Page i

Welcome message from author
This document is posted to help you gain knowledge. Please leave a comment to let me know what you think about it! Share it to your friends and learn new things together.
Transcript

Page i

All Rights Reserved
Copyright © 2005
The use, disclosure, modification, transfer, or transmittal of this work for any purpose, in any form, or by any means, without the written permission of the
copyright holder, is strictly forbidden.
VoiceDirector Device Configuration Guide Quintum Tenor DX
Disclaimer
The content of this manual is subject to change without notice and should not be construed as a commitment by the manufacturer, distributor, or service
provider. This manual is furnished for informational use only and the manufacturer, distributor, or service provider assumes no responsibility for any
errors or inaccuracies that may appear herein.
Any services provided through this equipment are not intended to replace or be a substitute for primary line voice services or Plain Old Telephone Service
("POTS") and are not meant to provide guaranteed Automatic Number Identification or Automatic Location Information capabilities associated with 911 or E911 services or to permit access to 411 directory assistance services. The
manufacturer, distributor, or service provider will not be liable for any damages, expenses, liabilities, risks, or harms arising out of or related to the services
provided through this equipment.
04.25.2006
Page ii

VoiceDirector Device Configuration Guide Quintum Tenor DX
Table of Contents 1. BCM WLAN600 WiFi Phone.................................................... 1
STEP 1 – SETUP ACCOUNT.........................Error! Bookmark not defined. STEP 2 - LOGGING INTO THE WEB CONFIGURATION INTERFACEError! Bookmark not defined. STEP 3 – CONFIGURING THE SIP PROXY SETTINGSError! Bookmark not defined. STEP 4 – RESTARTING THE PHONE ...........Error! Bookmark not defined.
Page iii
VoiceDirector Device Configuration Guide Quintum Tenor DX
1. Quintum Tenor DX
This guide contains VoiceDirector configuration instructions for the Quintum Tenor DX device.
Connect your PC to the same network as the Quintum Tenor DX.
Configuration of the Quintum Tenor DX is accomplished via the Quintum Tenor Configuration Manager software. If you have not previously installed the Configuration Manager, download and install the latest version at www.quintum.com.
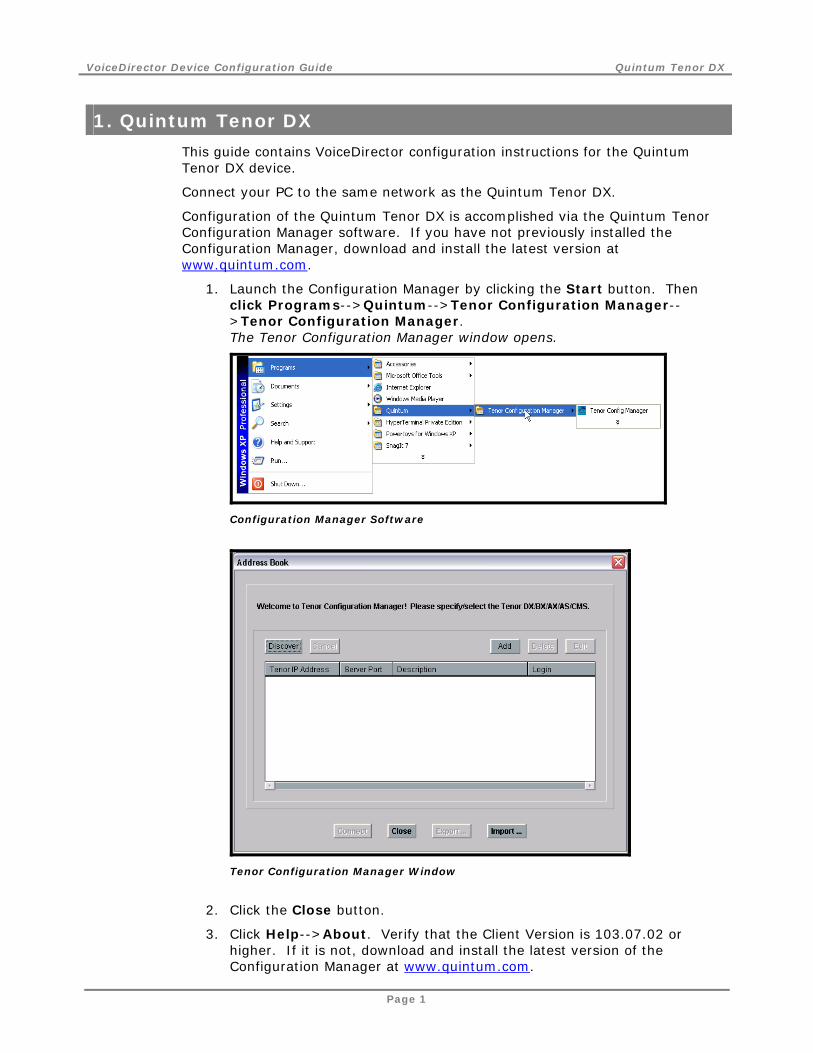
1. Launch the Configuration Manager by clicking the Start button. Then click Programs-->Quintum-->Tenor Configuration Manager-->Tenor Configuration Manager. The Tenor Configuration Manager window opens.
Configuration Manager Software
Tenor Configuration Manager Window
2. Click the Close button.
3. Click Help-->About. Verify that the Client Version is 103.07.02 or higher. If it is not, download and install the latest version of the Configuration Manager at www.quintum.com.
Page 1

VoiceDirector Device Configuration Guide Quintum Tenor DX
Client Version Number
4. On the menu bar at the top of the window click File-->Connect. The Address Book window opens.
Address Book Window
5. Click the Discover button. The Configuration Manager will search the local network for active gateways and display the results in the Discovery window.
Page 2
VoiceDirector Device Configuration Guide Quintum Tenor DX
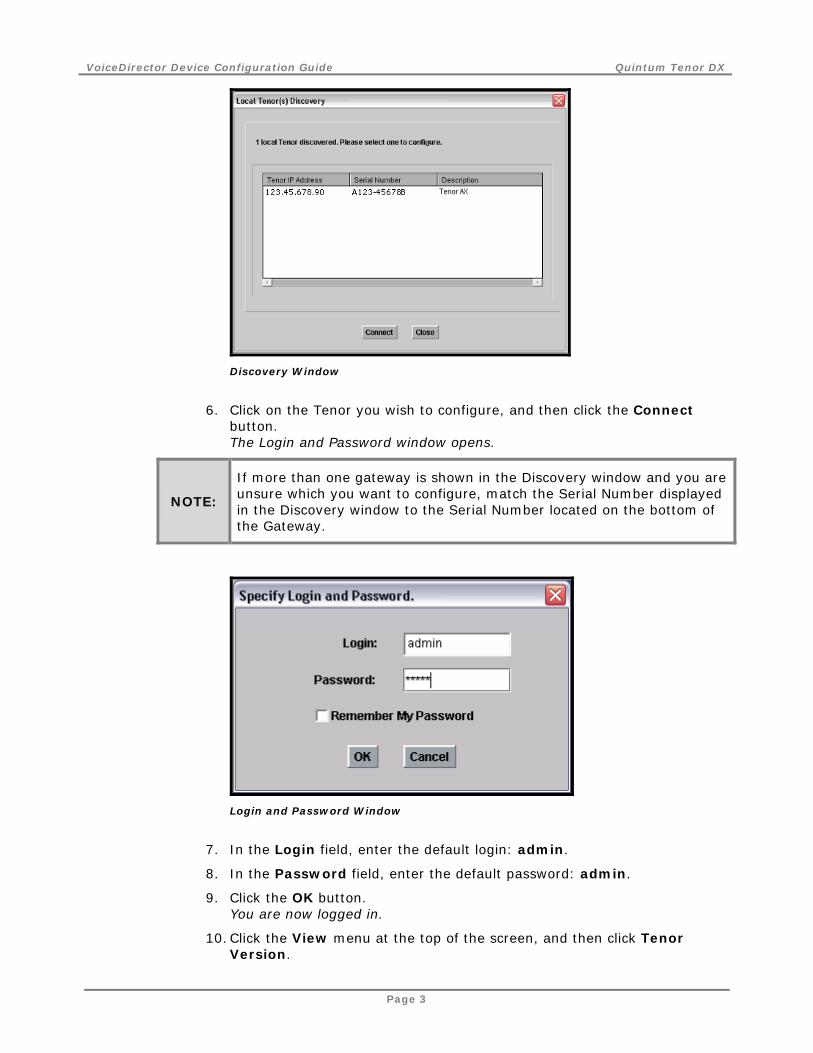
Discovery Window
6. Click on the Tenor you wish to configure, and then click the Connect button. The Login and Password window opens.
NOTE:
If more than one gateway is shown in the Discovery window and you are unsure which you want to configure, match the Serial Number displayed in the Discovery window to the Serial Number located on the bottom of the Gateway.
Login and Password Window
7. In the Login field, enter the default login: admin.
8. In the Password field, enter the default password: admin.
9. Click the OK button. You are now logged in.
10. Click the View menu at the top of the screen, and then click Tenor Version.
Page 3
VoiceDirector Device Configuration Guide Quintum Tenor DX
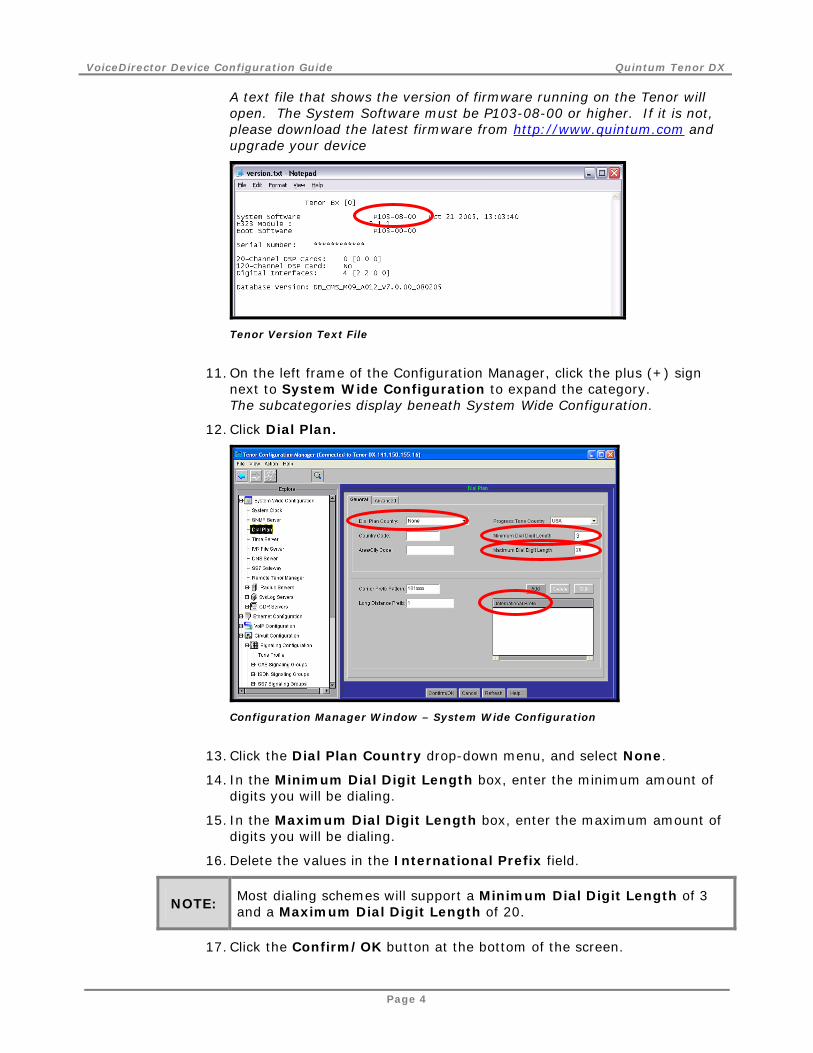
A text file that shows the version of firmware running on the Tenor will open. The System Software must be P103-08-00 or higher. If it is not, please download the latest firmware from http://www.quintum.com and upgrade your device
Tenor Version Text File
11. On the left frame of the Configuration Manager, click the plus (+) sign next to System Wide Configuration to expand the category. The subcategories display beneath System Wide Configuration.
12. Click Dial Plan.
Configuration Manager Window – System Wide Configuration
13. Click the Dial Plan Country drop-down menu, and select None.
14. In the Minimum Dial Digit Length box, enter the minimum amount of digits you will be dialing.
15. In the Maximum Dial Digit Length box, enter the maximum amount of digits you will be dialing.
16. Delete the values in the International Prefix field.
NOTE: Most dialing schemes will support a Minimum Dial Digit Length of 3 and a Maximum Dial Digit Length of 20.
17. Click the Confirm/OK button at the bottom of the screen.
Page 4
VoiceDirector Device Configuration Guide Quintum Tenor DX
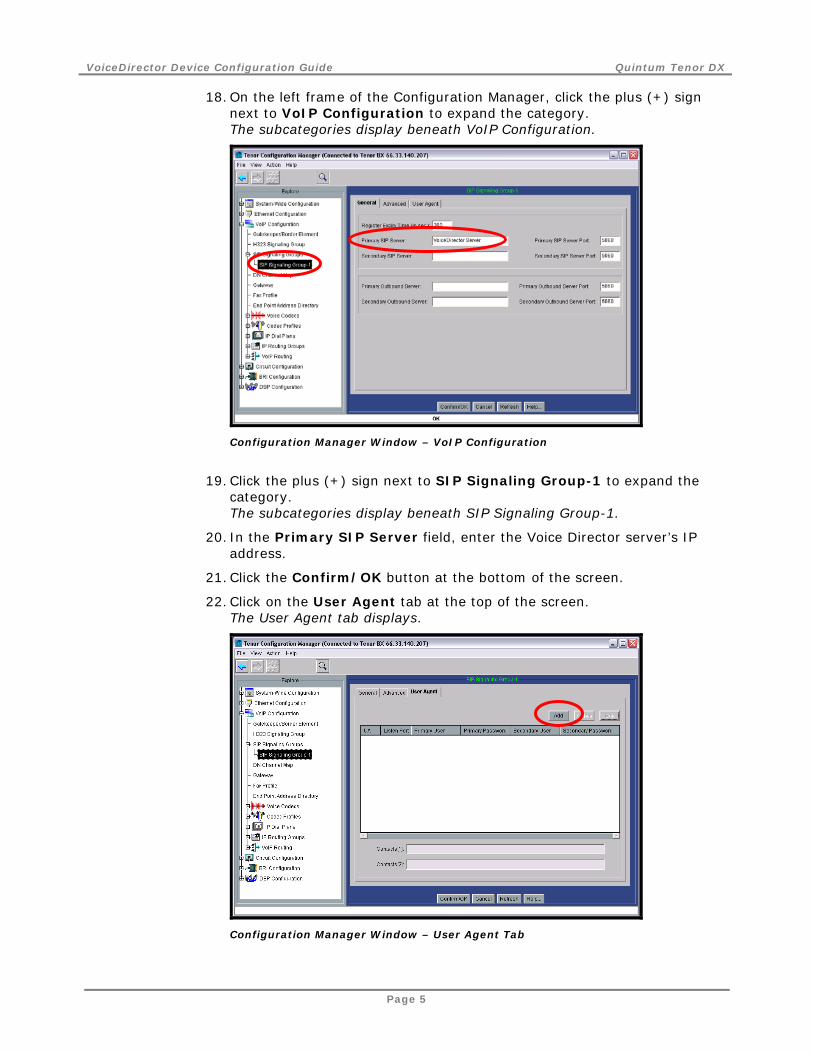
18. On the left frame of the Configuration Manager, click the plus (+) sign next to VoIP Configuration to expand the category. The subcategories display beneath VoIP Configuration.
Configuration Manager Window – VoIP Configuration
19. Click the plus (+) sign next to SIP Signaling Group-1 to expand the category. The subcategories display beneath SIP Signaling Group-1.
20. In the Primary SIP Server field, enter the Voice Director server’s IP address.
21. Click the Confirm/OK button at the bottom of the screen.
22. Click on the User Agent tab at the top of the screen. The User Agent tab displays.
Configuration Manager Window – User Agent Tab
Page 5
VoiceDirector Device Configuration Guide Quintum Tenor DX
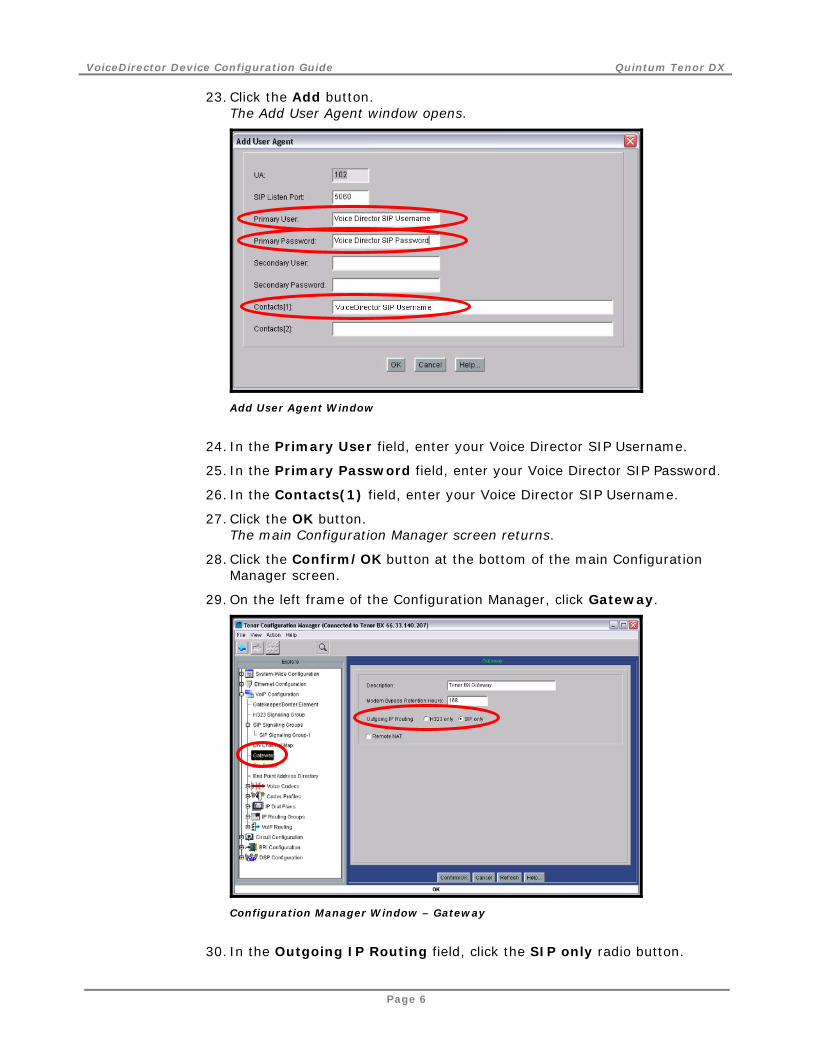
23. Click the Add button. The Add User Agent window opens.
Add User Agent Window
24. In the Primary User field, enter your Voice Director SIP Username.
25. In the Primary Password field, enter your Voice Director SIP Password.
26. In the Contacts(1) field, enter your Voice Director SIP Username.
27. Click the OK button. The main Configuration Manager screen returns.
28. Click the Confirm/OK button at the bottom of the main Configuration Manager screen.
29. On the left frame of the Configuration Manager, click Gateway.
Configuration Manager Window – Gateway
30. In the Outgoing IP Routing field, click the SIP only radio button.
Page 6
VoiceDirector Device Configuration Guide Quintum Tenor DX
31. Click the Confirm/OK button at the bottom of the screen.
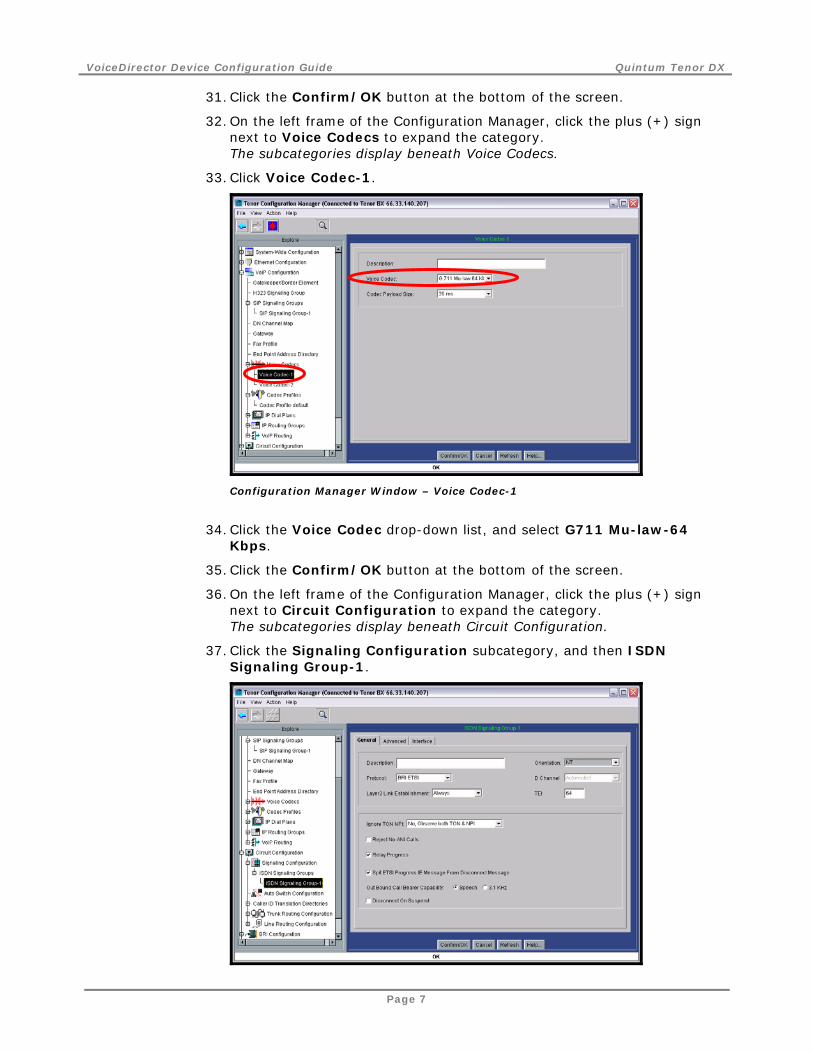
32. On the left frame of the Configuration Manager, click the plus (+) sign next to Voice Codecs to expand the category. The subcategories display beneath Voice Codecs.
33. Click Voice Codec-1.
Configuration Manager Window – Voice Codec-1
34. Click the Voice Codec drop-down list, and select G711 Mu-law-64 Kbps.
35. Click the Confirm/OK button at the bottom of the screen.
36. On the left frame of the Configuration Manager, click the plus (+) sign next to Circuit Configuration to expand the category. The subcategories display beneath Circuit Configuration.
37. Click the Signaling Configuration subcategory, and then ISDN Signaling Group-1.
Page 7
VoiceDirector Device Configuration Guide Quintum Tenor DX
Configuration Manager Window – ISDN Signaling Group-1
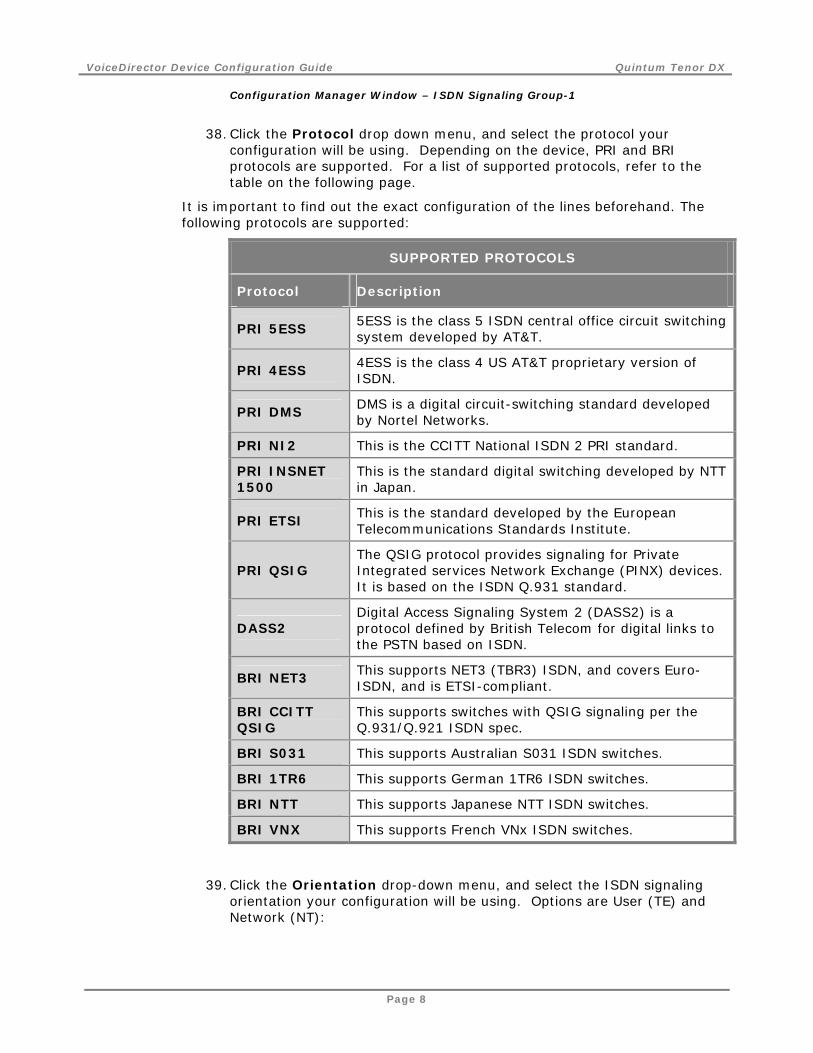
38. Click the Protocol drop down menu, and select the protocol your configuration will be using. Depending on the device, PRI and BRI protocols are supported. For a list of supported protocols, refer to the table on the following page.
It is important to find out the exact configuration of the lines beforehand. The following protocols are supported:
SUPPORTED PROTOCOLS
Protocol Description
PRI 5ESS 5ESS is the class 5 ISDN central office circuit switching system developed by AT&T.
PRI 4ESS 4ESS is the class 4 US AT&T proprietary version of ISDN.
PRI DMS DMS is a digital circuit-switching standard developed by Nortel Networks.
PRI NI2 This is the CCITT National ISDN 2 PRI standard.
PRI INSNET 1500
This is the standard digital switching developed by NTT in Japan.
PRI ETSI This is the standard developed by the European Telecommunications Standards Institute.
PRI QSIG The QSIG protocol provides signaling for Private Integrated services Network Exchange (PINX) devices. It is based on the ISDN Q.931 standard.
DASS2 Digital Access Signaling System 2 (DASS2) is a protocol defined by British Telecom for digital links to the PSTN based on ISDN.
BRI NET3 This supports NET3 (TBR3) ISDN, and covers Euro-ISDN, and is ETSI-compliant.
BRI CCITT QSIG
This supports switches with QSIG signaling per the Q.931/Q.921 ISDN spec.
BRI S031 This supports Australian S031 ISDN switches.
BRI 1TR6 This supports German 1TR6 ISDN switches.
BRI NTT This supports Japanese NTT ISDN switches.
BRI VNX This supports French VNx ISDN switches.
39. Click the Orientation drop-down menu, and select the ISDN signaling orientation your configuration will be using. Options are User (TE) and Network (NT):
Page 8
VoiceDirector Device Configuration Guide Quintum Tenor DX
o When this signaling group is connected to a PSTN/Trunk-Side Connection (the PSTN would be the network), then the Orientation is set to User.
o If this signaling group is connected to a PDX/Line-Side Connection, (which is typically User) then the Orientation is Network.
40. Click the Confirm/OK button at the bottom of the screen.
NOTE: If the link light above the connected port of the Tenor DX is orange, try changing the value in the Orientation field.
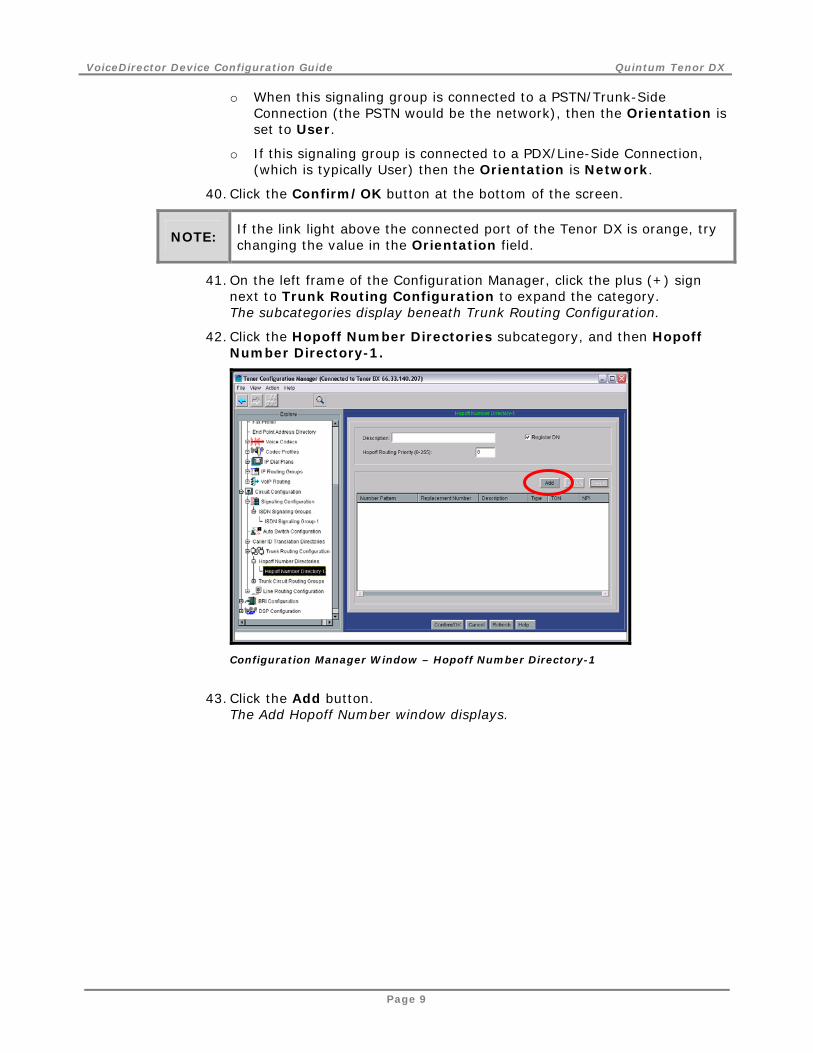
41. On the left frame of the Configuration Manager, click the plus (+) sign next to Trunk Routing Configuration to expand the category. The subcategories display beneath Trunk Routing Configuration.
42. Click the Hopoff Number Directories subcategory, and then Hopoff Number Directory-1.
Configuration Manager Window – Hopoff Number Directory-1
43. Click the Add button. The Add Hopoff Number window displays.
Page 9

VoiceDirector Device Configuration Guide Quintum Tenor DX
Add Hopoff Number Window
44. In the Number Pattern field, enter the Voice Director extension.
45. In the Replacement field, enter the PDX extension to which inbound calls on the Voice Director extension should be routed. Alternatively, if you want to route inbound calls to another Voice Director extension, enter the extension in the Replacement field. For example: If the Tenor DX should route inbound calls on Voice Director extension 4000 to PDX extension 123 (the extension on the PDX to which the Tenor DX is connected), enter 4000 in the Number Pattern field and 123 in the Replacement field.
46. Click the OK button.
47. On the main Configuration Manager screen, click the Confirm/OK button.
48. On the left frame of the Configuration Manager, click on the plus (+) sign next to Trunk Circuit Routing Groups to expand the category. The subcategories display beneath Trunk Circuit Routing Groups.
49. Click Trunk Circuit Routing Group-1.
Page 10

VoiceDirector Device Configuration Guide Quintum Tenor DX
Configuration Manager Window – Trunk Circuit Routing Group-1
50. Click the Overlap Dial checkbox to enable overlap dial.
51. Click the Provide Progress Tone checkbox to enable the feature.
52. Click the Confirm/OK button at the bottom of the screen.
53. Click the IVR tab at the top of the screen. The IVR tab displays.
Configuration Manager Window – IVR Tab
54. To enable a second dial tone (provided by the Tenor when the phone number connected to the T1/E1 line is dialed), click the Type drop-down menu, and select Provide 2nd Dial Tone.
55. Click the Call Services tab at the top of the screen.
Page 11
VoiceDirector Device Configuration Guide Quintum Tenor DX
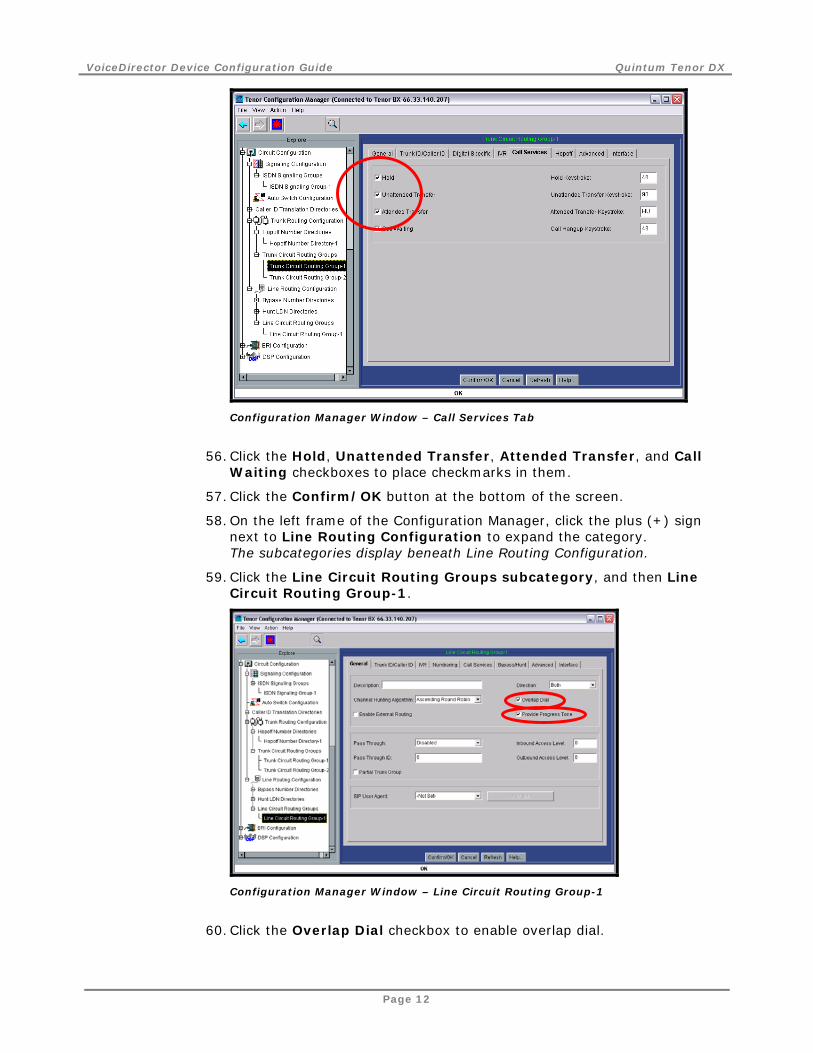
Configuration Manager Window – Call Services Tab
56. Click the Hold, Unattended Transfer, Attended Transfer, and Call Waiting checkboxes to place checkmarks in them.
57. Click the Confirm/OK button at the bottom of the screen.
58. On the left frame of the Configuration Manager, click the plus (+) sign next to Line Routing Configuration to expand the category. The subcategories display beneath Line Routing Configuration.
59. Click the Line Circuit Routing Groups subcategory, and then Line Circuit Routing Group-1.
Configuration Manager Window – Line Circuit Routing Group-1
60. Click the Overlap Dial checkbox to enable overlap dial.
Page 12

VoiceDirector Device Configuration Guide Quintum Tenor DX
61. If the Provide Progress Tone checkbox is not checked, click the checkbox to enable the feature.
62. Click the Confirm/OK button at the bottom of the screen.
63. Click on the Call Services tab at the top of the screen.
Configuration Manager Window – Call Services Tab
64. Check the Hold, Unattended Transfer, Attended Transfer, and Call Waiting checkboxes.
65. Click the Confirm/OK button at the bottom of the screen.
66. On the left frame of the Configuration Manager, click DS1 Configuration.
Configuration Manager Window – T1/E1 Configuration
67. Click the Online checkboxes in the DS1 Lines 1 & 2 and DS1 Lines 3 & 4 boxes.
68. Click the Confirm/OK button at the bottom of the screen.
Page 13

VoiceDirector Device Configuration Guide Quintum Tenor DX
69. On the left frame of the Configuration Manager, click Digital Interface-1.
Configuration Manager Window – Digital Interface-1
70. Click the Edit button. The Edit Channel Group window displays.
Edit Channel Group Window
71. Click the Associate Routing Group drop-down menu, and select Trunk Circuit Routing Group –1.
72. Click the OK button at the bottom of the screen. The Edit Channel Group window closes and the Digital Interface –1 window displays.
73. Click the Confirm/OK button at the bottom of the screen.
Page 14

VoiceDirector Device Configuration Guide Quintum Tenor DX
74. Repeat the process for any additional Digital Interface lines listed in the DS1 section on the left frame of the Configuration Manager.
75. Click the Submit Changes button on the menu bar (the button with the blue background and red star, displayed below) to save the changes.
Configuration Manager Window – Submit Button
IMPORTANT: The Submit Changes button must be pressed every time configuration changes are made to the Tenor; otherwise, the changes will not take effect.
Congratulations! You are now ready to start enjoying Voice Director’s superior quality on your Quintum Tenor DX.
Page 15
Related Documents