unitech P A500 Ent erprise PD A User’s Manual Rev. B 400544G

Welcome message from author
This document is posted to help you gain knowledge. Please leave a comment to let me know what you think about it! Share it to your friends and learn new things together.
Transcript

8/8/2019 PA500_UsersManual_RevB
http://slidepdf.com/reader/full/pa500usersmanualrevb 1/84
unitech
PA500 Enterprise PDA
User’s Manual
Rev. B
400544G

8/8/2019 PA500_UsersManual_RevB
http://slidepdf.com/reader/full/pa500usersmanualrevb 2/84
8/8/2019 PA500_UsersManual_RevB
http://slidepdf.com/reader/full/pa500usersmanualrevb 3/84
iii
Preface
About This Manual
This manual explains how to install, operate and maintain the PA500 Enterprise PDA.No part of this publication may be reproduced or used in any form, or by any electrical ormechanical means, without permission in writing from the manufacturer. This includeselectronic or mechanical means, such as photocopying, recording, or information storage andretrieval systems. The material in this manual is subject to change without notice. © Copyright 2007 unitech Electronics Co., Ltd. All rights reserved.
unitech global website address: http:\\www.unitech-adc.com.twBluetooth is a registered trademark of Bluetooth SIG.
Microsoft, Windows and ActiveSync are either registered trademarks ortrademarks of Microsoft Corporation. Other product names mentionedin this manual may be trademarks or registered trademarks of theirrespective companies and are hereby acknowledged.
Battery Notices
This unit is equipped with a battery pack and backup battery. It is possible that the unitechPA500 may not power-on due to battery discharge as a result of storage.In the above situation, plug the PA500 to the USB charging cable which is with DC in port orput the unit into the unitech PA500 USB Docking Station (with 5V/3A AC-DC adapter), andrecharge the unit for 16 hours in order to fully charge its backup battery.
The backup battery will charge from external power or the main battery (if the main battery stillhas enough power to turn on). In the event the main battery is fully charged, refrain from usingthe PA500 for 16 hours in order for the main battery to fully charge the backup battery.Backing-up data by backup battery only withut the main battery installed in batterycompartment may take as long as 1 hour. Therefore, in order to prevent data protection failuredue to backup battery failure, do not leave the PA500 without the rechargeable battery packinstalled, or without connection to AC power for an extended period of time.
Battery Charge Notice
It is important to consider the environment temperature whenever you are charging theLithium-Ion battery pack. The process is most efficient at normal room temperature or slightlycooler. It is essential that you charge batteries within the stated range of 0°C to 50°C.Charging batteries out of the specified range could damage the batteries and shorten theircharging life cycle.
This unit is equipped with a battery pack and backup battery. Both batteries will discharge after an extended period
of not being used.
When both batteries are discharged, recharge the unit for 16 hours in order to fully charge the main battery and
backup battery. There are two ways to recharge PA500:
1. Plug the USB charging cable to the PA500 and plug the 5V/2A AC-DC adapter to the power jack of the USB
charging cable.
2. Place the PA500 into the docking station and plug the 5V/2A AC-DC adapter to the power jack of the dockingstation.
For more details, refer to page 6, Charging the PA500.
If the main battery is removed, the backup battery ensures the data on SDRAM is safe for up to 1 hour. To prevent
data loss, do not leave the PA500 uncharged with the main battery removed for an extended period.

8/8/2019 PA500_UsersManual_RevB
http://slidepdf.com/reader/full/pa500usersmanualrevb 4/84
iv
Storage and Safety Notice
Although charged Lithium-Ion batteries may be left unused for several months, their capacitymay be depleted due to build up of internal resistance. If this happens, they will requirerecharging before they are used. Lithium-Ion batteries may be stored at temperatures between-20°C to 60°C, however they may be depleted more rapidly at the high end of this range. It isrecommended to store batteries within the normal room temperature.
RoHS Statement
This device conforms to RoHS (Reduction Of HazardousSubstances) European Union regulations that set maximumconcentration limits on hazardous materials used in electrical andelectronic equipment.

8/8/2019 PA500_UsersManual_RevB
http://slidepdf.com/reader/full/pa500usersmanualrevb 5/84
Table of Contents
v
Table of Contents
PrefaceAbout This Manual iii
BatteryNotices ...................................................................................................................... iii
Battery Charge Notice ............................................................................................................ iiiStorage and Safety Notice...................................................................................................... ivRoHS Statement..................................................................................................................... iv
Chapter 1Getting Started 1
Introducing the PA500 ....................................................................................................... 1
Features ................................................................................................................................. 1
Package Contents ............................................................................................................... 2
A Tour of the PA500............................................................................................................ 3
Front View............................................................................................................................... 3Back View............................................................................................................................... 4
Setting up the PA500.......................................................................................................... 5
Installing the Battery ............................................................................................................... 5Charging the PA500 ............................................................................................................... 6
Powering on the PA500.......................................................................................................... 8
Chapter 2Using the Hardware 9
Using the Keypad ................................................................................................................ 9
Using the Stylus ................................................................................................................. 10
Using the SDIO/MMC Slot............................................................................................... 11
Using the Laser Scanner ................................................................................................ 12
Command Interface .......................................................................................................... 14
Today Screen ....................................................................................................................... 14Start Menu ............................................................................................................................ 17Navigation Bar ...................................................................................................................... 17Command Bar....................................................................................................................... 18Pop-up Menus ...................................................................................................................... 19Notifications .......................................................................................................................... 19
Chapter 3Getting Connected 21
Establishing Device-PC Connection.......................................................................... 21
Installing Microsoft ActiveSync ............................................................................................. 21
Connecting the Device to Your Computer ............................................................................ 22

8/8/2019 PA500_UsersManual_RevB
http://slidepdf.com/reader/full/pa500usersmanualrevb 6/84
vi
Using ActiveSync .............................................................................................................. 24
Synchronizing Information with Your Computer ................................................................... 24Using ActiveSync to Exchange Files .................................................................................... 26Synchronization Options....................................................................................................... 27
Chapter 4Wireless Communications 28
Managing Wireless Connections ................................................................................ 28
Using the Wireless Manager................................................................................................. 28
Connectivity Features...................................................................................................... 29
Beam Function...................................................................................................................... 29Infrared Connection .............................................................................................................. 30Bluetooth Connection ........................................................................................................... 30Wi-Fi Connection .................................................................................................................. 34
Connecting to the Internet ............................................................................................. 35
Chapter 5Managing Programs 36
Accessing Programs ........................................................................................................ 36
Using the Barcode Scanner Programs ..................................................................... 37
Scan2Key ............................................................................................................................. 37Scanner Settings .................................................................................................................. 38
Chapter 6Customizing Your PA500 41
Adjusting Settings............................................................................................................. 41
Checking Main and Backup Battery Status ............................................................ 42Extending Battery Life ..................................................................................................... 43
Adjusting the Backlight Setting................................................................................... 44
Resetting the Device ........................................................................................................ 45
Warm Boot............................................................................................................................ 45Clean Boot............................................................................................................................ 45Cold Boot.............................................................................................................................. 46
Viewing Flash ROM Files................................................................................................ 46
Adding Programs to Your Device ............................................................................... 46
Adding a Program to the Start Menu ......................................................................... 47Removing Programs......................................................................................................... 50
Appendix ASystem Specifications 51
Appendix BRegulatory Compliance Statements 72
8/8/2019 PA500_UsersManual_RevB
http://slidepdf.com/reader/full/pa500usersmanualrevb 7/84
1
Chapter 1
Introducing the PA500
Thank you for purchasing the PA500 Enterprise PDA. Your PA500 was designed for users who need acompact and durable portable computer for data collection and real time transactions.
Ultra-rugged Design
The unitech PA500 Enterprise PDA is a compact mobile computing device designed for maximum
durability.Easy to Use
The unit is equipped with a color display with touch screen, a five-way directional key, and sixapplication keys. The PA500 supports integrated long range scanners for fast and accurate datacollection.The device also supports infrared interface, bluetooth, and wireless communicationcapability for exchanging information in a computing communication system.
Features
Getting Started
Powerful system
• Microsoft Windows Mobile 5.0 operating
system• Intel PXA270 processor with speed of upto 520 MHz
System memory
• 64 MB SDRAM• 64 MB Flash ROM
Display
• 3.5-inch QVGA LCD touch-sensitivescreen
• 320 x 240 resolution
Barcode scanner
• Symbol SE950• Hitachi HD6433657W barcode decoder
Expansion slot
• SDIO/MMC slot
Wireless connectivity
• 802.11b/g with diversity antenna
• Bluetooth• Infrared port
Communication
• 802.11b/g• Bluetooth• Infrared• USB Host & Client
Battery life
• RF enabled usage with 50% backlight: 4 hours• Charging time: 3.5 hours• Embedded backup battery cell
User-friendly interface• Special keys to launch particular
applications and display the on-screenkeyboard
• Keys for barcode scanning

8/8/2019 PA500_UsersManual_RevB
http://slidepdf.com/reader/full/pa500usersmanualrevb 8/84
2
Copyright 2007 unitech Electronics Co., Ltd. All rights reserved. unitech is a registered trademark of unitech Electronics Co., Ltd.
Package Contents
After opening the box, ensure the following accessories for the PA500 are present:
* The adapter’s replaceable clip plugs is available, depends on the region. If anything is missing or appears damaged, contact your dealer.
PA500 Terminal Power Adapter* Battery Pack
Stylus USB charging cableEarphone
Stylus with bungee lanyard
(optional)
USB docking station
(optional)
Leather case (optional)
CD-ROM Quick Reference Guide

8/8/2019 PA500_UsersManual_RevB
http://slidepdf.com/reader/full/pa500usersmanualrevb 9/84
Chapter 1 Getting Started
3
A Tour of the PA500
The following sections describe the main components and features of the PA500.
Front View
No. Component Description
1.Barcode laser scanner(optional)
Reads and captures information on a barcode label.
2. Status indicator Indicates the battery charging and barcode scanning status.• Green - Battery is fully charged, the device is running on
battery power, or barcode scanning process is completedwithout error.
• Red - Battery is charging, barcode scanner is activated andprocessing.
3. SDIO/MMC slot Accepts an SD (Secure Digital), MMC (Multimedia Card) or SDIO(Secure Digital Input Output) cards, allowing you to add morememory.Install add-on applications or use audio text files stored in it for
use with internal applications. You can also use it to backup datafrom your device.
4. Power button If the device is off, press this button to turn it on.Alternatively, when the unit is on, this key must be pressed andheld down for about two seconds in order to turn the device off.
5. LCD touch screen Displays the applications and data stored on your device. It istouch-sensitive and responds to the stylus or finger.
6. Keypad Includes a software keyboard button, navigation key andapplication buttons to launch Microsoft Outlook Mobile programs.
7. Microphone Inputs audio into your device when recording the voice notes.
8. Left scanner triggerkey Press to activate the barcode laser scanner.
9. Cord holder Eyelet for holding the elastic bungee lanyard.
Indicates the battery charging and barcode scanning status.
Green - Battery is fully charged or barcode scanning
process is completed without error.
Red - Battery is charging, barcode scanner is
fired/activated.
8/8/2019 PA500_UsersManual_RevB
http://slidepdf.com/reader/full/pa500usersmanualrevb 10/84
4
Copyright 2007 unitech Electronics Co., Ltd. All rights reserved. unitech is a registered trademark of unitech Electronics Co., Ltd.
Back View
No. Component Description
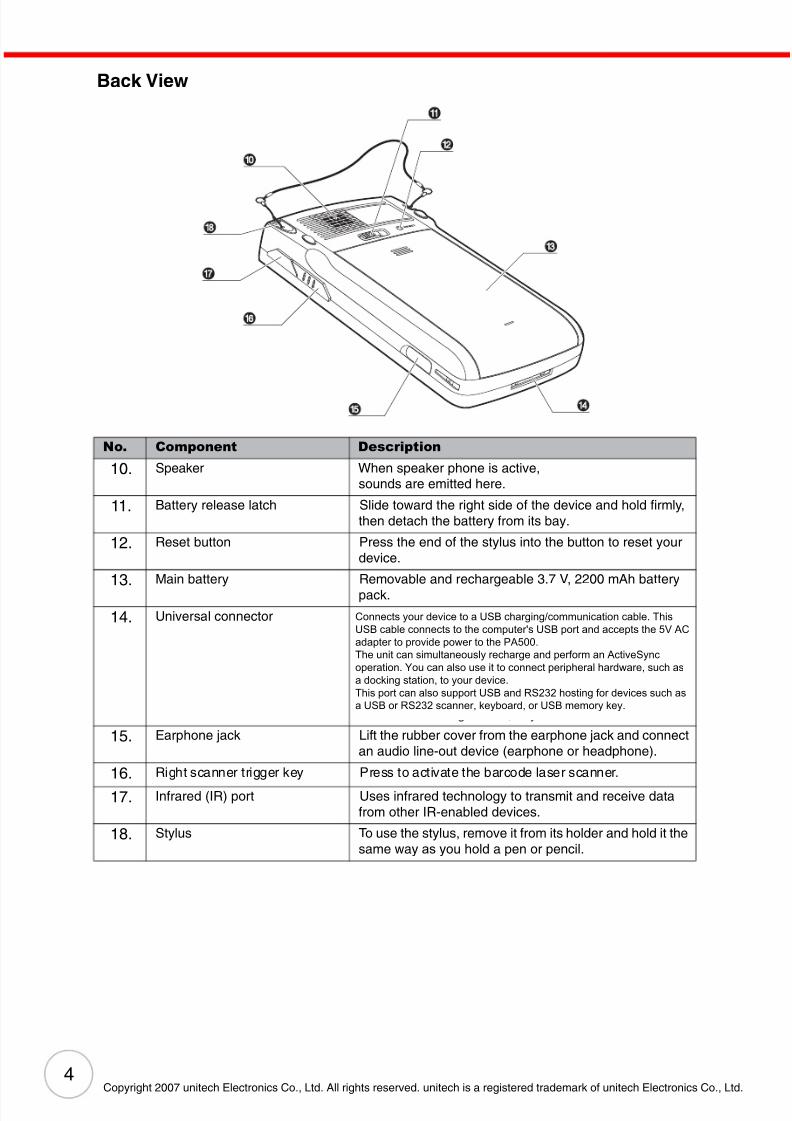
10. Speaker When speaker phone is active,sounds are emitted here.
11. Battery release latch Slide toward the right side of the device and hold firmly,then detach the battery from its bay.
12. Reset button Press the end of the stylus into the button to reset yourdevice.
13. Main battery Removable and rechargeable 3.7 V, 2200 mAh batterypack.
14. Universal connector Connects your device to a USB charging cable, which inturn connects to the computer’s USB port and throughthe AC adapter to an electrical outlet. This allows you torecharge your device and perform an ActiveSyncoperation.You can also use it to connect a peripheral hardware,such as a docking station, to your device.
15. Earphone jack Lift the rubber cover from the earphone jack and connectan audio line-out device (earphone or headphone).
16. Right scanner trigger key Press to activate the barcode laser scanner.
17. Infrared (IR) port Uses infrared technology to transmit and receive datafrom other IR-enabled devices.
18. Stylus To use the stylus, remove it from its holder and hold it thesame way as you hold a pen or pencil.
Connects your device to a USB charging/communication cable. This
USB cable connects to the computer's USB port and accepts the 5V AC
adapter to provide power to the PA500.
The unit can simultaneously recharge and perform an ActiveSync
operation. You can also use it to connect peripheral hardware, such as
a docking station, to your device.
This port can also support USB and RS232 hosting for devices such as
a USB or RS232 scanner, keyboard, or USB memory key.

8/8/2019 PA500_UsersManual_RevB
http://slidepdf.com/reader/full/pa500usersmanualrevb 11/84
Chapter 1 Getting Started
5
Setting up the PA500
Perform the following set up tasks to begin using your device:
• Install the battery pack• Charge your device• Power on the PA500
Installing the Battery
WARNING!There is a risk of fire and burns if the battery pack is handledimproperly. DO NOT disassemble, crush, puncture, short externalcontacts, or dispose the battery pack in fire or water. DO NOT attemptto open or service the battery pack. Dispose of used batteriesaccording to the local recycling guidelines in your area.
A backup battery cell is embedded into your device to prevent data loss when the removable battery
pack is removed or completely discharged. The backup battery will keep the data and system settings up
to 1 hour if the main battery is removed.
NOTE: To enable the internal battery cell to provide backup power supply, charge your devicewith the main battery pack for at least three and a half hours.
1. Position the battery pack, making sure the battery pack fits the shape of the batterycompartment.
2. Slide the battery pack into the battery bay. The battery pack locks to the chassis with an audibleclick.
3. If you remove the main battery and plug it back before the backup battery lost
power, PA500 will be warm start.
4. If you remove the main battery and plug it back after the backup battery lost power,
PA500 will be clean booted.

8/8/2019 PA500_UsersManual_RevB
http://slidepdf.com/reader/full/pa500usersmanualrevb 12/84
6
Copyright 2007 unitech Electronics Co., Ltd. All rights reserved. unitech is a registered trademark of unitech Electronics Co., Ltd.
Charging the PA500
For initial use, you need to charge your device for about 16 hours. After that, you can charge iteveryday to recharge the battery to full capacity. You can charge your device using the USB chargingcable or the docking station.
CAUTION! Operating the PA500 for the first time without the AC adapter, and
without fully charging the backup battery may result in loss of datastored in RAM memory.
NOTE: Data you entered may not be properly stored until the internal backup battery has been
fully charged.
To charge the device using the USB charging cable: 1. Attach the clip plug to the AC adapter, if necessary. Slide the replaceable clip plug into the AC
adapter until it locks into place with an audible click.2. Press and hold the connector button on the USB charging cable and connect it to the PA500
(1).
3. Plug the AC adapter cable into the power jack on the USB charging cable (2).4. Connect the AC adapter into an electrical outlet (3).

8/8/2019 PA500_UsersManual_RevB
http://slidepdf.com/reader/full/pa500usersmanualrevb 13/84
Chapter 1 Getting Started
7
To charge the device using the docking station: 1. Plug the AC adapter cable into the power jack on the docking station.2. Plug the AC adapter into an electrical outlet.3. Slide the device into the docking station until it clicks into place.
The connection is secure when the bottom edge of the device is aligned smoothly with the
docking station, and the LED indicator on the docking station and device lights up red.LED status during charging:
– Solid red: Charging
– Solid green: Charging complete
If the battery level becomes low , a status icon appears on the
device screen indicating low or very low battery status. In both cases, perform anActiveSync operation to back up your data, then recharge your device as soon as possible.If the battery level reaches low status, the device will enter sleep mode ; if the battery levelreaches very low status, the device will enter deep sleep mode . In this case, you have about72 hours to recharge your device after which you risk losing all data on your device’s internalmemory.
If the battery level reaches a low status, the device will enter a sleep mode and cannot be
powered up until the battery is charged. Windows Mobile 5.0 devices will retain installed
applications and data when the main battery is completely drained for extended periods of
time.

8/8/2019 PA500_UsersManual_RevB
http://slidepdf.com/reader/full/pa500usersmanualrevb 14/84
8
Copyright 2007 unitech Electronics Co., Ltd. All rights reserved. unitech is a registered trademark of unitech Electronics Co., Ltd.
Powering On the PA500
After you have initially charged your device for about 16 hours, the device is ready to be used. You cannow start up your device where you can calibrate the screen, set up the system time zone, and learn somebasic stylus usage.
1. Turn on your device by pressing the Power button on the front panel.
NOTE: The PA500 screen ships with a protective plastic film. You may remove it by peeling
from one corner. The screen will be more susceptible to scratching withoutthe film, but will be more readable.
The unitech PA500 welcome screen appears. The Windows Mobile screen will appear shortly.
2. Calibrate the PA500The calibrate screen will automatically appear when the unit is powered-on for the first time orafter the system is reset. This screen can also be accessed at any time by tapping Start → Settings → System tab→ Screen.The PA500 will prompt you to calibrate the unit by tapping a sequence of screen locations. Tapgently but firmly. When you have completed the series of taps, press the Enter button to confirmit.
3. Set the Time Zone, Date, and TimeSelect your current time zone from the Time zone drop-down menu, then tap Next.
4. Follow all onscreen instructions to complete the set up. The setup wizard provides tips for usingthe pop-up menus and assign a lock password to access your device.After the device setup, you can create an ActiveSync partnership to synchronize information
between your computer and your device. See Establishing Device-PC Connection on page 21for detailed instructions.

8/8/2019 PA500_UsersManual_RevB
http://slidepdf.com/reader/full/pa500usersmanualrevb 15/84
9
Chapter 2
Using the Keypad
The PA500 keypad has a navigation key and six special keys to launch particular applications anddisplay the on-screen keyboard.
No. Component Icon Description
1. Software keyboardbutton
Press to launch the on-screen keyboard.
2. Notes button Press to open Notes. Notes allows you to quickly record information, reminders, ideas, drawings, and phone numbers.You can create a written note or include a recording in a note.
3. Enter button Press the Enter button, center of the navigation key, toaccess the menu options and confirm your selection.
4. Navigation key Use the up, down, left, and right arrow keys to navigatethrough the menu options.
5. Email button Launch Microsoft Outlook Express.
6. Today button Customize the layout and information that is displayed on theToday screen.
7. Calendar button Press to bring up Calendar. Calendar enables you toconveniently manage your schedules and appointments orany other activities associated with date and time.
8. Tasks button Keep track of what you have to do and prioritize them basedon their severity and urgency.
Using the Hardware

8/8/2019 PA500_UsersManual_RevB
http://slidepdf.com/reader/full/pa500usersmanualrevb 16/84
10
Copyright 2007 unitech Electronics Co., Ltd. All rights reserved. unitech is a registered trademark of unitech Electronics Co., Ltd.
Using the Stylus
CAUTION! Never use anything other than PA500 stylus on the screen, otherwise this could cause a permanent damage.
1. Push the stylus in the direction of the arrow, then pull out to remove the stylus from its holder.
2. Hold the stylus like holding a pencil.3. To make a choice from a menu, lightly tap the tip of the stylus on that choice.4. To write data into a field on a form, use the stylus to print the letters or numbers(of on-screen keyboard).
Use very light pressure.

8/8/2019 PA500_UsersManual_RevB
http://slidepdf.com/reader/full/pa500usersmanualrevb 17/84
Chapter 2 Using the Hardware
11
Using the SDIO/MMC Slot
Your device has an expansion slot compatible with a range of SD, SDIO, and MMC storage cards,which are primarily used to back up or transfer files and data.
To insert a storage card:
1. Hold the device securely, then lift the rubber cover from the SDIO/MMC slot .
2. Push the card into the slot until you feel the SD card click into place, this will signal that the cardis already properly seated in the slot.
The card is secure when it is not protruding from the slot.
To remove a storage card: 1. Hold the device securely. Push the card in and release. The card pops out.
2. Remove the card from the slot.
8/8/2019 PA500_UsersManual_RevB
http://slidepdf.com/reader/full/pa500usersmanualrevb 18/84
12
Copyright 2007 unitech Electronics Co., Ltd. All rights reserved. unitech is a registered trademark of unitech Electronics Co., Ltd.
Using the Laser Scanner
PA500 has an integrated laser scanner which reads all major barcode labels with excellentperformance.
NOTE: The reading software must be enabled in order to operate the scanner. This can be auser-loaded application or a pre-loaded utility such as Scanner Settings or Scan2Key.
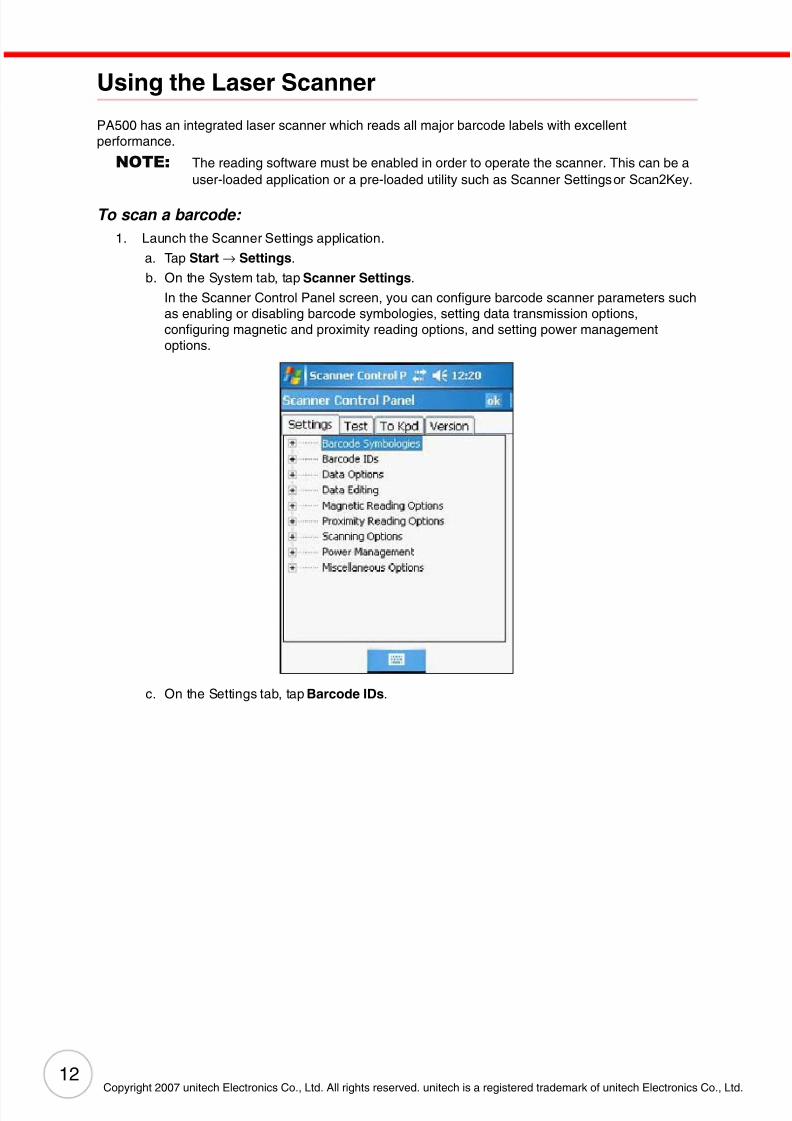
To scan a barcode: 1. Launch the Scanner Settings application.
a. Tap Start → Settings.
b. On the System tab, tap Scanner Settings.
In the Scanner Control Panel screen, you can configure barcode scanner parameters suchas enabling or disabling barcode symbologies, setting data transmission options,configuring magnetic and proximity reading options, and setting power managementoptions.
c. On the Settings tab, tap Barcode IDs.

8/8/2019 PA500_UsersManual_RevB
http://slidepdf.com/reader/full/pa500usersmanualrevb 19/84
Chapter 2 Using the Hardware
13
d. Tap the Test tab.
2. Press either one of the scanner trigger keys on the device.3. Aim the laser scanner at the selected barcode and press both trigger keys to scan. The
scanned barcode data appears on the screen.
4. On the Scanner Control Panel screen, tap ok to exit

8/8/2019 PA500_UsersManual_RevB
http://slidepdf.com/reader/full/pa500usersmanualrevb 20/84
14
Copyright 2007 unitech Electronics Co., Ltd. All rights reserved. unitech is a registered trademark of unitech Electronics Co., Ltd.
Command Interface
The following section explains the PA500 command interface.
Today Screen
When you turn on your device for the first time each day or after a preset period of inactivity, you’ll seethe Today screen.It provides an at-a-glance view of the important reminders and details.
To display the Today screen:
When viewing another screen, you can do either of the following:• Tap Start → Today.• Press the Today button on the device’s front panel.
8/8/2019 PA500_UsersManual_RevB
http://slidepdf.com/reader/full/pa500usersmanualrevb 21/84
Chapter 2 Using the Hardware
15
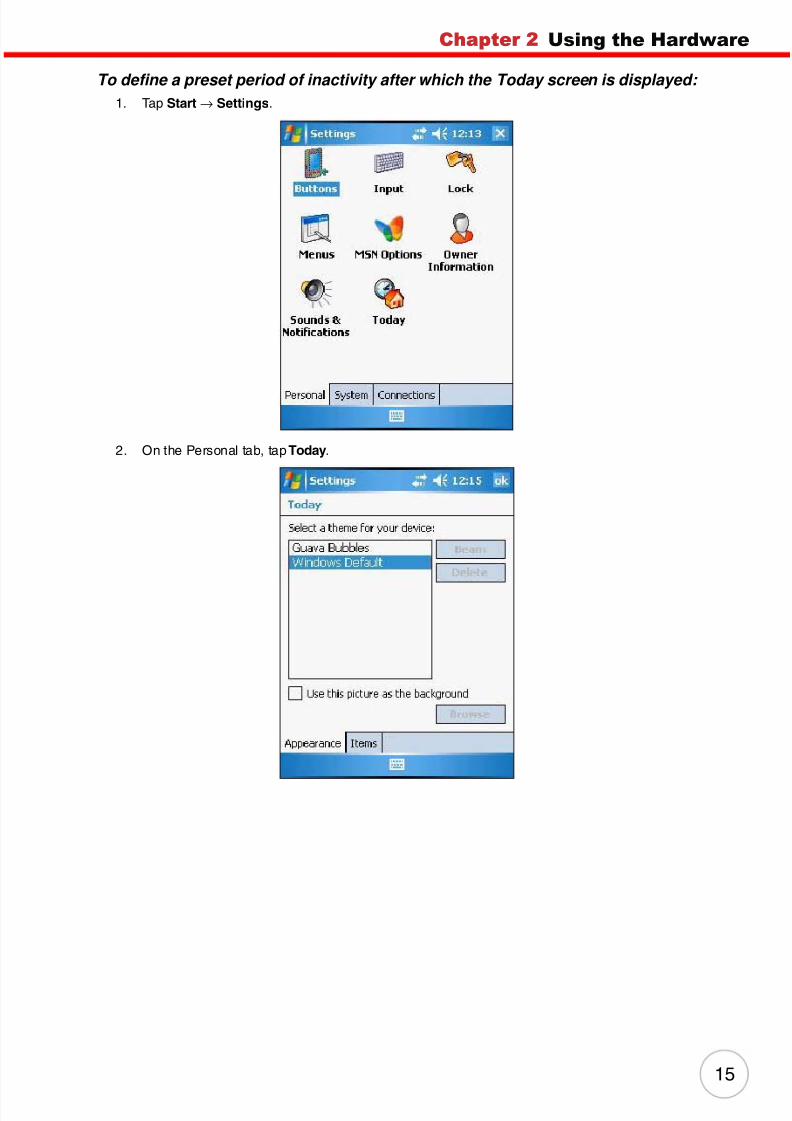
To define a preset period of inactivity after which the Today screen is displayed: 1. Tap Start → Settings.
2. On the Personal tab, tap Today.
8/8/2019 PA500_UsersManual_RevB
http://slidepdf.com/reader/full/pa500usersmanualrevb 22/84
16
Copyright 2007 unitech Electronics Co., Ltd. All rights reserved. unitech is a registered trademark of unitech Electronics Co., Ltd.
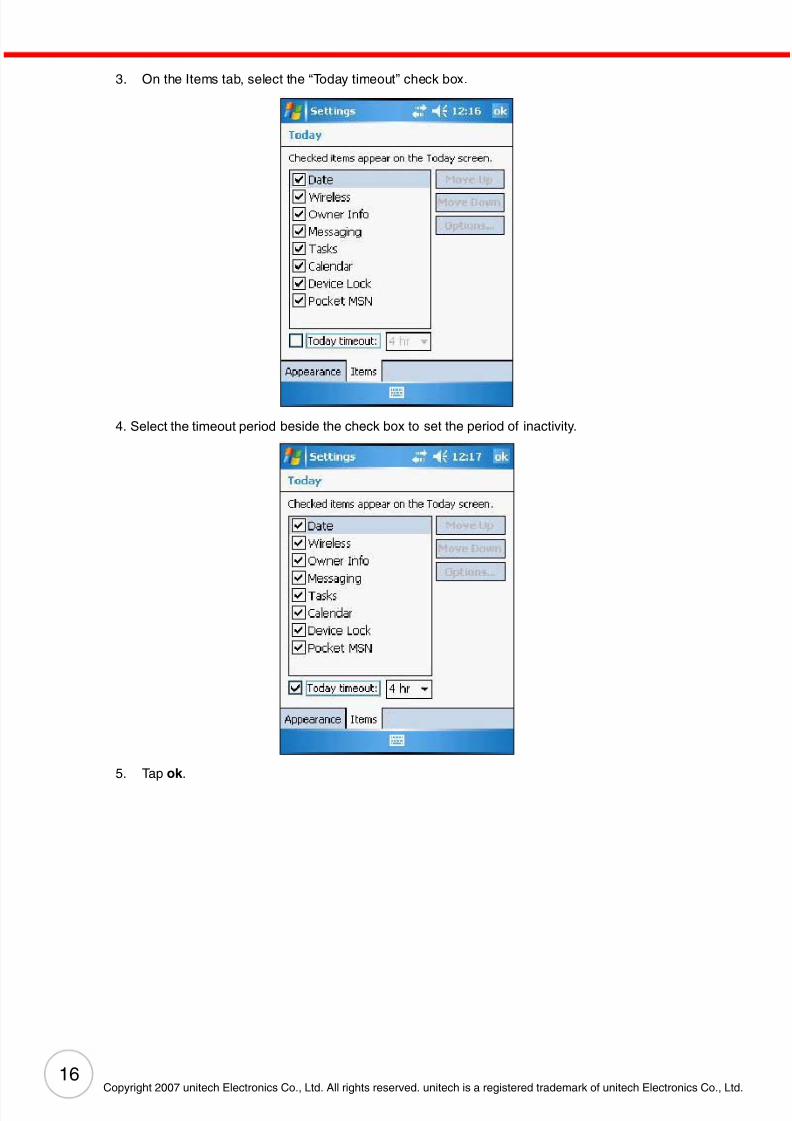
3. On the Items tab, select the “Today timeout” check box.
4. Select the timeout period beside the check box to set the period of inactivity.
5. Tap ok .

8/8/2019 PA500_UsersManual_RevB
http://slidepdf.com/reader/full/pa500usersmanualrevb 23/84
Chapter 2 Using the Hardware
17
Start Menu
The Start menu displays a list of active programs, as well as options to view the Programs, Settings andHelp screens etc.
Navigation Bar
The navigation bar is located at the top of the screen. It displays the notification icons for system alarms andreminders, status icons for the data connectivity, battery charge, and volume control.
Status Icons
The table below describes some of the status icons you may see on your device.
For more detailed description of the status icons, tap Start→ Help.
Status Icon Description
Turns all sounds on and off.
Indicates Bluetooth wireless technology is on.
Indicates that the main battery is charging. The PA500 is either plugged-in via theAC adapter or docking station.
Indicates the main battery is fully charged.
Indicates the main battery is low and needs to be charged.
Indicates the main battery is very low. Stop device operation and charge thedevice immediately.
Indicates the backup battery is very low. Stop device operation and charge thedevice immediately.
Indicates device is synchronized with a computer.
Wireless and Bluetooth connection is activated.

8/8/2019 PA500_UsersManual_RevB
http://slidepdf.com/reader/full/pa500usersmanualrevb 24/84
18
Copyright 2007 unitech Electronics Co., Ltd. All rights reserved. unitech is a registered trademark of unitech Electronics Co., Ltd.
Command Bar
Use the command bar at the bottom of the screen to perform tasks in programs.
The command bar includes menu names, buttons, and the Input Selector button.
• To create a new item in the current program, tap New.• To view a notification or an image file received on your device, tap View.
• To see the name of a button, tap and hold the stylus on the button. Drag the stylus off the button so that thecommand is not carried out.
• To view the soft keyboard, tap the Input Selector button or you can press the Software keyboard button.

8/8/2019 PA500_UsersManual_RevB
http://slidepdf.com/reader/full/pa500usersmanualrevb 25/84
Chapter 2 Using the Hardware
19
Pop-up Menus
With pop-up menus, you can quickly choose an action for an item. The actions in the pop-up menusvary from program to program.
To display a pop-up menu: 1. Tap and hold the stylus on the item that you want to perform the action on.
2. When the menu appears, lift the stylus, then do either of the following:– Tap the action you want to perform.
– Tap anywhere outside the menu to close the menu without performing an action.
Notifications
Your device will remind you when you have something to do or receive a message.For example, if you’ve set up an appointment in Calendar, a task with a due date in Tasks, data ormessage received, or an alarm in Clock; you’ll be notified in any of the following ways:
• A message box appears on the screen.
• A sound(which you can specify) is played.
8/8/2019 PA500_UsersManual_RevB
http://slidepdf.com/reader/full/pa500usersmanualrevb 26/84
20
Copyright 2007 unitech Electronics Co., Ltd. All rights reserved. unitech is a registered trademark of unitech Electronics Co., Ltd.
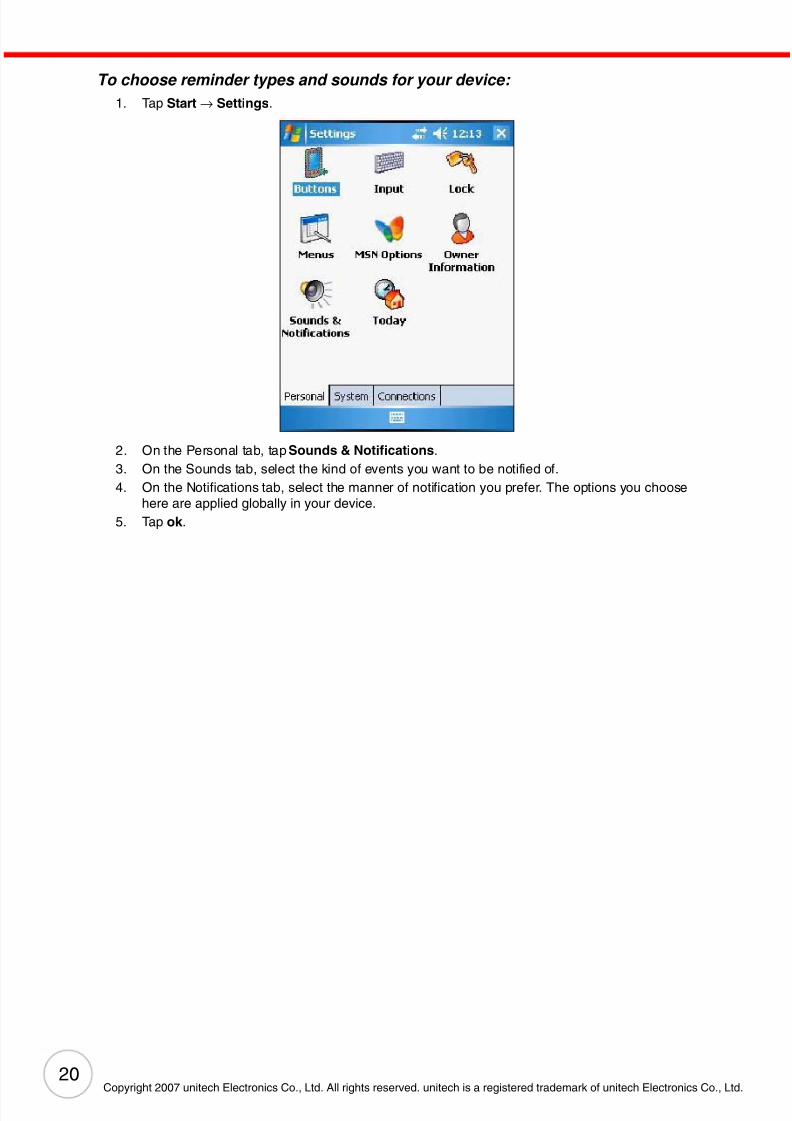
To choose reminder types and sounds for your device: 1. Tap Start → Settings.
2. On the Personal tab, tap Sounds & Notifications.3. On the Sounds tab, select the kind of events you want to be notified of.4. On the Notifications tab, select the manner of notification you prefer. The options you choose
here are applied globally in your device.5. Tap ok .
8/8/2019 PA500_UsersManual_RevB
http://slidepdf.com/reader/full/pa500usersmanualrevb 27/84
21
Chapter 3
Establishing Device-PC Connection
Installing Microsoft ActiveSync
In order to exchange data between your computer and the PA500, Microsoft ActiveSync must beinstalled on your computer. Use the USB charging cable that comes with your device or cradle toconnect the device to your computer.
NOTE: The PA500 Enterprise PDA requires ActiveSync version 4.2 or higher.
System installation requirements
• Microsoft Windows 2000 SP4, Server ® 2003 SP1, Server 2003 SP1 for titanium-based
systems, Server 2003 Standard x64 Edition, XP ® Media Center Edition, XP Professional x64Edition, XP SP1, XP SP2, XP Tablet Edition
• Microsoft Outlook ® 2000, Microsoft Outlook XP, or Microsoft Outlook® 2003 (recommended)messaging and collaboration clients required for Microsoft Outlook Office Mobilesynchronization
• Microsoft Office 2000, Microsoft Office XP or Microsoft Office 2003 for Microsoft Office Mobile ®
synchronization• Microsoft Internet Explorer 6.0 or later for Internet Explorer Mobile favorites synchronization• Microsoft Systems Management Server 2.0• Hard disk drive with 7 MB of available hard disk space (actual requirements may vary based on
selected features and user’s current system configuration)• USB port, Bluetooth, or infrared connection
To install Microsoft ActiveSync on your computer: 1. Close any open programs, including those that run at startup, and disable any virus-scanning
software.2. Download the ActiveSync software from the Microsoft ActiveSync Download page at
http://www.microsoft.com.
3. Browse to the location of the downloaded file, and double-click it.The installation wizard begins.
4. Follow the instructions on the screen to install Microsoft ActiveSync.After you have installed ActiveSync and restarted your computer, the ActiveSync icon willappear on your computer’s system tray (on the lower right-hand corner of the screen) and theActiveSync wizard appears.For detailed information on how to use ActiveSync on your computer, start ActiveSync, thenclick Help → Microsoft ActiveSync Help.
Getting Connected
8/8/2019 PA500_UsersManual_RevB
http://slidepdf.com/reader/full/pa500usersmanualrevb 28/84
22
Copyright 2007 unitech Electronics Co., Ltd. All rights reserved. unitech is a registered trademark of unitech Electronics Co., Ltd.
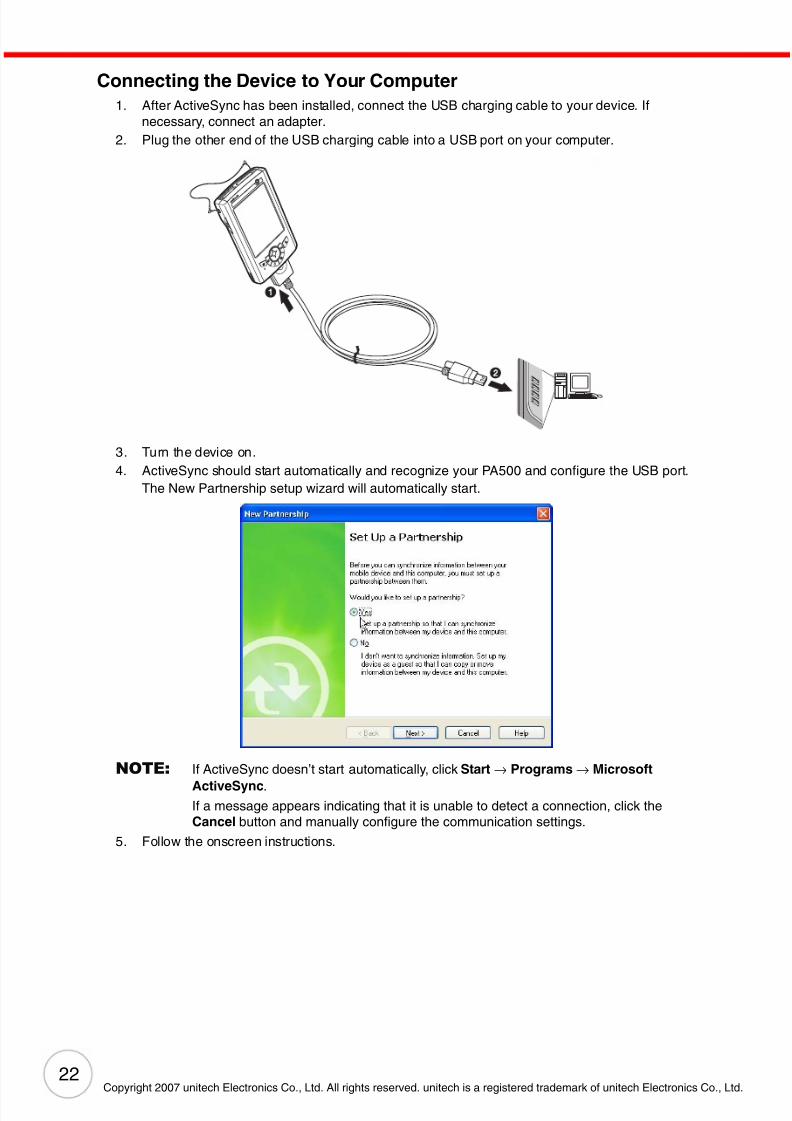
Connecting the Device to Your Computer
1. After ActiveSync has been installed, connect the USB charging cable to your device. Ifnecessary, connect an adapter.
2. Plug the other end of the USB charging cable into a USB port on your computer.
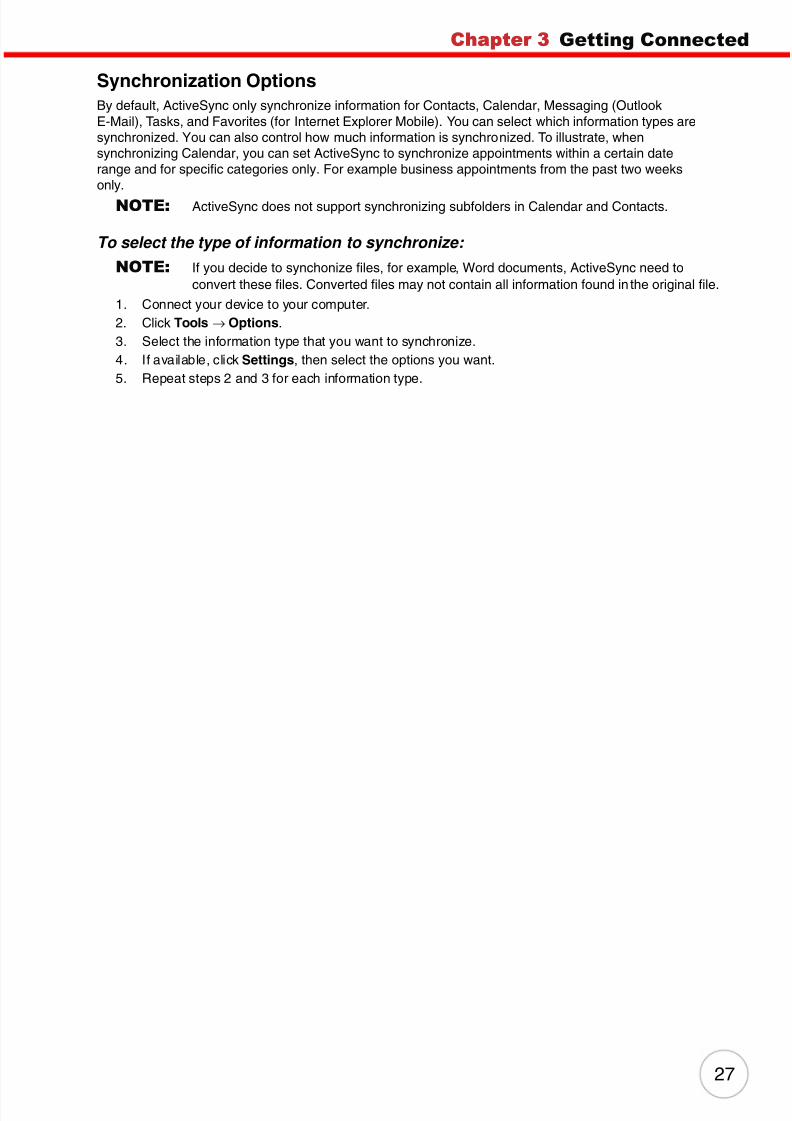
3. Turn the device on.4. ActiveSync should start automatically and recognize your PA500 and configure the USB port.
The New Partnership setup wizard will automatically start.
NOTE: If ActiveSync doesn’t start automatically, click Start → Programs → Microsoft
ActiveSync.If a message appears indicating that it is unable to detect a connection, click theCancel button and manually configure the communication settings.
5. Follow the onscreen instructions.

8/8/2019 PA500_UsersManual_RevB
http://slidepdf.com/reader/full/pa500usersmanualrevb 29/84
Chapter 3 Getting Connected
23
6. When the configuration process is complete, the ActiveSync window appears on your
computer, while the Data connectivity icon appears on your device’s navigation bar.
7. Synchronization will be initialized and will take place if you have chosen to synchronize
periodically or upon connection via several options — via USB charging cable, infraRed, orBluetooth connections.
NOTE: Your computer can create a partnership with multiple Enterprise PDA. Also, the PA500can create a partnership with up to two computers.

8/8/2019 PA500_UsersManual_RevB
http://slidepdf.com/reader/full/pa500usersmanualrevb 30/84
24
Copyright 2007 unitech Electronics Co., Ltd. All rights reserved. unitech is a registered trademark of unitech Electronics Co., Ltd.
Using ActiveSync
You can use ActiveSync to synchronize information between your PA500 and your computer so youalways have the most up-to-date information wherever your are.
Synchronizing Information with Your Computer
ActiveSync supports the following connection options between your device and your computer:• USB connection - using the USB charging cable. This connection is established when you have
created an ActiveSync partnership with your computer.• Infrared connection - ideal for quickly switching between multiple devices since cables or
adapters are not required.• Bluetooth connection - applicable only if your computer is equipped with a Bluetooth adapter or
access point.
To setup a USB ActiveSync connection: 1. Open ActiveSync on your computer.2. Click File → Connection Settings.
3. Select the “Allow USB connections” check box.4. Click OK.5. Open ActiveSync on your device.6. Tap Menu → Connections.
7. Select the “Synchronize all PCs using this connection” check box.8. Select USB.9. Tap ok .10. Connect your device to your computer using the USB charging cable. Synchronization is
automatically initiated.
To setup an Infrared ActiveSync connection: 1. Configure the infrared port on your computer. Refer to the computer’s documentation for
instructions.2. Once your computer’s IR port is ready, open ActiveSync on your computer.
3. Click File → Connection Settings.4. On the “Allow connections to one of the following” list, select Infrared Port (IR).5. Click OK.

8/8/2019 PA500_UsersManual_RevB
http://slidepdf.com/reader/full/pa500usersmanualrevb 31/84
Chapter 3 Getting Connected
25
6. Align the IR port of your device with the IR port on your computer.7. Open ActiveSync on your device.8. Tap Menu → Connect via IR.
To setup a Bluetooth ActiveSync connection: Your device is equipped with Bluetooth wireless technology that you can use to synchronize information
with a computer equipped with a Bluetooth adapter or access point. Bluetooth wireless technologyallows you to communicate with the computer whenever it is within the range.
1. Configure the Bluetooth connection on your computer. Refer to the Windows Online Help forinstructions.
2. Ensure Bluetooth is turned on your computer and detectable and within a close range.3. Make your device detectable to your PC by tapping Start→ Settings→ Connections tab→
Bluetooth.4. On the Mode tab, select the check boxes for the “Turn on Bluetooth” and “Make this device
discoverable to other devices” check box.
5. Tap ok .6. On your device, tap Start→ Programs→ ActiveSync.7. Tap Menu → Connect via Bluetooth.
If authentication is required, the Enter Passcode screen appears, type an alphanumericpasskey (PIN code), then tap Next; enter the same passkey on the computer.If you do not want to use a passkey, tap Next.
8. Select service. Check “Activesync”. Tap “Finish”.
9. To preserve battery power, be sure to end the bluetooth activesync connection when
synchronizing is complete. Tap “OK”.
10. From /start/Program, double tap “Activesync”.
11. Tap “Menu” at bottom right corner. Select “Connect via Bluetooth”.
Terminal connects to the PC via Bluetooth Activesync.

8/8/2019 PA500_UsersManual_RevB
http://slidepdf.com/reader/full/pa500usersmanualrevb 32/84
26
Copyright 2007 unitech Electronics Co., Ltd. All rights reserved. unitech is a registered trademark of unitech Electronics Co., Ltd.
Using ActiveSync to Exchange Files
You can use ActiveSync to exchange information from your device to your computer and vice versa.Changes you made to the information on one location will not affect the information on the other one. Ifyou want to automatically update information on both your device and computer, synchronize theinformation instead.
You can copy two types of information to your device: files and Pocket Access Windows CE Storeinformation.
The procedure below only applies to copying files. Refer to the ActiveSync Help on your computer forinstructions on how to copy Pocket Access Windows CE Store information.
NOTE: Files created on your computer may need to be converted by ActiveSync so that theycan be viewed and edited on your device and vice versa.
To copy files: 1. Connect your device to your computer.2. In ActiveSync on your computer, click Explore.
Windows Explorer opens the Mobile Device window for your device.
3. Locate the file that you want to copy on your device or computer.4. Do either one of the following:
– To copy the file to your device, right-click the file and click Copy. Place the cursor in thedesired folder for your device, right-click, then click Paste.
– To copy the file to your computer, right-click the file and click Copy. Place the cursor in thedesired folder for your computer, right click, then click Paste.
8/8/2019 PA500_UsersManual_RevB
http://slidepdf.com/reader/full/pa500usersmanualrevb 33/84
Chapter 3 Getting Connected
27
Synchronization Options
By default, ActiveSync only synchronize information for Contacts, Calendar, Messaging (OutlookE-Mail), Tasks, and Favorites (for Internet Explorer Mobile). You can select which information types aresynchronized. You can also control how much information is synchronized. To illustrate, whensynchronizing Calendar, you can set ActiveSync to synchronize appointments within a certain daterange and for specific categories only. For example business appointments from the past two weeksonly.
NOTE: ActiveSync does not support synchronizing subfolders in Calendar and Contacts.
To select the type of information to synchronize:
NOTE: If you decide to synchonize files, for example, Word documents, ActiveSync need toconvert these files. Converted files may not contain all information found in the original file.
1. Connect your device to your computer.2. Click Tools→ Options.3. Select the information type that you want to synchronize.4. If available, click Settings, then select the options you want.5. Repeat steps 2 and 3 for each information type.
8/8/2019 PA500_UsersManual_RevB
http://slidepdf.com/reader/full/pa500usersmanualrevb 34/84
28
Chapter 4
Managing Wireless Connections
Using the Wireless Manager
The Wireless Manager provides easy management to the wireless features on your device. Thisprogram complements your device’s integrated wireless card and enabling you to turn the wireless featureson and off and allows for centralized management of the Wi-Fi and Bluetooth settings.
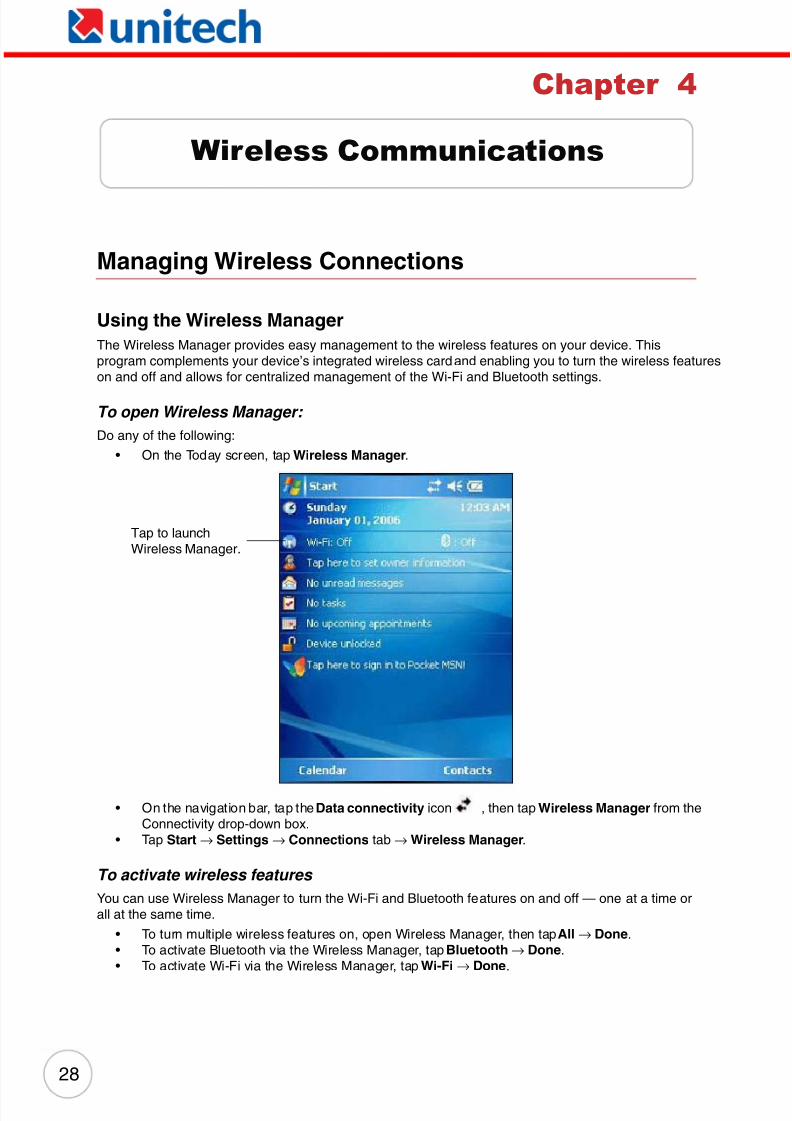
To open Wireless Manager: Do any of the following:
• On the Today screen, tap Wireless Manager.
• On the navigation bar, tap the Data connectivity icon , then tap Wireless Manager from theConnectivity drop-down box.
• Tap Start→ Settings→ Connections tab→Wireless Manager.
To activate wireless features You can use Wireless Manager to turn the Wi-Fi and Bluetooth features on and off — one at a time orall at the same time.
• To turn multiple wireless features on, open Wireless Manager, then tap All→ Done.• To activate Bluetooth via the Wireless Manager, tap Bluetooth→ Done.• To activate Wi-Fi via the Wireless Manager, tap Wi-Fi → Done.
Wireless Communications
Tap to launchWireless Manager.

8/8/2019 PA500_UsersManual_RevB
http://slidepdf.com/reader/full/pa500usersmanualrevb 35/84
Chapter 4 Wireless Communications
29
Connectivity Features
You can use your device to exchange information with other mobile devices and connect to yourcomputer, a network, or the Internet. You have the following options:
• Use the infrared sensor or Bluetooth function to exchange files from another IR- or Bluetooth-enabled device.
• Use Wi-Fi connection to send and receive email messages by using Messaging and view Webpages by using Internet Explorer Mobile.
Beam Function
In a Microsoft Windows Mobile program (except Messaging) and Picture & Videos, you can exchangefiles using either infrared or Bluetooth.
NOTE: You can also beam files (not folders) from the File Explorer screen. To do so, tap andhold the item you want to send, then tap Beam File from the pop-up menu.
You need to first activate the beam function before you can begin exchanging files with another IR- orBluetooth-enabled device.
To activate the Beam function: 1. Tap Start→ Settings.2. On the Connections tab, tap Beam.3. Tap “Receive all incoming beams” check box.
4. Tap ok .
8/8/2019 PA500_UsersManual_RevB
http://slidepdf.com/reader/full/pa500usersmanualrevb 36/84
30
Copyright 2007 unitech Electronics Co., Ltd. All rights reserved. unitech is a registered trademark of unitech Electronics Co., Ltd.
Infrared Connection
Using infrared, you can enable short-range file exchange between your device and another IR-enableddevice.
To exchange files using IR connection: 1. Ensure that the IR function on both your PA500 and on other device(which you want to exchange files
with) are turned on.2. Locate the item you want to send.
3. Align the IR port of your device with the IR port of the IR-enabled device, so that they are unobstructedand within a close range.
4. Tap and hold the item, then tap Beam [type of item] on the pop-up menu.5. Tap the device that you want to send the file to.
To receive files via IR connection: 1. Align the IR port of your device with the IR port of the IR-enabled device, so that they are unobstructed
and within a close range.2. Send the file from the other IR-enabled device.
3. On the Receiving Data callout, tap Yes.
Bluetooth Connection
Your device allows you to connect to any Bluetooth-enabled device in your personal area network(PAN). Once connected, you can send and receive files to another Bluetooth-enabled device, locate anduse any of the services available on the Bluetooth-enabled device you are connected to.
To setup a Bluetooth connection: 1. Activate the Bluetooth function.
You have two options to activate your device’s Bluetooth connection using the WirelessManager or the Bluetooth option under the Settings → Connections preferences. Onceactivated, Bluetooth connection is indicated as "On" in the Wireless Manager section of the Todayscreen.
– To activate Bluetooth via the Wireless Manager, see “Using the Wireless Manager” on page28.
– To activate Bluetooth using the Settings option:
a. Tap Start→ Settings.
b. On the Connections tab, tap Bluetooth.

8/8/2019 PA500_UsersManual_RevB
http://slidepdf.com/reader/full/pa500usersmanualrevb 37/84
Chapter 4 Wireless Communications
31
c. On the Mode tab, select all check boxes.
2. Tap ok .
NOTE: Deactivate the Bluetooth function when you do not plan to use it for an extended time.
3. Create a Bluetooth partnership.You need to create a Bluetooth partnership with another Bluetooth-enabled device in order toexchange the information.
a. On the Bluetooth settings screen, tap the Devices tab.
8/8/2019 PA500_UsersManual_RevB
http://slidepdf.com/reader/full/pa500usersmanualrevb 38/84
32
Copyright 2007 unitech Electronics Co., Ltd. All rights reserved. unitech is a registered trademark of unitech Electronics Co., Ltd.
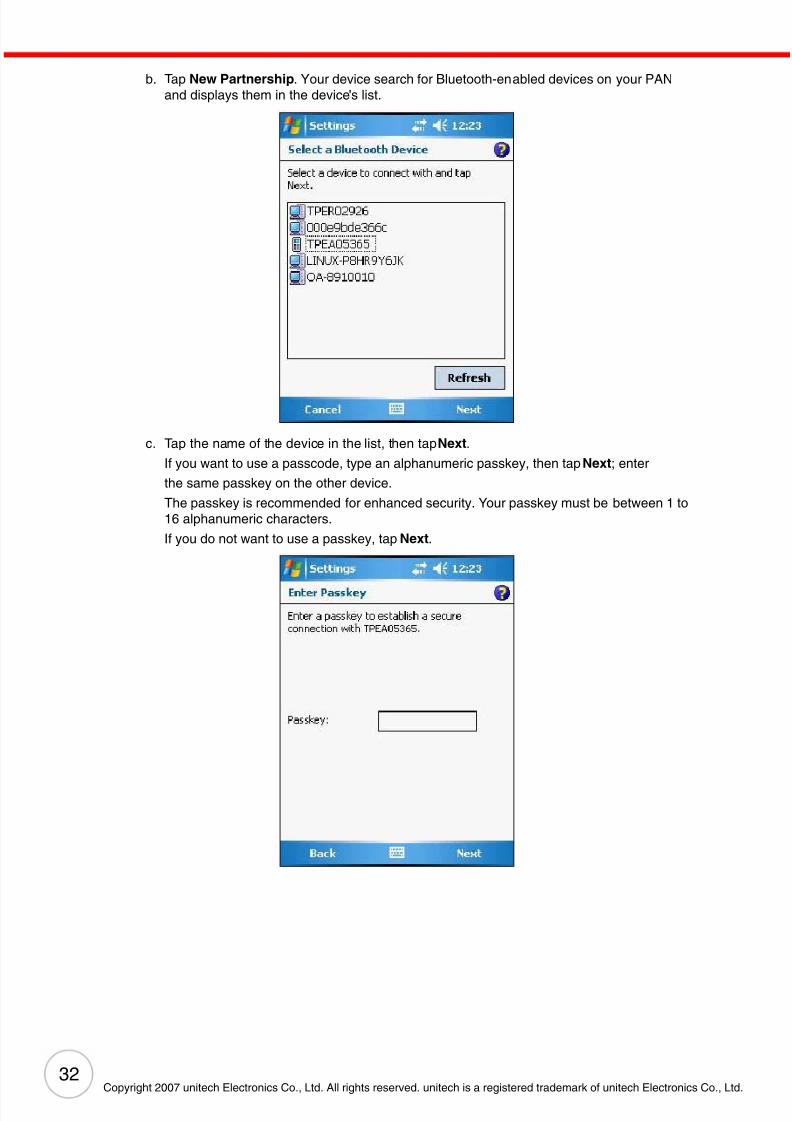
b. Tap New Partnership. Your device search for Bluetooth-enabled devices on your PANand displays them in the device's list.
c. Tap the name of the device in the list, then tap Next.
If you want to use a passcode, type an alphanumeric passkey, then tap Next; enter
the same passkey on the other device.
The passkey is recommended for enhanced security. Your passkey must be between 1 to16 alphanumeric characters.
If you do not want to use a passkey, tap Next.
8/8/2019 PA500_UsersManual_RevB
http://slidepdf.com/reader/full/pa500usersmanualrevb 39/84
Chapter 4 Wireless Communications
33
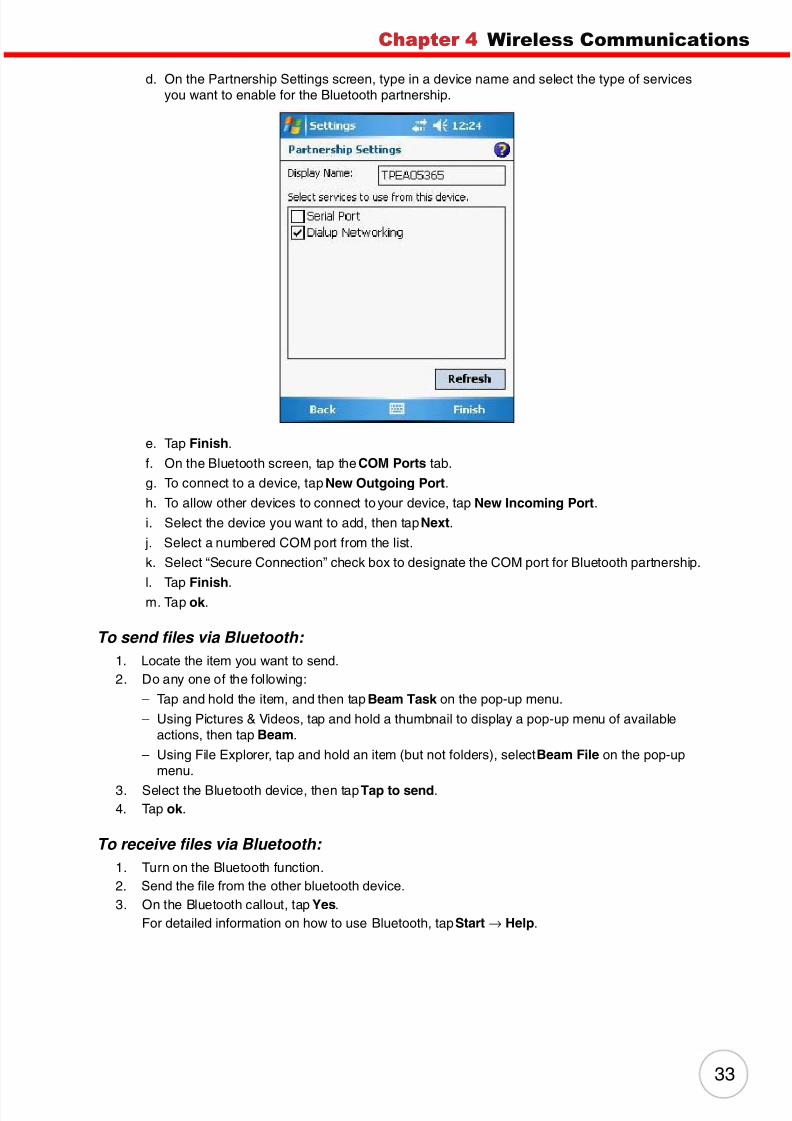
d. On the Partnership Settings screen, type in a device name and select the type of servicesyou want to enable for the Bluetooth partnership.
e. Tap Finish.
f. On the Bluetooth screen, tap the COM Ports tab.
g. To connect to a device, tap New Outgoing Port.
h. To allow other devices to connect to your device, tap New Incoming Port.
i. Select the device you want to add, then tap Next.
j. Select a numbered COM port from the list.
k. Select “Secure Connection” check box to designate the COM port for Bluetooth partnership.
l. Tap Fi
ni
sh.m. Tap ok .
To send files via Bluetooth: 1. Locate the item you want to send.
2. Do any one of the following:
– Tap and hold the item, and then tap Beam Task on the pop-up menu.
– Using Pictures & Videos, tap and hold a thumbnail to display a pop-up menu of availableactions, then tap Beam.
– Using File Explorer, tap and hold an item (but not folders), select Beam File on the pop-upmenu.
3. Select the Bluetooth device, then tap Tap to send.4. Tap ok .
To receive files via Bluetooth: 1. Turn on the Bluetooth function.2. Send the file from the other bluetooth device.
3. On the Bluetooth callout, tap Yes.For detailed information on how to use Bluetooth, tap Start→ Help.

8/8/2019 PA500_UsersManual_RevB
http://slidepdf.com/reader/full/pa500usersmanualrevb 40/84
34
Copyright 2007 unitech Electronics Co., Ltd. All rights reserved. unitech is a registered trademark of unitech Electronics Co., Ltd.
Wi-Fi Connection
Windows Mobile can support TCP/IP protocol, so the user can easily connect to the Internet by modemor high-frequency wireless LAN technology. Wi-Fi networks look and operate similarly to Ethernetnetworks. The only difference is that a radio transmission replaces the hard-wire connection betweenthe various nodes. This means all of your existing applications that currently operate over Ethernet willalso function utilizing WLAN without any special wireless network software.
With PA500 integrated Wi-Fi, you can scan for existing wireless network access point or hot spot.Wireless network access point or hot spot can be found in homes and offices or public areas such asinside the airport, restaurant, coffee shops, hotels, subway stations, or campus. Using Wi-Finetworking, you can connect to a computer, access the Internet, send and receive email and files.
A wireless network can be added either when the network is detected or by manually entering settingsinformation. Wi-Fi access in some areas may require a separate purchase of a service contract with awireless service provider. You can check with a Wi-Fi service provider for detailed information.
NOTE: Before doing these steps, you must do the following:
• Make sure your computer have TCP/IP installed.• Make sure the network system and remote access server in your workplace
supports TCP/IP.• Make sure you have remote access account. Ask your network administrator for
assistance on setting up a wireless connection.•
To set up a wireless network connection:
NOTE: Before doing these steps, determine if authentication information is needed.
1. Activate wireless connection.You have two options to activate your device’s wireless connection using the Wireless Manageror the Network Cards option under the Settings → Connections preferences. Once activated,Wi-Fi connection is indicated as On in the Wireless Manager section of the Today screen.
– To activate Wi-Fi connection via the Wireless Manager, see “Using the Wireless Manager” on
page 28.– To activate Wi-Fi connection using the Settings option:
a. Tap Start→ Settings.
b. On the Connections tab, tap Network Cards.
c. Tap the Wireless tab.
1. Tap the RF icon at the bottom of the screen.
2. A selection menu pop up.
Select “Enable Wireless”.
3. Once the RF card is detected, a dialog pop up.
4. Select a network SSID to connect to.
Select one of the network. Tap “OK”

8/8/2019 PA500_UsersManual_RevB
http://slidepdf.com/reader/full/pa500usersmanualrevb 41/84
Chapter 4 Wireless Communications
35
d. If there are networks already detected, tap and hold network name, then select Connect.
If none, tap Add New and follow all onscreen instructions.
e. Under the Network to access drop-down menu, select from the following networkconnection options:
— All available
— Only access points
— Only computer-to-computerf. When finished, tap OK.
To configure the wireless network connection settings, tap Start→ Settings→ Connections tab→ Network Cards. For more information on how to configure thewireless network settings, tap Start→ Help.
To connect to a wireless network: 1. Tap Start→ Settings.2. On the Connections tab, tap Network Cards.3. Tap the Wireless tab.4. On the command bar, tap Connect.
5. If a wireless network is connected, a “New Network Detected” callout appears.6. Tap Connect.
For more information on how to connect to a wireless network, tap Start→ Help.
Connecting to the Internet
After configuring your device’s wireless setting, you can now define the network settings you will be usingto access the Internet, connect to your office network and view intranet URLs.
Once you have established these network settings, use Internet Explorer Mobile to view Internet andintranet sites.
5. Select “The internet”. Tap “Connect”.
6. Enter the network key. Tap “Connect”.
7. Icon turn to double arrow, indicate that the
RF connection is running.
8. If you do not need to use the RF connection,
you can repeat step 1 ~2 and select “Disable Wireless”.

8/8/2019 PA500_UsersManual_RevB
http://slidepdf.com/reader/full/pa500usersmanualrevb 42/84
36
Chapter 5
Accessing Programs
Your PA500 supports a variety of PDA and wireless communication programs to help you manage bothpersonal and work-related information.
To open a Program: • Tap a program name from the Start menu.
• Tap Start → Programs, then tap a program icon.You can select which programs are displayed on the Start menu. For instructions, see “Adding aProgram to the Start Menu” on page 47.
Managing Programs

8/8/2019 PA500_UsersManual_RevB
http://slidepdf.com/reader/full/pa500usersmanualrevb 43/84
Chapter 5 Managing Programs
37
Using the Barcode Scanner Programs
Scan2Key
The Scan2Key application routes input from a scanner port to a keypad buffer.Using Scan2Key, scanned data can be directly input into scanner port aware application,
like Word Mobile.
To open Scan2Key: 1. Tap Start → Programs.
2. Tap Scan2Key. Scan2Key appears as an icon on lower right corner of the Today screen.

8/8/2019 PA500_UsersManual_RevB
http://slidepdf.com/reader/full/pa500usersmanualrevb 44/84
38
Copyright 2007 unitech Electronics Co., Ltd. All rights reserved. unitech is a registered trademark of unitech Electronics Co., Ltd.
To exit Scan2Key: 1. On the Today screen, tap and hold the Scan2Key icon, then tap Exit on the pop-up menu. The
Quit Scan2Key dialog box appears.
2. Tap Yes.
Scanner Settings
When it is necessary to change the default barcode symbology for a different application, the ScannerControl Panel provides the ability to change default symbology. The Scanner Control Panel also letsyou place delimiter characters behind scanned data and save the settings.
To view the default barcode symbologies: 1. Tap Start → Settings.2. On the System tab, tap Scanner Settings.

8/8/2019 PA500_UsersManual_RevB
http://slidepdf.com/reader/full/pa500usersmanualrevb 45/84
Chapter 5 Managing Programs
39
To view the default barcode symbologies: 1. Tap Start → Settings.2. On the System tab, tap Scanner Settings.3. On the Settings tab, tap the plus sign in front of Barcode Symbologies to expand and display
the list of barcode symbologies.
Below table lists the standard protocol for a particular type of barcode symbology.
Symbology Enable/
Disable
Check
Char/Digit
verification
Transmit
Check
Char/
Digit
Transmit
Leading
Char/
Digit
Transmit
Leading
Digit
Other
Bookland EAN YES — — — — —Codabar YES YES YES YES — CLSI format,
3 to 48 data lengthCode 11 YES — YES — — 2 check digits,
1 to 48 data lengthCode 128 YES — — — — 1 to 64 data lengthCode 32(PharmacyCode)
YES — — — YES Transmit tailing digit
Code 39 YES YES YES YES YES Full ASCII,Function Code,0 to 48 data length,Double labelsdecoding,Double labelsseparator
Code 93 YES — — — — 1 to 48 data lengthDelta Code YES YES YES — — —EAN 128 YES — — — — Transmit Code ID,
Field separatorEAN 13 YES — YES — YES —EAN 8 YES — YES — YES —

8/8/2019 PA500_UsersManual_RevB
http://slidepdf.com/reader/full/pa500usersmanualrevb 46/84
40
Copyright 2007 unitech Electronics Co., Ltd. All rights reserved. unitech is a registered trademark of unitech Electronics Co., Ltd.
Symbology Enable/
Disable
Check
Char/Digit
verification
Transmit
Check
Char/
Digit
Transmit
Leading
Digit
Transmit
Leading
Digit
Other
Interleaved2 of 5
YES YES YES — — Fixed Length,Not suppress start orstop digit,10 to 64 data length
Label CodeIV&V
YES — YES — — —
MSI/Plessey YES — YES — — Check digit doublemodule 10,1 to 16 data length
Standard 2of 5/Toshiba(China PostalCode) Group
YES YES YES — — Fixed Length,4 to 48 data length
Telepen YES — — — — Standardcharacter set
UPC A YES — YES — YESUPC E YES — YES — YES Zero Expansion,
NSCUPC/EANGroup
— — — — — Supplement 2,Supplement 5,Insert Space beforesupplement,Must havesupplement,
Add-on code try level

8/8/2019 PA500_UsersManual_RevB
http://slidepdf.com/reader/full/pa500usersmanualrevb 47/84
41
Chapter 6
Adjusting Settings
You can adjust the settings of your device to fit the way you work. Certain settings, such as
backlight, auto power off timer, system volume and processor speed can be adjusted.
To access Settings: Tap Start → Settings.
Customizing Your PA500

8/8/2019 PA500_UsersManual_RevB
http://slidepdf.com/reader/full/pa500usersmanualrevb 48/84
42
Copyright 2007 unitech Electronics Co., Ltd. All rights reserved. unitech is a registered trademark of unitech Electronics Co., Ltd.
Checking Main and Backup Battery Status
View power level for both the main and backup battery. To minimize power consumption, you can definesettings for the auto-off function and the processor’s operation speed.
To check the main and backup battery status:
1. Tap Start → Settings.2. On the System tab, tap Power.
3. Do either of the following:
– If the Plug or Battery icon appears on your device, double-tap the icon to bring thePower settings screen.
– Tap Start > Settings > System tab > Power.
4. The battery tab will show the status of the main and backup batteries. There are four kinds of
status icons, Good , Low , and Very Low or , that may appear on the top of the Todayscreen to indicate main battery or backup battery status. For more information on the batterystatus icons, see page 17.
NOTE: It is necessary to charge the main battery when the Low is displayed. To prevent
data loss, replace or recharge the device when the Very Low or status icons aredisplayed. If both icons are still displayed after charging, please contact unitechTechnical Support.

8/8/2019 PA500_UsersManual_RevB
http://slidepdf.com/reader/full/pa500usersmanualrevb 49/84
Chapter 6 Customizing Your PA500
43
Extending Battery Life
You can save your device’s battery life by doing either of the following:
• Change the automatic power settings• Minimize the use of backlight
To change the Automatic Power Settings: The PA500 will enter idle mode when there is no task, or all tasks are waiting for input. In defaultsetting, the PA500 will automatically turn itself off if it remains idle for 3 minutes and when there is noexternal charging power applied. Pressing the power button will return the PA500 to the same point atthe time of automatic shutdown.
1. Tap Start → Settings.2. On the System tab, tap Power.3. Tap the Advanced tab.4. Tap the “On battery power turn off device if not used for” check box and change the amount of
time before the unit turns off the backlight while running in battery power mode.
This function can also be activated when the PA500 is plugged into the power adapter or placedin its docking station. On the Advanced tab, tap the “On external power turn off device if notused for” check box and change the amount of time before the unit turns off the backlight whilerunning in external power mode.

8/8/2019 PA500_UsersManual_RevB
http://slidepdf.com/reader/full/pa500usersmanualrevb 50/84
44
Copyright 2007 unitech Electronics Co., Ltd. All rights reserved. unitech is a registered trademark of unitech Electronics Co., Ltd.
Adjusting the Backlight Setting
The power consumption of the LCD backlight is high, turn off the backlight function if it is not necessary.
To adjust the Backlight setting: 1. Tap Start → Settings.
2. On the System tab, tap Backlight.3. On the Battery Power tab, do either of the following:
– Tap the “Turn off backlight if device is not used for” check box and change the amount oftime before the unit turns off the backlight while running in battery power mode.
– Tap “Turn on backlight when button is pressed or the screen is tapped” check box.
4. On the External Power tab, do either of the following:
– Tap the “Turn off backlight if device is not used” check box and change the amount of timebefore the unit turns off the backlight while running in external power mode.
– Tap the “Turn on backlight when a button is pressed or the screen is tapped” check box.
5. Tap ok .
8/8/2019 PA500_UsersManual_RevB
http://slidepdf.com/reader/full/pa500usersmanualrevb 51/84
Chapter 6 Customizing Your PA500
45
Resetting the Device
There are three kinds of reset that you can perform on your device when the device’s operating systemstops responding or the system becomes corrupted. Depending on the situation, a warm boot, cleanboot, or cold boot can be performed.
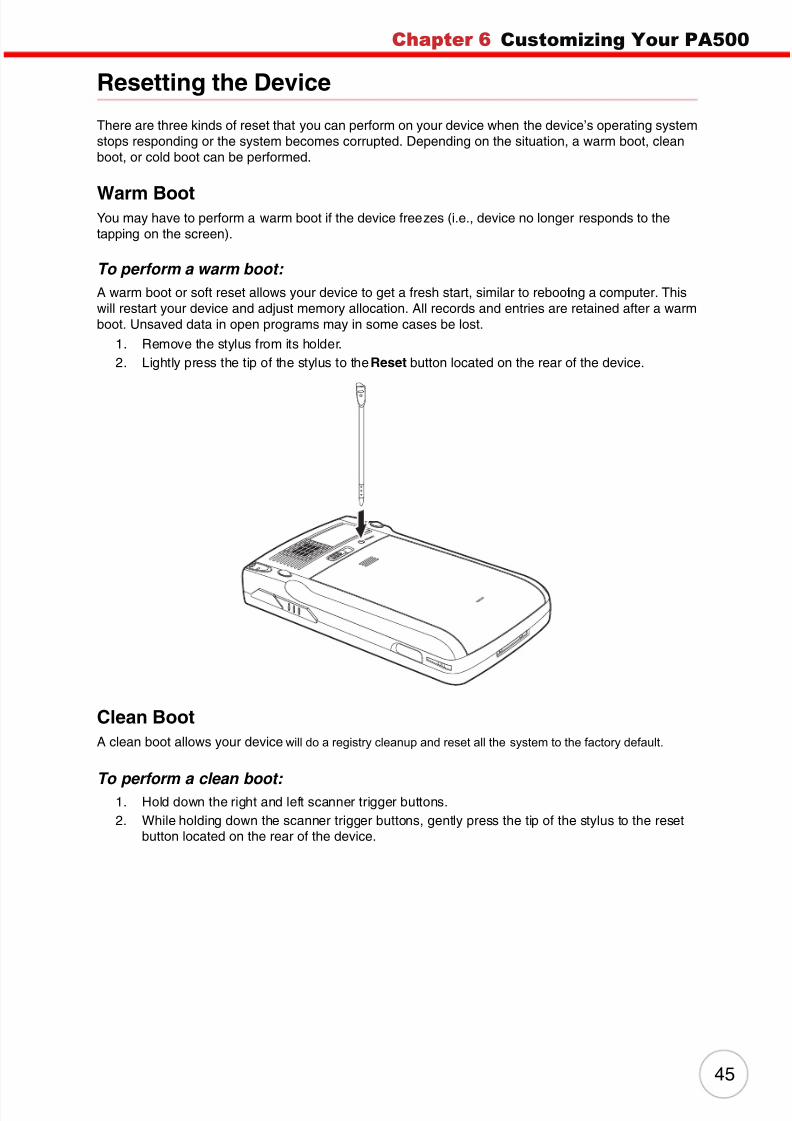
Warm BootYou may have to perform a warm boot if the device freezes (i.e., device no longer responds to thetapping on the screen).
To perform a warm boot: A warm boot or soft reset allows your device to get a fresh start, similar to rebooting a computer. Thiswill restart your device and adjust memory allocation. All records and entries are retained after a warmboot. Unsaved data in open programs may in some cases be lost.
1. Remove the stylus from its holder.2. Lightly press the tip of the stylus to the Reset button located on the rear of the device.
Clean Boot
A clean boot allows your device will do a registry cleanup and reset all the system to the factory default.
To perform a clean boot: 1. Hold down the right and left scanner trigger buttons.2. While holding down the scanner trigger buttons, gently press the tip of the stylus to the reset
button located on the rear of the device.

8/8/2019 PA500_UsersManual_RevB
http://slidepdf.com/reader/full/pa500usersmanualrevb 52/84
46
Copyright 2007 unitech Electronics Co., Ltd. All rights reserved. unitech is a registered trademark of unitech Electronics Co., Ltd.
Cold Boot
A cold boot will cut off power to your device. This will erase all records and entries, delete all programsyou have added, and restore the device default factory settings. Never perform a cold boot unless awarm or clean boot does not correct your problem. When you perform your next ActiveSync operation,you can restore any data that you previously synchronized to your computer or you can restore datathat you backed up to a storage card.
NOTE:When you perform a cold boot, the date and time settings are not retained. Formats,preferences, and other settings are restored to their default factory settings.
To perform a cold boot: 1. Hold down the power button.2. While holding down the power button, gently press the tip of the stylus to the reset button
located on the rear of the device.
Viewing Flash ROM Files
Flash ROM (read-only memory) is a rewritable storage for programs and data files. The benefit of thisfeature is that files and programs saved in Flash ROM are unaffected by the PA500 power status.
To access the Flash Memory files: 1. Connect the device to your computer. See page 22.2. On your computer, click My Computer → Mobile Device → Flash Storage.
To transfer files to Device’s Flash Memory: 1. Connect the device to your computer. See page 22.2. On your computer, click My Computer → Mobile Device → Flash Storage.3. Select the file that you want to save.
4. Click File → Save To and select Flash Storage.
Adding Programs to Your Device
Programs bundled with your device at the factory are stored in Flash ROM. You cannot remove theseprograms, and you’ll never accidentally lose Flash ROM contents. Software programs and data filesadded to your PA500 after factory installation can be stored in RAM (random access memory).
To add programs using ActiveSync: Before installing a program on your device, you must first install the appropriate software to your device
on your computer.1. Determine your device and processor type so that you know which version of the software to
install.
a. Tap Start→ Settings.
b. On the System tab, tap About.
c. On the Version tab, make a note of the processor information.
2. Download the program to your computer (or insert the CD or disk that contains the program intoyour computer).You may see a single *.xip, *.exe or *.zip file, a Setup.exe file, or several versions of files fordifferent device types and processors. Be sure to select the program designed for Pocket PCand your device’s processor type.
NOTE: Read any installation instructions. Read Me files or documentation that come with theprogram. Many programs provide special installation instructions.
3. Connect your device to your computer.
To access the Flash Memory files:
1. Click My Device > Flash Storage
To transfer the files to the device's flash memory:
1. Connect the device to your computer by ActiveSync.
2. On your computer's Activesync, click Mobile Device > Flash Storage.
3. Select the file that you want to transfer.
4. Drag the file from your terminal's flash storage folder to your computer's folder or drag the file from your
computer's folder to the terminal's flash storage folder.

8/8/2019 PA500_UsersManual_RevB
http://slidepdf.com/reader/full/pa500usersmanualrevb 53/84
Chapter 6 Customizing Your PA500
47
4. Double-click the *.exe file.
– If the file is an installer, the installation wizard will begin. Follow the directions on the screen.Once the software has been installed on your computer, the installer will automatically trans-fer the software to your device.
– If the file is not an installer, you will see an error message stating the program is valid but isdesigned for a different type of computer. You will need to move this file to your device. If youcannot find any installation instructions for the program in the Read Me file or documentation,
use ActiveSync Explore button to copy the program file to the Program Files folder on yourdevice. For more information on copying files using ActiveSync, see page 24.
5. Once installation is complete, tap Start→ Programs, then the program icon to launch it.If you are installing a *.cab file on your device, open ActiveSync on your desktop, then click theExplore button. The application will install on your device.
To add a program from the Internet: 1. Determine your device and processor type so that you know which version of the software to
install. Refer to previous section for instructions.2. Download the program to your device straight from the Internet using Internet Explorer Mobile.
NOTE: Read any installation instructions. Read Me files or documentation that come with theprogram. Many programs provide special installation instructions.
3. Tap the file, such as *.xip or *.exe file. The installation wizard will begin.4. Follow the onscreen instructions.
Adding a Program to the Start Menu
You can choose what program icons should appear on the menu based on which ones you use mostoften.
To add a program to the Start menu program using Settings: 1. Tap Start → Settings.2. On the Personal tab, tap Menus.
3. Select the check box for the programs you wish to add.
If you do not see the program you want, you can either use File Explorer on your device tomove the program to the Start Menu folder, or use ActiveSync on your computer to create ashortcut to the program and place the shortcut in the Start Menu folder.
4. Tap ok .

8/8/2019 PA500_UsersManual_RevB
http://slidepdf.com/reader/full/pa500usersmanualrevb 54/84
48
Copyright 2007 unitech Electronics Co., Ltd. All rights reserved. unitech is a registered trademark of unitech Electronics Co., Ltd.
To add a program to the Start menu program using File Explorer on your device: 1. Tap Start→ Programs→ File Explorer.2. Tap the My Device icon (tap the folder list, labeled My Documents by default, and then My
Device to see a list of all folders on your device).
3. Open the path: Windows | Start | Programs.

8/8/2019 PA500_UsersManual_RevB
http://slidepdf.com/reader/full/pa500usersmanualrevb 55/84
Chapter 6 Customizing Your PA500
49
4. Tap and hold the program you want to add to the menu, then tap Cut on the pop-up menu.
5. Open the path: Windows | Start Menu.6. Tap and hold a blank area of the screen, then tap Paste on the pop-up menu.

8/8/2019 PA500_UsersManual_RevB
http://slidepdf.com/reader/full/pa500usersmanualrevb 56/84
50
Copyright 2007 unitech Electronics Co., Ltd. All rights reserved. unitech is a registered trademark of unitech Electronics Co., Ltd.
7. A Confirm File Move dialog box appears, tap Yes.
8. The program will now appear on the Start menu.
To add a Start menu program using ActiveSync on your computer: 1. In the ActiveSync on your computer, click Explore to explore your device’s files and locate the
program.2. Right-click the program, and then click Create Shortcut.3. Open the path: Mobile Devices | Windows | Start Menu.4. Move the shortcut to the Start Menu folder. The shortcut now appears on the Start menu.
For more information on using ActiveSync, see ActiveSync
Help on your computer.
Removing Programs
You can only remove programs that you have installed. Programs that come with your device cannot beremoved.
To remove a program using Settings: 1. Tap Start → Settings.2. On the System tab, tap Remove Programs.
3. Tap the program you wish to remove.4. Tap Remove.
To remove a program using File Explorer on your device: If the program does not appear in the list of installed programs, use File Explorer on your device tolocate the program:
1. Tap Start → Programs→ File Explorer.2. Tap the My Device icon (tap the folder list, labeled My Documents by default, and then My
Device to see a list of all folders on your device).3. Open the path: Windows | Start | Programs.4. Tap and hold the program you want to remove, then tap Delete on the pop-up menu.

8/8/2019 PA500_UsersManual_RevB
http://slidepdf.com/reader/full/pa500usersmanualrevb 57/84
51
Appendix A
Processing/Memory CPU Intel PXA270 processor with speed of up to 520 MHz
Memory • SDRAM: 64 MB• Flash ROM: 64 MB Built-in (Flash Memory
Manager included)
Input/Output Input Devices • Touch screen• Stylus• Control buttons• Full alphanumeric software keyboard• Mag stripe reader
• Barcode scannerControl and Quicklaunch hot keys
• Navigation key• Software keyboard button• Email button• Today button• Calendar button• Tasks button• Notes button
Audio • Built-in speaker• 3.5 mm stereo earphone jack
• MicrophoneDisplay • 3.5" QVGA LCD touch-sensitive screen andElectroluminescent backlight
• 320 x 240 resolution
LED Indicator Dual colors (green/red) for barcode read indication
Scan Engine • Light Source: Visible Laser Diode (VLD) 650 nm• Min. print contrast: 25% absolute dark/light
reflectance at 650 nm• Power Consumption: 65 mA typical@5 V
Connectivity • USB port• SDIO/MMC slot
Wireless connectivity • BluetoothVersion: 1.1 and 1.2 with class 2 specificationPeak output power: 2 ±2 dBmFrequency band: 2400-2483.5 MHzOperating channels: 79 ChannelsModulation Type: GFSK
System Specifications

8/8/2019 PA500_UsersManual_RevB
http://slidepdf.com/reader/full/pa500usersmanualrevb 58/84
52
Copyright 2007 unitech Electronics Co., Ltd. All rights reserved. unitech is a registered trademark of unitech Electronics Co., Ltd.
Input/Output Wireless connectivity • WLAN (802.11b)802.11b low power (3.96 mW deep sleep mode)Peak output power: 18 ±2 dBmFrequency band: 2400-2483.5 MHzOperating channels: 11 ChannelsModulation Type:
CCK (1Mbps)DBPSK (2Mbps)DQPSK (5.5/11Mbps)
• WLAN (802.11g)802.11g low power (3.96 mW deep sleep mode)Peak output power: 15 ±2 dBmFrequency band: 2400-2483.5 MHzOperating channels: 11 ChannelsModulation Type: OFDM (6~54Mbps)
• Serial infrared port
Power Main battery Standard battery: 3.7 V, 2200 mAh
Battery life 4 hours
Battery charge • 3.5 hours with external AC adapter• 3.5 hours with docking station
Backup battery One hour data retaining time when main battery isremoved
Power management • Provide all voltage outputs required in this device• Retain memory content more than 72 hours after
automatic low battery shutdown• Provide 4 hours operating time with a standard
battery. The activities in operating period are:
a. Scan one barcode.b. Send this barcode data to the host via wireless
LAN.c. Repeat items 1 and 2 every 5 seconds.
• Provide 3-level battery status to show mainbattery capacity
• Provide 3-level battery status to show back-upbattery capacity
• 3.5 hours charging time• 16 hours backup battery charging time
8/8/2019 PA500_UsersManual_RevB
http://slidepdf.com/reader/full/pa500usersmanualrevb 59/84
Appendix A System Specifications
53
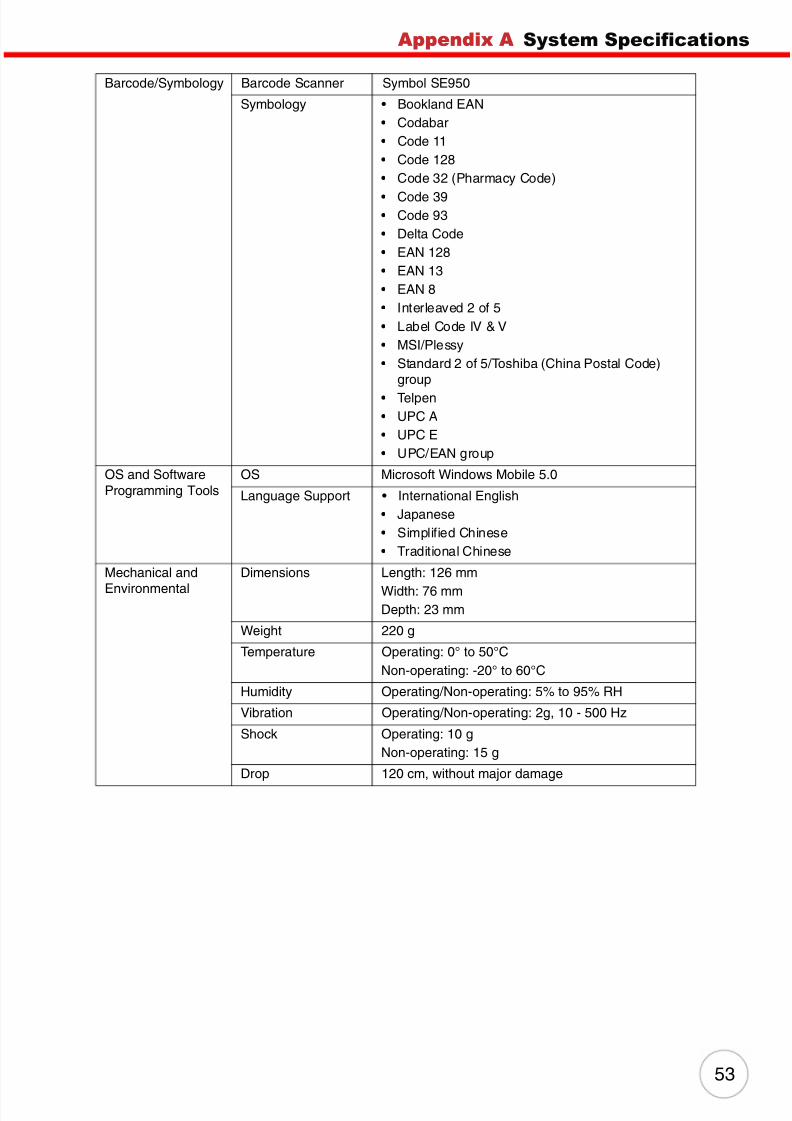
Barcode/Symbology Barcode Scanner Symbol SE950
Symbology • Bookland EAN• Codabar• Code 11• Code 128• Code 32 (Pharmacy Code)
• Code 39• Code 93• Delta Code• EAN 128• EAN 13• EAN 8• Interleaved 2 of 5• Label Code IV & V• MSI/Plessy• Standard 2 of 5/Toshiba (China Postal Code)
group
• Telpen• UPC A• UPC E• UPC/EAN group
OS and SoftwareProgramming Tools
OS Microsoft Windows Mobile 5.0
Language Support • International English• Japanese• Simplified Chinese• Traditional Chinese
Mechanical and
Environmental
Dimensions Length: 126 mm
Width: 76 mmDepth: 23 mm
Weight 220 g
Temperature Operating: 0° to 50°CNon-operating: -20° to 60°C
Humidity Operating/Non-operating: 5% to 95% RH
Vibration Operating/Non-operating: 2g, 10 - 500 Hz
Shock Operating: 10 gNon-operating: 15 g
Drop 120 cm, without major damage

8/8/2019 PA500_UsersManual_RevB
http://slidepdf.com/reader/full/pa500usersmanualrevb 60/84
54
Copyright 2007 unitech Electronics Co., Ltd. All rights reserved. unitech is a registered trademark of unitech Electronics Co., Ltd.
CPU/Speicher CPU Intel PXA270-Prozessor mit Frequenzen bis zu 520MHz
Speicher • SDRAM: 64 MB• Flash ROM: 64 MB integriert (inklusive Flash-
Speicher-Manager)
Eingang/Ausgang Eingangsgerate • Touchscreen• Stift• Kontrolltasten• Vollalphanumerische Software-Tastatur• Magnetstreifenleser• Barcode-Scanner
Kontroll- undSchnellstart-Hotkeys
• Navigationstaste• Tasks-Taste• Software keyboard-Taste• Today-Taste• E-Mail-Taste• Calendar-Taste• Notes-Taste
Audio • Eingebauter Lautsprecher• Mikrofon• 3,5 mm Stereo-Ohrhorerbuchse
Display • Beruhrungsempfindlicher 3,5-Zoll-QVGA-LCD-Bildschirm und elektroluminiszierendeBeleuchtung
• 320 x 240 Auflosung
LED-Anzeige Zwei Farben (grun/rot) fur Barcode-Leseanzeige
Scanmaschine • Lichtquelle: Sichtbare Laser-Diode (VLD) 650 nm• Min. Druckkontrast: 25% absolute Dunkelheit/
Lichtreflektion bei 650 nm• Leistungsaufnahme: 65 mA typisch@5 V
Anschlussfahigkeit • SB-Anschluss
• SDIO/MMC-SteckplatzDrahtlosanschluss • BluetoothVersion: 1.1 und 1.2 mit Spezifikation Klasse 2Ausgangsleistung (Spitze): -1 ±2 dBmFrequenzband: 2400-2483,5 MHzBetriebskanale: 79 KanaleModulationstyp: GFSK
Technische Daten des Systems

8/8/2019 PA500_UsersManual_RevB
http://slidepdf.com/reader/full/pa500usersmanualrevb 61/84
Appendix A System Specifications
55
Eingang/Ausgang Drahtlosanschluss • WLAN (802.11b)802.11b niedrige Leistung (3,96 mWTiefschlafmodus)Ausgangsleistung (Spitze): 18 ±2 dBmFrequenzband: 2400-2483,5 MHzBetriebskanale: 11 Kanale
Modulationstyp:CCK (1Mbps)DBPSK (2Mbps)DQPSK (5.5/11Mbps)
• WLAN (802.11g)802.11g niedrige Leistung (3,96 mWTiefschlafmodus)Ausgangsleistung (Spitze): 15 ±2 dBmFrequenzband: 2400-2483,5 MHzBetriebskanale: 11 KanaleModulationstyp: OFDM (6~54 Mbit/s)
• Serieller InfrarotanschlussStrom Hauptakku Standardakku: 3.7 V, 2200 mAh
Akkunutzungszeit 4 Stunden
Akkuladung • 3,5 Stunden mit externem Netzteil• 3,5 Stunden mit Dockingstation
Backup-Akku Daten werden bei Entfernung des Hauptakkus eineStunde lang beibehalten
Energieverwaltung • Gibt alle Spannungen aus, die in diesemTerminal benotigt werden
• Bewahrt den Speicherinhalt fur mindestens 72
Stunden nach automatischem Ausschaltenwegen schwachem Akku• 4 Stunden Betriebszeit mit einem Standardakku.
Die Aktivitaten in der Betriebszeit sind:a. Einen Barcode scannnen.b. Diese Barcode-Daten uber drahtloses LAN an
den Host senden.c. Punkte 1 und 2 alle 5 Sekunden wiederholen.
• Zeigt die Kapazitat des Hauptakkus anhandeines 3-Stufen-Akkustatus
• Zeigt die Kapazitat des Backup-Akkus anhandeines 3-Stufen-Akkustatus
• 3,5 Stunden Ladezeit• 16 Stunden Ladezeit fur Backup-Akku
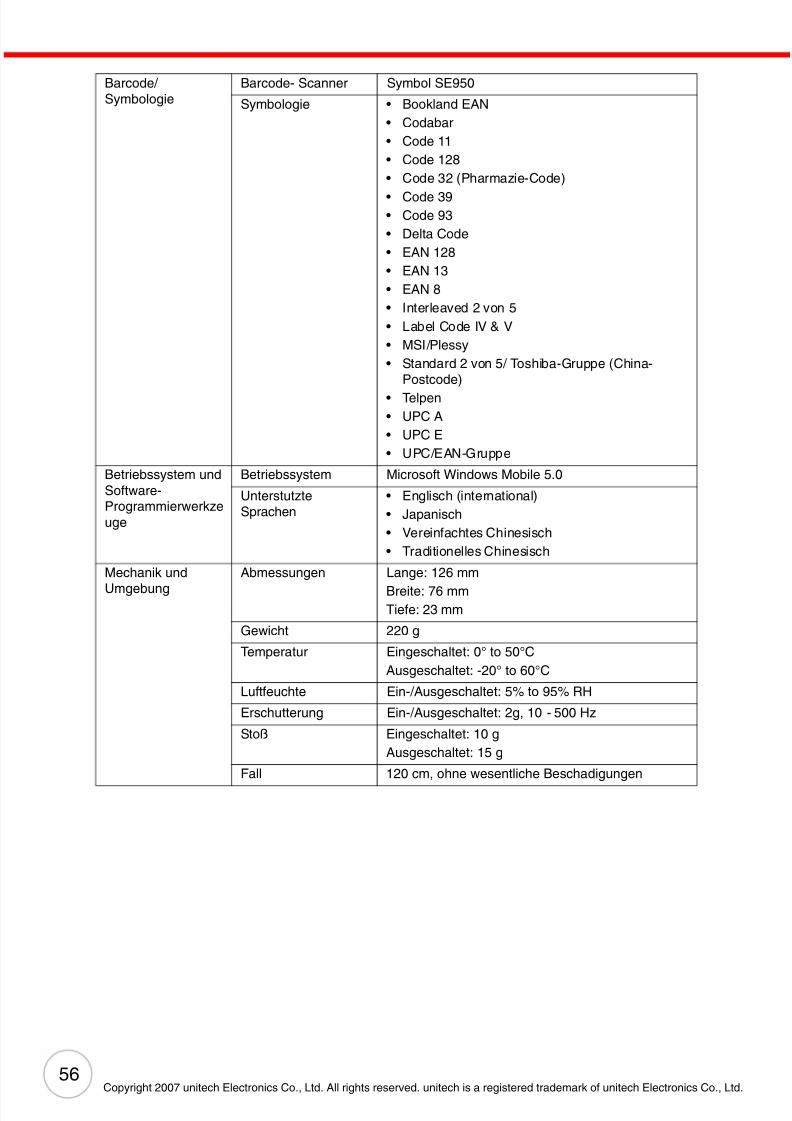
8/8/2019 PA500_UsersManual_RevB
http://slidepdf.com/reader/full/pa500usersmanualrevb 62/84
56
Copyright 2007 unitech Electronics Co., Ltd. All rights reserved. unitech is a registered trademark of unitech Electronics Co., Ltd.
Barcode/ Symbologie
Barcode- Scanner Symbol SE950
Symbologie • Bookland EAN• Codabar• Code 11• Code 128• Code 32 (Pharmazie-Code)
• Code 39• Code 93• Delta Code• EAN 128• EAN 13• EAN 8• Interleaved 2 von 5• Label Code IV & V• MSI/Plessy• Standard 2 von 5/ Toshiba-Gruppe (China-
Postcode)
• Telpen• UPC A• UPC E• UPC/EAN-Gruppe
Betriebssystem undSoftware-Programmierwerkzeuge
Betriebssystem Microsoft Windows Mobile 5.0
UnterstutzteSprachen
• Englisch (international)• Japanisch• Vereinfachtes Chinesisch• Traditionelles Chinesisch
Mechanik und
Umgebung
Abmessungen Lange: 126 mm
Breite: 76 mmTiefe: 23 mm
Gewicht 220 g
Temperatur Eingeschaltet: 0° to 50°CAusgeschaltet: -20° to 60°C
Luftfeuchte Ein-/Ausgeschaltet: 5% to 95% RH
Erschutterung Ein-/Ausgeschaltet: 2g, 10 - 500 Hz
Stoß Eingeschaltet: 10 gAusgeschaltet: 15 g
Fall 120 cm, ohne wesentliche Beschadigungen
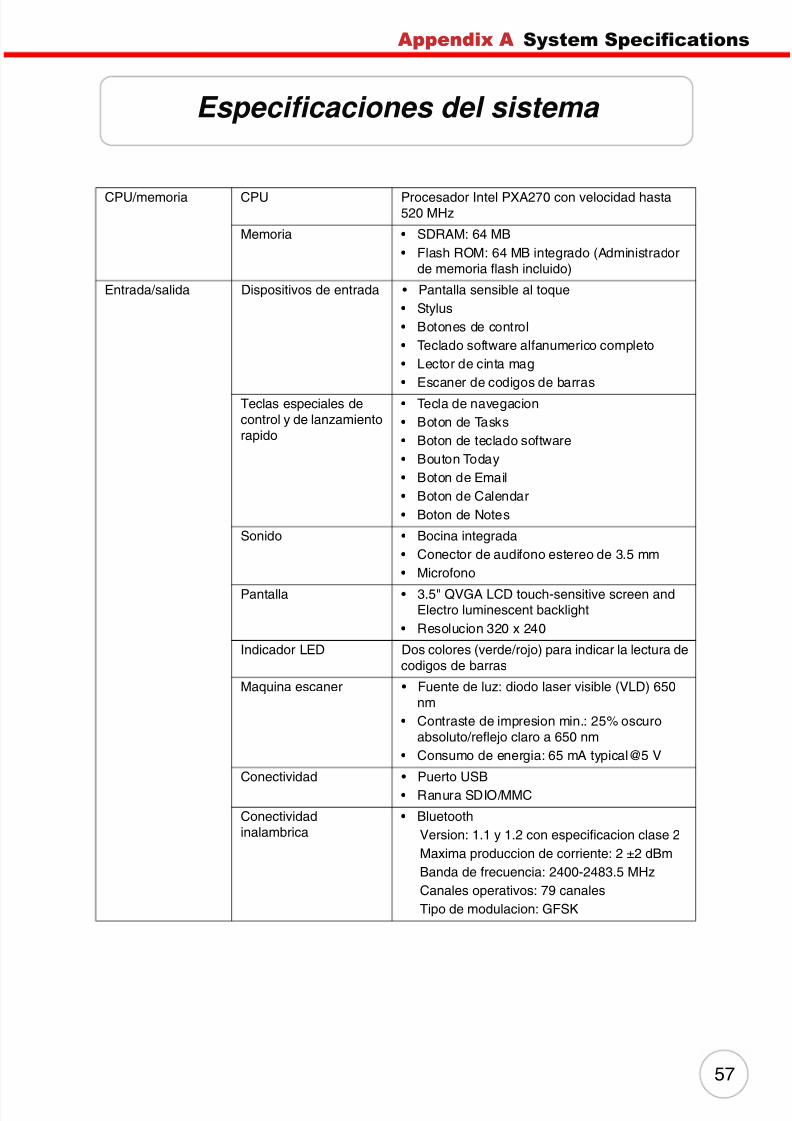
8/8/2019 PA500_UsersManual_RevB
http://slidepdf.com/reader/full/pa500usersmanualrevb 63/84
Appendix A System Specifications
57
CPU/memoria CPU Procesador Intel PXA270 con velocidad hasta520 MHz
Memoria • SDRAM: 64 MB• Flash ROM: 64 MB integrado (Administrador
de memoria flash incluido)
Entrada/salida Dispositivos de entrada • Pantalla sensible al toque• Stylus• Botones de control• Teclado software alfanumerico completo• Lector de cinta mag• Escaner de codigos de barras
Teclas especiales decontrol y de lanzamientorapido
• Tecla de navegacion• Boton de Tasks• Boton de teclado software• Bouton Today• Boton de Email• Boton de Calendar• Boton de Notes
Sonido • Bocina integrada• Conector de audifono estereo de 3.5 mm• Microfono
Pantalla • 3.5" QVGA LCD touch-sensitive screen andElectro luminescent backlight
• Resolucion 320 x 240
Indicador LED Dos colores (verde/rojo) para indicar la lectura decodigos de barras
Maquina escaner • Fuente de luz: diodo laser visible (VLD) 650nm
• Contraste de impresion min.: 25% oscuroabsoluto/reflejo claro a 650 nm
• Consumo de energia: 65 mA typical@5 V
Conectividad • Puerto USB• Ranura SDIO/MMC
Conectividadinalambrica
• BluetoothVersion: 1.1 y 1.2 con especificacion clase 2Maxima produccion de corriente: 2 ±2 dBmBanda de frecuencia: 2400-2483.5 MHzCanales operativos: 79 canalesTipo de modulacion: GFSK
Especificaciones del sistema

8/8/2019 PA500_UsersManual_RevB
http://slidepdf.com/reader/full/pa500usersmanualrevb 64/84
58
Copyright 2007 unitech Electronics Co., Ltd. All rights reserved. unitech is a registered trademark of unitech Electronics Co., Ltd.
Entrada/salida Conectividadinalambrica
• WLAN (802.11b)802.11b de baja corriente (3.96 mW en mododormir profundo)Maxima produccion de corriente: 18 ±2 dBmBanda de frecuencia: 2400-2483.5 MHzCanales operativos: 11 Channels
Tipo de modulacion:CCK (1Mbps)DBPSK (2Mbps)DQPSK (5.5/11Mbps)
• WLAN (802.11g)802.11g de baja corriente (3.96 mW en mododormir profundo)Maxima produccion de corriente: 15 ±2 dBmBanda de frecuencia: 2400-2483.5 MHzCanales operativos: 11 canalesTipo de modulacion: OFDM (6~54Mbps)
• Puerto serial infrarrojoEnergia Bateria principal Bateria estandar: 3.7 V, 2200 mAh
Duracion de carga de labateria
4 horas
Carga de bateria • 3.5 horas con adaptador de corriente ACexterno
• 3.5 horas con estacion de acoplamiento
Bateria de respaldo Una hora de uso despues de retirar la bateriaprincipal
Administracion deenergia
• Proporciona todas las salidas de voltajerequeridas en esta terminal
• Retiene el contenido de memoria por mas de72 horas luego del apagado automatico porbajo nivel de bateria
• Proporciona 4 horas de operacion usando unpaquete de bateria estandar. Las actividadesen el periodo de operacion son:a. Escanea un codigo de barras.b. Envia el dato del codigo de barras al
anfitrion atraves del LAN inalambrico.c. Repite articulos 1 y 2 cada 5 segundos.
• Proporciona 3 niveles de estado de bateria
para mostrar la capacidad de la bateriaprincipal
• Proporciona 3 niveles de estado de bateriapara mostrar la capacidad de la bateria derespaldo
• 3.5 horas para recargar la bateria• 16 horas para recargar la bateria de respaldo
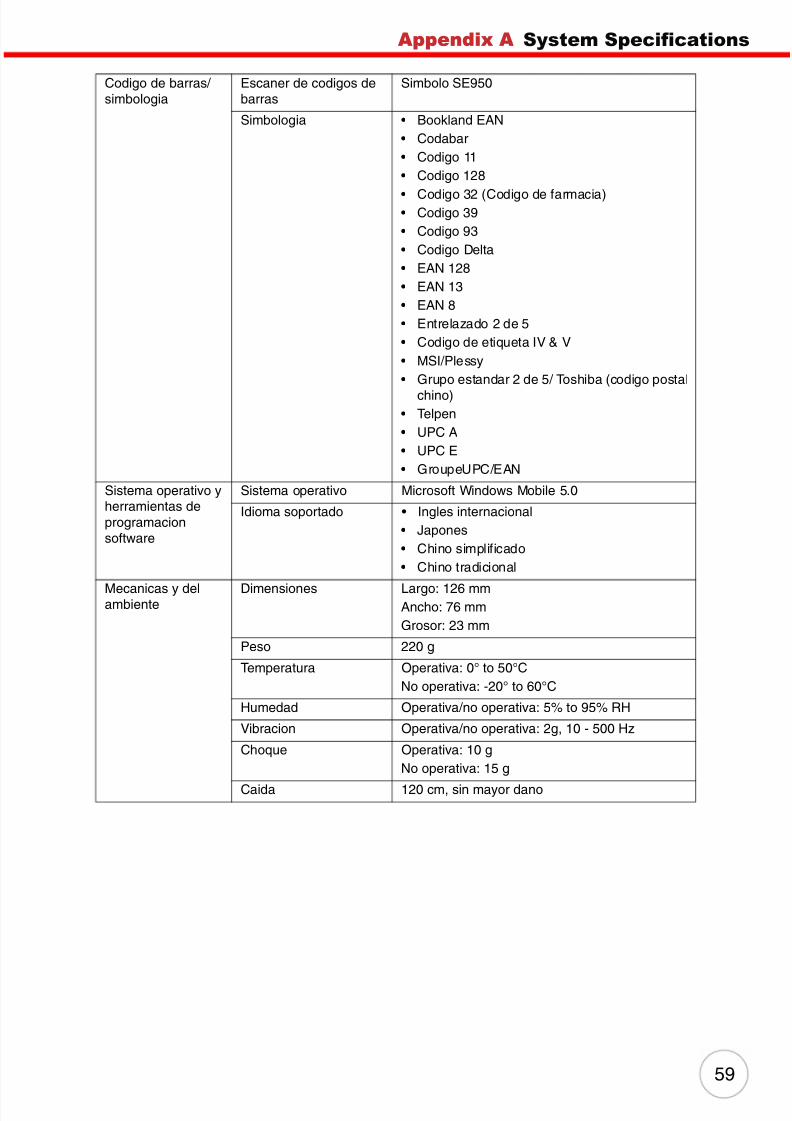
8/8/2019 PA500_UsersManual_RevB
http://slidepdf.com/reader/full/pa500usersmanualrevb 65/84
Appendix A System Specifications
59
Codigo de barras/ simbologia
Escaner de codigos debarras
Simbolo SE950
Simbologia • Bookland EAN• Codabar• Codigo 11• Codigo 128
• Codigo 32 (Codigo de farmacia)• Codigo 39• Codigo 93• Codigo Delta• EAN 128• EAN 13• EAN 8• Entrelazado 2 de 5• Codigo de etiqueta IV & V• MSI/Plessy• Grupo estandar 2 de 5/ Toshiba (codigo postal
chino)• Telpen• UPC A• UPC E• GroupeUPC/EAN
Sistema operativo yherramientas deprogramacionsoftware
Sistema operativo Microsoft Windows Mobile 5.0
Idioma soportado • Ingles internacional• Japones• Chino simplificado• Chino tradicional
Mecanicas y delambiente Dimensiones Largo: 126 mmAncho: 76 mmGrosor: 23 mm
Peso 220 g
Temperatura Operativa: 0° to 50°CNo operativa: -20° to 60°C
Humedad Operativa/no operativa: 5% to 95% RH
Vibracion Operativa/no operativa: 2g, 10 - 500 Hz
Choque Operativa: 10 gNo operativa: 15 g
Caida 120 cm, sin mayor dano

8/8/2019 PA500_UsersManual_RevB
http://slidepdf.com/reader/full/pa500usersmanualrevb 66/84
60
Copyright 2007 unitech Electronics Co., Ltd. All rights reserved. unitech is a registered trademark of unitech Electronics Co., Ltd.
Processeur/ Memoire
Processeur Processeur Intel PXA270 avec frequence jusqu'a520 MHz
Memoire • SDRAM: 64 MB• ROM Flash: 64 Mo integre (gestionnaire de
memoire Flash inclus)
Entree/Sortie Peripheriques d'entree • Ecran tactile• Stylet• Boutons de controle• Clavier logiciel alphanumerique complet• Lecteur de carte magnetique• Scanner de code barres
Touches speciales delancement rapide et decontrole
• Touche de Navigation• Bouton Tasks• Bouton Software keyboard• Bouton Today• Bouton Email• Bouton Calendar• Bouton Notes
Audio • Haut-parleur integre• Prise ecouteur stereo 3,5 mm• Microphone
Affichage • Ecran tactile LCD QVGA de 3,5 pouces etretroeclairage electroluminescent
• Resolution de 320 x 240
Voyant diode Bicolore (vert/rouge) pour l'indication de lecturede code barres
Moteur de numerisation • Source lumineuse : Diode a laser visible (VLD)650 nm
• Contraste d'impression mini : Reflectivitesombre/claire absolue 25% a 650 nm
• Consommation : 65 mA typique a 5 V
Connectivite • Port USB• Emplacement SDIO/MMC
Connectivite sans fil • BluetoothVersion : 1.1 et 1.2 avec specificationclasse 2Sortie d'alimentation de pointe : 2 ±2 dBmBande de frequence : 2400-2483.5 MHzCanaux de fonctionnement : 79 ChannelsType de modulation : GFSK
Specifications du systeme

8/8/2019 PA500_UsersManual_RevB
http://slidepdf.com/reader/full/pa500usersmanualrevb 67/84
Appendix A System Specifications
61
Entree/Sortie Connectivite sans fil • Reseau sans fil (802.11b)802.11b basse puissance (3,96 mW mode desommeil profond)Sortie d'alimentation de pointe : 18 ±2 dBmBande de frequence : 2400-2483.5 MHzCanaux de fonctionnement : 11 canaux
Type de modulation :CCK (1Mbps)DBPSK (2Mbps)DQPSK (5.5/11Mbps)
• Reseau sans fil (802.11g)802.11g basse puissance (3,96 mW mode desommeil profond)Sortie d'alimentation de pointe : 15 ±2 dBmBande de frequence : 2400-2483.5 MHzCanaux de fonctionnement : 11 canauxType de modulation : OFDM (6~54Mbps)
• Port infrarouge serieAlimentation Batterie principale Batterie standard : 3,7 V, 2200 mAh
Autonomie de la batterie 4 heures
Charge de la batterie • 3,5 heures avec adaptateur secteur externe• 3,5 heures avec station d'accueil
Batterie de secours Temps de retention des donnees d'une heure lorsdu retrait de la batterie principale
Gestion de l'alimentation • Fournir toutes les tensions necessaires danscet appareil
• Retenir le contenu de la memoire plus de 72
heures apres l'arret automatique pour batteriebasse• Fournir 4 heures de temps de fonctionnement
avec une batterie standard. Les activites enperiode de fonctionnement sont :a. Numeriser un code barres.b. Envoyer ces donnees de code barres au
hote via le reseau sans fil.c. Repeter les etapes 1 et 2 toutes les 5 sec-
ondes.• Fournir l'etat a 3 niveaux de la batterie pour
afficher la capacite de la batterie principale
• Fournir l'etat a 3 niveaux de la batterie pourafficher la capacite de la batterie de secours
• Temps de charge de 3,5 heures• Temps de charge de 16 heures de la batterie
de secourse

8/8/2019 PA500_UsersManual_RevB
http://slidepdf.com/reader/full/pa500usersmanualrevb 68/84
62
Copyright 2007 unitech Electronics Co., Ltd. All rights reserved. unitech is a registered trademark of unitech Electronics Co., Ltd.
Code barres/ Symboles
Scanner de code barres Symbol SE950
Symboles • Bookland EAN• Codabar• Code 11• Code 128• Code 32 (Code Pharmacie)
• Code 39• Code 93• Delta Code• EAN 128• EAN 13• EAN 8• 2 parmi 5 entrelaces• Code etiquette IV & V• MSI/Plessy• 2 parmi 5 standard/ groupe Toshiba (Code
postal chinois)
• Telpen• UPC A• UPC E• GroupeUPC/EAN
Systemed'exploitation etoutils deprogrammationlogicielle
Systeme d'exploitation Microsoft Windows Mobile 5.0
Prise en chargelinguistique
• Anglais international• Japonais• Chinois simplifie• Chinois traditionnel
Mecanique et
environnement
Dimensions Longueur : 126 mm
Largeur : 76 mmProfondeur : 23 mm
Poids 220 g
Temperature En marche : 0° to 50°CA l'arret : -20° to 60°C
Humidite En marche/A l'arret : 5% to 95% RH
Vibration En marche/A l'arret : 2g, 10 - 500 Hz
Choc En marche : 10 gA l'arret : 15 g
Chute 120 cm, sans degat majeur

8/8/2019 PA500_UsersManual_RevB
http://slidepdf.com/reader/full/pa500usersmanualrevb 69/84
Appendix A System Specifications
63
CPU/ 内存 CPU 520MHz Intel.PXA270 处理器
内存 SDRAM: 64 MB• Flash ROM: 6闪存 ROM 64MB内置闪存(含闪存管理器)
输入 / 输出 输入设备 • 触屏
• 记录笔
• 控制按钮
• 全字母数字软件键盘
• 磁条阅读器
• 条码扫描器
控制键与快捷键 • 导航键
• 任务键
• 软件键盘键
• 日志键
• Email 键
• 日历键
• 记录键
音频 • 内置扬声器
• 3.5mm 立体声耳机插孔
• 麦克风
显示屏 • 3.5”QVGA LCD 触摸屏及背光灯
• 分辨率:320 × 240LED 指示 双色 (绿 / 红)条码阅读指示
Scan Engine • 扫描引擎光源:650nm 可视激光二极管 (VLD)
• 最低印刷反差:650mm 时, 25% 绝对暗 / 光折射
• 功耗:5V 时标准量为 65mA
连接性 • USB 端口
• SDIO/MMC 插槽
无线连接性 • 蓝牙
型号:1.1 和 1.2,符合 2 级规范
峰值输出功率:2 ±2 dBm频带:2400-2483.5 MHz
工作频道:79 个频道
调制类型:GFSK
系统规格
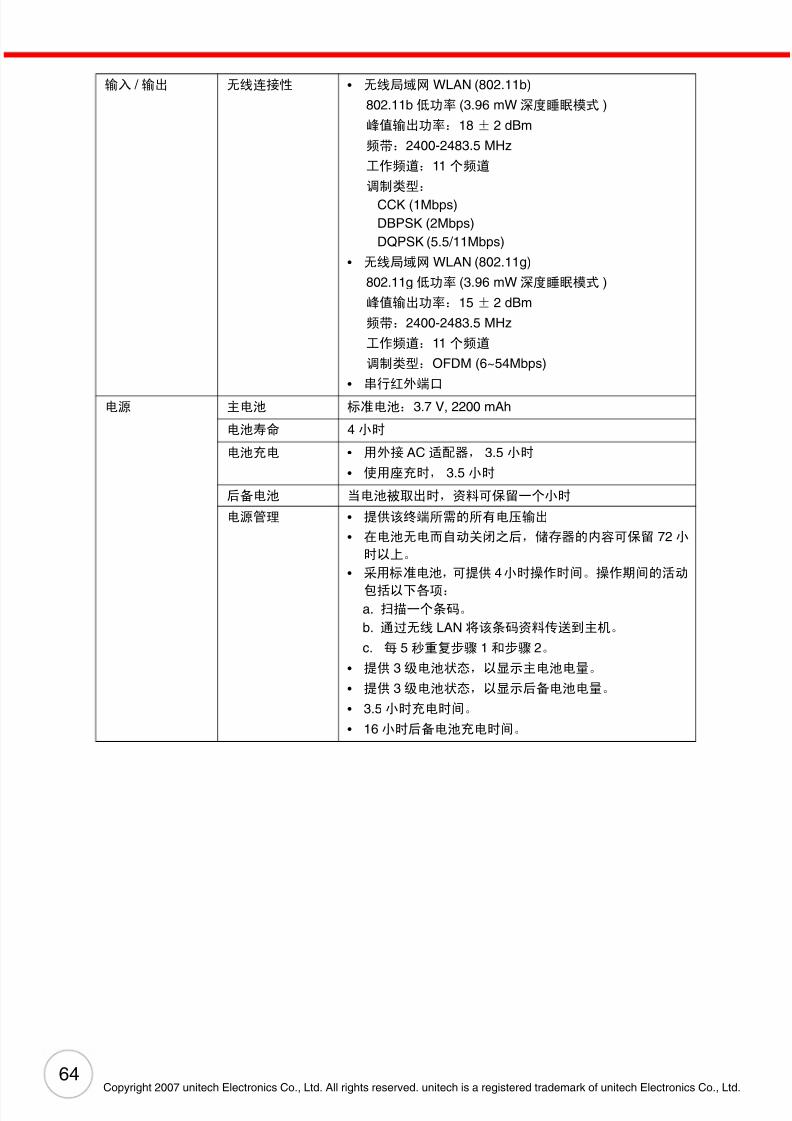
8/8/2019 PA500_UsersManual_RevB
http://slidepdf.com/reader/full/pa500usersmanualrevb 70/84
64
Copyright 2007 unitech Electronics Co., Ltd. All rights reserved. unitech is a registered trademark of unitech Electronics Co., Ltd.
输入 / 输出 无线连接性 • 无线局域网 WLAN (802.11b)
802.11b 低功率 (3.96 mW 深度睡眠模式 )
峰值输出功率:18 ± 2 dBm
频带:2400-2483.5 MHz
工作频道:11 个频道
调制类型:
CCK (1Mbps)
DBPSK (2Mbps)
DQPSK (5.5/11Mbps)
• 无线局域网 WLAN (802.11g)
802.11g 低功率 (3.96 mW 深度睡眠模式 )
峰值输出功率:15 ± 2 dBm
频带:2400-2483.5 MHz
工作频道:11 个频道
调制类型:OFDM (6~54Mbps)
• 串行红外端口
电源 主电池 标准电池:3.7 V, 2200 mAh
电池寿命 4 小时
电池充电 • 用外接 AC 适配器, 3.5 小时
• 使用座充时, 3.5 小时
后备电池 当电池被取出时,资料可保留一个小时
电源管理 • 提供该终端所需的所有电压输出
• 在电池无电而自动关闭之后,储存器的内容可保留 72 小
时以上。
• 采用标准电池,可提供 4 小时操作时间。操作期间的活动
包括以下各项:a. 扫描一个条码。
b. 通过无线 LAN 将该条码资料传送到主机。
c. 每 5 秒重复步骤 1 和步骤 2。
• 提供 3 级电池状态,以显示主电池电量。
• 提供 3 级电池状态,以显示后备电池电量。
• 3.5 小时充电时间。
• 16 小时后备电池充电时间。

8/8/2019 PA500_UsersManual_RevB
http://slidepdf.com/reader/full/pa500usersmanualrevb 71/84
Appendix A System Specifications
65
条码 / 符号 条码扫描器 Symbol SE950
符号 • Bookland EAN 码
• Codabar 码
• 11 码
• 128 码
• 32 码 (Pharmacy 码 )
• 39 码
• 93 码
• Delta 码
• EAN 128 码
• EAN 13 码
• EAN 8 码
• 隔行扫描 2/5
• IV & V 标号码
• MSI/Plessy 码
• 标准 2/5/ 东芝 ( 中国邮政区号 ) 组码• Telpen 码
• UPC A 码
• UPC E 码
• UPC/EAN 组码
操作系统与软件编
程工具
操作系统 Microsoft Windows Mobile 5.0
语言支持 • 全球通用英文
• 日文
• 简体中文
• 繁体中文
机械与环境条件 尺寸 长:126 mm
宽:76 mm
高:23 mm
重量 220 g
温度 工作:0° to 50°C
非工作:-20° to 60°C
湿度 工作 / 非工作:5% to 95% RH
振动 工作 / 非工作:2g, 10 - 500 Hz
冲击 工作:10 g
非工作:15 g
跌落 120 cm,无严重损坏
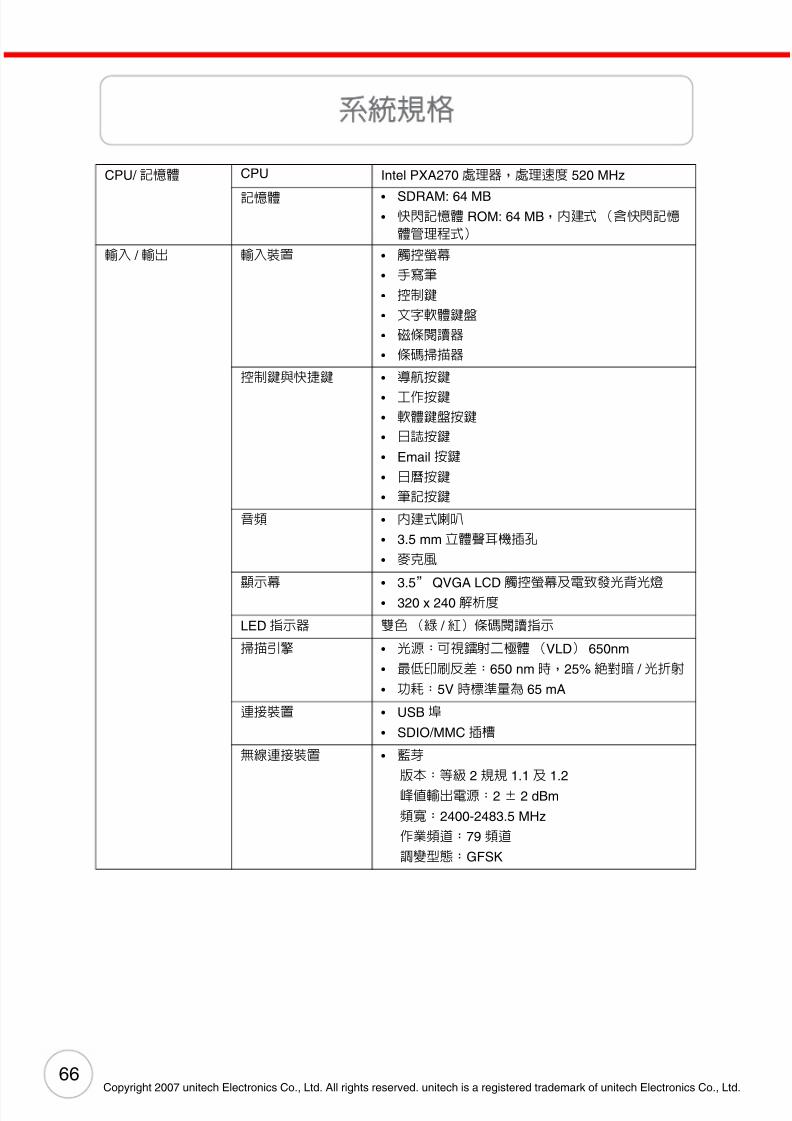
8/8/2019 PA500_UsersManual_RevB
http://slidepdf.com/reader/full/pa500usersmanualrevb 72/84
66
Copyright 2007 unitech Electronics Co., Ltd. All rights reserved. unitech is a registered trademark of unitech Electronics Co., Ltd.
CPU/ 記憶體 CPU Intel PXA270 處理器,處理速度 520 MHz
記憶體 SDRAM: 64 MB• 快閃記憶體 ROM: 64 MB,內建式 (含快閃記憶
體管理程式)
輸入 / 輸出 輸入裝置 • 觸控螢幕
• 手寫筆
• 控制鍵
• 文字軟體鍵盤
• 磁條閱讀器
• 條碼掃描器
控制鍵與快捷鍵 • 導航按鍵
• 工作按鍵
• 軟體鍵盤按鍵
• 日誌按鍵
• Email 按鍵
• 日曆按鍵
• 筆記按鍵
音頻 • 內建式喇叭
• 3.5 mm 立體聲耳機插孔
• 麥克風
顯示幕• 3.5
”QVGA LCD
觸控螢幕及電致發光背光燈
• 320 x 240 解析度
LED 指示器 雙色 (綠 / 紅)條碼閱讀指示
掃描引擎 • 光源:可視鐳射二極體 (VLD) 650nm
• 最低印刷反差:650 nm 時,25% 絕對暗 / 光折射
• 功耗:5V 時標準量為 65 mA
連接裝置 • USB 埠
• SDIO/MMC 插槽
無線連接裝置 • 藍芽
版本:等級 2 規規 1.1 及 1.2
峰值輸出電源:2 ± 2 dBm
頻寬:2400-2483.5 MHz
作業頻道:79 頻道
調變型態:GFSK
系統規格
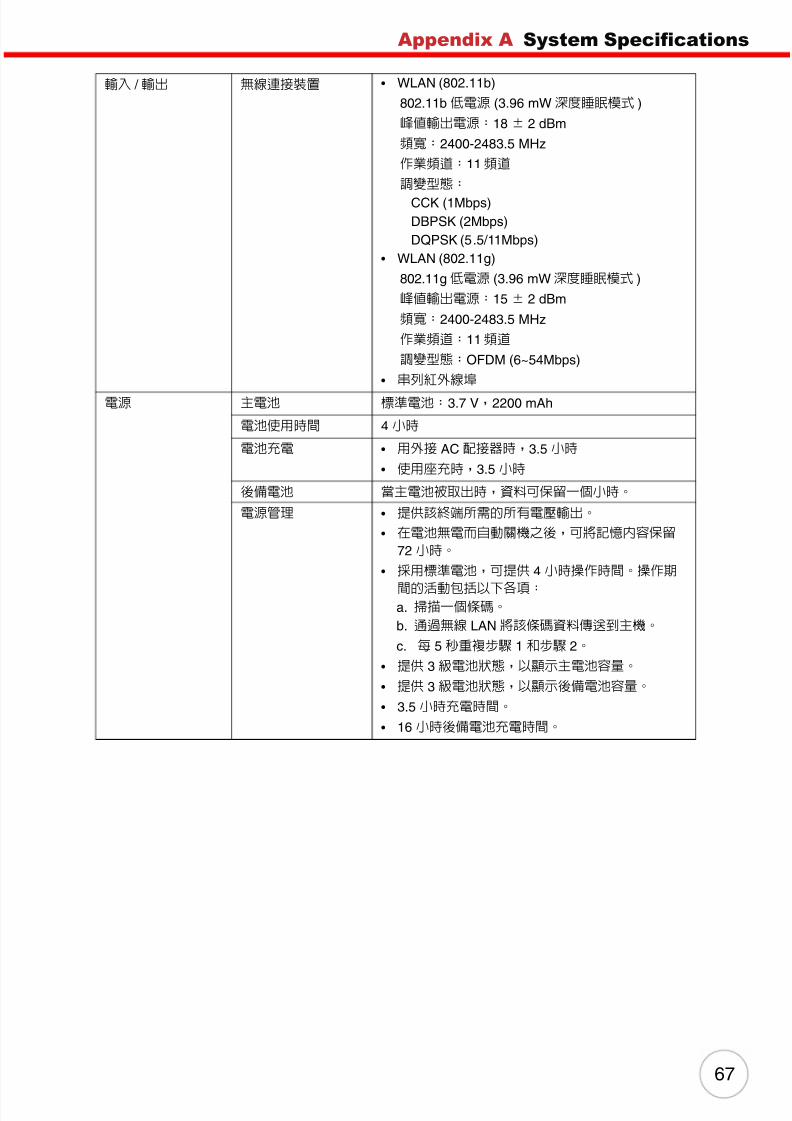
8/8/2019 PA500_UsersManual_RevB
http://slidepdf.com/reader/full/pa500usersmanualrevb 73/84
Appendix A System Specifications
67
輸入 / 輸出 無線連接裝置 • WLAN (802.11b)
802.11b 低電源 (3.96 mW 深度睡眠模式 )
峰值輸出電源:18 ± 2 dBm
頻寬:2400-2483.5 MHz
作業頻道:11 頻道
調變型態:
CCK (1Mbps)
DBPSK (2Mbps)
DQPSK (5.5/11Mbps)
• WLAN (802.11g)
802.11g 低電源 (3.96 mW 深度睡眠模式 )
峰值輸出電源:15 ± 2 dBm
頻寬:2400-2483.5 MHz
作業頻道:11 頻道
調變型態:OFDM (6~54Mbps)
• 串列紅外線埠
電源 主電池 標準電池:3.7 V,2200 mAh
電池使用時間 4 小時
電池充電 • 用外接 AC 配接器時,3.5 小時
• 使用座充時,3.5 小時
後備電池 當主電池被取出時,資料可保留一個小時。
電源管理 • 提供該終端所需的所有電壓輸出。
• 在電池無電而自動關機之後,可將記憶內容保留
72 小時。
• 採用標準電池,可提供 4 小時操作時間。操作期
間的活動包括以下各項:a. 掃描一個條碼。
b. 通過無線 LAN 將該條碼資料傳送到主機。
c. 每 5 秒重複步驟 1 和步驟 2。
• 提供 3 級電池狀態,以顯示主電池容量。
• 提供 3 級電池狀態,以顯示後備電池容量。
• 3.5 小時充電時間。
• 16 小時後備電池充電時間。
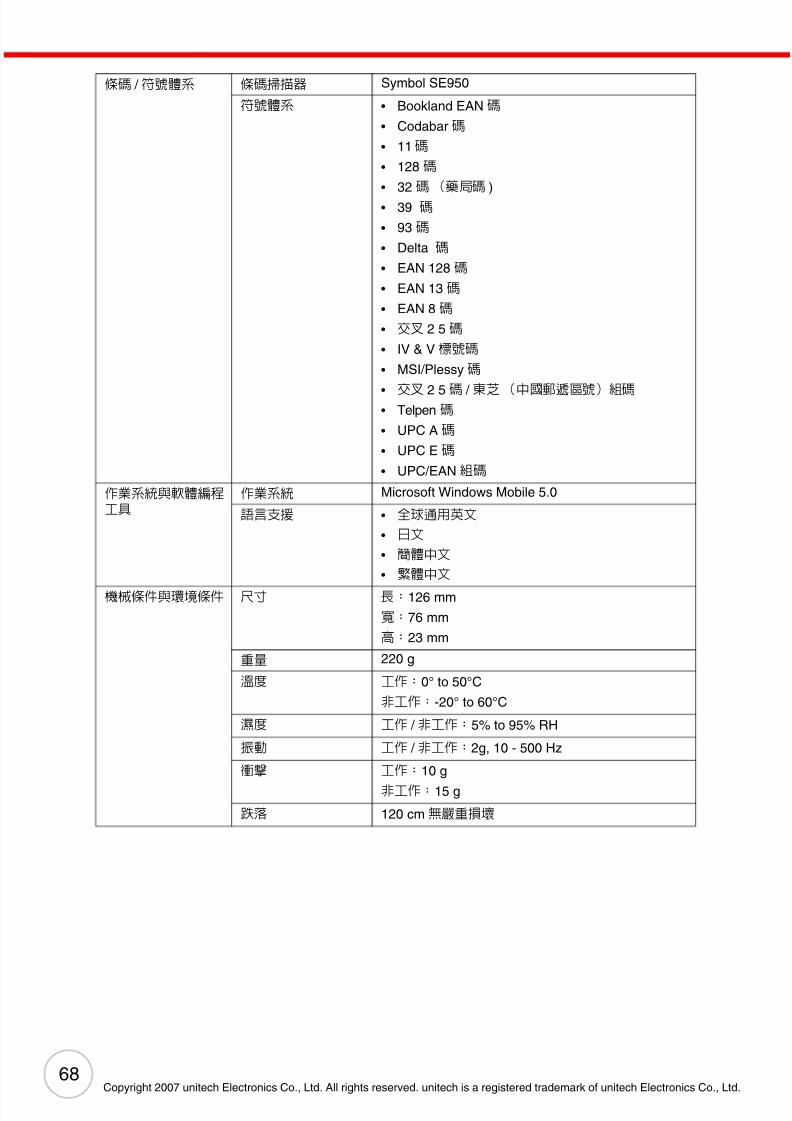
8/8/2019 PA500_UsersManual_RevB
http://slidepdf.com/reader/full/pa500usersmanualrevb 74/84
68
Copyright 2007 unitech Electronics Co., Ltd. All rights reserved. unitech is a registered trademark of unitech Electronics Co., Ltd.
條碼 / 符號體系 條碼掃描器 Symbol SE950
符號體系 • Bookland EAN 碼
• Codabar 碼
• 11 碼
• 128 碼
• 32 碼 (藥局碼 )
• 39 碼
• 93 碼
• Delta 碼
• EAN 128 碼
• EAN 13 碼
• EAN 8 碼
• 交叉 2 5 碼
• IV & V 標號碼
• MSI/Plessy 碼
• 交叉 2 5 碼 / 東芝 (中國郵遞區號)組碼• Telpen 碼
• UPC A 碼
• UPC E 碼
• UPC/EAN 組碼
作業系統與軟體編程工具
作業系統 Microsoft Windows Mobile 5.0
語言支援 • 全球通用英文
• 日文
• 簡體中文
• 繁體中文
機械條件與環境條件 尺寸 長:126 mm
寬:76 mm
高:23 mm
重量 220 g
溫度 工作:0° to 50°C
非工作:-20° to 60°C
濕度 工作 / 非工作:5% to 95% RH
振動 工作 / 非工作:2g, 10 - 500 Hz
衝擊 工作:10 g
非工作:15 g
跌落 120 cm 無嚴重損壞

8/8/2019 PA500_UsersManual_RevB
http://slidepdf.com/reader/full/pa500usersmanualrevb 75/84
Appendix A System Specifications
69
CPU/ メモリー CPU Intel PXA270 プロセッサー(520MHz)
メモリー • SDRAM:64 MB
• フラッシュ ROM:64MB 内蔵(フラッシュメモリー
マネージャー)
インプット / アウト
プット
インプットデバイス
• ッチスクリーン
• スタイラス
• コントロールボタン
• 英数字ソ ' トキーボード
• マグストライプリーダー
• バーコードスキャナー
コントロール・
クイックキー
• ナビゲーションキ ー
• ソ ' トウェア・キーボードボタン
• メールボタン
• ノートボタン
• タスクボタン
• Today ボタン
• カレンダーボタン
オーディオ • ビルトインスピーカ ー
• 3.5mm ステレオヘッドホンジャック
• マイク
ディスプレイ • 3.5”QVGA LCD タッチスクリーン、エレクトロルミネセントバックライト
• 解像度 320*240
LED インジケー
ター
バーコード読取デュアル表 '(緑・赤)
スキャンエンジン
• 光源:可視レーザーダイオード(VLD)650 nm
• 最小プリントコントラスト:25%アブソ 'ートダーク
/ ライト(650 nm 時)
• 消費電力:65 mA typical@5 V
接続 • USB ポート
• SDIO/MMC スロット
ワイヤレス接続 • ブルートゥース
バージョン:1.1 および 1.2、クラス 2 仕様
ピーク出力:2 ±2 dBm
周波数帯:2400-2483.5 MHz
作動チャンネル:79 チャンネル
変調タイプ:GFSK
システム・スペック
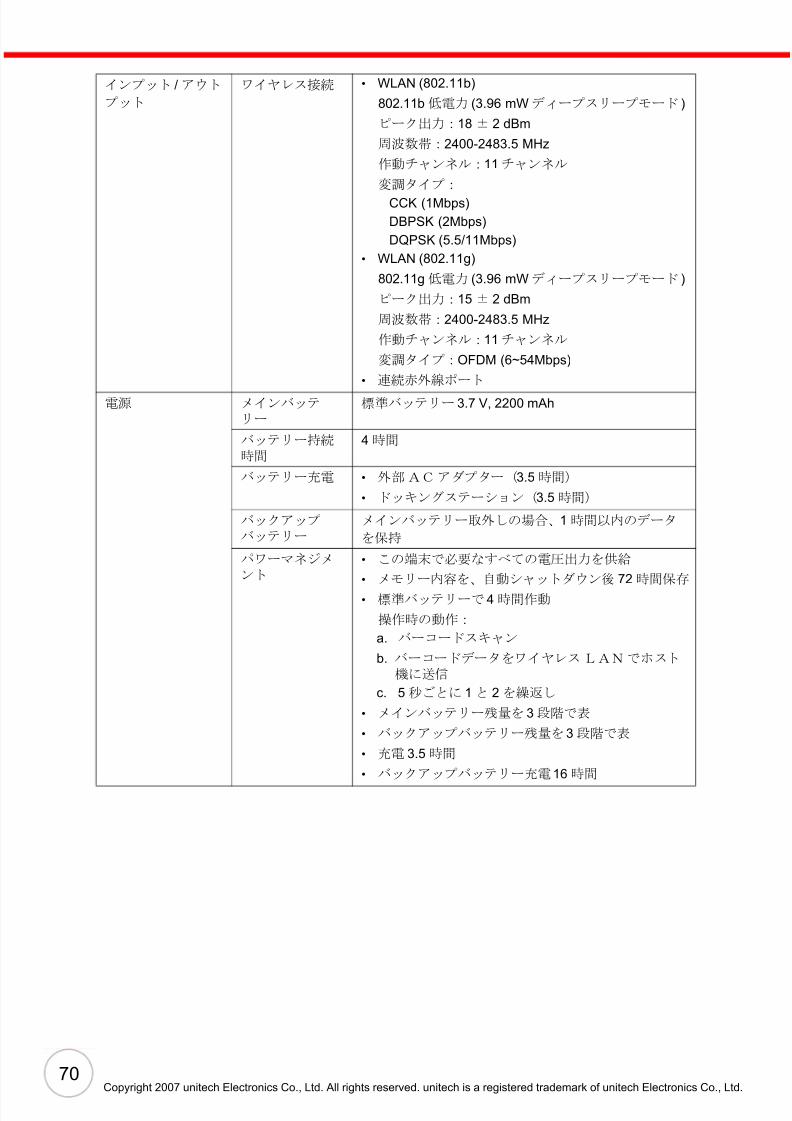
8/8/2019 PA500_UsersManual_RevB
http://slidepdf.com/reader/full/pa500usersmanualrevb 76/84
70Copyright 2007 unitech Electronics Co., Ltd. All rights reserved. unitech is a registered trademark of unitech Electronics Co., Ltd.
インプット / アウト
プット
ワイヤレス接続 • WLAN (802.11b)
802.11b 低電力 (3.96 mW ディープスリープモード )
ピーク出力:18 ± 2 dBm
周波数帯:2400-2483.5 MHz
作動チャンネル:11 チャンネル
変調タイプ:
CCK (1Mbps)
DBPSK (2Mbps)
DQPSK (5.5/11Mbps)
• WLAN (802.11g)
802.11g 低電力 (3.96 mW ディープスリープモード )
ピーク出力:15 ± 2 dBm
周波数帯:2400-2483.5 MHz
作動チャンネル:11 チャンネル
変調タイプ:OFDM (6~54Mbps)
• 連続赤外線ポート
電源 メインバッテリー
標準バッテリー 3.7 V, 2200 mAh
バッテリー持続時間
4 時間
バッテリー充電 • 外部 AC アダプター(3.5 時間)
• ドッキングステーション(3.5 時間)
バックアップバッテリー
メインバッテリー取外しの場合、1 時間以内のデータ
を保持
パワーマネジメント
• この端末で必要なすべての電圧出力を供給
• メモリー内容を、自動シャットダウン後 72 時間保存
• 標準バッテリーで 4 時間作動
操作時の動作:
a. バーコードスキャン
b. バーコードデータをワイヤレス LAN でホスト機に送信
c. 5 秒ごとに 1 と 2 を繰返し
• メインバッテリー残量を 3 段階で表
• バックアップバッテリー残量を 3 段階で表
• 充電 3.5 時間
• バックアップバッテリー充電 16 時間

8/8/2019 PA500_UsersManual_RevB
http://slidepdf.com/reader/full/pa500usersmanualrevb 77/84
Appendix A System Specifications
71
バーコード / コード バーコード
スキャナー
Symbol SE950
コード • コーダバー
• コード 11
• コード 128
• コード 32
• (薬学コード)
• コード 39
• コード 93
• デルタコード
• EAN 128
• EAN 13
• EAN 8
• インターリーブ 2、5
• Label Code IV & V
• MSI/Plessy
• Standard 2 of 5/ Toshiba (China Postal Code) group
• Telpen
• UPC A
• UPC E
• UPC/EAN グループ
OS、ソ ' トプログ
ラミングツール
OS OS: Microsoft Windows Mobile 5.0
言語サポート • 国際英語
• 日本語
• 簡体字中国 語
• 繁体字中国語
機構 ' 使用環境 寸法 長さ:126mm
幅:76mm
高さ:23 ㎜
重量 220 g
温度 作動時:0 - 50 ℃
非作動時:-20 - 60 ℃
湿度 作動時 / 非作動時:相対湿度 5%- 95%
振動 作動時 / 非作動時:2g, 10 - 500 Hz
衝撃 作動時:10g
非作動時:15g
落下 120cm 以下、大きなダメージ無き場合
8/8/2019 PA500_UsersManual_RevB
http://slidepdf.com/reader/full/pa500usersmanualrevb 78/84
72
Appendix B
FCC Statement This is a FCC Part 15 Class B product. In a domestic environment this product may cause radiointerference, in which case the user may be required to take adequate measures.
Canadian Compliance Statement This Class B Digital apparatus meets all requirements of the Canadian Interferance-CausingEquipment Regulations.
The device is certified to the requirements of RSS-139-1 for 2.4 GHz spread spectrum devices.
European Conformity Statement Declaration of Conformity with Regard to the R&TTE 1999/5/EC and EMC89/336/ EEC directives.
Laser Information The unitech PA500 series is certified in the U.S. to conform to the requirements of DHHS/CDRH 21CFRSubchapter J and to the requirements of IEC 825-1. Class II and Class 2products are not considered tobe hazardous. The PA500 series contains internally a Visible Laser Diode (VLD) whose emissions donot exceed the maximum limits as set forth in the above regulations. The scanner is designed so thatthere is no human access to harmful laser light during normal operation, user maintenance or duringprescribed service operations.The laser safety warning label required by the DHHS/IEC for the PA500series’s optional laser scanner module is located on the memory compartment cover, on the back of the
unit.
CAUTION! Use of controls or adjustments or performance of procedures other than those specifiedherein may result in hazardous laser light. Use of optical instruments with the scanner will increase eyehazard. Optical instruments include binolulars, microscopes, and magnifying glasses. This does notinclude eye glasses worn by the user.
Regulatory Compliance Statements

8/8/2019 PA500_UsersManual_RevB
http://slidepdf.com/reader/full/pa500usersmanualrevb 79/84
Appendix B Regulatory Compliance Statements
73
FCC-Erklärung Die ist ein mit FCC, Teil 15, übereinstimmendes Produkt der Klasse B. In einer Wohnumgebung könntedieses Produkt den Funkverkehr stören, wobei der Benutzer dann entsprechende Gegenmaßnahmentreffen muss.
Erklärung zur Übereinstimmung mit Vorschriften Kanadas Dieses Digitalgerät der Klasse B entspricht sämtlichen Anforderungen der kanadischen Bestimmungenfür störfelder-erzeugende Geräte.
Das Gerät besitzt die Zertifizierung für RSS-139-1-Anforderungen für 2,4 GHz Spread-Spectrum-Geräte.
Erklärung zur Übereinstimmung mit Vorschriften Europas Erklärung zur Übereinstimmung mit den Richtlinien R&TTE 1999/5/EG und EMV 89/336/EWG.
Laser-Information Die unitech PA500-Serie ist in den USA für Übereinstimmung mit den Anforderungen von DHHS/CDRH21CFR, Unterkapitel J, und den Anforderungen von IEC 825-1 zertifiziert. Produkte der Klasse II undKlasse 2 werden nicht als gefährlich angesehen. Die PA500-Serie besitzt intern eine sichtbareLaserdiode (VLD), deren Strahlung nicht die maximalen Grenzwerte, die in den obigen Bestimmungenfestgelegt sind, überschreitet. Der Scanner ist so ausgelegt, dass bei normalem Betrieb, währendWartungsarbeiten seitens des Benutzers oder bei festgesetzten Reparaturen kein menschlicherZugang zum gefährlichen Laserlicht erforderlich ist. Das von der DHHS/IEC für das optionaleLaserscannermodul der PA500-Serie geforderte Warnschild für Lasersicherheit befindet sich auf derAbdeckung des Speicherfachs auf der Rückseite des Geräts.
ACHTUNG – Die Bedienung von Kontrolltasten oder Einstellungen oder Ausführung von Vorgängen,die von den hier beschriebenen abweichen, können eine gefährliche Laserbestrahlung zur Folgehaben. Die Verwendung optischer Instrumente mit dem Scanner erhöht die Gefar für Ihr Augenlicht.Optische Instrumente beziehen sich auf Ferngläser, Mikroskope und Lupen. Vom Benutzer getrageneBrillen sind hiervon nicht betroffen.
Erklarung zur Ubereinstimmung mit

8/8/2019 PA500_UsersManual_RevB
http://slidepdf.com/reader/full/pa500usersmanualrevb 80/84
74
Copyright 2007 unitech Electronics Co., Ltd. All rights reserved. unitech is a registered trademark of unitech Electronics Co., Ltd.
Declaracion de la FCC Este es un producto de la clase B de la parte 15 de la Comision Federal de Comunicaciones (FCC).Este producto puede causar interferencias radiales en un entorno domestico. En tal caso el usuariodebera tomar medidas correctivas adecuadas.
Declaracion de conformidad con regulaciones canadienses Este aparato digital de la clase B satisface todos los requisitos de las regulaciones canadienses acercade las interferencias causadas por equipos.
Este dispositivo esta certificado de acuerdo a los requisitos RSS-139-1 para dispositivos con un rangoespectral de 2.4 GHz.
Declaracion de conformidad con regulaciones europeas Declaracion de conformidad con respecto a las directivas R&TTE 1999/5/EC y EMC 89/336/ EEC.
Informacion laser La computadora unitech de la serie PA500 esta certificada en los Estados Unidos por los requisitos delsubcapitulo J de DHHS/CDRH 21CFR y IEC 825-1. Los productos de la Clase II y Clase 2 no sonconsiderados peligrosos. La serie PA500 contiene un diodo laser visible (VLD) con emisiones que noexceden los limites establecidos por las regulaciones citadas. El escaner esta disenado para impedir elacceso humano a la luz laser danina durante su operacion normal, mantenimiento o reparacion. Laetiqueta de advertencia de seguridad laser DHHS/IEC para el modulo escaner laser opcional de laserie PA500 se encuentra en el compartimiento de memoria del panel trasero de la computadora.
ADVERTENCIA: El uso de controles, ajustes o procedimientos de rendimiento que no hayan sidoespecificados en este documento pueden resultar en una luz laser danina. El uso de instrumentosopticos con el escaner incrementaran el riesgo de posibles danos oculares. Tales instrumentos opticospueden ser binoculares, microscopios, y lupas. No se incluyen las gafas portadas por los usuarios.
Declaracion regulatoria

8/8/2019 PA500_UsersManual_RevB
http://slidepdf.com/reader/full/pa500usersmanualrevb 81/84
Appendix B Regulatory Compliance Statements
75
Déclaration FCC Ceci est un produit FCC article 15 classe B Dans un environnement domestique ce produit peut être àl’origine d’interférence radio, auquel cas l’utilisateur peut avoir l’obligation de prendre des mesuresadéquates.
Déclaration de conformité du Canada Cet appareil numerique de la classe B respecte les exigences du Reglement sur le material broilleur duCanada.
L’appareil est certifié aux exigences de RSS-139-1 pour les appareils de l’étalement de spectre 2,4GHz.
Déclaration de conformité pour l’Europe Déclaration de conformité en ce qui concerne les directives R&TTE 1999/5/EC et EMC 89/336/ EEC.
Informations sur le laser La gamme unitech PA500 est certifiée aux États-unis comme étant conforme aux exigences de DHHS/ CDRH 21CFR sous-chapitre J et aux exigences de IEC 825-1. Les produits de classe II et de classe 2ne sont pas considéré comme dangereux. La gamme PA500 contient en interne une diode à laservisible (VLD) dont les émissions n’excèdent pas les limites maximales définies dans lesréglementations ci-dessous. Le scanner est conçu pour qu’il n’y ait pas d’accès humain à une lumièrelaser nuisible pendant l’utilisation normale, l’entretien par l’utilisateur ou les opérations de serviceprescrites. L’étiquette d’avertissement de sécurité du laser exigée par DHHS/IEC pour le modulescanner laser en option de la gamme PA500 est située sur le couvercle du compartiment de lamémoire, sur l’arrière de l’unité.
ATTENTION – L’utilisation de contrôles, d’ajustements ou des procédures autres que ceux décrits dansce document peut résulter en une lumière laser dangereuse. L’utilisation d’instruments optiques avec lescanner augmentera le danger pour les yeux. Les instruments optiques comprennent les jumelles, lesmicroscopes et les loupes. Ceci ne comprend pas les lunettes portées par l’utilisateur.
Déclaration de conformité réglementaire
8/8/2019 PA500_UsersManual_RevB
http://slidepdf.com/reader/full/pa500usersmanualrevb 82/84
76
Copyright 2007 unitech Electronics Co., Ltd. All rights reserved. unitech is a registered trademark of unitech Electronics Co., Ltd.
FCC 声明
该款产品符合《FCC规则》第 15部分 B级产品规定。在家用环境下,该产品可能造成无线电干扰,用
户应采取有效的防范措施。
加拿大符合性声明
该款产品属于 B级数字设备,符合《加拿大干扰性设备规范》的所有要求。
兹证明该产品符合 RSS-139-1标准中对 2.4GHz扩频规定的各项要求。
欧洲符合性声明
根据 R&TTE 1999/5/EC与 EMC 89/336/ EEC指令,特此声明该款产品符合相关要求。
激光信息
unitech PA500系列产品,已在美国认证,符合《DHHS/CDRH 21CFR准则》中“J节”所规定的各
项要求,同时符合 IEC 825-1标准所规定的各项要求。据认证, II级与 2级产品不存在危险。PA500系
列产品内置可视激光二极管(VLD),其辐射不超过前述规定的最大限值。扫描器设计合理,正常操
作、用户维护或在规定的维修操作期间,有害激光不会对人造成影响或损害。根据DHHS/IEC准则或标
准规定,PA500系列产品可选激光扫描器模组所要求的激光安全警告标签加贴于内存盒外盖上。详见机
身背面。
注意:如果采用本指南规定之外的控制器或操作步骤或不依此处指示而进行调整,则可能会产生有害激
光。如果在使用扫描器的同时使用光学仪器,则会对眼睛造成更大的影响或损害。所谓的光学仪器包括
双筒望远镜、显微镜与放大镜,不包括使用者所配戴的眼镜。
符合性声明
8/8/2019 PA500_UsersManual_RevB
http://slidepdf.com/reader/full/pa500usersmanualrevb 83/84
Appendix B Regulatory Compliance Statements
77
歐洲符合性聲明
該款產品符合《FCC規則》第 15部分所規定的 B級產品。在家用環境下,該產品可能造成無線電干
擾。若此,用戶則應採取相應的防範措施。
加拿大符合性聲明
該款產品屬於 B級數位設備,符合《加拿大干擾性設備規範》的所有要求。
茲證明該產品符合 RSS-139-1 標準中對 2.4 GHz擴頻設備所規定的各項要求。
歐洲符合性聲明
根據 R&TTE 1999/5/EC與 EMC 89/336/ EEC指令,特此聲明該款產品符合相關要求。
鐳射資訊
unitech PA500系列產品,經在美國認證,符合《DHHS/CDRH 21CFR準則》中“J節”所規定的各
項要求,同時符合 IEC 825-1標準所規定的各項要求。據認為,II級與 2級產品存在危險。PA500系列
產品內建可視鐳射二極體(VLD),其輻射不超過前述規範所規定的最大限值。掃描器設計合理,正常
操作、用戶維護或在規定的維修操作期間,有害鐳射不會對人造成影響或損害。根據DHHS/IEC準則或
標準規定,PA500系列產品可選鐳射掃描器模組所要求的鐳射安全警告標籤加貼於記憶體盒外蓋上。詳
見機身背面。
注釋:如果採用本指南規定之外的控制器或操作步驟或不依此處指示而進行調整,則可能會形成有害鐳
射。如果在使用掃描器的同時使用光學儀器,則會對眼睛造成更大的影響或損害。所謂的光學儀器包括雙筒望遠鏡、顯微鏡與放大鏡,其中不包括使用者所戴用的眼鏡。
認證聲明

8/8/2019 PA500_UsersManual_RevB
http://slidepdf.com/reader/full/pa500usersmanualrevb 84/84
連 邦 通 信 委 員 会 声 明
これは連邦通信委員会 第 15、クラス B製品である。国内環境において、この製品は無線妨害を引き
起こす可能 'があり、その場合使用者は適切な対策の実施が必要になる可能 'がある。
カ ナ ダ の 準 拠 声 明
本クラス Bデジタル装置はカナダの環境規制に関するすべての必要条件を満たしている。
本機は 2.4ギガヘルツスペクトルデバイスとして、RSS-139-1の要件に公認される。
欧 州 統 一 声 明
EC R&TTE 1999/5および 89/336/EEC指示に関する統一宣言。
レ ー ザ ー 情 報
unitech PA500シリーズは、米国内においてDHHS/CDRH21CFR J節の要件、および IEC825-1の要
件を満たすと公認されています。クラス IIとクラス 2の製品が危険であるとは考えられていません。
PA500シリーズは製品内部に、放出が上記規則で説明される最大限度を超えない範囲の可視レーザー
ダイオード(VLD)を含んでいます。スキャナは、通常操作やメインテナンス等において、有害レー
ザーが人体に触れないよう設計されています。PA500シリーズの光学レーザースキャナーに対する、
DHHS/IECによるレーザー安全警戒基準は、本体後部のメモリー部カバーに記載されています。
警告:使用者がここに示す以外の操作・使用法を行った場合、有害なレーザー光線被害をもたらす可能 'があります。スキャナに光学機器を使用すると目に対する危険を増加させます。ここでいう光学機
器とは、双眼鏡、顕微鏡、および拡大鏡等を言います。使用者が着用しているメガネは含みません。
各 規 格 と の 適 合