SAP COMMUNITY NETWORK SDN - sdn.sap.com | BPX - bpx.sap.com | BOC - boc.sap.com © 2009 SAP AG 1 PA Custom Infotype Development - Employee Infotype for PA Module of SAP HCM Applies to: This document applies to SAP ECC 6.0, SAP Netweaver 2004s. For more information, visit the ABAP homepage . Summary This article drives you through the critical but simple process of developing custom infotype in SAP ECC 6.0 version for SAP HCM (Human Capital Management) Module. Here we have a requirement of employee information regarding the relatives in the company and related details for any of the group companies. Author: Gaurav Patwari Company: Torrent Power Ltd. Created on: 01 June 2009 Author Bio By education I am B.E. Information Technology, I am working as a Chief SAP ABAP Developer as well as SAP HCM Functional team member with Torrent Power Ltd. India’s one of the best Power Industry. My current technical work includes development with following ABAP, ABAP HR, ABAP Objects, Smartforms, BDC, BAPI, SAP Enterprise Portal, and SAP Web dynepro for Java.

Welcome message from author
This document is posted to help you gain knowledge. Please leave a comment to let me know what you think about it! Share it to your friends and learn new things together.
Transcript
SAP COMMUNITY NETWORK SDN - sdn.sap.com | BPX - bpx.sap.com | BOC - boc.sap.com © 2009 SAP AG 1
PA Custom Infotype Development - Employee Infotype for PA Module of SAP HCM
Applies to: This document applies to SAP ECC 6.0, SAP Netweaver 2004s.
For more information, visit the ABAP homepage.
Summary This article drives you through the critical but simple process of developing custom infotype in SAP ECC 6.0 version for SAP HCM (Human Capital Management) Module.
Here we have a requirement of employee information regarding the relatives in the company and related details for any of the group companies.
Author: Gaurav Patwari
Company: Torrent Power Ltd.
Created on: 01 June 2009
Author Bio By education I am B.E. Information Technology, I am working as a Chief SAP ABAP Developer as well as SAP HCM Functional team member with Torrent Power Ltd. India’s one of the best Power Industry. My current technical work includes development with following ABAP, ABAP HR, ABAP Objects, Smartforms, BDC, BAPI, SAP Enterprise Portal, and SAP Web dynepro for Java.
PA Custom Infotype Development - Employee Infotype for PA Module of SAP HCM
Table of Contents Steps for Developing Custom Infotype - 9501 .................................................................................................... 3 Detailed Process for Custom Infotype Development .......................................................................................... 3
1. PM01 ........................................................................................................................................................... 3 2. Type of Infotype .......................................................................................................................................... 3 3. Define the Structure for Your Infotype ........................................................................................................ 4 4. Enhacement Category ................................................................................................................................ 4 5. Can Be Enhanced ....................................................................................................................................... 4 6. Generate Objects ........................................................................................................................................ 5 7. Maintain Inftype Attributes .......................................................................................................................... 6 8. Intotype Attribute Details ............................................................................................................................. 7 9. Technical Attributes ..................................................................................................................................... 8 10. Test Your Infotype ................................................................................................................................... 11 11. Radio Button/ Check Box Fields ............................................................................................................. 12
Related Content ................................................................................................................................................ 16 Disclaimer and Liability Notice .......................................................................................................................... 17
SAP COMMUNITY NETWORK SDN - sdn.sap.com | BPX - bpx.sap.com | BOC - boc.sap.com © 2009 SAP AG 2
PA Custom Infotype Development - Employee Infotype for PA Module of SAP HCM
Steps for Developing Custom Infotype - 9501 Developing custom Infotype includes following steps:
1. Create PS Structure using T-code PM01.
2. Generate other required components.
3. Maintaining Technical Attributes for the Infotype.
4. Maintaining Infotype Characteristics
5. Testing the Infotype in PA30.
Detailed Process for Custom Infotype Development We will be creating a custom infotype for the SAP HR PA module, which will be serving as the neccessary documents to be collected Checklist for the new joinees in the company at the time of joining.
Now we will go through the step by step procedure for Custom infotype creation.
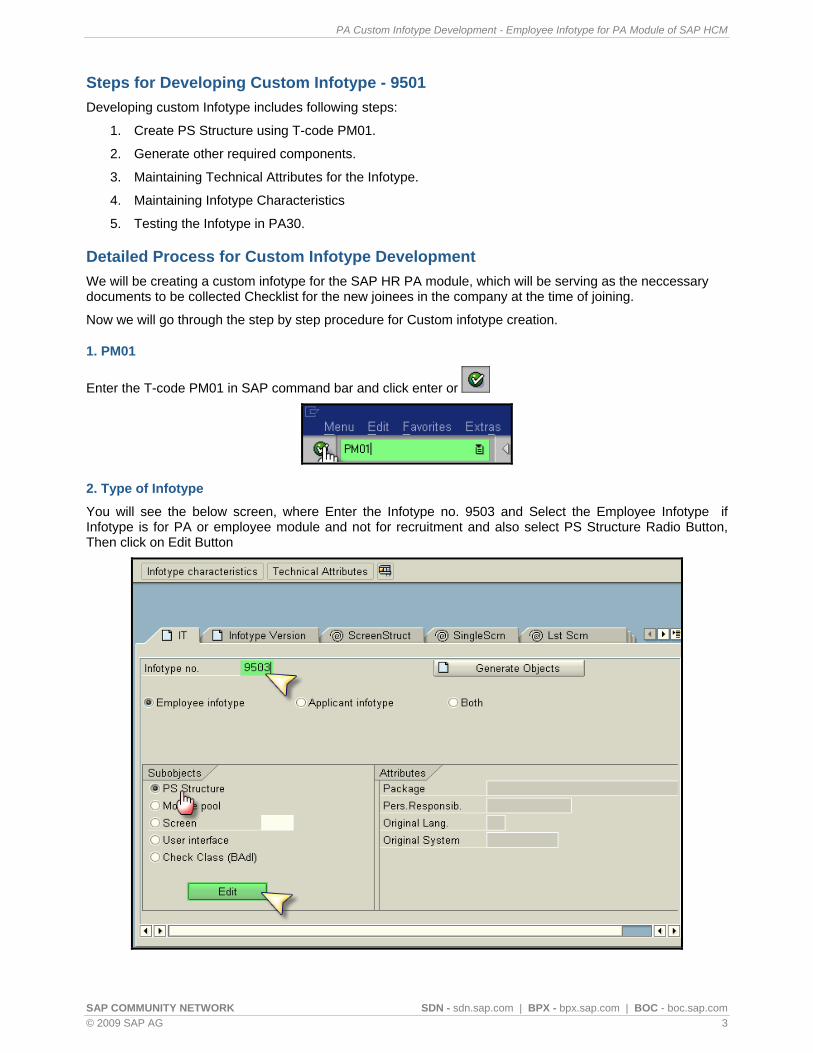
1. PM01
Enter the T-code PM01 in SAP command bar and click enter or
2. Type of Infotype
You will see the below screen, where Enter the Infotype no. 9503 and Select the Employee Infotype if Infotype is for PA or employee module and not for recruitment and also select PS Structure Radio Button, Then click on Edit Button
SAP COMMUNITY NETWORK SDN - sdn.sap.com | BPX - bpx.sap.com | BOC - boc.sap.com © 2009 SAP AG 3
PA Custom Infotype Development - Employee Infotype for PA Module of SAP HCM
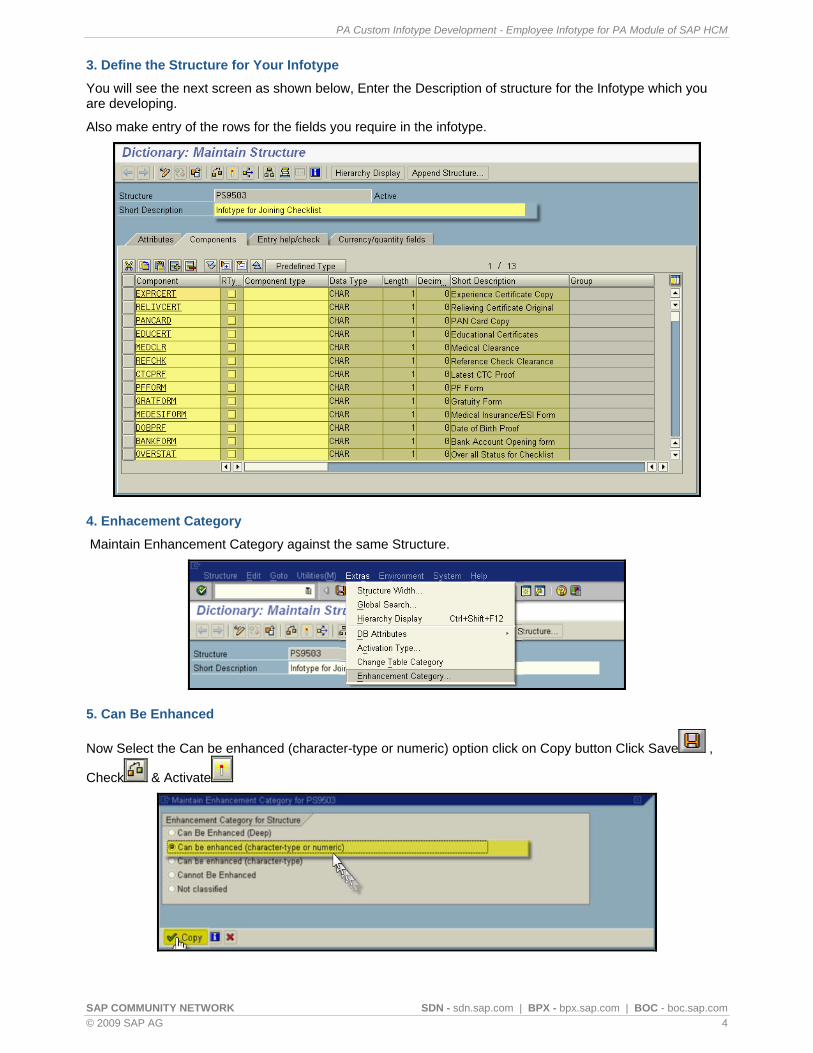
3. Define the Structure for Your Infotype
You will see the next screen as shown below, Enter the Description of structure for the Infotype which you are developing.
Also make entry of the rows for the fields you require in the infotype.
4. Enhacement Category
Maintain Enhancement Category against the same Structure.
5. Can Be Enhanced
Now Select the Can be enhanced (character-type or numeric) option click on Copy button Click Save ,
Check & Activate
SAP COMMUNITY NETWORK SDN - sdn.sap.com | BPX - bpx.sap.com | BOC - boc.sap.com © 2009 SAP AG 4
PA Custom Infotype Development - Employee Infotype for PA Module of SAP HCM
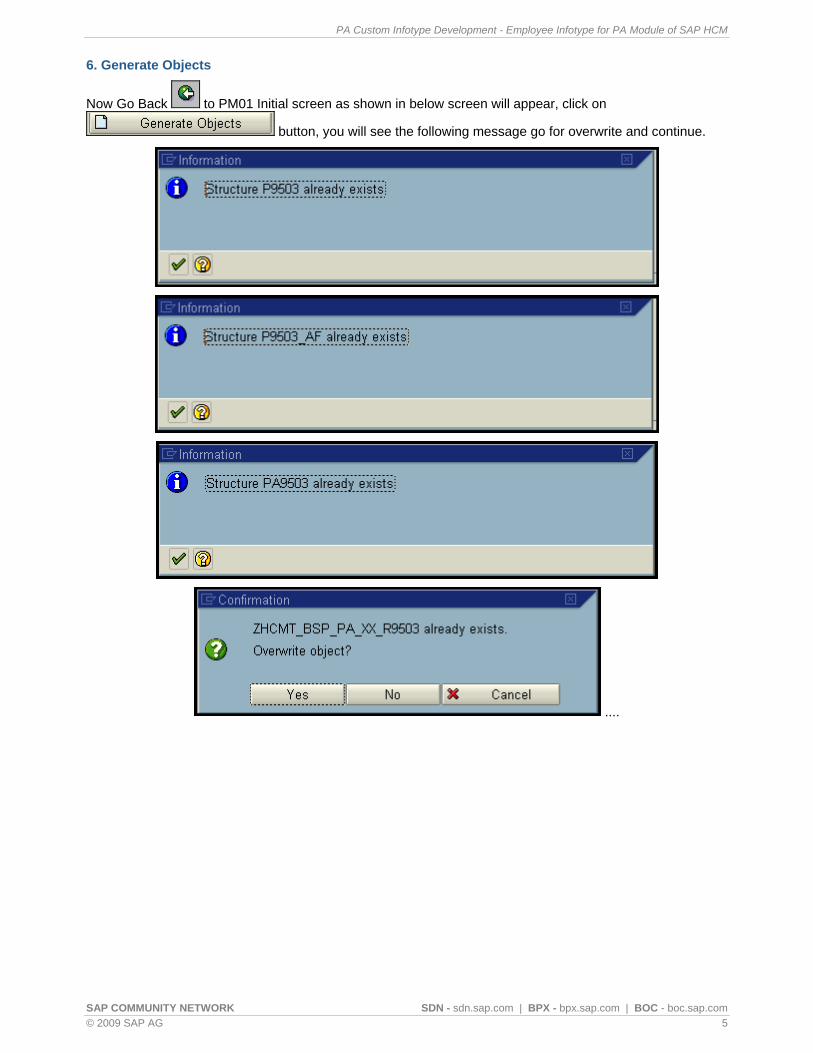
6. Generate Objects
Now Go Back to PM01 Initial screen as shown in below screen will appear, click on
button, you will see the following message go for overwrite and continue.
....
SAP COMMUNITY NETWORK SDN - sdn.sap.com | BPX - bpx.sap.com | BOC - boc.sap.com © 2009 SAP AG 5
PA Custom Infotype Development - Employee Infotype for PA Module of SAP HCM
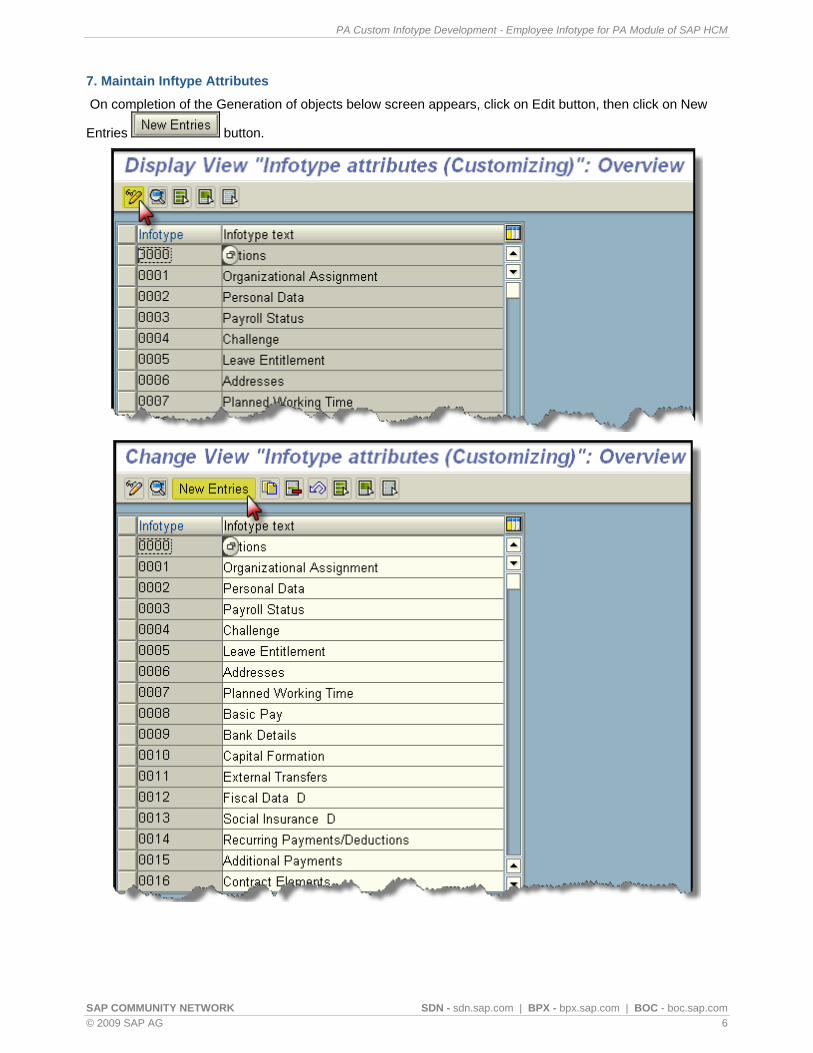
7. Maintain Inftype Attributes
On completion of the Generation of objects below screen appears, click on Edit button, then click on New
Entries button.
SAP COMMUNITY NETWORK SDN - sdn.sap.com | BPX - bpx.sap.com | BOC - boc.sap.com © 2009 SAP AG 6
PA Custom Infotype Development - Employee Infotype for PA Module of SAP HCM
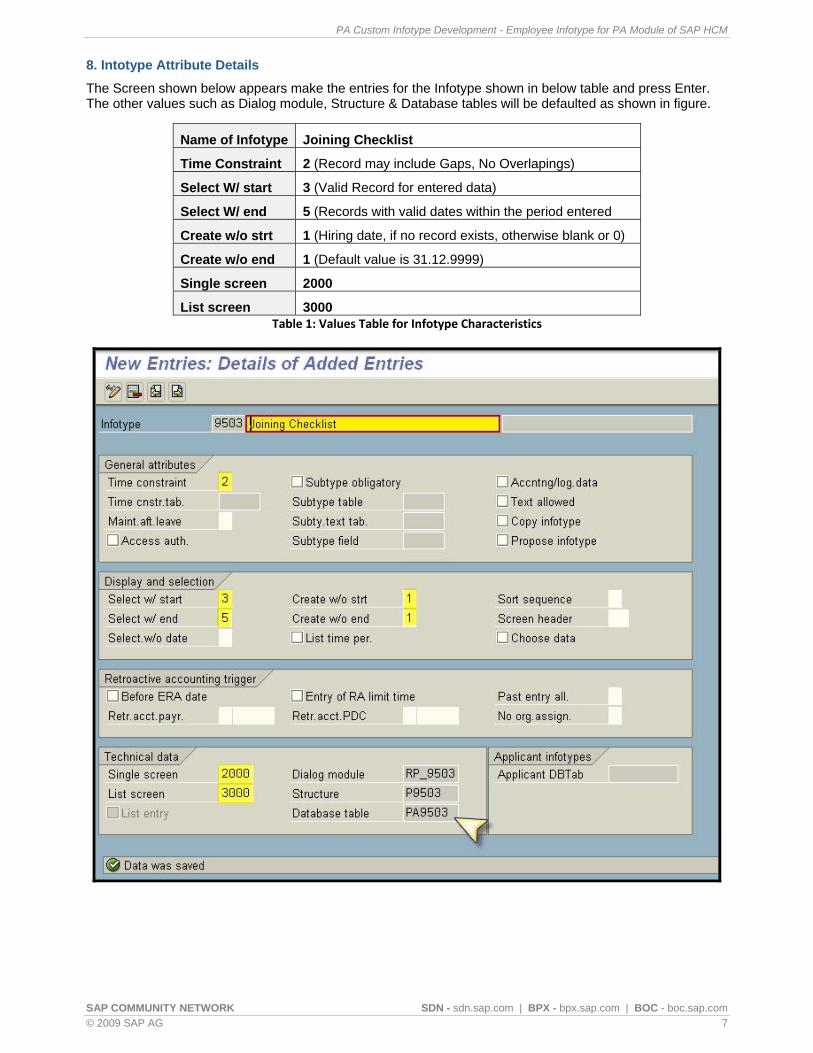
8. Intotype Attribute Details
The Screen shown below appears make the entries for the Infotype shown in below table and press Enter. The other values such as Dialog module, Structure & Database tables will be defaulted as shown in figure.
Name of Infotype Joining Checklist
Time Constraint 2 (Record may include Gaps, No Overlapings)
Select W/ start 3 (Valid Record for entered data)
Select W/ end 5 (Records with valid dates within the period entered
Create w/o strt 1 (Hiring date, if no record exists, otherwise blank or 0)
Create w/o end 1 (Default value is 31.12.9999)
Single screen 2000
List screen 3000 Table 1: Values Table for Infotype Characteristics
SAP COMMUNITY NETWORK SDN - sdn.sap.com | BPX - bpx.sap.com | BOC - boc.sap.com © 2009 SAP AG 7
PA Custom Infotype Development - Employee Infotype for PA Module of SAP HCM
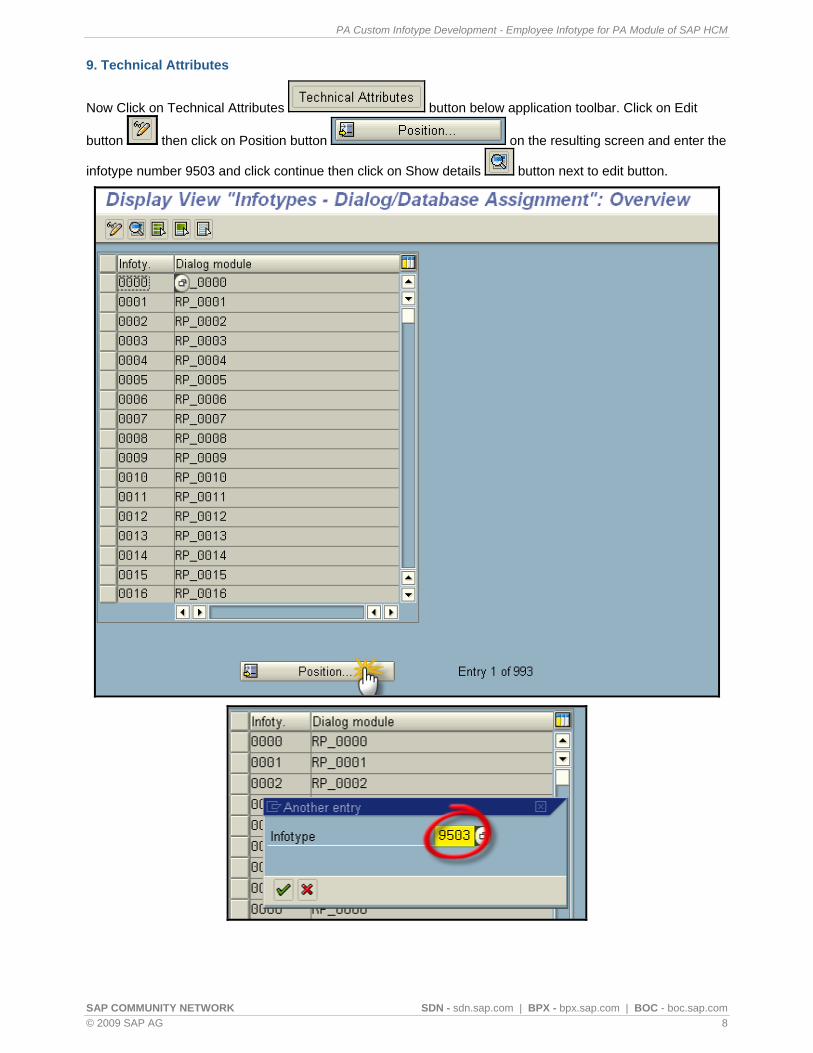
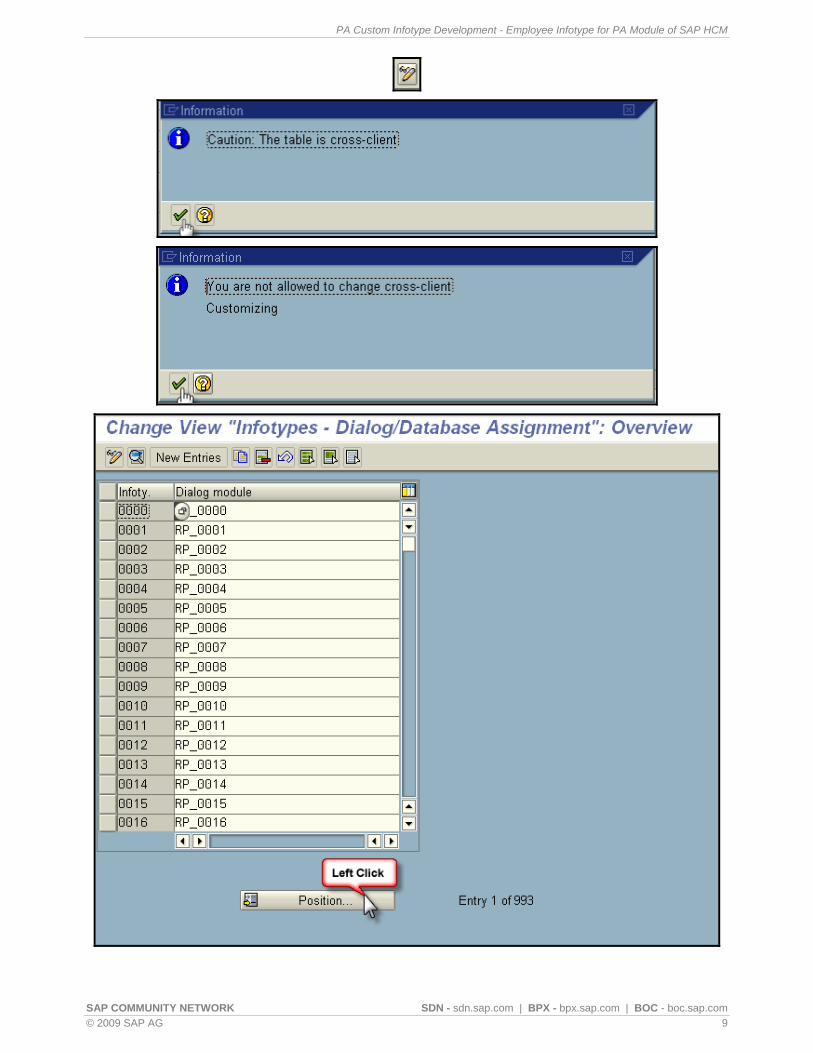
9. Technical Attributes
Now Click on Technical Attributes button below application toolbar. Click on Edit
button then click on Position button on the resulting screen and enter the
infotype number 9503 and click continue then click on Show details button next to edit button.
SAP COMMUNITY NETWORK SDN - sdn.sap.com | BPX - bpx.sap.com | BOC - boc.sap.com © 2009 SAP AG 8
PA Custom Infotype Development - Employee Infotype for PA Module of SAP HCM
SAP COMMUNITY NETWORK SDN - sdn.sap.com | BPX - bpx.sap.com | BOC - boc.sap.com © 2009 SAP AG 9
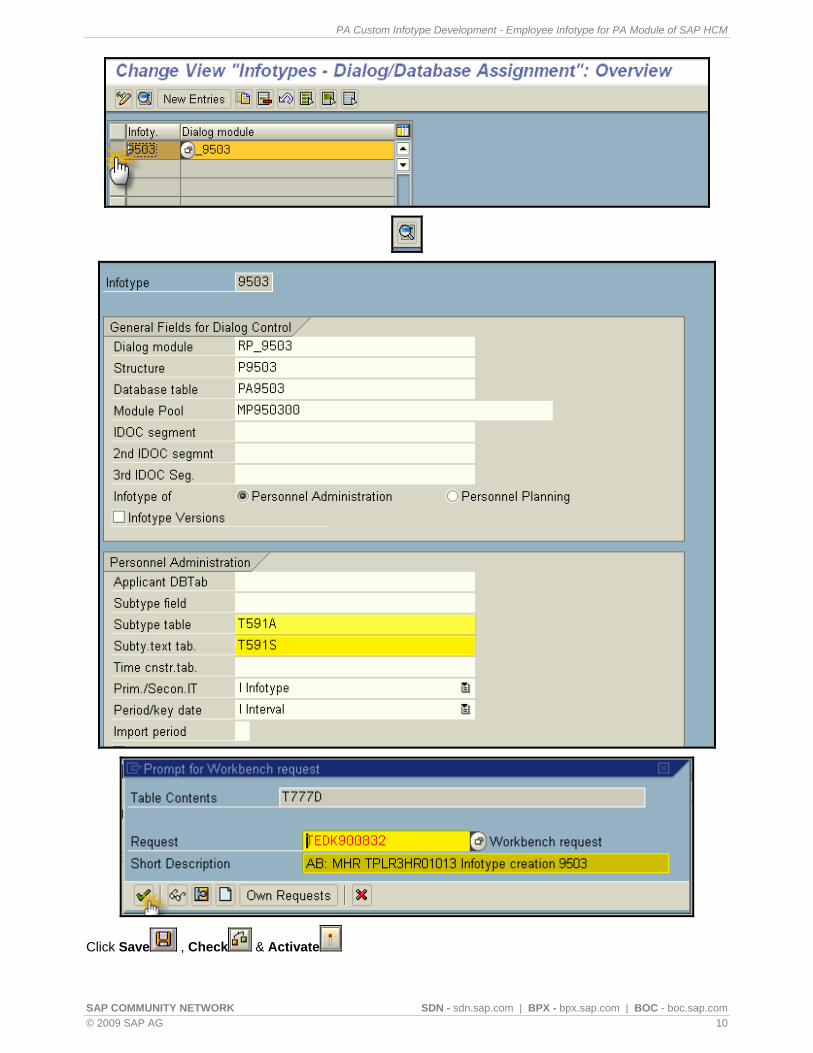
PA Custom Infotype Development - Employee Infotype for PA Module of SAP HCM
Click Save , Check & Activate
SAP COMMUNITY NETWORK SDN - sdn.sap.com | BPX - bpx.sap.com | BOC - boc.sap.com © 2009 SAP AG 10
PA Custom Infotype Development - Employee Infotype for PA Module of SAP HCM
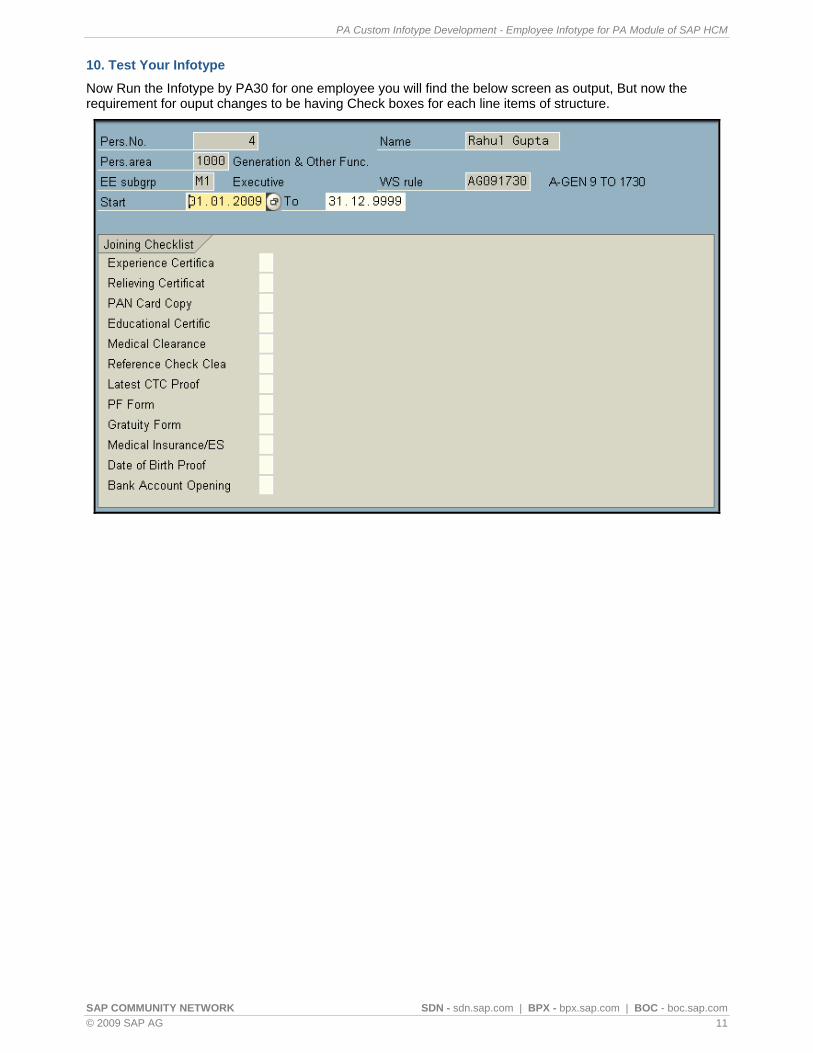
10. Test Your Infotype
Now Run the Infotype by PA30 for one employee you will find the below screen as output, But now the requirement for ouput changes to be having Check boxes for each line items of structure.
SAP COMMUNITY NETWORK SDN - sdn.sap.com | BPX - bpx.sap.com | BOC - boc.sap.com © 2009 SAP AG 11
PA Custom Infotype Development - Employee Infotype for PA Module of SAP HCM
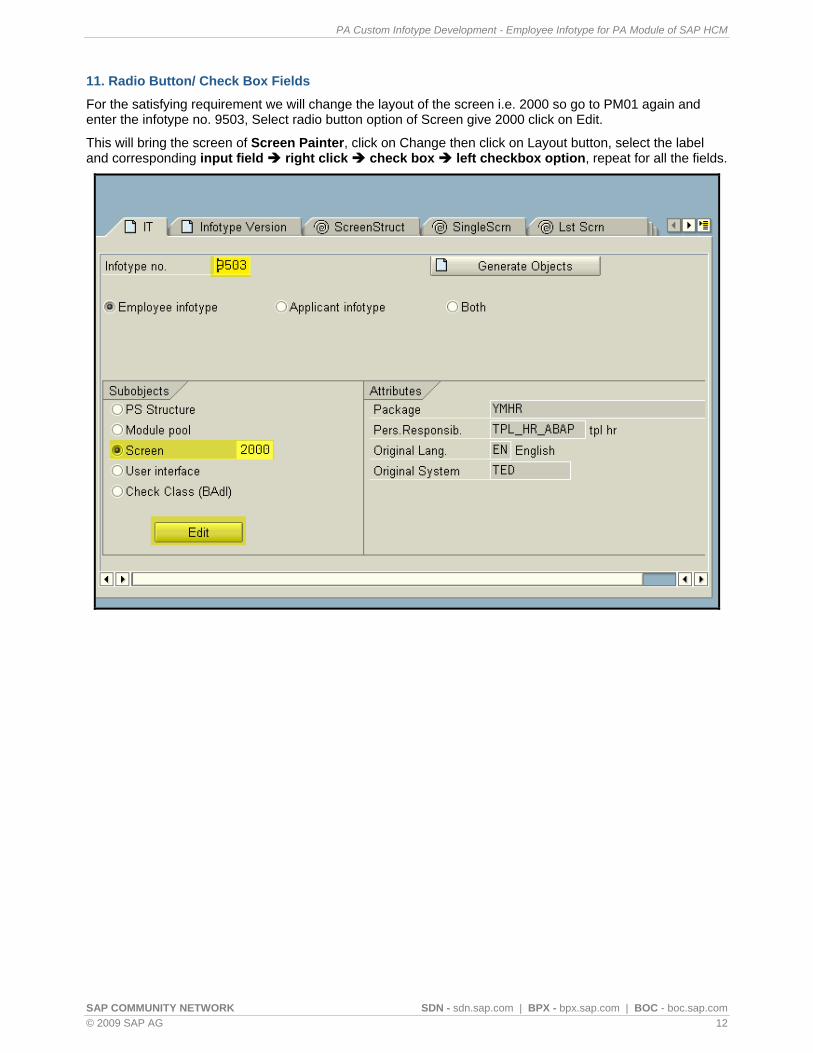
11. Radio Button/ Check Box Fields
For the satisfying requirement we will change the layout of the screen i.e. 2000 so go to PM01 again and enter the infotype no. 9503, Select radio button option of Screen give 2000 click on Edit.
This will bring the screen of Screen Painter, click on Change then click on Layout button, select the label and corresponding input field right click check box left checkbox option, repeat for all the fields.
SAP COMMUNITY NETWORK SDN - sdn.sap.com | BPX - bpx.sap.com | BOC - boc.sap.com © 2009 SAP AG 12

PA Custom Infotype Development - Employee Infotype for PA Module of SAP HCM
SAP COMMUNITY NETWORK SDN - sdn.sap.com | BPX - bpx.sap.com | BOC - boc.sap.com © 2009 SAP AG 13
PA Custom Infotype Development - Employee Infotype for PA Module of SAP HCM
SAP COMMUNITY NETWORK SDN - sdn.sap.com | BPX - bpx.sap.com | BOC - boc.sap.com © 2009 SAP AG 14
PA Custom Infotype Development - Employee Infotype for PA Module of SAP HCM
SAP COMMUNITY NETWORK SDN - sdn.sap.com | BPX - bpx.sap.com | BOC - boc.sap.com © 2009 SAP AG 15
PA Custom Infotype Development - Employee Infotype for PA Module of SAP HCM
Related Content https://www.sdn.sap.com/irj/scn/thread?messageID=1604358
https://www.sdn.sap.com/irj/scn/thread?messageID=1207928
https://www.sdn.sap.com/irj/scn/thread?messageID=7556900
For more information, visit the ABAP homepage.
SAP COMMUNITY NETWORK SDN - sdn.sap.com | BPX - bpx.sap.com | BOC - boc.sap.com © 2009 SAP AG 16
PA Custom Infotype Development - Employee Infotype for PA Module of SAP HCM
SAP COMMUNITY NETWORK SDN - sdn.sap.com | BPX - bpx.sap.com | BOC - boc.sap.com © 2009 SAP AG 17
Disclaimer and Liability Notice This document may discuss sample coding or other information that does not include SAP official interfaces and therefore is not supported by SAP. Changes made based on this information are not supported and can be overwritten during an upgrade.
SAP will not be held liable for any damages caused by using or misusing the information, code or methods suggested in this document, and anyone using these methods does so at his/her own risk.
SAP offers no guarantees and assumes no responsibility or liability of any type with respect to the content of this technical article or code sample, including any liability resulting from incompatibility between the content within this document and the materials and services offered by SAP. You agree that you will not hold, or seek to hold, SAP responsible or liable with respect to the content of this document.
Related Documents