Fixing Instructions for the Twinfix P600 Push-Fit Structural Glazing Bar System Tools you will need to construct 201 Cavendish Place your Twinfix roof: Birchwood Park Birchwood Tape measure Warrington Screwdriver Cheshire Spirit level WA3 6WU Hacksaw Drill Tel: 01925 811311 Hammer Fax: 01925 852955 Email: [email protected] Website: www.twinfix.co.uk

Welcome message from author
This document is posted to help you gain knowledge. Please leave a comment to let me know what you think about it! Share it to your friends and learn new things together.
Transcript
Fixing Instructions for the Twinfix
P600 Push-Fit
Structural Glazing Bar System
Tools you will need to construct 201 Cavendish Place your Twinfix roof: Birchwood Park Birchwood
Tape measure Warrington Screwdriver Cheshire Spirit level WA3 6WU
Hacksaw Drill Tel: 01925 811311 Hammer Fax: 01925 852955
Email: [email protected] Website: www.twinfix.co.uk
System Description The 600 system is designed for installing multiwall polycarbonate glazing and will span up to 3000mm unsupported. It consists of an aluminium base bar and a PVCu push fit cap that clamps the multiwall glazing firmly and securely in place. There is a wide range of complementary items, fixing accessories and matching profiles. The 600 system is supplied complete with a PVCu thermal underclad and is available in white only.
Glazing with Glass The P600 system is suitable for use with multiwall polycarbonate only. Neither single panes of glass or double glazed units can be used with the P600 system.
Design Detail Multiwall polycarbonate is normally used on a roof with a gentle slope, which will allow rainwater to drain into guttering. We recommend the minimum slope should be 5º. The 600 system can be used with 16mm and 25mm sheet.
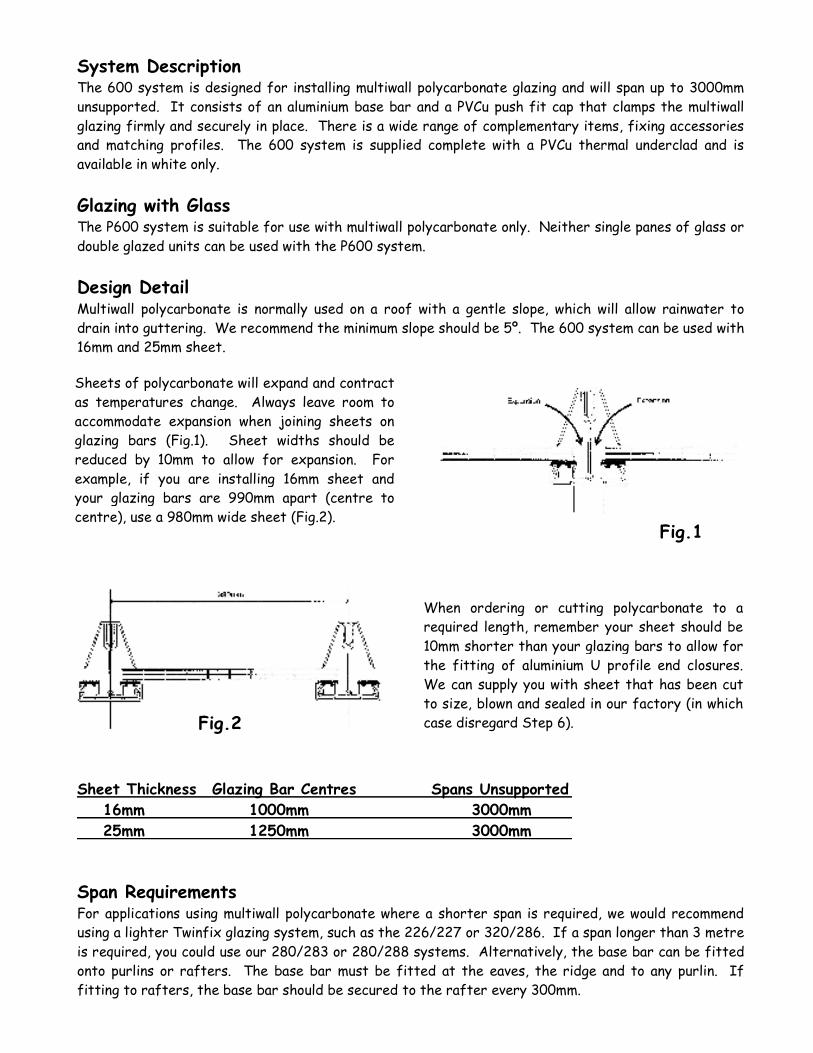
Sheet Thickness Glazing Bar Centres Spans Unsupported
16mm 1000mm 3000mm
25mm 1250mm 3000mm
Span Requirements For applications using multiwall polycarbonate where a shorter span is required, we would recommend using a lighter Twinfix glazing system, such as the 226/227 or 320/286. If a span longer than 3 metre is required, you could use our 280/283 or 280/288 systems. Alternatively, the base bar can be fitted onto purlins or rafters. The base bar must be fitted at the eaves, the ridge and to any purlin. If fitting to rafters, the base bar should be secured to the rafter every 300mm.
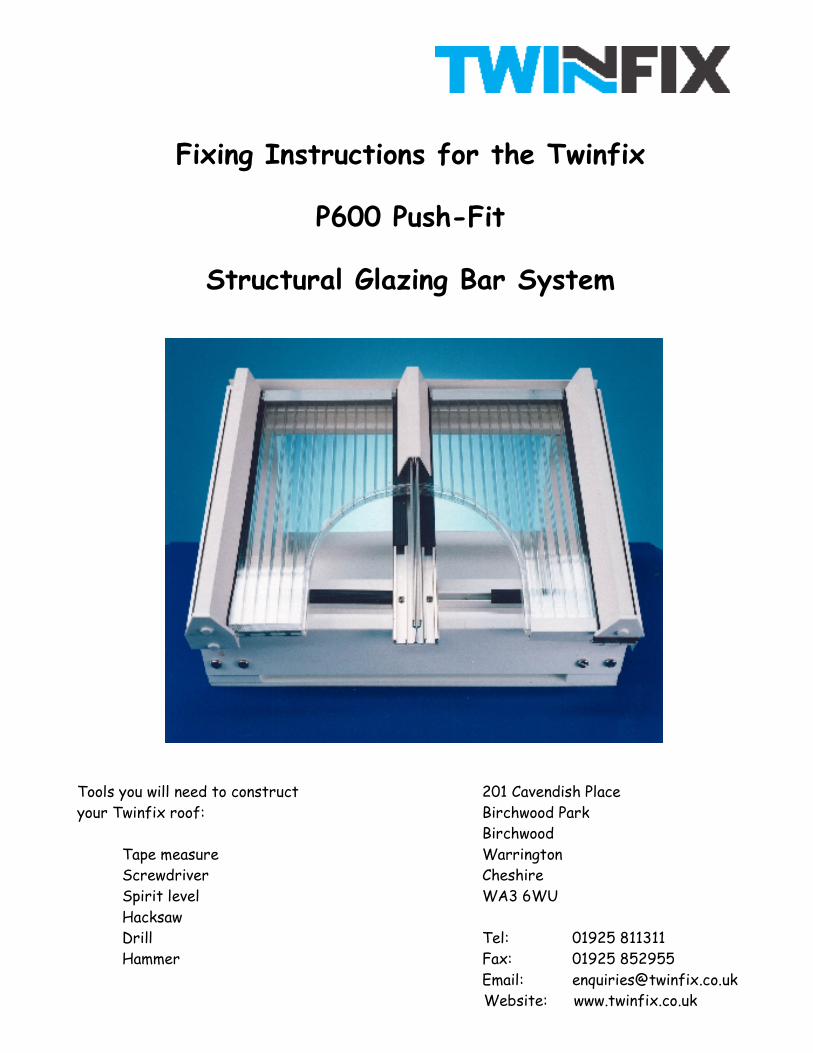
Sheets of polycarbonate will expand and contract as temperatures change. Always leave room to accommodate expansion when joining sheets on glazing bars (Fig.1). Sheet widths should be reduced by 10mm to allow for expansion. For example, if you are installing 16mm sheet and your glazing bars are 990mm apart (centre to centre), use a 980mm wide sheet (Fig.2).
When ordering or cutting polycarbonate to a required length, remember your sheet should be 10mm shorter than your glazing bars to allow for the fitting of aluminium U profile end closures. We can supply you with sheet that has been cut to size, blown and sealed in our factory (in which case disregard Step 6).
Fig.1
Fig.2
You can now start to fix the roof sheets; starting at one side of the roof and working across,
fixing and dressing down flashings as you go.
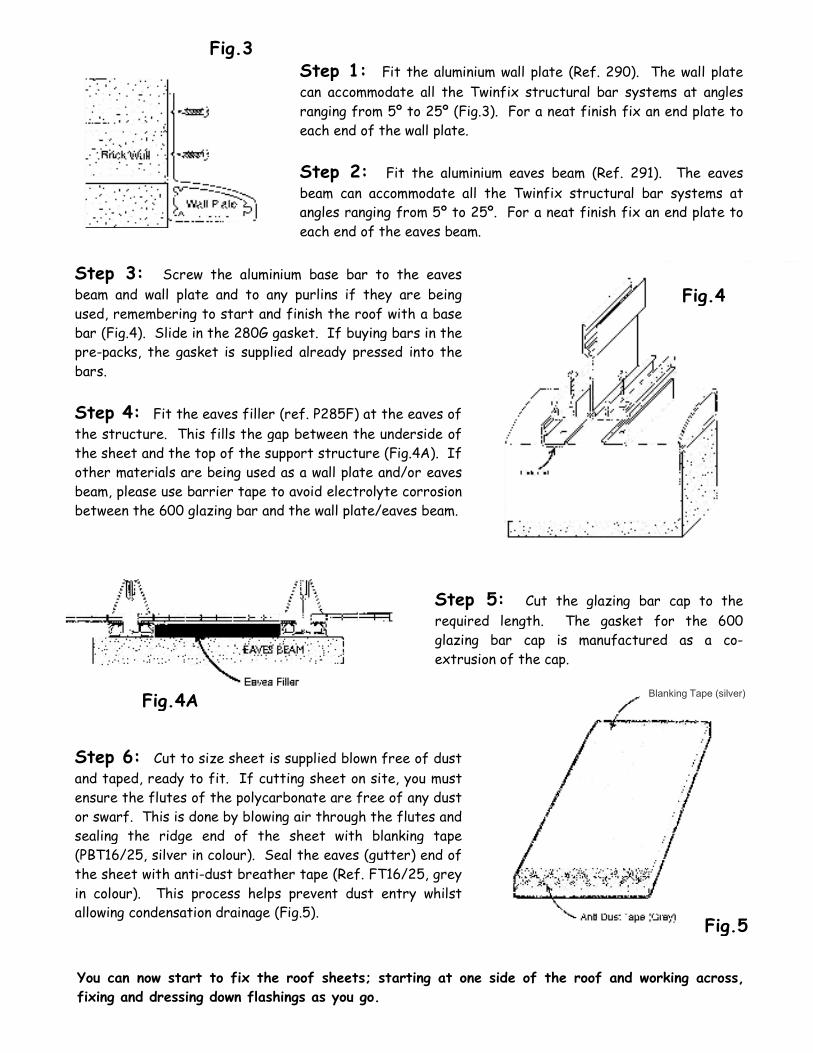
Step 1: Fit the aluminium wall plate (Ref. 290). The wall plate can accommodate all the Twinfix structural bar systems at angles ranging from 5º to 25º (Fig.3). For a neat finish fix an end plate to each end of the wall plate.
Step 2: Fit the aluminium eaves beam (Ref. 291). The eaves beam can accommodate all the Twinfix structural bar systems at angles ranging from 5º to 25º. For a neat finish fix an end plate to each end of the eaves beam.
Fig.4 Step 3: Screw the aluminium base bar to the eaves beam and wall plate and to any purlins if they are being used, remembering to start and finish the roof with a base bar (Fig.4). Slide in the 280G gasket. If buying bars in the pre-packs, the gasket is supplied already pressed into the bars.
Step 4: Fit the eaves filler (ref. P285F) at the eaves of the structure. This fills the gap between the underside of the sheet and the top of the support structure (Fig.4A). If other materials are being used as a wall plate and/or eaves beam, please use barrier tape to avoid electrolyte corrosion between the 600 glazing bar and the wall plate/eaves beam.
Step 5: Cut the glazing bar cap to the required length. The gasket for the 600 glazing bar cap is manufactured as a co-extrusion of the cap.
Step 6: Cut to size sheet is supplied blown free of dust and taped, ready to fit. If cutting sheet on site, you must ensure the flutes of the polycarbonate are free of any dust or swarf. This is done by blowing air through the flutes and sealing the ridge end of the sheet with blanking tape (PBT16/25, silver in colour). Seal the eaves (gutter) end of the sheet with anti-dust breather tape (Ref. FT16/25, grey in colour). This process helps prevent dust entry whilst allowing condensation drainage (Fig.5).
Fig.5
Fig.4A
Fig.3
Blanking Tape (silver)
Shaped Roofs The 600 system is not suitable for roofs where a hip is required. Alternative structural systems where hip versions are available include the 226/227, 280/3/4 and the 320/286 systems.
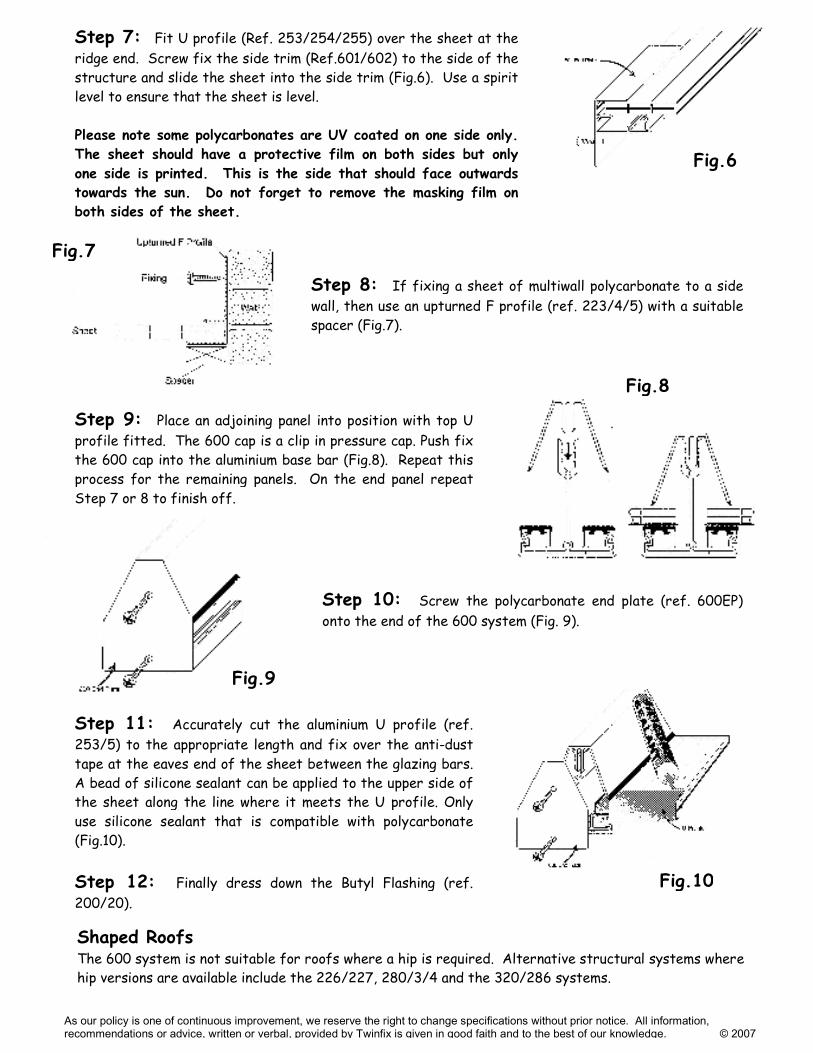
Step 7: Fit U profile (Ref. 253/254/255) over the sheet at the ridge end. Screw fix the side trim (Ref.601/602) to the side of the structure and slide the sheet into the side trim (Fig.6). Use a spirit level to ensure that the sheet is level.
Please note some polycarbonates are UV coated on one side only.
The sheet should have a protective film on both sides but only
one side is printed. This is the side that should face outwards
towards the sun. Do not forget to remove the masking film on
both sides of the sheet.
Step 8: If fixing a sheet of multiwall polycarbonate to a side wall, then use an upturned F profile (ref. 223/4/5) with a suitable spacer (Fig.7).
Fig.6
Fig.7
Step 9: Place an adjoining panel into position with top U profile fitted. The 600 cap is a clip in pressure cap. Push fix the 600 cap into the aluminium base bar (Fig.8). Repeat this process for the remaining panels. On the end panel repeat Step 7 or 8 to finish off.
Step 10: Screw the polycarbonate end plate (ref. 600EP) onto the end of the 600 system (Fig. 9).
Step 11: Accurately cut the aluminium U profile (ref. 253/5) to the appropriate length and fix over the anti-dust tape at the eaves end of the sheet between the glazing bars. A bead of silicone sealant can be applied to the upper side of the sheet along the line where it meets the U profile. Only use silicone sealant that is compatible with polycarbonate (Fig.10).
Step 12: Finally dress down the Butyl Flashing (ref. 200/20).
As our policy is one of continuous improvement, we reserve the right to change specifications without prior notice. All information, recommendations or advice, written or verbal, provided by Twinfix is given in good faith and to the best of our knowledge. © 2007
Fig.10
Fig.9
Fig.8
Related Documents