Owner’s Manual B B B B B ACK ACK ACK ACK ACK LINE 110 & 112 LINE 110 & 112 LINE 110 & 112 LINE 110 & 112 LINE 110 & 112 BASS C ASS C ASS C ASS C ASS COMB OMB OMB OMB OMBO AMPLIFIER O AMPLIFIER O AMPLIFIER O AMPLIFIER O AMPLIFIER

Welcome message from author
This document is posted to help you gain knowledge. Please leave a comment to let me know what you think about it! Share it to your friends and learn new things together.
Transcript
Owner’s Manual
BBBBBACKACKACKACKACKLINE 110 & 112LINE 110 & 112LINE 110 & 112LINE 110 & 112LINE 110 & 112BBBBBASS CASS CASS CASS CASS COMBOMBOMBOMBOMBO AMPLIFIERO AMPLIFIERO AMPLIFIERO AMPLIFIERO AMPLIFIER

3
BBBBBACKACKACKACKACKLINE 110 & 112LINE 110 & 112LINE 110 & 112LINE 110 & 112LINE 110 & 112
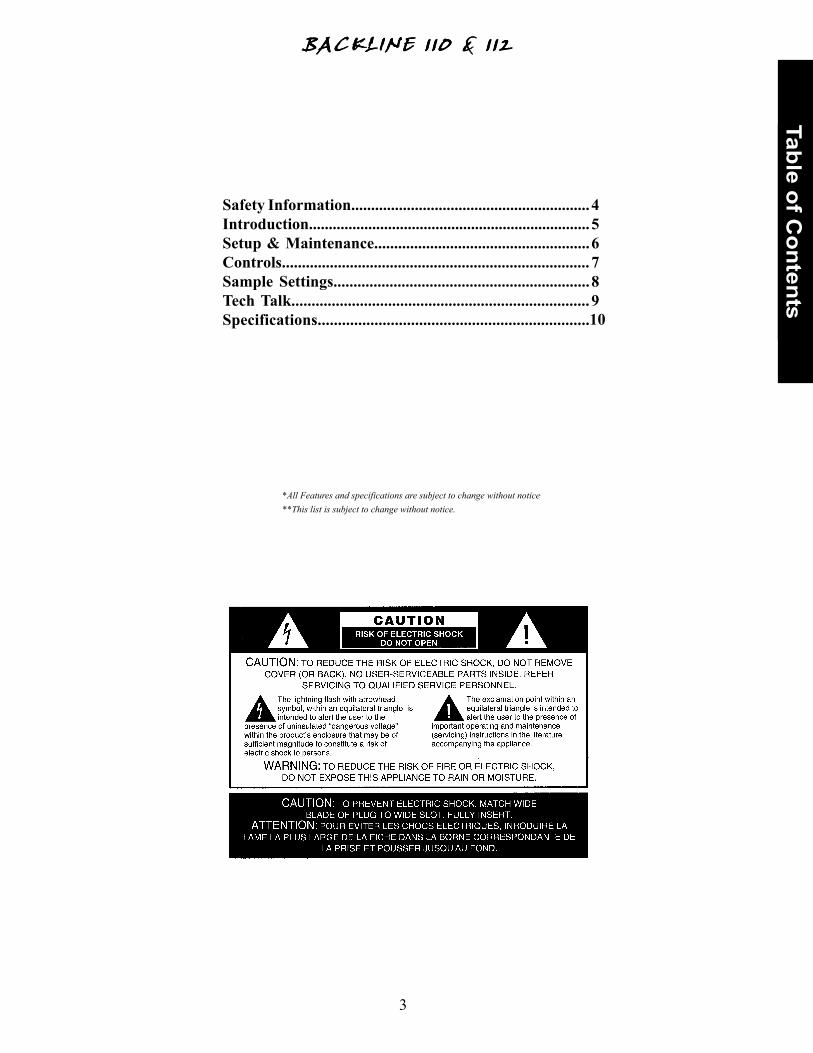
Safety Information............................................................Introduction.......................................................................Setup & Maintenance......................................................Controls.............................................................................Sample Settings................................................................Tech Talk..........................................................................Specifications...................................................................
*All Features and specifications are subject to change without notice.
**This list is subject to change without notice.
Table of Contents
10
456789
4
BBBBBACKACKACKACKACKLINE 110 & 112LINE 110 & 112LINE 110 & 112LINE 110 & 112LINE 110 & 112
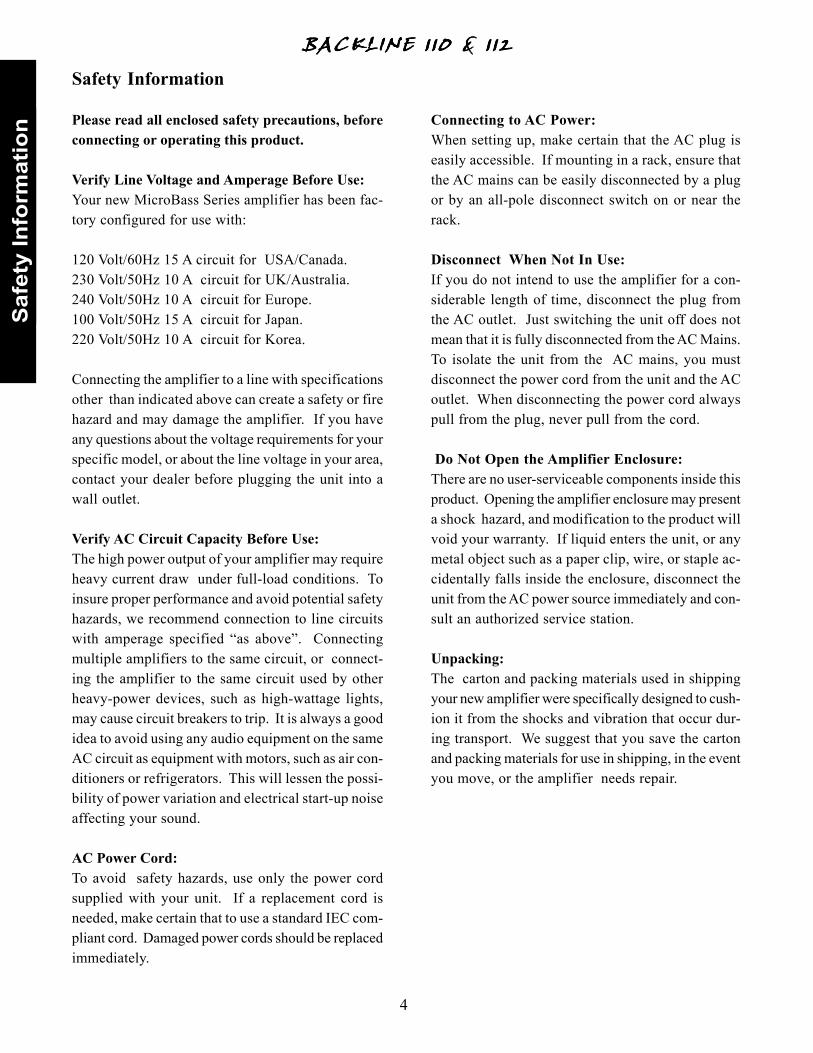
Safety Information
Please read all enclosed safety precautions, beforeconnecting or operating this product.
Verify Line Voltage and Amperage Before Use:Your new MicroBass Series amplifier has been fac-tory configured for use with:
120 Volt/60Hz 15 A circuit for USA/Canada.230 Volt/50Hz 10 A circuit for UK/Australia.240 Volt/50Hz 10 A circuit for Europe.100 Volt/50Hz 15 A circuit for Japan.220 Volt/50Hz 10 A circuit for Korea.
Connecting the amplifier to a line with specificationsother than indicated above can create a safety or firehazard and may damage the amplifier. If you haveany questions about the voltage requirements for yourspecific model, or about the line voltage in your area,contact your dealer before plugging the unit into awall outlet.
Verify AC Circuit Capacity Before Use:The high power output of your amplifier may requireheavy current draw under full-load conditions. Toinsure proper performance and avoid potential safetyhazards, we recommend connection to line circuitswith amperage specified “as above”. Connectingmultiple amplifiers to the same circuit, or connect-ing the amplifier to the same circuit used by otherheavy-power devices, such as high-wattage lights,may cause circuit breakers to trip. It is always a goodidea to avoid using any audio equipment on the sameAC circuit as equipment with motors, such as air con-ditioners or refrigerators. This will lessen the possi-bility of power variation and electrical start-up noiseaffecting your sound.
AC Power Cord:To avoid safety hazards, use only the power cordsupplied with your unit. If a replacement cord isneeded, make certain that to use a standard IEC com-pliant cord. Damaged power cords should be replacedimmediately.
Connecting to AC Power:When setting up, make certain that the AC plug iseasily accessible. If mounting in a rack, ensure thatthe AC mains can be easily disconnected by a plugor by an all-pole disconnect switch on or near therack.
Disconnect When Not In Use:If you do not intend to use the amplifier for a con-siderable length of time, disconnect the plug fromthe AC outlet. Just switching the unit off does notmean that it is fully disconnected from the AC Mains.To isolate the unit from the AC mains, you mustdisconnect the power cord from the unit and the ACoutlet. When disconnecting the power cord alwayspull from the plug, never pull from the cord.
Do Not Open the Amplifier Enclosure:There are no user-serviceable components inside thisproduct. Opening the amplifier enclosure may presenta shock hazard, and modification to the product willvoid your warranty. If liquid enters the unit, or anymetal object such as a paper clip, wire, or staple ac-cidentally falls inside the enclosure, disconnect theunit from the AC power source immediately and con-sult an authorized service station.
Unpacking:The carton and packing materials used in shippingyour new amplifier were specifically designed to cush-ion it from the shocks and vibration that occur dur-ing transport. We suggest that you save the cartonand packing materials for use in shipping, in the eventyou move, or the amplifier needs repair.
Saf
ety
Info
rmat
ion
5
BBBBBACKACKACKACKACKLINE 110 & 112LINE 110 & 112LINE 110 & 112LINE 110 & 112LINE 110 & 112
Congratulations
Your purchase of a new Gallien-Krueger BacklineSeries product is surely the result of much carefulconsideration on your part. For our part, we atGallien-Krueger are pleased that you chose us, andare determined that you will be a satisfied cus-tomer. In choosing a Backline Series product, younow own a combo with many unique features,which will allow to create your own distinctsound.
To get the most out of your new purchase pleasetake a few minutes to read through this manual. Ifyou are in a hurry, we suggest you at least readthrough the Quick Start section before setting upyour new rig. This will help get you started andgive you a few quick tips, but is not a substitutefor reading the rest of the manual.
Your amplifier should have come with the follow-ing items, please check the contents of the box toensure that you have everything.
Included with your Backline Combo:Backline 110 or 112 1Power cord 1Owner’s manual 1Warranty card 1Safety instructions sheet 1
If your Backline Series combo did not come withall the items listed, or if you encounter problemswhile setting up your new equipment, pleasecontact your local dealer, or us as soon as possible.
Gallien-Krueger, Inc.2234 Industrial DriveStockton, CA 95206phone: (209) 234-7300fax: (209) 234-8420Internet: www.gallien-krueger.comEmail: [email protected]
We wish you a lifetime of good playing andremember to always have fun!
Always Listening
I have never seen the point in doing things the wayothers have done them. I also have not been veryinterested in following the latest fad. I am aStanford educated engineer who worked his waythrough school as a musician. Like all musicians,I have lugged amplifiers up stairways and into cartrunks, always wondering why these things had tobe so heavy, bulky, and hard to handle.As I am the principal innovator at GK, our prod-ucts reflect my attitudes and life experiences. Idon’t model my designs after other manufacturer’sproducts (as some of our competitors are proud ofreciting). Instead, I believe new and old problemsare best solved with new solutions. Having takenour own path, GK products enjoy a unique, un-matched sound, allowing the artist using themevery opportunity to make an original statement.Having supported my products for over thirtyyears, I have learned from the story they tell.Gallien-Krueger is a reflection of that story, andhas a commitment to support that legacy. Just asthe products I created thirty years ago are stilltelling their story, the products we create todaywill be talking to us tomorrow.We’ll be listening,
Robert Gallien
Introduction
6
BBBBBACKACKACKACKACKLINE 110 & 112LINE 110 & 112LINE 110 & 112LINE 110 & 112LINE 110 & 112
Setup & Maintenance
Setup: To insure proper operation and to avoidpotential safety hazards, place the unit on a firm,level surface. Do not plug or unplug the instrumentor speaker cable while the amplifier power is on.Rack-mounting this unit is not recommended.
Heat & Ventilation: For proper ventilation, makesure there is at least 8 inches (20cm) of clearancearound the sides, top, back and front of the amplifier.Avoid using in extremely hot or cold locations andareas that are exposed to direct sunlight, or nearheating equipment. The heat sink fins and ventila-tion slots that form part of the enclosure are spe-cially designed to displace heat generated by theamplifier. Placing other electronic equipment nearthese heat-dissipation systems may possibly affectthe long-term reliability of both your amplifier andthe other equipment.
Moving the Unit: Before moving the unit, becertain to disconnect all cables. Make sure that youdisconnect the unit from the AC outlet. If Travelingwith the unit frequently, we recommend a road caseor gig bag to protect it from scratches and road wear.
Cleaning & Maintenance: Clean only with a drycloth. Never use benzene, thinner, alcohol, or othervolatile cleaning agents. Do not use abrasivecleaners, as they may damage the finish of metalparts. Avoid spraying insecticides near the unit. Noother maintenance should be necessary.
Speaker Configurations:Backline 112: One 8 Ohm 12" speakerBackline 110: One 8 Ohm 10" speaker
To drive an external cabinet, the combo’s internalspeaker can be disconnected by unplugging thespeaker cable connected to the combo’s backpanel.
Maximum recommended load with the internalspeaker disconnected:Backline 112: One 8 Ohm cabinet.Backline 110: One 8 Ohm cabinet.
Quick Start
The Backline 110/112 is designed to be simple tooperate. All controls have a well defined purposeand are well behaved. These directions will takeyou through the basics and give you a good startfor setting up your sound.
1. Set the power switch to Off and connect thesupplied power cable from the amplifier AC recep-tacle to an AC power outlet of proper voltage andpower rating (see safety information on page 8 fordetails).
2. Set all EQ controls and the Boost control to 12o’clock. The Voicing Filter should be turned all theway down to get a flat response. Set the Gain,Level-A, Level-B and Master Volumes at 0. Set theA/B switch to off (Channel A)
3. Using an instrument cable, connect your bass tothe Input jack and turn the power switch on and play.If the clip LED flashes excessively, push the buttonmarked -10db in. This will prevent you fromoverdriving the preamp. Occasional clip lightflashes occurring while playing very hard is okay.
4. Set the master control to 12 o’clock and slowlybring the Level-A volume up. Do not turn thevolume control in the input section past 12 o’clockunless you want an overdrive effect. If you have abass with passive electronics make sure the con-trols are all the way up. If you have a bass withactive electronics, turn all of the EQ controls onthe bass to the middle or flat position.
At This Point:You should be hearing your bass quite well. Youcan use the volume and Master to achieve acomfortable sound level. Remember: If you needmore volume, turn up the Master control first.
5. Now you are ready to check out the overdrivefeature (Channel-B). Push in the Level A/B button.The overdrive LED should light. Set the Gaincontrol to 9 o’clock as a starting point. Slowly raisethe Level-B volume to the desired sound level. Thiswill give a slightly distorted sound. Raising the gainwill add more distortion and sustain. (See SoundTips for more detail).
Set
up &
Mai
nten
ance
7
BBBBBACKACKACKACKACKLINE 110 & 112LINE 110 & 112LINE 110 & 112LINE 110 & 112LINE 110 & 112
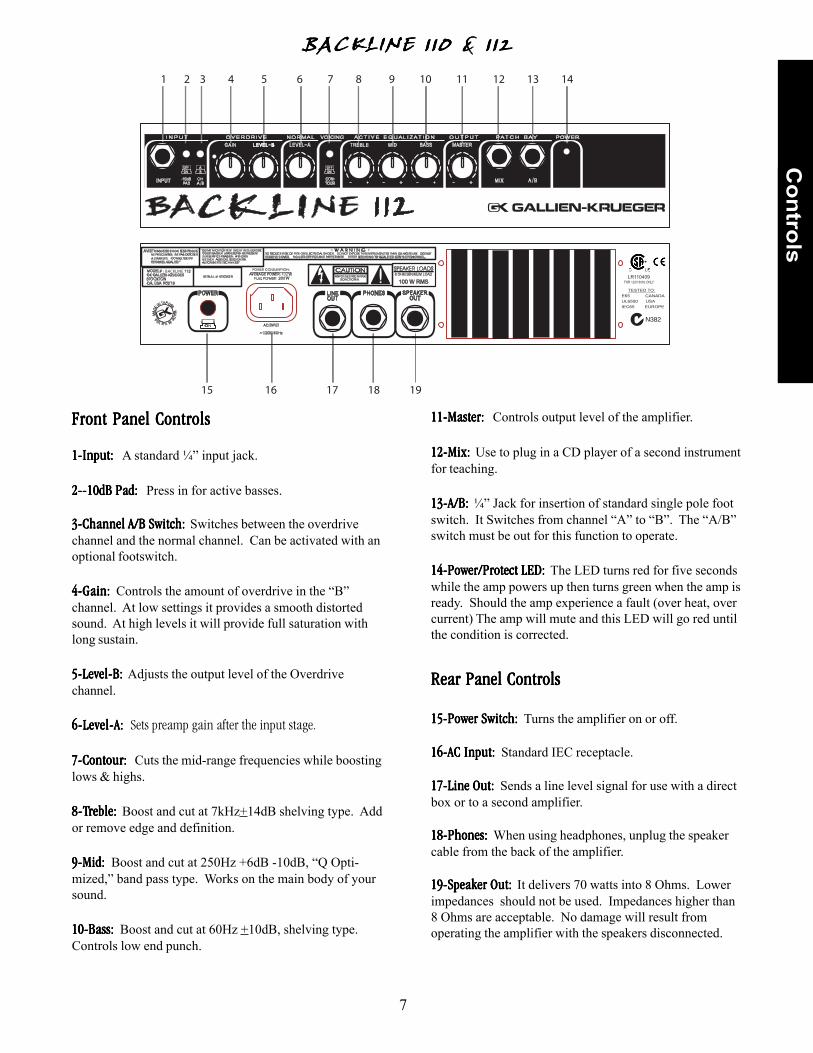
11-Master:11-Master:11-Master:11-Master:11-Master: Controls output level of the amplifier.
12-Mix:12-Mix:12-Mix:12-Mix:12-Mix: Use to plug in a CD player of a second instrumentfor teaching.
13-A/B:13-A/B:13-A/B:13-A/B:13-A/B: ¼” Jack for insertion of standard single pole footswitch. It Switches from channel “A” to “B”. The “A/B”switch must be out for this function to operate.
14-Power/Protect LED:14-Power/Protect LED:14-Power/Protect LED:14-Power/Protect LED:14-Power/Protect LED: The LED turns red for five secondswhile the amp powers up then turns green when the amp isready. Should the amp experience a fault (over heat, overcurrent) The amp will mute and this LED will go red untilthe condition is corrected.
Rear Panel ControlsRear Panel ControlsRear Panel ControlsRear Panel ControlsRear Panel Controls
15-Power Switch: 15-Power Switch: 15-Power Switch: 15-Power Switch: 15-Power Switch: Turns the amplifier on or off.
16-AC Input: 16-AC Input: 16-AC Input: 16-AC Input: 16-AC Input: Standard IEC receptacle.
17-Line Out: 17-Line Out: 17-Line Out: 17-Line Out: 17-Line Out: Sends a line level signal for use with a directbox or to a second amplifier.
18-Phones: 18-Phones: 18-Phones: 18-Phones: 18-Phones: When using headphones, unplug the speakercable from the back of the amplifier.
19-Speaker Out: 19-Speaker Out: 19-Speaker Out: 19-Speaker Out: 19-Speaker Out: It delivers 70 watts into 8 Ohms. Lowerimpedances should not be used. Impedances higher than8 Ohms are acceptable. No damage will result fromoperating the amplifier with the speakers disconnected.
Front Panel ControlsFront Panel ControlsFront Panel ControlsFront Panel ControlsFront Panel Controls
1-Input:1-Input:1-Input:1-Input:1-Input: A standard ¼” input jack.
2--10dB Pad:2--10dB Pad:2--10dB Pad:2--10dB Pad:2--10dB Pad: Press in for active basses.
3-Channel A/B Switch:3-Channel A/B Switch:3-Channel A/B Switch:3-Channel A/B Switch:3-Channel A/B Switch: Switches between the overdrivechannel and the normal channel. Can be activated with anoptional footswitch.
4-Gain: 4-Gain: 4-Gain: 4-Gain: 4-Gain: Controls the amount of overdrive in the “B”channel. At low settings it provides a smooth distortedsound. At high levels it will provide full saturation withlong sustain.
5-Level-B:5-Level-B:5-Level-B:5-Level-B:5-Level-B: Adjusts the output level of the Overdrivechannel.
6-Level-A: 6-Level-A: 6-Level-A: 6-Level-A: 6-Level-A: Sets preamp gain after the input stage.
7-Contour: 7-Contour: 7-Contour: 7-Contour: 7-Contour: Cuts the mid-range frequencies while boostinglows & highs.
8-T8-T8-T8-T8-Treble:reble:reble:reble:reble: Boost and cut at 7kHz+14dB shelving type. Addor remove edge and definition.
9-Mid: 9-Mid: 9-Mid: 9-Mid: 9-Mid: Boost and cut at 250Hz +6dB -10dB, “Q Opti-mized,” band pass type. Works on the main body of yoursound.
10-Bass: 10-Bass: 10-Bass: 10-Bass: 10-Bass: Boost and cut at 60Hz +10dB, shelving type.Controls low end punch.
Controls
1 2 3 4 5 6 7 8 9 10 11 12 13 14
15 16 17 18 19
8
BBBBBACKACKACKACKACKLINE 110 & 112LINE 110 & 112LINE 110 & 112LINE 110 & 112LINE 110 & 112S
ampl
e S
ettin
gs
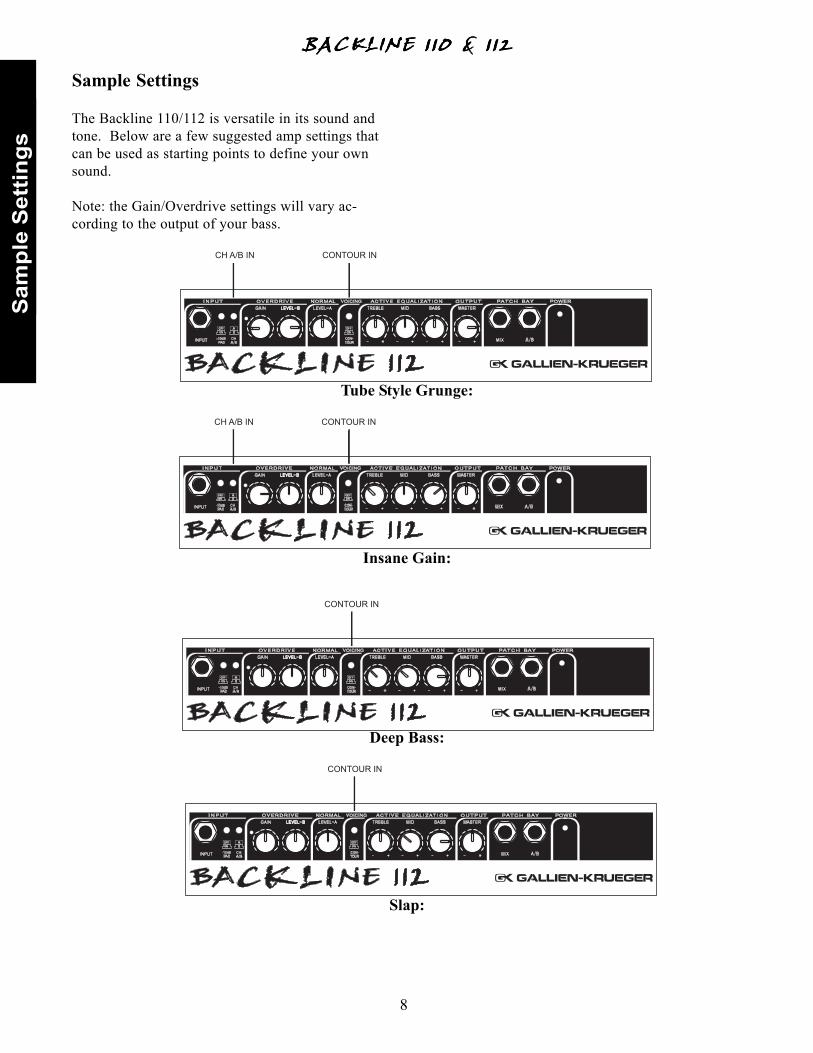
Sample Settings
The Backline 110/112 is versatile in its sound andtone. Below are a few suggested amp settings thatcan be used as starting points to define your ownsound.
Note: the Gain/Overdrive settings will vary ac-cording to the output of your bass.
Tube Style Grunge:
Insane Gain:
Deep Bass:
Slap:
CH A/B IN CONTOUR IN
CH A/B IN CONTOUR IN
CONTOUR IN
CONTOUR IN
9
BBBBBACKACKACKACKACKLINE 110 & 112LINE 110 & 112LINE 110 & 112LINE 110 & 112LINE 110 & 112
Tech Talk
Characteristics of the Backline 110 & 112The Backline 110/112 is a flexible, user-friendlystate-of-the-art bass amplifier designed to delivermaximum performance. This is accomplishedthrough these important features:
High current power supply and power ampcircuitry, for a quick and punchy responce.Three band active equalization for precisetone control.Mid-Contour ShapingSwitchable overdrive channel designedspecifically for bass.
High Current Capability:When a power amplifier is pushing a speaker coneand it needs to reproduce a high-power transient likea string slap, the amp must be able to deliver a highcurrent pulse to maintain cone control. If theamplifier can’t do this it simply cuts the transientoff, producing an unresponsive less out front sound.Creating these high current pulses requires extrapower devices (four times the current required todeliver its rated power), larger supply capacitors,and intelligent protection logic. GK is the only bassamp manufacturer that goes to the trouble andexpense to make this happen and it is a big reasonwhy GK amplifiers sound louder and cleaner thanother brands at the same power rating.
Active Equalization:Standard tone controls and graphic equalizers giveyou plenty of variation, but they don’t provide whatthe instrument really needs. In fact, graphic equaliz-ers are intended for room equalization and makepoor instrument equalizers. The GK equalizerreflects 30 years of development and refinement andis unique to the industry. Each section is a specialcircuit optimized to perform a Bass specific job inits operation range. These sections are wired inseries so they add to one another without creatingunmusical peaks or valleys. The result is an equal-izer that is easy to use and sounds natural at anysetting.
Contour:The Contour is based on the same contour circuit asthe 800RB. When engaged, it scoops out the midfrequencies while emphasizing the lows and highs.
Overdrive:The Overdrive channel in your Backline ampli-fier provides truly distinct distortion and sustainsounds. It is not a simple clipping circuit bututilizes FET’s connected in our exclusiveG.I.V.E. configuration. This is an added flexibil-ity unheard of in this class of product.
The Valve Effect:As in all GK amplifiers, the Backline amplifier in-corporates what we call the Valve Effect, orG.I.V.E(Gate Induced Valve Effect). We use fieldeffect devices with the gate biased in such a waythat emphasizes the optimum harmonic content ofthe signal. Working in concert with our unique FourBand Active Equalizer, and three stage Voicing FilterSection, the Valve Effect produces a consistentlypleasing bass tone.
Intelligent Protection Circuitry:The Backline Series’ protection circuitry con-stantly monitors for unsafe operating conditionssuch as short circuits, miswired speaker cables,blown speakers, improper ventilation and incor-rect speaker configurations. In addition, protec-tion is provided during power up/power down.If the Backline unit senses any unsafe operatingconditions, the output signal is immediatelymuted and the power light changes from Greento Red. The amplifier will remain muted untilthe fault is removed. If the protection circuitactivates while playing, turn the amplifier offand check the amplifier speaker output connec-tions. Be sure that you are not exceeding themaximum recommend load described in thismanual. If the problem persists, contact GKdirectly for technical advice.
Enjoy:You should now have a thorough understandingof how your new Backline amplifier works andwhat advantages it can offer you in getting“your” sound. We thank you for reading theOwner’s Manual and wish you the best of times!Please send us your comments via www.gallien-krueger.com or email us at [email protected].
.
.
..
Tech Talk
10
BBBBBACKACKACKACKACKLINE 110 & 112LINE 110 & 112LINE 110 & 112LINE 110 & 112LINE 110 & 112
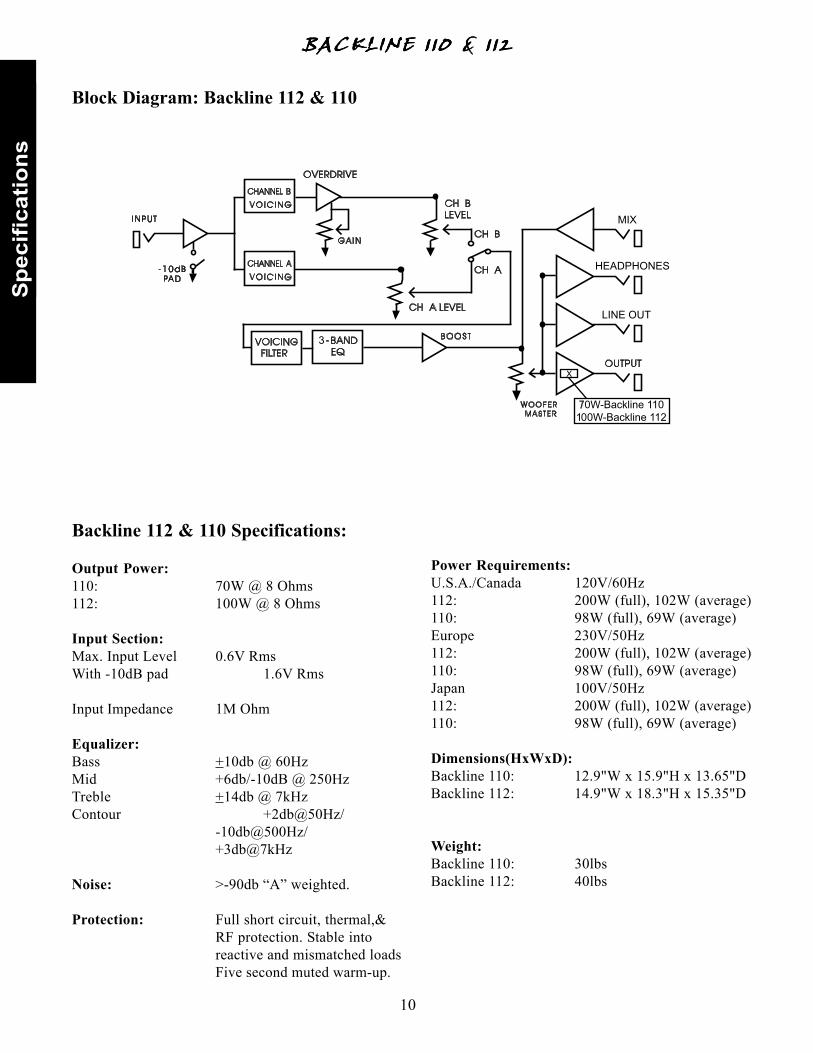
Backline 112 & 110 Specifications:
Output Power:110: 70W @ 8 Ohms112: 100W @ 8 Ohms
Input Section:Max. Input Level 0.6V RmsWith -10dB pad 1.6V Rms
Input Impedance 1M Ohm
Equalizer:Bass +10db @ 60HzMid +6db/-10dB @ 250HzTreble +14db @ 7kHzContour +2db@50Hz/
-10db@500Hz/+3db@7kHz
Noise: >-90db “A” weighted.
Protection: Full short circuit, thermal,&RF protection. Stable intoreactive and mismatched loadsFive second muted warm-up.
Power Requirements:U.S.A./Canada 120V/60Hz112: 200W (full), 102W (average)110: 98W (full), 69W (average)Europe 230V/50Hz112: 200W (full), 102W (average)110: 98W (full), 69W (average)Japan 100V/50Hz112: 200W (full), 102W (average)110: 98W (full), 69W (average)
Dimensions(HxWxD):Backline 110: 12.9"W x 15.9"H x 13.65"DBackline 112: 14.9"W x 18.3"H x 15.35"D
Weight:Backline 110: 30lbsBackline 112: 40lbs
Block Diagram: Backline 112 & 110
Spe
cific
atio
ns


Backline Series Owner’s ManualPart # 160-0180-B1
Related Documents