1 OUR LADY OF THE LAKE SCHOOL : South Entrance Landscape Proposal A project of the University of Washington’s Sustainable Community Landscapes Program at the Center for Urban Horticulture EHUF 480 Dr. Linda Chalker-Scott Julie Combs Naoko Ichii Brice Maryman Jennifer Szabo Rachael Watland

Welcome message from author
This document is posted to help you gain knowledge. Please leave a comment to let me know what you think about it! Share it to your friends and learn new things together.
Transcript
1
OUR LADY OF THE LAKE SCHOOL: South Entrance Landscape Proposal
A project of the University of Washington’s Sustainable Community Landscapes Program
at the Center for Urban Horticulture
EHUF 480 Dr. Linda Chalker-Scott
Julie Combs Naoko Ichii
Brice Maryman Jennifer Szabo
Rachael Watland
2
TABLE OF CONTENTS ABSTRACT. . . . . . . . . . . . . . . . . . . . . . . . . . . . . . . . . . . . . . . . . . . . . . . . . . . . . . . . . . . . . . . . .3 INTRODUCTION . . . . . . . . . . . . . . . . . . . . . . . . . . . . . . . . . . . . . . . . . . . . . . . . . . . . . . . . . 4 VISION STATEMENT . . . . . . . . . . . . . . . . . . . . . . . . . . . . . . . . . . . . . . . . . . . . . . . . . . . . . 4 PROJECT HISTORY . . . . . . . . . . . . . . . . . . . . . . . . . . . . . . . . . . . . . . . . . . . . . . . . . . . . . . . 4 The Our Lady of the Lake School and Parish The Sustainable Community Landscapes (SCL) Program EHUF 480 Course DESIGN PROCESS . . . . . . . . . . . . . . . . . . . . . . . . . . . . . . . . . . . . . . . . . . . . . . . . . . . . . . . . 6 Project Selection Design Program Design Narrative OUR LADY OF THE LAKE SITE ANALYSIS. . . . . . . . . . . . . . . . . . . . . . . . . . . . . . . . 11
Contextual Analysis Light and Seasonal Analysis Hydrology Soil Analysis
SOUTH ENTRANCE SITE ANALYSIS. . . . . . . . . . . . . . . . . . . . . . . . . . . . . . . . . . . . . . . . . . .15 PLANT SELECTION . . . . . . . . . . . . . . . . . . . . . . . . . . . . . . . . . . . . . . . . . . . . . . . . . . . . . . . . . . . . 17 CHILDREN’S EDUCATIONAL GARDEN. . . . . . . . . . . . . . . . . . . . . . . . . . . . . . . . . . 19 REGULATIONS AND ORDINANCES . . . . . . .. . . . . . . . . . . . . . . . . . . . . . . . . . . . . . .20 CONSTRUCTION. . . . . . . . . . . . . . . . . . . . . . . . . . . . . . . . . . . . . . . . . . . . . . . . . . . . . . . . 20 Site Preparation Hardscape Installation Plant Selection Soils and Softscape Installation
Nursery Selection Plant Installation Specifications
Maintenance and Aftercare REFERENCES . . . . . . . . . . . . . . . . . . . . . . . . . . . . . . . . . . . . . . . . . . . . . . . . . . . . . . . . . . . 28 APPENDICES Estimated Budget
Construction Timeline Construction Drawings
Soil Report Additional Resources
3
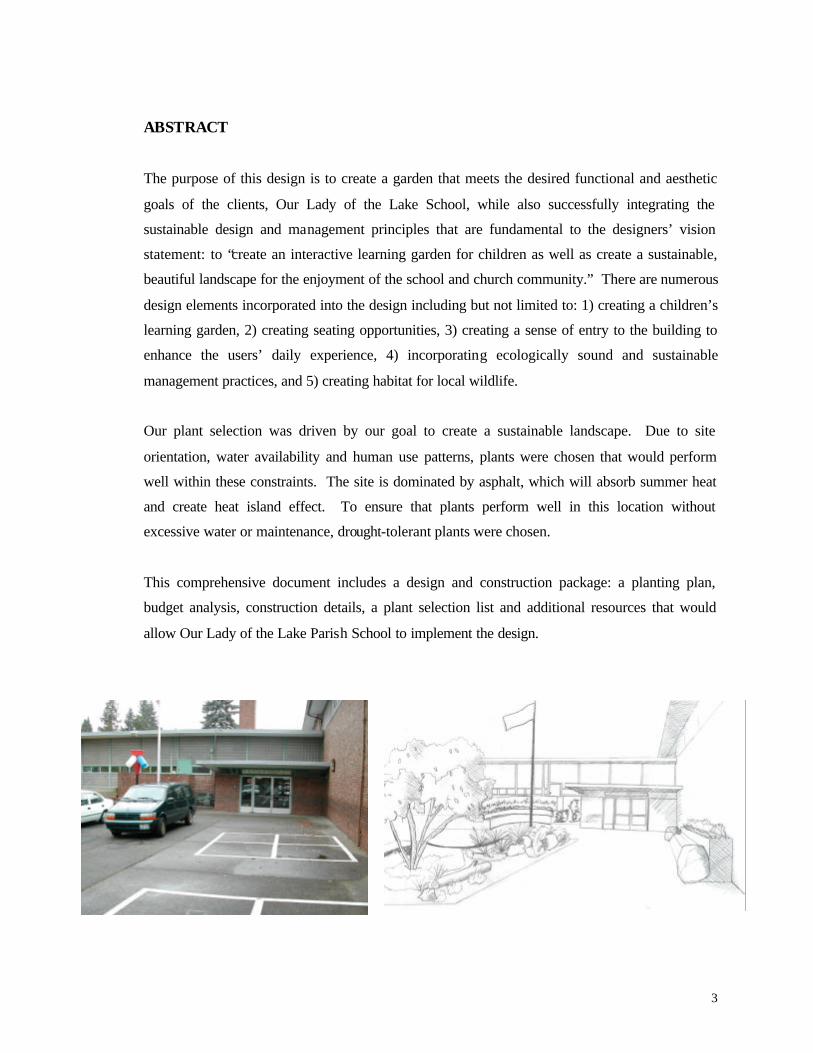
ABSTRACT
The purpose of this design is to create a garden that meets the desired functional and aesthetic
goals of the clients, Our Lady of the Lake School, while also successfully integrating the
sustainable design and management principles that are fundamental to the designers’ vision
statement: to “create an interactive learning garden for children as well as create a sustainable,
beautiful landscape for the enjoyment of the school and church community.” There are numerous
design elements incorporated into the design including but not limited to: 1) creating a children’s
learning garden, 2) creating seating opportunities, 3) creating a sense of entry to the building to
enhance the users’ daily experience, 4) incorporating ecologically sound and sustainable
management practices, and 5) creating habitat for local wildlife.
Our plant selection was driven by our goal to create a sustainable landscape. Due to site
orientation, water availability and human use patterns, plants were chosen that would perform
well within these constraints. The site is dominated by asphalt, which will absorb summer heat
and create heat island effect. To ensure that plants perform well in this location without
excessive water or maintenance, drought-tolerant plants were chosen.
This comprehensive document includes a design and construction package: a planting plan,
budget analysis, construction details, a plant selection list and additional resources that would
allow Our Lady of the Lake Parish School to implement the design.
4
INTRODUCTION
Through the Sustainable Community Landscapes program, the Our Lady of the Lake School and
Parish represented by faculty member Nancy Hanson was partnered with a group of students from
the EHUF 480 course “Selection and Management of Landscape Plants” taught by Dr. Linda
Chalker-Scott. The purpose of this partnership was to provide the school with a design and
installation plan for a new school garden, while providing the University students with an
opportunity to work with a real client. The design team members Julie Combs, Naoko Ichii,
Brice Maryman, Jennifer Szabo and Rachael Watland created this document as a comprehensive
summary of the their work during the course of the Fall 2002 quarter. It is intended to be a
workable plan for the clients at the Our Lady of the Lake School, as well as being used as part of
the project archive of the Center for Urban Horticulture at the University.
VISION STATEMENT
Our goal is to create an interactive learning garden for children as well as create a sustainable,
beautiful landscape for the enjoyment of the school and church community.
PROJECT HISTORY
The Our Lady of the Lake School and Parish
The Our Lady of the Lake parish has been worshiping together since 1929. The group purchased
the current property for the construction of a church in the 1940s. Shortly after this time, a group
of parishioners came together to create a school, and in 1949, the school building was completed
and opened to students. Soon a ballooning student population necessitated a larger facility, so the
school built an addition in 1955. Likewise, an expanded congregation built a new church in
1965. The property has remained largely unchanged since that time (Our Lady of the Lake Case
Statement, 1995)
Currently the school has 204 students in grades Kindergarden-8th grade. The school’s curriculum
includes environmental education as well as other hands-on science topics. The teachers would
like to enhance their curriculum by using the school grounds. The proposed plans would provide
flexible areas that classes could use to learn about topics such as the lifecycle of a plant, wildlife
5
habitat, and much more.
The Sustainable Community Landscapes (SCL) Program
The Sustainable Community Landscapes (SCL) program is a regional consortium based at the
Center for Urban Horticulture at the University of Washington. It serves to integrate regional
efforts to create, rehabilitate, and manage landscapes in human-altered or urban areas. They have
participants from K-12 and higher education, non-profit organizations, governmental agencies,
industry, and the community. Through the application of plant and soil sciences, they hope to
increase the percentage of sustainable landscapes in the Puget Sound region. Their educational
programs and outreach activities focus on increasing awareness of sustainable management
techniques, thereby reducing harmful practices that damage plants and ecosystems (SCL Website,
2002).
EHUF 480 Course
EHUF 480: Selection and Management of Landscape Plants is a five-credit class offered every
fall quarter. In this class, students are taught the basics of sustainable plant management and
selection, including theories, myths, and techniques. Early in the quarter, the students are
assigned to teams of 5-10 students to work on a site analysis, design scheme, and management
plan; clients are encouraged to work closely with students throughout the project. The students
work with community members to learn the site's history and analyze the soils, hydrology, plant
materials, uses, and other conditions that will influence site plans and plant success. Once the site
has been analyzed, students craft a design scheme, explaining what plants they recommend
installing, how they would deal with existing problems, etc. The students also create a detailed
five-year management plan explaining how to implement and care for the suggested design and
plantings. At the end of the quarter, community clients receive a book containing site analysis,
design ideas, and the management plan. This plan can then be implemented by the community
group, with or without help from students in EHUF 481 or 482 (SCL Website, 2002).
6
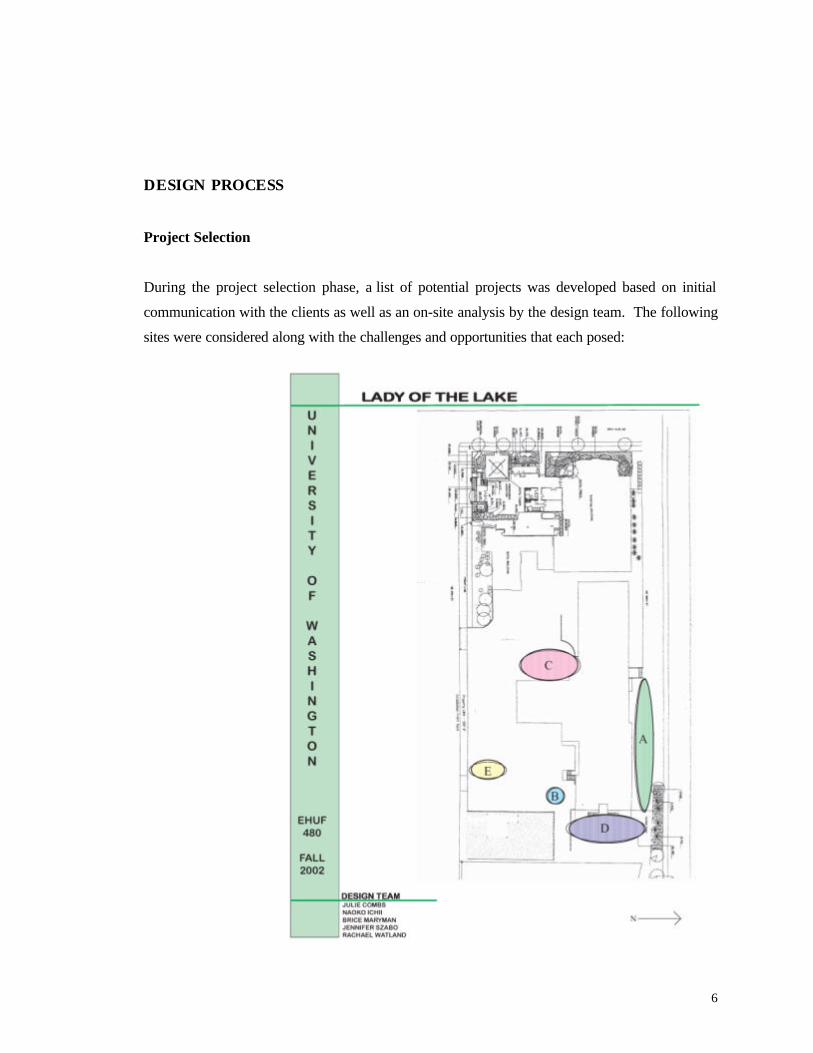
DESIGN PROCESS
Project Selection
During the project selection phase, a list of potential projects was developed based on initial
communication with the clients as well as an on-site analysis by the design team. The following
sites were considered along with the challenges and opportunities that each posed:
7
North Entrance
§ Everyday administrative entrance
§ In need of beautification
§ Public amenity
§ High visibility from street
§ façade change, not interactive
§ Soil health concerns
Cedar Tree in Planting Box
§ Centrally located
§ Highly compacted
§ Close to building
§ Health of tree is threatened
§ Kids seem attached to tree
§ Results would be difficult to predict because of feasibility
§ Opportunities to free up traffic patterns
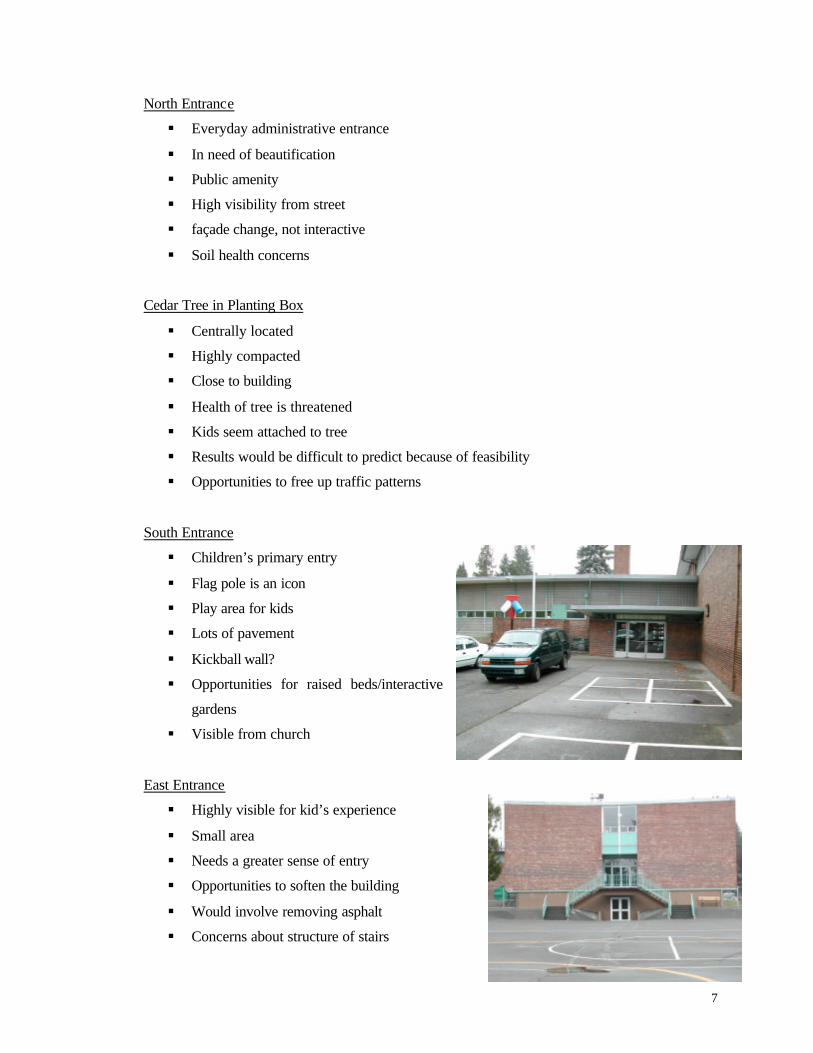
South Entrance
§ Children’s primary entry
§ Flag pole is an icon
§ Play area for kids
§ Lots of pavement
§ Kickball wall?
§ Opportunities for raised beds/interactive
gardens
§ Visible from church
East Entrance
§ Highly visible for kid’s experience
§ Small area
§ Needs a greater sense of entry
§ Opportunities to soften the building
§ Would involve removing asphalt
§ Concerns about structure of stairs

8
§ May remove kid’s biking area
Blue Spruce
§ Tearing up asphalt
§ Pressing need
§ Soil compaction affects tree health
§ Tree might require relocation
§ Less connection to the building
The design team presented these site options at an open meeting for interested members of the
School and Parish. Through this meeting, it was decided that the design team should focus its
attention on the South Entrance to the school, which represented the most fulfilling compromise
between the program and aesthetic desires for the children, faculty, parishioners and visitors. In
addition to site selection, this meeting provided further project definition that was then developed
into the design program.
Design Program
Based on the communications between the design team and the school liaison, as well as with
members of both the church and school communities, a design program was developed. The
following is a list of those key elements:
§ Potential for garden space to be used as part of curriculum or create learning
opportunities through interpretive signage
§ Seating
§ Sense of entry to the building to enhance children’s/teacher’s daily experience as
well as announcing the entry to visitors
§ Shaded/covered areas
§ Garden space that is interactive: providing children with an engaging sensory
experience
§ Preserve existing patterns of play (kickball area)
§ Gathering space around flagpole which references ceremonial uses (St. Francis)
§ Incorporation of children’s artwork
9
§ Creation of habitat for local wildlife
§ Incorporation of ecologically sound/sustainable management practices
§ Sign stating involvement of University of Washington
This design program provided the functional
parameters on which to build the aesthetics of the
final plan.
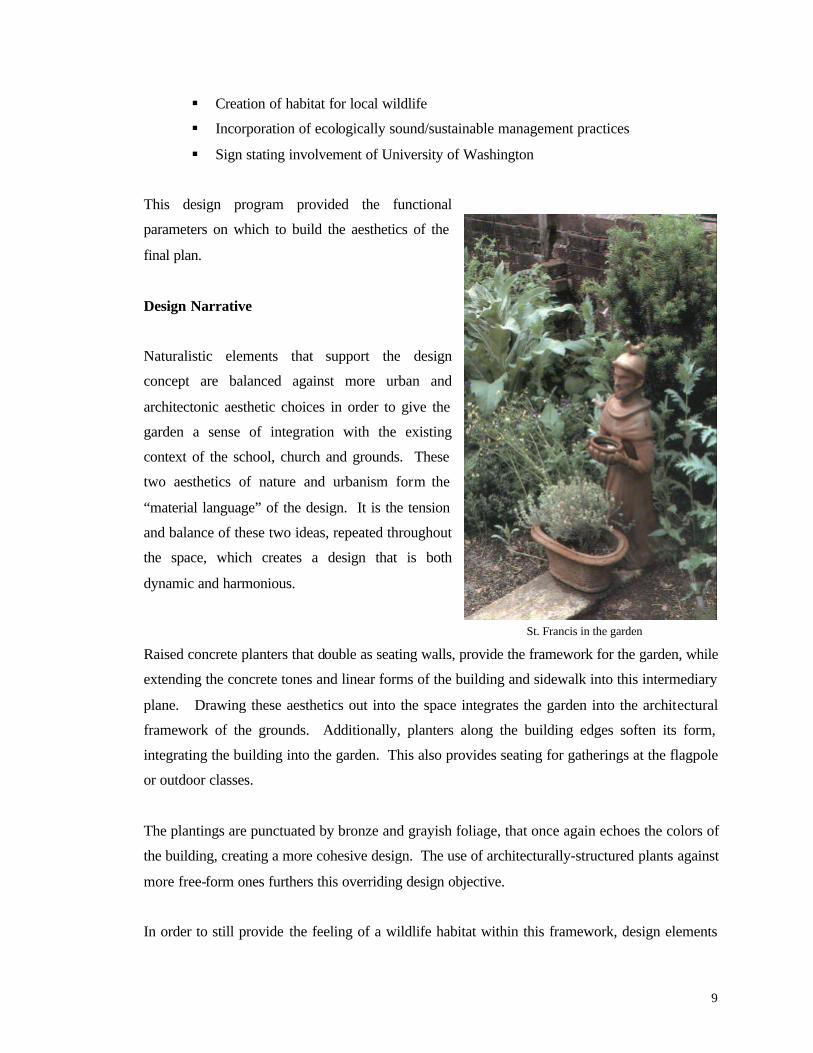
Design Narrative
Naturalistic elements that support the design
concept are balanced against more urban and
architectonic aesthetic choices in order to give the
garden a sense of integration with the existing
context of the school, church and grounds. These
two aesthetics of nature and urbanism form the
“material language” of the design. It is the tension
and balance of these two ideas, repeated throughout
the space, which creates a design that is both
dynamic and harmonious.
St. Francis in the garden
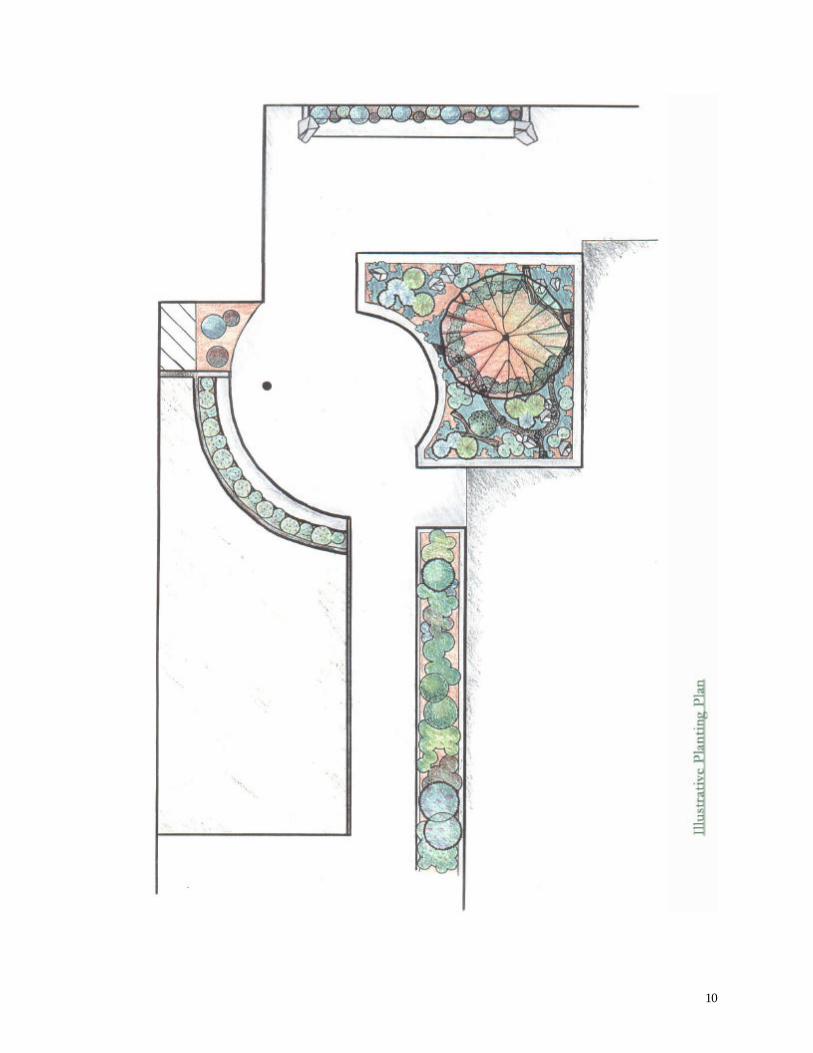
Raised concrete planters that double as seating walls, provide the framework for the garden, while
extending the concrete tones and linear forms of the building and sidewalk into this intermediary
plane. Drawing these aesthetics out into the space integrates the garden into the architectural
framework of the grounds. Additionally, planters along the building edges soften its form,
integrating the building into the garden. This also provides seating for gatherings at the flagpole
or outdoor classes.
The plantings are punctuated by bronze and grayish foliage, that once again echoes the colors of
the building, creating a more cohesive design. The use of architecturally-structured plants against
more free-form ones furthers this overriding design objective.
In order to still provide the feeling of a wildlife habitat within this framework, design elements
10
11
such as small boulders, driftwood and trails through planting beds are added. These elements
also create new opportunities for imaginative play. This playfulness is reinterpreted through the
incorporation of animal tracks in the concrete of the ground plane and stepping stones. Finally, a
statue of St. Francis acts as the cornerstone element, honoring both the function of the site as a
school and church as well as evoking the concept of wildlife habitat and nature.
All of these elements combine to create the balance and harmony between the two seemingly
competitive aesthetics of the natural and the urbane.
OUR LADY OF THE LAKE SITE ANALYSIS
Contextual Analysis
The Our Lady of the Lake property is located along 35th Avenue NE in the Meadowbrook
neighborhood of Seattle. Though 35th Avenue is an urban arterial with heavy vehicular usage,
the predominant land use that surrounds the school property is detached single family homes.
Most of these houses date from the post-WWII building boom. As a result, the neighborhood has
an established feel to it, creating a sense of stability and safety.
The Our Lady of the Lake site rests within the boundaries of the Thornton Creek watershed. This
water system is an important urban, salmon-bearing creek within Seattle. Community activist’s
like the Thornton Creek Alliance (TCA) and the Thornton Creek Project (TCP) have taken great
strides toward improving its water quality in recent years. Our Lady of the Lake sits like a
fortress guarding a ridge of land. The building defines the site’s sub-basins. The southern side of
the school slopes toward 89th Street NE while the northern side slopes toward 90th Street NE.
Since the school building sits closer toward 90th Street, more water runs off of the site toward 89th
Street NE.
Light and Seasonal Analysis
General Climate
The general mesoclimate conditions of the Seattle area accommodate a diverse array of plant
types. According to Sunset’s New Western Garden Book , Seattle is classified as zone 5 in the
USDA’s Plant Hardiness zone system. The Seattle area experiences relatively warm winters due
12
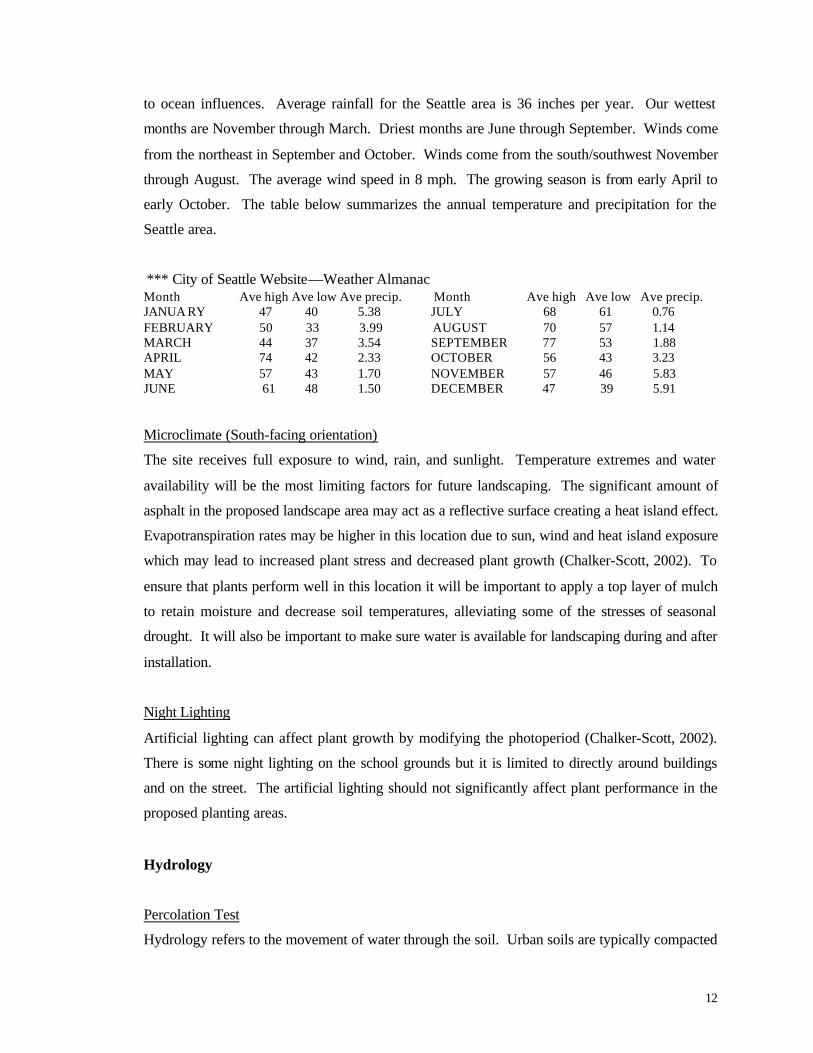
to ocean influences. Average rainfall for the Seattle area is 36 inches per year. Our wettest
months are November through March. Driest months are June through September. Winds come
from the northeast in September and October. Winds come from the south/southwest November
through August. The average wind speed in 8 mph. The growing season is from early April to
early October. The table below summarizes the annual temperature and precipitation for the
Seattle area.
*** City of Seattle Website—Weather Almanac Month Ave high Ave low Ave precip. Month Ave high Ave low Ave precip. JANUA RY 47 40 5.38 JULY 68 61 0.76 FEBRUARY 50 33 3.99 AUGUST 70 57 1.14 MARCH 44 37 3.54 SEPTEMBER 77 53 1.88 APRIL 74 42 2.33 OCTOBER 56 43 3.23 MAY 57 43 1.70 NOVEMBER 57 46 5.83 JUNE 61 48 1.50 DECEMBER 47 39 5.91 Microclimate (South-facing orientation)
The site receives full exposure to wind, rain, and sunlight. Temperature extremes and water
availability will be the most limiting factors for future landscaping. The significant amount of
asphalt in the proposed landscape area may act as a reflective surface creating a heat island effect.
Evapotranspiration rates may be higher in this location due to sun, wind and heat island exposure
which may lead to increased plant stress and decreased plant growth (Chalker-Scott, 2002). To
ensure that plants perform well in this location it will be important to apply a top layer of mulch
to retain moisture and decrease soil temperatures, alleviating some of the stresses of seasonal
drought. It will also be important to make sure water is available for landscaping during and after
installation.
Night Lighting
Artificial lighting can affect plant growth by modifying the photoperiod (Chalker-Scott, 2002).
There is some night lighting on the school grounds but it is limited to directly around buildings
and on the street. The artificial lighting should not significantly affect plant performance in the
proposed planting areas.
Hydrology
Percolation Test
Hydrology refers to the movement of water through the soil. Urban soils are typically compacted

13
resulting in poor drainage (Harris et al, 1999). A percolation test was preformed on the north side
of the site to determine the rate at which water moves through the soil. The soil type (see Soil
Analysis section) and condition (compaction issues) on the north side are comparable to what
might be found on the south side.
A hole was dug approximately 10 inches deep (500ml) into the soil in which 500 ml of water was
poured. It took the water approximately 50 minutes to drain indicating that the soil has very poor
drainage. In the future, if plants are installed in this area the soil should be broken up to
encourage better drainage. The results below show a very slow percolation rate indicating that
the soil is poorly drained and should be properly aerated before landscape installation begins.
Table 1. Percolation Test Results (10/18/02) Location: North side of school Initial Volume: 500 ml
Time to Drain 50 minutes to 1 hour
Soil Analysis
Sampling
Two soil samples were collected at Our Lady of the Lake School on October 18, 2002. Soil at
Site 1 was collected in the front yard near the north entrance of the school. Another soil sample
collected on at Site 2, under the cedar tree in the planting box.
Field Observation and Soil Texture
SITE 1: There was only turf grass growing but much of the grass was worn away in this area. The
soil was highly compacted since foot traffic was heavy going to and from the playgrounds in the
back of the school. A soil core revealed a lack of any discernable soil horizon. There was a layer
of very hard concrete at a depth of approximately 15 mm, which was very difficult to penetrate
through. There was a high volume of gravel and cobbles in the soil sample. The soil was a
uniform light brown in color and the texture was of a sandy loam variety.
SITE 2: The soil was much more compacted at this site than Site 1. The soil was so hard that it
was only possible to dig down 4 inches. The soil texture was a sandy loam, same as Site 1 except
there was a much higher volume of cobble and gravel stones in the sample. The color was
14
uniform and a slightly lighter brown than at Site 1.
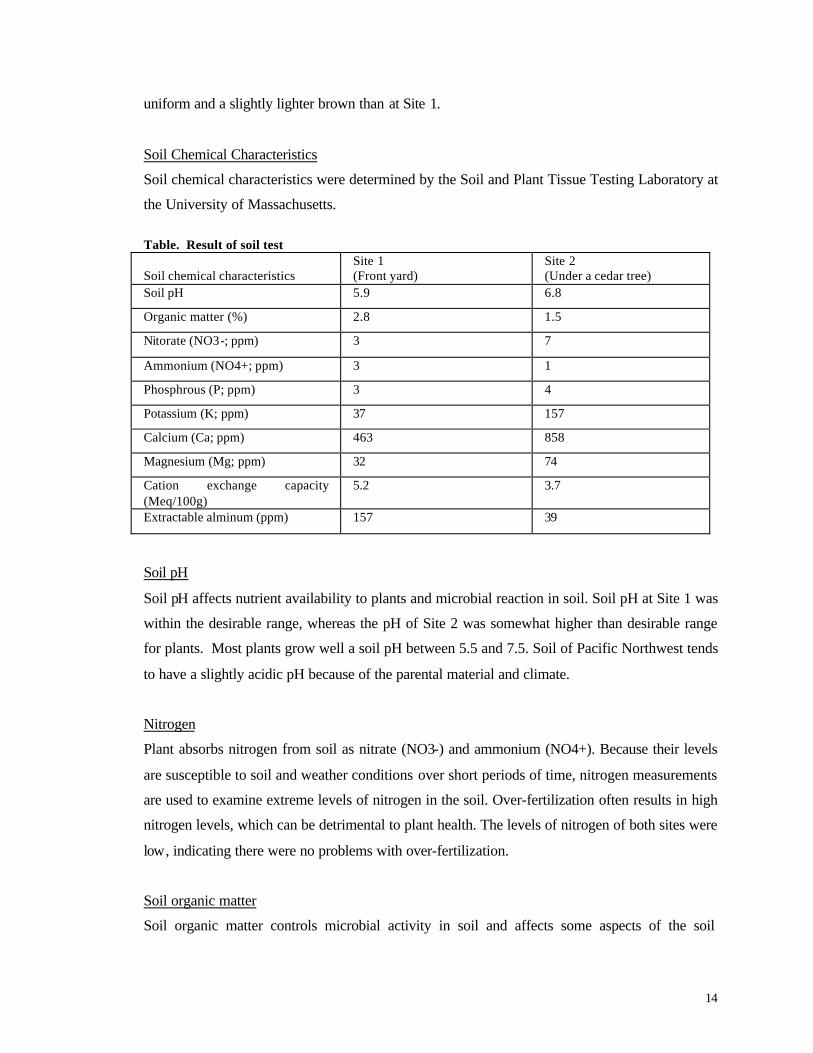
Soil Chemical Characteristics
Soil chemical characteristics were determined by the Soil and Plant Tissue Testing Laboratory at
the University of Massachusetts.
Table. Result of soil test Soil chemical characteristics
Site 1 (Front yard)
Site 2 (Under a cedar tree)
Soil pH 5.9 6.8
Organic matter (%) 2.8 1.5
Nitorate (NO3-; ppm) 3 7
Ammonium (NO4+; ppm) 3 1
Phosphrous (P; ppm) 3 4
Potassium (K; ppm) 37 157
Calcium (Ca; ppm) 463 858
Magnesium (Mg; ppm) 32 74
Cation exchange capacity (Meq/100g)
5.2 3.7
Extractable alminum (ppm) 157 39
Soil pH
Soil pH affects nutrient availability to plants and microbial reaction in soil. Soil pH at Site 1 was
within the desirable range, whereas the pH of Site 2 was somewhat higher than desirable range
for plants. Most plants grow well a soil pH between 5.5 and 7.5. Soil of Pacific Northwest tends
to have a slightly acidic pH because of the parental material and climate.
Nitrogen
Plant absorbs nitrogen from soil as nitrate (NO3-) and ammonium (NO4+). Because their levels
are susceptible to soil and weather conditions over short periods of time, nitrogen measurements
are used to examine extreme levels of nitrogen in the soil. Over-fertilization often results in high
nitrogen levels, which can be detrimental to plant health. The levels of nitrogen of both sites were
low, indicating there were no problems with over-fertilization.
Soil organic matter
Soil organic matter controls microbial activity in soil and affects some aspects of the soil
15
structure. Organic matter at both sites was much lower than desired range (4% to 10%). Low
organic matter was likely caused by soil compaction and the lack of significant vegetation at both
sites. Because the soil at Site 2 was highly compacted, decomposing leaves from the cedar tree
were not able to enter the soil and increase the organic content. On the other hand, turf grass roots
at Site 1contributed some organic matter to the soil.
Phosphorous
Phosphorous levels in both sites were relatively low. A deficiency of phosphorous can lead to
impaired vegetation growth and weak root systems. However, no phosphorus should be added to
these sites because high level of phosphorous leads not only to water pollution but also to nutrient
deficiency such as iron and manganese.
Potassium
Plants take up large amounts of potassium during the growing season. Potassium deficiencies
cause marginal and interve inal chlorosis and scorching. While the potassium level at Site 2 was
high enough, that of Site 1 was low. Potassium deficiency is related to soil pH, soil texture, soil
organic matter, and cation exchange capacity.
Cation exchange capacity
Cation exchange capacity (CEC) indicates the soil’s ability to hold and supply nutrients to plants.
CEC is affected by soil texture, organic matter levels, and soil pH. CEC levels were low at both
sites mainly because of low organic matter.
Lead
Soil lead levels are important for playground safety because soil contamination by lead becomes a
health risk. Although lead level of the Site 1 was higher than that of the Site 2, both were within
acceptable ranges.
SOUTH ENTRANCE SITE ANALYSIS
Water
The site does not receive supplemental water beyond natural precipitation. There is a hose bib
along the west side of the gymnasium façade, but this is no longer functioning. There was talk
16
about having this outle t repaired. We would recommend its’ installation in order to facilitate
garden maintenance.
The lack of additional water led us to investigate some type of rainwater harvesting/collection
system, but when we found out the school roof was made of tar and other petroleum based
products, we decided that this would not be the proper place for that type of system, especially
since children might end up eating the fruits and berries in the area.
Water issues lead to some specific plant issues as well. Due to the high thermal and solar gain on
this side of the building, drought tolerant plants seemed to be the most appropriate types of plants
by far. These plants would also benefit the larger urban watershed, since they draw less heavily
on those resources. (See http://www.cityofseattle.net/util/RESCONS/plantNaturally/ or
http://www.ci.seattle.wa.us/util/lawncare/rightplants/resources.htm for more information).
Use
The site is currently the outdoor multi-purpose area for the school. On weekdays, children run
and play on the asphalt and the “little toy.” During the weeknights, PTA meetings and
community groups fill the parking lot. On the Feast of St. Francis, a blessing of the animals is
held around the flagpole. During the weekends, cars pick up and drop-off parishioners near the
flag pole and school entrance before parking on the asphalt.
Pedestrian Traffic
Pedestrian traffic flows primarily into the building along the bisecting north-south axis of the
building. However the scurry of tiny feet pound the pavement across the entire site,
concentrating on the area near and around the little toy.
The Our Lady of the Lake Parish School site presents many challenges. The multiplicity of uses,
while allowing for many user groups to use the space, allows none of them to feel like they know
which space is truly theirs. School children at church on the weekend may find their favorite
patch of weekday play surface being guarded by a Ford Expedition. We believe that there are
other ways to more effectively delineate where one group of users’ space ends and where another
begins. In particular, we hope to provide some type of green space for the children that wrestled
some of the hard, paved surfaces away from the automobiles and gave it directly to the younger
age groups. This is particularly important since it has been proven that an interaction with nature
17
at an early age and creating “child-owned spaces” promotes early childhood development (Moore
& Long, 1997;Nabhan & Trimble, 1994).
The playground area that is being designed is a multi-functioning space with many constraints.
The largest constraint is the need for parking as regulated by city codes. There are also utility
areas that require vehicle access, such as the church dumpster. A new design must allow for this
dual purpose as well as continued access to these areas. The proposed design will create well-
defined areas of vegetation that will not conflict with necessary parking.
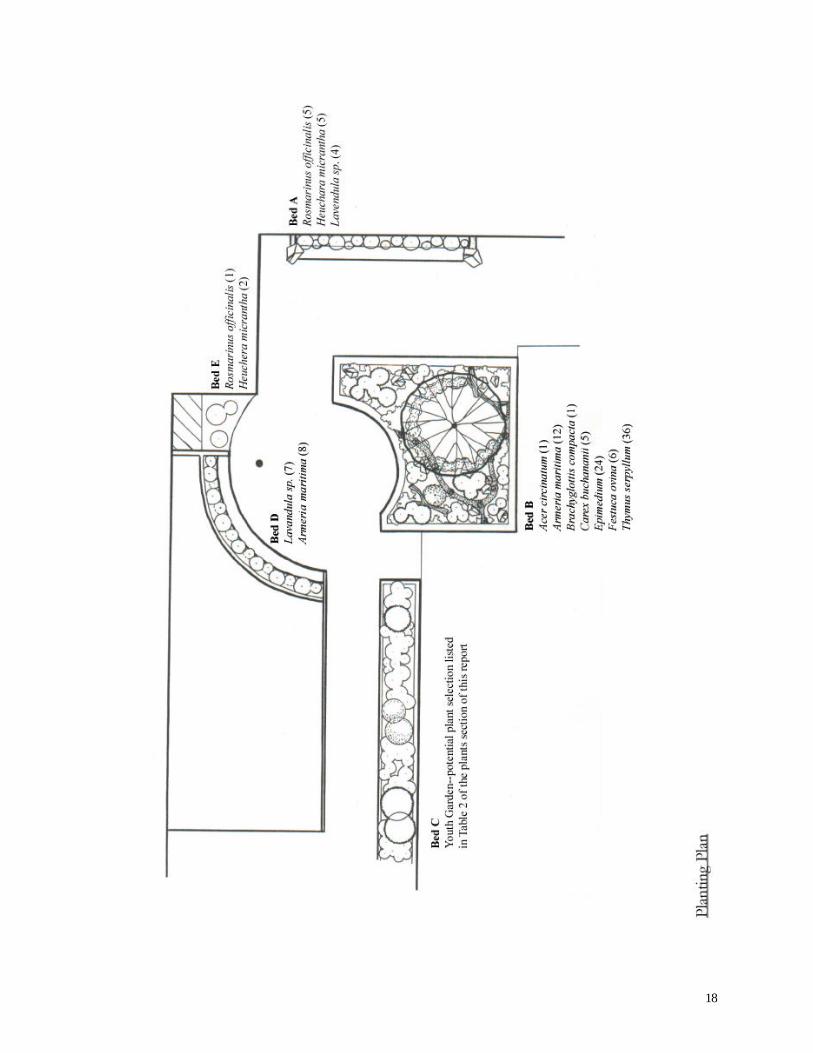
PLANT SELECTION
Sustainable Landscape
One of the key elements of sustainable community landscapes is installing plants that require a
low-maintenance regime. Therefore, we chose plants that would respond well to the existing site
conditions. Since the site has good exposure, plants were selected that can tolerate high light
levels. Most of the plants require low to moderate amounts of water, reducing the need for
irrigation even during dry summers. Groundcover—Thymus serpyllum—was used to protect the
soil by adding organic matter and conserving soil moisture. Two ornamental grasses—Festuca
and Carex.--were selected because they are drought-tolerant and low maintenance. Our choice for
a larger shrub, Rosmarinus officinalis also meets criteria of toughness and low maintenance.
Central Bed and Planter Boxes
Plants in the central bed and planter boxes areas were selected based on site conditions. The
south-facing orientation limits the planting palette to species that would perform well in
compacted soil, full sun and low to moderate water requirements. A limited selection of native
plants would perform well in the central bed; this justified our decision to use mostly non-native
ornamental plants in this area. We have selected plants--Armeria, Bracyglottis, Epimedium,
Heuchera, and Lavandula-–that will perform well for the site conditions (i.e. low to moderate
water requirements, full sun and low maintenance.
18
19
CHILDREN’S EDUCATIONAL GARDEN
Children’s Benefit
Engaging sensory experience
Plants that engage children’s senses have been chosen to encourage their interaction with nature.
Vine maple (Acer circinatum) was chosen because of autumn leaf color. The contrast between the
evergreen plants and the maple’s bright red foliage will impress and delight children, providing
them with a visual record of the changing seasons. The understory plants were chosen using a
cohesive color palette, while providing variety through an assortment of textural experiences.
Heuchera micrantha was chosen out of many cultivars and varieties because of its purple foliage.
Perennial plants such as Armeria martima and Epimedium were chosen because of showy and
colorful flower. Rosmarinus officinalis is ever-blooming shrub with colorful flowers.
Lavendula heterophylla and L. multifida will provide sweet scent. Carex buchananii was chosen
not only because of it ornamental value, but also because of its tactile softness.
Safety
Safety concerns were thoroughly considered. We avoided any plant that is poisonous, thorny, or
sharp was avoided. Due to concerns for the children’s safety—as well as maintenance concerns—
we avoided plants that produced fruits, berries or acorns; because of concerns that they would be
eaten or used as “ammunition.”
Creating learning opportunities
An educational garden was incorporated; this area will be used as an outdoor laboratory to study
various aspects of the natural world. This area is flexible and can be changed periodically as
curriculums or interest dictate. A native plant garden designed to attract hummingbirds is one
potential theme for the experimental garden. The objective of a hummingbird garden using
indigenous plants would be to increase children’s familiarity with the native plant of the Pacific
Northwest, to learn which hummingbirds use the Puget Sound region during their migratory
journeys, and to learn about plant and pollinator interaction.
Enhancing wildlife habitat
Enhancing wildlife habitat will give children sensory experiences and increase biodiversity at the
site. Some plants such as Rosmarinus officinals and Lavendula spp. attract hummingbirds and
20
butterflies. As an additional benefit, the proposed design will create positive impacts—by
reducing impervious surfaces and minimizing water usage—for the salmon in the Thornton Creek
system.
REGULATIONS AND ORDINANCES
One of the main constraints for the design of the selected area was the parking requirements of
the site. The site takes advantage of having the duel purpose of being a playground for school
children during the weekdays, and serving as a parking lot for the church during weekends and
evenings. Both the church and the school share the same requirements for the amounts of
necessary parking that are dictated by the City of Seattle Municipal Code, Section 23.54.015,
which requires “1 parking space for each 80 square feet of all auditoria and public assembly
rooms.” The playground supplements the additional need during the weekends when the church
building is in greater use.
Working from the site plan that was used to acquire the original city approval for sufficient
parking, we determined that additional parallel parking could be created along the fence on the
south end of the playground. These spaces would allow for the displaced parking spaces due to
the new design.
In addition to vehicular access, the design of a playground requires the examination of other
issues. The playground should meet standards set out by the Americans with Disabilities Act.
These regulations involve sensitive design that creates spaces that are accessible to people of all
abilities. The design should address elements such as minimal slope requirements, path widths
and equal experiences. These standards can be found on the website www.ada.gov.
CONSTRUCTION
Site Preparation
The first step in preparing the site for landscape installation is the removal of unnecessary asphalt
and concrete in areas that will become the central planting beds. With a paving saw and
jackhammer, this task should take a few volunteers one day to complete.
21
Hardscape Installation
While this portion of the site proposal requires more skilled labor, a few handy parents or
parishioners can likely tackle this project during a long weekend. For the central bed, concrete
formwork should be constructed and the seating curbs poured. The more difficult construction
will happen on the benches. Again, formwork will need to be constructed, but will include
curves, cut-outs for stone placement and other advanced construction techniques. Once the forms
are in place, the concrete should be poured and allowed to cure.
These hardscape installations should be built according to the drawings in the appendices.
Please note that we have designed a recessed area to install tiles on the long bench against the
current gym wall. We envision these tiles as pieces that the schoolchildren would design and
paint, so that the benches could show off all of the amazing activities of the school. In addition,
by participating in the construction of this new area, the children would have some connection to
it.
Soil and Softscape Installation
The final stage of the construction will involve importing and grading the soil and installing the
plant materials. After removing aspha lt, use a pickaxe to loosen up the first 6 inches of soil.
Breaking up the soil will improve drainage (Chalker-Scott, 2002). After soil has been properly
aerated backfill and thoroughly mix in 4-6 inches of unammended soil. If unammend soil is not
available, then use a 3 and 1 mix. If 3 and 1 mix is used backfill up to 8 inches because it will
subside as it decomposes. All other planters and beds should be filled with the same unammended
soil.
For the educational garden, dig asphalt up and scarify the surface except where the bed dies to
grade. Where the bed dies to grade loosen up soil approximately 4-5 inches with pickaxe and mix
in unammended soil. Fill bed with unammended soil just below the curb of the planter box. If
unammend soil is not available, then use a 3 and 1 mix. But again, more soil will be needed
because it will decompose and subside.
22
Nursery Selection
We recommend purchasing plants from City People’s Nursery, Swanson’s Nursery or Sky
Nursery. Unfortunately, native plant selections for the children’s educational garden may be
limited at these places.
For native plant selection please see King County’s web site on native plant sources for the
Pacific Northwest (http://dnr.metrokc.gov/wlr/pi/npnursry.htm). There is also a generous supply
of native seeds online. It may be a great biology project for the kids to germinate the seeds, grow
them in milk cartons and plant them in the educational garden.
No matter where the product is purchased, it is important to choose healthy specimens to ensure
that plants will perform well. Nurseries will not always have high-quality material, but we
suggests taking the time to find acceptable material because high quality plants will perform
better and live longer in the landscape. Plants that perform well will reduce maintenance and
replacement costs, saving money in the long run. The following are some general guidelines for
selecting containerized plants (Chalker-Scott, 2002).
§ Make sure plant shows general vigor, i.e. healthy leaves (no damage), no twig die back
on stems and overall healthy appearance.
§ Plants should be “can-full” meaning that they are firmly in the pot. Plants that wobble or
are movable should be avoided because they may have root problems.
§ The size of the plant should be proportional to the size of the container. For example, if
you choose plants that are very tall in a small container, the relatively small root system
may be insufficient to support the crown growth.
§ Do not choose plants if roots are growing out of the bottom of the container. This
indicates that the plant is root-bound and may have circling or girdling roots that may
cause the plant to perform poorly and die shortly after installation.
§ Do not choose plants that have been poorly pruned (i.e. heading or topping). This may
lead to an undesirable and unstable growth habit later on.
For choosing the vine maple (Acer circinatum) keep in mind the above suggestions as well as:
23
§ Choose plants with good trunk taper. Inspect root crown of B&B (balled and burlapped)
trees to avoid damaged or rotted trunks. If you are unable to see the root crown, peal
back the burlap and check for rot. The B&B should not cover the lower trunk.
§ Avoid trees with “knees”1. This indicates possible circling or girdling roots which will
lead to tree death or poor performance.
§ Make sure the plant looks uniform in size and shape.
§ Make sure the root ball is intact and not dried out.
§ Make sure it is the appropriate size for the species.
Plant Installation Specifications
These are general plant installation specifications for containerized woody perennials. Fall is
generally the best time to install plants because they usually outperform those planted in winter or
late spring. Winter may be too cold for certain species to establish and summer and spring would
require more water and aftercare (Harris et al. 1999). It is important to care for material prior to
planting so they can perform their best when placed in the ground. Plants on site should be
protected from excessive light and heat so they do not desiccate. Keep the roots cool and moist.
Planting Hole Preparation
1 With a shovel or spade dig a shallow-wide hole no deeper than root mass but at least
twice as wide so backfill can be worked in easily around plant (Harris et al. 1999).
2 Remove all debris from planting hole (i.e. gravel, rocks, roots, plastic…).
3 The sides should be scarified with a shovel or spade so roots can penetrate beyond
the backfill/native soil interface. Do not loosen or disturb soil at the bottom of hole
because it could cause the plant to subside (Chalker-Scott 2002).
4 Create a mound in the middle of planting hole. The mound should be able to support
the size and structure of the root crown.
5 Do not add soil amendments into the hole (i.e. compost, mulch, or fertilizers).
Preparing Roots
1 Remove all foreign material from plant and root mass (plastic tags, wire, burlap…).
2 Potting material must be removed (try to examine roots before you buy them to make
1 Tree knees refer to roots that have come out of the soil and then submerged back into the soil, exposing a portion of the root near the trunk. The presence of knees often indicates kinked or circling roots, which can

24
sure they are not root bound otherwise removing potting material will be labor
intensive). Removal of soil medium is important because differences in soil texture
may inhibit plant establishment.
3 Examine roots and prune out any circling, kinking, girdling, damaged, diseased or
excessively long roots.
Placing Plant in Hole
1 Drape or spread the plant’s roots radially and evenly over the mound.
2 Orient the healthiest portion toward where it will be most visible (i.e. if next to a
building orient weaker side facing the building).
3 Root crown should be level with or above grade.
4 Only backfill with unamended native soil. Backfilling with mulch or potting soil will
decompose overtime and cause subsidence. It will also prevent root expansion
because roots will tend to stay within the original growth medium (Chalker-Scott
2002).
5 Use fingers to work in soil, using a shovel or spade could compact or damage roots.
6 Water to settle plant and eliminate any air pockets in the soil.
7 Add more unamended backfill if necessary and water again.
Immediate Aftercare
1 A top layer of organic mulch should be applied on the top of the root zone area.
Make sure you leave 1-2 inches mulch-free around the trunk. Woodchips are best to
use for woody perennials (Chalker-Scott 2002).
2 If a plant needs to be staked for support, stake low and loose (the bottom 1/3 of
plant). Stakes should be removed after one growing season (Chalker-Scott 2002).
3 Build a small berm around the edge of the planting hole to contain water for the
plant.
4 Prune any dead or diseased branches from vegetative portion of plant. Be careful not
to top prune or prune any live portions unless there is damage otherwise plant
performance may suffer.
5 Water plant thoroughly and maintain watering regime while the new transplant
establishes: typically one to two growing seasons (Chalker-Scott 2002).
shorten plant longevity.
25
(Note: Please see the Sustainable Community Landscapes webpage for visual images of these
plant installation techniques [http://www.cfr.washington.edu/research.mulch/]).
Maintenance and Aftercare
General maintenance for each garden
Because landscape plants for Our Lady Lake of School were selected for their attributes of low
maintenance and adaptability for existing site conditions, they will require only minimal care.
The educational garden may require a little more care depending on what theme is chosen such as
regular watering.
Watering
Since the landscape plants were selected with minimal or moderate irrigation needs, only
occasional watering is needed after the plants are successfully established. See the chart of
selected plant lists for watering guideline for each specific plant. Initially, give enough water
every 4-7 days during the first growing season to establish a strong root system. Dry summers in
Seattle will be crucial for some perennial plants to survive at the educational garden. Regular
watering is recommended during this season.
Since water uptake and loss differ among plants and site conditions, it is important to carefully
check the soil conditions at each site before watering. The best time to water is in the morning
and anytime when plants are dry.
Mulching
Organic mulch should be applied to the sites. Woodchips are a desirable type of mulch because of
its affordability, availability, and appearance. Mulch will not only control weeds but will improve
soil structure and nutrient content by adding organic matter to the soil. Because the site is
surrounded by asphalt, temperature extremes and high evapotranspiration rates will be
problematic. Mulch will mitigate these obstacles by improving aeration of the soil and conserving
water. It is important to replenish mulch twice a year for maximum effectiveness. Woodchips will
not be applied to the youth garden since either perennials or annuals will be planted. Instead of
woodchips, other organic mulch would be applied to topsoil.
26
Weeding
Regular weed removal is recommended for two reasons. First, the landscape should be kept
attractive at all times. Second, weeds should be removed for plant health. Weeding is necessary
to reduce competition between perennials and weeds for limited nutrient and water resources. As
the shrubs and perennials become established, the need for intensive weeding will decrease
significantly.
Pruning
Because most selected plants are shrubs or perennials, they require little to no pruning. Pruning
influences vigor, flowering of the plant, maintains neat forms and controls the size of the plant.
However, it is important to prune plants in correct manner at the right time. Proper pruning for
each plant is described in the “General care for individual plants” section below.
Fertilizing
If mulch is properly and regularly applied, conventional fertilizers will not be needed. The mulch
will release enough nitrogen and other nutrients necessary for the plants. Compost may be used as
a fertilizer in the educational garden. However, all fertilizers should be thoroughly checked for
their suitability for use near children.
Replacing plants
Plants should be replaced immediately as needed. Suggestions for replacing each plant is
described in the “General care for individual plants” section below.
Plant inspection
Plants should be inspected periodically in terms of plant health. It is necessary to know the growing pattern
and morphology of the plant to detect health problems . Weather patterns and cultural practices are other
factors affecting plant health. If there are any problems with a plant, it is important to determine whether
they are caused by biotic (diseases, pests) or abiotic (cultural condition) reasons. There are many useful
web sites available, regarding Integrated Pest Management, such as Hort Sense provided by Washington
State University (http://pep.wsu.edu/hortsense/).
Keeping records
All maintenance activities that are performed throughout the year, including pest/disease
inspection, should be recorded. Keeping records will help to enhance plant health and improve
garden conditions, therefore encouraging sustainable landscapes.
27
General care for individual plants
Acer circinatum: Pruning should be done in summer or early fall to minimize sap bleed. Only
perform collar cuts. Avoid flush-cutting, stub-cuts and top pruning. During the first few years,
pruning is essential to train the young plant. Proper pruning should result with a central trunk and
strong branch structure.
Rosmarinus officinalis: Occasional pruning may be needed to remove older plants. If the plant
becomes woody, remove a few of the old branches so that the plant can fill in with new growth.
Armeria maritima: Water moderately during summer.
Epimedium perralchicum: Cut back in late winter before new growth begins.
Heuchera micrantha: Remove dead flowers to have a longer blooming period. May be divided in
spring every 3 or 4 years.
Lavandula spp.: Prune back or shear every year after blooming to keep the plant neat.
Potential plants for the educational garden
Aquilegia formosa: Cut back old stems for second crop of flowers. Every 3 or 4 years
replacement will be needed.
Aster foliaceus: Can be divided in late fall or early spring.
Camassia quamash: Give enough water to keep soil moisture during growing and blooming
period.
Campanula rotundifolia: Maintain adequate drainage around the plant. The plant can be
propagated by seeds.
Phlox subulata : Requires moderate watering in the summer. Cut back half of plant material after
blooming.
Silene acaulis: Water regularly.

28
REFERENCES
ADA Home Page. US Department of Justice. 2002. Online at www.ada.gov Brenzel, K.N., ed. Sunset Western Garden Book. Menlo Park, CA: Sunset Publishing
Corporation. 2001 Clark, David E. Sunset New Western Garden Book. California: Land Publishing Co. 1979. City of Seattle Weather Almanac . 2002. http://local.seattle.citysearch.com/weatheralmanac.html.
2002. Chalker-Scott, Linda. EHUF 480: Plant Selection and Management lecture notes. 2002. Cahill, Angela. Sustainable Community Landscapes: A regional consortium based at the
Center for Urban Horticulture. http://www.cfr.washington.edu/research.mulch/. 2002. Gary Paul Nabhan and Stephen Trimble. The Geography of Childhood: why children need wild
places. Boston, Mass. : Beacon Press, 1994. Greg Rabourn. Native Plant Sources for the Pacific Northwest.
http://dnr.metrokc.gov/wlr/pi/npnursry.htm . 2002 Harris, R., J. Clark, and N. Matheny. Arboriculture: Integrated Management of Landscape Trees,
Shrubs, and Vines, Third Edition. Prentice-Hall, Inc., Upper Saddle River, New Jersey. 1999. Kruckeberg, A. Native Plants of the Pacific Northwest. Seattle, Washington: University of
Washington Press. 1981. Robin C. Moore & Herb H. Wong. Natural learning : the life history of an environmental
schoolyard : creating environments for rediscovering nature's way of teaching. Berkeley, Calif.: MIG Communications, 1997.
University of Massachusetts. Results and Interpretations of Soil Tests. UMass Extension Service.
2002. Online at http://www.umass.edu/plsoils/soiltest/factsheets1.htm Washington State University. Hort Sense, Online at http://pep.wsu.edu/hortsense/. 2002.

APPENDIX A
Estimated Budget
29

CONSTRUCTION BUDGET Site Assessment Site Selection Site Analysis (traffic, light, vegetation, etc.) Soil Analysis
Collection of Samples Lab Analysis
Site Assessment Grand Total Actual Site Assessment Total
Design and Planning Design Process Drafting Production of Plans and Documents
Design/Planning Grand Total Actual Design/Planning Total
Site Preparation Remove Asphault
Rental of Jackhammer Rental of Concrete Saw
Clear Asphault Debris
Site Preparation Grand Total Actual Site Preparation Total (minus labor)
Install Hardscaping Build Seating Curb Formwork Pour Seating Curb Build Gym Bench Formwork Position Boulders Pour Gym Bench Build Flag Bench Formwork Pour Flag Bench Materials: Rental of Concrete Mixer Plywood for Formwork Concrete Accessory Materials Concrete Coloring
Hardscape Installation Grand Total Actual Hardscape Installation Total
# of Hours 3 3
.5 N/A
20 5 20
24
16 6 2 48 4 8 8 4
$34 4/bd. 75/yd n/a n/a
Rate/hr.
$35 $35
$35
$123
$35 $35 $35
$20 $68 $91 $20
$20 $20 $20 $20 $20 $20 $20
$34 $80
$150 $40 $40
Total $105 $105
$35
$123 $368 $0.00
$700 $175 $700
$1575 $0.00
$480 $68 $91
$320
$959 $159
$120 $40
$960 $80
$160 $160
$80 $1600
$34 $80
$150 $40 $40
$344
$1894 $394

Install Softscaping Pick axe and mix imported topsoil with gravel sub-base in
planting area Dump and Grade Imported Topsoil Place Boulders and Logs Install Plant Materials Install Mulch Materials Boulders Soil Woodchips Acer circinatum (B&B) Rosmarinus officinalis (1gal.) Armeria maritime (1gal.) Brachyglottis compacta (1gal.) Epimedium (1gal.) Carex buchananii (1gal.) Festuca ovina (1gal.) Huechera micrantha (1gal.) Lavendula sp. (1gal.) Thymus serphyllum (4”)
Softscape Installation Grand Total Actual Softscape Installation Total*
# of Hours
2
4 1.5
5 3
Unit Cost
$80 $500 $100
$40 $9
$15 $10 $15 $10 $10 $10
$9 $2
Rate/Hr.
$20
$20 $20 $20 $20
Quantity
4 1 1 1 6
20 1
24 5 6 7
11 36
Total
$40
$80 $30
$100 $60
$310
Total Cost $320 $500 $100
$40 $54
$300 $10
$360 $50 $60 $70 $99 $72
$2025
$2335 $2025

MAINTENANCE BUDGET First year after planting Watering: May-October (and as needed) .5 hours per week Plant Health Assessment Site visit once per month for .5 hour Reapplication of Mulch Labor Continuing Growing Season Maintenance Raking, weeding, trash removal; twice per month for .5 hour
Total Second year after planting Watering: May-October (and as needed) .5 hours per week Plant Health Assessment and Maintenance Site visit once per two months for .5 hour Professional consultation as needed Material for pest control – to be determined upon consultation Pruning Labor Reapplication of Mulch Labor Continuing Growing Season Maintenance Raking, weeding, trash removal; twice per month for .5 hour
Total Third year after planting Watering: May-October (and as needed) .5 hours per week Plant Health Assessment and Maintenance Site visit once during summer for .5 hour Professional consultation as needed Material for pest control – to be determined upon consultation Pruning Labor Continuing Growing Season Maintenance Raking, weeding, trash removal; twice per month for .5 hour
Total
12
6
1.5
12
12
3 1
1
1.5
12
12
.5
1.5
12
$20
$45
$20
$20
$20
$45 $45
$20
$20
$20
$20
$45
$20
$20
$240
$270
$30
$240
$780
$240
$135 $45
$20
$30
$240
$710
$240
$45
$30
$240
$555

Fourth year after planting Watering: May-October (and as needed) .5 hours per week Plant Health Assessment and Maintenance Site visit once during summer for .5 hour Professional consultation as needed Material for pest control – to be determined upon consultation Pruning Labor Continuing Growing Season Maintenance Raking, weeding, trash removal; twice per month for .5 hour
Total Fifth year after planting Watering: May-October (and as needed) .5 hours per week Plant Health Assessment and Maintenance Site visit once during summer for .5 hour Professional consultation as needed Material for pest control – to be determined upon consultation Pruning Labor Continuing Growing Season Maintenance Raking, weeding, trash removal; twice per month for .5 hour
Total
12
.5
1.5
12
12
.5
1.5
12
$20
$45
$20
$20
$20
$45
$20
$20
$240
$45
$30
$240
$555
$240
$45
$30
$240
$555

30
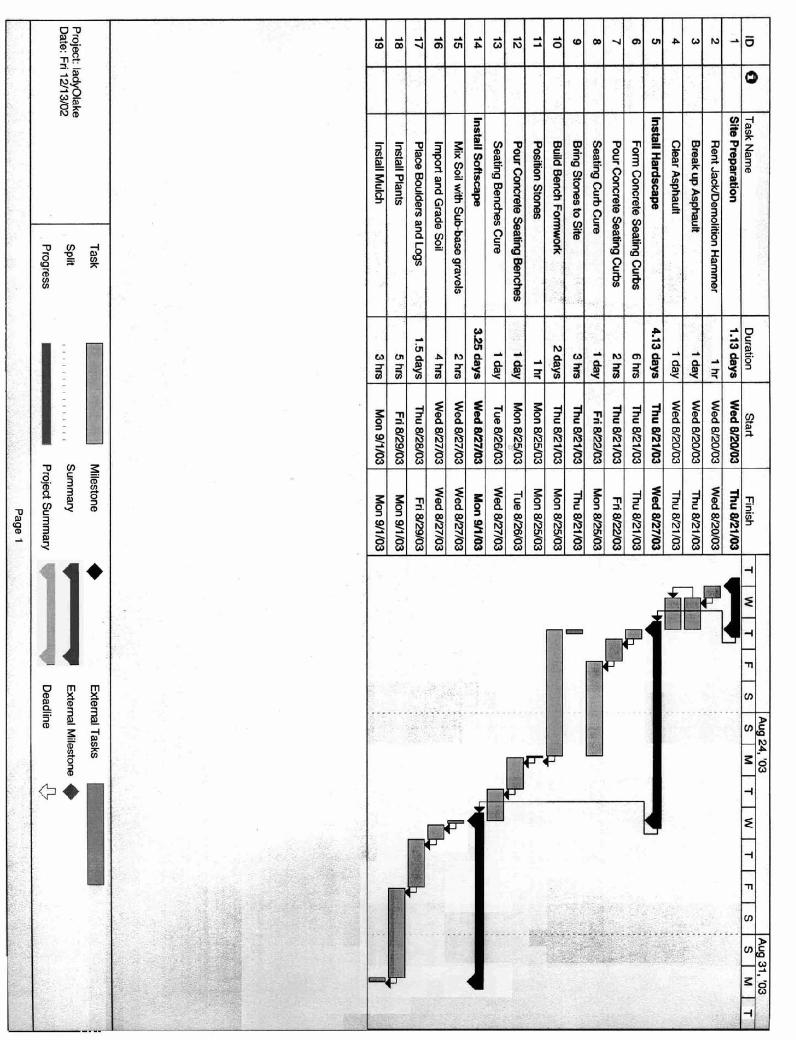
APPENDIX B Construction Timeline

31
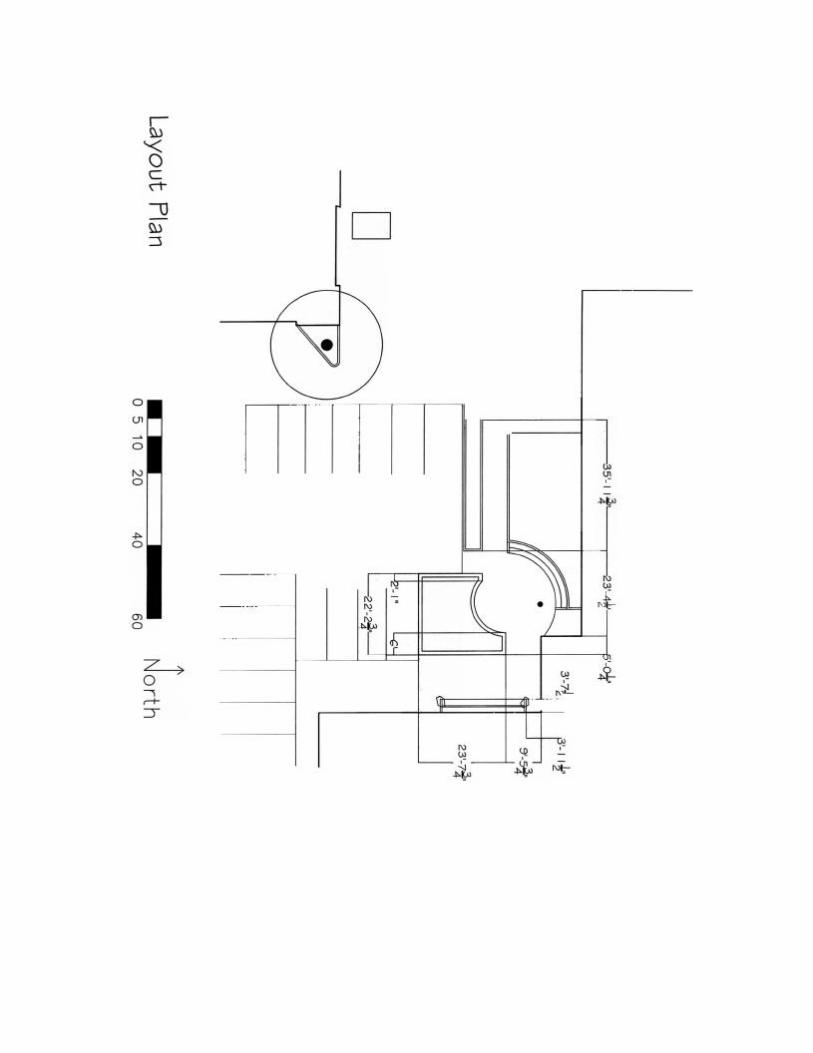
APPENDIX C Construction Drawings
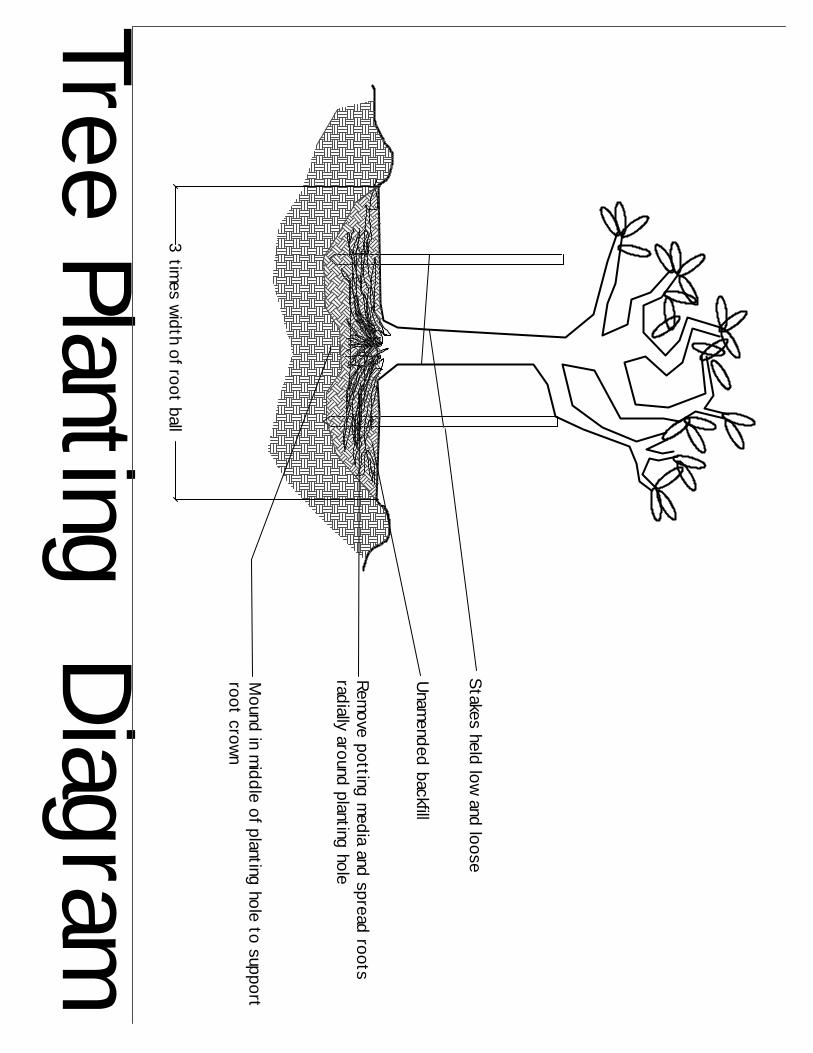
3 tim
es width of root ball
Stakes held low
and loose
Remove potting m
edia and spread roots radially around planting hole
Unam
ended backfill
Mound in m
iddle of planting hole to supportroot crow
n
Tree Planting Diagram
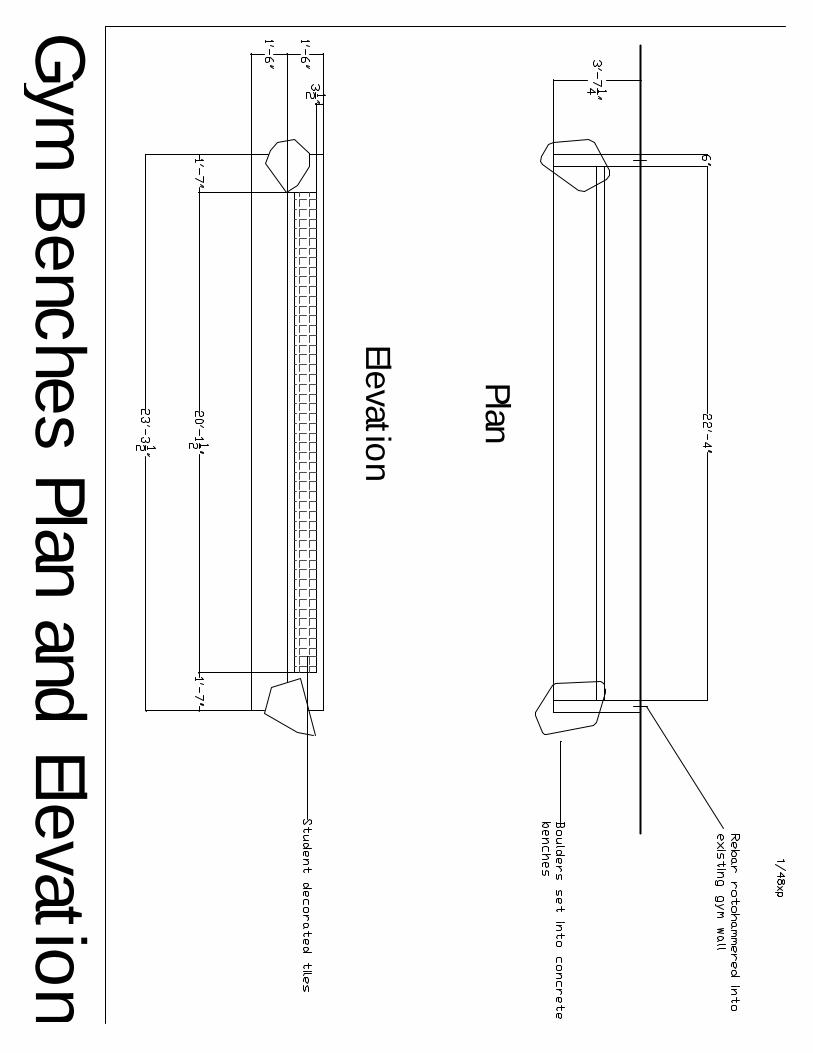
Gym
Benches Plan and Elevation
Plan
Elevation
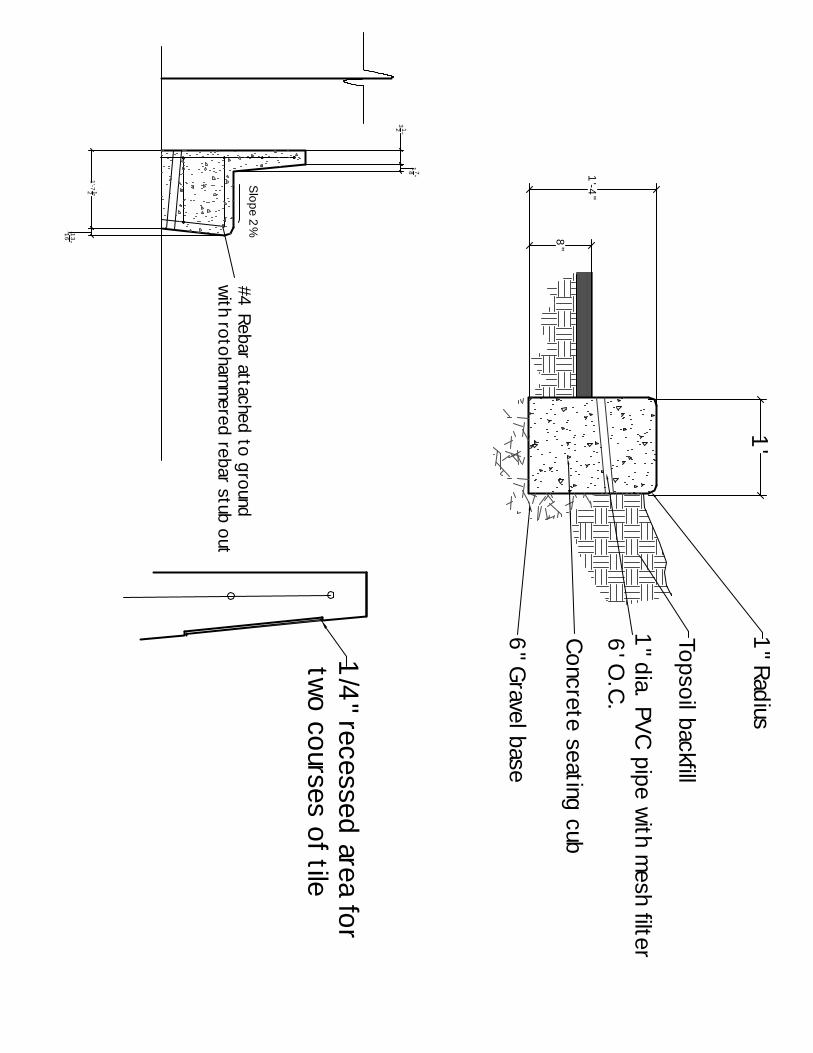
1/4
" recessed area for tw
o courses of tile
1'-7
12 "
1 13
16
"
312
"
178
"
#4 Rebar attached to ground
with rotoham
mered rebar stub out
Slope 2
%
1'
1'-4
"
8"
Concrete seating cub
1" dia. PV
C pipe w
ith mesh filter
6' O
.C.
1" Radius
6" G
ravel base
Topsoil backfill

32
APPENDIX D Soil Report

33

34

35
APPENDIX E
Additional Resources

36
Codes and Regulations www.cityofseattle.net/dclu
Playground Design
www.peacefulplaygrounds.com
www.boundlessplaygrounds.org
Funding
http://www.schoolgrants.org/Links/playground_funding.htm
Native Plant Resources
These all came from the King County Website Native Plant Resources of the Pacific Northwest http://dnr.metrokc.gov/wlr/pi/npresrcs.htm www.wnps.org Washington Native Plant Society - A non profit organization for native plants. www.plantnative.com - Includes a great step by step plan for naturescaping. www.rainyside.com Maritime Pacific Northwest Gardening has a nice native plant section with photos. www.wildwords.com/Bombus/ - Includes a very useful list of Pacific Northwest Native Plants for Wildlife. www.wa.gov/dnr/htdocs/fr/nhp/index.html - Washington Natural Heritage Program lists rare and endangered native plants. gardening.wsu.edu/text/nwnative.htm - Washington State University Native Plants Identifying, Propagating, and Landscaping. Nice photos! www.tardigrade.org - Pacific Northwest Native Wildlife Gardening. Includes a listserv for gardening for wildlife (with native plants).
Related Documents