i ©2011-2013 - All Rights Reserved - Information and specifications contained herein subject to change without notice V1.0.2 - 5/7/2013 OMOBAR OUBLE OWNER’S MANUAL Version 3

Welcome message from author
This document is posted to help you gain knowledge. Please leave a comment to let me know what you think about it! Share it to your friends and learn new things together.
Transcript

i©2011-2013 - All Rights Reserved - Information and specifications contained herein subject to change without notice
V1.0.2 - 5/7/2013
OMOBAR
OUBLE
OWNER’S MANUAL
Version 3

i
Safety Warnings and Cautions
• Read and understand all of these safety warnings and cautions as well as this entire manual before attempting to operate the Vibiemme Double Domobar Espresso Machine.
• This manual is to be used only with the Vibiemme Double Domobar (dual boiler, rotary pump, and PID controlled brew temperature).
• Your Vibiemme Double Domobar espresso machine is heavy. Take great care when lifting or moving it. Place it on a suitable, stable surface which can support the weight.
• If there is evidence of moisture on or around the machine or in the packing materials when you take it out of its shipping box, allow the machine to air dry at least 24 hours before use.
• Route the power cord where it cannot be tripped over. The use of an extension cord with this machine is not recommended.
• This machine draws a lot of electrical current. Be sure that the circuit into which it is plugged can handle the machine’s electrical requirements. If the circuit breaker is repeatedly tripped or the circuit’s fuse repeatedly blows, consult an electrician to determine the cause. A possible solution may be to use a different circuit or to be sure that the Vibiemme DD is the only device using that circuit.
• Power protection, surge suppression of 1040 joules or higher is recommended to protect the electronics of this machine. There are electronic components inside which can be damaged by surges, and even the heat-ing elements can be burned out from a power surge. Breakdowns caused by power surges are not covered by the warranty.
• The Vibiemme DD espresso machine is designed to be left on all day. This can create a safety hazard due to a number of outer surfaces and components that present a burn hazard while this machine is in operation. The massive brewgroup can remain quite hot for hours after turning the machine off. The thermosyphon will continue to circulate hot water through the internal parts of the brewgroup even with the machine un-plugged. Some of those surfaces are hot enough to cause serious burns. Do not assume that the group is cool just because the machine has been turned off.
• Easy access to hot water and steam wand valves as well as the brew lever can present a safety hazard. If there are children, elderly, pets, or other adults who may have access to the machine, and/or to whom these may present a hazard, it is important for you to assess the level of danger to them and act accordingly to mitigate that danger. Possibilities include closing off and locking the room or location where the machine will be located so that the machine will not be accessible to them.
• Do not cover the machine while it is on. Air needs to circulate around the machine to keep the electronics from overheating. Allow ample room around the base of the machine for air to circulate.
• Placing the machine under a low cabinet can cause heat to build up in the machine and can heat the cabinet. In some circumstances this can result in property damage.
• The steam from this machine can quickly cause deep and serious burns. Use great care when steaming. The steam wand gets very hot when in use and will stay hot for some time after use.
• The hot water from this machine can be at or very near the boiling point. Use caution whenever dispensing hot water. There are times when hot water can be dispensed even when the machine is off.
• Some of the chemicals necessary to maintain this machine can present a safety hazard. Thoroughly read all directions, warnings, and cautions on all products before use. Be absolutely sure that the products you are using are appropriate for this machine. Misuse of a product can cause severe damage to the machine. Such damage is not covered by the warranty.
ii
• Some of the procedures outlined in this manual may be beyond the ability or experience of some users. This may include, but is not limited to, de-scaling of the boiler. Read all instructions before beginning any proce-dure, and if you do not feel comfortable performing the task, refer servicing to qualified personnel. Damage caused by improper servicing or maintenance is not covered by the warranty.
• When shutting the machine down, aim the steam wand and the hot water wand over the drip tray so if the machine is turned on with a valve open, the steam or hot water will be less likely to cause burns to anyone nearby.
• Never immerse the machine in any liquid, and do not allow liquids or other foreign matter to drip or pour through the top of the machine.
• If a puddle of water appears under the machine, immediately unplug the machine from the outlet, then turn the power switch on the machine to “Position 0.” Check to see if the Drip Tray is overfilled or has been displaced from its normal position. If not, contact your reseller for assistance in diagnosis and for technical support.
• A machine connected to an external water line (“plumbed”) can dispense water through the brewing group even if the machine is unplugged and turned off if the supply line to the machine is pressurized. Consult a plumber about installing a valve to shut off the supply line.
• Do not run the machine without a working, available, and connected water source. Damage to the pump because of insufficient water supply is not covered by the warranty.
• This appliance is not intended for use by persons (including children) with reduced physical, sensory or mental capabilities, or lack of experience and knowledge. No one should operate this espresso machine without first reading and understanding this manual, or receiving qualified and appropriate instruction and supervision by a person responsible for their safety.
• If the supply cord is damaged, it must be replaced by an authorized or qualified service person in order to avoid a safety hazard.
• No internal parts of this machine are intended to be repaired, replaced, adjusted, or modified by anyone other than a qualified service technician or under the direct supervision of a qualified service technician.
• This appliance is intended to be used in household and similar applications such as: - staff kitchen areas in shops, offices and other working environments; - farm houses - by clients in hotels, motels and other residential type environments - bed and breakfast type environments.• This machine is not rated for commercial use.
The diagrams in this manual are not necessarily to scale. They have been created for general educational purposes only to illustrate the various functions of the Vibiemme Domobar Super in a simple-to-understand man-ner. These do not depict the exact design features of the espresso machine. They are not be used for technical support nor for repair purposes. They are diagrammatic illustrations to help you gain a better understanding of the basic operation of the major internal components.
All specifications and design features are subject to change without notice. Any modifications to this machine, including but not limited to attaching a drain line or hooking the ma-
chine to an external water source is done at your own risk, and neither damage done to the machine, nor damage to property, nor injury is covered by the warranty.
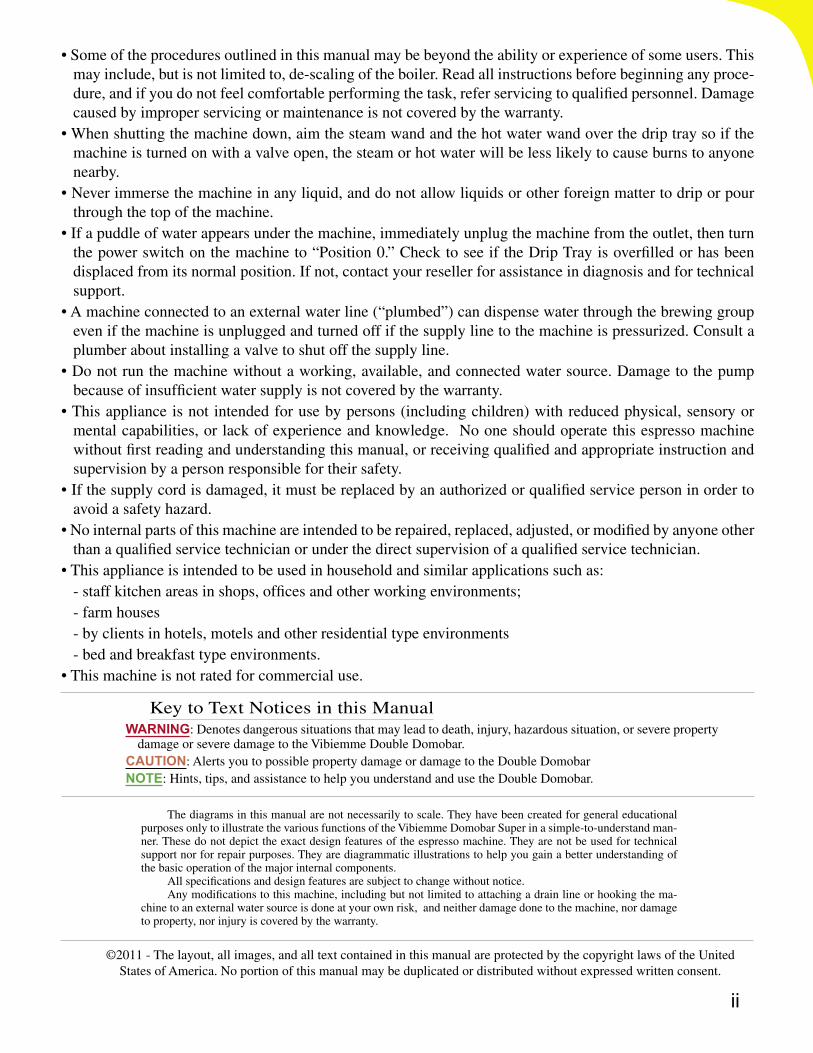
Key to Text Notices in this ManualWARNING: Denotes dangerous situations that may lead to death, injury, hazardous situation, or severe property
damage or severe damage to the Vibiemme Double Domobar.CAUTION: Alerts you to possible property damage or damage to the Double Domobar NOTE: Hints, tips, and assistance to help you understand and use the Double Domobar.
©2011 - The layout, all images, and all text contained in this manual are protected by the copyright laws of the UnitedStates of America. No portion of this manual may be duplicated or distributed without expressed written consent.
PART I - Introduction and Safety
PART II - Learn About Your machineKnowing how the machine operates will help you make better use of your Vibiemme Double Domobar.
PART III - SET UPUnpacking, basic initial set-up and assembly, and important water supply information.
PART IV - Initial StartupImportant information for all owners concerning operating your Double Domobar for the first time and accessing the PID system’s interface.
PART V - Get the Most from Your VibiemmeInformation on making espresso and steaming milk to assist you in getting the best from your Vibiemme
PART VI - Keeping your Vibiemme HealthySimple cleaning and maintenance tasks to help keep your Vibiemme operating for years to come.
This manual created by FRCN Digital Imaging - www.FRCNdigital.com
CHAPTER page pageCHAPTER
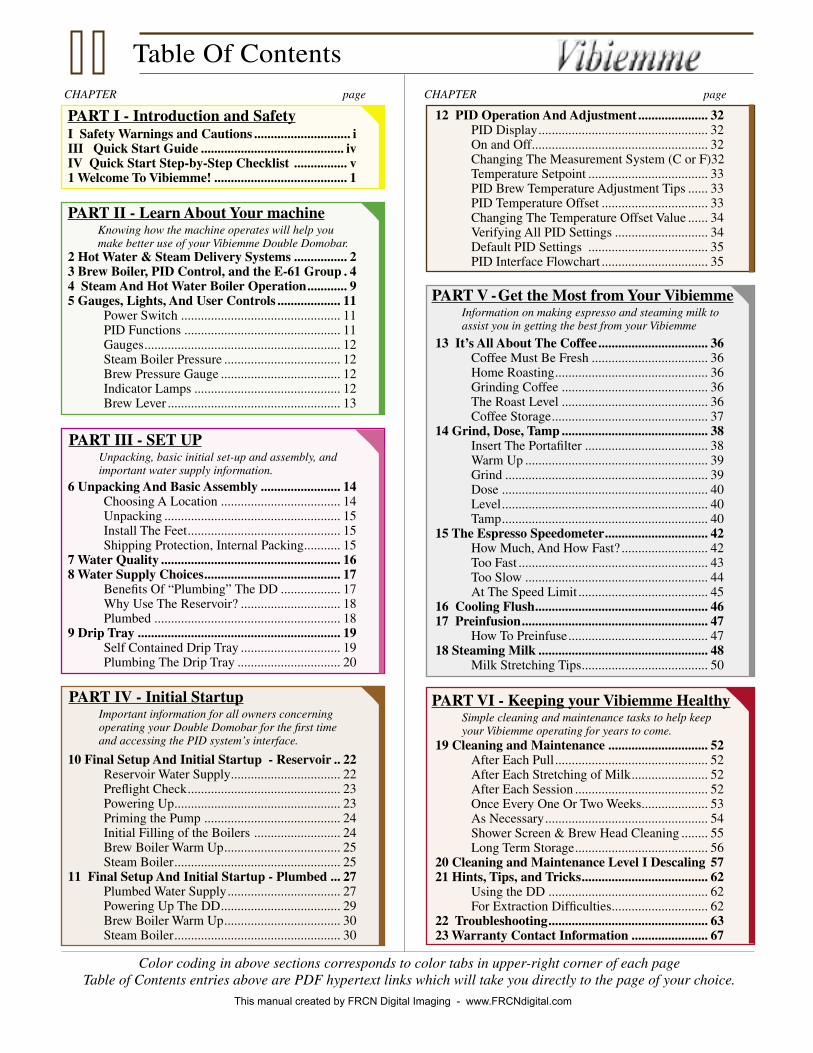
Color coding in above sections corresponds to color tabs in upper-right corner of each pageTable of Contents entries above are PDF hypertext links which will take you directly to the page of your choice.
iii
Table Of Contents
I Safety Warnings and Cautions ............................. iIII Quick Start Guide ........................................... ivIV Quick Start Step-by-Step Checklist ................ v1 Welcome To Vibiemme! ........................................ 1
2 Hot Water & Steam Delivery Systems ................ 23 Brew Boiler, PID Control, and the E-61 Group . 44 Steam And Hot Water Boiler Operation ............ 95 Gauges, Lights, And User Controls ................... 11
Power Switch ................................................ 11PID Functions ............................................... 11Gauges ........................................................... 12Steam Boiler Pressure ................................... 12Brew Pressure Gauge .................................... 12Indicator Lamps ............................................ 12Brew Lever .................................................... 13
6 Unpacking And Basic Assembly ........................ 14Choosing A Location .................................... 14Unpacking ..................................................... 15Install The Feet .............................................. 15Shipping Protection, Internal Packing ........... 15
7 Water Quality ...................................................... 168 Water Supply Choices ......................................... 17
Benefits Of “Plumbing” The DD .................. 17Why Use The Reservoir? .............................. 18Plumbed ........................................................ 18
9 Drip Tray ............................................................. 19Self Contained Drip Tray .............................. 19Plumbing The Drip Tray ............................... 20
10 Final Setup And Initial Startup - Reservoir .. 22Reservoir Water Supply ................................. 22Preflight Check .............................................. 23Powering Up .................................................. 23Priming the Pump ......................................... 24Initial Filling of the Boilers .......................... 24Brew Boiler Warm Up ................................... 25Steam Boiler .................................................. 25
11 Final Setup And Initial Startup - Plumbed ... 27Plumbed Water Supply .................................. 27Powering Up The DD .................................... 29Brew Boiler Warm Up ................................... 30Steam Boiler .................................................. 30
12 PID Operation And Adjustment ..................... 32PID Display ................................................... 32On and Off ..................................................... 32Changing The Measurement System (C or F) 32Temperature Setpoint .................................... 33PID Brew Temperature Adjustment Tips ...... 33PID Temperature Offset ................................ 33Changing The Temperature Offset Value ...... 34Verifying All PID Settings ............................ 34Default PID Settings .................................... 35PID Interface Flowchart ................................ 35
13 It’s All About The Coffee ................................. 36Coffee Must Be Fresh ................................... 36Home Roasting .............................................. 36Grinding Coffee ............................................ 36The Roast Level ............................................ 36Coffee Storage ............................................... 37
14 Grind, Dose, Tamp ............................................ 38Insert The Portafilter ..................................... 38Warm Up ....................................................... 39Grind ............................................................. 39Dose .............................................................. 40Level .............................................................. 40Tamp .............................................................. 40
15 The Espresso Speedometer ............................... 42How Much, And How Fast? .......................... 42Too Fast ......................................................... 43Too Slow ....................................................... 44At The Speed Limit ....................................... 45
16 Cooling Flush .................................................... 4617 Preinfusion ........................................................ 47
How To Preinfuse .......................................... 4718 Steaming Milk ................................................... 48
Milk Stretching Tips ...................................... 50
19 Cleaning and Maintenance .............................. 52After Each Pull .............................................. 52After Each Stretching of Milk ....................... 52After Each Session ........................................ 52Once Every One Or Two Weeks .................... 53As Necessary ................................................. 54Shower Screen & Brew Head Cleaning ........ 55Long Term Storage ........................................ 56
20 Cleaning and Maintenance Level I Descaling 5721 Hints, Tips, and Tricks ...................................... 62
Using the DD ................................................ 62For Extraction Difficulties ............................. 62
22 Troubleshooting ................................................ 6323 Warranty Contact Information ....................... 67
iv
Quick Start Guide
The diagrams in this manual are not necessarily to scale. They have been created for general educational purposes only to illustrate function of the Vibiemme Domobar Super in a simple-to-understand manner. These do not depict the exact design features of the espresso machine. They are not be used for technical support nor for repair purposes. They are diagrammatic illustrations to help you gain a better understanding of the basic operation of the major internal components.
All specifications and design features are subject to change without notice. Any modifications to this machine, including but not limited to attaching a drain line or hooking the machine to an external water source is
done at your own risk, and damage done to the machine, damage to property, nor injury is covered by the warranty.
I Safety Warnings and Cautions ..................... i
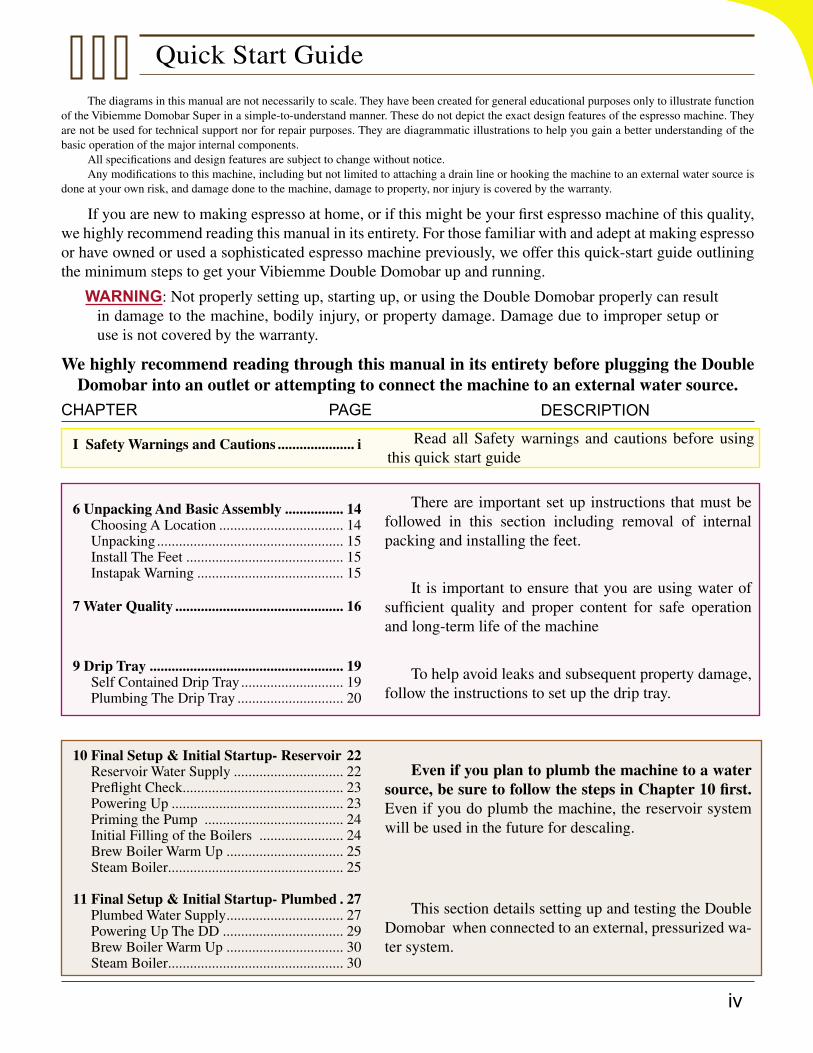
If you are new to making espresso at home, or if this might be your first espresso machine of this quality, we highly recommend reading this manual in its entirety. For those familiar with and adept at making espresso or have owned or used a sophisticated espresso machine previously, we offer this quick-start guide outlining the minimum steps to get your Vibiemme Double Domobar up and running.
WARNING: Not properly setting up, starting up, or using the Double Domobar properly can result in damage to the machine, bodily injury, or property damage. Damage due to improper setup or use is not covered by the warranty.
6 Unpacking And Basic Assembly ................ 14 Choosing A Location .................................. 14 Unpacking ................................................... 15 Install The Feet ........................................... 15 Instapak Warning ........................................ 15
Read all Safety warnings and cautions before using this quick start guide
There are important set up instructions that must be followed in this section including removal of internal packing and installing the feet.
To help avoid leaks and subsequent property damage, follow the instructions to set up the drip tray.
Even if you plan to plumb the machine to a water source, be sure to follow the steps in Chapter 10 first. Even if you do plumb the machine, the reservoir system will be used in the future for descaling.
This section details setting up and testing the Double Domobar when connected to an external, pressurized wa-ter system.
CHAPTER PAGE DESCRIPTION
It is important to ensure that you are using water of sufficient quality and proper content for safe operation and long-term life of the machine
We highly recommend reading through this manual in its entirety before plugging the Double Domobar into an outlet or attempting to connect the machine to an external water source.
7 Water Quality .............................................. 16
9 Drip Tray ..................................................... 19 Self Contained Drip Tray ............................ 19 Plumbing The Drip Tray ............................. 20
10 Final Setup & Initial Startup- Reservoir 22 Reservoir Water Supply .............................. 22 Preflight Check ............................................ 23 Powering Up ............................................... 23 Priming the Pump ...................................... 24 Initial Filling of the Boilers ....................... 24 Brew Boiler Warm Up ................................ 25 Steam Boiler ................................................ 25
11 Final Setup & Initial Startup- Plumbed . 27 Plumbed Water Supply ................................ 27 Powering Up The DD ................................. 29 Brew Boiler Warm Up ................................ 30 Steam Boiler ................................................ 30

v
Quick Start Step-by-Step Checklist
1 Read all Safety Warnings And Cautions ...................... i
2 Choosing an appropriate location ............................ 14
3 Unpack and save shipping materials ........................ 15
4 Install the feet ........................................................... 15
5 Look for Instapak Warning Sheet ............................. 15
6 Assess water quality & decide on water source ..... 16
7 Set up and install the drip tray .................................. 19
8 Adjust the reservoir platform for reservoir use ......... 22
9 Set water switch to reservoir position ....................... 22
10 Verify that low-water switch operates properly ........ 22
11 Prime the rotary pump ............................................. 24
12 Fill brew boiler ........................................................ 24
13 Test brew system for proper water flow ................... 25
14 Allow brew boiler to heat up ................................... 25
15 Fill steam boiler ....................................................... 25
16 Allow steam boiler to heat up .................................. 25
17 Test hot water and steam output .............................. 26
WARNING: Not properly setting up, starting up, or using the Double Domobar properly can result in damage to the machine, bodily injury, or property damage. Damage due to improper setup or use is not covered by the warranty. We highly recommend reading through this manual in its entirety before plugging the Double Domobar into an outlet or attempting to connect the ma-chine to an external water source. This checklist is supplied as a convenience only. It is your responsibility to assure that the details of each step below is properly followed as detailed in this owners manual.
PAGE
This “Quick-Start” checklist is not meant to replace a thorough understanding of the process of preparing and using your Vibiemme Double Domobar, nor can it be used as a definitive set of instructions for set up and use. It is supplied only to help you verify that you have followed the necessary steps to set up and initially start the Vibiemme Double Domobar.
CONTINUE BELOW FOR PLUMBED WATER OPTION ONLY:
18 Set water switch for plumbed option ....................... 27
19 Defeat reservoir water level safety switch ............... 28
20 Connect plumbed water supply hose ....................... 28
21 Test plumbed supply ............................................... 29
22 Brew boiler ............................................................. 30
23 Steam boiler ............................................................. 30
1
Welcome To Vibiemme!
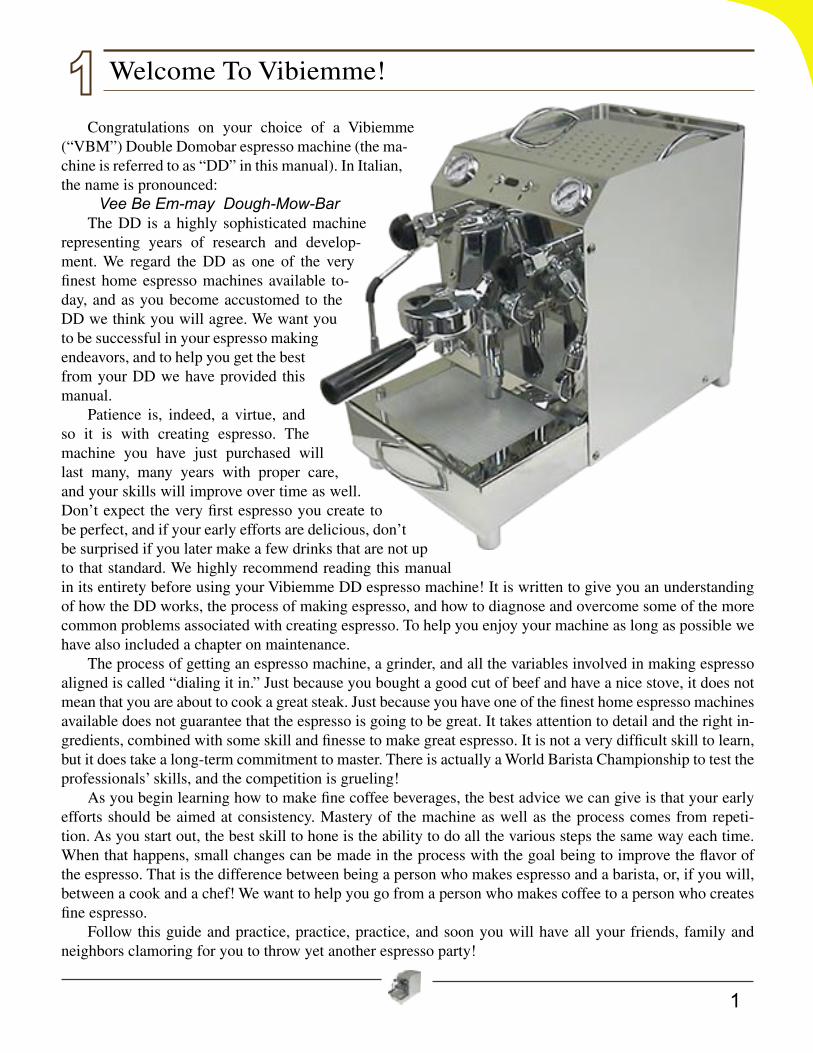
Congratulations on your choice of a Vibiemme (“VBM”) Double Domobar espresso machine (the ma-chine is referred to as “DD” in this manual). In Italian, the name is pronounced:
Vee Be Em-may Dough-Mow-BarThe DD is a highly sophisticated machine
representing years of research and develop-ment. We regard the DD as one of the very finest home espresso machines available to-day, and as you become accustomed to the DD we think you will agree. We want you to be successful in your espresso making endeavors, and to help you get the best from your DD we have provided this manual.
Patience is, indeed, a virtue, and so it is with creating espresso. The machine you have just purchased will last many, many years with proper care, and your skills will improve over time as well. Don’t expect the very first espresso you create to be perfect, and if your early efforts are delicious, don’t be surprised if you later make a few drinks that are not up to that standard. We highly recommend reading this manual in its entirety before using your Vibiemme DD espresso machine! It is written to give you an understanding of how the DD works, the process of making espresso, and how to diagnose and overcome some of the more common problems associated with creating espresso. To help you enjoy your machine as long as possible we have also included a chapter on maintenance.
The process of getting an espresso machine, a grinder, and all the variables involved in making espresso aligned is called “dialing it in.” Just because you bought a good cut of beef and have a nice stove, it does not mean that you are about to cook a great steak. Just because you have one of the finest home espresso machines available does not guarantee that the espresso is going to be great. It takes attention to detail and the right in-gredients, combined with some skill and finesse to make great espresso. It is not a very difficult skill to learn, but it does take a long-term commitment to master. There is actually a World Barista Championship to test the professionals’ skills, and the competition is grueling!
As you begin learning how to make fine coffee beverages, the best advice we can give is that your early efforts should be aimed at consistency. Mastery of the machine as well as the process comes from repeti-tion. As you start out, the best skill to hone is the ability to do all the various steps the same way each time. When that happens, small changes can be made in the process with the goal being to improve the flavor of the espresso. That is the difference between being a person who makes espresso and a barista, or, if you will, between a cook and a chef! We want to help you go from a person who makes coffee to a person who creates fine espresso.
Follow this guide and practice, practice, practice, and soon you will have all your friends, family and neighbors clamoring for you to throw yet another espresso party!
2
Hot Water & Steam Delivery Systems
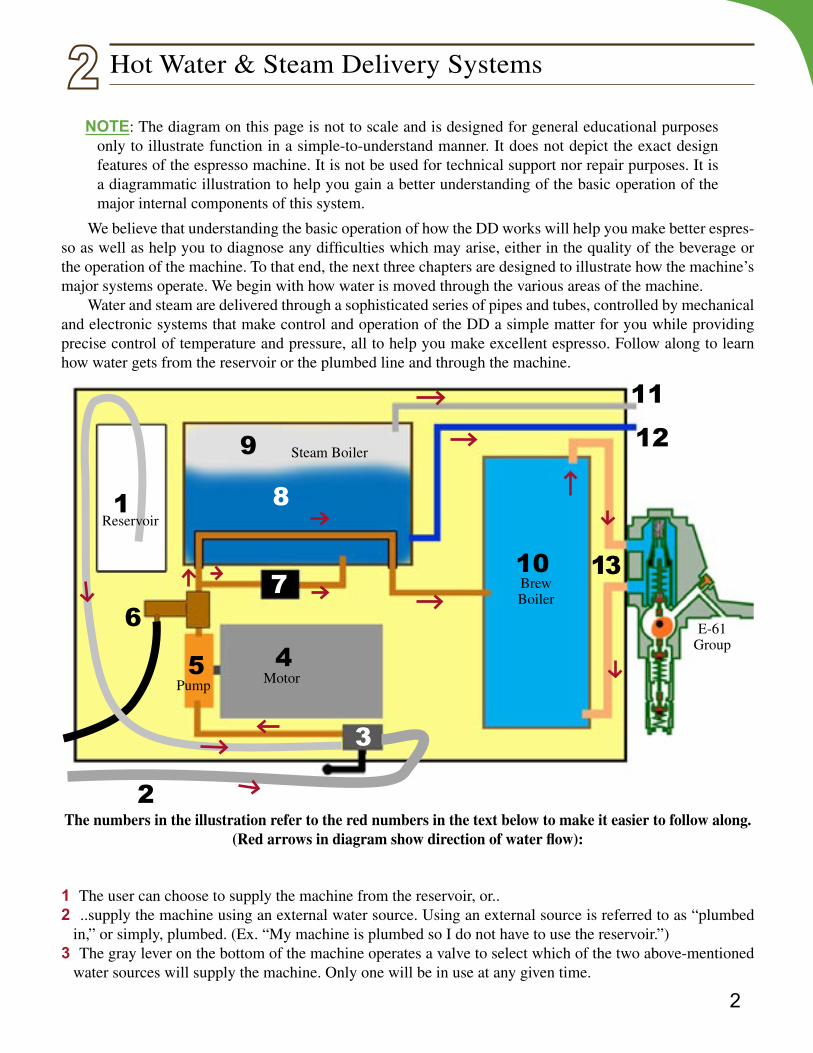
NOTE: The diagram on this page is not to scale and is designed for general educational purposes only to illustrate function in a simple-to-understand manner. It does not depict the exact design features of the espresso machine. It is not be used for technical support nor repair purposes. It is a diagrammatic illustration to help you gain a better understanding of the basic operation of the major internal components of this system.
We believe that understanding the basic operation of how the DD works will help you make better espres-so as well as help you to diagnose any difficulties which may arise, either in the quality of the beverage or the operation of the machine. To that end, the next three chapters are designed to illustrate how the machine’s major systems operate. We begin with how water is moved through the various areas of the machine.
Water and steam are delivered through a sophisticated series of pipes and tubes, controlled by mechanical and electronic systems that make control and operation of the DD a simple matter for you while providing precise control of temperature and pressure, all to help you make excellent espresso. Follow along to learn how water gets from the reservoir or the plumbed line and through the machine.
The numbers in the illustration refer to the red numbers in the text below to make it easier to follow along.(Red arrows in diagram show direction of water flow):
1 The user can choose to supply the machine from the reservoir, or..2 ..supply the machine using an external water source. Using an external source is referred to as “plumbed
in,” or simply, plumbed. (Ex. “My machine is plumbed so I do not have to use the reservoir.”)3 The gray lever on the bottom of the machine operates a valve to select which of the two above-mentioned
water sources will supply the machine. Only one will be in use at any given time.
1
2
3
45
67
8
9
10
1112
BrewBoiler
Steam Boiler
MotorPump
E-61Group
13
Reservoir
3
4 A large, powerful motor..5 ..spins the rotary pump which pushes water into and through the machine. A factory-set, adjustable bypass
valve built into the pump regulates the pressure which the pump delivers for optimal performance. The pump is activated whenever the user is extracting espresso, and it can activate automatically whenever the machine needs to refill the steam boiler.
6 Just after the pump is a pressure relief valve. This valve serves two purposes. Except when the brew lever is lifted to open the group, the brew boiler and its related plumbing are a sealed system. When water is heated in a sealed container it expands with great force and the pressure which is created must be released. The valve operates as an expansion valve during those times, venting the extra pressure into the drip tray.
The valve also acts as a safety valve. Although the pump regulates brew pressure on its own, this relief valve is located as a safety device in case there is a problem with the pump. If the pressure becomes exces-sive the valve opens and vents the excess water into the drip tray. It’s factory setting is around 14 BAR, well above the normal pressure used to make espresso.
7 Depending on the current circumstances, a solenoid-operated valve decides whether water can be sent to the steam boiler or not. Water enters the brew boiler through the preheating tube, through the steam boiler, and fills the brew boiler by displacement. The brew boiler is always 100% full.
8 The steam/hot water boiler (which will be referred to from this point forward as the “steam boiler”) holds steam as well as hot water. It is the pressure of the steam in this closed chamber and not the action of the pump that dispenses hot water from low in the boiler. If the pump runs while dispensing hot water it is only refilling the boiler and not actually pumping hot water.
9 Steam is dispensed off the top of the boiler. The pressure of the steam pushes the steam out of the boiler. If the pump runs while you are releasing steam it is only refilling the boiler and not pumping steam.
10 Hot water for brewing espresso is held in a separate, smaller boiler which is used exclusively for brewing espresso. Only the water from this boiler passes through the E-61 brewgroup. We will refer to this boiler as the “brew boiler” from this point forward.
11 Steam is sent to the steam valve through a copper pipe.12 Hot water is sent through a separate copper pipe to the hot water valve.13 Two large-diameter pipes carry water to the brewgroup. These supply water to the group for brewing, but
they have another function. While the machine is idling (on, but not being used), water flows through these pipes by convection currents to keep the group hot and ready to brew. The hottest water rises to the top of the brew boiler and into the group. As it heats the group and loses some of its thermal energy, it becomes slightly more dense (heavier) and flows out of the bottom of the group and back to the bottom of the brew boiler and the cycle continues like this until you start a brew cycle at which time both pipes supply hot water to the group.

4
1 - To sense the temperature of the water in the brew boiler there is a metal probe that penetrates into the brew boiler and is immersed in the water inside the boiler. The hollow probe contains a thermal sensor that is connected to the electronics in the machine. Think of it as an electronic thermometer.
2 - The electronics that control this system is called a PID which stands for “Proportional, Integral, Deriva-tive.” These three things constitute a mathematical process that figures all this out. To put it simply, the PID is a digital thermostat that is programmed to know how the device to which it is connected behaves, and how it can best control it in a precise way. Vibiemme has pre-programmed the PID with the information it needs to best control this specific system.
3 - The PID’s electronics can’t directly handle the wattage that the heating element draws, so a solid state relay (SSR) is used. This device isolates the high current that the heating element draws from the sensitive electronics of the PID. Think of it as the heating element’s switch that the PID can turn on or off.
4 - The heating element is immersed in the brew boiler’s water, and as it heats the water the PID’s probe senses the water’s temperature and that information is always being processed in the PID to give you precise brew-temperature control.
12
3 4
BrewBoiler
E-61Group
PIDControlBox
SSR
The numbers in the illustration refer to the numbers in the text below to make it easier to follow along:
Brew Boiler, PID Control, and the E-61 Group
NOTE: The diagrams on these pages are not to scale and are designed for general educational pur-poses only to illustrate the function of the machine in a simple-to-understand manner. These do not depict the exact design features of the espresso machine. They are not be used for technical support nor repair purposes. They are diagrammatic illustrations to help you gain a better understanding of the basic operation of the major internal components of this system.
There is a lot of technology and precision design in the working of the Double Domobar which help bring you such great espresso. Much of that technology is hidden inside the case and deep in the boilers. A visible portion of that technology is the digital display on the face of the DD. In the center of the front panel, between the gauges, the blue LED displays the brewing temperature setpoint. The following explains how the DD uses electronic technology to control the temperature of the brew boiler.

5
The Inner Workings of the E-61 Group
The E-61 group has been around for over five decades, and it continues to be one of the most effective group designs in the industry. Why? Because it is simple, easy to service, and effective. In the following dia-grams we explain the basic operation of this marvelous design.
At Idle
1 The brew lever is in the fully-down position.2 The cam inside the group, rotated by the movement
of the brew lever, is in a position that allows the upper brew valve to be closed by the pressure of its spring. The machine is idling (turned on, but not being presently used).
3 The upper, hollow portion of the group is filled with heated water from the boiler.
4 Water in the boiler is heated and becomes less dense. It rises to the top of the boiler, making its way into the top of the group by a convection current through the upper thermosyphon pipe shown in the diagram on the previ-ous page. The thermal energy held by the water is trans-ferred to the massive brass casting.
5 The water cools as it releases its thermal energy, increas-es in density, and “sinks” to the bottom of the chamber.
6 The denser water passes out of the group, through the lower thermosyphon tube, and returns to the bottom of the boiler and begins it journey all over again. This convection current continues as long as the machine re-mains in its idling state, keeping the group heated, and ready to use.
Brew Mode Begins
7 The brew lever is lifted fully by the user. This action closes the contacts of the microswitch on the front of the DD (switch not shown) and the pump starts.
8 The cam is rotated by that movement of the lever, and the brew valve is pushed open.
9 The cam has moved away from the infusion valve and the two lower valves are closed by their springs.
10 The pump has started and water is forced through the boiler into the group through both thermosyphon tubes.
11 Water passes through the filter screen, and then through the gicleur (“Jet” - a brass screw with a small calibrated hole through it), which is the only path water can take into the mushroom.
12 Water passes through the inside of the “mushroom” and pressure begins to build in all the areas where there is water as indicated by the light blue color in this dia-gram. The coffee is being “infused” with hot water.
13 Once the pressure of the water reaches about 1.5 BAR the infusion valve opens.
The numbers in the illustrations refer to the red numbers in the text below to make it easier to follow along:
3 4
65
2
1
8
9
10
1112
13
7

6
Pressure Builds
14 The infusion valve is pushed open by the pressure of the incoming water (direction of flow indicated by the blue arrows). The space below the infusion valve begins to fill with water. During the time it takes to fill this void, the pressure in the entire brew path cannot exceed that which is determined by the force of the spring which normally holds this valve in the closed position. This water at low pressure is pre-wetting (“infusing”) the cof-fee at this time.
15 The exhaust valve at the bottom of the group is held by a much stiffer spring which exerts a force greater than the brewing pressure. This valve will remain closed, as seen here, until the user lowers the lever back to the ful-ly-down, “at rest” position.
16 Once the infusion chamber is completely filled, the en-tire brew path reaches the maximum brewing force from the pump. This increase in pressure will be obvious if you are watching the brew pressure gauge.
17 When that equilibrium in pressure is achieved, the in-fusion valve will close, and it will stay in that closed position for most of the extraction process, as long as the pressure above and below that valve are equal.
18 Pressure also builds over the coffee at this time, and now the extraction begins in earnest.
15
14
1617
18

7
Extraction Ends
19 At the end of the extraction the user lowers the brew lever fully, rotating the internal cam back to its “at rest” position. This also opens the contacts of the electrical microswitch on the front of the DD (switch not shown) and the pump stops.
20 The brew valve is returned to its closed position...21 ...and both the infusion as well as the exhaust valve (the two valves in the lower group) are opened by the
movement of the cam. 22 The pressure of the water still contained in the group, in the areas below the brew valve, is now released
out of the group. The pressurized water passes the infusion valve and the exhaust valve, and is expelled into the drip tray. The sound of the released water under pressure can be easily heard the instant the lever is lowered.
19
20
21
22
The machine is once again idling “at rest,” and the boiler is heating the water. As soon as there is water in the boiler that is hotter than the temperature of the group, the convection current begins again. With no wait-ing, the machine is ready to once again make espresso as it was at the beginning of this section.

8
Gicleur
Mushroom
Brew Valve
Cam
Operating Lever Shaft
Infusion Valve
Exhaust Valve
Vibiemme E-61 Group Cutaway View
Dark blue arrows indicate location of some of the
various sealing gaskets.
Thermosyphon Inlet & Outlet
Note that the infusion and exhaust valves are both open (indicated by these two green arrows). This group is shown in an “at rest”
state as it would be when themachine is not being used.
Shaft Seal
Brew valve is inthe closed position
9
2
7
3
4
6
8
9
10
Steam Boiler
5
1
Steam And Hot Water Boiler Operation
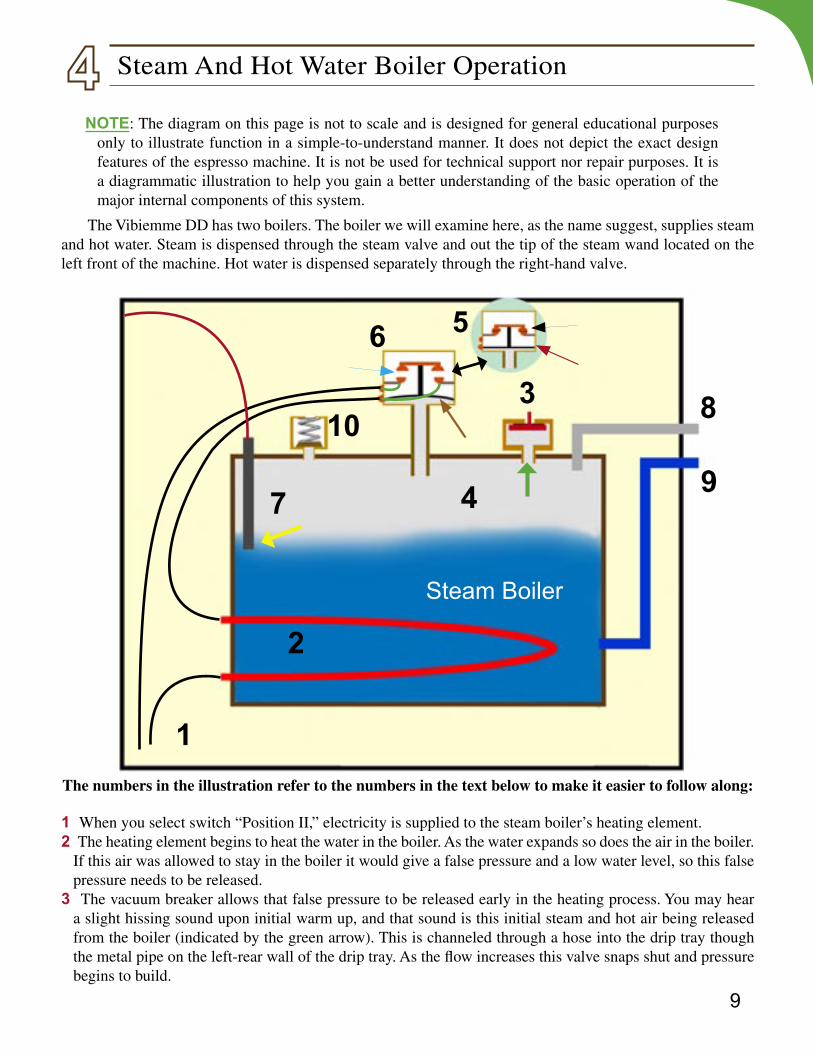
NOTE: The diagram on this page is not to scale and is designed for general educational purposes only to illustrate function in a simple-to-understand manner. It does not depict the exact design features of the espresso machine. It is not be used for technical support nor repair purposes. It is a diagrammatic illustration to help you gain a better understanding of the basic operation of the major internal components of this system.
The Vibiemme DD has two boilers. The boiler we will examine here, as the name suggest, supplies steam and hot water. Steam is dispensed through the steam valve and out the tip of the steam wand located on the left front of the machine. Hot water is dispensed separately through the right-hand valve.
The numbers in the illustration refer to the numbers in the text below to make it easier to follow along:
1 When you select switch “Position II,” electricity is supplied to the steam boiler’s heating element. 2 The heating element begins to heat the water in the boiler. As the water expands so does the air in the boiler.
If this air was allowed to stay in the boiler it would give a false pressure and a low water level, so this false pressure needs to be released.
3 The vacuum breaker allows that false pressure to be released early in the heating process. You may hear a slight hissing sound upon initial warm up, and that sound is this initial steam and hot air being released from the boiler (indicated by the green arrow). This is channeled through a hose into the drip tray though the metal pipe on the left-rear wall of the drip tray. As the flow increases this valve snaps shut and pressure begins to build.
10
4 With the vacuum breaker valve closed and the heating element still energized, pressure in the boiler in-creases which is indicated by the boiler pressure gauge on the front panel of the DD. As long as the heating element is energized, pressure will continue to increase. There has to be some way to turn off the heating element.
5 The Pressurestat is a switch that is operated by the pressure in the boiler. In this inset illustration, the pres-sure in the boiler has dropped and the diaphragm relaxes (indicated by the red arrow) and moves the con-tacts together (black arrow) closing the circuit. Electricity flows through the wires in the completed circuit and the heating element is energized. The pressure in the boiler begins to increase.
6 When the pressure in the boiler reaches the set point of the pressurestat, the diaphragm is pushed by the pressure (indicated by the brown arrow), and it separates the electrical contact (light blue arrow), opening the circuit. The heating element no longer receives a flow of electricity. The steam boiler now begins to cool until the pressure drops below a point designed into the pressurestat. The switch eventually closes, and the cycle begins again. This is why you will see the needle of the boiler pressure gauge slowly rise, slowly fall, and then rise again.
But how does this control temperature? Boyle’s Law, as applied here, states that for a given volume of gas, when the temperature is increased, the pressure of the gas increases a predictable amount. So in our example, as the pressure of the steam in the closed boiler increases, the temperature of the steam and the water has also increased. The pressurestat is used to sense the pressure in the boiler, and so controls the temperature like a thermostat - thus, we can call it a “pressure thermostat,” or pressurestat.
7 We need to control the water level in the boiler. Too high and water will come out of the steam wand making a mess with your milk. Too low and the heating element can be exposed which can easily damage it. Addi-tionally, the water, when heated, holds a lot of thermal energy which adds greatly to the power and volume of available steam. The hot water itself actually works as a steam storage system.
To help maintain the optimal level of water in the steam boiler, there is a metal probe which passes through the outer surface of the boiler. It is electrically isolated from the metal boiler. When the water level drops below the tip (indicated by the yellow arrow) the electrical connection is broken and the control box in the DD “senses” this to start the pump and simultaneously opens the fill valve to allow water to be pumped into the boiler. When the water level touches the tip of the sensor, an electrical circuit is completed from the probe, through the water, to ground. The control box responds and closes the fill valve and stops the pump.
8 A pipe draws steam off the top of the boiler and directs it to the steam valve.9 A similar pipe, but this one connected to the bottom of the boiler, directs hot water to the hot water valve. 10 Finally, what if the system somehow malfunctions? If the pressure in the boiler gets excessive it can be
dangerous. All steam boilers are equipped with a safety valve to release dangerous pressure in emergency situations. If the pressure rises above a predetermined level, the steam will push the valve open against its internal spring pressure, releasing steam and lowering the pressure inside the steam boiler to a safe level.
WARNING: If you hear a violent release of steam from inside of the machine, immediately discon-nect the power cord from the outlet and when the steam release subsides, carefully turn the power switch to “Position 0.” Call for service assistance from your reseller before using the machine again.
3 When the machine is turned off, or the power switch is set to “Position I,” the heating element in the steam boiler no longer receives electricity, and pressure in the boiler begins to drop. As the water and steam cool and contract, the pressure in the boiler eventually drops to a little below atmospheric pressure and the vacuum breaker valve (3) opens allowing air to relieve the partial vacuum in the boiler.
11
Gauges, Lights, And User Controls
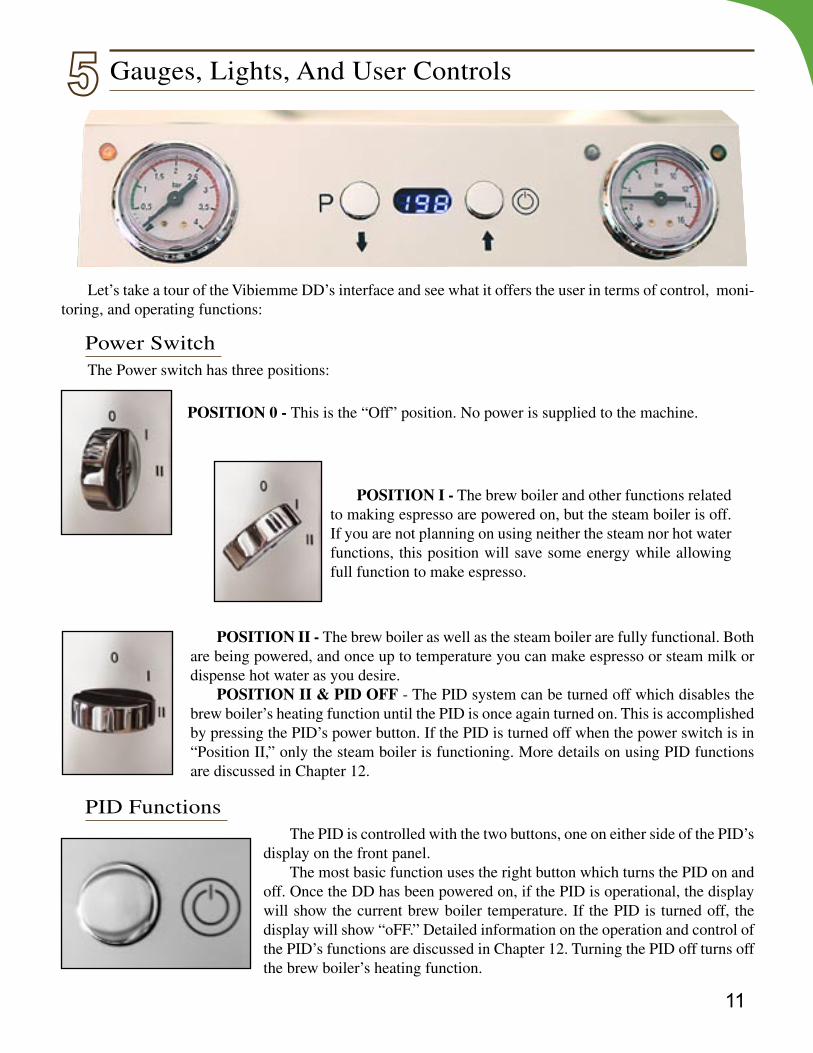
POSITION 0 - This is the “Off” position. No power is supplied to the machine.
POSITION I - The brew boiler and other functions related to making espresso are powered on, but the steam boiler is off. If you are not planning on using neither the steam nor hot water functions, this position will save some energy while allowing full function to make espresso.
POSITION II - The brew boiler as well as the steam boiler are fully functional. Both are being powered, and once up to temperature you can make espresso or steam milk or dispense hot water as you desire.
POSITION II & PID OFF - The PID system can be turned off which disables the brew boiler’s heating function until the PID is once again turned on. This is accomplished by pressing the PID’s power button. If the PID is turned off when the power switch is in “Position II,” only the steam boiler is functioning. More details on using PID functions are discussed in Chapter 12.
Let’s take a tour of the Vibiemme DD’s interface and see what it offers the user in terms of control, moni-toring, and operating functions:
Power SwitchThe Power switch has three positions:
PID FunctionsThe PID is controlled with the two buttons, one on either side of the PID’s
display on the front panel.The most basic function uses the right button which turns the PID on and
off. Once the DD has been powered on, if the PID is operational, the display will show the current brew boiler temperature. If the PID is turned off, the display will show “oFF.” Detailed information on the operation and control of the PID’s functions are discussed in Chapter 12. Turning the PID off turns off the brew boiler’s heating function.
12
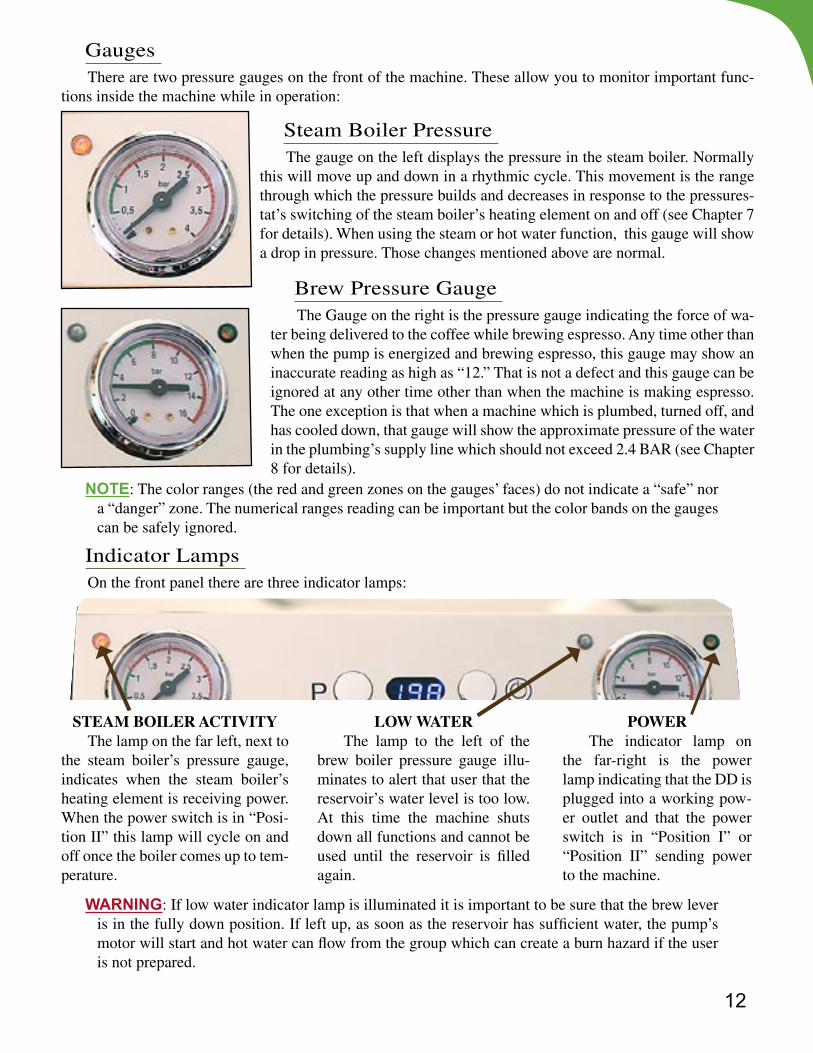
GaugesThere are two pressure gauges on the front of the machine. These allow you to monitor important func-
tions inside the machine while in operation:
Steam Boiler PressureThe gauge on the left displays the pressure in the steam boiler. Normally
this will move up and down in a rhythmic cycle. This movement is the range through which the pressure builds and decreases in response to the pressures-tat’s switching of the steam boiler’s heating element on and off (see Chapter 7 for details). When using the steam or hot water function, this gauge will show a drop in pressure. Those changes mentioned above are normal.
Brew Pressure GaugeThe Gauge on the right is the pressure gauge indicating the force of wa-
ter being delivered to the coffee while brewing espresso. Any time other than when the pump is energized and brewing espresso, this gauge may show an inaccurate reading as high as “12.” That is not a defect and this gauge can be ignored at any other time other than when the machine is making espresso. The one exception is that when a machine which is plumbed, turned off, and has cooled down, that gauge will show the approximate pressure of the water in the plumbing’s supply line which should not exceed 2.4 BAR (see Chapter 8 for details).
WARNING: If low water indicator lamp is illuminated it is important to be sure that the brew lever is in the fully down position. If left up, as soon as the reservoir has sufficient water, the pump’s motor will start and hot water can flow from the group which can create a burn hazard if the user is not prepared.
Indicator LampsOn the front panel there are three indicator lamps:
STEAM BOILER ACTIVITY The lamp on the far left, next to
the steam boiler’s pressure gauge, indicates when the steam boiler’s heating element is receiving power. When the power switch is in “Posi-tion II” this lamp will cycle on and off once the boiler comes up to tem-perature.
LOW WATERThe lamp to the left of the
brew boiler pressure gauge illu-minates to alert that user that the reservoir’s water level is too low. At this time the machine shuts down all functions and cannot be used until the reservoir is filled again.
POWERThe indicator lamp on
the far-right is the power lamp indicating that the DD is plugged into a working pow-er outlet and that the power switch is in “Position I” or “Position II” sending power to the machine.
NOTE: The color ranges (the red and green zones on the gauges’ faces) do not indicate a “safe” nor a “danger” zone. The numerical ranges reading can be important but the color bands on the gauges can be safely ignored.
13
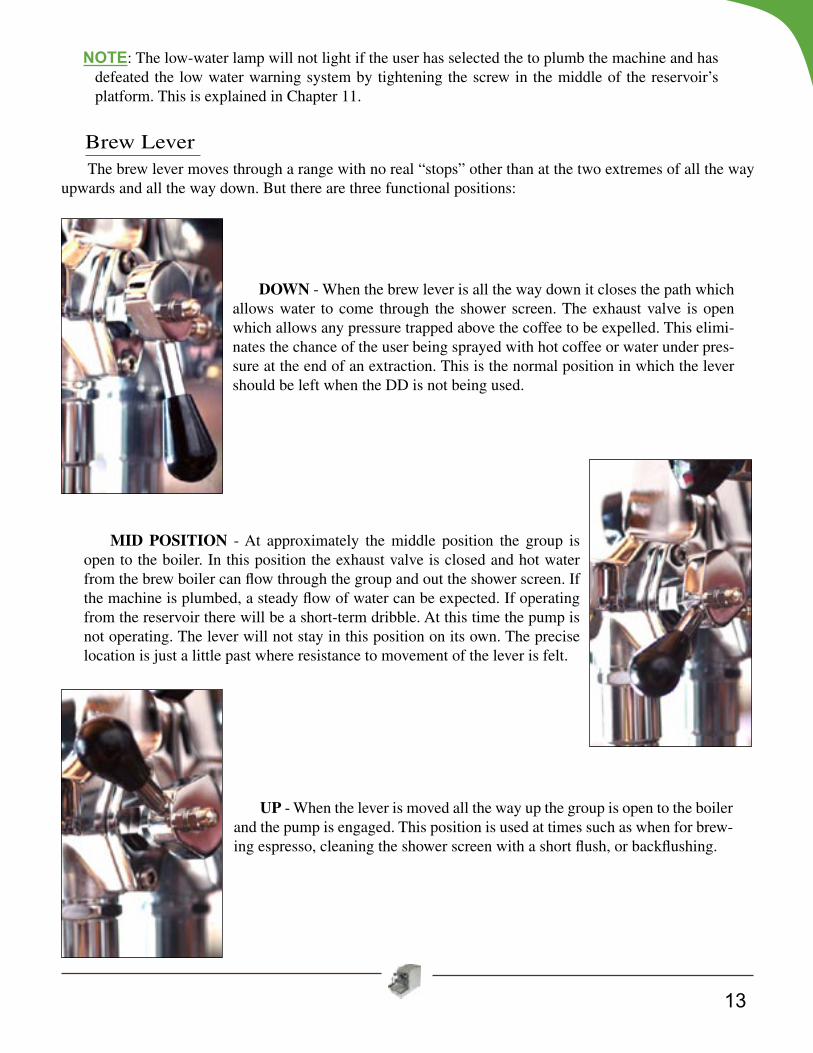
DOWN - When the brew lever is all the way down it closes the path which allows water to come through the shower screen. The exhaust valve is open which allows any pressure trapped above the coffee to be expelled. This elimi-nates the chance of the user being sprayed with hot coffee or water under pres-sure at the end of an extraction. This is the normal position in which the lever should be left when the DD is not being used.
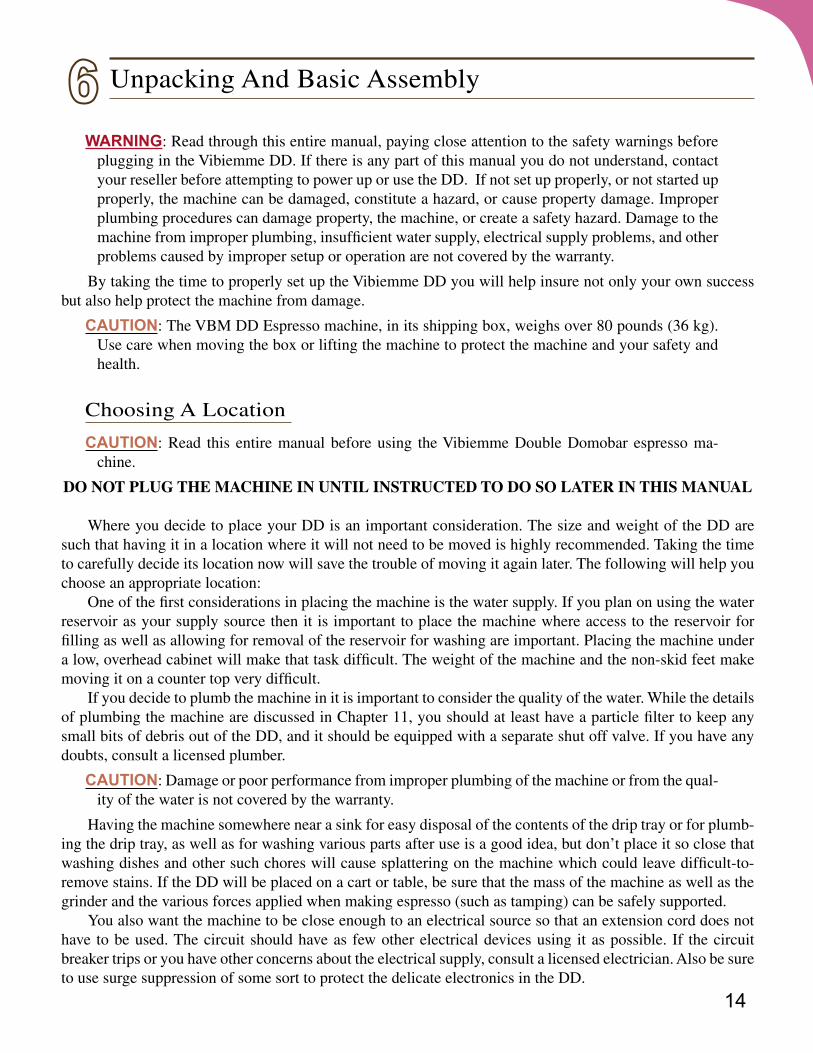
MID POSITION - At approximately the middle position the group is open to the boiler. In this position the exhaust valve is closed and hot water from the brew boiler can flow through the group and out the shower screen. If the machine is plumbed, a steady flow of water can be expected. If operating from the reservoir there will be a short-term dribble. At this time the pump is not operating. The lever will not stay in this position on its own. The precise location is just a little past where resistance to movement of the lever is felt.
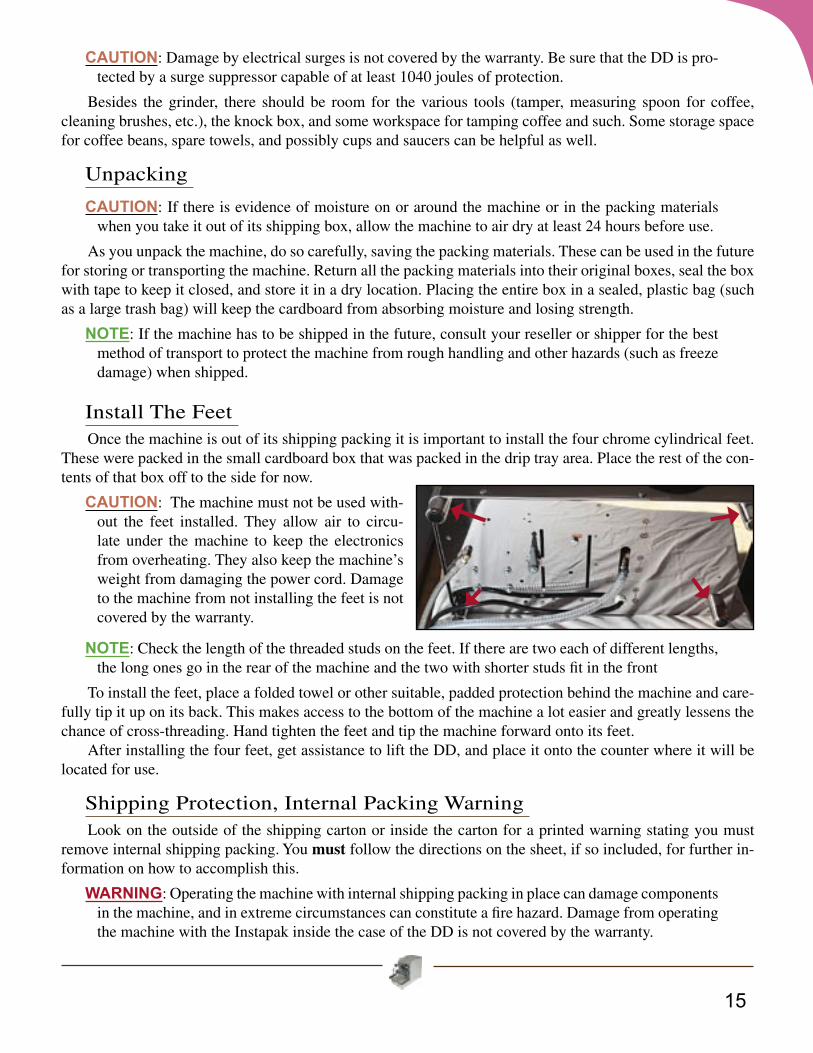
UP - When the lever is moved all the way up the group is open to the boiler and the pump is engaged. This position is used at times such as when for brew-ing espresso, cleaning the shower screen with a short flush, or backflushing.
Brew LeverThe brew lever moves through a range with no real “stops” other than at the two extremes of all the way
upwards and all the way down. But there are three functional positions:
NOTE: The low-water lamp will not light if the user has selected the to plumb the machine and has defeated the low water warning system by tightening the screw in the middle of the reservoir’s platform. This is explained in Chapter 11.
14
Unpacking And Basic Assembly
WARNING: Read through this entire manual, paying close attention to the safety warnings before plugging in the Vibiemme DD. If there is any part of this manual you do not understand, contact your reseller before attempting to power up or use the DD. If not set up properly, or not started up properly, the machine can be damaged, constitute a hazard, or cause property damage. Improper plumbing procedures can damage property, the machine, or create a safety hazard. Damage to the machine from improper plumbing, insufficient water supply, electrical supply problems, and other problems caused by improper setup or operation are not covered by the warranty.
By taking the time to properly set up the Vibiemme DD you will help insure not only your own success but also help protect the machine from damage.
CAUTION: The VBM DD Espresso machine, in its shipping box, weighs over 80 pounds (36 kg). Use care when moving the box or lifting the machine to protect the machine and your safety and health.
Choosing A Location
CAUTION: Read this entire manual before using the Vibiemme Double Domobar espresso ma-chine.
DO NOT PLUG THE MACHINE IN UNTIL INSTRUCTED TO DO SO LATER IN THIS MANUAL
Where you decide to place your DD is an important consideration. The size and weight of the DD are such that having it in a location where it will not need to be moved is highly recommended. Taking the time to carefully decide its location now will save the trouble of moving it again later. The following will help you choose an appropriate location:
One of the first considerations in placing the machine is the water supply. If you plan on using the water reservoir as your supply source then it is important to place the machine where access to the reservoir for filling as well as allowing for removal of the reservoir for washing are important. Placing the machine under a low, overhead cabinet will make that task difficult. The weight of the machine and the non-skid feet make moving it on a counter top very difficult.
If you decide to plumb the machine in it is important to consider the quality of the water. While the details of plumbing the machine are discussed in Chapter 11, you should at least have a particle filter to keep any small bits of debris out of the DD, and it should be equipped with a separate shut off valve. If you have any doubts, consult a licensed plumber.
CAUTION: Damage or poor performance from improper plumbing of the machine or from the qual-ity of the water is not covered by the warranty.
Having the machine somewhere near a sink for easy disposal of the contents of the drip tray or for plumb-ing the drip tray, as well as for washing various parts after use is a good idea, but don’t place it so close that washing dishes and other such chores will cause splattering on the machine which could leave difficult-to-remove stains. If the DD will be placed on a cart or table, be sure that the mass of the machine as well as the grinder and the various forces applied when making espresso (such as tamping) can be safely supported.
You also want the machine to be close enough to an electrical source so that an extension cord does not have to be used. The circuit should have as few other electrical devices using it as possible. If the circuit breaker trips or you have other concerns about the electrical supply, consult a licensed electrician. Also be sure to use surge suppression of some sort to protect the delicate electronics in the DD.
15
CAUTION: Damage by electrical surges is not covered by the warranty. Be sure that the DD is pro-tected by a surge suppressor capable of at least 1040 joules of protection.
Besides the grinder, there should be room for the various tools (tamper, measuring spoon for coffee, cleaning brushes, etc.), the knock box, and some workspace for tamping coffee and such. Some storage space for coffee beans, spare towels, and possibly cups and saucers can be helpful as well.
Unpacking
CAUTION: If there is evidence of moisture on or around the machine or in the packing materials when you take it out of its shipping box, allow the machine to air dry at least 24 hours before use.
As you unpack the machine, do so carefully, saving the packing materials. These can be used in the future for storing or transporting the machine. Return all the packing materials into their original boxes, seal the box with tape to keep it closed, and store it in a dry location. Placing the entire box in a sealed, plastic bag (such as a large trash bag) will keep the cardboard from absorbing moisture and losing strength.
NOTE: If the machine has to be shipped in the future, consult your reseller or shipper for the best method of transport to protect the machine from rough handling and other hazards (such as freeze damage) when shipped.
Install The FeetOnce the machine is out of its shipping packing it is important to install the four chrome cylindrical feet.
These were packed in the small cardboard box that was packed in the drip tray area. Place the rest of the con-tents of that box off to the side for now.
CAUTION: The machine must not be used with-out the feet installed. They allow air to circu-late under the machine to keep the electronics from overheating. They also keep the machine’s weight from damaging the power cord. Damage to the machine from not installing the feet is not covered by the warranty.
NOTE: Check the length of the threaded studs on the feet. If there are two each of different lengths, the long ones go in the rear of the machine and the two with shorter studs fit in the front
To install the feet, place a folded towel or other suitable, padded protection behind the machine and care-fully tip it up on its back. This makes access to the bottom of the machine a lot easier and greatly lessens the chance of cross-threading. Hand tighten the feet and tip the machine forward onto its feet.
After installing the four feet, get assistance to lift the DD, and place it onto the counter where it will be located for use.
Shipping Protection, Internal Packing WarningLook on the outside of the shipping carton or inside the carton for a printed warning stating you must
remove internal shipping packing. You must follow the directions on the sheet, if so included, for further in-formation on how to accomplish this.
WARNING: Operating the machine with internal shipping packing in place can damage components in the machine, and in extreme circumstances can constitute a fire hazard. Damage from operating the machine with the Instapak inside the case of the DD is not covered by the warranty.

16
Water Quality
All coffee beverages start with two things- coffee and water. Because the majority of espresso is water, it should come as no surprise that quality water is important to the taste of the espresso. Water that is too high in minerals can eventually create problems for your machine and even cause failures. Water that is too low in mineral content can cause over-filling of the steam boiler. Either condition can degrade the quality of the espresso. So what water to use?
CAUTION: Damage to the machine caused by poor water quality, particulate matter in the water, in-sufficient mineral content, or other water-quality issues are not covered by the warranty. If you are in doubt, take steps to assure that the water you are using is up to standards before using the DD.
The Vibiemme DD cannot use distilled or reverse osmosis (RO) water because these waters contain virtu-ally no minerals. The water level sensor in the steam boiler requires a small amount of minerals to sense the water level. Without these minerals being present, the boiler may be overfilled and that can cause numerous problems including damage to the machine. These types of “pure” water can also leach copper from the boil-ers and related plumbing in the machine, having the potential to eventually cause very expensive damage. On the other hand, water too high in mineral content can cause rapid buildup of hard-water deposits known as scale. The buildup of scale can reduce boiler volume, cause poor heating performance, slow water and steam delivery, and can eventually lead to clogged water passages and even heating element failure.
Your water company should be able to supply you with water test data for the water supplied to your home. If such information is not available to you, inexpensive water test kits are readily available for purchase and these can be used to test the hardness of your water. At the minimum your should know the “General Hardness” (also referred to as alkaline hardness) and the carbonate hardness of the water you are using. It is beyond the scope of this manual to include detailed information regarding water quality and its effect on the taste of the espresso and the life of your espresso machine.
For a DD connected to a plumbed water source, having an inline carbon filter can improve the taste of the water as well by removing chlorine and other contaminants which affect taste. You may also wish to use a particle filter which will keep sediment, sand, and other foreign particles carried in your water out of the machine. If you find you have to clean grains of sand or small bits of minerals out of the screens on the home’s faucets and the inlet screens on your washing machine, a particle filter is highly recommended. Beyond that, if your water is high in carbonate hardness, a softener cartridge can remove virtually all traces of the carbonate hardness, preventing scale build up as long as the softener system is effective. Consult your retailer to help decide which possible solutions would work best for you.
NOTE: If you have any doubts as to the quality of your water, consult your local water utility or your retail agent where you bought your machine and learn about water testing and treatment solutions. It will help you make better espresso and extend the life of your DD.
17
Water Supply Choices
The Vibiemme Double Domobar gives you two choices to supply water to the machine. You can manually fill the reservoir located inside the case at the rear of the machine, or you can choose to connect the machine directly to a pressurized water source and supply it much like water is supplied to your kitchen faucet. Each method of supplying water has its place and its own benefits.
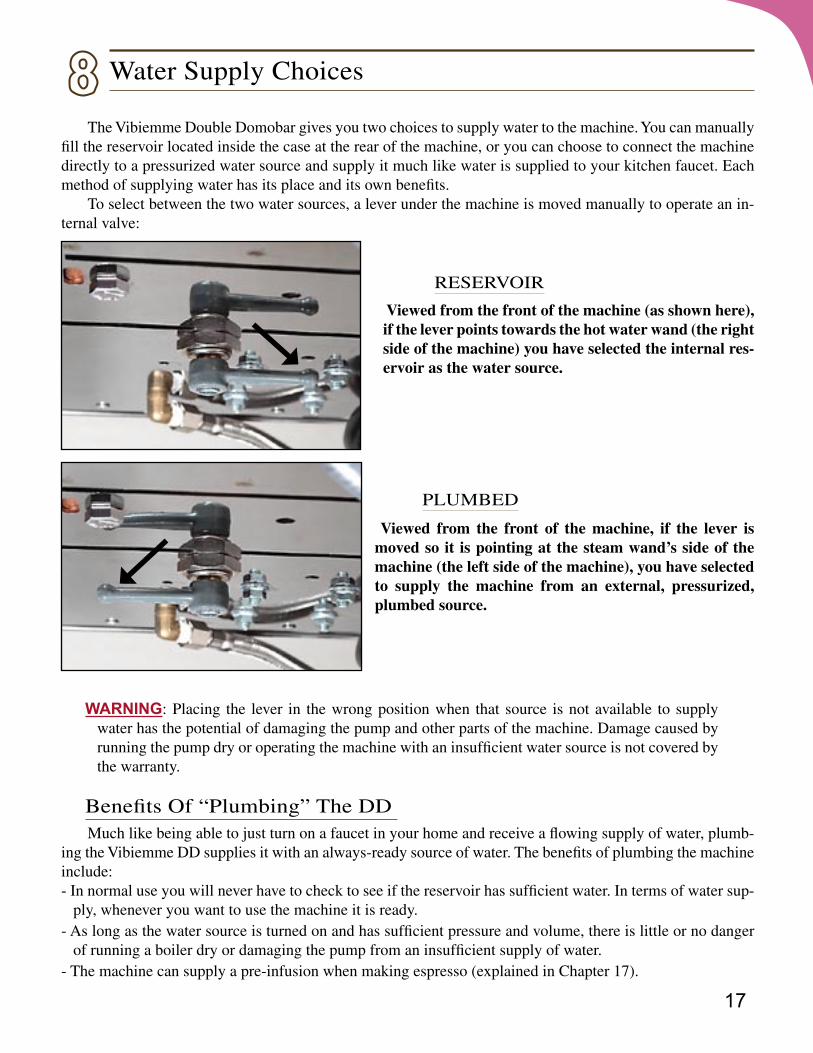
To select between the two water sources, a lever under the machine is moved manually to operate an in-ternal valve:
WARNING: Placing the lever in the wrong position when that source is not available to supply water has the potential of damaging the pump and other parts of the machine. Damage caused by running the pump dry or operating the machine with an insufficient water source is not covered by the warranty.
Benefits Of “Plumbing” The DDMuch like being able to just turn on a faucet in your home and receive a flowing supply of water, plumb-
ing the Vibiemme DD supplies it with an always-ready source of water. The benefits of plumbing the machine include:- In normal use you will never have to check to see if the reservoir has sufficient water. In terms of water sup-
ply, whenever you want to use the machine it is ready. - As long as the water source is turned on and has sufficient pressure and volume, there is little or no danger
of running a boiler dry or damaging the pump from an insufficient supply of water.- The machine can supply a pre-infusion when making espresso (explained in Chapter 17).
Viewed from the front of the machine, if the lever is moved so it is pointing at the steam wand’s side of the machine (the left side of the machine), you have selected to supply the machine from an external, pressurized, plumbed source.
Viewed from the front of the machine (as shown here), if the lever points towards the hot water wand (the right side of the machine) you have selected the internal res-ervoir as the water source.
RESERVOIR
PLUMBED

18
NOTE: For those users who choose to plumb the machine, Chapter 11 details setting up and starting the machine using the plumb option. Chapter 10 should first be followed by all users to verify that the reservoir option also operates correctly.
Why Use The Reservoir?With all the benefits of a plumbed machine, why use the reservoir? There are situations where you may
have no choice. It may be that the water available is too harsh and you cannot install a treatment system. Or possibly you are in a location that does not allow installing the necessary plumbing lines, such as in a rental property.
Additionally, users who choose to plumb the DD will eventually use the reservoir option to temporarily supply the machine with a chemical mixture to descale the machine which is discussed in detail in Chapter 20. Switching to the reservoir makes it a very easy matter to run the descaling solution through the boilers without having to remove the outer case cover.
Whichever water source you choose, by moving the lever (whether to the reservoir or the plumbed posi-tion), the other source is isolated and will not supply water to the machine. Whichever you choose as your primary water supply, be sure to consider the quality of the water to ensure long life of your Vibiemme DD.
Chapter 10 details setting up and starting the machine using the reservoir.
PlumbedDetails are given on setting up and using the Plumbed source in a later Chapter 11. But be aware that each
community has various requirements regarding how to connect plumbing, so if you are planning on connect-ing the machine directly to the water supplied to your home, consult a licensed plumber. It is important that if the pressure of the water source varies or exceeds about 40 PSI (3 BAR), that you use a pressure regulator that is set to approximately 40 PSI (3 BAR). High pressures can cause leaks and may result in damage. Irregular pressure can lead to inconsistent results.
WARNING: Damage to the machine caused by improper plumbing, high pressure, particulate mat-ter in the water, or other similar water-source problems is not covered by the warranty. These can also create hazardous situations such as leaks occurring inside the machine.
CAUTION: Improper plumbing techniques or design can cause leaks which can damage property. These leaks and the damage that can be caused are not covered by the warranty.
19
Drip Tray
The drip tray catches water from the exhaust valve, flushing of the group, and other waste water that comes from the machine. You have two choices when it comes to the drip tray. You can use the drip tray as a self-contained catch-pan, or it can be plumbed into a waste drainage system.
If the tray is plumbed into a waste system, it eliminates the need to empty the tray. When the drain oper-ates properly, all the waste water runs into the tray and out of the DD through the supplied hose. This is an excellent feature, particularly for those who plumb the machine. If you use that option as well, it means you will be relieved of the duty of checking the tray as well as checking level of water in the reservoir- no more refilling, and no more dumping.
If you have to use the self-contained drip tray, be aware that its capacity is limited. Do not allow the waste water in the tray to get more than about 1½” (35 mm) deep. The hole at the back-left of the tray can allow the water to drip into the machine and will cause spilling when removing the tray and bringing it to the sink for disposal.
CAUTION: The drip tray must be checked and emptied regularly. Do not allow the water level to reach the punched hole in the back-left of the drip tray. This will cause water to leak under the drip tray, into the machine, and onto the counter. Water damage is not covered by the warranty.
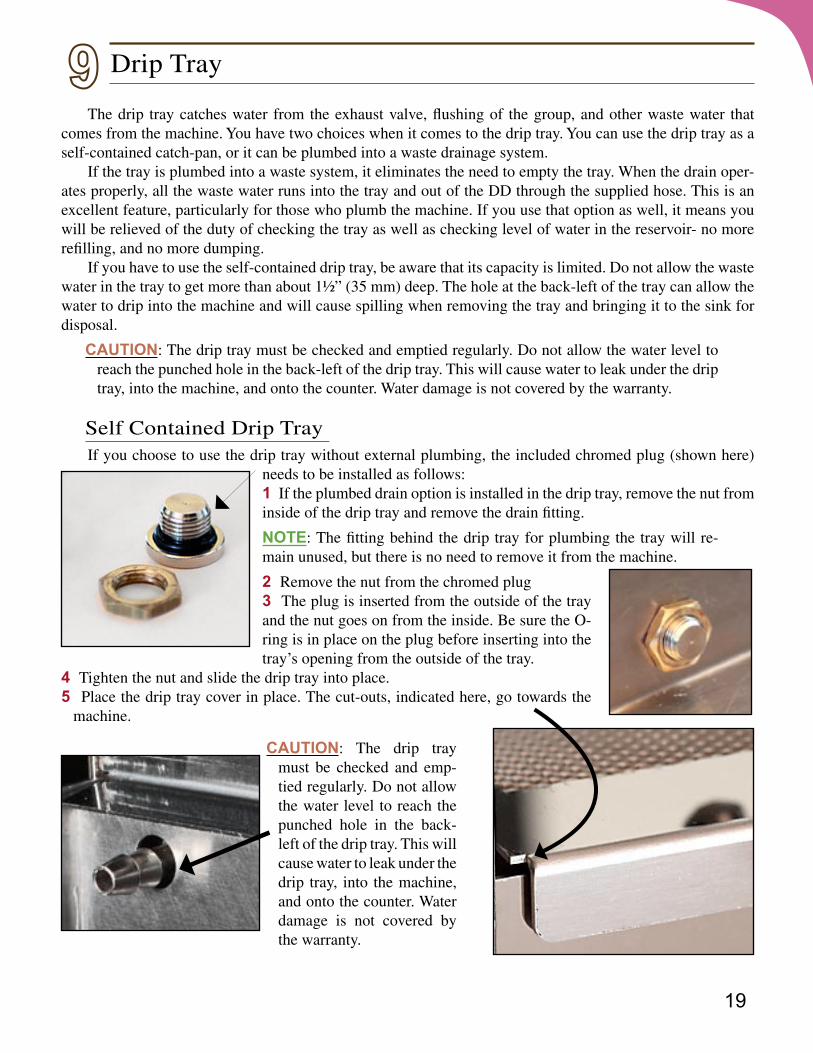
Self Contained Drip TrayIf you choose to use the drip tray without external plumbing, the included chromed plug (shown here)
needs to be installed as follows:1 If the plumbed drain option is installed in the drip tray, remove the nut from inside of the drip tray and remove the drain fitting.
NOTE: The fitting behind the drip tray for plumbing the tray will re-main unused, but there is no need to remove it from the machine.
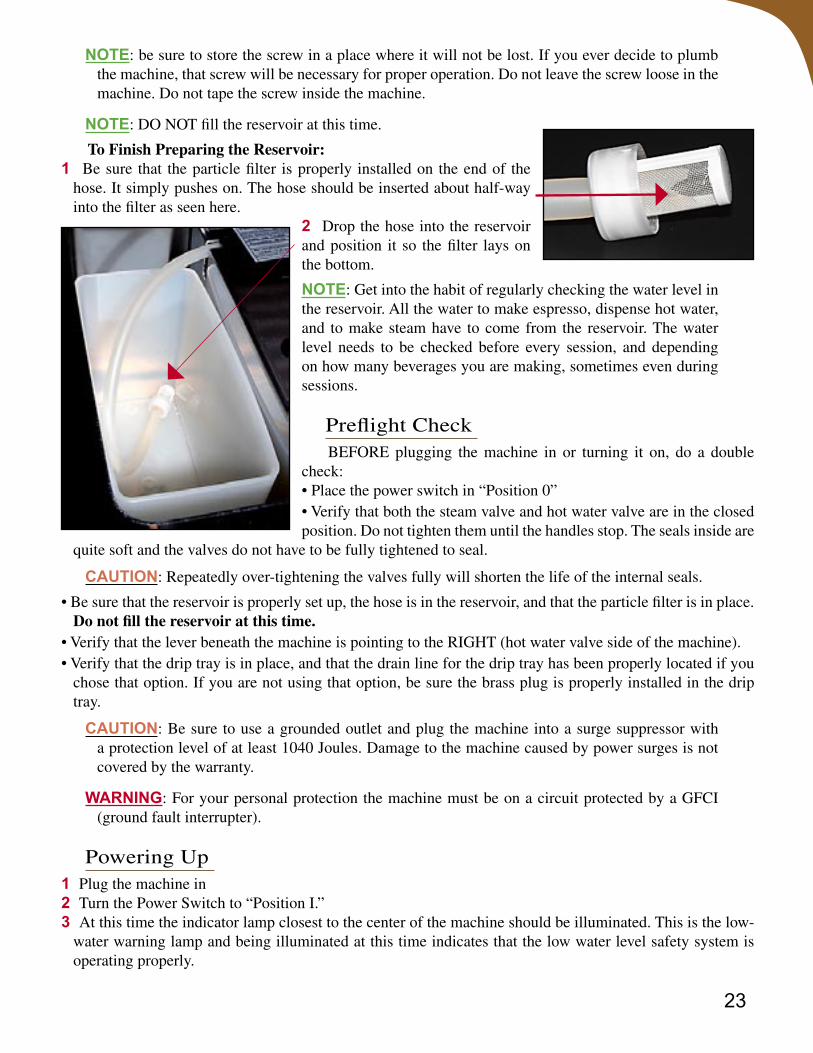
2 Remove the nut from the chromed plug3 The plug is inserted from the outside of the tray and the nut goes on from the inside. Be sure the O-ring is in place on the plug before inserting into the tray’s opening from the outside of the tray.
4 Tighten the nut and slide the drip tray into place.5 Place the drip tray cover in place. The cut-outs, indicated here, go towards the
machine.
CAUTION: The drip tray must be checked and emp-tied regularly. Do not allow the water level to reach the punched hole in the back-left of the drip tray. This will cause water to leak under the drip tray, into the machine, and onto the counter. Water damage is not covered by the warranty.

20
Plumbing The Drip TrayThe drip tray may come with the plumbing fitting (seen here) installed
on the drip tray. It “plugs” into a “socket” on the machine so that water will flow out of the tray and through that fitting. Two O-rings on the tray’s fitting eliminate leakage at that point.
CAUTION: Check to see that the nut holding the brass drain fitting on the drip tray is tight. If left loose, water will leak, get under the drip tray, into the machine, and onto the counter. Water damage is not covered by the warranty.
If the plumb option is being used, be sure to use the included seal which may be a white plastic washer or a black O-ring, and place it on the plumb fitting before inserting the fitting through the back of the drip tray from the outside of the tray. The nut is tightened on the inside of the drip tray.
To complete the drainage system of the drip tray you need to attach the included rein-forced vinyl hose to the barb fitting under the machine. That hose then needs to be routed to send the waste water away from the ma-chine. There are a number of ways to deal with that. It could be as simple as running the hose along the counter’s back-splash and into the nearest sink.
Be aware that this hose drains by grav-ity, and waste cannot flow “uphill.” Along its length the hose should not run “uphill.” This can create a water dam which can result in flooding of the drip tray.
Another method could be to drop the end of the hose into a waste container. If you choose that method, keep these things in mind:• A large plastic container such as a one gallon plastic water bottle (not included) should be sufficient for at
least a week or two’s use. When choosing such an option take care that the bottle will remain upright.• A larger size can allow you to go for an extended period of time before having to empty the waste container,
but we recommend emptying it regularly to avoid unwanted growth and odors in the area which also may constitute a health hazard.
• Be sure that the container is vented to allow the air in it to be displaced by the water flowing in. • The waste container should be placed so that children and pets do not have access to it.
NOTE: The waste must be collected and handled according to local health and safety codes. Check with the local health department or building code engineer to assure you are in compliance.
The waste hose can also be connected in such away as empty into your structure’s existing waste (sewage) system. Be aware that building codes generally are quite strict as to how waste systems are connected. Con-necting a waste line improperly has the potential to direct waste into the drip tray or to allow sewage gas to vent into the drip tray. For safety and sanitary reasons, we advise that you consult a licensed plumber before connecting the drain hose directly to a structure’s waste-water drainage or sewage system.
WARNING: Connecting a waste line improperly has the potential to direct waste into the drip tray or to allow sewage gas to vent into the drip tray. This can create a very serious health hazard.

21
After connecting the hose to the barb fitting, and depending on how the hose is run, you may need to secure the hose onto the fitting with a tie-wrap or hose clamp (not included). Additionally, make sure that the nut securing the fitting to the machine, behind the area where the drip tray slides in, is tightened and the other end of the drain hose cannot be dislodged out of the drain location.
CAUTION: If either end of the hose is not properly connected or comes loose, the waste water from the drip tray may cause property damage. Such damage is not covered by the warranty.
Whichever method you choose, no portion of the hose anywhere along its length can be higher than the drip tray. Waste water cannot run uphill, and if the hose is too high it will cause the drip tray to overflow.
CAUTION: If the water level in the drip tray reaches the punched hole in the back of the drip tray, water will leak under the drip tray, into the machine, and onto the counter. Water damage is not covered by the warranty.
Whichever option you choose, always verify that the drip tray is fully inserted into the machine. This will help ensure that all waste water is captured in the drip tray.
Whether plumbed or not, the drip tray should be removed weekly for cleaning. Wash with a sponge and warm, soapy waster, rinse and towel dry to avoid water stains. Wipe up any spills in the frame of the machine before replacing the tray.

22
Final Setup And Initial Startup - Reservoir
NOTE: This chapter will take you through setting up the machine in order to use water from the internal reservoir. Even if you plan on plumbing the machine, it is important to first verify that the reservoir option operates properly. You will eventually need to use the reservoir to descale the machine, and if for no other reason, we would like you to verify that the reservoir option is working properly while the machine is still under warranty.
WARNING: Until told to do so later in this section, DO NOT plug the machine’s power cord in!
Reservoir Water SupplyTo prepare the machine to use the reservoir, the gray lever on
the bottom of the machine must be turned so that it points to the RIGHT side of the machine (when facing the machine from the front). That is, pointing to the same side as the hot water tap.
CAUTION: If this lever is in the wrong position the pump can be run dry and damaged. Damage from operating the machine with insufficient water supply is not covered by the warranty.
The next step is to lift off the top cover of the machine using the two handles, lift the hose out of the reservoir, and remove the water reservoir from the machine. Wash it using a small amount of mild detergent and a soft sponge, rinse thoroughly to remove all traces of soap, and dry the reservoir. Never use any abrasive scrubbing pads or products which might scratch the plastic of the reservoir.
Looking down into where the reservoir normally resides, you will see its platform. The vertical movement of this platform operates a microswitch. When the water level gets low, the reservoir weighs less, and so the platform is lifted by the action of the springs upon which it rests. Before the reservoir runs dry, a switch under the platform will shut down the machine and the low water lamp will be illuminated. If that happens, neither the pump nor the heating elements will operate.
NOTE: The platform is captured in the machine and is not removable.
Before using the reservoir it is best to remove the screw that is located in the center of the platform. If left in place it can vibrate to a tighter position and defeat the water level safety switch. If that happens the machine can run low on water and be damaged.
CAUTION: Damage to the machine from running low on water is not covered by the warranty.
After removing the screw it is important to check the operation of the water level safety switch. To verify that the switch is working properly, place the empty reservoir back into the machine and slowly press the reservoir downward. When it descends about 1/2 inch (1 to 2cm) you should hear a click sound. That is the switch. Now release the reservoir slowly, and once again there should be another click.
If those “clicks” do not occur contact your reseller for technical assistance.
23
NOTE: be sure to store the screw in a place where it will not be lost. If you ever decide to plumb the machine, that screw will be necessary for proper operation. Do not leave the screw loose in the machine. Do not tape the screw inside the machine.
NOTE: DO NOT fill the reservoir at this time.
To Finish Preparing the Reservoir:1 Be sure that the particle filter is properly installed on the end of the
hose. It simply pushes on. The hose should be inserted about half-way into the filter as seen here.
2 Drop the hose into the reservoir and position it so the filter lays on the bottom.
NOTE: Get into the habit of regularly checking the water level in the reservoir. All the water to make espresso, dispense hot water, and to make steam have to come from the reservoir. The water level needs to be checked before every session, and depending on how many beverages you are making, sometimes even during sessions.
Preflight CheckBEFORE plugging the machine in or turning it on, do a double
check:• Place the power switch in “Position 0”• Verify that both the steam valve and hot water valve are in the closed position. Do not tighten them until the handles stop. The seals inside are
quite soft and the valves do not have to be fully tightened to seal.
CAUTION: Repeatedly over-tightening the valves fully will shorten the life of the internal seals.
• Be sure that the reservoir is properly set up, the hose is in the reservoir, and that the particle filter is in place. Do not fill the reservoir at this time.
• Verify that the lever beneath the machine is pointing to the RIGHT (hot water valve side of the machine).• Verify that the drip tray is in place, and that the drain line for the drip tray has been properly located if you
chose that option. If you are not using that option, be sure the brass plug is properly installed in the drip tray.
CAUTION: Be sure to use a grounded outlet and plug the machine into a surge suppressor with a protection level of at least 1040 Joules. Damage to the machine caused by power surges is not covered by the warranty.
WARNING: For your personal protection the machine must be on a circuit protected by a GFCI (ground fault interrupter).
Powering Up1 Plug the machine in2 Turn the Power Switch to “Position I.” 3 At this time the indicator lamp closest to the center of the machine should be illuminated. This is the low-
water warning lamp and being illuminated at this time indicates that the low water level safety system is operating properly.

24
4 Fill the reservoir slowly and carefully. The use of a large funnel or a pitcher with an easy-to-control stream is recommended. When there is approximate-ly one inch (about 2.5 cm) of water, or possibly a little more in the reservoir, the low-water warning lamp should go off. The PID display should now be illuminated.
CAUTION: If the low-water warning lamp is now off and the PID display does not illuminate or shows odd, unreadable characters which do not clear in a few seconds, turn the power switch to “Position 0,” unplug the machine, and contact your reseller for technical sup-port.
As soon as the lamp goes off and you verify that the PID display is showing legible characters: 4a Turn the power switch to “Position 0.” Look inside the reservoir. The water level should be just covering
the intake filter. This verifies that the switch is properly adjusted and working as designed. 4b Finish filling the reservoir to within about 1/2” of the top.
CAUTION: If the lamp did not turn off, stop, turn the power switch to “Position 0”, unplug the ma-chine, and contact your reseller for technical support.
Priming the Pump Rotary pumps were not originally intended to draw water from a reservoir. Because of that, it is a good
idea to prime the pump this first time to be sure that it will correctly draw water from the reservoir. It is not always necessary to do this when first starting up a new machine, but it insures that the pump is protected from running without water. Follow these directions to prime the pump:5 Lift the hose out of the reservoir and remove the filter from the end of the hose.6 Hold the hose straight up and using a suitable tool (turkey baster, syringe, or small funnel for example)
completely fill the hose with water. 7 While still holding the filled hose upwards in one hand, turn the power switch to “Position 1” and lift the
brew lever all the way. Almost immediately, the water in the hose should be drawn into the pump. As soon as the water level in the hose begins to recede, immediately lower the brew lever fully and turn the power switch to “Position 0.”
8 Replace the filter on the end of the hose and drop it into the reservoir
Initial Filling of the Boilers 9 With the reservoir filled, lift the brew lever fully and turn the power switch to “Position I.” You should hear
the pump begin to run immediately you should see the water level begin to drop in the reservoir. In thirty seconds or less, water should come from the group. As soon as it does, lower the brew lever all the way. The pump might continue to run because the DD is filling the steam boiler. If the level does not begin to drop right away, lower the lever to turn off the pump and turn the power switch to “Position 0,” and return to Step 5, “Priming the Pump,” and repeat that procedure.
WARNING: If the reservoir level does not begin to drop within the first five seconds, lower the brew lever completely and turn the power switch to “Position 0”. Unplug the machine, and consult your reseller for technical support. Leaving the machine on with no or low water in either boiler can damage the machine! This type of damage is not covered by the warranty.
10 When the pump stops, recheck the reservoir’s water level. Because the DD’s steam boiler is quite empty upon delivery the first refill will use more water than subsequent activities.
NOTE: Remember to regularly check the water level of the reservoir.
11 When the pump stops and the reservoir has been refilled, lift the brew lever to the brew position (fully up). The pump will run again and water will once again issue forth from the group and flow into the drip tray.
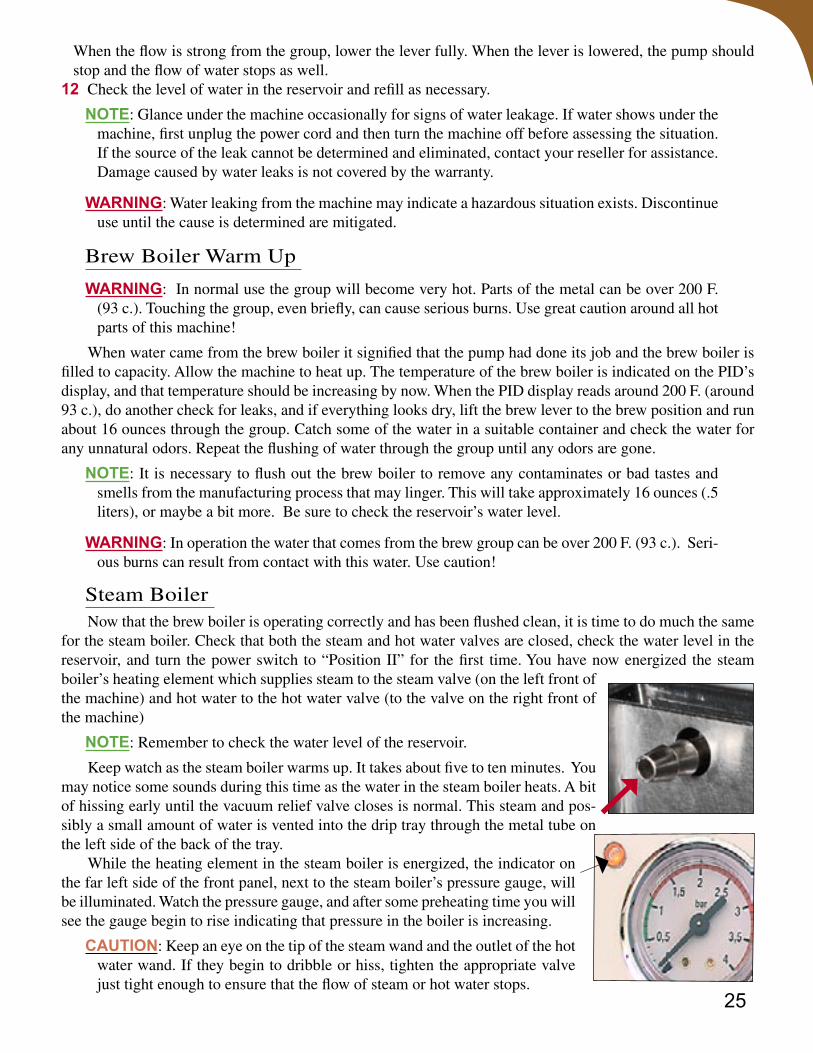
25
When the flow is strong from the group, lower the lever fully. When the lever is lowered, the pump should stop and the flow of water stops as well.
12 Check the level of water in the reservoir and refill as necessary.
NOTE: Glance under the machine occasionally for signs of water leakage. If water shows under the machine, first unplug the power cord and then turn the machine off before assessing the situation. If the source of the leak cannot be determined and eliminated, contact your reseller for assistance. Damage caused by water leaks is not covered by the warranty.
WARNING: Water leaking from the machine may indicate a hazardous situation exists. Discontinue use until the cause is determined are mitigated.
Brew Boiler Warm Up
WARNING: In normal use the group will become very hot. Parts of the metal can be over 200 F. (93 c.). Touching the group, even briefly, can cause serious burns. Use great caution around all hot parts of this machine!
When water came from the brew boiler it signified that the pump had done its job and the brew boiler is filled to capacity. Allow the machine to heat up. The temperature of the brew boiler is indicated on the PID’s display, and that temperature should be increasing by now. When the PID display reads around 200 F. (around 93 c.), do another check for leaks, and if everything looks dry, lift the brew lever to the brew position and run about 16 ounces through the group. Catch some of the water in a suitable container and check the water for any unnatural odors. Repeat the flushing of water through the group until any odors are gone.
NOTE: It is necessary to flush out the brew boiler to remove any contaminates or bad tastes and smells from the manufacturing process that may linger. This will take approximately 16 ounces (.5 liters), or maybe a bit more. Be sure to check the reservoir’s water level.
WARNING: In operation the water that comes from the brew group can be over 200 F. (93 c.). Seri-ous burns can result from contact with this water. Use caution!
Steam BoilerNow that the brew boiler is operating correctly and has been flushed clean, it is time to do much the same
for the steam boiler. Check that both the steam and hot water valves are closed, check the water level in the reservoir, and turn the power switch to “Position II” for the first time. You have now energized the steam boiler’s heating element which supplies steam to the steam valve (on the left front of the machine) and hot water to the hot water valve (to the valve on the right front of the machine)
NOTE: Remember to check the water level of the reservoir.
Keep watch as the steam boiler warms up. It takes about five to ten minutes. You may notice some sounds during this time as the water in the steam boiler heats. A bit of hissing early until the vacuum relief valve closes is normal. This steam and pos-sibly a small amount of water is vented into the drip tray through the metal tube on the left side of the back of the tray.
While the heating element in the steam boiler is energized, the indicator on the far left side of the front panel, next to the steam boiler’s pressure gauge, will be illuminated. Watch the pressure gauge, and after some preheating time you will see the gauge begin to rise indicating that pressure in the boiler is increasing.
CAUTION: Keep an eye on the tip of the steam wand and the outlet of the hot water wand. If they begin to dribble or hiss, tighten the appropriate valve just tight enough to ensure that the flow of steam or hot water stops.

26
WARNING: The valve bodies as well as the steam wand and hot water wand can be hot enough to cause serious burns. Get into the habit of assuming that they are hot and handle them appropriately.
When the pressure indicated on the gauge is at about 1 BAR and the heating element activity light goes off, place an appropriate vessel under the hot water wand and slowly open the valve. Hot water should issue forth from the wand.
WARNING: The water from the hot water wand can be dispensed with great pres-sure. It will be very close to the boiling temperature of water which can cause very serious burns! Use extreme caution when dispensing hot water! Open the valve slowly and carefully. Less then ½ turn of the valve is sufficient. The steam that comes from the vessel when dispensing hot water can be dense enough to cause burns, and hot water that splatters can also constitute a burn hazard. Never hold the vessel with your hands while dispensing hot water!
When you have dispensed about six to eight ounces of water, shut off the valve, dispose of the water care-fully and safely. The pump will run to automatically refill the boiler. The pressure gauge will indicate a drop in pressure. Wait for pressure to build again in the boiler.
You may be aware of an odor in the water that was just dispensed. That is normal the first time the ma-chine is used. Repeat the dispensing of about six to eight ounces of water in this way, waiting for the boiler to refill and for pressure to build up in the steam boiler, and carefully discarding the water each time. Repeat until the odor is no longer present in the dispensed water.
When the odor is gone, repeat this using the steam function. Once again, with a suitable vessel under the steam wand, slowly open the steam valve and allow a good amount of steam to escape. When first opening the steam valve it is normal for some hot water to spray out. Be ready with a suitable vessel held with the wand well enveloped by the vessel to catch the spraying water. The use of a steaming pitcher, held by the handle is advised.
WARNING: The steam from this machine is very powerful and has the potential to cause very seri-ous burns almost instantly. The steam wand will become very hot during use and will stay very hot after use. Use extreme caution, and open the valve slowly and carefully when dispensing steam! A spurt of hot water can also come from this wand when first opening it.
After about twenty seconds or so, close the steam valve and wait for pressure to build again. Repeat this until the steam loses any unnatural odor.
CAUTION: Check under the machine once again to verify that there are no leaks. If any leaks are noticed, unplug the machine and turn the power switch to “Position 0.” If the source of the leak is not easily found, contact your reseller for technical assistance.
NOTE: If you are plumbing the machine to an external water source, go to Chapter 11. Users who will continue to use only the reservoir to supply water to the machine may now go directly to Chapter 12.
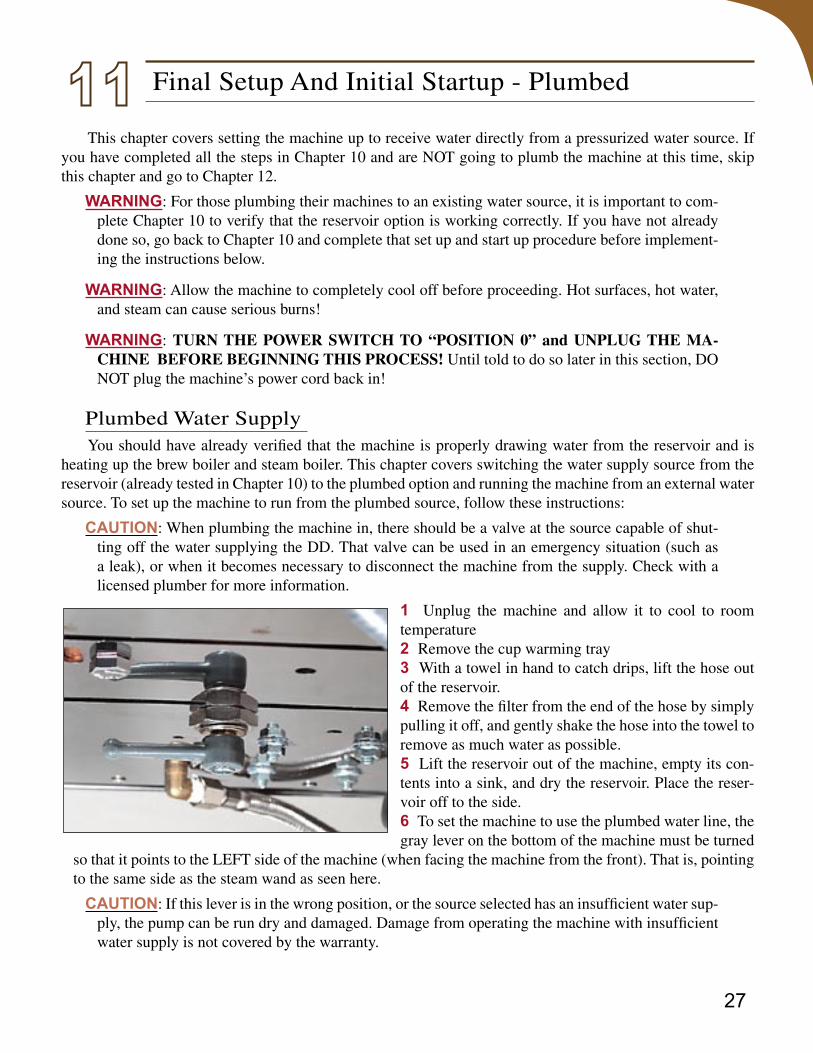
27
Final Setup And Initial Startup - Plumbed
This chapter covers setting the machine up to receive water directly from a pressurized water source. If you have completed all the steps in Chapter 10 and are NOT going to plumb the machine at this time, skip this chapter and go to Chapter 12.
WARNING: For those plumbing their machines to an existing water source, it is important to com-plete Chapter 10 to verify that the reservoir option is working correctly. If you have not already done so, go back to Chapter 10 and complete that set up and start up procedure before implement-ing the instructions below.
WARNING: Allow the machine to completely cool off before proceeding. Hot surfaces, hot water, and steam can cause serious burns!
WARNING: TURN THE POWER SWITCH TO “POSITION 0” and UNPLUG THE MA-CHINE BEFORE BEGINNING THIS PROCESS! Until told to do so later in this section, DO NOT plug the machine’s power cord back in!
Plumbed Water SupplyYou should have already verified that the machine is properly drawing water from the reservoir and is
heating up the brew boiler and steam boiler. This chapter covers switching the water supply source from the reservoir (already tested in Chapter 10) to the plumbed option and running the machine from an external water source. To set up the machine to run from the plumbed source, follow these instructions:
CAUTION: When plumbing the machine in, there should be a valve at the source capable of shut-ting off the water supplying the DD. That valve can be used in an emergency situation (such as a leak), or when it becomes necessary to disconnect the machine from the supply. Check with a licensed plumber for more information.
1 Unplug the machine and allow it to cool to room temperature2 Remove the cup warming tray3 With a towel in hand to catch drips, lift the hose out of the reservoir. 4 Remove the filter from the end of the hose by simply pulling it off, and gently shake the hose into the towel to remove as much water as possible. 5 Lift the reservoir out of the machine, empty its con-tents into a sink, and dry the reservoir. Place the reser-voir off to the side. 6 To set the machine to use the plumbed water line, the gray lever on the bottom of the machine must be turned
so that it points to the LEFT side of the machine (when facing the machine from the front). That is, pointing to the same side as the steam wand as seen here.
CAUTION: If this lever is in the wrong position, or the source selected has an insufficient water sup-ply, the pump can be run dry and damaged. Damage from operating the machine with insufficient water supply is not covered by the warranty.

28
7 The reservoir platform’s center screw has to be tightened until the microswitch clicks. This closes the low-water safety switch allowing the machine to operate without water in the reservoir. Slowly tighten the center screw while carefully listening for the water-level safety microswitch to click. After the click, turn the screw at least one more additional turn. If you do not hear the click, loosen the screw fully and try again, tightening the screw until the audible click occurs. 8 Connect the included braided water hose to a cold-water source. The large fitting on the supplied steel-mesh, reinforced hose has a female end 3/8” BSPP threads (British Standard Parallel Pipe) so an appropri-ate adapter is required (not included - contact your reseller).
CAUTION: This machine is only designed to draw in cold water. The pump can be damaged by being supplied with heated water. Damage to the pump from hot water is not covered by the war-ranty.
CAUTION: Be aware that the pump is not designed to draw wa-ter against gravity so if you are intending on using a self-contained water source (such as a large water bottle) it is recommended to use a pump system to supply the source water under pressure to the machine. Damage to the pump from insufficient water supply is not covered by the warranty.
9 Before connecting the other end of the supply line to the machine, hold the free end of the hose in a suitable container (like a pail or bucket) and have someone else turn on the supply line’s shutoff valve (that valve is not part of the DD and is not included with the DD). Run approximately one gallon of water through the hose to clear it of any loose debris, Teflon tape bits, or any other foreign debris to keep this from entering the machine.
CAUTION: Water can come from this hose with sufficient force to cause the hose to come out of the container and spray water about the area. Water damage is not covered by the warranty.
CAUTION: An inline particle filter is highly recommended. The pump as well as valves and other parts of the machine can be damaged by grit, sand, or other similar foreign matter in the water. Damage caused by water that is not filtered is not covered by the warranty.
CAUTION: Line pressure should be no more than about 40 PSI. Higher pressures can force the water refill valve to open which can overfill the steam boiler.
10 Turn off the water supply.11 Remove the protective cap on the 90 degree fitting on the bottom on the DD (cap not shown here), and
fit the smaller end of the included braided hose to the fitting. Use Teflon tape to assure that the threads are sealed. Do not allow any Teflon tape to be placed in a way that could possibly allow the Teflon to get into the water stream and subsequently into the DD’s water system.
12 Check that the brew lever is in the off posi-tion (moved fully down), and turn the supply valve for the water supply back to the on posi-tion. In a short time you should see the brew pressure gauge on the right side of the panel indicate the line pressure. This is normal.

29
NOTE: When the machine is plumbed, and the water line is pressurized (on), the brew pressure gauge will read the line pressure or higher. Very high readings will sometimes occur when the machine is on and idling (not used), and that is normal. The only time that this gauge shows useful information is generally when you are extracting espresso.
NOTE: If the pressure on the line is excessive it has the potential to cause leaks and inconsistent per-formance. In the case of high pressure or irregular pressure in the supply line, a pressure regulator is recommended to be placed inline with the supply source.
CAUTION: Check all connections for leaks, and be sure to check under the machine for leaks as well. Damage caused by water leaks is not covered by the warranty.
CAUTION: If the plumbed water supply has to be shut off for any reason, it is advised to set the power switch to “Position 0” and unplug the machine’s power cord from the outlet. If the machine is powered on without a water supply it is possible to damage the pump and other parts of the ma-chine. Damage from insufficient water supply is not covered by the warranty.
13 At this point, lift the brew lever and check that water flows at a regular rate through the group.
CAUTION: When the machine is plumbed, if the lever is lifted and you are not in attendance, water can overflow the drip tray and cause property damage. The catch bottle (if so used) can overflow as well. Do not leave the DD unattended with the brew lever in the up position.
Powering Up The DDDo a double check:
• Place the power switch in “Position 0”• Verify that both the steam valve and hot water valve are in the closed position. Do not tighten them until the
handles stop. The seals inside are quite soft and the valves do not have to be fully tightened to seal.
CAUTION: Repeatedly tightening the valves fully will shorten the life of the internal seals.
• Be sure that the water source is properly set up, and that the lever beneath the machine is turned in the proper direction. Looking under the machine from the front you should see the lever pointing to your LEFT for plumbed.
• Verify that the drip tray is in place, and that the drain line for the drip tray has been properly located if you chose that option. If you are not using that option, be sure the brass plug is properly installed in the drip tray.
• Lift the brew lever and wait until a good flow of water issues froth from the group and into the drip tray. Once it is shown that there is water flowing, fully lower the brew lever.
CAUTION: Be sure to use a grounded outlet and plug the machine into a surge suppressor with a protection level of at least 1040 Joules. Damage to the machine caused by power surges is not covered by the warranty.
WARNING: For your personal protection the machine must be on a circuit protected by a GFCI (ground fault circuit interrupter).
14 Plug the machine in15 Turn the switch to “Position I.” You should notice that the PID display on the front panel shows a startup
sequence and then will display the current temperature of the water in the brew boiler. The pump may run to automatically fill the steam boiler with water. Once the steam boiler is filled to the level determined by the water level sensor, the autofill electronics should turn the pump off.

30
CAUTION: If the PID display does not illuminate or shows odd, unreadable characters which do not clear in a few seconds, turn the power switch to “Position 0”, unplug the machine, and contact your reseller for technical support.
NOTE: The indicator lamp to the LEFT of the brew pressure gauge on the right side of the front panel will never be illuminated if you are using the plumbed option.
16 Glance under the machine occasionally for signs of water leakage. If water shows under the machine, first unplug the power cord and then turn the machine off before assessing the situation. If source of the leak cannot be determined and eliminated, contact your reseller for assistance. Damage caused by water leaks is not covered by the warranty.
WARNING: Water leaking from the machine may indicate that a potentially hazardous situation exists. If water is leaking, first unplug the machine, then turn the power switch to “Position 0”, and turn off the water supply valve at the source. Discontinue use until the source of the leak is determined and mitigated.
17 If everything seems as it should be at this point, lift the brew lever again. The pump should start (it can be heard) and a stronger flow of water should come from the group. Lower the lever fully and the pump should stop.
Brew Boiler Warm Up
WARNING: In normal use the group will become very hot. Parts of the metal can be over 200° F. (93 c.). Touching the group, even briefly, can cause serious burns. Use great caution around all hot parts of this machine!
Allow the machine to heat up. The temperature of the brew boiler as indicated on the PID’s display should be moving upwards. When the PID display reaches around 200° F. (93 c.) Do another check for leaks, and if everything looks dry, run about 16 ounces (.5 L.) through the group by lifting the brew lever. Catch some of the water in a suitable container and check the water for any unnatural odors. Repeat until any odors are gone.
NOTE: It is necessary to flush out the brew boiler to remove any contaminates or bad tastes and smells from the manufacturing process that may linger. This will take approximately 16 ounces (.5 liters), or maybe a bit more. Even though this may not be necessary if correctly completed in Chapter 10, it will help remove any air in the lines which was introduced when switching water sources and connecting the plumb water hose.
WARNING: The water that comes from the brew group can be over 200° F. (93 c.). Serious burns can result from contact with this water. Use caution!
Steam BoilerNow that the brew boiler is operating correctly and has been flushed clean, it is time to do much the same
for the steam boiler. Check that both the steam and hot water valves are closed and turn the power switch to Position II.” You have now energized the steam boiler which supplies steam to the steam valve (on the left front of the machine) and hot water (to the valve on the right front of the machine).
WARNING: The water that comes from the brew group can be over 200° F. (93 c.). Serious burns can result from contact with this water. Use caution!
Allow about five or ten minutes for the steam boiler to heat up. You may notice some sounds during this time as the water in the steam boiler heats. A bit of hissing early on until the vacuum relief valve closes is normal. This steam and possibly a small amount of water is vented into the drip tray through the metal tube on the left side of the back of the tray.

31
If the heating element in the steam boiler is energized, the indicator on the far left side of the front panel, next to the steam boiler’s pressure gauge, will be illuminated. Watch the pressure gauge, and after some pre-heating time you will see it begin to rise indicating that pressure in the boiler is increasing.
CAUTION: Keep an eye on the steam wand and the hot water wand. If they begin to dribble or hiss, tighten the appropriate valve just tight enough to ensure that the flow of steam or hot water stops.
WARNING: The valve bodies as well as the steam wand and hot water wand can be hot enough to cause serious burns. Get into the habit of assuming that they are hot and handle them appropri-ately.
When the pressure indicated on the gauge is at about 1 BAR and the steam boiler activity light goes off, place an appropriate vessel under the hot water wand and slowly open the valve. Hot water should issue forth from the wand.
WARNING: The water from the hot water wand will be very close to the boiling temperature of water. The water can cause very serious burns! Use extreme caution when dispensing hot water! Open the valve slowly. The steam that comes from the vessel when dispensing hot water can be dense enough to cause burns, and hot water which can splash can also constitute a burn hazard. Do not hold the vessel using your hand while dispensing hot water!
When you have dispensed about eight ounces of water, shut off the valve, dispose of the water safely, and wait for pressure to build again in the boiler. You may be aware of an odor in the water. That is normal the first time the machine is used. Continue dispensing water in this way, carefully discarding the water each time, until the odor is no longer present.
Now repeat this using the steam function. Once again, with a suitable vessel under the steam wand, slowly open the steam valve and allow a good amount of steam to escape. When first opening the steam valve it is normal for some hot water to spray out. Be ready with a suitable vessel held with the wand well encircled by the vessel to catch the spraying water.
WARNING: The steam from this machine is very powerful and has the potential to cause very seri-ous burns almost instantly. The steam wand will become very hot during use and will stay very hot after use. Use extreme caution when opening the steam valve and when dispensing steam!
After about twenty seconds or so, close the steam valve and wait for pressure to build again. Repeat this until the steam loses any unnatural odor.
CAUTION: Check under the machine once again to verify that there are no leaks. If any leaks are noticed, unplug the machine, turn the power switch to “Position 0”, and contact your reseller for technical assistance.

32
PID Operation And Adjustment
The PID has various settings and functions that can be changed by the user. This section leads you through the various settings, explaining their function as well as giving step-by-step instructions on how to change each of them and which to leave alone.
WARNING: There are certain PID settings that if changed can have a negative effect on the opera-tion of the DD. Damage to the machine or property, personal injury, or negative performance can be the result, and such damage or difficulties are not covered by the warranty.
PID DisplayThe digital display on the front panel of the DD normally displays the temperature of the water in the
boiler in real time. You will notice some drift in the temperature as various factors affect the temperature. Normally, when the machine is idling, that will not be more than about one or momentarily two degrees.
During an extraction, you will notice that the temperature displayed will drop which is a normal occur-rence. Even though the brew boiler water is preheated before entering the brew boiler, the incoming water is still slightly cooler than the water already heated in the brew boiler. The temperature that really matters is the temperature of the water hitting the coffee. Tests with sophisticated equipment have shown that the drift in temperature at the coffee is within a one degree range. This is a positive result from the design of the DD and how the water is transported out of the boiler and to the coffee. So don’t be concerned about the change in the display’s temperature reading when an espresso extraction is taking place.
On and OffAt any time you desire, you can turn the PID on or off. ON is the factory default when the machine is first
powered up. If you turn the PID off, that becomes the default, even if the machine is unplugged. The button to the right of the PID’s display controls this function. To turn the PID off, when the machine has powered up and the PID displays the brew-boiler’s temperature, press and hold the PID Power button for approximately one second until “oFF” is displayed. Repeat to turn the PID’s function back on.
NOTE: When the PID is turned off, the brew boiler’s heating element is no longer energized and the water in the brew boiler begins to cool.
CAUTION: Only change the temperature settings with the brew boiler on (the PID display should show the current brew boiler temperature). “oFF” should not be displayed before making changes.
Changing The Measurement System (C or F)The PID system can be easily changed to display your choice of Centigrade or Fahrenheit units of tem-
perature measurement:1 With the power switch in “Position 0,” hold down both PID buttons at the same time turn the power switch
to either “Position I” or “Position II.”2 Continue holding the buttons down until the display reads “F.03”. 3 Release the buttons4 Press the right button to display the current default temperature measurement system which will be either
“°F” or “°C.” Press either button to toggle between “°F” or “°C”. If no button is pressed for a period of ap-proximately two seconds, the display will revert to “F.03.” Pressing the right button will once again display the last-selected temperature measurement system.
5 To commit the change to the PID’s memory, release the buttons and turn the DD off. Next time you turn the DD on, the last-selected measurement system will be in use and remain the default until changed by the user.
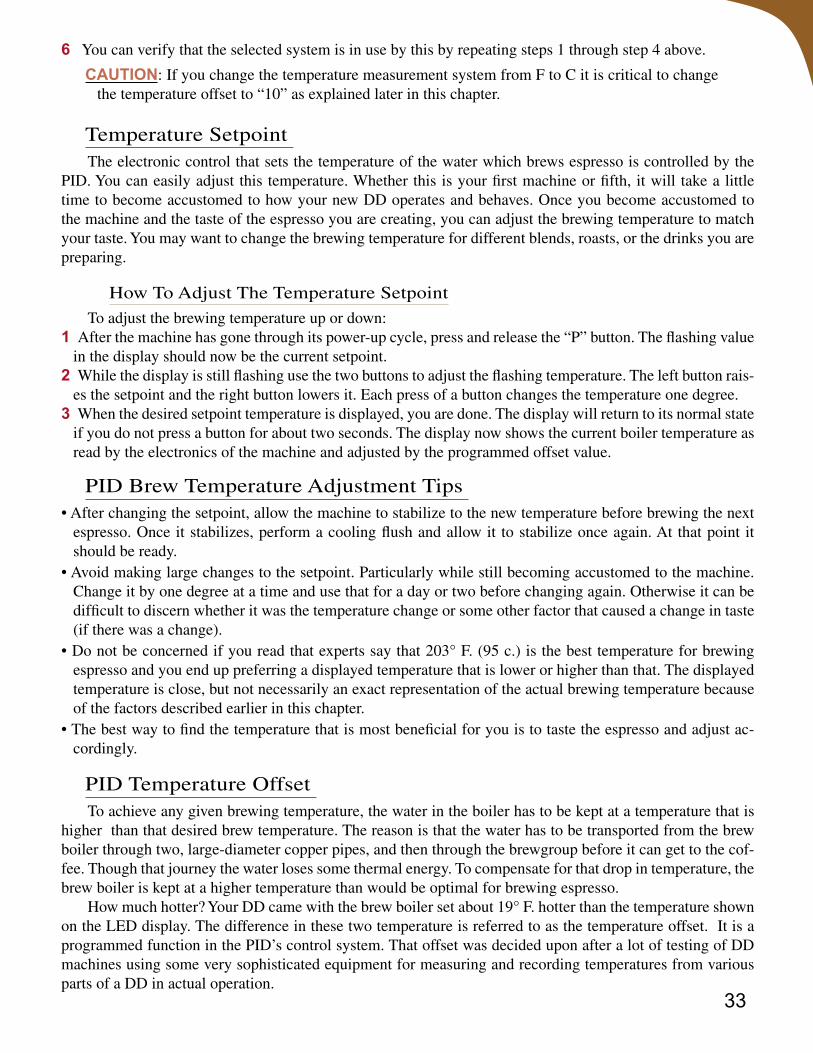
33
6 You can verify that the selected system is in use by this by repeating steps 1 through step 4 above.
CAUTION: If you change the temperature measurement system from F to C it is critical to change the temperature offset to “10” as explained later in this chapter.
Temperature SetpointThe electronic control that sets the temperature of the water which brews espresso is controlled by the
PID. You can easily adjust this temperature. Whether this is your first machine or fifth, it will take a little time to become accustomed to how your new DD operates and behaves. Once you become accustomed to the machine and the taste of the espresso you are creating, you can adjust the brewing temperature to match your taste. You may want to change the brewing temperature for different blends, roasts, or the drinks you are preparing.
How To Adjust The Temperature Setpoint
To adjust the brewing temperature up or down:1 After the machine has gone through its power-up cycle, press and release the “P” button. The flashing value
in the display should now be the current setpoint. 2 While the display is still flashing use the two buttons to adjust the flashing temperature. The left button rais-
es the setpoint and the right button lowers it. Each press of a button changes the temperature one degree. 3 When the desired setpoint temperature is displayed, you are done. The display will return to its normal state
if you do not press a button for about two seconds. The display now shows the current boiler temperature as read by the electronics of the machine and adjusted by the programmed offset value.
PID Brew Temperature Adjustment Tips• After changing the setpoint, allow the machine to stabilize to the new temperature before brewing the next
espresso. Once it stabilizes, perform a cooling flush and allow it to stabilize once again. At that point it should be ready.
• Avoid making large changes to the setpoint. Particularly while still becoming accustomed to the machine. Change it by one degree at a time and use that for a day or two before changing again. Otherwise it can be difficult to discern whether it was the temperature change or some other factor that caused a change in taste (if there was a change).
• Do not be concerned if you read that experts say that 203° F. (95 c.) is the best temperature for brewing espresso and you end up preferring a displayed temperature that is lower or higher than that. The displayed temperature is close, but not necessarily an exact representation of the actual brewing temperature because of the factors described earlier in this chapter.
• The best way to find the temperature that is most beneficial for you is to taste the espresso and adjust ac-cordingly.
PID Temperature OffsetTo achieve any given brewing temperature, the water in the boiler has to be kept at a temperature that is
higher than that desired brew temperature. The reason is that the water has to be transported from the brew boiler through two, large-diameter copper pipes, and then through the brewgroup before it can get to the cof-fee. Though that journey the water loses some thermal energy. To compensate for that drop in temperature, the brew boiler is kept at a higher temperature than would be optimal for brewing espresso.
How much hotter? Your DD came with the brew boiler set about 19° F. hotter than the temperature shown on the LED display. The difference in these two temperature is referred to as the temperature offset. It is a programmed function in the PID’s control system. That offset was decided upon after a lot of testing of DD machines using some very sophisticated equipment for measuring and recording temperatures from various parts of a DD in actual operation.

34
The temperature offset gives the user a convenient way to refer to the brewing temperature without doing the math to figure out the difference between the displayed temperature and the brewing temperature, except that temperature offset is not always a precise indication of the actual brewing temperature. There are a num-ber of environmental and other factors which can affect the actual brew temperature, and thus the accuracy of the offset. Factors may include: • How long the machine has been on• The temperature of the air around the group in the room in which it is located• Air movement in the room caused by the number of people who walk past the machine while it idles• Whether an air conditioner or a fan blows on the machine• The altitude
Changing The Temperature Offset ValueWe recommend leaving the offset temperature programmed at its default setting of 19 until you become
quite accustomed to the machine or have a specific reason for changing it. To adjust the offset:1 With the power switch in “Position 0,” hold down both PID buttons at the same time turn the power switch
to either “Position I” or “Position II.”2 Continue holding the buttons down until the display reads “F.03”. 3 Release the buttons4 Repeatedly press and release the left button and cycle through the various display parameters until the
display reads “F.04.” 5 When “F.04” is displayed, press the right button once to display the programmed offset temperature.
CAUTION: In Fahrenheit the temperature offset default value is 19. If you change the tempera-ture measurement system to centigrade it is important to change the offset value to 10.
6 Press the right button to increase the offset temperature or the left button to decrease the offset temperature. If no change is made for a period of approximately two seconds, the display will revert to “F.04.” Pressing the right button will bring back the last selected offset temperature.
7 Once the desired offset temperature is displayed, to commit it to memory, release the buttons and turn the DD power switch to “Position 0.” Next time you turn the DD on, the last-selected offset will be applied. You can verify this by repeating step 1 through step 5 in this section. To leave the programming mode and return to standard operation the DD has to be turned off then on again.
Verifying All PID SettingsThere are six settings in the PID’s system. The three sections above cover the measurement unit system,
brew temperature setpoint, and the brew boiler temperature offset. These are the only settings which should be changed by the user unless directed to do so by the reseller or an authorized technical support representa-tive. The other three are the P, I, and D values which create a mathematical system used to regulate how the electronics control the brew boiler temperature. Generally, we do not recommend changing these settings, and you do so at your own risk. This section is placed here so that you can verify that the settings are correct in case you make a mistake at some point when adjusting other parameters:
WARNING: Changing these P, I, or D values, either purposely or accidentally, can have a negative affect on the operation of the DD. Damage to the machine or property, personal injury, or negative performance can be the result, and such damage or difficulties are not covered by the warranty.
1 With the power switch in “Position 0,” hold down both PID buttons at the same time turn the power switch to either “Position I” or “Position II.”
2 Continue holding the buttons down until the display reads “F.03” then release the buttons.3 Press and release the left button. Display now reads “P.”
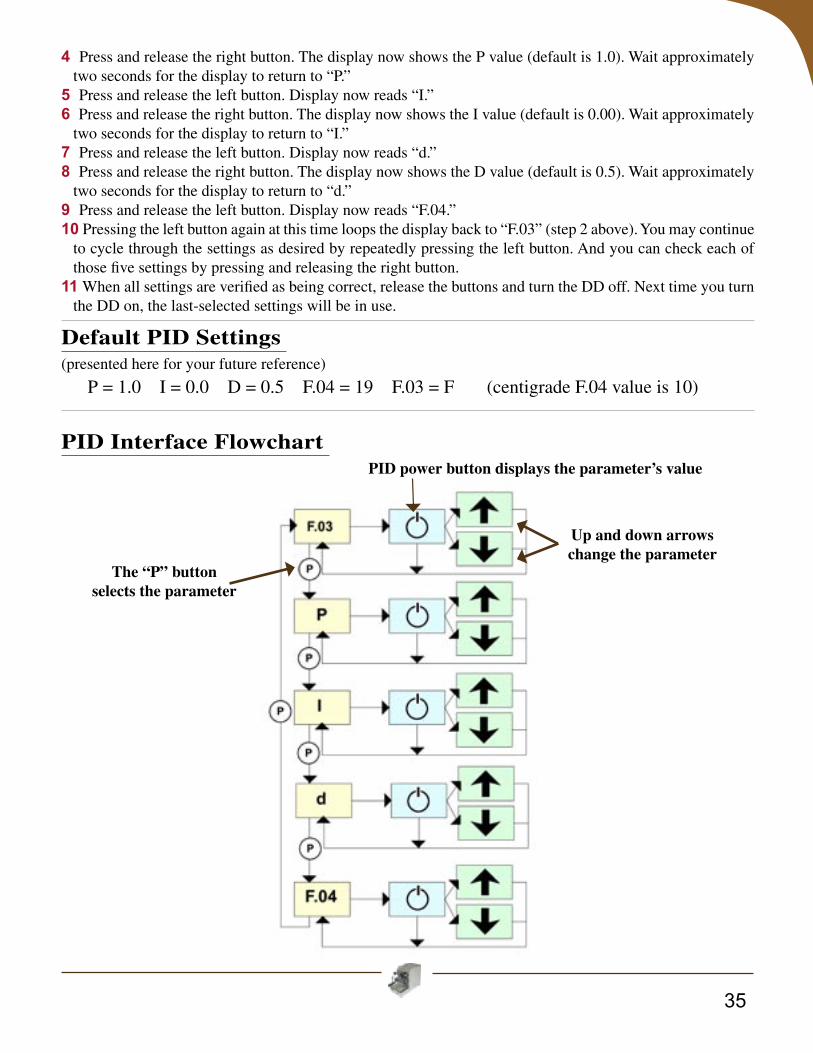
35
4 Press and release the right button. The display now shows the P value (default is 1.0). Wait approximately two seconds for the display to return to “P.”
5 Press and release the left button. Display now reads “I.” 6 Press and release the right button. The display now shows the I value (default is 0.00). Wait approximately
two seconds for the display to return to “I.”7 Press and release the left button. Display now reads “d.” 8 Press and release the right button. The display now shows the D value (default is 0.5). Wait approximately
two seconds for the display to return to “d.”9 Press and release the left button. Display now reads “F.04.” 10 Pressing the left button again at this time loops the display back to “F.03” (step 2 above). You may continue
to cycle through the settings as desired by repeatedly pressing the left button. And you can check each of those five settings by pressing and releasing the right button.
11 When all settings are verified as being correct, release the buttons and turn the DD off. Next time you turn the DD on, the last-selected settings will be in use.
PID Interface Flowchart
Up and down arrowschange the parameter
PID power button displays the parameter’s value
The “P” buttonselects the parameter
Default PID Settings (presented here for your future reference)
P = 1.0 I = 0.0 D = 0.5 F.04 = 19 F.03 = F (centigrade F.04 value is 10)

36
It’s All About The Coffee
Let’s take a few moments before making espresso and talk about coffee. Whatever the beverage you in-tend to make with your new Vibiemme Double Domobar, they all start with two things- water and coffee. It should be apparent that the “coffee taste” of the beverage comes from the coffee beans that you use, whether it be a straight espresso, an Americano, latte, or cappuccino.
Coffee Must Be FreshFirst and foremost, it is important that the coffee you use be fresh. Whatever the brewing method, fresh
coffee is always important, but never more so than when making espresso. If you buy coffee in bags or cans that say, “Best if Used By...,” followed by a date that is months away, you can be fairly-well assured that it is not fresh. Those beans, if properly packed, may be drinkable for the first day or so after opening, but it doesn’t take long for them to begin to taste stale. For espresso, coffee that is more than about two or three weeks old from the time it was roasted will probably not make the best possible beverage. Note that we are talking about the date the coffee was roasted, not the date it was shipped, not the date it was packed, and not the date you bought it. The first time that you are get to pull some shots of espresso using coffee that is just a few days old you will immediately notice the difference.
The best source of whole-bean, freshly-roasted coffee might be right in your local community. Find a lo-cal coffee roaster that can supply you with fresh beans. Many independent coffee shops now roast their own coffee or are supplied by a local roaster. Ask them on what day they usually roast and try to pick up your beans as close to the roasting date as possible. If you cannot find a local roaster, look for an online reseller who can supply fresh beans. Don’t be afraid to experiment. Order beans from various suppliers until you find something you like.
Home RoastingAnother source of fresh coffee could right at home! Roasted coffee lasts about two to three weeks before
being stale, but green (un-roasted) coffee beans can easily last a year if stored carefully. There are numerous coffee-roasting appliances available for home use, and an online search for “green coffee beans” will turn up more sources than you might imagine. If you are interested, talk to your reseller and find out what coffee-roasting appliance they recommend.
Grinding CoffeeThe phrase “whole beans” was used in a previous paragraph. We recommend that you never use pre-
ground coffee in your DD. When making espresso, the size of the coffee particles is critical. You have one of the very finest espresso machines available for home use and it deserves to be supplied with coffee ground in an equally capable grinder. The rate of flow of the espresso is regulated by how fine or how coarse the coffee is ground, so a grinder capable of accurate adjustment plays a huge part in creating fine espresso. How ac-curate? As little as a 0.001” (0.025 mm) can make a discernible difference in the final product. Beyond that, once coffee is ground it quickly can become stale and so it should be used within a few minutes of grinding. Whole beans, ground per use in a quality grinder, is the only way to get the best tasting espresso from your new machine.
The Roast LevelThe roast is also important. One of the most widely-held misconceptions is that coffee beans used for
espresso need to be very dark roasted. If you look at the bins of stale coffee at the supermarket you will often see nearly-black beans in a bin marked “Espresso Roast.” There is no such thing as “Espresso Roast.” Very
37
dark and oily beans are almost always over-roasted for most any coffee making method, especially espresso. There are exceptions, but they are rare. If you like the taste that dark-roasted coffee gives then that is fine, but give yourself the opportunity to experience the taste of properly roasted coffee which should only exhibit a few drops if oil here and there and have a dark oak or mahogany color to them. If there is a rule about roasting and espresso, we can say that the darker the beans, the less they will taste like coffee and the more they will taste of the roast alone. Additionally, if we risk generalizing once again, the darker the roast the more bitter the espresso.
Coffee StorageIf you are in a situation where you need to store beans for more than a week or ten days, the best solution
is as follows:Divide the coffee into a number of two-day or three-day portions. Place these in glass canning jars of a
volume that allows each jar to be filled as fully as possible so that as much air as possible is displaced by the presence of the beans. Seal the jars tightly (vacuum packing is not necessary) and place them in your freezer. Remove one jar the evening before you need more coffee in order to allow them to come up to room tempera-ture before being opened. This eliminates condensation on the beans.

38
Grind, Dose, Tamp
Let’s put the DD to work! You have spent a good amount of time making sure that the DD is properly setup and working as intended, so you deserve a nice espresso as a reward for your efforts. If this is your first time making espresso, don’t worry if things do not go quite as planned. Even the most confident and respected of baristas will pull a bad shot once in a while that ends up being poured into the sink. There are a lot of vari-ables that can turn what might have been a good beverage into something that should be tossed. With patience and practice you will get a feel for the process and become more and more successful in your efforts.
As we outline what you need to do to prepare coffee for pulling a shot of espresso please be aware that there is no one correct or best way to do this. Debates over this procedure continue to this day (and the de-bate will likely never end). Articles have been written, websites created, and books have been written on this process. These simple instructions are meant to give you a starting point. Over time you will create and refine your own procedure. Think of the following as a foundation from which to build.
Your goal at this point, as we have mentioned, is consistency. You are trying to do all the following tasks the same way each time. The one variable that you should be adjusting at this point, the grind, will be dis-cussed in detail in Chapter 15.
If you are new to making espresso (and even if you are not), the best advice we can offer is to keep things simple. It is easy to fall into a pattern of adding all sorts of steps, procedures, trials, and tribulations when it comes to making espresso. Strive to eliminate steps instead of adding them.
Let’s walk through the process:
Insert The PortafilterAt this point you are well on your way and will soon be ready to make espresso. While the machine is
warming up, take the two portafilter handles and three baskets and wash them in hot soapy water, rinse thor-oughly, and dry.
NOTE: Using nylon, metal, or other abrasive scrubbing pads or scouring powders will scratch the chrome, stainless and plastic parts of the machine. Only use a soft sponge to wash the portafilters and baskets.
Locate the correct portafilter. Your machine came with two portafilter handles and three baskets. These two are for making espresso:
A single basket is for making aboutone ounce of espresso at a time
A double basket (with more holes and greater volume) for making about two ounces at a time

39
Also included was a blind basket (with no holes) for backflushing. The use of that filter will be described fully in Chapter 19.
You were also supplied with two portafilter handles. These are identical as seen on the previous page ex-cept for one having a double spout to make it easier to pour into two cups at the same time, and the other has a single sided spout which is designed to pour into one cup.
NOTE: If you will be using cups that are wide enough to sit under both spouts of the double-spout portafilter, feel free to use the double to make a double espresso into one cup. The double spout also makes it a lot easier to hold the portafilter while tamping (explained later in this chapter). In other words, use any basket in either of the portafilter bodies at any time.
Choose the one you will be using to get started, insert the desired filter basket by simply pushing it in until is clicks fully into place, and lock the assembly into the brewhead. Always leave the portafilter in place while the machine is warming up so that it becomes fully warmed up along with the rest of the brew path.
NOTE: It is recommended to lock the portafilter that you will be using into the group when you turn on the machine. This allow the portafilter to heat up as the machine does.
Now it’s time to wait! Patience is a virtue when it comes to making espresso and here is our first example. The boilers, that huge brass brewgroup, the portafilter, and all the related metal parts connecting them all need to come up to temperature. As the brew boiler heats up, hot water will circulate through the brewgroup help-ing to speed things up. For best results allow at least twenty or thirty minutes from the time that the machine is first turned on before the machine will be used. When the PID display first shows the target temperature it only means the water inside the boiler is at the desired temperature. It takes additional time for the rest of the brewing path to be ready.
WARNING: The entire brewgroup and the portafilter will get hot enough to cause burns. Use cau-tion when using the machine, and if there are any small children in the home (or guests not ac-customed to such appliances) make sure that they are aware of the dangers and protect them from injury. Shiny chrome surfaces invite curious hands!
As the machine begins to warm up you can verify that the machine is operating properly by viewing the PID display and the steam boiler’s pressure gauge. The temperature displayed on the PID will usually stay within about one or two degrees of the preset temperature while the machine is idling (on but unused). If the power switch is in “Position II,” the steam boiler’s gauge will move through a range, upwards and downwards, of about .3 to .5 BAR after it has warmed up. That is normal.
Enough talk! Let’s make some espresso!
Warm UpYou should have already chosen the portafilter and basket for your current needs (a double basket for a
two ounce shot or a single basket for a one ounce shot). It should have been locked into the brewhead while the Domobar Super was warming up. Allow the machine to warm up for thirty minutes or more before the first use of the day.
WARNING: The Vibiemme Double is designed so that it can be safely left on all day. An unattended machine can be a hazard to children, pets, and adults not aware of the hot surfaces, hot water, and steam that can come from the machine. These all present the potential to cause very serious burns.
GrindLet’s take a brief aside to discuss the importance of the grinder itself. A huge part of espresso is an amount
of very finely-ground coffee with as little dust as possible, and with particles in a controlled size range. We cannot emphasize too strongly that your choice of grinder is critical for quality espresso. You have purchased

40
one of the finest espresso machines available and to get the most from it you need to use a grinder of equal quality.
A grinder specifically designed to be used for espresso is highly recommended. The best of these are designed to have an infinite range of adjustment so that fine-tuning of the grind can be accomplished. If you are shopping for a grinder or are not sure whether your grinder is up to the task at hand, please contact your reseller to discuss what grinder will best suit your needs.
DoseFor our purposes, the word “dose” will be used in two ways:
Dose 1 - (noun) - The amount of coffee used to make an espresso. “I used a sixteen gram dose for that double espresso.” 2 - (verb) - The act of dispensing coffee into the portafilter. “Dose the coffee into the portafilter carefully so that it is as level as possible.”
Remove the pre-heated portafilter from the brewhead and use a clean towel to wipe the inside of the basket dry. Perform a cooling flush which is discussed in more detail in Chapter 16. For now, remove the portafilter, lift the brew lever all the way, and allow the water to run into the drip tray for about four seconds.
WARNING: The water coming from the group at this time can easily be over 200° F. (93°C.). Use caution to prevent burns.
Following the directions for your grinder, set it for espresso (a very fine grind, almost like flour), and grind your fresh coffee beans, slightly over-filling the basket. As you fill the basket with ground coffee try to move the portafilter just enough to help the grounds fall from the grinder in such a way so no voids are left. Don’t worry too much about getting the grind exactly correct as we will be discussing this in greater detail in Chapter 15.
As you progress over time, a more controlled dose will give more consistent results. One method of con-trolling dose is to weigh the coffee. Record the weight of the complete portafilter before adding the coffee, and then weigh it again after you finish the dosing. You will need an accurate gram scale, and the recom-mended resolution is one-tenth of a gram or better to do this accurately. For the included portafilter double basket figure about 16 grams of coffee, and about 8 grams for a single as good starting points. Remember that all recommendations in regards to dose and tamp are just starting points. Adjust as necessary to get the best espresso for you.
LevelLevel off the dose (the mound of coffee) in the portafilter using a suitable tool. The straight handle of
a plastic coffee scoop works well. With some practice, even the backside of a bent finger can be used. Try to accomplish two things- the first is to not compact or compress the coffee. Work across the coffee and not downwards. The second goal is to try to fill all voids that may remain. Do that by working the coffee across in one direction and then change direction and push the coffee across again another to accomplish that goal. Make it easy on yourself— just do the minimum amount of work here to get things level and the coffee in the portafilter as evenly distributed as you can.
TampThe coffee needs to be physically compressed now. A proper-sized tamper is necessary to do that, and the
included tamper that came with your machine is sub-standard in this regard. Contact your reseller for a qual-ity, 58 mm tamper if you have not already purchased one.
Step one is to press down with about 10 pounds (4.5 kg) of force. For your first few attempts it is advised

41
to use a scale to measure the amount of force it takes to accomplish that. If you are new to this process, the amount of force needed to achieve a ten pound tamp is probably a lot less than you might think! For most people, ten pounds can be achieved with two fingers (but don’t attempt that). When tamping, grip the tamper comfortably and tamp in a way that leaves the top surface of the coffee level. You can judge that by keeping an eye on the tamper and compare its position to the top edge of the filter basket.
Remove the tamper and inspect the coffee to see if the coffee is mostly level in the basket. A level surface is one indication of good coffee distribution and level tamping. A level surface gives a better chance of the water passing evenly through the entire mass of coffee during the extraction process.
Tamp once again with about 30 to 35 pounds (13 to 16 kg) of force. That’s it. Twisting of the tamper to “polish” the surface, tapping on the side of the portafilter, and other such steps are not necessary, and in some cases will do more harm than good if quality espresso is your goal. To reiterate, keep things simple and elimi-nate unnecessary steps whenever possible.
Place the tamper off to the side and use your hand to wipe off the loose coffee from the top edge of the basket where it will seat up against the brewhead gasket. Many baristas will invert the portafilter over the grinder’s doser to clear it of loose coffee (if you have a doserless model, do this over a small bowl). This is a good test to assure that you have properly tamped the coffee. Do this carefully because, every once in a while, all the coffee will fall out of the basket!
Move the portafilter over to the brewhead and carefully lock it into place so as not to disturb the fine work you have done during preparation. Bumping the portafilter can dislodge the coffee in the portafilter and cause a poor shot.
Place a cup under the portafilter’s spout (or cups, or spouts as the case may be), and fully lift the brew lever.
Here comes the espresso!
42
The Espresso Speedometer
If everything in Chapter 14 went smoothly and was done within the necessary parameters, out dribbled some viscous, warm, dark, delicious espresso, but it doesn’t always work that way. Within all those prepara-tion steps you went through there are a lot of things that can cause poor results. This chapter is aimed at as-sisting you in diagnosing the problems and applying solutions.
Espresso has speeds- more accurately, it has rates of flow while being created. When you switched the machine to brew, the pump pushed water into the dedicated brew boiler and the hot water in the brew boiler was displaced and forced through the brewhead, through the coffee, and out of the portafilter into your cup. How it emerged, what it looks like, how fast it flows, and, most importantly, how it tastes, are all indications as to how well the previous steps were performed.
How Much, And How Fast?There is a volume of espresso that should take a certain amount of time to be created for best results.
Whether it is a double or single extraction, the extraction, or “pull,” should be about 25 seconds including pre-infusion time (See Chapter 17 for details on preinfusion). The term “Pull” comes from the original espresso machines that were lever operated and the barista had to “pull” the lever to push the water through the cof-fee.
As the espresso issues forth from the portafilter spouts you will notice that some extractions issue forth too slowly and others flow much too fast. There is a “sweet spot” of aligned parameters that is sometimes referred to as the “Golden Rule of Espresso.” The general parameters that define this (for a double espresso) are about 2 ounces (60 ml.) of espresso in about 25 seconds. For a single it is about one ounce in the same amount of time.
Let us stress “about” as it is used above. The so-called “Golden Rule of Espresso” is not really a rule, but a guideline- no more than a starting point. It should be considered just a foundation from which to begin your espresso education. While extractions of 20 seconds or less are usually not going to be acceptable, extrac-tions of thirty or forty seconds can be excellent. A very tasty double can be as little as 1.25 ounces (37 ml) to as much as 2.5 ounces (73 ml). Bottom line: There is no “rule” except what works for you and your personal taste. Think of these parameters as a bell curve with the greatest percentage of success to be at the central peak of the curve.
Learning what various flow rates look like so that you can visually identify when things are working as they should, as well as when they should, is a good place to begin. Below you will learn how to differentiate a good pull from bad as well learn solutions to most common problems.
In the three photographic examples that follow on the next two pages we are using a portafilter without spouts. The entire bottom of the portafilter’s body has been removed. These are often referred to as a “bottom-less portafilter.” When using this tool to make espresso you are presented with a show that is not only alluring, but also offers instant feedback as to whether your preparation process was successful or not. As you can see, it more effectively reveals what is going on. These portafilters are often referred to as “bottomless.” If hav-ing one of these “bottomless” portafilters interests you, they are available to you as an option. Contact your reseller for availability and cost.
Additionally, changing the setting on the grinder is one of the most important adjustments you will be making. Be sure to refer to your grinder’s owner’s manual for the proper method to accomplish a change in grind. It is always best to only change the grind setting while the grinder is running. After a change is made, run a little coffee through and discard the grounds as nearly all grinders retain some ground coffee in the grind chamber and the chute where it is ejected. The “old” grounds must be purged for accurate assessment of the change.

43
Too FastHere we see a flow of
espresso that is issuing forth too quickly. The flow seen here be-gan almost immediately, lacked viscosity (it is thin and watery), and was spraying espresso all over the counter. Notice that the color of the stream is quite light in color. The spraying jets are not noticeable with the original portafilter included with the DD, but the fast flow and light color certainly will be. The espresso will lack body (will be like water on the palate). These are all signs of under-extraction. Causes of under extraction can include:
• Too coarse of a grind. Set your grinder to a finer grind. How much finer? It depends on the grinder itself. As each brand works differently you will need to experiment to learn just how much to change the grind. The faster the flow the more the grinder will need to be adjusted towards a finer setting.
• Channeling. This is usually caused either by improper distribution of the coffee before tamping. The coffee may have been dosed with voids (air pockets) in the mass of grounds. The force of the water can bypass much of the coffee, flowing through the path of least resistance without extracting the rest of the coffee properly.
• Under-dosing. There was not enough coffee in the basket and so there was not enough resistance to the flow of water.
• Over-Dosing. Using too much coffee can cause the compacted coffee to hit the shower screen when insert-ing the portafilter into the group. This disturbs the coffee causing cracks in the compacted mass before extraction begins.
• Faulty basket. If a basket develops a crack it can flex open under brew pressure and allow the puck to be damaged causing a fast flow. If this is suspected, examine the area on the floor of the basket around the outer perimeter of the perforations which is where most cracks occur. This is a rare occurrence in home use.

44
Too SlowHere is a pull that lasted a long time and yet hardly an ounce was produced even though this was a double
basket and we should have double that amount in the cup. This photo was taken after about thirty seconds. Notice the dark, viscous flow which is a sign of over-extraction. This will usually result in a harsh taste that few would enjoy. Possible causes of this slow flow extraction could include:• Coffee ground too fine. Adjust the grinder one or two clicks (or settings) more coarse and try again.• Worn or inaccurate grinder burrs. Old, worn grinder burrs or a low-quality grinder can create a lot of
dust in the grind. This dust migrates towards the bottom of the basket during extraction and clogs the small openings, dramatically restricting the flow of water. This also results in a very bitter beverage because of the “fines” that end up in the cup.
• Low pump pressure. Although not likely, this can be caused by a mis-adjusted or faulty pressure relief valve on the rotary pump.
• Clogged filter basket. If enough of the holes in the filter basket are clogged it can slow the flow sufficiently to make proper extraction difficult or impossible. Wash and dry the basket and examine it by holding it up to a strong light source. If clogged, soak it overnight in espresso machine cleaner (See Chapter 19). If that does not correct the problem you can try using a pin to carefully clean the holes. If that does not work, re-place the basket.

45
At The Speed LimitHere we see a delicious, prop-
er flow that created about two ounces in about twenty-five sec-onds. It flowed from the spouts like warm honey, slow and thick, and although the color lightened a bit as it neared the end, even at its lightest color it was a rich, cara-mel tone. Looks good enough to drink!
The variables involved when choosing a grind, dosing an amount of ground coffee, and tamping can create a wide range of results. A grind that is one step finer on your grinder can create a different taste if combined with a slightly smaller dose of coffee. One step the other direction (coarser) and a harder tamp with a slightly fuller dose may be preferred with the coffee you are using. Add all the other variables such as the age of the coffee, how it was roasted, the ori-gin blend of the beans, and various brewing temperatures to which you set the PID and things can get quite complicated!
The best advice as you begin this journey is to work at getting all these variables as consistent as possible and just change the grind to create the best espresso you can. As you improve your skills you may notice that as a batch of coffee gets older you need to change the grind slightly. You may even notice that when the humidity in the air changes you need a different grind. Don’t get locked into a set routine. If something is not right in the taste of the coffee, don’t hesitate to modify your tech-nique. Try a different grind. Change the dose. If nothing seems to work, change the coffee.
When searching for a better taste, try to change just one factor at a time. If you change the grind, and the dose, and the PID temperature setting, and you get a better drink, which of the changes had the greatest affect on the taste? Using the scientific method of changing only one variable at a time in an “espresso experiment” will help you learn your machine and gain more insight as to how it best works for you. This is particularly true if this is your first machine or your first step into the realm of professional-quality machines.
The art and science of making excellent espresso is a journey as much as a destination. Enjoying the beverage is the destination, and there are many roads that will lead you to that delicious drink along your journey.
But please remember that in all adjustments you make, you are preparing a food product. The only thing that matters is how the espresso tastes.

46
Cooling Flush
One of the benefits of the Vibiemme Double Domobar is the thermosyphon built into the E-61 brewgroup. As you read in Chapter 3, convection recirculates hot water from the brew boiler through the E-61 brewgroup and back into the boiler which helps create thermal stability throughout the entire brewing path. With the PID control of the dedicated brewing boiler, the boiler and the group are held at a controlled temperature, ready to brew when you are. Temperature control and stability goes a long way to helping you get consistent results, and few machines in any price range can match the DD when it comes to brew temperature control and con-sistent performance.
You may have read that with some other espresso machines which have a thermosyphon system and E-61 group that a cooling flush is necessary. It is the same with the DD. But since the DD’s dedicated brew boiler does not have a heat exchanger and it does not have to hold steam, the amount of time (and thus, water) needed when performing a cooling flush is minimized. Usually just two to four seconds of cooling-flush time will be sufficient.
The reason to flush the brewhead and heat exchanger is that the water in the brewing path can slightly overheat. If the water in the boiler was exactly at brewing temperature, by the time it got to the coffee it would be too cold. To compensate for that the brew boiler is held about nineteen degrees hotter than the desired brew temperature (this is the temperature offfset discussed in Chapter 12). When the machine sits idling, that “extra” heat energy can be transferred into the upper thermosyphon tube and then into the E-61 group. Ad-ditionally, after extended periods of idling, a small amount of steam can build up in the water from dissolved air in the water that is released. If that overheated water or steam was used to brew coffee you might get an over-extracted, harsh tasting espresso. The cooling flush eliminates that over-heated water and assures that the brew path is closer the correct temperature.
A cooling flush couldn’t be much easier: Remove the portafilter and lift the brew lever as if you are mak-ing an espresso. That’s it - just lift the brew lever and count about three or four seconds as the hot water pours from the group into the drip tray, then fully lower the lever. Done. Now just grind, dose, tamp, lock in, and make espresso!
You will find that regardless as to how long the machine has been on, whether thirty minutes or three hours, about the same cooling flush duration is quite effective. This is due to the advanced design of the brew boiler and PID system. As you become more accustomed to how your DD operates, and how small changes affect the taste of the espresso, you can tailor the cooling-flush time to match your tastes. You may find that after the machine sits idling for more than an hour or two that a slightly longer flush is more effective.
If the machine is in current use, such as when making consecutive extractions, you only need to perform the cooling flush before the first extraction. After that, the design of the machine will maintain the proper tem-perature. The cooling flush only needs to be performed when the machine has been sitting, unused and idling (on) for longer than about twenty or thirty minutes.

47
Preinfusion
If you have chosen to plumb your machine to an external water source you have already read that the DD’s plumbing is pressurized all the time.*1 Lifting the brew lever at any time, even if the DD is disconnected from the power source, will allow a steady, low-pressure water flow out of the brewhead. This can be used to great advantage when making espresso.
For the DD to make espresso, water is forced through the coffee at approximately 130 PSI (around 9 BAR). The rotary pump is capable of delivering that in a very short time once the pump’s motor has been acti-vated. Because of this quick ramping-up of pressure, it limits the amount of time that the coffee has to absorb water and expand in preparation for delivering the espresso into the cup. An improvement in the espresso can be had by beginning the extraction in a slower, gentler way called preinfusion.
Just as the name infers, to preinfuse is to infuse some water into the coffee before actually beginning the full force of the extraction process. The benefit is that you get a more even, fuller extraction. The “pre-soaked” coffee also gets a chance to “pre-expand” which limits the chance of water finding an easy path through the coffee, thus limiting channeling.
How To Preinfuse1 Prepare to extract espresso just as you always have; grind, dose, tamp, lock the portafilter into the group,
and place a cup under the spouts. 2 Lift the lever to around halfway. When you reach that half-way point you will feel an increase in the resis-
tance to the movement of the lever. A slight amount further is where preinfusion will begin. To verify that you are a the correct position, watch the brew pressure gauge (the one on the right), and you will see the water pressure drop slightly when you have moved the lever the correct distance. You have opened the brew valve inside the group that allowed water in the thermosyphon tubes to enter the portafilter (see Chapter 3 for details). The pressure in the plumbed line is now pushing water into the boiler and then into the portafilter at low pressure. The coffee is getting wet. If you move the lever too far the pump may start. No need to panic about that, but it is best to just lift the lever all the way and allow the extraction to complete. Once the pump starts, lowering the lever has the potential to fracture the compacted coffee and ruin the extraction.3 After starting the preinfusion, count about three seconds, then lift the brew lever all the way to begin the extraction of espresso. You will notice that the espresso begins to drip out in a much shorter time than if you had just lifted the lever fully with no preinfusion.
How long should you preinfuse? There is no rule, as it is simply a matter of taste. It can be as little as two or three seconds. Some coffees benefit from longer times. You can even hold the lever in the preinfuse position until the first drops of espresso begin to dribble out of the portafilter spouts. As with all things espresso we recommend that you experiment. Use three seconds for a week, then try five seconds the next week and see if you can tell the difference. Or try two seconds. The rule for what you should do is: do what makes the best tasting espresso for you.
*1 The preinfusion process described above is effective only with a plumbed machine. A DD supplied by the internal reservoir will supply infusion at the beginning of the extraction process through the design of the E-61 group as explained in Chapter 3, but this will not be quite as effective as described here, nor does it offer the duration or control available in a plumbed machine.

48
Steaming Milk
Making a latte, cappuccino, or other similar milk and espresso beverages requires you to “stretch” milk. That involves using the steam wand to force steam and air into the milk causing the milk to increase in volume and viscosity. This is a skill that can take time to master. Although making stiff, fluffy foam is not hard, getting the fine microfoam that the finest baristas desire is more difficult.
This process is often referred to as “stretching” because the milk can increase from twenty-five to as much as fifty percent in volume, or even more! When done properly the process gives the milk an increased sweetness adding a delightful flavor to espresso. Adding about four ounces to a double espresso creates a cappuccino and adding about six ounces to a double creates a latte. Of course, there are no rules you need to follow- add as much or as little as you like to create the beverage that pleases you or your guests. That’s one of the great benefits of owning your own espresso machine!
If you have previously owned one of the basic, consumer-oriented machines, it may have been equipped with an enhancing attachment on the steam wand. These devices suck extra air into the steam and create a stiff, spoonable foam which is not what we are after. The steam wand on the Double Domobar has two holes and the steam boiler creates a lot of steam power. Careful use of this can create excellent microfoam- injudicious use will splatter milk right out of the pitcher!
WARNING: The steam from this machine is very powerful. Great care must be taken when using the steam function. Steam burns are very serious.
1 Begin the preparations by pouring desired amount of milk into your steaming pitcher. The milk should be cold. If difficulties persist in getting good results is can also be helpful to keep the pitcher in the fridge to keep it cold which will extend the time you have during the steaming process. There should be at least an inch or more of milk. The more the better, as long as there is room for the milk to swirl without spilling and to allow room for expansion. Don’t want to stretch that much milk? Use a smaller pitcher to achieve a suf-ficient starting depth. If the milk is too shallow in the pitcher, the power of the steam can splash it out of the pitcher, and there is a greatly-increased chance of making lots of big bubbles.
You also need to have a small towel or dishrag that has a portion of it soaked but not dripping. This is just to wipe off the steam wand as soon as it is removed from the milk. If milk is left on the wand, the heat of the metal will bake the milk which can be difficult to remove. Fold the wet rag into multiple layers to insulate your hand from the heat.
2 Start by purging the steam wand of moisture. Steam condenses in the steam wand’s plumbing and this must be removed before placing the wand in the pitcher. Carefully and slowly, open and close the steam valve a couple of times so that only steam comes out with no blasts of water. If you do not purge the wand, the blast of water will splash milk all over!
CAUTION: Steam is very hot and capable of causing serious burns. The metal steam wand will also be very hot and even a brief touch can cause burns. Hold the rubber safety cover on the wand when moving the wand. Use a towel, folded into multiple layers, to catch the water the comes out of the wand, or use a second pitcher held under the wand to catch the water that comes out.
NOTE: When closing the either the steam or hot water valve, close them just tight enough to stop leaks or drips. Over-tightening the valves will shorten the life of the seal inside.
3 At this time, take the already-filled steaming pitcher in hand and get ready. On the last blast when clearing the wand, as soon as you close the valve and the flow of steam diminishes, place the pitcher under the wand and lift the pitcher until the tip of the steaming wand is below the surface of the milk. Slowly and carefully turn up the steam by opening the valve.
49
If you do this correctly, the last bit of steam will be coming from the wand just as the wand enters the milk. This helps avoid the splashing you might get otherwise. It also helps avoid the contracting air in the wand from pulling milk into the wand.
Having the wand directly in the center of the pitcher, pointed straight down makes the best use of the Vibiemme steam wand. But depending on the design of your pitcher you may find that having it off to one side, or even tipping the pitcher may work better for you. But if you are accustomed to a one-hole steaming tip, this centered position is a good starting place.
How much should you open the valve? In most cases, once the steam flow begins even slightly, no more than about 1/4 turn is probably going to be sufficient. Anything over about 1/2 turn will not increase the power of the steam, but it will increase the time it will take to stop the process because of how far the valve will need to be turned to stop the flow of steam, which in turn will increase the risk of overheating the milk and ruining your efforts. If you find you have to open the valve further than about 1/4 to 1/2 turn, it could be that it was shut off too tightly the last time it was used. Remember, this is a commercial-quality machine and it delivers commercial-level performance!
4 Within the first few seconds the steam should be moving the milk in a repeating action or motion. If the milk is splashing like a boiling pot, try to reposition the wand in the milk, change the angle of the pitcher in relation to the steam wand, or turn the steam valve to decrease the force of the steam. Coordinating the pitcher’s angle, the depth of the wand, position of the wand in the pitcher, and the power of the steam takes practice. Don’t get discouraged.
5 We are still in the first few seconds of this process. Now that the milk is moving, lower the pitcher just far enough to get the wand a little closer to the surface. You should hear an occasional sound a little like ripping cloth. There is a delicate balance between drawing in a bit of air for a smooth action and drawing in too much air and creating a splashing, foamy mess. If done correctly you will hear an intermittent sound like “Tshhh.. Tshhhh.... Tssshhh.” If the tip of the wand is too close to the surface, the steam force will pull in to much air and you will hear, “BLURBBB blubbb BLURRB.” If you see large, visible bubbles (like dish washing suds) on the surface of the milk it means that too much air is being drawn in too quickly, caused by having the tip is too close to the surface.
Although that sounds easy, finding the balance between the two requires a delicate touch. Relax your hands and arms and let the machine do the work, but be ready to adjust the pitcher. You will learn to pre-dict the milk’s behavior over time. As the milk changes in volume you will need to adjust the height of the pitcher to keep the steam wand at the desired level. Do so carefully. Some of the milk on the surface may actually be foam and the power of the steam can push it into the milk causing it to cavitate which will bring on the dreaded BLURRBS! Holding the tip at too great of a depth during this part of the procedure will keep the steam from pulling in air, and all you might create is hot milk. Patience and practice will help you prevail.
NOTE: Don’t try to force the milk to stretch. The power of the steam and quality of the milk will do the work for you. “Forcing” more air into the milk to try to get better results will not help. Finesse is needed, not force.
6 After about the first five seconds of introducing air in this way, the milk will hit the 100° F. (40 c.) degree mark. No thermometer? No problem! If you are carefully holding your hand on the side of the pitcher, this is the time when the pitcher just starts to feel pleasantly warm to your hand. This is the time to raise the pitcher in order to move the tip of the steam wand deeper into the milk. You are trying to achieve two things: stop drawing in air and to get the milk to swirl. Now the steam is breaking up the tiny bubbles in the milk and creating micro-foam which is a coating of the milk’s fat around the protein molecules.
7 As with any fine art, one of the important lessons to learn is when to stop. When in doubt, it is generally better to stop sooner than later. A steaming thermometer can be a big help here. When you hit about 140° F. (60 c.) you need to have your hand on the steam valve because you should not go much past 145° F. (63 c.). Stopping the steam there you will notice that the thermometer will continue to climb a bit more to about
50
150° (70 c.) or a few degrees past that. If you get the milk too hot it will rapidly lose its stretch and volume. Beyond that point it will be scalded and can add a nasty taste to your beverage. Practice timing when to stop so the milk hits no more than about 150° F. (70 c.). With your hand on the pitcher, the time to stop is about the time the pitcher becomes, or is about to become, uncomfortably warm to hold.
CAUTION: The outer surface of the pitcher can get hot enough to cause you to jerk away. This can cause milk to splash out of the pitcher with a potential to cause burns.
So how to tell when you have gone far enough and have the right sort of consistency? Besides using the thermometer, if you have good light to enable you to see the surface of the milk as you work, during this final stretching phase you will see the surface change in the way it begins to reflect light. The milk’s surface will turn into a shiny, almost iridescent white with the sheen of silk. The viscosity will be somewhat like white latex paint.
8 When you think it is time to stop, by all means do so, and don’t hesitate. Better stopping just a bit too soon than going a bit too far! Holding the pitcher by the handle in one hand and carefully moving the other hand to the steam valve as you are in the last few seconds makes it easier to stop when the time is right.
When ready to stop, close the steam valve. While holding the pitcher still, pick up the wet rag with your free hand and then remove the pitcher from under the wand. As soon as the wand is exposed, use the wet rag to wipe the wand to remove the milk residue. When the exterior of the wand is clean, remove the rag and open and close the steam valve quickly to give a quick blast to clear the wand of any milk residue which may have gotten in through the holes in the tip.
CAUTION: The milk in the pitcher can be quite hot. Remove the pitcher carefully and only after the flow of steam has stopped. Removing the pitcher from the wand too soon can cause hot milk to be splashed out of the pitcher. Use care when wiping the wand as the metal parts it will be very hot. Use caution when releasing steam from an exposed steam wand. Hot steam can cause burns.
9 Examine the milk in the pitcher. If there are any large bubbles try knocking the pitcher downward on the counter top to pop them. Do so gently so as not to “bounce” milk out of the pitcher. Now swirl the pitcher by placing its bottom flat on the counter and swirl the pitcher in small circles to homogenize the stretched milk. This also will give you instant feedback as to the consistency of the milk to indicate how successful you were in the stretching process
10 Pour yourself a cappuccino or a latte, and enjoy!
Milk Stretching Tips• It is generally best to pull your espresso shot first and then steam the milk. If milk is allowed to sit for long
it loses its texture. For milk-based drinks, whatever flavor might be lost in the espresso from sitting for a minute or two won’t be sensed in a milk-laden beverage. As you become more adept at stretching the milk you will be able to start an espresso extraction and then stretch the milk at the same time. The dual boilers of the DD make that an easy task, keeping the extraction controlled while still supplying excellent steaming power.
• Pulling the espresso directly into the serving cups will retain as much flavor and crema as possible.• Using a correctly shaped pitcher can help. The best are the ones that look like a bell- wider at the bottom
than at the top. The narrowing helps keep the milk contained when the steam tries to force it up out of the pitcher and also helps swirl the milk using the force of the steam.
• Use a quality milk. The bargain brands are often from cows fed a low-quality feed or silage and the milk is more difficult to stretch and does not hold the stretch as well. Try a name-brand, quality 2%. Once you get better at this you can experiment. For an indulgent treat, try mixing two parts milk with one part cream or half-and-half.
• Soymilk can also be used. Experiment to find one that suits our taste and style of steaming. As with cow

51
milk, soymilk comes in different quality ranges, and some stretch better then others. Try several to find one that works for you. Generally speaking, soymilk will not create the sort of quality microfoam that can be had from “real” milk, nor will it hold its stretch quite as long.
• If things are going too fast as you begin learning, try placing the pitcher as well as the milk in the freezer for a few minutes before use. The colder the milk, the more time you will have to work it.
• A pitcher that is sized to the job helps. A 28 ounce (.8 L.) steaming pitcher with only 4 ounces (0.1 L.) of milk in it will be very difficult to work.
• To practice getting the proper position, put one drop of dish washing detergent into the chosen amount of water in the steaming pitcher and work on getting that stretched as you would with milk.
• Once milk has been steamed, if it didn’t come out right either use it as is or enjoy it as a hot milk beverage. You can’t “un-cook” an egg, and you can’t successfully re-steam milk.
• Take your time. The valve controlling the steaming does not have to be opened all the way. Rushing things does not give the milk time to develop. On the other side of the coin, if done too slowly there will not be enough air drawn into the milk nor enough “mixing” action and all you will have is hot milk.
• Microfoam is a stretched milk that is not stiff or spoonable like meringue, but is more viscous than milk be-fore it was stretched. How hot you make it, how much air you add, and how long it took, all come together to create perfect microfoam. There is nothing wrong with stiff, spoonable milk if that is what you like, but this stiff foam does not add the same texture, feel, or sweetness to the beverage like prefect microfoam.
• When steaming the milk, carefully place your free hand on the side of the pitcher. Watch the thermometer as you feel the temperature of the metal pitcher and you will soon learn what 140° F. (60 c.) feels like and at that point you will no longer need to use the thermometer.
With practice and patience, you will find your steaming technique improve over time, and you will soon be proud of the drinks you are serving.

52
Cleaning and Maintenance
As with all fine tools, the Vibiemme Double Domobar can give you years of trouble-free service and bet-ter performance if properly maintained. Your DD does require a bit of care, but it is not at all difficult.
Although the following guidelines will give you some idea of how often the tasks should be performed, there is no specific set of rules concerning the frequency of various cleaning and maintenance chores. A machine that is being used to make two or three drinks each day in a home environment will not need to be cleaned as often as a machine in an office of a dozen or more people where it is called upon to make fifty drinks a day. If in doubt, it is better to do most cleaning and maintenance chores a little too often than not often enough.
After Each PullKnock Puck - After each pull is completed, the spent coffee puck in the portafilter should be knocked out.
The best way is to use a knock box. These feature a cushioned bar that protects the portafilter from damage and quiets the banging sound.
Quick Flush - As soon as you remove the portafilter from the brewhead after a pull, cycle the brew func-tion for about one second. This will help flush out any stray coffee grounds on or behind the shower screen.
Flush The Portafilter - If you are not immediately going to pull another shot, use the water of the quick flush (when the water becomes clear) to wash the remaining grounds out of the portafilter. Wipe dry with a towel, and lock the portafilter back into the group. It is best to leave the portafilter in the group to keep the portafilter heated.
After Each Stretching of MilkThe steam wand must be wiped off immediately after every use with a damp towel or dish rag after re-
moving the milk pitcher from under the wand. As soon as the wand is wiped clean, the steam valve should be briefly opened to create a blast of steam to force out the remaining milk that may be in the wand. Allowing milk to sit on (or in) the wand will cause the milk to bake onto the hot metal. This is not only unsanitary but can also become very difficult to remove. If you do have baked on milk we do not recommend soaking the wand in a pitcher. This can cause dirty water to be drawn into the wand and under certain conditions, possibly into the boiler. Difficult-to-remove milk can be cleaned using a product specially formulated for this task.
WARNING: The steam wand can be very hot. Avoid touching the wand directly and use caution when wiping the wand. The heat can cause the water on the rag to turn to steam which can cause a burn.
If necessary, the steam wand’s tip can be removed by unscrewing it so that it can be soaked for further cleaning. Use care not to lose or damage the sealing 0-ring or the diffusing washer (if so equipped).
After Each SessionBrewhead - The area where the portafilter locks into place gets ex-
posed to a lot of coffee and must be kept clean. Coffee residue left here will not only degrade performance over time but can also detrimentally affect the taste of the coffee.
At the end of each session use the brewhead brush which was included with your Vibiemme Double Domobar to clean the screen as well as to give the area in which the brewhead gasket resides a scrubbing.
Portafilter - At the end of each session the portafilter should be rinsed under hot, running water and dried off before storage. While it should be left in place on the brewhead during use, if the machine is being turned off, the portafilter can be stored elsewhere so that the moisture can evaporate from the brewhead. Otherwise it can stagnate in there.

53
Daily Blind Flush- At the end of the session, or when you are through using the machine for that day, you should do a blind flush. It is a very simple task:1 Remove a filter basket from either of the portafilters and insert the blind basket in its place. The blind filter
basket is the one that has no holes in it seen here:
2 Lock the portafilter into place just like you would to make espresso.3 Engage the brew function as if you are making espresso4 Watch the pressure gauge. When the normal brewing pressure is reached, wait about five seconds, then
fully lower the lever to turn of the brew function. There will be a “whoosh” of water out of the bottom of the group into the drip tray.
5 Repeat steps 3 and 4 one or two more times. 6 Loosen but do not remove the portafilter and turn on the brew switch again. Wiggle the handle of the loose
portafilter so that water can flush the area around the brewhead.
WARNING: Hot water will spill out and pour onto the drip tray. Use caution to avoid burns from the splashing hot water.
Once Every One Or Two WeeksBackflushing - This is the process of forcing a special cleaning detergent though the brewgroup. This
will remove any stray coffee left in the places that normal, day-to-day cleaning cannot reach. How often this should be done depends on how much use the machine gets, the coffee you use, as well as the amount of cof-fee you use for each pull. If you are making one or two beverages a day then once a month is probably suf-ficient. If you are making around four to six doubles a day then once every two weeks is probably a good idea. If the machine is being used all day (such as in an office) then backflushing every day may be in order.
Your DD was supplied with a blind filter (shown above) to be used to backflush. This is the basket with no holes in it seen in the photo at the top of this page. To use it, follow these simple instructions:
WARNING: Some cleaning agents used for this purpose can be quite strong. Follow all safety rec-ommendations on the cleaner’s packaging. Only use chemicals specifically designated for back-flushing. Other cleaners can cause problems or even damage to your machine. Such damage is not covered by the warranty.
1 Insert the blind filter into one of the portafilters.2 Place a small amount of espresso machine cleaner into the basket (see manufacturer’s instructions for spe-
cific amounts to be used).
NOTE: Many of these cleaners are formulated for use in commercial environments and are quite concentrated. Use of excessive amounts of some cleaners may cause accelerated wear to some internal group parts. We recommend using 1/4 tsp. (1.2 ml) in the blind basket to start.
3 Lock the portafilter into place just like you would to make espresso.4 Manually engage the brew function5 When you reach normal brewing pressure, wait five seconds, then turn the brew function off.6 Repeat steps 4 and 5 until you see the suds of the cleaning agent appear in the drip tray (removing the drip
tray cover during this process can help you see what is going on). When some of the suds from the cleaning
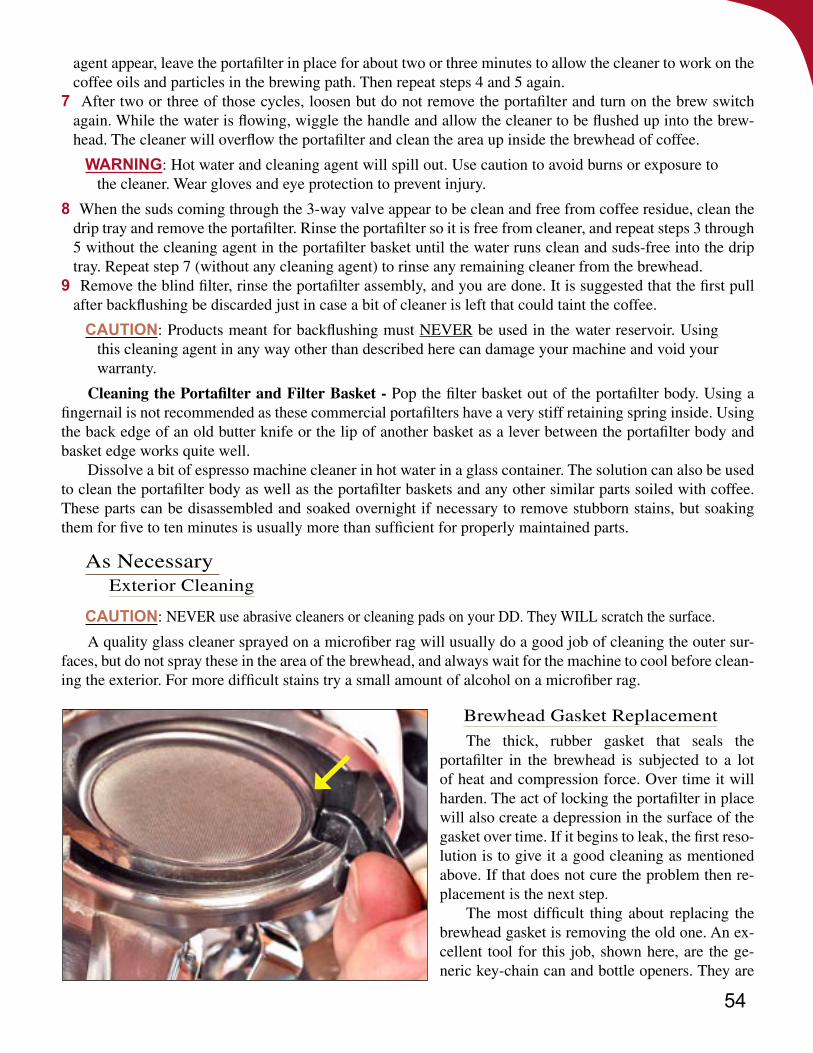
54
agent appear, leave the portafilter in place for about two or three minutes to allow the cleaner to work on the coffee oils and particles in the brewing path. Then repeat steps 4 and 5 again.
7 After two or three of those cycles, loosen but do not remove the portafilter and turn on the brew switch again. While the water is flowing, wiggle the handle and allow the cleaner to be flushed up into the brew-head. The cleaner will overflow the portafilter and clean the area up inside the brewhead of coffee.
WARNING: Hot water and cleaning agent will spill out. Use caution to avoid burns or exposure to the cleaner. Wear gloves and eye protection to prevent injury.
8 When the suds coming through the 3-way valve appear to be clean and free from coffee residue, clean the drip tray and remove the portafilter. Rinse the portafilter so it is free from cleaner, and repeat steps 3 through 5 without the cleaning agent in the portafilter basket until the water runs clean and suds-free into the drip tray. Repeat step 7 (without any cleaning agent) to rinse any remaining cleaner from the brewhead.
9 Remove the blind filter, rinse the portafilter assembly, and you are done. It is suggested that the first pull after backflushing be discarded just in case a bit of cleaner is left that could taint the coffee.
CAUTION: Products meant for backflushing must NEVER be used in the water reservoir. Using this cleaning agent in any way other than described here can damage your machine and void your warranty.
Cleaning the Portafilter and Filter Basket - Pop the filter basket out of the portafilter body. Using a fingernail is not recommended as these commercial portafilters have a very stiff retaining spring inside. Using the back edge of an old butter knife or the lip of another basket as a lever between the portafilter body and basket edge works quite well.
Dissolve a bit of espresso machine cleaner in hot water in a glass container. The solution can also be used to clean the portafilter body as well as the portafilter baskets and any other similar parts soiled with coffee. These parts can be disassembled and soaked overnight if necessary to remove stubborn stains, but soaking them for five to ten minutes is usually more than sufficient for properly maintained parts.
As NecessaryExterior Cleaning
CAUTION: NEVER use abrasive cleaners or cleaning pads on your DD. They WILL scratch the surface.
A quality glass cleaner sprayed on a microfiber rag will usually do a good job of cleaning the outer sur-faces, but do not spray these in the area of the brewhead, and always wait for the machine to cool before clean-ing the exterior. For more difficult stains try a small amount of alcohol on a microfiber rag.
Brewhead Gasket Replacement
The thick, rubber gasket that seals the portafilter in the brewhead is subjected to a lot of heat and compression force. Over time it will harden. The act of locking the portafilter in place will also create a depression in the surface of the gasket over time. If it begins to leak, the first reso-lution is to give it a good cleaning as mentioned above. If that does not cure the problem then re-placement is the next step.
The most difficult thing about replacing the brewhead gasket is removing the old one. An ex-cellent tool for this job, shown here, are the ge-neric key-chain can and bottle openers. They are
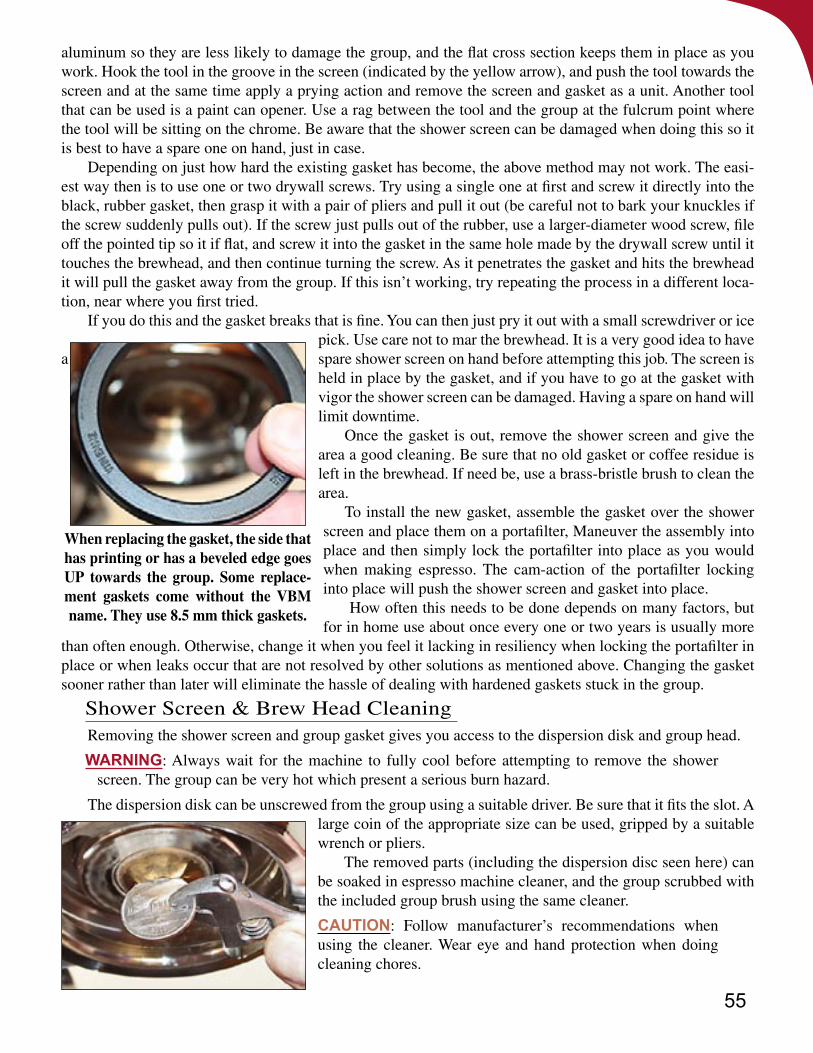
55
aluminum so they are less likely to damage the group, and the flat cross section keeps them in place as you work. Hook the tool in the groove in the screen (indicated by the yellow arrow), and push the tool towards the screen and at the same time apply a prying action and remove the screen and gasket as a unit. Another tool that can be used is a paint can opener. Use a rag between the tool and the group at the fulcrum point where the tool will be sitting on the chrome. Be aware that the shower screen can be damaged when doing this so it is best to have a spare one on hand, just in case.
Depending on just how hard the existing gasket has become, the above method may not work. The easi-est way then is to use one or two drywall screws. Try using a single one at first and screw it directly into the black, rubber gasket, then grasp it with a pair of pliers and pull it out (be careful not to bark your knuckles if the screw suddenly pulls out). If the screw just pulls out of the rubber, use a larger-diameter wood screw, file off the pointed tip so it if flat, and screw it into the gasket in the same hole made by the drywall screw until it touches the brewhead, and then continue turning the screw. As it penetrates the gasket and hits the brewhead it will pull the gasket away from the group. If this isn’t working, try repeating the process in a different loca-tion, near where you first tried.
If you do this and the gasket breaks that is fine. You can then just pry it out with a small screwdriver or ice pick. Use care not to mar the brewhead. It is a very good idea to have
a spare shower screen on hand before attempting this job. The screen is held in place by the gasket, and if you have to go at the gasket with vigor the shower screen can be damaged. Having a spare on hand will limit downtime.
Once the gasket is out, remove the shower screen and give the area a good cleaning. Be sure that no old gasket or coffee residue is left in the brewhead. If need be, use a brass-bristle brush to clean the area.
To install the new gasket, assemble the gasket over the shower screen and place them on a portafilter, Maneuver the assembly into place and then simply lock the portafilter into place as you would when making espresso. The cam-action of the portafilter locking into place will push the shower screen and gasket into place.
How often this needs to be done depends on many factors, but for in home use about once every one or two years is usually more
than often enough. Otherwise, change it when you feel it lacking in resiliency when locking the portafilter in place or when leaks occur that are not resolved by other solutions as mentioned above. Changing the gasket sooner rather than later will eliminate the hassle of dealing with hardened gaskets stuck in the group.
Shower Screen & Brew Head CleaningRemoving the shower screen and group gasket gives you access to the dispersion disk and group head.
WARNING: Always wait for the machine to fully cool before attempting to remove the shower screen. The group can be very hot which present a serious burn hazard.
The dispersion disk can be unscrewed from the group using a suitable driver. Be sure that it fits the slot. A large coin of the appropriate size can be used, gripped by a suitable wrench or pliers.
The removed parts (including the dispersion disc seen here) can be soaked in espresso machine cleaner, and the group scrubbed with the included group brush using the same cleaner.
CAUTION: Follow manufacturer’s recommendations when using the cleaner. Wear eye and hand protection when doing cleaning chores.
When replacing the gasket, the side that has printing or has a beveled edge goes UP towards the group. Some replace-ment gaskets come without the VBM name. They use 8.5 mm thick gaskets.

56
Rinse all parts thoroughly before replacing in the machine. Screw the dispersion disk in using the coin, but do not over-tighten. A snug fit is sufficient.
Long Term StorageThe brew boiler and steam boiler contain water. Because of that, if
the Double Domombar is not going to be used for a while or is being placed into storage some factors must be considered.
The first is environmental temperature. If it can be avoided, the machine should never be stored where it will be subjected to freezing temperatures. If there is water in the machine that freezes, there is a potential for a tremendous amount of damage. As the water turns to ice it expands with great force. The pump, all the internal metal pipes, and both boilers face destruction from this expanding force.
WARNING: Freeze damage can destroy a machine. Pipes can burst and the boilers can be ruptured. Freeze damage is not covered by the warranty.
It is very difficult to remove all the water from the machine, and it is a job best left to a technician. The best solution to the problem is to avoid leaving the machine in a place where it is subject to freezing. If you know that it will be left in freezing conditions check with your local RV supply store. They sell anti-freeze chemicals designed to be used in drinking water systems. Be sure that the additives are safe to use on copper, brass, plastic, and chrome parts.
CAUTION: If using an anti-freeze chemical, tape a warning message over the power plug as well as to the face of the machine warning of the addition of these chemicals and to completely flush the machine before use!
WARNING: Damage from these sorts of chemicals is not covered by the warranty. Use of these chemicals and storage in freezing conditions is done at your own risk.
Even if not stored in such extreme conditions as mentioned above, when placing a stored machine back into service you must flush out the machine with fresh water to remove any stale water. If the machine has just been sitting unused for a while, it is best to replace the water in the boilers. Pull about 10 ounces (300 ml.) through the group to flush out the brew boiler, and dispense about 30 ounces (.9 L.), 6 ounces (175 ml.) at a time, through the hot water wand to refresh the water in the steam boiler.

57
Cleaning and Maintenance - Level I Descaling
WARNING: Descaling requires the pumping of a strong chemical solution through the machine. These special chemicals usually contain an acid which can be hazardous. Carefully follow the manufacturer’s safety precautions and recommendations for proper use. Even when working care-fully, some of this chemical may splash. Gloves and eye protection are required when handling and using these chemicals. Do not allow spectators in the area when working. Do not touch your face or eyes during this as the descaler can cause serious irritation and burns to sensitive tissues. Immediately consult a physician or call emergency services if this occurs.
CAUTION: The acidic solution can splash when de-scaling. Protect the working surface as well as the machine itself and immediately wash off any that splashes or spills.
This procedure is a simple descaling of the Double Domobar espresso machine which does not re-quire access to internal components. This procedure does not replace the need for a “Level II” descal-ing. Level I descaling does not reach all levels of the steam boiler where scale may be forming. We offer these instructions as an informational resource only. If you decide to follow these instructions you do so at your own risk. Contact your reseller for details concerning Level II descaling.
Descaling of an espresso machine helps rid various internal areas of hard water deposits. Depending on the mineral content of your water and how often you use your DD, you should descale the Double Domobar’s boilers at least once every six months. In extreme cases where water is very high in scaling minerals, it might be necessary to descale once a month.
As water is repeatedly heated and some of it boils off as steam, some of the mineral content in the water is left behind. These minerals can form hard water deposits which can cause problems such as: • failure of the water-level sensor to function properly • heating element failure • clogging of the thermosyphon pipes • low volume of brewing water • poor pressurestat response • low-temperature brewgroup • drips and leaks from the brewgroup
De-scaling is a preventative maintenance chore that can help avoid these problems and will significantly prolong the life of your Double Domobar.
CAUTION: Only use products which explicitly state that they are intended for the removal of min-eral deposits in the boilers of espresso machines. Some other products, such as those made for cleaning coffee pots or removing hard water scale from bathrooms must never be used! No other chemicals should ever be added to the water in the reservoir or run through the DD’s boilers. Al-ways follow the product manufacturer’s recommendations, instructions, and warnings when de-scaling an espresso machine. Use of improper cleaners in the boiler can void the warranty, damage numerous parts of the espresso machine, and may create a health hazard or dangerous situation.
A - Descaling the Brew Boiler
NOTE: Both of the following procedures “A - Descaling the Brew Boiler” and “B - Descaling the Steam Boiler,” should be followed each time the machine is descaled.
1 Turn the power switch to “Position 0.”

58
2 If you equipped your machine with an in-reservoir water softener, remove it from the intake hose and place it aside until this process is completed. The descaling agent can damage the water softener if it is left in place during this process and can damage the espresso machine as well! Do not reinstall the water softener until this entire procedure is completed.
3 The original particle filter which came with the machine that fits onto the end of the hose must be installed. The original particle filter will stop any foreign matter from entering the machine.
5 Premix the descaling solution according to the manufacturer’s recommendations. You will need a total of about 3 quarts (3 liters) of solution. If you are using a powdered descaler, heat one-half the amount of water the instructions of the product call for, mix the powder in that water and allow to dissolve, then add cold water to bring the total volume to the correct level.
CAUTION: The pump is not designed to pump hot water.
6 Carefully pour the de-scaling agent into the DD’s reservoir, filling it to about 1/2” (2cm) from the top.
CAUTION: Do not allow the descaling solution to drip or splash into the machine.
7 Turn the power switch to “Position I” and allow the machine to reach operating temperature. 8 Remove the drip tray cover and if necessary, empty the drip tray. Replace the drip tray.9 Place a large, heat-resistant container under the group, such as a large measuring cup of heat-resistant glass
(we will refer to this as the “vessel” from this point on). Lift the brewing lever to the brew position and pump 16 ounces (0.5 liters) of solution through the machine and into the vessel. Discard the dispensed water. As you move through these steps, do not allow the reservoir to become empty.
WARNING: In many of these steps, such as when pumping the de-scaler through the brewhead and removing the hoses from the water reservoir, splashing acid can create a safety hazard. Gloves, eye protection, and protection for the working surface are required.
4 FOR PLUMBED MACHINES ONLY - If you have been supplying the DD with water using the plumbed option, access the lever on the bottom of the machine and turn it to face the hot water wand’s side of the machine (pointing to the right when you are facing the front of the machine).
Remove the reservoir and remove the screw in the center of the reservoir’s platform. Place the reservoir on the platform and push down on it and release it. It should click when pushed down and click once again when released. Removing this screw prevents the machine from running with an empty reservoir which can damage the pump or other components.
CAUTION: Running the machine without an ample water supply can damage the pump and other parts. Damage from insufficient water is not covered by the warranty.
Priming the Pump.
A Rotary pumps were not originally designed to draw water in from a reservoir. Because of that, it is a good idea to prime the pump at this time to be sure that it will correctly draw water from the reservoir. It is not always necessary to do this, but it insures that the pump is protected from running without water.
A Lift the hose out of the reservoir and remove the filter from the end of the hose.B Hold the hose straight up and using a suitable tool (turkey baster, syringe, or small funnel for ex-
ample) completely fill the hose with water. C While still holding the filled hose upwards in one hand, turn the power switch to “Position I” and
lift the brew lever all the way. Almost immediately, the water in the hose should be drawn into the pump. As soon as the water level in the hose begins to recede, immediately lower the brew lever fully and turn the power switch to “Position 0.”
D Replace the filter on the end of the hose and drop it into the reservoir

59
CAUTION: The discarded fluid from the machine will contain some of the acid solution. In all these steps, discard the used descaling agent according to the manufacturer’s recommendations and lo-cal regulations. If the used de-scaling agent can be legally and safely poured down a drain, allow the faucet to run into the sink to dilute the acid. Never re-use the spent acid.
10 Wait at least thirty minutes for the descaler to work. As much as two hours might be necessary depend-ing on the level of hardness of your water, how long since the last descale, and how much use the machine gets.
11 Remove the reservoir, pour any remaining unused descaler back into the original mixing container, rinse the reservoir, wipe the outside dry, and replace it in the machine.
12 Fill the reservoir with clean water.13 Place the vessel under the group again and pump 16 ounces (0.5 liters) of water through the group, refilling
the reservoir as necessary. 14 Discard the liquid and repeat, pumping another 16 ounces of clean water through the group.15 Rinse and dry the vessel. Run about ten more ounces of water through the group using the brew function
into the vessel again. If the water looks clear and clean, allow that water to cool sufficiently, and smell it. If it smells clean, pick up a drop or two (no more) on a clean, dry spoon and taste it. The water should have no acidic taste to it at this time. If it does, repeat steps 16 and 17 and taste again. Repeat the flush-and-taste sequence until all traces of acidic taste has been removed.
CAUTION: Most proper de-scaling agents are a form of acid which is food safe, and when present in this highly diluted form are relatively safe to consume. Read the label of the product you are using to be sure it is safe before sampling the discarded water. Sample only a very small amount.
16 If there is no acidic taste left in the water, the descaling procedure of the brew boiler is complete. Continue with Part B.
B - Descaling the Steam Boiler
Since the steam boiler is a separate internal component from the brew boiler, it too must be descaled. 17 Press and hold the PID power button until the display reads “oFF.” 18 Remove the end parts from both the steam wand as well as the hot water wand.19 Turn the power switch to “Position II.” The PID display should still show “oFF.” Allow the steam boiler
to come up to its full operating pressure.20 When the steam boiler comes up to pressure, turn the Power Switch to “Position 0.”21 Place the vessel under the hot water wand and open the hot water valve. Discard the collected water. If
necessary, close the valve, empty the vessel, and repeat until no more water comes from the wand.
CAUTION: Water dispensed from the hot water tap can be over 200° F. (93 c.). This can cause seri-ous burns. Use Caution!
22 Close the hot water valve.23 Empty the reservoir and refill it with descaling solution.24 Be sure that the hot water and steam valves are closed.25 Turn the power switch to “Position I.” The PID should read “oFF” at this time. If not, use the PID power
button to turn the PID to “oFF.” The pump will run as soon as the power is turned on. Allow the pump to run until it stops on its own. Be sure to check the level in the reservoir. If it becomes necessary to refill the reservoir with descaler, turn the power switch to “Position 0,” refill with the descaling solution, then turn the power switch back to “Position I.” Repeat until the pump stops on its own.
26 When the pump stops, turn the power switch to “Position II.” 27 Once the steam pressure gauge indicates the normal pressure range, wait at least thirty minutes for the des-
caler to work. As much as two hours might be necessary depending on the level of hardness of your water, how long since the last descale, and how much use the machine gets
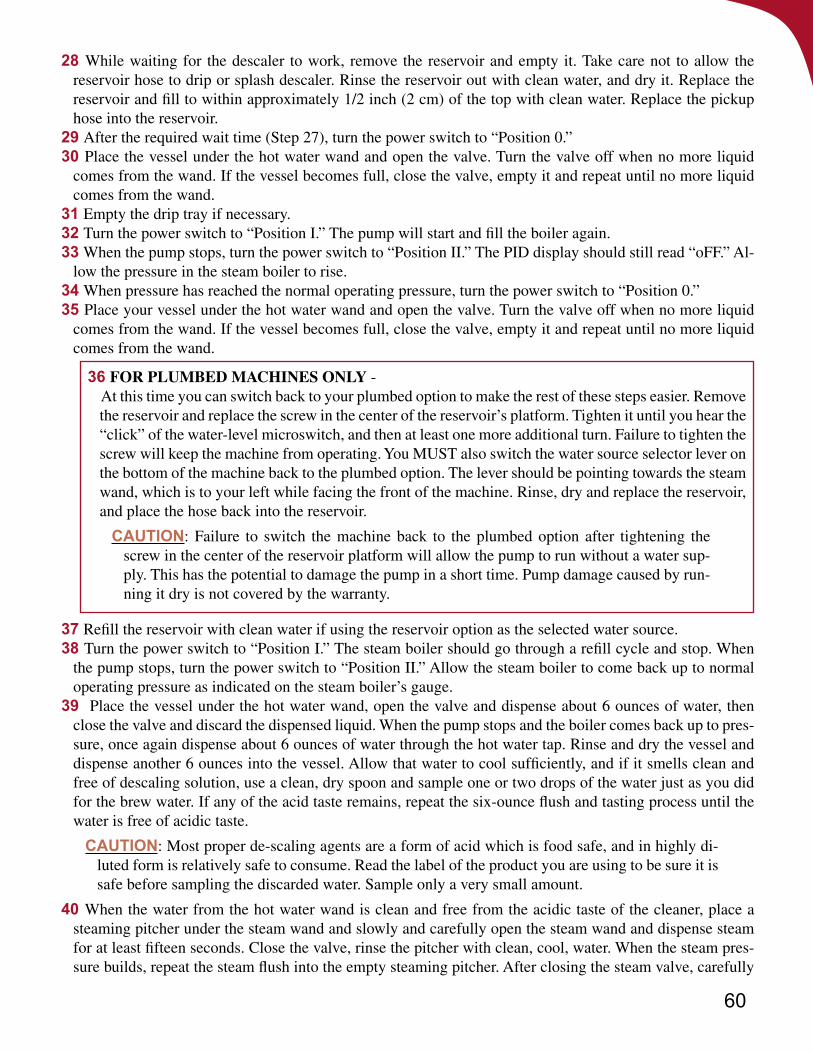
60
28 While waiting for the descaler to work, remove the reservoir and empty it. Take care not to allow the reservoir hose to drip or splash descaler. Rinse the reservoir out with clean water, and dry it. Replace the reservoir and fill to within approximately 1/2 inch (2 cm) of the top with clean water. Replace the pickup hose into the reservoir.
29 After the required wait time (Step 27), turn the power switch to “Position 0.” 30 Place the vessel under the hot water wand and open the valve. Turn the valve off when no more liquid
comes from the wand. If the vessel becomes full, close the valve, empty it and repeat until no more liquid comes from the wand.
31 Empty the drip tray if necessary.32 Turn the power switch to “Position I.” The pump will start and fill the boiler again. 33 When the pump stops, turn the power switch to “Position II.” The PID display should still read “oFF.” Al-
low the pressure in the steam boiler to rise. 34 When pressure has reached the normal operating pressure, turn the power switch to “Position 0.” 35 Place your vessel under the hot water wand and open the valve. Turn the valve off when no more liquid
comes from the wand. If the vessel becomes full, close the valve, empty it and repeat until no more liquid comes from the wand.
36 FOR PLUMBED MACHINES ONLY - At this time you can switch back to your plumbed option to make the rest of these steps easier. Remove
the reservoir and replace the screw in the center of the reservoir’s platform. Tighten it until you hear the “click” of the water-level microswitch, and then at least one more additional turn. Failure to tighten the screw will keep the machine from operating. You MUST also switch the water source selector lever on the bottom of the machine back to the plumbed option. The lever should be pointing towards the steam wand, which is to your left while facing the front of the machine. Rinse, dry and replace the reservoir, and place the hose back into the reservoir.
CAUTION: Failure to switch the machine back to the plumbed option after tightening the screw in the center of the reservoir platform will allow the pump to run without a water sup-ply. This has the potential to damage the pump in a short time. Pump damage caused by run-ning it dry is not covered by the warranty.
37 Refill the reservoir with clean water if using the reservoir option as the selected water source.38 Turn the power switch to “Position I.” The steam boiler should go through a refill cycle and stop. When
the pump stops, turn the power switch to “Position II.” Allow the steam boiler to come back up to normal operating pressure as indicated on the steam boiler’s gauge.
39 Place the vessel under the hot water wand, open the valve and dispense about 6 ounces of water, then close the valve and discard the dispensed liquid. When the pump stops and the boiler comes back up to pres-sure, once again dispense about 6 ounces of water through the hot water tap. Rinse and dry the vessel and dispense another 6 ounces into the vessel. Allow that water to cool sufficiently, and if it smells clean and free of descaling solution, use a clean, dry spoon and sample one or two drops of the water just as you did for the brew water. If any of the acid taste remains, repeat the six-ounce flush and tasting process until the water is free of acidic taste.
CAUTION: Most proper de-scaling agents are a form of acid which is food safe, and in highly di-luted form is relatively safe to consume. Read the label of the product you are using to be sure it is safe before sampling the discarded water. Sample only a very small amount.
40 When the water from the hot water wand is clean and free from the acidic taste of the cleaner, place a steaming pitcher under the steam wand and slowly and carefully open the steam wand and dispense steam for at least fifteen seconds. Close the valve, rinse the pitcher with clean, cool, water. When the steam pres-sure builds, repeat the steam flush into the empty steaming pitcher. After closing the steam valve, carefully

61
smell the air in the vessel and if it smells clean and free of the acid smell, taste a sample of some of the condensed liquid in the pitcher to detect any trace acid solution. Repeat step 42 and 43 as necessary until all acidic aroma is gone from the steam.
41 Turn the PID back on so that it once again displays the brew boiler temperature.
NOTE: To remind you once again, if you are using the reservoir option, be sure to refill the reservoir with clean water as necessary while you complete these steps.
Contact your reseller for recommendations on cleaning products or for further assistance.

62
Hints, Tips, and Tricks
You might have found that the owner’s manuals of some other machines have a special section filled with little tweaks, tricks, and adjustments aimed at teaching the owner to enhance or modify the way their espresso machine operates to make it work they way they want, or sometimes just to force it to make a drinkable espresso. The Vibiemme Double Domobar has been designed in a way that the home barista can be successful virtually from the start with little further effort. Virtually all of the things you can do to get the DD to perform to your liking have been covered in other parts of this manual. These include:
Using the DD• Adjusting the PID setpoint • Using pre-infusion• Adjusting the PID offset• Using a cooling flush
For Extraction Difficulties• Change the grind• Change the coffee• Change the amount of coffee you use each time• Switch to the double basket for a while if you have been using the single.• Allow sufficient warm-up time
• If you are having difficulties producing good espresso, change something you are doing. It may be the amount of coffee you are using or the grind setting. If you cannot figure out a grind, set the grinder to a finer setting until it “chokes” the machine (no espresso comes out even after fifteen seconds of extraction time) . Now adjust the grinder towards a more coarse setting a little at a time until you find a setting that produces good results.
• The best advice is to try another coffee. Did the coffee you are using work on your last machine? That does not mean it will work with the DD. Different machines can extract different flavor profiles from the same coffee. How fresh is it? Stale coffee can cause all sort of problems including fast extractions to bad taste.
• If you know someone more experienced in making espresso at home, invite them over to “play” with your new machine. They may be able to spot some mistake you are making or may have a small change in your preparation technique that can make a big difference.
• There are coffee shops that offer classes in making espresso. Call around and see if one is offered in your community.
• Finally, we can’t stress enough that the grinder is extremely important. It could be that it needs new burrs, or just is not up to the task of supplying the quality of grind that the DD deserves. If you are unsure whether your grinder is of a suitable quality for the DD, contact your reseller.

63
Troubleshooting
1 • The machine is not working at all and no lights come on.
Be sure it is plugged in and the circuit into which it is plugged is working. Try another outlet if in doubt. Try an outlet on a circuit that powers no other electrical appliances. Check the voltage of the circuit while the DD is in operation. Be sure that the PID is on (see Chapter 12) and that the power switch is in “Position I” or “Position II.”
2 • I hear the pump but no water comes out when using the reservoir option
Rotary pumps are designed to receive water from a pressurized source. You may need to prime the pump if you are using the reservoir option and a situation such as one of the following has taken place: • You are using the reservoir for the first time • You haven’t used the reservoir for a while (such as a plumbed machine being descaled) • You ran the reservoir out of water • The reservoir pick up hose came out of the water and pulled in air
Follow these directions to prime the pump:1 Be sure that the water selector valve is switched to the reservoir position (pointing to your RIGHT when
looking under the machine from the front)2 Lift the hose out of the reservoir and remove the filter from the end of the hose.3 Hold the hose straight up and using a suitable tool (turkey baster, syringe, or small funnel for example)
completely fill the hose with water. 4 While still holding the filled hose upwards in one hand, turn the power switch to “Position 1” and lift the
brew lever all the way. Almost immediately, the water in the hose should be drawn into the pump. As soon as the water level in the hose begins to recede, immediately lower the brew lever fully and turn the power switch to “Position 0.” If the water is not drawn in you may need to force the water with some pres-sure into the hose while the pump is running. A large size syringe or equivalent tool can be used.
5 Replace the filter on the end of the hose and lay the filter flat on the bottom of reservoir.6 Turn the power switch to “Position I” and lift the brew lever. The pump should now be drawing water from
the reservoir and a flow of water should come from the group.
3 • The brewing temperature is too hot or too cold.
Use the information in Chapter 12 and verify that the PID Offset Temperature has been correctly adjusted to match the temperature measurement standard you have chosen (the correct offset is 19 for Fahrenheit and 10 for centigrade).
4 • No water can be pumped when plumbed
Be sure that the valve on the main water source supplying the DD is in the on position (not part of the DD). Check that the lever on the bottom of the DD is pointing towards the LEFT when facing the front of the machine.
5 • I can pump water through the group, but the water is always cold.
Check that the PID is on (Displaying a temperature and not the word “oFF”).

64
6 • I can brew espresso but there is no pressure for steam.
• Be sure that the power switch is in “Position II.”• Check the reading on the steam-boiler pressure gauge. • Allow time for steam boiler to heat up after turning the machine on• Remove the steam wand’s tip and check for debris in the tip.
7 • The coffee tastes bad
The list of causes is nearly endless. Volumes can be written on what can cause espresso to taste bad. Here are a few tips to help:
• Be sure that the coffee you are using is fresh• Try a different brand of coffee. • Use a quality grinder and grind the beans fresh, within a few minutes of each extraction.• If you know someone who makes espresso, invite them over and let them try making espresso with your
equipment and coffee. Sometimes the smallest change in procedure can make a big difference in taste.
8 • The coffee tastes bitter.
• brewing temperature that is too hot • coffee that is over-roasted or stale • cheap, low-quality coffee • worn burrs of low-quality grinder that makes too much dust • brew pressure that is too high • not using enough coffee in the portafilter.
9 • The coffee tastes too acidic (“sour”).
• brewing temperature that is too cold • coffee that is under-roasted • brew pressure that is too low • bad or spoiled coffee
10 • I hear a constant hissing sound from inside the DD.
When the power switch is in “Position II”, this could indicate that there has been a failure of the vacuum breaker valve to seal properly. Discontinue use of the machine, unplug it from the outlet, and contact your reseller for technical assistance.
11 • The brew pressure gauge gives erratic readings
The brew pressure gauge on the front panel should only be used as a general indicator as to what is hap-pening during the brewing cycle. There are only three situations in which the gauge will display any useful information • When there is a properly prepared portafilter, filled with properly ground and tamped coffee, locked in the
brewhead, and the brewing process is underway (lever all the way up). •When you are using preinfusion with a plumbed machine, the gauge’s displayed pressure will drop slightly
when you have moved the lever to the correct position.• A plumbed machine will show the line pressure while the DD is off and cool, but it is not a very accurate
reading because of the scale of the gauge. At no other times will this gauge display any accurate information.

65
12 • The counter area under the machine is wet.
Immediately unplug the machine from the outlet and turn the power switch to “Position 0.” The most likely cause is from the drip tray area. If water gets outside of the drip tray it can leak out of the bottom of the frame. Remove the drip tray and check for water under the tray. Wipe dry. Also check that the plug or plumb-in fitting in the tray is tight. If this cannot be verified as the source of the leak, unplug the machine, discontinue use, and contact your reseller for technical assistance.
66
MAINTENANCE NOTESDate Task Notes
9/1/2011 Descaled Small amount of scale removed
67
NOTES:
For East Coast Warranty Service For West Coast Warranty Service
1st-Line Customer Care Center E-mail: [email protected] 732- 414-1816
Stefano’s Espresso Care E-mail: [email protected] 541-935-1212
Warranty Contact Information

68
OMOBAR
OUBLE
This manual created by FRCN Digital Imaging - www.FRCNdigital.com
OWNER’S MANUAL
Related Documents