OU Campus Reference Guide

Welcome message from author
This document is posted to help you gain knowledge. Please leave a comment to let me know what you think about it! Share it to your friends and learn new things together.
Transcript

OU Campus Reference Guide

OTS Publication: OU4 • 3/9/2018 • [email protected] • Office of Technology Services © 2018 Towson University This work is licensed under the Creative Commons Attribution-NonCommercial-NoDerivs License.
Details available at http://www.towson.edu/OTStraining Document made accessible: 3/9/2018
Table of Contents End-User Introduction ................................................................................................................................................4
What is a CMS? .......................................................................................................................................................4
How it Works ..........................................................................................................................................................4
New Philosophy ......................................................................................................................................................4
Highlights of the New TU Website .........................................................................................................................4
OU Campus Support ...............................................................................................................................................5
OTS WebDev .......................................................................................................................................................5
OTS Training ........................................................................................................................................................5
Log In/Out Process .....................................................................................................................................................6
Logging into OU Campus ........................................................................................................................................6
Logging Out of OU Campus ....................................................................................................................................6
Overview of the Environment ....................................................................................................................................7
Checking Pages In and Out .........................................................................................................................................8
Editing Main Content ..................................................................................................................................................8
The JustEdit Toolbar ...............................................................................................................................................8
Copy/Paste Text from Word ................................................................................................................................ 10
Formatting Text ................................................................................................................................................... 11
Adding a Bullet List .............................................................................................................................................. 11
Production Vs. Staging ......................................................................................................................................... 11
Adding Hyperlinks ................................................................................................................................................ 11
Email Address .................................................................................................................................................. 12
External Links ................................................................................................................................................... 12
Internal Links ................................................................................................................................................... 13
Uploading and Linking to Content ........................................................................................................................... 14
Uploading and Submitting Content for Approval ............................................................................................ 14
Linking to Content ............................................................................................................................................... 15
Spell Checking Your Content ............................................................................................................................... 15
Reusable Content .................................................................................................................................................... 16
Inserting a Repeatable Visual List Snippet .......................................................................................................... 16
Replacing the Image ........................................................................................................................................ 17
Inserting a Table Snippet ................................................................................................................................. 18
Deleting a Snippet ............................................................................................................................................... 19
Inserting an Asset ................................................................................................................................................ 19
Saving and Previewing the Page .............................................................................................................................. 20

OTS Publication: OU4 • 3/9/2018 • [email protected] • Office of Technology Services © 2018 Towson University This work is licensed under the Creative Commons Attribution-NonCommercial-NoDerivs License.
Details available at http://www.towson.edu/OTStraining Document made accessible: 3/9/2018
Page Check........................................................................................................................................................... 20
Submitting for Approval ...................................................................................................................................... 21
Dashboard ............................................................................................................................................................... 22
Adding Gadgets to the Dashboard ...................................................................................................................... 22
Workflow ............................................................................................................................................................. 23
Status in Workflow .......................................................................................................................................... 23
Inbox ................................................................................................................................................................ 23
Content Owner Responsibilities (Level 6) ............................................................................................................... 24
Approve Documents ............................................................................................................................................ 24
Approve or Decline Content (Web Page) ............................................................................................................ 25
Other Publishing Options .................................................................................................................................... 26
Schedule a Publish ........................................................................................................................................... 26
Reassigning Approval of Content from Users .................................................................................................. 26
Reports .................................................................................................................................................................... 27
Appendix .................................................................................................................................................................. 28
Appendix 1 – CMS Infographic ............................................................................................................................ 29
Appendix 2 – Web Image Codes .......................................................................................................................... 30
Appendix 3 - Setting Reminders .......................................................................................................................... 31
Scheduled Reminder........................................................................................................................................ 31
Setting Stale Reminders .................................................................................................................................. 32
Appendix 4 - Versions .......................................................................................................................................... 33
Comparing Versions ......................................................................................................................................... 33
Reverting to a Previous Version ...................................................................................................................... 33

OU Campus: User Guide
4
End-User Introduction What is a CMS? Refer to Appendix 1.
• A content management system (CMS) is an organized and structured way of creating, managing and presenting content of a web site.
• OU Campus is a web-based solution which makes it easy to manage websites and updates. • With OU multiple web pages can be updated instantly, producing uniform changes across all web pages.
How it Works
• The page is created and the contributor adds content. • Level 6 approves or declines content, and then publishes the content to the web. • Website visitors see the content.
New Philosophy Our previous website was becoming too difficult to manage. There was a lot of inconsistency and websites were becoming a wall of words. It seemed that everyone had a different idea of how the website should look and were not going through the proper channels to have pages created and add images, and formatting was inconsistent.
• Uniform site – Pages update simultaneously and consistently. • Multiple Design Options – Variety of templates available. • Visually Appealing – No more walls of words; chunked content, snippets and assets.
Highlights of the New TU Website Through interviews with current faculty, staff, and students, the following views were incorporated into the new design of the website.
• Vibrant, friendly, accessible and innovative • Highlights TU's value, affordability, perfect size and location, diverse and welcoming community • Simplified and streamlined content, elimination of outdated and unvisited pages • Presents a voice and tone that is smart, energetic, and warm • Emphasizes photography and video more in our storytelling

OU Campus: User Guide
5
OU Campus Support OU Campus support information may be found on the following website: OU Campus Support
Below are instructions for filling out a techhelp ticket for OTS WebDev and OTS Training.
OTS WebDev
1. From your favorite browser, type techhelp.towson.edu 2. Request type: Employee Role 3. Next Drop Down: Website Development (University) 4. Next Drop Down: CMS
OTS Training 1. From your favorite browser, type techhelp.towson.edu 2. Request type: Employee Role 3. Next Drop Down: Training and Documentation 4. Next Drop Down: Request Training 5. Training Services: OU Campus
*Do not call the OTS Help Center, they cannot help you with OU Campus. Throughout the site, the in-context help links are available and are specific to the area or task at-hand. These links open the relevant page at the Support site.
Figure 1

OU Campus: User Guide
6
Log In/Out Process Logging into OU Campus 1. Using your favorite browser, navigate to the desired page on the “live” website. We will be using Chrome in
this training. Please login using the URL on the index card provided to you: www.towson.edu/_training/session*/example-*.html.
2. Click the DirectEdit link on the published page. For Towson University, the DirectEdit link is the © copyright symbol in the footer.
Figure 2
3. From the InCommon screen, choose Towson University from the drop-down menu under Select your School.
4. Select the radio button beside Remember my selection permanently. 5. Click Next. 6. Enter your NetID and Password in the Towson University Authenticated Login Page and click the Login
button.
Figure 3
Note: Steps 3-5 will only need to be done once on any machine. Note: If OU Campus is the active window in the browser, the session will remain active. If you open a new tab and remain on it for a period of 15 minutes, you will automatically be logged out of OU Campus. Logging Out of OU Campus 1. Hover over your user name in the upper right hand corner of the screen and choose Logout from the menu.
Figure 4
2. The Towson University Shibboleth Identity Provider screen will appear. Please close the browser to complete the logout process.
OU Campus: User Guide
7
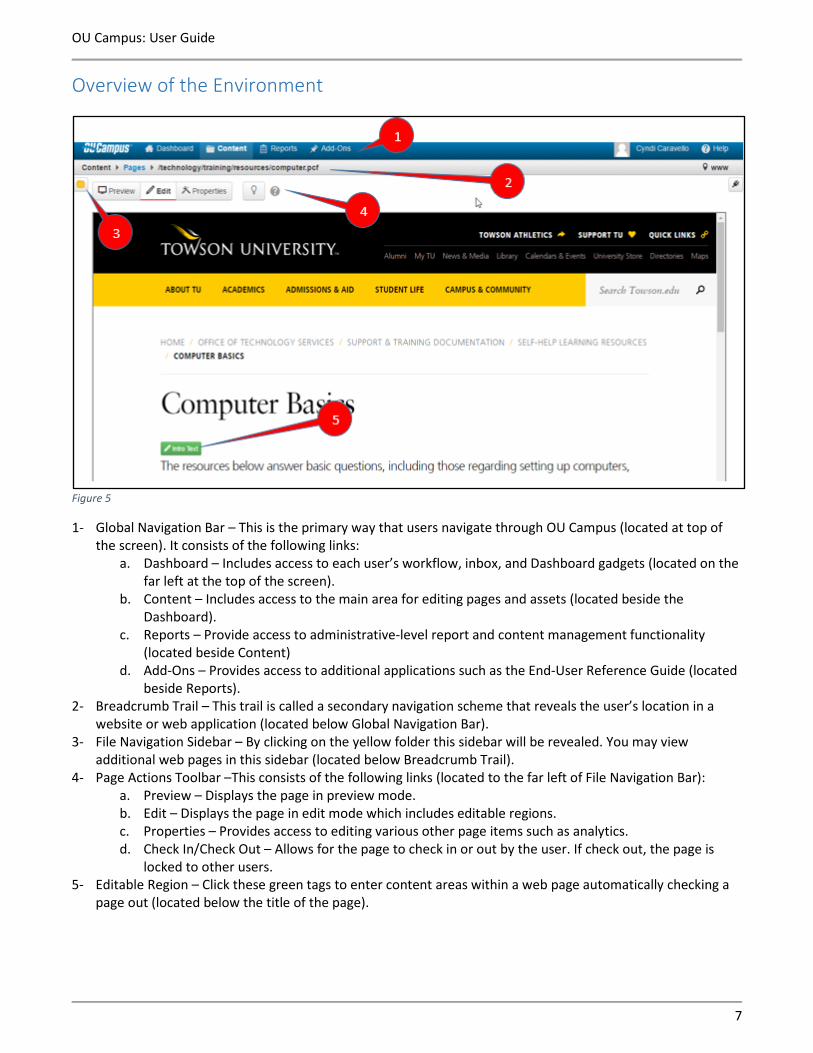
Overview of the Environment
Figure 5
1- Global Navigation Bar – This is the primary way that users navigate through OU Campus (located at top of the screen). It consists of the following links:
a. Dashboard – Includes access to each user’s workflow, inbox, and Dashboard gadgets (located on the far left at the top of the screen).
b. Content – Includes access to the main area for editing pages and assets (located beside the Dashboard).
c. Reports – Provide access to administrative-level report and content management functionality (located beside Content)
d. Add-Ons – Provides access to additional applications such as the End-User Reference Guide (located beside Reports).
2- Breadcrumb Trail – This trail is called a secondary navigation scheme that reveals the user’s location in a website or web application (located below Global Navigation Bar).
3- File Navigation Sidebar – By clicking on the yellow folder this sidebar will be revealed. You may view additional web pages in this sidebar (located below Breadcrumb Trail).
4- Page Actions Toolbar –This consists of the following links (located to the far left of File Navigation Bar): a. Preview – Displays the page in preview mode. b. Edit – Displays the page in edit mode which includes editable regions. c. Properties – Provides access to editing various other page items such as analytics. d. Check In/Check Out – Allows for the page to check in or out by the user. If check out, the page is
locked to other users. 5- Editable Region – Click these green tags to enter content areas within a web page automatically checking a
page out (located below the title of the page).
OU Campus: User Guide
8
Checking Pages In and Out In order to edit a page, you must check that page out. There are a couple ways to do this: Please do not check out the page yet, it will be done in the next step. 1. Click the lightbulb at the top of the screen.
Figure 6
2. Click in an editable region. Click on Main Content. This not only checks out the page, it puts you in edit mode.
3. You know that a page is checked out, when the lightbulb icon turns yellow. Additional icons will appear in the Page Actions Toolbar: Versions, Page Check and Save Versions. These are covered later in this manual.
Figure 7
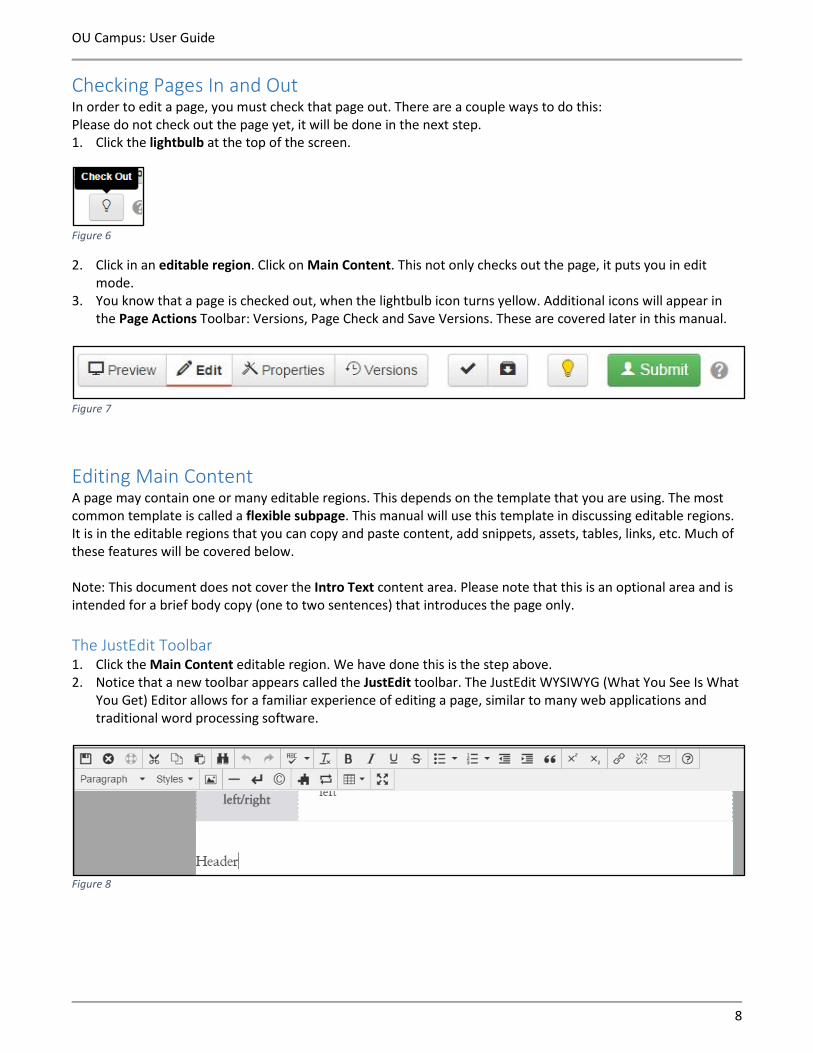
Editing Main Content A page may contain one or many editable regions. This depends on the template that you are using. The most common template is called a flexible subpage. This manual will use this template in discussing editable regions. It is in the editable regions that you can copy and paste content, add snippets, assets, tables, links, etc. Much of these features will be covered below. Note: This document does not cover the Intro Text content area. Please note that this is an optional area and is intended for a brief body copy (one to two sentences) that introduces the page only. The JustEdit Toolbar 1. Click the Main Content editable region. We have done this is the step above. 2. Notice that a new toolbar appears called the JustEdit toolbar. The JustEdit WYSIWYG (What You See Is What
You Get) Editor allows for a familiar experience of editing a page, similar to many web applications and traditional word processing software.
Figure 8

OU Campus: User Guide
9
3. Some of the most common functions of this toolbar are listed below:
Figure 9
• The save buttons. The leftmost is Save and Exit, which will save changes and take the user out of editing the region. The center icon is Exit without Saving, which discards all changes made since entering the region and exits. The rightmost icon is Restore Last Draft, which restores the region to its last saved version. To save changes without exiting the editable region, use the keyboard command Ctrl + S (for a PC) or Cmd + S (for a Mac).
Figure 10
• Clear formatting. This removes any formatting from selected text, including font styles and colors.
Figure 11
• Block quote. This formats text as a block quote.
Figure 12
• The link buttons. The leftmost is Insert Link, which allows a user to create a hyperlink on the page to either an internal page within the site, an internal document, or an external webpage. The next icon removes the hyperlink. The envelope icon, Insert/Edit Mailto Link, inserts an email address as a link that will prompt users to open an emailing program when they click on it.
Figure 13
• Help. Provides a list of every icon on the toolbar and a description of all their functions.
Figure 14
• Paragraph and Styles both provide dropdown options for different styles that may be applied to text. Paragraph formats are applied to paragraphs in their entirety, whereas Styles formatting is applied to any amount of selected text, whether it is many lines or one word.

OU Campus: User Guide
10
Figure 15
• Additional formatting options. The leftmost will insert a horizontal line as a visual divider between text. The center icon inserts a line break, which will create a new line of text without breaking the paragraph formatting. The rightmost icon allows for the insertion of special characters such as ©, ä, £, etc.
Figure 16
• Reusable content. These buttons allow for the insertion of snippets (left) and assets (right). These functions will be covered in greater detail later in the guide.
Figure 17
• Insert/Edit Table. This allows the user to insert a table, similar to those found in most word processing programs, and make changes to it continuously. Options include changing the amount of rows and columns, merging and splitting cells, adding or deleting rows and columns, and modifying table properties such as cell width and height. Best practice is to add a table as a snippet.
Figure 18
• Maximize Content Region. This enlarges the editable region so that it takes up the entire view within the OU Campus frame.
Copy/Paste Text from Word 1. Scroll to the paragraph after the heading and select the entire paragraph and delete it. 2. Open the Windows Explorer and open the document titled mission-statement. 3. Copy the entire text (CTRL + A) and then click the Copy icon or press CTRL + C on your keyboard. 4. Move back to OU Campus and make sure your cursor is under the Header and paste the text by pressing
CTRL + V on your keyboard. Note: The Paste icon in the JustEdit toolbar does not work to paste.

OU Campus: User Guide
11
Formatting Text 1. Scroll up to the word Header and select this text. Type OTS Training which will replace the text. 2. Click anywhere inside OTS Training and then click the down arrow beside Paragraph in the JustEdit toolbar. 3. Choose Heading 3. 4. Select the text “Bridging the divide between the world of technology and the university community” and
make this bold and italic (B icon and I icon). Note: Use H3 and H4 headers to organize the main content of a page instead of plain bold headers. Adding a Bullet List 1. Scroll down and select the text Create a bulleted or numbered list below. Type OTS Training offers the
following: and press ENTER. 2. Click the Bullet icon. Type three items: Self-help documents, Videos, Workshops (pressing ENTER between
each item.
Note: To turn off the bullet list, press ENTER twice or click on the Bullet icon again.
Figure 19
Production Vs. Staging OU Campus is called a dual server environment. This means that content contributors (Level 4) create content on the Staging server. This data is stored on the Staging server until it is approved. The Production server is where the content is published (the live server) and is where the viewers actually see the content. Level 6 owners will publish to this server. Note: While a page is checked out, if you see a Submit button at the top of your screen you are a level 4. If you see a Publish button at the top of your screen you are a level 6. Adding Hyperlinks There are different types of hyperlinks that can be added to your webpage – internal, external and Email addresses. Internal links are links within the OU Campus environment. External links are located outside the OU Campus environment and include the forms repository. Note: When creating links, avoid using click here. Instead, highlight a word or phrase and create a link from that (ex. view our forms repository)

OU Campus: User Guide
12
Email Address 1. Click in a blank area in the main content and type Contact OTS Training via Email. 2. Select Email. 3. Click the Insert/Edit Mailto Link icon in the JustEdit toolbar. 4. Type the email address beside Address. Type [email protected]. 5. Type a Subject. Type Additional Information Needed. 6. Click OK. 7. Click the Save and Exit icon in the JustEdit toolbar.
Figure 20
External Links It is a best practice to copy and paste the URL of the external link into the Insert Link box. 1. Open a new tab in your browser. 2. Go to the external link by typing it in the address bar. Type www.usmd.edu and press ENTER. 3. Copy the URL in the address bar. 4. Move back to your page in OU Campus and click Main Content to get back into Edit mode. 5. Scroll down to External Link and select this text. 6. Click the Insert/Edit Link icon in the JustEdit toolbar. Press CTRL + V to paste the external link in the URL
box. 7. You may change the Text to display which will actually show up on the webpage. Type University System of
Maryland. 8. Change the Target to New Window. This ensures that all external links will pop-up in a new window alerting
the user that they are moving outside the Towson University website.
Figure 21
9. Click OK. 10. Press CTRL+S to save.

OU Campus: User Guide
13
Internal Links 1. Scroll down to Internal Link and select this text. 2. Click the Insert/Edit Link icon in the JustEdit toolbar. 3. Click the Browse icon. Do not just type in the URL here, you must select it for internal links because it adds a
dependency tag (see definition in note below). 4. In the Select File box, click the down arrow besides Staging and choose Production. 5. Click the www beside Site on the left side of the box. 6. Choose the correct location. We will choose maps and then index.html.
Figure 22
7. Click Insert. The Insert Link box will appear.
Figure 23
Note: The brackets {{}} are called dependency tags. If the location of the internal link changes, all websites using this link will automatically be updated to the new location (helps avoid broken links). 8. You may change the Text to display which will actually show up on the webpage. Type Campus Map. 9. Click OK. 10. Click the Save and Exit icon in the JustEdit toolbar.

OU Campus: User Guide
14
Uploading and Linking to Content If you are adding a Word, Excel, pdf, etc., you must upload that content first. Content must be approved before publishing. You may not upload images. Uploading and Submitting Content for Approval 1. Hover over Content and choose Pages from the Global Navigation bar. 2. Click the documents folder. 3. Click the Upload button. 4. Click the Add button.
Figure 24
5. Choose the desired file and click Open. Choose claflyer*.pdf on the thumb drive. Files names must follow the below naming conventions. If a file is not named correctly, it will not allow you to upload.
• all lowercase • no spaces • no special characters • use a – between words
Note: You may also drag and drop one or multiple files into this box. 6. Right click and choose Rename if the correct naming convention is not followed.
Rename the file cla-flyer-*.pdf. and press ENTER. 7. Click Start Upload. 8. Upload Successful with appear. 9. Click Close. 10. After uploading the document, hover over the target documents row and click the lightbulb to check the
document out. 11. Hover over the target documents row and then hover over Publish and choose Submit for Approval.
Figure 25
12. The Submit for Approval form will appear. Type a Subject. Type Please approve this pdf. 13. Type a Message. Type This goes with the OTS Training page. 14. Click Submit. A message will appear confirming that the document was submitted for approval. The owner
will receive a message in their email.

OU Campus: User Guide
15
Linking to Content Now that you have uploaded the content, you must link to that content. You may still link to content before that content has been approved. However, the document will not show up in a published web page until it is approved.
Figure 26
1. Using the breadcrumb trail, maneuver back to your web page. Click session* and then click on your web page.
2. Click the Main Content tag. 3. Scroll down and select the text .pdf. 4. Click the Insert/Edit Link icon in the JustEdit toolbar. 5. Click the Browse icon. 6. In the Select File box, choose documents. 7. Choose the file from the Select File box and click Insert. Select cla-flyer*.pdf. 8. Change the Text to display which will actually show up on the webpage. Add the document type in
parenthesis after the document name in all upper case. Type CLA Classes (PDF).
Note: Adding the document type is mandatory and it must be in parenthesis and all upper case. Examples include (PDF), (XLSX), (DOCX), (PPTX), etc. Note: If you are linking to a published document that is not in your folder (such as a published document from another department), please make sure to switch to Production in order to locate and link to the document. 9. Change the Target to New Window. 10. Click OK.
Spell Checking Your Content 1. Click the Spell Check icon in the JustEdit toolbar. 2. Potentially misspelled words will show up with a red line. 3. Click on a word with a red line and a pop down box will appear. Choose Ignore, Ignore All or there may be a
suggestion. Fix support and mission. 4. Click the ABC and it will turn off the red lines.

OU Campus: User Guide
16
Reusable Content There are two main types of reusable content – snippets and assets. Snippets can be placed into any editable region inside OU Campus, and when inserted, the snippet code becomes part of the page’s HTML. Snippets are useful for creating a specific format, such as a chart or quote format, which can then be edited on the page with the specific content desired. They are starter code, rather than a centrally controlled piece of content. An asset is centrally managed. When an asset is edited and published, all pages subscribing to that asset are automatically republished to reflect the change. Note: It is recommended that a snippet be used when inserting an image or a table. Refer to the Style Guide for a visual display of which snippets are intended for which area of a page. Inserting a Repeatable Visual List Snippet 1. Click where you want the snippet to be placed on the webpage. Scroll down and click under Insert a
Repeatable Visual List Snippet below. 2. Click the Snippet icon in the JustEdit Toolbar.
Figure 27
3. The Choose Snippet box will appear.
Figure 28
4. Click the down arrow beside Categories at the top of the box. Choose a category. We will choose Main Content as an example. Note: Be aware that most snippets will be taken from the Main Content or the Right Column category. Be careful with Full Width snippets. They cannot go in the main content area. They must go in a footer area.
5. Choose a snippet from the list. We will choose the Repeatable Visual List Block Callout as an example. 6. Click Insert.

OU Campus: User Guide
17
Replacing the Image When choosing an image for a snippet, be aware that certain images fit into certain snippets. When you receive the Photography Selection Form back, the names of the images will be changed. They will include a letter code. These codes correspond to an image size and shape. Refer to Appendix 3 for a list of photo image codes and the corresponding snippet. 1. Right-click on the image in the snippet and click Insert/Edit Image. 2. Click the Browse icon to open the file chooser. 3. From the Environments drop down menu, choose Production. 4. Choose an Images folder.
Note: For global images, choose the Images folder that will appear. For departmental images, navigate to your department folder and then to the Images folder. You may also filter by an image code.
5. Click in Filter and type sq. Click on an image to select it and then click Insert. We will choose bhi-class-hebrew-sq.jpg for this example. A Repeatable Visual List Block Callout snippet requires a square image.
Note: Do not click the Edit Image link in the bottom right corner of the image.
Figure 29
6. Click Insert. 7. From the Insert/Edit Image dialog box, be sure to add a Description. This is the Alt Text which is required for
accessibility purposes. Type Traveling Trainers. 8. You may also add a Tooltip which appears in a box above the picture when you hover over it. Leave Blank.
Note: You may also change the dimensions however the image will automatically resize itself for a best fit.
Figure 30
9. Click the OK button.

OU Campus: User Guide
18
Note: Your picture will not appear until the page is published. 10. Add the following additional fields to the snippet:
a. Title – This is a short title as relates to the image. Select Title and type Traveling Trainer b. Description – This is a more descriptive text. Select Desc and type OTS Training will provide laptops for
customized training. 11. Link – Right-click on the word link and choose Insert/Edit Link. Follow the instructions under the Adding
Hyperlinks area of this document to add your desired link. Sample below. (Choose Browse. Change to Production from Staging. Click technology and then index.html. Click Insert. Make your screen match the one below. Click on OK.)
Figure 31
Figure 32
12. Press CTRL+S.
Inserting a Table Snippet When inserting a table on a page, it is a best practice to use the table snippet - assured that it is accessible and mobile ready. Below are things to keep in mind when adding a table to ta page: • Only use when table has more than 2 rows (and more than 1 column). • The information in the table needs to be related. • Do no use pictures in tables. • Do not use a table within an accordion and no accordions in tables. • Each row must have a least one item in it – don’t use a row as a category break. • Main content section should have tables with no more than 4 columns, otherwise it should be put in a full-
width section. Contact Jackie Durbin or Rick Ivy if you need a larger table so they may add a full width section to your page.

OU Campus: User Guide
19
1. Click under the first paragraph in the Main Content area and click the Snippet icon. 2. In the Filter box, type Table. 3. Choose Table 2-column and click Insert. 4. Fill in the table as below (pressing TAB to move from cell to cell and also to create a new cell:
Figure 33
Deleting a Snippet You may delete a snippet, like the one you see at the top of the Main Content area. 1. Move to the snippet at the top of the main content area. 2. Right-click on the snippet. 3. Click Delete Table.
Figure 34
Inserting an Asset Assets are a type of reusable content inside OU Campus. They are managed centrally from Content > Assets and can be placed on any number of pages. When an asset is edited and published, all pages subscribing to that asset are automatically republished to reflect the change. Some common assets include timelines or statistics (such as enrollment numbers) that must be updated regularly, image galleries, or forms. 1. Click where you want the asset to appear on the webpage. Scroll down and click under Insert Adobe Reader
asset at the bottom of this content area. 2. Click the Insert Asset icon in the JustEdit Toolbar.
Figure 35

OU Campus: User Guide
20
3. From the Select Asset box, choose an asset. We will choose Adobe Reader. Note: It is required to add the Adobe Reader asset when including a pdf on your webpage. Place the asset directly below the pdf. If there are multiple pdfs on a page, place the asset at the bottom of the page. 4. Click Insert. 5. Press CTRL+S.
Saving and Previewing the Page After you have added all your content, it is time to save the page. 1. Click the Save and Exit icon on the JustEdit toolbar.
Figure 36
2. Click the Preview button in the Page Actions toolbar. This is how it will look once it is published to the web.
Figure 37
Page Check Page Check is used to run a series of checks on a page before it is published. Page Check can be run from the Page Actions toolbar, or it can be configured to be run when you click the Publish button (this is called Final Check). There are three checks available: Spell Check, Link Check, and Accessibility Check. 1. Click Page Check from the Page Actions toolbar. 2. The Page Check box will appear.
Figure 38

OU Campus: User Guide
21
3. Click on one of the tests (Spelling, Links, and Accessibility) to run them individually, or select Run All to run all available tests.
Figure 39
4. We will choose Run All for this example. 5. Click Show Results under Links. Notice the wwww.towson.edu/admissions is broken. 6. Click Close. 7. Click Done. 8. Click the Edit button and click Main Content. Fix the link. (right click/edit link/remove the first W/Click OK). 9. Press Save & Exit.
Submitting for Approval After adding all content, it is time to submit the page for approval and to publish. 1. Click the Submit button in the Page Actions toolbar.
Figure 40
2. The Submit for Approval form will appear. It will automatically be addressed to your content owner. 3. Fill in the Subject field (which is required) and add a message if you wish. Add what you see in the screen
capture below. 4. Click Submit. The file will automatically become locked by the content owner (level 6). 5. Level 6 content owner will be notified by email.
Figure 41

OU Campus: User Guide
22
Dashboard The OU Campus Dashboard provides a location within the CMS where each individual user can access user-specific messaging and gadgets. The Dashboard can be customized by each individual user by choosing which gadgets to show or hide in the view. The Dashboard shows such things as: • Gadgets – A gadget is a program that provides additional functionality to OU Campus. Once specific
Dashboard gadgets have been configured to be available for a group of users, members of the group can choose which gadgets to show on the main content area. The Configure Dashboard feature can be used by each individual user to choose which gadgets to show in the main content area. Frequently displayed gadgets include an activity feed of recent site activity, the system inbox for messaging and notifications, a list of pages that are currently checked out by the user, and site analytics. Dashboard gadget can be reordered by clicking the gray title bar and dragging to the new location.
• Workflow – The Workflow list view shows content that a user has sent to another user for approval or content that has been sent to the current user for approval. These messages are separate from other messages (which can be viewed in Inbox and Sent). Content moving through an approval process can be tracked using this screen.
• Inbox – Inbox displays messages from other users as well as automated messages associated with scheduled
actions, such as a notification of scheduled publish or notification of page expiration. The Inbox Gadget is also shown on the Dashboard and includes how many new messages are in the inbox. The Inbox includes a linked list of messages and the functionality to compose a message.
Adding Gadgets to the Dashboard 1. Click Dashboard on the Global Navigation bar. You will enter in Overview mode. 2. Click Configure Dashboard to enable or disable specific gadgets. 3. Click on any number of the available gadgets to enable or disable them. Enabled gadgets are highlighted in
green. 4. Click Save when done.
Figure 42

OU Campus: User Guide
23
Workflow 1. Hover over Dashboard on the Global Navigation bar and choose Workflow or choose it from the Overview
page.
Figure 43
2. The Workflow screen includes the following features and functionality: a. The number of items in the Workflow b. Filter tool to narrow down visible results in the list view c. Selection checkboxes to select and delete multiple messages at a time, or to view a single workflow
message d. Sortable columns in the list view. Messages can be sorted by From, Approver, File, Status, or Date e. The linked file name which can be clicked to preview the content f. Status icons indicated where the page is in the workflow process g. The date and time that the content was sent for approval
Figure 44
Status in Workflow A status icon is shown in the Status column for each content item. Content listed in Workflow can be previewed by any user, but only the user to whom the content was sent has the file checked out and can perform other actions upon it. Clicking a status icon shows the Workflow Message. Inbox 1. Hover over Dashboard on the Global Navigation bar and choose Inbox or choose it from the Overview
page. 2. All messages you have received will appear in the Inbox.

OU Campus: User Guide
24
Content Owner Responsibilities (Level 6) Instructor will sign out as a level 4 and sign in as a level 6 – this is a demo only!!! Approve Documents You must approve documents before approving pages. 1. Hover over Dashboard and then click Workflow in the Global Navigation bar. You may also click on the link
in your Email (subject approve document).
Figure 45
2. Click the document link that is awaiting approval. 3. Click Publish.
Figure 46
4. You will receive a message verifying publication.
Figure 47
Note: If you publish a page before publishing files, the Include Unpublished Dependencies checkbox appears and automatically will be checked. If left checked, all unpublished documents will automatically be published so as to avoid broken links. It is strongly recommended that you review and approve documents before approving pages. Click the View Files link for a list of all unpublished documents and publish them by following the steps above.
Figure 48

OU Campus: User Guide
25
Approve or Decline Content (Web Page) 1. Hover over Dashboard and then click Workflow in the Global Navigation bar. You may also click on the link
in your Email. 2. Click the page link that is awaiting approval.
Figure 49
3. Review the content, and if the content meets the requirements to be published, click Publish. If the content does not meet the requirements to be published, click Decline.
Figure 50
4. If you click Publish, the page will go through a mandatory Final Check (spelling, links and accessibility). Click Publish. The editor will automatically be notified that the page was published in Outlook Email and also in the Inbox in OU Campus.
Figure 51
5. After clicking Publish, a message will tell you that a publish is in progress. When complete you will get a message telling you the publish was successful.
Figure 52
6. Click View in a New Window. 7. If you Decline, the editor will automatically be notified that the page was declined.

OU Campus: User Guide
26
Other Publishing Options Schedule a Publish You would schedule a publish for a campaign beginning a certain time. Or maybe you are going on vacation and you wish a page to publish while you are gone. 1. Hover over Dashboard and then click Workflow in the Global Navigation bar. You may also click on the link
in your Email. 2. Click the page link that is awaiting approval. 3. Click the drop down arrow beside Publish and Choose Schedule.
Figure 53
4. From the Schedule box, select a Date and Time that the content will be published on.
Figure 54
Reassigning Approval of Content from Users You can only reassign pages to people with access to your page. You will be locked out of editing any page you reassign. 1. Hover over Dashboard and then click Workflow in the Global Navigation bar. You may also click on the link
in your Email. 2. Click the page link that is awaiting approval.

OU Campus: User Guide
27
3. Click the drop down arrow beside Publish and Reassign.
Figure 55
4. Select a user to send the file to from the drop-down menu labeled To. 5. Fill out all necessary fields and click the Send button.
Reports Reports are a function that allows for various overviews of site statistics. The amount of reports available depends on the level of the user accessing the report menu; lower user levels may not be able to access all the reports detailed below. The Reports menu is located on the Global Navigation Bar.
Figure 56
The different reports available are: 1. Required Actions: This uses Dependency Manager to scan pages for any broken links (whether to pages or
files) and to check for any out-of-sync pages. 2. Checked-Out Content: Allows users to either see only their own checked-out content or all content that has
been checked-out site wide, depending on user level. 3. Pending Approvals: Again, allows users to see either pages awaiting only their approval or all pages
submitted for approval across the site, depending on user level. 4. Scheduled Actions: Another report that is dependent on user level, allowing users to only see actions they
themselves have set or all pages that have been set up with a scheduled action. 5. Recent Saves: Displays a list of content that has been recently saved and includes information about the type
of save that was performed. 6. Recent Publishes: Displays a list of content that has been recently published, and includes information about
the type of publish that was performed.

OU Campus: User Guide
28
Appendix

OU Campus: User Guide
29
Appendix 1 – CMS Infographic
Figure 57

OU Campus: User Guide
30
Appendix 2 – Web Image Codes
Figure 58

OU Campus: User Guide
31
Appendix 3 - Setting Reminders You may set two types of reminders – scheduled or stale. A scheduled reminder is used when there is a specific date and time when a reminder message should be sent. For example, if tuition increases at the specific time every year, a scheduled reminder may be set for the week prior to the tuition change. Scheduled reminders may have a repeat period like every six months or every semester. Scheduled Reminder 1. Click the Properties button in the Page Actions toolbar. 2. Click Reminders from the Log screen. 3. Select the checkbox beside Set Scheduled Reminder. 4. Select a Date and Time from the designated fields. Choose Next Friday at 8:00 am. 5. You may also choose when to repeat the reminder. Place a number beside Repeat Every and then click the
arrow beside Days and choose Days, Weeks Months or Years. Choose 1 Years. 6. Under Notification, choose who will receive the reminder. 7. Add a Subject of Tuition 8. Add a Message of Revise the tuition figure. 9. Optionally, select the checkbox labeled Send Copy to Email to send an external email to the designated
email address. 10. Click Save. (this is located in the bottom right corner of the screen) Please do not do this.
Figure 59
11. Uncheck Set Scheduled Reminder. (So we can look at Stale Reminders)

OU Campus: User Guide
32
Setting Stale Reminders A stale reminder is set to make sure a page is being updated periodically – not at a set date and time. For example, if you have created a web page that is a campaign, you may want to set a stale reminder to take the page down after a certain amount of time (like 60 days). 1. Click the Properties button in the Page Actions toolbar. 2. Click Reminders. 3. Select the checkbox beside Set Stale Reminder. 4. Place a number beside Stale After and then click the arrow beside Days and choose Days, Weeks Months or
Years. Type 30 and choose Days. 5. Under Notification, choose who will receive the reminder. 6. Add a Subject (keep the default). 7. Add a Message of Revise the new campaign details. 8. Optionally, select the checkbox labeled Send Copy to Email to send an external email to the designated
email address. 9. Click Save. (located at the bottom right corner of the screen) Please do not do this.
Figure 60

OU Campus: User Guide
33
Appendix 4 - Versions Each time a page is published, an automatic version is created. You may also create a backup version manually. This may be used to move between different versions of a webpage that are set to go up at certain timeframes. For example, the Cook Library may change their main webpage for the different seasons or semesters because of hour changes, etc. Comparing Versions 1. Check out the page by clicking the lightbulb. 2. Click the Versions button in the Page Actions toolbar. The Versions screen will appear. 3. Hover over the target version’s row and select Compare. Choose the latest version of the page. 4. Anything added will show up in green. Anything deleted will show up in red.
Reverting to a Previous Version We will view this only - please do not do this.
Figure 61
1. Click the Versions button in the Page Actions toolbar. The Versions screen will appear. 2. Hover over the version’s row and select Revert. This will revert the page on staging to the selected version.
The page must be published before the change is reflected on the live site. Note: Revert is only available on Staging and not in production.
Related Documents