Originally Released: February 2011 Latest Update: May 2011 Web page: http://daveyw.edsstuff.org Email: [email protected]

Welcome message from author
This document is posted to help you gain knowledge. Please leave a comment to let me know what you think about it! Share it to your friends and learn new things together.
Transcript

Originally Released: February 2011
Latest Update: May 2011
Web page: http://daveyw.edsstuff.org
Email: [email protected]

- 2 -
CONTENTS
PAGE
1.0 BACKGROUND 3
2.0 EQUIPMENT 4
2.1 Initial Steam and Rotating Table 4
2.2 Vacuum Application 6
2.3 Steamer Upgrade 9
2.4 Cleaning Fluids 10
2.5 Cleaning Brushes 12
3.0 STEAM AND VACUUM CLEANING PROCESS 13
4.0 PROCESS UPDATES 15
4.1 Vacuum Cycle Re-wetting 15
4.2 Vacuum Wand Sealing Lips 15
4.3 Enzymatic Cleaning Agent Trial 16

- 3 -
1.0 BACKGROUND
This is a follow on from a manual sink based method documented here
within my Homepage http://daveyw.edsstuff.org
This process stood me well for a number of years and over 500 albums, however the
growing claims of the Vinyl fraternity regarding the benefits of using Steam as a
cleaning medium led me to consider the benefits of this approach.
A key drawback with the above manual method is the time required to allow the
records to air dry. I was therefore also keen to explore the possibility of integrating
Vacuum drying.
After spending some time reviewing relevant forum posts and a number of the Videos
on the WWW, I embarked on some initial trials using my trusty Espresso maker as the
initial source of the steam and a new method for cleaning my vinyl grew from there.
_____________________________________________________________
Note:
This document is intended to share a process that I have developed for my own use.
The author takes no responsibility for any injury to persons or damage to property if
attempting to apply the processes described within this document.

- 4 -
2.0 EQUIPMENT
2.1 Initial Steam and Rotating Table
I initially experimented with static steam cleaning using my Espresso Coffee maker;
The steam generation actually worked quite well, the nozzle allowing a fan of steam to
be applied with reasonable accuracy.
However, it became clear that I needed a rotating base to not only apply the steam but
to support washing and drying.
After a little investigation I ended up buying one of these for 5 GBP (approx 8USD).
IKEA SNUDDA – Lazy Susan Rotating Table

- 5 -
The base could do with being a little wider but other than that it proved to be pretty
much perfect for the job of manually turning the record while applying the steam.
I added a central spindle and used some highish density foam to hold the vinyl and
raise it off the base of the table to ensure that the cleaning fluid and steam did not
migrate to the under side.
The clamping system consisted of a plastic disc to cover the label clamped down by a
jam jar lid and rubber door stop – Surprisingly effective.
- 6 -
There is a small sealing strip at the base of the rim of the plastic disc to reduce risk of
steam/fluid contact with the label.
2.2 Vacuum Application
My attention then turned to developing a vacuum system to remove the cleaning and
rinsing fluids.
While watching professional RCM's in action, I noticed that most employed a felt lip
around the suction orifice. The felt lip being in contact with the playing surface during
the drying cycle.
While I could see that this approach concentrated the suction on the grooves, I also saw
that when the wand is removed, residues were left on the record from the cleaning
operation where the felt was last in contact with the record.
One of my objectives was to develop a system that relied solely on the suction of the
vacuum system without any direct contact with the record surface.
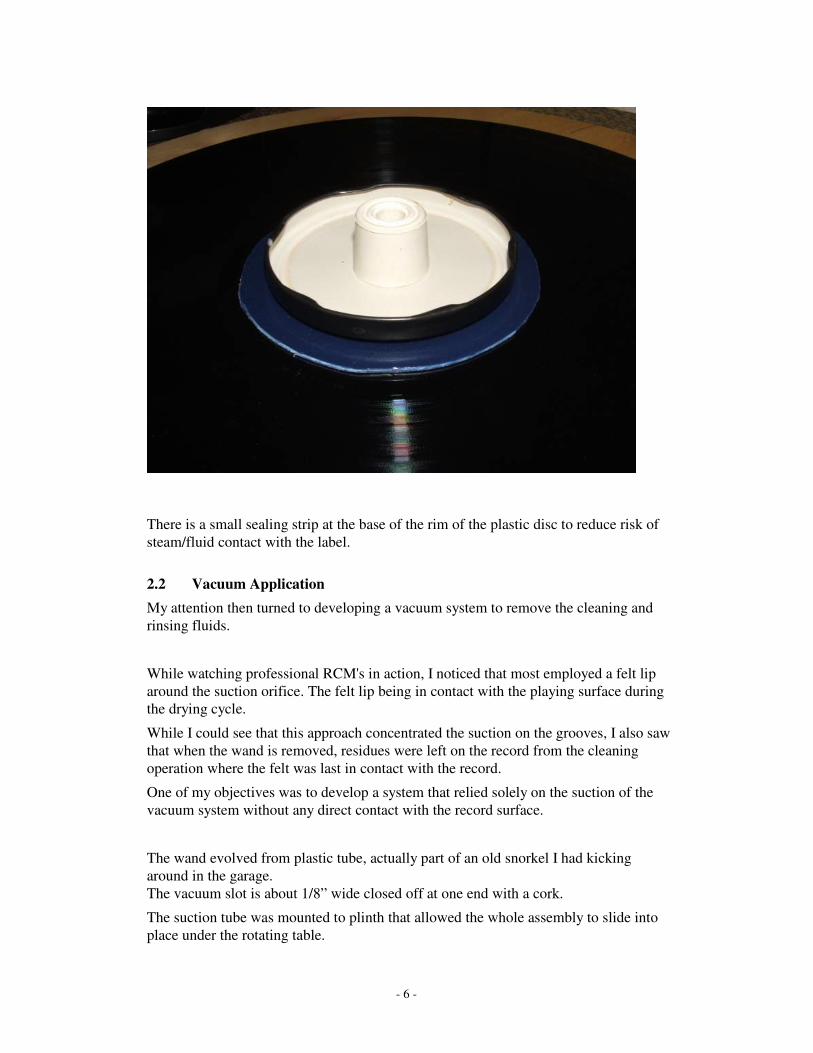
The wand evolved from plastic tube, actually part of an old snorkel I had kicking
around in the garage.
The vacuum slot is about 1/8” wide closed off at one end with a cork.
The suction tube was mounted to plinth that allowed the whole assembly to slide into
place under the rotating table.
- 7 -
The base of the vacuuming assembly slides under the turntable, butting up against the
base. This aligns the wand with the record, with it's suction end hovering just above the
thin plastic disc protecting the label.
The vacuum nozzle is then approx 2mm above the vinyl surface.

- 8 -
When the vacuum is applied the vinyl lifts from the surface from the outer edge.
In order to hold the record flat I added a taped PVC strip that runs against the upper,
outer edge of the lead in.
There is no contact between the vinyl and the wand other than at that point.
Initial trials were delivered using our domestic vacuum cleaner, strangely enough my
good lady was not very impressed with soapy suds being sucked into her shiny new
machine.
So a dedicated compact 1300W domestic unit was found using the local Freecycle
group.
http://www.freecycle.org/group/
For those not familiar with this International Operation, it’s a great way to source
unwanted items for little projects such as this.
The bag was removed and the motor entry filter (coarse foam) and exit filter cleaned.
During the vacuum process I’ve found that a small amount of dampness migrates about
6” down the bellows of the suction pipe from here on it the liquid appears to vaporise,
with no dampness on the motor filters.
I intend to keep an eye on this when cleaning multiple records at a time, to date I’ve
done no more than 5 at a time.
Even this little unit gives plenty of suction, so much so that with a few thinner LP’s,
the record would visually arc upwards off the turntable between the two restraining
points.

- 9 -
This was easily rectified by tuning the level of suction via adjustment of the main
vacuum nozzle bypass valve.
2.3 Steamer Upgrade
While developing the cleaning process it became evident that the Coffee Maker was
struggling a little. With repeated use on multiple discs it would vapour lock and stop
functioning. A more permanent solution had to be found.
After a little Web surfing this is what I went for;
A compact hand held steam cleaner that is ideal for the job.
It fires a strong jet of fine steam mist straight down into the grooves.

- 10 -
2.3 Cleaning Fluids
OK this is where things get a little contentious.
The key thing to bear in mind is that the cleaning fluid is applied after steam cleaning.
The surface of the record is fully wetted and able to receive a neat dose of suitable
cleaning agent.
Initially I applied a drop of standard washing up liquid directly to the brush but this
tended to foam on scrubbing, running off the edge of the record and contaminating the
lower face which has just been cleaned.
Also, I found that 4-5 rotations were required to pull the liquid off the surface of the
record and even then I was not convinced that there weren’t remnants in the base of the
grooves.
I decided that a spray on de-greaser and cleaning agent was required for the first
cleaning cycle and after a little trial and error I ended up using a general purpose
cleaning agent, specifically designed for grease.
I’m sure there’s stuff in here that would have the vinyl fraternity shouting NO!
But it’s applied sparingly, to a fully wetted record then vacuumed off.
I’ve witnessed no adverse consequences, this is possibly because immediately after this
application I use a 2nd
cleaning cycle that uses an IPA based fluid to ensure there’s no
nastys left in the grooves

- 11 -
Possibly another odd choice but this is what I use as the Stage 2 cleaning agent.
“Thaw Quick” – an IPA based spray on fluid actually designed for de-icing fridges and
freezers.
I’ve used it for a variety of cleaning tasks in the past and it has proven to be remarkably
versatile and just the ticket for cleaning even my most cherished records.
The ingredients are simply: Water, IPA & Sodium Ether Sulphate.
As I say, the choice of cleaning agents can be very contentious, if you don’t like these
then “no problem”, use whatever you are personally comfortable with.
After this second cleaning stage I then apply a third Steam Clean and Vacuum cycle as
a final clean rinse.
After the two preceding cleaning cycles the water is instantaneously pulled off the
surface and grooves, leaving a gleaming and totally dry disc, ready to play.
- 12 -
2.5 Cleaning Brushes
Oh dear! Here we go again with more potential division amongst the ranks.
I’ve tried a few and rejected them;
Velvet Pad’s: Not convinced they get into the base of the grooves
Carbon Fibre Brushes: Bristles aren’t stiff enough and modern examples tend to shed
Fine Paint Brushes: OK nice and fine but again not stiff enough
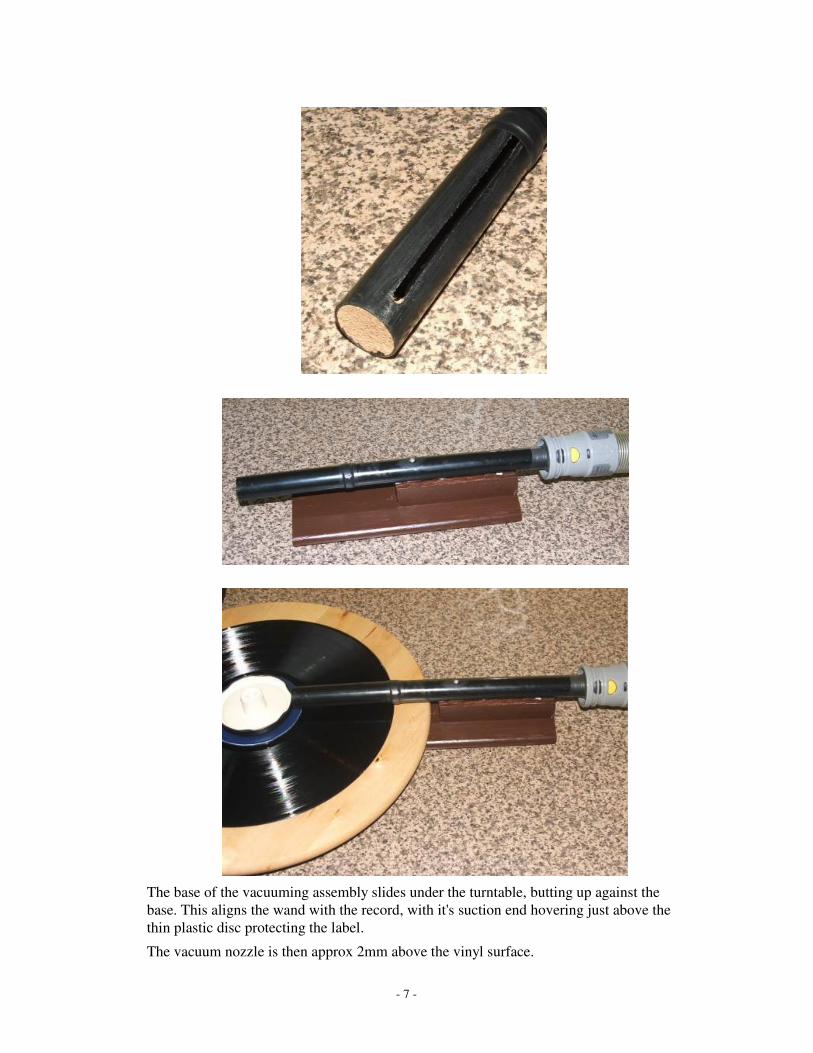
This is what I’ve ended up using for both the scrubbing cycles;
It looks like a normal paint brush doesn’t it?
But look closely at the picture.
These brushes found at a local DIY store have two different sets of bristles.
The primary bristles are very fine synthetic items, you can just about make out one of
them at the bottom of the picture. Not quite as fine as a standard Carbon Fibre dry
cleaning brush, but not too far away and certainly smaller than a standard “fine line”
stylus.
On their own they’d be too soft and deflect when scrubbing, but there are further
bristles which are much stiffer.
These are clear and show up as the shinier items in the picture about ¼” shorter than
the fine bristles.
These shorter stiff bristles support the fine bristles during scrubbing, ensuring they do
not deflect when gentle pressure is applied.
I use two different 2” wide brushes, one for each of the two cleaning cycles and so far
they are proving to be absolutely ideal for the task.

- 13 -
3.0 STEAM AND VACUUM CLEANING PROCESS
Still a little bit of “work in progress” but this is a summary of the current process;
A 3 stage process
a) Steam, Clean (using a degreasing agent Mr. Muscle) & Vac
b) Steam, Clean (using a IPA solution) & Vac
c) Steam Rinse and Vac
It breaks down like this;
a i) Steam Clean
The steam is the only wetting agent so it should be pretty close to impurity free.
The steam is applied to the surface of the record, holding the nozzle about 1" away
from the vinyl, gradually working outwards from the lead out while rotating the table.
At the end the surface of the record is covered in a surface layer of condensed water.
a ii) Scrub
Apply a small spray of Kitchen Cleaner onto the wetted disc.
While rotating the record scrub the record with the cleaning brush of choice, again
working inside out.
a iii) Vac
Slide the vacuum assembly into place and switch on the vacuum.
Fairly rapidly rotate the record one whole turn to quickly suck up the majority of the
liquid, then slowly rotate a 2-3 further revolutions until the grooves visually appear dry.
Looking at the grooves at a shallow angle in good light works well to verify if it’s dry.
b i) Steam Clean (as a i)
b ii) Scrub
Small spray of IPA solution onto the wetted record and scrub as in a ii.
b iii) Vac (as a iii)
c i) Steam Clean (as a i)
cii) Vac (as a iii)
It’s worth viewing the videos on the web page to get a better appreciation:
http://daveyw.edsstuff.org/vinyl/S&VVC/

- 14 -
This process provides very satisfying results and I’ve migrated from fairly unloved
discs for initial experiments to some pretty prized but elderly offerings such as original
copies of Santana’s debut and Led Zeppelin I & III amongst others.
It takes approximately five minutes per 12” and the disc is ready to play straight away.

- 15 -
4.0 PROCESS UPDATES
May 2011
4.1 Vacuum Cycle Re-wetting
Depending upon the level of applied steam, it is possible that after the scrubbing cycles
the disc surface can become a little dry, some of the moisture evaporating off the warm
vinyl, probably accelerated by the presence of the cleaning agents.
Re-wetting via a quick application (5 seconds with a quick spin) of steam improves the
efficiency of the subsequent vacuum application. The wetted liquid is sucked off the
vinyl more effectively.
4.2 Vacuum Wand Sealing Lips
I experimented with the use of velvet lips on the suction wand, uing a fairly loose
knitted variety that actually doesn’t retain fluid as the air is actually sucked through the
strands keeping them dry.
This type of sticky backed velvet can be bought from most Arts & Crafts stores, I’d
expecting a single A4 sheet to last well over 500 records.

- 16 -
The picture shows the velvet stopping at the end of the slot, don’t forget that the rest of
the wand sits on the label protector, so the full force of the vacuum goes straight to the
surface of the record.
To be honest, this level of suction, even with a basic domestic vacuum cleaner is too
much, I had difficulty actually turning the vinyl, the grip was so strong. I’ve had to trim
back the level of suction using the bypass valve.
The key difference with the velvet lips is the time to pull the liquid off the vinyl.
Without the lips took typically 3-4 revolutions, with the lips it’s no more than two.
In terms of end result, with and without the velvet lips making contact with the vinyl, I
couldn’t make a call.
I don’t think it’s delivering any greater sonic results, but it is slightly quicker.
However, found that if I was cleaning records that had a large amount of surface dust
(generally discs bought from vendors that have been sitting unplayed for many years)
then this level of dirt could be retained within the fibres and take a couple of purging
cycles to clean out.
I could have delivered a pre-cleaning hand wash, but it all adds unnecessary time.
So the lips were removed and I reverted back to the process as described and video’d,
hovering the vacuum nozzle just above the vinyl with absolutely nothing in contact
with the playing surface.
An extra advantage is that dedicated wands for cleaning or rinsing are not required.
4.3 Enzymatic Cleaning Agent Trial
A fellow vinyl compadre sent me an Enzyme cleaning agent (Endozime) he’s been
using for some time to trial as a bit of a comparator.
I kicked off by re-cleaning, with the defined process, some previously cleaned records
with the Mr. Muscle Kitchen Cleaner. I selected ones that still had a small amount of
back ground noise/crackle.
The enzymatic cleaning agent had no effect when comparing back to back recordings -
all the same subtle nasties were still there.
I then repeated, this time leaving the Endozime solution on the surface of the record for
3-5 mins per side before scrubbing and vacuuming.
Again no difference.
I then did two further batches of records with Endozime and then Mr. Muscle.
Conclusions are rather difficult to make as the results are so close, but this is what I
believe the situation to be following these trials.
The Endozime requires time to act to get the best out of it, leaving for about 5mins
feels about right and if you’re cleaning process and/or patience allows, then this is a
very valid way to go.
In my case I'm really looking for a process that optimises speed with effectiveness - on
this front the Mr. Muscle wins out.
A quick (<30 second) scrub with Mr. Muscle seems to equate to a 3-5 minute
Endozime soak and scrub – I really couldn’t detect a difference.
Related Documents