Guild of Oregon Woodworkers Volume #25, Issue #3 March 2008 OREGON WOOD WORKS The March Guild meeting will be at Franklin High School, 5405 SE Woodward St. Portland, OR Jim Hall, a professional wood turner and fellow guild member is going to be doing some wood turning basics with some special tips. He will also do a sharpening demo to show you how to get the most out of your lathe tools. Brian is bringing in some cherry and some beautiful burled maple he came across over the winter for Jim to work with. Expect a great show. If you made a table with Bill Bolstad, please bring it. Social time begins at 6:30. O UR N EXT M EETING —A PRIL 16, 2008 7:00 PM Inside this Issue: Intra-Guild Contest 1 Even the Worst Day 2 The Next Big Show 3 Shop Tours: Dave Miller 3 Screw Loose 4 Bills Shop: A Table... 6 Wood Movement 6 Last: David Douglass. 7 About George 7 Make a Chisel 8 Disaster befalls Cyclone 8 Toxic Cutting Boards 9 Hammer & Tenon 9 East central Portland. Travel east on Pow- ell (Ross Island Bridge). At 52nd avenue, turn north. In three blocks turn right on Woodward. Two blocks to the shop en- trance. Or continue to 54th, turn left and three blocks ahead dead ends at the school Tool of the Month W hat will you bring?? There’s still time. Get to the shop and fire up that table saw. Take on a challenge. The chance to show oth- ers a sample of your work is coming again soon. An audience of admir- ing Guild members. And maybe there’s a little cash prize waiting for you.. Judging will be done on three quality levels: Professional, Inter- mediate and Hobbyist. Projects will be judged on quality of fit, function, form and the display of the wood’s visual beauty. Entries will be accompanied by a numbered paper with a brief detail of the pro- ject (wood type, finish, unusual at- tributes, etc.). Cash prizes will be determined by the quantity of projects in each level, starting with a "first, second and third" in each and modi- fied accordingly on the night of the event. This should help if we face a situation like last year where there were only three "beginners" (so each one won) and a lot of "intermediates" who were left empty. The George E. DuBois award, “Best of Show” will be awarded to the project that best exemplifies the capabilities of a woodworker GIVEN THEIR LEVEL, so the one that gets the most votes count will not necessarily win. The judges will determine the one that is Best when compared with an assumed capability, after the original voting is done and they have a list of projects to choose from. Another project, the fourth place winner will move up to fill the void created by Best of Show. Winners will be asked to comment on their project to the group. (Continued on page 8) T HE I NTRA -G UILD W OODWORKING C ONTEST B Y B RIAN W ARRINGTON

Welcome message from author
This document is posted to help you gain knowledge. Please leave a comment to let me know what you think about it! Share it to your friends and learn new things together.
Transcript
Guild of Oregon Woodworkers Volume #25 , Issue #3
March 2008
O R E G O N W O O D W O R K S
The March Guild meeting will be at Franklin High School, 5405 SE Woodward St. Portland, OR
Jim Hall, a professional wood turner and fellow guild member is going to be doing some wood turning basics with some special tips. He will also do a sharpening demo to show you how to get the most out of your lathe tools. Brian is bringing in some cherry and some beautiful burled maple he came across over the winter for Jim to work with.
Expect a great show. If you made a table with Bill Bolstad, please bring it. Social time begins at 6:30.
O U R N E X T M E E T I N G — A P R I L 1 6 , 2 0 0 8 7 : 0 0 P M
I n s i d e t h i s I s s u e :
Intra-Guild Contest 1
Even the Worst Day 2
The Next Big Show 3
Shop Tours: Dave Miller 3
Screw Loose 4
Bills Shop: A Table... 6
Wood Movement 6
Last: David Douglass. 7
About George 7
Make a Chisel 8
Disaster befalls Cyclone 8
Toxic Cutting Boards 9
Hammer & Tenon 9
East central Portland. Travel east on Pow-ell (Ross Island Bridge). At 52nd avenue, turn north. In three blocks turn right on Woodward. Two blocks to the shop en-trance. Or continue to 54th, turn left and three blocks ahead dead ends at the school
Tool of the Month
W hat will you bring??
There’s still time. Get to the shop and fire up that table saw. Take on a
challenge. The chance to show oth-ers a sample of your work is coming again soon. An audience of admir-ing Guild members. And maybe there’s a little cash prize waiting for you..
Judging will be done on three quality levels: Professional, Inter-mediate and Hobbyist. Projects will be judged on quality of fit, function, form and the display of the wood’s visual beauty. Entries will be accompanied by a numbered paper with a brief detail of the pro-ject (wood type, finish, unusual at-tributes, etc.).
Cash prizes will be determined by the quantity of projects in each level, starting with a "first, second and third" in each and modi-
fied accordingly on the night of the event. This should help if we face a situation like last year where there were only three
"beginners" (so each one won) and a lot of "intermediates" who were left empty.
The George E. DuBois award, “Best of Show” will be awarded to the project that best exemplifies the capabilities of a woodworker GIVEN THEIR LEVEL, so the one that gets the most votes count will not necessarily win.
The judges will determine the one that is Best when compared with an assumed capability, after the original voting is done and they have a list of projects to choose from. Another project, the fourth place winner will
move up to fill the void created by Best of Show. Winners will be asked to comment on their project to the group.
(Continued on page 8)
T H E I N T R A - G U I L D W O O D W O R K I N G C O N T E S T B Y B R I A N W A R R I N G T O N
Page 2 Volume #25, Issue #3
J ust cutting up plywood and making boxes. I have heard that phrase used by some furniture makers to denigrate cabinet makers, and I’ve probably used it myself once or twice, but in the context of a sad fact of life about making a living in a wood shop.
Well, I’ve just finished a few days in the shop cutting up plywood to make boxes. I’ll explain:
I was approached by Natalie Warren, who was at the time the President of the Oregon Potters Association (OPA), about making some display pedestals for a group of Japanese ceramicists. The Japanese group is coming to Portland to display work at the Japanese Gardens and then both display their work and do demonstrations at the “Showcase” exhibit at the end of April.
I thought like that sounded like a good Guild project, and I wanted to have a better connection for our Guild with the OPA since we were going to start this year exhibiting at the “Showcase” ourselves. This is originally an OPA show and we’ll be riding their coat-tails. Nice way to get the relationship underway to help them with their Japanese guests.
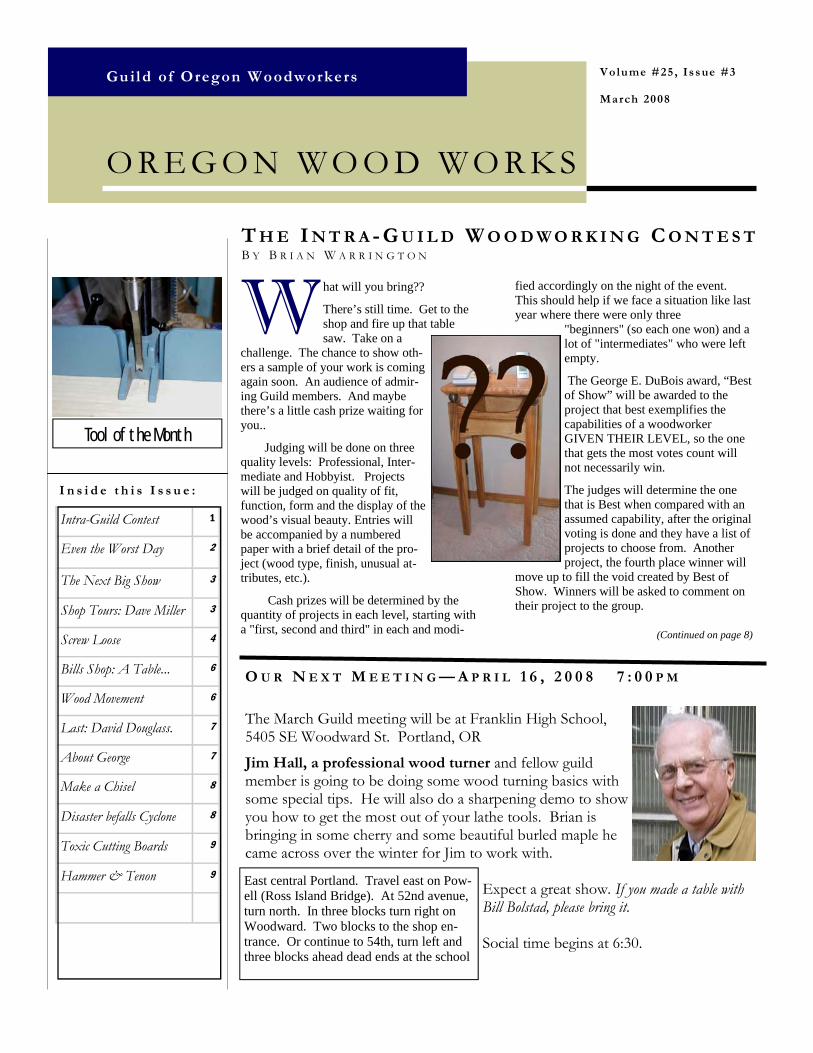
As time went along, and the OPA and Japanese delegation wrote back and forth, the number and size of the pedestals grew and grew, until it was look-ing like about 50 some recti-linear boxes with the bottoms open -- some made to tele-scope-stack into each other and others not. The sizes, of course, were all given in centimeters, but converted to inches, they range from 28-inch cubes to about 8-inch by 10-inch boxes.
So I figured out how much plywood we’d need; they finagled a good price from Crosscut Hardwoods, and to make that story short, Crosscut showed up at my shop a week and a half ago with 50 sheets of ¾-inch shop birch. Do you know how big a stack 50 sheets is? The stack is 38 inches tall! “Ye Gods,” says I to myself, “have I made another stupid promise?”
Daunted, I pulled a first couple sheets off and made one 28-inch cube. That, of course, is five pieces, 28-inches square. Twice through the saw to cut each piece (10 cuts), four times through to miter the top (4 cuts), three times each to miter each of four sides(12 cuts). Then repeat the latter to make a spline slot in each piece (26 cuts). Grand total, 42 cuts per pedestal, times 50 pedestals, that’s 2100 cuts just to make the blasted pieces!
I decided, however, it was silly to call out the troops so a larger group could watch two people work at the table saw, so Steve Philps came over and helped me cut up the sheets of ply-wood into the two hundred and fifty pieces we needed. That took us the better part of a long afternoon, but it wasn’t bad because we could lie to each other between cuts.
The next morning, I stared at the stacks and thought first about getting somebody else to do this, but gave that up as a non-starter. So be-fore too long I had all my air cleaners fired up,
the ear protectors on, and I was merrily mitering and slotting all those pieces. Took me the better part of two days.
OK, so that gets me to the point of this. It was boring. It was more than boring, it was boooor-ing. And dangerous. More than once, I watched my left hand drift closer and closer to that whirling steel and carbide; it was like watching some-body else until it dawned on me that I’d better give the blade a wider berth.
About the sixth hour, I started to throw a pity party. Oh poor me. Doing all this boring pro bono work when I could be making money doing something much more fun. Here I was -- cutting up sheets of plywood to make boxes. Woe was me.
That’s when it hit me. Would I rather be doing this than sitting in front of a computer back in my old cubicle on the sixth floor of the Bonneville Power Administration build-ing? No contest!
When my shop furnace gave out this winter, and I was working in the cold while waiting for Chuck the fur-nace guy to get there, would I rather have been sitting in an endless meeting with peo-ple hemming and hawing and not really doing anything but covering their virtual be-hinds? No contest!
When I found I misspelled “Genesis Society” on the Architectural Heritage Cen-ter’s sponsor board, would I
rather have been prarie-dogging to watch the clock, waiting for five o’clock to roll around? No contest!
Is the worst day in my shop better than the best day in the office? No contest!
(Besides, some of you other guys are putting the boxes together while I am flying to Paris. Should I feel guilty or not?
NO CONTEST!!
E V E N T H E W O R S T D A Y . . . B Y L E E J O H N S O N , P R E S I D E N T
Would I rather be doing woodworking than…
OREGON WOOD WORKS Page 3
Bob Oswald was voted in as Vice President.
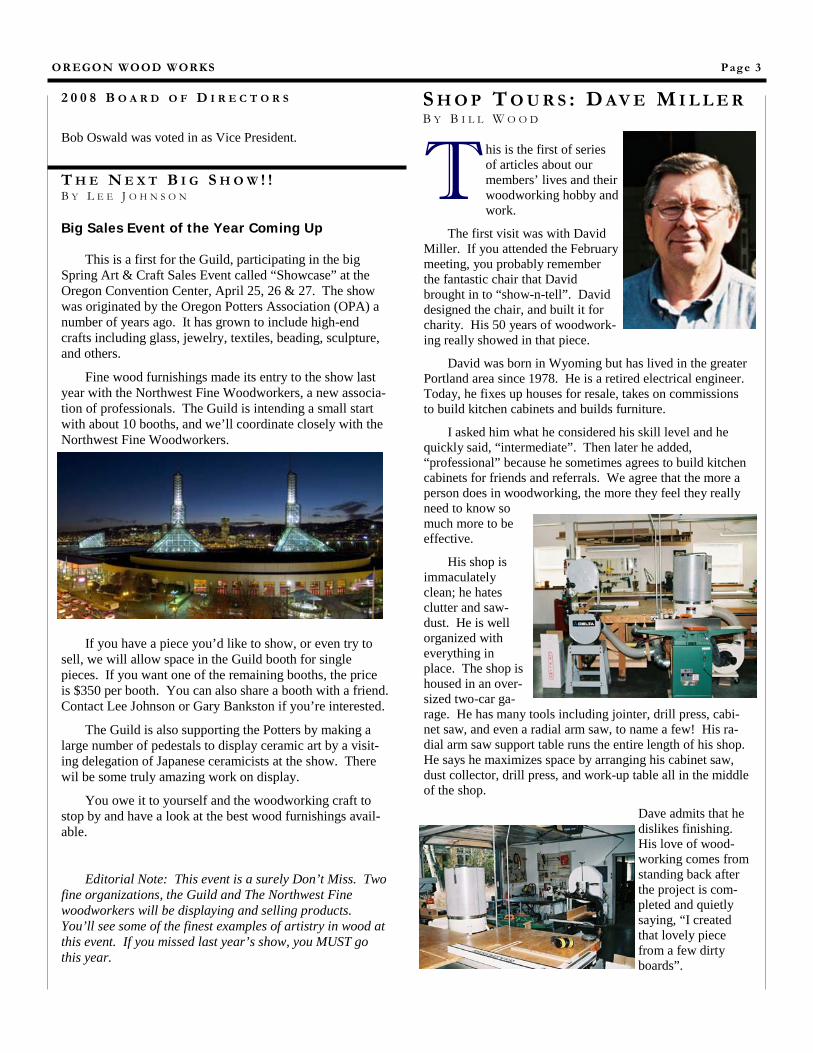
T his is the first of series of articles about our members’ lives and their woodworking hobby and work.
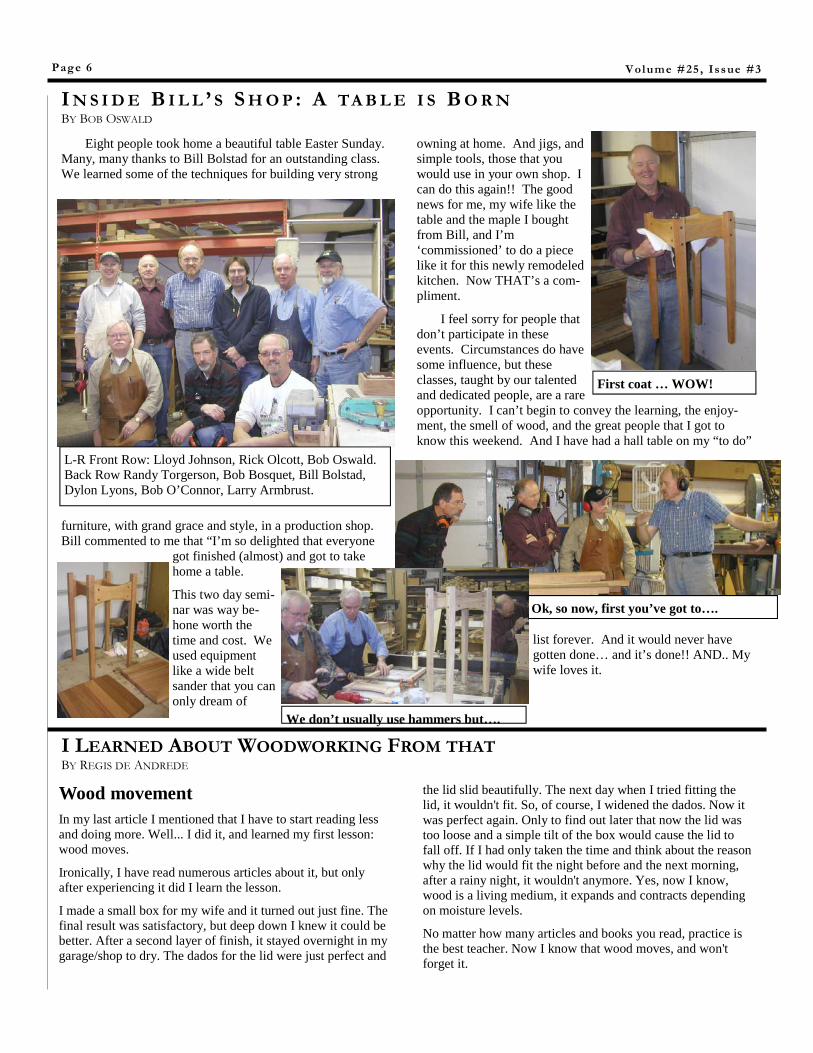
The first visit was with David Miller. If you attended the February meeting, you probably remember the fantastic chair that David brought in to “show-n-tell”. David designed the chair, and built it for charity. His 50 years of woodwork-ing really showed in that piece.
David was born in Wyoming but has lived in the greater Portland area since 1978. He is a retired electrical engineer. Today, he fixes up houses for resale, takes on commissions to build kitchen cabinets and builds furniture.
I asked him what he considered his skill level and he quickly said, “intermediate”. Then later he added, “professional” because he sometimes agrees to build kitchen cabinets for friends and referrals. We agree that the more a person does in woodworking, the more they feel they really need to know so much more to be effective.
His shop is immaculately clean; he hates clutter and saw-dust. He is well organized with everything in place. The shop is housed in an over-sized two-car ga-rage. He has many tools including jointer, drill press, cabi-net saw, and even a radial arm saw, to name a few! His ra-dial arm saw support table runs the entire length of his shop. He says he maximizes space by arranging his cabinet saw, dust collector, drill press, and work-up table all in the middle of the shop.
Dave admits that he dislikes finishing. His love of wood-working comes from standing back after the project is com-pleted and quietly saying, “I created that lovely piece from a few dirty boards”.
2 0 0 8 B O A R D O F D I R E C T O R S
S H O P T O U R S : D AV E M I L L E R B Y B I L L W O O D
T H E N E X T B I G S H O W ! ! B Y L E E J O H N S O N
Big Sales Event of the Year Coming Up
This is a first for the Guild, participating in the big Spring Art & Craft Sales Event called “Showcase” at the Oregon Convention Center, April 25, 26 & 27. The show was originated by the Oregon Potters Association (OPA) a number of years ago. It has grown to include high-end crafts including glass, jewelry, textiles, beading, sculpture, and others.
Fine wood furnishings made its entry to the show last year with the Northwest Fine Woodworkers, a new associa-tion of professionals. The Guild is intending a small start with about 10 booths, and we’ll coordinate closely with the Northwest Fine Woodworkers.
If you have a piece you’d like to show, or even try to sell, we will allow space in the Guild booth for single pieces. If you want one of the remaining booths, the price is $350 per booth. You can also share a booth with a friend. Contact Lee Johnson or Gary Bankston if you’re interested.
The Guild is also supporting the Potters by making a large number of pedestals to display ceramic art by a visit-ing delegation of Japanese ceramicists at the show. There wil be some truly amazing work on display.
You owe it to yourself and the woodworking craft to stop by and have a look at the best wood furnishings avail-able.
Editorial Note: This event is a surely Don’t Miss. Two fine organizations, the Guild and The Northwest Fine woodworkers will be displaying and selling products. You’ll see some of the finest examples of artistry in wood at this event. If you missed last year’s show, you MUST go this year.
Page 4 Volume #25 , Issue #3
available to me. When the initial design work is done, I’ll make a few more detailed drawings to Figure out how much of, and what material to use. That’s also where I start thinking in more detail about just how various ele-ments will fit together, how to start fabricating things, and how to conserve on material use. More wads of paper will
likely result.
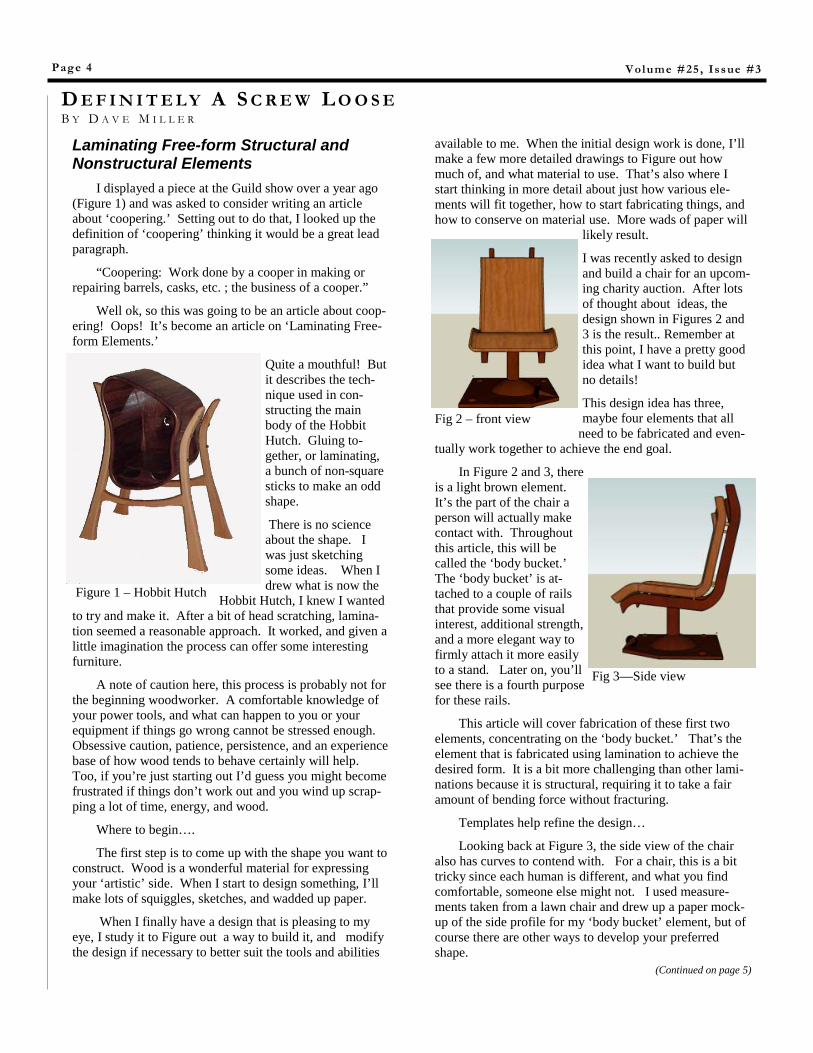
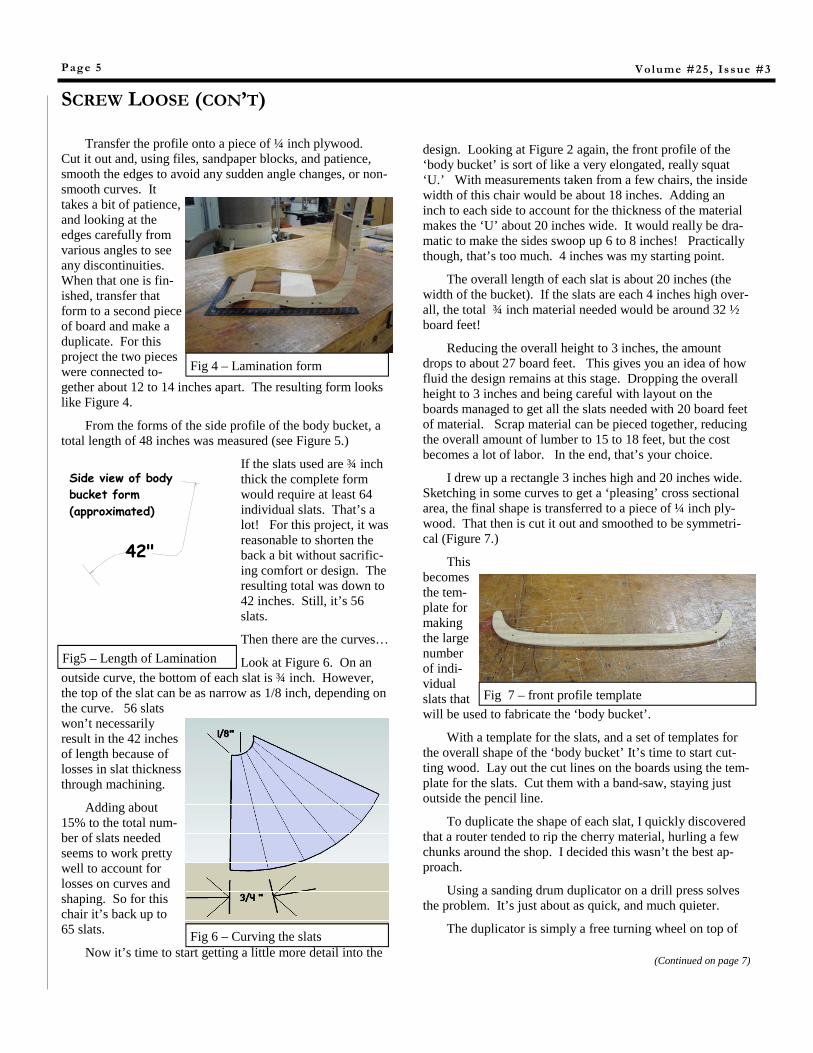
I was recently asked to design and build a chair for an upcom-ing charity auction. After lots of thought about ideas, the design shown in Figures 2 and 3 is the result.. Remember at this point, I have a pretty good idea what I want to build but no details!
This design idea has three, maybe four elements that all
need to be fabricated and even-tually work together to achieve the end goal.
In Figure 2 and 3, there is a light brown element. It’s the part of the chair a person will actually make contact with. Throughout this article, this will be called the ‘body bucket.’ The ‘body bucket’ is at-tached to a couple of rails that provide some visual interest, additional strength, and a more elegant way to firmly attach it more easily to a stand. Later on, you’ll see there is a fourth purpose for these rails.
This article will cover fabrication of these first two elements, concentrating on the ‘body bucket.’ That’s the element that is fabricated using lamination to achieve the desired form. It is a bit more challenging than other lami-nations because it is structural, requiring it to take a fair amount of bending force without fracturing.
Templates help refine the design…
Looking back at Figure 3, the side view of the chair also has curves to contend with. For a chair, this is a bit tricky since each human is different, and what you find comfortable, someone else might not. I used measure-ments taken from a lawn chair and drew up a paper mock-up of the side profile for my ‘body bucket’ element, but of course there are other ways to develop your preferred shape.
(Continued on page 5)
Laminating Free-form Structural and Nonstructural Elements
I displayed a piece at the Guild show over a year ago (Figure 1) and was asked to consider writing an article about ‘coopering.’ Setting out to do that, I looked up the definition of ‘coopering’ thinking it would be a great lead paragraph.
“Coopering: Work done by a cooper in making or repairing barrels, casks, etc. ; the business of a cooper.”
Well ok, so this was going to be an article about coop-ering! Oops! It’s become an article on ‘Laminating Free-form Elements.’
Quite a mouthful! But it describes the tech-nique used in con-structing the main body of the Hobbit Hutch. Gluing to-gether, or laminating, a bunch of non-square sticks to make an odd shape.
There is no science about the shape. I was just sketching some ideas. When I drew what is now the
Hobbit Hutch, I knew I wanted to try and make it. After a bit of head scratching, lamina-tion seemed a reasonable approach. It worked, and given a little imagination the process can offer some interesting furniture.
A note of caution here, this process is probably not for the beginning woodworker. A comfortable knowledge of your power tools, and what can happen to you or your equipment if things go wrong cannot be stressed enough. Obsessive caution, patience, persistence, and an experience base of how wood tends to behave certainly will help. Too, if you’re just starting out I’d guess you might become frustrated if things don’t work out and you wind up scrap-ping a lot of time, energy, and wood.
Where to begin….
The first step is to come up with the shape you want to construct. Wood is a wonderful material for expressing your ‘artistic’ side. When I start to design something, I’ll make lots of squiggles, sketches, and wadded up paper.
When I finally have a design that is pleasing to my eye, I study it to Figure out a way to build it, and modify the design if necessary to better suit the tools and abilities
D E F I N I T E L Y A S C R E W L O O S E B Y D A V E M I L L E R
Figure 1 – Hobbit Hutch
Fig 2 – front view
Fig 3—Side view
Page 5 Volume #25 , Issue #3
design. Looking at Figure 2 again, the front profile of the ‘body bucket’ is sort of like a very elongated, really squat ‘U.’ With measurements taken from a few chairs, the inside width of this chair would be about 18 inches. Adding an inch to each side to account for the thickness of the material makes the ‘U’ about 20 inches wide. It would really be dra-matic to make the sides swoop up 6 to 8 inches! Practically though, that’s too much. 4 inches was my starting point.
The overall length of each slat is about 20 inches (the width of the bucket). If the slats are each 4 inches high over-all, the total ¾ inch material needed would be around 32 ½ board feet!
Reducing the overall height to 3 inches, the amount drops to about 27 board feet. This gives you an idea of how fluid the design remains at this stage. Dropping the overall height to 3 inches and being careful with layout on the boards managed to get all the slats needed with 20 board feet of material. Scrap material can be pieced together, reducing the overall amount of lumber to 15 to 18 feet, but the cost becomes a lot of labor. In the end, that’s your choice.
I drew up a rectangle 3 inches high and 20 inches wide. Sketching in some curves to get a ‘pleasing’ cross sectional area, the final shape is transferred to a piece of ¼ inch ply-wood. That then is cut it out and smoothed to be symmetri-cal (Figure 7.)
This becomes the tem-plate for making the large number of indi-vidual slats that will be used to fabricate the ‘body bucket’.
With a template for the slats, and a set of templates for the overall shape of the ‘body bucket’ It’s time to start cut-ting wood. Lay out the cut lines on the boards using the tem-plate for the slats. Cut them with a band-saw, staying just outside the pencil line.
To duplicate the shape of each slat, I quickly discovered that a router tended to rip the cherry material, hurling a few chunks around the shop. I decided this wasn’t the best ap-proach.
Using a sanding drum duplicator on a drill press solves the problem. It’s just about as quick, and much quieter.
The duplicator is simply a free turning wheel on top of
(Continued on page 7)
Transfer the profile onto a piece of ¼ inch plywood. Cut it out and, using files, sandpaper blocks, and patience, smooth the edges to avoid any sudden angle changes, or non-smooth curves. It takes a bit of patience, and looking at the edges carefully from various angles to see any discontinuities. When that one is fin-ished, transfer that form to a second piece of board and make a duplicate. For this project the two pieces were connected to-gether about 12 to 14 inches apart. The resulting form looks like Figure 4.
From the forms of the side profile of the body bucket, a total length of 48 inches was measured (see Figure 5.)
If the slats used are ¾ inch thick the complete form would require at least 64 individual slats. That’s a lot! For this project, it was reasonable to shorten the back a bit without sacrific-ing comfort or design. The resulting total was down to 42 inches. Still, it’s 56 slats.
Then there are the curves…
Look at Figure 6. On an outside curve, the bottom of each slat is ¾ inch. However, the top of the slat can be as narrow as 1/8 inch, depending on the curve. 56 slats won’t necessarily result in the 42 inches of length because of losses in slat thickness through machining.
Adding about 15% to the total num-ber of slats needed seems to work pretty well to account for losses on curves and shaping. So for this chair it’s back up to 65 slats.
Now it’s time to start getting a little more detail into the
SCREW LOOSE (CON’T)
Fig 4 – Lamination form
Fig5 – Length of Lamination
42"
Side view of body bucket form(approximated)
Fig 6 – Curving the slats
Fig 7 – front profile template
Page 6 Volume #25 , Issue #3
I N S I D E B I L L ’ S S H O P : A TA B L E I S B O R N BY BOB OSWALD
Eight people took home a beautiful table Easter Sunday. Many, many thanks to Bill Bolstad for an outstanding class. We learned some of the techniques for building very strong
furniture, with grand grace and style, in a production shop. Bill commented to me that “I’m so delighted that everyone
got finished (almost) and got to take home a table.
This two day semi-nar was way be-hone worth the time and cost. We used equipment like a wide belt sander that you can only dream of
the lid slid beautifully. The next day when I tried fitting the lid, it wouldn't fit. So, of course, I widened the dados. Now it was perfect again. Only to find out later that now the lid was too loose and a simple tilt of the box would cause the lid to fall off. If I had only taken the time and think about the reason why the lid would fit the night before and the next morning, after a rainy night, it wouldn't anymore. Yes, now I know, wood is a living medium, it expands and contracts depending on moisture levels.
No matter how many articles and books you read, practice is the best teacher. Now I know that wood moves, and won't forget it.
Wood movement In my last article I mentioned that I have to start reading less and doing more. Well... I did it, and learned my first lesson: wood moves.
Ironically, I have read numerous articles about it, but only after experiencing it did I learn the lesson.
I made a small box for my wife and it turned out just fine. The final result was satisfactory, but deep down I knew it could be better. After a second layer of finish, it stayed overnight in my garage/shop to dry. The dados for the lid were just perfect and
I LEARNED ABOUT WOODWORKING FROM THAT BY REGIS DE ANDREDE
owning at home. And jigs, and simple tools, those that you would use in your own shop. I can do this again!! The good news for me, my wife like the table and the maple I bought from Bill, and I’m ‘commissioned’ to do a piece like it for this newly remodeled kitchen. Now THAT’s a com-pliment.
I feel sorry for people that don’t participate in these events. Circumstances do have some influence, but these classes, taught by our talented and dedicated people, are a rare opportunity. I can’t begin to convey the learning, the enjoy-ment, the smell of wood, and the great people that I got to know this weekend. And I have had a hall table on my “to do”
list forever. And it would never have gotten done… and it’s done!! AND.. My wife loves it.
L-R Front Row: Lloyd Johnson, Rick Olcott, Bob Oswald. Back Row Randy Torgerson, Bob Bosquet, Bill Bolstad, Dylon Lyons, Bob O’Connor, Larry Armbrust.
First coat … WOW!
Ok, so now, first you’ve got to….
We don’t usually use hammers but….
Page 7 Volume #25 , Issue #3
Jeff Reardon , wood shop manager for David Douglass Douglass High School treated us to a fine look inside the pro-gram at the school.
I forgot my camera and John Dubay was unable to attend. Good news, Barb Hall bailed me out.
Three of Jeff’s stu-
dents, Eric, a junior and Vladimir and Mike, two sen-iors, presented some of their projects. Very fine crafts-manship from these young folks. I wish I could make a Sam Maloof chair as good as the one we saw.
All of the young men want to keep woodworking as part of their future. Furniture, production, a lot of choices and a wide open future. With their talent, I know they’ll find doors opening and opportunities waiting.
The meet-ing ended with a little brainstorm-ing session for Jeff about the definition of woodworking. Though provok-ing. It gave me pause for thought. What do I see and enjoy in woodworking. But that’s another article.
THE LAST MEETING BY BOB OSWALD
I talked with George DuBois today (Sat 3/29). Time is marching on and it is taking its toll. He was in good spirits and we had a very good conversation. I wanted to let you know that George is under Hospice care and is catching up with friends as much as pos-
sible. Keep him in your thoughts.
For the many of you who have joined the Guild is the past couple of years, George is a pioneer, bringing the Guild to the state you see it today. It is open to woodworkers of all levels, sharing knowledge and helping everyone to enjoy this great activity to the max.
I f you're thinking of getting into a Multi Router, or are just curious about what it is, then this seminar
will answer all your questions. It isn't called "the Chairmaker's friend" for noth-ing. Learn more about this machine through this Guild seminar. The seminar will demonstrate the incredible features of a MultiRouter. Ariel will build a side table with drawer and shelf; all joinery done with the Multi-Router. You’ll see the manufacture of finger joints and through-dovetails. Enroll in the few remain seats on the Guild website under seminars.
F R A N K L A R O Q U E ’ S W I S D O M . . .
the sanding drum. (Figure 8.) With course paper, it’s quick to duplicate the slats.
Build a box to sit on the drill press table, connected to a vacuum. The box is simply two chunks of ¾ inch melamine with a three-inch deep skirt around them and a hole for the vacuum. On the melamine, a 2 ¼ inch hole is drilled in line with the sanding drum. The drum is then lowered into it so the duplicator wheel contacts the template. With the vacuum, there is very little dust and the melamine surface is great for sliding the wood around as you sand.
After shaping 65 slats, you WILL be ready for a break.
CONTINUED NEXT MONTH...
(Continued from page 5)
SCREW LOOSE (CON’T)
THINKING OF GEORGE BY BOB OSWALD
Once in a while I have a place that I cannot use my pinner to fasten fragile parts together. One situation comes to mind. It is when I re-installed the drawer bottoms in an old dresser. The bottom had shrunk and no longer fit in the front groove and the nail holes do not line up with the back. I buy #16 x 1-1/4" nails to replace the old nails, (I use metal bluing to make them look old). Cut the head off one of the nails and chuck it in your drill 1/8" and re-drill the hole. This will give you a hole that is the right size and the end of the nail will bite-in and make for a tight joint. This also is good for re-attaching delicate carvings.
Fig 8 – sanding duplicator
M U L T I R O U T E R … W I T H A R I E L E N R I Q U E Z
Mike —involved in many projects
Eric: a Great Jewelry Box
Jeff Reardon
W E L C O M E N E W M E M B E R S
Welcome to the Guild the following new people. Mark Culley, Randal Torgerson, , Rod Edwards, Philip Nel-son, Bryan Kirby, Charles Weigant and Lars Wahlstrom
G U I L D S E M I N A R S C H E D U L E
Event Date Activity Basics of Fine Woodworking
Begins Mar 15
Series III. Once cancel-lation; one seat available
Tool Making April 19 Dave Jeske teaches the basics of tool making including heat treating
Multi-Router May 3 Ariel Enriquez will build a small table with drawer and shelf using this super tool
Basics of Fine Woodoworking
September To be offered sometime in the fall.
Page 8 Volume #25 , Issue #3
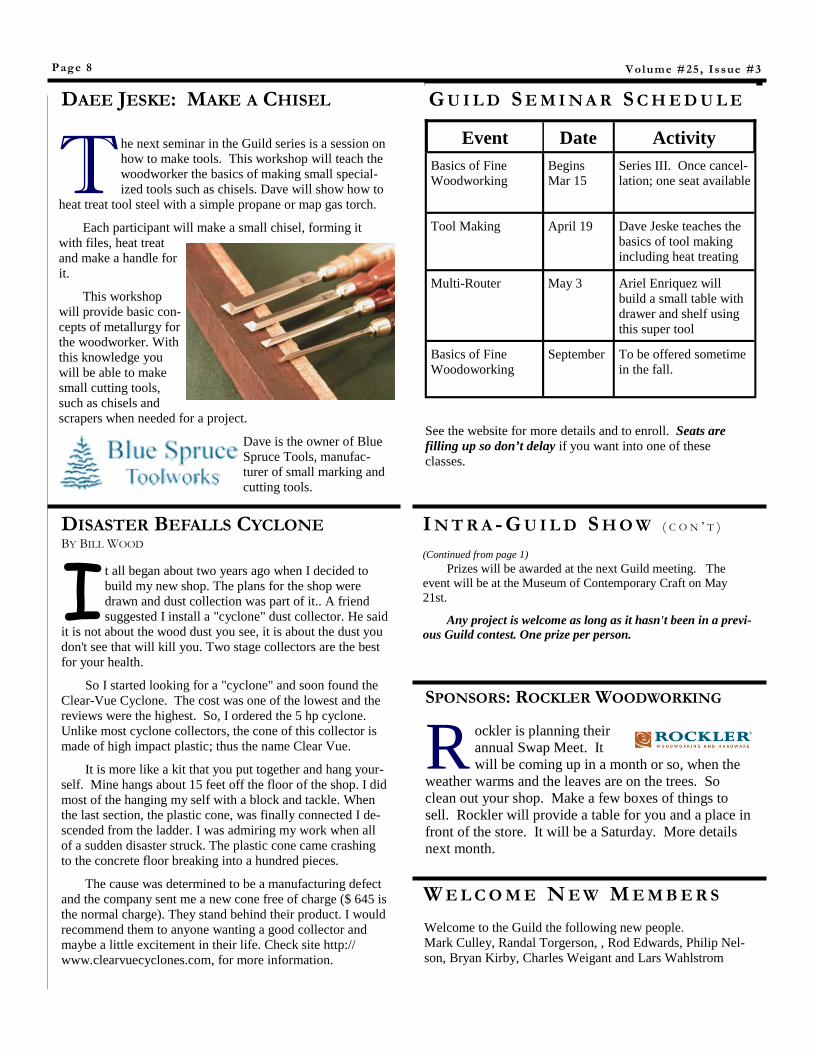
DAEE JESKE: MAKE A CHISEL
DISASTER BEFALLS CYCLONE BY BILL WOOD
R ockler is planning their annual Swap Meet. It will be coming up in a month or so, when the
weather warms and the leaves are on the trees. So clean out your shop. Make a few boxes of things to sell. Rockler will provide a table for you and a place in front of the store. It will be a Saturday. More details next month.
SPONSORS: ROCKLER WOODWORKING
I t all began about two years ago when I decided to build my new shop. The plans for the shop were drawn and dust collection was part of it.. A friend suggested I install a "cyclone" dust collector. He said
it is not about the wood dust you see, it is about the dust you don't see that will kill you. Two stage collectors are the best for your health.
So I started looking for a "cyclone" and soon found the Clear-Vue Cyclone. The cost was one of the lowest and the reviews were the highest. So, I ordered the 5 hp cyclone. Unlike most cyclone collectors, the cone of this collector is made of high impact plastic; thus the name Clear Vue.
It is more like a kit that you put together and hang your-self. Mine hangs about 15 feet off the floor of the shop. I did most of the hanging my self with a block and tackle. When the last section, the plastic cone, was finally connected I de-scended from the ladder. I was admiring my work when all of a sudden disaster struck. The plastic cone came crashing to the concrete floor breaking into a hundred pieces.
The cause was determined to be a manufacturing defect and the company sent me a new cone free of charge ($ 645 is the normal charge). They stand behind their product. I would recommend them to anyone wanting a good collector and maybe a little excitement in their life. Check site http://www.clearvuecyclones.com, for more information.
T he next seminar in the Guild series is a session on how to make tools. This workshop will teach the woodworker the basics of making small special-ized tools such as chisels. Dave will show how to
heat treat tool steel with a simple propane or map gas torch.
Each participant will make a small chisel, forming it with files, heat treat and make a handle for it.
This workshop will provide basic con-cepts of metallurgy for the woodworker. With this knowledge you will be able to make small cutting tools, such as chisels and scrapers when needed for a project.
Dave is the owner of Blue Spruce Tools, manufac-turer of small marking and cutting tools.
See the website for more details and to enroll. Seats are filling up so don’t delay if you want into one of these classes.
Prizes will be awarded at the next Guild meeting. The event will be at the Museum of Contemporary Craft on May 21st.
Any project is welcome as long as it hasn't been in a previ-ous Guild contest. One prize per person.
(Continued from page 1)
I N T R A - G U I L D S H O W ( C O N ’ T )
Page 9 Volume #25 , Issue #3
T his isn’t about ill fitting joinery. It’s about a transition, mine, from hammer and nails car-pentry to Mortise and Tenon, and dovetails and all the nuances of fine woodworking. I met the Guild at the state fair in 2003. It
seems like a long time ago, and in woodworking progress it is. It’s only been four years. I’ve dabbled with wood since my Dad conscripted me into helping with repairs around the house, many an odd half-a-century ago.
I’ve built things around my own home, but always ham-mer and nails construction. Decks, a well house. The big-gest project was a silk screen printing studio in my Hillsboro back yard. But as I look back on that type of woodworking, I didn’t know how to make a decent picture frame. Reflect-ing on what the Guild has done for me, while passing time in the car on the way into town to teach a dovetail class (get it? Dovetails!!), I wondered how I would build a simple ply-wood box today if I didn’t know what I do know now. And the answer is butt joints and nails. Smear in a lot of glue to help hold it together.
Joinery, what a wonderful invention. I have a plywood box like that today, to hold my dovetail jig. Irony runs deep here. Rabbets, glue, nothing fancy but no nails. I recently built some cabinets for the shop to practice rail and stile join-ery. No nails. Another project, the addition of drawers and the necessary support structure under the workbench, half blind dovetail drawers, half lap, loose tenon and various rab-bet and dado joinery applications. What a difference. Today it feels like second nature, far from perfect mind you, but yesterday I used a real claw hammer for the first time in years to re-set nails in the front deck. A very strange feeling.
Woodworking is what you put into it. I joined the Guild, like many do, to just sit and listen. And hopefully learn something. If I had done just that, I would probably, as many do, have dropped off along the way. But I wound up helping with a project, going on a shop tour, writing an arti-cle about it because it was fun to put in words what I had experienced that day. And the Guild published it. The long and short of the last four years is a tremendous growth in skills, confidence and love of woodworking. It’s a long story in four short years about the doors that have opened, the paths traveled, the opportunities pursued.
I used to avoid dovetails, and a score of other things like sharpening, sanding, finishing ...I forget what else. Today it’s just another in the large list of choices to consider when planning a project.
You have to love it. I do, with all my heart.
C utting boards should be made from human friendly woods, not just arbitrary scrap!!. The scrap barrel breadboard project of a couple months ago was in-teresting. It brought to light the difference between art and the human machine.
If you are going to use a wood product for food preparation or human contact, a different set of rules apply than if it’s an object of art.
The cutting boards I use on a daily basis are typically made from walnut and maple. The finish is laxitive grade mineral oil, and beeswax, made in a double boiler.
This new "scrap pile" cutting board made for the show is an artsy, thing of beauty, made from this "african limbali" and another light colored wood of unknown species. At a dinner party, some time ago, the host asked after dinner if anyone would like some Hemlock "tea", My wife really wanted some.(duh). He wanted to see if anyone knew how deadly, a common wood such as hemlock could be. So mak-ing a cutting board from the scrap pile may have this similar lesson to be learned!
Toxicity of woods in the shop!!!!.Who’d a thunk ???
Some other thoughts on food grade finishes. There is a salad bowl finish available commercially, recipe unknown. Walnut oil is a food grade finish, but it can cause allergic reactions in people with nut allergies. My home brew of min-eral oil and beeswax—I think that one is pretty safe.
As far as toxic woods, we could go on forever about that. But one thing to consider, is that the effects of allergic reactions to certain wood dust has a cumulative effect. This means that with continued exposure, the reaction can get a lot worse. I seem to have a real problem with Rosewood and members of the Rosewood family like Cocobolo. The Afri-can species that we all got so much of in Parkrose a few years ago isn't much better.
My solution was the "Trend" Airshield. It filters the air, and blows air across your face. much better then a cannister type respirator. My friend Sid was always coughing in his shop and I told him about the Airshield and he is now a happy camper! That one costs about $270.00 with 2 batter-ies. 3M makes a similar product, but with the Hepa filters etc. it is close to $1000. So talking about toxins in the shop isn't a bad idea! Consider the possibility of mold in all that wood dust you can never seem to get to. My shop is only heated when I work in it, and the ground under the wood floor can get pretty damp this time of year. Mold can be a real problem.
A great reference is a Wood Magazine article, December 1989, “What you should know about Toxic Wood.”
T O X I C C U T T I N G B O A R D S B Y L E N W A L K O
H A M M E R & T E N O N B Y B O B O S W A L D
The Guild of Oregon Wood-workers is a group of profes-sional and amateur woodworkers like you, committed to developing our craftsmanship and wood-working business skills. The Guild offers many benefits for members, including: • monthly educational meetings • monthly newsletter • mentoring program to help
members develop their skills in specific areas
• discounts • woodworking shows • network of business partners
(the key to our development as members and as a Guild, providing additional learning opportunities)
• and a network of support.
For information on how you can become a member, see the Guild website listed below.
P.O. Box 13744 Portland, OR 97213-0744
Guild of Oregon Woodworkers
We’re on the Web! www.GuildOfOregonWoodworkers.com
G U I L D O F O R E G O N WO O D WO R K E R S P.O. Box 13744, Portland, OR 97213-0744
C L A S S E S , S E M I N A R S , D E M O S , A N D S U C H . . . . Northwest Woodworking Studio 503-284-1644, www.northwestwoodworking.com Rockler Woodworking 503-672-7266, www.rockler.com Oregon College of Art and Craft 503-297-5544, www.ocac.edu Woodcraft 503-684-1428, www.woodcraft.com Woodcrafters 503-231-0226, 212 NE 6th Avenue, Portland, www.woodcrafters.us
T H E G U I L D I S P R O U D T O B E S P O N S O R E D B Y :
Crosscut Hardwoods ** Hardwood Industries ** Lumber Products ** Barbo Machinery
Goby Walnut Products Irwin Industrial Tools Rockler Woodworking & Hardware Woodcrafters, Portland
♦ Some sponsors offer discounts to current Guild members. Refer to the website under Bene-fits/Discounts for details and restrictions. Remember to thank them for their generosity.
♦ ** Scholarship Sponsor
Northwest Woodworking Studio Oregon College of Art and Craft
A F F I L I A T E S :
S U P P O R T I N G : Woodcraft
Related Documents