ORDER POWER! Work Orders User Guide Release 4.0.3 Computer Solutions, Inc. Since 1978 6187 N.W. 167th Street, Unit H33 Miami Lakes, FL 33015 (305) 558-7000 [email protected]

Welcome message from author
This document is posted to help you gain knowledge. Please leave a comment to let me know what you think about it! Share it to your friends and learn new things together.
Transcript

ORDER POWER!
Work Orders
User Guide Release 4.0.3
Computer Solutions, Inc.
Since 1978 6187 N.W. 167th Street, Unit H33 Miami Lakes, FL 33015 (305) 558-7000 [email protected]

Copyright
ORDER POWER! Version 4.0.3 Computer Solutions, Inc. 1 1-2002 Work Orders Work Orders Document Version 4.0.3 All Rights Reserved. Printed in the U.S.A. December 4, 2002 Computer Solutions, Inc. 6187 NW 167 Street Suite H33 Miami Lakes, Florida 33015 U.S.A. Telephone: (305) 558-7000 Fax: (305) 557-0003 AS/400 is a registered trademark of the IBM Corporation. ORDER POWER! is a registered trademark of Computer Solutions, Inc.

ORDER POWER! Work Orders i
Table of Contents
WORK ORDERS.........................................................................................................................................................1
Make-to-order vs. Make-to-Stock .......................................................................................................................1 WIP Tracking......................................................................................................................................................1 Integration With Inventory Warehouse Management.........................................................................................1 Comprehensive Reporting..................................................................................................................................1 More about Work Orders....................................................................................................................................1
Setting up ORDER POWER! for Work Orders.............................................................................................................2 Company Profile options for Work Orders ..............................................................................................................2
To set up Company Profile options for Work Orders..........................................................................................2 Working with the Work Order support master files .................................................................................................4 Working with Work Centers ....................................................................................................................................5
To work with Work Centers ................................................................................................................................5 To create a new Work Center ............................................................................................................................5 To change a Work Center ..................................................................................................................................6 To display a Work Center...................................................................................................................................7
Working with Routing Codes...................................................................................................................................7 To work with Routing Codes...............................................................................................................................7 To create a new Routing code............................................................................................................................8 To change Routing code ....................................................................................................................................8 To display a Routing code..................................................................................................................................9 To work with Routing Header Notes...................................................................................................................9
Working with Routing Steps..................................................................................................................................10 To work with Routing Steps..............................................................................................................................10 To create a new Routing Step ..........................................................................................................................10 To change Routing Step...................................................................................................................................11 To display a Routing Step ................................................................................................................................12 To work with Routing Step Notes .....................................................................................................................12
Working with Work Order Comment Codes..........................................................................................................12 To create a new Work Order Comment Code..................................................................................................13 To change a Work Order Comment Code........................................................................................................13 To display a Work Order Comment Code ........................................................................................................14
Working with Manufacturing Cost Types and GL Manufacturing Classes ............................................................16 To work with Manufacturing Cost Types...........................................................................................................16 To work with GL Manufacturing Classes ..........................................................................................................17 To create a new GL Manufacturing Class ........................................................................................................17 To change a GL Manufacturing Class ..............................................................................................................18 To display a GL Manufacturing Class...............................................................................................................19
Setting up an Item for Work Orders ......................................................................................................................19 Item Master settings .........................................................................................................................................19 Bill of Materials .................................................................................................................................................20 To create a Bill of Materials ..............................................................................................................................21 To add (create) a new Materials Item to a Bill of Materials...............................................................................21 To change a Materials Item on a Bill of Materials.............................................................................................22 To display a Materials Item...............................................................................................................................23 To add a Warehouse Location for the Manufactured Item ...............................................................................23 To set up manufacturing cost for an Item.........................................................................................................24
Managing Production with OP! Work Orders .............................................................................................................26 Creating Work Orders from Customer orders .......................................................................................................27
To create Work Orders from Customer orders.................................................................................................27 Creating Manual Work Orders ..............................................................................................................................28 Release Work Orders ...........................................................................................................................................30
To release Work Orders ...................................................................................................................................31 Issue Components ................................................................................................................................................32
To issue components .......................................................................................................................................32 To work with quantities of components being issued .......................................................................................35
Enter Progress of Work Order...............................................................................................................................36 To enter progress of a Work Order ..................................................................................................................36

ii Work Orders ORDER POWER!
Recording Finished Goods....................................................................................................................................38 To record finished goods..................................................................................................................................38
Deleting a Work Order ..........................................................................................................................................42 Work Order Inquiry & Maintenance.......................................................................................................................43
To display a list of Work Orders .......................................................................................................................43 To change a Work Order header......................................................................................................................45 To work with a Work Order’s Routing Steps.....................................................................................................46 To create a new Routing Step ..........................................................................................................................47 To change a Routing Step................................................................................................................................47 To display a Work Order’s Routing Steps ........................................................................................................48 To work with a Work Order’s Routing Step notes.............................................................................................48 To work with a Work Order’s Bill of Materials...................................................................................................48 To add a new Materials Item to a Work Order’s Bill of Materials......................................................................49 To change a Work Order’s Bill of Materials......................................................................................................50 To display a Work Order’s Bill of Materials ......................................................................................................51 Audit (To view a history of status changes to the selected Work Order)..........................................................51
Working with a Work Order’s Document References ...........................................................................................51 To create a new Work Order Document...........................................................................................................52 To change a Work Order Document ................................................................................................................53 To display a Work Order Document .................................................................................................................54
Adding Work Order Document References in Order Entry ...................................................................................54 To add a Work Order Document References to a line .....................................................................................54 To add a Work Order Document References to a customer order...................................................................56 To work with Work Order Header Notes...........................................................................................................56 Transactions (To view the progress of the selected Work Order) ....................................................................56
To print the Work Order Package .........................................................................................................................57 To print an Open Work Order Listing ....................................................................................................................58 Component Availability Inquiry..............................................................................................................................59
To view Component availability ........................................................................................................................60 Working with Work Order Notes ................................................................................................................................62
To work with Routing code Notes.....................................................................................................................62 To create or change Routing Header Notes.....................................................................................................62
User Guide
ORDER POWER! Work Orders 1
Work Orders
The ORDER POWER! Work Order system supports the manufacturing of Items which you identify as "Manufactured" using the Manufactured field in Item Maintenance. This field is set to "M" for Make-to-Order, or "S" for Make-to-Stock.
You predefine Bills of Materials, Work Centers, and Routings from the Work with Files menu, and then create Work Orders from the Work Orders menu. ORDER POWER! will automatically create Work Orders for Make-to-Order items based on existing customer orders. For Make-to-Stock Items, you manually create Work Orders based on your expected demand.
Make-to-order vs. Make-to-Stock A Make-to-Order Item is an item which is customized or normally not stocked, which you manufacture to the requirements of a customer’s order. A Make-to-Stock Item is marketable to many customers, and probably made in advance of expected orders.
WIP Tracking Component Items are moved from inventory into a Work In Process (WIP) Location in the production warehouse. Each WIP movement can be tracked by from-location, time, and the person who moved the items.
Integration With Inventory Warehouse Management You issue components of Manufactured Items to specific Work Orders by transferring them from warehouse bins to a Work in Process location. The manufactured parent is subsequently moved back from Work in Process to any Warehouse location.
Comprehensive Reporting A collection of reports and inquiries can be used to extract information quickly.
More about Work Orders • Component substitutions are allowed.
• Component materials for Manufactured Items are identified with pick lists.
• Backflushing of all or some component materials can be done for shop orders on an order by order, component by component basis.
• The costs of materials used, plus optional standard overhead costs, are the factors used in calculating the cost of the manufactured Parent item.
• Shop orders are tracked using routings, operations and work centers.

2 Work Orders ORDER POWER!
Setting up ORDER POWER! for Work Orders
Here is a checklist of things you will need to set up to use Work Orders:
Company Profile ........................................................................see below Work Order support master files ........................................... see page 4 Work Order Work Centers ............................................. see page 5 Work Order Routing Codes ............................................. see page 7 Work Order Comment Codes (optional)........................ see page 10
Set up GL for Work Orders.................................................. see page 15 Manufacturing Cost Types (optional)............................. see page 16 GL Manufacturing Classes (optional) ............................ see page 17
Items ........................................................................................ see page 19 Item master set up ........................................................... see page 19 Bill of Materials ............................................................... see page 20 Warehouse Location........................................................ see page 23 Setting up Manufacturing Cost (optional) ..................... see page 24
Company Profile options for Work Orders The information you enter in the Company Profile customizes ORDER POWER! to meet your company's unique business requirements.
To set up Company Profile options for Work Orders 1. From the ORDER POWER! Main Menu, select: Work with Files Company
Profile F15 (Maintenance) Work Orders to display Company Profile Update Panel 19 (figure 1).
Company # 001 OP! 4.0 DEVELOPMENT ** CO# 001 Pane Company # 001 OP! 4.0 DEVELOPMENT ** CO# 001 Pane Company # 001 OP! 4.0 DEVELOPMENT ** CO# 001 Pane Company # 001 OP! 4.0 DEVELOPMENT ** CO# 001 Panel 19 l 19 l 19 l 19 Profile Update Profile Update Profile Update Profile Update Next Work Order Number Next Work Order Number Next Work Order Number Next Work Order Number 106 106 106 106 Update Sched Ship Date Update Sched Ship Date Update Sched Ship Date Update Sched Ship Date NNNN Y/N Y/N Y/N Y/N Nex Nex Nex Next Work Order Batch t Work Order Batch t Work Order Batch t Work Order Batch 102 102 102 102 Account for Scrap Account for Scrap Account for Scrap Account for Scrap IIII I/W I/W I/W I/W Add On Days to Complete Add On Days to Complete Add On Days to Complete Add On Days to Complete 1.00 1.00 1.00 1.00 (Inventory or Write Off) (Inventory or Write Off) (Inventory or Write Off) (Inventory or Write Off) Make to order defaults to ship complete Make to order defaults to ship complete Make to order defaults to ship complete Make to order defaults to ship complete YYYY Y/N Y/N Y/N Y/N Issue components Issue components Issue components Issue components by by by by 2222 1=Batch# 2=WO# 3=Ord# 1=Batch# 2=WO# 3=Ord# 1=Batch# 2=WO# 3=Ord# 1=Batch# 2=WO# 3=Ord# ---- ---- ---- ---- ---- ---- ---- ---- ---- ---- ---- ---- ---- Info Fields Info Fields Info Fields Info Fields ---- ---- ---- ---- ---- ---- ---- ---- ---- ---- ---- ---- Routing Header: Mand Routing Header: Mand Routing Header: Mand Routing Header: Mandatory Work Order Transaction: Mandatory atory Work Order Transaction: Mandatory atory Work Order Transaction: Mandatory atory Work Order Transaction: Mandatory 1 ............ 1 ............ 1 ............ 1 ............ RHINFO1 RHINFO1 RHINFO1 RHINFO1 NNNN Y/N 1 ............ Y/N 1 ............ Y/N 1 ............ Y/N 1 ............ WTINFO1 WTINFO1 WTINFO1 WTINFO1 NNNN Y/N Y/N Y/N Y/N 2 ............ 2 ............ 2 ............ 2 ............ RHINFO2 RHINFO2 RHINFO2 RHINFO2 NNNN Y/N 2 ............ Y/N 2 ............ Y/N 2 ............ Y/N 2 ............ WTINFO2 WTINFO2 WTINFO2 WTINFO2 NNNN Y/N Y/N Y/N Y/N 3 ............ 3 ............ 3 ............ 3 ............ RHINFO3 RHINFO3 RHINFO3 RHINFO3 NNNN Y/N Y/N Y/N Y/N 3 ............ 3 ............ 3 ............ 3 ............ WTINFO3 WTINFO3 WTINFO3 WTINFO3 NNNN Y/N Y/N Y/N Y/N Routing Step: Mandatory Routing Step: Mandatory Routing Step: Mandatory Routing Step: Mandatory 1 ............ 1 ............ 1 ............ 1 ............ RDINFO1 RDINFO1 RDINFO1 RDINFO1 NNNN Y/N Y/N Y/N Y/N 2 ............ 2 ............ 2 ............ 2 ............ RDINFO2 RDINFO2 RDINFO2 RDINFO2 NNNN Y/N Y/N Y/N Y/N 3 ............ 3 ............ 3 ............ 3 ............ RDINFO3 RDINFO3 RDINFO3 RDINFO3 NNNN Y/N Y/N Y/N Y/N Work Center Master: Mandatory Bill Of Materials: Mandatory Work Center Master: Mandatory Bill Of Materials: Mandatory Work Center Master: Mandatory Bill Of Materials: Mandatory Work Center Master: Mandatory Bill Of Materials: Mandatory 1 ............ 1 ............ 1 ............ 1 ............ INFO1 INFO1 INFO1 INFO1 NNNN Y/N 1 ............ Y/N 1 ............ Y/N 1 ............ Y/N 1 ............ BMINFO1 BMINFO1 BMINFO1 BMINFO1 NNNN Y/N Y/N Y/N Y/N 2 ............ 2 ............ 2 ............ 2 ............ INFO2 INFO2 INFO2 INFO2 NNNN Y/N 2 ............ Y/N 2 ............ Y/N 2 ............ Y/N 2 ............ BMINFO2 BMINFO2 BMINFO2 BMINFO2 NNNN Y/N Y/N Y/N Y/N 3 ............ 3 ............ 3 ............ 3 ............ INFO3 INFO3 INFO3 INFO3 NNNN Y/N 3 ............ Y/N 3 ............ Y/N 3 ............ Y/N 3 ............ BMINFO3 BMINFO3 BMINFO3 BMINFO3 NNNN Y/N Y/N Y/N Y/N F1=Help F3=Exit F12=Cancel F1=Help F3=Exit F12=Cancel F1=Help F3=Exit F12=Cancel F1=Help F3=Exit F12=Cancel
Company Profile Update Panel 19 (figure 1)

ORDER POWER! Work Orders 3
2. Complete the following fields:
Next Work Order Number Type a number to specify the next Work Order number you want ORDER POWER! to create. This will be automatically incremented every time a work order is created.
Update Sched Ship Date Type Y(es) or N(o) to indicate whether or not you want the estimated completion date of Make-to-Order Work Orders to be used as the scheduled shipment date on associated customer orders. If you want, you can have the system add safety days to that scheduled shipment date using the Add On Days to Complete field on this panel.
Next Work Order Batch Type the next Work Order batch number you want ORDER POWER! to create. Make-to-Order Work Orders, based on customer orders, are created in numbered batches. This will be automatically incremented every time a work order batch is created.
Account for Scrap If scrap is typically produced in the manufacture of an item, you may factor that scrap into the item’s Bill of Materials quantities, so that sufficient Component Items will be issued to complete the finished product. Upon completion of the Work Order, on the Record Finished Goods Entry panel (figure 36) you may designate that the excess material was scrapped, or that it is being returned to regular inventory. Scrapped or wasted material affects the cost of the manufactured parent item.
Type I(nventory) or W(riteoff) to indicate which option you want to use as a default when designating the disposition of excess material on Record Finished Goods Entry panel (figure 36). This default may be overridden for any component in any work order.
Add On Days to Complete If you have typed Y(es) in the Update Sched Ship Date field above, type the number of days you want to add to the Work Order’s estimated completion date when ORDER POWER! updates the scheduled shipment date on customer orders.
Make to order defaults to ship complete Type Y(es) or N(o) to indicate whether or not you want Order Entry to default to Ship Complete on order lines where there is a Make-to-order item and quantity greater than one. This will prevent partial quantities from shipping before the work order is completed.
Issue components by Type a code to indicate which field you want to be the cursor’s default position on Issue Components Select panel (figure 30) for issuing components.
1 Batch Number

4 Work Orders ORDER POWER!
2 Work Order 3 Customer Order
Info Fields These user-definable fields display on the panels indicated, and can be used to collect miscellaneous information about each Work Order. These Info Fields appear on the following panels:
Routing Header see Routing Code Update panel (figure 7) Work Order Transaction Future enhancement Routing Step Routing Step Update panel (figure 10) Work Center Master Future enhancement Bill Of Materials Future enhancement
Mandatory Type Y(es) or N(o) to indicate whether the user is required to fill the respective Info Field during data entry.
3. Press Enter to update the Company Profile.
Working with the Work Order support master files The Work Order system relies on several files that you should set up in advance.
Work Centers see page 5 The manufacturing area can be divided into physical or logical Work Centers which can be used in the routing process. A routing defines a series of work centers in which the product is manufactured.
Work Order Routing Codes see page 7 A Routing code describes the manufacturing process. It can be created with an unlimited number of steps. Each step usually represents movement through a work center.
Work Order Comment Codes see page 12 A Work Order Comment code may be assigned to a line of notes related to a Work Order to specify whether or not you want the notes to print on Work Orders and/or Work Order Pick Tickets.
Manufacturing Cost Types see page 16 Up to 24 standard cost components, such as direct labor, indirect labor, fixed overhead, variable overhead, depreciation, allocated rent, etc. may be defined. Then for each manufactured item, the standard cost amount for each of these cost types may be specified. Those costs are added to the cost of the parent item as the work order is completed.
GL Manufacturing Classes see page 16 The 24 Manufacturing Cost Types (above) can each have a General Ledger expense account associated with them in a GL Manufacturing Class. An unlimited number of GL Manufacturing Classes can be created, which are then assigned to items or groups of items. This allows the same overhead

ORDER POWER! Work Orders 5
costs for different items to be booked to different GL accounts.
Working with Work Centers The manufacturing area can be divided into physical or logical Work Centers. A Work Center can consist of a machine, a process, people, or combinations of the above. A Work center may be optionally identified as belonging to a GL department. This has no effect on accounting, it is for reference only.
To work with Work Centers 1. From the ORDER POWER! Main Menu, select: Work with Files ö ö ö ö Work Order
Work Centers ö to display the Work Center Inquiry panel (figure 2).
OP! 4.0 DEVELOPMENT ** CO# 001 OP! 4.0 DEVELOPMENT ** CO# 001 OP! 4.0 DEVELOPMENT ** CO# 001 OP! 4.0 DEVELOPMENT ** CO# 001 Pstn: Pstn: Pstn: Pstn: Work Center Inquiry Work Center Inquiry Work Center Inquiry Work Center Inquiry Show Delete : Show Delete : Show Delete : Show Delete : NNNN.... 2=Change 5=Display 2=Change 5=Display 2=Change 5=Display 2=Change 5=Display Work Center Description Vendor # Dept Del Work Center Description Vendor # Dept Del Work Center Description Vendor # Dept Del Work Center Description Vendor # Dept Del CUTTING ROOM Fabric Cutting Room 001 CUTTING ROOM Fabric Cutting Room 001 CUTTING ROOM Fabric Cutting Room 001 CUTTING ROOM Fabric Cutting Room 001 FABRIC ISSUE Issue station FABRIC ISSUE Issue station FABRIC ISSUE Issue station FABRIC ISSUE Issue station MAILROOM Mailroom MAILROOM Mailroom MAILROOM Mailroom MAILROOM Mailroom NEWSCOPY Write Newsletter NEWSCOPY Write Newsletter NEWSCOPY Write Newsletter NEWSCOPY Write Newsletter PRINT Printing PRINT Printing PRINT Printing PRINT Printing ROOM1 ROOM1 ROOM1 ROOM1 ROOM 1 ROOM 1 ROOM 1 ROOM 1 SEWING #1 Sewing station #1 SEWING #1 Sewing station #1 SEWING #1 Sewing station #1 SEWING #1 Sewing station #1 ---- Sylvia Sylvia Sylvia Sylvia TESTING TESTING DUMMY ONLY TESTING TESTING DUMMY ONLY TESTING TESTING DUMMY ONLY TESTING TESTING DUMMY ONLY .... Bottom Bottom Bottom Bottom F1=Help F3=Exit F6=Create F7=Bkwd F8=Fwd F10=Top F12=Cancel F18=Bot F21=Print F1=Help F3=Exit F6=Create F7=Bkwd F8=Fwd F10=Top F12=Cancel F18=Bot F21=Print F1=Help F3=Exit F6=Create F7=Bkwd F8=Fwd F10=Top F12=Cancel F18=Bot F21=Print F1=Help F3=Exit F6=Create F7=Bkwd F8=Fwd F10=Top F12=Cancel F18=Bot F21=Print
Work Center Inquiry panel (figure 2)
These actions are available, in addition to the standard ORDER POWER! functions:
Action Description 2=Change Display Work Center Update panel (figure 4) to work with an
existing Work Center
5=Display Display the Work Center Display window similar to Work Center Update panel (figure 4) to view a Work Center’s set up
F6=Create Display the Work Center Prompt panel (figure 3) to create a new Work Center
To create a new Work Center 1. On the Work Center Inquiry panel (figure 2), press F6 (Create) to display the Work
Order Document Prompt panel (figure 52).
6 Work Orders ORDER POWER!
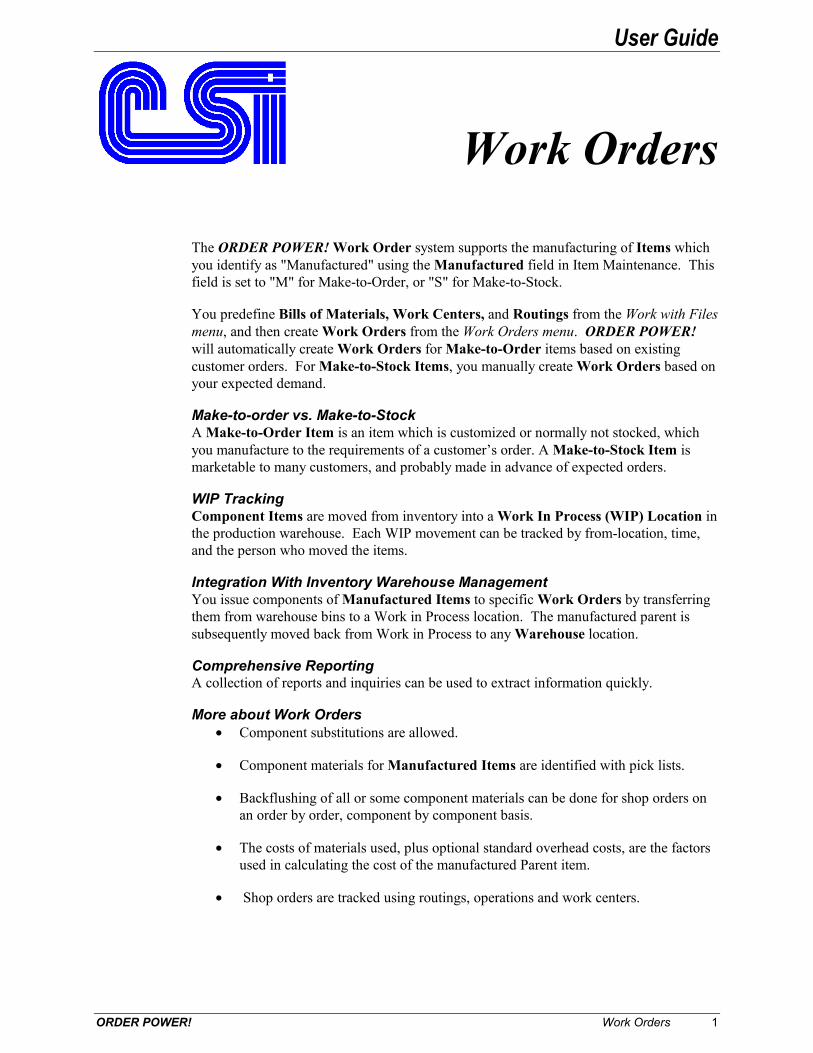
OP! 4.0 DEVELOPMENT ** CO# 001 OP! 4.0 DEVELOPMENT ** CO# 001 OP! 4.0 DEVELOPMENT ** CO# 001 OP! 4.0 DEVELOPMENT ** CO# 001 Work Center Prompt Work Center Prompt Work Center Prompt Work Center Prompt Work Center Code Work Center Code Work Center Code Work Center Code .... F1=H F1=H F1=H F1=Help F3=Exit F12=Cancel elp F3=Exit F12=Cancel elp F3=Exit F12=Cancel elp F3=Exit F12=Cancel
Work Center Prompt panel (figure 3)
1a. Complete this field:
Work Center Code Type the name by which you want to identify a logical Work Center which can be used in the routing process.
1b. Press Enter to display the Work Center Update panel (figure 4).
To change a Work Center 1. On the Work Center Inquiry panel (figure 2), type 2 (Change), beside the Work
Center you want to work with, then press Enter to display the Work Center Update panel (figure 4).
OP! 4.0 DEVELOPMENT ** CO# 001 OP! 4.0 DEVELOPMENT ** CO# 001 OP! 4.0 DEVELOPMENT ** CO# 001 OP! 4.0 DEVELOPMENT ** CO# 001 Work Center Update Work Center Update Work Center Update Work Center Update Work Center Code Work Center Code Work Center Code Work Center Code CUTTING ROOM CUTTING ROOM CUTTING ROOM CUTTING ROOM Description Fabr Description Fabr Description Fabr Description Fabric Cutting Room ic Cutting Room ic Cutting Room ic Cutting Room ?Vendor Number ?Vendor Number ?Vendor Number ?Vendor Number .... ?Department ?Department ?Department ?Department 001001001001 Delete Delete Delete Delete .... F1=Help F3=Exit F4=?List F12=Cancel F1=Help F3=Exit F4=?List F12=Cancel F1=Help F3=Exit F4=?List F12=Cancel F1=Help F3=Exit F4=?List F12=Cancel
Work Center Update panel (figure 4)
2. Complete these fields:
Description Type a description of the Work Center you are defining.

ORDER POWER! Work Orders 7
Vendor Number If the work center is at a vendor’s site, you may enter the Vendor Number here. This is for reference only.
Department Type a GL Department code that you relate to the Work Center. This is for reference only, and has no General Ledger effect
3. Press Enter to update the Work Center.
To display a Work Center On the Work Center Inquiry panel (figure 2), type 5 (Display) beside the Work Center you want to see, then press Enter to display the Work Center Display window similar to Work Order Document Update panel (figure 53).
Working with Routing Codes A Routing code is a user-defined code that describes the manufacturing process. It can be created with up to 999 Routing steps. Each step represents the Work Center where the work will be done. ORDER POWER! supports a default routing code for each manufactured item, as well as an unlimited number of alternate routings which may be assigned to any specific work order. Multiple items may share the same routing code.
To work with Routing Codes 1. From the ORDER POWER! Main Menu, select: Work with Files ö ö ö ö Work Order
Routing Codes ö to display the Routing Header Master Inquiry panel (figure 5).
OP! 4.0 DEVELOPMENT ** CO# 001 OP! 4.0 DEVELOPMENT ** CO# 001 OP! 4.0 DEVELOPMENT ** CO# 001 OP! 4.0 DEVELOPMENT ** CO# 001 Pstn: Pstn: Pstn: Pstn: Routing Header Master Inquiry Show Delete : Routing Header Master Inquiry Show Delete : Routing Header Master Inquiry Show Delete : Routing Header Master Inquiry Show Delete : NNNN 2=Change 5=Display 6=Routing Steps 7=Notes 2=Change 5=Display 6=Routing Steps 7=Notes 2=Change 5=Display 6=Routing Steps 7=Notes 2=Change 5=Display 6=Routing Steps 7=Notes Days to Days to Days to Days to Routing Code Description Complete Del Routing Code Description Complete Del Routing Code Description Complete Del Routing Code Description Complete Del BELL1 Bell Collection .50 BELL1 Bell Collection .50 BELL1 Bell Collection .50 BELL1 Bell Collection .50 FLAG/2PART Flags with 2par FLAG/2PART Flags with 2par FLAG/2PART Flags with 2par FLAG/2PART Flags with 2part assembly 2.50 t assembly 2.50 t assembly 2.50 t assembly 2.50 PARENT 1 Routing code for Parent1 999.00 PARENT 1 Routing code for Parent1 999.00 PARENT 1 Routing code for Parent1 999.00 PARENT 1 Routing code for Parent1 999.00 NEWS Newsletter Production 3.00 NEWS Newsletter Production 3.00 NEWS Newsletter Production 3.00 NEWS Newsletter Production 3.00 .... Bottom Bottom Bottom Bottom F1=Hlp F3=Ext F6=Crt F7=Bkwd F8=Fwd F10=Top F12=Cxl F18=Bot F21=Prt F1=Hlp F3=Ext F6=Crt F7=Bkwd F8=Fwd F10=Top F12=Cxl F18=Bot F21=Prt F1=Hlp F3=Ext F6=Crt F7=Bkwd F8=Fwd F10=Top F12=Cxl F18=Bot F21=Prt F1=Hlp F3=Ext F6=Crt F7=Bkwd F8=Fwd F10=Top F12=Cxl F18=Bot F21=Prt
Routing Header Master Inquiry panel (figure 5)
These actions are available, in addition to the standard ORDER POWER! functions:
Action Description 2=Change Display Routing Code Update panel (figure 7) to work with an
existing Routing code
5=Display Display the Routing Header Display window similar to Routing Code Update panel (figure 7) to view a Routing code
8 Work Orders ORDER POWER!
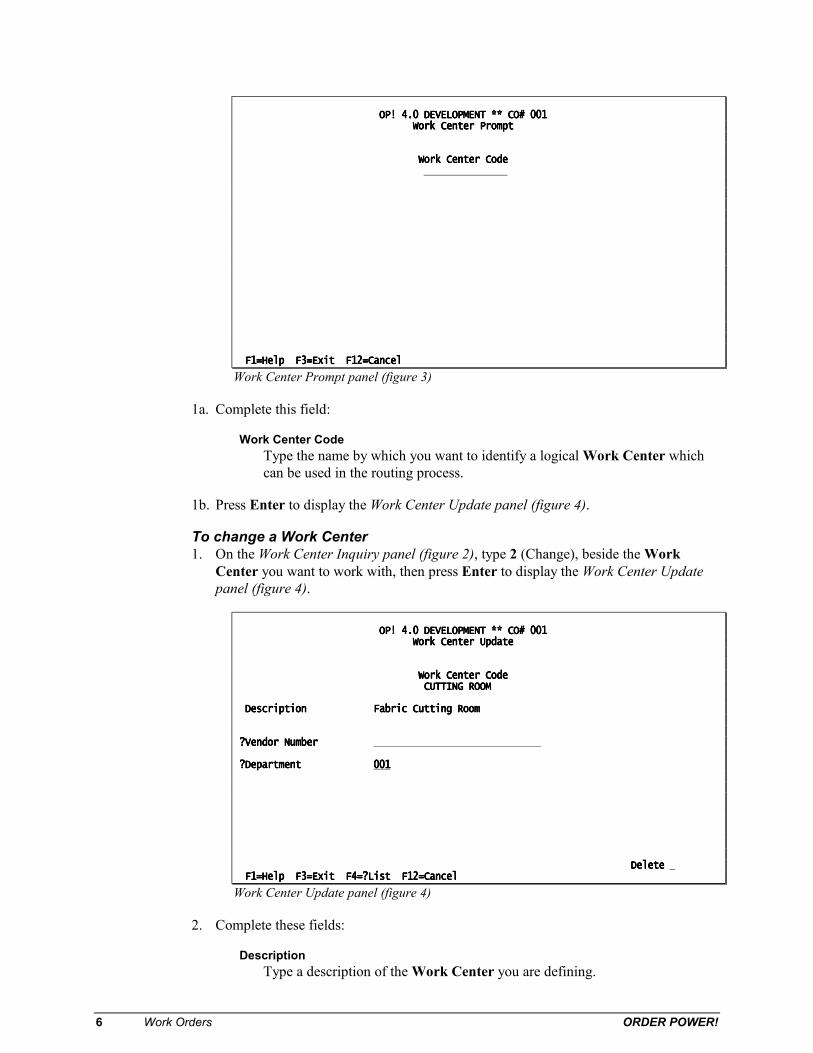
Action Description 6=Routing Steps Display the Routing Master Detail Inquiry panel (figure 8) to view
the steps in a Routing code
7=Notes Display the Routing Header Notes window (figure 63) to view Routing Notes
F6=Create Display the Routing Code Prompt panel (figure 6) to create a new Routing code
To create a new Routing code 1. On the Routing Header Master Inquiry panel (figure 5), press F6 (Create) to display
the Routing Code Prompt panel (figure 6).
OP! 4.0 DEVELOPMENT ** CO# 001 OP! 4.0 DEVELOPMENT ** CO# 001 OP! 4.0 DEVELOPMENT ** CO# 001 OP! 4.0 DEVELOPMENT ** CO# 001 Routing Code Prompt Routing Code Prompt Routing Code Prompt Routing Code Prompt Routing Code Routing Code Routing Code Routing Code .... F1=Help F3=Exit F12=Cancel F1=Help F3=Exit F12=Cancel F1=Help F3=Exit F12=Cancel F1=Help F3=Exit F12=Cancel
Routing Code Prompt panel (figure 6)
1a. Complete this field:
Routing Code Type a name to identify the routing code that you will use to define the steps (sequences) required for the manufacturing process.
1b. Press Enter to display the Routing Code Update panel (figure 7).
To change Routing code 1. On the Routing Header Master Inquiry panel (figure 5), type 2 (Change), beside the
Routing code you want to work with, then press Enter to display the Routing Code Update panel (figure 7).

ORDER POWER! Work Orders 9
OP! 4.0 DEVELOPMENT ** CO# 001 OP! 4.0 DEVELOPMENT ** CO# 001 OP! 4.0 DEVELOPMENT ** CO# 001 OP! 4.0 DEVELOPMENT ** CO# 001 Routing Code Update Routing Code Update Routing Code Update Routing Code Update Routing Code Routing Code Routing Code Routing Code ZOO ZOO ZOO ZOO Description........................ Description........................ Description........................ Description........................ Newsletter Production Newsletter Production Newsletter Production Newsletter Production .... Number of Calen Number of Calen Number of Calen Number of Calendar Days to complete dar Days to complete dar Days to complete dar Days to complete 3.00 3.00 3.00 3.00 RHINFO1 ........................ RHINFO1 ........................ RHINFO1 ........................ RHINFO1 ........................ .... RHINFO2 ........................ RHINFO2 ........................ RHINFO2 ........................ RHINFO2 ........................ .... RHINFO3 ........................ RHINFO3 ........................ RHINFO3 ........................ RHINFO3 ........................ .... D D D Delete elete elete elete .... F1=Help F3=Exit F12=Cancel F1=Help F3=Exit F12=Cancel F1=Help F3=Exit F12=Cancel F1=Help F3=Exit F12=Cancel
Routing Code Update panel (figure 7)
2. Complete these fields:
Description Type a description of the Routing code you are defining.
Number of Calendar Days to complete Type the number of days that you expect production of this product to last. This reflects calendar days, not work days. This information will be used to calculate an estimated completion date when a work order is released, based on the date it is released. Because these days are not sensitive to the quantity being manufactured, and do not consider shop capacity, you may need to change the estimated completion date of a released work order.
Info field 1 / Info field 2 / Info field 3 These user-definable fields can be used to collect miscellaneous information about each Routing code. Data entry into in these fields may be optional or mandatory depending on how you define the fields in the Company Profile (see page 2).
3. Press Enter to update the Routing code.
To display a Routing code On the Routing Header Master Inquiry panel (figure 5), type 5 (Display) beside the Routing code you want to see, then press Enter to display the Routing Header Display window similar to Routing Code Update panel (figure 7).
To work with Routing Header Notes Routing Header Notes are used to record any additional information you want to associate with this Routing Header, and optionally print on selected work order documents.
On the Routing Header Master Inquiry panel (figure 5), type 7 (Notes) beside the Routing Header you want to see, to display the Routing Header Notes panel (not shown). See the “Working with Work Order Notes” section on page 62 for detailed instructions.

10 Work Orders ORDER POWER!
Working with Routing Steps A Routing Step defines a single action in the manufacturing process, and identifies where (in which Work Center) it takes place.
To work with Routing Steps 1. On the Routing Header Master Inquiry panel (figure 5), type 6 (Routing Steps) to
display the Routing Master Detail Inquiry panel (figure 8).
OP! 4.0 DEVELOPMENT ** CO# 001 OP! 4.0 DEVELOPMENT ** CO# 001 OP! 4.0 DEVELOPMENT ** CO# 001 OP! 4.0 DEVELOPMENT ** CO# 001 Ps Ps Ps Ps Pstn Pstn Pstn Pstn : : : : Routing Master Detail Inquiry Show Del: Routing Master Detail Inquiry Show Del: Routing Master Detail Inquiry Show Del: Routing Master Detail Inquiry Show Del: NNNN 2= Routing Code ZOO Newsletter Production 2= Routing Code ZOO Newsletter Production 2= Routing Code ZOO Newsletter Production 2= Routing Code ZOO Newsletter Production 2=Change 5=Display 7=Notes 2=Change 5=Display 7=Notes 2=Change 5=Display 7=Notes 2=Change 5=Display 7=Notes .... 6666 Step Description Step Description Step Description Step Description Work Center Run Rate Del Work Center Run Rate Del Work Center Run Rate Del Work Center Run Rate Del 10 10 10 10 Prepare Copy NEWSCOPYPrepare Copy NEWSCOPYPrepare Copy NEWSCOPYPrepare Copy NEWSCOPY 30 30 30 30 Create layout on PC NEWSCOPYCreate layout on PC NEWSCOPYCreate layout on PC NEWSCOPYCreate layout on PC NEWSCOPY 40 40 40 40 Print Newsletter PRINT Print Newsletter PRINT Print Newsletter PRINT Print Newsletter PRINT 50 50 50 50 Address and mail MAILROOMAddress and mail MAILROOMAddress and mail MAILROOMAddress and mail MAILROOM .... Bottom Bottom Bottom Bottom F1=Help F3=Exit F6=Create F7=Bkwd F8=Fwd F1=Help F3=Exit F6=Create F7=Bkwd F8=Fwd F1=Help F3=Exit F6=Create F7=Bkwd F8=Fwd F1=Help F3=Exit F6=Create F7=Bkwd F8=Fwd F10=Top F12=Can F10=Top F12=Can F10=Top F12=Can F10=Top F12=Cancel F18=Bottom F20=Renumber F21=Print cel F18=Bottom F20=Renumber F21=Print cel F18=Bottom F20=Renumber F21=Print cel F18=Bottom F20=Renumber F21=Print F1 F1 F1 F1
Routing Master Detail Inquiry panel (figure 8)
These actions are available, in addition to the standard ORDER POWER! functions:
Action Description 2=Change Display Routing Step Update panel (figure 10) to work with an
existing Routing Step
5=Display Display the display the Routing Step Display window similar to Routing Step Update panel (figure 10) to view a Routing Step’s set up
7=Notes Display the Routing Step Notes window (not shown) similar to Routing Header Notes window (figure 63) to work with notes specific to the selected Routing Step.
F6=Create Display the Routing Step Prompt panel (figure 9) to create a new Routing Step
F20=Renumber Renumbers the routing steps in increments of 10.
To create a new Routing Step 1. On the Routing Master Detail Inquiry panel (figure 8), press F6 (Create) to display
the Routing Code Prompt panel (figure 6).
ORDER POWER! Work Orders 11
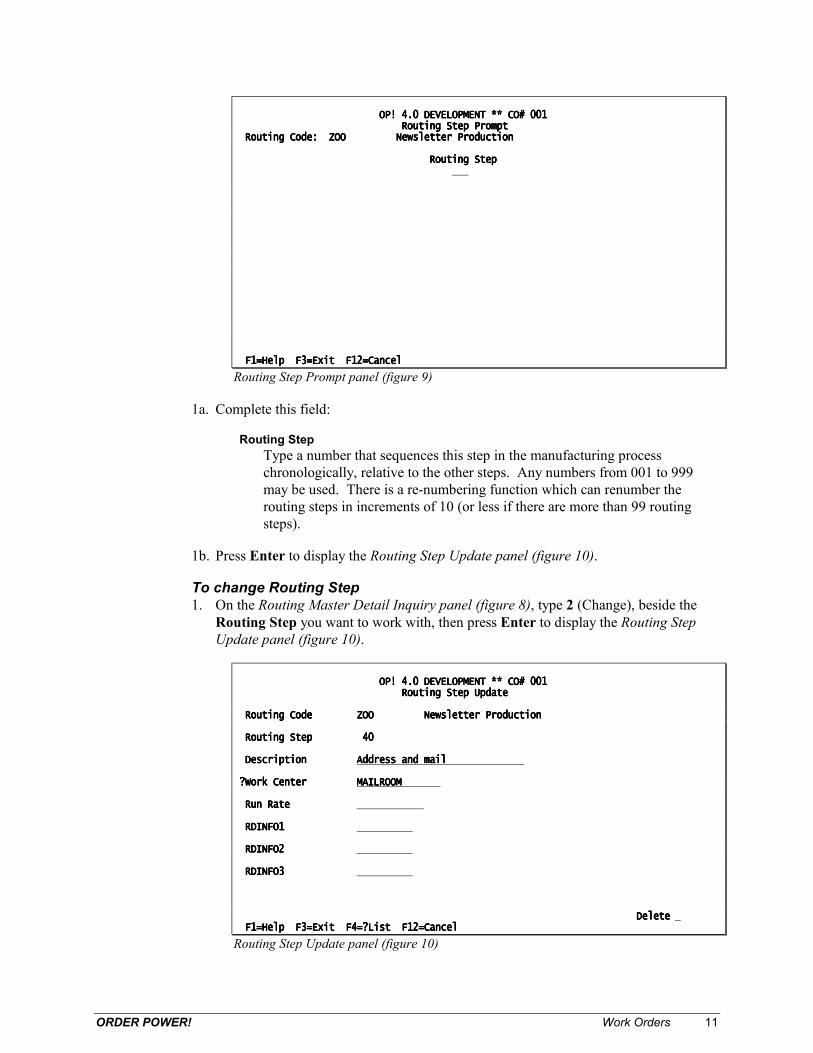
OP! 4.0 DEVELOPMENT ** CO# 001 OP! 4.0 DEVELOPMENT ** CO# 001 OP! 4.0 DEVELOPMENT ** CO# 001 OP! 4.0 DEVELOPMENT ** CO# 001 Routing Step Prompt Routing Step Prompt Routing Step Prompt Routing Step Prompt Routing Code: ZOO Newsletter Production Routing Code: ZOO Newsletter Production Routing Code: ZOO Newsletter Production Routing Code: ZOO Newsletter Production Routing Step Routing Step Routing Step Routing Step .... F1=Help F3=E F1=Help F3=E F1=Help F3=E F1=Help F3=Exit F12=Cancel xit F12=Cancel xit F12=Cancel xit F12=Cancel
Routing Step Prompt panel (figure 9)
1a. Complete this field:
Routing Step Type a number that sequences this step in the manufacturing process chronologically, relative to the other steps. Any numbers from 001 to 999 may be used. There is a re-numbering function which can renumber the routing steps in increments of 10 (or less if there are more than 99 routing steps).
1b. Press Enter to display the Routing Step Update panel (figure 10).
To change Routing Step 1. On the Routing Master Detail Inquiry panel (figure 8), type 2 (Change), beside the
Routing Step you want to work with, then press Enter to display the Routing Step Update panel (figure 10).
OP! 4.0 DEVELOPMENT ** CO# 001 OP! 4.0 DEVELOPMENT ** CO# 001 OP! 4.0 DEVELOPMENT ** CO# 001 OP! 4.0 DEVELOPMENT ** CO# 001 Routing Step Update Routing Step Update Routing Step Update Routing Step Update Routing Code ZOO Newsletter Production Routing Code ZOO Newsletter Production Routing Code ZOO Newsletter Production Routing Code ZOO Newsletter Production Routing Step 40 Routing Step 40 Routing Step 40 Routing Step 40 Description Description Description Description Address and mail Address and mail Address and mail Address and mail .... ?Work Center ?Work Center ?Work Center ?Work Center MAILROOM MAILROOM MAILROOM MAILROOM .... Run Rate Run Rate Run Rate Run Rate .... RDINFO1 RDINFO1 RDINFO1 RDINFO1 .... RDINFO2 RDINFO2 RDINFO2 RDINFO2 .... RDINFO3 RDINFO3 RDINFO3 RDINFO3 .... Delete Delete Delete Delete .... F1=Help F3=Exit F4=?List F12=Cancel F1=Help F3=Exit F4=?List F12=Cancel F1=Help F3=Exit F4=?List F12=Cancel F1=Help F3=Exit F4=?List F12=Cancel
Routing Step Update panel (figure 10)

12 Work Orders ORDER POWER!
2. Complete these fields:
Description Type a description of the Routing Step you are defining.
Work Center Type the user-defined code that describes logical Work Center which will be used in this routing step.
Run Rate Possible future enhancement
3. Press Enter to update the Routing Step.
To display a Routing Step On the Routing Master Detail Inquiry panel (figure 8), type 5 (Display) beside the Routing Step you want to see, then press Enter to display the Routing Step Display window similar to Routing Step Update panel (figure 10).
To work with Routing Step Notes Routing Step Notes are used to record any additional information you want to associate with this Routing Step.
On the Routing Master Detail Inquiry panel (figure 8), type 7 (Notes) beside the Routing Step you want to see, to display the Routing Step Notes window (not shown). See the “Working with Work Order Notes” section on page 62 for detailed instructions.
Working with Work Order Comment Codes A Work Order Comment code is a user-defined alphanumeric code that may be assigned to a line of notes related to a Work Order. You can specify whether or not you want the notes to print on Work Orders and/or the Work Orders Pick Tickets which are produced for picking component items.
1. From the ORDER POWER! Main Menu, select: Work with Files Work Order Comment Codes to display Work Order Comment Code Inquiry panel (figure 11).
OP! 4.0 DEVELOPMENT ** CO# 001 OP! 4.0 DEVELOPMENT ** CO# 001 OP! 4.0 DEVELOPMENT ** CO# 001 OP! 4.0 DEVELOPMENT ** CO# 001 Position To : Position To : Position To : Position To : Work Order Comment Code Inquiry Show Delete : Work Order Comment Code Inquiry Show Delete : Work Order Comment Code Inquiry Show Delete : Work Order Comment Code Inquiry Show Delete : NNNN 2=Change 5=Display 2=Change 5=Display 2=Change 5=Display 2=Change 5=Display Code Description Code Description Code Description Code Description Del Del Del Del INF Who to see for more info about this job INF Who to see for more info about this job INF Who to see for more info about this job INF Who to see for more info about this job MSC Miscellaneous MSC Miscellaneous MSC Miscellaneous MSC Miscellaneous Bottom Bottom Bottom Bottom F1=Help F3=Exi F1=Help F3=Exi F1=Help F3=Exi F1=Help F3=Exit F6=Create F7=Bkwd F8=Fwd F10=Top F12=Cancel F18=Bot F21=Print t F6=Create F7=Bkwd F8=Fwd F10=Top F12=Cancel F18=Bot F21=Print t F6=Create F7=Bkwd F8=Fwd F10=Top F12=Cancel F18=Bot F21=Print t F6=Create F7=Bkwd F8=Fwd F10=Top F12=Cancel F18=Bot F21=Print
Work Order Comment Code Inquiry panel (figure 11)

ORDER POWER! Work Orders 13
These actions are available, in addition to the standard ORDER POWER! functions:
Action Description 2=Change Display Work Order Comment Code Update panel (figure 13) to
work with an existing Work Order Comment Code
5=Display Display the Work Order Comment Code Display window similar to Work Order Comment Code Update panel (figure 13) to view a Work Order Comment Code’s set up
F6=Create Display the Work Order Comment Code Prompt panel (figure 12) to create a new Work Order Comment Code
To create a new Work Order Comment Code 1. On the Work Order Comment Code Inquiry panel (figure 11), press F6 (Create) to
display the Work Order Comment Code Prompt panel (figure 12).
OP! 4.0 DEVELOPMENT ** CO# 001 OP! 4.0 DEVELOPMENT ** CO# 001 OP! 4.0 DEVELOPMENT ** CO# 001 OP! 4.0 DEVELOPMENT ** CO# 001 Work Order Comment Code Prompt Work Order Comment Code Prompt Work Order Comment Code Prompt Work Order Comment Code Prompt Comment Code Comment Code Comment Code Comment Code .... F1=H F1=H F1=H F1=Help F3=Exit F12=Cancel elp F3=Exit F12=Cancel elp F3=Exit F12=Cancel elp F3=Exit F12=Cancel
Work Order Comment Code Prompt panel (figure 12)
1a. Complete this field:
Comment Code Type a code that you want to be available for assignment to comments, when they are entered later by users.
1b. Press Enter to display the Work Order Comment Code Update panel (figure 13).
To change a Work Order Comment Code 1. On the Work Order Comment Code Inquiry panel (figure 11), type 2 (Change), beside
the Work Order Comment Code you want to work with, then press Enter to display the Work Order Comment Code Update panel (figure 13).

14 Work Orders ORDER POWER!
OP! 4.0 DEVELOPMENT ** CO# 001 OP! 4.0 DEVELOPMENT ** CO# 001 OP! 4.0 DEVELOPMENT ** CO# 001 OP! 4.0 DEVELOPMENT ** CO# 001 Work Order Comment Code Update Work Order Comment Code Update Work Order Comment Code Update Work Order Comment Code Update Comment Code Comment Code Comment Code Comment Code INF INF INF INF Description Description Description Description Who to see for more info about this job Who to see for more info about this job Who to see for more info about this job Who to see for more info about this job .... Print on Y/N Print on Y/N Print on Y/N Print on Y/N Work Order Work Order Work Order Work Order YYYY W.O.Pick Tickets W.O.Pick Tickets W.O.Pick Tickets W.O.Pick Tickets YYYY Delete Delete Delete Delete .... F1=Help F3=Exit F F1=Help F3=Exit F F1=Help F3=Exit F F1=Help F3=Exit F12=Cancel 12=Cancel 12=Cancel 12=Cancel
Work Order Comment Code Update panel (figure 13)
2. Complete these fields:
Description Type a description of the Work Order Comment Code you are defining.
Print on: Work Order Print on: W.O.Pick Tickets
Type Y(es) or N(o) to indicate whether or not you want to print the comments created using this code.
• When Work Order comment codes are used in Bill of Materials notes, only the “print on pick ticket” flag is recognized, which conditions the printing of BOM notes on the pick ticket which is produced from Work Order option #4 (Issue Components).
• When Work Order comment codes are used on Routing notes, only the “print on work order” flag is recognized.
3. Press Enter to update the Work Order Comment Code.
To display a Work Order Comment Code On the Work Order Comment Code Inquiry panel (figure 11), type 5 (Display) beside the Work Order Comment Code you want to see, then press Enter to display the Work Order Comment Code Display window similar to Work Order Document Update panel (figure 53).

ORDER POWER! Work Orders 15
Setting up GL for Work Orders
General Ledger contra-inventory accounts must be established for the new Inventory Transaction Effect codes:
031 Transfer Component To/From WIP 032 WO Receipt - Finished Good 033 WO Component Used 034 WO Scrap
The General Ledger entries to the contra accounts for inventory transactions 031, 032, and 033 will always net to zero. For example, when a component is transferred to WIP, the following GL entries are made:
• Transaction 031 removes the component from its non-WIP location. The component’s inventory account is credited, and the contra account for Transaction 031 is debited.
• Another Transaction 031 places the component into its WIP location. The component’s inventory account is debited, and the contra account for Transaction 031 is credited.
When the above two transactions are posted to the General Ledger, the net effect is zero, to both the inventory and the contra accounts. However the contra account must be defined, and must be a valid GL account, for the entries to be made correctly.
When components are used in a manufactured item, the following GL entries are made:
• Transaction 033 removes the components from inventory. The components’ inventory accounts are credited, and the contra account for Transaction Effect Code 033 is debited for the value of the components.
• Transaction 032 places the parent into inventory. The parent’s inventory account is debited, and the contra account for Transaction Effect Code 032 is credited for the value of the components.
The contra account for 033 is debited with the same amount as the contra account for 032. When the above transactions are posted to the General Ledger, the net effect on the contra accounts is zero. However the contra account(s) must be defined, and must be valid, for the entries to be made correctly.
Dedicated “wash” accounts are recommended for use as the contra accounts for Transaction Effect codes 031, 032, and 033. The same GL account may be used as the contra account for all three transactions, or different accounts may be used, but the sum of the transactions to those three accounts will always net to zero. If those account(s) are dedicated to these Work Order transactions and are audited periodically, a non-zero net balance indicates an accounting error.
Transaction Effect Code 034 is used when you write off the expense of scrapped components. The component’s inventory account is credited and the contra account is debited. A contra account must be assigned or no scrap entries will be made to the General Ledger.

16 Work Orders ORDER POWER!
You must set up Manufacturing Cost Types before GL Manufacturing Classes.
Summary of GL Setup for Work Orders If you are using the General Ledger, a contra account must be assigned to Transaction Effect codes 031, 032, 033 and 034. The identical account may be used as the contra account for Transaction Effect codes 031, 032 and 033. ORDER POWER! should maintain a zero balance in that account. A different account should be used for the 034 scrap transaction.
Working with Manufacturing Cost Types and GL Manufacturing Classes The cost of materials components is only a part of the cost of a manufactured product. Other costs, such as Direct labor, Indirect labor, Temp labor, Fixed overhead, Variable overhead, depreciation, rent, etc. also contribute to the cost of the product and are supported as standard costs. These standard costs, plus the cost of materials, make up the total cost of manufacturing an item and are used in calculating the average inventory cost of such items.
There are three tasks which define those standard costs:
• Define up to 24 company-wide Manufacturing Cost Types, such as Direct labor, Indirect labor, Temp labor, Fixed overhead, Variable overhead, depreciation, rent, etc.
• Create Manufacturing GL Classes, in which you assign a GL account to each of the cost types above.
• Assign a Manufacturing GL Class to an item, and define the per-unit overhead costs for that item by Cost Type.
To work with Manufacturing Cost Types 1. From the ORDER POWER! Main Menu, select:
Work with Files ö ö ö ö Manufacturing Cost Types ö ö ö ö F15 (Maintenance) to display the Manufacturing Cost Type Maintenance panel (figure 14).
OP! 4.0 DEVELOPMENT ** CO# 001 OP! 4.0 DEVELOPMENT ** CO# 001 OP! 4.0 DEVELOPMENT ** CO# 001 OP! 4.0 DEVELOPMENT ** CO# 001 Manufacturing Cost Type Maintenance Manufacturing Cost Type Maintenance Manufacturing Cost Type Maintenance Manufacturing Cost Type Maintenance Cost Type 1 Cost Type 1 Cost Type 1 Cost Type 1 Labor Labor Labor Labor Cost Type 13 Cost Type 13 Cost Type 13 Cost Type 13 .... Cost Type 2 Cost Type 2 Cost Type 2 Cost Type 2 Overhead Overhead Overhead Overhead Cost Type 14 Cost Type 14 Cost Type 14 Cost Type 14 .... Cost Type 3 Cost Type 3 Cost Type 3 Cost Type 3 Packaging Packaging Packaging Packaging Cost Type 15 Cost Type 15 Cost Type 15 Cost Type 15 .... Cost Type 4 Cost Type 4 Cost Type 4 Cost Type 4 Cost Type 16 Cost Type 16 Cost Type 16 Cost Type 16 .... Cost Type 5 Cost Type 5 Cost Type 5 Cost Type 5 Cost Type 17 Cost Type 17 Cost Type 17 Cost Type 17 .... Cost Type 6 Cost Type 6 Cost Type 6 Cost Type 6 Cost Type 18 Cost Type 18 Cost Type 18 Cost Type 18 .... Cost Type 7 Cost Type 7 Cost Type 7 Cost Type 7 Cost Type 19 Cost Type 19 Cost Type 19 Cost Type 19 .... Cost Type 8 Cost Type 8 Cost Type 8 Cost Type 8 Cost Type 20 Cost Type 20 Cost Type 20 Cost Type 20 .... Cost Type 9 Cost Type 9 Cost Type 9 Cost Type 9 Cost Type 21 Cost Type 21 Cost Type 21 Cost Type 21 .... Cost Type 10 Cost Type 10 Cost Type 10 Cost Type 10 Cost Type 22 Cost Type 22 Cost Type 22 Cost Type 22 .... Cost Type 11 Cost Type 11 Cost Type 11 Cost Type 11 Cost Type 23 Cost Type 23 Cost Type 23 Cost Type 23 .... Cost Type 12 Cost Type 12 Cost Type 12 Cost Type 12 Cost Type 24 Cost Type 24 Cost Type 24 Cost Type 24 .... F1=Help F3=Exit F12=Cancel F1=Help F3=Exit F12=Cancel F1=Help F3=Exit F12=Cancel F1=Help F3=Exit F12=Cancel
Manufacturing Cost Type Maintenance panel (figure 14)

ORDER POWER! Work Orders 17
2. For each Manufacturing Cost Type you are defining, type a description of the costs you want the ability to accumulate in your GL Manufacturing Classes. These descriptions appear on Work Order Document Update panel (figure 53).
To work with GL Manufacturing Classes When overhead costs are applied to a manufactured item, the item’s Inventory account is debited. The Overhead account in the item’s GL Manufacturing Class is credited. A comparison of those credit amounts with the actual overhead expenses booked, will reveal variances of standard-to-actual overhead costs.
From the ORDER POWER! Main Menu, select: Work with Files ö ö ö ö GL Manufacturing Classes to display the GL Manufacturing Class Inquiry panel (figure 15).
OP! 4.0 DEVELOPMENT ** CO# 001 OP! 4.0 DEVELOPMENT ** CO# 001 OP! 4.0 DEVELOPMENT ** CO# 001 OP! 4.0 DEVELOPMENT ** CO# 001 Pstn : Pstn : Pstn : Pstn : GL Manufacturing GL Manufacturing GL Manufacturing GL Manufacturing Class Inquiry Show Delete: Class Inquiry Show Delete: Class Inquiry Show Delete: Class Inquiry Show Delete: NNNN 2=Change 5=Display 2=Change 5=Display 2=Change 5=Display 2=Change 5=Display GL Class Description Del GL Class Description Del GL Class Description Del GL Class Description Del NWS Newsletter Production NWS Newsletter Production NWS Newsletter Production NWS Newsletter Production HAT Hat Production HAT Hat Production HAT Hat Production HAT Hat Production SHU Shoe Production SHU Shoe Production SHU Shoe Production SHU Shoe Production MIS Miscellaneous MIS Miscellaneous MIS Miscellaneous MIS Miscellaneous .... Bottom Bottom Bottom Bottom F1=Help F3=Exit F6=Create F7=Bkwd F8=Fwd F10=Top F12=Cancel F18=Bot F21=Print F1=Help F3=Exit F6=Create F7=Bkwd F8=Fwd F10=Top F12=Cancel F18=Bot F21=Print F1=Help F3=Exit F6=Create F7=Bkwd F8=Fwd F10=Top F12=Cancel F18=Bot F21=Print F1=Help F3=Exit F6=Create F7=Bkwd F8=Fwd F10=Top F12=Cancel F18=Bot F21=Print
GL Manufacturing Class Inquiry panel (figure 15)
These actions are available, in addition to the standard ORDER POWER! functions:
Action Description 2=Change Display Work Order Document Update panel (figure 53) to work
with an existing GL Manufacturing Class
5=Display Display the GL Manufacturing Class Display window similar to Work Order Document Update panel (figure 53) to view a GL Manufacturing Class’s set up
F6=Create Display the Work Order Document Prompt panel (figure 52) to create a new GL Manufacturing Class
To create a new GL Manufacturing Class 1. On the GL Manufacturing Class Inquiry panel (figure 15), press F6 (Create) to
display the Work Order Document Prompt panel (figure 52).
18 Work Orders ORDER POWER!
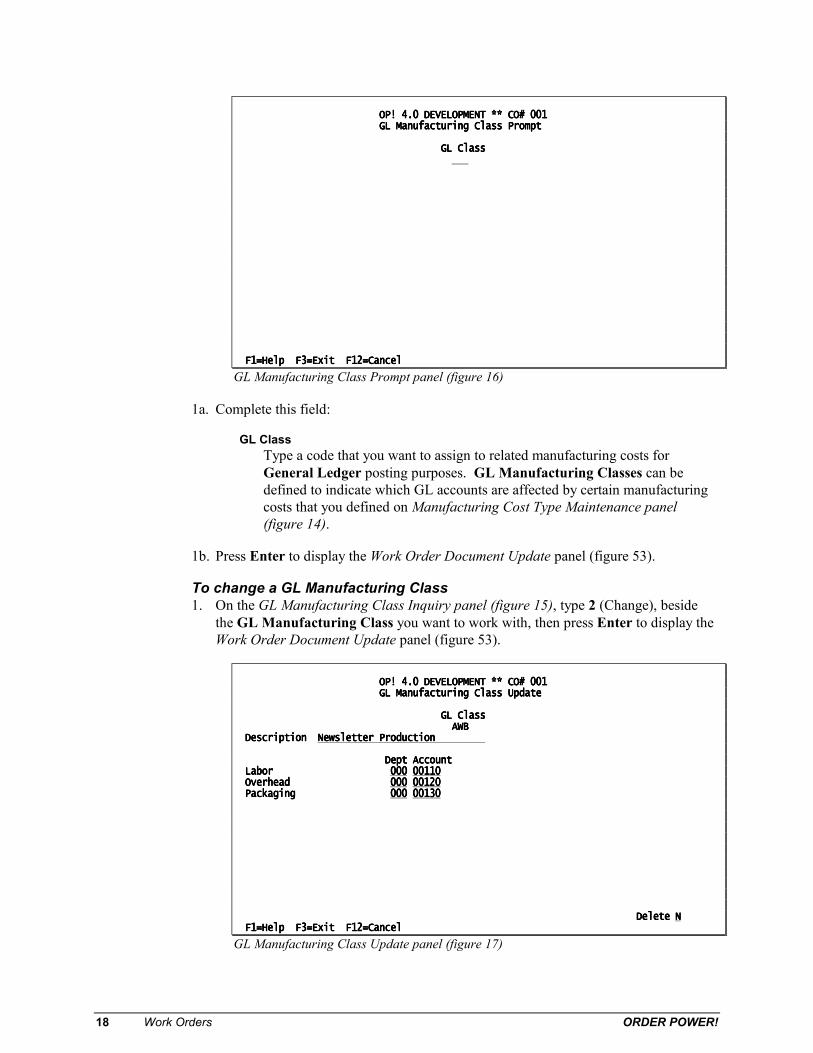
OP! 4.0 DEVELOPMENT ** CO# 001 OP! 4.0 DEVELOPMENT ** CO# 001 OP! 4.0 DEVELOPMENT ** CO# 001 OP! 4.0 DEVELOPMENT ** CO# 001 GL Manufacturing Class Prompt GL Manufacturing Class Prompt GL Manufacturing Class Prompt GL Manufacturing Class Prompt GL Class GL Class GL Class GL Class .... F1=Help F3=Exit F12=Cancel F1=Help F3=Exit F12=Cancel F1=Help F3=Exit F12=Cancel F1=Help F3=Exit F12=Cancel
GL Manufacturing Class Prompt panel (figure 16)
1a. Complete this field:
GL Class Type a code that you want to assign to related manufacturing costs for General Ledger posting purposes. GL Manufacturing Classes can be defined to indicate which GL accounts are affected by certain manufacturing costs that you defined on Manufacturing Cost Type Maintenance panel (figure 14).
1b. Press Enter to display the Work Order Document Update panel (figure 53).
To change a GL Manufacturing Class 1. On the GL Manufacturing Class Inquiry panel (figure 15), type 2 (Change), beside
the GL Manufacturing Class you want to work with, then press Enter to display the Work Order Document Update panel (figure 53).
OP! 4.0 DEVELOPMENT ** CO# 001 OP! 4.0 DEVELOPMENT ** CO# 001 OP! 4.0 DEVELOPMENT ** CO# 001 OP! 4.0 DEVELOPMENT ** CO# 001 GL Manufacturing Class Update GL Manufacturing Class Update GL Manufacturing Class Update GL Manufacturing Class Update GL Class GL Class GL Class GL Class AWB AWB AWB AWB Description Description Description Description Newsletter Production Newsletter Production Newsletter Production Newsletter Production .... Dept Account Dept Account Dept Account Dept Account Labor Labor Labor Labor 000000000000 00110001100011000110 Overhead Overhead Overhead Overhead 000000000000 00120001200012000120 Packaging Packaging Packaging Packaging 000000000000 00130001300013000130 Delete Delete Delete Delete NNNN F1=Help F3=Exit F12=Cancel F1=Help F3=Exit F12=Cancel F1=Help F3=Exit F12=Cancel F1=Help F3=Exit F12=Cancel
GL Manufacturing Class Update panel (figure 17)

ORDER POWER! Work Orders 19
2. Complete these fields:
Description Type a description of the GL Manufacturing Class you are defining.
3. The Manufacturing Cost Types which you previously defined are displayed. For each manufacturing cost type displayed, complete the following fields:
Dept / Account Type the GL account you wish to be credited for each overhead cost type (each manufactured item’s inventory account is the GL account to be debited). Enter the Department and Account numbers, defined in the General Ledger account number format. The ORDER POWER! GL account number is defined to be CCC-DDD-AAAAA, where CCC is the Company number, DDD is the Department number, AAAAA is the Account number. If no GL account is entered, there will be no GL entries created for that Manufacturing Cost Type within this GL Manufacturing Class.
3. Press Enter to update the GL Manufacturing Class.
To display a GL Manufacturing Class On the GL Manufacturing Class Inquiry panel (figure 15), type 5 (Display) beside the GL Manufacturing Class you want to see, then press Enter to display the GL Manufacturing Class Display window similar to Work Order Document Update panel (figure 53).
Setting up Items for Work Orders Here is a checklist of things you will need to set up for each Manufactured Item to use Work Orders:
Item master set up see below Bill of Materials see page 20 Warehouse Location see page 23 Setting up Manufacturing Cost (optional) ..................... see page 24
Item Master settings 1. From the ORDER POWER! Main Menu, select: Work with Files Items to
display the Item Selection panel.
2. Type the name of the Item you want to work with in the Item Code field, then press Enter to display the Item Inquiry panel.
3. Type 2 (Change) beside the Item you want to work with, then press Enter to display the Item Update panel (figure 18).

20 Work Orders ORDER POWER!
For more information about working with Items, see the “ORDER POWER! Item Maintenance Users Guide.”
For more information about working with Items, see the “ORDER POWER! Item Maintenance Users Guide.”
OP! 4.0 DEVELOPMENT ** CO# 001 OP! 4.0 DEVELOPMENT ** CO# 001 OP! 4.0 DEVELOPMENT ** CO# 001 OP! 4.0 DEVELOPMENT ** CO# 001 Item Update Item Update Item Update Item Update Item POLICEUNIFORM Item POLICEUNIFORM Item POLICEUNIFORM Item POLICEUNIFORM Descript Descript Descript Description ion ion ion Miami Dade County Officer’s Uniform Miami Dade County Officer’s Uniform Miami Dade County Officer’s Uniform Miami Dade County Officer’s Uniform .... Search Words Search Words Search Words Search Words .... Start Date Start Date Start Date Start Date End Date End Date End Date End Date Creation Date 6/14/02 Creation Date 6/14/02 Creation Date 6/14/02 Creation Date 6/14/02 ?Primary Vendor ?Primary Vendor ?Primary Vendor ?Primary Vendor ?Style ?Style ?Style ?Style .... Stock Stock Stock Stock ?Stock UOM ?Stock UOM ?Stock UOM ?Stock UOM *G 1.000 Each *G 1.000 Each *G 1.000 Each *G 1.000 Each Salable Salable Salable Salable ?Sales UOM ?Sales UOM ?Sales UOM ?Sales UOM *G 1.000 Each *G 1.000 Each *G 1.000 Each *G 1.000 Each ?Purchase UOM ?Purchase UOM ?Purchase UOM ?Purchase UOM *G *G *G *G 1.000 Each 1.000 Each 1.000 Each 1.000 Each Manufactured Manufactured Manufactured Manufactured MMMM M/S/N ?Routing Code M/S/N ?Routing Code M/S/N ?Routing Code M/S/N ?Routing Code Drop Ship Drop Ship Drop Ship Drop Ship .... Phase Out Phase Out Phase Out Phase Out Phase Out Date Phase Out Date Phase Out Date Phase Out Date .... Royalty Item Royalty Item Royalty Item Royalty Item ?Royalty Vendor ?Royalty Vendor ?Royalty Vendor ?Royalty Vendor R R R Royalty oyalty oyalty oyalty A/P A/P A/P A/P Kit Parent Item Kit Parent Item Kit Parent Item Kit Parent Item List Components on Documents List Components on Documents List Components on Documents List Components on Documents On Invoice On Invoice On Invoice On Invoice .... Assortment Item Assortment Item Assortment Item Assortment Item Allow Partial Ship Allow Partial Ship Allow Partial Ship Allow Partial Ship .... Continuity Item Continuity Item Continuity Item Continuity Item Serial/Lot/Gift Certificate Serial/Lot/Gift Certificate Serial/Lot/Gift Certificate Serial/Lot/Gift Certificate S/L/G S/L/G S/L/G S/L/G Gift Certificate: Face Value Gift Certificate: Face Value Gift Certificate: Face Value Gift Certificate: Face Value Fixed Fixed Fixed Fixed Y/N Y/N Y/N Y/N ?Superseding Item ?Superseding Item ?Superseding Item ?Superseding Item .... Check Superseding Available Check Superseding Available Check Superseding Available Check Superseding Available .... ?Supersede Comment Code ?Supersede Comment Code ?Supersede Comment Code ?Supersede Comment Code Delete Delete Delete Delete .... F1=Help F3=Exit F4=?List F6=Ext Desc F12=Cancel F1=Help F3=Exit F4=?List F6=Ext Desc F12=Cancel F1=Help F3=Exit F4=?List F6=Ext Desc F12=Cancel F1=Help F3=Exit F4=?List F6=Ext Desc F12=Cancel F14=Hist F15=Qty Avail F16=Open POs F22=Audit F23=User F24=More F14=Hist F15=Qty Avail F16=Open POs F22=Audit F23=User F24=More F14=Hist F15=Qty Avail F16=Open POs F22=Audit F23=User F24=More F14=Hist F15=Qty Avail F16=Open POs F22=Audit F23=User F24=More
Item Update panel (figure 18)
4. Complete the Item setup as needed. The following fields are required for a Manufactured Item:
Stock A Manufactured Item must be Stock Y(es).
Manufactured
Type a code to indicate if this Manufactured Item is:
M (Make-to-Order Item) S (Make-to-Stock Item)
A Make-to-Order Item is an item which is customized or normally not inventoried, that you manufacture to the requirements of a single order. A Make-to-Stock Item is marketable to many customers, and probably made in advance of expected orders.
To support legacy functionality, values of Y, N or blank will be accepted into this field. Those values indicate that the item is not a manufactured item.
Routing Code Type the user-defined code that describes the manufacturing process you have defined for this Item. This is a default routing code which may be overridden for any work order.
5. When you have completed all the Item maintenance panels, press Enter to update the Item record.
Bill of Materials For each manufactured Item, you must create a Bill of Materials (BOM) that defines all of the Component items necessary. You can create a single-level BOM for a finished Item or subassembly. A BOM can contain subassemblies which have their own BOM to create an unlimited number of levels. The BOM tracks all material costs, (including scrap) used in producing an Item.

ORDER POWER! Work Orders 21
To create a Bill of Materials 1. From the ORDER POWER! Main Menu, select: Work with Files Items to
display the Item Selection panel.
2. Type the name of the Item you want to work with in the Item Code field, then press Enter to display the Item Inquiry panel.
3. Type 10 (Kit) beside the Manufactured Item you want to work with to display Bill of Materials Items Inquiry panel (figure 19). When Option 10 is used with a Manufactured item, the Bill of Materials panels are displayed. When the same option is used with a Kit, the Kit Components panels are displayed.
OP! 4.0 DEVELOPMENT ** OP! 4.0 DEVELOPMENT ** OP! 4.0 DEVELOPMENT ** OP! 4.0 DEVELOPMENT ** CO# 001 CO# 001 CO# 001 CO# 001 Item Inquiry Show Delete : N Item Inquiry Show Delete : N Item Inquiry Show Delete : N Item Inquiry Show Delete : N 2=Change 5=Display 6=Ext Desc 7=Prc 8=Qtys 9=Vend Ref 10=Kit 11=Cls Prc 2=Change 5=Display 6=Ext Desc 7=Prc 8=Qtys 9=Vend Ref 10=Kit 11=Cls Prc 2=Change 5=Display 6=Ext Desc 7=Prc 8=Qtys 9=Vend Ref 10=Kit 11=Cls Prc 2=Change 5=Display 6=Ext Desc 7=Prc 8=Qtys 9=Vend Ref 10=Kit 11=Cls Prc AWBWORKORDER Bill of Materials Items Inquiry Show Delete : AWBWORKORDER Bill of Materials Items Inquiry Show Delete : AWBWORKORDER Bill of Materials Items Inquiry Show Delete : AWBWORKORDER Bill of Materials Items Inquiry Show Delete : NNNN .... Make2Order Item Make2Order Item Make2Order Item Make2Order Item ---- Newsletter Newsletter Newsletter Newsletter Pstn: Pstn: Pstn: Pstn: D D D D 2=Change 5=Display 6=Ext Desc 8=Qty Avail e 2=Change 5=Display 6=Ext Desc 8=Qty Avail e 2=Change 5=Display 6=Ext Desc 8=Qty Avail e 2=Change 5=Display 6=Ext Desc 8=Qty Avail e Seq.# Material Item Description Quantity l Seq.# Material Item Description Quantity l Seq.# Material Item Description Quantity l Seq.# Material Item Description Quantity l 10 TONER Print cartridge 2.000 10 TONER Print cartridge 2.000 10 TONER Print cartridge 2.000 10 TONER Print cartridge 2.000 20 PAPER Paper for the newsletter 500.000 20 PAPER Paper for the newsletter 500.000 20 PAPER Paper for the newsletter 500.000 20 PAPER Paper for the newsletter 500.000 .... Bottom Bottom Bottom Bottom F1=Help F3=Exit F6=Crt F7=Bkwd F8=Fwd F10=Top F12=Cancel F18=Bottom F1=Help F3=Exit F6=Crt F7=Bkwd F8=Fwd F10=Top F12=Cancel F18=Bottom F1=Help F3=Exit F6=Crt F7=Bkwd F8=Fwd F10=Top F12=Cancel F18=Bottom F1=Help F3=Exit F6=Crt F7=Bkwd F8=Fwd F10=Top F12=Cancel F18=Bottom F20=Renumber F21=Print F20=Renumber F21=Print F20=Renumber F21=Print F20=Renumber F21=Print
Bill of Materials Items Inquiry panel (figure 19)
These actions are available, in addition to the standard ORDER POWER! functions:
Action Description 2=Change Display Material Item Update panel (figure 21) to work with an
existing Materials Item
5=Display Display the Materials Item Display window similar to Material Item Update panel (figure 21) to view a Materials Item’s set up
F6=Crt Display the Material Item Prompt panel (figure 20) to create a new Materials Item
F20=Renumber Renumber the displayed Items, in the same order, but incrementing by 10
To add (create) a new Materials Item to a Bill of Materials 1. On the Bill of Materials Items Inquiry panel (figure 19), press F6 (Create) to display
the Material Item Prompt panel (figure 20).
22 Work Orders ORDER POWER!
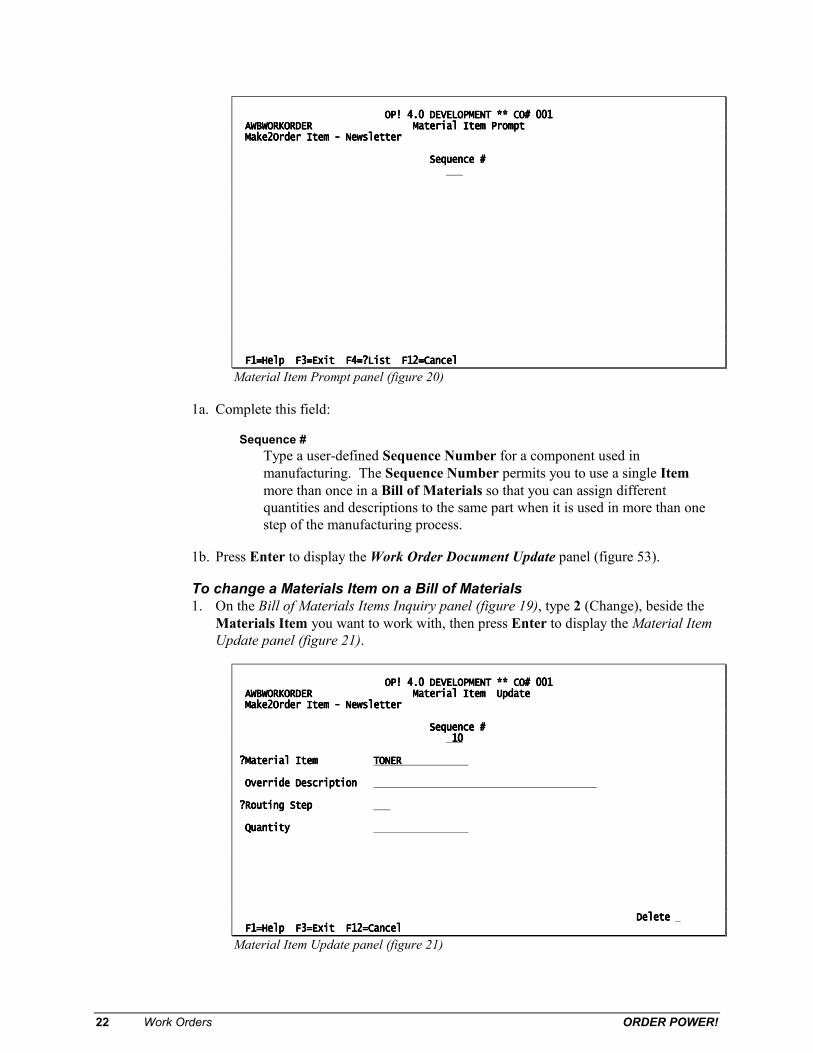
OP! 4.0 DEVELOPMENT ** CO# 001 OP! 4.0 DEVELOPMENT ** CO# 001 OP! 4.0 DEVELOPMENT ** CO# 001 OP! 4.0 DEVELOPMENT ** CO# 001 AWBWORKORDER Material Item Prompt AWBWORKORDER Material Item Prompt AWBWORKORDER Material Item Prompt AWBWORKORDER Material Item Prompt Make2Order Item Make2Order Item Make2Order Item Make2Order Item ---- Newsletter Newsletter Newsletter Newsletter Sequence # Sequence # Sequence # Sequence # .... F1=Help F3=Exit F F1=Help F3=Exit F F1=Help F3=Exit F F1=Help F3=Exit F4=?List F12=Cancel 4=?List F12=Cancel 4=?List F12=Cancel 4=?List F12=Cancel
Material Item Prompt panel (figure 20)
1a. Complete this field:
Sequence # Type a user-defined Sequence Number for a component used in manufacturing. The Sequence Number permits you to use a single Item more than once in a Bill of Materials so that you can assign different quantities and descriptions to the same part when it is used in more than one step of the manufacturing process.
1b. Press Enter to display the Work Order Document Update panel (figure 53).
To change a Materials Item on a Bill of Materials 1. On the Bill of Materials Items Inquiry panel (figure 19), type 2 (Change), beside the
Materials Item you want to work with, then press Enter to display the Material Item Update panel (figure 21).
OP! 4.0 DEVELOPMENT ** CO# 001 OP! 4.0 DEVELOPMENT ** CO# 001 OP! 4.0 DEVELOPMENT ** CO# 001 OP! 4.0 DEVELOPMENT ** CO# 001 AWBWORKORDER AWBWORKORDER AWBWORKORDER AWBWORKORDER Material Item Update Material Item Update Material Item Update Material Item Update Make2Order Item Make2Order Item Make2Order Item Make2Order Item ---- Newsletter Newsletter Newsletter Newsletter Sequence # Sequence # Sequence # Sequence # 10 10 10 10 ?Material Item ?Material Item ?Material Item ?Material Item TONER TONER TONER TONER .... Override Description Override Description Override Description Override Description .... ?Routing Step ?Routing Step ?Routing Step ?Routing Step .... Quantity Quantity Quantity Quantity .... .... Delete Delete Delete Delete .... F1=Help F3=Exit F12=Cancel F1=Help F3=Exit F12=Cancel F1=Help F3=Exit F12=Cancel F1=Help F3=Exit F12=Cancel
Material Item Update panel (figure 21)

ORDER POWER! Work Orders 23
2. Complete these fields:
Material Item Type the Item number of the component you are adding to the Bill of Materials.
Override Description (optional) Type an optional description that you want to associate with this Material Item, for purposes of this manufactured Item/Sequence number.
Routing Step Type an optional Routing Step that you want to associate with this Material Item, for purposes of this manufactured Item/Sequence number.
Quantity Type the quantity of this Material Item that you want to associate with this Manufactured Item, for purposes of this Manufactured Item/Sequence Number.
3. Press Enter to update the Bill of Materials.
To display a Materials Item On the Bill of Materials Items Inquiry panel (figure 19), type 5 (Display) beside the Materials Item you want to see, then press Enter to display the Materials Item Display window similar to Work Order Document Update panel (figure 53).
To add a Warehouse Location for the Manufactured Item
This step is not necessary if a Warehouse Location already exists for the Item. Multiple locations may optionally be defined, and any location may be overridden during transaction entry.
1. From the ORDER POWER! Main Menu, select: Work with Files Items to display the Item Selection panel.
2. Type the name of the Item you want to work with in the Item Code field, then press Enter to display the Item Inquiry panel.
3. Type 13 (QOH) beside the Item you want to work with, then press Enter to display the Item Quantities On Hand window.
4. Press F6 (Create) to display the Item Quantities On Hand Prompt panel (figure 22).
24 Work Orders ORDER POWER!
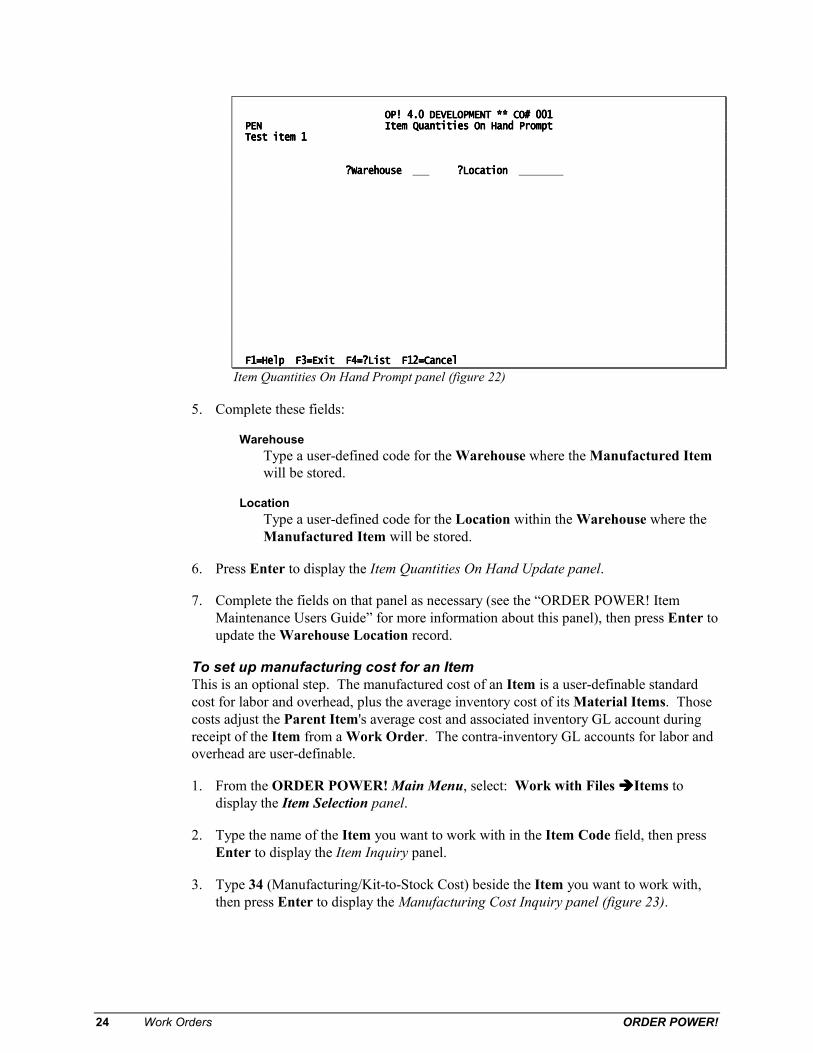
OP! 4. OP! 4. OP! 4. OP! 4.0 DEVELOPMENT ** CO# 001 0 DEVELOPMENT ** CO# 001 0 DEVELOPMENT ** CO# 001 0 DEVELOPMENT ** CO# 001 PEN Item Quantities On Hand Prompt PEN Item Quantities On Hand Prompt PEN Item Quantities On Hand Prompt PEN Item Quantities On Hand Prompt Test item 1 Test item 1 Test item 1 Test item 1 ?Warehouse ?Warehouse ?Warehouse ?Warehouse ?Location ?Location ?Location ?Location .... F1=Help F3=Exit F4=?List F12=Cancel F1=Help F3=Exit F4=?List F12=Cancel F1=Help F3=Exit F4=?List F12=Cancel F1=Help F3=Exit F4=?List F12=Cancel
Item Quantities On Hand Prompt panel (figure 22)
5. Complete these fields:
Warehouse Type a user-defined code for the Warehouse where the Manufactured Item will be stored.
Location Type a user-defined code for the Location within the Warehouse where the Manufactured Item will be stored.
6. Press Enter to display the Item Quantities On Hand Update panel.
7. Complete the fields on that panel as necessary (see the “ORDER POWER! Item Maintenance Users Guide” for more information about this panel), then press Enter to update the Warehouse Location record.
To set up manufacturing cost for an Item This is an optional step. The manufactured cost of an Item is a user-definable standard cost for labor and overhead, plus the average inventory cost of its Material Items. Those costs adjust the Parent Item's average cost and associated inventory GL account during receipt of the Item from a Work Order. The contra-inventory GL accounts for labor and overhead are user-definable.
1. From the ORDER POWER! Main Menu, select: Work with Files Items to display the Item Selection panel.
2. Type the name of the Item you want to work with in the Item Code field, then press Enter to display the Item Inquiry panel.
3. Type 34 (Manufacturing/Kit-to-Stock Cost) beside the Item you want to work with, then press Enter to display the Manufacturing Cost Inquiry panel (figure 23).

ORDER POWER! Work Orders 25
OP! 4.0 DEVELOPMENT ** CO# 0 OP! 4.0 DEVELOPMENT ** CO# 0 OP! 4.0 DEVELOPMENT ** CO# 0 OP! 4.0 DEVELOPMENT ** CO# 001 01 01 01 Manufacturing Cost Inquiry Manufacturing Cost Inquiry Manufacturing Cost Inquiry Manufacturing Cost Inquiry Delete Delete Delete Delete Item AWBWORKORDER Make2Order Item Item AWBWORKORDER Make2Order Item Item AWBWORKORDER Make2Order Item Item AWBWORKORDER Make2Order Item ---- Newsletter Newsletter Newsletter Newsletter Cost GL Class Cost GL Class Cost GL Class Cost GL Class Labor .0000 Labor .0000 Labor .0000 Labor .0000 Overhead .0000 Overhead .0000 Overhead .0000 Overhead .0000 Packaging Packaging Packaging Packaging .0000 .0000 .0000 .0000 F1=Help F3=Exit F12=Cancel F15=Maint F21=Print F1=Help F3=Exit F12=Cancel F15=Maint F21=Print F1=Help F3=Exit F12=Cancel F15=Maint F21=Print F1=Help F3=Exit F12=Cancel F15=Maint F21=Print
Manufacturing Cost Inquiry panel (figure 23)
4. Press F15 (Maint) to unprotect input, then complete these fields to record manufacturing costs for the selected Item:
Cost GL Class Type the user-defined code that indicates the GL Manufacturing Class you want to associate with this Item. (See page 17 for more information about setting up GL Manufacturing Classes).
Labor / Overhead / Packaging Type the costs, per stocking unit of measure, you want to associate with this Manufactured Item.
5. Press Enter to update the Manufacturing Cost Item record.
26 Work Orders ORDER POWER!
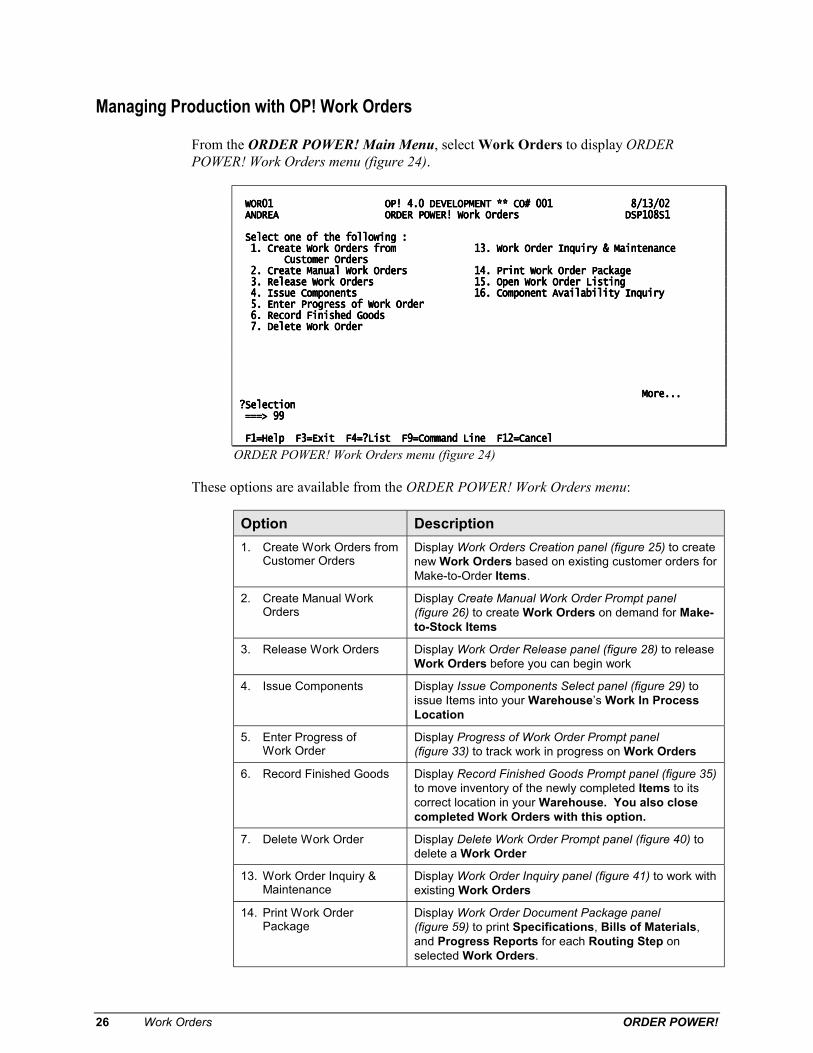
Managing Production with OP! Work Orders
From the ORDER POWER! Main Menu, select Work Orders to display ORDER POWER! Work Orders menu (figure 24).
WOR01 OP! 4.0 DEVELOPMENT ** CO# 001 8/13/02 WOR01 OP! 4.0 DEVELOPMENT ** CO# 001 8/13/02 WOR01 OP! 4.0 DEVELOPMENT ** CO# 001 8/13/02 WOR01 OP! 4.0 DEVELOPMENT ** CO# 001 8/13/02 ANDREA ORDER POWER! Work Orders DSP108S1 ANDREA ORDER POWER! Work Orders DSP108S1 ANDREA ORDER POWER! Work Orders DSP108S1 ANDREA ORDER POWER! Work Orders DSP108S1 Select one of the following : Select one of the following : Select one of the following : Select one of the following : 1. Create Work Orders from 13. Work Order Inquiry & Maintenance 1. Create Work Orders from 13. Work Order Inquiry & Maintenance 1. Create Work Orders from 13. Work Order Inquiry & Maintenance 1. Create Work Orders from 13. Work Order Inquiry & Maintenance Customer Orders Customer Orders Customer Orders Customer Orders 2. Create Manual Work Orders 14. Print Work Order Package 2. Create Manual Work Orders 14. Print Work Order Package 2. Create Manual Work Orders 14. Print Work Order Package 2. Create Manual Work Orders 14. Print Work Order Package 3. Release Work Orders 15. Open Work Order Listing 3. Release Work Orders 15. Open Work Order Listing 3. Release Work Orders 15. Open Work Order Listing 3. Release Work Orders 15. Open Work Order Listing 4. Issue Components 4. Issue Components 4. Issue Components 4. Issue Components 16. Component Availability Inquiry 16. Component Availability Inquiry 16. Component Availability Inquiry 16. Component Availability Inquiry 5. Enter Progress of Work Order 5. Enter Progress of Work Order 5. Enter Progress of Work Order 5. Enter Progress of Work Order 6. Record Finished Goods 6. Record Finished Goods 6. Record Finished Goods 6. Record Finished Goods 7. Delete Work Order 7. Delete Work Order 7. Delete Work Order 7. Delete Work Order More... More... More... More... ?Selection ?Selection ?Selection ?Selection ===> 99 ===> 99 ===> 99 ===> 99 F1=Help F F1=Help F F1=Help F F1=Help F3=Exit F4=?List F9=Command Line F12=Cancel 3=Exit F4=?List F9=Command Line F12=Cancel 3=Exit F4=?List F9=Command Line F12=Cancel 3=Exit F4=?List F9=Command Line F12=Cancel
ORDER POWER! Work Orders menu (figure 24)
These options are available from the ORDER POWER! Work Orders menu:
Option Description 1. Create Work Orders from
Customer Orders Display Work Orders Creation panel (figure 25) to create new Work Orders based on existing customer orders for Make-to-Order Items.
2. Create Manual Work Orders
Display Create Manual Work Order Prompt panel (figure 26) to create Work Orders on demand for Make-to-Stock Items
3. Release Work Orders Display Work Order Release panel (figure 28) to release Work Orders before you can begin work
4. Issue Components Display Issue Components Select panel (figure 29) to issue Items into your Warehouse’s Work In Process Location
5. Enter Progress of Work Order
Display Progress of Work Order Prompt panel (figure 33) to track work in progress on Work Orders
6. Record Finished Goods Display Record Finished Goods Prompt panel (figure 35) to move inventory of the newly completed Items to its correct location in your Warehouse. You also close completed Work Orders with this option.
7. Delete Work Order Display Delete Work Order Prompt panel (figure 40) to delete a Work Order
13. Work Order Inquiry & Maintenance
Display Work Order Inquiry panel (figure 41) to work with existing Work Orders
14. Print Work Order Package
Display Work Order Document Package panel (figure 59) to print Specifications, Bills of Materials, and Progress Reports for each Routing Step on selected Work Orders.

ORDER POWER! Work Orders 27
Option Description 15. Open Work Order Listing Displays the Open Work Order Selection panel
(figure 60) to print a report of the current status of all open Work Orders.
16. Component Availability Inquiry
Display Component Availability Inquiry panel (figure 61)
Creating Work Orders from Customer orders
Make-to-Order Items can be automatically transferred to production orders from customer orders. This batch program can automatically create one work order for every make-to-order line in customer orders. Optionally, those work orders can be created manually. When the work order is subsequently released to production, the Estimated Completion Date of the work order becomes the Scheduled Shipment date of the ordered item in the customer’s order if the Company Profile says to do so. When it’s finished, the manufactured item is committed to its customer order.
To create Work Orders from Customer orders Use this option to generate Work Orders based on existing customer orders for Make-to-Order Items. (Use the “Create Manual Work Orders” option to create Work Orders for Make-to-Stock Items.) You cannot create Work Orders for orders that are on HOLD.
1. On the ORDER POWER! Work Orders menu (figure 24), select Create Work Orders from Customer Orders to display Work Orders Creation panel (figure 25).
OP! 4.0 DEVELOPMENT ** CO# 001 OP! 4.0 DEVELOPMENT ** CO# 001 OP! 4.0 DEVELOPMENT ** CO# 001 OP! 4.0 DEVELOPMENT ** CO# 001 Work Orders Creation Work Orders Creation Work Orders Creation Work Orders Creation Thru Requested Date ....... Thru Requested Date ....... Thru Requested Date ....... Thru Requested Date ....... 8/13/02 8/13/02 8/13/02 8/13/02 ?Warehouse ................. ?Warehouse ................. ?Warehouse ................. ?Warehouse ................. MIAMIAMIAMIA Item Number ............... Item Number ............... Item Number ............... Item Number ............... 1111 1=All 2=Select 1=All 2=Select 1=All 2=Select 1=All 2=Select Order Number .............. Order Number .............. Order Number .............. Order Number .............. 2222 1=All 2=Select 3=Range 1=All 2=Select 3=Range 1=All 2=Select 3=Range 1=All 2=Select 3=Range Use Current Printer Default Use Current Printer Default Use Current Printer Default Use Current Printer Default YYYY Y/N Y/N Y/N Y/N Submit to Batch............ Submit to Batch............ Submit to Batch............ Submit to Batch............ NNNN Y/N Y/N Y/N Y/N Save Changes .............. Save Changes .............. Save Changes .............. Save Changes .............. NNNN Y/N Y/N Y/N Y/N F1=Help F3=Exit F4=?List F12=Cancel F1=Help F3=Exit F4=?List F12=Cancel F1=Help F3=Exit F4=?List F12=Cancel F1=Help F3=Exit F4=?List F12=Cancel
Work Orders Creation panel (figure 25)
2. Complete these fields to select Customer Orders for which you want to create Work Orders:
Thru Requested Date Type a date Work Orders will be created for Make-to-Order items in customer orders, where the Requested Shipment Date of the ordered item is earlier than or equal to the date entered here.
28 Work Orders ORDER POWER!
Warehouse Type a user-defined code that indicates which Warehouse you want to create Work Orders for.
Item Number Type a code to indicate if you want to:
1 Create Work Orders for all Make-to-Order Items that have been ordered by customers
2 Create Work Orders for specific Make-to-Order Items that have been ordered by customers
Order Number Type a code to indicate if you want to create Work Orders for:
1 All customer orders. 2 Specific customer orders. 3 A range of customer orders.
Use Current Printer Defaults Type Y(es) or N(o) to indicate whether or not you want to change the existing printer defaults for the current report.
Submit to Batch Type a code to indicate whether the report should be submitted to a job queue to process behind the scenes in batch mode and immediately free up your terminal, or run the report interactively which locks the terminal until the program has completed.
Y (es) indicates that the report will be submitted as a batch job N (o) indicates that the report will be run interactively
Save Changes Type Y(es) or N(o) to indicate whether or not you want any changes made to the defaults for the current panel to be applied to all subsequent displays of that panel. This eliminates redundant data entry.
3. Press Enter to create Work Orders.
Creating Manual Work Orders Use this option to generate Work Orders on demand for Make-to-Stock Items. It may optionally be used for Make-to-Order Items on specific sales order/lines.
If you choose to create manual work orders for Make-to-Order customer orders, Order Power! will not prevent you from creating and releasing more than one manual work order for a single Make-to-Order customer order and line, nor will it prevent you from creating and releasing manual work orders whose quantities, individually or in total, exceed those ordered by the customer. The customer order’s Audit will show every work order created, however the ordered line will only show the most recent work order created. As those multiple work orders are completed, they will each be committed to the customer order, up to the quantity ordered by the customer. Any excess quantities completed will be placed, uncommitted, into inventory.
To create Manual Work Orders:

ORDER POWER! Work Orders 29
1. On the ORDER POWER! Work Orders menu (figure 24), select Create Manual Work Orders to display Create Manual Work Order Prompt panel (figure 26).
OP! 4.0 DEVELOPMENT ** CO# 001 OP! 4.0 DEVELOPMENT ** CO# 001 OP! 4.0 DEVELOPMENT ** CO# 001 OP! 4.0 DEVELOPMENT ** CO# 001 Create Manual Work Order Prompt Create Manual Work Order Prompt Create Manual Work Order Prompt Create Manual Work Order Prompt Work Order # 25 Work Order # 25 Work Order # 25 Work Order # 25 ?Item ?Item ?Item ?Item .... Customer Order Customer Order Customer Order Customer Order Line Line Line Line F1=Help F2=Unprotect F3=Exit F4=?List F12=Cancel F1=Help F2=Unprotect F3=Exit F4=?List F12=Cancel F1=Help F2=Unprotect F3=Exit F4=?List F12=Cancel F1=Help F2=Unprotect F3=Exit F4=?List F12=Cancel
Create Manual Work Order Prompt panel (figure 26)
2. If you are creating a Work Order for a Make-to-Stock Item, complete this field:
Item Type the Item number of the Make-to-Stock Item for which you are creating this Work Order.
- or -
If you are creating a Work Order for a Make-to-Order Item, press F2 (Unprotect), then complete these fields:
Customer Order Type the order number for which you are creating this Work Order.
Line Type the line number (within the order you entered above) for which you are creating this Work Order.
3. Press Enter to display the Routing Code field, which is prefilled with the Routing Code you defined on Item Update panel (figure 18).
4. Press Enter to continue, or type a different user-defined Routing code that contains the steps necessary for manufacturing this Item, then press Enter to display the Create Manual Work Order Update panel (figure 27).

30 Work Orders ORDER POWER!
OP! 4.0 DEVELOPMENT * OP! 4.0 DEVELOPMENT * OP! 4.0 DEVELOPMENT * OP! 4.0 DEVELOPMENT ** CO# 001 * CO# 001 * CO# 001 * CO# 001 Create Manual Work Order Update Create Manual Work Order Update Create Manual Work Order Update Create Manual Work Order Update Work Order # 25 Work Order # 25 Work Order # 25 Work Order # 25 Item AWBMAKE2STOCK Item AWBMAKE2STOCK Item AWBMAKE2STOCK Item AWBMAKE2STOCK ?Whse ?Whse ?Whse ?Whse .... Quantity: Quantity: Quantity: Quantity: Ordered Ordered Ordered Ordered .... Ro Ro Ro Routing Code ZOO uting Code ZOO uting Code ZOO uting Code ZOO Newsletter Production Newsletter Production Newsletter Production Newsletter Production .... Est Completion Est Completion Est Completion Est Completion Date Date Date Date Days to Complete Days to Complete Days to Complete Days to Complete 3.00 3.00 3.00 3.00 .... F1=Help F3=Exit F4=?List F12=Cancel F1=Help F3=Exit F4=?List F12=Cancel F1=Help F3=Exit F4=?List F12=Cancel F1=Help F3=Exit F4=?List F12=Cancel
Create Manual Work Order Update panel (figure 27)
5. Complete these fields:
Whse Type the user-defined code that indicates the production Warehouse for this manufactured Item.
Quantity Ordered Type the quantity of the Item that you intend to produce.
Routing Code (optional override description) Type an alternative description of the Routing Code that you have used for this Work Order.
Est Completion Date (optional) Type the estimated completion date of the Work Order. If left blank, when the Work Order is released to production this date will be calculated using the field below, “Days to Complete”. Also when a Make-to-Order Work Order is released, this date plus “Add on days to complete” in the Company Profile may become the Scheduled Release Date of the manufactured item in the Customer Order.
Days to Complete (optional) Type the number of days that you expect production of this Item to last. This reflects calendar days, not work days.
6. Press Enter to update the Work Order.
Release Work Orders You must release Work Orders before you can begin work. This process creates demand on the components of the Manufactured Item’s Bill of Materials in their “Qty On Cust Order” and “Qty On WO” totals. When Make-to-Order work orders are released, the associated customer orders’ Scheduled Shipment Date may be optionally be changed by the system.

ORDER POWER! Work Orders 31
To release Work Orders 1. On the ORDER POWER! Work Orders menu (figure 24), select Release Work
Orders to display Work Order Release panel (figure 28).
OP! 4.0 DEVELOPMENT ** CO# 001 OP! 4.0 DEVELOPMENT ** CO# 001 OP! 4.0 DEVELOPMENT ** CO# 001 OP! 4.0 DEVELOPMENT ** CO# 001 Work Order Release Work Order Release Work Order Release Work Order Release Release Date .............. Release Date .............. Release Date .............. Release Date .............. 8/13/02 8/13/02 8/13/02 8/13/02 ?Warehouse ................. ?Warehouse ................. ?Warehouse ................. ?Warehouse ................. MIAMIAMIAMIA Work Order Number ......... Work Order Number ......... Work Order Number ......... Work Order Number ......... 1111 1=All 2=Select 3=Range 1=All 2=Select 3=Range 1=All 2=Select 3=Range 1=All 2=Select 3=Range Batch ..................... Batch ..................... Batch ..................... Batch ..................... 1111 1=All 2=Select 1=All 2=Select 1=All 2=Select 1=All 2=Select Use C Use C Use C Use Current Printer Default urrent Printer Default urrent Printer Default urrent Printer Default YYYY Y/N Y/N Y/N Y/N Submit to Batch............ Submit to Batch............ Submit to Batch............ Submit to Batch............ NNNN Y/N Y/N Y/N Y/N Save Changes .............. Save Changes .............. Save Changes .............. Save Changes .............. NNNN Y/N Y/N Y/N Y/N F1=Help F3=Exit F4=?List F12=Cancel F1=Help F3=Exit F4=?List F12=Cancel F1=Help F3=Exit F4=?List F12=Cancel F1=Help F3=Exit F4=?List F12=Cancel
Work Order Release panel (figure 28)
2. Complete these fields:
Release Date Type the date on which you expect to release this Work Order to the shop floor. Future dates are acceptable. For Make-to-Order work orders, this date is the starting basis for calculating the customer order’s Scheduled Shipment date.
Warehouse Type a user-defined code that indicates for which Warehouse you want to release Work Orders.
Work Order Number Type a code to indicate if you want to:
1 Release all Work Orders for the specified Warehouse 2 Release selected Work Orders for the specified Warehouse 3 Release a range Work Order numbers for the specified Warehouse

32 Work Orders ORDER POWER!
The Batch Number can be found on the “Work Orders Created Listing” that ORDER POWER! produces when you run the Create Work Orders from Customer Orders option. It can also be seen in each customer order’s Audit history.
Batch Type a code to indicate if you want to:
1 Release all Work Orders for the specified Warehouse
2 Release selected batches of Work Orders for the specified Warehouse
3 Release a range of Work Order batches for the specified Warehouse
Use Current Printer Defaults Type Y(es) or N(o) to indicate whether or not you want to change the existing printer defaults for the current report.
Submit to Batch Type a code to indicate whether the report should be submitted to a job queue to process behind the scenes in batch mode and immediately free up your terminal, or run the report interactively which locks the terminal until the program has completed.
Y (es) indicates that the report will be submitted as a batch job N (o) indicates that the report will be run interactively
Save Changes Type Y(es) or N(o) to indicate whether or not you want any changes made to the defaults for the current report to be applied to all subsequent displays of this panel. This eliminates redundant data entry.
3. Press Enter to release Work Orders.
Issue Components Items can be issued into your Warehouse’s Work In Process location based on all the components required, or you can issue partial quantities throughout large production runs.
To issue components This optional step issues quantities of the components on the Manufactured Item’s Bill of Materials. Components will only be issued for Items on Work Orders that you have released. Using this option allows you to move components from available inventory into a logical Work in Process location so that they are not available for order picking.
1. On the ORDER POWER! Work Orders menu (figure 24), select Issue Components to display Issue Components Select panel (figure 29).

ORDER POWER! Work Orders 33
OP! 4.0 DEVELOPMENT ** CO# 001 OP! 4.0 DEVELOPMENT ** CO# 001 OP! 4.0 DEVELOPMENT ** CO# 001 OP! 4.0 DEVELOPMENT ** CO# 001 Issue Components Select Issue Components Select Issue Components Select Issue Components Select ?Warehouse .................. ?Warehouse .................. ?Warehouse .................. ?Warehouse .................. MIAMIAMIAMIA Save Changes ............... Save Changes ............... Save Changes ............... Save Changes ............... NNNN Y/N Y/N Y/N Y/N F1=Help F3=Exit F4=?List F12=Cancel F1=Help F3=Exit F4=?List F12=Cancel F1=Help F3=Exit F4=?List F12=Cancel F1=Help F3=Exit F4=?List F12=Cancel
Issue Components Select panel (figure 29)
2. Complete these fields:
Warehouse Type a user-defined code of the Warehouse for which you want to issue components.
Save Changes Type Y(es) or N(o) to indicate whether or not you want any changes made to the display for the current panel to be applied to all subsequent displays of the panel. This eliminates redundant data entry.
3. Press Enter to display Issue Components Select panel (figure 30).
OP! 4.0 DEVELOPMENT ** CO# 001 OP! 4.0 DEVELOPMENT ** CO# 001 OP! 4.0 DEVELOPMENT ** CO# 001 OP! 4.0 DEVELOPMENT ** CO# 001 Issue Components Select Issue Components Select Issue Components Select Issue Components Select B B B Batch Number ...................... atch Number ...................... atch Number ...................... atch Number ...................... .... -------- OR OR OR OR -------- ?From Work Order ................... ?From Work Order ................... ?From Work Order ................... ?From Work Order ................... .... To Work Order To Work Order To Work Order To Work Order ..................... ..................... ..................... ..................... .... -------- OR OR OR OR -------- .... ?From Customer Order ............... ?From Customer Order ............... ?From Customer Order ............... ?From Customer Order ............... .... To Customer Order ......... To Customer Order ......... To Customer Order ......... To Customer Order ................. ........ ........ ........ .... Issue Method ...................... Issue Method ...................... Issue Method ...................... Issue Method ...................... 1111 1=Enter Details 2=Prefill As Expected 1=Enter Details 2=Prefill As Expected 1=Enter Details 2=Prefill As Expected 1=Enter Details 2=Prefill As Expected 3 3 3 3=Issue As Expected =Issue As Expected =Issue As Expected =Issue As Expected F1=Help F3=Exit/No Post F4=?List F15=Exit/Post F1=Help F3=Exit/No Post F4=?List F15=Exit/Post F1=Help F3=Exit/No Post F4=?List F15=Exit/Post F1=Help F3=Exit/No Post F4=?List F15=Exit/Post
Issue Components Select panel (figure 30)

34 Work Orders ORDER POWER!
4. Complete these fields to select Work Orders for which you want to issue components:
Batch Number Type the Batch Number that can be found on the “Work Orders Created Listing” that ORDER POWER! produces when you run the Create Work Orders from Customer Orders option, or in the customer order’s Audit display.
-or- From Work Order / To Work Order
Type a range of Work Orders numbers. -or-
From Customer Order / To Customer Order Type a range of Customer order numbers.
5. Complete this field:
Issue Method Type a code to indicate if you want to:
1= Enter Details - Enter quantities to issue for each component on each Work Order
2= Prefill As Expected – Pre-fills the quantity to be issued with the quantity required by the Bill of Materials, limited to what is available to be issued from inventory, then displays the pre-filled amounts so they can be viewed and changed.
3= Issue As Expected – Issue the total quantity required by the Bill of Materials, limited to what is available to be issued from inventory.
6. Press Enter.
• If you typed 1 (Enter Details) or 2 (Prefill As Expected) in the Issue Method field, ORDER POWER! displays Issue Components Detail panel (figure 31). For option 2 (Prefill As Expected), the components’ from-locations will also be pre-filled based on the same logic that Customer Order Release uses for picking.
• If you typed 3 (Issue As Expected) in the Issue Method field, ORDER POWER! issues the total quantity required, if it is available, then redisplays the Issue Components Select panel (figure 30). The quantities may still be displayed or changed by selecting 1 (Enter Details) for the work order. Press F15 (Exit/Post) to issue the components.

ORDER POWER! Work Orders 35
Work Order: 14 OP! 4.0 DEVELOPMENT ** CO# 001 Cust Order 128740 Work Order: 14 OP! 4.0 DEVELOPMENT ** CO# 001 Cust Order 128740 Work Order: 14 OP! 4.0 DEVELOPMENT ** CO# 001 Cust Order 128740 Work Order: 14 OP! 4.0 DEVELOPMENT ** CO# 001 Cust Order 128740 Item: AWBWORKORDER Issue Components Detail Line 1 Item: AWBWORKORDER Issue Components Detail Line 1 Item: AWBWORKORDER Issue Components Detail Line 1 Item: AWBWORKORDER Issue Components Detail Line 1 1=Select 2=Prefill As Expected 1=Select 2=Prefill As Expected 1=Select 2=Prefill As Expected 1=Select 2=Prefill As Expected Issue Todate/ Issue Todate/ Issue Todate/ Issue Todate/ Item Description Required Qty Issue Today Item Description Required Qty Issue Today Item Description Required Qty Issue Today Item Description Required Qty Issue Today TONER Print cartridge TONER Print cartridge TONER Print cartridge TONER Print cartridge 4.000 2.000 4.000 2.000 4.000 2.000 4.000 2.000 2.000 2.000 2.000 2.000 PAPER Paper for the newsletter PAPER Paper for the newsletter PAPER Paper for the newsletter PAPER Paper for the newsletter 4.000 4.000 4.000 4.000 12.000 12.000 12.000 12.000 .... .... .... .... .... .... .... .... Bottom Bottom Bottom Bottom .... F1=Help F7=Bkwd F8=Fwd F10=Top F11=All F12=Cancel F20=Bypass F23=As Expected F1=Help F7=Bkwd F8=Fwd F10=Top F11=All F12=Cancel F20=Bypass F23=As Expected F1=Help F7=Bkwd F8=Fwd F10=Top F11=All F12=Cancel F20=Bypass F23=As Expected F1=Help F7=Bkwd F8=Fwd F10=Top F11=All F12=Cancel F20=Bypass F23=As Expected
Issue Components Detail panel (figure 31)
These actions are available, in addition to the standard ORDER POWER! functions:
Action Description 1=Select Display Issue Components Item Detail window (figure 32) to
work with quantities of components being issued
2=Prefill As Expected Display Issue Components Item Detail window (figure 32) to work with quantities of components being issued. Quantities are prefilled using this option.
F11=All Display Issue Components Item Detail window (figure 32) to work with quantities of components being issued for every Item on the displayed list
F20=Bypass Skips to the next Work Order (if you have selected more than one) without issuing anything,
F23=As Expected Issues components that are required (per the Bill of Materials) for the Work Order
To work with quantities of components being issued 1. On Issue Components Detail panel (figure 31), type 1 (Select) beside each component
you want to work with, then press Enter to display Issue Components Item Detail window (figure 32).

36 Work Orders ORDER POWER!
Work Order: 14 OP! 4.0 DEVELOPMENT ** CO# 001 Cust Order 128740 Work Order: 14 OP! 4.0 DEVELOPMENT ** CO# 001 Cust Order 128740 Work Order: 14 OP! 4.0 DEVELOPMENT ** CO# 001 Cust Order 128740 Work Order: 14 OP! 4.0 DEVELOPMENT ** CO# 001 Cust Order 128740 Item: AWBWORKORDER Issue Components Detail Line Item: AWBWORKORDER Issue Components Detail Line Item: AWBWORKORDER Issue Components Detail Line Item: AWBWORKORDER Issue Components Detail Line 1 1 1 1 1=Select 2=Prefill As Expected Issue Todate/ 1=Select 2=Prefill As Expected Issue Todate/ 1=Select 2=Prefill As Expected Issue Todate/ 1=Select 2=Prefill As Expected Issue Todate/ Item Description Required Qty Issue Today Item Description Required Qty Issue Today Item Description Required Qty Issue Today Item Description Required Qty Issue Today TONER Print cartridge TONER Print cartridge TONER Print cartridge TONER Print cartridge 4.000 2.000 4.000 2.000 4.000 2.000 4.000 2.000 2.000 2.000 2.000 2.000 PAPER Paper for the newsletter PAPER Paper for the newsletter PAPER Paper for the newsletter PAPER Paper for the newsletter 4.000 4.000 4.000 4.000 12.000 12.000 12.000 12.000 .... TONER TONER TONER TONER Print cartridge Print cartridge Print cartridge Print cartridge Whse MIA Whse MIA Whse MIA Whse MIA .... Issue Qty Location Required 4.000 Issue Qty Location Required 4.000 Issue Qty Location Required 4.000 Issue Qty Location Required 4.000 2.000 2.000 2.000 2.000 AWB AWB AWB AWB Todate 2.000 Todate 2.000 Todate 2.000 Todate 2.000 .... .... .... .... Bottom Bottom Bottom Bottom F1=Help F7=Bkwd F8=Fwd F10=Top F1=Help F7=Bkwd F8=Fwd F10=Top F1=Help F7=Bkwd F8=Fwd F10=Top F1=Help F7=Bkwd F8=Fwd F10=Top F1 F1 F1 F12=Cancel F23=As Expected 2=Cancel F23=As Expected 2=Cancel F23=As Expected 2=Cancel F23=As Expected F1=Help F7=Bkwd F8=F F1=Help F7=Bkwd F8=F F1=Help F7=Bkwd F8=F F1=Help F7=Bkwd F8=F
Issue Components Item Detail window (figure 32)
2. Complete these fields:
Issue Qty Type the quantity of the Materials Item you want to issue to this Work Order.
Location Type the location from which you want these Items to be picked. If left blank, picking logic will be used to automatically determine the location(s) from which the component should be picked.
3. Press Enter to issue the Materials Item to this Work Order.
4. Press F15 (Exit/Post) to issue the components. This will create and post a batch of inventory transactions, using Inventory Effect Code 031 “Issue To/From WIP” to transfer the components from their designated locations to the WIP location. A pick ticket will print which can be used to physically pick the components.
Enter Progress of Work Order Use this optional step to record the progress of a Work Order through its routing steps, so that information is available to other ORDER POWER! users.
To enter progress of a Work Order 1. On the ORDER POWER! Work Orders menu (figure 24), select Enter Progress of
Work Order to display the Progress of Work Order Prompt panel (figure 33).

ORDER POWER! Work Orders 37
OP! 4.0 DEVELOPMENT ** CO# 001 OP! 4.0 DEVELOPMENT ** CO# 001 OP! 4.0 DEVELOPMENT ** CO# 001 OP! 4.0 DEVELOPMENT ** CO# 001 Progress of Work Order Prompt Progress of Work Order Prompt Progress of Work Order Prompt Progress of Work Order Prompt ?Work Order # ?Work Order # ?Work Order # ?Work Order # .... ?Routing Step ?Routing Step ?Routing Step ?Routing Step .... Complete as Expected Complete as Expected Complete as Expected Complete as Expected Y/N Y/N Y/N Y/N .... F1=Help F3=Exit F4=?List F12=Cancel F1=Help F3=Exit F4=?List F12=Cancel F1=Help F3=Exit F4=?List F12=Cancel F1=Help F3=Exit F4=?List F12=Cancel
Progress of Work Order Prompt panel (figure 33)
2. Complete these fields to select the Work Order / Routing Step for which you want to record progress:
Work Order # Type the Work Order number.
Routing Step Type the Routing Step number which was been fully or partly completed.
Complete as Expected Type Y(es) or N(o) to indicate whether all quantities of the parent item have been completed at this routing step. This will pre-fill the following panel with the expected parent quantity and completion flag.
3. Press Enter. ORDER POWER! displays Progress of Work Order Entry panel (figure 34).
OP! 4.0 DEVELOPMENT ** CO# 001 OP! 4.0 DEVELOPMENT ** CO# 001 OP! 4.0 DEVELOPMENT ** CO# 001 OP! 4.0 DEVELOPMENT ** CO# 001 Progress of Work Order Entry Progress of Work Order Entry Progress of Work Order Entry Progress of Work Order Entry Work Order # 11 Customer Order 128497 Work Order # 11 Customer Order 128497 Work Order # 11 Customer Order 128497 Work Order # 11 Customer Order 128497 Routing Step 20 Line 1 Routing Step 20 Line 1 Routing Step 20 Line 1 Routing Step 20 Line 1 Item Item Item Item NEWSLETTER NEWSLETTER NEWSLETTER NEWSLETTER Quantity Quantity Quantity Quantity Ordered 75.000 Ordered 75.000 Ordered 75.000 Ordered 75.000 Total Work Order To Date Total Work Order To Date Total Work Order To Date Total Work Order To Date Hours Used Hours Used Hours Used Hours Used Completed Completed Completed Completed Hours .00 Hours .00 Hours .00 Hours .00 Cost Cost Cost Cost Cost .0000 Cost .0000 Cost .0000 Cost .0000 Step Completed Step Completed Step Completed Step Completed Y/N Y/N Y/N Y/N .... F1=Help F3=Exit F12=Cancel F1=Help F3=Exit F12=Cancel F1=Help F3=Exit F12=Cancel F1=Help F3=Exit F12=Cancel
Progress of Work Order Entry panel (figure 34)

38 Work Orders ORDER POWER!
4. Complete these fields:
Quantity Type the quantity of the Manufactured item which has completed this routing step. If an error is made, quantities may be reversed by entering a minus sign after the quantity (for example, 10-).
Hours Used (optional) Type the number of hours used in completing this step.
Cost Type the cost of completing this step. You can use this field to capture miscellaneous manufacturing costs and subcontracting costs incurred in the manufacturing process. These costs are not used for accounting in the General Ledger.
Step Completed Type Y(es) or N(o) to indicate if this step is complete. A previously completed routing step will default to Y, but the step may be re-opened with an N.
5. Press Enter to update the step.
Recording Finished Goods Use this option to transfer finished Items to their eventual inventory locations. Component Items which are not used can be transferred back to inventory, or they can be scrapped.
To record finished goods This step is required to create the appropriate inventory transactions when items have been completed in a Work Order. You can also close the Work Order using this option.
1. On the ORDER POWER! Work Orders menu (figure 24), select Record Finished Goods to display Record Finished Goods Prompt panel (figure 35).
OP! 4.0 DEVELOPMENT ** CO# 001 OP! 4.0 DEVELOPMENT ** CO# 001 OP! 4.0 DEVELOPMENT ** CO# 001 OP! 4.0 DEVELOPMENT ** CO# 001 Record Finished Goods Prompt Record Finished Goods Prompt Record Finished Goods Prompt Record Finished Goods Prompt ?Work Order # ?Work Order # ?Work Order # ?Work Order # .... F1=Help F3=Exit/No Post F4=?List F12=Cancel F15=Exit/Post F1=Help F3=Exit/No Post F4=?List F12=Cancel F15=Exit/Post F1=Help F3=Exit/No Post F4=?List F12=Cancel F15=Exit/Post F1=Help F3=Exit/No Post F4=?List F12=Cancel F15=Exit/Post
Record Finished Goods Prompt panel (figure 35)
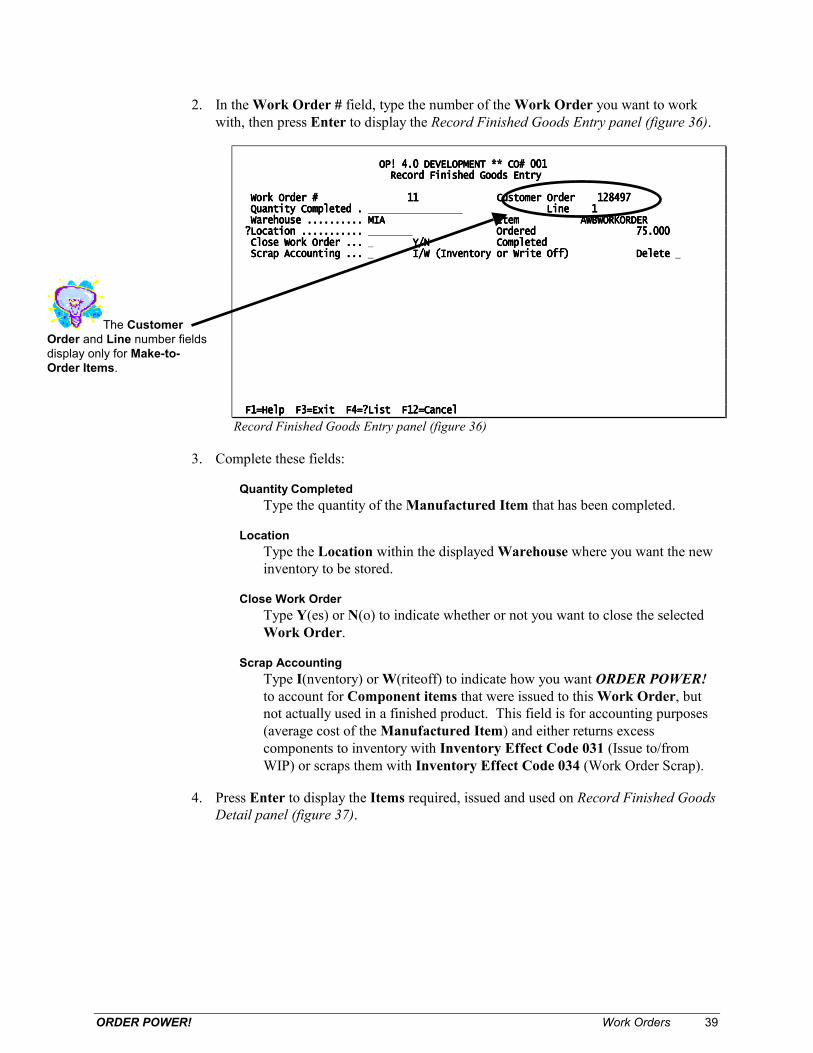
ORDER POWER! Work Orders 39
2. In the Work Order # field, type the number of the Work Order you want to work with, then press Enter to display the Record Finished Goods Entry panel (figure 36).
OP! 4.0 DEVELOPMENT ** CO# 001 OP! 4.0 DEVELOPMENT ** CO# 001 OP! 4.0 DEVELOPMENT ** CO# 001 OP! 4.0 DEVELOPMENT ** CO# 001 Record F Record F Record F Record Finished Goods Entry inished Goods Entry inished Goods Entry inished Goods Entry Work Order # 11 Customer Order 128497 Work Order # 11 Customer Order 128497 Work Order # 11 Customer Order 128497 Work Order # 11 Customer Order 128497 Quantity Completed . Quantity Completed . Quantity Completed . Quantity Completed . Line 1 Line 1 Line 1 Line 1 Warehouse .......... MIA Item AWBWORKORDER Warehouse .......... MIA Item AWBWORKORDER Warehouse .......... MIA Item AWBWORKORDER Warehouse .......... MIA Item AWBWORKORDER ?Location ........... ?Location ........... ?Location ........... ?Location ........... Ordered 75.000 Ordered 75.000 Ordered 75.000 Ordered 75.000 Close Work Order ... Close Work Order ... Close Work Order ... Close Work Order ... Y/N Completed Y/N Completed Y/N Completed Y/N Completed Scrap Accounting ... Scrap Accounting ... Scrap Accounting ... Scrap Accounting ... I/W (Inventory or Write Off) Delete I/W (Inventory or Write Off) Delete I/W (Inventory or Write Off) Delete I/W (Inventory or Write Off) Delete .... .... F1=Help F3=Exit F4=?List F12=Cancel F1=Help F3=Exit F4=?List F12=Cancel F1=Help F3=Exit F4=?List F12=Cancel F1=Help F3=Exit F4=?List F12=Cancel
Record Finished Goods Entry panel (figure 36)
3. Complete these fields:
Quantity Completed Type the quantity of the Manufactured Item that has been completed.
Location Type the Location within the displayed Warehouse where you want the new inventory to be stored.
Close Work Order Type Y(es) or N(o) to indicate whether or not you want to close the selected Work Order.
Scrap Accounting Type I(nventory) or W(riteoff) to indicate how you want ORDER POWER! to account for Component items that were issued to this Work Order, but not actually used in a finished product. This field is for accounting purposes (average cost of the Manufactured Item) and either returns excess components to inventory with Inventory Effect Code 031 (Issue to/from WIP) or scraps them with Inventory Effect Code 034 (Work Order Scrap).
4. Press Enter to display the Items required, issued and used on Record Finished Goods Detail panel (figure 37).
The Customer Order and Line number fields display only for Make-to-Order Items.

40 Work Orders ORDER POWER!
OP! 4.0 DEVELOPMENT ** CO# 001 OP! 4.0 DEVELOPMENT ** CO# 001 OP! 4.0 DEVELOPMENT ** CO# 001 OP! 4.0 DEVELOPMENT ** CO# 001 Record Finished Goods Detail Record Finished Goods Detail Record Finished Goods Detail Record Finished Goods Detail Work Order # 35 Ordered 7.000 Work Order # 35 Ordered 7.000 Work Order # 35 Ordered 7.000 Work Order # 35 Ordered 7.000 Quantity Completed . 2.000 Completed 5.000 Quantity Completed . 2.000 Completed 5.000 Quantity Completed . 2.000 Completed 5.000 Quantity Completed . 2.000 Completed 5.000 Warehouse .......... MIA Warehouse .......... MIA Warehouse .......... MIA Warehouse .......... MIA Location ........... AWB Location ........... AWB Location ........... AWB Location ........... AWB Close Work Or Close Work Or Close Work Or Close Work Order ... Y Y/N der ... Y Y/N der ... Y Y/N der ... Y Y/N Scrap Accounting ... W I/W (Inventory or Write Off) Scrap Accounting ... W I/W (Inventory or Write Off) Scrap Accounting ... W I/W (Inventory or Write Off) Scrap Accounting ... W I/W (Inventory or Write Off) 1=Select 1=Select 1=Select 1=Select Seq Item Seq Item Seq Item Seq Item Required Issued Used Required Issued Used Required Issued Used Required Issued Used 10 PEN 14.000 14.000 4.000 10 PEN 14.000 14.000 4.000 10 PEN 14.000 14.000 4.000 10 PEN 14.000 14.000 4.000 20 INK 35.000 35.000 10.000 20 INK 35.000 35.000 10.000 20 INK 35.000 35.000 10.000 20 INK 35.000 35.000 10.000 ........ Bottom Bottom Bottom Bottom F1=Help F7=Bkwd F8=Fwd F10=Top F11=All F12=Cancel F18=Bot F1=Help F7=Bkwd F8=Fwd F10=Top F11=All F12=Cancel F18=Bot F1=Help F7=Bkwd F8=Fwd F10=Top F11=All F12=Cancel F18=Bot F1=Help F7=Bkwd F8=Fwd F10=Top F11=All F12=Cancel F18=Bot
Record Finished Goods Detail panel (figure 37)
5. If the quantities required, issued and used are correct for all Items, press Enter to redisplay Record Finished Goods Entry panel (figure 36) to process the next Work Order. If this is the last one you are working with, press F15 (Exit/Post) to display Finished Goods Posting Confirmation window (figure 39).
Otherwise, if the quantities displayed are not all correct (such as if you did not issue Material Items before production), you can:
• Type 1 (Select) beside each Item whose quantities you want to adjust
- or -
• Press F11 (All) to select all the Items
then press Enter to display Finished Goods Disposition window (figure 38).
OP! 4.0 DEVELOPMENT ** CO# 001 OP! 4.0 DEVELOPMENT ** CO# 001 OP! 4.0 DEVELOPMENT ** CO# 001 OP! 4.0 DEVELOPMENT ** CO# 001 Record Finished Goods Detail Record Finished Goods Detail Record Finished Goods Detail Record Finished Goods Detail Work Order # 41 Ordered 13.000 Work Order # 41 Ordered 13.000 Work Order # 41 Ordered 13.000 Work Order # 41 Ordered 13.000 Quantity Completed . 13.000 Completed Quantity Completed . 13.000 Completed Quantity Completed . 13.000 Completed Quantity Completed . 13.000 Completed Warehouse .......... MIA Warehouse .......... MIA Warehouse .......... MIA Warehouse .......... MIA Location ........... Location ........... Location ........... Location ........... Close Work Order ... Y Y/N Close Work Order ... Y Y/N Close Work Order ... Y Y/N Close Work Order ... Y Y/N Scrap Accounting ... I I/W Seq # 010 Scrap Accounting ... I I/W Seq # 010 Scrap Accounting ... I I/W Seq # 010 Scrap Accounting ... I I/W Seq # 010 1=Select PEN 1=Select PEN 1=Select PEN 1=Select PEN Seq Item Req Test item 1 Seq Item Req Test item 1 Seq Item Req Test item 1 Seq Item Req Test item 1 10 PEN 2 Required 26.000 10 PEN 2 Required 26.000 10 PEN 2 Required 26.000 10 PEN 2 Required 26.000 20 INK 6 Issued 20 INK 6 Issued 20 INK 6 Issued 20 INK 6 Issued Used ...... Used ...... Used ...... Used ...... .... Scrap ..... Scrap ..... Scrap ..... Scrap ..... .... Return .... Return .... Return .... Return .... .... ?Location ?Location ?Location ?Location .... Backflush Backflush Backflush Backflush .... ?Location ?Location ?Location ?Location .... F1=Help F4=?List F12=Cancel F1=Help F4=?List F12=Cancel F1=Help F4=?List F12=Cancel F1=Help F4=?List F12=Cancel F1=Help F7=Bkwd F8=Fwd F10=Top F1=Help F7=Bkwd F8=Fwd F10=Top F1=Help F7=Bkwd F8=Fwd F10=Top F1=Help F7=Bkwd F8=Fwd F10=Top
Finished Goods Disposition window (figure 38)

ORDER POWER! Work Orders 41
6. Complete these fields to update the disposition of Material Items:
Used Type the quantity of the Material Item that was used in creating the finished Manufactured Items. These will be removed from the WIP inventory location with Inventory Effect Code 033 “WO Component Used.”
Scrap Type the quantity of the Material Item that was wasted or broken in production, and should be subtracted from Inventory. These will be removed from the WIP inventory location with Inventory Effect Code 034 “WO Scrap.”
Return Type the quantity of the Material Item that was unused in production, and should be returned to Inventory. These will be moved from the WIP inventory location back into available inventory with Inventory Effect Code 031 “Transfer Component to/from WIP”.
Location Type the inventory location to which you want the unused component returned.
Backflush Type the quantity of the Material Item that was used, but not previously moved from Inventory to WIP with the “Issue Components” menu option. This will issue the remaining required components from inventory.
Location Type the inventory location from which you want the component backflushed.
7. Press Enter to display to process the next Work Order. If this is the last one you are working with, the Record Finished Goods Entry panel (figure 36) will be displayed. From there, press F15 (Exit/Post) to display the Finished Goods Posting Confirmation window (figure 39).
OP! 4.0 DEVELOPMENT ** CO# 001 OP! 4.0 DEVELOPMENT ** CO# 001 OP! 4.0 DEVELOPMENT ** CO# 001 OP! 4.0 DEVELOPMENT ** CO# 001 Record Finished Goods Prompt Record Finished Goods Prompt Record Finished Goods Prompt Record Finished Goods Prompt ?Work Order # ?Work Order # ?Work Order # ?Work Order # .... Posting Date Posting Date Posting Date Posting Date 10/03/0210/03/0210/03/0210/03/02 Use Current Printer Defaults Use Current Printer Defaults Use Current Printer Defaults Use Current Printer Defaults YYYY Y/N Y/N Y/N Y/N Submit to Batch Submit to Batch Submit to Batch Submit to Batch NNNN Y/N Y/N Y/N Y/N F1=Help F3=Exit/No Post F12=Cancel F1=Help F3=Exit/No Post F12=Cancel F1=Help F3=Exit/No Post F12=Cancel F1=Help F3=Exit/No Post F12=Cancel F1=Help F3=Exit/No Post F4=?List F1=Help F3=Exit/No Post F4=?List F1=Help F3=Exit/No Post F4=?List F1=Help F3=Exit/No Post F4=?List
Finished Goods Posting Confirmation window (figure 39)

42 Work Orders ORDER POWER!
8. Complete these fields:
Posting Date Type the date you want to appear to these transactions.
Submit to Batch Type a code to indicate whether the posting should be submitted to a job queue to process behind the scenes in batch mode and immediately free up your terminal, or complete the posting interactively which locks the terminal until the posting has completed.
Y (es) indicates that the report will be submitted as a batch job N (o) indicates that the report will be run interactively
Save Changes Type Y(es) or N(o) to indicate whether or not you want any changes made to the display for the current panel to be applied to all subsequent displays of the panel. This eliminates redundant data entry.
9. Press Enter to post the transactions. This will move the finished goods into available inventory, using Inventory Effect Code 032 “WO Receipt - Finished Good”. If the work order was make-to-order, the finished product is also committed to the associated customer order.
Deleting a Work Order Use this option to delete a Work Order. You cannot delete a Work Order if you have already issued Material Items or completed some or all of the Manufactured Items. In that case the Work Order must be closed with the Record Finished Goods option (even if no finished goods were produced) instead of being deleted.
1. On the ORDER POWER! Work Orders menu (figure 24), select Delete Work Order to display the Delete Work Order Prompt panel (figure 40).
OP! 4.0 DEVELOPMENT ** CO# 001 OP! 4.0 DEVELOPMENT ** CO# 001 OP! 4.0 DEVELOPMENT ** CO# 001 OP! 4.0 DEVELOPMENT ** CO# 001 Delete Work Order Prompt Delete Work Order Prompt Delete Work Order Prompt Delete Work Order Prompt ?Work Order # ?Work Order # ?Work Order # ?Work Order # .... F1=Help F3=Exit F4=?List F12=Cancel F1=Help F3=Exit F4=?List F12=Cancel F1=Help F3=Exit F4=?List F12=Cancel F1=Help F3=Exit F4=?List F12=Cancel
Delete Work Order Prompt panel (figure 40)
2. In the Work Order # field, type the number of the Work Order that you want to delete, then press Enter to display the Delete field. If the Work Order was created

ORDER POWER! Work Orders 43
You can further refine your search by typing Y(es) or N(o) in the fields at the upper right side of the panel to indicate whether or not you want to see Created, Active, Closed, and/or Deleted Work Orders.
for a Make-to-Order Item, ORDER POWER! will also display the Customer Order and Line number for your reference.
3. Type Y(es) in the Delete field, then press Enter to delete the Work Order.
Work Order Inquiry & Maintenance Use the Work Order Inquiry & Maintenance option to select Work Orders that you want to work with.
To display a list of Work Orders 1. On the ORDER POWER! Work Orders menu (figure 24), select Work Order
Inquiry & Maintenance to display the Work Order Inquiry panel (figure 41).
OP! 4.0 DEV OP! 4.0 DEV OP! 4.0 DEV OP! 4.0 DEVELOPMENT ** CO# 001 Show Created : ELOPMENT ** CO# 001 Show Created : ELOPMENT ** CO# 001 Show Created : ELOPMENT ** CO# 001 Show Created : YYYY All Orders Work Order Inquiry Active : All Orders Work Order Inquiry Active : All Orders Work Order Inquiry Active : All Orders Work Order Inquiry Active : YYYY Closed : Closed : Closed : Closed : YYYY Select one of the following : Select one of the following : Select one of the following : Select one of the following : Deleted : Deleted : Deleted : Deleted : YYYY Work Order # Work Order # Work Order # Work Order # .... ?Customer Order # ?Customer Order # ?Customer Order # ?Customer Order # .... ?Routing Code ?Routing Code ?Routing Code ?Routing Code .... ?Item ?Item ?Item ?Item .... ?Component ?Component ?Component ?Component .... ?Work Center ?Work Center ?Work Center ?Work Center .... Creation Date Creation Date Creation Date Creation Date .... Release Date Release Date Release Date Release Date .... Est Completion Date Est Completion Date Est Completion Date Est Completion Date .... Batc Batc Batc Batch Number h Number h Number h Number .... F1=Help F3=Exit F4=?List F12=Cancel F1=Help F3=Exit F4=?List F12=Cancel F1=Help F3=Exit F4=?List F12=Cancel F1=Help F3=Exit F4=?List F12=Cancel
Work Order Inquiry panel (figure 41)
2. Complete one of these fields to select Work Orders for display, or just press Enter to display all Work Orders:
Work Order # Type a Work Order number to display a list of Work Orders, sorted by Work Order number, starting at that number.
Customer Order # Type a Customer Order number to display a list of Work Orders created based on the specified order.
Routing Code Type a Routing Code to display a list of Work Orders that use the specified code.
Item Type an Item number to display a list of Work Orders, sorted by Work Order number, created for the manufacturing of the specified Item.

44 Work Orders ORDER POWER!
Component Type a Component number to display a list of Work Orders which use that component in their Bills of Materials.
Work Center Type a Work Center number to display a list of Work Orders which use that Work Center in their routings.
Creation Date Type a Creation Date to display a list of Work Orders, sorted by Creation Date, starting at that date.
Release Date Type a Release Date to display a list of Work Orders, sorted by Release Date, starting at that date.
Est Completion Date Type an Estimated Completion Date to display a list of Work Orders, sorted by Estimated Completion Date, starting at that date.
Batch Number Type a Work Order Batch Number to display a list of Make-to-Order Work Orders, sorted by Estimated Completion Date within the selected batch.
3. Press Enter to display Work Order Inquiry panel (figure 42). The display fields vary depending on which field you use for selection, as described above.
OP! 4.0 DEVELOPMENT ** CO# 001 OP! 4.0 DEVELOPMENT ** CO# 001 OP! 4.0 DEVELOPMENT ** CO# 001 OP! 4.0 DEVELOPMENT ** CO# 001 All Orders Work Order Inqu All Orders Work Order Inqu All Orders Work Order Inqu All Orders Work Order Inquiry Show Created: iry Show Created: iry Show Created: iry Show Created: NNNN Active: Active: Active: Active: YYYY Closed: Closed: Closed: Closed: YYYY Deleted: Deleted: Deleted: Deleted: YYYY 2=Change 5=Header 6=Routing Steps 7=Components 8=Audit 9=Documents 2=Change 5=Header 6=Routing Steps 7=Components 8=Audit 9=Documents 2=Change 5=Header 6=Routing Steps 7=Components 8=Audit 9=Documents 2=Change 5=Header 6=Routing Steps 7=Components 8=Audit 9=Documents 10=Notes 11=Transactions Customer 10=Notes 11=Transactions Customer 10=Notes 11=Transactions Customer 10=Notes 11=Transactions Customer Order # Date Order # Date Order # Date Order # Date ------------ Status Status Status Status ------------ Order Routing Routing Cd Order Routing Routing Cd Order Routing Routing Cd Order Routing Routing Cd 103 8/12/02 Closed 8/12/02 PARENT 1 PARENT 1 103 8/12/02 Closed 8/12/02 PARENT 1 PARENT 1 103 8/12/02 Closed 8/12/02 PARENT 1 PARENT 1 103 8/12/02 Closed 8/12/02 PARENT 1 PARENT 1 104 8/12/02 Closed 8/15/02 PARENT 1 PAR 104 8/12/02 Closed 8/15/02 PARENT 1 PAR 104 8/12/02 Closed 8/15/02 PARENT 1 PAR 104 8/12/02 Closed 8/15/02 PARENT 1 PARENT 1 ENT 1 ENT 1 ENT 1 105 8/13/02 Closed 8/15/02 PARENT 1 PARENT 1 105 8/13/02 Closed 8/15/02 PARENT 1 PARENT 1 105 8/13/02 Closed 8/15/02 PARENT 1 PARENT 1 105 8/13/02 Closed 8/15/02 PARENT 1 PARENT 1 106 8/15/02 Closed 8/16/02 PARENT 1 PARENT 1 106 8/15/02 Closed 8/16/02 PARENT 1 PARENT 1 106 8/15/02 Closed 8/16/02 PARENT 1 PARENT 1 106 8/15/02 Closed 8/16/02 PARENT 1 PARENT 1 107 8/16/02 Closed 8/16/02 PARENT 1 PARENT 1 107 8/16/02 Closed 8/16/02 PARENT 1 PARENT 1 107 8/16/02 Closed 8/16/02 PARENT 1 PARENT 1 107 8/16/02 Closed 8/16/02 PARENT 1 PARENT 1 108 8/16/02 Closed 8/16/02 PARENT 1 PARENT 1 108 8/16/02 Closed 8/16/02 PARENT 1 PARENT 1 108 8/16/02 Closed 8/16/02 PARENT 1 PARENT 1 108 8/16/02 Closed 8/16/02 PARENT 1 PARENT 1 109 8/19/02 Active 8/19/02 PARENT 1 PARENT 1 109 8/19/02 Active 8/19/02 PARENT 1 PARENT 1 109 8/19/02 Active 8/19/02 PARENT 1 PARENT 1 109 8/19/02 Active 8/19/02 PARENT 1 PARENT 1 110 8/19/02 Active 8/19/02 PARENT 1 PARENT 1 110 8/19/02 Active 8/19/02 PARENT 1 PARENT 1 110 8/19/02 Active 8/19/02 PARENT 1 PARENT 1 110 8/19/02 Active 8/19/02 PARENT 1 PARENT 1 111 8/ 111 8/ 111 8/ 111 8/19/02 Delete 126645 PARENT 1 PARENT 1 19/02 Delete 126645 PARENT 1 PARENT 1 19/02 Delete 126645 PARENT 1 PARENT 1 19/02 Delete 126645 PARENT 1 PARENT 1 112 8/19/02 Active 8/19/02 126645 PARENT 1 PARENT 1 112 8/19/02 Active 8/19/02 126645 PARENT 1 PARENT 1 112 8/19/02 Active 8/19/02 126645 PARENT 1 PARENT 1 112 8/19/02 Active 8/19/02 126645 PARENT 1 PARENT 1 11 9/10/02 Active 9/12/02 128497 ZOO ZOO 11 9/10/02 Active 9/12/02 128497 ZOO ZOO 11 9/10/02 Active 9/12/02 128497 ZOO ZOO 11 9/10/02 Active 9/12/02 128497 ZOO ZOO 13 9/12/02 Active 13 9/12/02 Active 13 9/12/02 Active 13 9/12/02 Active 9/12/02 ZOO ZOO 9/12/02 ZOO ZOO 9/12/02 ZOO ZOO 9/12/02 ZOO ZOO 14 9/13/02 Active 9/13/02 128740 ZOO ZOO 14 9/13/02 Active 9/13/02 128740 ZOO ZOO 14 9/13/02 Active 9/13/02 128740 ZOO ZOO 14 9/13/02 Active 9/13/02 128740 ZOO ZOO .... Bottom Bottom Bottom Bottom F1=Help F3=Exit F7=Bkwd F8=Fwd F10=Top F12=Cancel F18=Bot F1=Help F3=Exit F7=Bkwd F8=Fwd F10=Top F12=Cancel F18=Bot F1=Help F3=Exit F7=Bkwd F8=Fwd F10=Top F12=Cancel F18=Bot F1=Help F3=Exit F7=Bkwd F8=Fwd F10=Top F12=Cancel F18=Bot
Work Order Inquiry panel (figure 42)
These actions are available, in addition to the standard ORDER POWER! functions:
Action Description 2=Change Display Work Order Header Update panel (figure 43) to work
with an existing Work Order
5=Header Display the Work Order Header Display similar to Work Order Header Update panel (figure 43)

ORDER POWER! Work Orders 45
Action Description 6=Routing Steps Display the Work Order Routing Steps Inquiry window
(figure 44) to work with Routing Steps
7=Components Display Work Order Bill of Materials Item Inquiry window (figure 47) to work with Manufactured Item’s Bill of Materials for the selected Work Order
8=Audit Display Work Order Audit Display panel (figure 50) to view a history of status changes to the selected Work Order
9=Documents Display the Order Documents window Fig #??? to work with PC document files that are associated with the selected Work Order
10=Notes Display the Work Order Header Notes window (not shown) similar to Routing Header Notes window (figure 63) to work with notes specific to the selected Work Order.
11=Transactions Display the Work Order Transaction Display panel (figure 58) to view transactions that you have entered using the “Enter Progress of Work Order" option
To change a Work Order header 1. On the Work Order Inquiry panel (figure 42), type 2 (Change), beside the Work
Order you want to work with, then press Enter to display the Work Order Header Update panel (figure 43).
OP! 4.0 DEVELOPMENT ** CO# 001 OP! 4.0 DEVELOPMENT ** CO# 001 OP! 4.0 DEVELOPMENT ** CO# 001 OP! 4.0 DEVELOPMENT ** CO# 001 Work Order Header Update Work Order Header Update Work Order Header Update Work Order Header Update Work Order # 16 Status Work Order # 16 Status Work Order # 16 Status Work Order # 16 Status Batch Batch Batch Batch ?Routing Code ?Routing Code ?Routing Code ?Routing Code ZOO ZOO ZOO ZOO .... Newsletter Production Newsletter Production Newsletter Production Newsletter Production .... Customer Order Created 9/18/02 13:01:36 Customer Order Created 9/18/02 13:01:36 Customer Order Created 9/18/02 13:01:36 Customer Order Created 9/18/02 13:01:36 Line CSIUSER DSP108S1 Line CSIUSER DSP108S1 Line CSIUSER DSP108S1 Line CSIUSER DSP108S1 Item AWBMAKE2STOCK Released 9/18/0 Item AWBMAKE2STOCK Released 9/18/0 Item AWBMAKE2STOCK Released 9/18/0 Item AWBMAKE2STOCK Released 9/18/02 13:10:39 2 13:10:39 2 13:10:39 2 13:10:39 Whse MIA CSIUSER DSP108S1 Whse MIA CSIUSER DSP108S1 Whse MIA CSIUSER DSP108S1 Whse MIA CSIUSER DSP108S1 Est Completion Date Est Completion Date Est Completion Date Est Completion Date 9/30/02 9/30/02 9/30/02 9/30/02 Completion Date Completion Date Completion Date Completion Date Days to Complete Days to Complete Days to Complete Days to Complete 3.00 3.00 3.00 3.00 Quantity: Quantity: Quantity: Quantity: Ordered Ordered Ordered Ordered 150.000 150.000 150.000 150.000 .... Completed Completed Completed Completed Release Unit Cost Posted Total Release Unit Cost Posted Total Release Unit Cost Posted Total Release Unit Cost Posted Total Materials Materials Materials Materials Materials Materials Materials Materials Other Other Other Other Other Other Other Other Transaction Costs Transaction Costs Transaction Costs Transaction Costs F1=Help F3=Exit F4=?List F1=Help F3=Exit F4=?List F1=Help F3=Exit F4=?List F1=Help F3=Exit F4=?List F12=Cancel F12=Cancel F12=Cancel F12=Cancel
Work Order Header Update panel (figure 43)
2. Update these fields with changes that will be applied to the selected Work Order only:
Est Completion Date Type the estimated completion date if you want to change the displayed date. If a customer order is associated with this work order, its Scheduled Shipment date will be updated.
Work Order Number

46 Work Orders ORDER POWER!
Days to Complete Type the number of days that you expect production of this Item to last. This reflects calendar days, not labor.
Quantity Ordered Type the quantity of the Manufactured Item that you want to produce on this Work Order.
3. Press Enter to update the Work Order.
To work with a Work Order’s Routing Steps Use this option to create or modify Routing Steps defined in the Routing code for the selected Work Order only.
1. On the Work Order Inquiry panel (figure 42), type 6 (Routing Steps), beside the Work Order you want to work with, then press Enter to display the Work Order Routing Steps Inquiry window (figure 44).
OP! 4.0 DEVELOPMENT ** CO# 001 OP! 4.0 DEVELOPMENT ** CO# 001 OP! 4.0 DEVELOPMENT ** CO# 001 OP! 4.0 DEVELOPMENT ** CO# 001 All Orders Work Order Inquiry Show Created: All Orders Work Order Inquiry Show Created: All Orders Work Order Inquiry Show Created: All Orders Work Order Inquiry Show Created: YYYY Active: Active: Active: Active: YYYY Closed: Closed: Closed: Closed: YYYY Deleted: Deleted: Deleted: Deleted: YYYY WO# 26 Work Order Routing Steps Inquiry Show Delete : WO# 26 Work Order Routing Steps Inquiry Show Delete : WO# 26 Work Order Routing Steps Inquiry Show Delete : WO# 26 Work Order Routing Steps Inquiry Show Delete : Pstn: Pstn: Pstn: Pstn: .... 2=Change 5=Display 7=Notes D 2=Change 5=Display 7=Notes D 2=Change 5=Display 7=Notes D 2=Change 5=Display 7=Notes D e e e e Step # Description Step # Description Step # Description Step # Description -------- Status Status Status Status -------- l l l l 010 Prepare Copy Active 010 Prepare Copy Active 010 Prepare Copy Active 010 Prepare Copy Active 020 Create lay 020 Create lay 020 Create lay 020 Create layout on PC Release out on PC Release out on PC Release out on PC Release 030 Print Newsletter Release 030 Print Newsletter Release 030 Print Newsletter Release 030 Print Newsletter Release 040 Address and mail Release 040 Address and mail Release 040 Address and mail Release 040 Address and mail Release 050 This is an extra step 050 This is an extra step 050 This is an extra step 050 This is an extra step Release Release Release Release .... Bottom Bottom Bottom Bottom F1=Help F3=Exit F6=Crt F7=Bkwd F8=Fwd F10=Top F12=Cancel F18=Bottom F1=Help F3=Exit F6=Crt F7=Bkwd F8=Fwd F10=Top F12=Cancel F18=Bottom F1=Help F3=Exit F6=Crt F7=Bkwd F8=Fwd F10=Top F12=Cancel F18=Bottom F1=Help F3=Exit F6=Crt F7=Bkwd F8=Fwd F10=Top F12=Cancel F18=Bottom
Work Order Routing Steps Inquiry window (figure 44)
These actions are available, in addition to the standard ORDER POWER! functions:
Action Description 2=Change Display Routing Step Update panel (figure 46) to work with an
existing Routing Step
5=Display Display the Routing Step Display window similar to Routing Step Update panel (figure 46) to view a Routing Step’s set up
7=Notes Display the Work Order Step Notes window (not shown) similar to Routing Header Notes window (figure 63) to work with notes specific to the selected Work Order / Routing Step.
F6=Create Display the Routing Step Prompt panel (figure 45) to create a new Routing Step

ORDER POWER! Work Orders 47
To create a new Routing Step 1. On the Work Order Routing Steps Inquiry window (figure 44), press F6 (Create) to
display the Routing Step Prompt panel (figure 45).
OP! 4.0 DEVELOPMENT ** CO# 001 OP! 4.0 DEVELOPMENT ** CO# 001 OP! 4.0 DEVELOPMENT ** CO# 001 OP! 4.0 DEVELOPMENT ** CO# 001 00000 00000 00000 000000026 Routing Step Prompt 0026 Routing Step Prompt 0026 Routing Step Prompt 0026 Routing Step Prompt Routing Step Routing Step Routing Step Routing Step .... F1=Help F3=Exit F4=?List F12=Cancel F1=Help F3=Exit F4=?List F12=Cancel F1=Help F3=Exit F4=?List F12=Cancel F1=Help F3=Exit F4=?List F12=Cancel
Routing Step Prompt panel (figure 45)
1a. Complete this field:
Routing Step Type a number that positions this step in the manufacturing process chronologically, relative to the other steps.
1b. Press Enter to display the Routing Step Update panel (figure 46).
To change a Routing Step 1. On the Work Order Routing Steps Inquiry window (figure 44), type 2 (Change),
beside the Routing Step you want to work with, then press Enter to display the Routing Step Update panel (figure 46).
OP! 4.0 DEVELOPMENT ** CO# 001 OP! 4.0 DEVELOPMENT ** CO# 001 OP! 4.0 DEVELOPMENT ** CO# 001 OP! 4.0 DEVELOPMENT ** CO# 001 000000026 Routing Step Update 000000026 Routing Step Update 000000026 Routing Step Update 000000026 Routing Step Update Routing Step Routing Step Routing Step Routing Step 10 10 10 10 Status Code Status Code Status Code Status Code RRRR (A=Create, R=Released, C=Completed) (A=Create, R=Released, C=Completed) (A=Create, R=Released, C=Completed) (A=Create, R=Released, C=Completed) Description Description Description Description Prepare Copy Prepare Copy Prepare Copy Prepare Copy ?Work Center ?Work Center ?Work Center ?Work Center NEWSCOPY NEWSCOPY NEWSCOPY NEWSCOPY .... ?Vendor # ?Vendor # ?Vendor # ?Vendor # .... PO # PO # PO # PO # .... Quantity Ordered Quantity Ordered Quantity Ordered Quantity Ordered 2.000 2.000 2.000 2.000 .... Quantity Completed Quantity Completed Quantity Completed Quantity Completed Estimated Completion Date Estimated Completion Date Estimated Completion Date Estimated Completion Date 9/26/02 9/26/02 9/26/02 9/26/02 (MMDDYY) (MMDDYY) (MMDDYY) (MMDDYY) Actual Completion Date Actual Completion Date Actual Completion Date Actual Completion Date (MMDDYY) (MMDDYY) (MMDDYY) (MMDDYY) .... Delete Delete Delete Delete .... F1=Help F3=Exit F12=Cancel F1=Help F3=Exit F12=Cancel F1=Help F3=Exit F12=Cancel F1=Help F3=Exit F12=Cancel
Routing Step Update panel (figure 46)
Work Order Number
Work Order Number
48 Work Orders ORDER POWER!
2. Update these fields with changes that will be applied to the selected Work Order only:
Status Code Type a code to indicate the progress of this step. This is an optional field used to display the status of this work order to other Order Power! users.
(override) Description (optional) Type an alternative description of this Routing Step.
Work Center Type the Work Center for this Routing Step.
Vendor # Type code assigned to a supplier of goods and/or services who is performing this step. This is for reference only.
PO # Type the Purchase Order number used for the Vendor you entered above. This is for reference only.
Quantity Ordered Type the quantity of the Manufactured Item that you want to produce in this Routing Step.
Estimated Completion Date Type the estimated completion date of this Routing Step.
Actual Completion Date Type the actual completion date of this Routing Step, when it occurs. This is normally done with Menu option #5 “Enter progress of Work Order”, which allows more information to be captured.
3. Press Enter to update the Routing Step.
To display a Work Order’s Routing Steps On the Work Order Routing Steps Inquiry window (figure 44), type 5 (Display) beside the Routing Step you want to see, then press Enter to display the Routing Step Display window similar to Routing Step Update panel (figure 46).
To work with a Work Order’s Routing Step notes Use this option to record any additional information you want to associate with this Routing Step for the selected Work Order only.
On the Work Order Routing Steps Inquiry window (figure 44), type 7 (Notes) beside the Routing Step you want to see, and the Routing notes are displayed. See the “Working with Work Order Notes” section on page 62 for detailed instructions.
To work with a Work Order’s Bill of Materials Use this option to modify a Manufactured Item’s Bill of Materials for the selected Work Order only.

ORDER POWER! Work Orders 49
1. On the Work Order Inquiry panel (figure 42), type 7 (Components), beside the Work Order you want to work with, then press Enter to display the Work Order Bill of Materials Item Inquiry window (figure 47).
OP! 4.0 DEVELOPMENT ** CO# 001 OP! 4.0 DEVELOPMENT ** CO# 001 OP! 4.0 DEVELOPMENT ** CO# 001 OP! 4.0 DEVELOPMENT ** CO# 001 All Orders Work Or All Orders Work Or All Orders Work Or All Orders Work Order Inquiry Show Created: der Inquiry Show Created: der Inquiry Show Created: der Inquiry Show Created: YYYY Active: Active: Active: Active: YYYY Closed: Closed: Closed: Closed: YYYY Deleted: Deleted: Deleted: Deleted: YYYY WO# 35 Work Order Bill of Materials It WO# 35 Work Order Bill of Materials It WO# 35 Work Order Bill of Materials It WO# 35 Work Order Bill of Materials Item Inquiry Show Delete : em Inquiry Show Delete : em Inquiry Show Delete : em Inquiry Show Delete : NNNN Pstn: Pstn: Pstn: Pstn: .... 2=Change 5=Display 6=Ext Desc 7=Notes 2=Change 5=Display 6=Ext Desc 7=Notes 2=Change 5=Display 6=Ext Desc 7=Notes 2=Change 5=Display 6=Ext Desc 7=Notes Net Net Net Net Seq.# Material Item Quantity Needed Quantity Issued Del Seq.# Material Item Quantity Needed Quantity Issued Del Seq.# Material Item Quantity Needed Quantity Issued Del Seq.# Material Item Quantity Needed Quantity Issued Del 10 PEN 14.000 10 PEN 14.000 10 PEN 14.000 10 PEN 14.000 20 INK 35.000 20 INK 35.000 20 INK 35.000 20 INK 35.000 .... Bottom Bottom Bottom Bottom F1=Help F3=Exit F6=Crt F7=Bkwd F8=Fwd F10=Top F12=Cancel F18=Bot F1=Help F3=Exit F6=Crt F7=Bkwd F8=Fwd F10=Top F12=Cancel F18=Bot F1=Help F3=Exit F6=Crt F7=Bkwd F8=Fwd F10=Top F12=Cancel F18=Bot F1=Help F3=Exit F6=Crt F7=Bkwd F8=Fwd F10=Top F12=Cancel F18=Bot
Work Order Bill of Materials Item Inquiry window (figure 47)
These actions are available, in addition to the standard ORDER POWER! functions:
Action Description 2=Change Display Material Item Update panel (figure 49) to work with an
existing Work Order’s Bill of Materials
5=Display Display the Work Order’s Bill of Materials Display window similar to Material Item Update panel (figure 49) to view a Work Order’s Bill of Materials’ set up
6=Ext Desc Display the Extended Description Inquiry window (not shown) similar to Routing Header Notes window (figure 63) to work with the Material Item’s Extended Description specific to the selected Work Order / Bill of Materials.
7=Notes Display the Bill Of Materials Notes window (not shown) similar to Routing Header Notes window (figure 63) to work with notes specific to the selected Work Order / Bill of Materials.
F6=Create Display the Material Item Prompt panel (figure 48) to add a new Materials Item to a Work Order’s Bill of Materials
To add a new Materials Item to a Work Order’s Bill of Materials 1. On the Work Order Bill of Materials Item Inquiry window (figure 47), press F6
(Create) to display the Material Item Prompt panel (figure 48).

50 Work Orders ORDER POWER!
OP! 4.0 DEVELOPMENT ** CO# 001 OP! 4.0 DEVELOPMENT ** CO# 001 OP! 4.0 DEVELOPMENT ** CO# 001 OP! 4.0 DEVELOPMENT ** CO# 001 35 Material Item Prompt 35 Material Item Prompt 35 Material Item Prompt 35 Material Item Prompt Sequence # Sequence # Sequence # Sequence # .... F1=Help F3=Exit F4=?List F12=Cancel F1=Help F3=Exit F4=?List F12=Cancel F1=Help F3=Exit F4=?List F12=Cancel F1=Help F3=Exit F4=?List F12=Cancel
Material Item Prompt panel (figure 48)
1a. Complete this field:
Sequence # Type a user-defined Sequence Number for a component used in manufacturing. The Sequence Number permits you to use a single Item more than once in a Bill of Materials so that you can assign different quantities and descriptions to the same part when it is used in more than one step of the manufacturing process.
1b. Press Enter to display the Material Item Update panel (figure 49).
To change a Work Order’s Bill of Materials 1. On the Work Order Bill of Materials Item Inquiry window (figure 47), type 2
(Change), beside the Work Order’s Bill of Materials you want to work with, then press Enter to display the Material Item Update panel (figure 49).
OP! 4.0 DEVELOPMENT ** CO# 001 OP! 4.0 DEVELOPMENT ** CO# 001 OP! 4.0 DEVELOPMENT ** CO# 001 OP! 4.0 DEVELOPMENT ** CO# 001 35 Material Item Update 35 Material Item Update 35 Material Item Update 35 Material Item Update Sequence # Sequence # Sequence # Sequence # 10 10 10 10 ?Material Item ?Material Item ?Material Item ?Material Item TONER TONER TONER TONER .... Description Description Description Description To print the Newsletter To print the Newsletter To print the Newsletter To print the Newsletter .... Routing Step 30 Routing Step 30 Routing Step 30 Routing Step 30 Warehouse Warehouse Warehouse Warehouse MIA MIA MIA MIA WIP Location WIP Location WIP Location WIP Location Quantity Needed Quantity Needed Quantity Needed Quantity Needed 14.000 14.000 14.000 14.000 .... Quantity Issued Quantity Issued Quantity Issued Quantity Issued Quantity Committed Quantity Committed Quantity Committed Quantity Committed Delete Delete Delete Delete .... F1=Help F3=Exit F12=Cancel F1=Help F3=Exit F12=Cancel F1=Help F3=Exit F12=Cancel F1=Help F3=Exit F12=Cancel
Material Item Update panel (figure 49)
Work Order Number
Work Order Number

ORDER POWER! Work Orders 51
2. Complete these fields:
Material Item Type the Item number of the component you are adding to the Bill of Materials.
Override Description Type a description that you want to associate with this Material Item, for purposes of this Manufactured Item/Sequence Number.
Quantity Needed Type the quantity of this Material Item that you want to associate with this Manufactured Item, for purposes of this Manufactured Item/Sequence Number. You can either change or delete existing Bill of Materials items and quantities needed, or add new ones.
3. Press Enter to update the Work Order’s Bill of Materials.
To display a Work Order’s Bill of Materials On the Work Order Bill of Materials Item Inquiry window (figure 47), type 5 (Display) beside the Work Order’s Bill of Materials you want to see, then press Enter to display the Work Order’s Bill of Materials Display window similar to Material Item Update panel (figure 49).
Audit (To view a history of status changes to the selected Work Order) 1. On the Work Order Inquiry panel (figure 42), type 8 (Audit) beside the Work Order
you want to see, to display the Work Order Audit Display panel (figure 50).
A WO# 26 Work Order Audit Display From: OLDEST A WO# 26 Work Order Audit Display From: OLDEST A WO# 26 Work Order Audit Display From: OLDEST A WO# 26 Work Order Audit Display From: OLDEST To: NEWEST To: NEWEST To: NEWEST To: NEWEST 2 2 2 2 1 Action/Info Date Time User Workstn 1 Action/Info Date Time User Workstn 1 Action/Info Date Time User Workstn 1 Action/Info Date Time User Workstn CREATE WORK ORDER 9/19/02 13:54:50 CSIUSER CREATE WORK ORDER 9/19/02 13:54:50 CSIUSER CREATE WORK ORDER 9/19/02 13:54:50 CSIUSER CREATE WORK ORDER 9/19/02 13:54:50 CSIUSER DSP108S1 DSP108S1 DSP108S1 DSP108S1 8888 WO01005 WO01005 WO01005 WO01005 .... RELEASE WORK ORDER 9/23/02 11:01:35 CSIUSER DSP108S1 RELEASE WORK ORDER 9/23/02 11:01:35 CSIUSER DSP108S1 RELEASE WORK ORDER 9/23/02 11:01:35 CSIUSER DSP108S1 RELEASE WORK ORDER 9/23/02 11:01:35 CSIUSER DSP108S1 WO01002 WO01002 WO01002 WO01002 .... .... .... .... .... .... .... .... .... .... Bottom Bottom Bottom Bottom F1=Help F3=Exit F7=Bkwd F8=Fwd F10=Top F12 F1=Help F3=Exit F7=Bkwd F8=Fwd F10=Top F12 F1=Help F3=Exit F7=Bkwd F8=Fwd F10=Top F12 F1=Help F3=Exit F7=Bkwd F8=Fwd F10=Top F12=Cancl F16=Seq F18=Bot F21=Prt =Cancl F16=Seq F18=Bot F21=Prt =Cancl F16=Seq F18=Bot F21=Prt =Cancl F16=Seq F18=Bot F21=Prt
Work Order Audit Display panel (figure 50)
Working with a Work Order’s Document References The Work Order system allows you to reference any PC documents that may be relevant to the Manufactured Item, such as an image of a logo, a document containing assembly instructions, a color sample, or drawings of components and assemblies. These document references may also be created during Customer Order Entry for Make-to-Order items. The actual documents may be stored in the AS/400’s Integrated File System, or on a PC.

52 Work Orders ORDER POWER!
1. On the Work Order Inquiry panel (figure 42), type 9 (Documents) beside the Work Order you want to work with, to display Work Order Documents window (figure 51).
OP! 4.0 DEVELOPMENT ** CO# 001 OP! 4.0 DEVELOPMENT ** CO# 001 OP! 4.0 DEVELOPMENT ** CO# 001 OP! 4.0 DEVELOPMENT ** CO# 001 All Orders All Orders All Orders All Orders 77 77 77 77 Work Order Documents Show Delete : N Work Order Documents Show Delete : N Work Order Documents Show Delete : N Work Order Documents Show Delete : N 2=Change 5=Heade 2=Change 5=Heade 2=Change 5=Heade 2=Change 5=Heade 10=Notes 11=Tran Pstn: 10=Notes 11=Tran Pstn: 10=Notes 11=Tran Pstn: 10=Notes 11=Tran Pstn: .... Order # D Order # D Order # D Order # D 76 11/ 2=Change 5=Display 76 11/ 2=Change 5=Display 76 11/ 2=Change 5=Display 76 11/ 2=Change 5=Display 9 9 9 9 77 11/ 77 11/ 77 11/ 77 11/ 101 7/ Seq.# Description 101 7/ Seq.# Description 101 7/ Seq.# Description 101 7/ Seq.# Description Del Del Del Del 102 7/ 102 7/ 102 7/ 102 7/ 101 Line Item Document 101 Line Item Document 101 Line Item Document 101 Line Item Document .... 103 8/ 103 8/ 103 8/ 103 8/ 104 8/ 104 8/ 104 8/ 104 8/ 105 8/ 105 8/ 105 8/ 105 8/ 106 8/ 106 8/ 106 8/ 106 8/ 107 8/ 107 8/ 107 8/ 107 8/ 108 8/ 108 8/ 108 8/ 108 8/ 109 8/ 109 8/ 109 8/ 109 8/ 110 8/ 110 8/ 110 8/ 110 8/ 111 8/ 111 8/ 111 8/ 111 8/ 112 8/ Bottom 112 8/ Bottom 112 8/ Bottom 112 8/ Bottom F1=Help F3=Exit F6=Crt F7=Bkwd F8=Fwd F10=Top F12=Cancel F1=Help F3=Exit F6=Crt F7=Bkwd F8=Fwd F10=Top F12=Cancel F1=Help F3=Exit F6=Crt F7=Bkwd F8=Fwd F10=Top F12=Cancel F1=Help F3=Exit F6=Crt F7=Bkwd F8=Fwd F10=Top F12=Cancel F18=Bot F2 F18=Bot F2 F18=Bot F2 F18=Bot F20=Order Documents 0=Order Documents 0=Order Documents 0=Order Documents F1=Help F3=Exit F1=Help F3=Exit F1=Help F3=Exit F1=Help F3=Exit
Work Order Documents window (figure 51)
These actions are available, in addition to the standard ORDER POWER! functions:
Action Description 2=Change Display Work Order Document Update panel (figure 53) to work
with an existing Order Document
5=Display Display the Order Document Display window similar to Work Order Document Update panel (figure 53) to view a Order Document’s set up
F6=Create Display the Work Order Document Prompt panel (figure 52) to create a new Order Document
F20=Order Documents
Display the Order Documents window, similar to Work Order Documents window (figure 51), to work with documents that refer to the complete customer order, rather than only a single line which is the basis of the selected Work Order.
To create a new Work Order Document 1. On the Work Order Documents window (figure 51) , press F6 (Create) to display the
Work Order Document Prompt panel (figure 52).

ORDER POWER! Work Orders 53
OP! 4.0 DEVELOPMENT ** CO# 001 OP! 4.0 DEVELOPMENT ** CO# 001 OP! 4.0 DEVELOPMENT ** CO# 001 OP! 4.0 DEVELOPMENT ** CO# 001 77 Work Order Document Prompt 77 Work Order Document Prompt 77 Work Order Document Prompt 77 Work Order Document Prompt Sequence # Sequence # Sequence # Sequence # .... F1=Help F3=Exit F4=?List F12=Cancel F1=Help F3=Exit F4=?List F12=Cancel F1=Help F3=Exit F4=?List F12=Cancel F1=Help F3=Exit F4=?List F12=Cancel
Work Order Document Prompt panel (figure 52)
1a. Complete this field:
Sequence # Type a number to indicate the display sequence, relative to the others in the same list.
1b. Press Enter to display the Work Order Document Update panel (figure 53).
To change a Work Order Document 1. On the Work Order Documents window (figure 51), type 2 (Change), beside the
Order Document you want to work with, then press Enter to display the Work Order Document Update panel (figure 53).
OP! 4.0 DEVE OP! 4.0 DEVE OP! 4.0 DEVE OP! 4.0 DEVELOPMENT ** CO# 001 LOPMENT ** CO# 001 LOPMENT ** CO# 001 LOPMENT ** CO# 001 77 Work Order Document Update 77 Work Order Document Update 77 Work Order Document Update 77 Work Order Document Update Sequence # Sequence # Sequence # Sequence # 101 101 101 101 Description Description Description Description Newsletter Specs Document Newsletter Specs Document Newsletter Specs Document Newsletter Specs Document .... Document: Document: Document: Document: Path Path Path Path C:C:C:C:\\\\lineitemlineitemlineitemlineitem\\\\document document document document .... Name Name Name Name workorder.doc workorder.doc workorder.doc workorder.doc .... Customer Customer Customer Customer Order # 146434 Order # 146434 Order # 146434 Order # 146434 Line # 1 Line # 1 Line # 1 Line # 1 Delete Delete Delete Delete F1=Help F3=Exit F12=Cancel F1=Help F3=Exit F12=Cancel F1=Help F3=Exit F12=Cancel F1=Help F3=Exit F12=Cancel
Work Order Document Update panel (figure 53)
2. Complete these fields:
Description Type a description of the Document Reference you are defining.
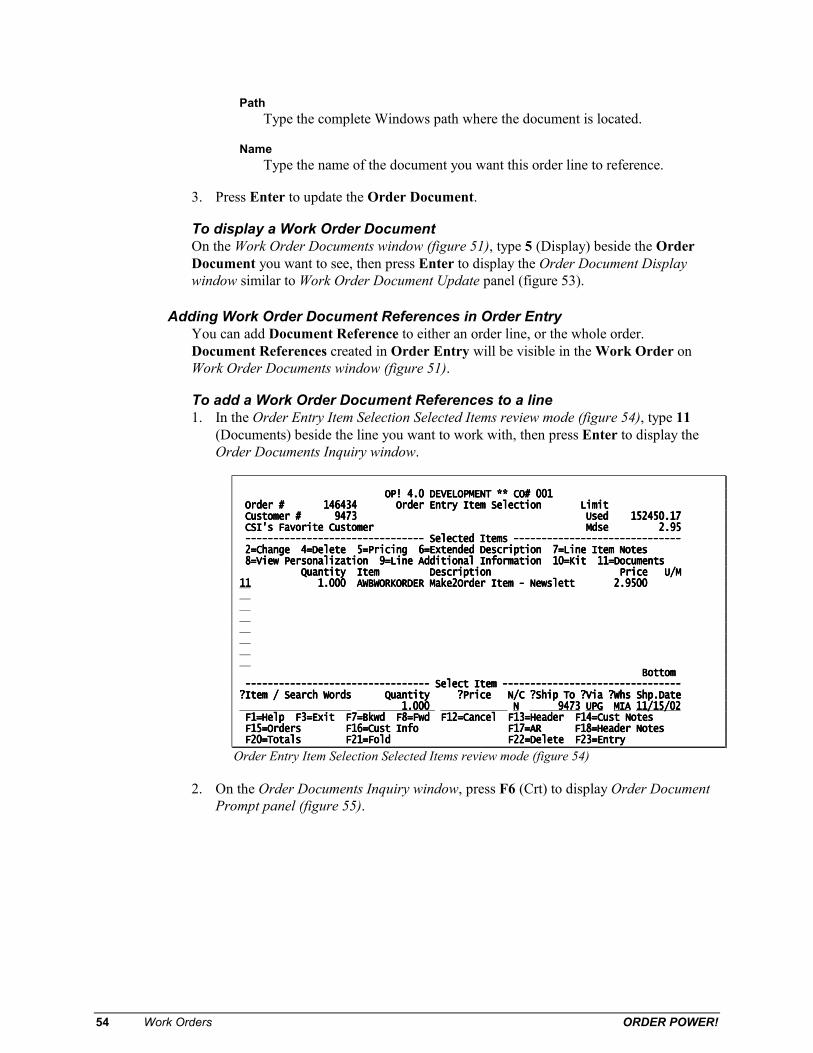
54 Work Orders ORDER POWER!
Path Type the complete Windows path where the document is located.
Name Type the name of the document you want this order line to reference.
3. Press Enter to update the Order Document.
To display a Work Order Document On the Work Order Documents window (figure 51), type 5 (Display) beside the Order Document you want to see, then press Enter to display the Order Document Display window similar to Work Order Document Update panel (figure 53).
Adding Work Order Document References in Order Entry You can add Document Reference to either an order line, or the whole order. Document References created in Order Entry will be visible in the Work Order on Work Order Documents window (figure 51).
To add a Work Order Document References to a line 1. In the Order Entry Item Selection Selected Items review mode (figure 54), type 11
(Documents) beside the line you want to work with, then press Enter to display the Order Documents Inquiry window.
OP! 4.0 DEVELOPMENT ** CO# 001 OP! 4.0 DEVELOPMENT ** CO# 001 OP! 4.0 DEVELOPMENT ** CO# 001 OP! 4.0 DEVELOPMENT ** CO# 001 Order # 146434 Order Entry Item Selection Limit Order # 146434 Order Entry Item Selection Limit Order # 146434 Order Entry Item Selection Limit Order # 146434 Order Entry Item Selection Limit Customer # 9473 Customer # 9473 Customer # 9473 Customer # 9473 Used 152450.17 Used 152450.17 Used 152450.17 Used 152450.17 CSI's Favorite Customer Mdse 2.95 CSI's Favorite Customer Mdse 2.95 CSI's Favorite Customer Mdse 2.95 CSI's Favorite Customer Mdse 2.95 -------------------------------------------------------------------------------------------------------------------------------- Selected Items Selected Items Selected Items Selected Items ------------------------------------------------------------------------------------------------------------------------ 2=Change 4=Delete 5=Pricing 6=Extended Description 7=Line Item 2=Change 4=Delete 5=Pricing 6=Extended Description 7=Line Item 2=Change 4=Delete 5=Pricing 6=Extended Description 7=Line Item 2=Change 4=Delete 5=Pricing 6=Extended Description 7=Line Item Notes Notes Notes Notes 8=View Personalization 9=Line Additional Information 10=Kit 11=Documents 8=View Personalization 9=Line Additional Information 10=Kit 11=Documents 8=View Personalization 9=Line Additional Information 10=Kit 11=Documents 8=View Personalization 9=Line Additional Information 10=Kit 11=Documents Quantity Item Description Price U/M Quantity Item Description Price U/M Quantity Item Description Price U/M Quantity Item Description Price U/M 11111111 1.000 AWBWORKORDER Make2Order Item 1.000 AWBWORKORDER Make2Order Item 1.000 AWBWORKORDER Make2Order Item 1.000 AWBWORKORDER Make2Order Item ---- Newslett 2.9500 Newslett 2.9500 Newslett 2.9500 Newslett 2.9500 .... .... .... .... .... .... .... Bottom Bottom Bottom Bottom ------------------------------------------------------------------------------------------------------------------------------------ Select Item Select Item Select Item Select Item -------------------------------------------------------------------------------------------------------------------------------- ?Item / Search Words Quantity ?Item / Search Words Quantity ?Item / Search Words Quantity ?Item / Search Words Quantity ?Price N/C ?Ship To ?Via ?Whs Shp.Date ?Price N/C ?Ship To ?Via ?Whs Shp.Date ?Price N/C ?Ship To ?Via ?Whs Shp.Date ?Price N/C ?Ship To ?Via ?Whs Shp.Date 1.000 1.000 1.000 1.000 NNNN 9473 9473 9473 9473 UPGUPGUPGUPG MIAMIAMIAMIA 11/15/02 11/15/02 11/15/02 11/15/02 F1=Help F3=Exit F7=Bkwd F8=Fwd F12=Cancel F13=Header F14=Cust Notes F1=Help F3=Exit F7=Bkwd F8=Fwd F12=Cancel F13=Header F14=Cust Notes F1=Help F3=Exit F7=Bkwd F8=Fwd F12=Cancel F13=Header F14=Cust Notes F1=Help F3=Exit F7=Bkwd F8=Fwd F12=Cancel F13=Header F14=Cust Notes F15=Orders F16=Cust Info F17 F15=Orders F16=Cust Info F17 F15=Orders F16=Cust Info F17 F15=Orders F16=Cust Info F17=AR F18=Header Notes =AR F18=Header Notes =AR F18=Header Notes =AR F18=Header Notes F20=Totals F21=Fold F22=Delete F23=Entry F20=Totals F21=Fold F22=Delete F23=Entry F20=Totals F21=Fold F22=Delete F23=Entry F20=Totals F21=Fold F22=Delete F23=Entry
Order Entry Item Selection Selected Items review mode (figure 54)
2. On the Order Documents Inquiry window, press F6 (Crt) to display Order Document Prompt panel (figure 55).

ORDER POWER! Work Orders 55
OP! 4.0 DEVELOPMENT ** CO# 001 OP! 4.0 DEVELOPMENT ** CO# 001 OP! 4.0 DEVELOPMENT ** CO# 001 OP! 4.0 DEVELOPMENT ** CO# 001 O 146434 1 Order Document Prompt O 146434 1 Order Document Prompt O 146434 1 Order Document Prompt O 146434 1 Order Document Prompt Sequence # Sequence # Sequence # Sequence # .... F1=Help F3=Exit F4=?List F12=Cancel F1=Help F3=Exit F4=?List F12=Cancel F1=Help F3=Exit F4=?List F12=Cancel F1=Help F3=Exit F4=?List F12=Cancel
Order Document Prompt panel (figure 55)
3. In the Sequence # field, type a number to indicate the display sequence, relative to the others in the same list, then press Enter to display Order Document Update panel (figure 56).
OP! 4.0 DEVELOPMENT ** OP! 4.0 DEVELOPMENT ** OP! 4.0 DEVELOPMENT ** OP! 4.0 DEVELOPMENT ** CO# 001 CO# 001 CO# 001 CO# 001 O 146434 1 Order Document Update O 146434 1 Order Document Update O 146434 1 Order Document Update O 146434 1 Order Document Update Sequence # Sequence # Sequence # Sequence # 101 101 101 101 Description Description Description Description Newsletter Specs Document Newsletter Specs Document Newsletter Specs Document Newsletter Specs Document .... Document: Document: Document: Document: Path Path Path Path C:C:C:C:\\\\lineitemlineitemlineitemlineitem\\\\document document document document .... Name Name Name Name workorder.doc workorder.doc workorder.doc workorder.doc .... Work Order Work Order Work Order Work Order Delete Delete Delete Delete .... F1=Help F3=Exit F12=Cancel F1=Help F3=Exit F12=Cancel F1=Help F3=Exit F12=Cancel F1=Help F3=Exit F12=Cancel
Order Document Update panel (figure 56)
4. Complete these fields:
Description Type a description of the Document Reference you are defining.
Path Type the complete Windows path where the document is located.
Name Type the name of the document you want this order line to reference.
5. Press Enter to update the Document Reference. This reference will appear on Work Order Documents window (figure 51).

56 Work Orders ORDER POWER!
To add a Work Order Document References to a customer order 1. In the Order Entry Shipping & Tender Information panel, press F24 (More Opt) to
display the Order Entry Shipping & Tender Additional Options window (figure 57).
OP! 4.0 DEVELOPMENT ** CO# 001 OP! 4.0 DEVELOPMENT ** CO# 001 OP! 4.0 DEVELOPMENT ** CO# 001 OP! 4.0 DEVELOPMENT ** CO# 001 Order # 145626 Shipping & Tender Infor Order # 145626 Shipping & Tender Infor Order # 145626 Shipping & Tender Infor Order # 145626 Shipping & Tender Infor Customer # Customer # Customer # Customer # 473 T Additional Options 473 T Additional Options 473 T Additional Options 473 T Additional Options CSI's Favorite Cu CSI's Favorite Cu CSI's Favorite Cu CSI's Favorite Customer stomer stomer stomer 1=Select 1=Select 1=Select 1=Select ?Tender AR Accts. Receivable ?Tender AR Accts. Receivable ?Tender AR Accts. Receivable ?Tender AR Accts. Receivable Work with Coupons Work with Coupons Work with Coupons Work with Coupons Tender Number Tender Number Tender Number Tender Number Exp Exp Exp Exp Ba Ba Ba Ba View Personalization View Personalization View Personalization View Personalization ?Priority Code ?Priority Code ?Priority Code ?Priority Code User User User User ?Terms Code N30 Net 30 days ?Terms Code N30 Net 30 days ?Terms Code N30 Net 30 days ?Terms Code N30 Net 30 days Order Statistics Order Statistics Order Statistics Order Statistics Change Ship Via Change Ship Via Change Ship Via Change Ship Via Chg Sched Ship Date Chg Sched Ship Date Chg Sched Ship Date Chg Sched Ship Date Hold Hold Hold Hold NNNN Y/N ?Hold Code Y/N ?Hold Code Y/N ?Hold Code Y/N ?Hold Code Create Order Activity Create Order Activity Create Order Activity Create Order Activity Freight Collect Freight Collect Freight Collect Freight Collect NNNN Y/N Y/N Y/N Y/N Ac Ac Ac Activity Tracking Inq tivity Tracking Inq tivity Tracking Inq tivity Tracking Inq 1111 Work with Documents Work with Documents Work with Documents Work with Documents Special Special Special Special Suppress Refund Suppress Refund Suppress Refund Suppress Refund Instructions Instructions Instructions Instructions .... Ship Label Ship Label Ship Label Ship Label .... .... Gift Order Gift Order Gift Order Gift Order NNNN Y/N ?Coupon Y/N ?Coupon Y/N ?Coupon Y/N ?Coupon .... Bottom Bottom Bottom Bottom F1=Help F2=Unprotect F3=Exit F4=?List F6=Swipe F1=Help F3=Exit F1=Help F2=Unprotect F3=Exit F4=?List F6=Swipe F1=Help F3=Exit F1=Help F2=Unprotect F3=Exit F4=?List F6=Swipe F1=Help F3=Exit F1=Help F2=Unprotect F3=Exit F4=?List F6=Swipe F1=Help F3=Exit F14=Cust Notes F15=Orders F16=Cust F12=Cancel F14=Cust Notes F15=Orders F16=Cust F12=Cancel F14=Cust Notes F15=Orders F16=Cust F12=Cancel F14=Cust Notes F15=Orders F16=Cust F12=Cancel F18=Header Not F18=Header Not F18=Header Not F18=Header Notes F21=Hdr Fields F22=Dele es F21=Hdr Fields F22=Dele es F21=Hdr Fields F22=Dele es F21=Hdr Fields F22=Dele
Order Entry Shipping & Tender Additional Options window (figure 57)
2. Type 1 (Select) beside the Work with Documents option, then press Enter to display Order Document Prompt panel (figure 55).
3. In the Sequence # field, type a number to indicate the display sequence, relative to the others in the same list, then press Enter to display Order Document Update panel (figure 56).
4. Complete these fields:
Description Type a description of the Document Reference you are defining.
Path Type the complete Windows path where the document is located.
Name Type the name of the correspondence document you want this order line to reference.
5. Press Enter to update the Document Reference.
To work with Work Order Header Notes Work Order Header Notes are used to record any additional textual information which is not contained in a separate document (see Work Order Documents), which you want to associate with this Work Order. See “Working with Work Order Notes” section on page 62 for detailed instructions.
Transactions (To view the progress of the selected Work Order) 1. On the Work Order Inquiry panel (figure 42), type 11 (Transactions) beside the Work
Order you want to see, then press Enter to display the Work Order Transaction
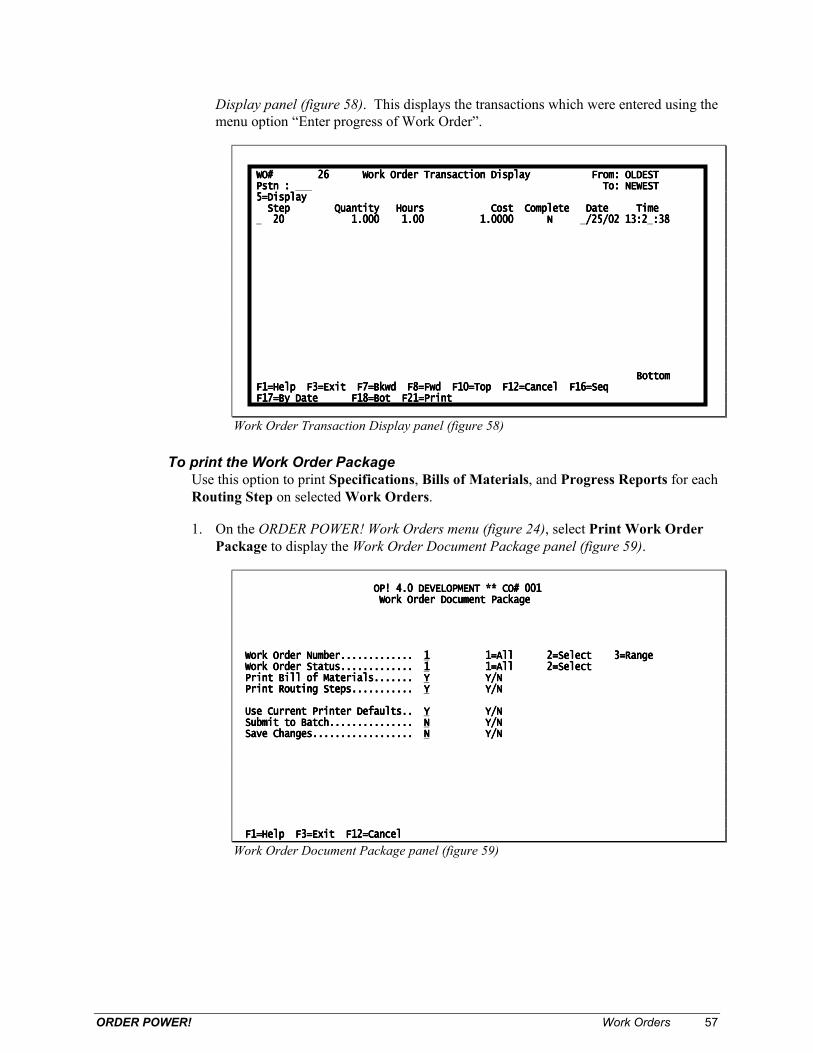
ORDER POWER! Work Orders 57
Display panel (figure 58). This displays the transactions which were entered using the menu option “Enter progress of Work Order”.
WO# 26 W WO# 26 W WO# 26 W WO# 26 Work Order Transaction Display From: OLDEST ork Order Transaction Display From: OLDEST ork Order Transaction Display From: OLDEST ork Order Transaction Display From: OLDEST Pstn : Pstn : Pstn : Pstn : To: NEWEST To: NEWEST To: NEWEST To: NEWEST .... 5=Display 5=Display 5=Display 5=Display Step Quantity Hours Step Quantity Hours Step Quantity Hours Step Quantity Hours Cost Complete Date Time Cost Complete Date Time Cost Complete Date Time Cost Complete Date Time 20 1.000 1.00 1.0000 N 20 1.000 1.00 1.0000 N 20 1.000 1.00 1.0000 N 20 1.000 1.00 1.0000 N /25/02 13:2/25/02 13:2/25/02 13:2/25/02 13:2 :38 :38 :38 :38 Bottom Bottom Bottom Bottom F1=Help F3=Exit F1=Help F3=Exit F1=Help F3=Exit F1=Help F3=Exit F7=Bkwd F8=Fwd F10=Top F12=Cancel F16=Seq F7=Bkwd F8=Fwd F10=Top F12=Cancel F16=Seq F7=Bkwd F8=Fwd F10=Top F12=Cancel F16=Seq F7=Bkwd F8=Fwd F10=Top F12=Cancel F16=Seq F17=By Date F18=Bot F21=Print F17=By Date F18=Bot F21=Print F17=By Date F18=Bot F21=Print F17=By Date F18=Bot F21=Print
Work Order Transaction Display panel (figure 58)
To print the Work Order Package Use this option to print Specifications, Bills of Materials, and Progress Reports for each Routing Step on selected Work Orders.
1. On the ORDER POWER! Work Orders menu (figure 24), select Print Work Order Package to display the Work Order Document Package panel (figure 59).
OP! 4.0 DEVELOPMENT ** CO# 001 OP! 4.0 DEVELOPMENT ** CO# 001 OP! 4.0 DEVELOPMENT ** CO# 001 OP! 4.0 DEVELOPMENT ** CO# 001 Work Order Document Package Work Order Document Package Work Order Document Package Work Order Document Package Work Order Number............. Work Order Number............. Work Order Number............. Work Order Number............. 1111 1=All 2=Select 3=Range 1=All 2=Select 3=Range 1=All 2=Select 3=Range 1=All 2=Select 3=Range Work Order Status............. Work Order Status............. Work Order Status............. Work Order Status............. 1111 1=All 2=Select 1=All 2=Select 1=All 2=Select 1=All 2=Select Print Bill of Material Print Bill of Material Print Bill of Material Print Bill of Materials....... s....... s....... s....... YYYY Y/N Y/N Y/N Y/N Print Routing Steps........... Print Routing Steps........... Print Routing Steps........... Print Routing Steps........... YYYY Y/N Y/N Y/N Y/N Use Current Printer Defaults.. Use Current Printer Defaults.. Use Current Printer Defaults.. Use Current Printer Defaults.. YYYY Y/N Y/N Y/N Y/N Submit to Batch............... Submit to Batch............... Submit to Batch............... Submit to Batch............... NNNN Y/N Y/N Y/N Y/N Save Changes.................. Save Changes.................. Save Changes.................. Save Changes.................. NNNN Y/N Y/N Y/N Y/N F1=Help F3=Exit F12=Cancel F1=Help F3=Exit F12=Cancel F1=Help F3=Exit F12=Cancel F1=Help F3=Exit F12=Cancel
Work Order Document Package panel (figure 59)

58 Work Orders ORDER POWER!
2. Complete these fields to select Work Orders for which you want to print documents:
Work Order Number Type a code to indicate if you want to print documents for: 1 All Work Orders 2 Specific Work Orders 3 A specified range of Work Orders only
Work Order Status 1 All statuses 2 Specified statuses
Print Bill of Materials Type Y(es) or N(o) to indicate whether or not you want to print Bills of Materials.
Print Routing Steps Type Y(es) or N(o) to indicate whether or not you want to print Routing Steps.
Use Current Printer Defaults Type Y(es) or N(o) to indicate whether or not you want to change the existing printer defaults for the current report.
Submit to Batch Type a code to indicate whether the report should be submitted to a job queue to process behind the scenes in batch mode and immediately free up your terminal, or run the report interactively which locks the terminal until the report has completed.
Y (es) indicates that the report will be submitted as a batch job N (o) indicates that the report will be run interactively
Save Changes Type Y(es) or N(o) to indicate whether or not you want any changes made to the defaults for the current report to be applied to all subsequent printings of that report. This eliminates redundant data entry.
3. Press Enter to process the reports.
To print an Open Work Order Listing 1. On the ORDER POWER! Work Orders menu (figure 24), select Open Work Order
Listing to display the Open Work Order Selection panel (figure 60).
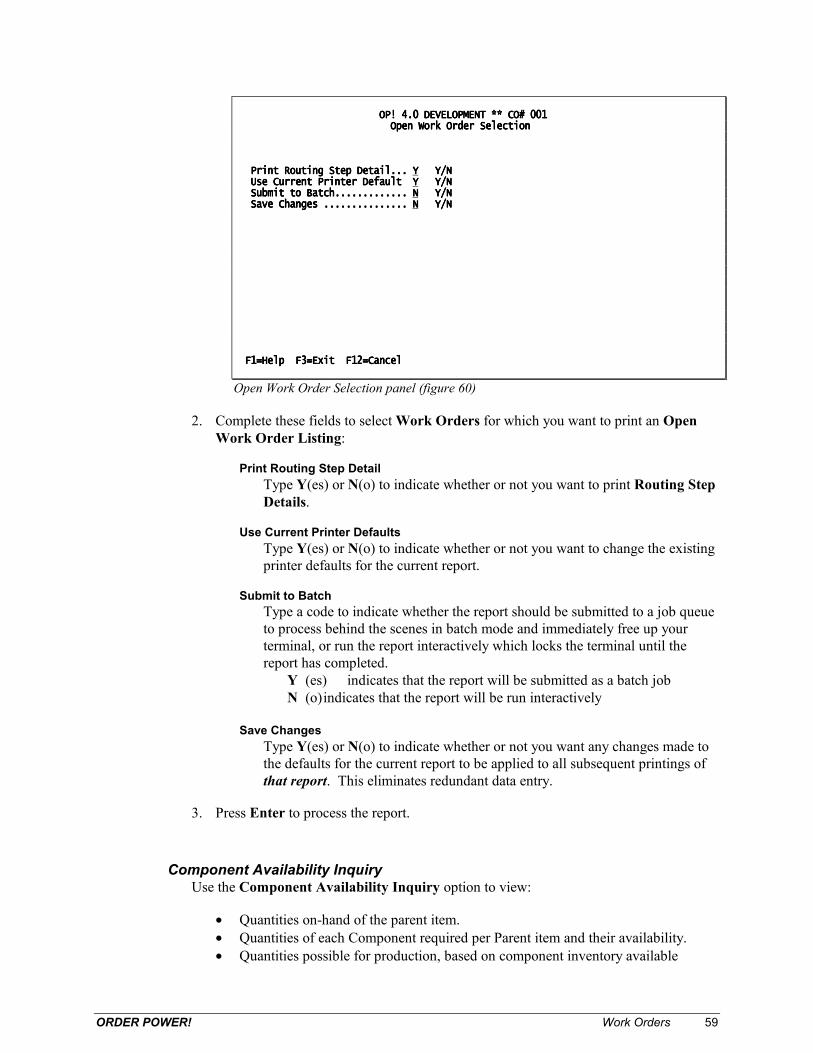
ORDER POWER! Work Orders 59
OP! 4.0 DEVELOPMENT ** CO# 001 OP! 4.0 DEVELOPMENT ** CO# 001 OP! 4.0 DEVELOPMENT ** CO# 001 OP! 4.0 DEVELOPMENT ** CO# 001 Open Work Order Selection Open Work Order Selection Open Work Order Selection Open Work Order Selection Print Routing Step Detail... Print Routing Step Detail... Print Routing Step Detail... Print Routing Step Detail... YYYY Y/N Y/N Y/N Y/N Use Curr Use Curr Use Curr Use Current Printer Default ent Printer Default ent Printer Default ent Printer Default YYYY Y/N Y/N Y/N Y/N Submit to Batch............. Submit to Batch............. Submit to Batch............. Submit to Batch............. NNNN Y/N Y/N Y/N Y/N Save Changes ............... Save Changes ............... Save Changes ............... Save Changes ............... NNNN Y/N Y/N Y/N Y/N F1=Help F3=Exit F12=Cancel F1=Help F3=Exit F12=Cancel F1=Help F3=Exit F12=Cancel F1=Help F3=Exit F12=Cancel
Open Work Order Selection panel (figure 60)
2. Complete these fields to select Work Orders for which you want to print an Open Work Order Listing:
Print Routing Step Detail Type Y(es) or N(o) to indicate whether or not you want to print Routing Step Details.
Use Current Printer Defaults Type Y(es) or N(o) to indicate whether or not you want to change the existing printer defaults for the current report.
Submit to Batch Type a code to indicate whether the report should be submitted to a job queue to process behind the scenes in batch mode and immediately free up your terminal, or run the report interactively which locks the terminal until the report has completed.
Y (es) indicates that the report will be submitted as a batch job N (o) indicates that the report will be run interactively
Save Changes Type Y(es) or N(o) to indicate whether or not you want any changes made to the defaults for the current report to be applied to all subsequent printings of that report. This eliminates redundant data entry.
3. Press Enter to process the report.
Component Availability Inquiry
Use the Component Availability Inquiry option to view:
• Quantities on-hand of the parent item. • Quantities of each Component required per Parent item and their availability. • Quantities possible for production, based on component inventory available

60 Work Orders ORDER POWER!
• Quantities of components expected from your suppliers
To view Component availability Use this option to view and calculate the number of Material Items required finish a specified quantity of a Manufactured Item.
1. On the ORDER POWER! Work Orders menu (figure 24), select Component Availability Inquiry to display the Component Availability Inquiry panel (figure 61).
OP! 4.0 DEVELOPMENT ** CO# 001 OP! 4.0 DEVELOPMENT ** CO# 001 OP! 4.0 DEVELOPMENT ** CO# 001 OP! 4.0 DEVELOPMENT ** CO# 001 ?Parent Item ?Parent Item ?Parent Item ?Parent Item .... ?Warehouse ?Warehouse ?Warehouse ?Warehouse .... Weeks For Average Weeks For Average Weeks For Average Weeks For Average 1 1 1 1 .... F1=Help F3=Exit F4=?List F12=Cancel F1=Help F3=Exit F4=?List F12=Cancel F1=Help F3=Exit F4=?List F12=Cancel F1=Help F3=Exit F4=?List F12=Cancel
Component Availability Inquiry panel (figure 61)
2. Complete these fields:
Parent Item Type the user-defined code of a Manufactured Item you want to inquire on.
Warehouse Type the user-defined code the Warehouse for this Item you want to inquire on.
Weeks For Average Type the number of weeks you want ORDER POWER! to use in calculating the Average Qty Per Shipment field on the Component Availability Inquiry panel (figure 62).
3. Press Enter to display Component Availability Inquiry panel (figure 62).
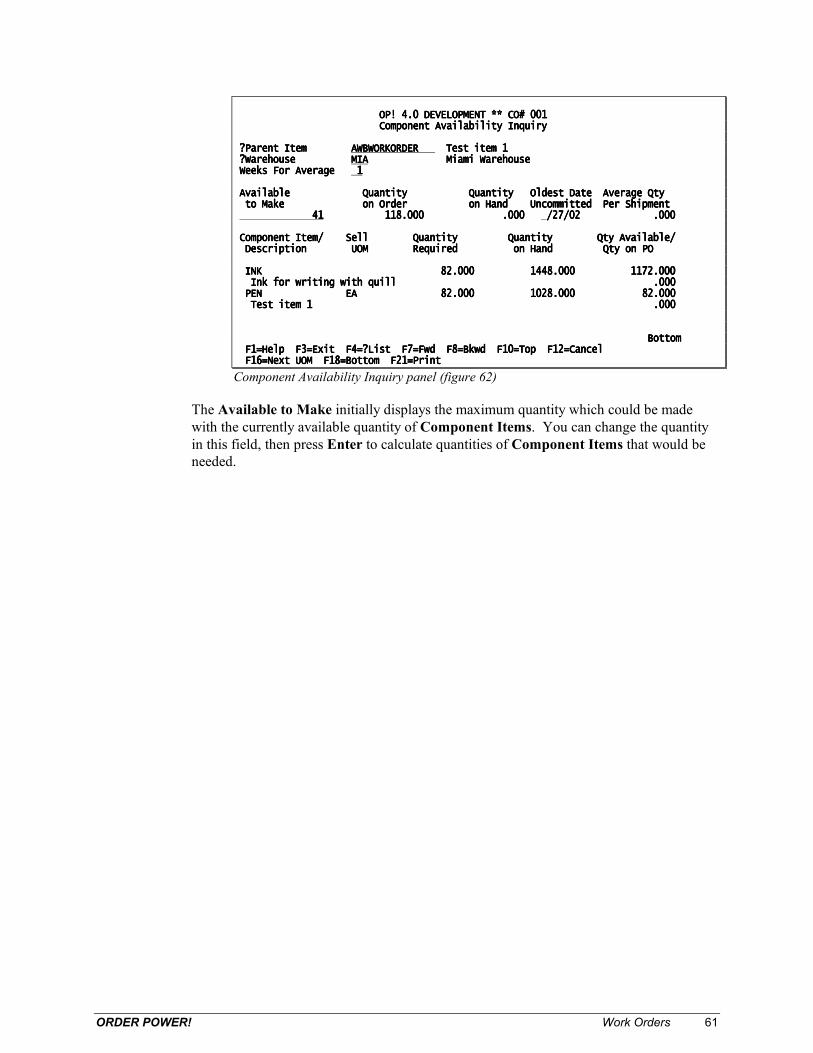
ORDER POWER! Work Orders 61
OP! 4.0 DEVELOPMENT ** CO# 001 OP! 4.0 DEVELOPMENT ** CO# 001 OP! 4.0 DEVELOPMENT ** CO# 001 OP! 4.0 DEVELOPMENT ** CO# 001 Component Availability Inquiry Component Availability Inquiry Component Availability Inquiry Component Availability Inquiry ?Parent Item ?Parent Item ?Parent Item ?Parent Item AWBWORKORDER AWBWORKORDER AWBWORKORDER AWBWORKORDER Test item 1 Test item 1 Test item 1 Test item 1 ?Warehouse ?Warehouse ?Warehouse ?Warehouse MIAMIAMIAMIA Miami Warehouse Miami Warehouse Miami Warehouse Miami Warehouse Weeks For Average Weeks For Average Weeks For Average Weeks For Average 1 1 1 1 Available Quantity Quantity Oldest Date Average Qty Available Quantity Quantity Oldest Date Average Qty Available Quantity Quantity Oldest Date Average Qty Available Quantity Quantity Oldest Date Average Qty to Make on Order o to Make on Order o to Make on Order o to Make on Order on Hand Uncommitted Per Shipment n Hand Uncommitted Per Shipment n Hand Uncommitted Per Shipment n Hand Uncommitted Per Shipment 41 41 41 41 118.000 .000 118.000 .000 118.000 .000 118.000 .000 /27/02 .000 /27/02 .000 /27/02 .000 /27/02 .000 Component Item/ Sell Quantity QuantitComponent Item/ Sell Quantity QuantitComponent Item/ Sell Quantity QuantitComponent Item/ Sell Quantity Quantity Qty Available/ y Qty Available/ y Qty Available/ y Qty Available/ Description UOM Required on Hand Qty on PO Description UOM Required on Hand Qty on PO Description UOM Required on Hand Qty on PO Description UOM Required on Hand Qty on PO INK 82.000 1448.000 INK 82.000 1448.000 INK 82.000 1448.000 INK 82.000 1448.000 1172.000 1172.000 1172.000 1172.000 Ink for writing with quill .000 Ink for writing with quill .000 Ink for writing with quill .000 Ink for writing with quill .000 PEN EA 82.000 1028.000 82.000 PEN EA 82.000 1028.000 82.000 PEN EA 82.000 1028.000 82.000 PEN EA 82.000 1028.000 82.000 .... Test item 1 .000 Test item 1 .000 Test item 1 .000 Test item 1 .000 Bottom Bottom Bottom Bottom F1=Help F3= F1=Help F3= F1=Help F3= F1=Help F3=Exit F4=?List F7=Fwd F8=Bkwd F10=Top F12=Cancel Exit F4=?List F7=Fwd F8=Bkwd F10=Top F12=Cancel Exit F4=?List F7=Fwd F8=Bkwd F10=Top F12=Cancel Exit F4=?List F7=Fwd F8=Bkwd F10=Top F12=Cancel F16=Next UOM F18=Bottom F21=Print F16=Next UOM F18=Bottom F21=Print F16=Next UOM F18=Bottom F21=Print F16=Next UOM F18=Bottom F21=Print
Component Availability Inquiry panel (figure 62)
The Available to Make initially displays the maximum quantity which could be made with the currently available quantity of Component Items. You can change the quantity in this field, then press Enter to calculate quantities of Component Items that would be needed.

62 Work Orders ORDER POWER!
Working with Work Order Notes
Work Order Notes are used to record any additional information you want to associate with a Work Order, Routing code, Routing Step or Bill of Materials.
Notes which are attached to the Routing Codes and Routing Steps in the routing master file are copied at Work Order creation to the Work Orders which use that Routing Code. This is true of Routing notes only. These notes are commonly used for instructions to the shop floor.
The following example describes a procedure for working with Routing Code Notes, but also applies to other Work Order Notes.
To work with Routing code Notes 1. On the Routing Header Master Inquiry panel (figure 5), type 7 (Notes) to display
Routing Header Notes window (figure 63).
OP! 4.0 DEVELOPMENT ** CO# 001 OP! 4.0 DEVELOPMENT ** CO# 001 OP! 4.0 DEVELOPMENT ** CO# 001 OP! 4.0 DEVELOPMENT ** CO# 001 Pstn: Pstn: Pstn: Pstn: Routing Header Notes Routing Header Notes Routing Header Notes Routing Header Notes Show Delete : Show Delete : Show Delete : Show Delete : NNNN 2=Chang Routing Code: ZOO Newsletter Production 2=Chang Routing Code: ZOO Newsletter Production 2=Chang Routing Code: ZOO Newsletter Production 2=Chang Routing Code: ZOO Newsletter Production 5=Display 5=Display 5=Display 5=Display Comment Comment Comment Comment Code Line Del Code Line Del Code Line Del Code Line Del 7777 ABW The CSI Newsletter, "ORDER POWER! News a 001 ABW The CSI Newsletter, "ORDER POWER! News a 001 ABW The CSI Newsletter, "ORDER POWER! News a 001 ABW The CSI Newsletter, "ORDER POWER! News a 001 ABW nd Views," is published quarterly using 002 ABW nd Views," is published quarterly using 002 ABW nd Views," is published quarterly using 002 ABW nd Views," is published quarterly using 002 ABW a super ABW a super ABW a super ABW a super----secret hybrid photocopy separati 003 secret hybrid photocopy separati 003 secret hybrid photocopy separati 003 secret hybrid photocopy separati 003 AB AB AB ABW on system developed by NROSE. 004 W on system developed by NROSE. 004 W on system developed by NROSE. 004 W on system developed by NROSE. 004 .... Bottom Bottom Bottom Bottom F1=Help F3=Exit F6=Create/Change F7=Bkwd F8=Fwd F F1=Help F3=Exit F6=Create/Change F7=Bkwd F8=Fwd F F1=Help F3=Exit F6=Create/Change F7=Bkwd F8=Fwd F F1=Help F3=Exit F6=Create/Change F7=Bkwd F8=Fwd F =Copy =Copy =Copy =Copy F10=Top F12=Cancel F16=Sort Sequence F18=Bot F10=Top F12=Cancel F16=Sort Sequence F18=Bot F10=Top F12=Cancel F16=Sort Sequence F18=Bot F10=Top F12=Cancel F16=Sort Sequence F18=Bot F21=Print F21=Print F21=Print F21=Print F1=Hlp F1=Hlp F1=Hlp F1=Hlp
Routing Header Notes window (figure 63)
These actions are available, in addition to the standard ORDER POWER! functions:
Action Description F6=Create/Change Display Routing Header Notes panel (figure 64) to work with the
Routing Header Notes
F16=Sort Sequence F16=Line Sequence
Toggles the display between sorting on the Comment Code and sorting on the line number
To create or change Routing Header Notes 1. On the Routing Header Notes window (figure 63), press F6 (Create/Change) to
display the Routing Header Notes panel (figure 64).

ORDER POWER! Work Orders 63
OP! 4.0 DEVELOPMENT ** CO# 001 OP! 4.0 DEVELOPMENT ** CO# 001 OP! 4.0 DEVELOPMENT ** CO# 001 OP! 4.0 DEVELOPMENT ** CO# 001 Routing Header Notes Show Delete : Routing Header Notes Show Delete : Routing Header Notes Show Delete : Routing Header Notes Show Delete : NNNN Routing Code: ZOO Newsletter Production Routing Code: ZOO Newsletter Production Routing Code: ZOO Newsletter Production Routing Code: ZOO Newsletter Production ?Comment ?Comment ?Comment ?Comment Code Notes Deleted Line # Code Notes Deleted Line # Code Notes Deleted Line # Code Notes Deleted Line # ABWABWABWABW The CSI Newsletter, "ORDER POWER! News aThe CSI Newsletter, "ORDER POWER! News aThe CSI Newsletter, "ORDER POWER! News aThe CSI Newsletter, "ORDER POWER! News a 001 001 001 001 ABWABWABWABW nd Views," is published quarterly using nd Views," is published quarterly using nd Views," is published quarterly using nd Views," is published quarterly using 002 002 002 002 ABWABWABWABW a supera supera supera super----secret hybrid photocopy separatisecret hybrid photocopy separatisecret hybrid photocopy separatisecret hybrid photocopy separati 003 003 003 003 AB AB AB ABW W W W on system developed by NROSE. on system developed by NROSE. on system developed by NROSE. on system developed by NROSE. .... 004 004 004 004 005 005 005 005 006 006 006 006 007 007 007 007 008 008 008 008 00 00 00 00 010 010 010 010 011 011 011 011 012 012 012 012 013 013 013 013 014 014 014 014 015 015 015 015 .... More... More... More... More... F1=Help F3=Exit F4=?List F7=Bkwd F8=Fwd F10=Top F12=Cancel F18=Bottom F1=Help F3=Exit F4=?List F7=Bkwd F8=Fwd F10=Top F12=Cancel F18=Bottom F1=Help F3=Exit F4=?List F7=Bkwd F8=Fwd F10=Top F12=Cancel F18=Bottom F1=Help F3=Exit F4=?List F7=Bkwd F8=Fwd F10=Top F12=Cancel F18=Bottom
Routing Header Notes panel (figure 64)
Each line of the Routing Header Note can have its own Comment Code. Each line can also be deleted separately.
2. Complete these fields:
?Comment Code Type a user-defined code that you want to assign to a line of notes. The code indicates if you want to print the line of notes on Work Order documents or Work Order pick tickets.
Notes Type additional information. You can use as many lines as necessary.
Deleted Type D(elete) beside the line(s) you want to delete.
3. Press Enter to update the Routing Header Notes.

64 Work Orders ORDER POWER!
Related Documents