Oracle® Retail Xstore Point of Service Manager’s Guide Release 19.0 F25016-03 August 2021

Welcome message from author
This document is posted to help you gain knowledge. Please leave a comment to let me know what you think about it! Share it to your friends and learn new things together.
Transcript
Oracle® Retail Xstore Point of ServiceManager’s Guide
Release 19.0
F25016-03
August 2021
Oracle Retail Xstore Point of Service Manager's Guide, Release 19.0
F25016-03
Copyright © 2021, Oracle and/or its affiliates. All rights reserved.
Primary Author: T Gunston
Contributing Author: J Robinson
This software and related documentation are provided under a license agreement containing restrictions on use and disclosure and are protected by intellectual property laws. Except as expressly permitted in your license agreement or allowed by law, you may not use, copy, reproduce, translate, broadcast, modify, license, transmit, distribute, exhibit, perform, publish, or display any part, in any form, or by any means. Reverse engineering, disassembly, or decompilation of this software, unless required by law for interoperability, is prohibited.
The information contained herein is subject to change without notice and is not warranted to be error-free. If you find any errors, please report them to us in writing.
If this software or related documentation is delivered to the U.S. Government or anyone licensing it on behalf of the U.S. Government, the following notice is applicable:
U.S. GOVERNMENT END USERS: Oracle programs, including any operating system, integrated software, any programs installed on the hardware, and/or documentation, delivered to U.S. Government end users are "commercial computer software" pursuant to the applicable Federal Acquisition Regulation and agency-specific supplemental regulations. As such, use, duplication, disclosure, modification, and adaptation of the programs, including any operating system, integrated software, any programs installed on the hardware, and/or documentation, shall be subject to license terms and license restrictions applicable to the programs. No other rights are granted to the U.S. Government.
This software or hardware is developed for general use in a variety of information management applications. It is not developed or intended for use in any inherently dangerous applications, including applications that may create a risk of personal injury. If you use this software or hardware in dangerous applications, then you shall be responsible to take all appropriate fail-safe, backup, redundancy, and other measures to ensure its safe use. Oracle Corporation and its affiliates disclaim any liability for any damages caused by use of this software or hardware in dangerous applications.
Oracle and Java are registered trademarks of Oracle and/or its affiliates. Other names may be trademarks of their respective owners.
Intel and Intel Xeon are trademarks or registered trademarks of Intel Corporation. All SPARC trademarks are used under license and are trademarks or registered trademarks of SPARC International, Inc. AMD, Opteron, the AMD logo, and the AMD Opteron logo are trademarks or registered trademarks of Advanced Micro Devices. UNIX is a registered trademark of The Open Group.
This software or hardware and documentation may provide access to or information on content, products, and services from third parties. Oracle Corporation and its affiliates are not responsible for and expressly disclaim all warranties of any kind with respect to third-party content, products, and services. Oracle Corporation and its affiliates will not be responsible for any loss, costs, or damages incurred due to your access to or use of third-party content, products, or services.
Value-Added Reseller (VAR) Language
Oracle Retail VAR Applications
The following restrictions and provisions only apply to the programs referred to in this section and licensed to you. You acknowledge that the programs may contain third party software (VAR applications) licensed to Oracle. Depending upon your product and its version number, the VAR applications may include:
(i) the MicroStrategy Components developed and licensed by MicroStrategy Services Corporation (MicroStrategy) of McLean, Virginia to Oracle and imbedded in the MicroStrategy for Oracle Retail Data Warehouse and MicroStrategy for Oracle Retail Planning & Optimization applications.
(ii) the Wavelink component developed and licensed by Wavelink Corporation (Wavelink) of Kirkland, Washington, to Oracle and imbedded in Oracle Retail Mobile Store Inventory Management.
(iii) the software component known as Access Via™ licensed by Access Via of Seattle, Washington, and imbedded in Oracle Retail Signs and Oracle Retail Labels and Tags.
(iv) the software component known as Adobe Flex™ licensed by Adobe Systems Incorporated of San Jose, California, and imbedded in Oracle Retail Promotion Planning & Optimization application.
You acknowledge and confirm that Oracle grants you use of only the object code of the VAR Applications. Oracle will not deliver source code to the VAR Applications to you. Notwithstanding any other term or condition of the agreement and this ordering document, you shall not cause or permit alteration of any VAR Applications. For purposes of this section, "alteration" refers to all alterations, translations, upgrades, enhancements, customizations or modifications of all or any portion of the VAR Applications including all

reconfigurations, reassembly or reverse assembly, re-engineering or reverse engineering and recompilations or reverse compilations of the VAR Applications or any derivatives of the VAR Applications. You acknowledge that it shall be a breach of the agreement to utilize the relationship, and/or confidential information of the VAR Applications for purposes of competitive discovery.
The VAR Applications contain trade secrets of Oracle and Oracle's licensors and Customer shall not attempt, cause, or permit the alteration, decompilation, reverse engineering, disassembly or other reduction of the VAR Applications to a human perceivable form. Oracle reserves the right to replace, with functional equivalent software, any of the VAR Applications in future releases of the applicable program.
v
Contents
Send Us Your Comments ....................................................................................................................... xv
Preface .............................................................................................................................................................. xvii
Audience.................................................................................................................................................... xvii
Documentation Accessibility .................................................................................................................. xvii
Related Documents .................................................................................................................................. xvii
Customer Support ................................................................................................................................... xviii
Review Patch Documentation ............................................................................................................... xviii
Improved Process for Oracle Retail Documentation Corrections .................................................... xviii
Oracle Retail Documentation at the Oracle Help Center ................................................................... xix
Conventions ............................................................................................................................................... xix
1 Documentation and Screen Conventions
Documentation Conventions Overview .............................................................................................. 1-1
Information Conventions.................................................................................................................. 1-2
Where to Look for Additional Help...................................................................................................... 1-2
Back Office Touch-Screen Navigation ................................................................................................. 1-2
Active Keyboard Keys ............................................................................................................................. 1-3
Back Office Screen Conventions ........................................................................................................... 1-4
Bread Crumbs ..................................................................................................................................... 1-4
Menu List Options ............................................................................................................................. 1-5
Screen Layout ..................................................................................................................................... 1-6
Tabs ............................................................................................................................................... 1-7
Menu Buttons .............................................................................................................................. 1-7
Function Keys .............................................................................................................................. 1-7
Message Bar ................................................................................................................................. 1-8
Status Bar...................................................................................................................................... 1-9
Static Information Area........................................................................................................... 1-10
Information Areas.................................................................................................................... 1-11
Prompts and Forms ................................................................................................................. 1-11
Response Required Prompt............................................................................................. 1-12
Selection Required Prompt.............................................................................................. 1-12
Required Prompt .............................................................................................................. 1-13
System Information Prompt............................................................................................ 1-13
Search Forms .................................................................................................................... 1-13
vi
Data Entry Form .............................................................................................................. 1-14
2 Customer Maintenance
Accessing the Back Office ...................................................................................................................... 2-1
Accessing Customer Maintenance and Accounts .............................................................................. 2-3
Customer Maintenance ..................................................................................................................... 2-4
Adding a New Customer Record .................................................................................................... 2-6
Associations Tab.......................................................................................................................... 2-8
Addresses Tab ............................................................................................................................. 2-9
Adding a Comment to a Customer Record............................................................................. 2-9
Viewing a Customer Record.......................................................................................................... 2-11
Customer List Report............................................................................................................................ 2-13
3 Gift Registry
Accessing the Gift Registry .................................................................................................................... 3-2
Creating a New Registry ......................................................................................................................... 3-4
Modifying a Gift Registry ...................................................................................................................... 3-6
Adding Items ...................................................................................................................................... 3-6
Changing the Quantity...................................................................................................................... 3-7
Deleting an Item ................................................................................................................................. 3-7
Viewing and Modifying Details....................................................................................................... 3-7
Viewing and Modifying Owners ..................................................................................................... 3-8
To Modify the Primary Owner ................................................................................................. 3-8
To Create a New Owner ............................................................................................................ 3-8
To Edit Registry Owner Information ....................................................................................... 3-9
To Delete an Owner................................................................................................................. 3-10
Viewing and Modifying Attributes .............................................................................................. 3-10
To Create a New Attribute ..................................................................................................... 3-10
To Edit an Attribute................................................................................................................. 3-12
To Delete an Attribute............................................................................................................. 3-12
Viewing and Modifying Addresses.............................................................................................. 3-13
To Create a New Address....................................................................................................... 3-13
To Edit an Existing Address................................................................................................... 3-14
To Delete an Existing Address ............................................................................................... 3-14
Print Registry ......................................................................................................................................... 3-15
4 Employee Maintenance
Accessing Back Office Employee Maintenance Functions .............................................................. 4-2
Maintaining Employee Information..................................................................................................... 4-3
Viewing an Employee Record................................................................................................................ 4-5
Editing an Employee Record.................................................................................................................. 4-5
Changing an Employee's Password ................................................................................................ 4-6
Establish Password Challenge Questions....................................................................................... 4-8
Setting Up an Employee Fingerprint Record.............................................................................. 4-10
Adding a Comment ........................................................................................................................ 4-12
Adding a New Employee............................................................................................................... 4-12
vii
Voiding (Terminating) an Employee Record.............................................................................. 4-15
Employee Maintenance Tabs Overview ........................................................................................... 4-17
General Tab ...................................................................................................................................... 4-18
Human Resources Tab.................................................................................................................... 4-19
Security Tab...................................................................................................................................... 4-21
Fingerprint Tab................................................................................................................................ 4-22
Fingerprint Scans Panel........................................................................................................... 4-22
Finger Selected Panel............................................................................................................... 4-22
Comment Tab .................................................................................................................................. 4-23
Borrow Employee .................................................................................................................................. 4-24
Employee Productivity Report............................................................................................................ 4-26
Associate Advance................................................................................................................................. 4-26
5 Employee Scheduling
Work Shifts................................................................................................................................................ 5-1
Time Off ..................................................................................................................................................... 5-1
Reports........................................................................................................................................................ 5-1
Creating An Employee Schedule .......................................................................................................... 5-2
Create New Schedule Options ......................................................................................................... 5-4
Adding a Manual Shift ...................................................................................................................... 5-5
Adding a Pre-Defined Shift .............................................................................................................. 5-7
Copying a Day Schedule................................................................................................................... 5-9
Copying a Week Schedule ............................................................................................................. 5-11
Editing a Schedule........................................................................................................................... 5-13
Edit Existing Schedule Menu Options ......................................................................................... 5-15
Changing a Shift .............................................................................................................................. 5-16
Deleting a Shift ................................................................................................................................ 5-18
Maintaining Employee Time-Off Schedules ............................................................................... 5-19
Adding Time-Off Periods ....................................................................................................... 5-19
Removing an Employee Time-Off Period ............................................................................ 5-25
Editing an Employee Time-Off Period ............................................................................................. 5-28
Printing the Time-Off Schedule......................................................................................................... 5-30
Maintaining Employee Shifts ............................................................................................................. 5-31
Creating a New Shift....................................................................................................................... 5-31
Editing an Existing Shift................................................................................................................. 5-33
Schedule Reports............................................................................................................................. 5-35
Employee Time Off Summary Report.......................................................................................... 5-36
Employee Performance Report Overview................................................................................... 5-36
Schedule Detail Report Overview ................................................................................................ 5-37
6 Message Maintenance and Task Management
Creating and Maintaining Messages.................................................................................................... 6-1
Creating a New Message................................................................................................................... 6-3
Editing a Message .............................................................................................................................. 6-5
Deleting a Message ............................................................................................................................ 6-7
Reviewing Task Management Information ........................................................................................ 6-8
viii
Viewing Task Progress ...................................................................................................................... 6-8
Viewing Black Book Customers.................................................................................................... 6-11
7 Payroll and Timecard Maintenance
Accessing Back Office Payroll & Timecard Maintenance Functions............................................. 7-2
Payroll and Timecard Maintenance...................................................................................................... 7-3
Payroll Maintenance Tab .................................................................................................................. 7-5
Editing a Payroll Record ............................................................................................................ 7-7
Reviewing a Payroll Record ...................................................................................................... 7-8
Posting the Employee's Payroll Record ................................................................................... 7-9
Posting all Employee Payroll Records at One Time ........................................................... 7-10
Viewing and Editing Posted Payroll Records...................................................................... 7-12
Payroll Posting Day ................................................................................................................. 7-12
Payroll Comments Tab................................................................................................................... 7-13
Adding Comments .................................................................................................................. 7-13
Timecard Maintenance Tab ........................................................................................................... 7-14
Editing a Timecard Record ..................................................................................................... 7-15
Adding a Timecard Record .................................................................................................... 7-16
Changing a Timecard Record................................................................................................. 7-17
Deleting a Timecard Record................................................................................................... 7-19
Viewing Timecard Exception Records.................................................................................. 7-21
Viewing Timecard Record History........................................................................................ 7-21
Timecard Comment Tab................................................................................................................. 7-22
Adding Comments .................................................................................................................. 7-23
Reports..................................................................................................................................................... 7-23
Posted Timecard Report................................................................................................................. 7-23
Open Timecard Report ................................................................................................................... 7-24
Payroll Summary Report................................................................................................................ 7-24
Payroll Detail By Employee Report.............................................................................................. 7-26
8 Register Open and Close
Accessing the Back Office Register Open/Close Functions............................................................. 8-1
Closing the Register ................................................................................................................................. 8-2
Standard Close.................................................................................................................................... 8-3
Editing Tender Group Counts .................................................................................................. 8-7
Cash Drawer Close............................................................................................................................. 8-8
Forcing a Register to Close .................................................................................................................. 8-14
Print Till Summary Receipt................................................................................................................. 8-14
Opening the Register............................................................................................................................ 8-15
Standard Open................................................................................................................................. 8-15
To Perform a Begin Count ...................................................................................................... 8-16
Cash Drawer Open.......................................................................................................................... 8-19
Changing Business Date ...................................................................................................................... 8-22
9 Store Open and Close
Closing the Store ...................................................................................................................................... 9-1

ix
Opening the Store .................................................................................................................................... 9-7
Calling the Update Service .................................................................................................................. 9-10
Manually Refresh Promotions............................................................................................................ 9-11
10 24/7 Store Environment
Store Opening ........................................................................................................................................ 10-1
Daily 24/7 Flows..................................................................................................................................... 10-2
Register/Till Open .......................................................................................................................... 10-3
Reconcile Register/Till ................................................................................................................... 10-9
Warning Messages ........................................................................................................................ 10-14
Register/Till Close ........................................................................................................................ 10-16
New Business Period .................................................................................................................... 10-20
Define Float .................................................................................................................................... 10-20
Prompt for Float ..................................................................................................................... 10-20
Pre-defined Float.................................................................................................................... 10-20
Carried Over Float Amount ................................................................................................. 10-20
Float Balance ........................................................................................................................... 10-20
Rolling Close ........................................................................................................................................ 10-21
End Retail Period........................................................................................................................... 10-21
Store Closure ........................................................................................................................................ 10-23
System Updates ................................................................................................................................... 10-24
11 Till Management
Till Accountability Process.................................................................................................................. 11-2
Till Start ............................................................................................................................................ 11-2
Till End.............................................................................................................................................. 11-2
Accessing Back Office Till Management Functions....................................................................... 11-3
About Till Options................................................................................................................................ 11-3
About Till Maintenance ....................................................................................................................... 11-5
Register Accountability Mode Options........................................................................................ 11-5
Till Accountability Mode Only Options ...................................................................................... 11-6
Till Options ............................................................................................................................................ 11-7
Changing the Float Amount .......................................................................................................... 11-7
Foreign Currency Maintenance................................................................................................... 11-10
Performing Paid In/Paid Out Transactions.............................................................................. 11-12
Paid In Transaction ................................................................................................................ 11-13
Paid Out Transaction............................................................................................................. 11-15
Post Voiding Transactions ........................................................................................................... 11-17
Register Accountability Mode Functions ....................................................................................... 11-21
Cash Pickup ................................................................................................................................... 11-21
Cash Transfer ................................................................................................................................. 11-22
Till Audit ........................................................................................................................................ 11-23
Mid-day Deposit............................................................................................................................ 11-25
Cash Drawers................................................................................................................................. 11-28
Attaching a Cash Drawer Till............................................................................................... 11-28
Removing a Cash Drawer Till .............................................................................................. 11-29
x
Reconciling a Networked Cash Drawer Till ...................................................................... 11-30
Till Accountability Mode Only Functions ..................................................................................... 11-33
Issuing a Till (Till Accountability Mode Only) ......................................................................... 11-33
Attaching Other Till (Till Accountability Mode Only) ............................................................ 11-37
Removing a Till (Till Accountability Mode Only).................................................................... 11-38
End Count Other Till (Till Accountability Mode Only) .......................................................... 11-38
Returning a Till (Till Accountability Mode Only) .................................................................... 11-38
Reconciling a Till (Till Accountability Mode Only) ................................................................. 11-40
12 Store Safe Maintenance
Configurations ....................................................................................................................................... 12-1
Safe Bag Management .......................................................................................................................... 12-2
Safe Bag Management Screen............................................................................................................. 12-3
Safe Bag Use ........................................................................................................................................... 12-4
Safe Bag Processes ................................................................................................................................ 12-4
Store Safe Opening with Safe Bag (Till Accountability Mode Only)....................................... 12-5
Store Safe Auditing with a Safe Bag............................................................................................. 12-5
Reconciling the Store Safe with a Safe Bag (Till Accountability Mode Only) ........................ 12-6
Preparing the Bank Deposit using a Safe Bag............................................................................. 12-7
Store Safe Cash Deposit using a Safe Bag.................................................................................... 12-7
Cash Pickup using a Safe Bag........................................................................................................ 12-8
13 Networked Cash Drawers
Discover and Activate a New Networked Cash Drawer ............................................................... 13-1
Open Cash Drawer................................................................................................................................ 13-3
Attach Cash Drawer .............................................................................................................................. 13-7
Remove Cash Drawer ........................................................................................................................... 13-9
Close Cash Drawer.............................................................................................................................. 13-11
14 Flash Sales Reports
Flash Sales Summary Report .............................................................................................................. 14-1
Flash Sales By Department Report .................................................................................................... 14-2
Flash Sales By Hour Report................................................................................................................. 14-2
Flash Sales By Employee Report ........................................................................................................ 14-2
15 Electronic Journal
Accessing Back Office Journal Functions......................................................................................... 15-1
Viewing the Electronic Journal........................................................................................................... 15-3
Viewing Transaction Detail ................................................................................................................ 15-5
Reprinting a Receipt ............................................................................................................................. 15-6
Printing a Gift Receipt ......................................................................................................................... 15-6
Multiple Gift Items - Grouping Items for Gift Receipts ............................................................ 15-7
To Group Gift Items................................................................................................................. 15-7
Finish and Print Option ......................................................................................................... 15-7
Add Grouping Option............................................................................................................. 15-7
To Continue without Grouping Gift Items .......................................................................... 15-8
xi
Printing a Rebate Receipt .................................................................................................................... 15-8
Post Voiding a Transaction ................................................................................................................. 15-9
Journal Report ...................................................................................................................................... 15-12
16 Order Broker Maintenance
Order Status............................................................................................................................................ 16-2
Order Status Values .............................................................................................................................. 16-3
Order Item Status .................................................................................................................................. 16-3
Fulfilling an Order ................................................................................................................................ 16-3
View Selected Order ............................................................................................................................. 16-7
Check Inventory .............................................................................................................................. 16-8
Accept Order.................................................................................................................................... 16-9
Pick/Reserve Order ........................................................................................................................ 16-9
Scan Pick Slip Items ................................................................................................................. 16-9
Print Pick List ......................................................................................................................... 16-12
Picking/Reserving an Order ................................................................................................ 16-13
Un-reserve Order .......................................................................................................................... 16-17
Reject Order ................................................................................................................................... 16-18
Shipping an Order......................................................................................................................... 16-20
Maintaining/Viewing an Order........................................................................................................ 16-22
Allocating an Item ............................................................................................................................... 16-23
17 Balance Inquiry
About Store Credit and Gift Certificate Balance Inquiry ............................................................. 17-1
Balance Information ............................................................................................................................. 17-1
18 Layaway Maintenance
Layaway Reports ................................................................................................................................... 18-1
Accessing Back Office Layaway Maintenance ................................................................................ 18-2
Static Information Area .................................................................................................................. 18-5
Customer Information.................................................................................................................... 18-5
Order Totals ..................................................................................................................................... 18-5
Layaway Tab Information ............................................................................................................. 18-5
Items Tab .................................................................................................................................. 18-6
Activity Tab ............................................................................................................................. 18-7
Comments Tab ........................................................................................................................ 18-8
To Cancel a Layaway Account ............................................................................................................ 18-9
Cancel Layaway - When the Customer Is Present......................................................................... 18-11
19 Work Order Maintenance
Accessing Work Order Maintenance Functions.............................................................................. 19-2
Maintaining Work Orders ................................................................................................................... 19-4
Maintaining Work Order Records ................................................................................................ 19-5
To View and Edit a Work Order Record .............................................................................. 19-5
Static Information Area........................................................................................................... 19-6
xii
Summary Tab Information ..................................................................................................... 19-6
To View and Edit Work Order Items .................................................................................... 19-8
Adding a Task .......................................................................................................................... 19-9
Deleting a Task ....................................................................................................................... 19-10
Converting an Estimate......................................................................................................... 19-11
Viewing/Adding Task Instructions.................................................................................... 19-12
Adding Parts........................................................................................................................... 19-13
Deleting Parts ......................................................................................................................... 19-13
Changing the Quantity.......................................................................................................... 19-14
Changing the Price................................................................................................................. 19-14
Changing the Tax Location................................................................................................... 19-15
Changing the Tax to Tax Exempt ........................................................................................ 19-16
Changing the Tax Amount ................................................................................................... 19-17
Changing the Tax Percentage............................................................................................... 19-18
To View and Add a Work Order Comment ................................................................................... 19-19
Comments Tab Information ........................................................................................................ 19-19
Adding a Comment to the Work Order Record ....................................................................... 19-19
To View Work Order History ........................................................................................................... 19-20
History Tab Information .............................................................................................................. 19-20
To View and Edit a Work Order Item Record ............................................................................... 19-20
Work Item Tab Information......................................................................................................... 19-20
Editing Item Information ............................................................................................................. 19-21
Shipping Work Orders ....................................................................................................................... 19-22
Receiving Work Orders...................................................................................................................... 19-26
Work Order Invoices .......................................................................................................................... 19-28
Viewing Work Order Invoice History........................................................................................ 19-32
20 Special Order Maintenance
Accessing Back Office Special Order Maintenance ....................................................................... 20-2
Static Information Area .................................................................................................................. 20-4
Customer Information.................................................................................................................... 20-4
Order Totals ..................................................................................................................................... 20-4
Special Order Tab Information...................................................................................................... 20-4
Items Tab .................................................................................................................................. 20-5
Activity Tab .............................................................................................................................. 20-5
Comments Tab ........................................................................................................................ 20-6
To Cancel a Special Order Account ................................................................................................... 20-7
21 Shelf Labels
Printing Shelf Labels ............................................................................................................................ 21-1
ZPL II Label Printers............................................................................................................................. 21-5
To Change an Item.......................................................................................................................... 21-7
To Look Up an Item ........................................................................................................................ 21-9
To Add a Receiving Document ................................................................................................... 21-10
To Save a Batch - ZPL II Only ..................................................................................................... 21-11
To Retrieve a Batch - ZPL II Only ............................................................................................... 21-11
To Delete a Batch - ZPL II Only .................................................................................................. 21-12
xiii
22 Training Mode
Accessing Training Mode .................................................................................................................... 22-1
Starting Training Mode .................................................................................................................. 22-1
To Exit Training Mode ................................................................................................................... 22-4
23 Hardware Functions
Enabling and Disabling Hardware .................................................................................................... 23-1
To Disable a Hardware Device ..................................................................................................... 23-2
To Enable a Hardware Device....................................................................................................... 23-4
Reinitialize Hardware .......................................................................................................................... 23-5
Networked Cash Drawers.................................................................................................................... 23-5
Managing Networked Cash Drawers .......................................................................................... 23-6
Configuring Networked Cash Drawers....................................................................................... 23-7
Releasing a Cash Drawer ............................................................................................................... 23-8
Mobile Client Device Access .............................................................................................................. 23-9
Mobile Device Quick Config ............................................................................................................ 23-10
Update PINpad Key (TransArmor) .................................................................................................. 23-11
24 Tax Free Invoices
Issuing Tax Free Invoices..................................................................................................................... 24-1
Issuing a Tax Free Invoice from the Electronic Journal............................................................. 24-2
Lookup Traveler....................................................................................................................... 24-6
Issuing a Tax Free Invoice from the Invoice Menu .................................................................... 24-6
Reprinting Tax Free Invoices .............................................................................................................. 24-9
Reprinting a Tax Free Invoice from the Electronic Journal....................................................... 24-9
Reprinting Tax Free Invoice from the Invoice Menu............................................................... 24-10
Voiding a Tax Free Invoice................................................................................................................ 24-12
Tax Free Invoice Returns ................................................................................................................... 24-14
25 Miscellaneous Functions
Changing Your Password .................................................................................................................... 25-1
Forgot Password Challenge Questions........................................................................................ 25-4
Using the Dashboard ............................................................................................................................ 25-6
Dashboard Information.................................................................................................................. 25-7
Sales Performance .................................................................................................................... 25-8
Top 5 Departments .................................................................................................................. 25-8
Top 5 Performers...................................................................................................................... 25-8
Hot 5 Items................................................................................................................................ 25-8
Store Goals Performance......................................................................................................... 25-8
Sales and Productivity Dashboard..................................................................................................... 25-9
Opening a Browser.............................................................................................................................. 25-13
Exchanging Serial Numbers.............................................................................................................. 25-14
xv
Send Us Your Comments
Oracle® Retail Xstore Point-of-Service Manager's Guide, Release 19.0.
Oracle welcomes customers' comments and suggestions on the quality and usefulness of this document.
Your feedback is important, and helps us to best meet your needs as a user of our products. For example:
■ Are the implementation steps correct and complete?
■ Did you understand the context of the procedures?
■ Did you find any errors in the information?
■ Does the structure of the information help you with your tasks?
■ Do you need different information or graphics? If so, where, and in what format?
■ Are the examples correct? Do you need more examples?
If you find any errors or have any other suggestions for improvement, then please tell us your name, the name of the company who has licensed our products, the title and part number of the documentation and the chapter, section, and page number (if available).
Send your comments to us using the electronic mail address: [email protected]
Please give your name, address, electronic mail address, and telephone number (optional).
If you need assistance with Oracle software, then please contact your support representative or Oracle Support Services.
If you require training or instruction in using Oracle software, then please contact your Oracle local office and inquire about our Oracle University offerings. A list of Oracle offices is available on our Web site at http://www.oracle.com.
Note: Before sending us your comments, you might like to check that you have the latest version of the document and if any concerns are already addressed. To do this, access the Online Documentation available on the Oracle Help Center (OHC) website. It contains the most current Documentation Library plus all documents revised or released recently.
xvii
Preface
Oracle Retail Xstore is point-of-sale (POS) software. This guide describes the activities supported by Oracle Retail Xstore.
AudienceThis guide is for staff who implement, support, or use Xstore.
Documentation AccessibilityFor information about Oracle's commitment to accessibility, visit the Oracle Accessibility Program website at http://www.oracle.com/pls/topic/lookup?ctx=acc&id=docacc.
Access to Oracle Support
Oracle customers that have purchased support have access to electronic support through My Oracle Support. For information, visit http://www.oracle.com/pls/topic/lookup?ctx=acc&id=info or visit http://www.oracle.com/pls/topic/lookup?ctx=acc&id=trs if you are hearing impaired.
Related DocumentsFor more information, see the following documents in the Oracle Retail Xstore Suite Release 19.0 documentation set:
■ Oracle Retail Xstore Suite Release Notes
■ Oracle Retail Xstore Suite 19.0/Merchandising 16.0.2 Implementation Guide
■ Oracle Retail Xstore Suite Implementation and Security Guide
■ Oracle Retail Xstore Point-of-Service User Guide
■ Oracle Retail Xstore Point-of-Service Mobile User Guide
■ Oracle Retail Xstore Point-of-Service Reports Guide
■ Oracle Retail Xstore Point-of-Service Manager's Guide
■ Oracle Retail Xstore Point-of-Service Shipping, Receiving, and Inventory Guide
■ Oracle Retail Xstore Office User Guide
■ Oracle Retail Xstore Point-of-Service Frameworks and Technologies Guide
■ Oracle Retail Xstore Suite Deal Pricing Guide
xviii
■ Oracle Retail Xenvironment User Guide
■ Oracle Retail Xstore Point-of-Service Services Guide
■ Oracle Retail Xstore Point-of-Service Technical Guide
■ Oracle Retail Xstore Point-of-Service Host Interface Guide
■ Oracle Retail Xstore Point-of-Service POS Log Files
■ Oracle Retail Xstore Point-of-Service Database Dictionary Guide
■ Oracle Retail Xstore Office Database Dictionary Guide
Customer SupportTo contact Oracle Customer Support, access My Oracle Support at the following URL:
https://support.oracle.com
When contacting Customer Support, please provide the following:
■ Product version and program/module name
■ Functional and technical description of the problem (include business impact)
■ Detailed step-by-step instructions to re-create
■ Exact error message received
■ Screen shots of each step you take
Review Patch DocumentationWhen you install the application for the first time, you install either a base release (for example, 19.0) or a later patch release (for example, 19.0.1). If you are installing the base release or additional patches, read the documentation for all releases that have occurred since the base release before you begin installation. Documentation for patch releases can contain critical information related to the base release, as well as information about code changes since the base release.
Improved Process for Oracle Retail Documentation CorrectionsTo more quickly address critical corrections to Oracle Retail documentation content, Oracle Retail documentation may be republished whenever a critical correction is needed. For critical corrections, the republication of an Oracle Retail document may at times not be attached to a numbered software release; instead, the Oracle Retail document will simply be replaced at the Oracle Help Center (OHC) website, or, in the case of Data Models, to the applicable My Oracle Support Documentation container where they reside.
This process will prevent delays in making critical corrections available to customers. For the customer, it means that before you begin installation, you must verify that you have the most recent version of the Oracle Retail documentation set. Oracle Retail documentation is available at the Oracle Help Center at the following URL:
https://docs.oracle.com/en/industries/retail/index.html
An updated version of the applicable Oracle Retail document is indicated by Oracle part number, as well as print date (month and year). An updated version uses the same part number, with a higher-numbered suffix. For example, part number F123456-02 is an updated version of a document with part number F123456-01.
xix
If a more recent version of a document is available, that version supersedes all previous versions.
Oracle Retail Documentation at the Oracle Help Center Oracle Retail product documentation is available on the following website:
https://docs.oracle.com/en/industries/retail/index.html
(Data Model documents are not available through Oracle Help Center. You can obtain them through My Oracle Support.)
ConventionsThe following text conventions are used in this document:
Convention Meaning
boldface Boldface type indicates graphical user interface elements associated with an action, or terms defined in text or the glossary.
italic Italic type indicates book titles, emphasis, or placeholder variables for which you supply particular values.
monospace Monospace type indicates commands within a paragraph, URLs, code in examples, text that appears on the screen, or text that you enter.
1
Documentation and Screen Conventions 1-1
1Documentation and Screen Conventions
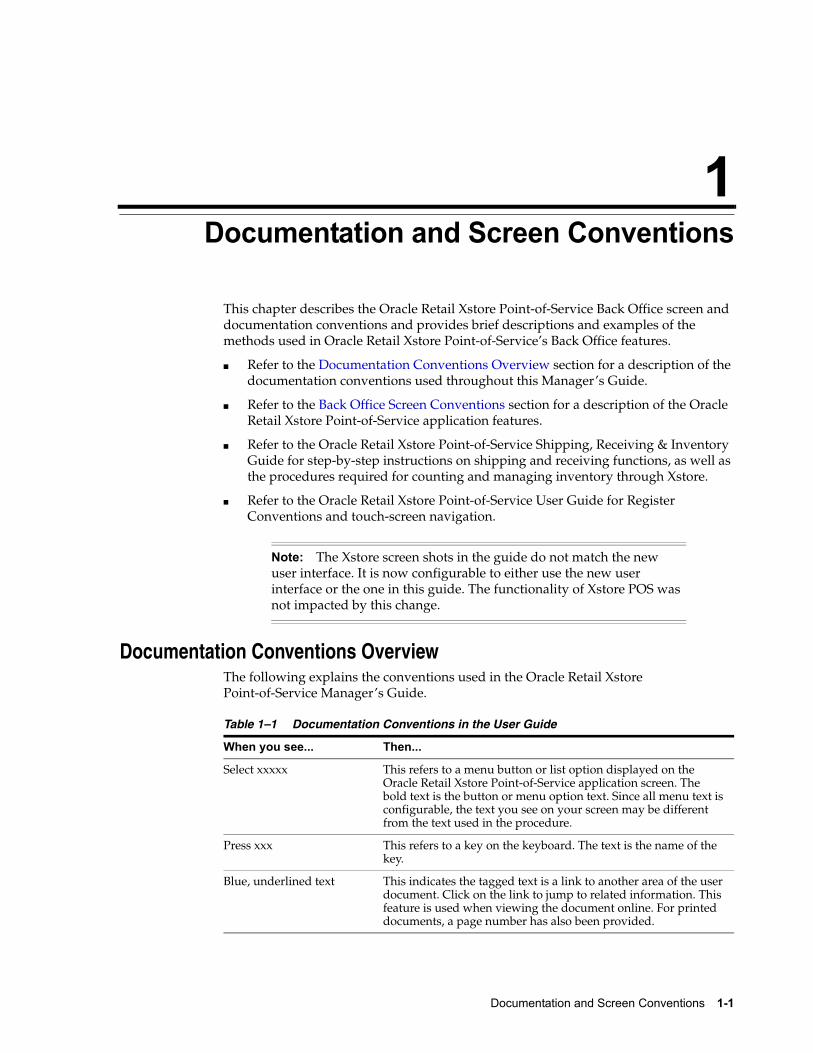
This chapter describes the Oracle Retail Xstore Point-of-Service Back Office screen and documentation conventions and provides brief descriptions and examples of the methods used in Oracle Retail Xstore Point-of-Service’s Back Office features.
■ Refer to the Documentation Conventions Overview section for a description of the documentation conventions used throughout this Manager’s Guide.
■ Refer to the Back Office Screen Conventions section for a description of the Oracle Retail Xstore Point-of-Service application features.
■ Refer to the Oracle Retail Xstore Point-of-Service Shipping, Receiving & Inventory Guide for step-by-step instructions on shipping and receiving functions, as well as the procedures required for counting and managing inventory through Xstore.
■ Refer to the Oracle Retail Xstore Point-of-Service User Guide for Register Conventions and touch-screen navigation.
Documentation Conventions OverviewThe following explains the conventions used in the Oracle Retail Xstore Point-of-Service Manager’s Guide.
Note: The Xstore screen shots in the guide do not match the new user interface. It is now configurable to either use the new user interface or the one in this guide. The functionality of Xstore POS was not impacted by this change.
Table 1–1 Documentation Conventions in the User Guide
When you see... Then...
Select xxxxx This refers to a menu button or list option displayed on the Oracle Retail Xstore Point-of-Service application screen. The bold text is the button or menu option text. Since all menu text is configurable, the text you see on your screen may be different from the text used in the procedure.
Press xxx This refers to a key on the keyboard. The text is the name of the key.
Blue, underlined text This indicates the tagged text is a link to another area of the user document. Click on the link to jump to related information. This feature is used when viewing the document online. For printed documents, a page number has also been provided.
Where to Look for Additional Help
1-2 Oracle® Retail Xstore Point-of-Service Manager's Guide
Information Conventions
Where to Look for Additional HelpA variety of guides provide you with complete information about the Oracle Retail Xstore Point-of-Service POS system.
■ The Oracle Retail Xstore Point-of-Service User Guide provides detailed information for entering sale, refund, and miscellaneous transactions, and is designed to provide training assistance for cashier-level employees. It also provides detailed basic navigation information such as touch-screen components.
■ The Oracle Retail Xstore Point-of-Service Reports Guide contains a description of each report, step-by-step instructions on how to run each report, an explanation of the criteria selection options, and a report sample.
■ The Oracle Retail Xstore Point-of-Service Shipping, Receiving, & Inventory Guide provides step-by-step instructions for shipping and receiving functions, as well as the procedures required for counting and managing inventory through Oracle Retail Xstore Point-of-Service.
Back Office Touch-Screen NavigationXstore uses multi-touch gesture navigation throughout to allow for full touch-screen transactions.
The following figure illustrates list navigation options for touch-screen users. The up/down arrows and side-scroll bar will only display if there is a large list.
Note: This information is provided to improve your understanding, simplify a task, or point out special circumstances.
Important: This information is important for the user to be aware of. For example, information that can help prevent the loss of data.
Tip: This information is related to the task at hand, but not required to perform the task. For example, this information may include best practices or practical information that can help the user in the performance of the task.
Important: Touch-screen navigation is configurable by your corporate office; all features may not be activated on your system.
Active Keyboard Keys
Documentation and Screen Conventions 1-3
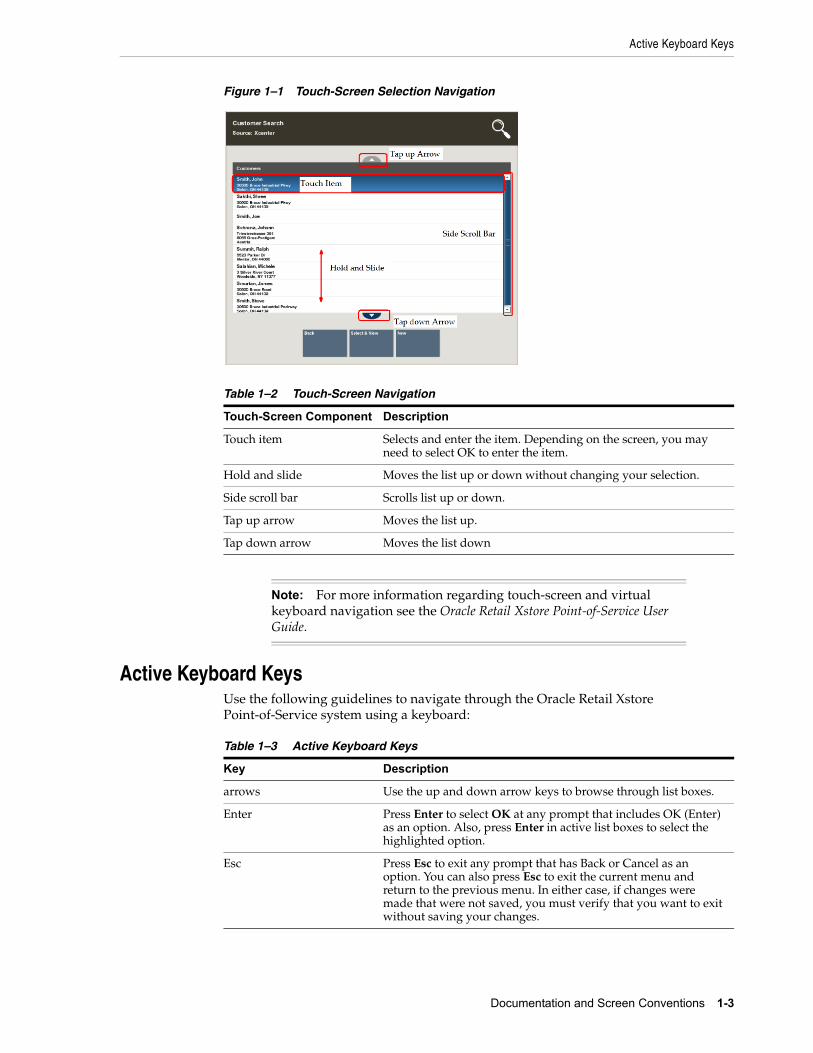
Figure 1–1 Touch-Screen Selection Navigation
Active Keyboard KeysUse the following guidelines to navigate through the Oracle Retail Xstore Point-of-Service system using a keyboard:
Table 1–2 Touch-Screen Navigation
Touch-Screen Component Description
Touch item Selects and enter the item. Depending on the screen, you may need to select OK to enter the item.
Hold and slide Moves the list up or down without changing your selection.
Side scroll bar Scrolls list up or down.
Tap up arrow Moves the list up.
Tap down arrow Moves the list down
Note: For more information regarding touch-screen and virtual keyboard navigation see the Oracle Retail Xstore Point-of-Service User Guide.
Table 1–3 Active Keyboard Keys
Key Description
arrows Use the up and down arrow keys to browse through list boxes.
Enter Press Enter to select OK at any prompt that includes OK (Enter) as an option. Also, press Enter in active list boxes to select the highlighted option.
Esc Press Esc to exit any prompt that has Back or Cancel as an option. You can also press Esc to exit the current menu and return to the previous menu. In either case, if changes were made that were not saved, you must verify that you want to exit without saving your changes.
Back Office Screen Conventions
1-4 Oracle® Retail Xstore Point-of-Service Manager's Guide
Back Office Screen ConventionsMost Manager tasks are performed using Xstore’s Back Office features. To review the screen convention for the register see the Oracle Retail Xstore Point-of-Service User Guide.
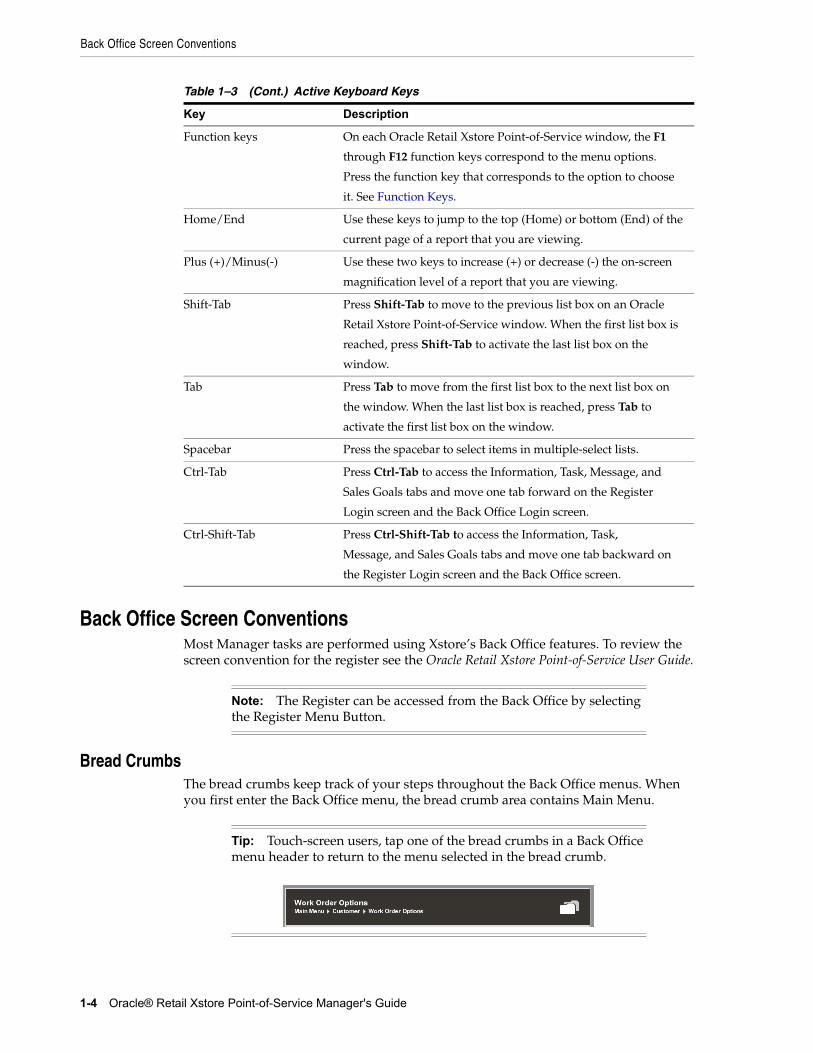
Bread CrumbsThe bread crumbs keep track of your steps throughout the Back Office menus. When you first enter the Back Office menu, the bread crumb area contains Main Menu.
Function keys On each Oracle Retail Xstore Point-of-Service window, the F1
through F12 function keys correspond to the menu options.
Press the function key that corresponds to the option to choose
it. See Function Keys.
Home/End Use these keys to jump to the top (Home) or bottom (End) of the
current page of a report that you are viewing.
Plus (+)/Minus(-) Use these two keys to increase (+) or decrease (-) the on-screen
magnification level of a report that you are viewing.
Shift-Tab Press Shift-Tab to move to the previous list box on an Oracle
Retail Xstore Point-of-Service window. When the first list box is
reached, press Shift-Tab to activate the last list box on the
window.
Tab Press Tab to move from the first list box to the next list box on
the window. When the last list box is reached, press Tab to
activate the first list box on the window.
Spacebar Press the spacebar to select items in multiple-select lists.
Ctrl-Tab Press Ctrl-Tab to access the Information, Task, Message, and
Sales Goals tabs and move one tab forward on the Register
Login screen and the Back Office Login screen.
Ctrl-Shift-Tab Press Ctrl-Shift-Tab to access the Information, Task,
Message, and Sales Goals tabs and move one tab backward on
the Register Login screen and the Back Office screen.
Note: The Register can be accessed from the Back Office by selecting the Register Menu Button.
Tip: Touch-screen users, tap one of the bread crumbs in a Back Office menu header to return to the menu selected in the bread crumb.
Table 1–3 (Cont.) Active Keyboard Keys
Key Description
Back Office Screen Conventions
Documentation and Screen Conventions 1-5
Menu List OptionsThe Back Office functions are available from the Main Menu that is displayed when you log in to the Back Office. Some functions on the list may not be available to all employees. Individual access is based on menu configuration. Security may be different for each employee, employee group, or register group.
The Back Office menu has been restructured into seven options:
■ Associate
■ Till
■ Customer
■ Employee
■ Hardware
■ Inventory
■ Reporting
There are several ways to select a menu item:
■ Type the corresponding number from your keyboard or virtual keyboard.
■ TOUCH-SCREEN Tap the menu option.
■ If there is a long list of options, up and down arrow keys display. Touch-screen users press these arrows to navigate the list. Keyboard users press the keyboard arrows to move the menu list.
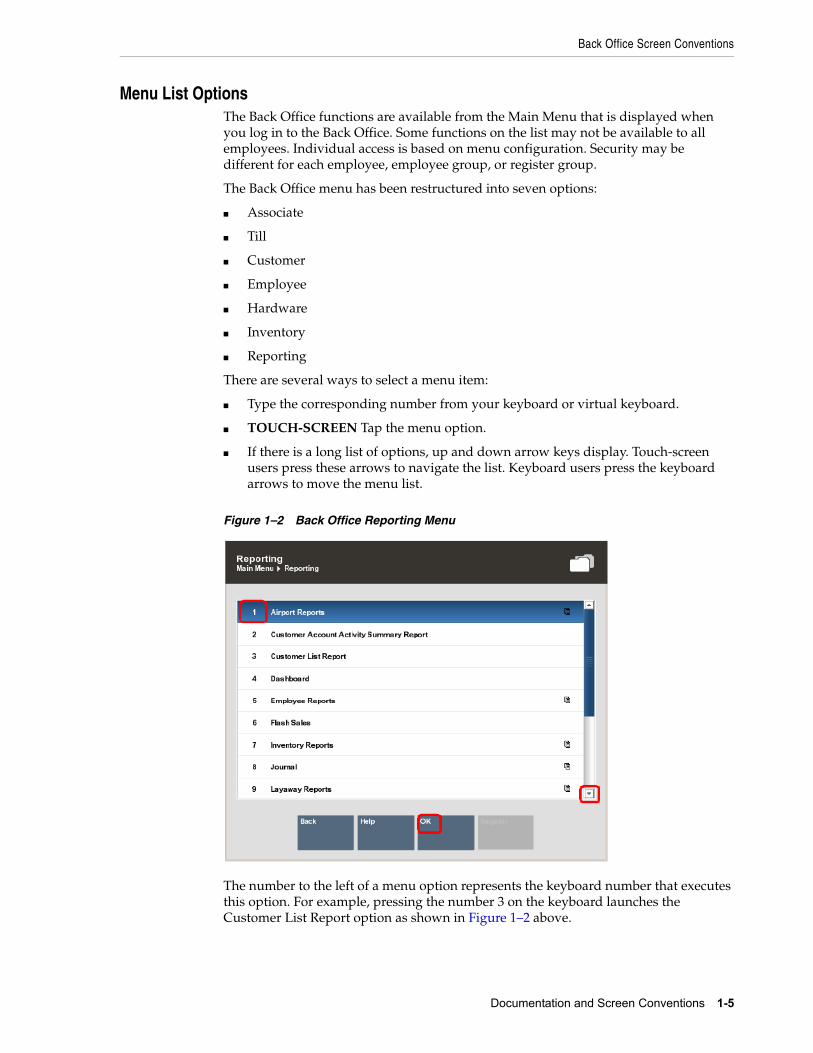
Figure 1–2 Back Office Reporting Menu
The number to the left of a menu option represents the keyboard number that executes this option. For example, pressing the number 3 on the keyboard launches the Customer List Report option as shown in Figure 1–2 above.

Back Office Screen Conventions
1-6 Oracle® Retail Xstore Point-of-Service Manager's Guide
This symbol to the right of a menu option indicates that there are additional sub- menus for this option. If you select a menu option with submenus, Oracle Retail Xstore Point-of-Service displays additional functions that are available for that option.
If an option is grayed out, the option is not available to the current user. This is configurable by security level. Other menu options may not be available when the register or store is closed.
Figure 1–3 Option Grayed Out
A menu option with a key icon indicates that a security ID is required.
Figure 1–4 Option with Key Icon
Screen Layout
Figure 1–5 Screen Layout Areas
For more information about these Back Office screen areas, refer to:
■ Static Information Area
■ Tabs
■ Information Areas
■ Screen Title (Changes per function)
Back Office Screen Conventions
Documentation and Screen Conventions 1-7
■ Menu Buttons (availability determined by function and the user’s security). See Menu Buttons
■ Message Bar
TabsTo open tab screens:
■ Select the Previous tab or Next tab menu button.
■ Touch-screen users, can tap the desired tab.
Menu ButtonsThe menu button options can be found on the bottom of most menus and forms. If you are using a keyboard, you can press the associated function key. Menu buttons with the following icons denote additional functions:
Function Keys
The Xstore menu buttons show the functions that are available for each Xstore window. Each menu button has a function key (F1 - F12) assigned to it. Because each Xstore menu is configurable, the button functions on your system may appear in a different order or have different text than shown throughout this manual.
Some of the functions on a menu may not be available to some employees. Availability of a function depends on menu security, and it may be different for each employee, employee group, or register group.
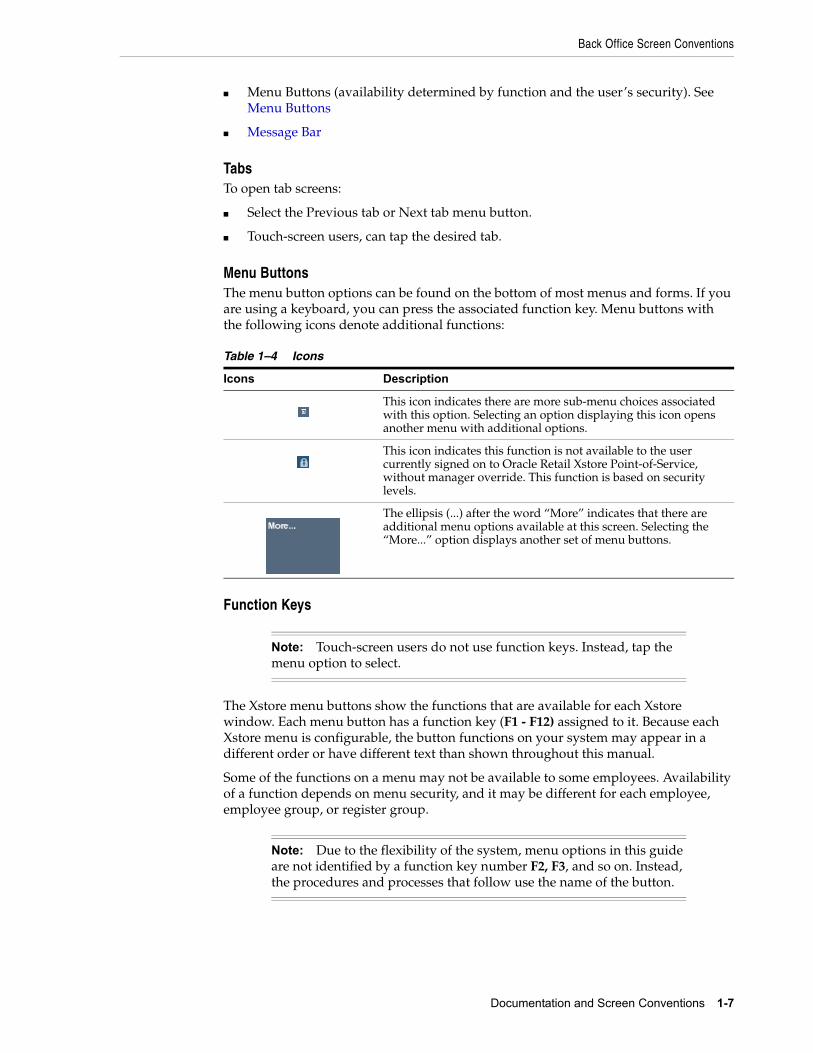
Table 1–4 Icons
Icons Description
This icon indicates there are more sub-menu choices associated with this option. Selecting an option displaying this icon opens another menu with additional options.
This icon indicates this function is not available to the user currently signed on to Oracle Retail Xstore Point-of-Service, without manager override. This function is based on security levels.
The ellipsis (...) after the word “More” indicates that there are additional menu options available at this screen. Selecting the “More...” option displays another set of menu buttons.
Note: Touch-screen users do not use function keys. Instead, tap the menu option to select.
Note: Due to the flexibility of the system, menu options in this guide are not identified by a function key number F2, F3, and so on. Instead, the procedures and processes that follow use the name of the button.
Back Office Screen Conventions
1-8 Oracle® Retail Xstore Point-of-Service Manager's Guide
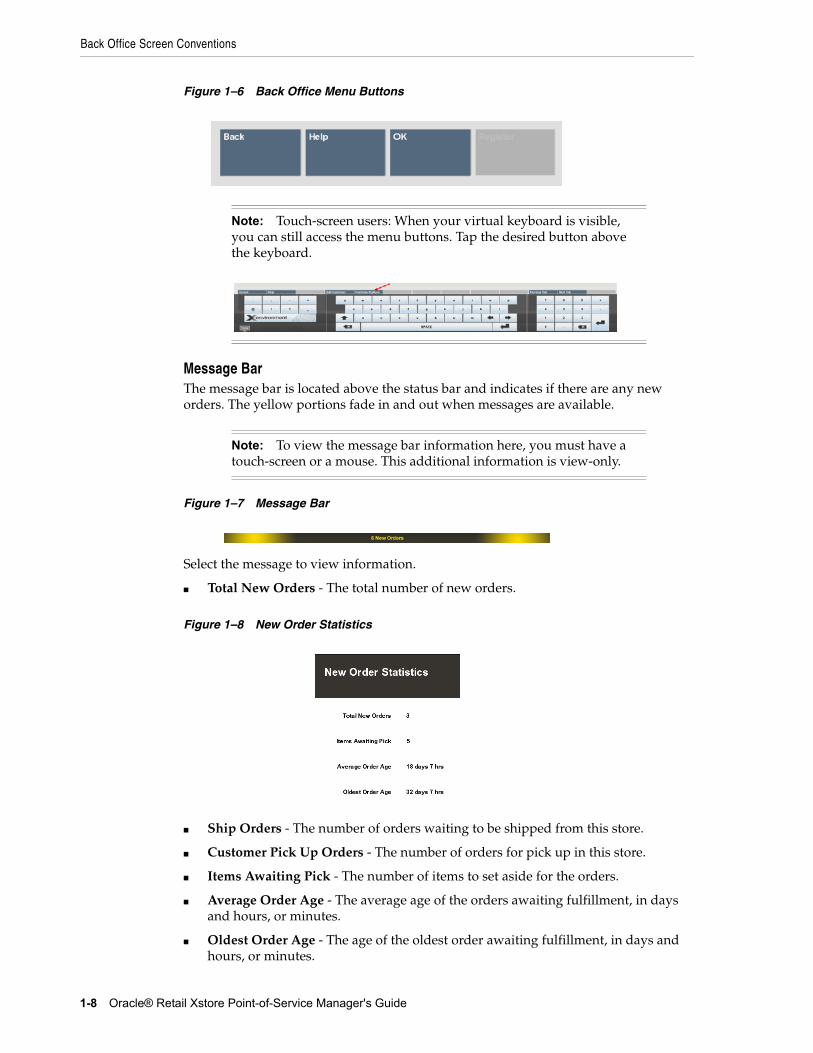
Figure 1–6 Back Office Menu Buttons
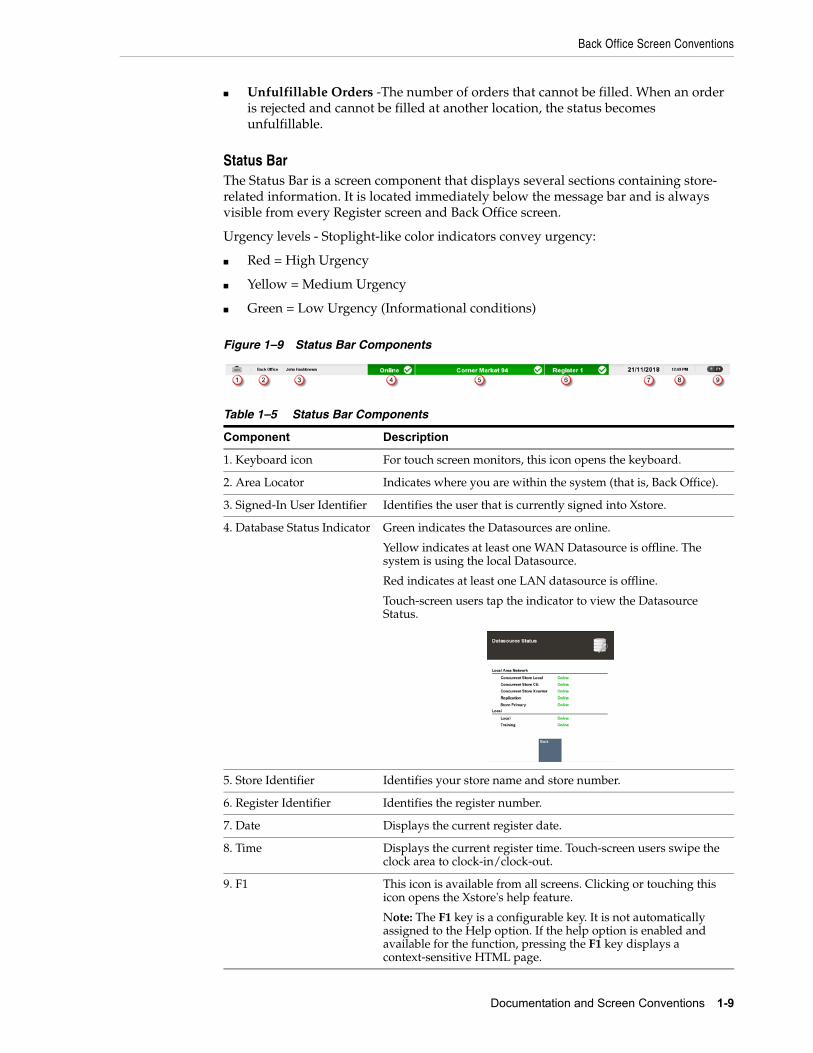
Message BarThe message bar is located above the status bar and indicates if there are any new orders. The yellow portions fade in and out when messages are available.
Figure 1–7 Message Bar
Select the message to view information.
■ Total New Orders - The total number of new orders.
Figure 1–8 New Order Statistics
■ Ship Orders - The number of orders waiting to be shipped from this store.
■ Customer Pick Up Orders - The number of orders for pick up in this store.
■ Items Awaiting Pick - The number of items to set aside for the orders.
■ Average Order Age - The average age of the orders awaiting fulfillment, in days and hours, or minutes.
■ Oldest Order Age - The age of the oldest order awaiting fulfillment, in days and hours, or minutes.
Note: Touch-screen users: When your virtual keyboard is visible, you can still access the menu buttons. Tap the desired button above the keyboard.
Note: To view the message bar information here, you must have a touch-screen or a mouse. This additional information is view-only.
Back Office Screen Conventions
Documentation and Screen Conventions 1-9
■ Unfulfillable Orders -The number of orders that cannot be filled. When an order is rejected and cannot be filled at another location, the status becomes unfulfillable.
Status BarThe Status Bar is a screen component that displays several sections containing store- related information. It is located immediately below the message bar and is always visible from every Register screen and Back Office screen.
Urgency levels - Stoplight-like color indicators convey urgency:
■ Red = High Urgency
■ Yellow = Medium Urgency
■ Green = Low Urgency (Informational conditions)
Figure 1–9 Status Bar Components
Table 1–5 Status Bar Components
Component Description
1. Keyboard icon For touch screen monitors, this icon opens the keyboard.
2. Area Locator Indicates where you are within the system (that is, Back Office).
3. Signed-In User Identifier Identifies the user that is currently signed into Xstore.
4. Database Status Indicator Green indicates the Datasources are online.
Yellow indicates at least one WAN Datasource is offline. The system is using the local Datasource.
Red indicates at least one LAN datasource is offline.
Touch-screen users tap the indicator to view the Datasource Status.
5. Store Identifier Identifies your store name and store number.
6. Register Identifier Identifies the register number.
7. Date Displays the current register date.
8. Time Displays the current register time. Touch-screen users swipe the clock area to clock-in/clock-out.
9. F1 This icon is available from all screens. Clicking or touching this icon opens the Xstore's help feature.
Note: The F1 key is a configurable key. It is not automatically assigned to the Help option. If the help option is enabled and available for the function, pressing the F1 key displays a context-sensitive HTML page.
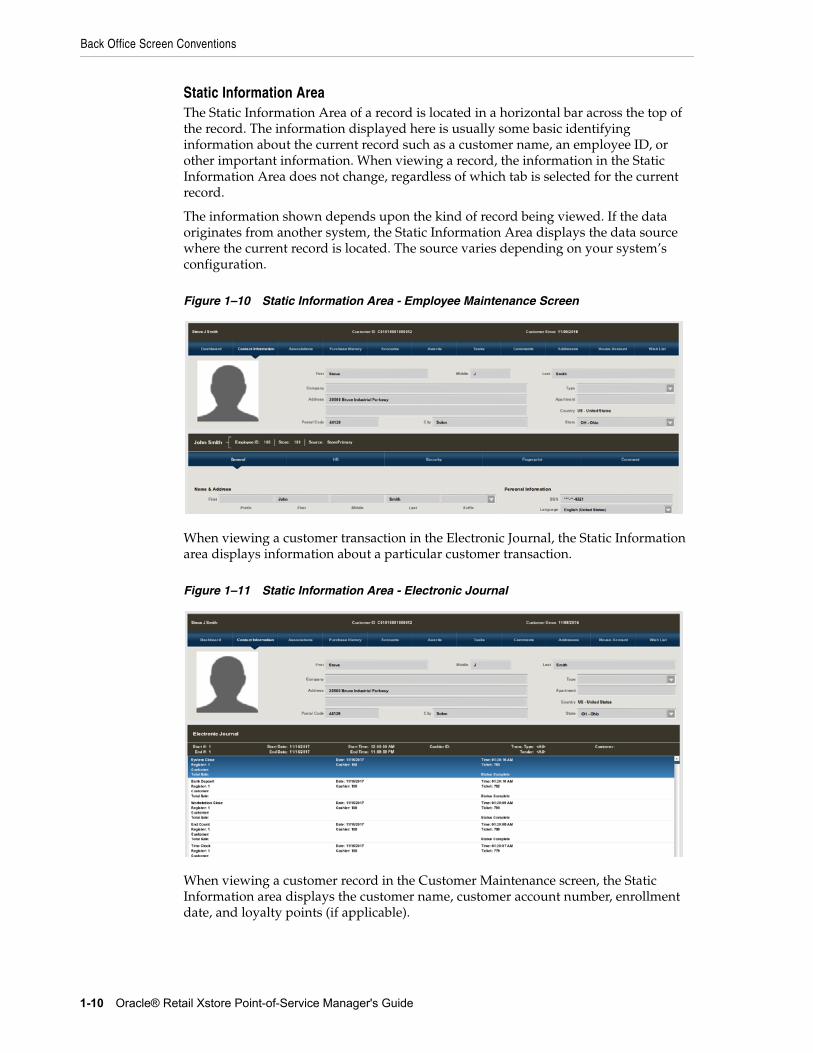
Back Office Screen Conventions
1-10 Oracle® Retail Xstore Point-of-Service Manager's Guide
Static Information AreaThe Static Information Area of a record is located in a horizontal bar across the top of the record. The information displayed here is usually some basic identifying information about the current record such as a customer name, an employee ID, or other important information. When viewing a record, the information in the Static Information Area does not change, regardless of which tab is selected for the current record.
The information shown depends upon the kind of record being viewed. If the data originates from another system, the Static Information Area displays the data source where the current record is located. The source varies depending on your system’s configuration.
Figure 1–10 Static Information Area - Employee Maintenance Screen
When viewing a customer transaction in the Electronic Journal, the Static Information area displays information about a particular customer transaction.
Figure 1–11 Static Information Area - Electronic Journal
When viewing a customer record in the Customer Maintenance screen, the Static Information area displays the customer name, customer account number, enrollment date, and loyalty points (if applicable).
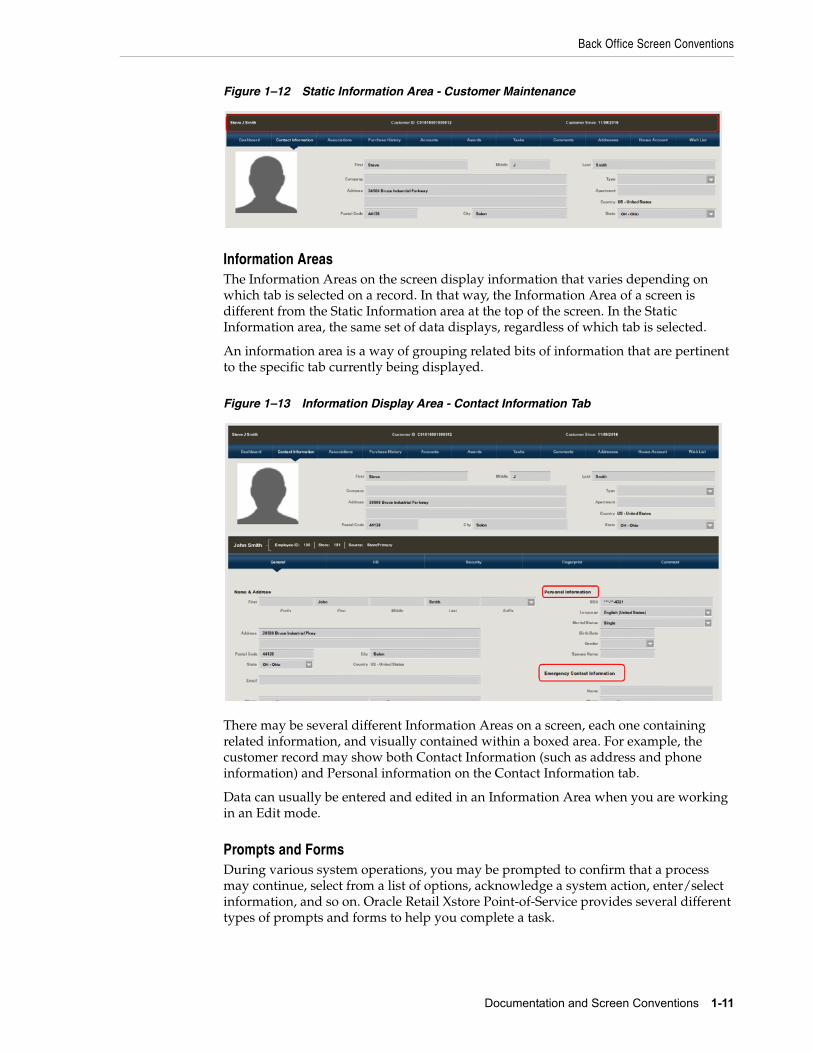
Back Office Screen Conventions
Documentation and Screen Conventions 1-11
Figure 1–12 Static Information Area - Customer Maintenance
Information AreasThe Information Areas on the screen display information that varies depending on which tab is selected on a record. In that way, the Information Area of a screen is different from the Static Information area at the top of the screen. In the Static Information area, the same set of data displays, regardless of which tab is selected.
An information area is a way of grouping related bits of information that are pertinent to the specific tab currently being displayed.
Figure 1–13 Information Display Area - Contact Information Tab
There may be several different Information Areas on a screen, each one containing related information, and visually contained within a boxed area. For example, the customer record may show both Contact Information (such as address and phone information) and Personal information on the Contact Information tab.
Data can usually be entered and edited in an Information Area when you are working in an Edit mode.
Prompts and FormsDuring various system operations, you may be prompted to confirm that a process may continue, select from a list of options, acknowledge a system action, enter/select information, and so on. Oracle Retail Xstore Point-of-Service provides several different types of prompts and forms to help you complete a task.
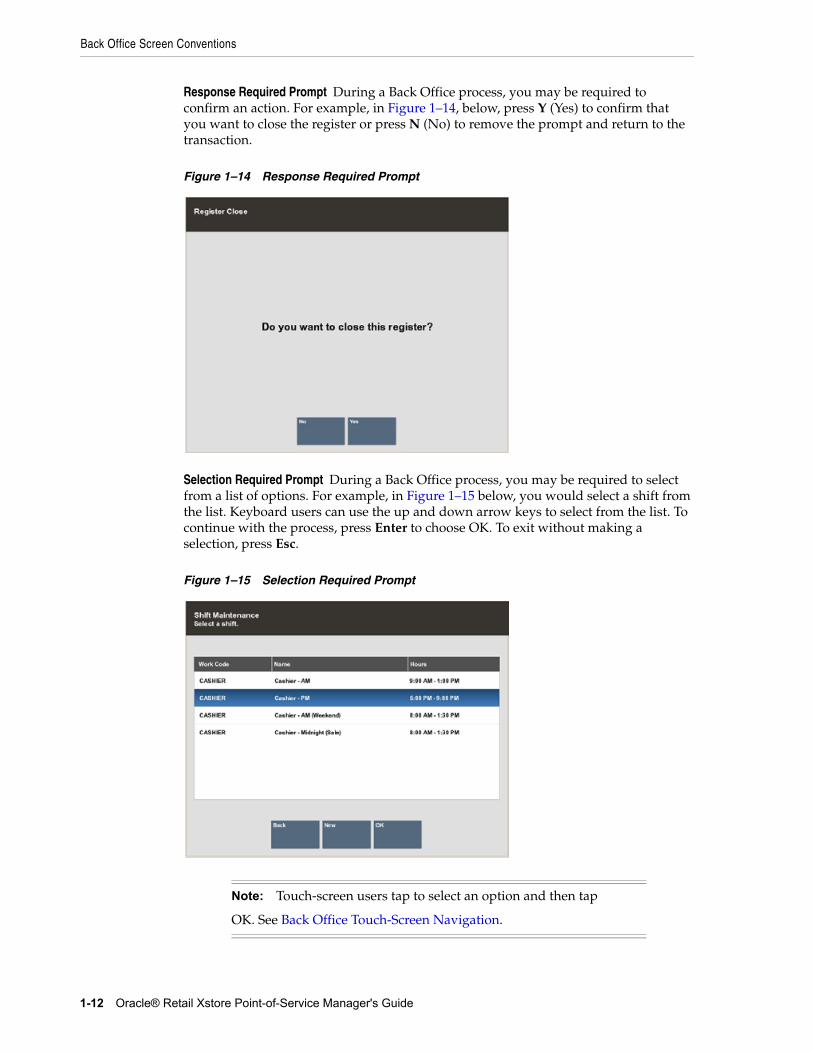
Back Office Screen Conventions
1-12 Oracle® Retail Xstore Point-of-Service Manager's Guide
Response Required Prompt During a Back Office process, you may be required to confirm an action. For example, in Figure 1–14, below, press Y (Yes) to confirm that you want to close the register or press N (No) to remove the prompt and return to the transaction.
Figure 1–14 Response Required Prompt
Selection Required Prompt During a Back Office process, you may be required to select from a list of options. For example, in Figure 1–15 below, you would select a shift from the list. Keyboard users can use the up and down arrow keys to select from the list. To continue with the process, press Enter to choose OK. To exit without making a selection, press Esc.
Figure 1–15 Selection Required Prompt
Note: Touch-screen users tap to select an option and then tap
OK. See Back Office Touch-Screen Navigation.
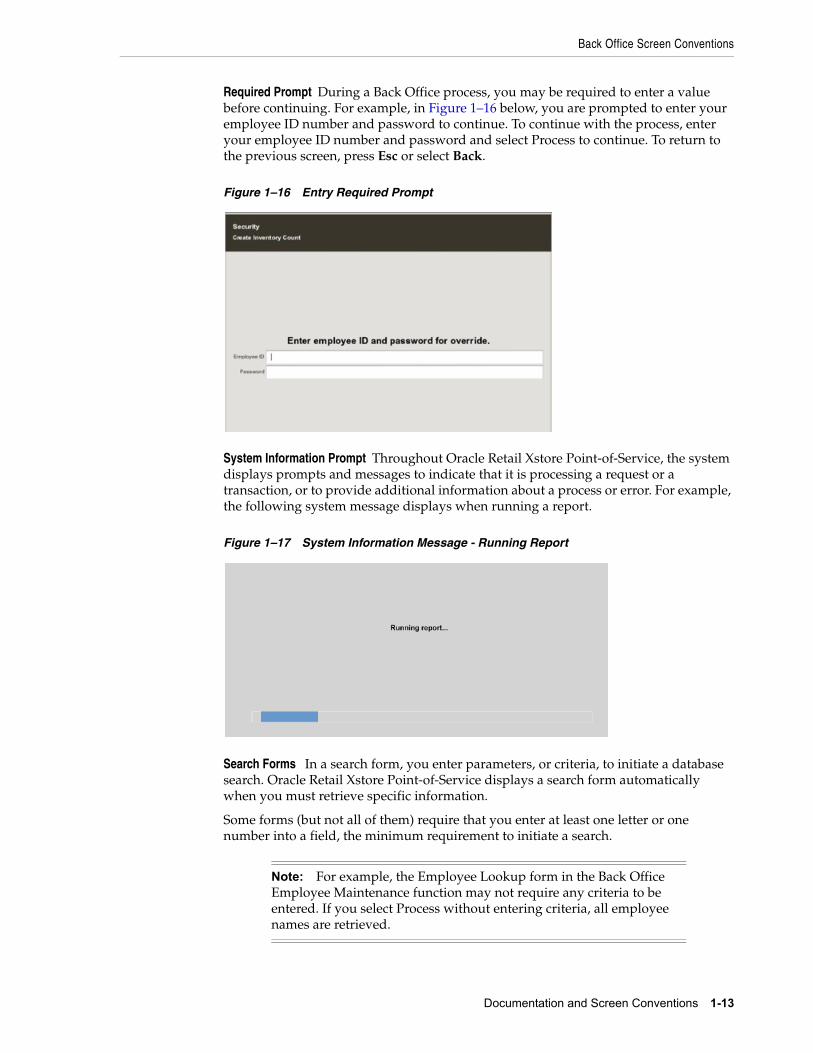
Back Office Screen Conventions
Documentation and Screen Conventions 1-13
Required Prompt During a Back Office process, you may be required to enter a value before continuing. For example, in Figure 1–16 below, you are prompted to enter your employee ID number and password to continue. To continue with the process, enter your employee ID number and password and select Process to continue. To return to the previous screen, press Esc or select Back.
Figure 1–16 Entry Required Prompt
System Information Prompt Throughout Oracle Retail Xstore Point-of-Service, the system displays prompts and messages to indicate that it is processing a request or a transaction, or to provide additional information about a process or error. For example, the following system message displays when running a report.
Figure 1–17 System Information Message - Running Report
Search Forms In a search form, you enter parameters, or criteria, to initiate a database search. Oracle Retail Xstore Point-of-Service displays a search form automatically when you must retrieve specific information.
Some forms (but not all of them) require that you enter at least one letter or one number into a field, the minimum requirement to initiate a search.
Note: For example, the Employee Lookup form in the Back Office Employee Maintenance function may not require any criteria to be entered. If you select Process without entering criteria, all employee names are retrieved.
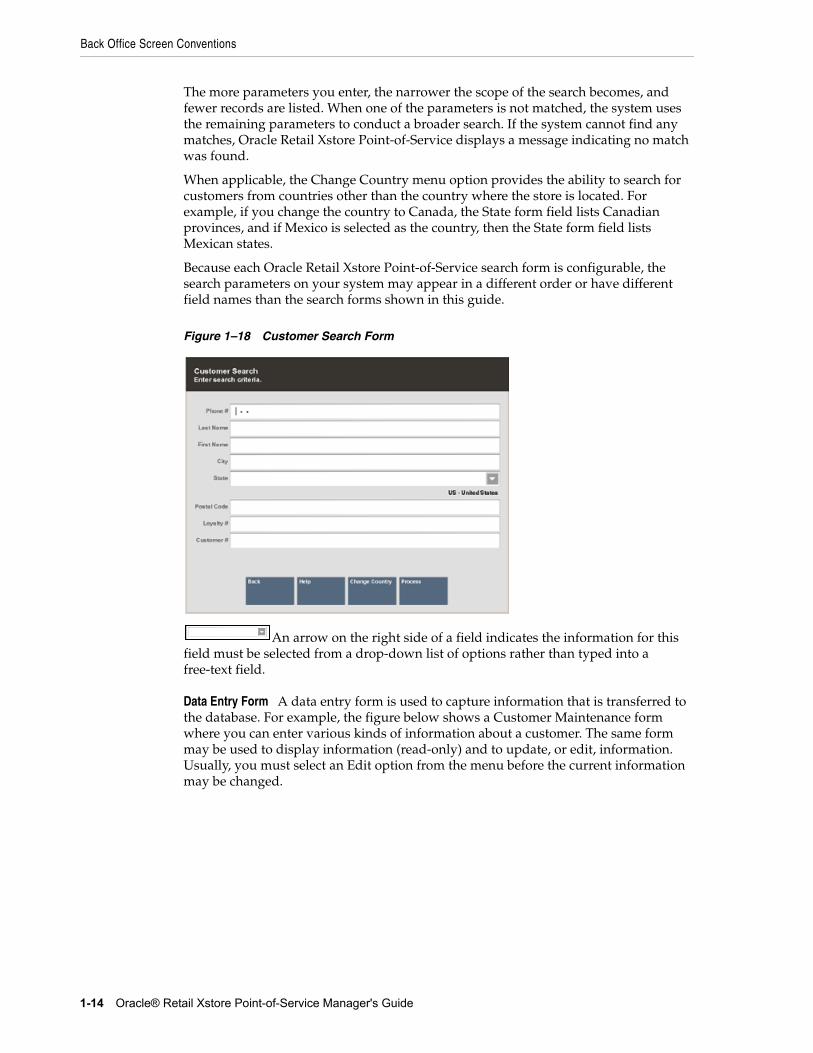
Back Office Screen Conventions
1-14 Oracle® Retail Xstore Point-of-Service Manager's Guide
The more parameters you enter, the narrower the scope of the search becomes, and fewer records are listed. When one of the parameters is not matched, the system uses the remaining parameters to conduct a broader search. If the system cannot find any matches, Oracle Retail Xstore Point-of-Service displays a message indicating no match was found.
When applicable, the Change Country menu option provides the ability to search for customers from countries other than the country where the store is located. For example, if you change the country to Canada, the State form field lists Canadian provinces, and if Mexico is selected as the country, then the State form field lists Mexican states.
Because each Oracle Retail Xstore Point-of-Service search form is configurable, the search parameters on your system may appear in a different order or have different field names than the search forms shown in this guide.
Figure 1–18 Customer Search Form
An arrow on the right side of a field indicates the information for this field must be selected from a drop-down list of options rather than typed into a free-text field.
Data Entry Form A data entry form is used to capture information that is transferred to the database. For example, the figure below shows a Customer Maintenance form where you can enter various kinds of information about a customer. The same form may be used to display information (read-only) and to update, or edit, information. Usually, you must select an Edit option from the menu before the current information may be changed.
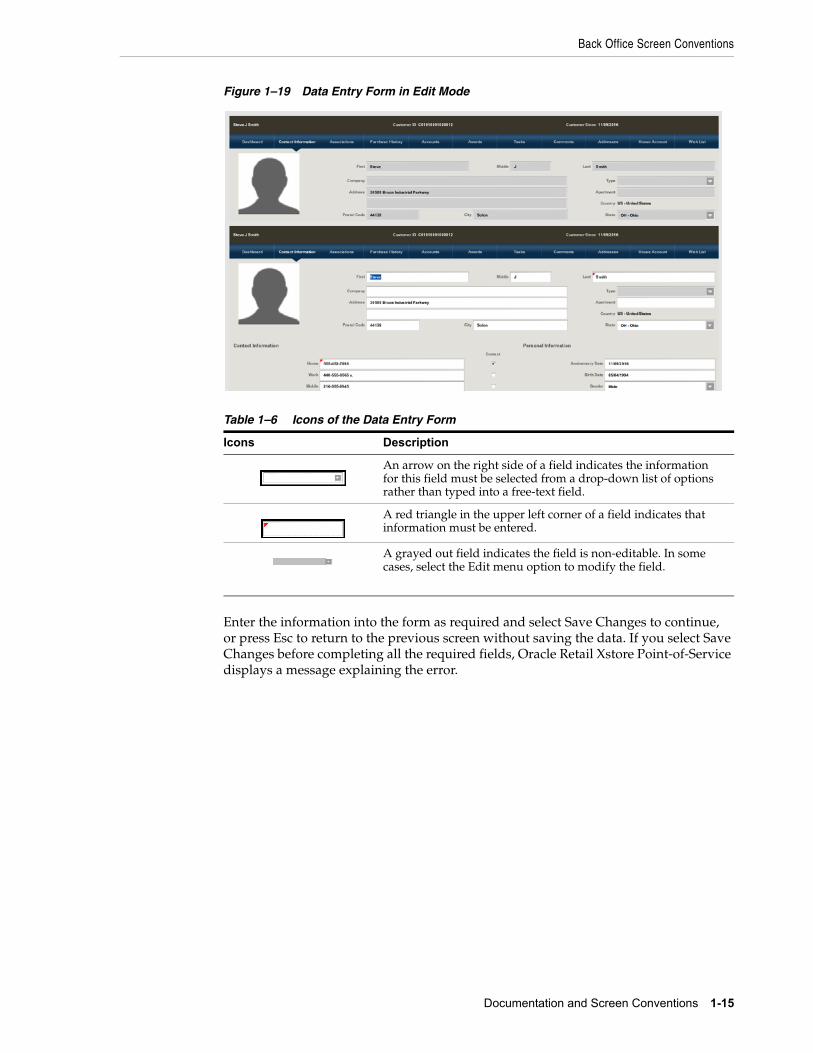
Back Office Screen Conventions
Documentation and Screen Conventions 1-15
Figure 1–19 Data Entry Form in Edit Mode
Enter the information into the form as required and select Save Changes to continue, or press Esc to return to the previous screen without saving the data. If you select Save Changes before completing all the required fields, Oracle Retail Xstore Point-of-Service displays a message explaining the error.
Table 1–6 Icons of the Data Entry Form
Icons Description
An arrow on the right side of a field indicates the information for this field must be selected from a drop-down list of options rather than typed into a free-text field.
A red triangle in the upper left corner of a field indicates that information must be entered.
A grayed out field indicates the field is non-editable. In some cases, select the Edit menu option to modify the field.
2
Customer Maintenance 2-1
2Customer Maintenance
Customer Maintenance includes activities related to entering a new customer into the customer database, updating customer information, and viewing or printing customer information. Customer Maintenance is typically initiated when an employee performs a register transaction and discovers that the customer’s name is not in the database and must be entered for the first time. Customer maintenance is also required when customer information is found to be incorrect and must be changed, or when it is incomplete and additional data must be entered.
The Customer Maintenance screens are essentially the same whether accessed through the Back Office or through the register. Refer to the Oracle Retail Xstore Point-of-Service User Guide for detailed instructions on modifying customer records.
Accessing the Back Office
Associates with the correct security privileges may access Customer Maintenance from the Back Office Main Menu.
In addition to all the customer maintenance functions available from the register, the Back Office Customer Maintenance Menu also offers a Customer List Report. Refer to the Oracle Retail Xstore Point-of-Service Reports Guide for more information.
1. Select the Back Office menu button from the Register Login screen.
Note: The Customer Maintenance activities that may be accessed are controlled by each user’s security level. An associate must have the proper security privileges to perform any customer maintenance.
Note: Because each Oracle Retail Xstore Point-of-Service menu is configurable, the button functions and the menu options on your system may appear in a different order or have different text than the examples shown in this guide.
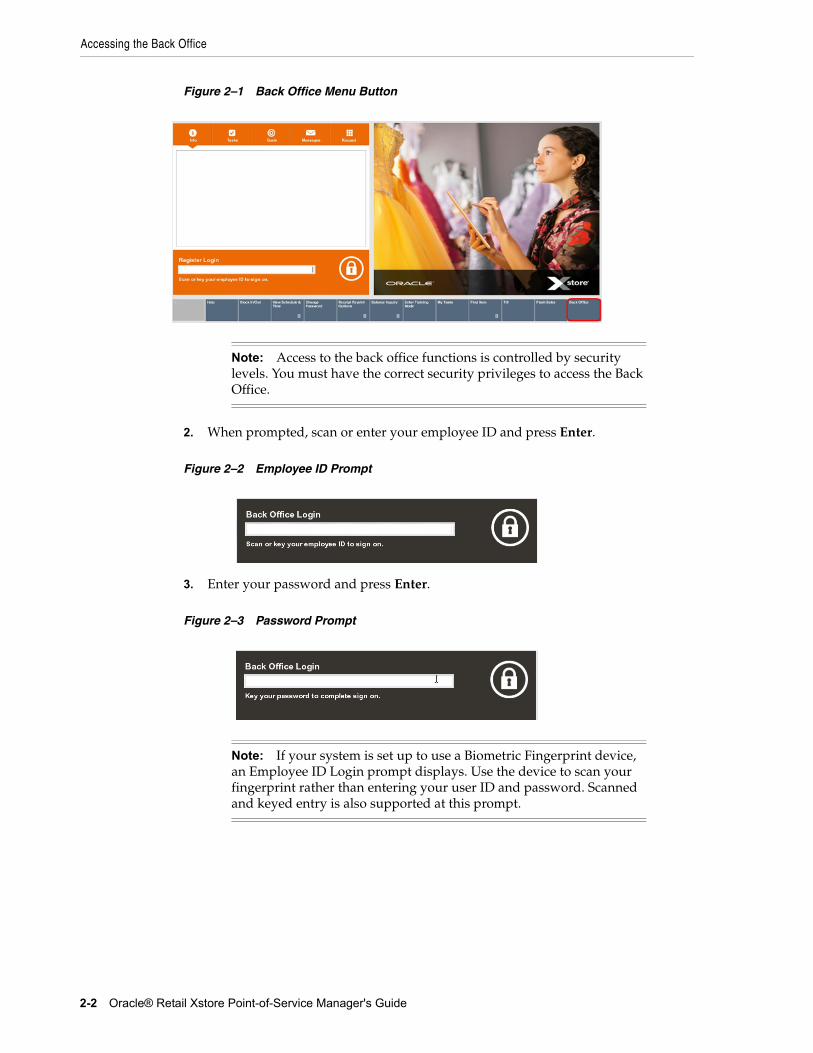
Accessing the Back Office
2-2 Oracle® Retail Xstore Point-of-Service Manager's Guide
Figure 2–1 Back Office Menu Button
2. When prompted, scan or enter your employee ID and press Enter.
Figure 2–2 Employee ID Prompt
3. Enter your password and press Enter.
Figure 2–3 Password Prompt
Note: Access to the back office functions is controlled by security levels. You must have the correct security privileges to access the Back Office.
Note: If your system is set up to use a Biometric Fingerprint device, an Employee ID Login prompt displays. Use the device to scan your fingerprint rather than entering your user ID and password. Scanned and keyed entry is also supported at this prompt.
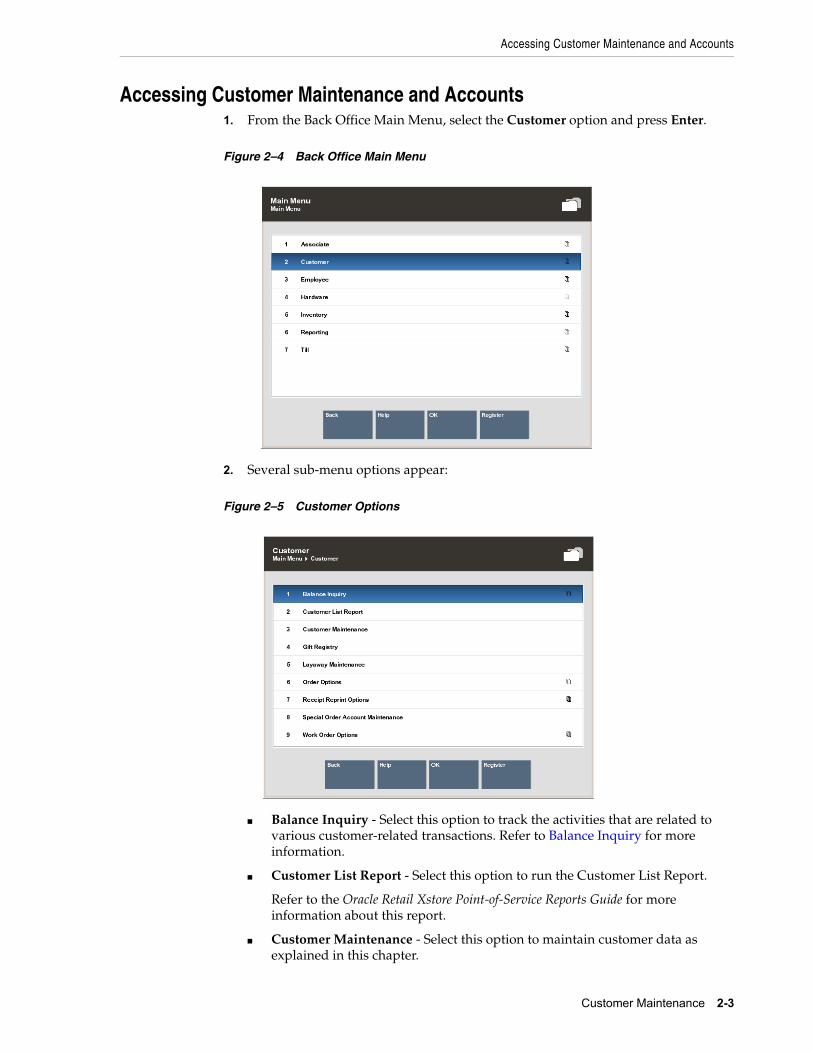
Accessing Customer Maintenance and Accounts
Customer Maintenance 2-3
Accessing Customer Maintenance and Accounts1. From the Back Office Main Menu, select the Customer option and press Enter.
Figure 2–4 Back Office Main Menu
2. Several sub-menu options appear:
Figure 2–5 Customer Options
■ Balance Inquiry - Select this option to track the activities that are related to various customer-related transactions. Refer to Balance Inquiry for more information.
■ Customer List Report - Select this option to run the Customer List Report.
Refer to the Oracle Retail Xstore Point-of-Service Reports Guide for more information about this report.
■ Customer Maintenance - Select this option to maintain customer data as explained in this chapter.
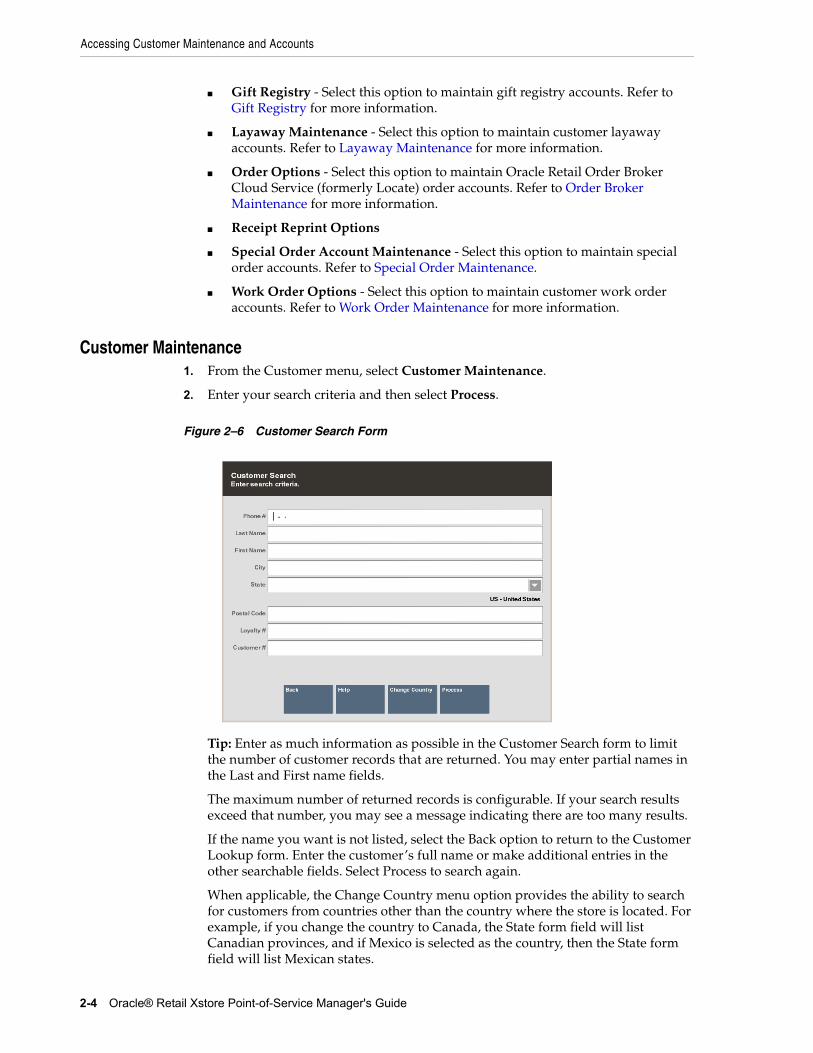
Accessing Customer Maintenance and Accounts
2-4 Oracle® Retail Xstore Point-of-Service Manager's Guide
■ Gift Registry - Select this option to maintain gift registry accounts. Refer to Gift Registry for more information.
■ Layaway Maintenance - Select this option to maintain customer layaway accounts. Refer to Layaway Maintenance for more information.
■ Order Options - Select this option to maintain Oracle Retail Order Broker Cloud Service (formerly Locate) order accounts. Refer to Order Broker Maintenance for more information.
■ Receipt Reprint Options
■ Special Order Account Maintenance - Select this option to maintain special order accounts. Refer to Special Order Maintenance.
■ Work Order Options - Select this option to maintain customer work order accounts. Refer to Work Order Maintenance for more information.
Customer Maintenance1. From the Customer menu, select Customer Maintenance.
2. Enter your search criteria and then select Process.
Figure 2–6 Customer Search Form
Tip: Enter as much information as possible in the Customer Search form to limit the number of customer records that are returned. You may enter partial names in the Last and First name fields.
The maximum number of returned records is configurable. If your search results exceed that number, you may see a message indicating there are too many results.
If the name you want is not listed, select the Back option to return to the Customer Lookup form. Enter the customer’s full name or make additional entries in the other searchable fields. Select Process to search again.
When applicable, the Change Country menu option provides the ability to search for customers from countries other than the country where the store is located. For example, if you change the country to Canada, the State form field will list Canadian provinces, and if Mexico is selected as the country, then the State form field will list Mexican states.
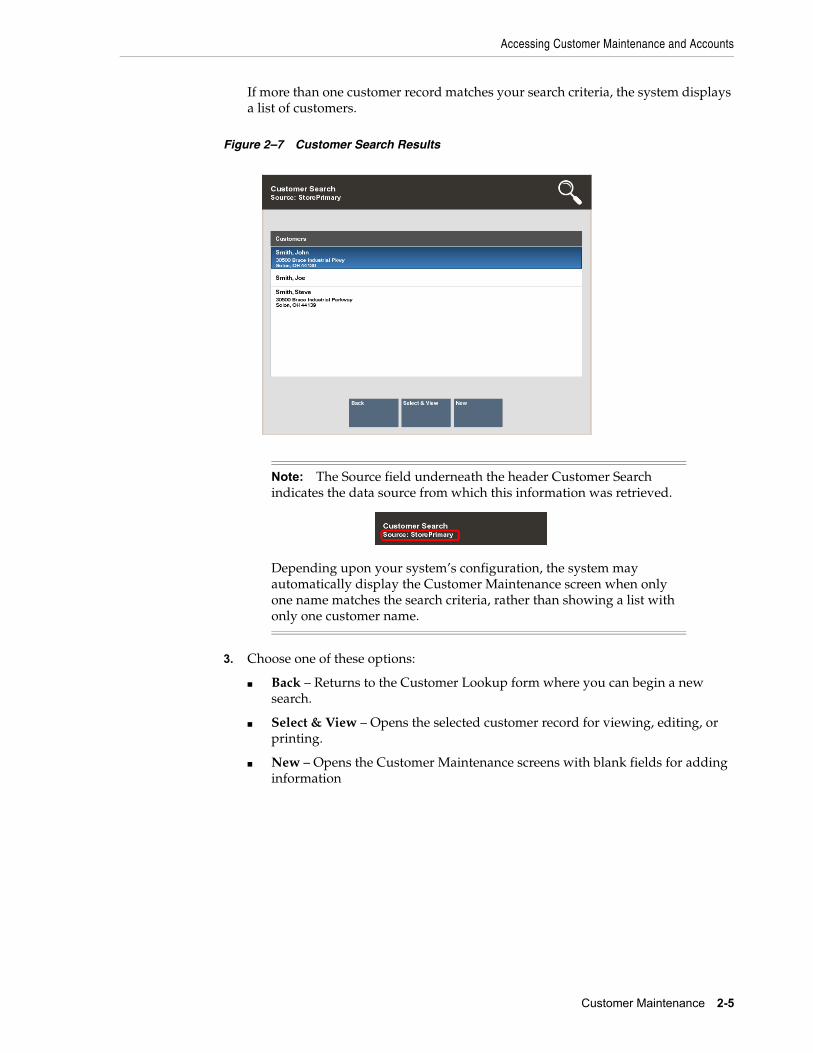
Accessing Customer Maintenance and Accounts
Customer Maintenance 2-5
If more than one customer record matches your search criteria, the system displays a list of customers.
Figure 2–7 Customer Search Results
3. Choose one of these options:
■ Back – Returns to the Customer Lookup form where you can begin a new search.
■ Select & View – Opens the selected customer record for viewing, editing, or printing.
■ New – Opens the Customer Maintenance screens with blank fields for adding information
Note: The Source field underneath the header Customer Search indicates the data source from which this information was retrieved.
Depending upon your system’s configuration, the system may automatically display the Customer Maintenance screen when only one name matches the search criteria, rather than showing a list with only one customer name.
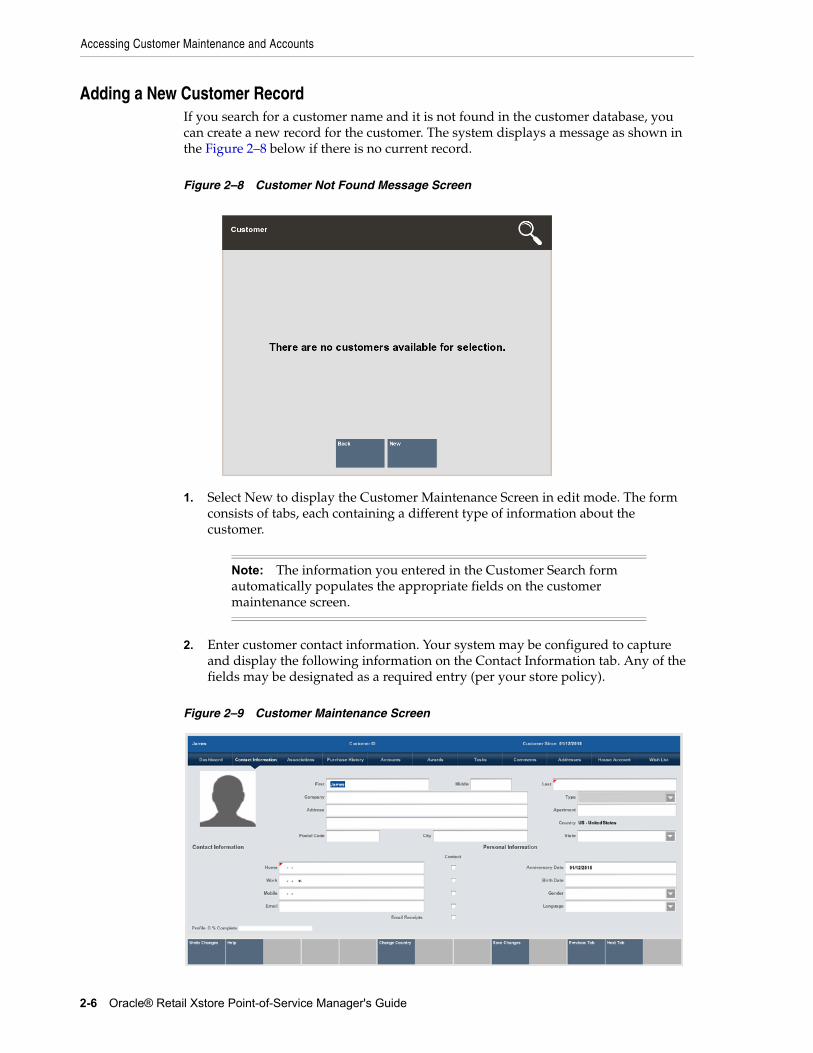
Accessing Customer Maintenance and Accounts
2-6 Oracle® Retail Xstore Point-of-Service Manager's Guide
Adding a New Customer RecordIf you search for a customer name and it is not found in the customer database, you can create a new record for the customer. The system displays a message as shown in the Figure 2–8 below if there is no current record.
Figure 2–8 Customer Not Found Message Screen
1. Select New to display the Customer Maintenance Screen in edit mode. The form consists of tabs, each containing a different type of information about the customer.
2. Enter customer contact information. Your system may be configured to capture and display the following information on the Contact Information tab. Any of the fields may be designated as a required entry (per your store policy).
Figure 2–9 Customer Maintenance Screen
Note: The information you entered in the Customer Search form automatically populates the appropriate fields on the customer maintenance screen.

Accessing Customer Maintenance and Accounts
Customer Maintenance 2-7
■ Any field that required an entry is marked with a red triangle in the upper left corner of the field.
■ Any field that has a selectable list of options displays a down arrow on the right side of the field.
3. Select the Associations tab to make additional entries for personal information such as tax exemptions. See Associations Tab.
Tip: When you enter a valid postal code for the customer, the system automatically enters the city and state information.
Table 2–1 Contact Information Fields
Field Name Description
First name, middle initial, last name
The system automatically creates an initial cap for the first letter you type here if you don't press the Shift key when entering the customer's name.
Company If you enter a company name here, the Organization Type field becomes active.
Type Associated with Company entries; for example, Club, Company, School, and so on. This field is only active after a Company name is entered
Address Two address lines are provided. This is the customer's primary address.
Apartment # Optional field.
Postal Code The system automatically supplies the city and state if it recognizes the Zip/Postal code that you enter.
City Automatically populated if the system recognizes the Zip/Postal code that you entered first.
State/Province If you begin typing, the system auto-fills the field with states/provinces defined for your store.
Country Defaults to the country in which the store is located, but can be changed using the Change Country option.
Phone Numbers As you enter data in these fields, the associated contact permission check marks become active. Check mark whether or not it is okay to contact the customer by selecting the corresponding yes box.
Email address Format this email address correctly so it can be used to contact the customer. If the customer would like to receive receipt copies via email, this must be a valid email address and the Email flag (Email?) must be set to "Yes".
Anniversary Date This information can be used to display a message such as "Happy Anniversary" before or after the anniversary.
Birth Date This information can be used to display a message such as "Happy Birthday John" before or after the customer's birthday.
Gender The gender will determine the avatar picture in the contact information tab.
Language The language code for the customer's preferred language.
Email Receipts "Yes" indicates the customer would like to have email receipts automatically selected when purchasing items.
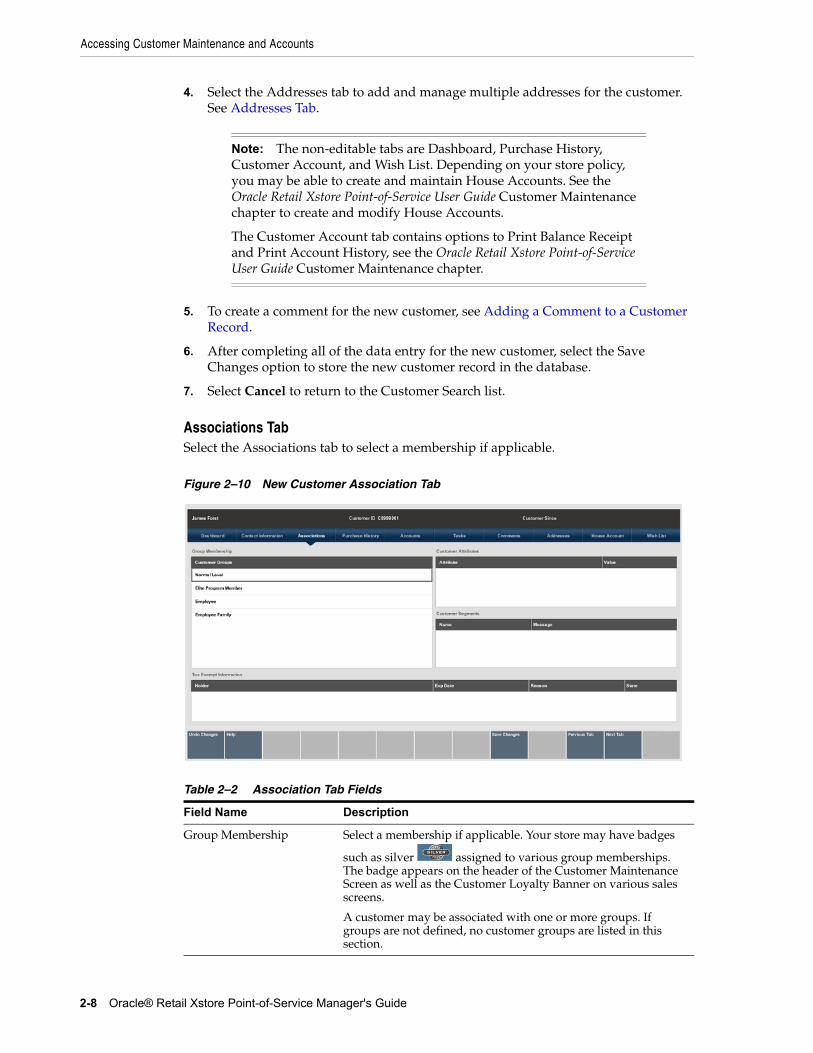
Accessing Customer Maintenance and Accounts
2-8 Oracle® Retail Xstore Point-of-Service Manager's Guide
4. Select the Addresses tab to add and manage multiple addresses for the customer. See Addresses Tab.
5. To create a comment for the new customer, see Adding a Comment to a Customer Record.
6. After completing all of the data entry for the new customer, select the Save Changes option to store the new customer record in the database.
7. Select Cancel to return to the Customer Search list.
Associations TabSelect the Associations tab to select a membership if applicable.
Figure 2–10 New Customer Association Tab
Note: The non-editable tabs are Dashboard, Purchase History, Customer Account, and Wish List. Depending on your store policy, you may be able to create and maintain House Accounts. See the Oracle Retail Xstore Point-of-Service User Guide Customer Maintenance chapter to create and modify House Accounts.
The Customer Account tab contains options to Print Balance Receipt and Print Account History, see the Oracle Retail Xstore Point-of-Service User Guide Customer Maintenance chapter.
Table 2–2 Association Tab Fields
Field Name Description
Group Membership Select a membership if applicable. Your store may have badges
such as silver assigned to various group memberships. The badge appears on the header of the Customer Maintenance Screen as well as the Customer Loyalty Banner on various sales screens.
A customer may be associated with one or more groups. If groups are not defined, no customer groups are listed in this section.
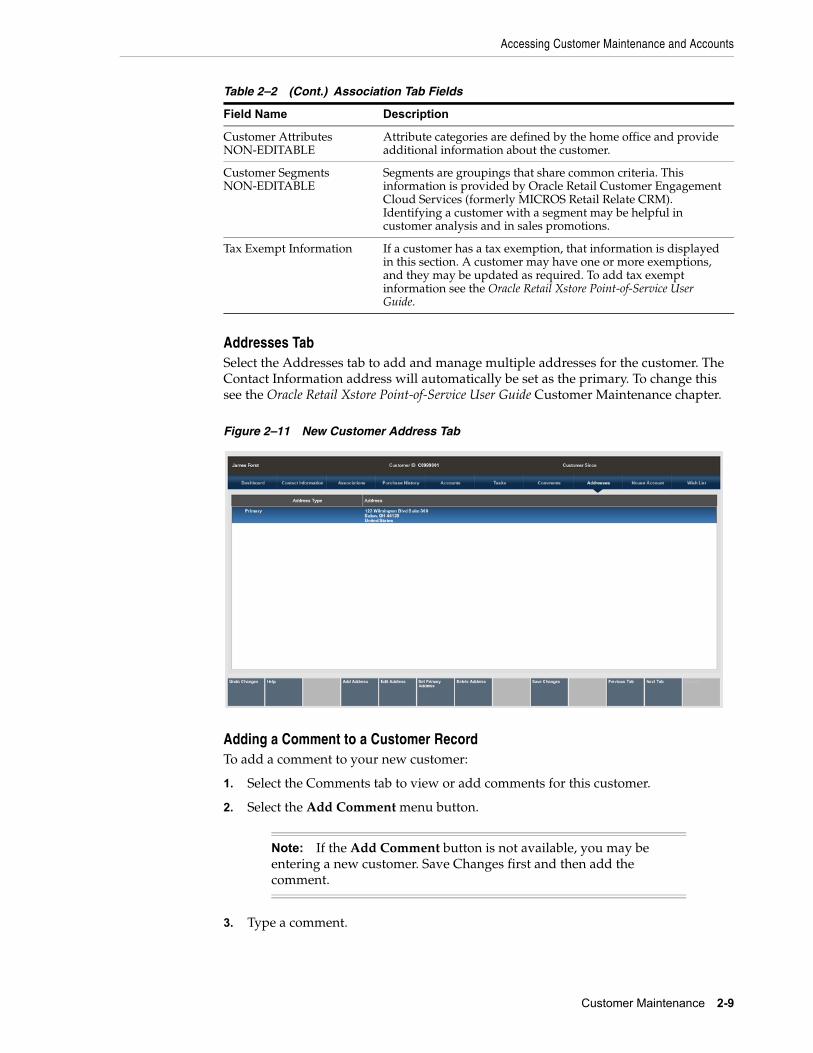
Accessing Customer Maintenance and Accounts
Customer Maintenance 2-9
Addresses TabSelect the Addresses tab to add and manage multiple addresses for the customer. The Contact Information address will automatically be set as the primary. To change this see the Oracle Retail Xstore Point-of-Service User Guide Customer Maintenance chapter.
Figure 2–11 New Customer Address Tab
Adding a Comment to a Customer RecordTo add a comment to your new customer:
1. Select the Comments tab to view or add comments for this customer.
2. Select the Add Comment menu button.
3. Type a comment.
Customer Attributes NON-EDITABLE
Attribute categories are defined by the home office and provide additional information about the customer.
Customer Segments NON-EDITABLE
Segments are groupings that share common criteria. This information is provided by Oracle Retail Customer Engagement Cloud Services (formerly MICROS Retail Relate CRM). Identifying a customer with a segment may be helpful in customer analysis and in sales promotions.
Tax Exempt Information If a customer has a tax exemption, that information is displayed in this section. A customer may have one or more exemptions, and they may be updated as required. To add tax exempt information see the Oracle Retail Xstore Point-of-Service User Guide.
Note: If the Add Comment button is not available, you may be entering a new customer. Save Changes first and then add the comment.
Table 2–2 (Cont.) Association Tab Fields
Field Name Description
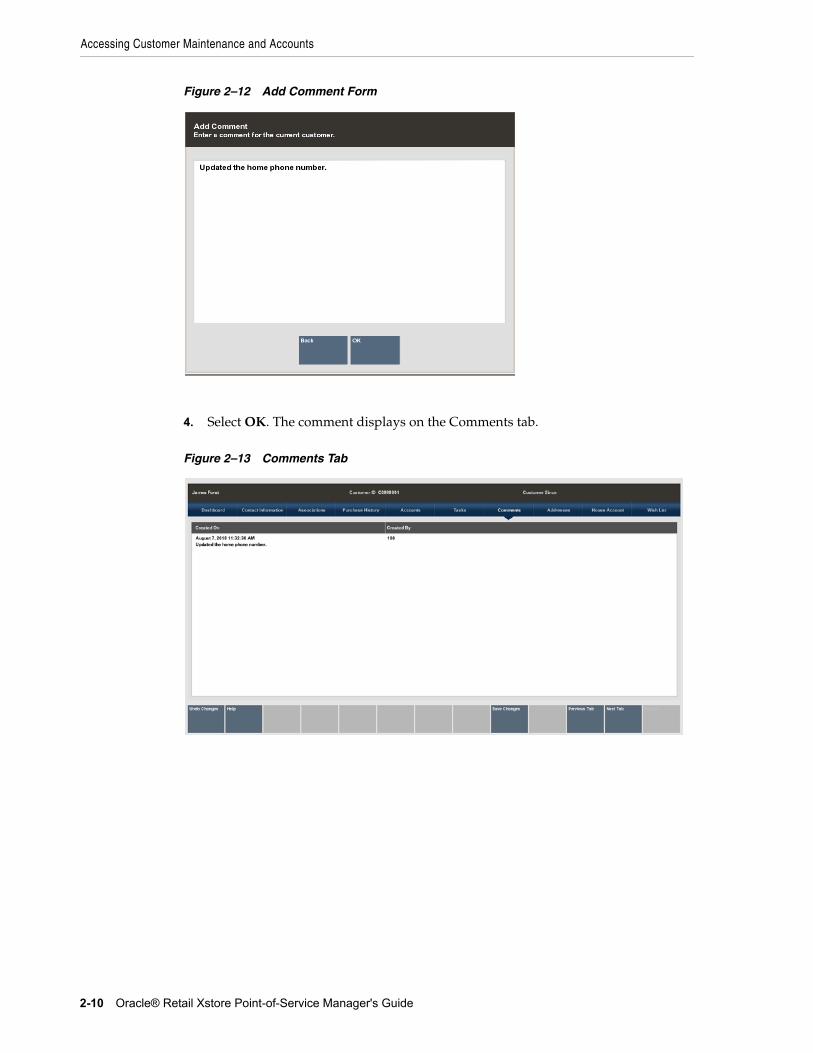
Accessing Customer Maintenance and Accounts
2-10 Oracle® Retail Xstore Point-of-Service Manager's Guide
Figure 2–12 Add Comment Form
4. Select OK. The comment displays on the Comments tab.
Figure 2–13 Comments Tab
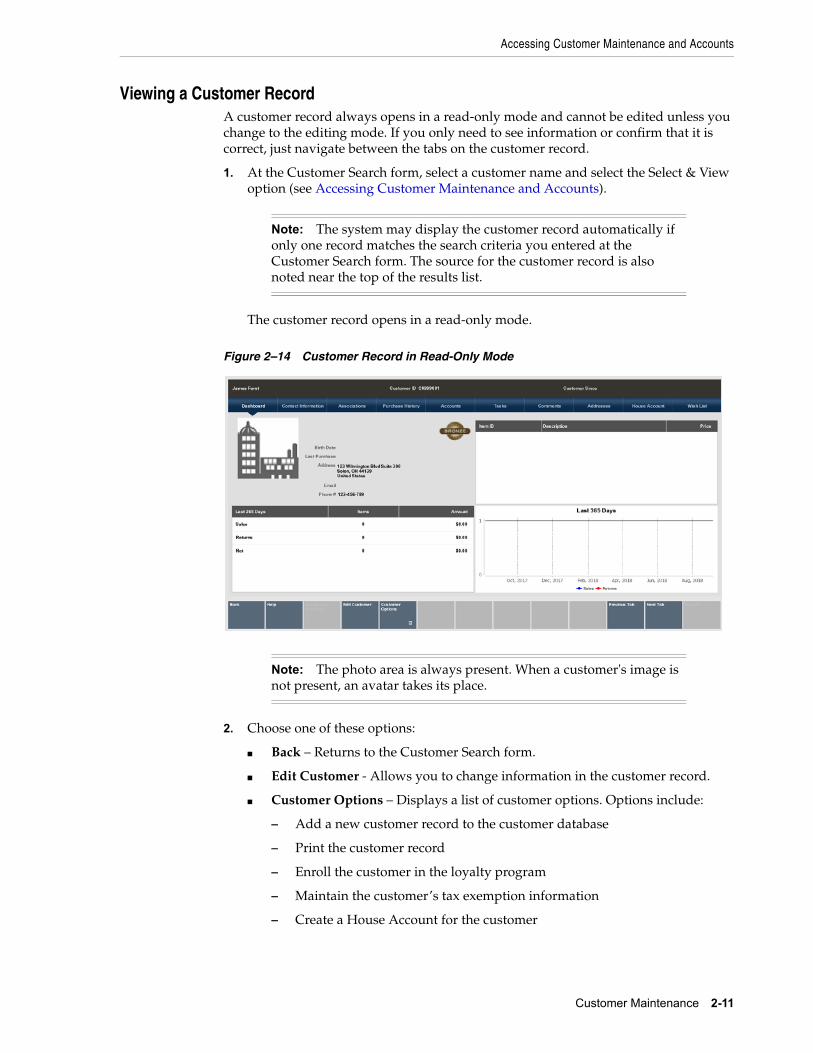
Accessing Customer Maintenance and Accounts
Customer Maintenance 2-11
Viewing a Customer RecordA customer record always opens in a read-only mode and cannot be edited unless you change to the editing mode. If you only need to see information or confirm that it is correct, just navigate between the tabs on the customer record.
1. At the Customer Search form, select a customer name and select the Select & View option (see Accessing Customer Maintenance and Accounts).
The customer record opens in a read-only mode.
Figure 2–14 Customer Record in Read-Only Mode
2. Choose one of these options:
■ Back – Returns to the Customer Search form.
■ Edit Customer - Allows you to change information in the customer record.
■ Customer Options – Displays a list of customer options. Options include:
– Add a new customer record to the customer database
– Print the customer record
– Enroll the customer in the loyalty program
– Maintain the customer’s tax exemption information
– Create a House Account for the customer
Note: The system may display the customer record automatically if only one record matches the search criteria you entered at the Customer Search form. The source for the customer record is also noted near the top of the results list.
Note: The photo area is always present. When a customer's image is not present, an avatar takes its place.
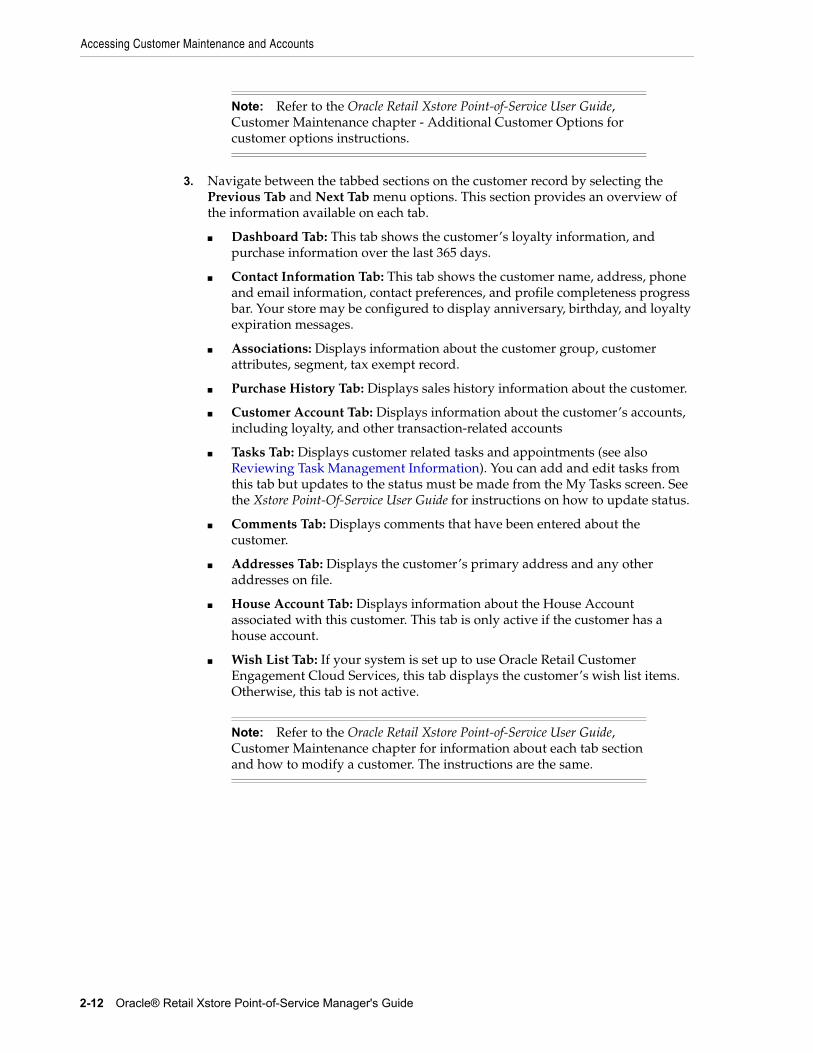
Accessing Customer Maintenance and Accounts
2-12 Oracle® Retail Xstore Point-of-Service Manager's Guide
3. Navigate between the tabbed sections on the customer record by selecting the Previous Tab and Next Tab menu options. This section provides an overview of the information available on each tab.
■ Dashboard Tab: This tab shows the customer’s loyalty information, and purchase information over the last 365 days.
■ Contact Information Tab: This tab shows the customer name, address, phone and email information, contact preferences, and profile completeness progress bar. Your store may be configured to display anniversary, birthday, and loyalty expiration messages.
■ Associations: Displays information about the customer group, customer attributes, segment, tax exempt record.
■ Purchase History Tab: Displays sales history information about the customer.
■ Customer Account Tab: Displays information about the customer’s accounts, including loyalty, and other transaction-related accounts
■ Tasks Tab: Displays customer related tasks and appointments (see also Reviewing Task Management Information). You can add and edit tasks from this tab but updates to the status must be made from the My Tasks screen. See the Xstore Point-Of-Service User Guide for instructions on how to update status.
■ Comments Tab: Displays comments that have been entered about the customer.
■ Addresses Tab: Displays the customer’s primary address and any other addresses on file.
■ House Account Tab: Displays information about the House Account associated with this customer. This tab is only active if the customer has a house account.
■ Wish List Tab: If your system is set up to use Oracle Retail Customer Engagement Cloud Services, this tab displays the customer’s wish list items. Otherwise, this tab is not active.
Note: Refer to the Oracle Retail Xstore Point-of-Service User Guide, Customer Maintenance chapter - Additional Customer Options for customer options instructions.
Note: Refer to the Oracle Retail Xstore Point-of-Service User Guide, Customer Maintenance chapter for information about each tab section and how to modify a customer. The instructions are the same.
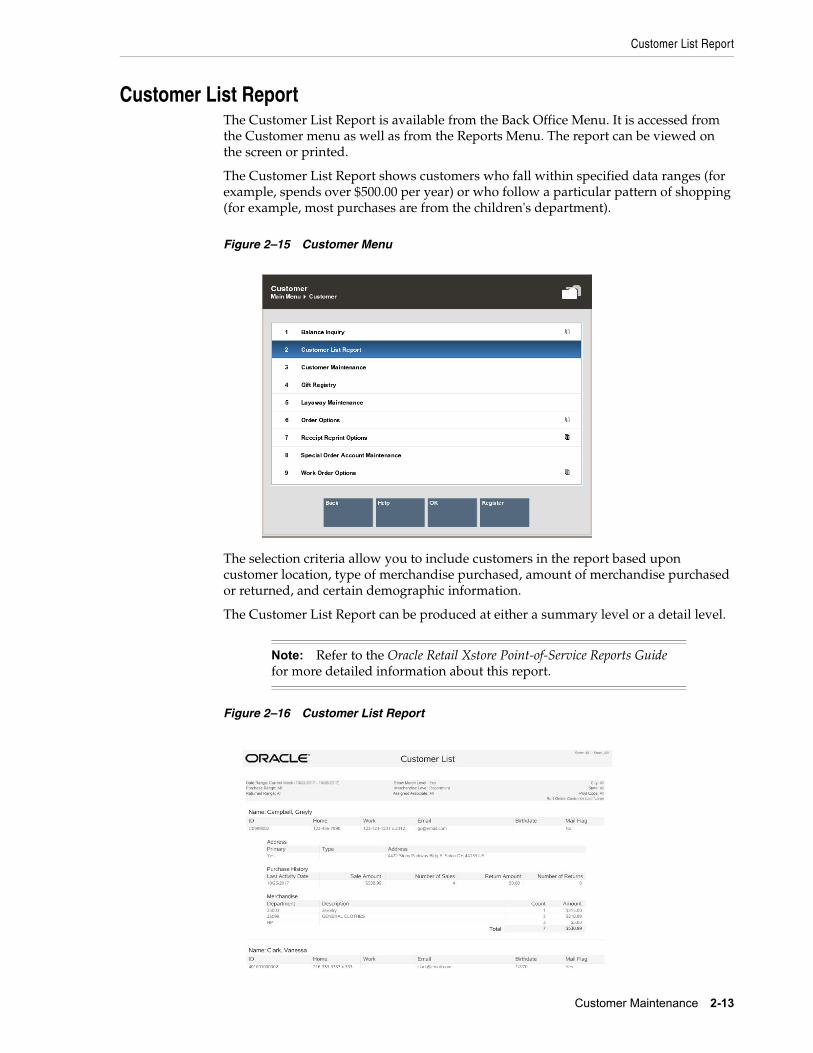
Customer List Report
Customer Maintenance 2-13
Customer List ReportThe Customer List Report is available from the Back Office Menu. It is accessed from the Customer menu as well as from the Reports Menu. The report can be viewed on the screen or printed.
The Customer List Report shows customers who fall within specified data ranges (for example, spends over $500.00 per year) or who follow a particular pattern of shopping (for example, most purchases are from the children's department).
Figure 2–15 Customer Menu
The selection criteria allow you to include customers in the report based upon customer location, type of merchandise purchased, amount of merchandise purchased or returned, and certain demographic information.
The Customer List Report can be produced at either a summary level or a detail level.
Figure 2–16 Customer List Report
Note: Refer to the Oracle Retail Xstore Point-of-Service Reports Guide for more detailed information about this report.
3
Gift Registry 3-1
3Gift Registry
The Gift Registry feature is a tool to assist the customer in purchasing gifts for someone registered. Items in a sale transaction can be associated to a registry; additionally, gift registries can be set up and maintained in the system from the Back Office. Gift Registry is available if you are using Oracle Retail Customer Engagement Cloud Services.
You can sell, return and cancel gift registry items in the Register mode of Xstore Point- of-Service. To sell an item off of a gift registry, you must first assign the gift registry to the sale or order. Gift registry sales can be added to special orders as well as Oracle Retail Order Broker Cloud Service orders.
If an item on the registry is returned with the original receipt, the gift registry is automatically updated.
Refer to the Xstore Point-of-Service User Guide for more information about the point of sale functions.
To conduct the following, you must log in to the Back Office:
■ Accessing the Gift Registry
■ Modifying a Gift Registry
■ Print Registry
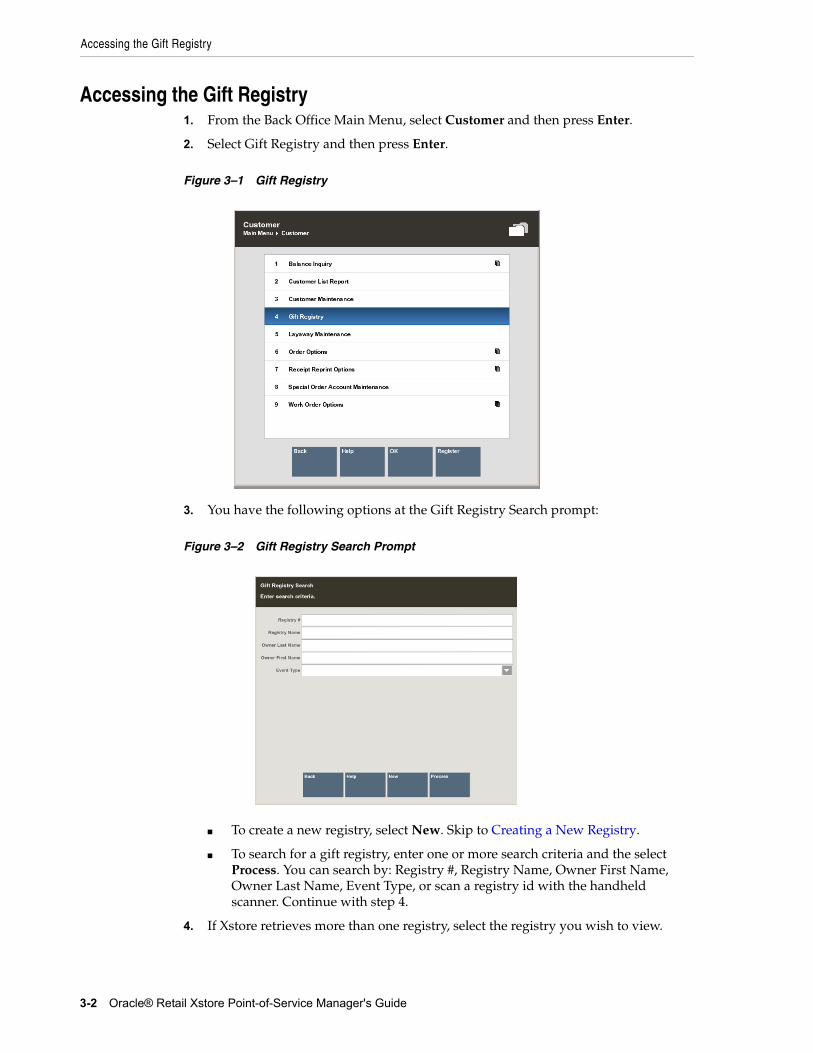
Accessing the Gift Registry
3-2 Oracle® Retail Xstore Point-of-Service Manager's Guide
Accessing the Gift Registry1. From the Back Office Main Menu, select Customer and then press Enter.
2. Select Gift Registry and then press Enter.
Figure 3–1 Gift Registry
3. You have the following options at the Gift Registry Search prompt:
Figure 3–2 Gift Registry Search Prompt
■ To create a new registry, select New. Skip to Creating a New Registry.
■ To search for a gift registry, enter one or more search criteria and the select Process. You can search by: Registry #, Registry Name, Owner First Name, Owner Last Name, Event Type, or scan a registry id with the handheld scanner. Continue with step 4.
4. If Xstore retrieves more than one registry, select the registry you wish to view.
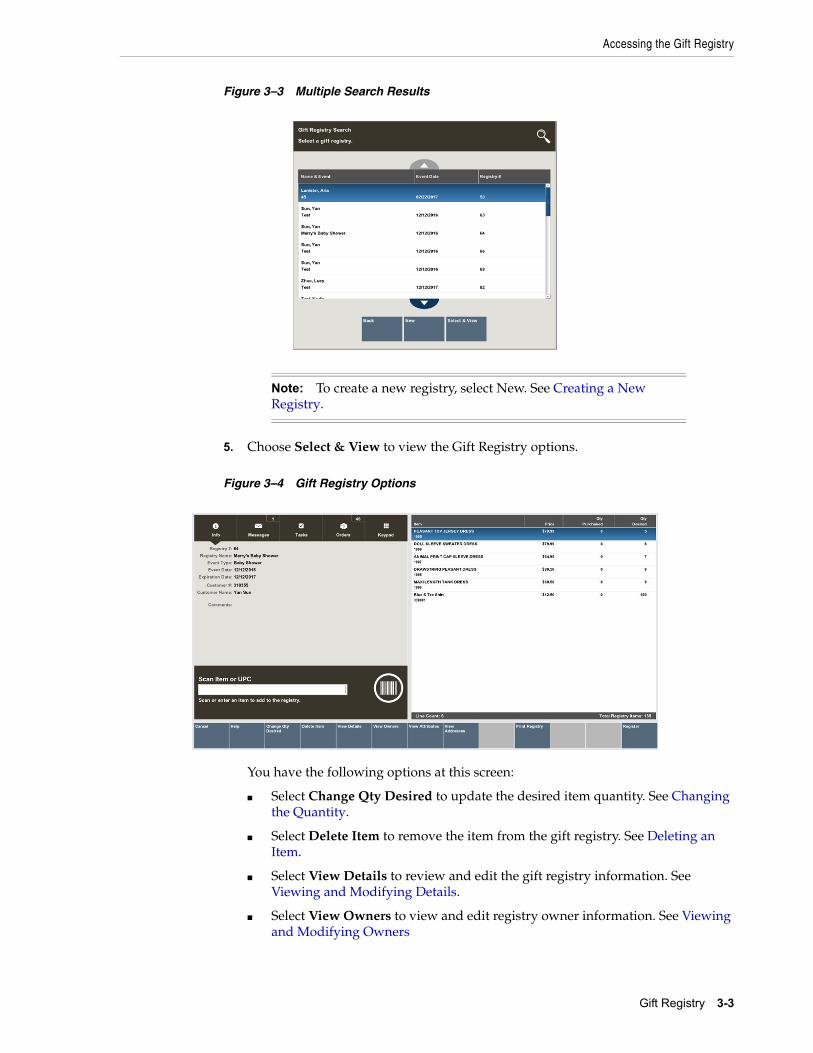
Accessing the Gift Registry
Gift Registry 3-3
Figure 3–3 Multiple Search Results
5. Choose Select & View to view the Gift Registry options.
Figure 3–4 Gift Registry Options
You have the following options at this screen:
■ Select Change Qty Desired to update the desired item quantity. See Changing the Quantity.
■ Select Delete Item to remove the item from the gift registry. See Deleting an Item.
■ Select View Details to review and edit the gift registry information. See Viewing and Modifying Details.
■ Select View Owners to view and edit registry owner information. See Viewing and Modifying Owners
Note: To create a new registry, select New. See Creating a New Registry.

Creating a New Registry
3-4 Oracle® Retail Xstore Point-of-Service Manager's Guide
■ Select View Attributes to see additional attribute information such as wedding date, baby’s gender, and so on. See Viewing and Modifying Attributes.
■ Select View Addresses to view any addresses associated with the registry. Addresses include before event, after event, and vendor’s address. See Viewing and Modifying Addresses.
Creating a New Registry1. To create a new registry, select New from the Gift Registry Search prompt or the
search results list. The Customer Search form displays.
2. Enter the search criteria for the person for which you wish to create a gift registry. Select Process.
Figure 3–5 Customer Search Form
3. Select the customer from the retrieved list. If the customer is not listed, create a new customer record by selecting New. See the Xstore POS User Guide for instructions on Adding a New Customer. Once you’ve added a new customer, the Registry Details screen displays.
4. Complete the required fields and select Process:
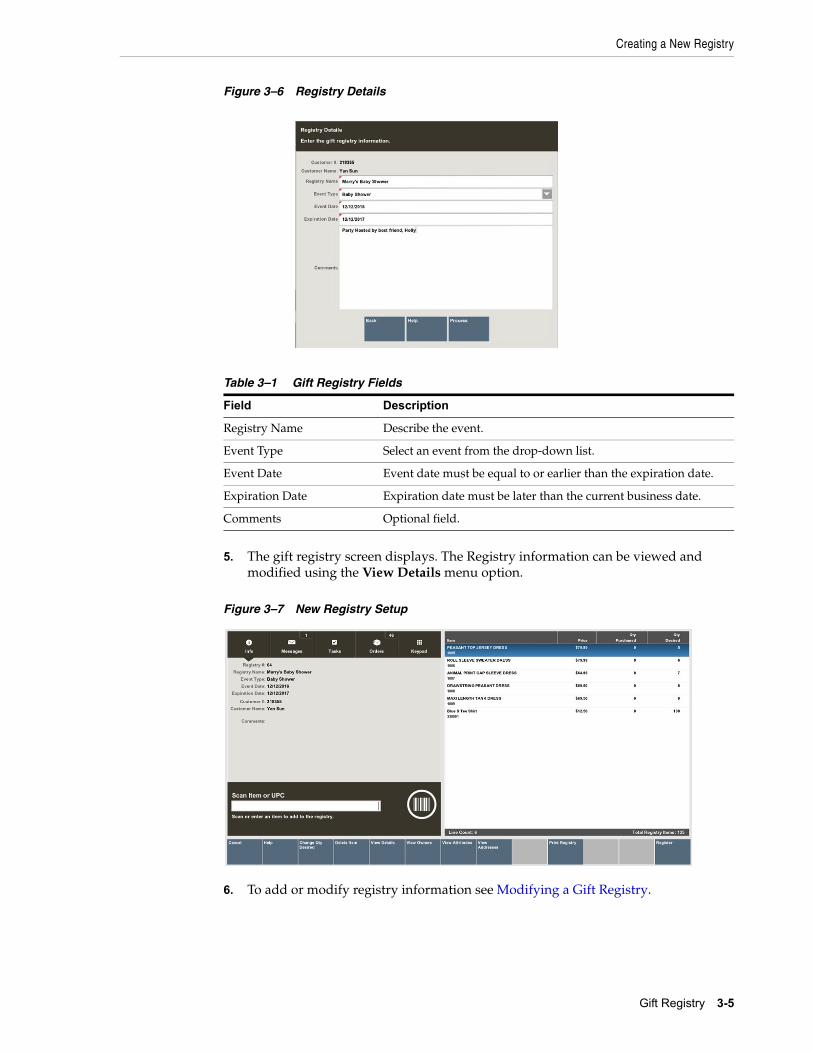
Creating a New Registry
Gift Registry 3-5
Figure 3–6 Registry Details
5. The gift registry screen displays. The Registry information can be viewed and modified using the View Details menu option.
Figure 3–7 New Registry Setup
6. To add or modify registry information see Modifying a Gift Registry.
Table 3–1 Gift Registry Fields
Field Description
Registry Name Describe the event.
Event Type Select an event from the drop-down list.
Event Date Event date must be equal to or earlier than the expiration date.
Expiration Date Expiration date must be later than the current business date.
Comments Optional field.
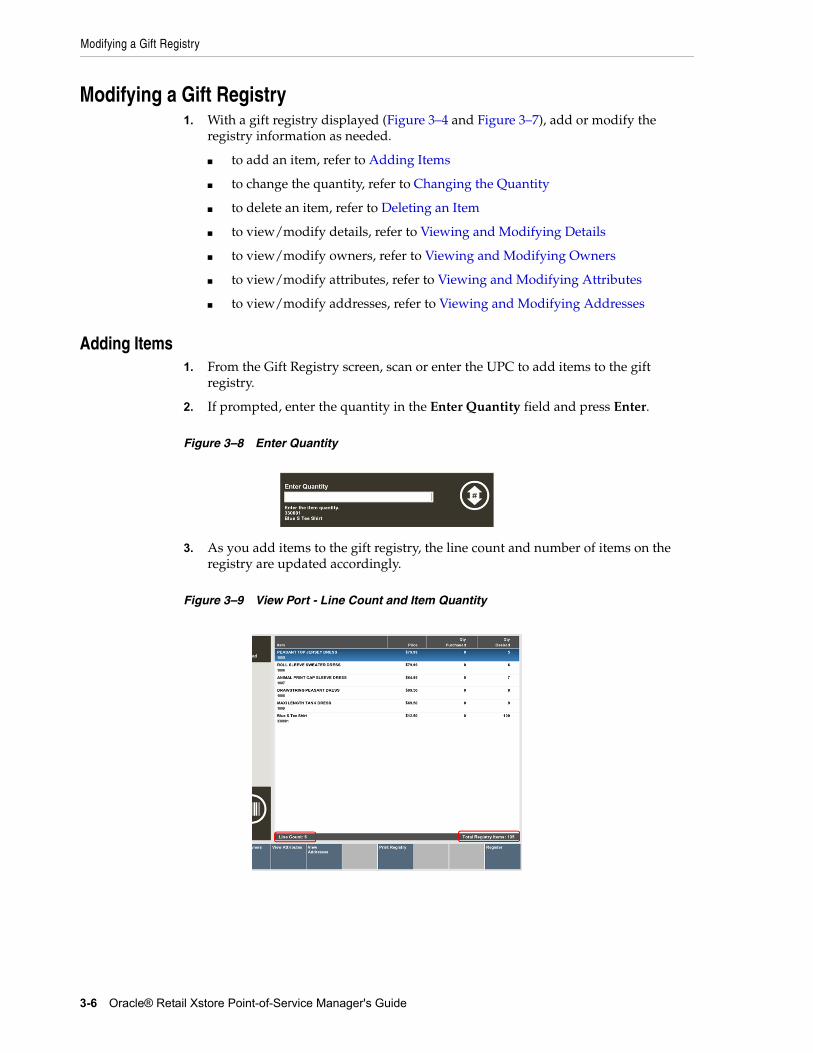
Modifying a Gift Registry
3-6 Oracle® Retail Xstore Point-of-Service Manager's Guide
Modifying a Gift Registry1. With a gift registry displayed (Figure 3–4 and Figure 3–7), add or modify the
registry information as needed.
■ to add an item, refer to Adding Items
■ to change the quantity, refer to Changing the Quantity
■ to delete an item, refer to Deleting an Item
■ to view/modify details, refer to Viewing and Modifying Details
■ to view/modify owners, refer to Viewing and Modifying Owners
■ to view/modify attributes, refer to Viewing and Modifying Attributes
■ to view/modify addresses, refer to Viewing and Modifying Addresses
Adding Items1. From the Gift Registry screen, scan or enter the UPC to add items to the gift
registry.
2. If prompted, enter the quantity in the Enter Quantity field and press Enter.
Figure 3–8 Enter Quantity
3. As you add items to the gift registry, the line count and number of items on the registry are updated accordingly.
Figure 3–9 View Port - Line Count and Item Quantity
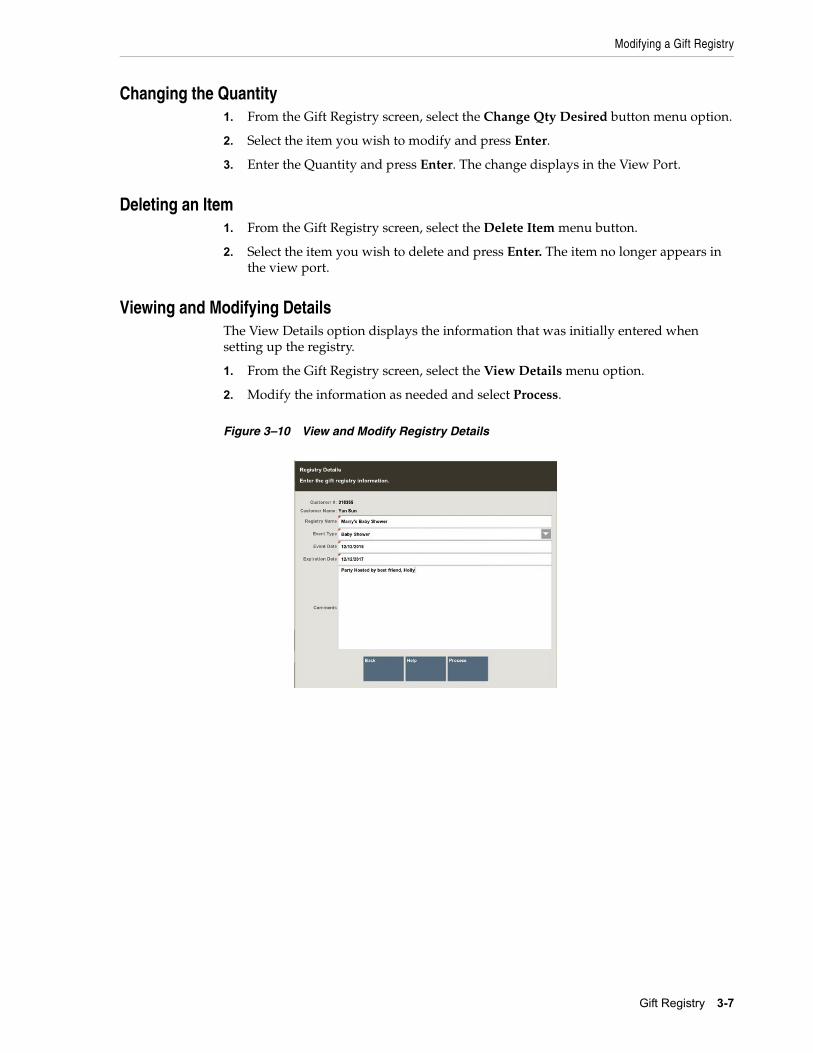
Modifying a Gift Registry
Gift Registry 3-7
Changing the Quantity1. From the Gift Registry screen, select the Change Qty Desired button menu option.
2. Select the item you wish to modify and press Enter.
3. Enter the Quantity and press Enter. The change displays in the View Port.
Deleting an Item1. From the Gift Registry screen, select the Delete Item menu button.
2. Select the item you wish to delete and press Enter. The item no longer appears in the view port.
Viewing and Modifying DetailsThe View Details option displays the information that was initially entered when setting up the registry.
1. From the Gift Registry screen, select the View Details menu option.
2. Modify the information as needed and select Process.
Figure 3–10 View and Modify Registry Details
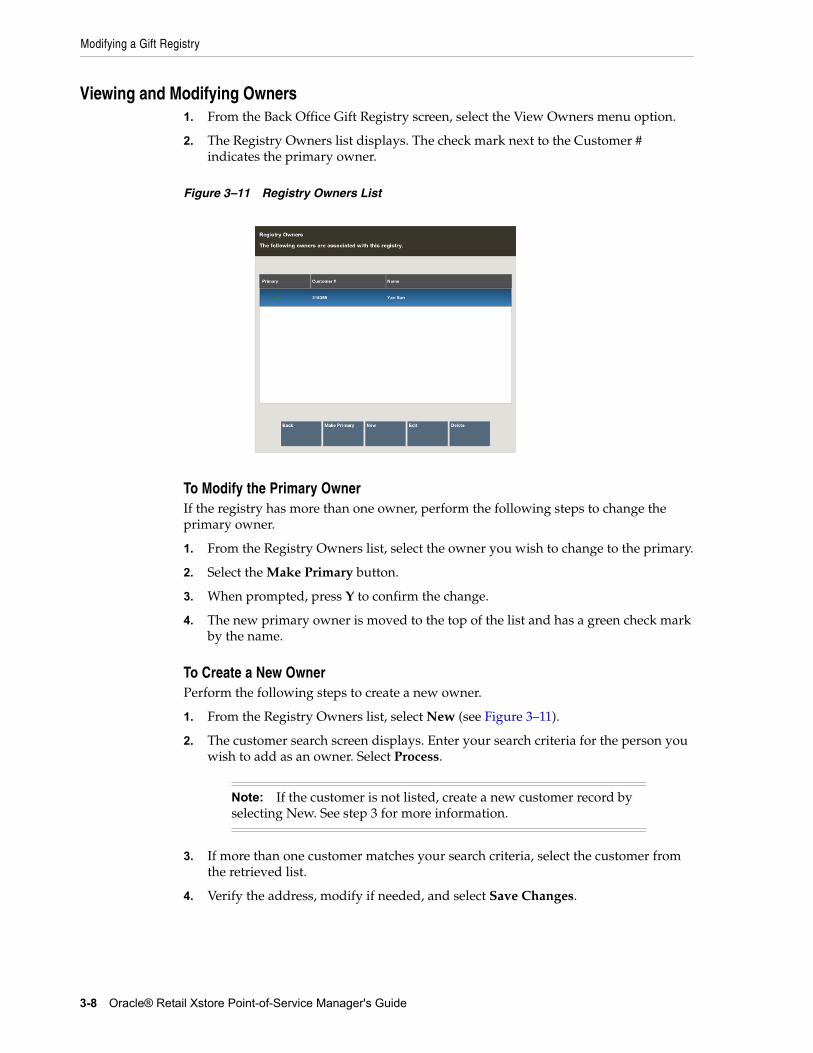
Modifying a Gift Registry
3-8 Oracle® Retail Xstore Point-of-Service Manager's Guide
Viewing and Modifying Owners1. From the Back Office Gift Registry screen, select the View Owners menu option.
2. The Registry Owners list displays. The check mark next to the Customer # indicates the primary owner.
Figure 3–11 Registry Owners List
To Modify the Primary OwnerIf the registry has more than one owner, perform the following steps to change the primary owner.
1. From the Registry Owners list, select the owner you wish to change to the primary.
2. Select the Make Primary button.
3. When prompted, press Y to confirm the change.
4. The new primary owner is moved to the top of the list and has a green check mark by the name.
To Create a New OwnerPerform the following steps to create a new owner.
1. From the Registry Owners list, select New (see Figure 3–11).
2. The customer search screen displays. Enter your search criteria for the person you wish to add as an owner. Select Process.
3. If more than one customer matches your search criteria, select the customer from the retrieved list.
4. Verify the address, modify if needed, and select Save Changes.
Note: If the customer is not listed, create a new customer record by selecting New. See step 3 for more information.
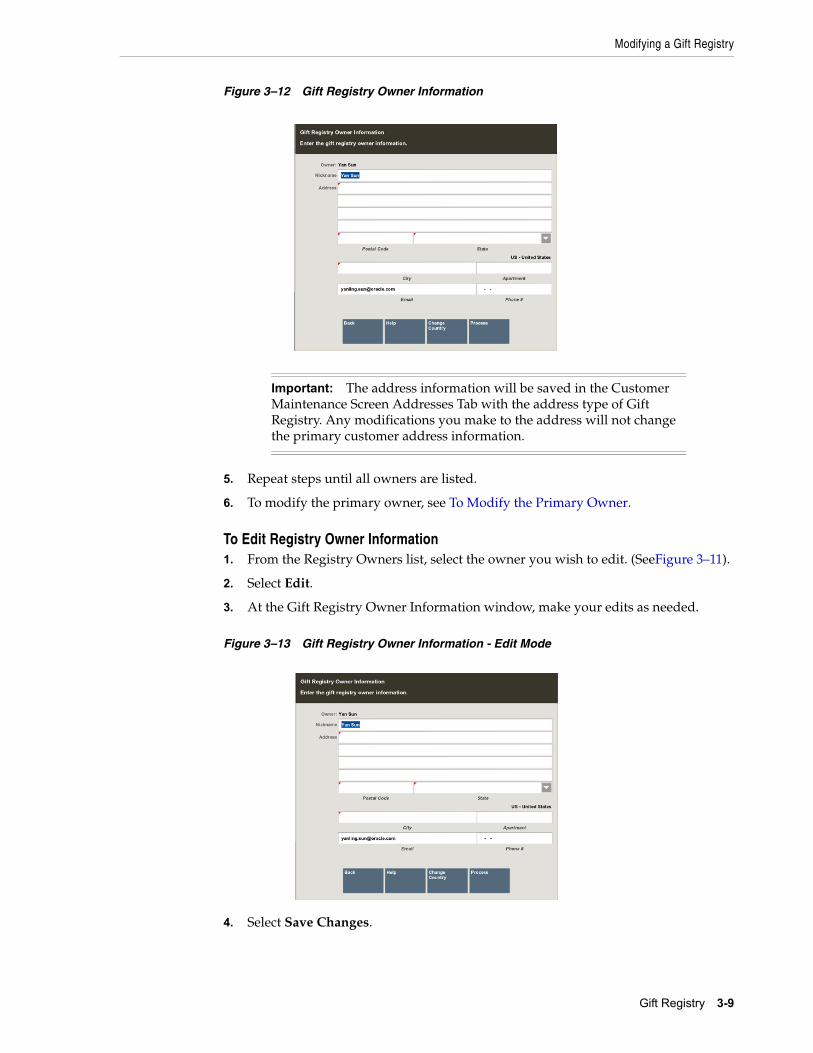
Modifying a Gift Registry
Gift Registry 3-9
Figure 3–12 Gift Registry Owner Information
5. Repeat steps until all owners are listed.
6. To modify the primary owner, see To Modify the Primary Owner.
To Edit Registry Owner Information1. From the Registry Owners list, select the owner you wish to edit. (SeeFigure 3–11).
2. Select Edit.
3. At the Gift Registry Owner Information window, make your edits as needed.
Figure 3–13 Gift Registry Owner Information - Edit Mode
4. Select Save Changes.
Important: The address information will be saved in the Customer Maintenance Screen Addresses Tab with the address type of Gift Registry. Any modifications you make to the address will not change the primary customer address information.

Modifying a Gift Registry
3-10 Oracle® Retail Xstore Point-of-Service Manager's Guide
To Delete an Owner1. From the Registry Owners list, select the owner you wish to remove.
2. Select Delete.
3. When prompted, press Y to confirm the deletion.
4. The Registry owner screen displays without the deleted owner. Select Back to return to the gift registry. To modify the primary owner, see To Modify the Primary Owner.
Viewing and Modifying AttributesThe message window of the Gift Registry screen displays only three attributes. To see additional attributes, or to modify an attribute, select View Attributes.
Figure 3–14 Gift Registry Screen - Attributes Area Display
To Create a New Attribute1. From the Gift Registry screen, select the View Attributes menu button.
2. From the Registry Attributes list, select New.
Important: You cannot delete a primary owner. Press Esc to close the prompt: the primary registry owner cannot be deleted.
Designate a different primary owner prior to deletion. See To Modify the Primary Owner.
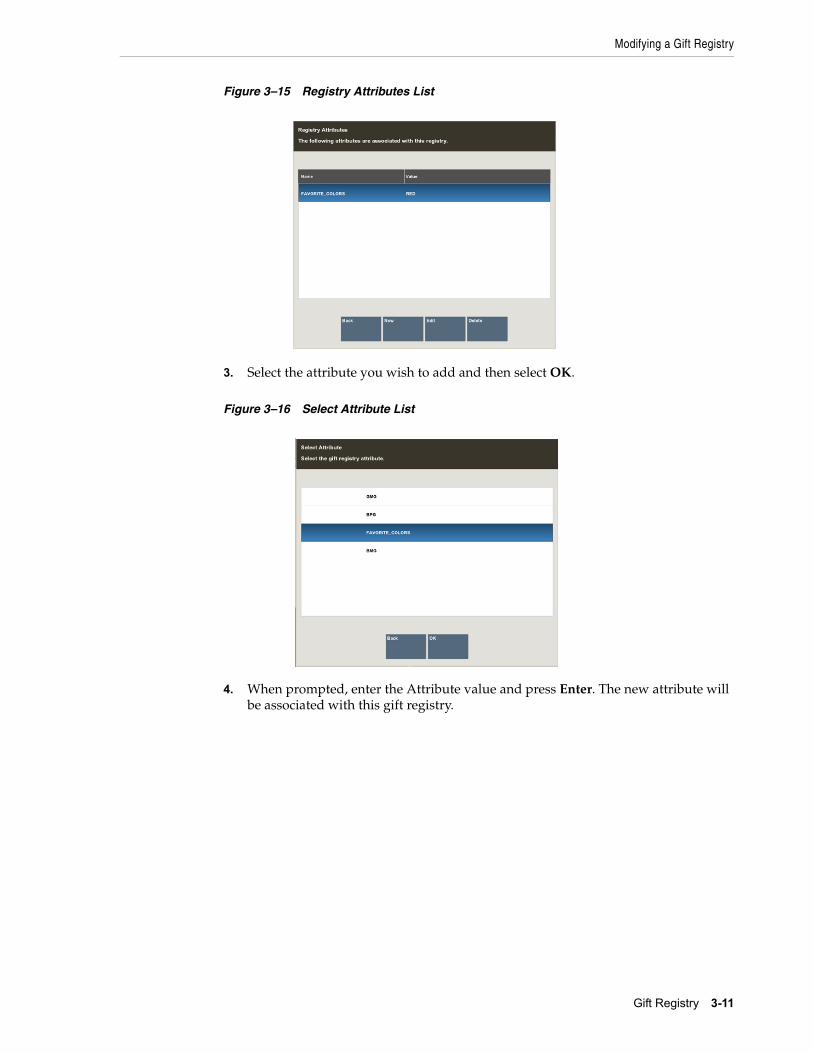
Modifying a Gift Registry
Gift Registry 3-11
Figure 3–15 Registry Attributes List
3. Select the attribute you wish to add and then select OK.
Figure 3–16 Select Attribute List
4. When prompted, enter the Attribute value and press Enter. The new attribute will be associated with this gift registry.
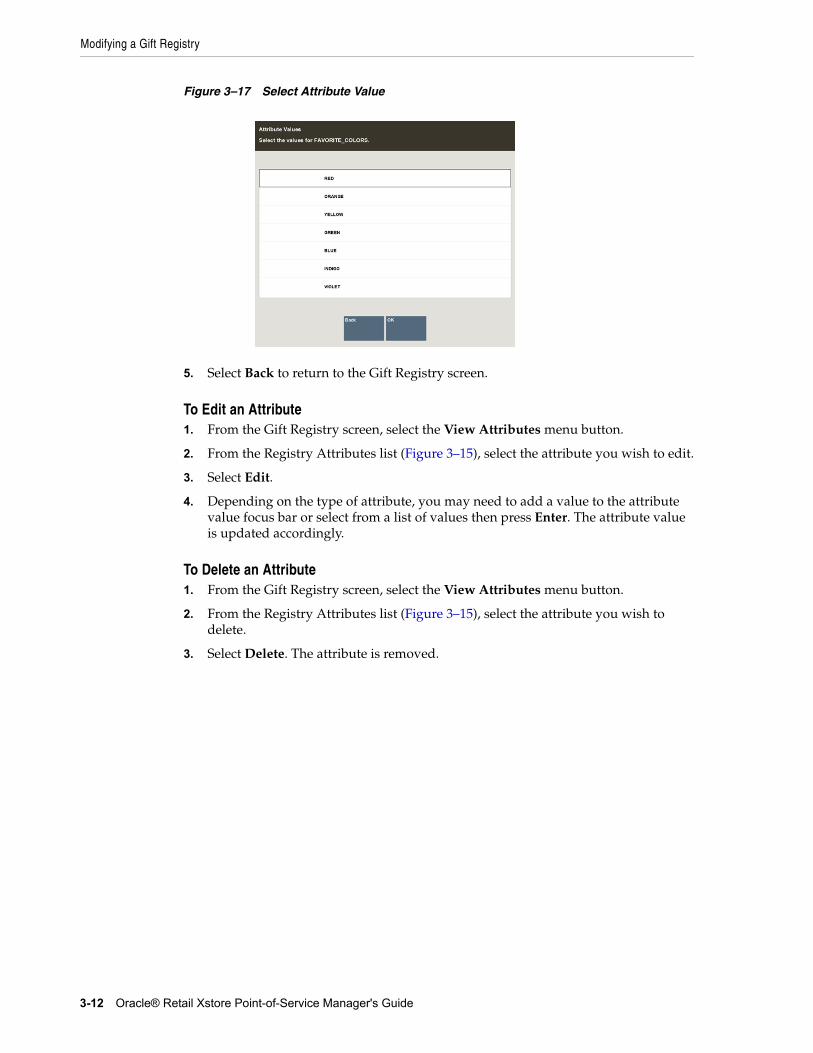
Modifying a Gift Registry
3-12 Oracle® Retail Xstore Point-of-Service Manager's Guide
Figure 3–17 Select Attribute Value
5. Select Back to return to the Gift Registry screen.
To Edit an Attribute1. From the Gift Registry screen, select the View Attributes menu button.
2. From the Registry Attributes list (Figure 3–15), select the attribute you wish to edit.
3. Select Edit.
4. Depending on the type of attribute, you may need to add a value to the attribute value focus bar or select from a list of values then press Enter. The attribute value is updated accordingly.
To Delete an Attribute1. From the Gift Registry screen, select the View Attributes menu button.
2. From the Registry Attributes list (Figure 3–15), select the attribute you wish to delete.
3. Select Delete. The attribute is removed.
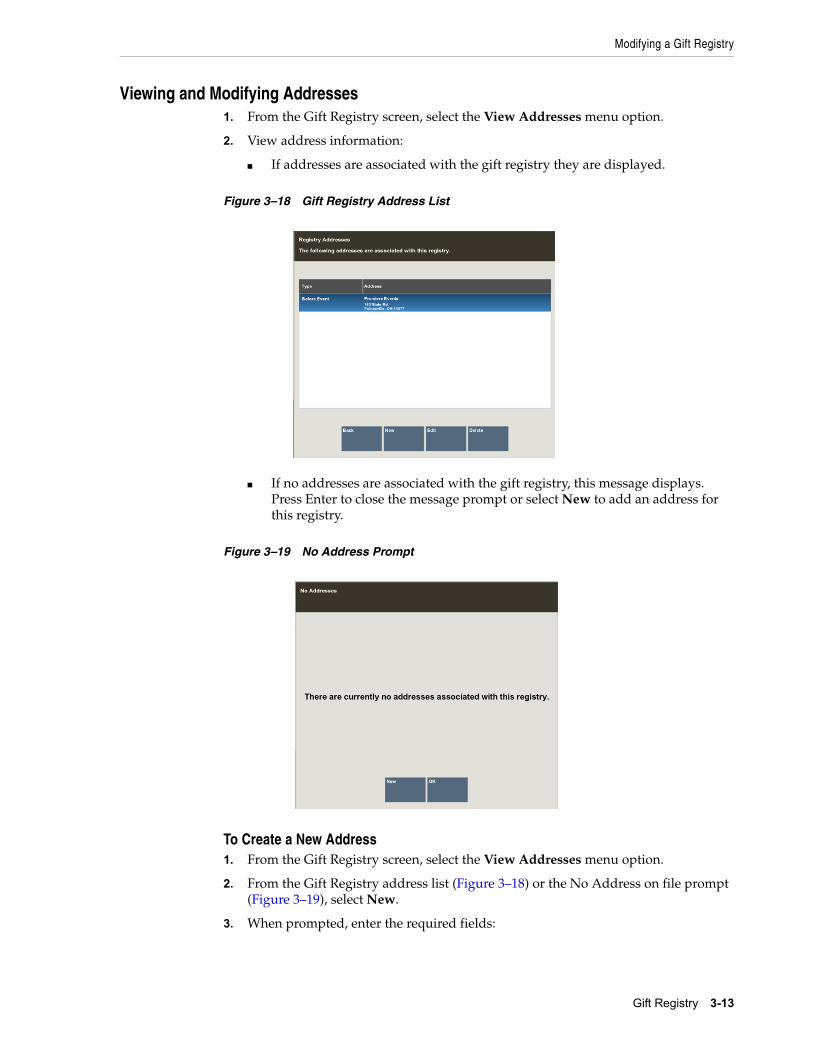
Modifying a Gift Registry
Gift Registry 3-13
Viewing and Modifying Addresses1. From the Gift Registry screen, select the View Addresses menu option.
2. View address information:
■ If addresses are associated with the gift registry they are displayed.
Figure 3–18 Gift Registry Address List
■ If no addresses are associated with the gift registry, this message displays. Press Enter to close the message prompt or select New to add an address for this registry.
Figure 3–19 No Address Prompt
To Create a New Address1. From the Gift Registry screen, select the View Addresses menu option.
2. From the Gift Registry address list (Figure 3–18) or the No Address on file prompt (Figure 3–19), select New.
3. When prompted, enter the required fields:
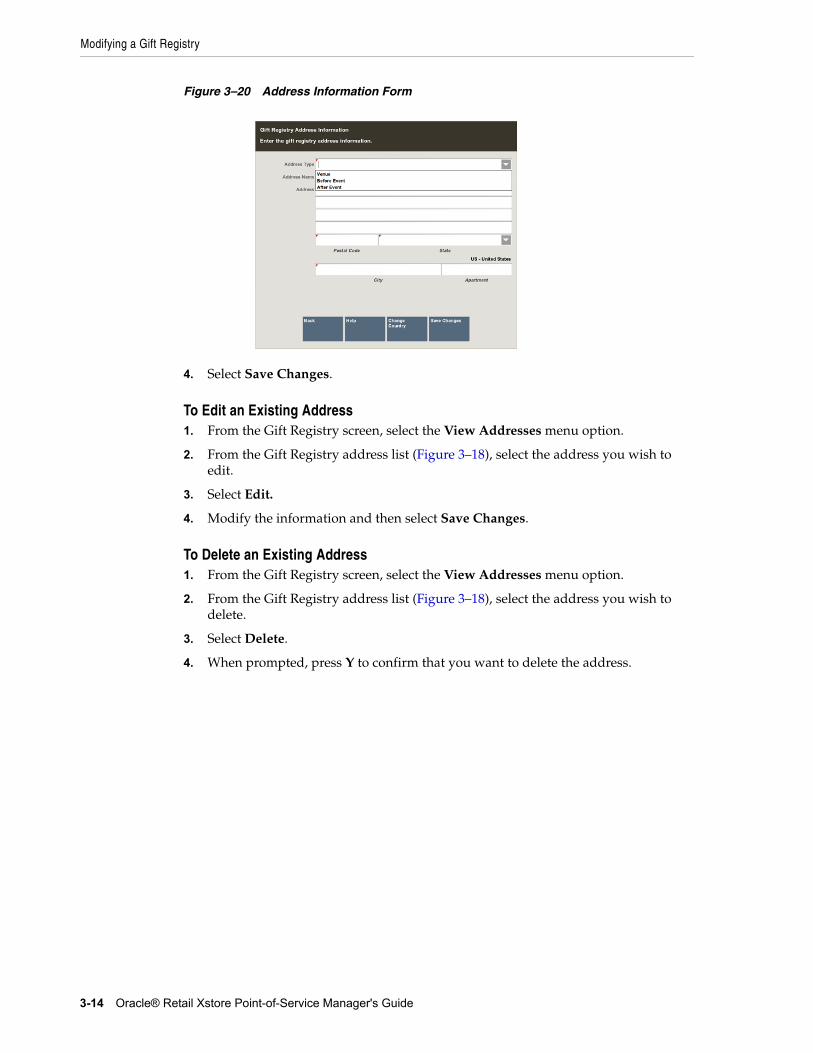
Modifying a Gift Registry
3-14 Oracle® Retail Xstore Point-of-Service Manager's Guide
Figure 3–20 Address Information Form
4. Select Save Changes.
To Edit an Existing Address1. From the Gift Registry screen, select the View Addresses menu option.
2. From the Gift Registry address list (Figure 3–18), select the address you wish to edit.
3. Select Edit.
4. Modify the information and then select Save Changes.
To Delete an Existing Address1. From the Gift Registry screen, select the View Addresses menu option.
2. From the Gift Registry address list (Figure 3–18), select the address you wish to delete.
3. Select Delete.
4. When prompted, press Y to confirm that you want to delete the address.
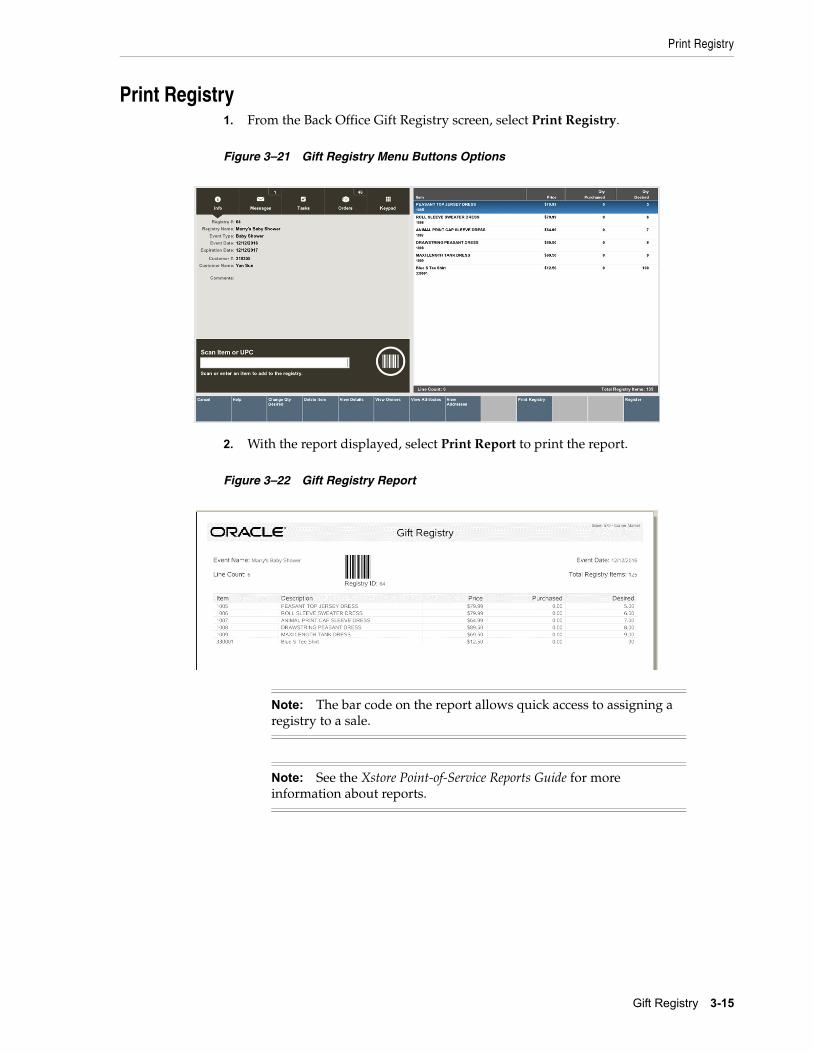
Print Registry
Gift Registry 3-15
Print Registry1. From the Back Office Gift Registry screen, select Print Registry.
Figure 3–21 Gift Registry Menu Buttons Options
2. With the report displayed, select Print Report to print the report.
Figure 3–22 Gift Registry Report
Note: The bar code on the report allows quick access to assigning a registry to a sale.
Note: See the Xstore Point-of-Service Reports Guide for more information about reports.
4
Employee Maintenance 4-1
4Employee Maintenance
[1] Oracle Retail Xstore Point-of-Service maintains various kinds of information about store associates. Associates who have the proper security privileges may add, view, update, terminate, and void an employee record. The employee maintenance screen is organized into five categories, each one accessible by selecting an on-screen tab. The tabs are named General, Human Resources (HR), Security, Fingerprint, and Comment. The Employee Maintenance Menu also provides additional functions including an Employee Productivity Report, the ability to borrow an employee from another store in the organization, and an employee payroll advance function.
This chapter contains the following sections:
■ Accessing Back Office Employee Maintenance Functions
■ Maintaining Employee Information
■ Viewing an Employee Record
■ Editing an Employee Record
■ Employee Maintenance Tabs Overview
■ Borrow Employee
■ Employee Productivity Report
■ Associate Advance
Note: Because each Oracle Retail Xstore Point-of-Service menu is configurable, the button functions and the menu options on your system may appear in a different order or have different text than the examples shown in this manual.

Accessing Back Office Employee Maintenance Functions
4-2 Oracle® Retail Xstore Point-of-Service Manager's Guide
Accessing Back Office Employee Maintenance Functions1. After logging in to the Back Office (see Accessing the Back Office), select the
Employee Maintenance and Payroll option and press Enter.
Figure 4–1 Back Office Main Menu - Employee Maintenance and Payroll Option
2. At the Employee Maintenance and Payroll menu, select one of the options and press Enter.
The following options are available:
■ Employee Maintenance - Select this option to maintain employee records. Refer to Maintaining Employee Information.
■ Time and Attendance - Select this option to maintain employee timecard and payroll information. Refer to Payroll and Timecard Maintenance.
■ Employee Scheduling Maintenance - Select this option to create and edit employees’ work schedules and manage employees’ time off. Refer to Employee Scheduling.
■ Task Maintenance - Select this option to create and maintain employee tasks. Refer to Message Maintenance and Task Management.
■ Message Maintenance - Select this option to create and maintain employee messages. Refer to Message Maintenance and Task Management.
Tip: Access a menu option with a single keystroke. Just press the keyboard number or letter associated with any menu option to use that function.
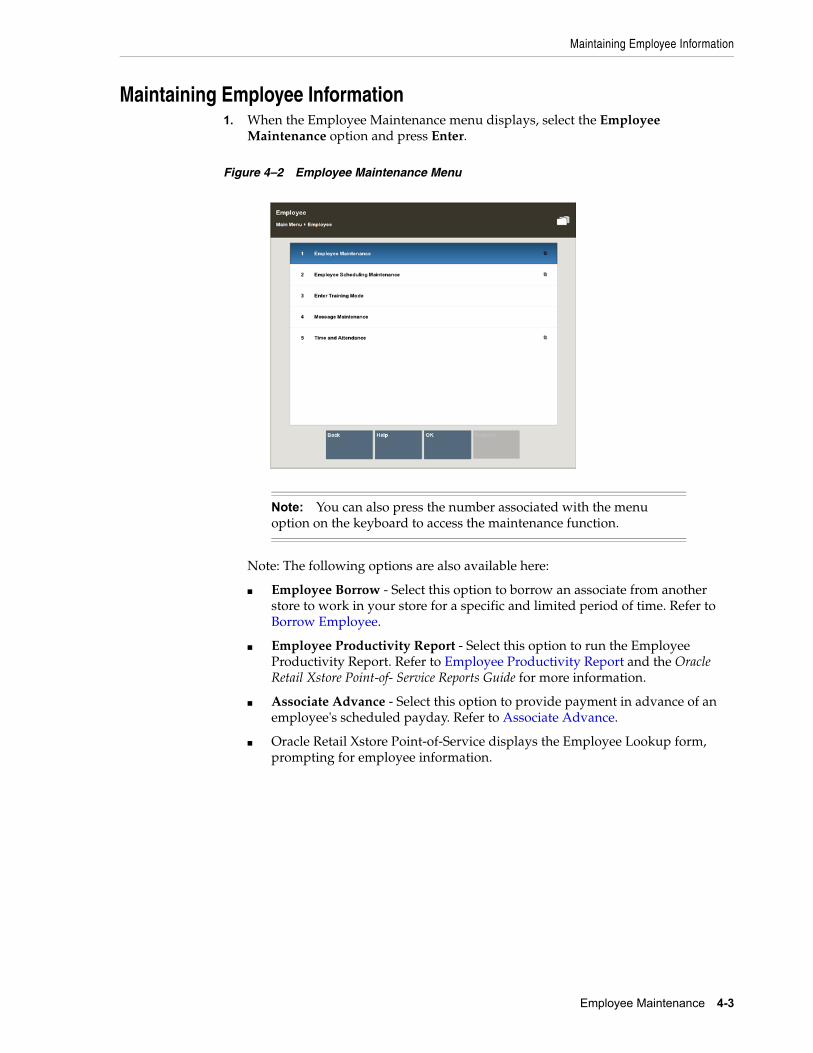
Maintaining Employee Information
Employee Maintenance 4-3
Maintaining Employee Information1. When the Employee Maintenance menu displays, select the Employee
Maintenance option and press Enter.
Figure 4–2 Employee Maintenance Menu
Note: The following options are also available here:
■ Employee Borrow - Select this option to borrow an associate from another store to work in your store for a specific and limited period of time. Refer to Borrow Employee.
■ Employee Productivity Report - Select this option to run the Employee Productivity Report. Refer to Employee Productivity Report and the Oracle Retail Xstore Point-of- Service Reports Guide for more information.
■ Associate Advance - Select this option to provide payment in advance of an employee's scheduled payday. Refer to Associate Advance.
■ Oracle Retail Xstore Point-of-Service displays the Employee Lookup form, prompting for employee information.
Note: You can also press the number associated with the menu option on the keyboard to access the maintenance function.
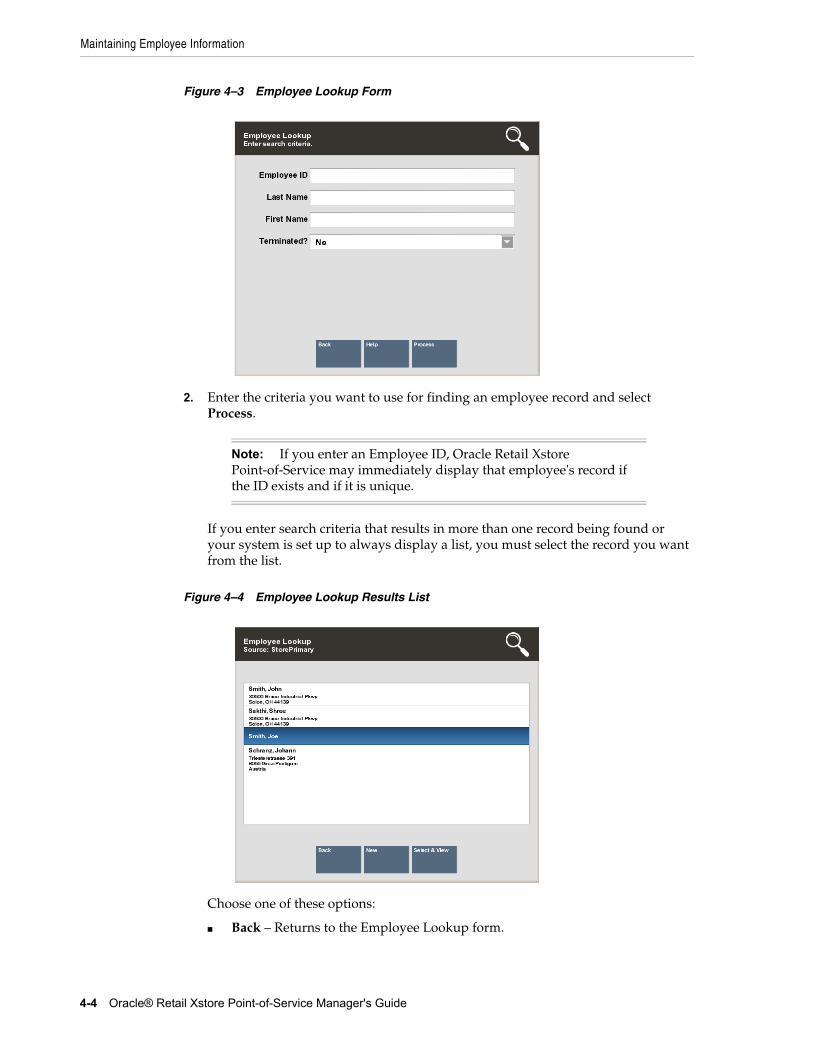
Maintaining Employee Information
4-4 Oracle® Retail Xstore Point-of-Service Manager's Guide
Figure 4–3 Employee Lookup Form
2. Enter the criteria you want to use for finding an employee record and select Process.
If you enter search criteria that results in more than one record being found or your system is set up to always display a list, you must select the record you want from the list.
Figure 4–4 Employee Lookup Results List
Choose one of these options:
■ Back – Returns to the Employee Lookup form.
Note: If you enter an Employee ID, Oracle Retail Xstore Point-of-Service may immediately display that employee's record if the ID exists and if it is unique.
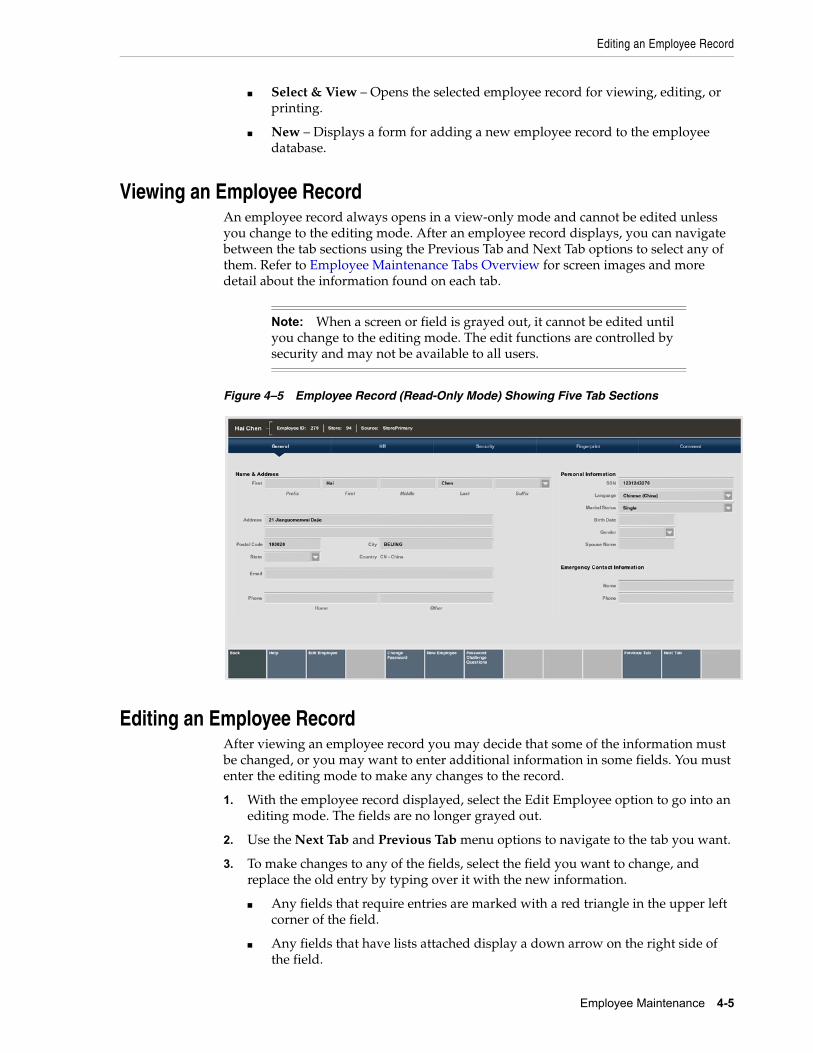
Editing an Employee Record
Employee Maintenance 4-5
■ Select & View – Opens the selected employee record for viewing, editing, or printing.
■ New – Displays a form for adding a new employee record to the employee database.
Viewing an Employee RecordAn employee record always opens in a view-only mode and cannot be edited unless you change to the editing mode. After an employee record displays, you can navigate between the tab sections using the Previous Tab and Next Tab options to select any of them. Refer to Employee Maintenance Tabs Overview for screen images and more detail about the information found on each tab.
Figure 4–5 Employee Record (Read-Only Mode) Showing Five Tab Sections
Editing an Employee RecordAfter viewing an employee record you may decide that some of the information must be changed, or you may want to enter additional information in some fields. You must enter the editing mode to make any changes to the record.
1. With the employee record displayed, select the Edit Employee option to go into an editing mode. The fields are no longer grayed out.
2. Use the Next Tab and Previous Tab menu options to navigate to the tab you want.
3. To make changes to any of the fields, select the field you want to change, and replace the old entry by typing over it with the new information.
■ Any fields that require entries are marked with a red triangle in the upper left corner of the field.
■ Any fields that have lists attached display a down arrow on the right side of the field.
Note: When a screen or field is grayed out, it cannot be edited until you change to the editing mode. The edit functions are controlled by security and may not be available to all users.
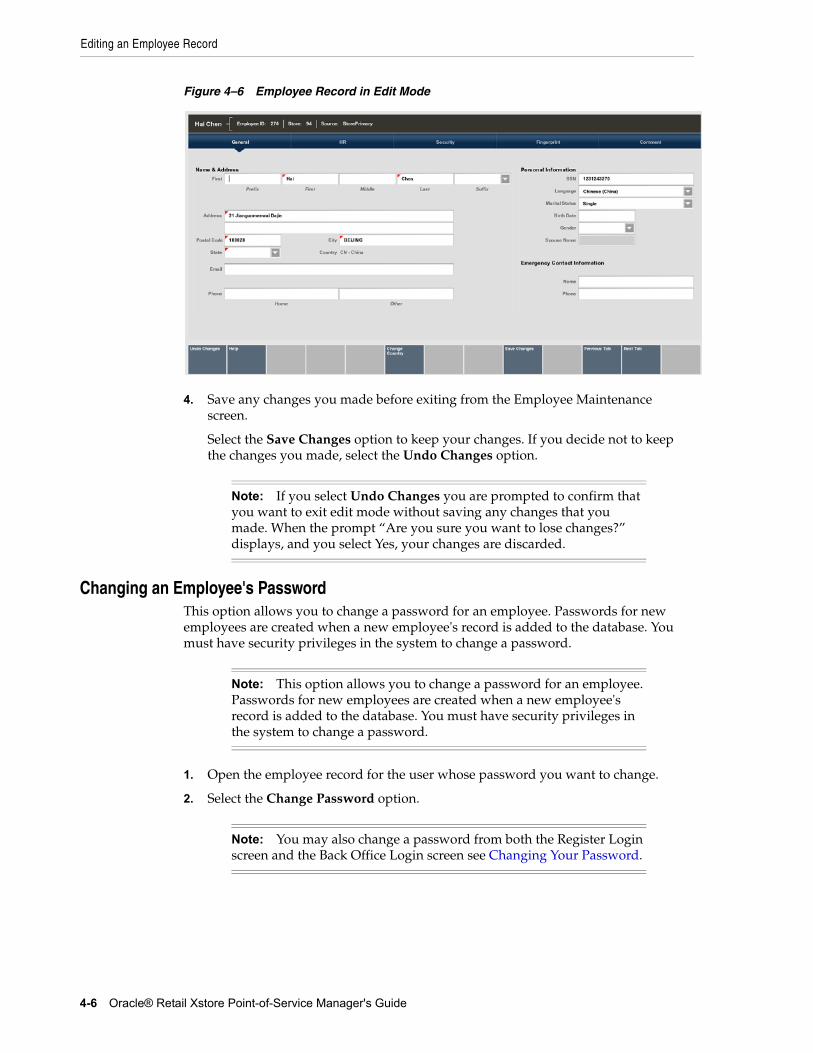
Editing an Employee Record
4-6 Oracle® Retail Xstore Point-of-Service Manager's Guide
Figure 4–6 Employee Record in Edit Mode
4. Save any changes you made before exiting from the Employee Maintenance screen.
Select the Save Changes option to keep your changes. If you decide not to keep the changes you made, select the Undo Changes option.
Changing an Employee's PasswordThis option allows you to change a password for an employee. Passwords for new employees are created when a new employee's record is added to the database. You must have security privileges in the system to change a password.
1. Open the employee record for the user whose password you want to change.
2. Select the Change Password option.
Note: If you select Undo Changes you are prompted to confirm that you want to exit edit mode without saving any changes that you made. When the prompt “Are you sure you want to lose changes?” displays, and you select Yes, your changes are discarded.
Note: This option allows you to change a password for an employee. Passwords for new employees are created when a new employee's record is added to the database. You must have security privileges in the system to change a password.
Note: You may also change a password from both the Register Login screen and the Back Office Login screen see Changing Your Password.
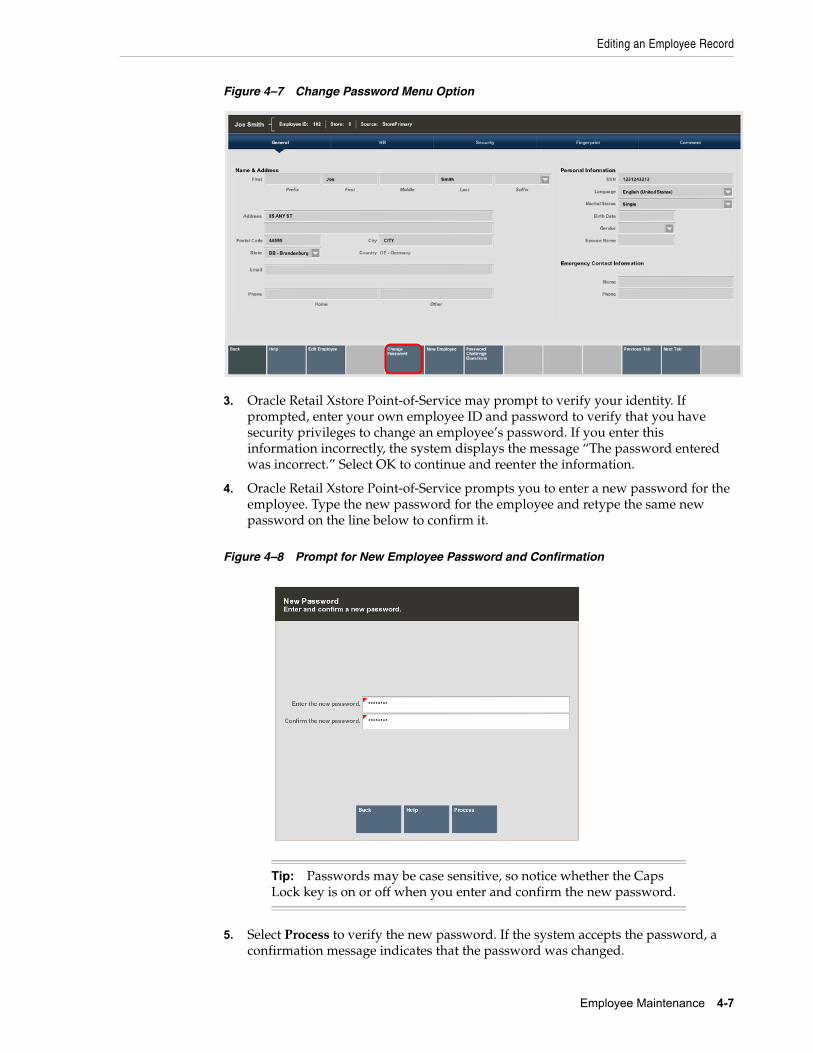
Editing an Employee Record
Employee Maintenance 4-7
Figure 4–7 Change Password Menu Option
3. Oracle Retail Xstore Point-of-Service may prompt to verify your identity. If prompted, enter your own employee ID and password to verify that you have security privileges to change an employee’s password. If you enter this information incorrectly, the system displays the message “The password entered was incorrect.” Select OK to continue and reenter the information.
4. Oracle Retail Xstore Point-of-Service prompts you to enter a new password for the employee. Type the new password for the employee and retype the same new password on the line below to confirm it.
Figure 4–8 Prompt for New Employee Password and Confirmation
5. Select Process to verify the new password. If the system accepts the password, a confirmation message indicates that the password was changed.
Tip: Passwords may be case sensitive, so notice whether the Caps Lock key is on or off when you enter and confirm the new password.
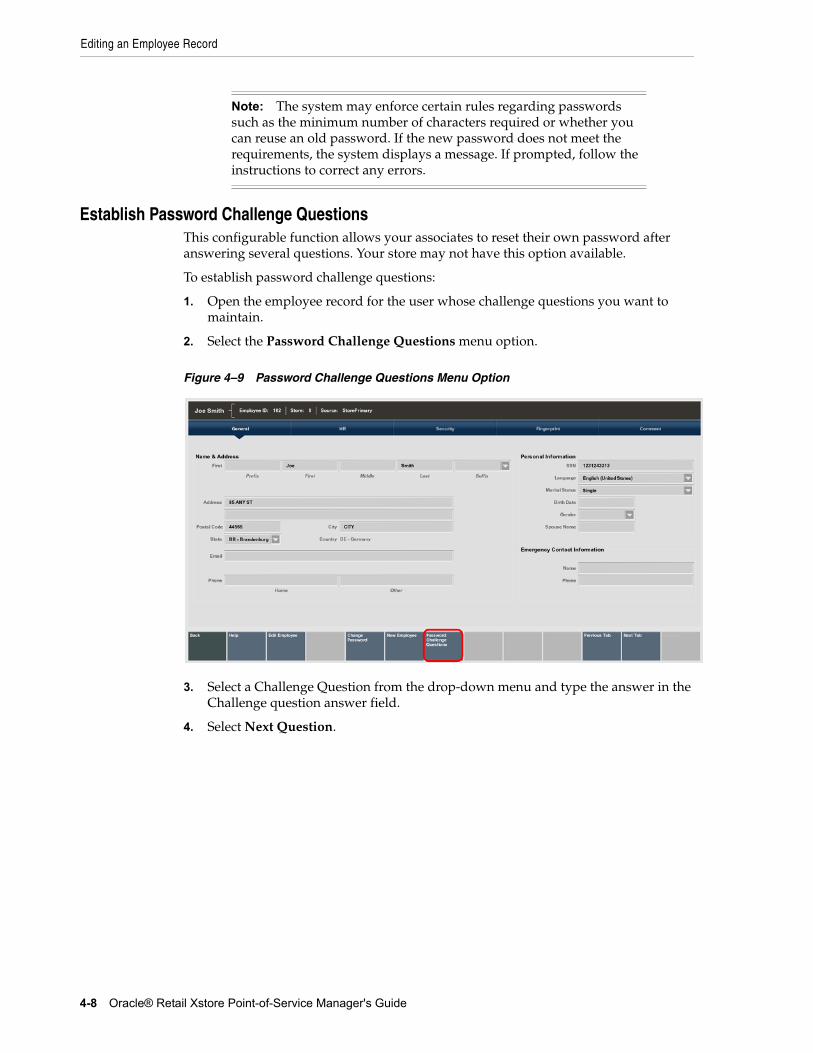
Editing an Employee Record
4-8 Oracle® Retail Xstore Point-of-Service Manager's Guide
Establish Password Challenge QuestionsThis configurable function allows your associates to reset their own password after answering several questions. Your store may not have this option available.
To establish password challenge questions:
1. Open the employee record for the user whose challenge questions you want to maintain.
2. Select the Password Challenge Questions menu option.
Figure 4–9 Password Challenge Questions Menu Option
3. Select a Challenge Question from the drop-down menu and type the answer in the Challenge question answer field.
4. Select Next Question.
Note: The system may enforce certain rules regarding passwords such as the minimum number of characters required or whether you can reuse an old password. If the new password does not meet the requirements, the system displays a message. If prompted, follow the instructions to correct any errors.
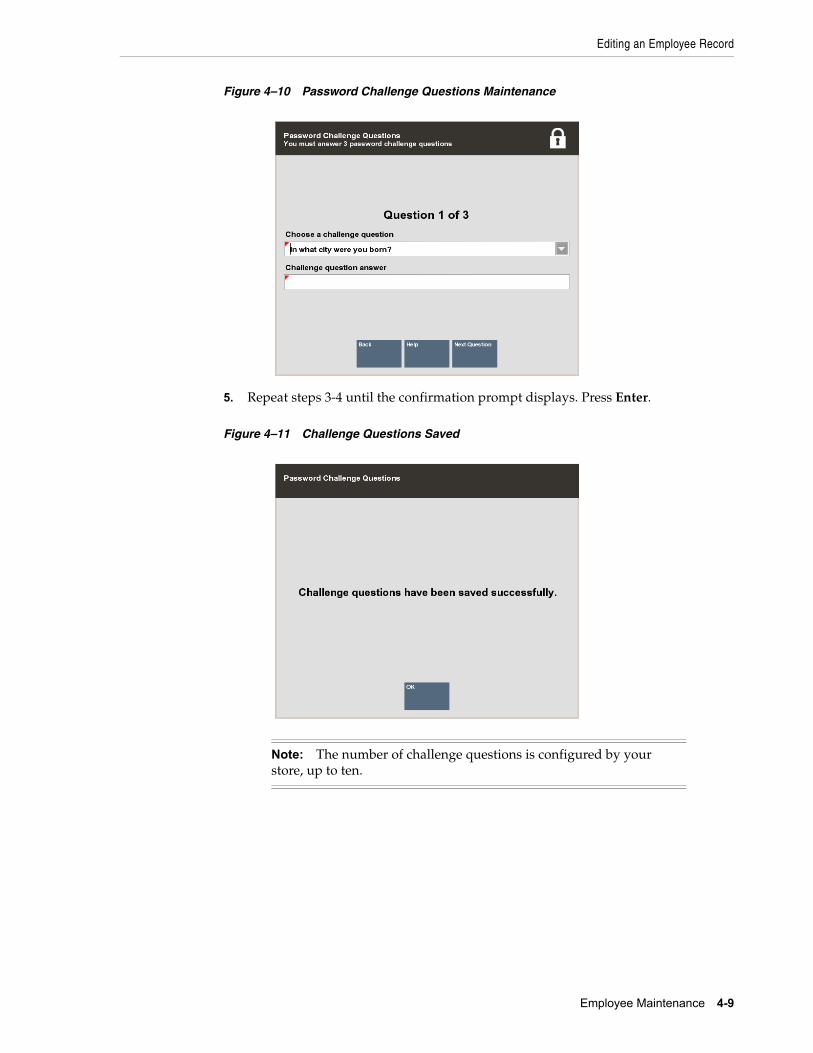
Editing an Employee Record
Employee Maintenance 4-9
Figure 4–10 Password Challenge Questions Maintenance
5. Repeat steps 3-4 until the confirmation prompt displays. Press Enter.
Figure 4–11 Challenge Questions Saved
Note: The number of challenge questions is configured by your store, up to ten.
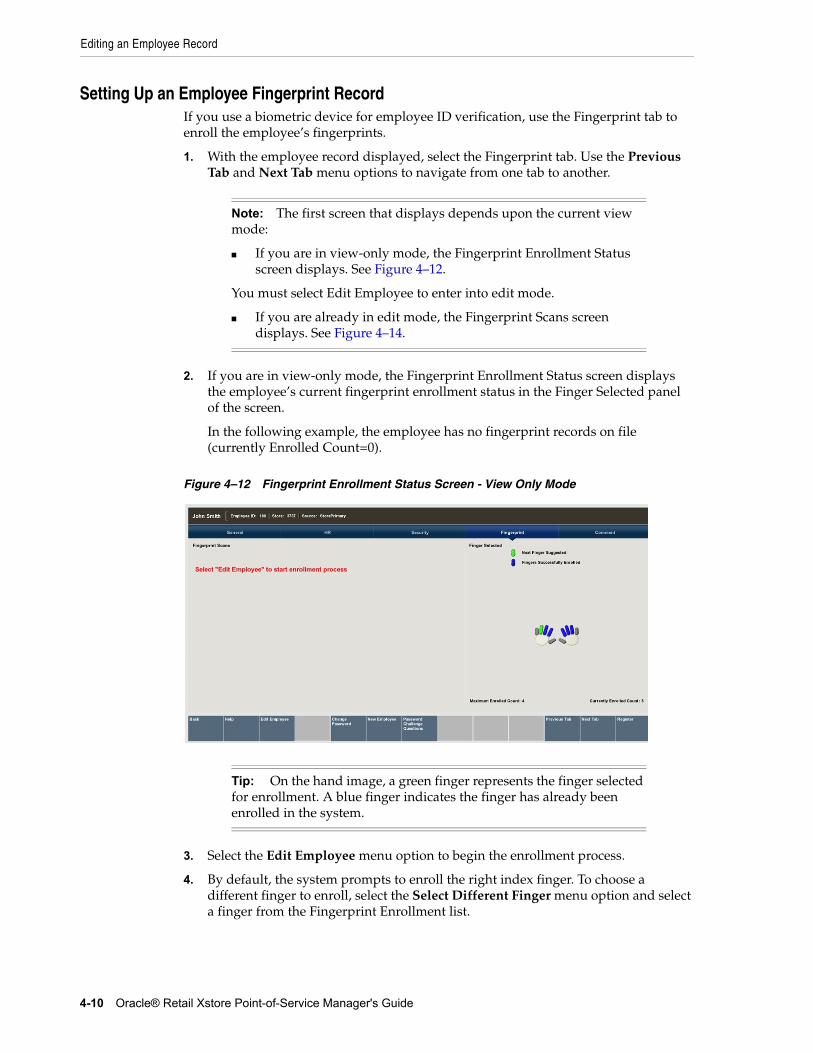
Editing an Employee Record
4-10 Oracle® Retail Xstore Point-of-Service Manager's Guide
Setting Up an Employee Fingerprint RecordIf you use a biometric device for employee ID verification, use the Fingerprint tab to enroll the employee’s fingerprints.
1. With the employee record displayed, select the Fingerprint tab. Use the Previous Tab and Next Tab menu options to navigate from one tab to another.
2. If you are in view-only mode, the Fingerprint Enrollment Status screen displays the employee’s current fingerprint enrollment status in the Finger Selected panel of the screen.
In the following example, the employee has no fingerprint records on file (currently Enrolled Count=0).
Figure 4–12 Fingerprint Enrollment Status Screen - View Only Mode
3. Select the Edit Employee menu option to begin the enrollment process.
4. By default, the system prompts to enroll the right index finger. To choose a different finger to enroll, select the Select Different Finger menu option and select a finger from the Fingerprint Enrollment list.
Note: The first screen that displays depends upon the current view mode:
■ If you are in view-only mode, the Fingerprint Enrollment Status screen displays. See Figure 4–12.
You must select Edit Employee to enter into edit mode.
■ If you are already in edit mode, the Fingerprint Scans screen displays. See Figure 4–14.
Tip: On the hand image, a green finger represents the finger selected for enrollment. A blue finger indicates the finger has already been enrolled in the system.
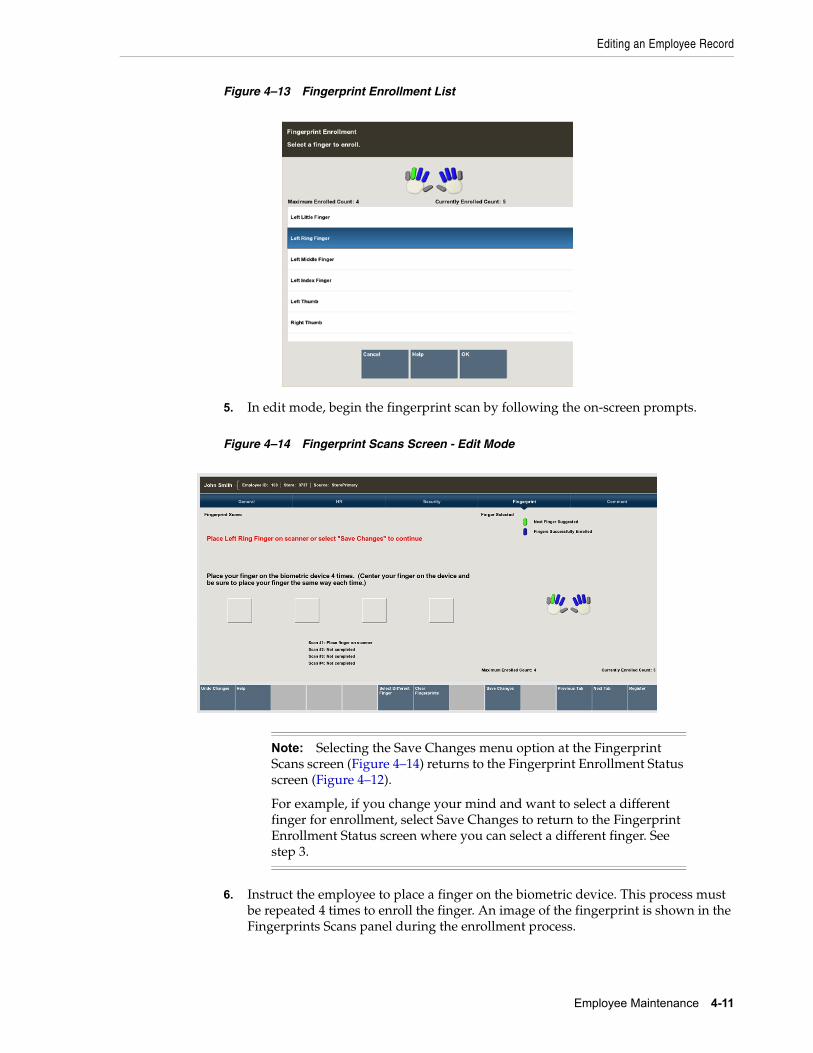
Editing an Employee Record
Employee Maintenance 4-11
Figure 4–13 Fingerprint Enrollment List
5. In edit mode, begin the fingerprint scan by following the on-screen prompts.
Figure 4–14 Fingerprint Scans Screen - Edit Mode
6. Instruct the employee to place a finger on the biometric device. This process must be repeated 4 times to enroll the finger. An image of the fingerprint is shown in the Fingerprints Scans panel during the enrollment process.
Note: Selecting the Save Changes menu option at the Fingerprint Scans screen (Figure 4–14) returns to the Fingerprint Enrollment Status screen (Figure 4–12).
For example, if you change your mind and want to select a different finger for enrollment, select Save Changes to return to the Fingerprint Enrollment Status screen where you can select a different finger. See step 3.
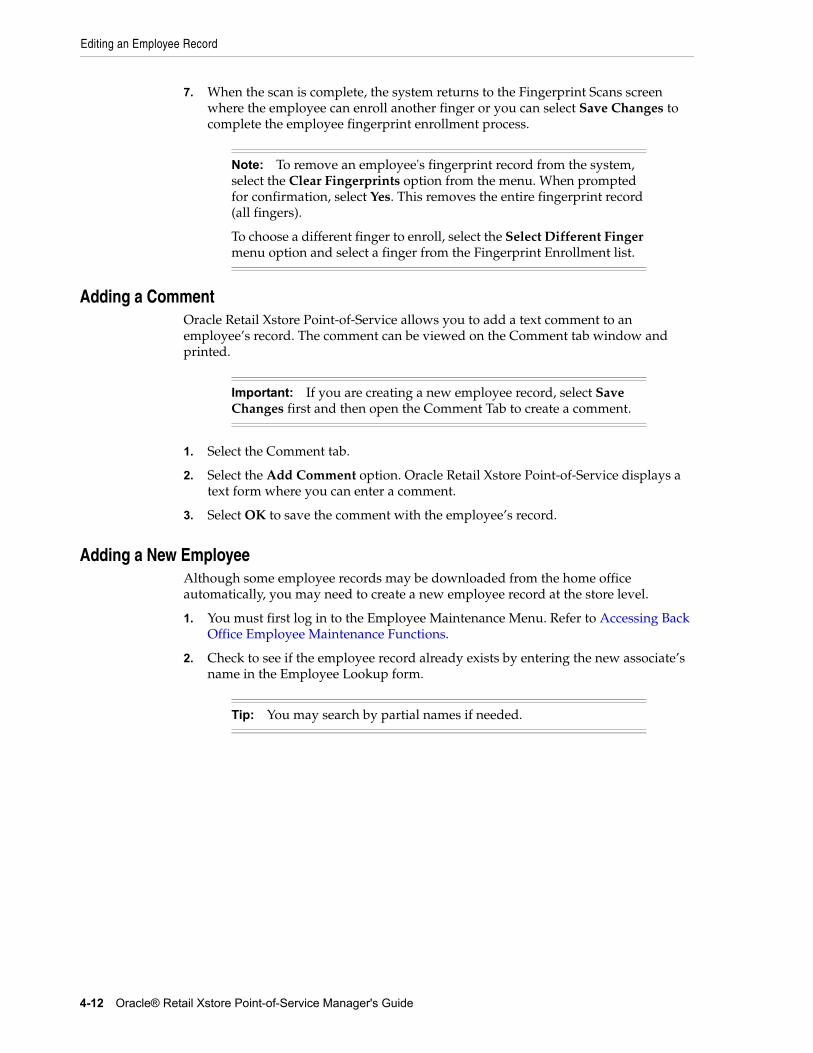
Editing an Employee Record
4-12 Oracle® Retail Xstore Point-of-Service Manager's Guide
7. When the scan is complete, the system returns to the Fingerprint Scans screen where the employee can enroll another finger or you can select Save Changes to complete the employee fingerprint enrollment process.
Adding a CommentOracle Retail Xstore Point-of-Service allows you to add a text comment to an employee’s record. The comment can be viewed on the Comment tab window and printed.
1. Select the Comment tab.
2. Select the Add Comment option. Oracle Retail Xstore Point-of-Service displays a text form where you can enter a comment.
3. Select OK to save the comment with the employee’s record.
Adding a New EmployeeAlthough some employee records may be downloaded from the home office automatically, you may need to create a new employee record at the store level.
1. You must first log in to the Employee Maintenance Menu. Refer to Accessing Back Office Employee Maintenance Functions.
2. Check to see if the employee record already exists by entering the new associate’s name in the Employee Lookup form.
Note: To remove an employee's fingerprint record from the system, select the Clear Fingerprints option from the menu. When prompted for confirmation, select Yes. This removes the entire fingerprint record (all fingers).
To choose a different finger to enroll, select the Select Different Finger menu option and select a finger from the Fingerprint Enrollment list.
Important: If you are creating a new employee record, select Save Changes first and then open the Comment Tab to create a comment.
Tip: You may search by partial names if needed.
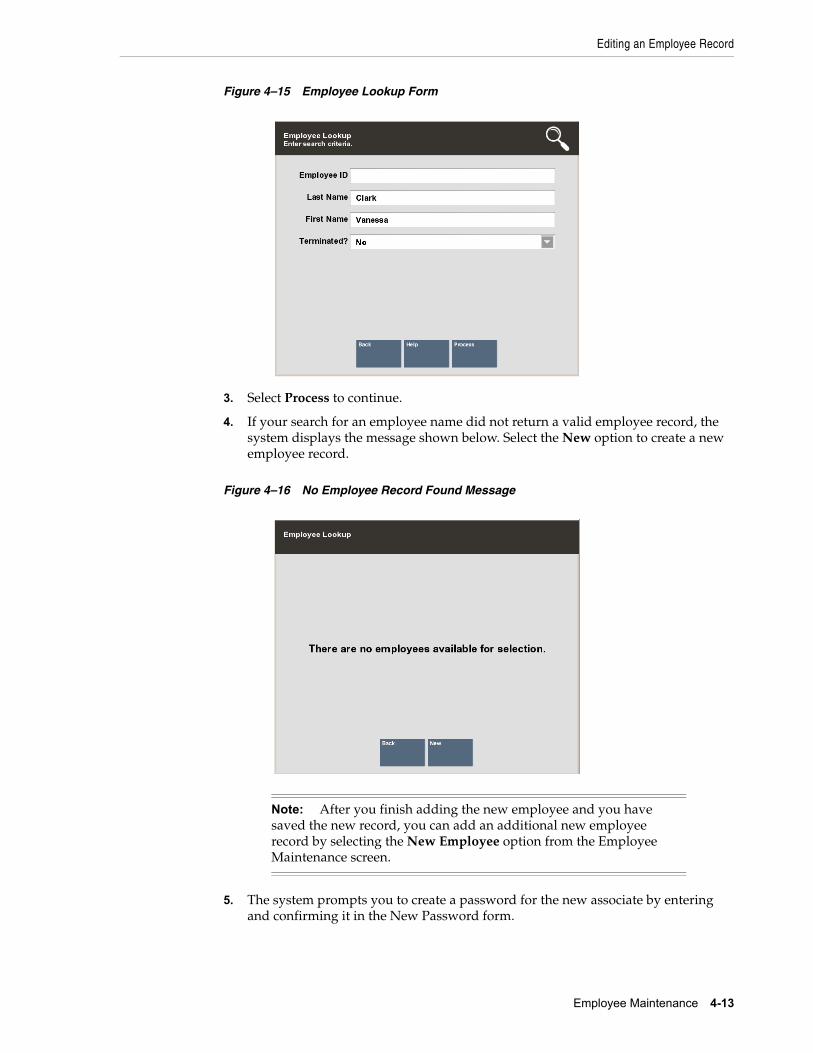
Editing an Employee Record
Employee Maintenance 4-13
Figure 4–15 Employee Lookup Form
3. Select Process to continue.
4. If your search for an employee name did not return a valid employee record, the system displays the message shown below. Select the New option to create a new employee record.
Figure 4–16 No Employee Record Found Message
5. The system prompts you to create a password for the new associate by entering and confirming it in the New Password form.
Note: After you finish adding the new employee and you have saved the new record, you can add an additional new employee record by selecting the New Employee option from the Employee Maintenance screen.
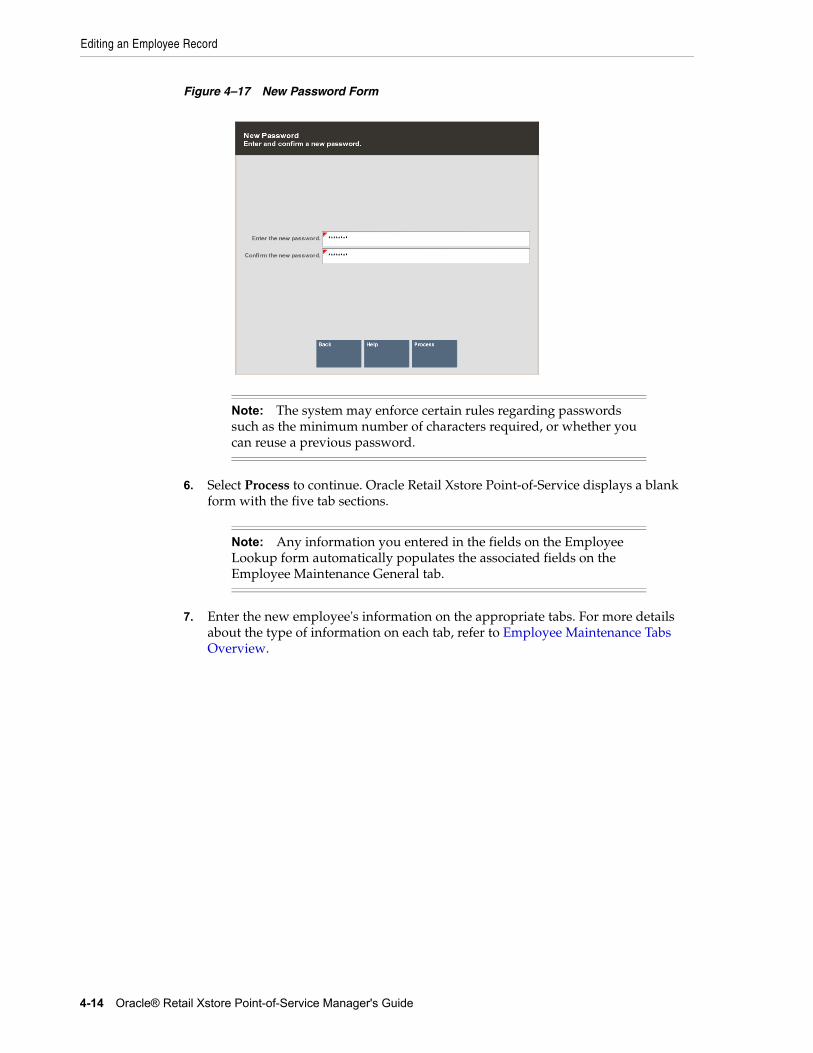
Editing an Employee Record
4-14 Oracle® Retail Xstore Point-of-Service Manager's Guide
Figure 4–17 New Password Form
6. Select Process to continue. Oracle Retail Xstore Point-of-Service displays a blank form with the five tab sections.
7. Enter the new employee's information on the appropriate tabs. For more details about the type of information on each tab, refer to Employee Maintenance Tabs Overview.
Note: The system may enforce certain rules regarding passwords such as the minimum number of characters required, or whether you can reuse a previous password.
Note: Any information you entered in the fields on the Employee Lookup form automatically populates the associated fields on the Employee Maintenance General tab.
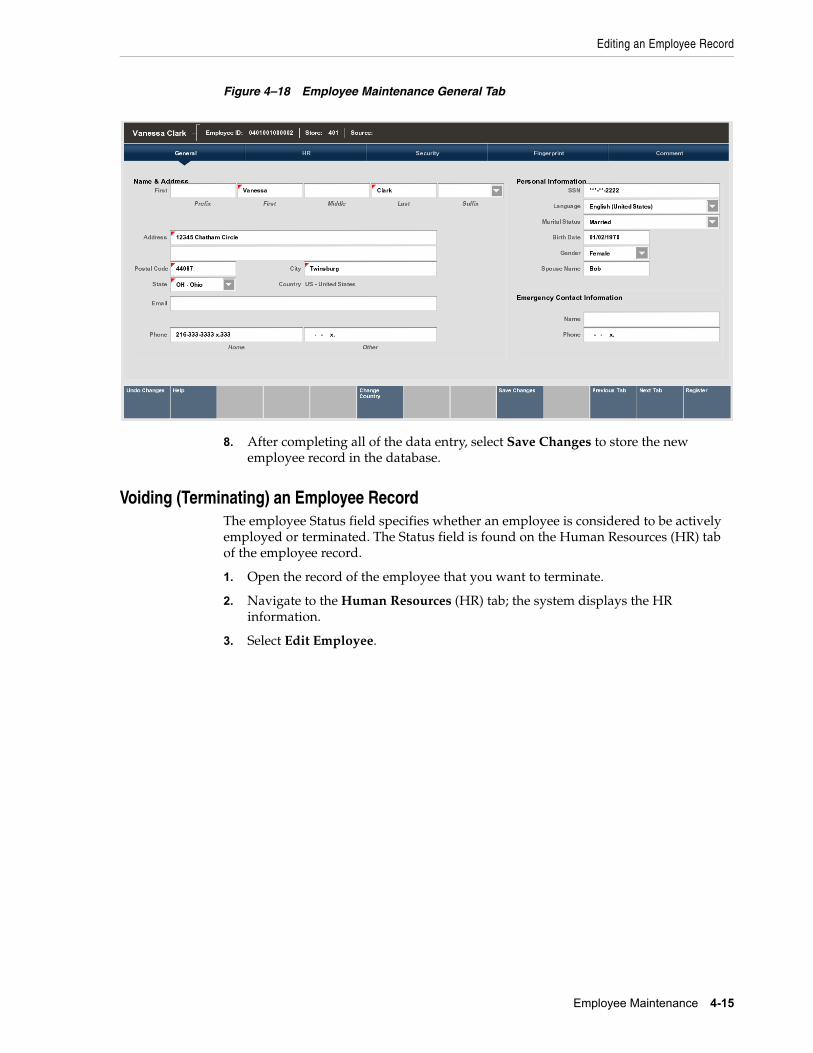
Editing an Employee Record
Employee Maintenance 4-15
Figure 4–18 Employee Maintenance General Tab
8. After completing all of the data entry, select Save Changes to store the new employee record in the database.
Voiding (Terminating) an Employee RecordThe employee Status field specifies whether an employee is considered to be actively employed or terminated. The Status field is found on the Human Resources (HR) tab of the employee record.
1. Open the record of the employee that you want to terminate.
2. Navigate to the Human Resources (HR) tab; the system displays the HR information.
3. Select Edit Employee.
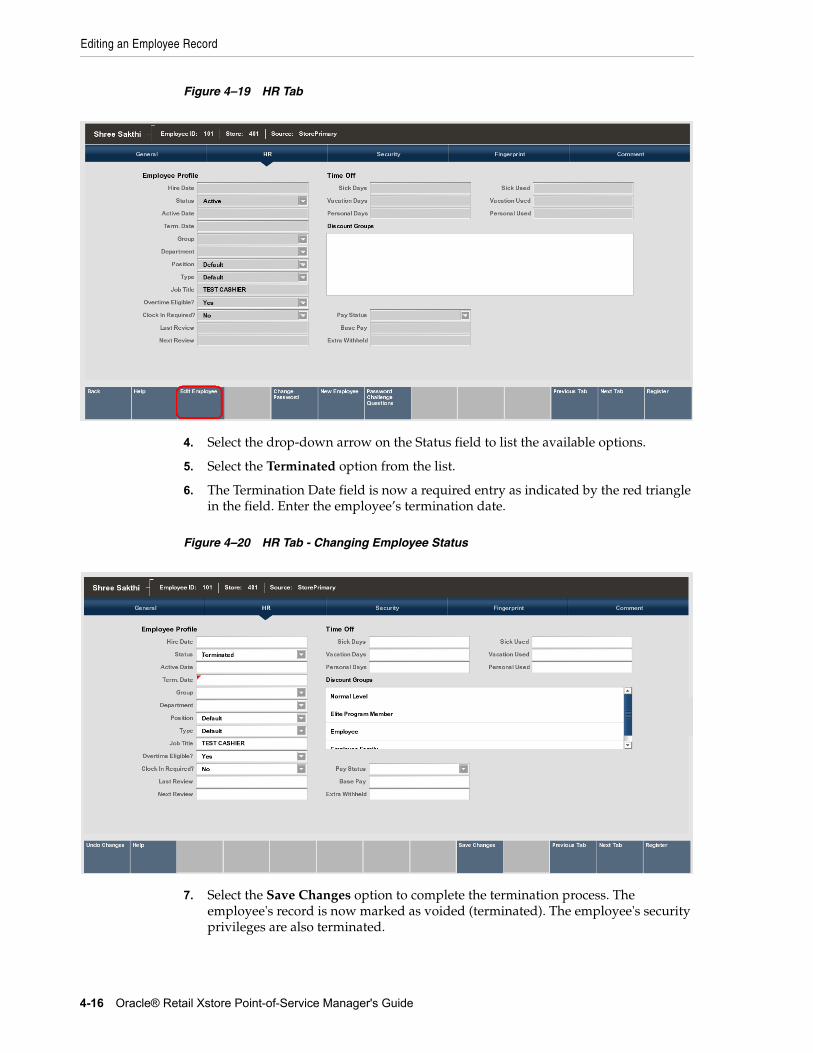
Editing an Employee Record
4-16 Oracle® Retail Xstore Point-of-Service Manager's Guide
Figure 4–19 HR Tab
4. Select the drop-down arrow on the Status field to list the available options.
5. Select the Terminated option from the list.
6. The Termination Date field is now a required entry as indicated by the red triangle in the field. Enter the employee’s termination date.
Figure 4–20 HR Tab - Changing Employee Status
7. Select the Save Changes option to complete the termination process. The employee's record is now marked as voided (terminated). The employee's security privileges are also terminated.
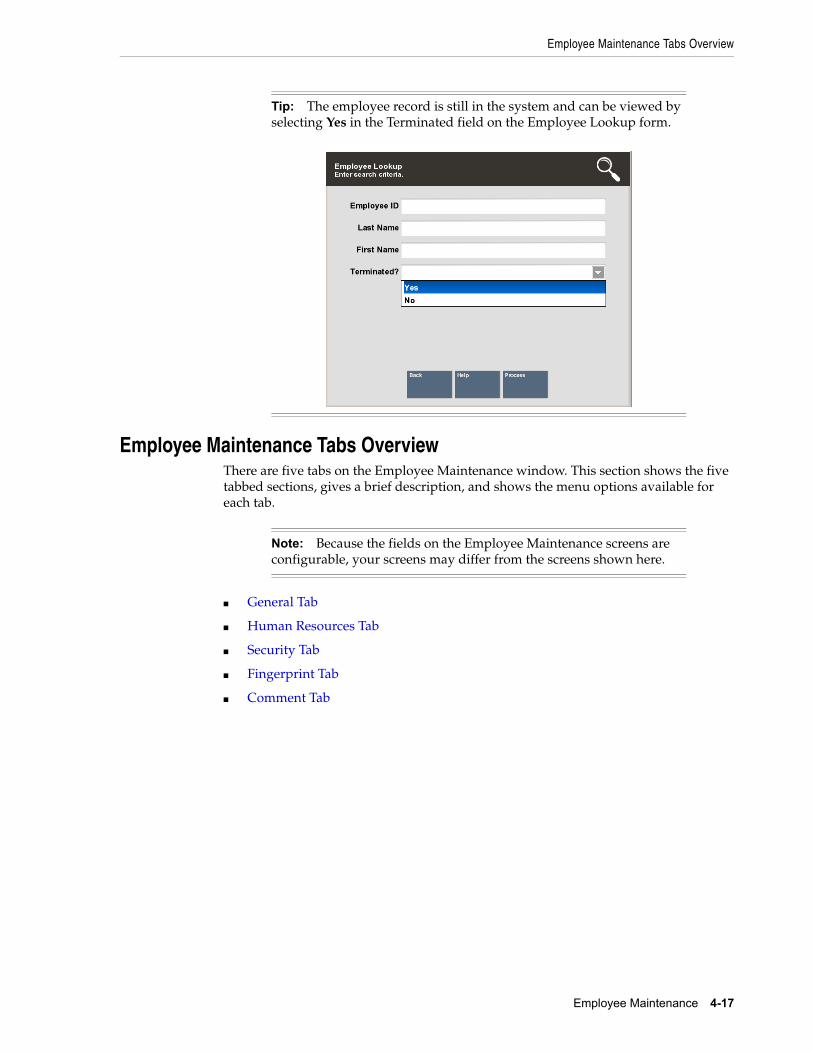
Employee Maintenance Tabs Overview
Employee Maintenance 4-17
Employee Maintenance Tabs OverviewThere are five tabs on the Employee Maintenance window. This section shows the five tabbed sections, gives a brief description, and shows the menu options available for each tab.
■ General Tab
■ Human Resources Tab
■ Security Tab
■ Fingerprint Tab
■ Comment Tab
Tip: The employee record is still in the system and can be viewed by selecting Yes in the Terminated field on the Employee Lookup form.
Note: Because the fields on the Employee Maintenance screens are configurable, your screens may differ from the screens shown here.
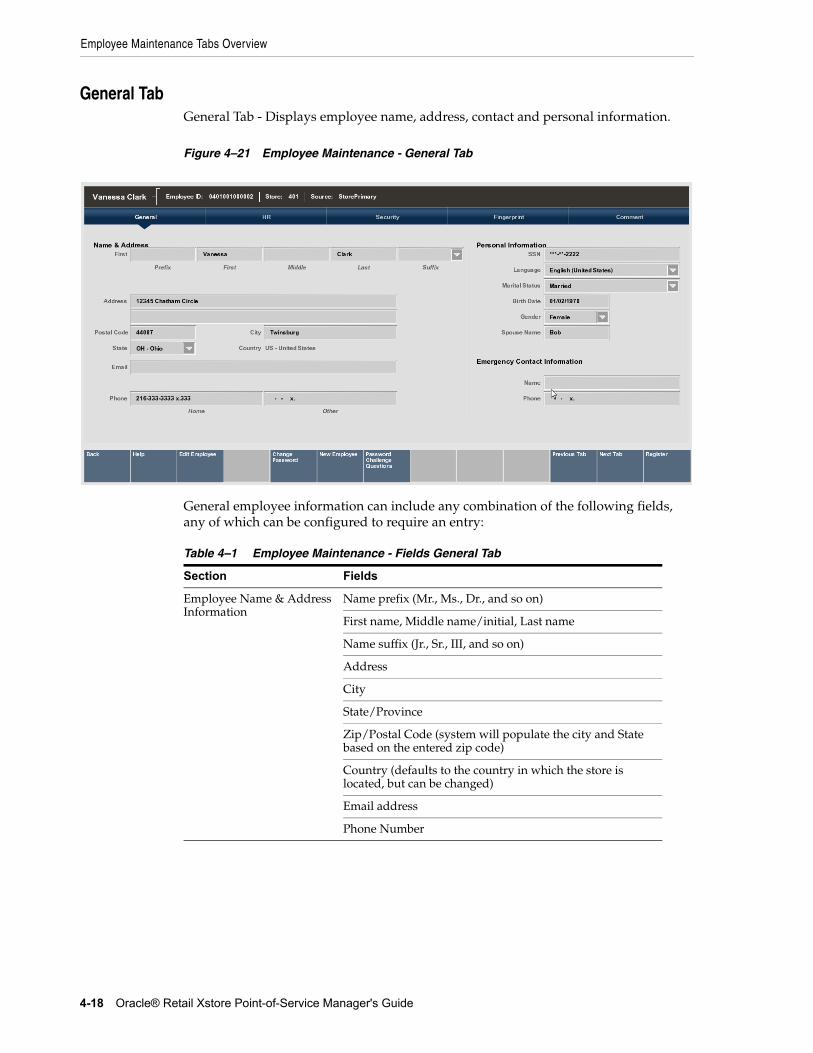
Employee Maintenance Tabs Overview
4-18 Oracle® Retail Xstore Point-of-Service Manager's Guide
General TabGeneral Tab - Displays employee name, address, contact and personal information.
Figure 4–21 Employee Maintenance - General Tab
General employee information can include any combination of the following fields, any of which can be configured to require an entry:
Table 4–1 Employee Maintenance - Fields General Tab
Section Fields
Employee Name & Address Information
Name prefix (Mr., Ms., Dr., and so on)
First name, Middle name/initial, Last name
Name suffix (Jr., Sr., III, and so on)
Address
City
State/Province
Zip/Postal Code (system will populate the city and State based on the entered zip code)
Country (defaults to the country in which the store is located, but can be changed)
Email address
Phone Number
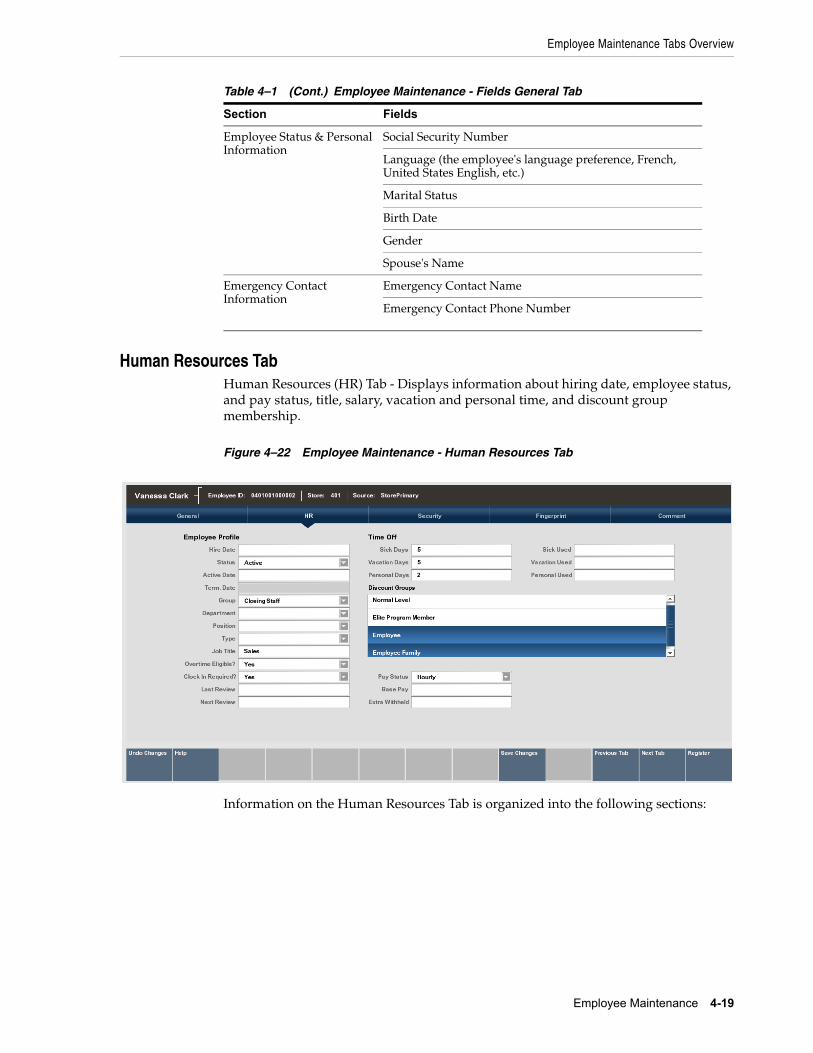
Employee Maintenance Tabs Overview
Employee Maintenance 4-19
Human Resources TabHuman Resources (HR) Tab - Displays information about hiring date, employee status, and pay status, title, salary, vacation and personal time, and discount group membership.
Figure 4–22 Employee Maintenance - Human Resources Tab
Information on the Human Resources Tab is organized into the following sections:
Employee Status & Personal Information
Social Security Number
Language (the employee's language preference, French, United States English, etc.)
Marital Status
Birth Date
Gender
Spouse's Name
Emergency Contact Information
Emergency Contact Name
Emergency Contact Phone Number
Table 4–1 (Cont.) Employee Maintenance - Fields General Tab
Section Fields
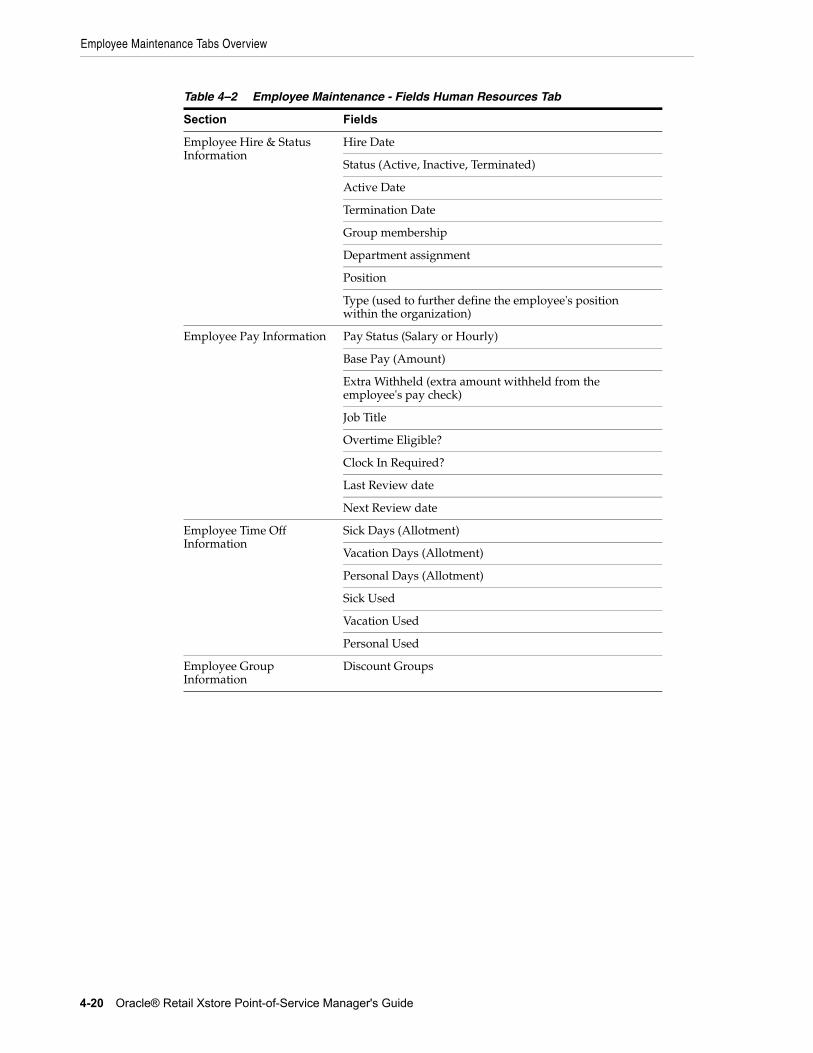
Employee Maintenance Tabs Overview
4-20 Oracle® Retail Xstore Point-of-Service Manager's Guide
Table 4–2 Employee Maintenance - Fields Human Resources Tab
Section Fields
Employee Hire & Status Information
Hire Date
Status (Active, Inactive, Terminated)
Active Date
Termination Date
Group membership
Department assignment
Position
Type (used to further define the employee's position within the organization)
Employee Pay Information Pay Status (Salary or Hourly)
Base Pay (Amount)
Extra Withheld (extra amount withheld from the employee's pay check)
Job Title
Overtime Eligible?
Clock In Required?
Last Review date
Next Review date
Employee Time Off Information
Sick Days (Allotment)
Vacation Days (Allotment)
Personal Days (Allotment)
Sick Used
Vacation Used
Personal Used
Employee Group Information
Discount Groups
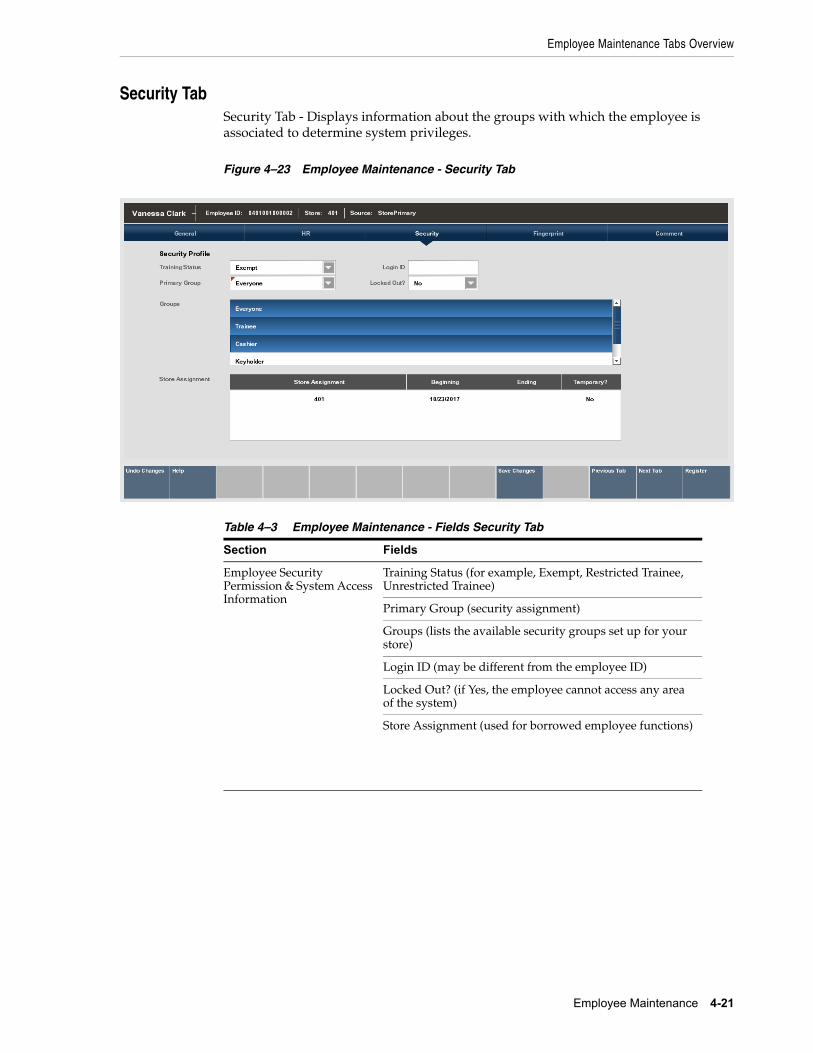
Employee Maintenance Tabs Overview
Employee Maintenance 4-21
Security TabSecurity Tab - Displays information about the groups with which the employee is associated to determine system privileges.
Figure 4–23 Employee Maintenance - Security Tab
Table 4–3 Employee Maintenance - Fields Security Tab
Section Fields
Employee Security Permission & System Access Information
Training Status (for example, Exempt, Restricted Trainee, Unrestricted Trainee)
Primary Group (security assignment)
Groups (lists the available security groups set up for your store)
Login ID (may be different from the employee ID)
Locked Out? (if Yes, the employee cannot access any area of the system)
Store Assignment (used for borrowed employee functions)
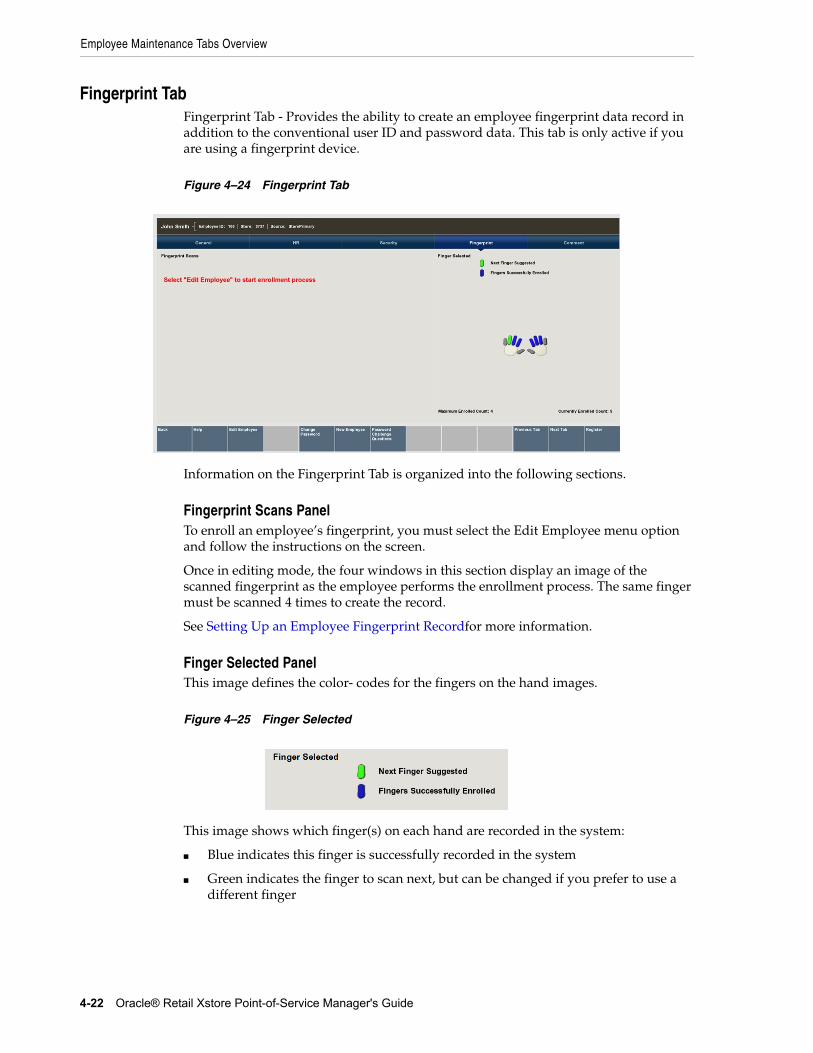
Employee Maintenance Tabs Overview
4-22 Oracle® Retail Xstore Point-of-Service Manager's Guide
Fingerprint TabFingerprint Tab - Provides the ability to create an employee fingerprint data record in addition to the conventional user ID and password data. This tab is only active if you are using a fingerprint device.
Figure 4–24 Fingerprint Tab
Information on the Fingerprint Tab is organized into the following sections.
Fingerprint Scans PanelTo enroll an employee’s fingerprint, you must select the Edit Employee menu option and follow the instructions on the screen.
Once in editing mode, the four windows in this section display an image of the scanned fingerprint as the employee performs the enrollment process. The same finger must be scanned 4 times to create the record.
See Setting Up an Employee Fingerprint Recordfor more information.
Finger Selected PanelThis image defines the color- codes for the fingers on the hand images.
Figure 4–25 Finger Selected
This image shows which finger(s) on each hand are recorded in the system:
■ Blue indicates this finger is successfully recorded in the system
■ Green indicates the finger to scan next, but can be changed if you prefer to use a different finger
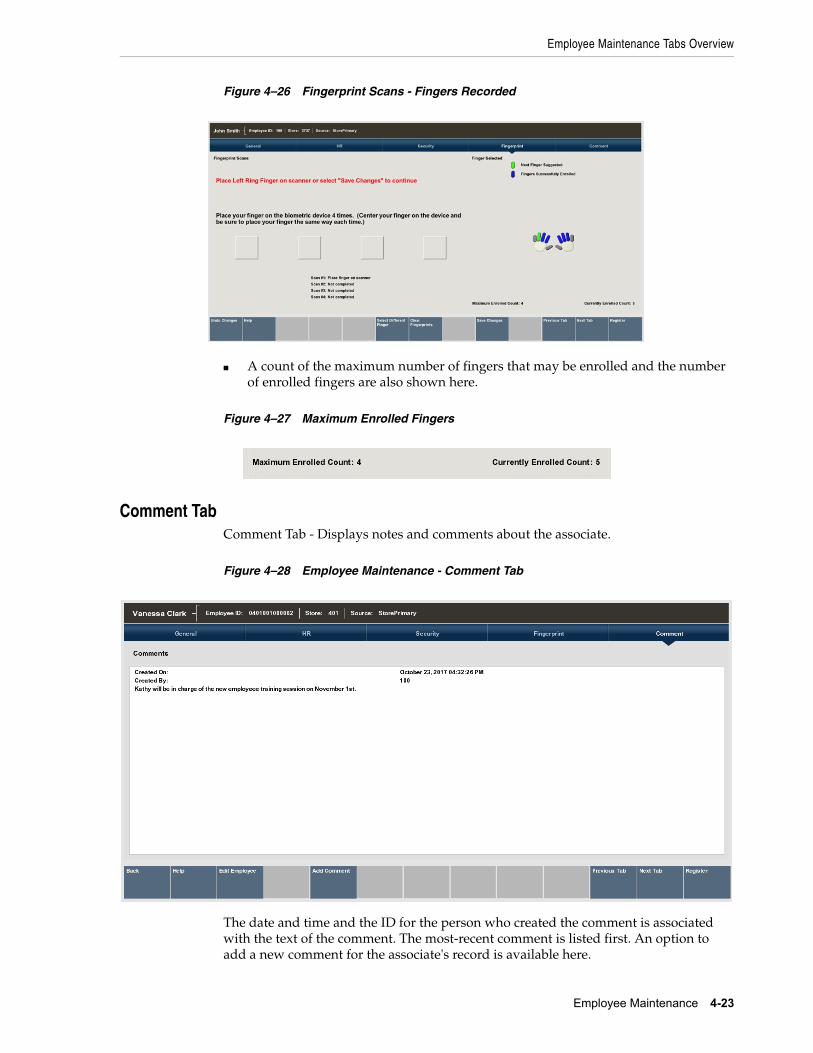
Employee Maintenance Tabs Overview
Employee Maintenance 4-23
Figure 4–26 Fingerprint Scans - Fingers Recorded
■ A count of the maximum number of fingers that may be enrolled and the number of enrolled fingers are also shown here.
Figure 4–27 Maximum Enrolled Fingers
Comment TabComment Tab - Displays notes and comments about the associate.
Figure 4–28 Employee Maintenance - Comment Tab
The date and time and the ID for the person who created the comment is associated with the text of the comment. The most-recent comment is listed first. An option to add a new comment for the associate's record is available here.
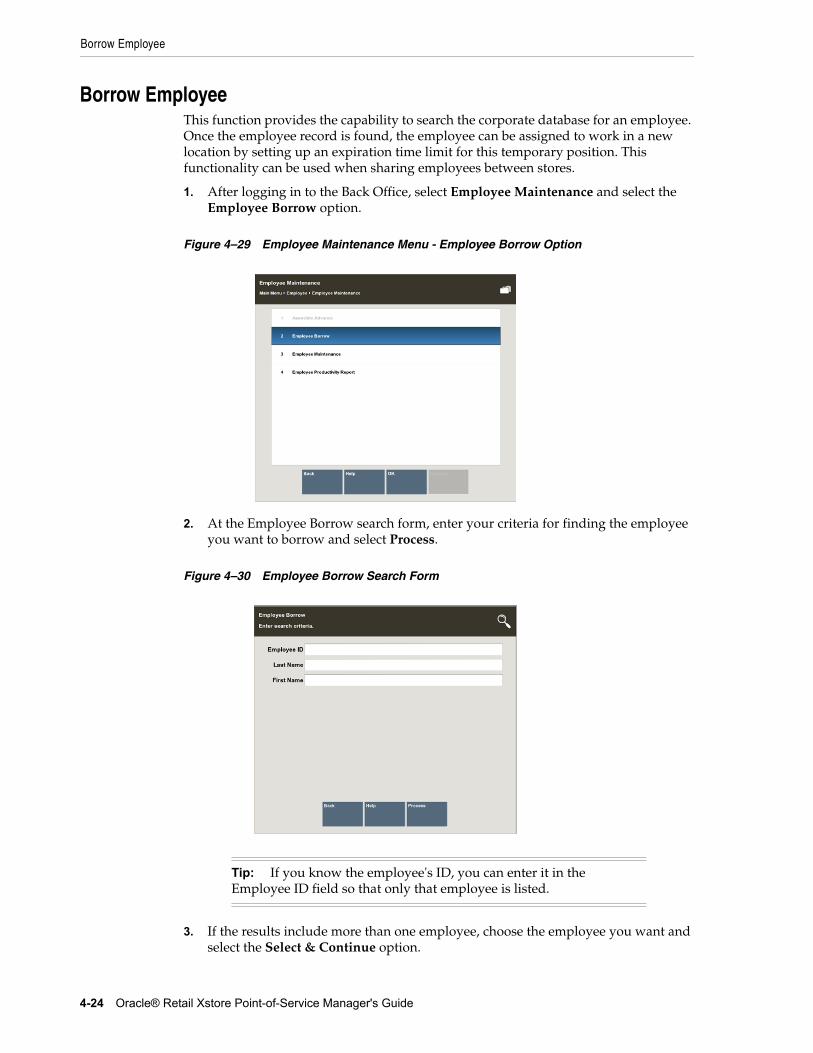
Borrow Employee
4-24 Oracle® Retail Xstore Point-of-Service Manager's Guide
Borrow EmployeeThis function provides the capability to search the corporate database for an employee. Once the employee record is found, the employee can be assigned to work in a new location by setting up an expiration time limit for this temporary position. This functionality can be used when sharing employees between stores.
1. After logging in to the Back Office, select Employee Maintenance and select the Employee Borrow option.
Figure 4–29 Employee Maintenance Menu - Employee Borrow Option
2. At the Employee Borrow search form, enter your criteria for finding the employee you want to borrow and select Process.
Figure 4–30 Employee Borrow Search Form
3. If the results include more than one employee, choose the employee you want and select the Select & Continue option.
Tip: If you know the employee's ID, you can enter it in the Employee ID field so that only that employee is listed.
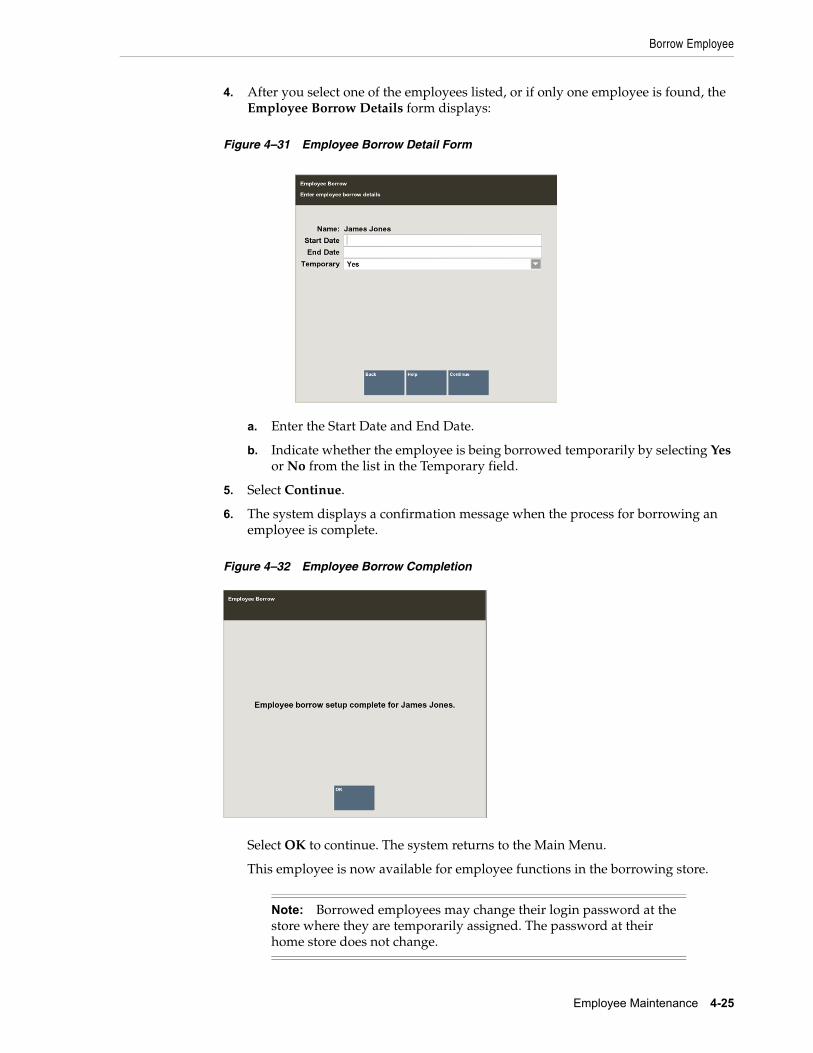
Borrow Employee
Employee Maintenance 4-25
4. After you select one of the employees listed, or if only one employee is found, the Employee Borrow Details form displays:
Figure 4–31 Employee Borrow Detail Form
a. Enter the Start Date and End Date.
b. Indicate whether the employee is being borrowed temporarily by selecting Yes or No from the list in the Temporary field.
5. Select Continue.
6. The system displays a confirmation message when the process for borrowing an employee is complete.
Figure 4–32 Employee Borrow Completion
Select OK to continue. The system returns to the Main Menu.
This employee is now available for employee functions in the borrowing store.
Note: Borrowed employees may change their login password at the store where they are temporarily assigned. The password at their home store does not change.
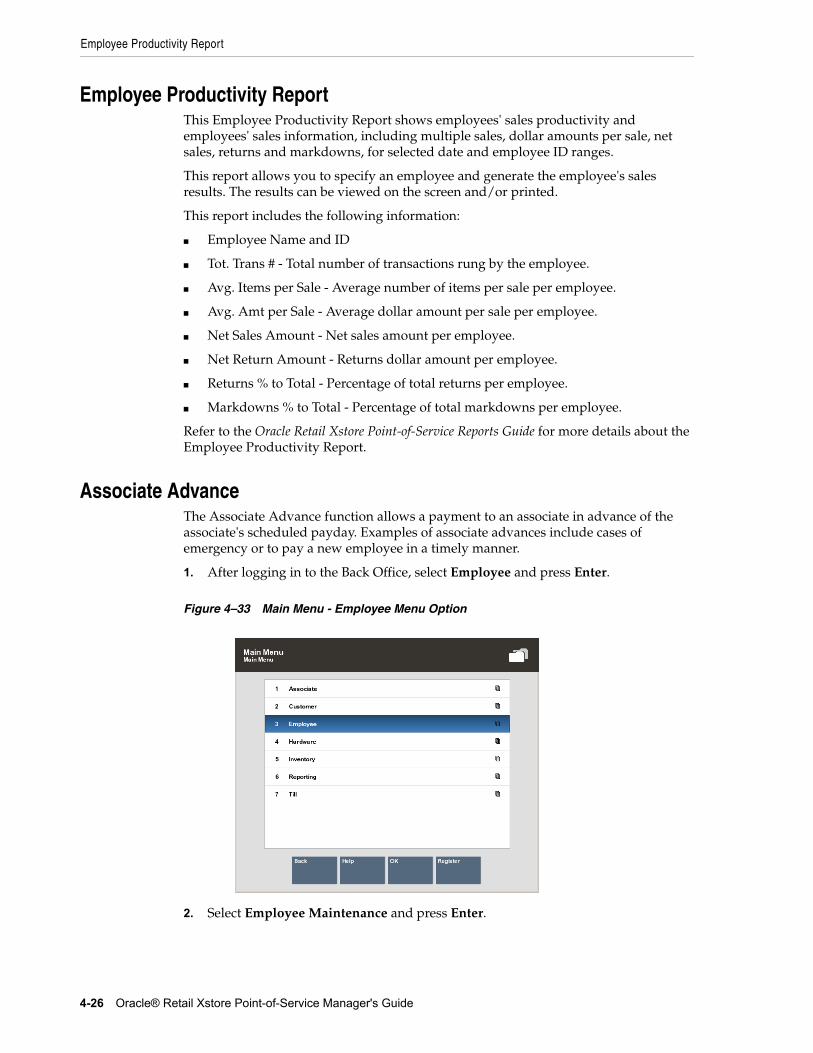
Employee Productivity Report
4-26 Oracle® Retail Xstore Point-of-Service Manager's Guide
Employee Productivity ReportThis Employee Productivity Report shows employees' sales productivity and employees' sales information, including multiple sales, dollar amounts per sale, net sales, returns and markdowns, for selected date and employee ID ranges.
This report allows you to specify an employee and generate the employee's sales results. The results can be viewed on the screen and/or printed.
This report includes the following information:
■ Employee Name and ID
■ Tot. Trans # - Total number of transactions rung by the employee.
■ Avg. Items per Sale - Average number of items per sale per employee.
■ Avg. Amt per Sale - Average dollar amount per sale per employee.
■ Net Sales Amount - Net sales amount per employee.
■ Net Return Amount - Returns dollar amount per employee.
■ Returns % to Total - Percentage of total returns per employee.
■ Markdowns % to Total - Percentage of total markdowns per employee.
Refer to the Oracle Retail Xstore Point-of-Service Reports Guide for more details about the Employee Productivity Report.
Associate AdvanceThe Associate Advance function allows a payment to an associate in advance of the associate's scheduled payday. Examples of associate advances include cases of emergency or to pay a new employee in a timely manner.
1. After logging in to the Back Office, select Employee and press Enter.
Figure 4–33 Main Menu - Employee Menu Option
2. Select Employee Maintenance and press Enter.
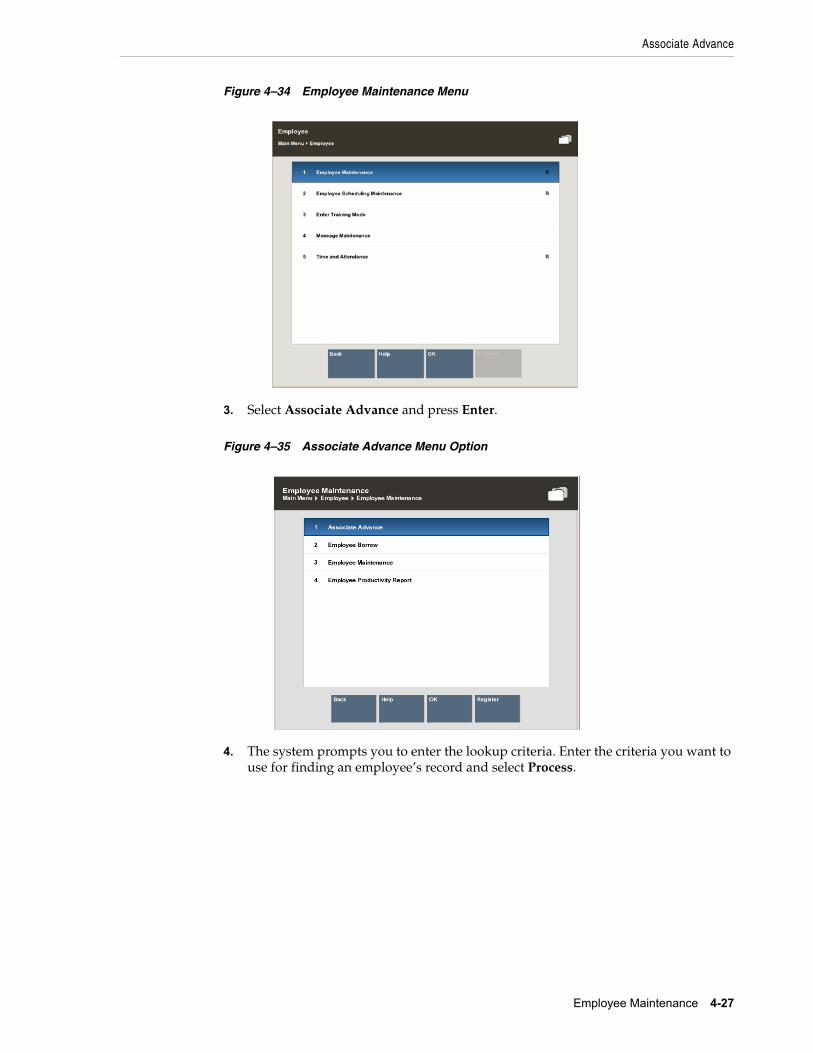
Associate Advance
Employee Maintenance 4-27
Figure 4–34 Employee Maintenance Menu
3. Select Associate Advance and press Enter.
Figure 4–35 Associate Advance Menu Option
4. The system prompts you to enter the lookup criteria. Enter the criteria you want to use for finding an employee’s record and select Process.

Associate Advance
4-28 Oracle® Retail Xstore Point-of-Service Manager's Guide
Figure 4–36 Employee Lookup Form
■ If you enter an Employee ID, Oracle Retail Xstore Point-of-Service may immediately display a prompt for the cash advance amount.
■ If you enter search criteria that results in more than one record being found, or if your system is set up to always show a list, you must select the employee you want from the list.
5. At the prompt, enter the cash advance amount and press Enter to continue.
Figure 4–37 Cash Advance Amount Prompt
The system records the transaction and returns to the Main Menu.
Oracle Retail Xstore Point-of-Service prints a receipt with the associate's advance information and an employee signature line. Both a store copy and an employee copy are printed.
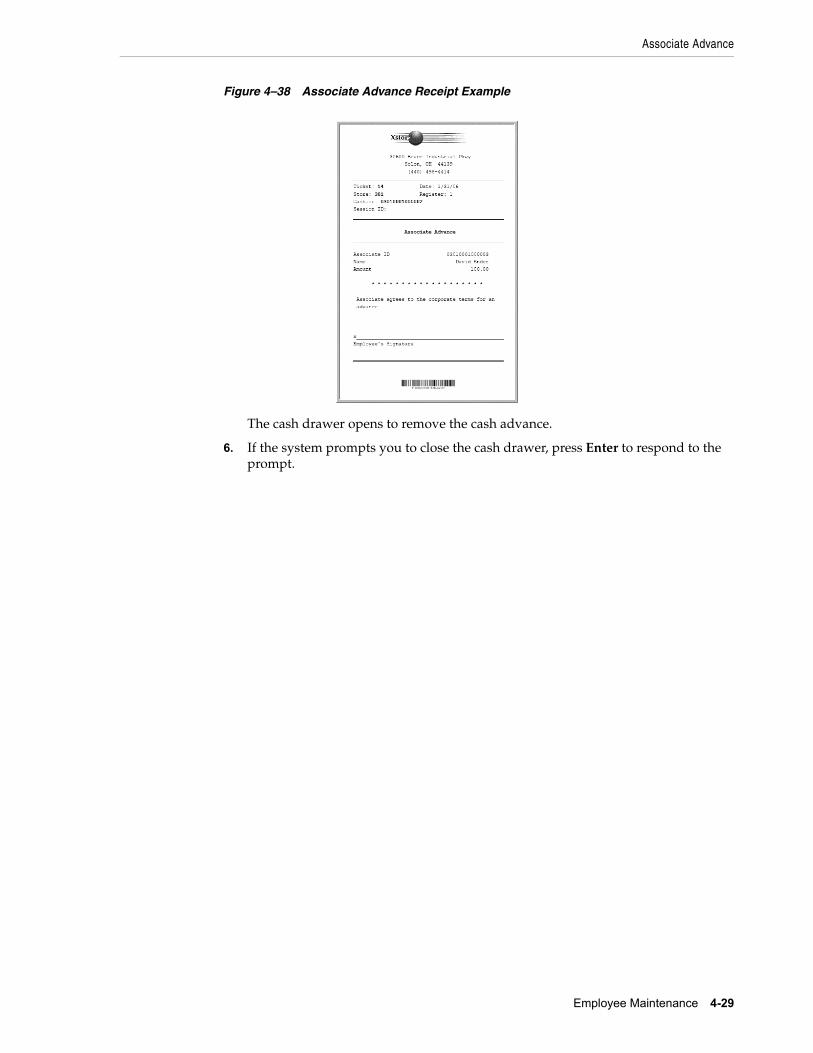
Associate Advance
Employee Maintenance 4-29
Figure 4–38 Associate Advance Receipt Example
The cash drawer opens to remove the cash advance.
6. If the system prompts you to close the cash drawer, press Enter to respond to the prompt.
5
Employee Scheduling 5-1
5Employee Scheduling
Employee Scheduling allows you to perform a variety of scheduling activities:
■ Create and maintain employee work shifts
■ Schedule and maintain employee time-off events such as vacations and other times when employees may not be available for work
■ Assign employees to defined work shifts
Employees can view and print their schedules at the Register Login screen. They may also view a list of other employees who are assigned to work on a specific day. Refer to the Oracle Retail Xstore Point-of-Service User Guide for more information.
Work ShiftsWork shifts may be created to define a specific set of working hours or days (weekday mornings, weekend evenings, and so on), or with the intent that individuals who belong to a particular group (day managers, night managers, and so on) may be assigned to it. After a shift has been created, an individual employee may be assigned to it. See Maintaining Employee Shifts.
Time OffUse the Maintain Employee Time Off function to define times when an employee is not available to work. These times can be set up as recurring events that span several days or as single events. See Maintaining Employee Time-Off Schedules.
ReportsThe following scheduling reports are available:
■ Employee Performance Report - This report shows the scheduled hours for an employee or all employees, the hours actually worked, and the difference between scheduled and worked hours. The employee’s total sales and average sales for the period are also shown.
■ Employee Schedule Detail - This report shows the employees who are scheduled for each day in the selected week. Each day of the week is listed, the employees scheduled, their individual start and end times, and the total hours for each day. This report also includes the total scheduled hours for the week.
■ Employee Time Off Summary Report - This report lists all employees who have time off scheduled for the selected week, and it shows the time-off days, hours (if less than a full day), and the reason for the time-off.
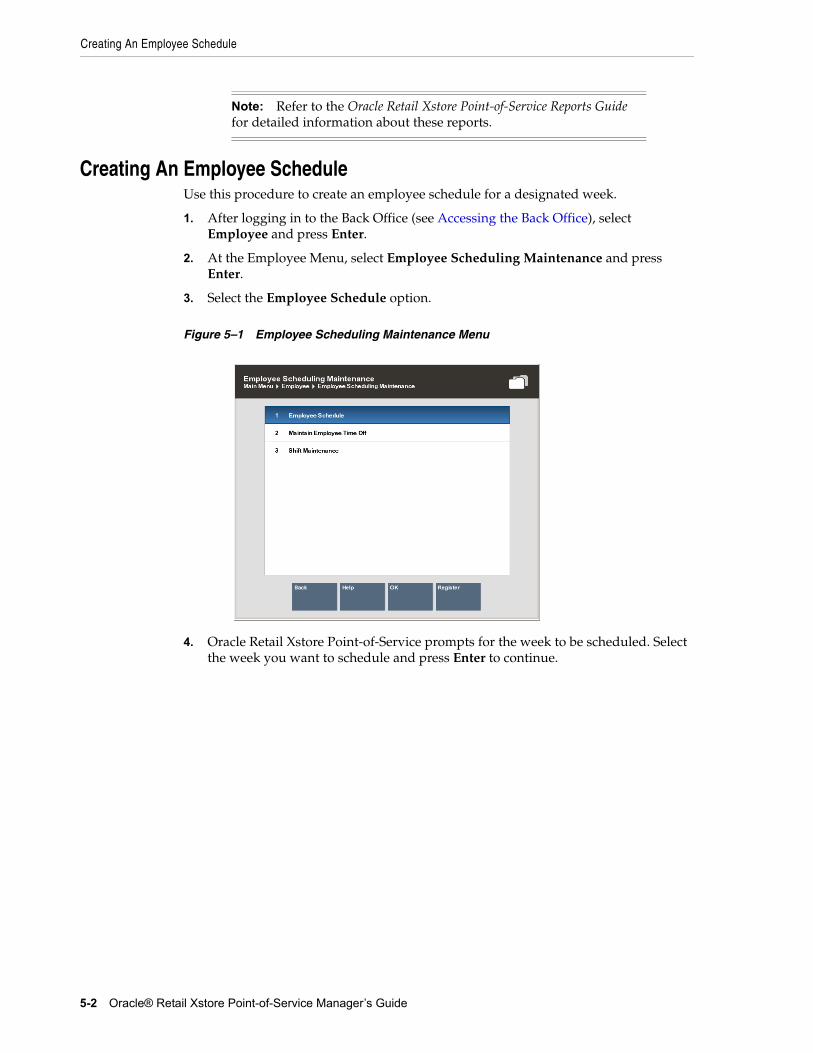
Creating An Employee Schedule
5-2 Oracle® Retail Xstore Point-of-Service Manager’s Guide
Creating An Employee ScheduleUse this procedure to create an employee schedule for a designated week.
1. After logging in to the Back Office (see Accessing the Back Office), select Employee and press Enter.
2. At the Employee Menu, select Employee Scheduling Maintenance and press Enter.
3. Select the Employee Schedule option.
Figure 5–1 Employee Scheduling Maintenance Menu
4. Oracle Retail Xstore Point-of-Service prompts for the week to be scheduled. Select the week you want to schedule and press Enter to continue.
Note: Refer to the Oracle Retail Xstore Point-of-Service Reports Guide for detailed information about these reports.
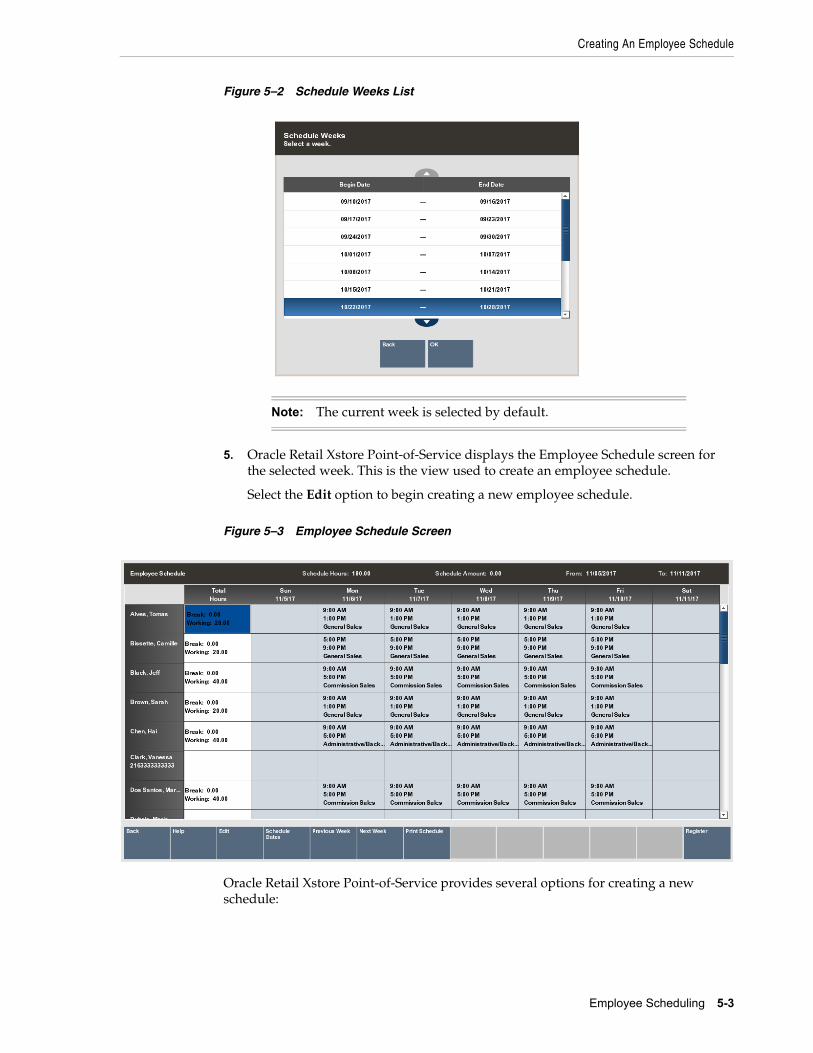
Creating An Employee Schedule
Employee Scheduling 5-3
Figure 5–2 Schedule Weeks List
5. Oracle Retail Xstore Point-of-Service displays the Employee Schedule screen for the selected week. This is the view used to create an employee schedule.
Select the Edit option to begin creating a new employee schedule.
Figure 5–3 Employee Schedule Screen
Oracle Retail Xstore Point-of-Service provides several options for creating a new schedule:
Note: The current week is selected by default.

Creating An Employee Schedule
5-4 Oracle® Retail Xstore Point-of-Service Manager’s Guide
Create New Schedule Options
■ Add Manual Shift - Use this option to create a shift to apply to a specific employee/day on the schedule. See Adding a Manual Shift.
■ Add Shift From List - Use this option to apply a pre-defined shift to a specific employee/day on the schedule. See Adding a Pre-Defined Shift.
■ Copy Day Schedule - Use this option to copy an existing schedule from one day to a day (or days) in this new schedule. See Copying a Day Schedule.
■ Copy Week Schedule - Use this option to copy an existing weekly schedule from one week to this new weekly schedule. See Copying a Week Schedule.
Note: To define the shifts, see Creating a New Shift.
Note: Scheduling Exceptions...
■ If you schedule a shift for an employee with approved time off for the period, Oracle Retail Xstore Point-of-Service displays a prompt alerting you to the conflict.
■ Select the Add to Schedule option to schedule the employee and override the time-off event.
<OR>
■ Select the Remove From Schedule option to remove the conflicted shift(s) from the schedule.
■ You cannot edit records for any date that precedes the current date.
Note:
■ You can assign multiple shifts to the same employee, on the same day. This is useful if you employ many part-time employees.
■ If desired, you can schedule multiple shorter shifts during the day for just one employee. For example a three-hour INVENTORY/ STOCK shift in the morning and a two-hour CASHIER shift in the afternoon.
■ See Figure 5–6 for an example of an employee (Frank, Fern) with 2 shifts in a single day.
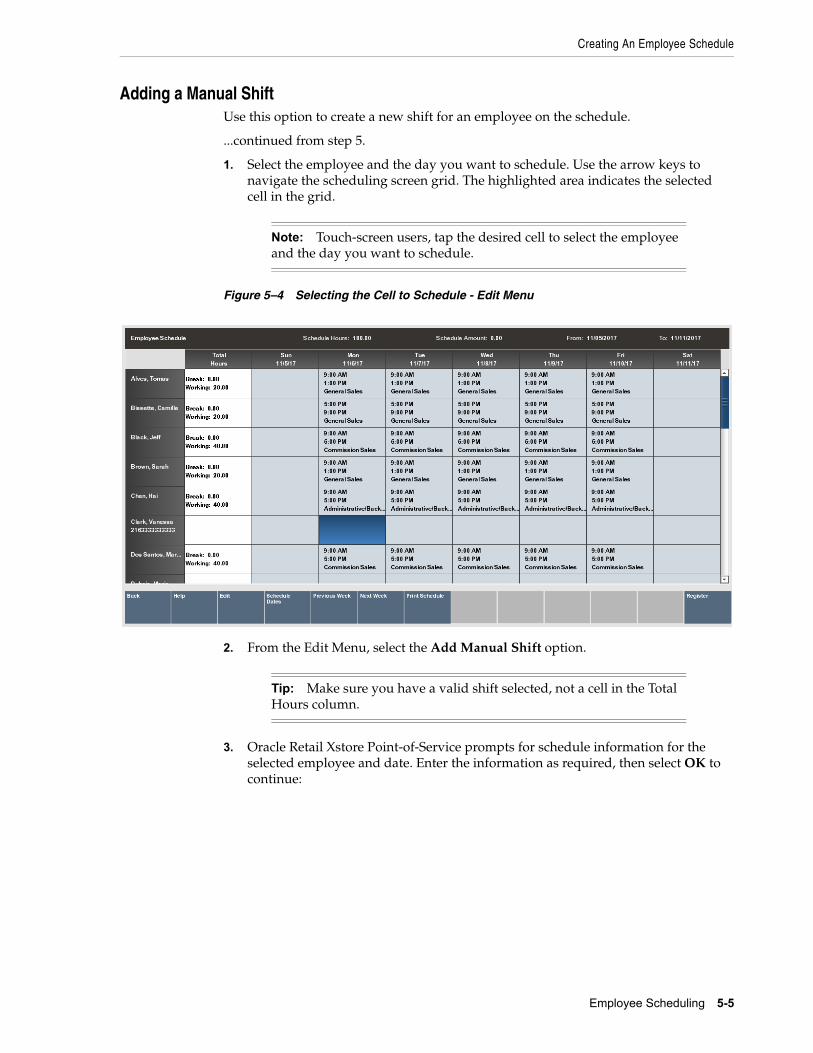
Creating An Employee Schedule
Employee Scheduling 5-5
Adding a Manual ShiftUse this option to create a new shift for an employee on the schedule.
...continued from step 5.
1. Select the employee and the day you want to schedule. Use the arrow keys to navigate the scheduling screen grid. The highlighted area indicates the selected cell in the grid.
Figure 5–4 Selecting the Cell to Schedule - Edit Menu
2. From the Edit Menu, select the Add Manual Shift option.
3. Oracle Retail Xstore Point-of-Service prompts for schedule information for the selected employee and date. Enter the information as required, then select OK to continue:
Note: Touch-screen users, tap the desired cell to select the employee and the day you want to schedule.
Tip: Make sure you have a valid shift selected, not a cell in the Total Hours column.
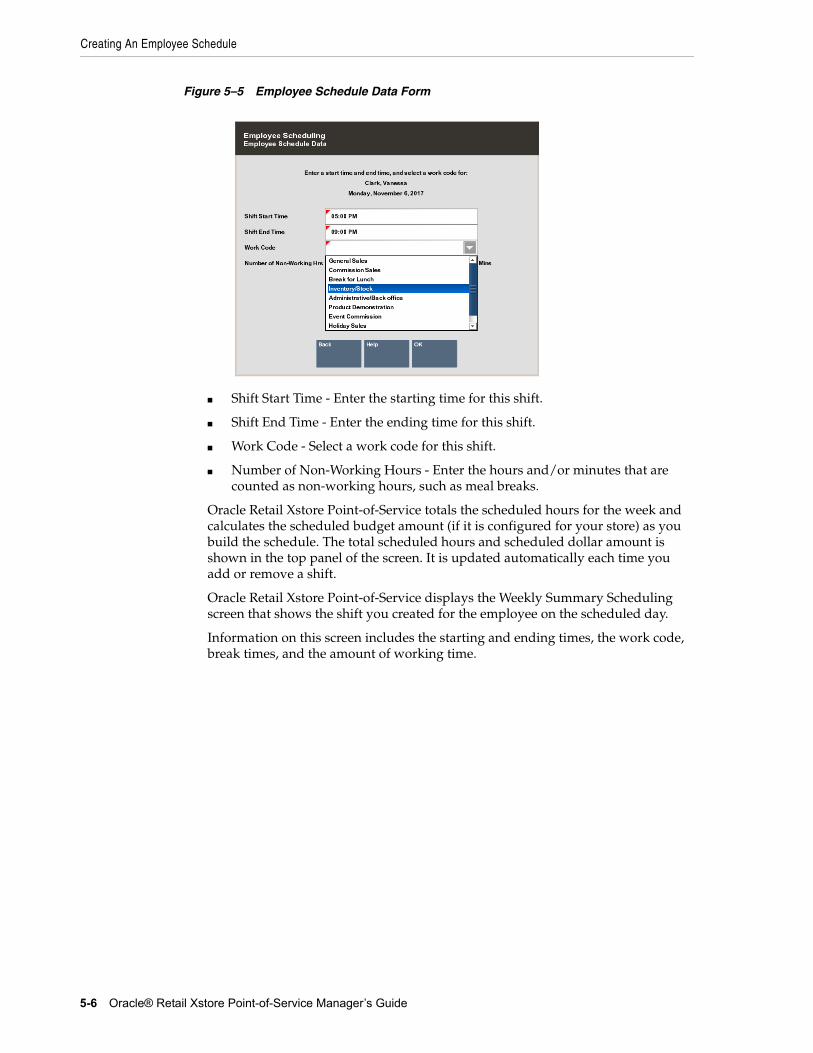
Creating An Employee Schedule
5-6 Oracle® Retail Xstore Point-of-Service Manager’s Guide
Figure 5–5 Employee Schedule Data Form
■ Shift Start Time - Enter the starting time for this shift.
■ Shift End Time - Enter the ending time for this shift.
■ Work Code - Select a work code for this shift.
■ Number of Non-Working Hours - Enter the hours and/or minutes that are counted as non-working hours, such as meal breaks.
Oracle Retail Xstore Point-of-Service totals the scheduled hours for the week and calculates the scheduled budget amount (if it is configured for your store) as you build the schedule. The total scheduled hours and scheduled dollar amount is shown in the top panel of the screen. It is updated automatically each time you add or remove a shift.
Oracle Retail Xstore Point-of-Service displays the Weekly Summary Scheduling screen that shows the shift you created for the employee on the scheduled day.
Information on this screen includes the starting and ending times, the work code, break times, and the amount of working time.
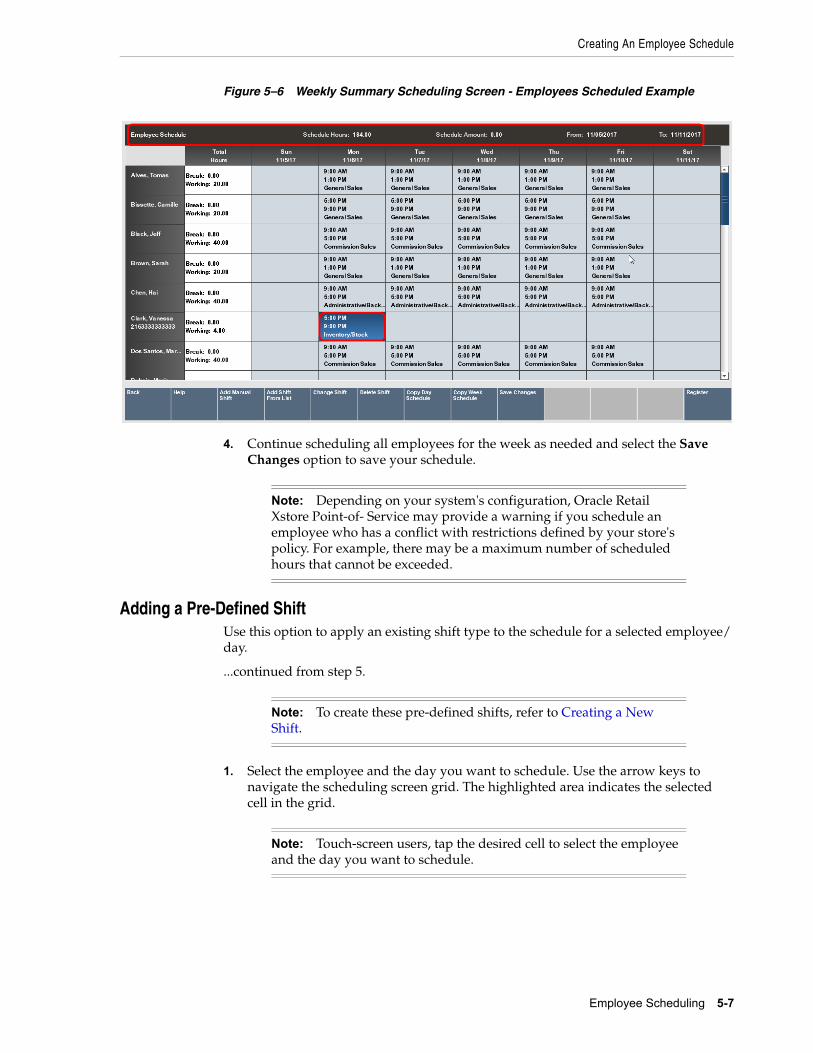
Creating An Employee Schedule
Employee Scheduling 5-7
Figure 5–6 Weekly Summary Scheduling Screen - Employees Scheduled Example
4. Continue scheduling all employees for the week as needed and select the Save Changes option to save your schedule.
Adding a Pre-Defined ShiftUse this option to apply an existing shift type to the schedule for a selected employee/ day.
...continued from step 5.
1. Select the employee and the day you want to schedule. Use the arrow keys to navigate the scheduling screen grid. The highlighted area indicates the selected cell in the grid.
Note: Depending on your system's configuration, Oracle Retail Xstore Point-of- Service may provide a warning if you schedule an employee who has a conflict with restrictions defined by your store's policy. For example, there may be a maximum number of scheduled hours that cannot be exceeded.
Note: To create these pre-defined shifts, refer to Creating a New Shift.
Note: Touch-screen users, tap the desired cell to select the employee and the day you want to schedule.
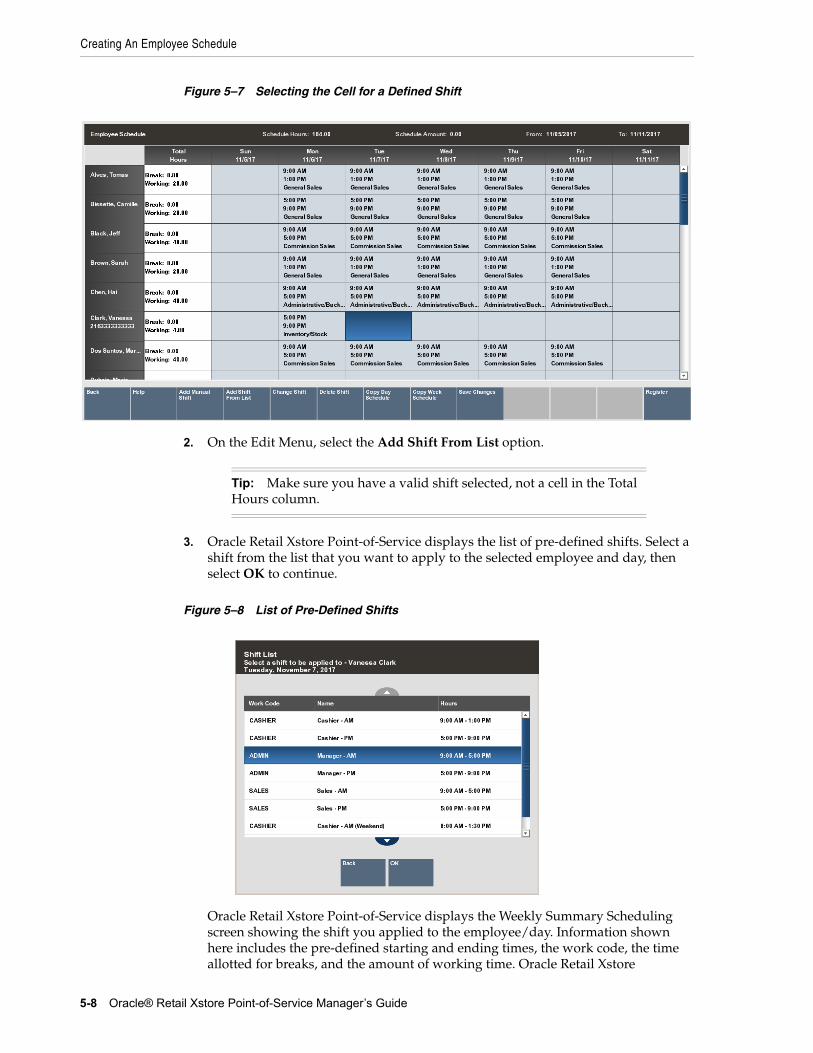
Creating An Employee Schedule
5-8 Oracle® Retail Xstore Point-of-Service Manager’s Guide
Figure 5–7 Selecting the Cell for a Defined Shift
2. On the Edit Menu, select the Add Shift From List option.
3. Oracle Retail Xstore Point-of-Service displays the list of pre-defined shifts. Select a shift from the list that you want to apply to the selected employee and day, then select OK to continue.
Figure 5–8 List of Pre-Defined Shifts
Oracle Retail Xstore Point-of-Service displays the Weekly Summary Scheduling screen showing the shift you applied to the employee/day. Information shown here includes the pre-defined starting and ending times, the work code, the time allotted for breaks, and the amount of working time. Oracle Retail Xstore
Tip: Make sure you have a valid shift selected, not a cell in the Total Hours column.
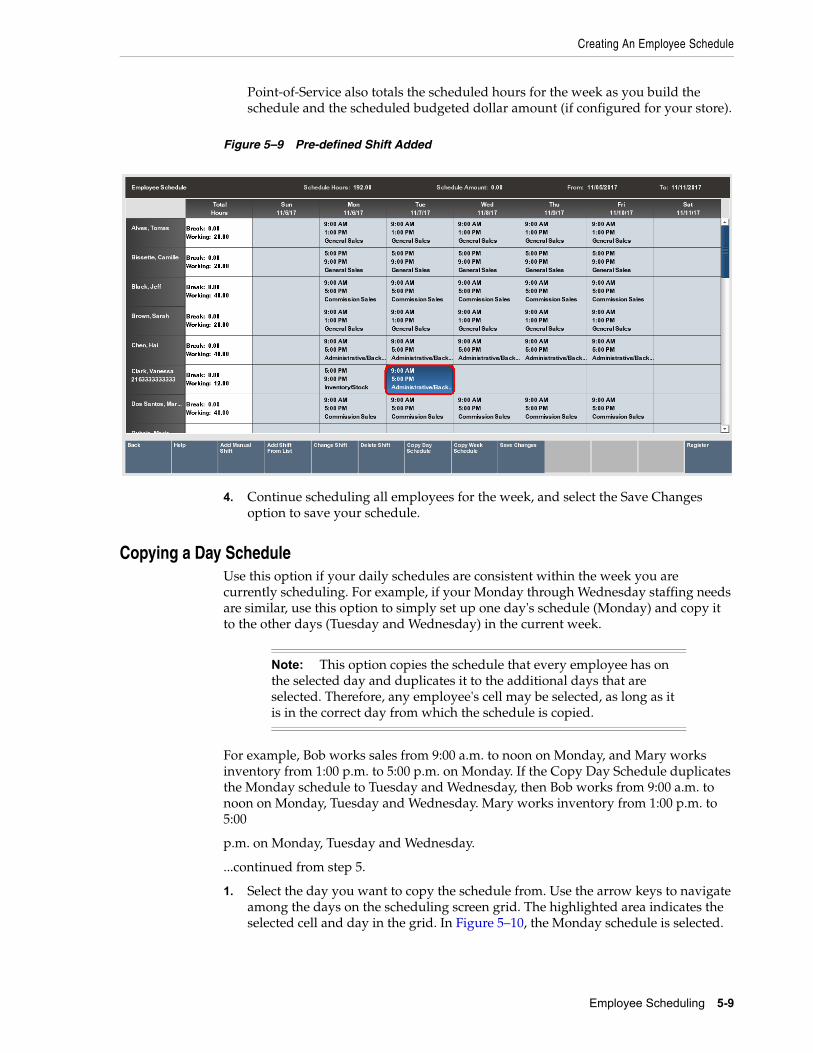
Creating An Employee Schedule
Employee Scheduling 5-9
Point-of-Service also totals the scheduled hours for the week as you build the schedule and the scheduled budgeted dollar amount (if configured for your store).
Figure 5–9 Pre-defined Shift Added
4. Continue scheduling all employees for the week, and select the Save Changes option to save your schedule.
Copying a Day ScheduleUse this option if your daily schedules are consistent within the week you are currently scheduling. For example, if your Monday through Wednesday staffing needs are similar, use this option to simply set up one day's schedule (Monday) and copy it to the other days (Tuesday and Wednesday) in the current week.
For example, Bob works sales from 9:00 a.m. to noon on Monday, and Mary works inventory from 1:00 p.m. to 5:00 p.m. on Monday. If the Copy Day Schedule duplicates the Monday schedule to Tuesday and Wednesday, then Bob works from 9:00 a.m. to noon on Monday, Tuesday and Wednesday. Mary works inventory from 1:00 p.m. to 5:00
p.m. on Monday, Tuesday and Wednesday.
...continued from step 5.
1. Select the day you want to copy the schedule from. Use the arrow keys to navigate among the days on the scheduling screen grid. The highlighted area indicates the selected cell and day in the grid. In Figure 5–10, the Monday schedule is selected.
Note: This option copies the schedule that every employee has on the selected day and duplicates it to the additional days that are selected. Therefore, any employee's cell may be selected, as long as it is in the correct day from which the schedule is copied.
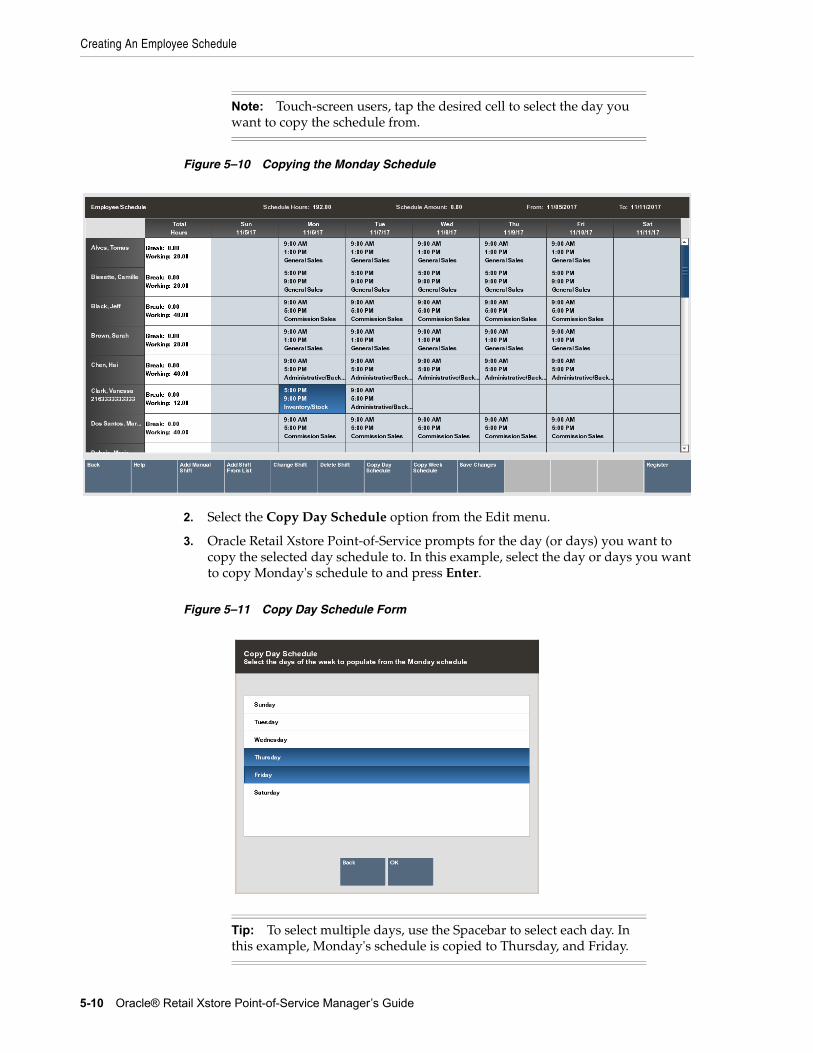
Creating An Employee Schedule
5-10 Oracle® Retail Xstore Point-of-Service Manager’s Guide
Figure 5–10 Copying the Monday Schedule
2. Select the Copy Day Schedule option from the Edit menu.
3. Oracle Retail Xstore Point-of-Service prompts for the day (or days) you want to copy the selected day schedule to. In this example, select the day or days you want to copy Monday's schedule to and press Enter.
Figure 5–11 Copy Day Schedule Form
Note: Touch-screen users, tap the desired cell to select the day you want to copy the schedule from.
Tip: To select multiple days, use the Spacebar to select each day. In this example, Monday's schedule is copied to Thursday, and Friday.
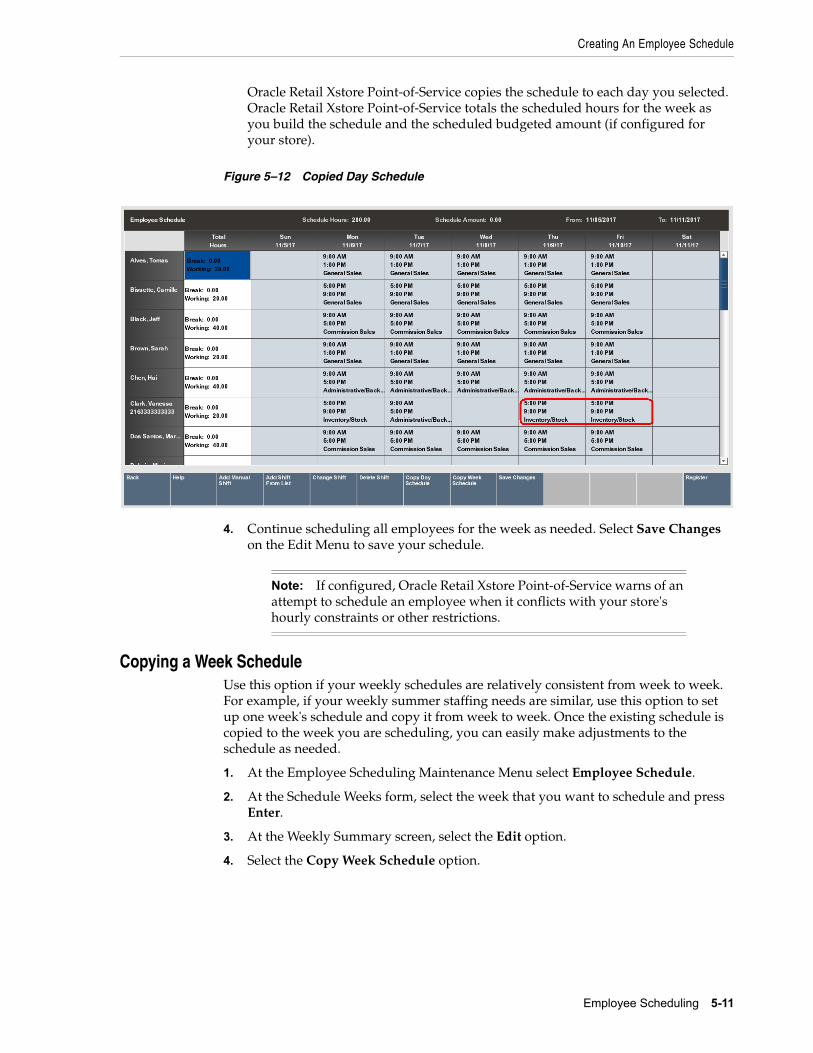
Creating An Employee Schedule
Employee Scheduling 5-11
Oracle Retail Xstore Point-of-Service copies the schedule to each day you selected. Oracle Retail Xstore Point-of-Service totals the scheduled hours for the week as you build the schedule and the scheduled budgeted amount (if configured for your store).
Figure 5–12 Copied Day Schedule
4. Continue scheduling all employees for the week as needed. Select Save Changes on the Edit Menu to save your schedule.
Copying a Week ScheduleUse this option if your weekly schedules are relatively consistent from week to week. For example, if your weekly summer staffing needs are similar, use this option to set up one week's schedule and copy it from week to week. Once the existing schedule is copied to the week you are scheduling, you can easily make adjustments to the schedule as needed.
1. At the Employee Scheduling Maintenance Menu select Employee Schedule.
2. At the Schedule Weeks form, select the week that you want to schedule and press Enter.
3. At the Weekly Summary screen, select the Edit option.
4. Select the Copy Week Schedule option.
Note: If configured, Oracle Retail Xstore Point-of-Service warns of an attempt to schedule an employee when it conflicts with your store's hourly constraints or other restrictions.
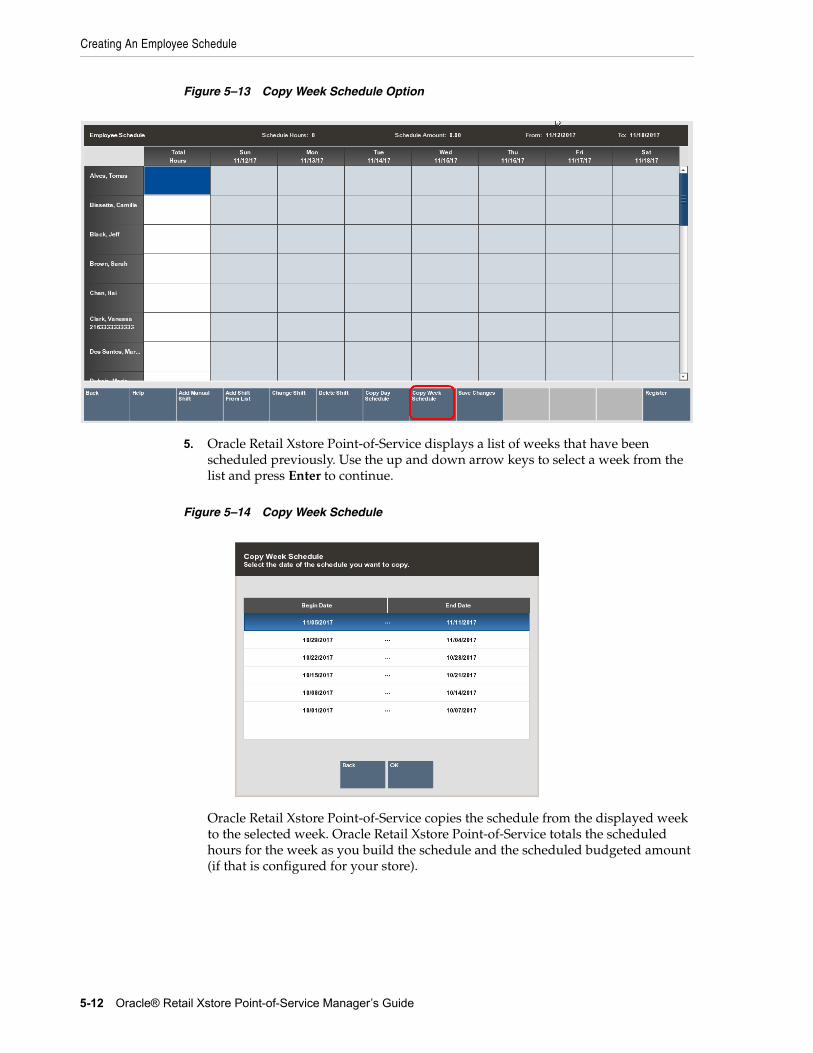
Creating An Employee Schedule
5-12 Oracle® Retail Xstore Point-of-Service Manager’s Guide
Figure 5–13 Copy Week Schedule Option
5. Oracle Retail Xstore Point-of-Service displays a list of weeks that have been scheduled previously. Use the up and down arrow keys to select a week from the list and press Enter to continue.
Figure 5–14 Copy Week Schedule
Oracle Retail Xstore Point-of-Service copies the schedule from the displayed week to the selected week. Oracle Retail Xstore Point-of-Service totals the scheduled hours for the week as you build the schedule and the scheduled budgeted amount (if that is configured for your store).
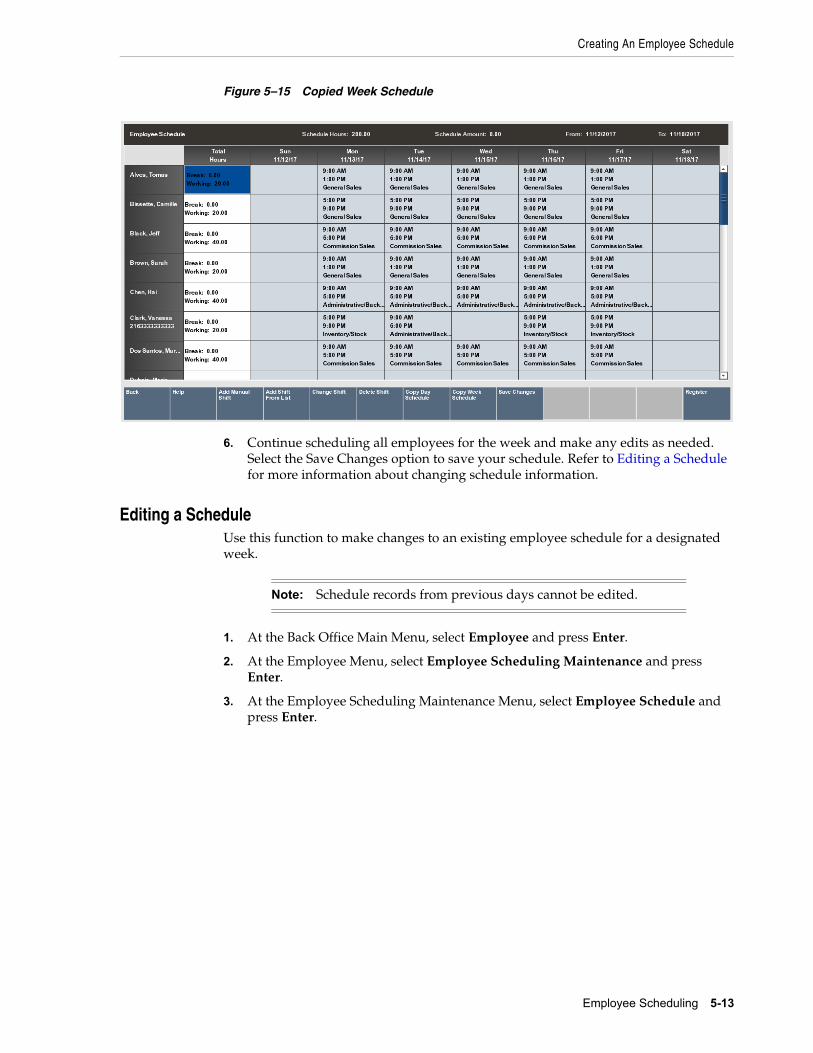
Creating An Employee Schedule
Employee Scheduling 5-13
Figure 5–15 Copied Week Schedule
6. Continue scheduling all employees for the week and make any edits as needed. Select the Save Changes option to save your schedule. Refer to Editing a Schedule for more information about changing schedule information.
Editing a ScheduleUse this function to make changes to an existing employee schedule for a designated week.
1. At the Back Office Main Menu, select Employee and press Enter.
2. At the Employee Menu, select Employee Scheduling Maintenance and press Enter.
3. At the Employee Scheduling Maintenance Menu, select Employee Schedule and press Enter.
Note: Schedule records from previous days cannot be edited.
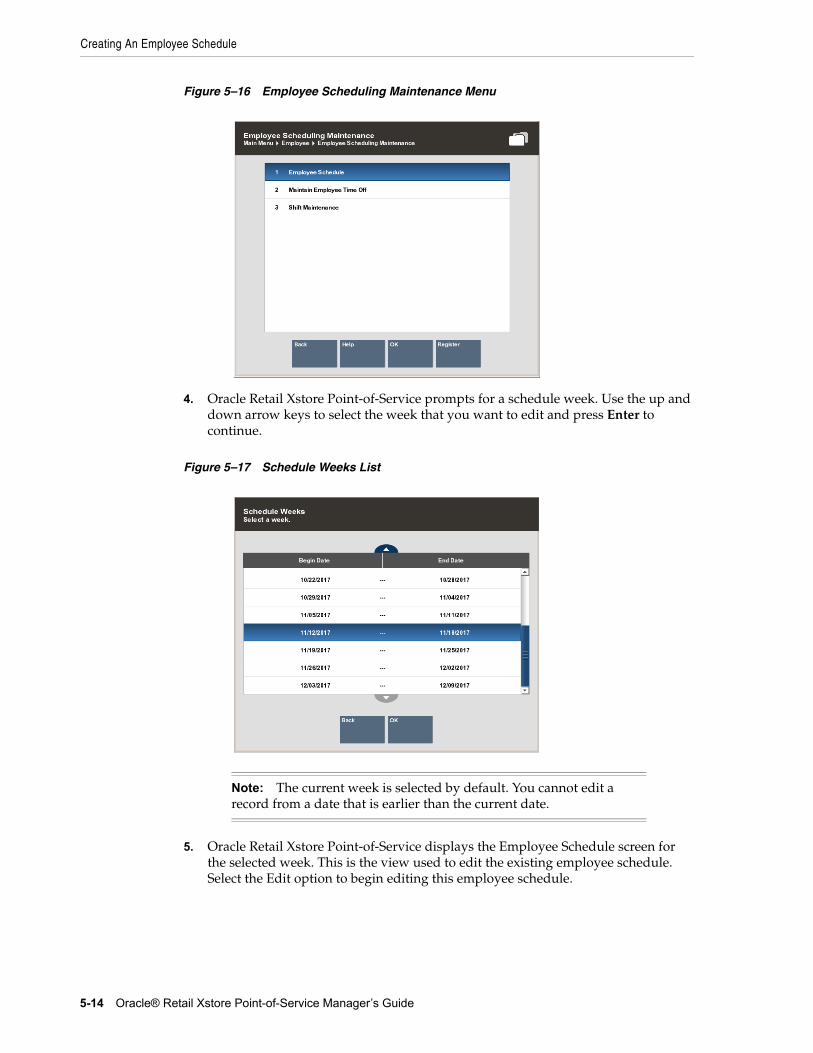
Creating An Employee Schedule
5-14 Oracle® Retail Xstore Point-of-Service Manager’s Guide
Figure 5–16 Employee Scheduling Maintenance Menu
4. Oracle Retail Xstore Point-of-Service prompts for a schedule week. Use the up and down arrow keys to select the week that you want to edit and press Enter to continue.
Figure 5–17 Schedule Weeks List
5. Oracle Retail Xstore Point-of-Service displays the Employee Schedule screen for the selected week. This is the view used to edit the existing employee schedule. Select the Edit option to begin editing this employee schedule.
Note: The current week is selected by default. You cannot edit a record from a date that is earlier than the current date.
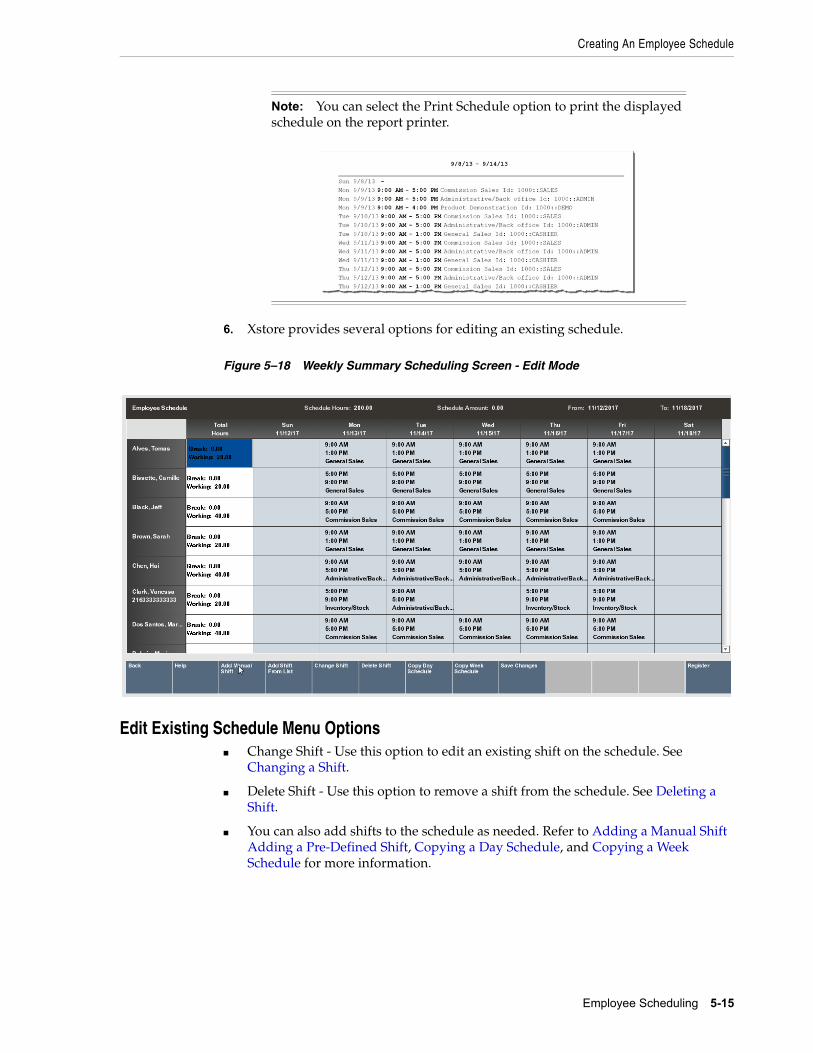
Creating An Employee Schedule
Employee Scheduling 5-15
6. Xstore provides several options for editing an existing schedule.
Figure 5–18 Weekly Summary Scheduling Screen - Edit Mode
Edit Existing Schedule Menu Options■ Change Shift - Use this option to edit an existing shift on the schedule. See
Changing a Shift.
■ Delete Shift - Use this option to remove a shift from the schedule. See Deleting a Shift.
■ You can also add shifts to the schedule as needed. Refer to Adding a Manual Shift Adding a Pre-Defined Shift, Copying a Day Schedule, and Copying a Week Schedule for more information.
Note: You can select the Print Schedule option to print the displayed schedule on the report printer.
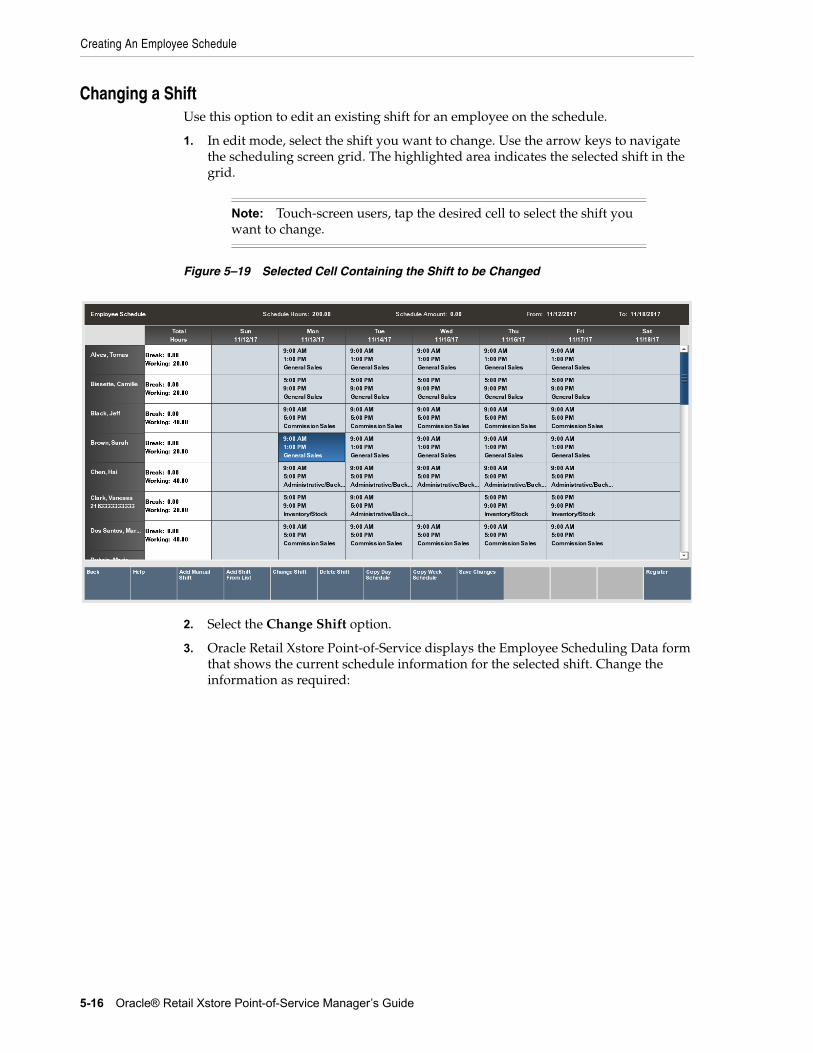
Creating An Employee Schedule
5-16 Oracle® Retail Xstore Point-of-Service Manager’s Guide
Changing a ShiftUse this option to edit an existing shift for an employee on the schedule.
1. In edit mode, select the shift you want to change. Use the arrow keys to navigate the scheduling screen grid. The highlighted area indicates the selected shift in the grid.
Figure 5–19 Selected Cell Containing the Shift to be Changed
2. Select the Change Shift option.
3. Oracle Retail Xstore Point-of-Service displays the Employee Scheduling Data form that shows the current schedule information for the selected shift. Change the information as required:
Note: Touch-screen users, tap the desired cell to select the shift you want to change.
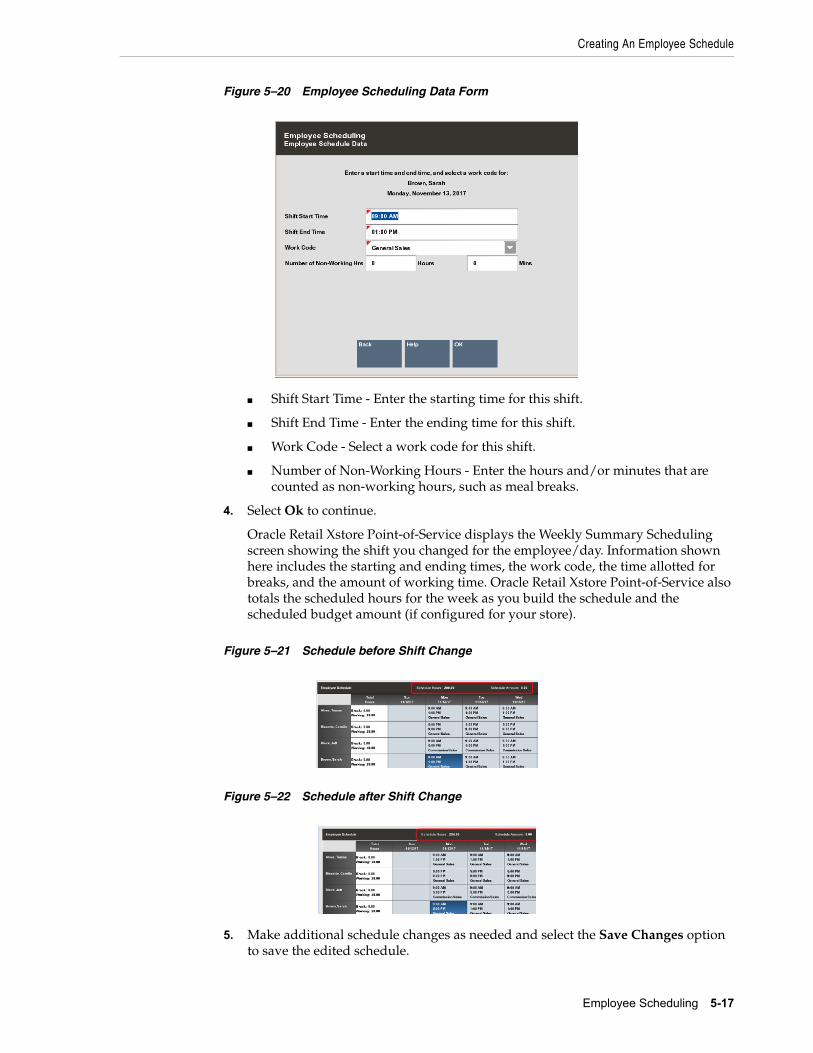
Creating An Employee Schedule
Employee Scheduling 5-17
Figure 5–20 Employee Scheduling Data Form
■ Shift Start Time - Enter the starting time for this shift.
■ Shift End Time - Enter the ending time for this shift.
■ Work Code - Select a work code for this shift.
■ Number of Non-Working Hours - Enter the hours and/or minutes that are counted as non-working hours, such as meal breaks.
4. Select Ok to continue.
Oracle Retail Xstore Point-of-Service displays the Weekly Summary Scheduling screen showing the shift you changed for the employee/day. Information shown here includes the starting and ending times, the work code, the time allotted for breaks, and the amount of working time. Oracle Retail Xstore Point-of-Service also totals the scheduled hours for the week as you build the schedule and the scheduled budget amount (if configured for your store).
Figure 5–21 Schedule before Shift Change
Figure 5–22 Schedule after Shift Change
5. Make additional schedule changes as needed and select the Save Changes option to save the edited schedule.
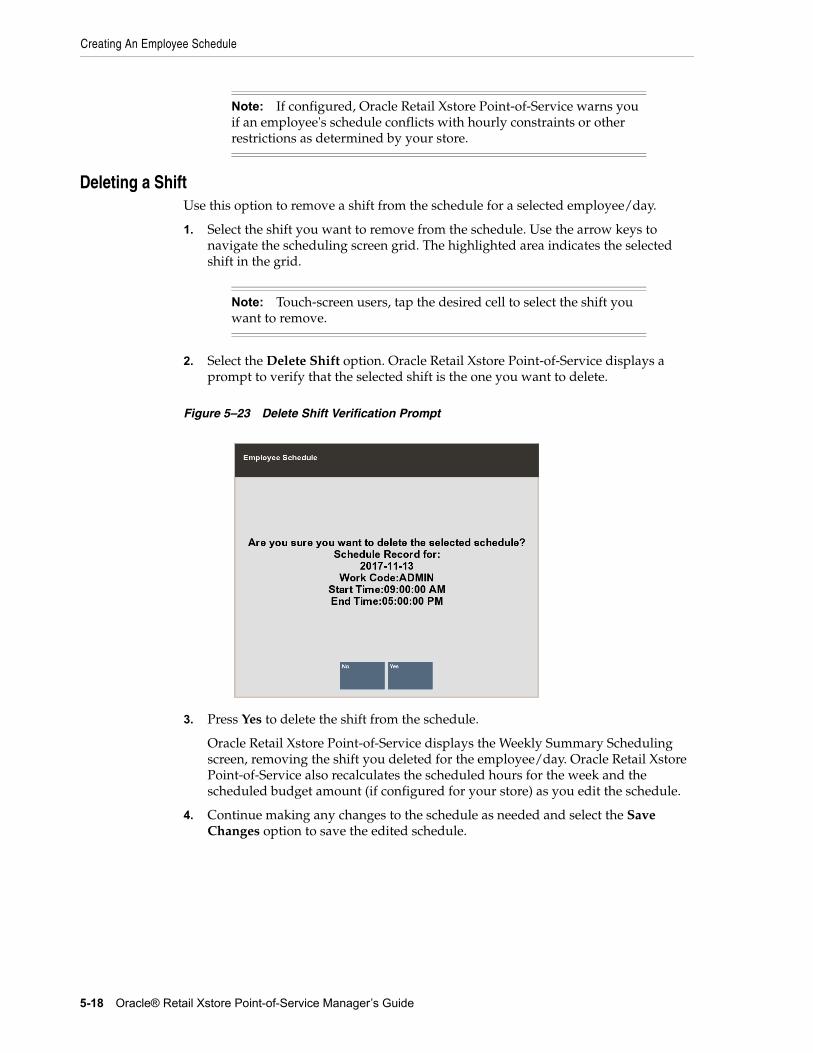
Creating An Employee Schedule
5-18 Oracle® Retail Xstore Point-of-Service Manager’s Guide
Deleting a ShiftUse this option to remove a shift from the schedule for a selected employee/day.
1. Select the shift you want to remove from the schedule. Use the arrow keys to navigate the scheduling screen grid. The highlighted area indicates the selected shift in the grid.
2. Select the Delete Shift option. Oracle Retail Xstore Point-of-Service displays a prompt to verify that the selected shift is the one you want to delete.
Figure 5–23 Delete Shift Verification Prompt
3. Press Yes to delete the shift from the schedule.
Oracle Retail Xstore Point-of-Service displays the Weekly Summary Scheduling screen, removing the shift you deleted for the employee/day. Oracle Retail Xstore Point-of-Service also recalculates the scheduled hours for the week and the scheduled budget amount (if configured for your store) as you edit the schedule.
4. Continue making any changes to the schedule as needed and select the Save Changes option to save the edited schedule.
Note: If configured, Oracle Retail Xstore Point-of-Service warns you if an employee's schedule conflicts with hourly constraints or other restrictions as determined by your store.
Note: Touch-screen users, tap the desired cell to select the shift you want to remove.

Creating An Employee Schedule
Employee Scheduling 5-19
Maintaining Employee Time-Off SchedulesTo create and edit time-off events, Oracle Retail Xstore Point-of-Service prompts you for information such as the type of time-off period (whole day, half day, partial day), whether the time-off period spans multiple days or a single day, and the dates and times of the time-off period. This information is shown during the employee scheduling process, alerting you to scheduling exceptions if you try to schedule an employee with previously-approved time off for the time period you are scheduling.
Adding Time-Off PeriodsUse this function to add employees' time-off requests to the schedule.
From the Back Office Employee Scheduling Maintenance menu, select the Maintain Employee Time Off option and press Enter.
Figure 5–24 Employee Scheduling Maintenance Menu
1. Oracle Retail Xstore Point-of-Service prompts you to select a schedule week. Select the week for the time-off event and press Enter to continue.
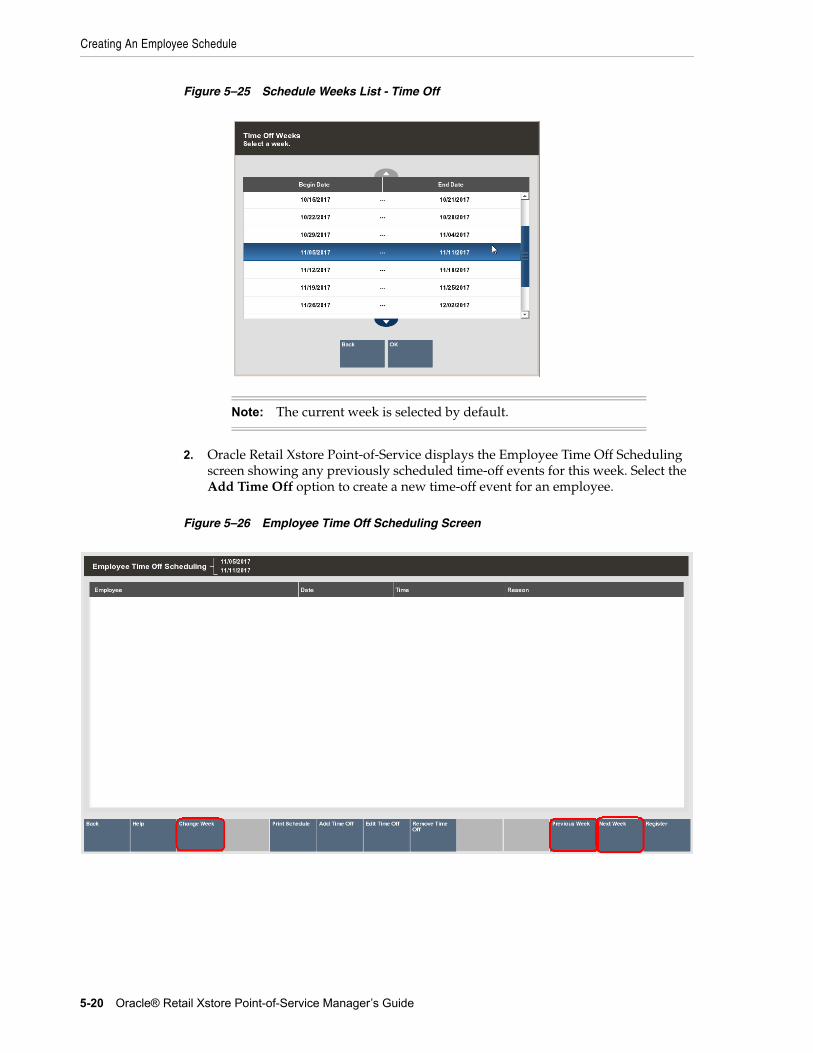
Creating An Employee Schedule
5-20 Oracle® Retail Xstore Point-of-Service Manager’s Guide
Figure 5–25 Schedule Weeks List - Time Off
2. Oracle Retail Xstore Point-of-Service displays the Employee Time Off Scheduling screen showing any previously scheduled time-off events for this week. Select the Add Time Off option to create a new time-off event for an employee.
Figure 5–26 Employee Time Off Scheduling Screen
Note: The current week is selected by default.
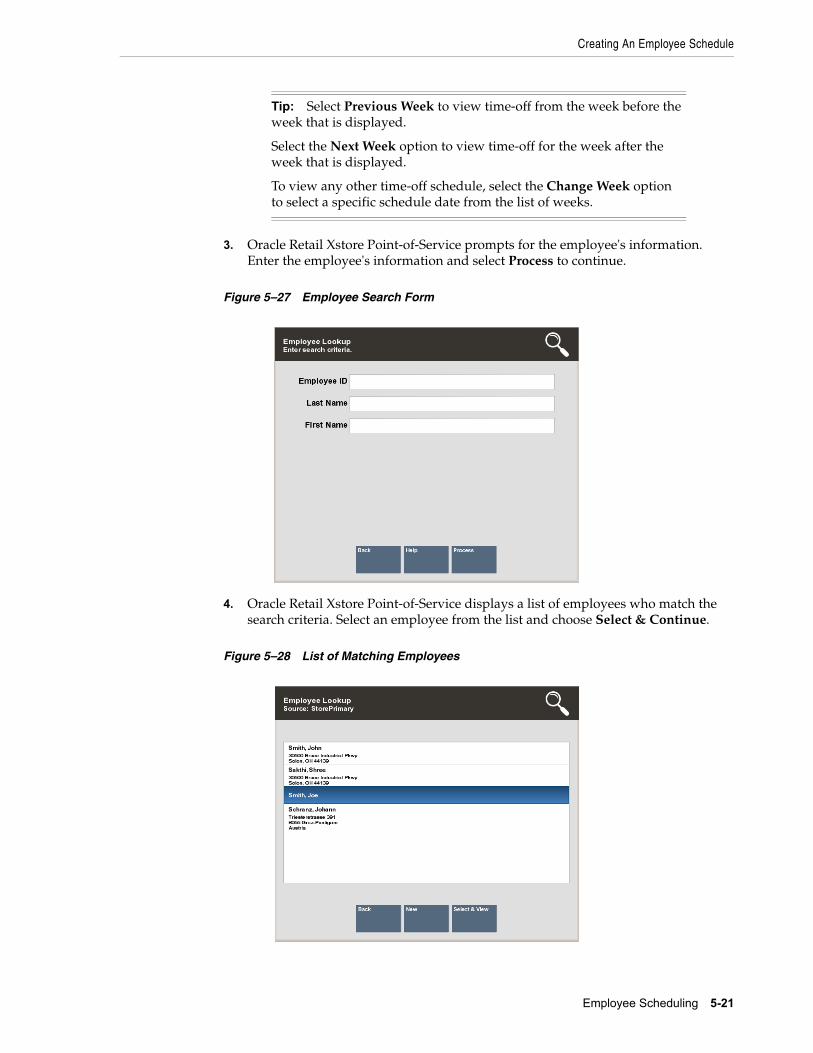
Creating An Employee Schedule
Employee Scheduling 5-21
3. Oracle Retail Xstore Point-of-Service prompts for the employee's information. Enter the employee's information and select Process to continue.
Figure 5–27 Employee Search Form
4. Oracle Retail Xstore Point-of-Service displays a list of employees who match the search criteria. Select an employee from the list and choose Select & Continue.
Figure 5–28 List of Matching Employees
Tip: Select Previous Week to view time-off from the week before the week that is displayed.
Select the Next Week option to view time-off for the week after the week that is displayed.
To view any other time-off schedule, select the Change Week option to select a specific schedule date from the list of weeks.
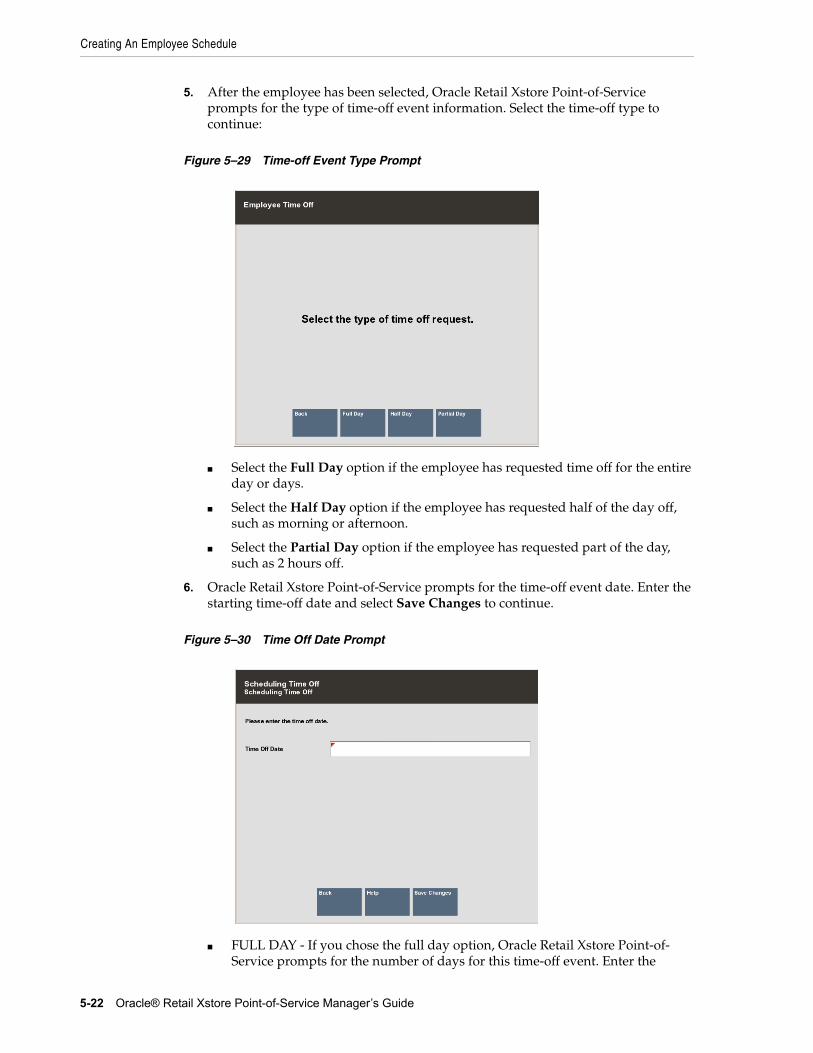
Creating An Employee Schedule
5-22 Oracle® Retail Xstore Point-of-Service Manager’s Guide
5. After the employee has been selected, Oracle Retail Xstore Point-of-Service prompts for the type of time-off event information. Select the time-off type to continue:
Figure 5–29 Time-off Event Type Prompt
■ Select the Full Day option if the employee has requested time off for the entire day or days.
■ Select the Half Day option if the employee has requested half of the day off, such as morning or afternoon.
■ Select the Partial Day option if the employee has requested part of the day, such as 2 hours off.
6. Oracle Retail Xstore Point-of-Service prompts for the time-off event date. Enter the starting time-off date and select Save Changes to continue.
Figure 5–30 Time Off Date Prompt
■ FULL DAY - If you chose the full day option, Oracle Retail Xstore Point-of- Service prompts for the number of days for this time-off event. Enter the
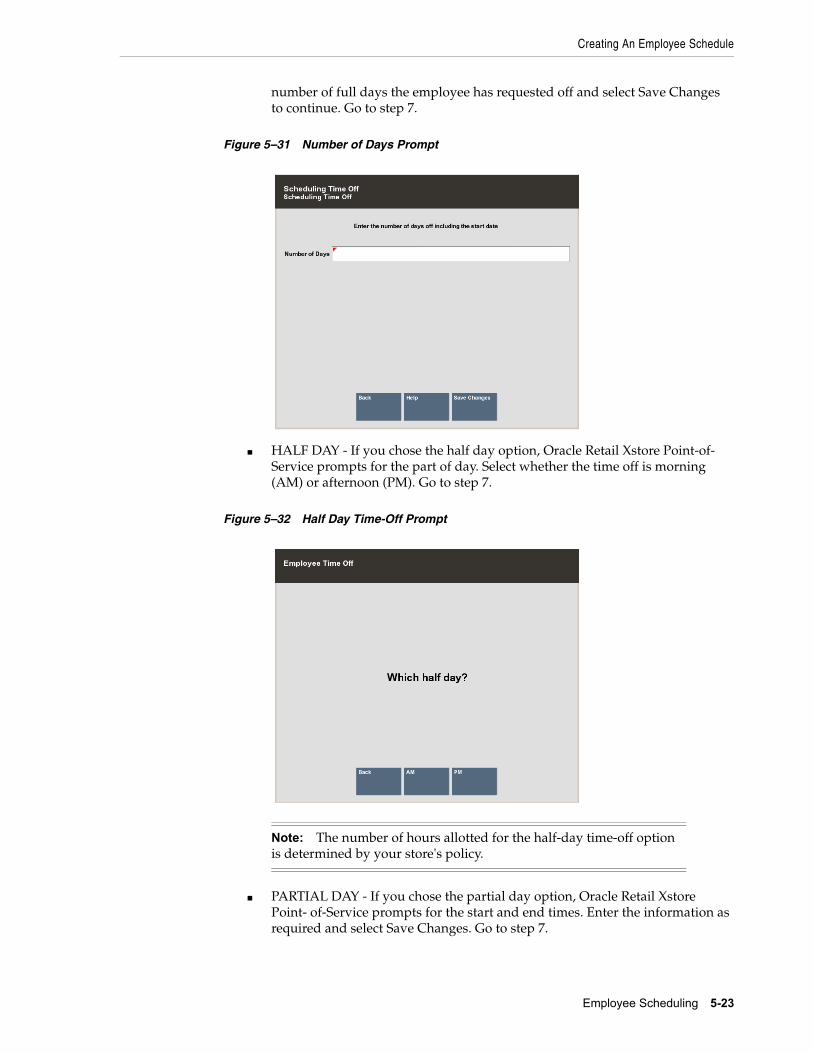
Creating An Employee Schedule
Employee Scheduling 5-23
number of full days the employee has requested off and select Save Changes to continue. Go to step 7.
Figure 5–31 Number of Days Prompt
■ HALF DAY - If you chose the half day option, Oracle Retail Xstore Point-of- Service prompts for the part of day. Select whether the time off is morning (AM) or afternoon (PM). Go to step 7.
Figure 5–32 Half Day Time-Off Prompt
■ PARTIAL DAY - If you chose the partial day option, Oracle Retail Xstore Point- of-Service prompts for the start and end times. Enter the information as required and select Save Changes. Go to step 7.
Note: The number of hours allotted for the half-day time-off option is determined by your store's policy.
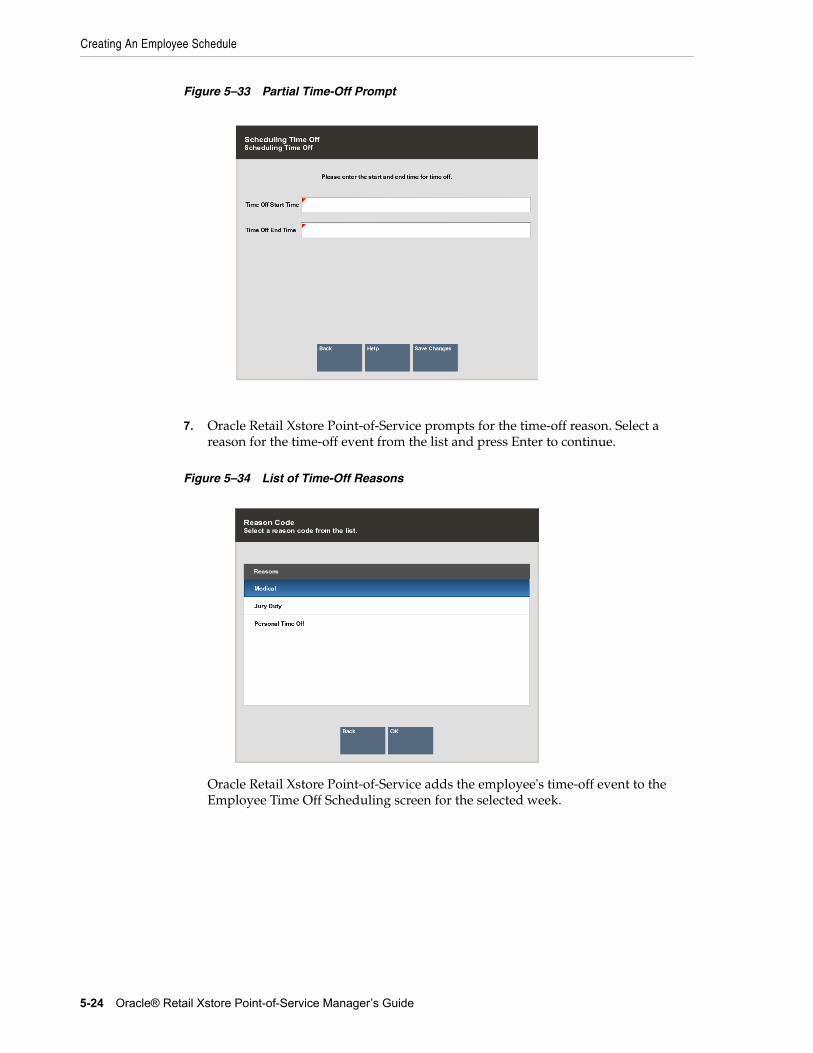
Creating An Employee Schedule
5-24 Oracle® Retail Xstore Point-of-Service Manager’s Guide
Figure 5–33 Partial Time-Off Prompt
7. Oracle Retail Xstore Point-of-Service prompts for the time-off reason. Select a reason for the time-off event from the list and press Enter to continue.
Figure 5–34 List of Time-Off Reasons
Oracle Retail Xstore Point-of-Service adds the employee's time-off event to the Employee Time Off Scheduling screen for the selected week.
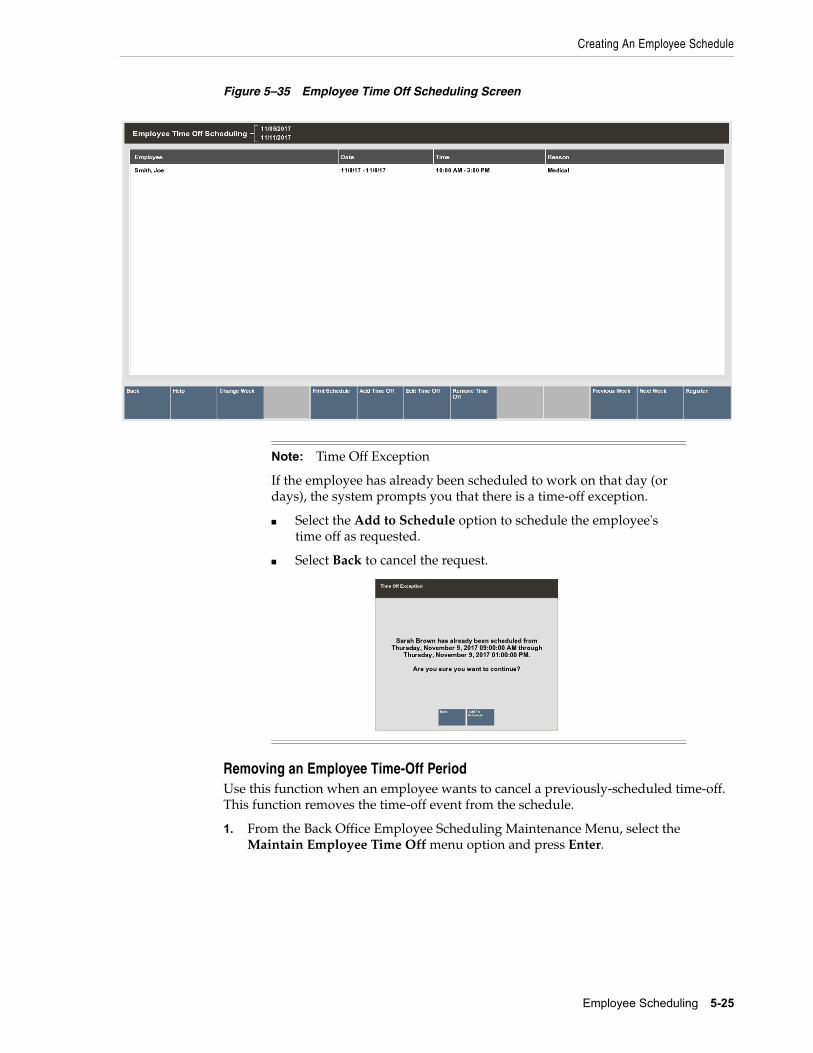
Creating An Employee Schedule
Employee Scheduling 5-25
Figure 5–35 Employee Time Off Scheduling Screen
Removing an Employee Time-Off PeriodUse this function when an employee wants to cancel a previously-scheduled time-off. This function removes the time-off event from the schedule.
1. From the Back Office Employee Scheduling Maintenance Menu, select the Maintain Employee Time Off menu option and press Enter.
Note: Time Off Exception
If the employee has already been scheduled to work on that day (or days), the system prompts you that there is a time-off exception.
■ Select the Add to Schedule option to schedule the employee's time off as requested.
■ Select Back to cancel the request.
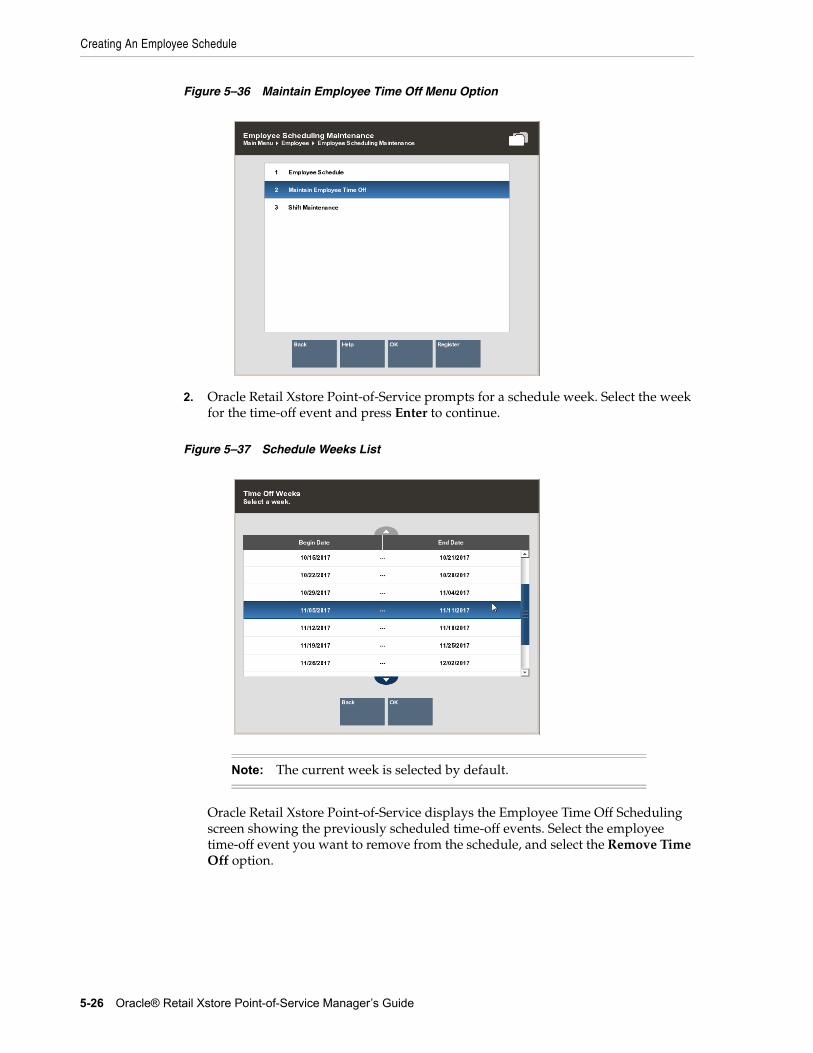
Creating An Employee Schedule
5-26 Oracle® Retail Xstore Point-of-Service Manager’s Guide
Figure 5–36 Maintain Employee Time Off Menu Option
2. Oracle Retail Xstore Point-of-Service prompts for a schedule week. Select the week for the time-off event and press Enter to continue.
Figure 5–37 Schedule Weeks List
Oracle Retail Xstore Point-of-Service displays the Employee Time Off Scheduling screen showing the previously scheduled time-off events. Select the employee time-off event you want to remove from the schedule, and select the Remove Time Off option.
Note: The current week is selected by default.
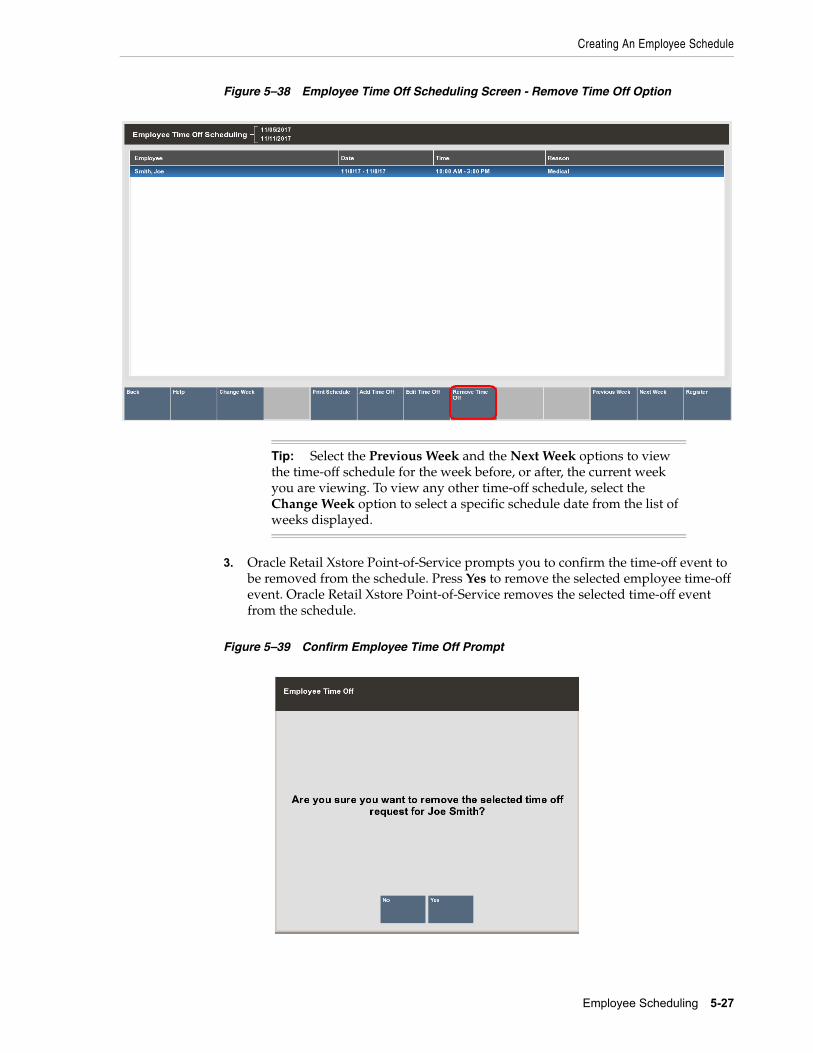
Creating An Employee Schedule
Employee Scheduling 5-27
Figure 5–38 Employee Time Off Scheduling Screen - Remove Time Off Option
3. Oracle Retail Xstore Point-of-Service prompts you to confirm the time-off event to be removed from the schedule. Press Yes to remove the selected employee time-off event. Oracle Retail Xstore Point-of-Service removes the selected time-off event from the schedule.
Figure 5–39 Confirm Employee Time Off Prompt
Tip: Select the Previous Week and the Next Week options to view the time-off schedule for the week before, or after, the current week you are viewing. To view any other time-off schedule, select the Change Week option to select a specific schedule date from the list of weeks displayed.
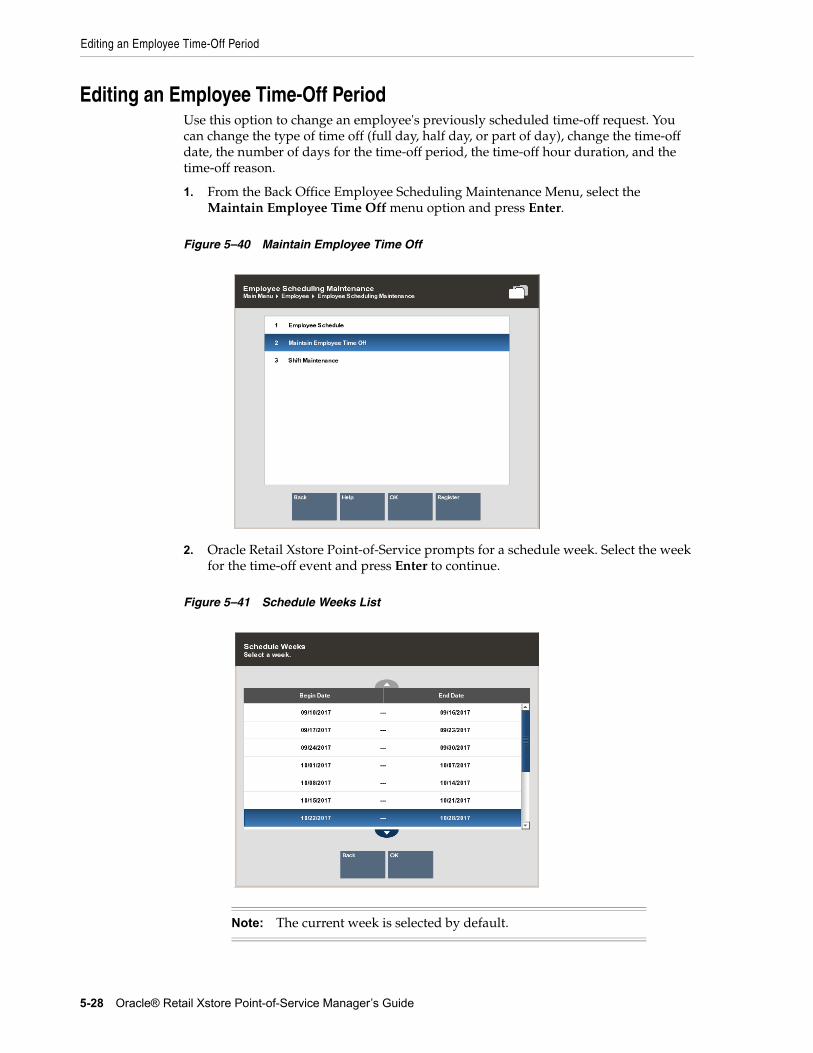
Editing an Employee Time-Off Period
5-28 Oracle® Retail Xstore Point-of-Service Manager’s Guide
Editing an Employee Time-Off PeriodUse this option to change an employee's previously scheduled time-off request. You can change the type of time off (full day, half day, or part of day), change the time-off date, the number of days for the time-off period, the time-off hour duration, and the time-off reason.
1. From the Back Office Employee Scheduling Maintenance Menu, select the Maintain Employee Time Off menu option and press Enter.
Figure 5–40 Maintain Employee Time Off
2. Oracle Retail Xstore Point-of-Service prompts for a schedule week. Select the week for the time-off event and press Enter to continue.
Figure 5–41 Schedule Weeks List
Note: The current week is selected by default.
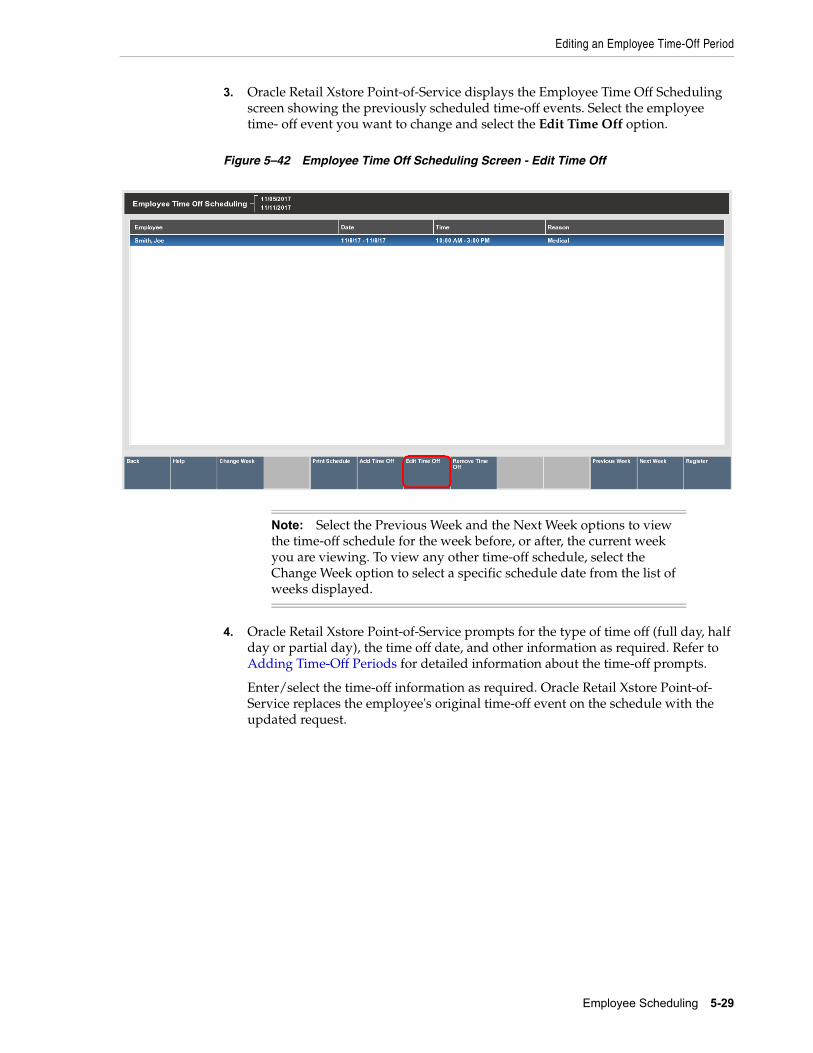
Editing an Employee Time-Off Period
Employee Scheduling 5-29
3. Oracle Retail Xstore Point-of-Service displays the Employee Time Off Scheduling screen showing the previously scheduled time-off events. Select the employee time- off event you want to change and select the Edit Time Off option.
Figure 5–42 Employee Time Off Scheduling Screen - Edit Time Off
4. Oracle Retail Xstore Point-of-Service prompts for the type of time off (full day, half day or partial day), the time off date, and other information as required. Refer to Adding Time-Off Periods for detailed information about the time-off prompts.
Enter/select the time-off information as required. Oracle Retail Xstore Point-of- Service replaces the employee's original time-off event on the schedule with the updated request.
Note: Select the Previous Week and the Next Week options to view the time-off schedule for the week before, or after, the current week you are viewing. To view any other time-off schedule, select the Change Week option to select a specific schedule date from the list of weeks displayed.

Printing the Time-Off Schedule
5-30 Oracle® Retail Xstore Point-of-Service Manager’s Guide
Printing the Time-Off ScheduleYou can print the Employee Time-off Summary Report from both the Employee Time Off Scheduling screen and from the Back Office Employee Scheduling Maintenance menu.
Figure 5–43 Employee Time Off Summary Report
■ Printing the schedule from the Employee Time Off Scheduling screen (Print Schedule button) prints the current schedule shown on the screen.
■ Printing the schedule from the Back Office Employee Scheduling Maintenance menu prompts you to select a week to be printed.
Figure 5–44 Employee Schedule Report Menu Option
Note: Refer to the Oracle Retail Xstore Point-of-Service Reports Guide for detailed information about running reports

Maintaining Employee Shifts
Employee Scheduling 5-31
Maintaining Employee ShiftsTo make employee scheduling easier, you can create and edit pre-defined shifts that may be applied during the employee scheduling function.
Creating a New ShiftUse this procedure to create a new shift to be used during employee scheduling.
1. From the Back Office Employee Scheduling Maintenance Menu, select the Shift Maintenance menu option and press Enter.
Figure 5–45 Shift Maintenance Menu Option
2. Oracle Retail Xstore Point-of-Service prompts for the shift information. Select the New option to create a new shift type.
Figure 5–46 Shift Criteria Prompt
3. Oracle Retail Xstore Point-of-Service prompts for the shift detail information. Enter the information for the new shift:
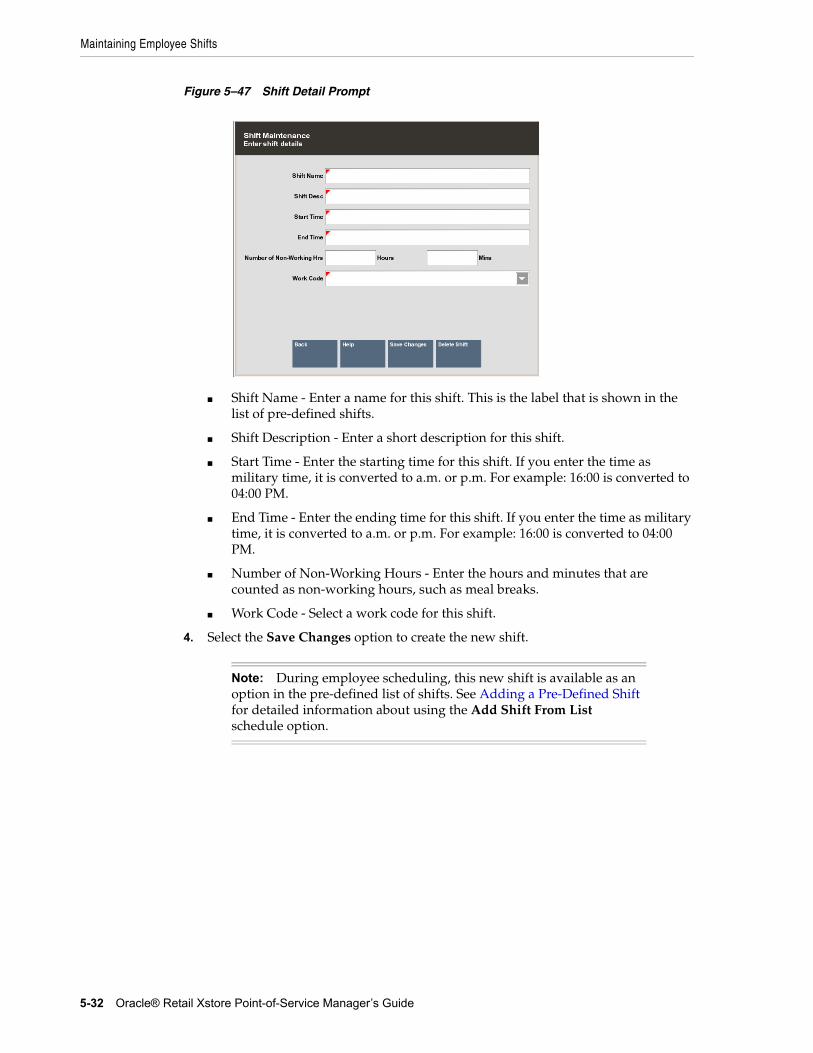
Maintaining Employee Shifts
5-32 Oracle® Retail Xstore Point-of-Service Manager’s Guide
Figure 5–47 Shift Detail Prompt
■ Shift Name - Enter a name for this shift. This is the label that is shown in the list of pre-defined shifts.
■ Shift Description - Enter a short description for this shift.
■ Start Time - Enter the starting time for this shift. If you enter the time as military time, it is converted to a.m. or p.m. For example: 16:00 is converted to 04:00 PM.
■ End Time - Enter the ending time for this shift. If you enter the time as military time, it is converted to a.m. or p.m. For example: 16:00 is converted to 04:00 PM.
■ Number of Non-Working Hours - Enter the hours and minutes that are counted as non-working hours, such as meal breaks.
■ Work Code - Select a work code for this shift.
4. Select the Save Changes option to create the new shift.
Note: During employee scheduling, this new shift is available as an option in the pre-defined list of shifts. See Adding a Pre-Defined Shift for detailed information about using the Add Shift From List schedule option.
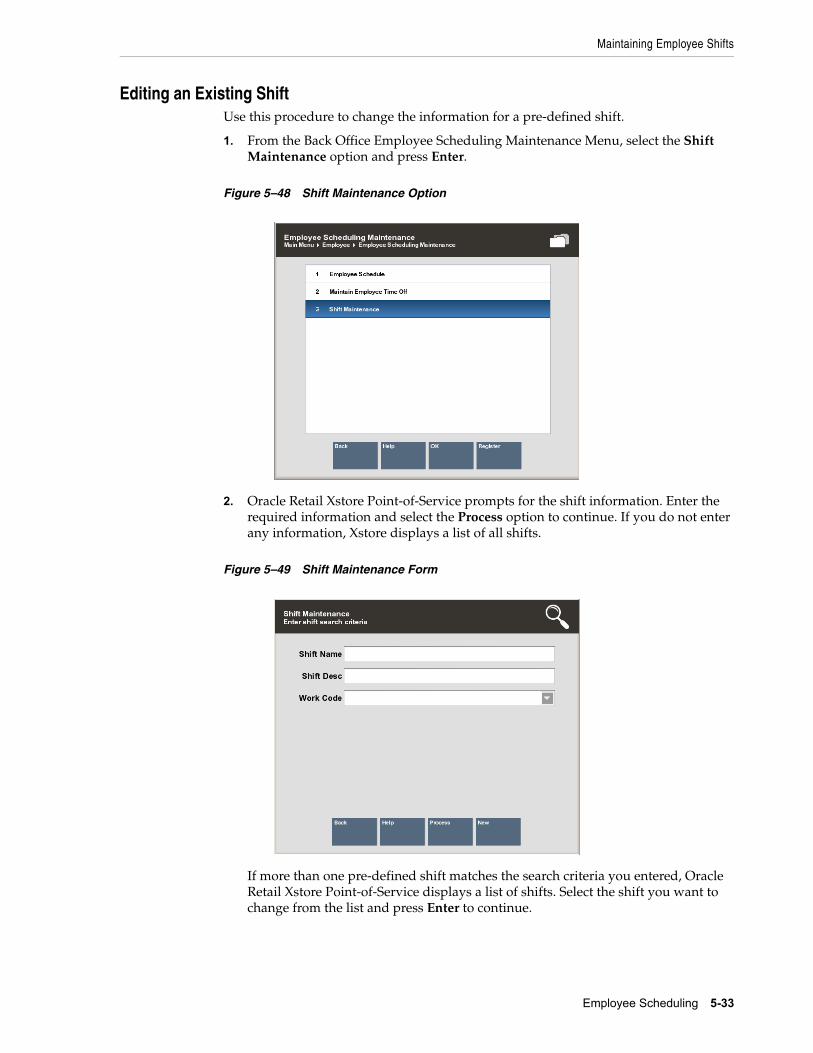
Maintaining Employee Shifts
Employee Scheduling 5-33
Editing an Existing ShiftUse this procedure to change the information for a pre-defined shift.
1. From the Back Office Employee Scheduling Maintenance Menu, select the Shift Maintenance option and press Enter.
Figure 5–48 Shift Maintenance Option
2. Oracle Retail Xstore Point-of-Service prompts for the shift information. Enter the required information and select the Process option to continue. If you do not enter any information, Xstore displays a list of all shifts.
Figure 5–49 Shift Maintenance Form
If more than one pre-defined shift matches the search criteria you entered, Oracle Retail Xstore Point-of-Service displays a list of shifts. Select the shift you want to change from the list and press Enter to continue.
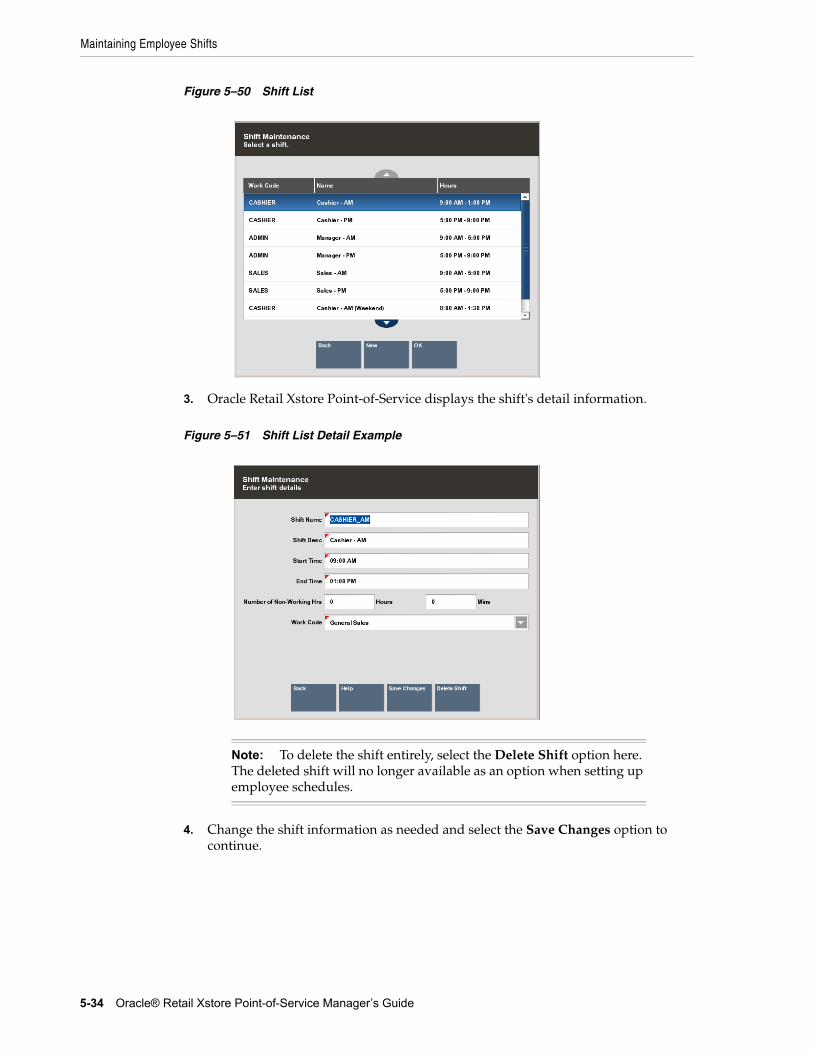
Maintaining Employee Shifts
5-34 Oracle® Retail Xstore Point-of-Service Manager’s Guide
Figure 5–50 Shift List
3. Oracle Retail Xstore Point-of-Service displays the shift's detail information.
Figure 5–51 Shift List Detail Example
4. Change the shift information as needed and select the Save Changes option to continue.
Note: To delete the shift entirely, select the Delete Shift option here. The deleted shift will no longer available as an option when setting up employee schedules.
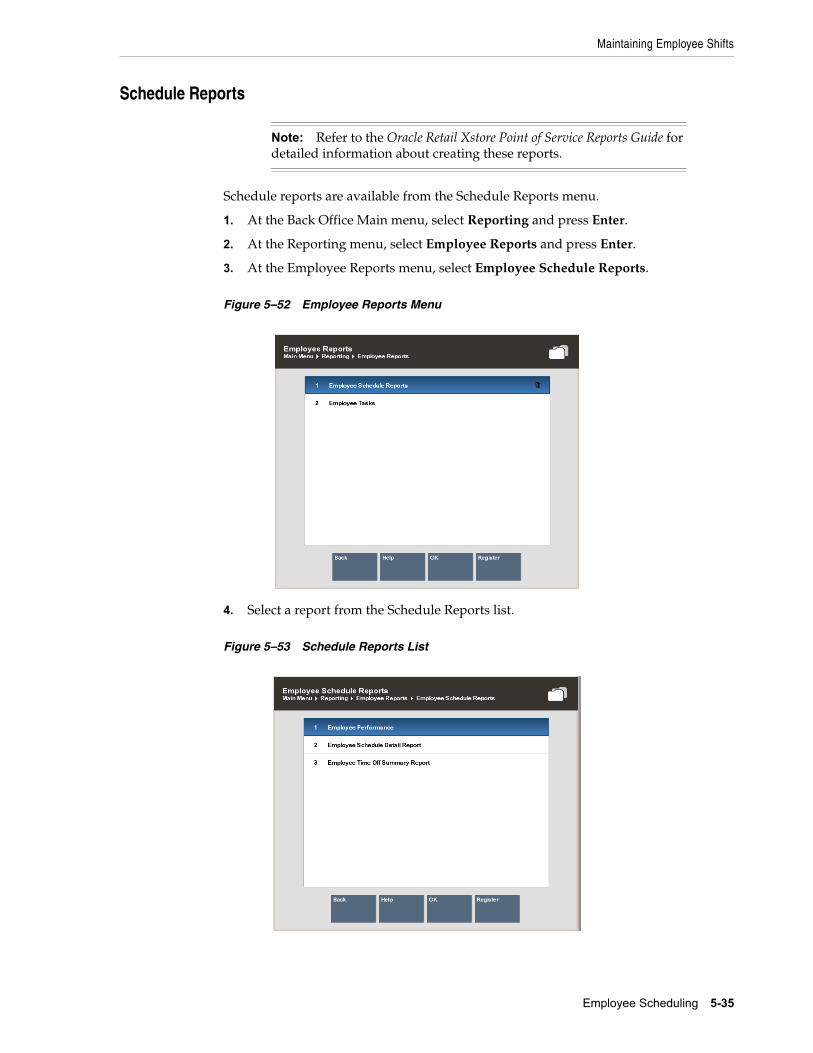
Maintaining Employee Shifts
Employee Scheduling 5-35
Schedule Reports
Schedule reports are available from the Schedule Reports menu.
1. At the Back Office Main menu, select Reporting and press Enter.
2. At the Reporting menu, select Employee Reports and press Enter.
3. At the Employee Reports menu, select Employee Schedule Reports.
Figure 5–52 Employee Reports Menu
4. Select a report from the Schedule Reports list.
Figure 5–53 Schedule Reports List
Note: Refer to the Oracle Retail Xstore Point of Service Reports Guide for detailed information about creating these reports.
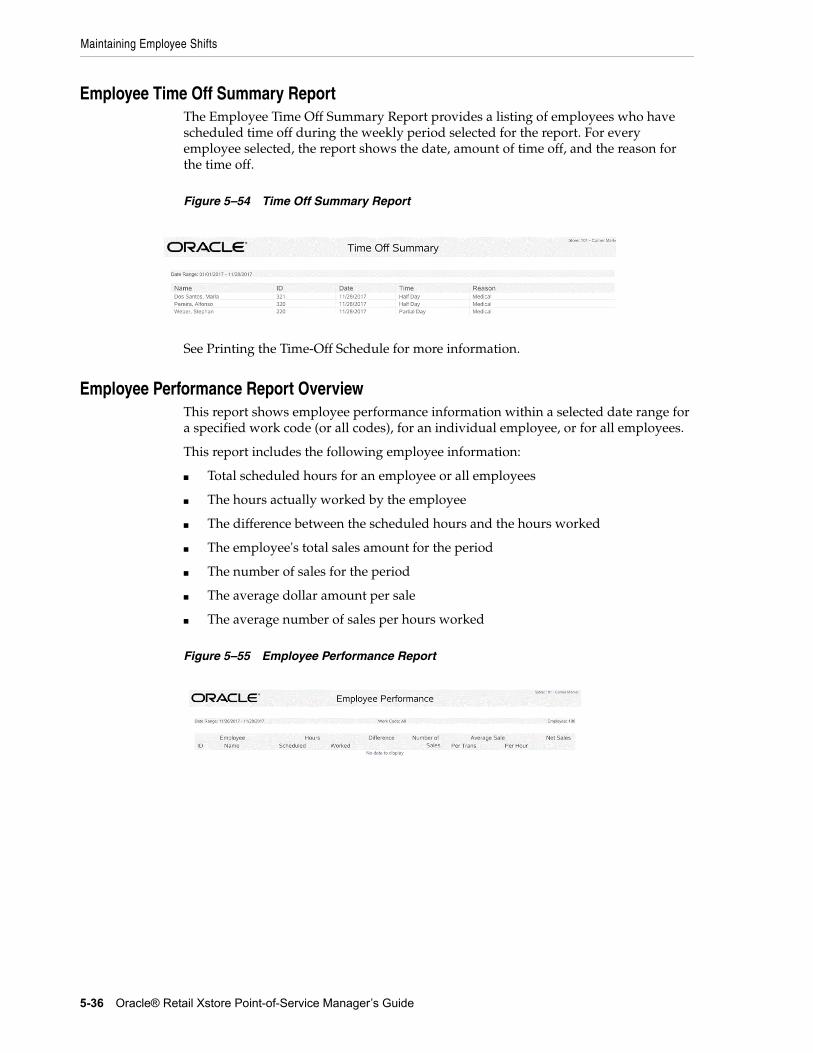
Maintaining Employee Shifts
5-36 Oracle® Retail Xstore Point-of-Service Manager’s Guide
Employee Time Off Summary ReportThe Employee Time Off Summary Report provides a listing of employees who have scheduled time off during the weekly period selected for the report. For every employee selected, the report shows the date, amount of time off, and the reason for the time off.
Figure 5–54 Time Off Summary Report
See Printing the Time-Off Schedule for more information.
Employee Performance Report OverviewThis report shows employee performance information within a selected date range for a specified work code (or all codes), for an individual employee, or for all employees.
This report includes the following employee information:
■ Total scheduled hours for an employee or all employees
■ The hours actually worked by the employee
■ The difference between the scheduled hours and the hours worked
■ The employee's total sales amount for the period
■ The number of sales for the period
■ The average dollar amount per sale
■ The average number of sales per hours worked
Figure 5–55 Employee Performance Report
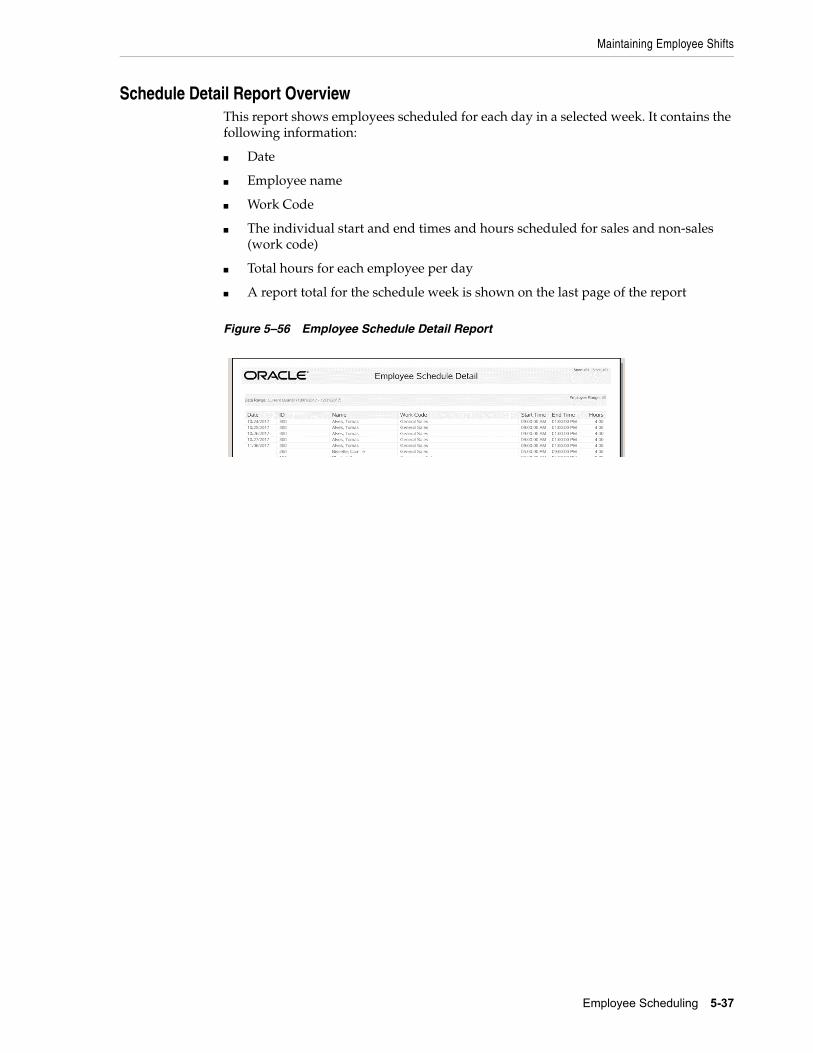
Maintaining Employee Shifts
Employee Scheduling 5-37
Schedule Detail Report OverviewThis report shows employees scheduled for each day in a selected week. It contains the following information:
■ Date
■ Employee name
■ Work Code
■ The individual start and end times and hours scheduled for sales and non-sales (work code)
■ Total hours for each employee per day
■ A report total for the schedule week is shown on the last page of the report
Figure 5–56 Employee Schedule Detail Report
6
Message Maintenance and Task Management 6-1
6Message Maintenance and Task Management
Messages can be viewed from both the Register Login screen and the Back Office Login screen. You may also be able to view messages from the transaction screens depending on your store configuration.
Task Management is a feature that encompasses tasks assigned to associates in a store for completion as well as tasks that are customer-focused such as appointments. Tasks have workflows associated with them so at any time a manager can easily see the current status of the task. This section also includes instructions on how to use the Black Book feature to view your associate's primary customers.
The following topics are covered:
■ Creating and Maintaining Messages
– Creating a New Message
– Editing a Message
– Deleting a Message
■ Reviewing Task Management Information
– Viewing Task Progress
– Viewing Black Book Customers
Creating and Maintaining MessagesMessages are for information purposes only, and require no action by the employee. Messages may be downloaded from the corporate office, and messages can also be created and maintained at the store level using the Back Office Message Maintenance menu option.
Messages can be store-based or register-based, and provide the ability for both the corporate office and the store managers to share information with all employees.
Messages can be maintained at the corporate office or using the Back Office functions. Only store-created messages can be edited at the store level. Messages from the corporate office cannot be changed or deleted.
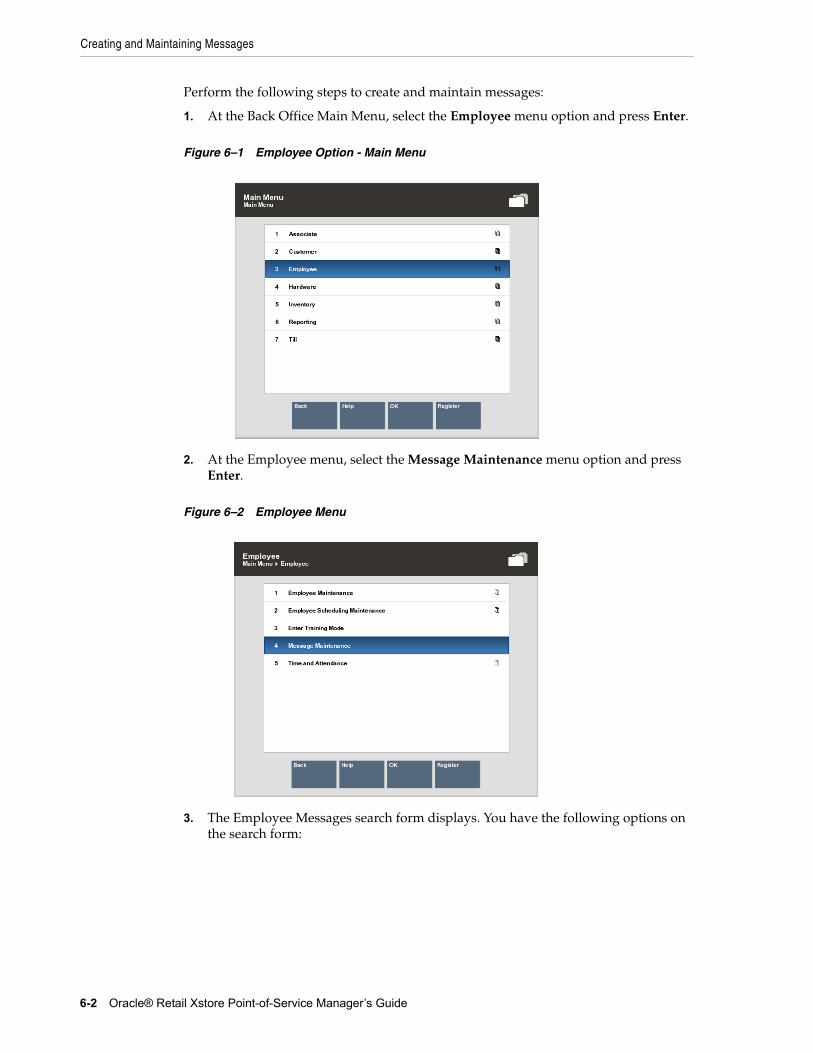
Creating and Maintaining Messages
6-2 Oracle® Retail Xstore Point-of-Service Manager’s Guide
Perform the following steps to create and maintain messages:
1. At the Back Office Main Menu, select the Employee menu option and press Enter.
Figure 6–1 Employee Option - Main Menu
2. At the Employee menu, select the Message Maintenance menu option and press Enter.
Figure 6–2 Employee Menu
3. The Employee Messages search form displays. You have the following options on the search form:
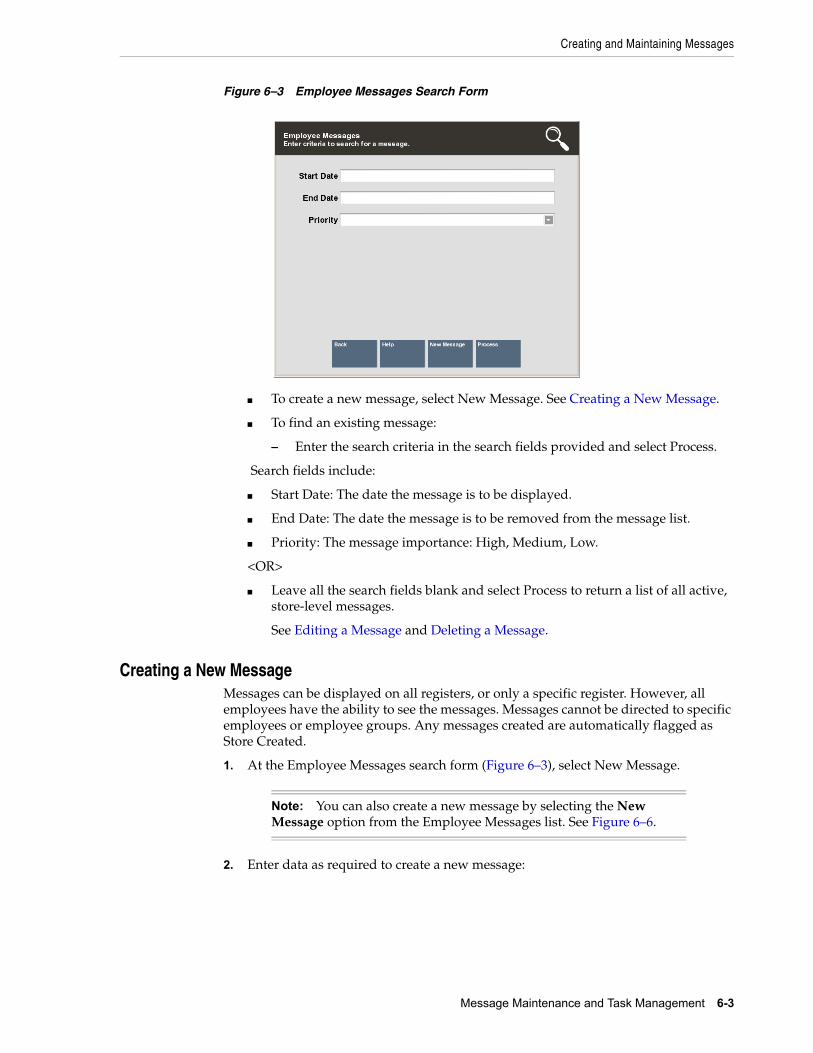
Creating and Maintaining Messages
Message Maintenance and Task Management 6-3
Figure 6–3 Employee Messages Search Form
■ To create a new message, select New Message. See Creating a New Message.
■ To find an existing message:
– Enter the search criteria in the search fields provided and select Process.
Search fields include:
■ Start Date: The date the message is to be displayed.
■ End Date: The date the message is to be removed from the message list.
■ Priority: The message importance: High, Medium, Low.
<OR>
■ Leave all the search fields blank and select Process to return a list of all active, store-level messages.
See Editing a Message and Deleting a Message.
Creating a New MessageMessages can be displayed on all registers, or only a specific register. However, all employees have the ability to see the messages. Messages cannot be directed to specific employees or employee groups. Any messages created are automatically flagged as Store Created.
1. At the Employee Messages search form (Figure 6–3), select New Message.
2. Enter data as required to create a new message:
Note: You can also create a new message by selecting the New Message option from the Employee Messages list. See Figure 6–6.
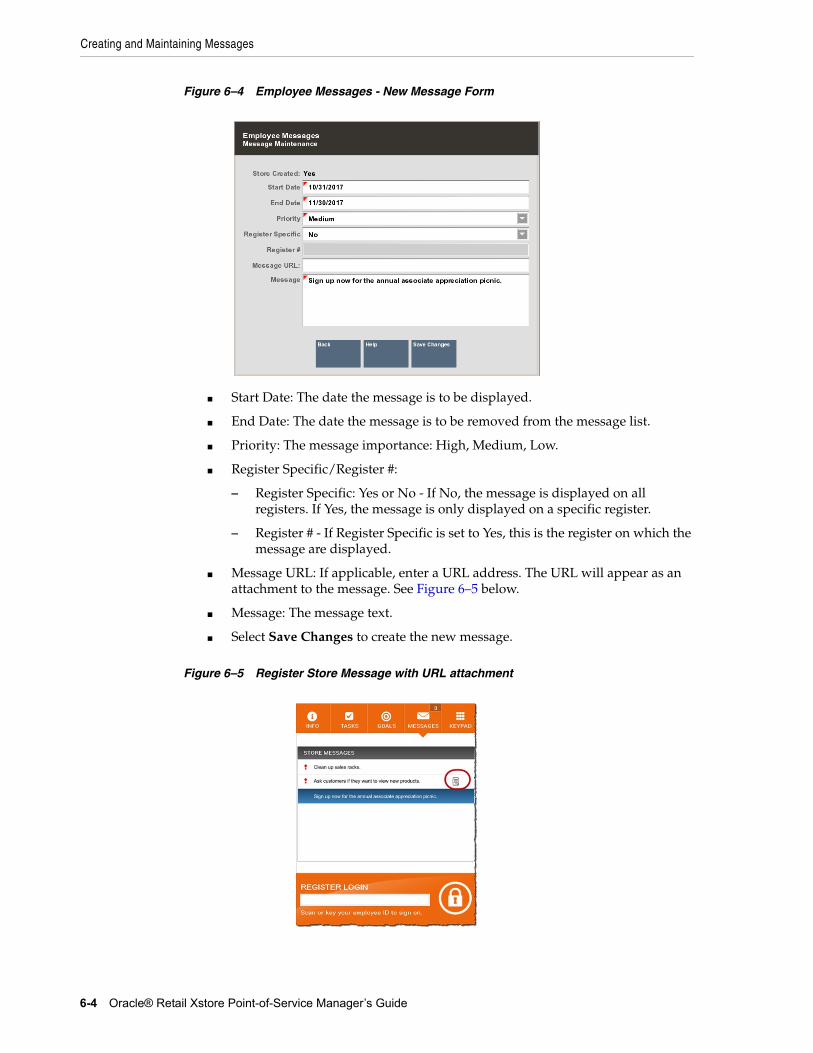
Creating and Maintaining Messages
6-4 Oracle® Retail Xstore Point-of-Service Manager’s Guide
Figure 6–4 Employee Messages - New Message Form
■ Start Date: The date the message is to be displayed.
■ End Date: The date the message is to be removed from the message list.
■ Priority: The message importance: High, Medium, Low.
■ Register Specific/Register #:
– Register Specific: Yes or No - If No, the message is displayed on all registers. If Yes, the message is only displayed on a specific register.
– Register # - If Register Specific is set to Yes, this is the register on which the message are displayed.
■ Message URL: If applicable, enter a URL address. The URL will appear as an attachment to the message. See Figure 6–5 below.
■ Message: The message text.
■ Select Save Changes to create the new message.
Figure 6–5 Register Store Message with URL attachment
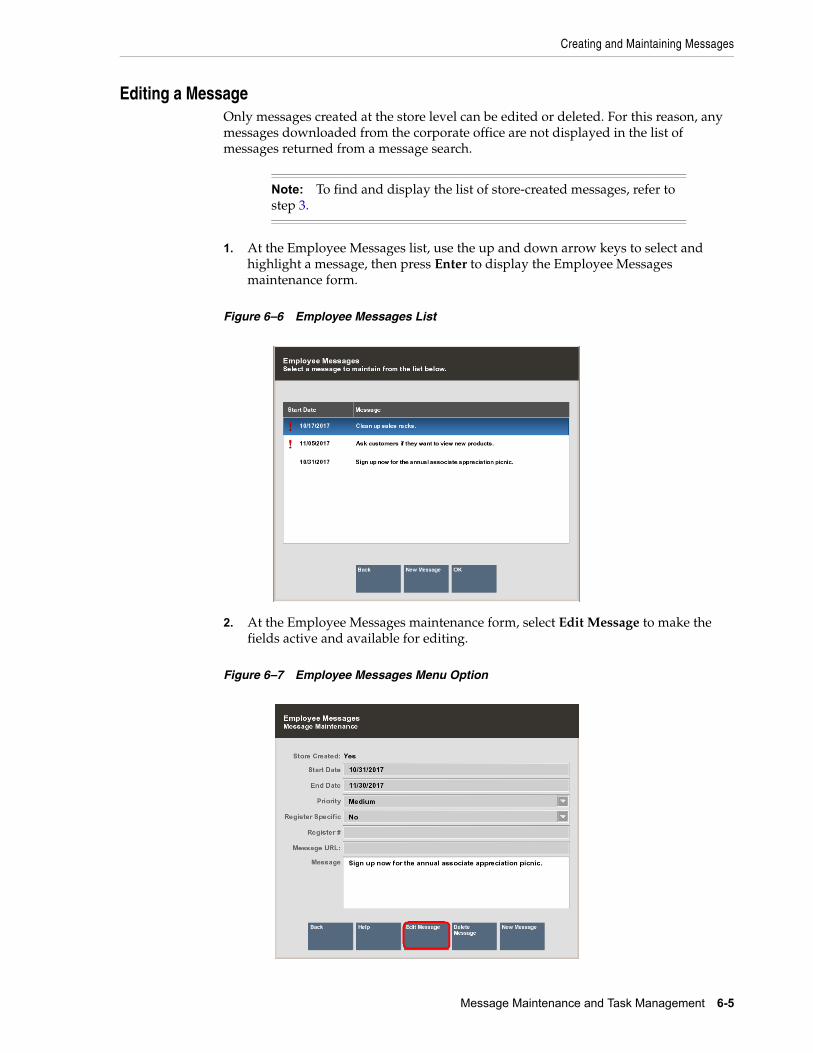
Creating and Maintaining Messages
Message Maintenance and Task Management 6-5
Editing a MessageOnly messages created at the store level can be edited or deleted. For this reason, any messages downloaded from the corporate office are not displayed in the list of messages returned from a message search.
1. At the Employee Messages list, use the up and down arrow keys to select and highlight a message, then press Enter to display the Employee Messages maintenance form.
Figure 6–6 Employee Messages List
2. At the Employee Messages maintenance form, select Edit Message to make the fields active and available for editing.
Figure 6–7 Employee Messages Menu Option
Note: To find and display the list of store-created messages, refer to step 3.
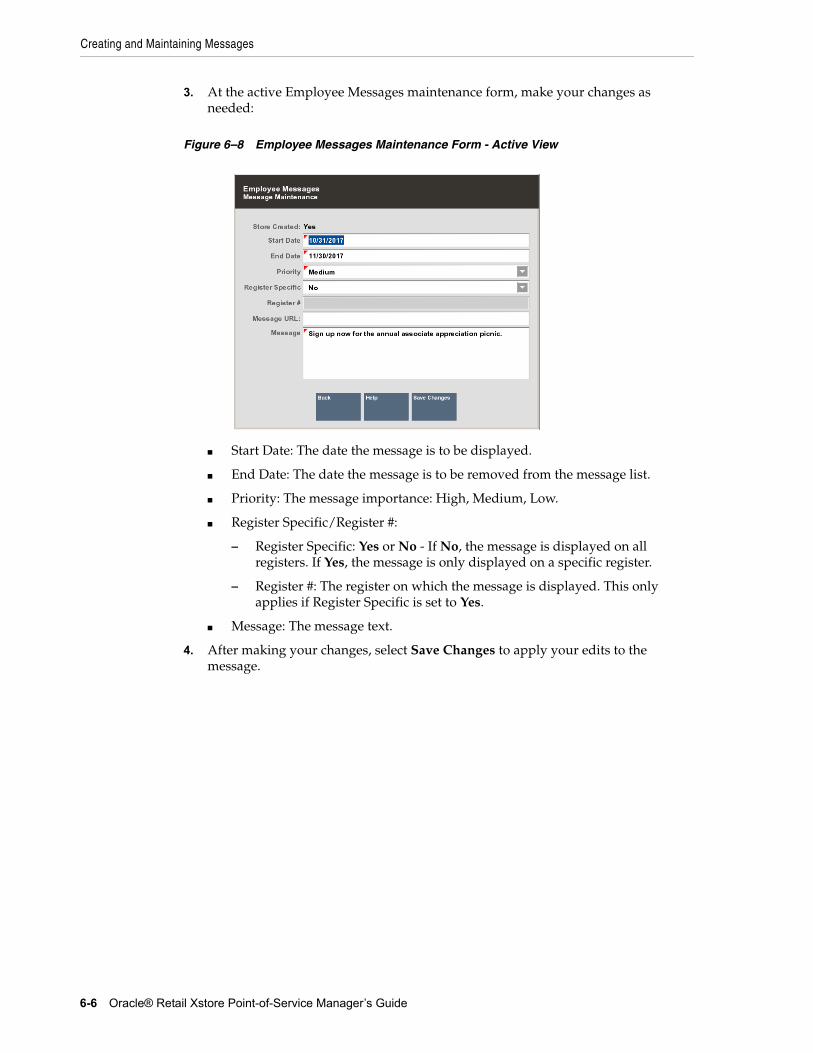
Creating and Maintaining Messages
6-6 Oracle® Retail Xstore Point-of-Service Manager’s Guide
3. At the active Employee Messages maintenance form, make your changes as needed:
Figure 6–8 Employee Messages Maintenance Form - Active View
■ Start Date: The date the message is to be displayed.
■ End Date: The date the message is to be removed from the message list.
■ Priority: The message importance: High, Medium, Low.
■ Register Specific/Register #:
– Register Specific: Yes or No - If No, the message is displayed on all registers. If Yes, the message is only displayed on a specific register.
– Register #: The register on which the message is displayed. This only applies if Register Specific is set to Yes.
■ Message: The message text.
4. After making your changes, select Save Changes to apply your edits to the message.
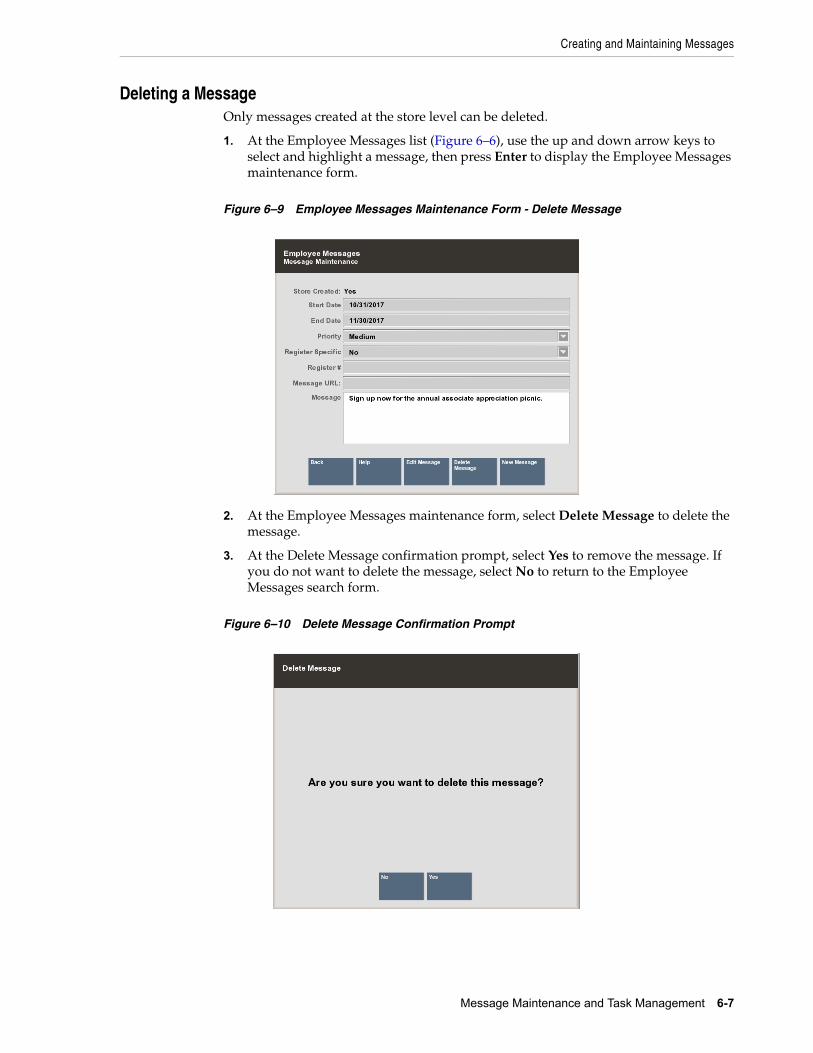
Creating and Maintaining Messages
Message Maintenance and Task Management 6-7
Deleting a MessageOnly messages created at the store level can be deleted.
1. At the Employee Messages list (Figure 6–6), use the up and down arrow keys to select and highlight a message, then press Enter to display the Employee Messages maintenance form.
Figure 6–9 Employee Messages Maintenance Form - Delete Message
2. At the Employee Messages maintenance form, select Delete Message to delete the message.
3. At the Delete Message confirmation prompt, select Yes to remove the message. If you do not want to delete the message, select No to return to the Employee Messages search form.
Figure 6–10 Delete Message Confirmation Prompt
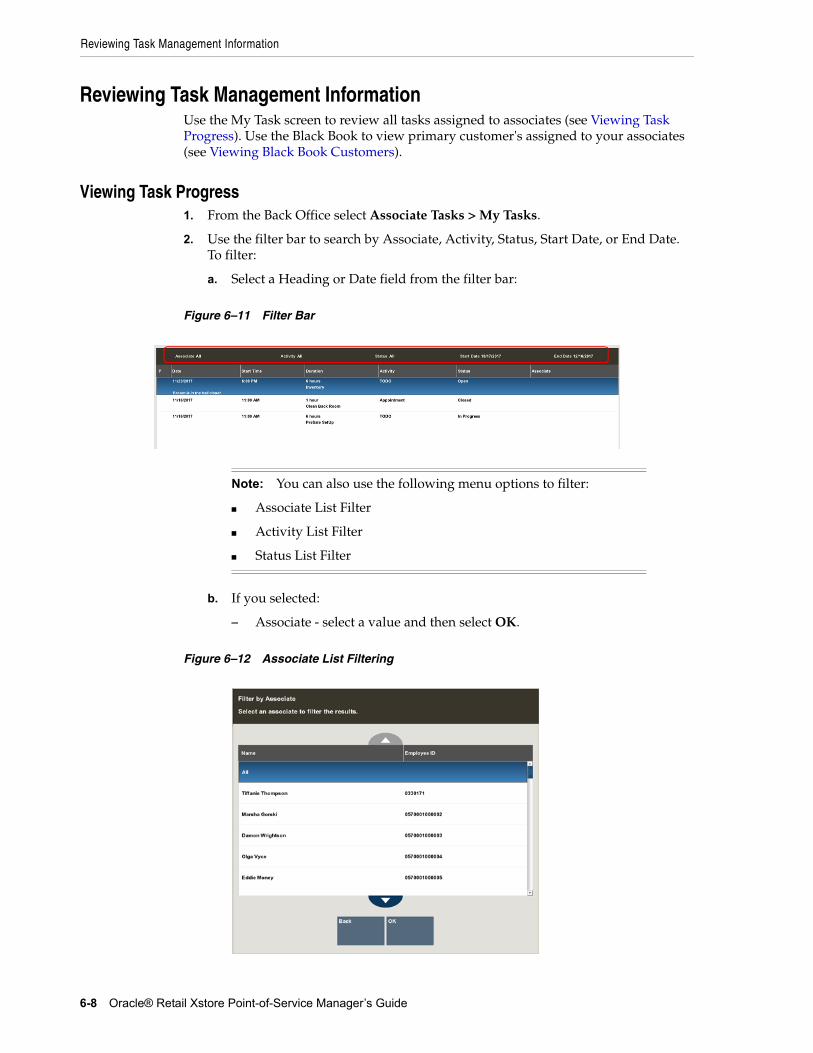
Reviewing Task Management Information
6-8 Oracle® Retail Xstore Point-of-Service Manager’s Guide
Reviewing Task Management InformationUse the My Task screen to review all tasks assigned to associates (see Viewing Task Progress). Use the Black Book to view primary customer's assigned to your associates (see Viewing Black Book Customers).
Viewing Task Progress1. From the Back Office select Associate Tasks > My Tasks.
2. Use the filter bar to search by Associate, Activity, Status, Start Date, or End Date. To filter:
a. Select a Heading or Date field from the filter bar:
Figure 6–11 Filter Bar
b. If you selected:
– Associate - select a value and then select OK.
Figure 6–12 Associate List Filtering
Note: You can also use the following menu options to filter:
■ Associate List Filter
■ Activity List Filter
■ Status List Filter
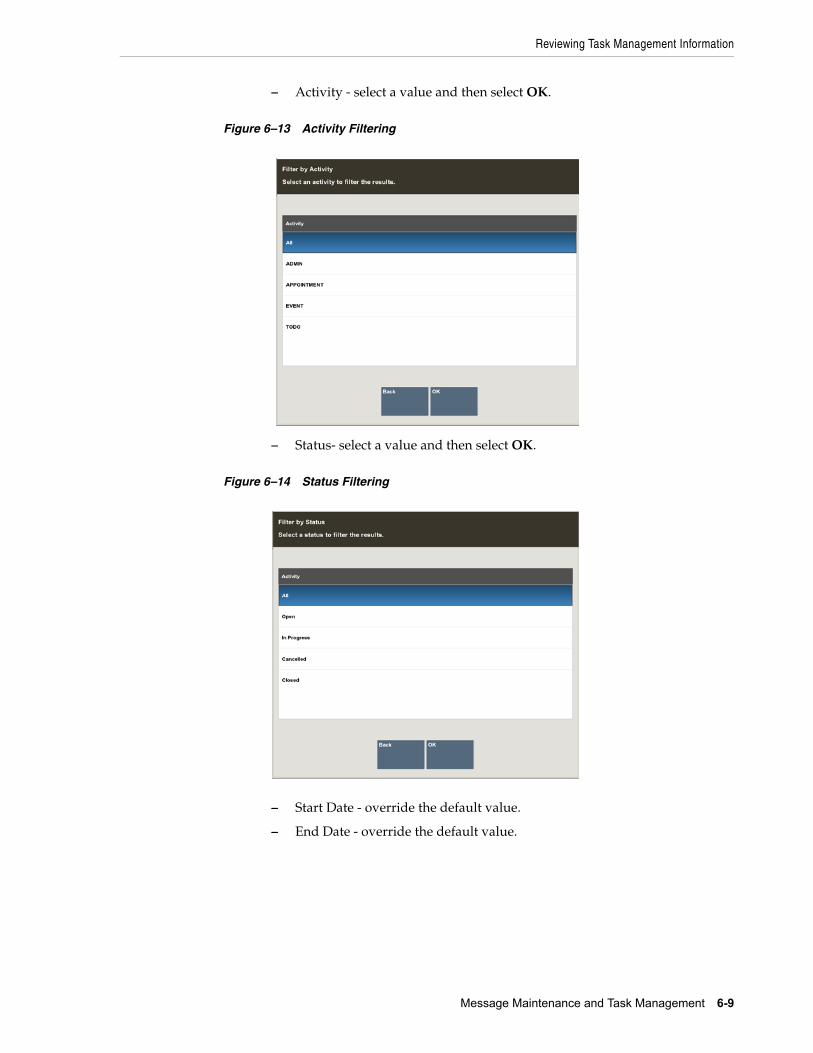
Reviewing Task Management Information
Message Maintenance and Task Management 6-9
– Activity - select a value and then select OK.
Figure 6–13 Activity Filtering
– Status- select a value and then select OK.
Figure 6–14 Status Filtering
– Start Date - override the default value.
– End Date - override the default value.
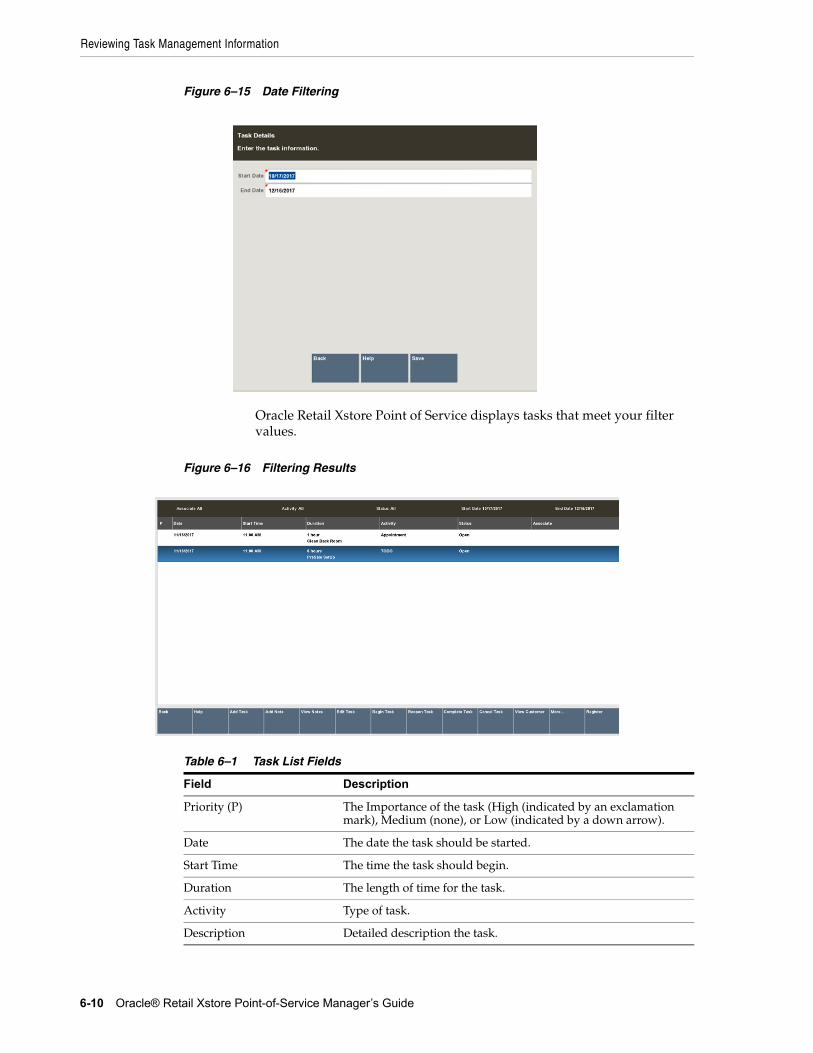
Reviewing Task Management Information
6-10 Oracle® Retail Xstore Point-of-Service Manager’s Guide
Figure 6–15 Date Filtering
Oracle Retail Xstore Point of Service displays tasks that meet your filter values.
Figure 6–16 Filtering Results
Table 6–1 Task List Fields
Field Description
Priority (P) The Importance of the task (High (indicated by an exclamation mark), Medium (none), or Low (indicated by a down arrow).
Date The date the task should be started.
Start Time The time the task should begin.
Duration The length of time for the task.
Activity Type of task.
Description Detailed description the task.
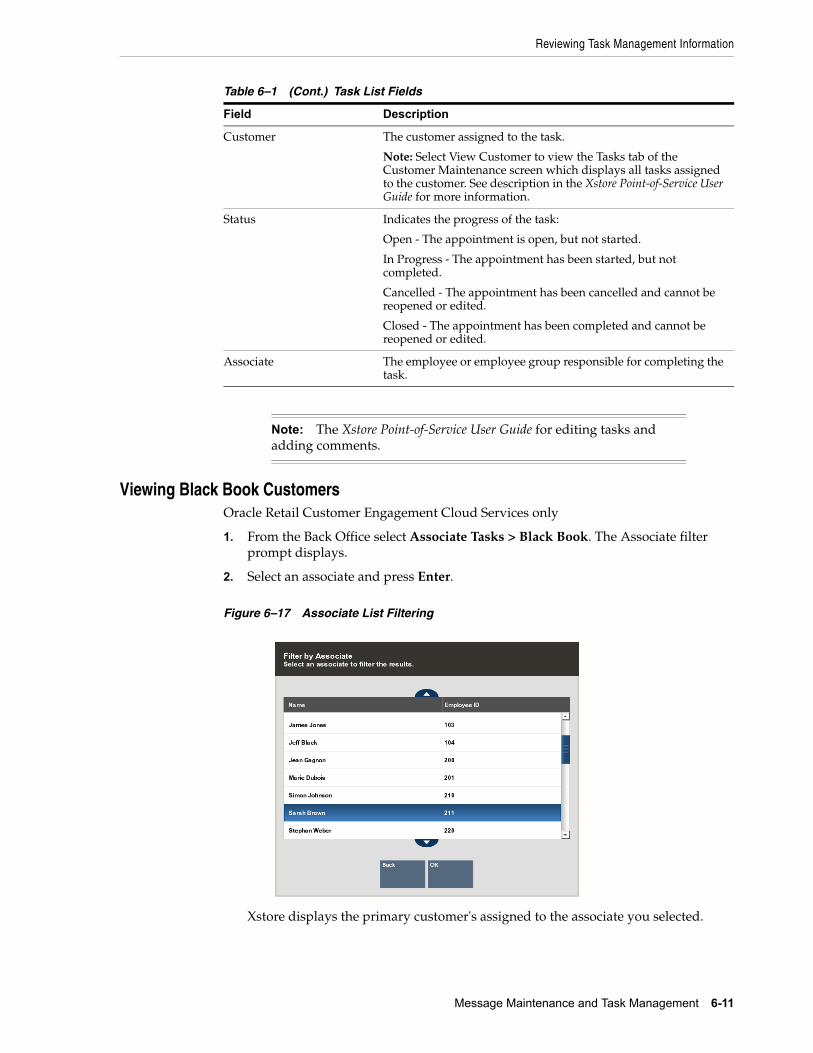
Reviewing Task Management Information
Message Maintenance and Task Management 6-11
Viewing Black Book CustomersOracle Retail Customer Engagement Cloud Services only
1. From the Back Office select Associate Tasks > Black Book. The Associate filter prompt displays.
2. Select an associate and press Enter.
Figure 6–17 Associate List Filtering
Xstore displays the primary customer's assigned to the associate you selected.
Customer The customer assigned to the task.
Note: Select View Customer to view the Tasks tab of the Customer Maintenance screen which displays all tasks assigned to the customer. See description in the Xstore Point-of-Service User Guide for more information.
Status Indicates the progress of the task:
Open - The appointment is open, but not started.
In Progress - The appointment has been started, but not completed.
Cancelled - The appointment has been cancelled and cannot be reopened or edited.
Closed - The appointment has been completed and cannot be reopened or edited.
Associate The employee or employee group responsible for completing the task.
Note: The Xstore Point-of-Service User Guide for editing tasks and adding comments.
Table 6–1 (Cont.) Task List Fields
Field Description
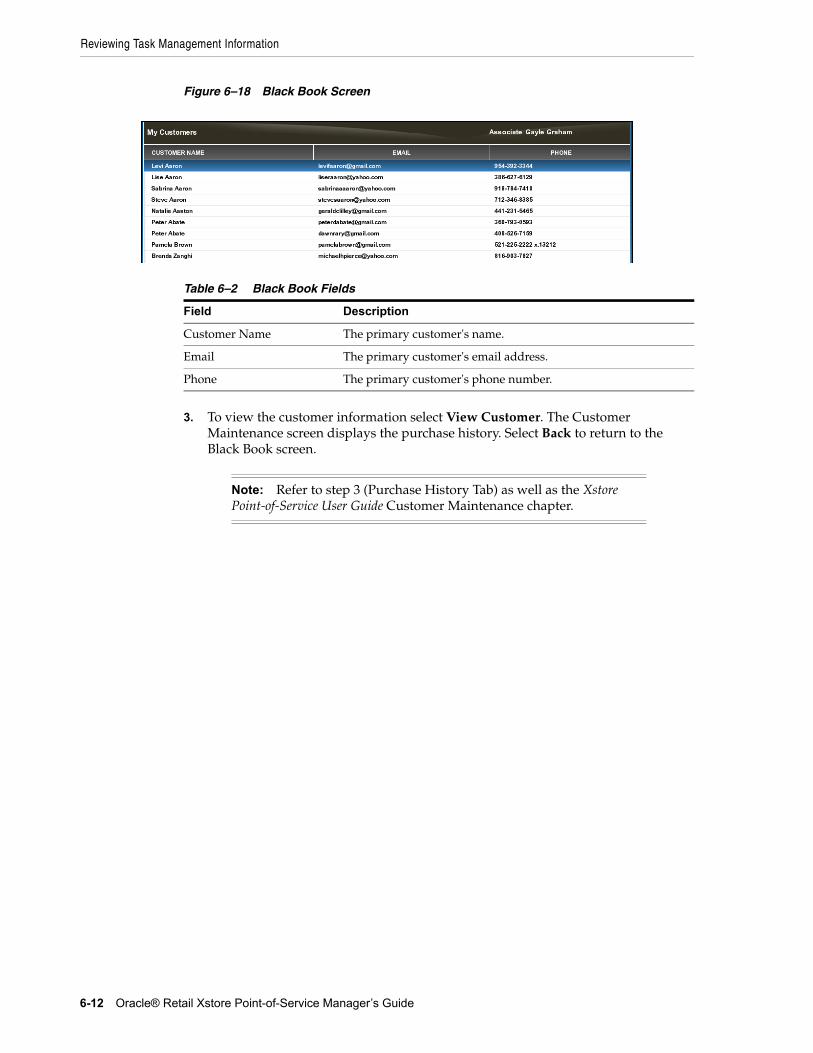
Reviewing Task Management Information
6-12 Oracle® Retail Xstore Point-of-Service Manager’s Guide
Figure 6–18 Black Book Screen
3. To view the customer information select View Customer. The Customer Maintenance screen displays the purchase history. Select Back to return to the Black Book screen.
Table 6–2 Black Book Fields
Field Description
Customer Name The primary customer's name.
Email The primary customer's email address.
Phone The primary customer's phone number.
Note: Refer to step 3 (Purchase History Tab) as well as the Xstore Point-of-Service User Guide Customer Maintenance chapter.
7
Payroll and Timecard Maintenance 7-1
7Payroll and Timecard Maintenance
Payroll Maintenance refers to the system functions that allow you to view, analyze, edit, and post weekly payroll information to the home office. Payroll information includes the daily hours-by work assignment-for each employee for a given week, including overtime hours. This payroll information for each week is derived from the timecard shift data.
Timecard Maintenance refers to system functions that allow you to view and edit timecard entries created through the clock-in/clock-out process. You may also create new timecard entries and void existing ones, whether they were created automatically or manually. For example, use Timecard Maintenance to modify an employee's timecard when the employee fails to clock-in or clock-out properly. Timecard entries also directly translate into payroll data, assuming the payroll data is not modified later.
The following topics are covered:
■ Accessing Back Office Payroll & Timecard Maintenance Functions
■ Payroll and Timecard Maintenance
– Payroll Maintenance Tab
– Payroll Comments Tab
– Timecard Maintenance Tab
– Timecard Comment Tab
■ Reports
– Posted Timecard Report
– Open Timecard Report
– Payroll Summary Report
– Payroll Detail By Employee Report
Note: Refer to Employee Scheduling for information about scheduling and maintaining employee time-off events such as vacations and other times when employees may not be available for work, creating and maintaining employee work shifts and assigning employees to defined work shifts.
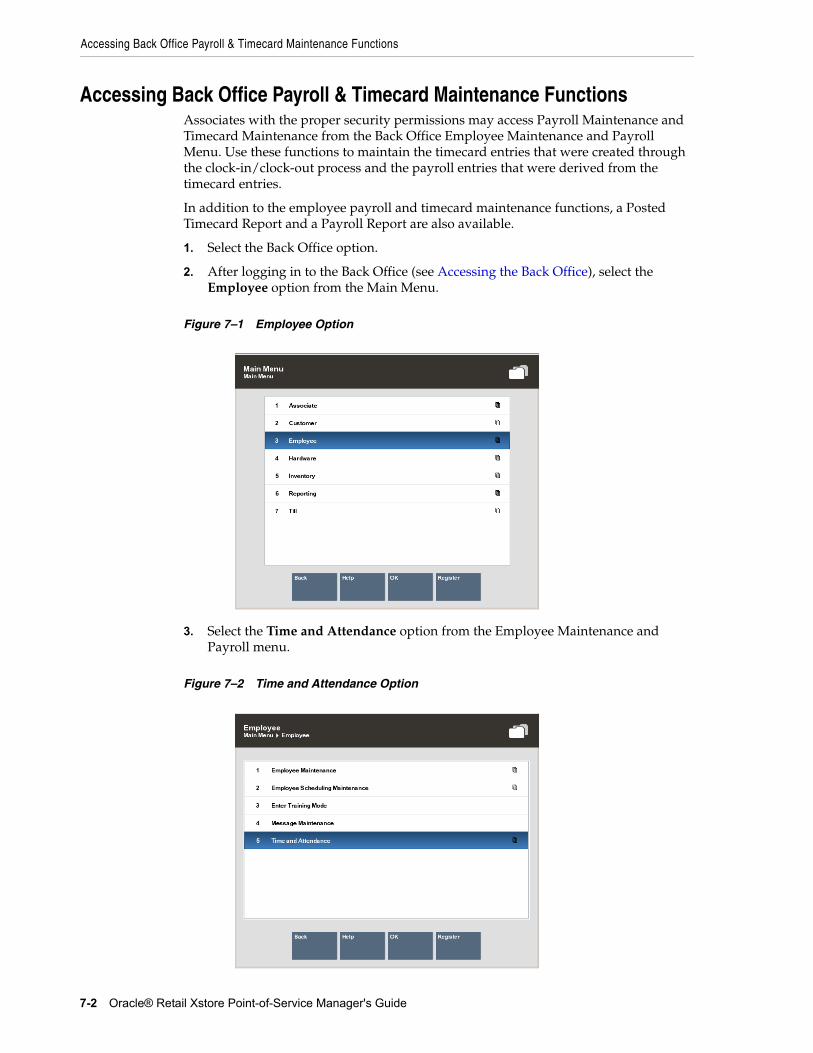
Accessing Back Office Payroll & Timecard Maintenance Functions
7-2 Oracle® Retail Xstore Point-of-Service Manager's Guide
Accessing Back Office Payroll & Timecard Maintenance FunctionsAssociates with the proper security permissions may access Payroll Maintenance and Timecard Maintenance from the Back Office Employee Maintenance and Payroll Menu. Use these functions to maintain the timecard entries that were created through the clock-in/clock-out process and the payroll entries that were derived from the timecard entries.
In addition to the employee payroll and timecard maintenance functions, a Posted Timecard Report and a Payroll Report are also available.
1. Select the Back Office option.
2. After logging in to the Back Office (see Accessing the Back Office), select the Employee option from the Main Menu.
Figure 7–1 Employee Option
3. Select the Time and Attendance option from the Employee Maintenance and Payroll menu.
Figure 7–2 Time and Attendance Option
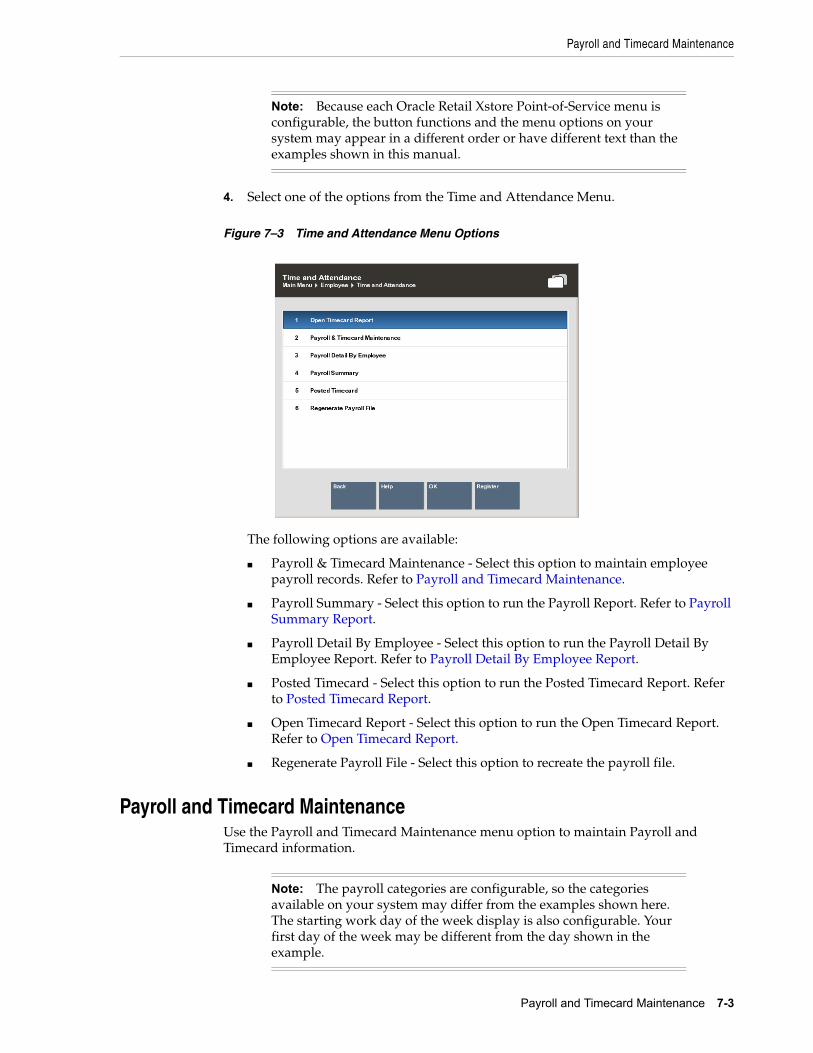
Payroll and Timecard Maintenance
Payroll and Timecard Maintenance 7-3
4. Select one of the options from the Time and Attendance Menu.
Figure 7–3 Time and Attendance Menu Options
The following options are available:
■ Payroll & Timecard Maintenance - Select this option to maintain employee payroll records. Refer to Payroll and Timecard Maintenance.
■ Payroll Summary - Select this option to run the Payroll Report. Refer to Payroll Summary Report.
■ Payroll Detail By Employee - Select this option to run the Payroll Detail By Employee Report. Refer to Payroll Detail By Employee Report.
■ Posted Timecard - Select this option to run the Posted Timecard Report. Refer to Posted Timecard Report.
■ Open Timecard Report - Select this option to run the Open Timecard Report. Refer to Open Timecard Report.
■ Regenerate Payroll File - Select this option to recreate the payroll file.
Payroll and Timecard MaintenanceUse the Payroll and Timecard Maintenance menu option to maintain Payroll and Timecard information.
Note: Because each Oracle Retail Xstore Point-of-Service menu is configurable, the button functions and the menu options on your system may appear in a different order or have different text than the examples shown in this manual.
Note: The payroll categories are configurable, so the categories available on your system may differ from the examples shown here. The starting work day of the week display is also configurable. Your first day of the week may be different from the day shown in the example.
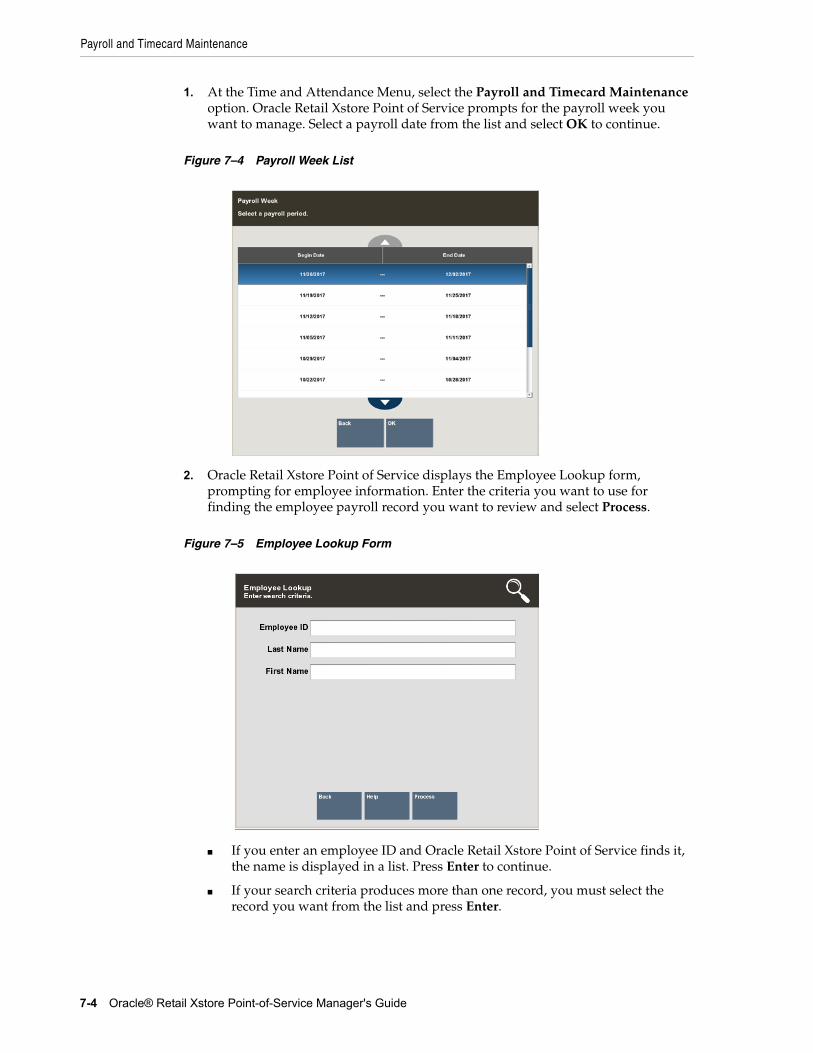
Payroll and Timecard Maintenance
7-4 Oracle® Retail Xstore Point-of-Service Manager's Guide
1. At the Time and Attendance Menu, select the Payroll and Timecard Maintenance option. Oracle Retail Xstore Point of Service prompts for the payroll week you want to manage. Select a payroll date from the list and select OK to continue.
Figure 7–4 Payroll Week List
2. Oracle Retail Xstore Point of Service displays the Employee Lookup form, prompting for employee information. Enter the criteria you want to use for finding the employee payroll record you want to review and select Process.
Figure 7–5 Employee Lookup Form
■ If you enter an employee ID and Oracle Retail Xstore Point of Service finds it, the name is displayed in a list. Press Enter to continue.
■ If your search criteria produces more than one record, you must select the record you want from the list and press Enter.

Payroll and Timecard Maintenance
Payroll and Timecard Maintenance 7-5
Figure 7–6 Employee Results List
When you have located and selected the employee, Oracle Retail Xstore Point of Service displays the Payroll Maintenance record for the employee. The record includes the following tabs:
– Payroll Maintenance Tab
– Payroll Comments Tab
– Timecard Maintenance Tab
– Timecard Comment Tab
Payroll Maintenance TabUse the Payroll Maintenance tab to verify and enter payroll hours for a selected payroll period. All payroll records should be reviewed manually and saved before the payroll finish date. This includes hours automatically fed to payroll from the timecard clock in/ clock out records. Posted payroll information is uploaded to the home office at closing.
You must find and display an employee payroll record for a specific payroll week so that you may view it or change it.

Payroll and Timecard Maintenance
7-6 Oracle® Retail Xstore Point-of-Service Manager's Guide
Figure 7–7 Payroll Maintenance Screen
The Payroll Maintenance tab shows the following information:
■ Employee information: Employee ID, name, and department.
■ The days of the week and the date for each day; for example, Sunday through Saturday.
■ Regular Hours Worked - These hours are determined from the timecard records and cannot be changed here. Refer to Editing a Timecard Record for more information on changing timecard records.
■ Overtime Hours - These hours are calculated automatically by the system, based on the overtime rules established by the home office. These hours cannot be changed here. Refer to Editing a Timecard Record for more information on changing timecard records.
■ Double Overtime Hours - These hours are calculated automatically by the system based on the overtime rules established by the home office. These hours cannot be changed here. Refer to Editing a Timecard Record for more information on changing timecard records.
■ Non-Working Hours Categories - These types of payroll hours can be edited in Payroll Maintenance using the Edit Non-Working Hours option. Examples of non-working hours include:
– Vacation Hours
– Sick Hours
– Personal Hours
– Other Hours
– Holiday Hours
– Bereavement Hours
– Jury Hours
– Funeral Hours
■ Total Hours - The total working hours for each category by day and by week.
■ Totals - The total hours by day and by week.
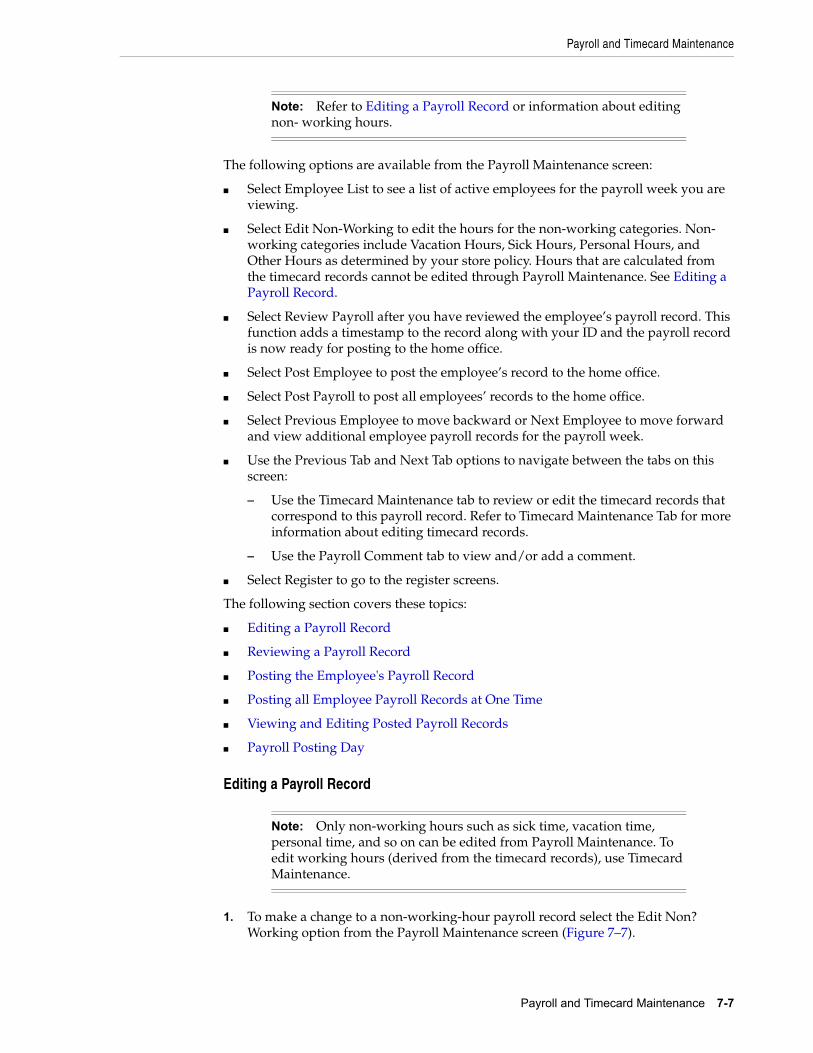
Payroll and Timecard Maintenance
Payroll and Timecard Maintenance 7-7
The following options are available from the Payroll Maintenance screen:
■ Select Employee List to see a list of active employees for the payroll week you are viewing.
■ Select Edit Non-Working to edit the hours for the non-working categories. Non- working categories include Vacation Hours, Sick Hours, Personal Hours, and Other Hours as determined by your store policy. Hours that are calculated from the timecard records cannot be edited through Payroll Maintenance. See Editing a Payroll Record.
■ Select Review Payroll after you have reviewed the employee’s payroll record. This function adds a timestamp to the record along with your ID and the payroll record is now ready for posting to the home office.
■ Select Post Employee to post the employee’s record to the home office.
■ Select Post Payroll to post all employees’ records to the home office.
■ Select Previous Employee to move backward or Next Employee to move forward and view additional employee payroll records for the payroll week.
■ Use the Previous Tab and Next Tab options to navigate between the tabs on this screen:
– Use the Timecard Maintenance tab to review or edit the timecard records that correspond to this payroll record. Refer to Timecard Maintenance Tab for more information about editing timecard records.
– Use the Payroll Comment tab to view and/or add a comment.
■ Select Register to go to the register screens.
The following section covers these topics:
■ Editing a Payroll Record
■ Reviewing a Payroll Record
■ Posting the Employee's Payroll Record
■ Posting all Employee Payroll Records at One Time
■ Viewing and Editing Posted Payroll Records
■ Payroll Posting Day
Editing a Payroll Record
1. To make a change to a non-working-hour payroll record select the Edit Non? Working option from the Payroll Maintenance screen (Figure 7–7).
Note: Refer to Editing a Payroll Record or information about editing non- working hours.
Note: Only non-working hours such as sick time, vacation time, personal time, and so on can be edited from Payroll Maintenance. To edit working hours (derived from the timecard records), use Timecard Maintenance.
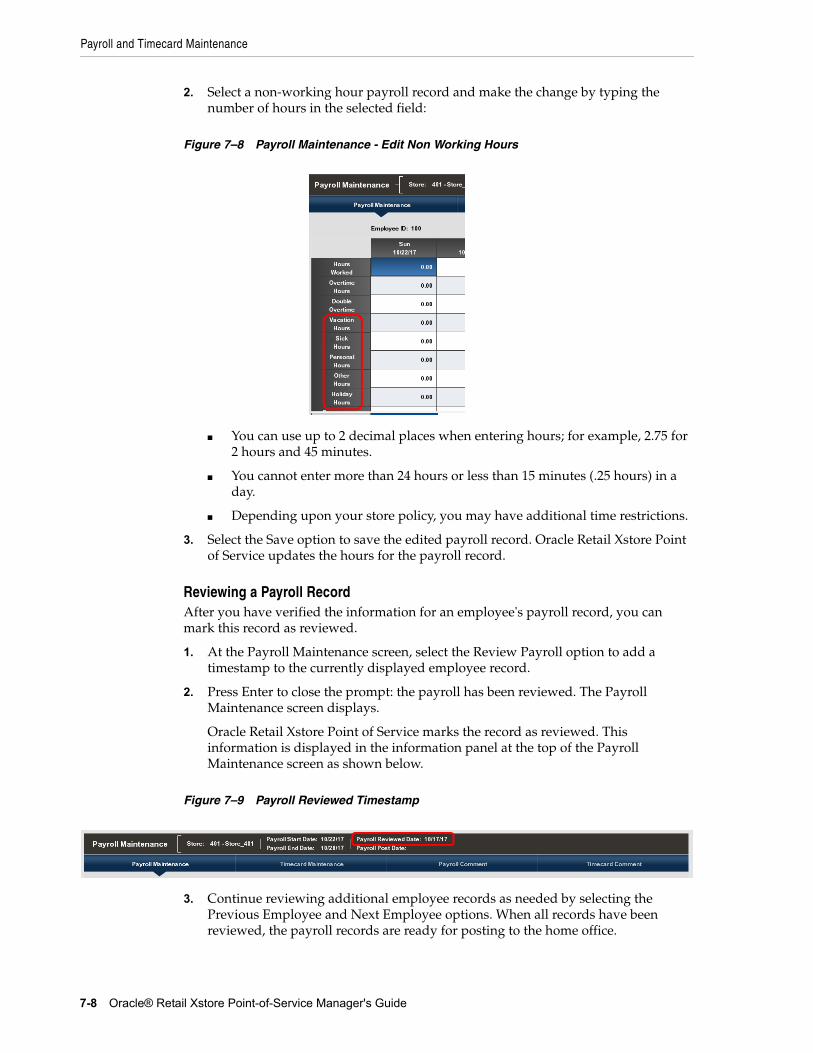
Payroll and Timecard Maintenance
7-8 Oracle® Retail Xstore Point-of-Service Manager's Guide
2. Select a non-working hour payroll record and make the change by typing the number of hours in the selected field:
Figure 7–8 Payroll Maintenance - Edit Non Working Hours
■ You can use up to 2 decimal places when entering hours; for example, 2.75 for 2 hours and 45 minutes.
■ You cannot enter more than 24 hours or less than 15 minutes (.25 hours) in a day.
■ Depending upon your store policy, you may have additional time restrictions.
3. Select the Save option to save the edited payroll record. Oracle Retail Xstore Point of Service updates the hours for the payroll record.
Reviewing a Payroll RecordAfter you have verified the information for an employee's payroll record, you can mark this record as reviewed.
1. At the Payroll Maintenance screen, select the Review Payroll option to add a timestamp to the currently displayed employee record.
2. Press Enter to close the prompt: the payroll has been reviewed. The Payroll Maintenance screen displays.
Oracle Retail Xstore Point of Service marks the record as reviewed. This information is displayed in the information panel at the top of the Payroll Maintenance screen as shown below.
Figure 7–9 Payroll Reviewed Timestamp
3. Continue reviewing additional employee records as needed by selecting the Previous Employee and Next Employee options. When all records have been reviewed, the payroll records are ready for posting to the home office.
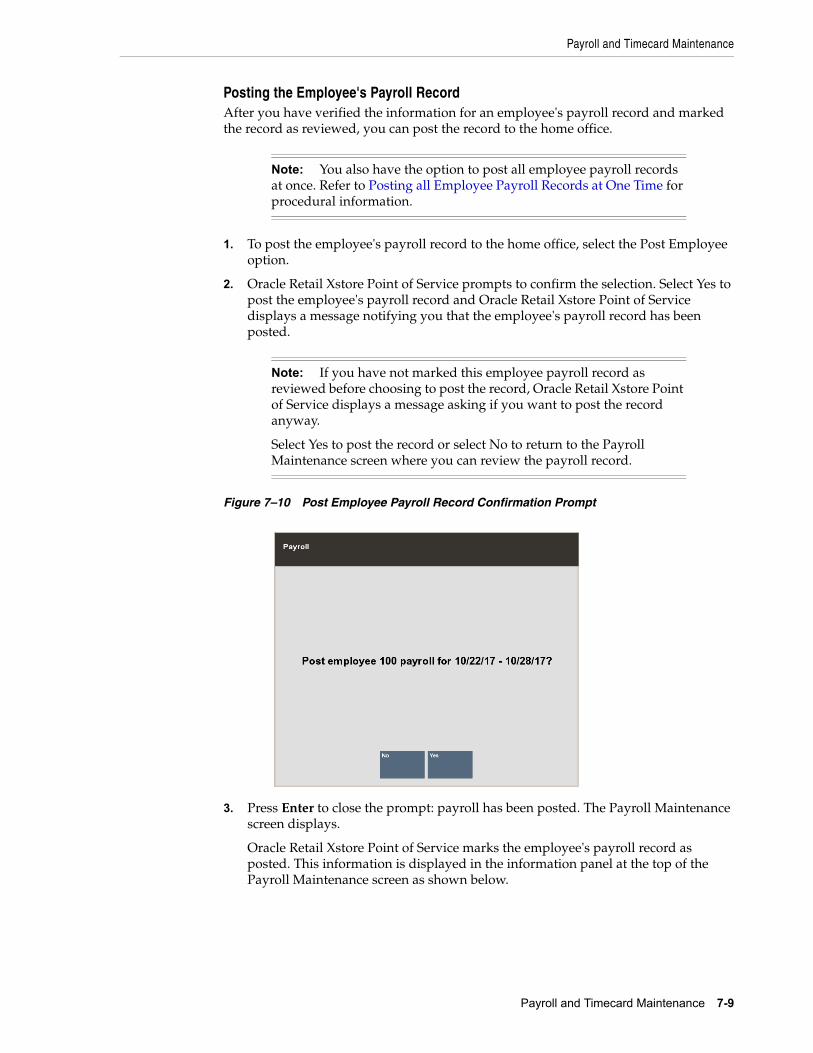
Payroll and Timecard Maintenance
Payroll and Timecard Maintenance 7-9
Posting the Employee's Payroll RecordAfter you have verified the information for an employee's payroll record and marked the record as reviewed, you can post the record to the home office.
1. To post the employee's payroll record to the home office, select the Post Employee option.
2. Oracle Retail Xstore Point of Service prompts to confirm the selection. Select Yes to post the employee's payroll record and Oracle Retail Xstore Point of Service displays a message notifying you that the employee's payroll record has been posted.
Figure 7–10 Post Employee Payroll Record Confirmation Prompt
3. Press Enter to close the prompt: payroll has been posted. The Payroll Maintenance screen displays.
Oracle Retail Xstore Point of Service marks the employee's payroll record as posted. This information is displayed in the information panel at the top of the Payroll Maintenance screen as shown below.
Note: You also have the option to post all employee payroll records at once. Refer to Posting all Employee Payroll Records at One Time for procedural information.
Note: If you have not marked this employee payroll record as reviewed before choosing to post the record, Oracle Retail Xstore Point of Service displays a message asking if you want to post the record anyway.
Select Yes to post the record or select No to return to the Payroll Maintenance screen where you can review the payroll record.
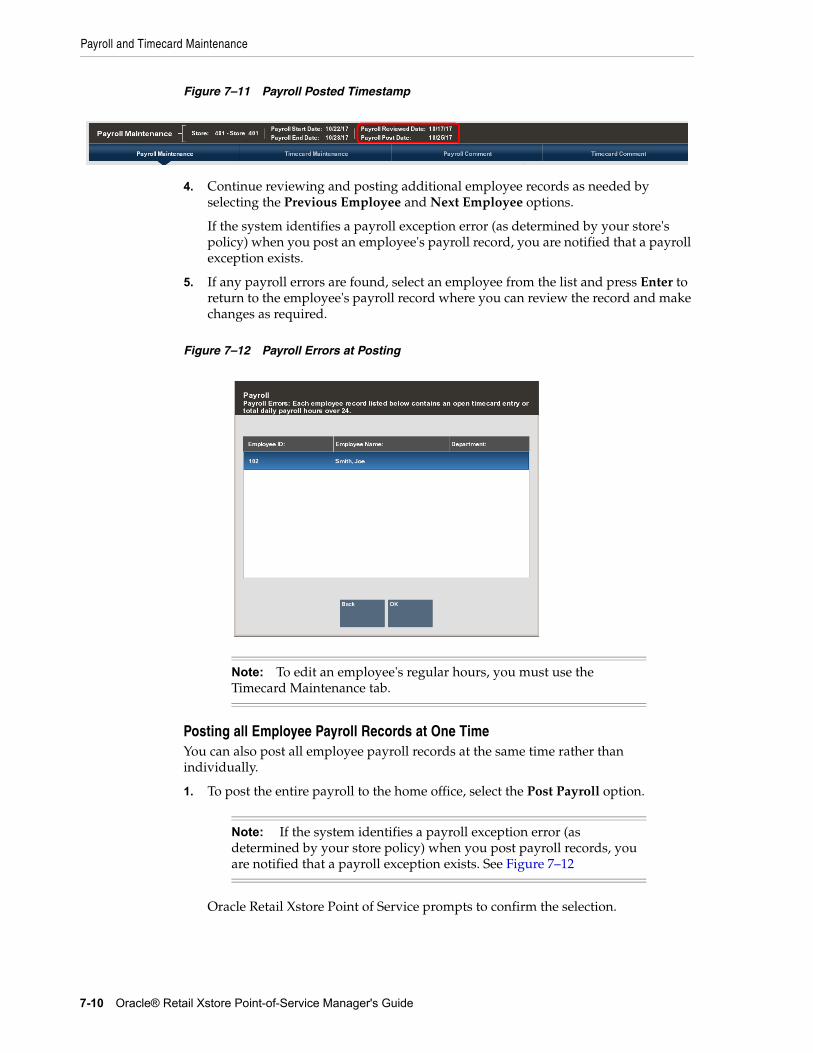
Payroll and Timecard Maintenance
7-10 Oracle® Retail Xstore Point-of-Service Manager's Guide
Figure 7–11 Payroll Posted Timestamp
4. Continue reviewing and posting additional employee records as needed by selecting the Previous Employee and Next Employee options.
If the system identifies a payroll exception error (as determined by your store's policy) when you post an employee's payroll record, you are notified that a payroll exception exists.
5. If any payroll errors are found, select an employee from the list and press Enter to return to the employee's payroll record where you can review the record and make changes as required.
Figure 7–12 Payroll Errors at Posting
Posting all Employee Payroll Records at One TimeYou can also post all employee payroll records at the same time rather than individually.
1. To post the entire payroll to the home office, select the Post Payroll option.
Oracle Retail Xstore Point of Service prompts to confirm the selection.
Note: To edit an employee's regular hours, you must use the Timecard Maintenance tab.
Note: If the system identifies a payroll exception error (as determined by your store policy) when you post payroll records, you are notified that a payroll exception exists. See Figure 7–12
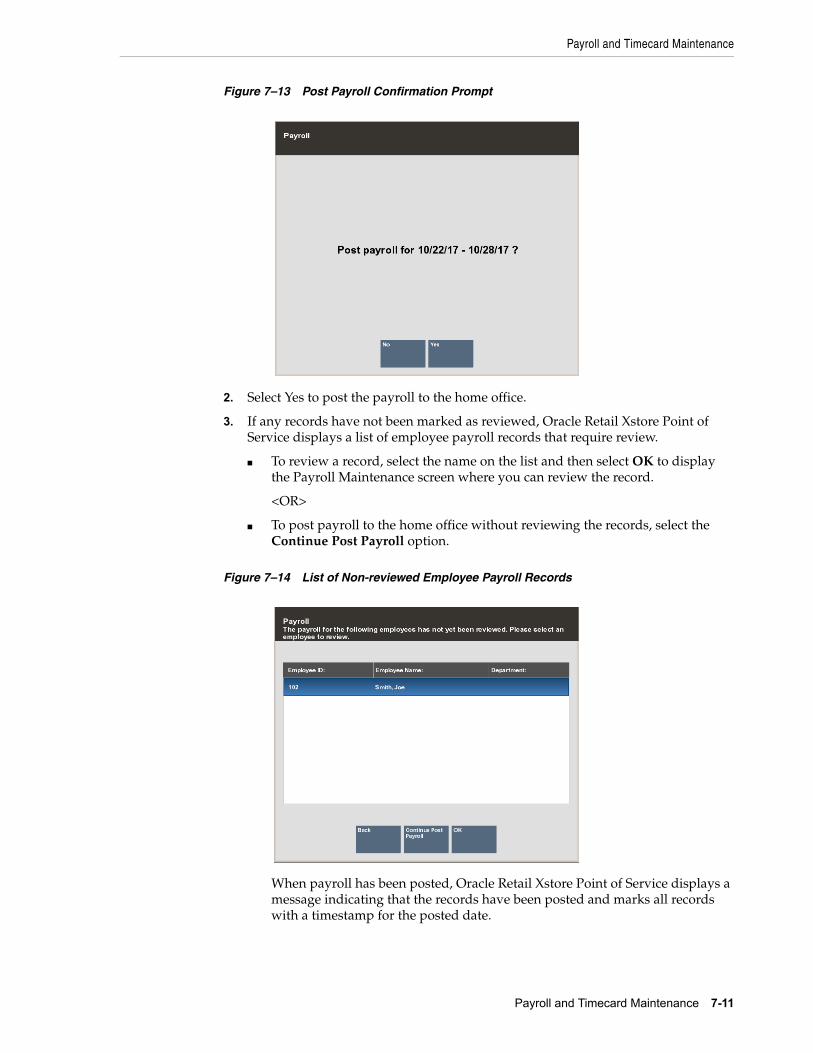
Payroll and Timecard Maintenance
Payroll and Timecard Maintenance 7-11
Figure 7–13 Post Payroll Confirmation Prompt
2. Select Yes to post the payroll to the home office.
3. If any records have not been marked as reviewed, Oracle Retail Xstore Point of Service displays a list of employee payroll records that require review.
■ To review a record, select the name on the list and then select OK to display the Payroll Maintenance screen where you can review the record.
<OR>
■ To post payroll to the home office without reviewing the records, select the Continue Post Payroll option.
Figure 7–14 List of Non-reviewed Employee Payroll Records
When payroll has been posted, Oracle Retail Xstore Point of Service displays a message indicating that the records have been posted and marks all records with a timestamp for the posted date.

Payroll and Timecard Maintenance
7-12 Oracle® Retail Xstore Point-of-Service Manager's Guide
Figure 7–15 Payroll Posted Message
Viewing and Editing Posted Payroll RecordsOnce payroll records have been posted, you can view the information at the Payroll Maintenance screen and edit information if you have the proper security permissions.
1. When you select an option to edit timecard and/or payroll information for a posted payroll record, Oracle Retail Xstore Point of Service displays a message informing you that payroll has been posted. Any changes you make to a posted record must be re-posted to the home office manually.
Figure 7–16 Payroll Posted - Edit Message
2. Select OK to acknowledge this message and make your edits as required.
Payroll Posting DayOn the day payroll must be posted to the home office, Oracle Retail Xstore Point of Service may display a message indicating that payroll records are due. This message displays when you exit the Payroll Maintenance function without posting the payroll
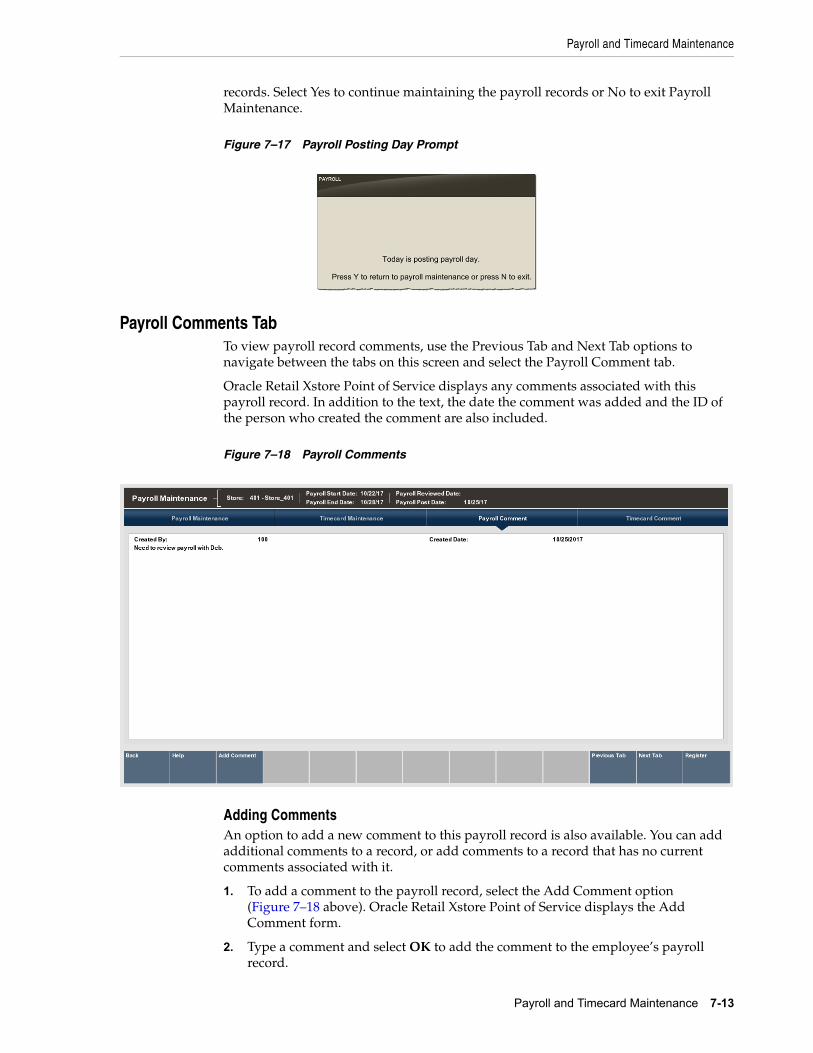
Payroll and Timecard Maintenance
Payroll and Timecard Maintenance 7-13
records. Select Yes to continue maintaining the payroll records or No to exit Payroll Maintenance.
Figure 7–17 Payroll Posting Day Prompt
Payroll Comments TabTo view payroll record comments, use the Previous Tab and Next Tab options to navigate between the tabs on this screen and select the Payroll Comment tab.
Oracle Retail Xstore Point of Service displays any comments associated with this payroll record. In addition to the text, the date the comment was added and the ID of the person who created the comment are also included.
Figure 7–18 Payroll Comments
Adding CommentsAn option to add a new comment to this payroll record is also available. You can add additional comments to a record, or add comments to a record that has no current comments associated with it.
1. To add a comment to the payroll record, select the Add Comment option (Figure 7–18 above). Oracle Retail Xstore Point of Service displays the Add Comment form.
2. Type a comment and select OK to add the comment to the employee’s payroll record.
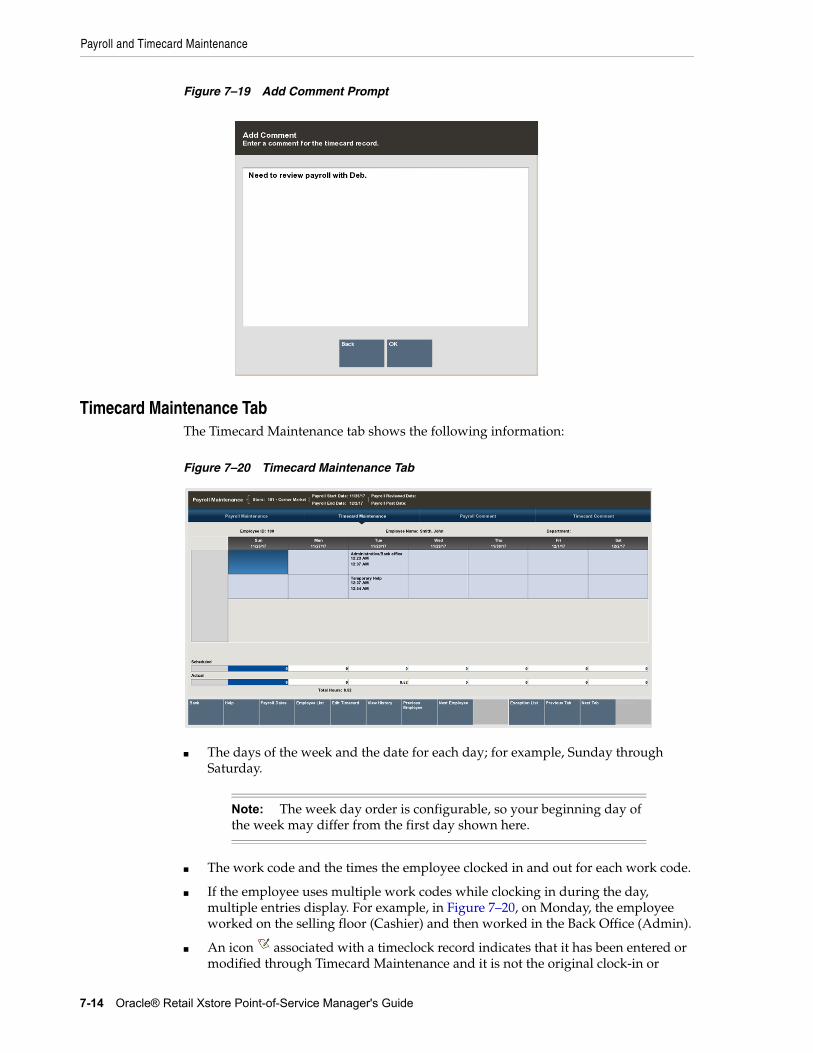
Payroll and Timecard Maintenance
7-14 Oracle® Retail Xstore Point-of-Service Manager's Guide
Figure 7–19 Add Comment Prompt
Timecard Maintenance TabThe Timecard Maintenance tab shows the following information:
Figure 7–20 Timecard Maintenance Tab
■ The days of the week and the date for each day; for example, Sunday through Saturday.
■ The work code and the times the employee clocked in and out for each work code.
■ If the employee uses multiple work codes while clocking in during the day, multiple entries display. For example, in Figure 7–20, on Monday, the employee worked on the selling floor (Cashier) and then worked in the Back Office (Admin).
■ An icon associated with a timeclock record indicates that it has been entered or modified through Timecard Maintenance and it is not the original clock-in or
Note: The week day order is configurable, so your beginning day of the week may differ from the first day shown here.
Payroll and Timecard Maintenance
Payroll and Timecard Maintenance 7-15
clock- out record, or that the record has an exception to a timecard rule. Select the record and the View History option for details about this modified record.
■ The hours scheduled for each day. Available if the scheduling option is used.
■ The actual hours worked each day.
■ The total number of hours worked for the week.
The following menu options are available from the Timecard Maintenance screen:
■ Payroll Dates - Select this option to view the list of payroll dates. Select a new date from the list to view the selected employee’s timecard record for the new payroll week.
■ Employee List - Select this option to view a list of active employees for the payroll week you are viewing.
■ Edit Timecard - Select this option to edit the timecard record.
■ View History - Select this option to view the details about a specific timeclock record.
■ Previous Employee/Next Employee - Select these options to move backward/ forward to view additional employee timecard records for the payroll week.
■ Exception List - Select this option to view a list of employee records that have exceptions for this payroll week. Exception rules are set up by the home office.
■ Use the Previous Tab and the Next Tab menu options to navigate between the Timecard Maint tab and the Timecard Comment tab.
■ Timecard Comment Tab- Select this tab to view and/or add a comment.
This section covers the following topics:
■ Editing a Timecard Record
■ Adding a Timecard Record
■ Changing a Timecard Record
■ Deleting a Timecard Record
■ Viewing Timecard Exception Records
■ Viewing Timecard Record History
Editing a Timecard Record1. To change a timecard record, select the record that you want to change on the
Timecard Maintenance screen and select the Edit Timecard option.
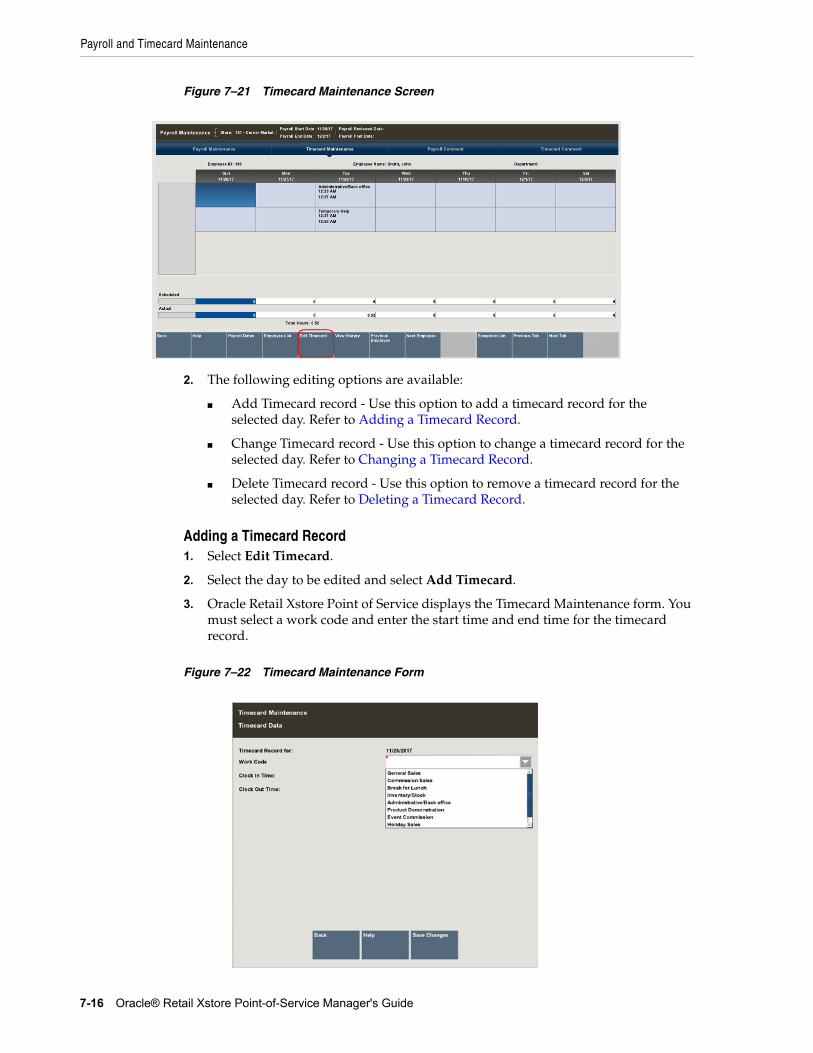
Payroll and Timecard Maintenance
7-16 Oracle® Retail Xstore Point-of-Service Manager's Guide
Figure 7–21 Timecard Maintenance Screen
2. The following editing options are available:
■ Add Timecard record - Use this option to add a timecard record for the selected day. Refer to Adding a Timecard Record.
■ Change Timecard record - Use this option to change a timecard record for the selected day. Refer to Changing a Timecard Record.
■ Delete Timecard record - Use this option to remove a timecard record for the selected day. Refer to Deleting a Timecard Record.
Adding a Timecard Record1. Select Edit Timecard.
2. Select the day to be edited and select Add Timecard.
3. Oracle Retail Xstore Point of Service displays the Timecard Maintenance form. You must select a work code and enter the start time and end time for the timecard record.
Figure 7–22 Timecard Maintenance Form
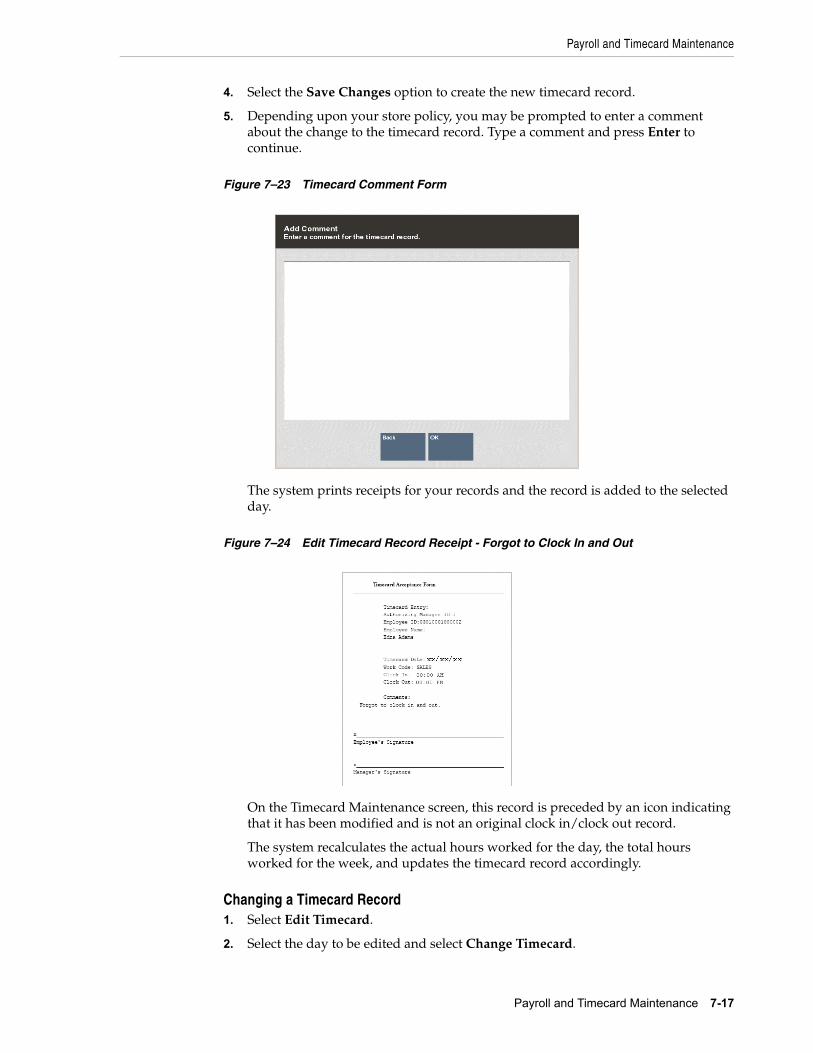
Payroll and Timecard Maintenance
Payroll and Timecard Maintenance 7-17
4. Select the Save Changes option to create the new timecard record.
5. Depending upon your store policy, you may be prompted to enter a comment about the change to the timecard record. Type a comment and press Enter to continue.
Figure 7–23 Timecard Comment Form
The system prints receipts for your records and the record is added to the selected day.
Figure 7–24 Edit Timecard Record Receipt - Forgot to Clock In and Out
On the Timecard Maintenance screen, this record is preceded by an icon indicating that it has been modified and is not an original clock in/clock out record.
The system recalculates the actual hours worked for the day, the total hours worked for the week, and updates the timecard record accordingly.
Changing a Timecard Record1. Select Edit Timecard.
2. Select the day to be edited and select Change Timecard.
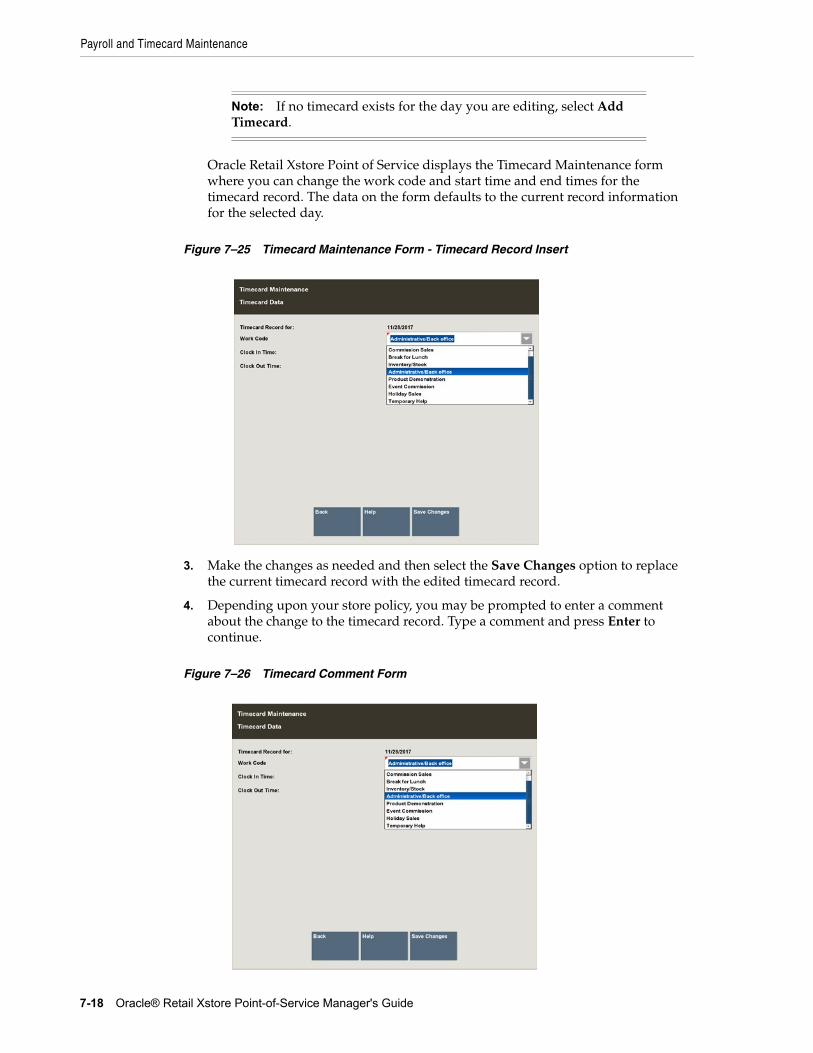
Payroll and Timecard Maintenance
7-18 Oracle® Retail Xstore Point-of-Service Manager's Guide
Oracle Retail Xstore Point of Service displays the Timecard Maintenance form where you can change the work code and start time and end times for the timecard record. The data on the form defaults to the current record information for the selected day.
Figure 7–25 Timecard Maintenance Form - Timecard Record Insert
3. Make the changes as needed and then select the Save Changes option to replace the current timecard record with the edited timecard record.
4. Depending upon your store policy, you may be prompted to enter a comment about the change to the timecard record. Type a comment and press Enter to continue.
Figure 7–26 Timecard Comment Form
Note: If no timecard exists for the day you are editing, select Add Timecard.
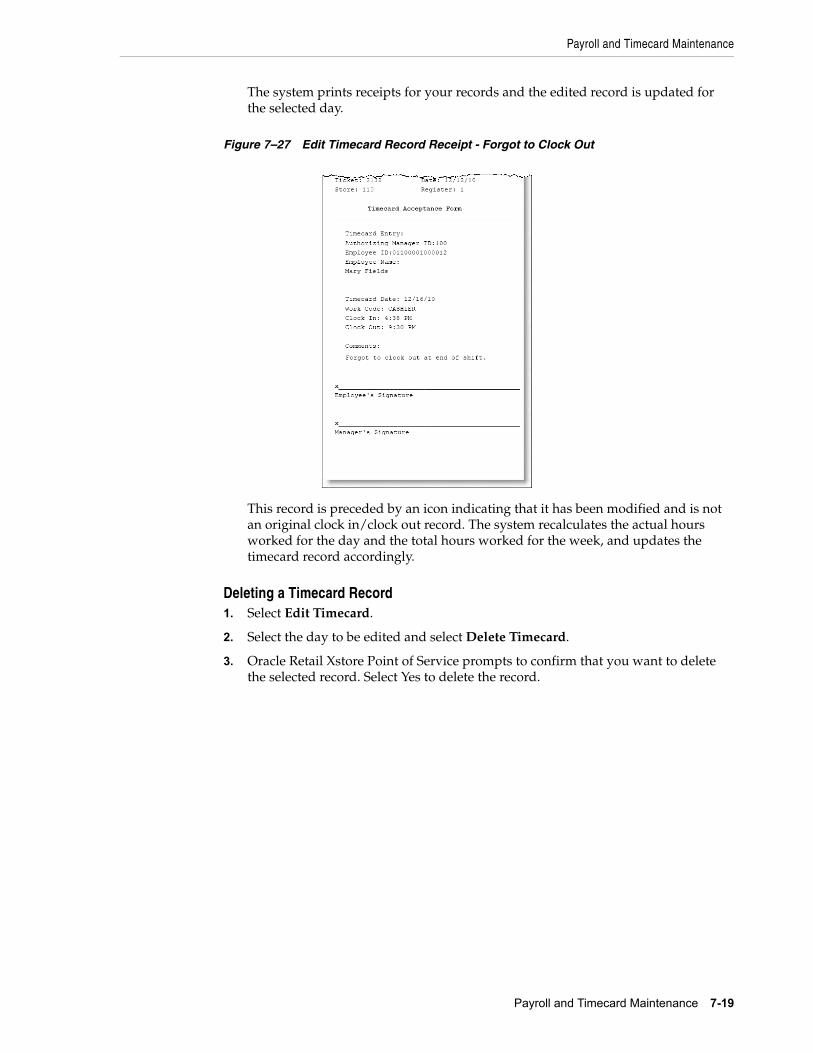
Payroll and Timecard Maintenance
Payroll and Timecard Maintenance 7-19
The system prints receipts for your records and the edited record is updated for the selected day.
Figure 7–27 Edit Timecard Record Receipt - Forgot to Clock Out
This record is preceded by an icon indicating that it has been modified and is not an original clock in/clock out record. The system recalculates the actual hours worked for the day and the total hours worked for the week, and updates the timecard record accordingly.
Deleting a Timecard Record1. Select Edit Timecard.
2. Select the day to be edited and select Delete Timecard.
3. Oracle Retail Xstore Point of Service prompts to confirm that you want to delete the selected record. Select Yes to delete the record.
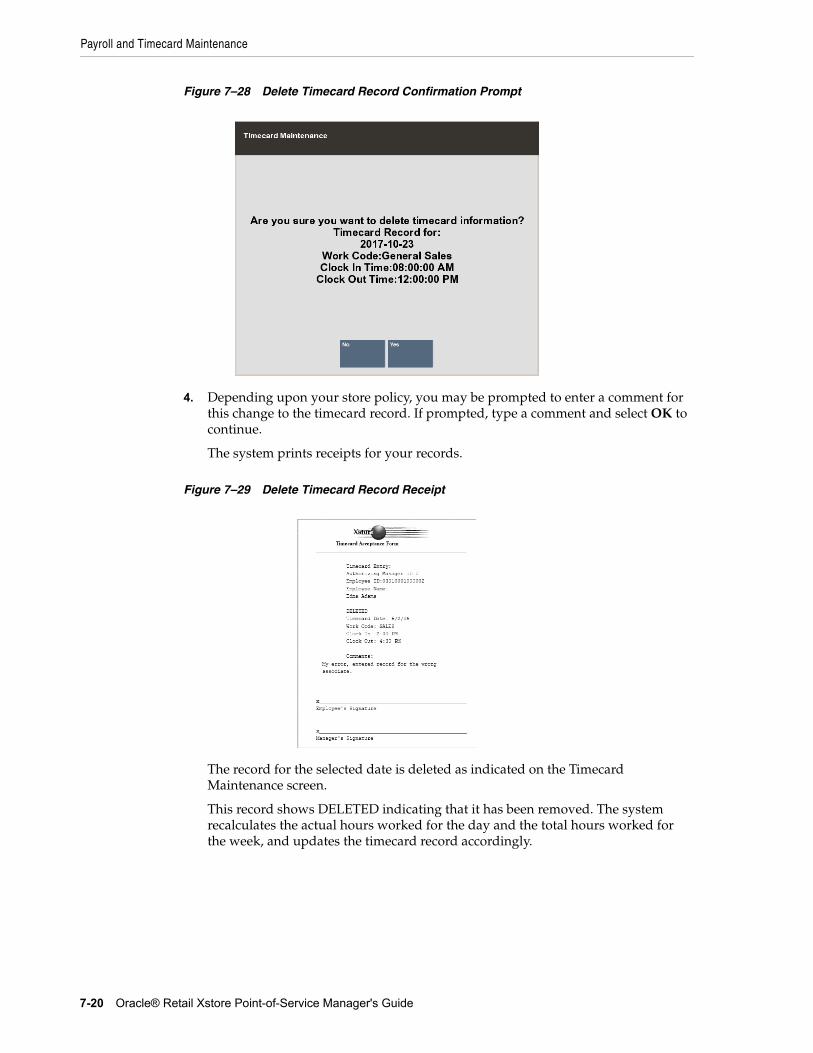
Payroll and Timecard Maintenance
7-20 Oracle® Retail Xstore Point-of-Service Manager's Guide
Figure 7–28 Delete Timecard Record Confirmation Prompt
4. Depending upon your store policy, you may be prompted to enter a comment for this change to the timecard record. If prompted, type a comment and select OK to continue.
The system prints receipts for your records.
Figure 7–29 Delete Timecard Record Receipt
The record for the selected date is deleted as indicated on the Timecard Maintenance screen.
This record shows DELETED indicating that it has been removed. The system recalculates the actual hours worked for the day and the total hours worked for the week, and updates the timecard record accordingly.
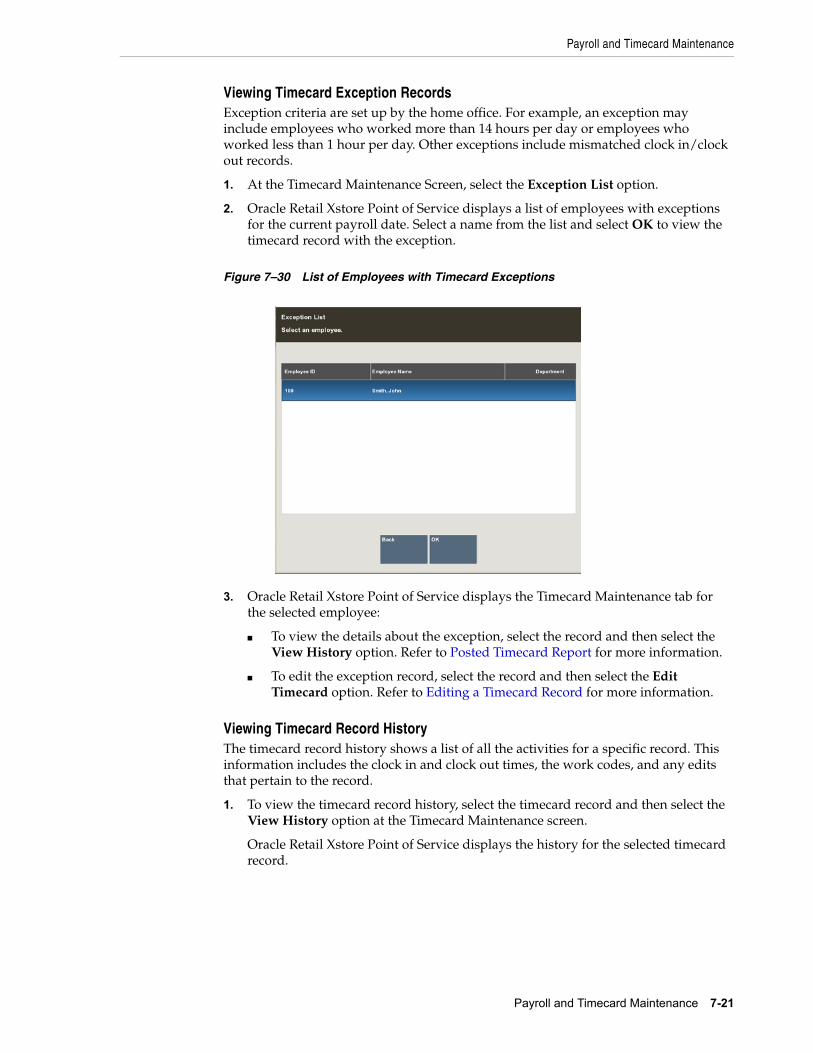
Payroll and Timecard Maintenance
Payroll and Timecard Maintenance 7-21
Viewing Timecard Exception RecordsException criteria are set up by the home office. For example, an exception may include employees who worked more than 14 hours per day or employees who worked less than 1 hour per day. Other exceptions include mismatched clock in/clock out records.
1. At the Timecard Maintenance Screen, select the Exception List option.
2. Oracle Retail Xstore Point of Service displays a list of employees with exceptions for the current payroll date. Select a name from the list and select OK to view the timecard record with the exception.
Figure 7–30 List of Employees with Timecard Exceptions
3. Oracle Retail Xstore Point of Service displays the Timecard Maintenance tab for the selected employee:
■ To view the details about the exception, select the record and then select the View History option. Refer to Posted Timecard Report for more information.
■ To edit the exception record, select the record and then select the Edit Timecard option. Refer to Editing a Timecard Record for more information.
Viewing Timecard Record HistoryThe timecard record history shows a list of all the activities for a specific record. This information includes the clock in and clock out times, the work codes, and any edits that pertain to the record.
1. To view the timecard record history, select the timecard record and then select the View History option at the Timecard Maintenance screen.
Oracle Retail Xstore Point of Service displays the history for the selected timecard record.
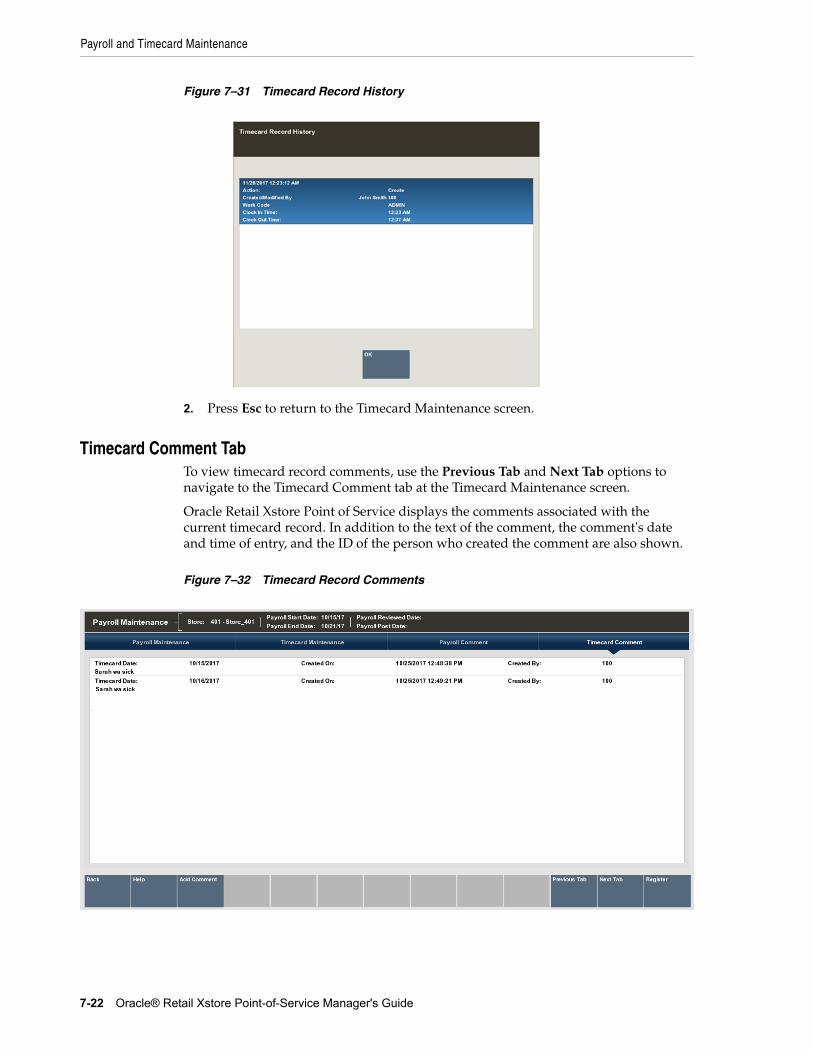
Payroll and Timecard Maintenance
7-22 Oracle® Retail Xstore Point-of-Service Manager's Guide
Figure 7–31 Timecard Record History
2. Press Esc to return to the Timecard Maintenance screen.
Timecard Comment TabTo view timecard record comments, use the Previous Tab and Next Tab options to navigate to the Timecard Comment tab at the Timecard Maintenance screen.
Oracle Retail Xstore Point of Service displays the comments associated with the current timecard record. In addition to the text of the comment, the comment's date and time of entry, and the ID of the person who created the comment are also shown.
Figure 7–32 Timecard Record Comments
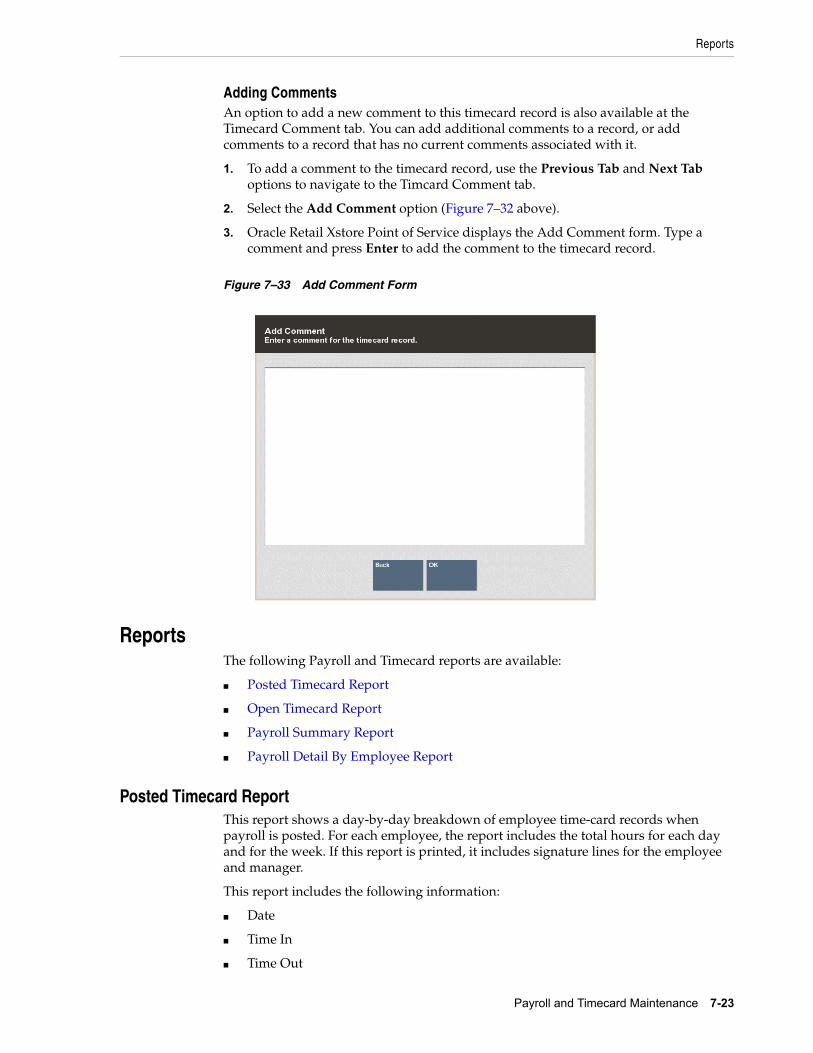
Reports
Payroll and Timecard Maintenance 7-23
Adding CommentsAn option to add a new comment to this timecard record is also available at the Timecard Comment tab. You can add additional comments to a record, or add comments to a record that has no current comments associated with it.
1. To add a comment to the timecard record, use the Previous Tab and Next Tab options to navigate to the Timcard Comment tab.
2. Select the Add Comment option (Figure 7–32 above).
3. Oracle Retail Xstore Point of Service displays the Add Comment form. Type a comment and press Enter to add the comment to the timecard record.
Figure 7–33 Add Comment Form
ReportsThe following Payroll and Timecard reports are available:
■ Posted Timecard Report
■ Open Timecard Report
■ Payroll Summary Report
■ Payroll Detail By Employee Report
Posted Timecard ReportThis report shows a day-by-day breakdown of employee time-card records when payroll is posted. For each employee, the report includes the total hours for each day and for the week. If this report is printed, it includes signature lines for the employee and manager.
This report includes the following information:
■ Date
■ Time In
■ Time Out
Reports
7-24 Oracle® Retail Xstore Point-of-Service Manager's Guide
■ Category
■ Hours
■ Day Total
■ Week Total
Refer to the Oracle Retail Xstore Point of Service Reports Guide for details about this report.
Open Timecard ReportThe Open TimeCard Report provides a listing of employees who have time cards with Clock-In times but who have not yet clocked out from work. The report lists the employee name and ID, the clock-in time and the work code selected at clock-in time. This report includes the following information:
■ Employee ID
■ Name
■ Clock-In Time
■ Register
■ Work Code
Refer to the Oracle Retail Xstore Point of Service Reports Guide for details about this report.
Payroll Summary ReportThe Payroll Summary Report shows all of the hours displayed on the Payroll Maintenance screen for all active employees for a pay period.
This report includes the following information:
■ Employee Name/ID
■ Date/Weekday
■ Reg Hours - The regular hours worked, excluding overtime hours.
■ Over Time Hours - The overtime hours worked.
■ Double Time Hours - Overtime hours worked at a double pay rate.
■ Non-Working Hours - Non-working categories include Vacation Hours, Sick Hours, Personal Hours, and Other Hours as determined by your store policy.
■ Total Hours - The total hours worked for each employee and category.
■ Report Total Hours - The sum of all hours for all employees on the report.
Note: Refer to the Oracle Retail Xstore Point of Service Reports Guide for details about this report.
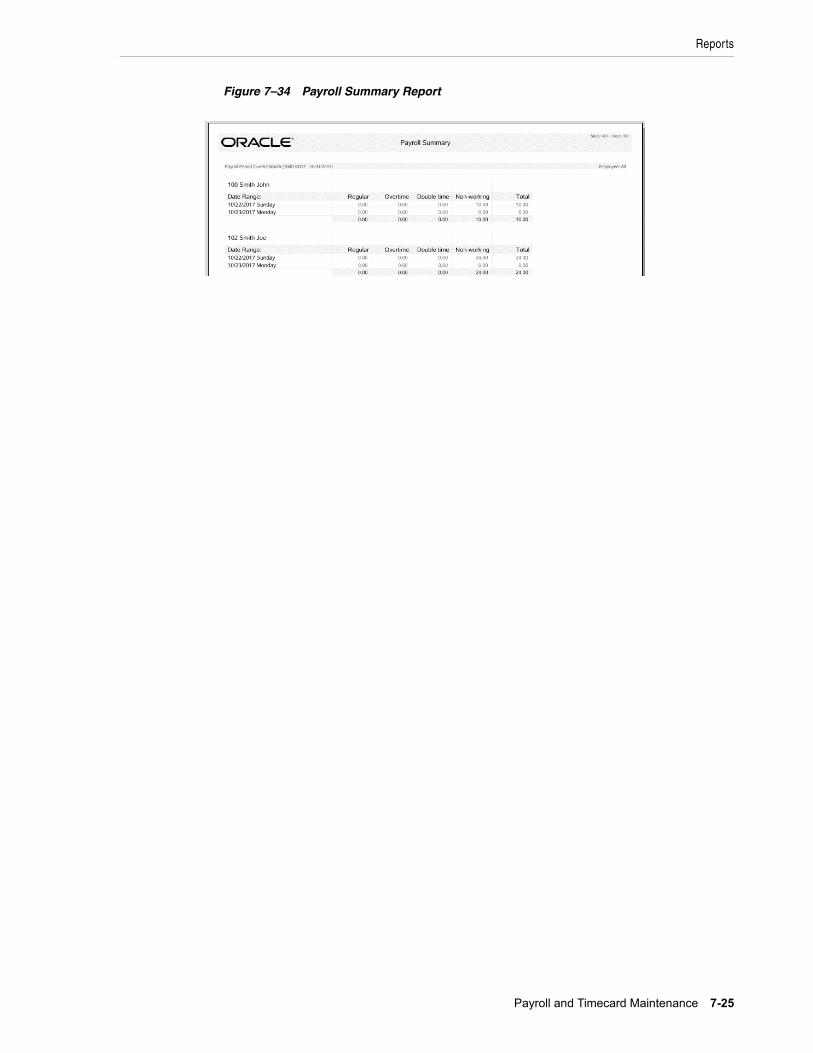
Reports
Payroll and Timecard Maintenance 7-25
Figure 7–34 Payroll Summary Report
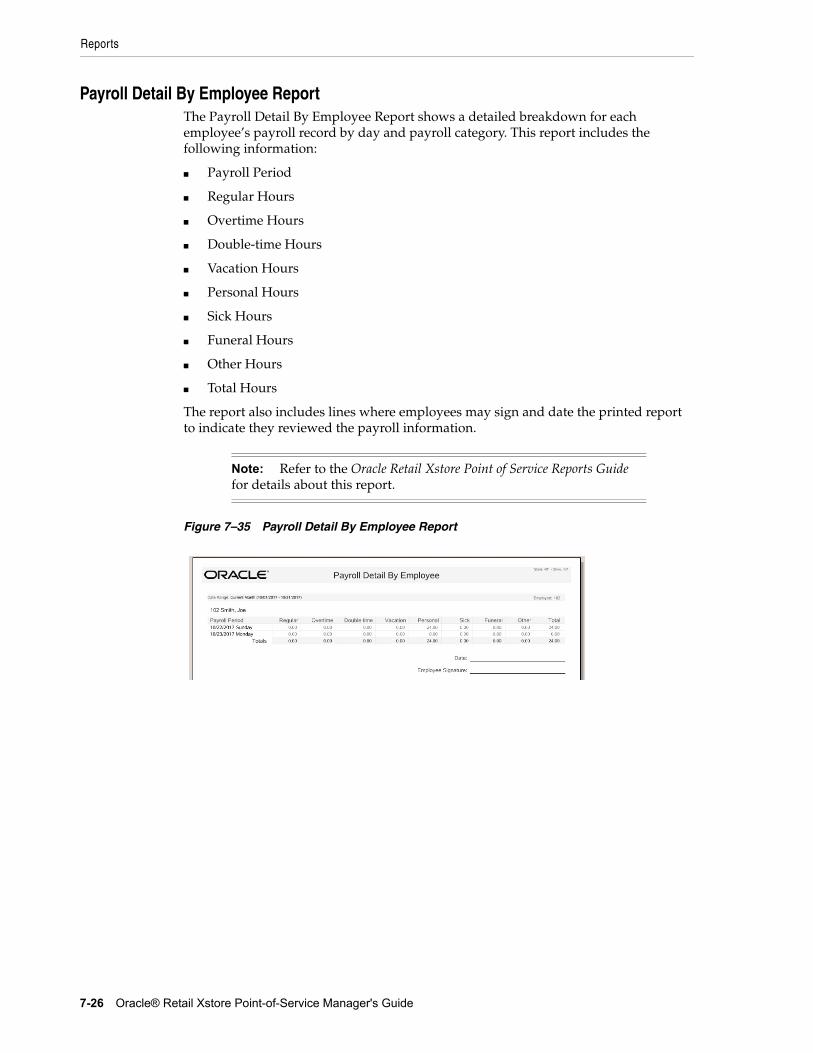
Reports
7-26 Oracle® Retail Xstore Point-of-Service Manager's Guide
Payroll Detail By Employee ReportThe Payroll Detail By Employee Report shows a detailed breakdown for each employee’s payroll record by day and payroll category. This report includes the following information:
■ Payroll Period
■ Regular Hours
■ Overtime Hours
■ Double-time Hours
■ Vacation Hours
■ Personal Hours
■ Sick Hours
■ Funeral Hours
■ Other Hours
■ Total Hours
The report also includes lines where employees may sign and date the printed report to indicate they reviewed the payroll information.
Figure 7–35 Payroll Detail By Employee Report
Note: Refer to the Oracle Retail Xstore Point of Service Reports Guide for details about this report.
8
Register Open and Close 8-1
8Register Open and Close
[2] Open the register to ring sales. Close the register to reconcile the cash drawer and to lock the register from further sales.
This chapter contains the following sections:
■ Accessing the Back Office Register Open/Close Functions
■ Closing the Register
– Standard Close
– Cash Drawer Close
■ Forcing a Register to Close
■ Print Till Summary Receipt
■ Opening the Register
– Standard Open
– Cash Drawer Open
■ Changing Business Date
Accessing the Back Office Register Open/Close Functions1. After logging into the Back Office (see Accessing the Back Office), select the Open/
Close Options menu option within Till and press Enter.
2. Select an option from the Open/Close Options menu and press Enter.
Note: Due to the numerous system configuration options available, menu options are not identified by a function key number (F2, F3, and so on). Instead, the name on the button is used throughout this guide.
Note: Refer to the chapter 24/7 Store Environment for processes on 24/7 trading.
Tip: You can also press the number/letter associated with the menu option on the keyboard to access the open and close functions.
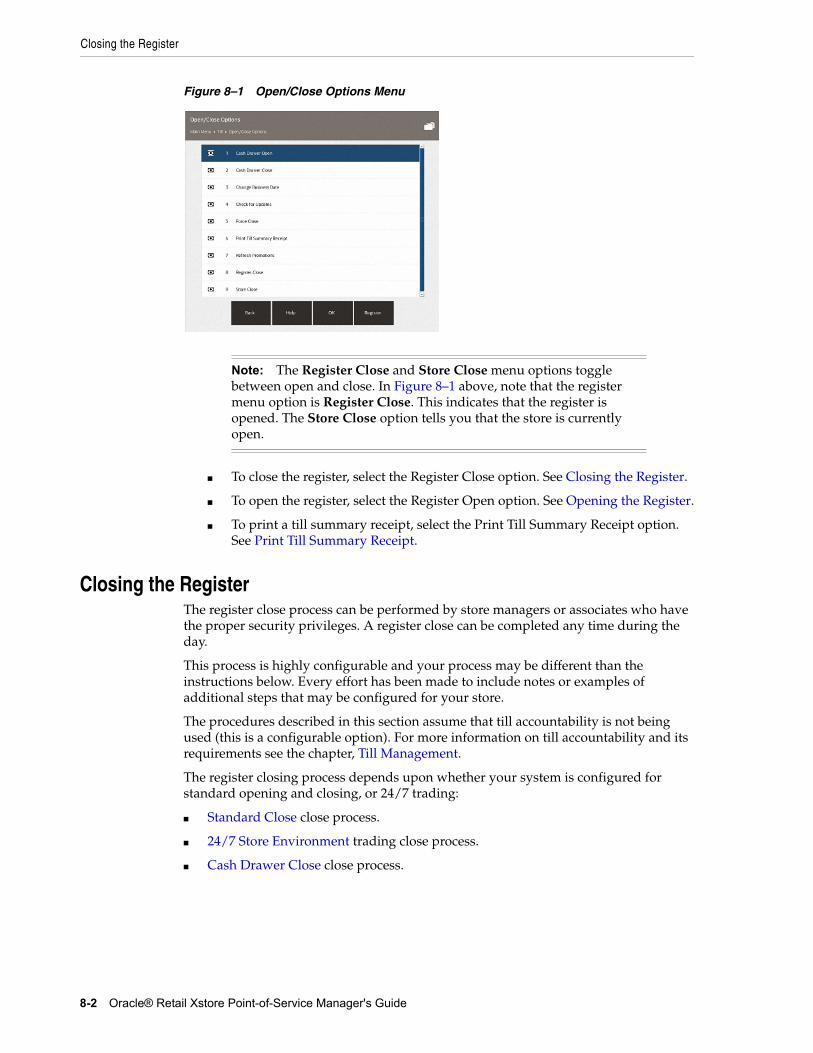
Closing the Register
8-2 Oracle® Retail Xstore Point-of-Service Manager's Guide
Figure 8–1 Open/Close Options Menu
■ To close the register, select the Register Close option. See Closing the Register.
■ To open the register, select the Register Open option. See Opening the Register.
■ To print a till summary receipt, select the Print Till Summary Receipt option. See Print Till Summary Receipt.
Closing the RegisterThe register close process can be performed by store managers or associates who have the proper security privileges. A register close can be completed any time during the day.
This process is highly configurable and your process may be different than the instructions below. Every effort has been made to include notes or examples of additional steps that may be configured for your store.
The procedures described in this section assume that till accountability is not being used (this is a configurable option). For more information on till accountability and its requirements see the chapter, Till Management.
The register closing process depends upon whether your system is configured for standard opening and closing, or 24/7 trading:
■ Standard Close close process.
■ 24/7 Store Environment trading close process.
■ Cash Drawer Close close process.
Note: The Register Close and Store Close menu options toggle between open and close. In Figure 8–1 above, note that the register menu option is Register Close. This indicates that the register is opened. The Store Close option tells you that the store is currently open.
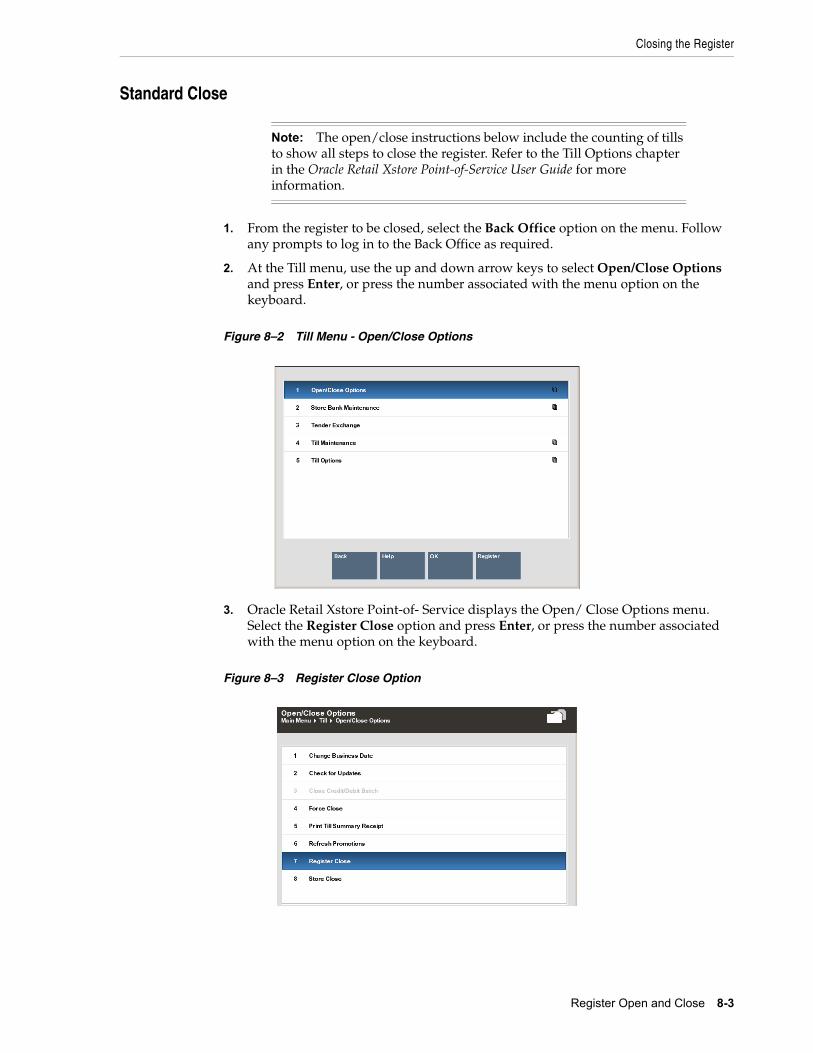
Closing the Register
Register Open and Close 8-3
Standard Close
1. From the register to be closed, select the Back Office option on the menu. Follow any prompts to log in to the Back Office as required.
2. At the Till menu, use the up and down arrow keys to select Open/Close Options and press Enter, or press the number associated with the menu option on the keyboard.
Figure 8–2 Till Menu - Open/Close Options
3. Oracle Retail Xstore Point-of- Service displays the Open/ Close Options menu. Select the Register Close option and press Enter, or press the number associated with the menu option on the keyboard.
Figure 8–3 Register Close Option
Note: The open/close instructions below include the counting of tills to show all steps to close the register. Refer to the Till Options chapter in the Oracle Retail Xstore Point-of-Service User Guide for more information.
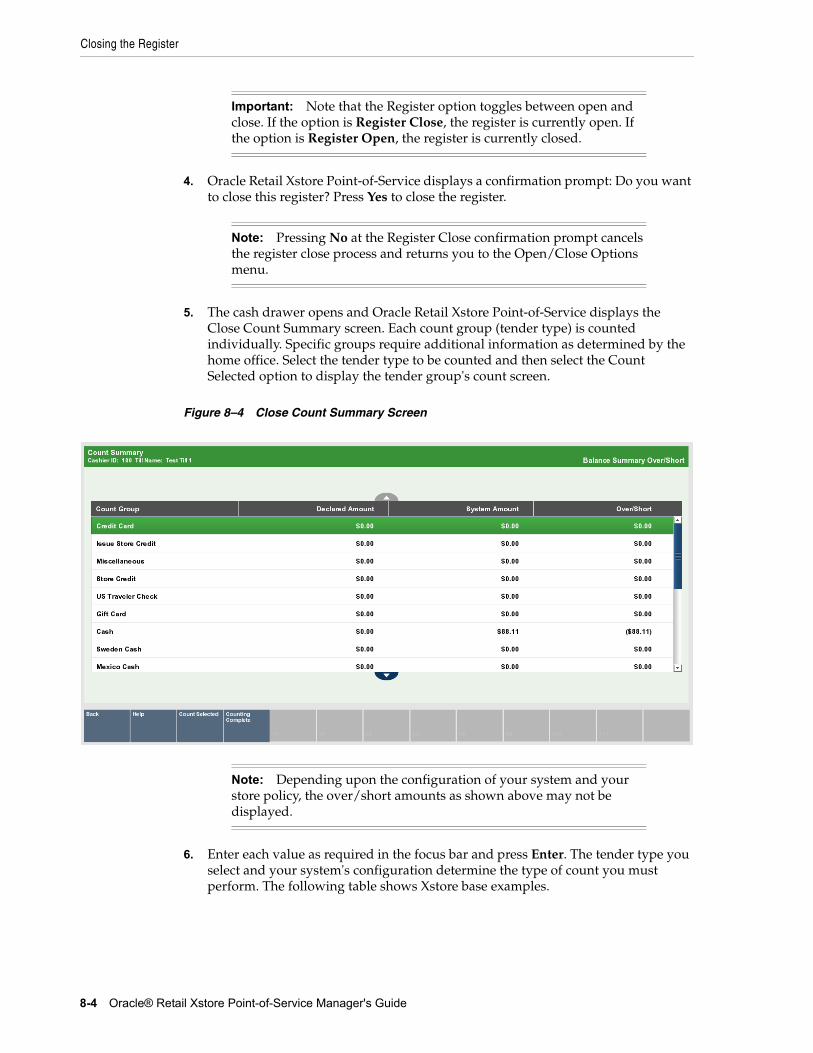
Closing the Register
8-4 Oracle® Retail Xstore Point-of-Service Manager's Guide
4. Oracle Retail Xstore Point-of-Service displays a confirmation prompt: Do you want to close this register? Press Yes to close the register.
5. The cash drawer opens and Oracle Retail Xstore Point-of-Service displays the Close Count Summary screen. Each count group (tender type) is counted individually. Specific groups require additional information as determined by the home office. Select the tender type to be counted and then select the Count Selected option to display the tender group's count screen.
Figure 8–4 Close Count Summary Screen
6. Enter each value as required in the focus bar and press Enter. The tender type you select and your system's configuration determine the type of count you must perform. The following table shows Xstore base examples.
Important: Note that the Register option toggles between open and close. If the option is Register Close, the register is currently open. If the option is Register Open, the register is currently closed.
Note: Pressing No at the Register Close confirmation prompt cancels the register close process and returns you to the Open/Close Options menu.
Note: Depending upon the configuration of your system and your store policy, the over/short amounts as shown above may not be displayed.
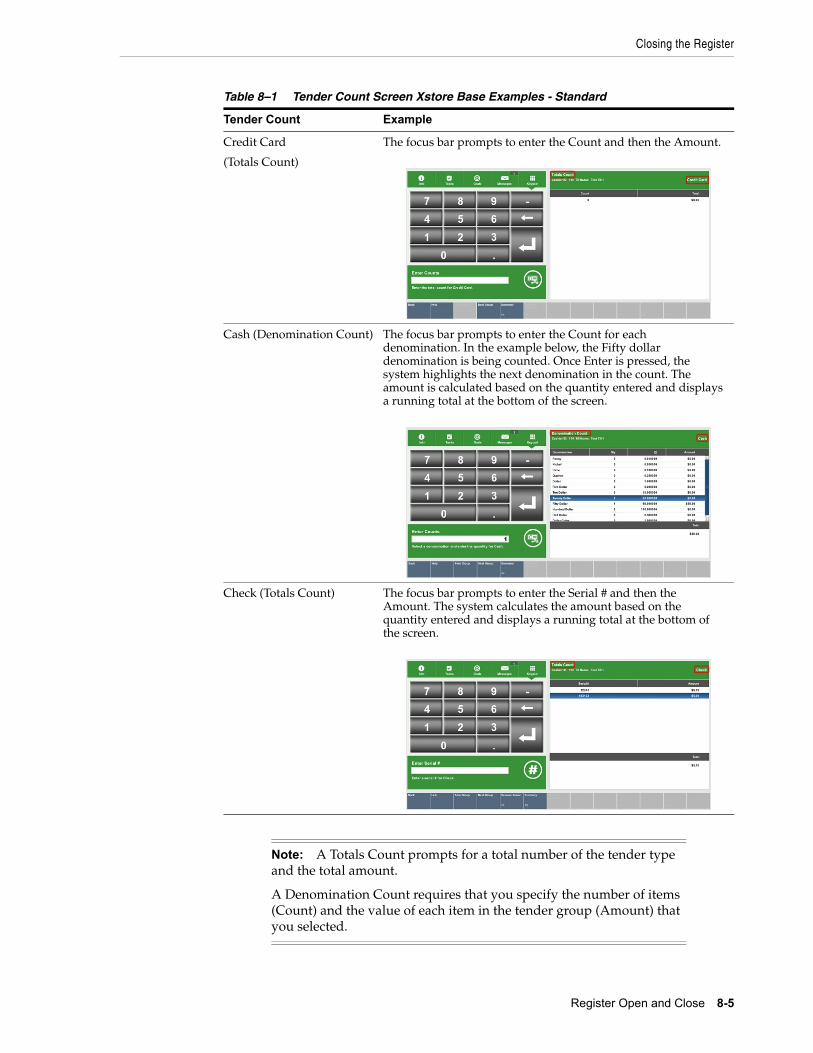
Closing the Register
Register Open and Close 8-5
Table 8–1 Tender Count Screen Xstore Base Examples - Standard
Tender Count Example
Credit Card
(Totals Count)
The focus bar prompts to enter the Count and then the Amount.
Cash (Denomination Count) The focus bar prompts to enter the Count for each denomination. In the example below, the Fifty dollar denomination is being counted. Once Enter is pressed, the system highlights the next denomination in the count. The amount is calculated based on the quantity entered and displays a running total at the bottom of the screen.
Check (Totals Count) The focus bar prompts to enter the Serial # and then the Amount. The system calculates the amount based on the quantity entered and displays a running total at the bottom of the screen.
Note: A Totals Count prompts for a total number of the tender type and the total amount.
A Denomination Count requires that you specify the number of items (Count) and the value of each item in the tender group (Amount) that you selected.
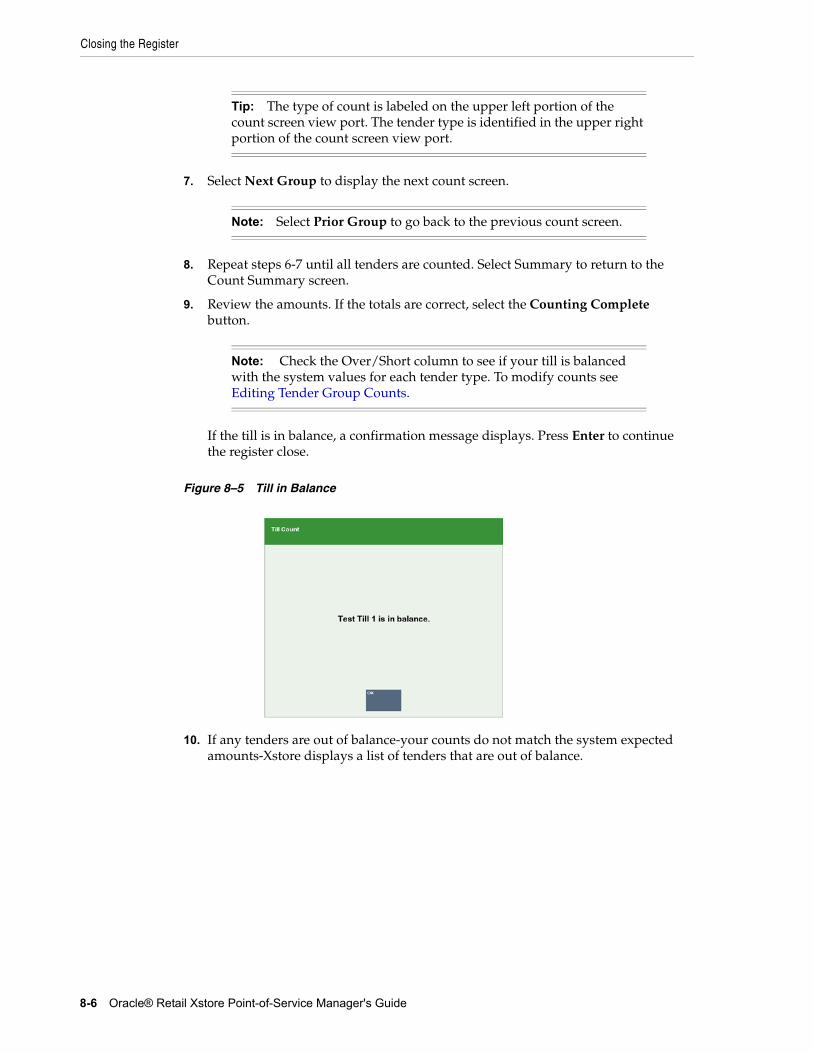
Closing the Register
8-6 Oracle® Retail Xstore Point-of-Service Manager's Guide
7. Select Next Group to display the next count screen.
8. Repeat steps 6-7 until all tenders are counted. Select Summary to return to the Count Summary screen.
9. Review the amounts. If the totals are correct, select the Counting Complete button.
If the till is in balance, a confirmation message displays. Press Enter to continue the register close.
Figure 8–5 Till in Balance
10. If any tenders are out of balance-your counts do not match the system expected amounts-Xstore displays a list of tenders that are out of balance.
Tip: The type of count is labeled on the upper left portion of the count screen view port. The tender type is identified in the upper right portion of the count screen view port.
Note: Select Prior Group to go back to the previous count screen.
Note: Check the Over/Short column to see if your till is balanced with the system values for each tender type. To modify counts see Editing Tender Group Counts.
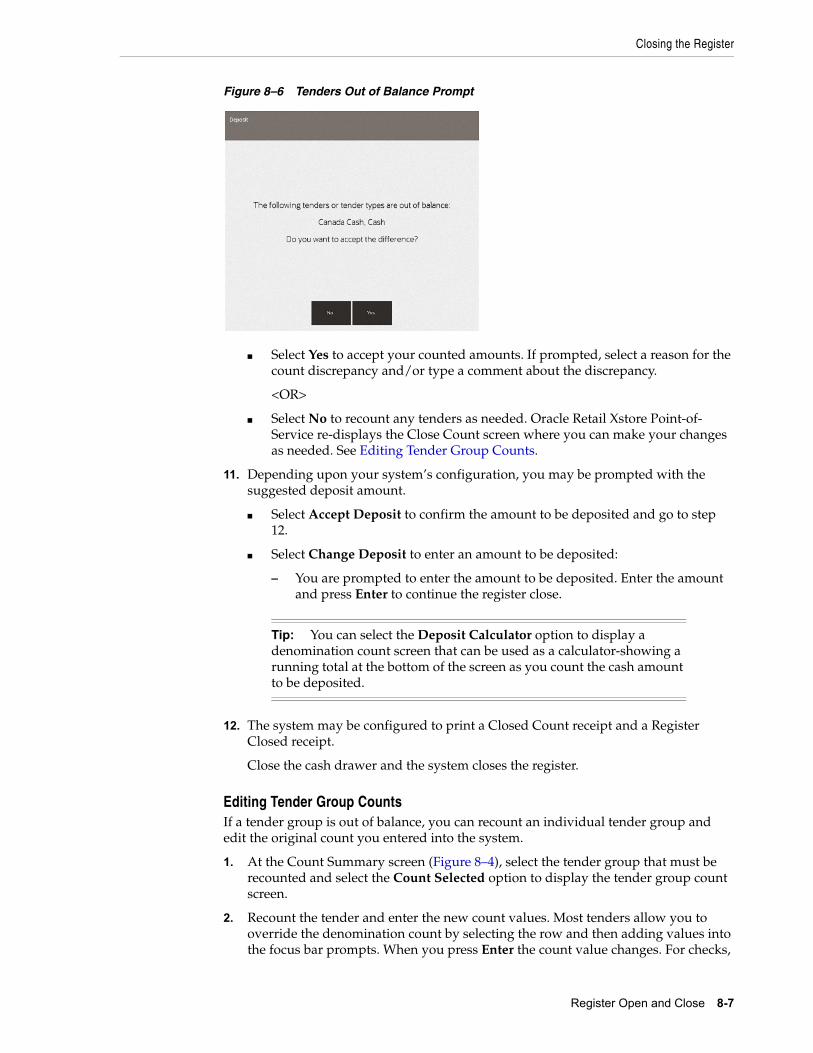
Closing the Register
Register Open and Close 8-7
Figure 8–6 Tenders Out of Balance Prompt
■ Select Yes to accept your counted amounts. If prompted, select a reason for the count discrepancy and/or type a comment about the discrepancy.
<OR>
■ Select No to recount any tenders as needed. Oracle Retail Xstore Point-of- Service re-displays the Close Count screen where you can make your changes as needed. See Editing Tender Group Counts.
11. Depending upon your system’s configuration, you may be prompted with the suggested deposit amount.
■ Select Accept Deposit to confirm the amount to be deposited and go to step 12.
■ Select Change Deposit to enter an amount to be deposited:
– You are prompted to enter the amount to be deposited. Enter the amount and press Enter to continue the register close.
12. The system may be configured to print a Closed Count receipt and a Register Closed receipt.
Close the cash drawer and the system closes the register.
Editing Tender Group CountsIf a tender group is out of balance, you can recount an individual tender group and edit the original count you entered into the system.
1. At the Count Summary screen (Figure 8–4), select the tender group that must be recounted and select the Count Selected option to display the tender group count screen.
2. Recount the tender and enter the new count values. Most tenders allow you to override the denomination count by selecting the row and then adding values into the focus bar prompts. When you press Enter the count value changes. For checks,
Tip: You can select the Deposit Calculator option to display a denomination count screen that can be used as a calculator-showing a running total at the bottom of the screen as you count the cash amount to be deposited.

Closing the Register
8-8 Oracle® Retail Xstore Point-of-Service Manager's Guide
however, you must select the Remove Count button to delete the row and then re- enter the Serial # and Amount.
Figure 8–7 Remove Count Option
3. Select the Summary option to view the changes and return to the Tender Group Summary screen.
4. Repeat steps 1-3 for each tender group that is not balanced. When you have completed editing the tender groups, select the Counting Complete option. If there are tender groups that are still out of balance, a screen displays prompting whether you want to recount the tenders or accept the count and continue with the register close process.
5. Depending upon your system’s configuration, you may be prompted with the suggested deposit amount. See step 10 to complete the register close process.
Cash Drawer CloseIf your system is configured to use networked cash drawers, closing the register is done by closing the cash drawer.
You must remove the till before closing the cash drawer. See Removing a Cash Drawer Till for more information.
To close the cash drawer:
1. In the Back Office menu, select Open/Close Options.
Figure 8–8 Open/Close Options - Register Close

Closing the Register
Register Open and Close 8-9
2. Select Cash Drawer Close. A list of open cash drawers displays.
3. Select the drawer to close.
4. Select OK. A confirmation prompt opens.
5. Select Yes.
6. The physical cash drawer opens and Oracle Retail Xstore Point-of-Service displays the Close Count Summary screen. Each count group (tender type) is counted individually. Specific groups require additional information as determined by the home office. Select the tender type to be counted and then select the Count Selected option to display the tender group's count screen.
Figure 8–9 Close Count Summary Screen
7. Enter each value as required in the focus bar and press Enter. The tender type you select and your system's configuration determine the type of count you must perform. The following table shows Xstore base examples.
Note: Depending upon the configuration of your system and your store policy, the over/short amounts as shown above may not be displayed.
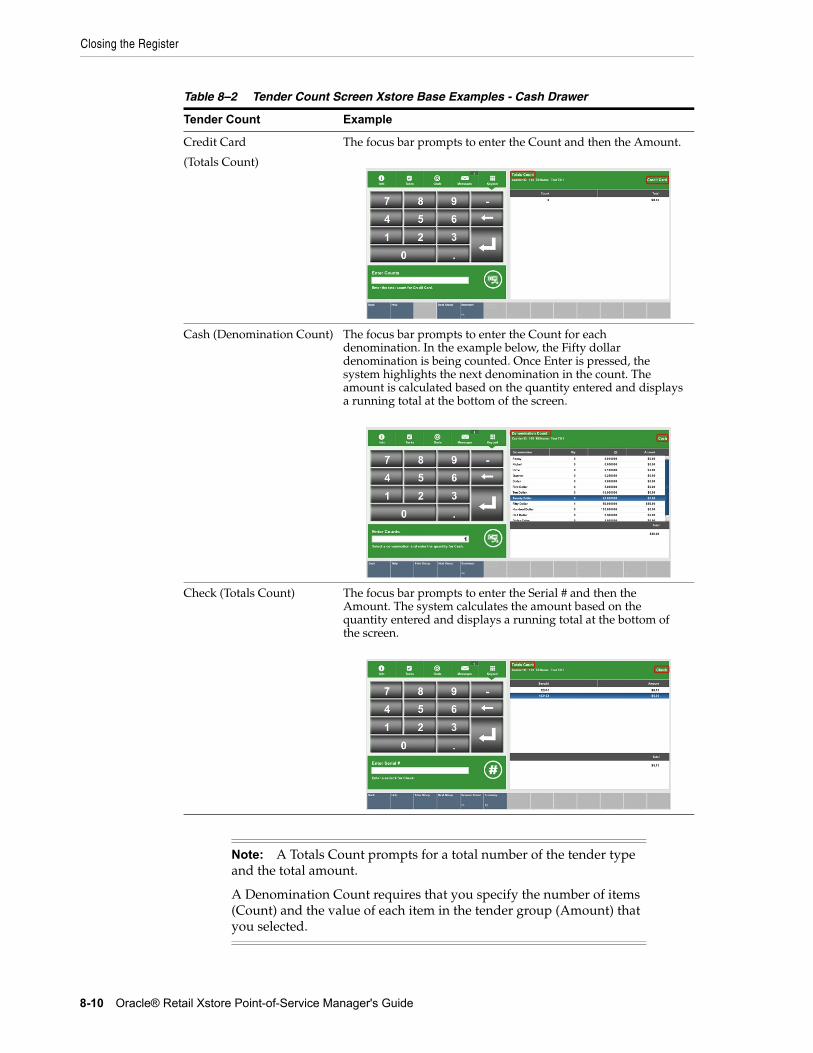
Closing the Register
8-10 Oracle® Retail Xstore Point-of-Service Manager's Guide
Table 8–2 Tender Count Screen Xstore Base Examples - Cash Drawer
Tender Count Example
Credit Card
(Totals Count)
The focus bar prompts to enter the Count and then the Amount.
Cash (Denomination Count) The focus bar prompts to enter the Count for each denomination. In the example below, the Fifty dollar denomination is being counted. Once Enter is pressed, the system highlights the next denomination in the count. The amount is calculated based on the quantity entered and displays a running total at the bottom of the screen.
Check (Totals Count) The focus bar prompts to enter the Serial # and then the Amount. The system calculates the amount based on the quantity entered and displays a running total at the bottom of the screen.
Note: A Totals Count prompts for a total number of the tender type and the total amount.
A Denomination Count requires that you specify the number of items (Count) and the value of each item in the tender group (Amount) that you selected.
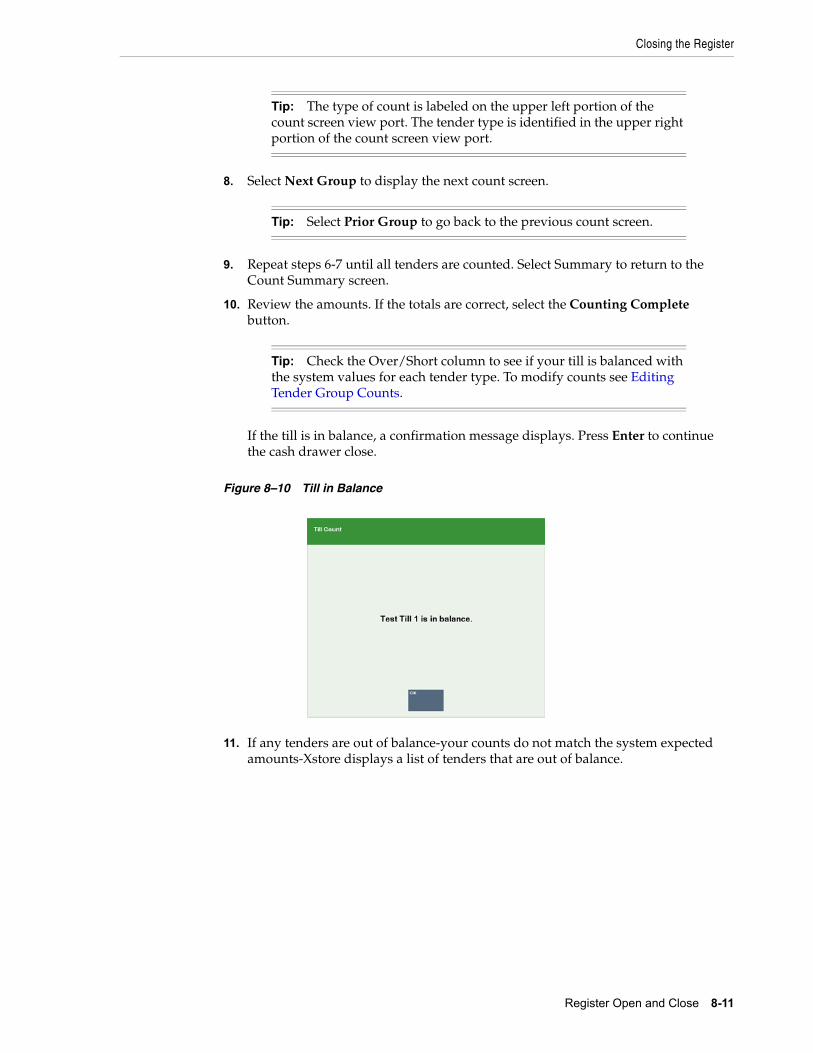
Closing the Register
Register Open and Close 8-11
8. Select Next Group to display the next count screen.
9. Repeat steps 6-7 until all tenders are counted. Select Summary to return to the Count Summary screen.
10. Review the amounts. If the totals are correct, select the Counting Complete button.
If the till is in balance, a confirmation message displays. Press Enter to continue the cash drawer close.
Figure 8–10 Till in Balance
11. If any tenders are out of balance-your counts do not match the system expected amounts-Xstore displays a list of tenders that are out of balance.
Tip: The type of count is labeled on the upper left portion of the count screen view port. The tender type is identified in the upper right portion of the count screen view port.
Tip: Select Prior Group to go back to the previous count screen.
Tip: Check the Over/Short column to see if your till is balanced with the system values for each tender type. To modify counts see Editing Tender Group Counts.
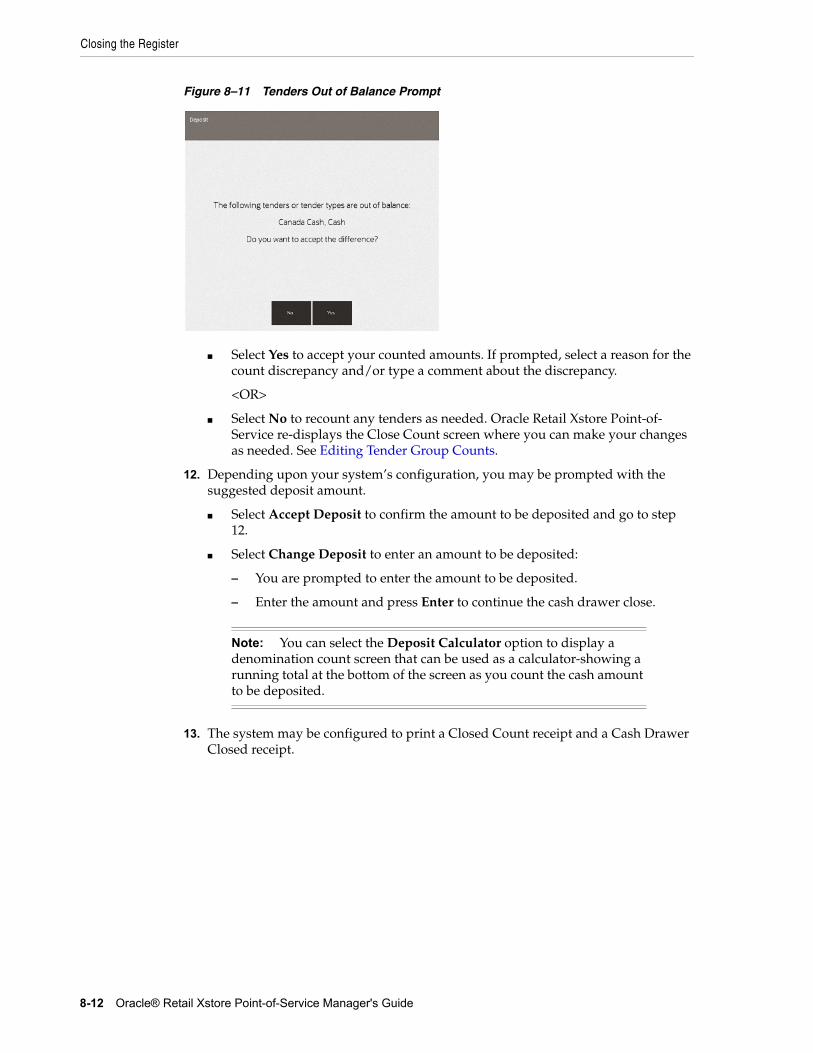
Closing the Register
8-12 Oracle® Retail Xstore Point-of-Service Manager's Guide
Figure 8–11 Tenders Out of Balance Prompt
■ Select Yes to accept your counted amounts. If prompted, select a reason for the count discrepancy and/or type a comment about the discrepancy.
<OR>
■ Select No to recount any tenders as needed. Oracle Retail Xstore Point-of- Service re-displays the Close Count screen where you can make your changes as needed. See Editing Tender Group Counts.
12. Depending upon your system’s configuration, you may be prompted with the suggested deposit amount.
■ Select Accept Deposit to confirm the amount to be deposited and go to step 12.
■ Select Change Deposit to enter an amount to be deposited:
– You are prompted to enter the amount to be deposited.
– Enter the amount and press Enter to continue the cash drawer close.
13. The system may be configured to print a Closed Count receipt and a Cash Drawer Closed receipt.
Note: You can select the Deposit Calculator option to display a denomination count screen that can be used as a calculator-showing a running total at the bottom of the screen as you count the cash amount to be deposited.
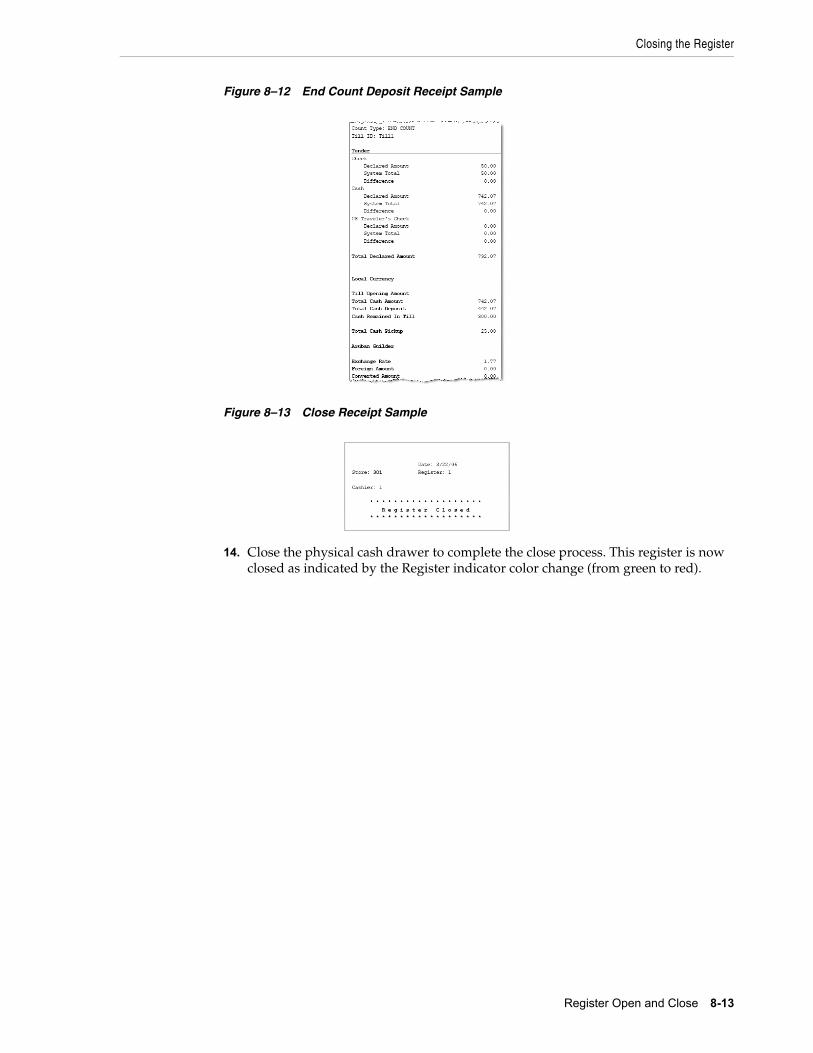
Closing the Register
Register Open and Close 8-13
Figure 8–12 End Count Deposit Receipt Sample
Figure 8–13 Close Receipt Sample
14. Close the physical cash drawer to complete the close process. This register is now closed as indicated by the Register indicator color change (from green to red).
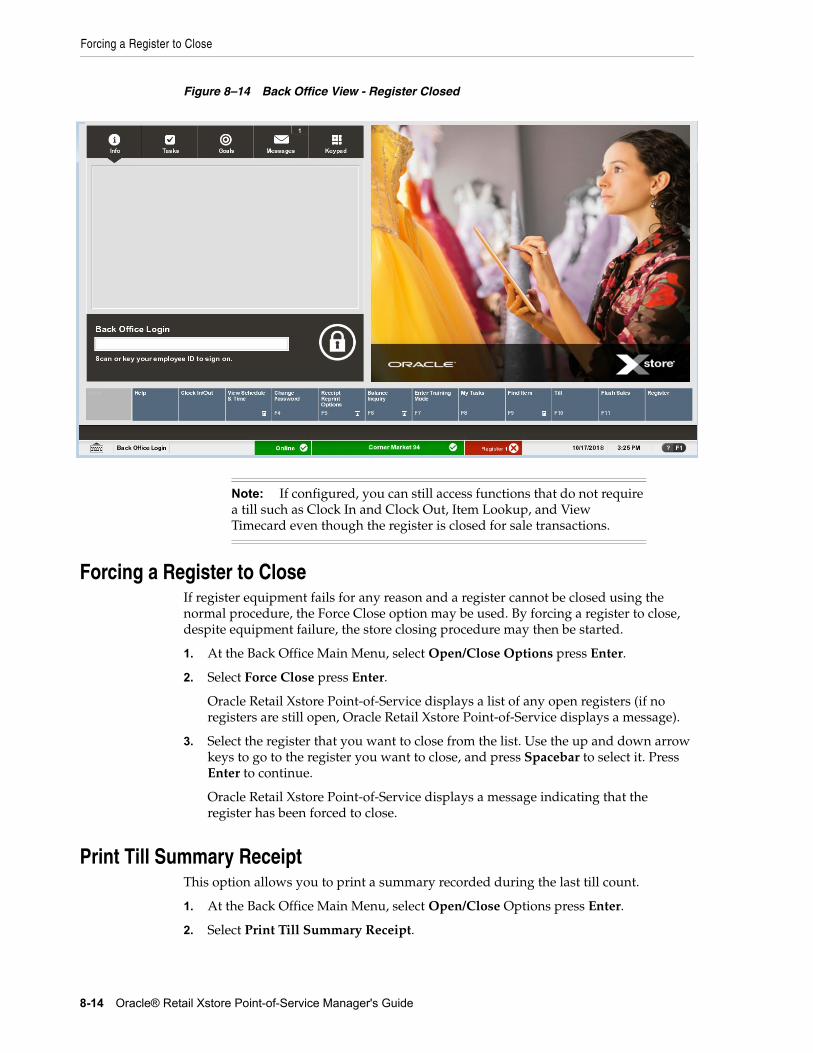
Forcing a Register to Close
8-14 Oracle® Retail Xstore Point-of-Service Manager's Guide
Figure 8–14 Back Office View - Register Closed
Forcing a Register to CloseIf register equipment fails for any reason and a register cannot be closed using the normal procedure, the Force Close option may be used. By forcing a register to close, despite equipment failure, the store closing procedure may then be started.
1. At the Back Office Main Menu, select Open/Close Options press Enter.
2. Select Force Close press Enter.
Oracle Retail Xstore Point-of-Service displays a list of any open registers (if no registers are still open, Oracle Retail Xstore Point-of-Service displays a message).
3. Select the register that you want to close from the list. Use the up and down arrow keys to go to the register you want to close, and press Spacebar to select it. Press Enter to continue.
Oracle Retail Xstore Point-of-Service displays a message indicating that the register has been forced to close.
Print Till Summary ReceiptThis option allows you to print a summary recorded during the last till count.
1. At the Back Office Main Menu, select Open/Close Options press Enter.
2. Select Print Till Summary Receipt.
Note: If configured, you can still access functions that do not require a till such as Clock In and Clock Out, Item Lookup, and View Timecard even though the register is closed for sale transactions.
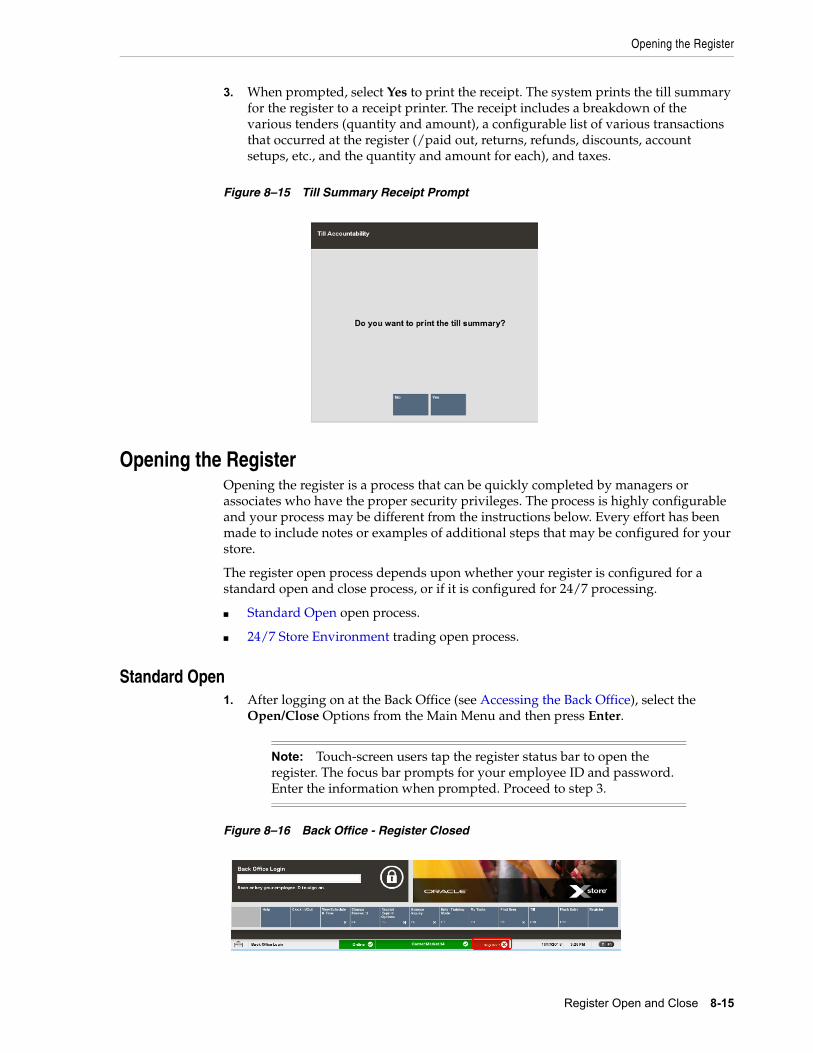
Opening the Register
Register Open and Close 8-15
3. When prompted, select Yes to print the receipt. The system prints the till summary for the register to a receipt printer. The receipt includes a breakdown of the various tenders (quantity and amount), a configurable list of various transactions that occurred at the register (/paid out, returns, refunds, discounts, account setups, etc., and the quantity and amount for each), and taxes.
Figure 8–15 Till Summary Receipt Prompt
Opening the RegisterOpening the register is a process that can be quickly completed by managers or associates who have the proper security privileges. The process is highly configurable and your process may be different from the instructions below. Every effort has been made to include notes or examples of additional steps that may be configured for your store.
The register open process depends upon whether your register is configured for a standard open and close process, or if it is configured for 24/7 processing.
■ Standard Open open process.
■ 24/7 Store Environment trading open process.
Standard Open1. After logging on at the Back Office (see Accessing the Back Office), select the
Open/Close Options from the Main Menu and then press Enter.
Figure 8–16 Back Office - Register Closed
Note: Touch-screen users tap the register status bar to open the register. The focus bar prompts for your employee ID and password. Enter the information when prompted. Proceed to step 3.
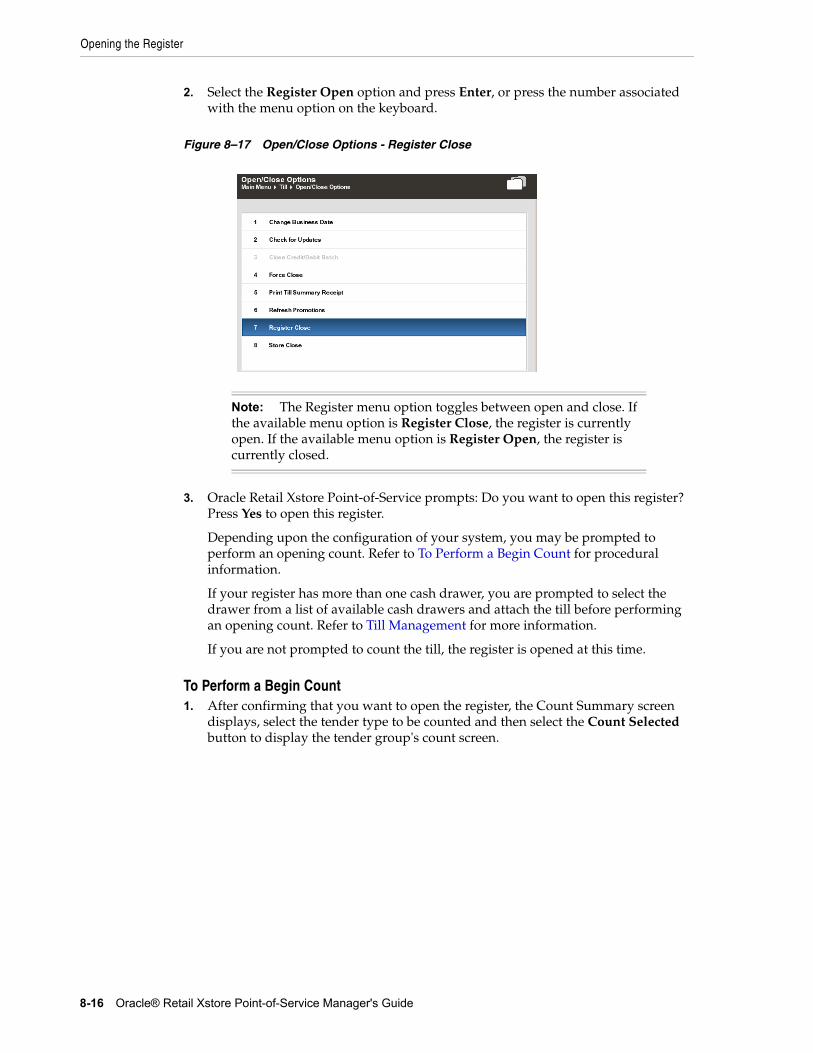
Opening the Register
8-16 Oracle® Retail Xstore Point-of-Service Manager's Guide
2. Select the Register Open option and press Enter, or press the number associated with the menu option on the keyboard.
Figure 8–17 Open/Close Options - Register Close
3. Oracle Retail Xstore Point-of-Service prompts: Do you want to open this register? Press Yes to open this register.
Depending upon the configuration of your system, you may be prompted to perform an opening count. Refer to To Perform a Begin Count for procedural information.
If your register has more than one cash drawer, you are prompted to select the drawer from a list of available cash drawers and attach the till before performing an opening count. Refer to Till Management for more information.
If you are not prompted to count the till, the register is opened at this time.
To Perform a Begin Count1. After confirming that you want to open the register, the Count Summary screen
displays, select the tender type to be counted and then select the Count Selected button to display the tender group's count screen.
Note: The Register menu option toggles between open and close. If the available menu option is Register Close, the register is currently open. If the available menu option is Register Open, the register is currently closed.
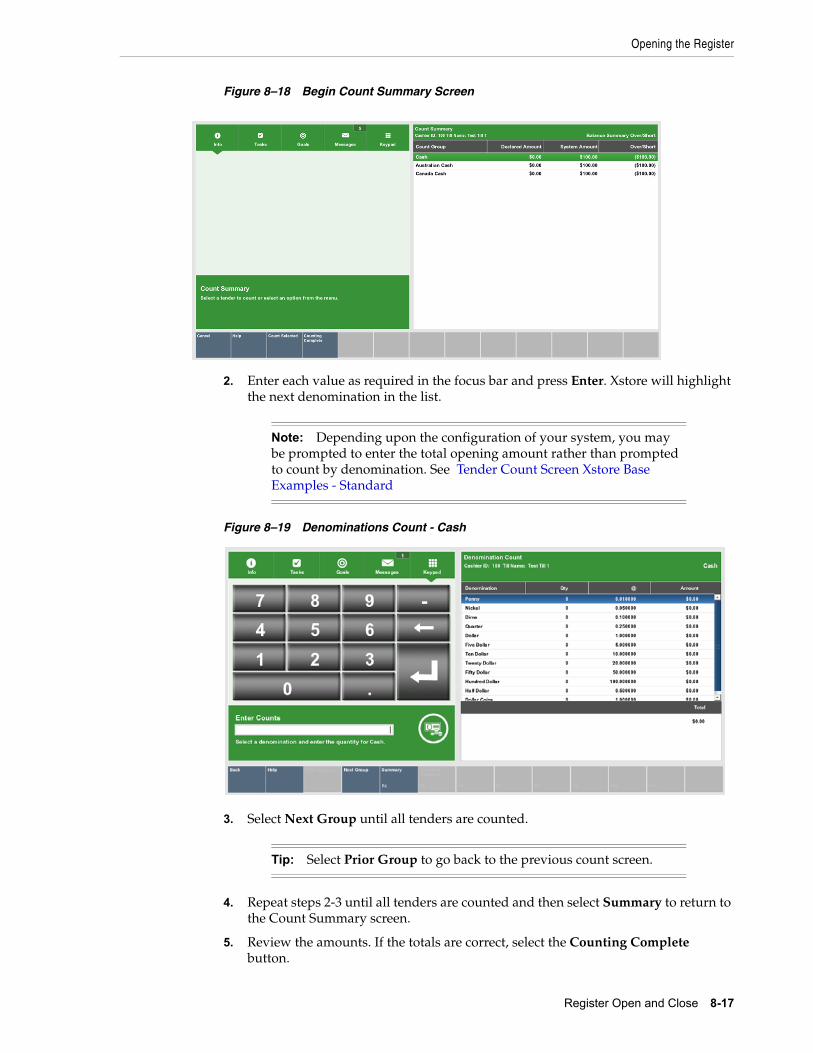
Opening the Register
Register Open and Close 8-17
Figure 8–18 Begin Count Summary Screen
2. Enter each value as required in the focus bar and press Enter. Xstore will highlight the next denomination in the list.
Figure 8–19 Denominations Count - Cash
3. Select Next Group until all tenders are counted.
4. Repeat steps 2-3 until all tenders are counted and then select Summary to return to the Count Summary screen.
5. Review the amounts. If the totals are correct, select the Counting Complete button.
Note: Depending upon the configuration of your system, you may be prompted to enter the total opening amount rather than prompted to count by denomination. See Tender Count Screen Xstore Base Examples - Standard
Tip: Select Prior Group to go back to the previous count screen.
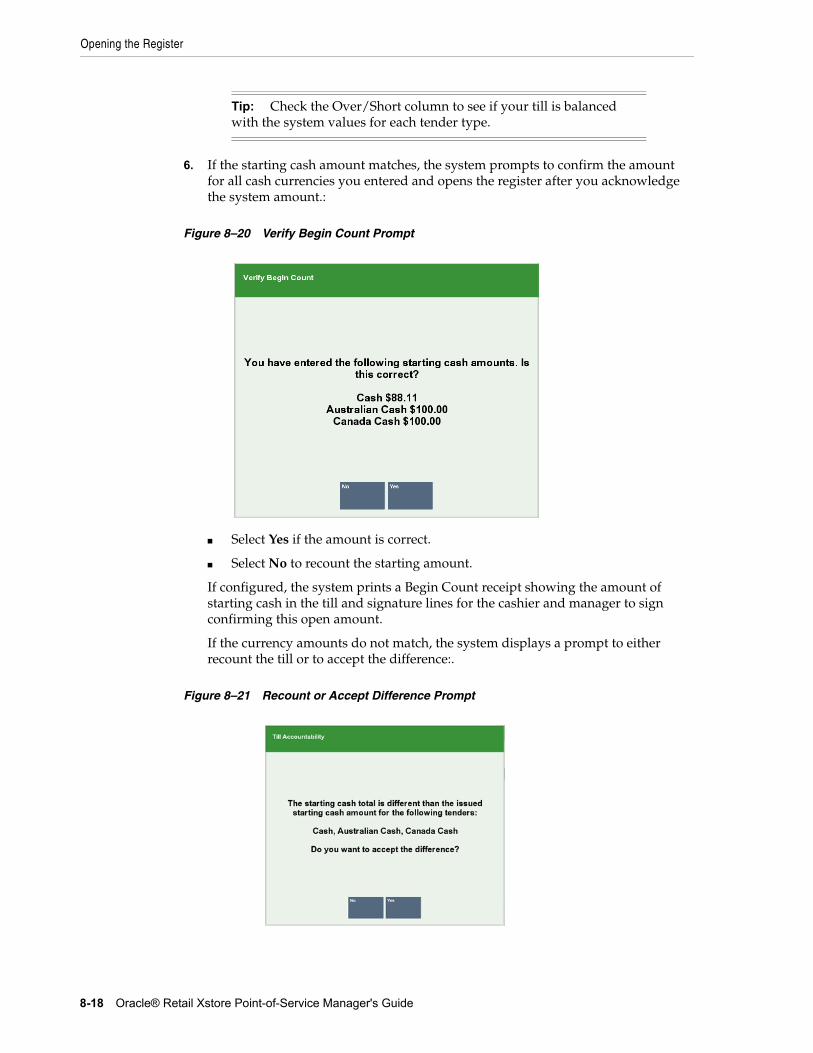
Opening the Register
8-18 Oracle® Retail Xstore Point-of-Service Manager's Guide
6. If the starting cash amount matches, the system prompts to confirm the amount for all cash currencies you entered and opens the register after you acknowledge the system amount.:
Figure 8–20 Verify Begin Count Prompt
■ Select Yes if the amount is correct.
■ Select No to recount the starting amount.
If configured, the system prints a Begin Count receipt showing the amount of starting cash in the till and signature lines for the cashier and manager to sign confirming this open amount.
If the currency amounts do not match, the system displays a prompt to either recount the till or to accept the difference:.
Figure 8–21 Recount or Accept Difference Prompt
Tip: Check the Over/Short column to see if your till is balanced with the system values for each tender type.
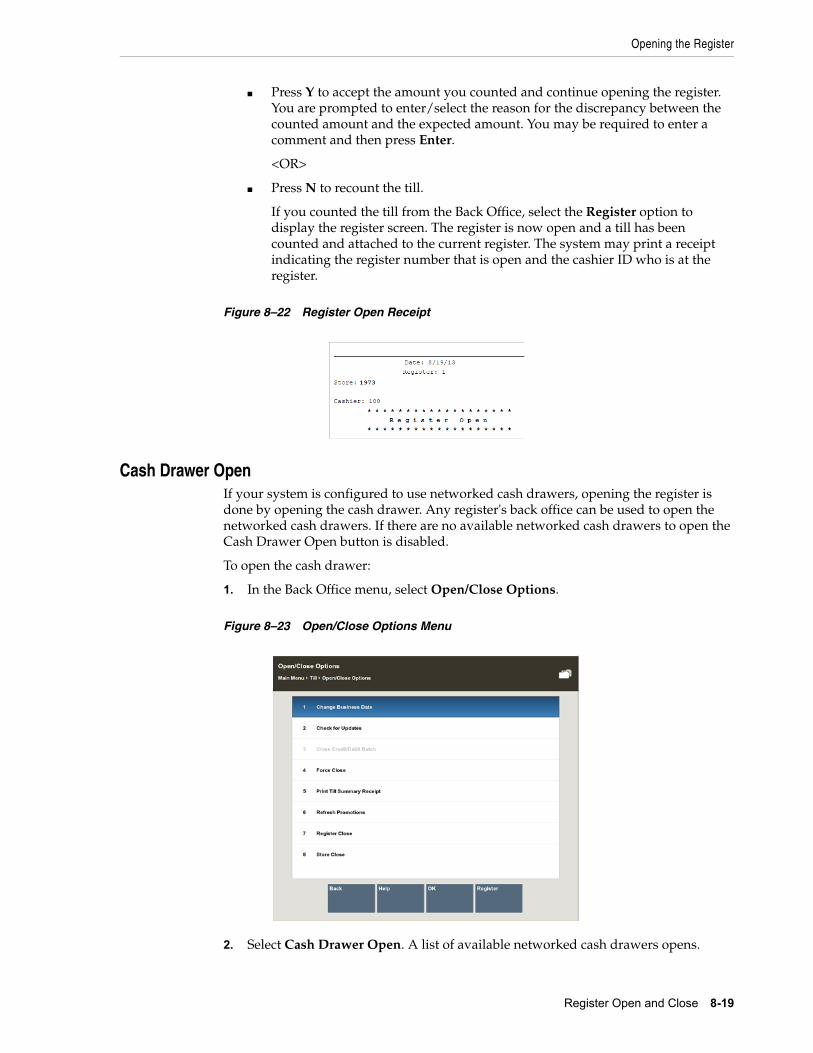
Opening the Register
Register Open and Close 8-19
■ Press Y to accept the amount you counted and continue opening the register. You are prompted to enter/select the reason for the discrepancy between the counted amount and the expected amount. You may be required to enter a comment and then press Enter.
<OR>
■ Press N to recount the till.
If you counted the till from the Back Office, select the Register option to display the register screen. The register is now open and a till has been counted and attached to the current register. The system may print a receipt indicating the register number that is open and the cashier ID who is at the register.
Figure 8–22 Register Open Receipt
Cash Drawer OpenIf your system is configured to use networked cash drawers, opening the register is done by opening the cash drawer. Any register's back office can be used to open the networked cash drawers. If there are no available networked cash drawers to open the Cash Drawer Open button is disabled.
To open the cash drawer:
1. In the Back Office menu, select Open/Close Options.
Figure 8–23 Open/Close Options Menu
2. Select Cash Drawer Open. A list of available networked cash drawers opens.
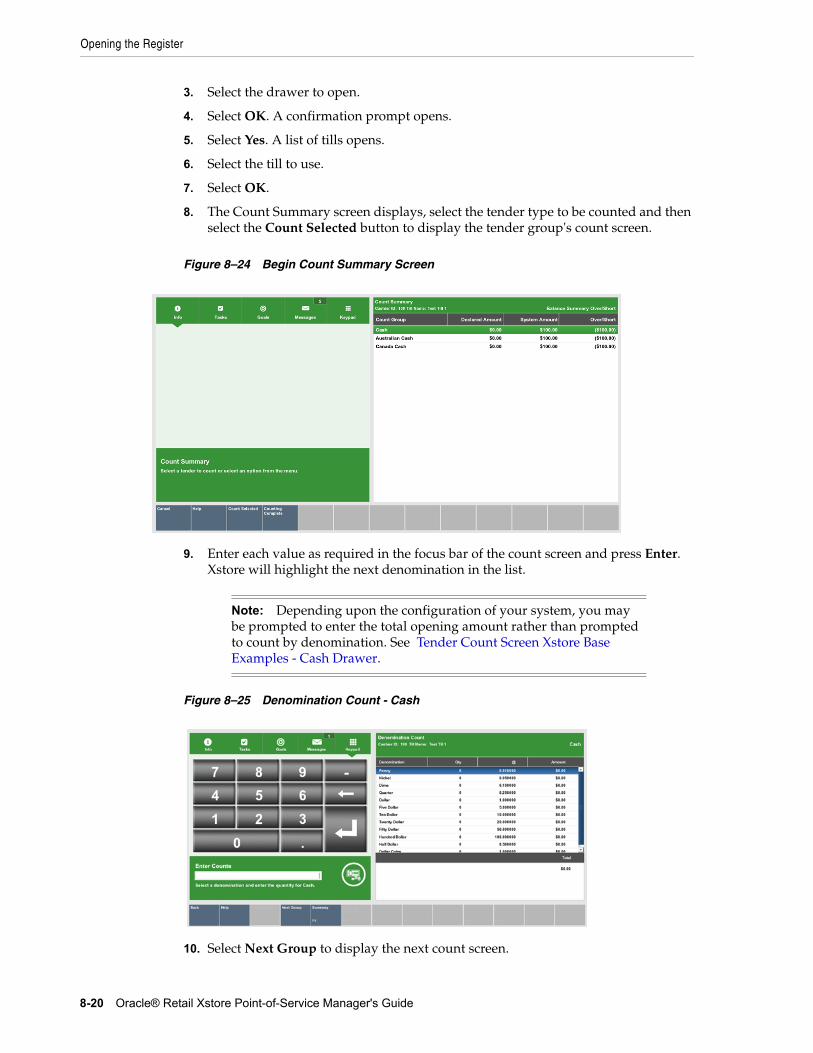
Opening the Register
8-20 Oracle® Retail Xstore Point-of-Service Manager's Guide
3. Select the drawer to open.
4. Select OK. A confirmation prompt opens.
5. Select Yes. A list of tills opens.
6. Select the till to use.
7. Select OK.
8. The Count Summary screen displays, select the tender type to be counted and then select the Count Selected button to display the tender group's count screen.
Figure 8–24 Begin Count Summary Screen
9. Enter each value as required in the focus bar of the count screen and press Enter. Xstore will highlight the next denomination in the list.
Figure 8–25 Denomination Count - Cash
10. Select Next Group to display the next count screen.
Note: Depending upon the configuration of your system, you may be prompted to enter the total opening amount rather than prompted to count by denomination. See Tender Count Screen Xstore Base Examples - Cash Drawer.
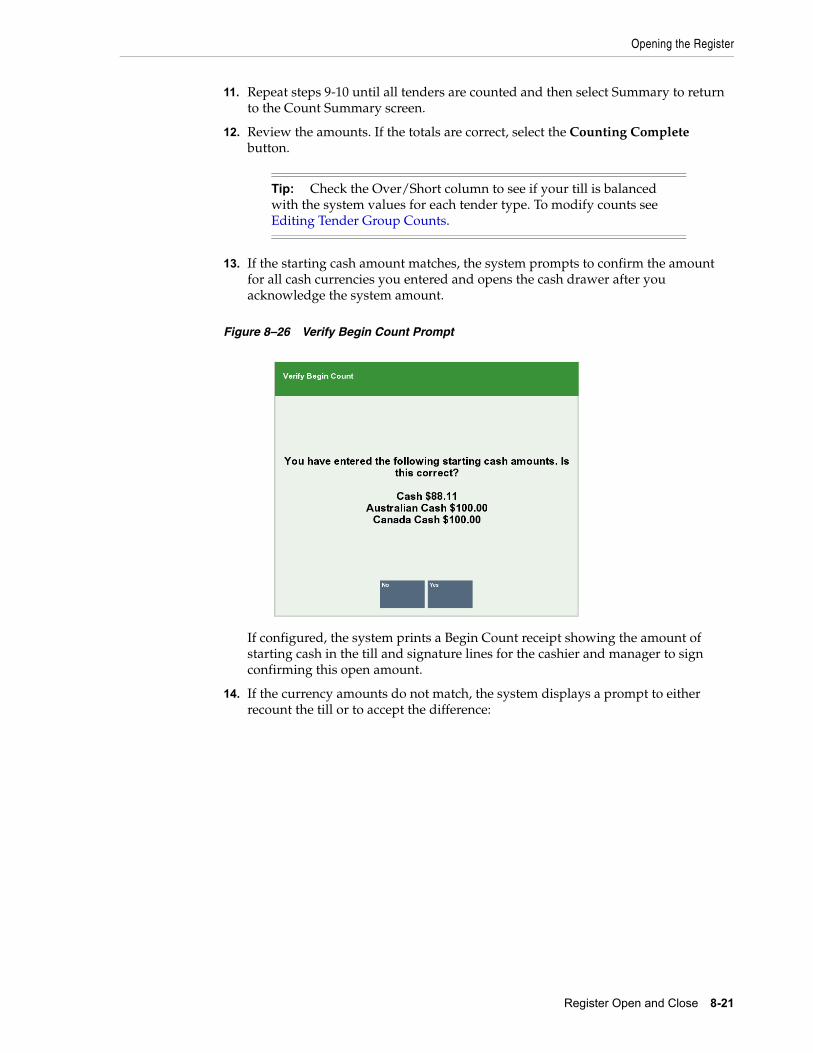
Opening the Register
Register Open and Close 8-21
11. Repeat steps 9-10 until all tenders are counted and then select Summary to return to the Count Summary screen.
12. Review the amounts. If the totals are correct, select the Counting Complete button.
13. If the starting cash amount matches, the system prompts to confirm the amount for all cash currencies you entered and opens the cash drawer after you acknowledge the system amount.
Figure 8–26 Verify Begin Count Prompt
If configured, the system prints a Begin Count receipt showing the amount of starting cash in the till and signature lines for the cashier and manager to sign confirming this open amount.
14. If the currency amounts do not match, the system displays a prompt to either recount the till or to accept the difference:
Tip: Check the Over/Short column to see if your till is balanced with the system values for each tender type. To modify counts see Editing Tender Group Counts.
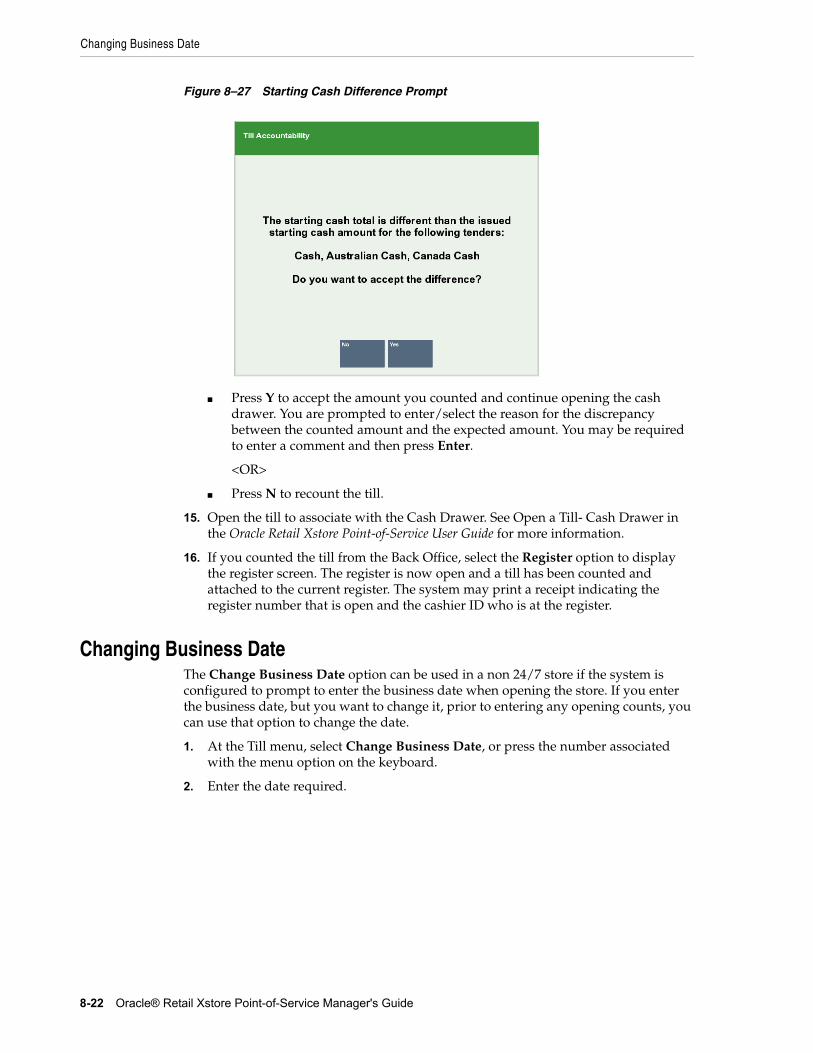
Changing Business Date
8-22 Oracle® Retail Xstore Point-of-Service Manager's Guide
Figure 8–27 Starting Cash Difference Prompt
■ Press Y to accept the amount you counted and continue opening the cash drawer. You are prompted to enter/select the reason for the discrepancy between the counted amount and the expected amount. You may be required to enter a comment and then press Enter.
<OR>
■ Press N to recount the till.
15. Open the till to associate with the Cash Drawer. See Open a Till- Cash Drawer in the Oracle Retail Xstore Point-of-Service User Guide for more information.
16. If you counted the till from the Back Office, select the Register option to display the register screen. The register is now open and a till has been counted and attached to the current register. The system may print a receipt indicating the register number that is open and the cashier ID who is at the register.
Changing Business DateThe Change Business Date option can be used in a non 24/7 store if the system is configured to prompt to enter the business date when opening the store. If you enter the business date, but you want to change it, prior to entering any opening counts, you can use that option to change the date.
1. At the Till menu, select Change Business Date, or press the number associated with the menu option on the keyboard.
2. Enter the date required.
9
Store Open and Close 9-1
9Store Open and Close
Store Close
The store is closed to lock out certain business transaction functionality. The store close process clears daily data, accepts downloads from the home office, and prepares your store to open for a new business day. The store close is divided into multiple, individual processes. Oracle Retail Xstore Point of Service guides you through each step in the process.
Store Open
The store open process opens the store for the new business day. The store is opened to allow business transactions in the system. The store open process begins when an associate signs on for the first time after a store close is finished. Oracle Retail Xstore Point of Service guides you through each step in the process.
This chapter covers the following topics:
■ Closing the Store
■ Opening the Store
■ Calling the Update Service
■ Manually Refresh Promotions
Closing the StorePrerequisites: To begin the store close, all of the tills and registers must be closed for the business date and all associates should be signed off, except for the closing associate and the till open for that register. The store bank must be counted and reconciled.
The store close function is highly configurable and your process may be different from the instructions below. Every effort has been made to include notes or examples of additional steps that may be configured for your store.
1. After logging into the Back Office, (see Accessing the Back Office), select the Open/Close Options menu option and press Enter.
Note: If your store has a lead register where the database is hosted, the lead register must be the last register closed. If you attempt to close the lead register before all other registers are closed, the system prompts you to close the other registers before closing the lead register.
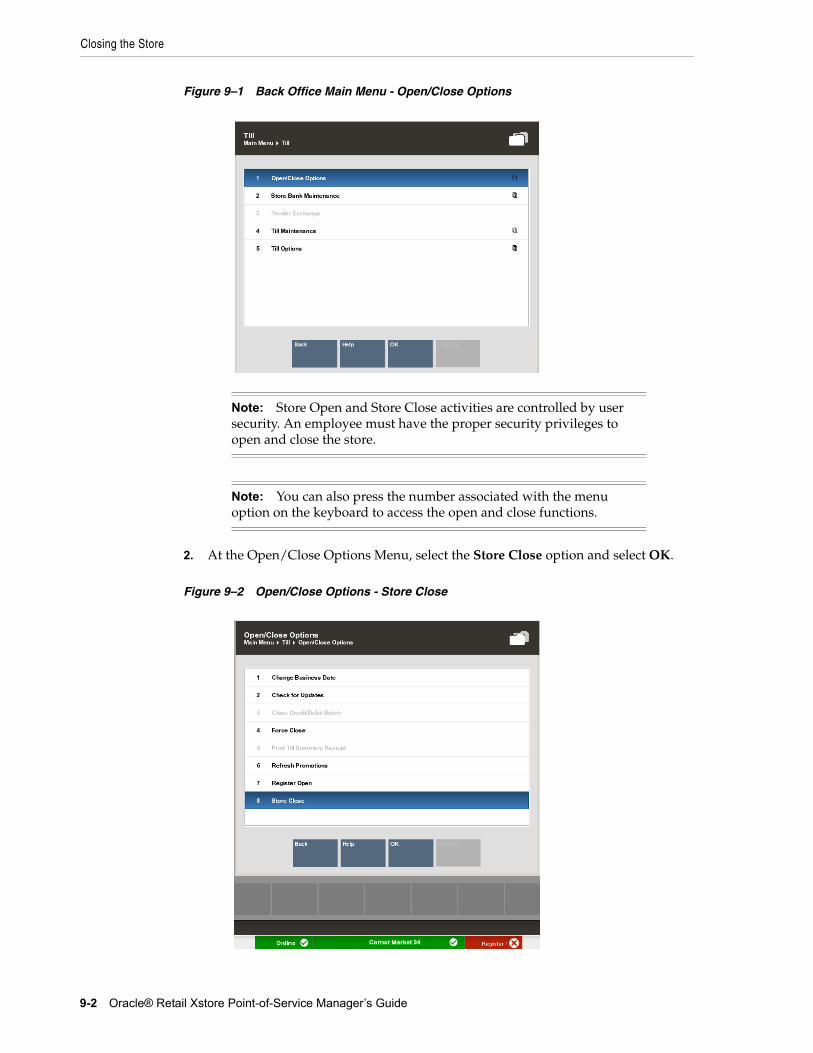
Closing the Store
9-2 Oracle® Retail Xstore Point-of-Service Manager’s Guide
Figure 9–1 Back Office Main Menu - Open/Close Options
2. At the Open/Close Options Menu, select the Store Close option and select OK.
Figure 9–2 Open/Close Options - Store Close
Note: Store Open and Store Close activities are controlled by user security. An employee must have the proper security privileges to open and close the store.
Note: You can also press the number associated with the menu option on the keyboard to access the open and close functions.
Closing the Store
Store Open and Close 9-3
3. The system prompts: Do you want to close this store? Select Yes to begin the store close process.
4. Oracle Retail Xstore Point of Service verifies that all registers are closed. If any registers are still open, the system displays a list of open registers and prompts you to close each register before the store close process can continue.
Refer to chapter Register Open and Close, for more information about closing the register.
5. Oracle Retail Xstore Point of Service searches for and lists any transactions created on the current business date that were suspended and not subsequently resumed and completed or cancelled. If any suspended transactions are found, the system displays a list showing the suspended transactions.
You have the following options:
■ Press Enter (Continue) to automatically cancel all listed transactions and continue with the store close process (step 6. below).
<OR>
■ Press Esc (Back) to cancel the store close process and reconcile the suspended transactions per your store policy.
In addition, the system may also list any pending orders that require attention. The associate performing the store close can either cancel the store close process, or allow Oracle Retail Xstore Point of Service to continue with the store close. The pending orders retain the same status and are not changed in any way by this notification prompt.
6. If prompted, select the bank or institution for the bank deposit and press Enter.
7. Depending upon the configuration of your system, you may be prompted to enter a message that displays when the store is opened for the next business day. If prompted, type a message and press Enter.
Note: The Register Close and Store Close menu options toggle between open and close. In Figure 9–2 above, note that the register menu option is Register Open. This indicates that all registers are closed and you can begin closing the store. The Store Close option tells you that the store is currently open.
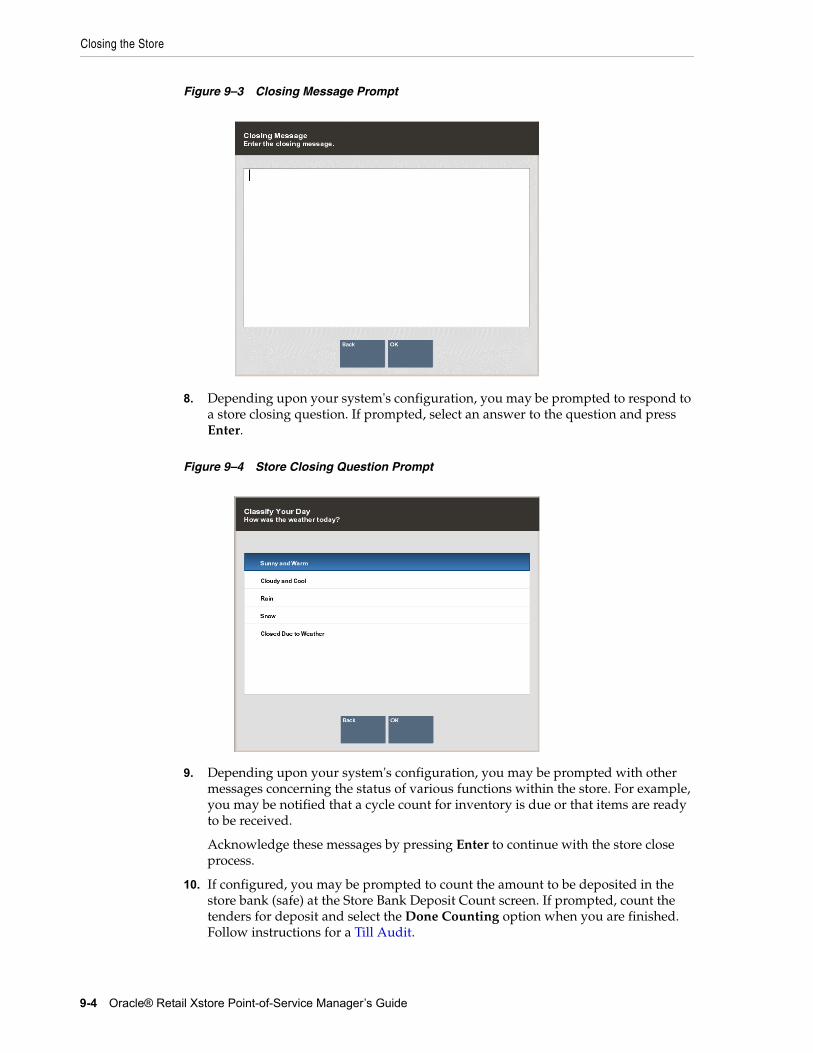
Closing the Store
9-4 Oracle® Retail Xstore Point-of-Service Manager’s Guide
Figure 9–3 Closing Message Prompt
8. Depending upon your system's configuration, you may be prompted to respond to a store closing question. If prompted, select an answer to the question and press Enter.
Figure 9–4 Store Closing Question Prompt
9. Depending upon your system's configuration, you may be prompted with other messages concerning the status of various functions within the store. For example, you may be notified that a cycle count for inventory is due or that items are ready to be received.
Acknowledge these messages by pressing Enter to continue with the store close process.
10. If configured, you may be prompted to count the amount to be deposited in the store bank (safe) at the Store Bank Deposit Count screen. If prompted, count the tenders for deposit and select the Done Counting option when you are finished. Follow instructions for a Till Audit.
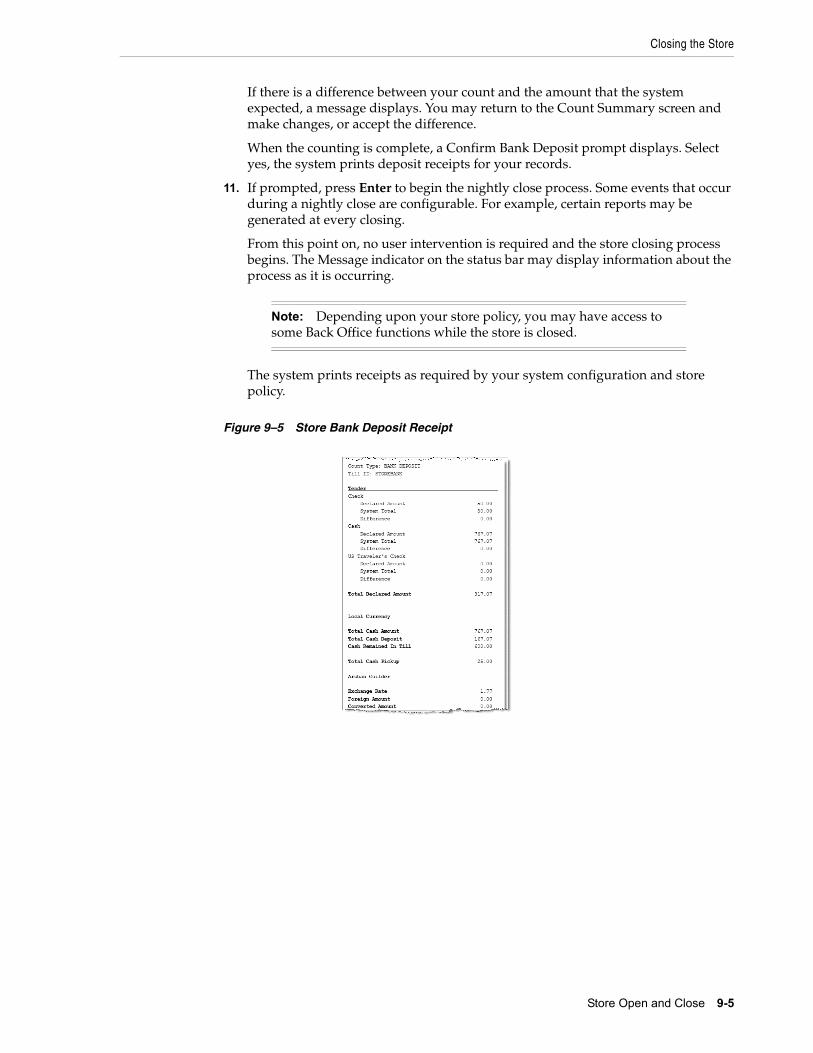
Closing the Store
Store Open and Close 9-5
If there is a difference between your count and the amount that the system expected, a message displays. You may return to the Count Summary screen and make changes, or accept the difference.
When the counting is complete, a Confirm Bank Deposit prompt displays. Select yes, the system prints deposit receipts for your records.
11. If prompted, press Enter to begin the nightly close process. Some events that occur during a nightly close are configurable. For example, certain reports may be generated at every closing.
From this point on, no user intervention is required and the store closing process begins. The Message indicator on the status bar may display information about the process as it is occurring.
The system prints receipts as required by your system configuration and store policy.
Figure 9–5 Store Bank Deposit Receipt
Note: Depending upon your store policy, you may have access to some Back Office functions while the store is closed.
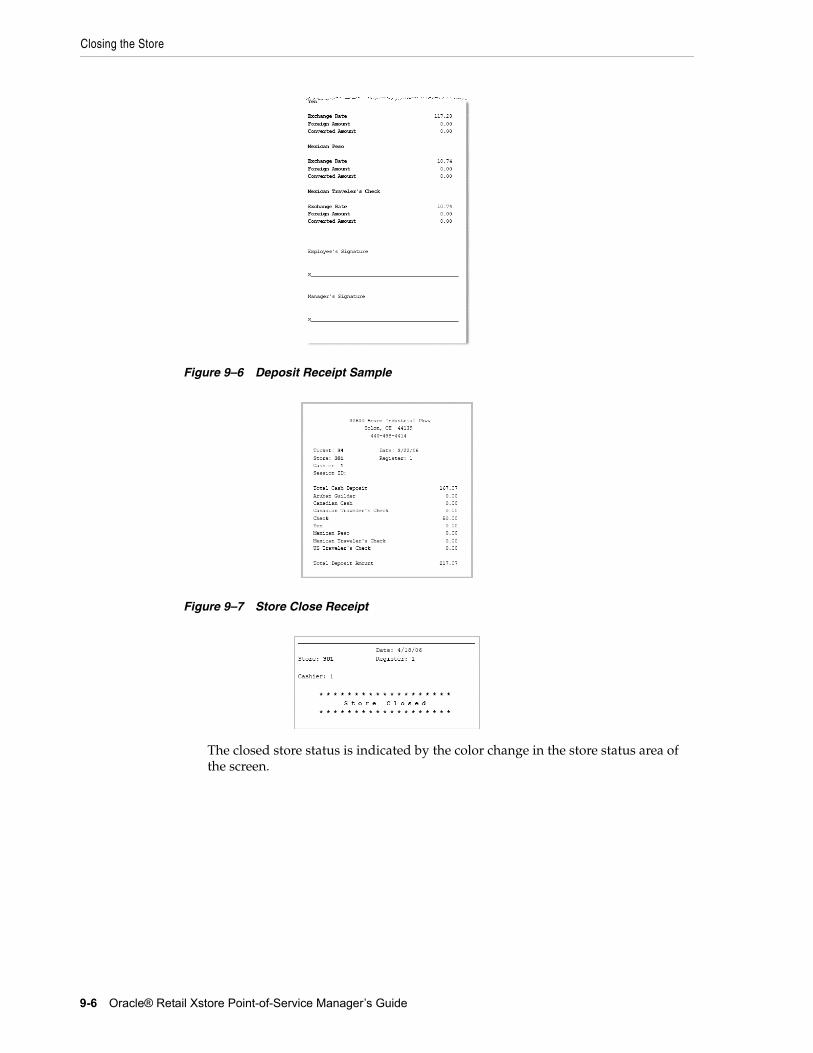
Closing the Store
9-6 Oracle® Retail Xstore Point-of-Service Manager’s Guide
Figure 9–6 Deposit Receipt Sample
Figure 9–7 Store Close Receipt
The closed store status is indicated by the color change in the store status area of the screen.
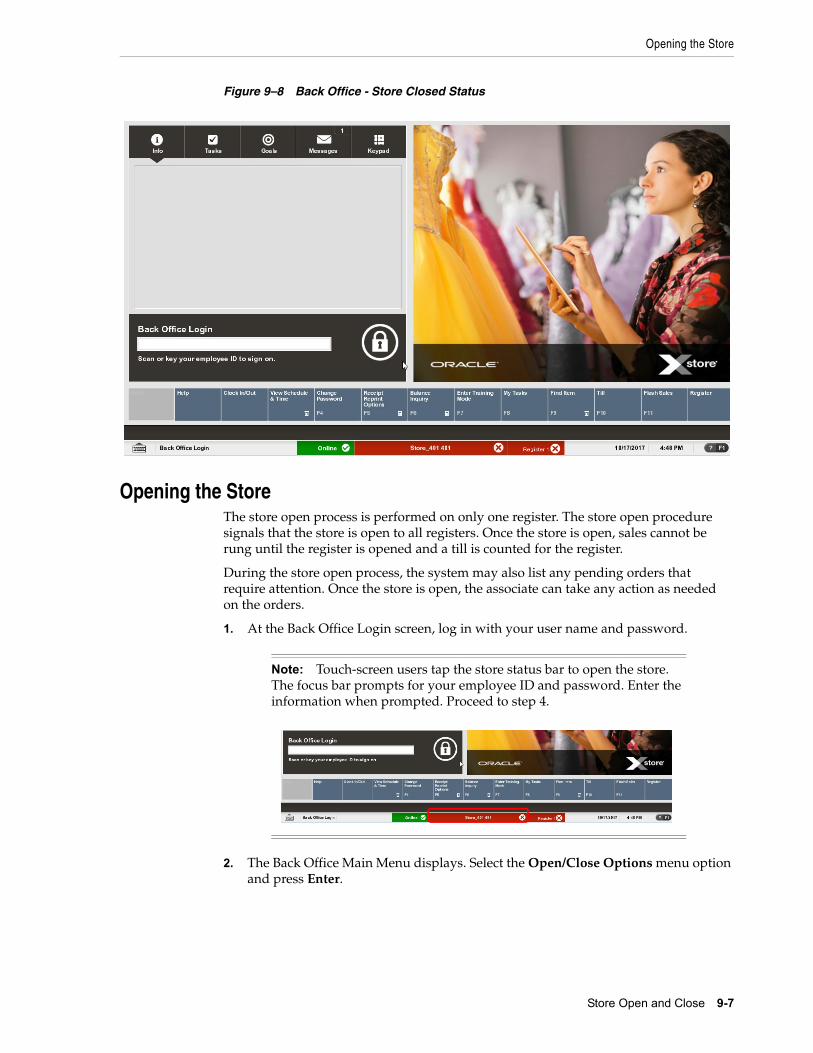
Opening the Store
Store Open and Close 9-7
Figure 9–8 Back Office - Store Closed Status
Opening the StoreThe store open process is performed on only one register. The store open procedure signals that the store is open to all registers. Once the store is open, sales cannot be rung until the register is opened and a till is counted for the register.
During the store open process, the system may also list any pending orders that require attention. Once the store is open, the associate can take any action as needed on the orders.
1. At the Back Office Login screen, log in with your user name and password.
2. The Back Office Main Menu displays. Select the Open/Close Options menu option and press Enter.
Note: Touch-screen users tap the store status bar to open the store. The focus bar prompts for your employee ID and password. Enter the information when prompted. Proceed to step 4.
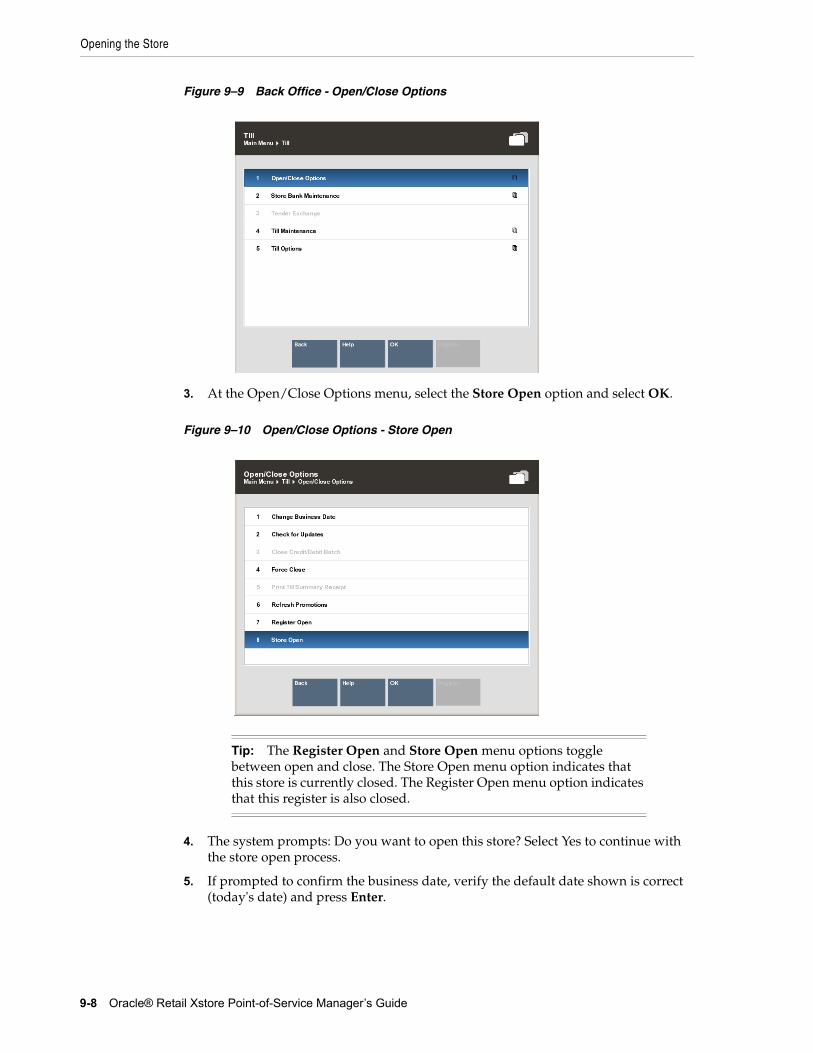
Opening the Store
9-8 Oracle® Retail Xstore Point-of-Service Manager’s Guide
Figure 9–9 Back Office - Open/Close Options
3. At the Open/Close Options menu, select the Store Open option and select OK.
Figure 9–10 Open/Close Options - Store Open
4. The system prompts: Do you want to open this store? Select Yes to continue with the store open process.
5. If prompted to confirm the business date, verify the default date shown is correct (today's date) and press Enter.
Tip: The Register Open and Store Open menu options toggle between open and close. The Store Open menu option indicates that this store is currently closed. The Register Open menu option indicates that this register is also closed.
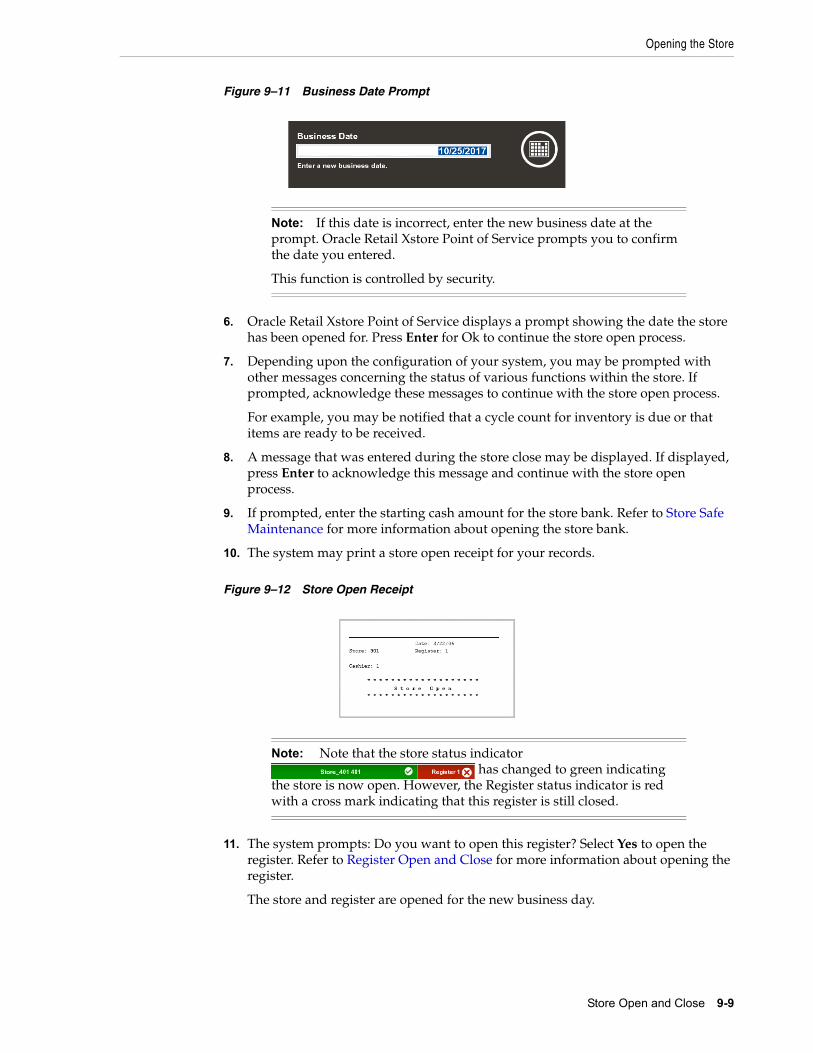
Opening the Store
Store Open and Close 9-9
Figure 9–11 Business Date Prompt
6. Oracle Retail Xstore Point of Service displays a prompt showing the date the store has been opened for. Press Enter for Ok to continue the store open process.
7. Depending upon the configuration of your system, you may be prompted with other messages concerning the status of various functions within the store. If prompted, acknowledge these messages to continue with the store open process.
For example, you may be notified that a cycle count for inventory is due or that items are ready to be received.
8. A message that was entered during the store close may be displayed. If displayed, press Enter to acknowledge this message and continue with the store open process.
9. If prompted, enter the starting cash amount for the store bank. Refer to Store Safe Maintenance for more information about opening the store bank.
10. The system may print a store open receipt for your records.
Figure 9–12 Store Open Receipt
11. The system prompts: Do you want to open this register? Select Yes to open the register. Refer to Register Open and Close for more information about opening the register.
The store and register are opened for the new business day.
Note: If this date is incorrect, enter the new business date at the prompt. Oracle Retail Xstore Point of Service prompts you to confirm the date you entered.
This function is controlled by security.
Note: Note that the store status indicator has changed to green indicating
the store is now open. However, the Register status indicator is red with a cross mark indicating that this register is still closed.
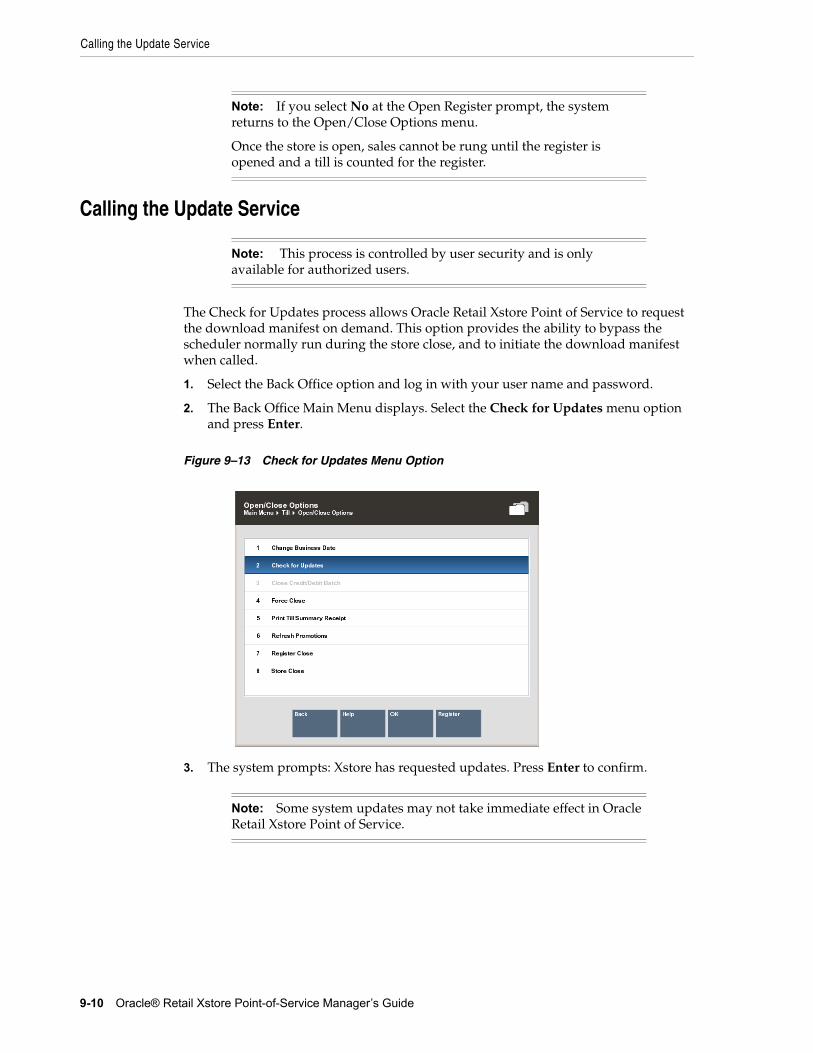
Calling the Update Service
9-10 Oracle® Retail Xstore Point-of-Service Manager’s Guide
Calling the Update Service
The Check for Updates process allows Oracle Retail Xstore Point of Service to request the download manifest on demand. This option provides the ability to bypass the scheduler normally run during the store close, and to initiate the download manifest when called.
1. Select the Back Office option and log in with your user name and password.
2. The Back Office Main Menu displays. Select the Check for Updates menu option and press Enter.
Figure 9–13 Check for Updates Menu Option
3. The system prompts: Xstore has requested updates. Press Enter to confirm.
Note: If you select No at the Open Register prompt, the system returns to the Open/Close Options menu.
Once the store is open, sales cannot be rung until the register is opened and a till is counted for the register.
Note: This process is controlled by user security and is only available for authorized users.
Note: Some system updates may not take immediate effect in Oracle Retail Xstore Point of Service.
Manually Refresh Promotions
Store Open and Close 9-11
Manually Refresh PromotionsTypically a promotion is updated with new information during a register restart. Use this process to update new promotions that are cached without having to restart that register, such as in the middle of the day.
To refresh the promotion cache for a register:
1. In the Back Office menu, select Open/Close Options.
2. Select Refresh Promotions.
3. Oracle Retail Xstore Point of Service displays a confirmation prompt: Are you sure you want to refresh promotions? This may take several minutes.
4. Press Y to continue. A progress bar is displayed until the update is complete.
5. When the update is complete, a prompt is displayed: "Promotions have been refreshed as of (time and day)." Select OK to exit.
Note: Applies to registers only and you would need to perform this action on each register to update it's cache for promotions.
Note: Pressing N at the Refresh Promotions confirmation prompt cancels the refresh process and returns you to the Open/Close Options menu.
10
24/7 Store Environment 10-1
1024/7 Store Environment
A store can function 24 hours a day and seven days a week.
If your system is configured to support a 24 hour store environment, the store will perform a rolling close on registers. Each register will be rolled over to the next retail period (business day) one by one; always keeping at least one register available for use.
A retail period is the period in which the retailer defines as their store hours (for example, 12:00 am - 11:59 pm).
A retail session is defined as the time in which a register is opened until it's closed. Multiple retail sessions can occur within a retail period.
The 24 hour store environment is supported for both register accountability and till accountability. Register accountability is where a till is assigned to a register and can be used by any cashier that uses the register. Till accountability is where a till is assigned to a specific cashier. The assigned till can be attached to any register the cashier may work on during the day.
Deferred cash management allows the retailer to open a store on the next business day without reconciling, closing the store, or ending the retail period. These processes have been separated so they can be completed at a later date.
This chapter covers the following topics:
■ Store Opening
■ Daily 24/7 Flows
■ Rolling Close
■ Store Closure
■ System Updates
Store OpeningFull store opening is usually only done with the first initial opening of the store. It is performed on only one register. The store open procedure signals that the store is open to all registers. See Opening the Store for more information.
Once the store is open, sales cannot be rung until the register is opened and a till is counted for the register.
Daily 24/7 Flows
10-2 Oracle® Retail Xstore Point of Service Manager's Guide
Daily 24/7 FlowsFor systems using 24/7 trading, the register open process must be performed on each register every day. Depending upon the configuration of your system and the time that the register is opened, the system may prompt you to open the register for the previous day or the next day.
You have different options to configure the system about the desired process in the 24 hour environment. During the 24 hour flow, the system may ask the cashier to re-open the register during the close register process automatically. Alternatively, the register is not opened automatically, which would require the cashier to log in to open the register.
Depending on your system’s configuration, the float can be configured so:
■ the cashier is prompted to enter the float amount
■ the cashier starts with the pre-defined float
■ the remaining cash balance on the register being carried over as the new float amount
■ the remaining cash currencies being adjusted to the approximate default, known as the Float Balance
Once the float has been defined, the register is open and the new retail session has begun.
After an open register is approaching the end of a retail period, Warning Messages are displayed to encourage the closing of the register and to move to the next retail period. You can continue to perform transactions on the register until the end of a configurable grace period. At the end of the grace period, you must close the register. This ensures that all the registers are moved forward to the next retail period.
The rolling close process is separated from the register reconciliation process in a register accountability configuration. This means that register reconciliation is not required before closing a register or retail period.
If the register is configured to open automatically after the Register/Till Close process without user interaction, you may be prompted to enter a new amount or a new till is inserted into the drawer with a pre-determined float amount.
Use the following steps to complete a full daily cycle:
■ Register/Till Open
■ Reconcile Register/Till
■ Warning Messages
■ Register/Till Close
■ New Business Period
■ Define Float

Daily 24/7 Flows
24/7 Store Environment 10-3
Register/Till OpenTo open a register that is configured for 24/7 trading, follow these steps:
1. When you attempt to log in to the system, Oracle Retail Xstore Point-of- Service determines the status of the register and store. If the register status is closed, a Register Closed message displays if configured to do so. Press OK to close the message.
Figure 10–1 No Access - Register Closed
The red register indicator on the status bar also shows that the register is closed.
Figure 10–2 Status Bar - Register Closed
2. Select the Back Office option on the Register menu to open the register from the Back Office Main Menu.
Note: If you are using a touch-screen, tap the red register status bar to open the register. The focus bar prompts for your employee ID and password. Enter the information when prompted. Proceed to step 7.
Note: Access to the back office functions is controlled by security levels. You must have the correct security privileges to access the Back Office.
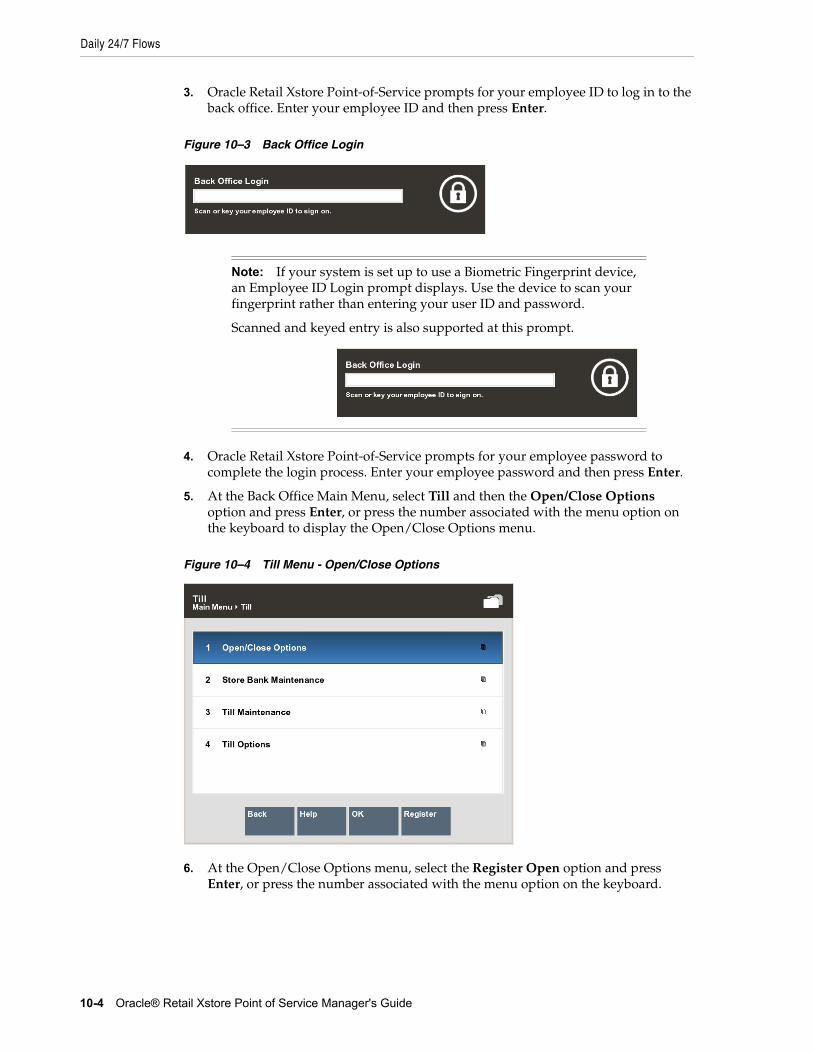
Daily 24/7 Flows
10-4 Oracle® Retail Xstore Point of Service Manager's Guide
3. Oracle Retail Xstore Point-of-Service prompts for your employee ID to log in to the back office. Enter your employee ID and then press Enter.
Figure 10–3 Back Office Login
4. Oracle Retail Xstore Point-of-Service prompts for your employee password to complete the login process. Enter your employee password and then press Enter.
5. At the Back Office Main Menu, select Till and then the Open/Close Options option and press Enter, or press the number associated with the menu option on the keyboard to display the Open/Close Options menu.
Figure 10–4 Till Menu - Open/Close Options
6. At the Open/Close Options menu, select the Register Open option and press Enter, or press the number associated with the menu option on the keyboard.
Note: If your system is set up to use a Biometric Fingerprint device, an Employee ID Login prompt displays. Use the device to scan your fingerprint rather than entering your user ID and password.
Scanned and keyed entry is also supported at this prompt.
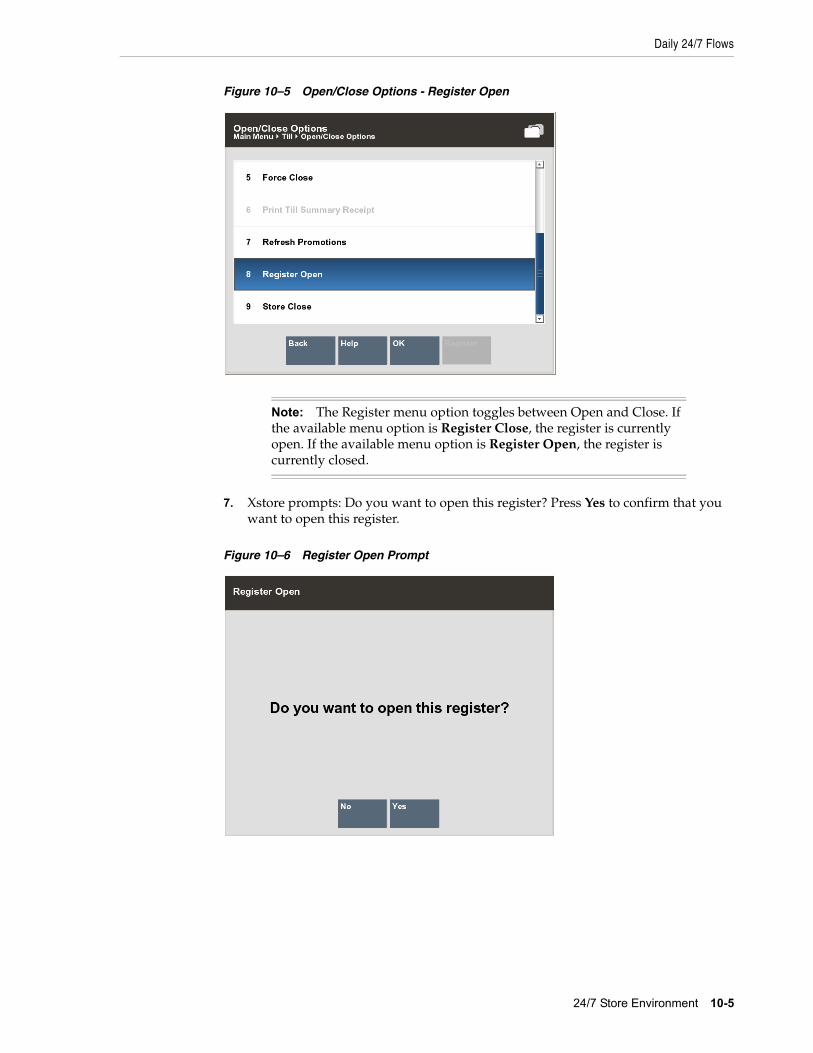
Daily 24/7 Flows
24/7 Store Environment 10-5
Figure 10–5 Open/Close Options - Register Open
7. Xstore prompts: Do you want to open this register? Press Yes to confirm that you want to open this register.
Figure 10–6 Register Open Prompt
Note: The Register menu option toggles between Open and Close. If the available menu option is Register Close, the register is currently open. If the available menu option is Register Open, the register is currently closed.
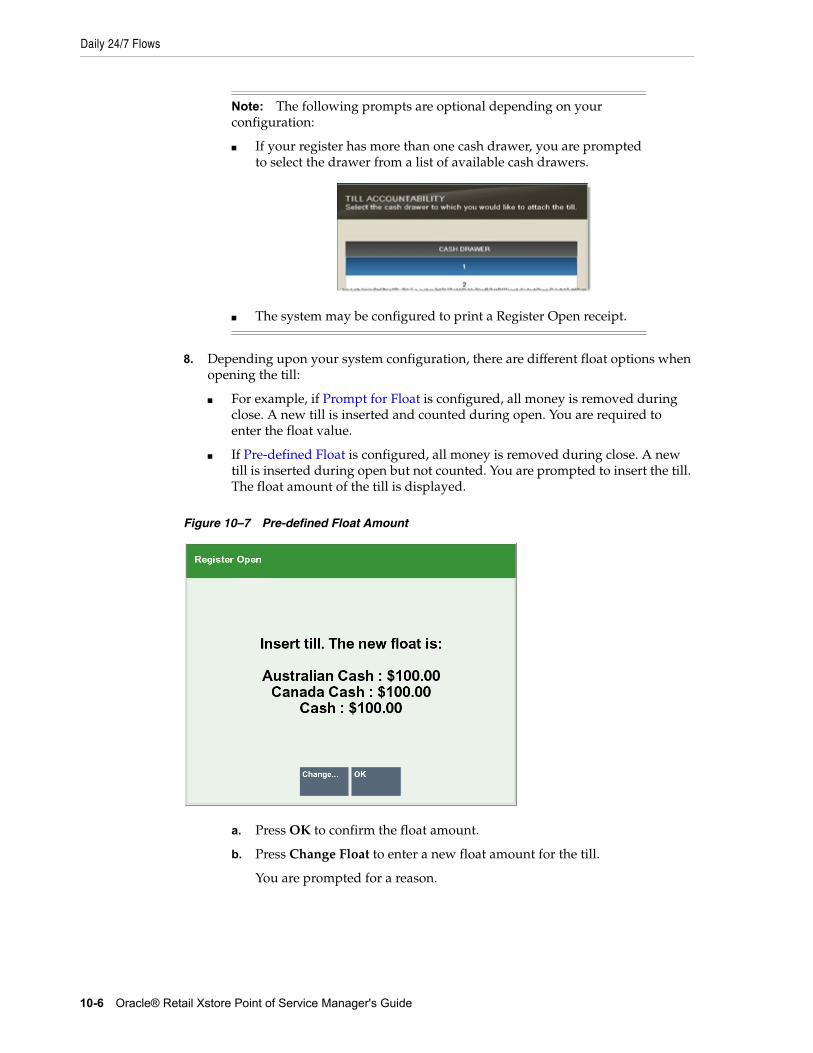
Daily 24/7 Flows
10-6 Oracle® Retail Xstore Point of Service Manager's Guide
8. Depending upon your system configuration, there are different float options when opening the till:
■ For example, if Prompt for Float is configured, all money is removed during close. A new till is inserted and counted during open. You are required to enter the float value.
■ If Pre-defined Float is configured, all money is removed during close. A new till is inserted during open but not counted. You are prompted to insert the till. The float amount of the till is displayed.
Figure 10–7 Pre-defined Float Amount
a. Press OK to confirm the float amount.
b. Press Change Float to enter a new float amount for the till.
You are prompted for a reason.
Note: The following prompts are optional depending on your configuration:
■ If your register has more than one cash drawer, you are prompted to select the drawer from a list of available cash drawers.
■ The system may be configured to print a Register Open receipt.
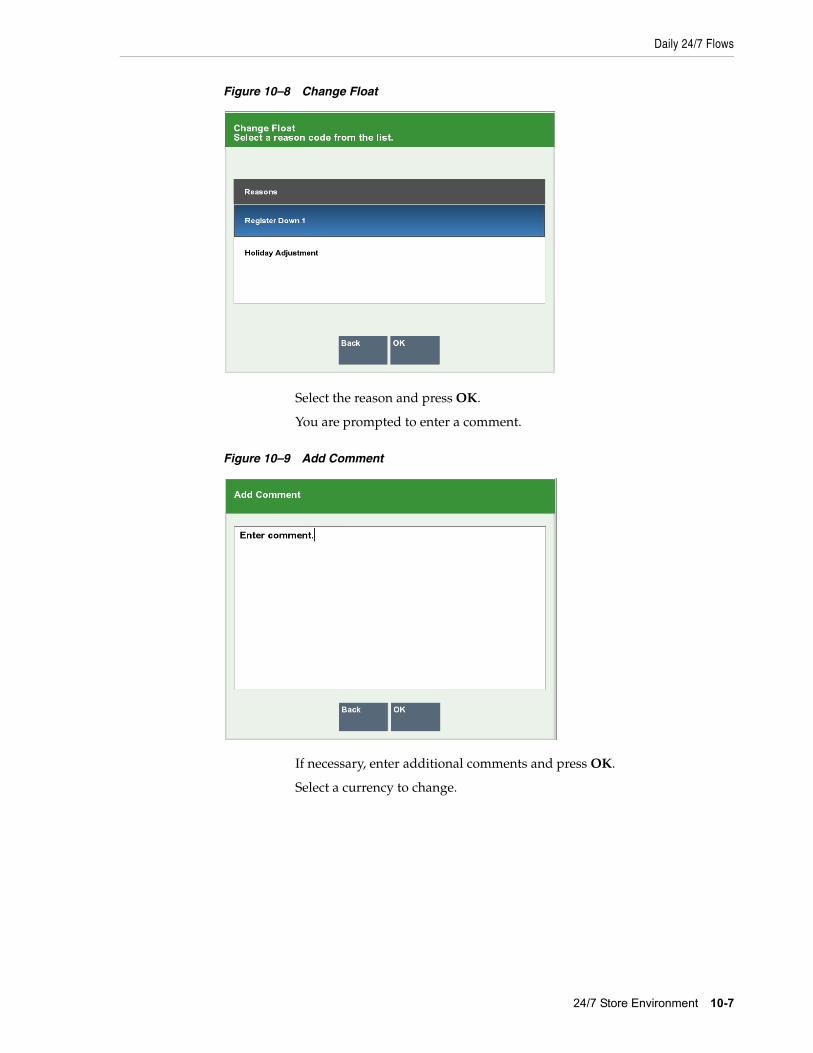
Daily 24/7 Flows
24/7 Store Environment 10-7
Figure 10–8 Change Float
Select the reason and press OK.
You are prompted to enter a comment.
Figure 10–9 Add Comment
If necessary, enter additional comments and press OK.
Select a currency to change.
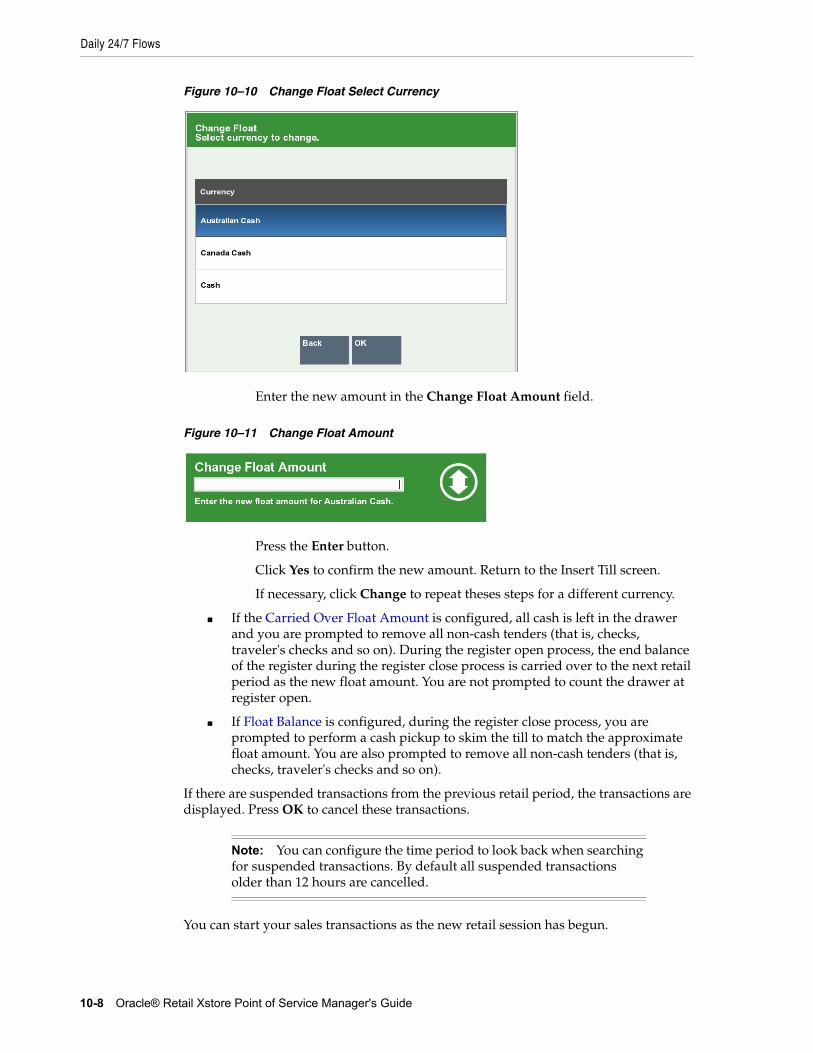
Daily 24/7 Flows
10-8 Oracle® Retail Xstore Point of Service Manager's Guide
Figure 10–10 Change Float Select Currency
Enter the new amount in the Change Float Amount field.
Figure 10–11 Change Float Amount
Press the Enter button.
Click Yes to confirm the new amount. Return to the Insert Till screen.
If necessary, click Change to repeat theses steps for a different currency.
■ If the Carried Over Float Amount is configured, all cash is left in the drawer and you are prompted to remove all non-cash tenders (that is, checks, traveler's checks and so on). During the register open process, the end balance of the register during the register close process is carried over to the next retail period as the new float amount. You are not prompted to count the drawer at register open.
■ If Float Balance is configured, during the register close process, you are prompted to perform a cash pickup to skim the till to match the approximate float amount. You are also prompted to remove all non-cash tenders (that is, checks, traveler's checks and so on).
If there are suspended transactions from the previous retail period, the transactions are displayed. Press OK to cancel these transactions.
You can start your sales transactions as the new retail session has begun.
Note: You can configure the time period to look back when searching for suspended transactions. By default all suspended transactions older than 12 hours are cancelled.
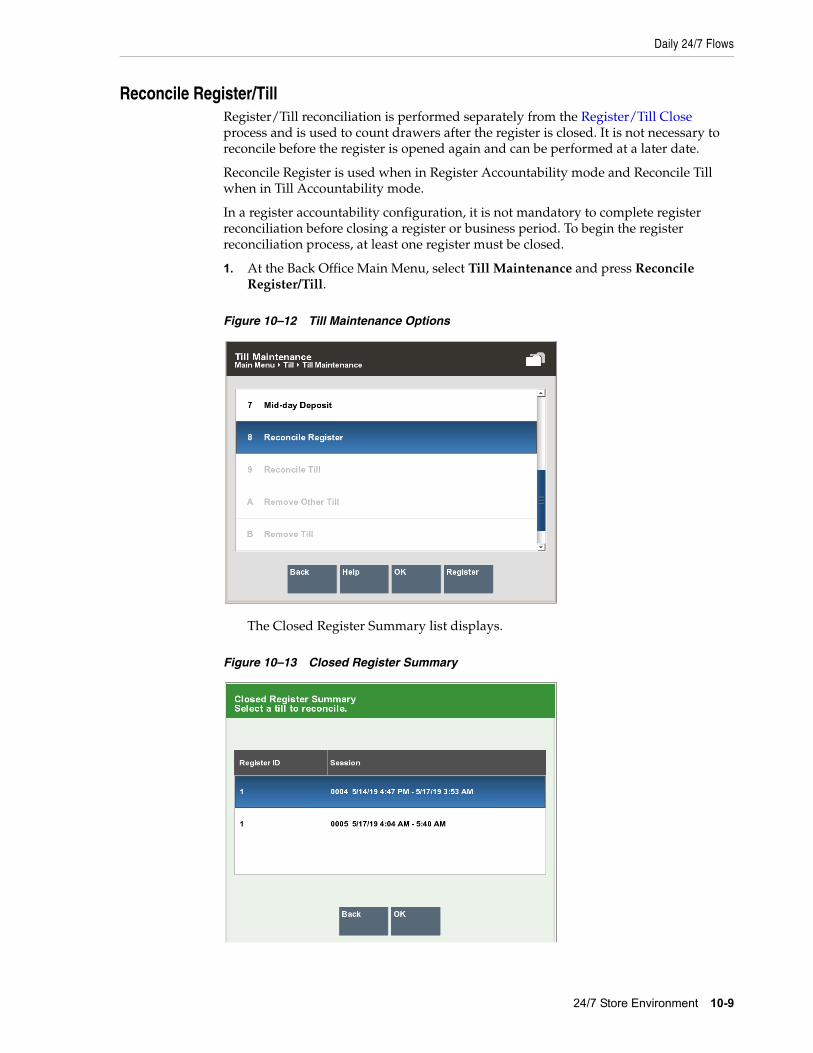
Daily 24/7 Flows
24/7 Store Environment 10-9
Reconcile Register/TillRegister/Till reconciliation is performed separately from the Register/Till Close process and is used to count drawers after the register is closed. It is not necessary to reconcile before the register is opened again and can be performed at a later date.
Reconcile Register is used when in Register Accountability mode and Reconcile Till when in Till Accountability mode.
In a register accountability configuration, it is not mandatory to complete register reconciliation before closing a register or business period. To begin the register reconciliation process, at least one register must be closed.
1. At the Back Office Main Menu, select Till Maintenance and press Reconcile Register/Till.
Figure 10–12 Till Maintenance Options
The Closed Register Summary list displays.
Figure 10–13 Closed Register Summary
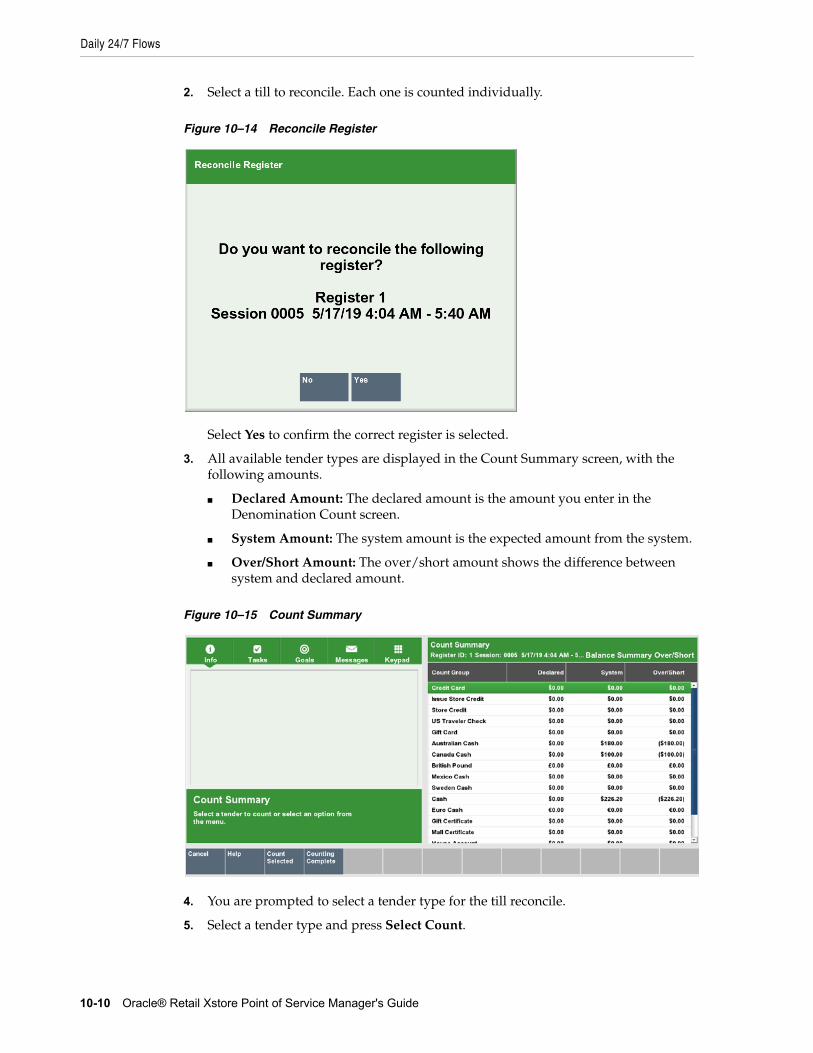
Daily 24/7 Flows
10-10 Oracle® Retail Xstore Point of Service Manager's Guide
2. Select a till to reconcile. Each one is counted individually.
Figure 10–14 Reconcile Register
Select Yes to confirm the correct register is selected.
3. All available tender types are displayed in the Count Summary screen, with the following amounts.
■ Declared Amount: The declared amount is the amount you enter in the Denomination Count screen.
■ System Amount: The system amount is the expected amount from the system.
■ Over/Short Amount: The over/short amount shows the difference between system and declared amount.
Figure 10–15 Count Summary
4. You are prompted to select a tender type for the till reconcile.
5. Select a tender type and press Select Count.
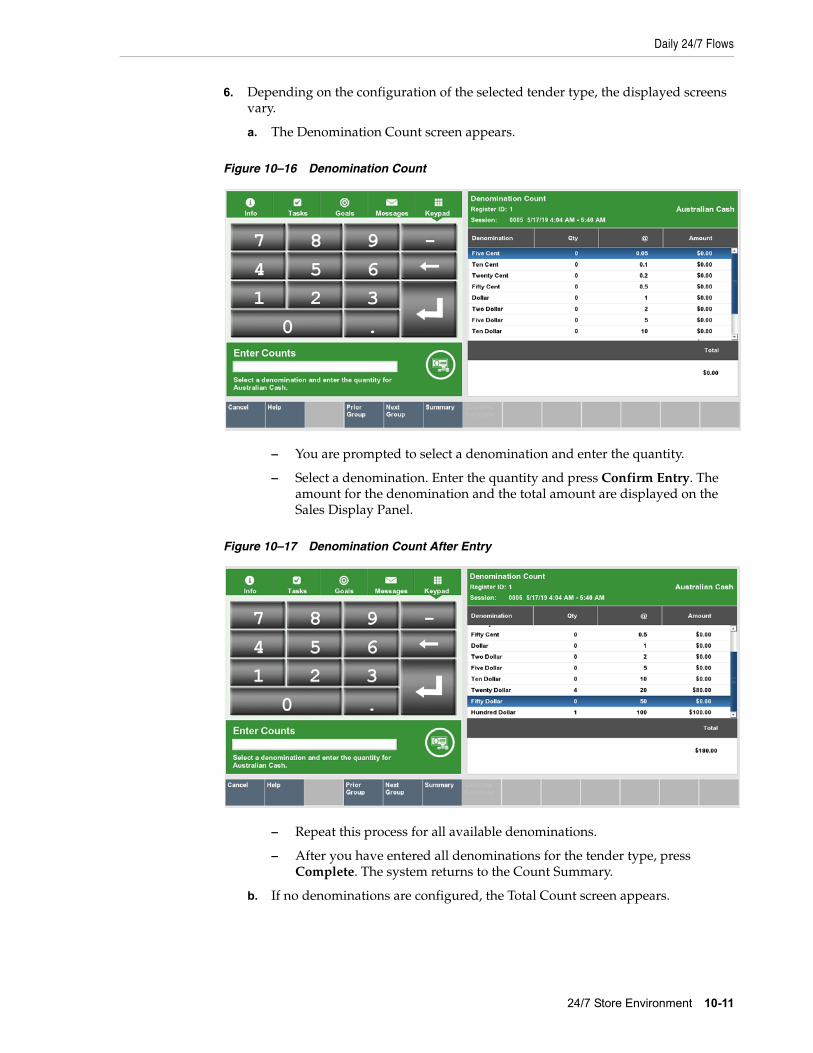
Daily 24/7 Flows
24/7 Store Environment 10-11
6. Depending on the configuration of the selected tender type, the displayed screens vary.
a. The Denomination Count screen appears.
Figure 10–16 Denomination Count
– You are prompted to select a denomination and enter the quantity.
– Select a denomination. Enter the quantity and press Confirm Entry. The amount for the denomination and the total amount are displayed on the Sales Display Panel.
Figure 10–17 Denomination Count After Entry
– Repeat this process for all available denominations.
– After you have entered all denominations for the tender type, press Complete. The system returns to the Count Summary.
b. If no denominations are configured, the Total Count screen appears.
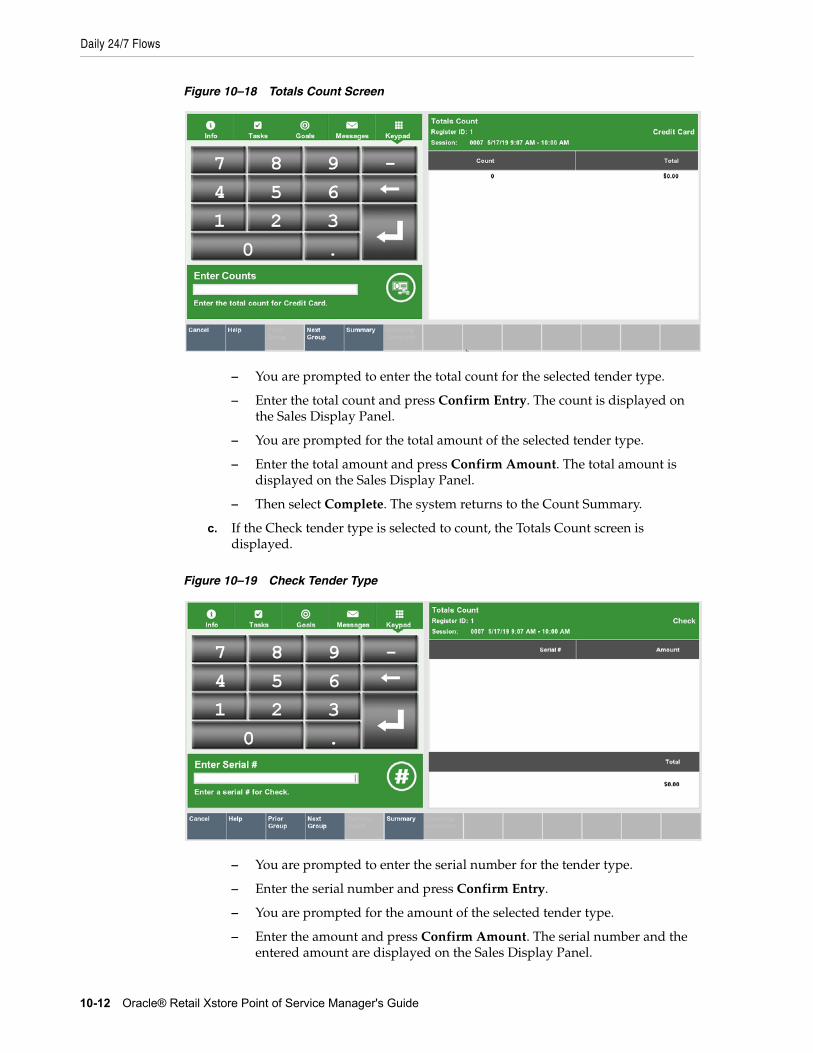
Daily 24/7 Flows
10-12 Oracle® Retail Xstore Point of Service Manager's Guide
Figure 10–18 Totals Count Screen
– You are prompted to enter the total count for the selected tender type.
– Enter the total count and press Confirm Entry. The count is displayed on the Sales Display Panel.
– You are prompted for the total amount of the selected tender type.
– Enter the total amount and press Confirm Amount. The total amount is displayed on the Sales Display Panel.
– Then select Complete. The system returns to the Count Summary.
c. If the Check tender type is selected to count, the Totals Count screen is displayed.
Figure 10–19 Check Tender Type
– You are prompted to enter the serial number for the tender type.
– Enter the serial number and press Confirm Entry.
– You are prompted for the amount of the selected tender type.
– Enter the amount and press Confirm Amount. The serial number and the entered amount are displayed on the Sales Display Panel.
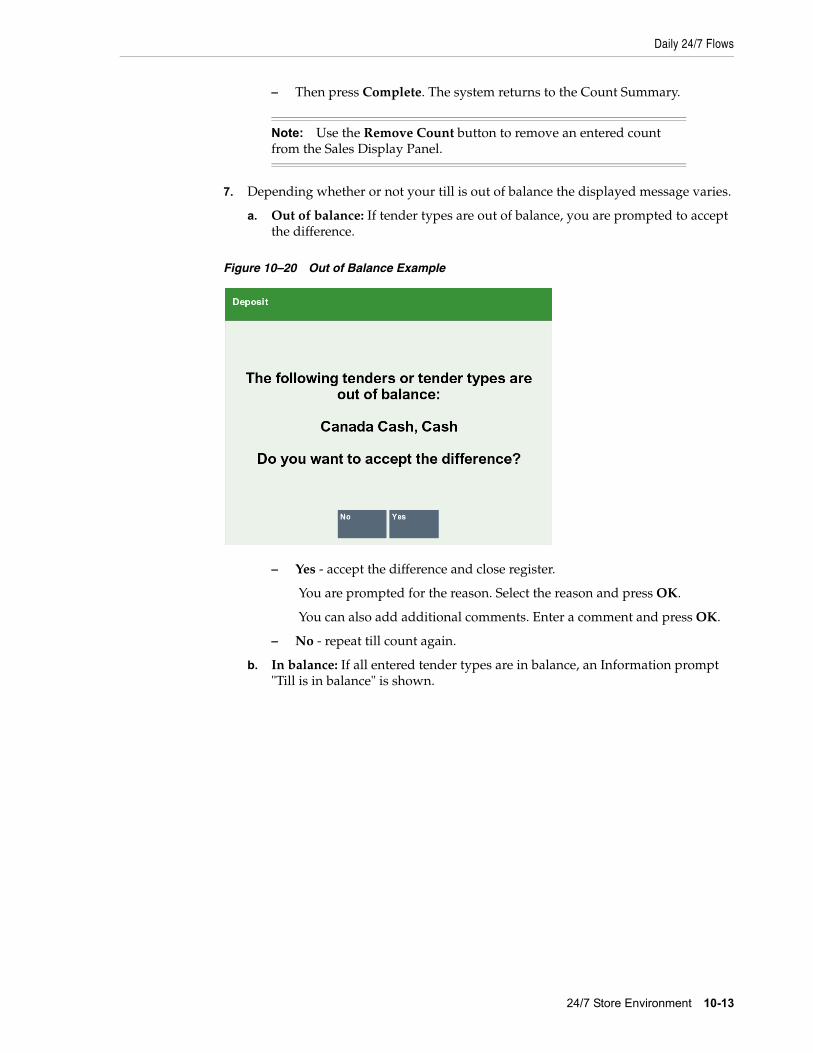
Daily 24/7 Flows
24/7 Store Environment 10-13
– Then press Complete. The system returns to the Count Summary.
7. Depending whether or not your till is out of balance the displayed message varies.
a. Out of balance: If tender types are out of balance, you are prompted to accept the difference.
Figure 10–20 Out of Balance Example
– Yes - accept the difference and close register.
You are prompted for the reason. Select the reason and press OK.
You can also add additional comments. Enter a comment and press OK.
– No - repeat till count again.
b. In balance: If all entered tender types are in balance, an Information prompt "Till is in balance" is shown.
Note: Use the Remove Count button to remove an entered count from the Sales Display Panel.

Daily 24/7 Flows
10-14 Oracle® Retail Xstore Point of Service Manager's Guide
Figure 10–21 Till in Balance
Press OK to close the Information prompt.
8. The register/till is reconciled.
Once all the registers are reconciled within a retail period, you can perform End Retail Period.
Warning MessagesWarning messages inform you that the end of retail period is approaching and you should start the Register/Till Close process. The default time frame for the 24/7 rolling close functionality is 24 hours (but this can be configured). A grace period allows you to close the register within a configurable gap. Once the grace period has ended, you must close the register and move to the next retail period. The following messages are displayed.
1. By default, a warning message is displayed one hour before the end of the retail period. This message appears at the beginning of a transaction, every 10 minutes until the register close process has been started.
Note: The time frame for the warning messages is configurable.
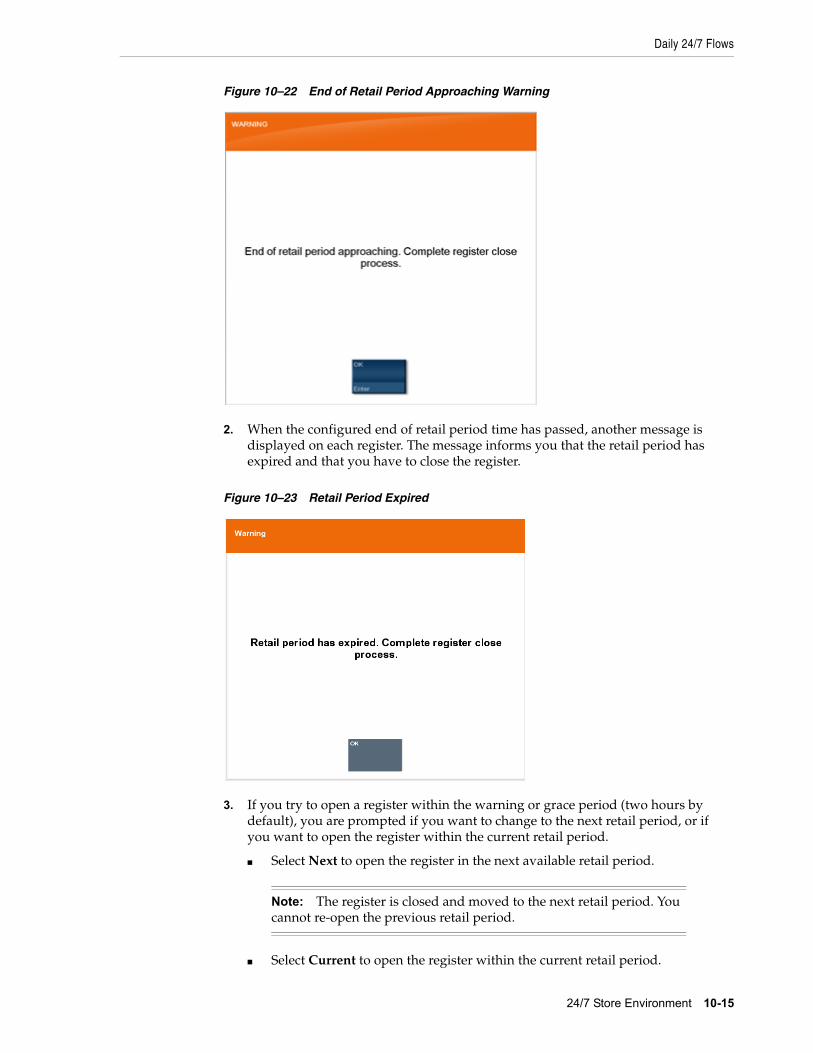
Daily 24/7 Flows
24/7 Store Environment 10-15
Figure 10–22 End of Retail Period Approaching Warning
2. When the configured end of retail period time has passed, another message is displayed on each register. The message informs you that the retail period has expired and that you have to close the register.
Figure 10–23 Retail Period Expired
3. If you try to open a register within the warning or grace period (two hours by default), you are prompted if you want to change to the next retail period, or if you want to open the register within the current retail period.
■ Select Next to open the register in the next available retail period.
■ Select Current to open the register within the current retail period.
Note: The register is closed and moved to the next retail period. You cannot re-open the previous retail period.
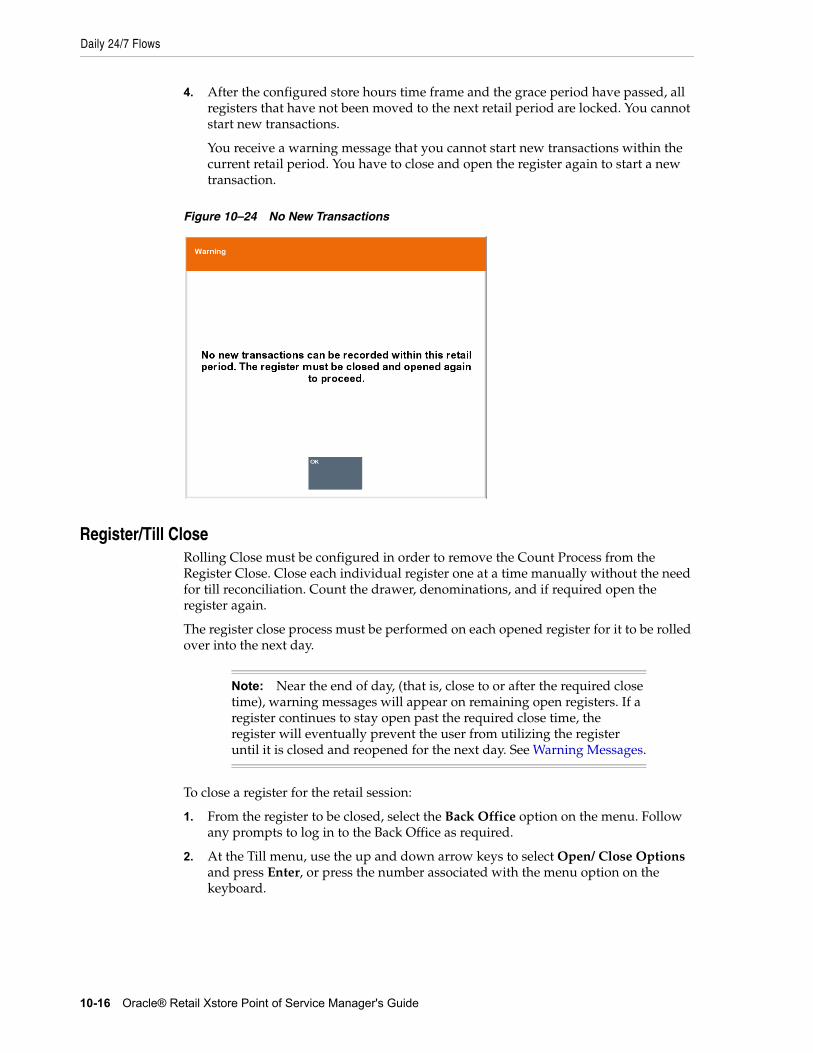
Daily 24/7 Flows
10-16 Oracle® Retail Xstore Point of Service Manager's Guide
4. After the configured store hours time frame and the grace period have passed, all registers that have not been moved to the next retail period are locked. You cannot start new transactions.
You receive a warning message that you cannot start new transactions within the current retail period. You have to close and open the register again to start a new transaction.
Figure 10–24 No New Transactions
Register/Till CloseRolling Close must be configured in order to remove the Count Process from the Register Close. Close each individual register one at a time manually without the need for till reconciliation. Count the drawer, denominations, and if required open the register again.
The register close process must be performed on each opened register for it to be rolled over into the next day.
To close a register for the retail session:
1. From the register to be closed, select the Back Office option on the menu. Follow any prompts to log in to the Back Office as required.
2. At the Till menu, use the up and down arrow keys to select Open/ Close Options and press Enter, or press the number associated with the menu option on the keyboard.
Note: Near the end of day, (that is, close to or after the required close time), warning messages will appear on remaining open registers. If a register continues to stay open past the required close time, the register will eventually prevent the user from utilizing the register until it is closed and reopened for the next day. See Warning Messages.
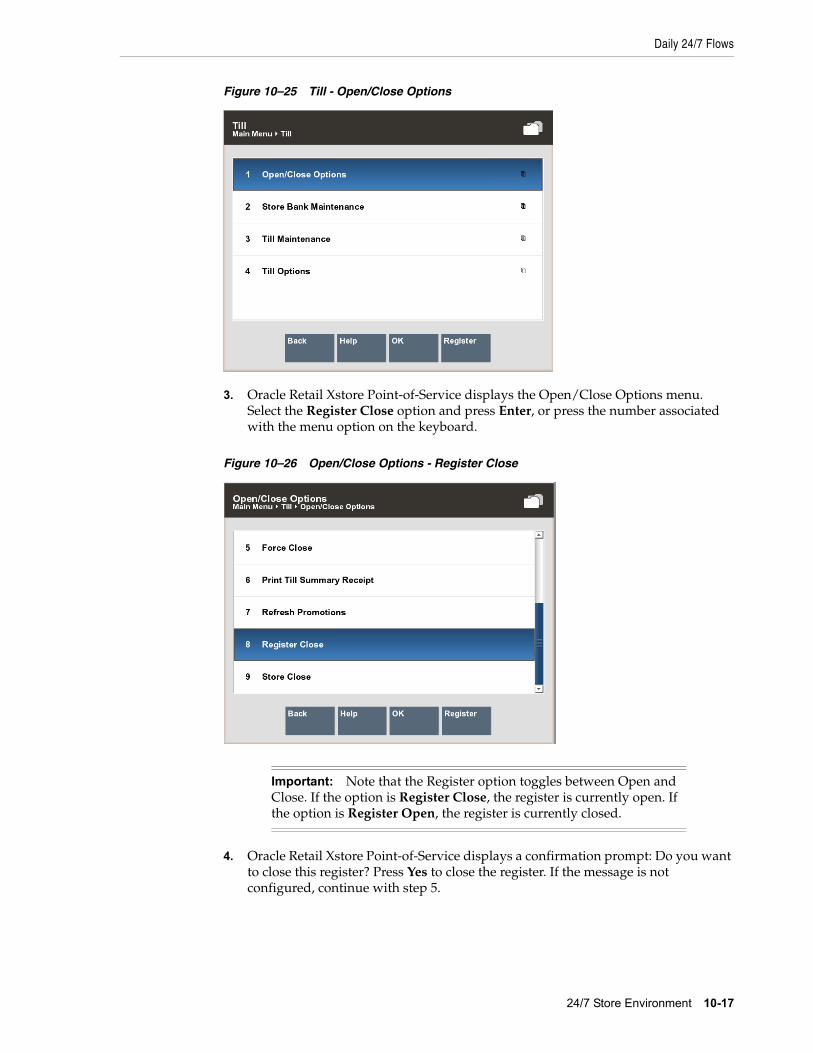
Daily 24/7 Flows
24/7 Store Environment 10-17
Figure 10–25 Till - Open/Close Options
3. Oracle Retail Xstore Point-of-Service displays the Open/Close Options menu. Select the Register Close option and press Enter, or press the number associated with the menu option on the keyboard.
Figure 10–26 Open/Close Options - Register Close
4. Oracle Retail Xstore Point-of-Service displays a confirmation prompt: Do you want to close this register? Press Yes to close the register. If the message is not configured, continue with step 5.
Important: Note that the Register option toggles between Open and Close. If the option is Register Close, the register is currently open. If the option is Register Open, the register is currently closed.
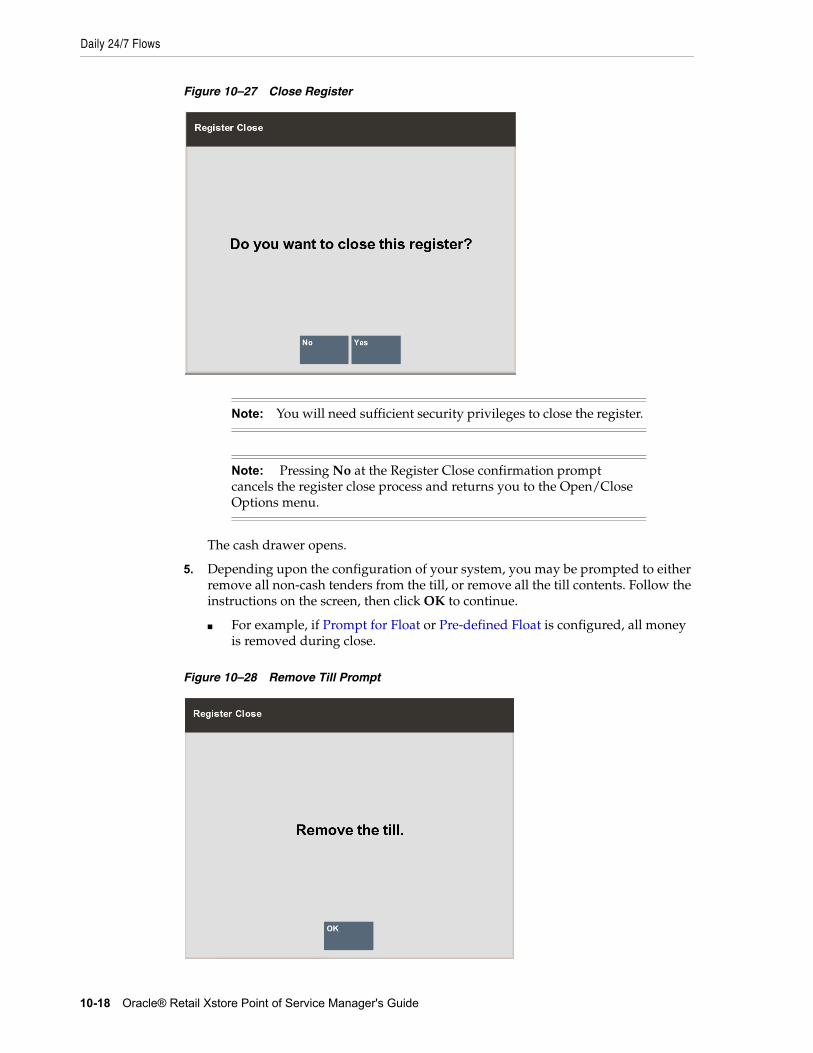
Daily 24/7 Flows
10-18 Oracle® Retail Xstore Point of Service Manager's Guide
Figure 10–27 Close Register
The cash drawer opens.
5. Depending upon the configuration of your system, you may be prompted to either remove all non-cash tenders from the till, or remove all the till contents. Follow the instructions on the screen, then click OK to continue.
■ For example, if Prompt for Float or Pre-defined Float is configured, all money is removed during close.
Figure 10–28 Remove Till Prompt
Note: You will need sufficient security privileges to close the register.
Note: Pressing No at the Register Close confirmation prompt cancels the register close process and returns you to the Open/Close Options menu.
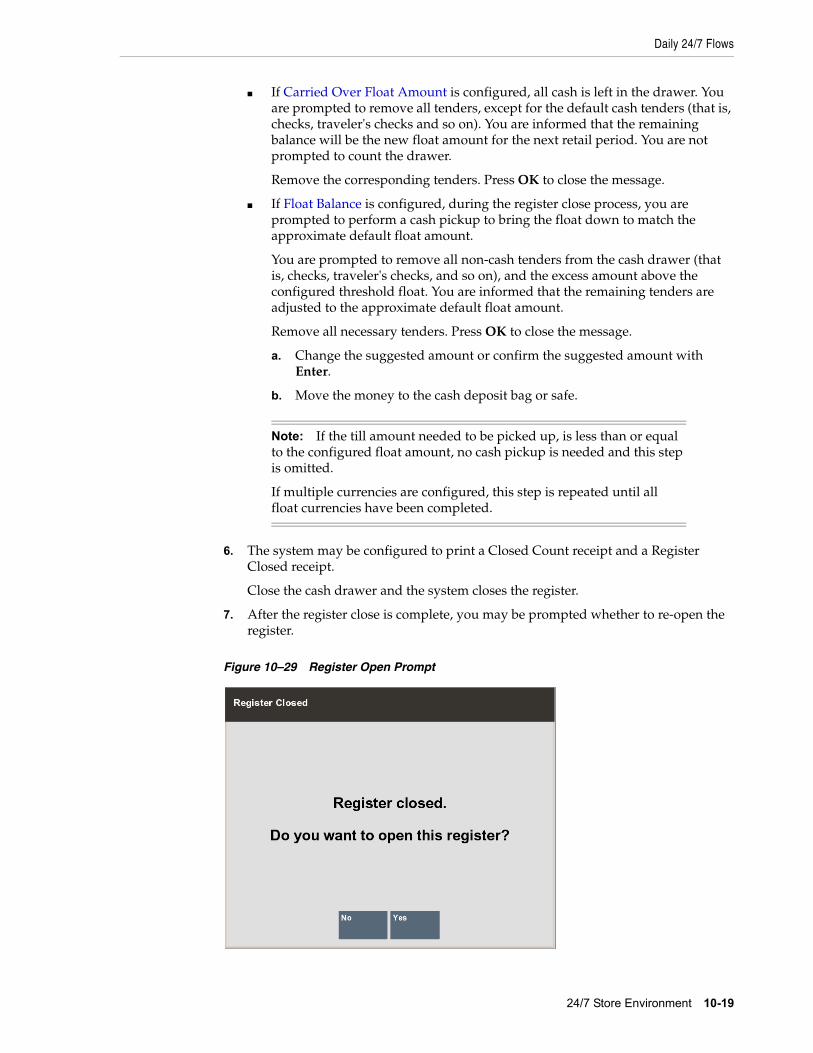
Daily 24/7 Flows
24/7 Store Environment 10-19
■ If Carried Over Float Amount is configured, all cash is left in the drawer. You are prompted to remove all tenders, except for the default cash tenders (that is, checks, traveler's checks and so on). You are informed that the remaining balance will be the new float amount for the next retail period. You are not prompted to count the drawer.
Remove the corresponding tenders. Press OK to close the message.
■ If Float Balance is configured, during the register close process, you are prompted to perform a cash pickup to bring the float down to match the approximate default float amount.
You are prompted to remove all non-cash tenders from the cash drawer (that is, checks, traveler's checks, and so on), and the excess amount above the configured threshold float. You are informed that the remaining tenders are adjusted to the approximate default float amount.
Remove all necessary tenders. Press OK to close the message.
a. Change the suggested amount or confirm the suggested amount with Enter.
b. Move the money to the cash deposit bag or safe.
6. The system may be configured to print a Closed Count receipt and a Register Closed receipt.
Close the cash drawer and the system closes the register.
7. After the register close is complete, you may be prompted whether to re-open the register.
Figure 10–29 Register Open Prompt
Note: If the till amount needed to be picked up, is less than or equal to the configured float amount, no cash pickup is needed and this step is omitted.
If multiple currencies are configured, this step is repeated until all float currencies have been completed.
Daily 24/7 Flows
10-20 Oracle® Retail Xstore Point of Service Manager's Guide
■ Click No to keep the register closed.
■ Click Yes to re-open the register.
New Business PeriodThe processes that typically happen behind the scenes during a traditional store close process happens when the first register is opened in a new retail period.
Define FloatHow the float is handled when opening/closing a register can be configured in one of the following ways:
■ Prompt for Float
■ Pre-defined Float
■ Carried Over Float Amount
■ Float Balance
Prompt for FloatIf the function Prompt for Float is enabled, all money is removed during close. A new till is inserted and counted during the register open process. The value of the float is entered.
At the register close you are prompted to remove the till but no counting of the drawer is done at this time.
Pre-defined FloatAll money is removed during close but you are not prompted to count the drawer. A new till is inserted during open, but not counted.
During the register open process, you are prompted to insert a new till into the drawer which includes a pre-configured till amount. There is the option to Change Float if required.
Carried Over Float AmountAll cash is left in the drawer but you are prompted to remove all non-cash tenders such as checks. The balance of the register amount during register close will carry over to the next business period as the new float amount.
During the register open process, the end balance of the register during the register close process is carried over to the next retail period as the new float amount. You are not prompted to count the drawer.
Float BalanceDuring the register close process, you are prompted to perform a pickup of the excess money above the configured float amount. During close, enough money is removed to bring the float down to the approximate default float. The prompt ’Remaining currencies will be adjusted to the approximate default float’ is shown.
You are not prompted to count the drawer at register open.
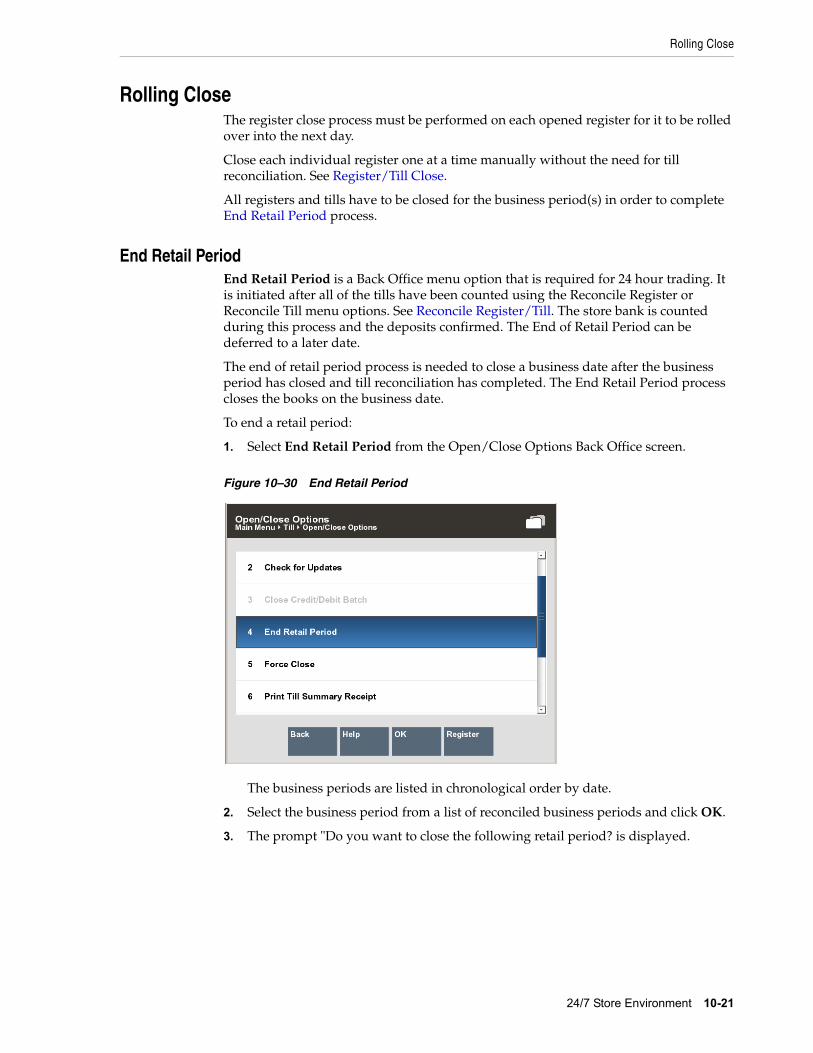
Rolling Close
24/7 Store Environment 10-21
Rolling CloseThe register close process must be performed on each opened register for it to be rolled over into the next day.
Close each individual register one at a time manually without the need for till reconciliation. See Register/Till Close.
All registers and tills have to be closed for the business period(s) in order to complete End Retail Period process.
End Retail PeriodEnd Retail Period is a Back Office menu option that is required for 24 hour trading. It is initiated after all of the tills have been counted using the Reconcile Register or Reconcile Till menu options. See Reconcile Register/Till. The store bank is counted during this process and the deposits confirmed. The End of Retail Period can be deferred to a later date.
The end of retail period process is needed to close a business date after the business period has closed and till reconciliation has completed. The End Retail Period process closes the books on the business date.
To end a retail period:
1. Select End Retail Period from the Open/Close Options Back Office screen.
Figure 10–30 End Retail Period
The business periods are listed in chronological order by date.
2. Select the business period from a list of reconciled business periods and click OK.
3. The prompt "Do you want to close the following retail period? is displayed.
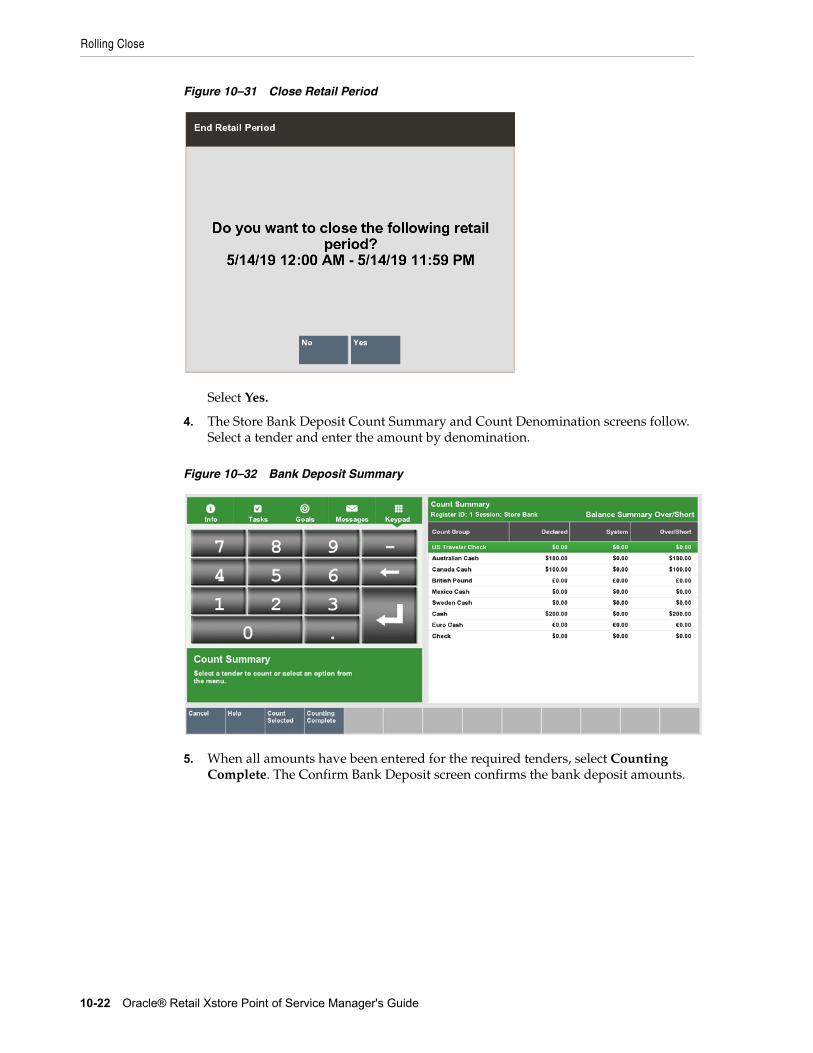
Rolling Close
10-22 Oracle® Retail Xstore Point of Service Manager's Guide
Figure 10–31 Close Retail Period
Select Yes.
4. The Store Bank Deposit Count Summary and Count Denomination screens follow. Select a tender and enter the amount by denomination.
Figure 10–32 Bank Deposit Summary
5. When all amounts have been entered for the required tenders, select Counting Complete. The Confirm Bank Deposit screen confirms the bank deposit amounts.
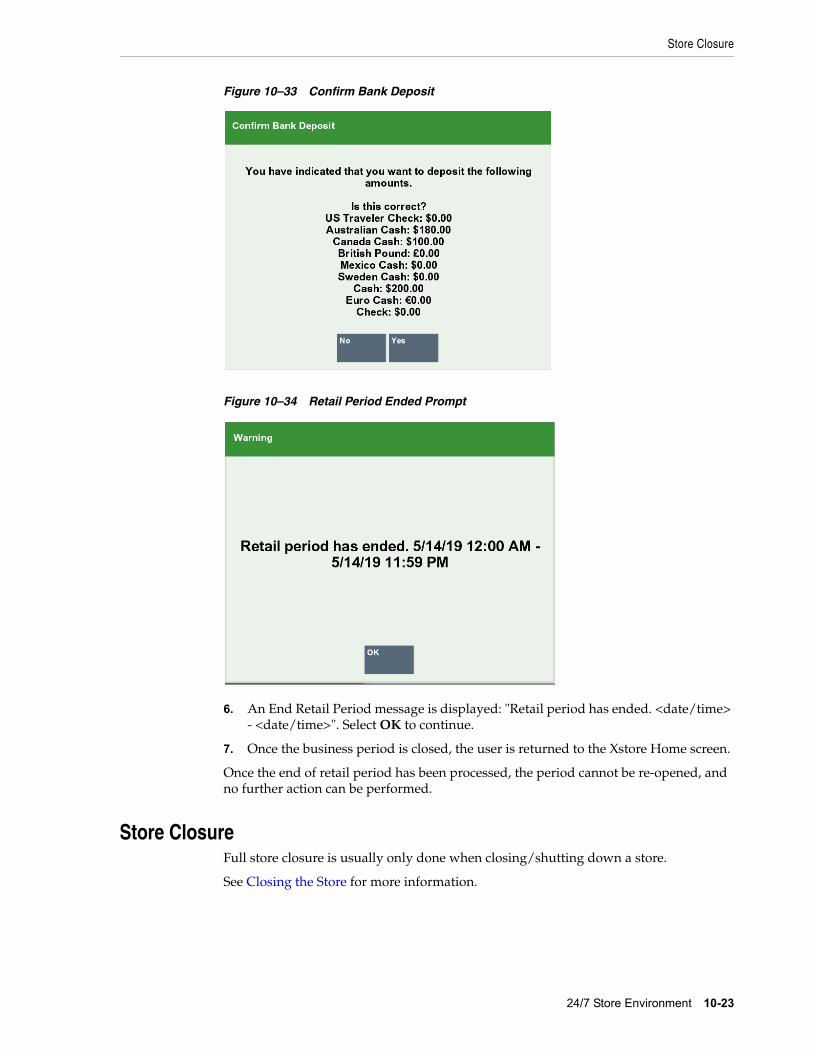
Store Closure
24/7 Store Environment 10-23
Figure 10–33 Confirm Bank Deposit
Figure 10–34 Retail Period Ended Prompt
6. An End Retail Period message is displayed: "Retail period has ended. <date/time> - <date/time>". Select OK to continue.
7. Once the business period is closed, the user is returned to the Xstore Home screen.
Once the end of retail period has been processed, the period cannot be re-opened, and no further action can be performed.
Store ClosureFull store closure is usually only done when closing/shutting down a store.
See Closing the Store for more information.
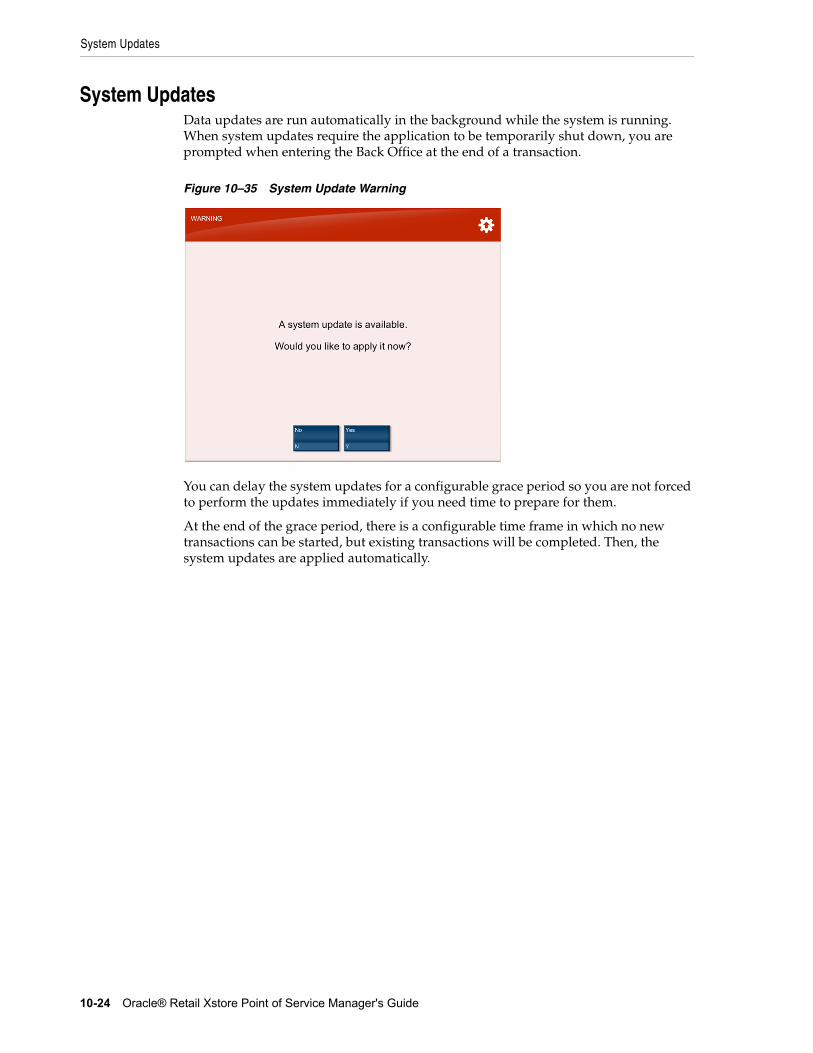
System Updates
10-24 Oracle® Retail Xstore Point of Service Manager's Guide
System UpdatesData updates are run automatically in the background while the system is running. When system updates require the application to be temporarily shut down, you are prompted when entering the Back Office at the end of a transaction.
Figure 10–35 System Update Warning
You can delay the system updates for a configurable grace period so you are not forced to perform the updates immediately if you need time to prepare for them.
At the end of the grace period, there is a configurable time frame in which no new transactions can be started, but existing transactions will be completed. Then, the system updates are applied automatically.
11
Till Management 11-1
11Till Management
There are two types of till management: Register Accountability and Till Accountability. Register Accountability is the default system mode and is used unless the system is configured to use Till Accountability.
Register Accountability: A till is assigned to a register and can be used by any cashier that uses the register. The first associate who signs on to the register is responsible for opening the till. The associate is then required to count the drawer. This process assigns the drawer to the current register.
Alternatively, the till can be assigned to networked cash drawers.
Depending upon your store policy, the cashier enters the total amount of cash in the till, or enters the quantity of each cash denomination. If a float amount (a configurable value) has been left in the till, the system calculates the difference between the float amount and the actual opening amount entered, and if there is a difference, allows the cashier to recount the till or accept the new amount.
Till Accountability: A till is assigned to a specific cashier. The assigned till can be attached to any register the cashier may work on during the day. The cashier must count the assigned till and then attach the till to a cash drawer/register before ringing transactions. The system can be configured to allow the cashier to enter a total amount counted, or to count by denomination. For denomination counts, the cashier counts and enters each denomination separately and each count is saved into the system.
At the end of the cashier's shift, the cashier must count and return the assigned till to the cash management office for reconciliation. This process transfers responsibility for the assigned till back to the cash manager.
Till Accountability also allows Dual Cash Drawer functionality, in which one register can use two separate cash drawers. This allows two cashiers to share a single POS register while keeping their tills separate.
This chapter contains the following sections:
■ Till Accountability Process
■ Accessing Back Office Till Management Functions
■ About Till Options
■ About Till Maintenance
■ Register Accountability Mode Functions
Note: Refer to the Oracle Retail Xstore Point-of-Service User Guide for detailed information about counting tills.
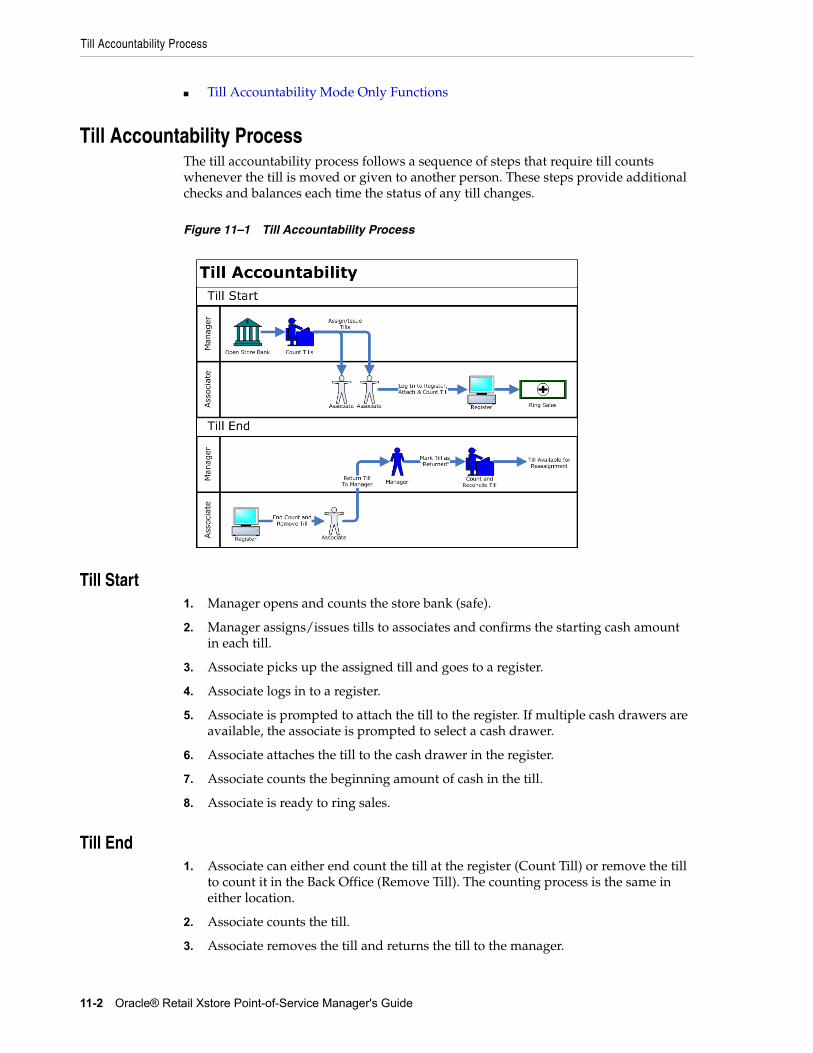
Till Accountability Process
11-2 Oracle® Retail Xstore Point-of-Service Manager's Guide
■ Till Accountability Mode Only Functions
Till Accountability ProcessThe till accountability process follows a sequence of steps that require till counts whenever the till is moved or given to another person. These steps provide additional checks and balances each time the status of any till changes.
Figure 11–1 Till Accountability Process
Till Start1. Manager opens and counts the store bank (safe).
2. Manager assigns/issues tills to associates and confirms the starting cash amount in each till.
3. Associate picks up the assigned till and goes to a register.
4. Associate logs in to a register.
5. Associate is prompted to attach the till to the register. If multiple cash drawers are available, the associate is prompted to select a cash drawer.
6. Associate attaches the till to the cash drawer in the register.
7. Associate counts the beginning amount of cash in the till.
8. Associate is ready to ring sales.
Till End1. Associate can either end count the till at the register (Count Till) or remove the till
to count it in the Back Office (Remove Till). The counting process is the same in either location.
2. Associate counts the till.
3. Associate removes the till and returns the till to the manager.
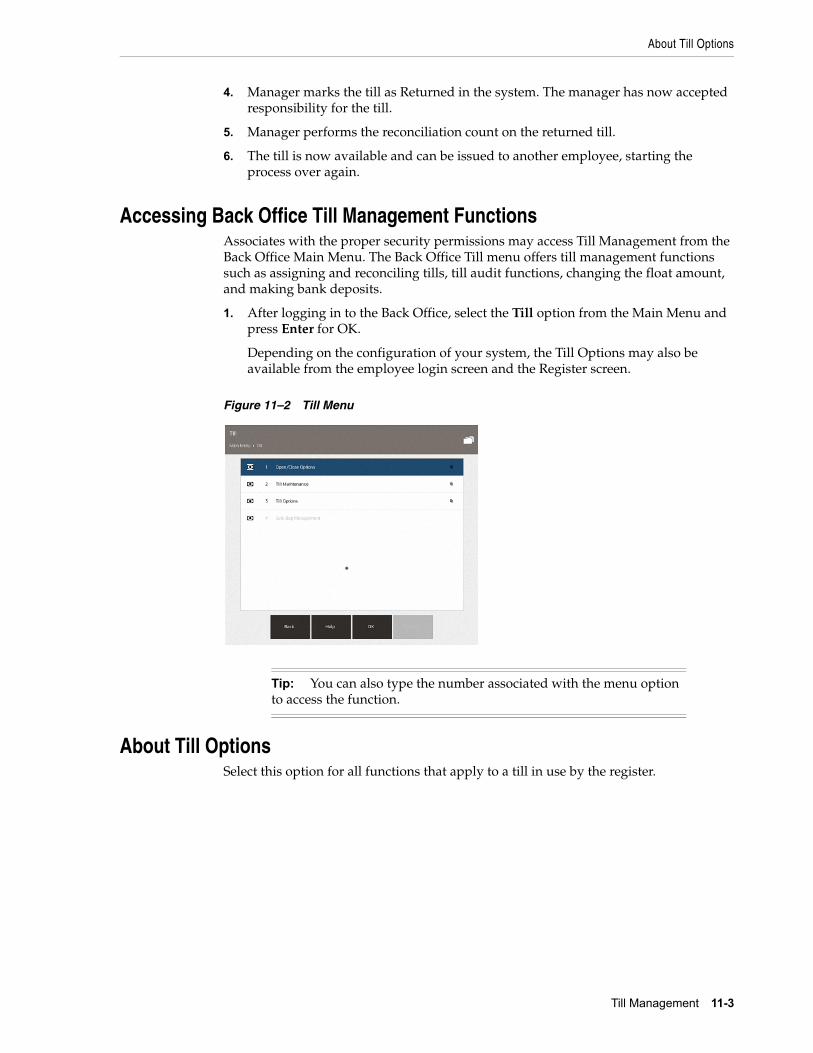
About Till Options
Till Management 11-3
4. Manager marks the till as Returned in the system. The manager has now accepted responsibility for the till.
5. Manager performs the reconciliation count on the returned till.
6. The till is now available and can be issued to another employee, starting the process over again.
Accessing Back Office Till Management FunctionsAssociates with the proper security permissions may access Till Management from the Back Office Main Menu. The Back Office Till menu offers till management functions such as assigning and reconciling tills, till audit functions, changing the float amount, and making bank deposits.
1. After logging in to the Back Office, select the Till option from the Main Menu and press Enter for OK.
Depending on the configuration of your system, the Till Options may also be available from the employee login screen and the Register screen.
Figure 11–2 Till Menu
About Till OptionsSelect this option for all functions that apply to a till in use by the register.
Tip: You can also type the number associated with the menu option to access the function.
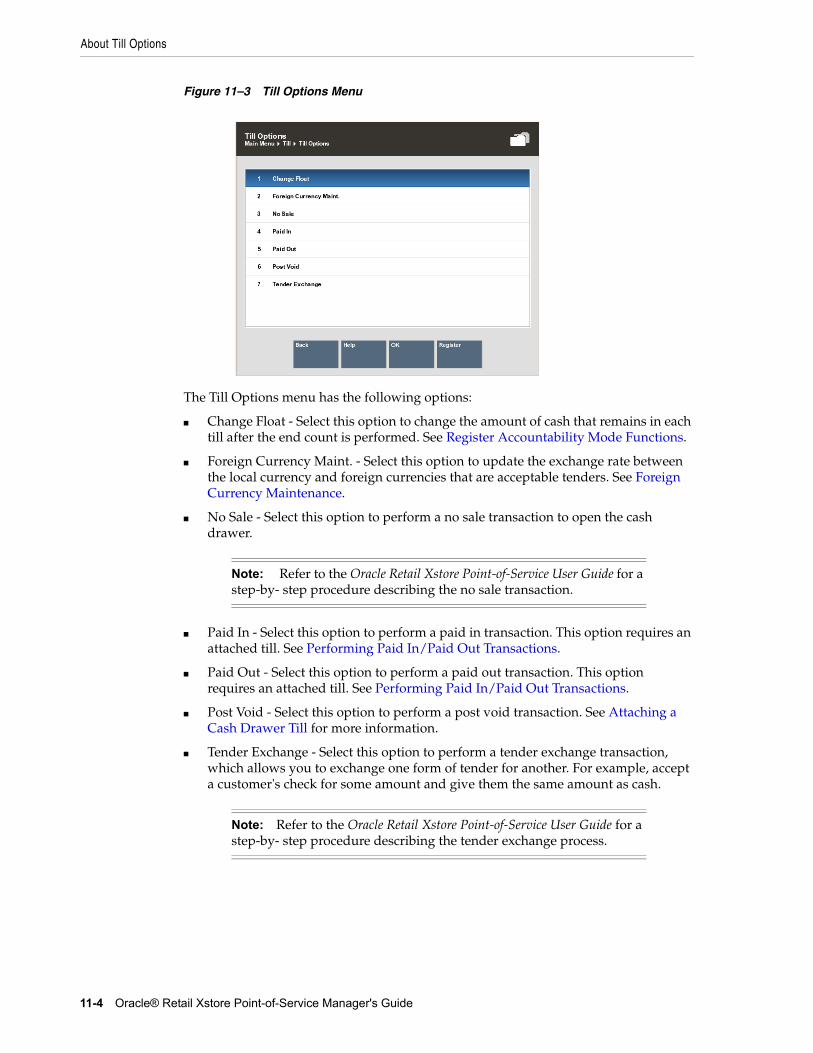
About Till Options
11-4 Oracle® Retail Xstore Point-of-Service Manager's Guide
Figure 11–3 Till Options Menu
The Till Options menu has the following options:
■ Change Float - Select this option to change the amount of cash that remains in each till after the end count is performed. See Register Accountability Mode Functions.
■ Foreign Currency Maint. - Select this option to update the exchange rate between the local currency and foreign currencies that are acceptable tenders. See Foreign Currency Maintenance.
■ No Sale - Select this option to perform a no sale transaction to open the cash drawer.
■ Paid In - Select this option to perform a paid in transaction. This option requires an attached till. See Performing Paid In/Paid Out Transactions.
■ Paid Out - Select this option to perform a paid out transaction. This option requires an attached till. See Performing Paid In/Paid Out Transactions.
■ Post Void - Select this option to perform a post void transaction. See Attaching a Cash Drawer Till for more information.
■ Tender Exchange - Select this option to perform a tender exchange transaction, which allows you to exchange one form of tender for another. For example, accept a customer's check for some amount and give them the same amount as cash.
Note: Refer to the Oracle Retail Xstore Point-of-Service User Guide for a step-by- step procedure describing the no sale transaction.
Note: Refer to the Oracle Retail Xstore Point-of-Service User Guide for a step-by- step procedure describing the tender exchange process.
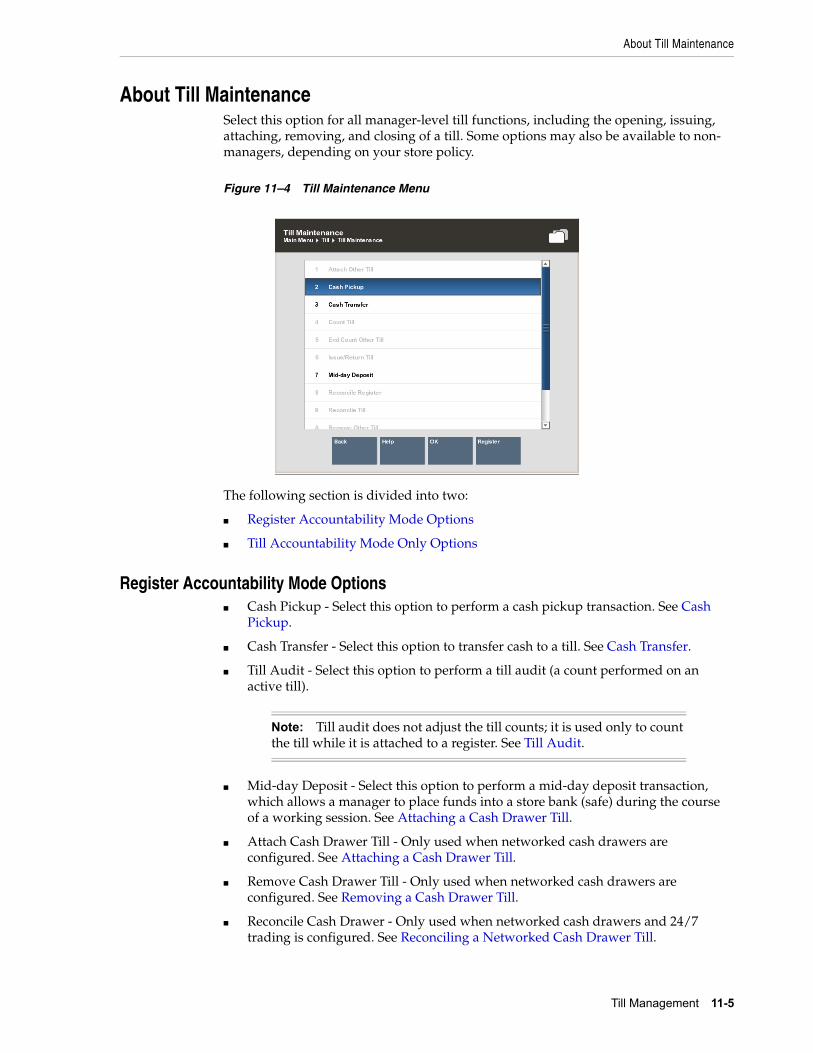
About Till Maintenance
Till Management 11-5
About Till MaintenanceSelect this option for all manager-level till functions, including the opening, issuing, attaching, removing, and closing of a till. Some options may also be available to non- managers, depending on your store policy.
Figure 11–4 Till Maintenance Menu
The following section is divided into two:
■ Register Accountability Mode Options
■ Till Accountability Mode Only Options
Register Accountability Mode Options■ Cash Pickup - Select this option to perform a cash pickup transaction. See Cash
Pickup.
■ Cash Transfer - Select this option to transfer cash to a till. See Cash Transfer.
■ Till Audit - Select this option to perform a till audit (a count performed on an active till).
■ Mid-day Deposit - Select this option to perform a mid-day deposit transaction, which allows a manager to place funds into a store bank (safe) during the course of a working session. See Attaching a Cash Drawer Till.
■ Attach Cash Drawer Till - Only used when networked cash drawers are configured. See Attaching a Cash Drawer Till.
■ Remove Cash Drawer Till - Only used when networked cash drawers are configured. See Removing a Cash Drawer Till.
■ Reconcile Cash Drawer - Only used when networked cash drawers and 24/7 trading is configured. See Reconciling a Networked Cash Drawer Till.
Note: Till audit does not adjust the till counts; it is used only to count the till while it is attached to a register. See Till Audit.
About Till Maintenance
11-6 Oracle® Retail Xstore Point-of-Service Manager's Guide
Till Accountability Mode Only OptionsWhen using till accountability, the following options are available, in addition to the options listed above for register accountability.
■ Issue/Return Till (Till Accountability Mode Only) - Select this option to assign a till to a cashier and to enter the starting cash amount, or return an issued till. See Issuing a Till (Till Accountability Mode Only).
■ Count Till (Till Accountability Mode Only) - Select this option to perform a begin count or close count on a till. If a begin count was not performed on the till, this option starts a begin count. If a begin count was performed on the till, this option starts a close count.
– See To Perform a Begin Count for a description of the begin count procedure.
– See Closing the Register for a description of the close count procedure.
■ Attach Other Till (Till Accountability Mode Only) - Select this option to attach a till to the register. This option can attach a till that is assigned to you or to another associate. See Attaching Other Till (Till Accountability Mode Only).
■ Remove Till (Till Accountability Mode Only) - Select this option to remove a till that is assigned to you and attached to the register. See Removing a Till (Till Accountability Mode Only).
■ Remove Other Till (Till Accountability Mode Only) - Select this option to remove any employee’s till that is attached to the register. See Removing a Till (Till Accountability Mode Only).
■ End Count Other Till (Till Accountability Mode Only) - Select this option to end count a till assigned to any employee. See End Count Other Till (Till Accountability Mode Only).
■ Reconcile Till (Till Accountability Mode Only) - Select this option to count a returned till and compare your counts with the cashier’s counts. See Reconciling a Till (Till Accountability Mode Only).
■ Store Safe Maintenance - Select this option for all functions related to the store safe. This submenu contains the following functions:
– Open Store Safe (Till Accountability Mode Only) - Select this option to open the store safe. See Store Safe Opening with Safe Bag (Till Accountability Mode Only).
– Reconcile Store Safe (Till Accountability Mode Only) - Select this option to reconcile the store safe. See Reconciling the Store Safe with a Safe Bag (Till Accountability Mode Only).
– Safe Deposit - Select this option to remove money from the store bank so that it can be deposited into a bank. See Preparing the Bank Deposit using a Safe Bag.
– Store Safe Audit - Select this option to perform an audit count of the store bank (store safe). See Store Safe Auditing with a Safe Bag.
– Store Bank Cash Deposit - Select this option to make a cash deposit into the store bank. See Store Safe Cash Deposit using a Safe Bag.
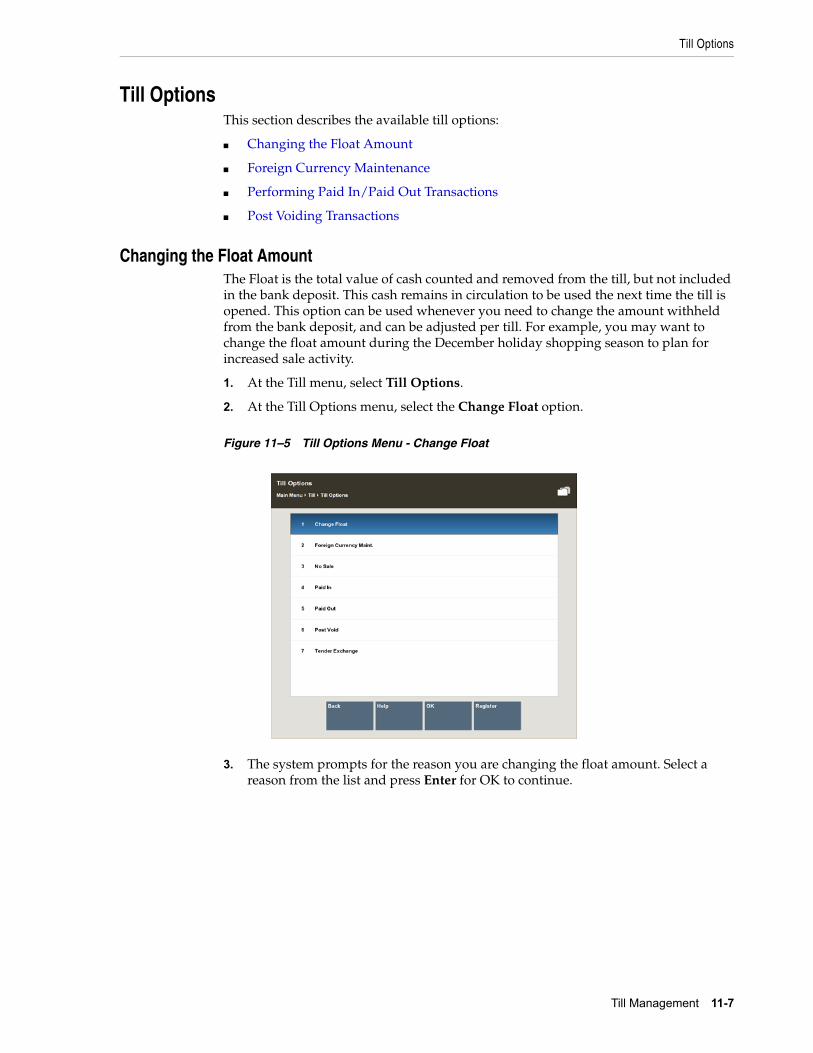
Till Options
Till Management 11-7
Till OptionsThis section describes the available till options:
■ Changing the Float Amount
■ Foreign Currency Maintenance
■ Performing Paid In/Paid Out Transactions
■ Post Voiding Transactions
Changing the Float AmountThe Float is the total value of cash counted and removed from the till, but not included in the bank deposit. This cash remains in circulation to be used the next time the till is opened. This option can be used whenever you need to change the amount withheld from the bank deposit, and can be adjusted per till. For example, you may want to change the float amount during the December holiday shopping season to plan for increased sale activity.
1. At the Till menu, select Till Options.
2. At the Till Options menu, select the Change Float option.
Figure 11–5 Till Options Menu - Change Float
3. The system prompts for the reason you are changing the float amount. Select a reason from the list and press Enter for OK to continue.
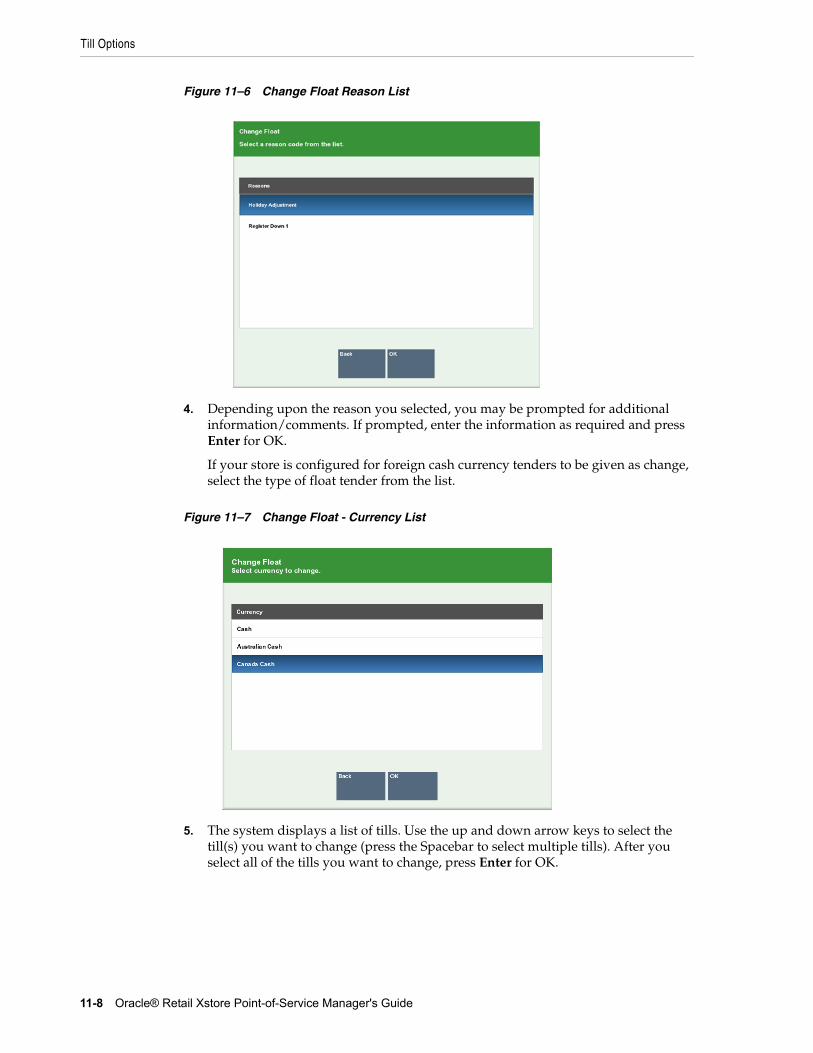
Till Options
11-8 Oracle® Retail Xstore Point-of-Service Manager's Guide
Figure 11–6 Change Float Reason List
4. Depending upon the reason you selected, you may be prompted for additional information/comments. If prompted, enter the information as required and press Enter for OK.
If your store is configured for foreign cash currency tenders to be given as change, select the type of float tender from the list.
Figure 11–7 Change Float - Currency List
5. The system displays a list of tills. Use the up and down arrow keys to select the till(s) you want to change (press the Spacebar to select multiple tills). After you select all of the tills you want to change, press Enter for OK.
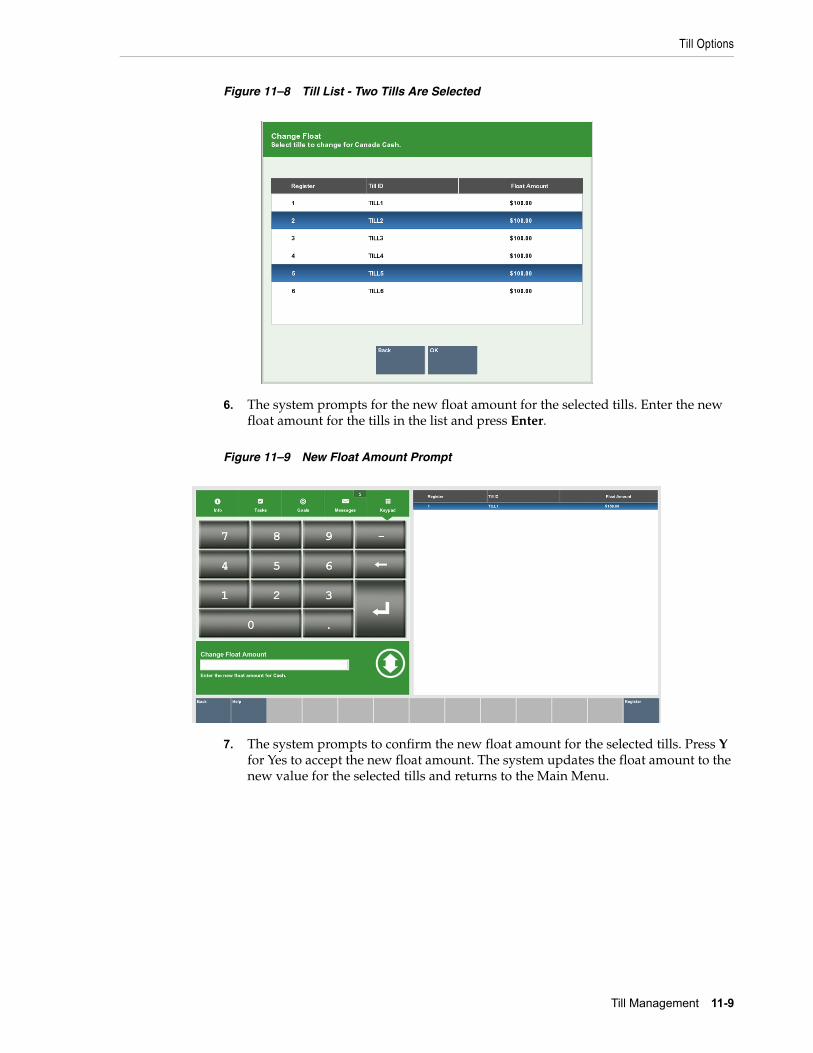
Till Options
Till Management 11-9
Figure 11–8 Till List - Two Tills Are Selected
6. The system prompts for the new float amount for the selected tills. Enter the new float amount for the tills in the list and press Enter.
Figure 11–9 New Float Amount Prompt
7. The system prompts to confirm the new float amount for the selected tills. Press Y for Yes to accept the new float amount. The system updates the float amount to the new value for the selected tills and returns to the Main Menu.
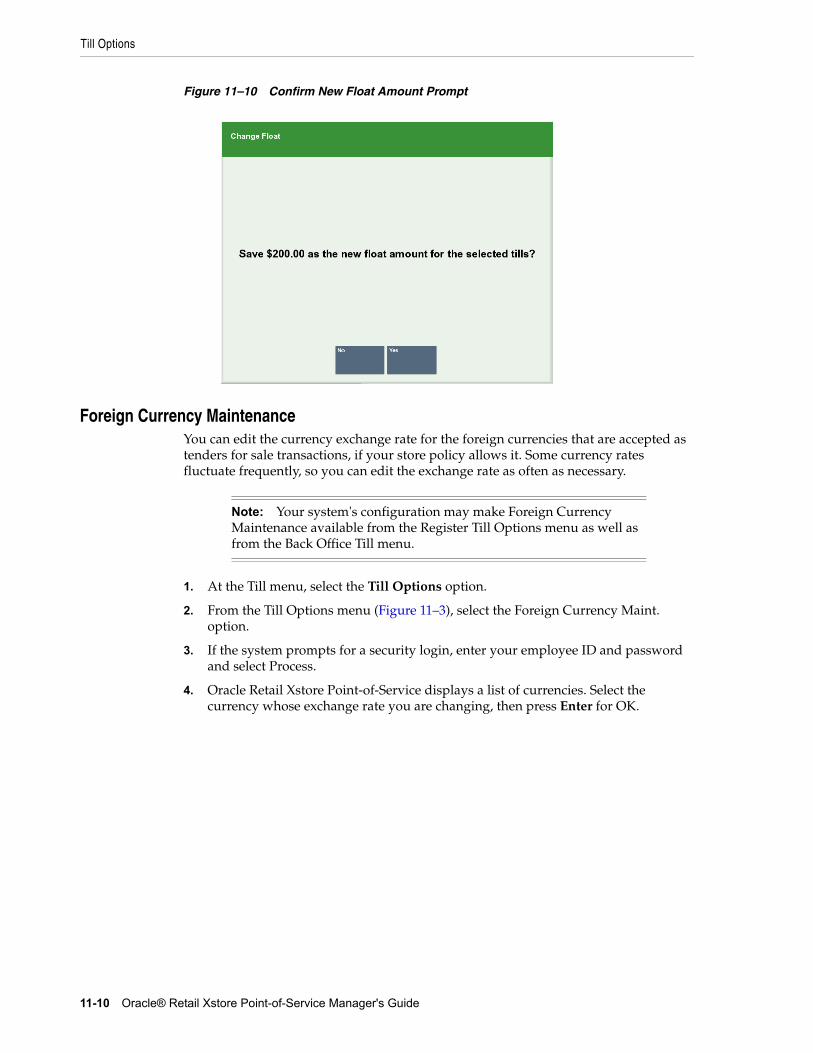
Till Options
11-10 Oracle® Retail Xstore Point-of-Service Manager's Guide
Figure 11–10 Confirm New Float Amount Prompt
Foreign Currency MaintenanceYou can edit the currency exchange rate for the foreign currencies that are accepted as tenders for sale transactions, if your store policy allows it. Some currency rates fluctuate frequently, so you can edit the exchange rate as often as necessary.
1. At the Till menu, select the Till Options option.
2. From the Till Options menu (Figure 11–3), select the Foreign Currency Maint. option.
3. If the system prompts for a security login, enter your employee ID and password and select Process.
4. Oracle Retail Xstore Point-of-Service displays a list of currencies. Select the currency whose exchange rate you are changing, then press Enter for OK.
Note: Your system's configuration may make Foreign Currency Maintenance available from the Register Till Options menu as well as from the Back Office Till menu.

Till Options
Till Management 11-11
Figure 11–11 Foreign Currency List
5. The system displays the current information for the currency you selected. Enter the new exchange rate and a comment, then select Save New Rate.
Figure 11–12 New Exchange Rate
6. Oracle Retail Xstore Point-of-Service prompts whether to change the exchange rate. Select Yes to continue.
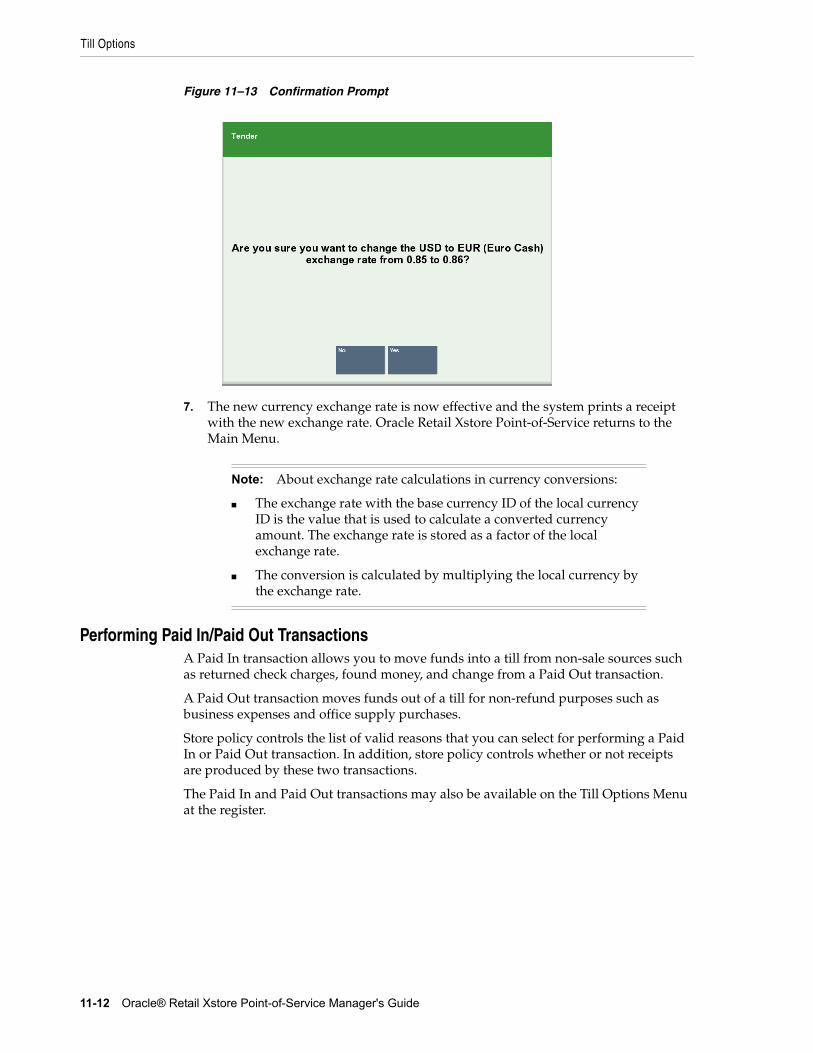
Till Options
11-12 Oracle® Retail Xstore Point-of-Service Manager's Guide
Figure 11–13 Confirmation Prompt
7. The new currency exchange rate is now effective and the system prints a receipt with the new exchange rate. Oracle Retail Xstore Point-of-Service returns to the Main Menu.
Performing Paid In/Paid Out TransactionsA Paid In transaction allows you to move funds into a till from non-sale sources such as returned check charges, found money, and change from a Paid Out transaction.
A Paid Out transaction moves funds out of a till for non-refund purposes such as business expenses and office supply purchases.
Store policy controls the list of valid reasons that you can select for performing a Paid In or Paid Out transaction. In addition, store policy controls whether or not receipts are produced by these two transactions.
The Paid In and Paid Out transactions may also be available on the Till Options Menu at the register.
Note: About exchange rate calculations in currency conversions:
■ The exchange rate with the base currency ID of the local currency ID is the value that is used to calculate a converted currency amount. The exchange rate is stored as a factor of the local exchange rate.
■ The conversion is calculated by multiplying the local currency by the exchange rate.

Till Options
Till Management 11-13
Paid In Transaction1. From the Till Menu, select the Till Options option.
2. From the Till Options menu, select the Paid In option.
Figure 11–14 Till Menu - Paid In Option
3. The system prompts you to enter a paid out receipt barcode. If you are now placing funds back into the till from a previous paid out transaction and you have the receipt, scan or enter the barcode and press Enter. Otherwise, just press Enter to bypass this prompt.
Figure 11–15 Paid Out Receipt Barcode Prompt
4. Select a reason for this Paid In transaction and press Enter for OK.
Note: A till must be attached to the register to perform Paid In/Paid Out transactions. If a till is not attached and one of those options is selected, a message is displayed indicating that a till must be attached for the transaction to be performed.
In an only networked cash drawer environment you are required to scan the cash drawer barcode to link it to the transaction before the drawer pops.
In a mixed network/local cash drawer environment, select whether to use a network cash drawer.
Note: If the register has more than one cash drawer, you may be prompted to select the till to be used for this process.
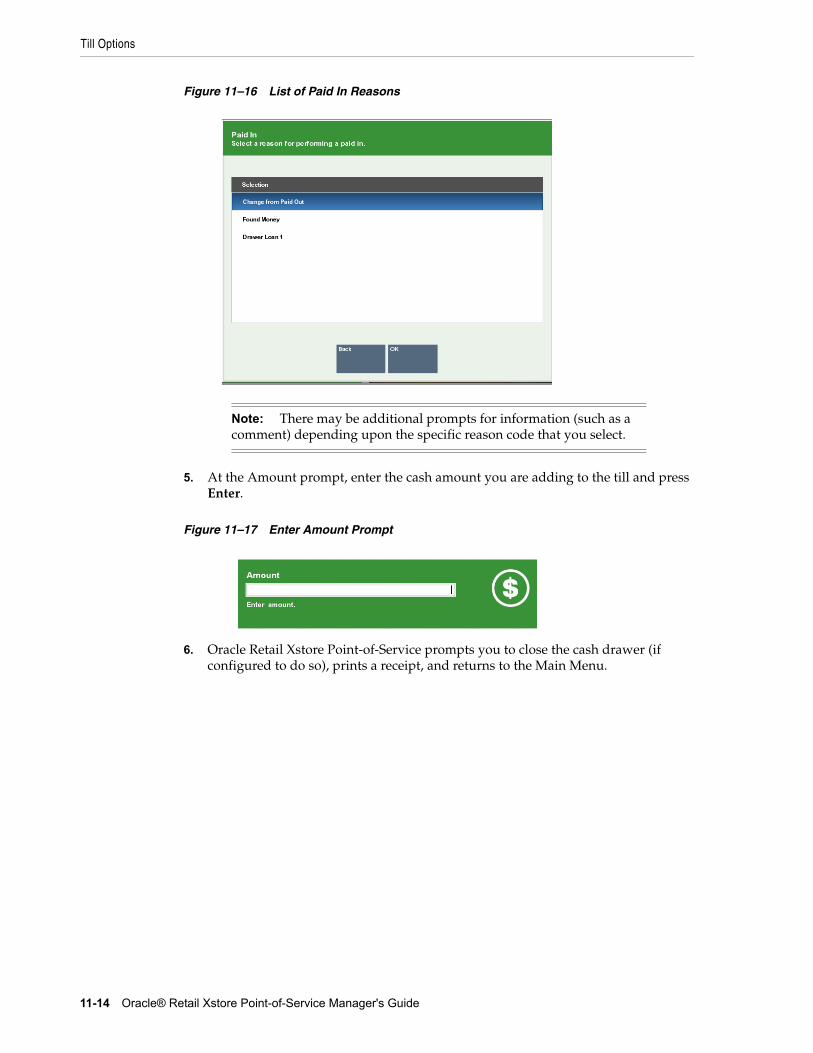
Till Options
11-14 Oracle® Retail Xstore Point-of-Service Manager's Guide
Figure 11–16 List of Paid In Reasons
5. At the Amount prompt, enter the cash amount you are adding to the till and press Enter.
Figure 11–17 Enter Amount Prompt
6. Oracle Retail Xstore Point-of-Service prompts you to close the cash drawer (if configured to do so), prints a receipt, and returns to the Main Menu.
Note: There may be additional prompts for information (such as a comment) depending upon the specific reason code that you select.
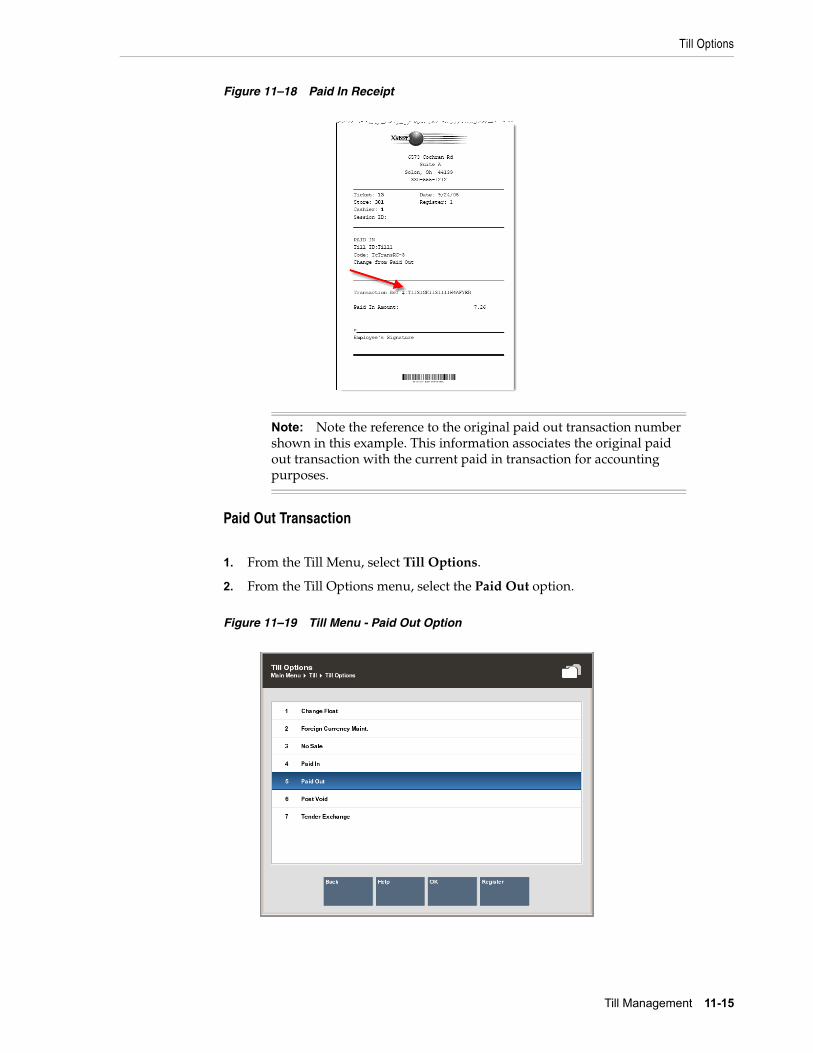
Till Options
Till Management 11-15
Figure 11–18 Paid In Receipt
Paid Out Transaction
1. From the Till Menu, select Till Options.
2. From the Till Options menu, select the Paid Out option.
Figure 11–19 Till Menu - Paid Out Option
Note: Note the reference to the original paid out transaction number shown in this example. This information associates the original paid out transaction with the current paid in transaction for accounting purposes.
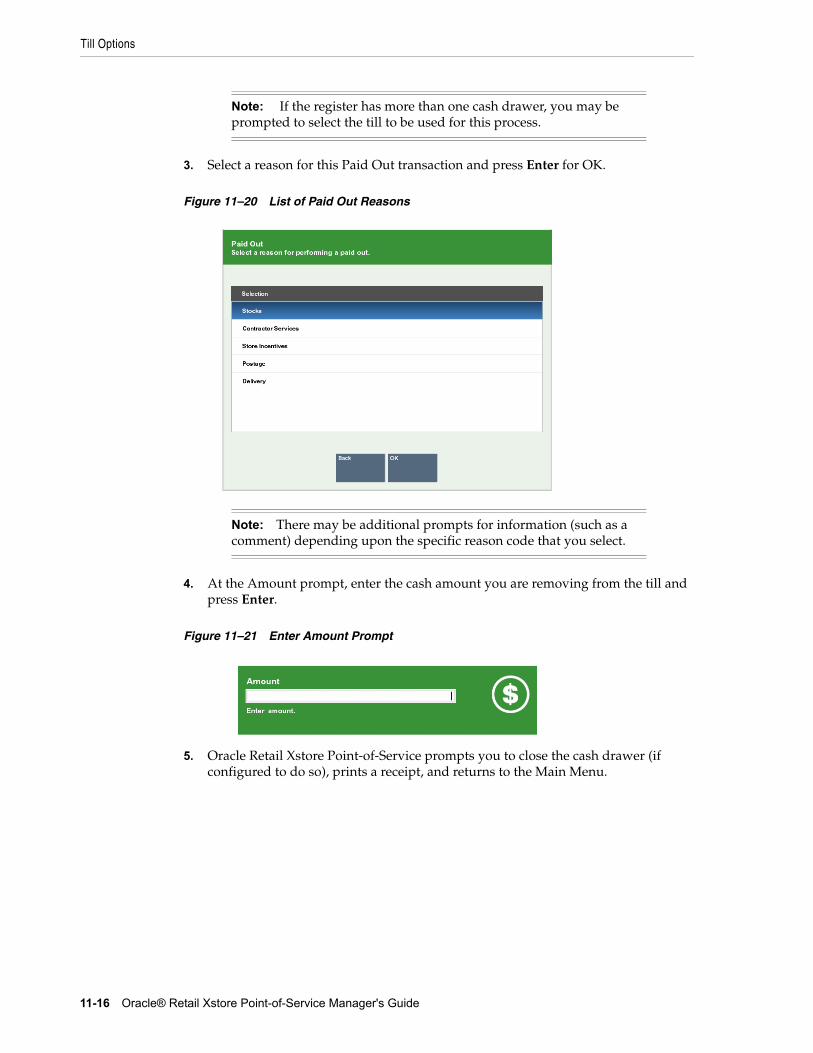
Till Options
11-16 Oracle® Retail Xstore Point-of-Service Manager's Guide
3. Select a reason for this Paid Out transaction and press Enter for OK.
Figure 11–20 List of Paid Out Reasons
4. At the Amount prompt, enter the cash amount you are removing from the till and press Enter.
Figure 11–21 Enter Amount Prompt
5. Oracle Retail Xstore Point-of-Service prompts you to close the cash drawer (if configured to do so), prints a receipt, and returns to the Main Menu.
Note: If the register has more than one cash drawer, you may be prompted to select the till to be used for this process.
Note: There may be additional prompts for information (such as a comment) depending upon the specific reason code that you select.
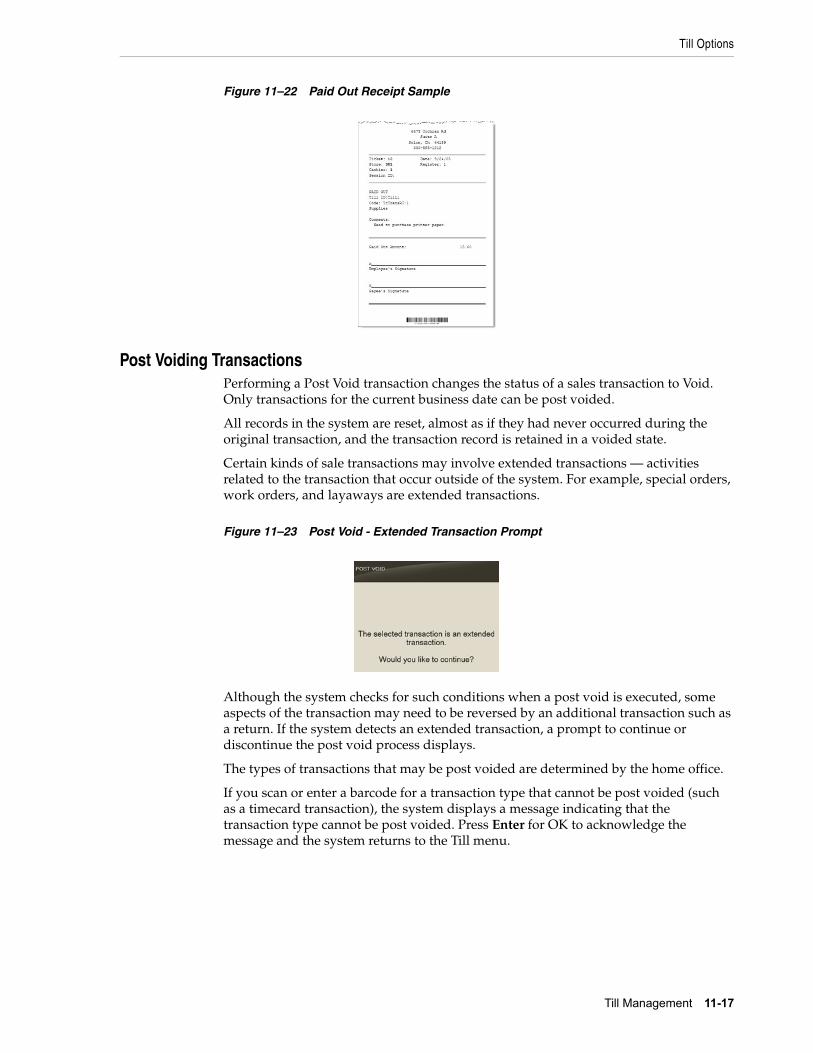
Till Options
Till Management 11-17
Figure 11–22 Paid Out Receipt Sample
Post Voiding TransactionsPerforming a Post Void transaction changes the status of a sales transaction to Void. Only transactions for the current business date can be post voided.
All records in the system are reset, almost as if they had never occurred during the original transaction, and the transaction record is retained in a voided state.
Certain kinds of sale transactions may involve extended transactions — activities related to the transaction that occur outside of the system. For example, special orders, work orders, and layaways are extended transactions.
Figure 11–23 Post Void - Extended Transaction Prompt
Although the system checks for such conditions when a post void is executed, some aspects of the transaction may need to be reversed by an additional transaction such as a return. If the system detects an extended transaction, a prompt to continue or discontinue the post void process displays.
The types of transactions that may be post voided are determined by the home office.
If you scan or enter a barcode for a transaction type that cannot be post voided (such as a timecard transaction), the system displays a message indicating that the transaction type cannot be post voided. Press Enter for OK to acknowledge the message and the system returns to the Till menu.
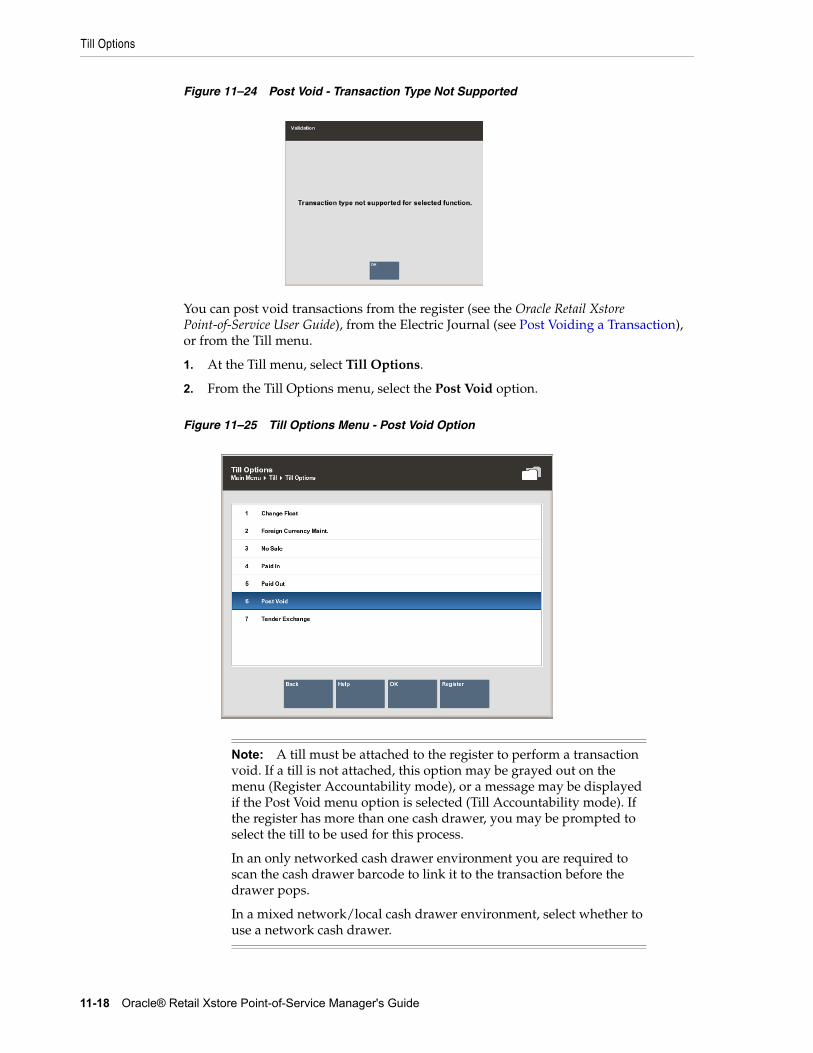
Till Options
11-18 Oracle® Retail Xstore Point-of-Service Manager's Guide
Figure 11–24 Post Void - Transaction Type Not Supported
You can post void transactions from the register (see the Oracle Retail Xstore Point-of-Service User Guide), from the Electric Journal (see Post Voiding a Transaction), or from the Till menu.
1. At the Till menu, select Till Options.
2. From the Till Options menu, select the Post Void option.
Figure 11–25 Till Options Menu - Post Void Option
Note: A till must be attached to the register to perform a transaction void. If a till is not attached, this option may be grayed out on the menu (Register Accountability mode), or a message may be displayed if the Post Void menu option is selected (Till Accountability mode). If the register has more than one cash drawer, you may be prompted to select the till to be used for this process.
In an only networked cash drawer environment you are required to scan the cash drawer barcode to link it to the transaction before the drawer pops.
In a mixed network/local cash drawer environment, select whether to use a network cash drawer.
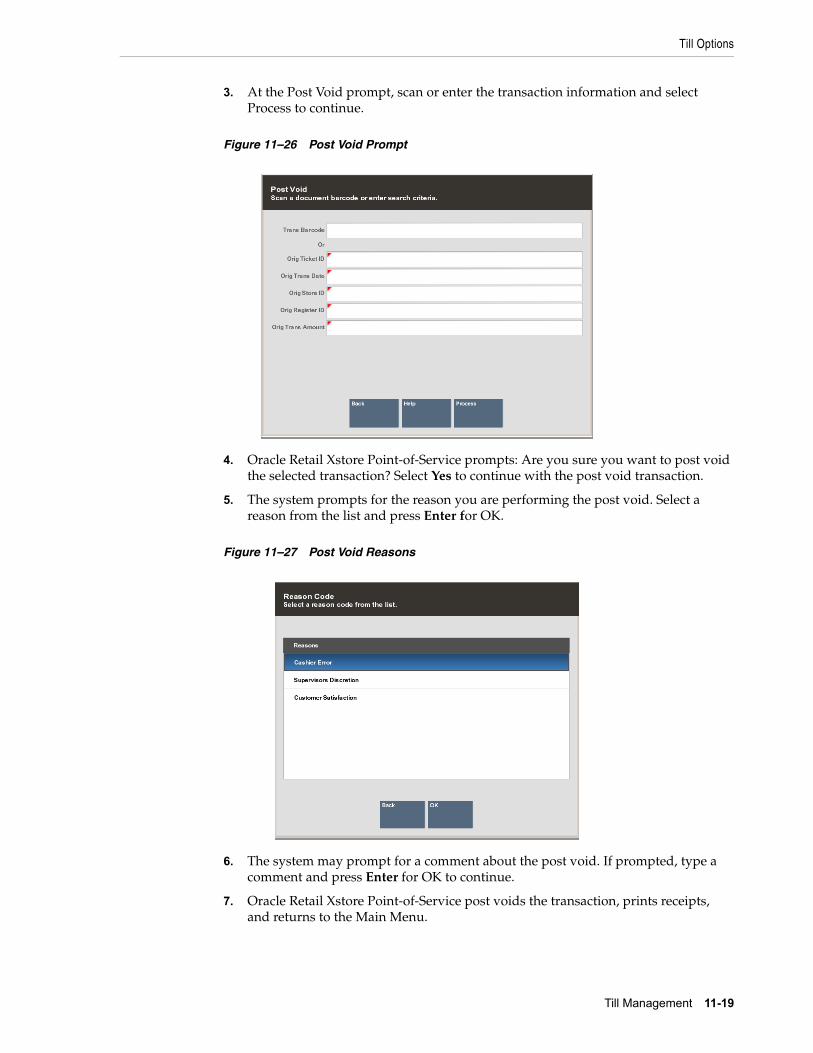
Till Options
Till Management 11-19
3. At the Post Void prompt, scan or enter the transaction information and select Process to continue.
Figure 11–26 Post Void Prompt
4. Oracle Retail Xstore Point-of-Service prompts: Are you sure you want to post void the selected transaction? Select Yes to continue with the post void transaction.
5. The system prompts for the reason you are performing the post void. Select a reason from the list and press Enter for OK.
Figure 11–27 Post Void Reasons
6. The system may prompt for a comment about the post void. If prompted, type a comment and press Enter for OK to continue.
7. Oracle Retail Xstore Point-of-Service post voids the transaction, prints receipts, and returns to the Main Menu.
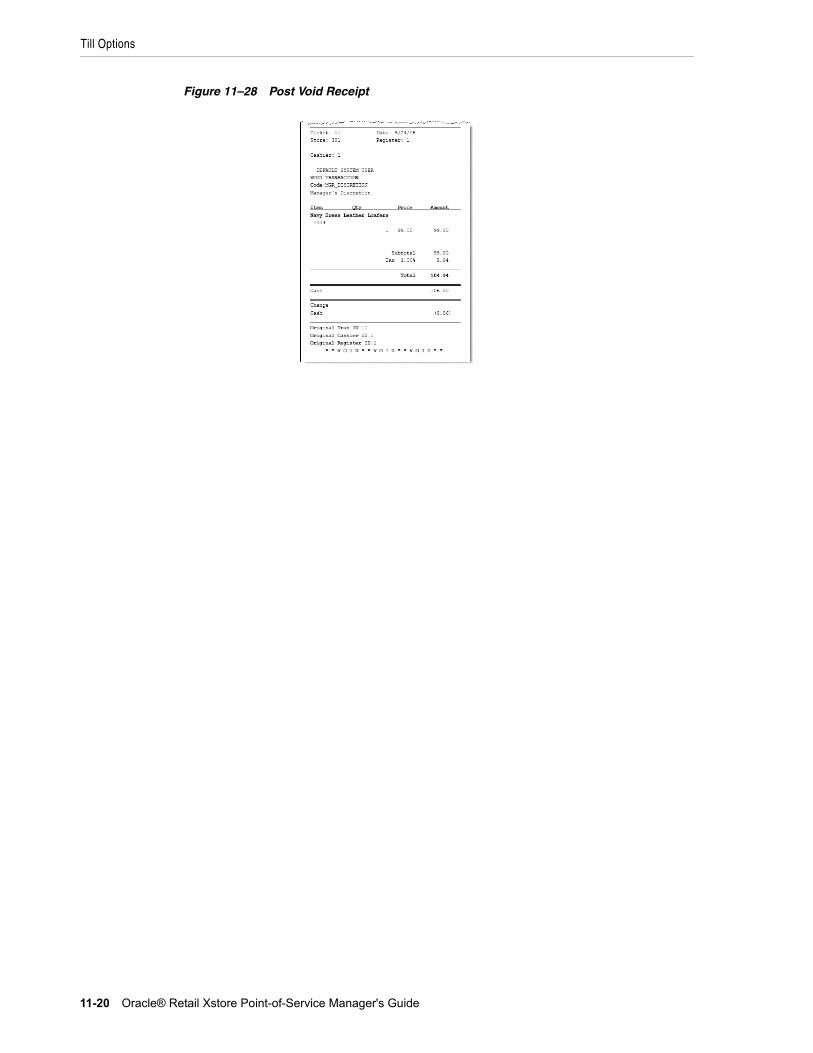
Till Options
11-20 Oracle® Retail Xstore Point-of-Service Manager's Guide
Figure 11–28 Post Void Receipt
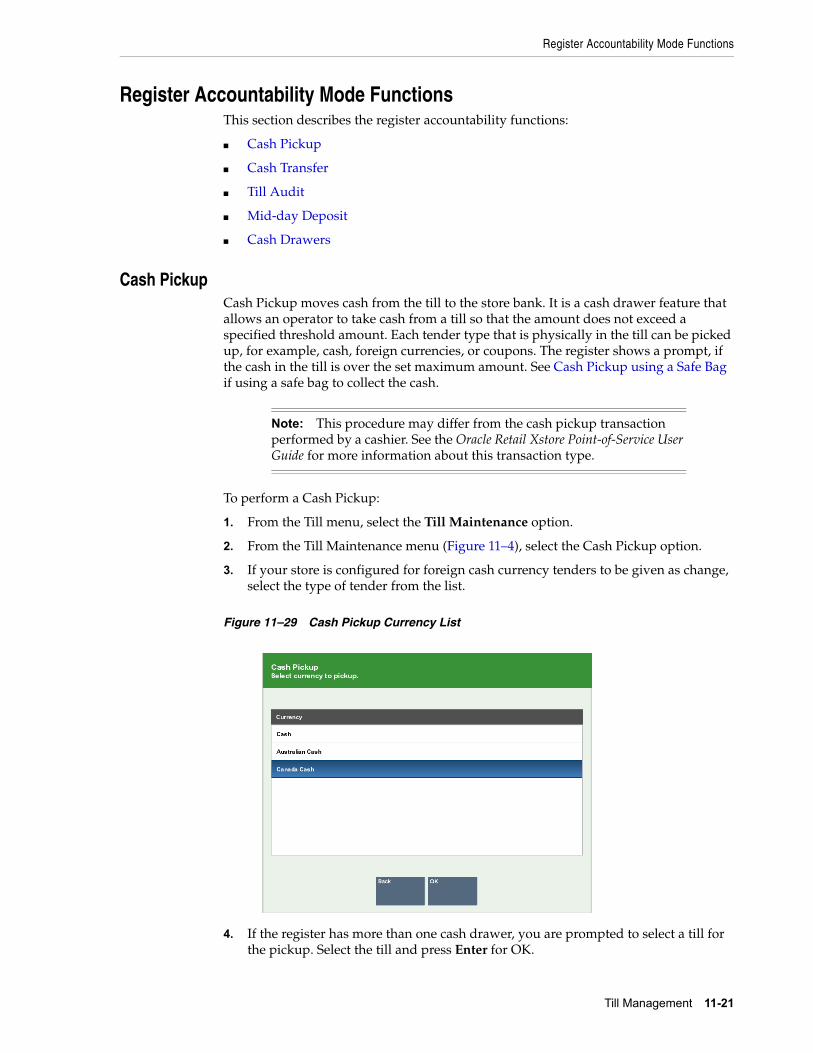
Register Accountability Mode Functions
Till Management 11-21
Register Accountability Mode FunctionsThis section describes the register accountability functions:
■ Cash Pickup
■ Cash Transfer
■ Till Audit
■ Mid-day Deposit
■ Cash Drawers
Cash PickupCash Pickup moves cash from the till to the store bank. It is a cash drawer feature that allows an operator to take cash from a till so that the amount does not exceed a specified threshold amount. Each tender type that is physically in the till can be picked up, for example, cash, foreign currencies, or coupons. The register shows a prompt, if the cash in the till is over the set maximum amount. See Cash Pickup using a Safe Bag if using a safe bag to collect the cash.
To perform a Cash Pickup:
1. From the Till menu, select the Till Maintenance option.
2. From the Till Maintenance menu (Figure 11–4), select the Cash Pickup option.
3. If your store is configured for foreign cash currency tenders to be given as change, select the type of tender from the list.
Figure 11–29 Cash Pickup Currency List
4. If the register has more than one cash drawer, you are prompted to select a till for the pickup. Select the till and press Enter for OK.
Note: This procedure may differ from the cash pickup transaction performed by a cashier. See the Oracle Retail Xstore Point-of-Service User Guide for more information about this transaction type.
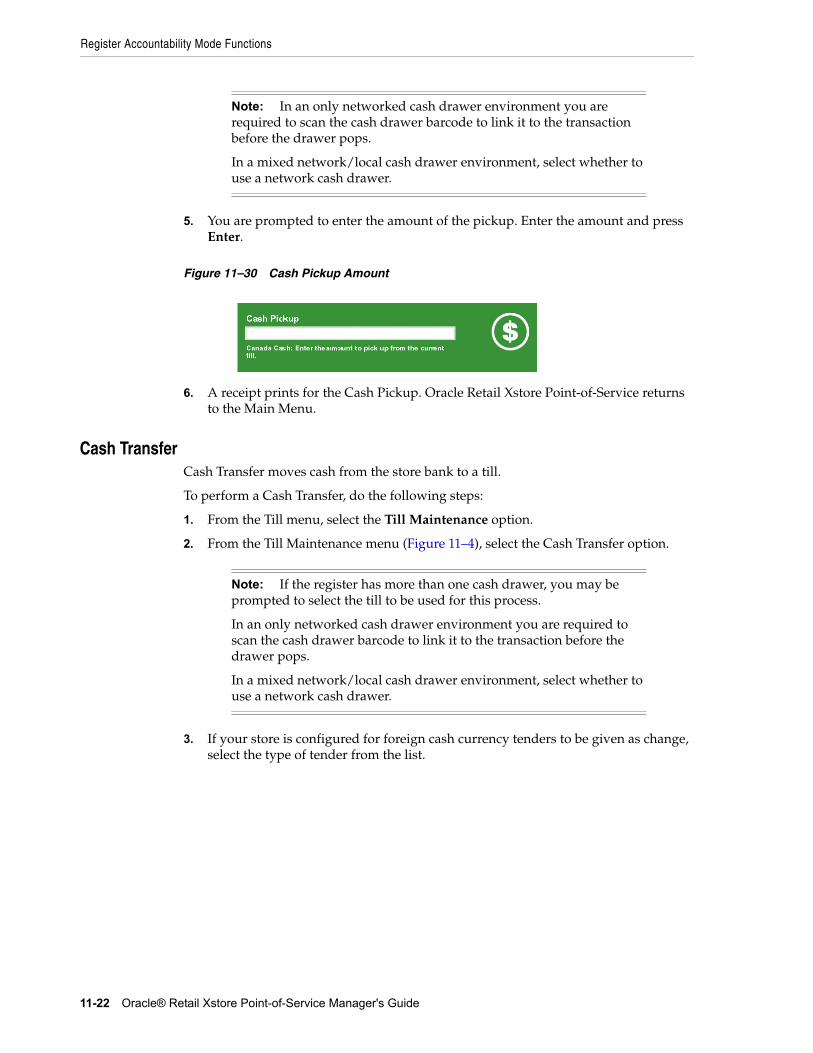
Register Accountability Mode Functions
11-22 Oracle® Retail Xstore Point-of-Service Manager's Guide
5. You are prompted to enter the amount of the pickup. Enter the amount and press Enter.
Figure 11–30 Cash Pickup Amount
6. A receipt prints for the Cash Pickup. Oracle Retail Xstore Point-of-Service returns to the Main Menu.
Cash TransferCash Transfer moves cash from the store bank to a till.
To perform a Cash Transfer, do the following steps:
1. From the Till menu, select the Till Maintenance option.
2. From the Till Maintenance menu (Figure 11–4), select the Cash Transfer option.
3. If your store is configured for foreign cash currency tenders to be given as change, select the type of tender from the list.
Note: In an only networked cash drawer environment you are required to scan the cash drawer barcode to link it to the transaction before the drawer pops.
In a mixed network/local cash drawer environment, select whether to use a network cash drawer.
Note: If the register has more than one cash drawer, you may be prompted to select the till to be used for this process.
In an only networked cash drawer environment you are required to scan the cash drawer barcode to link it to the transaction before the drawer pops.
In a mixed network/local cash drawer environment, select whether to use a network cash drawer.

Register Accountability Mode Functions
Till Management 11-23
Figure 11–31 Cash Transfer Currency List
4. You are prompted to enter the amount of the Cash Transfer. Enter the amount, then press Enter.
Figure 11–32 Cash Transfer Amount Prompt
5. A receipt prints for the Cash Transfer and Oracle Retail Xstore Point-of-Service returns to the Main Menu.
Till AuditTill Audit provides the capability to select a tender type, record its total current value, and see if that value balances with the amount that the system shows for the same tender. The system calculates and displays any difference (over/short) between the two amounts.
A Till Audit may be performed any time after the Beginning Count and before the Ending Count. The till does not need to be removed after the audit is completed.
1. From the Till menu, select the Till Maintenance option.
2. From the Till Maintenance menu (Figure 11–4), select the Till Audit option.
Note: If the register has more than one cash drawer, you may be prompted to select the till to be used for this process.
In an only networked cash drawer environment you are required to scan the cash drawer barcode to link it to the transaction before the drawer pops.
In a mixed network/local cash drawer environment, select whether to use a network cash drawer.
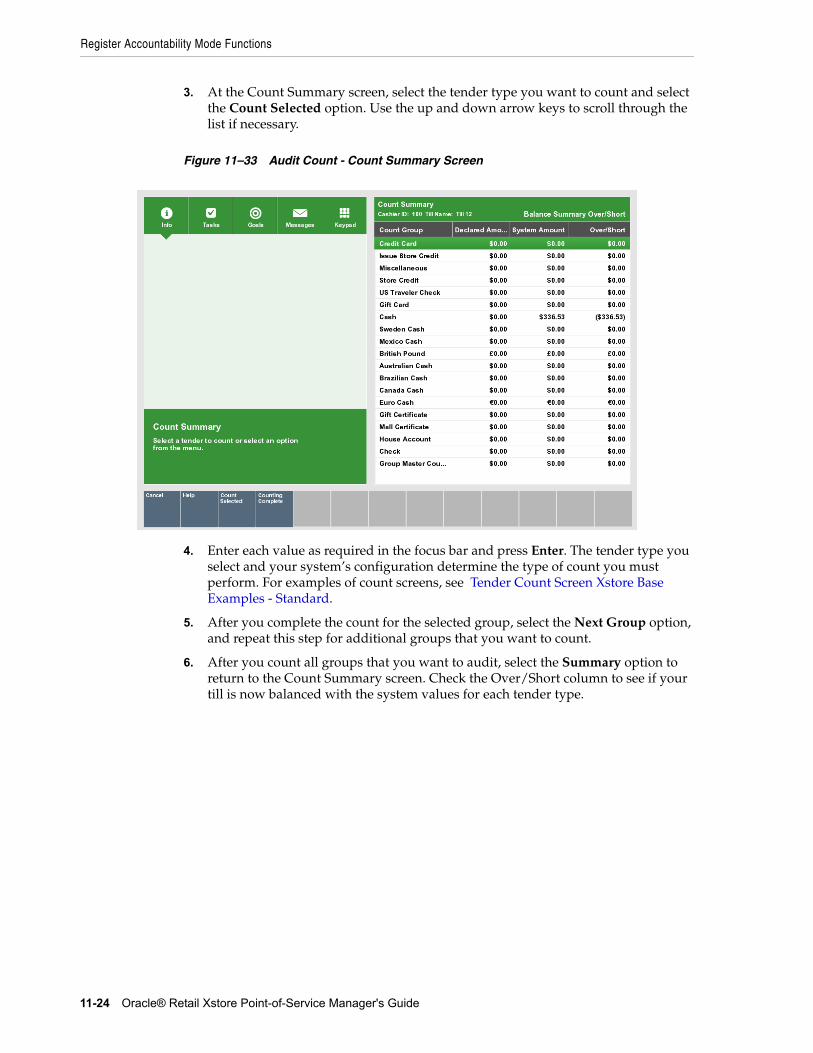
Register Accountability Mode Functions
11-24 Oracle® Retail Xstore Point-of-Service Manager's Guide
3. At the Count Summary screen, select the tender type you want to count and select the Count Selected option. Use the up and down arrow keys to scroll through the list if necessary.
Figure 11–33 Audit Count - Count Summary Screen
4. Enter each value as required in the focus bar and press Enter. The tender type you select and your system’s configuration determine the type of count you must perform. For examples of count screens, see Tender Count Screen Xstore Base Examples - Standard.
5. After you complete the count for the selected group, select the Next Group option, and repeat this step for additional groups that you want to count.
6. After you count all groups that you want to audit, select the Summary option to return to the Count Summary screen. Check the Over/Short column to see if your till is now balanced with the system values for each tender type.
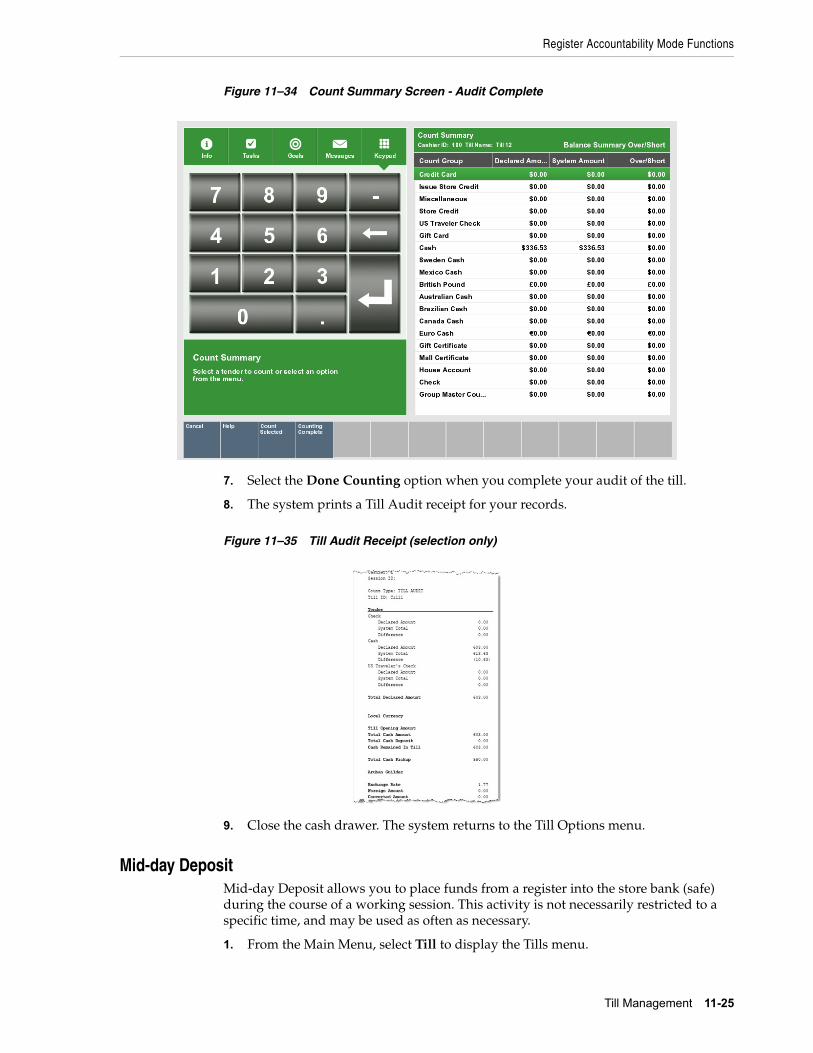
Register Accountability Mode Functions
Till Management 11-25
Figure 11–34 Count Summary Screen - Audit Complete
7. Select the Done Counting option when you complete your audit of the till.
8. The system prints a Till Audit receipt for your records.
Figure 11–35 Till Audit Receipt (selection only)
9. Close the cash drawer. The system returns to the Till Options menu.
Mid-day DepositMid-day Deposit allows you to place funds from a register into the store bank (safe) during the course of a working session. This activity is not necessarily restricted to a specific time, and may be used as often as necessary.
1. From the Main Menu, select Till to display the Tills menu.
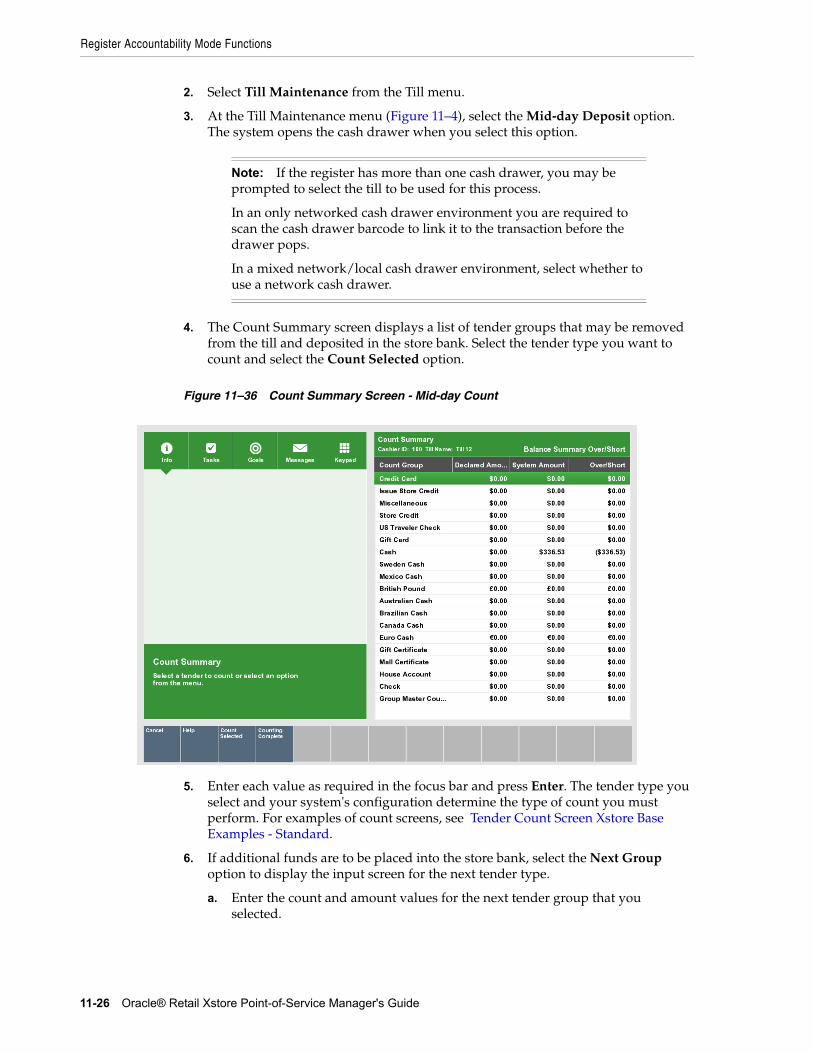
Register Accountability Mode Functions
11-26 Oracle® Retail Xstore Point-of-Service Manager's Guide
2. Select Till Maintenance from the Till menu.
3. At the Till Maintenance menu (Figure 11–4), select the Mid-day Deposit option. The system opens the cash drawer when you select this option.
4. The Count Summary screen displays a list of tender groups that may be removed from the till and deposited in the store bank. Select the tender type you want to count and select the Count Selected option.
Figure 11–36 Count Summary Screen - Mid-day Count
5. Enter each value as required in the focus bar and press Enter. The tender type you select and your system's configuration determine the type of count you must perform. For examples of count screens, see Tender Count Screen Xstore Base Examples - Standard.
6. If additional funds are to be placed into the store bank, select the Next Group option to display the input screen for the next tender type.
a. Enter the count and amount values for the next tender group that you selected.
Note: If the register has more than one cash drawer, you may be prompted to select the till to be used for this process.
In an only networked cash drawer environment you are required to scan the cash drawer barcode to link it to the transaction before the drawer pops.
In a mixed network/local cash drawer environment, select whether to use a network cash drawer.
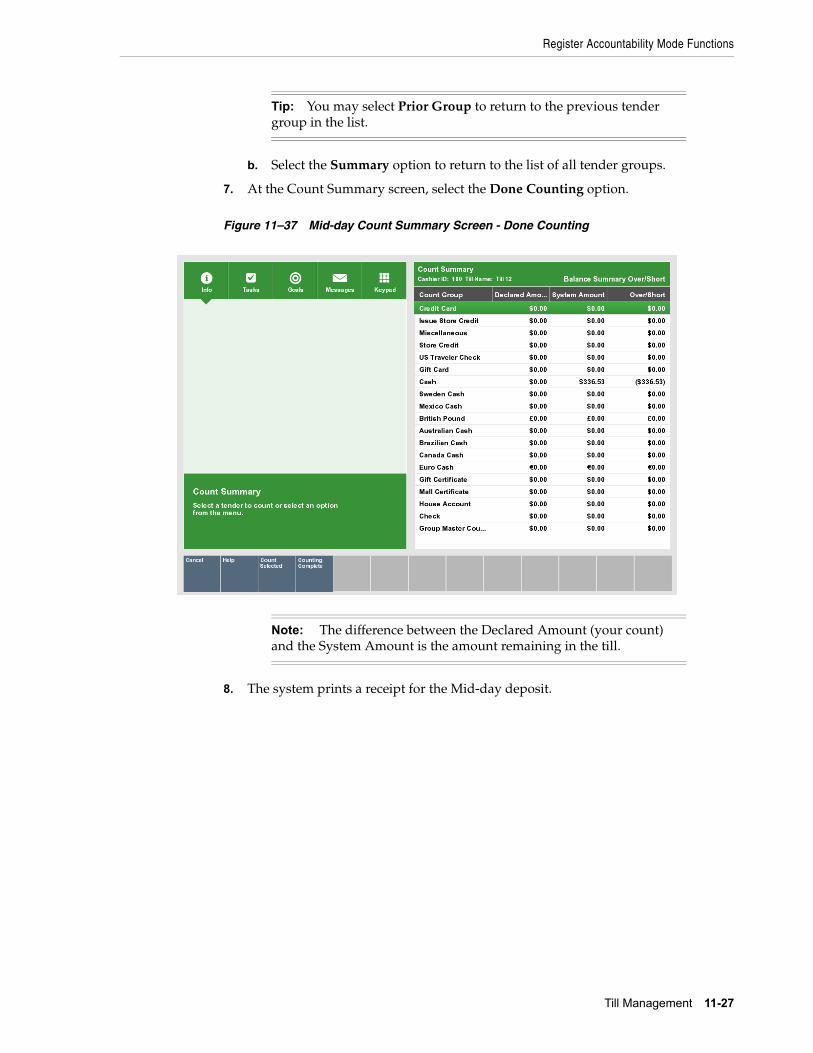
Register Accountability Mode Functions
Till Management 11-27
b. Select the Summary option to return to the list of all tender groups.
7. At the Count Summary screen, select the Done Counting option.
Figure 11–37 Mid-day Count Summary Screen - Done Counting
8. The system prints a receipt for the Mid-day deposit.
Tip: You may select Prior Group to return to the previous tender group in the list.
Note: The difference between the Declared Amount (your count) and the System Amount is the amount remaining in the till.
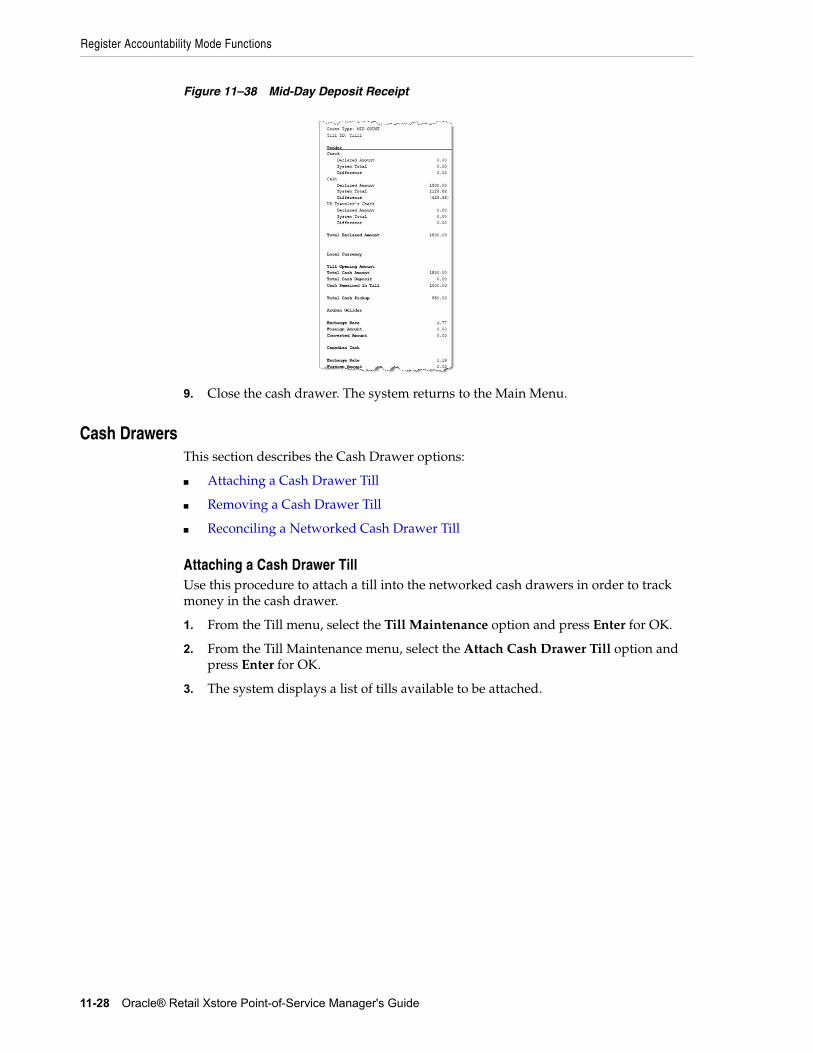
Register Accountability Mode Functions
11-28 Oracle® Retail Xstore Point-of-Service Manager's Guide
Figure 11–38 Mid-Day Deposit Receipt
9. Close the cash drawer. The system returns to the Main Menu.
Cash DrawersThis section describes the Cash Drawer options:
■ Attaching a Cash Drawer Till
■ Removing a Cash Drawer Till
■ Reconciling a Networked Cash Drawer Till
Attaching a Cash Drawer TillUse this procedure to attach a till into the networked cash drawers in order to track money in the cash drawer.
1. From the Till menu, select the Till Maintenance option and press Enter for OK.
2. From the Till Maintenance menu, select the Attach Cash Drawer Till option and press Enter for OK.
3. The system displays a list of tills available to be attached.
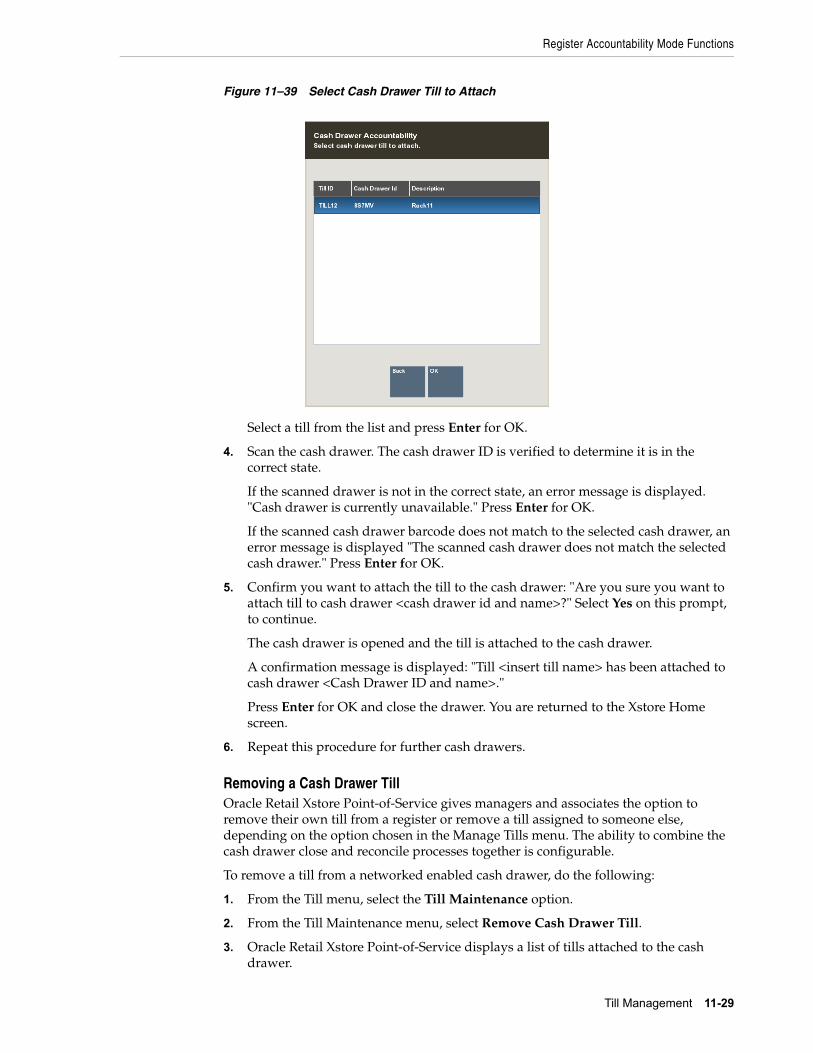
Register Accountability Mode Functions
Till Management 11-29
Figure 11–39 Select Cash Drawer Till to Attach
Select a till from the list and press Enter for OK.
4. Scan the cash drawer. The cash drawer ID is verified to determine it is in the correct state.
If the scanned drawer is not in the correct state, an error message is displayed. "Cash drawer is currently unavailable." Press Enter for OK.
If the scanned cash drawer barcode does not match to the selected cash drawer, an error message is displayed "The scanned cash drawer does not match the selected cash drawer." Press Enter for OK.
5. Confirm you want to attach the till to the cash drawer: "Are you sure you want to attach till to cash drawer <cash drawer id and name>?" Select Yes on this prompt, to continue.
The cash drawer is opened and the till is attached to the cash drawer.
A confirmation message is displayed: "Till <insert till name> has been attached to cash drawer <Cash Drawer ID and name>."
Press Enter for OK and close the drawer. You are returned to the Xstore Home screen.
6. Repeat this procedure for further cash drawers.
Removing a Cash Drawer TillOracle Retail Xstore Point-of-Service gives managers and associates the option to remove their own till from a register or remove a till assigned to someone else, depending on the option chosen in the Manage Tills menu. The ability to combine the cash drawer close and reconcile processes together is configurable.
To remove a till from a networked enabled cash drawer, do the following:
1. From the Till menu, select the Till Maintenance option.
2. From the Till Maintenance menu, select Remove Cash Drawer Till.
3. Oracle Retail Xstore Point-of-Service displays a list of tills attached to the cash drawer.
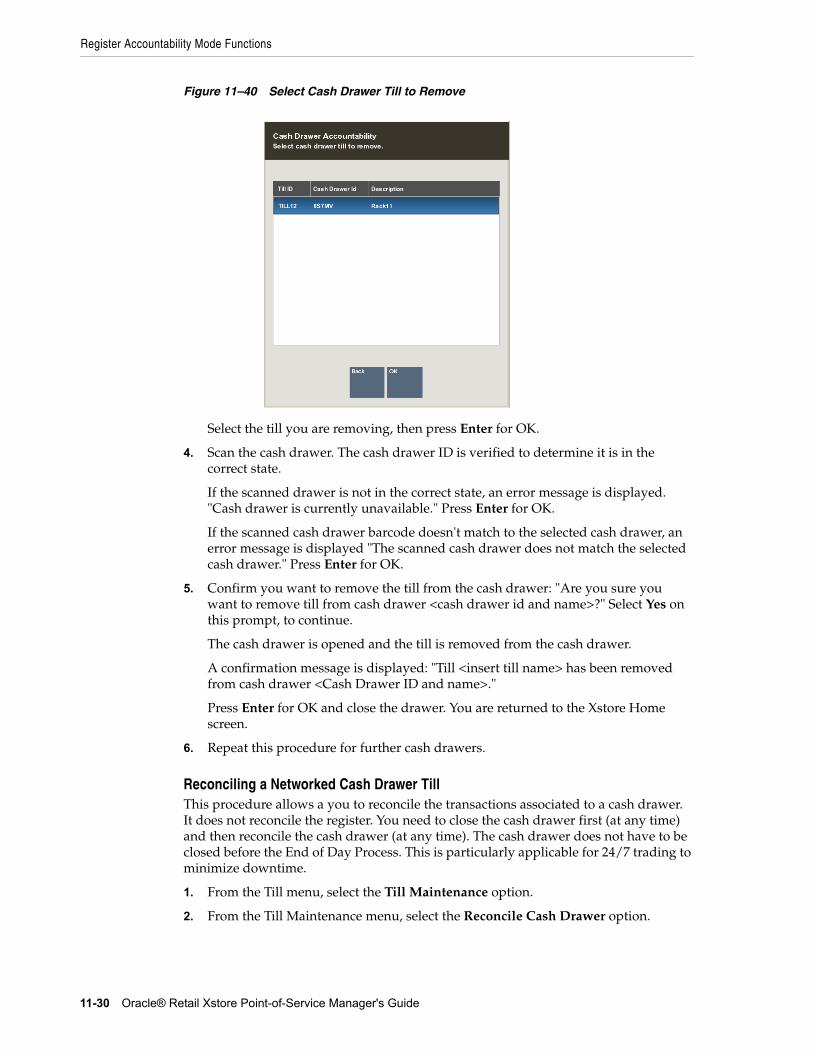
Register Accountability Mode Functions
11-30 Oracle® Retail Xstore Point-of-Service Manager's Guide
Figure 11–40 Select Cash Drawer Till to Remove
Select the till you are removing, then press Enter for OK.
4. Scan the cash drawer. The cash drawer ID is verified to determine it is in the correct state.
If the scanned drawer is not in the correct state, an error message is displayed. "Cash drawer is currently unavailable." Press Enter for OK.
If the scanned cash drawer barcode doesn't match to the selected cash drawer, an error message is displayed "The scanned cash drawer does not match the selected cash drawer." Press Enter for OK.
5. Confirm you want to remove the till from the cash drawer: "Are you sure you want to remove till from cash drawer <cash drawer id and name>?" Select Yes on this prompt, to continue.
The cash drawer is opened and the till is removed from the cash drawer.
A confirmation message is displayed: "Till <insert till name> has been removed from cash drawer <Cash Drawer ID and name>."
Press Enter for OK and close the drawer. You are returned to the Xstore Home screen.
6. Repeat this procedure for further cash drawers.
Reconciling a Networked Cash Drawer TillThis procedure allows a you to reconcile the transactions associated to a cash drawer. It does not reconcile the register. You need to close the cash drawer first (at any time) and then reconcile the cash drawer (at any time). The cash drawer does not have to be closed before the End of Day Process. This is particularly applicable for 24/7 trading to minimize downtime.
1. From the Till menu, select the Till Maintenance option.
2. From the Till Maintenance menu, select the Reconcile Cash Drawer option.
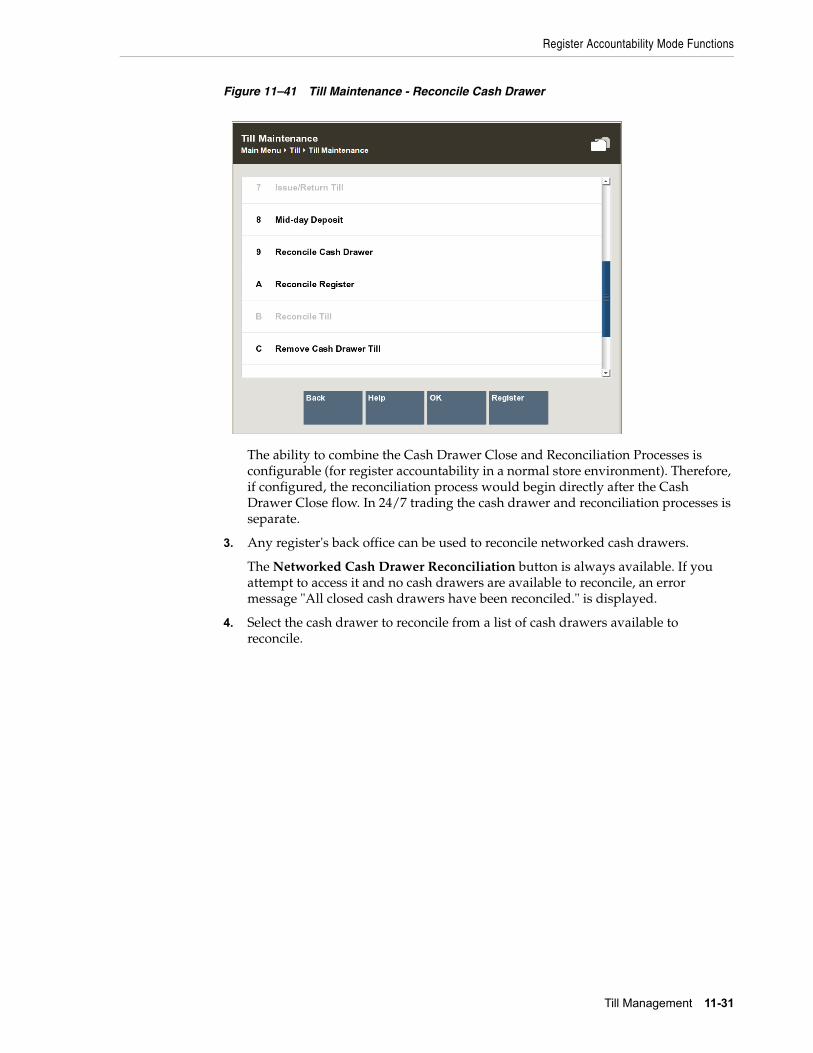
Register Accountability Mode Functions
Till Management 11-31
Figure 11–41 Till Maintenance - Reconcile Cash Drawer
The ability to combine the Cash Drawer Close and Reconciliation Processes is configurable (for register accountability in a normal store environment). Therefore, if configured, the reconciliation process would begin directly after the Cash Drawer Close flow. In 24/7 trading the cash drawer and reconciliation processes is separate.
3. Any register's back office can be used to reconcile networked cash drawers.
The Networked Cash Drawer Reconciliation button is always available. If you attempt to access it and no cash drawers are available to reconcile, an error message "All closed cash drawers have been reconciled." is displayed.
4. Select the cash drawer to reconcile from a list of cash drawers available to reconcile.
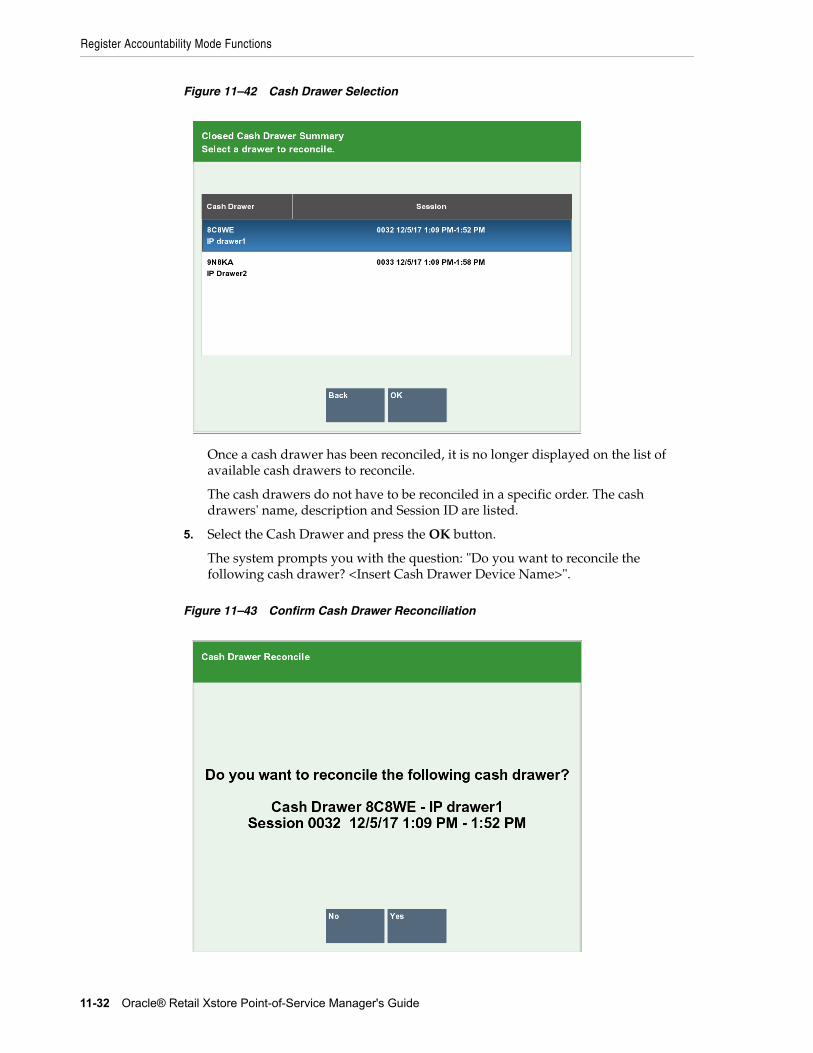
Register Accountability Mode Functions
11-32 Oracle® Retail Xstore Point-of-Service Manager's Guide
Figure 11–42 Cash Drawer Selection
Once a cash drawer has been reconciled, it is no longer displayed on the list of available cash drawers to reconcile.
The cash drawers do not have to be reconciled in a specific order. The cash drawers' name, description and Session ID are listed.
5. Select the Cash Drawer and press the OK button.
The system prompts you with the question: "Do you want to reconcile the following cash drawer? <Insert Cash Drawer Device Name>".
Figure 11–43 Confirm Cash Drawer Reconciliation
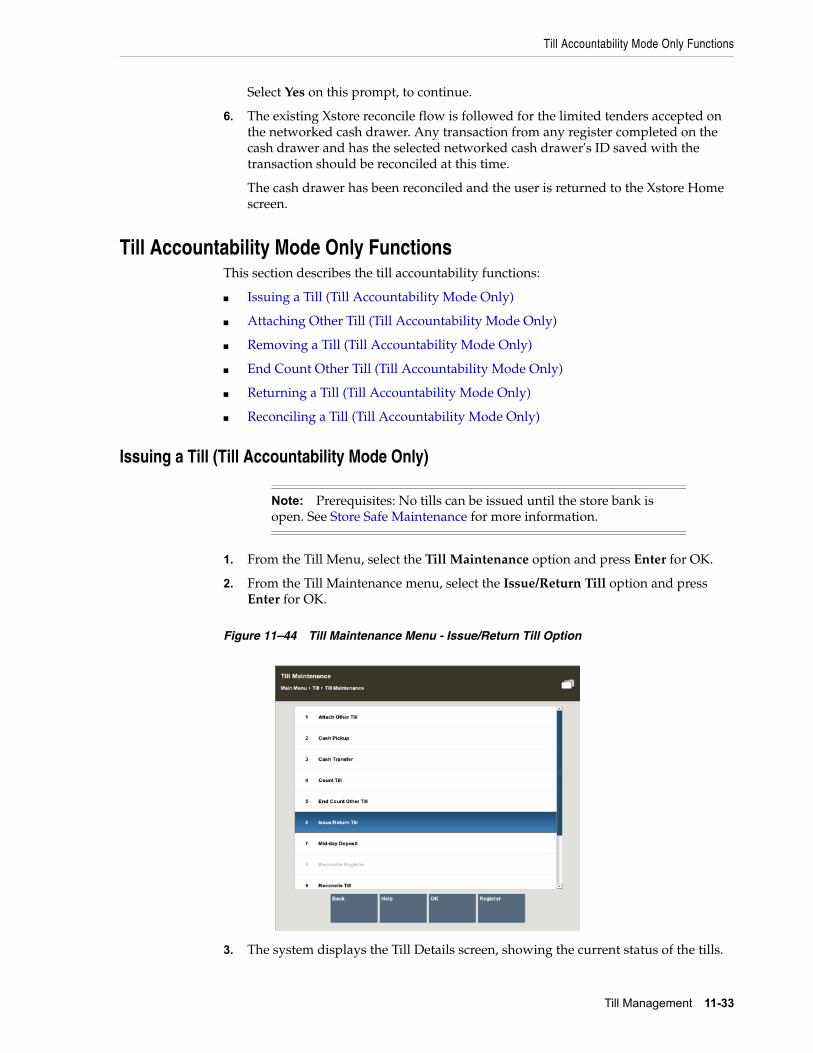
Till Accountability Mode Only Functions
Till Management 11-33
Select Yes on this prompt, to continue.
6. The existing Xstore reconcile flow is followed for the limited tenders accepted on the networked cash drawer. Any transaction from any register completed on the cash drawer and has the selected networked cash drawer's ID saved with the transaction should be reconciled at this time.
The cash drawer has been reconciled and the user is returned to the Xstore Home screen.
Till Accountability Mode Only FunctionsThis section describes the till accountability functions:
■ Issuing a Till (Till Accountability Mode Only)
■ Attaching Other Till (Till Accountability Mode Only)
■ Removing a Till (Till Accountability Mode Only)
■ End Count Other Till (Till Accountability Mode Only)
■ Returning a Till (Till Accountability Mode Only)
■ Reconciling a Till (Till Accountability Mode Only)
Issuing a Till (Till Accountability Mode Only)
1. From the Till Menu, select the Till Maintenance option and press Enter for OK.
2. From the Till Maintenance menu, select the Issue/Return Till option and press Enter for OK.
Figure 11–44 Till Maintenance Menu - Issue/Return Till Option
3. The system displays the Till Details screen, showing the current status of the tills.
Note: Prerequisites: No tills can be issued until the store bank is open. See Store Safe Maintenance for more information.
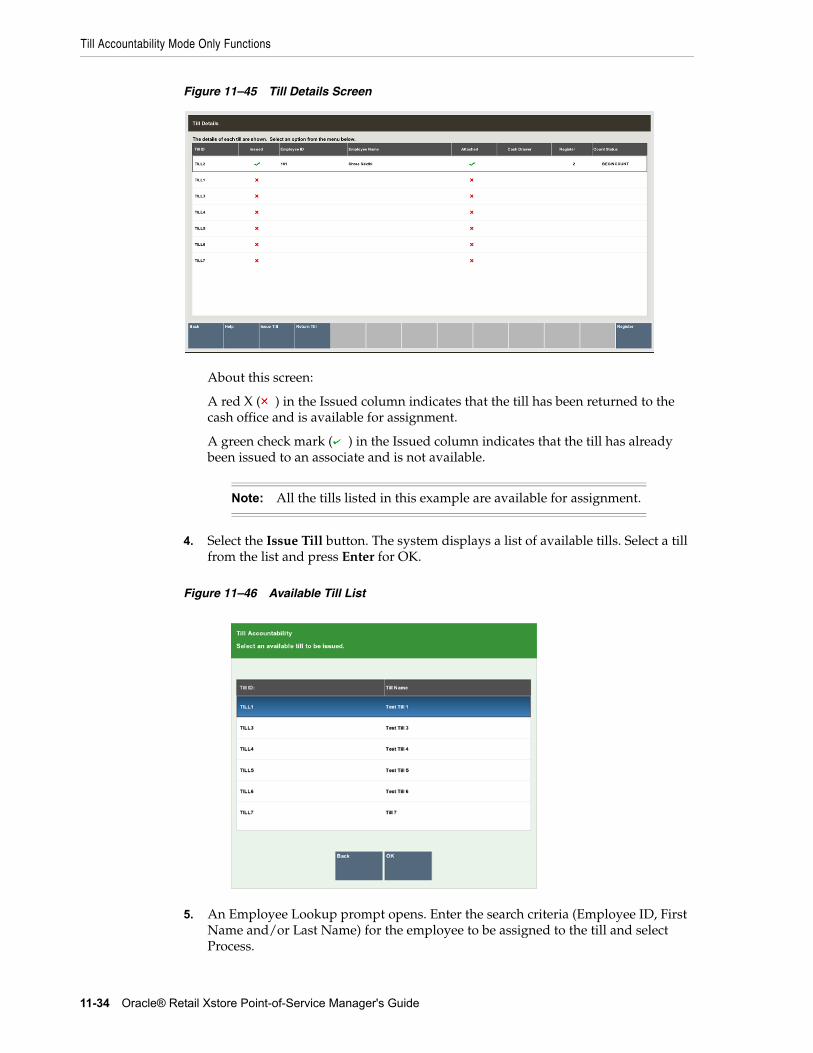
Till Accountability Mode Only Functions
11-34 Oracle® Retail Xstore Point-of-Service Manager's Guide
Figure 11–45 Till Details Screen
About this screen:
A red X ( ) in the Issued column indicates that the till has been returned to the cash office and is available for assignment.
A green check mark ( ) in the Issued column indicates that the till has already been issued to an associate and is not available.
4. Select the Issue Till button. The system displays a list of available tills. Select a till from the list and press Enter for OK.
Figure 11–46 Available Till List
5. An Employee Lookup prompt opens. Enter the search criteria (Employee ID, First Name and/or Last Name) for the employee to be assigned to the till and select Process.
Note: All the tills listed in this example are available for assignment.
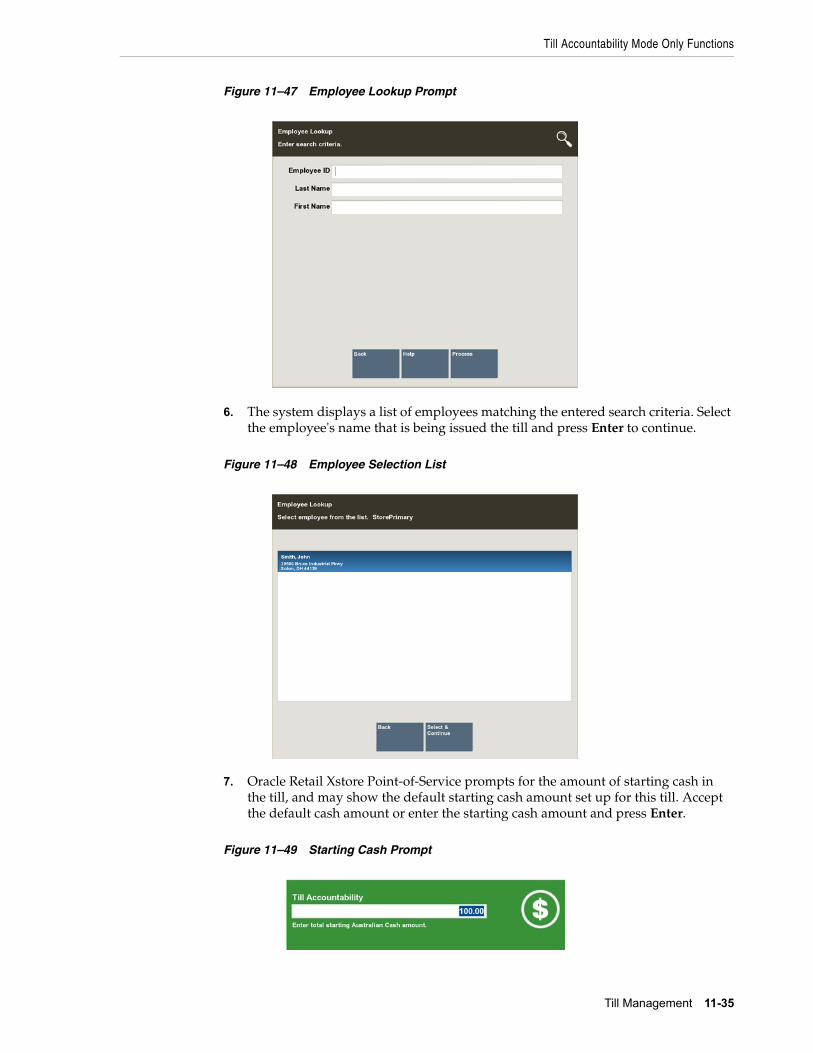
Till Accountability Mode Only Functions
Till Management 11-35
Figure 11–47 Employee Lookup Prompt
6. The system displays a list of employees matching the entered search criteria. Select the employee's name that is being issued the till and press Enter to continue.
Figure 11–48 Employee Selection List
7. Oracle Retail Xstore Point-of-Service prompts for the amount of starting cash in the till, and may show the default starting cash amount set up for this till. Accept the default cash amount or enter the starting cash amount and press Enter.
Figure 11–49 Starting Cash Prompt
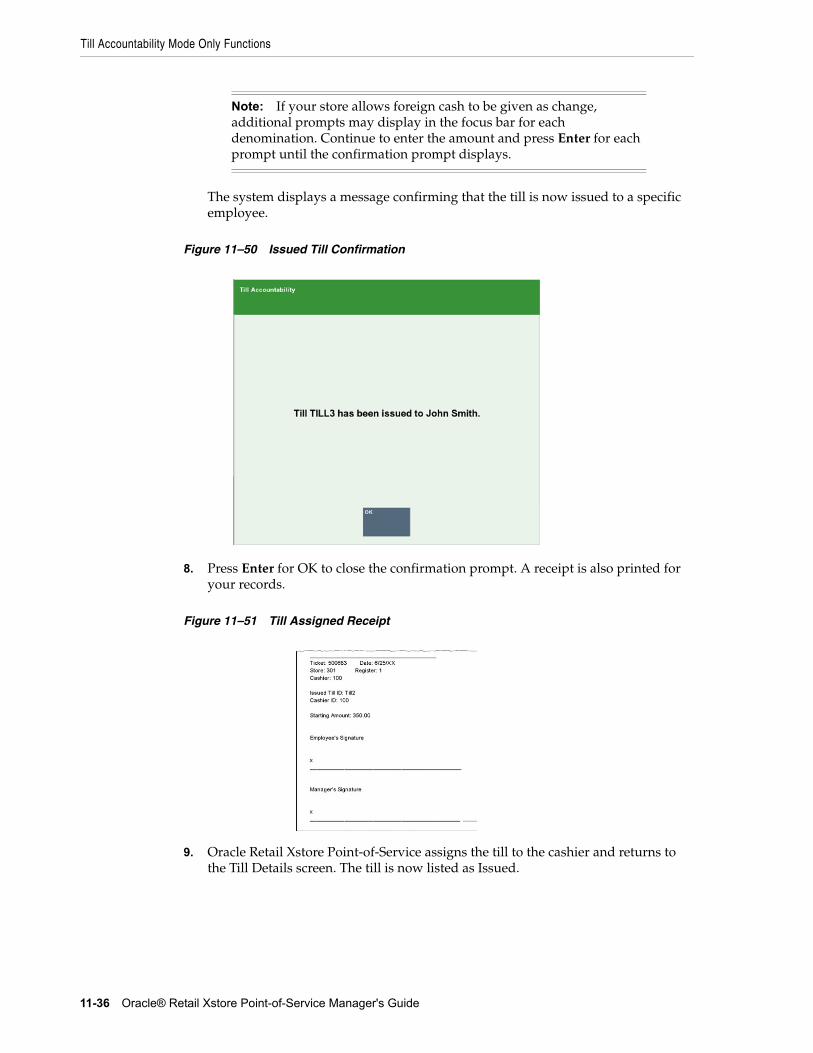
Till Accountability Mode Only Functions
11-36 Oracle® Retail Xstore Point-of-Service Manager's Guide
The system displays a message confirming that the till is now issued to a specific employee.
Figure 11–50 Issued Till Confirmation
8. Press Enter for OK to close the confirmation prompt. A receipt is also printed for your records.
Figure 11–51 Till Assigned Receipt
9. Oracle Retail Xstore Point-of-Service assigns the till to the cashier and returns to the Till Details screen. The till is now listed as Issued.
Note: If your store allows foreign cash to be given as change, additional prompts may display in the focus bar for each denomination. Continue to enter the amount and press Enter for each prompt until the confirmation prompt displays.
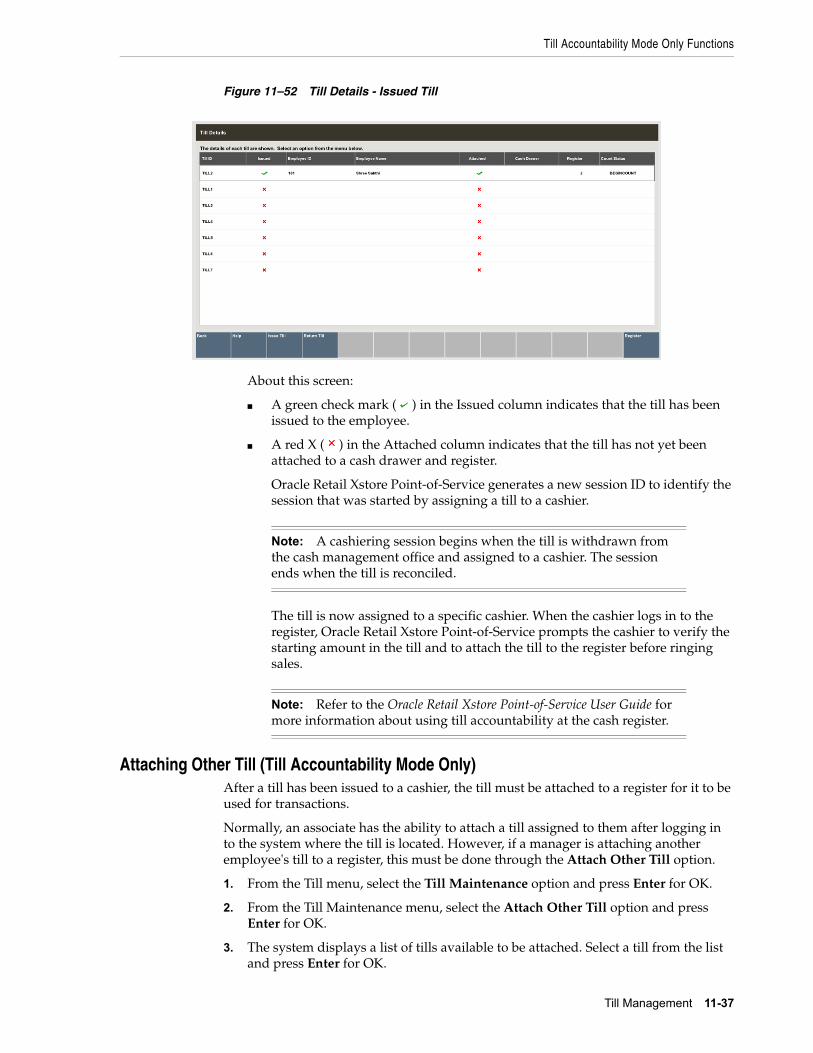
Till Accountability Mode Only Functions
Till Management 11-37
Figure 11–52 Till Details - Issued Till
About this screen:
■ A green check mark ( ) in the Issued column indicates that the till has been issued to the employee.
■ A red X ( ) in the Attached column indicates that the till has not yet been attached to a cash drawer and register.
Oracle Retail Xstore Point-of-Service generates a new session ID to identify the session that was started by assigning a till to a cashier.
The till is now assigned to a specific cashier. When the cashier logs in to the register, Oracle Retail Xstore Point-of-Service prompts the cashier to verify the starting amount in the till and to attach the till to the register before ringing sales.
Attaching Other Till (Till Accountability Mode Only)After a till has been issued to a cashier, the till must be attached to a register for it to be used for transactions.
Normally, an associate has the ability to attach a till assigned to them after logging in to the system where the till is located. However, if a manager is attaching another employee's till to a register, this must be done through the Attach Other Till option.
1. From the Till menu, select the Till Maintenance option and press Enter for OK.
2. From the Till Maintenance menu, select the Attach Other Till option and press Enter for OK.
3. The system displays a list of tills available to be attached. Select a till from the list and press Enter for OK.
Note: A cashiering session begins when the till is withdrawn from the cash management office and assigned to a cashier. The session ends when the till is reconciled.
Note: Refer to the Oracle Retail Xstore Point-of-Service User Guide for more information about using till accountability at the cash register.
Till Accountability Mode Only Functions
11-38 Oracle® Retail Xstore Point-of-Service Manager's Guide
4. If your system is configured to allow two (2) tills on the register and both cash drawers are still available, the system prompts for the cash drawer to use for the till. Select the cash drawer to be used, then press Enter for OK.
5. Perform the Begin Count on the till.
See To Perform a Begin Count for the Begin Count procedure.
At the confirmation prompt, select OK.
Removing a Till (Till Accountability Mode Only)Oracle Retail Xstore Point-of-Service gives managers and associates the option to remove their own till from a register or remove a till assigned to someone else, depending on the option chosen in the Manage Tills menu.
To remove a till, do the following:
1. From the Manage Till menu, select the Till Maintenance option, then press Enter for OK.
2. From the Till Maintenance menu, select Remove Till or Remove Other Till option, then press Enter for OK.
■ If you selected Remove Other Till, continue with step 3.
■ If you selected Remove Other Till, Oracle Retail Xstore Point-of-Service displays a list of tills attached to the register. Select the till you are removing, then press Enter for OK. Skip to step 5.
3. The system prompts whether to remove the till from the register.
■ Press Y or select Yes to remove the till.
■ Press N or select No to keep the till attached to the register and return to the Manage Tills menu.
4. Oracle Retail Xstore Point-of-Service displays a message confirming that the till has been removed from the register. Press Enter for Ok to close the prompt.
5. A receipt prints for the till removal and Oracle Retail Xstore Point-of-Service returns to the Till Maintenance menu.
End Count Other Till (Till Accountability Mode Only)To end count a till assigned to any employee, do the following:
1. From the Till menu, select the Till Maintenance option, then press Enter.
2. From the Till Maintenance menu, select the End Count Other Till option, then press Enter for OK.
3. The system prompts you to select the till that is being end counted. Select the till, then press Enter for OK.
4. Continue the end count process as with a normal closing count.
5. See Closing the Register for a description of the closing count procedure.
Returning a Till (Till Accountability Mode Only)Before a till can be reconciled, the till must be marked as Returned. This indicates that the till has been transferred from the control of the associate/cashier to the manager.
Prerequisites: The following steps must be completed before you can return a till.
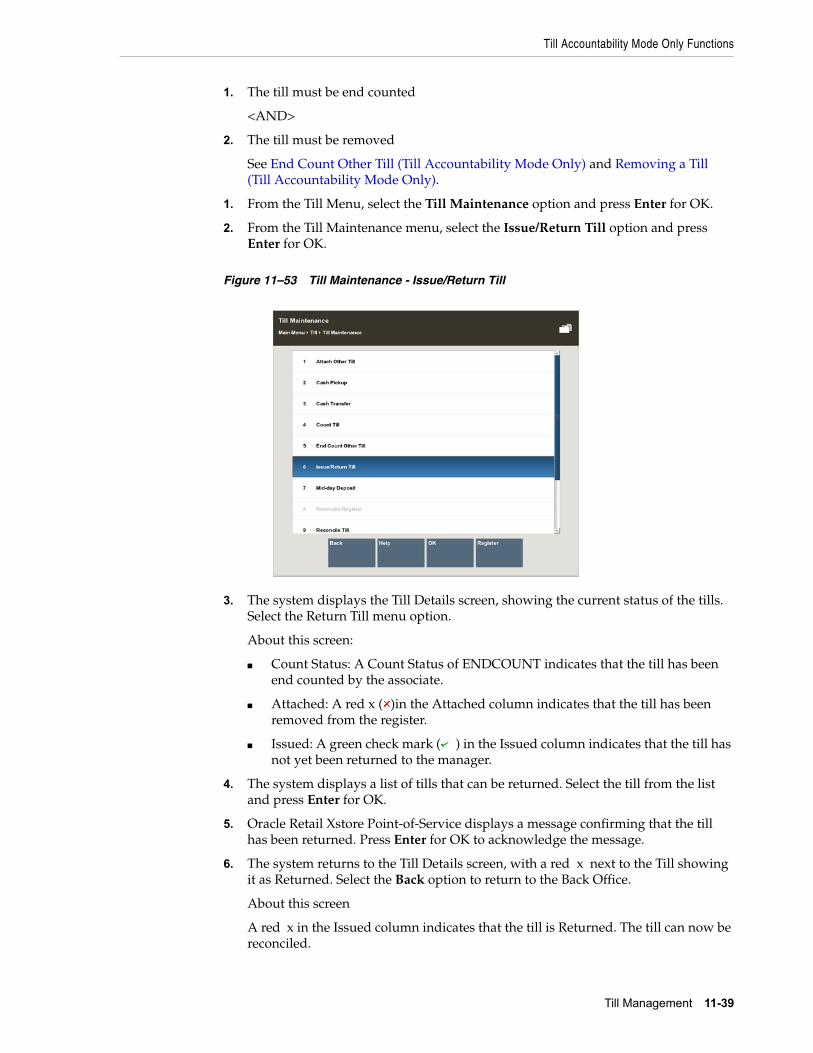
Till Accountability Mode Only Functions
Till Management 11-39
1. The till must be end counted
<AND>
2. The till must be removed
See End Count Other Till (Till Accountability Mode Only) and Removing a Till (Till Accountability Mode Only).
1. From the Till Menu, select the Till Maintenance option and press Enter for OK.
2. From the Till Maintenance menu, select the Issue/Return Till option and press Enter for OK.
Figure 11–53 Till Maintenance - Issue/Return Till
3. The system displays the Till Details screen, showing the current status of the tills. Select the Return Till menu option.
About this screen:
■ Count Status: A Count Status of ENDCOUNT indicates that the till has been end counted by the associate.
■ Attached: A red x ( )in the Attached column indicates that the till has been removed from the register.
■ Issued: A green check mark ( ) in the Issued column indicates that the till has not yet been returned to the manager.
4. The system displays a list of tills that can be returned. Select the till from the list and press Enter for OK.
5. Oracle Retail Xstore Point-of-Service displays a message confirming that the till has been returned. Press Enter for OK to acknowledge the message.
6. The system returns to the Till Details screen, with a red x next to the Till showing it as Returned. Select the Back option to return to the Back Office.
About this screen
A red x in the Issued column indicates that the till is Returned. The till can now be reconciled.
Till Accountability Mode Only Functions
11-40 Oracle® Retail Xstore Point-of-Service Manager's Guide
Reconciling a Till (Till Accountability Mode Only)The final check of a till is performed at till reconciliation, when the till is counted and checked against the amount the cashier counted for the till. Following till reconciliation, the till is closed.
See also: End Count Other Till (Till Accountability Mode Only), Removing a Till (Till Accountability Mode Only), and Returning a Till (Till Accountability Mode Only).
1. From the Till menu, select the Till Maintenance option and press Enter for OK.
2. From the Till Maintenance menu, select the Reconcile Till option and press Enter for OK.
3. Select a till to reconcile from the list of tills and press Enter for OK.
4. At the Count Summary screen, select the tender type you want to count and then select the Count Selected option.
5. Enter each value as required in the focus bar and press Enter. The tender type you select and your system’s configuration determine the type of count you must perform. For examples of count screens, see Tender Count Screen Xstore Base Examples - Standard.
6. After you complete the count for the selected group, select the Next Group option, and repeat this step for additional groups that you want to count.
7. After you count all groups that you want to audit, select the Summary option to return to the Count Summary screen.
8. The system records the information, prints a reconcile receipt for your records, and returns to the Till Management menu.
Important:
Prerequisites: The following steps must be completed before you can reconcile a till:
1. The till must have an ENDCOUNT status. Activity: The associate has performed a close count on the till.
2. The till has been removed from the register. Activity: The associate has performed the Remove Till function at the register.
3. The till has been returned, indicating the till has been transferred from the control of the associate to the cash manager. Activity: The cash manager has marked the till as returned using the Issue/Return function.
Note: Depending upon the configuration of your system, the over/short amounts as shown above may not be displayed.
Select the View Over/Short Reasons button to review comments regarding the end count.
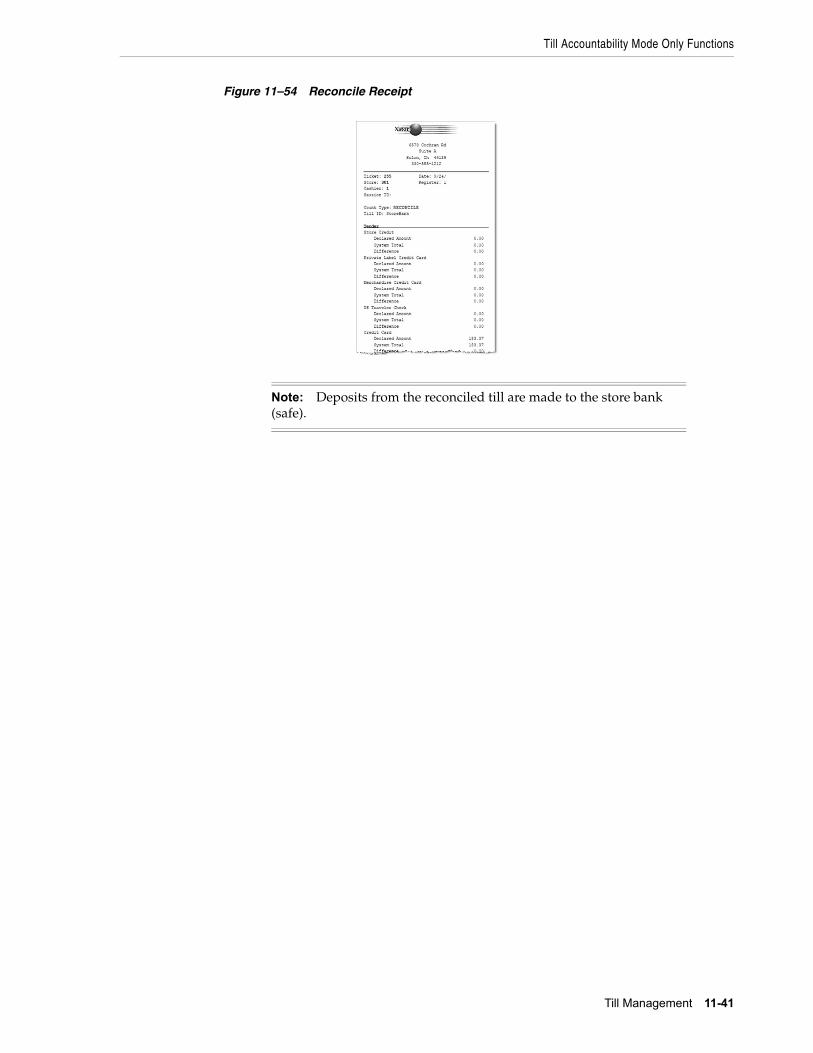
Till Accountability Mode Only Functions
Till Management 11-41
Figure 11–54 Reconcile Receipt
Note: Deposits from the reconciled till are made to the store bank (safe).
12
Store Safe Maintenance 12-1
12Store Safe Maintenance
Safe bags are used by retailers that deal with a large volume of cash. Using safe bags allows retailers to move money quickly and safely from safe bags into cash drawers or from cash drawers into safe bags. Safe bags can come in many styles - they can be a plastic tube that is used or a large zippered pouch.
Every safe bag has a unique number and can be used in the Pickup, Add Float and Store Safe process. When configured to use safe bags, all cash processes will prompt you to scan (or manually enter), the safe bag first before processing.
In the Cash Pick Up process the safe bag will be filled with money and closed.
In the store safe processes, a list of safe bag ID's with amount should be displayed.
Every safe bag in the store safe can be used in the Add Float process or in the Bank Deposit process.
ConfigurationsThere are two configurations in Xadmin for retailers.
The first one determines if a store will use safe bags. When configured this means that during till functions (bank deposits, opening the store safe, safe audits, reconciling safes, cash transfer and cash pick ups - anything that involves cash) the system prompts you to scan the safe bag or enter the safe bag id.
The second configuration set depends on whether or not the retailer will count the money during a cash pick up or not. Most retailers want the process to be fast so the default is NO/false. If they set the value to true then the retailer is prompted for the amount of cash that is being picked up and this will require the manager to count the cash before putting it into the safe bag.
Retailers should not mix these settings up in a store because that will cause confusion - all registers should either be configured to count money at cash pickup or all registers should be configured not to count money during a cash pickup.
■ Safe Bags Used in Store - default false
■ Safe Bag Money is Counted During Cash Pick Up - default false
It is recommended not to mix register settings within a store.
Safe Bag Management
12-2 Oracle® Retail Xstore Point-of-Service Manager's Guide
Safe Bag ManagementThe safe bag management screen (available only on tablet/thin and desktop) is where safe bags are created and managed. A store first needs to create/add safe bags for use in their store. They will select Create safe bag and scan the safe bag - they can do this for all the safe bags they want to use. They will do this any time they also need to add more safe bags for use in their store. If they scan a safe bag that is already in use in their store they will be prompted the bag is already in use. Once a safe bag is created the user can add money into the safe bag to be used in a bank deposit that will be created later or for cash transfers. They would select the function for Add Funds. By putting money in safe bags using the Add Funds function these bags can be used during the bank deposit or cash transfer process. During a cash transfer the process remains as it does today but at the start of the function the user is asked to scan the safe bag that the money is coming from. All of the money that is in a safe bag is used in the function - for example if the safe bag has $200 in it (determined during the Add Funds process) all of the funds will be used during the process, for example cash transfer. If a cash transfer is done all $200 will be transferred. There is no option to use only half the money. That applies any time money is used in a safe bag. Also, safe bags do not allow users to mix currency types. One currency per bag. For example, if US Cash is selected as the currency type during the Add Funds process that is the only currency type that is allowed in that bag. Other currency types can be used in other safe bags - but one currency type per bag. When a safe bag is used in a cash transfer the safe bag is now empty and in "available" status that allows it to be used again.
There are 4 statuses a safe bag can be in:
■ Available - the status for a newly created bag ready to be used in a function. Example - In a Cash pick up or to add funds into it using Add Funds function. Bags in available status can be used for Cash Pickups. These bags could not be used in a cash transfer as there is no money in them yet - Xstore would display an error.
■ Counted - the status for a safe bag that was used during the Add Funds process and can now be used for cash transfer or bank deposit whenever the retailer is ready. Bags in Counted status cannot be used for a cash pickup process as this bag is not empty - Xstore would display an error.
■ Deposited - the status for a bag that was used during the bank deposit process. This safe bag is sitting in the safe until someone takes it to the bank for deposit. This bag could not be used in a cash transfer, a cash pickup or any other process - the user would get an error if they tried. Bags in Deposited status cannot be used for cash transfers as the money has been assigned for a bank deposit - Xstore would display an error. Also, these bags could not be used in a cash pick up process as the bag is not in Available status - Xstore would display an error.
■ Undeclared - the status for a safe bag that was used during a cash pick up. The money in the bag must be declared by using the Declare into Safe process from the management screen. All safe bags used during a cash pick up (whether it was counted at the cash drawer or not counted) must be declared and counted because until it is declared the cash drawer doesn't know how much money was taken - that cash is still a part of the drawer until it is declared. If the store was configured to count the money at the cash pickup and the money counted during the declaration process did not match, the standard Xstore discrepancy process would be done. Also, during the register close process any safe bags that are Undeclared must be counted first - Xstore would display an error that there are safe bags that need declared first. For example, if a store was in till accountability mode and the user was going to count the till, any safe bags that had been used in cash pickups must be counted because that money is still, technically, in the drawer until it is
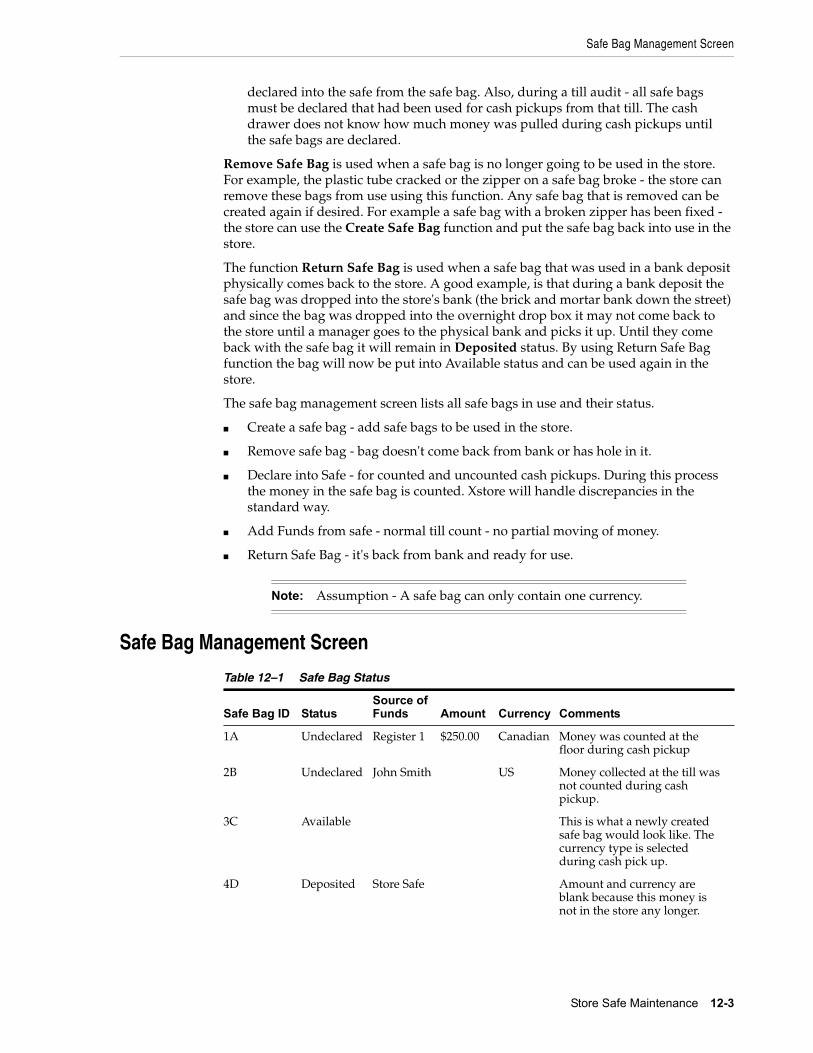
Safe Bag Management Screen
Store Safe Maintenance 12-3
declared into the safe from the safe bag. Also, during a till audit - all safe bags must be declared that had been used for cash pickups from that till. The cash drawer does not know how much money was pulled during cash pickups until the safe bags are declared.
Remove Safe Bag is used when a safe bag is no longer going to be used in the store. For example, the plastic tube cracked or the zipper on a safe bag broke - the store can remove these bags from use using this function. Any safe bag that is removed can be created again if desired. For example a safe bag with a broken zipper has been fixed - the store can use the Create Safe Bag function and put the safe bag back into use in the store.
The function Return Safe Bag is used when a safe bag that was used in a bank deposit physically comes back to the store. A good example, is that during a bank deposit the safe bag was dropped into the store's bank (the brick and mortar bank down the street) and since the bag was dropped into the overnight drop box it may not come back to the store until a manager goes to the physical bank and picks it up. Until they come back with the safe bag it will remain in Deposited status. By using Return Safe Bag function the bag will now be put into Available status and can be used again in the store.
The safe bag management screen lists all safe bags in use and their status.
■ Create a safe bag - add safe bags to be used in the store.
■ Remove safe bag - bag doesn't come back from bank or has hole in it.
■ Declare into Safe - for counted and uncounted cash pickups. During this process the money in the safe bag is counted. Xstore will handle discrepancies in the standard way.
■ Add Funds from safe - normal till count - no partial moving of money.
■ Return Safe Bag - it's back from bank and ready for use.
Safe Bag Management Screen
Note: Assumption - A safe bag can only contain one currency.
Table 12–1 Safe Bag Status
Safe Bag ID StatusSource of Funds Amount Currency Comments
1A Undeclared Register 1 $250.00 Canadian Money was counted at the floor during cash pickup
2B Undeclared John Smith US Money collected at the till was not counted during cash pickup.
3C Available This is what a newly created safe bag would look like. The currency type is selected during cash pick up.
4D Deposited Store Safe Amount and currency are blank because this money is not in the store any longer.
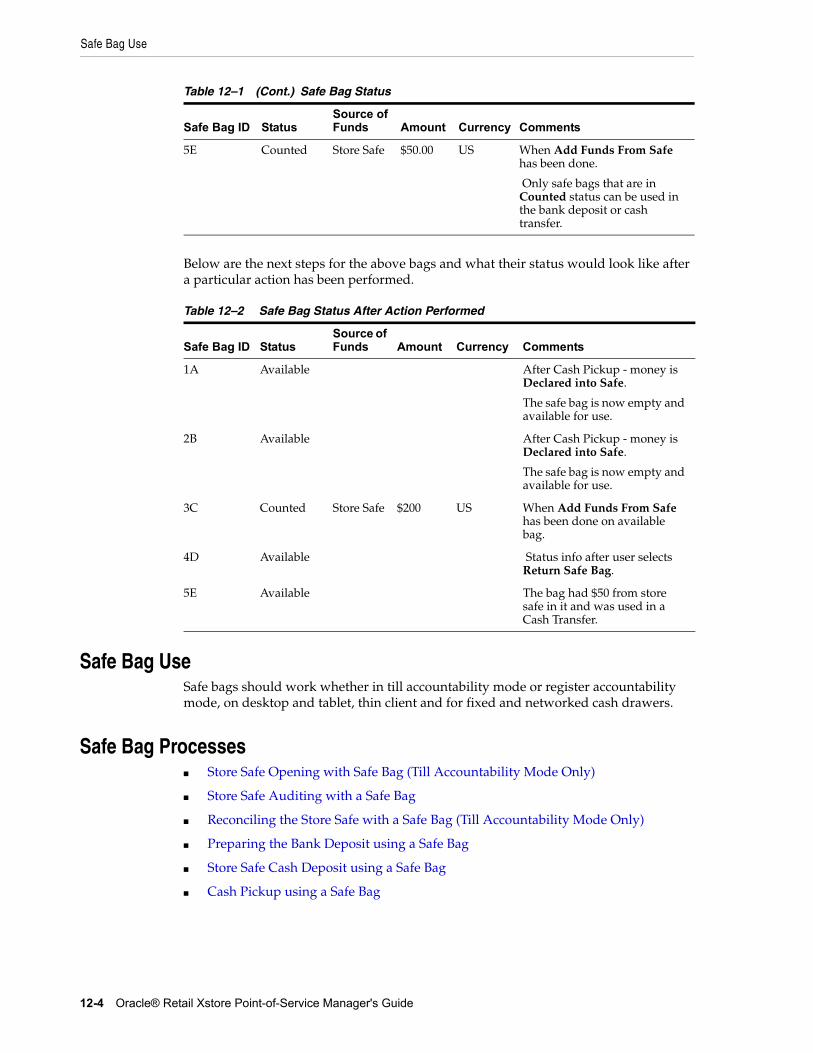
Safe Bag Use
12-4 Oracle® Retail Xstore Point-of-Service Manager's Guide
Below are the next steps for the above bags and what their status would look like after a particular action has been performed.
Safe Bag UseSafe bags should work whether in till accountability mode or register accountability mode, on desktop and tablet, thin client and for fixed and networked cash drawers.
Safe Bag Processes ■ Store Safe Opening with Safe Bag (Till Accountability Mode Only)
■ Store Safe Auditing with a Safe Bag
■ Reconciling the Store Safe with a Safe Bag (Till Accountability Mode Only)
■ Preparing the Bank Deposit using a Safe Bag
■ Store Safe Cash Deposit using a Safe Bag
■ Cash Pickup using a Safe Bag
5E Counted Store Safe $50.00 US When Add Funds From Safe has been done.
Only safe bags that are in Counted status can be used in the bank deposit or cash transfer.
Table 12–2 Safe Bag Status After Action Performed
Safe Bag ID StatusSource of Funds Amount Currency Comments
1A Available After Cash Pickup - money is Declared into Safe.
The safe bag is now empty and available for use.
2B Available After Cash Pickup - money is Declared into Safe.
The safe bag is now empty and available for use.
3C Counted Store Safe $200 US When Add Funds From Safe has been done on available bag.
4D Available Status info after user selects Return Safe Bag.
5E Available The bag had $50 from store safe in it and was used in a Cash Transfer.
Table 12–1 (Cont.) Safe Bag Status
Safe Bag ID StatusSource of Funds Amount Currency Comments
Safe Bag Processes
Store Safe Maintenance 12-5
Store Safe Opening with Safe Bag (Till Accountability Mode Only)
To open the store safe, do the following:
1. From the Till menu, select the Store Safe Maintenance option.
2. From the Store Safe Maintenance menu, select the Open Store Safe option.
3. At the Count Summary screen, select the tender type you want to count and then select the Count Selected option.
4. If Safe Bag functionality is activated, the system displays a list of safe bags that are in the store safe at the prior store safe close. This list of safe bags cannot be changed, added or adjusted here.
5. Enter each value as required.
6. After you complete the count for the selected group, select the Next Group option, and repeat this step for additional groups that you want to count.
7. After you count all groups that you want to audit, select Back to return to the Count Summary screen.
8. When all denomination quantities have been entered, select Counting Complete.
■ If the opening amount in the store safe does not equal the amount that was in the store safe at the prior store safe close, the system prompts whether to accept or reject the discrepancy.
– Select Yes to accept the discrepancy. You may be prompted to enter a comment and then press OK.
– Select No to reject the discrepancy and return to the denomination counts.
■ If the opening amount in the store safe equals the amount that was in the store safe at the prior store safe close, the system displays a message confirming that the store safe is in balance. Acknowledge the message to continue.
9. Oracle Retail Xstore Point-of-Service opens the store safe, prints a receipt for the opening of the store safe with the denomination count, and returns to the Main Menu.
Store Safe Auditing with a Safe BagThe store safe audit function is used to count the tenders in your store safe. This audit function provides the capability to select a tender type, record its total current value, and compare that value with the system-recorded amount for the same tender.
The system calculates and displays any difference (over/short) between the expected amount and the actual amount.
1. From the Till menu, select the Store Bank Maintenance option.
2. From the Store Bank Maintenance menu, select the Store Bank Audit option.
Note: This function may be part of the store open process.
Note: An audit does not change the expected amount in the store safe.
Safe Bag Processes
12-6 Oracle® Retail Xstore Point-of-Service Manager's Guide
3. At the Count Summary screen, select the tender type you want to count and then select the Count Selected option to start the store bank audit process.
4. If Safe Bag functionality is activated the system displays a list of Safe Bags that are in the store safe at the prior store bank close.
5. Enter each value as required. The tender type you select and your system's configuration determine the type of count you must perform.
6. After you complete the count for the selected group, select the Next Group option, and repeat this step for additional groups that you want to count.
7. After you count all groups that you want to audit, select the Back option to return to the Count Summary screen.
8. When you have counted all the tenders in the store bank, select Counting Complete to complete the audit and return to the Main Menu.
Reconciling the Store Safe with a Safe Bag (Till Accountability Mode Only)
To close the store safe, the store safe must also be reconciled. In Oracle Retail Xstore Point-of-Service, the store safe is automatically closed once it is reconciled. To reconcile and close the store safe, do the following:
1. From the Till menu, select the Store Safe Maintenance option.
2. From the Store Safe Maintenance menu, select the Reconcile Store Safe option.
3. The Reconcile Store Safe screen opens. Select each count group and count the tenders in the store safe.
4. If Safe Bag functionality is activated the system displays a list of safe bags that are in the store safe at the prior store safe close.
5. When you have counted all the tenders in the store bank, select Counting Complete to complete the reconciliation and return to the Till menu.
6. Oracle Retail Xstore Point-of-Service prints a receipt for the store bank reconciliation and closes the store bank. The system returns to the Main Menu.
Note: Depending upon the configuration of your system, the over/short amounts as shown above may not be displayed.
Note: Before you can close the store safe, all tills must be reconciled.
Note: Depending upon the configuration of your system, the over/short amounts may not be displayed.
Safe Bag Processes
Store Safe Maintenance 12-7
Preparing the Bank Deposit using a Safe Bag1. From the Till menu, select the Store Safe Maintenance option.
2. From the Store Safe Maintenance menu select, the Bank Deposit option.
3. Depending upon your store policy, you may be prompted to select the bank where the money should be deposited. If prompted, select a bank from the list and press OK.
4. At the Count Summary screen, select the tender type you want to count and then select the Counting Complete button.
5. If Safe Bag functionality is activated the system displays a list of safe bags that are in the store bank at the prior store bank close.
6. Enter each value as required.
7. After you complete the count for the selected group, select the Next Group option, and repeat this step for additional groups that you want to count.
8. After you count all groups that you want to audit, select Back to return to the Count Summary screen.
9. Select Counting Complete when you have finished counting.
10. The system displays a confirmation prompt showing the bank deposit tenders and amounts you counted. Select Yes to accept the bank deposit amounts as shown or select No to return to the Count Summary screen to make any adjustments as needed.
When the bank deposit count is complete, the system prints a deposit slip showing all tenders to be deposited and returns to the Store Bank Maintenance menu.
Store Safe Cash Deposit using a Safe Bag
During the day, there may be times when you must deposit cash into the store bank. Use this procedure when a cash deposit is to be made into the store bank.
1. From the Till menu, select the Store Safe Maintenance option.
2. From the Store Safe Maintenance menu, select the Store Safe Cash Deposit option
3. If your store is configured for foreign cash currency tenders to be given as change, select the type of currency you are depositing.
4. At the Count Summary screen, select the tender type you want to count and then select the Counting Complete button.
5. Scan or manually enter the Safe Bag ID.
6. Enter the amount and select OK to confirm the amount.
Note: Depending upon the configuration of your system, the over/short amounts as shown above may not be displayed.
Note: Once the Store Safe has been reconciled, you cannot make cash deposits into it.
Safe Bag Processes
12-8 Oracle® Retail Xstore Point-of-Service Manager's Guide
7. Oracle Retail Xstore Point-of-Service prints a receipt for the deposit and returns to the Store Bank Maintenance menu.
Cash Pickup using a Safe BagYou can scan or manually enter an identification number for a safe bag during the Cash Pickup process, if configured. This function allows you to monitor the safe bag ID and the amount transferred from the till to the safe.
To pick up cash from the till and enter a safe bag ID, follow the steps below:
1. You are prompted to select the corresponding currency. Select for example, USD and press OK.
2. Select Cash Pickup. You are prompted to scan or manually enter the safe bag ID.
3. Scan, or enter the safe bag ID and press OK.
4. If you are prompted for the cash pickup amount. Enter the cash pickup amount and select OK to confirm the amount.
5. The cash drawer opens, remove the money for the cash pickup. The system prints a receipt for the cash pickup.
Note: The Safe Bag ID process is disabled by default.
Note: You can perform Cash Pickups multiple times per day. Every time the cash in the till exceeds a specific threshold amount, the amount can be reduced using this functionality.

13
Networked Cash Drawers 13-1
13Networked Cash Drawers
This chapter describes the process of integrating networked cash drawers into the store.
1. Manage Networked Cash Drawer (only for new networked cash drawers that have not been configured yet).
a. Configure cash drawer
b. Activate cash drawer
2. Open Cash Drawer
a. Assign and count till
3. Attach Cash Drawer Till
a. Scan cash drawer
b. Put physical till in cash drawer
4. Networked Cash Drawer is ready for use in Xstore Sales
5. Remove Cash Drawer Till
a. Scan cash drawer
b. Remove physical till from cash drawer
6. Close Cash Drawer
a. Count till
Discover and Activate a New Networked Cash DrawerDiscover new networked cash drawers using the Manage Networked Cash Drawer menu option. These steps are only required for new networked cash drawers.
1. From the Main menu, select Till then Manage Networked Cash Drawers. The list of networked cash drawers displays. If this is the first time drawers are being discovered the list may be empty.
Note: If a networked cash drawer has a status of Reset extra steps are required. This is the status that is shown when Xstore does not recognize the configurations found upon discovery of the cash drawer. A hard reset is required. Refer to your IP Cash drawer device documentation for instructions on resetting the networked cash drawer.
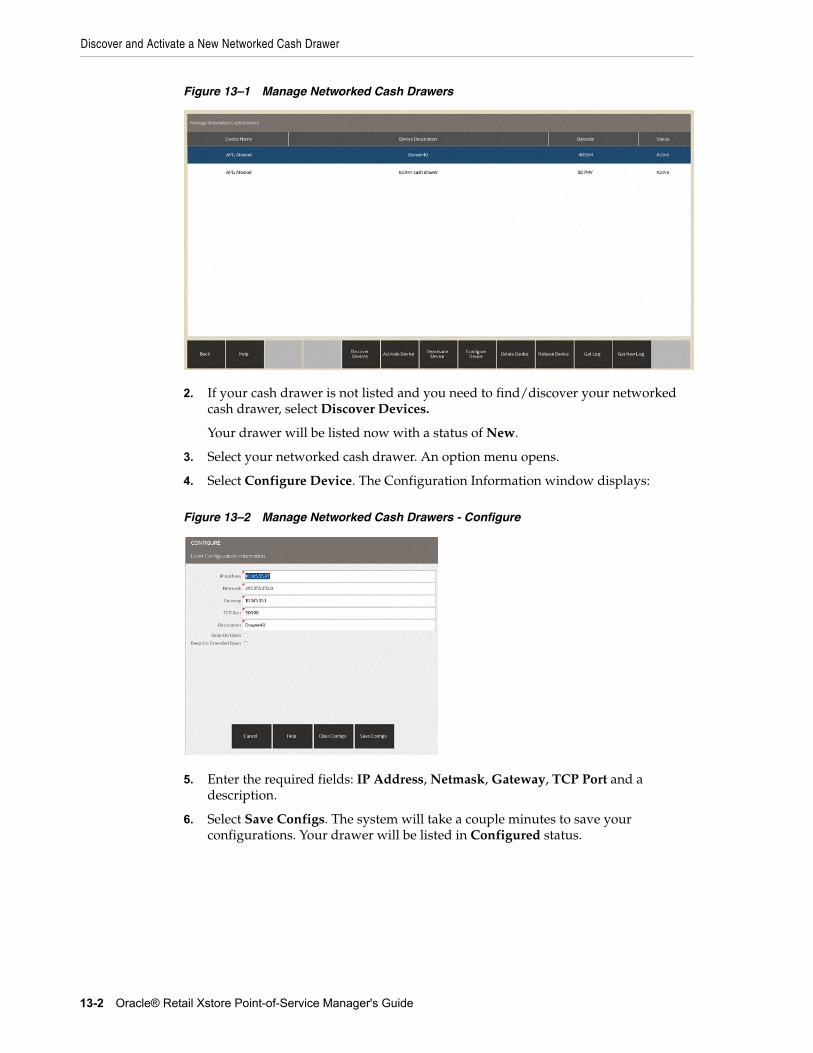
Discover and Activate a New Networked Cash Drawer
13-2 Oracle® Retail Xstore Point-of-Service Manager's Guide
Figure 13–1 Manage Networked Cash Drawers
2. If your cash drawer is not listed and you need to find/discover your networked cash drawer, select Discover Devices.
Your drawer will be listed now with a status of New.
3. Select your networked cash drawer. An option menu opens.
4. Select Configure Device. The Configuration Information window displays:
Figure 13–2 Manage Networked Cash Drawers - Configure
5. Enter the required fields: IP Address, Netmask, Gateway, TCP Port and a description.
6. Select Save Configs. The system will take a couple minutes to save your configurations. Your drawer will be listed in Configured status.
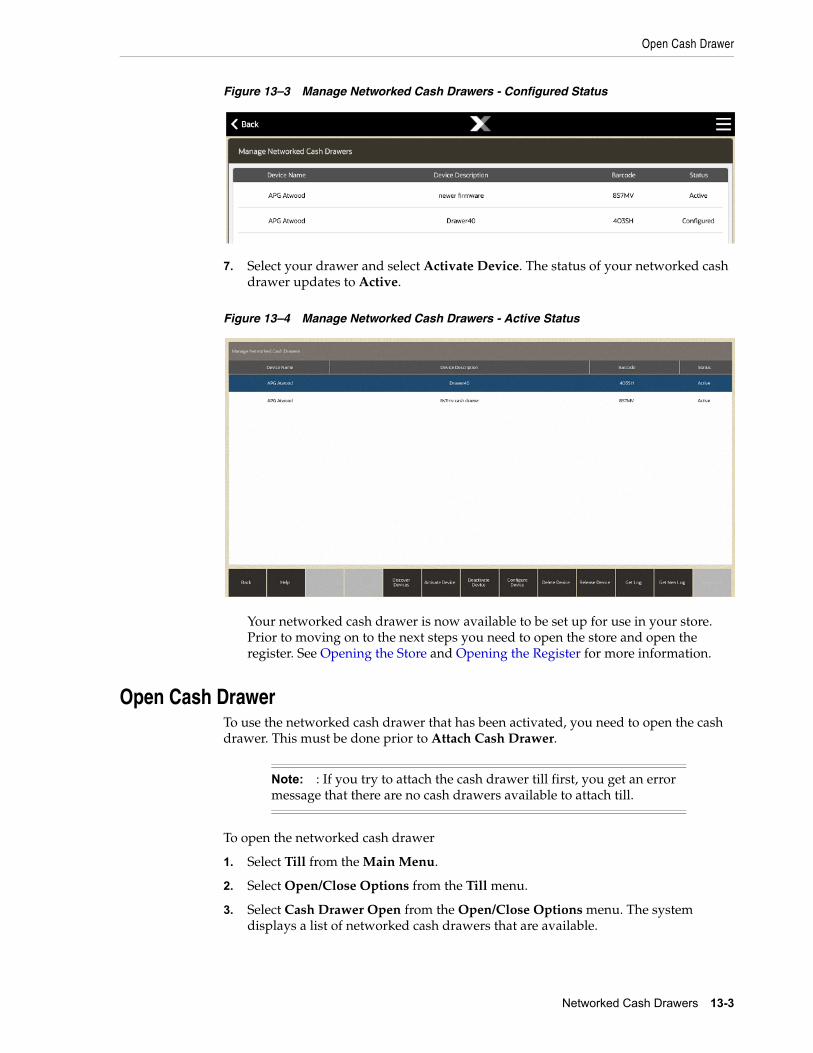
Open Cash Drawer
Networked Cash Drawers 13-3
Figure 13–3 Manage Networked Cash Drawers - Configured Status
7. Select your drawer and select Activate Device. The status of your networked cash drawer updates to Active.
Figure 13–4 Manage Networked Cash Drawers - Active Status
Your networked cash drawer is now available to be set up for use in your store. Prior to moving on to the next steps you need to open the store and open the register. See Opening the Store and Opening the Register for more information.
Open Cash DrawerTo use the networked cash drawer that has been activated, you need to open the cash drawer. This must be done prior to Attach Cash Drawer.
To open the networked cash drawer
1. Select Till from the Main Menu.
2. Select Open/Close Options from the Till menu.
3. Select Cash Drawer Open from the Open/Close Options menu. The system displays a list of networked cash drawers that are available.
Note: : If you try to attach the cash drawer till first, you get an error message that there are no cash drawers available to attach till.
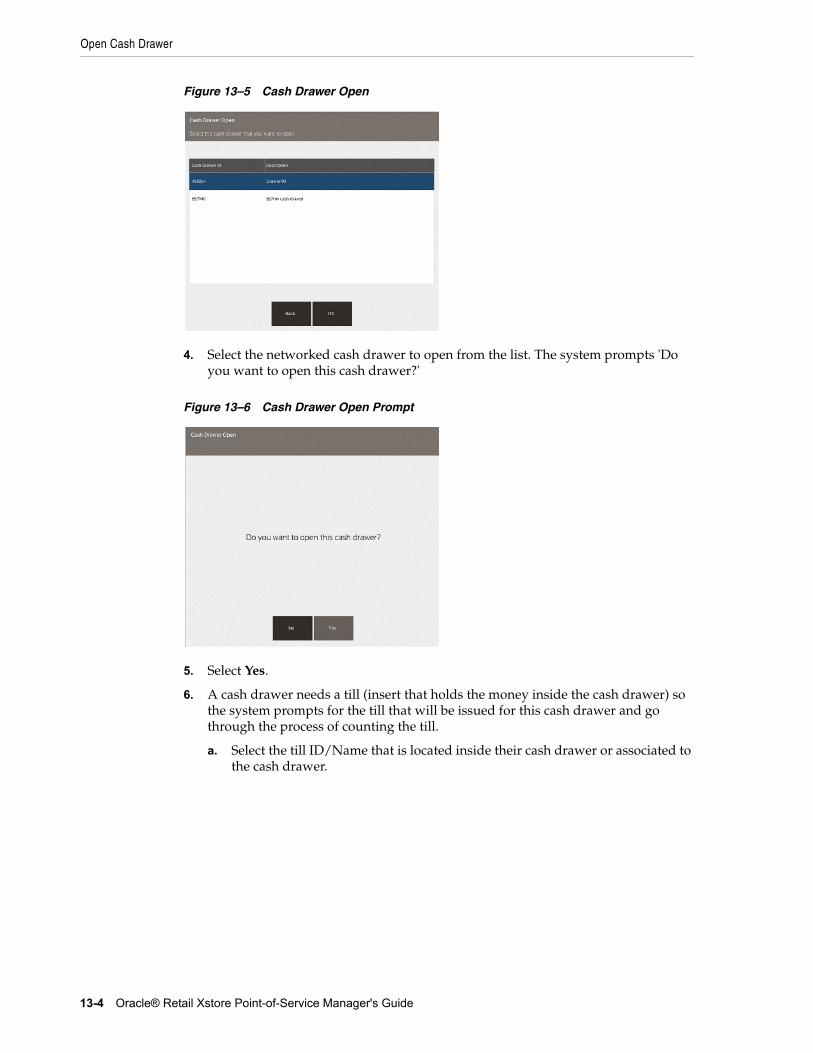
Open Cash Drawer
13-4 Oracle® Retail Xstore Point-of-Service Manager's Guide
Figure 13–5 Cash Drawer Open
4. Select the networked cash drawer to open from the list. The system prompts 'Do you want to open this cash drawer?'
Figure 13–6 Cash Drawer Open Prompt
5. Select Yes.
6. A cash drawer needs a till (insert that holds the money inside the cash drawer) so the system prompts for the till that will be issued for this cash drawer and go through the process of counting the till.
a. Select the till ID/Name that is located inside their cash drawer or associated to the cash drawer.
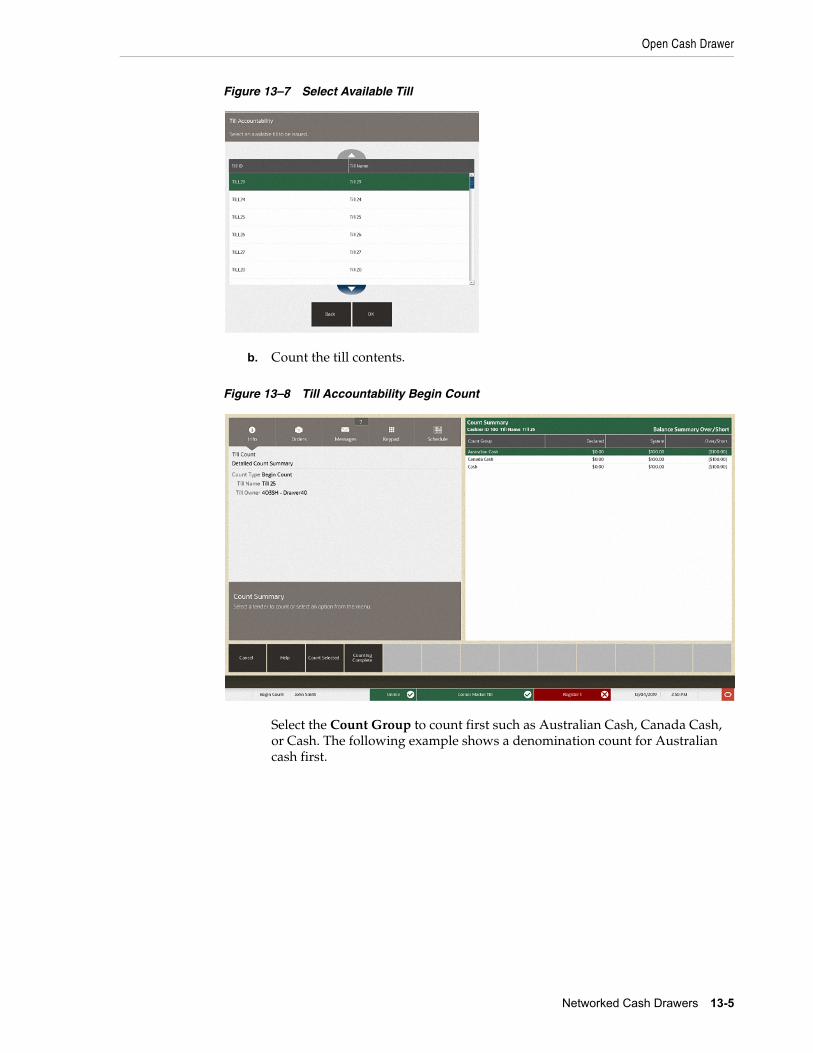
Open Cash Drawer
Networked Cash Drawers 13-5
Figure 13–7 Select Available Till
b. Count the till contents.
Figure 13–8 Till Accountability Begin Count
Select the Count Group to count first such as Australian Cash, Canada Cash, or Cash. The following example shows a denomination count for Australian cash first.
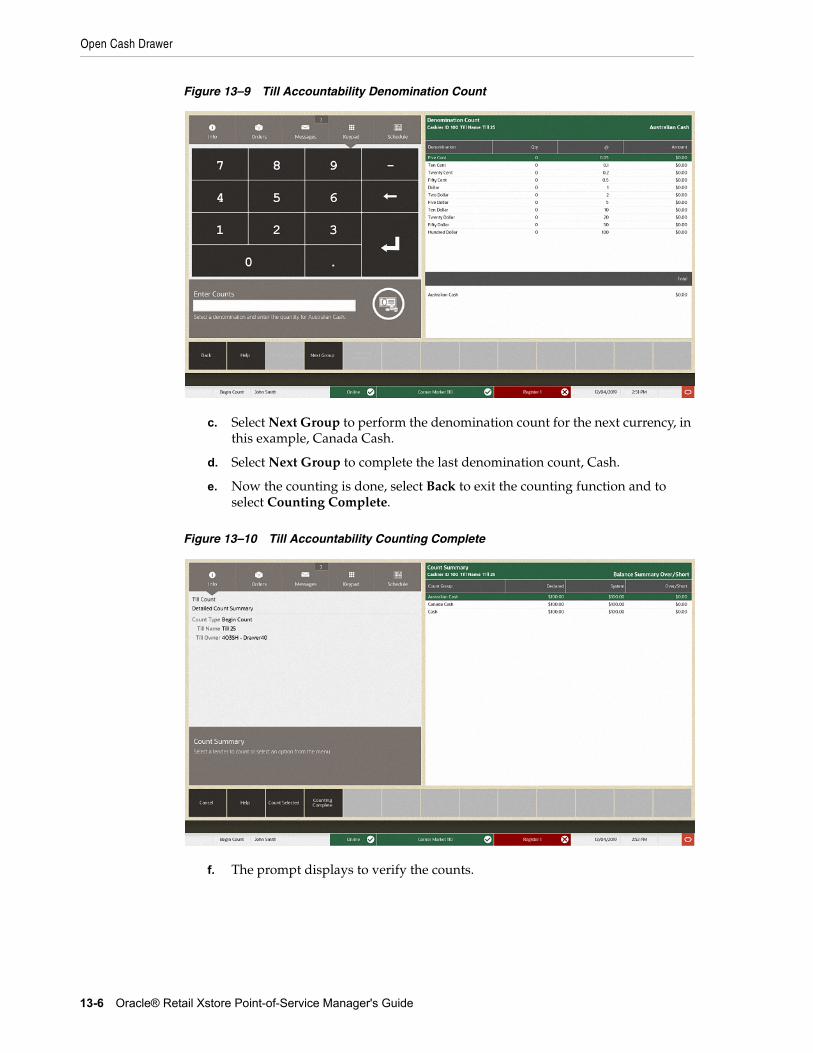
Open Cash Drawer
13-6 Oracle® Retail Xstore Point-of-Service Manager's Guide
Figure 13–9 Till Accountability Denomination Count
c. Select Next Group to perform the denomination count for the next currency, in this example, Canada Cash.
d. Select Next Group to complete the last denomination count, Cash.
e. Now the counting is done, select Back to exit the counting function and to select Counting Complete.
Figure 13–10 Till Accountability Counting Complete
f. The prompt displays to verify the counts.
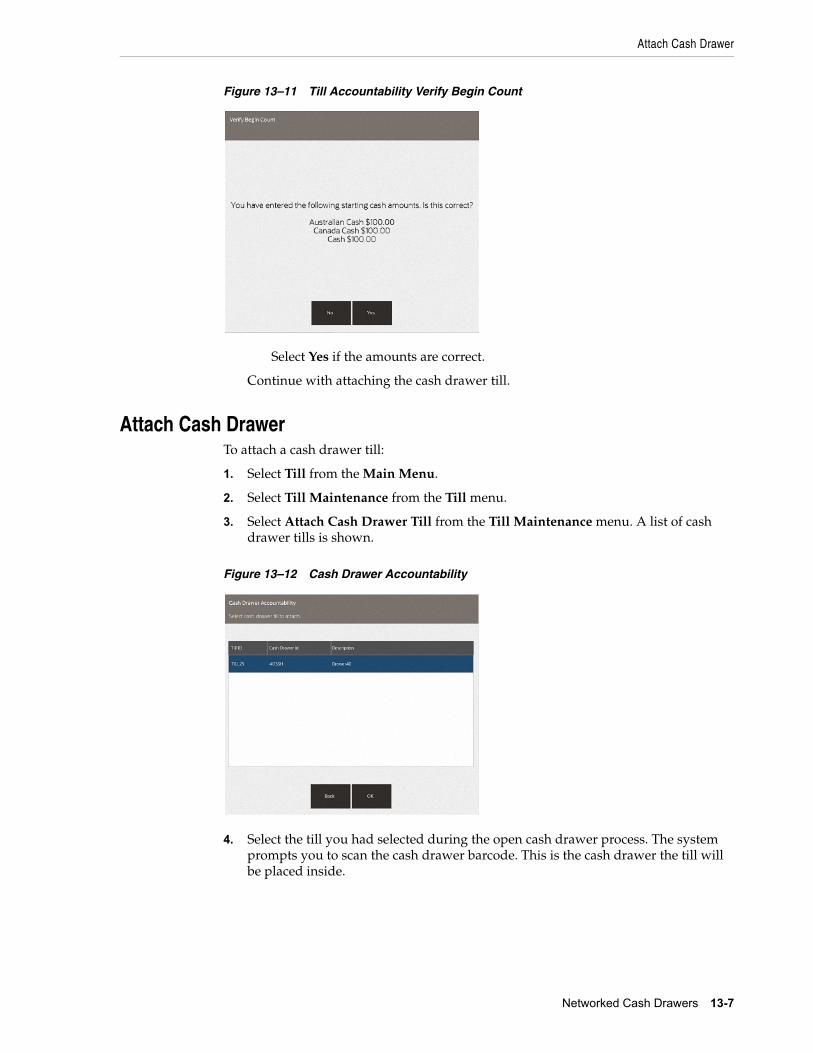
Attach Cash Drawer
Networked Cash Drawers 13-7
Figure 13–11 Till Accountability Verify Begin Count
Select Yes if the amounts are correct.
Continue with attaching the cash drawer till.
Attach Cash DrawerTo attach a cash drawer till:
1. Select Till from the Main Menu.
2. Select Till Maintenance from the Till menu.
3. Select Attach Cash Drawer Till from the Till Maintenance menu. A list of cash drawer tills is shown.
Figure 13–12 Cash Drawer Accountability
4. Select the till you had selected during the open cash drawer process. The system prompts you to scan the cash drawer barcode. This is the cash drawer the till will be placed inside.
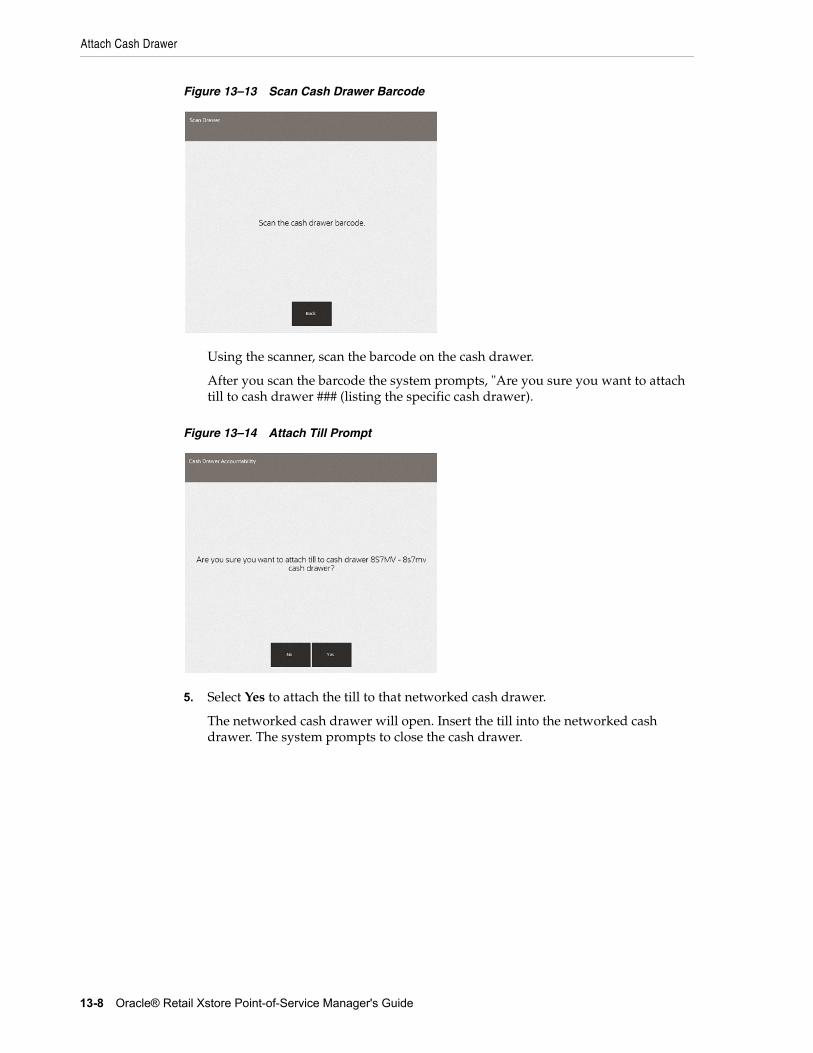
Attach Cash Drawer
13-8 Oracle® Retail Xstore Point-of-Service Manager's Guide
Figure 13–13 Scan Cash Drawer Barcode
Using the scanner, scan the barcode on the cash drawer.
After you scan the barcode the system prompts, "Are you sure you want to attach till to cash drawer ### (listing the specific cash drawer).
Figure 13–14 Attach Till Prompt
5. Select Yes to attach the till to that networked cash drawer.
The networked cash drawer will open. Insert the till into the networked cash drawer. The system prompts to close the cash drawer.
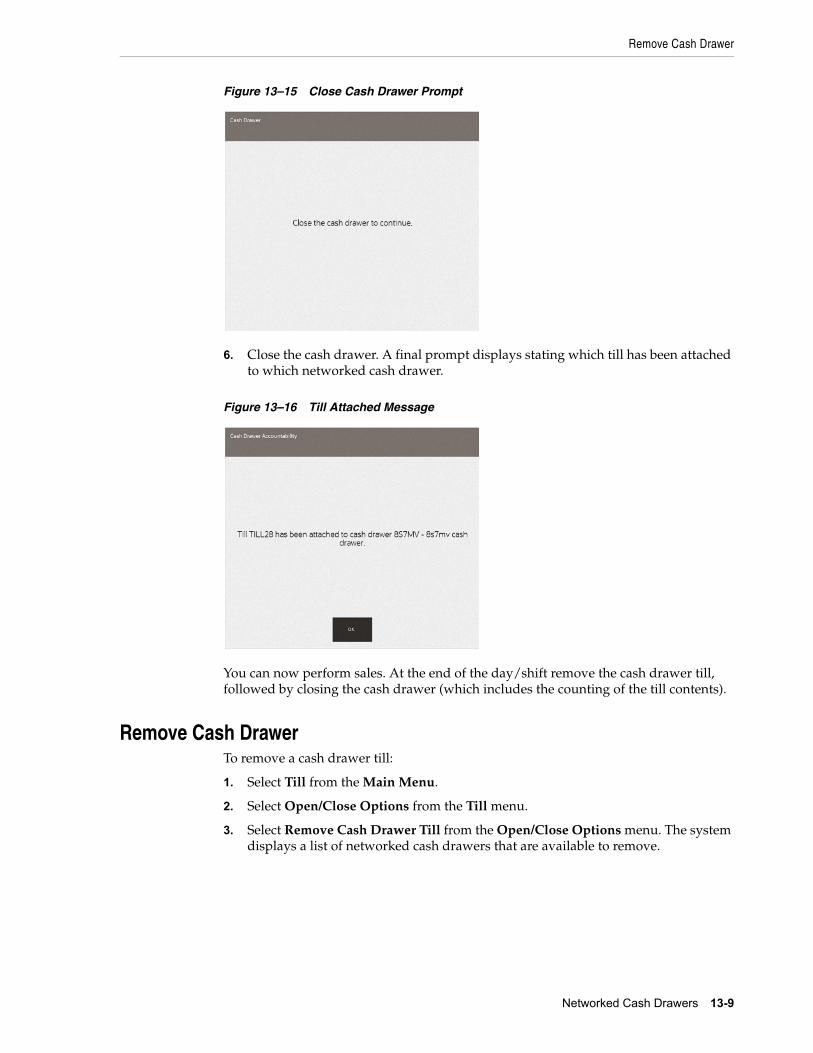
Remove Cash Drawer
Networked Cash Drawers 13-9
Figure 13–15 Close Cash Drawer Prompt
6. Close the cash drawer. A final prompt displays stating which till has been attached to which networked cash drawer.
Figure 13–16 Till Attached Message
You can now perform sales. At the end of the day/shift remove the cash drawer till, followed by closing the cash drawer (which includes the counting of the till contents).
Remove Cash DrawerTo remove a cash drawer till:
1. Select Till from the Main Menu.
2. Select Open/Close Options from the Till menu.
3. Select Remove Cash Drawer Till from the Open/Close Options menu. The system displays a list of networked cash drawers that are available to remove.
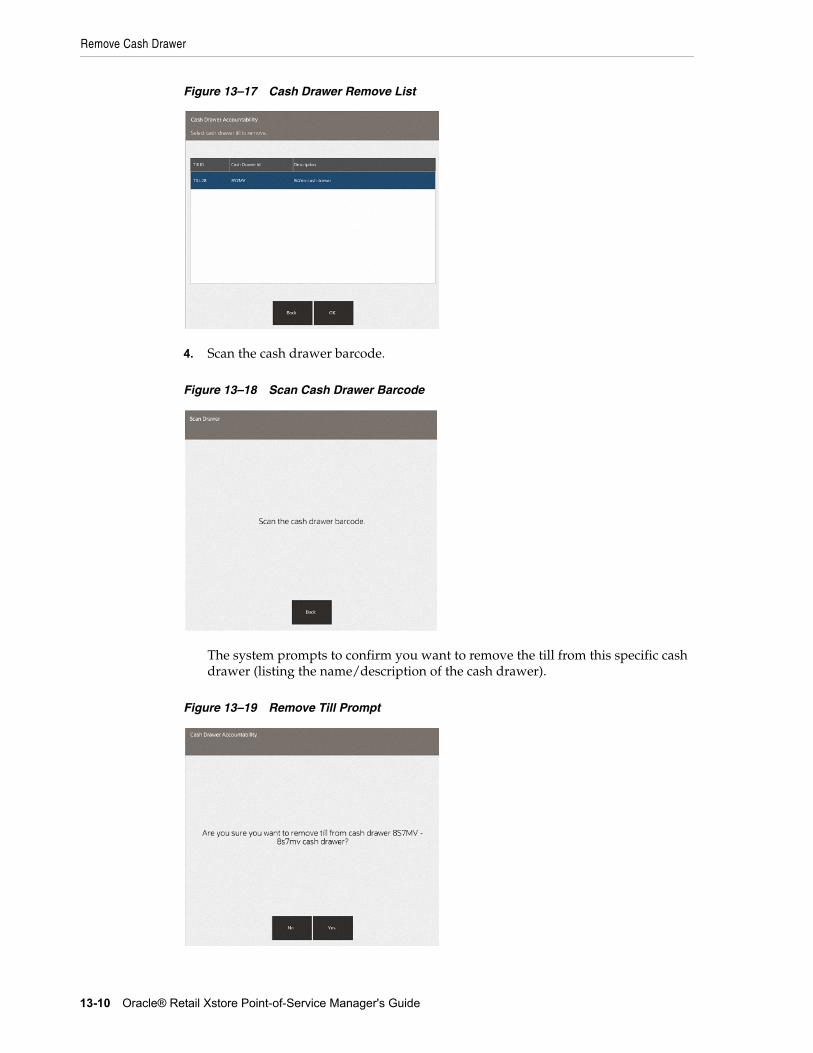
Remove Cash Drawer
13-10 Oracle® Retail Xstore Point-of-Service Manager's Guide
Figure 13–17 Cash Drawer Remove List
4. Scan the cash drawer barcode.
Figure 13–18 Scan Cash Drawer Barcode
The system prompts to confirm you want to remove the till from this specific cash drawer (listing the name/description of the cash drawer).
Figure 13–19 Remove Till Prompt
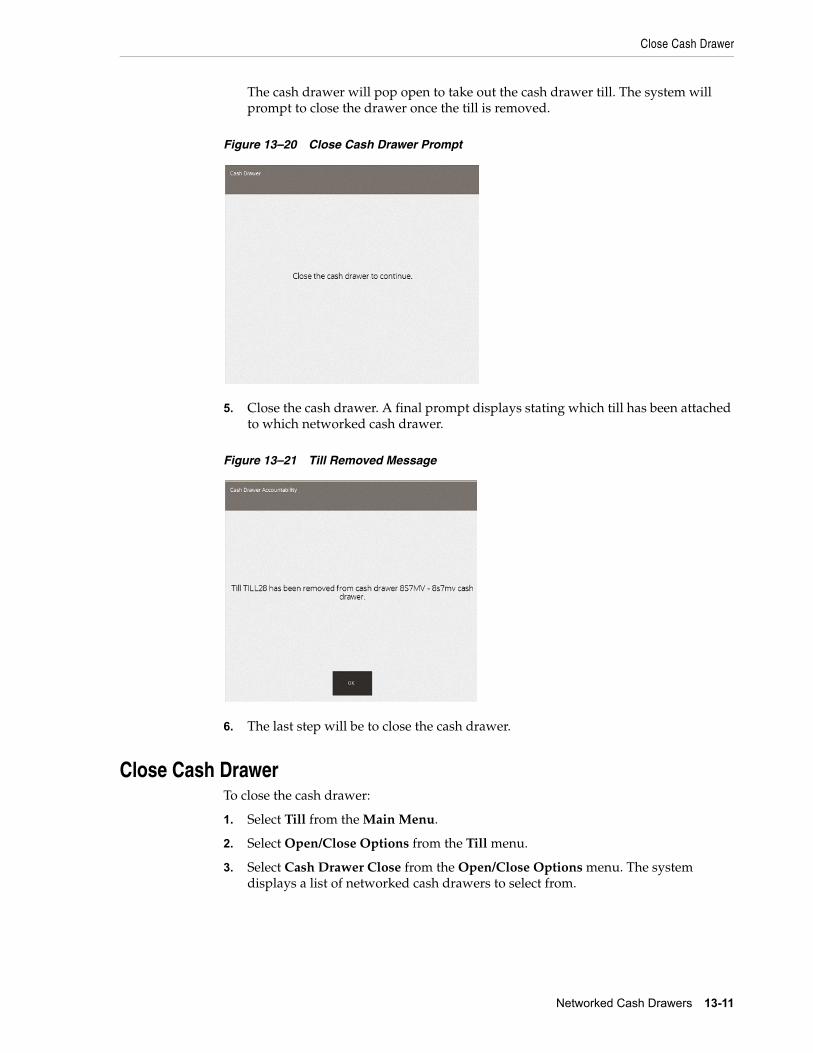
Close Cash Drawer
Networked Cash Drawers 13-11
The cash drawer will pop open to take out the cash drawer till. The system will prompt to close the drawer once the till is removed.
Figure 13–20 Close Cash Drawer Prompt
5. Close the cash drawer. A final prompt displays stating which till has been attached to which networked cash drawer.
Figure 13–21 Till Removed Message
6. The last step will be to close the cash drawer.
Close Cash DrawerTo close the cash drawer:
1. Select Till from the Main Menu.
2. Select Open/Close Options from the Till menu.
3. Select Cash Drawer Close from the Open/Close Options menu. The system displays a list of networked cash drawers to select from.
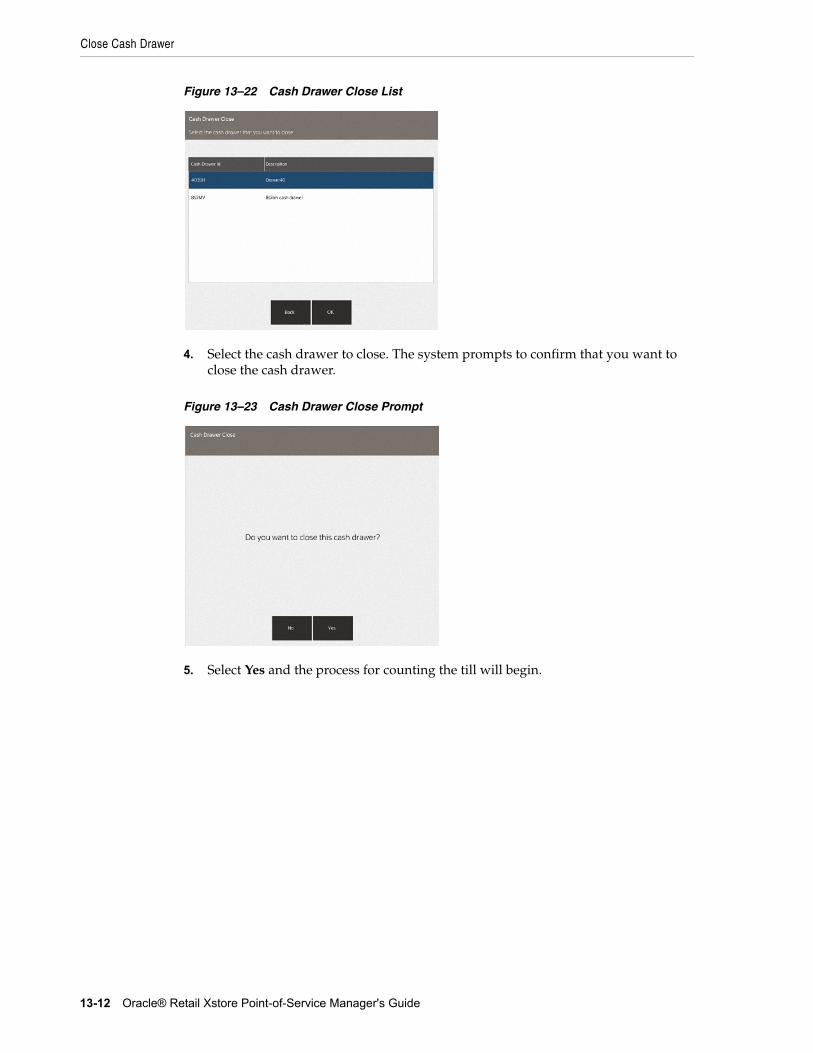
Close Cash Drawer
13-12 Oracle® Retail Xstore Point-of-Service Manager's Guide
Figure 13–22 Cash Drawer Close List
4. Select the cash drawer to close. The system prompts to confirm that you want to close the cash drawer.
Figure 13–23 Cash Drawer Close Prompt
5. Select Yes and the process for counting the till will begin.
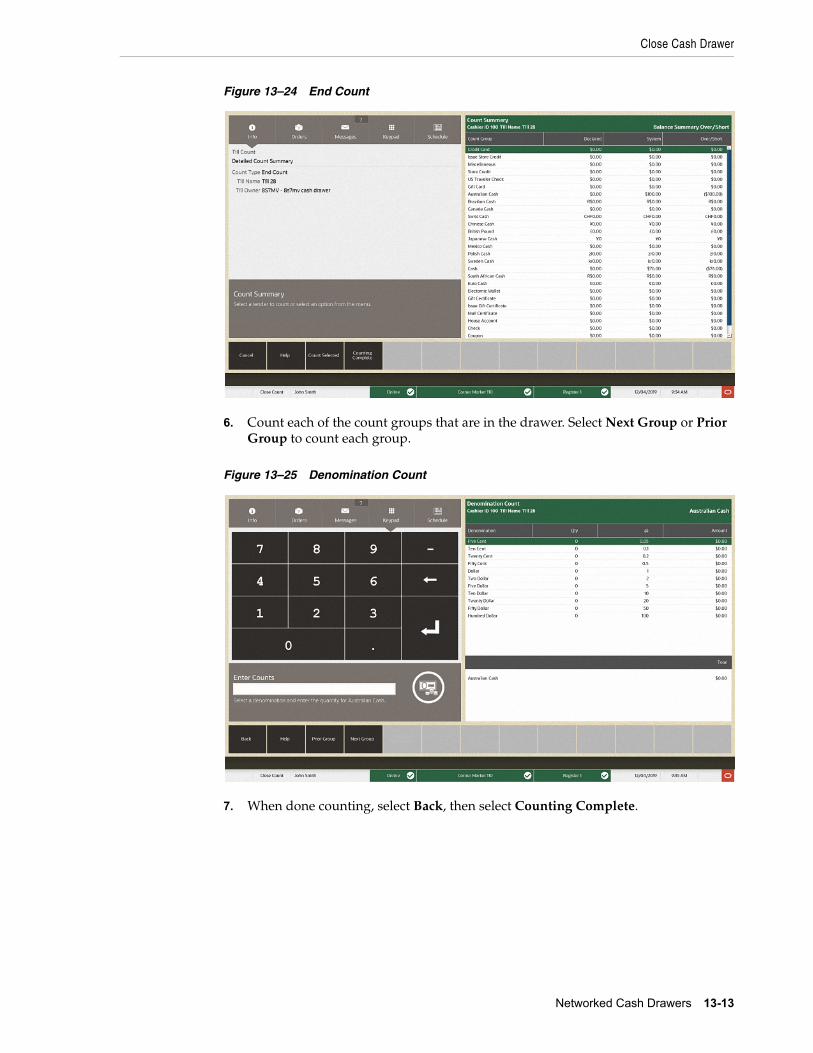
Close Cash Drawer
Networked Cash Drawers 13-13
Figure 13–24 End Count
6. Count each of the count groups that are in the drawer. Select Next Group or Prior Group to count each group.
Figure 13–25 Denomination Count
7. When done counting, select Back, then select Counting Complete.
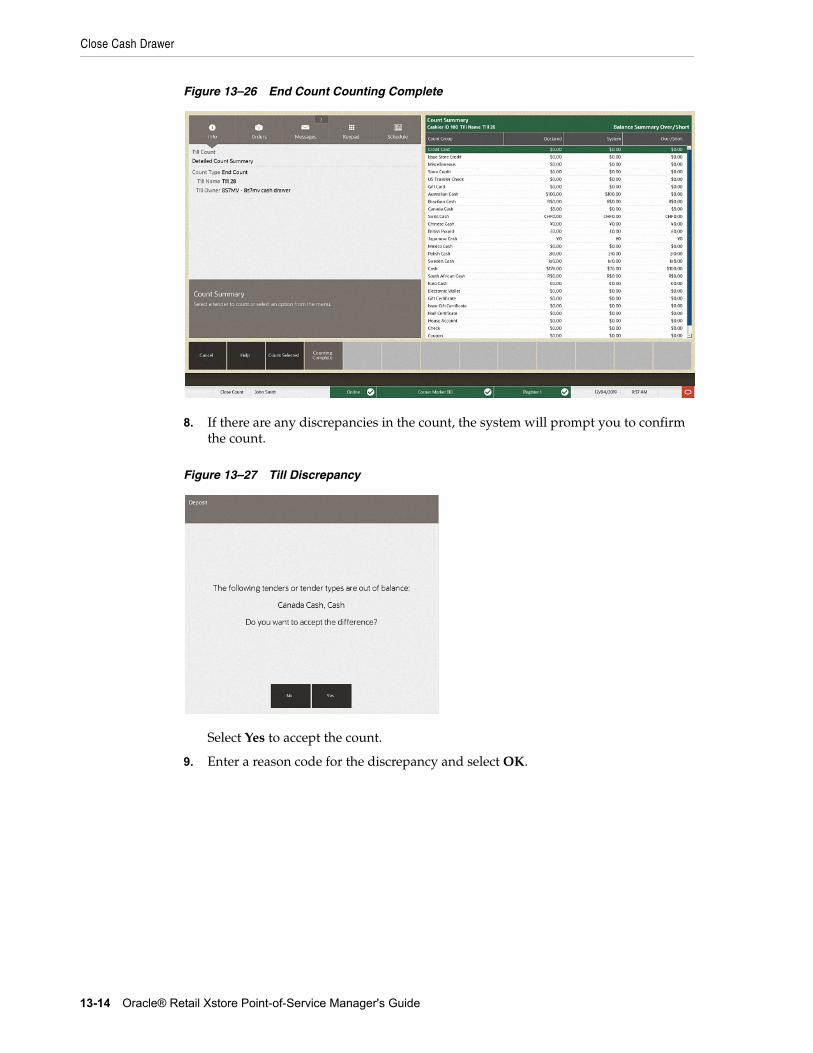
Close Cash Drawer
13-14 Oracle® Retail Xstore Point-of-Service Manager's Guide
Figure 13–26 End Count Counting Complete
8. If there are any discrepancies in the count, the system will prompt you to confirm the count.
Figure 13–27 Till Discrepancy
Select Yes to accept the count.
9. Enter a reason code for the discrepancy and select OK.
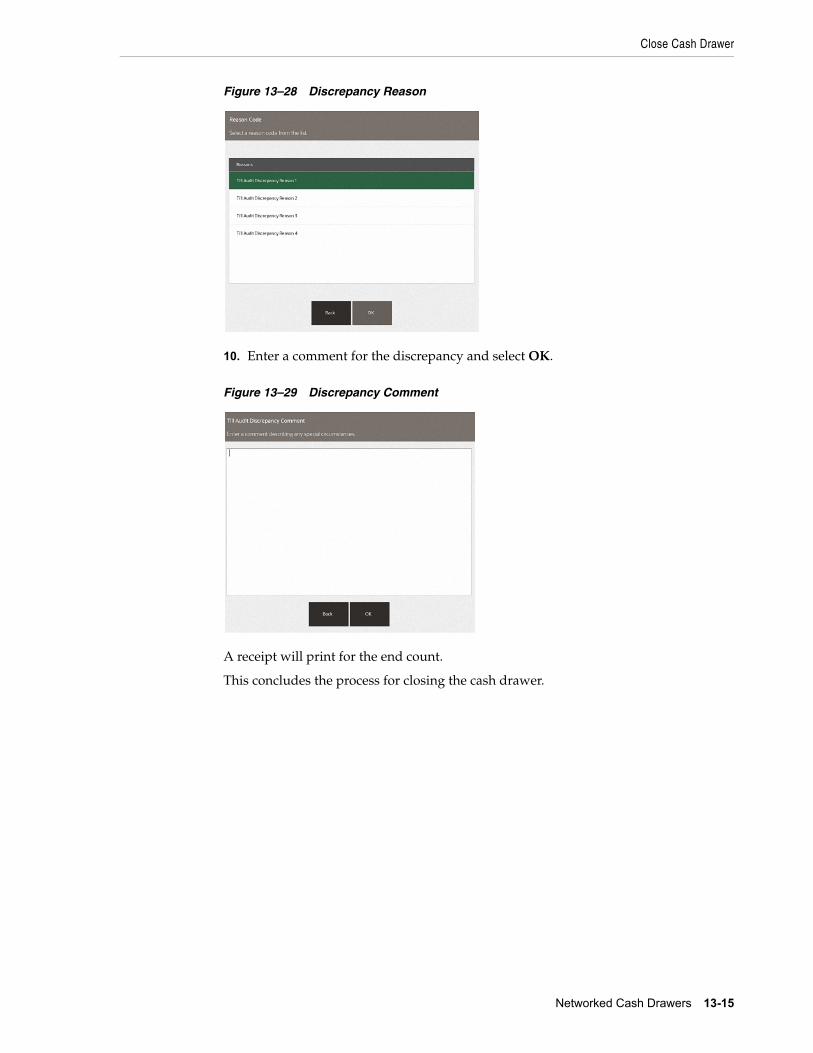
Close Cash Drawer
Networked Cash Drawers 13-15
Figure 13–28 Discrepancy Reason
10. Enter a comment for the discrepancy and select OK.
Figure 13–29 Discrepancy Comment
A receipt will print for the end count.
This concludes the process for closing the cash drawer.
14
Flash Sales Reports 14-1
14Flash Sales Reports
The Flash Sales Reports include four different reports, each of which may be displayed on the screen or printed:
■ Flash Sales Summary Report
■ Flash Sales By Department Report
■ Flash Sales By Hour Report
■ Flash Sales By Employee Report
The Flash Sales reports provide an instant snapshot of sales at the moment that you select one of the reports. Three of the four reports display data in a column format and also in graphic format as bar charts and pie charts. The exception is the Flash Sales By Employee Report, which does not include graphs.
Each of the reports provides a criteria selection screen where you may set the parameters that are used to select the data included in the report.
All of the reports may be viewed online and printed immediately, or saved so that they may be viewed later. Saved reports may be preserved with the original selection parameters or with the original data.
All of the Flash Sales reports are also accessible from the Back Office Reporting Menu.
Flash Sales Summary ReportThe Flash Sales Summary Report provides current sales results for the entire store. It includes looks at sales results from two perspectives:
Sales - The count of transactions and the dollar amount of the transactions in the following categories: gross sales, net sales, returns, discounts and total tax.
Tenders - The count of transactions and the dollar amount for each tender type that was used, such as cash, various credit cards, store credit, gift certificates, and so on.
The last page of the Flash Sales Summary report includes a pie chart of the tenders used and a bar chart of the sales results.
Note: Refer to the Oracle Retail Xstore Point of Service Reports Guide for details about the Flash Sales Reports.
Flash Sales By Department Report
14-2 Oracle® Retail Xstore Point-of-Service Manager’s Guide
Flash Sales By Department ReportThe Flash Sales By Department Report provides current sales results for the entire store for each department. It includes the department name and number, count of transactions in each department and the dollar amount of the sales per department.
The last page of the Flash Sales By Department Report includes a vertical bar graph showing dollar values per department.
Flash Sales By Hour ReportThe Flash Sales By Hour Report provides current sales results for the entire store in hourly increments. It includes an hour by hour breakdown of sales and shows the transaction count per hour, item count per hour and net sales per hour.
The last page of the Flash Sales By Hour Report includes a horizontal bar graph showing sales dollars, item count, and transaction count per hour.
Flash Sales By Employee ReportThe Flash Sales By Employee Report provides up-to-the-moment sales results on a specified date for every employee. It includes the employee name and ID, number of transactions and the total dollar value of those transactions.
15
Electronic Journal 15-1
15Electronic Journal
[3] The electronic journal is an electronically-captured record of all transactions. The search capabilities allow you to quickly locate any transaction and to view the detailed information on the receipt associated with a specific transaction. You may also print gift receipts, reprint receipts, tax free invoices and post void transactions from the Electronic Journal if you have the proper security permissions. A Journal Report showing detailed transaction information is also available.
The following topics are described in this chapter:
■ Accessing Back Office Journal Functions
■ Viewing the Electronic Journal
■ Viewing Transaction Detail
■ Reprinting a Receipt
■ Printing a Gift Receipt
■ Printing a Rebate Receipt
■ Post Voiding a Transaction
■ Journal Report
Accessing Back Office Journal FunctionsEmployees with the proper security permissions may access the Electronic Journal from the Back Office Menu. The Journal menu provides options to view the Electronic Journal and to run the Journal Report.
1. After logging in to the Back Office (see Accessing the Back Office), select the Journal option from the Reporting menu and press Enter.
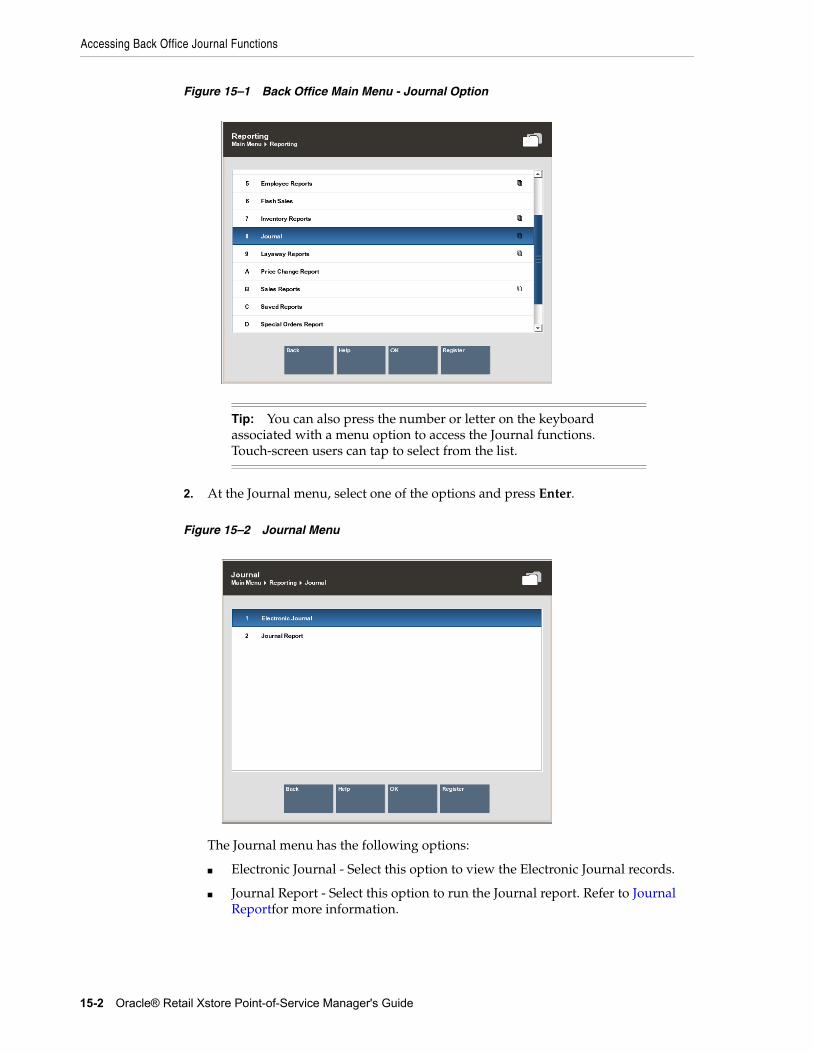
Accessing Back Office Journal Functions
15-2 Oracle® Retail Xstore Point-of-Service Manager's Guide
Figure 15–1 Back Office Main Menu - Journal Option
2. At the Journal menu, select one of the options and press Enter.
Figure 15–2 Journal Menu
The Journal menu has the following options:
■ Electronic Journal - Select this option to view the Electronic Journal records.
■ Journal Report - Select this option to run the Journal report. Refer to Journal Reportfor more information.
Tip: You can also press the number or letter on the keyboard associated with a menu option to access the Journal functions. Touch-screen users can tap to select from the list.
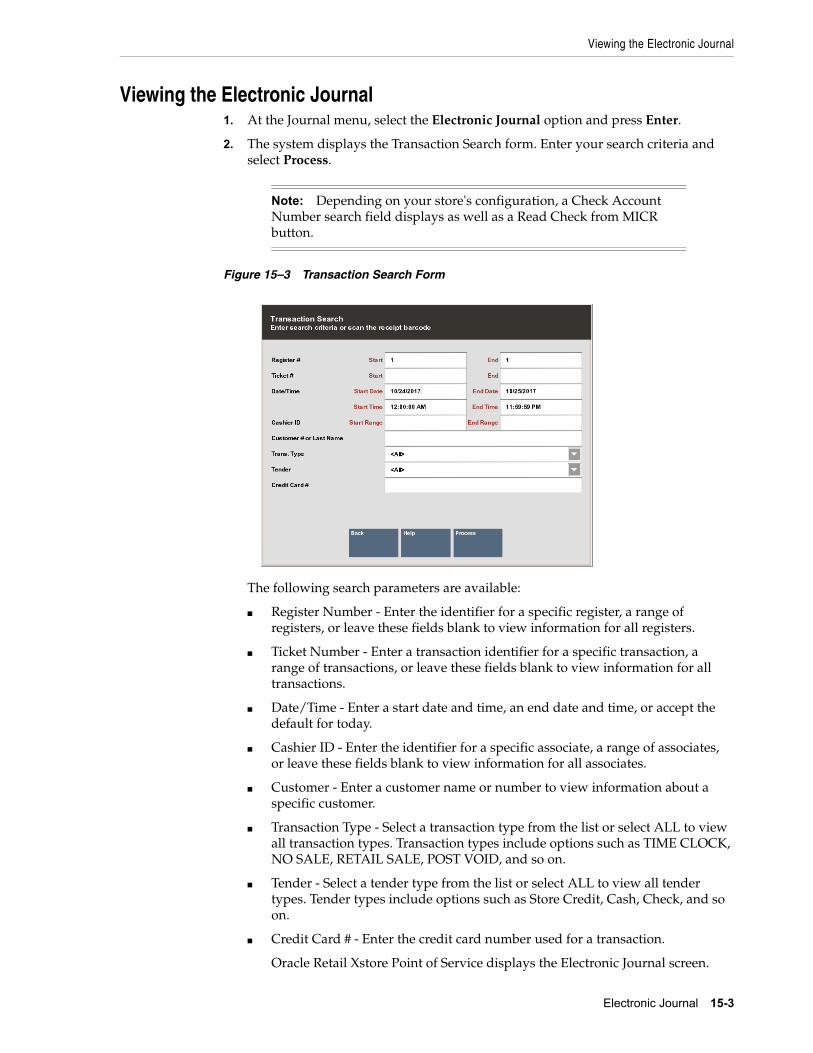
Viewing the Electronic Journal
Electronic Journal 15-3
Viewing the Electronic Journal1. At the Journal menu, select the Electronic Journal option and press Enter.
2. The system displays the Transaction Search form. Enter your search criteria and select Process.
Figure 15–3 Transaction Search Form
The following search parameters are available:
■ Register Number - Enter the identifier for a specific register, a range of registers, or leave these fields blank to view information for all registers.
■ Ticket Number - Enter a transaction identifier for a specific transaction, a range of transactions, or leave these fields blank to view information for all transactions.
■ Date/Time - Enter a start date and time, an end date and time, or accept the default for today.
■ Cashier ID - Enter the identifier for a specific associate, a range of associates, or leave these fields blank to view information for all associates.
■ Customer - Enter a customer name or number to view information about a specific customer.
■ Transaction Type - Select a transaction type from the list or select ALL to view all transaction types. Transaction types include options such as TIME CLOCK, NO SALE, RETAIL SALE, POST VOID, and so on.
■ Tender - Select a tender type from the list or select ALL to view all tender types. Tender types include options such as Store Credit, Cash, Check, and so on.
■ Credit Card # - Enter the credit card number used for a transaction.
Oracle Retail Xstore Point of Service displays the Electronic Journal screen.
Note: Depending on your store's configuration, a Check Account Number search field displays as well as a Read Check from MICR button.
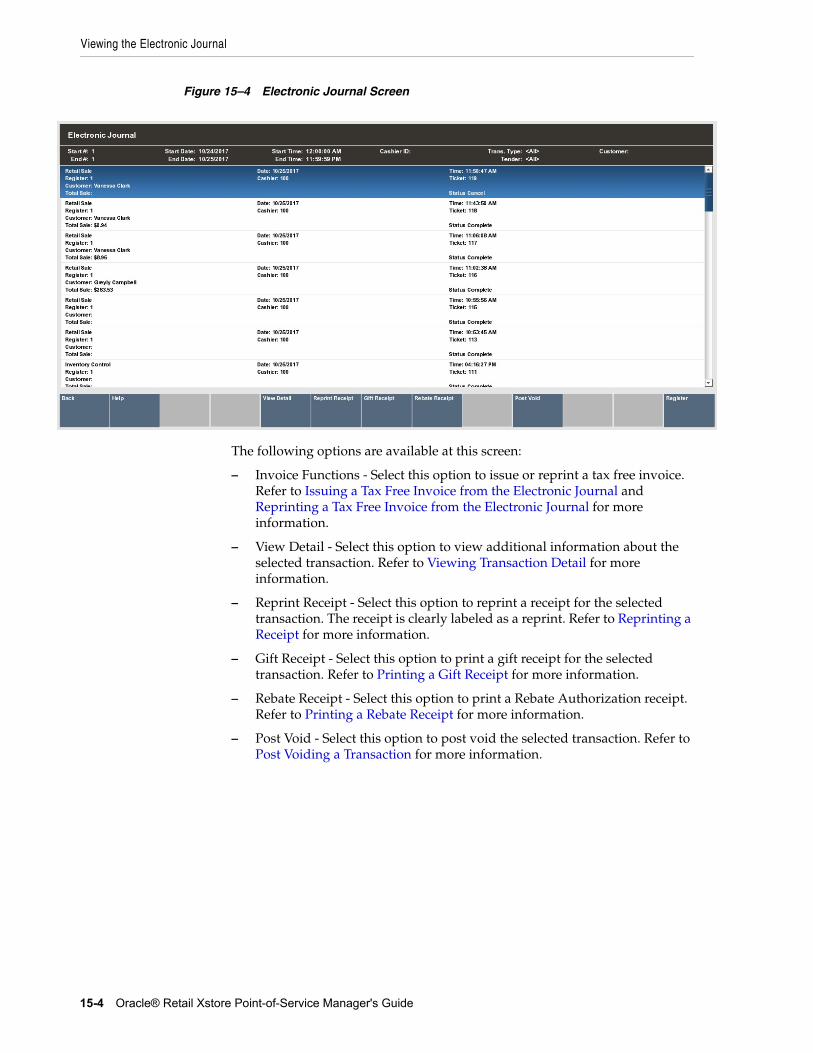
Viewing the Electronic Journal
15-4 Oracle® Retail Xstore Point-of-Service Manager's Guide
Figure 15–4 Electronic Journal Screen
The following options are available at this screen:
– Invoice Functions - Select this option to issue or reprint a tax free invoice. Refer to Issuing a Tax Free Invoice from the Electronic Journal and Reprinting a Tax Free Invoice from the Electronic Journal for more information.
– View Detail - Select this option to view additional information about the selected transaction. Refer to Viewing Transaction Detail for more information.
– Reprint Receipt - Select this option to reprint a receipt for the selected transaction. The receipt is clearly labeled as a reprint. Refer to Reprinting a Receipt for more information.
– Gift Receipt - Select this option to print a gift receipt for the selected transaction. Refer to Printing a Gift Receipt for more information.
– Rebate Receipt - Select this option to print a Rebate Authorization receipt. Refer to Printing a Rebate Receipt for more information.
– Post Void - Select this option to post void the selected transaction. Refer to Post Voiding a Transaction for more information.
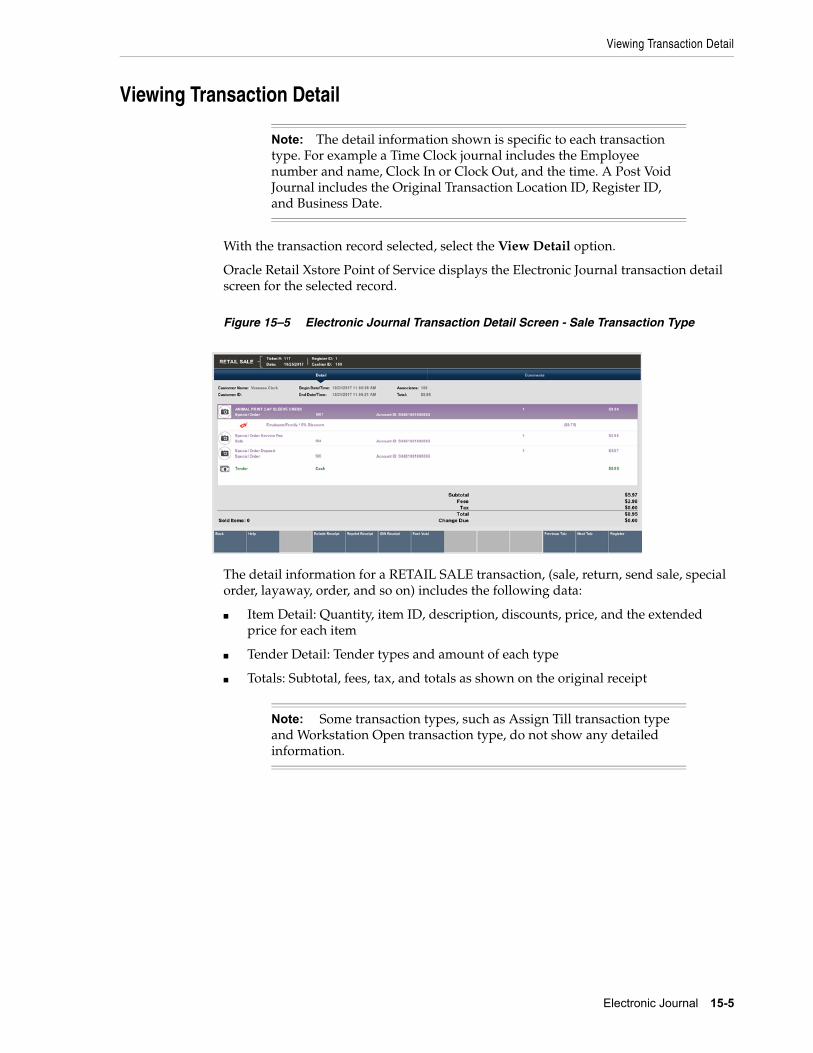
Viewing Transaction Detail
Electronic Journal 15-5
Viewing Transaction Detail
With the transaction record selected, select the View Detail option.
Oracle Retail Xstore Point of Service displays the Electronic Journal transaction detail screen for the selected record.
Figure 15–5 Electronic Journal Transaction Detail Screen - Sale Transaction Type
The detail information for a RETAIL SALE transaction, (sale, return, send sale, special order, layaway, order, and so on) includes the following data:
■ Item Detail: Quantity, item ID, description, discounts, price, and the extended price for each item
■ Tender Detail: Tender types and amount of each type
■ Totals: Subtotal, fees, tax, and totals as shown on the original receipt
Note: The detail information shown is specific to each transaction type. For example a Time Clock journal includes the Employee number and name, Clock In or Clock Out, and the time. A Post Void Journal includes the Original Transaction Location ID, Register ID, and Business Date.
Note: Some transaction types, such as Assign Till transaction type and Workstation Open transaction type, do not show any detailed information.
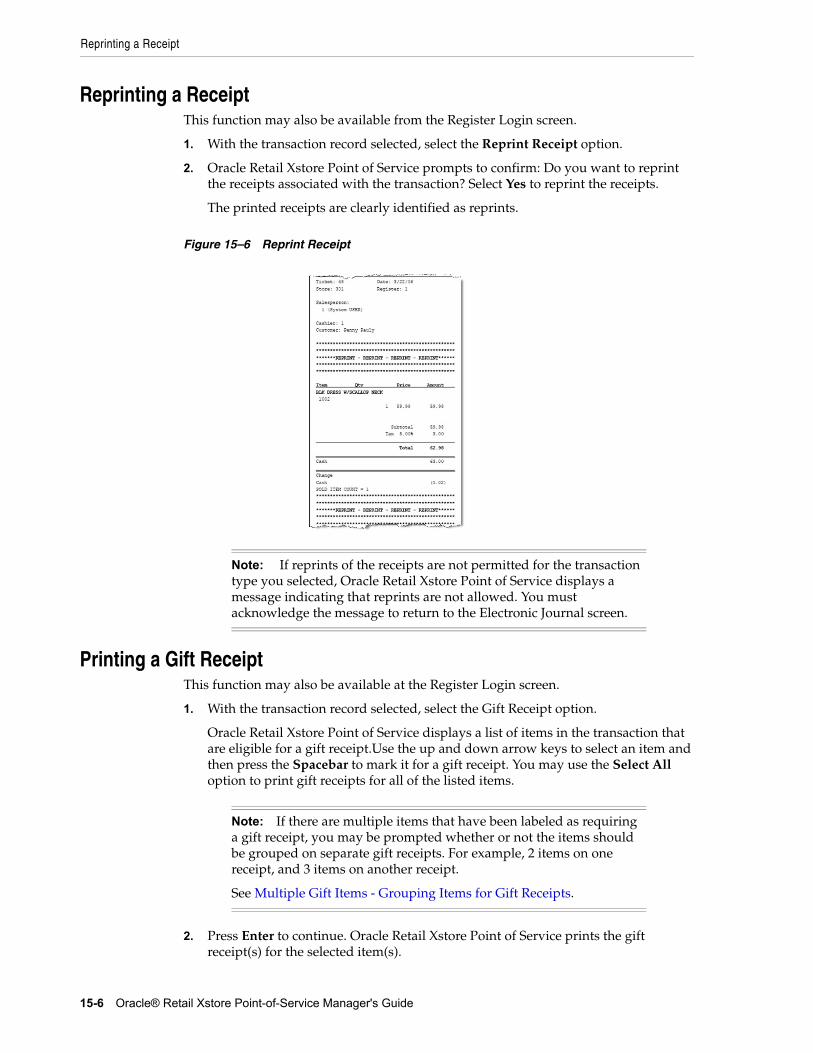
Reprinting a Receipt
15-6 Oracle® Retail Xstore Point-of-Service Manager's Guide
Reprinting a ReceiptThis function may also be available from the Register Login screen.
1. With the transaction record selected, select the Reprint Receipt option.
2. Oracle Retail Xstore Point of Service prompts to confirm: Do you want to reprint the receipts associated with the transaction? Select Yes to reprint the receipts.
The printed receipts are clearly identified as reprints.
Figure 15–6 Reprint Receipt
Printing a Gift ReceiptThis function may also be available at the Register Login screen.
1. With the transaction record selected, select the Gift Receipt option.
Oracle Retail Xstore Point of Service displays a list of items in the transaction that are eligible for a gift receipt.Use the up and down arrow keys to select an item and then press the Spacebar to mark it for a gift receipt. You may use the Select All option to print gift receipts for all of the listed items.
2. Press Enter to continue. Oracle Retail Xstore Point of Service prints the gift receipt(s) for the selected item(s).
Note: If reprints of the receipts are not permitted for the transaction type you selected, Oracle Retail Xstore Point of Service displays a message indicating that reprints are not allowed. You must acknowledge the message to return to the Electronic Journal screen.
Note: If there are multiple items that have been labeled as requiring a gift receipt, you may be prompted whether or not the items should be grouped on separate gift receipts. For example, 2 items on one receipt, and 3 items on another receipt.
See Multiple Gift Items - Grouping Items for Gift Receipts.
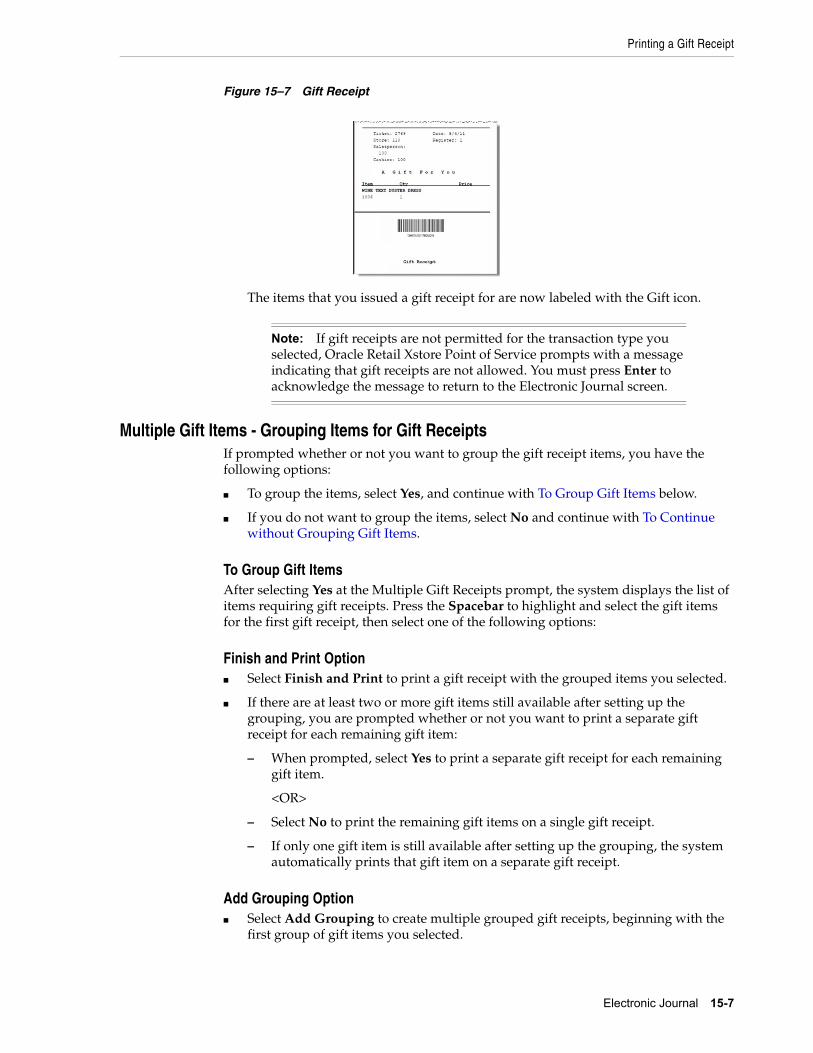
Printing a Gift Receipt
Electronic Journal 15-7
Figure 15–7 Gift Receipt
The items that you issued a gift receipt for are now labeled with the Gift icon.
Multiple Gift Items - Grouping Items for Gift ReceiptsIf prompted whether or not you want to group the gift receipt items, you have the following options:
■ To group the items, select Yes, and continue with To Group Gift Items below.
■ If you do not want to group the items, select No and continue with To Continue without Grouping Gift Items.
To Group Gift ItemsAfter selecting Yes at the Multiple Gift Receipts prompt, the system displays the list of items requiring gift receipts. Press the Spacebar to highlight and select the gift items for the first gift receipt, then select one of the following options:
Finish and Print Option ■ Select Finish and Print to print a gift receipt with the grouped items you selected.
■ If there are at least two or more gift items still available after setting up the grouping, you are prompted whether or not you want to print a separate gift receipt for each remaining gift item:
– When prompted, select Yes to print a separate gift receipt for each remaining gift item.
<OR>
– Select No to print the remaining gift items on a single gift receipt.
– If only one gift item is still available after setting up the grouping, the system automatically prints that gift item on a separate gift receipt.
Add Grouping Option■ Select Add Grouping to create multiple grouped gift receipts, beginning with the
first group of gift items you selected.
Note: If gift receipts are not permitted for the transaction type you selected, Oracle Retail Xstore Point of Service prompts with a message indicating that gift receipts are not allowed. You must press Enter to acknowledge the message to return to the Electronic Journal screen.
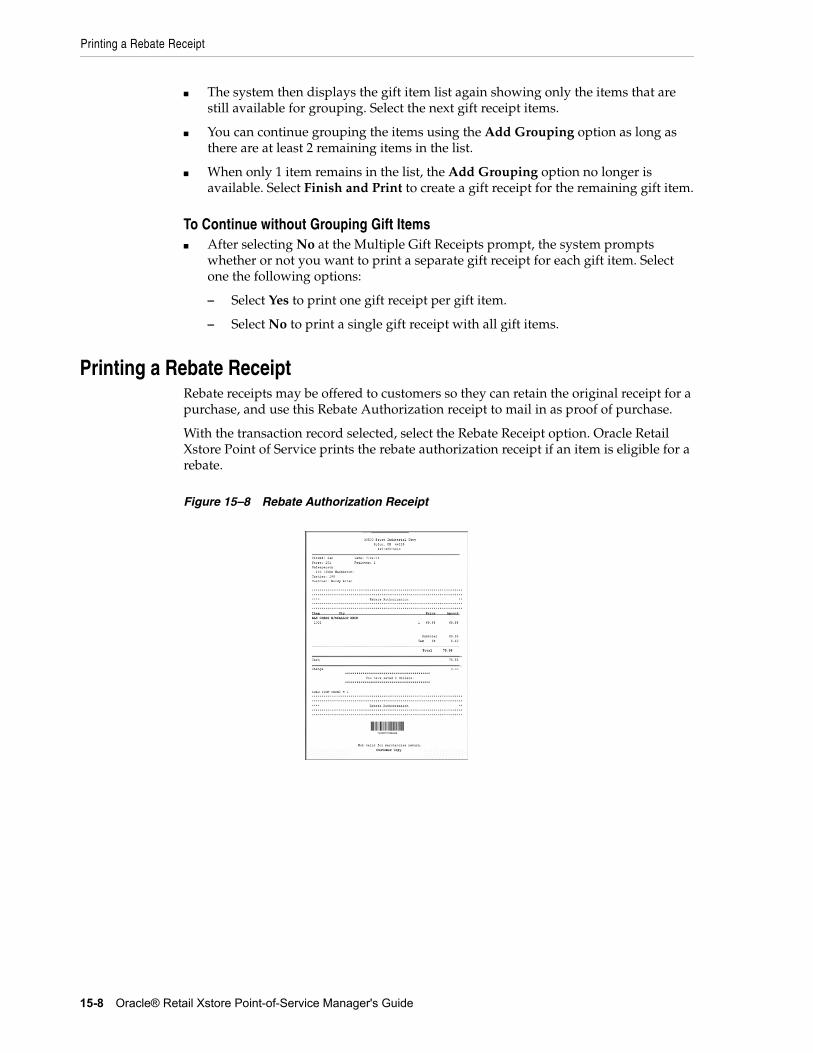
Printing a Rebate Receipt
15-8 Oracle® Retail Xstore Point-of-Service Manager's Guide
■ The system then displays the gift item list again showing only the items that are still available for grouping. Select the next gift receipt items.
■ You can continue grouping the items using the Add Grouping option as long as there are at least 2 remaining items in the list.
■ When only 1 item remains in the list, the Add Grouping option no longer is available. Select Finish and Print to create a gift receipt for the remaining gift item.
To Continue without Grouping Gift Items■ After selecting No at the Multiple Gift Receipts prompt, the system prompts
whether or not you want to print a separate gift receipt for each gift item. Select one the following options:
– Select Yes to print one gift receipt per gift item.
– Select No to print a single gift receipt with all gift items.
Printing a Rebate ReceiptRebate receipts may be offered to customers so they can retain the original receipt for a purchase, and use this Rebate Authorization receipt to mail in as proof of purchase.
With the transaction record selected, select the Rebate Receipt option. Oracle Retail Xstore Point of Service prints the rebate authorization receipt if an item is eligible for a rebate.
Figure 15–8 Rebate Authorization Receipt
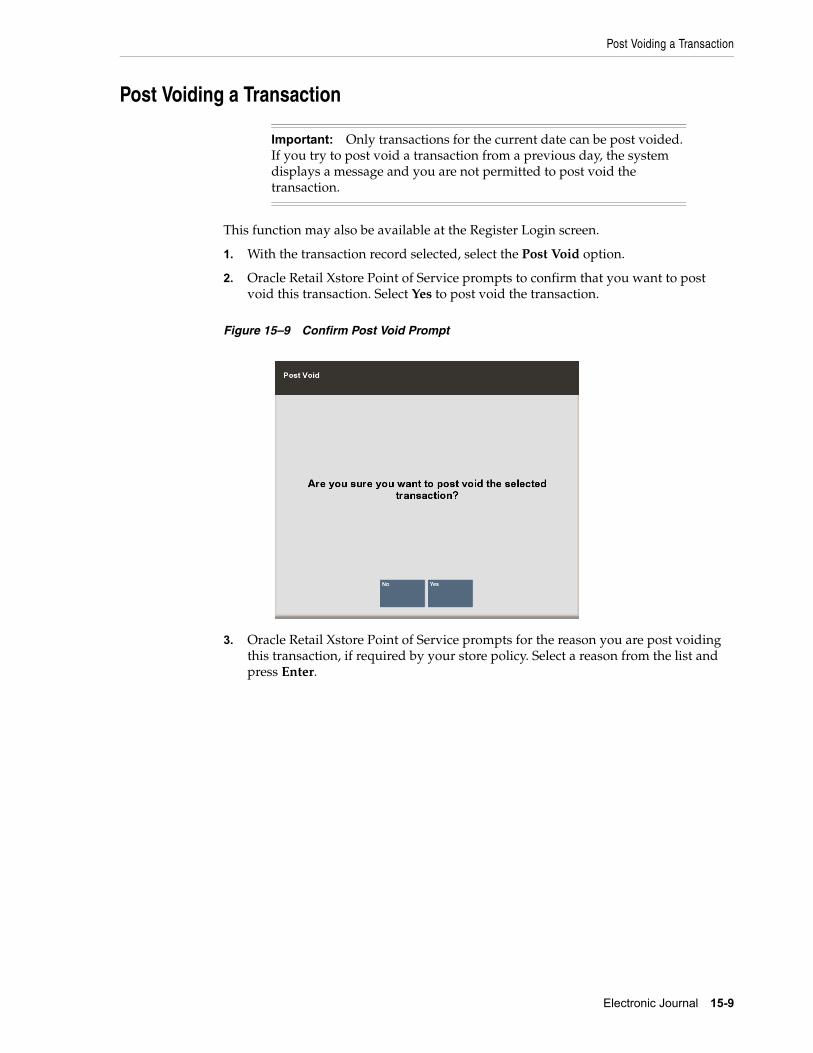
Post Voiding a Transaction
Electronic Journal 15-9
Post Voiding a Transaction
This function may also be available at the Register Login screen.
1. With the transaction record selected, select the Post Void option.
2. Oracle Retail Xstore Point of Service prompts to confirm that you want to post void this transaction. Select Yes to post void the transaction.
Figure 15–9 Confirm Post Void Prompt
3. Oracle Retail Xstore Point of Service prompts for the reason you are post voiding this transaction, if required by your store policy. Select a reason from the list and press Enter.
Important: Only transactions for the current date can be post voided. If you try to post void a transaction from a previous day, the system displays a message and you are not permitted to post void the transaction.
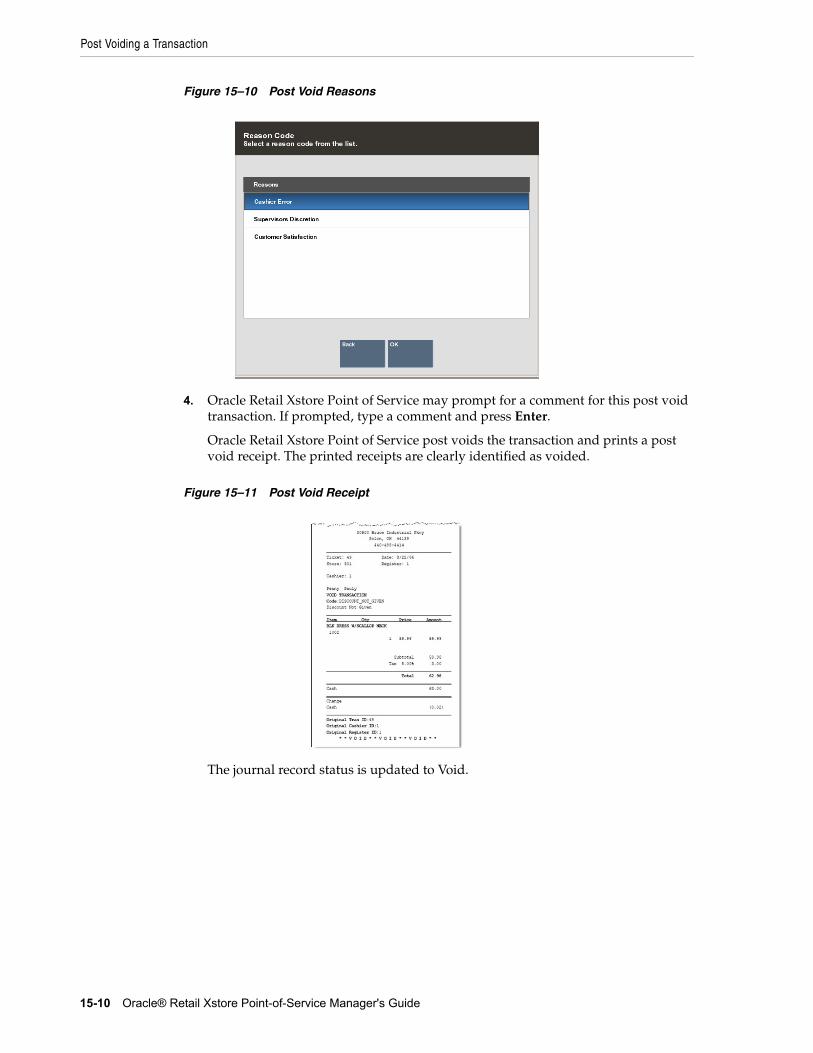
Post Voiding a Transaction
15-10 Oracle® Retail Xstore Point-of-Service Manager's Guide
Figure 15–10 Post Void Reasons
4. Oracle Retail Xstore Point of Service may prompt for a comment for this post void transaction. If prompted, type a comment and press Enter.
Oracle Retail Xstore Point of Service post voids the transaction and prints a post void receipt. The printed receipts are clearly identified as voided.
Figure 15–11 Post Void Receipt
The journal record status is updated to Void.
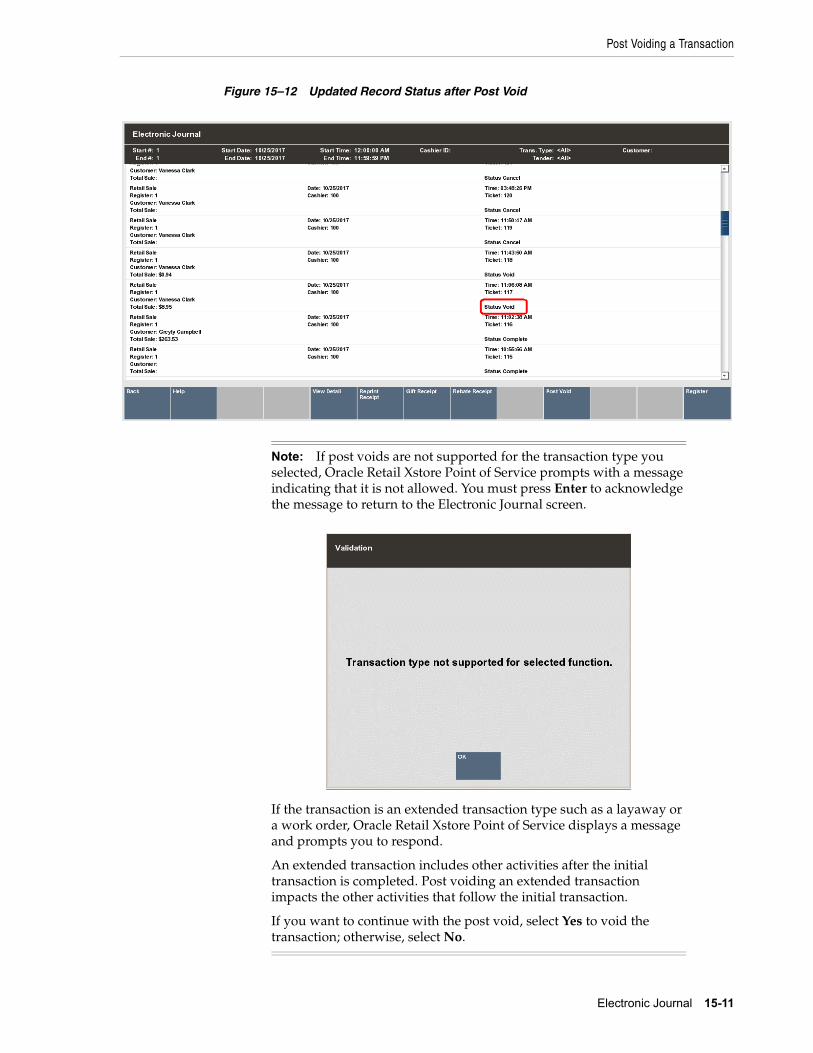
Post Voiding a Transaction
Electronic Journal 15-11
Figure 15–12 Updated Record Status after Post Void
Note: If post voids are not supported for the transaction type you selected, Oracle Retail Xstore Point of Service prompts with a message indicating that it is not allowed. You must press Enter to acknowledge the message to return to the Electronic Journal screen.
If the transaction is an extended transaction type such as a layaway or a work order, Oracle Retail Xstore Point of Service displays a message and prompts you to respond.
An extended transaction includes other activities after the initial transaction is completed. Post voiding an extended transaction impacts the other activities that follow the initial transaction.
If you want to continue with the post void, select Yes to void the transaction; otherwise, select No.
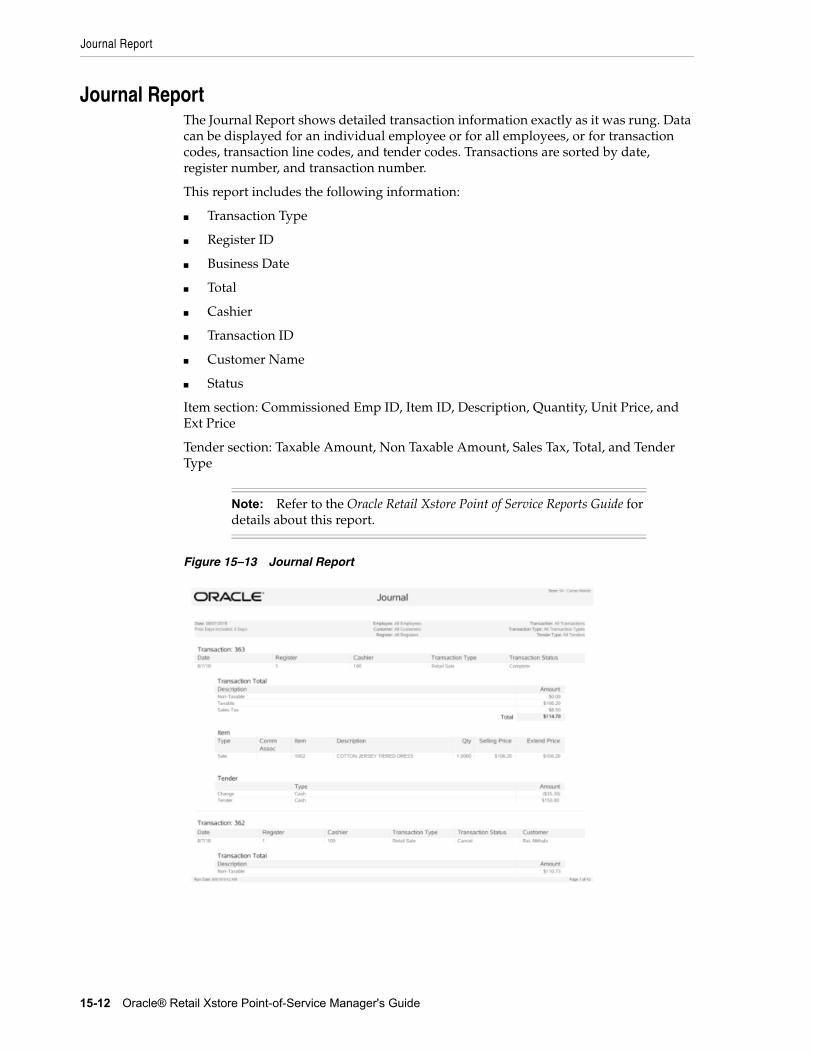
Journal Report
15-12 Oracle® Retail Xstore Point-of-Service Manager's Guide
Journal ReportThe Journal Report shows detailed transaction information exactly as it was rung. Data can be displayed for an individual employee or for all employees, or for transaction codes, transaction line codes, and tender codes. Transactions are sorted by date, register number, and transaction number.
This report includes the following information:
■ Transaction Type
■ Register ID
■ Business Date
■ Total
■ Cashier
■ Transaction ID
■ Customer Name
■ Status
Item section: Commissioned Emp ID, Item ID, Description, Quantity, Unit Price, and Ext Price
Tender section: Taxable Amount, Non Taxable Amount, Sales Tax, Total, and Tender Type
Figure 15–13 Journal Report
Note: Refer to the Oracle Retail Xstore Point of Service Reports Guide for details about this report.
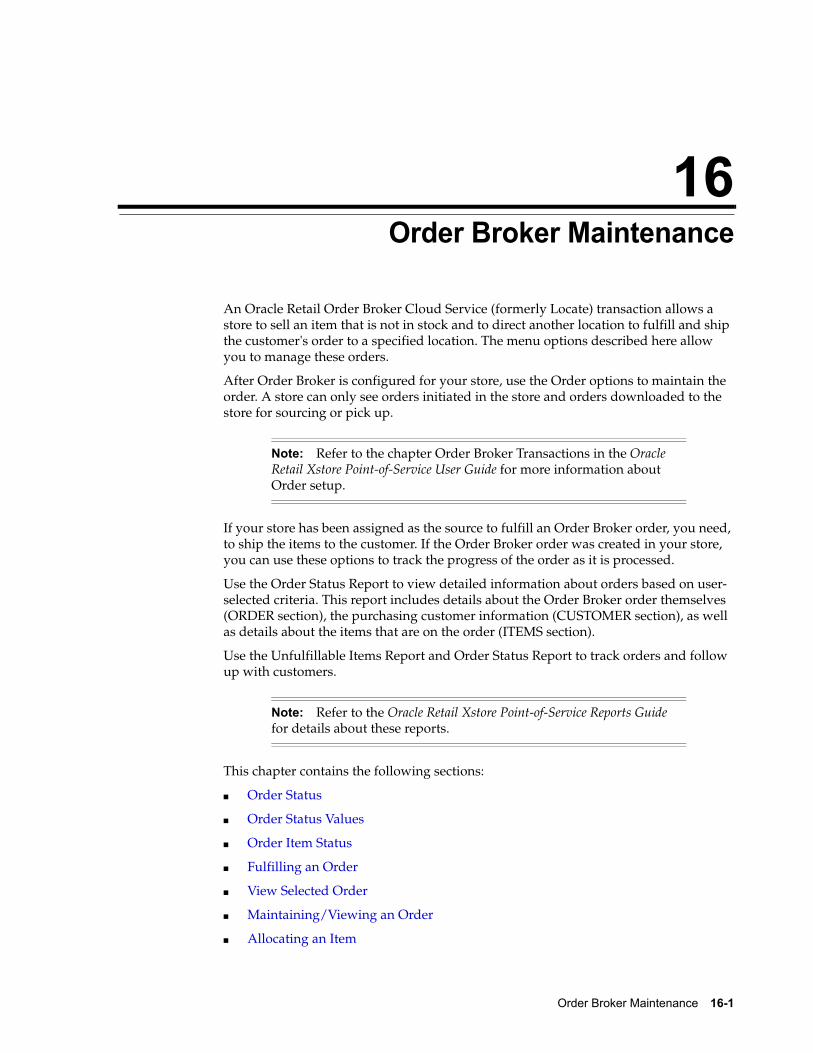
16
Order Broker Maintenance 16-1
16Order Broker Maintenance
An Oracle Retail Order Broker Cloud Service (formerly Locate) transaction allows a store to sell an item that is not in stock and to direct another location to fulfill and ship the customer's order to a specified location. The menu options described here allow you to manage these orders.
After Order Broker is configured for your store, use the Order options to maintain the order. A store can only see orders initiated in the store and orders downloaded to the store for sourcing or pick up.
If your store has been assigned as the source to fulfill an Order Broker order, you need, to ship the items to the customer. If the Order Broker order was created in your store, you can use these options to track the progress of the order as it is processed.
Use the Order Status Report to view detailed information about orders based on user- selected criteria. This report includes details about the Order Broker order themselves (ORDER section), the purchasing customer information (CUSTOMER section), as well as details about the items that are on the order (ITEMS section).
Use the Unfulfillable Items Report and Order Status Report to track orders and follow up with customers.
This chapter contains the following sections:
■ Order Status
■ Order Status Values
■ Order Item Status
■ Fulfilling an Order
■ View Selected Order
■ Maintaining/Viewing an Order
■ Allocating an Item
Note: Refer to the chapter Order Broker Transactions in the Oracle Retail Xstore Point-of-Service User Guide for more information about Order setup.
Note: Refer to the Oracle Retail Xstore Point-of-Service Reports Guide for details about these reports.
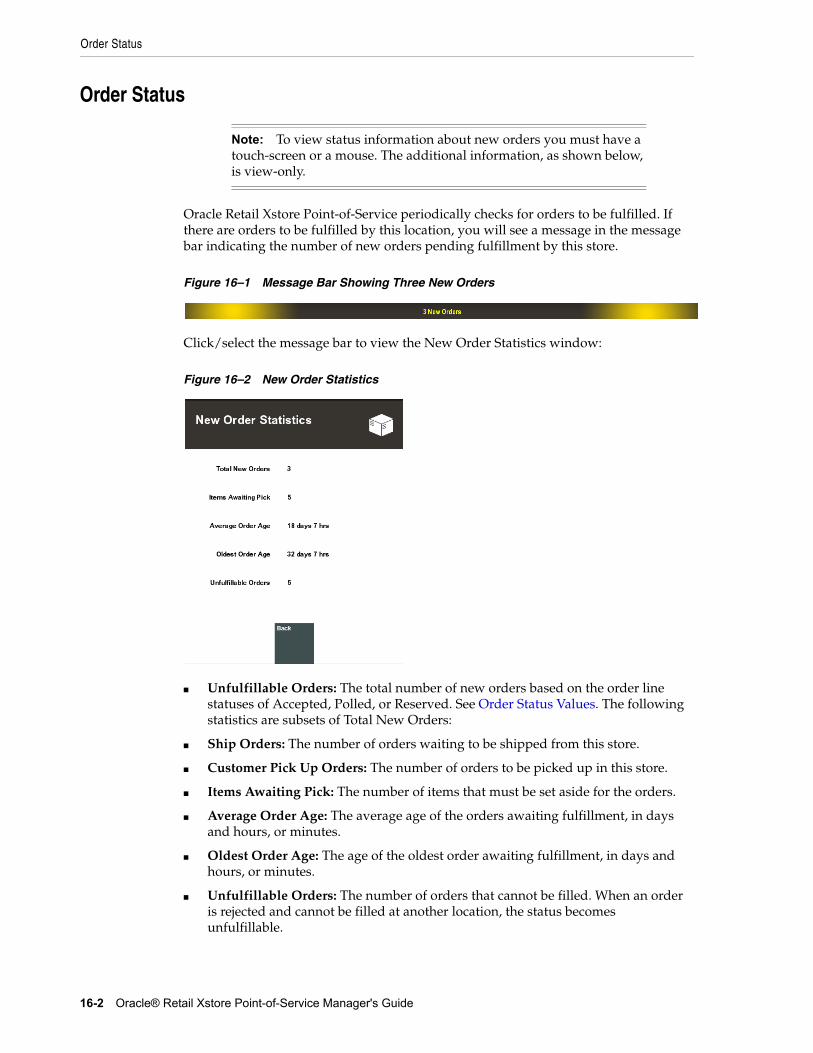
Order Status
16-2 Oracle® Retail Xstore Point-of-Service Manager's Guide
Order Status
Oracle Retail Xstore Point-of-Service periodically checks for orders to be fulfilled. If there are orders to be fulfilled by this location, you will see a message in the message bar indicating the number of new orders pending fulfillment by this store.
Figure 16–1 Message Bar Showing Three New Orders
Click/select the message bar to view the New Order Statistics window:
Figure 16–2 New Order Statistics
■ Unfulfillable Orders: The total number of new orders based on the order line statuses of Accepted, Polled, or Reserved. See Order Status Values. The following statistics are subsets of Total New Orders:
■ Ship Orders: The number of orders waiting to be shipped from this store.
■ Customer Pick Up Orders: The number of orders to be picked up in this store.
■ Items Awaiting Pick: The number of items that must be set aside for the orders.
■ Average Order Age: The average age of the orders awaiting fulfillment, in days and hours, or minutes.
■ Oldest Order Age: The age of the oldest order awaiting fulfillment, in days and hours, or minutes.
■ Unfulfillable Orders: The number of orders that cannot be filled. When an order is rejected and cannot be filled at another location, the status becomes unfulfillable.
Note: To view status information about new orders you must have a touch-screen or a mouse. The additional information, as shown below, is view-only.
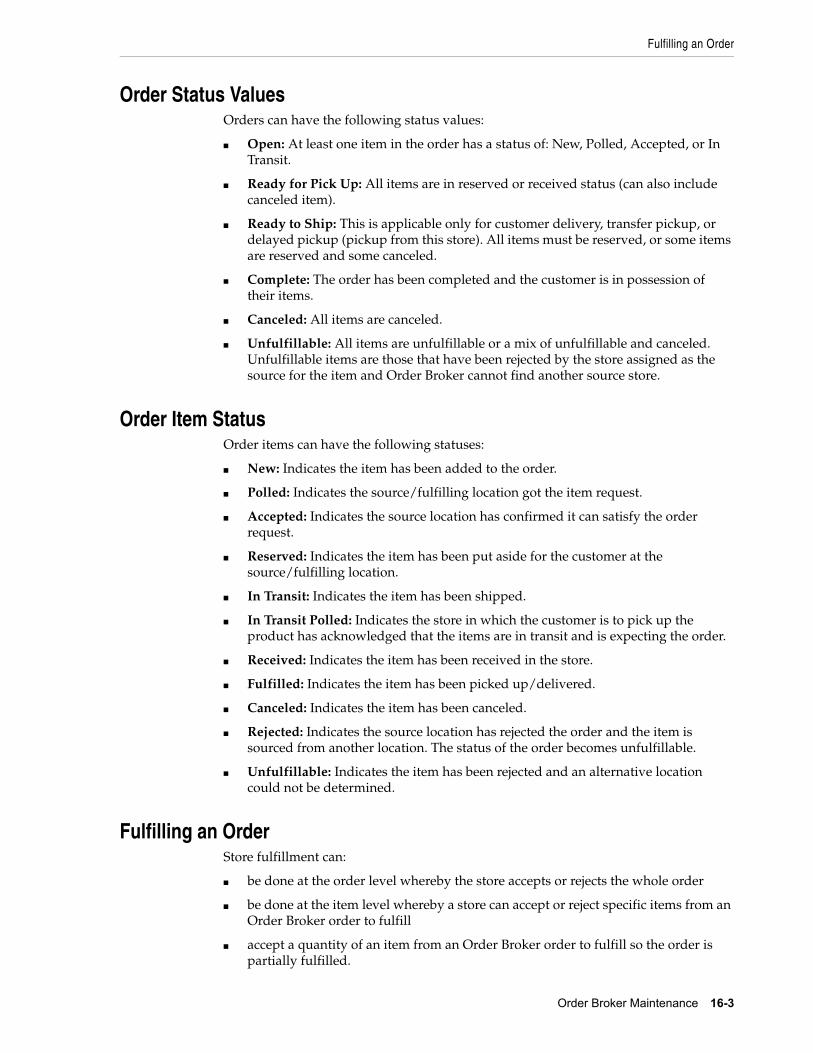
Fulfilling an Order
Order Broker Maintenance 16-3
Order Status ValuesOrders can have the following status values:
■ Open: At least one item in the order has a status of: New, Polled, Accepted, or In Transit.
■ Ready for Pick Up: All items are in reserved or received status (can also include canceled item).
■ Ready to Ship: This is applicable only for customer delivery, transfer pickup, or delayed pickup (pickup from this store). All items must be reserved, or some items are reserved and some canceled.
■ Complete: The order has been completed and the customer is in possession of their items.
■ Canceled: All items are canceled.
■ Unfulfillable: All items are unfulfillable or a mix of unfulfillable and canceled. Unfulfillable items are those that have been rejected by the store assigned as the source for the item and Order Broker cannot find another source store.
Order Item StatusOrder items can have the following statuses:
■ New: Indicates the item has been added to the order.
■ Polled: Indicates the source/fulfilling location got the item request.
■ Accepted: Indicates the source location has confirmed it can satisfy the order request.
■ Reserved: Indicates the item has been put aside for the customer at the source/fulfilling location.
■ In Transit: Indicates the item has been shipped.
■ In Transit Polled: Indicates the store in which the customer is to pick up the product has acknowledged that the items are in transit and is expecting the order.
■ Received: Indicates the item has been received in the store.
■ Fulfilled: Indicates the item has been picked up/delivered.
■ Canceled: Indicates the item has been canceled.
■ Rejected: Indicates the source location has rejected the order and the item is sourced from another location. The status of the order becomes unfulfillable.
■ Unfulfillable: Indicates the item has been rejected and an alternative location could not be determined.
Fulfilling an OrderStore fulfillment can:
■ be done at the order level whereby the store accepts or rejects the whole order
■ be done at the item level whereby a store can accept or reject specific items from an Order Broker order to fulfill
■ accept a quantity of an item from an Order Broker order to fulfill so the order is partially fulfilled.
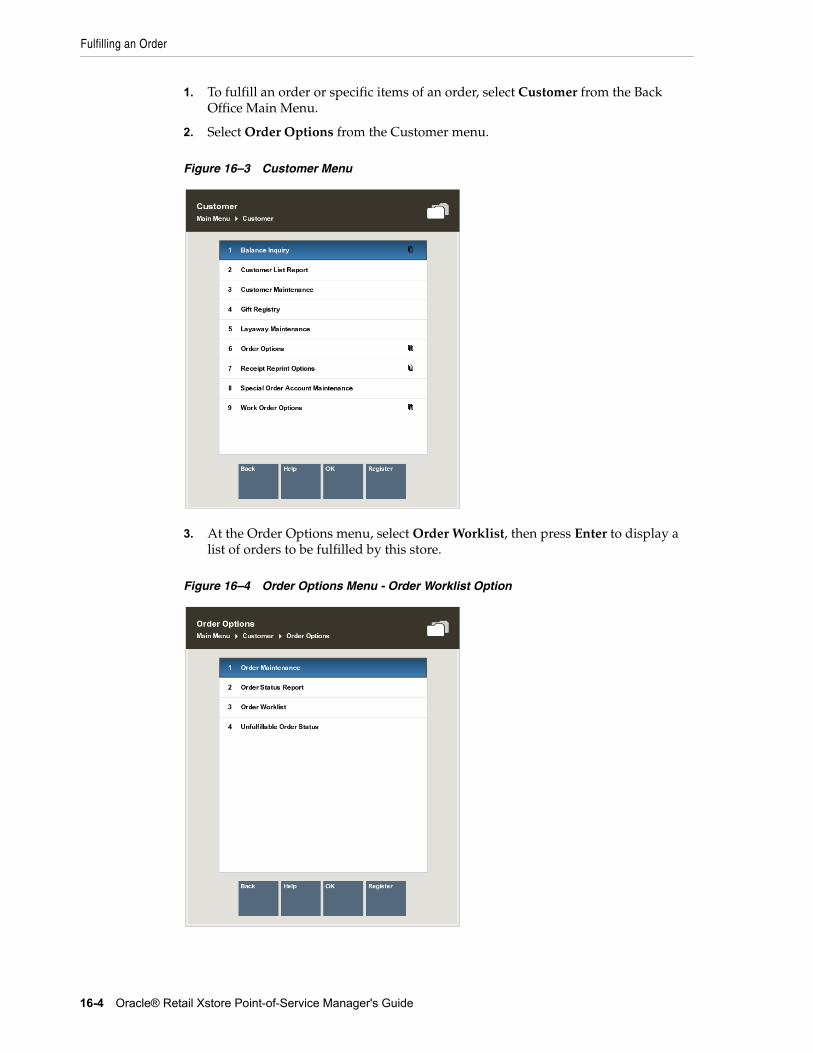
Fulfilling an Order
16-4 Oracle® Retail Xstore Point-of-Service Manager's Guide
1. To fulfill an order or specific items of an order, select Customer from the Back Office Main Menu.
2. Select Order Options from the Customer menu.
Figure 16–3 Customer Menu
3. At the Order Options menu, select Order Worklist, then press Enter to display a list of orders to be fulfilled by this store.
Figure 16–4 Order Options Menu - Order Worklist Option
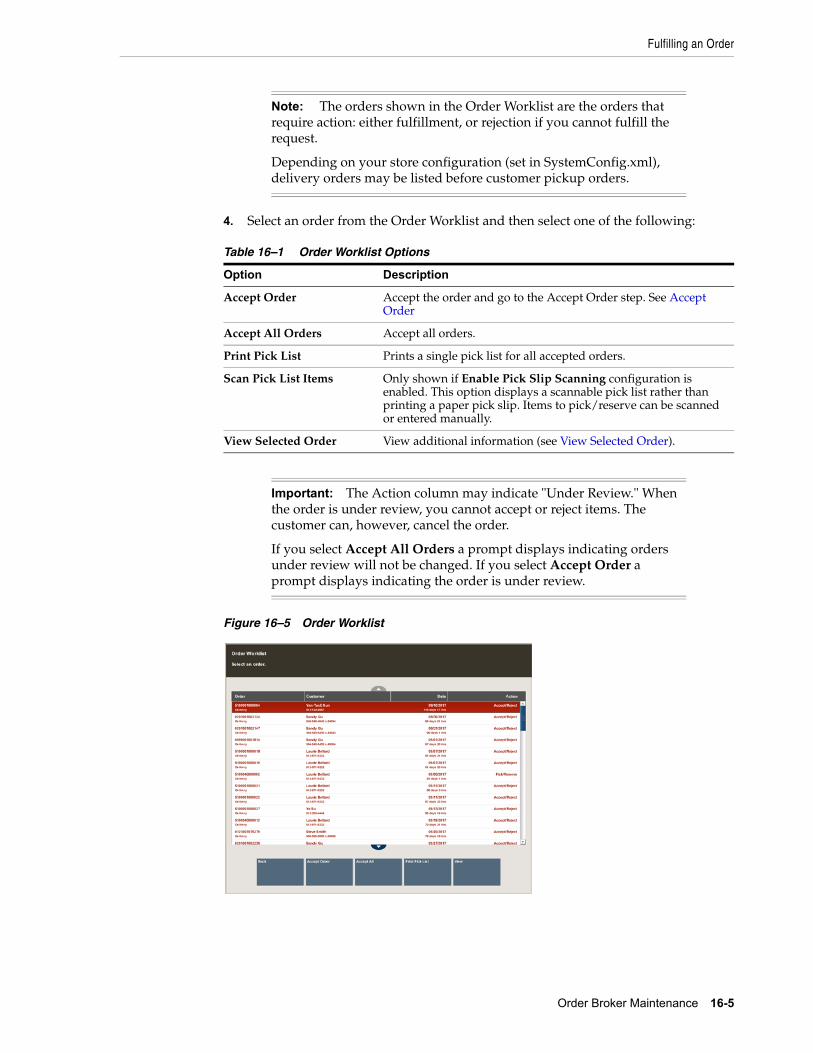
Fulfilling an Order
Order Broker Maintenance 16-5
4. Select an order from the Order Worklist and then select one of the following:
Figure 16–5 Order Worklist
Note: The orders shown in the Order Worklist are the orders that require action: either fulfillment, or rejection if you cannot fulfill the request.
Depending on your store configuration (set in SystemConfig.xml), delivery orders may be listed before customer pickup orders.
Table 16–1 Order Worklist Options
Option Description
Accept Order Accept the order and go to the Accept Order step. See Accept Order
Accept All Orders Accept all orders.
Print Pick List Prints a single pick list for all accepted orders.
Scan Pick List Items Only shown if Enable Pick Slip Scanning configuration is enabled. This option displays a scannable pick list rather than printing a paper pick slip. Items to pick/reserve can be scanned or entered manually.
View Selected Order View additional information (see View Selected Order).
Important: The Action column may indicate "Under Review." When the order is under review, you cannot accept or reject items. The customer can, however, cancel the order.
If you select Accept All Orders a prompt displays indicating orders under review will not be changed. If you select Accept Order a prompt displays indicating the order is under review.
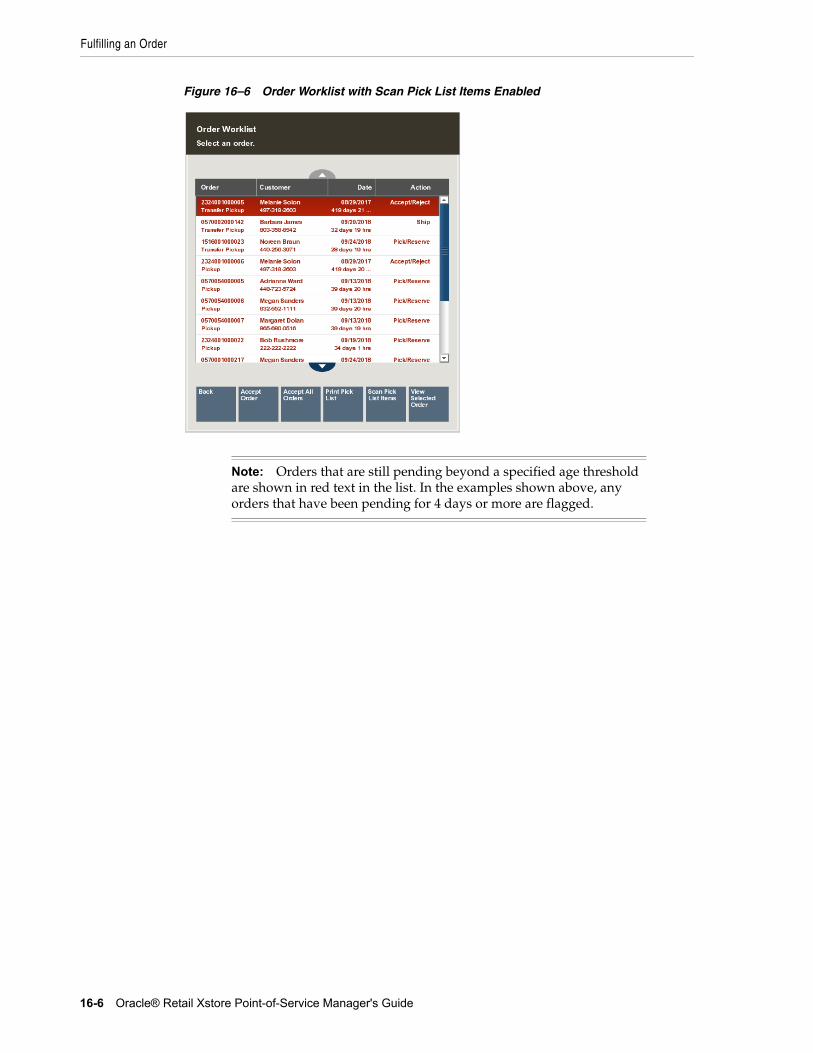
Fulfilling an Order
16-6 Oracle® Retail Xstore Point-of-Service Manager's Guide
Figure 16–6 Order Worklist with Scan Pick List Items Enabled
Note: Orders that are still pending beyond a specified age threshold are shown in red text in the list. In the examples shown above, any orders that have been pending for 4 days or more are flagged.
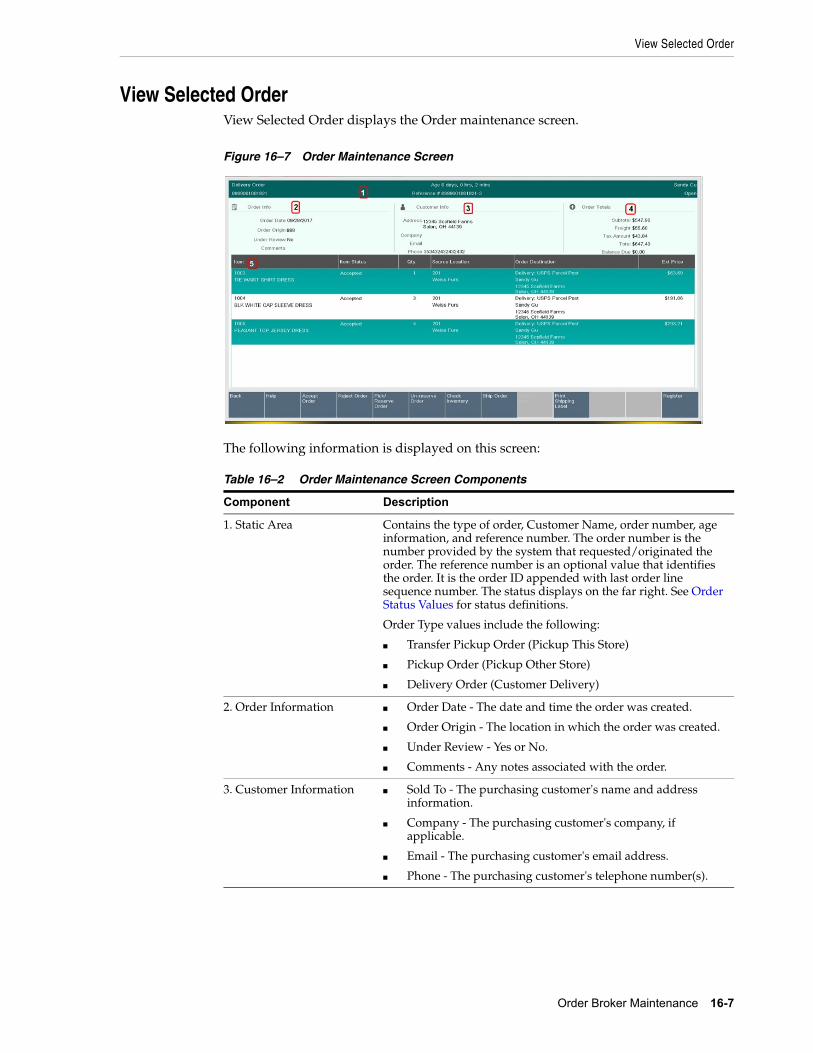
View Selected Order
Order Broker Maintenance 16-7
View Selected OrderView Selected Order displays the Order maintenance screen.
Figure 16–7 Order Maintenance Screen
The following information is displayed on this screen:
Table 16–2 Order Maintenance Screen Components
Component Description
1. Static Area Contains the type of order, Customer Name, order number, age information, and reference number. The order number is the number provided by the system that requested/originated the order. The reference number is an optional value that identifies the order. It is the order ID appended with last order line sequence number. The status displays on the far right. See Order Status Values for status definitions.
Order Type values include the following:
■ Transfer Pickup Order (Pickup This Store)
■ Pickup Order (Pickup Other Store)
■ Delivery Order (Customer Delivery)
2. Order Information ■ Order Date - The date and time the order was created.
■ Order Origin - The location in which the order was created.
■ Under Review - Yes or No.
■ Comments - Any notes associated with the order.
3. Customer Information ■ Sold To - The purchasing customer's name and address information.
■ Company - The purchasing customer's company, if applicable.
■ Email - The purchasing customer's email address.
■ Phone - The purchasing customer's telephone number(s).
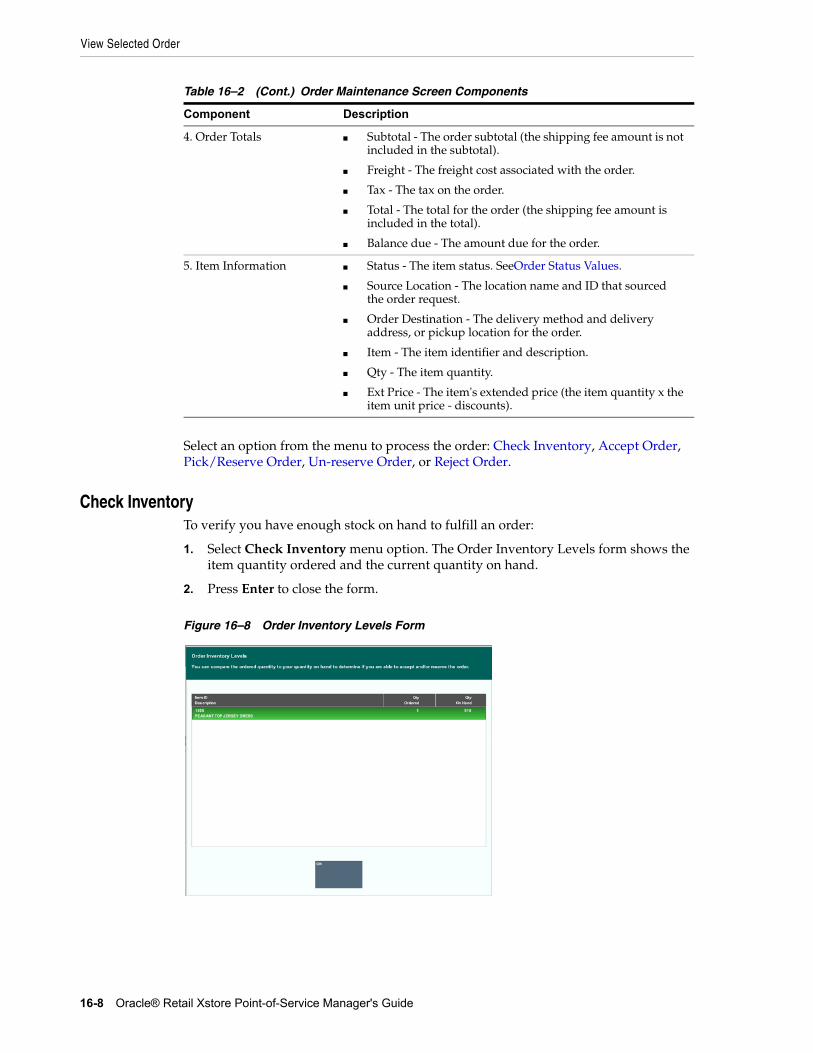
View Selected Order
16-8 Oracle® Retail Xstore Point-of-Service Manager's Guide
Select an option from the menu to process the order: Check Inventory, Accept Order, Pick/Reserve Order, Un-reserve Order, or Reject Order.
Check InventoryTo verify you have enough stock on hand to fulfill an order:
1. Select Check Inventory menu option. The Order Inventory Levels form shows the item quantity ordered and the current quantity on hand.
2. Press Enter to close the form.
Figure 16–8 Order Inventory Levels Form
4. Order Totals ■ Subtotal - The order subtotal (the shipping fee amount is not included in the subtotal).
■ Freight - The freight cost associated with the order.
■ Tax - The tax on the order.
■ Total - The total for the order (the shipping fee amount is included in the total).
■ Balance due - The amount due for the order.
5. Item Information ■ Status - The item status. SeeOrder Status Values.
■ Source Location - The location name and ID that sourced the order request.
■ Order Destination - The delivery method and delivery address, or pickup location for the order.
■ Item - The item identifier and description.
■ Qty - The item quantity.
■ Ext Price - The item's extended price (the item quantity x the item unit price - discounts).
Table 16–2 (Cont.) Order Maintenance Screen Components
Component Description
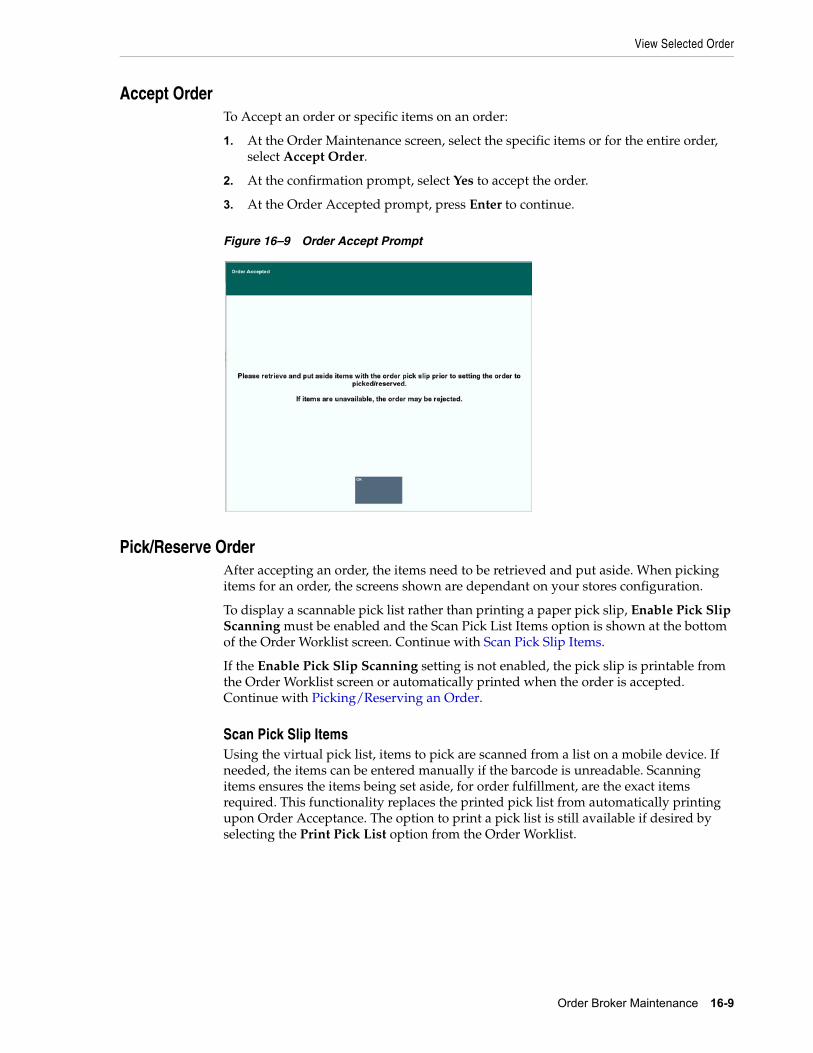
View Selected Order
Order Broker Maintenance 16-9
Accept OrderTo Accept an order or specific items on an order:
1. At the Order Maintenance screen, select the specific items or for the entire order, select Accept Order.
2. At the confirmation prompt, select Yes to accept the order.
3. At the Order Accepted prompt, press Enter to continue.
Figure 16–9 Order Accept Prompt
Pick/Reserve OrderAfter accepting an order, the items need to be retrieved and put aside. When picking items for an order, the screens shown are dependant on your stores configuration.
To display a scannable pick list rather than printing a paper pick slip, Enable Pick Slip Scanning must be enabled and the Scan Pick List Items option is shown at the bottom of the Order Worklist screen. Continue with Scan Pick Slip Items.
If the Enable Pick Slip Scanning setting is not enabled, the pick slip is printable from the Order Worklist screen or automatically printed when the order is accepted. Continue with Picking/Reserving an Order.
Scan Pick Slip ItemsUsing the virtual pick list, items to pick are scanned from a list on a mobile device. If needed, the items can be entered manually if the barcode is unreadable. Scanning items ensures the items being set aside, for order fulfillment, are the exact items required. This functionality replaces the printed pick list from automatically printing upon Order Acceptance. The option to print a pick list is still available if desired by selecting the Print Pick List option from the Order Worklist.
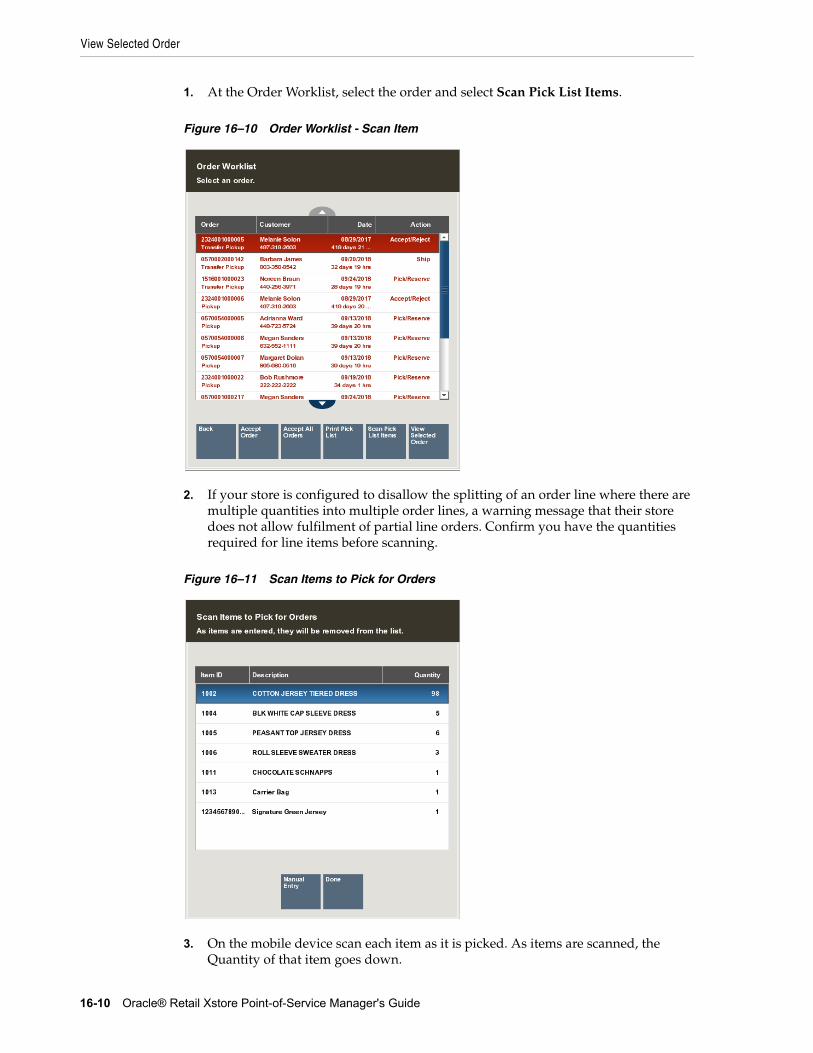
View Selected Order
16-10 Oracle® Retail Xstore Point-of-Service Manager's Guide
1. At the Order Worklist, select the order and select Scan Pick List Items.
Figure 16–10 Order Worklist - Scan Item
2. If your store is configured to disallow the splitting of an order line where there are multiple quantities into multiple order lines, a warning message that their store does not allow fulfilment of partial line orders. Confirm you have the quantities required for line items before scanning.
Figure 16–11 Scan Items to Pick for Orders
3. On the mobile device scan each item as it is picked. As items are scanned, the Quantity of that item goes down.
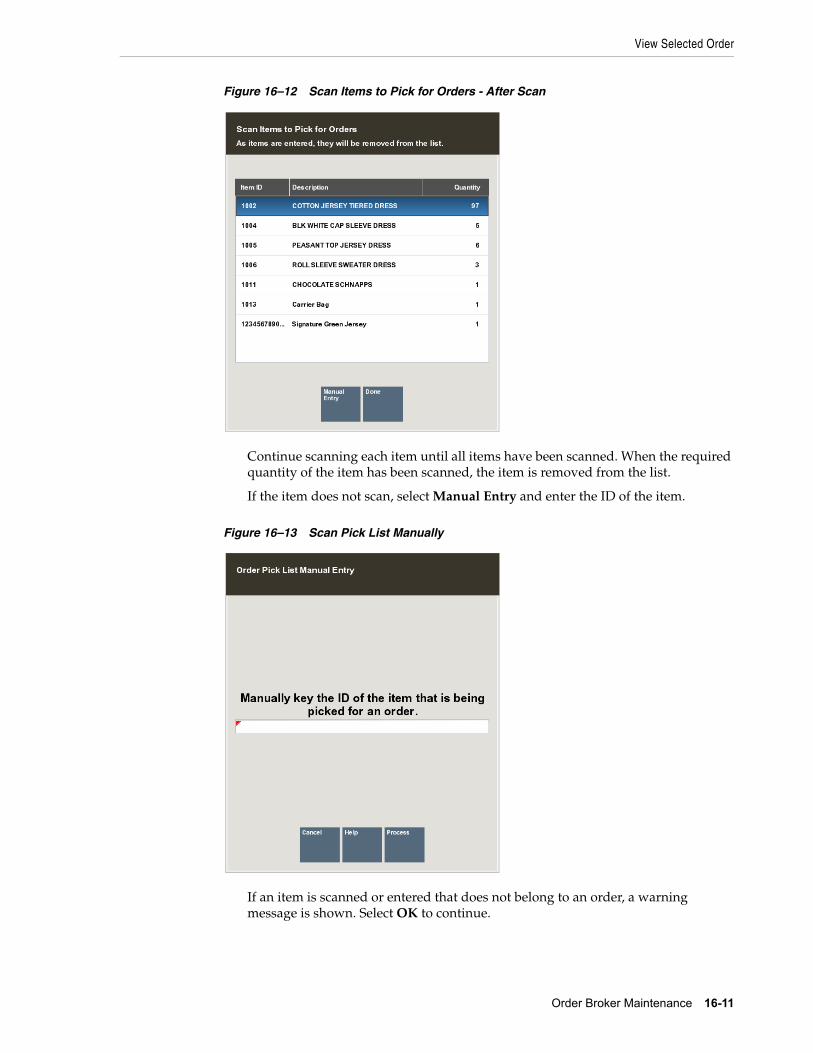
View Selected Order
Order Broker Maintenance 16-11
Figure 16–12 Scan Items to Pick for Orders - After Scan
Continue scanning each item until all items have been scanned. When the required quantity of the item has been scanned, the item is removed from the list.
If the item does not scan, select Manual Entry and enter the ID of the item.
Figure 16–13 Scan Pick List Manually
If an item is scanned or entered that does not belong to an order, a warning message is shown. Select OK to continue.
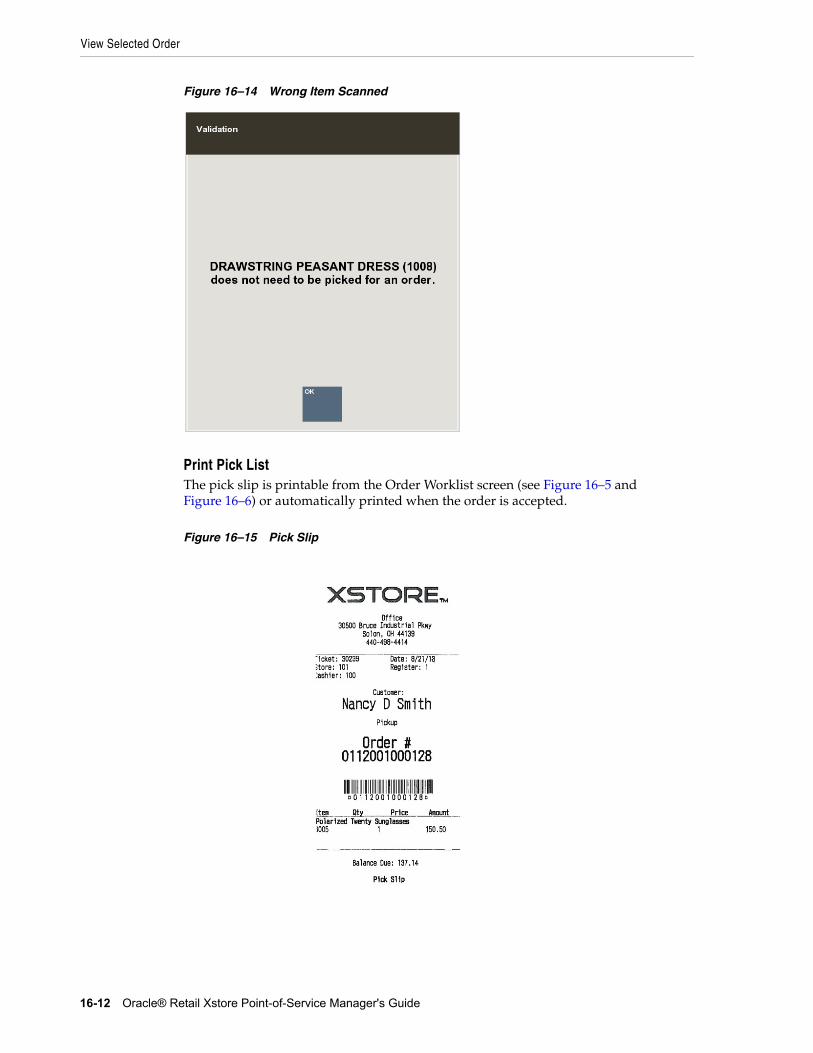
View Selected Order
16-12 Oracle® Retail Xstore Point-of-Service Manager's Guide
Figure 16–14 Wrong Item Scanned
Print Pick ListThe pick slip is printable from the Order Worklist screen (see Figure 16–5 and Figure 16–6) or automatically printed when the order is accepted.
Figure 16–15 Pick Slip
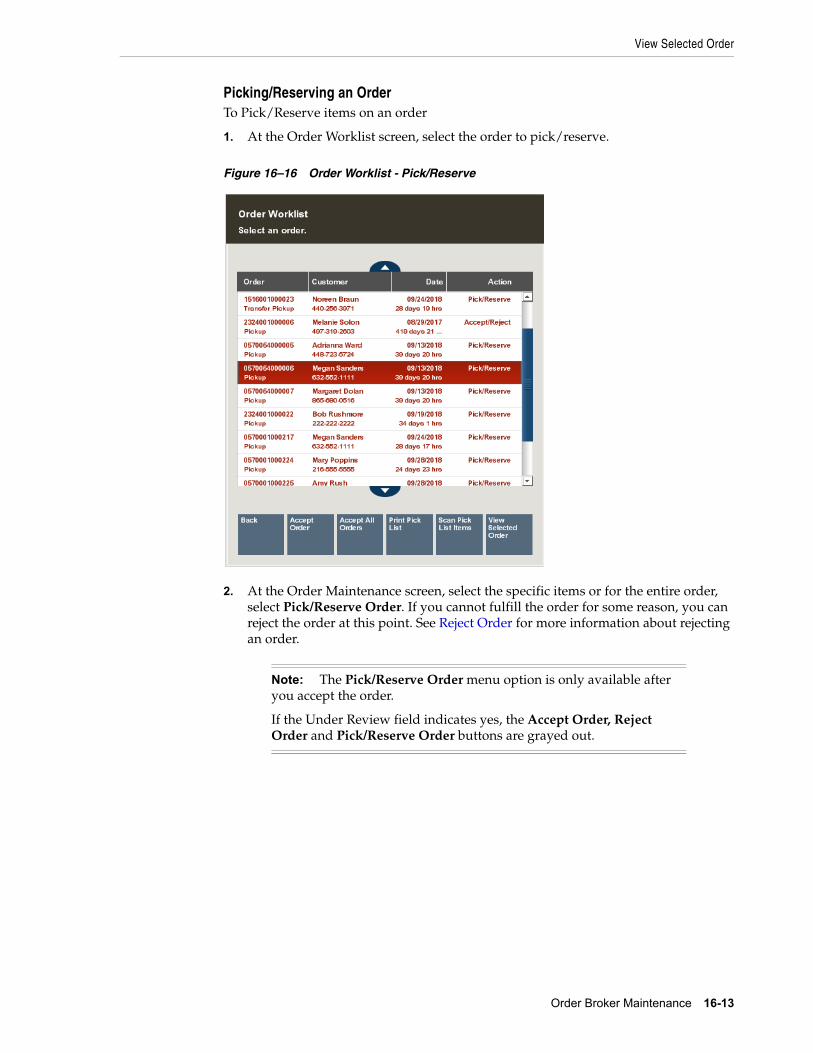
View Selected Order
Order Broker Maintenance 16-13
Picking/Reserving an OrderTo Pick/Reserve items on an order
1. At the Order Worklist screen, select the order to pick/reserve.
Figure 16–16 Order Worklist - Pick/Reserve
2. At the Order Maintenance screen, select the specific items or for the entire order, select Pick/Reserve Order. If you cannot fulfill the order for some reason, you can reject the order at this point. See Reject Order for more information about rejecting an order.
Note: The Pick/Reserve Order menu option is only available after you accept the order.
If the Under Review field indicates yes, the Accept Order, Reject Order and Pick/Reserve Order buttons are grayed out.
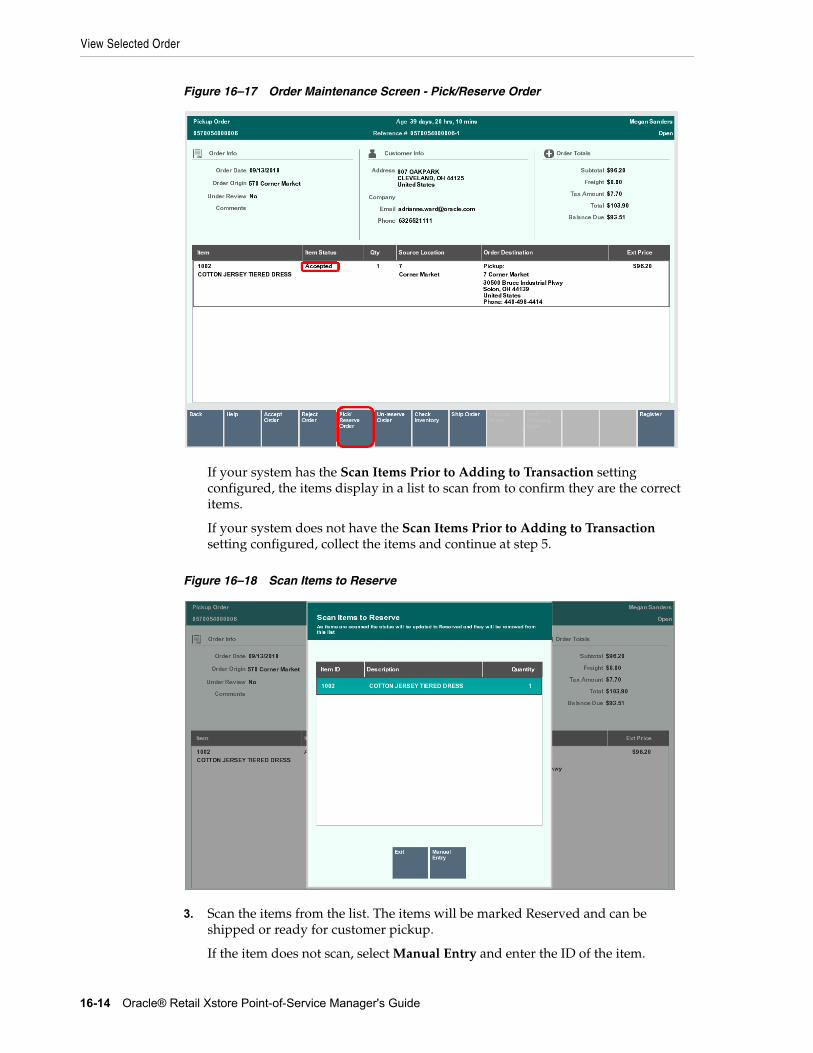
View Selected Order
16-14 Oracle® Retail Xstore Point-of-Service Manager's Guide
Figure 16–17 Order Maintenance Screen - Pick/Reserve Order
If your system has the Scan Items Prior to Adding to Transaction setting configured, the items display in a list to scan from to confirm they are the correct items.
If your system does not have the Scan Items Prior to Adding to Transaction setting configured, collect the items and continue at step 5.
Figure 16–18 Scan Items to Reserve
3. Scan the items from the list. The items will be marked Reserved and can be shipped or ready for customer pickup.
If the item does not scan, select Manual Entry and enter the ID of the item.
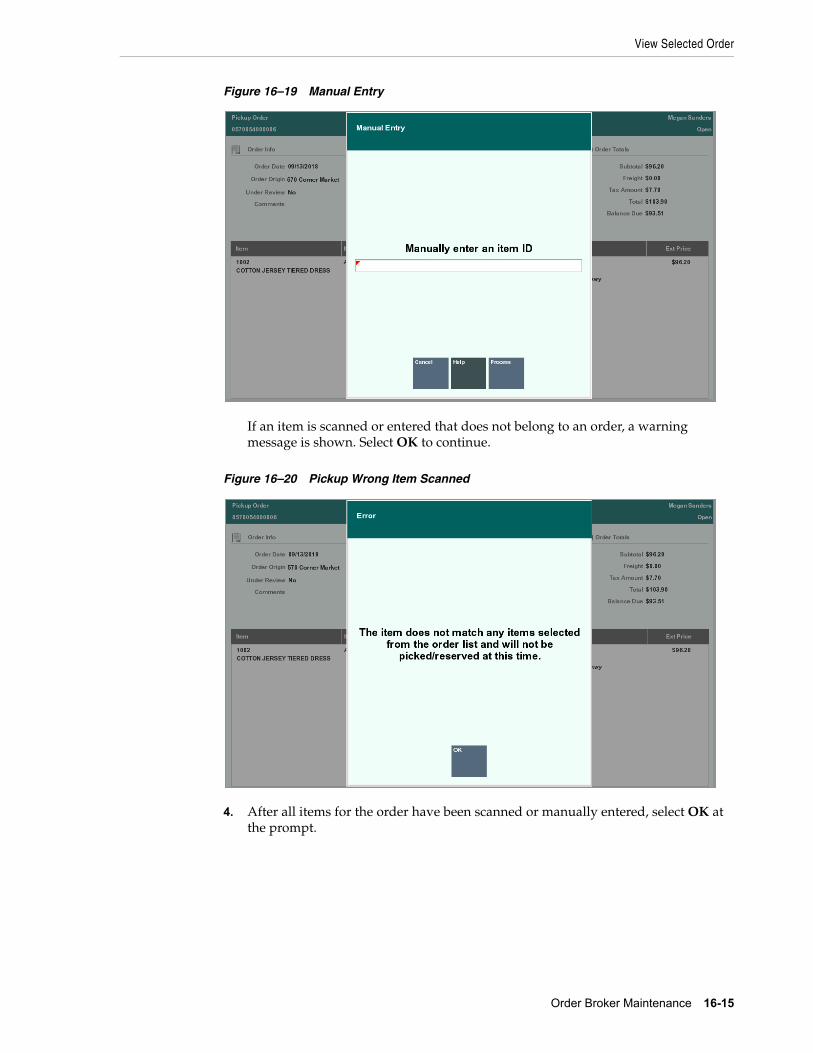
View Selected Order
Order Broker Maintenance 16-15
Figure 16–19 Manual Entry
If an item is scanned or entered that does not belong to an order, a warning message is shown. Select OK to continue.
Figure 16–20 Pickup Wrong Item Scanned
4. After all items for the order have been scanned or manually entered, select OK at the prompt.
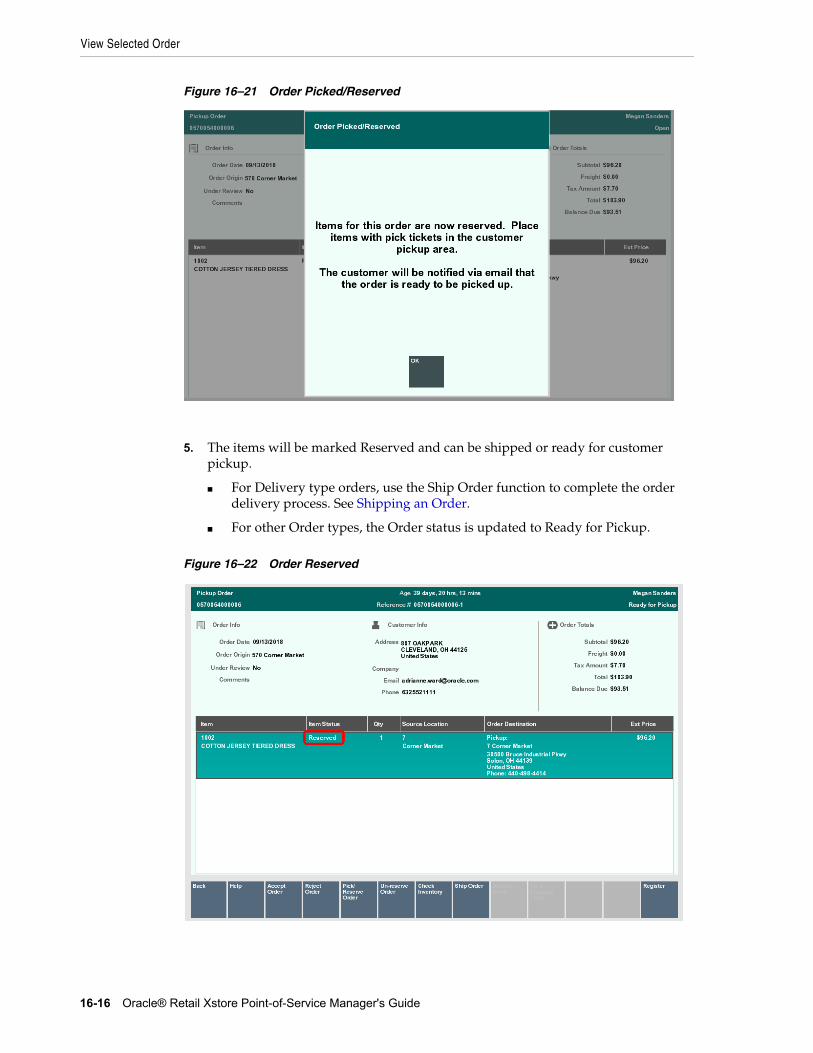
View Selected Order
16-16 Oracle® Retail Xstore Point-of-Service Manager's Guide
Figure 16–21 Order Picked/Reserved
5. The items will be marked Reserved and can be shipped or ready for customer pickup.
■ For Delivery type orders, use the Ship Order function to complete the order delivery process. See Shipping an Order.
■ For other Order types, the Order status is updated to Ready for Pickup.
Figure 16–22 Order Reserved
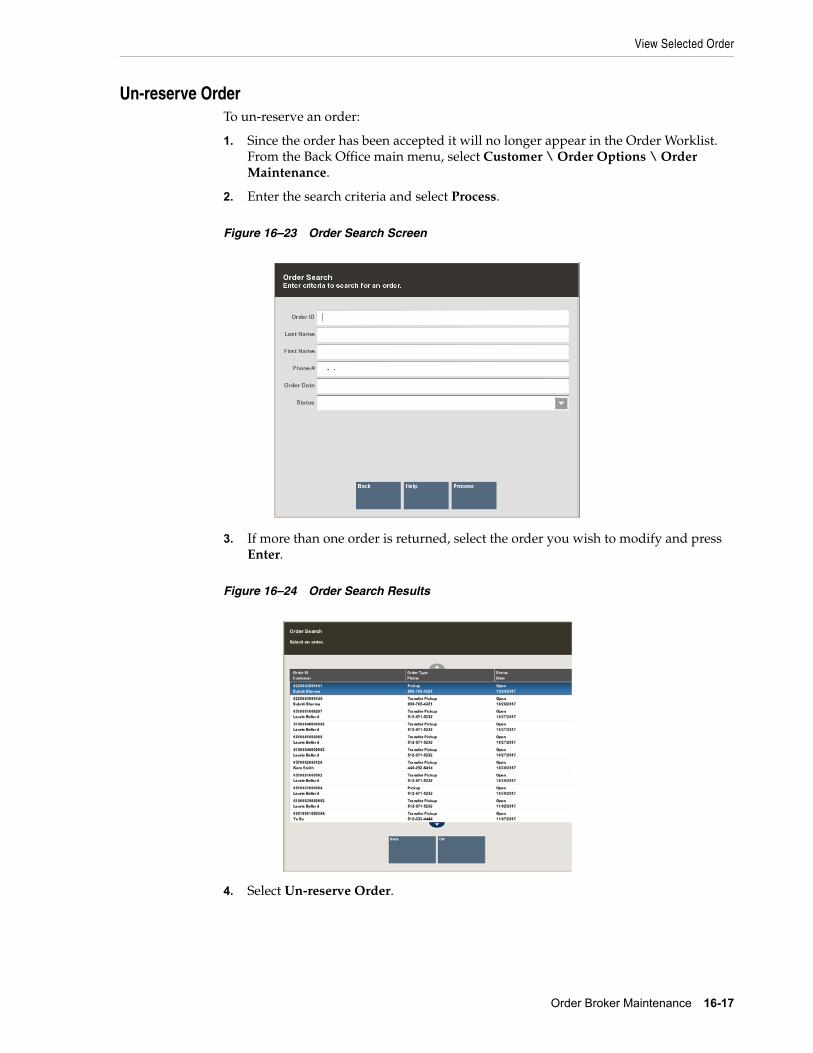
View Selected Order
Order Broker Maintenance 16-17
Un-reserve OrderTo un-reserve an order:
1. Since the order has been accepted it will no longer appear in the Order Worklist. From the Back Office main menu, select Customer \ Order Options \ Order Maintenance.
2. Enter the search criteria and select Process.
Figure 16–23 Order Search Screen
3. If more than one order is returned, select the order you wish to modify and press Enter.
Figure 16–24 Order Search Results
4. Select Un-reserve Order.
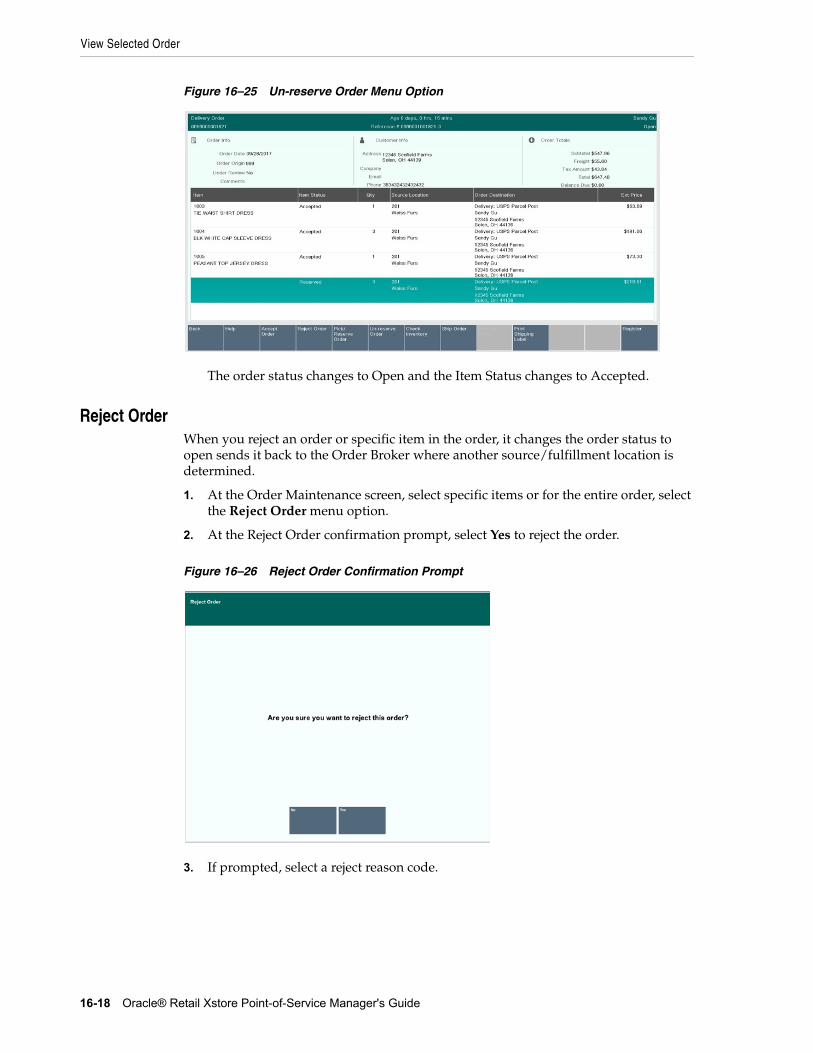
View Selected Order
16-18 Oracle® Retail Xstore Point-of-Service Manager's Guide
Figure 16–25 Un-reserve Order Menu Option
The order status changes to Open and the Item Status changes to Accepted.
Reject OrderWhen you reject an order or specific item in the order, it changes the order status to open sends it back to the Order Broker where another source/fulfillment location is determined.
1. At the Order Maintenance screen, select specific items or for the entire order, select the Reject Order menu option.
2. At the Reject Order confirmation prompt, select Yes to reject the order.
Figure 16–26 Reject Order Confirmation Prompt
3. If prompted, select a reject reason code.
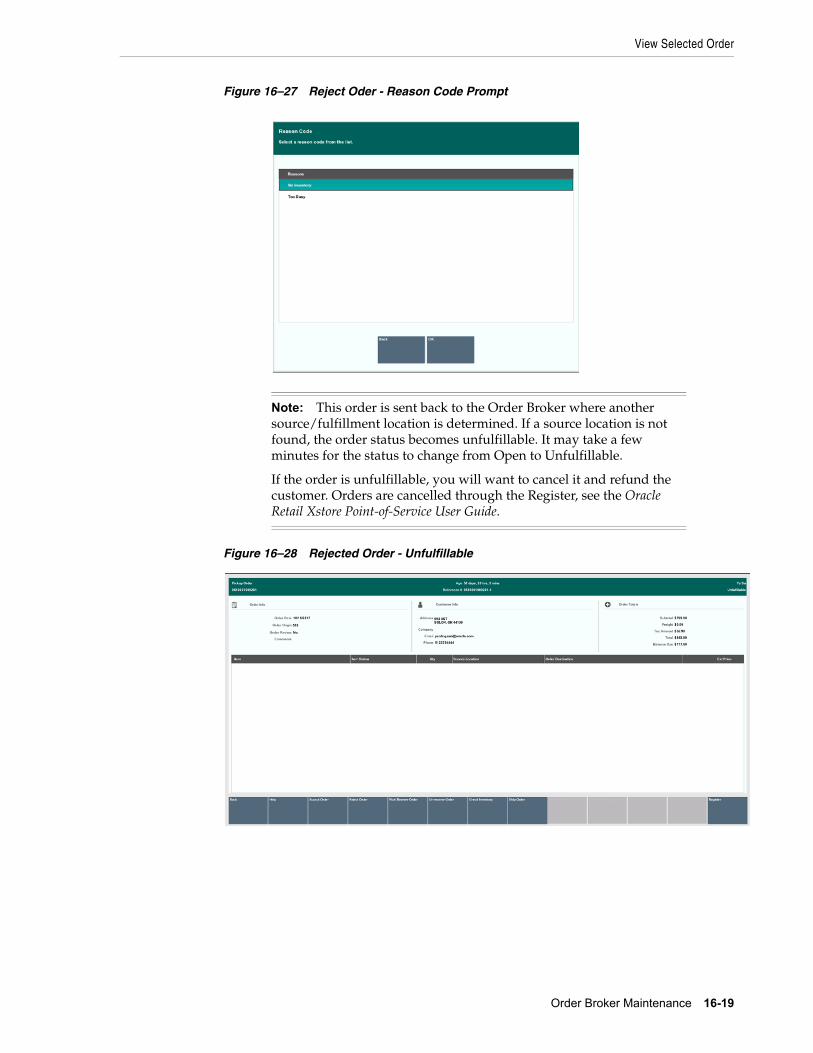
View Selected Order
Order Broker Maintenance 16-19
Figure 16–27 Reject Oder - Reason Code Prompt
Figure 16–28 Rejected Order - Unfulfillable
Note: This order is sent back to the Order Broker where another source/fulfillment location is determined. If a source location is not found, the order status becomes unfulfillable. It may take a few minutes for the status to change from Open to Unfulfillable.
If the order is unfulfillable, you will want to cancel it and refund the customer. Orders are cancelled through the Register, see the Oracle Retail Xstore Point-of-Service User Guide.
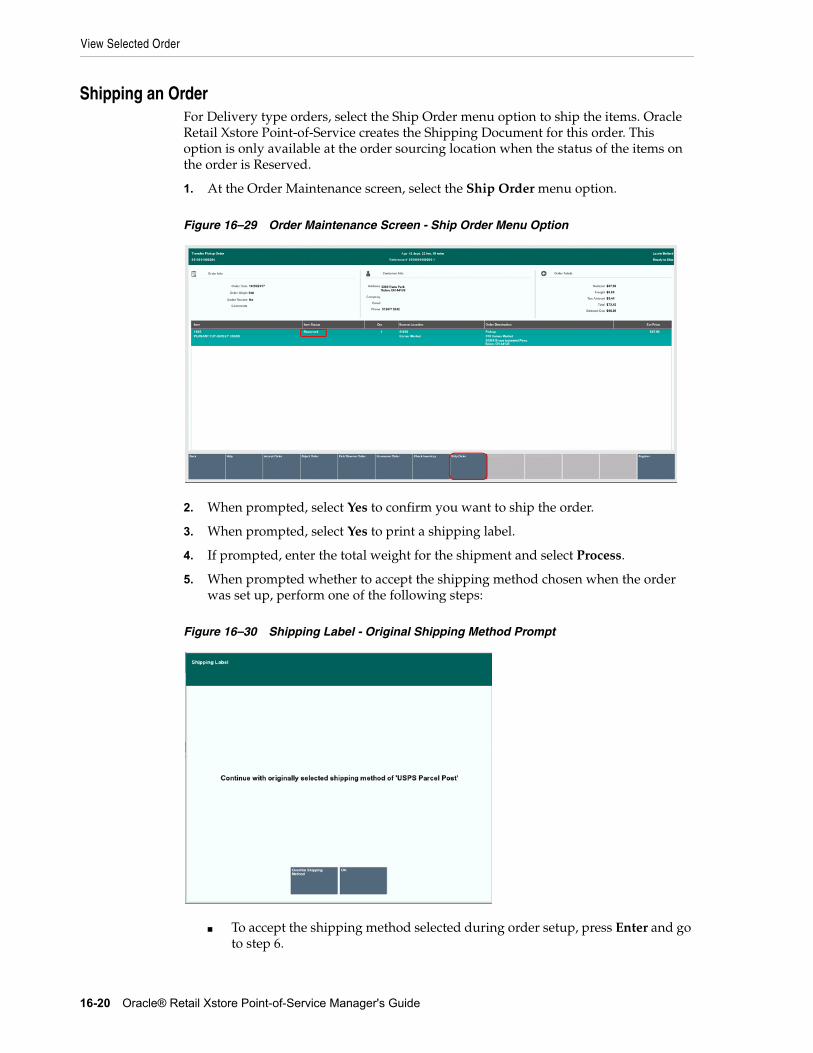
View Selected Order
16-20 Oracle® Retail Xstore Point-of-Service Manager's Guide
Shipping an OrderFor Delivery type orders, select the Ship Order menu option to ship the items. Oracle Retail Xstore Point-of-Service creates the Shipping Document for this order. This option is only available at the order sourcing location when the status of the items on the order is Reserved.
1. At the Order Maintenance screen, select the Ship Order menu option.
Figure 16–29 Order Maintenance Screen - Ship Order Menu Option
2. When prompted, select Yes to confirm you want to ship the order.
3. When prompted, select Yes to print a shipping label.
4. If prompted, enter the total weight for the shipment and select Process.
5. When prompted whether to accept the shipping method chosen when the order was set up, perform one of the following steps:
Figure 16–30 Shipping Label - Original Shipping Method Prompt
■ To accept the shipping method selected during order setup, press Enter and go to step 6.
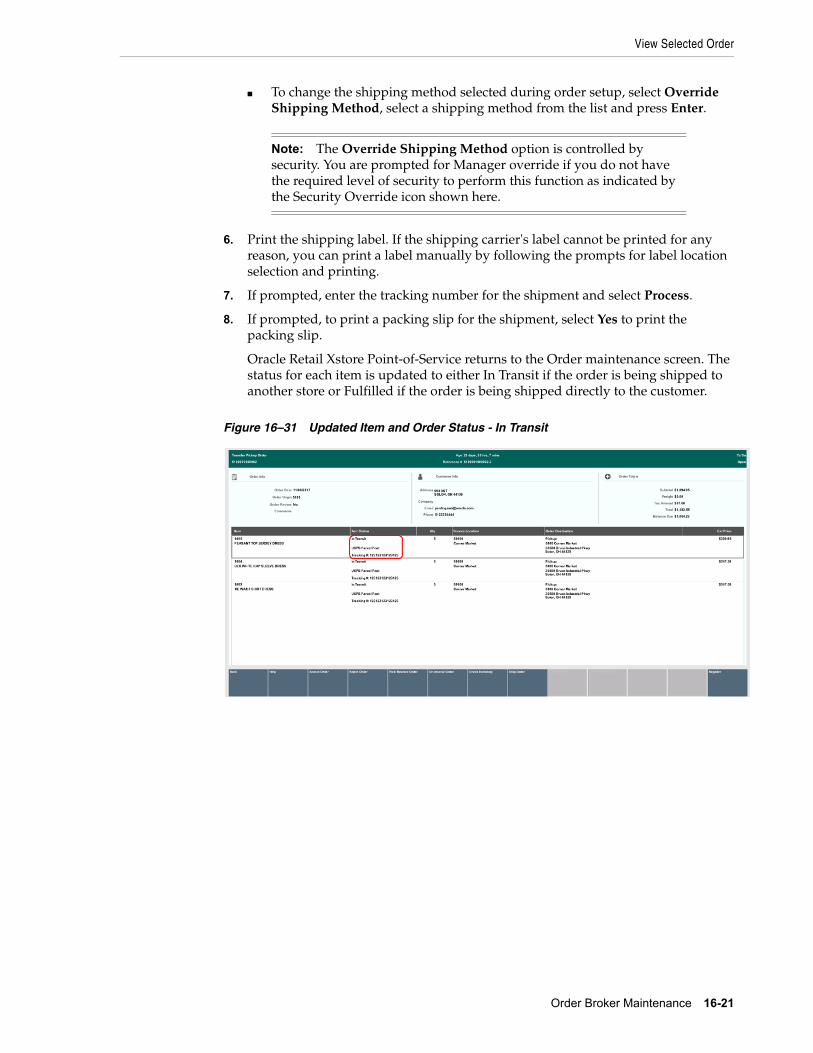
View Selected Order
Order Broker Maintenance 16-21
■ To change the shipping method selected during order setup, select Override Shipping Method, select a shipping method from the list and press Enter.
6. Print the shipping label. If the shipping carrier's label cannot be printed for any reason, you can print a label manually by following the prompts for label location selection and printing.
7. If prompted, enter the tracking number for the shipment and select Process.
8. If prompted, to print a packing slip for the shipment, select Yes to print the packing slip.
Oracle Retail Xstore Point-of-Service returns to the Order maintenance screen. The status for each item is updated to either In Transit if the order is being shipped to another store or Fulfilled if the order is being shipped directly to the customer.
Figure 16–31 Updated Item and Order Status - In Transit
Note: The Override Shipping Method option is controlled by security. You are prompted for Manager override if you do not have the required level of security to perform this function as indicated by the Security Override icon shown here.
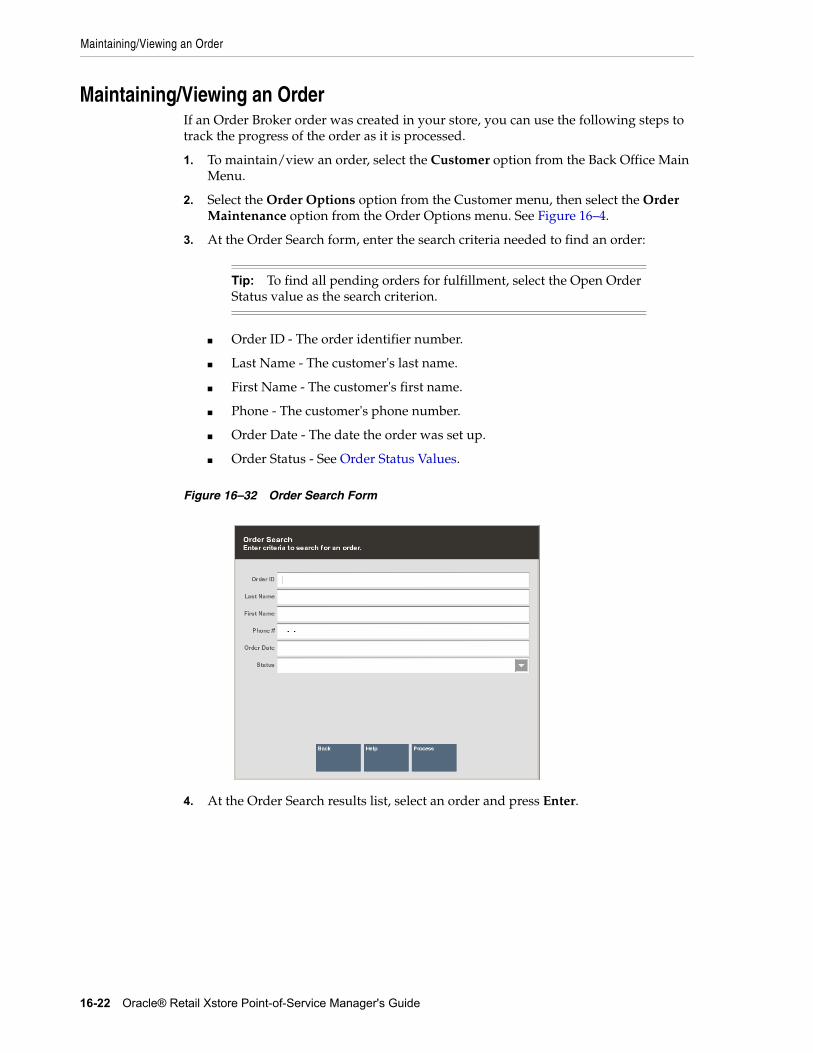
Maintaining/Viewing an Order
16-22 Oracle® Retail Xstore Point-of-Service Manager's Guide
Maintaining/Viewing an OrderIf an Order Broker order was created in your store, you can use the following steps to track the progress of the order as it is processed.
1. To maintain/view an order, select the Customer option from the Back Office Main Menu.
2. Select the Order Options option from the Customer menu, then select the Order Maintenance option from the Order Options menu. See Figure 16–4.
3. At the Order Search form, enter the search criteria needed to find an order:
■ Order ID - The order identifier number.
■ Last Name - The customer's last name.
■ First Name - The customer's first name.
■ Phone - The customer's phone number.
■ Order Date - The date the order was set up.
■ Order Status - See Order Status Values.
Figure 16–32 Order Search Form
4. At the Order Search results list, select an order and press Enter.
Tip: To find all pending orders for fulfillment, select the Open Order Status value as the search criterion.
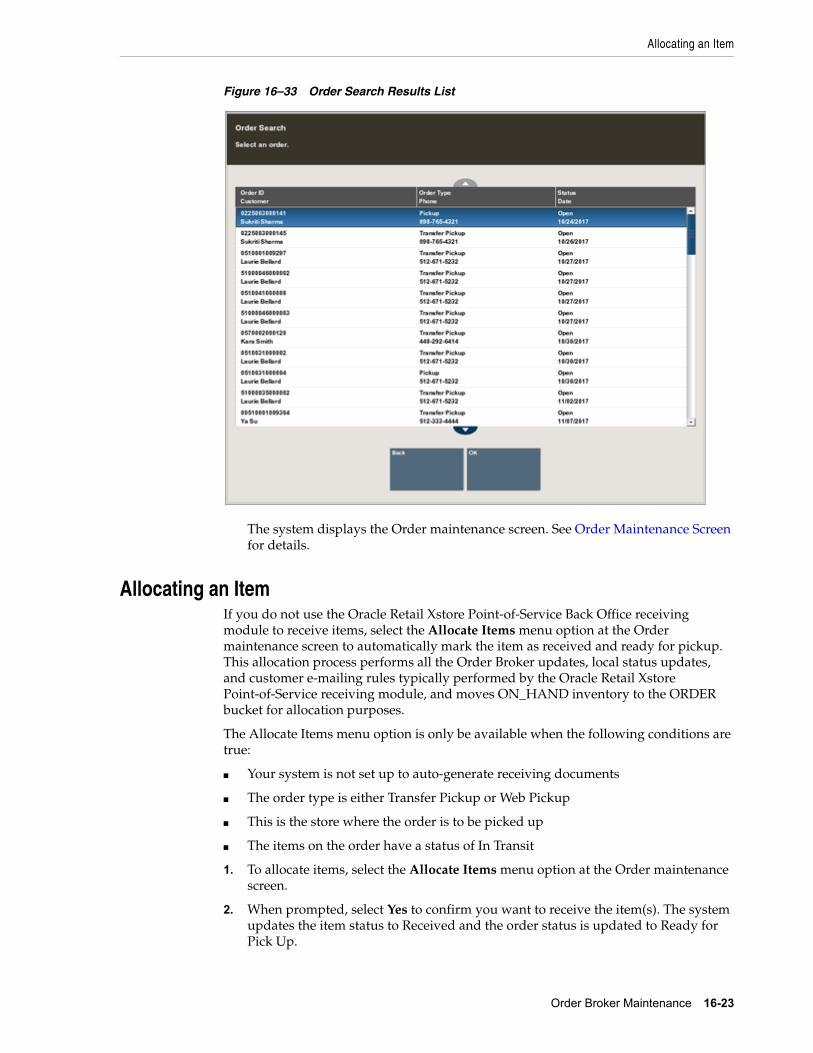
Allocating an Item
Order Broker Maintenance 16-23
Figure 16–33 Order Search Results List
The system displays the Order maintenance screen. See Order Maintenance Screen for details.
Allocating an ItemIf you do not use the Oracle Retail Xstore Point-of-Service Back Office receiving module to receive items, select the Allocate Items menu option at the Order maintenance screen to automatically mark the item as received and ready for pickup. This allocation process performs all the Order Broker updates, local status updates, and customer e-mailing rules typically performed by the Oracle Retail Xstore Point-of-Service receiving module, and moves ON_HAND inventory to the ORDER bucket for allocation purposes.
The Allocate Items menu option is only be available when the following conditions are true:
■ Your system is not set up to auto-generate receiving documents
■ The order type is either Transfer Pickup or Web Pickup
■ This is the store where the order is to be picked up
■ The items on the order have a status of In Transit
1. To allocate items, select the Allocate Items menu option at the Order maintenance screen.
2. When prompted, select Yes to confirm you want to receive the item(s). The system updates the item status to Received and the order status is updated to Ready for Pick Up.
17
Balance Inquiry 17-1
17Balance Inquiry
The system creates accounts to track the activities that are related to various customer- related transactions. The status of an account may change from time to time as different events occur that affect the account. An individual customer may have several different kinds of accounts open at the same time. The Balance Inquiry process is associated with customer accounts and is used to check the amount remaining on a customer's store credit voucher, gift card, or gift certificate.
About Store Credit and Gift Certificate Balance InquiryWhen a balance inquiry for a store credit or gift certificate is performed, Oracle Retail Xstore Point of Service first determines which currency the store credit or gift certificate is in. If this currency is different than your store's local currency, then the foreign tender amount of the store credit or gift certificate is automatically converted to the local tender and amount using the current exchange rate on file. This localization is shown on the screen and on the receipt, if printed.
Balance InformationThe Balance Inquiry function allows you to see the current balance on various types of accounts that a customer may have. The types of inquiries available depend upon the types of accounts that are offered by a store. For example, balance inquiries may be performed for:
■ Gift Cards
■ Gift Certificates
■ Store Credit accounts
■ Loyalty accounts
■ Gift Receipts
1. After logging in to the Back Office (see Accessing the Back Office), select the Balance Inquiry option from the Customer menu to view the inquiry functions available in your store.
Note: Other customer account types such as Work Orders, Special Orders, Layaways, and Orders are documented in separate chapters in this book.
House Account information can be found in Customer Maintenance.
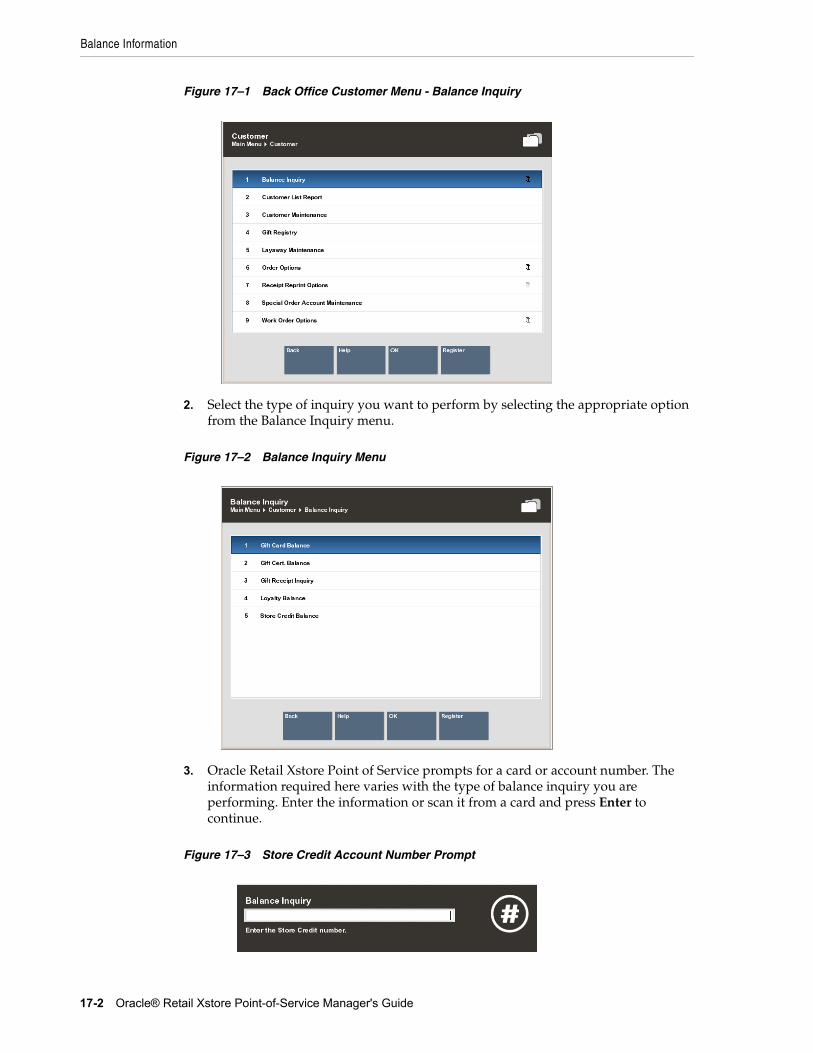
Balance Information
17-2 Oracle® Retail Xstore Point-of-Service Manager's Guide
Figure 17–1 Back Office Customer Menu - Balance Inquiry
2. Select the type of inquiry you want to perform by selecting the appropriate option from the Balance Inquiry menu.
Figure 17–2 Balance Inquiry Menu
3. Oracle Retail Xstore Point of Service prompts for a card or account number. The information required here varies with the type of balance inquiry you are performing. Enter the information or scan it from a card and press Enter to continue.
Figure 17–3 Store Credit Account Number Prompt
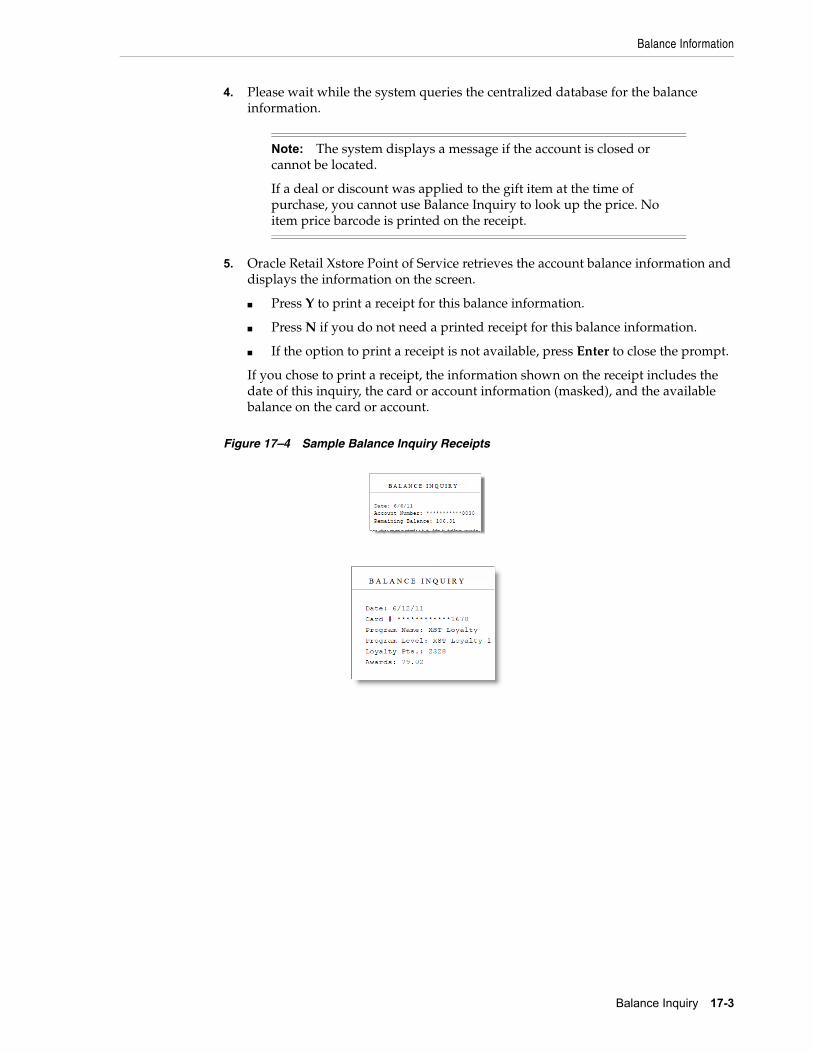
Balance Information
Balance Inquiry 17-3
4. Please wait while the system queries the centralized database for the balance information.
5. Oracle Retail Xstore Point of Service retrieves the account balance information and displays the information on the screen.
■ Press Y to print a receipt for this balance information.
■ Press N if you do not need a printed receipt for this balance information.
■ If the option to print a receipt is not available, press Enter to close the prompt.
If you chose to print a receipt, the information shown on the receipt includes the date of this inquiry, the card or account information (masked), and the available balance on the card or account.
Figure 17–4 Sample Balance Inquiry Receipts
Note: The system displays a message if the account is closed or cannot be located.
If a deal or discount was applied to the gift item at the time of purchase, you cannot use Balance Inquiry to look up the price. No item price barcode is printed on the receipt.
18
Layaway Maintenance 18-1
18Layaway Maintenance
Layaways are similar to special orders and work orders because they are persistent sales. Generally, this indicates that the sale transaction in which the layaway is created is not the end of the transaction's life-cycle. Persistent sales can have an arbitrary number of transactions in their life-cycles, but non-persistent sales consist of a single transaction (and a possible void of that transaction).
The operational rules for layaways may also differ from those for non-persistent sales or even other types of persistent sales. For example, a layaway does not require the customer to pay for the items in full when purchased. Also, layaway items may not be reflected in the store's sales figures until the customer takes the item into possession (at pickup).
After a layaway account has been created, the account information is available from the Back Office. Use the Back Office Layaway Maintenance functions to track, update, and maintain layaway accounts
The following sections are contained in this chapter:
■ Layaway Reports
■ Accessing Back Office Layaway Maintenance
■ To Cancel a Layaway Account
■ Cancel Layaway - When the Customer Is Present
Layaway ReportsThe following reports are available from the Reports menu to help maintain layaway accounts:
■ Layaway Aging Summary Report
■ Layaway Aging Detail Report
■ Layaway Account Activity Summary Report
■ Layaway Account Activity Detail Report
The Layaway Aging reports show layaway accounts based on a specified aging period. Select the Summary report option to print a condensed version of the Layaway Aging Report and select the Detail report option to print an itemized version of the Layaway Aging Report.
Note: Refer to the Oracle Retail Xstore Point-of-Service User Guide for information about setting up layaway accounts.
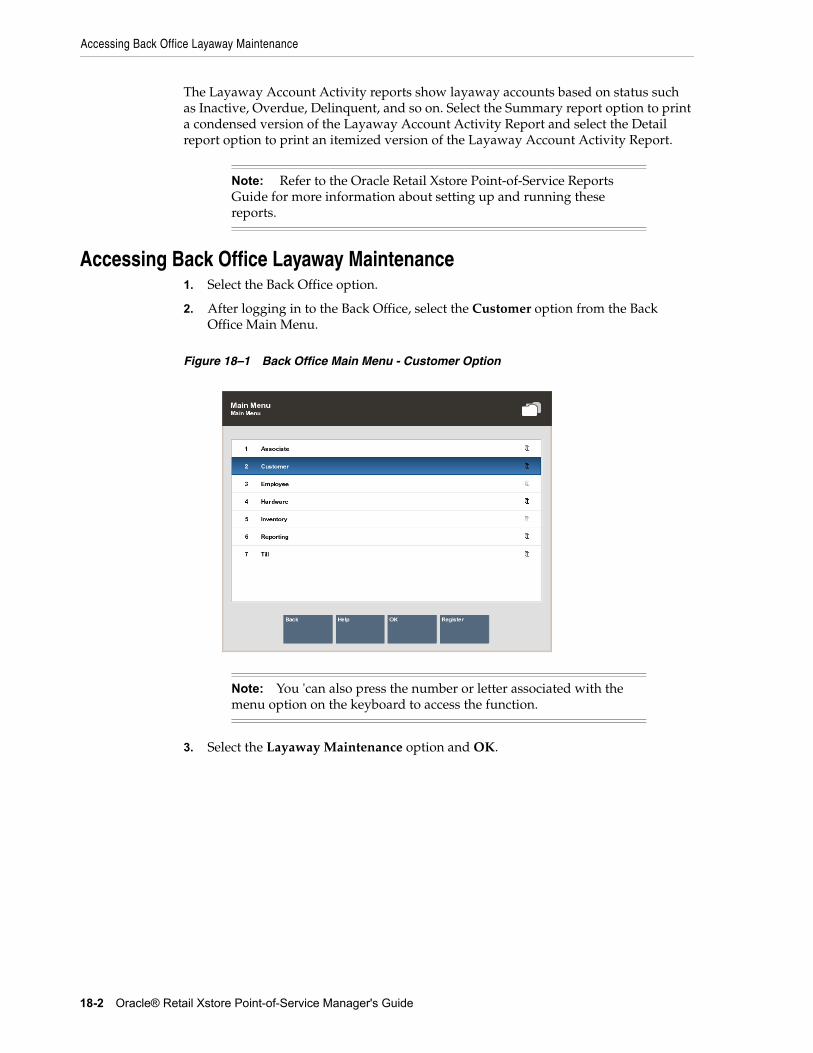
Accessing Back Office Layaway Maintenance
18-2 Oracle® Retail Xstore Point-of-Service Manager's Guide
The Layaway Account Activity reports show layaway accounts based on status such as Inactive, Overdue, Delinquent, and so on. Select the Summary report option to print a condensed version of the Layaway Account Activity Report and select the Detail report option to print an itemized version of the Layaway Account Activity Report.
Accessing Back Office Layaway Maintenance1. Select the Back Office option.
2. After logging in to the Back Office, select the Customer option from the Back Office Main Menu.
Figure 18–1 Back Office Main Menu - Customer Option
3. Select the Layaway Maintenance option and OK.
Note: Refer to the Oracle Retail Xstore Point-of-Service Reports Guide for more information about setting up and running these reports.
Note: You 'can also press the number or letter associated with the menu option on the keyboard to access the function.
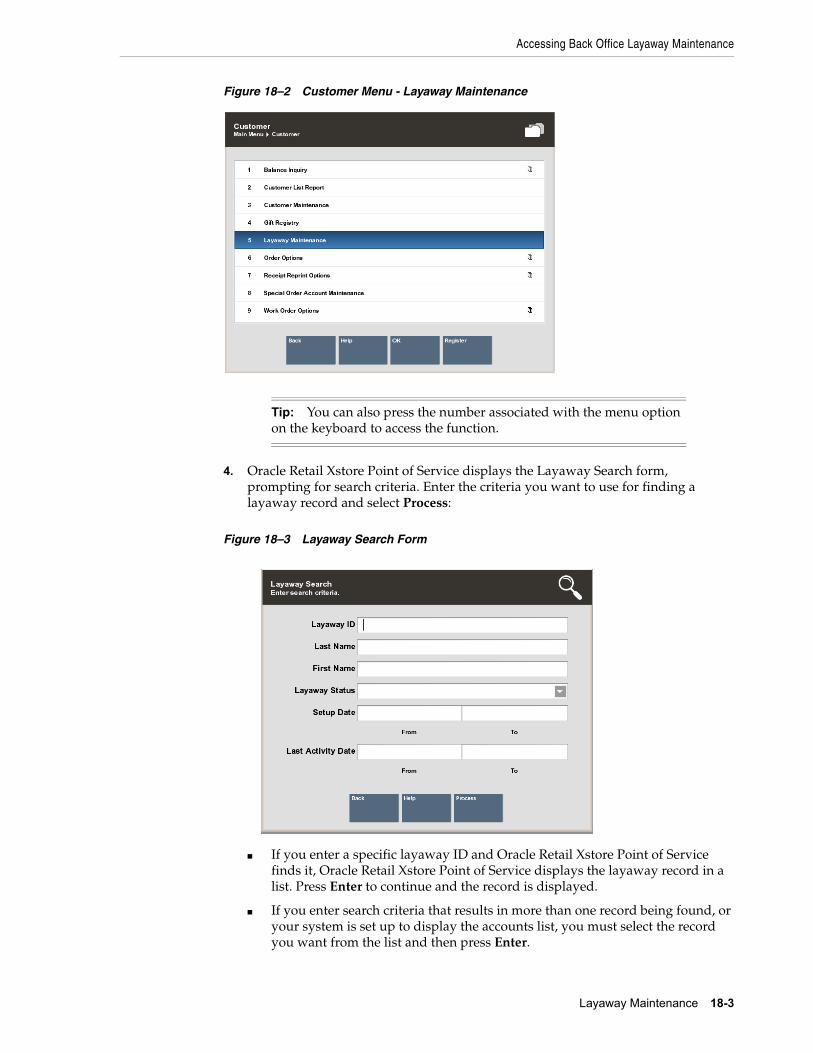
Accessing Back Office Layaway Maintenance
Layaway Maintenance 18-3
Figure 18–2 Customer Menu - Layaway Maintenance
4. Oracle Retail Xstore Point of Service displays the Layaway Search form, prompting for search criteria. Enter the criteria you want to use for finding a layaway record and select Process:
Figure 18–3 Layaway Search Form
■ If you enter a specific layaway ID and Oracle Retail Xstore Point of Service finds it, Oracle Retail Xstore Point of Service displays the layaway record in a list. Press Enter to continue and the record is displayed.
■ If you enter search criteria that results in more than one record being found, or your system is set up to display the accounts list, you must select the record you want from the list and then press Enter.
Tip: You can also press the number associated with the menu option on the keyboard to access the function.
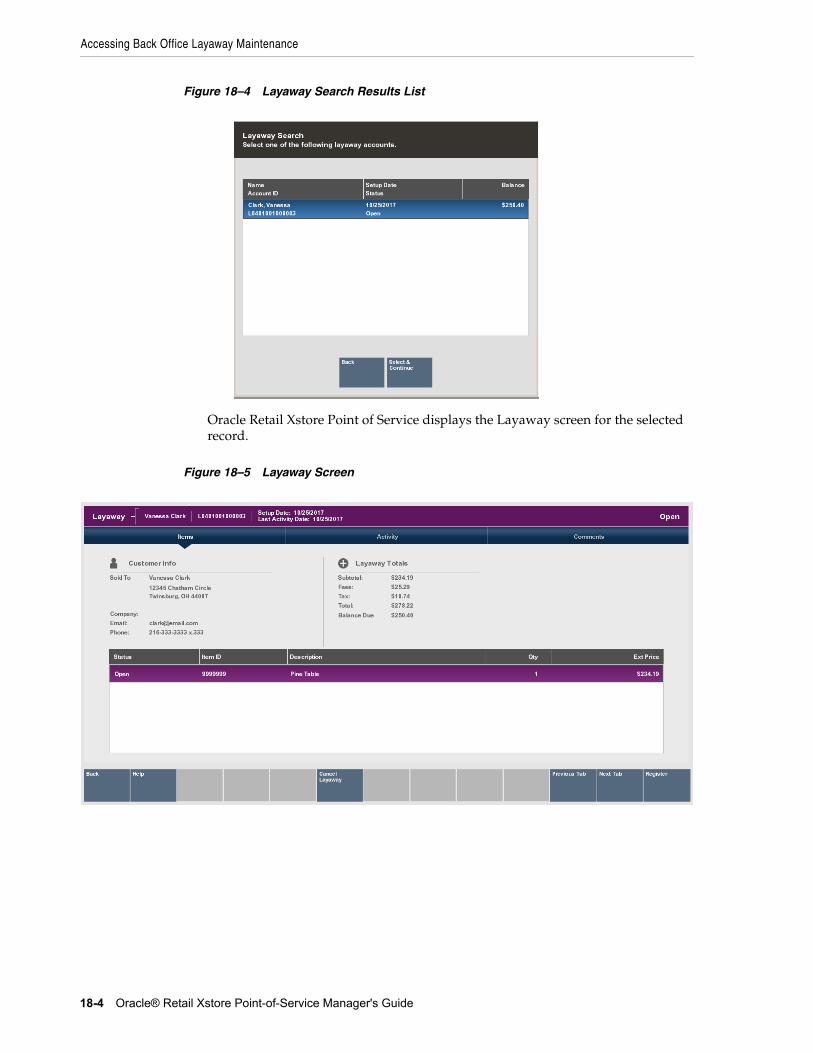
Accessing Back Office Layaway Maintenance
18-4 Oracle® Retail Xstore Point-of-Service Manager's Guide
Figure 18–4 Layaway Search Results List
Oracle Retail Xstore Point of Service displays the Layaway screen for the selected record.
Figure 18–5 Layaway Screen
Accessing Back Office Layaway Maintenance
Layaway Maintenance 18-5
The Layaway screen provides the following information:
■ Static Information Area
■ Customer Information
■ Order Totals
■ Layaway Tab Information
Static Information AreaThe upper panel on the screen shows the summary information for the Layaway account, including its status and customer contact information. This panel is always displayed when viewing any of the tabs on this screen.
Customer InformationThe customer information area displays:
■ Sold To - The purchasing customer’s name and address information.
■ Company - The purchasing customer’s company, if applicable.
■ Email - The purchasing customer’s email address.
■ Phone - The purchasing customer’s telephone number(s).
Order TotalsThe order totals information displays:
■ Subtotal - The Layaway subtotal (the shipping fee amount is not included in the subtotal).
■ Fees - Additional cost associated with the Layaway.
■ Tax - The tax on the Layaway.
■ Total - The total for the Layaway (the shipping fee amount is included in the total).
■ Balance Due - The amount due for the Layaway.
Layaway Tab InformationDetailed Layaway information is presented on three tabs; Items, Activity, and Comments. You can navigate between the tab sections by using the Previous Tab and Next Tab menu options. Each tab contains specific information about the customer's Layaway account.
■ Items Tab: Shows the item information for the Layaway account.
■ Activity Tab: Shows the activity information for the Layaway account.
■ Comments Tab: Shows any comments associated with the Layaway account.
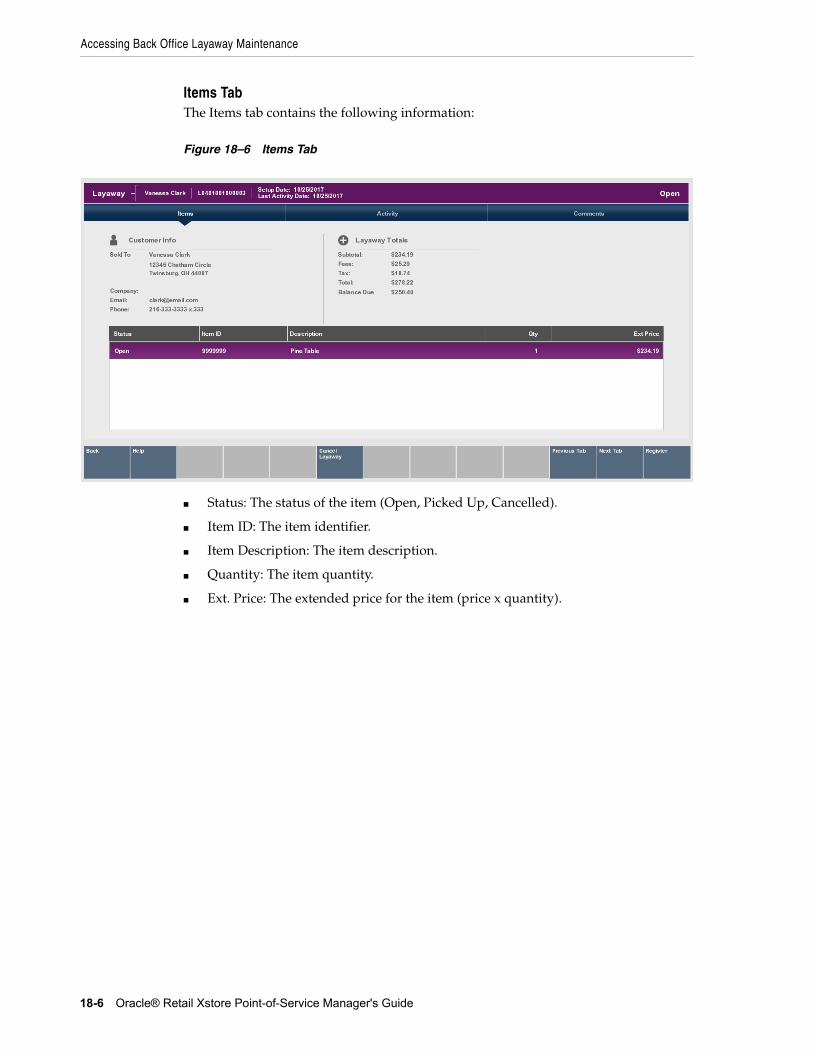
Accessing Back Office Layaway Maintenance
18-6 Oracle® Retail Xstore Point-of-Service Manager's Guide
Items Tab The Items tab contains the following information:
Figure 18–6 Items Tab
■ Status: The status of the item (Open, Picked Up, Cancelled).
■ Item ID: The item identifier.
■ Item Description: The item description.
■ Quantity: The item quantity.
■ Ext. Price: The extended price for the item (price x quantity).
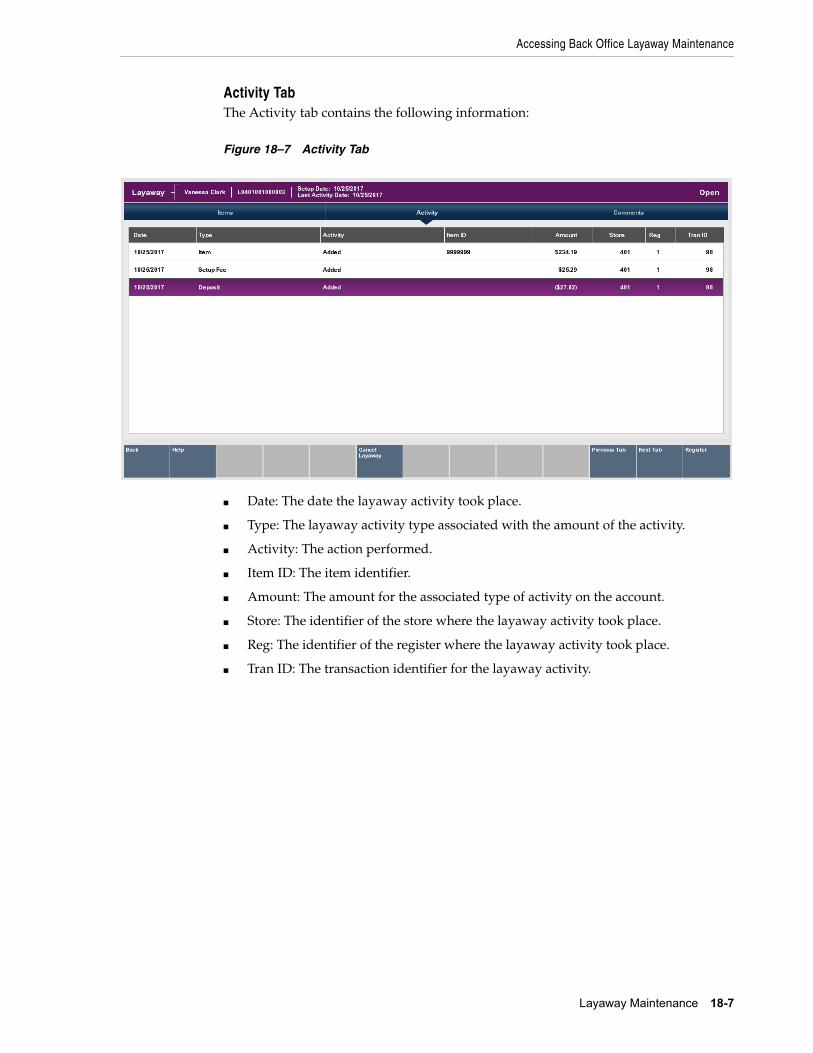
Accessing Back Office Layaway Maintenance
Layaway Maintenance 18-7
Activity Tab The Activity tab contains the following information:
Figure 18–7 Activity Tab
■ Date: The date the layaway activity took place.
■ Type: The layaway activity type associated with the amount of the activity.
■ Activity: The action performed.
■ Item ID: The item identifier.
■ Amount: The amount for the associated type of activity on the account.
■ Store: The identifier of the store where the layaway activity took place.
■ Reg: The identifier of the register where the layaway activity took place.
■ Tran ID: The transaction identifier for the layaway activity.
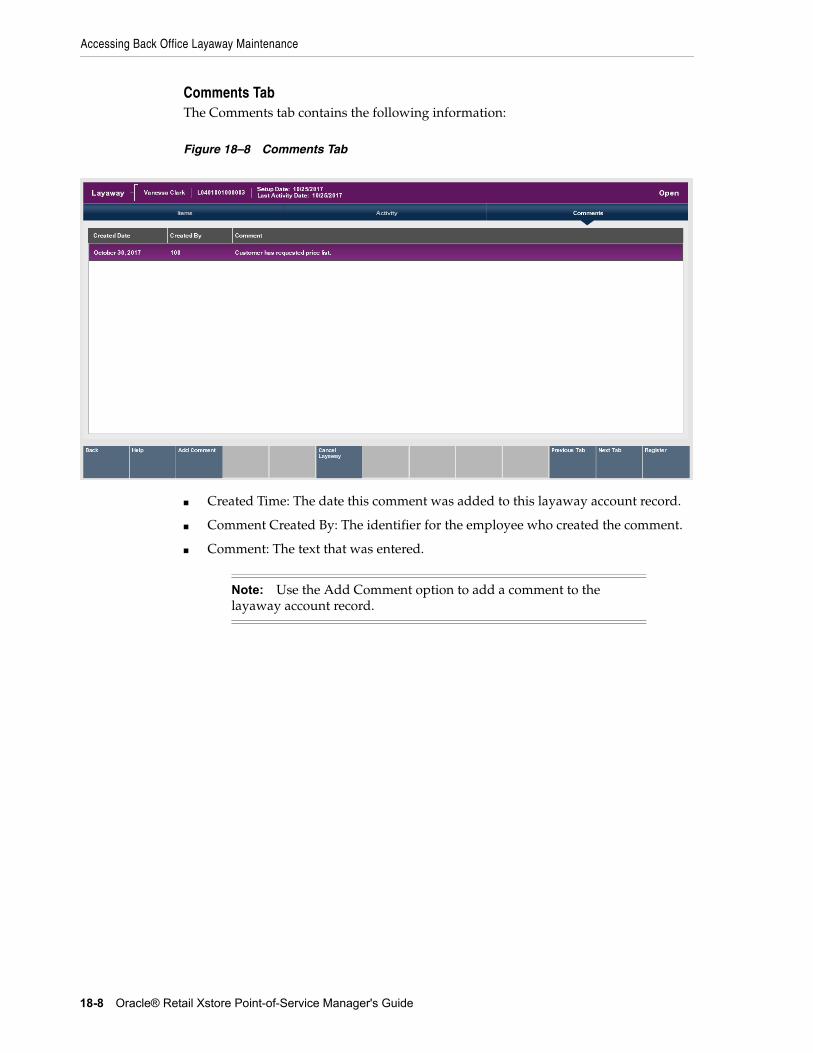
Accessing Back Office Layaway Maintenance
18-8 Oracle® Retail Xstore Point-of-Service Manager's Guide
Comments Tab The Comments tab contains the following information:
Figure 18–8 Comments Tab
■ Created Time: The date this comment was added to this layaway account record.
■ Comment Created By: The identifier for the employee who created the comment.
■ Comment: The text that was entered.
Note: Use the Add Comment option to add a comment to the layaway account record.
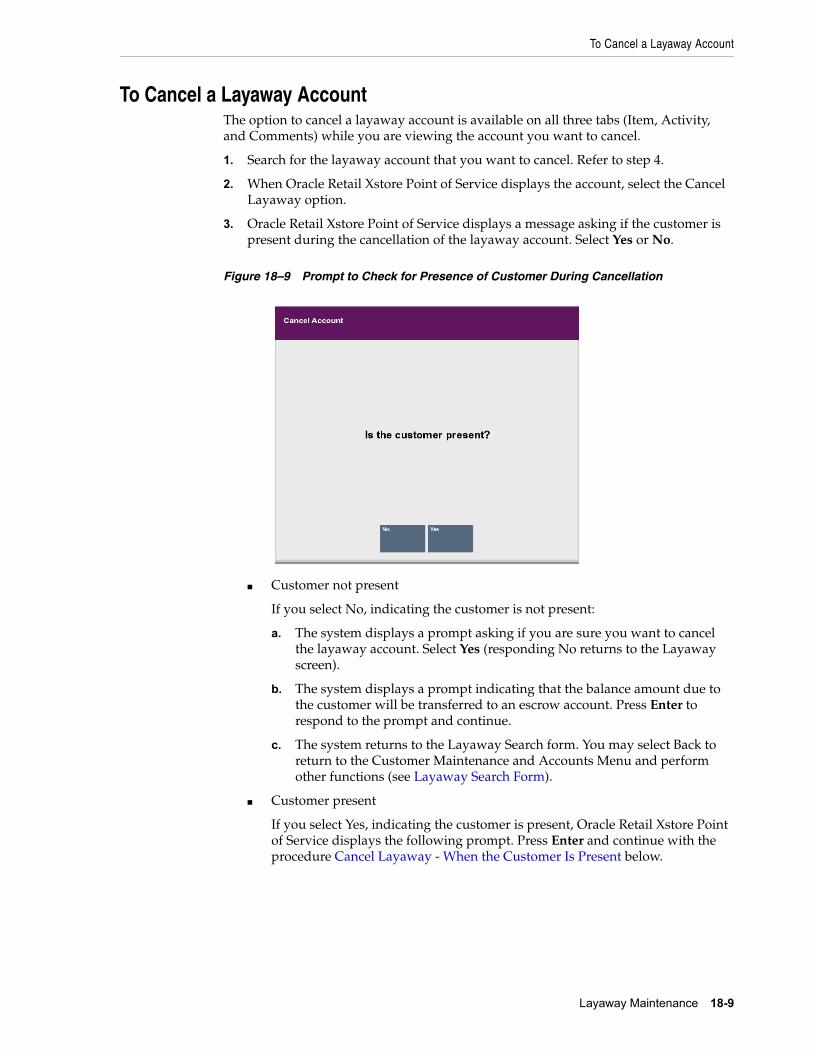
To Cancel a Layaway Account
Layaway Maintenance 18-9
To Cancel a Layaway AccountThe option to cancel a layaway account is available on all three tabs (Item, Activity, and Comments) while you are viewing the account you want to cancel.
1. Search for the layaway account that you want to cancel. Refer to step 4.
2. When Oracle Retail Xstore Point of Service displays the account, select the Cancel Layaway option.
3. Oracle Retail Xstore Point of Service displays a message asking if the customer is present during the cancellation of the layaway account. Select Yes or No.
Figure 18–9 Prompt to Check for Presence of Customer During Cancellation
■ Customer not present
If you select No, indicating the customer is not present:
a. The system displays a prompt asking if you are sure you want to cancel the layaway account. Select Yes (responding No returns to the Layaway screen).
b. The system displays a prompt indicating that the balance amount due to the customer will be transferred to an escrow account. Press Enter to respond to the prompt and continue.
c. The system returns to the Layaway Search form. You may select Back to return to the Customer Maintenance and Accounts Menu and perform other functions (see Layaway Search Form).
■ Customer present
If you select Yes, indicating the customer is present, Oracle Retail Xstore Point of Service displays the following prompt. Press Enter and continue with the procedure Cancel Layaway - When the Customer Is Present below.
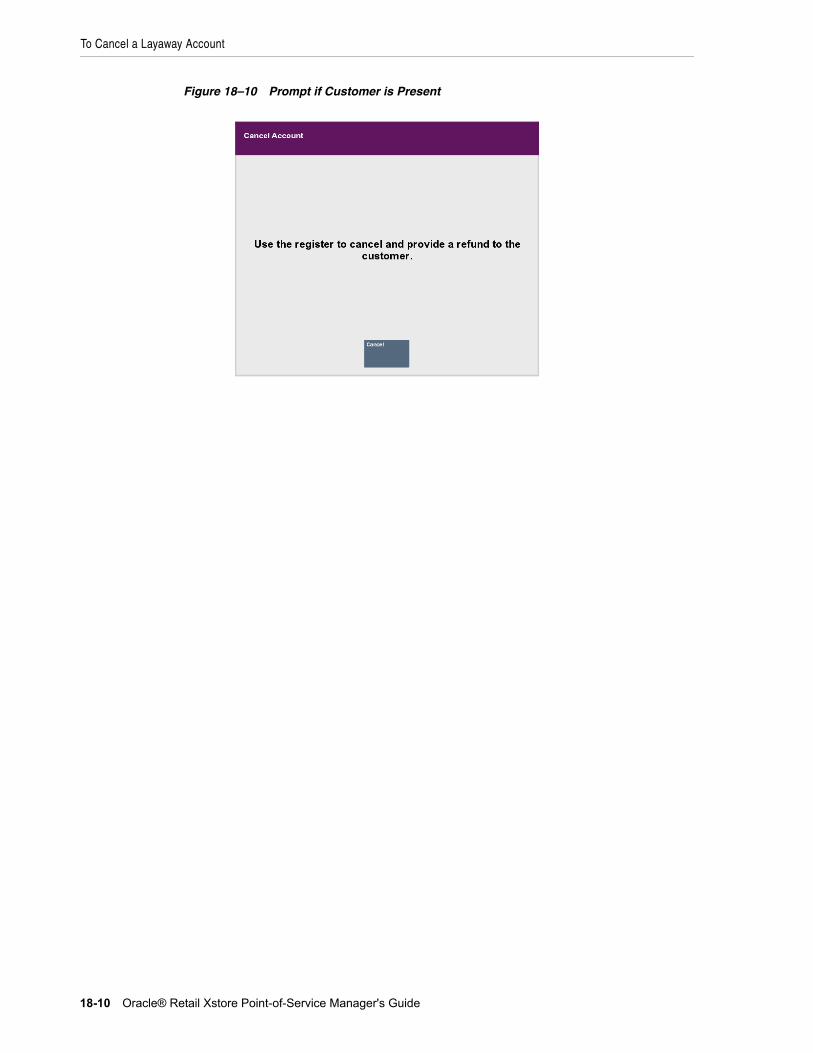
To Cancel a Layaway Account
18-10 Oracle® Retail Xstore Point-of-Service Manager's Guide
Figure 18–10 Prompt if Customer is Present
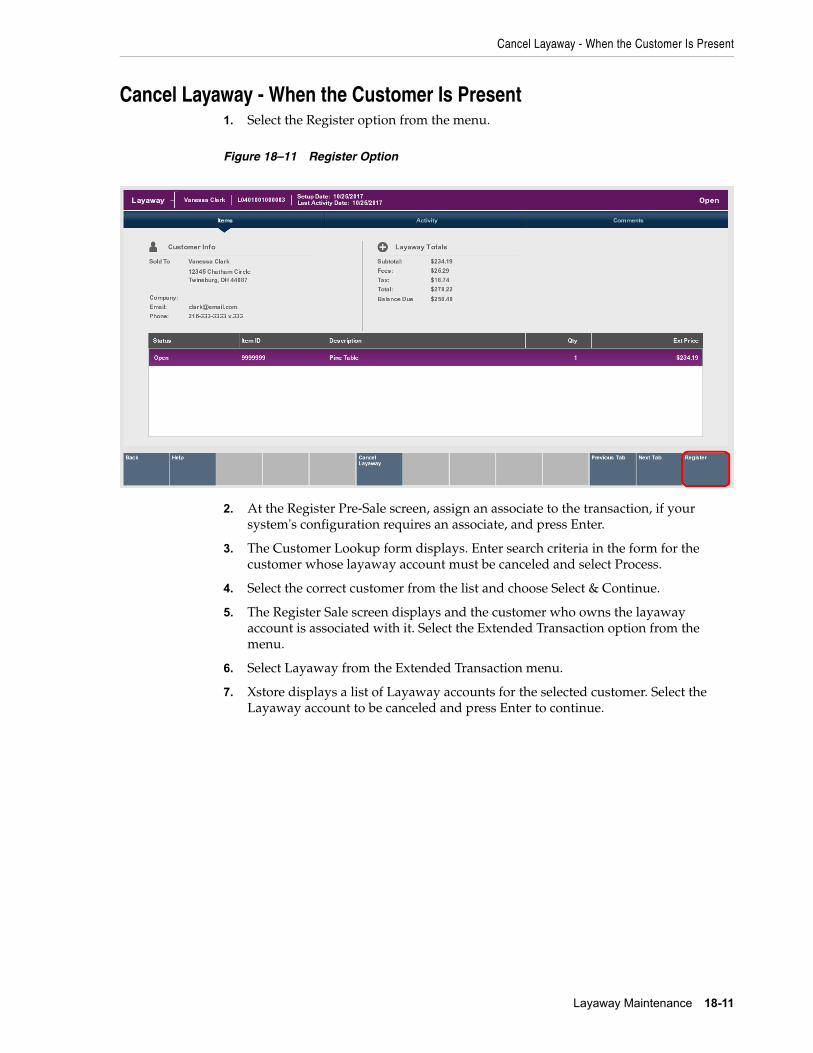
Cancel Layaway - When the Customer Is Present
Layaway Maintenance 18-11
Cancel Layaway - When the Customer Is Present1. Select the Register option from the menu.
Figure 18–11 Register Option
2. At the Register Pre-Sale screen, assign an associate to the transaction, if your system's configuration requires an associate, and press Enter.
3. The Customer Lookup form displays. Enter search criteria in the form for the customer whose layaway account must be canceled and select Process.
4. Select the correct customer from the list and choose Select & Continue.
5. The Register Sale screen displays and the customer who owns the layaway account is associated with it. Select the Extended Transaction option from the menu.
6. Select Layaway from the Extended Transaction menu.
7. Xstore displays a list of Layaway accounts for the selected customer. Select the Layaway account to be canceled and press Enter to continue.
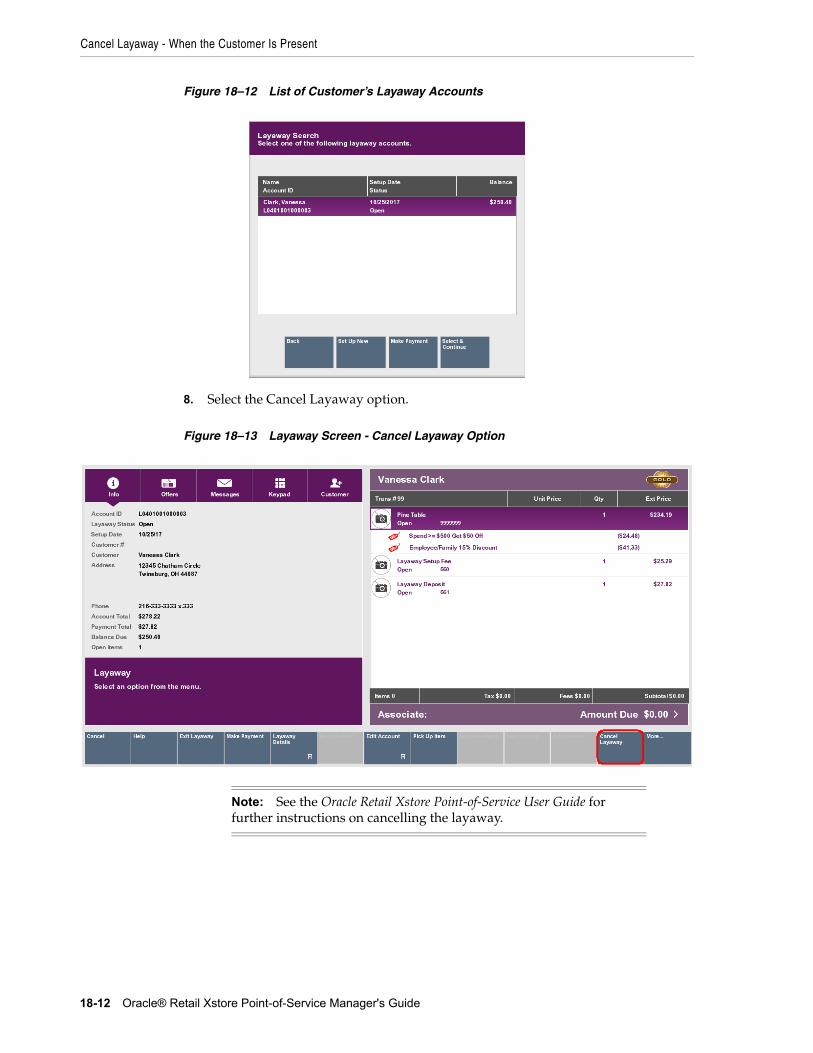
Cancel Layaway - When the Customer Is Present
18-12 Oracle® Retail Xstore Point-of-Service Manager's Guide
Figure 18–12 List of Customer’s Layaway Accounts
8. Select the Cancel Layaway option.
Figure 18–13 Layaway Screen - Cancel Layaway Option
Note: See the Oracle Retail Xstore Point-of-Service User Guide for further instructions on cancelling the layaway.
19
Work Order Maintenance 19-1
19Work Order Maintenance
A Work Order is a request to take some action (perform a task) on an item. The item may be on the current sale transaction at the register, or it may be a previously- purchased item.
Work Order tasks may be organized into logically related categories. For example, some tasks may be related to jewelry, while others are related to automotive parts. Vendors who perform the work must be defined and associated with a store location because it's possible that a vendor may offer service only within a restricted geographic area.
After a Work Order has been created, the information in the Work Order account is accessible from the Back Office. Use the Back Office Work Order Maintenance functions to track, update, and maintain Work Order accounts.
This chapter contains the following sections:
■ Accessing Work Order Maintenance Functions
■ Maintaining Work Orders
■ To View and Add a Work Order Comment
■ To View Work Order History
■ To View and Edit a Work Order Item Record
■ Shipping Work Orders
■ Receiving Work Orders
■ Work Order Invoices
Note: Refer to the Oracle Retail Xstore Point-of-Service User Guide for information about setting up Work Orders.

Accessing Work Order Maintenance Functions
19-2 Oracle® Retail Xstore Point-of-Service Manager's Guide
Accessing Work Order Maintenance Functions1. Select the Back Office option.
2. After logging in to the Back Office, select the Customer option from the Main Menu and press Enter.
Figure 19–1 Back Office Main Menu - Customer Option
3. Select the Work Order Options option from the Customer menu and press Enter.
Figure 19–2 Customer Menu - Work Order Options
4. Oracle Retail Xstore Point of Service displays the Work Order Options menu. The following work order options are available:
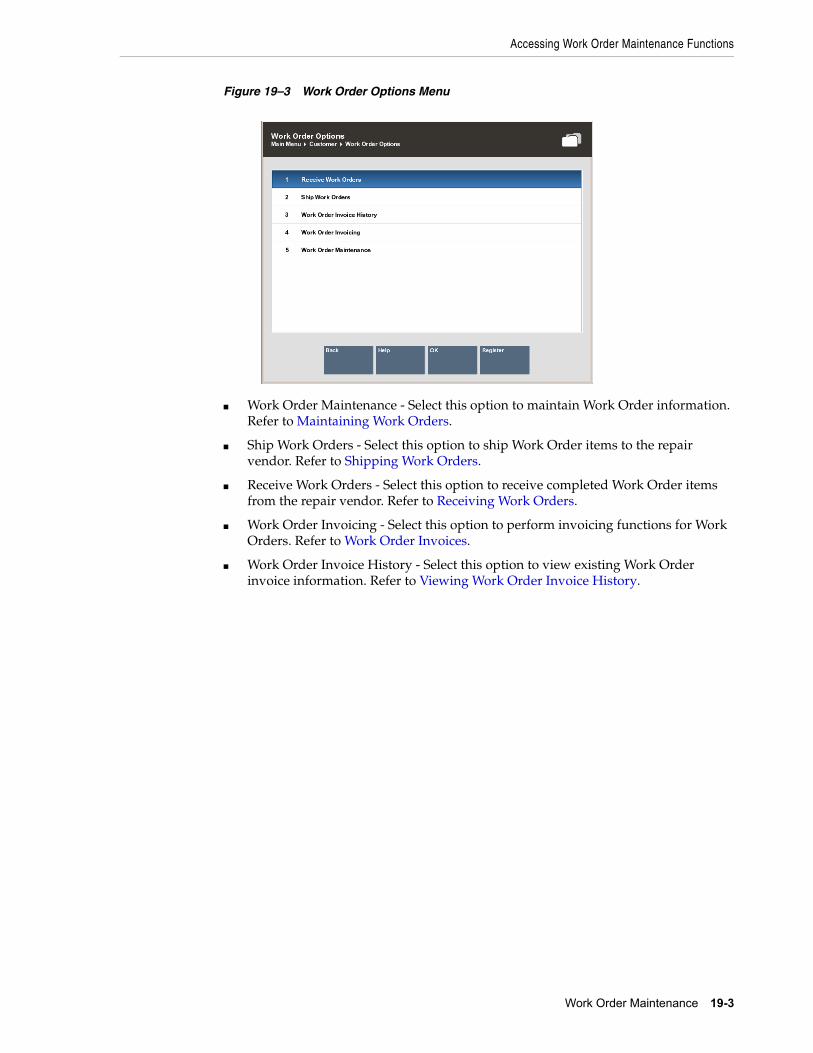
Accessing Work Order Maintenance Functions
Work Order Maintenance 19-3
Figure 19–3 Work Order Options Menu
■ Work Order Maintenance - Select this option to maintain Work Order information. Refer to Maintaining Work Orders.
■ Ship Work Orders - Select this option to ship Work Order items to the repair vendor. Refer to Shipping Work Orders.
■ Receive Work Orders - Select this option to receive completed Work Order items from the repair vendor. Refer to Receiving Work Orders.
■ Work Order Invoicing - Select this option to perform invoicing functions for Work Orders. Refer to Work Order Invoices.
■ Work Order Invoice History - Select this option to view existing Work Order invoice information. Refer to Viewing Work Order Invoice History.
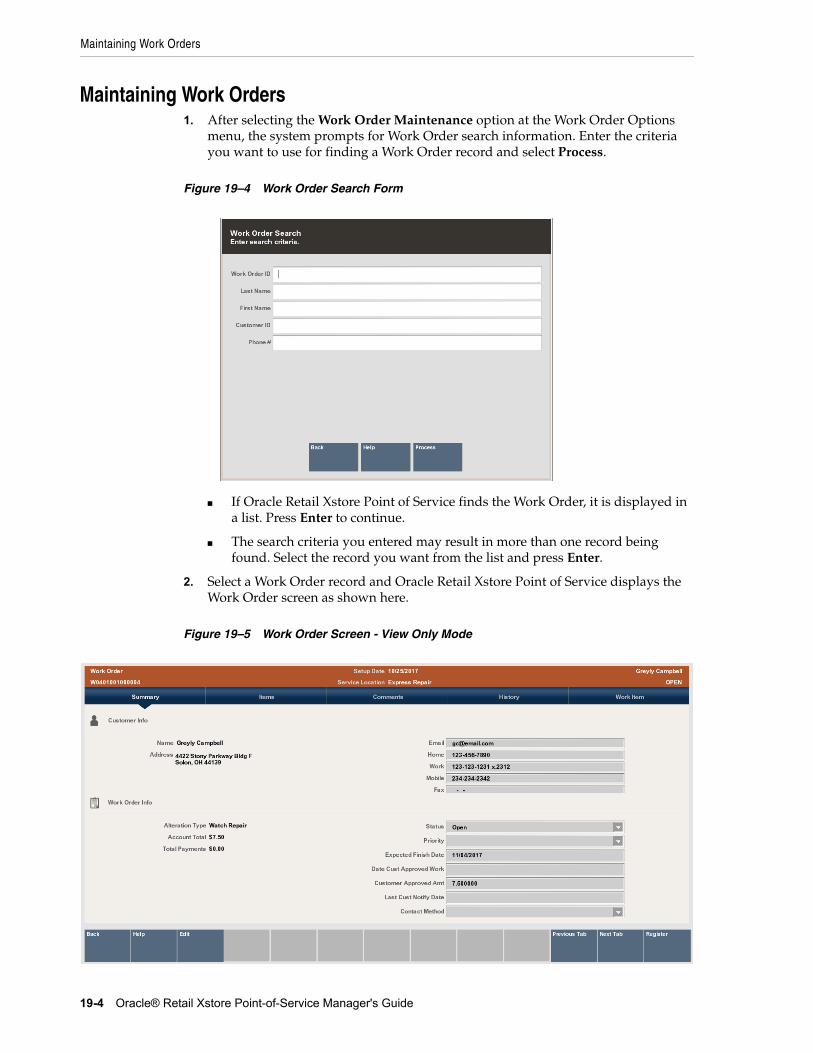
Maintaining Work Orders
19-4 Oracle® Retail Xstore Point-of-Service Manager's Guide
Maintaining Work Orders1. After selecting the Work Order Maintenance option at the Work Order Options
menu, the system prompts for Work Order search information. Enter the criteria you want to use for finding a Work Order record and select Process.
Figure 19–4 Work Order Search Form
■ If Oracle Retail Xstore Point of Service finds the Work Order, it is displayed in a list. Press Enter to continue.
■ The search criteria you entered may result in more than one record being found. Select the record you want from the list and press Enter.
2. Select a Work Order record and Oracle Retail Xstore Point of Service displays the Work Order screen as shown here.
Figure 19–5 Work Order Screen - View Only Mode
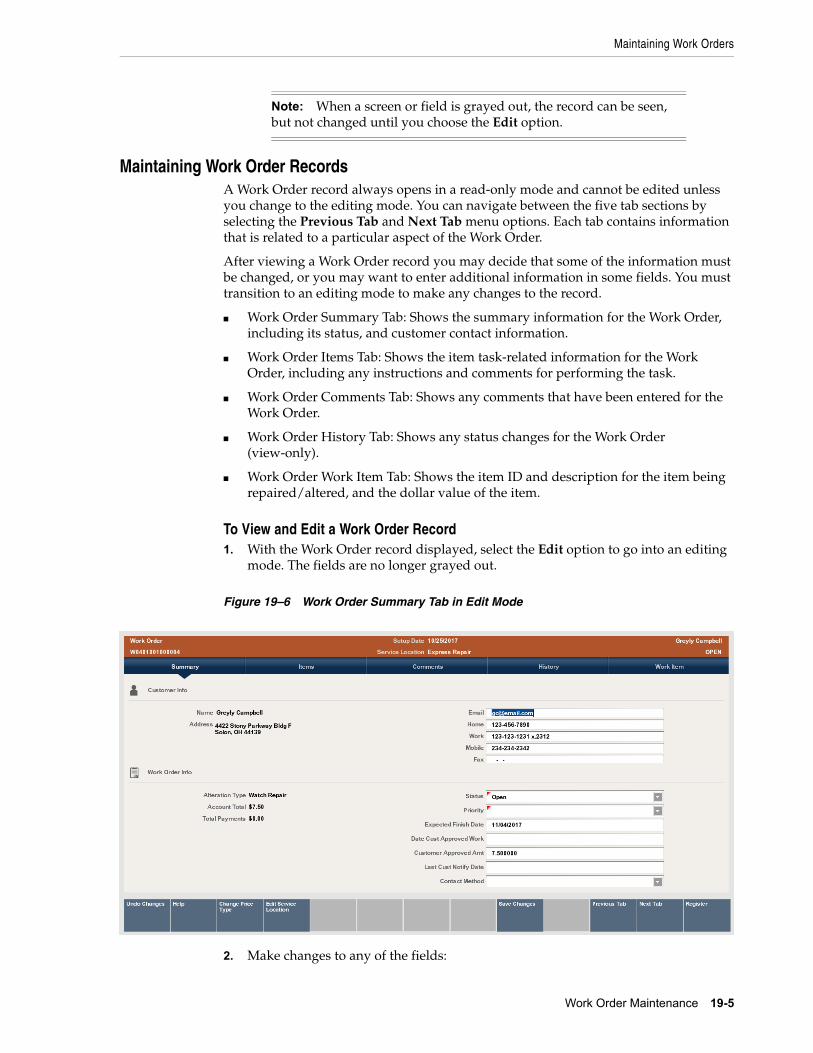
Maintaining Work Orders
Work Order Maintenance 19-5
Maintaining Work Order RecordsA Work Order record always opens in a read-only mode and cannot be edited unless you change to the editing mode. You can navigate between the five tab sections by selecting the Previous Tab and Next Tab menu options. Each tab contains information that is related to a particular aspect of the Work Order.
After viewing a Work Order record you may decide that some of the information must be changed, or you may want to enter additional information in some fields. You must transition to an editing mode to make any changes to the record.
■ Work Order Summary Tab: Shows the summary information for the Work Order, including its status, and customer contact information.
■ Work Order Items Tab: Shows the item task-related information for the Work Order, including any instructions and comments for performing the task.
■ Work Order Comments Tab: Shows any comments that have been entered for the Work Order.
■ Work Order History Tab: Shows any status changes for the Work Order (view-only).
■ Work Order Work Item Tab: Shows the item ID and description for the item being repaired/altered, and the dollar value of the item.
To View and Edit a Work Order Record1. With the Work Order record displayed, select the Edit option to go into an editing
mode. The fields are no longer grayed out.
Figure 19–6 Work Order Summary Tab in Edit Mode
2. Make changes to any of the fields:
Note: When a screen or field is grayed out, the record can be seen, but not changed until you choose the Edit option.
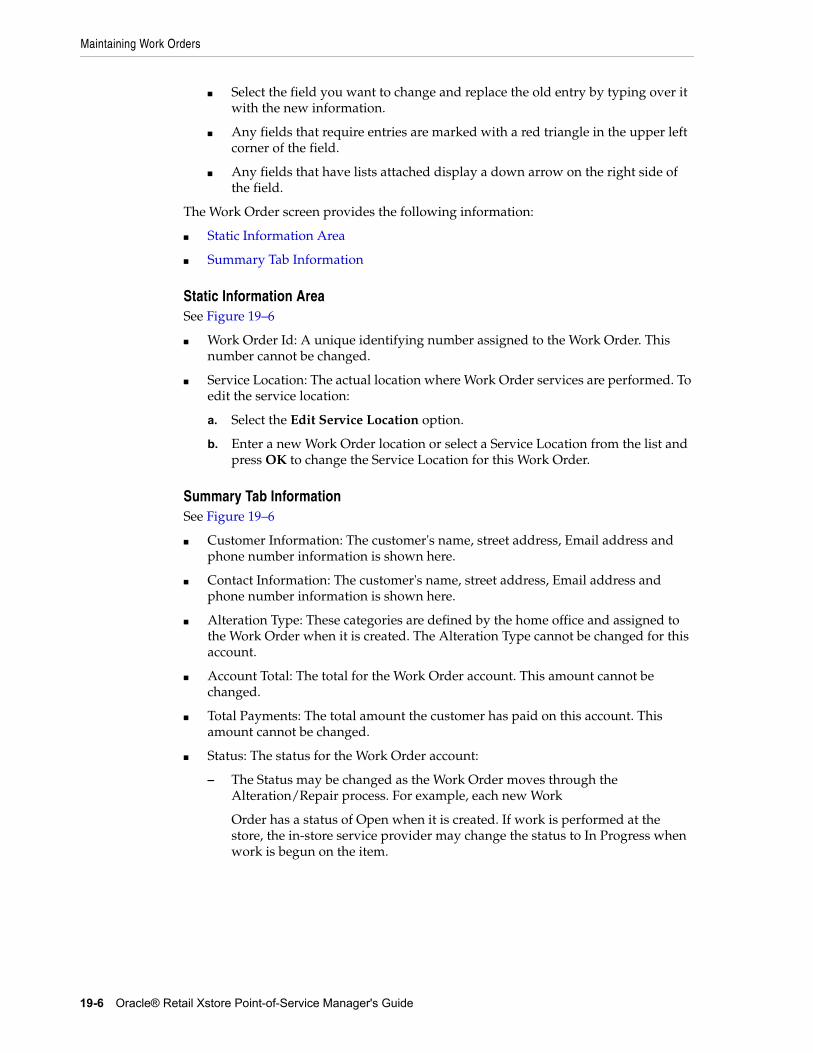
Maintaining Work Orders
19-6 Oracle® Retail Xstore Point-of-Service Manager's Guide
■ Select the field you want to change and replace the old entry by typing over it with the new information.
■ Any fields that require entries are marked with a red triangle in the upper left corner of the field.
■ Any fields that have lists attached display a down arrow on the right side of the field.
The Work Order screen provides the following information:
■ Static Information Area
■ Summary Tab Information
Static Information AreaSee Figure 19–6
■ Work Order Id: A unique identifying number assigned to the Work Order. This number cannot be changed.
■ Service Location: The actual location where Work Order services are performed. To edit the service location:
a. Select the Edit Service Location option.
b. Enter a new Work Order location or select a Service Location from the list and press OK to change the Service Location for this Work Order.
Summary Tab InformationSee Figure 19–6
■ Customer Information: The customer's name, street address, Email address and phone number information is shown here.
■ Contact Information: The customer's name, street address, Email address and phone number information is shown here.
■ Alteration Type: These categories are defined by the home office and assigned to the Work Order when it is created. The Alteration Type cannot be changed for this account.
■ Account Total: The total for the Work Order account. This amount cannot be changed.
■ Total Payments: The total amount the customer has paid on this account. This amount cannot be changed.
■ Status: The status for the Work Order account:
– The Status may be changed as the Work Order moves through the Alteration/Repair process. For example, each new Work
Order has a status of Open when it is created. If work is performed at the store, the in-store service provider may change the status to In Progress when work is begun on the item.
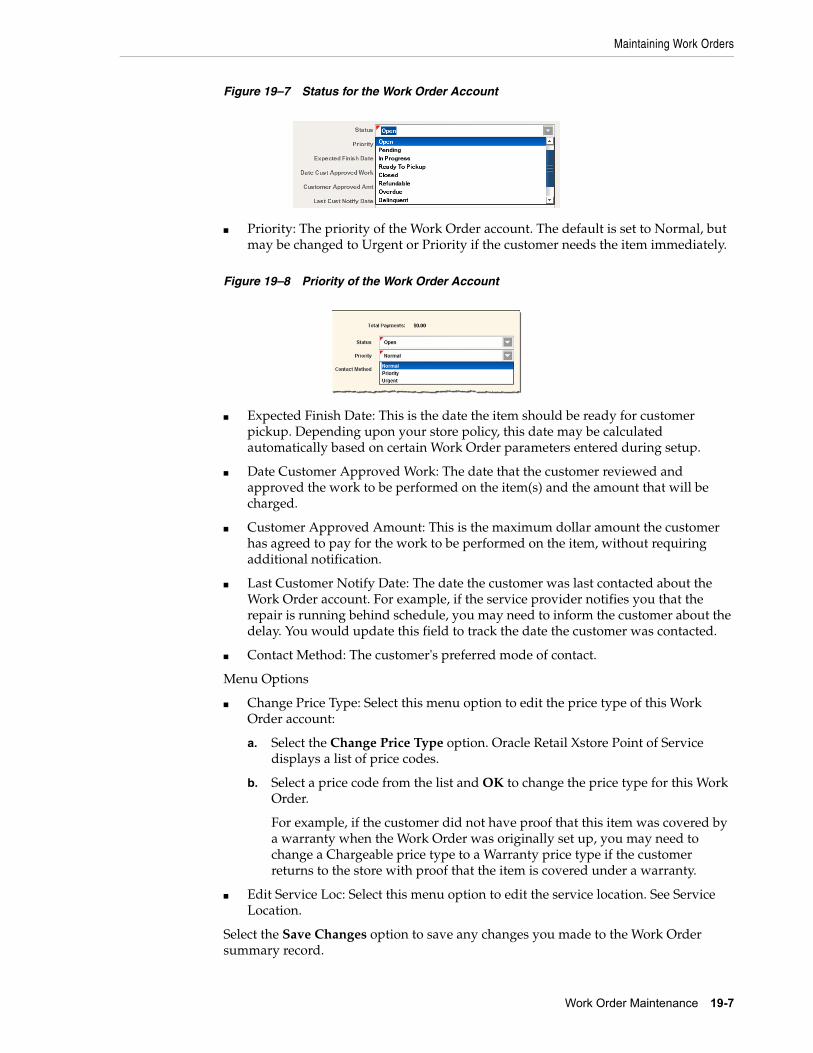
Maintaining Work Orders
Work Order Maintenance 19-7
Figure 19–7 Status for the Work Order Account
■ Priority: The priority of the Work Order account. The default is set to Normal, but may be changed to Urgent or Priority if the customer needs the item immediately.
Figure 19–8 Priority of the Work Order Account
■ Expected Finish Date: This is the date the item should be ready for customer pickup. Depending upon your store policy, this date may be calculated automatically based on certain Work Order parameters entered during setup.
■ Date Customer Approved Work: The date that the customer reviewed and approved the work to be performed on the item(s) and the amount that will be charged.
■ Customer Approved Amount: This is the maximum dollar amount the customer has agreed to pay for the work to be performed on the item, without requiring additional notification.
■ Last Customer Notify Date: The date the customer was last contacted about the Work Order account. For example, if the service provider notifies you that the repair is running behind schedule, you may need to inform the customer about the delay. You would update this field to track the date the customer was contacted.
■ Contact Method: The customer's preferred mode of contact.
Menu Options
■ Change Price Type: Select this menu option to edit the price type of this Work Order account:
a. Select the Change Price Type option. Oracle Retail Xstore Point of Service displays a list of price codes.
b. Select a price code from the list and OK to change the price type for this Work Order.
For example, if the customer did not have proof that this item was covered by a warranty when the Work Order was originally set up, you may need to change a Chargeable price type to a Warranty price type if the customer returns to the store with proof that the item is covered under a warranty.
■ Edit Service Loc: Select this menu option to edit the service location. See Service Location.
Select the Save Changes option to save any changes you made to the Work Order summary record.
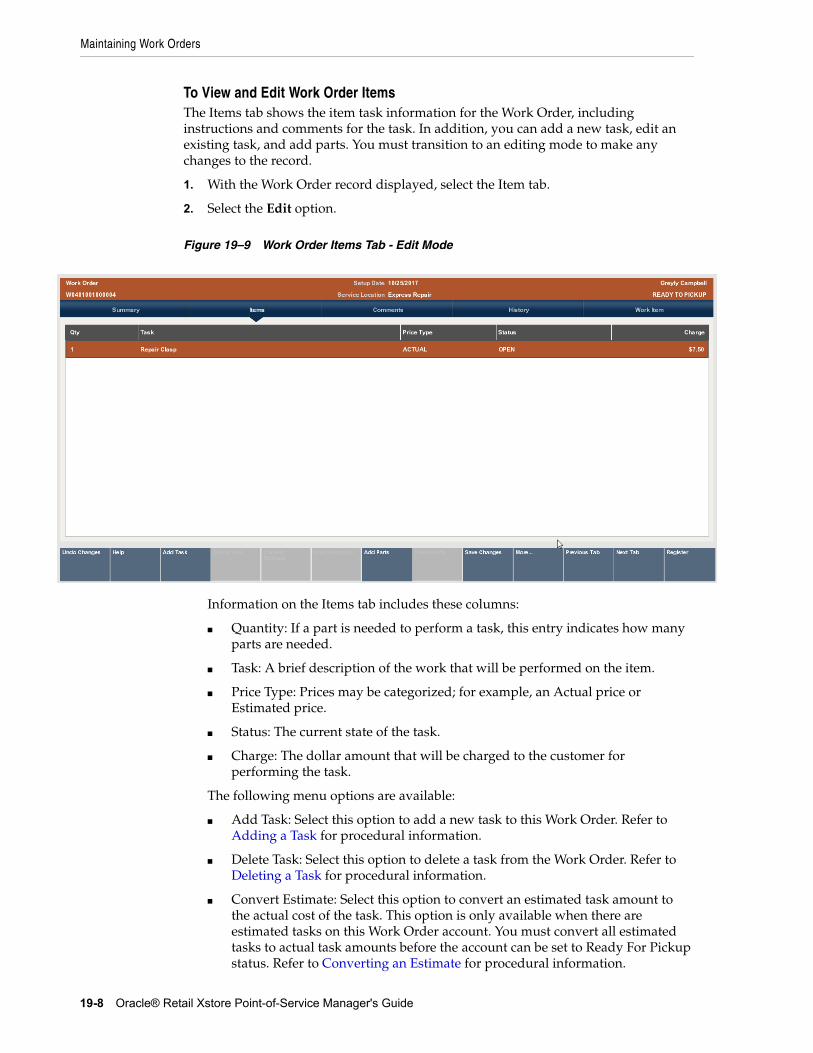
Maintaining Work Orders
19-8 Oracle® Retail Xstore Point-of-Service Manager's Guide
To View and Edit Work Order ItemsThe Items tab shows the item task information for the Work Order, including instructions and comments for the task. In addition, you can add a new task, edit an existing task, and add parts. You must transition to an editing mode to make any changes to the record.
1. With the Work Order record displayed, select the Item tab.
2. Select the Edit option.
Figure 19–9 Work Order Items Tab - Edit Mode
Information on the Items tab includes these columns:
■ Quantity: If a part is needed to perform a task, this entry indicates how many parts are needed.
■ Task: A brief description of the work that will be performed on the item.
■ Price Type: Prices may be categorized; for example, an Actual price or Estimated price.
■ Status: The current state of the task.
■ Charge: The dollar amount that will be charged to the customer for performing the task.
The following menu options are available:
■ Add Task: Select this option to add a new task to this Work Order. Refer to Adding a Task for procedural information.
■ Delete Task: Select this option to delete a task from the Work Order. Refer to Deleting a Task for procedural information.
■ Convert Estimate: Select this option to convert an estimated task amount to the actual cost of the task. This option is only available when there are estimated tasks on this Work Order account. You must convert all estimated tasks to actual task amounts before the account can be set to Ready For Pickup status. Refer to Converting an Estimate for procedural information.
Maintaining Work Orders
Work Order Maintenance 19-9
■ Add Instruction: Select this option to add, view, and edit task instructions. Refer to Viewing/Adding Task Instructions for procedural information.
■ Add Parts: Select this option to add parts to the Work Order. Refer to Adding Parts for procedural information.
■ Delete Parts: Select this option to remove parts from the Work Order. This option is only available when there are parts on this Work Order. Refer to Deleting Parts for procedural information.
■ Change Quantity: Select this option to change the task quantity. Refer to Changing the Quantity for procedural information.
■ Change Price: Select this option to change the task price. Refer to Changing the Price for procedural information.
■ Change Tax Location: Select this option to change the tax location. Refer to Changing the Tax Location for procedural information.
■ Tax Exempt: Select this option to change the tax to tax exempt. Refer to Changing the Tax to Tax Exempt for procedural information.
■ Change Tax Amount: Select this option to change the tax amount. Refer to Changing the Tax Amount for procedural information.
■ Change Tax Percent: Select this option to change the tax percentage. Refer to Changing the Tax Percentage for procedural information.
3. Select the Save Changes option to save any changes you made to the Work Order items record.
Adding a Task1. With the Work Order record displayed in edit mode, select the Add Task option.
2. Oracle Retail Xstore Point of Service displays a list of tasks available for this Work Order category. Use the up and down arrow keys to go to a task(s) and press Spacebar to select it. After marking all required tasks, press Enter to add them to the Work Order.
Note: Select the More... option as needed to access the menu options available at the Items tab.
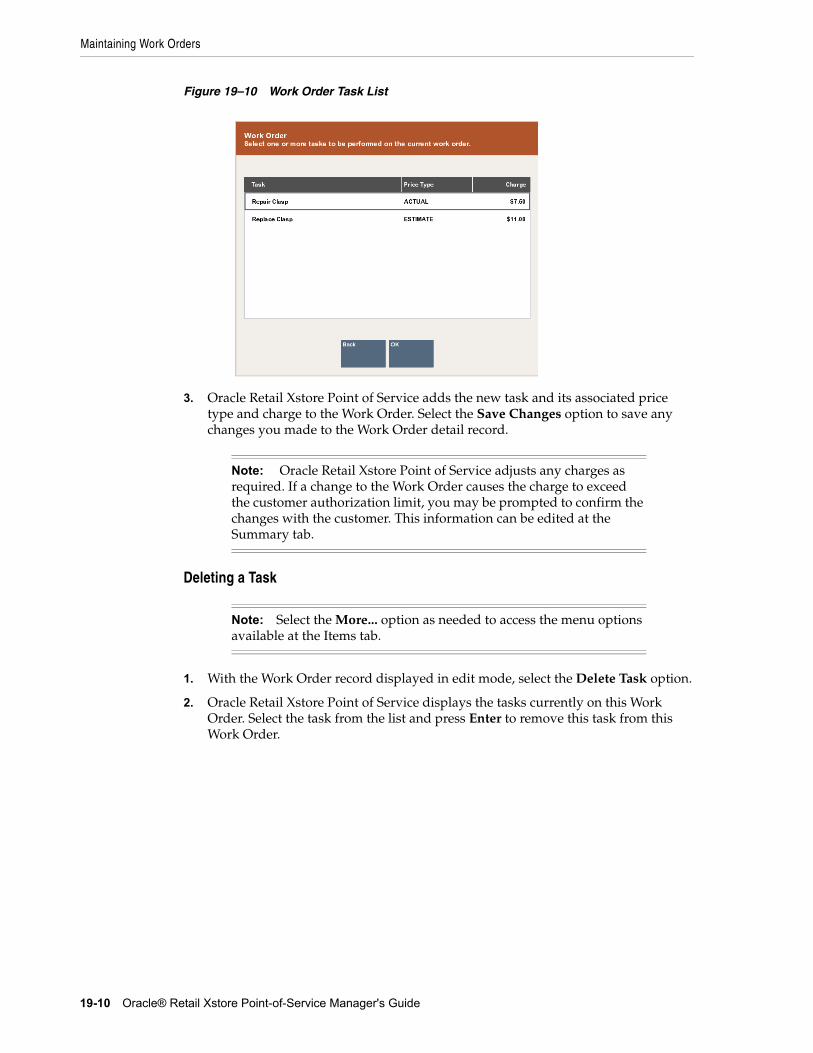
Maintaining Work Orders
19-10 Oracle® Retail Xstore Point-of-Service Manager's Guide
Figure 19–10 Work Order Task List
3. Oracle Retail Xstore Point of Service adds the new task and its associated price type and charge to the Work Order. Select the Save Changes option to save any changes you made to the Work Order detail record.
Deleting a Task
1. With the Work Order record displayed in edit mode, select the Delete Task option.
2. Oracle Retail Xstore Point of Service displays the tasks currently on this Work Order. Select the task from the list and press Enter to remove this task from this Work Order.
Note: Oracle Retail Xstore Point of Service adjusts any charges as required. If a change to the Work Order causes the charge to exceed the customer authorization limit, you may be prompted to confirm the changes with the customer. This information can be edited at the Summary tab.
Note: Select the More... option as needed to access the menu options available at the Items tab.
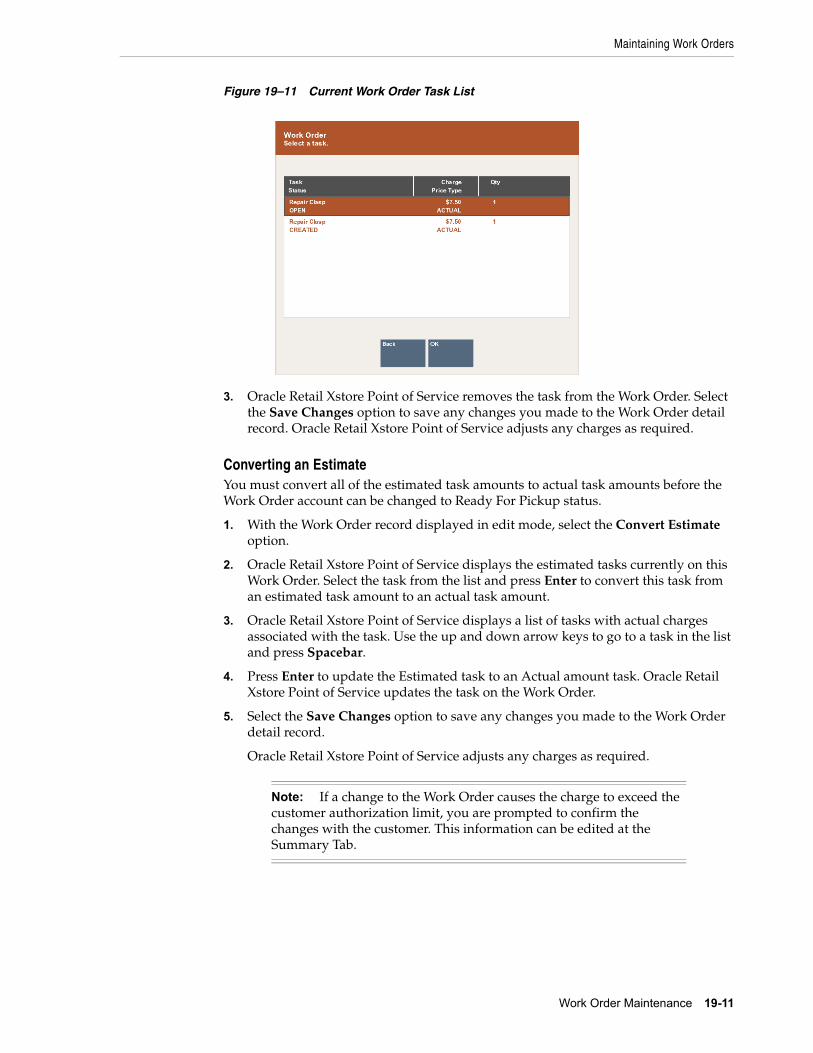
Maintaining Work Orders
Work Order Maintenance 19-11
Figure 19–11 Current Work Order Task List
3. Oracle Retail Xstore Point of Service removes the task from the Work Order. Select the Save Changes option to save any changes you made to the Work Order detail record. Oracle Retail Xstore Point of Service adjusts any charges as required.
Converting an EstimateYou must convert all of the estimated task amounts to actual task amounts before the Work Order account can be changed to Ready For Pickup status.
1. With the Work Order record displayed in edit mode, select the Convert Estimate option.
2. Oracle Retail Xstore Point of Service displays the estimated tasks currently on this Work Order. Select the task from the list and press Enter to convert this task from an estimated task amount to an actual task amount.
3. Oracle Retail Xstore Point of Service displays a list of tasks with actual charges associated with the task. Use the up and down arrow keys to go to a task in the list and press Spacebar.
4. Press Enter to update the Estimated task to an Actual amount task. Oracle Retail Xstore Point of Service updates the task on the Work Order.
5. Select the Save Changes option to save any changes you made to the Work Order detail record.
Oracle Retail Xstore Point of Service adjusts any charges as required.
Note: If a change to the Work Order causes the charge to exceed the customer authorization limit, you are prompted to confirm the changes with the customer. This information can be edited at the Summary Tab.
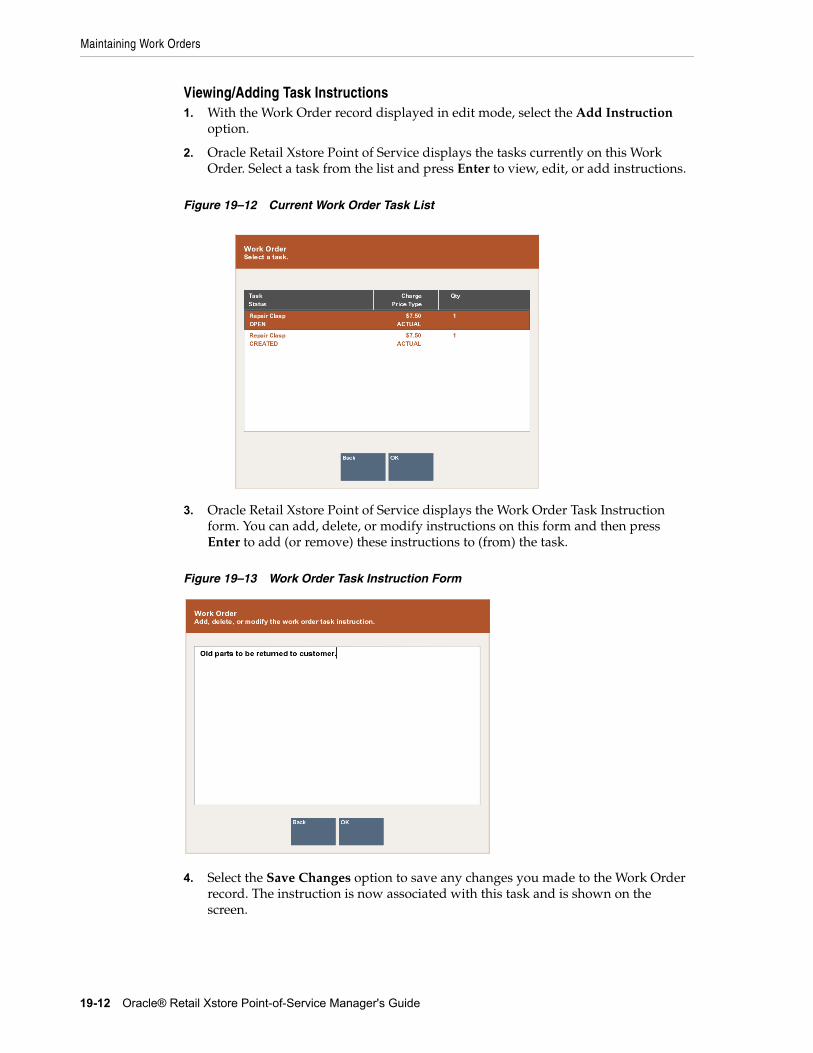
Maintaining Work Orders
19-12 Oracle® Retail Xstore Point-of-Service Manager's Guide
Viewing/Adding Task Instructions1. With the Work Order record displayed in edit mode, select the Add Instruction
option.
2. Oracle Retail Xstore Point of Service displays the tasks currently on this Work Order. Select a task from the list and press Enter to view, edit, or add instructions.
Figure 19–12 Current Work Order Task List
3. Oracle Retail Xstore Point of Service displays the Work Order Task Instruction form. You can add, delete, or modify instructions on this form and then press Enter to add (or remove) these instructions to (from) the task.
Figure 19–13 Work Order Task Instruction Form
4. Select the Save Changes option to save any changes you made to the Work Order record. The instruction is now associated with this task and is shown on the screen.
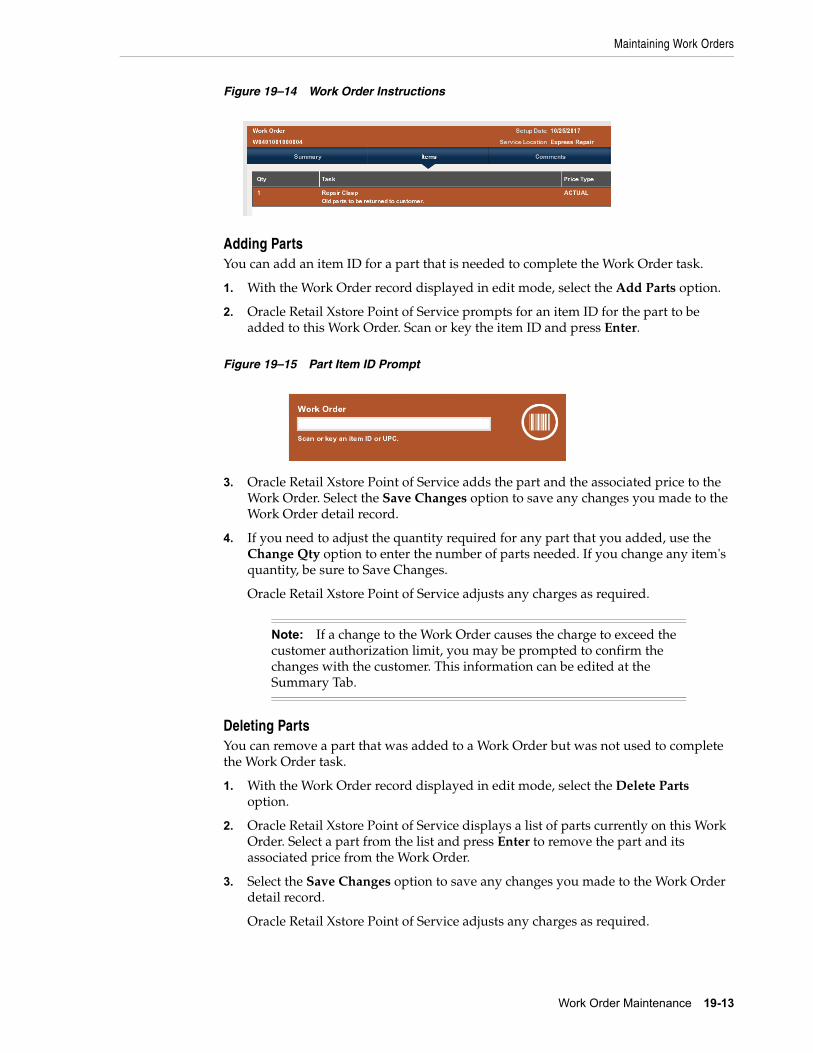
Maintaining Work Orders
Work Order Maintenance 19-13
Figure 19–14 Work Order Instructions
Adding PartsYou can add an item ID for a part that is needed to complete the Work Order task.
1. With the Work Order record displayed in edit mode, select the Add Parts option.
2. Oracle Retail Xstore Point of Service prompts for an item ID for the part to be added to this Work Order. Scan or key the item ID and press Enter.
Figure 19–15 Part Item ID Prompt
3. Oracle Retail Xstore Point of Service adds the part and the associated price to the Work Order. Select the Save Changes option to save any changes you made to the Work Order detail record.
4. If you need to adjust the quantity required for any part that you added, use the Change Qty option to enter the number of parts needed. If you change any item's quantity, be sure to Save Changes.
Oracle Retail Xstore Point of Service adjusts any charges as required.
Deleting PartsYou can remove a part that was added to a Work Order but was not used to complete the Work Order task.
1. With the Work Order record displayed in edit mode, select the Delete Parts option.
2. Oracle Retail Xstore Point of Service displays a list of parts currently on this Work Order. Select a part from the list and press Enter to remove the part and its associated price from the Work Order.
3. Select the Save Changes option to save any changes you made to the Work Order detail record.
Oracle Retail Xstore Point of Service adjusts any charges as required.
Note: If a change to the Work Order causes the charge to exceed the customer authorization limit, you may be prompted to confirm the changes with the customer. This information can be edited at the Summary Tab.
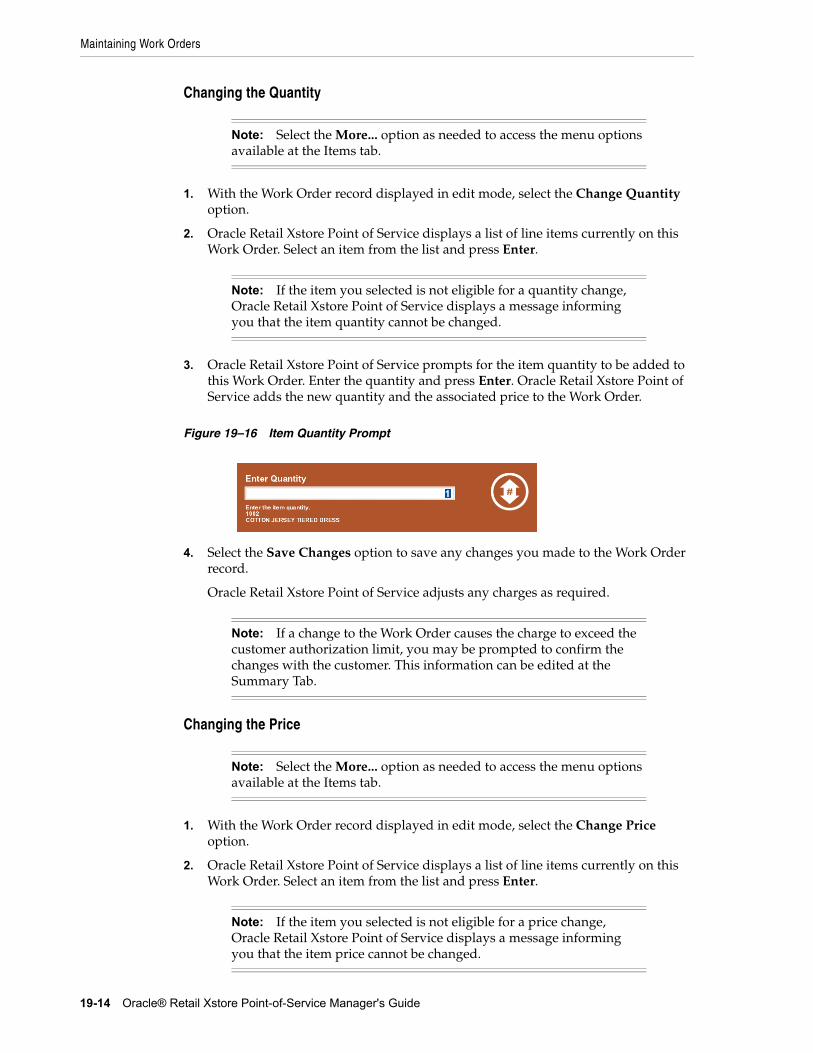
Maintaining Work Orders
19-14 Oracle® Retail Xstore Point-of-Service Manager's Guide
Changing the Quantity
1. With the Work Order record displayed in edit mode, select the Change Quantity option.
2. Oracle Retail Xstore Point of Service displays a list of line items currently on this Work Order. Select an item from the list and press Enter.
3. Oracle Retail Xstore Point of Service prompts for the item quantity to be added to this Work Order. Enter the quantity and press Enter. Oracle Retail Xstore Point of Service adds the new quantity and the associated price to the Work Order.
Figure 19–16 Item Quantity Prompt
4. Select the Save Changes option to save any changes you made to the Work Order record.
Oracle Retail Xstore Point of Service adjusts any charges as required.
Changing the Price
1. With the Work Order record displayed in edit mode, select the Change Price option.
2. Oracle Retail Xstore Point of Service displays a list of line items currently on this Work Order. Select an item from the list and press Enter.
Note: Select the More... option as needed to access the menu options available at the Items tab.
Note: If the item you selected is not eligible for a quantity change, Oracle Retail Xstore Point of Service displays a message informing you that the item quantity cannot be changed.
Note: If a change to the Work Order causes the charge to exceed the customer authorization limit, you may be prompted to confirm the changes with the customer. This information can be edited at the Summary Tab.
Note: Select the More... option as needed to access the menu options available at the Items tab.
Note: If the item you selected is not eligible for a price change, Oracle Retail Xstore Point of Service displays a message informing you that the item price cannot be changed.
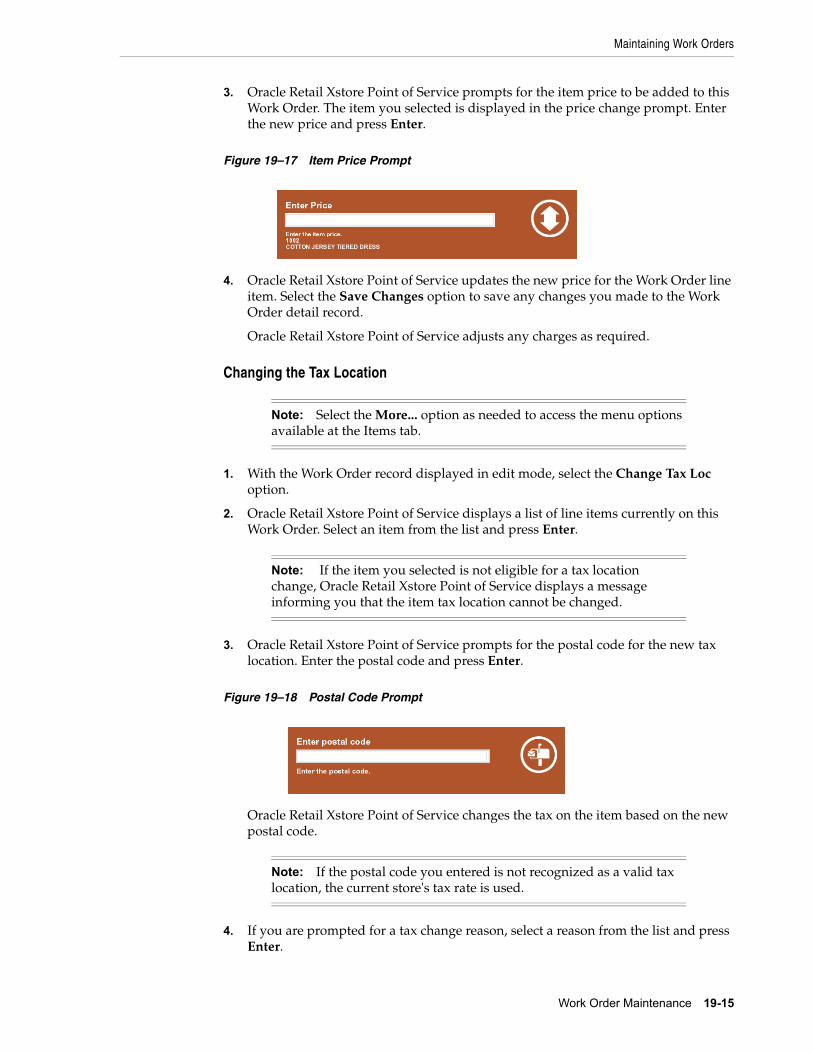
Maintaining Work Orders
Work Order Maintenance 19-15
3. Oracle Retail Xstore Point of Service prompts for the item price to be added to this Work Order. The item you selected is displayed in the price change prompt. Enter the new price and press Enter.
Figure 19–17 Item Price Prompt
4. Oracle Retail Xstore Point of Service updates the new price for the Work Order line item. Select the Save Changes option to save any changes you made to the Work Order detail record.
Oracle Retail Xstore Point of Service adjusts any charges as required.
Changing the Tax Location
1. With the Work Order record displayed in edit mode, select the Change Tax Loc option.
2. Oracle Retail Xstore Point of Service displays a list of line items currently on this Work Order. Select an item from the list and press Enter.
3. Oracle Retail Xstore Point of Service prompts for the postal code for the new tax location. Enter the postal code and press Enter.
Figure 19–18 Postal Code Prompt
Oracle Retail Xstore Point of Service changes the tax on the item based on the new postal code.
4. If you are prompted for a tax change reason, select a reason from the list and press Enter.
Note: Select the More... option as needed to access the menu options available at the Items tab.
Note: If the item you selected is not eligible for a tax location change, Oracle Retail Xstore Point of Service displays a message informing you that the item tax location cannot be changed.
Note: If the postal code you entered is not recognized as a valid tax location, the current store's tax rate is used.
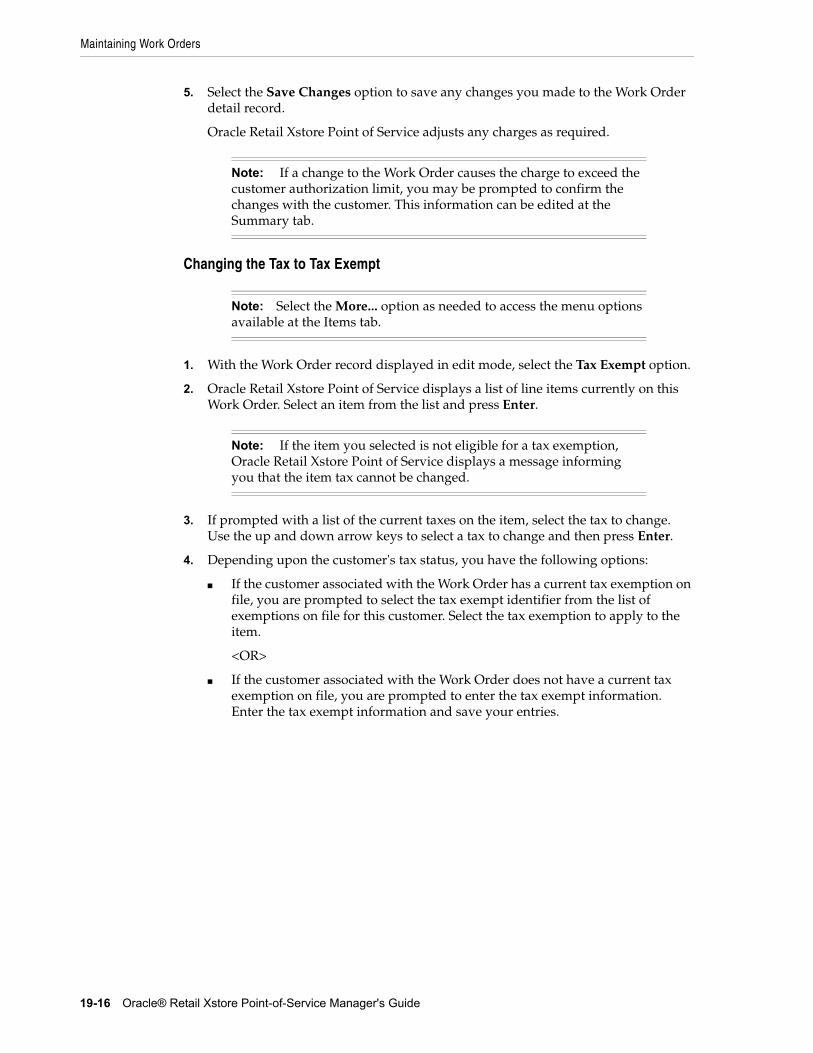
Maintaining Work Orders
19-16 Oracle® Retail Xstore Point-of-Service Manager's Guide
5. Select the Save Changes option to save any changes you made to the Work Order detail record.
Oracle Retail Xstore Point of Service adjusts any charges as required.
Changing the Tax to Tax Exempt
1. With the Work Order record displayed in edit mode, select the Tax Exempt option.
2. Oracle Retail Xstore Point of Service displays a list of line items currently on this Work Order. Select an item from the list and press Enter.
3. If prompted with a list of the current taxes on the item, select the tax to change. Use the up and down arrow keys to select a tax to change and then press Enter.
4. Depending upon the customer's tax status, you have the following options:
■ If the customer associated with the Work Order has a current tax exemption on file, you are prompted to select the tax exempt identifier from the list of exemptions on file for this customer. Select the tax exemption to apply to the item.
<OR>
■ If the customer associated with the Work Order does not have a current tax exemption on file, you are prompted to enter the tax exempt information. Enter the tax exempt information and save your entries.
Note: If a change to the Work Order causes the charge to exceed the customer authorization limit, you may be prompted to confirm the changes with the customer. This information can be edited at the Summary tab.
Note: Select the More... option as needed to access the menu options available at the Items tab.
Note: If the item you selected is not eligible for a tax exemption, Oracle Retail Xstore Point of Service displays a message informing you that the item tax cannot be changed.
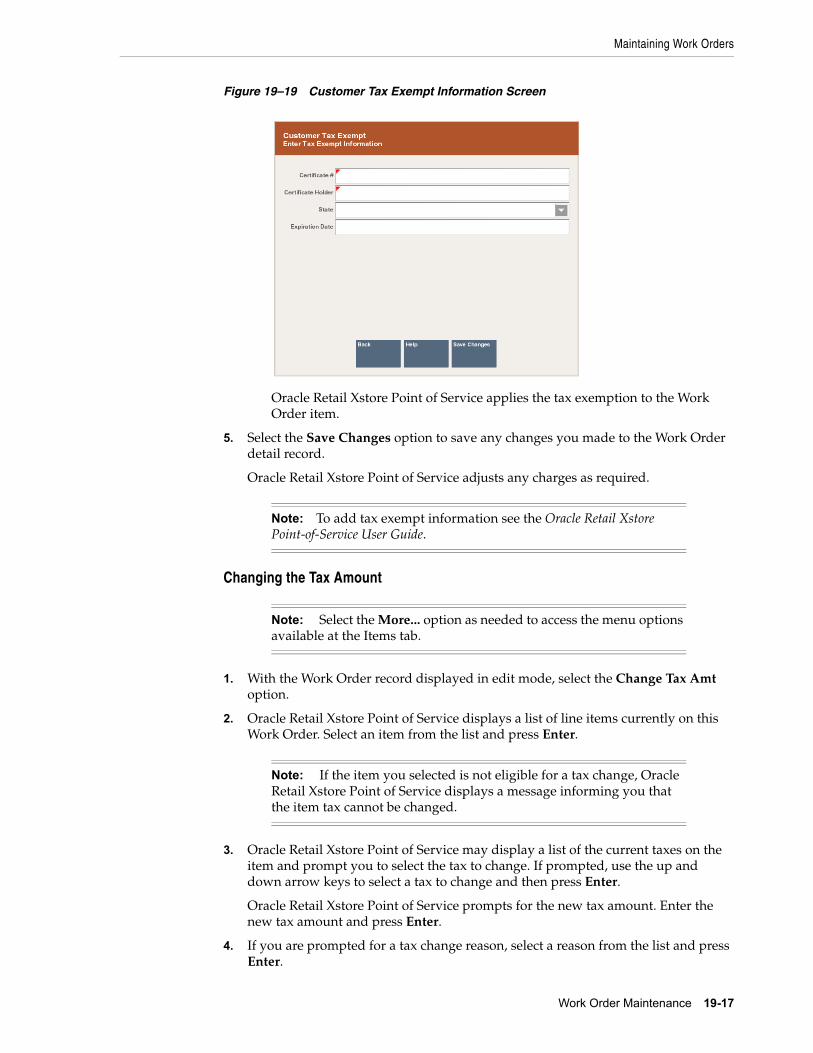
Maintaining Work Orders
Work Order Maintenance 19-17
Figure 19–19 Customer Tax Exempt Information Screen
Oracle Retail Xstore Point of Service applies the tax exemption to the Work Order item.
5. Select the Save Changes option to save any changes you made to the Work Order detail record.
Oracle Retail Xstore Point of Service adjusts any charges as required.
Changing the Tax Amount
1. With the Work Order record displayed in edit mode, select the Change Tax Amt option.
2. Oracle Retail Xstore Point of Service displays a list of line items currently on this Work Order. Select an item from the list and press Enter.
3. Oracle Retail Xstore Point of Service may display a list of the current taxes on the item and prompt you to select the tax to change. If prompted, use the up and down arrow keys to select a tax to change and then press Enter.
Oracle Retail Xstore Point of Service prompts for the new tax amount. Enter the new tax amount and press Enter.
4. If you are prompted for a tax change reason, select a reason from the list and press Enter.
Note: To add tax exempt information see the Oracle Retail Xstore Point-of-Service User Guide.
Note: Select the More... option as needed to access the menu options available at the Items tab.
Note: If the item you selected is not eligible for a tax change, Oracle Retail Xstore Point of Service displays a message informing you that the item tax cannot be changed.
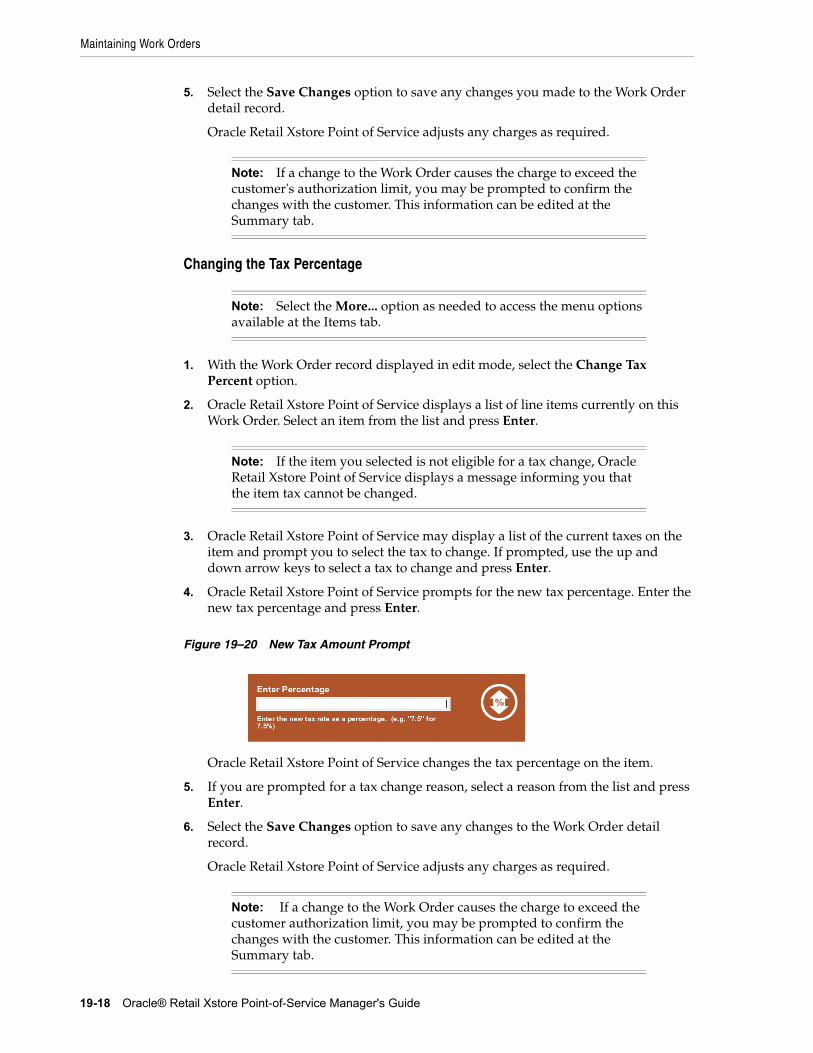
Maintaining Work Orders
19-18 Oracle® Retail Xstore Point-of-Service Manager's Guide
5. Select the Save Changes option to save any changes you made to the Work Order detail record.
Oracle Retail Xstore Point of Service adjusts any charges as required.
Changing the Tax Percentage
1. With the Work Order record displayed in edit mode, select the Change Tax Percent option.
2. Oracle Retail Xstore Point of Service displays a list of line items currently on this Work Order. Select an item from the list and press Enter.
3. Oracle Retail Xstore Point of Service may display a list of the current taxes on the item and prompt you to select the tax to change. If prompted, use the up and down arrow keys to select a tax to change and press Enter.
4. Oracle Retail Xstore Point of Service prompts for the new tax percentage. Enter the new tax percentage and press Enter.
Figure 19–20 New Tax Amount Prompt
Oracle Retail Xstore Point of Service changes the tax percentage on the item.
5. If you are prompted for a tax change reason, select a reason from the list and press Enter.
6. Select the Save Changes option to save any changes to the Work Order detail record.
Oracle Retail Xstore Point of Service adjusts any charges as required.
Note: If a change to the Work Order causes the charge to exceed the customer's authorization limit, you may be prompted to confirm the changes with the customer. This information can be edited at the Summary tab.
Note: Select the More... option as needed to access the menu options available at the Items tab.
Note: If the item you selected is not eligible for a tax change, Oracle Retail Xstore Point of Service displays a message informing you that the item tax cannot be changed.
Note: If a change to the Work Order causes the charge to exceed the customer authorization limit, you may be prompted to confirm the changes with the customer. This information can be edited at the Summary tab.
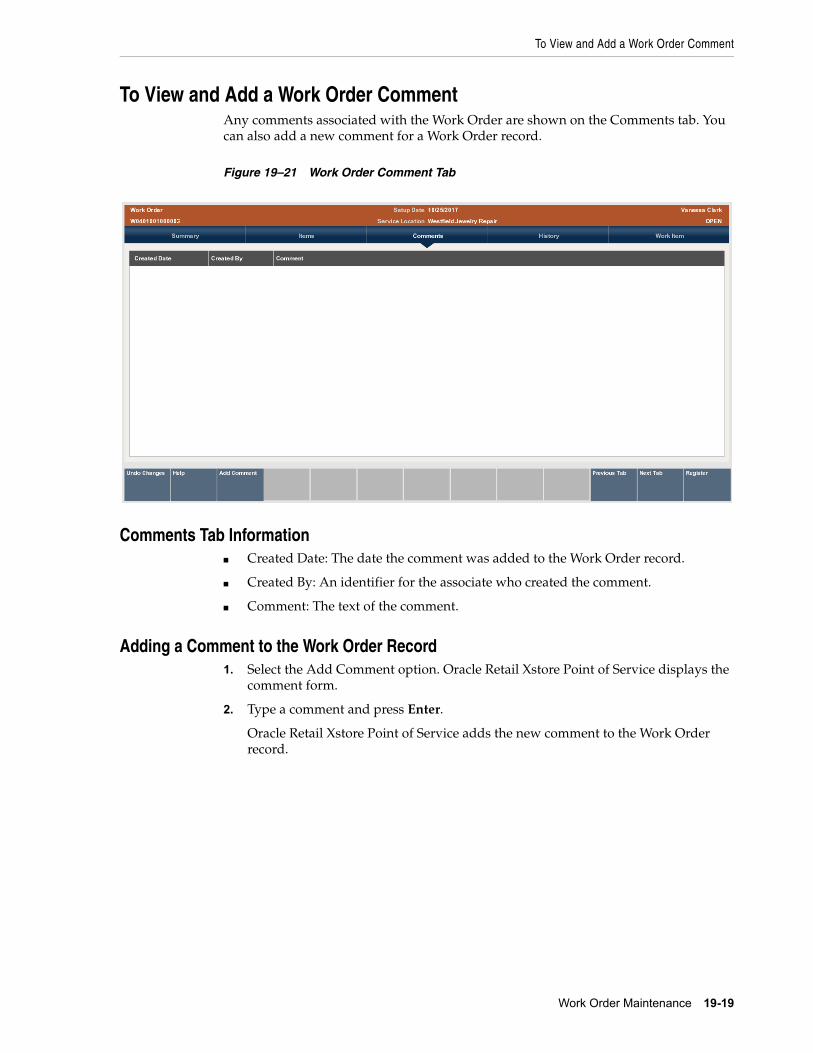
To View and Add a Work Order Comment
Work Order Maintenance 19-19
To View and Add a Work Order CommentAny comments associated with the Work Order are shown on the Comments tab. You can also add a new comment for a Work Order record.
Figure 19–21 Work Order Comment Tab
Comments Tab Information■ Created Date: The date the comment was added to the Work Order record.
■ Created By: An identifier for the associate who created the comment.
■ Comment: The text of the comment.
Adding a Comment to the Work Order Record1. Select the Add Comment option. Oracle Retail Xstore Point of Service displays the
comment form.
2. Type a comment and press Enter.
Oracle Retail Xstore Point of Service adds the new comment to the Work Order record.
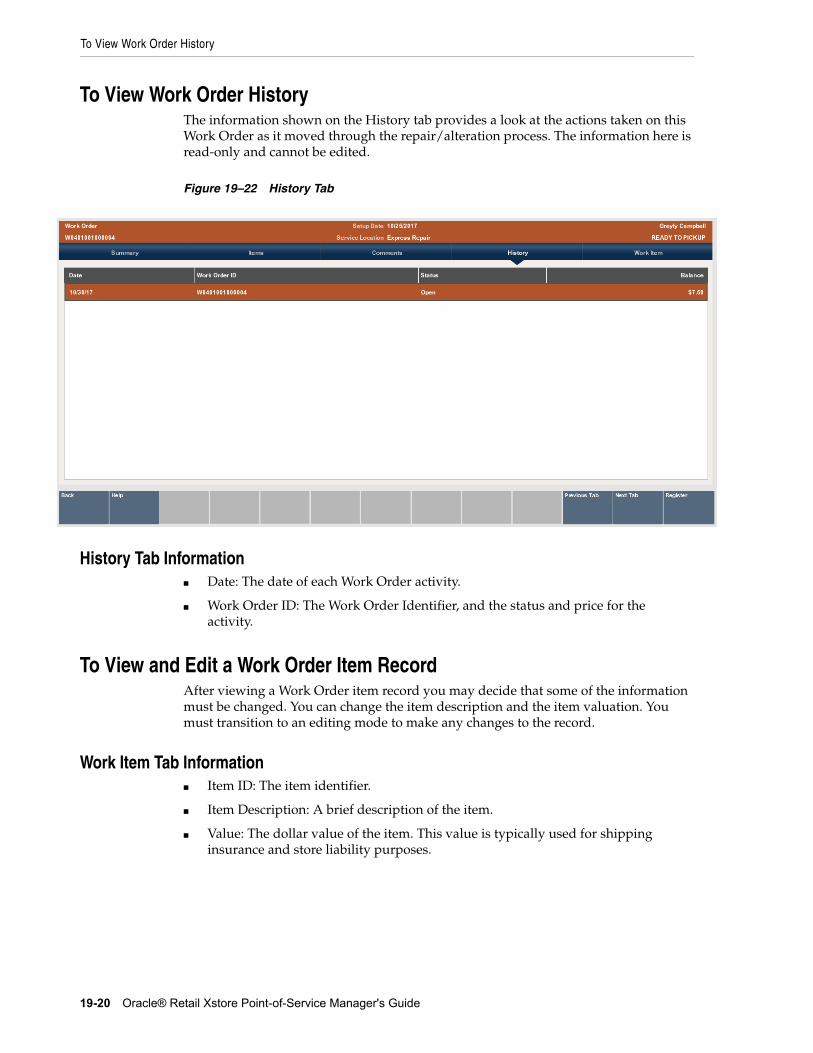
To View Work Order History
19-20 Oracle® Retail Xstore Point-of-Service Manager's Guide
To View Work Order HistoryThe information shown on the History tab provides a look at the actions taken on this Work Order as it moved through the repair/alteration process. The information here is read-only and cannot be edited.
Figure 19–22 History Tab
History Tab Information■ Date: The date of each Work Order activity.
■ Work Order ID: The Work Order Identifier, and the status and price for the activity.
To View and Edit a Work Order Item RecordAfter viewing a Work Order item record you may decide that some of the information must be changed. You can change the item description and the item valuation. You must transition to an editing mode to make any changes to the record.
Work Item Tab Information■ Item ID: The item identifier.
■ Item Description: A brief description of the item.
■ Value: The dollar value of the item. This value is typically used for shipping insurance and store liability purposes.
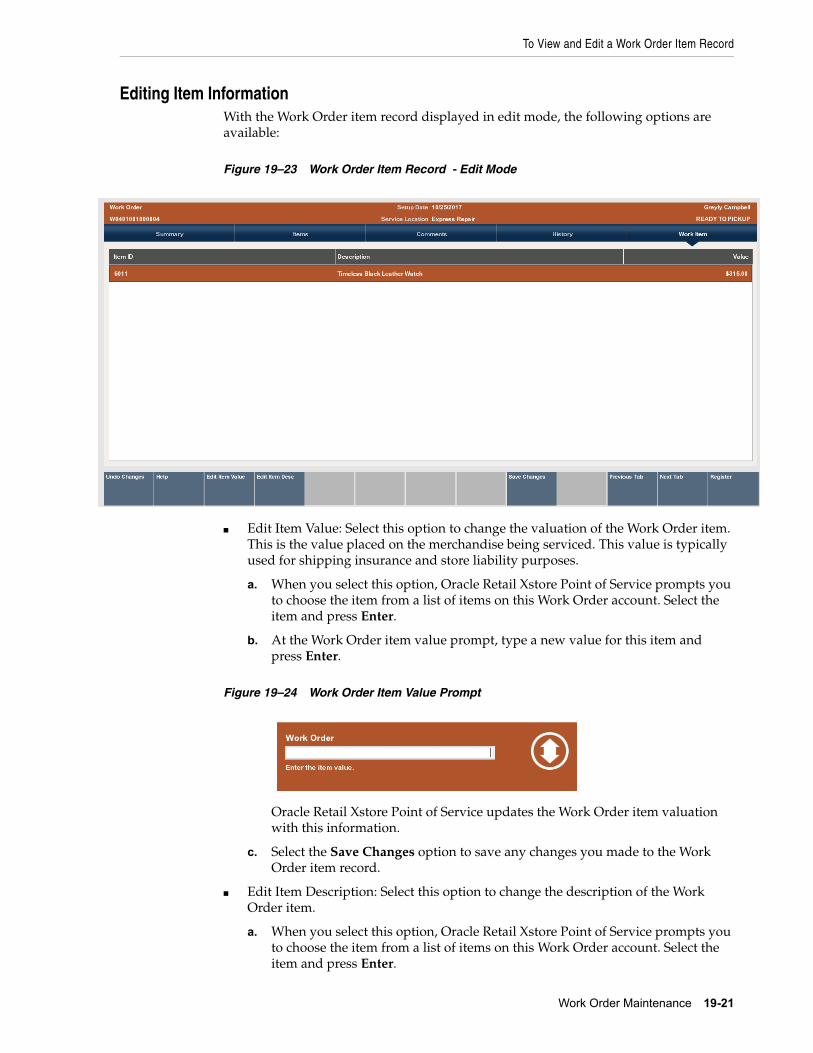
To View and Edit a Work Order Item Record
Work Order Maintenance 19-21
Editing Item InformationWith the Work Order item record displayed in edit mode, the following options are available:
Figure 19–23 Work Order Item Record - Edit Mode
■ Edit Item Value: Select this option to change the valuation of the Work Order item. This is the value placed on the merchandise being serviced. This value is typically used for shipping insurance and store liability purposes.
a. When you select this option, Oracle Retail Xstore Point of Service prompts you to choose the item from a list of items on this Work Order account. Select the item and press Enter.
b. At the Work Order item value prompt, type a new value for this item and press Enter.
Figure 19–24 Work Order Item Value Prompt
Oracle Retail Xstore Point of Service updates the Work Order item valuation with this information.
c. Select the Save Changes option to save any changes you made to the Work Order item record.
■ Edit Item Description: Select this option to change the description of the Work Order item.
a. When you select this option, Oracle Retail Xstore Point of Service prompts you to choose the item from a list of items on this Work Order account. Select the item and press Enter.
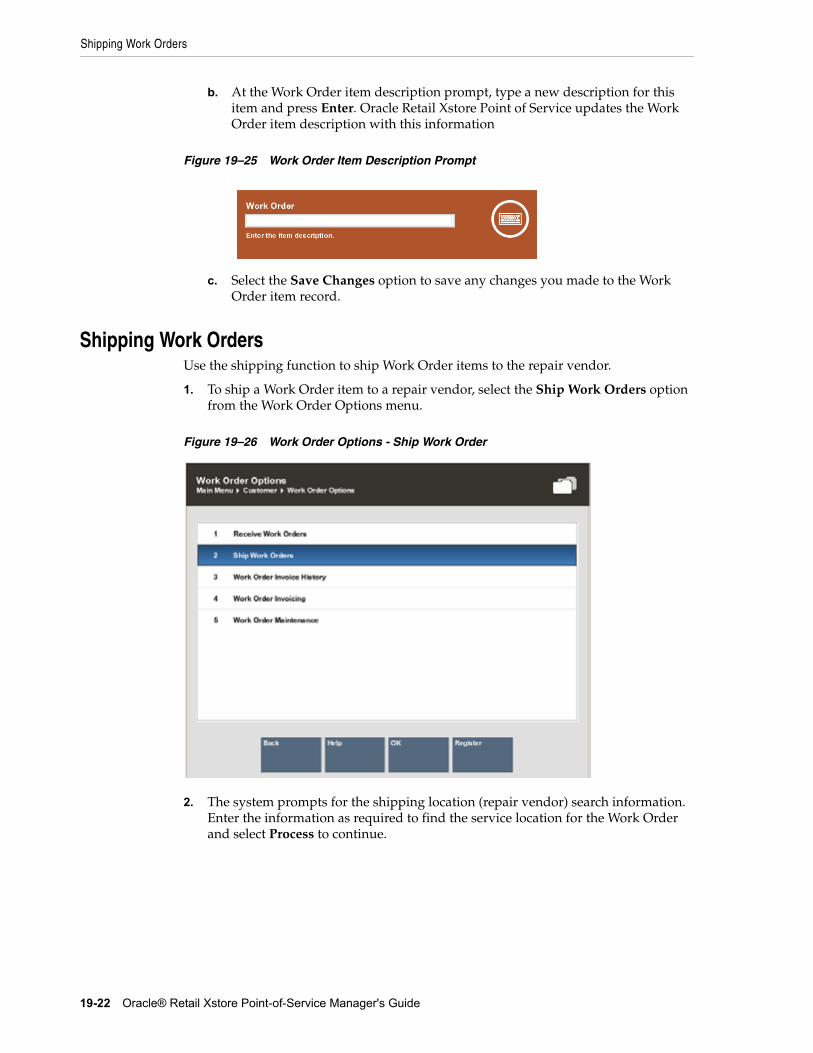
Shipping Work Orders
19-22 Oracle® Retail Xstore Point-of-Service Manager's Guide
b. At the Work Order item description prompt, type a new description for this item and press Enter. Oracle Retail Xstore Point of Service updates the Work Order item description with this information
Figure 19–25 Work Order Item Description Prompt
c. Select the Save Changes option to save any changes you made to the Work Order item record.
Shipping Work OrdersUse the shipping function to ship Work Order items to the repair vendor.
1. To ship a Work Order item to a repair vendor, select the Ship Work Orders option from the Work Order Options menu.
Figure 19–26 Work Order Options - Ship Work Order
2. The system prompts for the shipping location (repair vendor) search information. Enter the information as required to find the service location for the Work Order and select Process to continue.
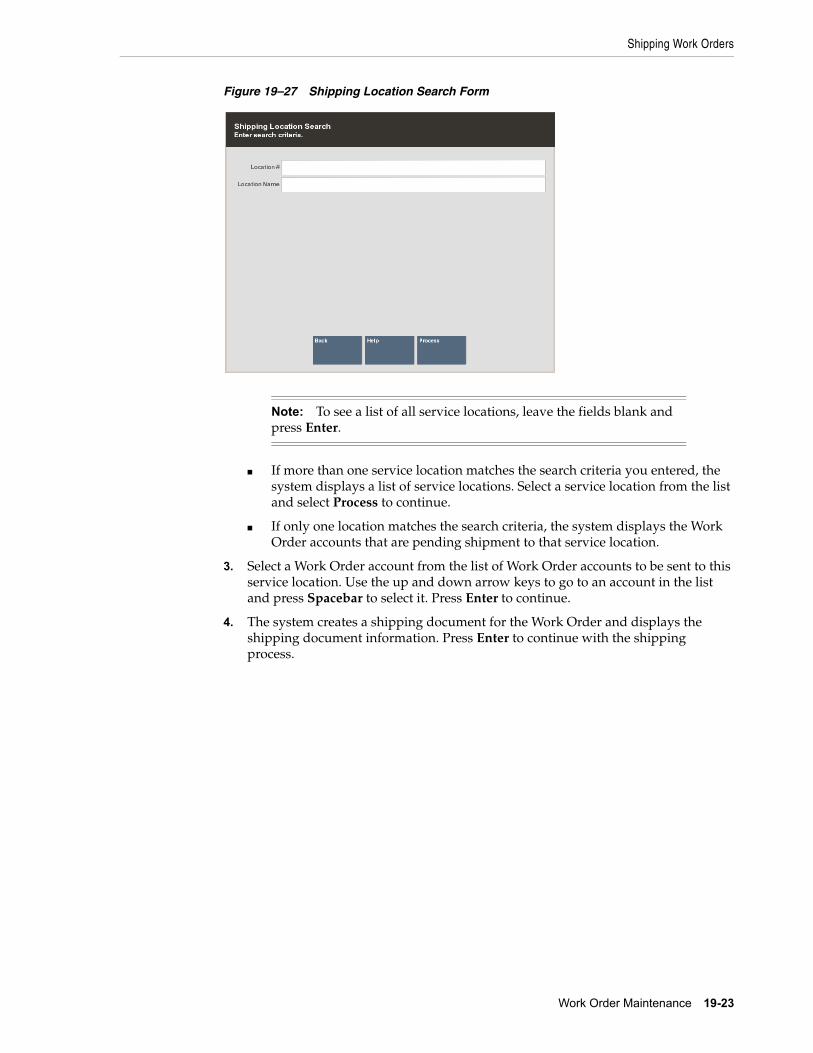
Shipping Work Orders
Work Order Maintenance 19-23
Figure 19–27 Shipping Location Search Form
■ If more than one service location matches the search criteria you entered, the system displays a list of service locations. Select a service location from the list and select Process to continue.
■ If only one location matches the search criteria, the system displays the Work Order accounts that are pending shipment to that service location.
3. Select a Work Order account from the list of Work Order accounts to be sent to this service location. Use the up and down arrow keys to go to an account in the list and press Spacebar to select it. Press Enter to continue.
4. The system creates a shipping document for the Work Order and displays the shipping document information. Press Enter to continue with the shipping process.
Note: To see a list of all service locations, leave the fields blank and press Enter.
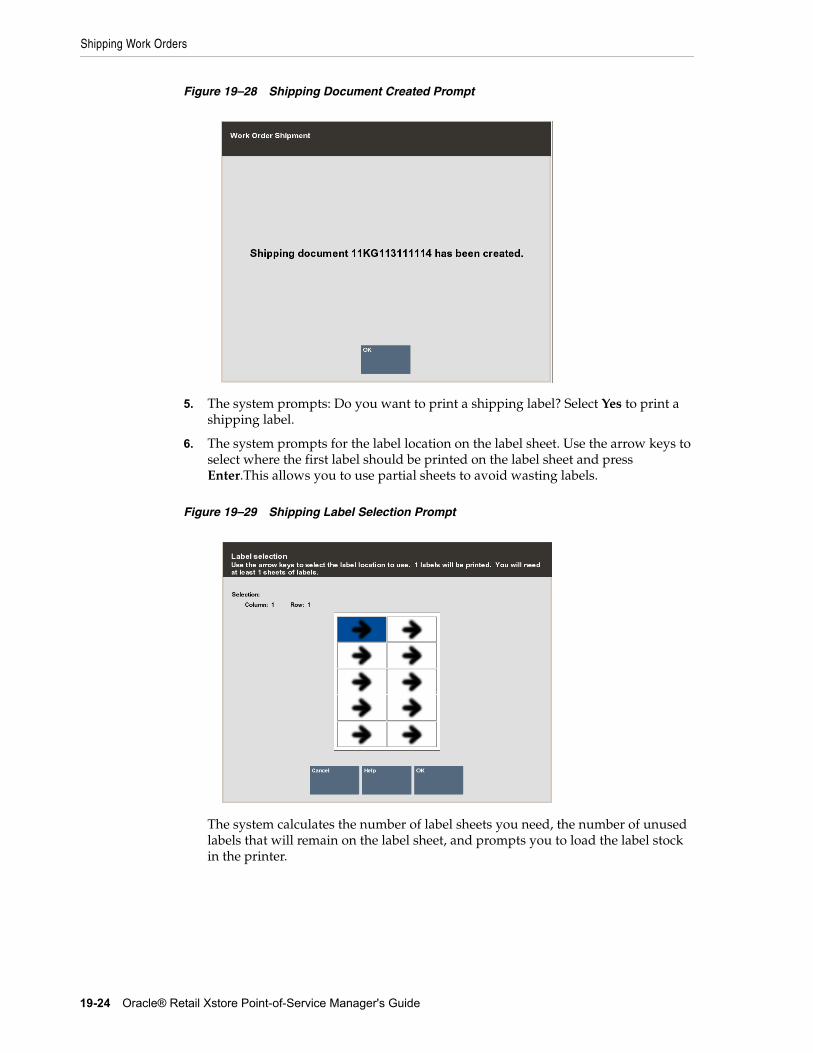
Shipping Work Orders
19-24 Oracle® Retail Xstore Point-of-Service Manager's Guide
Figure 19–28 Shipping Document Created Prompt
5. The system prompts: Do you want to print a shipping label? Select Yes to print a shipping label.
6. The system prompts for the label location on the label sheet. Use the arrow keys to select where the first label should be printed on the label sheet and press Enter.This allows you to use partial sheets to avoid wasting labels.
Figure 19–29 Shipping Label Selection Prompt
The system calculates the number of label sheets you need, the number of unused labels that will remain on the label sheet, and prompts you to load the label stock in the printer.

Shipping Work Orders
Work Order Maintenance 19-25
Figure 19–30 Print Label Prompt
7. Press Enter when you are ready to print the shipping label.
The system prints the labels and returns to the Shipping Location Search form where you can continue shipping Work Orders to service locations.
Figure 19–31 Shipping Label Sample
8. The system prompts: Do you want to print a packing slip?
■ Select No if you do not want to print a packing slip. The system skips printing a packing slip.
<OR>
■ Select Yes to print a packing slip on the report printer. Xstore returns to the Shipping Location Search Form (Figure 19–27).
Figure 19–32 Packing Slip Sample
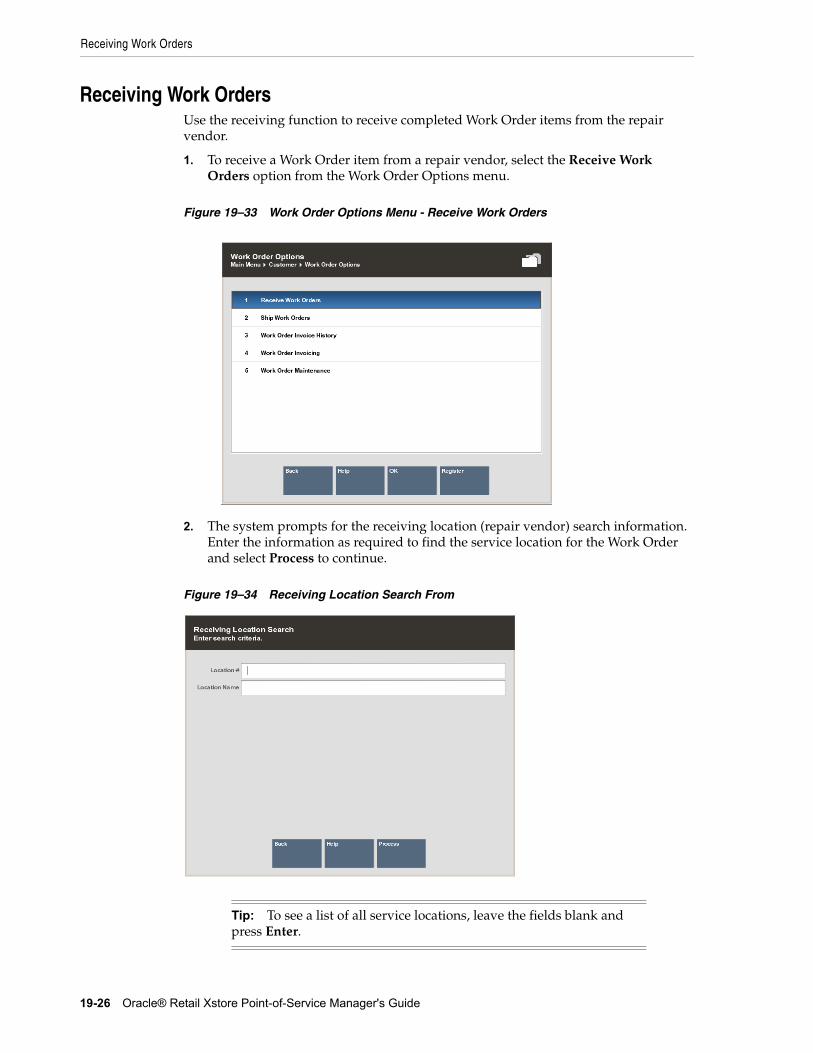
Receiving Work Orders
19-26 Oracle® Retail Xstore Point-of-Service Manager's Guide
Receiving Work OrdersUse the receiving function to receive completed Work Order items from the repair vendor.
1. To receive a Work Order item from a repair vendor, select the Receive Work Orders option from the Work Order Options menu.
Figure 19–33 Work Order Options Menu - Receive Work Orders
2. The system prompts for the receiving location (repair vendor) search information. Enter the information as required to find the service location for the Work Order and select Process to continue.
Figure 19–34 Receiving Location Search From
Tip: To see a list of all service locations, leave the fields blank and press Enter.
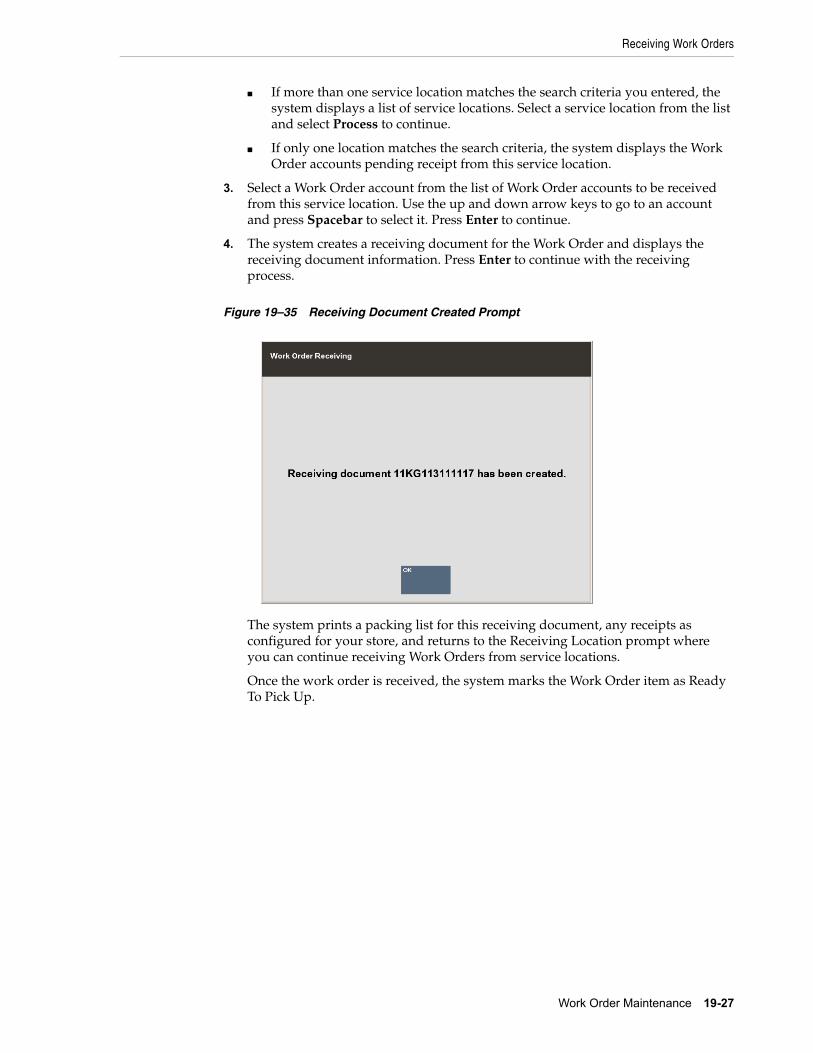
Receiving Work Orders
Work Order Maintenance 19-27
■ If more than one service location matches the search criteria you entered, the system displays a list of service locations. Select a service location from the list and select Process to continue.
■ If only one location matches the search criteria, the system displays the Work Order accounts pending receipt from this service location.
3. Select a Work Order account from the list of Work Order accounts to be received from this service location. Use the up and down arrow keys to go to an account and press Spacebar to select it. Press Enter to continue.
4. The system creates a receiving document for the Work Order and displays the receiving document information. Press Enter to continue with the receiving process.
Figure 19–35 Receiving Document Created Prompt
The system prints a packing list for this receiving document, any receipts as configured for your store, and returns to the Receiving Location prompt where you can continue receiving Work Orders from service locations.
Once the work order is received, the system marks the Work Order item as Ready To Pick Up.
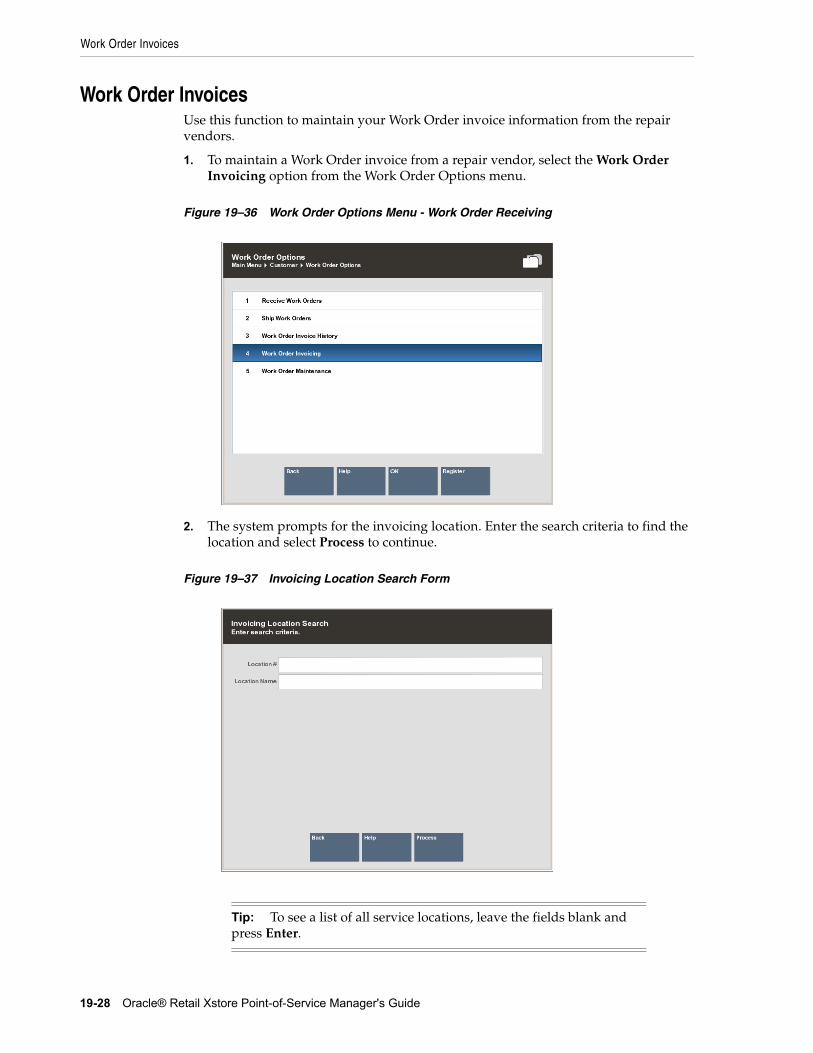
Work Order Invoices
19-28 Oracle® Retail Xstore Point-of-Service Manager's Guide
Work Order InvoicesUse this function to maintain your Work Order invoice information from the repair vendors.
1. To maintain a Work Order invoice from a repair vendor, select the Work Order Invoicing option from the Work Order Options menu.
Figure 19–36 Work Order Options Menu - Work Order Receiving
2. The system prompts for the invoicing location. Enter the search criteria to find the location and select Process to continue.
Figure 19–37 Invoicing Location Search Form
Tip: To see a list of all service locations, leave the fields blank and press Enter.
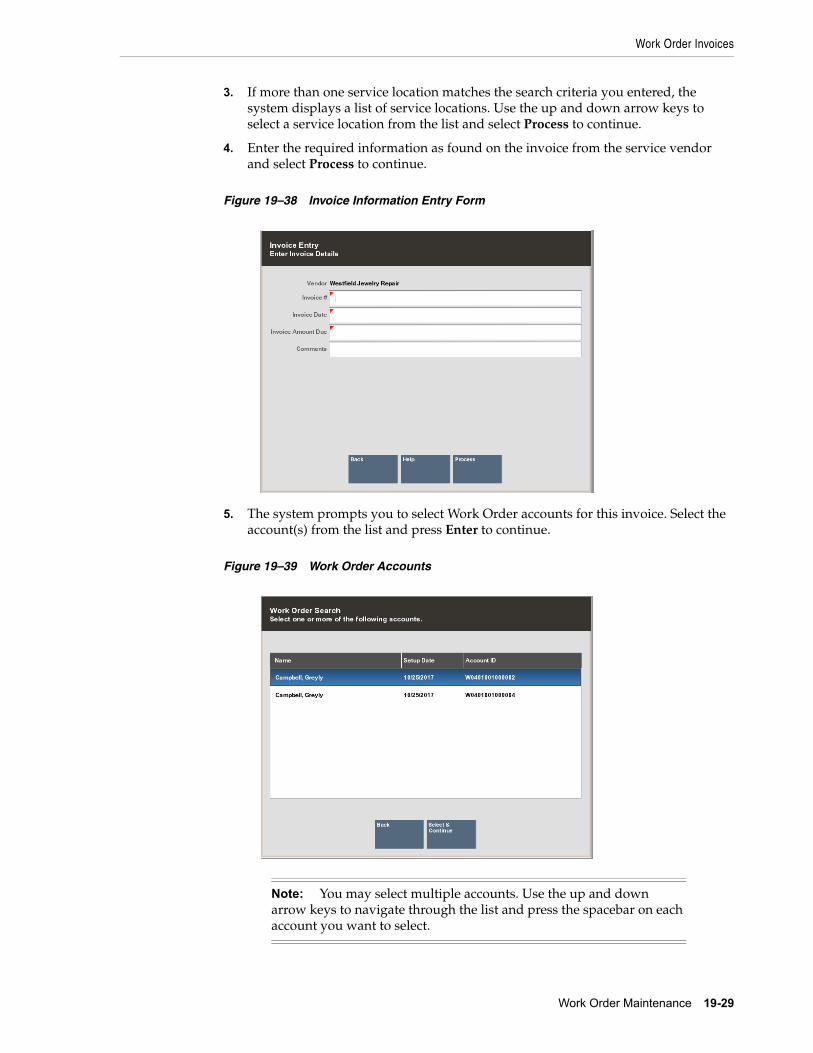
Work Order Invoices
Work Order Maintenance 19-29
3. If more than one service location matches the search criteria you entered, the system displays a list of service locations. Use the up and down arrow keys to select a service location from the list and select Process to continue.
4. Enter the required information as found on the invoice from the service vendor and select Process to continue.
Figure 19–38 Invoice Information Entry Form
5. The system prompts you to select Work Order accounts for this invoice. Select the account(s) from the list and press Enter to continue.
Figure 19–39 Work Order Accounts
Note: You may select multiple accounts. Use the up and down arrow keys to navigate through the list and press the spacebar on each account you want to select.
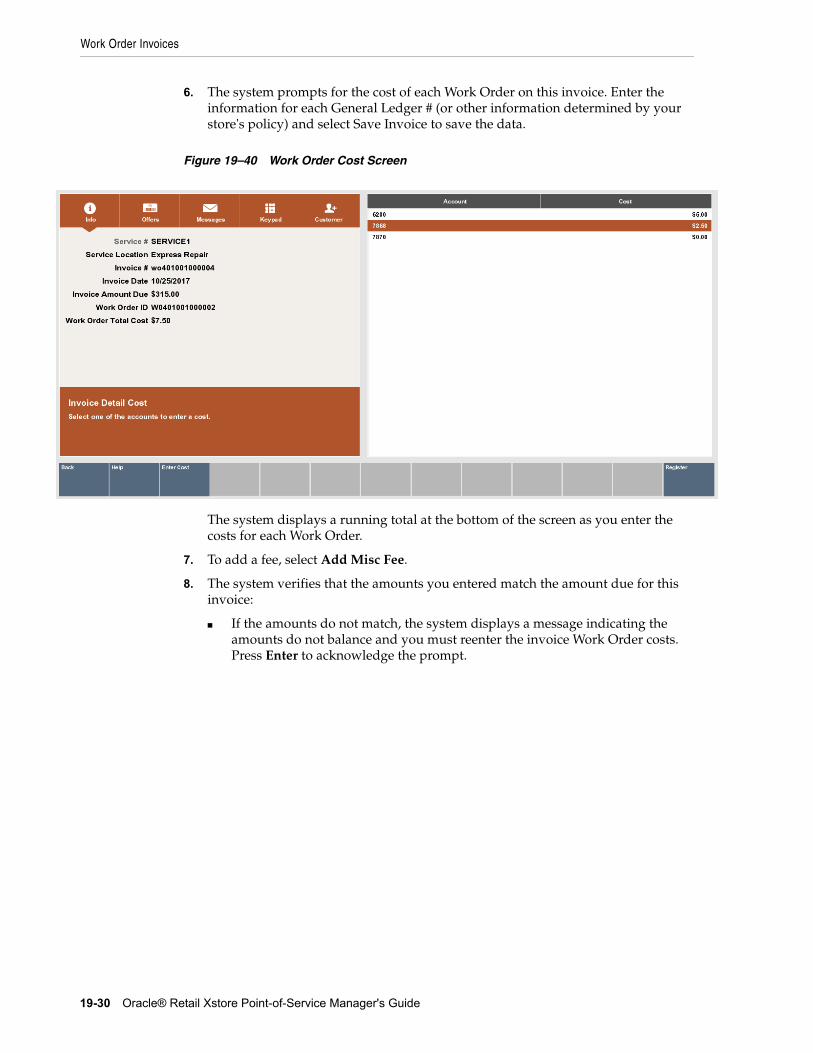
Work Order Invoices
19-30 Oracle® Retail Xstore Point-of-Service Manager's Guide
6. The system prompts for the cost of each Work Order on this invoice. Enter the information for each General Ledger # (or other information determined by your store's policy) and select Save Invoice to save the data.
Figure 19–40 Work Order Cost Screen
The system displays a running total at the bottom of the screen as you enter the costs for each Work Order.
7. To add a fee, select Add Misc Fee.
8. The system verifies that the amounts you entered match the amount due for this invoice:
■ If the amounts do not match, the system displays a message indicating the amounts do not balance and you must reenter the invoice Work Order costs. Press Enter to acknowledge the prompt.
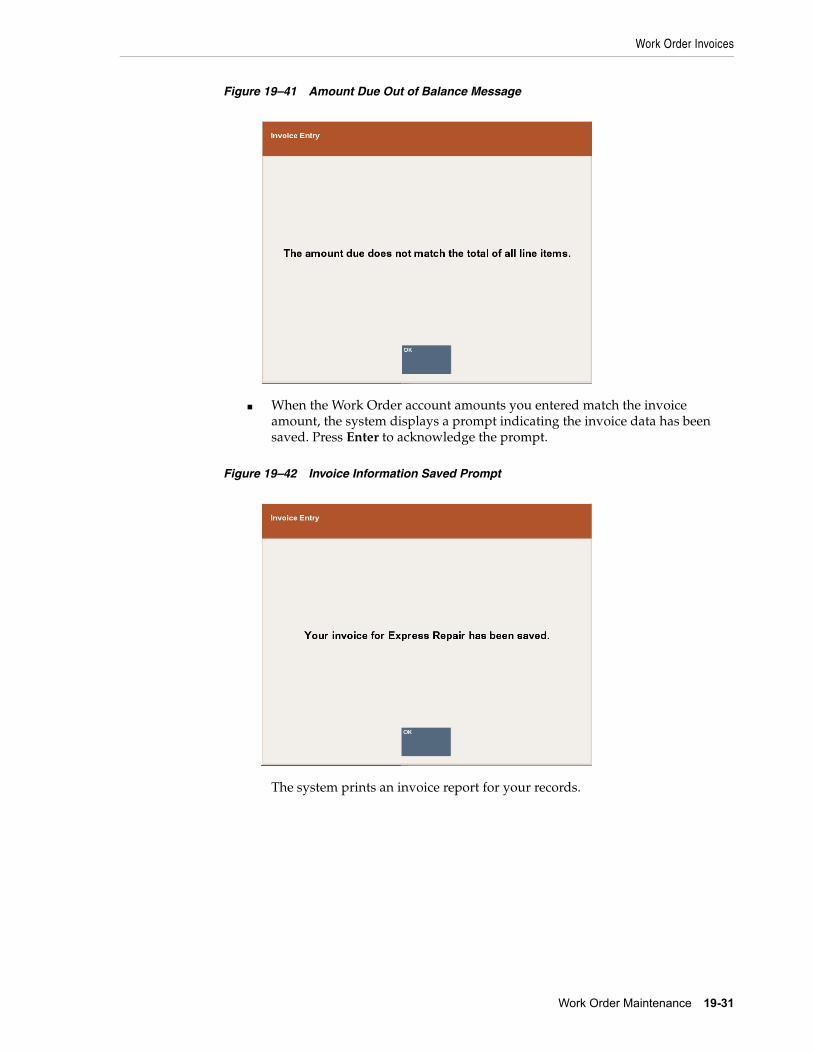
Work Order Invoices
Work Order Maintenance 19-31
Figure 19–41 Amount Due Out of Balance Message
■ When the Work Order account amounts you entered match the invoice amount, the system displays a prompt indicating the invoice data has been saved. Press Enter to acknowledge the prompt.
Figure 19–42 Invoice Information Saved Prompt
The system prints an invoice report for your records.

Work Order Invoices
19-32 Oracle® Retail Xstore Point-of-Service Manager's Guide
Viewing Work Order Invoice HistoryUse this function to view information about completed Work Order invoices.
1. To view Work Order invoice history, select the Work Order Invoice History option from the Work Order Options menu.
Figure 19–43 Work Order Options Menu - Work Order Invoice History Option
2. The system prompts for the invoicing location. Enter the search criteria to find the location and select Process to continue.
Figure 19–44 Invoicing Location Search Form
Tip: To see a list of all service locations, leave the fields blank and press Enter.
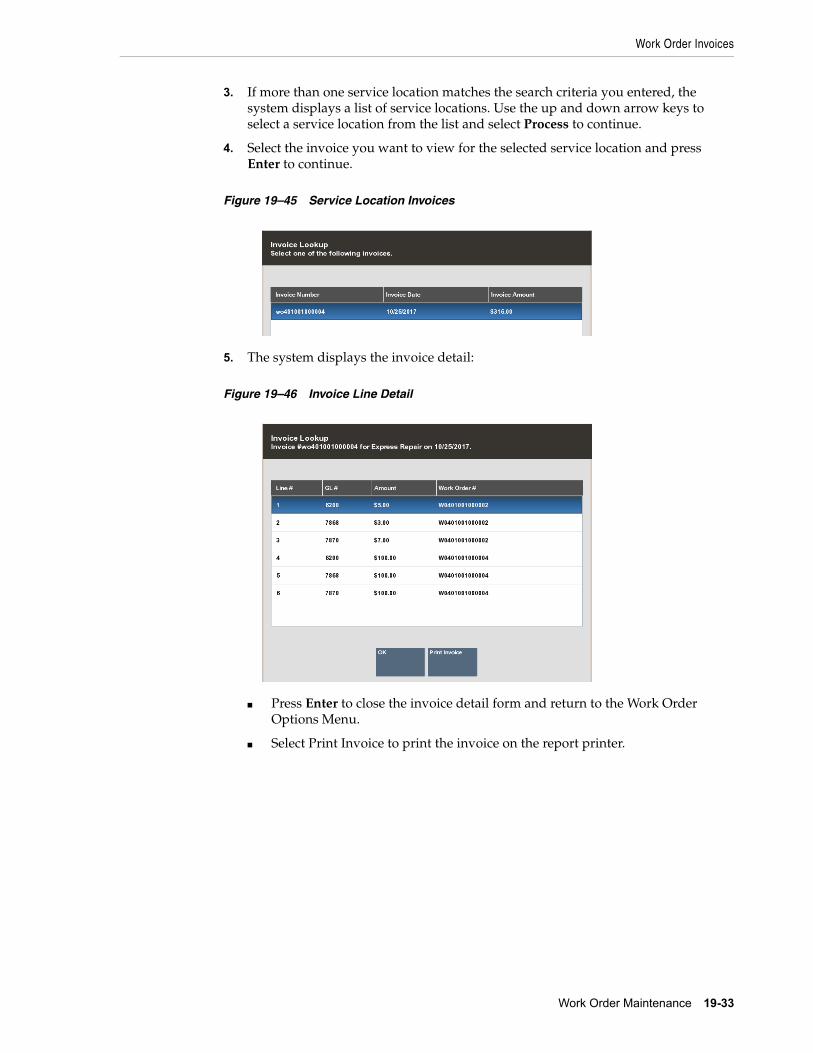
Work Order Invoices
Work Order Maintenance 19-33
3. If more than one service location matches the search criteria you entered, the system displays a list of service locations. Use the up and down arrow keys to select a service location from the list and select Process to continue.
4. Select the invoice you want to view for the selected service location and press Enter to continue.
Figure 19–45 Service Location Invoices
5. The system displays the invoice detail:
Figure 19–46 Invoice Line Detail
■ Press Enter to close the invoice detail form and return to the Work Order Options Menu.
■ Select Print Invoice to print the invoice on the report printer.
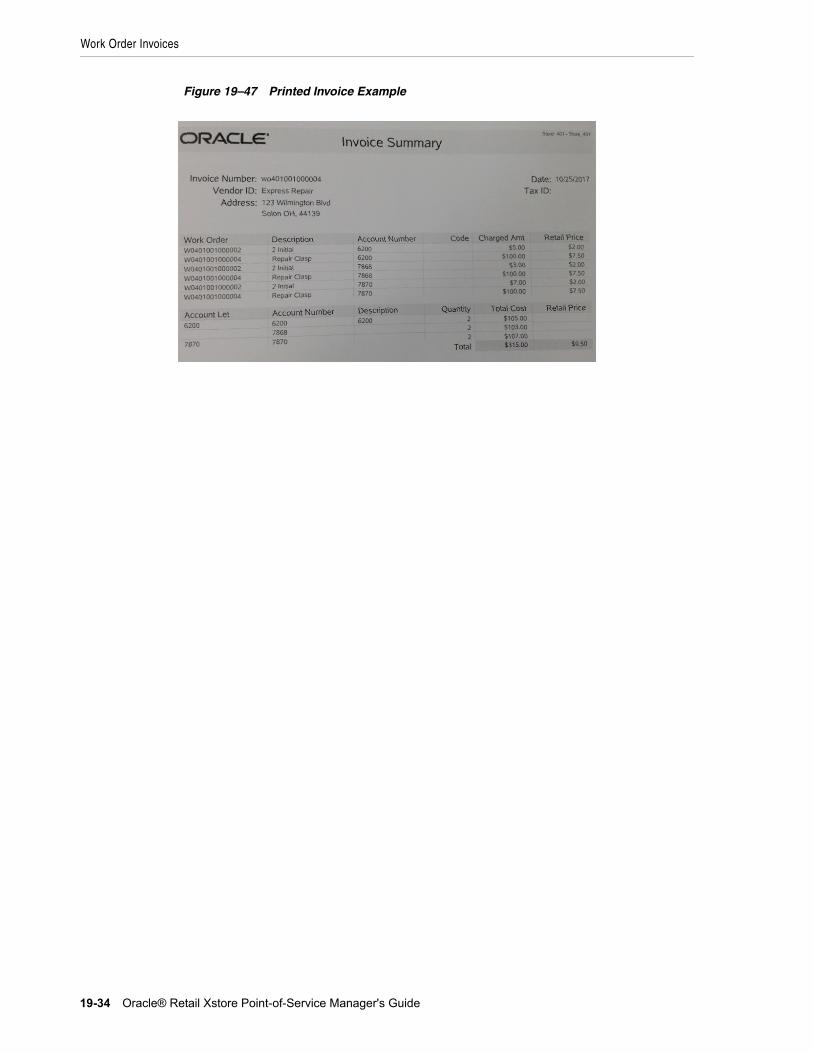
Work Order Invoices
19-34 Oracle® Retail Xstore Point-of-Service Manager's Guide
Figure 19–47 Printed Invoice Example
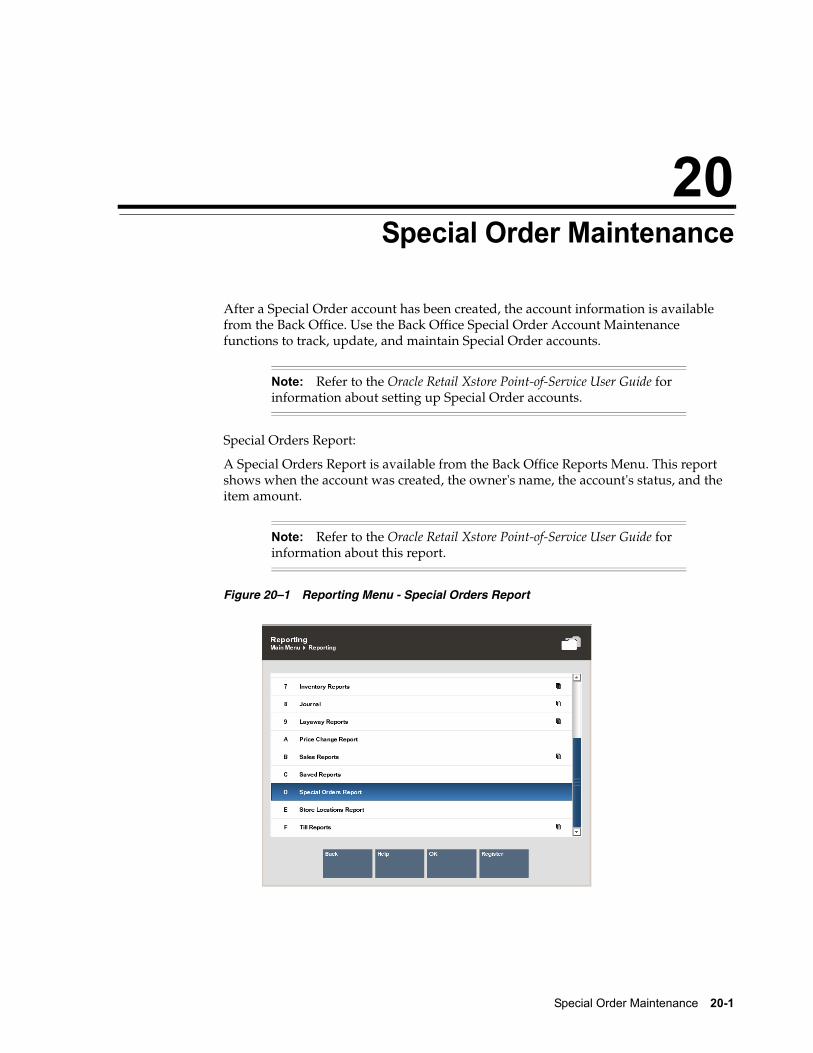
20
Special Order Maintenance 20-1
20Special Order Maintenance
[4] After a Special Order account has been created, the account information is available from the Back Office. Use the Back Office Special Order Account Maintenance functions to track, update, and maintain Special Order accounts.
Special Orders Report:
A Special Orders Report is available from the Back Office Reports Menu. This report shows when the account was created, the owner's name, the account's status, and the item amount.
Figure 20–1 Reporting Menu - Special Orders Report
Note: Refer to the Oracle Retail Xstore Point-of-Service User Guide for information about setting up Special Order accounts.
Note: Refer to the Oracle Retail Xstore Point-of-Service User Guide for information about this report.
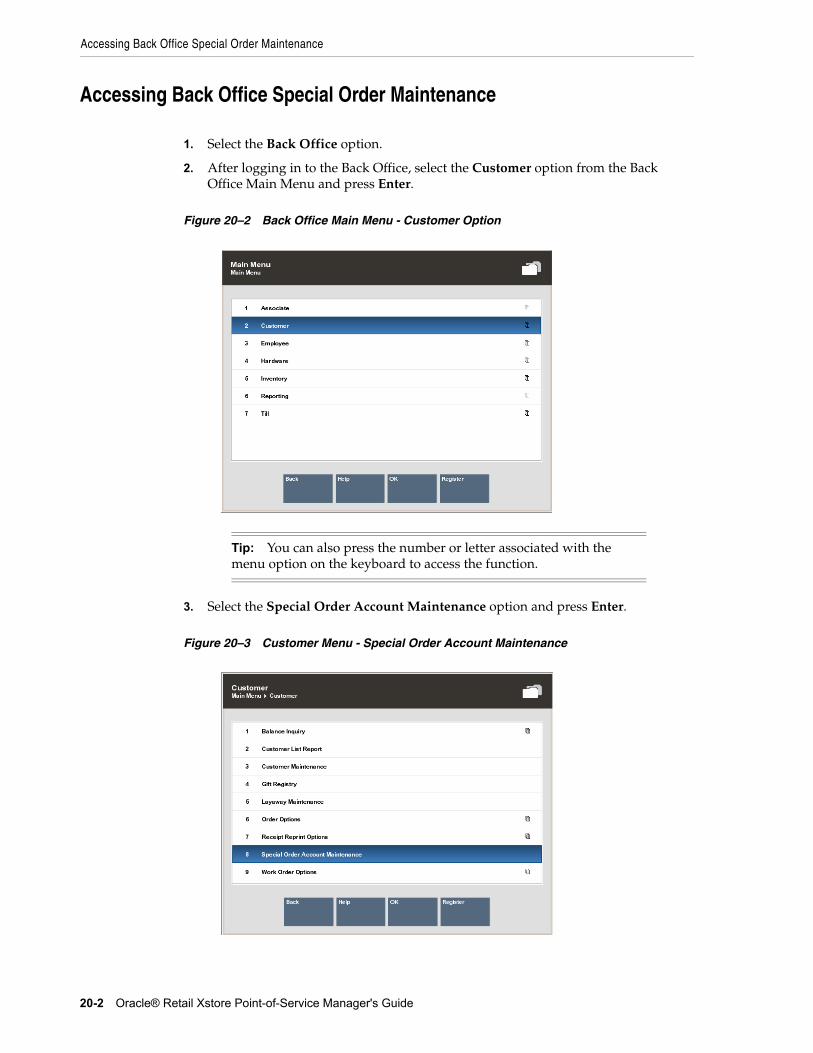
Accessing Back Office Special Order Maintenance
20-2 Oracle® Retail Xstore Point-of-Service Manager's Guide
Accessing Back Office Special Order Maintenance
1. Select the Back Office option.
2. After logging in to the Back Office, select the Customer option from the Back Office Main Menu and press Enter.
Figure 20–2 Back Office Main Menu - Customer Option
3. Select the Special Order Account Maintenance option and press Enter.
Figure 20–3 Customer Menu - Special Order Account Maintenance
Tip: You can also press the number or letter associated with the menu option on the keyboard to access the function.
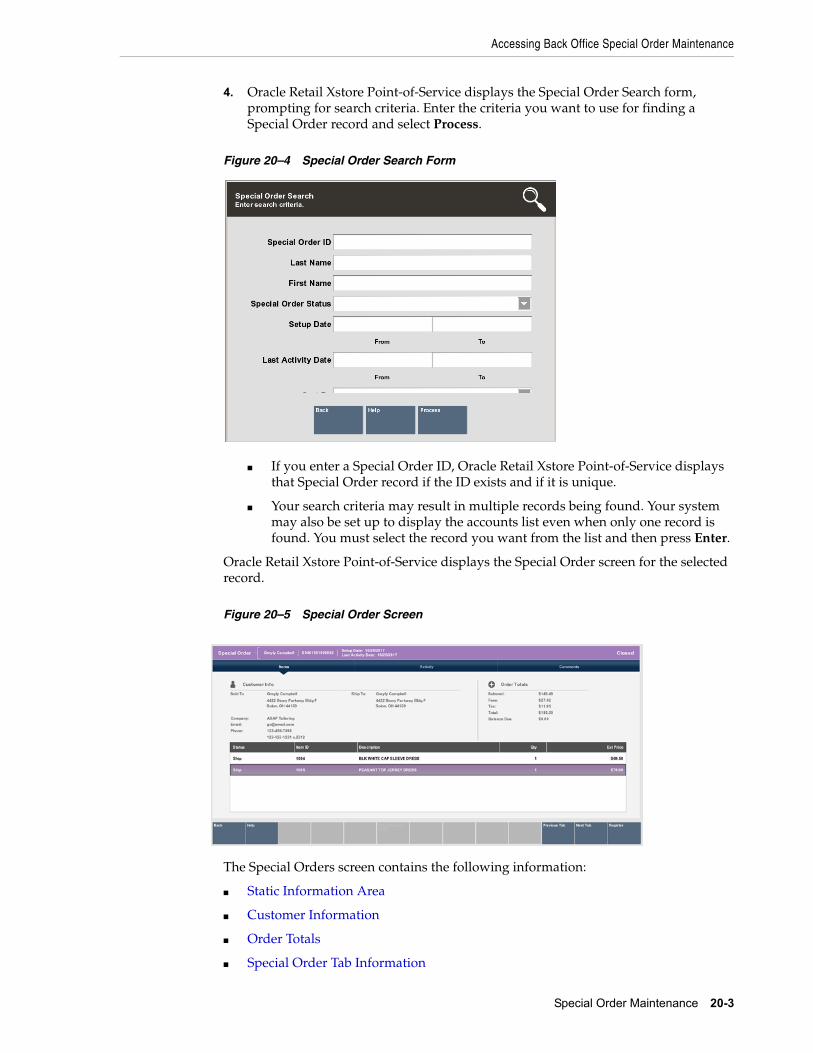
Accessing Back Office Special Order Maintenance
Special Order Maintenance 20-3
4. Oracle Retail Xstore Point-of-Service displays the Special Order Search form, prompting for search criteria. Enter the criteria you want to use for finding a Special Order record and select Process.
Figure 20–4 Special Order Search Form
■ If you enter a Special Order ID, Oracle Retail Xstore Point-of-Service displays that Special Order record if the ID exists and if it is unique.
■ Your search criteria may result in multiple records being found. Your system may also be set up to display the accounts list even when only one record is found. You must select the record you want from the list and then press Enter.
Oracle Retail Xstore Point-of-Service displays the Special Order screen for the selected record.
Figure 20–5 Special Order Screen
The Special Orders screen contains the following information:
■ Static Information Area
■ Customer Information
■ Order Totals
■ Special Order Tab Information
Accessing Back Office Special Order Maintenance
20-4 Oracle® Retail Xstore Point-of-Service Manager's Guide
Static Information AreaThe upper portion of the screen shows the summary information for the Special Order account, including its status and customer contact information. This panel is always displayed when viewing any of the tabs on this screen.
Customer InformationThe customer information area displays:
■ Sold To - The purchasing customer's name and address information.
■ Company - The purchasing customer's company, if applicable.
■ Email - The purchasing customer's email address.
■ Phone - The purchasing customer's telephone number(s).
■ Ship To - The name and address information to ship to.
Order TotalsThe order totals information displays:
■ Subtotal - The order subtotal (the shipping fee amount is not included in the subtotal).
■ Fees - Additional cost associated with the order.
■ Tax - The tax on the order.
■ Total - The total for the order (the shipping fee amount is included in the total).
■ Balance Due - The amount due for the order.
Special Order Tab InformationDetailed Special Order information is presented on three tabs; Items, Activity, and Comments. You can navigate between the tab sections by using the Previous Tab and Next Tab menu options. Each tab contains specific information about the customer's Special Order account.
■ Items Tab: Shows the item information for the Special Order account.
■ Activity Tab: Shows the activity information for the Special Order account.
■ Comments Tab: Shows any comments associated with the Special Order account.
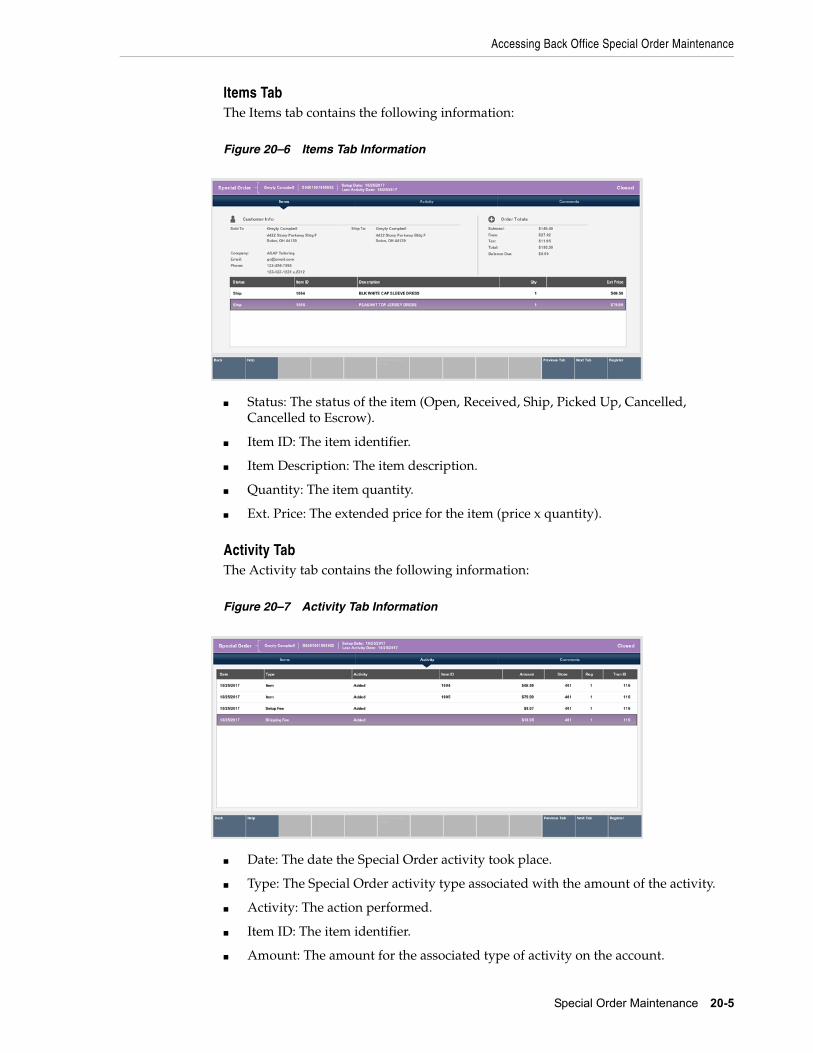
Accessing Back Office Special Order Maintenance
Special Order Maintenance 20-5
Items Tab The Items tab contains the following information:
Figure 20–6 Items Tab Information
■ Status: The status of the item (Open, Received, Ship, Picked Up, Cancelled, Cancelled to Escrow).
■ Item ID: The item identifier.
■ Item Description: The item description.
■ Quantity: The item quantity.
■ Ext. Price: The extended price for the item (price x quantity).
Activity Tab The Activity tab contains the following information:
Figure 20–7 Activity Tab Information
■ Date: The date the Special Order activity took place.
■ Type: The Special Order activity type associated with the amount of the activity.
■ Activity: The action performed.
■ Item ID: The item identifier.
■ Amount: The amount for the associated type of activity on the account.
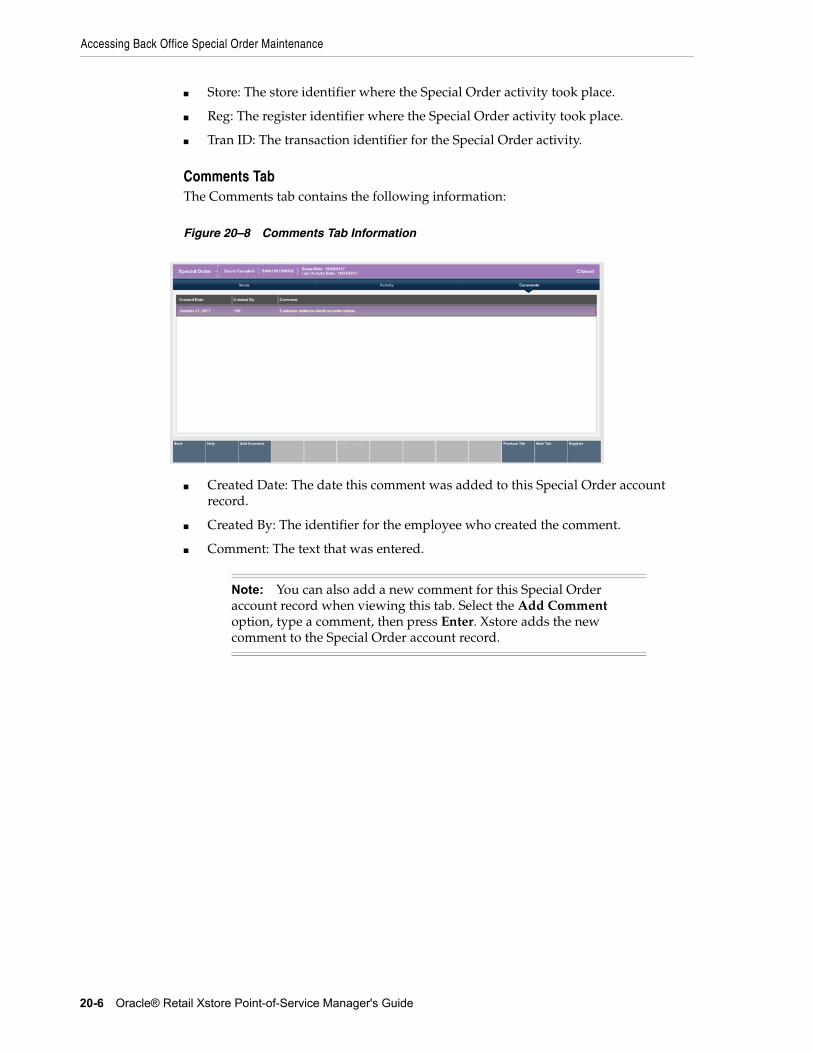
Accessing Back Office Special Order Maintenance
20-6 Oracle® Retail Xstore Point-of-Service Manager's Guide
■ Store: The store identifier where the Special Order activity took place.
■ Reg: The register identifier where the Special Order activity took place.
■ Tran ID: The transaction identifier for the Special Order activity.
Comments Tab The Comments tab contains the following information:
Figure 20–8 Comments Tab Information
■ Created Date: The date this comment was added to this Special Order account record.
■ Created By: The identifier for the employee who created the comment.
■ Comment: The text that was entered.
Note: You can also add a new comment for this Special Order account record when viewing this tab. Select the Add Comment option, type a comment, then press Enter. Xstore adds the new comment to the Special Order account record.
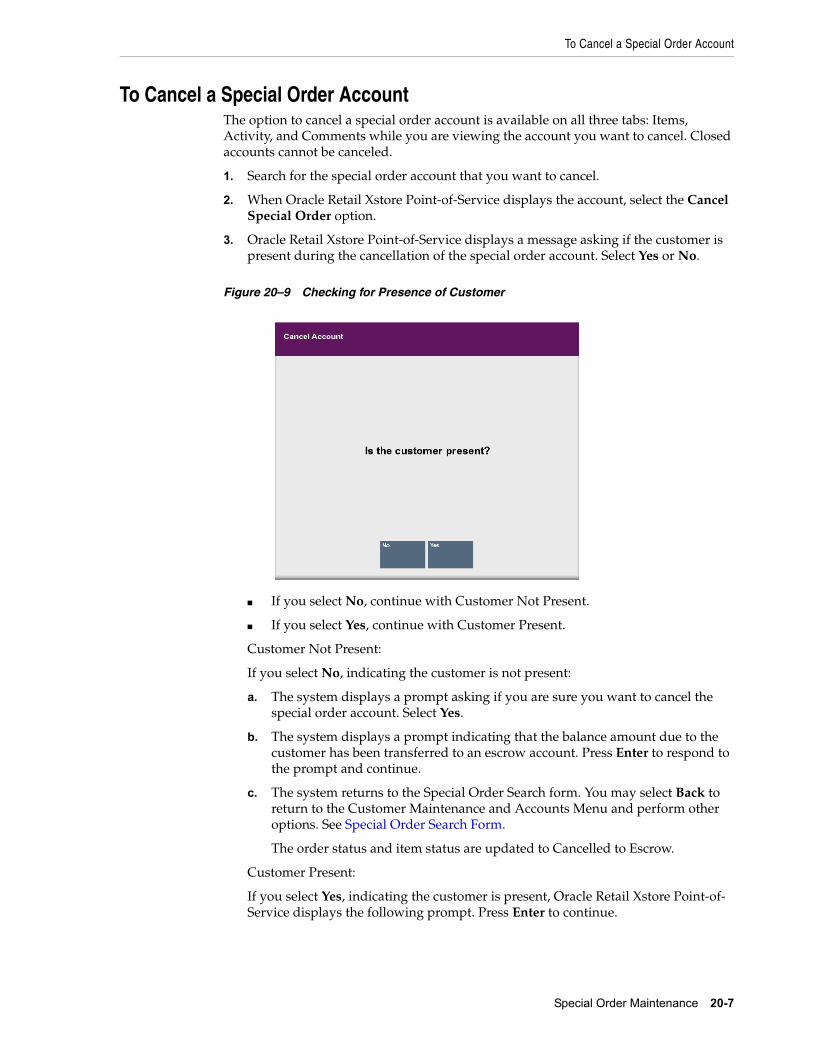
To Cancel a Special Order Account
Special Order Maintenance 20-7
To Cancel a Special Order AccountThe option to cancel a special order account is available on all three tabs: Items, Activity, and Comments while you are viewing the account you want to cancel. Closed accounts cannot be canceled.
1. Search for the special order account that you want to cancel.
2. When Oracle Retail Xstore Point-of-Service displays the account, select the Cancel Special Order option.
3. Oracle Retail Xstore Point-of-Service displays a message asking if the customer is present during the cancellation of the special order account. Select Yes or No.
Figure 20–9 Checking for Presence of Customer
■ If you select No, continue with Customer Not Present.
■ If you select Yes, continue with Customer Present.
Customer Not Present:
If you select No, indicating the customer is not present:
a. The system displays a prompt asking if you are sure you want to cancel the special order account. Select Yes.
b. The system displays a prompt indicating that the balance amount due to the customer has been transferred to an escrow account. Press Enter to respond to the prompt and continue.
c. The system returns to the Special Order Search form. You may select Back to return to the Customer Maintenance and Accounts Menu and perform other options. See Special Order Search Form.
The order status and item status are updated to Cancelled to Escrow.
Customer Present:
If you select Yes, indicating the customer is present, Oracle Retail Xstore Point-of- Service displays the following prompt. Press Enter to continue.
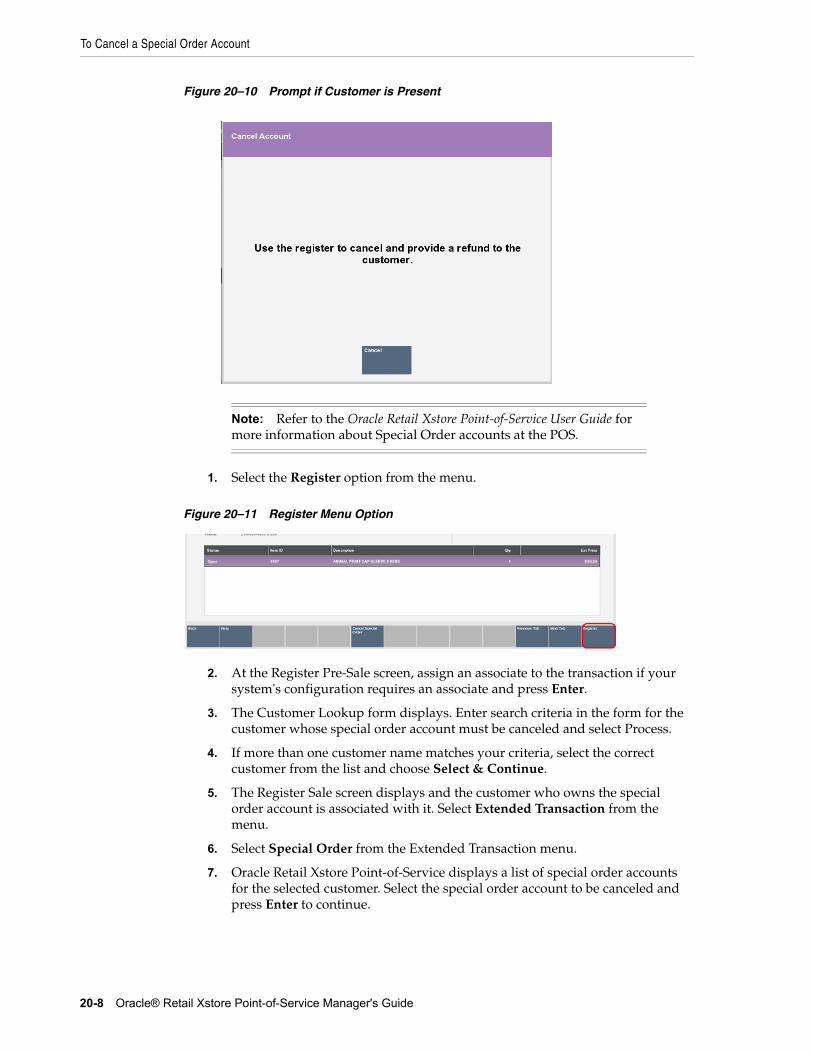
To Cancel a Special Order Account
20-8 Oracle® Retail Xstore Point-of-Service Manager's Guide
Figure 20–10 Prompt if Customer is Present
1. Select the Register option from the menu.
Figure 20–11 Register Menu Option
2. At the Register Pre-Sale screen, assign an associate to the transaction if your system's configuration requires an associate and press Enter.
3. The Customer Lookup form displays. Enter search criteria in the form for the customer whose special order account must be canceled and select Process.
4. If more than one customer name matches your criteria, select the correct customer from the list and choose Select & Continue.
5. The Register Sale screen displays and the customer who owns the special order account is associated with it. Select Extended Transaction from the menu.
6. Select Special Order from the Extended Transaction menu.
7. Oracle Retail Xstore Point-of-Service displays a list of special order accounts for the selected customer. Select the special order account to be canceled and press Enter to continue.
Note: Refer to the Oracle Retail Xstore Point-of-Service User Guide for more information about Special Order accounts at the POS.
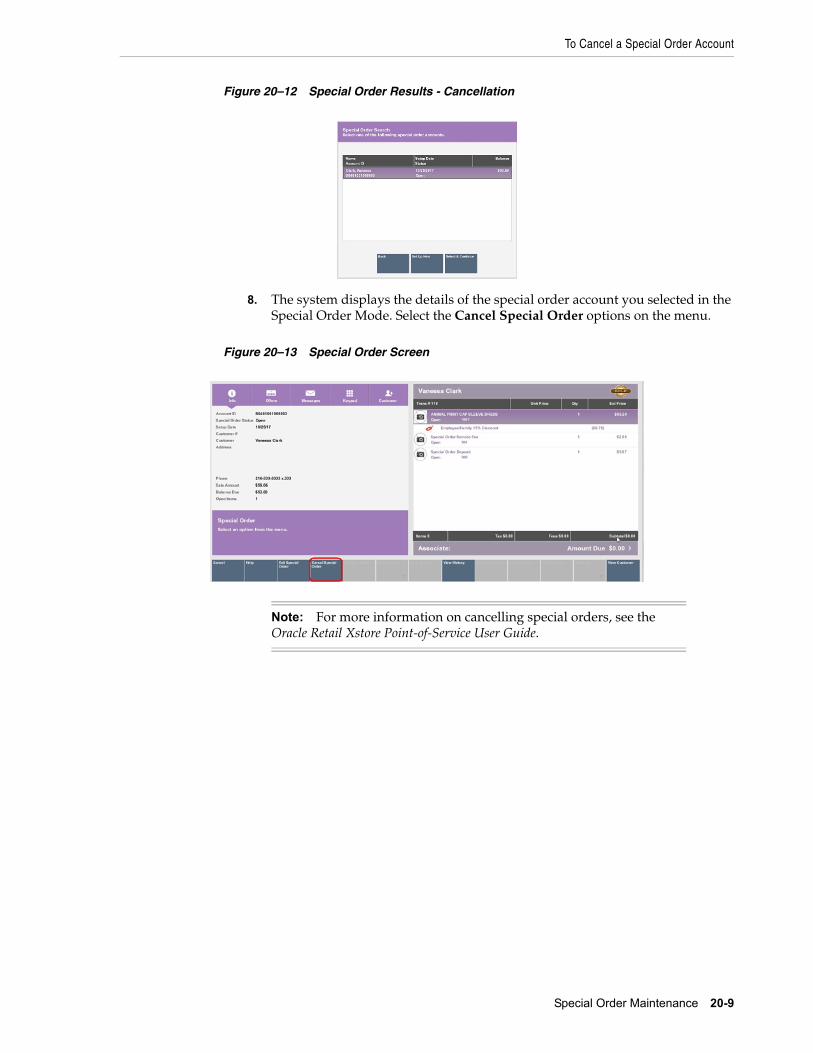
To Cancel a Special Order Account
Special Order Maintenance 20-9
Figure 20–12 Special Order Results - Cancellation
8. The system displays the details of the special order account you selected in the Special Order Mode. Select the Cancel Special Order options on the menu.
Figure 20–13 Special Order Screen
Note: For more information on cancelling special orders, see the Oracle Retail Xstore Point-of-Service User Guide.
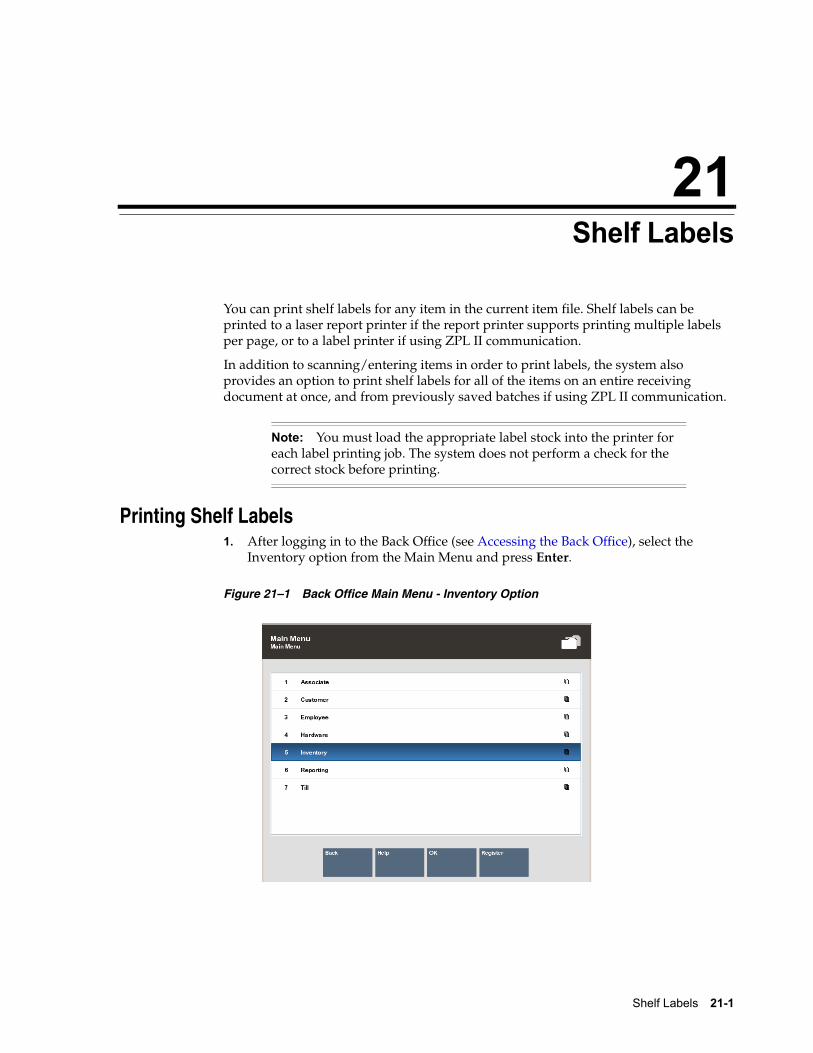
21
Shelf Labels 21-1
21Shelf Labels
[5] You can print shelf labels for any item in the current item file. Shelf labels can be printed to a laser report printer if the report printer supports printing multiple labels per page, or to a label printer if using ZPL II communication.
[6] In addition to scanning/entering items in order to print labels, the system also provides an option to print shelf labels for all of the items on an entire receiving document at once, and from previously saved batches if using ZPL II communication.
Printing Shelf Labels1. After logging in to the Back Office (see Accessing the Back Office), select the
Inventory option from the Main Menu and press Enter.
Figure 21–1 Back Office Main Menu - Inventory Option
Note: You must load the appropriate label stock into the printer for each label printing job. The system does not perform a check for the correct stock before printing.
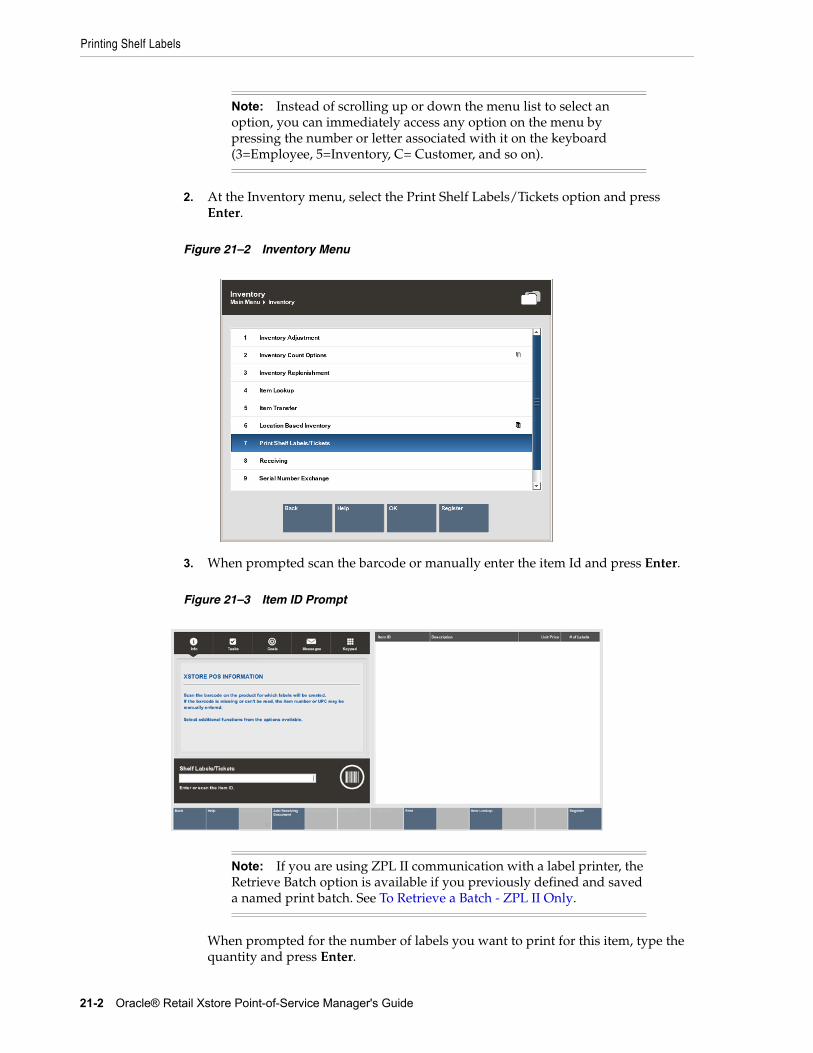
Printing Shelf Labels
21-2 Oracle® Retail Xstore Point-of-Service Manager's Guide
2. At the Inventory menu, select the Print Shelf Labels/Tickets option and press Enter.
Figure 21–2 Inventory Menu
3. When prompted scan the barcode or manually enter the item Id and press Enter.
Figure 21–3 Item ID Prompt
When prompted for the number of labels you want to print for this item, type the quantity and press Enter.
Note: Instead of scrolling up or down the menu list to select an option, you can immediately access any option on the menu by pressing the number or letter associated with it on the keyboard (3=Employee, 5=Inventory, C= Customer, and so on).
Note: If you are using ZPL II communication with a label printer, the Retrieve Batch option is available if you previously defined and saved a named print batch. See To Retrieve a Batch - ZPL II Only.
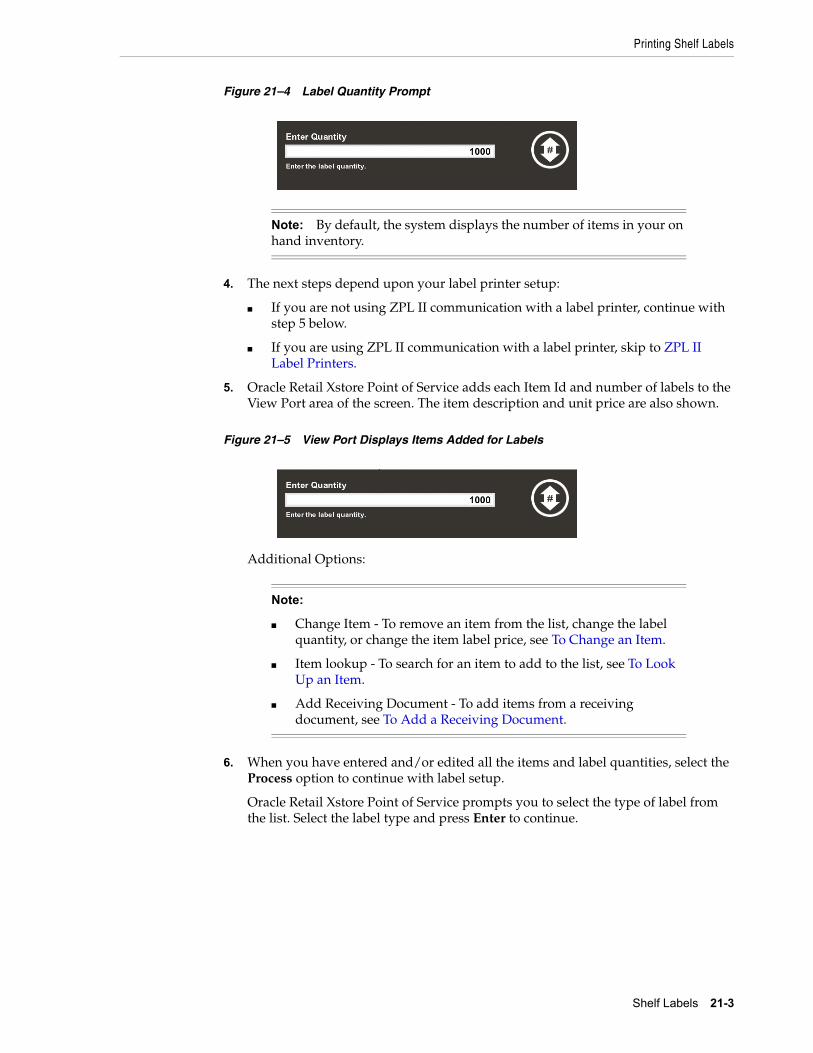
Printing Shelf Labels
Shelf Labels 21-3
Figure 21–4 Label Quantity Prompt
4. The next steps depend upon your label printer setup:
■ If you are not using ZPL II communication with a label printer, continue with step 5 below.
■ If you are using ZPL II communication with a label printer, skip to ZPL II Label Printers.
5. Oracle Retail Xstore Point of Service adds each Item Id and number of labels to the View Port area of the screen. The item description and unit price are also shown.
Figure 21–5 View Port Displays Items Added for Labels
Additional Options:
6. When you have entered and/or edited all the items and label quantities, select the Process option to continue with label setup.
Oracle Retail Xstore Point of Service prompts you to select the type of label from the list. Select the label type and press Enter to continue.
Note: By default, the system displays the number of items in your on hand inventory.
Note:
■ Change Item - To remove an item from the list, change the label quantity, or change the item label price, see To Change an Item.
■ Item lookup - To search for an item to add to the list, see To Look Up an Item.
■ Add Receiving Document - To add items from a receiving document, see To Add a Receiving Document.
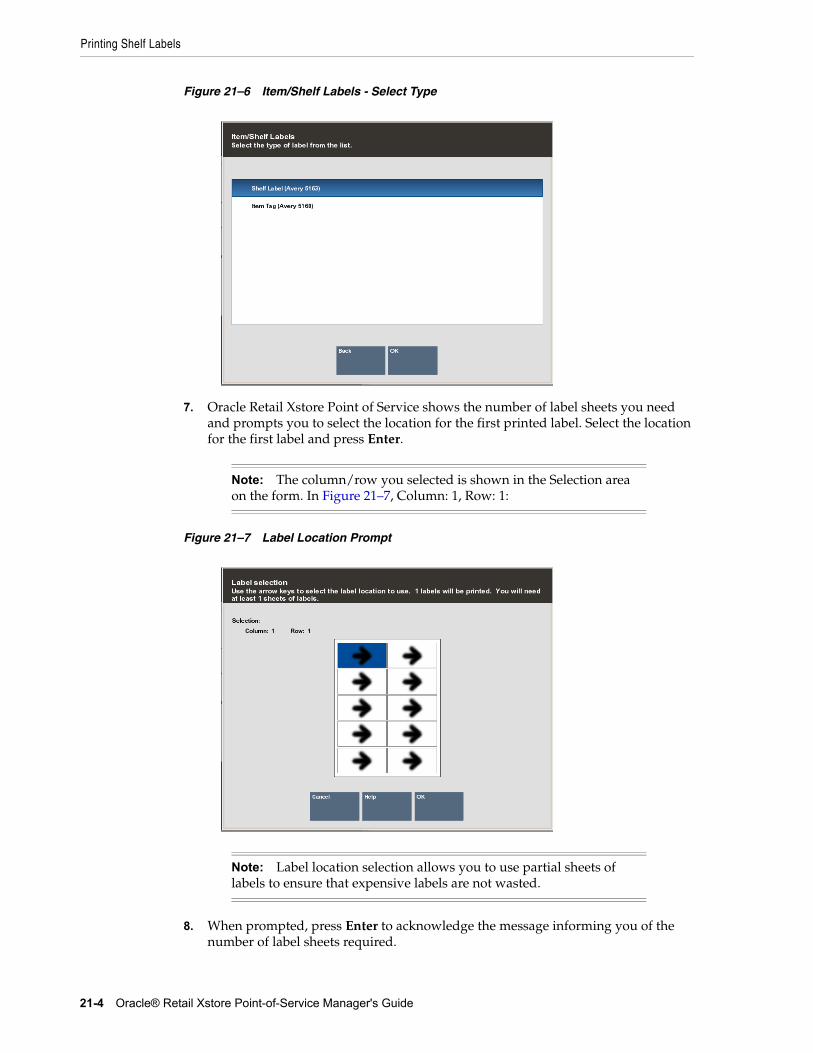
Printing Shelf Labels
21-4 Oracle® Retail Xstore Point-of-Service Manager's Guide
Figure 21–6 Item/Shelf Labels - Select Type
7. Oracle Retail Xstore Point of Service shows the number of label sheets you need and prompts you to select the location for the first printed label. Select the location for the first label and press Enter.
Figure 21–7 Label Location Prompt
8. When prompted, press Enter to acknowledge the message informing you of the number of label sheets required.
Note: The column/row you selected is shown in the Selection area on the form. In Figure 21–7, Column: 1, Row: 1:
Note: Label location selection allows you to use partial sheets of labels to ensure that expensive labels are not wasted.
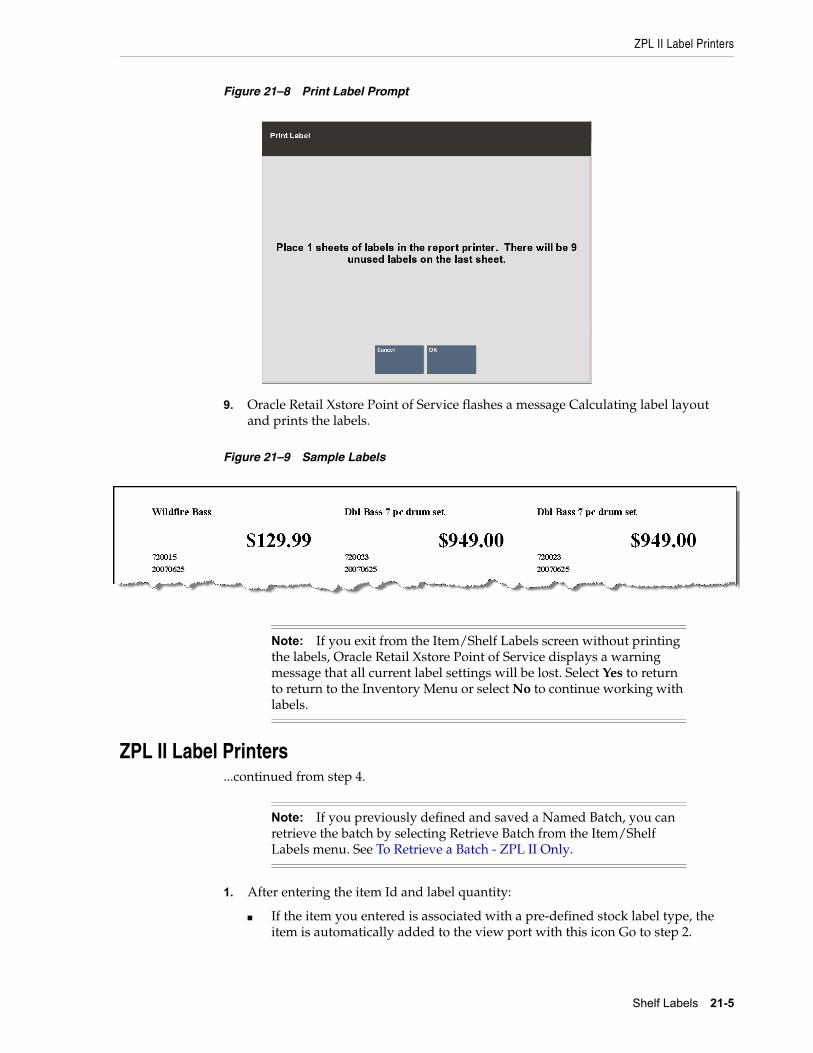
ZPL II Label Printers
Shelf Labels 21-5
Figure 21–8 Print Label Prompt
9. Oracle Retail Xstore Point of Service flashes a message Calculating label layout and prints the labels.
Figure 21–9 Sample Labels
ZPL II Label Printers...continued from step 4.
1. After entering the item Id and label quantity:
■ If the item you entered is associated with a pre-defined stock label type, the item is automatically added to the view port with this icon Go to step 2.
Note: If you exit from the Item/Shelf Labels screen without printing the labels, Oracle Retail Xstore Point of Service displays a warning message that all current label settings will be lost. Select Yes to return to return to the Inventory Menu or select No to continue working with labels.
Note: If you previously defined and saved a Named Batch, you can retrieve the batch by selecting Retrieve Batch from the Item/Shelf Labels menu. See To Retrieve a Batch - ZPL II Only.
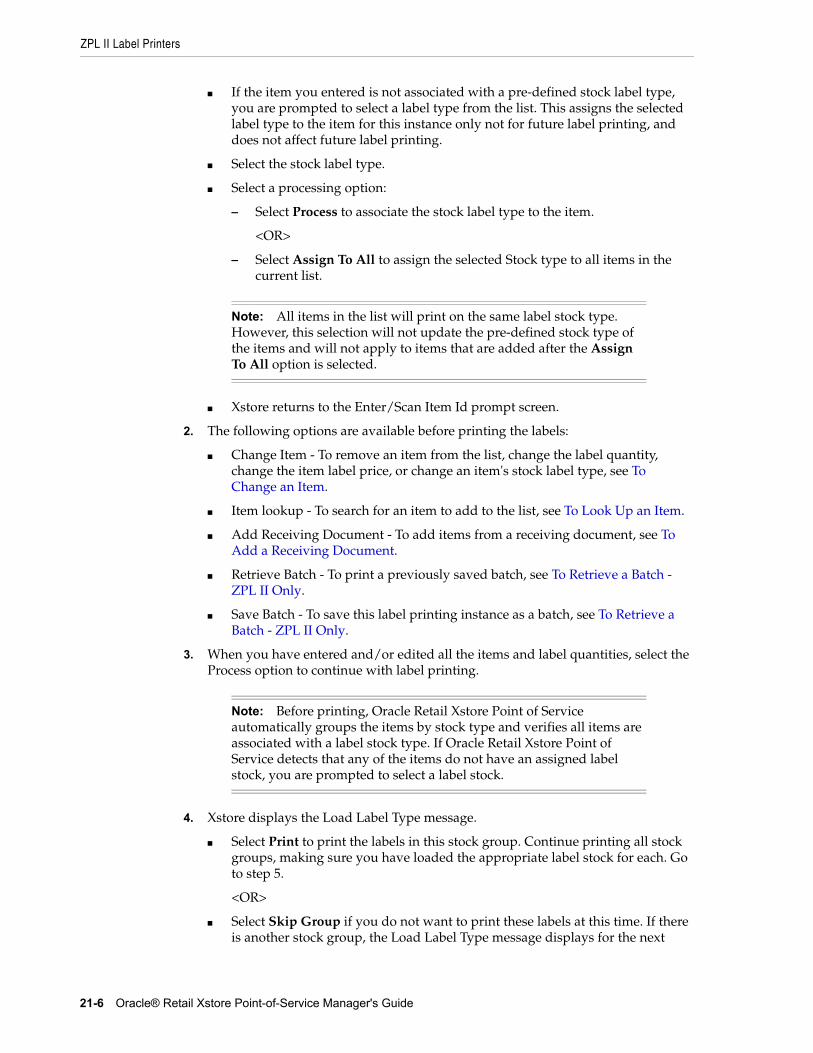
ZPL II Label Printers
21-6 Oracle® Retail Xstore Point-of-Service Manager's Guide
■ If the item you entered is not associated with a pre-defined stock label type, you are prompted to select a label type from the list. This assigns the selected label type to the item for this instance only not for future label printing, and does not affect future label printing.
■ Select the stock label type.
■ Select a processing option:
– Select Process to associate the stock label type to the item.
<OR>
– Select Assign To All to assign the selected Stock type to all items in the current list.
■ Xstore returns to the Enter/Scan Item Id prompt screen.
2. The following options are available before printing the labels:
■ Change Item - To remove an item from the list, change the label quantity, change the item label price, or change an item's stock label type, see To Change an Item.
■ Item lookup - To search for an item to add to the list, see To Look Up an Item.
■ Add Receiving Document - To add items from a receiving document, see To Add a Receiving Document.
■ Retrieve Batch - To print a previously saved batch, see To Retrieve a Batch - ZPL II Only.
■ Save Batch - To save this label printing instance as a batch, see To Retrieve a Batch - ZPL II Only.
3. When you have entered and/or edited all the items and label quantities, select the Process option to continue with label printing.
4. Xstore displays the Load Label Type message.
■ Select Print to print the labels in this stock group. Continue printing all stock groups, making sure you have loaded the appropriate label stock for each. Go to step 5.
<OR>
■ Select Skip Group if you do not want to print these labels at this time. If there is another stock group, the Load Label Type message displays for the next
Note: All items in the list will print on the same label stock type. However, this selection will not update the pre-defined stock type of the items and will not apply to items that are added after the Assign To All option is selected.
Note: Before printing, Oracle Retail Xstore Point of Service automatically groups the items by stock type and verifies all items are associated with a label stock type. If Oracle Retail Xstore Point of Service detects that any of the items do not have an assigned label stock, you are prompted to select a label stock.
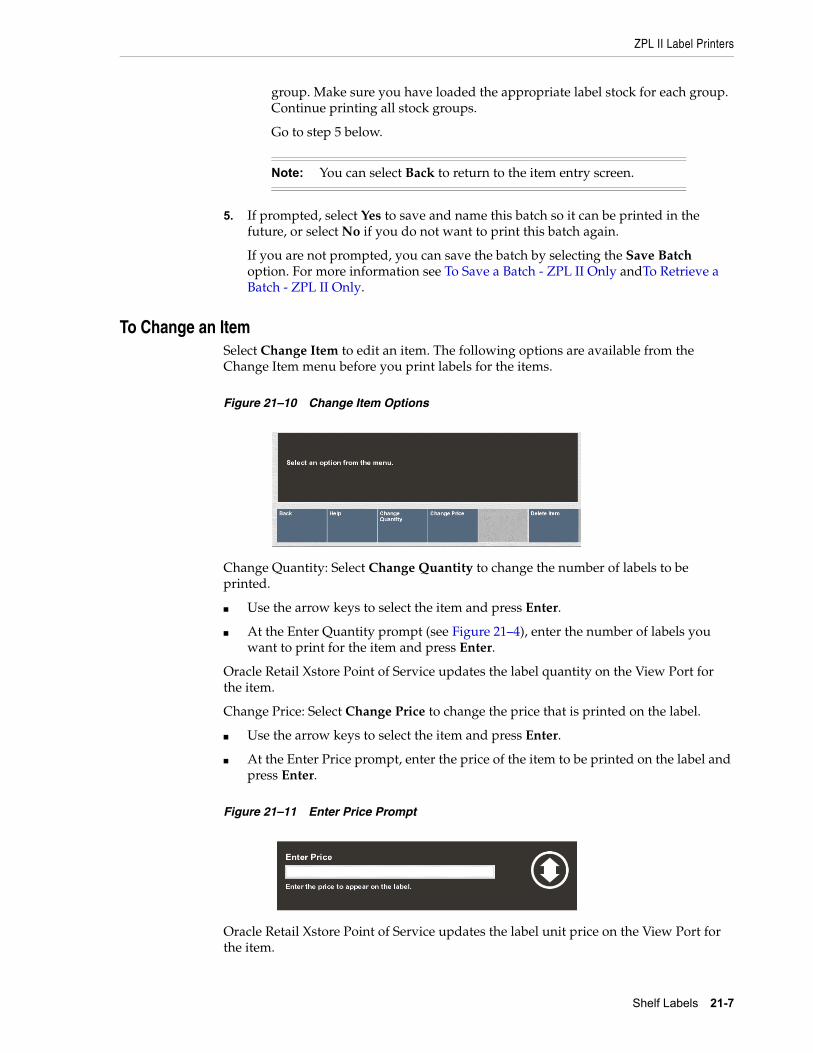
ZPL II Label Printers
Shelf Labels 21-7
group. Make sure you have loaded the appropriate label stock for each group. Continue printing all stock groups.
Go to step 5 below.
5. If prompted, select Yes to save and name this batch so it can be printed in the future, or select No if you do not want to print this batch again.
If you are not prompted, you can save the batch by selecting the Save Batch option. For more information see To Save a Batch - ZPL II Only andTo Retrieve a Batch - ZPL II Only.
To Change an ItemSelect Change Item to edit an item. The following options are available from the Change Item menu before you print labels for the items.
Figure 21–10 Change Item Options
Change Quantity: Select Change Quantity to change the number of labels to be printed.
■ Use the arrow keys to select the item and press Enter.
■ At the Enter Quantity prompt (see Figure 21–4), enter the number of labels you want to print for the item and press Enter.
Oracle Retail Xstore Point of Service updates the label quantity on the View Port for the item.
Change Price: Select Change Price to change the price that is printed on the label.
■ Use the arrow keys to select the item and press Enter.
■ At the Enter Price prompt, enter the price of the item to be printed on the label and press Enter.
Figure 21–11 Enter Price Prompt
Oracle Retail Xstore Point of Service updates the label unit price on the View Port for the item.
Note: You can select Back to return to the item entry screen.
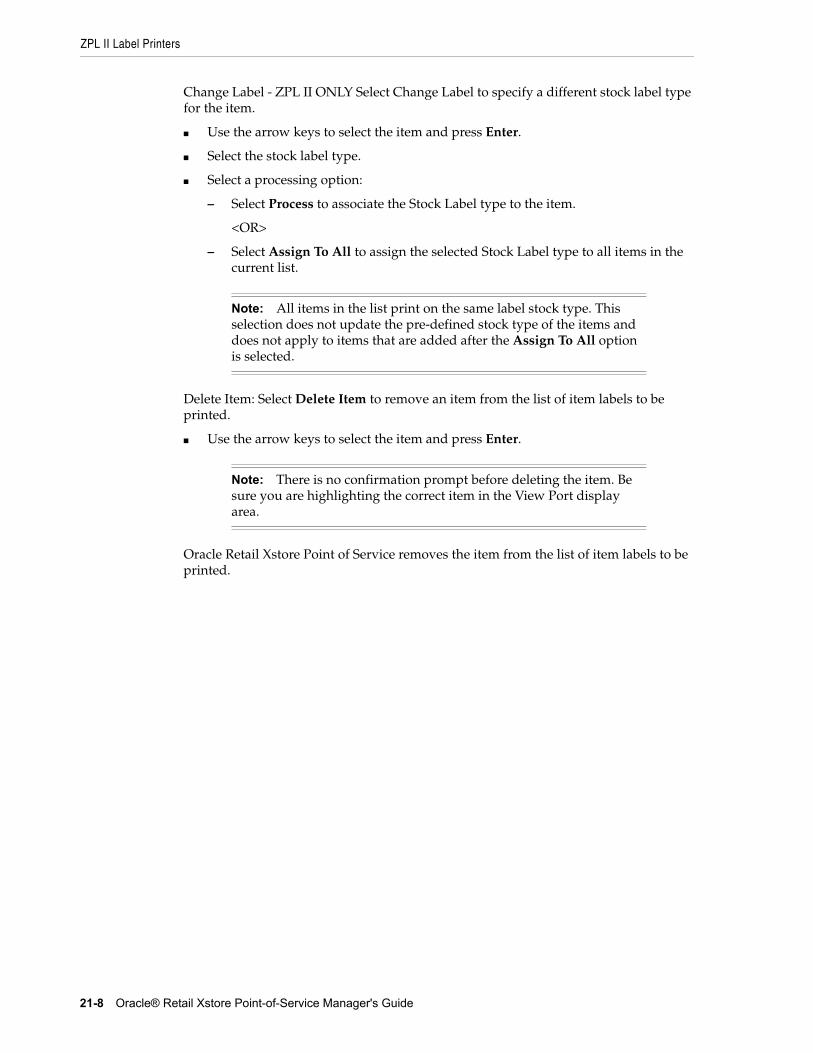
ZPL II Label Printers
21-8 Oracle® Retail Xstore Point-of-Service Manager's Guide
Change Label - ZPL II ONLY Select Change Label to specify a different stock label type for the item.
■ Use the arrow keys to select the item and press Enter.
■ Select the stock label type.
■ Select a processing option:
– Select Process to associate the Stock Label type to the item.
<OR>
– Select Assign To All to assign the selected Stock Label type to all items in the current list.
Delete Item: Select Delete Item to remove an item from the list of item labels to be printed.
■ Use the arrow keys to select the item and press Enter.
Oracle Retail Xstore Point of Service removes the item from the list of item labels to be printed.
Note: All items in the list print on the same label stock type. This selection does not update the pre-defined stock type of the items and does not apply to items that are added after the Assign To All option is selected.
Note: There is no confirmation prompt before deleting the item. Be sure you are highlighting the correct item in the View Port display area.
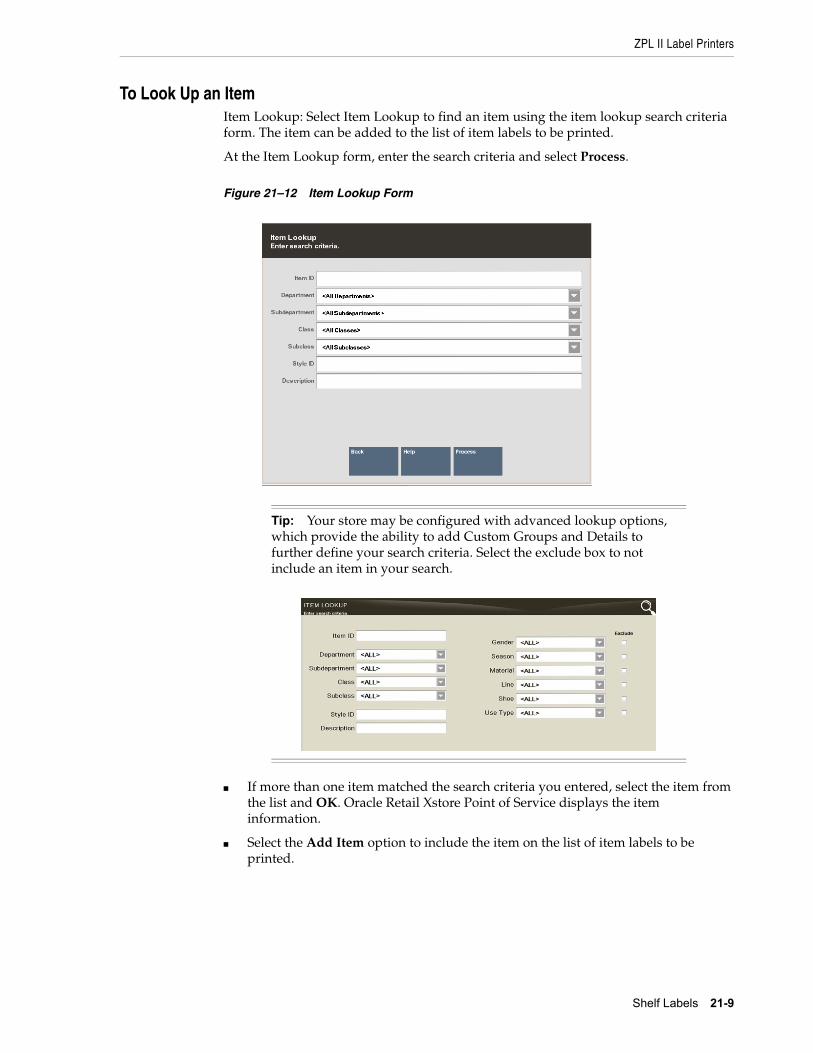
ZPL II Label Printers
Shelf Labels 21-9
To Look Up an ItemItem Lookup: Select Item Lookup to find an item using the item lookup search criteria form. The item can be added to the list of item labels to be printed.
At the Item Lookup form, enter the search criteria and select Process.
Figure 21–12 Item Lookup Form
■ If more than one item matched the search criteria you entered, select the item from the list and OK. Oracle Retail Xstore Point of Service displays the item information.
■ Select the Add Item option to include the item on the list of item labels to be printed.
Tip: Your store may be configured with advanced lookup options, which provide the ability to add Custom Groups and Details to further define your search criteria. Select the exclude box to not include an item in your search.
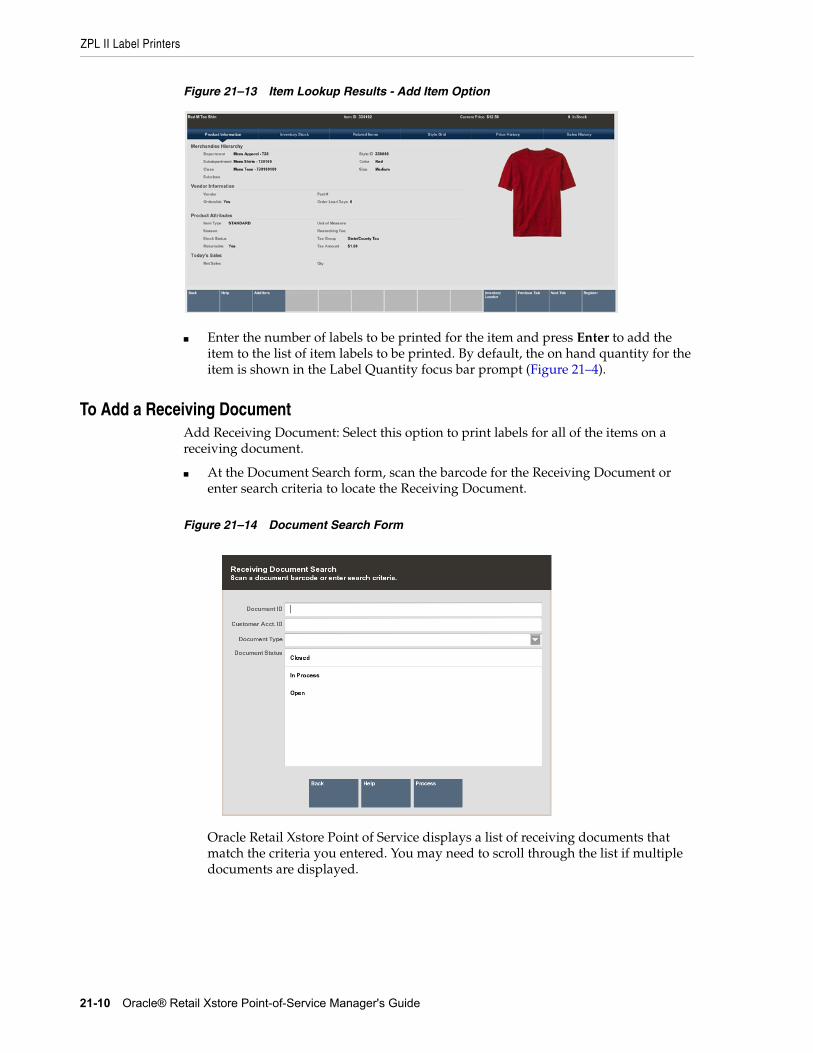
ZPL II Label Printers
21-10 Oracle® Retail Xstore Point-of-Service Manager's Guide
Figure 21–13 Item Lookup Results - Add Item Option
■ Enter the number of labels to be printed for the item and press Enter to add the item to the list of item labels to be printed. By default, the on hand quantity for the item is shown in the Label Quantity focus bar prompt (Figure 21–4).
To Add a Receiving DocumentAdd Receiving Document: Select this option to print labels for all of the items on a receiving document.
■ At the Document Search form, scan the barcode for the Receiving Document or enter search criteria to locate the Receiving Document.
Figure 21–14 Document Search Form
Oracle Retail Xstore Point of Service displays a list of receiving documents that match the criteria you entered. You may need to scroll through the list if multiple documents are displayed.
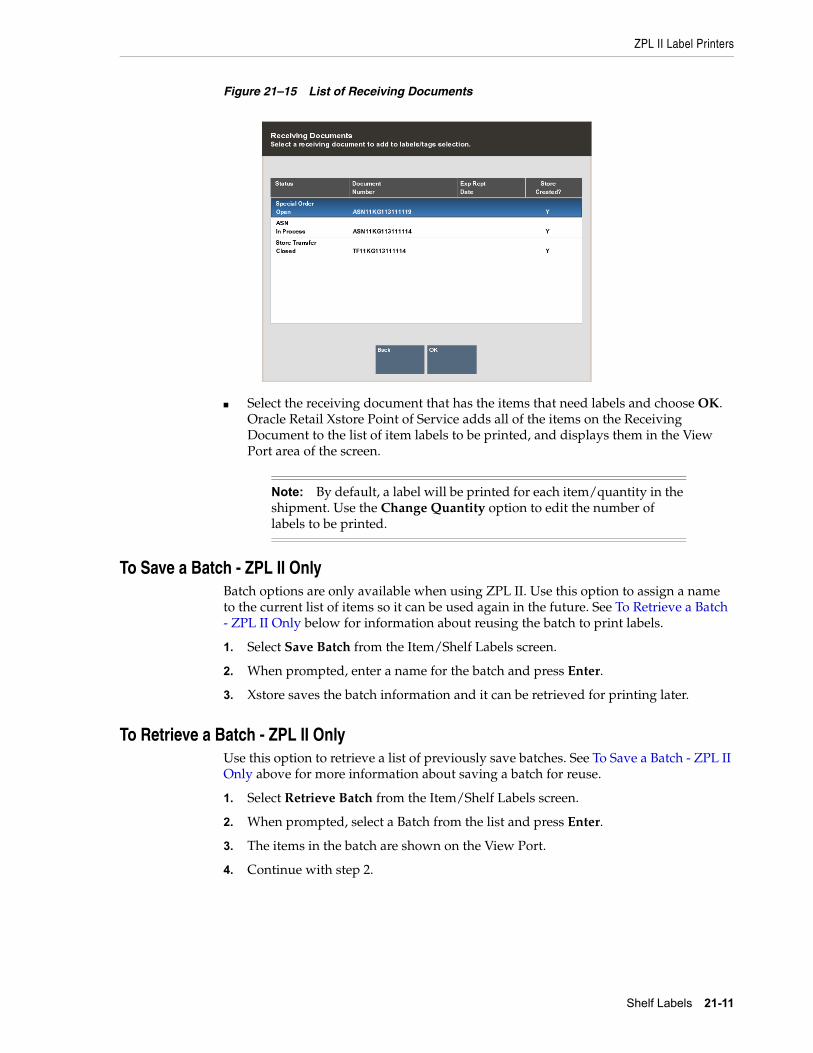
ZPL II Label Printers
Shelf Labels 21-11
Figure 21–15 List of Receiving Documents
■ Select the receiving document that has the items that need labels and choose OK. Oracle Retail Xstore Point of Service adds all of the items on the Receiving Document to the list of item labels to be printed, and displays them in the View Port area of the screen.
To Save a Batch - ZPL II OnlyBatch options are only available when using ZPL II. Use this option to assign a name to the current list of items so it can be used again in the future. See To Retrieve a Batch - ZPL II Only below for information about reusing the batch to print labels.
1. Select Save Batch from the Item/Shelf Labels screen.
2. When prompted, enter a name for the batch and press Enter.
3. Xstore saves the batch information and it can be retrieved for printing later.
To Retrieve a Batch - ZPL II OnlyUse this option to retrieve a list of previously save batches. See To Save a Batch - ZPL II Only above for more information about saving a batch for reuse.
1. Select Retrieve Batch from the Item/Shelf Labels screen.
2. When prompted, select a Batch from the list and press Enter.
3. The items in the batch are shown on the View Port.
4. Continue with step 2.
Note: By default, a label will be printed for each item/quantity in the shipment. Use the Change Quantity option to edit the number of labels to be printed.
ZPL II Label Printers
21-12 Oracle® Retail Xstore Point-of-Service Manager's Guide
To Delete a Batch - ZPL II OnlyUse this option to delete a previously saved batch.
1. Select Retrieve Batch from the Item/Shelf Labels screen.
2. When prompted, select a Batch from the saved Batch List and select Delete Batch.
3. At the confirmation prompt, select Yes to delete the batch. Selecting No returns to the saved Batch List and the selected batch is not deleted.
4. Xstore returns to the Saved Batch list and the selected batch is removed from the list.
22
Training Mode 22-1
22Training Mode
Training Mode allows you to train new employees on the system-at both the POS Register and in the Back Office-without being concerned that any live data may be impacted.
In Training Mode, store employees can simulate most of the functions provided by Oracle Retail Xstore Point of Service in normal operating mode. Any transactions performed in Training Mode are distinguished from transactions conducted in operating mode in several ways. First, the data elements associated with live and training transactions are separated from each other. In addition, any artifacts related to them, such as receipts, reports, and so on, are also kept separately.
Your system's configuration applies to both the live and training modes. For example, if you are using Till Accountability in the live mode, the rules for Till Accountability also apply in training mode. Even though a till may be attached to the register in live mode, the first time that you log into the training mode you must assign a till to an employee and attach a till to the register from the Back Office.
You can exit training mode at any time and return to live operating mode.
Accessing Training Mode
Starting Training Mode1. To log in to Training Mode from the Back Office:
■ Log in to the Back Office using your employee ID and password.
■ Select the Enter Training Mode option at the Employee Menu.
Tip: Training Mode can be accessed from both the Register Login screen and the Back Office Login screen.
You can log into the training mode using the same password that you use in the live, production mode. In Training Mode, Oracle Retail Xstore Point of Service shows only the functions and menu options that are permitted by your security level in production mode.
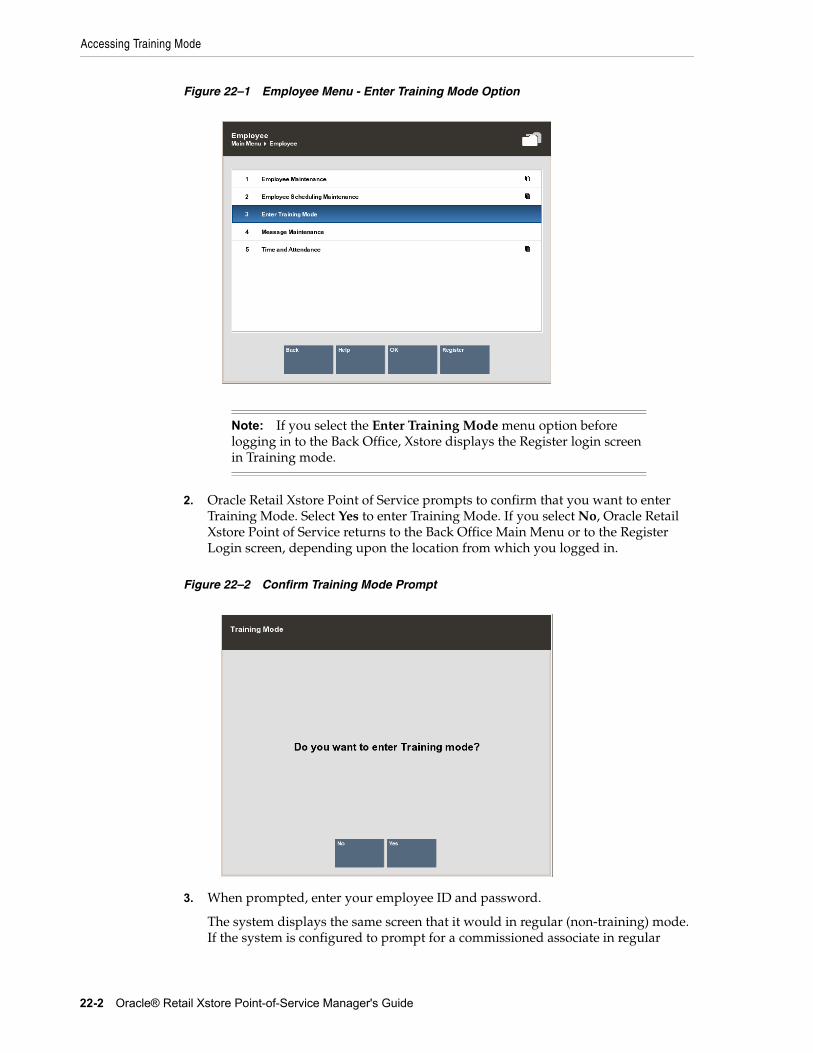
Accessing Training Mode
22-2 Oracle® Retail Xstore Point-of-Service Manager's Guide
Figure 22–1 Employee Menu - Enter Training Mode Option
2. Oracle Retail Xstore Point of Service prompts to confirm that you want to enter Training Mode. Select Yes to enter Training Mode. If you select No, Oracle Retail Xstore Point of Service returns to the Back Office Main Menu or to the Register Login screen, depending upon the location from which you logged in.
Figure 22–2 Confirm Training Mode Prompt
3. When prompted, enter your employee ID and password.
The system displays the same screen that it would in regular (non-training) mode. If the system is configured to prompt for a commissioned associate in regular
Note: If you select the Enter Training Mode menu option before logging in to the Back Office, Xstore displays the Register login screen in Training mode.
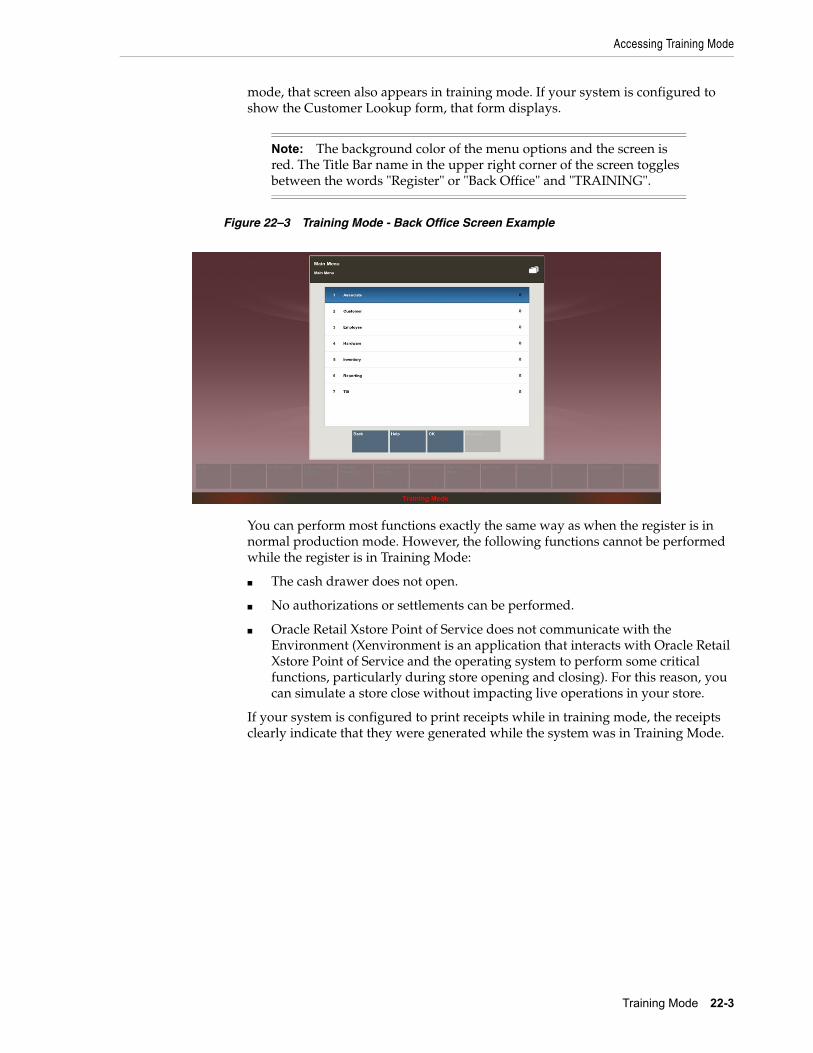
Accessing Training Mode
Training Mode 22-3
mode, that screen also appears in training mode. If your system is configured to show the Customer Lookup form, that form displays.
Figure 22–3 Training Mode - Back Office Screen Example
You can perform most functions exactly the same way as when the register is in normal production mode. However, the following functions cannot be performed while the register is in Training Mode:
■ The cash drawer does not open.
■ No authorizations or settlements can be performed.
■ Oracle Retail Xstore Point of Service does not communicate with the Environment (Xenvironment is an application that interacts with Oracle Retail Xstore Point of Service and the operating system to perform some critical functions, particularly during store opening and closing). For this reason, you can simulate a store close without impacting live operations in your store.
If your system is configured to print receipts while in training mode, the receipts clearly indicate that they were generated while the system was in Training Mode.
Note: The background color of the menu options and the screen is red. The Title Bar name in the upper right corner of the screen toggles between the words "Register" or "Back Office" and "TRAINING".
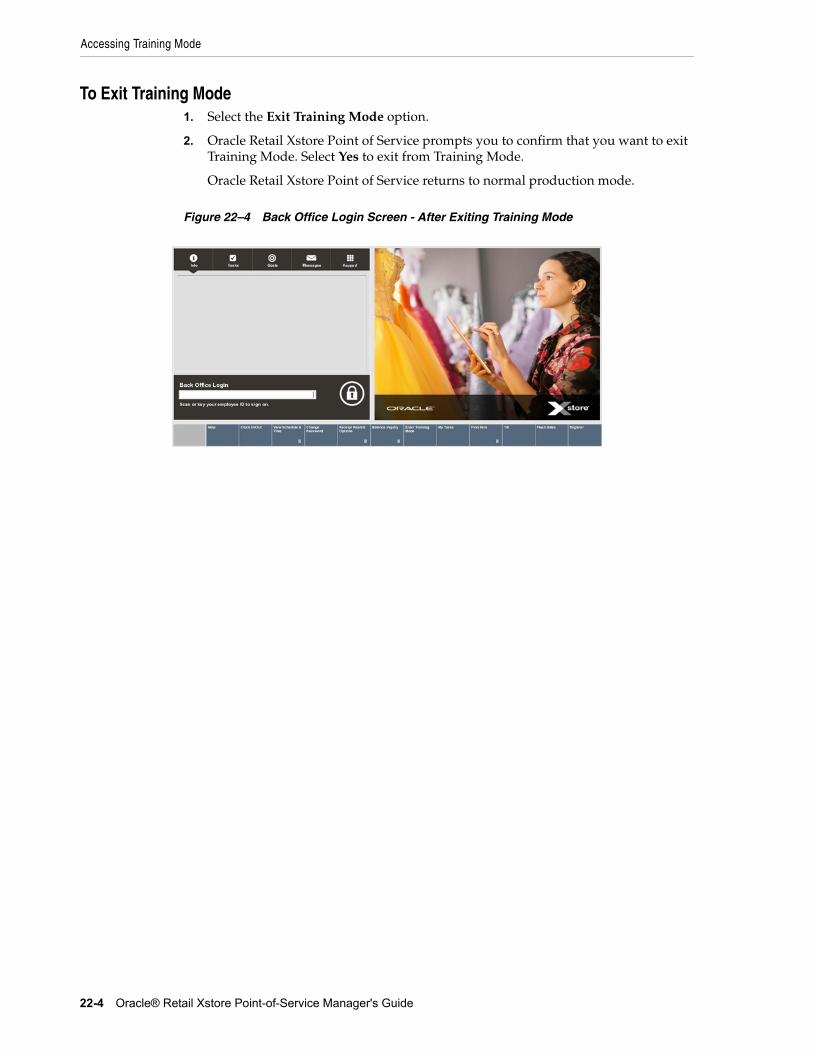
Accessing Training Mode
22-4 Oracle® Retail Xstore Point-of-Service Manager's Guide
To Exit Training Mode1. Select the Exit Training Mode option.
2. Oracle Retail Xstore Point of Service prompts you to confirm that you want to exit Training Mode. Select Yes to exit from Training Mode.
Oracle Retail Xstore Point of Service returns to normal production mode.
Figure 22–4 Back Office Login Screen - After Exiting Training Mode
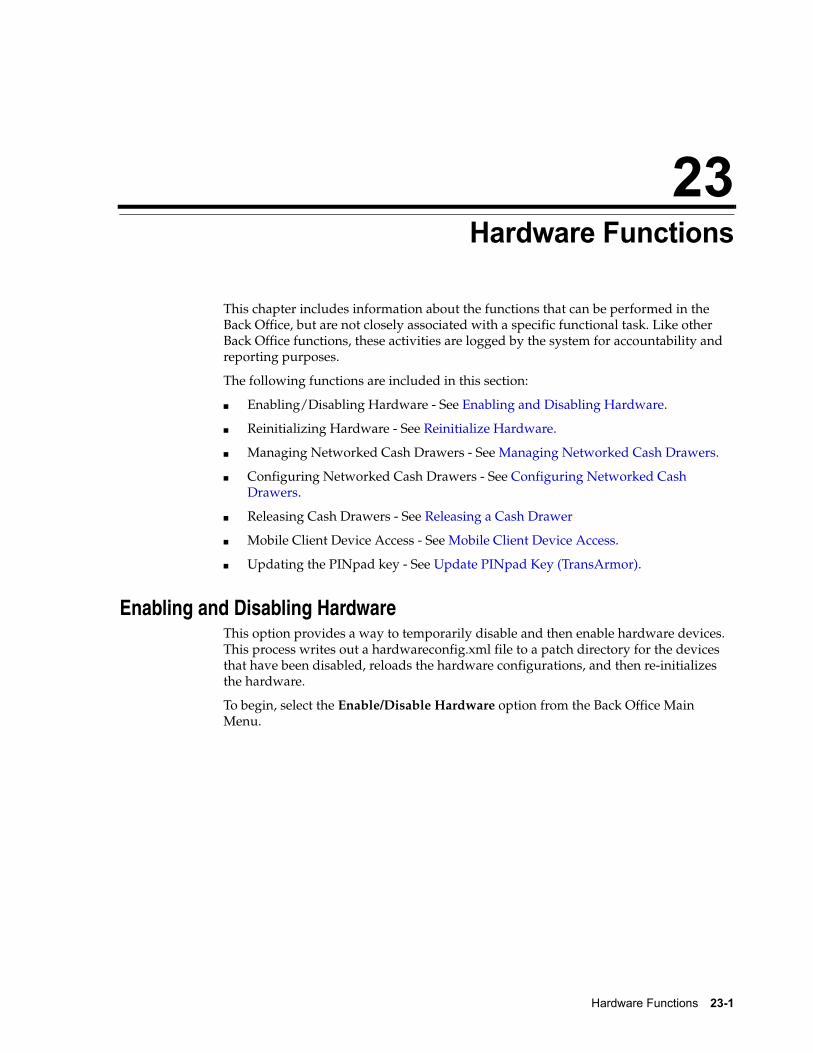
23
Hardware Functions 23-1
23Hardware Functions
This chapter includes information about the functions that can be performed in the Back Office, but are not closely associated with a specific functional task. Like other Back Office functions, these activities are logged by the system for accountability and reporting purposes.
The following functions are included in this section:
■ Enabling/Disabling Hardware - See Enabling and Disabling Hardware.
■ Reinitializing Hardware - See Reinitialize Hardware.
■ Managing Networked Cash Drawers - See Managing Networked Cash Drawers.
■ Configuring Networked Cash Drawers - See Configuring Networked Cash Drawers.
■ Releasing Cash Drawers - See Releasing a Cash Drawer
■ Mobile Client Device Access - See Mobile Client Device Access.
■ Updating the PINpad key - See Update PINpad Key (TransArmor).
Enabling and Disabling HardwareThis option provides a way to temporarily disable and then enable hardware devices. This process writes out a hardwareconfig.xml file to a patch directory for the devices that have been disabled, reloads the hardware configurations, and then re-initializes the hardware.
To begin, select the Enable/Disable Hardware option from the Back Office Main Menu.
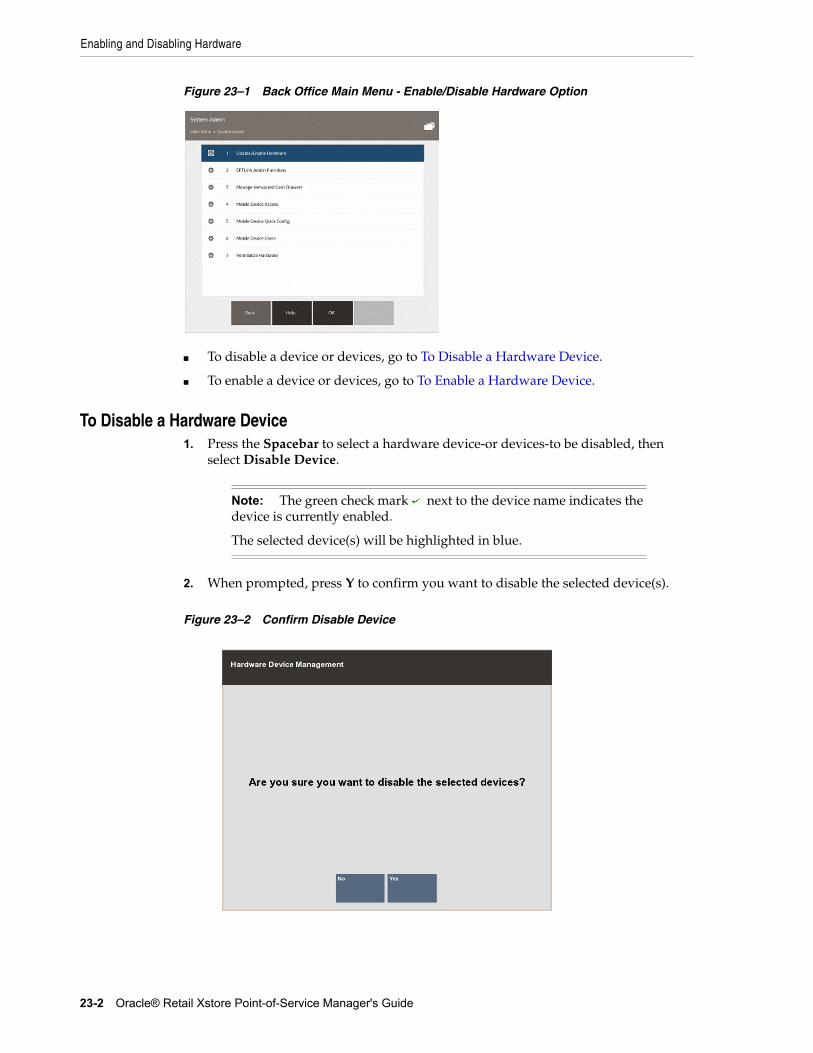
Enabling and Disabling Hardware
23-2 Oracle® Retail Xstore Point-of-Service Manager's Guide
Figure 23–1 Back Office Main Menu - Enable/Disable Hardware Option
■ To disable a device or devices, go to To Disable a Hardware Device.
■ To enable a device or devices, go to To Enable a Hardware Device.
To Disable a Hardware Device1. Press the Spacebar to select a hardware device-or devices-to be disabled, then
select Disable Device.
2. When prompted, press Y to confirm you want to disable the selected device(s).
Figure 23–2 Confirm Disable Device
Note: The green check mark next to the device name indicates the device is currently enabled.
The selected device(s) will be highlighted in blue.
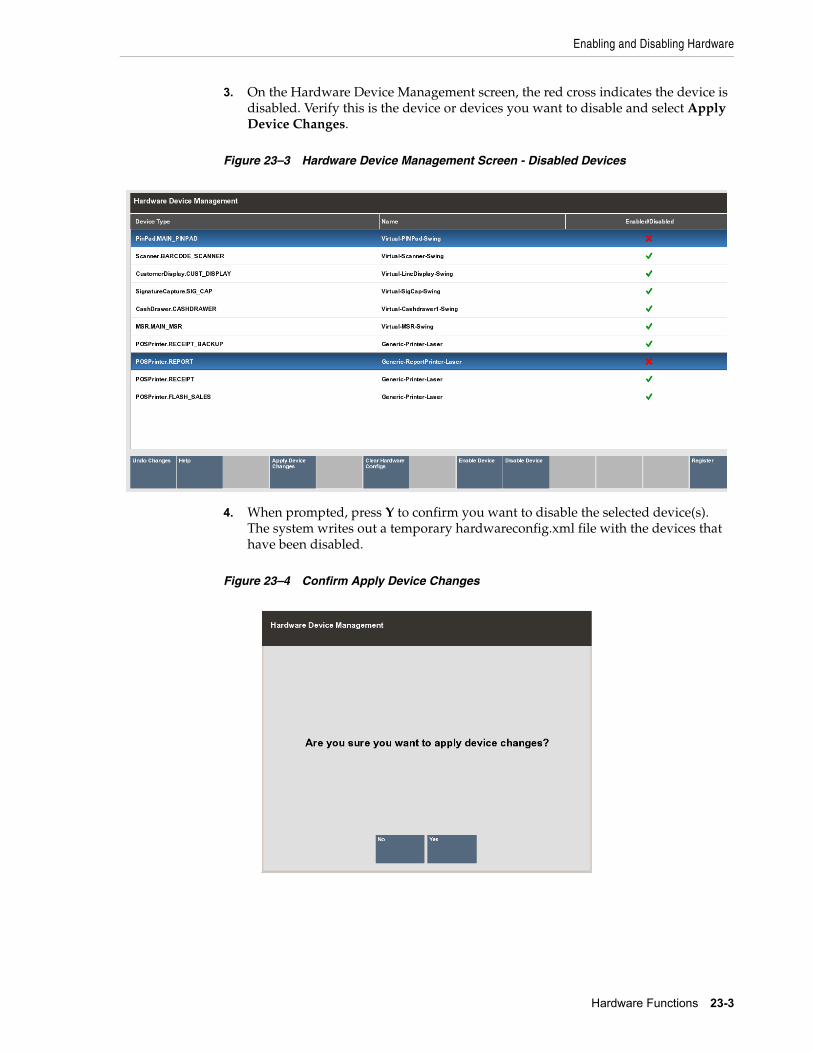
Enabling and Disabling Hardware
Hardware Functions 23-3
3. On the Hardware Device Management screen, the red cross indicates the device is disabled. Verify this is the device or devices you want to disable and select Apply Device Changes.
Figure 23–3 Hardware Device Management Screen - Disabled Devices
4. When prompted, press Y to confirm you want to disable the selected device(s). The system writes out a temporary hardwareconfig.xml file with the devices that have been disabled.
Figure 23–4 Confirm Apply Device Changes
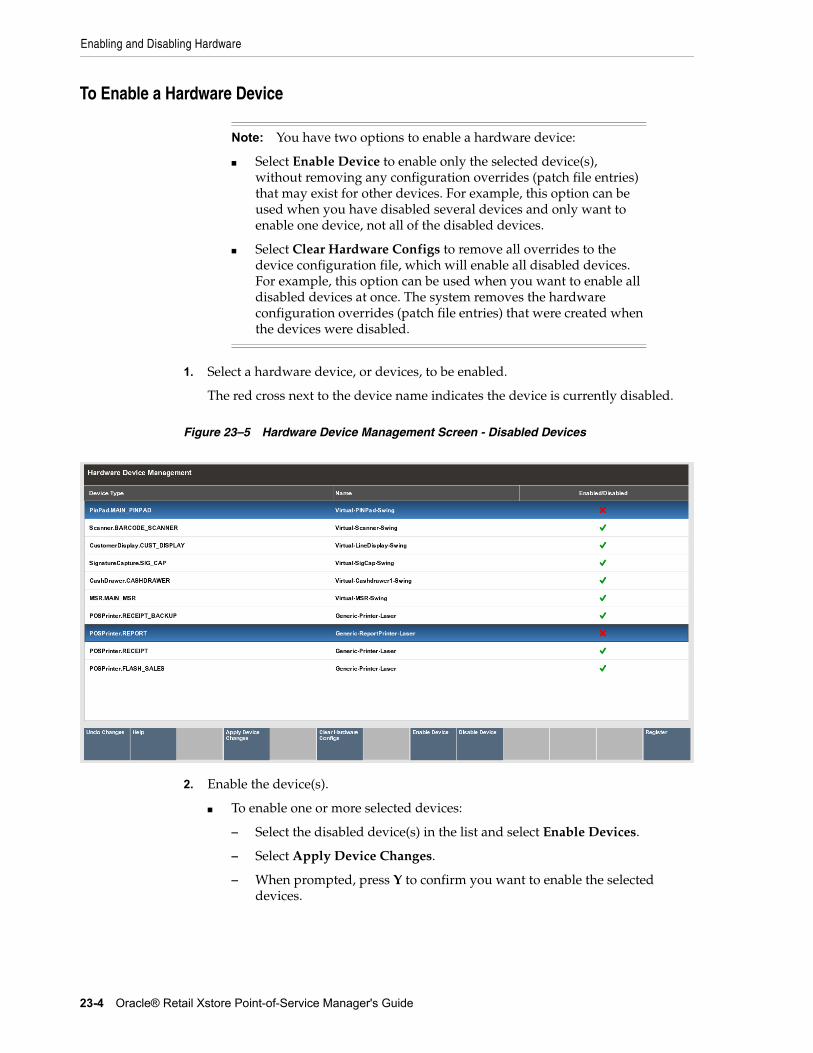
Enabling and Disabling Hardware
23-4 Oracle® Retail Xstore Point-of-Service Manager's Guide
To Enable a Hardware Device
1. Select a hardware device, or devices, to be enabled.
The red cross next to the device name indicates the device is currently disabled.
Figure 23–5 Hardware Device Management Screen - Disabled Devices
2. Enable the device(s).
■ To enable one or more selected devices:
– Select the disabled device(s) in the list and select Enable Devices.
– Select Apply Device Changes.
– When prompted, press Y to confirm you want to enable the selected devices.
Note: You have two options to enable a hardware device:
■ Select Enable Device to enable only the selected device(s), without removing any configuration overrides (patch file entries) that may exist for other devices. For example, this option can be used when you have disabled several devices and only want to enable one device, not all of the disabled devices.
■ Select Clear Hardware Configs to remove all overrides to the device configuration file, which will enable all disabled devices. For example, this option can be used when you want to enable all disabled devices at once. The system removes the hardware configuration overrides (patch file entries) that were created when the devices were disabled.

Networked Cash Drawers
Hardware Functions 23-5
Figure 23–6 Confirm Device Prompt
<OR>
■ To enable all disabled devices at once:
– Select Clear Hardware Configs. You do not need to select a hardware device in the list when using this option. All disabled devices are enabled by default.
– When prompted, press Y to confirm you want to remove all the configuration overrides in the temporary hardwareconfig.xml file.
3. The hardware devices are enabled.
Reinitialize HardwareSelect the Reinitialize Hardware menu option to reset the peripheral hardware devices. The system performs the following process for the hardware devices:
close -->release-->claim-->open
When prompted, select Yes to confirm you want to re-initialize the hardware.
Networked Cash DrawersThis section describes the networked cash drawers:
■ Managing Networked Cash Drawers
■ Configuring Networked Cash Drawers
■ Releasing a Cash Drawer
Note: If there are any device errors detected when enabling a device, the system displays a warning message about the non- functional devices.
Note: Reinitializing hardware is also used to register a VeriFone device with TransArmor.
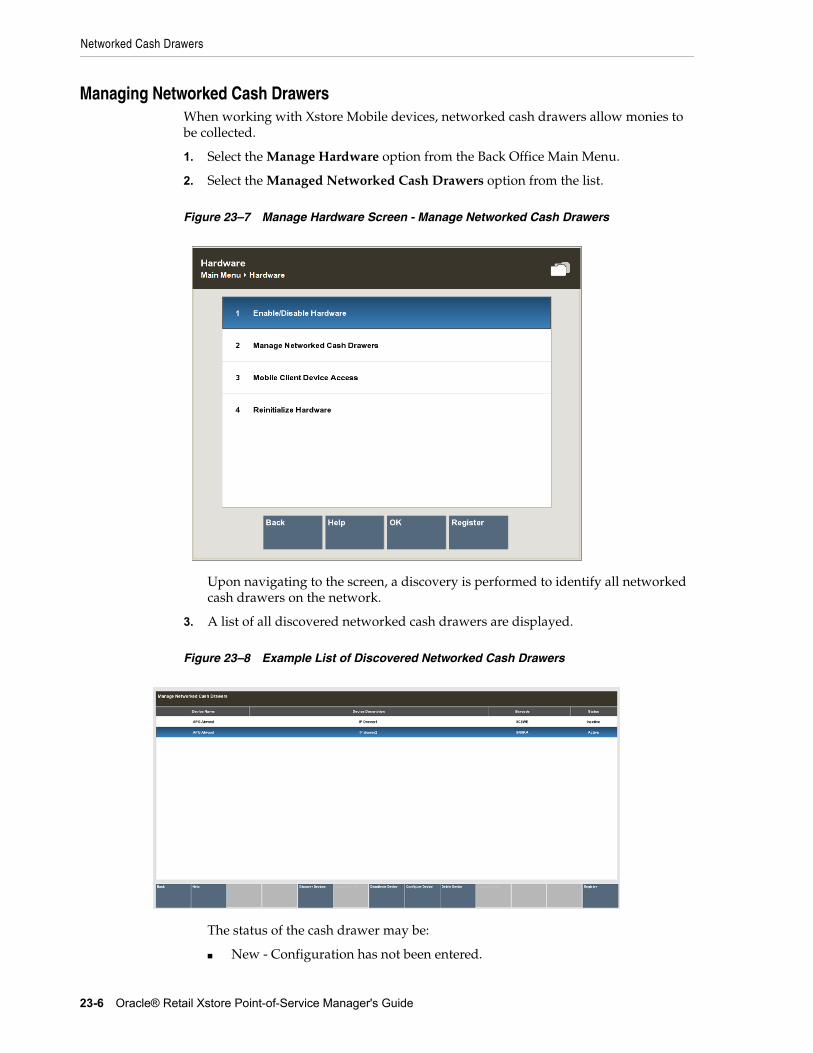
Networked Cash Drawers
23-6 Oracle® Retail Xstore Point-of-Service Manager's Guide
Managing Networked Cash DrawersWhen working with Xstore Mobile devices, networked cash drawers allow monies to be collected.
1. Select the Manage Hardware option from the Back Office Main Menu.
2. Select the Managed Networked Cash Drawers option from the list.
Figure 23–7 Manage Hardware Screen - Manage Networked Cash Drawers
Upon navigating to the screen, a discovery is performed to identify all networked cash drawers on the network.
3. A list of all discovered networked cash drawers are displayed.
Figure 23–8 Example List of Discovered Networked Cash Drawers
The status of the cash drawer may be:
■ New - Configuration has not been entered.
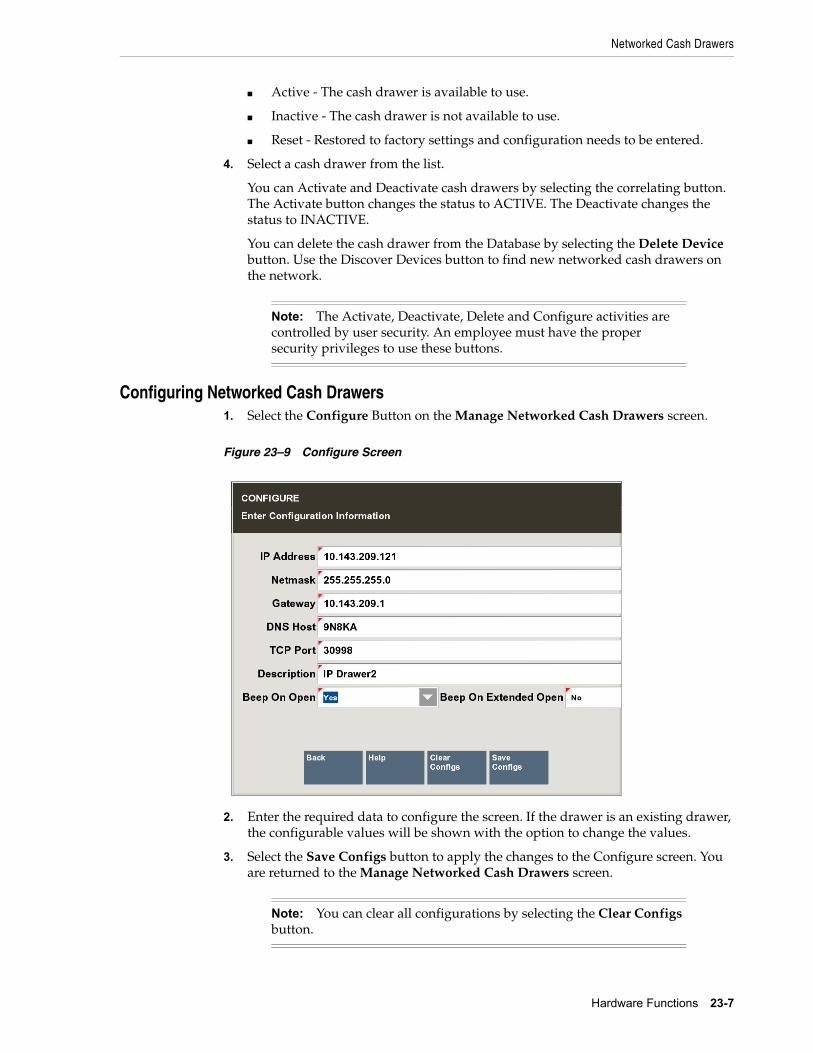
Networked Cash Drawers
Hardware Functions 23-7
■ Active - The cash drawer is available to use.
■ Inactive - The cash drawer is not available to use.
■ Reset - Restored to factory settings and configuration needs to be entered.
4. Select a cash drawer from the list.
You can Activate and Deactivate cash drawers by selecting the correlating button. The Activate button changes the status to ACTIVE. The Deactivate changes the status to INACTIVE.
You can delete the cash drawer from the Database by selecting the Delete Device button. Use the Discover Devices button to find new networked cash drawers on the network.
Configuring Networked Cash Drawers1. Select the Configure Button on the Manage Networked Cash Drawers screen.
Figure 23–9 Configure Screen
2. Enter the required data to configure the screen. If the drawer is an existing drawer, the configurable values will be shown with the option to change the values.
3. Select the Save Configs button to apply the changes to the Configure screen. You are returned to the Manage Networked Cash Drawers screen.
Note: The Activate, Deactivate, Delete and Configure activities are controlled by user security. An employee must have the proper security privileges to use these buttons.
Note: You can clear all configurations by selecting the Clear Configs button.
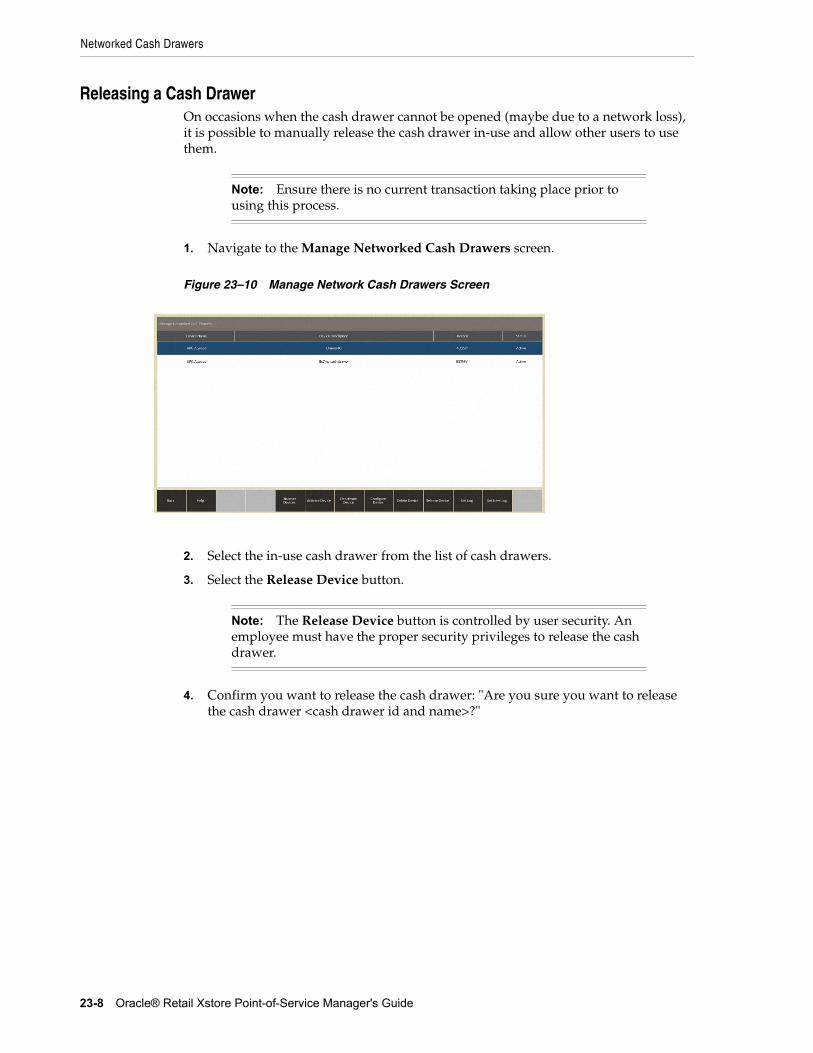
Networked Cash Drawers
23-8 Oracle® Retail Xstore Point-of-Service Manager's Guide
Releasing a Cash DrawerOn occasions when the cash drawer cannot be opened (maybe due to a network loss), it is possible to manually release the cash drawer in-use and allow other users to use them.
1. Navigate to the Manage Networked Cash Drawers screen.
Figure 23–10 Manage Network Cash Drawers Screen
2. Select the in-use cash drawer from the list of cash drawers.
3. Select the Release Device button.
4. Confirm you want to release the cash drawer: "Are you sure you want to release the cash drawer <cash drawer id and name>?"
Note: Ensure there is no current transaction taking place prior to using this process.
Note: The Release Device button is controlled by user security. An employee must have the proper security privileges to release the cash drawer.
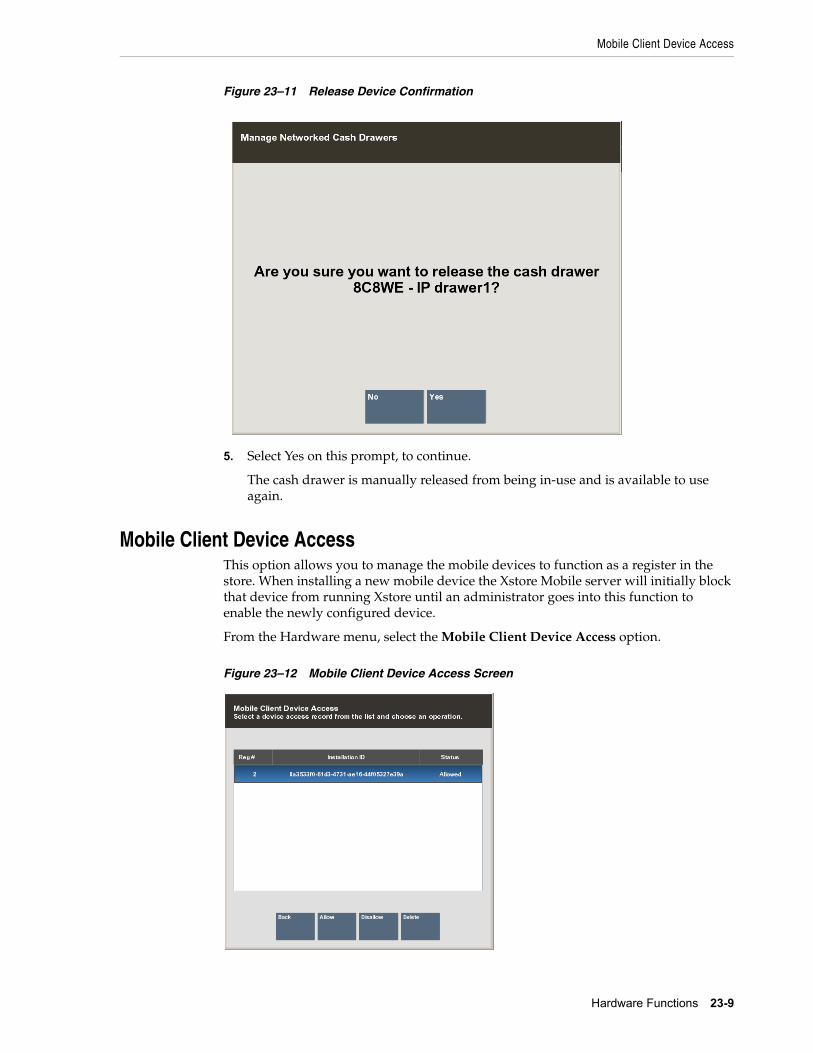
Mobile Client Device Access
Hardware Functions 23-9
Figure 23–11 Release Device Confirmation
5. Select Yes on this prompt, to continue.
The cash drawer is manually released from being in-use and is available to use again.
Mobile Client Device AccessThis option allows you to manage the mobile devices to function as a register in the store. When installing a new mobile device the Xstore Mobile server will initially block that device from running Xstore until an administrator goes into this function to enable the newly configured device.
From the Hardware menu, select the Mobile Client Device Access option.
Figure 23–12 Mobile Client Device Access Screen
Mobile Device Quick Config
23-10 Oracle® Retail Xstore Point-of-Service Manager's Guide
To enable the mobile device to function as a register in the store select the Allow button or select the Disallow button to disable access to any currently enabled mobile device.
Select the Delete button to remove the device configuration from the Xstore register.
See also the Xstore Point-of-Service Mobile User Guide for more information about operating the mobile device.
Mobile Device Quick ConfigMobile Device Quick Config allows you to generate a QR code for a mobile device to connect to the Xstore Mobile server.
1. Select System Admin from the Main Menu.
2. Click Mobile Device Quick Config in the System Admin menu.
3. For the mobile device you want to configure, enter the register ID it should have.
4. Xstore generates a QR code containing the configuration information.
5. On the mobile device you want to configure, go into the Configuration screen. Swiping the screen from the left to the right on the mobile device gains access to the Configuration screen. Select Scan to Configure to scan the generated barcode.
6. Scan the QR code. The mobile device is added.
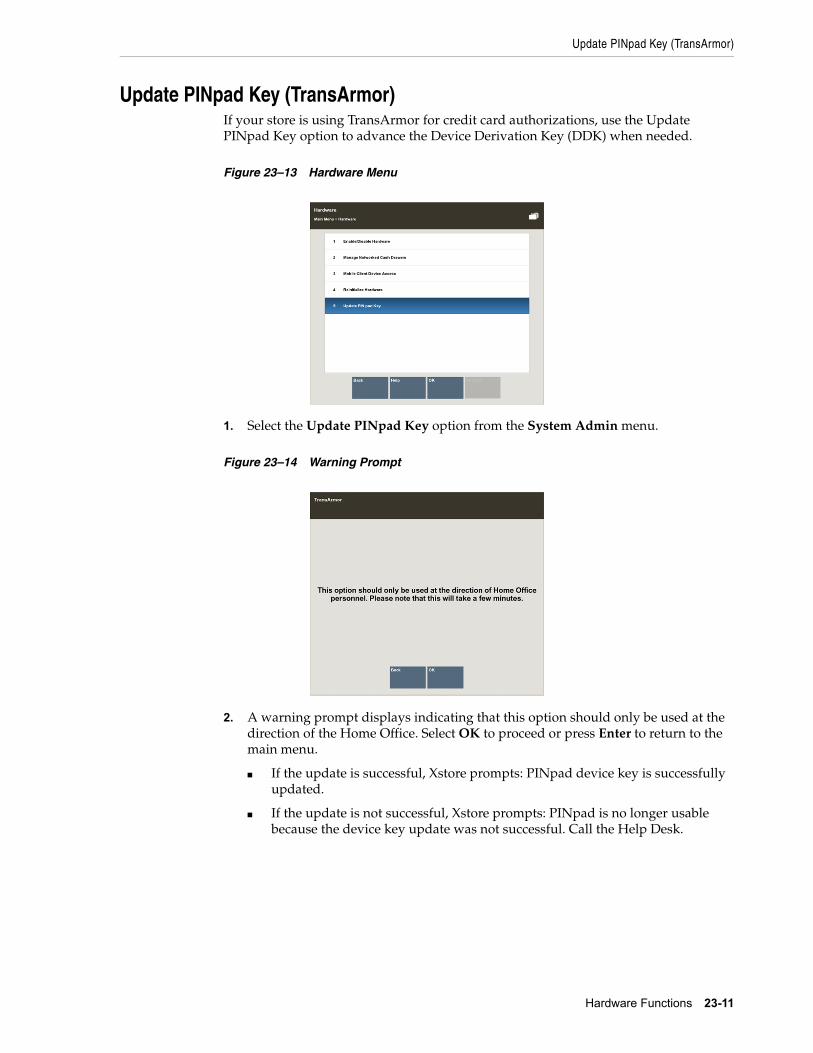
Update PINpad Key (TransArmor)
Hardware Functions 23-11
Update PINpad Key (TransArmor)If your store is using TransArmor for credit card authorizations, use the Update PINpad Key option to advance the Device Derivation Key (DDK) when needed.
Figure 23–13 Hardware Menu
1. Select the Update PINpad Key option from the System Admin menu.
Figure 23–14 Warning Prompt
2. A warning prompt displays indicating that this option should only be used at the direction of the Home Office. Select OK to proceed or press Enter to return to the main menu.
■ If the update is successful, Xstore prompts: PINpad device key is successfully updated.
■ If the update is not successful, Xstore prompts: PINpad is no longer usable because the device key update was not successful. Call the Help Desk.
24
Tax Free Invoices 24-1
24Tax Free Invoices
Some countries offer “Tax Free Shopping” to shoppers from other countries, and allow for the reclaiming of value added tax (VAT) on their purchases. The final cost for the traveler is the value of the merchandise minus the taxes and the fee of the provider.
Xstore Point of Service has been integrated with the two largest providers:
■ Global Blue
Using their IC2 services and IC2 web forms embedded within Xstore
■ Planet Payment (previously known as Premier Tax Free (PTF) or Fintrax(FX))
Using Xstore forms
If Oracle Retail Xstore Point of Service at the store has been configured to integrate with one of these Tax Free Providers, then eligible shoppers can request a Tax Free Invoice (TFI) during the sale, which they can later use to reclaim the VAT they have paid on their purchases. See the Oracle Retail Xstore Point of Service User Guide for more information.
The following functions are included in this section:
■ Issuing Tax Free Invoices - See Issuing Tax Free Invoices.
■ Reprinting Tax Free Invoices - See Reprinting Tax Free Invoices.
■ Voiding Tax Free Invoices - See Voiding a Tax Free Invoice.
■ Tax Free Invoice Returns - See Tax Free Invoice Returns.
Issuing Tax Free InvoicesTax Free Invoices for a sale (or multiple sales) can be issued and printed in the Back Office after the sales completion in the POS, from either the:
■ Journal or the,
■ Invoice Menu
Note: The country where the store is located could have limitations in terms of how many days the sale can be held.
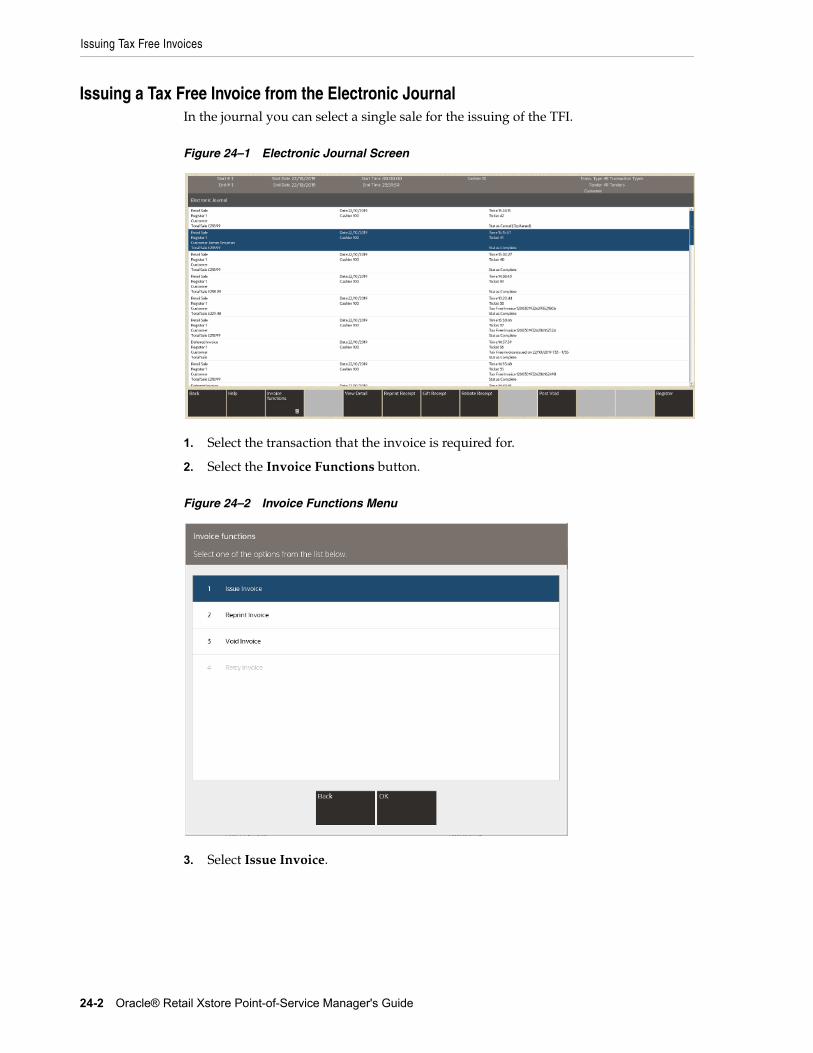
Issuing Tax Free Invoices
24-2 Oracle® Retail Xstore Point-of-Service Manager's Guide
Issuing a Tax Free Invoice from the Electronic JournalIn the journal you can select a single sale for the issuing of the TFI.
Figure 24–1 Electronic Journal Screen
1. Select the transaction that the invoice is required for.
2. Select the Invoice Functions button.
Figure 24–2 Invoice Functions Menu
3. Select Issue Invoice.

Issuing Tax Free Invoices
Tax Free Invoices 24-3
Figure 24–3 Issue Invoice Type
4. Select TaxFree as the type of invoice to print.
The Tax Free Invoice form is displayed to capture the customers information.
With Global Blue IC2, the IC2 Webform is displayed embedded within Xstore.
a. Enter the customers information.
The IC2 form controls which fields are displayed, which are mandatory and which refund methods are available. The cashier can lookup the customer details using the customers Global Blue Card or passport number, and if located by IC2, the customers details will be displayed into the form, saving the cashier from manually keying all of these details. If a customer is already attached to the sales transaction, then Xstore will default the customers details, which can be edited if required.
b. When all mandatory fields have been entered, the cashier selects the required refund method.
c. The cashier then selects Issue, in order to issue and print the Tax Free Invoice - the cashier will hand this over to the customer, along with the Xstore receipts, after the tendering process is completed.
Note: The connection from Xstore to the Tax Free Provider must be available, in order for a Tax Free Invoice to be issued.
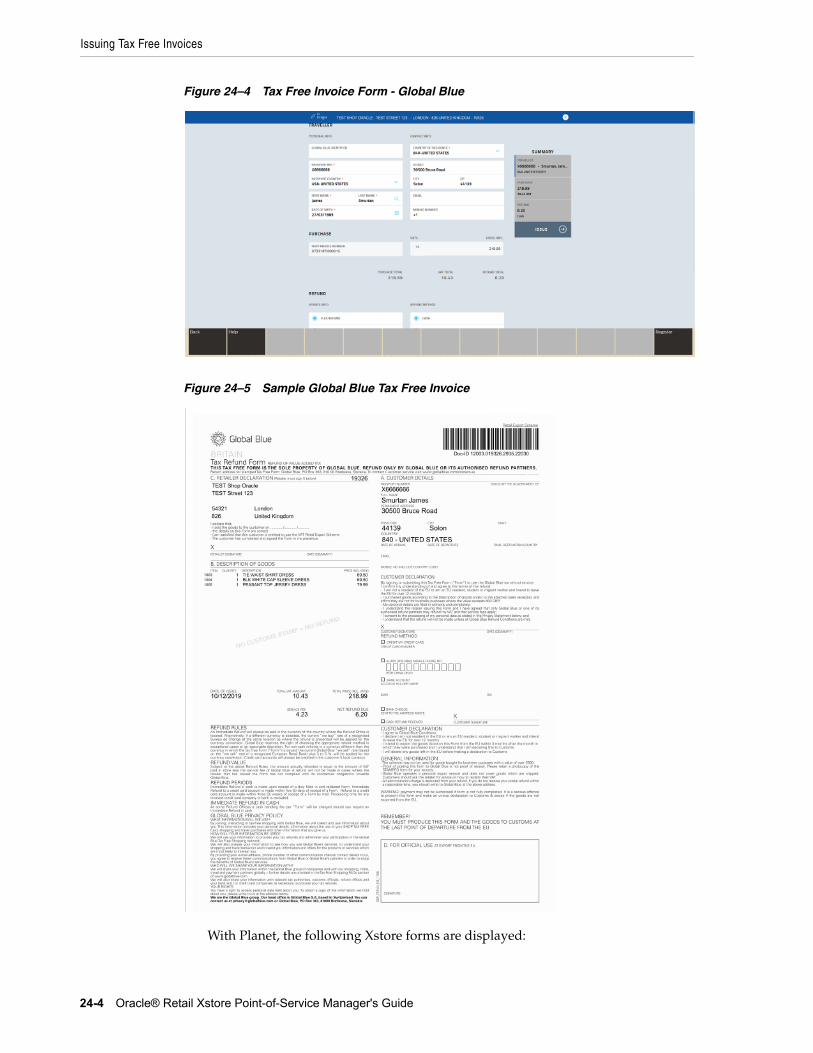
Issuing Tax Free Invoices
24-4 Oracle® Retail Xstore Point-of-Service Manager's Guide
Figure 24–4 Tax Free Invoice Form - Global Blue
Figure 24–5 Sample Global Blue Tax Free Invoice
With Planet, the following Xstore forms are displayed:

Issuing Tax Free Invoices
Tax Free Invoices 24-5
Figure 24–6 Tax Free Invoice Form - Planet
a. Enter the Tax Free information for the customer or select Lookup Traveler.
Customer name and address details.
Document Type: Possible values include, Passport, Driving License and Identity Card and Other.
Document #: The id of the selected document type.
Document Country: Country for the customer’s document.
Tax Number: Required in Portugal only, when the Document Country is also set to Portugal.
Mobile Number: Customer mobile phone number including the country prefix.
Birth Date: Customer’s birth date.
Final Destination: Final travel destination for the customer.
Email: Customer email address.
Arrival Date: Date the customer arrived in the country.
Departure Date: Date the customer will leave the country.
Service: Service offered by the tax free providers for the types of refund service.
Refund Method: Method by which to provide the refund such as credit card.
Note: Dependent on your stores country, some fields will be pre- filled, some fields will be optional and some will be mandatory.
Note: Only countries locally eligible for a VAT refund are available in this menu.
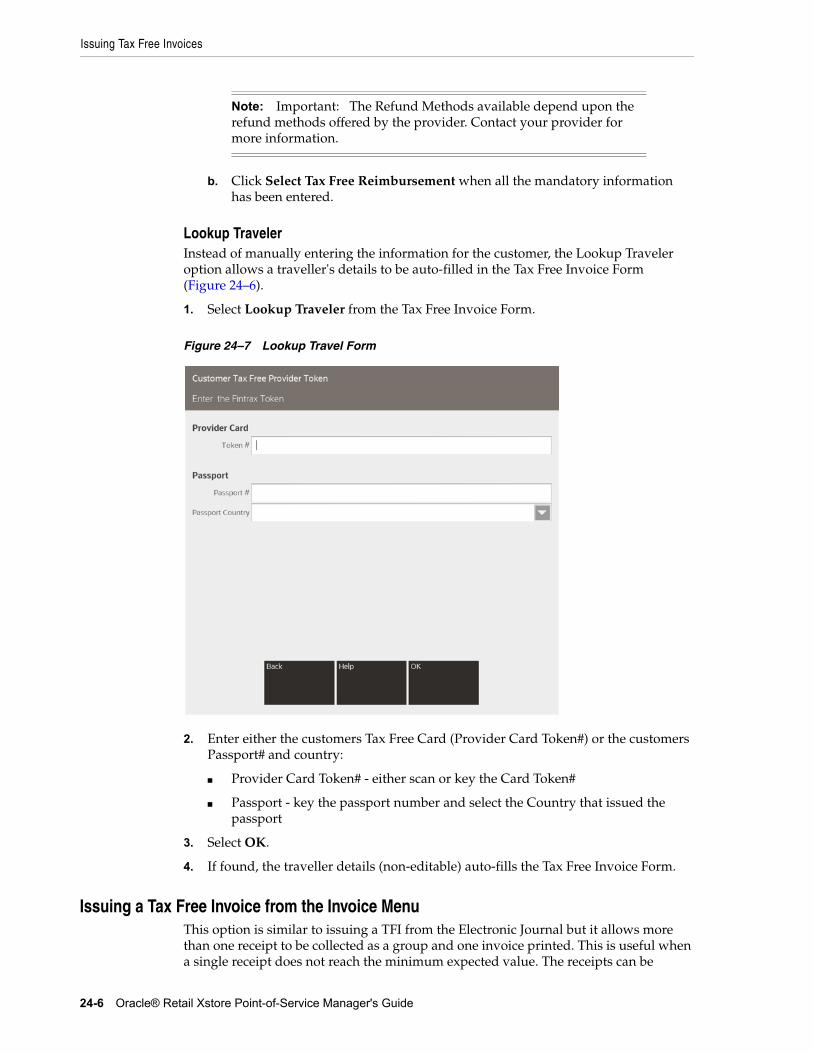
Issuing Tax Free Invoices
24-6 Oracle® Retail Xstore Point-of-Service Manager's Guide
b. Click Select Tax Free Reimbursement when all the mandatory information has been entered.
Lookup TravelerInstead of manually entering the information for the customer, the Lookup Traveler option allows a traveller's details to be auto-filled in the Tax Free Invoice Form (Figure 24–6).
1. Select Lookup Traveler from the Tax Free Invoice Form.
Figure 24–7 Lookup Travel Form
2. Enter either the customers Tax Free Card (Provider Card Token#) or the customers Passport# and country:
■ Provider Card Token# - either scan or key the Card Token#
■ Passport - key the passport number and select the Country that issued the passport
3. Select OK.
4. If found, the traveller details (non-editable) auto-fills the Tax Free Invoice Form.
Issuing a Tax Free Invoice from the Invoice MenuThis option is similar to issuing a TFI from the Electronic Journal but it allows more than one receipt to be collected as a group and one invoice printed. This is useful when a single receipt does not reach the minimum expected value. The receipts can be
Note: Important: The Refund Methods available depend upon the refund methods offered by the provider. Contact your provider for more information.
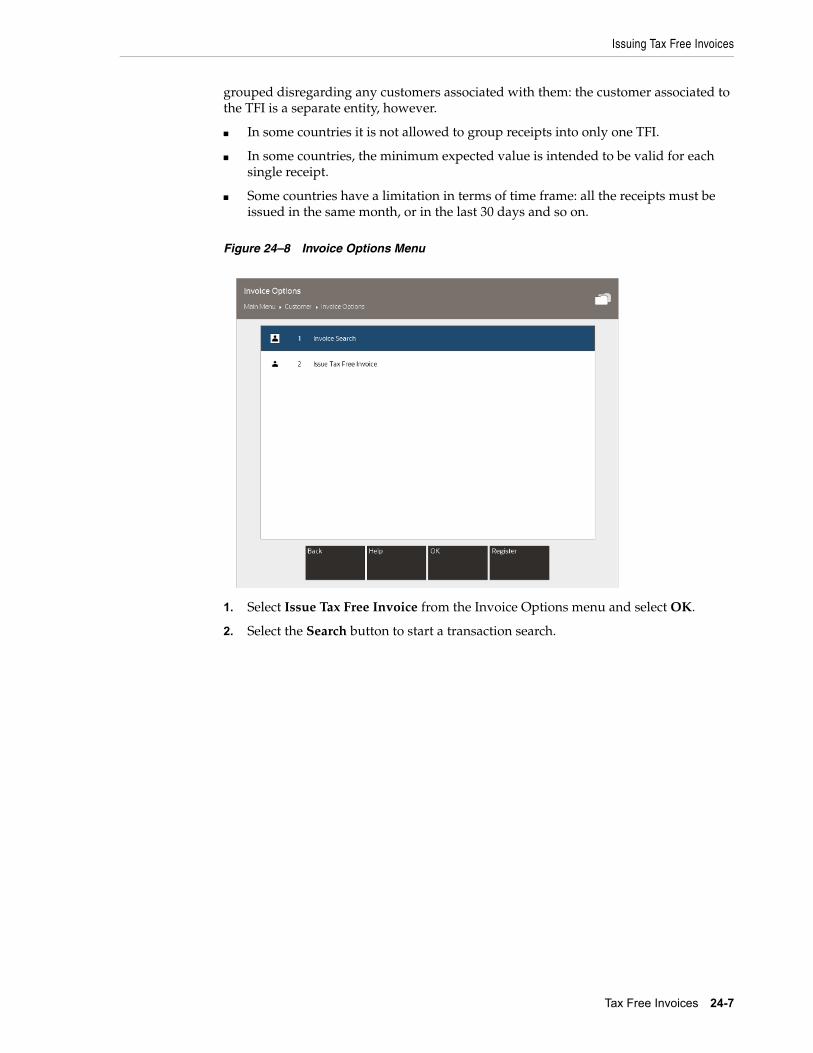
Issuing Tax Free Invoices
Tax Free Invoices 24-7
grouped disregarding any customers associated with them: the customer associated to the TFI is a separate entity, however.
■ In some countries it is not allowed to group receipts into only one TFI.
■ In some countries, the minimum expected value is intended to be valid for each single receipt.
■ Some countries have a limitation in terms of time frame: all the receipts must be issued in the same month, or in the last 30 days and so on.
Figure 24–8 Invoice Options Menu
1. Select Issue Tax Free Invoice from the Invoice Options menu and select OK.
2. Select the Search button to start a transaction search.
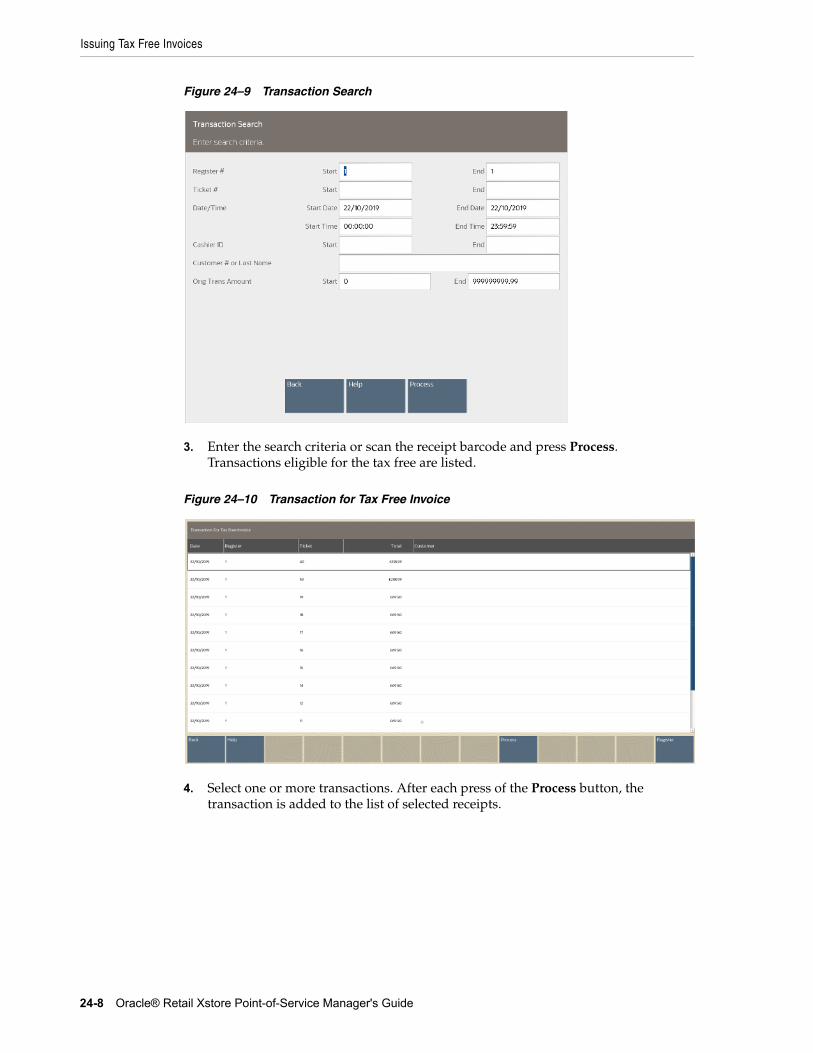
Issuing Tax Free Invoices
24-8 Oracle® Retail Xstore Point-of-Service Manager's Guide
Figure 24–9 Transaction Search
3. Enter the search criteria or scan the receipt barcode and press Process. Transactions eligible for the tax free are listed.
Figure 24–10 Transaction for Tax Free Invoice
4. Select one or more transactions. After each press of the Process button, the transaction is added to the list of selected receipts.
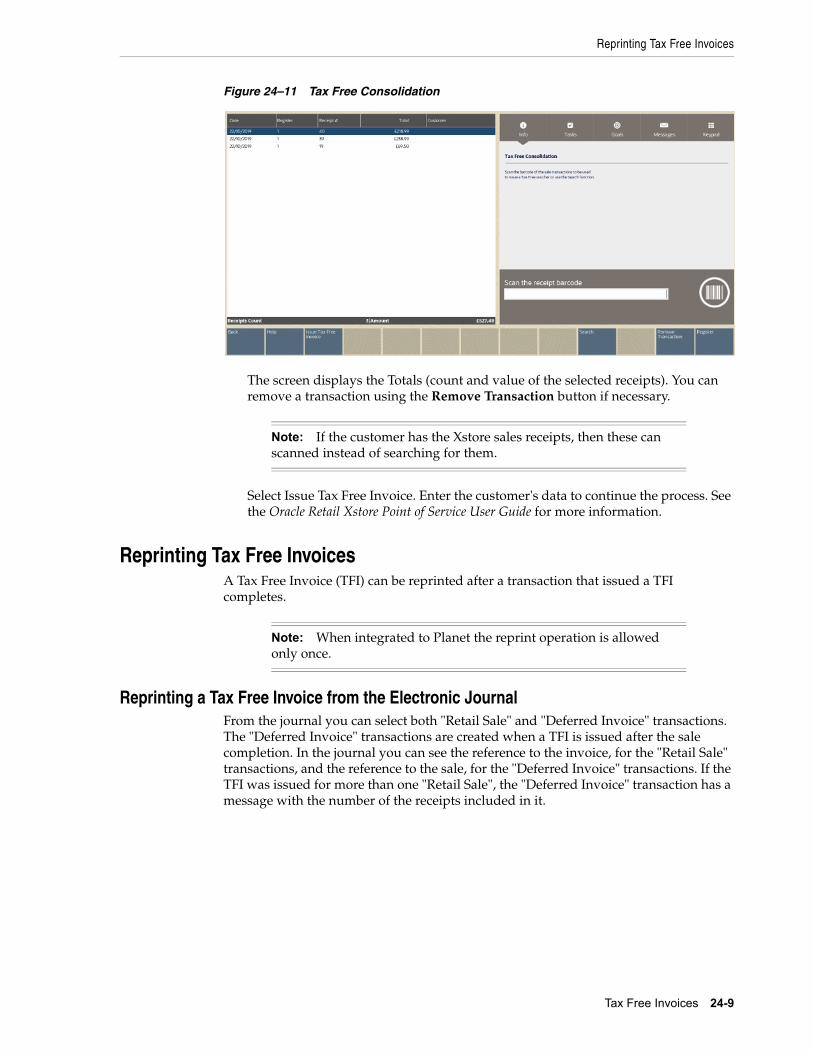
Reprinting Tax Free Invoices
Tax Free Invoices 24-9
Figure 24–11 Tax Free Consolidation
The screen displays the Totals (count and value of the selected receipts). You can remove a transaction using the Remove Transaction button if necessary.
Select Issue Tax Free Invoice. Enter the customer's data to continue the process. See the Oracle Retail Xstore Point of Service User Guide for more information.
Reprinting Tax Free InvoicesA Tax Free Invoice (TFI) can be reprinted after a transaction that issued a TFI completes.
Reprinting a Tax Free Invoice from the Electronic JournalFrom the journal you can select both "Retail Sale" and "Deferred Invoice" transactions. The "Deferred Invoice" transactions are created when a TFI is issued after the sale completion. In the journal you can see the reference to the invoice, for the "Retail Sale" transactions, and the reference to the sale, for the "Deferred Invoice" transactions. If the TFI was issued for more than one "Retail Sale", the "Deferred Invoice" transaction has a message with the number of the receipts included in it.
Note: If the customer has the Xstore sales receipts, then these can scanned instead of searching for them.
Note: When integrated to Planet the reprint operation is allowed only once.
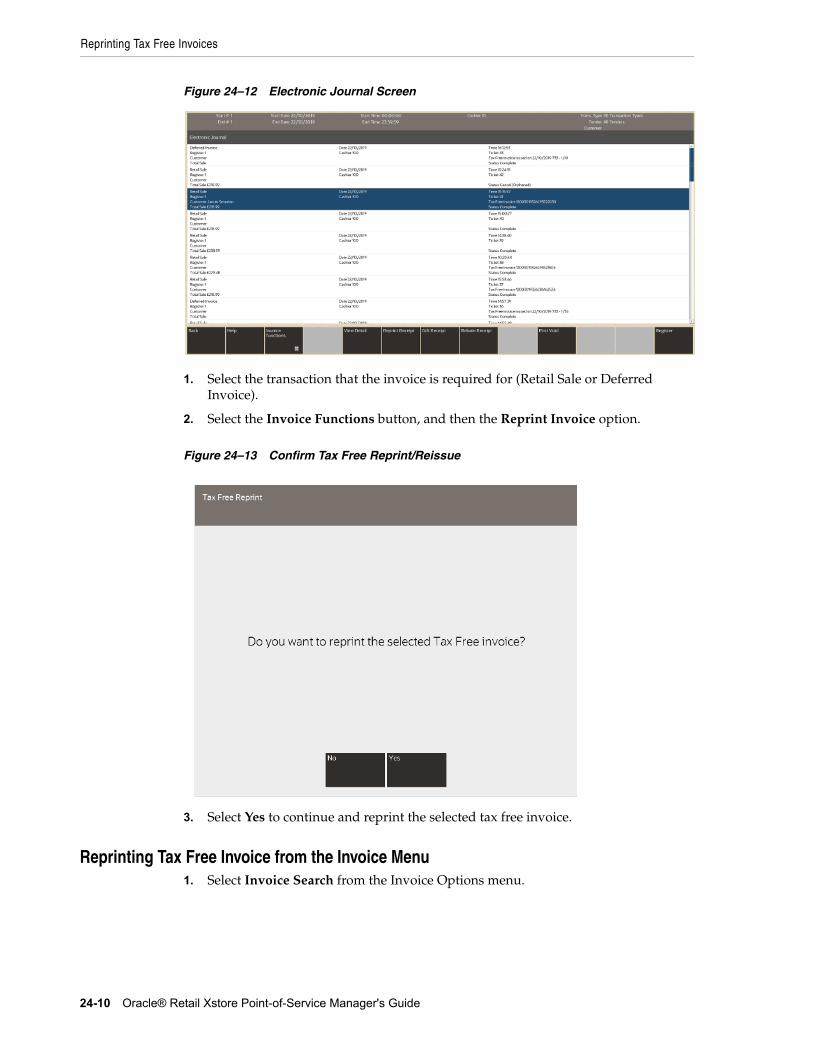
Reprinting Tax Free Invoices
24-10 Oracle® Retail Xstore Point-of-Service Manager's Guide
Figure 24–12 Electronic Journal Screen
1. Select the transaction that the invoice is required for (Retail Sale or Deferred Invoice).
2. Select the Invoice Functions button, and then the Reprint Invoice option.
Figure 24–13 Confirm Tax Free Reprint/Reissue
3. Select Yes to continue and reprint the selected tax free invoice.
Reprinting Tax Free Invoice from the Invoice Menu1. Select Invoice Search from the Invoice Options menu.
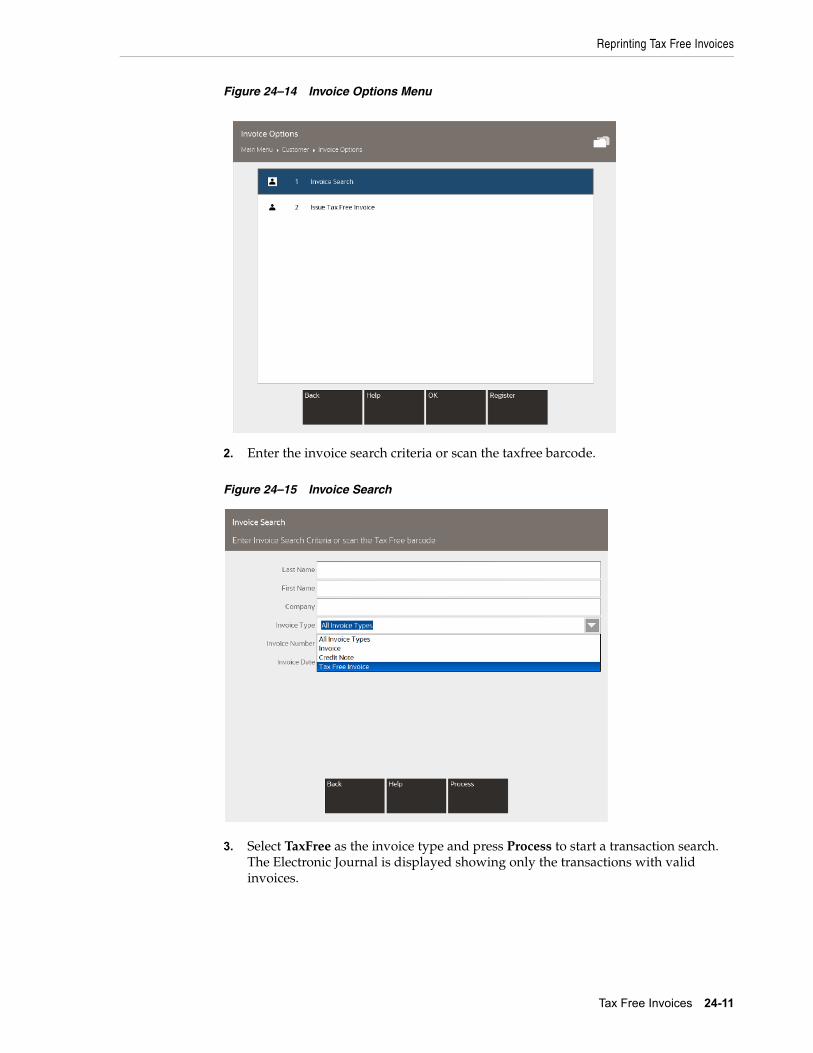
Reprinting Tax Free Invoices
Tax Free Invoices 24-11
Figure 24–14 Invoice Options Menu
2. Enter the invoice search criteria or scan the taxfree barcode.
Figure 24–15 Invoice Search
3. Select TaxFree as the invoice type and press Process to start a transaction search. The Electronic Journal is displayed showing only the transactions with valid invoices.
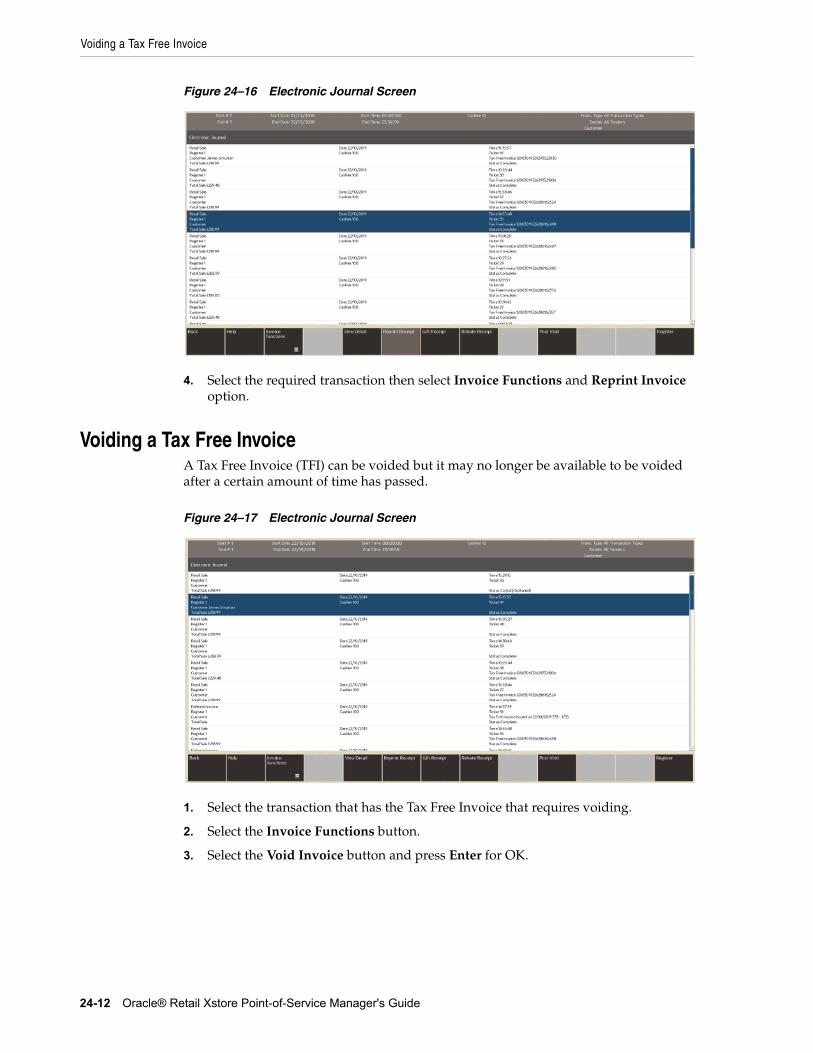
Voiding a Tax Free Invoice
24-12 Oracle® Retail Xstore Point-of-Service Manager's Guide
Figure 24–16 Electronic Journal Screen
4. Select the required transaction then select Invoice Functions and Reprint Invoice option.
Voiding a Tax Free InvoiceA Tax Free Invoice (TFI) can be voided but it may no longer be available to be voided after a certain amount of time has passed.
Figure 24–17 Electronic Journal Screen
1. Select the transaction that has the Tax Free Invoice that requires voiding.
2. Select the Invoice Functions button.
3. Select the Void Invoice button and press Enter for OK.
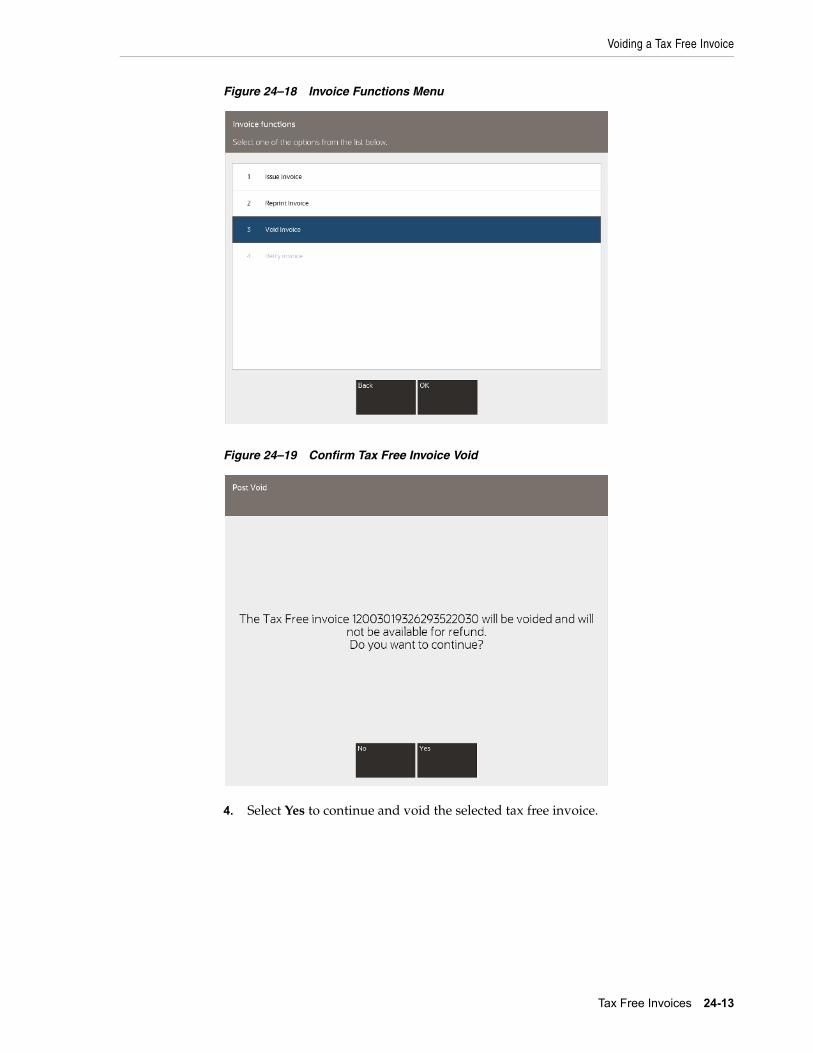
Voiding a Tax Free Invoice
Tax Free Invoices 24-13
Figure 24–18 Invoice Functions Menu
Figure 24–19 Confirm Tax Free Invoice Void
4. Select Yes to continue and void the selected tax free invoice.
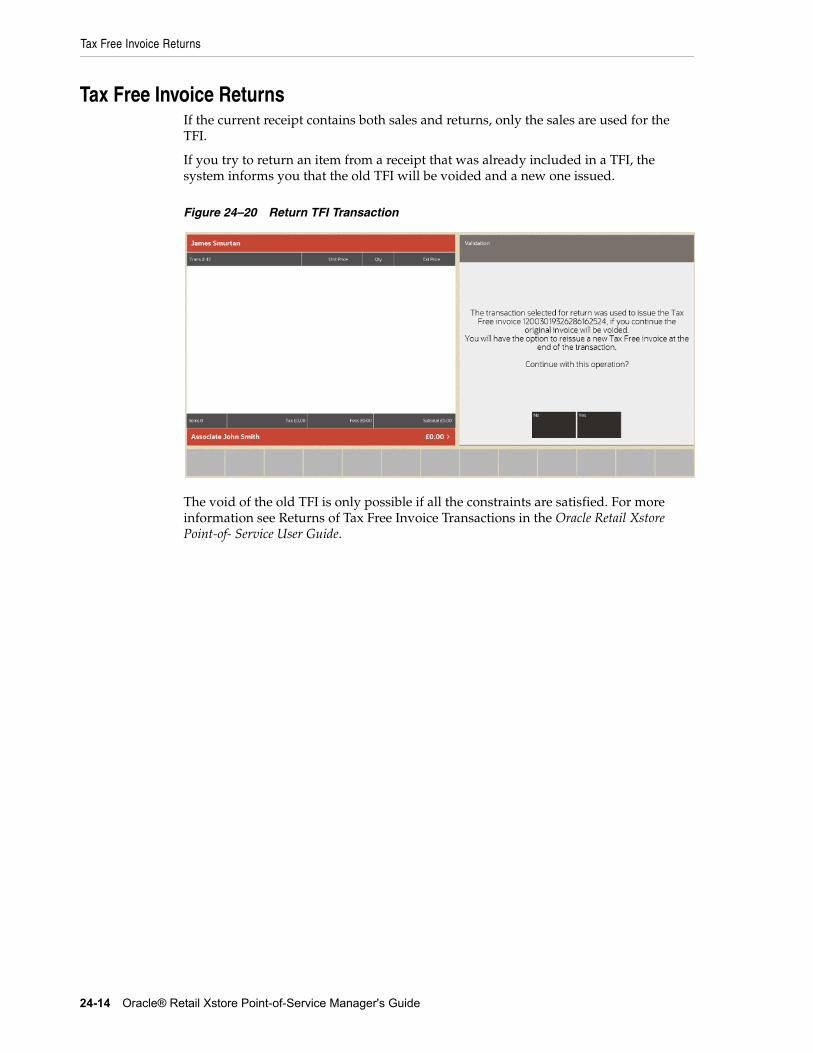
Tax Free Invoice Returns
24-14 Oracle® Retail Xstore Point-of-Service Manager's Guide
Tax Free Invoice ReturnsIf the current receipt contains both sales and returns, only the sales are used for the TFI.
If you try to return an item from a receipt that was already included in a TFI, the system informs you that the old TFI will be voided and a new one issued.
Figure 24–20 Return TFI Transaction
The void of the old TFI is only possible if all the constraints are satisfied. For more information see Returns of Tax Free Invoice Transactions in the Oracle Retail Xstore Point-of- Service User Guide.

25
Miscellaneous Functions 25-1
25Miscellaneous Functions
[7] This chapter includes information about the functions that can be performed in the Back Office, but are not closely associated with a specific functional task. Like other Back Office functions, these activities are logged by the system for accountability and reporting purposes.
The following functions are included in this section:
■ Change your password - See Changing Your Password.
■ Dashboard View - See Using the Dashboard.
■ Oracle Retail XBRi Sales & Productivity Dashboard - See Sales and Productivity Dashboard.
■ Open a browser to access the World Wide Web - See Opening a Browser.
■ Exchange Serial Numbers - See Exchanging Serial Numbers.
Changing Your Password
If your store is configured to use password challenge questions, you can re-set your password without knowing your current password by answering questions. See Forgot Password Challenge Questions for more information.
The Change Password option is available from the Back Office Login screen - before you log in to the system.
Note: This function is also available from the POS register and the Employee Maintenance Menu in the Back Office. Refer to Employee Maintenance.
If you need to change another employee's password, not your password, use the process described in Changing an Employee's Password.
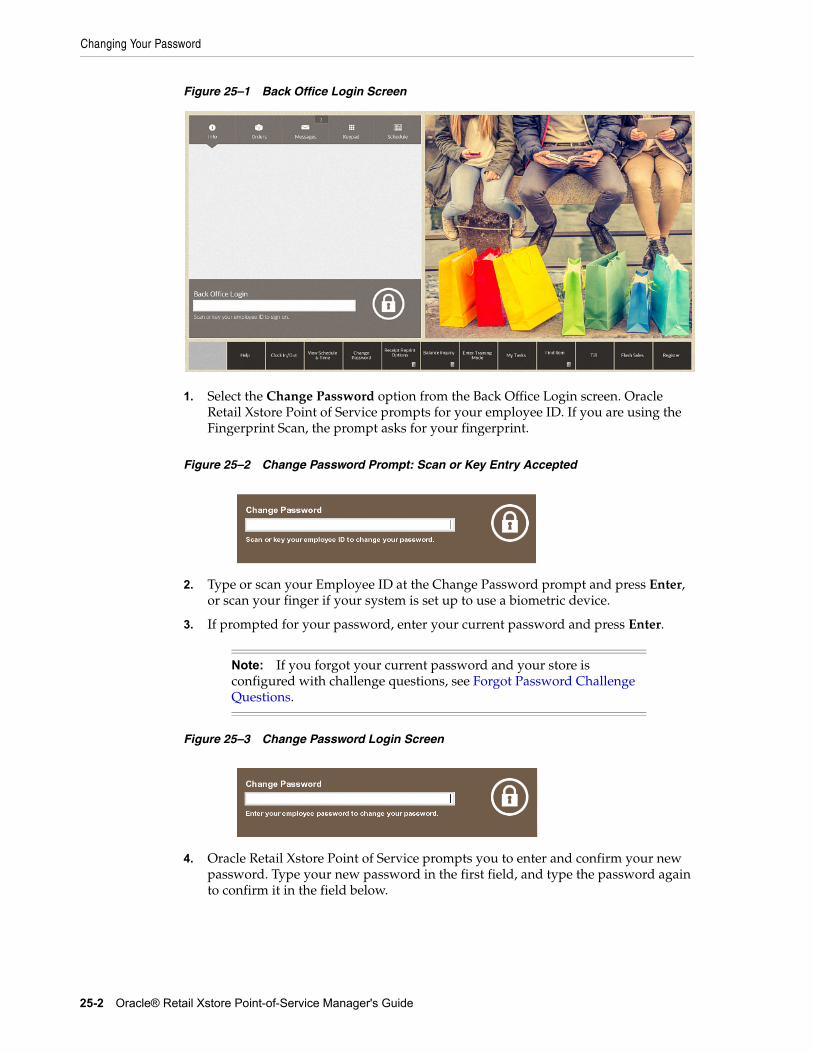
Changing Your Password
25-2 Oracle® Retail Xstore Point-of-Service Manager's Guide
Figure 25–1 Back Office Login Screen
1. Select the Change Password option from the Back Office Login screen. Oracle Retail Xstore Point of Service prompts for your employee ID. If you are using the Fingerprint Scan, the prompt asks for your fingerprint.
Figure 25–2 Change Password Prompt: Scan or Key Entry Accepted
2. Type or scan your Employee ID at the Change Password prompt and press Enter, or scan your finger if your system is set up to use a biometric device.
3. If prompted for your password, enter your current password and press Enter.
Figure 25–3 Change Password Login Screen
4. Oracle Retail Xstore Point of Service prompts you to enter and confirm your new password. Type your new password in the first field, and type the password again to confirm it in the field below.
Note: If you forgot your current password and your store is configured with challenge questions, see Forgot Password Challenge Questions.
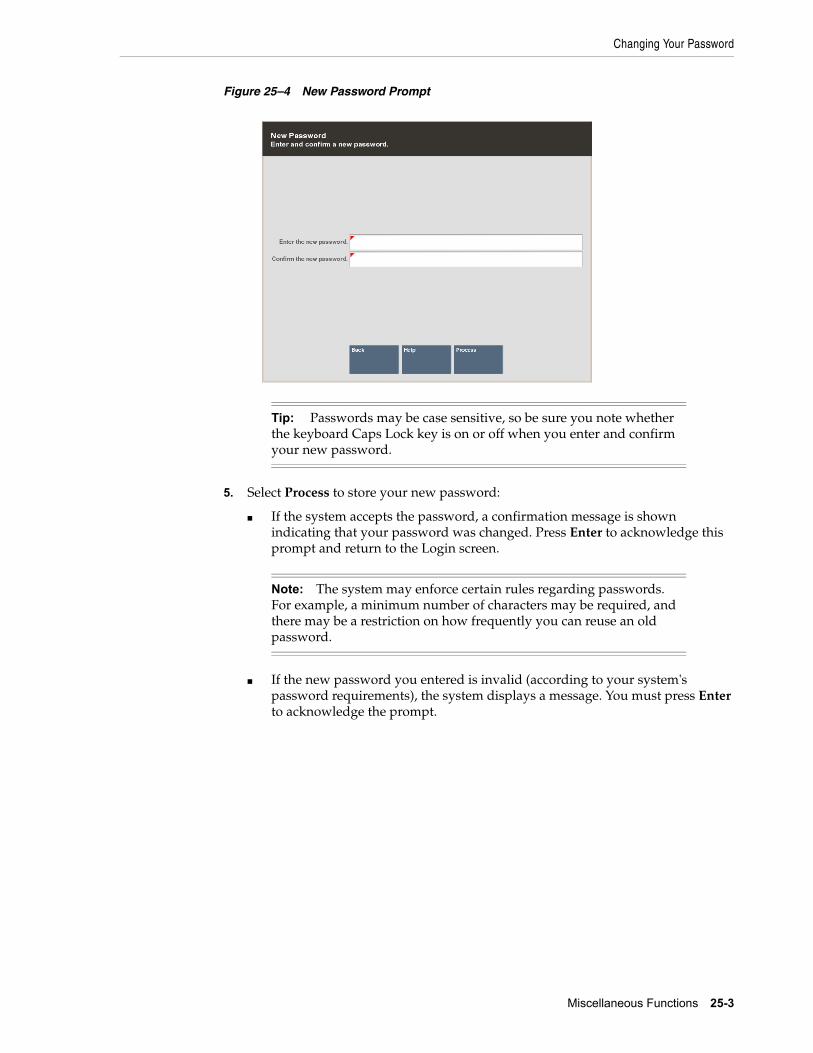
Changing Your Password
Miscellaneous Functions 25-3
Figure 25–4 New Password Prompt
5. Select Process to store your new password:
■ If the system accepts the password, a confirmation message is shown indicating that your password was changed. Press Enter to acknowledge this prompt and return to the Login screen.
■ If the new password you entered is invalid (according to your system's password requirements), the system displays a message. You must press Enter to acknowledge the prompt.
Tip: Passwords may be case sensitive, so be sure you note whether the keyboard Caps Lock key is on or off when you enter and confirm your new password.
Note: The system may enforce certain rules regarding passwords. For example, a minimum number of characters may be required, and there may be a restriction on how frequently you can reuse an old password.
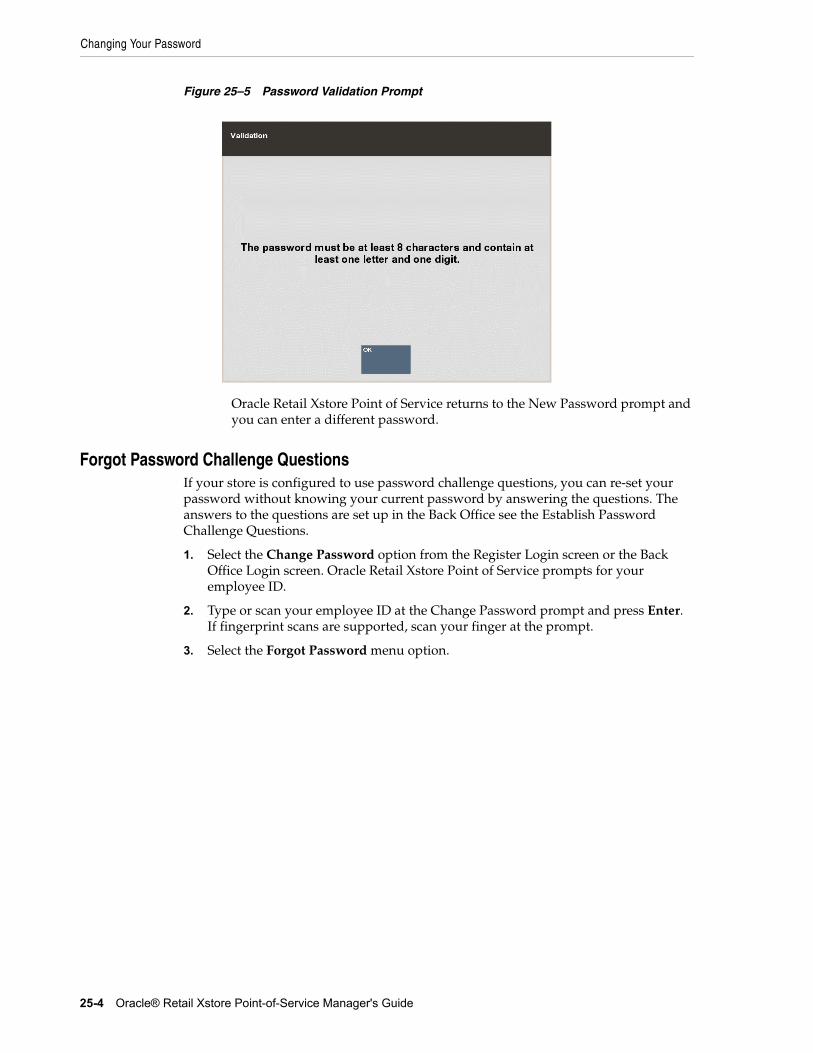
Changing Your Password
25-4 Oracle® Retail Xstore Point-of-Service Manager's Guide
Figure 25–5 Password Validation Prompt
Oracle Retail Xstore Point of Service returns to the New Password prompt and you can enter a different password.
Forgot Password Challenge QuestionsIf your store is configured to use password challenge questions, you can re-set your password without knowing your current password by answering the questions. The answers to the questions are set up in the Back Office see the Establish Password Challenge Questions.
1. Select the Change Password option from the Register Login screen or the Back Office Login screen. Oracle Retail Xstore Point of Service prompts for your employee ID.
2. Type or scan your employee ID at the Change Password prompt and press Enter. If fingerprint scans are supported, scan your finger at the prompt.
3. Select the Forgot Password menu option.
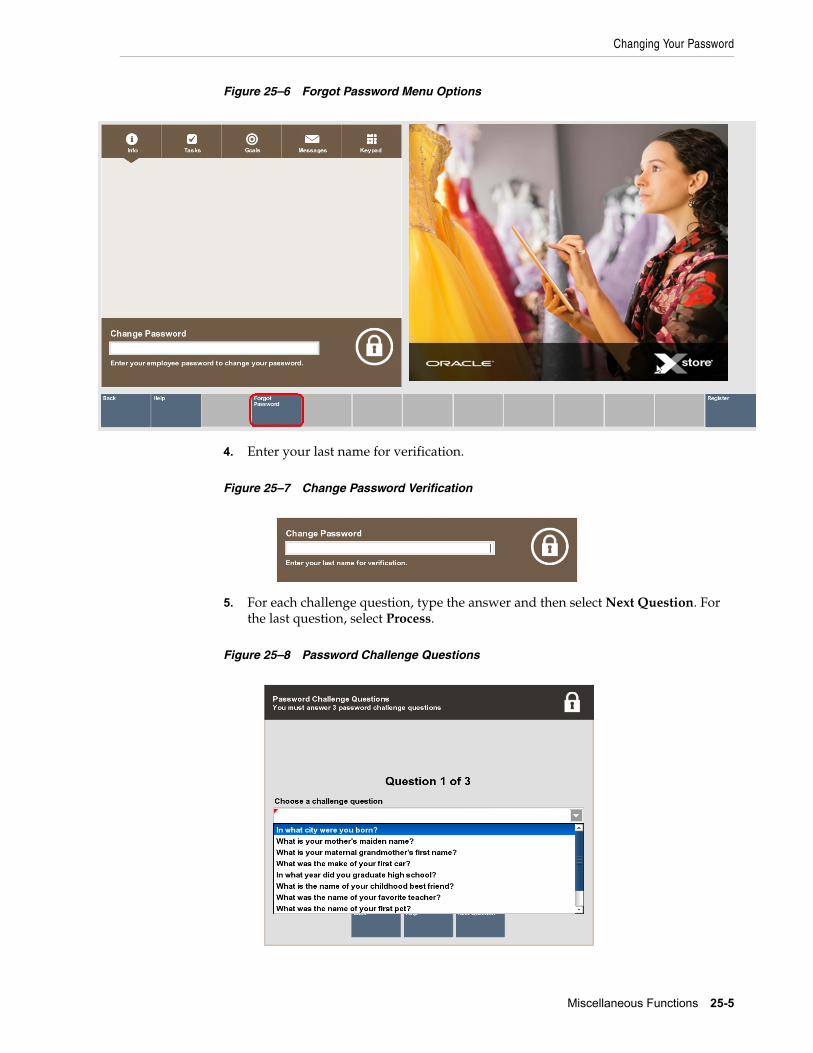
Changing Your Password
Miscellaneous Functions 25-5
Figure 25–6 Forgot Password Menu Options
4. Enter your last name for verification.
Figure 25–7 Change Password Verification
5. For each challenge question, type the answer and then select Next Question. For the last question, select Process.
Figure 25–8 Password Challenge Questions
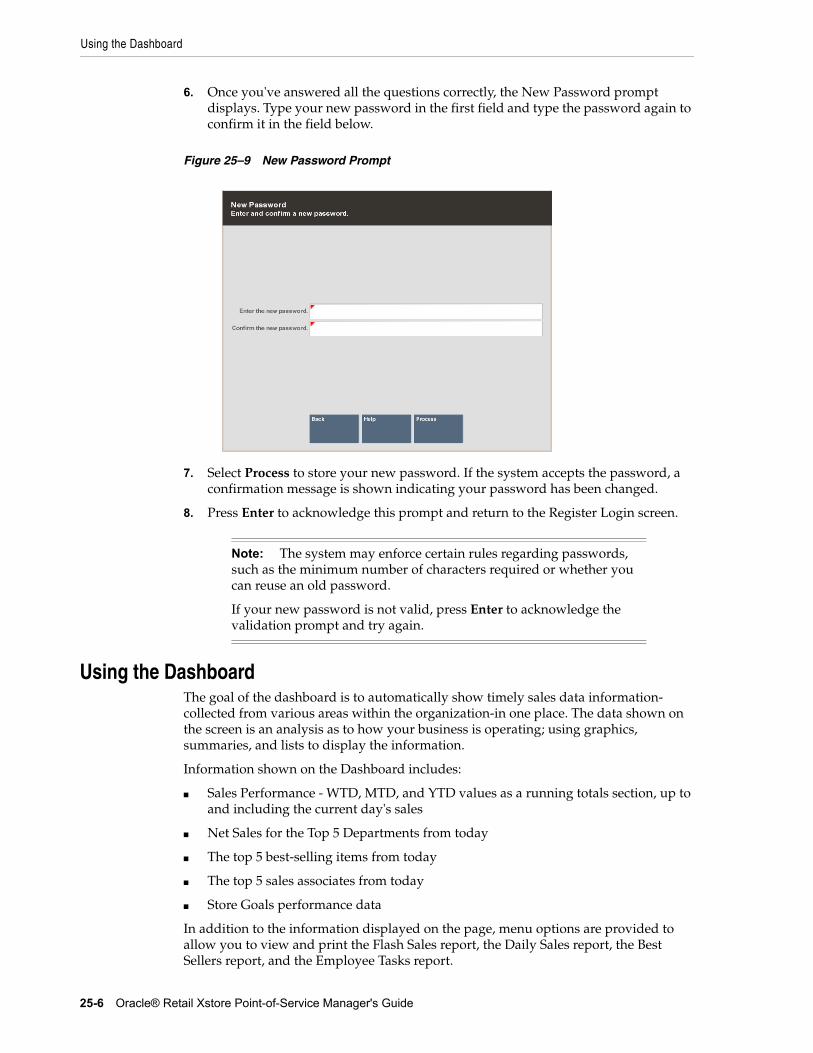
Using the Dashboard
25-6 Oracle® Retail Xstore Point-of-Service Manager's Guide
6. Once you've answered all the questions correctly, the New Password prompt displays. Type your new password in the first field and type the password again to confirm it in the field below.
Figure 25–9 New Password Prompt
7. Select Process to store your new password. If the system accepts the password, a confirmation message is shown indicating your password has been changed.
8. Press Enter to acknowledge this prompt and return to the Register Login screen.
Using the DashboardThe goal of the dashboard is to automatically show timely sales data information- collected from various areas within the organization-in one place. The data shown on the screen is an analysis as to how your business is operating; using graphics, summaries, and lists to display the information.
Information shown on the Dashboard includes:
■ Sales Performance - WTD, MTD, and YTD values as a running totals section, up to and including the current day's sales
■ Net Sales for the Top 5 Departments from today
■ The top 5 best-selling items from today
■ The top 5 sales associates from today
■ Store Goals performance data
In addition to the information displayed on the page, menu options are provided to allow you to view and print the Flash Sales report, the Daily Sales report, the Best Sellers report, and the Employee Tasks report.
Note: The system may enforce certain rules regarding passwords, such as the minimum number of characters required or whether you can reuse an old password.
If your new password is not valid, press Enter to acknowledge the validation prompt and try again.
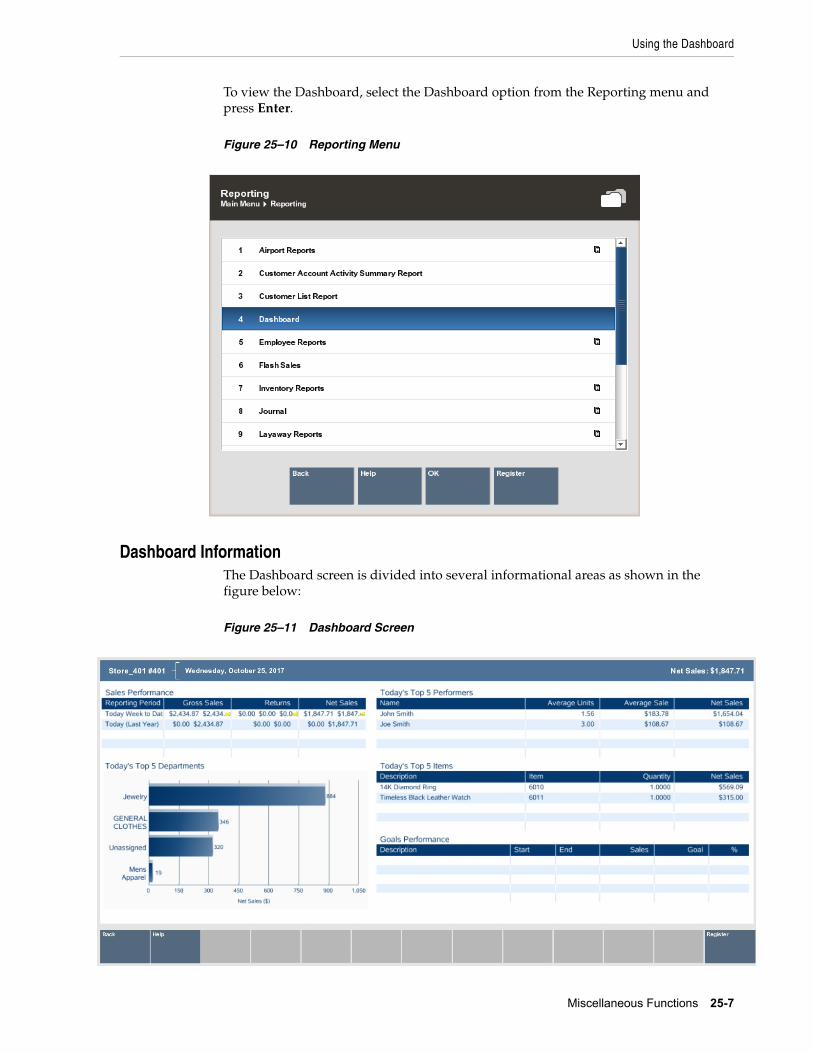
Using the Dashboard
Miscellaneous Functions 25-7
To view the Dashboard, select the Dashboard option from the Reporting menu and press Enter.
Figure 25–10 Reporting Menu
Dashboard InformationThe Dashboard screen is divided into several informational areas as shown in the figure below:
Figure 25–11 Dashboard Screen
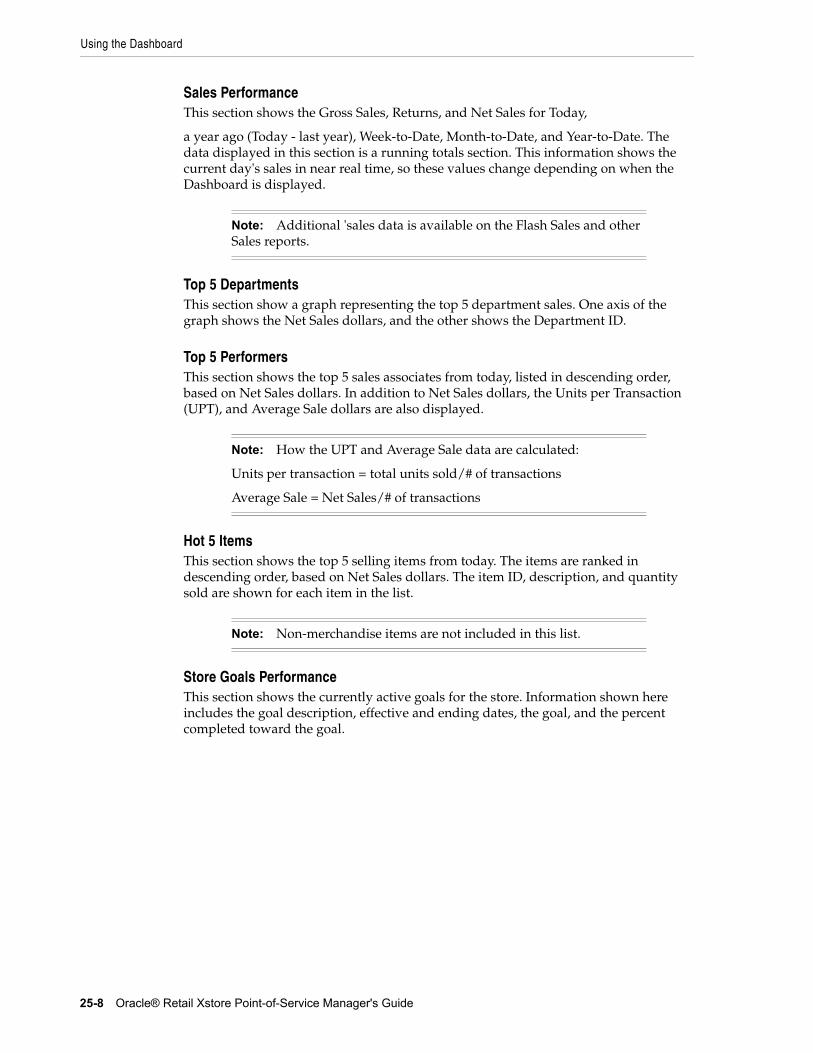
Using the Dashboard
25-8 Oracle® Retail Xstore Point-of-Service Manager's Guide
Sales PerformanceThis section shows the Gross Sales, Returns, and Net Sales for Today,
a year ago (Today - last year), Week-to-Date, Month-to-Date, and Year-to-Date. The data displayed in this section is a running totals section. This information shows the current day's sales in near real time, so these values change depending on when the Dashboard is displayed.
Top 5 DepartmentsThis section show a graph representing the top 5 department sales. One axis of the graph shows the Net Sales dollars, and the other shows the Department ID.
Top 5 PerformersThis section shows the top 5 sales associates from today, listed in descending order, based on Net Sales dollars. In addition to Net Sales dollars, the Units per Transaction (UPT), and Average Sale dollars are also displayed.
Hot 5 ItemsThis section shows the top 5 selling items from today. The items are ranked in descending order, based on Net Sales dollars. The item ID, description, and quantity sold are shown for each item in the list.
Store Goals PerformanceThis section shows the currently active goals for the store. Information shown here includes the goal description, effective and ending dates, the goal, and the percent completed toward the goal.
Note: Additional 'sales data is available on the Flash Sales and other Sales reports.
Note: How the UPT and Average Sale data are calculated:
Units per transaction = total units sold/# of transactions
Average Sale = Net Sales/# of transactions
Note: Non-merchandise items are not included in this list.
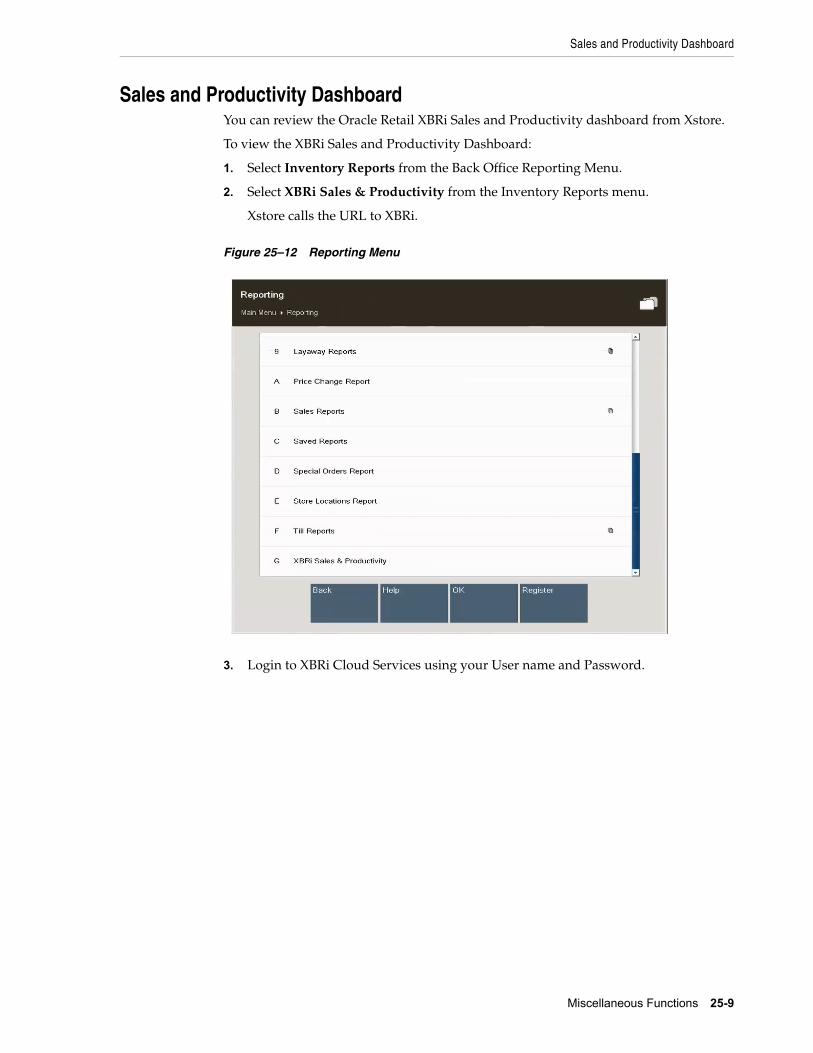
Sales and Productivity Dashboard
Miscellaneous Functions 25-9
Sales and Productivity DashboardYou can review the Oracle Retail XBRi Sales and Productivity dashboard from Xstore.
To view the XBRi Sales and Productivity Dashboard:
1. Select Inventory Reports from the Back Office Reporting Menu.
2. Select XBRi Sales & Productivity from the Inventory Reports menu.
Xstore calls the URL to XBRi.
Figure 25–12 Reporting Menu
3. Login to XBRi Cloud Services using your User name and Password.
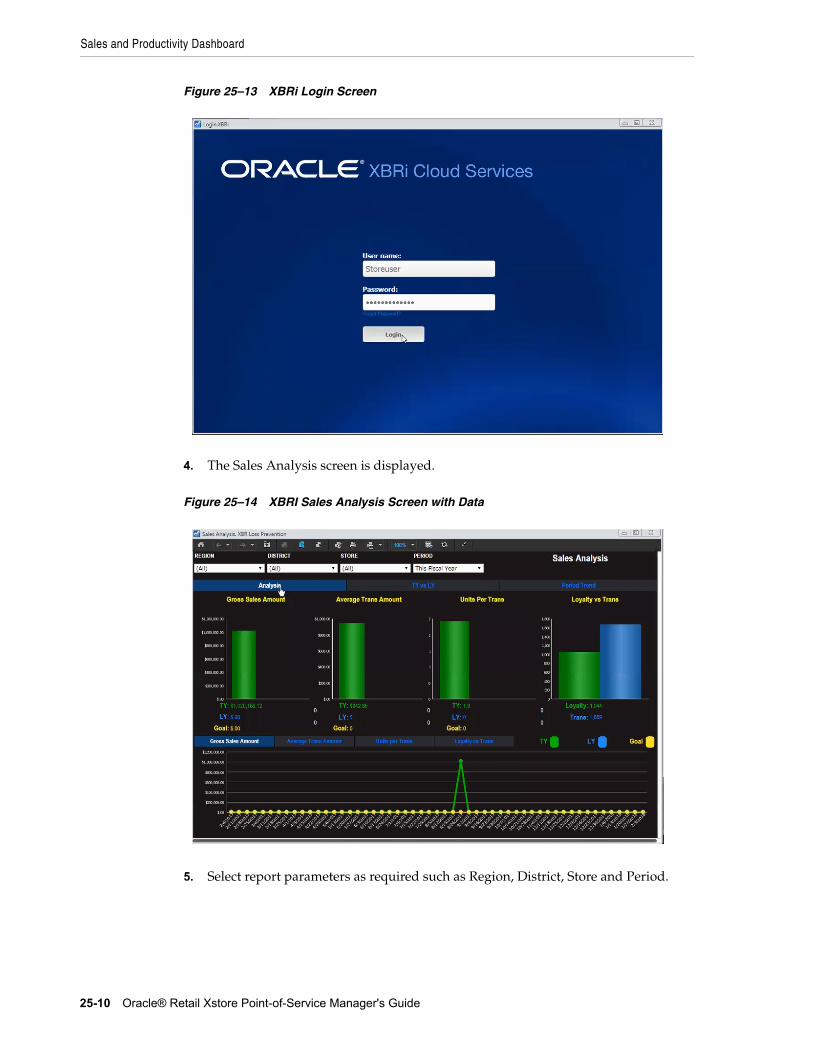
Sales and Productivity Dashboard
25-10 Oracle® Retail Xstore Point-of-Service Manager's Guide
Figure 25–13 XBRi Login Screen
4. The Sales Analysis screen is displayed.
Figure 25–14 XBRI Sales Analysis Screen with Data
5. Select report parameters as required such as Region, District, Store and Period.
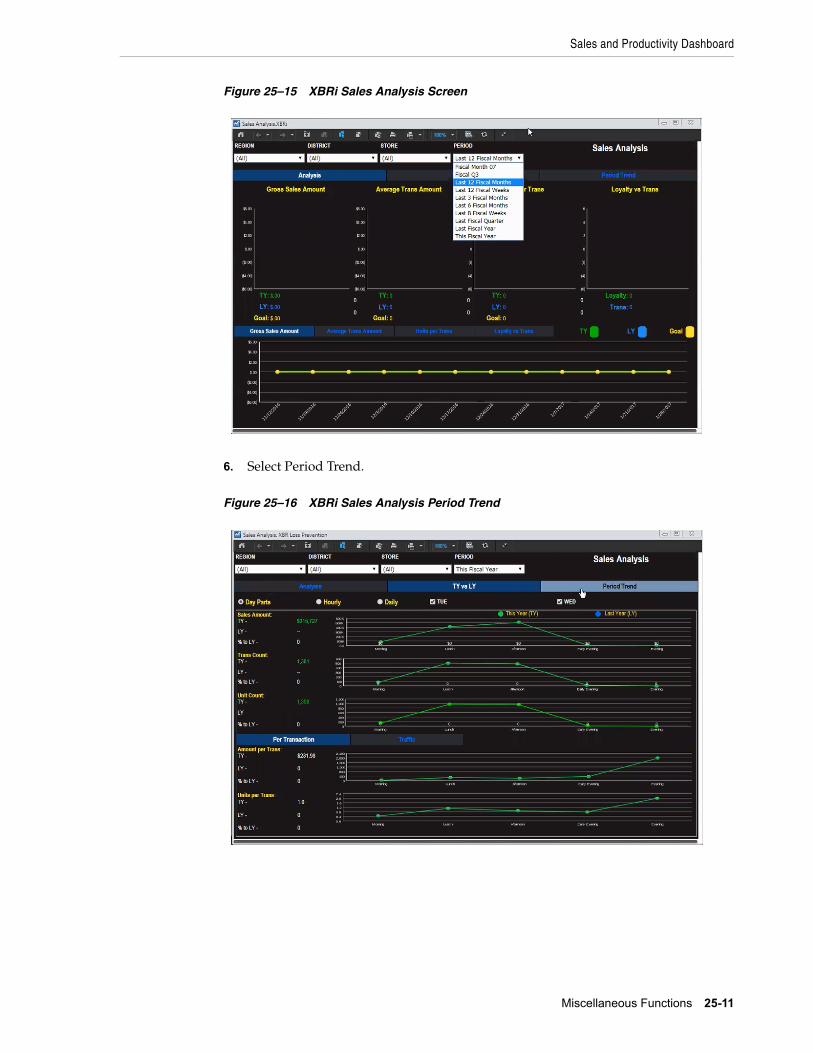
Sales and Productivity Dashboard
Miscellaneous Functions 25-11
Figure 25–15 XBRi Sales Analysis Screen
6. Select Period Trend.
Figure 25–16 XBRi Sales Analysis Period Trend
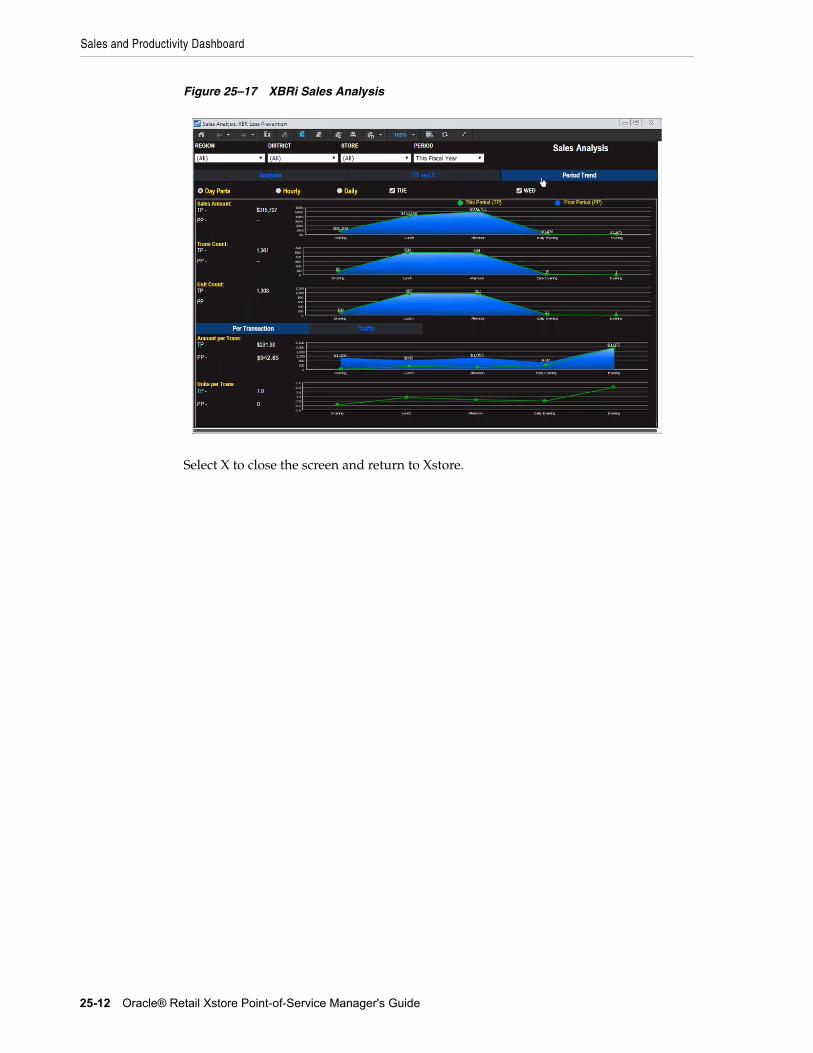
Sales and Productivity Dashboard
25-12 Oracle® Retail Xstore Point-of-Service Manager's Guide
Figure 25–17 XBRi Sales Analysis
Select X to close the screen and return to Xstore.
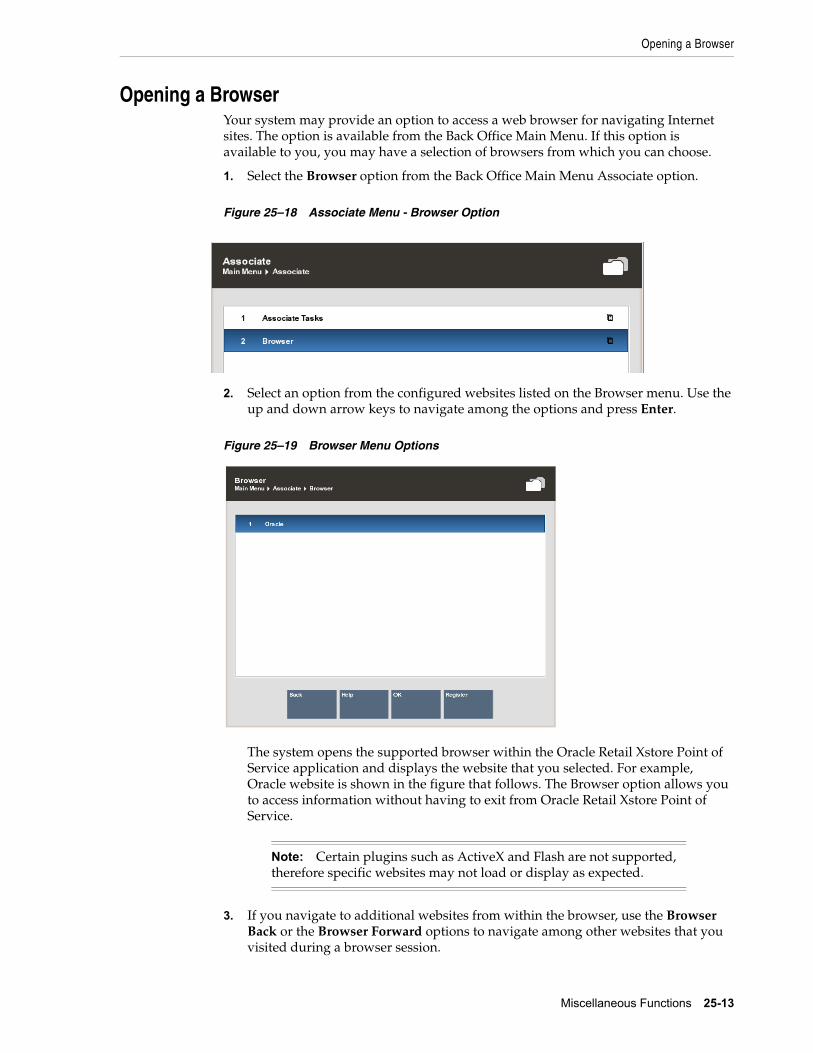
Opening a Browser
Miscellaneous Functions 25-13
Opening a BrowserYour system may provide an option to access a web browser for navigating Internet sites. The option is available from the Back Office Main Menu. If this option is available to you, you may have a selection of browsers from which you can choose.
1. Select the Browser option from the Back Office Main Menu Associate option.
Figure 25–18 Associate Menu - Browser Option
2. Select an option from the configured websites listed on the Browser menu. Use the up and down arrow keys to navigate among the options and press Enter.
Figure 25–19 Browser Menu Options
The system opens the supported browser within the Oracle Retail Xstore Point of Service application and displays the website that you selected. For example, Oracle website is shown in the figure that follows. The Browser option allows you to access information without having to exit from Oracle Retail Xstore Point of Service.
3. If you navigate to additional websites from within the browser, use the Browser Back or the Browser Forward options to navigate among other websites that you visited during a browser session.
Note: Certain plugins such as ActiveX and Flash are not supported, therefore specific websites may not load or display as expected.
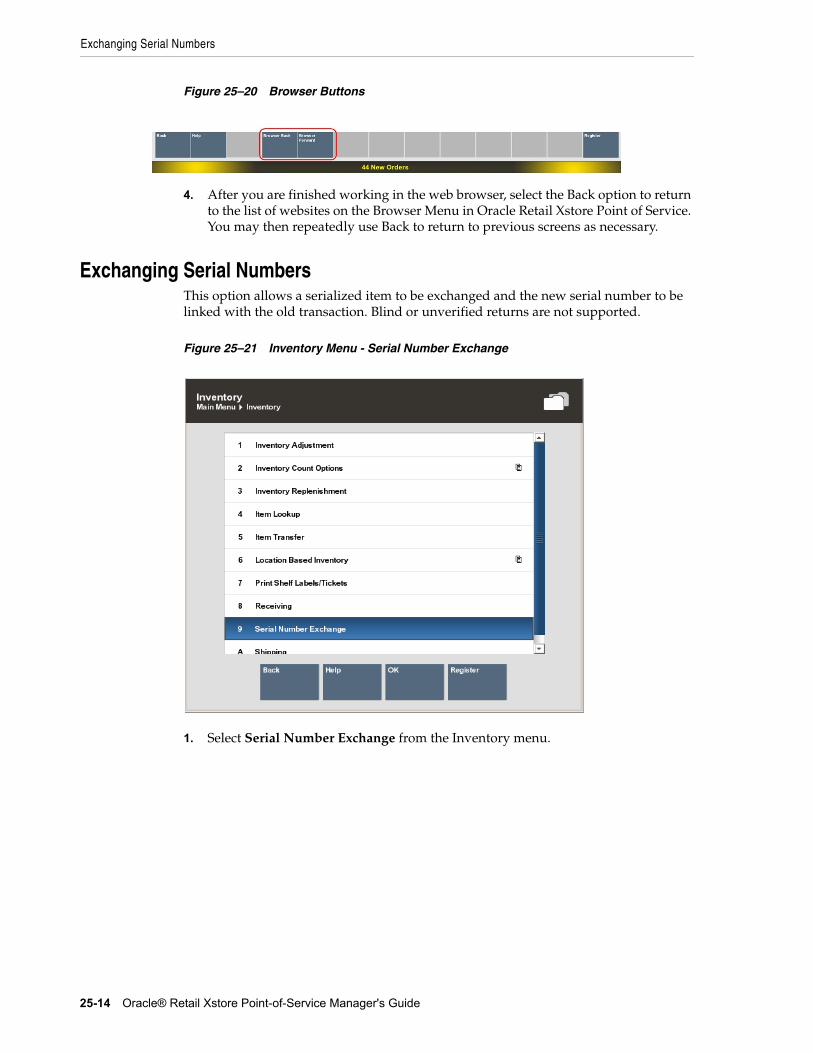
Exchanging Serial Numbers
25-14 Oracle® Retail Xstore Point-of-Service Manager's Guide
Figure 25–20 Browser Buttons
4. After you are finished working in the web browser, select the Back option to return to the list of websites on the Browser Menu in Oracle Retail Xstore Point of Service. You may then repeatedly use Back to return to previous screens as necessary.
Exchanging Serial NumbersThis option allows a serialized item to be exchanged and the new serial number to be linked with the old transaction. Blind or unverified returns are not supported.
Figure 25–21 Inventory Menu - Serial Number Exchange
1. Select Serial Number Exchange from the Inventory menu.
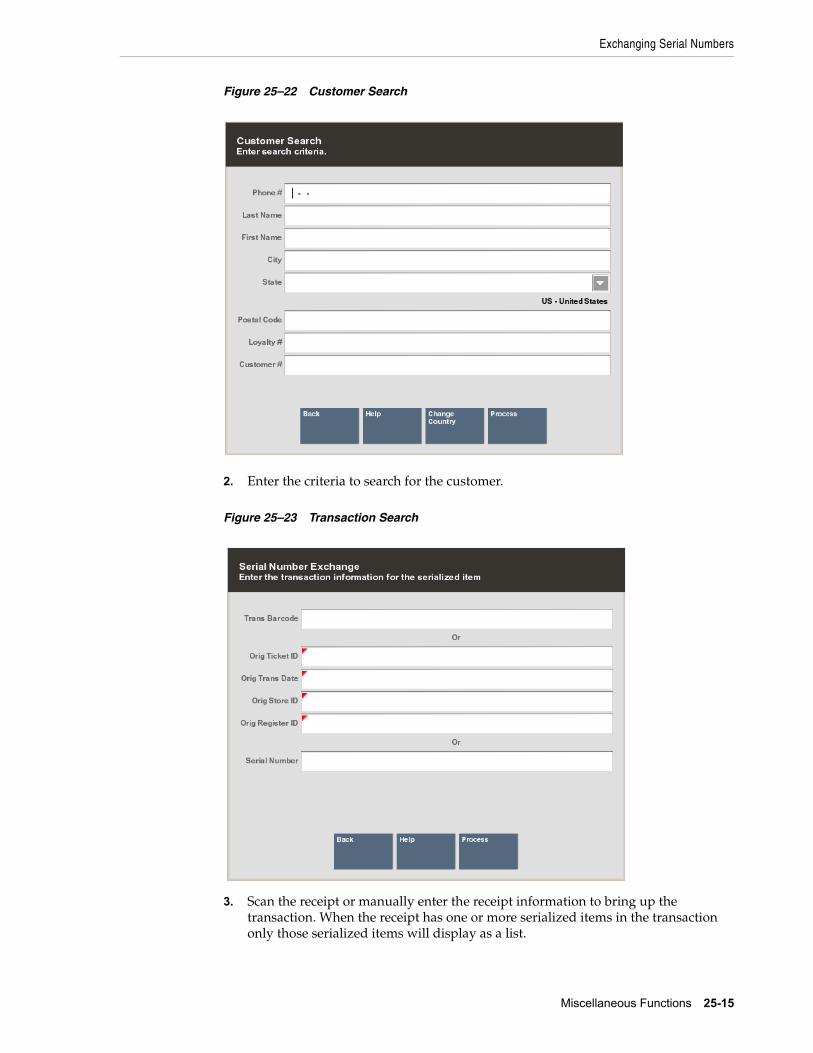
Exchanging Serial Numbers
Miscellaneous Functions 25-15
Figure 25–22 Customer Search
2. Enter the criteria to search for the customer.
Figure 25–23 Transaction Search
3. Scan the receipt or manually enter the receipt information to bring up the transaction. When the receipt has one or more serialized items in the transaction only those serialized items will display as a list.
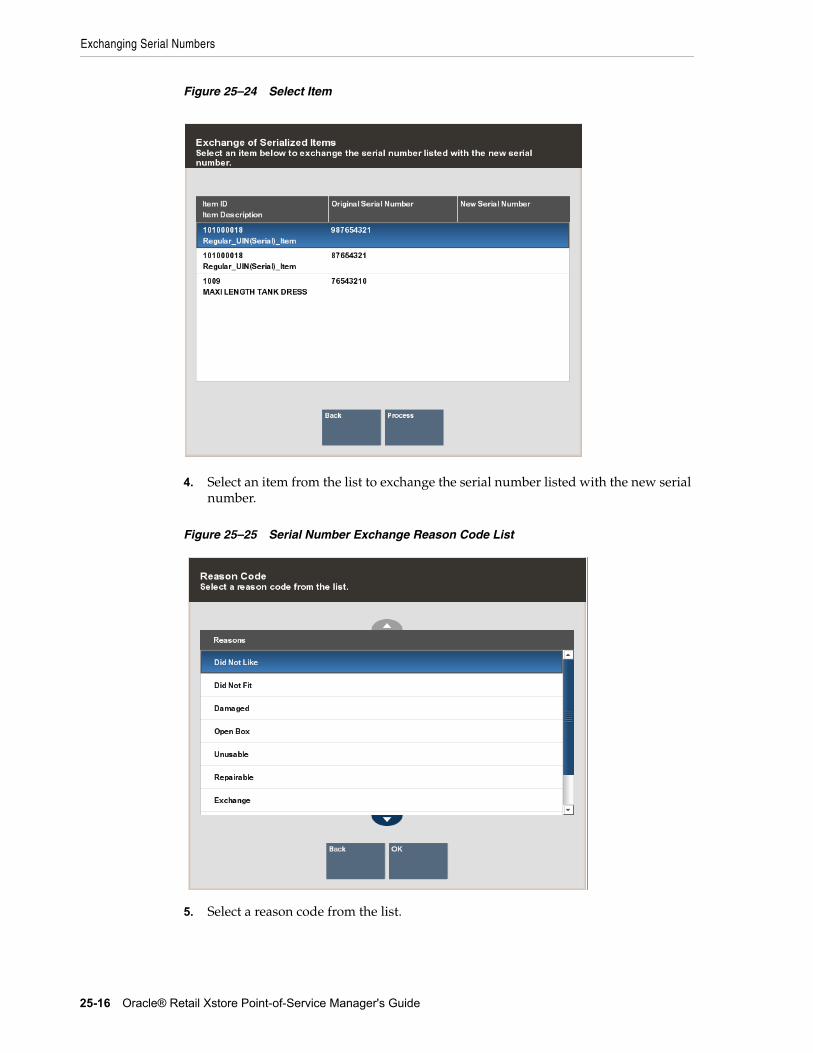
Exchanging Serial Numbers
25-16 Oracle® Retail Xstore Point-of-Service Manager's Guide
Figure 25–24 Select Item
4. Select an item from the list to exchange the serial number listed with the new serial number.
Figure 25–25 Serial Number Exchange Reason Code List
5. Select a reason code from the list.
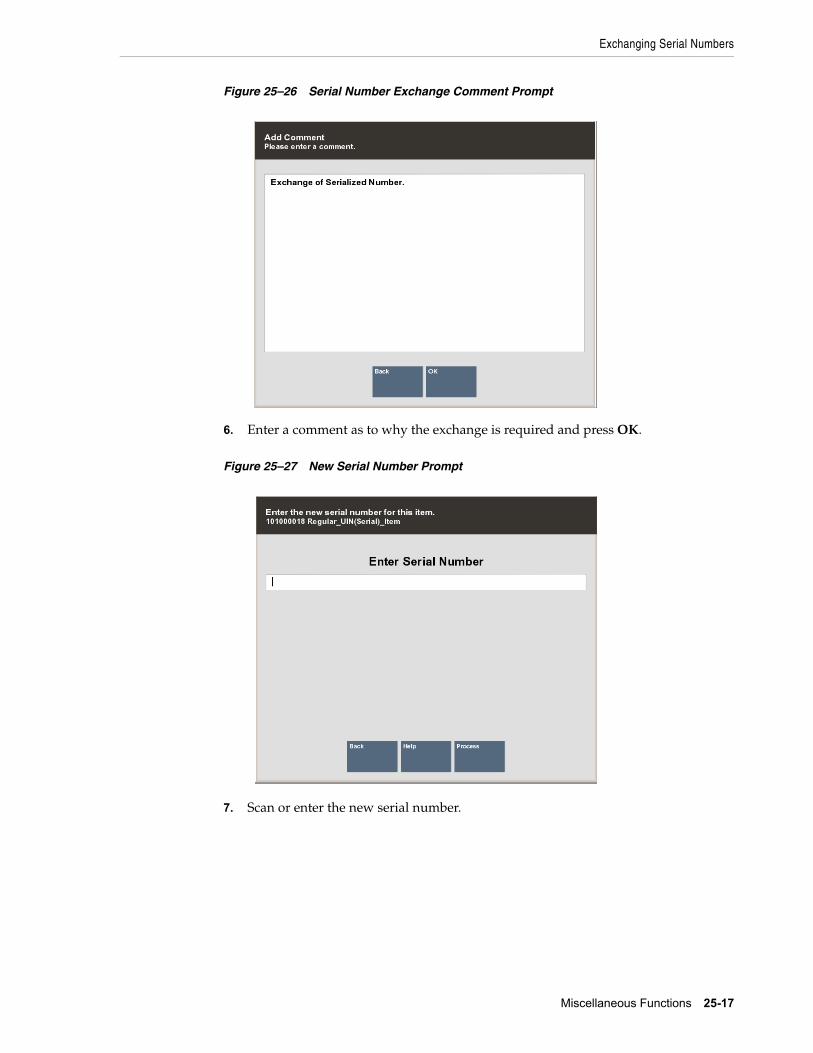
Exchanging Serial Numbers
Miscellaneous Functions 25-17
Figure 25–26 Serial Number Exchange Comment Prompt
6. Enter a comment as to why the exchange is required and press OK.
Figure 25–27 New Serial Number Prompt
7. Scan or enter the new serial number.
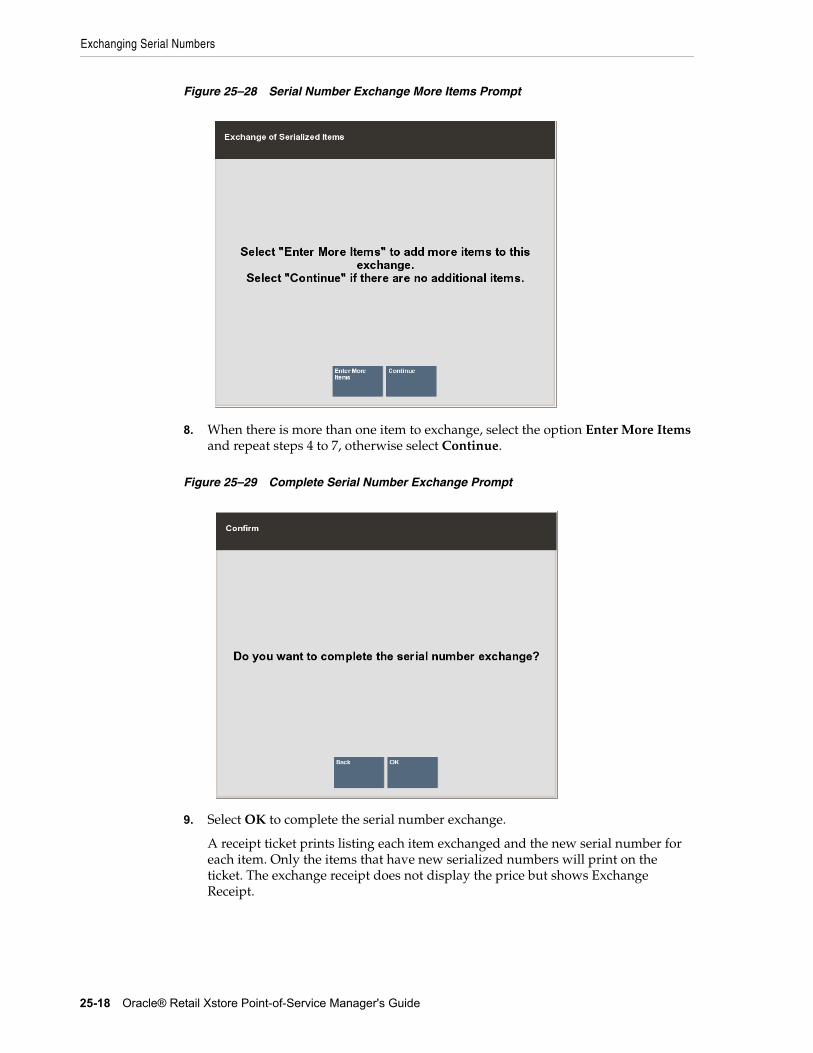
Exchanging Serial Numbers
25-18 Oracle® Retail Xstore Point-of-Service Manager's Guide
Figure 25–28 Serial Number Exchange More Items Prompt
8. When there is more than one item to exchange, select the option Enter More Items and repeat steps 4 to 7, otherwise select Continue.
Figure 25–29 Complete Serial Number Exchange Prompt
9. Select OK to complete the serial number exchange.
A receipt ticket prints listing each item exchanged and the new serial number for each item. Only the items that have new serialized numbers will print on the ticket. The exchange receipt does not display the price but shows Exchange Receipt.
Exchanging Serial Numbers
Miscellaneous Functions 25-19
Note: If a customer decides to return a serialized item, that had been exchanged, the system will have the latest serial number on file for that item.
Related Documents

![[]Oracle® Retail Xstore Point-of-Service for Grocery …...Oracle Retail Xstore Point-of-Service for Grocery/User Guide, Release 16.0 Oracle welcomes customers' comments and suggestions](https://static.cupdf.com/doc/110x72/5e62a1200b0c5259912365cd/oracle-retail-xstore-point-of-service-for-grocery-oracle-retail-xstore-point-of-service.jpg)


