Oracle ® Retail XBR Loss Prevention and Store Analytics Implementation Guide Release 7.0 August 2015

Welcome message from author
This document is posted to help you gain knowledge. Please leave a comment to let me know what you think about it! Share it to your friends and learn new things together.
Transcript
Oracle® Retail XBR Loss Prevention and Store AnalyticsImplementation Guide Release 7.0
August 2015
ii
Oracle® Retail XBR Loss Prevention and Store Analytics Implementation Guide, Release 7.0
Copyright © 2015, Oracle and/or its affiliates. All rights reserved.
This software and related documentation are provided under a license agreement containing restrictions on use and disclosure and are protected by intellectual property laws. Except as expressly permitted in your license agreement or allowed by law, you may not use, copy, reproduce, translate, broadcast, modify, license, transmit, distribute, exhibit, perform, publish, or display any part, in any form, or by any means. Reverse engineering, disassembly, or decompilation of this software, unless required by law for interoperability, is prohibited.
The information contained herein is subject to change without notice and is not warranted to be error-free. If you find any errors, please report them to us in writing.
If this software or related documentation is delivered to the U.S. Government or anyone licensing it on behalf of the U.S. Government, then the following notice is applicable:
U.S. GOVERNMENT END USERS: Oracle programs, including any operating system, integrated software, any programs installed on the hardware, and/or documentation, delivered to U.S. Government end users are "commercial computer software" pursuant to the applicable Federal Acquisition Regulation and agency-specific supplemental regulations. As such, use, duplication, disclosure, modification, and adaptation of the programs, including any operating system, integrated software, any programs installed on the hardware, and/or documentation, shall be subject to license terms and license restrictions applicable to the programs. No other rights are granted to the U.S. Government.
This software or hardware is developed for general use in a variety of information management applications. It is not developed or intended for use in any inherently dangerous applications, including applications that may create a risk of personal injury. If you use this software or hardware in dangerous applications, then you shall be responsible to take all appropriate fail-safe, backup, redundancy, and other measures to ensure its safe use. Oracle Corporation and its affiliates disclaim any liability for any damages caused by use of this software or hardware in dangerous applications.
Oracle and Java are registered trademarks of Oracle and/or its affiliates. Other names may be trademarks of their respective owners.
Intel and Intel Xeon are trademarks or registered trademarks of Intel Corporation. All SPARC trademarks are used under license and are trademarks or registered trademarks of SPARC International, Inc. AMD, Opteron, the AMD logo, and the AMD Opteron logo are trademarks or registered trademarks of Advanced Micro Devices. UNIX is a registered trademark of The Open Group.
This software or hardware and documentation may provide access to or information on content, products, and services from third parties. Oracle Corporation and its affiliates are not responsible for and expressly disclaim all warranties of any kind with respect to third-party content, products, and services unless otherwise set forth in an applicable agreement between you and Oracle. Oracle Corporation and its affiliates will not be responsible for any loss, costs, or damages incurred due to your access to or use of third-party content, products, or services, except as set forth in an applicable agreement between you and Oracle.
Oracle Retail VAR Applications
The following restrictions and provisions only apply to the programs referred to in this section and licensed to you. You acknowledge that the programs may contain third party software (VAR applications) licensed to Oracle. Depending upon your product and its version number, the VAR applications may include:
(i) the MicroStrategy Components developed and licensed by MicroStrategy Services Corporation (MicroStrategy) of McLean, Virginia to Oracle and imbedded in the MicroStrategy for Oracle Retail Data Warehouse and MicroStrategy for Oracle Retail Planning & Optimization applications.
(ii) the Wavelink component developed and licensed by Wavelink Corporation (Wavelink) of Kirkland, Washington, to Oracle and imbedded in Oracle Retail Mobile Store Inventory Management.
(iii) the software component known as Access Via™ licensed by Access Via of Seattle, Washington, and imbedded in Oracle Retail Signs and Oracle Retail Labels and Tags.
(iv) the software component known as Adobe Flex™ licensed by Adobe Systems Incorporated of San Jose, California, and imbedded in Oracle Retail Promotion Planning & Optimization application.
You acknowledge and confirm that Oracle grants you use of only the object code of the VAR Applications. Oracle will not deliver source code to the VAR Applications to you. Notwithstanding any other term or condition of the agreement and this ordering document, you shall not cause or permit alteration of any VAR Applications. For purposes of this section, "alteration" refers to all alterations, translations, upgrades, enhancements, customizations or modifications of all or any portion of the VAR Applications including all reconfigurations, reassembly or reverse assembly, re-engineering or reverse engineering and recompilations or reverse compilations of the VAR Applications or any derivatives of the VAR Applications. You acknowledge that it shall be a breach of the agreement to utilize the relationship, and/or confidential information of the VAR Applications for purposes of competitive discovery.
The VAR Applications contain trade secrets of Oracle and Oracle's licensors and Customer shall not attempt, cause, or permit the alteration, decompilation, reverse engineering, disassembly or other reduction of the VAR Applications to a human perceivable form. Oracle reserves the right to replace, with functional equivalent software, any of the VAR Applications in future releases of the applicable program.
iv
Contact Information
30500 Bruce Industrial Parkway
Cleveland, OH 44139 USA
Toll Free: 888.328.2826
Tel: 440.498.4414
Fax: 440.542.3043
1800 West Park Drive
Westboro, MA 01581
Tel:508.655.7500
Fax:508.647.9495
7031 Columbia Gateway Drive
Columbia, MD 21046-2289
Tel: 443.285.6000

XBR® 7.0.0 XBR Implementation Guide
7.0.0 CONSIDERATIONS AND UPGRADE ADVISEMENTS
This section presents a brief explanation of new, changed or updated, and other important information that the person performing an upgrade or new installation should read before starting the installation/configuration.
All Users
Employee Violations DashboardA new feature has been added that provides an intuitive dashboard report called an Employee Violations Dashboard (EVD) as a unique distribution on alert reports. The EVDs will be generated for each employee/cashier that exceeded one or more alert filters configured in a scheduled query. The EVDs will be distributed as a PDF attachment via email to each recipient on the scheduled run.
If upgrading to XBR 7.0, the default condition for EVD for a customer is “Off”. EVDs must be enabled through the Customer Profile page in XBR Desktop. See “Enabling EVD” on page 317 for instructions.
The EVD can be configured by changing the settings in the dvreport-config.xml file. See “Employee Violations Dashboard” on page 187 for more information.
The EVD KPI violations can be modified or new ones created. See “EVD Maintenance” on page 318 for more information.
The logo and instructions that appear in the footer of the EVD report can be changed to meet customer specifications.
The logo (png, jpg, or gif format) should be approximately 8k or less in size with an image size of about 80 px wide by 40 px high. The logo must also be placed in the following folder:
...\tomcat\liferay\html\skin\image\common\report_menu_icons\
See “Employee Violations Dashboard” on page 187 for more information on configuring the logo and instructions.
OrgintroThe orgintro utility should be run according to the following guidelines:
If this is a new XBR 7.0.0 installation, run orgintro after the database and Desktop have been installed.
If upgrading to XBR 7.0.0 from XBR 6.8.x, orgintro does not have to be run.
If upgrading to XBR 7.0.0 from an XBR version earlier than 6.8.x, run orgintro after all database upgrades have be done.
Note: The rebranding for the latest version of this documentation set is in development as part of post MICROS acquisition activities. References to former MICROS product names may exist throughout this existing documentation set.
i

XBR Implementation Guide XBR® 7.0.0
RETAIL/GROCERY
No MatchIf upgrading to XBR 7.0, determine if the required elements for No Match are present. These elements are:
original purchase transaction information for refunds and exchanges
transaction detail for cancels and post voids.
If these elements are present, No Match can be enabled.
Refer to “No Match Analysis” on page 360 for enable/disable information on No Match.
Post VoidsIf upgrading to XBR 7.0, determine if the transaction detail for the post voiding transaction is provided in the Tlog. If this information is not provided, enable the Post Void procedure so that it can be created.
Refer to “Post Void - Details” on page 359 for enable/disable information on Post Voids.
Staging FieldsFour new fields have been added to the staging/audit temp table - config_version, volume, weight and linetime. Since Oracle uses a control card, no control card change is necessary for the upgrade if the new fields are not being output from the loader. If the loader is modified to output the four new fields or you are doing a new install then you will be required to use the new 7.0 control card. The 7.0 control cards have been included on the installation CD and in CVS.
OracleOracle New Install or 7.0 Upgrade with new fields - Use 7.0 control card located here
For XBR:
CVS:\ database_scripts\Database Architecture\Database Scripts\Analytics Product Suite 7.0\XBR 7.0\XBR Retail 7.0\Oracle\ pos_staging_70.ctl
Or
CD:\XBR-FULL\DATABASE_SCRIPTS\RETAIL\NEW_INSTALL\ORACLE\pos_staging_70.ctl
For Balance:
CVS:\database_scripts\Database Architecture\Database Scripts\Analytics Product Suite 7.0\Balance 7.0\Oracle\adc_pos_data_tmp_70.ctl
Or
CD:\ BALANCE-FULL\DATABASE_SCRIPTS\RETAIL\NEW_INSTALL\ORACLE\adc_pos_data_tmp_70.ctl
SQL ServerFor SQL Server, no format file was used with BCP prior to version 7.0. This will cause an error during data processing for upgraded customers if the new fields are not being output from
ii

XBR® 7.0.0 XBR Implementation Guide
the loader. A format file is now required to be used in this situation. For consistency we suggest a format file be used with a new install and with an upgrade if the loader has been modified to output the four new fields. The new 7.0 and old format cards have been included on the installation CD and in CVS. Note: _old refers to the file without the 4 new fields.
SQL Server New Install or 7.0 Upgrade with new fields - Use new format file located here
For XBR:
CVS:\database_scripts\Database Architecture\Database Scripts\Analytics Product Suite 7.0\XBR 7.0\XBR Retail 7.0\SQL Server\ pos_staging_70.fmt
Or
CD:\XBR-FULL\DATABASE_SCRIPTS\RETAIL\NEW_INSTALL\MSSQL\pos_staging_70.fmt
For Balance:
CVS:\database_scripts\Database Architecture\Database Scripts\Analytics Product Suite 7.0\Balance 7.0\SQL Server\adc_pos_data_tmp_70.fmt
Or
CD:\BALANCE-FULL\DATABASE_SCRIPTS\RETAIL\NEW_INSTALL\MSSQL\adc_pos_data_tmp_70.fmt
SQL Server 7.0 Upgrade without new fields - Use old format file located here
For XBR:
CVS:\database_scripts\Database Architecture\Database Scripts\Analytics Product Suite 7.0\XBR 7.0\XBR Retail 7.0\SQL Server\ pos_staging_old.fmt
Or
CD:\XBR-FULL\DATABASE_SCRIPTS\RETAIL\UPGRADE\MSSQL\pos_staging_old.fmt
For Balance:
CVS:\database_scripts\Database Architecture\Database Scripts\Analytics Product Suite 7.0\Balance 7.0\SQL Server\adc_pos_data_tmp_old.fmt
Or
CD:\ BALANCE-FULL\DATABASE_SCRIPTS\RETAIL\UPGRADE\MSSQL\adc_pos_data_tmp_old.fmt
Statistics BucketsFor the 7.0 upgrade, some new statistics buckets were added and some existing statistics buckets were updated. The following information pertains to the 7.0 upgrade not 7.0 new installs.
The new statistics buckets were inserted into pro_view_syntax with active_flag = 'Y'. If the customer chooses not to use these new statistics buckets and/or the information is not available in the tlog, they must be turned off (active_flag = “N”).
The New statistic buckets are:
CA_REF_EXC_NO_ORIG_TX_AMT CA_REF_EXC_NO_ORIG_TX_CT
CASH_REF_SAME_DAY_AMOUNT CASH_REF_SAME_DAY_COUNT
iii

XBR Implementation Guide XBR® 7.0.0
The updated statistics buckets were inserted into pro_view_syntax with system = 'UPG' and active_flag = 'N'. This was done to avoid overwriting any existing formulas. The active_flag for any record where system = 'UPG' are to remain inactive. The implementation team will be responsible to make these updated statistic buckets active if necessary. The system field will also need to be changed to 'STAT'.
SQL Example:
The updated statistics buckets are:
CASH_REF_SINGLE_SKU_AMT CASH_REF_SINGLE_SKU_CT
EMP_OWN_TRANS_AMOUNT EMP_OWN_TRANS_COUNT
EMP_OWN_TRANS_DISC_AMOUNT REF_EXC_NO_ORIG_TX_AMT
REF_EXC_NO_ORIG_TX_CT REF_SAME_DAY_AMOUNT
REF_SAME_DAY_COUNT SALES_LT_THRESH_AMOUNT
SALES_LT_THRESH_COUNT SALES_LT_THRESH_LV_AMT
SALES_LT_THRESH_MOD_AMT SALES_LT_THRESH_MOD_COUNT
--First turn off the existing STAT bucketupdate pro_view_syntax set active_flag= 'N' where system = 'STAT' and posting_source = 'ST' and target_field = '<target_field>';--Then activate the UPG bucket. Update pro_view_syntax set system = 'STAT', active_flag = 'Y' where system = 'UPG' and posting_source = 'ST' andtarget_field = '<target_field>';
CANCEL_NOMATCH_AMOUNT CANCEL_NOMATCH_COUNT
CASH_POST_VOID_AMOUNT CASH_POST_VOID_COUNT
GCARD_ISS_AMOUNT GCARD_ISS_LINE_COUNT
GCARD_SOLD_AMOUNT GCARD_SOLD_COUNT
POSTVOID_NOMATCH_AMOUNT POSTVOID_NOMATCH_COUNT
REF_EXCH_MO_NOMATCH_AMOUNT REF_EXCH_MO_NOMATCH_COUNT
GCARD_ISS_LINE_COUNT and GCARD_ISS_AMOUNT are actually new buckets. The GCARD_SOLD_COUNT & AMOUNT used to include both issued and sold gift cards but now they have been broken out into two buckets.
iv
XBR® 7.0.0 XBR Implementation Guide
Extensibility
ProceduresIf a custom procedure is being used, it may need to be modified to include the 7.0 modifications. Query pro_procedures to see if a custom procedure is in use. If custom_name is NULL, then no further action is required since the core procedures were updated with the upgrade script. If custom_name is not NULL, the custom procedure needs to be compared to the core procedure and the custom procedure modified accordingly. This can be accomplished by using the Web Interface (DB Config) to edit the procedure definition. The following extensible procedures have been modified for 7.0:
SP_ADC_BR_POST_GL
SP_ADC_BR_UPDATE
SP_ADC_LM_AGING
SP_ADC_MOVE_REL
SP_ADC_NO_POLL
SP_MST_UPD_EMP
SP_PRO_LOAD_HIST
SP_PRO_LOAD_SPO
SP_PRO_LOAD_STATS (MSSQL Only)
SP_PRO_VIDEO
ViewsIf a custom view is being used, it may need to be modified to include the 7.0 modifications. Query pro_views for active non-core views (orgid <> -1001 and active_flag = Y) to see if a custom view is in use. If no custom view is in use, no further action was required since the modified core views were delivered to pro_views and then the views were re-created based on the settings in pro_views. If there is a custom view in use, the custom view needs to be compared to the core view and the custom view modified accordingly. This can be accomplished by using the Web Interface (DB Config) to edit the view definition. The following extensible views have been modified for 7.0:
ADC_JRNL_HDR
POS_ARCHIVE_DTL
POS_ARCHIVE_HDR
POS_JRNL_DTL
POS_JRNL_HDR
POS_JRNL_SKU
POS_JRNL_TND
POS_SALES_HDR
POS_SALES_OTH
POS_SALES_SKU
v
XBR Implementation Guide XBR® 7.0.0
POS_SALES_TND
POS_STAGING_DTL
POS_STAGING_HDR
POS_STAGING_HDR_FLG
POS_STAGING_HDR_LOAD
POS_STATISTICS
POS_VIDEO
Creating New Queries for Upgrading CustomersFor customers upgrading to v7.0, there is a new library (COREUPG) that will be created and utilized as a repository for Operations to deliver new reporting to customers on an as needed basis. The Upgrade Library includes all new queries/controls, modified queries/controls, and queries that are linked to or from modified queries.
See “Install XBR 7.0.0 Upgrade Query Library” on page 275 for information on upgrading an Oracle database.
See “Install XBR 7.0.0 Upgrade Query Library” on page 283 for information on upgrading a SQL Server database.
CORE Library/Upgrade LibraryNew queries that have been created to support new application functionality (i.e. - Query Tracking) are automatically added into the CORE XBR library. New queries and controls that have been created for XBR Retail and Balance that support data model changes (i.e. new statistic buckets) are imported into distinct upgrade libraries, COREUPG and BALUPG. These libraries contain queries and controls that are new, modified, or a dependency on a new or modified query.
In order for the customer to have access to this new reporting, the queries and controls must be copied either to an existing customer library or a new library (e.g. - XBR70, which will specifically contain the new queries.) It is recommended that a new library be created so that any modified or custom queries created by the customer are not overwritten.
If the queries and controls are going to be copied to a new library, this library must be created.
Use the following procedure to create a new library:
1. Log into XBR Desktop as XBRADMIN.
2. Select Administration Libraries.
3. Click New in the side panel.
vi
XBR® 7.0.0 XBR Implementation Guide
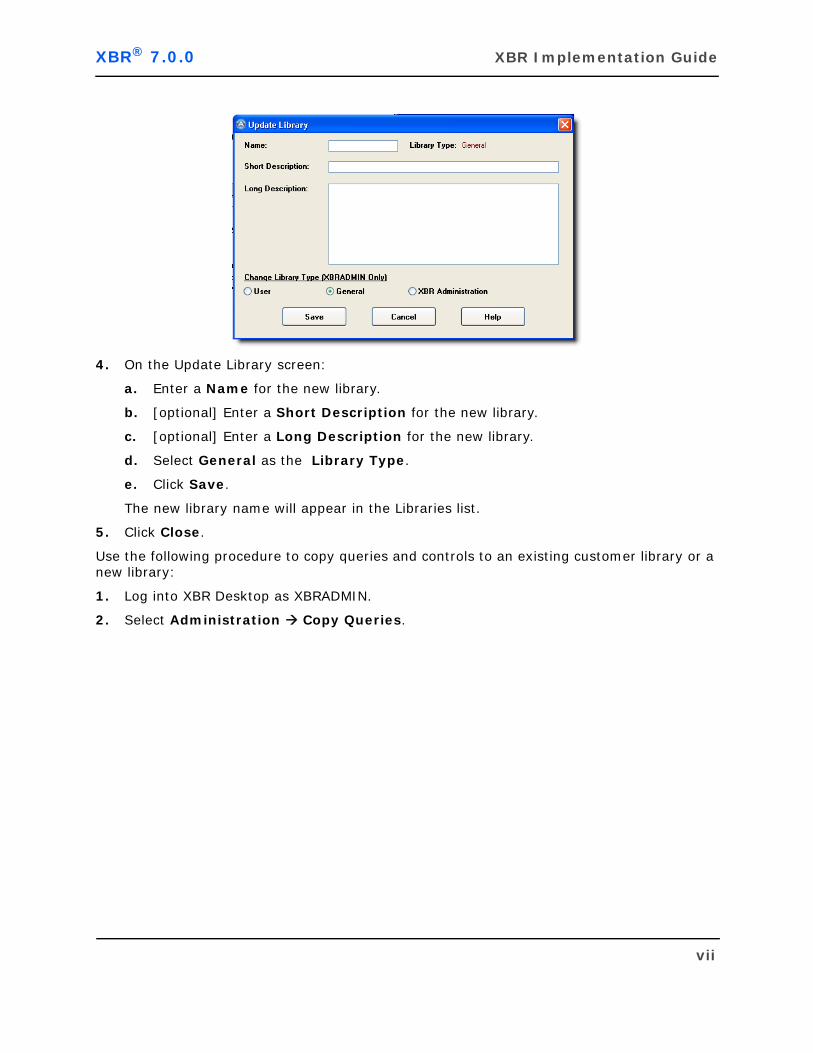
4. On the Update Library screen:
a. Enter a Name for the new library.
b. [optional] Enter a Short Description for the new library.
c. [optional] Enter a Long Description for the new library.
d. Select General as the Library Type.
e. Click Save.
The new library name will appear in the Libraries list.
5. Click Close.
Use the following procedure to copy queries and controls to an existing customer library or a new library:
1. Log into XBR Desktop as XBRADMIN.
2. Select Administration Copy Queries.
vii
XBR Implementation Guide XBR® 7.0.0
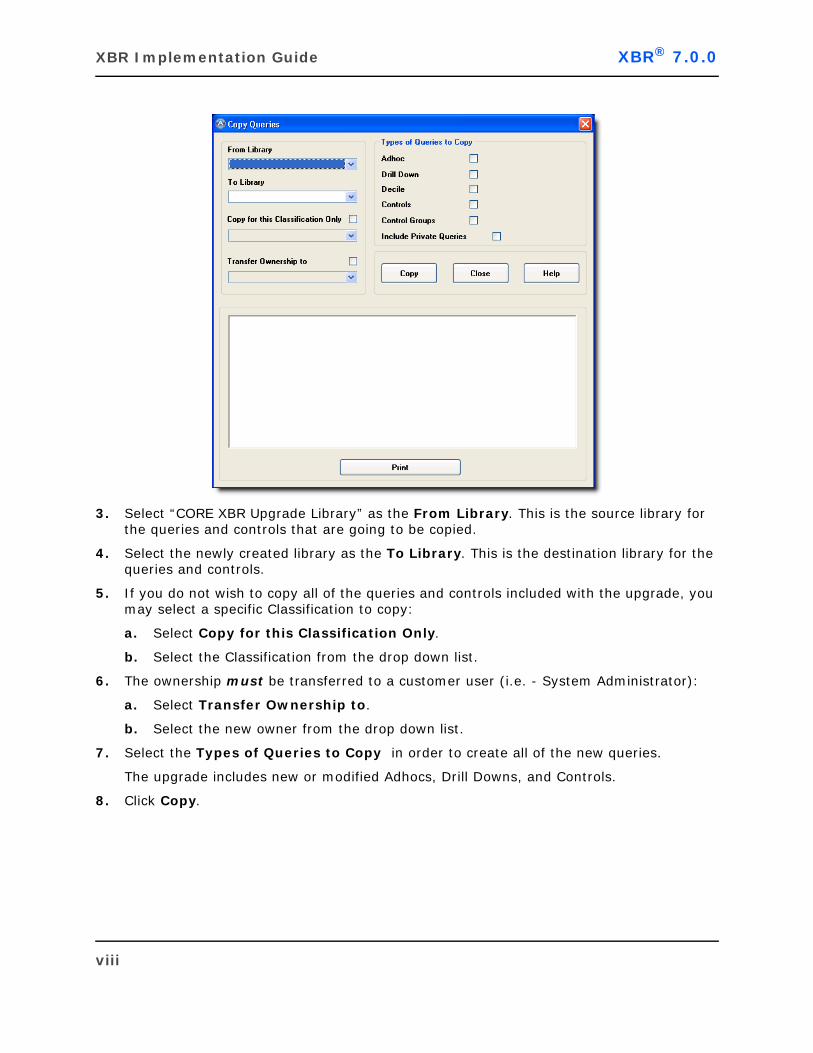
3. Select “CORE XBR Upgrade Library” as the From Library. This is the source library for the queries and controls that are going to be copied.
4. Select the newly created library as the To Library. This is the destination library for the queries and controls.
5. If you do not wish to copy all of the queries and controls included with the upgrade, you may select a specific Classification to copy:
a. Select Copy for this Classification Only.
b. Select the Classification from the drop down list.
6. The ownership must be transferred to a customer user (i.e. - System Administrator):
a. Select Transfer Ownership to.
b. Select the new owner from the drop down list.
7. Select the Types of Queries to Copy in order to create all of the new queries.
The upgrade includes new or modified Adhocs, Drill Downs, and Controls.
8. Click Copy.
viii
XBR® 7.0.0 XBR Implementation Guide
FOODSERVICE
CORE Metadata and Query LibraryDatabase utility scripts have been developed to provide a mechanism to refresh the CORE metadata in hosted, multi-tenant environments so that new organizations added to the database receive the most current metadata and query library.
See “Refresh XBR-mymicros CORE Metadata in Multi-Tenant Environments” on page 270 for information on running these scripts.
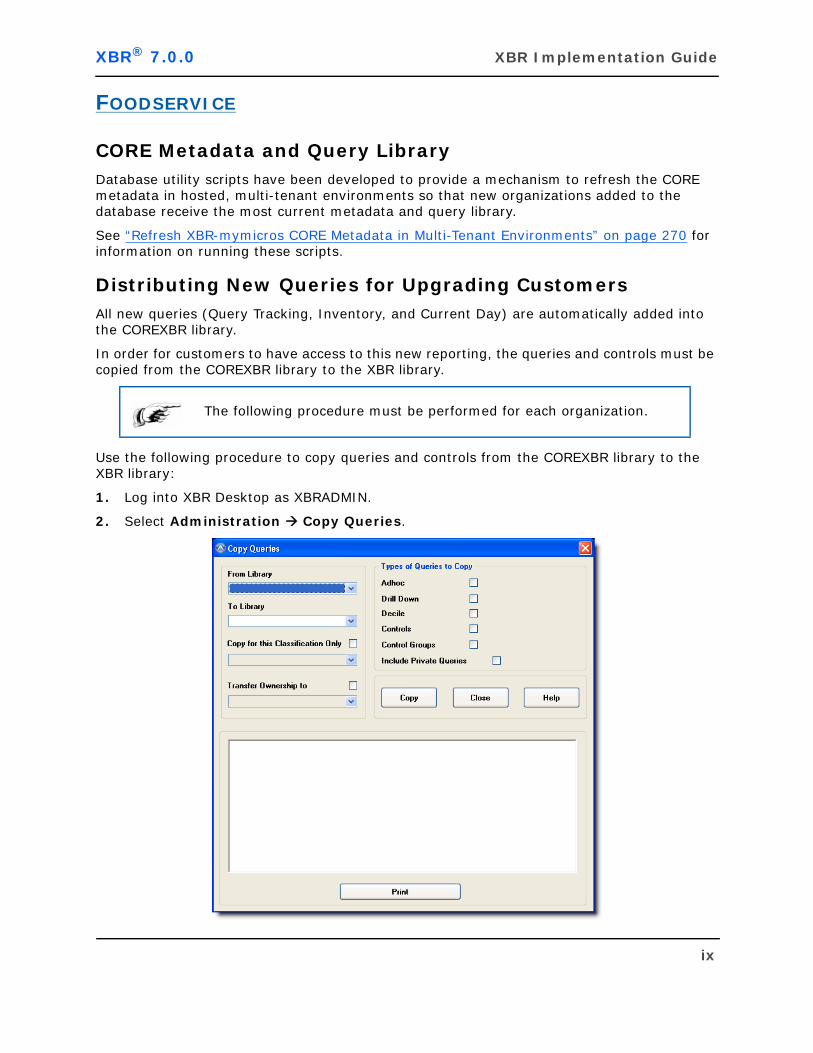
Distributing New Queries for Upgrading CustomersAll new queries (Query Tracking, Inventory, and Current Day) are automatically added into the COREXBR library.
In order for customers to have access to this new reporting, the queries and controls must be copied from the COREXBR library to the XBR library.
Use the following procedure to copy queries and controls from the COREXBR library to the XBR library:
1. Log into XBR Desktop as XBRADMIN.
2. Select Administration Copy Queries.
The following procedure must be performed for each organization.
ix

XBR Implementation Guide XBR® 7.0.0
3. Select “COREXBR” as the From Library. This is the source library for the queries and controls that are going to be copied.
4. Select the XBR library for the organization as the To Library. This is the destination library for the queries and controls.
5. Select Copy for this Classification Only.
6. Select “Current Day” from the drop down list.
7. The ownership must be transferred to a customer user (i.e. - System Administrator):
a. Select Transfer Ownership to.
b. Select the new owner from the drop down list.
8. Select the Types of Queries to Copy in order to create all of the new queries.
The upgrade includes new or modified Adhocs, Drill Downs, and Controls.
9. Click Copy.
10. Repeat steps 5 through 9 for the “Inventory” and “Query Tracking” classifications.
x
7.0.0 Considerations and Upgrade AdvisementsAll Users . . . . . . . . . . . . . . . . . . . . . . . . . . . . . . . . . . . . . . . . . . . . . . . . . . . . . . . . . . i
Employee Violations Dashboard . . . . . . . . . . . . . . . . . . . . . . . . . . . . . . . . . . . . . . . . iOrgintro . . . . . . . . . . . . . . . . . . . . . . . . . . . . . . . . . . . . . . . . . . . . . . . . . . . . . . . . i
Retail/Grocery . . . . . . . . . . . . . . . . . . . . . . . . . . . . . . . . . . . . . . . . . . . . . . . . . . . . . . iiNo Match . . . . . . . . . . . . . . . . . . . . . . . . . . . . . . . . . . . . . . . . . . . . . . . . . . . . . . . iiPost Voids. . . . . . . . . . . . . . . . . . . . . . . . . . . . . . . . . . . . . . . . . . . . . . . . . . . . . . . iiStaging Fields . . . . . . . . . . . . . . . . . . . . . . . . . . . . . . . . . . . . . . . . . . . . . . . . . . . . ii
Oracle . . . . . . . . . . . . . . . . . . . . . . . . . . . . . . . . . . . . . . . . . . . . . . . . . . . . . . . iiSQL Server . . . . . . . . . . . . . . . . . . . . . . . . . . . . . . . . . . . . . . . . . . . . . . . . . . . ii
Statistics Buckets. . . . . . . . . . . . . . . . . . . . . . . . . . . . . . . . . . . . . . . . . . . . . . . . . iiiExtensibility . . . . . . . . . . . . . . . . . . . . . . . . . . . . . . . . . . . . . . . . . . . . . . . . . . . . .v
Procedures. . . . . . . . . . . . . . . . . . . . . . . . . . . . . . . . . . . . . . . . . . . . . . . . . . . .vViews . . . . . . . . . . . . . . . . . . . . . . . . . . . . . . . . . . . . . . . . . . . . . . . . . . . . . . .v
Creating New Queries for Upgrading Customers. . . . . . . . . . . . . . . . . . . . . . . . . . . . viCORE Library/Upgrade Library . . . . . . . . . . . . . . . . . . . . . . . . . . . . . . . . . . . . . . . . vi
Foodservice . . . . . . . . . . . . . . . . . . . . . . . . . . . . . . . . . . . . . . . . . . . . . . . . . . . . . . . ixCORE Metadata and Query Library . . . . . . . . . . . . . . . . . . . . . . . . . . . . . . . . . . . . . ixDistributing New Queries for Upgrading Customers . . . . . . . . . . . . . . . . . . . . . . . . . ix
Chapter 1: About This GuideOverview . . . . . . . . . . . . . . . . . . . . . . . . . . . . . . . . . . . . . . . . . . . . . . . . . . . . . . . . .2
Who Should Use this Guide . . . . . . . . . . . . . . . . . . . . . . . . . . . . . . . . . . . . . . . . . . .3Upgrading . . . . . . . . . . . . . . . . . . . . . . . . . . . . . . . . . . . . . . . . . . . . . . . . . . . . . . .3XBR Version 7.0 Supported Platforms. . . . . . . . . . . . . . . . . . . . . . . . . . . . . . . . . . . .4
Chapter 2: XBR Desktop ApplicationOverview . . . . . . . . . . . . . . . . . . . . . . . . . . . . . . . . . . . . . . . . . . . . . . . . . . . . . . . . .6
About This Chapter . . . . . . . . . . . . . . . . . . . . . . . . . . . . . . . . . . . . . . . . . . . . . . . .6Audience. . . . . . . . . . . . . . . . . . . . . . . . . . . . . . . . . . . . . . . . . . . . . . . . . . . . . . . .6Prerequisites . . . . . . . . . . . . . . . . . . . . . . . . . . . . . . . . . . . . . . . . . . . . . . . . . . . . .6Process Flow . . . . . . . . . . . . . . . . . . . . . . . . . . . . . . . . . . . . . . . . . . . . . . . . . . . . .7
Pre-Installation Checks . . . . . . . . . . . . . . . . . . . . . . . . . . . . . . . . . . . . . . . . . . . . . . . .8Distributed Installations . . . . . . . . . . . . . . . . . . . . . . . . . . . . . . . . . . . . . . . . . . . . .8Centralized Installations . . . . . . . . . . . . . . . . . . . . . . . . . . . . . . . . . . . . . . . . . . . . .8Settings for XBR Installation: dtvcustom.ini . . . . . . . . . . . . . . . . . . . . . . . . . . . . . . .8Installing From a Network Drive . . . . . . . . . . . . . . . . . . . . . . . . . . . . . . . . . . . . . . .8
Installing the XBR Desktop Application . . . . . . . . . . . . . . . . . . . . . . . . . . . . . . . . . . . . .9Adding A New Organization . . . . . . . . . . . . . . . . . . . . . . . . . . . . . . . . . . . . . . . . . . . .39
Connect to Database . . . . . . . . . . . . . . . . . . . . . . . . . . . . . . . . . . . . . . . . . . . . . .40
T A B L E O F C O N T E N T S
Table of Contents xi

XBR Implementation Guide XBR® 7.0.0
Add Organization Attributes . . . . . . . . . . . . . . . . . . . . . . . . . . . . . . . . . . . . . . . . .40Add Organizational Data & Users . . . . . . . . . . . . . . . . . . . . . . . . . . . . . . . . . . . . . .42Additional Configuration for Hosted Customers . . . . . . . . . . . . . . . . . . . . . . . . . . . .42
XBR Desktop Application . . . . . . . . . . . . . . . . . . . . . . . . . . . . . . . . . . . . . . . . .42Table Editor . . . . . . . . . . . . . . . . . . . . . . . . . . . . . . . . . . . . . . . . . . . . . . . . . .43
Logging In . . . . . . . . . . . . . . . . . . . . . . . . . . . . . . . . . . . . . . . . . . . . . . . . . . . . .43Configuring the XBR Desktop Installation . . . . . . . . . . . . . . . . . . . . . . . . . . . . . . . . . .45
Video Vendor Configuration Settings . . . . . . . . . . . . . . . . . . . . . . . . . . . . . . . . . . .45LPMS Configuration Settings . . . . . . . . . . . . . . . . . . . . . . . . . . . . . . . . . . . . . . . . .46LDAP Configuration Settings . . . . . . . . . . . . . . . . . . . . . . . . . . . . . . . . . . . . . . . . .48Miscellaneous Configuration Options. . . . . . . . . . . . . . . . . . . . . . . . . . . . . . . . . . . .51
Enforcing Store Group Security. . . . . . . . . . . . . . . . . . . . . . . . . . . . . . . . . . . . .51Checking the Offline Reporting Interval . . . . . . . . . . . . . . . . . . . . . . . . . . . . . . .51
Email Configuration Settings . . . . . . . . . . . . . . . . . . . . . . . . . . . . . . . . . . . . . . . . .51Test the Email Component . . . . . . . . . . . . . . . . . . . . . . . . . . . . . . . . . . . . . . . .52
Testing the XBR Desktop Installation . . . . . . . . . . . . . . . . . . . . . . . . . . . . . . . . . . . . .53Changing an Existing XBR Desktop Installation . . . . . . . . . . . . . . . . . . . . . . . . . . . . . .53Installing an SSL Certificate . . . . . . . . . . . . . . . . . . . . . . . . . . . . . . . . . . . . . . . . . . .55
Assumptions Prior to Certificate Installation . . . . . . . . . . . . . . . . . . . . . . . . . . . . . .55SSL Certificate Installation Procedure . . . . . . . . . . . . . . . . . . . . . . . . . . . . . . . . . . .55
Troubleshooting the XBR Desktop Installation . . . . . . . . . . . . . . . . . . . . . . . . . . . . . . .62
Chapter 3: Query LauncherOverview . . . . . . . . . . . . . . . . . . . . . . . . . . . . . . . . . . . . . . . . . . . . . . . . . . . . . . . .68
About This Document . . . . . . . . . . . . . . . . . . . . . . . . . . . . . . . . . . . . . . . . . . . . . .68Audience. . . . . . . . . . . . . . . . . . . . . . . . . . . . . . . . . . . . . . . . . . . . . . . . . . . . . . .68
Configuring Query Launcher . . . . . . . . . . . . . . . . . . . . . . . . . . . . . . . . . . . . . . . . . . .69Modify the dtvlauncher.ini File . . . . . . . . . . . . . . . . . . . . . . . . . . . . . . . . . . . . . . . .69Pass Parameters to Query Launcher . . . . . . . . . . . . . . . . . . . . . . . . . . . . . . . . . . . .70
Syntax. . . . . . . . . . . . . . . . . . . . . . . . . . . . . . . . . . . . . . . . . . . . . . . . . . . . . .71Examples . . . . . . . . . . . . . . . . . . . . . . . . . . . . . . . . . . . . . . . . . . . . . . . . . . . .71
Sample dtvlauncher.ini . . . . . . . . . . . . . . . . . . . . . . . . . . . . . . . . . . . . . . . . . . . . .71Variable Settings in dtvlauncher.ini . . . . . . . . . . . . . . . . . . . . . . . . . . . . . . . . . . . .73Modify the mail.ini File . . . . . . . . . . . . . . . . . . . . . . . . . . . . . . . . . . . . . . . . . . . . .77
Test the Email component . . . . . . . . . . . . . . . . . . . . . . . . . . . . . . . . . . . . . . . .77Set Up the Query Launcher Kicker . . . . . . . . . . . . . . . . . . . . . . . . . . . . . . . . . . . . .78Installing the Query Launcher Kicker Service. . . . . . . . . . . . . . . . . . . . . . . . . . . . . .79
Query Launcher Kicker System Tray Icon. . . . . . . . . . . . . . . . . . . . . . . . . . . . . .87Query Launcher Kicker in Windows Task Manager. . . . . . . . . . . . . . . . . . . . . . . .87
Multi-Tenant Configuration . . . . . . . . . . . . . . . . . . . . . . . . . . . . . . . . . . . . . . . . . .88Batch Processing Setup - Multi-Tenant Hosted Environment . . . . . . . . . . . . . . . . . . .89
Offline Process . . . . . . . . . . . . . . . . . . . . . . . . . . . . . . . . . . . . . . . . . . . . . . . .90Qlaunch Process . . . . . . . . . . . . . . . . . . . . . . . . . . . . . . . . . . . . . . . . . . . . . .94
Troubleshooting the Query Launcher Installation . . . . . . . . . . . . . . . . . . . . . . . . . . . . .98
Chapter 4: XBR Web Server ApplicationOverview . . . . . . . . . . . . . . . . . . . . . . . . . . . . . . . . . . . . . . . . . . . . . . . . . . . . . . . 104
About This Chapter . . . . . . . . . . . . . . . . . . . . . . . . . . . . . . . . . . . . . . . . . . . . . . 104Audience. . . . . . . . . . . . . . . . . . . . . . . . . . . . . . . . . . . . . . . . . . . . . . . . . . . . . . 104Prerequisites . . . . . . . . . . . . . . . . . . . . . . . . . . . . . . . . . . . . . . . . . . . . . . . . . . . 104Process Flow . . . . . . . . . . . . . . . . . . . . . . . . . . . . . . . . . . . . . . . . . . . . . . . . . . . 105
xii Table of Contents
XBR® 7.0.0 XBR Implementation Guide
Installation . . . . . . . . . . . . . . . . . . . . . . . . . . . . . . . . . . . . . . . . . . . . . . . . . . . . . . 106Pre-Requisites/Requirements. . . . . . . . . . . . . . . . . . . . . . . . . . . . . . . . . . . . . . . . 106
Hardware Requirements . . . . . . . . . . . . . . . . . . . . . . . . . . . . . . . . . . . . . . . . 106Software Requirements . . . . . . . . . . . . . . . . . . . . . . . . . . . . . . . . . . . . . . . . . 106
Installation . . . . . . . . . . . . . . . . . . . . . . . . . . . . . . . . . . . . . . . . . . . . . . . . . . . . 107Web Server . . . . . . . . . . . . . . . . . . . . . . . . . . . . . . . . . . . . . . . . . . . . . . . . . 107Java Developer Kit (JDK) 1.6.x Path Variable . . . . . . . . . . . . . . . . . . . . . . . . . . 140Start the Web Application . . . . . . . . . . . . . . . . . . . . . . . . . . . . . . . . . . . . . . . 142Tomcat Service . . . . . . . . . . . . . . . . . . . . . . . . . . . . . . . . . . . . . . . . . . . . . . 143
Configuration . . . . . . . . . . . . . . . . . . . . . . . . . . . . . . . . . . . . . . . . . . . . . . . . . . . . . 147Tomcat Web Application Server . . . . . . . . . . . . . . . . . . . . . . . . . . . . . . . . . . . . . . 147
liferay.xml File . . . . . . . . . . . . . . . . . . . . . . . . . . . . . . . . . . . . . . . . . . . . . . . 147Server.xml File . . . . . . . . . . . . . . . . . . . . . . . . . . . . . . . . . . . . . . . . . . . . . . 163
XBR Web Application . . . . . . . . . . . . . . . . . . . . . . . . . . . . . . . . . . . . . . . . . . . . . 164dvreport-config.xml. . . . . . . . . . . . . . . . . . . . . . . . . . . . . . . . . . . . . . . . . . . . 164dvreport-common-sql.xml File . . . . . . . . . . . . . . . . . . . . . . . . . . . . . . . . . . . . 215
Liferay Portal Server . . . . . . . . . . . . . . . . . . . . . . . . . . . . . . . . . . . . . . . . . . . . . 217Portal Properties File (portal-ext.properties). . . . . . . . . . . . . . . . . . . . . . . . . . . 217General Settings . . . . . . . . . . . . . . . . . . . . . . . . . . . . . . . . . . . . . . . . . . . . . . 217
XBR Web Application on a Secured Web Site . . . . . . . . . . . . . . . . . . . . . . . . . . . . . 231Verify the Java Development Kit is in the System Path . . . . . . . . . . . . . . . . . . . 231Generate the Certificate Keystore . . . . . . . . . . . . . . . . . . . . . . . . . . . . . . . . . . 235Create a Certificate Signing Request . . . . . . . . . . . . . . . . . . . . . . . . . . . . . . . 240Request a Trusted Certificate . . . . . . . . . . . . . . . . . . . . . . . . . . . . . . . . . . . . . 241Configure the Tomcat Web Application Server . . . . . . . . . . . . . . . . . . . . . . . . . 242Verify the XBR Web Application Runs on a Secured Web Site . . . . . . . . . . . . . . . 243
Multi-Tenant Configuration . . . . . . . . . . . . . . . . . . . . . . . . . . . . . . . . . . . . . . . . . 244Multi-Node Configuration . . . . . . . . . . . . . . . . . . . . . . . . . . . . . . . . . . . . . . . . . . 244
liferay.xml . . . . . . . . . . . . . . . . . . . . . . . . . . . . . . . . . . . . . . . . . . . . . . . . . . 244dvreport-override-config.xml . . . . . . . . . . . . . . . . . . . . . . . . . . . . . . . . . . . . . 244
Password Security . . . . . . . . . . . . . . . . . . . . . . . . . . . . . . . . . . . . . . . . . . . . . . . 244Password Configuration . . . . . . . . . . . . . . . . . . . . . . . . . . . . . . . . . . . . . . . . . 245Password Assistance in the XBR Web Application . . . . . . . . . . . . . . . . . . . . . . . 245Password Email Notification . . . . . . . . . . . . . . . . . . . . . . . . . . . . . . . . . . . . . . 247
Testing the Installation . . . . . . . . . . . . . . . . . . . . . . . . . . . . . . . . . . . . . . . . . . . . . . 249Starting the XBR Web Server . . . . . . . . . . . . . . . . . . . . . . . . . . . . . . . . . . . . . . . 249Shutting Down the XBR Web Server. . . . . . . . . . . . . . . . . . . . . . . . . . . . . . . . . . . 249Starting XBR Web Client . . . . . . . . . . . . . . . . . . . . . . . . . . . . . . . . . . . . . . . . . . . 250
Upgrade . . . . . . . . . . . . . . . . . . . . . . . . . . . . . . . . . . . . . . . . . . . . . . . . . . . . . . . . 250Preserve Custom Settings . . . . . . . . . . . . . . . . . . . . . . . . . . . . . . . . . . . . . . . . . . 250Preserve SSL Certificates . . . . . . . . . . . . . . . . . . . . . . . . . . . . . . . . . . . . . . . . . . 251Upgrade Web Application . . . . . . . . . . . . . . . . . . . . . . . . . . . . . . . . . . . . . . . . . . 251
Chapter 5: Database SetupOverview . . . . . . . . . . . . . . . . . . . . . . . . . . . . . . . . . . . . . . . . . . . . . . . . . . . . . . . 254
About This Chapter . . . . . . . . . . . . . . . . . . . . . . . . . . . . . . . . . . . . . . . . . . . . . . 254Audience. . . . . . . . . . . . . . . . . . . . . . . . . . . . . . . . . . . . . . . . . . . . . . . . . . . . . . 254Prerequisites . . . . . . . . . . . . . . . . . . . . . . . . . . . . . . . . . . . . . . . . . . . . . . . . . . . 254
Foodservice (mymicros) Installation . . . . . . . . . . . . . . . . . . . . . . . . . . . . . . . . . . . . . 255New Oracle XBR-mymicros 7.0.0 Hosted Database Installation . . . . . . . . . . . . . . . . 255
Setting Up XBR Security in the mymicros Data Warehouse . . . . . . . . . . . . . . . . 255
Table of Contents xiii
XBR Implementation Guide XBR® 7.0.0
Creating a New XBR-mymicros Oracle Database . . . . . . . . . . . . . . . . . . . . . . . . 255Liferay Installation . . . . . . . . . . . . . . . . . . . . . . . . . . . . . . . . . . . . . . . . . . . . 258Post Installation . . . . . . . . . . . . . . . . . . . . . . . . . . . . . . . . . . . . . . . . . . . . . . 259
New Oracle XBR-mymicros 7.0.0 Self-Hosted Database Installation . . . . . . . . . . . . . 260Setting Up XBR Security in the Mymicros Data Warehouse. . . . . . . . . . . . . . . . . 260Liferay Installation . . . . . . . . . . . . . . . . . . . . . . . . . . . . . . . . . . . . . . . . . . . . 262Post Installation . . . . . . . . . . . . . . . . . . . . . . . . . . . . . . . . . . . . . . . . . . . . . . 263
New SQL Server XBR-mymicros 7.0.0 Self-Hosted Database Installation . . . . . . . . . 264Setting up XBR Security in the mymicros Data Warehouse. . . . . . . . . . . . . . . . . 264Liferay Installation . . . . . . . . . . . . . . . . . . . . . . . . . . . . . . . . . . . . . . . . . . . . 267
Upgrade XBR-mymicros Database to 7.0.0 . . . . . . . . . . . . . . . . . . . . . . . . . . . . . . 269Refresh XBR-mymicros CORE Metadata in Multi-Tenant Environments. . . . . . . . . 270
Retail/Grocery Installation . . . . . . . . . . . . . . . . . . . . . . . . . . . . . . . . . . . . . . . . . . . 271New Oracle XBR and Balance 7.0.0 Database Installation . . . . . . . . . . . . . . . . . . . . 271
Creating a New XBR and Balance Oracle Database . . . . . . . . . . . . . . . . . . . . . . 271Liferay Installation . . . . . . . . . . . . . . . . . . . . . . . . . . . . . . . . . . . . . . . . . . . . 274
Upgrade XBR Oracle Database to 7.0.0. . . . . . . . . . . . . . . . . . . . . . . . . . . . . . . . . 275Upgrade XBR from XBR 6.8.1 to XBR 7.0.0 . . . . . . . . . . . . . . . . . . . . . . . . . . . 275Install XBR 7.0.0 Upgrade Query Library . . . . . . . . . . . . . . . . . . . . . . . . . . . . . 275
New SQL Server XBR and Balance 7.0.0 Database Installation . . . . . . . . . . . . . . . . 277Creating a New XBR SQL Server Database . . . . . . . . . . . . . . . . . . . . . . . . . . . . 277Inventory Product Installation . . . . . . . . . . . . . . . . . . . . . . . . . . . . . . . . . . . . 280Liferay Product Installation. . . . . . . . . . . . . . . . . . . . . . . . . . . . . . . . . . . . . . . 281
Upgrade SQL Server XBR Database to 7.0.0 . . . . . . . . . . . . . . . . . . . . . . . . . . . . . 283Upgrade XBR from XBR 6.8.1 to XBR 7.0.0 . . . . . . . . . . . . . . . . . . . . . . . . . . . 283Install XBR 7.0.0 Upgrade Query Library . . . . . . . . . . . . . . . . . . . . . . . . . . . . . 283
Chapter 6: Video IntegrationOverview . . . . . . . . . . . . . . . . . . . . . . . . . . . . . . . . . . . . . . . . . . . . . . . . . . . . . . . 286
About This Chapter . . . . . . . . . . . . . . . . . . . . . . . . . . . . . . . . . . . . . . . . . . . . . . 286Audience. . . . . . . . . . . . . . . . . . . . . . . . . . . . . . . . . . . . . . . . . . . . . . . . . . . . . . 286Prerequisites . . . . . . . . . . . . . . . . . . . . . . . . . . . . . . . . . . . . . . . . . . . . . . . . . . . 287
Setting Up Video Integration for a Supported Vendor . . . . . . . . . . . . . . . . . . . . . . . . . 288Before You Begin . . . . . . . . . . . . . . . . . . . . . . . . . . . . . . . . . . . . . . . . . . . . . . . . 288Special Setup Required for ATVideo . . . . . . . . . . . . . . . . . . . . . . . . . . . . . . . . . . . 288Set Variables in PRO_SP_VARIABLES . . . . . . . . . . . . . . . . . . . . . . . . . . . . . . . . . . 289
Arrowsight . . . . . . . . . . . . . . . . . . . . . . . . . . . . . . . . . . . . . . . . . . . . . . . . . . 290ATVideo . . . . . . . . . . . . . . . . . . . . . . . . . . . . . . . . . . . . . . . . . . . . . . . . . . . . 290Dedicated Micros . . . . . . . . . . . . . . . . . . . . . . . . . . . . . . . . . . . . . . . . . . . . . 290FocusMicro. . . . . . . . . . . . . . . . . . . . . . . . . . . . . . . . . . . . . . . . . . . . . . . . . . 290i3DVR remote. . . . . . . . . . . . . . . . . . . . . . . . . . . . . . . . . . . . . . . . . . . . . . . . 291Image Vault . . . . . . . . . . . . . . . . . . . . . . . . . . . . . . . . . . . . . . . . . . . . . . . . . 2913VR Video Player . . . . . . . . . . . . . . . . . . . . . . . . . . . . . . . . . . . . . . . . . . . . . 291
Update XBR Desktop's dtvanalytics.ini file. . . . . . . . . . . . . . . . . . . . . . . . . . . . . . . 291Setting up a Custom Video Vendor . . . . . . . . . . . . . . . . . . . . . . . . . . . . . . . . . . . . . . 292
Creating a Custom Stored Procedure . . . . . . . . . . . . . . . . . . . . . . . . . . . . . . . . . . 292Registering the stored procedure . . . . . . . . . . . . . . . . . . . . . . . . . . . . . . . . . . . . . 293Updating XBR Desktop's dtvanalytics.ini file . . . . . . . . . . . . . . . . . . . . . . . . . . . . . 294
Register/Video Master . . . . . . . . . . . . . . . . . . . . . . . . . . . . . . . . . . . . . . . . . . . . . . 295Video Link Field Mapping . . . . . . . . . . . . . . . . . . . . . . . . . . . . . . . . . . . . . . . . . . . . . 296
xiv Table of Contents
XBR® 7.0.0 XBR Implementation Guide
Chapter 7: PCI Data SecurityOverview . . . . . . . . . . . . . . . . . . . . . . . . . . . . . . . . . . . . . . . . . . . . . . . . . . . . . . . 300
About This Chapter . . . . . . . . . . . . . . . . . . . . . . . . . . . . . . . . . . . . . . . . . . . . . . 300PCI Data Security Features . . . . . . . . . . . . . . . . . . . . . . . . . . . . . . . . . . . . . . . . . 300
PCI Configuration . . . . . . . . . . . . . . . . . . . . . . . . . . . . . . . . . . . . . . . . . . . . . . . . . . 301Settings . . . . . . . . . . . . . . . . . . . . . . . . . . . . . . . . . . . . . . . . . . . . . . . . . . . . . . 301Account Number Security . . . . . . . . . . . . . . . . . . . . . . . . . . . . . . . . . . . . . . . . . . 301Encrypted User ID and Password . . . . . . . . . . . . . . . . . . . . . . . . . . . . . . . . . . . . . 302
PCI Data Security Files . . . . . . . . . . . . . . . . . . . . . . . . . . . . . . . . . . . . . . . . . . . . . . 304PCI Data Security Database Changes . . . . . . . . . . . . . . . . . . . . . . . . . . . . . . . . . . . . 306
Tables/Fields . . . . . . . . . . . . . . . . . . . . . . . . . . . . . . . . . . . . . . . . . . . . . . . . . . . 306Views . . . . . . . . . . . . . . . . . . . . . . . . . . . . . . . . . . . . . . . . . . . . . . . . . . . . . . . . 307Roles . . . . . . . . . . . . . . . . . . . . . . . . . . . . . . . . . . . . . . . . . . . . . . . . . . . . . . . . 307
Account Number Security File . . . . . . . . . . . . . . . . . . . . . . . . . . . . . . . . . . . . . . . . . 308Account Number Security Form Field Descriptions . . . . . . . . . . . . . . . . . . . . . . . . . 309
TradeCipher . . . . . . . . . . . . . . . . . . . . . . . . . . . . . . . . . . . . . . . . . . . . . . . . . . . . . 312ETL . . . . . . . . . . . . . . . . . . . . . . . . . . . . . . . . . . . . . . . . . . . . . . . . . . . . . . . . . . . 313
Chapter 8: Employee Violations DashboardOverview . . . . . . . . . . . . . . . . . . . . . . . . . . . . . . . . . . . . . . . . . . . . . . . . . . . . . . . 316Enabling EVD . . . . . . . . . . . . . . . . . . . . . . . . . . . . . . . . . . . . . . . . . . . . . . . . . . . . . 317EVD Maintenance . . . . . . . . . . . . . . . . . . . . . . . . . . . . . . . . . . . . . . . . . . . . . . . . . . 318
Appendix A: System ArchitectureOverview . . . . . . . . . . . . . . . . . . . . . . . . . . . . . . . . . . . . . . . . . . . . . . . . . . . . . . . 322
About this Appendix . . . . . . . . . . . . . . . . . . . . . . . . . . . . . . . . . . . . . . . . . . . . . . 322Audience. . . . . . . . . . . . . . . . . . . . . . . . . . . . . . . . . . . . . . . . . . . . . . . . . . . . . . 322
Architecture of Process . . . . . . . . . . . . . . . . . . . . . . . . . . . . . . . . . . . . . . . . . . . . . . 323Nightly Polling and the ETL Process . . . . . . . . . . . . . . . . . . . . . . . . . . . . . . . . . . . . . 324
Overview . . . . . . . . . . . . . . . . . . . . . . . . . . . . . . . . . . . . . . . . . . . . . . . . . . . . . 324Kornshell Scripts . . . . . . . . . . . . . . . . . . . . . . . . . . . . . . . . . . . . . . . . . . . . . . . . . . 326RUN_ORDER_* File Formats . . . . . . . . . . . . . . . . . . . . . . . . . . . . . . . . . . . . . . . . . . 326
The init.ksh File . . . . . . . . . . . . . . . . . . . . . . . . . . . . . . . . . . . . . . . . . . . . . . . . . 328Controls . . . . . . . . . . . . . . . . . . . . . . . . . . . . . . . . . . . . . . . . . . . . . . . . . . . . . . . . 329
Creating Control Files for Each TLog. . . . . . . . . . . . . . . . . . . . . . . . . . . . . . . . . . . 329Creating Controls for Each Master File . . . . . . . . . . . . . . . . . . . . . . . . . . . . . . . . . 329Control Files/Format Files . . . . . . . . . . . . . . . . . . . . . . . . . . . . . . . . . . . . . . . . . . 329
ETL Control Processes for Incoming TLogs . . . . . . . . . . . . . . . . . . . . . . . . . . . . . . . . 330Running xstart. . . . . . . . . . . . . . . . . . . . . . . . . . . . . . . . . . . . . . . . . . . . . . . . . . 330Running xfinish . . . . . . . . . . . . . . . . . . . . . . . . . . . . . . . . . . . . . . . . . . . . . . . . . 332
ETL Control Processes for Incoming Master File Updates . . . . . . . . . . . . . . . . . . . . . . . 334Running xstart. . . . . . . . . . . . . . . . . . . . . . . . . . . . . . . . . . . . . . . . . . . . . . . . . . 334Running xfinish . . . . . . . . . . . . . . . . . . . . . . . . . . . . . . . . . . . . . . . . . . . . . . . . . 335The Data Flow Through XBR and Balance . . . . . . . . . . . . . . . . . . . . . . . . . . . . . . . 336
RUN_ORDER_START . . . . . . . . . . . . . . . . . . . . . . . . . . . . . . . . . . . . . . . . . . . . . . . . 337RUN_ORDER_START Procedures . . . . . . . . . . . . . . . . . . . . . . . . . . . . . . . . . . . . . 337Clear the Staging Table of Extracted Transactions (sp_pro_clear_stage). . . . . . . . . . 339
The PRO_REQUESTOR Table. . . . . . . . . . . . . . . . . . . . . . . . . . . . . . . . . . . . . . 339Downstream System Extracts. . . . . . . . . . . . . . . . . . . . . . . . . . . . . . . . . . . . . 340
Table of Contents xv
XBR Implementation Guide XBR® 7.0.0
Information on Purging Data . . . . . . . . . . . . . . . . . . . . . . . . . . . . . . . . . . . . . 341Update the Business Date (sp_adc_update_business_date) . . . . . . . . . . . . . . . . . . 341Create the Balance Error Views (sp_adc_create_views) . . . . . . . . . . . . . . . . . . . . . 341Create POS Statistics Views and GL Views (sp_pro_create_views) . . . . . . . . . . . . . . 342Move Transactions from the Interim Table to the Staging Table (sp_adc_move_int) . 342Move Suspended Transactions to the Staging Table (sp_adc_move_rel) . . . . . . . . . . 344Recheck Suspended Transactions (sp_adc_auto_rchk) . . . . . . . . . . . . . . . . . . . . . . 346
SP_ADC_REL Handling of Transaction Voids . . . . . . . . . . . . . . . . . . . . . . . . . . . 346SP_ADC_REL Handling of Other Transaction Edits . . . . . . . . . . . . . . . . . . . . . . . 347
Tag released and deleted transactions to be archived (sp_adc_his) . . . . . . . . . . . . . 347Archives released and deleted transactions (sp_adc_archive) . . . . . . . . . . . . . . . . . 348Gather Manager. . . . . . . . . . . . . . . . . . . . . . . . . . . . . . . . . . . . . . . . . . . . . . . . . 349Transform Manager . . . . . . . . . . . . . . . . . . . . . . . . . . . . . . . . . . . . . . . . . . . . . . 349
DBProcess Manager for Tlogs . . . . . . . . . . . . . . . . . . . . . . . . . . . . . . . . . . . . . . . . . 350RUN_ORDER_DBPROCESS Procedures . . . . . . . . . . . . . . . . . . . . . . . . . . . . . . . . . 350Clear the Temporary Tables (sp_adc_truncate) . . . . . . . . . . . . . . . . . . . . . . . . . . . 351Reload the Temporary Tables Using a Control or Format File . . . . . . . . . . . . . . . . . . 351Load the Staging Table Using a Control or Format File . . . . . . . . . . . . . . . . . . . . . . 351Set the Run ID (sp_pro_set_runid) . . . . . . . . . . . . . . . . . . . . . . . . . . . . . . . . . . . 352Trap Audit Errors . . . . . . . . . . . . . . . . . . . . . . . . . . . . . . . . . . . . . . . . . . . . . . . . 352Load the ADC_ERROR_STATUS_T Table (SP_ADC_LOAD) . . . . . . . . . . . . . . . . . . . . 353Load the Staging table with OK Transactions (sp_adc_move_stage). . . . . . . . . . . . . 353
RUN_ORDER_FINISH . . . . . . . . . . . . . . . . . . . . . . . . . . . . . . . . . . . . . . . . . . . . . . . 354Create the Batch Number (sp_pro_set_batchno) . . . . . . . . . . . . . . . . . . . . . . . . . . 355Find Duplicate Transactions in the Staging Table (sp_pro_dup_chk). . . . . . . . . . . . . 357Find No Polls (sp_adc_no_poll) . . . . . . . . . . . . . . . . . . . . . . . . . . . . . . . . . . . . . . 357Put Transactions into XBR History from Staging and Archives Older Versions (sp_pro_load_hist). . . . . . . . . . . . . . . . . . . . . . . . . . . . . . . . . . . . . . . . . . . . . . . 357
Creating Versions . . . . . . . . . . . . . . . . . . . . . . . . . . . . . . . . . . . . . . . . . . . . . 359Versioning Tables . . . . . . . . . . . . . . . . . . . . . . . . . . . . . . . . . . . . . . . . . . . . . 359Post Void - Details . . . . . . . . . . . . . . . . . . . . . . . . . . . . . . . . . . . . . . . . . . . . 359No Match Analysis. . . . . . . . . . . . . . . . . . . . . . . . . . . . . . . . . . . . . . . . . . . . . 360
Load the POS Statistical Tables (sp_pro_load_stats) . . . . . . . . . . . . . . . . . . . . . . . 364Load the Liabilities Management Tables and Views (sp_adc_lm) . . . . . . . . . . . . . . . 365Load the GL Post Tables (sp_adc_load_gl) . . . . . . . . . . . . . . . . . . . . . . . . . . . . . . 365Find Missing Transactions (sp_adc_missing) . . . . . . . . . . . . . . . . . . . . . . . . . . . . . 365Find User Audit Controls (UACS) (sp_adc_uac) . . . . . . . . . . . . . . . . . . . . . . . . . . . 366Find Over/Shorts (sp_adc_over_short) . . . . . . . . . . . . . . . . . . . . . . . . . . . . . . . . . 366Find Duplicate Transactions in the Transaction Audit Tables (sp_adc_suspend_dup_check)366Load the Bank Deposit Reconciliation Tables and Views (sp_adc_br) . . . . . . . . . . . . 366Create Missing Headers (sp_adc_create_hdr) . . . . . . . . . . . . . . . . . . . . . . . . . . . . 366Purge Old Transactions from XBR and Balance Tables (SP_PRO_TRANSDATE_PURGE) 366Create Partitions - For Oracle Only (sp_pro_create_partition) . . . . . . . . . . . . . . . . . 368Archive Logs and Results (files.archive) . . . . . . . . . . . . . . . . . . . . . . . . . . . . . . . . 368
DBProcess Manager Updates the Master Files . . . . . . . . . . . . . . . . . . . . . . . . . . . . . . 368Bank Feeds . . . . . . . . . . . . . . . . . . . . . . . . . . . . . . . . . . . . . . . . . . . . . . . . . . . . 369Master Files. . . . . . . . . . . . . . . . . . . . . . . . . . . . . . . . . . . . . . . . . . . . . . . . . . . . 370
Store Master . . . . . . . . . . . . . . . . . . . . . . . . . . . . . . . . . . . . . . . . . . . . . . . . 370Employee Master . . . . . . . . . . . . . . . . . . . . . . . . . . . . . . . . . . . . . . . . . . . . . 370Other Master Files. . . . . . . . . . . . . . . . . . . . . . . . . . . . . . . . . . . . . . . . . . . . . 372
Put the Configuration Files Into \Control . . . . . . . . . . . . . . . . . . . . . . . . . . . . . . . . 372Logs . . . . . . . . . . . . . . . . . . . . . . . . . . . . . . . . . . . . . . . . . . . . . . . . . . . . . . . . . . . 373
xvi Table of Contents

XBR® 7.0.0 XBR Implementation Guide
Control Logs . . . . . . . . . . . . . . . . . . . . . . . . . . . . . . . . . . . . . . . . . . . . . . . . . . . 373Sub-Gather Logs . . . . . . . . . . . . . . . . . . . . . . . . . . . . . . . . . . . . . . . . . . . . . . . . 373Sub-Transform Logs. . . . . . . . . . . . . . . . . . . . . . . . . . . . . . . . . . . . . . . . . . . . . . 374Sub-DBProcess Logs. . . . . . . . . . . . . . . . . . . . . . . . . . . . . . . . . . . . . . . . . . . . . . 374
Manager Logs . . . . . . . . . . . . . . . . . . . . . . . . . . . . . . . . . . . . . . . . . . . . . . . . . . . . 375Gather Manager Logs . . . . . . . . . . . . . . . . . . . . . . . . . . . . . . . . . . . . . . . . . . . . . 375Transform Manager Logs . . . . . . . . . . . . . . . . . . . . . . . . . . . . . . . . . . . . . . . . . . 375DBProcess Manager Logs . . . . . . . . . . . . . . . . . . . . . . . . . . . . . . . . . . . . . . . . . . 376
Glossary of Balance Terms . . . . . . . . . . . . . . . . . . . . . . . . . . . . . . . . . . . . . . . . . . . 377Hosted Food Service Architecture . . . . . . . . . . . . . . . . . . . . . . . . . . . . . . . . . . . . . . . 379
Mymicros Data Warehouse . . . . . . . . . . . . . . . . . . . . . . . . . . . . . . . . . . . . . . . . . 379XBR Database Schema . . . . . . . . . . . . . . . . . . . . . . . . . . . . . . . . . . . . . . . . . . . . 380XBR Transactional Database Views. . . . . . . . . . . . . . . . . . . . . . . . . . . . . . . . . . . . 381XBR Master (Reference) Views. . . . . . . . . . . . . . . . . . . . . . . . . . . . . . . . . . . . . . . 383XBR Location and Employee Master Tables . . . . . . . . . . . . . . . . . . . . . . . . . . . . . . 383
Location Master (MST_STORE) . . . . . . . . . . . . . . . . . . . . . . . . . . . . . . . . . . . . 384Employee Master (MST_EMPLOYEE) . . . . . . . . . . . . . . . . . . . . . . . . . . . . . . . . 385
XBR Configuration in mymicros portal . . . . . . . . . . . . . . . . . . . . . . . . . . . . . . . . . . . 385XBR Reporting . . . . . . . . . . . . . . . . . . . . . . . . . . . . . . . . . . . . . . . . . . . . . . . . . . 386
Appendix B: ExtensibilityOverview . . . . . . . . . . . . . . . . . . . . . . . . . . . . . . . . . . . . . . . . . . . . . . . . . . . . . . . 388
Audience. . . . . . . . . . . . . . . . . . . . . . . . . . . . . . . . . . . . . . . . . . . . . . . . . . . . . . 388Web Interface . . . . . . . . . . . . . . . . . . . . . . . . . . . . . . . . . . . . . . . . . . . . . . . . . . 389
Stored Procedure Extensibility . . . . . . . . . . . . . . . . . . . . . . . . . . . . . . . . . . . . . . . . . 390Web Interface . . . . . . . . . . . . . . . . . . . . . . . . . . . . . . . . . . . . . . . . . . . . . . . . . . 390
Modify a Stored Procedure . . . . . . . . . . . . . . . . . . . . . . . . . . . . . . . . . . . . . . . 390Delete a Stored Procedure . . . . . . . . . . . . . . . . . . . . . . . . . . . . . . . . . . . . . . 395
View Extensibility . . . . . . . . . . . . . . . . . . . . . . . . . . . . . . . . . . . . . . . . . . . . . . . . . . 397Web Interface . . . . . . . . . . . . . . . . . . . . . . . . . . . . . . . . . . . . . . . . . . . . . . . . . . 397
Add New or Custom Views . . . . . . . . . . . . . . . . . . . . . . . . . . . . . . . . . . . . . . . 397Modify Custom Views . . . . . . . . . . . . . . . . . . . . . . . . . . . . . . . . . . . . . . . . . . 401Delete a Custom View . . . . . . . . . . . . . . . . . . . . . . . . . . . . . . . . . . . . . . . . . . 402
Table of Contents xvii


C H A P T E R
About This Guide
Chapter 1: About This Guide XBR® 7.0.0
OVERVIEW
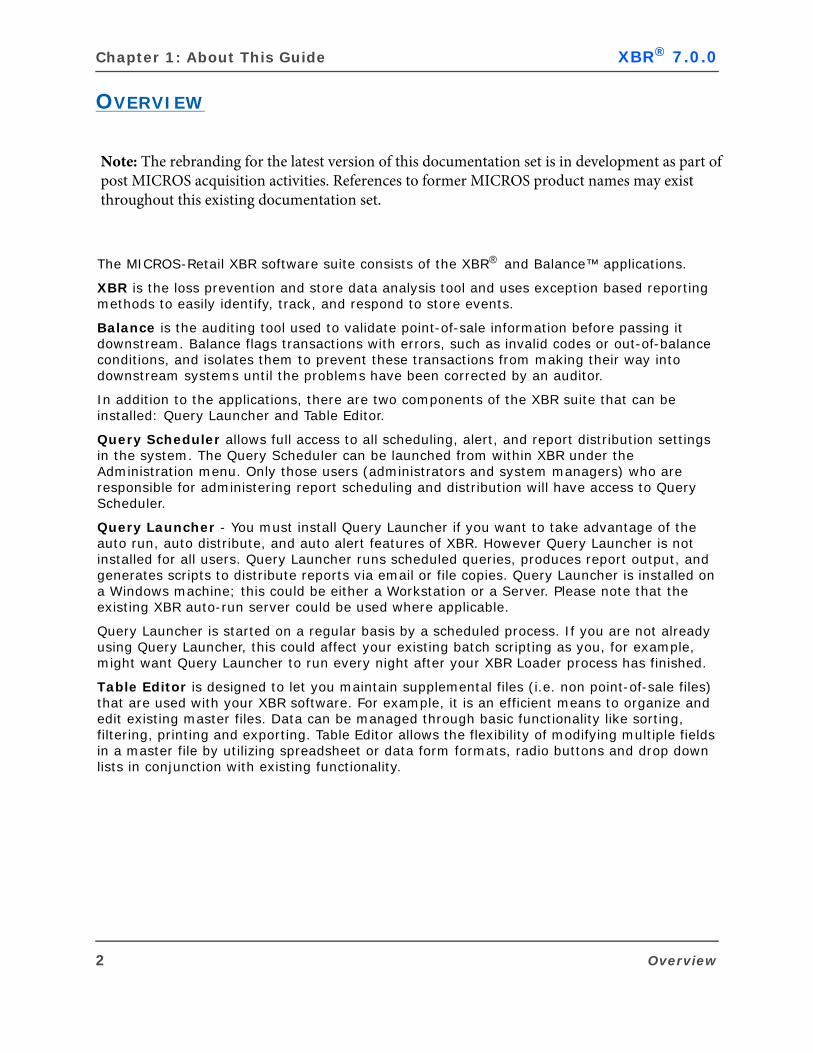
The MICROS-Retail XBR software suite consists of the XBR® and Balance™ applications.
XBR is the loss prevention and store data analysis tool and uses exception based reporting methods to easily identify, track, and respond to store events.
Balance is the auditing tool used to validate point-of-sale information before passing it downstream. Balance flags transactions with errors, such as invalid codes or out-of-balance conditions, and isolates them to prevent these transactions from making their way into downstream systems until the problems have been corrected by an auditor.
In addition to the applications, there are two components of the XBR suite that can be installed: Query Launcher and Table Editor.
Query Scheduler allows full access to all scheduling, alert, and report distribution settings in the system. The Query Scheduler can be launched from within XBR under the Administration menu. Only those users (administrators and system managers) who are responsible for administering report scheduling and distribution will have access to Query Scheduler.
Query Launcher - You must install Query Launcher if you want to take advantage of the auto run, auto distribute, and auto alert features of XBR. However Query Launcher is not installed for all users. Query Launcher runs scheduled queries, produces report output, and generates scripts to distribute reports via email or file copies. Query Launcher is installed on a Windows machine; this could be either a Workstation or a Server. Please note that the existing XBR auto-run server could be used where applicable.
Query Launcher is started on a regular basis by a scheduled process. If you are not already using Query Launcher, this could affect your existing batch scripting as you, for example, might want Query Launcher to run every night after your XBR Loader process has finished.
Table Editor is designed to let you maintain supplemental files (i.e. non point-of-sale files) that are used with your XBR software. For example, it is an efficient means to organize and edit existing master files. Data can be managed through basic functionality like sorting, filtering, printing and exporting. Table Editor allows the flexibility of modifying multiple fields in a master file by utilizing spreadsheet or data form formats, radio buttons and drop down lists in conjunction with existing functionality.
Note: The rebranding for the latest version of this documentation set is in development as part of post MICROS acquisition activities. References to former MICROS product names may exist throughout this existing documentation set.
2 Overview
XBR® 7.0.0 XBR Implementation Guide
This Implementation Guide describes the installation and configuration of MICROS-Retail XBR® (both Web and Desktop applications), Balance™, and also includes information about installing and configuring Query Launcher, and database setup information.
Refer to the following chapters for the information you need to get started:
Chapter 2, “XBR Desktop Application" on page 5 describes the installation and configuration of the desktop client software for MICROS-Retail XBR. Step-by-step procedures with screen images of the installation wizard and detailed configuration information guide you through the entire installation process.
Chapter 3, “Query Launcher" on page 59 provides installation and configuration instructions for Query Launcher. Step-by-step procedures with screen images of the installation software and detailed configuration information guide you through the entire installation process. Install Query Launcher if you want to take advantage of the auto-run, auto-distribute, and auto-alert features of XBR.
Chapter 4, “XBR Web Server Application" on page 103 describes the installation and configuration of the web application server and the desktop component of MICROS-Retail XBR. Step-by-step procedures with screen images of the installation wizard and detailed configuration information guide you through the entire installation process.
Chapter 5, “Database Setup" on page 253 describes database setup procedures, both a new install and an upgrade to an existing database. Procedures for Oracle and MS SQL databases are provided.
Appendix A, “System Architecture" on page 321 describes the objects used in the database, the processing and flow of data, and front-end setup needed to install and maintain Balance.
Appendix B, “Extensibility" on page 387 describes the process necessary to modify an existing CORE stored procedure or database view or create a new custom view.
Who Should Use this GuideThis guide is intended for anyone responsible for the installation, upgrade, and configuration of MICROS-Retail XBR and Balance, including Operations Technical Support and Customer Technical Support.
UpgradingThe MICROS-Retail XBR and Balance installation is a complete installation. In other words, these applications, when installed, do not overwrite or add components to previous versions.
If you would like to remove the previous version, use the installation CD for that version and follow the instructions in the Implementation Guide on using the “Remove” option. An alternate procedure would be to use the Windows Add/Remove Programs.
If you are already an XBR user and are adding Balance, please refer to the Balance Implementation Guide for installation information and procedures.
Overview 3

Chapter 1: About This Guide XBR® 7.0.0
XBR Version 7.0 Supported Platforms Database
Microsoft SQL 2005/2008
Oracle 10g/11g
Operating System
Application Server
-- Windows Server 2003/2008
Client
-- Windows XP
-- Windows 7 (64-bit)
Web Server
Apache Tomcat
Liferay Portal
JDK 1.6
Web Client
Internet Explorer 8.0
JRE 1.6
Balance
Windows XP
Windows 7 (64-bit)
Remote Desktop Connectivity & Access
Remote Desktop Services (Terminal Services)
Windows Server 2008 Release 2
The XBR Web Application server along with a Linux/Unix compatible DBMS (i.e. Oracle) are capable of being deployed in a Linux/Unix environment, however, are not certified on these platforms at this time nor have pre-configured installs for these environments.
The XBR Desktop, Balance Desktop and Query Launcher applications can only be deployed on Windows operating system environments.
4 Overview
C H A P T E R
XBR Desktop Application
Chapter 2: XBR Desktop Application XBR® 7.0.0
OVERVIEW
This chapter describes the installation and configuration of the desktop client software for MICROS-Retail XBR. Step-by-step instructions with screen images of the installation software and detailed configuration information walk you through the entire procedure.
About This ChapterIn this chapter you will install the XBR desktop application: See “Installing the XBR Desktop Application” on page 9.
After successfully installing XBR, you may want to further configure the application for your requirements: See “Configuring the XBR Desktop Installation” on page 45.
If you need to modify your XBR installation, you can add or remove features and reinstall any features: See “Changing an Existing XBR Desktop Installation” on page 53.
Troubleshooting tips help you to resolve some common problems: See “Troubleshooting the XBR Desktop Installation” on page 62.
To add a new organization to a multi-tenant instance: “Add Organization Attributes” on page 40
AudienceThis chapter is intended for the person who is responsible for installing and configuring XBR. This person should be familiar with Windows installation procedures and have some experience with editing configuration files.
PrerequisitesThis chapter assumes:
You know the name of the LDAP server, and the connection port value (if you use LDAP).
You know the database server name and other parameters that may be required to connect XBR to it.
You know the gateway IP address for email.
You know the server name and database name that will be used for offline reports, if it is different from the main database.
You know the org code that was used in the database setup.
If you are going to be using both XBR and Balance, in addition to performing the XBR installation/configuration procedures in this chapter; you must also perform the Balance installation/configuration procedures that are described in the Balance Implementation Guide.
6 Overview
XBR® 7.0.0 XBR Implementation Guide
Process FlowPerform the following steps in the order given to install the XBR 7.0.0 Desktop application.
1. Perform the Pre-Installation checks (“Pre-Installation Checks” on page 8).
2. Install the appropriate (Oracle or SQL Server) XBR database “Database Setup” on page 253).
3. Run the InstallShield installation procedure (“Installing the XBR Desktop Application” on page 9).
4. Run the Add Organization utility (“Adding A New Organization” on page 39).
5. [OPTIONAL] Configure the Desktop installation as necessary (“Configuring the XBR Desktop Installation” on page 45).
Do NOT perform this procedure if you are upgrading from XBR 6.8.x.
If you are upgrading from 6.7.x or this is a new installation, you must perform this procedure.
If you are upgrading from an XBR version earlier than 6.8.x, you must perform all the database upgrades before performing this procedure.
Overview 7
Chapter 2: XBR Desktop Application XBR® 7.0.0
PRE-INSTALLATION CHECKS
Read this section before you install the XBR Desktop application at a user workstation.
Distributed InstallationsDistribute a copy of the XBR CD to all users who will run a local copy of the XBR client software at their PC. You can make copies of the CD that has been supplied to you or you may distribute the CD files over your network.
Centralized InstallationsIf you are installing XBR from a centralized network drive, it is not necessary to distribute the CD to individual users. Individual products (including the XBR Desktop client software) are stored in subdirectories under a main product directory.
Settings for XBR Installation: dtvcustom.iniXBR uses a file called dtvcustom.ini that MICROS-Retail delivers on the installation CD. This file is important because it contains settings that are used during installation for customers who:
Use more than one video vendor.
Want to provide database settings to their users who are installing XBR 7.0.0.
Want to provide a default company email address.
The InstallShield application prompts you through the installation by using the contents of dtvcustom.ini as defaults for some of the parameter settings in the customer's .ini files.
Installing From a Network DriveIf your users install XBR from a network drive and the dtvcustom.ini file is on your installation CD, make sure the dtvcustom.ini file is in the same directory as the setup.exe file for XBR 7.0. If it isn't in the same directory, its settings are not used during installation.
Regardless of whether you are installing from the network or by distributing the CD to individual users, be sure that you have a network connection to your database servers. XBR uses several .DLL files from those servers.
If you wish to install the XBR Desktop application in more than one location, you must run the installation program for each location. Do not copy the installed XBR Desktop application from one location to another.
8 Pre-Installation Checks
XBR® 7.0.0 XBR Implementation Guide
INSTALLING THE XBR DESKTOP APPLICATION
1. Insert the XBR installation CD into the CD drive. The installation program should start automatically.
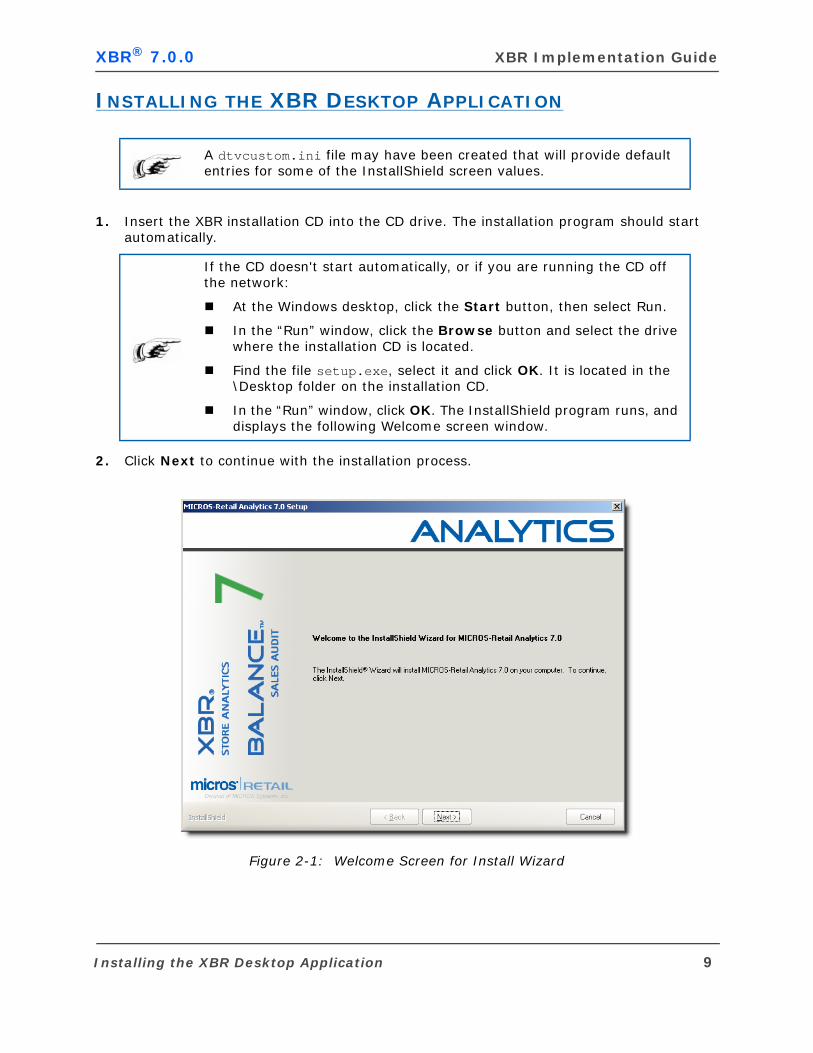
2. Click Next to continue with the installation process.
Figure 2-1: Welcome Screen for Install Wizard
A dtvcustom.ini file may have been created that will provide default entries for some of the InstallShield screen values.
If the CD doesn't start automatically, or if you are running the CD off the network:
At the Windows desktop, click the Start button, then select Run.
In the “Run” window, click the Browse button and select the drive where the installation CD is located.
Find the file setup.exe, select it and click OK. It is located in the \Desktop folder on the installation CD.
In the “Run” window, click OK. The InstallShield program runs, and displays the following Welcome screen window.
Installing the XBR Desktop Application 9
Chapter 2: XBR Desktop Application XBR® 7.0.0
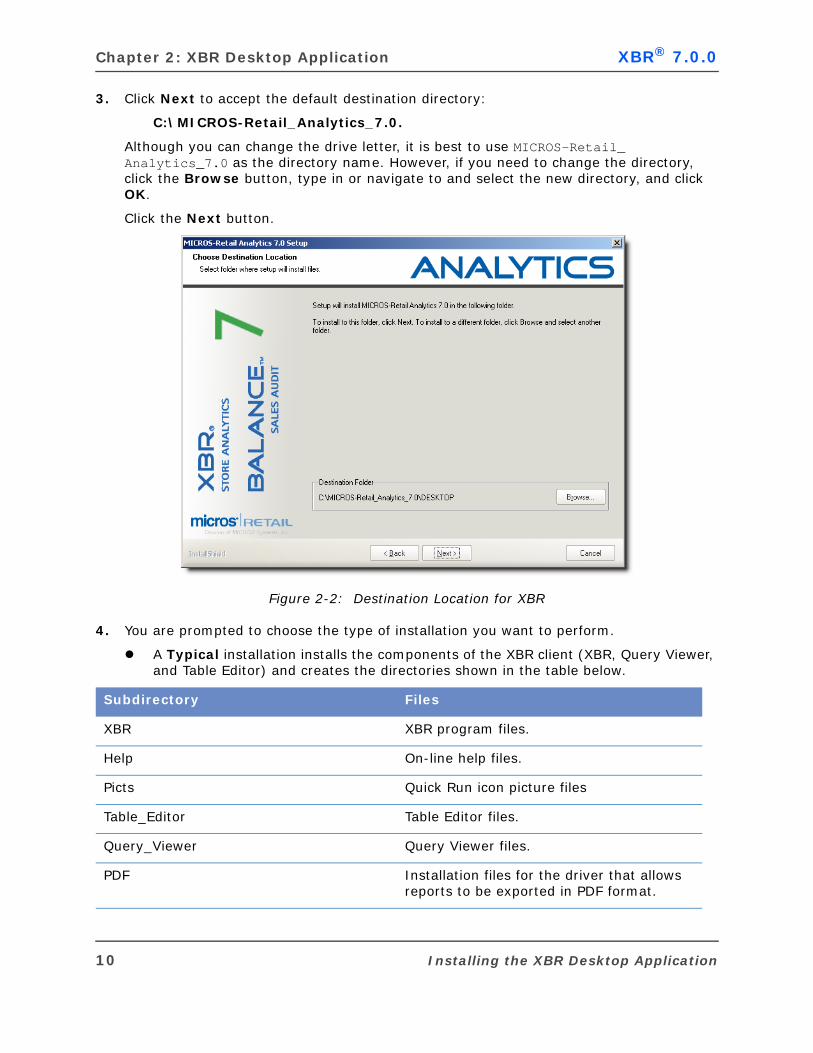
3. Click Next to accept the default destination directory:
C:\MICROS-Retail_Analytics_7.0.
Although you can change the drive letter, it is best to use MICROS-Retail_Analytics_7.0 as the directory name. However, if you need to change the directory, click the Browse button, type in or navigate to and select the new directory, and click OK.
Click the Next button.
Figure 2-2: Destination Location for XBR
4. You are prompted to choose the type of installation you want to perform.
A Typical installation installs the components of the XBR client (XBR, Query Viewer, and Table Editor) and creates the directories shown in the table below.
Subdirectory Files
XBR XBR program files.
Help On-line help files.
Picts Quick Run icon picture files
Table_Editor Table Editor files.
Query_Viewer Query Viewer files.
PDF Installation files for the driver that allows reports to be exported in PDF format.
10 Installing the XBR Desktop Application
XBR® 7.0.0 XBR Implementation Guide
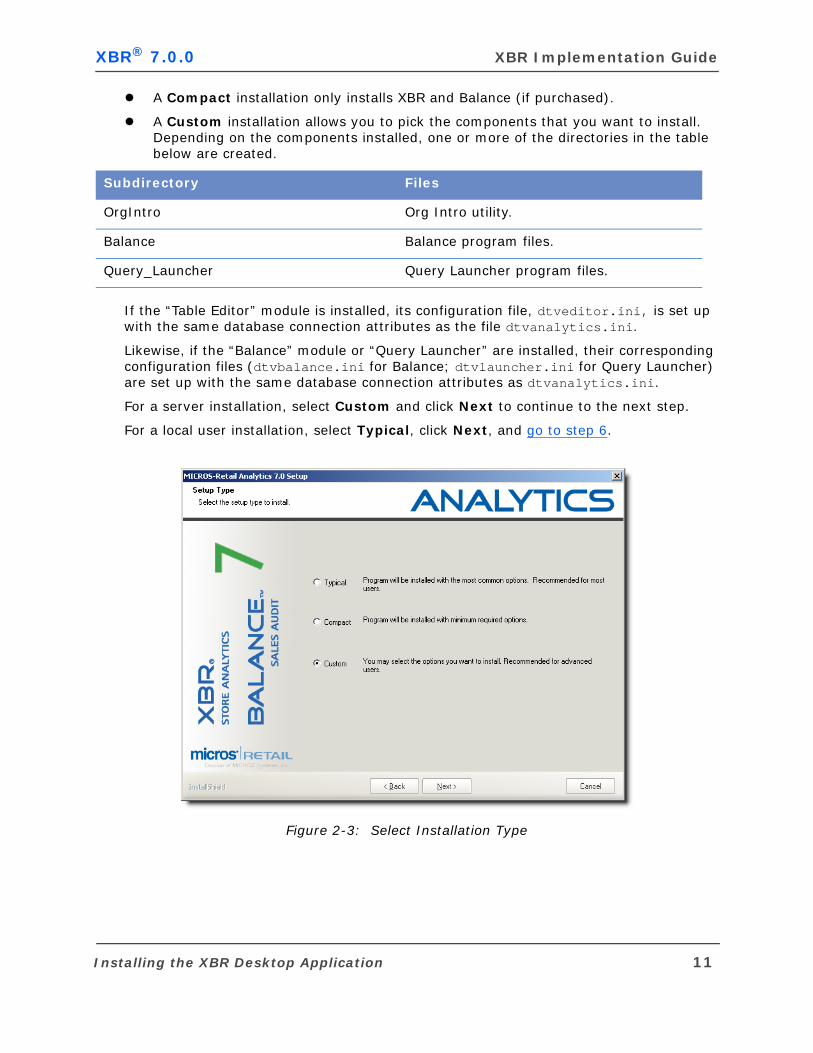
A Compact installation only installs XBR and Balance (if purchased).
A Custom installation allows you to pick the components that you want to install. Depending on the components installed, one or more of the directories in the table below are created.
If the “Table Editor” module is installed, its configuration file, dtveditor.ini, is set up with the same database connection attributes as the file dtvanalytics.ini.
Likewise, if the “Balance” module or “Query Launcher” are installed, their corresponding configuration files (dtvbalance.ini for Balance; dtvlauncher.ini for Query Launcher) are set up with the same database connection attributes as dtvanalytics.ini.
For a server installation, select Custom and click Next to continue to the next step.
For a local user installation, select Typical, click Next, and go to step 6.
Figure 2-3: Select Installation Type
Subdirectory Files
OrgIntro Org Intro utility.
Balance Balance program files.
Query_Launcher Query Launcher program files.
Installing the XBR Desktop Application 11
Chapter 2: XBR Desktop Application XBR® 7.0.0
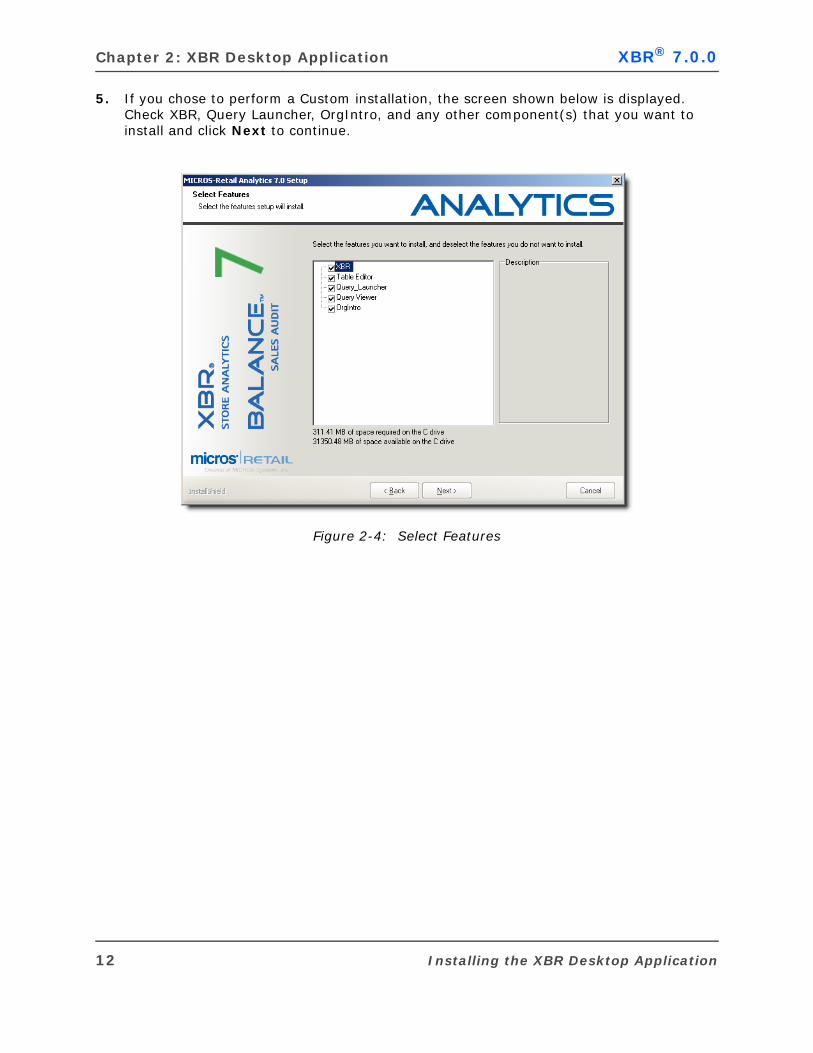
5. If you chose to perform a Custom installation, the screen shown below is displayed. Check XBR, Query Launcher, OrgIntro, and any other component(s) that you want to install and click Next to continue.
Figure 2-4: Select Features
12 Installing the XBR Desktop Application
XBR® 7.0.0 XBR Implementation Guide
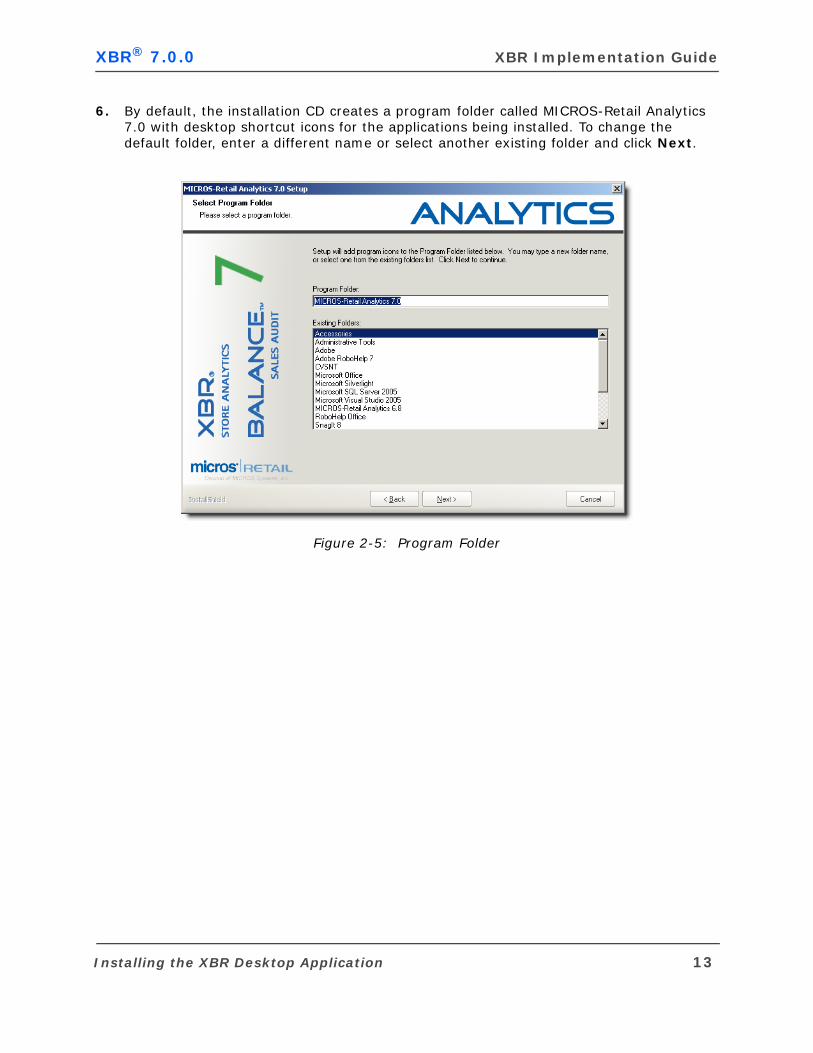
6. By default, the installation CD creates a program folder called MICROS-Retail Analytics 7.0 with desktop shortcut icons for the applications being installed. To change the default folder, enter a different name or select another existing folder and click Next.
Figure 2-5: Program Folder
Installing the XBR Desktop Application 13

Chapter 2: XBR Desktop Application XBR® 7.0.0
7. If necessary, you may change the settings you have selected by clicking Back to return to previous screens and make changes. If you believe that your settings are correct, click Next to begin the installation. The status of the installation is displayed as it occurs.
Figure 2-6: Current Settings
14 Installing the XBR Desktop Application
XBR® 7.0.0 XBR Implementation Guide
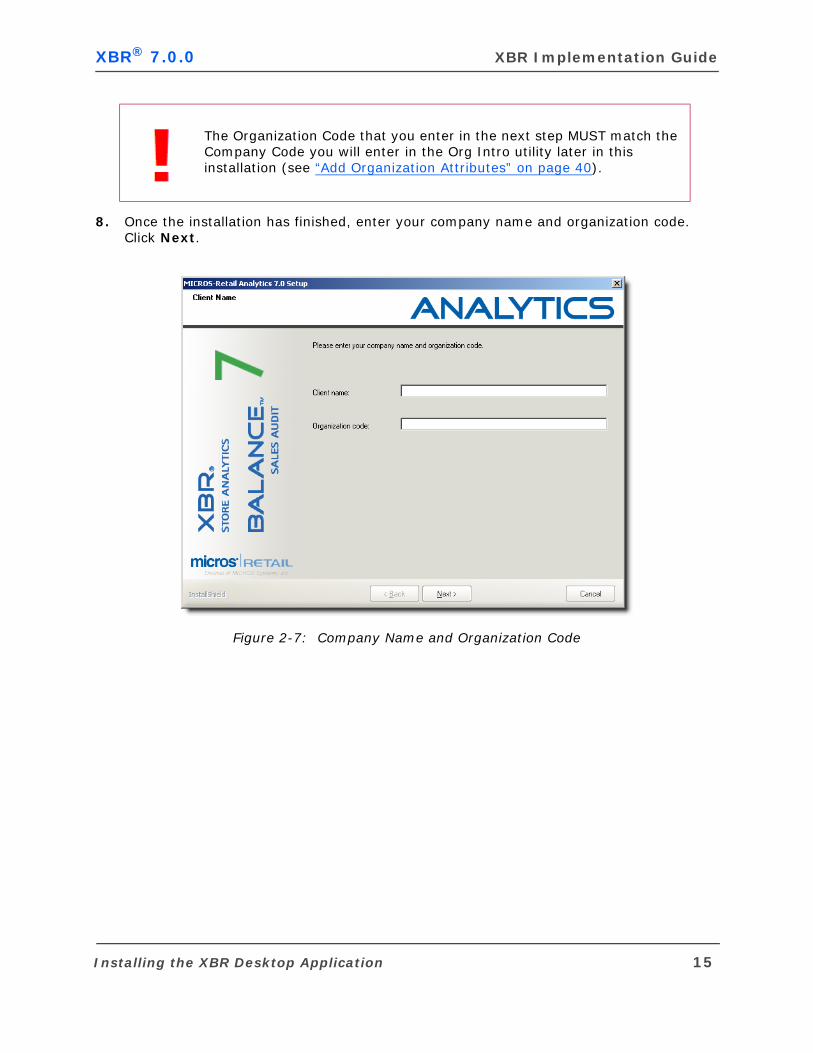
8. Once the installation has finished, enter your company name and organization code. Click Next.
Figure 2-7: Company Name and Organization Code
The Organization Code that you enter in the next step MUST match the Company Code you will enter in the Org Intro utility later in this installation (see “Add Organization Attributes” on page 40).
Installing the XBR Desktop Application 15
Chapter 2: XBR Desktop Application XBR® 7.0.0
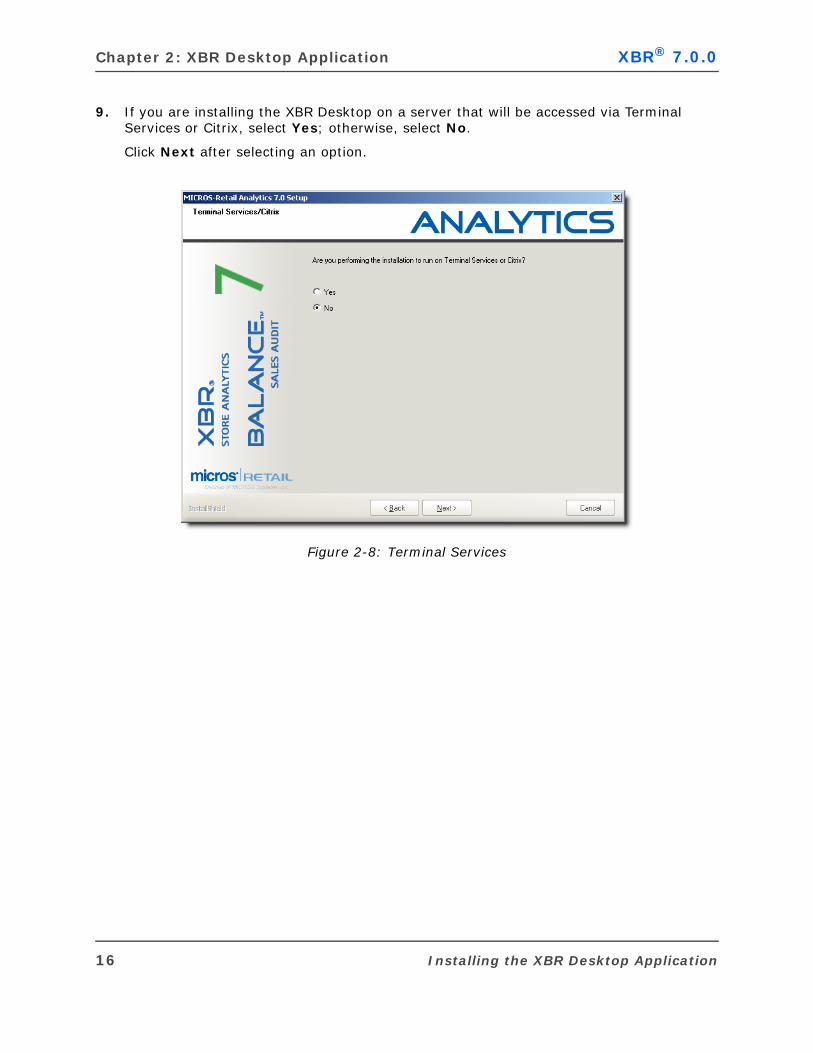
9. If you are installing the XBR Desktop on a server that will be accessed via Terminal Services or Citrix, select Yes; otherwise, select No.
Click Next after selecting an option.
Figure 2-8: Terminal Services
16 Installing the XBR Desktop Application
XBR® 7.0.0 XBR Implementation Guide
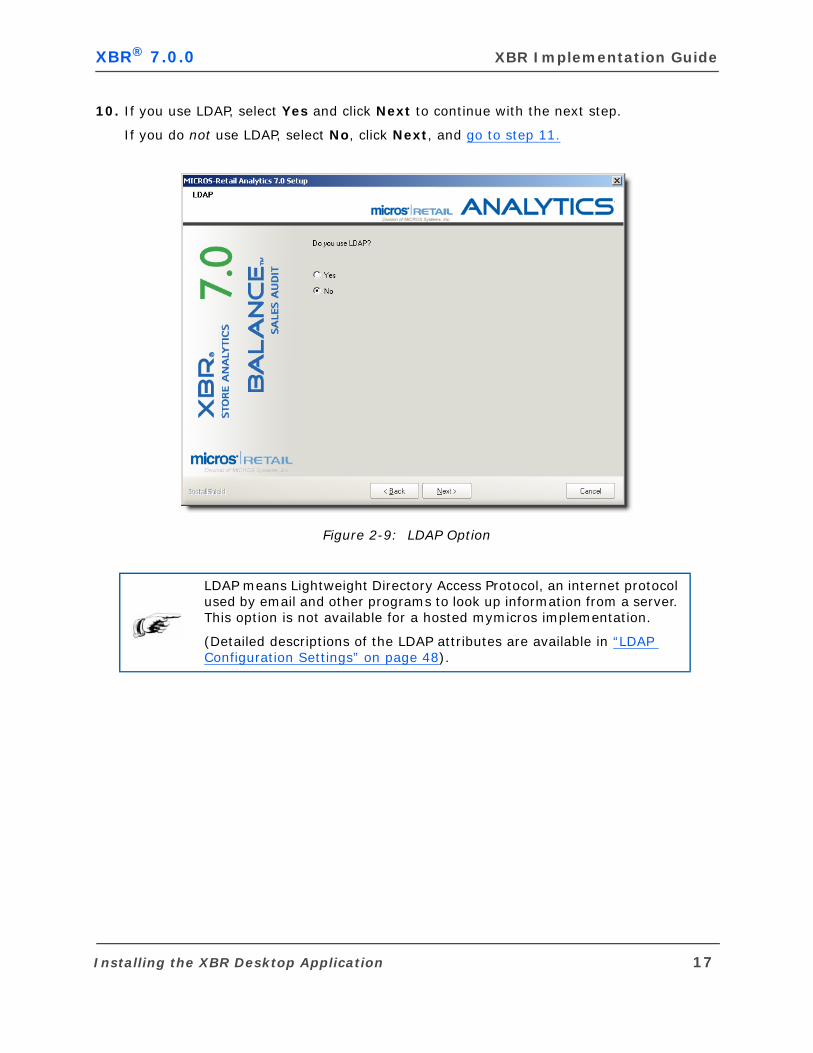
10. If you use LDAP, select Yes and click Next to continue with the next step.
If you do not use LDAP, select No, click Next, and go to step 11.
Figure 2-9: LDAP Option
LDAP means Lightweight Directory Access Protocol, an internet protocol used by email and other programs to look up information from a server. This option is not available for a hosted mymicros implementation.
(Detailed descriptions of the LDAP attributes are available in “LDAP Configuration Settings” on page 48).
Installing the XBR Desktop Application 17
Chapter 2: XBR Desktop Application XBR® 7.0.0
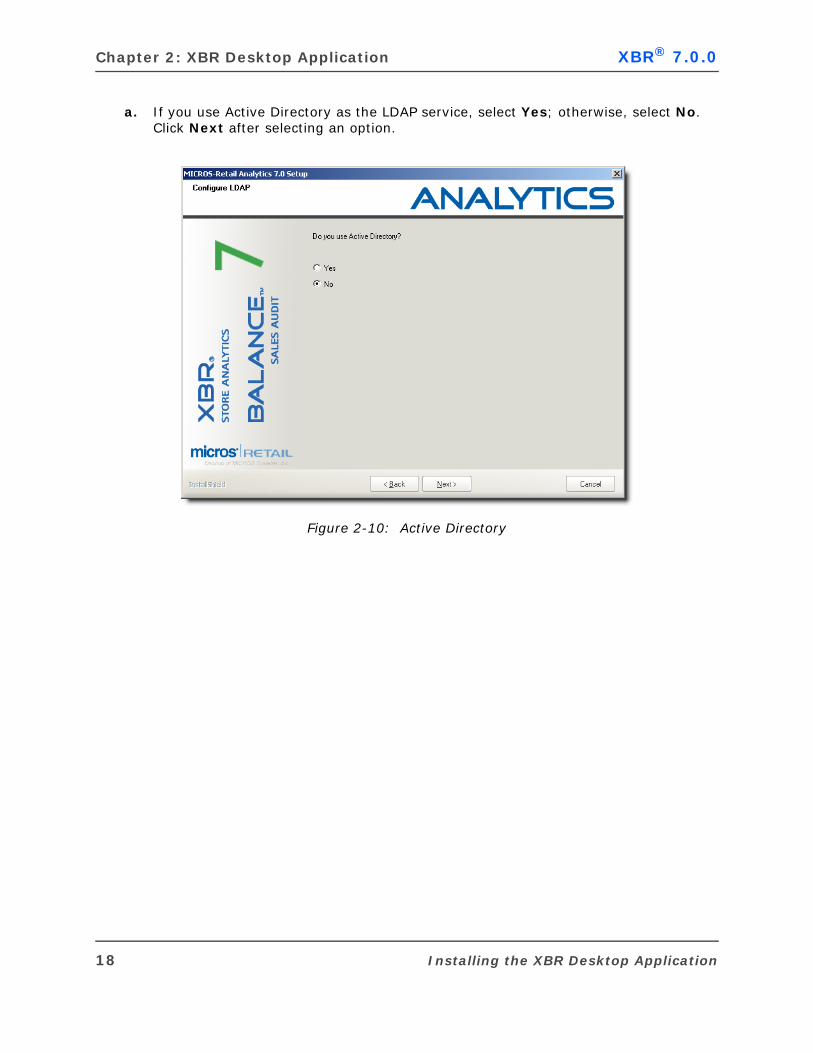
a. If you use Active Directory as the LDAP service, select Yes; otherwise, select No. Click Next after selecting an option.
Figure 2-10: Active Directory
18 Installing the XBR Desktop Application
XBR® 7.0.0 XBR Implementation Guide
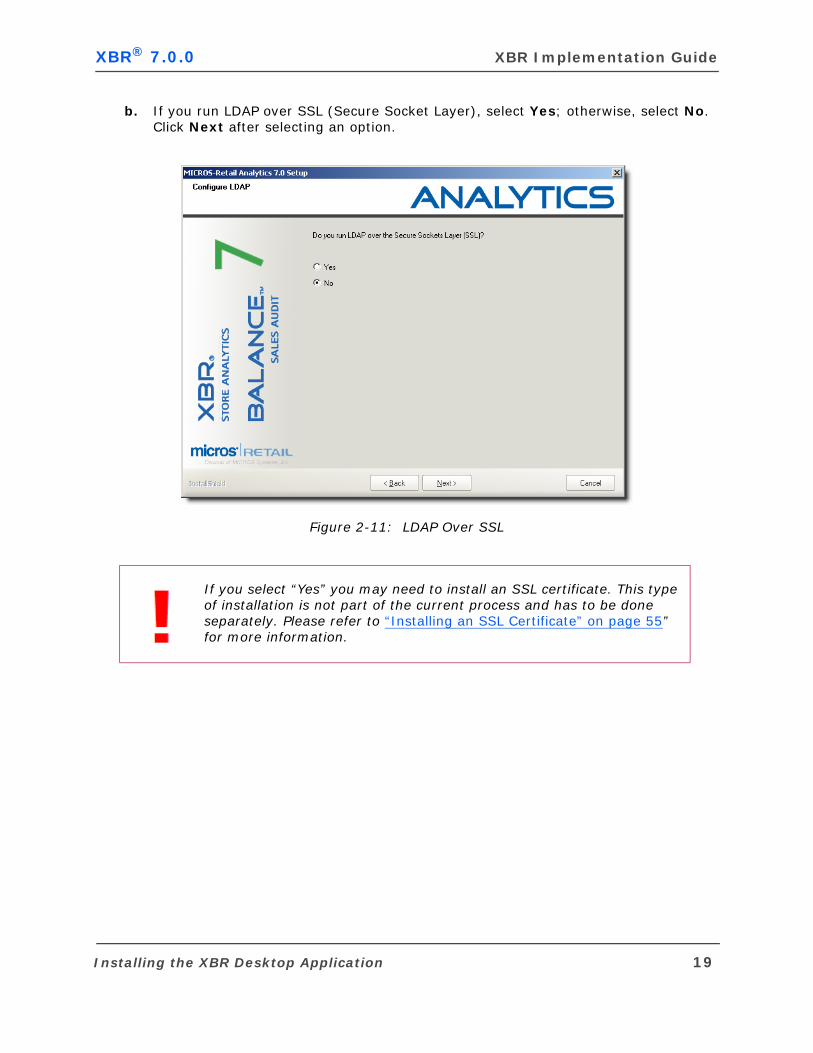
b. If you run LDAP over SSL (Secure Socket Layer), select Yes; otherwise, select No. Click Next after selecting an option.
Figure 2-11: LDAP Over SSL
If you select “Yes” you may need to install an SSL certificate. This type of installation is not part of the current process and has to be done separately. Please refer to “Installing an SSL Certificate” on page 55” for more information.
Installing the XBR Desktop Application 19
Chapter 2: XBR Desktop Application XBR® 7.0.0
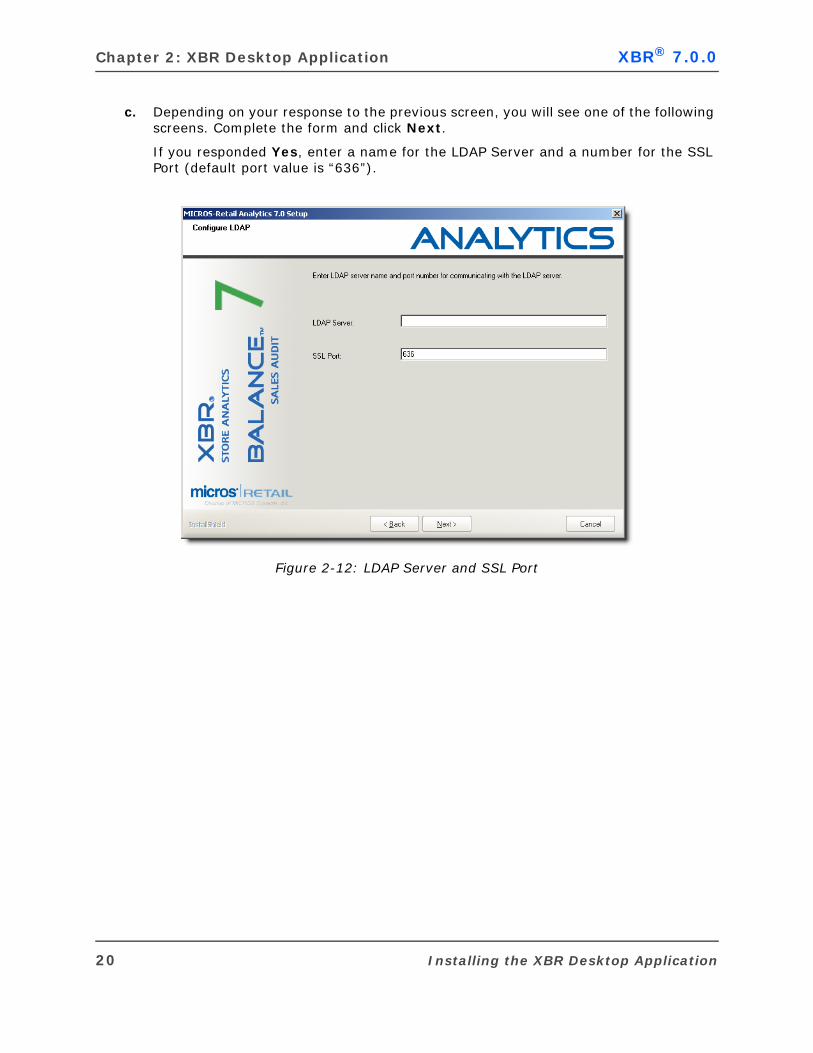
c. Depending on your response to the previous screen, you will see one of the following screens. Complete the form and click Next.
If you responded Yes, enter a name for the LDAP Server and a number for the SSL Port (default port value is “636”).
Figure 2-12: LDAP Server and SSL Port
20 Installing the XBR Desktop Application
XBR® 7.0.0 XBR Implementation Guide
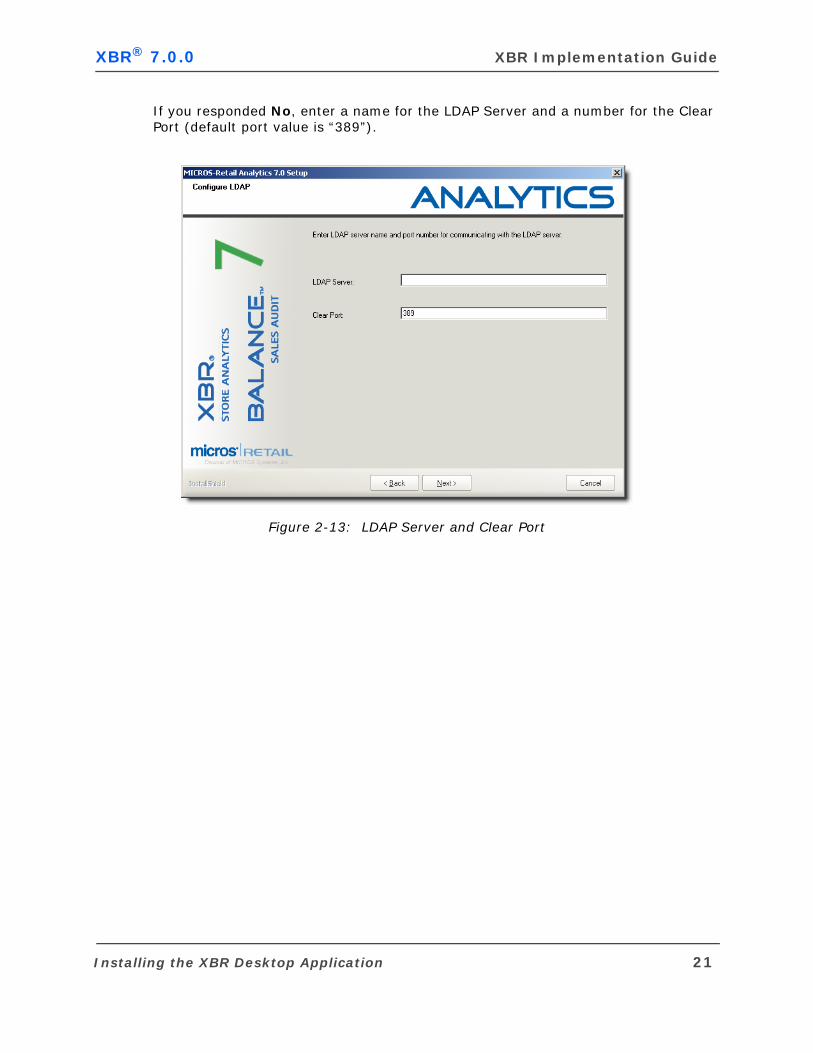
If you responded No, enter a name for the LDAP Server and a number for the Clear Port (default port value is “389”).
Figure 2-13: LDAP Server and Clear Port
Installing the XBR Desktop Application 21
Chapter 2: XBR Desktop Application XBR® 7.0.0
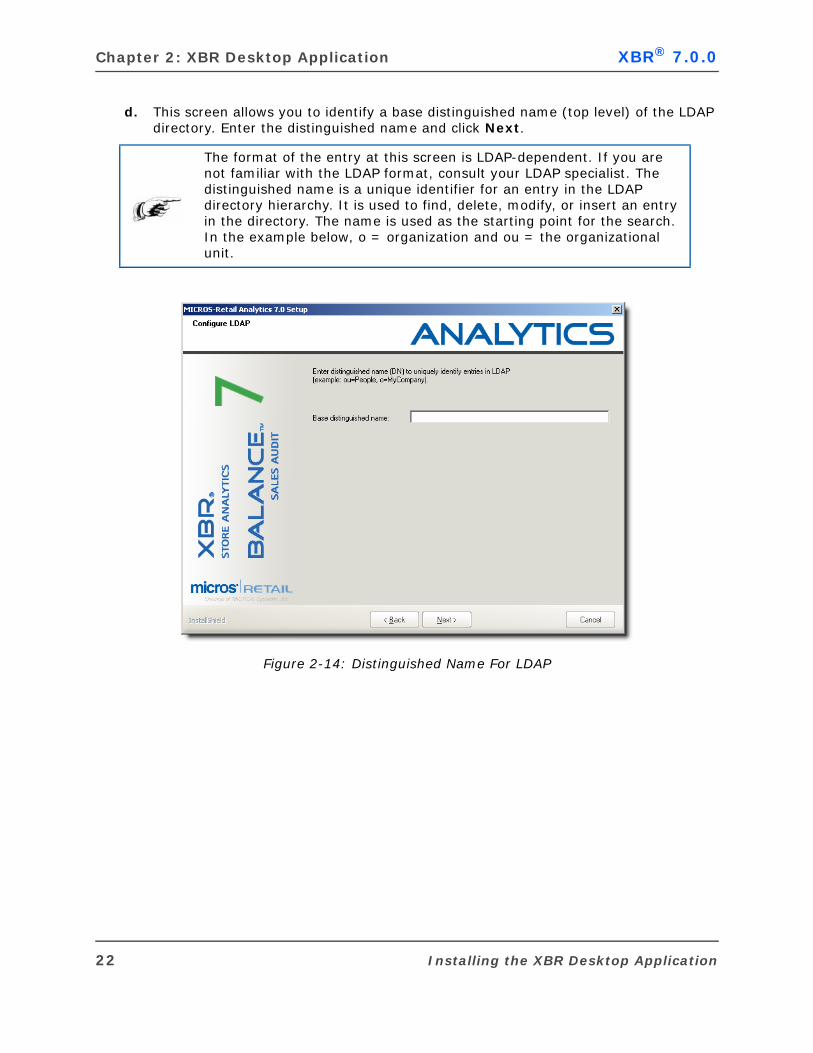
d. This screen allows you to identify a base distinguished name (top level) of the LDAP directory. Enter the distinguished name and click Next.
Figure 2-14: Distinguished Name For LDAP
The format of the entry at this screen is LDAP-dependent. If you are not familiar with the LDAP format, consult your LDAP specialist. The distinguished name is a unique identifier for an entry in the LDAP directory hierarchy. It is used to find, delete, modify, or insert an entry in the directory. The name is used as the starting point for the search. In the example below, o = organization and ou = the organizational unit.
22 Installing the XBR Desktop Application
XBR® 7.0.0 XBR Implementation Guide
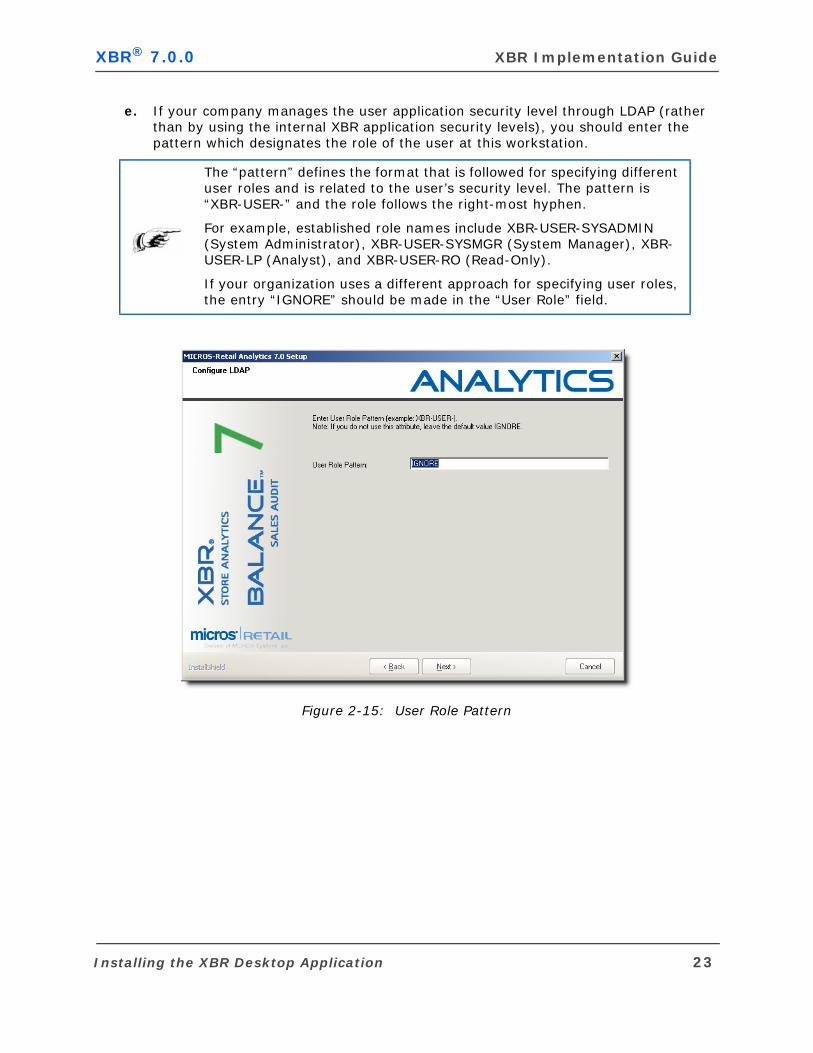
e. If your company manages the user application security level through LDAP (rather than by using the internal XBR application security levels), you should enter the pattern which designates the role of the user at this workstation.
Figure 2-15: User Role Pattern
The “pattern” defines the format that is followed for specifying different user roles and is related to the user’s security level. The pattern is “XBR-USER-” and the role follows the right-most hyphen.
For example, established role names include XBR-USER-SYSADMIN (System Administrator), XBR-USER-SYSMGR (System Manager), XBR-USER-LP (Analyst), and XBR-USER-RO (Read-Only).
If your organization uses a different approach for specifying user roles, the entry “IGNORE” should be made in the “User Role” field.
Installing the XBR Desktop Application 23

Chapter 2: XBR Desktop Application XBR® 7.0.0
11. If you are using Oracle as your database type, select Oracle, click Next, and continue with the next step.
If you are using SQL Server as your database type, select Microsoft SQL Server, click Next, and go to step 15.
Figure 2-16: Database Type
24 Installing the XBR Desktop Application
XBR® 7.0.0 XBR Implementation Guide
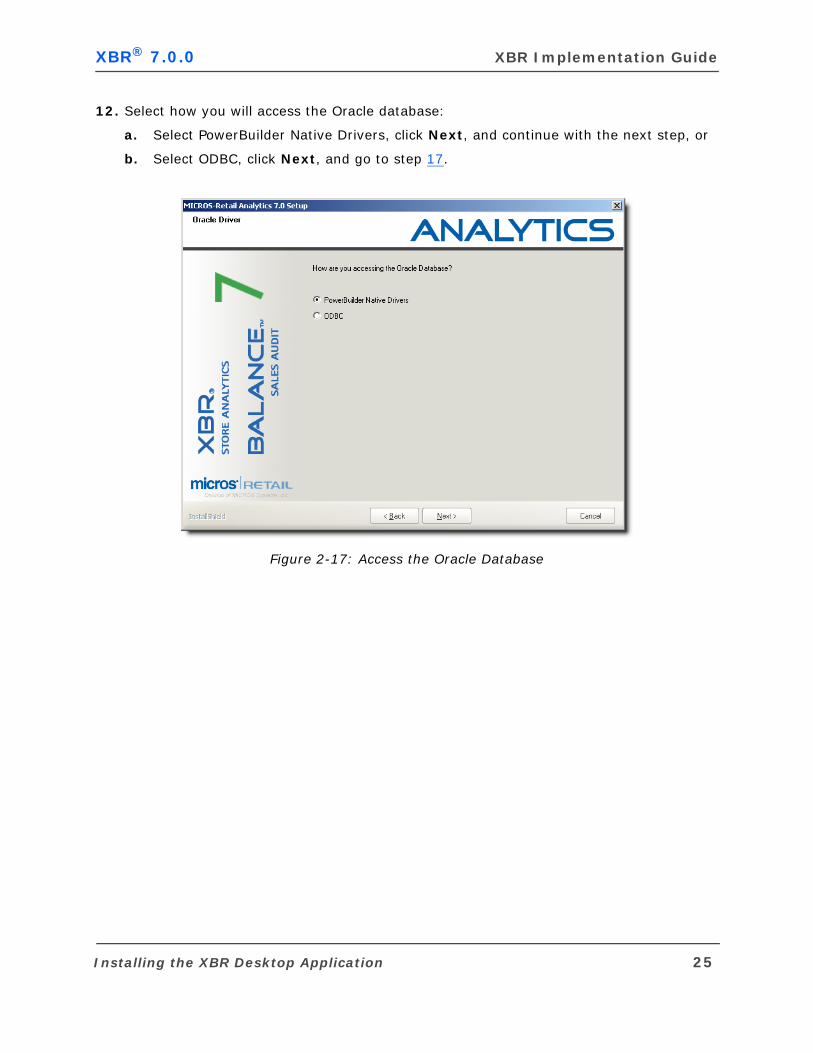
12. Select how you will access the Oracle database:
a. Select PowerBuilder Native Drivers, click Next, and continue with the next step, or
b. Select ODBC, click Next, and go to step 17.
Figure 2-17: Access the Oracle Database
Installing the XBR Desktop Application 25
Chapter 2: XBR Desktop Application XBR® 7.0.0
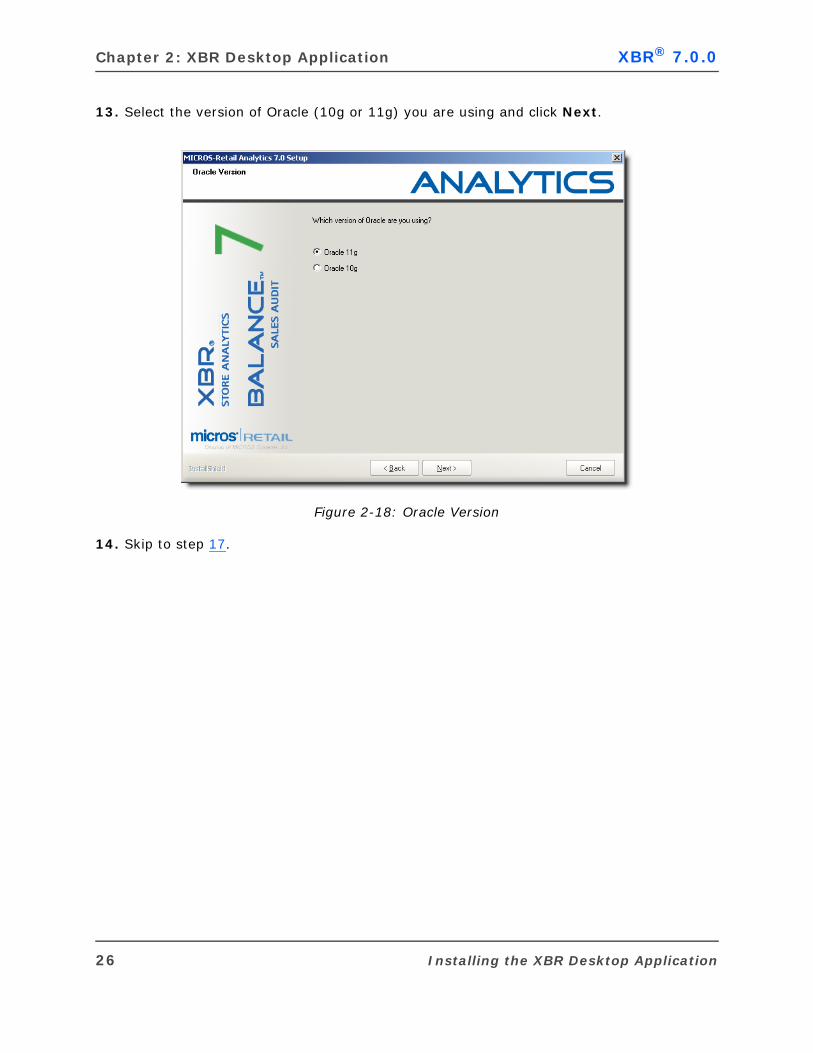
13. Select the version of Oracle (10g or 11g) you are using and click Next.
Figure 2-18: Oracle Version
14. Skip to step 17.
26 Installing the XBR Desktop Application
XBR® 7.0.0 XBR Implementation Guide
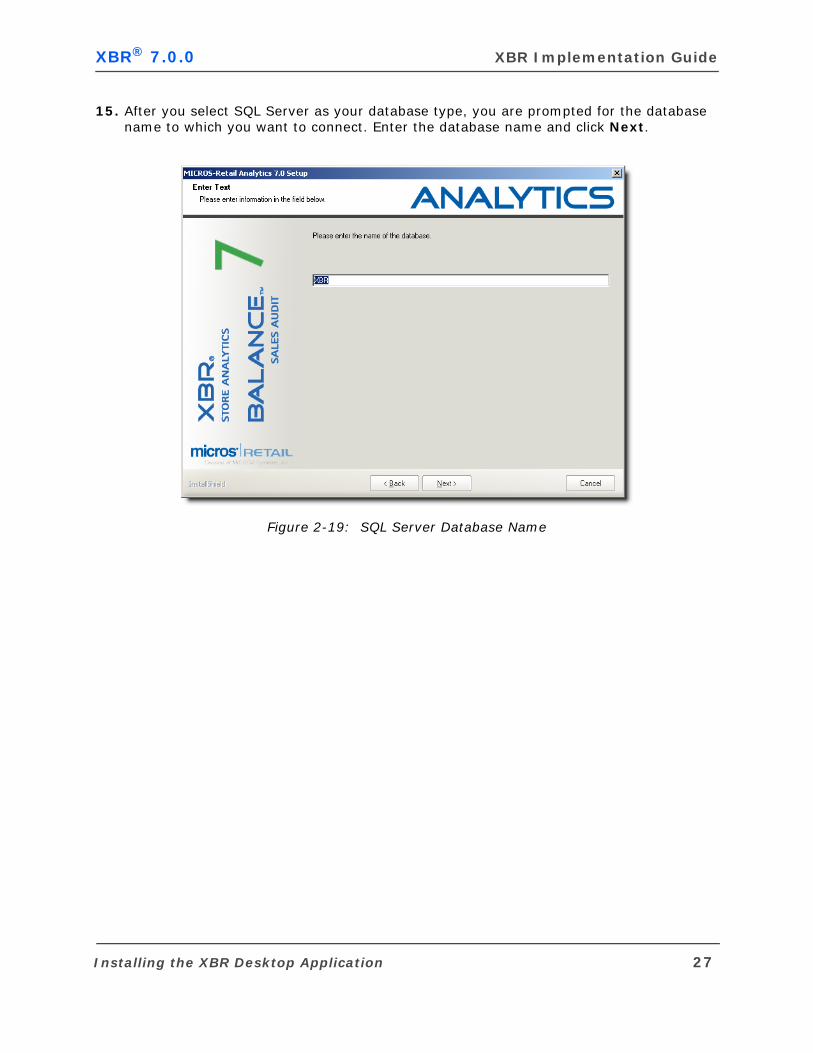
15. After you select SQL Server as your database type, you are prompted for the database name to which you want to connect. Enter the database name and click Next.
Figure 2-19: SQL Server Database Name
Installing the XBR Desktop Application 27
Chapter 2: XBR Desktop Application XBR® 7.0.0
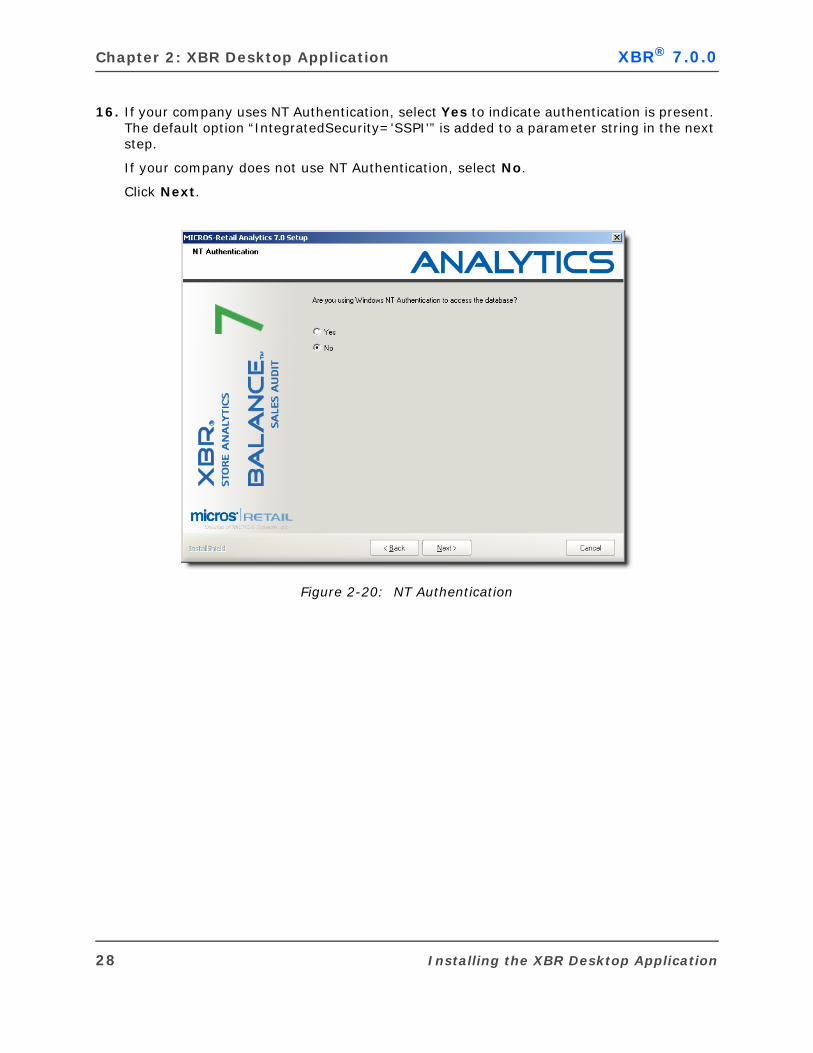
16. If your company uses NT Authentication, select Yes to indicate authentication is present. The default option “IntegratedSecurity='SSPI'” is added to a parameter string in the next step.
If your company does not use NT Authentication, select No.
Click Next.
Figure 2-20: NT Authentication
28 Installing the XBR Desktop Application
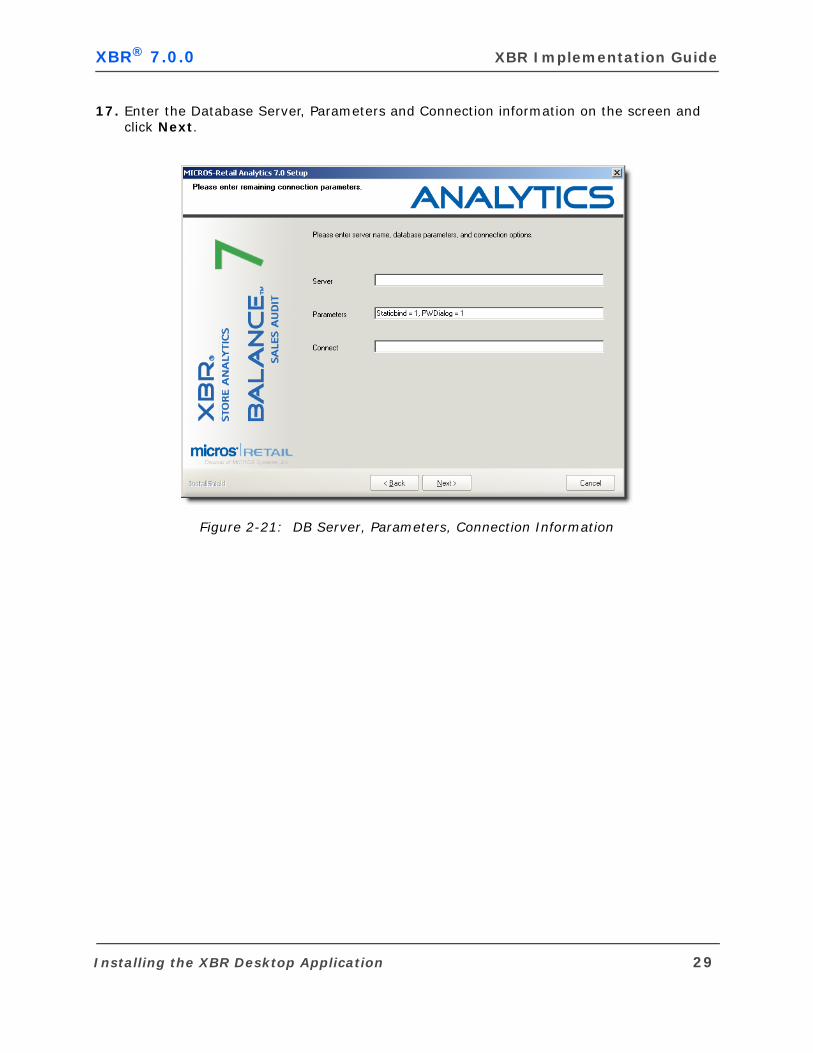
XBR® 7.0.0 XBR Implementation Guide
17. Enter the Database Server, Parameters and Connection information on the screen and click Next.
Figure 2-21: DB Server, Parameters, Connection Information
Installing the XBR Desktop Application 29
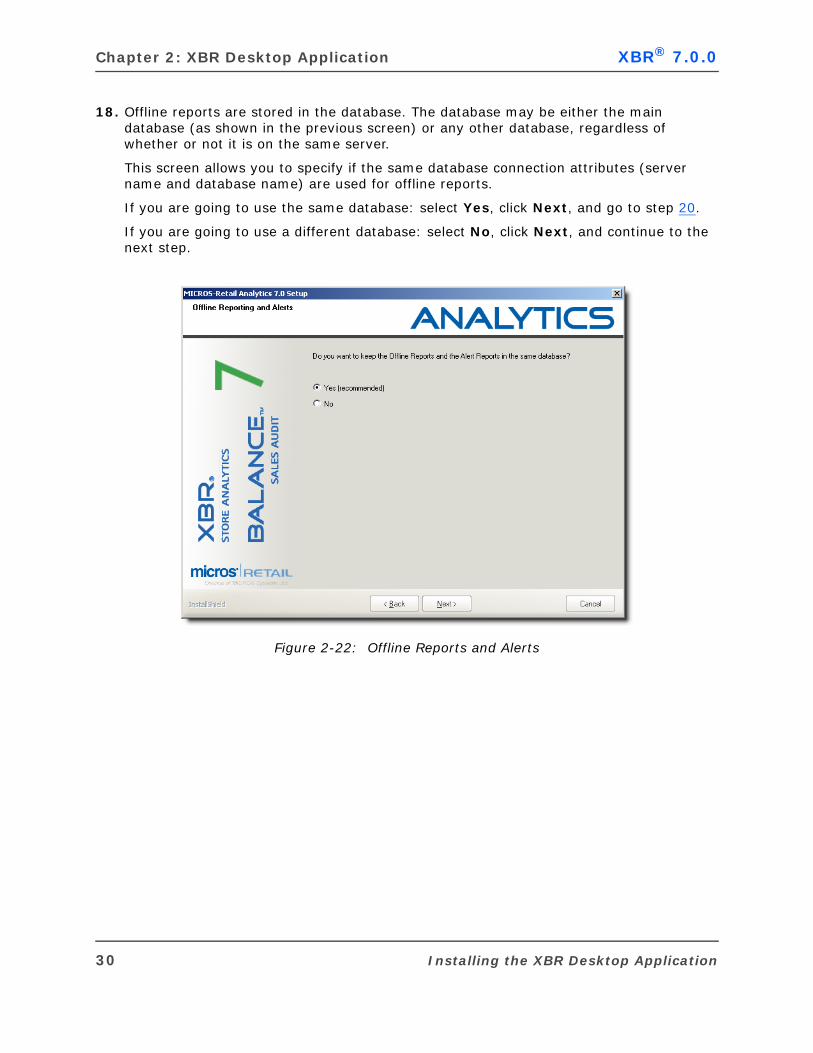
Chapter 2: XBR Desktop Application XBR® 7.0.0
18. Offline reports are stored in the database. The database may be either the main database (as shown in the previous screen) or any other database, regardless of whether or not it is on the same server.
This screen allows you to specify if the same database connection attributes (server name and database name) are used for offline reports.
If you are going to use the same database: select Yes, click Next, and go to step 20.
If you are going to use a different database: select No, click Next, and continue to the next step.
Figure 2-22: Offline Reports and Alerts
30 Installing the XBR Desktop Application
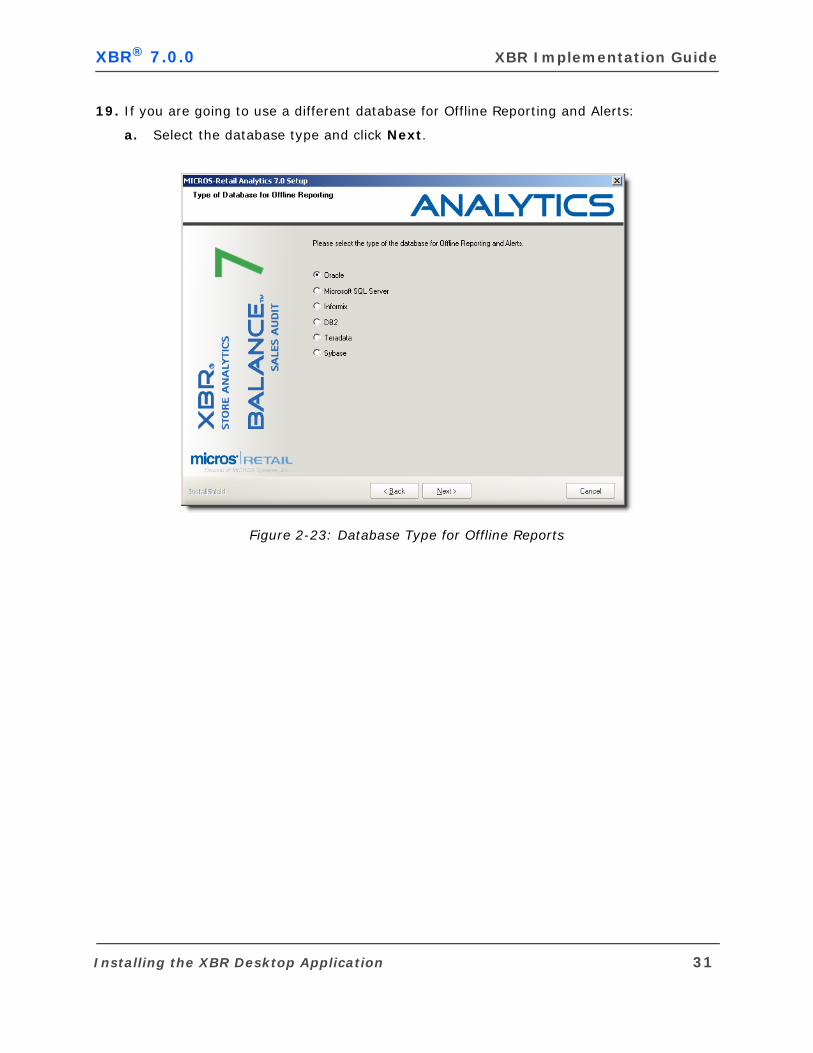
XBR® 7.0.0 XBR Implementation Guide
19. If you are going to use a different database for Offline Reporting and Alerts:
a. Select the database type and click Next.
Figure 2-23: Database Type for Offline Reports
Installing the XBR Desktop Application 31
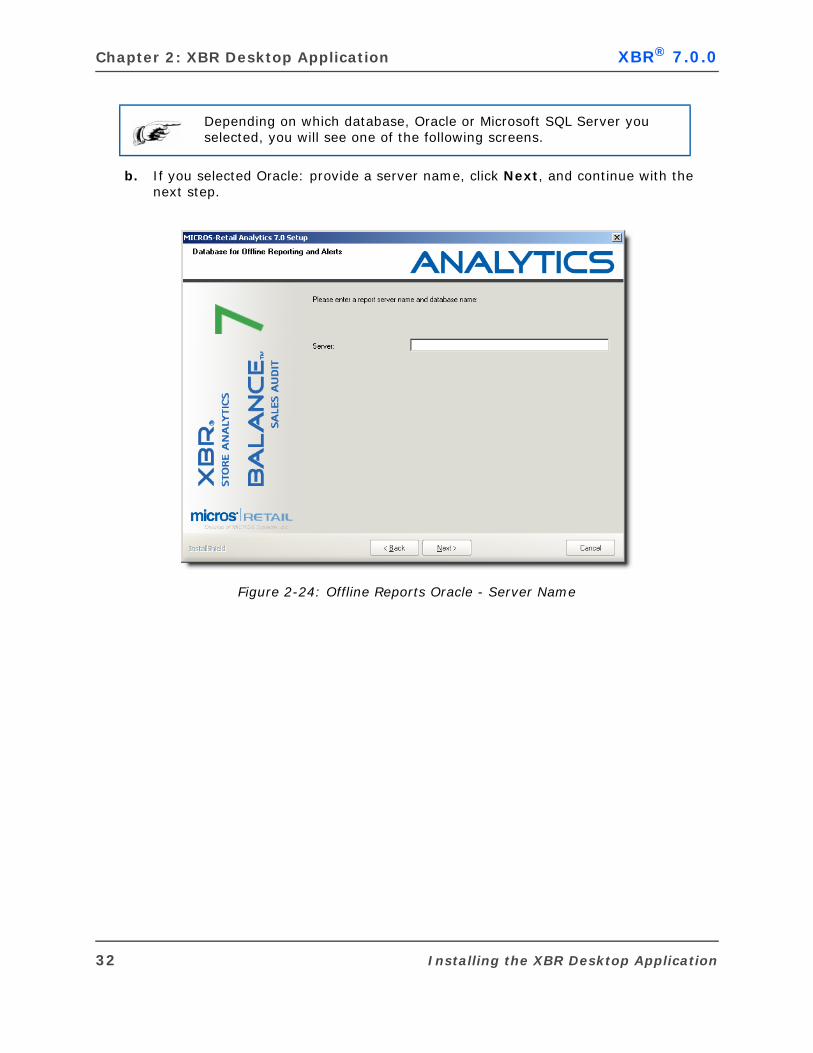
Chapter 2: XBR Desktop Application XBR® 7.0.0
b. If you selected Oracle: provide a server name, click Next, and continue with the next step.
Figure 2-24: Offline Reports Oracle - Server Name
Depending on which database, Oracle or Microsoft SQL Server you selected, you will see one of the following screens.
32 Installing the XBR Desktop Application
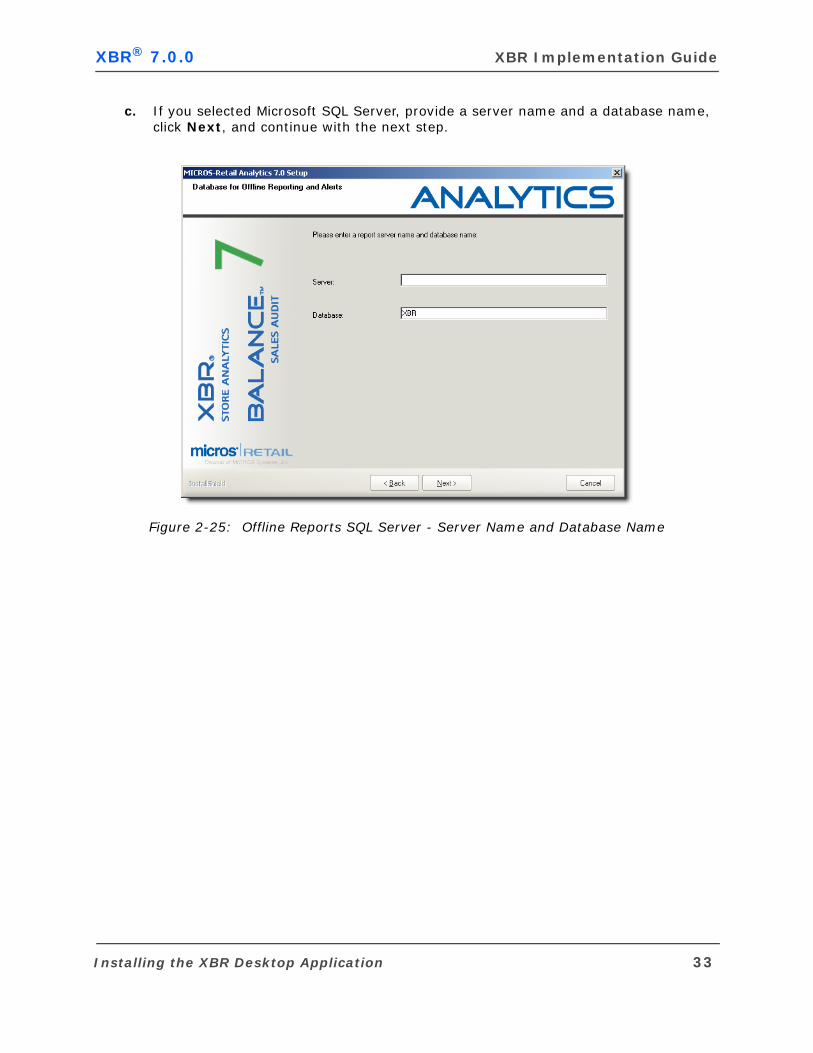
XBR® 7.0.0 XBR Implementation Guide
c. If you selected Microsoft SQL Server, provide a server name and a database name, click Next, and continue with the next step.
Figure 2-25: Offline Reports SQL Server - Server Name and Database Name
Installing the XBR Desktop Application 33
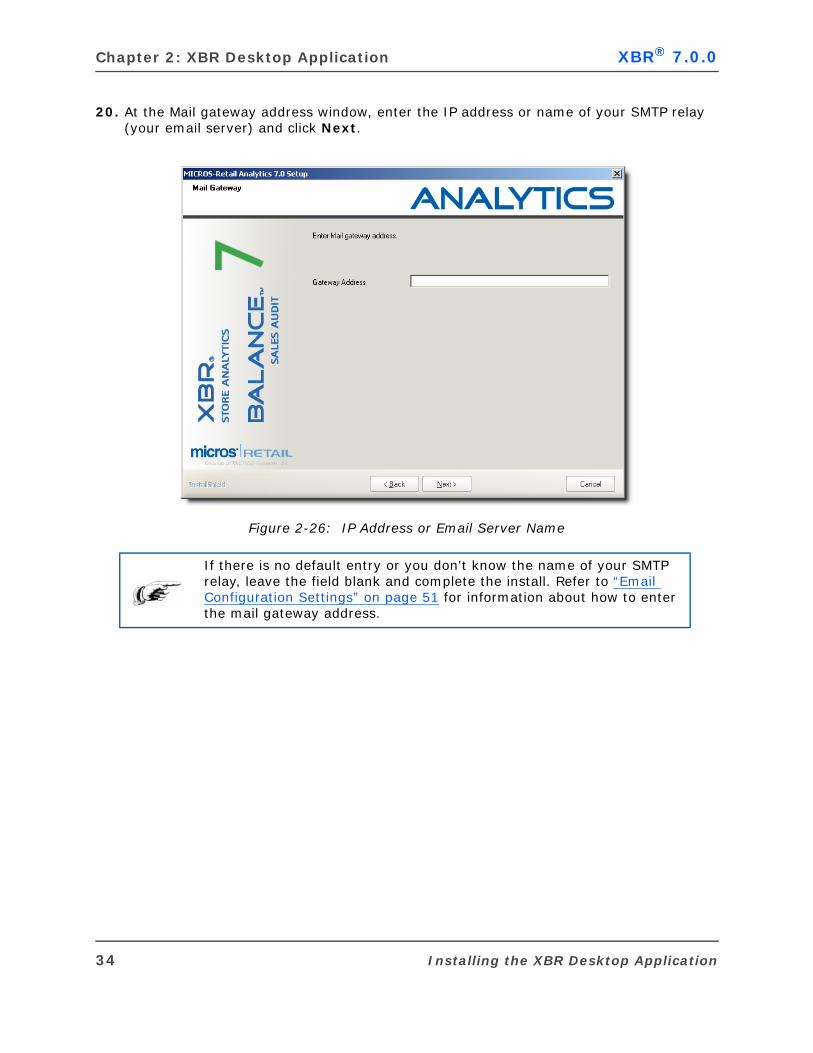
Chapter 2: XBR Desktop Application XBR® 7.0.0
20. At the Mail gateway address window, enter the IP address or name of your SMTP relay (your email server) and click Next.
Figure 2-26: IP Address or Email Server Name
If there is no default entry or you don't know the name of your SMTP relay, leave the field blank and complete the install. Refer to “Email Configuration Settings” on page 51 for information about how to enter the mail gateway address.
34 Installing the XBR Desktop Application

XBR® 7.0.0 XBR Implementation Guide
21. Enter the default email address to be used by the sender, for example, “[email protected]”. Click Next.
Figure 2-27: Sender’s Email Address
Installing the XBR Desktop Application 35
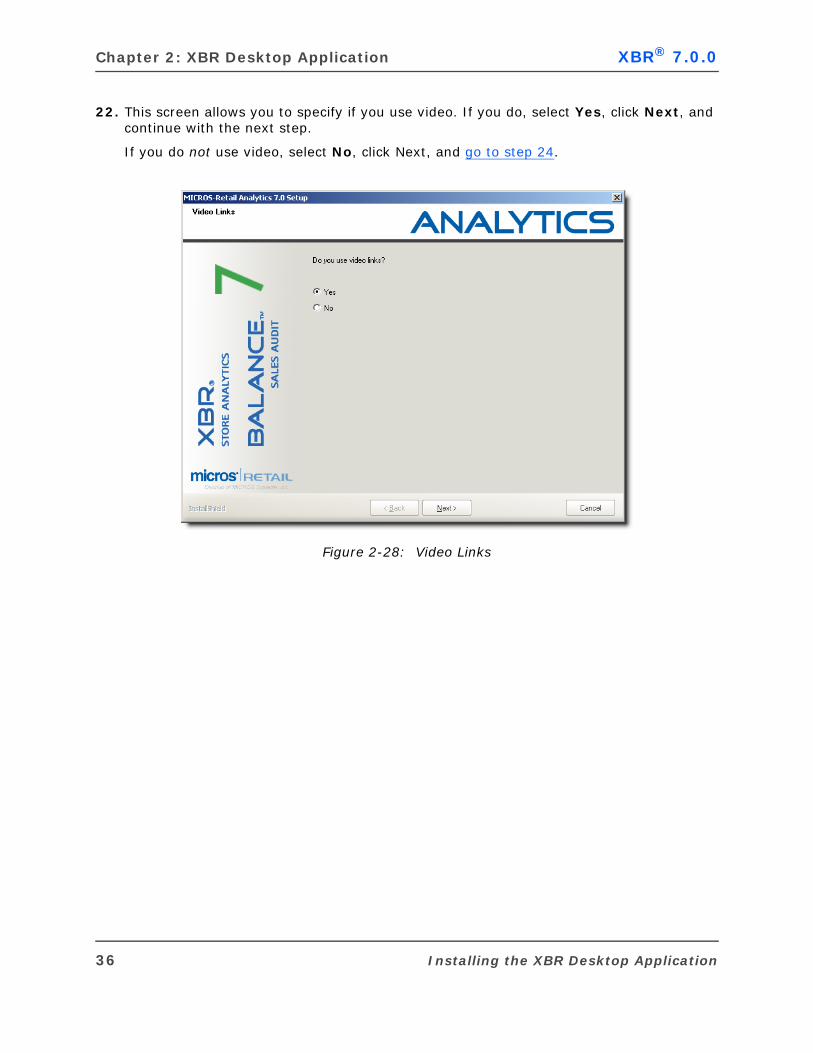
Chapter 2: XBR Desktop Application XBR® 7.0.0
22. This screen allows you to specify if you use video. If you do, select Yes, click Next, and continue with the next step.
If you do not use video, select No, click Next, and go to step 24.
Figure 2-28: Video Links
36 Installing the XBR Desktop Application
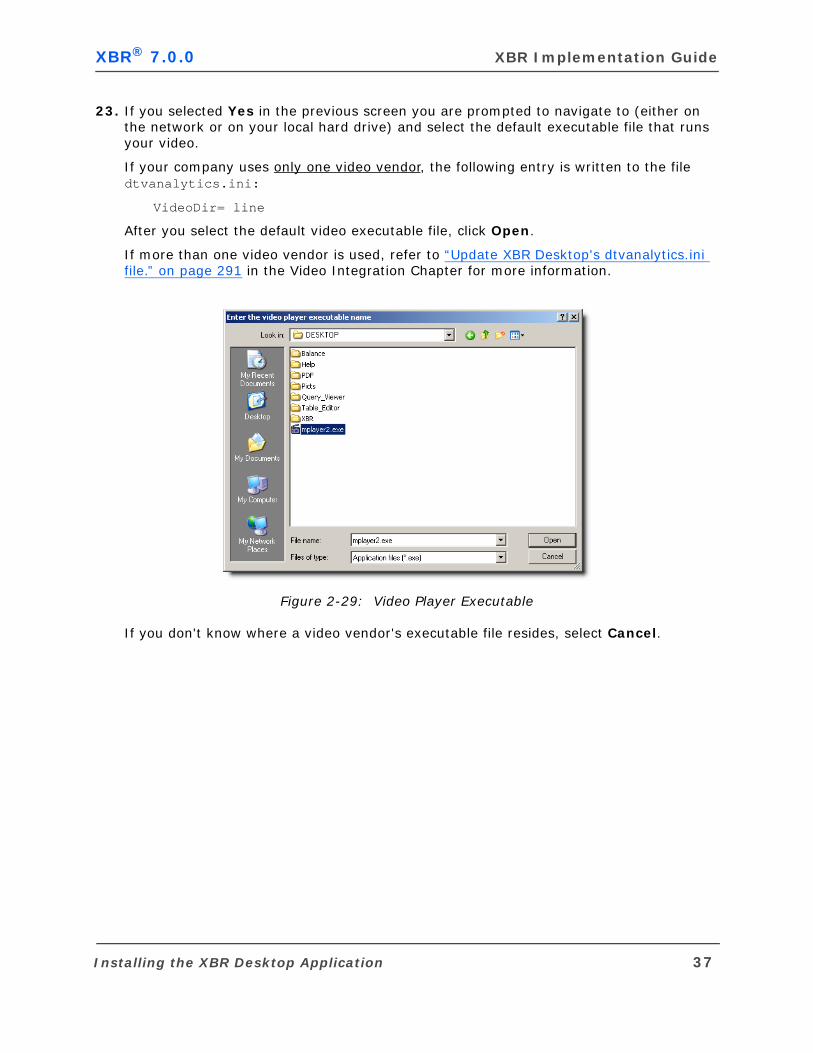
XBR® 7.0.0 XBR Implementation Guide
23. If you selected Yes in the previous screen you are prompted to navigate to (either on the network or on your local hard drive) and select the default executable file that runs your video.
If your company uses only one video vendor, the following entry is written to the file dtvanalytics.ini:
VideoDir= line
After you select the default video executable file, click Open.
If more than one video vendor is used, refer to “Update XBR Desktop's dtvanalytics.ini file.” on page 291 in the Video Integration Chapter for more information.
Figure 2-29: Video Player Executable
If you don't know where a video vendor's executable file resides, select Cancel.
Installing the XBR Desktop Application 37

Chapter 2: XBR Desktop Application XBR® 7.0.0
24. After the "Installation Complete" screen displays, click Finish to complete the installation. You're done with the InstallShield portion of the installation.
Figure 2-30: Installation Complete
The next step in the installation process is to add any organizations that need to be added (see “Adding A New Organization” on page 39).
38 Installing the XBR Desktop Application
XBR® 7.0.0 XBR Implementation Guide
ADDING A NEW ORGANIZATION
This section is intended to outline the required steps to introduce an organization to the deployment. The database must already be installed (or upgraded to 7.0.0) and you must have the connection information before proceeding with this process. This is required for both single tenant and multi-tenant environments and it is essential that this process is run for all new installs and 7.0.0 upgrades in order for the customer to access and utilize the application.
When the database is installed, it will include CORE metadata in most of the application tables. This data will be populated with an OrgID of -1001. This data needs to be cloned for the new organization so that the customer has their own metadata (data dictionary, lookups, date names, users, etc.) to use and modify. In multi-tenant environments, this will also prevent other organizations contained within the implementation from being affected. This data duplication process is done using a utility application Org Intro (orgintro.exe), which is installed in the \MICROS-Retail_Analytics_7.0\DESKTOP\OrgIntro directory during the XBR Desktop server installation. This process will call database scripts that clone the customer specific metadata for their OrgID, define the company code and URL, and create the default users for the newly added organization. The following sections outline the instructions and screens in the Org Intro application.
Do NOT perform this procedure if you are upgrading from XBR 6.8.x.
If you are upgrading from 6.7.x or this is a new installation, you must perform this procedure.
If you are upgrading from an XBR version earlier than 6.8.x, you must perform all the database upgrades before performing this procedure.
Adding A New Organization 39
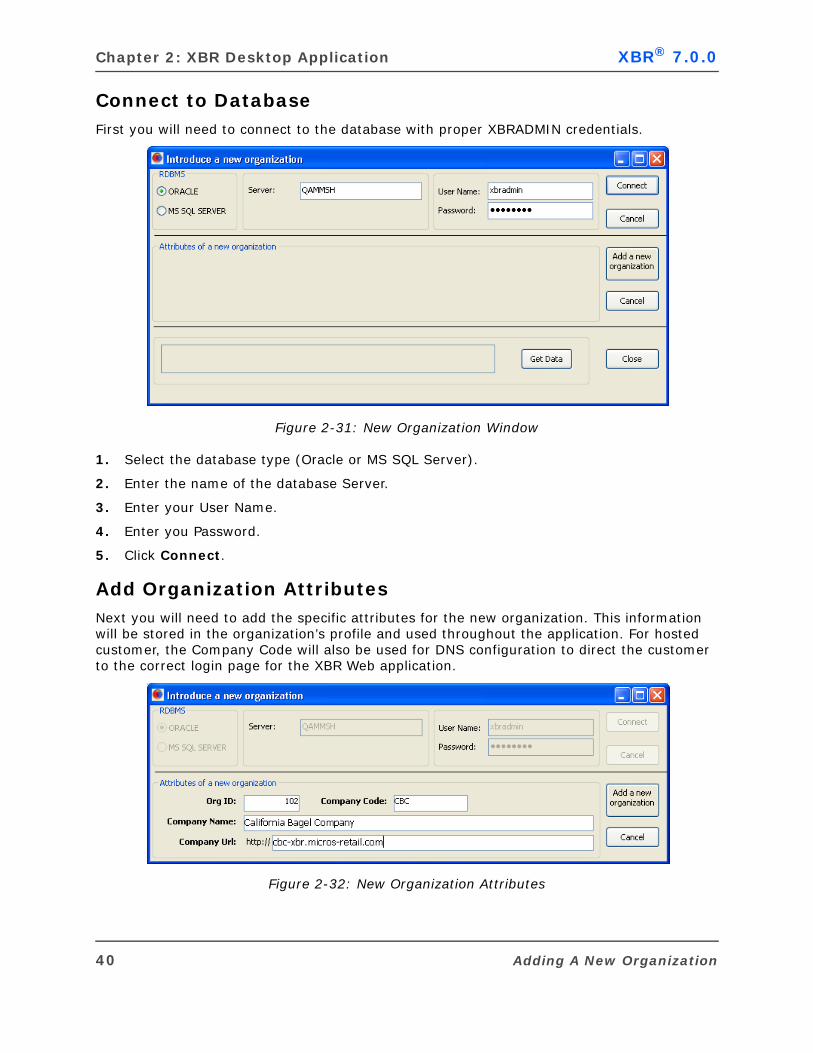
Chapter 2: XBR Desktop Application XBR® 7.0.0
Connect to DatabaseFirst you will need to connect to the database with proper XBRADMIN credentials.
Figure 2-31: New Organization Window
1. Select the database type (Oracle or MS SQL Server).
2. Enter the name of the database Server.
3. Enter your User Name.
4. Enter you Password.
5. Click Connect.
Add Organization AttributesNext you will need to add the specific attributes for the new organization. This information will be stored in the organization’s profile and used throughout the application. For hosted customer, the Company Code will also be used for DNS configuration to direct the customer to the correct login page for the XBR Web application.
Figure 2-32: New Organization Attributes
40 Adding A New Organization
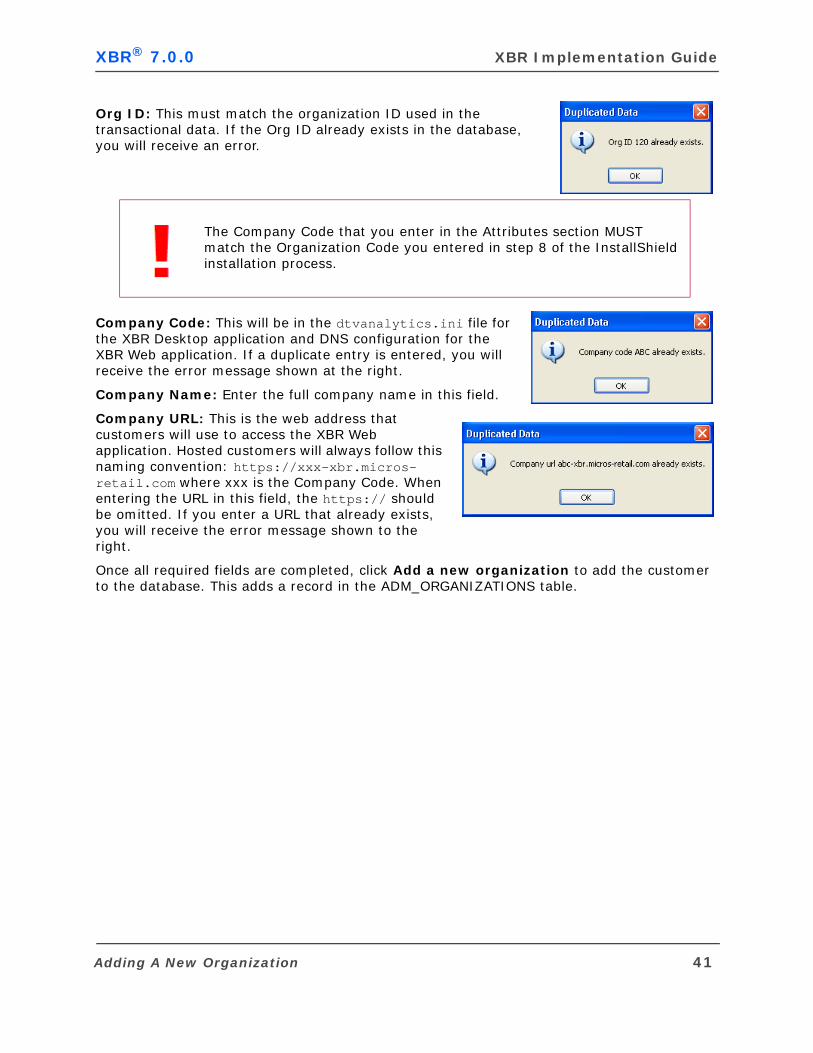
XBR® 7.0.0 XBR Implementation Guide
Org ID: This must match the organization ID used in the transactional data. If the Org ID already exists in the database, you will receive an error.
Company Code: This will be in the dtvanalytics.ini file for the XBR Desktop application and DNS configuration for the XBR Web application. If a duplicate entry is entered, you will receive the error message shown at the right.
Company Name: Enter the full company name in this field.
Company URL: This is the web address that customers will use to access the XBR Web application. Hosted customers will always follow this naming convention: https://xxx-xbr.micros-retail.com where xxx is the Company Code. When entering the URL in this field, the https:// should be omitted. If you enter a URL that already exists, you will receive the error message shown to the right.
Once all required fields are completed, click Add a new organization to add the customer to the database. This adds a record in the ADM_ORGANIZATIONS table.
The Company Code that you enter in the Attributes section MUST match the Organization Code you entered in step 8 of the InstallShield installation process.
Adding A New Organization 41
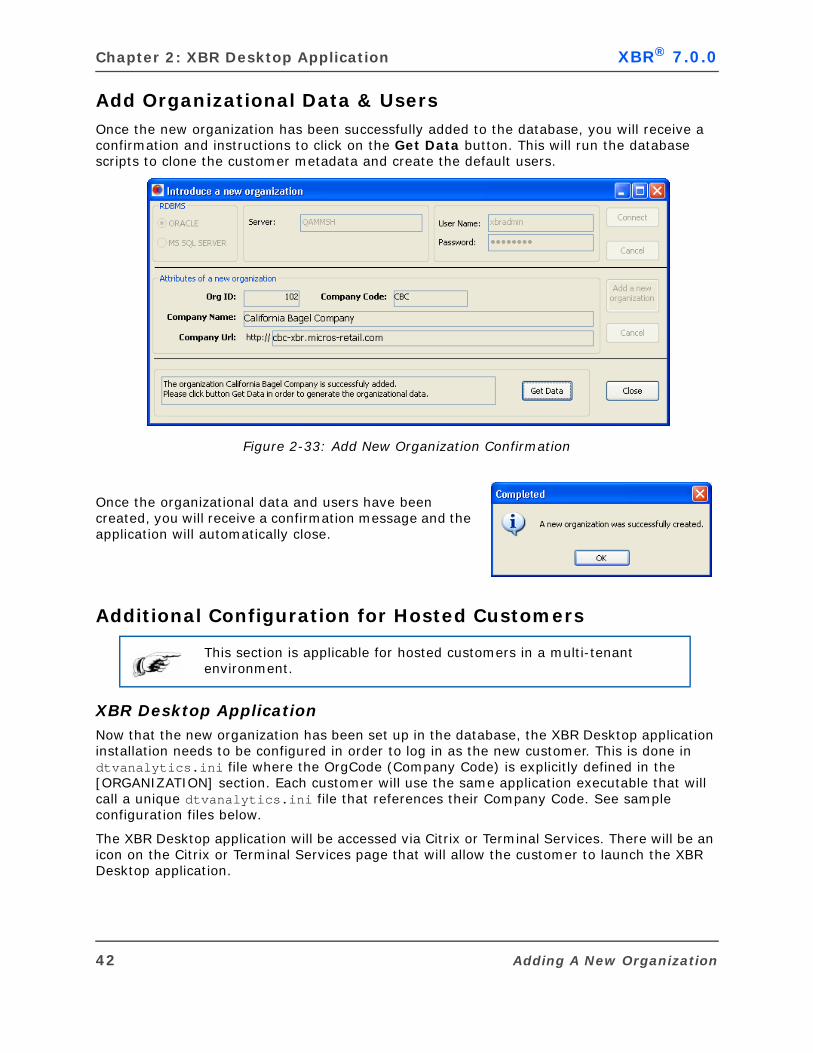
Chapter 2: XBR Desktop Application XBR® 7.0.0
Add Organizational Data & UsersOnce the new organization has been successfully added to the database, you will receive a confirmation and instructions to click on the Get Data button. This will run the database scripts to clone the customer metadata and create the default users.
Figure 2-33: Add New Organization Confirmation
Once the organizational data and users have been created, you will receive a confirmation message and the application will automatically close.
Additional Configuration for Hosted Customers
XBR Desktop ApplicationNow that the new organization has been set up in the database, the XBR Desktop application installation needs to be configured in order to log in as the new customer. This is done in dtvanalytics.ini file where the OrgCode (Company Code) is explicitly defined in the [ORGANIZATION] section. Each customer will use the same application executable that will call a unique dtvanalytics.ini file that references their Company Code. See sample configuration files below.
The XBR Desktop application will be accessed via Citrix or Terminal Services. There will be an icon on the Citrix or Terminal Services page that will allow the customer to launch the XBR Desktop application.
This section is applicable for hosted customers in a multi-tenant environment.
42 Adding A New Organization
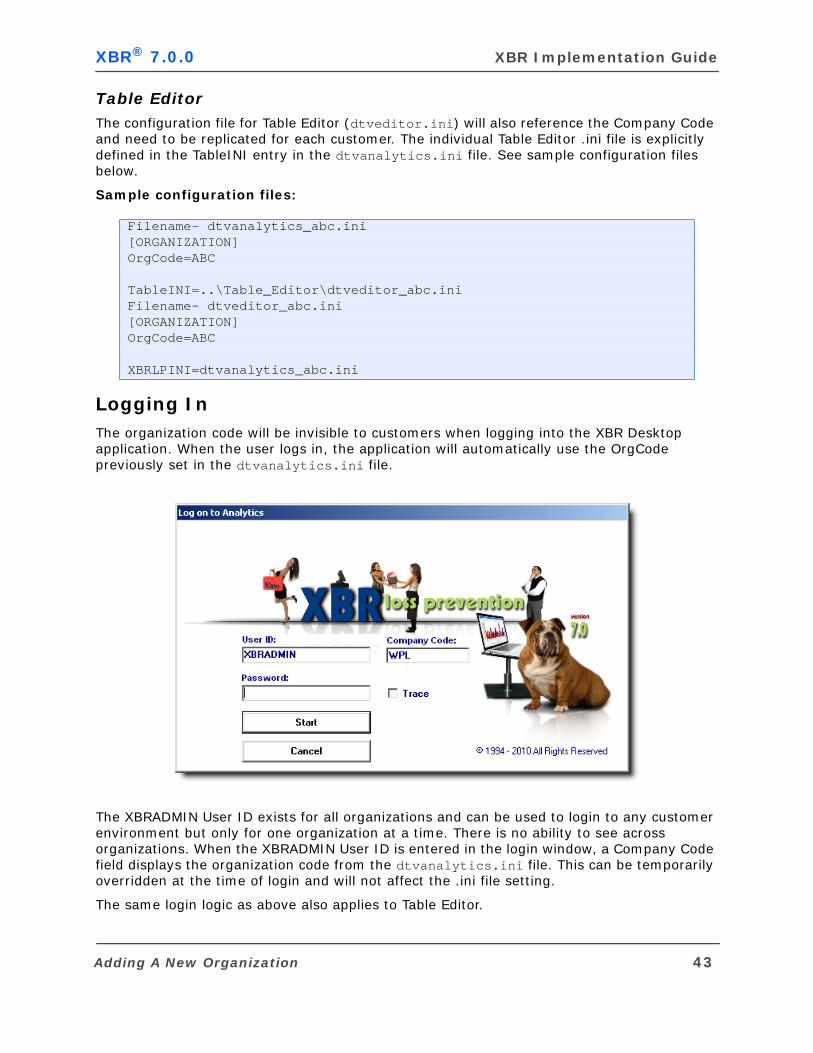
XBR® 7.0.0 XBR Implementation Guide
Table EditorThe configuration file for Table Editor (dtveditor.ini) will also reference the Company Code and need to be replicated for each customer. The individual Table Editor .ini file is explicitly defined in the TableINI entry in the dtvanalytics.ini file. See sample configuration files below.
Sample configuration files:
Logging InThe organization code will be invisible to customers when logging into the XBR Desktop application. When the user logs in, the application will automatically use the OrgCode previously set in the dtvanalytics.ini file.
The XBRADMIN User ID exists for all organizations and can be used to login to any customer environment but only for one organization at a time. There is no ability to see across organizations. When the XBRADMIN User ID is entered in the login window, a Company Code field displays the organization code from the dtvanalytics.ini file. This can be temporarily overridden at the time of login and will not affect the .ini file setting.
The same login logic as above also applies to Table Editor.
Filename- dtvanalytics_abc.ini[ORGANIZATION]OrgCode=ABC
TableINI=..\Table_Editor\dtveditor_abc.iniFilename- dtveditor_abc.ini[ORGANIZATION]OrgCode=ABC
XBRLPINI=dtvanalytics_abc.ini
Adding A New Organization 43
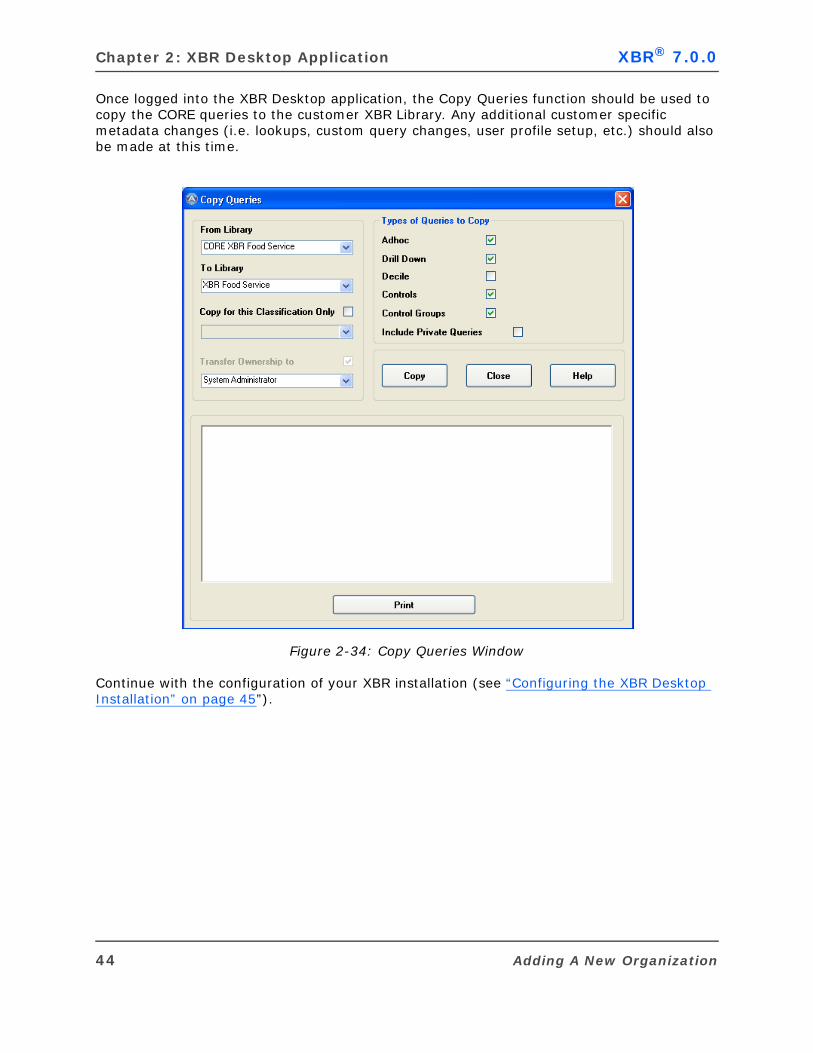
Chapter 2: XBR Desktop Application XBR® 7.0.0
Once logged into the XBR Desktop application, the Copy Queries function should be used to copy the CORE queries to the customer XBR Library. Any additional customer specific metadata changes (i.e. lookups, custom query changes, user profile setup, etc.) should also be made at this time.
Figure 2-34: Copy Queries Window
Continue with the configuration of your XBR installation (see “Configuring the XBR Desktop Installation” on page 45”).
44 Adding A New Organization
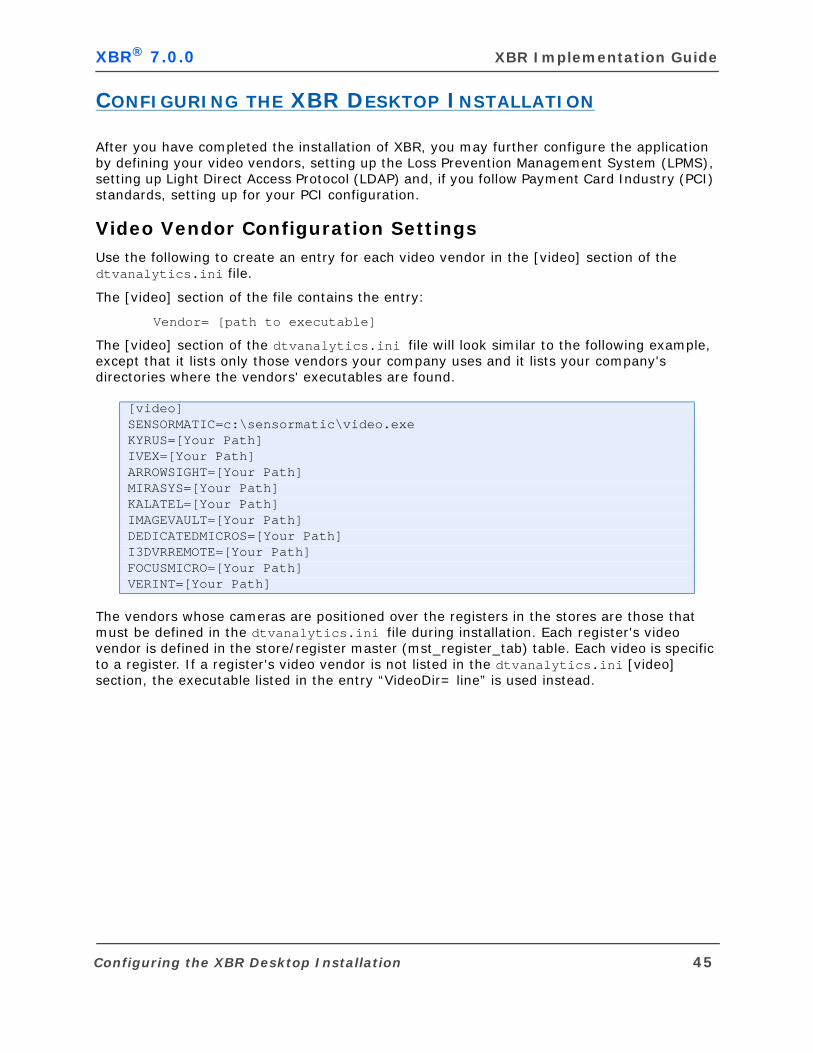
XBR® 7.0.0 XBR Implementation Guide
CONFIGURING THE XBR DESKTOP INSTALLATION
After you have completed the installation of XBR, you may further configure the application by defining your video vendors, setting up the Loss Prevention Management System (LPMS), setting up Light Direct Access Protocol (LDAP) and, if you follow Payment Card Industry (PCI) standards, setting up for your PCI configuration.
Video Vendor Configuration SettingsUse the following to create an entry for each video vendor in the [video] section of the dtvanalytics.ini file.
The [video] section of the file contains the entry:
Vendor= [path to executable]
The [video] section of the dtvanalytics.ini file will look similar to the following example, except that it lists only those vendors your company uses and it lists your company's directories where the vendors' executables are found.
The vendors whose cameras are positioned over the registers in the stores are those that must be defined in the dtvanalytics.ini file during installation. Each register's video vendor is defined in the store/register master (mst_register_tab) table. Each video is specific to a register. If a register's video vendor is not listed in the dtvanalytics.ini [video] section, the executable listed in the entry “VideoDir= line” is used instead.
[video]SENSORMATIC=c:\sensormatic\video.exeKYRUS=[Your Path]IVEX=[Your Path]ARROWSIGHT=[Your Path]MIRASYS=[Your Path]KALATEL=[Your Path]IMAGEVAULT=[Your Path]DEDICATEDMICROS=[Your Path]I3DVRREMOTE=[Your Path]FOCUSMICRO=[Your Path]VERINT=[Your Path]
Configuring the XBR Desktop Installation 45
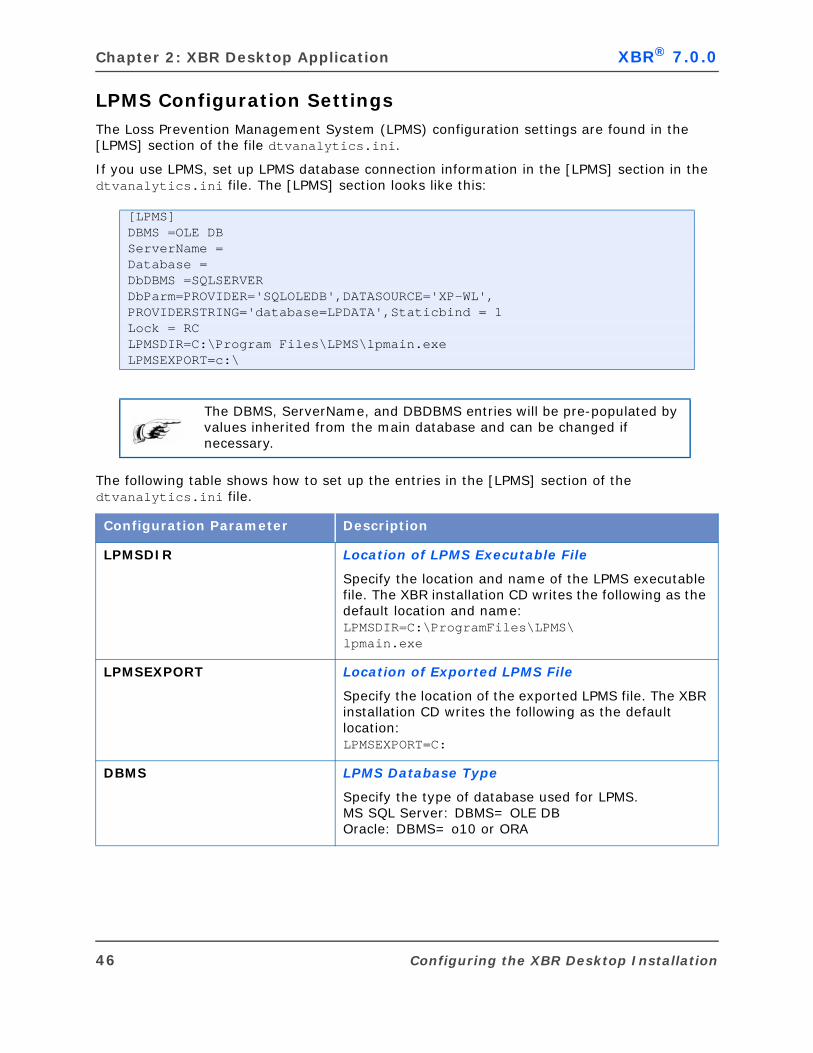
Chapter 2: XBR Desktop Application XBR® 7.0.0
LPMS Configuration SettingsThe Loss Prevention Management System (LPMS) configuration settings are found in the [LPMS] section of the file dtvanalytics.ini.
If you use LPMS, set up LPMS database connection information in the [LPMS] section in the dtvanalytics.ini file. The [LPMS] section looks like this:
The following table shows how to set up the entries in the [LPMS] section of the dtvanalytics.ini file.
[LPMS]DBMS =OLE DBServerName =Database =DbDBMS =SQLSERVERDbParm=PROVIDER='SQLOLEDB',DATASOURCE='XP-WL',PROVIDERSTRING='database=LPDATA',Staticbind = 1Lock = RCLPMSDIR=C:\Program Files\LPMS\lpmain.exeLPMSEXPORT=c:\
The DBMS, ServerName, and DBDBMS entries will be pre-populated by values inherited from the main database and can be changed if necessary.
Configuration Parameter Description
LPMSDIR Location of LPMS Executable File
Specify the location and name of the LPMS executable file. The XBR installation CD writes the following as the default location and name:LPMSDIR=C:\ProgramFiles\LPMS\lpmain.exe
LPMSEXPORT Location of Exported LPMS File
Specify the location of the exported LPMS file. The XBR installation CD writes the following as the default location:LPMSEXPORT=C:
DBMS LPMS Database Type
Specify the type of database used for LPMS.MS SQL Server: DBMS= OLE DBOracle: DBMS= o10 or ORA
46 Configuring the XBR Desktop Installation
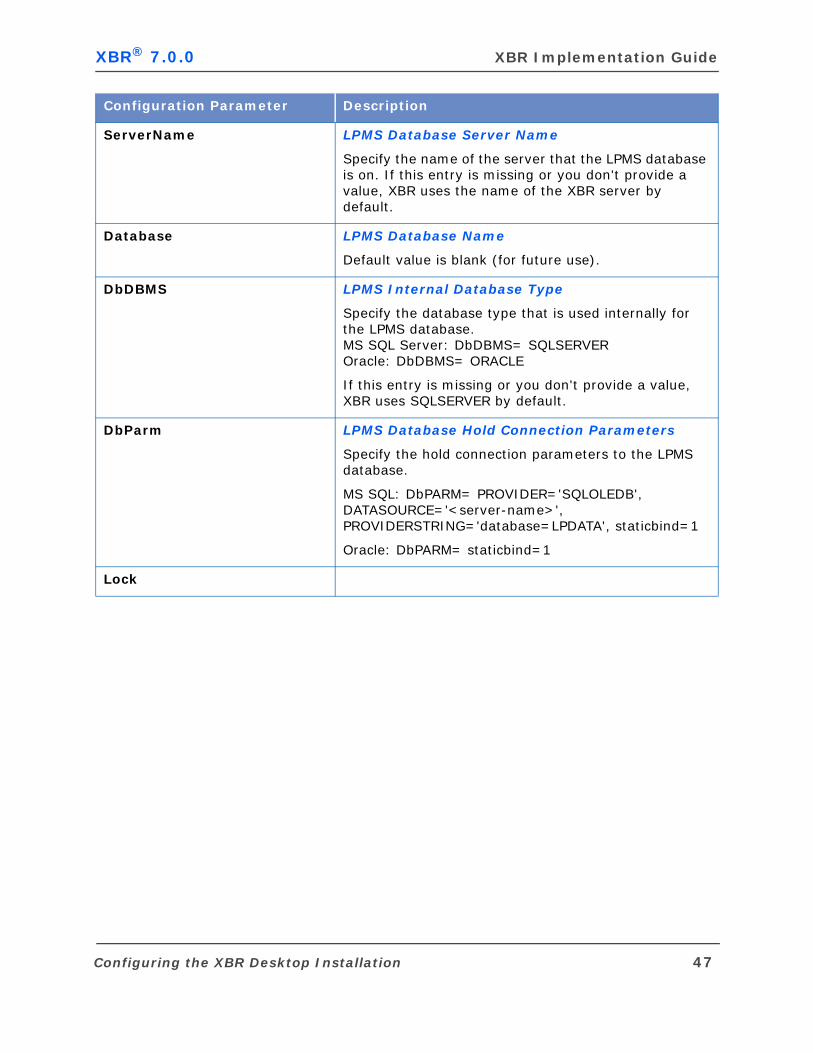
XBR® 7.0.0 XBR Implementation Guide
ServerName LPMS Database Server Name
Specify the name of the server that the LPMS database is on. If this entry is missing or you don't provide a value, XBR uses the name of the XBR server by default.
Database LPMS Database Name
Default value is blank (for future use).
DbDBMS LPMS Internal Database Type
Specify the database type that is used internally for the LPMS database.MS SQL Server: DbDBMS= SQLSERVEROracle: DbDBMS= ORACLE
If this entry is missing or you don't provide a value, XBR uses SQLSERVER by default.
DbParm LPMS Database Hold Connection Parameters
Specify the hold connection parameters to the LPMS database.
MS SQL: DbPARM= PROVIDER='SQLOLEDB',DATASOURCE='<server-name>', PROVIDERSTRING='database=LPDATA', staticbind=1
Oracle: DbPARM= staticbind=1
Lock
Configuration Parameter Description
Configuring the XBR Desktop Installation 47
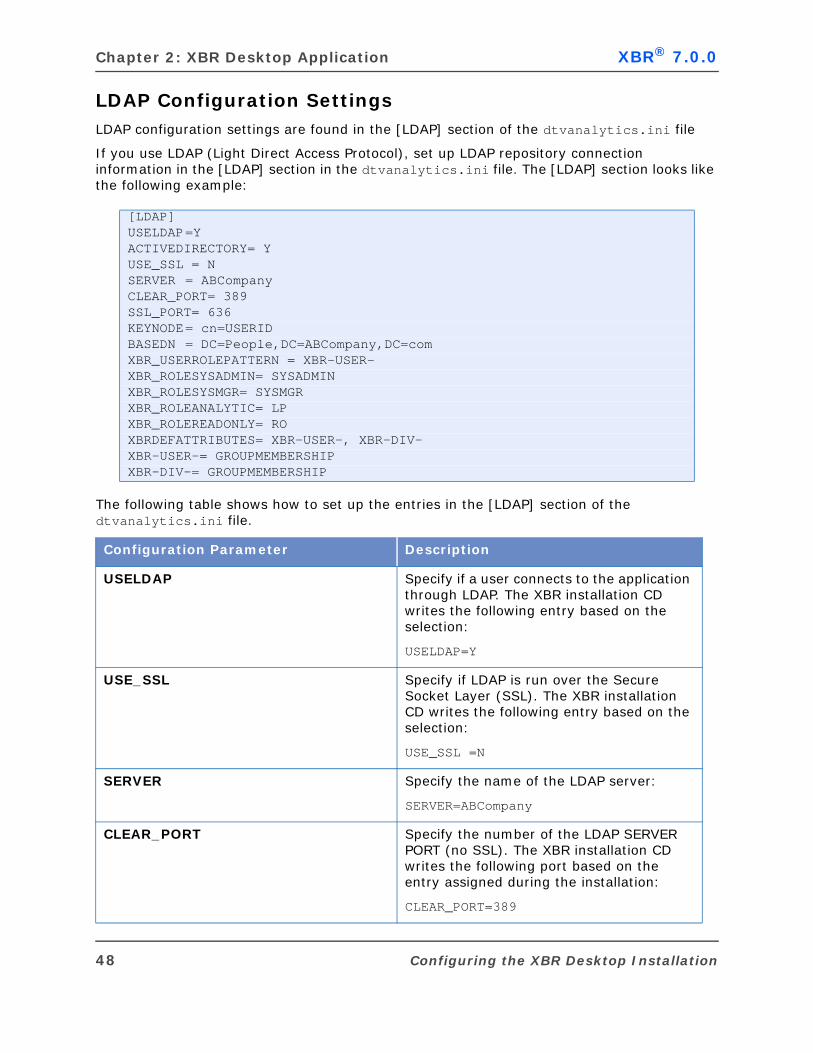
Chapter 2: XBR Desktop Application XBR® 7.0.0
LDAP Configuration SettingsLDAP configuration settings are found in the [LDAP] section of the dtvanalytics.ini file
If you use LDAP (Light Direct Access Protocol), set up LDAP repository connection information in the [LDAP] section in the dtvanalytics.ini file. The [LDAP] section looks like the following example:
The following table shows how to set up the entries in the [LDAP] section of the dtvanalytics.ini file.
[LDAP]USELDAP=YACTIVEDIRECTORY= YUSE_SSL = NSERVER = ABCompanyCLEAR_PORT= 389SSL_PORT= 636KEYNODE= cn=USERIDBASEDN = DC=People,DC=ABCompany,DC=comXBR_USERROLEPATTERN = XBR-USER-XBR_ROLESYSADMIN= SYSADMINXBR_ROLESYSMGR= SYSMGRXBR_ROLEANALYTIC= LPXBR_ROLEREADONLY= ROXBRDEFATTRIBUTES= XBR-USER-, XBR-DIV-XBR-USER-= GROUPMEMBERSHIPXBR-DIV-= GROUPMEMBERSHIP
Configuration Parameter Description
USELDAP Specify if a user connects to the application through LDAP. The XBR installation CD writes the following entry based on the selection:
USELDAP=Y
USE_SSL Specify if LDAP is run over the Secure Socket Layer (SSL). The XBR installation CD writes the following entry based on the selection:
USE_SSL =N
SERVER Specify the name of the LDAP server:
SERVER=ABCompany
CLEAR_PORT Specify the number of the LDAP SERVER PORT (no SSL). The XBR installation CD writes the following port based on the entry assigned during the installation:
CLEAR_PORT=389
48 Configuring the XBR Desktop Installation
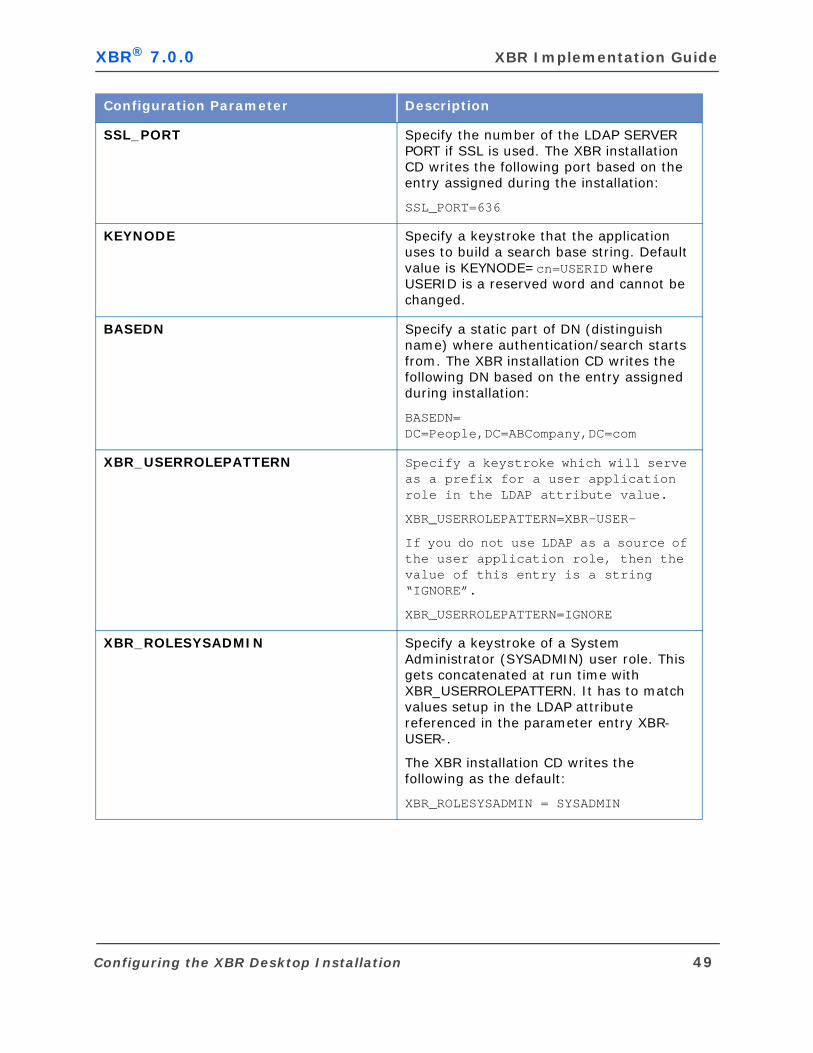
XBR® 7.0.0 XBR Implementation Guide
SSL_PORT Specify the number of the LDAP SERVER PORT if SSL is used. The XBR installation CD writes the following port based on the entry assigned during the installation:
SSL_PORT=636
KEYNODE Specify a keystroke that the application uses to build a search base string. Default value is KEYNODE=cn=USERID where USERID is a reserved word and cannot be changed.
BASEDN Specify a static part of DN (distinguish name) where authentication/search starts from. The XBR installation CD writes the following DN based on the entry assigned during installation:
BASEDN= DC=People,DC=ABCompany,DC=com
XBR_USERROLEPATTERN Specify a keystroke which will serve as a prefix for a user application role in the LDAP attribute value.
XBR_USERROLEPATTERN=XBR-USER-
If you do not use LDAP as a source of the user application role, then the value of this entry is a string “IGNORE”.
XBR_USERROLEPATTERN=IGNORE
XBR_ROLESYSADMIN Specify a keystroke of a System Administrator (SYSADMIN) user role. This gets concatenated at run time with XBR_USERROLEPATTERN. It has to match values setup in the LDAP attribute referenced in the parameter entry XBR-USER-.
The XBR installation CD writes the following as the default:
XBR_ROLESYSADMIN = SYSADMIN
Configuration Parameter Description
Configuring the XBR Desktop Installation 49
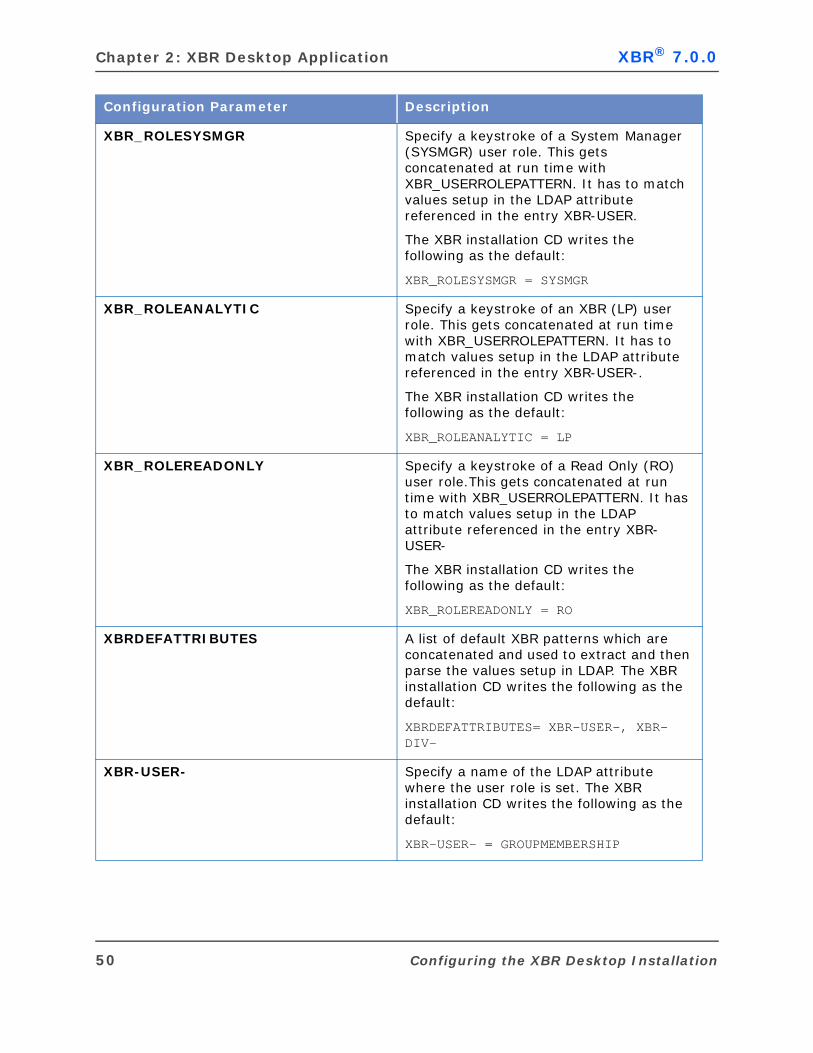
Chapter 2: XBR Desktop Application XBR® 7.0.0
XBR_ROLESYSMGR Specify a keystroke of a System Manager (SYSMGR) user role. This gets concatenated at run time with XBR_USERROLEPATTERN. It has to match values setup in the LDAP attribute referenced in the entry XBR-USER.
The XBR installation CD writes the following as the default:
XBR_ROLESYSMGR = SYSMGR
XBR_ROLEANALYTIC Specify a keystroke of an XBR (LP) user role. This gets concatenated at run time with XBR_USERROLEPATTERN. It has to match values setup in the LDAP attribute referenced in the entry XBR-USER-.
The XBR installation CD writes the following as the default:
XBR_ROLEANALYTIC = LP
XBR_ROLEREADONLY Specify a keystroke of a Read Only (RO) user role.This gets concatenated at run time with XBR_USERROLEPATTERN. It has to match values setup in the LDAP attribute referenced in the entry XBR-USER-
The XBR installation CD writes the following as the default:
XBR_ROLEREADONLY = RO
XBRDEFATTRIBUTES A list of default XBR patterns which are concatenated and used to extract and then parse the values setup in LDAP. The XBR installation CD writes the following as the default:
XBRDEFATTRIBUTES= XBR-USER-, XBR-DIV-
XBR-USER- Specify a name of the LDAP attribute where the user role is set. The XBR installation CD writes the following as the default:
XBR-USER- = GROUPMEMBERSHIP
Configuration Parameter Description
50 Configuring the XBR Desktop Installation
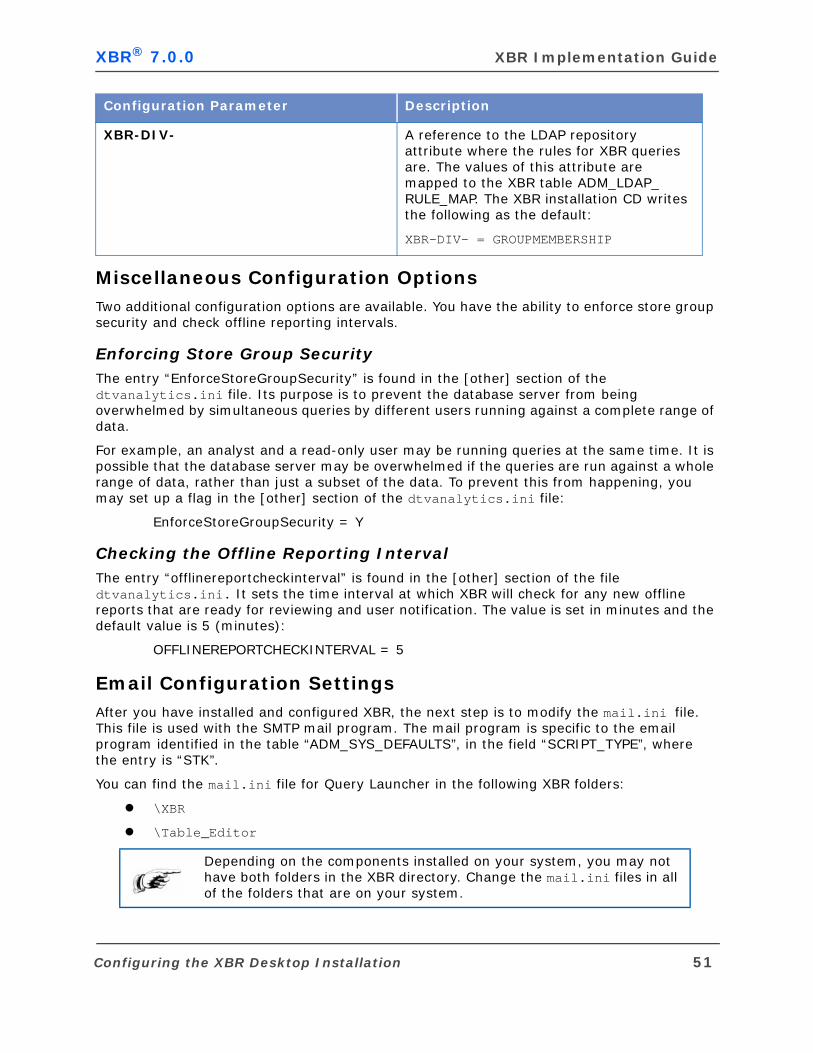
XBR® 7.0.0 XBR Implementation Guide
Miscellaneous Configuration OptionsTwo additional configuration options are available. You have the ability to enforce store group security and check offline reporting intervals.
Enforcing Store Group SecurityThe entry “EnforceStoreGroupSecurity” is found in the [other] section of the dtvanalytics.ini file. Its purpose is to prevent the database server from being overwhelmed by simultaneous queries by different users running against a complete range of data.
For example, an analyst and a read-only user may be running queries at the same time. It is possible that the database server may be overwhelmed if the queries are run against a whole range of data, rather than just a subset of the data. To prevent this from happening, you may set up a flag in the [other] section of the dtvanalytics.ini file:
EnforceStoreGroupSecurity = Y
Checking the Offline Reporting IntervalThe entry “offlinereportcheckinterval” is found in the [other] section of the file dtvanalytics.ini. It sets the time interval at which XBR will check for any new offline reports that are ready for reviewing and user notification. The value is set in minutes and the default value is 5 (minutes):
OFFLINEREPORTCHECKINTERVAL = 5
Email Configuration SettingsAfter you have installed and configured XBR, the next step is to modify the mail.ini file. This file is used with the SMTP mail program. The mail program is specific to the email program identified in the table “ADM_SYS_DEFAULTS”, in the field “SCRIPT_TYPE”, where the entry is “STK”.
You can find the mail.ini file for Query Launcher in the following XBR folders:
\XBR
\Table_Editor
XBR-DIV- A reference to the LDAP repository attribute where the rules for XBR queries are. The values of this attribute are mapped to the XBR table ADM_LDAP_RULE_MAP. The XBR installation CD writes the following as the default:
XBR-DIV- = GROUPMEMBERSHIP
Depending on the components installed on your system, you may not have both folders in the XBR directory. Change the mail.ini files in all of the folders that are on your system.
Configuration Parameter Description
Configuring the XBR Desktop Installation 51
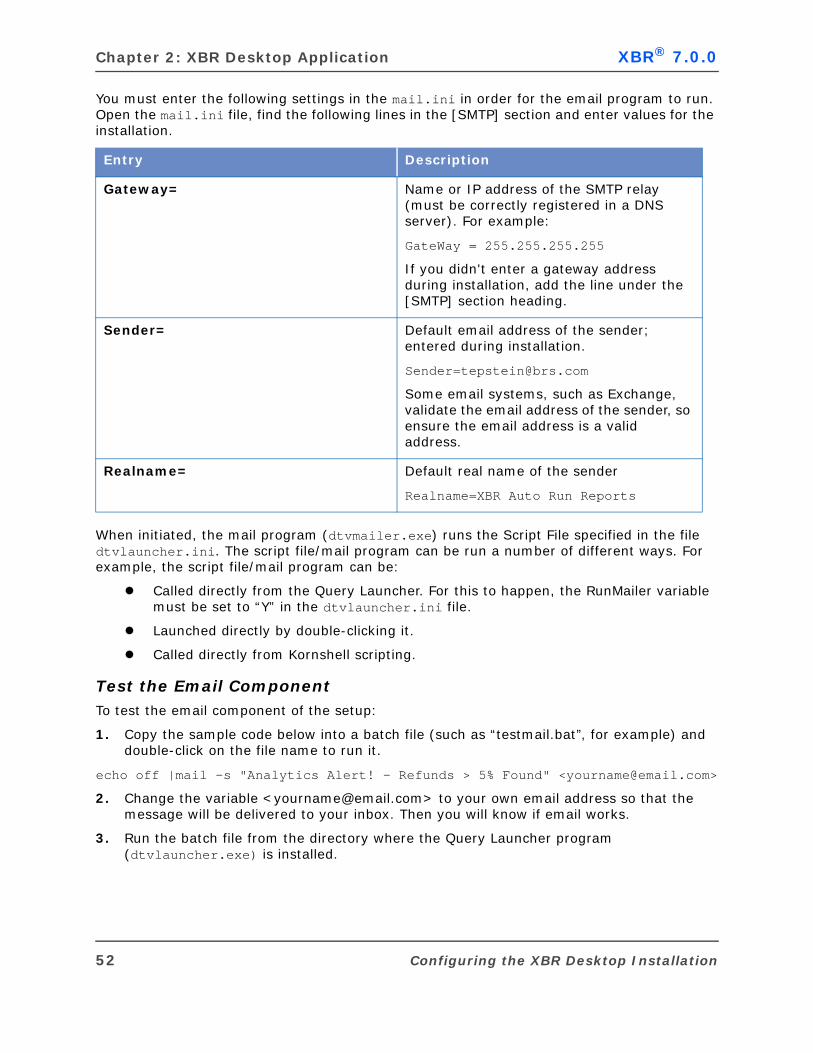
Chapter 2: XBR Desktop Application XBR® 7.0.0
You must enter the following settings in the mail.ini in order for the email program to run. Open the mail.ini file, find the following lines in the [SMTP] section and enter values for the installation.
When initiated, the mail program (dtvmailer.exe) runs the Script File specified in the file dtvlauncher.ini. The script file/mail program can be run a number of different ways. For example, the script file/mail program can be:
Called directly from the Query Launcher. For this to happen, the RunMailer variable must be set to “Y” in the dtvlauncher.ini file.
Launched directly by double-clicking it.
Called directly from Kornshell scripting.
Test the Email ComponentTo test the email component of the setup:
1. Copy the sample code below into a batch file (such as “testmail.bat”, for example) and double-click on the file name to run it.
echo off |mail -s "Analytics Alert! - Refunds > 5% Found" <[email protected]>
2. Change the variable <[email protected]> to your own email address so that the message will be delivered to your inbox. Then you will know if email works.
3. Run the batch file from the directory where the Query Launcher program (dtvlauncher.exe) is installed.
Entry Description
Gateway= Name or IP address of the SMTP relay (must be correctly registered in a DNS server). For example:
GateWay = 255.255.255.255
If you didn't enter a gateway address during installation, add the line under the [SMTP] section heading.
Sender= Default email address of the sender; entered during installation.
Some email systems, such as Exchange, validate the email address of the sender, so ensure the email address is a valid address.
Realname= Default real name of the sender
Realname=XBR Auto Run Reports
52 Configuring the XBR Desktop Installation

XBR® 7.0.0 XBR Implementation Guide
TESTING THE XBR DESKTOP INSTALLATION
To test your client installation:
1. Double-click the MICROS-Retail Analytics 7.0 program folder icon on your desktop.
2. Double-click the XBR icon in the MICROS-Retail Analytics 7.0 program group.
If you are having problems running XBR or Query Viewer, refer to the section "Troubleshooting the Client Installation" in “Troubleshooting the XBR Desktop Installation” on page 62.
CHANGING AN EXISTING XBR DESKTOP INSTALLATION
If you are missing a component after completing the installation, you can correct this.
1. Run the file setup.exe again from the installation CD. You are prompted to Modify, Repair, or Remove (components) from the installation.
Select “Modify” to add new components or remove existing components.
Select “Repair” to reinstall what is already installed on your machine. You may want to do this if you had problems during the initial installation.
Select “Remove” to remove XBR from the client. If you select Remove, you must reinstall XBR on the client.
Figure 2-35: Making Changes to the Installation
Testing the XBR Desktop Installation 53
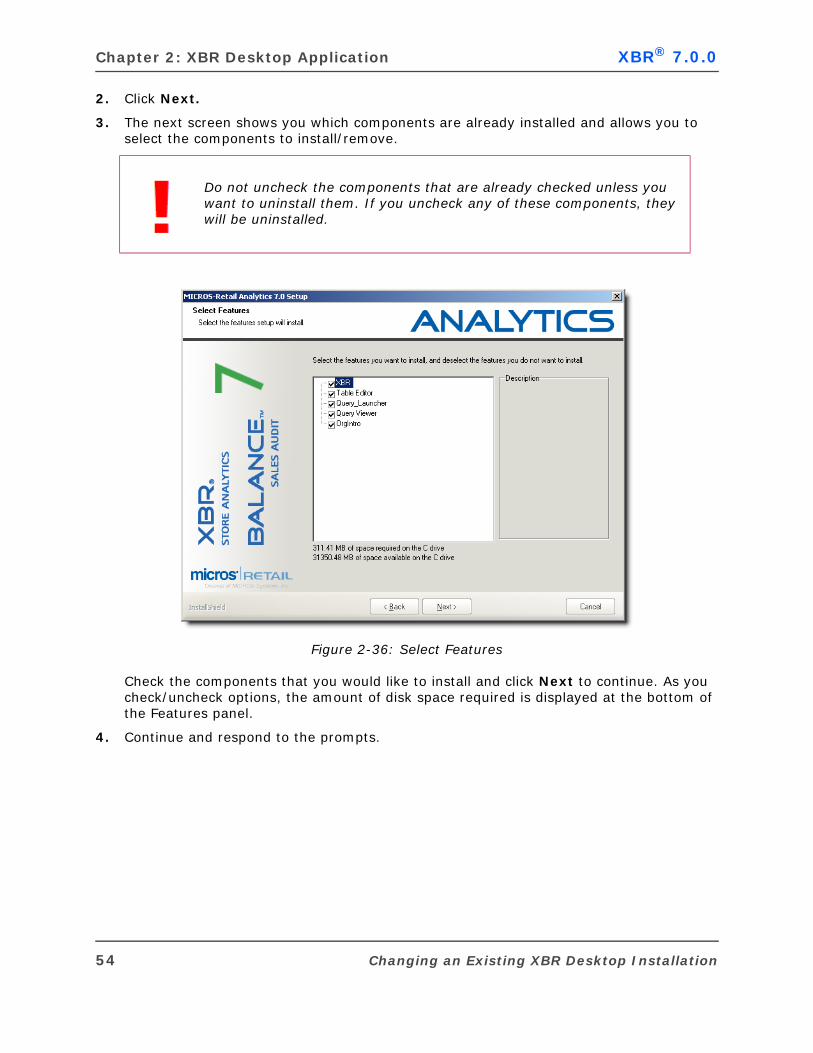
Chapter 2: XBR Desktop Application XBR® 7.0.0
2. Click Next.
3. The next screen shows you which components are already installed and allows you to select the components to install/remove.
Figure 2-36: Select Features
Check the components that you would like to install and click Next to continue. As you check/uncheck options, the amount of disk space required is displayed at the bottom of the Features panel.
4. Continue and respond to the prompts.
Do not uncheck the components that are already checked unless you want to uninstall them. If you uncheck any of these components, they will be uninstalled.
54 Changing an Existing XBR Desktop Installation

XBR® 7.0.0 XBR Implementation Guide
INSTALLING AN SSL CERTIFICATE
This section describes the procedure for installing an SSL certificate if it is required by your installation.
Assumptions Prior to Certificate InstallationThe procedure to install a certificate is based on two assumptions:
XBR is configured to connect to the LDAP server over SSL (Secure Socket Layer).
The person who performs the installation knows the location of the certificate file and its name.
SSL Certificate Installation Procedure1. Open the Microsoft Management Console (MMC) on the computer where XBR is being
installed: Select Start, and select “Run” from the Start Menu. When the Run dialog box displays, enter “mmc” and click OK.
Figure 2-37: Run Dialog Box
Installing an SSL Certificate 55
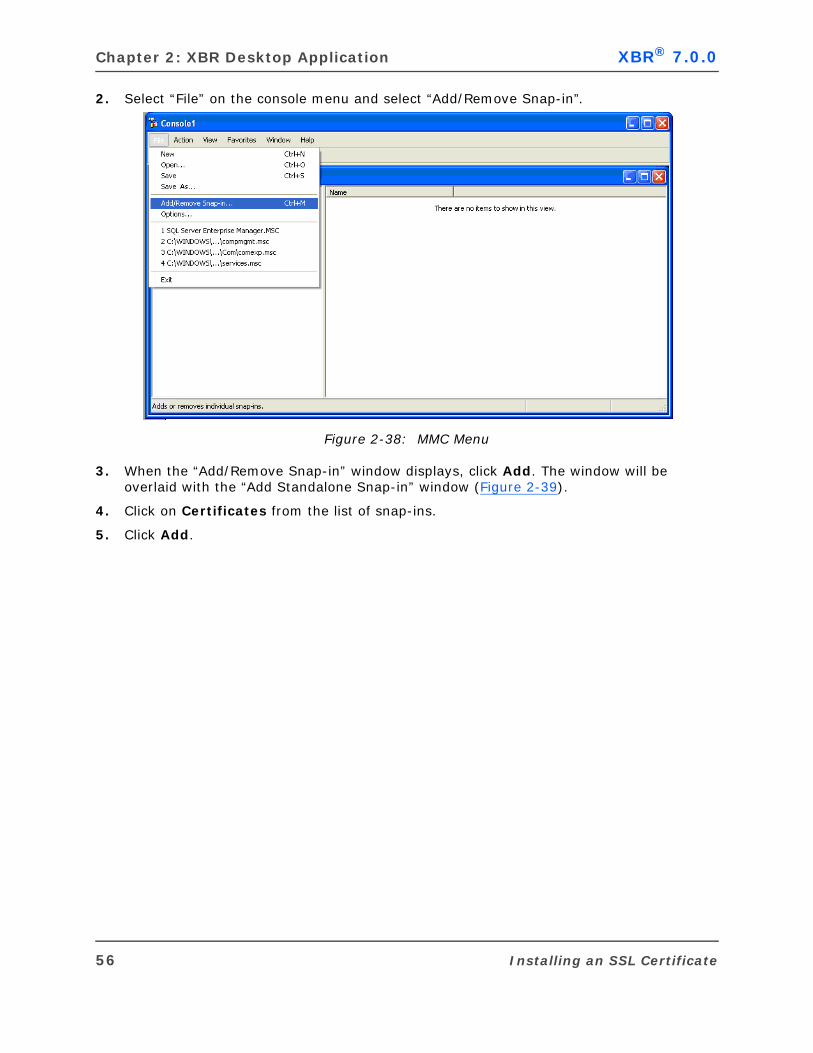
Chapter 2: XBR Desktop Application XBR® 7.0.0
2. Select “File” on the console menu and select “Add/Remove Snap-in”.
Figure 2-38: MMC Menu
3. When the “Add/Remove Snap-in” window displays, click Add. The window will be overlaid with the “Add Standalone Snap-in” window (Figure 2-39).
4. Click on Certificates from the list of snap-ins.
5. Click Add.
56 Installing an SSL Certificate
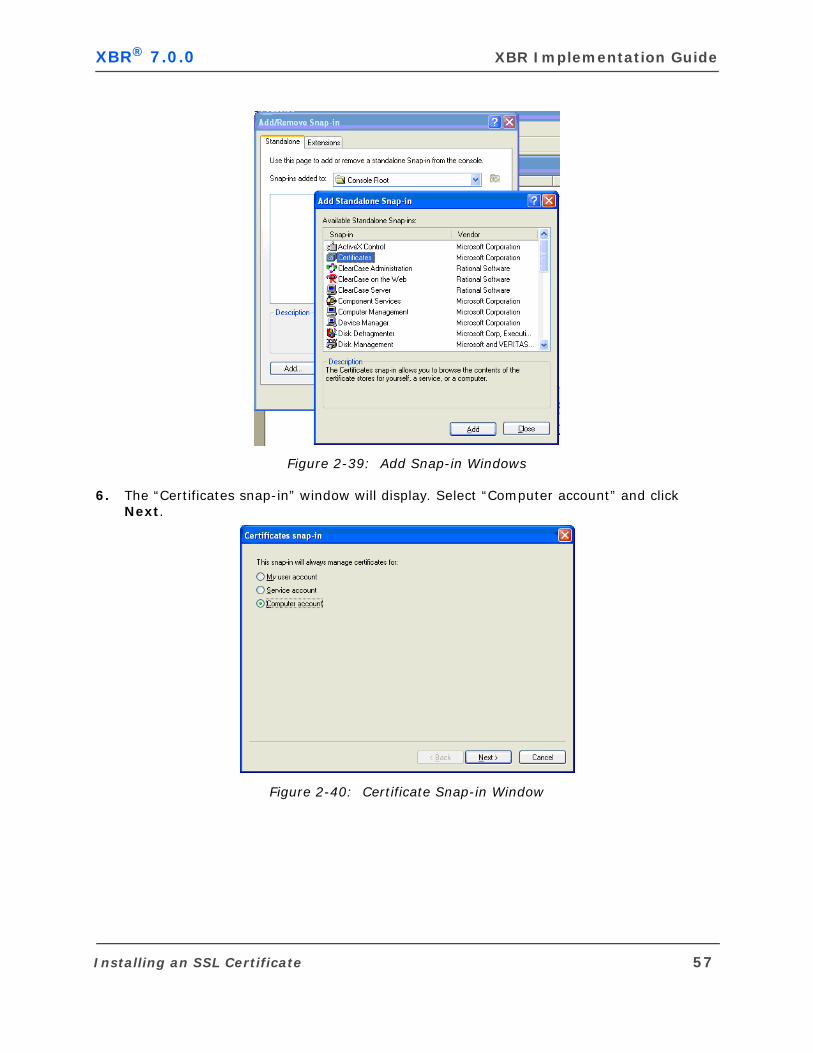
XBR® 7.0.0 XBR Implementation Guide
Figure 2-39: Add Snap-in Windows
6. The “Certificates snap-in” window will display. Select “Computer account” and click Next.
Figure 2-40: Certificate Snap-in Window
Installing an SSL Certificate 57
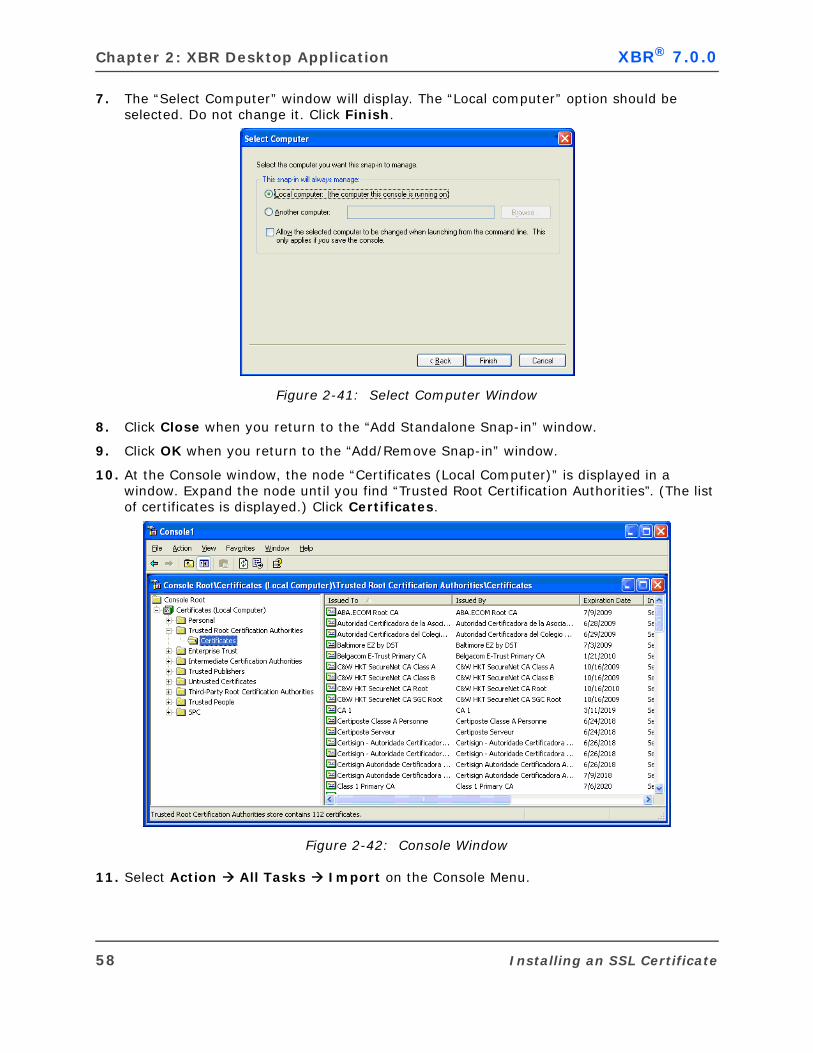
Chapter 2: XBR Desktop Application XBR® 7.0.0
7. The “Select Computer” window will display. The “Local computer” option should be selected. Do not change it. Click Finish.
Figure 2-41: Select Computer Window
8. Click Close when you return to the “Add Standalone Snap-in” window.
9. Click OK when you return to the “Add/Remove Snap-in” window.
10. At the Console window, the node “Certificates (Local Computer)” is displayed in a window. Expand the node until you find “Trusted Root Certification Authorities”. (The list of certificates is displayed.) Click Certificates.
Figure 2-42: Console Window
11. Select Action All Tasks Import on the Console Menu.
58 Installing an SSL Certificate
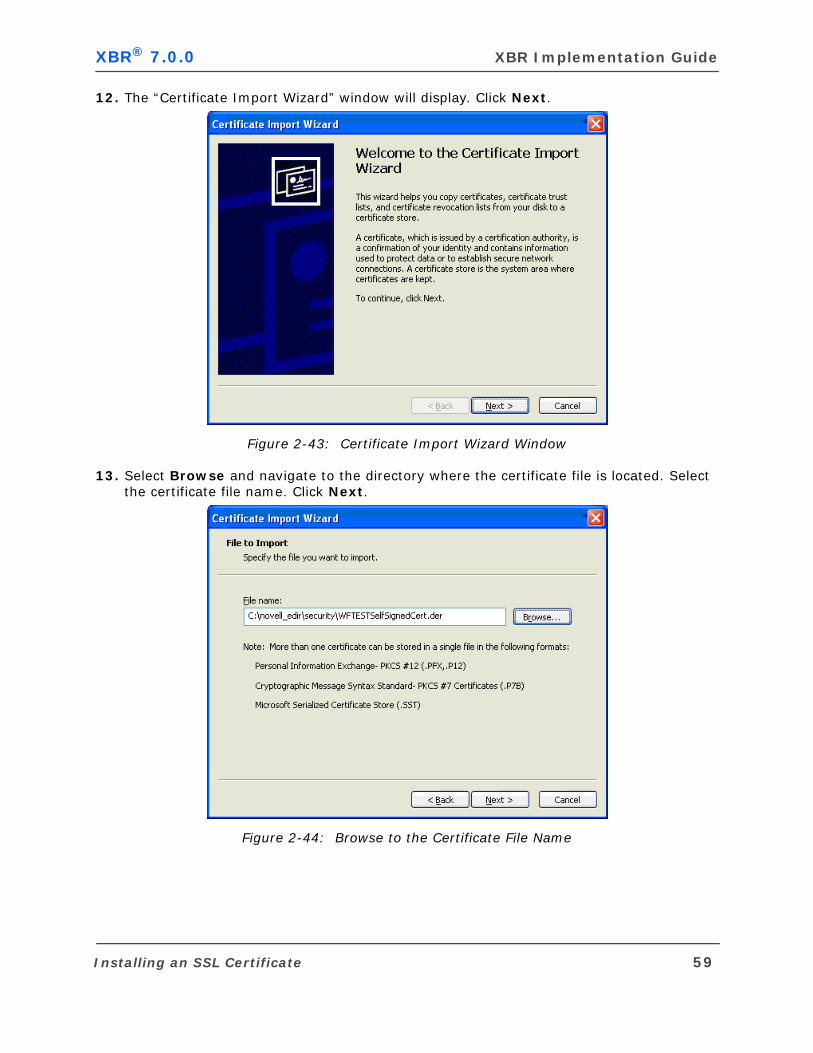
XBR® 7.0.0 XBR Implementation Guide
12. The “Certificate Import Wizard” window will display. Click Next.
Figure 2-43: Certificate Import Wizard Window
13. Select Browse and navigate to the directory where the certificate file is located. Select the certificate file name. Click Next.
Figure 2-44: Browse to the Certificate File Name
Installing an SSL Certificate 59
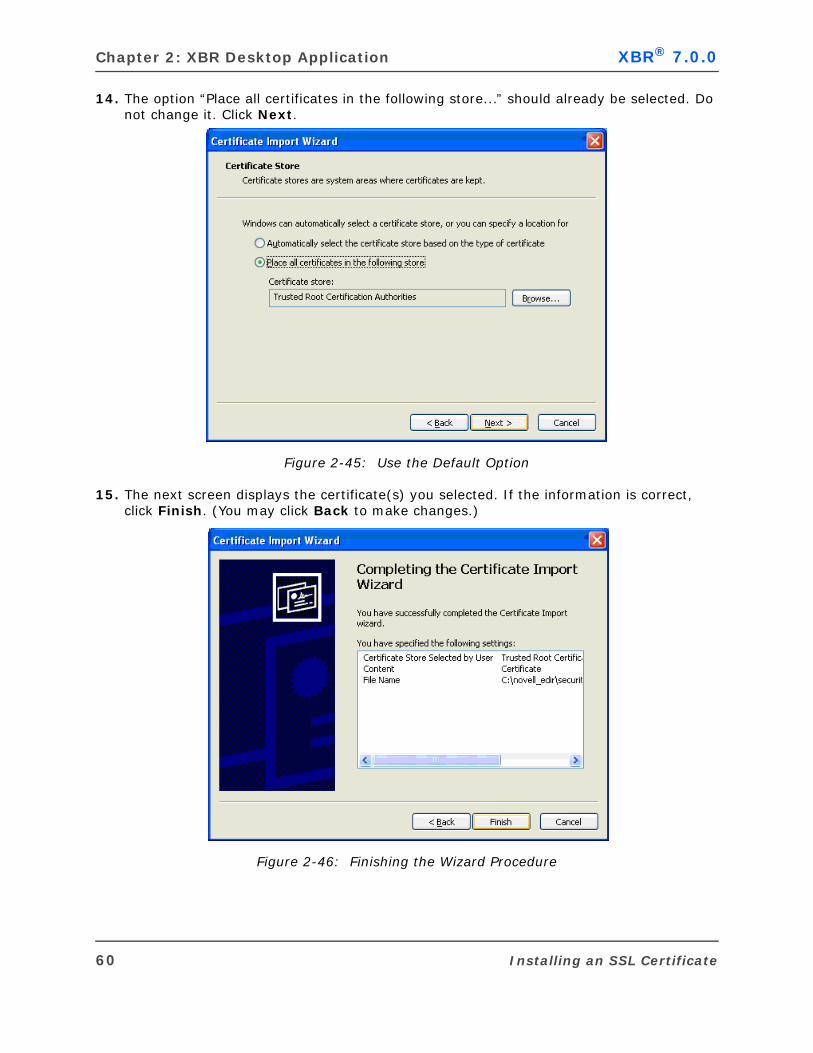
Chapter 2: XBR Desktop Application XBR® 7.0.0
14. The option “Place all certificates in the following store...” should already be selected. Do not change it. Click Next.
Figure 2-45: Use the Default Option
15. The next screen displays the certificate(s) you selected. If the information is correct, click Finish. (You may click Back to make changes.)
Figure 2-46: Finishing the Wizard Procedure
60 Installing an SSL Certificate
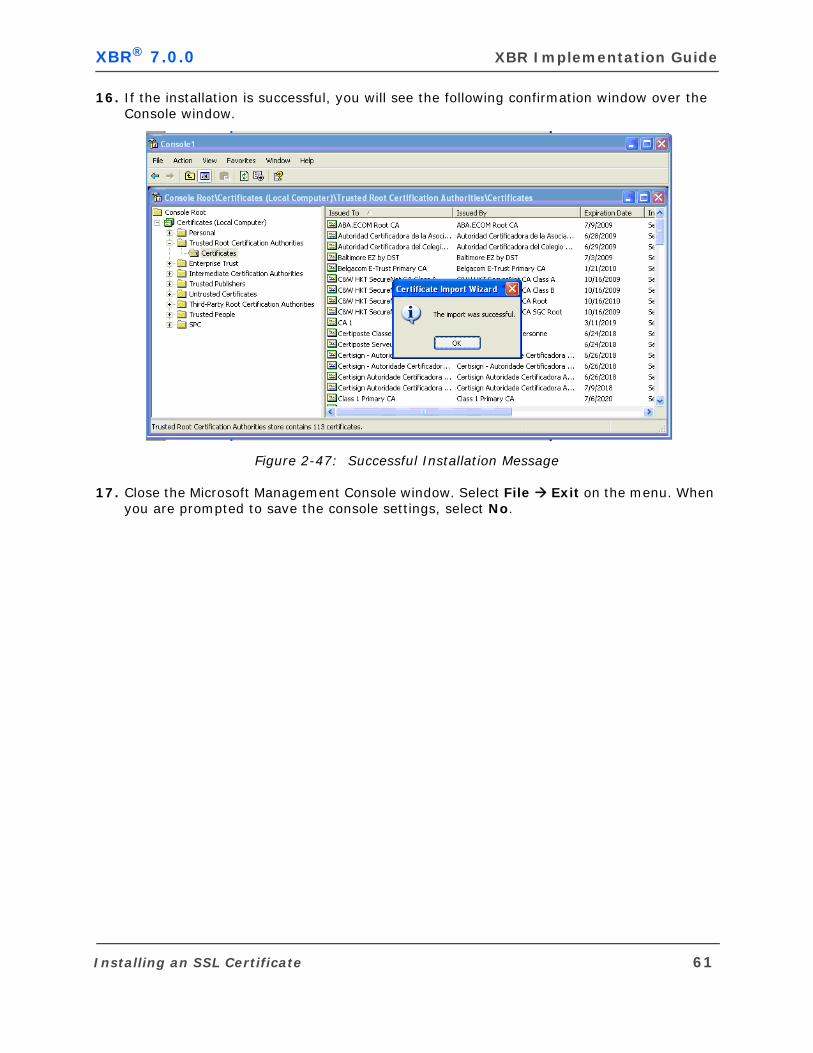
XBR® 7.0.0 XBR Implementation Guide
16. If the installation is successful, you will see the following confirmation window over the Console window.
Figure 2-47: Successful Installation Message
17. Close the Microsoft Management Console window. Select File Exit on the menu. When you are prompted to save the console settings, select No.
Installing an SSL Certificate 61
Chapter 2: XBR Desktop Application XBR® 7.0.0
TROUBLESHOOTING THE XBR DESKTOP INSTALLATION
This section provides solutions for problems that may occur with your XBR installation.
Problem 1 Can’t launch .PSR report files with the Query Viewer.
Solution The XBR installation should associate .PSR files with the Query Viewer automatically. But if it doesn't, you will see the message “Can’t launch .PSR report files with the Query Viewer” when you try to launch a .PSR file. You must manually create the association by following these steps:
1. Use Windows Explorer. Navigate to the “Query Viewer” directory (the default is “\MICROS-Retail_Analytics_7.0\Query_Viewer”) and double-click the file test.psr.
2. A dialog box will open. Select the option "Select the program from a list" option and click OK.
3. The “Open With” dialog box opens. Click the Browse button, and when the Browse window opens, navigate to the directory “\MICROS-Retail_Analytics_7.0\Query_Viewer”. Select the file dtvviewer.exe and click Open.
4. When the dialog closes, make sure the option "Always use the selected program to open this kind of file" is selected.
5. Click the OK button.
From now on, whenever you double-click a .PSR file or launch one from email the Query Viewer will open it.
Problem 2 Can’t export to PDF format.
Solution XBR installs a print driver (Amyuni PDF Converter) that converts exported reports to Adobe PDF format. First, check to make sure the driver was installed:
1. Click the Start button on the task bar. Select Settings, select Printers and Faxes.
2. Make sure that “Amyuni PDF Converter” is listed in the Name column.
If it is not there, reinstall the driver by double-clicking the file install.exe located in the following directory:
\MICROS-Retail_Analytics_7.0\PDF
A status window will open.
3. Click OK when the reinstallation is done.
You may need administrator rights to your PC to install it successfully.
62 Troubleshooting the XBR Desktop Installation
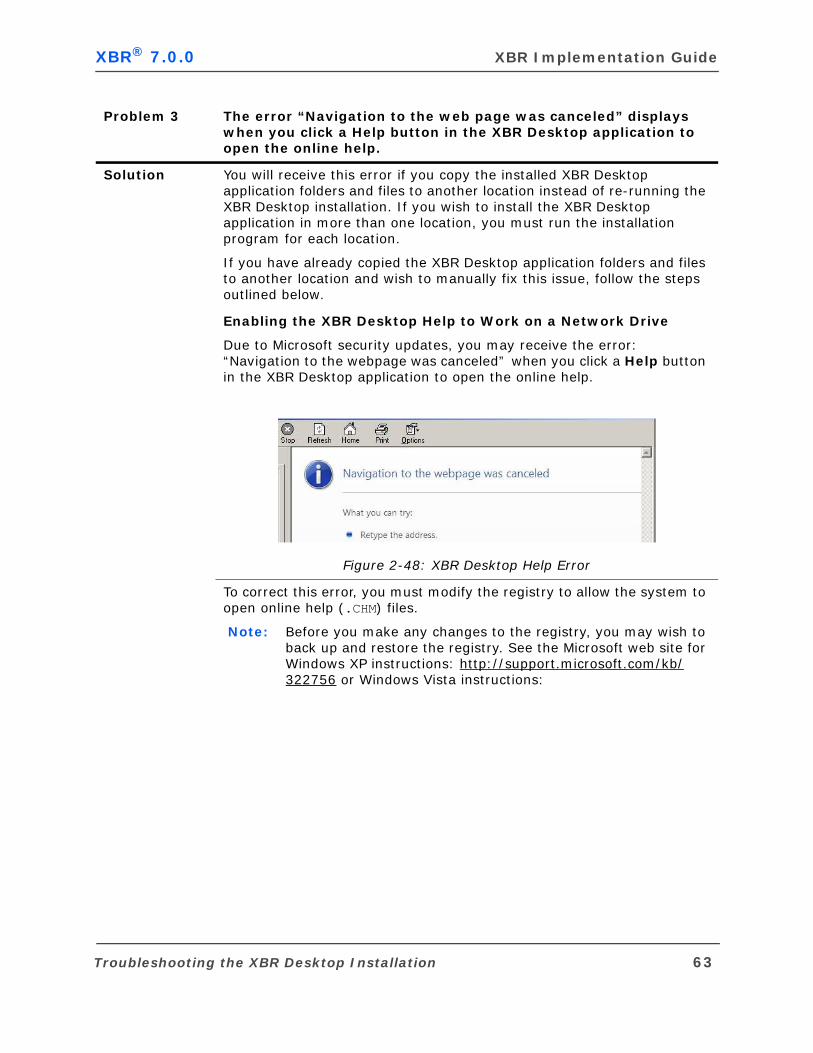
XBR® 7.0.0 XBR Implementation Guide
Problem 3 The error “Navigation to the web page was canceled” displays when you click a Help button in the XBR Desktop application to open the online help.
Solution You will receive this error if you copy the installed XBR Desktop application folders and files to another location instead of re-running the XBR Desktop installation. If you wish to install the XBR Desktop application in more than one location, you must run the installation program for each location.
If you have already copied the XBR Desktop application folders and files to another location and wish to manually fix this issue, follow the steps outlined below.
Enabling the XBR Desktop Help to Work on a Network Drive
Due to Microsoft security updates, you may receive the error: “Navigation to the webpage was canceled” when you click a Help button in the XBR Desktop application to open the online help.
Figure 2-48: XBR Desktop Help Error
To correct this error, you must modify the registry to allow the system to open online help (.CHM) files.
Note: Before you make any changes to the registry, you may wish to back up and restore the registry. See the Microsoft web site for Windows XP instructions: http://support.microsoft.com/kb/322756 or Windows Vista instructions:
Troubleshooting the XBR Desktop Installation 63
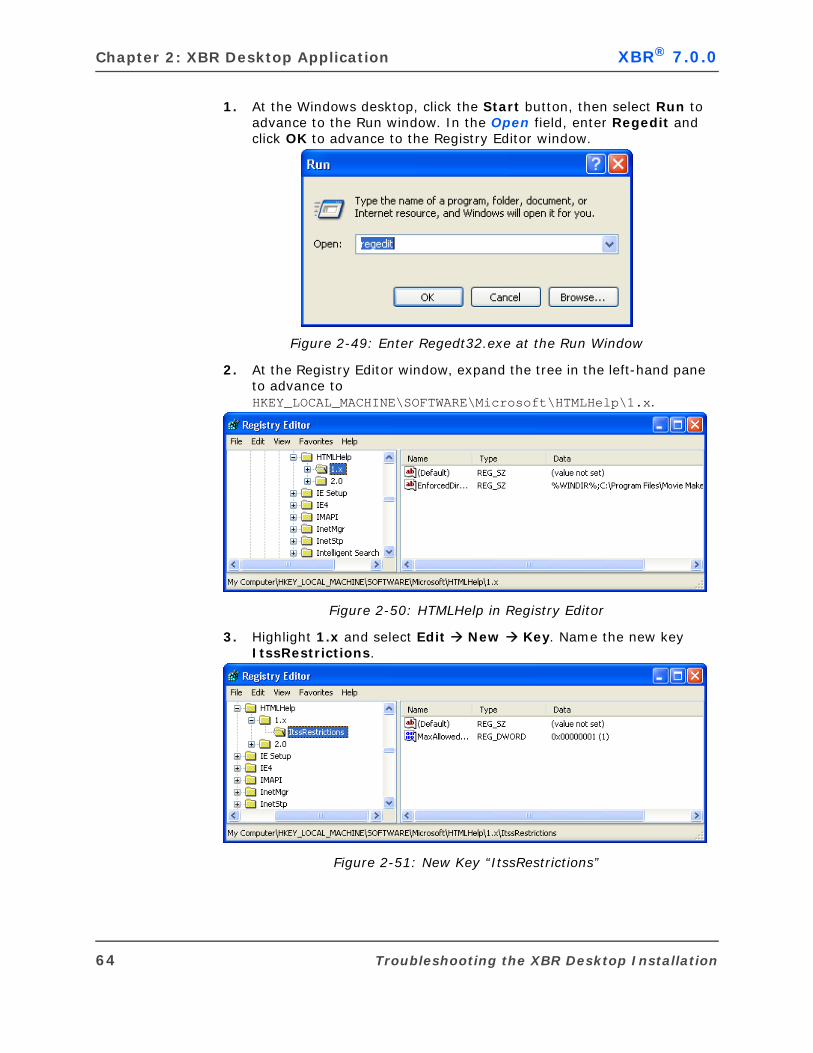
Chapter 2: XBR Desktop Application XBR® 7.0.0
1. At the Windows desktop, click the Start button, then select Run to advance to the Run window. In the Open field, enter Regedit and click OK to advance to the Registry Editor window.
Figure 2-49: Enter Regedt32.exe at the Run Window
2. At the Registry Editor window, expand the tree in the left-hand pane to advance to HKEY_LOCAL_MACHINE\SOFTWARE\Microsoft\HTMLHelp\1.x.
Figure 2-50: HTMLHelp in Registry Editor
3. Highlight 1.x and select Edit New Key. Name the new key ItssRestrictions.
Figure 2-51: New Key “ItssRestrictions”
64 Troubleshooting the XBR Desktop Installation
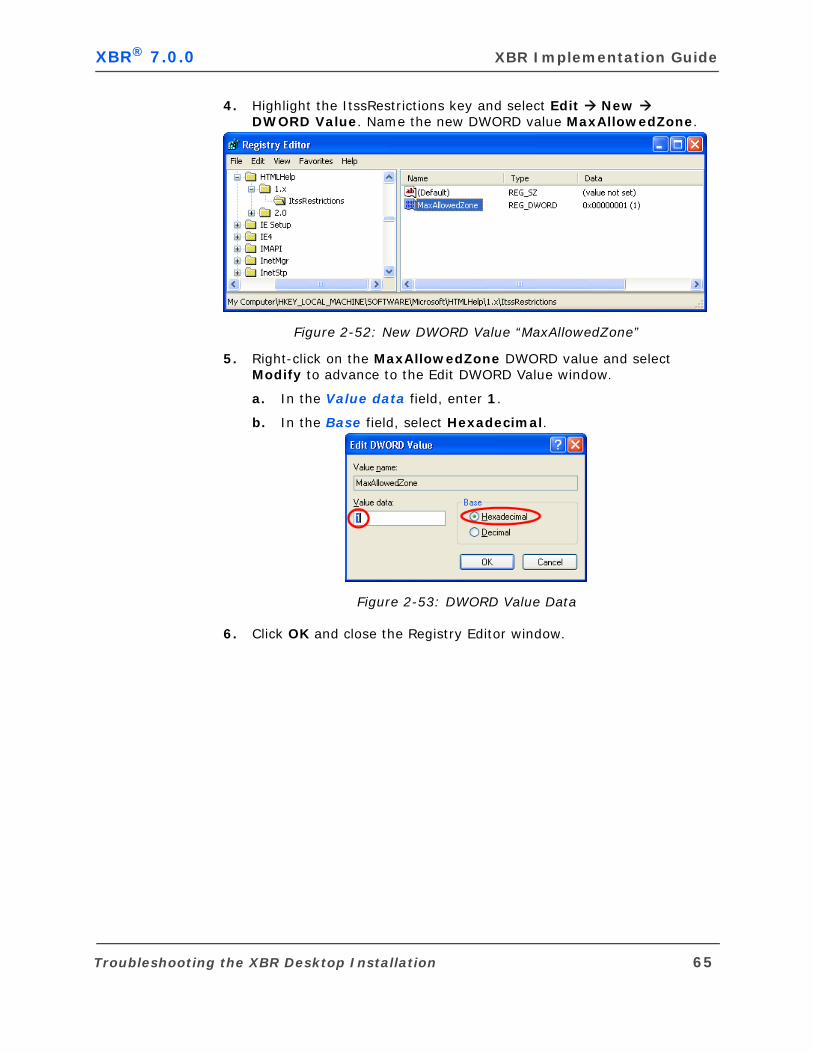
XBR® 7.0.0 XBR Implementation Guide
4. Highlight the ItssRestrictions key and select Edit New DWORD Value. Name the new DWORD value MaxAllowedZone.
Figure 2-52: New DWORD Value “MaxAllowedZone”
5. Right-click on the MaxAllowedZone DWORD value and select Modify to advance to the Edit DWORD Value window.
a. In the Value data field, enter 1.
b. In the Base field, select Hexadecimal.
Figure 2-53: DWORD Value Data
6. Click OK and close the Registry Editor window.
Troubleshooting the XBR Desktop Installation 65

C H A P T E R
Query Launcher
Chapter 3: Query Launcher XBR® 7.0.0
OVERVIEW
This document describes how to configure the Query Launcher component of MICROS-Retail XBR®. Query Launcher runs scheduled queries, produces report output, and generates scripts to distribute reports via email or file copies. To use the auto run, auto distribute, or auto alert features of XBR, Query Launcher must be installed.
About This DocumentThe following sections are available in this document:
Following the installation or upgrade to the current version of XBR, there are additional configuration steps that must be performed. This includes modifying the dtvlauncher.ini file, setting up the Query Launcher Kicker and Query Launcher Kicker Service, and modifying the mail.ini file: See “Configuring Query Launcher” on page 69.
Troubleshooting tips help resolve some common problems: See “Troubleshooting the Query Launcher Installation” on page 98.
Configuration of Qlaunch processes (including kicker functionality) for Multi-Tenant implementation: See “Multi-Tenant Configuration” on page 88.
If batch processing is going to be used: See “Batch Processing Setup - Multi-Tenant Hosted Environment” on page 89.
AudienceThis document is designed for the person responsible for installing and configuring Query Launcher. This person should be familiar with Windows installation procedures and basic text editing.
Query Launcher is installed as part of a Custom installation of the XBR Desktop Application installation. For more information on installing Query Launcher, see “Installing the XBR Desktop Application” on page 9.
68 Overview

XBR® 7.0.0 XBR Implementation Guide
CONFIGURING QUERY LAUNCHER
Modify the dtvlauncher.ini FileAfter installation, the dtvlauncher.ini needs to be edited. To edit the XBR dtvlauncher.ini file, open the file in Notepad or another text editor and make the following changes:
1. To change the database connection information, enter the database connection information in the [Data Source] and [XBR Database] sections in dtvlauncher.ini.
See “Variable Settings in dtvlauncher.ini” on page 73 for a full description of the variables and their values.
2. Specify the user ID and password in the UserID= and DatabasePassword= parameters under the [XBR Database] section.
If there is a generic user ID and/or password for connecting to the database and they are provided through the application INI file, the user ID and password can be encrypted:
UserId =530DFF31DBA74A83D30CDA7CC31CF229
DatabasePassword =0A30DFF31DBCF2293D30CD7CC31F31DB
To use the encrypted user ID and password, set the variable EncryptedPassword in the dtvlauncher.ini to TRUE or Y. This variable is in the section [XBR Database].
EncryptedPassword = TRUE
-or-
EncryptedPassword = Y
To generate the encrypted user ID and password, use the XBR Administrator tool, as described in the following procedure:
Within the General Default Maintenance dialog box there is an option to Encrypt a common user ID with the .ini files. The encrypted strings are automatically entered into the following files:
-- dtvanaltyics.ini
-- dtvbalance.ini
-- dtveditor.ini
Once you encrypt the user ID and password within the files, the encryption string replaces the unencrypted ID and password.
Query Launcher does not prompt for a user ID and password when it runs, so specify them here.
Configuring Query Launcher 69

Chapter 3: Query Launcher XBR® 7.0.0
Perform the following steps to encrypt a user ID and password:
1) In the XBR front end, select the Administration Configuration General Defaults menu option.
2) Click the Encrypt button.
3) Enter the user ID to encrypt in the String to Encrypt text box (Figure 3-1).
4) Click the Encrypt button. The encrypted number is displayed in the Encrypt text box.
5) Click the Clipboard button to copy the Encrypted value to the clipboard.
6) Check the UserId and/or Database password check boxes in the Override Connection Attributes (ini files) section. This will place the encrypted values in the .ini files instead of displaying the actual password and ID.
7) Click the Apply button.
8) Click the Cancel button to exit the dialog box.
9) In the text editor being used for the dtvlauncher.ini file, select the Edit button, then the Paste menu option. The encrypted user ID and password are entered in the file.
10) Delete the old, unencrypted UserId and DatabasePassword lines in the file.
11) Save the file.
Figure 3-1: Encrypt Function
Pass Parameters to Query LauncherWhen creating a batch file that will be scheduled using the Windows system scheduler or setting up a Windows shortcut, the following parameters can be passed to Query Launcher:
The name of the configuration (INI) file.
The mode (true/false) for processing runs scheduled for “Offline” or “As Soon As Possible”.
Base date.
You can use one, two, or all three of these parameters in any order.
The first parameter should be separated from the name of the application with a “space”. Subsequent parameters are separated using a semicolon (“;”).
70 Configuring Query Launcher
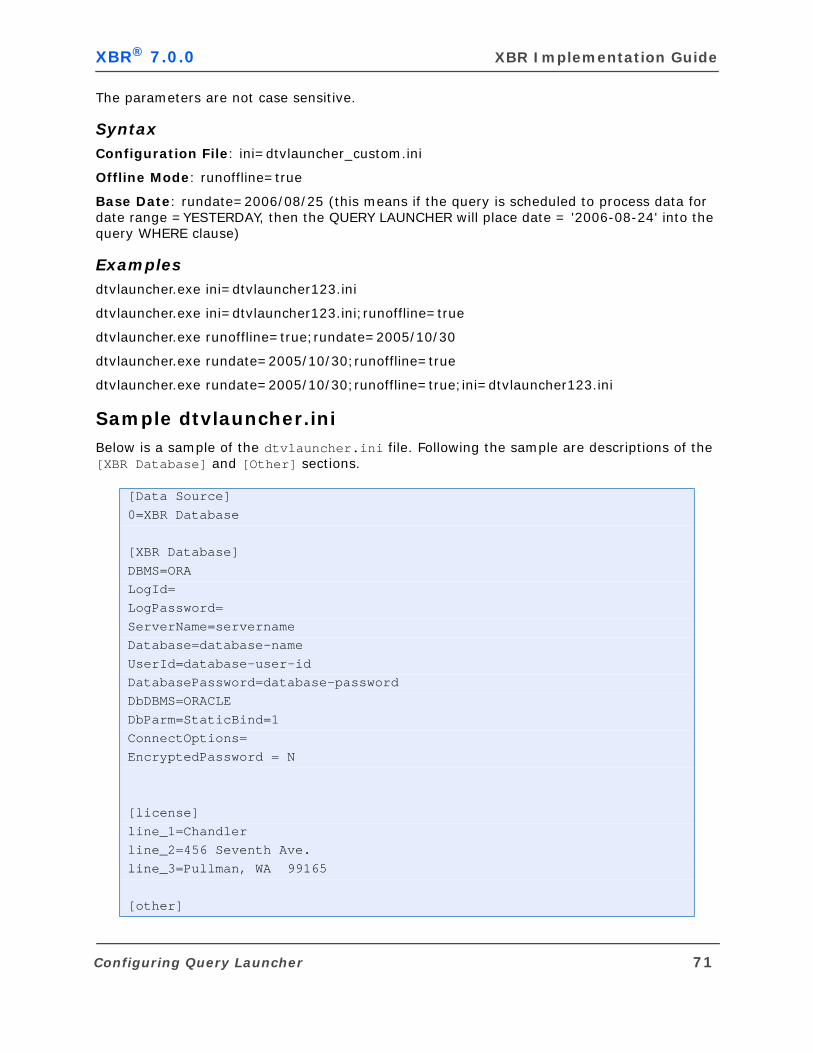
XBR® 7.0.0 XBR Implementation Guide
The parameters are not case sensitive.
SyntaxConfiguration File: ini=dtvlauncher_custom.ini
Offline Mode: runoffline=true
Base Date: rundate=2006/08/25 (this means if the query is scheduled to process data for date range =YESTERDAY, then the QUERY LAUNCHER will place date = '2006-08-24' into the query WHERE clause)
Examplesdtvlauncher.exe ini=dtvlauncher123.ini
dtvlauncher.exe ini=dtvlauncher123.ini;runoffline=true
dtvlauncher.exe runoffline=true;rundate=2005/10/30
dtvlauncher.exe rundate=2005/10/30;runoffline=true
dtvlauncher.exe rundate=2005/10/30;runoffline=true;ini=dtvlauncher123.ini
Sample dtvlauncher.iniBelow is a sample of the dtvlauncher.ini file. Following the sample are descriptions of the [XBR Database] and [Other] sections.
[Data Source]0=XBR Database
[XBR Database]DBMS=ORALogId=LogPassword=ServerName=servernameDatabase=database-nameUserId=database-user-idDatabasePassword=database-passwordDbDBMS=ORACLEDbParm=StaticBind=1ConnectOptions=EncryptedPassword = N
[license]line_1=Chandlerline_2=456 Seventh Ave.line_3=Pullman, WA 99165
[other]
Configuring Query Launcher 71
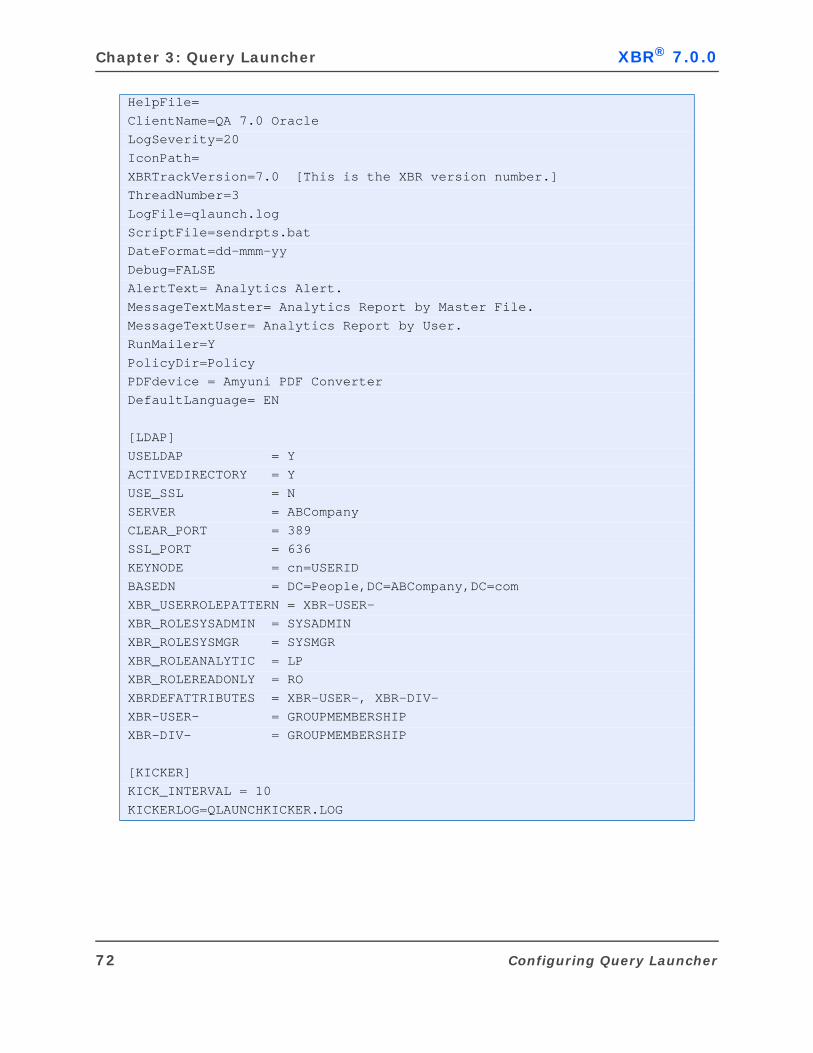
Chapter 3: Query Launcher XBR® 7.0.0
HelpFile=ClientName=QA 7.0 OracleLogSeverity=20IconPath=XBRTrackVersion=7.0 [This is the XBR version number.]ThreadNumber=3LogFile=qlaunch.logScriptFile=sendrpts.batDateFormat=dd-mmm-yyDebug=FALSEAlertText= Analytics Alert.MessageTextMaster= Analytics Report by Master File.MessageTextUser= Analytics Report by User.RunMailer=YPolicyDir=PolicyPDFdevice = Amyuni PDF ConverterDefaultLanguage= EN
[LDAP]USELDAP = YACTIVEDIRECTORY = YUSE_SSL = NSERVER = ABCompanyCLEAR_PORT = 389SSL_PORT = 636KEYNODE = cn=USERIDBASEDN = DC=People,DC=ABCompany,DC=comXBR_USERROLEPATTERN = XBR-USER-XBR_ROLESYSADMIN = SYSADMINXBR_ROLESYSMGR = SYSMGRXBR_ROLEANALYTIC = LPXBR_ROLEREADONLY = ROXBRDEFATTRIBUTES = XBR-USER-, XBR-DIV-XBR-USER- = GROUPMEMBERSHIPXBR-DIV- = GROUPMEMBERSHIP
[KICKER]KICK_INTERVAL = 10KICKERLOG=QLAUNCHKICKER.LOG
72 Configuring Query Launcher
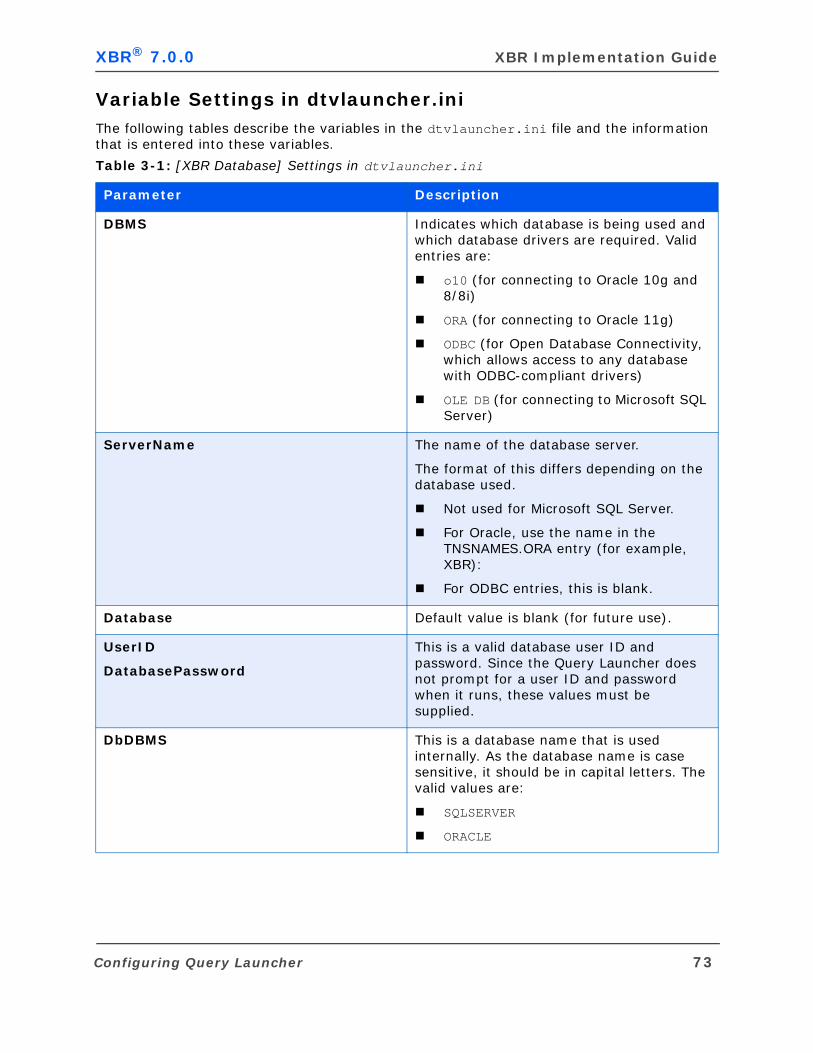
XBR® 7.0.0 XBR Implementation Guide
Variable Settings in dtvlauncher.iniThe following tables describe the variables in the dtvlauncher.ini file and the information that is entered into these variables.
Table 3-1: [XBR Database] Settings in dtvlauncher.ini
Parameter Description
DBMS Indicates which database is being used and which database drivers are required. Valid entries are:
o10 (for connecting to Oracle 10g and 8/8i)
ORA (for connecting to Oracle 11g)
ODBC (for Open Database Connectivity, which allows access to any database with ODBC-compliant drivers)
OLE DB (for connecting to Microsoft SQL Server)
ServerName The name of the database server.
The format of this differs depending on the database used.
Not used for Microsoft SQL Server.
For Oracle, use the name in the TNSNAMES.ORA entry (for example, XBR):
For ODBC entries, this is blank.
Database Default value is blank (for future use).
UserID
DatabasePassword
This is a valid database user ID and password. Since the Query Launcher does not prompt for a user ID and password when it runs, these values must be supplied.
DbDBMS This is a database name that is used internally. As the database name is case sensitive, it should be in capital letters. The valid values are:
SQLSERVER
ORACLE
Configuring Query Launcher 73
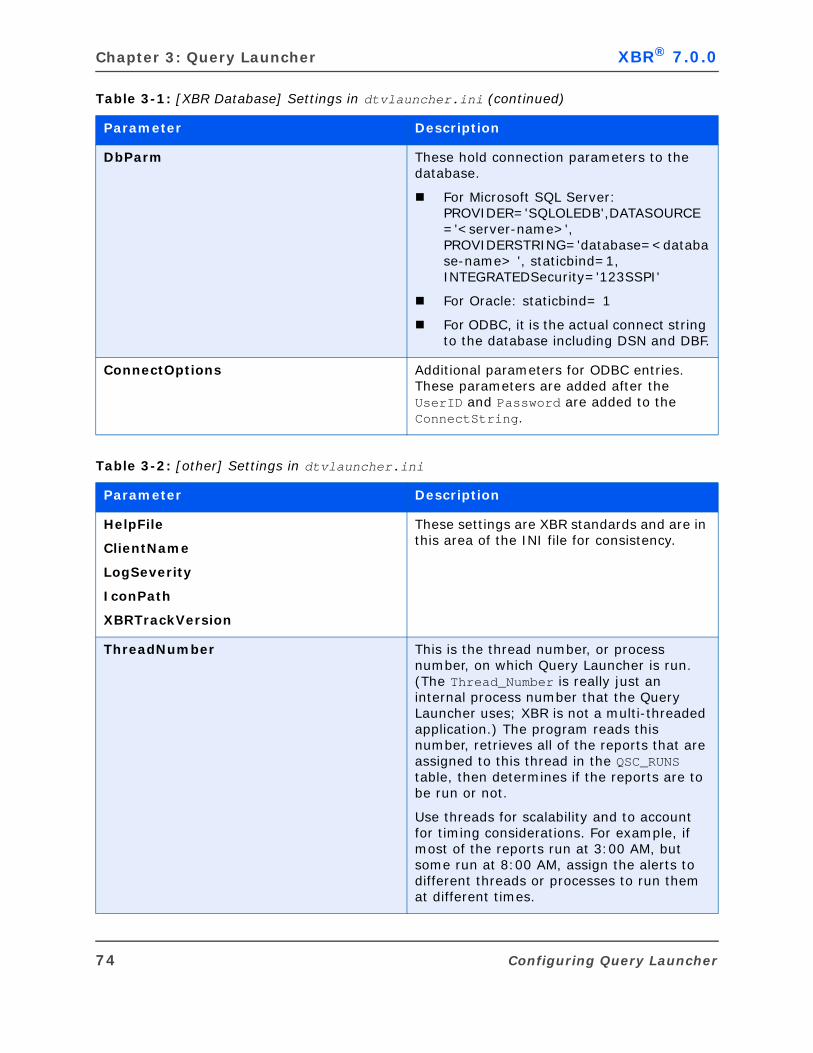
Chapter 3: Query Launcher XBR® 7.0.0
DbParm These hold connection parameters to the database.
For Microsoft SQL Server: PROVIDER='SQLOLEDB',DATASOURCE='<server-name>', PROVIDERSTRING='database=<database-name> ', staticbind=1, INTEGRATEDSecurity='123SSPI'
For Oracle: staticbind= 1
For ODBC, it is the actual connect string to the database including DSN and DBF.
ConnectOptions Additional parameters for ODBC entries. These parameters are added after the UserID and Password are added to the ConnectString.
Table 3-2: [other] Settings in dtvlauncher.ini
Parameter Description
HelpFile
ClientName
LogSeverity
IconPath
XBRTrackVersion
These settings are XBR standards and are in this area of the INI file for consistency.
ThreadNumber This is the thread number, or process number, on which Query Launcher is run. (The Thread_Number is really just an internal process number that the Query Launcher uses; XBR is not a multi-threaded application.) The program reads this number, retrieves all of the reports that are assigned to this thread in the QSC_RUNS table, then determines if the reports are to be run or not.
Use threads for scalability and to account for timing considerations. For example, if most of the reports run at 3:00 AM, but some run at 8:00 AM, assign the alerts to different threads or processes to run them at different times.
Table 3-1: [XBR Database] Settings in dtvlauncher.ini (continued)
Parameter Description
74 Configuring Query Launcher
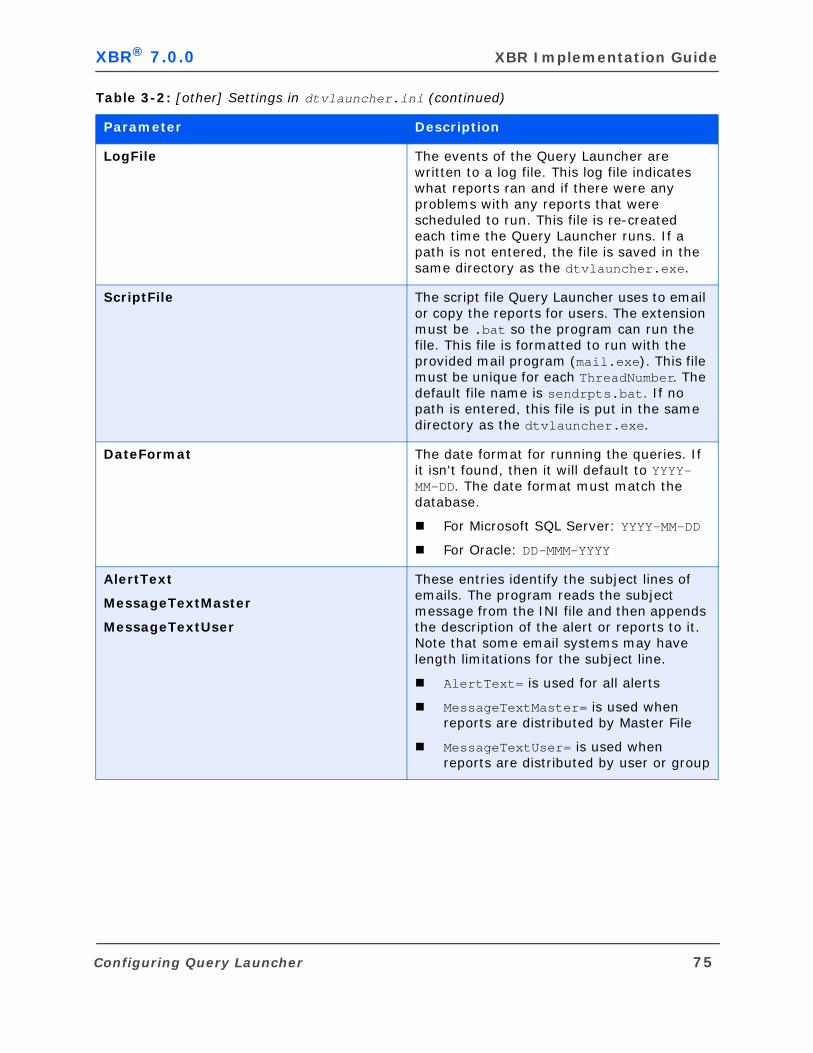
XBR® 7.0.0 XBR Implementation Guide
LogFile The events of the Query Launcher are written to a log file. This log file indicates what reports ran and if there were any problems with any reports that were scheduled to run. This file is re-created each time the Query Launcher runs. If a path is not entered, the file is saved in the same directory as the dtvlauncher.exe.
ScriptFile The script file Query Launcher uses to email or copy the reports for users. The extension must be .bat so the program can run the file. This file is formatted to run with the provided mail program (mail.exe). This file must be unique for each ThreadNumber. The default file name is sendrpts.bat. If no path is entered, this file is put in the same directory as the dtvlauncher.exe.
DateFormat The date format for running the queries. If it isn't found, then it will default to YYYY-MM-DD. The date format must match the database.
For Microsoft SQL Server: YYYY-MM-DD
For Oracle: DD-MMM-YYYY
AlertText
MessageTextMaster
MessageTextUser
These entries identify the subject lines of emails. The program reads the subject message from the INI file and then appends the description of the alert or reports to it. Note that some email systems may have length limitations for the subject line.
AlertText= is used for all alerts
MessageTextMaster= is used when reports are distributed by Master File
MessageTextUser= is used when reports are distributed by user or group
Table 3-2: [other] Settings in dtvlauncher.ini (continued)
Parameter Description
Configuring Query Launcher 75
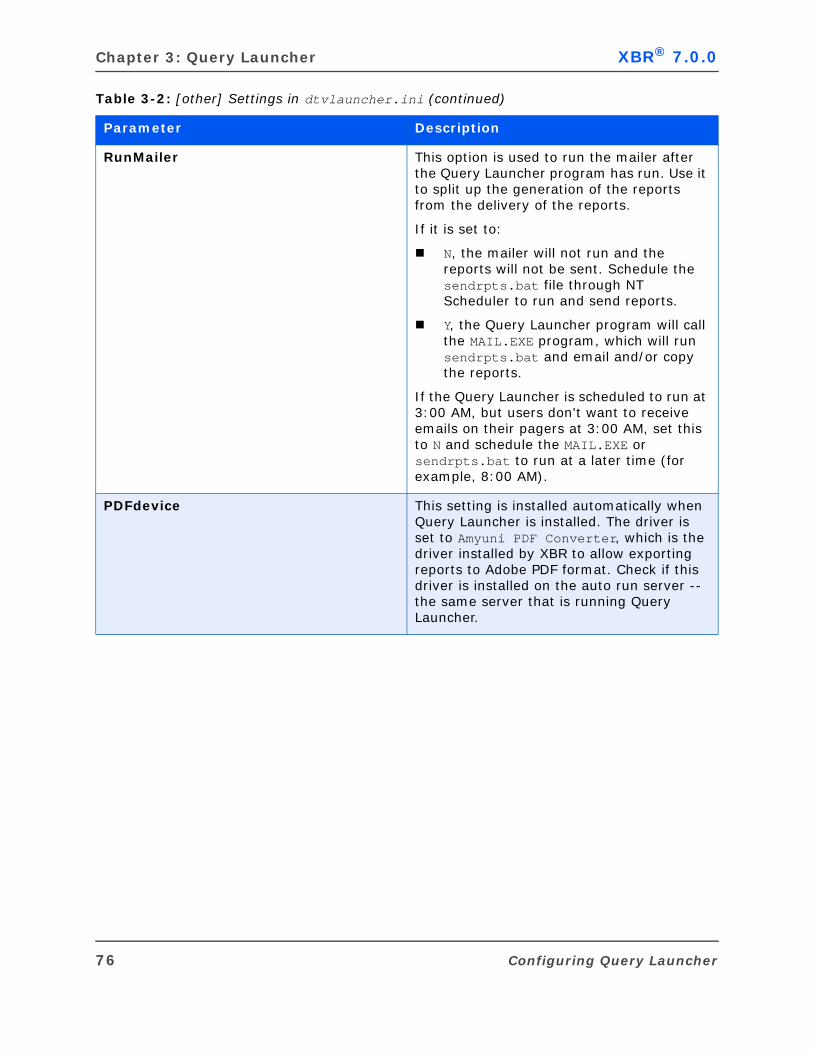
Chapter 3: Query Launcher XBR® 7.0.0
RunMailer This option is used to run the mailer after the Query Launcher program has run. Use it to split up the generation of the reports from the delivery of the reports.
If it is set to:
N, the mailer will not run and the reports will not be sent. Schedule the sendrpts.bat file through NT Scheduler to run and send reports.
Y, the Query Launcher program will call the MAIL.EXE program, which will run sendrpts.bat and email and/or copy the reports.
If the Query Launcher is scheduled to run at 3:00 AM, but users don't want to receive emails on their pagers at 3:00 AM, set this to N and schedule the MAIL.EXE or sendrpts.bat to run at a later time (for example, 8:00 AM).
PDFdevice This setting is installed automatically when Query Launcher is installed. The driver is set to Amyuni PDF Converter, which is the driver installed by XBR to allow exporting reports to Adobe PDF format. Check if this driver is installed on the auto run server -- the same server that is running Query Launcher.
Table 3-2: [other] Settings in dtvlauncher.ini (continued)
Parameter Description
76 Configuring Query Launcher
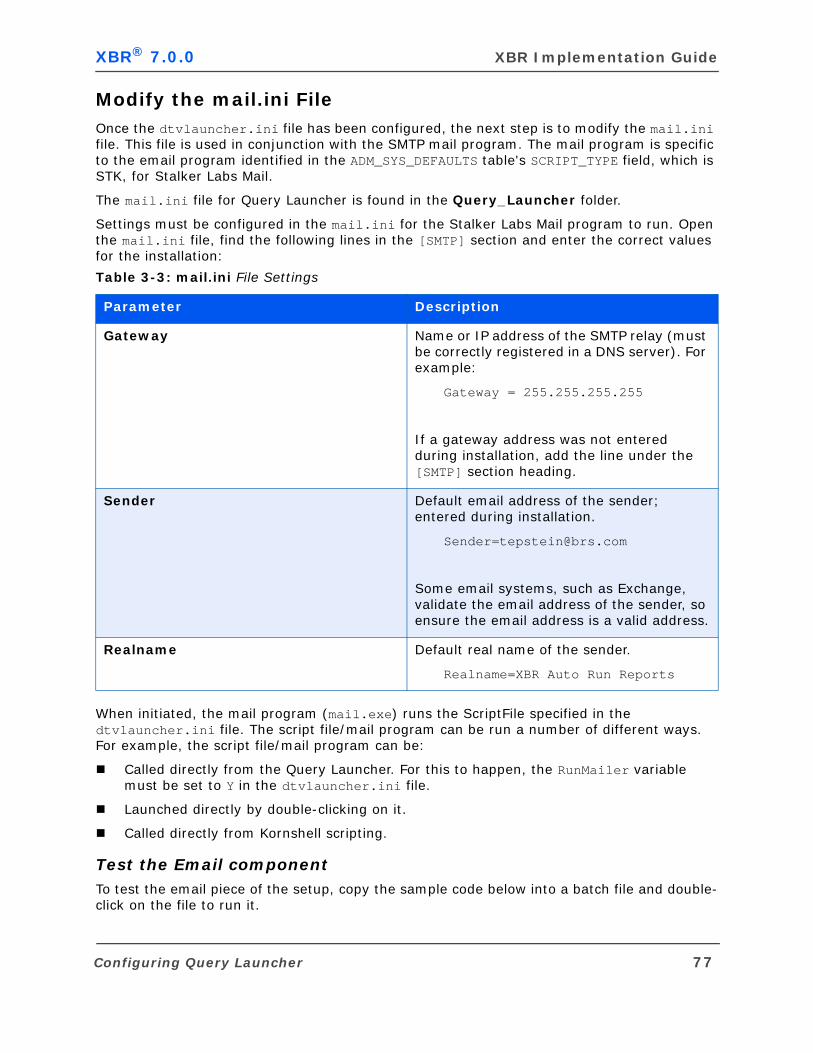
XBR® 7.0.0 XBR Implementation Guide
Modify the mail.ini FileOnce the dtvlauncher.ini file has been configured, the next step is to modify the mail.ini file. This file is used in conjunction with the SMTP mail program. The mail program is specific to the email program identified in the ADM_SYS_DEFAULTS table's SCRIPT_TYPE field, which is STK, for Stalker Labs Mail.
The mail.ini file for Query Launcher is found in the Query_Launcher folder.
Settings must be configured in the mail.ini for the Stalker Labs Mail program to run. Open the mail.ini file, find the following lines in the [SMTP] section and enter the correct values for the installation:
When initiated, the mail program (mail.exe) runs the ScriptFile specified in the dtvlauncher.ini file. The script file/mail program can be run a number of different ways. For example, the script file/mail program can be:
Called directly from the Query Launcher. For this to happen, the RunMailer variable must be set to Y in the dtvlauncher.ini file.
Launched directly by double-clicking on it.
Called directly from Kornshell scripting.
Test the Email componentTo test the email piece of the setup, copy the sample code below into a batch file and double-click on the file to run it.
Table 3-3: mail.ini File Settings
Parameter Description
Gateway Name or IP address of the SMTP relay (must be correctly registered in a DNS server). For example:
Gateway = 255.255.255.255
If a gateway address was not entered during installation, add the line under the [SMTP] section heading.
Sender Default email address of the sender; entered during installation.
Some email systems, such as Exchange, validate the email address of the sender, so ensure the email address is a valid address.
Realname Default real name of the sender.
Realname=XBR Auto Run Reports
Configuring Query Launcher 77
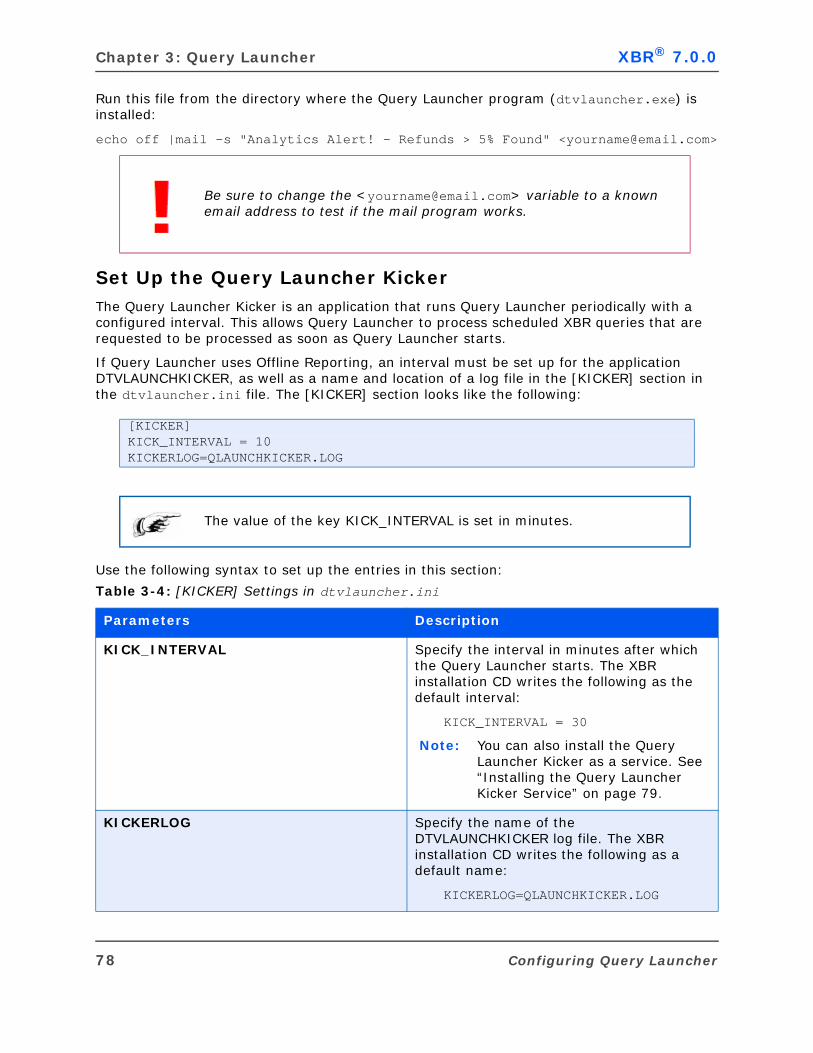
Chapter 3: Query Launcher XBR® 7.0.0
Run this file from the directory where the Query Launcher program (dtvlauncher.exe) is installed:
echo off |mail -s "Analytics Alert! - Refunds > 5% Found" <[email protected]>
Set Up the Query Launcher KickerThe Query Launcher Kicker is an application that runs Query Launcher periodically with a configured interval. This allows Query Launcher to process scheduled XBR queries that are requested to be processed as soon as Query Launcher starts.
If Query Launcher uses Offline Reporting, an interval must be set up for the application DTVLAUNCHKICKER, as well as a name and location of a log file in the [KICKER] section in the dtvlauncher.ini file. The [KICKER] section looks like the following:
Use the following syntax to set up the entries in this section:
Be sure to change the <[email protected]> variable to a known email address to test if the mail program works.
[KICKER]KICK_INTERVAL = 10KICKERLOG=QLAUNCHKICKER.LOG
The value of the key KICK_INTERVAL is set in minutes.
Table 3-4: [KICKER] Settings in dtvlauncher.ini
Parameters Description
KICK_INTERVAL Specify the interval in minutes after which the Query Launcher starts. The XBR installation CD writes the following as the default interval:
KICK_INTERVAL = 30
Note: You can also install the Query Launcher Kicker as a service. See “Installing the Query Launcher Kicker Service” on page 79.
KICKERLOG Specify the name of the DTVLAUNCHKICKER log file. The XBR installation CD writes the following as a default name:
KICKERLOG=QLAUNCHKICKER.LOG
78 Configuring Query Launcher
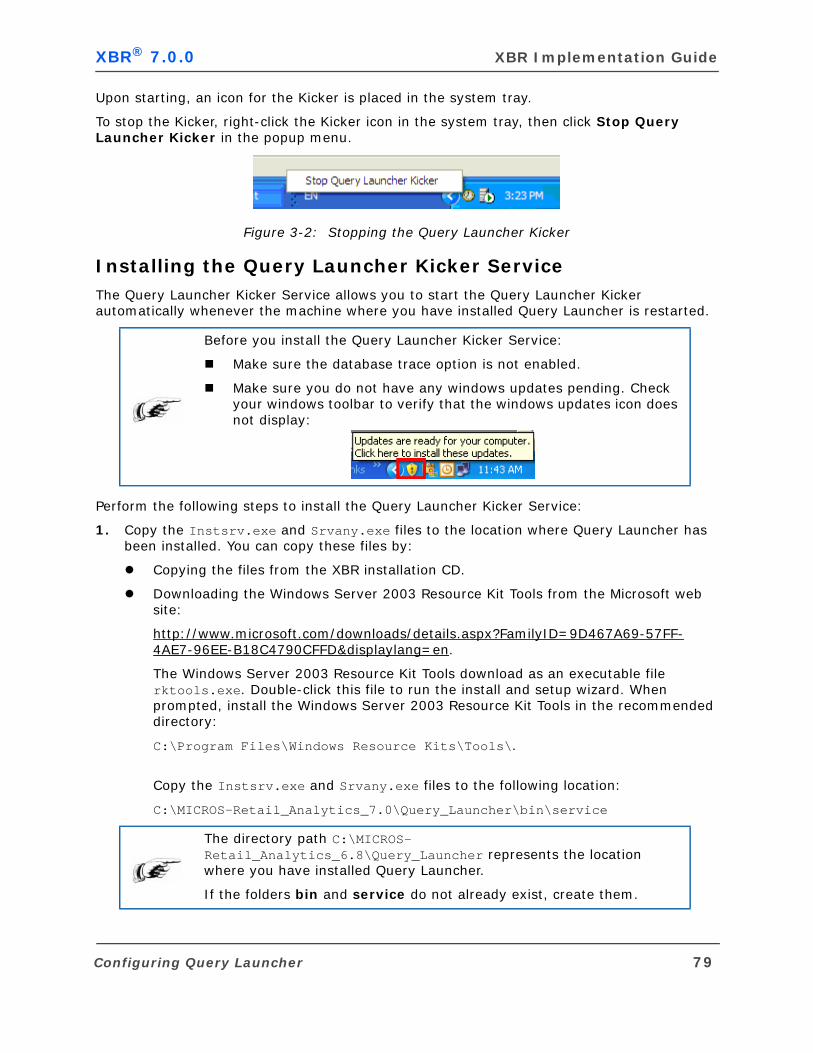
XBR® 7.0.0 XBR Implementation Guide
Upon starting, an icon for the Kicker is placed in the system tray.
To stop the Kicker, right-click the Kicker icon in the system tray, then click Stop Query Launcher Kicker in the popup menu.
Figure 3-2: Stopping the Query Launcher Kicker
Installing the Query Launcher Kicker ServiceThe Query Launcher Kicker Service allows you to start the Query Launcher Kicker automatically whenever the machine where you have installed Query Launcher is restarted.
Perform the following steps to install the Query Launcher Kicker Service:
1. Copy the Instsrv.exe and Srvany.exe files to the location where Query Launcher has been installed. You can copy these files by:
Copying the files from the XBR installation CD.
Downloading the Windows Server 2003 Resource Kit Tools from the Microsoft web site:
http://www.microsoft.com/downloads/details.aspx?FamilyID=9D467A69-57FF-4AE7-96EE-B18C4790CFFD&displaylang=en.
The Windows Server 2003 Resource Kit Tools download as an executable file rktools.exe. Double-click this file to run the install and setup wizard. When prompted, install the Windows Server 2003 Resource Kit Tools in the recommended directory:
C:\Program Files\Windows Resource Kits\Tools\.
Copy the Instsrv.exe and Srvany.exe files to the following location:
C:\MICROS-Retail_Analytics_7.0\Query_Launcher\bin\service
Before you install the Query Launcher Kicker Service:
Make sure the database trace option is not enabled.
Make sure you do not have any windows updates pending. Check your windows toolbar to verify that the windows updates icon does not display:
The directory path C:\MICROS-Retail_Analytics_6.8\Query_Launcher represents the location where you have installed Query Launcher.
If the folders bin and service do not already exist, create them.
Configuring Query Launcher 79
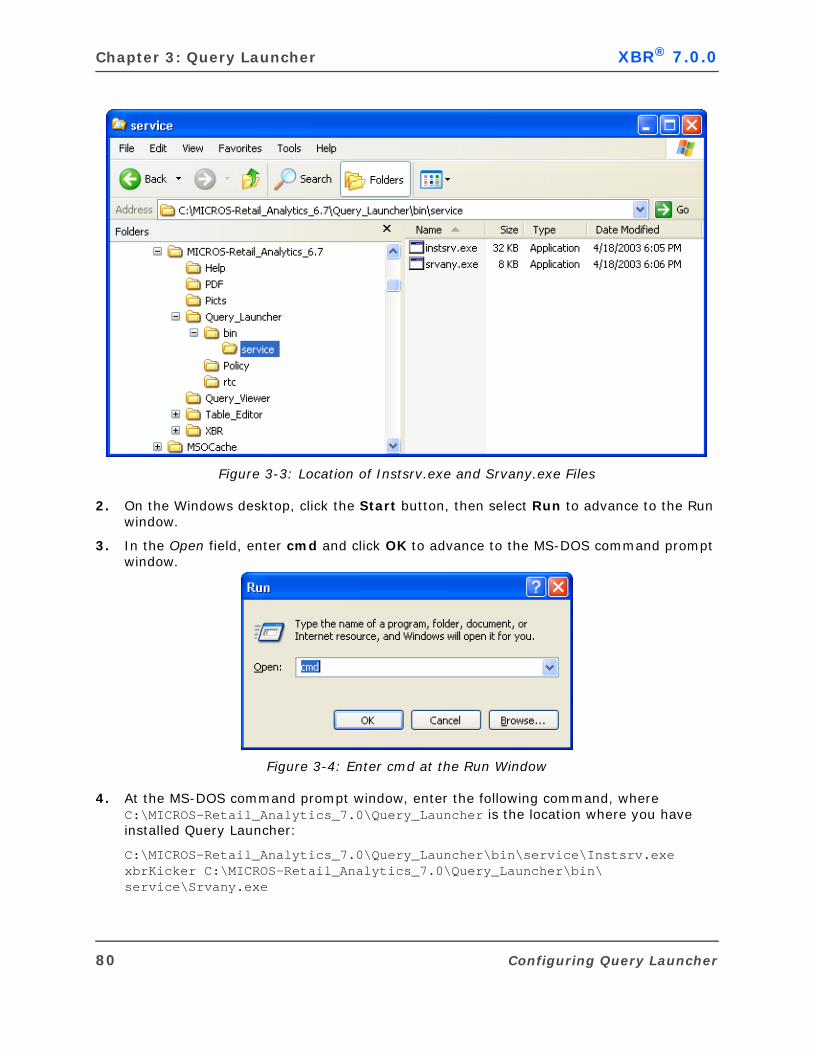
Chapter 3: Query Launcher XBR® 7.0.0
Figure 3-3: Location of Instsrv.exe and Srvany.exe Files
2. On the Windows desktop, click the Start button, then select Run to advance to the Run window.
3. In the Open field, enter cmd and click OK to advance to the MS-DOS command prompt window.
Figure 3-4: Enter cmd at the Run Window
4. At the MS-DOS command prompt window, enter the following command, where C:\MICROS-Retail_Analytics_7.0\Query_Launcher is the location where you have installed Query Launcher:
C:\MICROS-Retail_Analytics_7.0\Query_Launcher\bin\service\Instsrv.exe xbrKicker C:\MICROS-Retail_Analytics_7.0\Query_Launcher\bin\service\Srvany.exe
80 Configuring Query Launcher
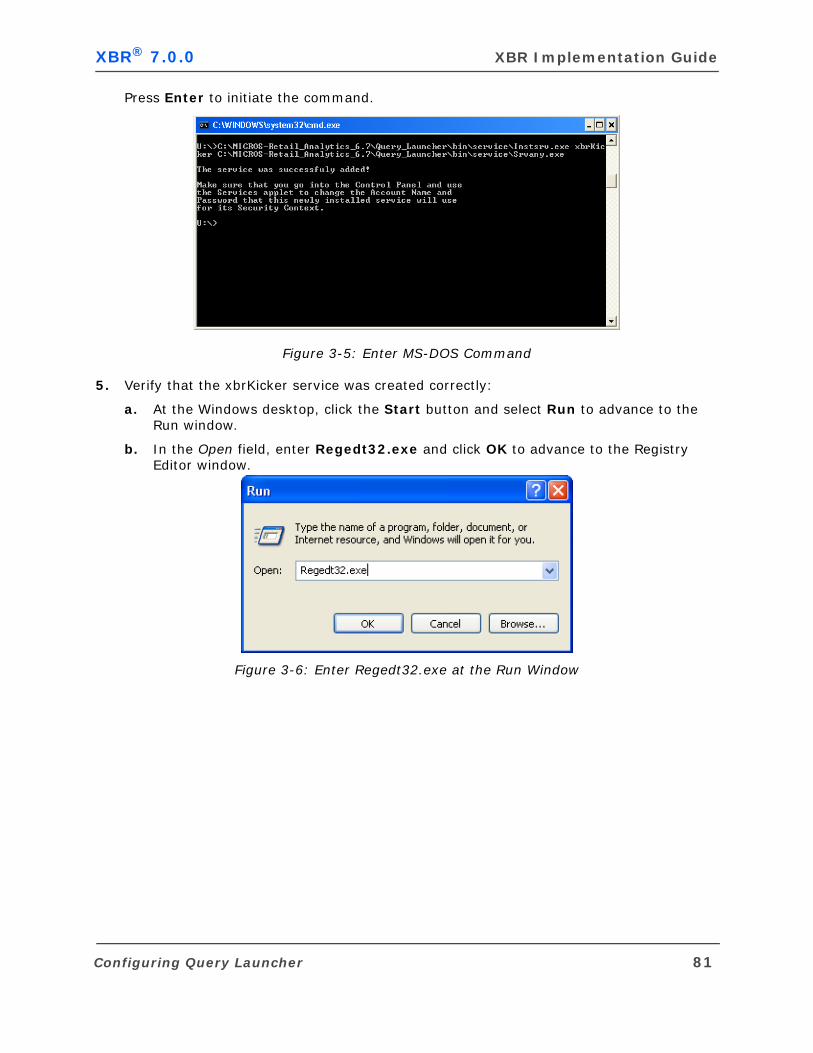
XBR® 7.0.0 XBR Implementation Guide
Press Enter to initiate the command.
Figure 3-5: Enter MS-DOS Command
5. Verify that the xbrKicker service was created correctly:
a. At the Windows desktop, click the Start button and select Run to advance to the Run window.
b. In the Open field, enter Regedt32.exe and click OK to advance to the Registry Editor window.
Figure 3-6: Enter Regedt32.exe at the Run Window
Configuring Query Launcher 81
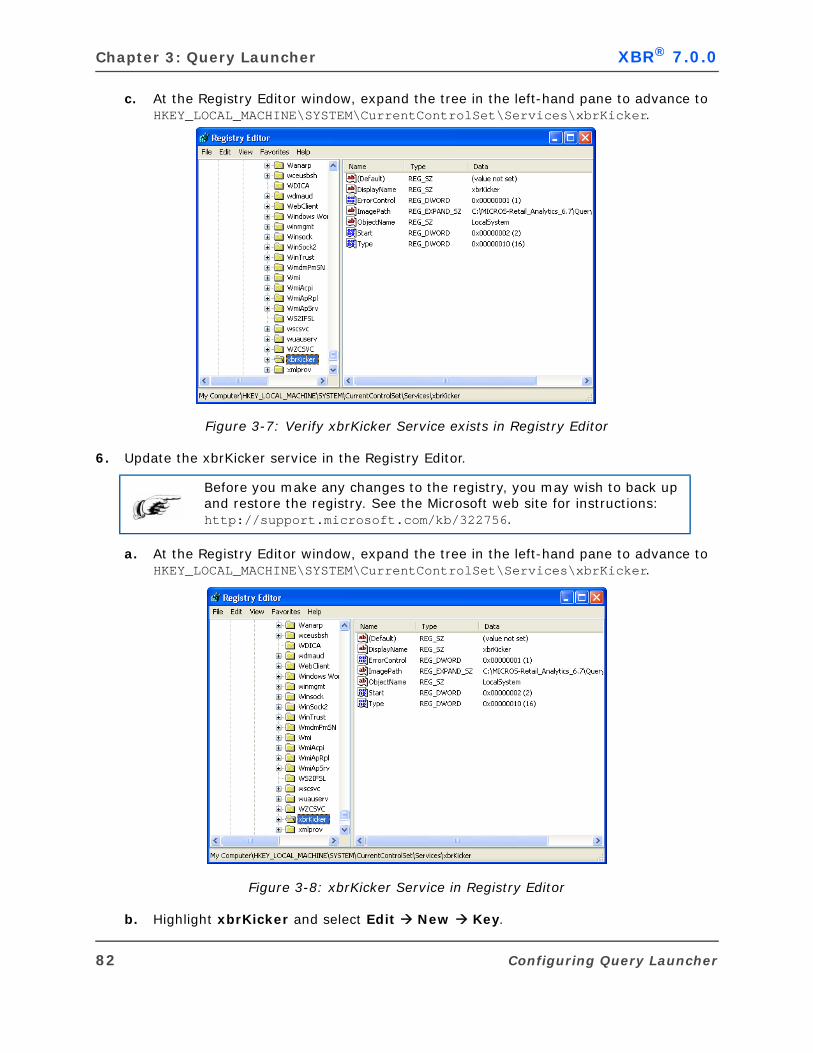
Chapter 3: Query Launcher XBR® 7.0.0
c. At the Registry Editor window, expand the tree in the left-hand pane to advance to HKEY_LOCAL_MACHINE\SYSTEM\CurrentControlSet\Services\xbrKicker.
Figure 3-7: Verify xbrKicker Service exists in Registry Editor
6. Update the xbrKicker service in the Registry Editor.
a. At the Registry Editor window, expand the tree in the left-hand pane to advance to HKEY_LOCAL_MACHINE\SYSTEM\CurrentControlSet\Services\xbrKicker.
Figure 3-8: xbrKicker Service in Registry Editor
b. Highlight xbrKicker and select Edit New Key.
Before you make any changes to the registry, you may wish to back up and restore the registry. See the Microsoft web site for instructions: http://support.microsoft.com/kb/322756.
82 Configuring Query Launcher
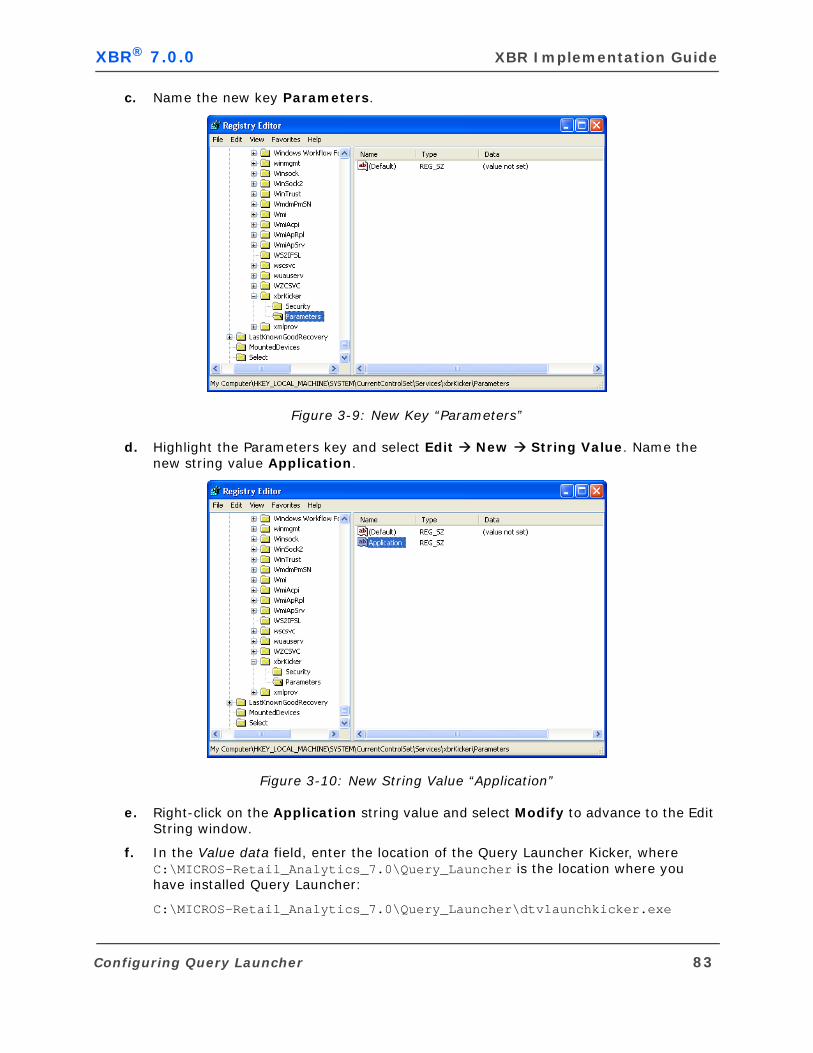
XBR® 7.0.0 XBR Implementation Guide
c. Name the new key Parameters.
Figure 3-9: New Key “Parameters”
d. Highlight the Parameters key and select Edit New String Value. Name the new string value Application.
Figure 3-10: New String Value “Application”
e. Right-click on the Application string value and select Modify to advance to the Edit String window.
f. In the Value data field, enter the location of the Query Launcher Kicker, where C:\MICROS-Retail_Analytics_7.0\Query_Launcher is the location where you have installed Query Launcher:
C:\MICROS-Retail_Analytics_7.0\Query_Launcher\dtvlaunchkicker.exe
Configuring Query Launcher 83
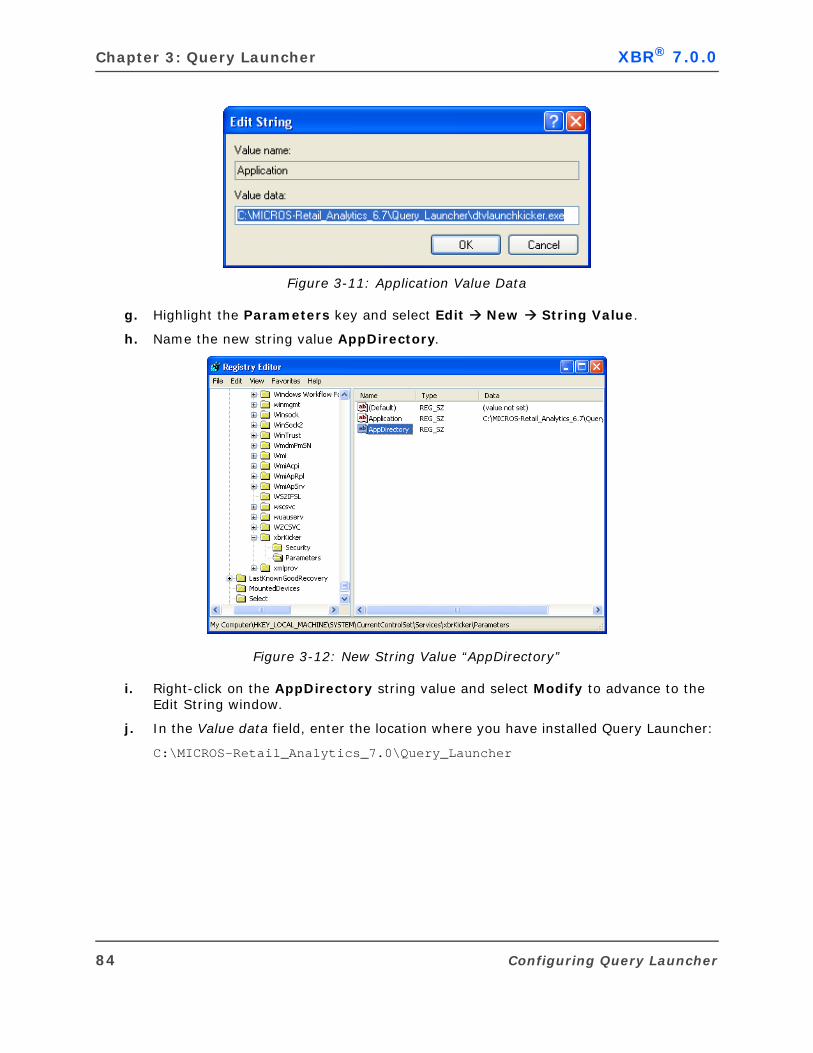
Chapter 3: Query Launcher XBR® 7.0.0
Figure 3-11: Application Value Data
g. Highlight the Parameters key and select Edit New String Value.
h. Name the new string value AppDirectory.
Figure 3-12: New String Value “AppDirectory”
i. Right-click on the AppDirectory string value and select Modify to advance to the Edit String window.
j. In the Value data field, enter the location where you have installed Query Launcher:
C:\MICROS-Retail_Analytics_7.0\Query_Launcher
84 Configuring Query Launcher
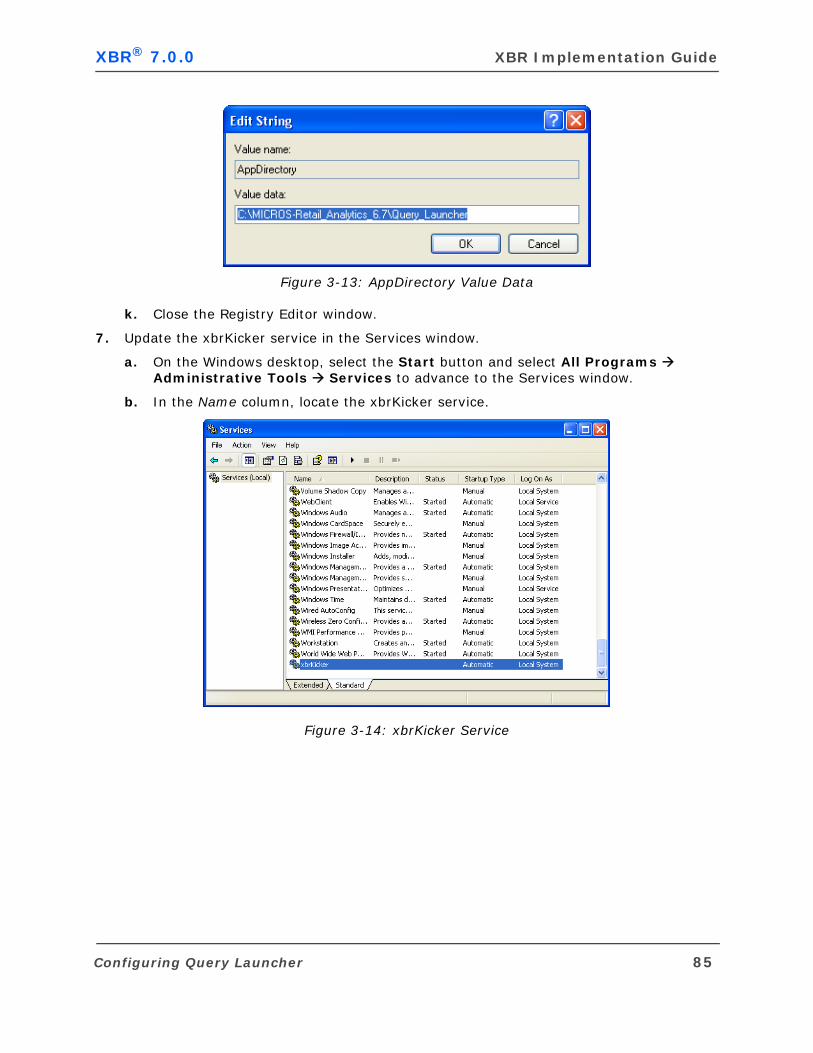
XBR® 7.0.0 XBR Implementation Guide
Figure 3-13: AppDirectory Value Data
k. Close the Registry Editor window.
7. Update the xbrKicker service in the Services window.
a. On the Windows desktop, select the Start button and select All Programs Administrative Tools Services to advance to the Services window.
b. In the Name column, locate the xbrKicker service.
Figure 3-14: xbrKicker Service
Configuring Query Launcher 85
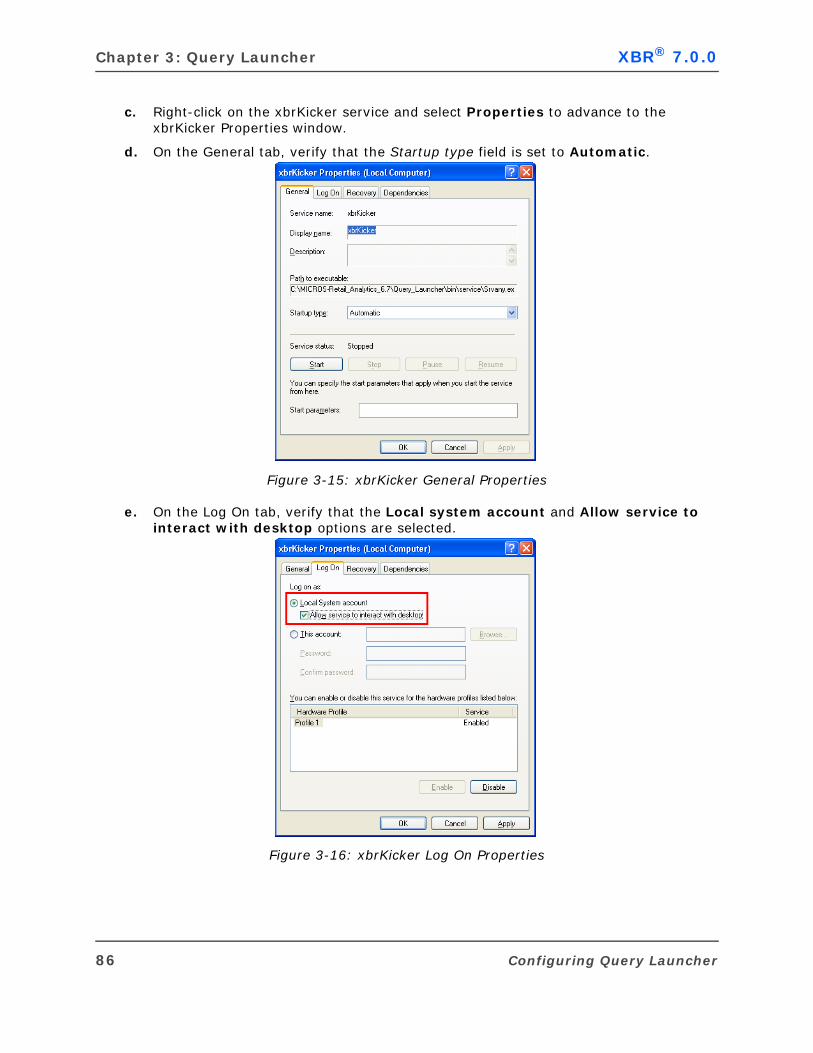
Chapter 3: Query Launcher XBR® 7.0.0
c. Right-click on the xbrKicker service and select Properties to advance to the xbrKicker Properties window.
d. On the General tab, verify that the Startup type field is set to Automatic.
Figure 3-15: xbrKicker General Properties
e. On the Log On tab, verify that the Local system account and Allow service to interact with desktop options are selected.
Figure 3-16: xbrKicker Log On Properties
86 Configuring Query Launcher

XBR® 7.0.0 XBR Implementation Guide
f. On the Recovery tab, verify that the First Failure, Second Failure, and Subsequent Failures fields are set to Restart the Service.
Figure 3-17: XBR Kicker Recovery Properties
g. Click OK to save your changes.
Query Launcher Kicker System Tray IconOnce the Query Launcher Kicker Service (xbrKicker) has been installed and configured, depending on your system configuration, the xbrKicker icon will display in your computer system tray as a clock icon.
Query Launcher Kicker in Windows Task ManagerYou can review the Query Launcher Kicker Service in the Windows Task Manager.
To view the Windows Task Manager:
1. Right-click on the computer system tray and select Task Manager to advance to the Windows Task Manager window.
2. At the Windows Task Manager window, select the Processes tab.
Select the Show processes from all users checkbox.
Configuring Query Launcher 87
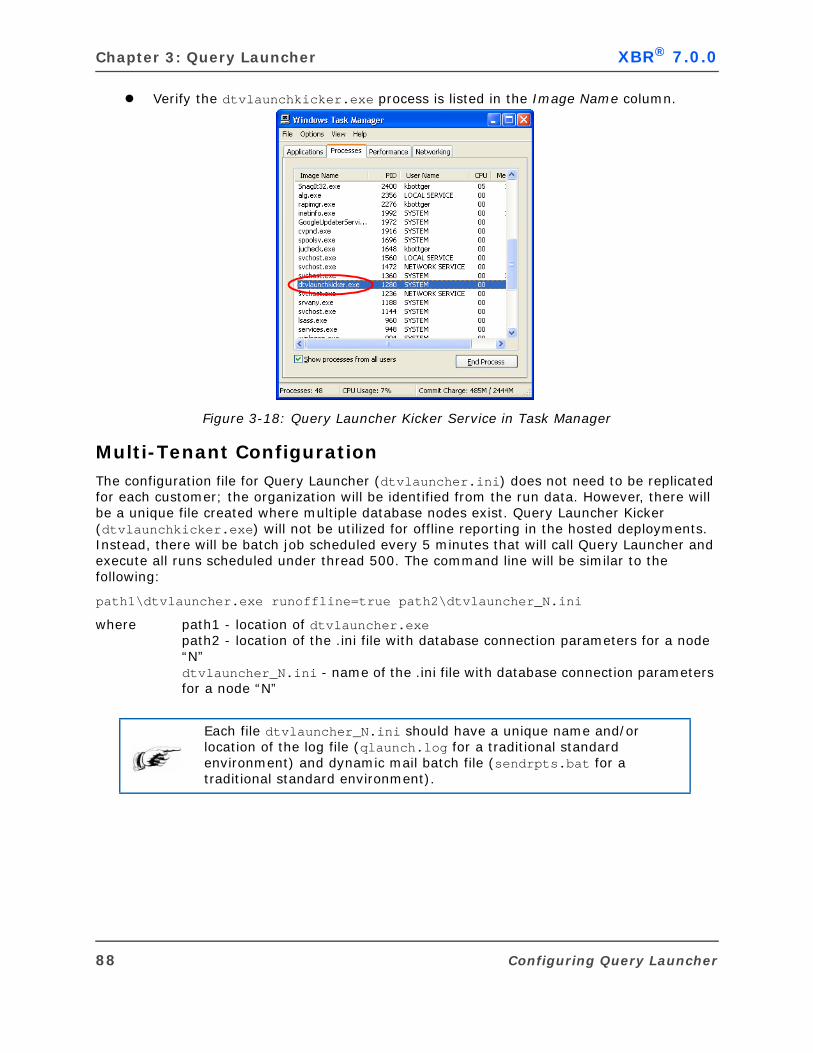
Chapter 3: Query Launcher XBR® 7.0.0
Verify the dtvlaunchkicker.exe process is listed in the Image Name column.
Figure 3-18: Query Launcher Kicker Service in Task Manager
Multi-Tenant ConfigurationThe configuration file for Query Launcher (dtvlauncher.ini) does not need to be replicated for each customer; the organization will be identified from the run data. However, there will be a unique file created where multiple database nodes exist. Query Launcher Kicker (dtvlaunchkicker.exe) will not be utilized for offline reporting in the hosted deployments. Instead, there will be batch job scheduled every 5 minutes that will call Query Launcher and execute all runs scheduled under thread 500. The command line will be similar to the following:
path1\dtvlauncher.exe runoffline=true path2\dtvlauncher_N.ini
where path1 - location of dtvlauncher.exepath2 - location of the .ini file with database connection parameters for a node “N”dtvlauncher_N.ini - name of the .ini file with database connection parameters for a node “N”
Each file dtvlauncher_N.ini should have a unique name and/or location of the log file (qlaunch.log for a traditional standard environment) and dynamic mail batch file (sendrpts.bat for a traditional standard environment).
88 Configuring Query Launcher
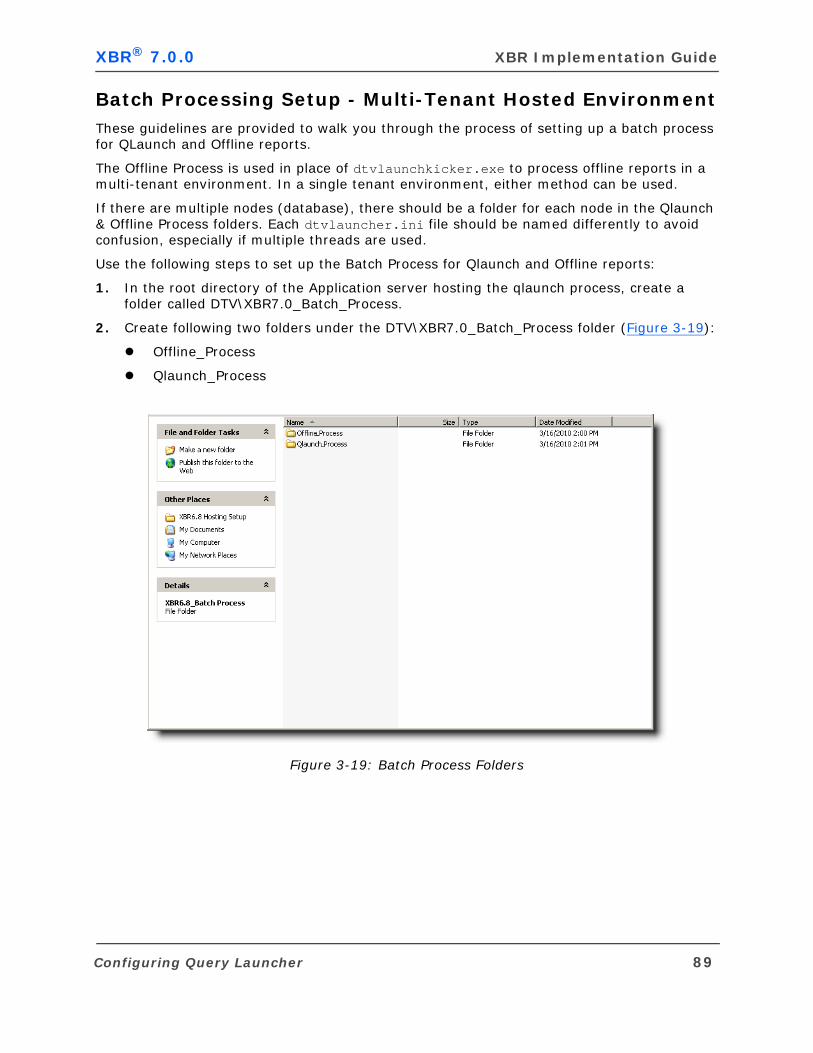
XBR® 7.0.0 XBR Implementation Guide
Batch Processing Setup - Multi-Tenant Hosted EnvironmentThese guidelines are provided to walk you through the process of setting up a batch process for QLaunch and Offline reports.
The Offline Process is used in place of dtvlaunchkicker.exe to process offline reports in a multi-tenant environment. In a single tenant environment, either method can be used.
If there are multiple nodes (database), there should be a folder for each node in the Qlaunch & Offline Process folders. Each dtvlauncher.ini file should be named differently to avoid confusion, especially if multiple threads are used.
Use the following steps to set up the Batch Process for Qlaunch and Offline reports:
1. In the root directory of the Application server hosting the qlaunch process, create a folder called DTV\XBR7.0_Batch_Process.
2. Create following two folders under the DTV\XBR7.0_Batch_Process folder (Figure 3-19):
Offline_Process
Qlaunch_Process
Figure 3-19: Batch Process Folders
Configuring Query Launcher 89
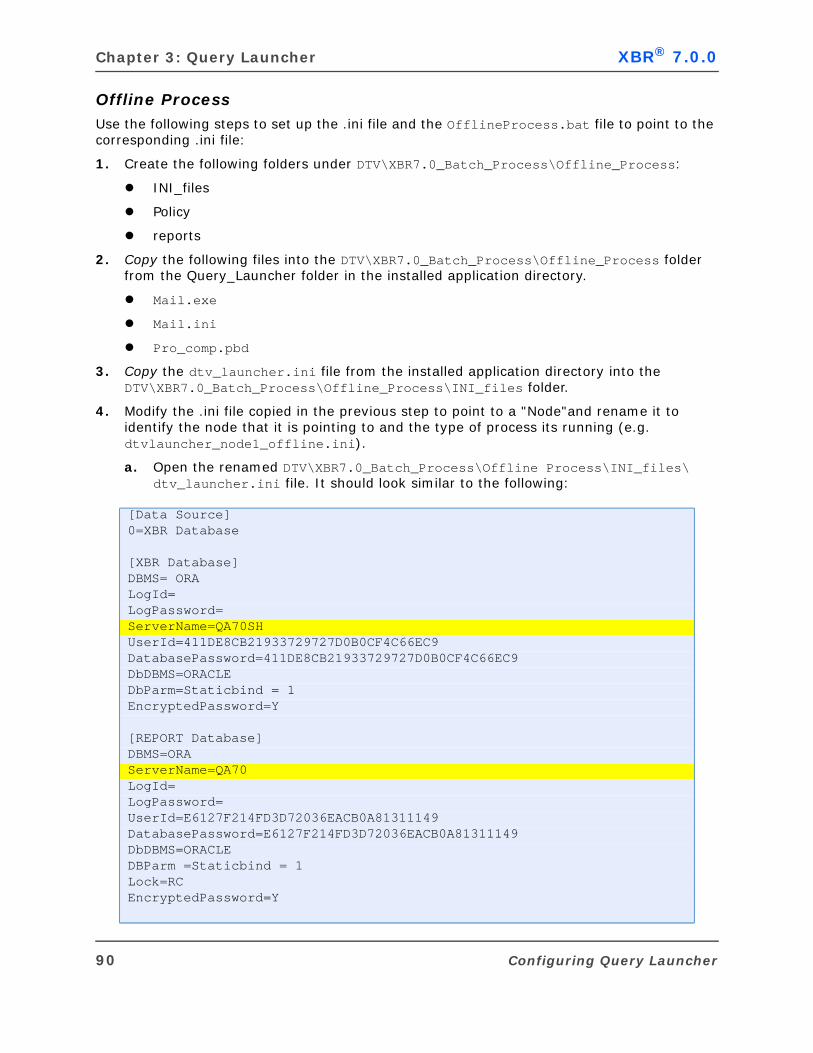
Chapter 3: Query Launcher XBR® 7.0.0
Offline ProcessUse the following steps to set up the .ini file and the OfflineProcess.bat file to point to the corresponding .ini file:
1. Create the following folders under DTV\XBR7.0_Batch_Process\Offline_Process:
INI_files
Policy
reports
2. Copy the following files into the DTV\XBR7.0_Batch_Process\Offline_Process folder from the Query_Launcher folder in the installed application directory.
Mail.exe
Mail.ini
Pro_comp.pbd
3. Copy the dtv_launcher.ini file from the installed application directory into the DTV\XBR7.0_Batch_Process\Offline_Process\INI_files folder.
4. Modify the .ini file copied in the previous step to point to a "Node"and rename it to identify the node that it is pointing to and the type of process its running (e.g. dtvlauncher_node1_offline.ini).
a. Open the renamed DTV\XBR7.0_Batch_Process\Offline Process\INI_files\dtv_launcher.ini file. It should look similar to the following:
[Data Source]0=XBR Database
[XBR Database]DBMS= ORALogId=LogPassword=ServerName=QA70SHUserId=411DE8CB21933729727D0B0CF4C66EC9DatabasePassword=411DE8CB21933729727D0B0CF4C66EC9DbDBMS=ORACLEDbParm=Staticbind = 1EncryptedPassword=Y
[REPORT Database]DBMS=ORAServerName=QA70LogId=LogPassword=UserId=E6127F214FD3D72036EACB0A81311149DatabasePassword=E6127F214FD3D72036EACB0A81311149DbDBMS=ORACLEDBParm =Staticbind = 1 Lock=RCEncryptedPassword=Y
90 Configuring Query Launcher
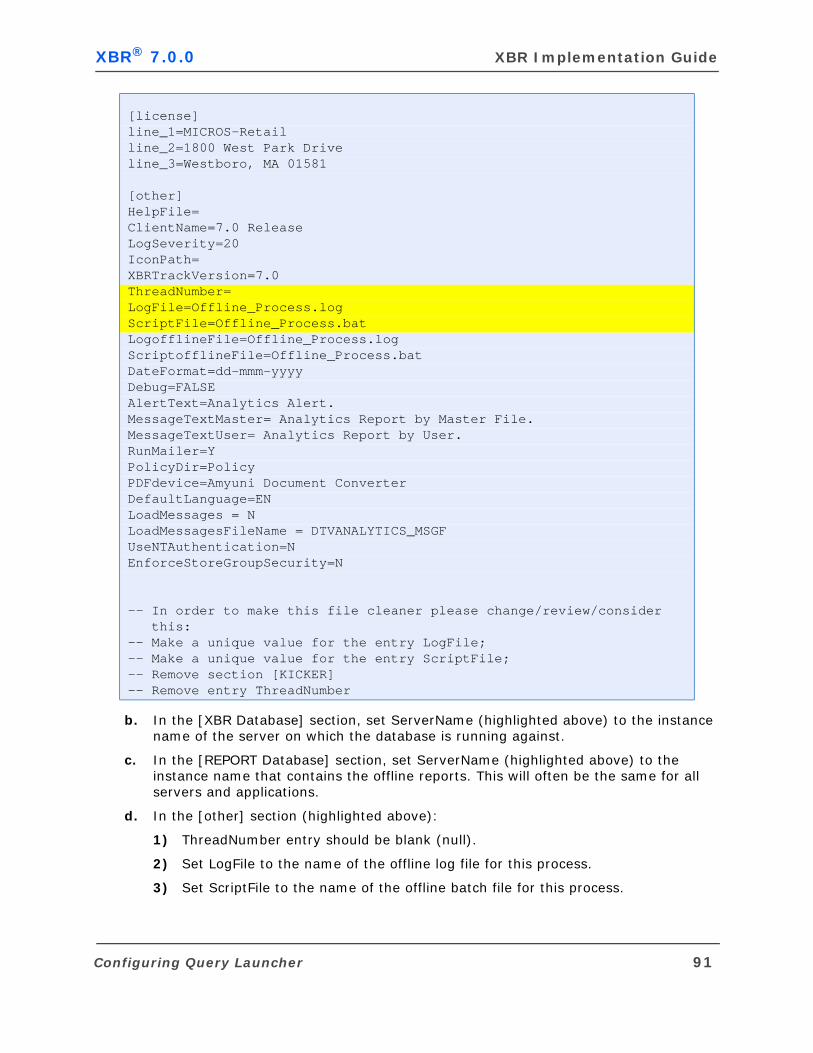
XBR® 7.0.0 XBR Implementation Guide
b. In the [XBR Database] section, set ServerName (highlighted above) to the instance name of the server on which the database is running against.
c. In the [REPORT Database] section, set ServerName (highlighted above) to the instance name that contains the offline reports. This will often be the same for all servers and applications.
d. In the [other] section (highlighted above):
1) ThreadNumber entry should be blank (null).
2) Set LogFile to the name of the offline log file for this process.
3) Set ScriptFile to the name of the offline batch file for this process.
[license]line_1=MICROS-Retailline_2=1800 West Park Driveline_3=Westboro, MA 01581
[other]HelpFile=ClientName=7.0 ReleaseLogSeverity=20IconPath=XBRTrackVersion=7.0ThreadNumber=LogFile=Offline_Process.logScriptFile=Offline_Process.batLogofflineFile=Offline_Process.logScriptofflineFile=Offline_Process.batDateFormat=dd-mmm-yyyyDebug=FALSEAlertText=Analytics Alert.MessageTextMaster= Analytics Report by Master File.MessageTextUser= Analytics Report by User.RunMailer=YPolicyDir=PolicyPDFdevice=Amyuni Document ConverterDefaultLanguage=ENLoadMessages = NLoadMessagesFileName = DTVANALYTICS_MSGFUseNTAuthentication=NEnforceStoreGroupSecurity=N
-- In order to make this file cleaner please change/review/consider this:-- Make a unique value for the entry LogFile;-- Make a unique value for the entry ScriptFile;-- Remove section [KICKER]-- Remove entry ThreadNumber
Configuring Query Launcher 91

Chapter 3: Query Launcher XBR® 7.0.0
5. Create additional ini files for each "Node" as shown below.
Figure 3-20: Offline Process ini Files
6. Create a batch file (Offline_Process.bat) in the DTV\XBR7.0_Batch_Process \Offline_Process folder to run the offline process for each "Node".
7. In the Offline_Process.bat file, make an entry for each .ini file. Each entry should have three parts:
C:\dtv\Qlauncher\dtvlauncher.exe runoffline=true ini=C:\DTV\XBR7.0_Batch Process\Offline Process\INI_files\dtvlauncher_node1_offline.ini
Part one: the location of dtvlauncher.exe.
Part two: offline flag.
Part three: “ini=” the location/name of the modified dtvlauncher.ini file.
Sample code:
REM ========== NODE 1 XBRP1 DATABASE pointing to Prod 1 server "C:\MICROS-Retail_Analytics_7.0\Query_Launcher\dtvlauncher.exe" runoffline=true; ini=C:\DTV\XBR7.0_Batch Process\Offline Process\INI_Files\dtvlauncher_node1_offline.ini;REM ========== NODE 2 XBRP2 DATABASE pointing to Prod2 server"C:\ MICROS-Retail_Analytics_7.0\Query_Launcher\dtvlauncher.exe" runoffline=true; ini=C:\DTV\ XBR7.0_Batch Process\Offline Process\INI_Files\dtvlauncher_node2_offline.ini;
92 Configuring Query Launcher
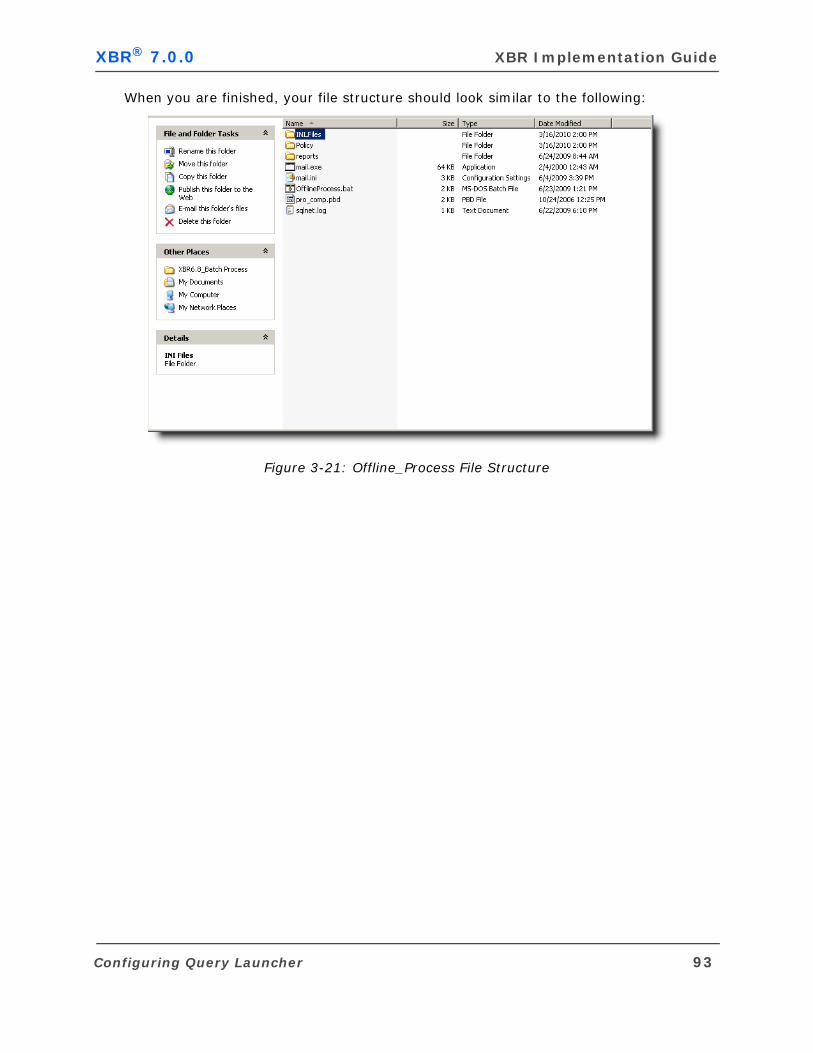
XBR® 7.0.0 XBR Implementation Guide
When you are finished, your file structure should look similar to the following:
Figure 3-21: Offline_Process File Structure
Configuring Query Launcher 93

Chapter 3: Query Launcher XBR® 7.0.0
Qlaunch ProcessIf there are multiple nodes (servers), there should be a folder for each node in the Qlaunch Process folder. Each server should have its own processes and each process will have its own dtvlauncher.ini file. Each .ini file should be named differently to avoid confusion, especially if multiple threads are used.
Use the following steps to set up the dtvlauncher.ini file and the Qlaunch_process.bat file to point to the corresponding .ini file:
1. Create the following folders under DTV\XBR7.0_Batch Process\Qlaunch_Process:
Node <number of node> (e.g. Node1; Node2; Node3 etc.)
Policy
reports
2. Copy the following files into the DTV\XBR7.0_Batch Process\Qlaunch_Process folder from the Query_Launcher folder in the installed application directory.
Mail.exe
Mail.ini
Pro_comp.pbd
3. Copy the dtv_launcher.ini file from the installed application directory to each "Node" folder created in the previous step.
4. Modify the ini file(s) copied in the previous step to point to a "Node"and rename it to identify the node that it is pointing to and the thread number for that node (e.g. dtvlauncher_node1_thread1.ini).
5. Open the DTV\XBR7.0_Batch Process\Qlaunch_Process\dtvlauncher_node1_thread1.ini file. It should look similar to the following:
[Data Source]0=XBR Database
[XBR Database]DBMS= ORALogId=LogPassword=ServerName=QAMMSHUserId=411DE8CB21933729727D0B0CF4C66EC9DatabasePassword=411DE8CB21933729727D0B0CF4C66EC9DbDBMS=ORACLEDbParm=Staticbind = 1EncryptedPassword=Y
[REPORT Database]DBMS=ORAServerName=QA_70LogId=411DE8CB21933729727D0B0CF4C66EC9LogPassword=411DE8CB21933729727D0B0CF4C66EC9UserId=DatabasePassword=
94 Configuring Query Launcher
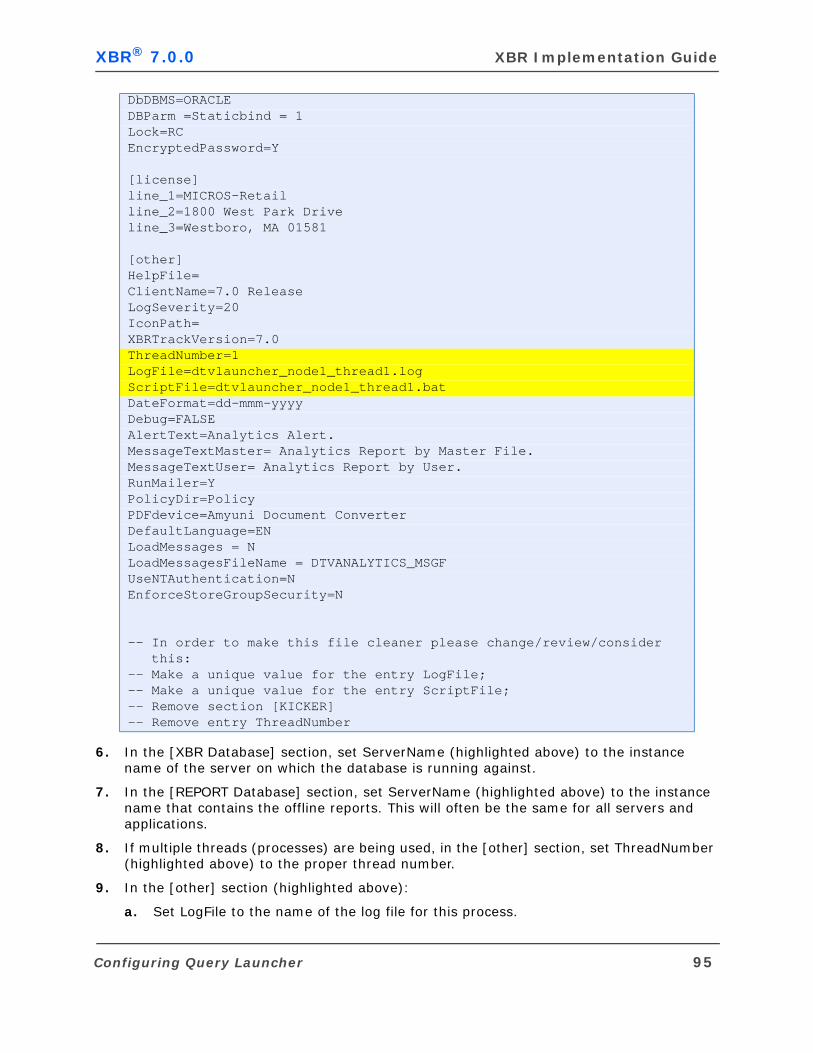
XBR® 7.0.0 XBR Implementation Guide
6. In the [XBR Database] section, set ServerName (highlighted above) to the instance name of the server on which the database is running against.
7. In the [REPORT Database] section, set ServerName (highlighted above) to the instance name that contains the offline reports. This will often be the same for all servers and applications.
8. If multiple threads (processes) are being used, in the [other] section, set ThreadNumber (highlighted above) to the proper thread number.
9. In the [other] section (highlighted above):
a. Set LogFile to the name of the log file for this process.
DbDBMS=ORACLEDBParm =Staticbind = 1 Lock=RCEncryptedPassword=Y
[license]line_1=MICROS-Retailline_2=1800 West Park Driveline_3=Westboro, MA 01581
[other]HelpFile=ClientName=7.0 ReleaseLogSeverity=20IconPath=XBRTrackVersion=7.0ThreadNumber=1LogFile=dtvlauncher_node1_thread1.logScriptFile=dtvlauncher_node1_thread1.batDateFormat=dd-mmm-yyyyDebug=FALSEAlertText=Analytics Alert.MessageTextMaster= Analytics Report by Master File.MessageTextUser= Analytics Report by User.RunMailer=YPolicyDir=PolicyPDFdevice=Amyuni Document ConverterDefaultLanguage=ENLoadMessages = NLoadMessagesFileName = DTVANALYTICS_MSGFUseNTAuthentication=NEnforceStoreGroupSecurity=N
-- In order to make this file cleaner please change/review/consider this:-- Make a unique value for the entry LogFile;-- Make a unique value for the entry ScriptFile;-- Remove section [KICKER]-- Remove entry ThreadNumber
Configuring Query Launcher 95
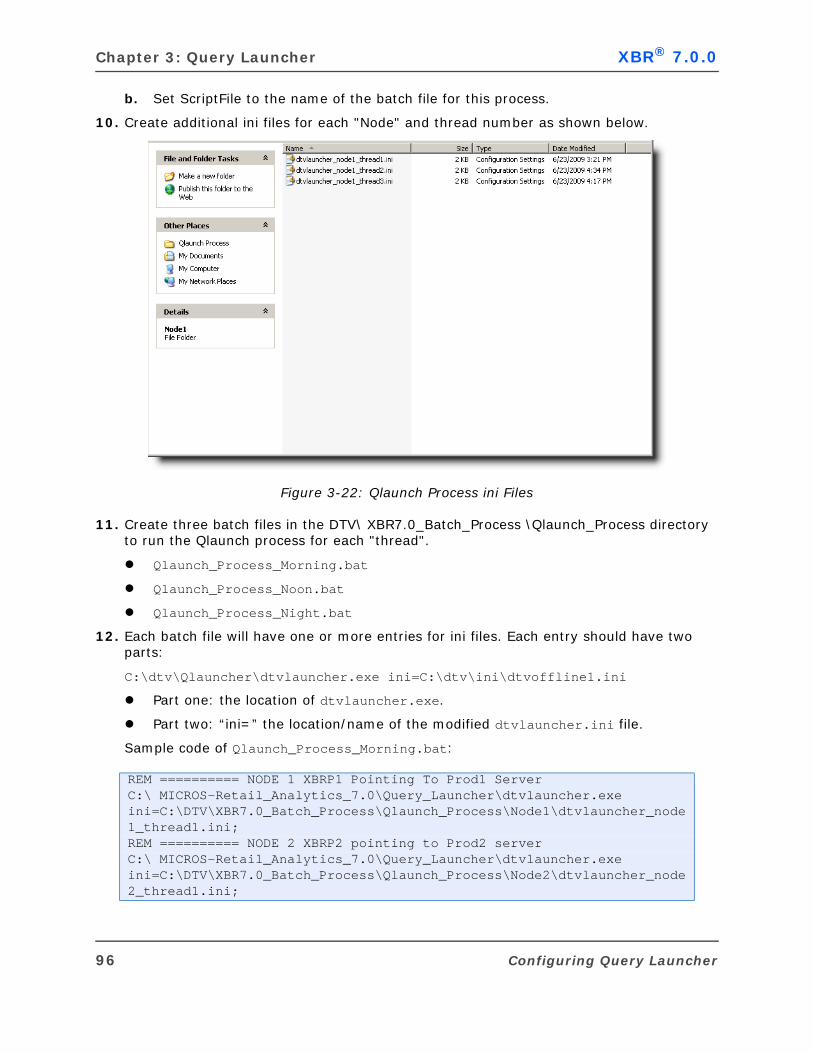
Chapter 3: Query Launcher XBR® 7.0.0
b. Set ScriptFile to the name of the batch file for this process.
10. Create additional ini files for each "Node" and thread number as shown below.
Figure 3-22: Qlaunch Process ini Files
11. Create three batch files in the DTV\ XBR7.0_Batch_Process \Qlaunch_Process directory to run the Qlaunch process for each "thread".
Qlaunch_Process_Morning.bat
Qlaunch_Process_Noon.bat
Qlaunch_Process_Night.bat
12. Each batch file will have one or more entries for ini files. Each entry should have two parts:
C:\dtv\Qlauncher\dtvlauncher.exe ini=C:\dtv\ini\dtvoffline1.ini
Part one: the location of dtvlauncher.exe.
Part two: “ini=” the location/name of the modified dtvlauncher.ini file.
Sample code of Qlaunch_Process_Morning.bat:
REM ========== NODE 1 XBRP1 Pointing To Prod1 ServerC:\ MICROS-Retail_Analytics_7.0\Query_Launcher\dtvlauncher.exe ini=C:\DTV\XBR7.0_Batch_Process\Qlaunch_Process\Node1\dtvlauncher_node1_thread1.ini;REM ========== NODE 2 XBRP2 pointing to Prod2 serverC:\ MICROS-Retail_Analytics_7.0\Query_Launcher\dtvlauncher.exe ini=C:\DTV\XBR7.0_Batch_Process\Qlaunch_Process\Node2\dtvlauncher_node2_thread1.ini;
96 Configuring Query Launcher

XBR® 7.0.0 XBR Implementation Guide
When you are finished, your file structure should look similar to the following:
Figure 3-23: Qlaunch_Process File Structure
Configuring Query Launcher 97
Chapter 3: Query Launcher XBR® 7.0.0
TROUBLESHOOTING THE QUERY LAUNCHER INSTALLATION
If Query Launcher is not performing in the manner expected, there may be a simple fix for the issue. Use the following troubleshooting methods to make simple checks or corrections of the installation.
Problem Can't export to PDF format
Solution During installation, a print driver that converts exported reports to Adobe PDF format should be installed in XBR. This print driver, Amyuni PDF Converter, may not have been installed correctly. First check to make sure the driver was installed:
1. From the Start menu on the task bar, select Settings, then Printers and Faxes.
2. Make sure that Amyuni PDF Converter is in the list of printers.
If it is not there, re-install the driver:
1. Open the directory \MICROS-Retail_Analytics_7.0\PDF in a window.
2. In the directory, run INSTALL.EXE program. It may require an administrator to run it so that it can be installed successfully.
Problem Can't connect to the database
Solution Make sure the appropriate database connection information is entered in the dtvlauncher.ini file for the Query Launcher. This product uses the same database connection information as XBR so, it should not need to be adjusted. However the UserID and DatabasePassword parameters must be entered in dtvlauncher.ini for the Query Launcher.
Problem: Reports are not being produced
Solution: Step 1: Were the reports scheduled to run for that day?
Look in the QSC_RUNS table to see which reports were scheduled for the day. Check the run_number, thread_number, and frequency from this table.
The frequency field indicates how often the report runs. Valid values for the frequency field are:
D Daily
W Weekly. The field run_day determines the day of the week on which the report runs.
M Monthly. The field run_day determines the day the month on which the report runs.
S Specify Dates. Query QSC_RUN_DATES where the run_number = the run_number from QSC_RUNS.
98 Troubleshooting the Query Launcher Installation
XBR® 7.0.0 XBR Implementation Guide
Step 2: If the reports were scheduled, what thread were they assigned to? Was there a Query Launcher instance set up to process this thread?
Look in the dtvlauncher.ini file for the ThreadNumber. Make sure a separate instance of the Query Launcher is set up to process each thread. If a separate instance wasn't set up, then copy the program to another directory and modify the INI file to process the thread. Then modify the WIN AT scheduler to schedule this new instance to run regularly.
Step 3: Were there users assigned to the query?
Look in the QSC_RUN_USERS table for the run_number to see who was assigned to receive output from the query, in the userid field.
If the field user_or_group = G, query the ADM_USER_PROFILE table where group_name = userid from the QSC_RUN_USERS table. Make sure the users who were supposed to receive the report are either assigned in the QSC_RUN_USERS table or are part of the group that is assigned to the query. If the users aren't assigned to the query, then they can be added using the front-end of XBR.
Step 4: Did the query produce any output?
Look in the qlaunch.log file in the Query Launcher directory. If there were no rows to print for the query, that will be indicated in the log file.
Step 5: Was the output suppressed?
Typically, a report is suppressed when users want to receive alerts only, but no attachments. To see if the report was suppressed:
1. Run XBR.
2. From the Administration menu, select Scheduler, then Schedule Queries.
3. Expand the tree for the report.
4. See if the report is suppressed for the query by double-clicking the query to open the Run Maintenance window.
5. Click the Distribution tab and look in the Output Type box.
6. The report could be suppressed for the user or group. To see if it is, double-click the user or group to open the Run Properties window and look in the Output Type box.
Problem: Reports are not being produced (continued)
Troubleshooting the Query Launcher Installation 99
Chapter 3: Query Launcher XBR® 7.0.0
Problem Users are not receiving emails
Solution Step 1: Were the reports created?
In the Query Launcher INI file (the default is dtvlauncher.ini), there is a variable named ScriptFile. This holds the name of the batch file that will be run by the mail program. Look at the file that was created, and if it has the date/time stamp close to the time it was scheduled to run, this verifies that the reports were created. If not, rerun the launcher program.
Additionally, look in the \reports subdirectory (or the directory specified in the output_dir column in the adm_sys_defaults table), where the generated reports are found. If there are reports with a date and time close to the time they were scheduled to be created, this verifies that they were created. If not, rerun the launcher program.
Step 2: Was the mailer scheduled to run?
In the Query Launcher INI file (default is dtvlauncher.ini), there is a variable named RunMailer.
If RunMailer is set to:
N, then the reports are not automatically mailed; the mailer must be scheduled separately. Users can set up queries and alerts to go to their beepers. If the mailer is scheduled to run later in the morning than the launcher, alerts are sent when the mailer runs. However, mission-critical alerts can be sent at the time they were created by setting the RunMailer option to Y.
Y, look in the directory from which the Query Launcher program is running. If there is a file named dead_letter.txt, open it. The program that actually mails the files writes to this file if it encounters an error. Usually this occurs when the program can't find the Gateway specified in the mail.ini file.
Step 3: Is the email address correct?
Use the front-end XBR application to verify the email addresses of users in their user profiles. If they are incorrect, correct them.
100 Troubleshooting the Query Launcher Installation
XBR® 7.0.0 XBR Implementation Guide
Problem Thread wasn't scheduled or needs to be rerun
Solution Schedule the instance of the Query Launcher to run through the WIN AT Scheduler if it isn't already scheduled.
To rerun a scheduled run, edit the rerun.bat file in the Query Launcher directory. (If there isn't a rerun.bat file there, create it following the examples below.) Use this file to pass parameters into the Query Launcher program. Valid parameters are:
ini=
rundate=
To pass both parameters, separate them by a semicolon (;).
The following sample rerun.bat line runs the Query Launcher for December 13, 2008, and passes the qlaunch2.ini to the program. The line constitutes the entire content of the rerun.bat file:
dtvlauncher.exe ini=qlaunch2.ini;rundate=12/13/2008
The ini= parameter is not required to use the default INI file (dtvlauncher.ini). To use the default INI, the contents of the rerun.bat file are:
dtvlauncher.exe rundate=12/13/2008
Regardless of whether this file is run manually or scheduled to run, the output will be produced for the date specified regardless of the actual date. For example: if today is Friday, 12/19/2008, and the example above is run, it will produce output for all of the reports that were scheduled to run on 12/13/2008 and all that are scheduled to run Daily, and on Fridays. The date ranges reflect the rundate (for example, Last Week would be 12/1/2008 - 12/07/2008 instead of 12/8/2008 - 12/14/2008).
Troubleshooting the Query Launcher Installation 101

C H A P T E R
XBR Web Server Application
Chapter 4: XBR Web Server Application XBR® 7.0.0
OVERVIEW
This chapter describes installing the default deployment configuration of the web server which includes the XBR Web Application embedded in the Liferay Portal Server (v3.1.0) hosted on the Apache Tomcat Web Server (v5.0.28).
About This ChapterThis chapter contains the following sections:
To set up the Java Developer’s Kit (JDK) Path variable and install the web server: see “Installation” on page 106.
See “Installation” on page 107 for information and procedures on using the InstallShield process to install the Web application.
To configure Liferay and the web server default port: see “Configuration” on page 147.
To configure and set up overrides for the main configuration file, dvreport-config.xml: see “XBR Web Application” on page 164.
To configure the portal-ext.properties file: see “Liferay Portal Server” on page 217
To enable the XBR Web Application to run on a secured web site: see “XBR Web Application on a Secured Web Site” on page 231.
For instructions on starting and shutting down the XBR Web Server and Starting the Web Client: see “Testing the Installation” on page 249.
To upgrade the XBR Web Application Server from a previous version: see “Upgrade” on page 250
Considerations for setting up internet access for the web application: see “Multi-Tenant Configuration” on page 244
AudienceThis chapter is intended for anyone responsible for installing or upgrading to the XBR Web Application Server.
PrerequisitesThis chapter assumes the following:
The installation's application database (including Liferay tables) and instances of XBR Desktop Client have already been upgraded to version 6.8 or greater.
A suitable hardware platform running a Windows operating system is available for web-application hosting.
Users exist for desktop application.
The latest service packs are installed for the versions of Microsoft Windows and Microsoft SQL Server being used.
Oracle: Oracle client is installed on the application server running the Web application and configured for connection to the database.
104 Overview
XBR® 7.0.0 XBR Implementation Guide
Process FlowThis section presents the process flow that should be followed when installing the XBR Desktop application using InstallShield.
1. Perform the InstallShield installation (“Installation” on page 107) process.
2. Add or edit the Path Environment Variable (“Java Developer Kit (JDK) 1.6.x Path Variable” on page 140).
3. [OPTIONAL] If desired, change the configuration settings on the Tomcat Web Application Server (“Configuration” on page 147).
4. [OPTIONAL] If desired, change configuration settings on the XBR Web Application (“XBR Web Application” on page 164).
5. [OPTIONAL] If desired, change configuration settings on the Liferay Portal Server (“Liferay Portal Server” on page 217).
6. If necessary, set up the Web Application to run on a secured web site (“XBR Web Application on a Secured Web Site” on page 231).
Overview 105
Chapter 4: XBR Web Server Application XBR® 7.0.0
INSTALLATION
Pre-Requisites/Requirements
Hardware RequirementsPerformance
This varies depending on the number of users and the typical size of the reports being processed. From experience with other customers, a Dual 2+ GHz cpu with 4+ GB Ram should be more than sufficient to handle around 250 users. If the box is powerful enough, it makes sense to deploy the web server on the same box as the Scheduler service used by the desktop application to handle scheduled reports. The web server has been tested on Windows 2003/2008 Server operating system.
Storage Space
The background report generation feature has been designed to have the option of caching reports in either the file system or a specified database datasource. If the file system option is selected, then sufficient space to hold the generated reports must be mounted on the server, either as a drive or a network file share. The network file share should be used if they are going to use multiple web servers in a cluster. If the database option is selected, then the same disk space needs to be available to the database instance that is being used to hold the reports. A safe starting point would be at least 10 GB per 50 users with the ability to grow as needed. Outside of the report storage consideration, the base web server needs only about 200 MB of free disk space at installation time.
Software RequirementsServer Side
JDK 1.6 must be installed on the server system. This is often pre-installed on many systems already, but can be downloaded from http://java.sun.com/javase/downloads/widget/jdk6.jsp. In the default deployment for v7.0, the Apache Tomcat Web server and Liferay Portal server are installed along with our software as an integrated bundle. No pre-installation of these is necessary. For Oracle deployments, the JDBC driver provided by Oracle is included and for MS SQL Server deployments, the open source jTDS driver is included so there is no need to separately pay for, or procure a JDBC driver for those two dbms types.
Client Side
MICROS-Retail officially supports the Internet Explorer web browser, version 8, running on the Windows XP or Windows 7 operating systems. Other web browser/operating system combinations that support javascript, cookies, and applets may work, but have not been tested. The web client uses java applets and will assert the use of JRE 1.6. While it is recommended that this be pre-installed, it is not necessary as the user should get prompted to download and install the correct version the first time they use the application. Java 6 (or other versions) can be installed at the same time, as other applications and applets may require that.
106 Installation
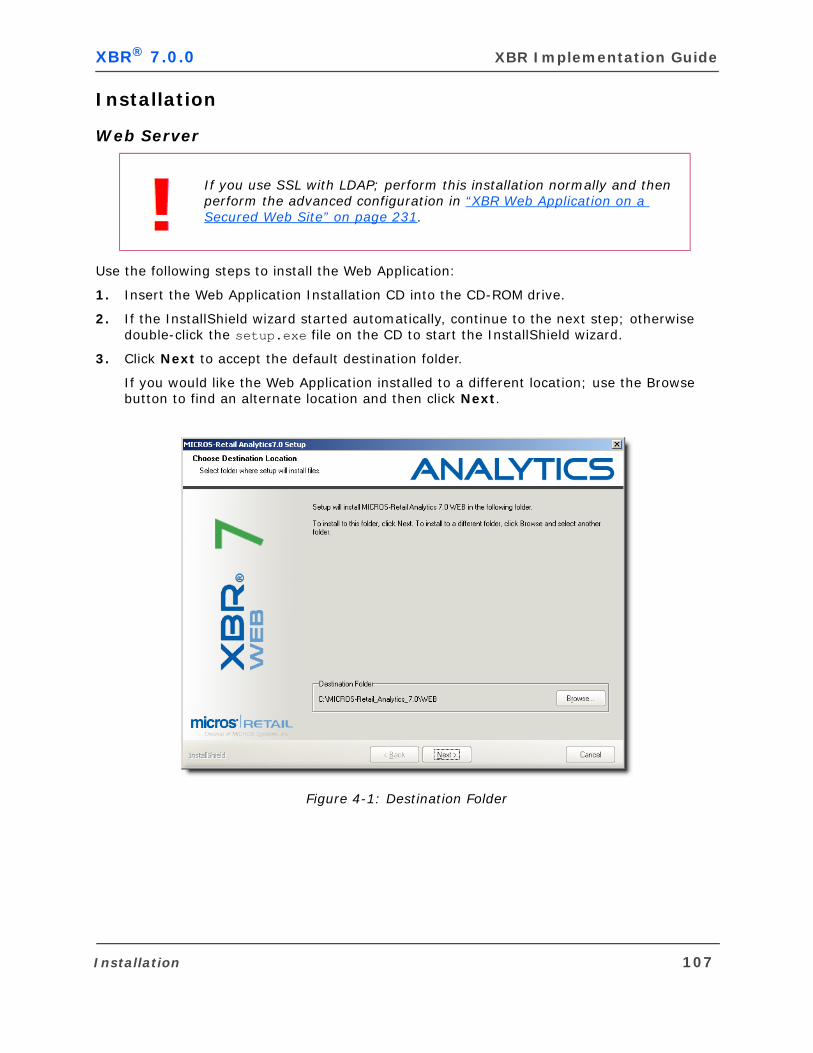
XBR® 7.0.0 XBR Implementation Guide
Installation
Web Server
Use the following steps to install the Web Application:
1. Insert the Web Application Installation CD into the CD-ROM drive.
2. If the InstallShield wizard started automatically, continue to the next step; otherwise double-click the setup.exe file on the CD to start the InstallShield wizard.
3. Click Next to accept the default destination folder.
If you would like the Web Application installed to a different location; use the Browse button to find an alternate location and then click Next.
Figure 4-1: Destination Folder
If you use SSL with LDAP; perform this installation normally and then perform the advanced configuration in “XBR Web Application on a Secured Web Site” on page 231.
Installation 107
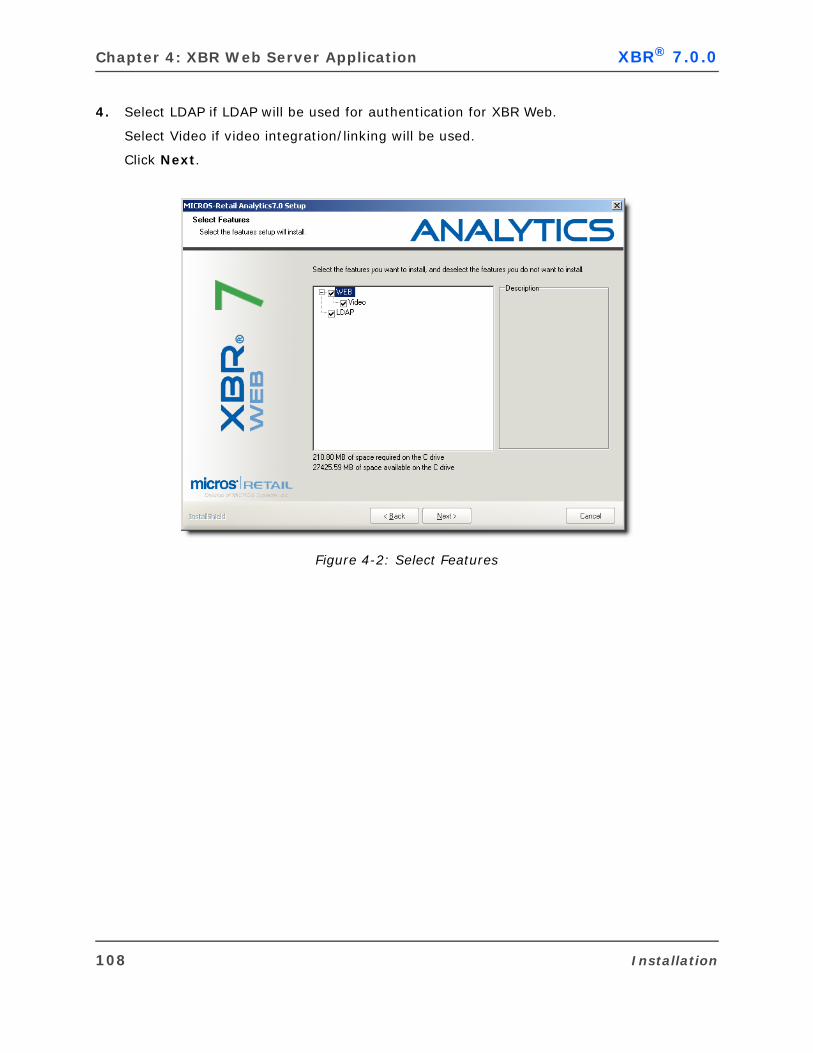
Chapter 4: XBR Web Server Application XBR® 7.0.0
4. Select LDAP if LDAP will be used for authentication for XBR Web.
Select Video if video integration/linking will be used.
Click Next.
Figure 4-2: Select Features
108 Installation
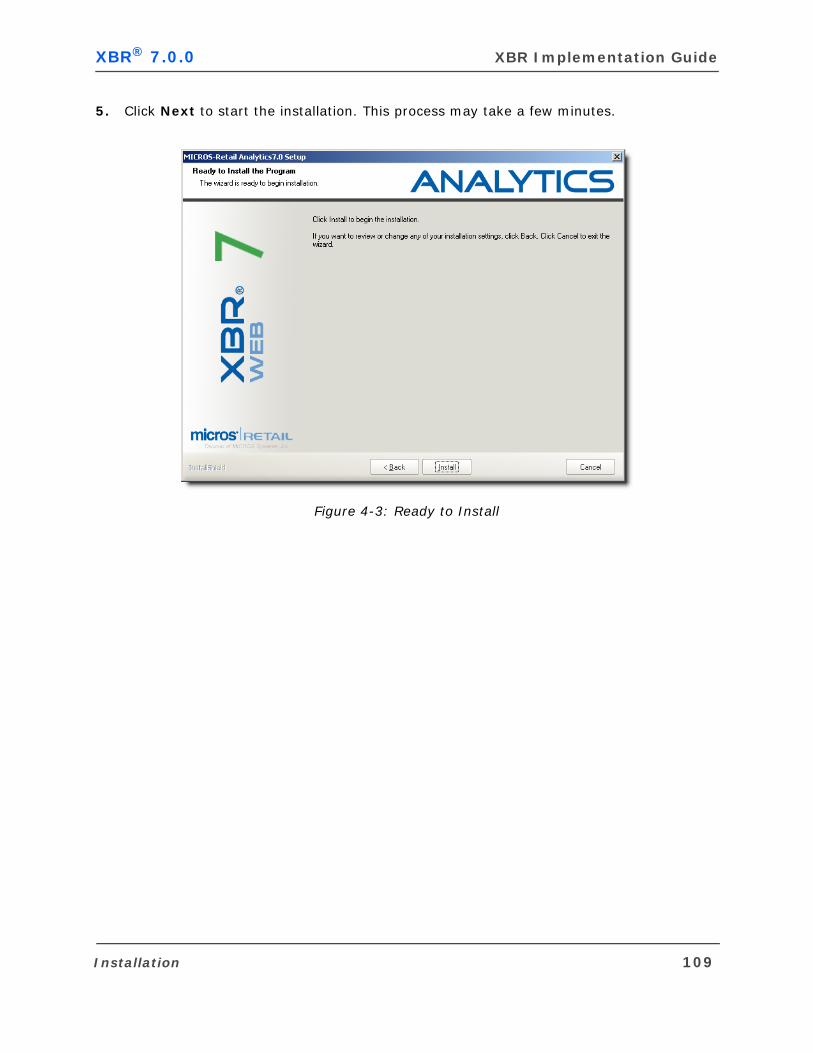
XBR® 7.0.0 XBR Implementation Guide
5. Click Next to start the installation. This process may take a few minutes.
Figure 4-3: Ready to Install
Installation 109
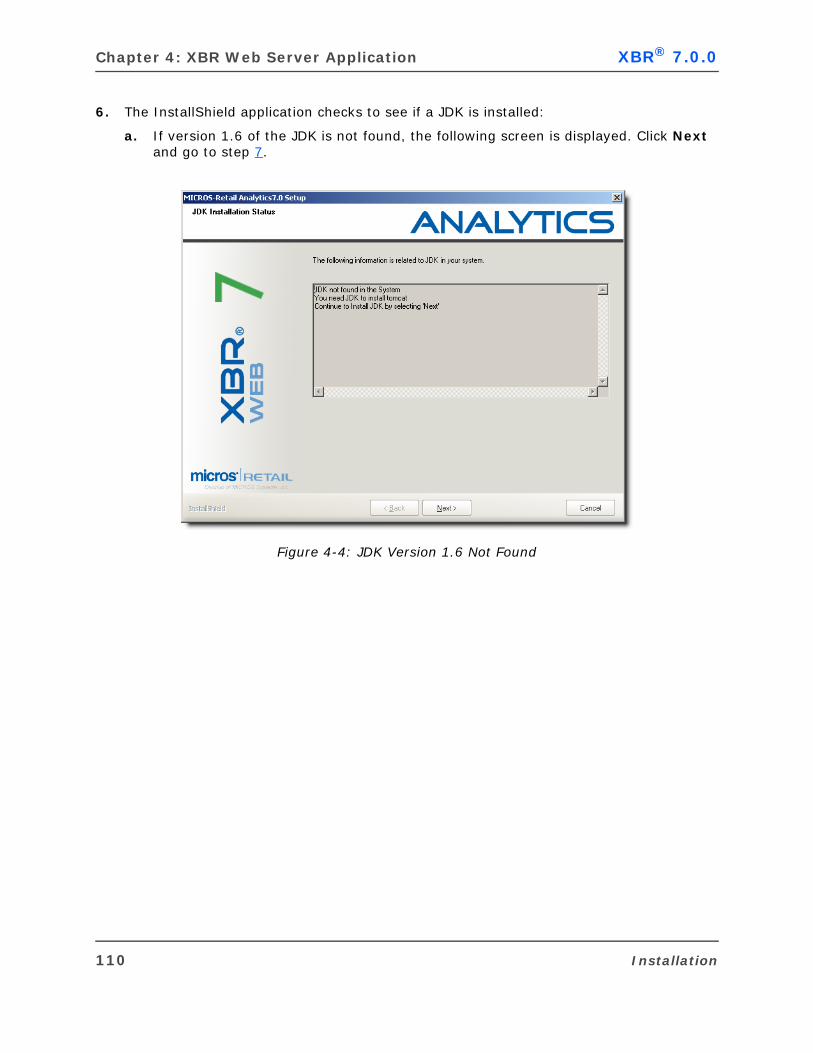
Chapter 4: XBR Web Server Application XBR® 7.0.0
6. The InstallShield application checks to see if a JDK is installed:
a. If version 1.6 of the JDK is not found, the following screen is displayed. Click Next and go to step 7.
Figure 4-4: JDK Version 1.6 Not Found
110 Installation
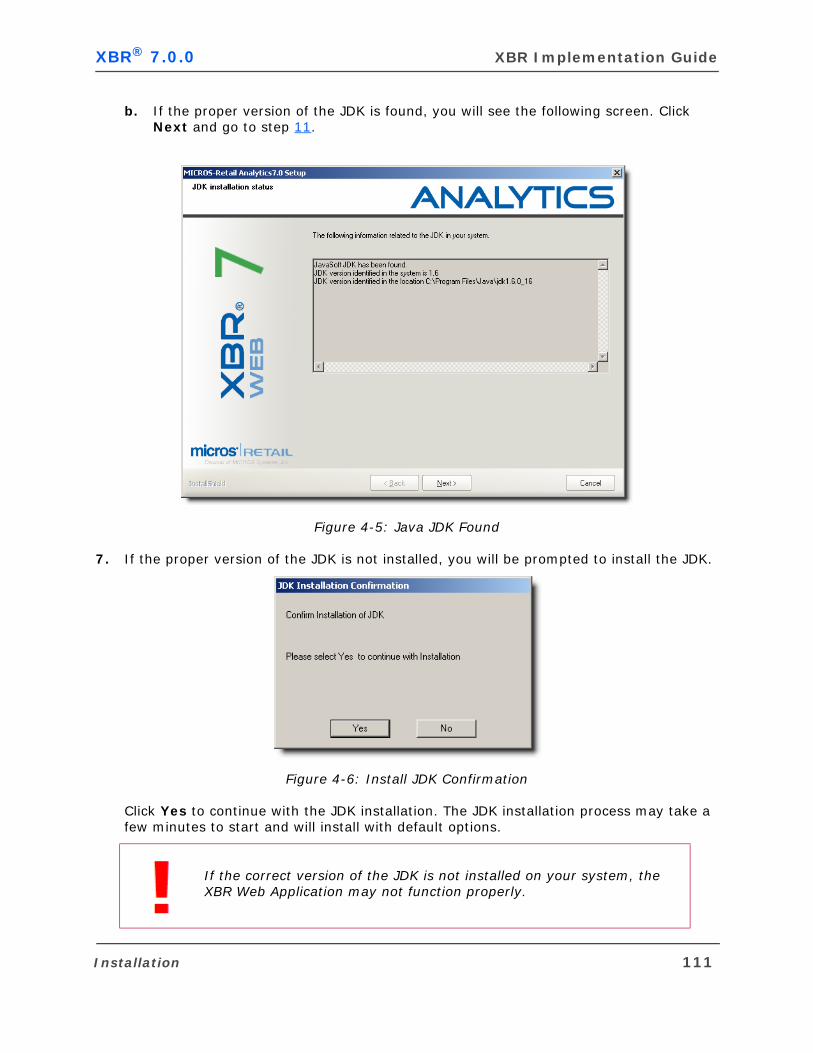
XBR® 7.0.0 XBR Implementation Guide
b. If the proper version of the JDK is found, you will see the following screen. Click Next and go to step 11.
Figure 4-5: Java JDK Found
7. If the proper version of the JDK is not installed, you will be prompted to install the JDK.
Figure 4-6: Install JDK Confirmation
Click Yes to continue with the JDK installation. The JDK installation process may take a few minutes to start and will install with default options.
If the correct version of the JDK is not installed on your system, the XBR Web Application may not function properly.
Installation 111
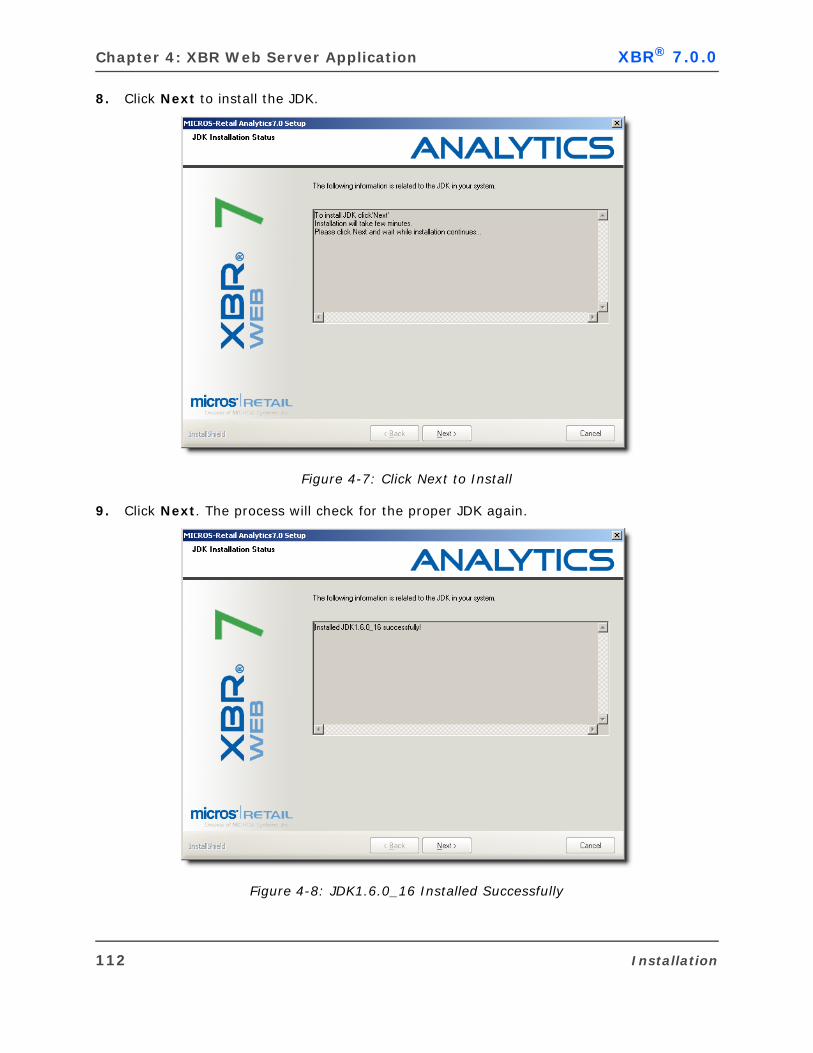
Chapter 4: XBR Web Server Application XBR® 7.0.0
8. Click Next to install the JDK.
Figure 4-7: Click Next to Install
9. Click Next. The process will check for the proper JDK again.
Figure 4-8: JDK1.6.0_16 Installed Successfully
112 Installation
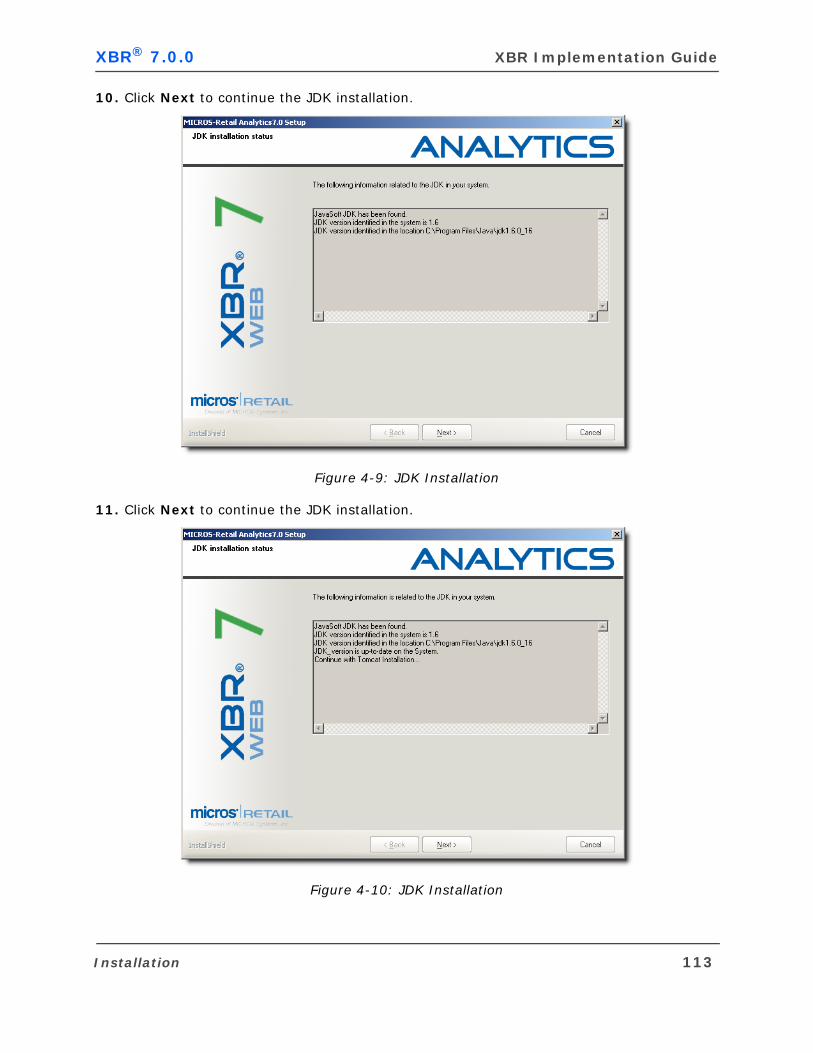
XBR® 7.0.0 XBR Implementation Guide
10. Click Next to continue the JDK installation.
Figure 4-9: JDK Installation
11. Click Next to continue the JDK installation.
Figure 4-10: JDK Installation
Installation 113
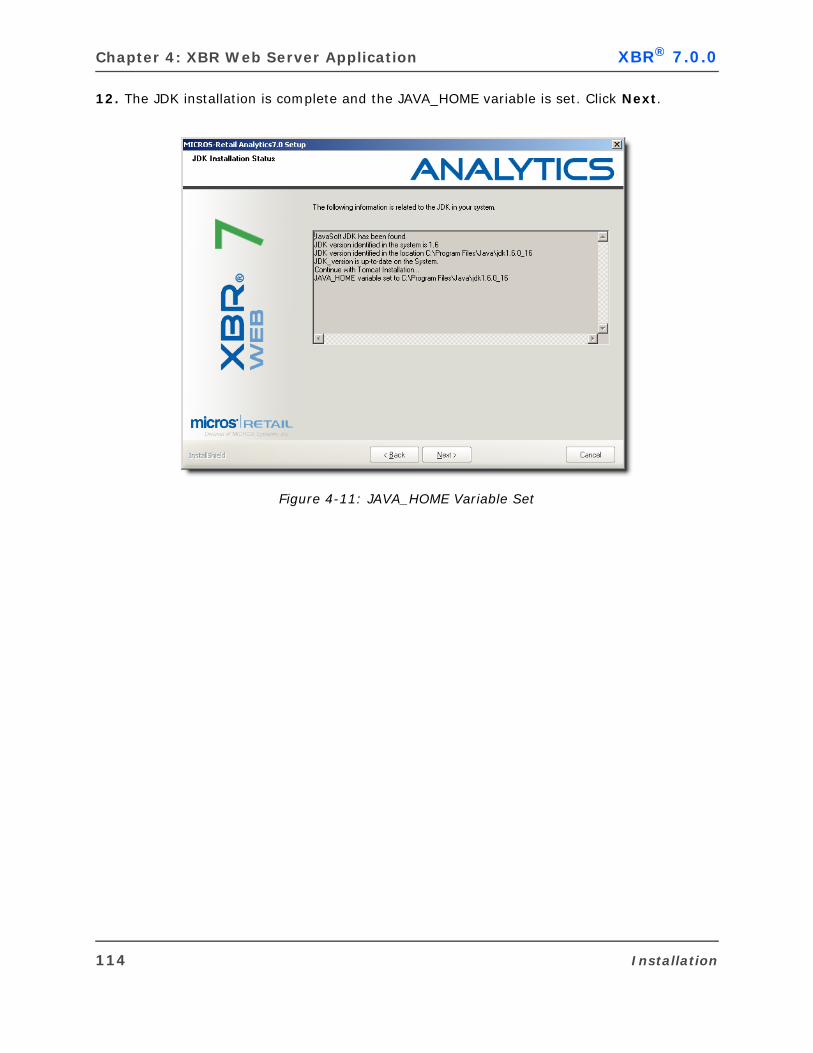
Chapter 4: XBR Web Server Application XBR® 7.0.0
12. The JDK installation is complete and the JAVA_HOME variable is set. Click Next.
Figure 4-11: JAVA_HOME Variable Set
114 Installation
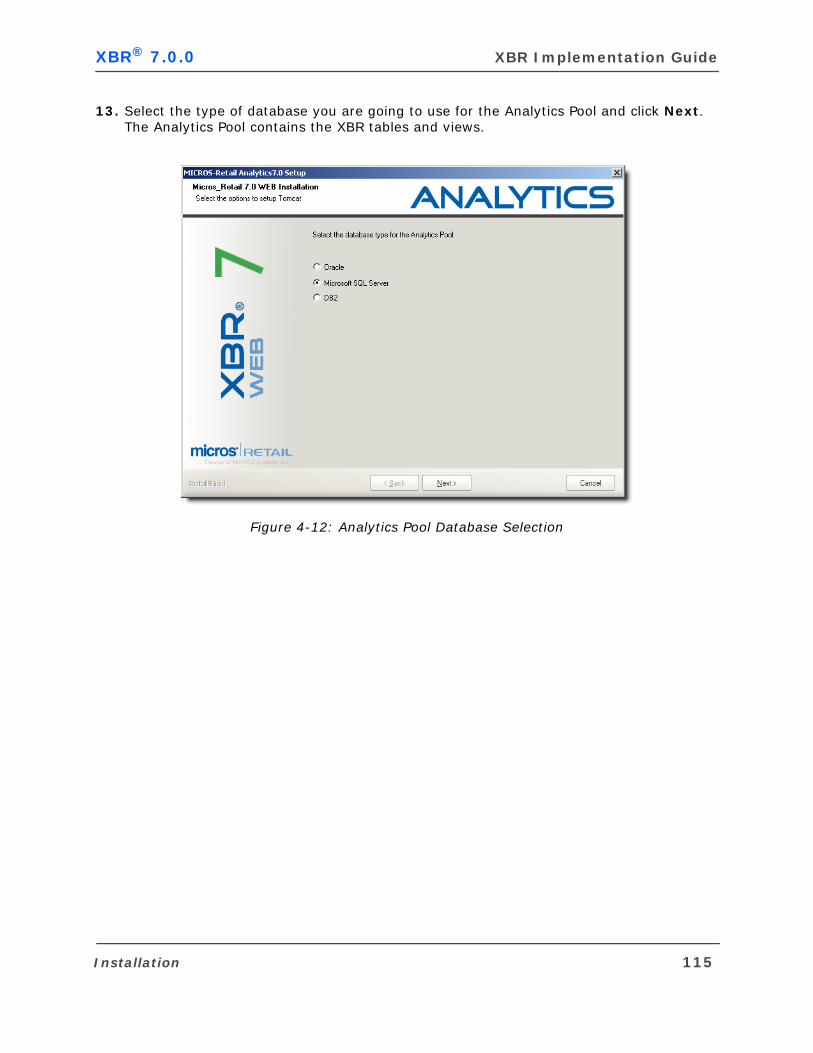
XBR® 7.0.0 XBR Implementation Guide
13. Select the type of database you are going to use for the Analytics Pool and click Next. The Analytics Pool contains the XBR tables and views.
Figure 4-12: Analytics Pool Database Selection
Installation 115
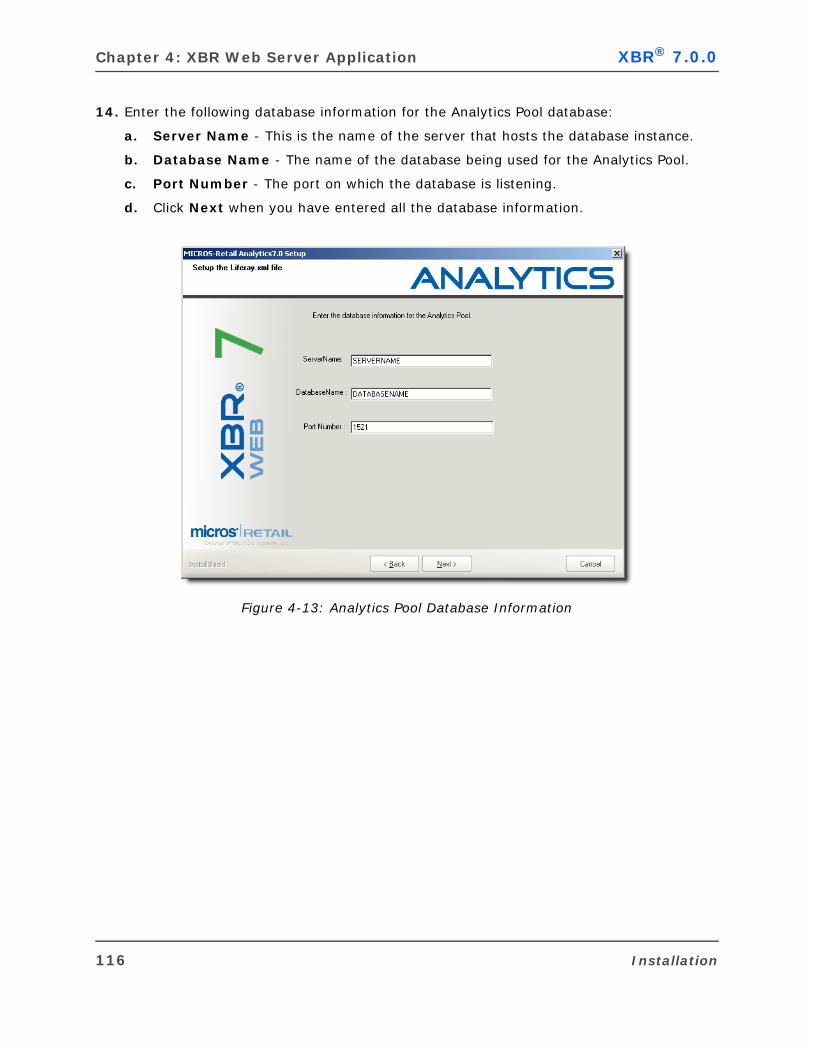
Chapter 4: XBR Web Server Application XBR® 7.0.0
14. Enter the following database information for the Analytics Pool database:
a. Server Name - This is the name of the server that hosts the database instance.
b. Database Name - The name of the database being used for the Analytics Pool.
c. Port Number - The port on which the database is listening.
d. Click Next when you have entered all the database information.
Figure 4-13: Analytics Pool Database Information
116 Installation
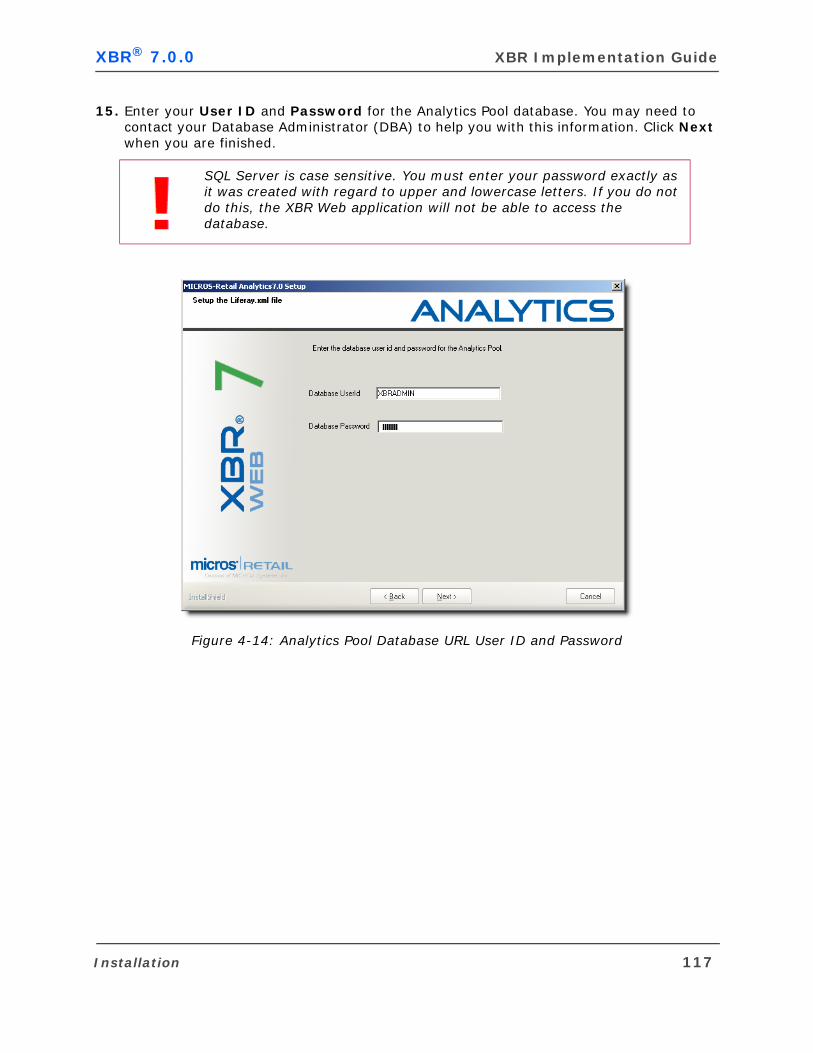
XBR® 7.0.0 XBR Implementation Guide
15. Enter your User ID and Password for the Analytics Pool database. You may need to contact your Database Administrator (DBA) to help you with this information. Click Next when you are finished.
Figure 4-14: Analytics Pool Database URL User ID and Password
SQL Server is case sensitive. You must enter your password exactly as it was created with regard to upper and lowercase letters. If you do not do this, the XBR Web application will not be able to access the database.
Installation 117

Chapter 4: XBR Web Server Application XBR® 7.0.0
16. Select Yes if you want to use the same User Name and Password for the remaining pools (Liferay and Offline Reports) or select No if you want to use different User Names and Passwords. Click Next to continue.
Figure 4-15: Same User Name and Password for Other Pools
118 Installation
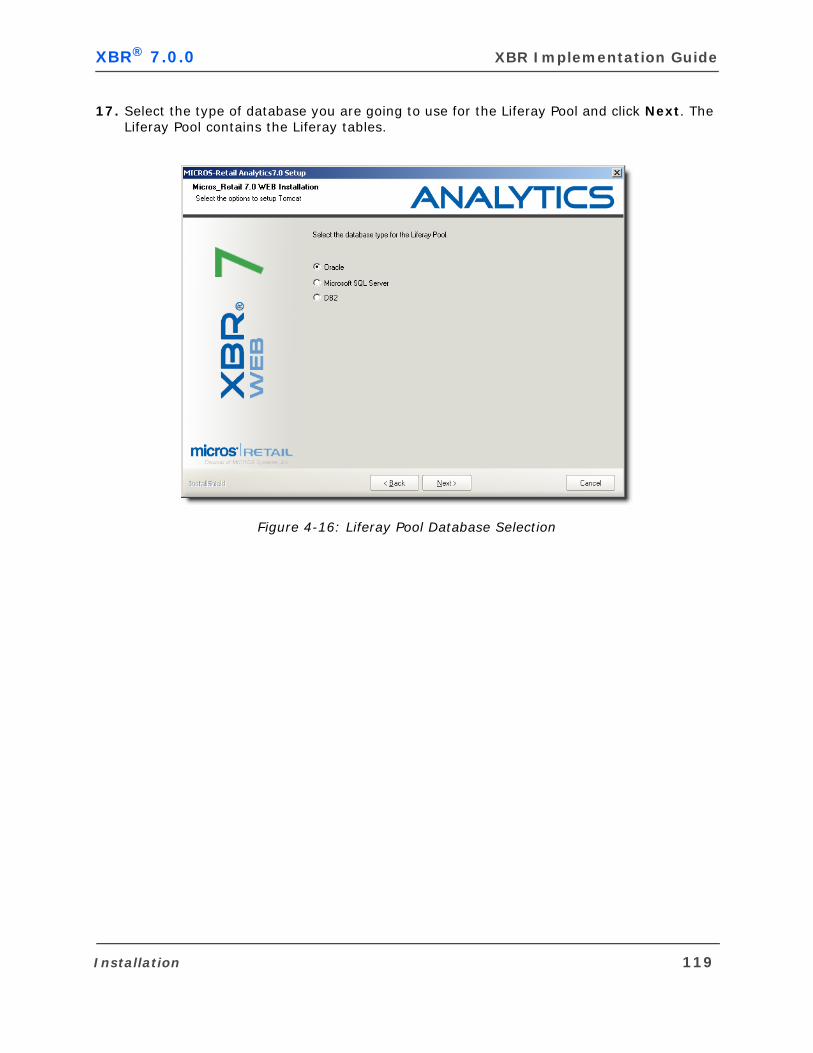
XBR® 7.0.0 XBR Implementation Guide
17. Select the type of database you are going to use for the Liferay Pool and click Next. The Liferay Pool contains the Liferay tables.
Figure 4-16: Liferay Pool Database Selection
Installation 119

Chapter 4: XBR Web Server Application XBR® 7.0.0
18. Enter the following database information for the Liferay Pool database:
a. Server Name - This is the name of the server that hosts the database instance.
b. Database Name - The name of the database being used for the Liferay Pool.
c. Port Number - The port on which the database is listening.
d. Click Next when you have entered all the database information.
Figure 4-17: Liferay Pool Database Information
120 Installation
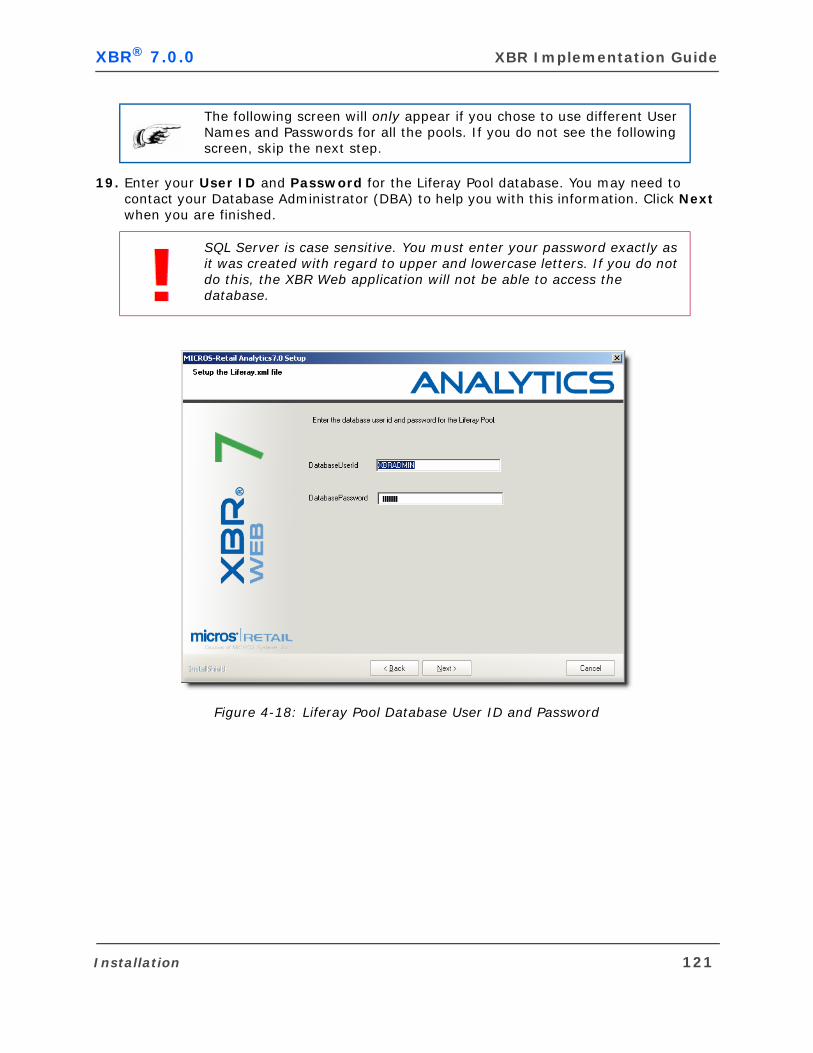
XBR® 7.0.0 XBR Implementation Guide
19. Enter your User ID and Password for the Liferay Pool database. You may need to contact your Database Administrator (DBA) to help you with this information. Click Next when you are finished.
Figure 4-18: Liferay Pool Database User ID and Password
The following screen will only appear if you chose to use different User Names and Passwords for all the pools. If you do not see the following screen, skip the next step.
SQL Server is case sensitive. You must enter your password exactly as it was created with regard to upper and lowercase letters. If you do not do this, the XBR Web application will not be able to access the database.
Installation 121
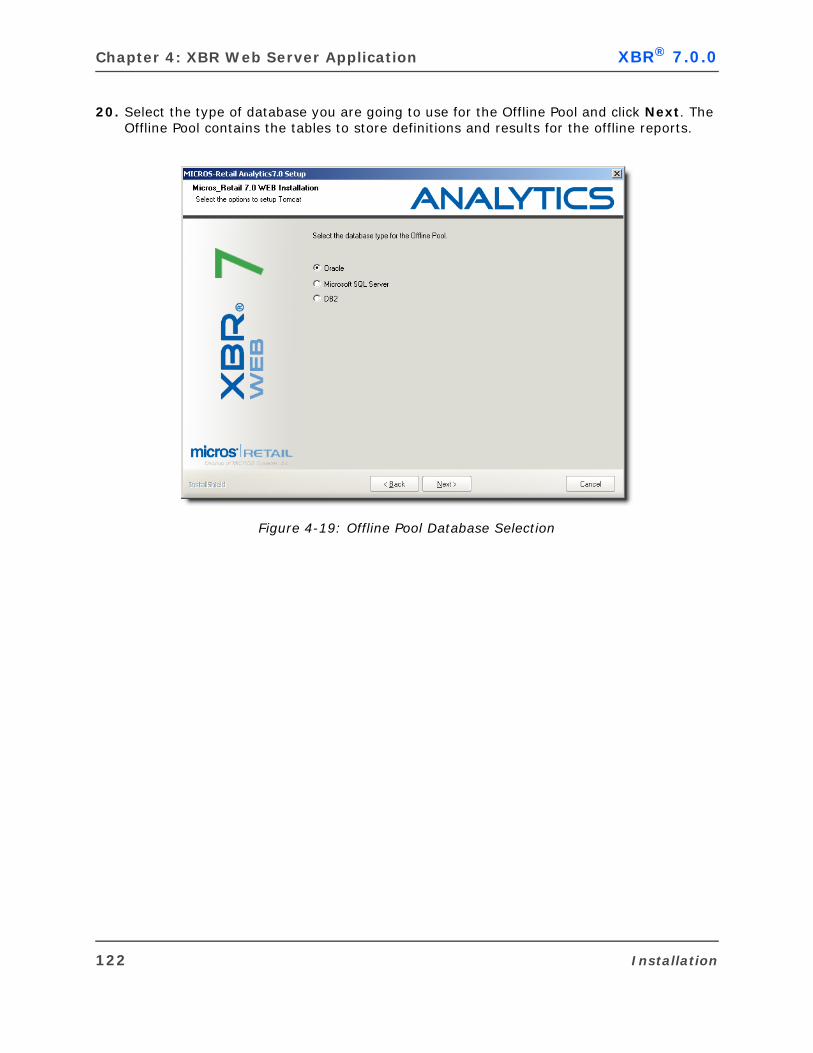
Chapter 4: XBR Web Server Application XBR® 7.0.0
20. Select the type of database you are going to use for the Offline Pool and click Next. The Offline Pool contains the tables to store definitions and results for the offline reports.
Figure 4-19: Offline Pool Database Selection
122 Installation
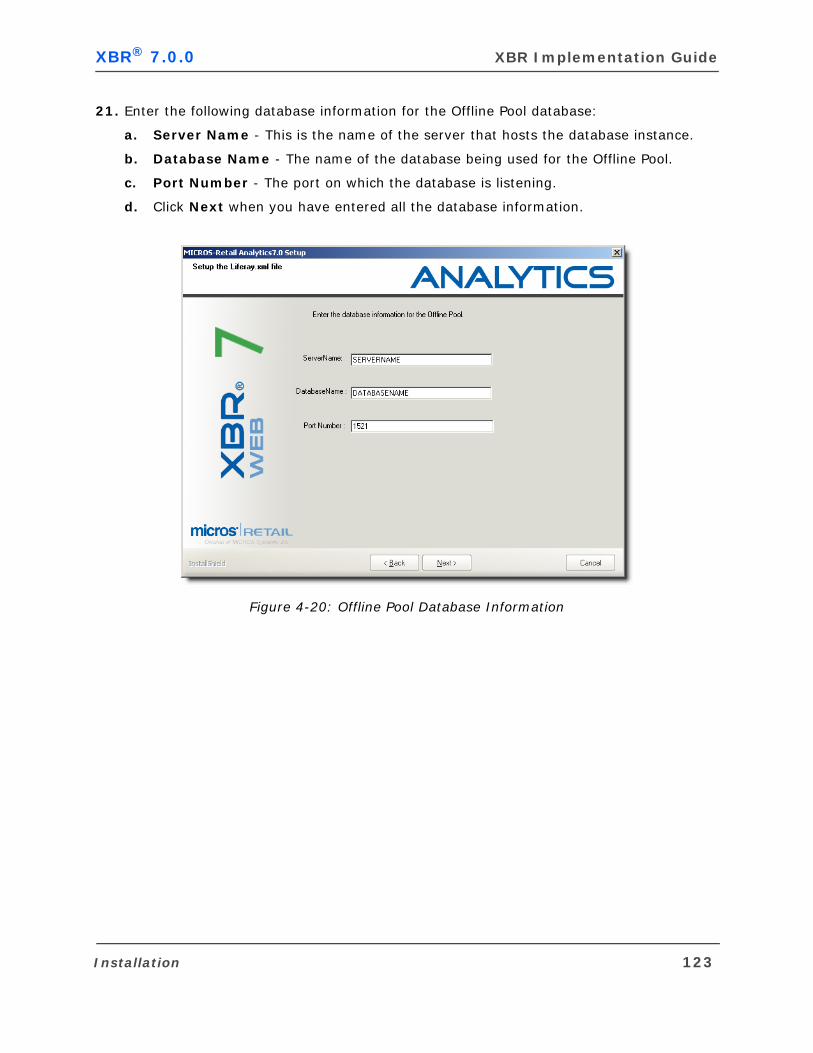
XBR® 7.0.0 XBR Implementation Guide
21. Enter the following database information for the Offline Pool database:
a. Server Name - This is the name of the server that hosts the database instance.
b. Database Name - The name of the database being used for the Offline Pool.
c. Port Number - The port on which the database is listening.
d. Click Next when you have entered all the database information.
Figure 4-20: Offline Pool Database Information
Installation 123
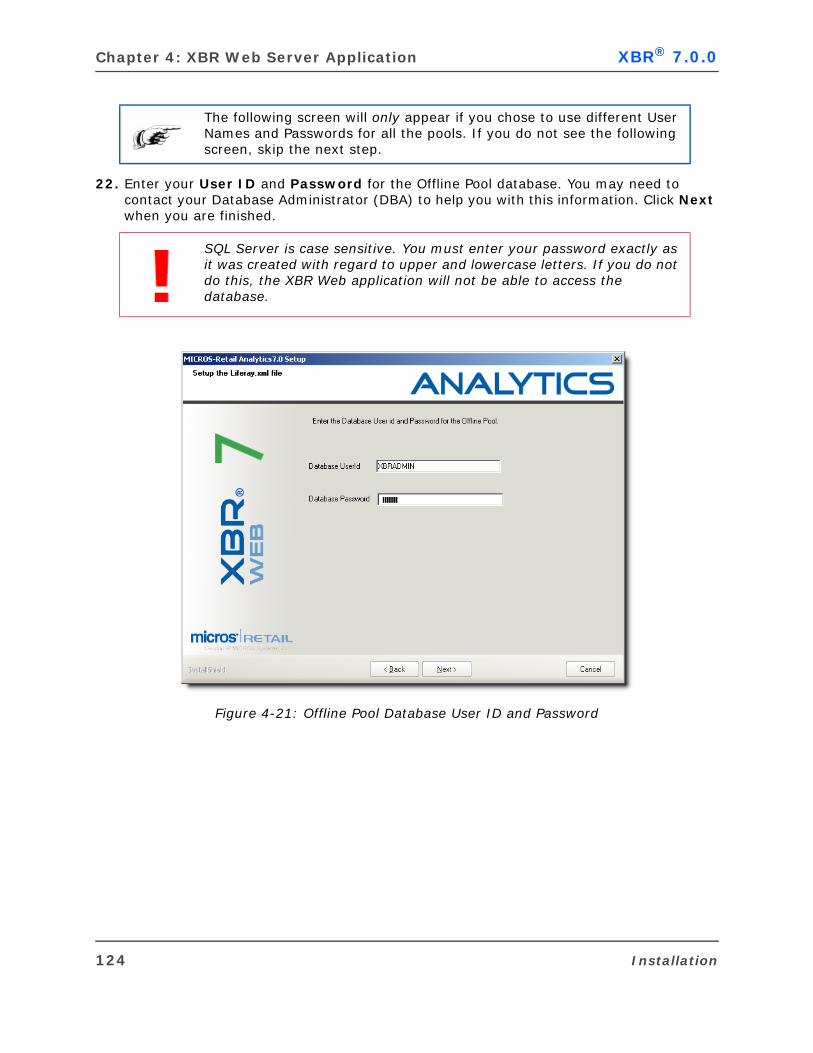
Chapter 4: XBR Web Server Application XBR® 7.0.0
22. Enter your User ID and Password for the Offline Pool database. You may need to contact your Database Administrator (DBA) to help you with this information. Click Next when you are finished.
Figure 4-21: Offline Pool Database User ID and Password
The following screen will only appear if you chose to use different User Names and Passwords for all the pools. If you do not see the following screen, skip the next step.
SQL Server is case sensitive. You must enter your password exactly as it was created with regard to upper and lowercase letters. If you do not do this, the XBR Web application will not be able to access the database.
124 Installation
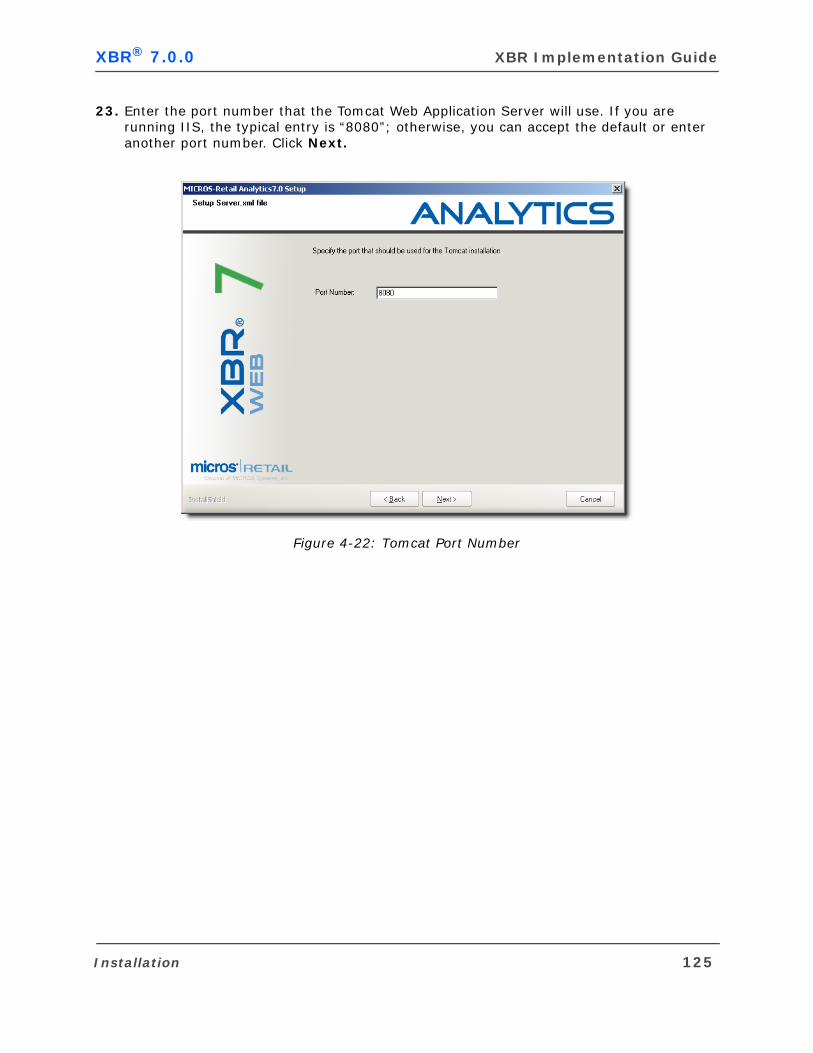
XBR® 7.0.0 XBR Implementation Guide
23. Enter the port number that the Tomcat Web Application Server will use. If you are running IIS, the typical entry is “8080”; otherwise, you can accept the default or enter another port number. Click Next.
Figure 4-22: Tomcat Port Number
Installation 125
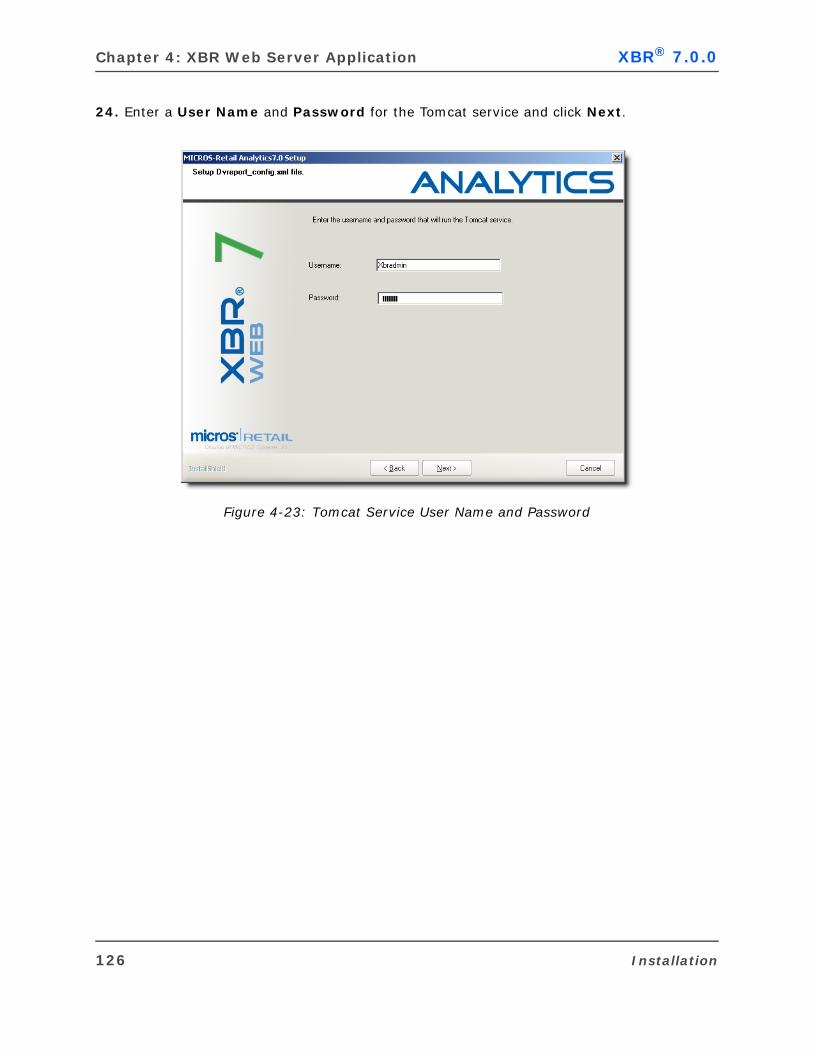
Chapter 4: XBR Web Server Application XBR® 7.0.0
24. Enter a User Name and Password for the Tomcat service and click Next.
Figure 4-23: Tomcat Service User Name and Password
126 Installation
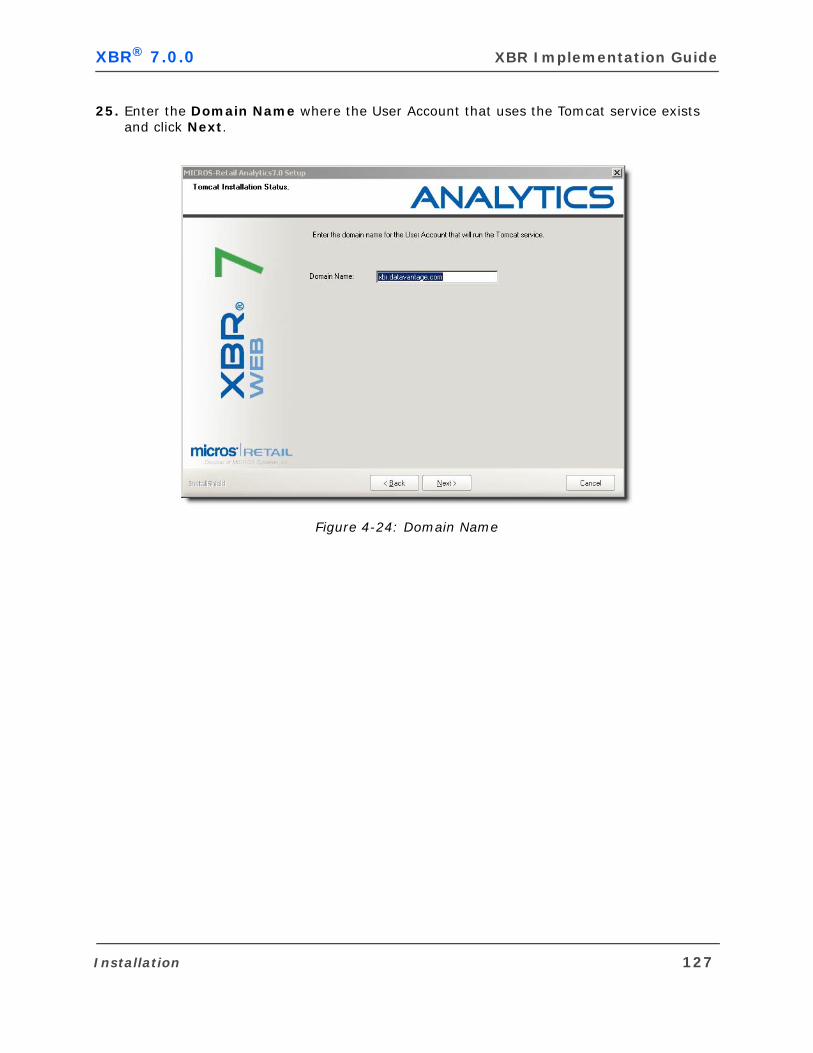
XBR® 7.0.0 XBR Implementation Guide
25. Enter the Domain Name where the User Account that uses the Tomcat service exists and click Next.
Figure 4-24: Domain Name
Installation 127

Chapter 4: XBR Web Server Application XBR® 7.0.0
26. Enter the Mail Server Name and click Next.
Figure 4-25: Mail Server Name
128 Installation
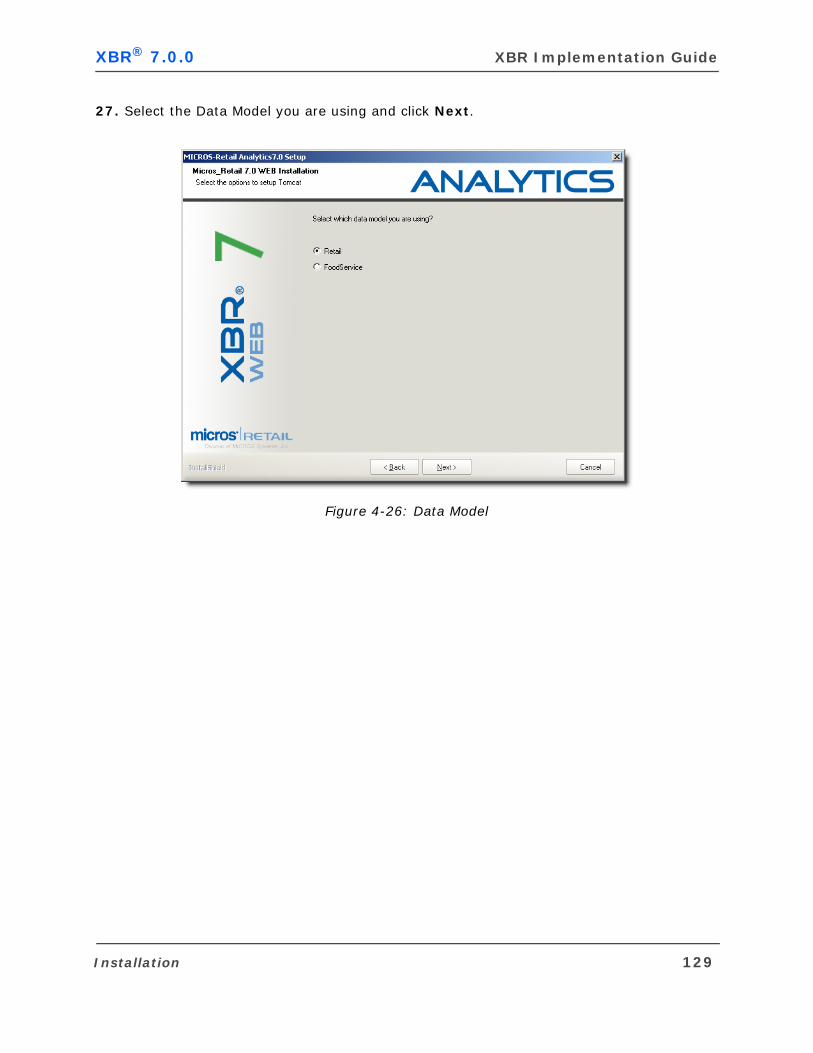
XBR® 7.0.0 XBR Implementation Guide
27. Select the Data Model you are using and click Next.
Figure 4-26: Data Model
Installation 129
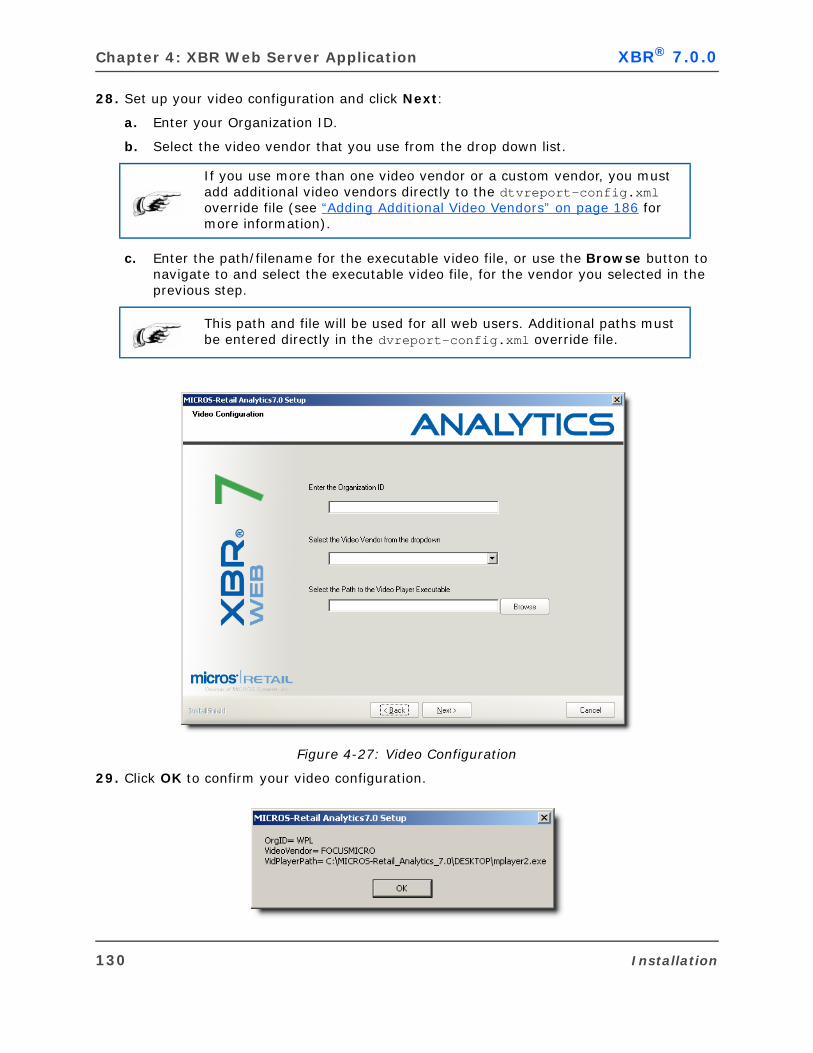
Chapter 4: XBR Web Server Application XBR® 7.0.0
28. Set up your video configuration and click Next:
a. Enter your Organization ID.
b. Select the video vendor that you use from the drop down list.
c. Enter the path/filename for the executable video file, or use the Browse button to navigate to and select the executable video file, for the vendor you selected in the previous step.
Figure 4-27: Video Configuration
29. Click OK to confirm your video configuration.
If you use more than one video vendor or a custom vendor, you must add additional video vendors directly to the dtvreport-config.xml override file (see “Adding Additional Video Vendors” on page 186 for more information).
This path and file will be used for all web users. Additional paths must be entered directly in the dvreport-config.xml override file.
130 Installation

XBR® 7.0.0 XBR Implementation Guide
30. The following screen will only be displayed if you are using SQL Server as your database. Enter the full name of the database server and click Next.
Figure 4-28: Database Server Name
Installation 131

Chapter 4: XBR Web Server Application XBR® 7.0.0
31. The following screen will only be displayed if you are using Oracle as your database. Enter the Oracle Net Service name from the TNS Names file and click Next.
Figure 4-29: Oracle Net Service Name
132 Installation
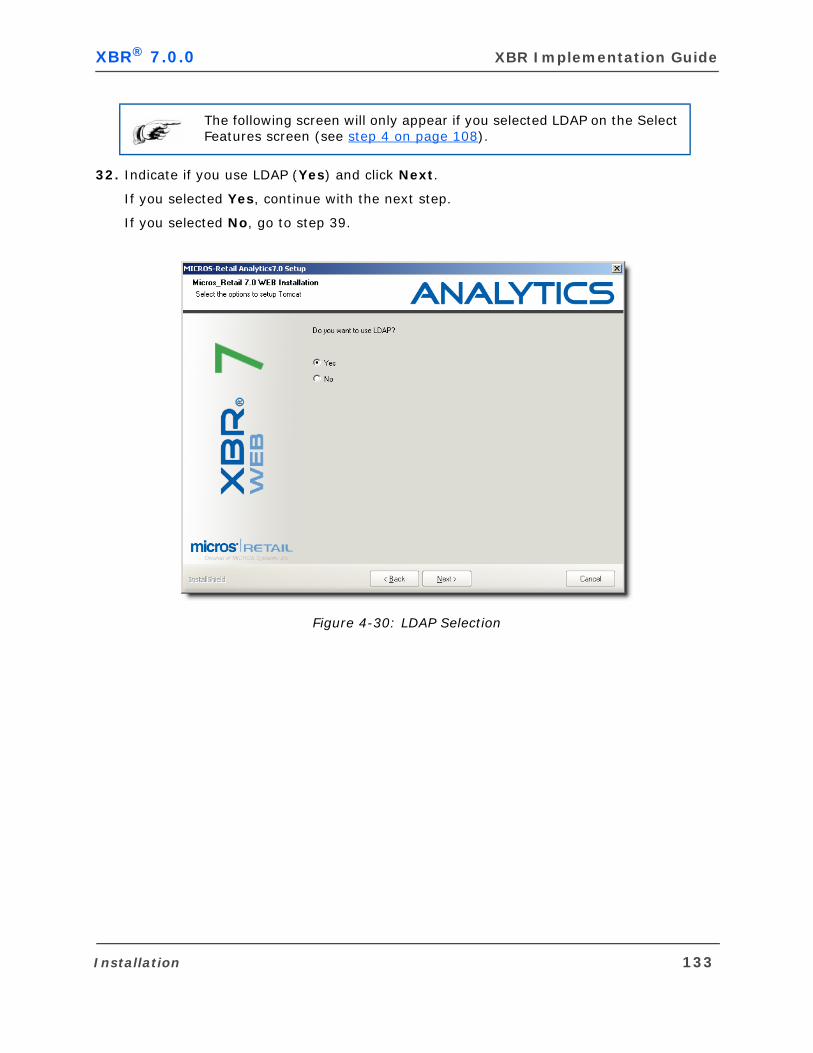
XBR® 7.0.0 XBR Implementation Guide
32. Indicate if you use LDAP (Yes) and click Next.
If you selected Yes, continue with the next step.
If you selected No, go to step 39.
Figure 4-30: LDAP Selection
The following screen will only appear if you selected LDAP on the Select Features screen (see step 4 on page 108).
Installation 133
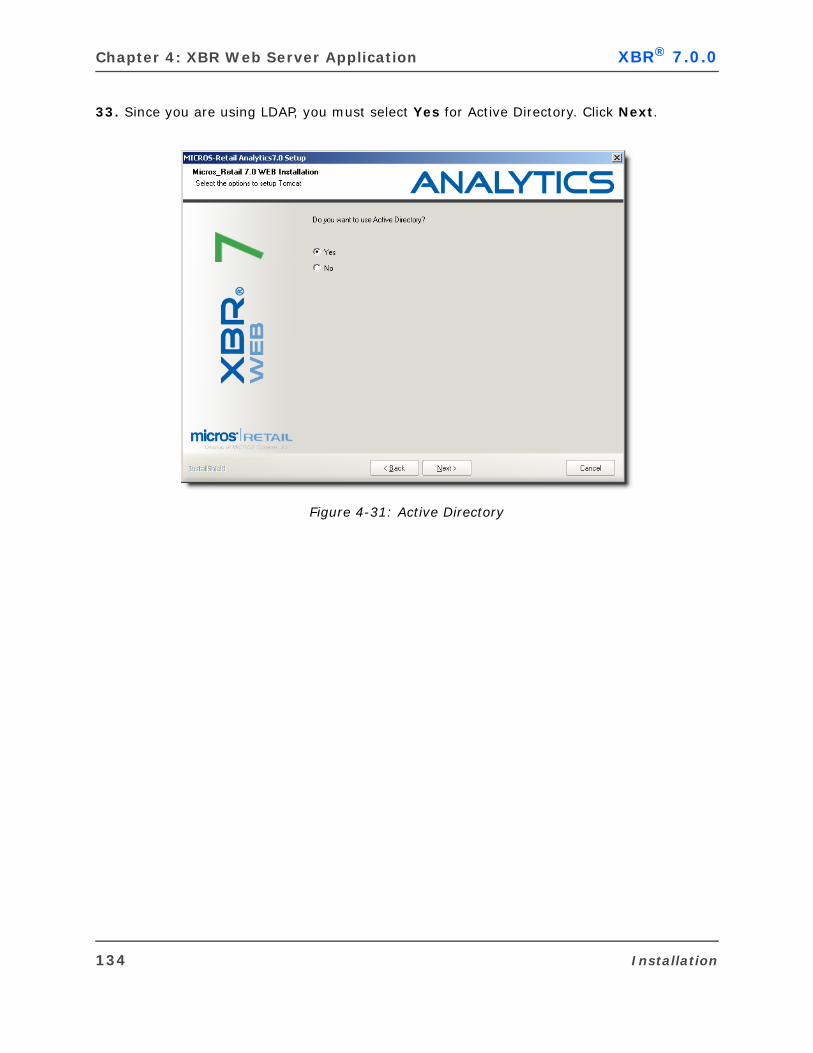
Chapter 4: XBR Web Server Application XBR® 7.0.0
33. Since you are using LDAP, you must select Yes for Active Directory. Click Next.
Figure 4-31: Active Directory
134 Installation
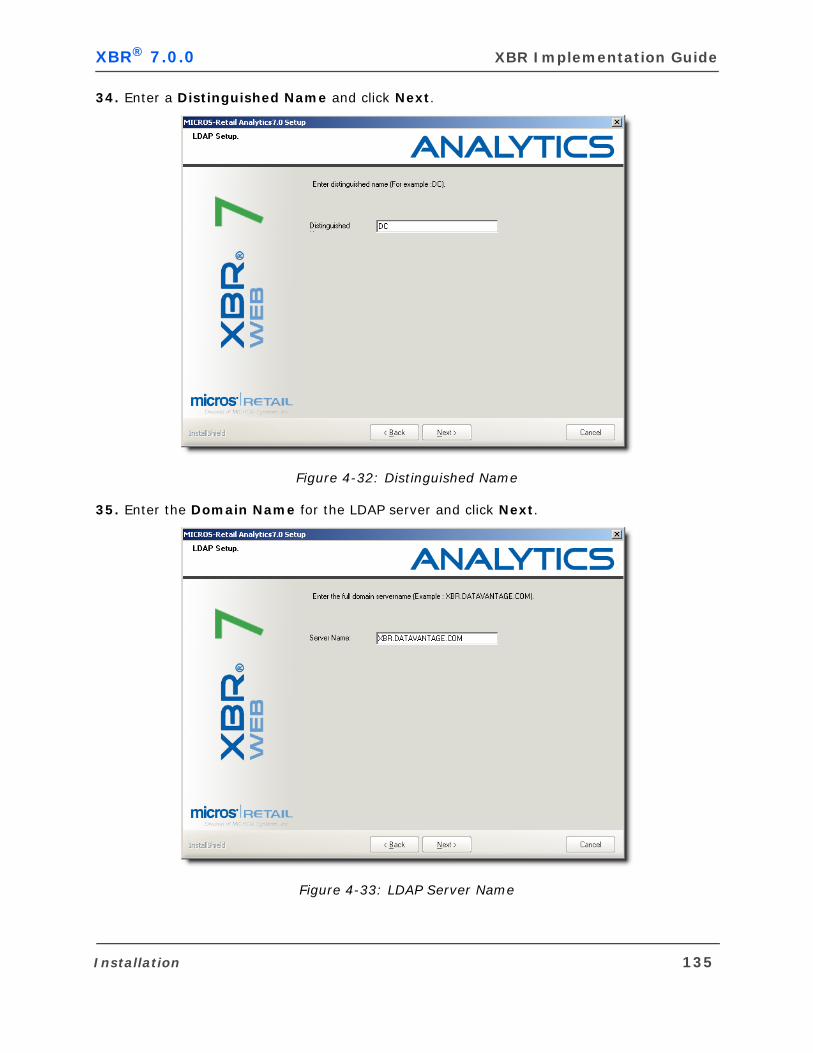
XBR® 7.0.0 XBR Implementation Guide
34. Enter a Distinguished Name and click Next.
Figure 4-32: Distinguished Name
35. Enter the Domain Name for the LDAP server and click Next.
Figure 4-33: LDAP Server Name
Installation 135

Chapter 4: XBR Web Server Application XBR® 7.0.0
36. Enter the Clear Port number that will be used to communicate with LDAP and click Next.
Figure 4-34: LDAP Clear Port Number
37. Enter the Administrative User ID and Password and click Next.
Figure 4-35: LDAP Admin User ID and Password
136 Installation
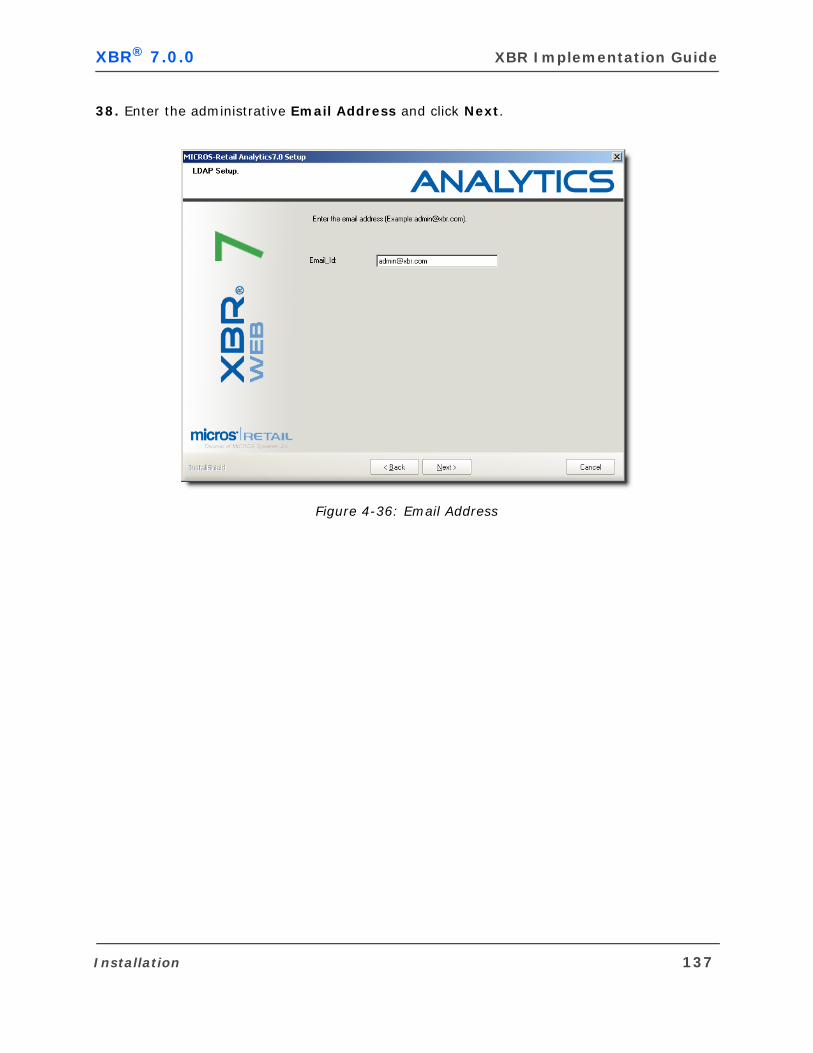
XBR® 7.0.0 XBR Implementation Guide
38. Enter the administrative Email Address and click Next.
Figure 4-36: Email Address
Installation 137
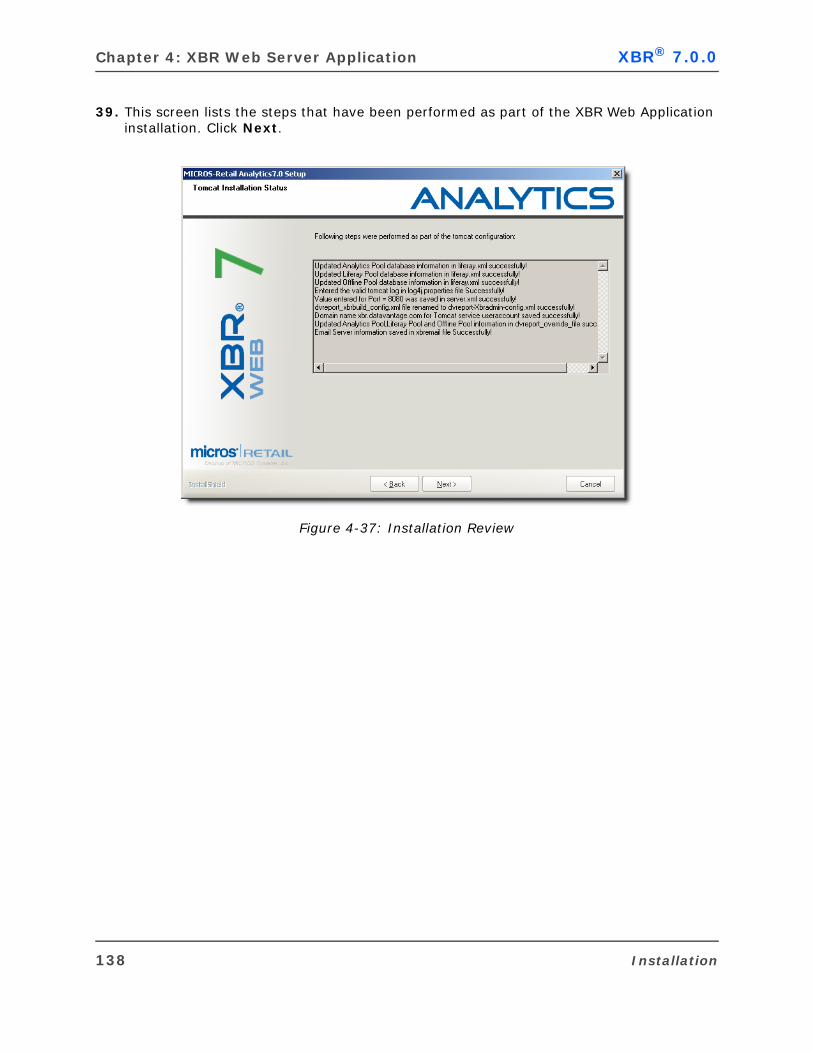
Chapter 4: XBR Web Server Application XBR® 7.0.0
39. This screen lists the steps that have been performed as part of the XBR Web Application installation. Click Next.
Figure 4-37: Installation Review
138 Installation
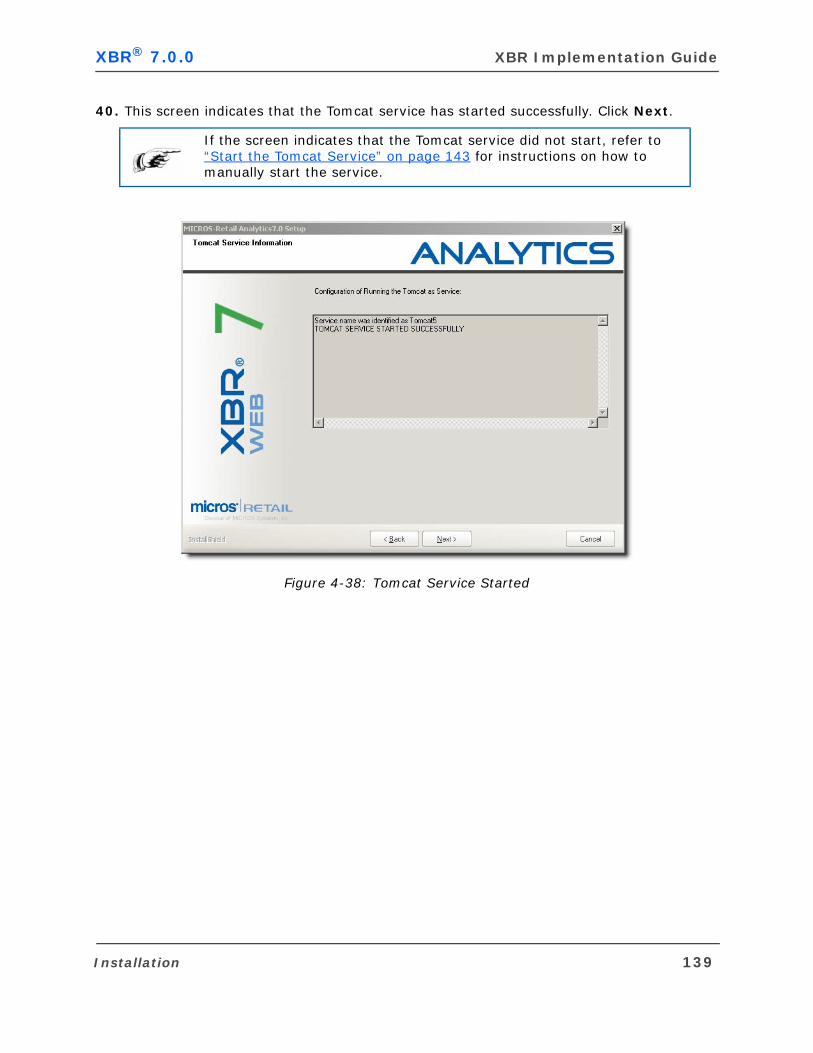
XBR® 7.0.0 XBR Implementation Guide
40. This screen indicates that the Tomcat service has started successfully. Click Next.
Figure 4-38: Tomcat Service Started
If the screen indicates that the Tomcat service did not start, refer to “Start the Tomcat Service” on page 143 for instructions on how to manually start the service.
Installation 139
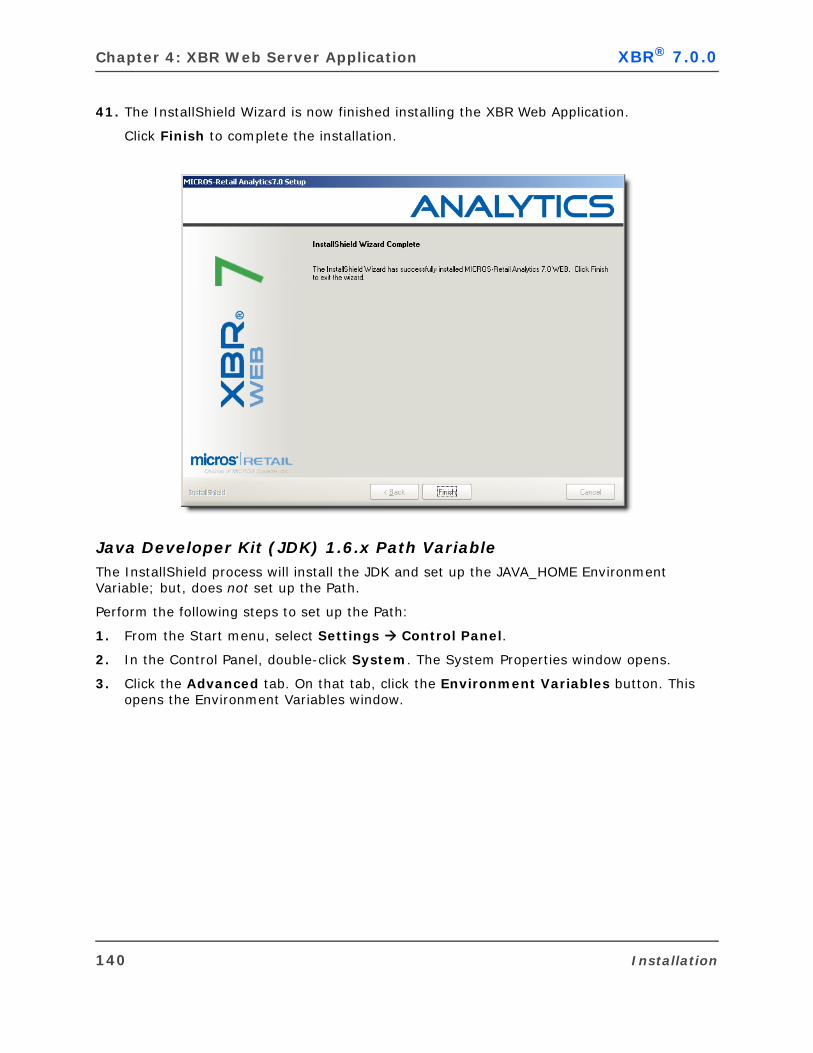
Chapter 4: XBR Web Server Application XBR® 7.0.0
41. The InstallShield Wizard is now finished installing the XBR Web Application.
Click Finish to complete the installation.
Java Developer Kit (JDK) 1.6.x Path VariableThe InstallShield process will install the JDK and set up the JAVA_HOME Environment Variable; but, does not set up the Path.
Perform the following steps to set up the Path:
1. From the Start menu, select Settings Control Panel.
2. In the Control Panel, double-click System. The System Properties window opens.
3. Click the Advanced tab. On that tab, click the Environment Variables button. This opens the Environment Variables window.
140 Installation
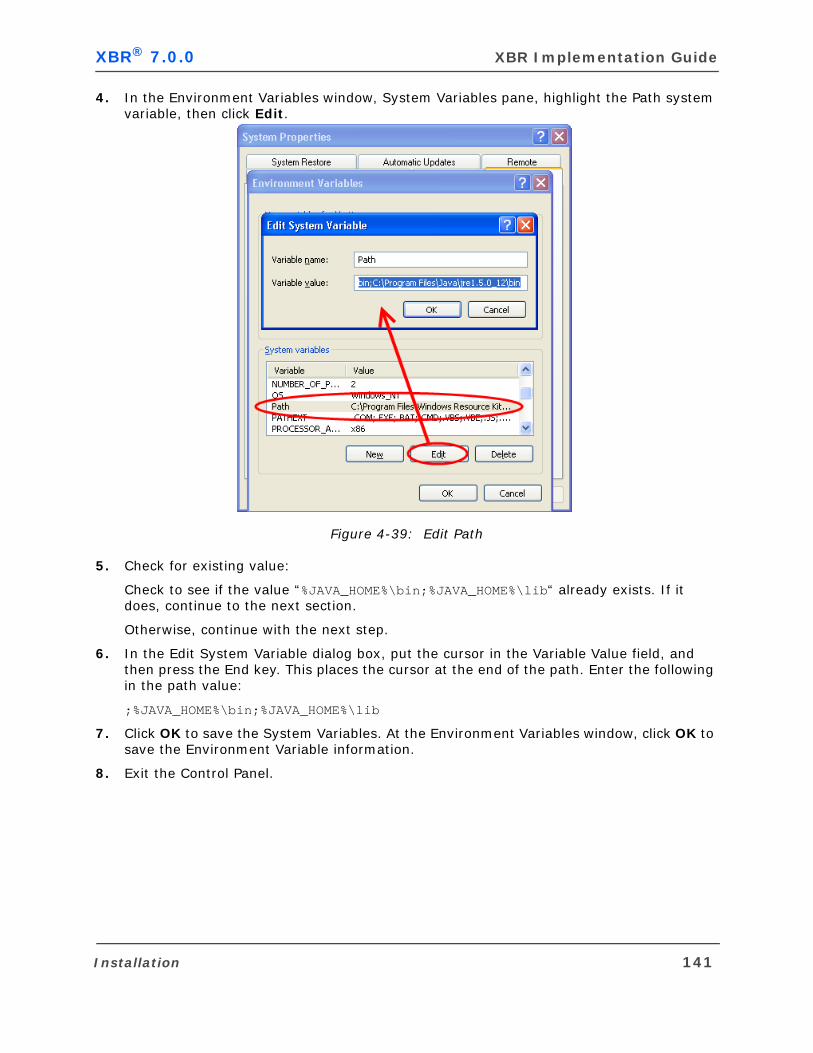
XBR® 7.0.0 XBR Implementation Guide
4. In the Environment Variables window, System Variables pane, highlight the Path system variable, then click Edit.
Figure 4-39: Edit Path
5. Check for existing value:
Check to see if the value “%JAVA_HOME%\bin;%JAVA_HOME%\lib“ already exists. If it does, continue to the next section.
Otherwise, continue with the next step.
6. In the Edit System Variable dialog box, put the cursor in the Variable Value field, and then press the End key. This places the cursor at the end of the path. Enter the following in the path value:
;%JAVA_HOME%\bin;%JAVA_HOME%\lib
7. Click OK to save the System Variables. At the Environment Variables window, click OK to save the Environment Variable information.
8. Exit the Control Panel.
Installation 141
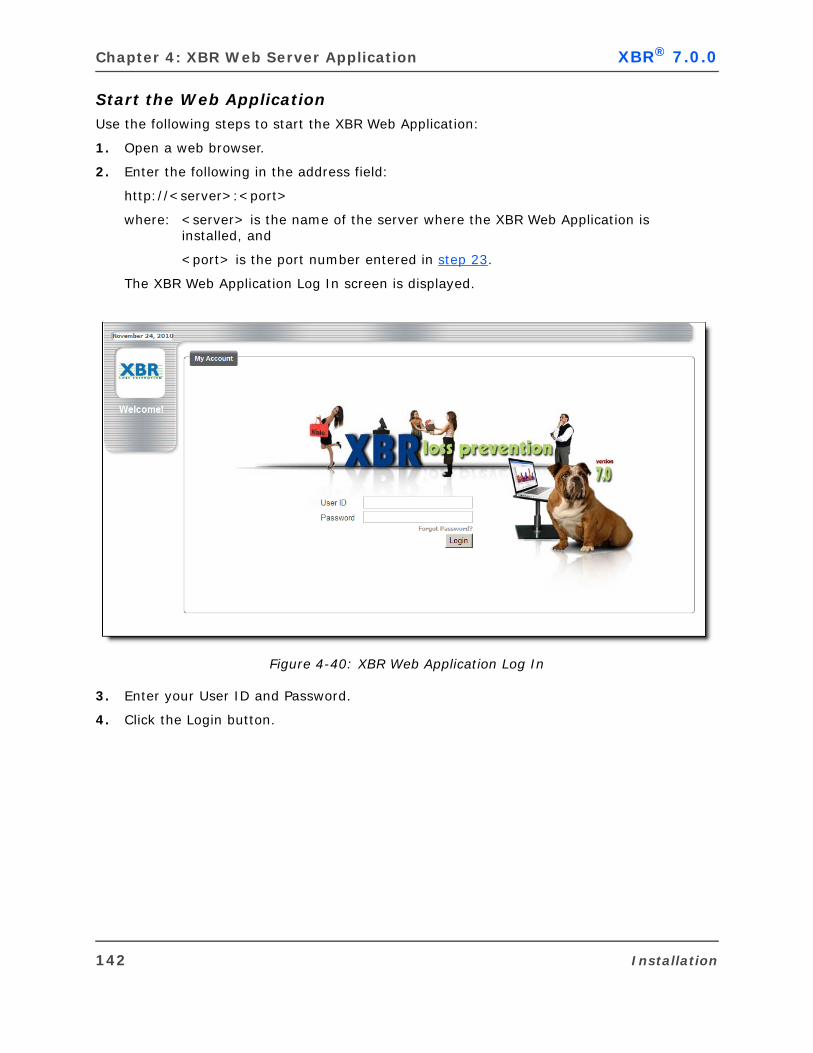
Chapter 4: XBR Web Server Application XBR® 7.0.0
Start the Web ApplicationUse the following steps to start the XBR Web Application:
1. Open a web browser.
2. Enter the following in the address field:
http://<server>:<port>
where: <server> is the name of the server where the XBR Web Application is installed, and
<port> is the port number entered in step 23.
The XBR Web Application Log In screen is displayed.
Figure 4-40: XBR Web Application Log In
3. Enter your User ID and Password.
4. Click the Login button.
142 Installation
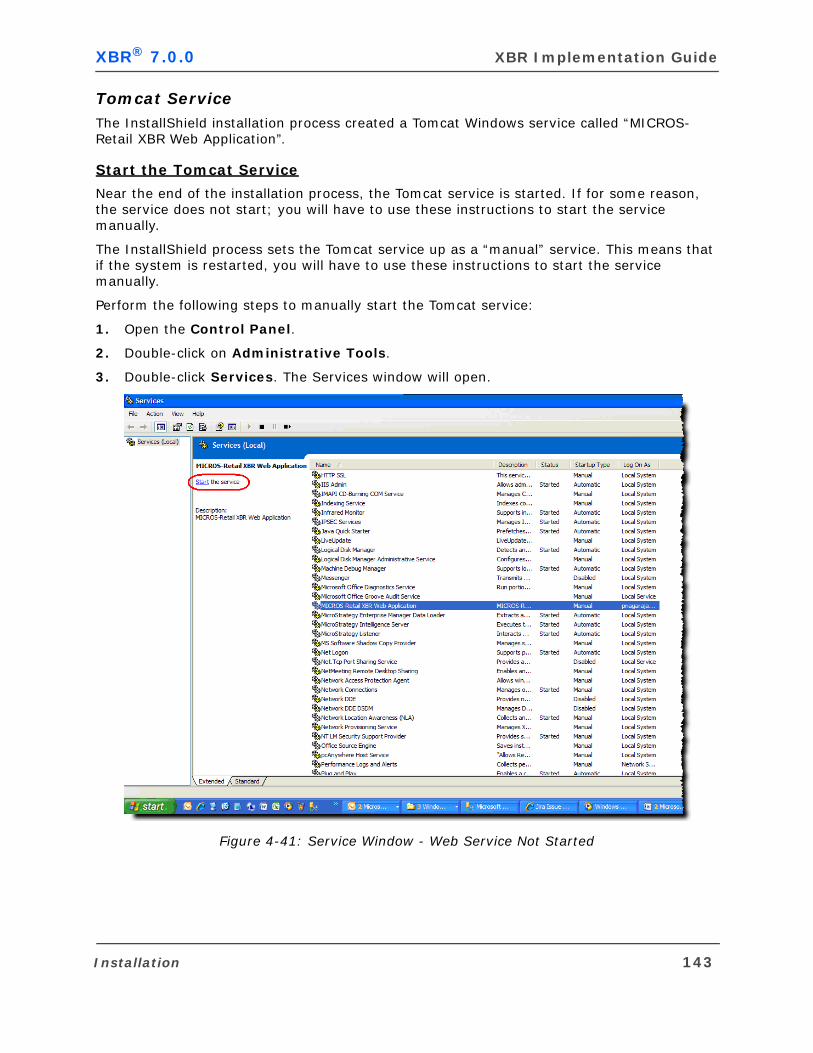
XBR® 7.0.0 XBR Implementation Guide
Tomcat ServiceThe InstallShield installation process created a Tomcat Windows service called “MICROS-Retail XBR Web Application”.
Start the Tomcat Service
Near the end of the installation process, the Tomcat service is started. If for some reason, the service does not start; you will have to use these instructions to start the service manually.
The InstallShield process sets the Tomcat service up as a “manual” service. This means that if the system is restarted, you will have to use these instructions to start the service manually.
Perform the following steps to manually start the Tomcat service:
1. Open the Control Panel.
2. Double-click on Administrative Tools.
3. Double-click Services. The Services window will open.
Figure 4-41: Service Window - Web Service Not Started
Installation 143
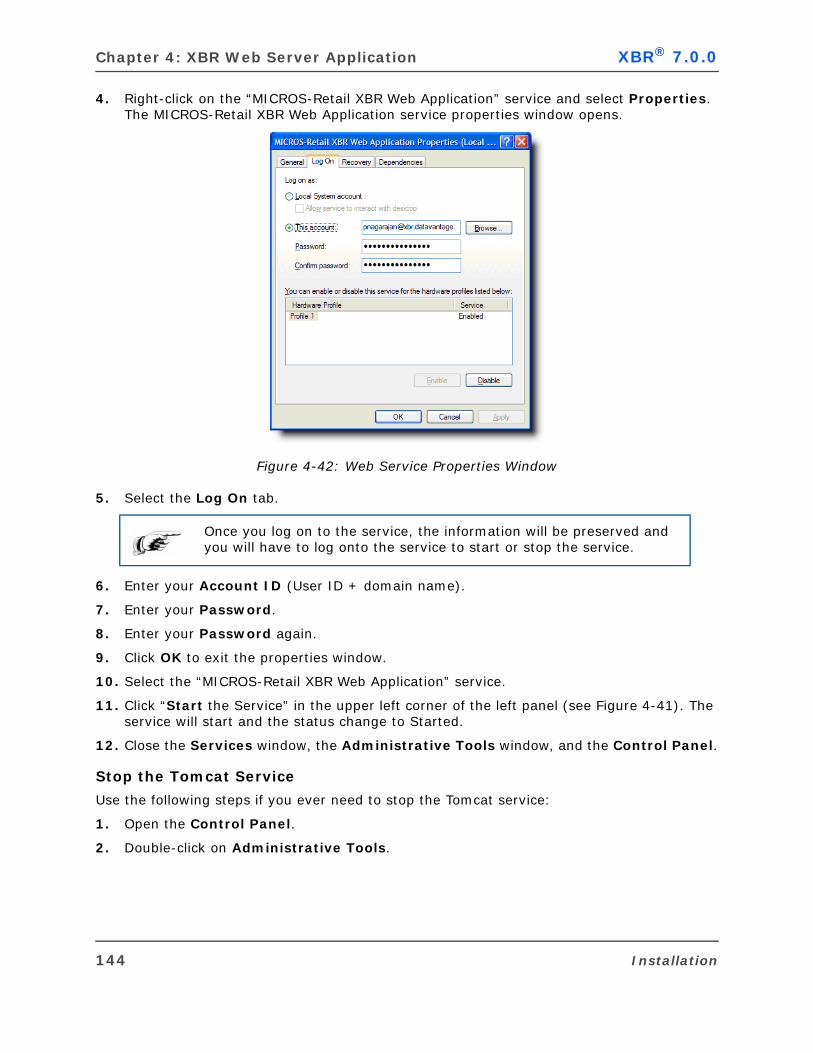
Chapter 4: XBR Web Server Application XBR® 7.0.0
4. Right-click on the “MICROS-Retail XBR Web Application” service and select Properties. The MICROS-Retail XBR Web Application service properties window opens.
Figure 4-42: Web Service Properties Window
5. Select the Log On tab.
6. Enter your Account ID (User ID + domain name).
7. Enter your Password.
8. Enter your Password again.
9. Click OK to exit the properties window.
10. Select the “MICROS-Retail XBR Web Application” service.
11. Click “Start the Service” in the upper left corner of the left panel (see Figure 4-41). The service will start and the status change to Started.
12. Close the Services window, the Administrative Tools window, and the Control Panel.
Stop the Tomcat Service
Use the following steps if you ever need to stop the Tomcat service:
1. Open the Control Panel.
2. Double-click on Administrative Tools.
Once you log on to the service, the information will be preserved and you will have to log onto the service to start or stop the service.
144 Installation
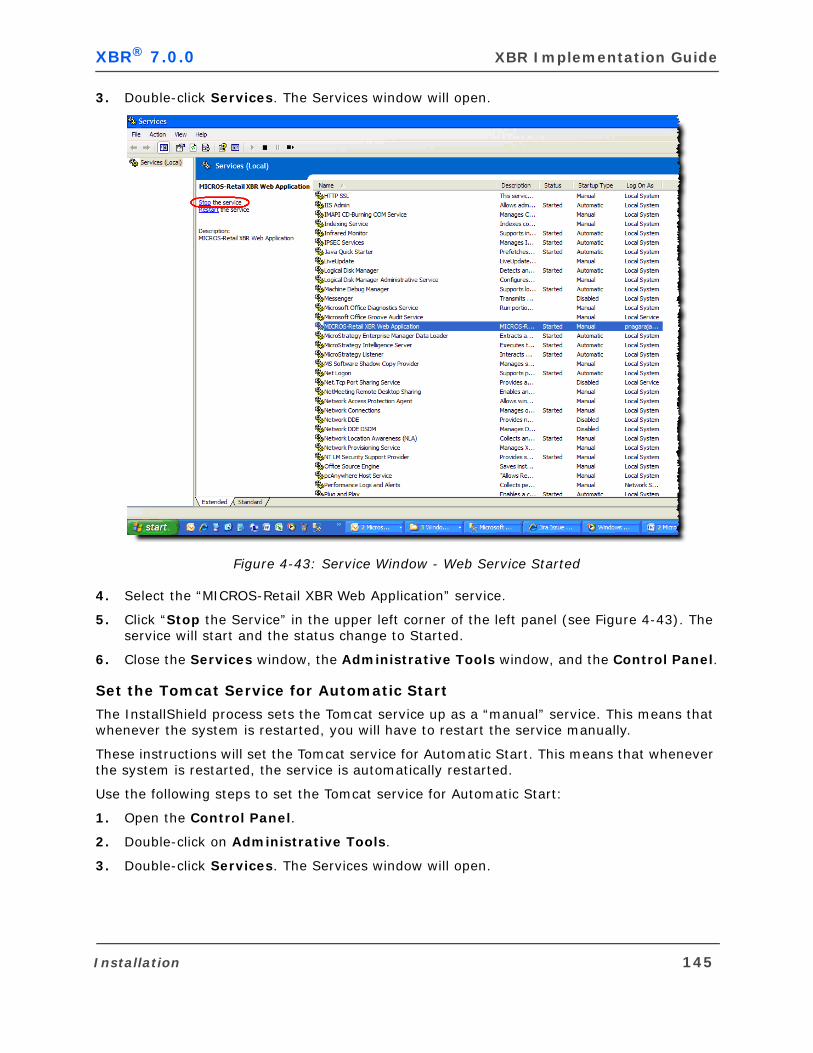
XBR® 7.0.0 XBR Implementation Guide
3. Double-click Services. The Services window will open.
Figure 4-43: Service Window - Web Service Started
4. Select the “MICROS-Retail XBR Web Application” service.
5. Click “Stop the Service” in the upper left corner of the left panel (see Figure 4-43). The service will start and the status change to Started.
6. Close the Services window, the Administrative Tools window, and the Control Panel.
Set the Tomcat Service for Automatic Start
The InstallShield process sets the Tomcat service up as a “manual” service. This means that whenever the system is restarted, you will have to restart the service manually.
These instructions will set the Tomcat service for Automatic Start. This means that whenever the system is restarted, the service is automatically restarted.
Use the following steps to set the Tomcat service for Automatic Start:
1. Open the Control Panel.
2. Double-click on Administrative Tools.
3. Double-click Services. The Services window will open.
Installation 145
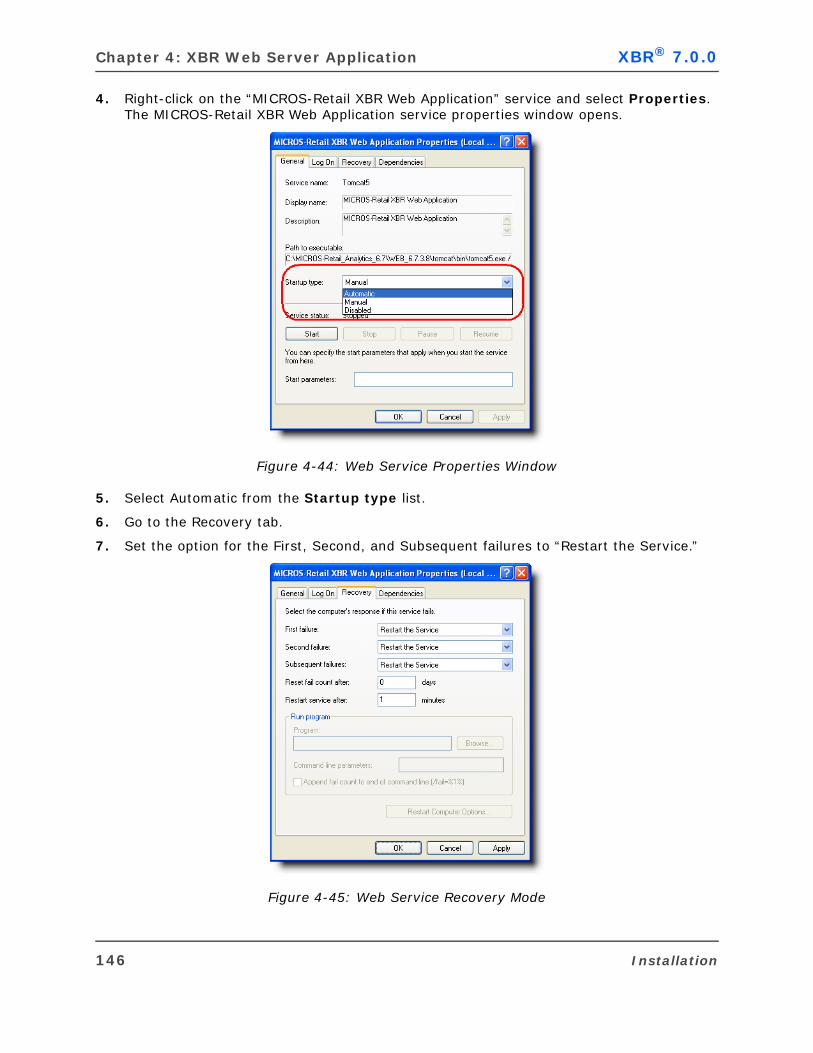
Chapter 4: XBR Web Server Application XBR® 7.0.0
4. Right-click on the “MICROS-Retail XBR Web Application” service and select Properties. The MICROS-Retail XBR Web Application service properties window opens.
Figure 4-44: Web Service Properties Window
5. Select Automatic from the Startup type list.
6. Go to the Recovery tab.
7. Set the option for the First, Second, and Subsequent failures to “Restart the Service.”
Figure 4-45: Web Service Recovery Mode
146 Installation
XBR® 7.0.0 XBR Implementation Guide
8. Click OK.
9. Close the Services window, the Administrative Tools window, and the Control Panel.
CONFIGURATION
The XBR Web Application installation procedure provides a basic default configuration. Depending on customer requirements, additional configuration may be required.
This section provides information and instructions for configuring the Tomcat Web Application Server and the XBR Web Application.
Tomcat Web Application ServerConfiguring the Tomcat Web Application Server consists of modifying the elements of two XML files: liferay.xml and server.xml according to the requirements of the customer.
liferay.xml FileThe liferay.xml file is used to configure the Tomcat Web Application Server, in particular:
Declare the database resources to be registered by the application server's internal (JNDI) directory services.
Configure Tomcat to generate system emails.
The liferay.xml file declares the Liferay Portal web application context for the host Tomcat web application server. In addition, it is used to register database resources to be used by the web application.
Typically, the liferay.xml file is located on the Tomcat Web Application Server in the following location:
C:\xbr_6.8.x.x\tomcat\conf\Catalina\localhost\liferay.xml
Datasources
Modify the liferay.xml file based upon the type of database installed. Currently, Oracle and MS SQL Server are the only supported databases. For support information for other databases, please contact your MICROS-Retail Project Manager.
The Application relies on the definitions for the following datasources:
LiferayPool: Contains the Liferay tables.
AnalyticsPool: Contains the XBR tables & views.
OfflineReportPool: Contains the tables to store definitions and results for the offline reports.
MICROS-Retail recommends against using Notepad or Wordpad to edit configuration files because they are known to cause problems when saving XML files. Please use a programmer's text editor such as jEdit, UltraEdit, TextPad, nEdit, etc. jEdit can be downloaded for free at:
http://www.jedit.org/index.php?page=download.
Configuration 147
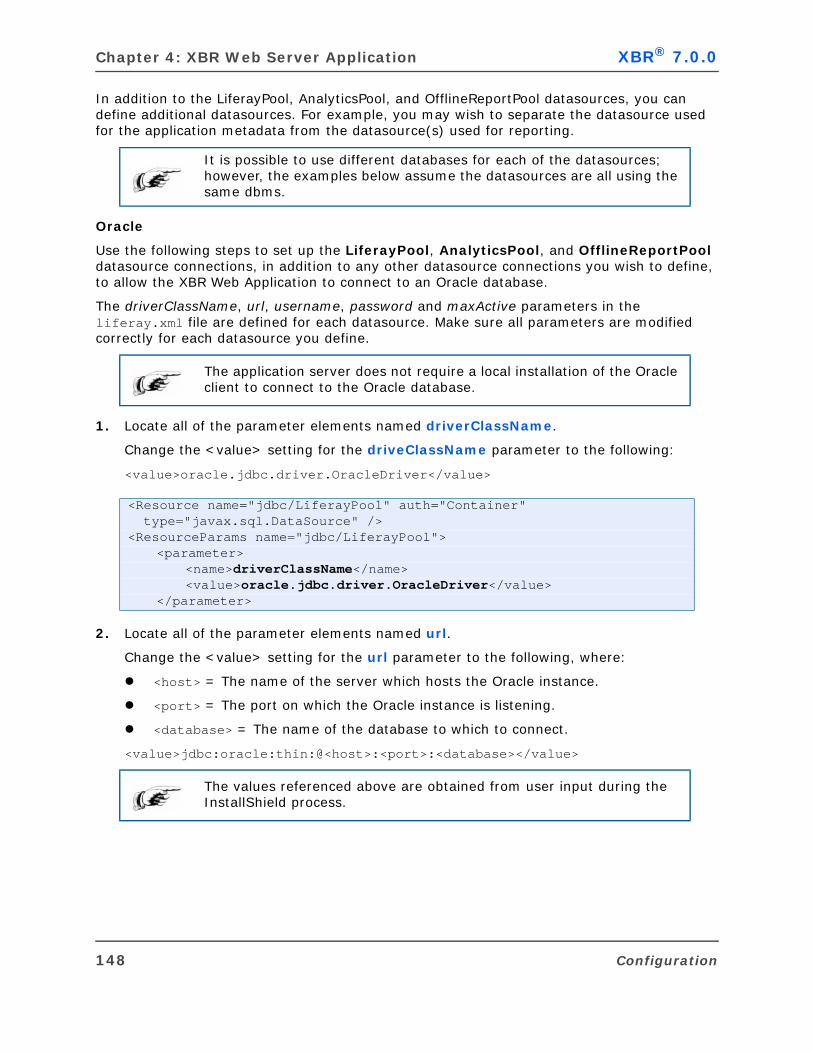
Chapter 4: XBR Web Server Application XBR® 7.0.0
In addition to the LiferayPool, AnalyticsPool, and OfflineReportPool datasources, you can define additional datasources. For example, you may wish to separate the datasource used for the application metadata from the datasource(s) used for reporting.
Oracle
Use the following steps to set up the LiferayPool, AnalyticsPool, and OfflineReportPool datasource connections, in addition to any other datasource connections you wish to define, to allow the XBR Web Application to connect to an Oracle database.
The driverClassName, url, username, password and maxActive parameters in the liferay.xml file are defined for each datasource. Make sure all parameters are modified correctly for each datasource you define.
1. Locate all of the parameter elements named driverClassName.
Change the <value> setting for the driveClassName parameter to the following:
<value>oracle.jdbc.driver.OracleDriver</value>
2. Locate all of the parameter elements named url.
Change the <value> setting for the url parameter to the following, where:
<host> = The name of the server which hosts the Oracle instance.
<port> = The port on which the Oracle instance is listening.
<database> = The name of the database to which to connect.
<value>jdbc:oracle:thin:@<host>:<port>:<database></value>
It is possible to use different databases for each of the datasources; however, the examples below assume the datasources are all using the same dbms.
The application server does not require a local installation of the Oracle client to connect to the Oracle database.
<Resource name="jdbc/LiferayPool" auth="Container" type="javax.sql.DataSource" /> <ResourceParams name="jdbc/LiferayPool">
<parameter> <name>driverClassName</name> <value>oracle.jdbc.driver.OracleDriver</value>
</parameter>
The values referenced above are obtained from user input during the InstallShield process.
148 Configuration

XBR® 7.0.0 XBR Implementation Guide
Example: If the host name is oracleportal, the port number is 1521 and the database name is lpdb, the url value would be:
3. Modify all of the following database connection parameters:
<parameter> <name>url</name> <value>jdbc:oracle:thin:@oracleportal:1521:lpdb</value>
</parameter>
Table 4-1: Database Connection Parameters (Oracle)
Configuration Parameter Description
username User ID
The user ID that the application server connection cache uses. This user ID must have access to the XBR schema on the database server.
This value is obtained from user input during the InstallShield process.
password User Password
The database password for the user ID supplied in the username parameter.
This value is obtained from user input during the InstallShield process.
Password encryption: To take advantage of automated obfuscation (encrypted value replacement ) combine all password tags into one single line (for example: <parameter><name>password</name> <value>clear_text_pwd</value></parameter>) and use EncryptedDataSourceFactory as the extended factory. Remember the password because it will become unreadable after the first load. Keep in mind password encryption/decryption is system/network user account (user.name) dependent. When the application is set up as a windows service use the same account (user.name) for Log on as.
Configuration 149

Chapter 4: XBR Web Server Application XBR® 7.0.0
Password (Continued)
Figure 4-46: User Account Log On
Unencrypted password parameter:
<parameter> <name>username</name> <value>xbruser</value> </parameter><parameter> <name>password</name> <value>xbruserpassword</value> </parameter>
Encrypted password parameter:
<parameter> <name>password</name> <value>-1109768743FQ8fDAkABAM=-1109768743 </value></parameter>
maxActive Maximum Number of Active Database Connections
The value of this parameter is the maximum number of active database connections that the web application will use. This is a throttle on the number of active connections with the DB managed by the JDBC driver. This number should be set in accordance with the installation's policy for the connection allocation for the DBMS.
<parameter> <name>maxActive</name> <value>5</value></parameter>
Table 4-1: Database Connection Parameters (Oracle) (continued)
Configuration Parameter Description
150 Configuration
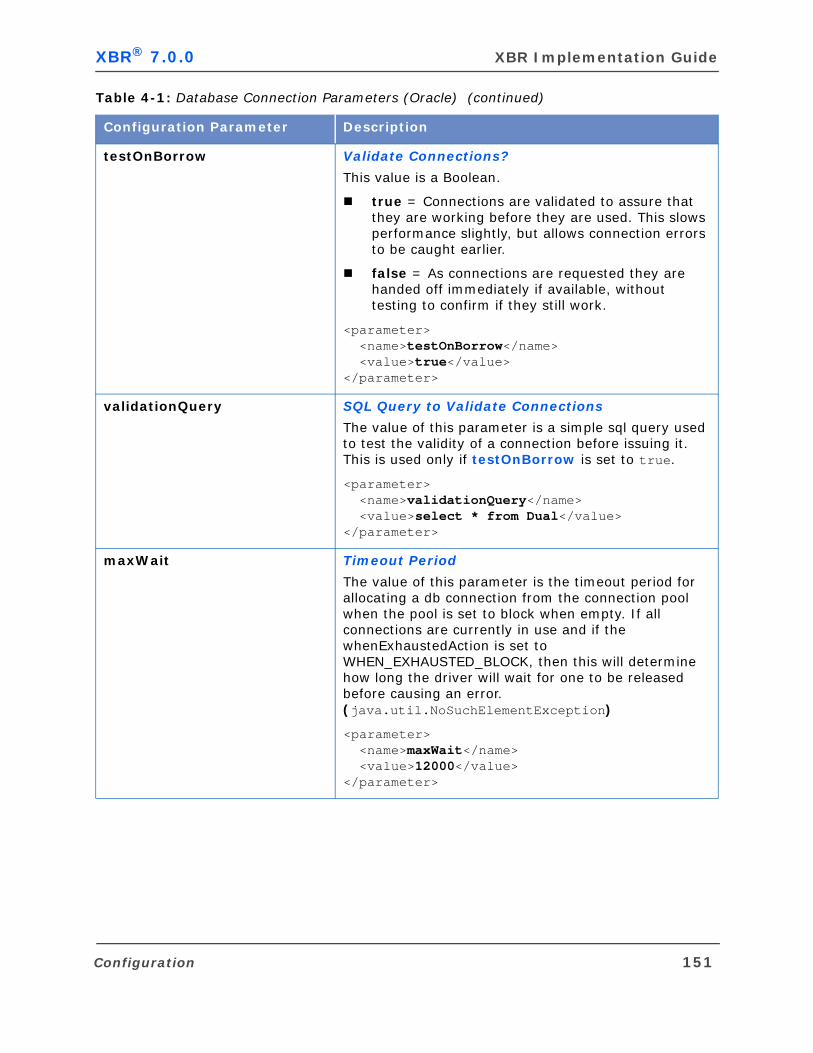
XBR® 7.0.0 XBR Implementation Guide
testOnBorrow Validate Connections?
This value is a Boolean.
true = Connections are validated to assure that they are working before they are used. This slows performance slightly, but allows connection errors to be caught earlier.
false = As connections are requested they are handed off immediately if available, without testing to confirm if they still work.
<parameter> <name>testOnBorrow</name> <value>true</value></parameter>
validationQuery SQL Query to Validate Connections
The value of this parameter is a simple sql query used to test the validity of a connection before issuing it. This is used only if testOnBorrow is set to true.
<parameter> <name>validationQuery</name> <value>select * from Dual</value></parameter>
maxWait Timeout Period
The value of this parameter is the timeout period for allocating a db connection from the connection pool when the pool is set to block when empty. If all connections are currently in use and if the whenExhaustedAction is set to WHEN_EXHAUSTED_BLOCK, then this will determine how long the driver will wait for one to be released before causing an error. (java.util.NoSuchElementException)
<parameter> <name>maxWait</name> <value>12000</value></parameter>
Table 4-1: Database Connection Parameters (Oracle) (continued)
Configuration Parameter Description
Configuration 151

Chapter 4: XBR Web Server Application XBR® 7.0.0
maxIdle Maximum Number of Idle Connections
The value of this parameter is the maximum number of idle connections in the pool.
<parameter> <name>maxIdle</name> <value>2</value></parameter>
whenExhaustedAction Action to take when Maximum Connections Reached
The value of this parameter is the action to be taken when a new connection is requested and the pool has reached the maximum number of active connections.
Valid values are:
0 = WHEN_EXHAUSTED_FAIL (throws a java.util.NoSuchElementException)
1 = WHEN_EXHAUSTED_BLOCK (does not allow the user to connect until a connection is available or maxWait time has expired).
2 = WHEN_EXHAUSTED_GROW (increases the maxActive value).
Most deployments should use 1 or 2.
<parameter> <name>whenExhaustedAction</name> <value>2</value></parameter>
Table 4-1: Database Connection Parameters (Oracle) (continued)
Configuration Parameter Description
152 Configuration
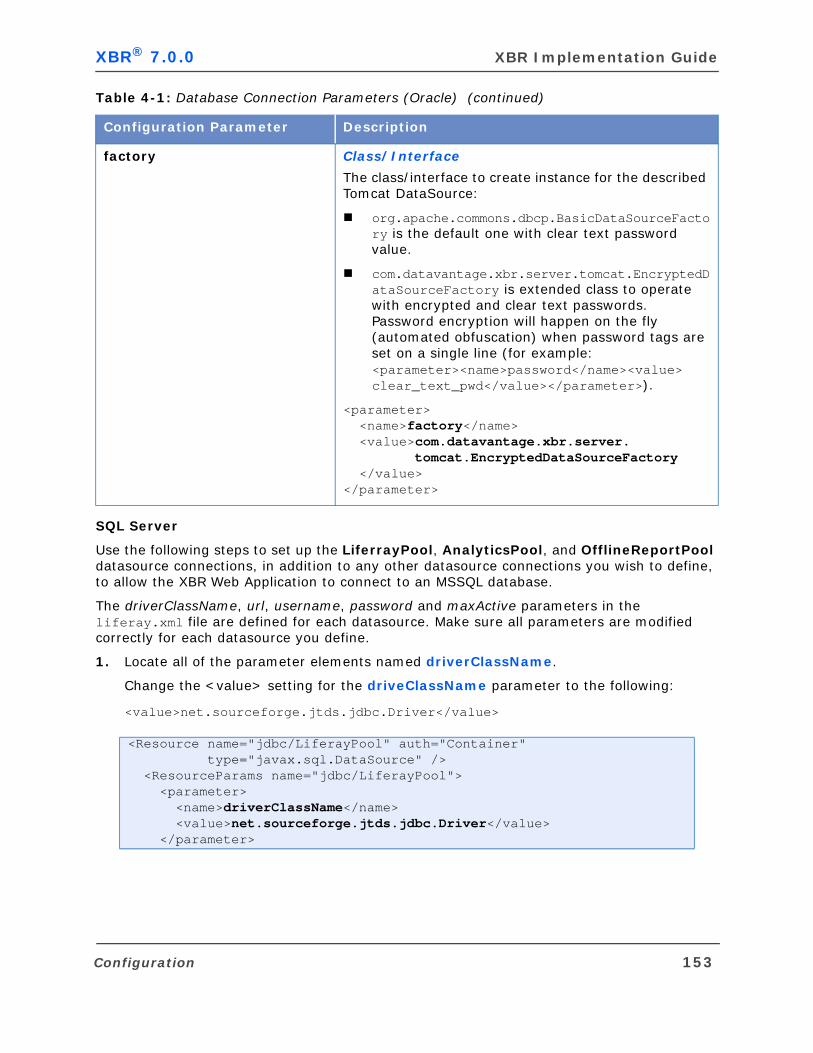
XBR® 7.0.0 XBR Implementation Guide
SQL Server
Use the following steps to set up the LiferrayPool, AnalyticsPool, and OfflineReportPool datasource connections, in addition to any other datasource connections you wish to define, to allow the XBR Web Application to connect to an MSSQL database.
The driverClassName, url, username, password and maxActive parameters in the liferay.xml file are defined for each datasource. Make sure all parameters are modified correctly for each datasource you define.
1. Locate all of the parameter elements named driverClassName.
Change the <value> setting for the driveClassName parameter to the following:
<value>net.sourceforge.jtds.jdbc.Driver</value>
factory Class/Interface
The class/interface to create instance for the described Tomcat DataSource:
org.apache.commons.dbcp.BasicDataSourceFactory is the default one with clear text password value.
com.datavantage.xbr.server.tomcat.EncryptedDataSourceFactory is extended class to operate with encrypted and clear text passwords. Password encryption will happen on the fly (automated obfuscation) when password tags are set on a single line (for example: <parameter><name>password</name><value> clear_text_pwd</value></parameter>).
<parameter> <name>factory</name> <value>com.datavantage.xbr.server. tomcat.EncryptedDataSourceFactory </value> </parameter>
<Resource name="jdbc/LiferayPool" auth="Container" type="javax.sql.DataSource" /> <ResourceParams name="jdbc/LiferayPool"> <parameter> <name>driverClassName</name> <value>net.sourceforge.jtds.jdbc.Driver</value> </parameter>
Table 4-1: Database Connection Parameters (Oracle) (continued)
Configuration Parameter Description
Configuration 153
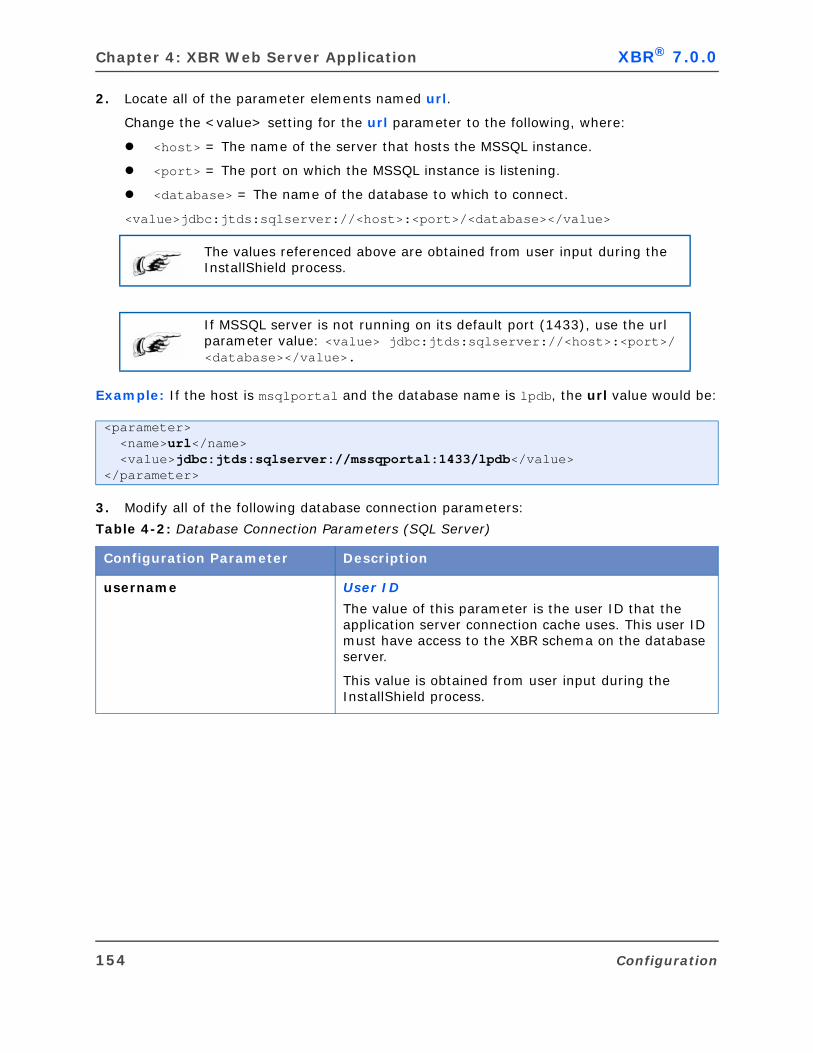
Chapter 4: XBR Web Server Application XBR® 7.0.0
2. Locate all of the parameter elements named url.
Change the <value> setting for the url parameter to the following, where:
<host> = The name of the server that hosts the MSSQL instance.
<port> = The port on which the MSSQL instance is listening.
<database> = The name of the database to which to connect.
<value>jdbc:jtds:sqlserver://<host>:<port>/<database></value>
Example: If the host is msqlportal and the database name is lpdb, the url value would be:
3. Modify all of the following database connection parameters:
The values referenced above are obtained from user input during the InstallShield process.
If MSSQL server is not running on its default port (1433), use the url parameter value: <value> jdbc:jtds:sqlserver://<host>:<port>/<database></value>.
<parameter> <name>url</name> <value>jdbc:jtds:sqlserver://mssqportal:1433/lpdb</value></parameter>
Table 4-2: Database Connection Parameters (SQL Server)
Configuration Parameter Description
username User ID
The value of this parameter is the user ID that the application server connection cache uses. This user ID must have access to the XBR schema on the database server.
This value is obtained from user input during the InstallShield process.
154 Configuration

XBR® 7.0.0 XBR Implementation Guide
password User Password
The value of this parameter is the database password for the user ID supplied in the previous parameter.
This value is obtained from user input during the InstallShield process.
To take advantage of automated obfuscation (encrypted value replacement) combine all password tags into one single line (for example: <parameter><name>password</name> <value>clear_text_pwd</value></parameter>) and use EncryptedDataSourceFactory as extended factory. Remember the password because it will become unreadable after the first load. Keep in mind password encryption/decryption is system/network user account (user.name) dependent. When the application is set up as a windows 'service' use the same account (user.name) for Log on as.
Figure 4-47: User Account Log On
Table 4-2: Database Connection Parameters (SQL Server) (continued)
Configuration Parameter Description
Configuration 155
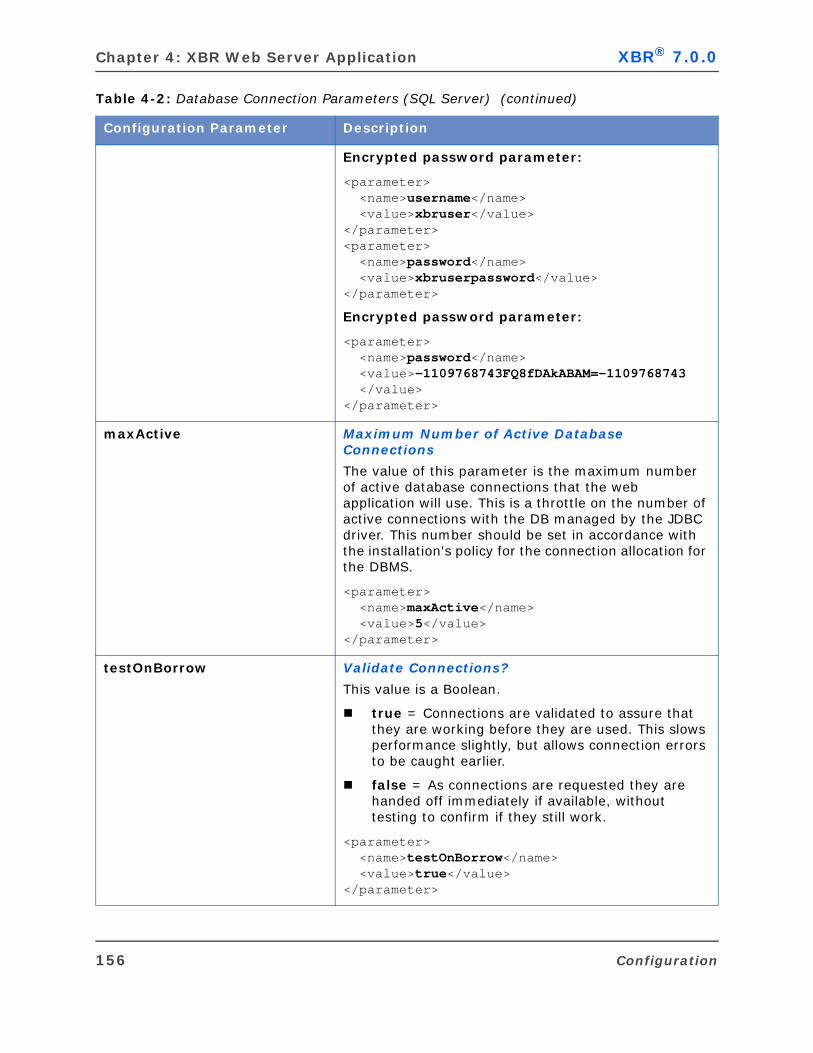
Chapter 4: XBR Web Server Application XBR® 7.0.0
Encrypted password parameter:
<parameter> <name>username</name> <value>xbruser</value> </parameter><parameter> <name>password</name> <value>xbruserpassword</value> </parameter>
Encrypted password parameter:
<parameter> <name>password</name> <value>-1109768743FQ8fDAkABAM=-1109768743 </value></parameter>
maxActive Maximum Number of Active Database Connections
The value of this parameter is the maximum number of active database connections that the web application will use. This is a throttle on the number of active connections with the DB managed by the JDBC driver. This number should be set in accordance with the installation's policy for the connection allocation for the DBMS.
<parameter> <name>maxActive</name> <value>5</value></parameter>
testOnBorrow Validate Connections?
This value is a Boolean.
true = Connections are validated to assure that they are working before they are used. This slows performance slightly, but allows connection errors to be caught earlier.
false = As connections are requested they are handed off immediately if available, without testing to confirm if they still work.
<parameter> <name>testOnBorrow</name> <value>true</value></parameter>
Table 4-2: Database Connection Parameters (SQL Server) (continued)
Configuration Parameter Description
156 Configuration
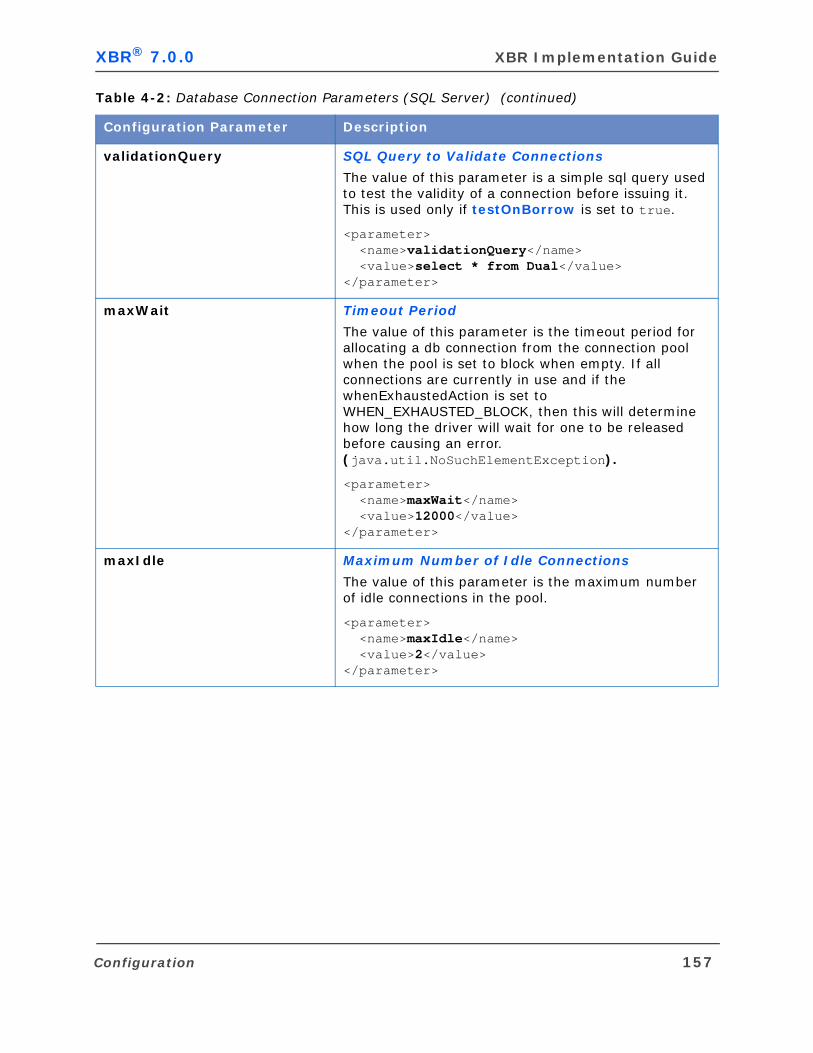
XBR® 7.0.0 XBR Implementation Guide
validationQuery SQL Query to Validate Connections
The value of this parameter is a simple sql query used to test the validity of a connection before issuing it. This is used only if testOnBorrow is set to true.
<parameter> <name>validationQuery</name> <value>select * from Dual</value></parameter>
maxWait Timeout Period
The value of this parameter is the timeout period for allocating a db connection from the connection pool when the pool is set to block when empty. If all connections are currently in use and if the whenExhaustedAction is set to WHEN_EXHAUSTED_BLOCK, then this will determine how long the driver will wait for one to be released before causing an error. (java.util.NoSuchElementException).
<parameter> <name>maxWait</name> <value>12000</value></parameter>
maxIdle Maximum Number of Idle Connections
The value of this parameter is the maximum number of idle connections in the pool.
<parameter> <name>maxIdle</name> <value>2</value></parameter>
Table 4-2: Database Connection Parameters (SQL Server) (continued)
Configuration Parameter Description
Configuration 157
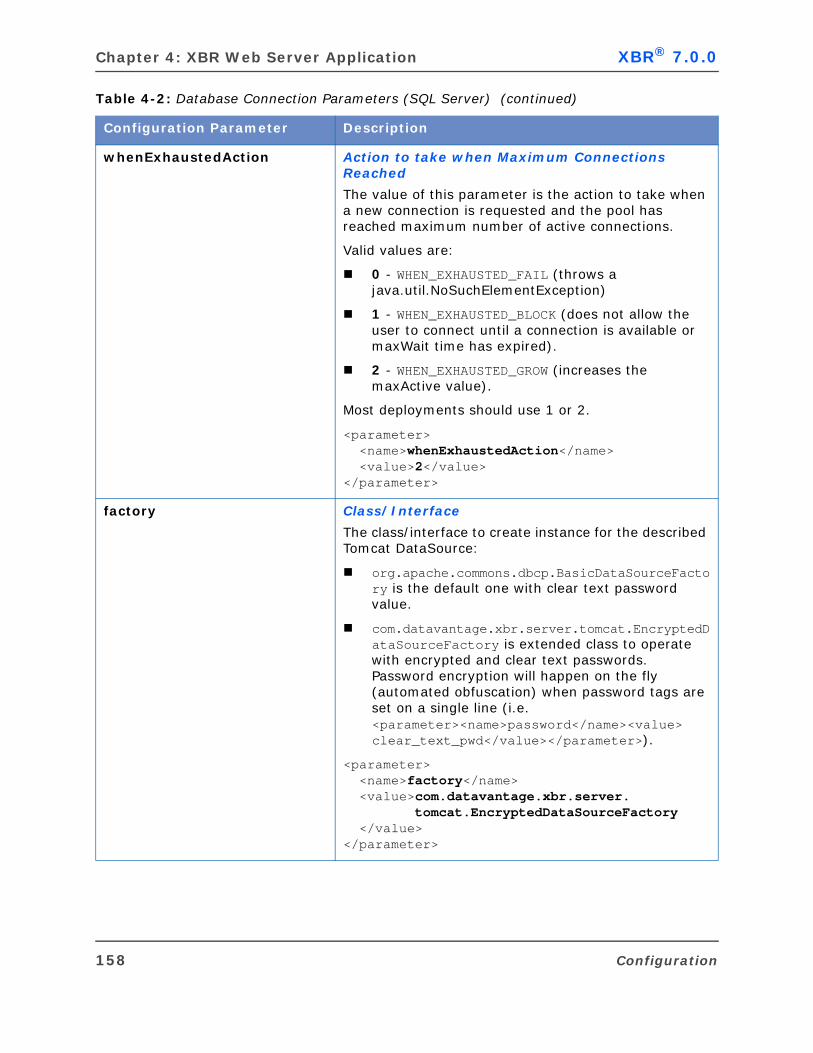
Chapter 4: XBR Web Server Application XBR® 7.0.0
whenExhaustedAction Action to take when Maximum Connections Reached
The value of this parameter is the action to take when a new connection is requested and the pool has reached maximum number of active connections.
Valid values are:
0 - WHEN_EXHAUSTED_FAIL (throws a java.util.NoSuchElementException)
1 - WHEN_EXHAUSTED_BLOCK (does not allow the user to connect until a connection is available or maxWait time has expired).
2 - WHEN_EXHAUSTED_GROW (increases the maxActive value).
Most deployments should use 1 or 2.
<parameter> <name>whenExhaustedAction</name> <value>2</value></parameter>
factory Class/Interface
The class/interface to create instance for the described Tomcat DataSource:
org.apache.commons.dbcp.BasicDataSourceFactory is the default one with clear text password value.
com.datavantage.xbr.server.tomcat.EncryptedDataSourceFactory is extended class to operate with encrypted and clear text passwords. Password encryption will happen on the fly (automated obfuscation) when password tags are set on a single line (i.e. <parameter><name>password</name><value> clear_text_pwd</value></parameter>).
<parameter> <name>factory</name> <value>com.datavantage.xbr.server. tomcat.EncryptedDataSourceFactory </value> </parameter>
Table 4-2: Database Connection Parameters (SQL Server) (continued)
Configuration Parameter Description
158 Configuration
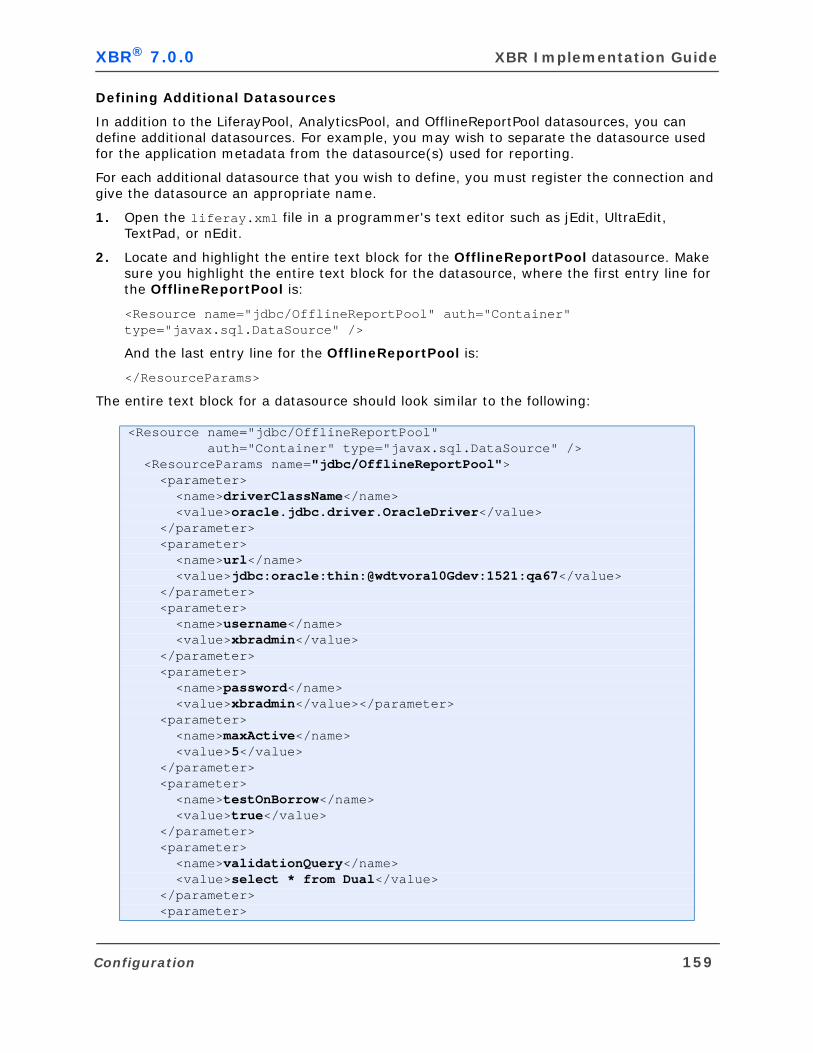
XBR® 7.0.0 XBR Implementation Guide
Defining Additional Datasources
In addition to the LiferayPool, AnalyticsPool, and OfflineReportPool datasources, you can define additional datasources. For example, you may wish to separate the datasource used for the application metadata from the datasource(s) used for reporting.
For each additional datasource that you wish to define, you must register the connection and give the datasource an appropriate name.
1. Open the liferay.xml file in a programmer's text editor such as jEdit, UltraEdit, TextPad, or nEdit.
2. Locate and highlight the entire text block for the OfflineReportPool datasource. Make sure you highlight the entire text block for the datasource, where the first entry line for the OfflineReportPool is:
<Resource name="jdbc/OfflineReportPool" auth="Container" type="javax.sql.DataSource" />
And the last entry line for the OfflineReportPool is:
</ResourceParams>
The entire text block for a datasource should look similar to the following:
<Resource name="jdbc/OfflineReportPool" auth="Container" type="javax.sql.DataSource" /> <ResourceParams name="jdbc/OfflineReportPool"> <parameter> <name>driverClassName</name> <value>oracle.jdbc.driver.OracleDriver</value> </parameter> <parameter> <name>url</name> <value>jdbc:oracle:thin:@wdtvora10Gdev:1521:qa67</value> </parameter> <parameter> <name>username</name> <value>xbradmin</value> </parameter> <parameter> <name>password</name> <value>xbradmin</value></parameter> <parameter> <name>maxActive</name> <value>5</value> </parameter> <parameter> <name>testOnBorrow</name> <value>true</value> </parameter> <parameter> <name>validationQuery</name> <value>select * from Dual</value> </parameter> <parameter>
Configuration 159
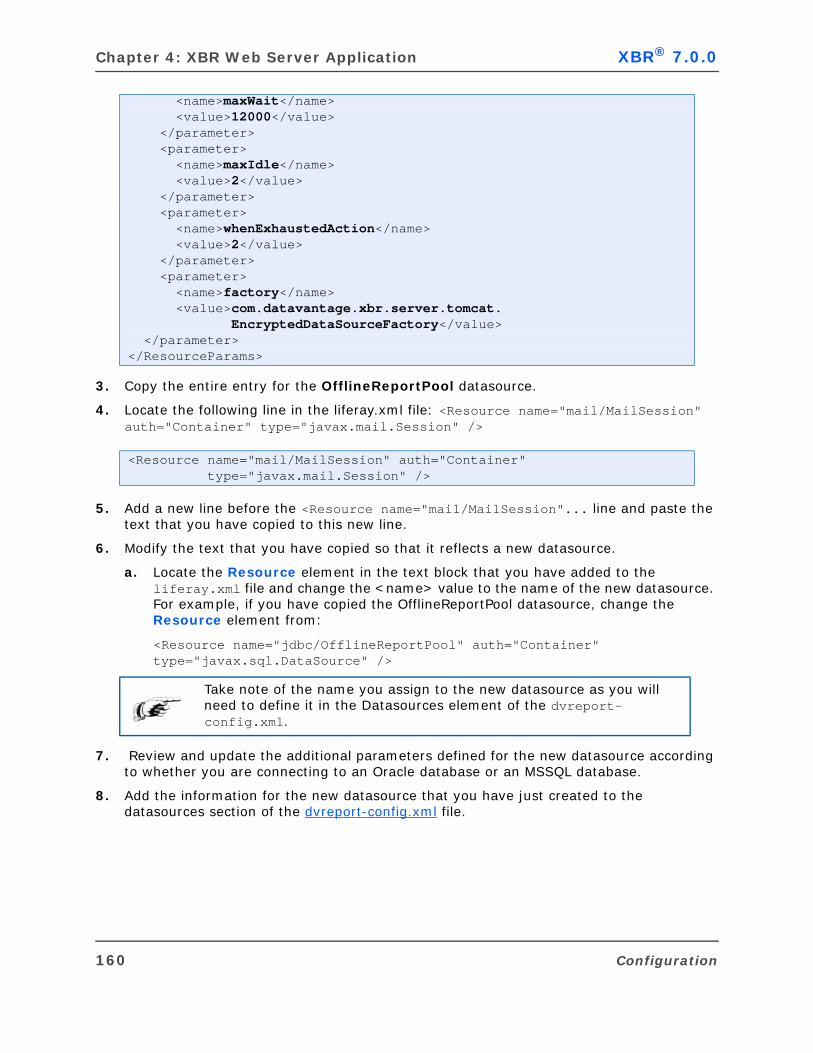
Chapter 4: XBR Web Server Application XBR® 7.0.0
3. Copy the entire entry for the OfflineReportPool datasource.
4. Locate the following line in the liferay.xml file: <Resource name="mail/MailSession"auth="Container" type="javax.mail.Session" />
5. Add a new line before the <Resource name="mail/MailSession"... line and paste thetext that you have copied to this new line.
6. Modify the text that you have copied so that it reflects a new datasource.
a. Locate the Resource element in the text block that you have added to theliferay.xml file and change the <name> value to the name of the new datasource.For example, if you have copied the OfflineReportPool datasource, change theResource element from:
<Resource name="jdbc/OfflineReportPool" auth="Container"type="javax.sql.DataSource" />
7. Review and update the additional parameters defined for the new datasource accordingto whether you are connecting to an Oracle database or an MSSQL database.
8. Add the information for the new datasource that you have just created to thedatasources section of the dvreport-config.xml file.
<name>maxWait</name><value>12000</value>
</parameter> <parameter>
<name>maxIdle</name><value>2</value>
</parameter> <parameter>
<name>whenExhaustedAction</name><value>2</value>
</parameter> <parameter>
<name>factory</name><value>com.datavantage.xbr.server.tomcat.
EncryptedDataSourceFactory</value> </parameter></ResourceParams>
<Resource name="mail/MailSession" auth="Container" type="javax.mail.Session" />
Take note of the name you assign to the new datasource as you will need to define it in the Datasources element of the dvreport-config.xml.
160 Configuration
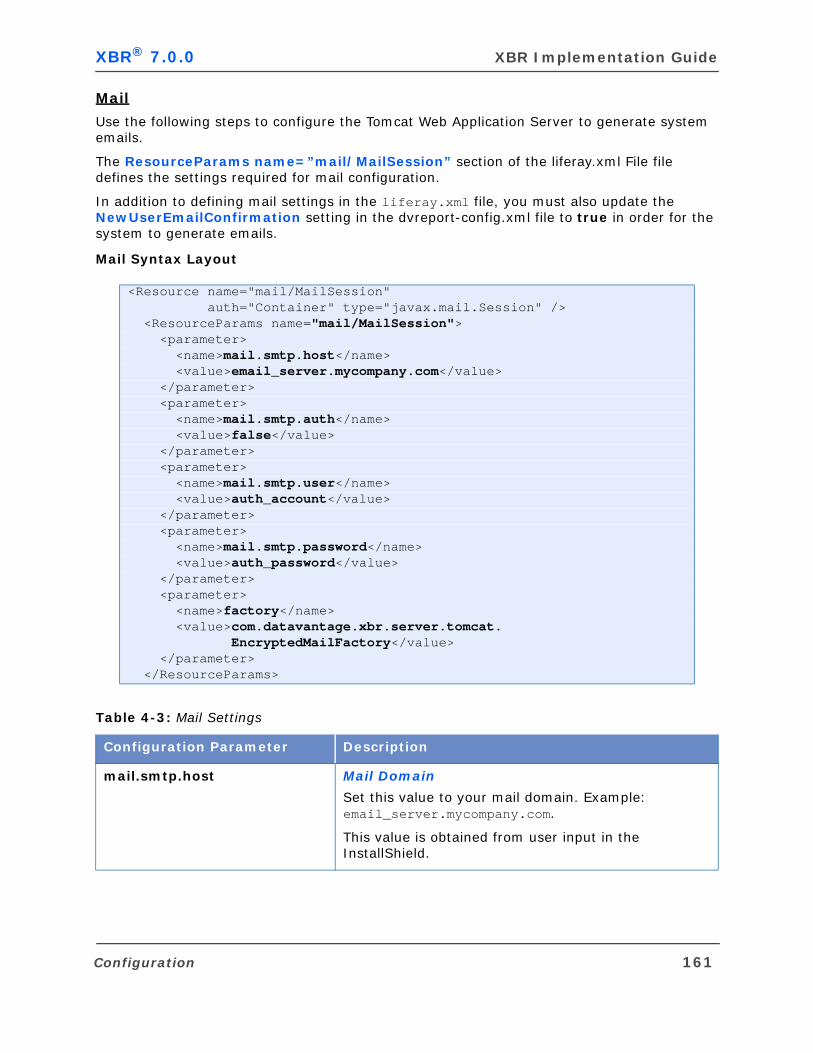
XBR® 7.0.0 XBR Implementation Guide
Use the following steps to configure the Tomcat Web Application Server to generate system emails.
The ResourceParams name=”mail/MailSession” section of the liferay.xml File file defines the settings required for mail configuration.
In addition to defining mail settings in the liferay.xml file, you must also update the NewUserEmailConfirmation setting in the dvreport-config.xml file to true in order for the system to generate emails.
Mail Syntax Layout
<Resource name="mail/MailSession" auth="Container" type="javax.mail.Session" /> <ResourceParams name="mail/MailSession"> <parameter> <name>mail.smtp.host</name> <value>email_server.mycompany.com</value> </parameter> <parameter> <name>mail.smtp.auth</name> <value>false</value> </parameter> <parameter> <name>mail.smtp.user</name> <value>auth_account</value> </parameter> <parameter> <name>mail.smtp.password</name> <value>auth_password</value> </parameter> <parameter> <name>factory</name> <value>com.datavantage.xbr.server.tomcat. EncryptedMailFactory</value> </parameter> </ResourceParams>
Table 4-3: Mail Settings
Configuration Parameter Description
mail.smtp.host Mail Domain
Set this value to your mail domain. Example: email_server.mycompany.com.
This value is obtained from user input in the InstallShield.
Configuration 161
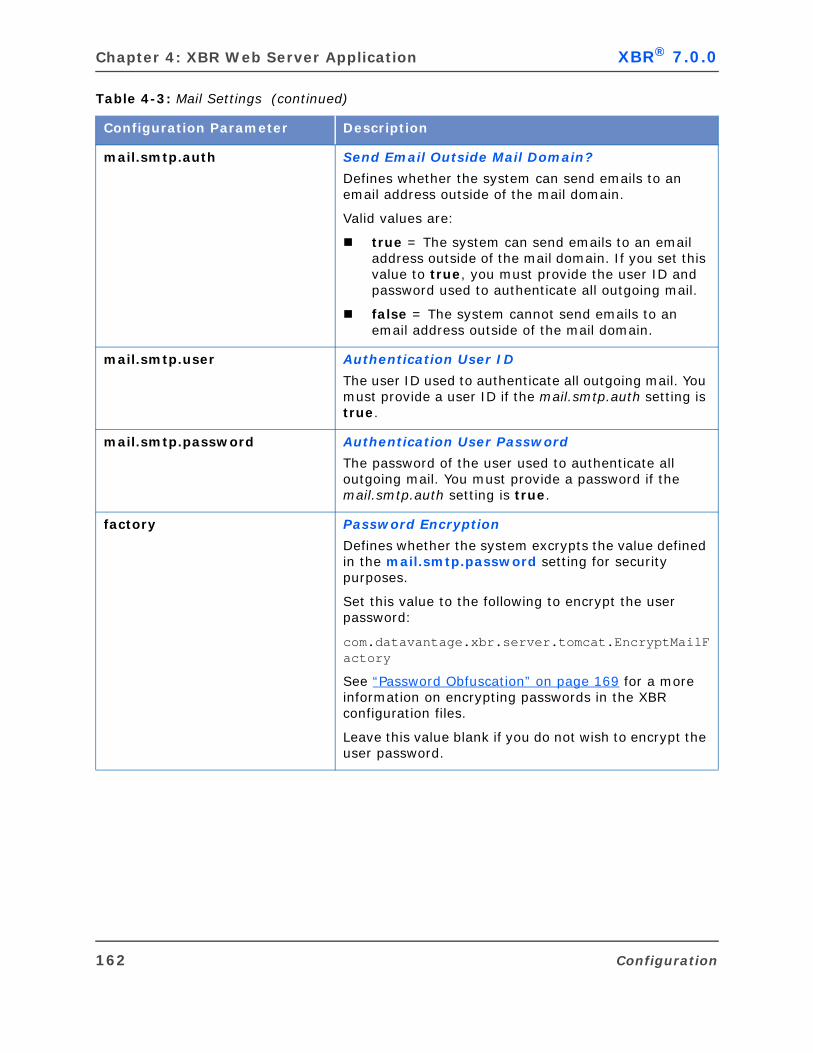
Chapter 4: XBR Web Server Application XBR® 7.0.0
mail.smtp.auth Send Email Outside Mail Domain?
Defines whether the system can send emails to an email address outside of the mail domain.
Valid values are:
true = The system can send emails to an email address outside of the mail domain. If you set this value to true, you must provide the user ID and password used to authenticate all outgoing mail.
false = The system cannot send emails to an email address outside of the mail domain.
mail.smtp.user Authentication User ID
The user ID used to authenticate all outgoing mail. You must provide a user ID if the mail.smtp.auth setting is true.
mail.smtp.password Authentication User Password
The password of the user used to authenticate all outgoing mail. You must provide a password if the mail.smtp.auth setting is true.
factory Password Encryption
Defines whether the system excrypts the value defined in the mail.smtp.password setting for security purposes.
Set this value to the following to encrypt the user password:
com.datavantage.xbr.server.tomcat.EncryptMailFactory
See “Password Obfuscation” on page 169 for a more information on encrypting passwords in the XBR configuration files.
Leave this value blank if you do not wish to encrypt the user password.
Table 4-3: Mail Settings (continued)
Configuration Parameter Description
162 Configuration
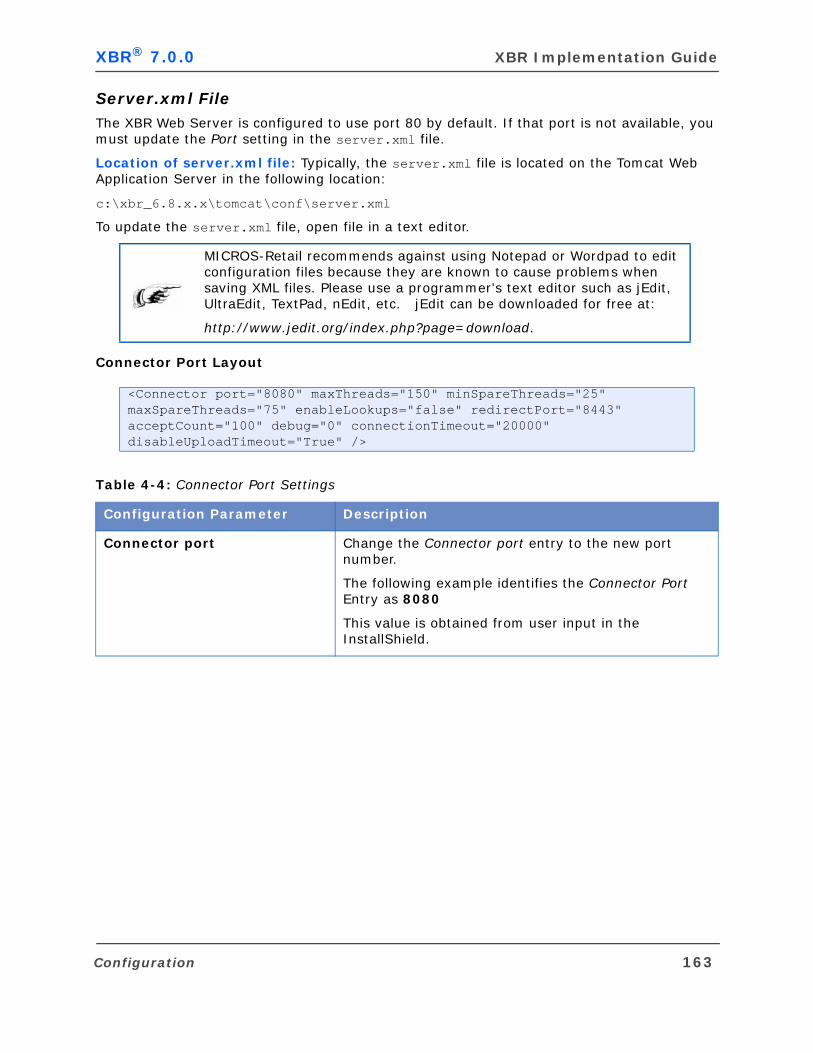
XBR® 7.0.0 XBR Implementation Guide
Server.xml FileThe XBR Web Server is configured to use port 80 by default. If that port is not available, you must update the Port setting in the server.xml file.
Location of server.xml file: Typically, the server.xml file is located on the Tomcat Web Application Server in the following location:
c:\xbr_6.8.x.x\tomcat\conf\server.xml
To update the server.xml file, open file in a text editor.
Connector Port Layout
MICROS-Retail recommends against using Notepad or Wordpad to edit configuration files because they are known to cause problems when saving XML files. Please use a programmer's text editor such as jEdit, UltraEdit, TextPad, nEdit, etc. jEdit can be downloaded for free at:
http://www.jedit.org/index.php?page=download.
<Connector port="8080" maxThreads="150" minSpareThreads="25" maxSpareThreads="75" enableLookups="false" redirectPort="8443" acceptCount="100" debug="0" connectionTimeout="20000" disableUploadTimeout="True" />
Table 4-4: Connector Port Settings
Configuration Parameter Description
Connector port Change the Connector port entry to the new port number.
The following example identifies the Connector Port Entry as 8080
This value is obtained from user input in the InstallShield.
Configuration 163
Chapter 4: XBR Web Server Application XBR® 7.0.0
XBR Web ApplicationThere are a variety of settings that can be configured to change the behavior of the XBR Web Application. The dvreport-config.xml file contains the default settings shipped with the XBR application. Custom modifications to these settings are loaded from external files.
An important consideration to note before starting the web server is that passwords specified in the dvreport configuration files will be obfuscated (encrypted) on behalf of the process owner. Once obfuscated, those files cannot be used to run the server under a different process owner unless the passwords are re-entered fresh. Custom mods, including all password elements, should be placed into separate files under the process owner's own home directory tree. If more than one user is to run the server using the same passwords, then that configuration file should be copied to each user's home directory before running the server. See “Password Obfuscation” on page 169 for more information on data encryption.
dvreport-config.xmlThe dvreport-config.xml is the main XML configuration file for the XBR application.
Typically, the dvreport-config.xml file is located on the Tomcat Web Application Server in the following location:
C:\MICROS-Retail_Analytics_7.0\WEB\tomcat\liferay\WEB-INF\dvreport-config.xml
Main Sections of the dvreport-config.xml File
The dvreport-config.xml is divided into several sections:
“Deployment Properties” on page 169
“General Configuration” on page 170
“SQL Files” on page 174
“Datasources” on page 175
“Cache” on page 178
“Exception” on page 180
“Lookups” on page 181
“Store Group Security” on page 184
“Video” on page 185
“Employee Violations Dashboard” on page 187
“Note History” on page 190
“Drop Down Display” on page 191
“Report Layout” on page 191
“Heart Beat Monitor (HBM)” on page 195
“Report File Repository” on page 201
“Home Layouts” on page 202
“LDAP/Active Directories (AD)” on page 203
“Background Report Generator (BRG)” on page 208
164 Configuration
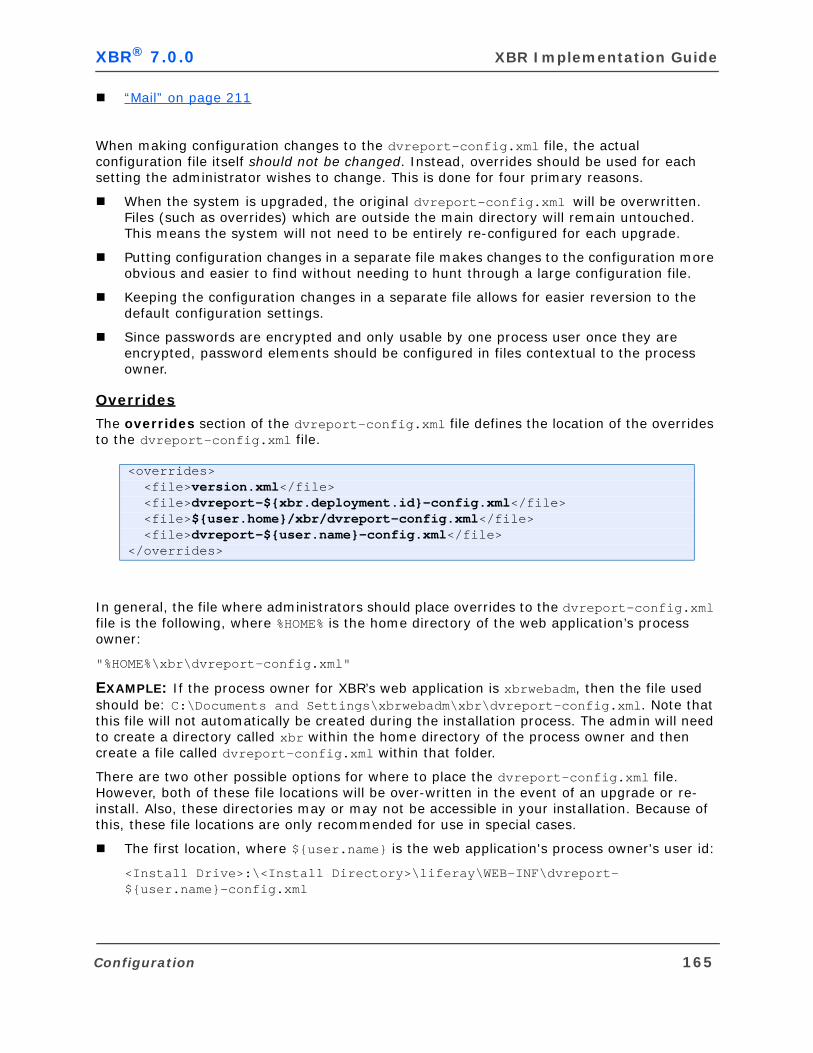
XBR® 7.0.0 XBR Implementation Guide
“Mail” on page 211
When making configuration changes to the dvreport-config.xml file, the actual configuration file itself should not be changed. Instead, overrides should be used for each setting the administrator wishes to change. This is done for four primary reasons.
When the system is upgraded, the original dvreport-config.xml will be overwritten. Files (such as overrides) which are outside the main directory will remain untouched. This means the system will not need to be entirely re-configured for each upgrade.
Putting configuration changes in a separate file makes changes to the configuration more obvious and easier to find without needing to hunt through a large configuration file.
Keeping the configuration changes in a separate file allows for easier reversion to the default configuration settings.
Since passwords are encrypted and only usable by one process user once they are encrypted, password elements should be configured in files contextual to the process owner.
Overrides
The overrides section of the dvreport-config.xml file defines the location of the overrides to the dvreport-config.xml file.
In general, the file where administrators should place overrides to the dvreport-config.xml file is the following, where %HOME% is the home directory of the web application’s process owner:
"%HOME%\xbr\dvreport-config.xml"
EXAMPLE: If the process owner for XBR’s web application is xbrwebadm, then the file used should be: C:\Documents and Settings\xbrwebadm\xbr\dvreport-config.xml. Note that this file will not automatically be created during the installation process. The admin will need to create a directory called xbr within the home directory of the process owner and then create a file called dvreport-config.xml within that folder.
There are two other possible options for where to place the dvreport-config.xml file. However, both of these file locations will be over-written in the event of an upgrade or re-install. Also, these directories may or may not be accessible in your installation. Because of this, these file locations are only recommended for use in special cases.
The first location, where ${user.name} is the web application's process owner's user id:
<Install Drive>:\<Install Directory>\liferay\WEB-INF\dvreport-${user.name}-config.xml
<overrides> <file>version.xml</file> <file>dvreport-${xbr.deployment.id}-config.xml</file> <file>${user.home}/xbr/dvreport-config.xml</file> <file>dvreport-${user.name}-config.xml</file> </overrides>
Configuration 165
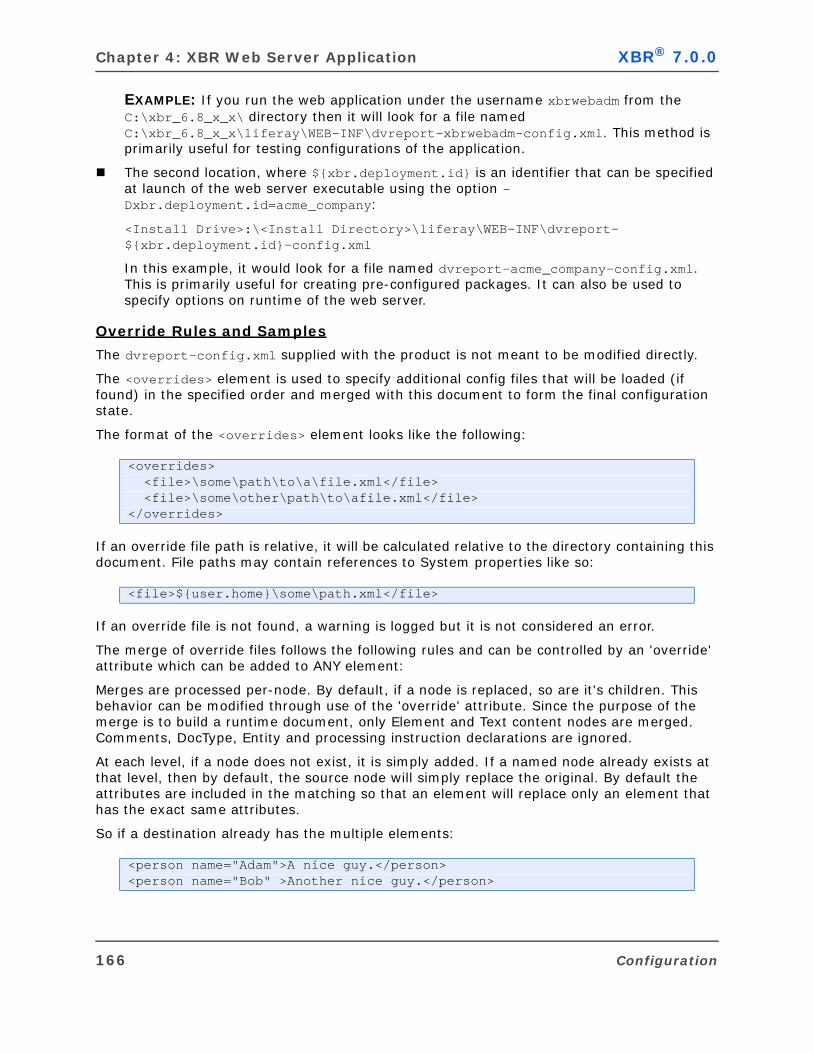
Chapter 4: XBR Web Server Application XBR® 7.0.0
EXAMPLE: If you run the web application under the username xbrwebadm from the C:\xbr_6.8_x_x\ directory then it will look for a file named C:\xbr_6.8_x_x\liferay\WEB-INF\dvreport-xbrwebadm-config.xml. This method is primarily useful for testing configurations of the application.
The second location, where ${xbr.deployment.id} is an identifier that can be specified at launch of the web server executable using the option –Dxbr.deployment.id=acme_company:
<Install Drive>:\<Install Directory>\liferay\WEB-INF\dvreport-${xbr.deployment.id}-config.xml
In this example, it would look for a file named dvreport-acme_company-config.xml. This is primarily useful for creating pre-configured packages. It can also be used to specify options on runtime of the web server.
Override Rules and Samples
The dvreport-config.xml supplied with the product is not meant to be modified directly.
The <overrides> element is used to specify additional config files that will be loaded (if found) in the specified order and merged with this document to form the final configuration state.
The format of the <overrides> element looks like the following:
If an override file path is relative, it will be calculated relative to the directory containing this document. File paths may contain references to System properties like so:
If an override file is not found, a warning is logged but it is not considered an error.
The merge of override files follows the following rules and can be controlled by an 'override' attribute which can be added to ANY element:
Merges are processed per-node. By default, if a node is replaced, so are it's children. This behavior can be modified through use of the 'override' attribute. Since the purpose of the merge is to build a runtime document, only Element and Text content nodes are merged. Comments, DocType, Entity and processing instruction declarations are ignored.
At each level, if a node does not exist, it is simply added. If a named node already exists at that level, then by default, the source node will simply replace the original. By default the attributes are included in the matching so that an element will replace only an element that has the exact same attributes.
So if a destination already has the multiple elements:
<overrides> <file>\some\path\to\a\file.xml</file> <file>\some\other\path\to\afile.xml</file></overrides>
<file>${user.home}\some\path.xml</file>
<person name="Adam">A nice guy.</person><person name="Bob" >Another nice guy.</person>
166 Configuration
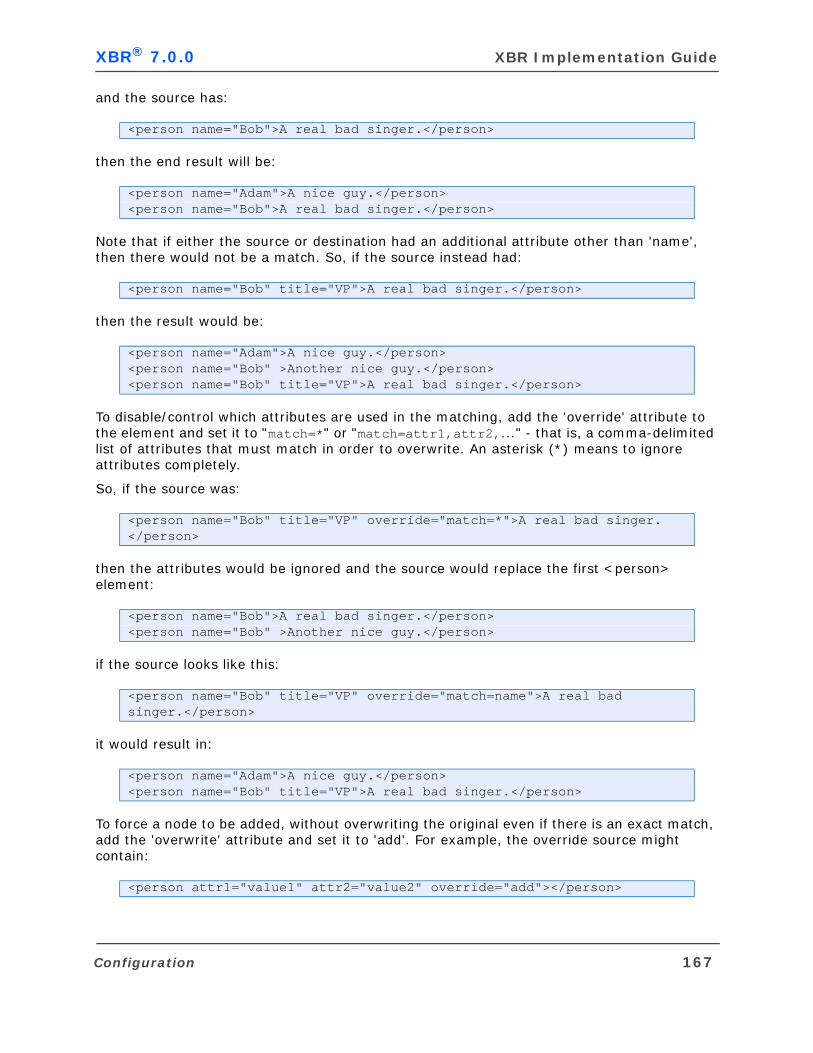
XBR® 7.0.0 XBR Implementation Guide
and the source has:
then the end result will be:
Note that if either the source or destination had an additional attribute other than 'name', then there would not be a match. So, if the source instead had:
then the result would be:
To disable/control which attributes are used in the matching, add the 'override' attribute to the element and set it to "match=*" or "match=attr1,attr2,..." - that is, a comma-delimited list of attributes that must match in order to overwrite. An asterisk (*) means to ignore attributes completely.
So, if the source was:
then the attributes would be ignored and the source would replace the first <person> element:
if the source looks like this:
it would result in:
To force a node to be added, without overwriting the original even if there is an exact match, add the 'overwrite' attribute and set it to 'add'. For example, the override source might contain:
<person name="Bob">A real bad singer.</person>
<person name="Adam">A nice guy.</person><person name="Bob">A real bad singer.</person>
<person name="Bob" title="VP">A real bad singer.</person>
<person name="Adam">A nice guy.</person><person name="Bob" >Another nice guy.</person><person name="Bob" title="VP">A real bad singer.</person>
<person name="Bob" title="VP" override="match=*">A real bad singer.</person>
<person name="Bob">A real bad singer.</person><person name="Bob" >Another nice guy.</person>
<person name="Bob" title="VP" override="match=name">A real bad singer.</person>
<person name="Adam">A nice guy.</person><person name="Bob" title="VP">A real bad singer.</person>
<person attr1="value1" attr2="value2" override="add"></person>
Configuration 167

Chapter 4: XBR Web Server Application XBR® 7.0.0
This will cause the source <person> attribute to be added as a sibling to any <person> that is already in the destination document at that level. This is most useful for adding child elements that have an n:1 relationship with their parent and do not have distinctive (or any) attributes, but may have distinctive content.
To merge children without overriding a parent, the 'override' attribute can be added to the parent element and set to "skip". For example, an override source might contain:
This will cause the merge to skip down past the grandparent and parent elements and merge each child node individually. If either the grandparent and parent elements do not already exist, then they are added, along with any attributes specified in the source version of these elements (sans the 'override' attribute).
If the destination element itself has the override attribute set to 'false', then neither it or it's children will be overridden.
So, to summarize, the override attribute can have the following values:
When on the source element:
add: Causes the source element to be added even if the destination parent already has an exact matching element.
skip: Causes this source element to only be added if there is no matching destination element. Processing continues on to the source element's children.
match:*|attr1[,attr[,...]] - If set to "*", then attributes will be ignored in matching the source element to a destination element. Otherwise, is a comma-delimited list of which attributes to include in the comparison.
false: No meaning.
When on the destination element:
add: No meaning.
skip: No meaning.
match: No meaning.
false: Prevents this element (and its children) from being overridden.
More than one value can be assigned to the override attribute - simply separate the values with semi-colons like so:
<grandparent override="skip"> <parent override="skip"> <child1 ..> ... </child1> <child2 ..> ... </child2> </parent></grandparent>
<FieldName override="skip;match=*;false">...</FieldName>
168 Configuration
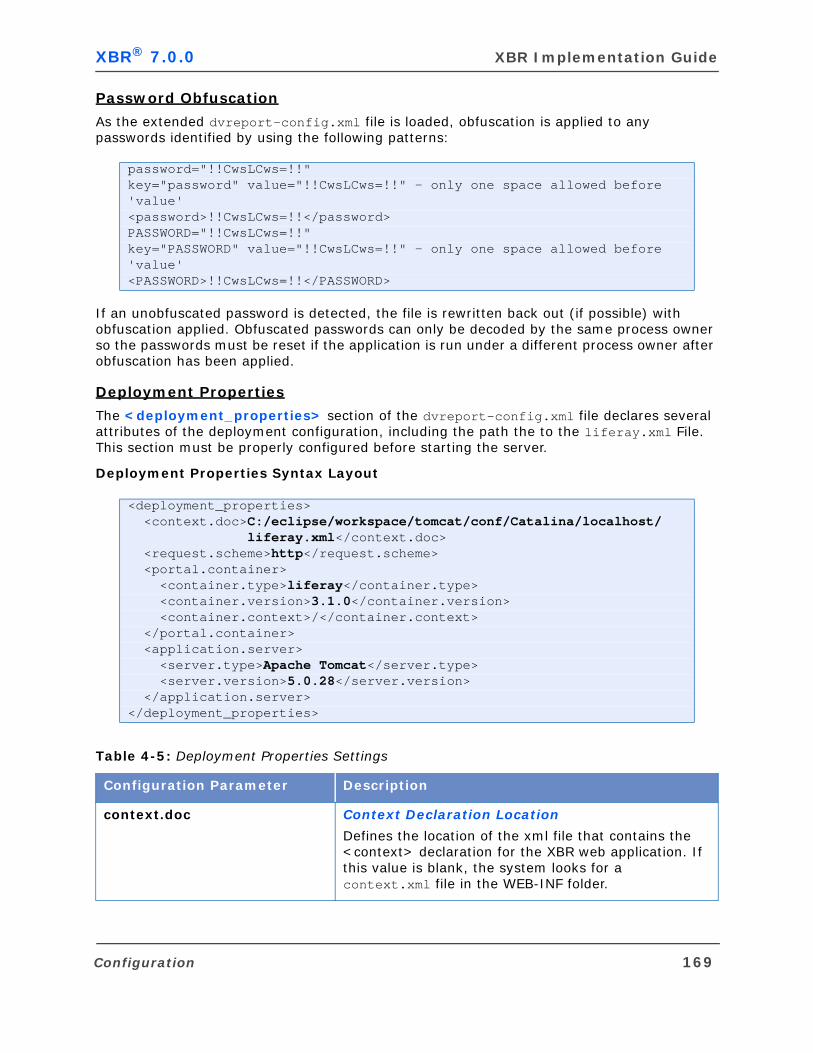
XBR® 7.0.0 XBR Implementation Guide
Password Obfuscation
As the extended dvreport-config.xml file is loaded, obfuscation is applied to any passwords identified by using the following patterns:
If an unobfuscated password is detected, the file is rewritten back out (if possible) with obfuscation applied. Obfuscated passwords can only be decoded by the same process owner so the passwords must be reset if the application is run under a different process owner after obfuscation has been applied.
Deployment Properties
The <deployment_properties> section of the dvreport-config.xml file declares several attributes of the deployment configuration, including the path the to the liferay.xml File. This section must be properly configured before starting the server.
Deployment Properties Syntax Layout
password="!!CwsLCws=!!" key="password" value="!!CwsLCws=!!" - only one space allowed before 'value' <password>!!CwsLCws=!!</password> PASSWORD="!!CwsLCws=!!" key="PASSWORD" value="!!CwsLCws=!!" - only one space allowed before 'value' <PASSWORD>!!CwsLCws=!!</PASSWORD>
<deployment_properties> <context.doc>C:/eclipse/workspace/tomcat/conf/Catalina/localhost/ liferay.xml</context.doc> <request.scheme>http</request.scheme> <portal.container> <container.type>liferay</container.type> <container.version>3.1.0</container.version> <container.context>/</container.context> </portal.container> <application.server> <server.type>Apache Tomcat</server.type> <server.version>5.0.28</server.version> </application.server> </deployment_properties>
Table 4-5: Deployment Properties Settings
Configuration Parameter Description
context.doc Context Declaration Location
Defines the location of the xml file that contains the <context> declaration for the XBR web application. If this value is blank, the system looks for a context.xml file in the WEB-INF folder.
Configuration 169
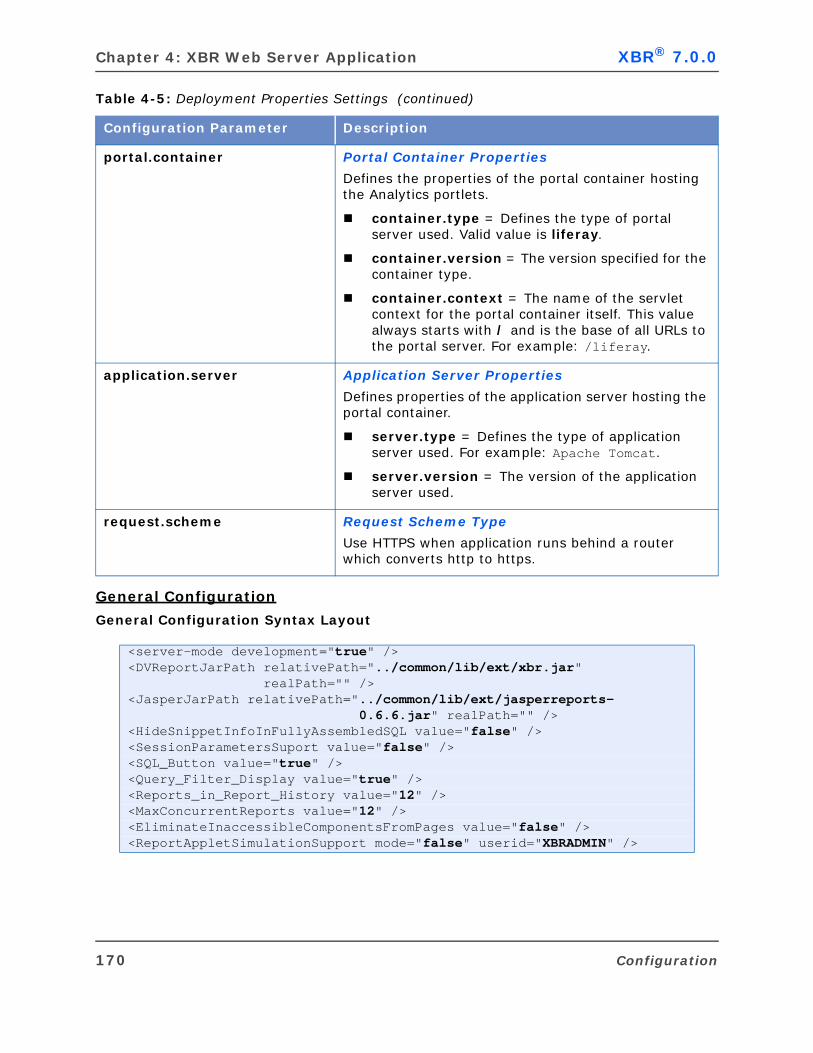
Chapter 4: XBR Web Server Application XBR® 7.0.0
General Configuration
General Configuration Syntax Layout
portal.container Portal Container Properties
Defines the properties of the portal container hosting the Analytics portlets.
container.type = Defines the type of portal server used. Valid value is liferay.
container.version = The version specified for the container type.
container.context = The name of the servlet context for the portal container itself. This value always starts with / and is the base of all URLs to the portal server. For example: /liferay.
application.server Application Server Properties
Defines properties of the application server hosting the portal container.
server.type = Defines the type of application server used. For example: Apache Tomcat.
server.version = The version of the application server used.
request.scheme Request Scheme Type
Use HTTPS when application runs behind a router which converts http to https.
<server-mode development="true" /> <DVReportJarPath relativePath="../common/lib/ext/xbr.jar" realPath="" /> <JasperJarPath relativePath="../common/lib/ext/jasperreports- 0.6.6.jar" realPath="" /><HideSnippetInfoInFullyAssembledSQL value="false" /> <SessionParametersSuport value="false" /> <SQL_Button value="true" /> <Query_Filter_Display value="true" /> <Reports_in_Report_History value="12" /> <MaxConcurrentReports value="12" /> <EliminateInaccessibleComponentsFromPages value="false" /> <ReportAppletSimulationSupport mode="false" userid="XBRADMIN" />
Table 4-5: Deployment Properties Settings (continued)
Configuration Parameter Description
170 Configuration
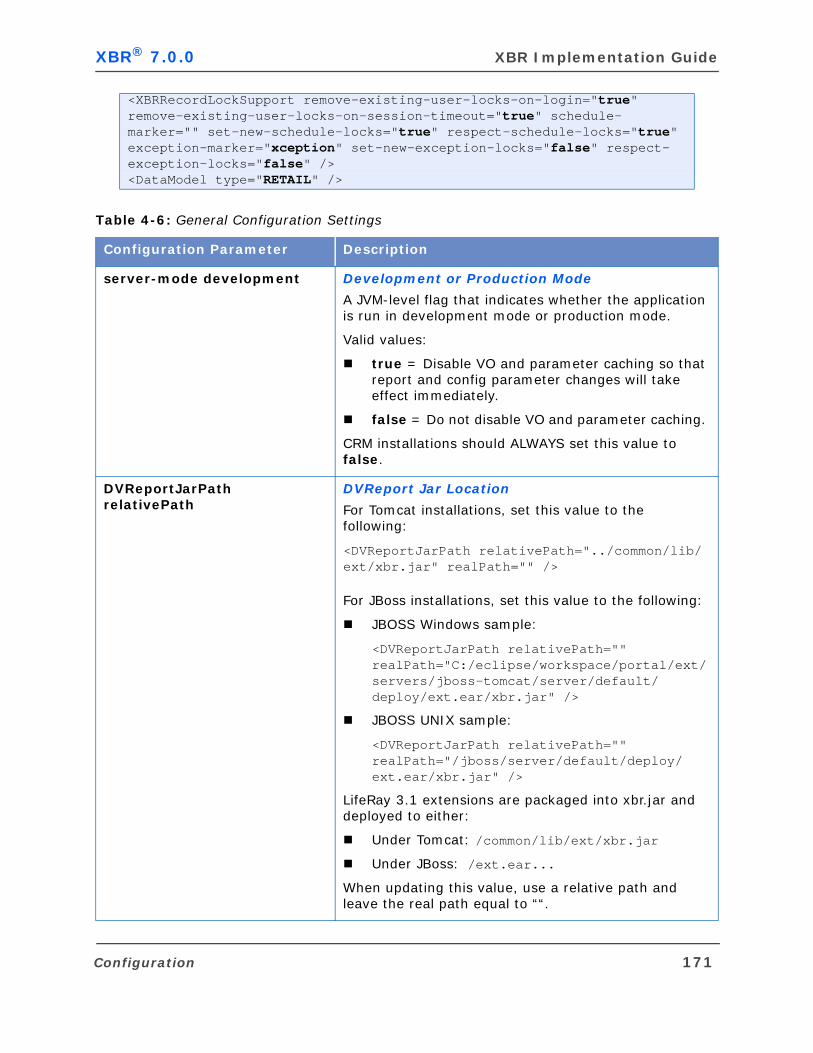
XBR® 7.0.0 XBR Implementation Guide
<XBRRecordLockSupport remove-existing-user-locks-on-login="true" remove-existing-user-locks-on-session-timeout="true" schedule-marker="" set-new-schedule-locks="true" respect-schedule-locks="true" exception-marker="xception" set-new-exception-locks="false" respect-exception-locks="false" /> <DataModel type="RETAIL" />
Table 4-6: General Configuration Settings
Configuration Parameter Description
server-mode development Development or Production Mode
A JVM-level flag that indicates whether the application is run in development mode or production mode.
Valid values:
true = Disable VO and parameter caching so that report and config parameter changes will take effect immediately.
false = Do not disable VO and parameter caching.
CRM installations should ALWAYS set this value to false.
DVReportJarPath relativePath
DVReport Jar Location
For Tomcat installations, set this value to the following:
<DVReportJarPath relativePath="../common/lib/ext/xbr.jar" realPath="" />
For JBoss installations, set this value to the following:
JBOSS Windows sample:
<DVReportJarPath relativePath="" realPath="C:/eclipse/workspace/portal/ext/servers/jboss-tomcat/server/default/deploy/ext.ear/xbr.jar" />
JBOSS UNIX sample:
<DVReportJarPath relativePath="" realPath="/jboss/server/default/deploy/ext.ear/xbr.jar" />
LifeRay 3.1 extensions are packaged into xbr.jar and deployed to either:
Under Tomcat: /common/lib/ext/xbr.jar
Under JBoss: /ext.ear...
When updating this value, use a relative path and leave the real path equal to ““.
Configuration 171
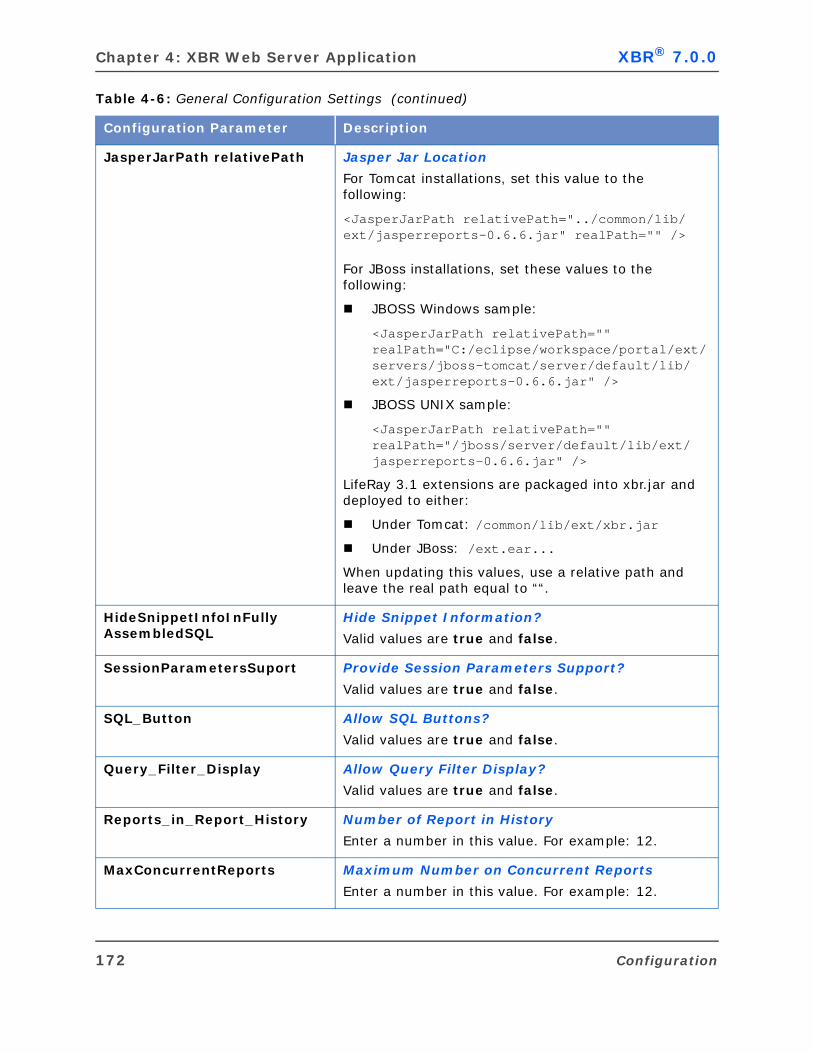
Chapter 4: XBR Web Server Application XBR® 7.0.0
JasperJarPath relativePath Jasper Jar Location
For Tomcat installations, set this value to the following:
<JasperJarPath relativePath="../common/lib/ext/jasperreports-0.6.6.jar" realPath="" />
For JBoss installations, set these values to the following:
JBOSS Windows sample:
<JasperJarPath relativePath="" realPath="C:/eclipse/workspace/portal/ext/servers/jboss-tomcat/server/default/lib/ext/jasperreports-0.6.6.jar" />
JBOSS UNIX sample:
<JasperJarPath relativePath="" realPath="/jboss/server/default/lib/ext/jasperreports-0.6.6.jar" />
LifeRay 3.1 extensions are packaged into xbr.jar and deployed to either:
Under Tomcat: /common/lib/ext/xbr.jar
Under JBoss: /ext.ear...
When updating this values, use a relative path and leave the real path equal to ““.
HideSnippetInfoInFullyAssembledSQL
Hide Snippet Information?
Valid values are true and false.
SessionParametersSuport Provide Session Parameters Support?
Valid values are true and false.
SQL_Button Allow SQL Buttons?
Valid values are true and false.
Query_Filter_Display Allow Query Filter Display?
Valid values are true and false.
Reports_in_Report_History Number of Report in History
Enter a number in this value. For example: 12.
MaxConcurrentReports Maximum Number on Concurrent Reports
Enter a number in this value. For example: 12.
Table 4-6: General Configuration Settings (continued)
Configuration Parameter Description
172 Configuration

XBR® 7.0.0 XBR Implementation Guide
EliminateInaccessibleComponentsFromPages
Hide Components that are Disabled for a User
Defines whether the system hides components that an Admin has disabled for a user. For example, if an Admin turns off user access to Quick Runs and Exceptions, the system hides Quick Runs and Exceptions for the user in the application.
Valid values:
true = The system hides components that an Admin has disabled for a user.
false = The system does not hide components that an Admin has disabled for a user.
ReportAppletSimulationSupport
Enable Report Validator
Enables the Report Validator. The Report Validator is a QA tool that is used to verify that execution of queries without using the GUI interface.
To enable the Report Validator, set the mode parameter to true and the userid to XBRADMIN.
XBRRecordLockSupport Support Record Lock
Specifies the extent to which the thin-client application respects the manual record locking scheme used by the Client-Server XBR.
DataModel Data Model Type
Defines the type of data model used by the XBR application. Valid values are RETAIL and FOODSERVICE.
Table 4-6: General Configuration Settings (continued)
Configuration Parameter Description
Configuration 173
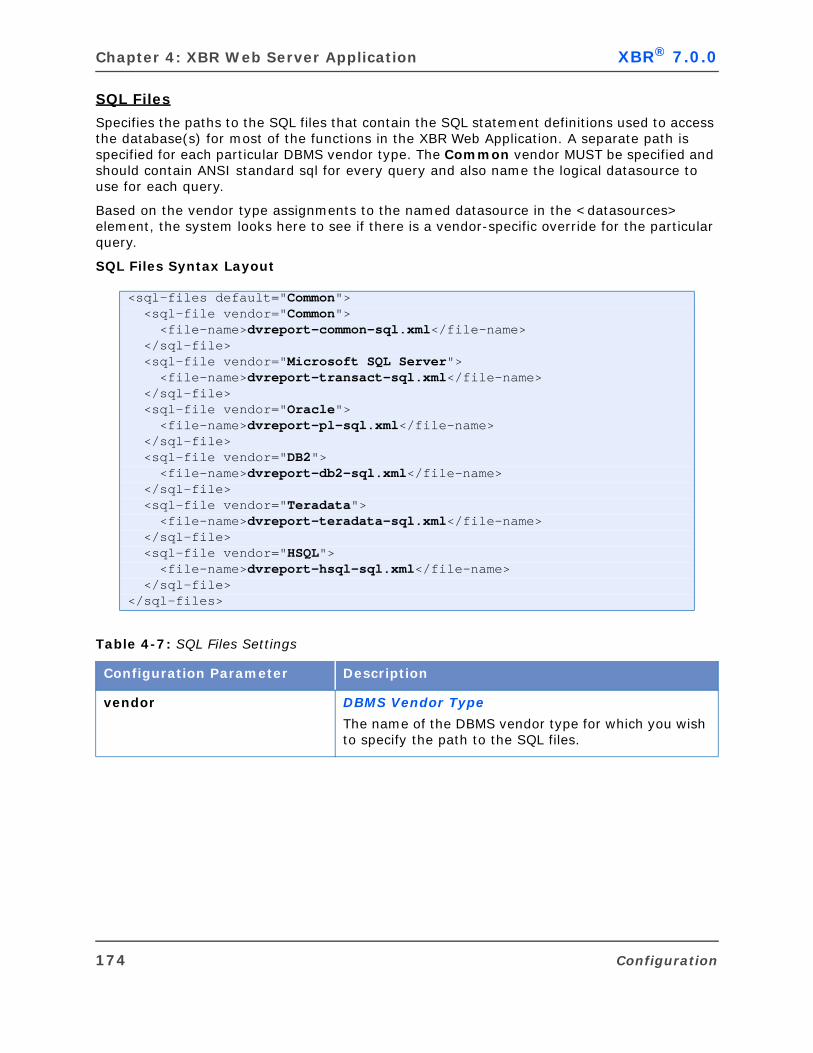
Chapter 4: XBR Web Server Application XBR® 7.0.0
SQL Files
Specifies the paths to the SQL files that contain the SQL statement definitions used to access the database(s) for most of the functions in the XBR Web Application. A separate path is specified for each particular DBMS vendor type. The Common vendor MUST be specified and should contain ANSI standard sql for every query and also name the logical datasource to use for each query.
Based on the vendor type assignments to the named datasource in the <datasources> element, the system looks here to see if there is a vendor-specific override for the particular query.
SQL Files Syntax Layout
<sql-files default="Common"> <sql-file vendor="Common"> <file-name>dvreport-common-sql.xml</file-name> </sql-file> <sql-file vendor="Microsoft SQL Server"> <file-name>dvreport-transact-sql.xml</file-name> </sql-file> <sql-file vendor="Oracle"> <file-name>dvreport-pl-sql.xml</file-name> </sql-file> <sql-file vendor="DB2"> <file-name>dvreport-db2-sql.xml</file-name> </sql-file> <sql-file vendor="Teradata"> <file-name>dvreport-teradata-sql.xml</file-name> </sql-file> <sql-file vendor="HSQL"> <file-name>dvreport-hsql-sql.xml</file-name> </sql-file> </sql-files>
Table 4-7: SQL Files Settings
Configuration Parameter Description
vendor DBMS Vendor Type
The name of the DBMS vendor type for which you wish to specify the path to the SQL files.
174 Configuration
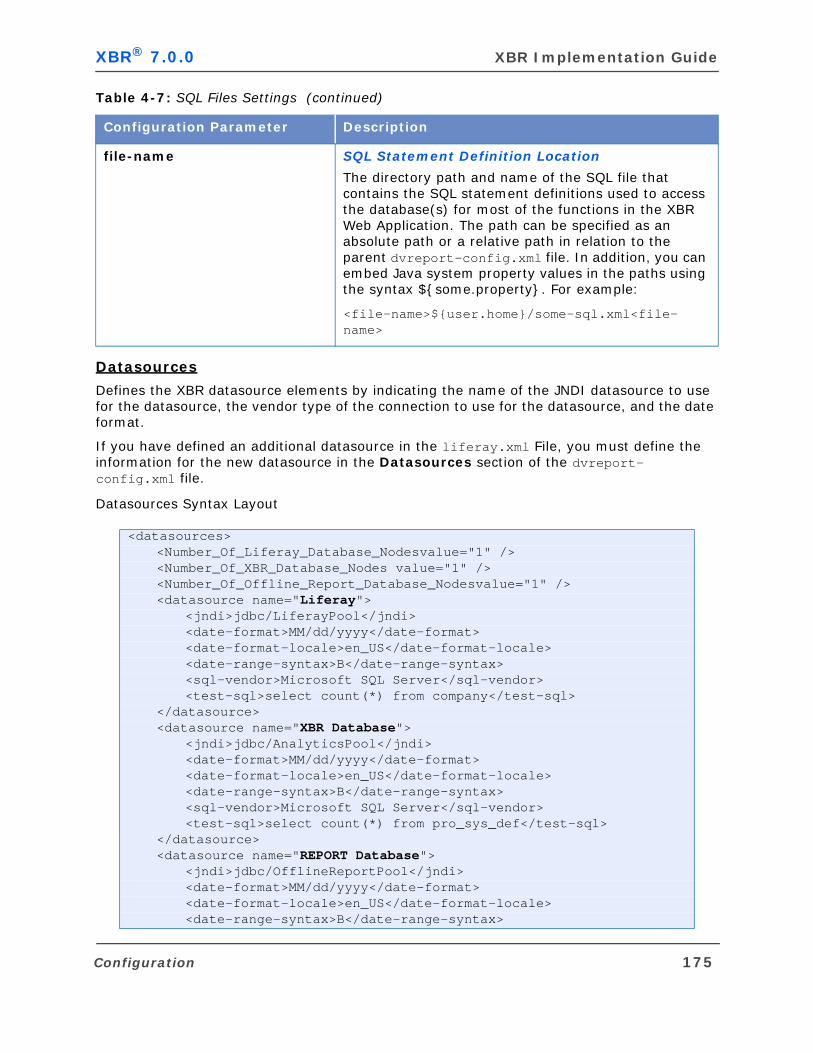
XBR® 7.0.0 XBR Implementation Guide
Datasources
Defines the XBR datasource elements by indicating the name of the JNDI datasource to use for the datasource, the vendor type of the connection to use for the datasource, and the date format.
If you have defined an additional datasource in the liferay.xml File, you must define the information for the new datasource in the Datasources section of the dvreport-config.xml file.
Datasources Syntax Layout
file-name SQL Statement Definition Location
The directory path and name of the SQL file that contains the SQL statement definitions used to access the database(s) for most of the functions in the XBR Web Application. The path can be specified as an absolute path or a relative path in relation to the parent dvreport-config.xml file. In addition, you can embed Java system property values in the paths using the syntax ${some.property}. For example:
<file-name>${user.home}/some-sql.xml<file-name>
<datasources> <Number_Of_Liferay_Database_Nodesvalue="1" /><Number_Of_XBR_Database_Nodes value="1" /><Number_Of_Offline_Report_Database_Nodesvalue="1" /><datasource name="Liferay">
<jndi>jdbc/LiferayPool</jndi> <date-format>MM/dd/yyyy</date-format> <date-format-locale>en_US</date-format-locale>
<date-range-syntax>B</date-range-syntax> <sql-vendor>Microsoft SQL Server</sql-vendor> <test-sql>select count(*) from company</test-sql>
</datasource> <datasource name="XBR Database">
<jndi>jdbc/AnalyticsPool</jndi> <date-format>MM/dd/yyyy</date-format> <date-format-locale>en_US</date-format-locale><date-range-syntax>B</date-range-syntax> <sql-vendor>Microsoft SQL Server</sql-vendor> <test-sql>select count(*) from pro_sys_def</test-sql>
</datasource> <datasource name="REPORT Database">
<jndi>jdbc/OfflineReportPool</jndi> <date-format>MM/dd/yyyy</date-format> <date-format-locale>en_US</date-format-locale><date-range-syntax>B</date-range-syntax>
Table 4-7: SQL Files Settings (continued)
Configuration Parameter Description
Configuration 175
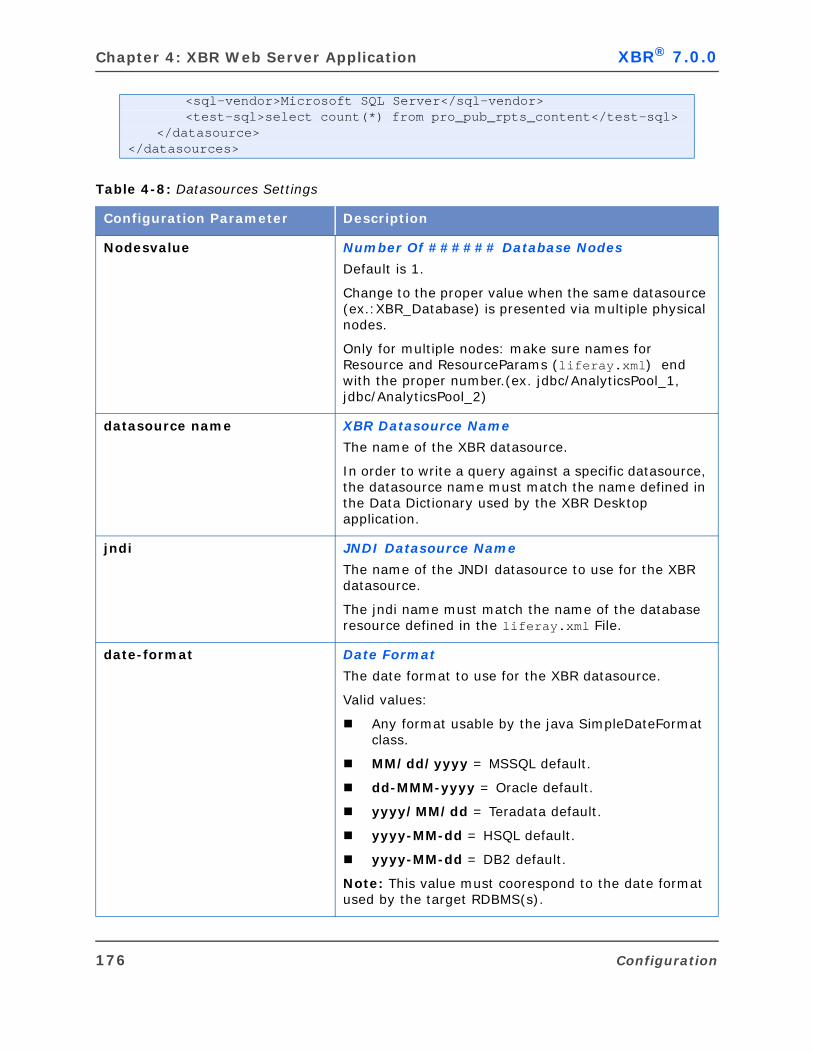
Chapter 4: XBR Web Server Application XBR® 7.0.0
<sql-vendor>Microsoft SQL Server</sql-vendor> <test-sql>select count(*) from pro_pub_rpts_content</test-sql>
</datasource> </datasources>
Table 4-8: Datasources Settings
Configuration Parameter Description
Nodesvalue Number Of ###### Database Nodes
Default is 1.
Change to the proper value when the same datasource (ex.:XBR_Database) is presented via multiple physical nodes.
Only for multiple nodes: make sure names for Resource and ResourceParams (liferay.xml) end with the proper number.(ex. jdbc/AnalyticsPool_1, jdbc/AnalyticsPool_2)
datasource name XBR Datasource Name
The name of the XBR datasource.
In order to write a query against a specific datasource, the datasource name must match the name defined in the Data Dictionary used by the XBR Desktop application.
jndi JNDI Datasource Name
The name of the JNDI datasource to use for the XBR datasource.
The jndi name must match the name of the database resource defined in the liferay.xml File.
date-format Date Format
The date format to use for the XBR datasource.
Valid values:
Any format usable by the java SimpleDateFormat class.
MM/dd/yyyy = MSSQL default.
dd-MMM-yyyy = Oracle default.
yyyy/MM/dd = Teradata default.
yyyy-MM-dd = HSQL default.
yyyy-MM-dd = DB2 default.
Note: This value must coorespond to the date format used by the target RDBMS(s).
176 Configuration
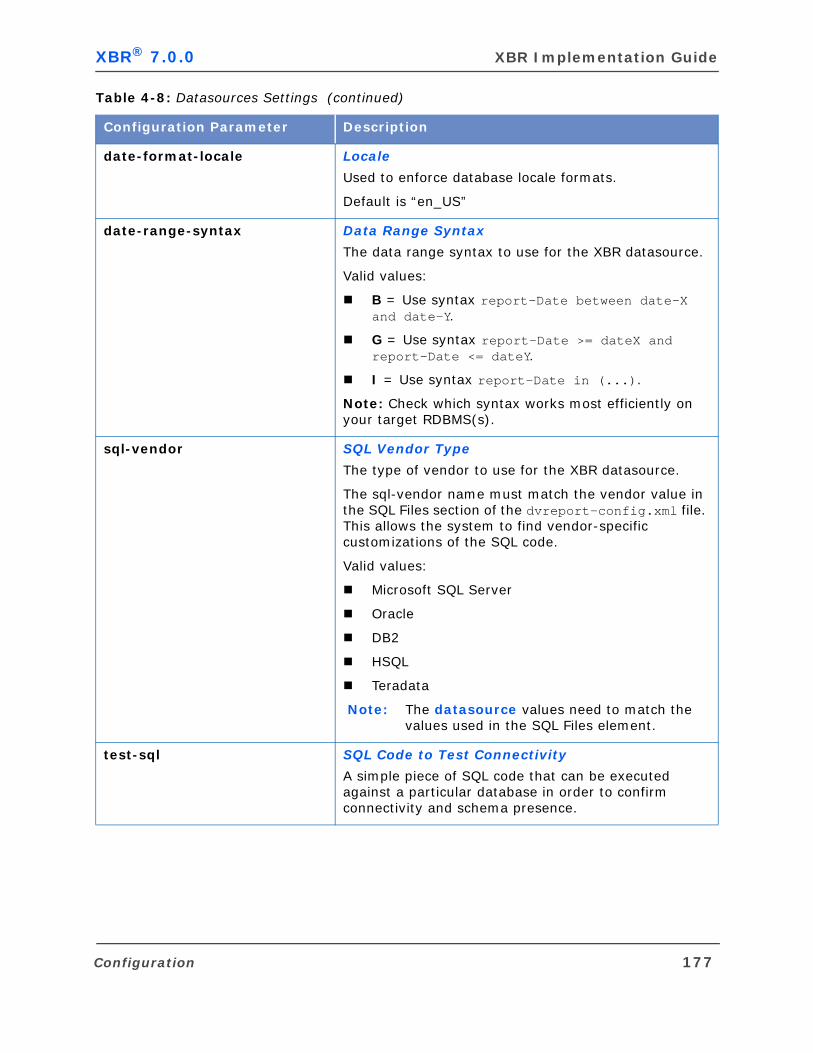
XBR® 7.0.0 XBR Implementation Guide
date-format-locale Locale
Used to enforce database locale formats.
Default is “en_US”
date-range-syntax Data Range Syntax
The data range syntax to use for the XBR datasource.
Valid values:
B = Use syntax report-Date between date-X and date-Y.
G = Use syntax report-Date >= dateX and report-Date <= dateY.
I = Use syntax report-Date in (...).
Note: Check which syntax works most efficiently on your target RDBMS(s).
sql-vendor SQL Vendor Type
The type of vendor to use for the XBR datasource.
The sql-vendor name must match the vendor value in the SQL Files section of the dvreport-config.xml file. This allows the system to find vendor-specific customizations of the SQL code.
Valid values:
Microsoft SQL Server
Oracle
DB2
HSQL
Teradata
Note: The datasource values need to match the values used in the SQL Files element.
test-sql SQL Code to Test Connectivity
A simple piece of SQL code that can be executed against a particular database in order to confirm connectivity and schema presence.
Table 4-8: Datasources Settings (continued)
Configuration Parameter Description
Configuration 177
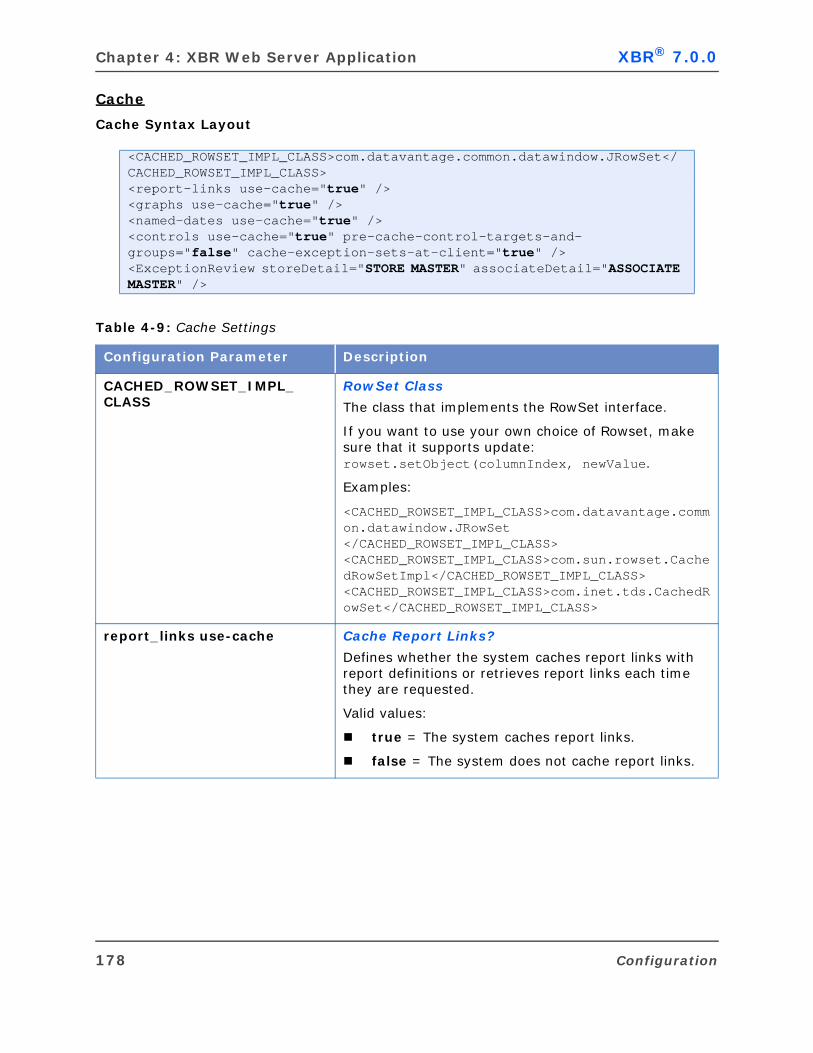
Chapter 4: XBR Web Server Application XBR® 7.0.0
Cache
Cache Syntax Layout
<CACHED_ROWSET_IMPL_CLASS>com.datavantage.common.datawindow.JRowSet</CACHED_ROWSET_IMPL_CLASS><report-links use-cache="true" /> <graphs use-cache="true" /> <named-dates use-cache="true" /> <controls use-cache="true" pre-cache-control-targets-and-groups="false" cache-exception-sets-at-client="true" /><ExceptionReview storeDetail="STORE MASTER" associateDetail="ASSOCIATE MASTER" />
Table 4-9: Cache Settings
Configuration Parameter Description
CACHED_ROWSET_IMPL_CLASS
RowSet Class
The class that implements the RowSet interface.
If you want to use your own choice of Rowset, make sure that it supports update: rowset.setObject(columnIndex, newValue.
Examples:
<CACHED_ROWSET_IMPL_CLASS>com.datavantage.common.datawindow.JRowSet</CACHED_ROWSET_IMPL_CLASS> <CACHED_ROWSET_IMPL_CLASS>com.sun.rowset.CachedRowSetImpl</CACHED_ROWSET_IMPL_CLASS> <CACHED_ROWSET_IMPL_CLASS>com.inet.tds.CachedRowSet</CACHED_ROWSET_IMPL_CLASS>
report_links use-cache Cache Report Links?
Defines whether the system caches report links with report definitions or retrieves report links each time they are requested.
Valid values:
true = The system caches report links.
false = The system does not cache report links.
178 Configuration
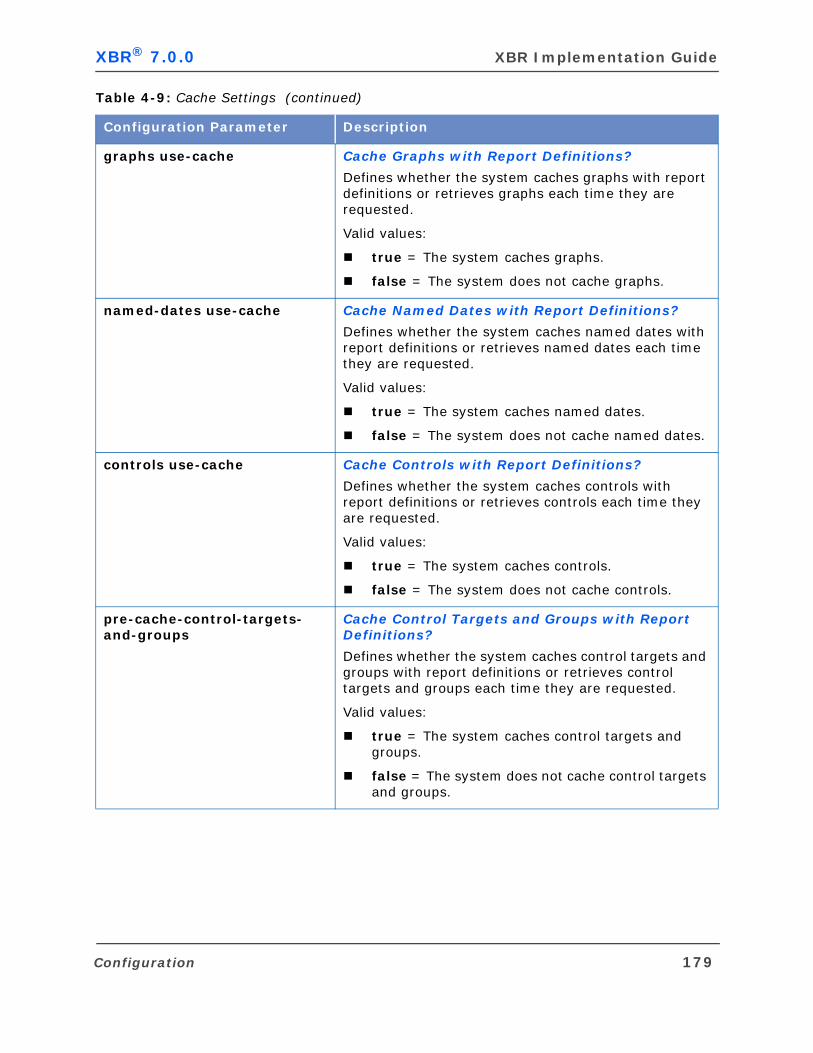
XBR® 7.0.0 XBR Implementation Guide
graphs use-cache Cache Graphs with Report Definitions?
Defines whether the system caches graphs with report definitions or retrieves graphs each time they are requested.
Valid values:
true = The system caches graphs.
false = The system does not cache graphs.
named-dates use-cache Cache Named Dates with Report Definitions?
Defines whether the system caches named dates with report definitions or retrieves named dates each time they are requested.
Valid values:
true = The system caches named dates.
false = The system does not cache named dates.
controls use-cache Cache Controls with Report Definitions?
Defines whether the system caches controls with report definitions or retrieves controls each time they are requested.
Valid values:
true = The system caches controls.
false = The system does not cache controls.
pre-cache-control-targets-and-groups
Cache Control Targets and Groups with Report Definitions?
Defines whether the system caches control targets and groups with report definitions or retrieves control targets and groups each time they are requested.
Valid values:
true = The system caches control targets and groups.
false = The system does not cache control targets and groups.
Table 4-9: Cache Settings (continued)
Configuration Parameter Description
Configuration 179

Chapter 4: XBR Web Server Application XBR® 7.0.0
Exception
This configuration provides the means for translating the Exception screen titles to another language.
Exception Syntax Layout
cache-exception-sets-at-client
Cache Exception Sets wiht the Client?
Defines whether the system caches exception sets with the client or retrieves exception sets each time they are requested.
Valid values:
true = The system caches exception sets.
false = The system does not cache exception sets.
ExceptionReview Provides appropriate query mapping for store and employee details
These settings should only be changed for foreign language versions of the XBR application.
Unicode entries may have to be used in order for some special characters to be displayed properly.
For example, MAÎTRE DE MAGASIN --> MAÎTRE DE MAGASIN.
<exception> <queries> <sets>EXCEPTION SETS</sets> <detail>EXCEPTION DETAIL</detail> <controlPoint>EXCEPTION VIEW SINGLE MEASURE</controlPoint> <controlGroup>EXCEPTION VIEW MULTI-MEASURES</controlGroup> <storeDetail>STORE MASTER</storeDetail> <associateDetail>ASSOCIATE MASTER</associateDetail> </queries></exception>
Table 4-10: Exception Settings
Configuration Parameter Description
sets Default value = EXCEPTION SETS
Table 4-9: Cache Settings (continued)
Configuration Parameter Description
180 Configuration
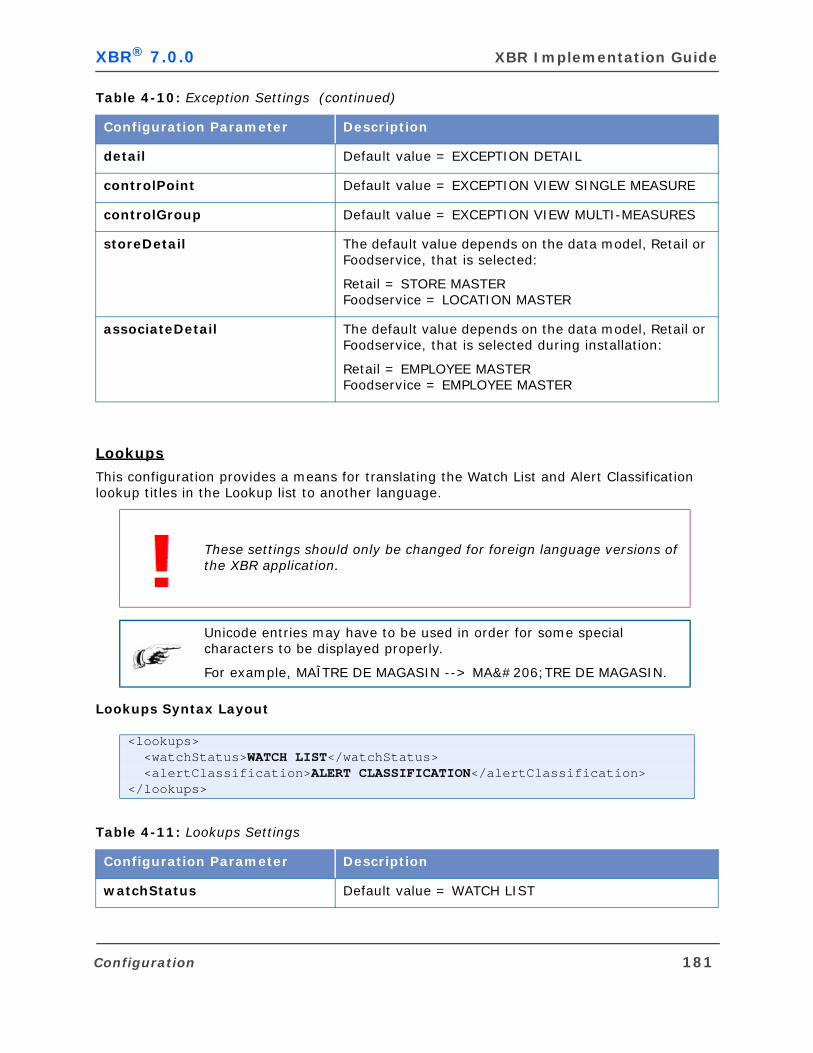
XBR® 7.0.0 XBR Implementation Guide
Lookups
This configuration provides a means for translating the Watch List and Alert Classification lookup titles in the Lookup list to another language.
Lookups Syntax Layout
detail Default value = EXCEPTION DETAIL
controlPoint Default value = EXCEPTION VIEW SINGLE MEASURE
controlGroup Default value = EXCEPTION VIEW MULTI-MEASURES
storeDetail The default value depends on the data model, Retail or Foodservice, that is selected:
Retail = STORE MASTERFoodservice = LOCATION MASTER
associateDetail The default value depends on the data model, Retail or Foodservice, that is selected during installation:
Retail = EMPLOYEE MASTERFoodservice = EMPLOYEE MASTER
These settings should only be changed for foreign language versions of the XBR application.
Unicode entries may have to be used in order for some special characters to be displayed properly.
For example, MAÎTRE DE MAGASIN --> MAÎTRE DE MAGASIN.
<lookups> <watchStatus>WATCH LIST</watchStatus> <alertClassification>ALERT CLASSIFICATION</alertClassification></lookups>
Table 4-11: Lookups Settings
Configuration Parameter Description
watchStatus Default value = WATCH LIST
Table 4-10: Exception Settings (continued)
Configuration Parameter Description
Configuration 181
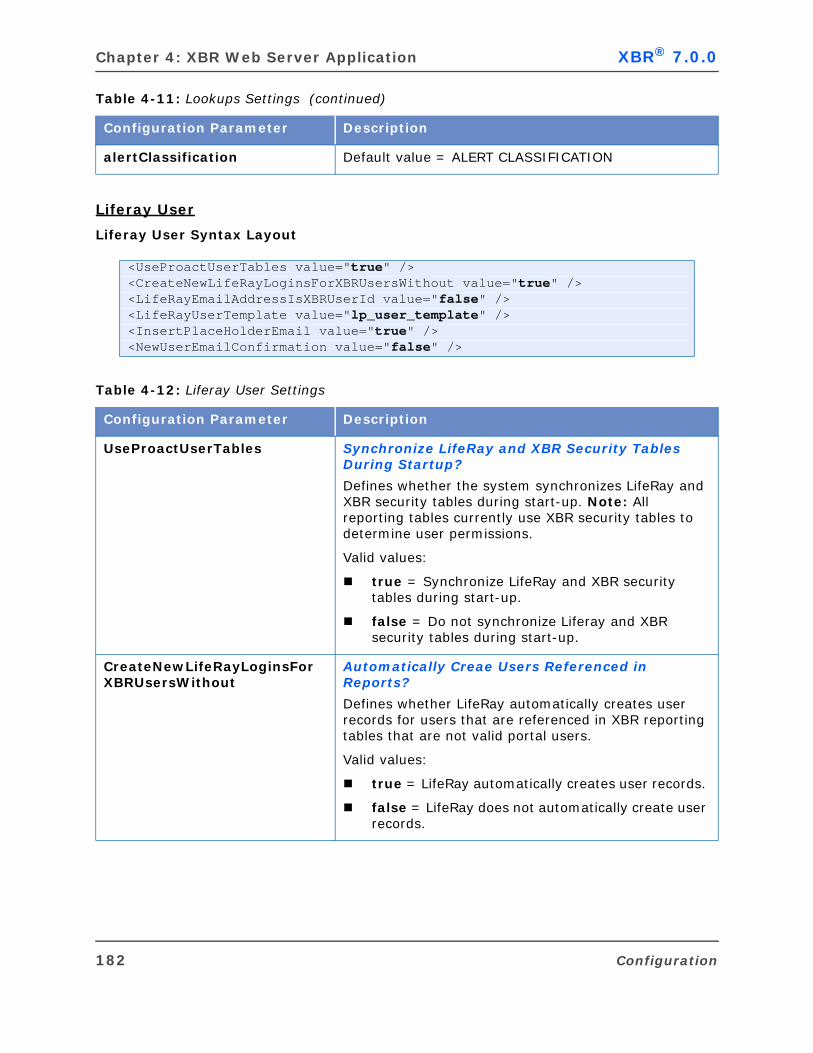
Chapter 4: XBR Web Server Application XBR® 7.0.0
Liferay User
Liferay User Syntax Layout
alertClassification Default value = ALERT CLASSIFICATION
<UseProactUserTables value="true" /><CreateNewLifeRayLoginsForXBRUsersWithout value="true" /> <LifeRayEmailAddressIsXBRUserId value="false" /> <LifeRayUserTemplate value="lp_user_template" /> <InsertPlaceHolderEmail value="true" /> <NewUserEmailConfirmation value="false" />
Table 4-12: Liferay User Settings
Configuration Parameter Description
UseProactUserTables Synchronize LifeRay and XBR Security Tables During Startup?
Defines whether the system synchronizes LifeRay and XBR security tables during start-up. Note: All reporting tables currently use XBR security tables to determine user permissions.
Valid values:
true = Synchronize LifeRay and XBR security tables during start-up.
false = Do not synchronize Liferay and XBR security tables during start-up.
CreateNewLifeRayLoginsForXBRUsersWithout
Automatically Creae Users Referenced in Reports?
Defines whether LifeRay automatically creates user records for users that are referenced in XBR reporting tables that are not valid portal users.
Valid values:
true = LifeRay automatically creates user records.
false = LifeRay does not automatically create user records.
Table 4-11: Lookups Settings (continued)
Configuration Parameter Description
182 Configuration
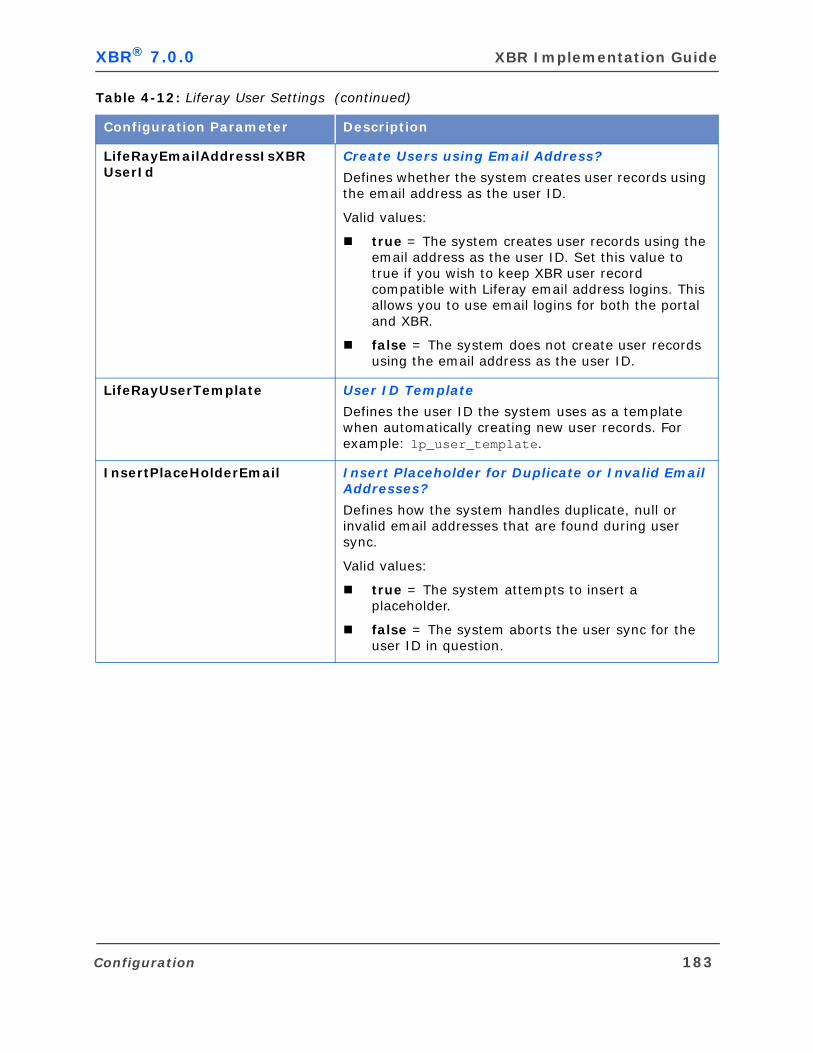
XBR® 7.0.0 XBR Implementation Guide
LifeRayEmailAddressIsXBRUserId
Create Users using Email Address?
Defines whether the system creates user records using the email address as the user ID.
Valid values:
true = The system creates user records using the email address as the user ID. Set this value to true if you wish to keep XBR user record compatible with Liferay email address logins. This allows you to use email logins for both the portal and XBR.
false = The system does not create user records using the email address as the user ID.
LifeRayUserTemplate User ID Template
Defines the user ID the system uses as a template when automatically creating new user records. For example: lp_user_template.
InsertPlaceHolderEmail Insert Placeholder for Duplicate or Invalid Email Addresses?
Defines how the system handles duplicate, null or invalid email addresses that are found during user sync.
Valid values:
true = The system attempts to insert a placeholder.
false = The system aborts the user sync for the user ID in question.
Table 4-12: Liferay User Settings (continued)
Configuration Parameter Description
Configuration 183
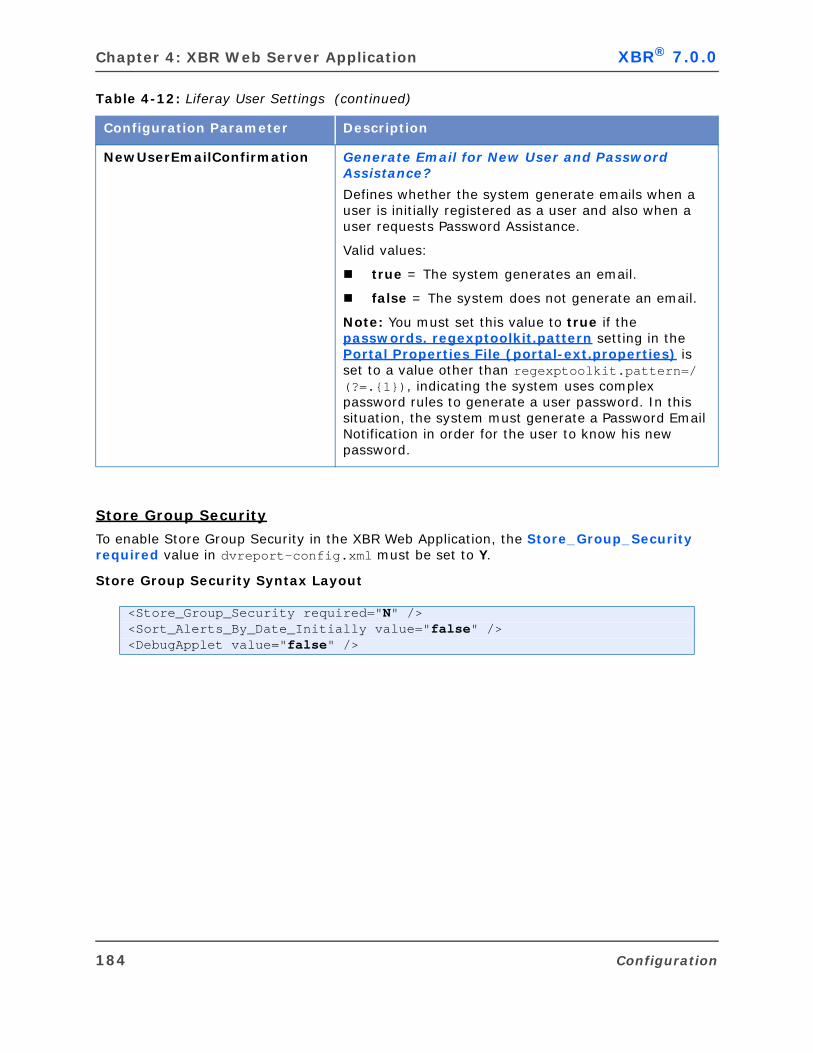
Chapter 4: XBR Web Server Application XBR® 7.0.0
Store Group Security
To enable Store Group Security in the XBR Web Application, the Store_Group_Security required value in dvreport-config.xml must be set to Y.
Store Group Security Syntax Layout
NewUserEmailConfirmation Generate Email for New User and Password Assistance?
Defines whether the system generate emails when a user is initially registered as a user and also when a user requests Password Assistance.
Valid values:
true = The system generates an email.
false = The system does not generate an email.
Note: You must set this value to true if the passwords. regexptoolkit.pattern setting in the Portal Properties File (portal-ext.properties) is set to a value other than regexptoolkit.pattern=/(?=.{1}), indicating the system uses complex password rules to generate a user password. In this situation, the system must generate a Password Email Notification in order for the user to know his new password.
<Store_Group_Security required="N" /> <Sort_Alerts_By_Date_Initially value="false" /> <DebugApplet value="false" />
Table 4-12: Liferay User Settings (continued)
Configuration Parameter Description
184 Configuration
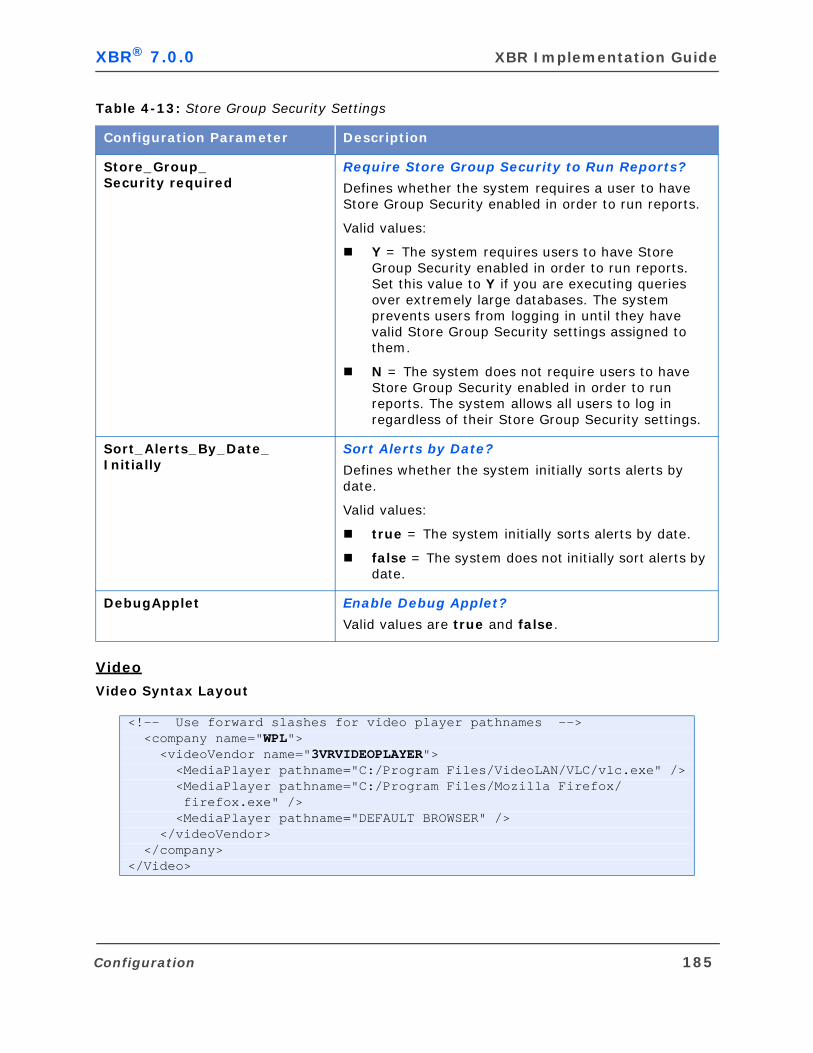
XBR® 7.0.0 XBR Implementation Guide
Video
Video Syntax Layout
Table 4-13: Store Group Security Settings
Configuration Parameter Description
Store_Group_Security required
Require Store Group Security to Run Reports?
Defines whether the system requires a user to have Store Group Security enabled in order to run reports.
Valid values:
Y = The system requires users to have Store Group Security enabled in order to run reports. Set this value to Y if you are executing queries over extremely large databases. The system prevents users from logging in until they have valid Store Group Security settings assigned to them.
N = The system does not require users to have Store Group Security enabled in order to run reports. The system allows all users to log in regardless of their Store Group Security settings.
Sort_Alerts_By_Date_Initially
Sort Alerts by Date?
Defines whether the system initially sorts alerts by date.
Valid values:
true = The system initially sorts alerts by date.
false = The system does not initially sort alerts by date.
DebugApplet Enable Debug Applet?
Valid values are true and false.
<!-- Use forward slashes for video player pathnames --> <company name="WPL"> <videoVendor name="3VRVIDEOPLAYER"> <MediaPlayer pathname="C:/Program Files/VideoLAN/VLC/vlc.exe" /> <MediaPlayer pathname="C:/Program Files/Mozilla Firefox/ firefox.exe" /> <MediaPlayer pathname="DEFAULT BROWSER" /> </videoVendor> </company></Video>
Configuration 185
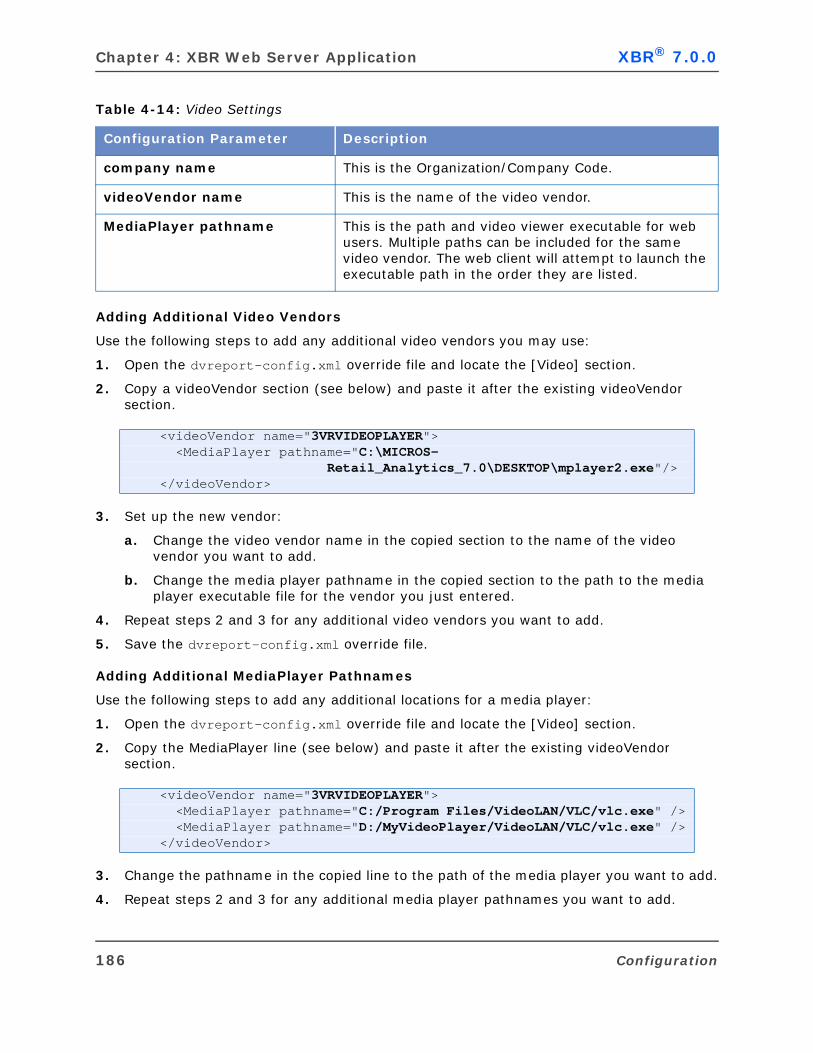
Chapter 4: XBR Web Server Application XBR® 7.0.0
Adding Additional Video Vendors
Use the following steps to add any additional video vendors you may use:
1. Open the dvreport-config.xml override file and locate the [Video] section.
2. Copy a videoVendor section (see below) and paste it after the existing videoVendor section.
3. Set up the new vendor:
a. Change the video vendor name in the copied section to the name of the video vendor you want to add.
b. Change the media player pathname in the copied section to the path to the media player executable file for the vendor you just entered.
4. Repeat steps 2 and 3 for any additional video vendors you want to add.
5. Save the dvreport-config.xml override file.
Adding Additional MediaPlayer Pathnames
Use the following steps to add any additional locations for a media player:
1. Open the dvreport-config.xml override file and locate the [Video] section.
2. Copy the MediaPlayer line (see below) and paste it after the existing videoVendor section.
3. Change the pathname in the copied line to the path of the media player you want to add.
4. Repeat steps 2 and 3 for any additional media player pathnames you want to add.
Table 4-14: Video Settings
Configuration Parameter Description
company name This is the Organization/Company Code.
videoVendor name This is the name of the video vendor.
MediaPlayer pathname This is the path and video viewer executable for web users. Multiple paths can be included for the same video vendor. The web client will attempt to launch the executable path in the order they are listed.
<videoVendor name="3VRVIDEOPLAYER"> <MediaPlayer pathname="C:\MICROS- Retail_Analytics_7.0\DESKTOP\mplayer2.exe"/> </videoVendor>
<videoVendor name="3VRVIDEOPLAYER"> <MediaPlayer pathname="C:/Program Files/VideoLAN/VLC/vlc.exe" /> <MediaPlayer pathname="D:/MyVideoPlayer/VideoLAN/VLC/vlc.exe" /> </videoVendor>
186 Configuration
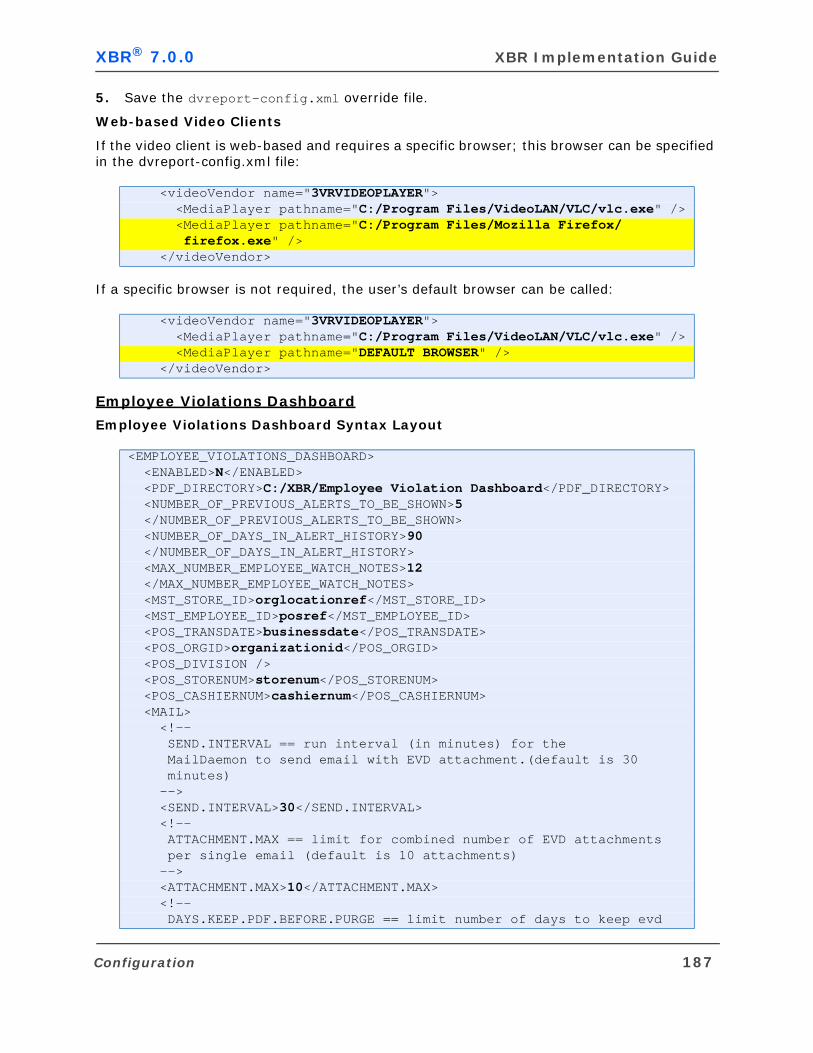
XBR® 7.0.0 XBR Implementation Guide
5. Save the dvreport-config.xml override file.
Web-based Video Clients
If the video client is web-based and requires a specific browser; this browser can be specified in the dvreport-config.xml file:
If a specific browser is not required, the user’s default browser can be called:
Employee Violations Dashboard
Employee Violations Dashboard Syntax Layout
<videoVendor name="3VRVIDEOPLAYER"> <MediaPlayer pathname="C:/Program Files/VideoLAN/VLC/vlc.exe" /> <MediaPlayer pathname="C:/Program Files/Mozilla Firefox/ firefox.exe" /> </videoVendor>
<videoVendor name="3VRVIDEOPLAYER"> <MediaPlayer pathname="C:/Program Files/VideoLAN/VLC/vlc.exe" /> <MediaPlayer pathname="DEFAULT BROWSER" /> </videoVendor>
<EMPLOYEE_VIOLATIONS_DASHBOARD> <ENABLED>N</ENABLED> <PDF_DIRECTORY>C:/XBR/Employee Violation Dashboard</PDF_DIRECTORY> <NUMBER_OF_PREVIOUS_ALERTS_TO_BE_SHOWN>5 </NUMBER_OF_PREVIOUS_ALERTS_TO_BE_SHOWN> <NUMBER_OF_DAYS_IN_ALERT_HISTORY>90 </NUMBER_OF_DAYS_IN_ALERT_HISTORY> <MAX_NUMBER_EMPLOYEE_WATCH_NOTES>12 </MAX_NUMBER_EMPLOYEE_WATCH_NOTES> <MST_STORE_ID>orglocationref</MST_STORE_ID> <MST_EMPLOYEE_ID>posref</MST_EMPLOYEE_ID> <POS_TRANSDATE>businessdate</POS_TRANSDATE> <POS_ORGID>organizationid</POS_ORGID> <POS_DIVISION /> <POS_STORENUM>storenum</POS_STORENUM> <POS_CASHIERNUM>cashiernum</POS_CASHIERNUM> <MAIL> <!-- SEND.INTERVAL == run interval (in minutes) for the MailDaemon to send email with EVD attachment.(default is 30 minutes) --> <SEND.INTERVAL>30</SEND.INTERVAL> <!-- ATTACHMENT.MAX == limit for combined number of EVD attachments per single email (default is 10 attachments) --> <ATTACHMENT.MAX>10</ATTACHMENT.MAX> <!-- DAYS.KEEP.PDF.BEFORE.PURGE == limit number of days to keep evd
Configuration 187

Chapter 4: XBR Web Server Application XBR® 7.0.0
mail attachments/pdf before purged by daemon. --> <DAYS.KEEP.PDF.BEFORE.PURGE>30</DAYS.KEEP.PDF.BEFORE.PURGE> </MAIL> <CUSTOMIZATION> <COMPANY name=”ORG_CODE”> <LOGO>Org_LOGO.gif</LOGO> <!-- dir: \tomcat\liferay\html\ skin\image\common\report_menu_icons\ --> <INSTRUCTION>Disclaimer: This alert report ... </INSTRUCTION> </COMPANY> </CUSTOMIZATION></EMPLOYEE_VIOLATIONS_DASHBOARD>
Table 4-15: Employee Violations Dashboard Settings
Configuration Parameter Description
ENABLED “Y” enables the Employee Violations Dashboard functionality.
PDF_DIRECTORY This setting specifies the location where the PDF reports are temporarily stored for distribution.
Default value = C:/MICROS-Retail_Analytics_7.0/WEB/tomcat/temp/EVD
NUMBER_OF_PREVIOUS_ALERTS_TO_BE_SHOWN
The number of previous EVD alerts for the employee that should appear on the report.
Default value = 5
NUMBER_OF_DAYS_IN_ALERT_HISTORY
The number of days the system should look back to find previous alerts for the employee. Transaction dates are used for the look back, not the alert dates.
Default value = 90
MAX_NUMBER_EMPLOYEE_WATCH_NOTES
The number of watch notes for the employee that should appear on the report.
Default value = 5
MST_STORE_ID The Store Master field used for the location number in the report header of the EVD.
Default values: Foodservice - orglocationrefRetail - storenum
MST_EMPLOYEE_ID The Employee Master field used for the employee number in the report header of the EVD.
Default values: Foodservice - posrefRetail - cashiernum
188 Configuration
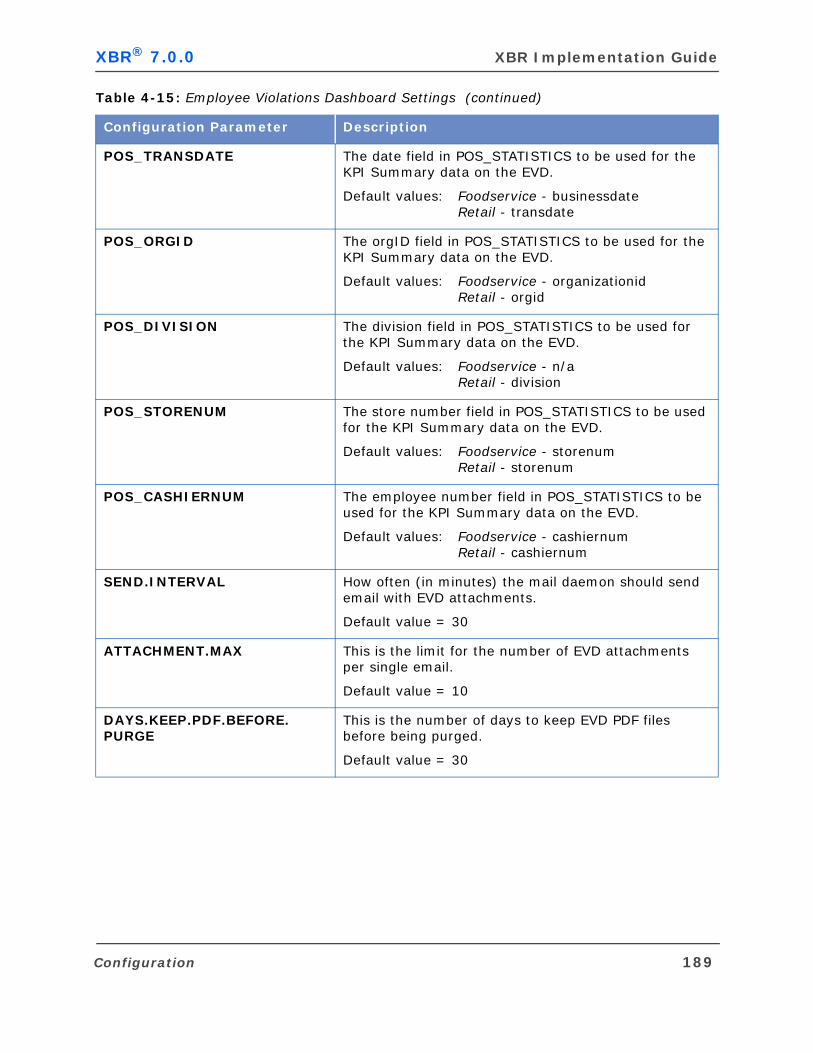
XBR® 7.0.0 XBR Implementation Guide
POS_TRANSDATE The date field in POS_STATISTICS to be used for the KPI Summary data on the EVD.
Default values: Foodservice - businessdateRetail - transdate
POS_ORGID The orgID field in POS_STATISTICS to be used for the KPI Summary data on the EVD.
Default values: Foodservice - organizationidRetail - orgid
POS_DIVISION The division field in POS_STATISTICS to be used for the KPI Summary data on the EVD.
Default values: Foodservice - n/aRetail - division
POS_STORENUM The store number field in POS_STATISTICS to be used for the KPI Summary data on the EVD.
Default values: Foodservice - storenumRetail - storenum
POS_CASHIERNUM The employee number field in POS_STATISTICS to be used for the KPI Summary data on the EVD.
Default values: Foodservice - cashiernumRetail - cashiernum
SEND.INTERVAL How often (in minutes) the mail daemon should send email with EVD attachments.
Default value = 30
ATTACHMENT.MAX This is the limit for the number of EVD attachments per single email.
Default value = 10
DAYS.KEEP.PDF.BEFORE.PURGE
This is the number of days to keep EVD PDF files before being purged.
Default value = 30
Table 4-15: Employee Violations Dashboard Settings (continued)
Configuration Parameter Description
Configuration 189
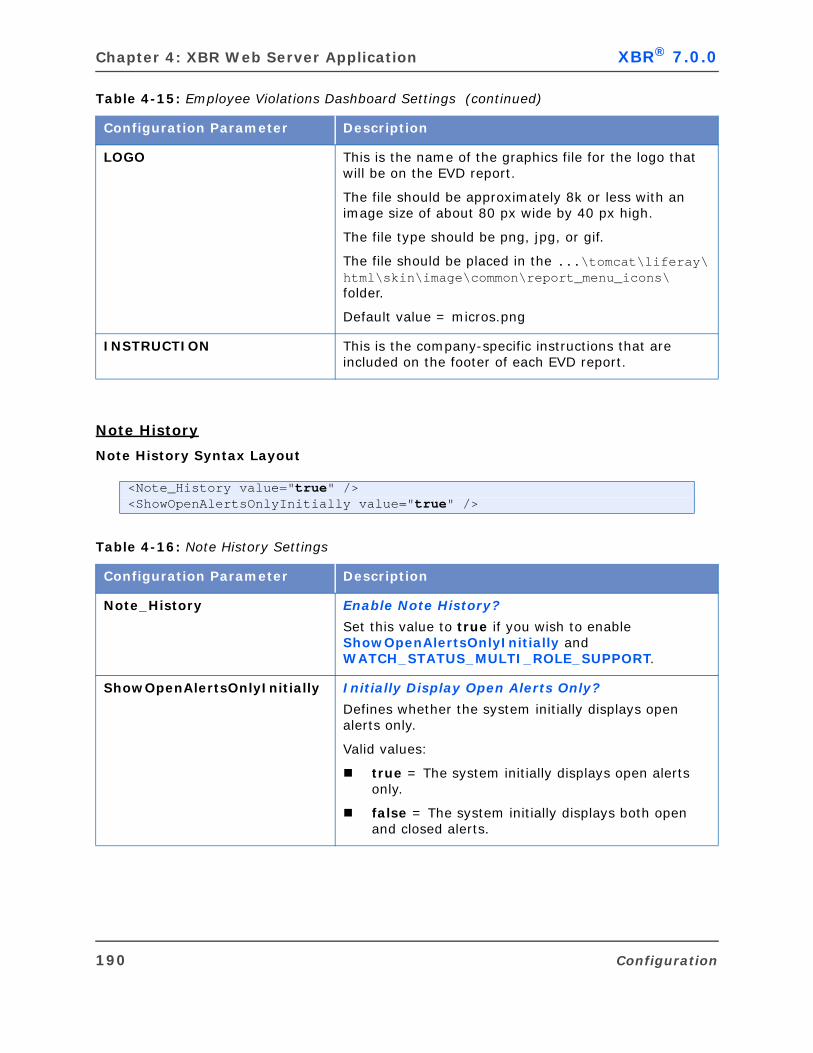
Chapter 4: XBR Web Server Application XBR® 7.0.0
Note History
Note History Syntax Layout
LOGO This is the name of the graphics file for the logo that will be on the EVD report.
The file should be approximately 8k or less with an image size of about 80 px wide by 40 px high.
The file type should be png, jpg, or gif.
The file should be placed in the ...\tomcat\liferay\html\skin\image\common\report_menu_icons\ folder.
Default value = micros.png
INSTRUCTION This is the company-specific instructions that are included on the footer of each EVD report.
<Note_History value="true" /> <ShowOpenAlertsOnlyInitially value="true" />
Table 4-16: Note History Settings
Configuration Parameter Description
Note_History Enable Note History?
Set this value to true if you wish to enable ShowOpenAlertsOnlyInitially and WATCH_STATUS_MULTI_ROLE_SUPPORT.
ShowOpenAlertsOnlyInitially Initially Display Open Alerts Only?
Defines whether the system initially displays open alerts only.
Valid values:
true = The system initially displays open alerts only.
false = The system initially displays both open and closed alerts.
Table 4-15: Employee Violations Dashboard Settings (continued)
Configuration Parameter Description
190 Configuration

XBR® 7.0.0 XBR Implementation Guide
Drop Down Display
Drop Down Display Syntax Layout
Report Layout
After the XBR web server starts running, fine tune the XBR Web Server operation and the layout of all the reports displayed by web clients by modifying the following entries in liferay\WEB-INF\dvreport-config.xml.
Report Layout Syntax Layout
<Sort_DropDown_By_Display_Value value="true" exceptions="MONTH, SEASON" />
Table 4-17: Drop Down Display Settings
Configuration Parameter Description
Sort_DropDown_By_Display_Value
Sort Drop Down Column Entries by Display Value?
Defines whether the system sorts entries in a drop down column in a Criteria Prompt panel by data value or display value.
Valid values:
true = The system sorts entries in a drop down column in a Criteria Prompt panel by display value.
false = The system sorts entries in a drop down column in a Criteria Prompt panel by data value.
exceptions Lookup Name Exceptions to Drop Down Column Sort
Allows you to specify the Lookup names that you wish the system to sort opposite the value specified for the Sort_DropDown_By_Display_Value parameter. For example, if you enter true for the Sort_DropDown_By_Display_Value, the system sorts entries in a drop down column in a Criteria Prompt panel by display value; however, for the Lookup names specified for the exceptions parameter, the system sorts entries in a drop down column in a Criteria Prompt panel by data value.
<ReportLayout> <DEFAULT_PAGE_WIDTH>792</DEFAULT_PAGE_WIDTH> <DEFAULT_PAGE_HEIGHT>612</DEFAULT_PAGE_HEIGHT> <DEFAULT_LEFT_MARGIN>0</DEFAULT_LEFT_MARGIN> <DEFAULT_RIGHT_MARGIN>0</DEFAULT_RIGHT_MARGIN>
Configuration 191
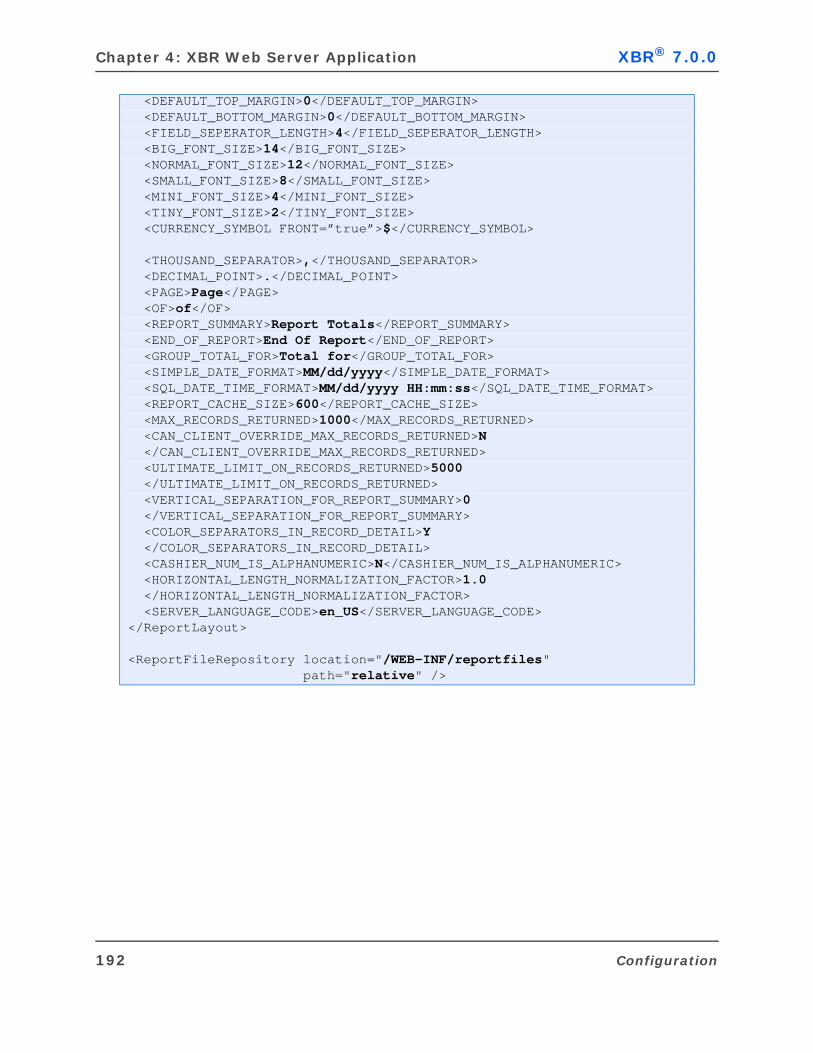
Chapter 4: XBR Web Server Application XBR® 7.0.0
<DEFAULT_TOP_MARGIN>0</DEFAULT_TOP_MARGIN> <DEFAULT_BOTTOM_MARGIN>0</DEFAULT_BOTTOM_MARGIN> <FIELD_SEPERATOR_LENGTH>4</FIELD_SEPERATOR_LENGTH> <BIG_FONT_SIZE>14</BIG_FONT_SIZE> <NORMAL_FONT_SIZE>12</NORMAL_FONT_SIZE> <SMALL_FONT_SIZE>8</SMALL_FONT_SIZE> <MINI_FONT_SIZE>4</MINI_FONT_SIZE> <TINY_FONT_SIZE>2</TINY_FONT_SIZE> <CURRENCY_SYMBOL FRONT=”true”>$</CURRENCY_SYMBOL>
<THOUSAND_SEPARATOR>,</THOUSAND_SEPARATOR> <DECIMAL_POINT>.</DECIMAL_POINT> <PAGE>Page</PAGE> <OF>of</OF> <REPORT_SUMMARY>Report Totals</REPORT_SUMMARY> <END_OF_REPORT>End Of Report</END_OF_REPORT> <GROUP_TOTAL_FOR>Total for</GROUP_TOTAL_FOR> <SIMPLE_DATE_FORMAT>MM/dd/yyyy</SIMPLE_DATE_FORMAT> <SQL_DATE_TIME_FORMAT>MM/dd/yyyy HH:mm:ss</SQL_DATE_TIME_FORMAT> <REPORT_CACHE_SIZE>600</REPORT_CACHE_SIZE> <MAX_RECORDS_RETURNED>1000</MAX_RECORDS_RETURNED> <CAN_CLIENT_OVERRIDE_MAX_RECORDS_RETURNED>N </CAN_CLIENT_OVERRIDE_MAX_RECORDS_RETURNED> <ULTIMATE_LIMIT_ON_RECORDS_RETURNED>5000 </ULTIMATE_LIMIT_ON_RECORDS_RETURNED> <VERTICAL_SEPARATION_FOR_REPORT_SUMMARY>0 </VERTICAL_SEPARATION_FOR_REPORT_SUMMARY> <COLOR_SEPARATORS_IN_RECORD_DETAIL>Y </COLOR_SEPARATORS_IN_RECORD_DETAIL> <CASHIER_NUM_IS_ALPHANUMERIC>N</CASHIER_NUM_IS_ALPHANUMERIC> <HORIZONTAL_LENGTH_NORMALIZATION_FACTOR>1.0 </HORIZONTAL_LENGTH_NORMALIZATION_FACTOR> <SERVER_LANGUAGE_CODE>en_US</SERVER_LANGUAGE_CODE> </ReportLayout>
<ReportFileRepository location="/WEB-INF/reportfiles" path="relative" />
192 Configuration
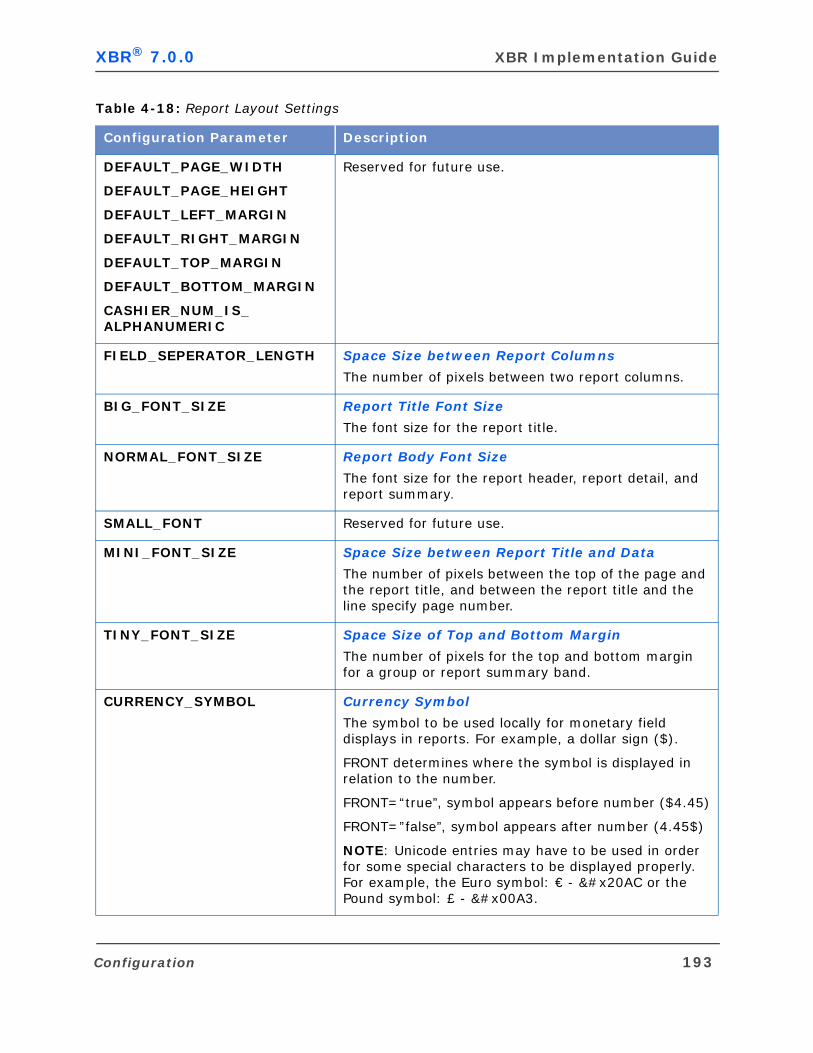
XBR® 7.0.0 XBR Implementation Guide
Table 4-18: Report Layout Settings
Configuration Parameter Description
DEFAULT_PAGE_WIDTH
DEFAULT_PAGE_HEIGHT
DEFAULT_LEFT_MARGIN
DEFAULT_RIGHT_MARGIN
DEFAULT_TOP_MARGIN
DEFAULT_BOTTOM_MARGIN
CASHIER_NUM_IS_ALPHANUMERIC
Reserved for future use.
FIELD_SEPERATOR_LENGTH Space Size between Report Columns
The number of pixels between two report columns.
BIG_FONT_SIZE Report Title Font Size
The font size for the report title.
NORMAL_FONT_SIZE Report Body Font Size
The font size for the report header, report detail, and report summary.
SMALL_FONT Reserved for future use.
MINI_FONT_SIZE Space Size between Report Title and Data
The number of pixels between the top of the page and the report title, and between the report title and the line specify page number.
TINY_FONT_SIZE Space Size of Top and Bottom Margin
The number of pixels for the top and bottom margin for a group or report summary band.
CURRENCY_SYMBOL Currency Symbol
The symbol to be used locally for monetary field displays in reports. For example, a dollar sign ($).
FRONT determines where the symbol is displayed in relation to the number.
FRONT=“true”, symbol appears before number ($4.45)
FRONT=”false”, symbol appears after number (4.45$)
NOTE: Unicode entries may have to be used in order for some special characters to be displayed properly. For example, the Euro symbol: € - € or the Pound symbol: £ - £.
Configuration 193

Chapter 4: XBR Web Server Application XBR® 7.0.0
THOUSAND_SEPARATOR Thousands Separator
The symbol to be used locally as the thousands separator in reports. For example, a comma (,).
DECIMAL_POINT Decimal Separator
The symbol to be used locally as the decimal separator in reports. For example, a period (.)
PAGE Page Numbering Descriptor
The word to be used for "page" in the page-numbering string "Page 1 of 3" at the upper right corner of each report page. For example, specify Page for English-speaking customers or “Pagina” for Spanish-speaking customers.
OF Page Numbering Sequence
The word to be used for "of" in the page-numbering string "Page 1 of 3" at the upper right corner of each report page. For example, specify of for English-speaking customers or “de” for Spanish-speaking customers.
REPORT_SUMMARY Report Summary Descriptor
The word(s) to be used for report summary. Example: Report Totals
END_OF_REPORT End of Report Descriptor
The word to be used for the end of report.
GROUP_TOTAL_FOR Group Total For Descriptor
The word to be used for the group total for: Total for.
SIMPLE_DATE_FORMAT Date Column Format
The format for displaying date columns. Possible values include:
mm/dd/yyyy = Displays 12/31/2005
mm-dd-yyyy = Displays 12-31-2005
dd-mm-yyyy = Displays 31-12-2005
dd-MMM = Displays 05-APR
SQL_DATE_TIME_FORMAT Reserved for future use.
Table 4-18: Report Layout Settings (continued)
Configuration Parameter Description
194 Configuration
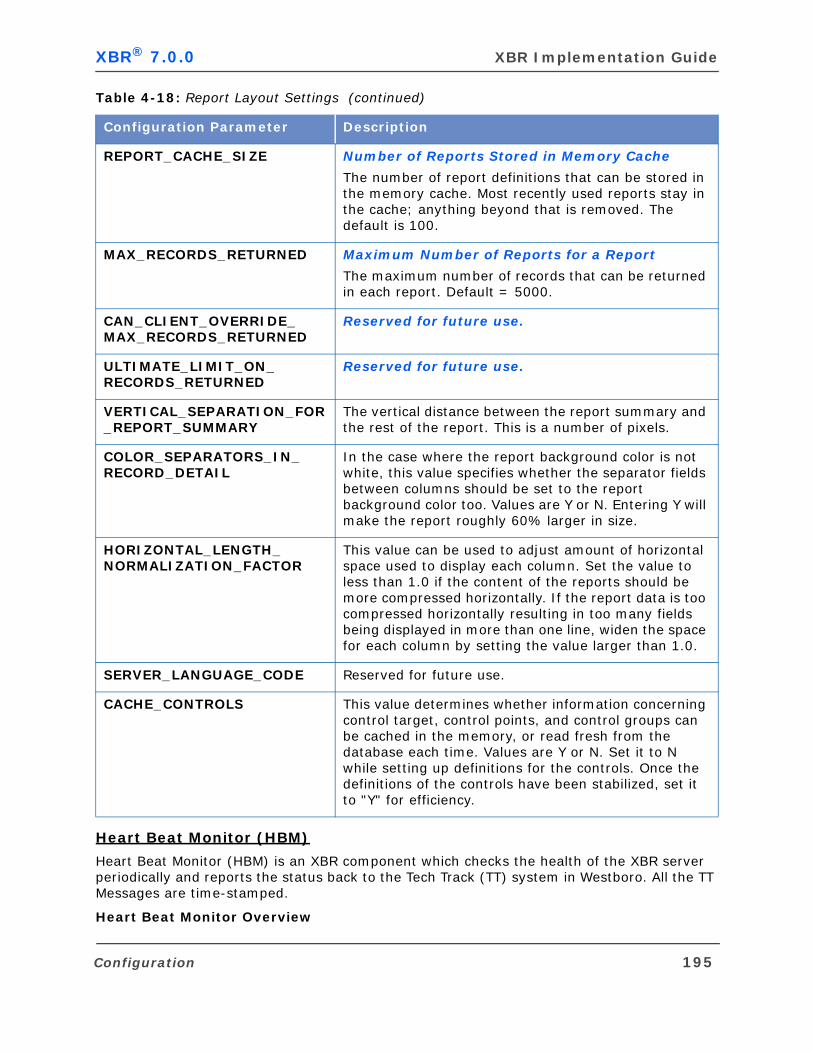
XBR® 7.0.0 XBR Implementation Guide
Heart Beat Monitor (HBM)
Heart Beat Monitor (HBM) is an XBR component which checks the health of the XBR server periodically and reports the status back to the Tech Track (TT) system in Westboro. All the TT Messages are time-stamped.
Heart Beat Monitor Overview
REPORT_CACHE_SIZE Number of Reports Stored in Memory Cache
The number of report definitions that can be stored in the memory cache. Most recently used reports stay in the cache; anything beyond that is removed. The default is 100.
MAX_RECORDS_RETURNED Maximum Number of Reports for a Report
The maximum number of records that can be returned in each report. Default = 5000.
CAN_CLIENT_OVERRIDE_MAX_RECORDS_RETURNED
Reserved for future use.
ULTIMATE_LIMIT_ON_RECORDS_RETURNED
Reserved for future use.
VERTICAL_SEPARATION_FOR_REPORT_SUMMARY
The vertical distance between the report summary and the rest of the report. This is a number of pixels.
COLOR_SEPARATORS_IN_RECORD_DETAIL
In the case where the report background color is not white, this value specifies whether the separator fields between columns should be set to the report background color too. Values are Y or N. Entering Y will make the report roughly 60% larger in size.
HORIZONTAL_LENGTH_NORMALIZATION_FACTOR
This value can be used to adjust amount of horizontal space used to display each column. Set the value to less than 1.0 if the content of the reports should be more compressed horizontally. If the report data is too compressed horizontally resulting in too many fields being displayed in more than one line, widen the space for each column by setting the value larger than 1.0.
SERVER_LANGUAGE_CODE Reserved for future use.
CACHE_CONTROLS This value determines whether information concerning control target, control points, and control groups can be cached in the memory, or read fresh from the database each time. Values are Y or N. Set it to N while setting up definitions for the controls. Once the definitions of the controls have been stabilized, set it to "Y" for efficiency.
Table 4-18: Report Layout Settings (continued)
Configuration Parameter Description
Configuration 195

Chapter 4: XBR Web Server Application XBR® 7.0.0
Whenever possible, the HBM helps the XBR server recover from errors. The following are the different types of messages sent by HBM to the Tech Track system:
Start Up Message
When the XBR server first starts up, HBM sends the following message back to TT:
Server Name
Amount of memory allocated to the Java Virtual Machine
Whether LDAP authentication is enabled
Point(s) in time when the XBR server is scheduled to be re-started
Time periods during which the XBR server is supposed to ignore errors
Time zone of the server
Heart Beat Message
From then on, HBM performs the following checks periodically:
Check the status of the Liferay connection pool
Check the status of the Liferay database
Check the status of the XBR connection pool
Check the status of the XBR database
Check the status of the LDAP directory
Check for memory leak
If everything is OK, the Heart Beat Monitor will send a heart beat message back to TT
Amount of free memory
# of reports being actively processed at the moment
Unrecoverable Error Message
If HBM detects one of the following errors:
Liferay database is not accessible
XBR database is not accessible
LDAP directory is not accessible
HBM will conclude that the XBR Server is in a hopeless state, and thus it will send a fail message back to TT indicating what unrecoverable error conditions have been detected.
Recoverable Error Message
If HBM detects the following recoverable errors:
Liferay database connection pool is bad but Liferay database is accessible
XBR database connection pool is bad but XBR database is accessible
JVM memory is running low
HBM will send a restart message back to TT and proceed to restart the XBR Server. Restart message will not trigger a service call.
Performance Statistics Message
196 Configuration

XBR® 7.0.0 XBR Implementation Guide
Each hour the Heart Beat Monitor reports to the Tech Track System the following performance statistics for the prior hour:
# report requests
# of successful report requests
# of report requests with errors
# of report requests rejected due to system being busy
# of reports with 0 records
# of reports with records between [1, 100]
# of reports with records between [101, 500]
# of reports with records between [500, 1000]
# of reports with records between [1001, 2000]
# of reports with records between [2001, 3000]
# of reports with records between [3001, 4000]
# of reports with records between [4001, 5000]
# of reports with records between > 5000
average processing time for reports with non-zero records.
Coordination between HBM Installer and Tech track Team
Before installing an XBR Server with HBM capability, the person performing the install should have the following information ready:
information about the server (e.g. name, location, and means of access)
date & time when the active monitoring by Tech Track should commence or stop
time when the XBR server is to have daily scheduled restart
time when the HBM will ignore errors
Heart Beat Monitor Syntax Layout
<Customer_Name value=”DTV” /><HeartBeatMonitor> <ENABLED>Y</ENABLED> <SEND_FTP>Y</SEND_FTP> <FTP_USER></FTP_USER> <FTP_PASSWORD></FTP_PASSWORD> <FTP_URL>ftp.xbr.com/TECHTRACK</FTP_URL> <LIFERAY_TEST_SQL>select count(*) from company</LIFERAY_TEST_SQL> <XBR_TEST_SQL>select count(*) from pro_sys_def</XBR_TEST_SQL> <TIME_BETWEEN_PROBES_IN_MINUTES>5</TIME_BETWEEN_PROBES_IN_MINUTES> <TIME_FOR_PROBE_AFTER_FAILURE_DETECTION>2 </TIME_FOR_PROBE_AFTER_FAILURE_DETECTION> <TIME_BETWEEN_USER_SYNCHRONIZATION_IN_MINUTES>10 </TIME_BETWEEN_USER_SYNCHRONIZATION_IN_MINUTES> <TIME_INTERVALS_FOR_IGNORING_ERRORS> </TIME_INTERVALS_FOR_IGNORING_ERRORS> <POINTS_IN_TIME_FOR_RESTARTING_ANALYTICS_SERVER>6:00
Configuration 197
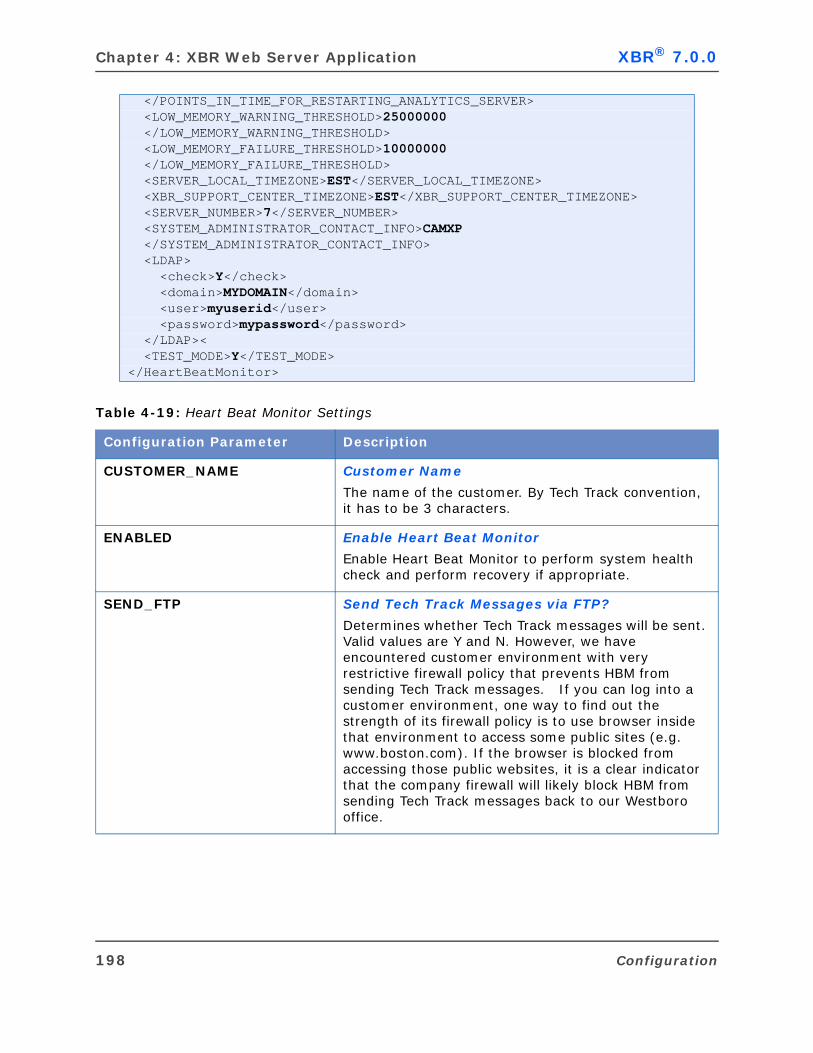
Chapter 4: XBR Web Server Application XBR® 7.0.0
</POINTS_IN_TIME_FOR_RESTARTING_ANALYTICS_SERVER> <LOW_MEMORY_WARNING_THRESHOLD>25000000 </LOW_MEMORY_WARNING_THRESHOLD> <LOW_MEMORY_FAILURE_THRESHOLD>10000000 </LOW_MEMORY_FAILURE_THRESHOLD> <SERVER_LOCAL_TIMEZONE>EST</SERVER_LOCAL_TIMEZONE> <XBR_SUPPORT_CENTER_TIMEZONE>EST</XBR_SUPPORT_CENTER_TIMEZONE> <SERVER_NUMBER>7</SERVER_NUMBER> <SYSTEM_ADMINISTRATOR_CONTACT_INFO>CAMXP </SYSTEM_ADMINISTRATOR_CONTACT_INFO> <LDAP> <check>Y</check> <domain>MYDOMAIN</domain> <user>myuserid</user> <password>mypassword</password> </LDAP>< <TEST_MODE>Y</TEST_MODE></HeartBeatMonitor>
Table 4-19: Heart Beat Monitor Settings
Configuration Parameter Description
CUSTOMER_NAME Customer Name
The name of the customer. By Tech Track convention, it has to be 3 characters.
ENABLED Enable Heart Beat Monitor
Enable Heart Beat Monitor to perform system health check and perform recovery if appropriate.
SEND_FTP Send Tech Track Messages via FTP?
Determines whether Tech Track messages will be sent. Valid values are Y and N. However, we have encountered customer environment with very restrictive firewall policy that prevents HBM from sending Tech Track messages. If you can log into a customer environment, one way to find out the strength of its firewall policy is to use browser inside that environment to access some public sites (e.g. www.boston.com). If the browser is blocked from accessing those public websites, it is a clear indicator that the company firewall will likely block HBM from sending Tech Track messages back to our Westboro office.
198 Configuration
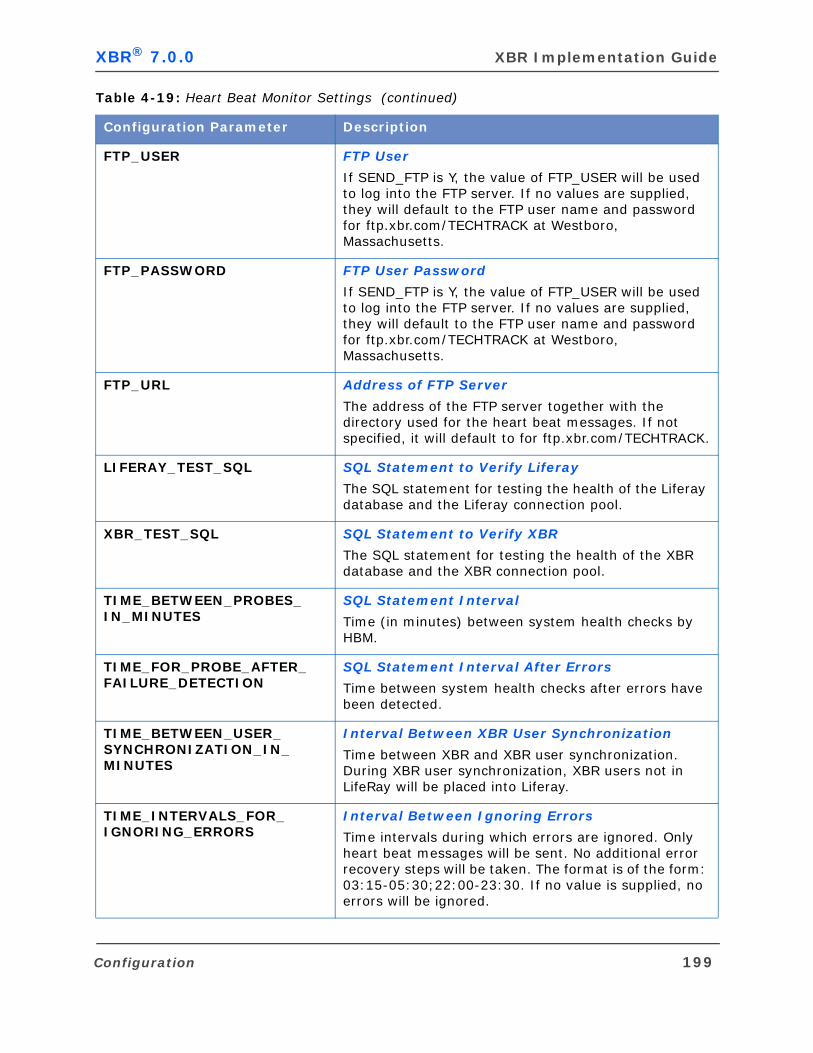
XBR® 7.0.0 XBR Implementation Guide
FTP_USER FTP User
If SEND_FTP is Y, the value of FTP_USER will be used to log into the FTP server. If no values are supplied, they will default to the FTP user name and password for ftp.xbr.com/TECHTRACK at Westboro, Massachusetts.
FTP_PASSWORD FTP User Password
If SEND_FTP is Y, the value of FTP_USER will be used to log into the FTP server. If no values are supplied, they will default to the FTP user name and password for ftp.xbr.com/TECHTRACK at Westboro, Massachusetts.
FTP_URL Address of FTP Server
The address of the FTP server together with the directory used for the heart beat messages. If not specified, it will default to for ftp.xbr.com/TECHTRACK.
LIFERAY_TEST_SQL SQL Statement to Verify Liferay
The SQL statement for testing the health of the Liferay database and the Liferay connection pool.
XBR_TEST_SQL SQL Statement to Verify XBR
The SQL statement for testing the health of the XBR database and the XBR connection pool.
TIME_BETWEEN_PROBES_IN_MINUTES
SQL Statement Interval
Time (in minutes) between system health checks by HBM.
TIME_FOR_PROBE_AFTER_FAILURE_DETECTION
SQL Statement Interval After Errors
Time between system health checks after errors have been detected.
TIME_BETWEEN_USER_SYNCHRONIZATION_IN_MINUTES
Interval Between XBR User Synchronization
Time between XBR and XBR user synchronization. During XBR user synchronization, XBR users not in LifeRay will be placed into Liferay.
TIME_INTERVALS_FOR_IGNORING_ERRORS
Interval Between Ignoring Errors
Time intervals during which errors are ignored. Only heart beat messages will be sent. No additional error recovery steps will be taken. The format is of the form: 03:15-05:30;22:00-23:30. If no value is supplied, no errors will be ignored.
Table 4-19: Heart Beat Monitor Settings (continued)
Configuration Parameter Description
Configuration 199
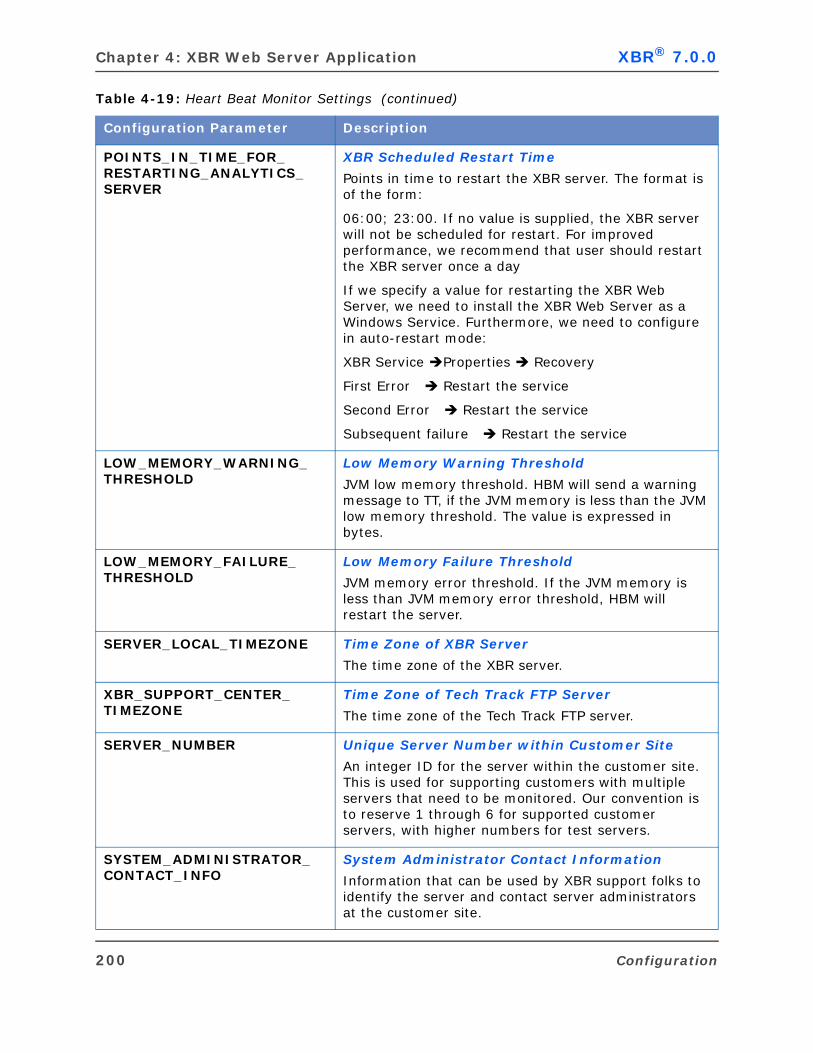
Chapter 4: XBR Web Server Application XBR® 7.0.0
POINTS_IN_TIME_FOR_RESTARTING_ANALYTICS_SERVER
XBR Scheduled Restart Time
Points in time to restart the XBR server. The format is of the form:
06:00; 23:00. If no value is supplied, the XBR server will not be scheduled for restart. For improved performance, we recommend that user should restart the XBR server once a day
If we specify a value for restarting the XBR Web Server, we need to install the XBR Web Server as a Windows Service. Furthermore, we need to configure in auto-restart mode:
XBR Service Properties Recovery
First Error Restart the service
Second Error Restart the service
Subsequent failure Restart the service
LOW_MEMORY_WARNING_THRESHOLD
Low Memory Warning Threshold
JVM low memory threshold. HBM will send a warning message to TT, if the JVM memory is less than the JVM low memory threshold. The value is expressed in bytes.
LOW_MEMORY_FAILURE_THRESHOLD
Low Memory Failure Threshold
JVM memory error threshold. If the JVM memory is less than JVM memory error threshold, HBM will restart the server.
SERVER_LOCAL_TIMEZONE Time Zone of XBR Server
The time zone of the XBR server.
XBR_SUPPORT_CENTER_TIMEZONE
Time Zone of Tech Track FTP Server
The time zone of the Tech Track FTP server.
SERVER_NUMBER Unique Server Number within Customer Site
An integer ID for the server within the customer site. This is used for supporting customers with multiple servers that need to be monitored. Our convention is to reserve 1 through 6 for supported customer servers, with higher numbers for test servers.
SYSTEM_ADMINISTRATOR_CONTACT_INFO
System Administrator Contact Information
Information that can be used by XBR support folks to identify the server and contact server administrators at the customer site.
Table 4-19: Heart Beat Monitor Settings (continued)
Configuration Parameter Description
200 Configuration
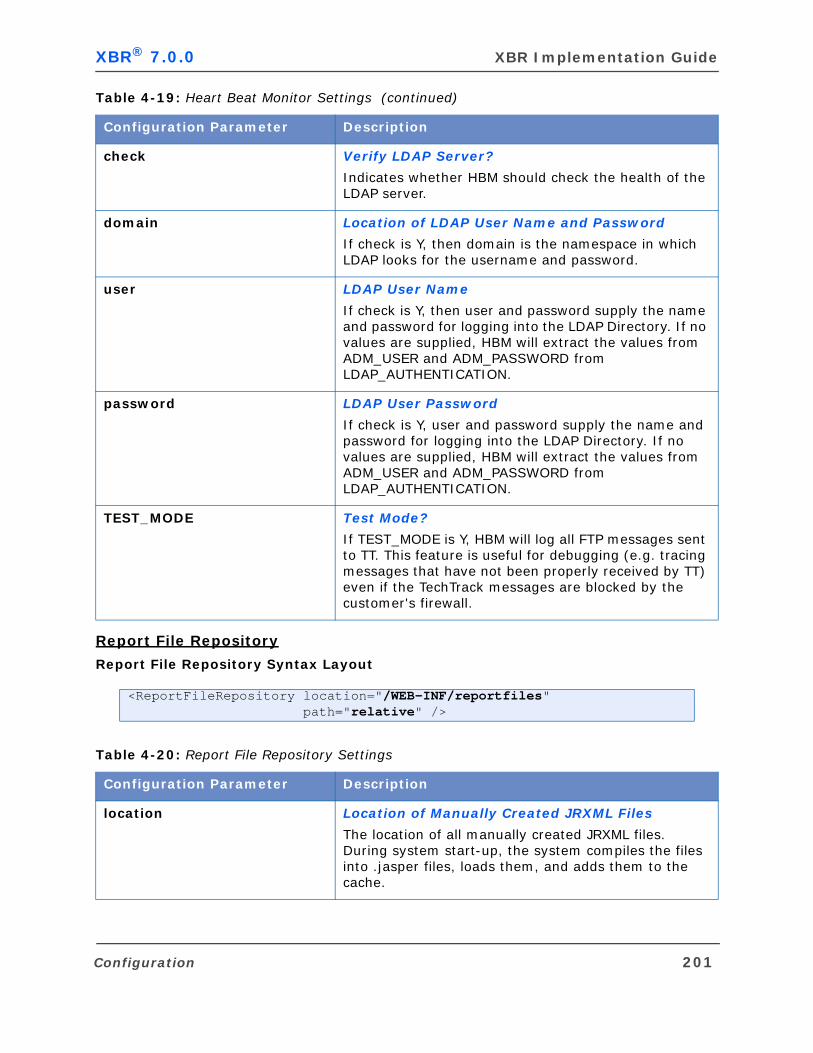
XBR® 7.0.0 XBR Implementation Guide
Report File Repository
Report File Repository Syntax Layout
check Verify LDAP Server?
Indicates whether HBM should check the health of the LDAP server.
domain Location of LDAP User Name and Password
If check is Y, then domain is the namespace in which LDAP looks for the username and password.
user LDAP User Name
If check is Y, then user and password supply the name and password for logging into the LDAP Directory. If no values are supplied, HBM will extract the values from ADM_USER and ADM_PASSWORD from LDAP_AUTHENTICATION.
password LDAP User Password
If check is Y, user and password supply the name and password for logging into the LDAP Directory. If no values are supplied, HBM will extract the values from ADM_USER and ADM_PASSWORD from LDAP_AUTHENTICATION.
TEST_MODE Test Mode?
If TEST_MODE is Y, HBM will log all FTP messages sent to TT. This feature is useful for debugging (e.g. tracing messages that have not been properly received by TT) even if the TechTrack messages are blocked by the customer's firewall.
<ReportFileRepository location="/WEB-INF/reportfiles" path="relative" />
Table 4-20: Report File Repository Settings
Configuration Parameter Description
location Location of Manually Created JRXML Files
The location of all manually created JRXML files. During system start-up, the system compiles the files into .jasper files, loads them, and adds them to the cache.
Table 4-19: Heart Beat Monitor Settings (continued)
Configuration Parameter Description
Configuration 201
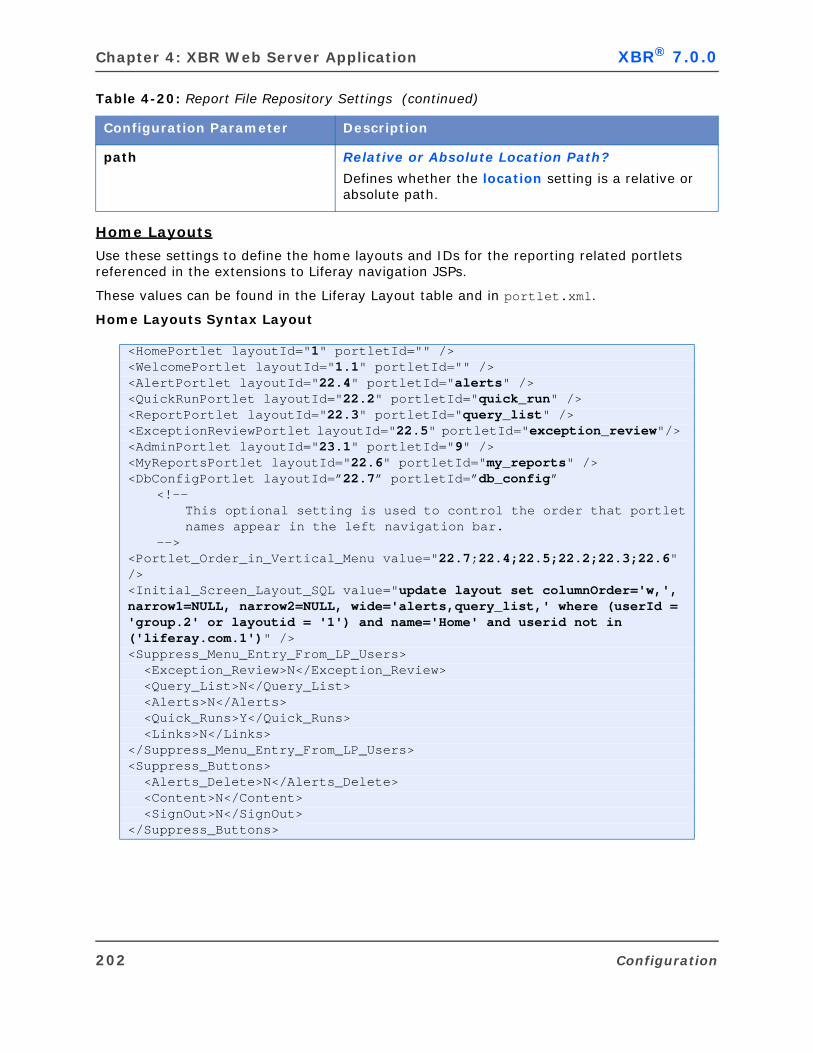
Chapter 4: XBR Web Server Application XBR® 7.0.0
Home Layouts
Use these settings to define the home layouts and IDs for the reporting related portlets referenced in the extensions to Liferay navigation JSPs.
These values can be found in the Liferay Layout table and in portlet.xml.
Home Layouts Syntax Layout
path Relative or Absolute Location Path?
Defines whether the location setting is a relative or absolute path.
<HomePortlet layoutId="1" portletId="" /> <WelcomePortlet layoutId="1.1" portletId="" /> <AlertPortlet layoutId="22.4" portletId="alerts" /> <QuickRunPortlet layoutId="22.2" portletId="quick_run" /> <ReportPortlet layoutId="22.3" portletId="query_list" /> <ExceptionReviewPortlet layoutId="22.5" portletId="exception_review"/> <AdminPortlet layoutId="23.1" portletId="9" /> <MyReportsPortlet layoutId="22.6" portletId="my_reports" /><DbConfigPortlet layoutId=”22.7” portletId=”db_config”
<!--This optional setting is used to control the order that portletnames appear in the left navigation bar.
--><Portlet_Order_in_Vertical_Menu value="22.7;22.4;22.5;22.2;22.3;22.6" /> <Initial_Screen_Layout_SQL value="update layout set columnOrder='w,', narrow1=NULL, narrow2=NULL, wide='alerts,query_list,' where (userId = 'group.2' or layoutid = '1') and name='Home' and userid not in ('liferay.com.1')" /> <Suppress_Menu_Entry_From_LP_Users> <Exception_Review>N</Exception_Review> <Query_List>N</Query_List> <Alerts>N</Alerts> <Quick_Runs>Y</Quick_Runs> <Links>N</Links> </Suppress_Menu_Entry_From_LP_Users> <Suppress_Buttons> <Alerts_Delete>N</Alerts_Delete> <Content>N</Content> <SignOut>N</SignOut> </Suppress_Buttons>
Table 4-20: Report File Repository Settings (continued)
Configuration Parameter Description
202 Configuration
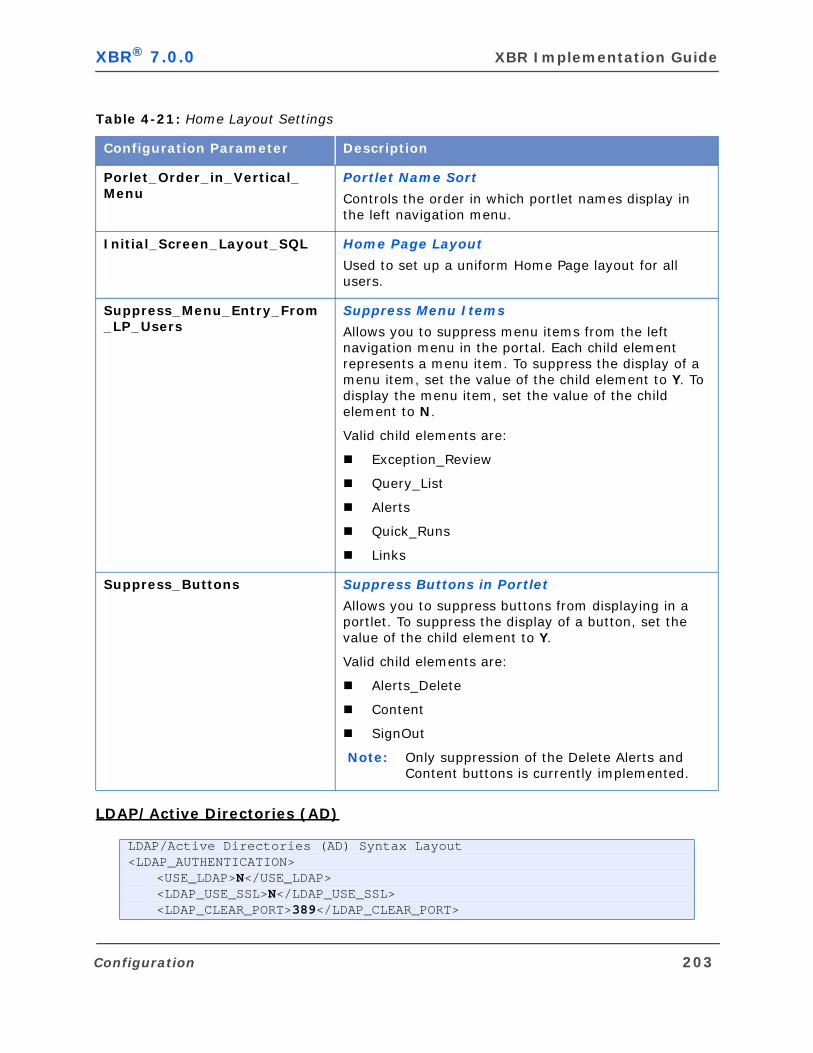
XBR® 7.0.0 XBR Implementation Guide
LDAP/Active Directories (AD)
Table 4-21: Home Layout Settings
Configuration Parameter Description
Porlet_Order_in_Vertical_Menu
Portlet Name Sort
Controls the order in which portlet names display in the left navigation menu.
Initial_Screen_Layout_SQL Home Page Layout
Used to set up a uniform Home Page layout for all users.
Suppress_Menu_Entry_From_LP_Users
Suppress Menu Items
Allows you to suppress menu items from the left navigation menu in the portal. Each child element represents a menu item. To suppress the display of a menu item, set the value of the child element to Y. To display the menu item, set the value of the child element to N.
Valid child elements are:
Exception_Review
Query_List
Alerts
Quick_Runs
Links
Suppress_Buttons Suppress Buttons in Portlet
Allows you to suppress buttons from displaying in a portlet. To suppress the display of a button, set the value of the child element to Y.
Valid child elements are:
Alerts_Delete
Content
SignOut
Note: Only suppression of the Delete Alerts and Content buttons is currently implemented.
LDAP/Active Directories (AD) Syntax Layout<LDAP_AUTHENTICATION>
<USE_LDAP>N</USE_LDAP> <LDAP_USE_SSL>N</LDAP_USE_SSL> <LDAP_CLEAR_PORT>389</LDAP_CLEAR_PORT>
Configuration 203
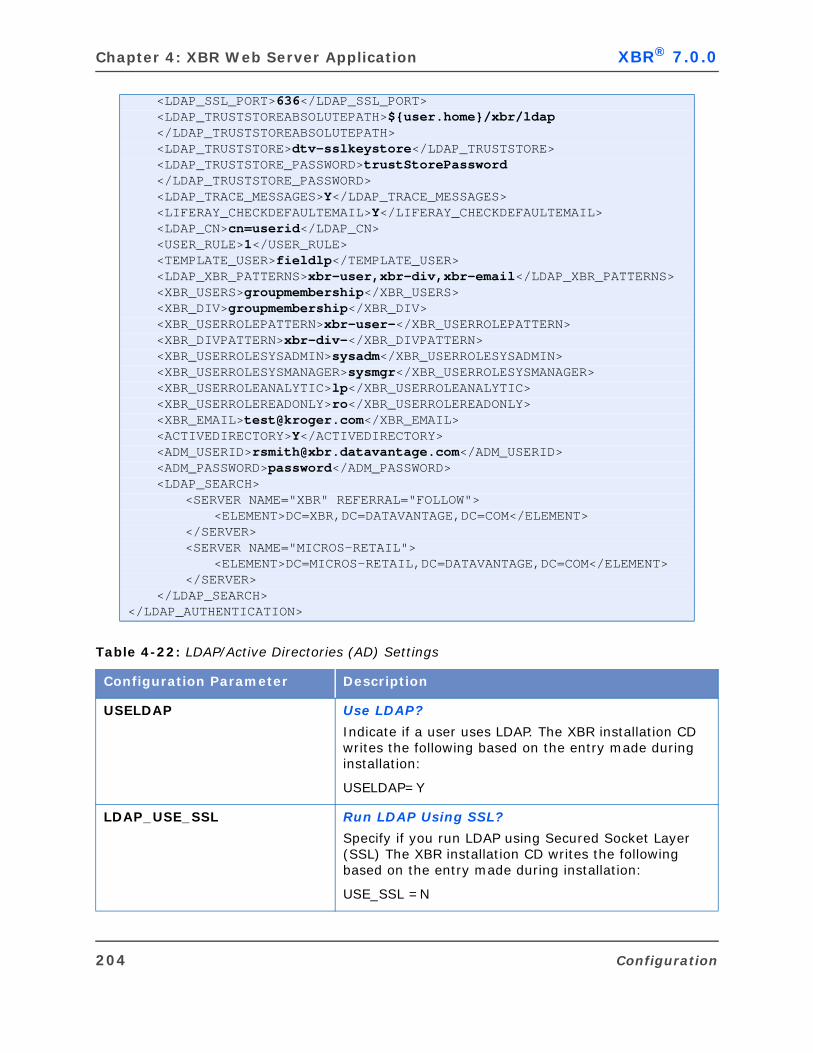
Chapter 4: XBR Web Server Application XBR® 7.0.0
<LDAP_SSL_PORT>636</LDAP_SSL_PORT> <LDAP_TRUSTSTOREABSOLUTEPATH>${user.home}/xbr/ldap</LDAP_TRUSTSTOREABSOLUTEPATH> <LDAP_TRUSTSTORE>dtv-sslkeystore</LDAP_TRUSTSTORE> <LDAP_TRUSTSTORE_PASSWORD>trustStorePassword</LDAP_TRUSTSTORE_PASSWORD> <LDAP_TRACE_MESSAGES>Y</LDAP_TRACE_MESSAGES> <LIFERAY_CHECKDEFAULTEMAIL>Y</LIFERAY_CHECKDEFAULTEMAIL> <LDAP_CN>cn=userid</LDAP_CN> <USER_RULE>1</USER_RULE> <TEMPLATE_USER>fieldlp</TEMPLATE_USER> <LDAP_XBR_PATTERNS>xbr-user,xbr-div,xbr-email</LDAP_XBR_PATTERNS> <XBR_USERS>groupmembership</XBR_USERS> <XBR_DIV>groupmembership</XBR_DIV> <XBR_USERROLEPATTERN>xbr-user-</XBR_USERROLEPATTERN> <XBR_DIVPATTERN>xbr-div-</XBR_DIVPATTERN> <XBR_USERROLESYSADMIN>sysadm</XBR_USERROLESYSADMIN> <XBR_USERROLESYSMANAGER>sysmgr</XBR_USERROLESYSMANAGER> <XBR_USERROLEANALYTIC>lp</XBR_USERROLEANALYTIC> <XBR_USERROLEREADONLY>ro</XBR_USERROLEREADONLY> <XBR_EMAIL>[email protected]</XBR_EMAIL> <ACTIVEDIRECTORY>Y</ACTIVEDIRECTORY> <ADM_USERID>[email protected]</ADM_USERID> <ADM_PASSWORD>password</ADM_PASSWORD> <LDAP_SEARCH>
<SERVER NAME="XBR" REFERRAL="FOLLOW"><ELEMENT>DC=XBR,DC=DATAVANTAGE,DC=COM</ELEMENT>
</SERVER><SERVER NAME="MICROS-RETAIL">
<ELEMENT>DC=MICROS-RETAIL,DC=DATAVANTAGE,DC=COM</ELEMENT> </SERVER>
</LDAP_SEARCH></LDAP_AUTHENTICATION>
Table 4-22: LDAP/Active Directories (AD) Settings
Configuration Parameter Description
USELDAP Use LDAP?
Indicate if a user uses LDAP. The XBR installation CD writes the following based on the entry made during installation:
USELDAP=Y
LDAP_USE_SSL Run LDAP Using SSL?
Specify if you run LDAP using Secured Socket Layer (SSL) The XBR installation CD writes the following based on the entry made during installation:
USE_SSL =N
204 Configuration
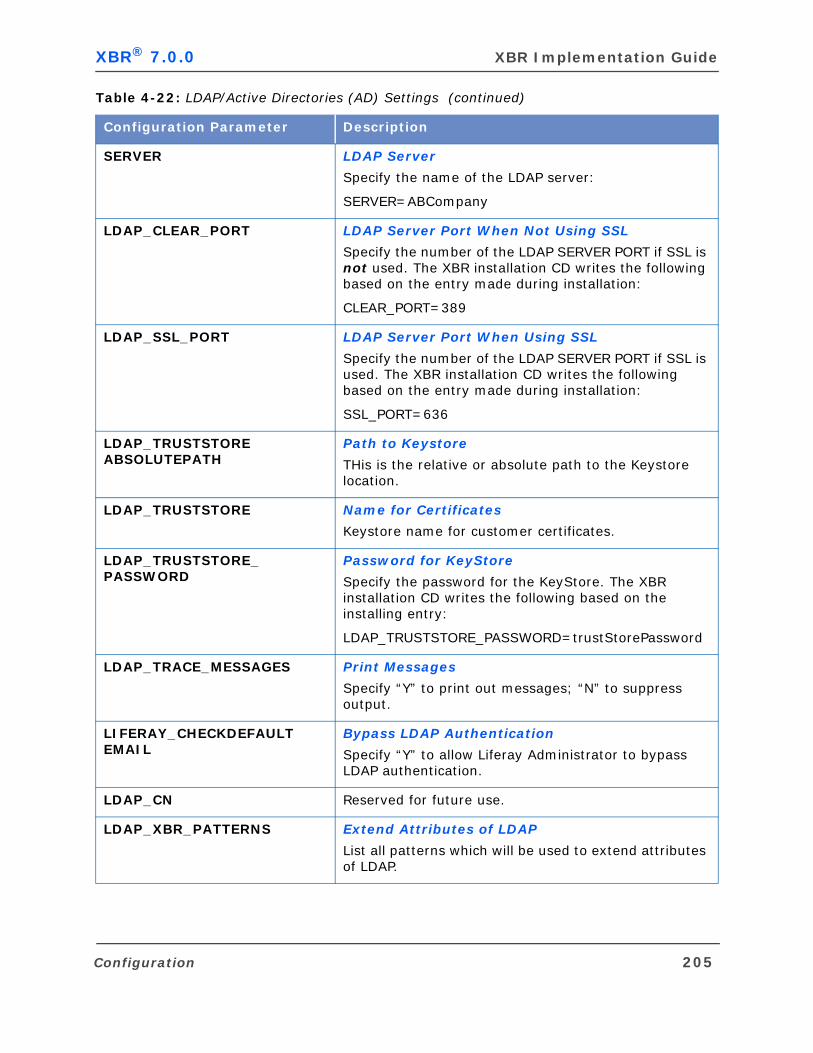
XBR® 7.0.0 XBR Implementation Guide
SERVER LDAP Server
Specify the name of the LDAP server:
SERVER=ABCompany
LDAP_CLEAR_PORT LDAP Server Port When Not Using SSL
Specify the number of the LDAP SERVER PORT if SSL is not used. The XBR installation CD writes the following based on the entry made during installation:
CLEAR_PORT=389
LDAP_SSL_PORT LDAP Server Port When Using SSL
Specify the number of the LDAP SERVER PORT if SSL is used. The XBR installation CD writes the following based on the entry made during installation:
SSL_PORT=636
LDAP_TRUSTSTOREABSOLUTEPATH
Path to Keystore
THis is the relative or absolute path to the Keystore location.
LDAP_TRUSTSTORE Name for Certificates
Keystore name for customer certificates.
LDAP_TRUSTSTORE_PASSWORD
Password for KeyStore
Specify the password for the KeyStore. The XBR installation CD writes the following based on the installing entry:
LDAP_TRUSTSTORE_PASSWORD=trustStorePassword
LDAP_TRACE_MESSAGES Print Messages
Specify “Y” to print out messages; “N” to suppress output.
LIFERAY_CHECKDEFAULTEMAIL
Bypass LDAP Authentication
Specify “Y” to allow Liferay Administrator to bypass LDAP authentication.
LDAP_CN Reserved for future use.
LDAP_XBR_PATTERNS Extend Attributes of LDAP
List all patterns which will be used to extend attributes of LDAP.
Table 4-22: LDAP/Active Directories (AD) Settings (continued)
Configuration Parameter Description
Configuration 205
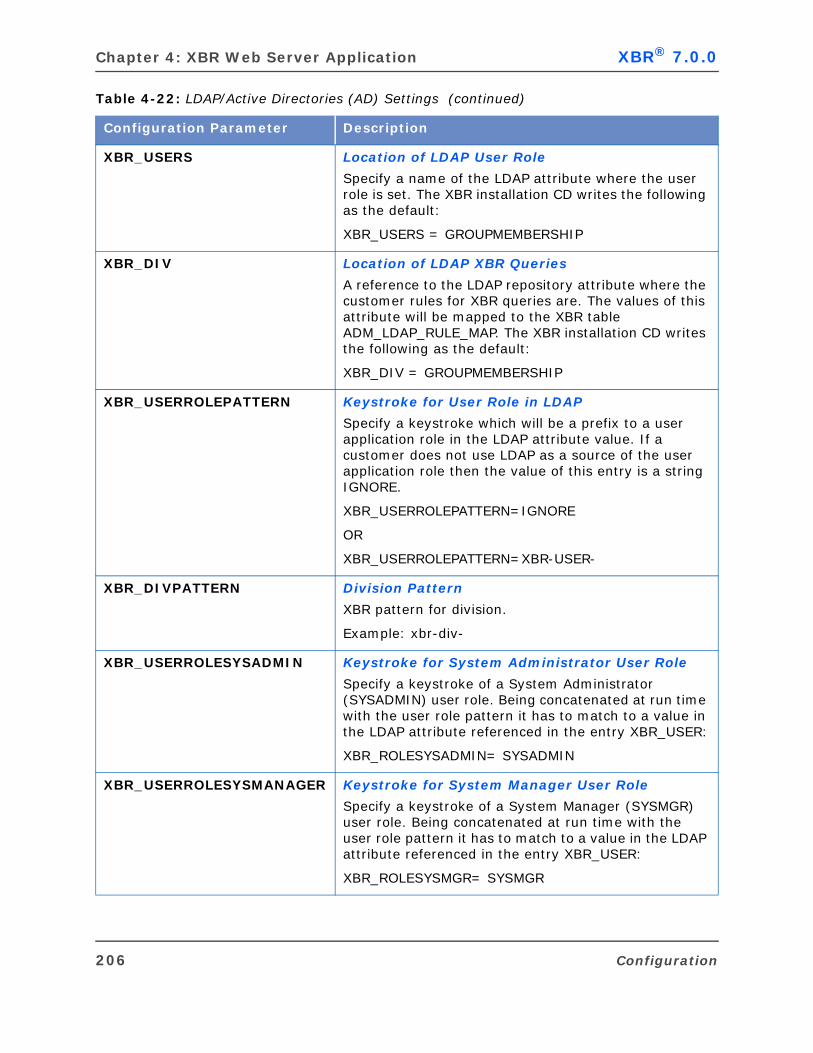
Chapter 4: XBR Web Server Application XBR® 7.0.0
XBR_USERS Location of LDAP User Role
Specify a name of the LDAP attribute where the user role is set. The XBR installation CD writes the following as the default:
XBR_USERS = GROUPMEMBERSHIP
XBR_DIV Location of LDAP XBR Queries
A reference to the LDAP repository attribute where the customer rules for XBR queries are. The values of this attribute will be mapped to the XBR table ADM_LDAP_RULE_MAP. The XBR installation CD writes the following as the default:
XBR_DIV = GROUPMEMBERSHIP
XBR_USERROLEPATTERN Keystroke for User Role in LDAP
Specify a keystroke which will be a prefix to a user application role in the LDAP attribute value. If a customer does not use LDAP as a source of the user application role then the value of this entry is a string IGNORE.
XBR_USERROLEPATTERN=IGNORE
OR
XBR_USERROLEPATTERN=XBR-USER-
XBR_DIVPATTERN Division Pattern
XBR pattern for division.
Example: xbr-div-
XBR_USERROLESYSADMIN Keystroke for System Administrator User Role
Specify a keystroke of a System Administrator (SYSADMIN) user role. Being concatenated at run time with the user role pattern it has to match to a value in the LDAP attribute referenced in the entry XBR_USER:
XBR_ROLESYSADMIN= SYSADMIN
XBR_USERROLESYSMANAGER Keystroke for System Manager User Role
Specify a keystroke of a System Manager (SYSMGR) user role. Being concatenated at run time with the user role pattern it has to match to a value in the LDAP attribute referenced in the entry XBR_USER:
XBR_ROLESYSMGR= SYSMGR
Table 4-22: LDAP/Active Directories (AD) Settings (continued)
Configuration Parameter Description
206 Configuration
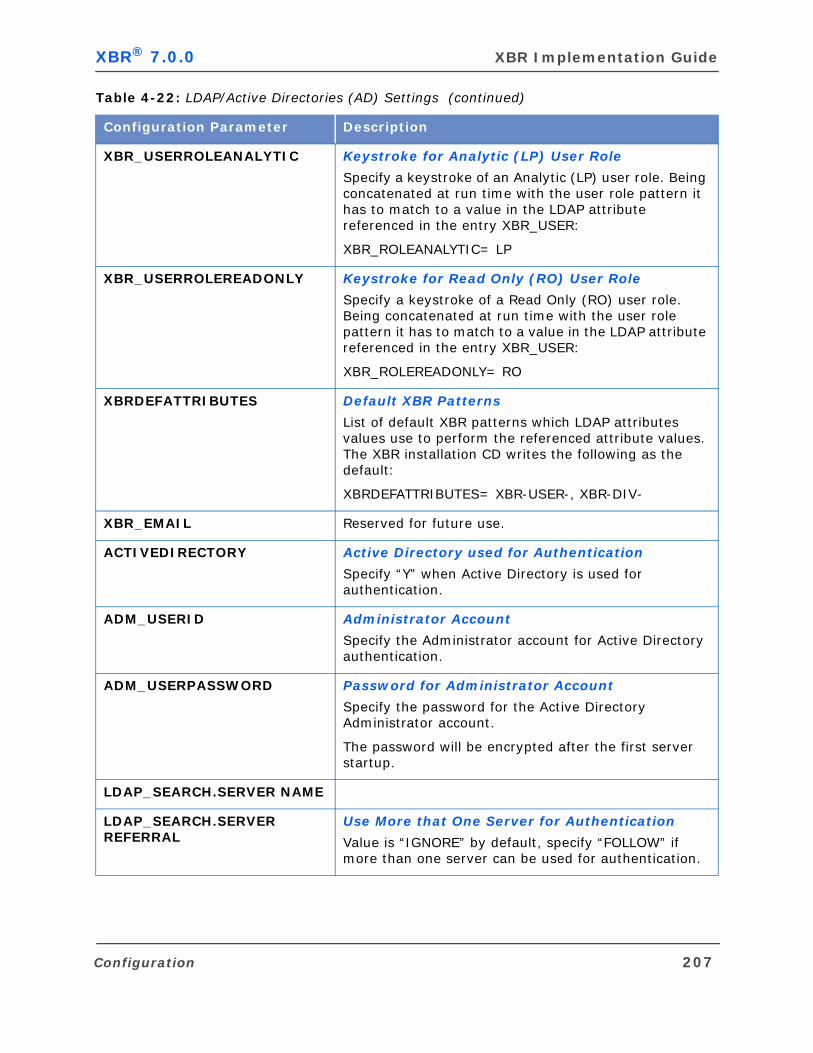
XBR® 7.0.0 XBR Implementation Guide
XBR_USERROLEANALYTIC Keystroke for Analytic (LP) User Role
Specify a keystroke of an Analytic (LP) user role. Being concatenated at run time with the user role pattern it has to match to a value in the LDAP attribute referenced in the entry XBR_USER:
XBR_ROLEANALYTIC= LP
XBR_USERROLEREADONLY Keystroke for Read Only (RO) User Role
Specify a keystroke of a Read Only (RO) user role. Being concatenated at run time with the user role pattern it has to match to a value in the LDAP attribute referenced in the entry XBR_USER:
XBR_ROLEREADONLY= RO
XBRDEFATTRIBUTES Default XBR Patterns
List of default XBR patterns which LDAP attributes values use to perform the referenced attribute values. The XBR installation CD writes the following as the default:
XBRDEFATTRIBUTES= XBR-USER-, XBR-DIV-
XBR_EMAIL Reserved for future use.
ACTIVEDIRECTORY Active Directory used for Authentication
Specify “Y” when Active Directory is used for authentication.
ADM_USERID Administrator Account
Specify the Administrator account for Active Directory authentication.
ADM_USERPASSWORD Password for Administrator Account
Specify the password for the Active Directory Administrator account.
The password will be encrypted after the first server startup.
LDAP_SEARCH.SERVER NAME
LDAP_SEARCH.SERVER REFERRAL
Use More that One Server for Authentication
Value is “IGNORE” by default, specify “FOLLOW” if more than one server can be used for authentication.
Table 4-22: LDAP/Active Directories (AD) Settings (continued)
Configuration Parameter Description
Configuration 207
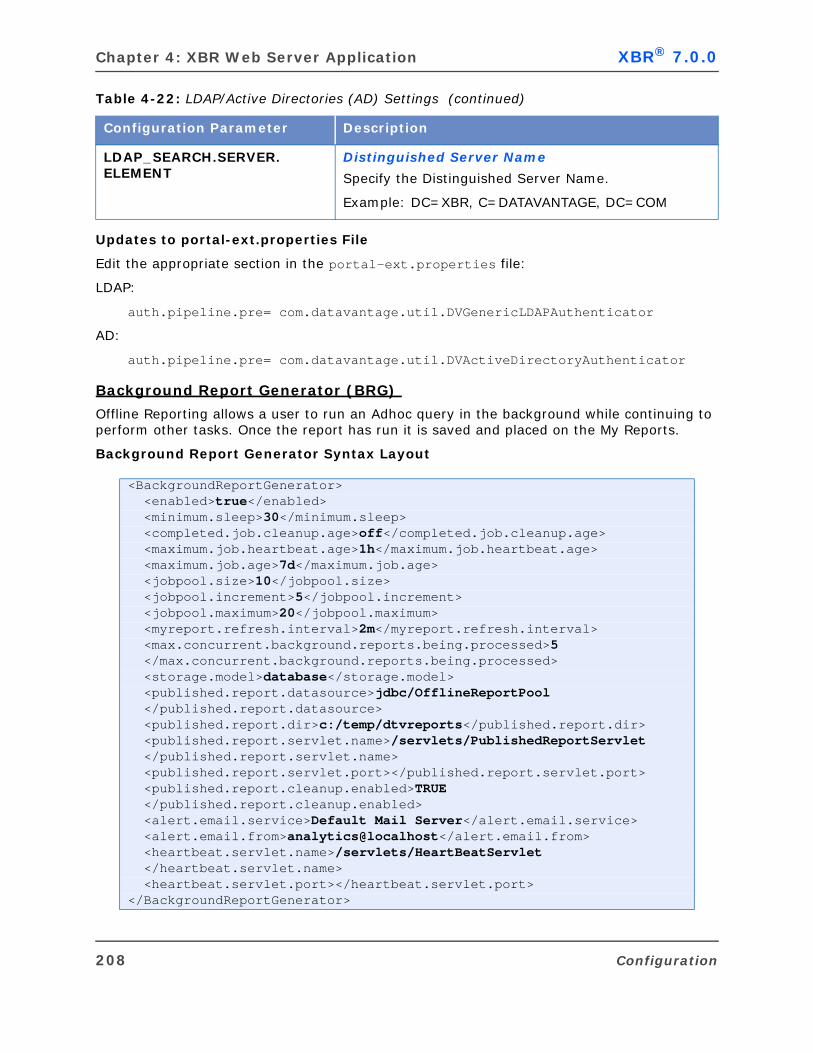
Chapter 4: XBR Web Server Application XBR® 7.0.0
Updates to portal-ext.properties File
Edit the appropriate section in the portal-ext.properties file:
LDAP:
auth.pipeline.pre= com.datavantage.util.DVGenericLDAPAuthenticator
AD:
auth.pipeline.pre= com.datavantage.util.DVActiveDirectoryAuthenticator
Background Report Generator (BRG)
Offline Reporting allows a user to run an Adhoc query in the background while continuing to perform other tasks. Once the report has run it is saved and placed on the My Reports.
Background Report Generator Syntax Layout
LDAP_SEARCH.SERVER.ELEMENT
Distinguished Server Name
Specify the Distinguished Server Name.
Example: DC=XBR, C=DATAVANTAGE, DC=COM
<BackgroundReportGenerator> <enabled>true</enabled> <minimum.sleep>30</minimum.sleep> <completed.job.cleanup.age>off</completed.job.cleanup.age> <maximum.job.heartbeat.age>1h</maximum.job.heartbeat.age> <maximum.job.age>7d</maximum.job.age> <jobpool.size>10</jobpool.size> <jobpool.increment>5</jobpool.increment> <jobpool.maximum>20</jobpool.maximum> <myreport.refresh.interval>2m</myreport.refresh.interval> <max.concurrent.background.reports.being.processed>5 </max.concurrent.background.reports.being.processed> <storage.model>database</storage.model> <published.report.datasource>jdbc/OfflineReportPool </published.report.datasource> <published.report.dir>c:/temp/dtvreports</published.report.dir> <published.report.servlet.name>/servlets/PublishedReportServlet </published.report.servlet.name> <published.report.servlet.port></published.report.servlet.port> <published.report.cleanup.enabled>TRUE </published.report.cleanup.enabled> <alert.email.service>Default Mail Server</alert.email.service> <alert.email.from>analytics@localhost</alert.email.from> <heartbeat.servlet.name>/servlets/HeartBeatServlet </heartbeat.servlet.name> <heartbeat.servlet.port></heartbeat.servlet.port></BackgroundReportGenerator>
Table 4-22: LDAP/Active Directories (AD) Settings (continued)
Configuration Parameter Description
208 Configuration
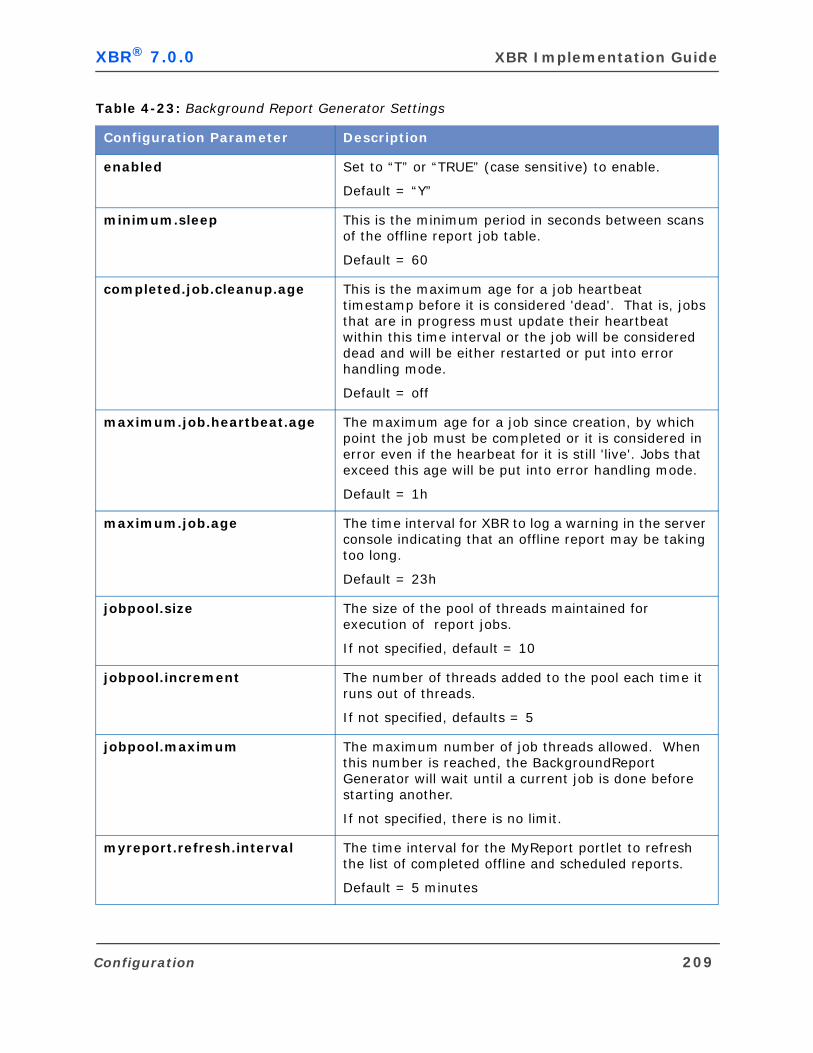
XBR® 7.0.0 XBR Implementation Guide
Table 4-23: Background Report Generator Settings
Configuration Parameter Description
enabled Set to “T” or “TRUE” (case sensitive) to enable.
Default = “Y”
minimum.sleep This is the minimum period in seconds between scans of the offline report job table.
Default = 60
completed.job.cleanup.age This is the maximum age for a job heartbeat timestamp before it is considered 'dead'. That is, jobs that are in progress must update their heartbeat within this time interval or the job will be considered dead and will be either restarted or put into error handling mode.
Default = off
maximum.job.heartbeat.age The maximum age for a job since creation, by which point the job must be completed or it is considered in error even if the hearbeat for it is still 'live'. Jobs that exceed this age will be put into error handling mode.
Default = 1h
maximum.job.age The time interval for XBR to log a warning in the server console indicating that an offline report may be taking too long.
Default = 23h
jobpool.size The size of the pool of threads maintained for execution of report jobs.
If not specified, default = 10
jobpool.increment The number of threads added to the pool each time it runs out of threads.
If not specified, defaults = 5
jobpool.maximum The maximum number of job threads allowed. When this number is reached, the BackgroundReportGenerator will wait until a current job is done before starting another.
If not specified, there is no limit.
myreport.refresh.interval The time interval for the MyReport portlet to refresh the list of completed offline and scheduled reports.
Default = 5 minutes
Configuration 209

Chapter 4: XBR Web Server Application XBR® 7.0.0
max.concurrent.background.reports.being.processed
This parameter limits the number of concurrent processed reports.
Default = 5
storage.model The type of storage to use for pre-generated reports.
Options are 'database' (default) or 'file'.
published.report.datasource The name of datasource to use for storing published reports to the database when the storage.model option is set to 'database'.
The name of the datasource must match a registered datasource for the web application context.
published.report.dir The location to publish generated reports when storage.model is ‘file’.
published.report.servlet.name
The name of Servlet used to serve the published report files. This should include the context in addition to the base name and may optionally include the schema and servername:port as well.
published.report.servlet.port The optional port specification to use when constructing published report URLs.
THis parameter is ignored if the published.report.servlet.name parameter is a fully specified URL string.
May be empty (null) which implies port 80.
published.report.cleanup toggles whether the Published Report Cleanup Daemon runs or not.
This defaults to "true" and must be set explicitely to "F"|"FALSE" (case insensitive) to disable. If this is turned off, reports marked for deletion in the My Reports control will not be deleted until this is re-enabled.
alert.email.service The name of Mail service to use to send alert email notifications. Please refer to <Mail> section below for information on defining/enabling mail services
alert.email.from The the email address to use in the 'from' header when composing an alert email notification.
heartbeat.servlet.name The URL address for probing the heartbeat servlet on remote hosts when testing for liveliness.
Table 4-23: Background Report Generator Settings (continued)
Configuration Parameter Description
210 Configuration

XBR® 7.0.0 XBR Implementation Guide
Use the Mail settings to define one or more mail <service>s that can be used to send/retrieve email from.
Mail Syntax Layout
heartbeat.servlet.port The optional port specification to use when constructing remote heartbeat servlet URLs.
<Mail> <service name="Default Mail Server" default="true"> <property key="mail.transport.protocol" value="smtp"/> <property key="mail.smtp.host" value="wdtvemail"/> <property key="mail.protocol.user" value="analytics"/> <property key="mail.smtp.auth" value="false" />
<authenticator class="com.datavantage.xbr.util.mail. EmbeddedAuthenticator"> <property key="username" value="${user.name}"/> <property key="password" value="!!AxIAAAQcARc=!!"/> </authenticator> </service></Mail>
Table 4-24: Mail Settings
Configuration Parameter Description
service name Service Name
Each declared service should have a name and optionally indicate whether to use it as the default service.
Only one service should be marked with default="true". If more than one is marked as the default, then the first one so marked will be considered the default. If no service is marked as the default, then the first declared service will be used as the default. This behavior is not guaranteed to be deterministic so it is strongly advised that the default is declared explicitly.
If more than one service is declared with the same name, the first one declared will be used for that name and subsequent declarations will be ignored (a warning will be logged).
Table 4-23: Background Report Generator Settings (continued)
Configuration Parameter Description
Configuration 211
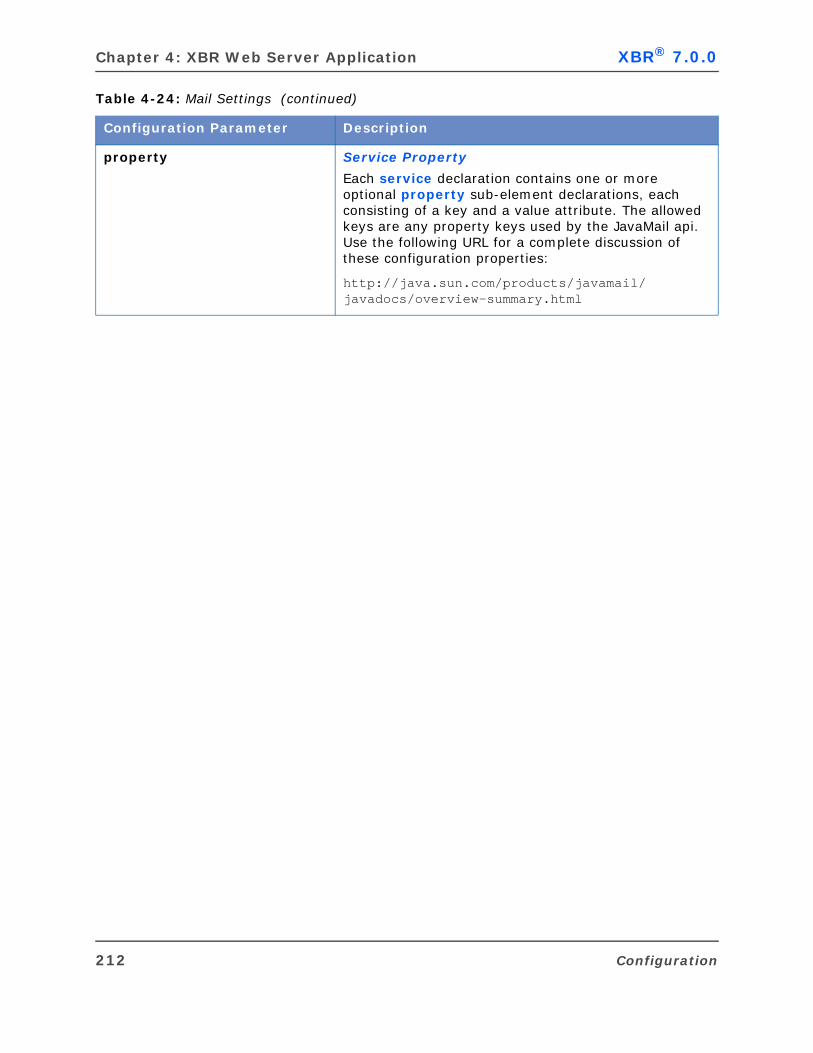
Chapter 4: XBR Web Server Application XBR® 7.0.0
property Service Property
Each service declaration contains one or more optional property sub-element declarations, each consisting of a key and a value attribute. The allowed keys are any property keys used by the JavaMail api. Use the following URL for a complete discussion of these configuration properties:
http://java.sun.com/products/javamail/javadocs/overview-summary.html
Table 4-24: Mail Settings (continued)
Configuration Parameter Description
212 Configuration

XBR® 7.0.0 XBR Implementation Guide
authenticator Authenticator
In addition to property declarations, each service may have at most one authenticator sub-element. The authenticator element has one required class attribute, which must be the fully-qualified class name of a subclass of javax.mail.Authenticator. The specified class must be visible to the classloader of the com.datavantage.xbr.uril.mail.MailService classloader. The authenticator may optionally declare property sub-elements as above. If so, and if the declared authenticator class provides a constructor that accepts a java.util.Properties object, then the declared property elements will be passed to the instantiated authenticator via that constructor. Otherwise, these property elements will be ignored.
Java System Properties
Property values in both service and authenticator may reference java System properties using the syntax ${property.name}.
Example:
<Mail> <service name="My Mail Service" default="true"> <property key="mail.transport.protocol" value="smtp"/> <property key="mail.smtp.host" value="mail.mydomain.com"/> <property key="mail.protocol.user" value="${user.name}"/> <authenticator class="org.example.mail. MyAuthenticator"> <property key="default.username" value="${user.name}"/> <property key="prompt" value="Please enter username and password!"/> </authenticator> </service></Mail>
Table 4-24: Mail Settings (continued)
Configuration Parameter Description
Configuration 213

Chapter 4: XBR Web Server Application XBR® 7.0.0
Miscellaneous Settings
<Max_XBR_Client_Memory_MBytes> is the maximum amount of memory the Web Client may use.
<Min_XBR_Client_Memory_MBytes> is the minimum amount of free memory
<MAX_SERVER_STARTUP_INTERVAL_IN_MINUTES> is the maximum time allowed for XBR Web Server to start up.
Syntax Layout
authenticator (Continued) Where:
public class MyAuthenticator extends Authenticator{...public MyAuthenticator (Properties props){...}...}
This mechanism allows you to initialize a prompt-less authenticator using embedded, declared username and password to be passed as initialization properties. Any credentials declared here will automatically be obfuscated.
...<Max_XBR_Client_Memory_MBytes value=”256” /><Min_XBR_Client_Memory_MBytes value=”28” />...<MAX_SERVER_STARTUP_INTERVAL_IN_MINUTES>5</MAX_SERVER_STARTUP_INTERVAL_IN_MINUTES>....
Table 4-25: Miscellaneous Settings
Configuration Parameter Description
Maximum XBR Client Memory Maximum XBR Client Memory
This is the maximum amount of memory the Web Client may use for Applet(s).
Table 4-24: Mail Settings (continued)
Configuration Parameter Description
214 Configuration
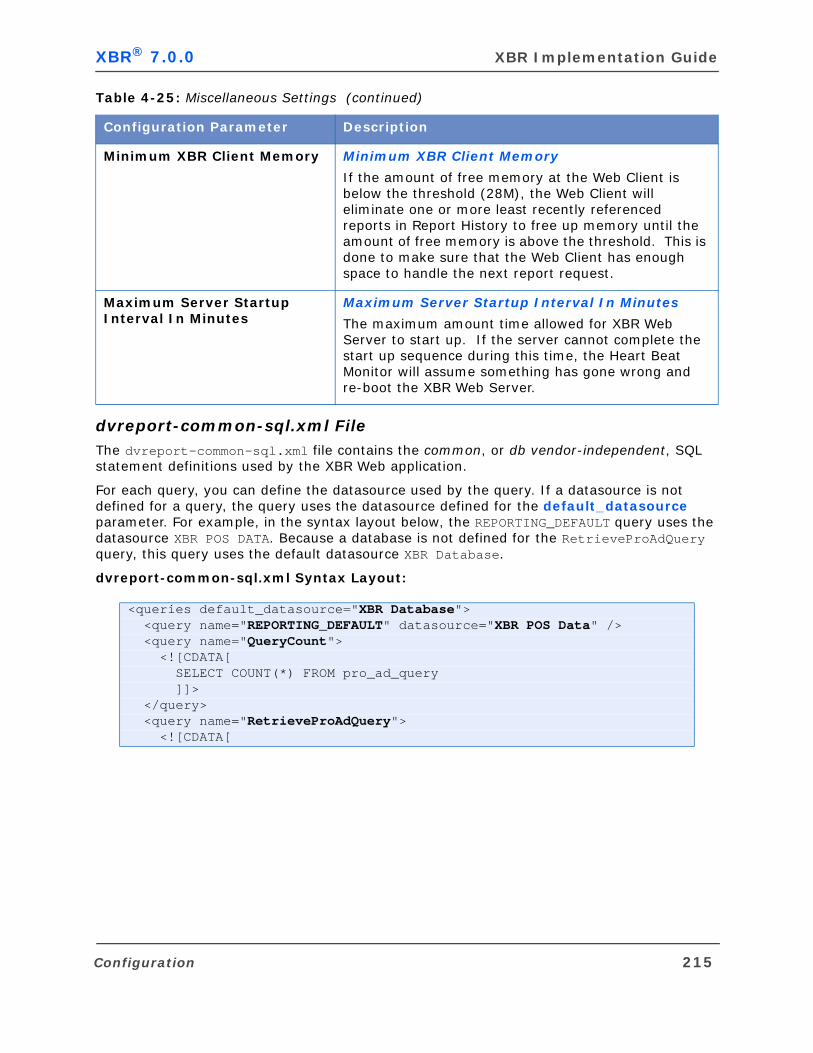
XBR® 7.0.0 XBR Implementation Guide
dvreport-common-sql.xml FileThe dvreport-common-sql.xml file contains the common, or db vendor-independent, SQL statement definitions used by the XBR Web application.
For each query, you can define the datasource used by the query. If a datasource is not defined for a query, the query uses the datasource defined for the default_datasource parameter. For example, in the syntax layout below, the REPORTING_DEFAULT query uses the datasource XBR POS DATA. Because a database is not defined for the RetrieveProAdQuery query, this query uses the default datasource XBR Database.
dvreport-common-sql.xml Syntax Layout:
Minimum XBR Client Memory Minimum XBR Client Memory
If the amount of free memory at the Web Client is below the threshold (28M), the Web Client will eliminate one or more least recently referenced reports in Report History to free up memory until the amount of free memory is above the threshold. This is done to make sure that the Web Client has enough space to handle the next report request.
Maximum Server Startup Interval In Minutes
Maximum Server Startup Interval In Minutes
The maximum amount time allowed for XBR Web Server to start up. If the server cannot complete the start up sequence during this time, the Heart Beat Monitor will assume something has gone wrong and re-boot the XBR Web Server.
<queries default_datasource="XBR Database"> <query name="REPORTING_DEFAULT" datasource="XBR POS Data" /> <query name="QueryCount"> <![CDATA[ SELECT COUNT(*) FROM pro_ad_query ]]> </query> <query name="RetrieveProAdQuery"> <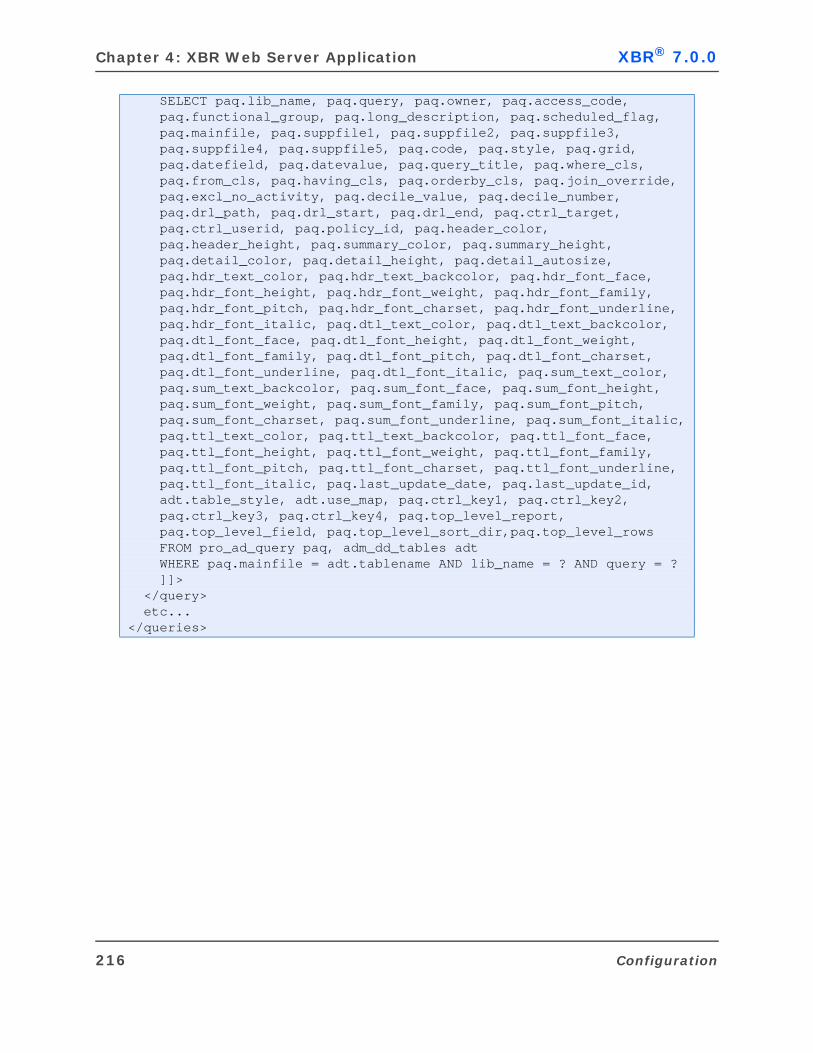
Chapter 4: XBR Web Server Application XBR® 7.0.0
SELECT paq.lib_name, paq.query, paq.owner, paq.access_code, paq.functional_group, paq.long_description, paq.scheduled_flag, paq.mainfile, paq.suppfile1, paq.suppfile2, paq.suppfile3, paq.suppfile4, paq.suppfile5, paq.code, paq.style, paq.grid, paq.datefield, paq.datevalue, paq.query_title, paq.where_cls, paq.from_cls, paq.having_cls, paq.orderby_cls, paq.join_override, paq.excl_no_activity, paq.decile_value, paq.decile_number, paq.drl_path, paq.drl_start, paq.drl_end, paq.ctrl_target, paq.ctrl_userid, paq.policy_id, paq.header_color, paq.header_height, paq.summary_color, paq.summary_height, paq.detail_color, paq.detail_height, paq.detail_autosize, paq.hdr_text_color, paq.hdr_text_backcolor, paq.hdr_font_face, paq.hdr_font_height, paq.hdr_font_weight, paq.hdr_font_family, paq.hdr_font_pitch, paq.hdr_font_charset, paq.hdr_font_underline, paq.hdr_font_italic, paq.dtl_text_color, paq.dtl_text_backcolor, paq.dtl_font_face, paq.dtl_font_height, paq.dtl_font_weight, paq.dtl_font_family, paq.dtl_font_pitch, paq.dtl_font_charset, paq.dtl_font_underline, paq.dtl_font_italic, paq.sum_text_color, paq.sum_text_backcolor, paq.sum_font_face, paq.sum_font_height, paq.sum_font_weight, paq.sum_font_family, paq.sum_font_pitch, paq.sum_font_charset, paq.sum_font_underline, paq.sum_font_italic, paq.ttl_text_color, paq.ttl_text_backcolor, paq.ttl_font_face, paq.ttl_font_height, paq.ttl_font_weight, paq.ttl_font_family, paq.ttl_font_pitch, paq.ttl_font_charset, paq.ttl_font_underline, paq.ttl_font_italic, paq.last_update_date, paq.last_update_id, adt.table_style, adt.use_map, paq.ctrl_key1, paq.ctrl_key2, paq.ctrl_key3, paq.ctrl_key4, paq.top_level_report, paq.top_level_field, paq.top_level_sort_dir,paq.top_level_rows FROM pro_ad_query paq, adm_dd_tables adt WHERE paq.mainfile = adt.tablename AND lib_name = ? AND query = ? ]]> </query> etc...</queries>
216 Configuration

XBR® 7.0.0 XBR Implementation Guide
Liferay Portal ServerThe Portal Properties file (portal-ext.properties) is used to configure the Liferay Portal Server. The portal-ext.properties file configures and sets up the portal as required by the customer.
Portal Properties File (portal-ext.properties)The portal-ext.properties file contains a number of configuration parameters used when customizing an installation. This section provides a brief overview of the parameters available in this file. For more detailed information on modification and configuration of this file, contact the MICROS-Retail XBR Web Application development group.
This file is located on the Liferay Portal Server in the following location, where xbr_6.8.x.x is the version of XBR you have installed.
xbr_6.8.x.x\tomcat\common\classes\portal-ext.properties
General SettingsTable 4-26: portal-ext.properties General Settings
Property Description
Portal Release Describes the release as Enterprise or Professional.
Portal Context Specifies the location of the shared portal context, and the number of instances at that can be served by the portal.
Log Identifies default web portal log files.
Error Identifies stack trace information for portal, printer and user.
Company Identifies the types of companies that can be selected in the portal configuration.
Users Configures user deletion, auto generation and validation.
Groups and Roles Configures portal group types, system roles and portal administrators. Additionally, this parameter can be configured to set personalized group pages and terms of use pages. See “Groups and Roles” on page 219.
Languages and Time Zones Configures the languages and country codes that are recognized. See “Languages and Time Zones” on page 221.
Skins Skins identify the portal's look and feel. There are several default skins, or the user can create their own skins. Create extended skins for customers who want their logos incorporated into the portal. See “Skins” on page 224.
Configuration 217
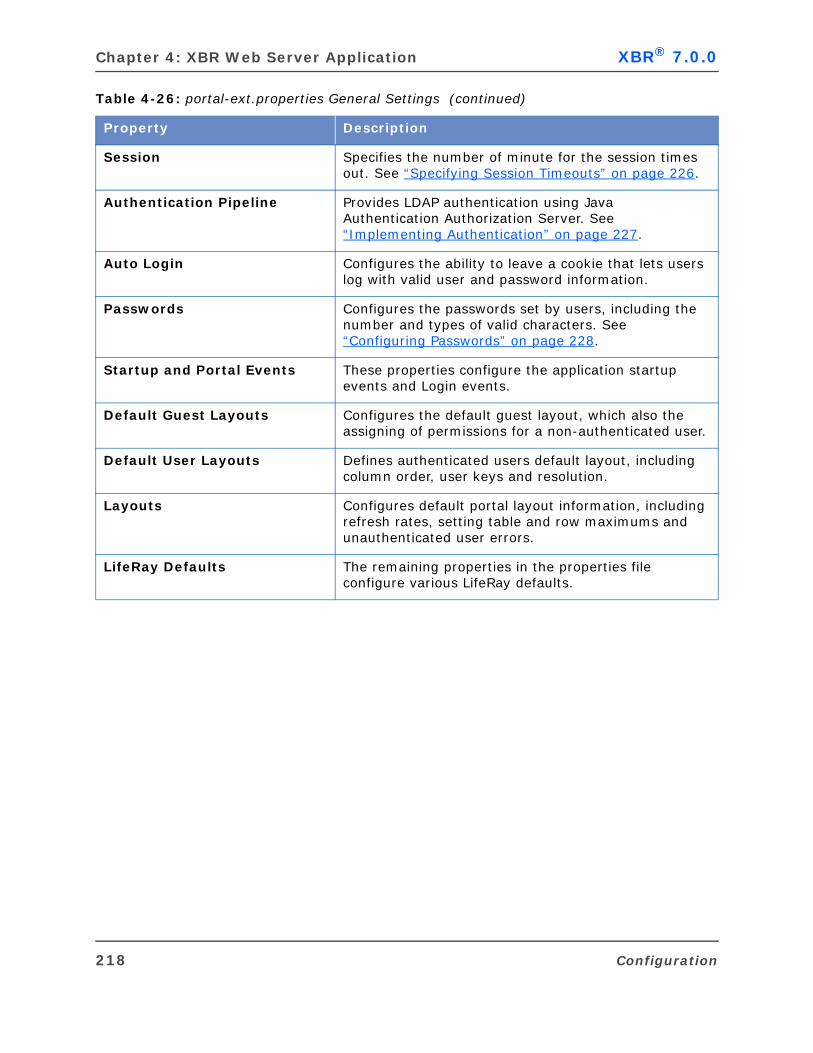
Chapter 4: XBR Web Server Application XBR® 7.0.0
Session Specifies the number of minute for the session times out. See “Specifying Session Timeouts” on page 226.
Authentication Pipeline Provides LDAP authentication using Java Authentication Authorization Server. See “Implementing Authentication” on page 227.
Auto Login Configures the ability to leave a cookie that lets users log with valid user and password information.
Passwords Configures the passwords set by users, including the number and types of valid characters. See “Configuring Passwords” on page 228.
Startup and Portal Events These properties configure the application startup events and Login events.
Default Guest Layouts Configures the default guest layout, which also the assigning of permissions for a non-authenticated user.
Default User Layouts Defines authenticated users default layout, including column order, user keys and resolution.
Layouts Configures default portal layout information, including refresh rates, setting table and row maximums and unauthenticated user errors.
LifeRay Defaults The remaining properties in the properties file configure various LifeRay defaults.
Table 4-26: portal-ext.properties General Settings (continued)
Property Description
218 Configuration
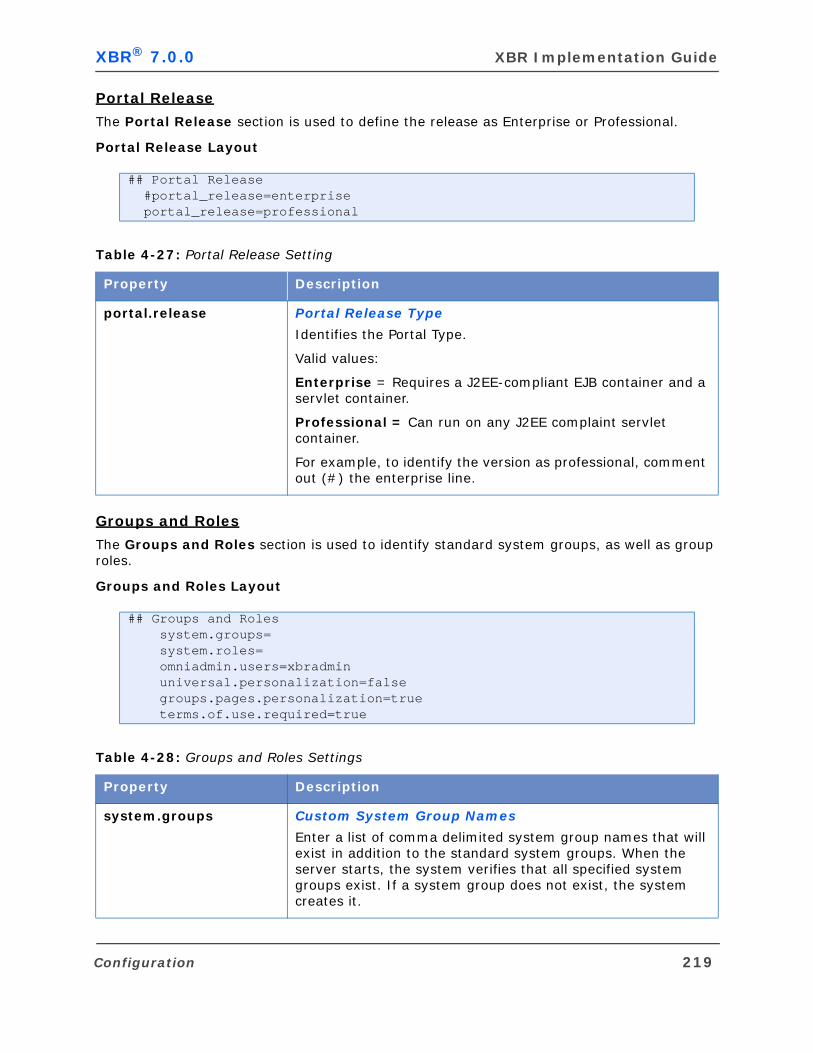
XBR® 7.0.0 XBR Implementation Guide
Portal Release
The Portal Release section is used to define the release as Enterprise or Professional.
Portal Release Layout
Groups and Roles
The Groups and Roles section is used to identify standard system groups, as well as group roles.
Groups and Roles Layout
## Portal Release #portal_release=enterprise portal_release=professional
Table 4-27: Portal Release Setting
Property Description
portal.release Portal Release Type
Identifies the Portal Type.
Valid values:
Enterprise = Requires a J2EE-compliant EJB container and a servlet container.
Professional = Can run on any J2EE complaint servlet container.
For example, to identify the version as professional, comment out (#) the enterprise line.
## Groups and Roles system.groups= system.roles= omniadmin.users=xbradmin universal.personalization=false groups.pages.personalization=true terms.of.use.required=true
Table 4-28: Groups and Roles Settings
Property Description
system.groups Custom System Group Names
Enter a list of comma delimited system group names that will exist in addition to the standard system groups. When the server starts, the system verifies that all specified system groups exist. If a system group does not exist, the system creates it.
Configuration 219
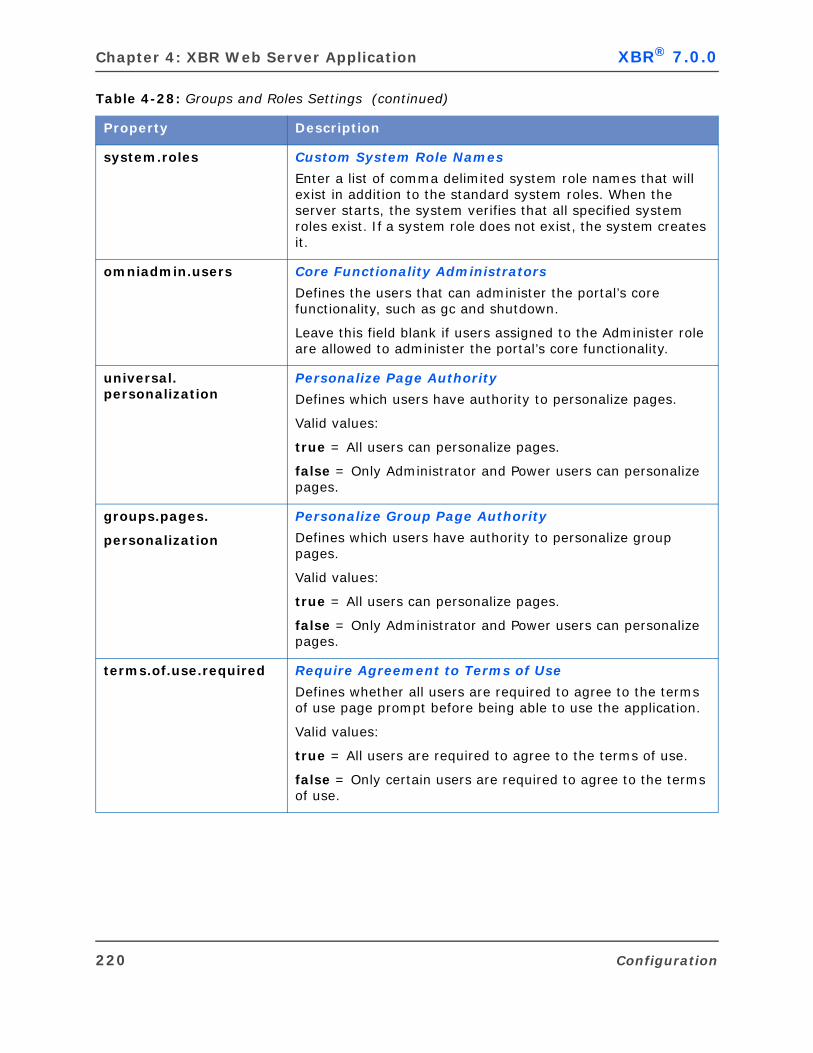
Chapter 4: XBR Web Server Application XBR® 7.0.0
system.roles Custom System Role Names
Enter a list of comma delimited system role names that will exist in addition to the standard system roles. When the server starts, the system verifies that all specified system roles exist. If a system role does not exist, the system creates it.
omniadmin.users Core Functionality Administrators
Defines the users that can administer the portal’s core functionality, such as gc and shutdown.
Leave this field blank if users assigned to the Administer role are allowed to administer the portal’s core functionality.
universal.personalization
Personalize Page Authority
Defines which users have authority to personalize pages.
Valid values:
true = All users can personalize pages.
false = Only Administrator and Power users can personalize pages.
groups.pages.
personalization
Personalize Group Page Authority
Defines which users have authority to personalize group pages.
Valid values:
true = All users can personalize pages.
false = Only Administrator and Power users can personalize pages.
terms.of.use.required Require Agreement to Terms of Use
Defines whether all users are required to agree to the terms of use page prompt before being able to use the application.
Valid values:
true = All users are required to agree to the terms of use.
false = Only certain users are required to agree to the terms of use.
Table 4-28: Groups and Roles Settings (continued)
Property Description
220 Configuration
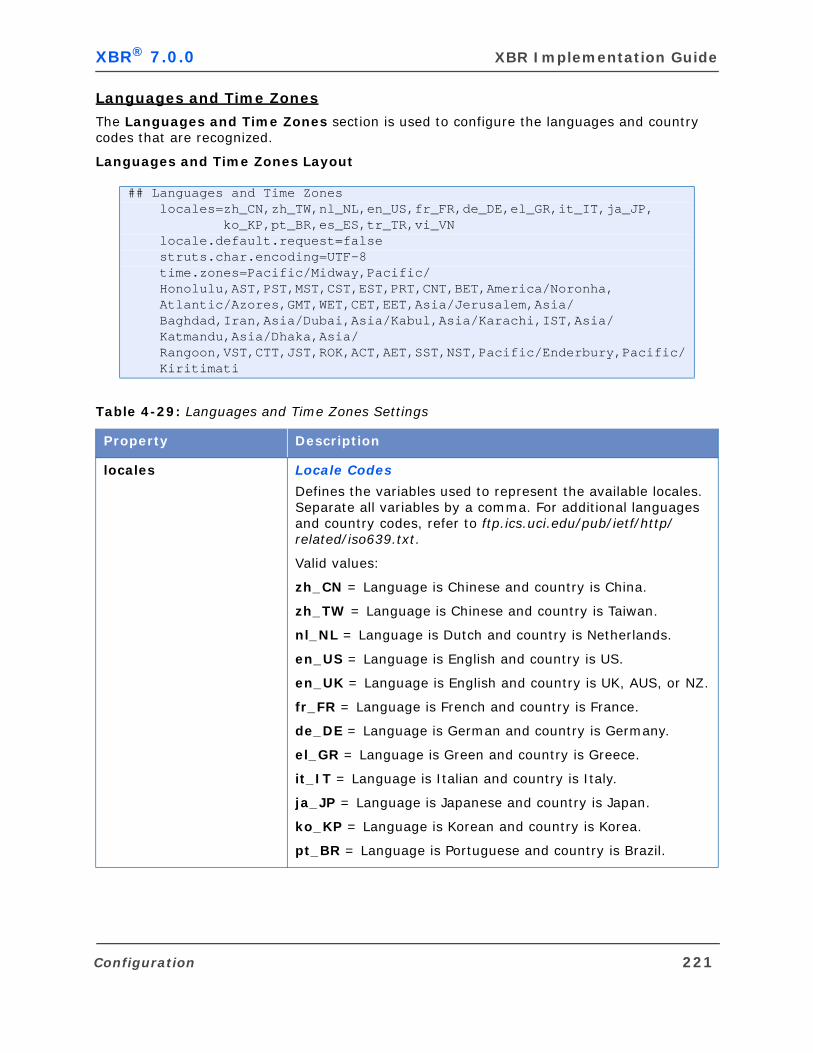
XBR® 7.0.0 XBR Implementation Guide
Languages and Time Zones
The Languages and Time Zones section is used to configure the languages and country codes that are recognized.
Languages and Time Zones Layout
## Languages and Time Zones locales=zh_CN,zh_TW,nl_NL,en_US,fr_FR,de_DE,el_GR,it_IT,ja_JP, ko_KP,pt_BR,es_ES,tr_TR,vi_VN locale.default.request=false struts.char.encoding=UTF-8 time.zones=Pacific/Midway,Pacific/ Honolulu,AST,PST,MST,CST,EST,PRT,CNT,BET,America/Noronha, Atlantic/Azores,GMT,WET,CET,EET,Asia/Jerusalem,Asia/ Baghdad,Iran,Asia/Dubai,Asia/Kabul,Asia/Karachi,IST,Asia/ Katmandu,Asia/Dhaka,Asia/ Rangoon,VST,CTT,JST,ROK,ACT,AET,SST,NST,Pacific/Enderbury,Pacific/ Kiritimati
Table 4-29: Languages and Time Zones Settings
Property Description
locales Locale Codes
Defines the variables used to represent the available locales. Separate all variables by a comma. For additional languages and country codes, refer to ftp.ics.uci.edu/pub/ietf/http/related/iso639.txt.
Valid values:
zh_CN = Language is Chinese and country is China.
zh_TW = Language is Chinese and country is Taiwan.
nl_NL = Language is Dutch and country is Netherlands.
en_US = Language is English and country is US.
en_UK = Language is English and country is UK, AUS, or NZ.
fr_FR = Language is French and country is France.
de_DE = Language is German and country is Germany.
el_GR = Language is Green and country is Greece.
it_IT = Language is Italian and country is Italy.
ja_JP = Language is Japanese and country is Japan.
ko_KP = Language is Korean and country is Korea.
pt_BR = Language is Portuguese and country is Brazil.
Configuration 221
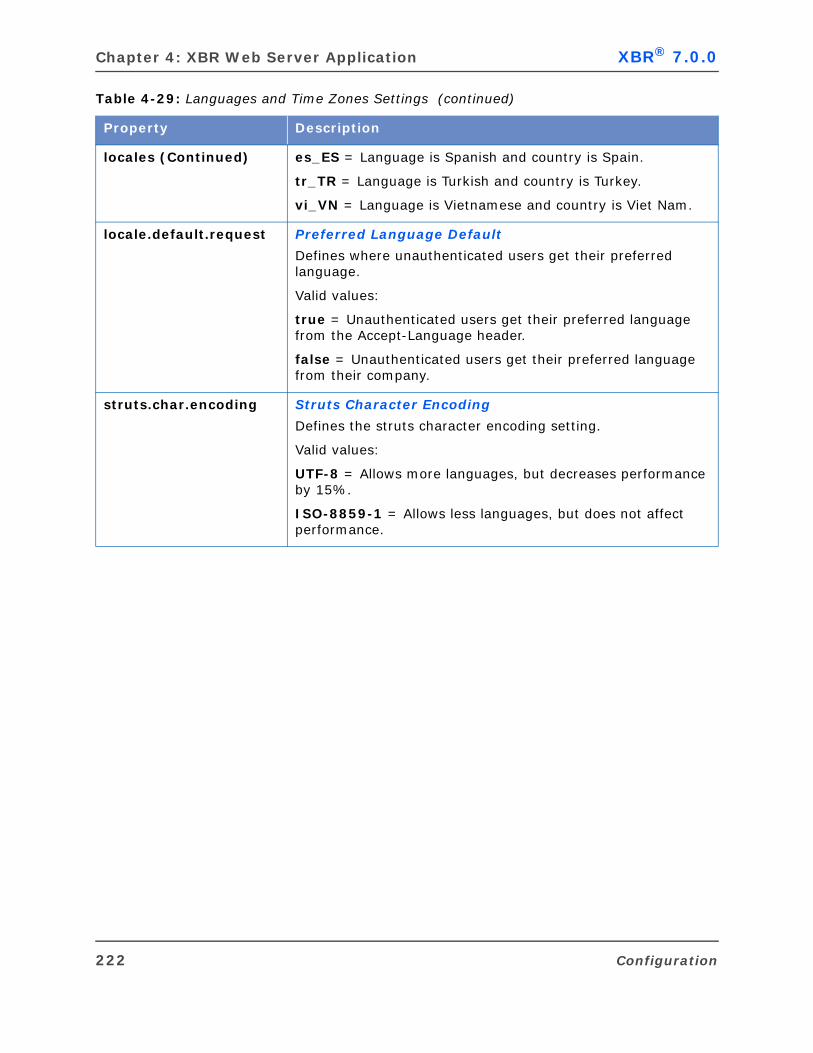
Chapter 4: XBR Web Server Application XBR® 7.0.0
locales (Continued) es_ES = Language is Spanish and country is Spain.
tr_TR = Language is Turkish and country is Turkey.
vi_VN = Language is Vietnamese and country is Viet Nam.
locale.default.request Preferred Language Default
Defines where unauthenticated users get their preferred language.
Valid values:
true = Unauthenticated users get their preferred language from the Accept-Language header.
false = Unauthenticated users get their preferred language from their company.
struts.char.encoding Struts Character Encoding
Defines the struts character encoding setting.
Valid values:
UTF-8 = Allows more languages, but decreases performance by 15%.
ISO-8859-1 = Allows less languages, but does not affect performance.
Table 4-29: Languages and Time Zones Settings (continued)
Property Description
222 Configuration
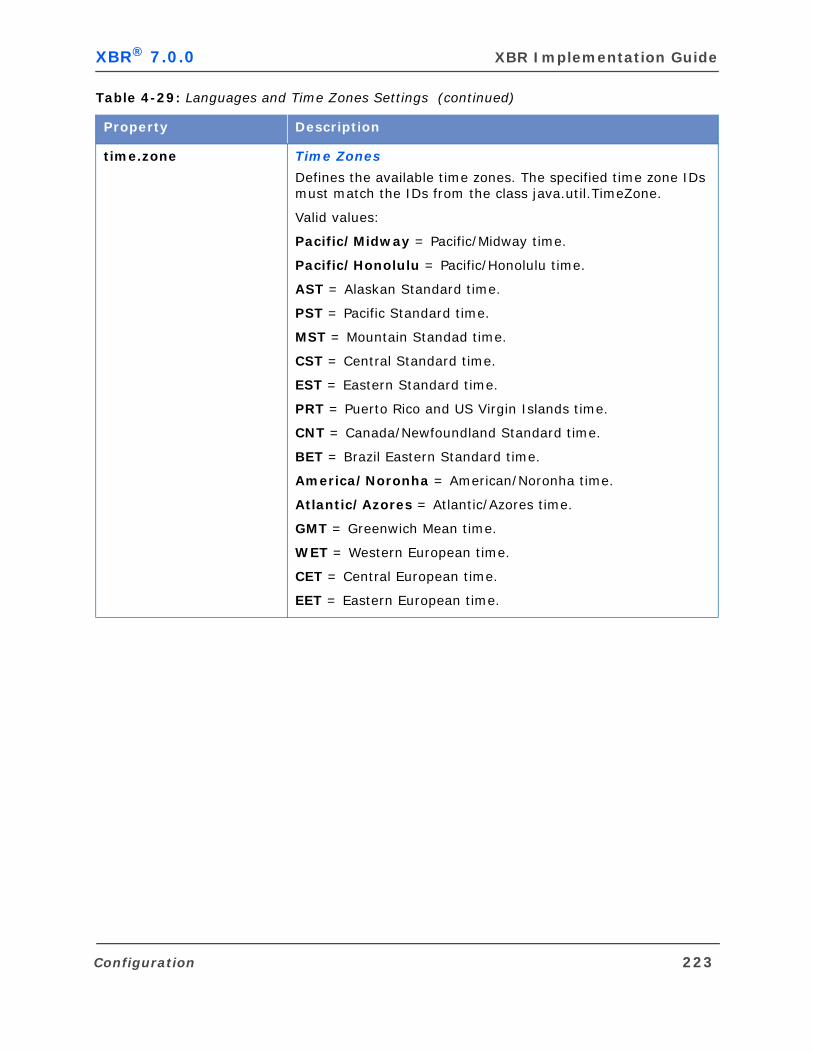
XBR® 7.0.0 XBR Implementation Guide
time.zone Time Zones
Defines the available time zones. The specified time zone IDs must match the IDs from the class java.util.TimeZone.
Valid values:
Pacific/Midway = Pacific/Midway time.
Pacific/Honolulu = Pacific/Honolulu time.
AST = Alaskan Standard time.
PST = Pacific Standard time.
MST = Mountain Standad time.
CST = Central Standard time.
EST = Eastern Standard time.
PRT = Puerto Rico and US Virgin Islands time.
CNT = Canada/Newfoundland Standard time.
BET = Brazil Eastern Standard time.
America/Noronha = American/Noronha time.
Atlantic/Azores = Atlantic/Azores time.
GMT = Greenwich Mean time.
WET = Western European time.
CET = Central European time.
EET = Eastern European time.
Table 4-29: Languages and Time Zones Settings (continued)
Property Description
Configuration 223
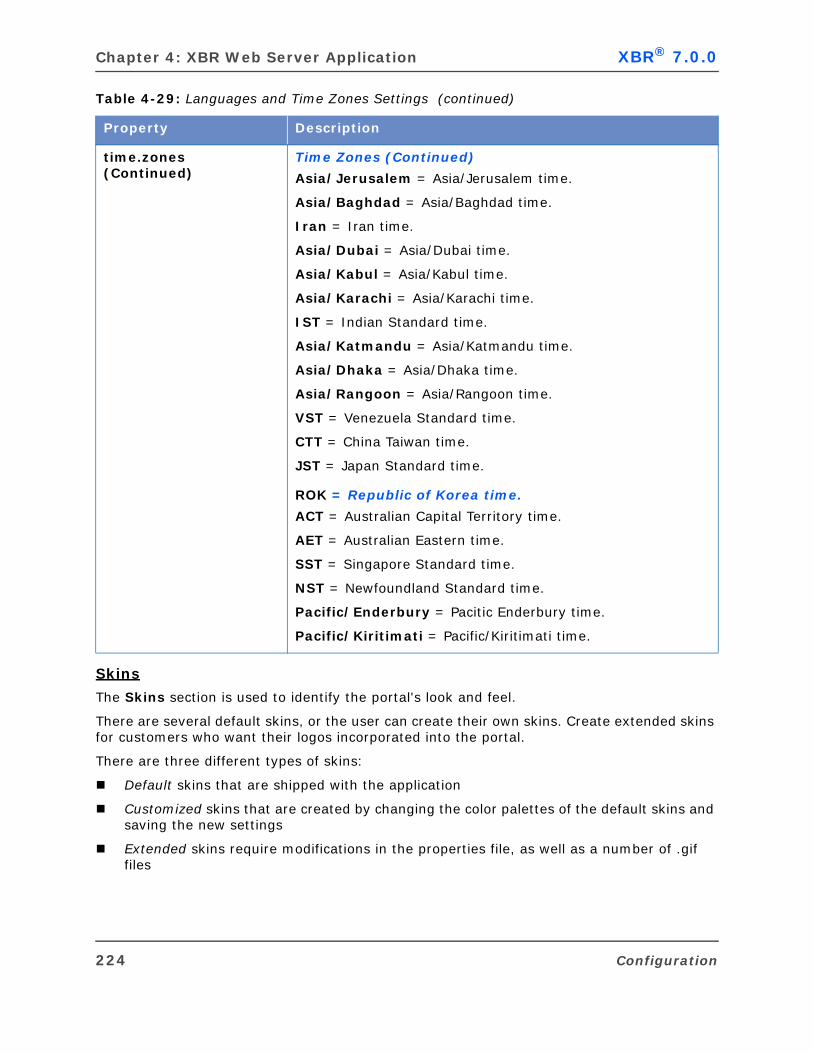
Chapter 4: XBR Web Server Application XBR® 7.0.0
Skins
The Skins section is used to identify the portal's look and feel.
There are several default skins, or the user can create their own skins. Create extended skins for customers who want their logos incorporated into the portal.
There are three different types of skins:
Default skins that are shipped with the application
Customized skins that are created by changing the color palettes of the default skins and saving the new settings
Extended skins require modifications in the properties file, as well as a number of .gif files
time.zones (Continued)
Time Zones (Continued)
Asia/Jerusalem = Asia/Jerusalem time.
Asia/Baghdad = Asia/Baghdad time.
Iran = Iran time.
Asia/Dubai = Asia/Dubai time.
Asia/Kabul = Asia/Kabul time.
Asia/Karachi = Asia/Karachi time.
IST = Indian Standard time.
Asia/Katmandu = Asia/Katmandu time.
Asia/Dhaka = Asia/Dhaka time.
Asia/Rangoon = Asia/Rangoon time.
VST = Venezuela Standard time.
CTT = China Taiwan time.
JST = Japan Standard time.
ROK = Republic of Korea time.
ACT = Australian Capital Territory time.
AET = Australian Eastern time.
SST = Singapore Standard time.
NST = Newfoundland Standard time.
Pacific/Enderbury = Pacitic Enderbury time.
Pacific/Kiritimati = Pacific/Kiritimati time.
Table 4-29: Languages and Time Zones Settings (continued)
Property Description
224 Configuration
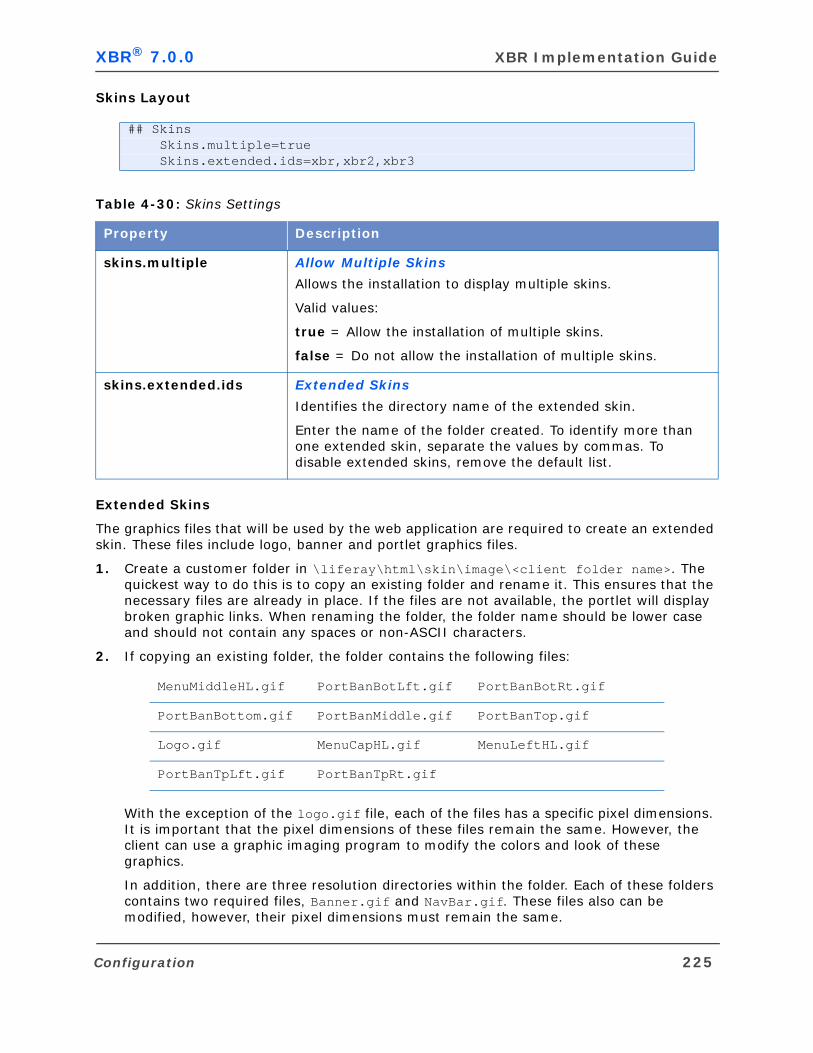
XBR® 7.0.0 XBR Implementation Guide
Skins Layout
Extended Skins
The graphics files that will be used by the web application are required to create an extended skin. These files include logo, banner and portlet graphics files.
1. Create a customer folder in \liferay\html\skin\image\<client folder name>. The quickest way to do this is to copy an existing folder and rename it. This ensures that the necessary files are already in place. If the files are not available, the portlet will display broken graphic links. When renaming the folder, the folder name should be lower case and should not contain any spaces or non-ASCII characters.
2. If copying an existing folder, the folder contains the following files:
With the exception of the logo.gif file, each of the files has a specific pixel dimensions. It is important that the pixel dimensions of these files remain the same. However, the client can use a graphic imaging program to modify the colors and look of these graphics.
In addition, there are three resolution directories within the folder. Each of these folders contains two required files, Banner.gif and NavBar.gif. These files also can be modified, however, their pixel dimensions must remain the same.
## Skins Skins.multiple=true Skins.extended.ids=xbr,xbr2,xbr3
Table 4-30: Skins Settings
Property Description
skins.multiple Allow Multiple Skins
Allows the installation to display multiple skins.
Valid values:
true = Allow the installation of multiple skins.
false = Do not allow the installation of multiple skins.
skins.extended.ids Extended Skins
Identifies the directory name of the extended skin.
Enter the name of the folder created. To identify more than one extended skin, separate the values by commas. To disable extended skins, remove the default list.
MenuMiddleHL.gif PortBanBotLft.gif PortBanBotRt.gif
PortBanBottom.gif PortBanMiddle.gif PortBanTop.gif
Logo.gif MenuCapHL.gif MenuLeftHL.gif
PortBanTpLft.gif PortBanTpRt.gif
Configuration 225
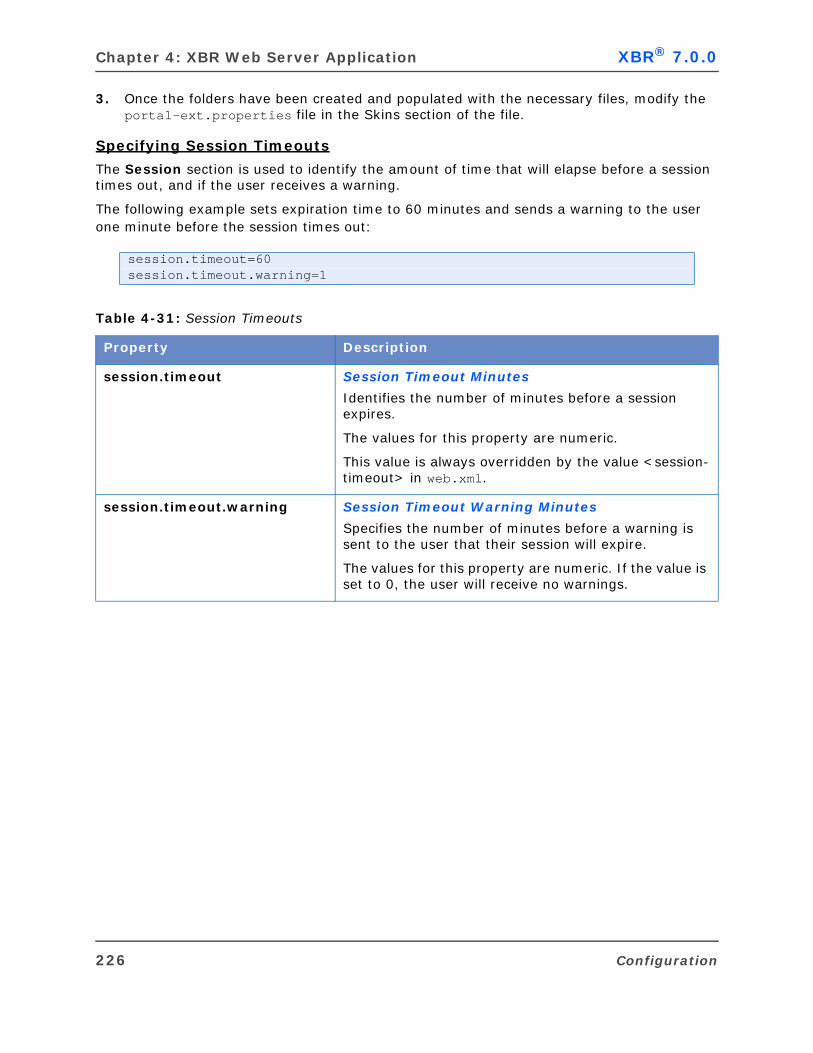
Chapter 4: XBR Web Server Application XBR® 7.0.0
3. Once the folders have been created and populated with the necessary files, modify the portal-ext.properties file in the Skins section of the file.
Specifying Session Timeouts
The Session section is used to identify the amount of time that will elapse before a session times out, and if the user receives a warning.
The following example sets expiration time to 60 minutes and sends a warning to the user one minute before the session times out:
session.timeout=60session.timeout.warning=1
Table 4-31: Session Timeouts
Property Description
session.timeout Session Timeout Minutes
Identifies the number of minutes before a session expires.
The values for this property are numeric.
This value is always overridden by the value <session-timeout> in web.xml.
session.timeout.warning Session Timeout Warning Minutes
Specifies the number of minutes before a warning is sent to the user that their session will expire.
The values for this property are numeric. If the value is set to 0, the user will receive no warnings.
226 Configuration
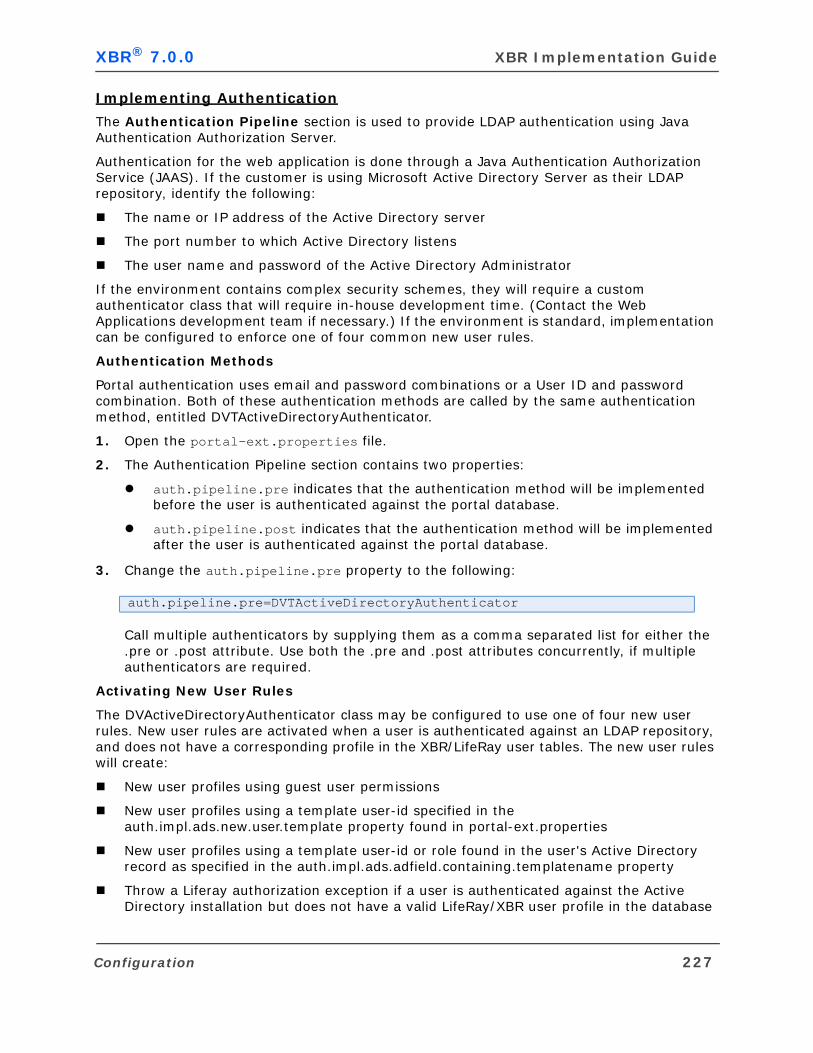
XBR® 7.0.0 XBR Implementation Guide
Implementing Authentication
The Authentication Pipeline section is used to provide LDAP authentication using Java Authentication Authorization Server.
Authentication for the web application is done through a Java Authentication Authorization Service (JAAS). If the customer is using Microsoft Active Directory Server as their LDAP repository, identify the following:
The name or IP address of the Active Directory server
The port number to which Active Directory listens
The user name and password of the Active Directory Administrator
If the environment contains complex security schemes, they will require a custom authenticator class that will require in-house development time. (Contact the Web Applications development team if necessary.) If the environment is standard, implementation can be configured to enforce one of four common new user rules.
Authentication Methods
Portal authentication uses email and password combinations or a User ID and password combination. Both of these authentication methods are called by the same authentication method, entitled DVTActiveDirectoryAuthenticator.
1. Open the portal-ext.properties file.
2. The Authentication Pipeline section contains two properties:
auth.pipeline.pre indicates that the authentication method will be implemented before the user is authenticated against the portal database.
auth.pipeline.post indicates that the authentication method will be implemented after the user is authenticated against the portal database.
3. Change the auth.pipeline.pre property to the following:
Call multiple authenticators by supplying them as a comma separated list for either the .pre or .post attribute. Use both the .pre and .post attributes concurrently, if multiple authenticators are required.
Activating New User Rules
The DVActiveDirectoryAuthenticator class may be configured to use one of four new user rules. New user rules are activated when a user is authenticated against an LDAP repository, and does not have a corresponding profile in the XBR/LifeRay user tables. The new user rules will create:
New user profiles using guest user permissions
New user profiles using a template user-id specified in the auth.impl.ads.new.user.template property found in portal-ext.properties
New user profiles using a template user-id or role found in the user's Active Directory record as specified in the auth.impl.ads.adfield.containing.templatename property
Throw a Liferay authorization exception if a user is authenticated against the Active Directory installation but does not have a valid LifeRay/XBR user profile in the database
auth.pipeline.pre=DVTActiveDirectoryAuthenticator
Configuration 227
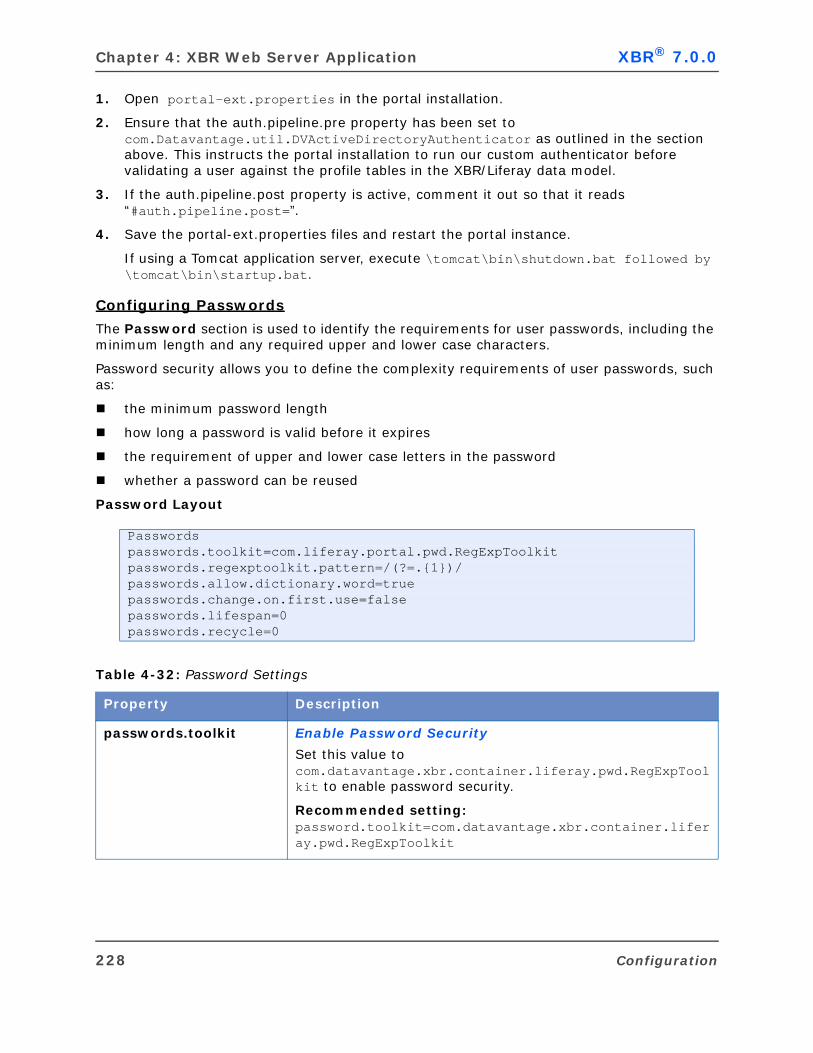
Chapter 4: XBR Web Server Application XBR® 7.0.0
1. Open portal-ext.properties in the portal installation.
2. Ensure that the auth.pipeline.pre property has been set to com.Datavantage.util.DVActiveDirectoryAuthenticator as outlined in the section above. This instructs the portal installation to run our custom authenticator before validating a user against the profile tables in the XBR/Liferay data model.
3. If the auth.pipeline.post property is active, comment it out so that it reads “#auth.pipeline.post=”.
4. Save the portal-ext.properties files and restart the portal instance.
If using a Tomcat application server, execute \tomcat\bin\shutdown.bat followed by \tomcat\bin\startup.bat.
Configuring Passwords
The Password section is used to identify the requirements for user passwords, including the minimum length and any required upper and lower case characters.
Password security allows you to define the complexity requirements of user passwords, such as:
the minimum password length
how long a password is valid before it expires
the requirement of upper and lower case letters in the password
whether a password can be reused
Password Layout
Passwordspasswords.toolkit=com.liferay.portal.pwd.RegExpToolkitpasswords.regexptoolkit.pattern=/(?=.{1})/passwords.allow.dictionary.word=truepasswords.change.on.first.use=falsepasswords.lifespan=0passwords.recycle=0
Table 4-32: Password Settings
Property Description
passwords.toolkit Enable Password Security
Set this value to com.datavantage.xbr.container.liferay.pwd.RegExpToolkit to enable password security.
Recommended setting: password.toolkit=com.datavantage.xbr.container.liferay.pwd.RegExpToolkit
228 Configuration
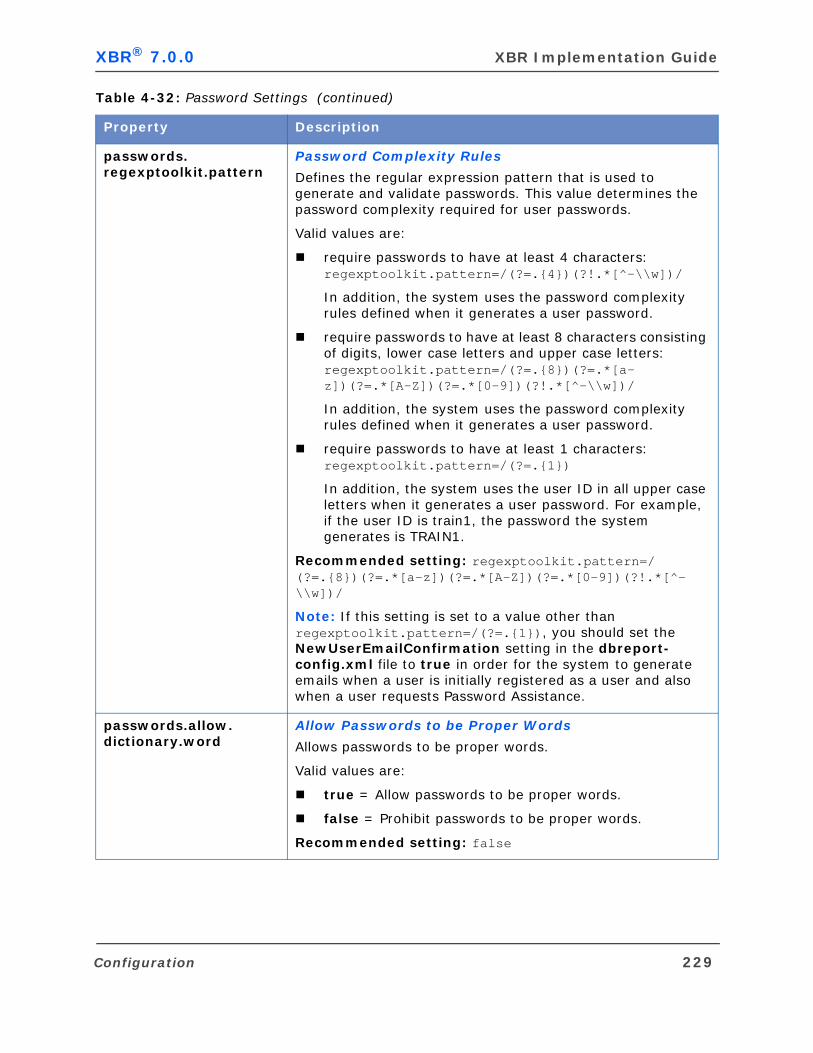
XBR® 7.0.0 XBR Implementation Guide
passwords.regexptoolkit.pattern
Password Complexity Rules
Defines the regular expression pattern that is used to generate and validate passwords. This value determines the password complexity required for user passwords.
Valid values are:
require passwords to have at least 4 characters: regexptoolkit.pattern=/(?=.{4})(?!.*[^-\\w])/
In addition, the system uses the password complexity rules defined when it generates a user password.
require passwords to have at least 8 characters consisting of digits, lower case letters and upper case letters: regexptoolkit.pattern=/(?=.{8})(?=.*[a-z])(?=.*[A-Z])(?=.*[0-9])(?!.*[^-\\w])/
In addition, the system uses the password complexity rules defined when it generates a user password.
require passwords to have at least 1 characters: regexptoolkit.pattern=/(?=.{1})
In addition, the system uses the user ID in all upper case letters when it generates a user password. For example, if the user ID is train1, the password the system generates is TRAIN1.
Recommended setting: regexptoolkit.pattern=/(?=.{8})(?=.*[a-z])(?=.*[A-Z])(?=.*[0-9])(?!.*[^-\\w])/
Note: If this setting is set to a value other than regexptoolkit.pattern=/(?=.{1}), you should set the NewUserEmailConfirmation setting in the dbreport-config.xml file to true in order for the system to generate emails when a user is initially registered as a user and also when a user requests Password Assistance.
passwords.allow.dictionary.word
Allow Passwords to be Proper Words
Allows passwords to be proper words.
Valid values are:
true = Allow passwords to be proper words.
false = Prohibit passwords to be proper words.
Recommended setting: false
Table 4-32: Password Settings (continued)
Property Description
Configuration 229
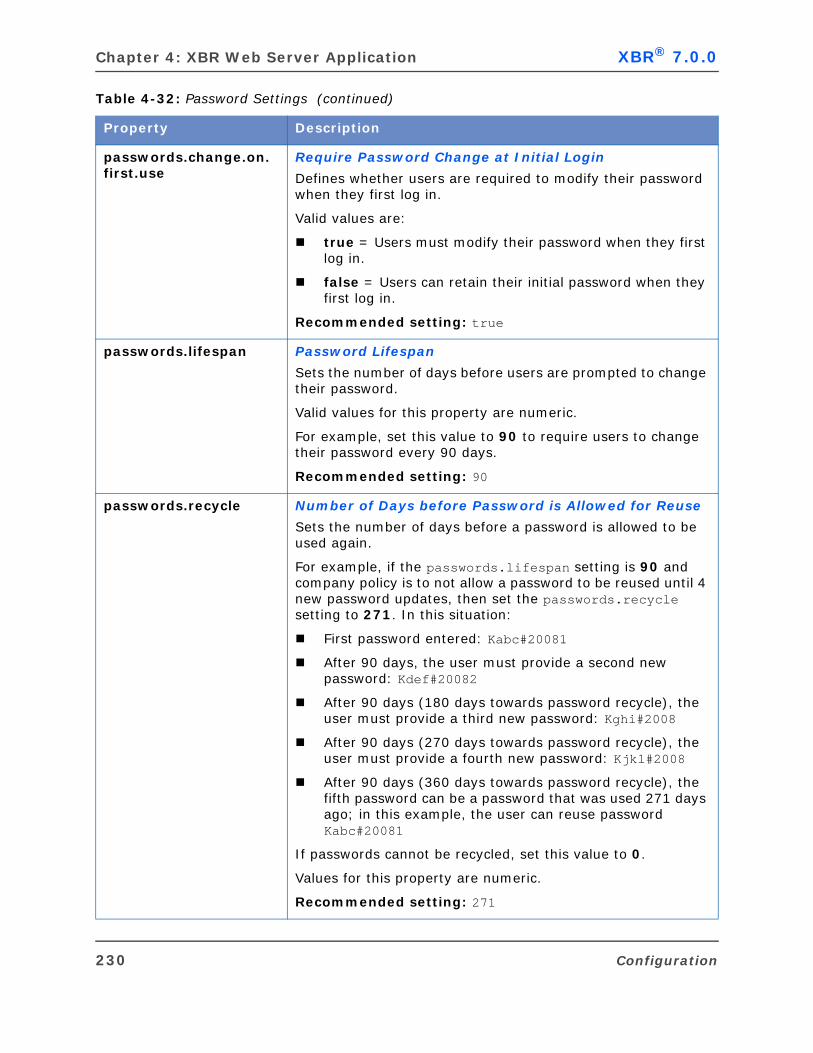
Chapter 4: XBR Web Server Application XBR® 7.0.0
passwords.change.on.first.use
Require Password Change at Initial Login
Defines whether users are required to modify their password when they first log in.
Valid values are:
true = Users must modify their password when they first log in.
false = Users can retain their initial password when they first log in.
Recommended setting: true
passwords.lifespan Password Lifespan
Sets the number of days before users are prompted to change their password.
Valid values for this property are numeric.
For example, set this value to 90 to require users to change their password every 90 days.
Recommended setting: 90
passwords.recycle Number of Days before Password is Allowed for Reuse
Sets the number of days before a password is allowed to be used again.
For example, if the passwords.lifespan setting is 90 and company policy is to not allow a password to be reused until 4 new password updates, then set the passwords.recycle setting to 271. In this situation:
First password entered: Kabc#20081
After 90 days, the user must provide a second new password: Kdef#20082
After 90 days (180 days towards password recycle), the user must provide a third new password: Kghi#2008
After 90 days (270 days towards password recycle), the user must provide a fourth new password: Kjkl#2008
After 90 days (360 days towards password recycle), the fifth password can be a password that was used 271 days ago; in this example, the user can reuse password Kabc#20081
If passwords cannot be recycled, set this value to 0.
Values for this property are numeric.
Recommended setting: 271
Table 4-32: Password Settings (continued)
Property Description
230 Configuration
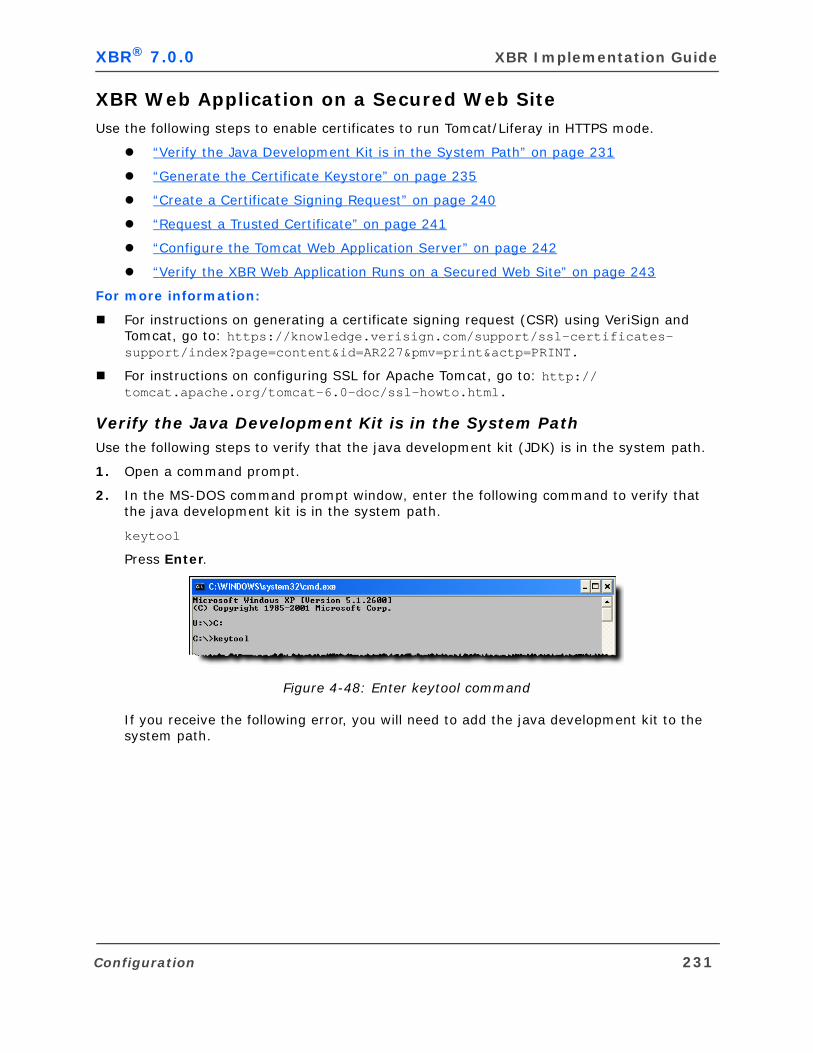
XBR® 7.0.0 XBR Implementation Guide
XBR Web Application on a Secured Web SiteUse the following steps to enable certificates to run Tomcat/Liferay in HTTPS mode.
“Verify the Java Development Kit is in the System Path” on page 231
“Generate the Certificate Keystore” on page 235
“Create a Certificate Signing Request” on page 240
“Request a Trusted Certificate” on page 241
“Configure the Tomcat Web Application Server” on page 242
“Verify the XBR Web Application Runs on a Secured Web Site” on page 243
For more information:
For instructions on generating a certificate signing request (CSR) using VeriSign and Tomcat, go to: https://knowledge.verisign.com/support/ssl-certificates-support/index?page=content&id=AR227&pmv=print&actp=PRINT.
For instructions on configuring SSL for Apache Tomcat, go to: http://tomcat.apache.org/tomcat-6.0-doc/ssl-howto.html.
Verify the Java Development Kit is in the System PathUse the following steps to verify that the java development kit (JDK) is in the system path.
1. Open a command prompt.
2. In the MS-DOS command prompt window, enter the following command to verify that the java development kit is in the system path.
keytool
Press Enter.
Figure 4-48: Enter keytool command
If you receive the following error, you will need to add the java development kit to the system path.
Configuration 231
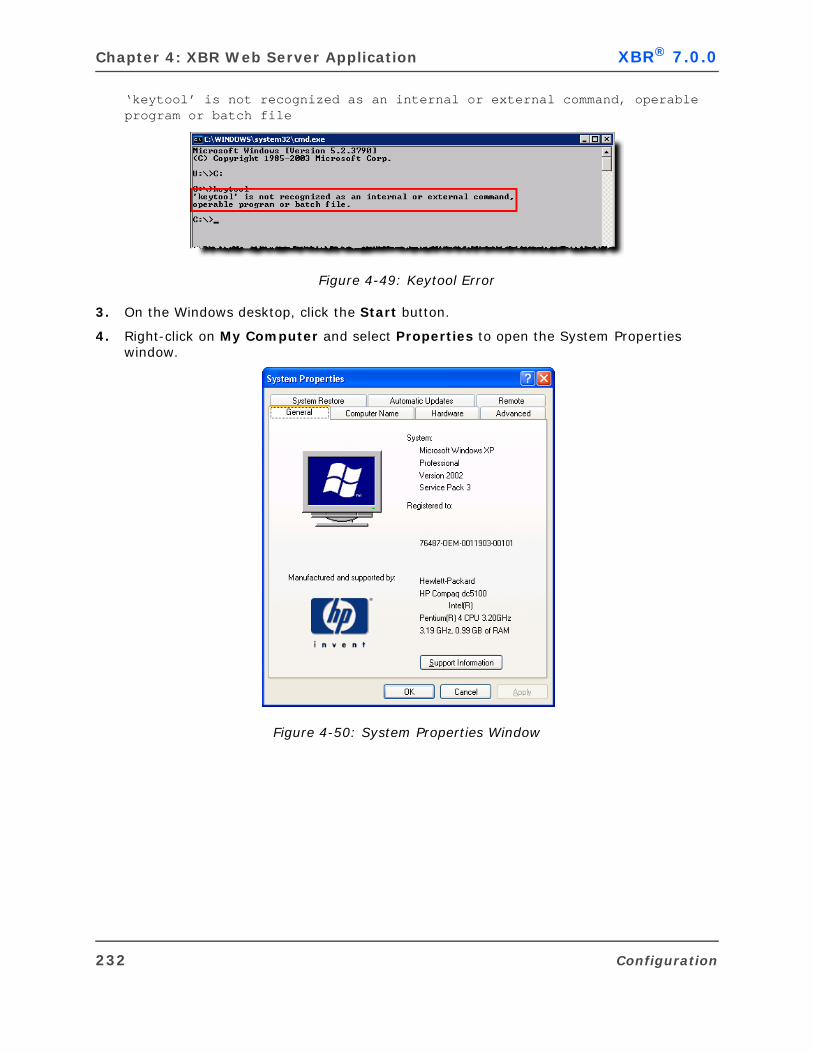
Chapter 4: XBR Web Server Application XBR® 7.0.0
‘keytool’ is not recognized as an internal or external command, operable program or batch file
Figure 4-49: Keytool Error
3. On the Windows desktop, click the Start button.
4. Right-click on My Computer and select Properties to open the System Properties window.
Figure 4-50: System Properties Window
232 Configuration
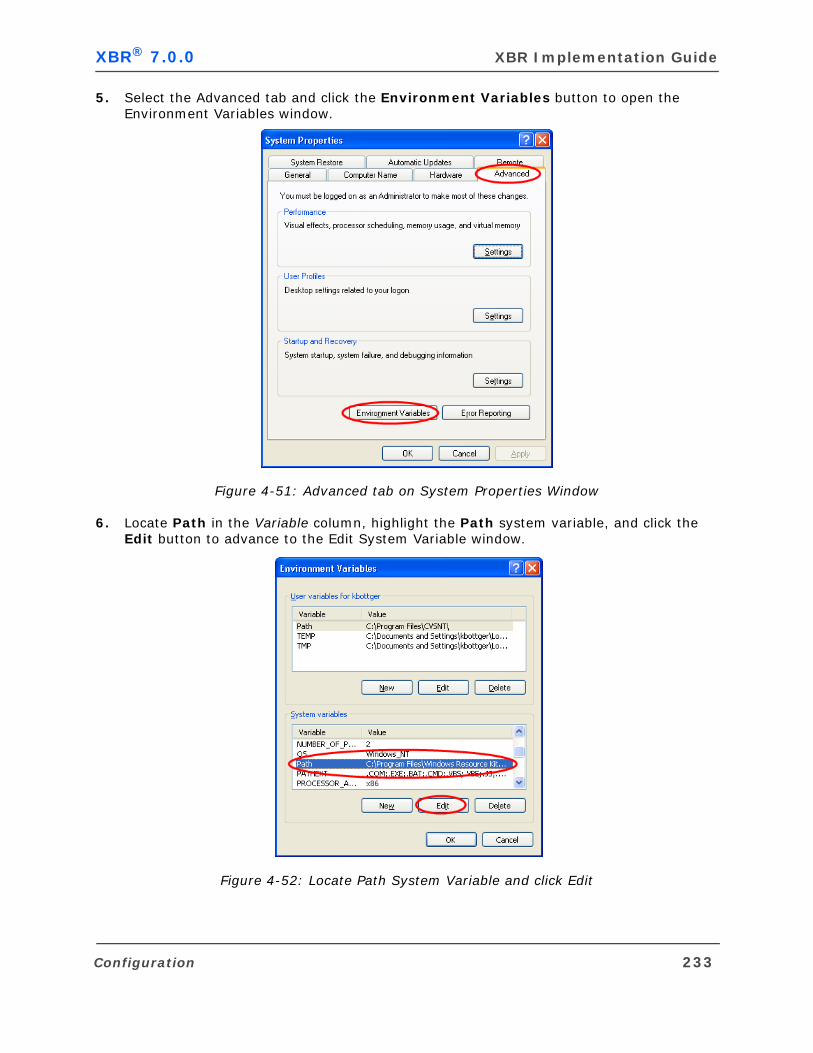
XBR® 7.0.0 XBR Implementation Guide
5. Select the Advanced tab and click the Environment Variables button to open the Environment Variables window.
Figure 4-51: Advanced tab on System Properties Window
6. Locate Path in the Variable column, highlight the Path system variable, and click the Edit button to advance to the Edit System Variable window.
Figure 4-52: Locate Path System Variable and click Edit
Configuration 233

Chapter 4: XBR Web Server Application XBR® 7.0.0
7. Place the cursor at the end of the data in the Variable value field. Enter a semi-colon (;) and add the location of the most recently installed java development kit to the end of the Variable value entry.
For example: C:\Program Files\Java\jre1.6.0_12\bin.
Click OK to save your changes.
Figure 4-53: Edit System Variable Window
8. Now that you have added the java development kit to the system path, verify that the keytool command is now successful in the MS-DOS command prompt window:
a. Open a command prompt.
b. Enter the following command to verify that the JDK is in the system path.
keytool
c. Press Enter.
Figure 4-54: Enter keytool command
If you receive a list of keytool usage, the JDK is in the system path.
Figure 4-55: Keytool Usage
234 Configuration
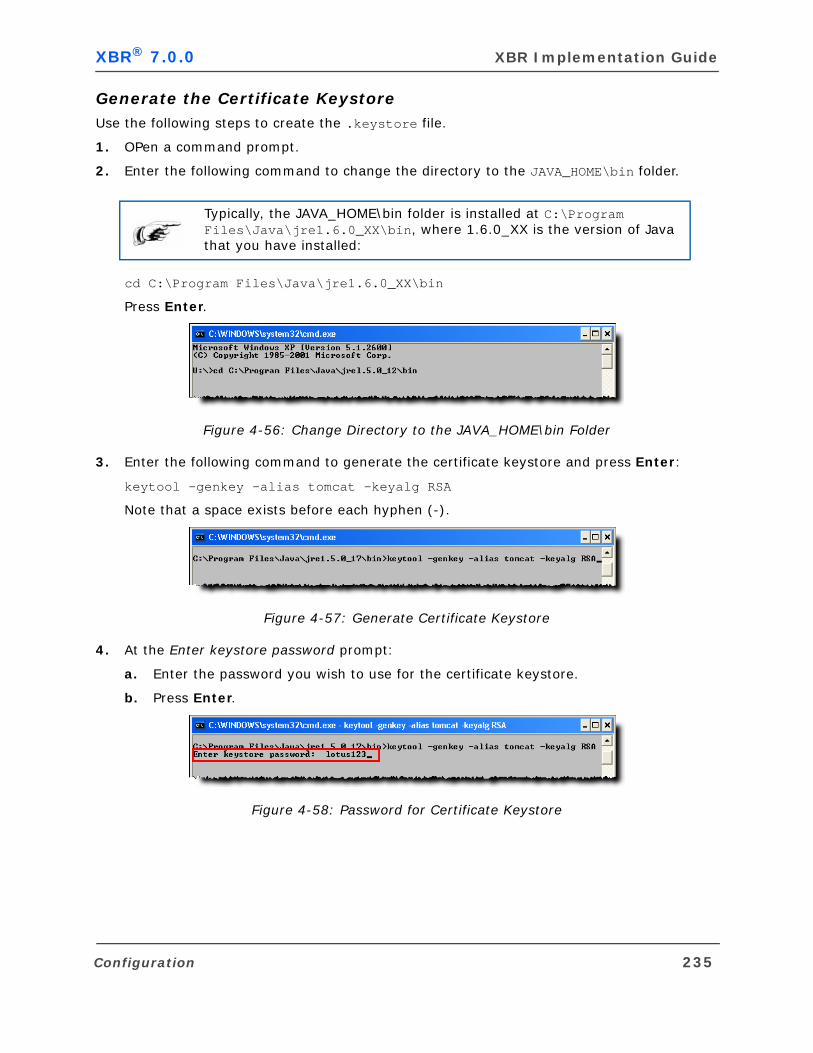
XBR® 7.0.0 XBR Implementation Guide
Generate the Certificate KeystoreUse the following steps to create the .keystore file.
1. OPen a command prompt.
2. Enter the following command to change the directory to the JAVA_HOME\bin folder.
cd C:\Program Files\Java\jre1.6.0_XX\bin
Press Enter.
Figure 4-56: Change Directory to the JAVA_HOME\bin Folder
3. Enter the following command to generate the certificate keystore and press Enter:
keytool -genkey -alias tomcat -keyalg RSA
Note that a space exists before each hyphen (-).
Figure 4-57: Generate Certificate Keystore
4. At the Enter keystore password prompt:
a. Enter the password you wish to use for the certificate keystore.
b. Press Enter.
Figure 4-58: Password for Certificate Keystore
Typically, the JAVA_HOME\bin folder is installed at C:\Program Files\Java\jre1.6.0_XX\bin, where 1.6.0_XX is the version of Java that you have installed:
Configuration 235
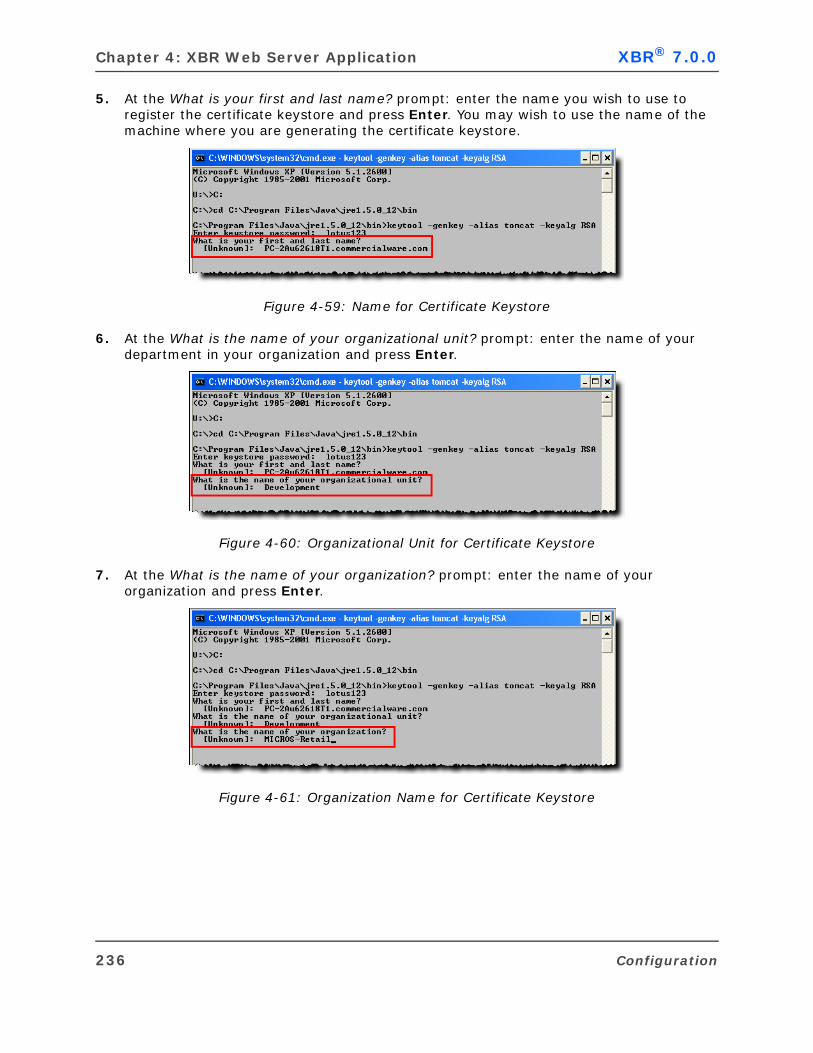
Chapter 4: XBR Web Server Application XBR® 7.0.0
5. At the What is your first and last name? prompt: enter the name you wish to use to register the certificate keystore and press Enter. You may wish to use the name of the machine where you are generating the certificate keystore.
Figure 4-59: Name for Certificate Keystore
6. At the What is the name of your organizational unit? prompt: enter the name of your department in your organization and press Enter.
Figure 4-60: Organizational Unit for Certificate Keystore
7. At the What is the name of your organization? prompt: enter the name of your organization and press Enter.
Figure 4-61: Organization Name for Certificate Keystore
236 Configuration
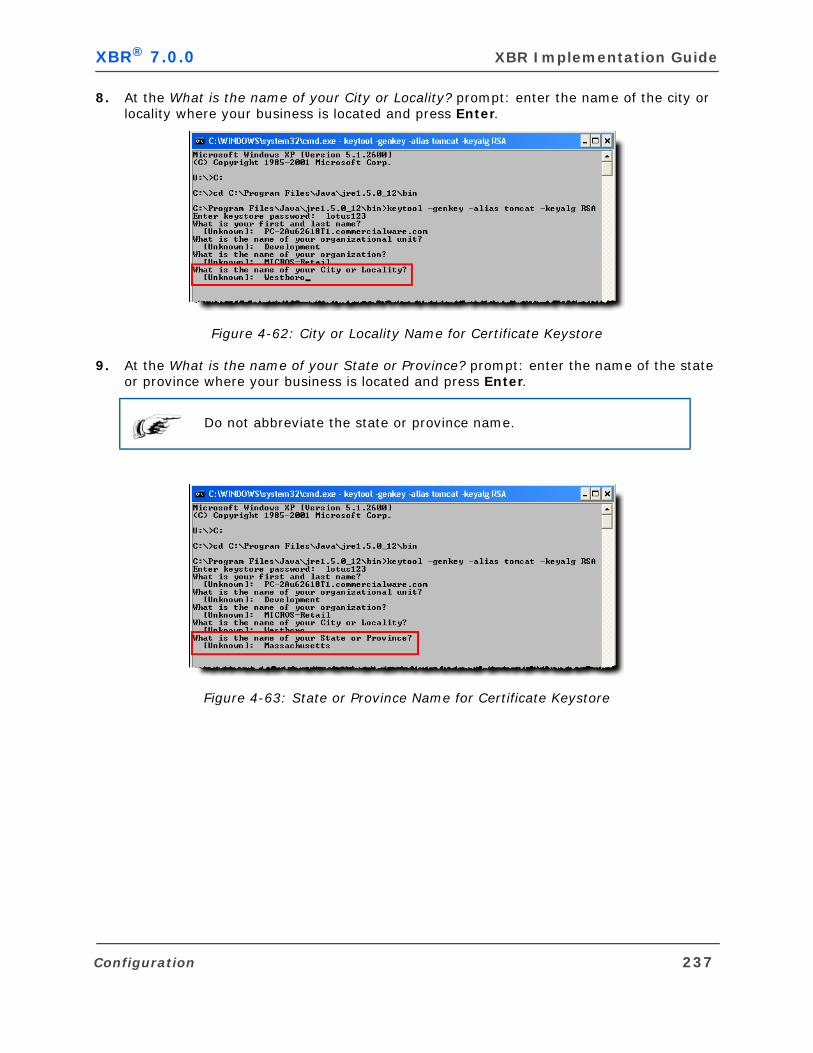
XBR® 7.0.0 XBR Implementation Guide
8. At the What is the name of your City or Locality? prompt: enter the name of the city or locality where your business is located and press Enter.
Figure 4-62: City or Locality Name for Certificate Keystore
9. At the What is the name of your State or Province? prompt: enter the name of the state or province where your business is located and press Enter.
Figure 4-63: State or Province Name for Certificate Keystore
Do not abbreviate the state or province name.
Configuration 237
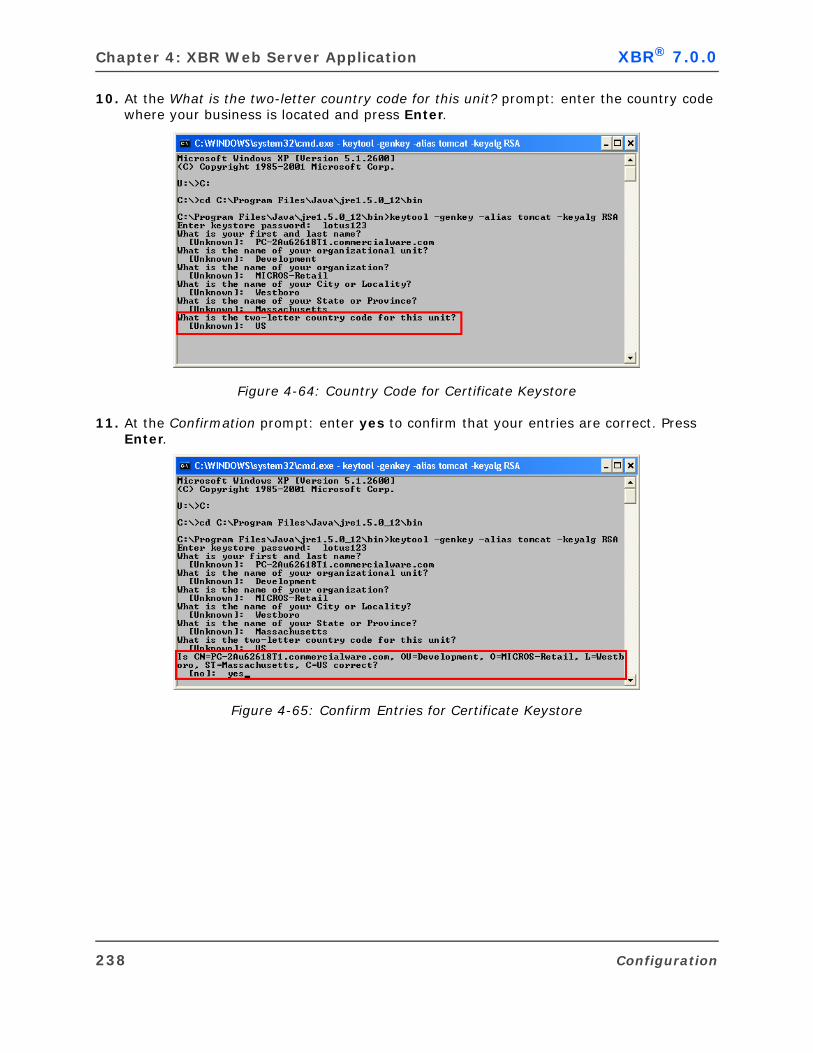
Chapter 4: XBR Web Server Application XBR® 7.0.0
10. At the What is the two-letter country code for this unit? prompt: enter the country code where your business is located and press Enter.
Figure 4-64: Country Code for Certificate Keystore
11. At the Confirmation prompt: enter yes to confirm that your entries are correct. Press Enter.
Figure 4-65: Confirm Entries for Certificate Keystore
238 Configuration
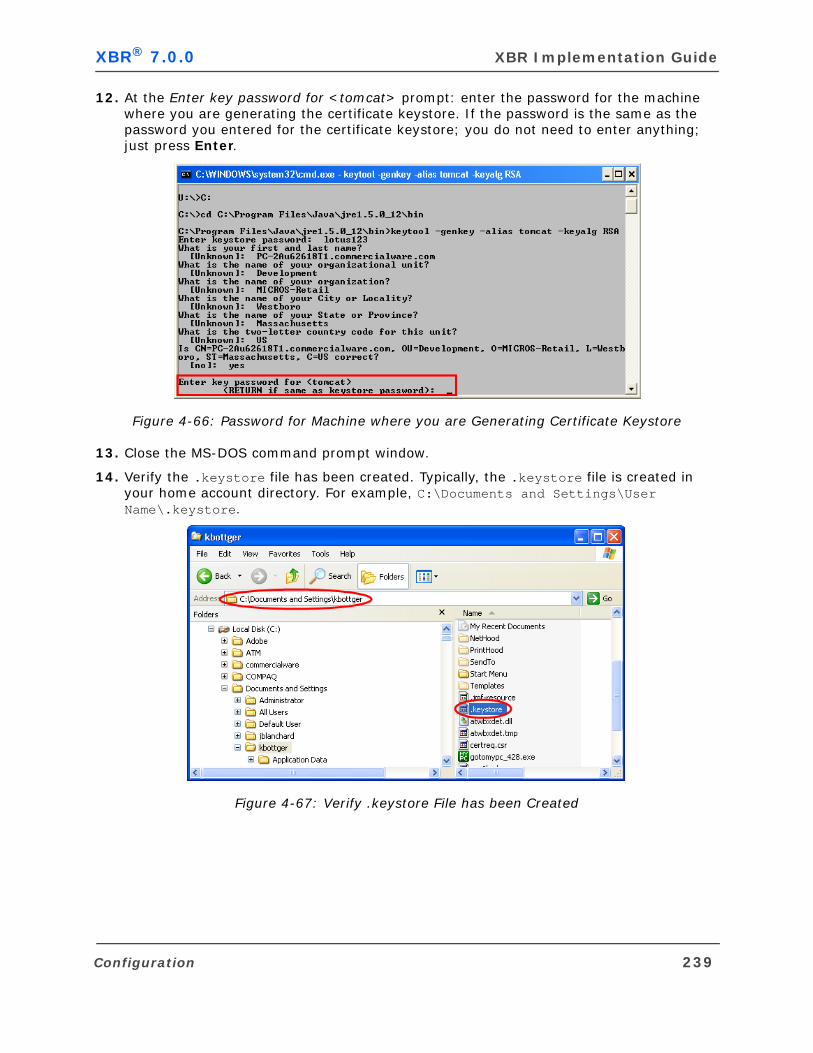
XBR® 7.0.0 XBR Implementation Guide
12. At the Enter key password for <tomcat> prompt: enter the password for the machine where you are generating the certificate keystore. If the password is the same as the password you entered for the certificate keystore; you do not need to enter anything; just press Enter.
Figure 4-66: Password for Machine where you are Generating Certificate Keystore
13. Close the MS-DOS command prompt window.
14. Verify the .keystore file has been created. Typically, the .keystore file is created in your home account directory. For example, C:\Documents and Settings\User Name\.keystore.
Figure 4-67: Verify .keystore File has been Created
Configuration 239

Chapter 4: XBR Web Server Application XBR® 7.0.0
Create a Certificate Signing RequestUse the following steps to create a certificate signing request file (certreq.csr).
1. Open a command prompt.
2. Enter the following command to change the directory to the location where you have generated the .keystore file and press Enter. Typically, the .keystore file is created in your home account directory. For example, C:\Documents and Settings\<User Name>, where User Name is the name of the user that generated the .keystore file.
Figure 4-68: Change Directory to the home account
3. Enter the following command to generate the certificate signing request file (certreq.csr) and press Enter:
keytool -certreq -keyalg RSA -alias tomcat -file certreq.csr
Notice that a space exists before each hyphen (-).
Figure 4-69: Generate Certificate Signing Request file (certreq.csr)
4. At the Enter keystore password prompt: enter the password defined for the certificate keystore and press Enter.
Figure 4-70: Password for Certificate Keystore
240 Configuration
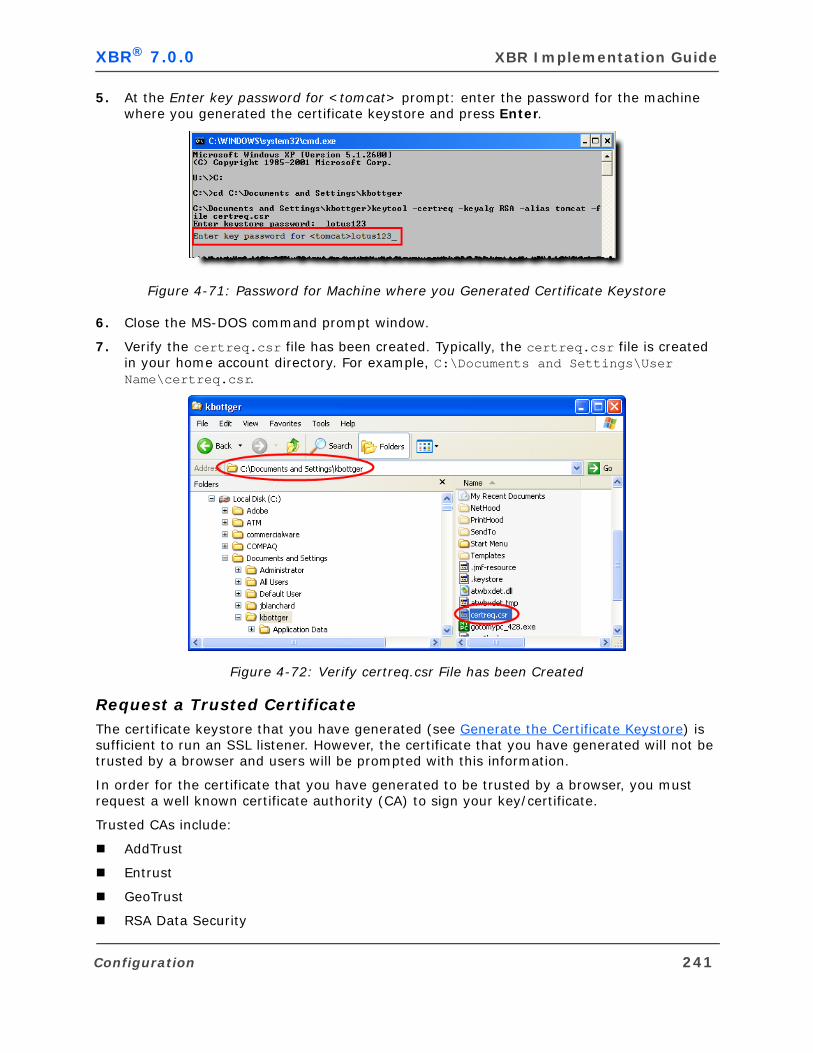
XBR® 7.0.0 XBR Implementation Guide
5. At the Enter key password for <tomcat> prompt: enter the password for the machine where you generated the certificate keystore and press Enter.
Figure 4-71: Password for Machine where you Generated Certificate Keystore
6. Close the MS-DOS command prompt window.
7. Verify the certreq.csr file has been created. Typically, the certreq.csr file is created in your home account directory. For example, C:\Documents and Settings\User Name\certreq.csr.
Figure 4-72: Verify certreq.csr File has been Created
Request a Trusted CertificateThe certificate keystore that you have generated (see Generate the Certificate Keystore) is sufficient to run an SSL listener. However, the certificate that you have generated will not be trusted by a browser and users will be prompted with this information.
In order for the certificate that you have generated to be trusted by a browser, you must request a well known certificate authority (CA) to sign your key/certificate.
Trusted CAs include:
AddTrust
Entrust
GeoTrust
RSA Data Security
Configuration 241
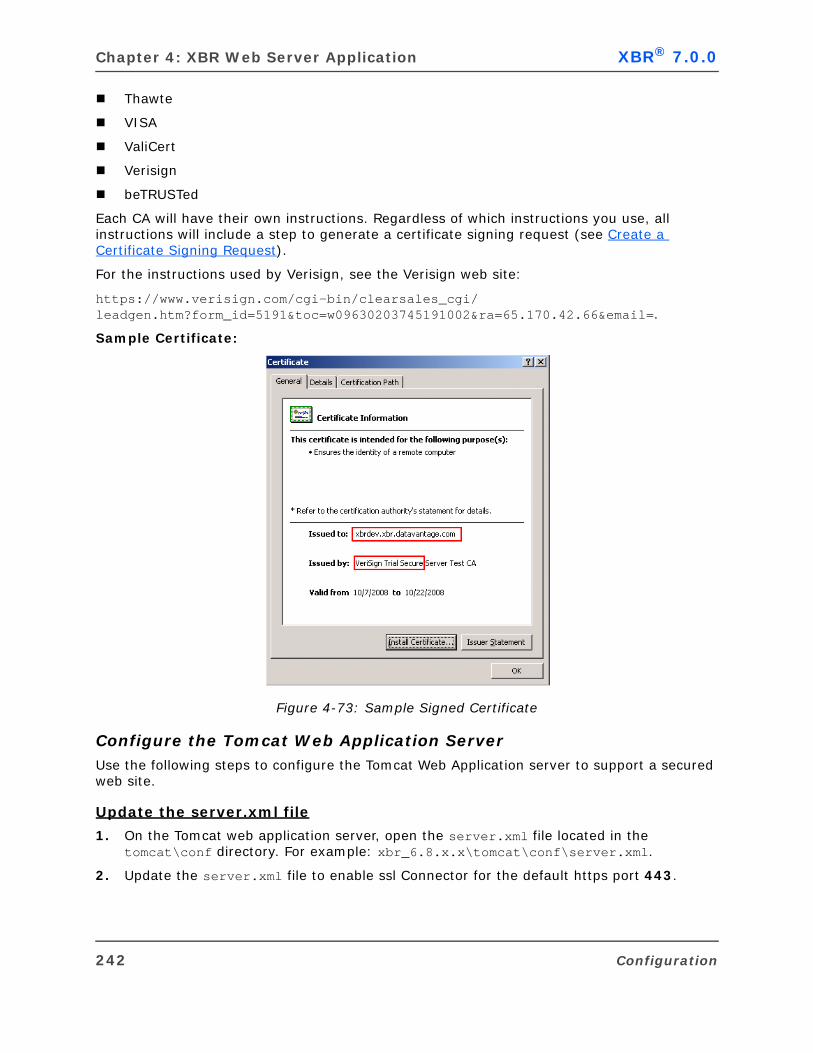
Chapter 4: XBR Web Server Application XBR® 7.0.0
Thawte
VISA
ValiCert
Verisign
beTRUSTed
Each CA will have their own instructions. Regardless of which instructions you use, all instructions will include a step to generate a certificate signing request (see Create a Certificate Signing Request).
For the instructions used by Verisign, see the Verisign web site:
https://www.verisign.com/cgi-bin/clearsales_cgi/leadgen.htm?form_id=5191&toc=w09630203745191002&ra=65.170.42.66&email=.
Sample Certificate:
Figure 4-73: Sample Signed Certificate
Configure the Tomcat Web Application ServerUse the following steps to configure the Tomcat Web Application server to support a secured web site.
Update the server.xml file
1. On the Tomcat web application server, open the server.xml file located in the tomcat\conf directory. For example: xbr_6.8.x.x\tomcat\conf\server.xml.
2. Update the server.xml file to enable ssl Connector for the default https port 443.
242 Configuration
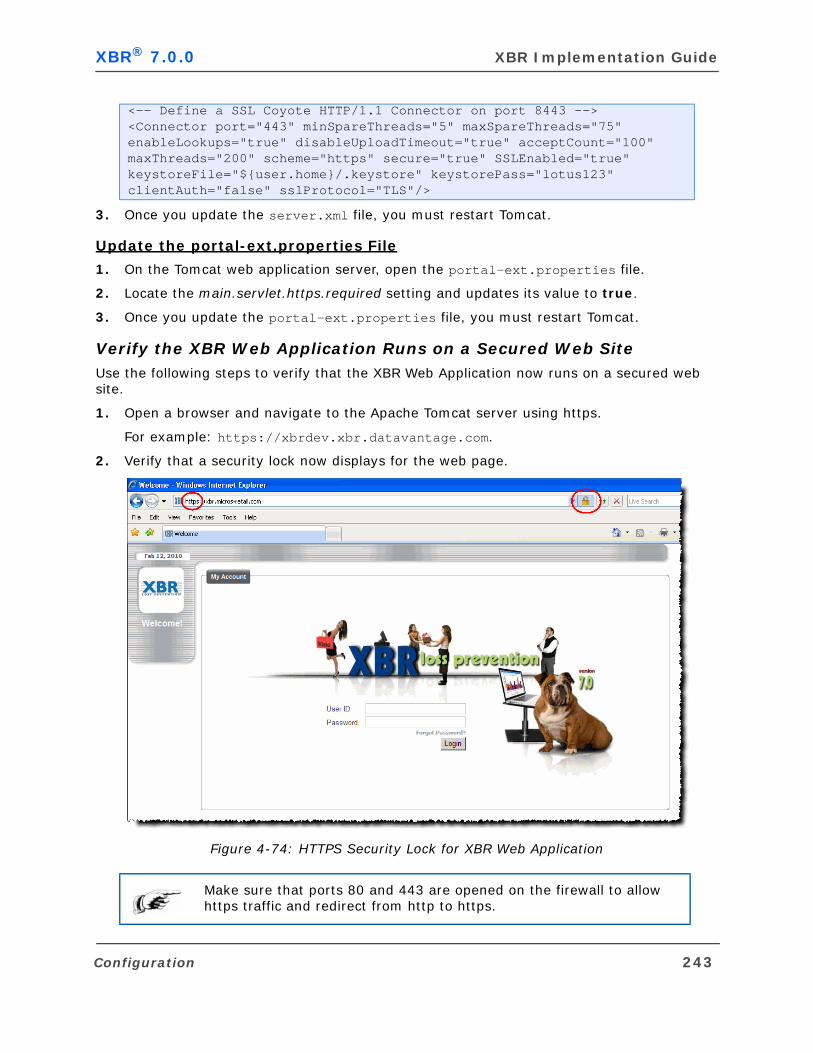
XBR® 7.0.0 XBR Implementation Guide
3. Once you update the server.xml file, you must restart Tomcat.
Update the portal-ext.properties File
1. On the Tomcat web application server, open the portal-ext.properties file.
2. Locate the main.servlet.https.required setting and updates its value to true.
3. Once you update the portal-ext.properties file, you must restart Tomcat.
Verify the XBR Web Application Runs on a Secured Web SiteUse the following steps to verify that the XBR Web Application now runs on a secured web site.
1. Open a browser and navigate to the Apache Tomcat server using https.
For example: https://xbrdev.xbr.datavantage.com.
2. Verify that a security lock now displays for the web page.
Figure 4-74: HTTPS Security Lock for XBR Web Application
<-- Define a SSL Coyote HTTP/1.1 Connector on port 8443 --> <Connector port="443" minSpareThreads="5" maxSpareThreads="75" enableLookups="true" disableUploadTimeout="true" acceptCount="100" maxThreads="200" scheme="https" secure="true" SSLEnabled="true" keystoreFile="${user.home}/.keystore" keystorePass="lotus123" clientAuth="false" sslProtocol="TLS"/>
Make sure that ports 80 and 443 are opened on the firewall to allow https traffic and redirect from http to https.
Configuration 243
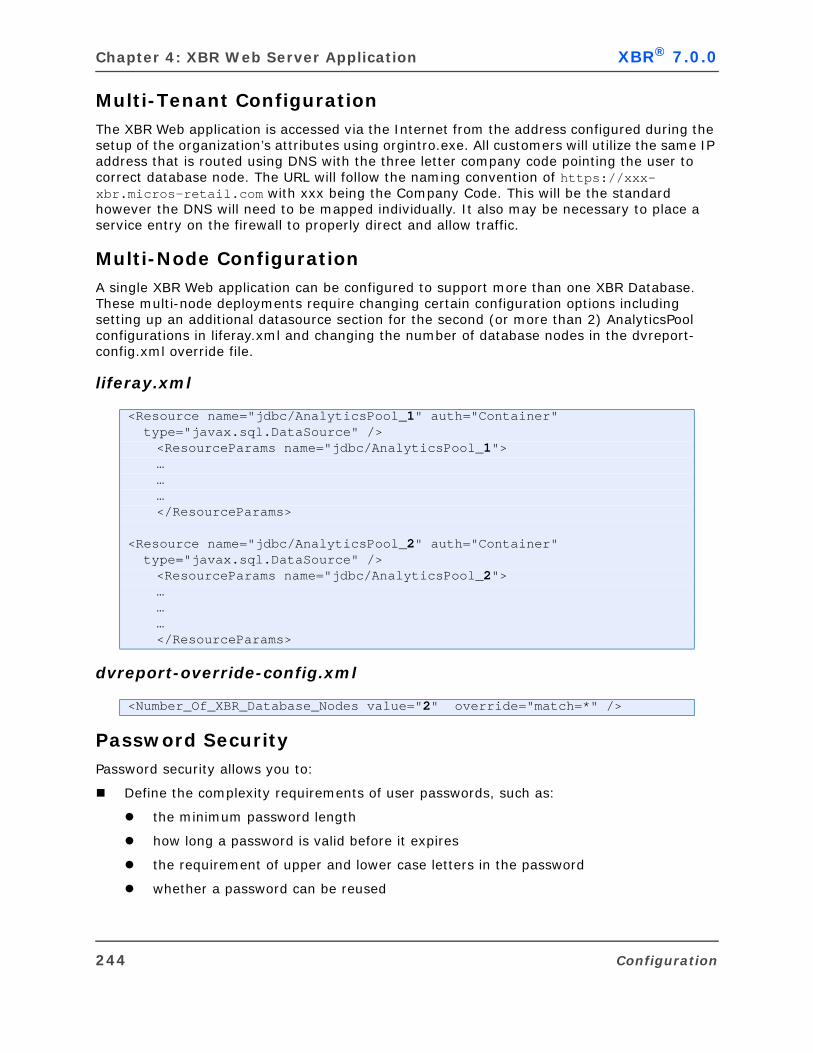
Chapter 4: XBR Web Server Application XBR® 7.0.0
Multi-Tenant ConfigurationThe XBR Web application is accessed via the Internet from the address configured during the setup of the organization’s attributes using orgintro.exe. All customers will utilize the same IP address that is routed using DNS with the three letter company code pointing the user to correct database node. The URL will follow the naming convention of https://xxx-xbr.micros-retail.com with xxx being the Company Code. This will be the standard however the DNS will need to be mapped individually. It also may be necessary to place a service entry on the firewall to properly direct and allow traffic.
Multi-Node ConfigurationA single XBR Web application can be configured to support more than one XBR Database. These multi-node deployments require changing certain configuration options including setting up an additional datasource section for the second (or more than 2) AnalyticsPool configurations in liferay.xml and changing the number of database nodes in the dvreport-config.xml override file.
liferay.xml
dvreport-override-config.xml
Password SecurityPassword security allows you to:
Define the complexity requirements of user passwords, such as:
the minimum password length
how long a password is valid before it expires
the requirement of upper and lower case letters in the password
whether a password can be reused
<Resource name="jdbc/AnalyticsPool_1" auth="Container" type="javax.sql.DataSource" />
<ResourceParams name="jdbc/AnalyticsPool_1">……… </ResourceParams>
<Resource name="jdbc/AnalyticsPool_2" auth="Container" type="javax.sql.DataSource" />
<ResourceParams name="jdbc/AnalyticsPool_2">……… </ResourceParams>
<Number_Of_XBR_Database_Nodes value="2" override="match=*" />
244 Configuration
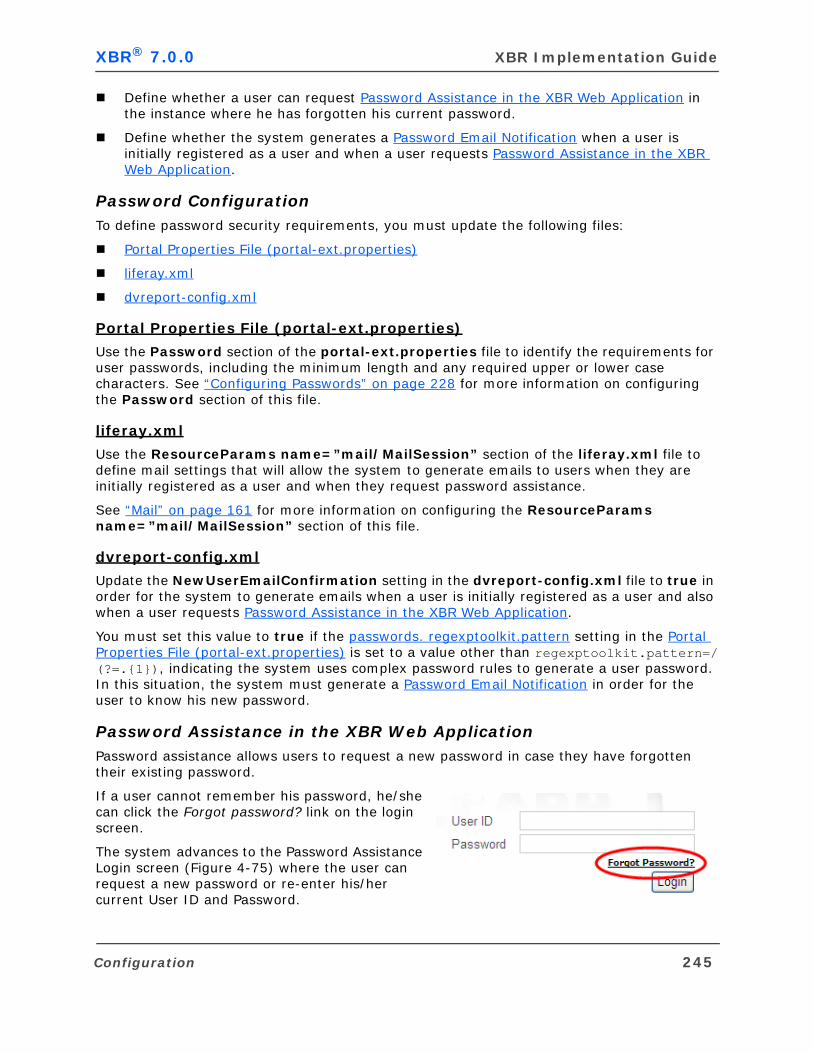
XBR® 7.0.0 XBR Implementation Guide
Define whether a user can request Password Assistance in the XBR Web Application in the instance where he has forgotten his current password.
Define whether the system generates a Password Email Notification when a user is initially registered as a user and when a user requests Password Assistance in the XBR Web Application.
Password ConfigurationTo define password security requirements, you must update the following files:
Portal Properties File (portal-ext.properties)
liferay.xml
dvreport-config.xml
Portal Properties File (portal-ext.properties)
Use the Password section of the portal-ext.properties file to identify the requirements for user passwords, including the minimum length and any required upper or lower case characters. See “Configuring Passwords” on page 228 for more information on configuring the Password section of this file.
liferay.xml
Use the ResourceParams name=”mail/MailSession” section of the liferay.xml file to define mail settings that will allow the system to generate emails to users when they are initially registered as a user and when they request password assistance.
See “Mail” on page 161 for more information on configuring the ResourceParams name=”mail/MailSession” section of this file.
dvreport-config.xml
Update the NewUserEmailConfirmation setting in the dvreport-config.xml file to true in order for the system to generate emails when a user is initially registered as a user and also when a user requests Password Assistance in the XBR Web Application.
You must set this value to true if the passwords. regexptoolkit.pattern setting in the Portal Properties File (portal-ext.properties) is set to a value other than regexptoolkit.pattern=/(?=.{1}), indicating the system uses complex password rules to generate a user password. In this situation, the system must generate a Password Email Notification in order for the user to know his new password.
Password Assistance in the XBR Web ApplicationPassword assistance allows users to request a new password in case they have forgotten their existing password.
If a user cannot remember his password, he/she can click the Forgot password? link on the login screen.
The system advances to the Password Assistance Login screen (Figure 4-75) where the user can request a new password or re-enter his/her current User ID and Password.
Configuration 245
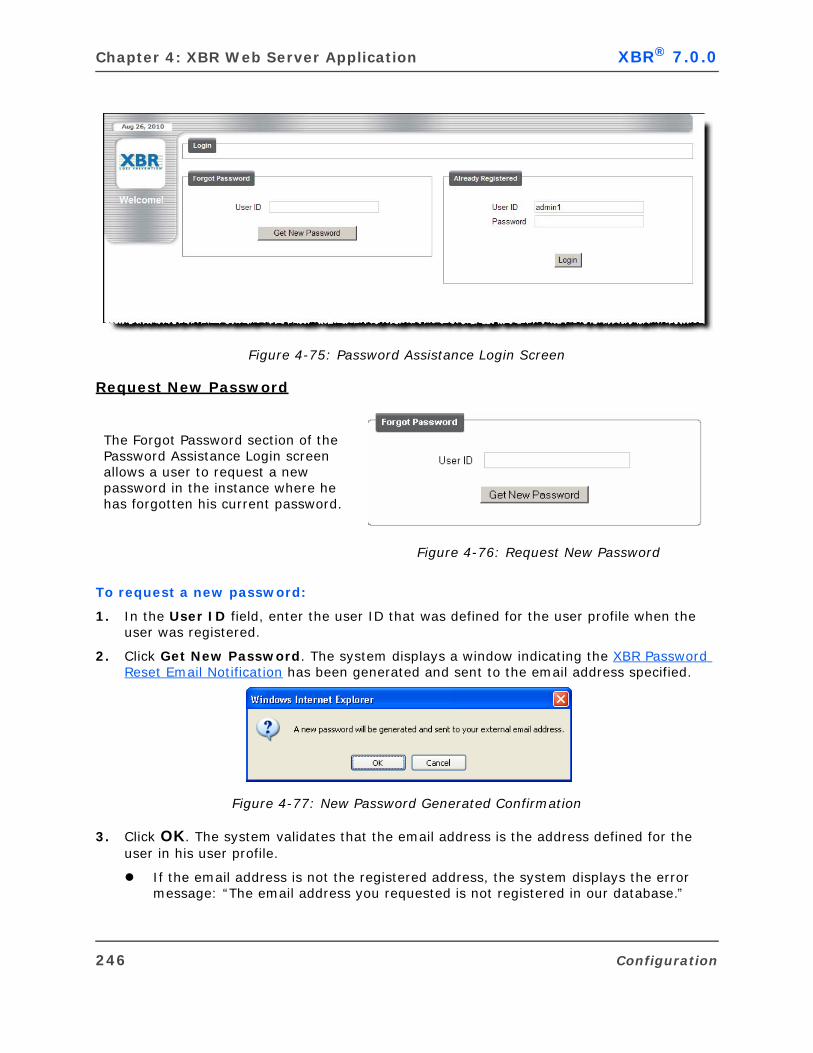
Chapter 4: XBR Web Server Application XBR® 7.0.0
Figure 4-75: Password Assistance Login Screen
Request New Password
To request a new password:
1. In the User ID field, enter the user ID that was defined for the user profile when the user was registered.
2. Click Get New Password. The system displays a window indicating the XBR Password Reset Email Notification has been generated and sent to the email address specified.
Figure 4-77: New Password Generated Confirmation
3. Click OK. The system validates that the email address is the address defined for the user in his user profile.
If the email address is not the registered address, the system displays the error message: “The email address you requested is not registered in our database.”
The Forgot Password section of the Password Assistance Login screen allows a user to request a new password in the instance where he has forgotten his current password.
Figure 4-76: Request New Password
246 Configuration

XBR® 7.0.0 XBR Implementation Guide
If the email address is the registered address, the system generates the XBR Password Reset Email Notification and sends the email to the address specified.
Reenter Current User ID and Password
To reenter the current user ID and password:
1. In the User ID field, enter a valid user ID.
2. In the Password field, enter the valid password for the user ID, keeping in mind the password complexity rules defined for user passwords.
3. Click Login.
To Enable Password Assistance
To enable password assistance, contact XBR technical support to update the Allow Forgot Password assistance? setting in the Company Profile to Yes.
Password Email NotificationYou can configure the system to generate a New User Email Notification or a XBR Password Reset Email Notification.
XBR - New User Email Notification
The system generates this email when a user is initially registered as a user if the NewUserEmailConfirmation setting in the dvreport-config.xml file is set to true and you have enabled email generation by updating the mail settings in the liferay.xml file.
The Already Registered section of the Password Assistance Login screen allows a user to reenter his/her user ID and password. The system automatically advances to this screen if a valid user ID and password is not entered on the initial login screen.
The error message “Authentication failed. Please try again.” is displayed and the system defaults to the user ID and password (encrypted) that the user entered on the initial login. Figure 4-78: Reenter User ID and Password
If the user cannot remember his current user ID and password, he can use the Forgot Password section of the Password Assistance Login screen to request a new password. See “Request New Password” on page 246.
Configuration 247
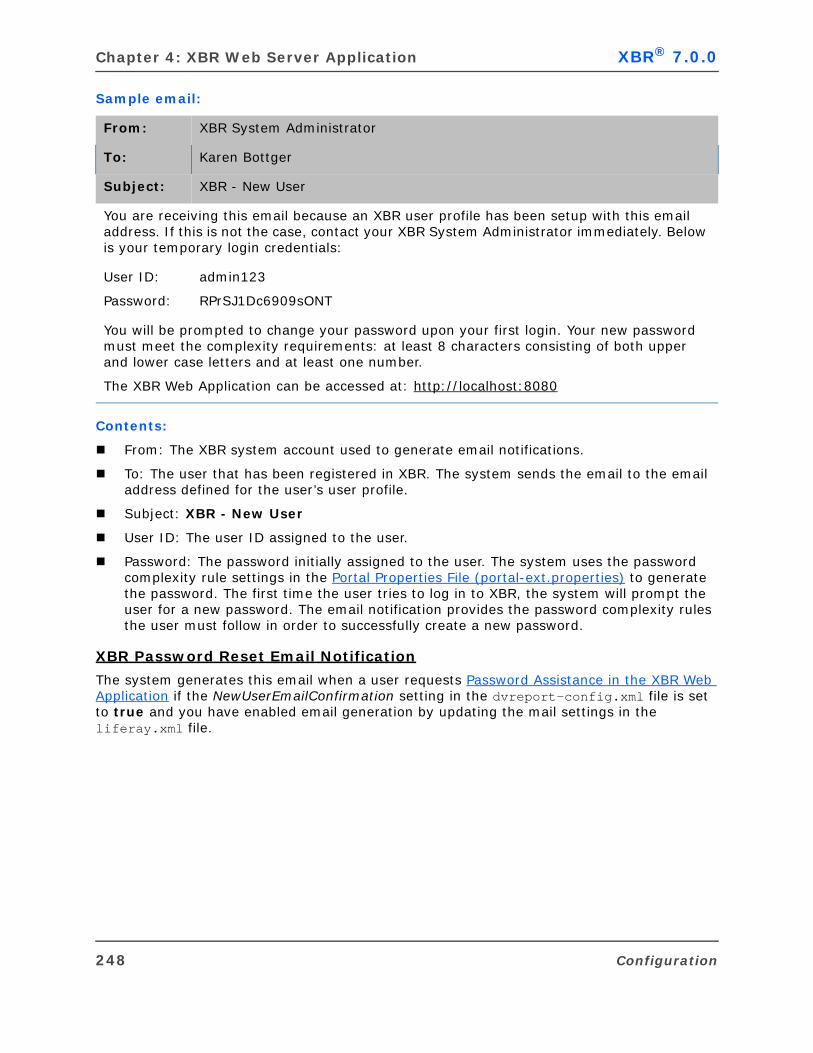
Chapter 4: XBR Web Server Application XBR® 7.0.0
Sample email:
Contents:
From: The XBR system account used to generate email notifications.
To: The user that has been registered in XBR. The system sends the email to the email address defined for the user’s user profile.
Subject: XBR - New User
User ID: The user ID assigned to the user.
Password: The password initially assigned to the user. The system uses the password complexity rule settings in the Portal Properties File (portal-ext.properties) to generate the password. The first time the user tries to log in to XBR, the system will prompt the user for a new password. The email notification provides the password complexity rules the user must follow in order to successfully create a new password.
XBR Password Reset Email Notification
The system generates this email when a user requests Password Assistance in the XBR Web Application if the NewUserEmailConfirmation setting in the dvreport-config.xml file is set to true and you have enabled email generation by updating the mail settings in the liferay.xml file.
From: XBR System Administrator
To: Karen Bottger
Subject: XBR - New User
You are receiving this email because an XBR user profile has been setup with this email address. If this is not the case, contact your XBR System Administrator immediately. Below is your temporary login credentials:
User ID:
Password:
admin123
RPrSJ1Dc6909sONT
You will be prompted to change your password upon your first login. Your new password must meet the complexity requirements: at least 8 characters consisting of both upper and lower case letters and at least one number.
The XBR Web Application can be accessed at: http://localhost:8080
248 Configuration
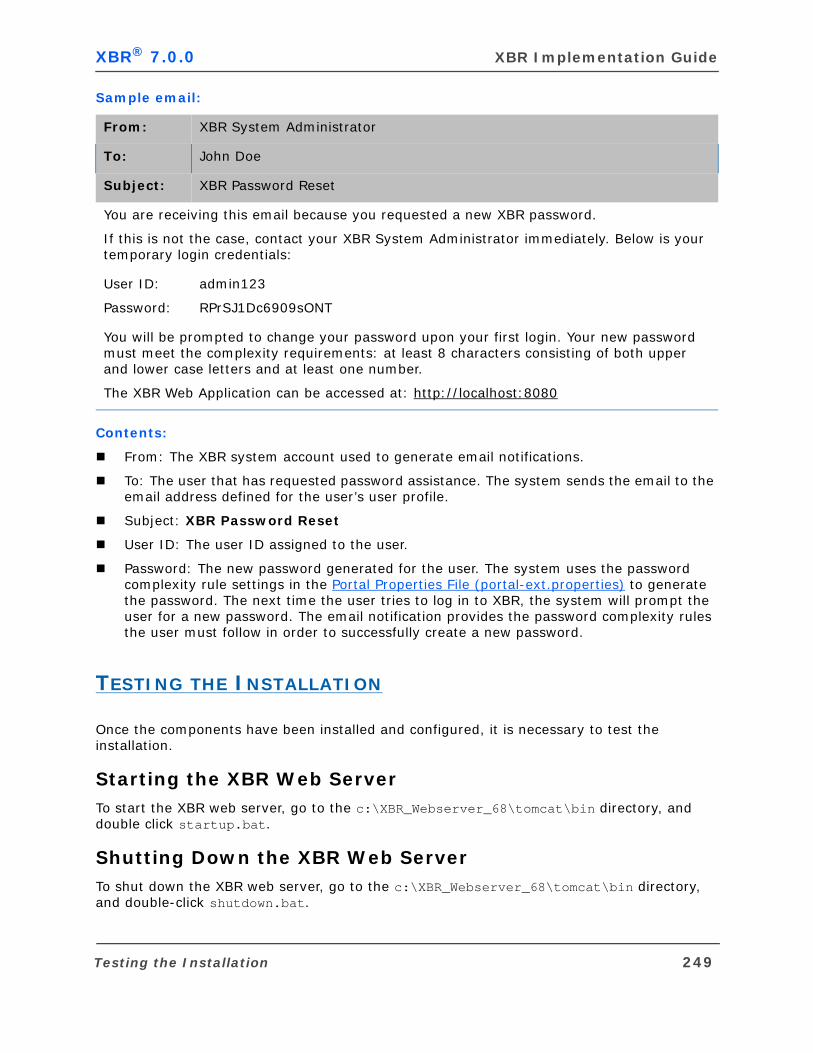
XBR® 7.0.0 XBR Implementation Guide
Sample email:
Contents:
From: The XBR system account used to generate email notifications.
To: The user that has requested password assistance. The system sends the email to the email address defined for the user’s user profile.
Subject: XBR Password Reset
User ID: The user ID assigned to the user.
Password: The new password generated for the user. The system uses the password complexity rule settings in the Portal Properties File (portal-ext.properties) to generate the password. The next time the user tries to log in to XBR, the system will prompt the user for a new password. The email notification provides the password complexity rules the user must follow in order to successfully create a new password.
TESTING THE INSTALLATION
Once the components have been installed and configured, it is necessary to test the installation.
Starting the XBR Web ServerTo start the XBR web server, go to the c:\XBR_Webserver_68\tomcat\bin directory, and double click startup.bat.
Shutting Down the XBR Web ServerTo shut down the XBR web server, go to the c:\XBR_Webserver_68\tomcat\bin directory, and double-click shutdown.bat.
From: XBR System Administrator
To: John Doe
Subject: XBR Password Reset
You are receiving this email because you requested a new XBR password.
If this is not the case, contact your XBR System Administrator immediately. Below is your temporary login credentials:
User ID:
Password:
admin123
RPrSJ1Dc6909sONT
You will be prompted to change your password upon your first login. Your new password must meet the complexity requirements: at least 8 characters consisting of both upper and lower case letters and at least one number.
The XBR Web Application can be accessed at: http://localhost:8080
Testing the Installation 249
Chapter 4: XBR Web Server Application XBR® 7.0.0
Starting XBR Web ClientTo start an XBR web client, start a web browser on a machine and set the URL to http://<hostname>:<port>.
where <hostname> is the name of the machine on which the XBR Web Server is installed and is currently running, and <port> is the port number specified in server.xml.
For example: http://discovery:8080/
UPGRADE
This section assumes that:
the XBR Desktop Application has been upgraded.
the database has been upgraded.
the environment variable JAVA_HOME and the System variable Path have been created and correct.
Preserve Custom SettingsIn order to preserve custom settings from prior XBR Web versions, perform the following procedure:
1. Use a file comparison tool (e.g. Beyond Compare) to find and copy the differences between the files listed below in the previous installation’s directory (e.g. xbr_v6.7.x.x) and in the recently created directory for v7.0.0.
xbr_v6.7.x.x\common\classes\portal-ext.properties (portal)
xbr_v6.7.x.x\liferay\WEB-INF\dvreport-[override]-config.xml (app)
xbr_v6.7.x.x\conf\Catalina\localhost\liferay.xml (db)
2. For customers that have customized corporate logo and skins, copy the content from the current installation's over to the new installation;
\tomcat\liferay\html\skin\image\default
\tomcat\liferay\html\skin\image\xbr
\tomcat\liferay\html\skin\image\xbr2
\tomcat\liferay\html\skin\image\xbr3
In order to upgrade the XBR Web Application, a copy of the xbr_v7.0.0 Installation CD is required.
Do NOT copy the files from the previous installation’s directory to the new directory. There are new parameters in these files that would be lost.
250 Upgrade

XBR® 7.0.0 XBR Implementation Guide
This will preserve files that have been added in more recent versions (in \tomcat\liferay\html\skin\image\default).
Preserve SSL CertificatesPerform this procedure if the site you are upgrading uses SSL to secure its site.
1. Prior to upgrading XBR, locate the directory with the prior installation (for example: xbr_v6.7.x.x).
2. Rename this directory to something unique so that the XBR upgrade process will not overwrite or delete this directory.
3. Perform the XBR upgrade (InstallShield (see “Upgrade” on page 250) or Manual (“Preserve Custom Settings” on page 250).
4. In the renamed directory, locate and open the \tomcat\conf\server.xml file.
5. Find the “Connector port=’443’” section and copy it.
6. Paste the copied section into the \tomcat\conf\server.xml file of the upgrade.
7. Locate and copy the \tomcat\conf\.keystore file from the renamed directory.
8. Paste the copied file into the tomcat\conf\ directory of the upgrade.
9. Update the location as a value of “keystoreFile” in the “Connector port=’443’” section of \tomcat\conf\server.xml file in the upgrade directory with the new address of the .keystore file.
Upgrade Web ApplicationUse the following steps to upgrade from a previous version of XBR to Version 7.0.0:
1. Locate the directory with the prior installation, such as xbr_v6.7.x.x, and run \bin\shutdown.bat to stop the server.
If the application is installed as a service, locate and stop a service named “Micros-Retail Analytics Loss Prevention Portal Server” or “Datavantage Analytics Loss Prevention Portal Server” from the Services panel.
2. Go to “Installation” on page 106 and perform the InstallShield process.
3. Open a web browser.
4. Enter the following in the address field:
http://<servername>:<port>
where: <servername> is the name of the server where the XBR Web Application is installed, and
<-- Define a SSL Coyote HTTP/1.1 Connector on port 8443 --> <Connector port="443" minSpareThreads="5" maxSpareThreads="75" enableLookups="true" disableUploadTimeout="true" acceptCount="100" maxThreads="200" scheme="https" secure="true" SSLEnabled="true" keystoreFile="c:/xbr_6.7.x.x/tomcat/conf/.keystore" keystorePass="lotus123" clientAuth="false" sslProtocol="TLS"/>
Upgrade 251
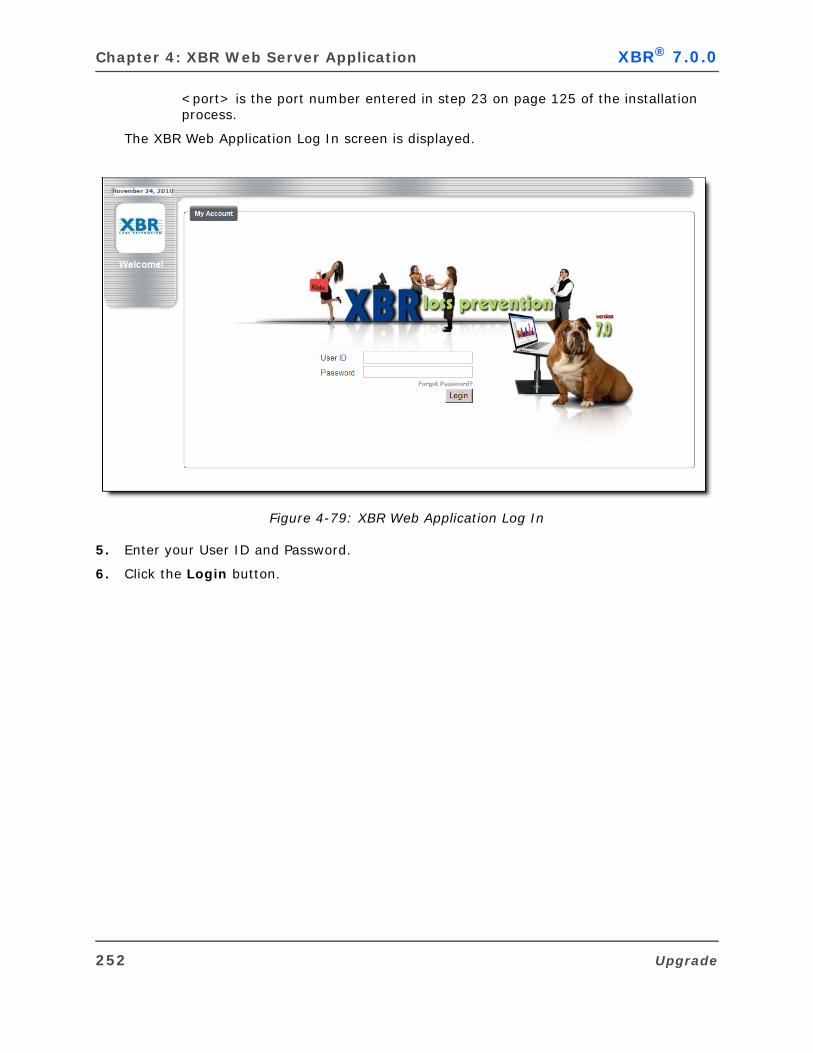
Chapter 4: XBR Web Server Application XBR® 7.0.0
<port> is the port number entered in step 23 on page 125 of the installation process.
The XBR Web Application Log In screen is displayed.
Figure 4-79: XBR Web Application Log In
5. Enter your User ID and Password.
6. Click the Login button.
252 Upgrade

C H A P T E R
Database Setup
Chapter 5: Database Setup XBR® 7.0.0
OVERVIEW
This chapter provides information for setting up a new XBR & Balance database installation. Instructions for both SQL Server Database and Oracle Database are provided.
About This ChapterThis chapter contains the following sections:
“New Oracle XBR-mymicros 7.0.0 Hosted Database Installation” on page 255 provides information for creating a new XBR-mymicros Oracle database in a hosted environment.
“New Oracle XBR-mymicros 7.0.0 Self-Hosted Database Installation” on page 260 provides information for creating a new XBR-mymicros Oracle database in a self-hosted environment.
“New SQL Server XBR-mymicros 7.0.0 Self-Hosted Database Installation” on page 264 provides information for creating a new SQL Server XBR-mymicros database in a self-hosted environment.
“Upgrade XBR-mymicros Database to 7.0.0” on page 269 provides information on upgrading an existing Oracle database (hosted or self-hosted environment) or SQL Server database to version 7.0.0.
“New Oracle XBR and Balance 7.0.0 Database Installation” on page 271 provides information for creating a new XBR Retail/Grocery & Balance Oracle database.
“Upgrade XBR Oracle Database to 7.0.0” on page 275 provides information for upgrading an existing XBR Retail/Grocery Oracle database.
“New SQL Server XBR and Balance 7.0.0 Database Installation” on page 277 provides information for creating a new XBR Retail/Grocery SQL Server database.
“Upgrade SQL Server XBR Database to 7.0.0” on page 283 provides information for upgrading an existing XBR Retail/Grocery SQL Server database.
AudienceThe procedures documented in this chapter are administrative functions and assume the user has basic database management skills.
PrerequisitesThe procedures documented in this chapter assume that a new “base” database is being created. The database is created from the objects provided on the CD repository and the system metadata is then loaded from the CD repository.
Refer to the Balance Implementation Guide for information on configuring the Balance database.
254 Overview
XBR® 7.0.0 XBR Implementation Guide
FOODSERVICE (MYMICROS) INSTALLATION
New Oracle XBR-mymicros 7.0.0 Hosted Database Installation
Setting Up XBR Security in the mymicros Data WarehouseFor a new XBR-mymicros 7.0.0 installation, the first part of the setup is run against all the current mymicros production database instances; however, many may be included in the mymicros data warehouse environment.
The following XBR-mymicros security script must be run to create the XBRREADONLY account which will be used to funnel requests from the XBR 7.0.0 database using database links. The links will be set up during the mymicros XBR 7.0.0 installation. This security script will also grant the XBRREADONLY account SELECT access to all of the required tables in the COREDB and LOCATION_ACTIVITY_DB databases.
The script is called Oracle_Mymicros_security.sql and can be found in either in CVS or on the release CD in the following directories:
CVS\database_scripts\Database Architecture\Database Scripts\Analytics Product Suite 7.0\XBR 7.0\XBR MyMicros 7.0\Oracle
or
CD:\DATABASE_SCRIPTS\FOODSERVICE\NEW_INSTALL\ORACLE
Creating a New XBR-mymicros Oracle DatabaseCreate a new Oracle Instance & Database using the Database Configuration assistant or ensure that a new instance and database have been created by the responsible DBA.
For Oracle 10g installations, to create the new database instance, you can modify and use the following scripts found in either in CVS or on the release CD in the following directories:
CVS\database_scripts\Database Architecture\Database Scripts\Analytics Product Suite 7.0\XBR 7.0\XBR MyMicros 7.0\Oracle
or
CD:\DATABASE_SCRIPTS\FOODSERVICE\NEW_INSTALL\ORACLE
1. Create a directory under your Oracle installation's Admin directory to match your instance name, then create a "scripts" directory under the admin\instance directory (i.e. E:\oracle\product\10.2.0\admin\newdb\scripts).
This script must be run from a privileged account by either the Mymicros implementation team or by the MICROS-Retail Operations technical team (if given appropriate permissions).
Foodservice (mymicros) Installation 255
Chapter 5: Database Setup XBR® 7.0.0
2. Copy the following scripts to your new scripts directory you just created.
build_database_70_10g.bat
build_database_70_10g.sql
cloneDBCreation.sql
CloneRmanRestore.sql
postScripts.sql
rmanRestoreDatafiles.sql
postDBCreation.sql
init.ora
initNEWDBTemp.ora (rename this file with new db name also)
Oracle_standard_tablespaces.sql
3. Edit these files and replace any occurrences of "newdb" with the name of your new database and path.
4. Copy these files to a "scripts" directory under the E:\oracle\product\10.2.0\admin directory hierarchy.
5. Open a command window, CD to the scripts directory and execute build_database_70_10g.bat.
You will be prompted to assign passwords for the sys and system users.
Once the database is created and empty, now it is time to create the XBR and Balance 7.0.0 Standard Tablespaces, Standard Security, and database objects.
6. Log into the new instance with the "sys" account and password as sysdba.
7. Update the tnsnames.ora and listener.ora with new database information.
8. Create the Standard Tablespaces by opening a SQL Query window either through Toad, SQL Plus, or other client interface tool, and attach to the newly created database.
a. Open the database script Oracle_standard_tablespaces.sql located at:
CVS\database_scripts\Database Architecture\Database Scripts\Analytics Product Suite 7.0\XBR 7.0\XBR MyMicros 7.0\Oracle
or
CD:\DATABASE_SCRIPTS\FOODSERVICE\NEW_INSTALL\ORACLE
b. Ensure the table space locations are correct.
c. Copy and paste into the SQL query window, and click Execute.
The tablespace locations have to be determined based on the Oracle system where the database is being created. This is determined based on how the Oracle DBA set up the resources on the database system, this information can be obtained from the Oracle DBA. Information needed would be the disk drive and directory where the Oracle data will be stored.
256 Foodservice (mymicros) Installation
XBR® 7.0.0 XBR Implementation Guide
9. Open the database script Oracle_standard_security.sql located at:
CVS\database_scripts\Database Architecture\Database Scripts\Analytics Product Suite 7.0\XBR 7.0\XBR MyMicros 7.0\Oracle
or
CD:\DATABASE_SCRIPTS\FOODSERVICE\NEW_INSTALL\ORACLE
10. Copy contents into SQL Query window and execute to create the database roles and users.
11. Log out and log back in to the database as user XBRADMIN.
12. Open the database script build_database_mmxbr70.sql located at:
CVS\database_scripts\Database Architecture\Database Scripts\Analytics Product Suite 7.0\XBR 7.0\XBR MyMicros 7.0\Oracle
or
CD:\DATABASE_SCRIPTS\FOODSERVICE\NEW_INSTALL\ORACLE
13. Copy the contents into SQL Query window and execute to create the database objects-- tables, views, functions, stored procedures, triggers, etc.
14. Click the Ignore Errors button to continue and ignore errors.
15. Now you must load the XBR-mymicros 7.0.0 system table metadata using the Migration Utility to load all the XBR formatted .PSR files. They are in metadata.zip located at:
CVS\database_scripts\Database Architecture\Database System Metadata\Analytics Product Suite 7.0\XBR 7.0\XBR MyMicros 7.0\Oracle\metadata
or
CD:\DATABASE_SCRIPTS\FOODSERVICE\NEW_INSTALL\ORACLE\METADATA
Copy the metadata.zip to a local hard drive and unzip to create the .PSR files.
16. The latest version of the Migration Utility must now be installed. The Operations Technical team is well versed in using this utility to migrate data. The utility is located on the CD at:
CD:\UTILITIES
a. Copy the utility to a folder on the desktop.
b. Execute migutil.exe to run the Migration Utility.
c. Once opened, click the DB Connect button to open the database connection dialog box and fill in the connection information for the database. If you are successful, you will see a message: "Connected to database."
d. Once connected, click Open Config button and select the Import tab.
e. Ensure ALL tables with the Replace Table option are selected. Also, deselect the option to Initialize Null Values before browsing to .PSR files.
This script will give many compilation errors and warnings, but this has been tested and is OK. These are only dependent object warnings and will be rectified after the next step.
Foodservice (mymicros) Installation 257

Chapter 5: Database Setup XBR® 7.0.0
f. Click on the Import button and browse to the location of the .PSR files. When you click on the first .PSR file, the import will begin. You can review the log file MGT_LOG.TXT in the Migration Utility folder to see if the data was loaded correctly.
The XBR-mymicros 7.0.0 database installation is now completed.
Liferay InstallationFor XBR-mymicros Version 7.0.0, the Liferay portal has been stripped out from the full XBR database installation, and is now a separate module that can be added as an option.
Use the following procedure to install the Oracle Liferay 7.0.0 tables:
1. Log into XBR as “XBRADMIN”.
2. Open the database script build_schema_liferay70.sql at:
CVS\database_scripts\Database Architecture\Database Scripts\Analytics Product Suite 7.0\Liferay 7.0\Oracle
or
CD:\DATABASE_SCRIPTS\LIFERAY\NEW_INSTALL\ORACLE
3. Copy contents into SQL Query window.
4. Click Execute to create the Liferay tables.
5. Load the Liferay 7.0.0 system table metadata using the Migration Utility.
They are located at:
CVS\database_scripts\Database Architecture\Database System Metadata\Analytics Product Suite 7.0\Liferay 7.0\Oracle\metadata
or
CD:\DATABASE_SCRIPTS\LIFERAY\NEW_INSTALL\ORACLE\METADATA
6. Copy the .PSR files to a folder on the desktop.
7. The Image table will have errors loading due to a problem with the Migration Utility handling the CLOB data type in Oracle. Execute the SP_INSERT_IMAGE procedure that is installed to populate the Image table.
Not every table selected is loaded with metadata so ignore messages that .PSR file is missing.
For XBR-mymicros Version 7.0.0, you must log in with the LIFERAY userid. See the System Administrator for the password to this account.
258 Foodservice (mymicros) Installation
XBR® 7.0.0 XBR Implementation Guide
Post InstallationSet up ORGID Database Links and Public Synonyms:
1. Log out and log back in to the database as user XBRADMIN.
2. Check the values in the script insert_adm_db_setup_MYMICROS_XBR.sql to ensure each database, schema and TNSNAME is correct with the connection information obtained from Mymicros and then execute the script.
3. Now run the stored procedure called SP_PRO_DATABASE_SETUP to create all the necessary database links and public synonyms.
4. Due to compilation warnings produced by step 13 on page 257 which causes security to not be applied correctly to views that have compilation warnings, you must rebuild the views by opening and exuting the database script 1004_build_views_70.sql in a query window. The script is located at:
CVS\database_scripts\Database Architecture\Database Scripts\Analytics Product Suite 7.0\XBR 7.0\XBR MyMicros 7.0\Oracle
or
CD:\DATABASE_SCRIPTS\FOODSERVICE\NEW_INSTALL\ORACLE
Foodservice (mymicros) Installation 259

Chapter 5: Database Setup XBR® 7.0.0
New Oracle XBR-mymicros 7.0.0 Self-Hosted Database Installation
Setting Up XBR Security in the Mymicros Data WarehouseFor a new XBR-mymicros 7.0.0 self-hosted installation, the first part of the setup is run against the current mymicros production database instance.
1. Log into the current mymicros production database instance with the COREDB login. See the System Administrator for the password.
2. Update the tnsnames.ora and listener.ora with new database information.
3. Create the standard tablespaces by opening a SQL Query window either through Toad, SQL Plus or other client interface tool and attach to the newly created database.
a. Open the database script Oracle_standard_tablespaces.sql located at:
CVS\database_scripts\Database Architecture\Database Scripts\Analytics Product Suite 7.0\XBR 7.0\XBR MyMicros 7.0\Oracle
or
CD:\DATABASE_SCRIPTS\FOODSERVICE\NEW_INSTALL\ORACLE
b. Ensure the tablespace locations are correct.
c. Change any occurrences of NEWDB with the name of your database instance.
d. Copy and paste into the SQL query window and execute.
The tablespace locations have to be determined based on the Oracle system where the database is being created. This is determined based on how the Oracle DBA set up the resources on the database system, this information can be obtained from the Oracle DBA. Information needed would be the disk drive and directory where the Oracle data will be stored.
4. Open the database script Oracle_standard_security.sql located at:
CVS\database_scripts\Database Architecture\Database Scripts\Analytics Product Suite 7.0\XBR 7.0\XBR MyMicros 7.0\Oracle
or
CD:\DATABASE_SCRIPTS\FOODSERVICE\NEW_INSTALL\ORACLE
5. Copy contents into SQL Query window and execute to create the database roles and users.
6. Now run the Mymicros XBR 7.0.0 Self-Hosted Security script:
a. Open the database script Mymicros_standard_security_SH.sql located at:
CVS\database_scripts\Database Architecture\Database Scripts\Analytics Product Suite 7.0\XBR 7.0\XBR MyMicros 7.0\Oracle
or
CD:\DATABASE_SCRIPTS\FOODSERVICE\NEW_INSTALL\ORACLE
b. Copy the contents into the SQL Query window and execute to set permissions on the COREDB and LOCATION_ACTIVITY_DB objects.
260 Foodservice (mymicros) Installation
XBR® 7.0.0 XBR Implementation Guide
7. Log out and log back in to the database as user XBRADMIN.
8. Open the database script build_database_mmxbr70.sql located at:
CVS\database_scripts\Database Architecture\Database Scripts\Analytics Product Suite 7.0\XBR 7.0\XBR MyMicros 7.0\Oracle
or
CD:\DATABASE_SCRIPTS\FOODSERVICE\NEW_INSTALL\ORACLE
9. Copy the contents into the SQL Query window and execute to create the database objects-- tables, views, functions, stored procedures, triggers, etc.
10. Click the Ignore Errors button to continue and ignore errors.
11. Now you must load the Mymicros XBR 7.0.0 system table metadata using the Migration Utility to load all the XBR formatted .PSR files. They are located at:
CVS\database_scripts\Database Architecture\Database System Metadata\Analytics Product Suite 7.0\XBR 7.0\XBR MyMicros 7.0\Oracle\metadata
or
CD:\DATABASE_SCRIPTS\FOODSERVICE\NEW_INSTALL\ORACLE\METADATA
Copy the .PSR files to a folder on the desktop.
12. The latest version of the Migration Utility must now be installed. The Operations Technical team is well versed in using this utility to migrate data. The utility is located on the CD at:
CD:\UTILITIES
a. Copy the utility to a folder on the desktop.
b. Execute migutil.exe to run the Migration Utility.
c. Once opened, click the DB Connect button to open the database connection dialog box and fill in the connection information for the database. If you are successful, you will see a message: "Connected to database."
d. Once connected, click the Open Config button and select the Import tab.
e. Ensure ALL tables with Replace Table option are selected. Also, deselect the option to Initialize Null Values before browsing to .PSR files.
f. Click on the Import button and browse to the location of the .PSR files. When you click on the first .PSR file, the import will begin. You can review the log in the MGT_LOG.TXT to see if the data was loaded correctly.
The XBR-mymicros 7.0.0 database installation is now completed.
This script will give many compilation errors and warnings, but this has been tested and is OK. These are only dependent object errors and warnings and will be rectified after the next step.
Not every table selected is loaded with metadata so ignore messages that .PSR file is missing.
Foodservice (mymicros) Installation 261
Chapter 5: Database Setup XBR® 7.0.0
Liferay InstallationFor XBR-mymicros Version 7.0.0 , the Liferay portal has been stripped out from the full XBR database installation and is now a separate module that can be added as an option.
Use the following procedure to install the Oracle Liferay 7.0.0 tables:
1. Log into XBR as “XBRADMIN”.
2. Open the database script build_schema_liferay70.sql at:
CVS\database_scripts\Database Architecture\Database Scripts\Analytics Product Suite 7.0\Liferay 7.0\Oracle
or
CD:\DATABASE_SCRIPTS\LIFERAY\NEW_INSTALL\ORACLE
3. Copy the contents into a SQL Query window.
4. Click Execute to create the Liferay tables.
5. Now you must load the Liferay 7.0.0 system table metadata using the Migration Utility.
They are located in the following location:
CVS\database_scripts\Database Architecture\Database System Metadata\Analytics Product Suite 7.0\Liferay 7.0\Oracle\metadata
or
CD:\DATABASE_SCRIPTS\LIFERAY\NEW_INSTALL\ORACLE\METADATA
Copy the .PSR files to a folder on the desktop.
6. The Image table will have errors loading due to a problem with the Migration Utility handling the CLOB data type in Oracle. Execute the SP_INSERT_IMAGE procedure that is installed to populate the Image table.
For Mymicros XBR Version 7.0.0, you must log in with the LIFERAY userid. See the System Administrator for the password to this account.
262 Foodservice (mymicros) Installation
XBR® 7.0.0 XBR Implementation Guide
Post InstallationSet up Database Links and Public Synonyms
1. Check the values in the script insert_adm_db_setup_MYMICROS_SH_70.sql to ensure each database, schema and TNSNAME are correct with the connection information obtained from Mymicros.
2. Execute the script.
3. Run the stored procedure called SP_PRO_DATABASE_SETUP to create all the necessary database links and public synonyms.
4. Due to compilation warnings produced by step 9 which causes security to not be applied correctly to views that have compilation warnings, you must rebuild the views by opening the database script 1004_build_views_70.sql at:
CVS\database_scripts\Database Architecture\Database Scripts\Analytics Product Suite 7.0\XBR 7.0\XBR MyMicros 7.0\Oracle
or
CD:\DATABASE_SCRIPTS\FOODSERVICE\NEW_INSTALL\ORACLE
At this point the Oracle Mymicros XBR 7.0.0 Self-Host installation is complete and there are no invalid objects in the database.
Foodservice (mymicros) Installation 263
Chapter 5: Database Setup XBR® 7.0.0
New SQL Server XBR-mymicros 7.0.0 Self-Hosted Database Installation
Setting up XBR Security in the mymicros Data WarehouseFor a new XBR-mymicros 7.0.0 installation, the first part of the setup is run against the current mymicros production database instance.
The following XBR-mymicros security script must be run to create the XBRREADONLY account which will be used to funnel requests from the XBR 7.0.0 database using database links. The links will be set up during the mymicros XBR 7.0.0 installation. This security script will also grant the XBRREADONLY account read only access to all the tables in COREDB and LOCATION_ACTIVITY_DB databases. This is accomplished by granting XBRREADONLY the db_readonly database role to COREDB and LOCATION_ACTIVITY_DB.
The script is called SQLServer_Mymicros_security.sql and can be found in either in CVS or on the release CD in the following directories:
CVS\database_scripts\Database Architecture\Database Scripts\Analytics Product Suite 7.0\XBR 7.0\XBR MyMicros 7.0\SQL Server
or
CD:\DATABASE_SCRIPTS\FOODSERVICE\NEW_INSTALL\MSSQL
Creating a New XBR-mymicros SQL Server Database
If beginning with a brand new SQL Server instance, initiate the database creation procedure with the following SQL script, sp_pro_create_database.sql. The database creation procedure will be created in the master database and used for all subsequent database creations. If this is an older SQL Server system, ensure the database procedure exists. If this is not needed, proceed to step 2.
1. Execute sp_pro_create_database.sql which is located at:
CVS\database_scripts\Database Architecture\Database Scripts\Analytics Product Suite 7.0\XBR 7.0\XBR MyMicros 7.0\SQL Server
or
CD:\DATABASE_SCRIPTS\FOODSERVICE\NEW_INSTALL\MSSQL
2. Make a copy of the SQL script exec_sp_pro_create_database.sql which is located at:
CVS\database_scripts\Database Architecture\Database Scripts\Analytics Product Suite 7.0\XBR 7.0\XBR MyMicros 7.0\SQL Server
or
CD:\DATABASE_SCRIPTS\FOODSERVICE\NEW_INSTALL\MSSQL
This script must be run from a privileged account by either the mymicros implementation team or by the MICROS-Retail Operations technical team (if given appropriate permissions).
The mymicros data warehouse and the XBR 7.0.0 database should be on separate SQL Server instances.
264 Foodservice (mymicros) Installation
XBR® 7.0.0 XBR Implementation Guide
3. Modify DATABASE_NAME, FILE_LOCATION, and LOG_LOCATION in the following three lines.
SET @DATABASE_NAME='NEWDB';
SET @FILE_LOCATION='E:\MSSQL\Data\';
SET @LOG_LOCATION='E:\MSSQL\Data\';
4. Open Microsoft SQL Server Management Studio and connect to the server you wish to create the new database on.
5. Open the script you just modified from exec_sp_pro_create_database.sql.
6. Highlight, copy and paste the contents of this script into a new query window and click Execute to create the new database. (It is OK if it master is the database name in the window. The script forces it to use the master database.)
7. Once the new database creation is complete:
a. Refresh the database panel.
b. Select the new database.
c. Click Query to open a new query window that will run against the new database.
8. Open the XBR 7.0.0 database setup SQL script SqlServer_database_setup.sql at:
CVS\database_scripts\Database Architecture\Database Scripts\Analytics Product Suite 7.0\XBR 7.0\XBR MyMicros 7.0\SQL Server
or
CD: \DATABASE_SCRIPTS\FOODSERVICE\NEW_INSTALL\MSSQL
9. Modify REMOTE_SERVER, REMOTEUSER, and REMOTEPWD in:
SET @REMOTE_SERVER='WDTVSQL2005DEV\XBRMM';
SET @REMOTEUSER = 'XBRREADONLY';
SET @REMOTEPWD = 'XBRREADONLY';
This script will create the database link and required synonyms.
Ensure the target system's data and log directory locations are correct. The database name is whatever name you have chosen for your new database (the name must start with a character). The file and log locations have to be based on the SQL Server system as to where the database is being created. This is determined on how the DBA set up the resources on the system. You can get this information from the DBA.
For MICROS-Retail in-house Operations client databases, you must run this script on the dedicated internal customer SQL Server system WDTVSQL2005DEV\SQL2005CUST and set the file and log locations to E:\Microsoft SQL Server\SQL2005CUST\Data.
Foodservice (mymicros) Installation 265
Chapter 5: Database Setup XBR® 7.0.0
10. Open the XBR & Balance 7.0.0 database creation SQL script build_database_70.sql at:
CVS:\database_scripts\Database Architecture\Database Scripts\MyMicrosXBR 6.8\SQL Server
or
CD: \DATABASE_SCRIPTS\FOODSERVICE\NEW_INSTALL\MSSQL
11. The first line of the script is “USE NEWDB”. Change the NEWDB to your new database name before running the script.
a. While still in the build_database_70.sql script, find the second occurrence of NEWDB.
b. Modify NEWDB along with the file location to be the same as the values you put into exec_sp_pro_create_database.sql when first creating the database in Step 3 above.
SET @DATABASE_NAME='NEWDB';
SET @FILE_LOCATION='E:\MSSQL\Data\NEWDB\';
12. Copy the contents of this script into the new query window you just opened and make sure the new database name is showing in the database drop down box located at the lower right corner of the Query button.
13. Execute the script by clicking the Execute button.
14. Load the XBR-mymicros 7.0.0 system table metadata using the Migration Utility. These XBR formatted .PSR files are located at:
CVS\database_scripts\Database Architecture\Database System Metadata\Analytics Product Suite 7.0\XBR 7.0\XBR MyMicros 7.0\SQL Server\metadata
or
CD:\DATABASE_SCRIPTS\FOODSERVICE\NEW_INSTALL\MSSQL\METADATA
Copy the psr files to a folder on the desktop.
15. The latest version of the Migration Utility must be installed. The Operations Technical team is well versed in using this utility to migrate data. You can a find it on the CD at:
CD:\UTILITIES
a. Copy the utility to a folder on the desktop.
b. Execute migutil.exe to run the Migration Utility.
c. Once opened, click the DB Connect button to open the database connection dialog box.
VERY IMPORTANT! Please be sure to leave the last Backslash in the file location!
266 Foodservice (mymicros) Installation
XBR® 7.0.0 XBR Implementation Guide
d. Fill in the connection information for the database. Remember to set DBMS = MS SQL and PB Driver = Ole DB. If you are successful, you will see a message, "Connected to database".
e. Once connected, select the Open Config button and then the Import tab. Make sure ALL tables with Replace Table option are selected. Also deselect the option to Initialize Null Values before browsing to PSR files.
f. Click on the Import button and go to the location of the psr files. Click on the first .PSR file and click OK; the import will begin. You can review the log file MGT_LOG.TXT in the Migration Utility folder to see if the data was loaded correctly.
The XBR-mymicros 7.0.0 database installation is now complete.
Liferay InstallationFor XBR Version 7.0.0, the Liferay portal has been stripped out from the full XBR database installation, and is now a separate module.
1. Log out and log back in to the database as user LIFERAY.
To install the SQL Server Liferay 7.0.0 tables:
2. Open the database script liferay_tables_70.sql at:
CVS\database_scripts\Database Architecture\Database Scripts\Analytics Product Suite 7.0\Liferay 7.0\SQL Server
or
CD:\DATABASE_SCRIPTS\LIFERAY\NEW_INSTALL\MSSQL
3. Copy contents into an SQL Query window and execute to create the Liferay tables.
4. Load the Liferay 7.0 system table metadata using the Migration Utility. They are located at:
CVS\database_scripts\Database Architecture\Database System Metadata\Analytics Product Suite 7.0\Liferay 7.0\SQL Server\metadata
or
CD:\DATABASE_SCRIPTS\LIFERAY\NEW_INSTALL\MSSQL\METADATA
5. Copy the .psr files to a folder on the desktop.
6. The latest version of the Migration Utility must be installed. The Operations Technical team is well versed in using this utility to migrate data. You can a find it on the CD at:
CD:\UTILITIES
a. Copy the utility to a folder on the desktop.
b. Execute migutil.exe to run the Migration Utility.
c. Once opened, click the DB Connect button to open the database connection dialog box.
Not every table selected is loaded with metadata so ignore messages that psr file is missing.
Foodservice (mymicros) Installation 267
Chapter 5: Database Setup XBR® 7.0.0
d. Fill in the connection information for the database. Remember to set DBMS = MS SQL and PB Driver = Ole DB. If you are successful, you will see a message, "Connected to database".
e. Once connected, select the Open Config button and then the Import tab. Make sure ALL tables with Replace Table option are selected. Also deselect the option to Initialize Null Values before browsing to PSR files.
f. Click on the Import button and go to the location of the psr files. Click on the first .PSR file and click OK; the import will begin. You can review the log file MGT_LOG.TXT in the Migration Utility folder to see if the data was loaded correctly.
Not every table selected is loaded with metadata so ignore messages that psr file is missing.
268 Foodservice (mymicros) Installation

XBR® 7.0.0 XBR Implementation Guide
Upgrade XBR-mymicros Database to 7.0.0
This section is applicable for the following situations:
Oracle XBR-mymicros database in a hosted environment
Oracle XBR-mymicros database in a self-hosted environment
SQL Server XBR-mymicros database in a self-hosted environment
The upgrade scripts for Oracle are in CVS or on the release CD in the following location:
CVS\database_scripts\Database Architecture\Database Scripts\Analytics Product Suite 7.0\XBR 7.0\XBR MyMicros 7.0\Oracle
or
CD: \DATABASE_SCRIPTS\FOODSERVICE\UPGRADE\ORACLE
Prior to running the Oracle XBR-mymicros 7.0 upgrade scripts, you must upgrade the security in the Mymicros databases by running the following security scripts from the same location.
For Oracle Self-Hosted installations, run:
Upgrade_Mymicros_standard_security_SH.sql
For Oracle Hosted installations, run:
Upgrade_Oracle_Mymicros_security.sql
The upgrade scripts for SQL Server are in CVS or on the release CD in the following location:
CVS\database_scripts\Database Architecture\Database Scripts\Analytics Product Suite 7.0\XBR 7.0\XBR MyMicros 7.0\SQL Server
or
CD: \DATABASE_SCRIPTS\FOODSERVICE\UPGRADE\MSSQL
Prior to running the SQL Server XBR-mymicros 7.0 upgrade script, you must upgrade the security in the Mymicros databases by running the following security script from the same location.
Before starting any upgrade, make sure you back up your database.
This script must be run from a privileged account by either the Mymicros implementation team or by the MICROS-Retail Operations technical team (if given appropriate permissions).
This script must be run from a privileged account by either the Mymicros implementation team or by the MICROS-Retail Operations technical team (if given appropriate permissions).
Foodservice (mymicros) Installation 269
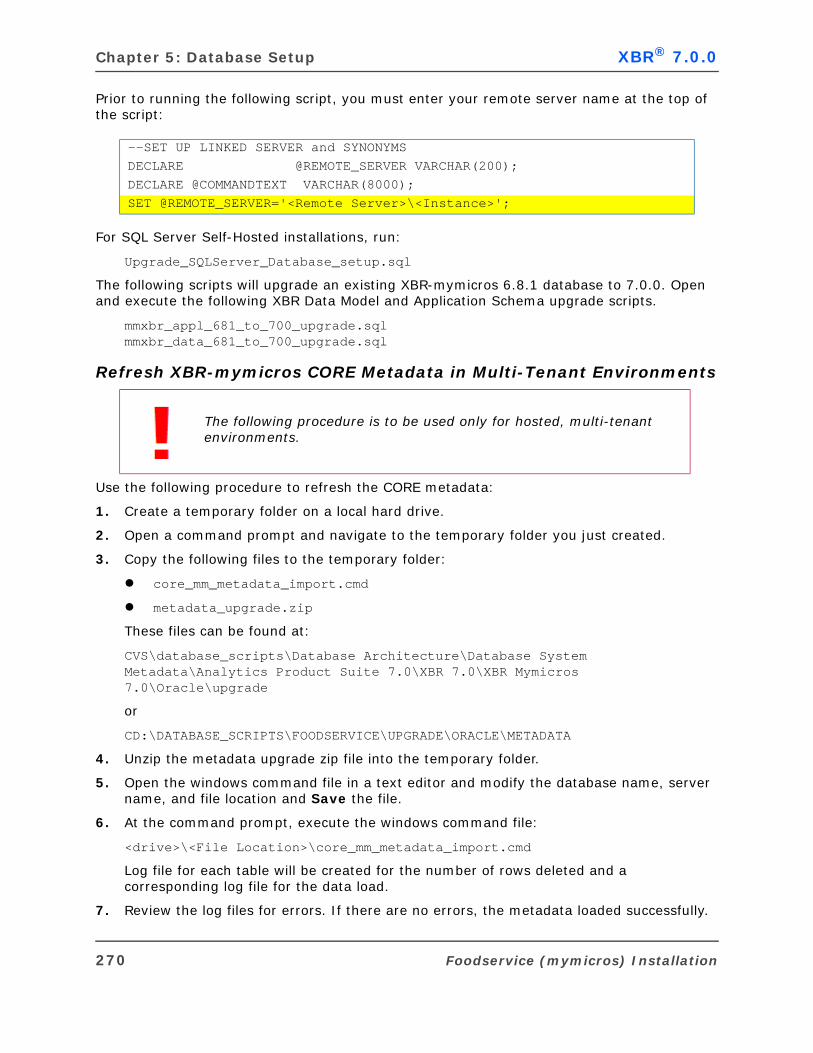
Chapter 5: Database Setup XBR® 7.0.0
Prior to running the following script, you must enter your remote server name at the top of the script:
For SQL Server Self-Hosted installations, run:
Upgrade_SQLServer_Database_setup.sql
The following scripts will upgrade an existing XBR-mymicros 6.8.1 database to 7.0.0. Open and execute the following XBR Data Model and Application Schema upgrade scripts.
mmxbr_appl_681_to_700_upgrade.sqlmmxbr_data_681_to_700_upgrade.sql
Refresh XBR-mymicros CORE Metadata in Multi-Tenant Environments
Use the following procedure to refresh the CORE metadata:
1. Create a temporary folder on a local hard drive.
2. Open a command prompt and navigate to the temporary folder you just created.
3. Copy the following files to the temporary folder:
core_mm_metadata_import.cmd
metadata_upgrade.zip
These files can be found at:
CVS\database_scripts\Database Architecture\Database System Metadata\Analytics Product Suite 7.0\XBR 7.0\XBR Mymicros 7.0\Oracle\upgrade
or
CD:\DATABASE_SCRIPTS\FOODSERVICE\UPGRADE\ORACLE\METADATA
4. Unzip the metadata upgrade zip file into the temporary folder.
5. Open the windows command file in a text editor and modify the database name, server name, and file location and Save the file.
6. At the command prompt, execute the windows command file:
<drive>\<File Location>\core_mm_metadata_import.cmd
Log file for each table will be created for the number of rows deleted and a corresponding log file for the data load.
7. Review the log files for errors. If there are no errors, the metadata loaded successfully.
--SET UP LINKED SERVER and SYNONYMSDECLARE @REMOTE_SERVER VARCHAR(200);DECLARE @COMMANDTEXT VARCHAR(8000);SET @REMOTE_SERVER='<Remote Server>\<Instance>';
The following procedure is to be used only for hosted, multi-tenant environments.
270 Foodservice (mymicros) Installation
XBR® 7.0.0 XBR Implementation Guide
RETAIL/GROCERY INSTALLATION
New Oracle XBR and Balance 7.0.0 Database Installation
Creating a New XBR and Balance Oracle DatabaseCreate a new Oracle Instance & Database using the Database Configuration assistant, or ensure that a new instance and database has been created by the responsible DBA.
For Oracle 10g installations, to create the new database instance, you can modify and use the following scripts found in either in CVS or on the release CD in the following directories:
CVS\database_scripts\Database Architecture\Database Scripts\Analytics Product Suite 7.0\XBR 7.0\XBR Retail 7.0\Oracle
or
CD:\DATABASE_SCRIPTS\RETAIL\NEW_INSTALL\ORACLE
1. Create a directory under your Oracle installation's Admin directory to match your instance name, then create a scripts directory under the admin\instance directory (i.e. E:\oracle\product\10.2.0\admin\newdb\scripts).
2. Copy the following scripts to the new “scripts” directory you just created:
build_database_70_10g.bat
build_database_70_10g.sql
cloneDBCreation.sql
CloneRmanRestore.sql
postScripts.sql
rmanRestoreDatafiles.sql
postDBCreation.sql
init.ora
initNEWDBTemp.ora (rename this file with new db name also)
Oracle_standard_tablespaces.sql
Oracle_standard_security.sql
3. Edit these files and replace any occurrences of "newdb" with the name of your new database and path.
4. Open a command window, CD to the scripts directory, and execute build_database_70_10g.bat.
You will be prompted to assign passwords for the sys and system users.
Once the database is created and empty, now it is time to create the XBR and Balance 7.0.0 Standard Tablespaces, Standard Security and database objects.
5. Log into the new instance with the "sys" account and password as sysdba.
6. Update the tnsnames.ora and listener.ora with new database information.
Retail/Grocery Installation 271

Chapter 5: Database Setup XBR® 7.0.0
7. Create the Standard Tablespaces by opening a SQL Query window either through Toad, SQL Plus, or some other client interface tool and attach to the newly created database.
a. Open the database script Oracle_standard_tablespaces.sql at:
CVS\database_scripts\Database Architecture\Database Scripts\Analytics Product Suite 7.0\XBR 7.0\XBR Retail 7.0\Oracle
or
CD:\DATABASE_SCRIPTS\RETAIL\NEW_INSTALL\ORACLE
b. Make sure the table space locations are correct.
c. Copy and paste the contents into the SQL query window, and execute.
The tablespace locations have to be determined based on the Oracle system where the database is being created. This is determined based on how the Oracle DBA set up the resources on the database system, this information can be obtained from the Oracle DBA. Information needed would be the disk drive and directory where the Oracle data will be stored.
8. Open the database script Oracle_standard_security.sql at:
CVS\database_scripts\Database Architecture\Database Scripts\Analytics Product Suite 7.0\XBR 7.0\XBR Retail 7.0\Oracle
or
CD:\DATABASE_SCRIPTS\RETAIL\NEW_INSTALL\ORACLE
9. Copy the contents into an SQL Query window and click Execute to create the database roles and users.
10. Log out and log back in to the database as user XBRADMIN.
11. Open the database script build_database_objects_70.sql at:
CVS\database_scripts\Database Architecture\Database Scripts\Analytics Product Suite 7.0\XBR 7.0\XBR Retail 7.0\Oracle
or
CD:\DATABASE_SCRIPTS\RETAIL\NEW_INSTALL\ORACLE
12. Copy the contents into an SQL Query window and click Execute to create all the database objects tables, views, functions, stored procedures, triggers, etc.
13. Click the Ignore Errors button to continue and ignore errors.
This script will give many compilation errors and warnings, but this has been tested and is OK, these are only dependent object errors and warnings, and will be rectified after the next step.
272 Retail/Grocery Installation
XBR® 7.0.0 XBR Implementation Guide
14. Due to compilation warnings produced by step 12 which causes security to not be applied correctly to views that have compilation warnings, you must rebuild the views by opening the database script 1004_build_views_70.sql at:
CVS\database_scripts\Database Architecture\Database Scripts\Analytics Product Suite 7.0\XBR 7.0\XBR Retail 7.0\Oracle
or
CD:\DATABASE_SCRIPTS\RETAIL\NEW_INSTALL\ORACLE
15. Copy the contents into SQL Query window and click Execute to recreate the views.
16. Load the XBR & Balance 7.0.0 system table metadata using the Migration Utility to load all the XBR formatted .PSR files. They are located at:
CVS\database_scripts\Database Architecture\Database System Metadata\Analytics Product Suite 7.0\XBR 7.0\XBR Retail 7.0\Oracle\metadata
or
CD:\DATABASE_SCRIPTS\RETAIL\NEW_INSTALL\ORACLE\METADATA
Copy the psr files to a folder on the desktop.
17. The latest version of the Migration Utility must be installed. The utility is located on the CD at:
CD:\UTILITIES
a. Copy the utility to a folder on the desktop.
b. Execute migutil.exe to run the Migration Utility.
c. Once it is open, click the DB Connect button to open the database connection dialog box.
d. Fill in the connection information for the database. If you are successful, you will see a message, "Connected to database".
e. Once connected, click the Open Config button and select the Import tab.
f. Make sure ALL tables with Replace Table option are selected. Also deselect the option to Initialize Null Values before browsing to PSR files.
g. Click on the Import button and browse to the location of the .PSR files. When you click on the first .PSR file, the import will begin. You can review the log in the MGT_LOG.TXT to see if the data was loaded correctly.
The XBR and Balance 7.0.0 Oracle database installation is finished.
Not every table selected is loaded with metadata so ignore messages that psr file is missing.
Retail/Grocery Installation 273
Chapter 5: Database Setup XBR® 7.0.0
Liferay InstallationFor XBR Version 7.0.0, the Liferay portal has been stripped out from the full XBR database installation, and is now a separate module.
Use the following procedure to install the Oracle Liferay 7.0.0 portal:
1. Open the database script build_schema_liferay70.sql at:
CVS\database_scripts\Database Architecture\Database Scripts\Analytics Product Suite 7.0\Liferay 7.0\Oracle
or
CD:\DATABASE_SCRIPTS\LIFERAY\NEW_INSTALL\ORACLE
2. Copy the contents into the SQL Query window and click Execute to create the Liferay tables.
3. Load the Liferay 7.0.0 system table metadata using the Migration Utility.
They are located at:
CVS\database_scripts\Database Architecture\Database System Metadata\Analytics Product Suite 7.0\Liferay 7.0\Oracle\metadata
or
CD:\DATABASE_SCRIPTS\LIFERAY\NEW_INSTALL\ORACLE\METADATA
Copy the psr files to a folder on the desktop.
4. The Image table will have errors loading due to a problem with the Migration Utility handling the CLOB data type in Oracle. Execute the SP_INSERT_IMAGE procedure that is installed to populate the Image table.
For XBR Version 7.0.0, you must log in with the LIFERAY userid. See the System Administrator for the password to this account.
274 Retail/Grocery Installation
XBR® 7.0.0 XBR Implementation Guide
Upgrade XBR Oracle Database to 7.0.0
Upgrade XBR from XBR 6.8.1 to XBR 7.0.0The upgrade scripts are in CVS or on the release CD in the following location:
CVS\database_scripts\Database Architecture\Database Scripts\Analytics Product Suite 7.0\XBR 7.0\XBR Retail 7.0\Oracle
or
CD: \DATABASE_SCRIPTS\RETAIL\UPGRADE\ANALYTICS_6.8\ORACLE
The following scripts will upgrade an existing or a new XBR 6.8.1 installation. Open and execute the following XBR Data Model and Application Schema upgrade scripts.
xbr_appl_681_to_700_upgrade.sql
xbr_data_681_to_700_upgrade.sql
Recompile all invalid views and procedures.
Install XBR 7.0.0 Upgrade Query LibraryUse the following procedure to install the new Upgrade query library for XBR 7.0.0:
1. Create a temporary folder on a local hard drive.
2. Open a command prompt and navigate to the temporary folder you just created.
3. Copy the following files to the temporary folder:
core_rpt_metadata_import.cmd
metadata_upgrade.zip
These files can be found at:
CVS\database_scripts\Database Architecture\Database System Metadata\Analytics Product Suite 7.0\XBR 7.0\XBR Retail 7.0\Oracle\upgrade
or
CD:\DATABASE_SCRIPTS\RETAIL\UPGRADE\ORACLE\METADATA
4. Unzip the metadata zip file into the temprary folder.
Before starting any upgrade, make sure you back up your database.
Due to Balance being dependent on XBR objects during and after an installation, it is necessary to upgrade XBR first, then Balance. And when upgrading the individual modules, the application schema upgrade script should always be run before the Data Model Schema upgrade scripts.
Retail/Grocery Installation 275

Chapter 5: Database Setup XBR® 7.0.0
5. Open the windows command file in a text editor and modify the database name, server name, and file location and Save the file.
6. At the command prompt, execute the windows command file:
<drive>\<File Location>\core_rpt_metadata_import.cmd
Log file for each table will be created for the number of rows deleted and a corresponding log file for the data load.
7. Review the log files for errors. If there are no errors, the metadata loaded successfully.
276 Retail/Grocery Installation
XBR® 7.0.0 XBR Implementation Guide
New SQL Server XBR and Balance 7.0.0 Database Installation
Creating a New XBR SQL Server DatabaseIf beginning with a brand new SQL Server instance, initiate the database creation procedure with the following SQL script, sp_pro_create_database.sql. The database creation procedure will be created in the master database and used for all subsequent database creations. If this is an older SQL Server system, ensure the database procedure exists. If this is not needed, proceed to step 2.
1. Execute sp_pro_create_database.sql at:
CVS\database_scripts\Database Architecture\Database Scripts\Analytics Product Suite 7.0\XBR 7.0\XBR Retail 7.0\SQL Server
or
CD: \DATABASE_SCRIPTS\RETAIL\NEW_INSTALL\MSSQL
2. Make a copy of the SQL script exec_sp_pro_create_database.sql located at:
CVS\database_scripts\Database Architecture\Database Scripts\Analytics Product Suite 7.0\XBR 7.0\XBR Retail 7.0\SQL Server
or
CD: \DATABASE_SCRIPTS\RETAIL\NEW_INSTALL\MSSQL
3. Modify DATABASE_NAME, FILE_LOCATION, and LOG_LOCATION in the following three lines:
SET @DATABASE_NAME='NEWDB';
SET @FILE_LOCATION='E:\MSSQL\Data\';
SET @LOG_LOCATION='E:\MSSQL\Data\';
Make sure the target system's data and log directory locations are correct. The database name is whatever name you have chosen for your new database (the name must start with a character). The file and log locations have to be based on the SQL Server system as to where the database is being created. This is determined on how the DBA set up the resources on the system. You can get this information from the DBA.
For example the database is named XBR700 and the DBA has set up a database directory on the E: drive in the following location - E:\Microsoft SQL Server\Data
The 3 lines in the script will look like this.
SET @DATABASE_NAME= XBR700;
SET @FILE_LOCATION= E:\Microsoft SQL Server\Data\ XBR700\;
SET @LOG_LOCATION= E:\Microsoft SQL Server\Data\ XBR700\;
Retail/Grocery Installation 277
Chapter 5: Database Setup XBR® 7.0.0
4. Open Microsoft SQL Server Management Studio and connect to the server you wish to create the new database on.
5. Open the script you just modified from exec_sp_pro_create_database.sql.
6. Highlight, copy and paste the contents of this script into a new query window and click Execute to create the new database. (It is OK if master is the database name in the window. The script forces it to use the master database.)
7. Once the new database creation is complete:
a. Refresh the database panel.
b. Select the new database.
c. Click Query to open a new query window that will run against the new database.
8. Open the XBR & Balance 7.0.0 database creation SQL script build_database_70.sql at:
CVS\database_scripts\Database Architecture\Database Scripts\Analytics Product Suite 7.0\XBR 7.0\XBR Retail 7.0\SQL Server
or
CD: \DATABASE_SCRIPTS\RETAIL\NEW_INSTALL\MSSQL
9. The first line of the script is USE NEWDB. Change NEWDB to your new database name before running the script.
10. Find the second occurrence of NEWDB.
11. Change “NEWDB” and the default file location to be the same as the values you put in exec_pro_create_database.sql in step 3 above.
SET @DATABASE_NAME='NEWDB';
SET @FILE_LOCATION='E:\MSSQL\Data\';
Please make sure to leave the last Backslash in the file location!
278 Retail/Grocery Installation
XBR® 7.0.0 XBR Implementation Guide
12. Determine whether you want to build a partitioned database or a non-partitioned database.
a. If you want a non-partitioned database (default), continue with step 13.
b. If you want a partitioned database:
Adjust the retention period by updating the value PARTITION_DAYS, default is 90 days. By default, the partition scheme gets today's date and creates partitions 90 days back from today. There is also an option to supply an end date for the partitions. Whatever date you supply, the partition scheme will use that date as the high end value of the date range and build the partitions 90 days back from that date.
13. Copy the contents of this script into the new query window you just opened.
14. Make sure the new database name is showing in the database drop down box located at the lower right corner of the Query button.
15. Execute the script by clicking the Execute button.
16. Load the XBR & Balance 7.0.0 system table metadata using the Migration Utility and load the files. These XBR formatted .PSR files are located at:
CVS\database_scripts\Database Architecture\Database System Metadata\Analytics Product Suite 7.0\XBR 7.0\XBR Retail 7.0\SQL Server\metadata
or
CD: \DATABASE_SCRIPTS\RETAIL\NEW_INSTALL\MSSQL\METADATA
Unzip the psr files to a folder on the desktop.
17. The latest version of the Migration Utility must be installed. The Operations Technical team is well versed in using this utility to migrate data. You can a find it on the CD at:
CD:\UTILITIES
a. Copy the utility to a folder on the desktop.
b. Execute migutil.exe to run the Migration Utility.
c. Once it is, click the DB Connect button to open the database connection dialog box.
d. Fill in the connection information for the database. Remember to set DBMS = MS SQL and PB Driver = Ole DB. If you are successful, you will see a message, "Connected to database".
e. Once connected, click the Open Config button and select the Import tab.
f. Make sure ALL tables with Replace Table option are selected.
g. Deselect the Initialize Null Values option before browsing to PSR files.
h. Click on the Import button and navigate to the location of the psr files. Click on the first .PSR file and click OK. The import will begin. You can review the log in MGT_LOG.TXT to see if the data was loaded correctly.
Not every table selected is loaded with metadata so ignore messages that psr file is missing.
Retail/Grocery Installation 279
Chapter 5: Database Setup XBR® 7.0.0
Now the XBR and Balance 7.0.0 database installation is finished.
Inventory Product InstallationThis is an OPTIONAL installation.
Use the following procedure to install the additional XBR Inventory product:
1. Execute the XBR Inventory upgrade script located at:
CVS\database_scripts\Database Architecture\Database Scripts\Analytics Product Suite 7.0\XBR 7.0\XBR Inventory 7.0\SQL Server
2. Open inventory_upgrade_core70.sql.
3. Search for NEWDB and change the database name to the name of the database you are upgrading, as well as changing the file location to that of the database you are upgrading. The file location section is just below the second iteration of NEWDB.
4. Copy and paste (without saving back to CVS) into the Query window, using the database you are upgrading and then execute the script.
5. Load the Inventory 7.0.0 system table metadata using the Migration Utility. They are at:
CVS\database_scripts\Database Architecture\Database System Metadata\Analytics Product Suite 7.0\XBR 7.0\XBR Inventory 7.0\SQL Server\metadata
or
CD:\DATABASE_SCRIPTS\RETAIL\NEW_INSTALL\MSSQL\METADATA
6. Unzip the psr files to a folder on the desktop.
7. The latest version of the Migration Utility must be installed. You can a find it on the CD at:
CD:\UTILITIES
a. Copy the utility to a folder on the desktop.
b. Execute migutil.exe to run the Migration Utility.
c. Once it is, click the DB Connect button to open the database connection dialog box.
d. Fill in the connection information for the database. Remember to set DBMS = MS SQL and PB Driver = Ole DB. If you are successful, you will see a message, "Connected to database".
e. Once connected, click the Open Config button and select the Import tab.
f. Make sure ALL tables with Replace Table option are selected.
g. Deselect the Initialize Null Values option before browsing to PSR files.
Only select the INV_STAT_SYNTAX and INV_TYPE_CONTROL tables. These are currently the only two metadata tables included with the Inventory product.
280 Retail/Grocery Installation
XBR® 7.0.0 XBR Implementation Guide
h. Click on the Import button and navigate to the location of the psr files. Click on the first .PSR file and click OK; the import will begin. You can review the log in MGT_LOG.TXT to see if the data was loaded correctly.
Now the XBR and Balance 7.0.0 database installation is finished.
Liferay Product InstallationFor XBR Version 7.0.0, the Liferay portal has been stripped out from the full XBR database installation, and is now a separate module.
Use the following procedure to install the SQL Server Liferay 7.0.0 tables:
1. Open the database script liferay_tables_70.sql at
CVS\database_scripts\Database Architecture\Database Scripts\Analytics Product Suite 7.0\Liferay 7.0\SQL Server
or
CD:\DATABASE_SCRIPTS\LIFERAY\NEW_INSTALL\MSSQL
2. Copy the contents into an SQL Query window and click Execute to create the Liferay tables.
3. Load the Liferay 7.0.0 system table metadata using the Migration Utility. They are located at:
CVS\database_scripts\Database Architecture\Database System Metadata\Analytics Product Suite 7.0\Liferay 7.0\SQL Server\metadata
or
CD:\DATABASE_SCRIPTS\LIFERAY\NEW_INSTALL\MSSQL\METADATA
4. Unzip the psr files to a folder on the desktop.
5. The latest version of the Migration Utility must be installed. The Operations Technical team is well versed in using this utility to migrate data. You can a find it on the CD at:
CD:\UTILITIES
a. Copy the utility to a folder on the desktop.
b. Execute migutil.exe to run the Migration Utility.
c. Once it is, click the DB Connect button to open the database connection dialog box.
d. Fill in the connection information for the database. Remember to set DBMS = MS SQL and PB Driver = Ole DB. If you are successful, you will see a message, "Connected to database".
e. Once connected, click the Open Config button and select the Import tab.
f. Make sure ALL tables with Replace Table option are selected.
g. Deselect the Initialize Null Values option before browsing to PSR files.
Not every table selected is loaded with metadata so ignore messages that psr file is missing.
Retail/Grocery Installation 281
Chapter 5: Database Setup XBR® 7.0.0
h. Click on the Import button and navigate to the location of the psr files. Click on the first .PSR file and click OK; the import will begin. You can review the log in MGT_LOG.TXT to see if the data was loaded correctly.
Now the XBR and Balance 7.0.0 database installation is finished.
Not every table selected is loaded with metadata so ignore messages that psr file is missing.
282 Retail/Grocery Installation
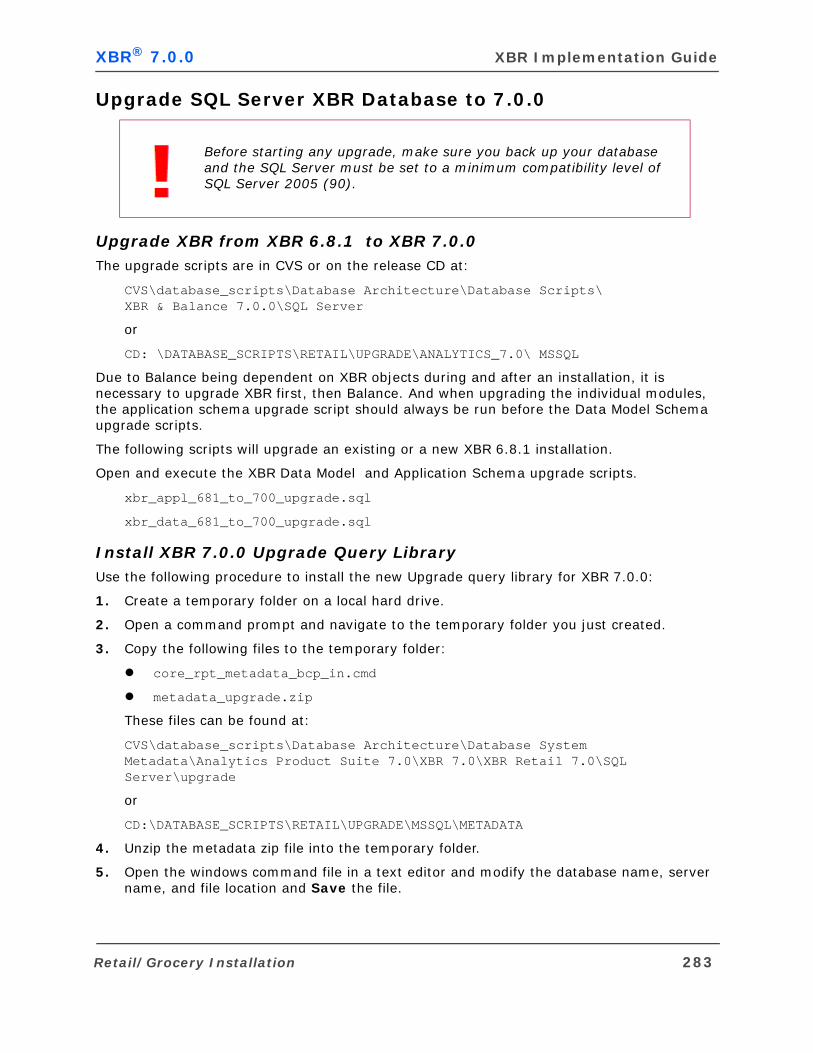
XBR® 7.0.0 XBR Implementation Guide
Upgrade SQL Server XBR Database to 7.0.0
Upgrade XBR from XBR 6.8.1 to XBR 7.0.0The upgrade scripts are in CVS or on the release CD at:
CVS\database_scripts\Database Architecture\Database Scripts\XBR & Balance 7.0.0\SQL Server
or
CD: \DATABASE_SCRIPTS\RETAIL\UPGRADE\ANALYTICS_7.0\ MSSQL
Due to Balance being dependent on XBR objects during and after an installation, it is necessary to upgrade XBR first, then Balance. And when upgrading the individual modules, the application schema upgrade script should always be run before the Data Model Schema upgrade scripts.
The following scripts will upgrade an existing or a new XBR 6.8.1 installation.
Open and execute the XBR Data Model and Application Schema upgrade scripts.
xbr_appl_681_to_700_upgrade.sql
xbr_data_681_to_700_upgrade.sql
Install XBR 7.0.0 Upgrade Query LibraryUse the following procedure to install the new Upgrade query library for XBR 7.0.0:
1. Create a temporary folder on a local hard drive.
2. Open a command prompt and navigate to the temporary folder you just created.
3. Copy the following files to the temporary folder:
core_rpt_metadata_bcp_in.cmd
metadata_upgrade.zip
These files can be found at:
CVS\database_scripts\Database Architecture\Database System Metadata\Analytics Product Suite 7.0\XBR 7.0\XBR Retail 7.0\SQL Server\upgrade
or
CD:\DATABASE_SCRIPTS\RETAIL\UPGRADE\MSSQL\METADATA
4. Unzip the metadata zip file into the temporary folder.
5. Open the windows command file in a text editor and modify the database name, server name, and file location and Save the file.
Before starting any upgrade, make sure you back up your database and the SQL Server must be set to a minimum compatibility level of SQL Server 2005 (90).
Retail/Grocery Installation 283
Chapter 5: Database Setup XBR® 7.0.0
6. At the command prompt, execute the windows command file:
<drive>\<File Location>\core_rpt_metadata_bcp_in.cmd
Log file for each table will be created for the number of rows deleted and a corresponding log file for the data load.
7. Review the log files for errors. If there are no errors, the metadata loaded successfully.
284 Retail/Grocery Installation
C H A P T E R
Video Integration

Chapter 6: Video Integration XBR® 7.0.0
OVERVIEW
This chapter describes how to set up video integration in XBR. This includes use of the pre-supported video vendors as well as the steps necessary to add support for other video vendors.
About This ChapterThe following sections are available in this chapter:
To add and set up a custom video vendor See “Setting up a Custom Video Vendor” on page 292.
AudienceThis chapter is designed for the person responsible for configuring the video vendor portion of XBR. If using a supported video vendor, this person should be familiar with editing database tables and configuration files. If adding support for a custom video vendor, this person should be familiar with editing configuration files, and writing SQL and SQL stored procedures.
The version of XBR referenced in this document supports the following video vendors: Sensormatic, Arrowsight, Kyrus, Image Vault, Dedicated Micros, i3DVR remote, FocusMicro, ATVideo, NiceVideo, and Tempest.
TIPIf you wish to add support for a custom video vendor and are not proficient with writing SQL and SQL stored procedures, please contact your MICROS-Retail representative.
286 Overview
XBR® 7.0.0 XBR Implementation Guide
PrerequisitesThis chapter assumes:
XBR has already been installed and is functioning properly.
The database is one of the following: Oracle 10g/11g or MS SQL Server 2005/2008.
If necessary, the upgrade scripts to XBR 7.0 have been properly installed in the database.
Video system: These instructions assume that the video system provides playback using one of two modes:
Web-addressable playback - (preferred)- a specified video segment can be retrieved and played back by passing a derived URL to a web-browser. This will be the only supported mode in future web versions of XBR when video linking is added to the web product.
Stand-alone video player - a specified video segment is retrieved and played back by passing derived command-line arguments to a specified executable. This is currently supported in the XBR desktop but will not be supported in future web versions.
Overview 287
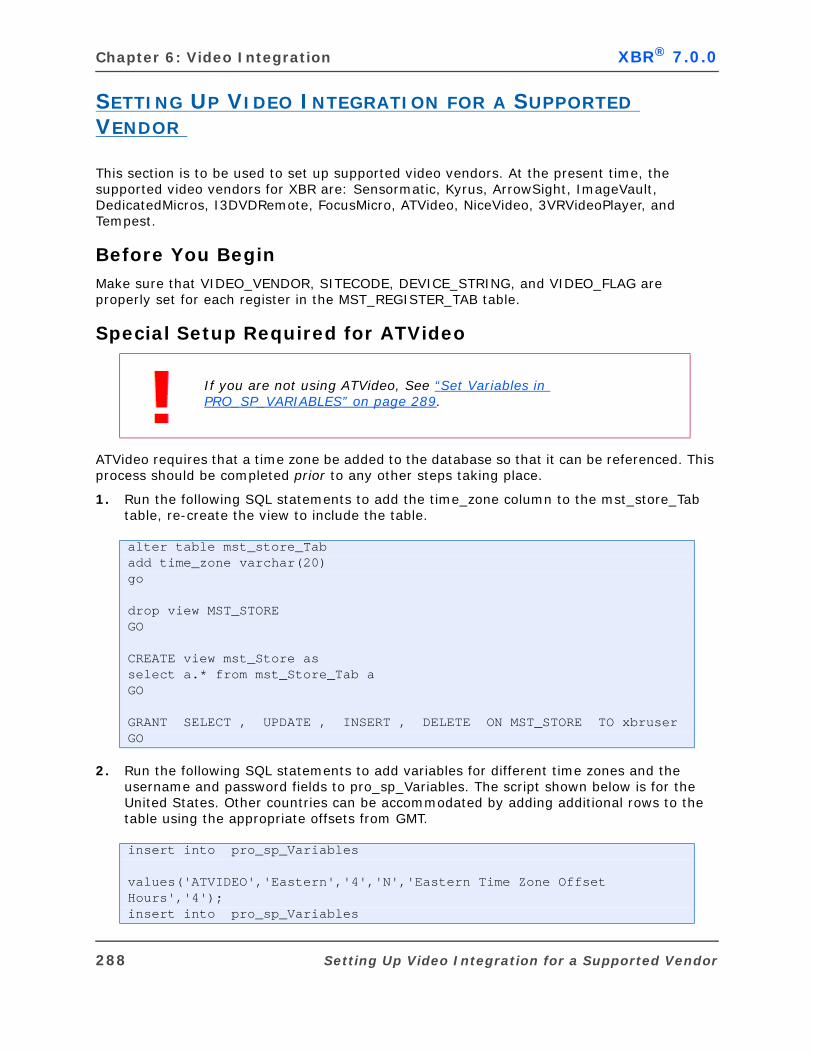
Chapter 6: Video Integration XBR® 7.0.0
SETTING UP VIDEO INTEGRATION FOR A SUPPORTED VENDOR
This section is to be used to set up supported video vendors. At the present time, the supported video vendors for XBR are: Sensormatic, Kyrus, ArrowSight, ImageVault, DedicatedMicros, I3DVDRemote, FocusMicro, ATVideo, NiceVideo, 3VRVideoPlayer, and Tempest.
Before You BeginMake sure that VIDEO_VENDOR, SITECODE, DEVICE_STRING, and VIDEO_FLAG are properly set for each register in the MST_REGISTER_TAB table.
Special Setup Required for ATVideo
ATVideo requires that a time zone be added to the database so that it can be referenced. This process should be completed prior to any other steps taking place.
1. Run the following SQL statements to add the time_zone column to the mst_store_Tab table, re-create the view to include the table.
2. Run the following SQL statements to add variables for different time zones and the username and password fields to pro_sp_Variables. The script shown below is for the United States. Other countries can be accommodated by adding additional rows to the table using the appropriate offsets from GMT.
If you are not using ATVideo, See “Set Variables in PRO_SP_VARIABLES” on page 289.
alter table mst_store_Tabadd time_zone varchar(20)go
drop view MST_STOREGO
CREATE view mst_Store asselect a.* from mst_Store_Tab aGO
GRANT SELECT , UPDATE , INSERT , DELETE ON MST_STORE TO xbruserGO
insert into pro_sp_Variables
values('ATVIDEO','Eastern','4','N','Eastern Time Zone Offset Hours','4');insert into pro_sp_Variables
288 Setting Up Video Integration for a Supported Vendor
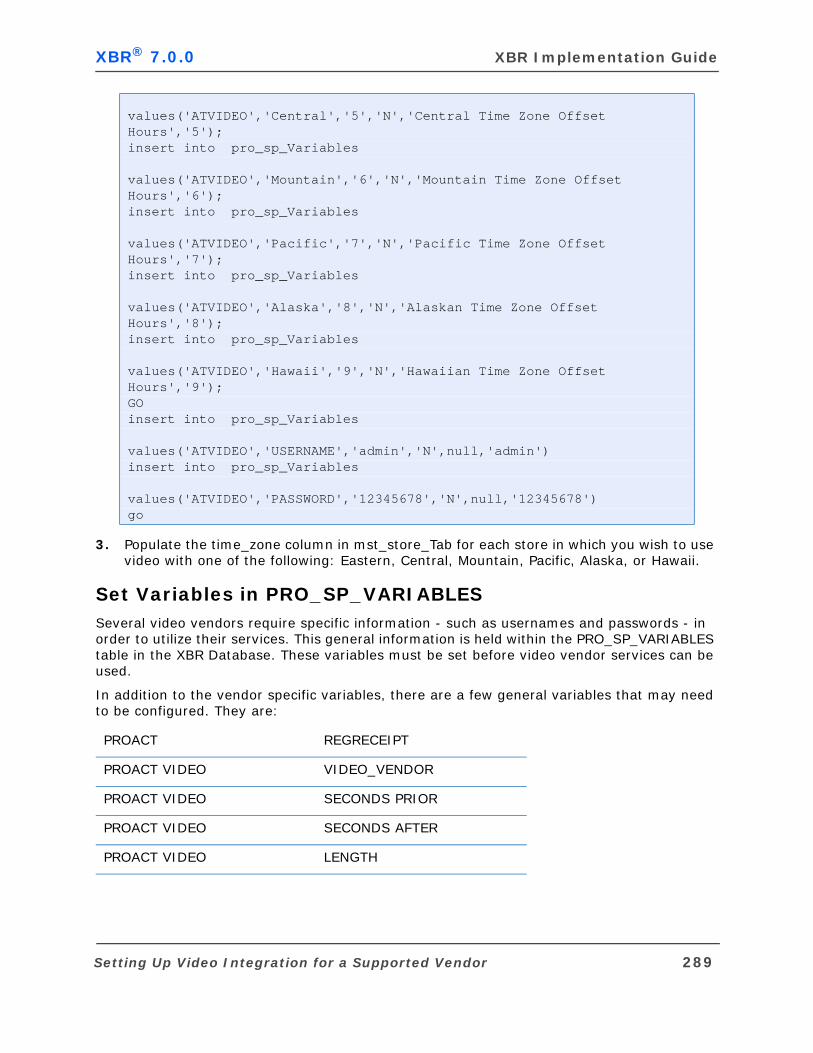
XBR® 7.0.0 XBR Implementation Guide
3. Populate the time_zone column in mst_store_Tab for each store in which you wish to use video with one of the following: Eastern, Central, Mountain, Pacific, Alaska, or Hawaii.
Set Variables in PRO_SP_VARIABLESSeveral video vendors require specific information - such as usernames and passwords - in order to utilize their services. This general information is held within the PRO_SP_VARIABLES table in the XBR Database. These variables must be set before video vendor services can be used.
In addition to the vendor specific variables, there are a few general variables that may need to be configured. They are:
values('ATVIDEO','Central','5','N','Central Time Zone Offset Hours','5');insert into pro_sp_Variables
values('ATVIDEO','Mountain','6','N','Mountain Time Zone Offset Hours','6');insert into pro_sp_Variables
values('ATVIDEO','Pacific','7','N','Pacific Time Zone Offset Hours','7');insert into pro_sp_Variables
values('ATVIDEO','Alaska','8','N','Alaskan Time Zone Offset Hours','8');insert into pro_sp_Variables
values('ATVIDEO','Hawaii','9','N','Hawaiian Time Zone Offset Hours','9');GOinsert into pro_sp_Variables
values('ATVIDEO','USERNAME','admin','N',null,'admin')insert into pro_sp_Variables
values('ATVIDEO','PASSWORD','12345678','N',null,'12345678')go
PROACT REGRECEIPT
PROACT VIDEO VIDEO_VENDOR
PROACT VIDEO SECONDS PRIOR
PROACT VIDEO SECONDS AFTER
PROACT VIDEO LENGTH
Setting Up Video Integration for a Supported Vendor 289
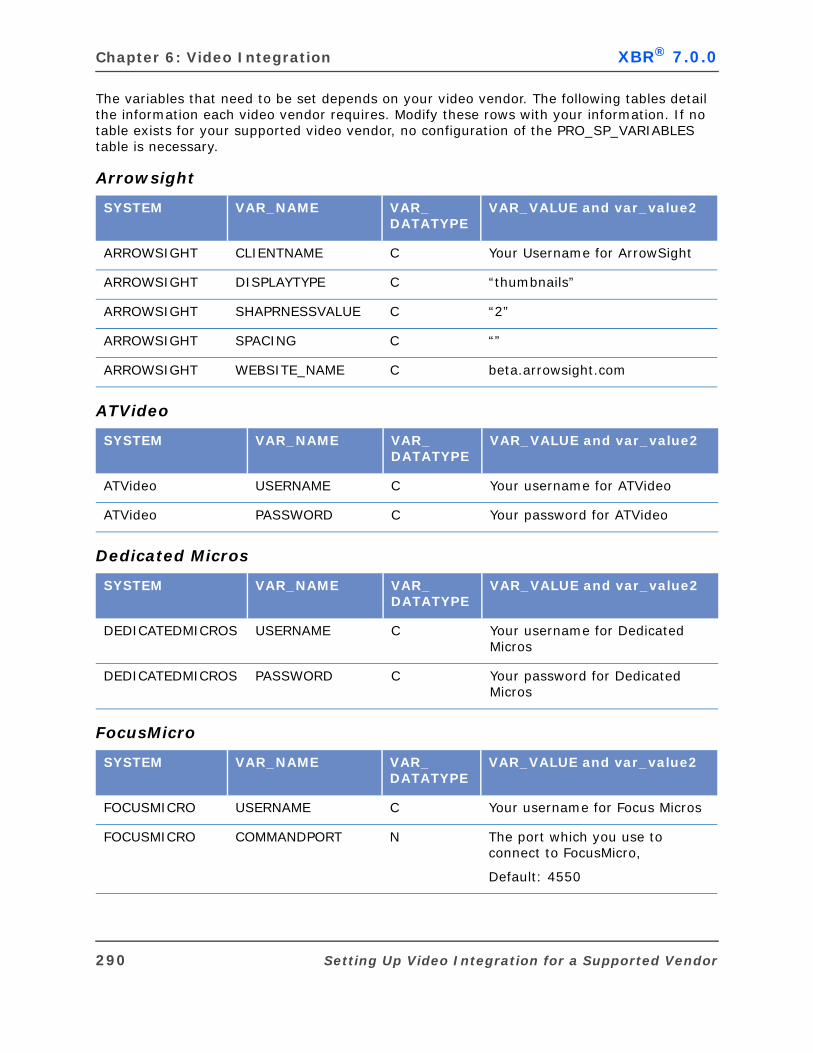
Chapter 6: Video Integration XBR® 7.0.0
The variables that need to be set depends on your video vendor. The following tables detail the information each video vendor requires. Modify these rows with your information. If no table exists for your supported video vendor, no configuration of the PRO_SP_VARIABLES table is necessary.
Arrowsight
ATVideo
Dedicated Micros
FocusMicro
SYSTEM VAR_NAME VAR_DATATYPE
VAR_VALUE and var_value2
ARROWSIGHT CLIENTNAME C Your Username for ArrowSight
ARROWSIGHT DISPLAYTYPE C “thumbnails”
ARROWSIGHT SHAPRNESSVALUE C “2”
ARROWSIGHT SPACING C “”
ARROWSIGHT WEBSITE_NAME C beta.arrowsight.com
SYSTEM VAR_NAME VAR_DATATYPE
VAR_VALUE and var_value2
ATVideo USERNAME C Your username for ATVideo
ATVideo PASSWORD C Your password for ATVideo
SYSTEM VAR_NAME VAR_DATATYPE
VAR_VALUE and var_value2
DEDICATEDMICROS USERNAME C Your username for Dedicated Micros
DEDICATEDMICROS PASSWORD C Your password for Dedicated Micros
SYSTEM VAR_NAME VAR_DATATYPE
VAR_VALUE and var_value2
FOCUSMICRO USERNAME C Your username for Focus Micros
FOCUSMICRO COMMANDPORT N The port which you use to connect to FocusMicro,
Default: 4550
290 Setting Up Video Integration for a Supported Vendor
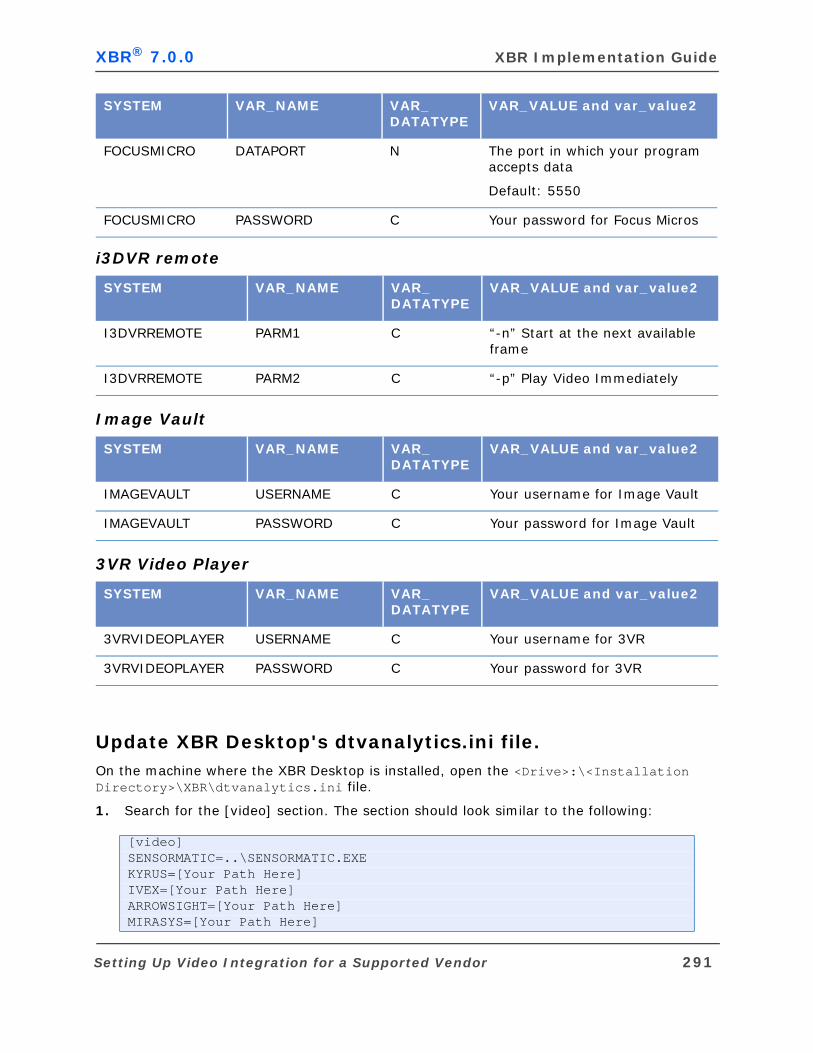
XBR® 7.0.0 XBR Implementation Guide
i3DVR remote
Image Vault
3VR Video Player
Update XBR Desktop's dtvanalytics.ini file.On the machine where the XBR Desktop is installed, open the <Drive>:\<Installation Directory>\XBR\dtvanalytics.ini file.
1. Search for the [video] section. The section should look similar to the following:
FOCUSMICRO DATAPORT N The port in which your program accepts data
Default: 5550
FOCUSMICRO PASSWORD C Your password for Focus Micros
SYSTEM VAR_NAME VAR_DATATYPE
VAR_VALUE and var_value2
I3DVRREMOTE PARM1 C “-n” Start at the next available frame
I3DVRREMOTE PARM2 C “-p” Play Video Immediately
SYSTEM VAR_NAME VAR_DATATYPE
VAR_VALUE and var_value2
IMAGEVAULT USERNAME C Your username for Image Vault
IMAGEVAULT PASSWORD C Your password for Image Vault
SYSTEM VAR_NAME VAR_DATATYPE
VAR_VALUE and var_value2
3VRVIDEOPLAYER USERNAME C Your username for 3VR
3VRVIDEOPLAYER PASSWORD C Your password for 3VR
[video]SENSORMATIC=..\SENSORMATIC.EXEKYRUS=[Your Path Here]IVEX=[Your Path Here]ARROWSIGHT=[Your Path Here]MIRASYS=[Your Path Here]
SYSTEM VAR_NAME VAR_DATATYPE
VAR_VALUE and var_value2
Setting Up Video Integration for a Supported Vendor 291
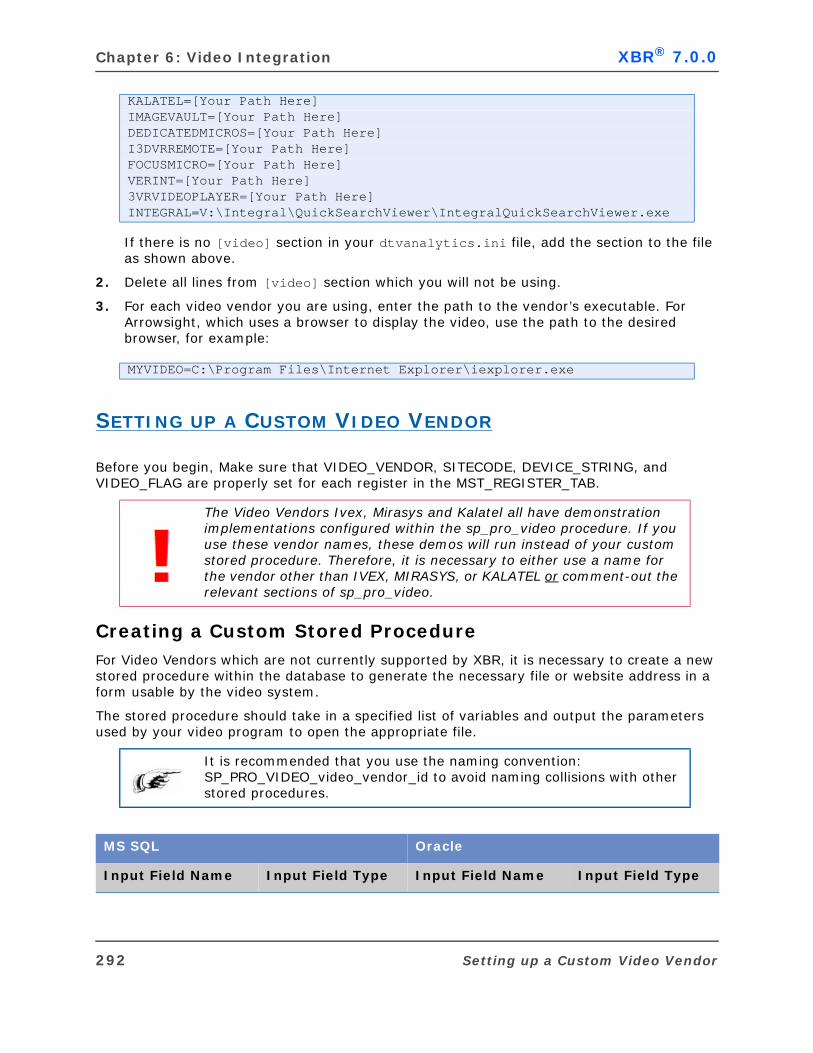
Chapter 6: Video Integration XBR® 7.0.0
If there is no [video] section in your dtvanalytics.ini file, add the section to the file as shown above.
2. Delete all lines from [video] section which you will not be using.
3. For each video vendor you are using, enter the path to the vendor’s executable. For Arrowsight, which uses a browser to display the video, use the path to the desired browser, for example:
SETTING UP A CUSTOM VIDEO VENDOR
Before you begin, Make sure that VIDEO_VENDOR, SITECODE, DEVICE_STRING, and VIDEO_FLAG are properly set for each register in the MST_REGISTER_TAB.
Creating a Custom Stored ProcedureFor Video Vendors which are not currently supported by XBR, it is necessary to create a new stored procedure within the database to generate the necessary file or website address in a form usable by the video system.
The stored procedure should take in a specified list of variables and output the parameters used by your video program to open the appropriate file.
KALATEL=[Your Path Here]IMAGEVAULT=[Your Path Here]DEDICATEDMICROS=[Your Path Here]I3DVRREMOTE=[Your Path Here]FOCUSMICRO=[Your Path Here]VERINT=[Your Path Here]3VRVIDEOPLAYER=[Your Path Here]INTEGRAL=V:\Integral\QuickSearchViewer\IntegralQuickSearchViewer.exe
MYVIDEO=C:\Program Files\Internet Explorer\iexplorer.exe
The Video Vendors Ivex, Mirasys and Kalatel all have demonstration implementations configured within the sp_pro_video procedure. If you use these vendor names, these demos will run instead of your custom stored procedure. Therefore, it is necessary to either use a name for the vendor other than IVEX, MIRASYS, or KALATEL or comment-out the relevant sections of sp_pro_video.
It is recommended that you use the naming convention: SP_PRO_VIDEO_video_vendor_id to avoid naming collisions with other stored procedures.
MS SQL Oracle
Input Field Name Input Field Type Input Field Name Input Field Type
292 Setting up a Custom Video Vendor
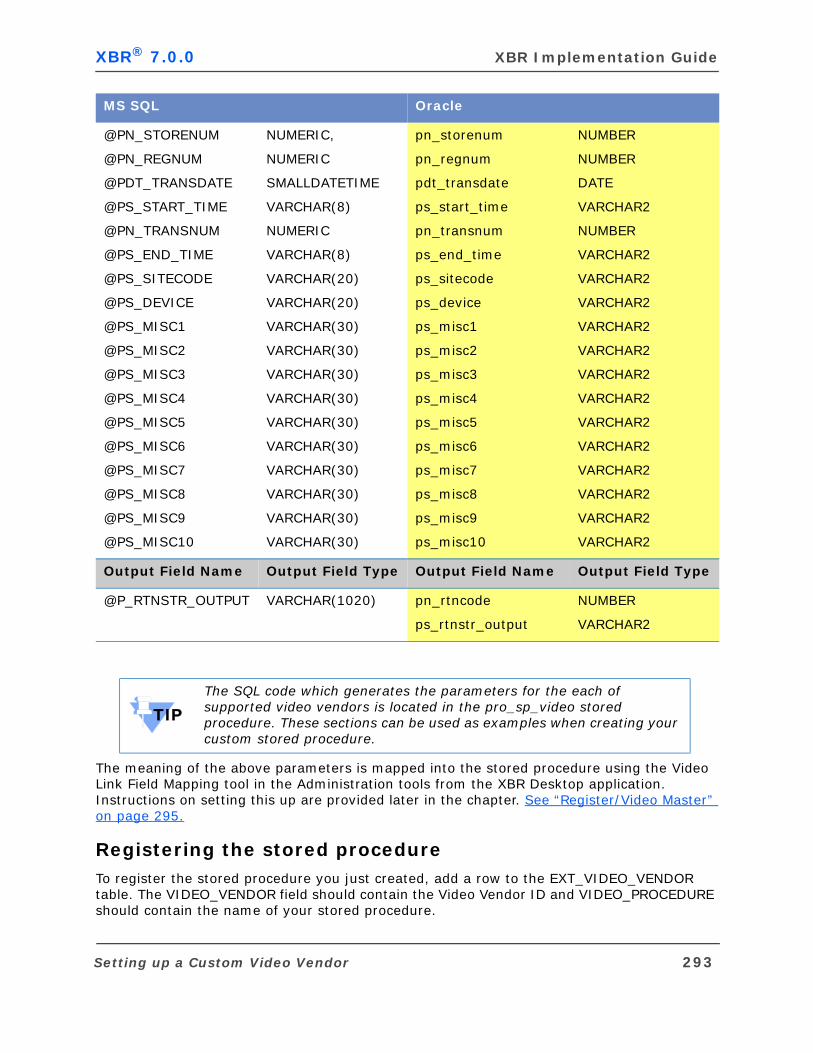
XBR® 7.0.0 XBR Implementation Guide
The meaning of the above parameters is mapped into the stored procedure using the Video Link Field Mapping tool in the Administration tools from the XBR Desktop application. Instructions on setting this up are provided later in the chapter. See “Register/Video Master” on page 295.
Registering the stored procedureTo register the stored procedure you just created, add a row to the EXT_VIDEO_VENDOR table. The VIDEO_VENDOR field should contain the Video Vendor ID and VIDEO_PROCEDURE should contain the name of your stored procedure.
@PN_STORENUM
@PN_REGNUM
@PDT_TRANSDATE
@PS_START_TIME
@PN_TRANSNUM
@PS_END_TIME
@PS_SITECODE
@PS_DEVICE
@PS_MISC1
@PS_MISC2
@PS_MISC3
@PS_MISC4
@PS_MISC5
@PS_MISC6
@PS_MISC7
@PS_MISC8
@PS_MISC9
@PS_MISC10
NUMERIC,
NUMERIC
SMALLDATETIME
VARCHAR(8)
NUMERIC
VARCHAR(8)
VARCHAR(20)
VARCHAR(20)
VARCHAR(30)
VARCHAR(30)
VARCHAR(30)
VARCHAR(30)
VARCHAR(30)
VARCHAR(30)
VARCHAR(30)
VARCHAR(30)
VARCHAR(30)
VARCHAR(30)
pn_storenum
pn_regnum
pdt_transdate
ps_start_time
pn_transnum
ps_end_time
ps_sitecode
ps_device
ps_misc1
ps_misc2
ps_misc3
ps_misc4
ps_misc5
ps_misc6
ps_misc7
ps_misc8
ps_misc9
ps_misc10
NUMBER
NUMBER
DATE
VARCHAR2
NUMBER
VARCHAR2
VARCHAR2
VARCHAR2
VARCHAR2
VARCHAR2
VARCHAR2
VARCHAR2
VARCHAR2
VARCHAR2
VARCHAR2
VARCHAR2
VARCHAR2
VARCHAR2
Output Field Name Output Field Type Output Field Name Output Field Type
@P_RTNSTR_OUTPUT VARCHAR(1020) pn_rtncode
ps_rtnstr_output
NUMBER
VARCHAR2
TIPThe SQL code which generates the parameters for the each of supported video vendors is located in the pro_sp_video stored procedure. These sections can be used as examples when creating your custom stored procedure.
MS SQL Oracle
Setting up a Custom Video Vendor 293
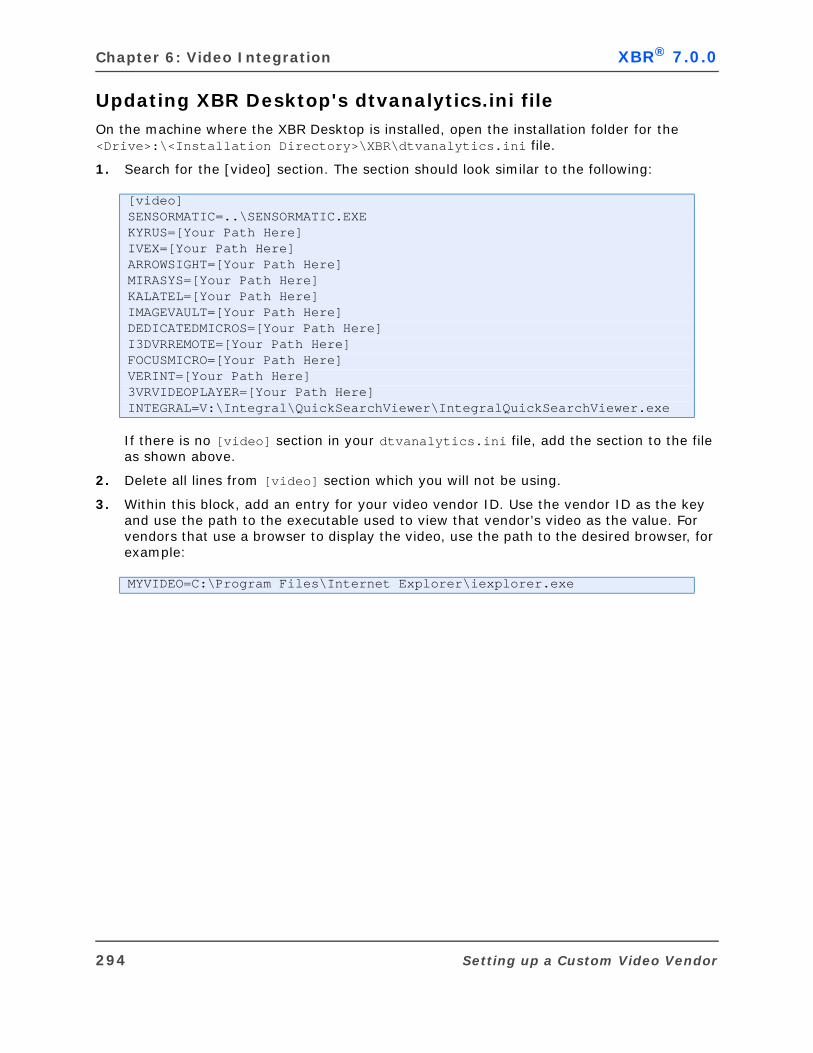
Chapter 6: Video Integration XBR® 7.0.0
Updating XBR Desktop's dtvanalytics.ini fileOn the machine where the XBR Desktop is installed, open the installation folder for the <Drive>:\<Installation Directory>\XBR\dtvanalytics.ini file.
1. Search for the [video] section. The section should look similar to the following:
If there is no [video] section in your dtvanalytics.ini file, add the section to the file as shown above.
2. Delete all lines from [video] section which you will not be using.
3. Within this block, add an entry for your video vendor ID. Use the vendor ID as the key and use the path to the executable used to view that vendor's video as the value. For vendors that use a browser to display the video, use the path to the desired browser, for example:
[video]SENSORMATIC=..\SENSORMATIC.EXEKYRUS=[Your Path Here]IVEX=[Your Path Here]ARROWSIGHT=[Your Path Here]MIRASYS=[Your Path Here]KALATEL=[Your Path Here]IMAGEVAULT=[Your Path Here]DEDICATEDMICROS=[Your Path Here]I3DVRREMOTE=[Your Path Here]FOCUSMICRO=[Your Path Here]VERINT=[Your Path Here]3VRVIDEOPLAYER=[Your Path Here]INTEGRAL=V:\Integral\QuickSearchViewer\IntegralQuickSearchViewer.exe
MYVIDEO=C:\Program Files\Internet Explorer\iexplorer.exe
294 Setting up a Custom Video Vendor

XBR® 7.0.0 XBR Implementation Guide
REGISTER/VIDEO MASTER
Use the Table Editor to modify a field in the Register/Video Master, indicating which stores are video enabled.
The system displays an error message if you try to link a video clip for a store without video capabilities.
The Register/Video Master allows for the cross-correlation entry of which camera is on what register for a given store. This ensures the appropriate video links are established from XBR queries.
The Device String is the camera number.
The Video Flag indicates whether the video for the register is enabled (Yes) or not (No).
The site code represents the IP address for the store's video system.
The video vendor directs the application to call the appropriate video viewer for this store/register combination.
Register/Video Master 295

Chapter 6: Video Integration XBR® 7.0.0
VIDEO LINK FIELD MAPPING
1. In the XBR Desktop application, select the Administration Configuration Video Link Field Mapping to open the Maintaining Fields for Video Links window.
Figure 6-1: Maintaining Fields for Video Links Dialog
2. Click the Add button to create a new row.
3. Select the “end_time” field in the newly created Field pull-down menu.
4. Enter “EndTime” in the newly created Header text field.
5. Click the Save button. This closes the window.
6. Open the Queries List.
7. Right-click on a query and select ‘Link’. This opens up the Link Field Maintenance dialog.
296 Video Link Field Mapping
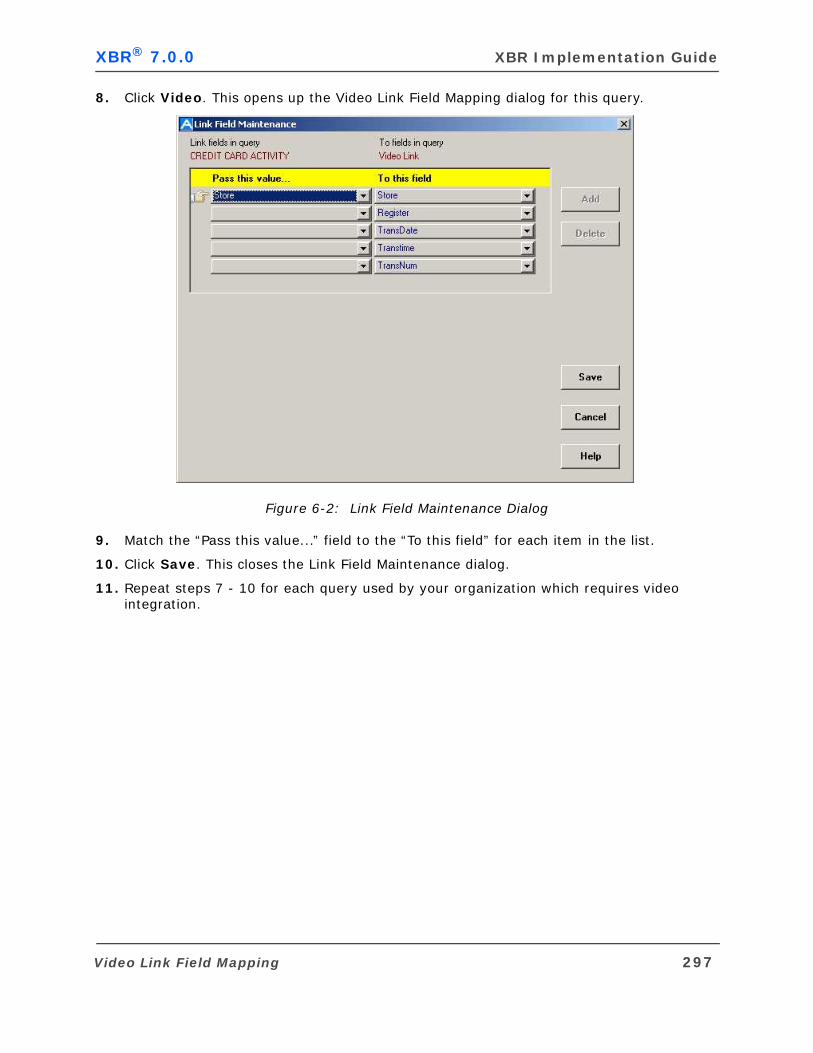
XBR® 7.0.0 XBR Implementation Guide
8. Click Video. This opens up the Video Link Field Mapping dialog for this query.
Figure 6-2: Link Field Maintenance Dialog
9. Match the “Pass this value...” field to the “To this field” for each item in the list.
10. Click Save. This closes the Link Field Maintenance dialog.
11. Repeat steps 7 - 10 for each query used by your organization which requires video integration.
Video Link Field Mapping 297


C H A P T E R
PCI Data Security

Chapter 7: PCI Data Security XBR® 7.0.0
OVERVIEW
PCI is the Payment Card Industry data security standard. PCI protects credit and debit numbers by imposing security requirements on the storage and dissemination of account numbers.
About This ChapterThis chapter describes how MICROS-Retail has implemented data security for the Analytics application suite to ensure compliance with PCI.
MICROS-Retail uses the AES-256 Standard (where AES stands for “Advanced Encryption Standard” and 256 is the key size in bits) for encryption which is an approved encryption method for PCI standards.
PCI Data Security Files
PCI Data Security Database Changes
Account Number Security File
TradeCipher
ETL
PCI Data Security FeaturesThe following features are provided for PCI Data Security in our Analytics suite of products, including XBR and BALANCE:
Account number masking - The user can select first 6/last 4 or last 4 only.
first 6/last 4 => 123456XXXXXX1234
last 4 => XXXXXXXXXXXX1234
Account number hashing - This provides a unique representation of an account number that masking cannot. A “salting” mechanism is also used to increase the security of the hashed value. A hashed value cannot be reverse processed to obtain the raw account number.
Encryption/Decryption - This process allows authorized users to decrypt and view the raw account number in XBR reports (only if Datavantage encryption is used). An audit log is maintained that lists the users that have accessed the decryption functionality.
Added database security by way of securing database login information.
300 Overview
XBR® 7.0.0 XBR Implementation Guide
PCI CONFIGURATION
SettingsIf you use PCI (Payment Card Industry standard), you must have a set of files that are part of PCI data security and that must be located in particular places:
DIGSEND.DLL - performs the actual encryption. It is placed for you by the application installer along with rest of DLL files.
PRO_COMP.PBD - XBR internal key. It is placed for you by the application installer along with rest of PBD files.
XBR.LIC - XBR key license file containing the encrypted second password for XBRADMIN. It is placed for you by the application installer one level up from the application folder.
COMP65.TXT - encrypted configuration file. It has to be created by the System Administrator using either XBR or BALANCE. This file should be placed on a network drive to make it accessible by the front-end and back-end applications, and it is not part of installation.
Account Number SecurityIn order for customer System Administrators to be able to configure PCI Account Number Security, XBRADMIN must enable PCI for the customer.
Use the following procedure to enable PCI:
1. Log in as XBRADMIN.
PCI Configuration 301

Chapter 7: PCI Data Security XBR® 7.0.0
2. Select Administration Configuration General Defaults.
Figure 7-1: Enable PCI Check Box
3. Select Enable PCI.
4. Click Save.
Encrypted User ID and PasswordIf you use a generic user ID and/or password for connecting to the database, and you provide them through the application’s .INI file, you may want to encrypt them, like the following example:
UserId=530DFF31DBA74A83D30CDA7CC31CF229
DatabasePassword=0A30DFF31DBCF2293D30CD7CC31F31DB
To use the encrypted user ID and password, you must have the entry “EncryptedPassword” in the file dtvlauncher.ini. The entry must be in the [XBR Database]) section of the file and its value must be set to “TRUE” or “Y”. Either of these two entries are acceptable:
EncryptedPassword = TRUE
or
EncryptedPassword = Y
To generate the encrypted user ID and password, use the XBR Administrator tool, as described in the following procedure:
Only the System Administrator can provide the encrypted values. Generate the encrypted user ID and password by using the XBR Administrator tool as described below.
302 PCI Configuration
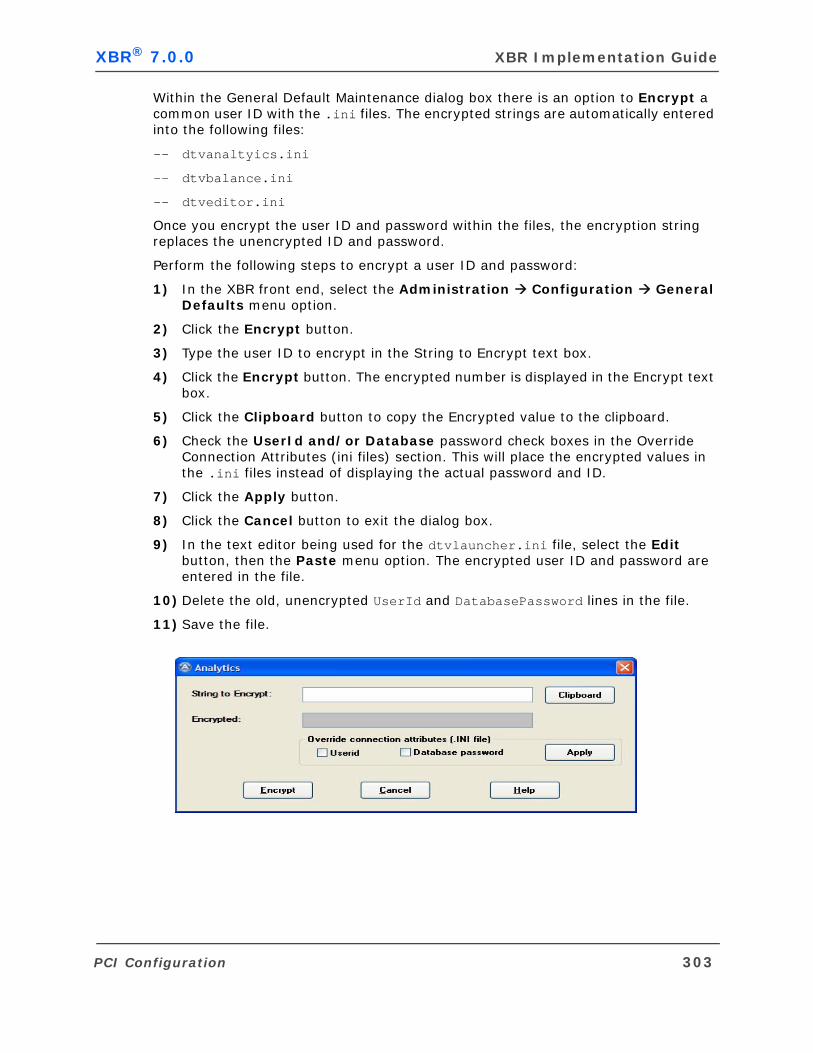
XBR® 7.0.0 XBR Implementation Guide
Within the General Default Maintenance dialog box there is an option to Encrypt a common user ID with the .ini files. The encrypted strings are automatically entered into the following files:
-- dtvanaltyics.ini
-- dtvbalance.ini
-- dtveditor.ini
Once you encrypt the user ID and password within the files, the encryption string replaces the unencrypted ID and password.
Perform the following steps to encrypt a user ID and password:
1) In the XBR front end, select the Administration Configuration General Defaults menu option.
2) Click the Encrypt button.
3) Type the user ID to encrypt in the String to Encrypt text box.
4) Click the Encrypt button. The encrypted number is displayed in the Encrypt text box.
5) Click the Clipboard button to copy the Encrypted value to the clipboard.
6) Check the UserId and/or Database password check boxes in the Override Connection Attributes (ini files) section. This will place the encrypted values in the .ini files instead of displaying the actual password and ID.
7) Click the Apply button.
8) Click the Cancel button to exit the dialog box.
9) In the text editor being used for the dtvlauncher.ini file, select the Edit button, then the Paste menu option. The encrypted user ID and password are entered in the file.
10) Delete the old, unencrypted UserId and DatabasePassword lines in the file.
11) Save the file.
PCI Configuration 303
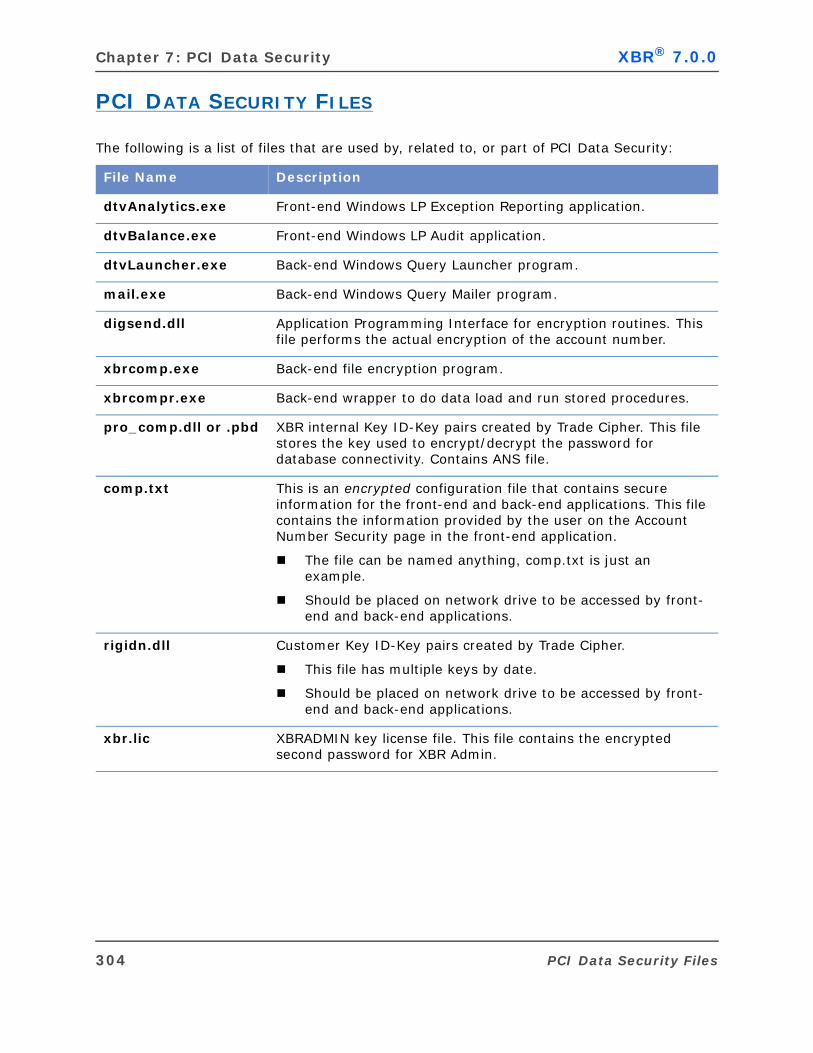
Chapter 7: PCI Data Security XBR® 7.0.0
PCI DATA SECURITY FILES
The following is a list of files that are used by, related to, or part of PCI Data Security:
File Name Description
dtvAnalytics.exe Front-end Windows LP Exception Reporting application.
dtvBalance.exe Front-end Windows LP Audit application.
dtvLauncher.exe Back-end Windows Query Launcher program.
mail.exe Back-end Windows Query Mailer program.
digsend.dll Application Programming Interface for encryption routines. This file performs the actual encryption of the account number.
xbrcomp.exe Back-end file encryption program.
xbrcompr.exe Back-end wrapper to do data load and run stored procedures.
pro_comp.dll or .pbd XBR internal Key ID-Key pairs created by Trade Cipher. This file stores the key used to encrypt/decrypt the password for database connectivity. Contains ANS file.
comp.txt This is an encrypted configuration file that contains secure information for the front-end and back-end applications. This file contains the information provided by the user on the Account Number Security page in the front-end application.
The file can be named anything, comp.txt is just an example.
Should be placed on network drive to be accessed by front-end and back-end applications.
rigidn.dll Customer Key ID-Key pairs created by Trade Cipher.
This file has multiple keys by date.
Should be placed on network drive to be accessed by front-end and back-end applications.
xbr.lic XBRADMIN key license file. This file contains the encrypted second password for XBR Admin.
304 PCI Data Security Files
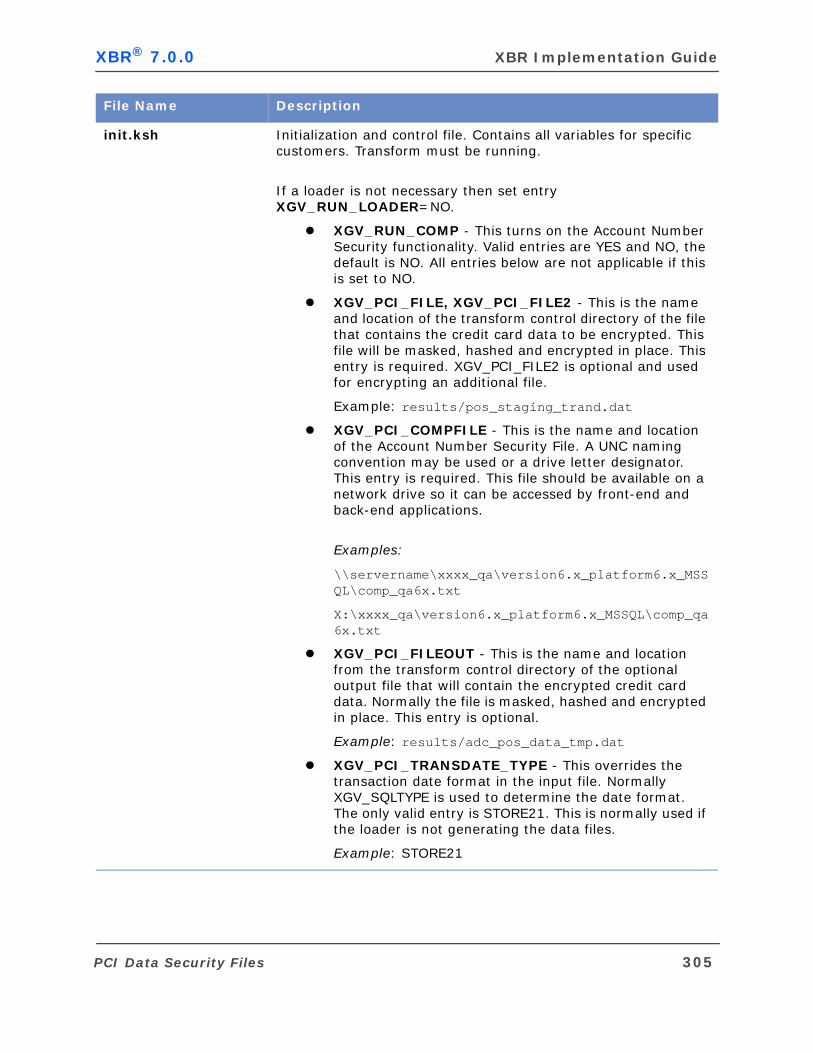
XBR® 7.0.0 XBR Implementation Guide
init.ksh Initialization and control file. Contains all variables for specific customers. Transform must be running.
If a loader is not necessary then set entry XGV_RUN_LOADER=NO.
XGV_RUN_COMP - This turns on the Account Number Security functionality. Valid entries are YES and NO, the default is NO. All entries below are not applicable if this is set to NO.
XGV_PCI_FILE, XGV_PCI_FILE2 - This is the name and location of the transform control directory of the file that contains the credit card data to be encrypted. This file will be masked, hashed and encrypted in place. This entry is required. XGV_PCI_FILE2 is optional and used for encrypting an additional file.
Example: results/pos_staging_trand.dat
XGV_PCI_COMPFILE - This is the name and location of the Account Number Security File. A UNC naming convention may be used or a drive letter designator. This entry is required. This file should be available on a network drive so it can be accessed by front-end and back-end applications.
Examples:
\\servername\xxxx_qa\version6.x_platform6.x_MSSQL\comp_qa6x.txt
X:\xxxx_qa\version6.x_platform6.x_MSSQL\comp_qa6x.txt
XGV_PCI_FILEOUT - This is the name and location from the transform control directory of the optional output file that will contain the encrypted credit card data. Normally the file is masked, hashed and encrypted in place. This entry is optional.
Example: results/adc_pos_data_tmp.dat
XGV_PCI_TRANSDATE_TYPE - This overrides the transaction date format in the input file. Normally XGV_SQLTYPE is used to determine the date format. The only valid entry is STORE21. This is normally used if the loader is not generating the data files.
Example: STORE21
File Name Description
PCI Data Security Files 305
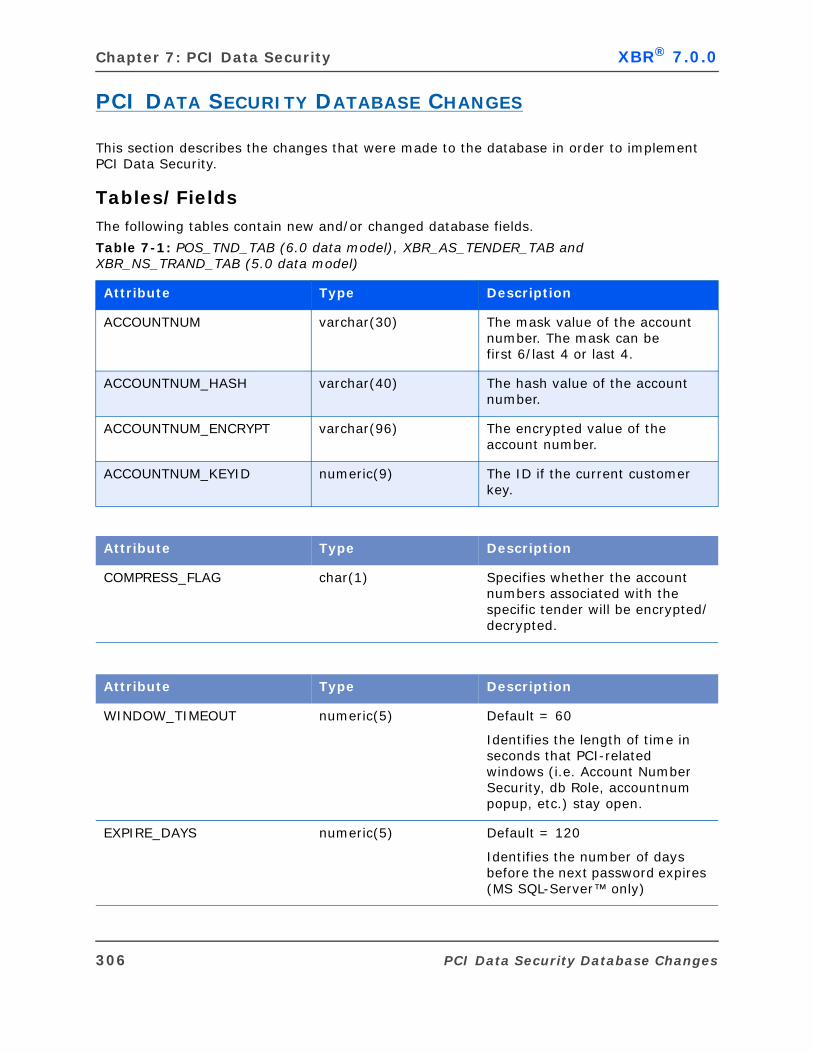
Chapter 7: PCI Data Security XBR® 7.0.0
PCI DATA SECURITY DATABASE CHANGES
This section describes the changes that were made to the database in order to implement PCI Data Security.
Tables/FieldsThe following tables contain new and/or changed database fields.
Table 7-1: POS_TND_TAB (6.0 data model), XBR_AS_TENDER_TAB and XBR_NS_TRAND_TAB (5.0 data model)
Attribute Type Description
ACCOUNTNUM varchar(30) The mask value of the account number. The mask can be first 6/last 4 or last 4.
ACCOUNTNUM_HASH varchar(40) The hash value of the account number.
ACCOUNTNUM_ENCRYPT varchar(96) The encrypted value of the account number.
ACCOUNTNUM_KEYID numeric(9) The ID if the current customer key.
Attribute Type Description
COMPRESS_FLAG char(1) Specifies whether the account numbers associated with the specific tender will be encrypted/decrypted.
Attribute Type Description
WINDOW_TIMEOUT numeric(5) Default = 60
Identifies the length of time in seconds that PCI-related windows (i.e. Account Number Security, db Role, accountnum popup, etc.) stay open.
EXPIRE_DAYS numeric(5) Default = 120
Identifies the number of days before the next password expires (MS SQL-Server™ only)
306 PCI Data Security Database Changes

XBR® 7.0.0 XBR Implementation Guide
ViewsThe PRO_COMP_VARIABLES and PRO_SP_VARIABLES views contain variables for the application.
The PRO_CHECK_PASSWORD view reports when the user’s password will expire. There are different views for MSSQL and Oracle.
Rolesxbrconnect - Standard Role
xbruser - Application Role, password protected
Any users that will be running the XBR or Balance applications should be granted the standard xbrconnect role. Users logging into these applications will be granted the application role xbruser by the corresponding application.
This is done by a stored procedure named sp_xbr_enable_role. The SQL statement to apply the application role is passed to the application, which has a default password of ‘rolepassword'. The application role xbruser would need to be created with this password.
A different password can be saved/encrypted in the application, but the application role xbruser would need to be created with this new password. Changing the password on the front-end application does not regenerate the password assigned to the application role xbruser.
CHECK_EXPIRE_DAYS numeric(5) Default = 10
Specifies the number of days before the password expires to check and display warning during login.
CHANGE_PASSWORD varchar(1) Allows the user to change their password within the application.
Attribute Type Description
DCRTACT numeric(10) Flag that specifies whether the user can decrypt.
EXPIRE_DATE datetime(8) When a user’s password will expire (MS SQL-Server™ only)
Attribute Type Description
PCI Data Security Database Changes 307
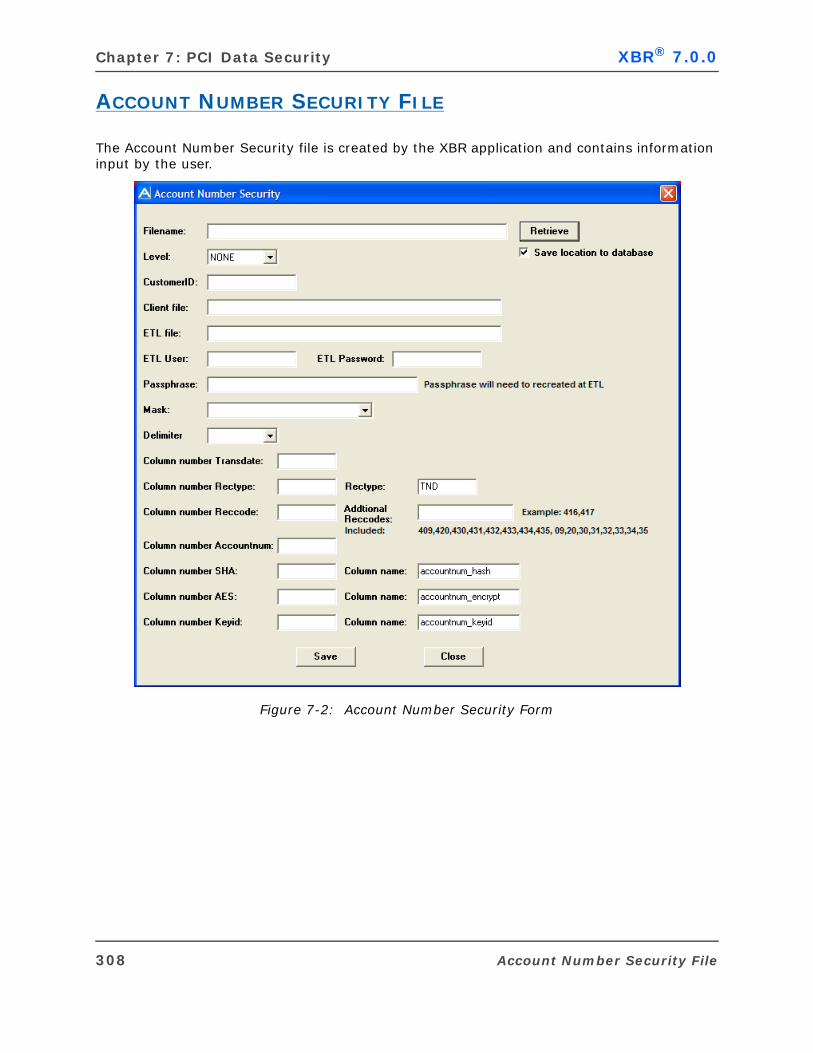
Chapter 7: PCI Data Security XBR® 7.0.0
ACCOUNT NUMBER SECURITY FILE
The Account Number Security file is created by the XBR application and contains information input by the user.
Figure 7-2: Account Number Security Form
308 Account Number Security File
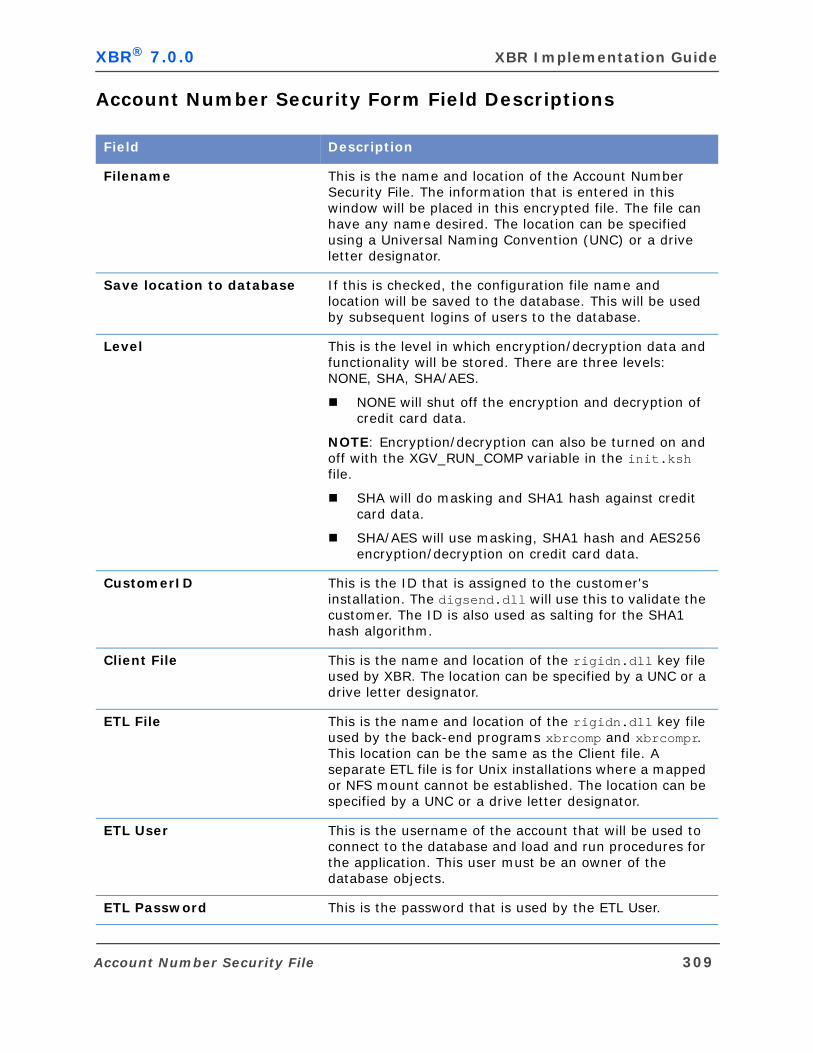
XBR® 7.0.0 XBR Implementation Guide
Account Number Security Form Field Descriptions
Field Description
Filename This is the name and location of the Account Number Security File. The information that is entered in this window will be placed in this encrypted file. The file can have any name desired. The location can be specified using a Universal Naming Convention (UNC) or a drive letter designator.
Save location to database If this is checked, the configuration file name and location will be saved to the database. This will be used by subsequent logins of users to the database.
Level This is the level in which encryption/decryption data and functionality will be stored. There are three levels: NONE, SHA, SHA/AES.
NONE will shut off the encryption and decryption of credit card data.
NOTE: Encryption/decryption can also be turned on and off with the XGV_RUN_COMP variable in the init.ksh file.
SHA will do masking and SHA1 hash against credit card data.
SHA/AES will use masking, SHA1 hash and AES256 encryption/decryption on credit card data.
CustomerID This is the ID that is assigned to the customer's installation. The digsend.dll will use this to validate the customer. The ID is also used as salting for the SHA1 hash algorithm.
Client File This is the name and location of the rigidn.dll key file used by XBR. The location can be specified by a UNC or a drive letter designator.
ETL File This is the name and location of the rigidn.dll key file used by the back-end programs xbrcomp and xbrcompr. This location can be the same as the Client file. A separate ETL file is for Unix installations where a mapped or NFS mount cannot be established. The location can be specified by a UNC or a drive letter designator.
ETL User This is the username of the account that will be used to connect to the database and load and run procedures for the application. This user must be an owner of the database objects.
ETL Password This is the password that is used by the ETL User.
Account Number Security File 309
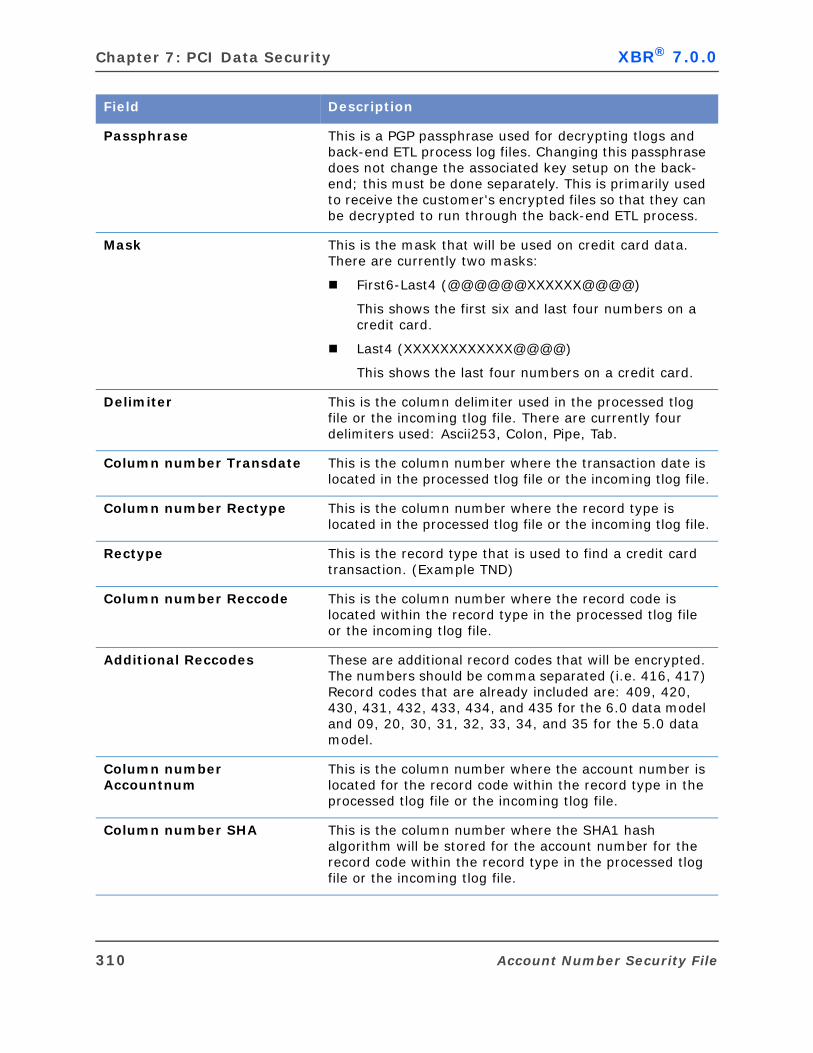
Chapter 7: PCI Data Security XBR® 7.0.0
Passphrase This is a PGP passphrase used for decrypting tlogs and back-end ETL process log files. Changing this passphrase does not change the associated key setup on the back-end; this must be done separately. This is primarily used to receive the customer's encrypted files so that they can be decrypted to run through the back-end ETL process.
Mask This is the mask that will be used on credit card data. There are currently two masks:
First6-Last4 (@@@@@@XXXXXX@@@@)
This shows the first six and last four numbers on a credit card.
Last4 (XXXXXXXXXXXX@@@@)
This shows the last four numbers on a credit card.
Delimiter This is the column delimiter used in the processed tlog file or the incoming tlog file. There are currently four delimiters used: Ascii253, Colon, Pipe, Tab.
Column number Transdate This is the column number where the transaction date is located in the processed tlog file or the incoming tlog file.
Column number Rectype This is the column number where the record type is located in the processed tlog file or the incoming tlog file.
Rectype This is the record type that is used to find a credit card transaction. (Example TND)
Column number Reccode This is the column number where the record code is located within the record type in the processed tlog file or the incoming tlog file.
Additional Reccodes These are additional record codes that will be encrypted. The numbers should be comma separated (i.e. 416, 417) Record codes that are already included are: 409, 420, 430, 431, 432, 433, 434, and 435 for the 6.0 data model and 09, 20, 30, 31, 32, 33, 34, and 35 for the 5.0 data model.
Column number Accountnum
This is the column number where the account number is located for the record code within the record type in the processed tlog file or the incoming tlog file.
Column number SHA This is the column number where the SHA1 hash algorithm will be stored for the account number for the record code within the record type in the processed tlog file or the incoming tlog file.
Field Description
310 Account Number Security File
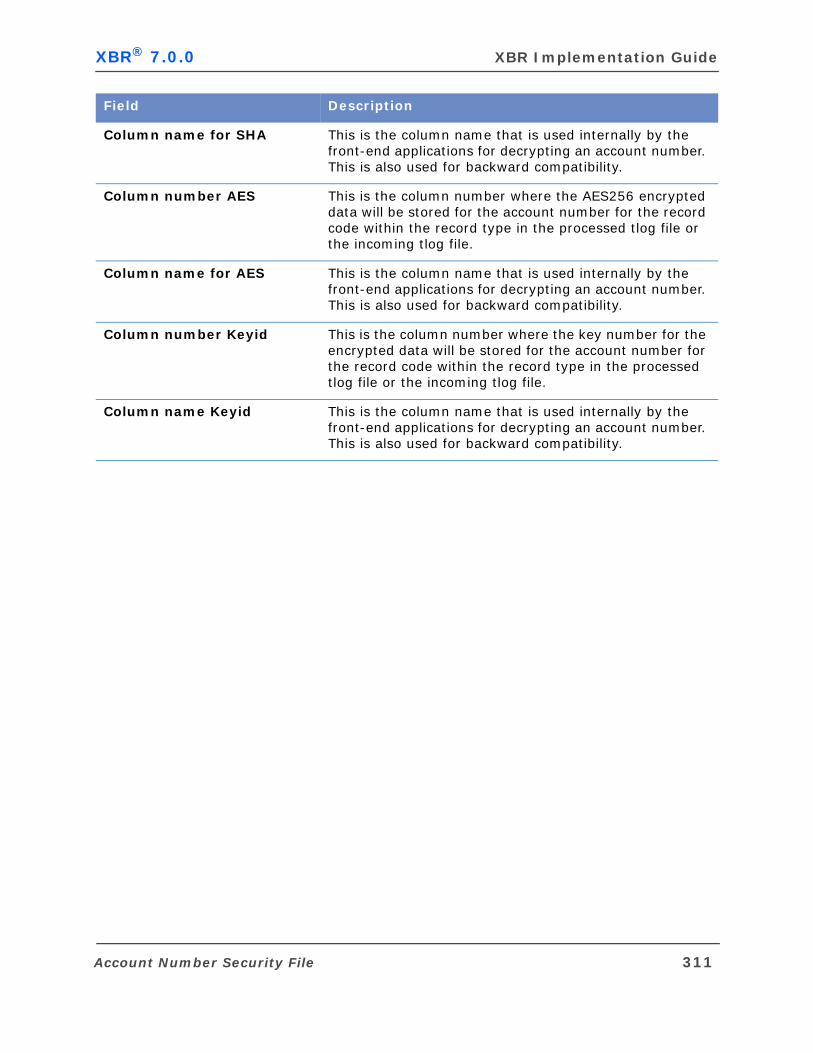
XBR® 7.0.0 XBR Implementation Guide
Column name for SHA This is the column name that is used internally by the front-end applications for decrypting an account number. This is also used for backward compatibility.
Column number AES This is the column number where the AES256 encrypted data will be stored for the account number for the record code within the record type in the processed tlog file or the incoming tlog file.
Column name for AES This is the column name that is used internally by the front-end applications for decrypting an account number. This is also used for backward compatibility.
Column number Keyid This is the column number where the key number for the encrypted data will be stored for the account number for the record code within the record type in the processed tlog file or the incoming tlog file.
Column name Keyid This is the column name that is used internally by the front-end applications for decrypting an account number. This is also used for backward compatibility.
Field Description
Account Number Security File 311
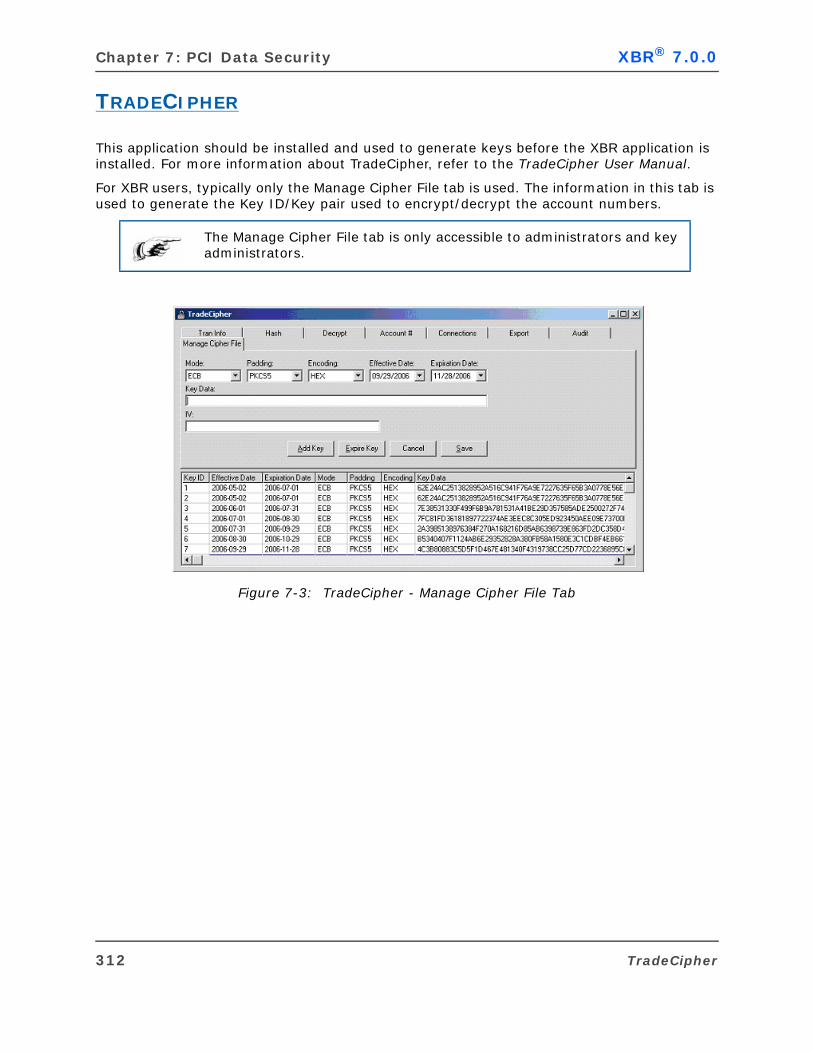
Chapter 7: PCI Data Security XBR® 7.0.0
TRADECIPHER
This application should be installed and used to generate keys before the XBR application is installed. For more information about TradeCipher, refer to the TradeCipher User Manual.
For XBR users, typically only the Manage Cipher File tab is used. The information in this tab is used to generate the Key ID/Key pair used to encrypt/decrypt the account numbers.
Figure 7-3: TradeCipher - Manage Cipher File Tab
The Manage Cipher File tab is only accessible to administrators and key administrators.
312 TradeCipher

XBR® 7.0.0 XBR Implementation Guide
ETL
The Extract Transform Load (ETL) process has three main components: Gather, Transform, and DBProcess.
Figure 7-4: PCI-ETL Process
The Gather step has not changed as a result of PCI Data Security; it retrieves the tlogs from the designated directory and prepares them for the Transform step.
In the Transform step, xbrload formats the tlogs and loads them into a data file. Once the data file is complete, xbrcomp creates the hash, mask. It passes the account number and Key ID to digsend.dll. digsend.dll opens rigidn.dll, parses for the Key Id and obtains the Key. The key is used to encrypt the account number which is returned to xbrcomp. The location of rigidn.dll is stored in the comp.txt file.
In the DBProcess step, xbrcompr loads the records from the data files into the database. xbrcompr must obtain the ETL User password from the pro_comp.dll to be able to access the database.
ETL 313

C H A P T E R
Employee Violations Dashboard
Chapter 8: Employee Violations Dashboard XBR® 7.0.0
OVERVIEW
Employee Violations Dashboard (EVD) is a unique distribution on alert reports. EVDs can be generated for each employee/cashier that has exceeded one or more alert filters configured in a scheduled query. If an employee exceeds multiple thresholds, the EVD will contain the description and details of each one that was exceeded. The EVDs are distributed as a PDF attachment via email to each recipient on the scheduled run.
The content of the EVDs includes:
summary data for the cashier of the key metrics related to the alert threshold reached
averages for the other cashiers in the store
averages for all cashiers in the chain
description for the KPI constraint reached
alert history for the cashier
watch status and note history for the cashier
hyperlink to the Web application
For information on configuring the EVD function and modifying the logo and instruction on the report, see “Employee Violations Dashboard” on page 187.
The report that is scheduled with an alert can only have one record per cashier/employee.
Alert thresholds can contain compound statements, but they must be separated by parentheses.
In an alert string, there must be a space before and after comparators so it can be parsed properly.
316 Overview

XBR® 7.0.0 XBR Implementation Guide
ENABLING EVD
If upgrading to XBR 7.0, the default condition for EVD for a customer is “Off”. EVDs must be enabled through the Customer Profile page in XBR Desktop:
1. Log in as “XBRADMIN”.
2. Select Adminstration Customer Profile.
3. In the Related Functionality section, check Employee Violations Dashboards (highlighted below) to enable EVD for the customer.
Enabling EVD 317
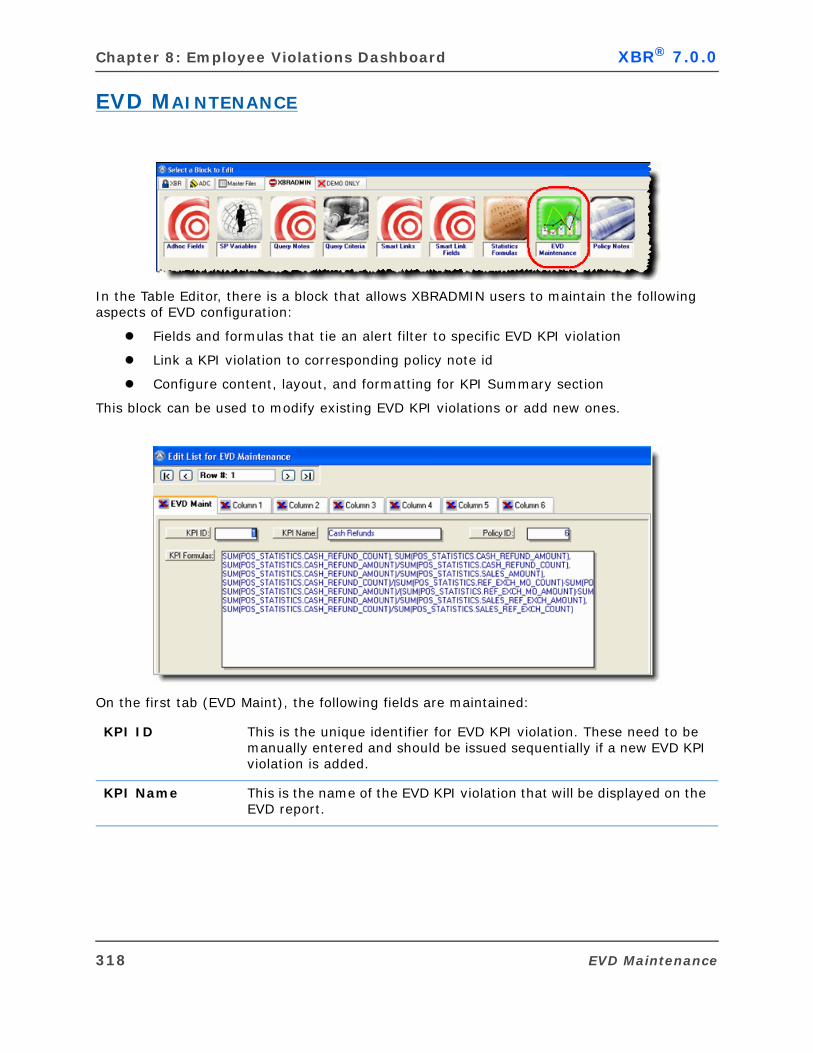
Chapter 8: Employee Violations Dashboard XBR® 7.0.0
EVD MAINTENANCE
In the Table Editor, there is a block that allows XBRADMIN users to maintain the following aspects of EVD configuration:
Fields and formulas that tie an alert filter to specific EVD KPI violation
Link a KPI violation to corresponding policy note id
Configure content, layout, and formatting for KPI Summary section
This block can be used to modify existing EVD KPI violations or add new ones.
On the first tab (EVD Maint), the following fields are maintained:
KPI ID This is the unique identifier for EVD KPI violation. These need to be manually entered and should be issued sequentially if a new EVD KPI violation is added.
KPI Name This is the name of the EVD KPI violation that will be displayed on the EVD report.
318 EVD Maintenance
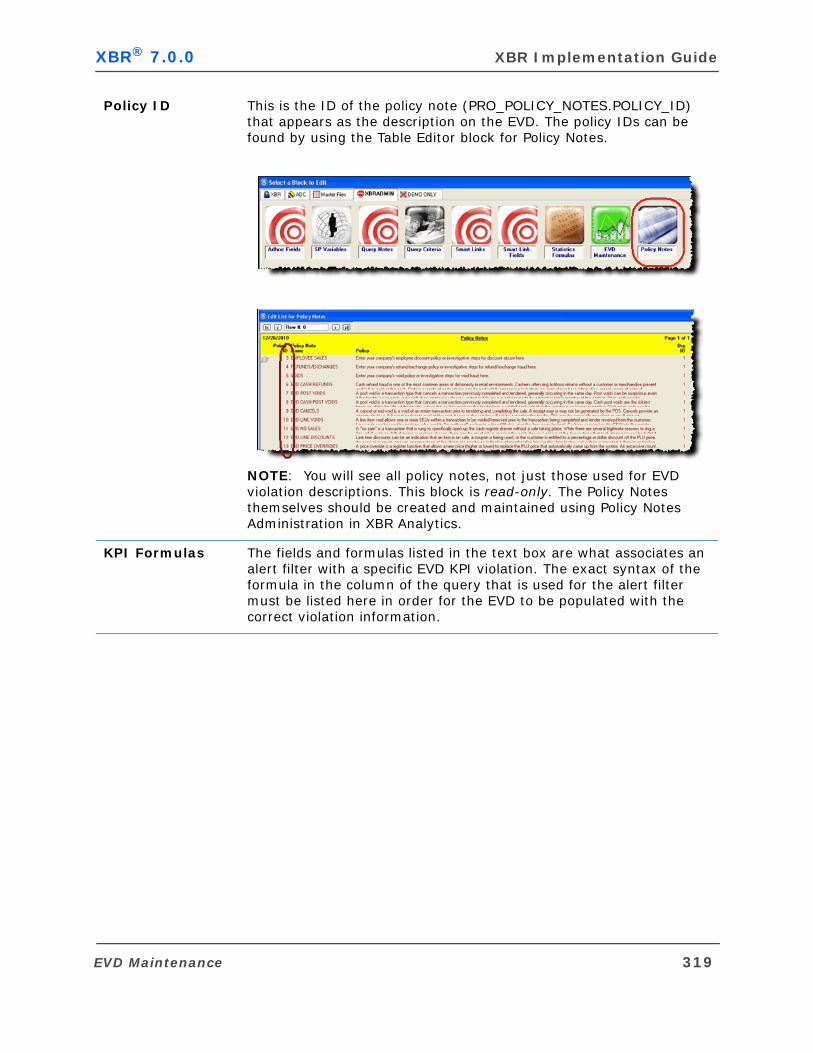
XBR® 7.0.0 XBR Implementation Guide
Policy ID This is the ID of the policy note (PRO_POLICY_NOTES.POLICY_ID) that appears as the description on the EVD. The policy IDs can be found by using the Table Editor block for Policy Notes.
NOTE: You will see all policy notes, not just those used for EVD violation descriptions. This block is read-only. The Policy Notes themselves should be created and maintained using Policy Notes Administration in XBR Analytics.
KPI Formulas The fields and formulas listed in the text box are what associates an alert filter with a specific EVD KPI violation. The exact syntax of the formula in the column of the query that is used for the alert filter must be listed here in order for the EVD to be populated with the correct violation information.
EVD Maintenance 319
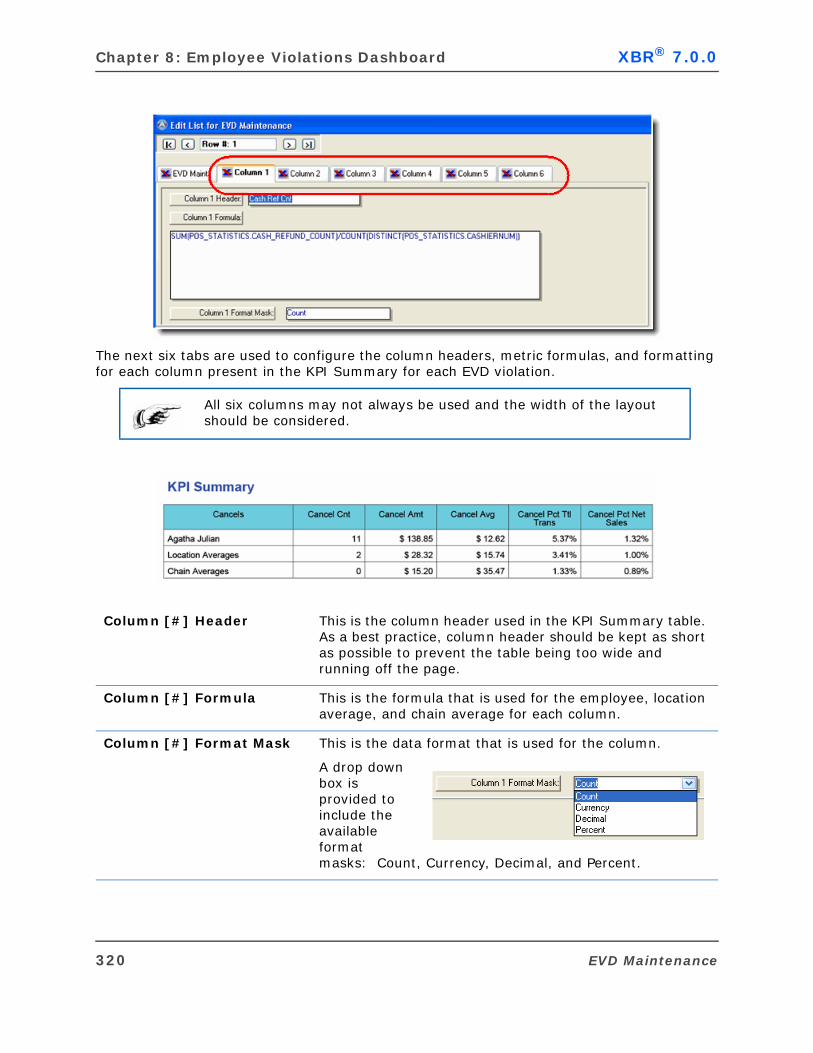
Chapter 8: Employee Violations Dashboard XBR® 7.0.0
The next six tabs are used to configure the column headers, metric formulas, and formatting for each column present in the KPI Summary for each EVD violation.
All six columns may not always be used and the width of the layout should be considered.
Column [#] Header This is the column header used in the KPI Summary table. As a best practice, column header should be kept as short as possible to prevent the table being too wide and running off the page.
Column [#] Formula This is the formula that is used for the employee, location average, and chain average for each column.
Column [#] Format Mask This is the data format that is used for the column.
A drop down box is provided to include the available format masks: Count, Currency, Decimal, and Percent.
320 EVD Maintenance

A P P E N D I X
System Architecture
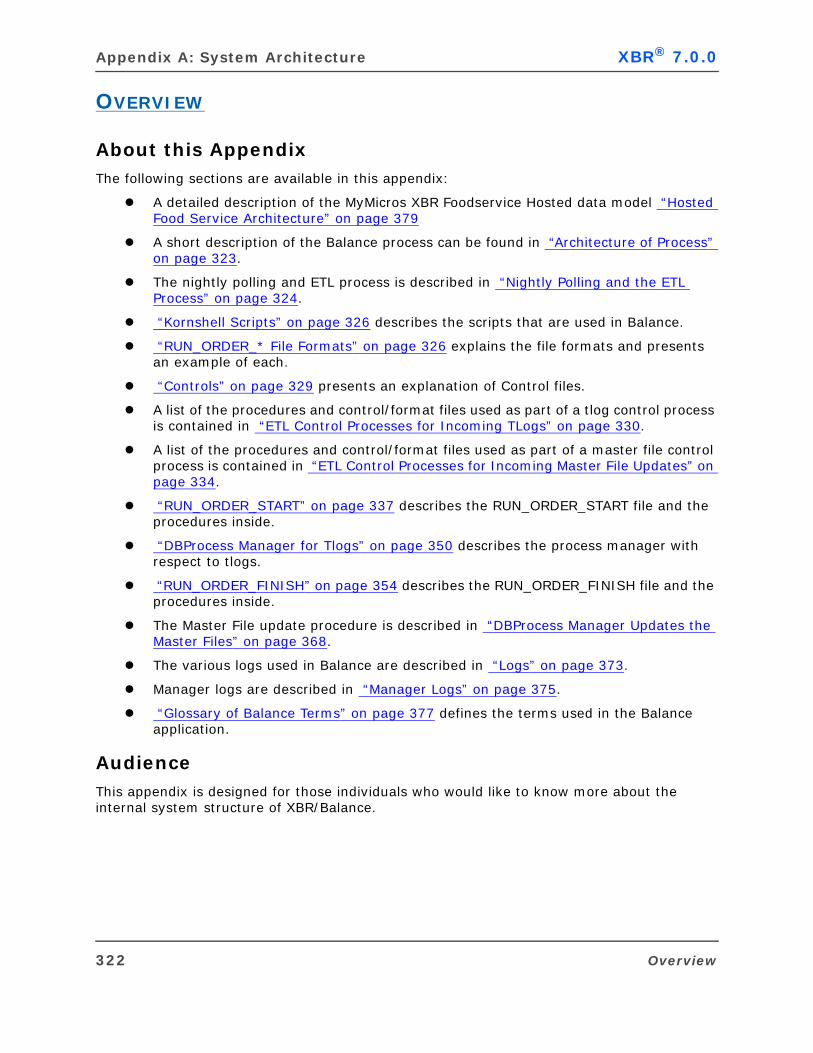
Appendix A: System Architecture XBR® 7.0.0
OVERVIEW
About this AppendixThe following sections are available in this appendix:
A detailed description of the MyMicros XBR Foodservice Hosted data model “Hosted Food Service Architecture” on page 379
A short description of the Balance process can be found in “Architecture of Process” on page 323.
The nightly polling and ETL process is described in “Nightly Polling and the ETL Process” on page 324.
“Kornshell Scripts” on page 326 describes the scripts that are used in Balance.
“RUN_ORDER_* File Formats” on page 326 explains the file formats and presents an example of each.
“Controls” on page 329 presents an explanation of Control files.
A list of the procedures and control/format files used as part of a tlog control process is contained in “ETL Control Processes for Incoming TLogs” on page 330.
A list of the procedures and control/format files used as part of a master file control process is contained in “ETL Control Processes for Incoming Master File Updates” on page 334.
“RUN_ORDER_START” on page 337 describes the RUN_ORDER_START file and the procedures inside.
“DBProcess Manager for Tlogs” on page 350 describes the process manager with respect to tlogs.
“RUN_ORDER_FINISH” on page 354 describes the RUN_ORDER_FINISH file and the procedures inside.
The Master File update procedure is described in “DBProcess Manager Updates the Master Files” on page 368.
The various logs used in Balance are described in “Logs” on page 373.
Manager logs are described in “Manager Logs” on page 375.
“Glossary of Balance Terms” on page 377 defines the terms used in the Balance application.
AudienceThis appendix is designed for those individuals who would like to know more about the internal system structure of XBR/Balance.
322 Overview
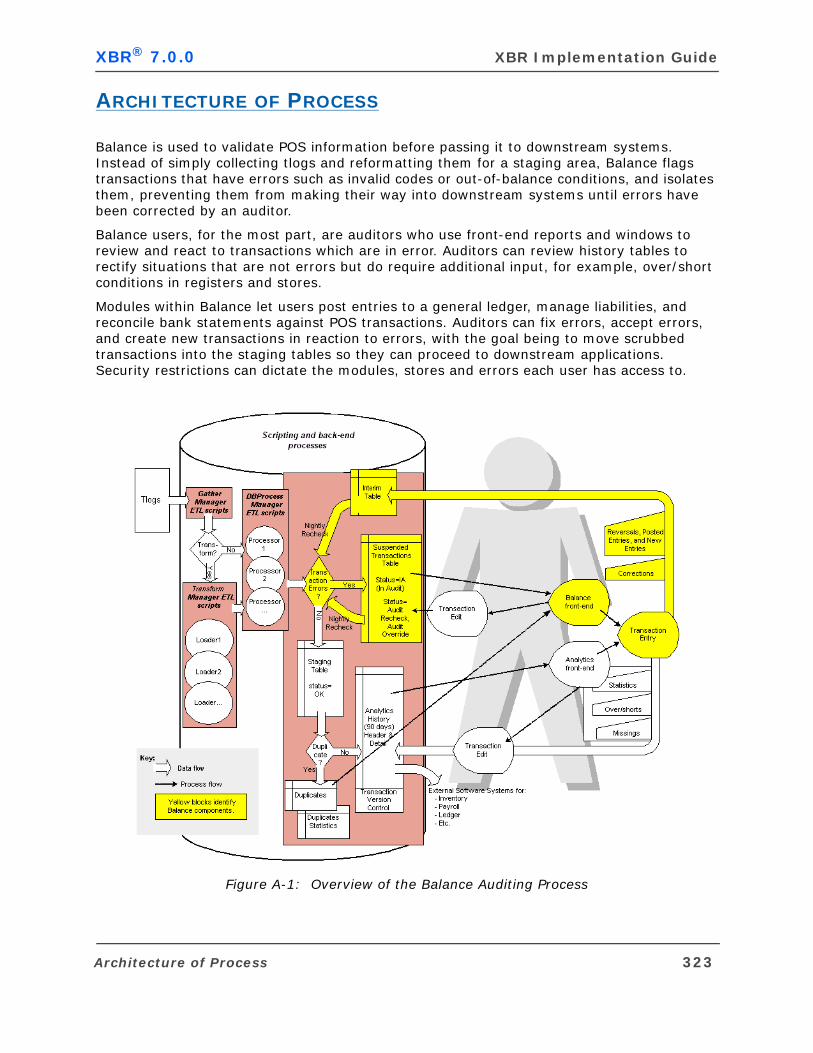
XBR® 7.0.0 XBR Implementation Guide
ARCHITECTURE OF PROCESS
Balance is used to validate POS information before passing it to downstream systems. Instead of simply collecting tlogs and reformatting them for a staging area, Balance flags transactions that have errors such as invalid codes or out-of-balance conditions, and isolates them, preventing them from making their way into downstream systems until errors have been corrected by an auditor.
Balance users, for the most part, are auditors who use front-end reports and windows to review and react to transactions which are in error. Auditors can review history tables to rectify situations that are not errors but do require additional input, for example, over/short conditions in registers and stores.
Modules within Balance let users post entries to a general ledger, manage liabilities, and reconcile bank statements against POS transactions. Auditors can fix errors, accept errors, and create new transactions in reaction to errors, with the goal being to move scrubbed transactions into the staging tables so they can proceed to downstream applications. Security restrictions can dictate the modules, stores and errors each user has access to.
Figure A-1: Overview of the Balance Auditing Process
Architecture of Process 323
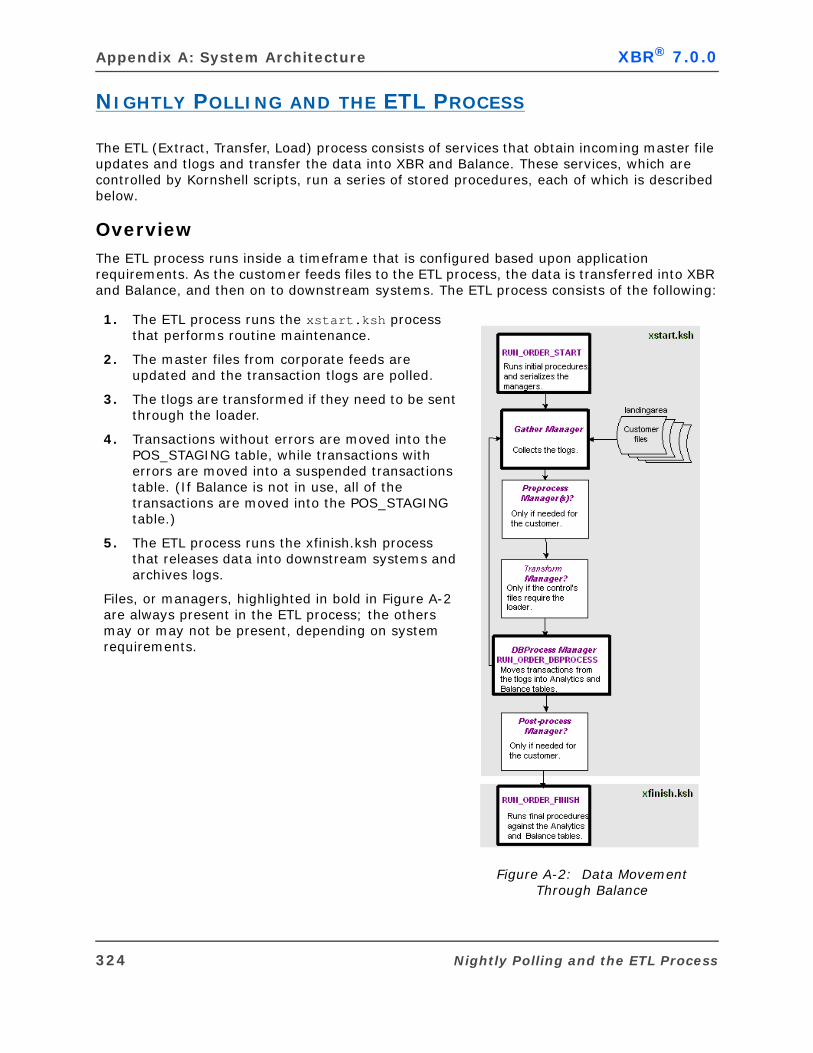
Appendix A: System Architecture XBR® 7.0.0
NIGHTLY POLLING AND THE ETL PROCESS
The ETL (Extract, Transfer, Load) process consists of services that obtain incoming master file updates and tlogs and transfer the data into XBR and Balance. These services, which are controlled by Kornshell scripts, run a series of stored procedures, each of which is described below.
OverviewThe ETL process runs inside a timeframe that is configured based upon application requirements. As the customer feeds files to the ETL process, the data is transferred into XBR and Balance, and then on to downstream systems. The ETL process consists of the following:
1. The ETL process runs the xstart.ksh process that performs routine maintenance.
2. The master files from corporate feeds are updated and the transaction tlogs are polled.
3. The tlogs are transformed if they need to be sent through the loader.
4. Transactions without errors are moved into the POS_STAGING table, while transactions with errors are moved into a suspended transactions table. (If Balance is not in use, all of the transactions are moved into the POS_STAGING table.)
5. The ETL process runs the xfinish.ksh process that releases data into downstream systems and archives logs.
Files, or managers, highlighted in bold in Figure A-2 are always present in the ETL process; the others may or may not be present, depending on system requirements.
Figure A-2: Data Movement Through Balance
324 Nightly Polling and the ETL Process
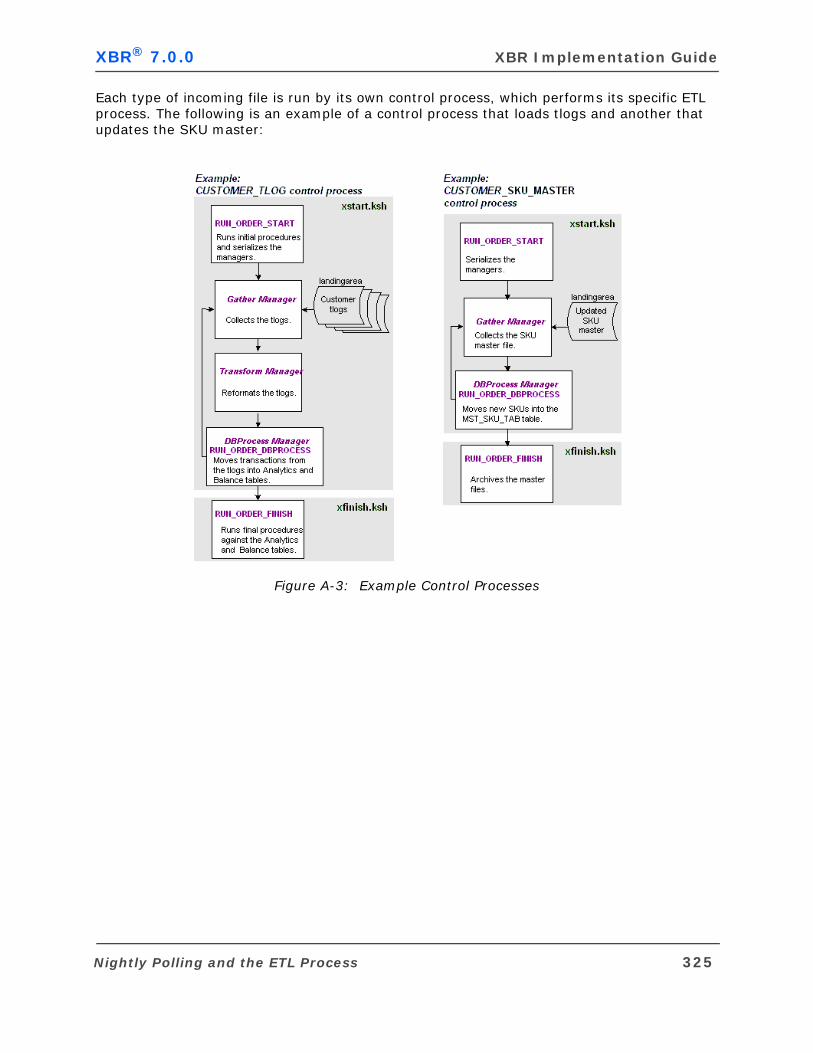
XBR® 7.0.0 XBR Implementation Guide
Each type of incoming file is run by its own control process, which performs its specific ETL process. The following is an example of a control process that loads tlogs and another that updates the SKU master:
Figure A-3: Example Control Processes
Nightly Polling and the ETL Process 325

Appendix A: System Architecture XBR® 7.0.0
KORNSHELL SCRIPTS
The ETL process consists of services that obtain incoming master file updates and tlogs and transfer the data into XBR and Balance. These services, which are controlled by Kornshell scripts, run a series of stored procedures to sort and process the data for XBR and Balance.
Each type of data file is managed by a control. Controls are sets of rules for processing specific forms of incoming data. For example, there is one control for tlogs. If there are multiple tlog formats, there will be a unique control for each format. The control rules access the managers, which release methods to subprocessors in those managers.
Managers are called from any number of controls that have been defined. These inputs can be processed simultaneously, creating a multi-threaded, multi-tasking process environment. In version 6.x, existing components of the Kornshell have been modified to enable easier configuration of new installs and upgrades.
The new Kornshell consists of three core managers; however, additional managers may be required based upon the installation:
Managers use methods, which are files that pass parameters to subprocessors that they manage. A subprocessor STATUS directory communicates to the manager. Possible manager statuses are: RUNNING, ERRORED, STOPPED.
Managers are initiated using the xstart_mgr.ksh script. Managers must be started before creating controls.
RUN_ORDER_* FILE FORMATS
RUN_ORDER_START, RUN_ORDER_DBPROCESS and RUN_ORDER_FINISH use lists of stored files to initiate various tasks. These files are run in the order in which they are entered into the script, and can be in a number of different formats:
Kornshell script (startup.ksh)
SQL statement (initiate8.sql)
SQL loader control file (load7.ctl)
PERL script (startperl.pl)
UNIX commands (kill, nice, mkdir)
BCP format file, (custom.fmt)
Gather Manager (gathermgr) Gathers tlogs and master files the customer sends to or puts into the landing area
Transform Manager (transformmgr) Runs the loader to transform the tlogs; this manager isn't used for master files
Process Manager (dbprocessmgr) Loads data into the data warehouse table
326 Kornshell Scripts
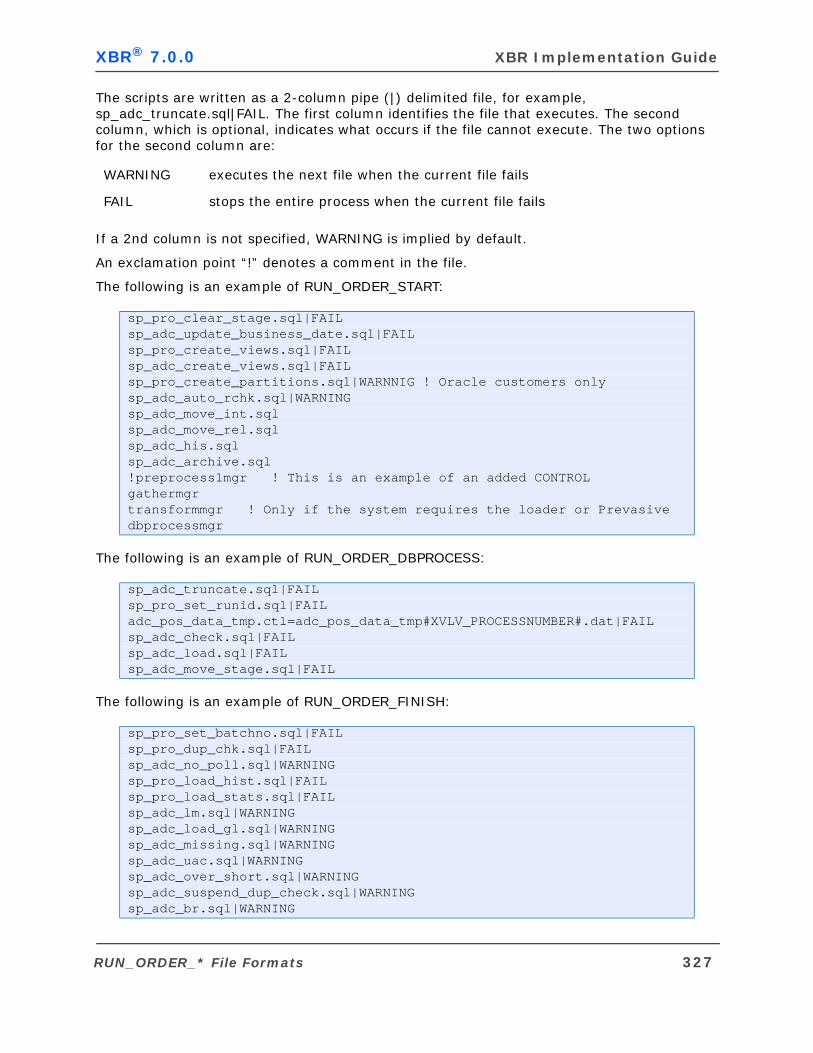
XBR® 7.0.0 XBR Implementation Guide
The scripts are written as a 2-column pipe (|) delimited file, for example, sp_adc_truncate.sql|FAIL. The first column identifies the file that executes. The second column, which is optional, indicates what occurs if the file cannot execute. The two options for the second column are:
If a 2nd column is not specified, WARNING is implied by default.
An exclamation point “!” denotes a comment in the file.
The following is an example of RUN_ORDER_START:
The following is an example of RUN_ORDER_DBPROCESS:
The following is an example of RUN_ORDER_FINISH:
WARNING executes the next file when the current file fails
FAIL stops the entire process when the current file fails
sp_pro_clear_stage.sql|FAILsp_adc_update_business_date.sql|FAILsp_pro_create_views.sql|FAILsp_adc_create_views.sql|FAILsp_pro_create_partitions.sql|WARNNIG ! Oracle customers onlysp_adc_auto_rchk.sql|WARNINGsp_adc_move_int.sqlsp_adc_move_rel.sqlsp_adc_his.sqlsp_adc_archive.sql!preprocess1mgr ! This is an example of an added CONTROLgathermgrtransformmgr ! Only if the system requires the loader or Prevasivedbprocessmgr
sp_adc_truncate.sql|FAILsp_pro_set_runid.sql|FAILadc_pos_data_tmp.ctl=adc_pos_data_tmp#XVLV_PROCESSNUMBER#.dat|FAILsp_adc_check.sql|FAILsp_adc_load.sql|FAILsp_adc_move_stage.sql|FAIL
sp_pro_set_batchno.sql|FAILsp_pro_dup_chk.sql|FAILsp_adc_no_poll.sql|WARNINGsp_pro_load_hist.sql|FAILsp_pro_load_stats.sql|FAILsp_adc_lm.sql|WARNINGsp_adc_load_gl.sql|WARNINGsp_adc_missing.sql|WARNINGsp_adc_uac.sql|WARNINGsp_adc_over_short.sql|WARNINGsp_adc_suspend_dup_check.sql|WARNINGsp_adc_br.sql|WARNING
RUN_ORDER_* File Formats 327
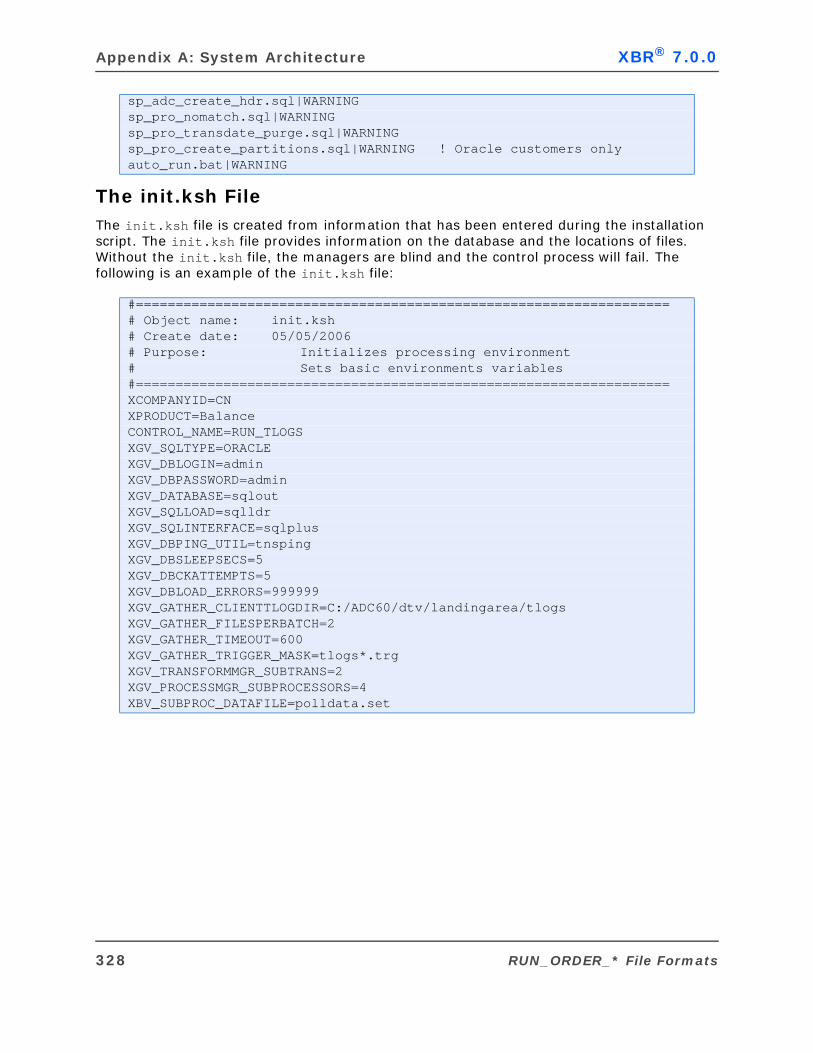
Appendix A: System Architecture XBR® 7.0.0
The init.ksh File The init.ksh file is created from information that has been entered during the installation script. The init.ksh file provides information on the database and the locations of files. Without the init.ksh file, the managers are blind and the control process will fail. The following is an example of the init.ksh file:
sp_adc_create_hdr.sql|WARNINGsp_pro_nomatch.sql|WARNINGsp_pro_transdate_purge.sql|WARNINGsp_pro_create_partitions.sql|WARNING ! Oracle customers onlyauto_run.bat|WARNING
#===================================================================# Object name: init.ksh# Create date: 05/05/2006# Purpose: Initializes processing environment # Sets basic environments variables#===================================================================XCOMPANYID=CNXPRODUCT=BalanceCONTROL_NAME=RUN_TLOGSXGV_SQLTYPE=ORACLEXGV_DBLOGIN=adminXGV_DBPASSWORD=adminXGV_DATABASE=sqloutXGV_SQLLOAD=sqlldrXGV_SQLINTERFACE=sqlplusXGV_DBPING_UTIL=tnspingXGV_DBSLEEPSECS=5XGV_DBCKATTEMPTS=5XGV_DBLOAD_ERRORS=999999XGV_GATHER_CLIENTTLOGDIR=C:/ADC60/dtv/landingarea/tlogsXGV_GATHER_FILESPERBATCH=2XGV_GATHER_TIMEOUT=600XGV_GATHER_TRIGGER_MASK=tlogs*.trgXGV_TRANSFORMMGR_SUBTRANS=2XGV_PROCESSMGR_SUBPROCESSORS=4XBV_SUBPROC_DATAFILE=polldata.set
328 RUN_ORDER_* File Formats
XBR® 7.0.0 XBR Implementation Guide
CONTROLS
Control files must be created for each tlog and master file. Controls can be set up manually, either from scratch or by copying a similar control and modifying it.
Creating Control Files for Each TLogIt is likely that only one format will be required for incoming tlogs, however if there are additional formats, it will be necessary to create additional control process for the tlogs.
To create control files, use the install_control.ksh script, which prompts for information, sets up controls, creates the directory structure, and enters the variables into the init.ksh file. The script is located in <drive>:\dtv\scriptcommon\install\install_control.ksh.
Because there is a control process for each type of incoming file, the following controls are necessary:
A control must exist for each type of tlog. If there is more than one type of tlog, there will be multiple controls.
A control must exist for each master file loaded by ETL processing.
A control for feeds, such as bank feeds.
Creating Controls for Each Master FileCreating a control for each master file is similar to creating a control for tlogs except that transformmgr is not required. It is necessary to create a different set of stored procedures for loading the master files into the database. It is possible to create a control for each master file using install_control.ksh.
In the case of a master file control without a loader, controls will not access the Transform Manager, but will progress directly from the Gather Manager to the DBProcess Manager. If the Transform Manager is not required, remove transformmgr from the installation.
Once the managers have been initiated and are running, the control processes are started with the xstart.ksh file. The xstart.ksh file uses the following processes to manage and process the data from each type of tlog.
Control Files/Format FilesThe ETL process uses control (.ctl) files for Oracle files, and format (.fmt) files for MS SQL files.
Controls 329
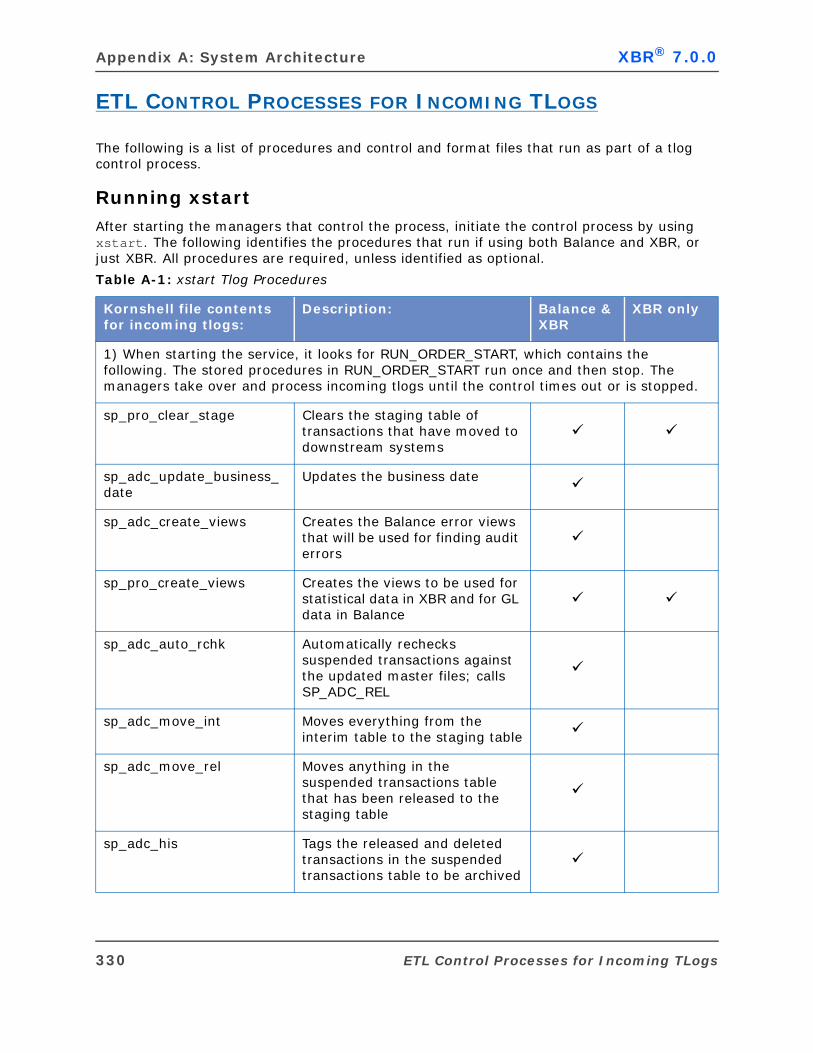
Appendix A: System Architecture XBR® 7.0.0
ETL CONTROL PROCESSES FOR INCOMING TLOGS
The following is a list of procedures and control and format files that run as part of a tlog control process.
Running xstartAfter starting the managers that control the process, initiate the control process by using xstart. The following identifies the procedures that run if using both Balance and XBR, or just XBR. All procedures are required, unless identified as optional.
Table A-1: xstart Tlog Procedures
Kornshell file contents for incoming tlogs:
Description: Balance & XBR
XBR only
1) When starting the service, it looks for RUN_ORDER_START, which contains the following. The stored procedures in RUN_ORDER_START run once and then stop. The managers take over and process incoming tlogs until the control times out or is stopped.
sp_pro_clear_stage Clears the staging table of transactions that have moved to downstream systems
sp_adc_update_business_date
Updates the business date
sp_adc_create_views Creates the Balance error views that will be used for finding audit errors
sp_pro_create_views Creates the views to be used for statistical data in XBR and for GL data in Balance
sp_adc_auto_rchk Automatically rechecks suspended transactions against the updated master files; calls SP_ADC_REL
sp_adc_move_int Moves everything from the interim table to the staging table
sp_adc_move_rel Moves anything in the suspended transactions table that has been released to the staging table
sp_adc_his Tags the released and deleted transactions in the suspended transactions table to be archived
330 ETL Control Processes for Incoming TLogs
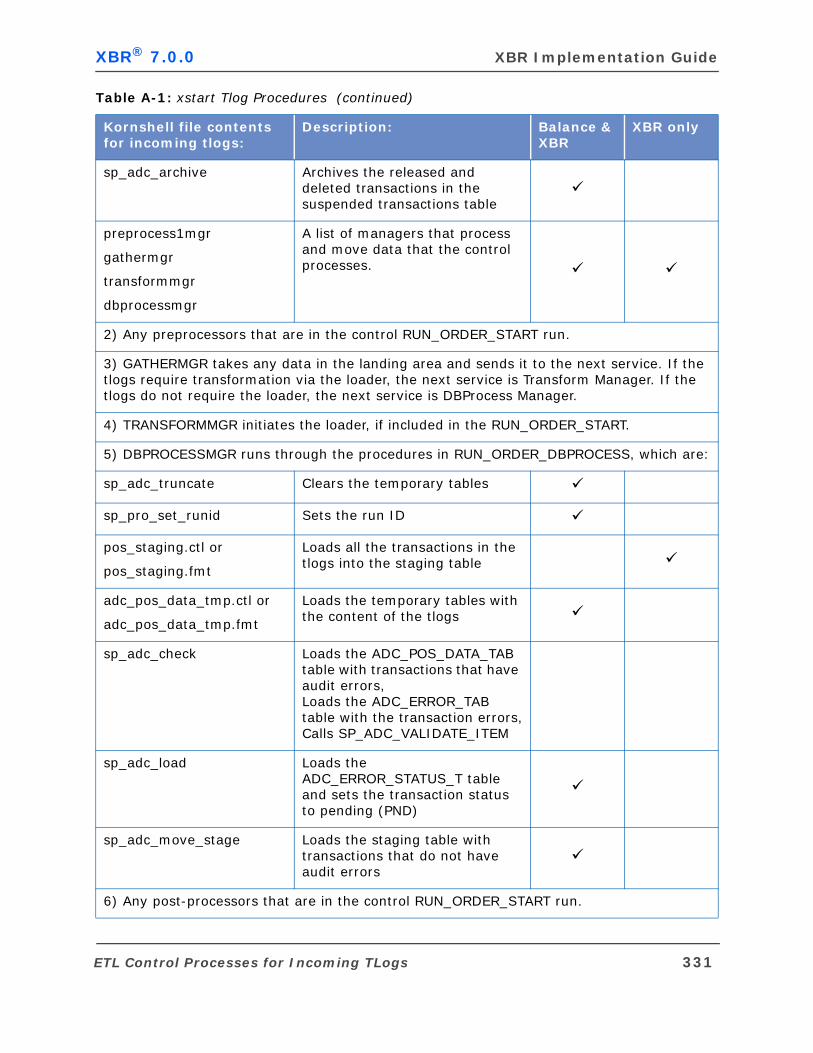
XBR® 7.0.0 XBR Implementation Guide
sp_adc_archive Archives the released and deleted transactions in the suspended transactions table
preprocess1mgr
gathermgr
transformmgr
dbprocessmgr
A list of managers that process and move data that the control processes.
2) Any preprocessors that are in the control RUN_ORDER_START run.
3) GATHERMGR takes any data in the landing area and sends it to the next service. If the tlogs require transformation via the loader, the next service is Transform Manager. If the tlogs do not require the loader, the next service is DBProcess Manager.
4) TRANSFORMMGR initiates the loader, if included in the RUN_ORDER_START.
5) DBPROCESSMGR runs through the procedures in RUN_ORDER_DBPROCESS, which are:
sp_adc_truncate Clears the temporary tables
sp_pro_set_runid Sets the run ID
pos_staging.ctl or
pos_staging.fmt
Loads all the transactions in the tlogs into the staging table
adc_pos_data_tmp.ctl or
adc_pos_data_tmp.fmt
Loads the temporary tables with the content of the tlogs
sp_adc_check Loads the ADC_POS_DATA_TAB table with transactions that have audit errors,Loads the ADC_ERROR_TAB table with the transaction errors,Calls SP_ADC_VALIDATE_ITEM
sp_adc_load Loads the ADC_ERROR_STATUS_T table and sets the transaction status to pending (PND)
sp_adc_move_stage Loads the staging table with transactions that do not have audit errors
6) Any post-processors that are in the control RUN_ORDER_START run.
Table A-1: xstart Tlog Procedures (continued)
Kornshell file contents for incoming tlogs:
Description: Balance & XBR
XBR only
ETL Control Processes for Incoming TLogs 331
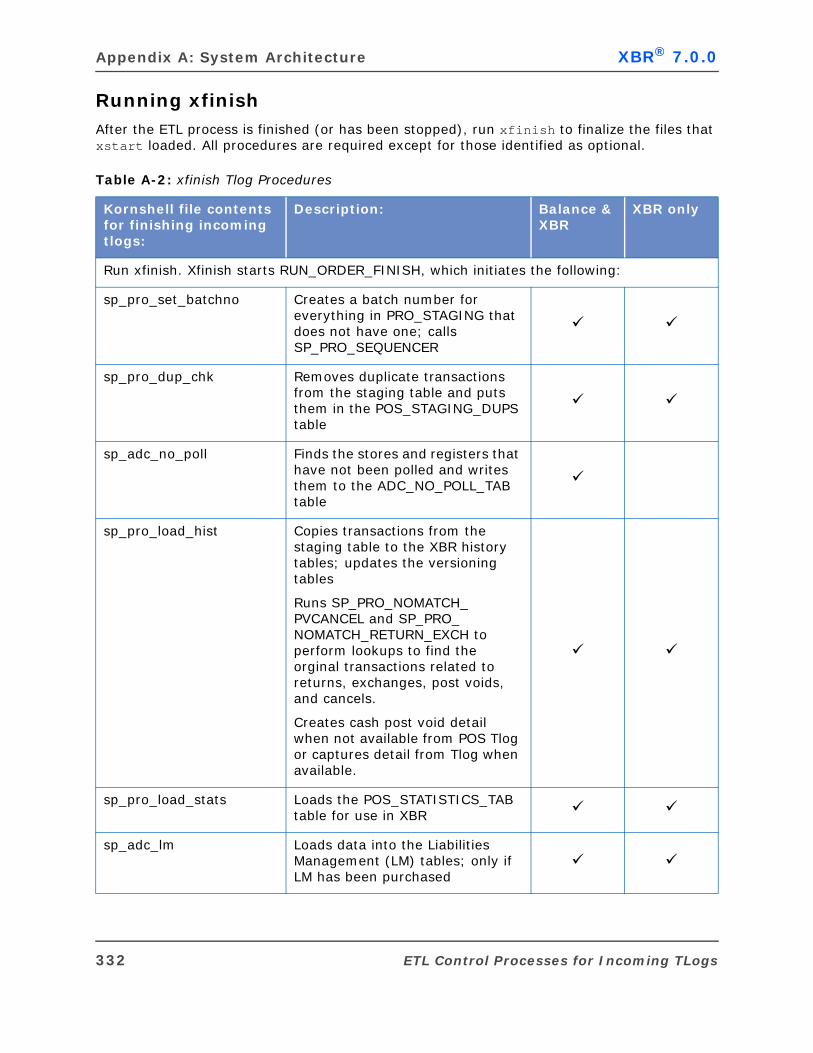
Appendix A: System Architecture XBR® 7.0.0
Running xfinishAfter the ETL process is finished (or has been stopped), run xfinish to finalize the files that xstart loaded. All procedures are required except for those identified as optional.
Table A-2: xfinish Tlog Procedures
Kornshell file contents for finishing incoming tlogs:
Description: Balance & XBR
XBR only
Run xfinish. Xfinish starts RUN_ORDER_FINISH, which initiates the following:
sp_pro_set_batchno Creates a batch number for everything in PRO_STAGING that does not have one; calls SP_PRO_SEQUENCER
sp_pro_dup_chk Removes duplicate transactions from the staging table and puts them in the POS_STAGING_DUPS table
sp_adc_no_poll Finds the stores and registers that have not been polled and writes them to the ADC_NO_POLL_TAB table
sp_pro_load_hist Copies transactions from the staging table to the XBR history tables; updates the versioning tables
Runs SP_PRO_NOMATCH_PVCANCEL and SP_PRO_NOMATCH_RETURN_EXCH to perform lookups to find the orginal transactions related to returns, exchanges, post voids, and cancels.
Creates cash post void detail when not available from POS Tlog or captures detail from Tlog when available.
sp_pro_load_stats Loads the POS_STATISTICS_TAB table for use in XBR
sp_adc_lm Loads data into the Liabilities Management (LM) tables; only if LM has been purchased
332 ETL Control Processes for Incoming TLogs
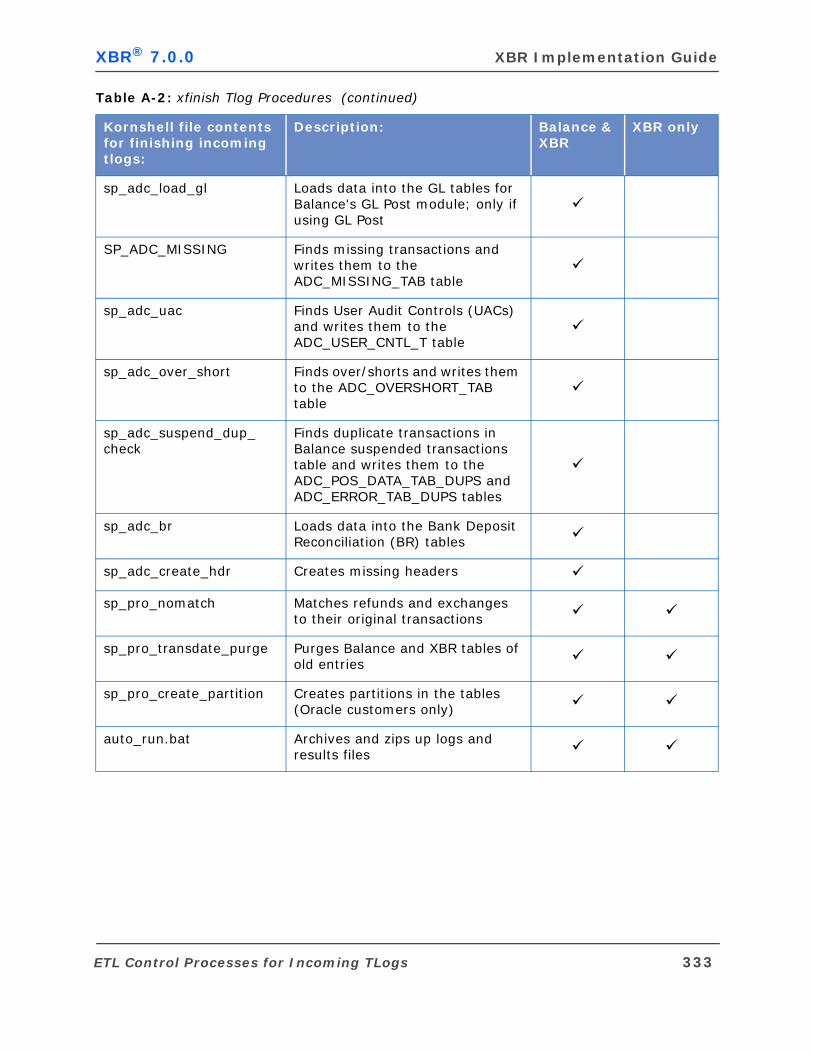
XBR® 7.0.0 XBR Implementation Guide
sp_adc_load_gl Loads data into the GL tables for Balance's GL Post module; only if using GL Post
SP_ADC_MISSING Finds missing transactions and writes them to the ADC_MISSING_TAB table
sp_adc_uac Finds User Audit Controls (UACs) and writes them to the ADC_USER_CNTL_T table
sp_adc_over_short Finds over/shorts and writes them to the ADC_OVERSHORT_TAB table
sp_adc_suspend_dup_check
Finds duplicate transactions in Balance suspended transactions table and writes them to the ADC_POS_DATA_TAB_DUPS and ADC_ERROR_TAB_DUPS tables
sp_adc_br Loads data into the Bank Deposit Reconciliation (BR) tables
sp_adc_create_hdr Creates missing headers
sp_pro_nomatch Matches refunds and exchanges to their original transactions
sp_pro_transdate_purge Purges Balance and XBR tables of old entries
sp_pro_create_partition Creates partitions in the tables (Oracle customers only)
auto_run.bat Archives and zips up logs and results files
Table A-2: xfinish Tlog Procedures (continued)
Kornshell file contents for finishing incoming tlogs:
Description: Balance & XBR
XBR only
ETL Control Processes for Incoming TLogs 333
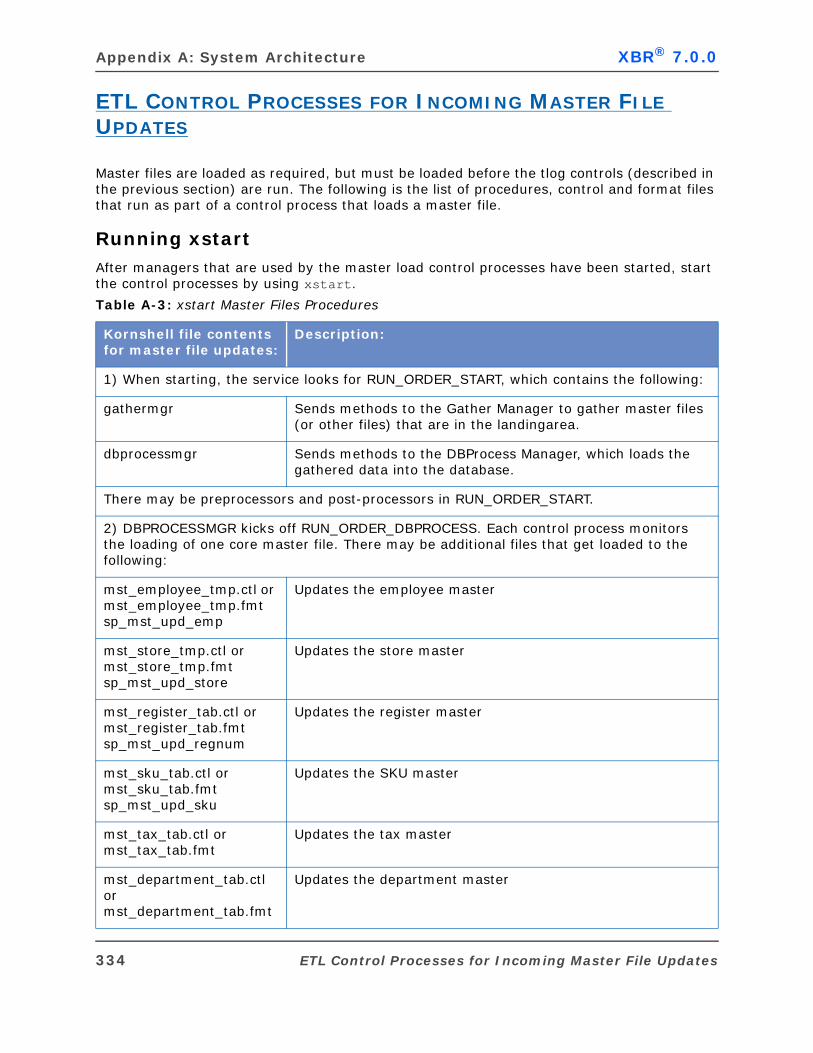
Appendix A: System Architecture XBR® 7.0.0
ETL CONTROL PROCESSES FOR INCOMING MASTER FILE UPDATES
Master files are loaded as required, but must be loaded before the tlog controls (described in the previous section) are run. The following is the list of procedures, control and format files that run as part of a control process that loads a master file.
Running xstartAfter managers that are used by the master load control processes have been started, start the control processes by using xstart.
Table A-3: xstart Master Files Procedures
Kornshell file contents for master file updates:
Description:
1) When starting, the service looks for RUN_ORDER_START, which contains the following:
gathermgr Sends methods to the Gather Manager to gather master files (or other files) that are in the landingarea.
dbprocessmgr Sends methods to the DBProcess Manager, which loads the gathered data into the database.
There may be preprocessors and post-processors in RUN_ORDER_START.
2) DBPROCESSMGR kicks off RUN_ORDER_DBPROCESS. Each control process monitors the loading of one core master file. There may be additional files that get loaded to the following:
mst_employee_tmp.ctl or mst_employee_tmp.fmt sp_mst_upd_emp
Updates the employee master
mst_store_tmp.ctl or mst_store_tmp.fmt sp_mst_upd_store
Updates the store master
mst_register_tab.ctl or mst_register_tab.fmt sp_mst_upd_regnum
Updates the register master
mst_sku_tab.ctl or mst_sku_tab.fmt sp_mst_upd_sku
Updates the SKU master
mst_tax_tab.ctl or mst_tax_tab.fmt
Updates the tax master
mst_department_tab.ctl or mst_department_tab.fmt
Updates the department master
334 ETL Control Processes for Incoming Master File Updates
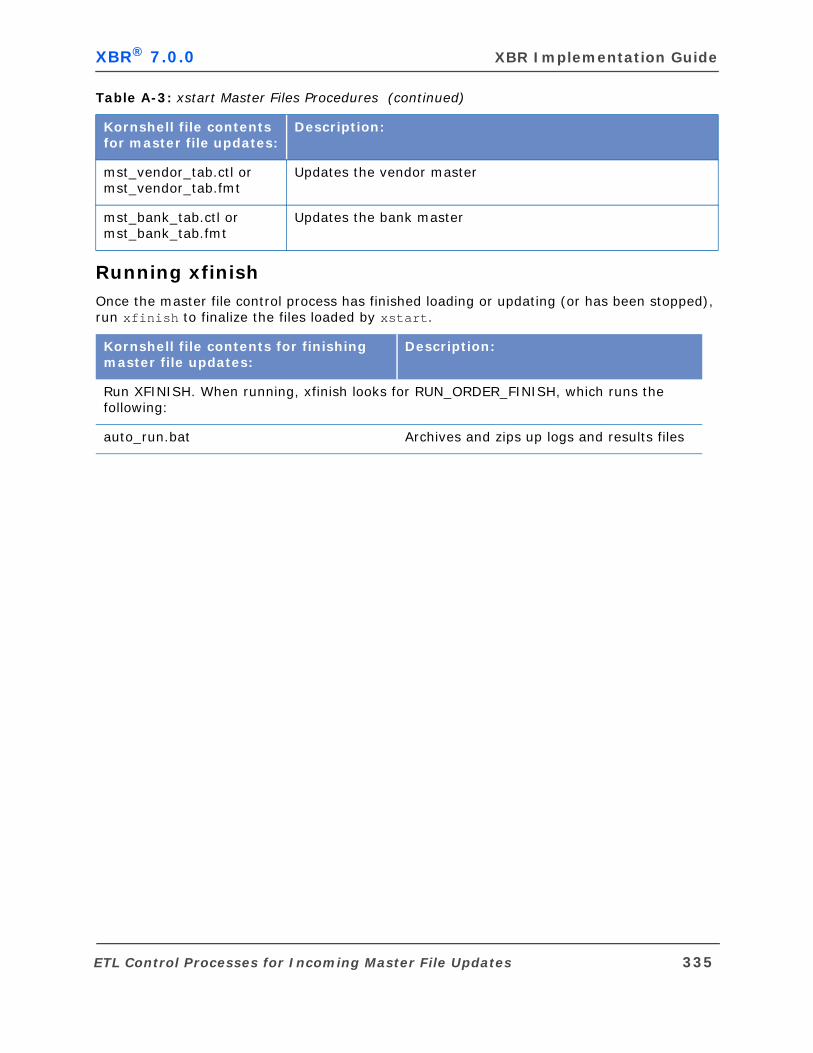
XBR® 7.0.0 XBR Implementation Guide
Running xfinishOnce the master file control process has finished loading or updating (or has been stopped), run xfinish to finalize the files loaded by xstart.
mst_vendor_tab.ctl or mst_vendor_tab.fmt
Updates the vendor master
mst_bank_tab.ctl or mst_bank_tab.fmt
Updates the bank master
Kornshell file contents for finishing master file updates:
Description:
Run XFINISH. When running, xfinish looks for RUN_ORDER_FINISH, which runs the following:
auto_run.bat Archives and zips up logs and results files
Table A-3: xstart Master Files Procedures (continued)
Kornshell file contents for master file updates:
Description:
ETL Control Processes for Incoming Master File Updates 335
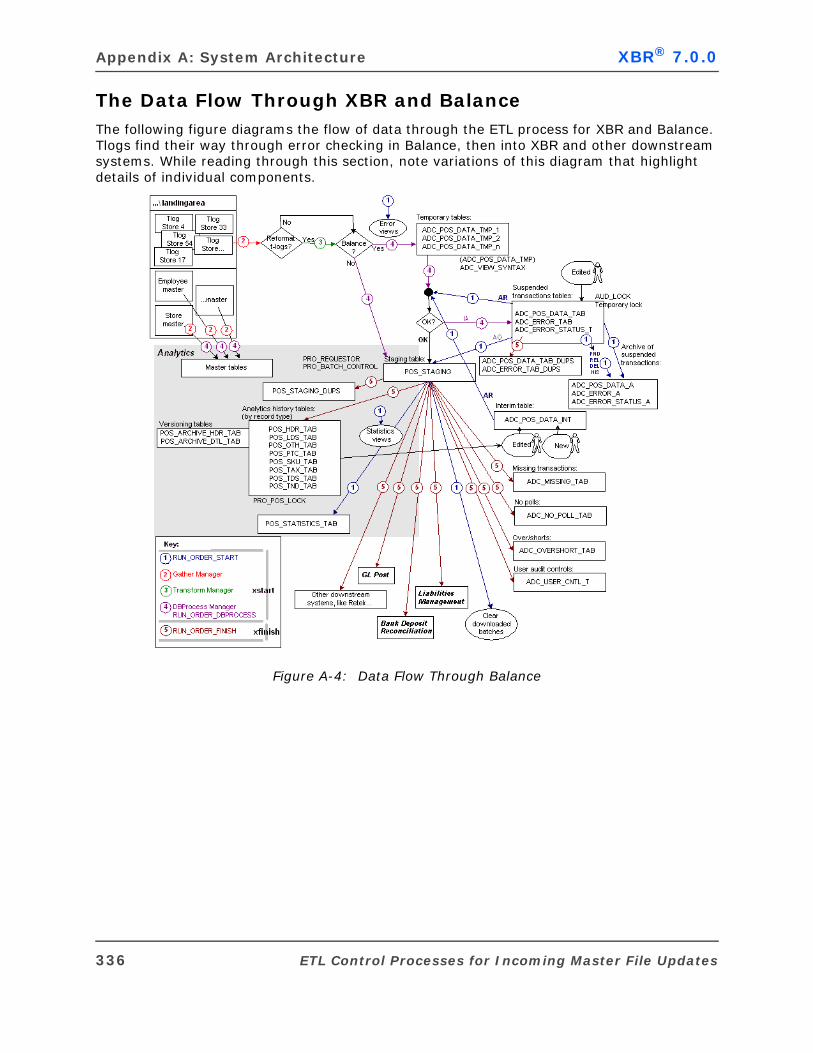
Appendix A: System Architecture XBR® 7.0.0
The Data Flow Through XBR and BalanceThe following figure diagrams the flow of data through the ETL process for XBR and Balance. Tlogs find their way through error checking in Balance, then into XBR and other downstream systems. While reading through this section, note variations of this diagram that highlight details of individual components.
Figure A-4: Data Flow Through Balance
336 ETL Control Processes for Incoming Master File Updates
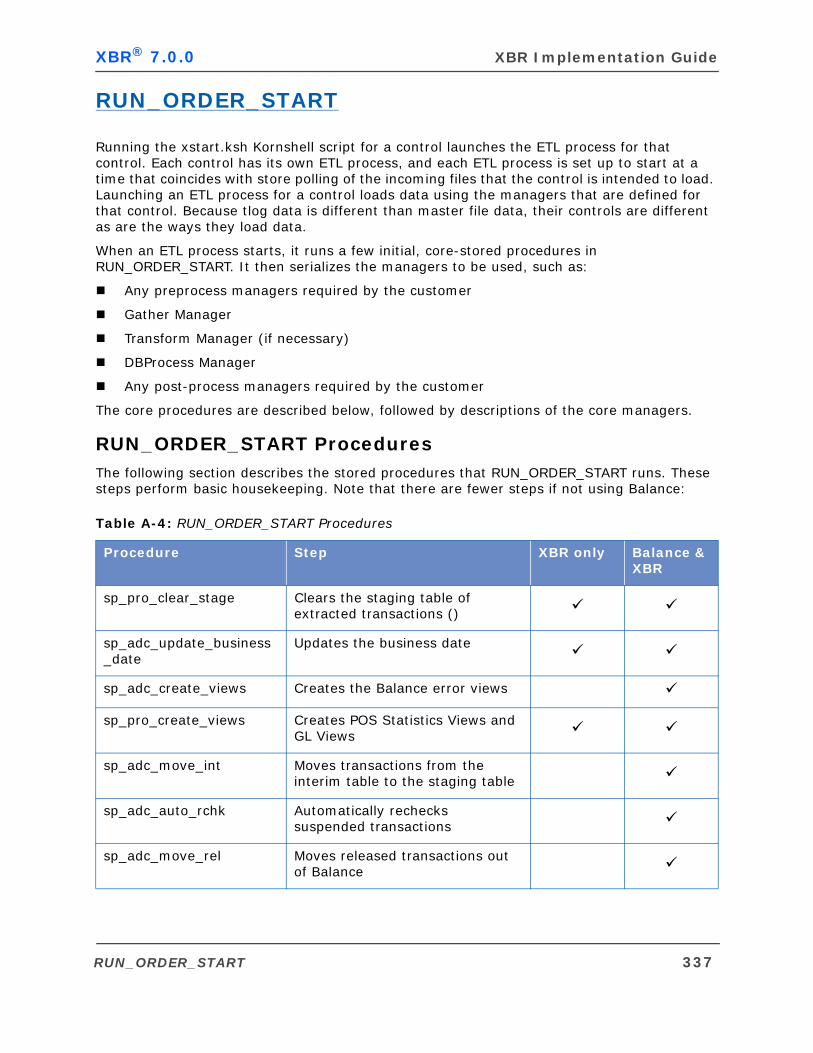
XBR® 7.0.0 XBR Implementation Guide
RUN_ORDER_START
Running the xstart.ksh Kornshell script for a control launches the ETL process for that control. Each control has its own ETL process, and each ETL process is set up to start at a time that coincides with store polling of the incoming files that the control is intended to load. Launching an ETL process for a control loads data using the managers that are defined for that control. Because tlog data is different than master file data, their controls are different as are the ways they load data.
When an ETL process starts, it runs a few initial, core-stored procedures in RUN_ORDER_START. It then serializes the managers to be used, such as:
Any preprocess managers required by the customer
Gather Manager
Transform Manager (if necessary)
DBProcess Manager
Any post-process managers required by the customer
The core procedures are described below, followed by descriptions of the core managers.
RUN_ORDER_START ProceduresThe following section describes the stored procedures that RUN_ORDER_START runs. These steps perform basic housekeeping. Note that there are fewer steps if not using Balance:
Table A-4: RUN_ORDER_START Procedures
Procedure Step XBR only Balance & XBR
sp_pro_clear_stage Clears the staging table of extracted transactions ()
sp_adc_update_business_date
Updates the business date
sp_adc_create_views Creates the Balance error views
sp_pro_create_views Creates POS Statistics Views and GL Views
sp_adc_move_int Moves transactions from the interim table to the staging table
sp_adc_auto_rchk Automatically rechecks suspended transactions
sp_adc_move_rel Moves released transactions out of Balance
RUN_ORDER_START 337
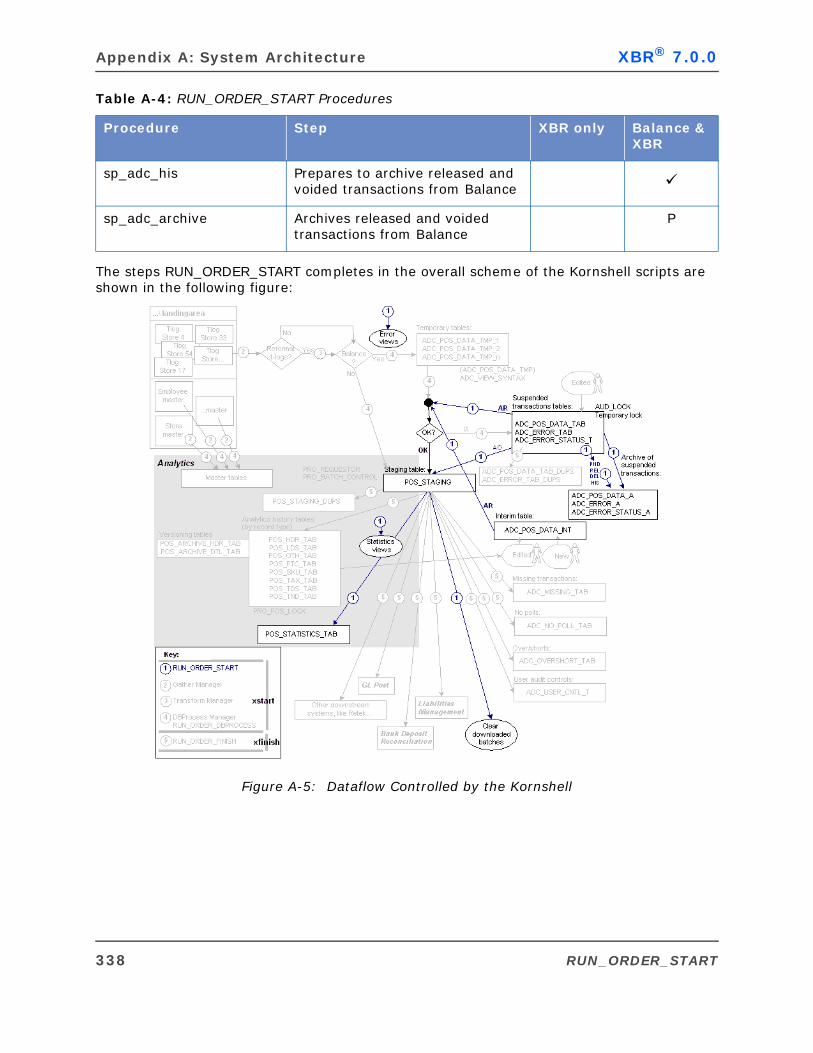
Appendix A: System Architecture XBR® 7.0.0
The steps RUN_ORDER_START completes in the overall scheme of the Kornshell scripts are shown in the following figure:
Figure A-5: Dataflow Controlled by the Kornshell
sp_adc_his Prepares to archive released and voided transactions from Balance
sp_adc_archive Archives released and voided transactions from Balance
P
Table A-4: RUN_ORDER_START Procedures
Procedure Step XBR only Balance & XBR
338 RUN_ORDER_START

XBR® 7.0.0 XBR Implementation Guide
Clear the Staging Table of Extracted Transactions (sp_pro_clear_stage)There are a number of downstream systems (such as Retek, the XBR history table, and the Balance GL Post module) that extract the POS transactions pulled in from tlogs. Because all POS transactions go through the POS_STAGING table (either as soon as they have polled or after they have been fixed in Balance), POS_STAGING is the table from which all downstream systems pull their transactions. POS transactions stay in this table until all downstream systems have extracted them. The SP_PRO_CLEAR_STAGE procedure then clears them from POS_STAGING as part of the ETL process routine housekeeping.
To do this, the ETL process tracks the downstream systems that have extracted each batch of transactions from POS_STAGING. After extraction, SP_PRO_CLEAR_STAGE removes the batch from POS_STAGING.
A batch consists of all POS transactions that Gather Manager pulled, as a group, out of the landing area. The POS transactions are processed as a group, and are added to the POS_STAGING table (the staging table) during a nightly run of the ETL process. If using Balance, a batch also consists of only those polled transactions that were error-free, and the transactions that were moved from the suspended transactions and interim tables into the staging table.
Batch numbers ensure that downstream systems have pulled the batch transactions before SP_PRO_CLEAR_STAGE removes the batch from the POS_STAGING table.
The PRO_REQUESTOR TableSP_PRO_CLEAR_STAGE refers to the PRO_REQUESTOR table to identify which downstream systems actively extract data from POS_STAGING. For example, the PRO_REQUESTOR table may look like the following:
Figure A-6: PRO_REQUESTOR Table Example
Note that the DATA_REQUESTOR_NAME column lists each downstream system entry along with the name of the stored procedure that performs the extract for that system. As such, XBR and Balance processes are downstream systems.
RUN_ORDER_START 339

Appendix A: System Architecture XBR® 7.0.0
Anything in PRO_REQUESTOR that has an ACTIVE_FLAG of Y is a downstream system that must extract transactions before SP_PRO_CLEAR_STAGE can clear the batch from POS_STAGING. Each of the core procedures listed above runs as part of the ETL process unless its row in the PRO_REQUESTOR table has been deactivated.
Downstream System Extracts SP_PRO_CLEAR_STAGE is aware that a downstream system has extracted batch transactions from POS_STAGING because successful downstream system extracts are tracked in the PRO_BATCH_CONTROL table. The stored procedures that act as downstream systems update the PRO_BATCH_CONTROL table by calling the SP_PRO_UPD_BATCH procedure. If any custom procedures that act as downstream systems are added, the new procedures must also update the PRO_BATCH_CONTROL table.
In PRO_BATCH_CONTROL, each downstream system gets four columns that record its extract status. The four columns are named using a prefix for each system. The prefix is the value in the REQUESTOR_ID column in the PRO_REQUESTOR table:
The following is an example of columns from the PRO_BATCH_CONTROL table:
Figure A-7: PRO_BATCH_CONTROL Table Column Example
Column naming conventions: For example:
prefix_START_DATE GL_START_DATE
prefix_END_DATE GL_END_DATE
prefix_NUM_RECORDS GL_NUM_RECORDS
prefix_ERROR_CODE GL_ERROR_CODE
340 RUN_ORDER_START
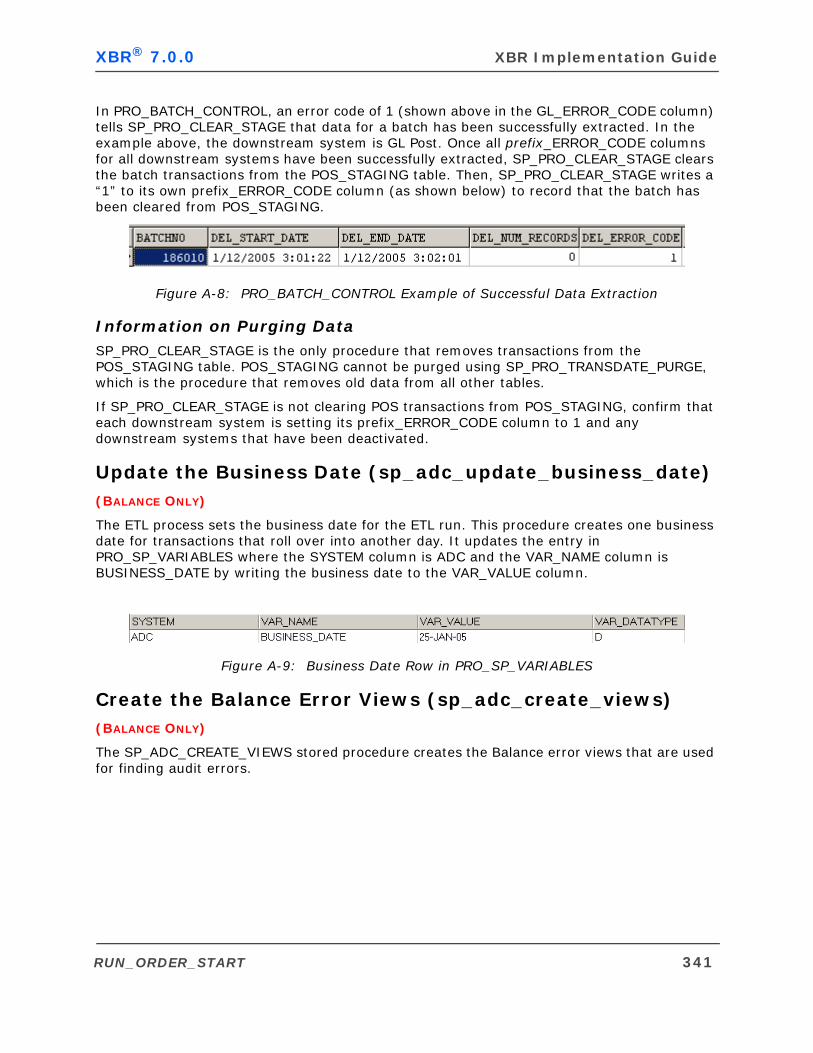
XBR® 7.0.0 XBR Implementation Guide
In PRO_BATCH_CONTROL, an error code of 1 (shown above in the GL_ERROR_CODE column) tells SP_PRO_CLEAR_STAGE that data for a batch has been successfully extracted. In the example above, the downstream system is GL Post. Once all prefix_ERROR_CODE columns for all downstream systems have been successfully extracted, SP_PRO_CLEAR_STAGE clears the batch transactions from the POS_STAGING table. Then, SP_PRO_CLEAR_STAGE writes a “1” to its own prefix_ERROR_CODE column (as shown below) to record that the batch has been cleared from POS_STAGING.
Figure A-8: PRO_BATCH_CONTROL Example of Successful Data Extraction
Information on Purging DataSP_PRO_CLEAR_STAGE is the only procedure that removes transactions from the POS_STAGING table. POS_STAGING cannot be purged using SP_PRO_TRANSDATE_PURGE, which is the procedure that removes old data from all other tables.
If SP_PRO_CLEAR_STAGE is not clearing POS transactions from POS_STAGING, confirm that each downstream system is setting its prefix_ERROR_CODE column to 1 and any downstream systems that have been deactivated.
Update the Business Date (sp_adc_update_business_date) (BALANCE ONLY)
The ETL process sets the business date for the ETL run. This procedure creates one business date for transactions that roll over into another day. It updates the entry in PRO_SP_VARIABLES where the SYSTEM column is ADC and the VAR_NAME column is BUSINESS_DATE by writing the business date to the VAR_VALUE column.
Figure A-9: Business Date Row in PRO_SP_VARIABLES
Create the Balance Error Views (sp_adc_create_views) (BALANCE ONLY)
The SP_ADC_CREATE_VIEWS stored procedure creates the Balance error views that are used for finding audit errors.
RUN_ORDER_START 341

Appendix A: System Architecture XBR® 7.0.0
Create POS Statistics Views and GL Views (sp_pro_create_views) The SP_PRO_CREATE_VIEWS stored procedure builds the views that are loaded as the ETL process loads the following:
POS statistics for use with XBR. A description of how the views are created and loaded is described on page 32.
GL data for use with Balance's GL Post module.
Move Transactions from the Interim Table to the Staging Table (sp_adc_move_int)(BALANCE ONLY)
Note: The following procedure executes after SP_ADC_AUTO_RCHK but is described here to identify procedures that move transactions from the suspended transactions table to the staging table.
The SP_ADC_MOVE_INT procedure moves transactions from the interim table ADC_POS_DATA_INT to the staging table POS_STAGING.
The SP_ADC_MOVE_REL procedure finds suspended transactions that have an ADC_ERROR_TAB status of AR, AO, or AD and puts them into the staging table. If a transaction has any errors that have an ADC_ERROR_TAB status of IA, it is not released (and therefore is not moved by the SP_ADC_MOVE_REL procedure).
It is assumed that transaction lines with a status of:
AD have been voided
AO have an error that has been overridden
AR have been screened by the error views and are clean
The following is an example of transaction that was voided by an auditor.
Figure A-10: Voided Transaction Example
342 RUN_ORDER_START

XBR® 7.0.0 XBR Implementation Guide
SP_ADC_INTERIM
All transactions in the interim table are a result of actions taken by a Balance user working with front-end windows. Before the transactions were moved into the table, they were screened for errors by the SP_ADC_INTERIM procedure. This procedure is called only from the Balance front-end when a Balance user saves a new transaction or edits a transaction from the history tables. SP_ADC_INTERIM screens the transactions for errors and moves transactions that are in error to the suspended transactions table. SP_ADC_INTERM leaves clean transactions in the interim table.
For that reason, the SP_ADC_MOVE_INT procedure assumes that all transactions in the interim table have no errors, and simply moves the entire content of the interim table into the POS_STAGING table. It then clears the interim table. The interim table repopulates when auditors and other Balance users modify transactions that are in XBR history or when they add new transactions.
Figure A-11: SP_AC_INTERM Procedure
Once it has screened for errors, SP_ADC_INTERIM does the following to any transaction errors it finds:
If the transaction contains a user audit control (UAC), it accepts the UAC. If the UAC condition still exists, it is caught again later in the ETL process by the SP_ADC_UAC procedure.
If the store, date, register, and cashier have an over/short that a user has accepted, SP_ADC_INTERIM changes the over/short's ACCEPT_FLAG (in the ADC_OVERSHORT_TAB table) back to N as the over/short may have changed. The ETL process checks for over/shorts again when the SP_ADC_OVER_SHORT procedure runs.
If the transaction is a missing transaction, the SP_ADC_INTERIM procedure removes it from the ADC_MISSING_TAB table. It then calls the SP_ADC_VALIDATE_ITEM procedure, which validates the transaction's SKUs.
RUN_ORDER_START 343
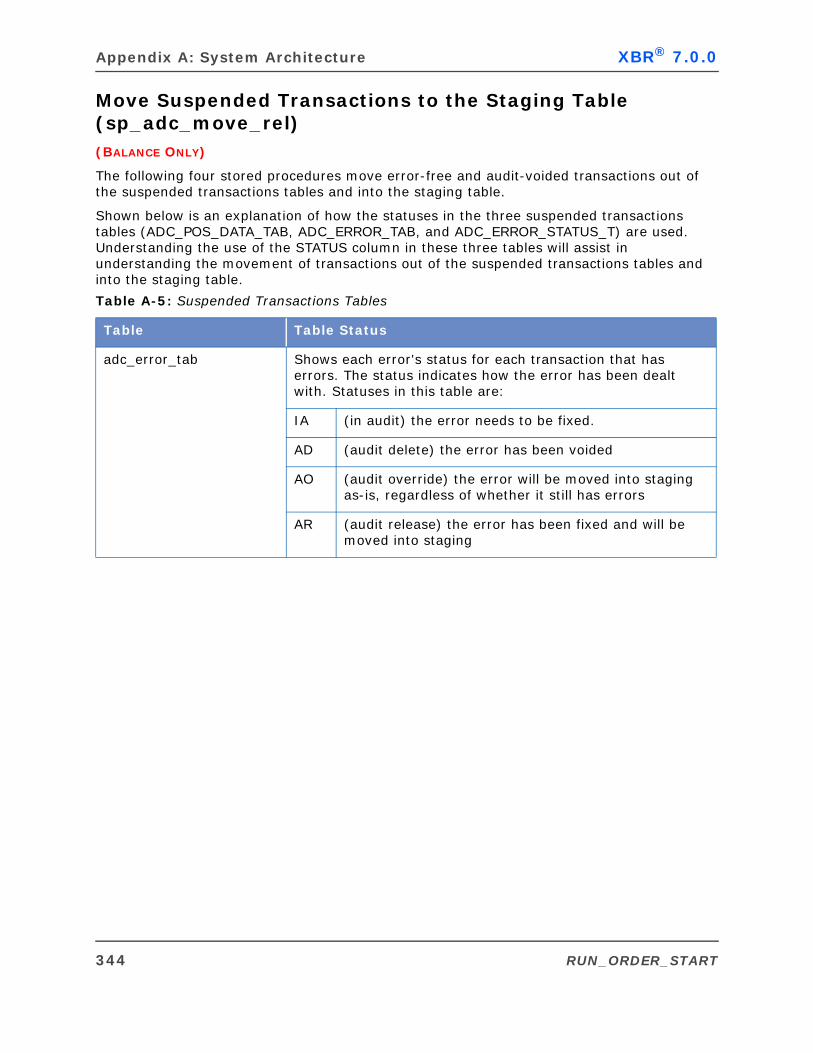
Appendix A: System Architecture XBR® 7.0.0
Move Suspended Transactions to the Staging Table (sp_adc_move_rel)(BALANCE ONLY)
The following four stored procedures move error-free and audit-voided transactions out of the suspended transactions tables and into the staging table.
Shown below is an explanation of how the statuses in the three suspended transactions tables (ADC_POS_DATA_TAB, ADC_ERROR_TAB, and ADC_ERROR_STATUS_T) are used. Understanding the use of the STATUS column in these three tables will assist in understanding the movement of transactions out of the suspended transactions tables and into the staging table.
Table A-5: Suspended Transactions Tables
Table Table Status
adc_error_tab Shows each error's status for each transaction that has errors. The status indicates how the error has been dealt with. Statuses in this table are:
IA (in audit) the error needs to be fixed.
AD (audit delete) the error has been voided
AO (audit override) the error will be moved into staging as-is, regardless of whether it still has errors
AR (audit release) the error has been fixed and will be moved into staging
344 RUN_ORDER_START
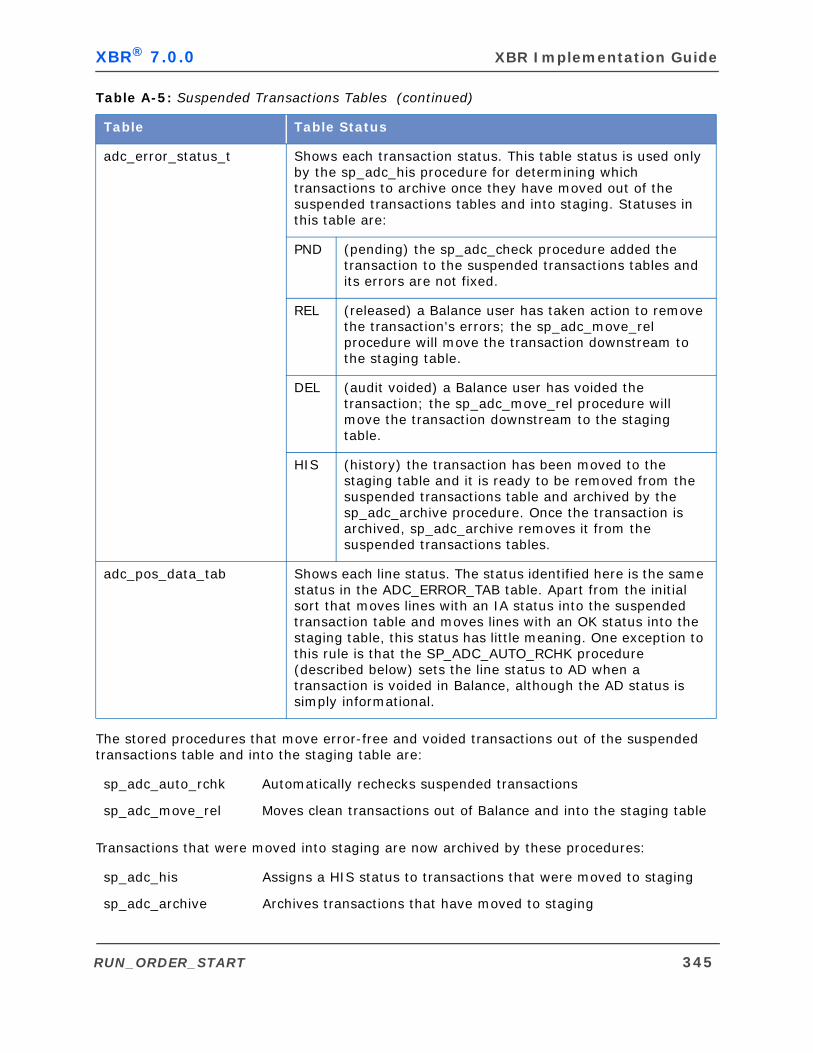
XBR® 7.0.0 XBR Implementation Guide
The stored procedures that move error-free and voided transactions out of the suspended transactions table and into the staging table are:
Transactions that were moved into staging are now archived by these procedures:
adc_error_status_t Shows each transaction status. This table status is used only by the sp_adc_his procedure for determining which transactions to archive once they have moved out of the suspended transactions tables and into staging. Statuses in this table are:
PND (pending) the sp_adc_check procedure added the transaction to the suspended transactions tables and its errors are not fixed.
REL (released) a Balance user has taken action to remove the transaction's errors; the sp_adc_move_rel procedure will move the transaction downstream to the staging table.
DEL (audit voided) a Balance user has voided the transaction; the sp_adc_move_rel procedure will move the transaction downstream to the staging table.
HIS (history) the transaction has been moved to the staging table and it is ready to be removed from the suspended transactions table and archived by the sp_adc_archive procedure. Once the transaction is archived, sp_adc_archive removes it from the suspended transactions tables.
adc_pos_data_tab Shows each line status. The status identified here is the same status in the ADC_ERROR_TAB table. Apart from the initial sort that moves lines with an IA status into the suspended transaction table and moves lines with an OK status into the staging table, this status has little meaning. One exception to this rule is that the SP_ADC_AUTO_RCHK procedure (described below) sets the line status to AD when a transaction is voided in Balance, although the AD status is simply informational.
sp_adc_auto_rchk Automatically rechecks suspended transactions
sp_adc_move_rel Moves clean transactions out of Balance and into the staging table
sp_adc_his Assigns a HIS status to transactions that were moved to staging
sp_adc_archive Archives transactions that have moved to staging
Table A-5: Suspended Transactions Tables (continued)
Table Table Status
RUN_ORDER_START 345
Appendix A: System Architecture XBR® 7.0.0
Recheck Suspended Transactions (sp_adc_auto_rchk)As soon as the master tables have been updated, transactions which where previously in error due to missing master records may no longer be in error because the master record that was missing is now present (for example, missing SKUs are now available in the SKU master). This is why the SP_ADC_AUTO_RCHK procedure runs immediately after updating the master files
Initially, SP_ADC_AUTO_RCHK finds the transactions that are no longer in error because the master record is now present. To do this SP_ADC_AUTO_RCHK runs all transactions that have in-audit errors through the ADC_ERROR_AUTO views. (In-audit errors are errors with a status of IA in the ADC_ERROR_TAB table.) If by doing this it finds a transaction error that is no longer an error, SP_ADC_AUTO_RCHK changes the transaction's error status in the ADC_ERROR_TAB table to AR (Audit Release).
The procedure does this recheck by running the ADC_ERROR_AUTO error views. With core Balance, there are ADC_ERROR_AUTO views for six error codes:
If these errors are active, they have ADC_ERROR_AUTO views that SP_ADC_AUTO_RCHK checks after the master files are updated.
When the ADC_ERROR_AUTO views have run and the transaction statuses have been changed to AR, SP_ADC_AUTO_RCHK runs the SP_ADC_REL procedure, which identifies the transactions that can be released to the staging table. SP_ADC_REL also releases those transactions that auditors corrected during the day. (Released transactions are moved to the staging table later by the SP_ADC_MOVE_REL procedure.) The Balance front-end also runs SP_ADC_REL when anyone runs Release Transactions from the Administration menu in Balance.
SP_ADC_REL primarily deals with releasing transactions. However, how SP_ADC_REL releases transaction edits depends on whether they are transaction voids or any other transaction edit.
SP_ADC_REL Handling of Transaction VoidsIf an auditor voids a transaction, the front-end records a status of AD for the transaction error in the ADC_ERROR_TAB table. The SP_ADC_REL procedure takes that transaction and does the following:
Sets the transaction status to DEL in the ADC_ERROR_STATUS_T table.
Changes all error statuses for the transaction errors to AD in the ADC_ERROR_TAB table; this essentially makes any remaining errors for the transaction irrelevant because the transaction has been voided.
001 Invalid Cashier Number
002 Invalid Employee Number
004 Invalid Store
006 Invalid Salesperson
010 Invalid Register/Store
012 Invalid SKU
346 RUN_ORDER_START
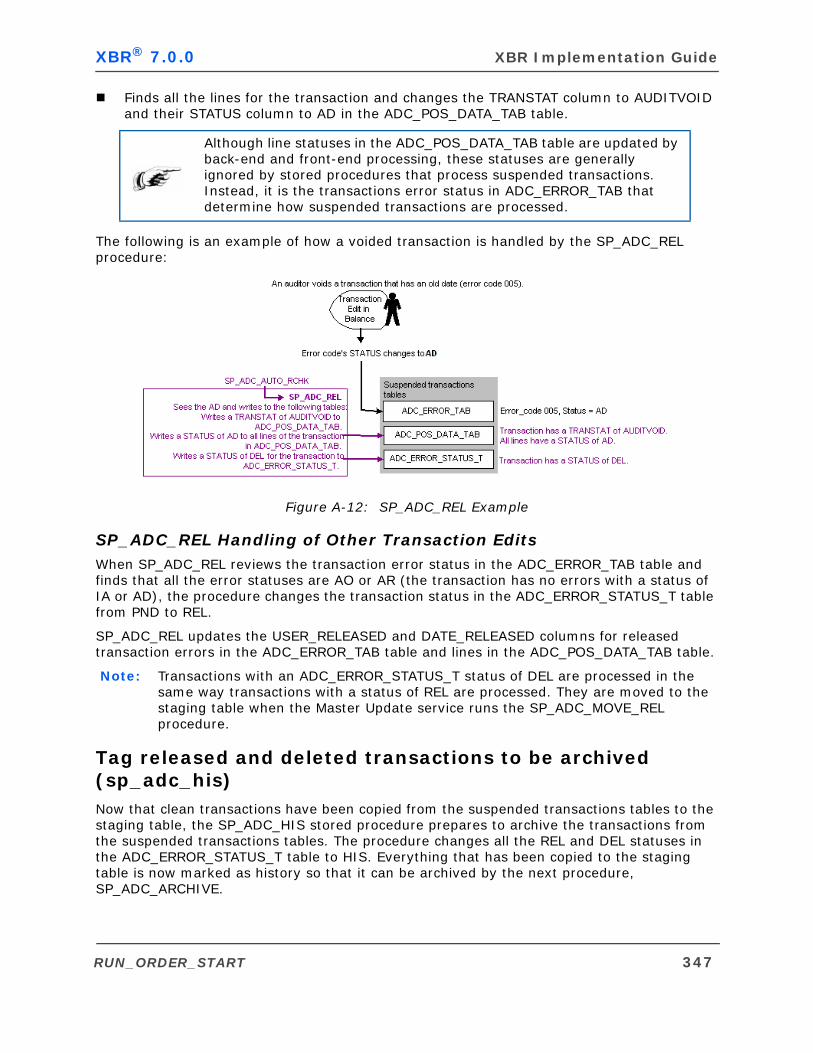
XBR® 7.0.0 XBR Implementation Guide
Finds all the lines for the transaction and changes the TRANSTAT column to AUDITVOID and their STATUS column to AD in the ADC_POS_DATA_TAB table.
The following is an example of how a voided transaction is handled by the SP_ADC_REL procedure:
Figure A-12: SP_ADC_REL Example
SP_ADC_REL Handling of Other Transaction EditsWhen SP_ADC_REL reviews the transaction error status in the ADC_ERROR_TAB table and finds that all the error statuses are AO or AR (the transaction has no errors with a status of IA or AD), the procedure changes the transaction status in the ADC_ERROR_STATUS_T table from PND to REL.
SP_ADC_REL updates the USER_RELEASED and DATE_RELEASED columns for released transaction errors in the ADC_ERROR_TAB table and lines in the ADC_POS_DATA_TAB table.
Note: Transactions with an ADC_ERROR_STATUS_T status of DEL are processed in the same way transactions with a status of REL are processed. They are moved to the staging table when the Master Update service runs the SP_ADC_MOVE_REL procedure.
Tag released and deleted transactions to be archived (sp_adc_his)Now that clean transactions have been copied from the suspended transactions tables to the staging table, the SP_ADC_HIS stored procedure prepares to archive the transactions from the suspended transactions tables. The procedure changes all the REL and DEL statuses in the ADC_ERROR_STATUS_T table to HIS. Everything that has been copied to the staging table is now marked as history so that it can be archived by the next procedure, SP_ADC_ARCHIVE.
Although line statuses in the ADC_POS_DATA_TAB table are updated by back-end and front-end processing, these statuses are generally ignored by stored procedures that process suspended transactions. Instead, it is the transactions error status in ADC_ERROR_TAB that determine how suspended transactions are processed.
RUN_ORDER_START 347
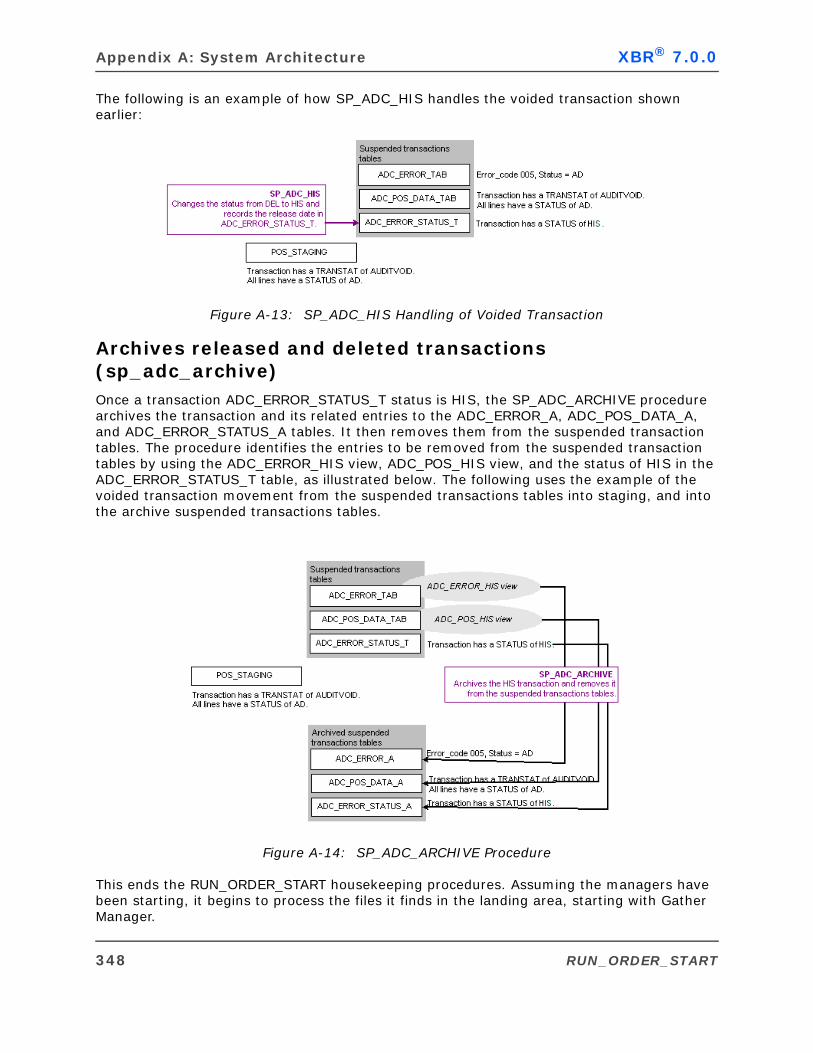
Appendix A: System Architecture XBR® 7.0.0
The following is an example of how SP_ADC_HIS handles the voided transaction shown earlier:
Figure A-13: SP_ADC_HIS Handling of Voided Transaction
Archives released and deleted transactions (sp_adc_archive)Once a transaction ADC_ERROR_STATUS_T status is HIS, the SP_ADC_ARCHIVE procedure archives the transaction and its related entries to the ADC_ERROR_A, ADC_POS_DATA_A, and ADC_ERROR_STATUS_A tables. It then removes them from the suspended transaction tables. The procedure identifies the entries to be removed from the suspended transaction tables by using the ADC_ERROR_HIS view, ADC_POS_HIS view, and the status of HIS in the ADC_ERROR_STATUS_T table, as illustrated below. The following uses the example of the voided transaction movement from the suspended transactions tables into staging, and into the archive suspended transactions tables.
Figure A-14: SP_ADC_ARCHIVE Procedure
This ends the RUN_ORDER_START housekeeping procedures. Assuming the managers have been starting, it begins to process the files it finds in the landing area, starting with Gather Manager.
348 RUN_ORDER_START
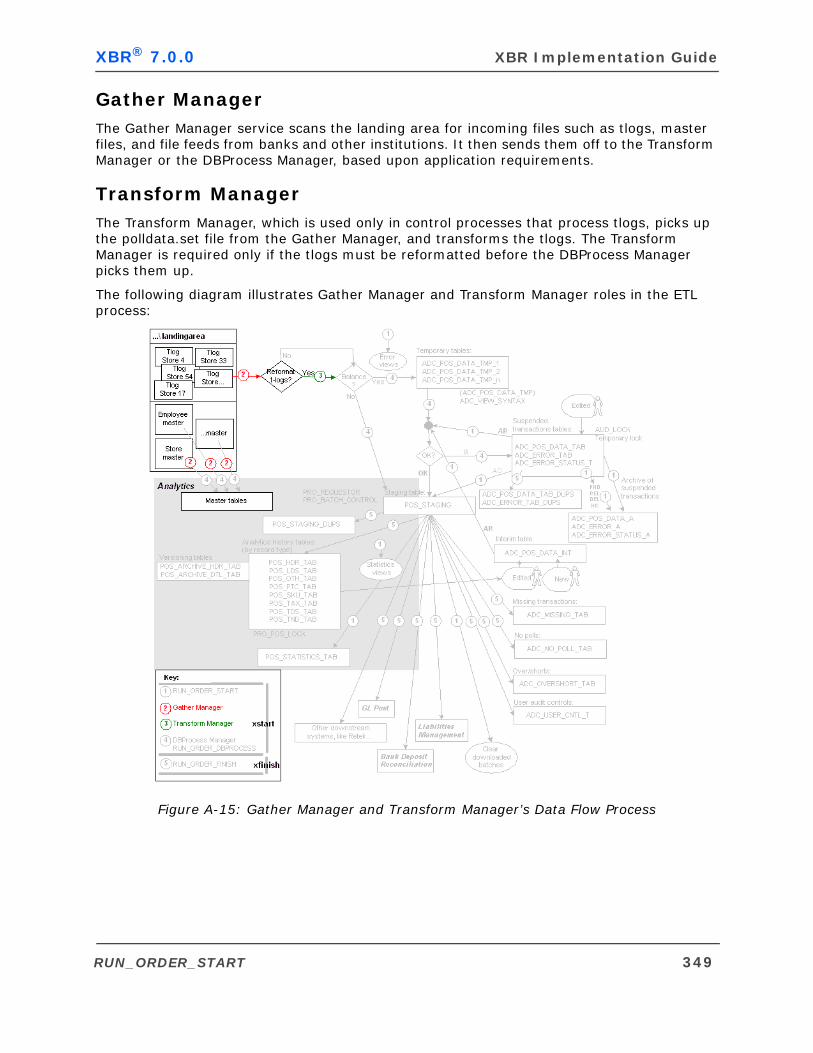
XBR® 7.0.0 XBR Implementation Guide
Gather Manager The Gather Manager service scans the landing area for incoming files such as tlogs, master files, and file feeds from banks and other institutions. It then sends them off to the Transform Manager or the DBProcess Manager, based upon application requirements.
Transform Manager The Transform Manager, which is used only in control processes that process tlogs, picks up the polldata.set file from the Gather Manager, and transforms the tlogs. The Transform Manager is required only if the tlogs must be reformatted before the DBProcess Manager picks them up.
The following diagram illustrates Gather Manager and Transform Manager roles in the ETL process:
Figure A-15: Gather Manager and Transform Manager’s Data Flow Process
RUN_ORDER_START 349
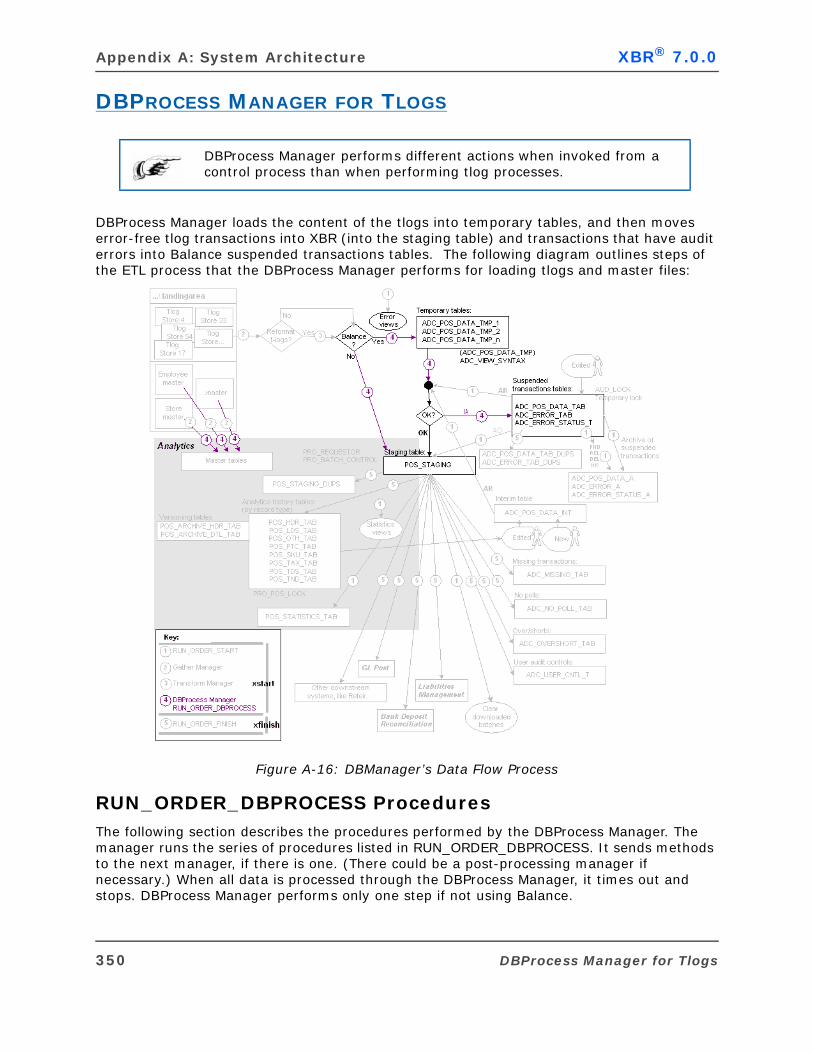
Appendix A: System Architecture XBR® 7.0.0
DBPROCESS MANAGER FOR TLOGS
DBProcess Manager loads the content of the tlogs into temporary tables, and then moves error-free tlog transactions into XBR (into the staging table) and transactions that have audit errors into Balance suspended transactions tables. The following diagram outlines steps of the ETL process that the DBProcess Manager performs for loading tlogs and master files:
Figure A-16: DBManager’s Data Flow Process
RUN_ORDER_DBPROCESS ProceduresThe following section describes the procedures performed by the DBProcess Manager. The manager runs the series of procedures listed in RUN_ORDER_DBPROCESS. It sends methods to the next manager, if there is one. (There could be a post-processing manager if necessary.) When all data is processed through the DBProcess Manager, it times out and stops. DBProcess Manager performs only one step if not using Balance.
DBProcess Manager performs different actions when invoked from a control process than when performing tlog processes.
350 DBProcess Manager for Tlogs
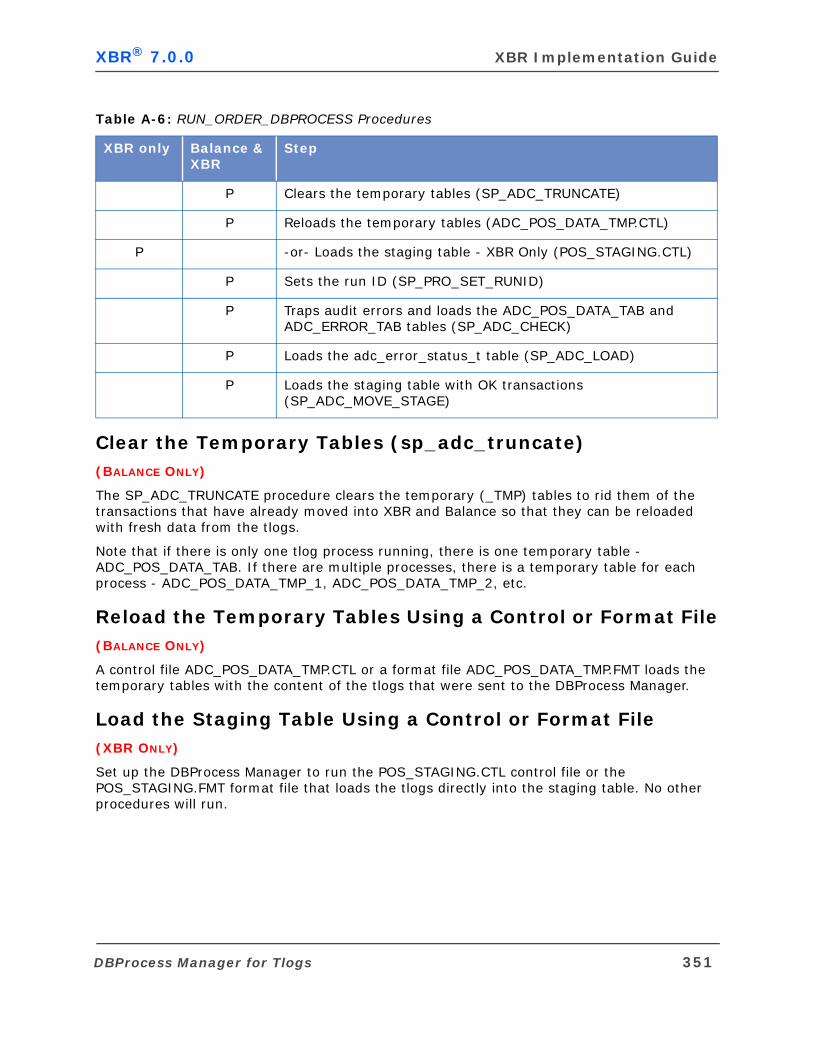
XBR® 7.0.0 XBR Implementation Guide
Clear the Temporary Tables (sp_adc_truncate) (BALANCE ONLY)
The SP_ADC_TRUNCATE procedure clears the temporary (_TMP) tables to rid them of the transactions that have already moved into XBR and Balance so that they can be reloaded with fresh data from the tlogs.
Note that if there is only one tlog process running, there is one temporary table - ADC_POS_DATA_TAB. If there are multiple processes, there is a temporary table for each process - ADC_POS_DATA_TMP_1, ADC_POS_DATA_TMP_2, etc.
Reload the Temporary Tables Using a Control or Format File(BALANCE ONLY)
A control file ADC_POS_DATA_TMP.CTL or a format file ADC_POS_DATA_TMP.FMT loads the temporary tables with the content of the tlogs that were sent to the DBProcess Manager.
Load the Staging Table Using a Control or Format File(XBR ONLY)
Set up the DBProcess Manager to run the POS_STAGING.CTL control file or the POS_STAGING.FMT format file that loads the tlogs directly into the staging table. No other procedures will run.
Table A-6: RUN_ORDER_DBPROCESS Procedures
XBR only Balance & XBR
Step
P Clears the temporary tables (SP_ADC_TRUNCATE)
P Reloads the temporary tables (ADC_POS_DATA_TMP.CTL)
P -or- Loads the staging table - XBR Only (POS_STAGING.CTL)
P Sets the run ID (SP_PRO_SET_RUNID)
P Traps audit errors and loads the ADC_POS_DATA_TAB and ADC_ERROR_TAB tables (SP_ADC_CHECK)
P Loads the adc_error_status_t table (SP_ADC_LOAD)
P Loads the staging table with OK transactions (SP_ADC_MOVE_STAGE)
DBProcess Manager for Tlogs 351
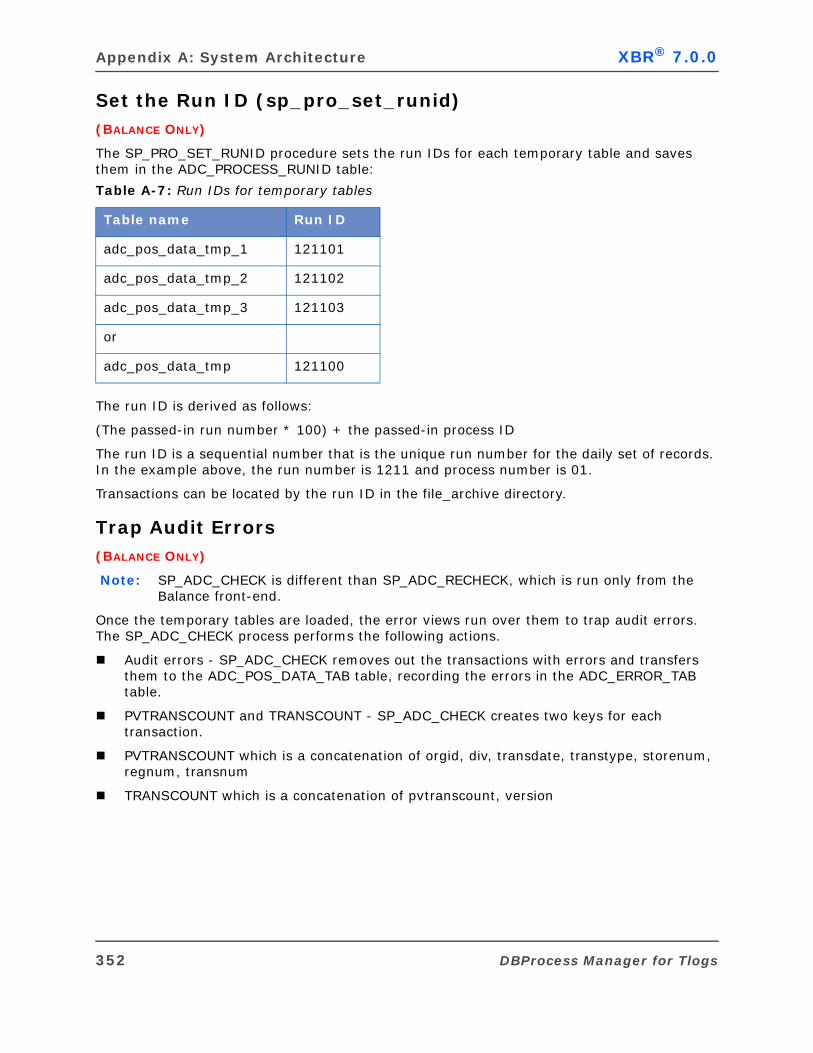
Appendix A: System Architecture XBR® 7.0.0
Set the Run ID (sp_pro_set_runid) (BALANCE ONLY)
The SP_PRO_SET_RUNID procedure sets the run IDs for each temporary table and saves them in the ADC_PROCESS_RUNID table:
The run ID is derived as follows:
(The passed-in run number * 100) + the passed-in process ID
The run ID is a sequential number that is the unique run number for the daily set of records. In the example above, the run number is 1211 and process number is 01.
Transactions can be located by the run ID in the file_archive directory.
Trap Audit Errors (BALANCE ONLY)
Note: SP_ADC_CHECK is different than SP_ADC_RECHECK, which is run only from the Balance front-end.
Once the temporary tables are loaded, the error views run over them to trap audit errors. The SP_ADC_CHECK process performs the following actions.
Audit errors - SP_ADC_CHECK removes out the transactions with errors and transfers them to the ADC_POS_DATA_TAB table, recording the errors in the ADC_ERROR_TAB table.
PVTRANSCOUNT and TRANSCOUNT - SP_ADC_CHECK creates two keys for each transaction.
PVTRANSCOUNT which is a concatenation of orgid, div, transdate, transtype, storenum, regnum, transnum
TRANSCOUNT which is a concatenation of pvtranscount, version
Table A-7: Run IDs for temporary tables
Table name Run ID
adc_pos_data_tmp_1 121101
adc_pos_data_tmp_2 121102
adc_pos_data_tmp_3 121103
or
adc_pos_data_tmp 121100
352 DBProcess Manager for Tlogs
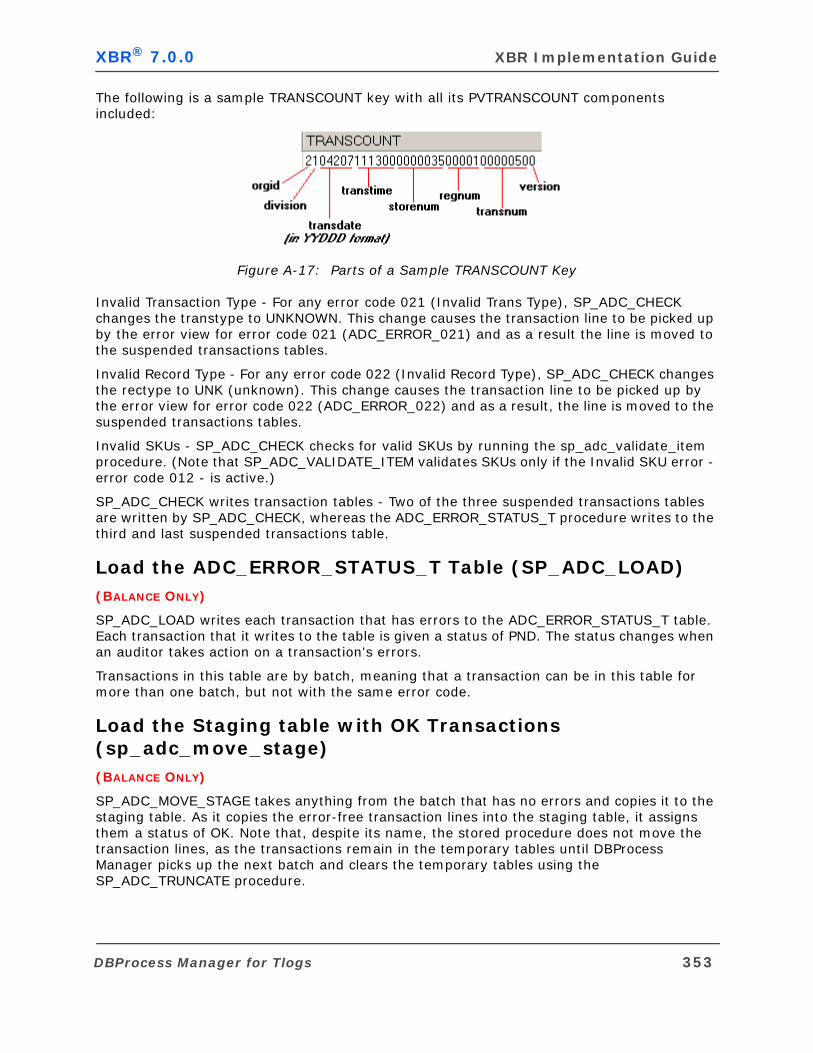
XBR® 7.0.0 XBR Implementation Guide
The following is a sample TRANSCOUNT key with all its PVTRANSCOUNT components included:
Figure A-17: Parts of a Sample TRANSCOUNT Key
Invalid Transaction Type - For any error code 021 (Invalid Trans Type), SP_ADC_CHECK changes the transtype to UNKNOWN. This change causes the transaction line to be picked up by the error view for error code 021 (ADC_ERROR_021) and as a result the line is moved to the suspended transactions tables.
Invalid Record Type - For any error code 022 (Invalid Record Type), SP_ADC_CHECK changes the rectype to UNK (unknown). This change causes the transaction line to be picked up by the error view for error code 022 (ADC_ERROR_022) and as a result, the line is moved to the suspended transactions tables.
Invalid SKUs - SP_ADC_CHECK checks for valid SKUs by running the sp_adc_validate_item procedure. (Note that SP_ADC_VALIDATE_ITEM validates SKUs only if the Invalid SKU error - error code 012 - is active.)
SP_ADC_CHECK writes transaction tables - Two of the three suspended transactions tables are written by SP_ADC_CHECK, whereas the ADC_ERROR_STATUS_T procedure writes to the third and last suspended transactions table.
Load the ADC_ERROR_STATUS_T Table (SP_ADC_LOAD) (BALANCE ONLY)
SP_ADC_LOAD writes each transaction that has errors to the ADC_ERROR_STATUS_T table. Each transaction that it writes to the table is given a status of PND. The status changes when an auditor takes action on a transaction's errors.
Transactions in this table are by batch, meaning that a transaction can be in this table for more than one batch, but not with the same error code.
Load the Staging table with OK Transactions (sp_adc_move_stage) (BALANCE ONLY)
SP_ADC_MOVE_STAGE takes anything from the batch that has no errors and copies it to the staging table. As it copies the error-free transaction lines into the staging table, it assigns them a status of OK. Note that, despite its name, the stored procedure does not move the transaction lines, as the transactions remain in the temporary tables until DBProcess Manager picks up the next batch and clears the temporary tables using the SP_ADC_TRUNCATE procedure.
DBProcess Manager for Tlogs 353
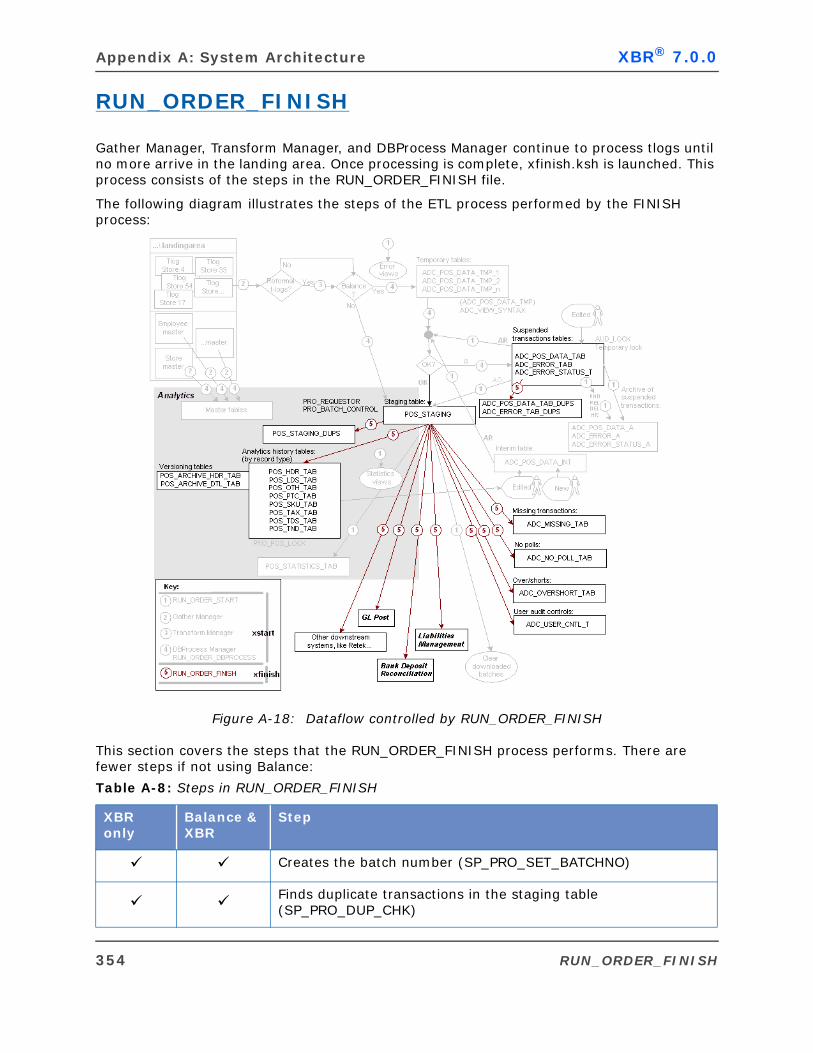
Appendix A: System Architecture XBR® 7.0.0
RUN_ORDER_FINISH
Gather Manager, Transform Manager, and DBProcess Manager continue to process tlogs until no more arrive in the landing area. Once processing is complete, xfinish.ksh is launched. This process consists of the steps in the RUN_ORDER_FINISH file.
The following diagram illustrates the steps of the ETL process performed by the FINISH process:
Figure A-18: Dataflow controlled by RUN_ORDER_FINISH
This section covers the steps that the RUN_ORDER_FINISH process performs. There are fewer steps if not using Balance:
Table A-8: Steps in RUN_ORDER_FINISH
XBR only
Balance & XBR
Step
Creates the batch number (SP_PRO_SET_BATCHNO)
Finds duplicate transactions in the staging table (SP_PRO_DUP_CHK)
354 RUN_ORDER_FINISH
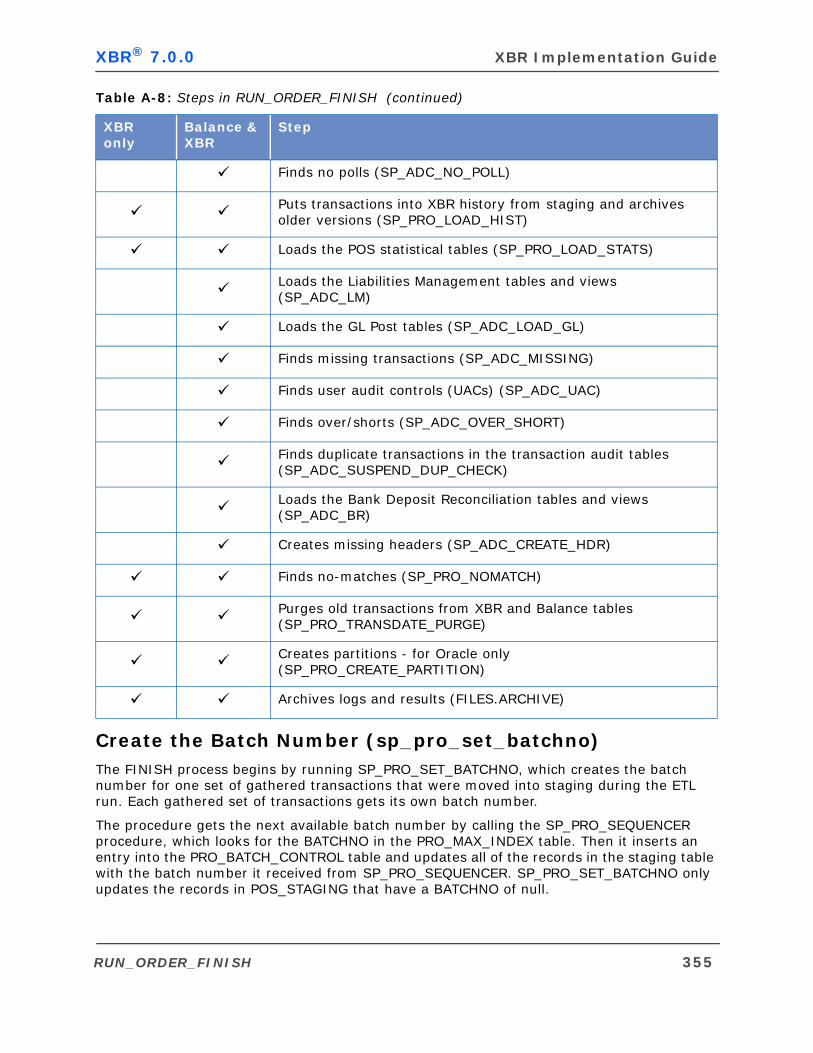
XBR® 7.0.0 XBR Implementation Guide
Create the Batch Number (sp_pro_set_batchno)The FINISH process begins by running SP_PRO_SET_BATCHNO, which creates the batch number for one set of gathered transactions that were moved into staging during the ETL run. Each gathered set of transactions gets its own batch number.
The procedure gets the next available batch number by calling the SP_PRO_SEQUENCER procedure, which looks for the BATCHNO in the PRO_MAX_INDEX table. Then it inserts an entry into the PRO_BATCH_CONTROL table and updates all of the records in the staging table with the batch number it received from SP_PRO_SEQUENCER. SP_PRO_SET_BATCHNO only updates the records in POS_STAGING that have a BATCHNO of null.
Finds no polls (SP_ADC_NO_POLL)
Puts transactions into XBR history from staging and archives older versions (SP_PRO_LOAD_HIST)
Loads the POS statistical tables (SP_PRO_LOAD_STATS)
Loads the Liabilities Management tables and views (SP_ADC_LM)
Loads the GL Post tables (SP_ADC_LOAD_GL)
Finds missing transactions (SP_ADC_MISSING)
Finds user audit controls (UACs) (SP_ADC_UAC)
Finds over/shorts (SP_ADC_OVER_SHORT)
Finds duplicate transactions in the transaction audit tables (SP_ADC_SUSPEND_DUP_CHECK)
Loads the Bank Deposit Reconciliation tables and views (SP_ADC_BR)
Creates missing headers (SP_ADC_CREATE_HDR)
Finds no-matches (SP_PRO_NOMATCH)
Purges old transactions from XBR and Balance tables (SP_PRO_TRANSDATE_PURGE)
Creates partitions - for Oracle only (SP_PRO_CREATE_PARTITION)
Archives logs and results (FILES.ARCHIVE)
Table A-8: Steps in RUN_ORDER_FINISH (continued)
XBR only
Balance & XBR
Step
RUN_ORDER_FINISH 355
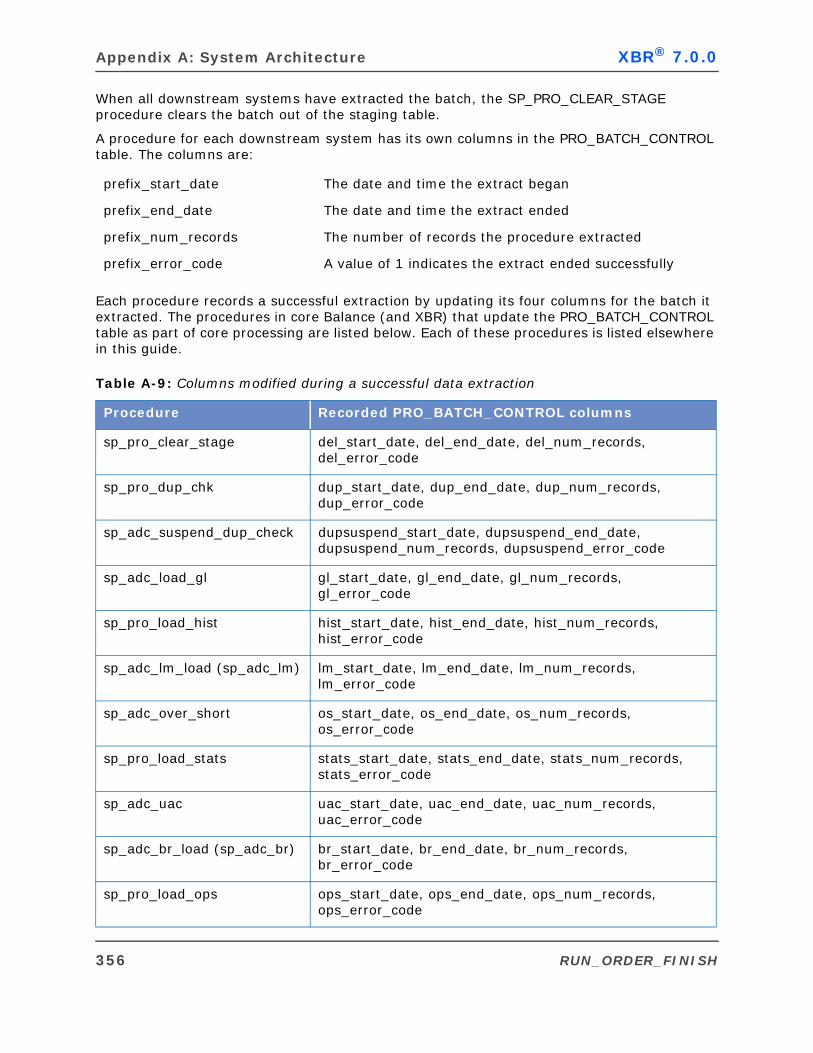
Appendix A: System Architecture XBR® 7.0.0
When all downstream systems have extracted the batch, the SP_PRO_CLEAR_STAGE procedure clears the batch out of the staging table.
A procedure for each downstream system has its own columns in the PRO_BATCH_CONTROL table. The columns are:
Each procedure records a successful extraction by updating its four columns for the batch it extracted. The procedures in core Balance (and XBR) that update the PRO_BATCH_CONTROL table as part of core processing are listed below. Each of these procedures is listed elsewhere in this guide.
prefix_start_date The date and time the extract began
prefix_end_date The date and time the extract ended
prefix_num_records The number of records the procedure extracted
prefix_error_code A value of 1 indicates the extract ended successfully
Table A-9: Columns modified during a successful data extraction
Procedure Recorded PRO_BATCH_CONTROL columns
sp_pro_clear_stage del_start_date, del_end_date, del_num_records, del_error_code
sp_pro_dup_chk dup_start_date, dup_end_date, dup_num_records, dup_error_code
sp_adc_suspend_dup_check dupsuspend_start_date, dupsuspend_end_date, dupsuspend_num_records, dupsuspend_error_code
sp_adc_load_gl gl_start_date, gl_end_date, gl_num_records, gl_error_code
sp_pro_load_hist hist_start_date, hist_end_date, hist_num_records, hist_error_code
sp_adc_lm_load (sp_adc_lm) lm_start_date, lm_end_date, lm_num_records, lm_error_code
sp_adc_over_short os_start_date, os_end_date, os_num_records, os_error_code
sp_pro_load_stats stats_start_date, stats_end_date, stats_num_records, stats_error_code
sp_adc_uac uac_start_date, uac_end_date, uac_num_records, uac_error_code
sp_adc_br_load (sp_adc_br) br_start_date, br_end_date, br_num_records, br_error_code
sp_pro_load_ops ops_start_date, ops_end_date, ops_num_records, ops_error_code
356 RUN_ORDER_FINISH
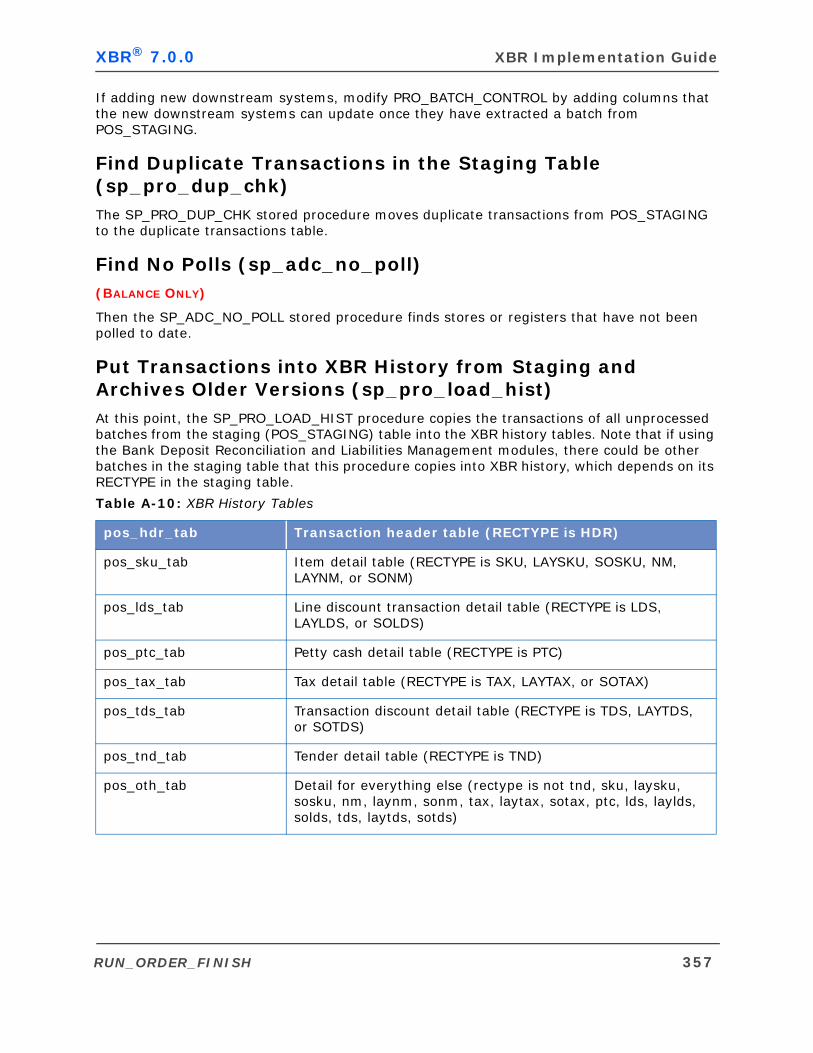
XBR® 7.0.0 XBR Implementation Guide
If adding new downstream systems, modify PRO_BATCH_CONTROL by adding columns that the new downstream systems can update once they have extracted a batch from POS_STAGING.
Find Duplicate Transactions in the Staging Table (sp_pro_dup_chk)The SP_PRO_DUP_CHK stored procedure moves duplicate transactions from POS_STAGING to the duplicate transactions table.
Find No Polls (sp_adc_no_poll)(BALANCE ONLY)
Then the SP_ADC_NO_POLL stored procedure finds stores or registers that have not been polled to date.
Put Transactions into XBR History from Staging and Archives Older Versions (sp_pro_load_hist)At this point, the SP_PRO_LOAD_HIST procedure copies the transactions of all unprocessed batches from the staging (POS_STAGING) table into the XBR history tables. Note that if using the Bank Deposit Reconciliation and Liabilities Management modules, there could be other batches in the staging table that this procedure copies into XBR history, which depends on its RECTYPE in the staging table.
Table A-10: XBR History Tables
pos_hdr_tab Transaction header table (RECTYPE is HDR)
pos_sku_tab Item detail table (RECTYPE is SKU, LAYSKU, SOSKU, NM, LAYNM, or SONM)
pos_lds_tab Line discount transaction detail table (RECTYPE is LDS, LAYLDS, or SOLDS)
pos_ptc_tab Petty cash detail table (RECTYPE is PTC)
pos_tax_tab Tax detail table (RECTYPE is TAX, LAYTAX, or SOTAX)
pos_tds_tab Transaction discount detail table (RECTYPE is TDS, LAYTDS, or SOTDS)
pos_tnd_tab Tender detail table (RECTYPE is TND)
pos_oth_tab Detail for everything else (rectype is not tnd, sku, laysku, sosku, nm, laynm, sonm, tax, laytax, sotax, ptc, lds, laylds, solds, tds, laytds, sotds)
RUN_ORDER_FINISH 357

Appendix A: System Architecture XBR® 7.0.0
Once done, SP_PRO_LOAD_HIST updates the PRO_BATCH_CONTROL table HIST_ columns to indicate that the batch has been moved into XBR history.
Figure A-19: PRO_BATCH_CONTROL HIST_ Columns
SP_PRO_LOAD_HIST sends only the most recent version of a transaction into the XBR history tables. Versioning tables are populated only if using Balance. It puts all other versions into the versioning tables, which are:
POS_ARCHIVE_HDR_TAB and
POS_ARCHIVE_DTL_TAB.
If when SP_PRO_LOAD_HIST runs, a transaction has a version of 0, it goes straight into the XBR history tables.
If a transaction has a version higher than 0, the transaction with the highest version number goes into the XBR history tables. SP_PRO_LOAD_HIST puts all lower versions into POS_ARCHIVE_HDR_TAB and POS_ARCHIVE_DTL_TAB. This means that lower versions come out of the XBR history table. Lower versions of header records go into the POS_ARCHIVE_HDR_TAB table, and lower versions of detail records go into the POS_ARCHIVE_DTL_TAB table.
The following is an example.
Figure A-20: Record Versioning Example
358 RUN_ORDER_FINISH
XBR® 7.0.0 XBR Implementation Guide
The two-versioning tables maintain the version history for the length of time specified in the PRO_TRANSDATE_PURGE table, and are purged when the SP_PRO_TRANSDATE_PURGE procedure runs during nightly processing.
Creating VersionsWhen the user makes a change to something in XBR history, the original remains version 0 and the front-end backs out the original values and stores this reversal as version 1. Then the new values that the user entered are saved by the front-end as version 2. Version 0 is locked in the XBR history tables, and versions 1 and 2 are saved in the interim table (unless, upon saving, the user introduced an audit error, in which case versions 1 and 2 are saved in the suspended transactions tables). So when the SP_PRO_LOAD_HIST procedure copies transactions out of the POS_STAGING table and into XBR history, it saves version 2 to the XBR history tables and relegates versions 0 and 1 to the versioning tables.
If a user then modifies the transaction again, he or she is modifying version 2, which gets locked in the XBR history tables and remains locked until the transaction is loaded back into the XBR history tables by the SP_PRO_LOAD_HIST procedure. When the user saves his or her changes, version 3 is the reversal of version 2, and version 4 contains the new values. At this point, version 2 is locked in the XBR history tables, and versions 3 and 4 are in the interim table (assuming there are no audit errors). When the ETL process runs that night:
SP_ADC_MOVE_INT sweeps versions 3 and 4 from the interim table into POS_STAGING, then
SP_PRO_LOAD_HIST:
-- Puts version 4 (the highest version number) into the XBR history tables.
-- Puts version 3 into the versioning tables.
-- Moves version 2 out of the XBR history tables into the archive tables.
Versioning Tables The version that is saved in the XBR history tables will always be an even-numbered version. If there are prior versions of a transaction in the versioning table, the table will contain the original even-numbered version and its odd-numbered reversal version. Following the example above, there would be four versions in the version tables: the original transaction, version 0; the reversal of the original transaction, version 1; the modified transaction, version 2; and the reversal of the modified transaction, version 3. The highest and most current version, Version 4, is in the XBR history tables.
Post Void - DetailsIf a POS system does not post detail for post voiding transactions in its tlog, this detail needs to be created in order to evaluate the SKU and tender details of the post void. This detail is generated from the original or post voided transaction.
All post void statistic buckets are aggregated using the post voiding transaction.
Whether the SP_PRO_LOAD_HIST procedure uses the post void detail written by the ETL or needs to create the detail from the post voided transaction can be enabled or disabled with the following entry to the SP_PRO_VARIABLES table:
RUN_ORDER_FINISH 359
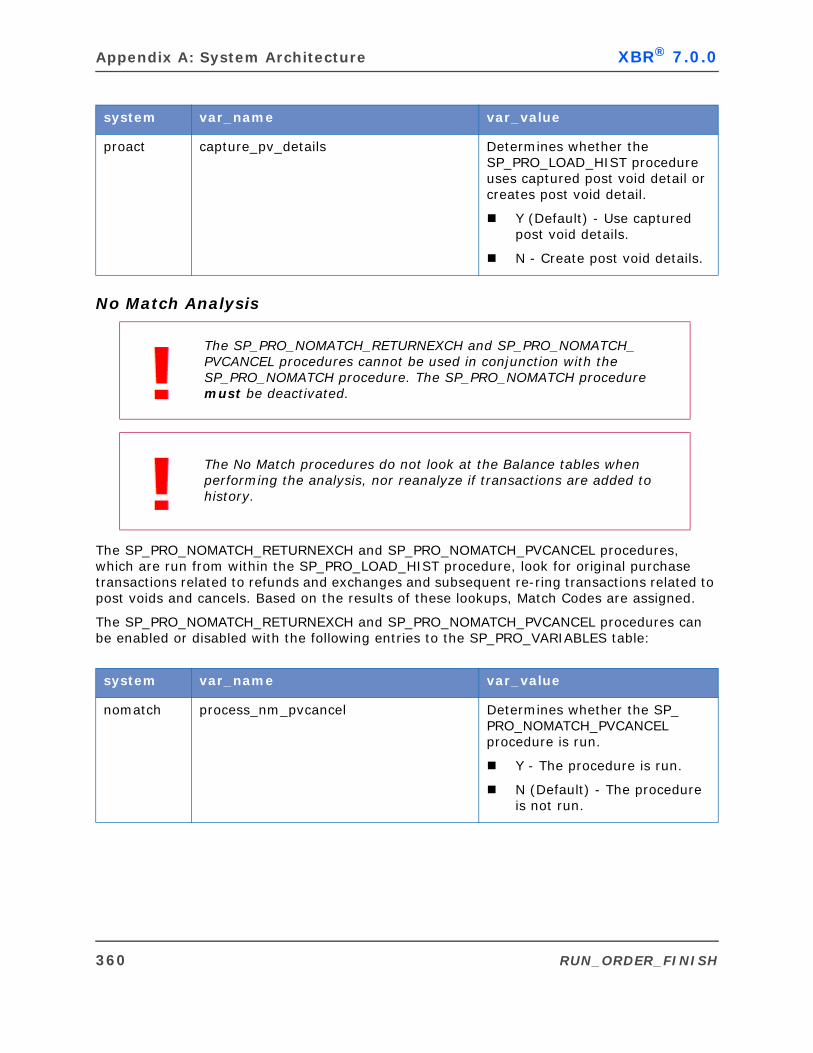
Appendix A: System Architecture XBR® 7.0.0
No Match Analysis
The SP_PRO_NOMATCH_RETURNEXCH and SP_PRO_NOMATCH_PVCANCEL procedures, which are run from within the SP_PRO_LOAD_HIST procedure, look for original purchase transactions related to refunds and exchanges and subsequent re-ring transactions related to post voids and cancels. Based on the results of these lookups, Match Codes are assigned.
The SP_PRO_NOMATCH_RETURNEXCH and SP_PRO_NOMATCH_PVCANCEL procedures can be enabled or disabled with the following entries to the SP_PRO_VARIABLES table:
system var_name var_value
proact capture_pv_details Determines whether the SP_PRO_LOAD_HIST procedure uses captured post void detail or creates post void detail.
Y (Default) - Use captured post void details.
N - Create post void details.
The SP_PRO_NOMATCH_RETURNEXCH and SP_PRO_NOMATCH_PVCANCEL procedures cannot be used in conjunction with the SP_PRO_NOMATCH procedure. The SP_PRO_NOMATCH procedure must be deactivated.
The No Match procedures do not look at the Balance tables when performing the analysis, nor reanalyze if transactions are added to history.
system var_name var_value
nomatch process_nm_pvcancel Determines whether the SP_PRO_NOMATCH_PVCANCEL procedure is run.
Y - The procedure is run.
N (Default) - The procedure is not run.
360 RUN_ORDER_FINISH
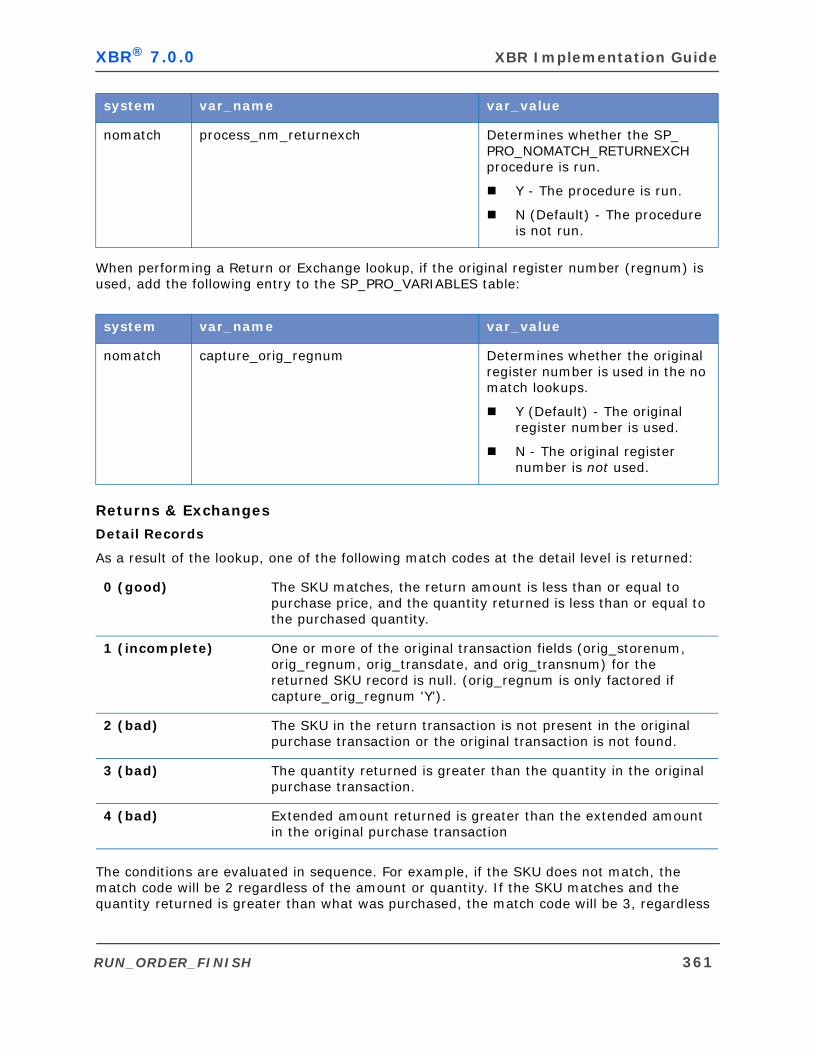
XBR® 7.0.0 XBR Implementation Guide
When performing a Return or Exchange lookup, if the original register number (regnum) is used, add the following entry to the SP_PRO_VARIABLES table:
Returns & Exchanges
Detail Records
As a result of the lookup, one of the following match codes at the detail level is returned:
The conditions are evaluated in sequence. For example, if the SKU does not match, the match code will be 2 regardless of the amount or quantity. If the SKU matches and the quantity returned is greater than what was purchased, the match code will be 3, regardless
nomatch process_nm_returnexch Determines whether the SP_PRO_NOMATCH_RETURNEXCH procedure is run.
Y - The procedure is run.
N (Default) - The procedure is not run.
system var_name var_value
nomatch capture_orig_regnum Determines whether the original register number is used in the no match lookups.
Y (Default) - The original register number is used.
N - The original register number is not used.
0 (good) The SKU matches, the return amount is less than or equal to purchase price, and the quantity returned is less than or equal to the purchased quantity.
1 (incomplete) One or more of the original transaction fields (orig_storenum, orig_regnum, orig_transdate, and orig_transnum) for the returned SKU record is null. (orig_regnum is only factored if capture_orig_regnum 'Y').
2 (bad) The SKU in the return transaction is not present in the original purchase transaction or the original transaction is not found.
3 (bad) The quantity returned is greater than the quantity in the original purchase transaction.
4 (bad) Extended amount returned is greater than the extended amount in the original purchase transaction
system var_name var_value
RUN_ORDER_FINISH 361
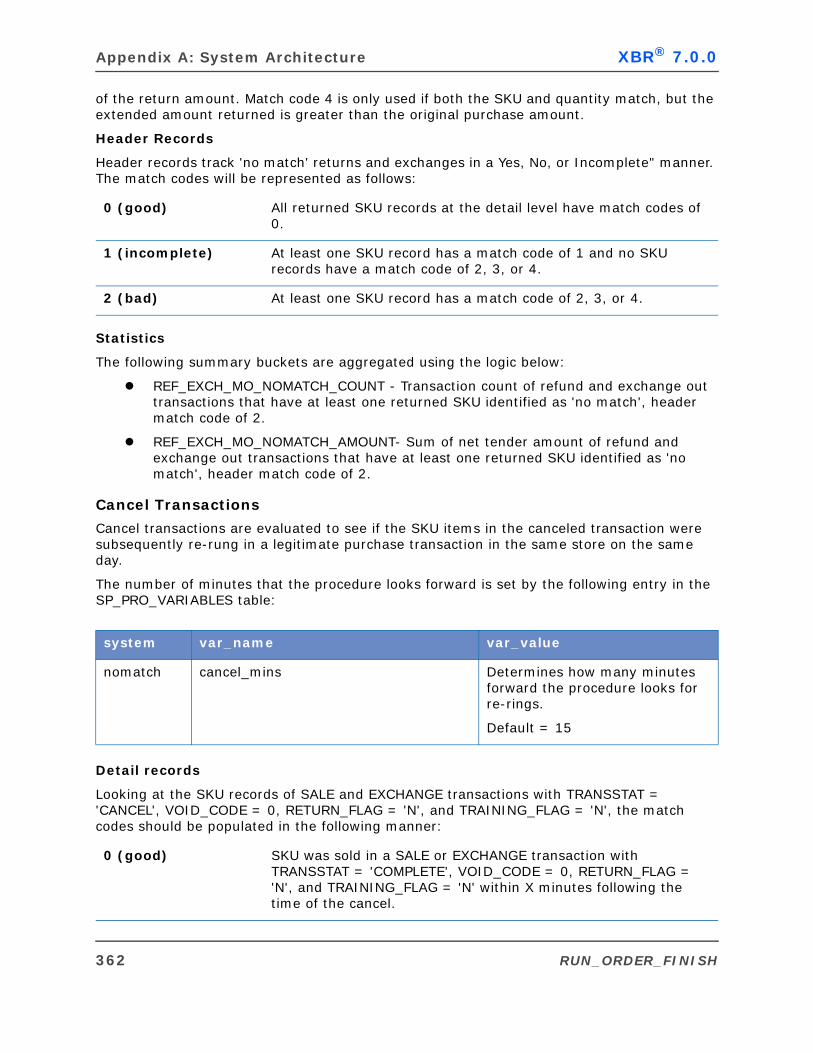
Appendix A: System Architecture XBR® 7.0.0
of the return amount. Match code 4 is only used if both the SKU and quantity match, but the extended amount returned is greater than the original purchase amount.
Header Records
Header records track 'no match' returns and exchanges in a Yes, No, or Incomplete" manner. The match codes will be represented as follows:
Statistics
The following summary buckets are aggregated using the logic below:
REF_EXCH_MO_NOMATCH_COUNT - Transaction count of refund and exchange out transactions that have at least one returned SKU identified as 'no match', header match code of 2.
REF_EXCH_MO_NOMATCH_AMOUNT- Sum of net tender amount of refund and exchange out transactions that have at least one returned SKU identified as 'no match', header match code of 2.
Cancel Transactions
Cancel transactions are evaluated to see if the SKU items in the canceled transaction were subsequently re-rung in a legitimate purchase transaction in the same store on the same day.
The number of minutes that the procedure looks forward is set by the following entry in the SP_PRO_VARIABLES table:
Detail records
Looking at the SKU records of SALE and EXCHANGE transactions with TRANSSTAT = 'CANCEL', VOID_CODE = 0, RETURN_FLAG = 'N', and TRAINING_FLAG = 'N', the match codes should be populated in the following manner:
0 (good) All returned SKU records at the detail level have match codes of 0.
1 (incomplete) At least one SKU record has a match code of 1 and no SKU records have a match code of 2, 3, or 4.
2 (bad) At least one SKU record has a match code of 2, 3, or 4.
system var_name var_value
nomatch cancel_mins Determines how many minutes forward the procedure looks for re-rings.
Default = 15
0 (good) SKU was sold in a SALE or EXCHANGE transaction with TRANSSTAT = 'COMPLETE', VOID_CODE = 0, RETURN_FLAG = 'N', and TRAINING_FLAG = 'N' within X minutes following the time of the cancel.
362 RUN_ORDER_FINISH
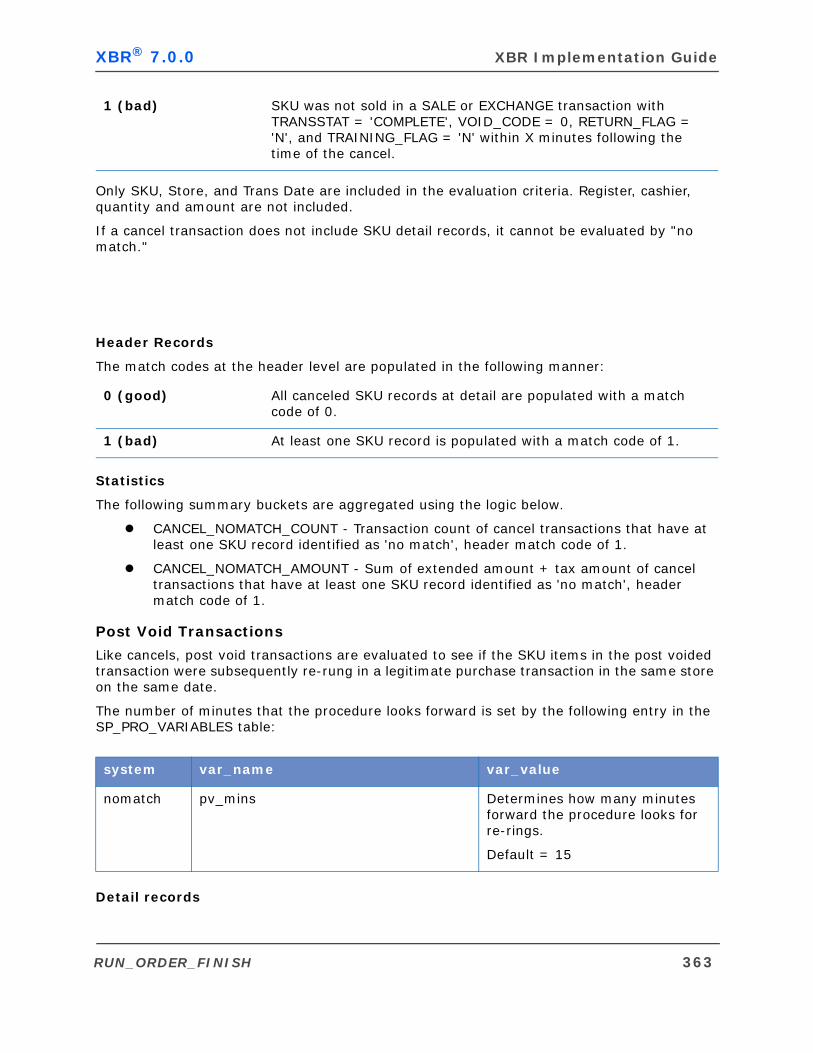
XBR® 7.0.0 XBR Implementation Guide
Only SKU, Store, and Trans Date are included in the evaluation criteria. Register, cashier, quantity and amount are not included.
If a cancel transaction does not include SKU detail records, it cannot be evaluated by "no match."
Header Records
The match codes at the header level are populated in the following manner:
Statistics
The following summary buckets are aggregated using the logic below.
CANCEL_NOMATCH_COUNT - Transaction count of cancel transactions that have at least one SKU record identified as 'no match', header match code of 1.
CANCEL_NOMATCH_AMOUNT - Sum of extended amount + tax amount of cancel transactions that have at least one SKU record identified as 'no match', header match code of 1.
Post Void Transactions
Like cancels, post void transactions are evaluated to see if the SKU items in the post voided transaction were subsequently re-rung in a legitimate purchase transaction in the same store on the same date.
The number of minutes that the procedure looks forward is set by the following entry in the SP_PRO_VARIABLES table:
Detail records
1 (bad) SKU was not sold in a SALE or EXCHANGE transaction with TRANSSTAT = 'COMPLETE', VOID_CODE = 0, RETURN_FLAG = 'N', and TRAINING_FLAG = 'N' within X minutes following the time of the cancel.
0 (good) All canceled SKU records at detail are populated with a match code of 0.
1 (bad) At least one SKU record is populated with a match code of 1.
system var_name var_value
nomatch pv_mins Determines how many minutes forward the procedure looks for re-rings.
Default = 15
RUN_ORDER_FINISH 363
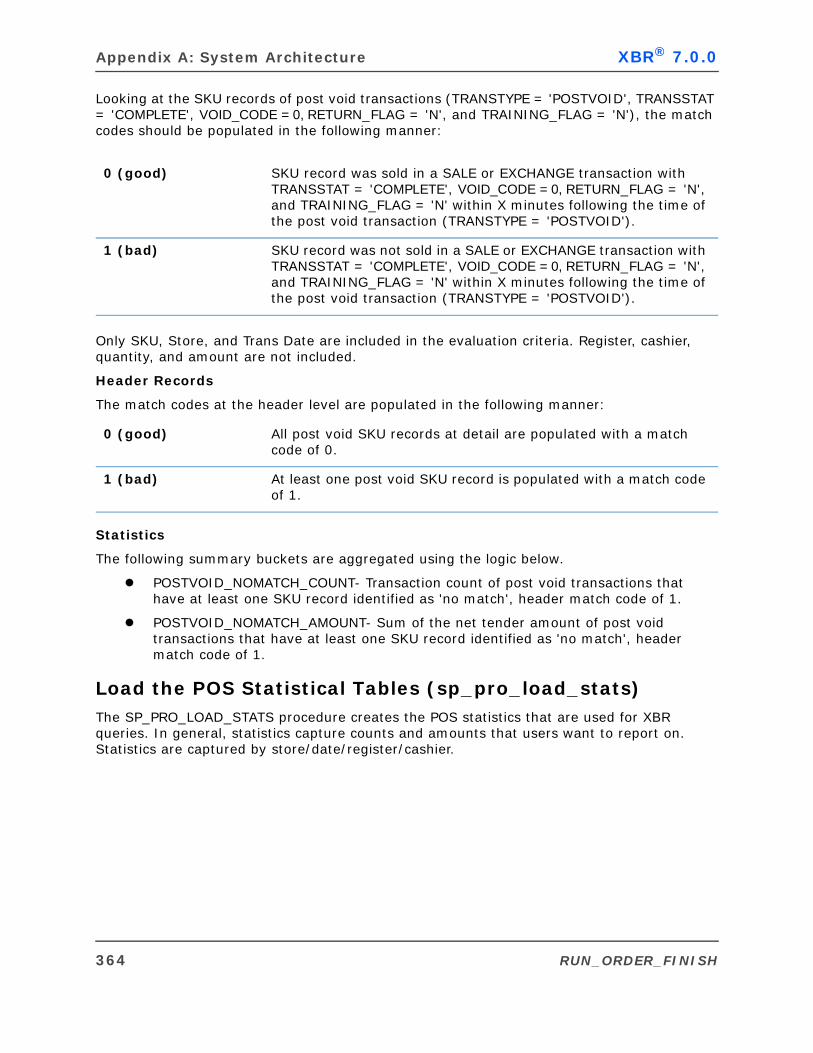
Appendix A: System Architecture XBR® 7.0.0
Looking at the SKU records of post void transactions (TRANSTYPE = 'POSTVOID', TRANSSTAT = 'COMPLETE', VOID_CODE = 0, RETURN_FLAG = 'N', and TRAINING_FLAG = 'N'), the match codes should be populated in the following manner:
Only SKU, Store, and Trans Date are included in the evaluation criteria. Register, cashier, quantity, and amount are not included.
Header Records
The match codes at the header level are populated in the following manner:
Statistics
The following summary buckets are aggregated using the logic below.
POSTVOID_NOMATCH_COUNT- Transaction count of post void transactions that have at least one SKU record identified as 'no match', header match code of 1.
POSTVOID_NOMATCH_AMOUNT- Sum of the net tender amount of post void transactions that have at least one SKU record identified as 'no match', header match code of 1.
Load the POS Statistical Tables (sp_pro_load_stats)The SP_PRO_LOAD_STATS procedure creates the POS statistics that are used for XBR queries. In general, statistics capture counts and amounts that users want to report on. Statistics are captured by store/date/register/cashier.
0 (good) SKU record was sold in a SALE or EXCHANGE transaction with TRANSSTAT = 'COMPLETE', VOID_CODE = 0, RETURN_FLAG = 'N', and TRAINING_FLAG = 'N' within X minutes following the time of the post void transaction (TRANSTYPE = 'POSTVOID').
1 (bad) SKU record was not sold in a SALE or EXCHANGE transaction with TRANSSTAT = 'COMPLETE', VOID_CODE = 0, RETURN_FLAG = 'N', and TRAINING_FLAG = 'N' within X minutes following the time of the post void transaction (TRANSTYPE = 'POSTVOID').
0 (good) All post void SKU records at detail are populated with a match code of 0.
1 (bad) At least one post void SKU record is populated with a match code of 1.
364 RUN_ORDER_FINISH
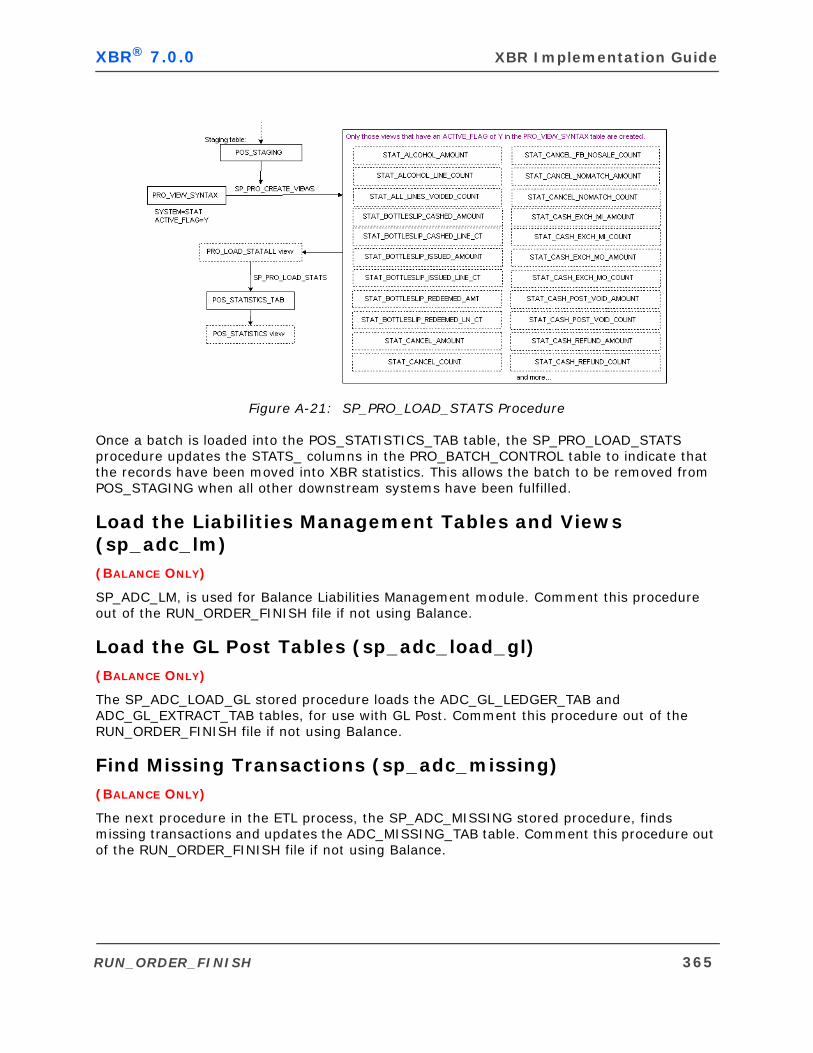
XBR® 7.0.0 XBR Implementation Guide
Figure A-21: SP_PRO_LOAD_STATS Procedure
Once a batch is loaded into the POS_STATISTICS_TAB table, the SP_PRO_LOAD_STATS procedure updates the STATS_ columns in the PRO_BATCH_CONTROL table to indicate that the records have been moved into XBR statistics. This allows the batch to be removed from POS_STAGING when all other downstream systems have been fulfilled.
Load the Liabilities Management Tables and Views (sp_adc_lm)(BALANCE ONLY)
SP_ADC_LM, is used for Balance Liabilities Management module. Comment this procedure out of the RUN_ORDER_FINISH file if not using Balance.
Load the GL Post Tables (sp_adc_load_gl)(BALANCE ONLY)
The SP_ADC_LOAD_GL stored procedure loads the ADC_GL_LEDGER_TAB and ADC_GL_EXTRACT_TAB tables, for use with GL Post. Comment this procedure out of the RUN_ORDER_FINISH file if not using Balance.
Find Missing Transactions (sp_adc_missing)(BALANCE ONLY)
The next procedure in the ETL process, the SP_ADC_MISSING stored procedure, finds missing transactions and updates the ADC_MISSING_TAB table. Comment this procedure out of the RUN_ORDER_FINISH file if not using Balance.
RUN_ORDER_FINISH 365

Appendix A: System Architecture XBR® 7.0.0
Find User Audit Controls (UACS) (sp_adc_uac)(BALANCE ONLY)
The SP_ADC_UAC stored procedure finds user audit controls (UACs) and updates the ADC_USER_CNTL_T table. Comment this procedure out of the RUN_ORDER_FINISH file if not using Balance.
Find Over/Shorts (sp_adc_over_short)(BALANCE ONLY)
The next procedure, the SP_ADC_OVER_SHORT stored procedure, finds over/shorts and updates the ADC_OVERSHORT_TAB table. Comment this procedure out of the RUN_ORDER_FINISH file if not using Balance.
Find Duplicate Transactions in the Transaction Audit Tables (sp_adc_suspend_dup_check)(BALANCE ONLY)
The SP_ADC_SUSPEND_DUP_CHECK stored procedure, finds duplicate transactions in Balance suspended transactions table and updates the duplicates table for Balance suspended transactions. Comment this procedure out of the RUN_ORDER_FINISH file if not using Balance.
Load the Bank Deposit Reconciliation Tables and Views (sp_adc_br)(BALANCE ONLY)
The SP_ADC_BR stored procedure, is used for Balance Bank Deposit Reconciliation module. Comment this procedure out of the RUN_ORDER_FINISH file if not using Balance.
Create Missing Headers (sp_adc_create_hdr)(BALANCE ONLY)
SP_ADC_CREATE_HDR finds transactions that do not have header records (transactions trapped in the ADC_ERROR_TAB table by error code 018) and inserts a header record into the ADC_POS_DATA_TAB table. Although transactions typically have headers, this procedure adds the header because the front-end will not work if a transaction is missing its header.
Purge Old Transactions from XBR and Balance Tables (SP_PRO_TRANSDATE_PURGE)After the interim and suspended transactions tables have been cleared of good transactions, the SP_PRO_TRANSDATE_PURGE procedure purges Balance and XBR tables of transactions that exceed the limits for holding on to them. Limits are defined for each individual database table in XBR and Balance. SP_PRO_TRANSDATE_PURGE finds the limits for each table by going through the active entries in the PRO_TRANSDATE_PURGE table. For example:
366 RUN_ORDER_FINISH
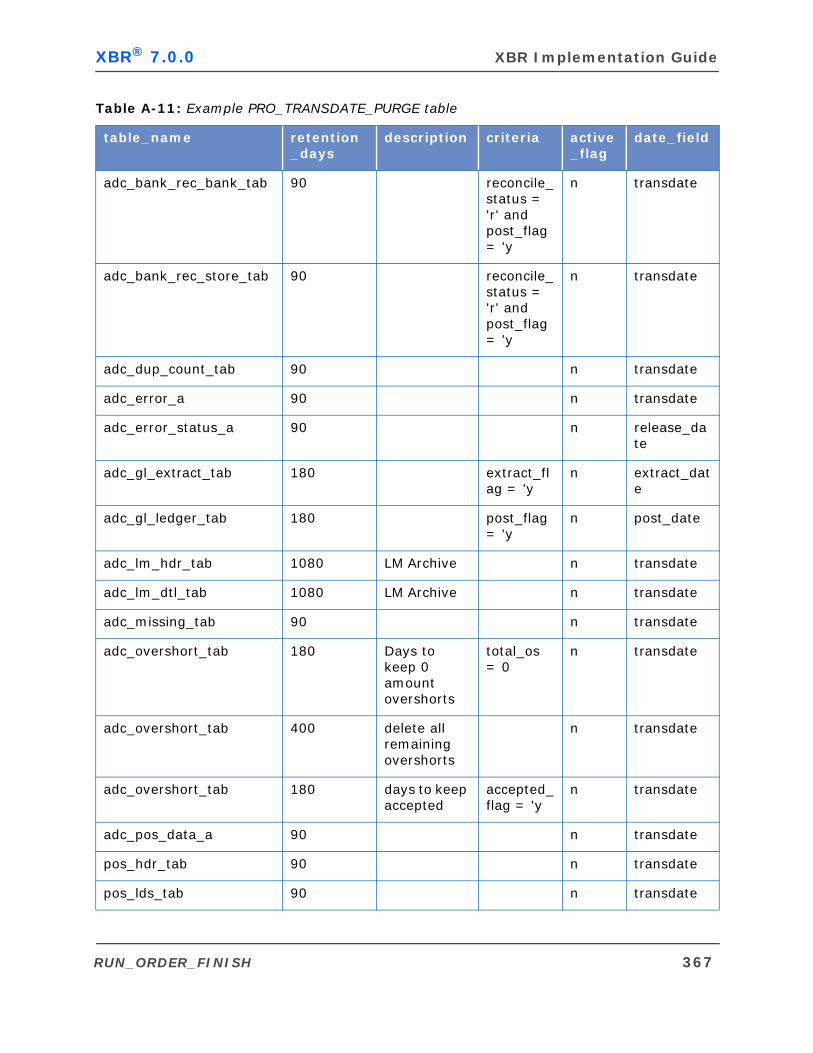
XBR® 7.0.0 XBR Implementation Guide
Table A-11: Example PRO_TRANSDATE_PURGE table
table_name retention _days
description criteria active_flag
date_field
adc_bank_rec_bank_tab 90 reconcile_status = 'r' and post_flag = 'y
n transdate
adc_bank_rec_store_tab 90 reconcile_status = 'r' and post_flag = 'y
n transdate
adc_dup_count_tab 90 n transdate
adc_error_a 90 n transdate
adc_error_status_a 90 n release_date
adc_gl_extract_tab 180 extract_flag = 'y
n extract_date
adc_gl_ledger_tab 180 post_flag = 'y
n post_date
adc_lm_hdr_tab 1080 LM Archive n transdate
adc_lm_dtl_tab 1080 LM Archive n transdate
adc_missing_tab 90 n transdate
adc_overshort_tab 180 Days to keep 0 amount overshorts
total_os = 0
n transdate
adc_overshort_tab 400 delete all remaining overshorts
n transdate
adc_overshort_tab 180 days to keep accepted
accepted_flag = 'y
n transdate
adc_pos_data_a 90 n transdate
pos_hdr_tab 90 n transdate
pos_lds_tab 90 n transdate
RUN_ORDER_FINISH 367
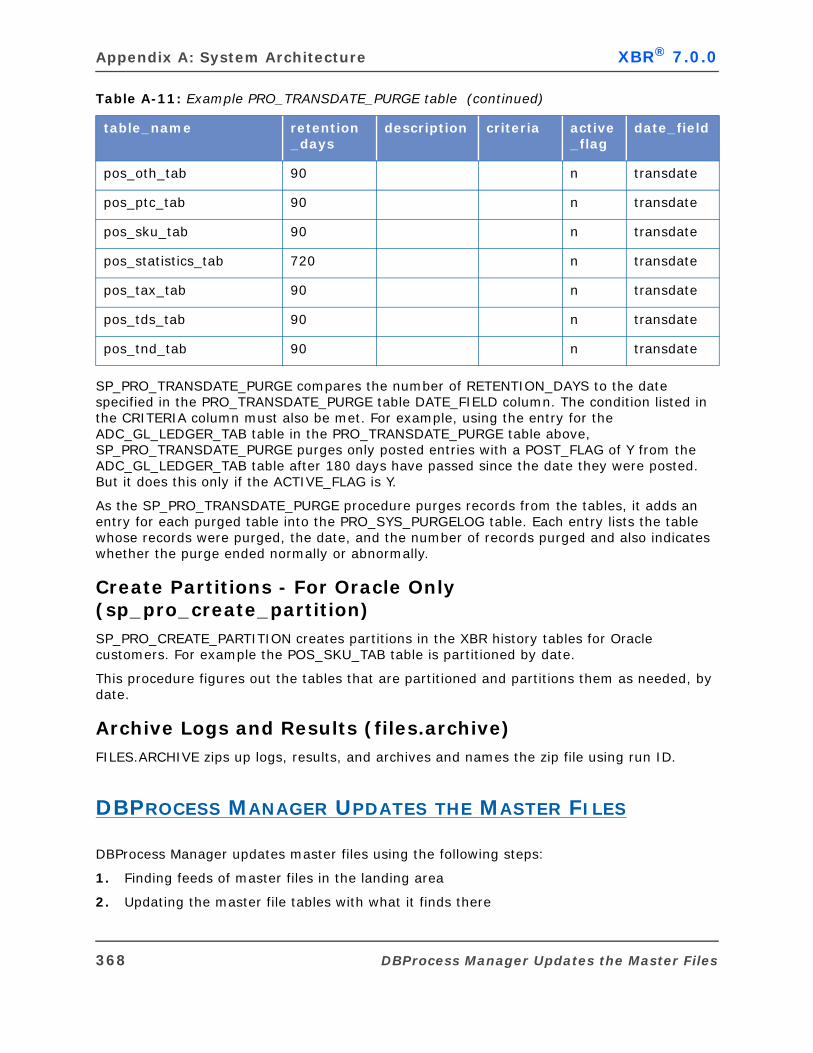
Appendix A: System Architecture XBR® 7.0.0
SP_PRO_TRANSDATE_PURGE compares the number of RETENTION_DAYS to the date specified in the PRO_TRANSDATE_PURGE table DATE_FIELD column. The condition listed in the CRITERIA column must also be met. For example, using the entry for the ADC_GL_LEDGER_TAB table in the PRO_TRANSDATE_PURGE table above, SP_PRO_TRANSDATE_PURGE purges only posted entries with a POST_FLAG of Y from the ADC_GL_LEDGER_TAB table after 180 days have passed since the date they were posted. But it does this only if the ACTIVE_FLAG is Y.
As the SP_PRO_TRANSDATE_PURGE procedure purges records from the tables, it adds an entry for each purged table into the PRO_SYS_PURGELOG table. Each entry lists the table whose records were purged, the date, and the number of records purged and also indicates whether the purge ended normally or abnormally.
Create Partitions - For Oracle Only (sp_pro_create_partition)SP_PRO_CREATE_PARTITION creates partitions in the XBR history tables for Oracle customers. For example the POS_SKU_TAB table is partitioned by date.
This procedure figures out the tables that are partitioned and partitions them as needed, by date.
Archive Logs and Results (files.archive)FILES.ARCHIVE zips up logs, results, and archives and names the zip file using run ID.
DBPROCESS MANAGER UPDATES THE MASTER FILES
DBProcess Manager updates master files using the following steps:
1. Finding feeds of master files in the landing area
2. Updating the master file tables with what it finds there
pos_oth_tab 90 n transdate
pos_ptc_tab 90 n transdate
pos_sku_tab 90 n transdate
pos_statistics_tab 720 n transdate
pos_tax_tab 90 n transdate
pos_tds_tab 90 n transdate
pos_tnd_tab 90 n transdate
Table A-11: Example PRO_TRANSDATE_PURGE table (continued)
table_name retention _days
description criteria active_flag
date_field
368 DBProcess Manager Updates the Master Files
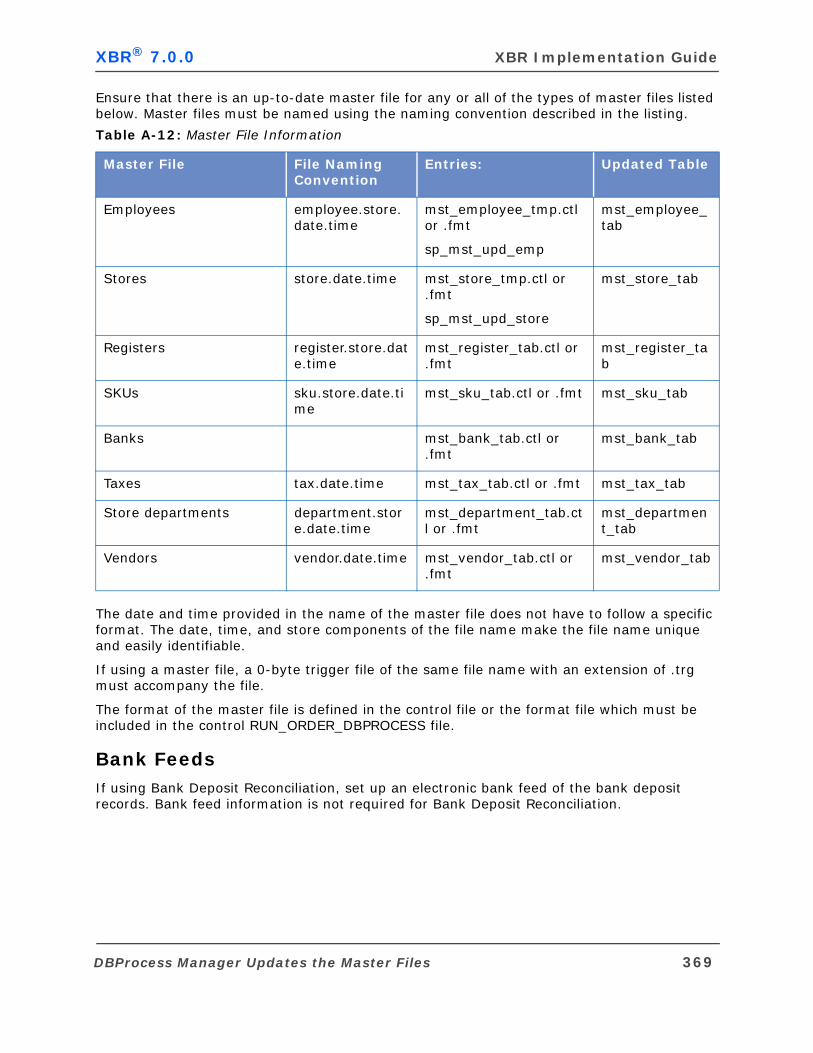
XBR® 7.0.0 XBR Implementation Guide
Ensure that there is an up-to-date master file for any or all of the types of master files listed below. Master files must be named using the naming convention described in the listing.
The date and time provided in the name of the master file does not have to follow a specific format. The date, time, and store components of the file name make the file name unique and easily identifiable.
If using a master file, a 0-byte trigger file of the same file name with an extension of .trg must accompany the file.
The format of the master file is defined in the control file or the format file which must be included in the control RUN_ORDER_DBPROCESS file.
Bank FeedsIf using Bank Deposit Reconciliation, set up an electronic bank feed of the bank deposit records. Bank feed information is not required for Bank Deposit Reconciliation.
Table A-12: Master File Information
Master File File Naming Convention
Entries: Updated Table
Employees employee.store.date.time
mst_employee_tmp.ctl or .fmt
sp_mst_upd_emp
mst_employee_tab
Stores store.date.time mst_store_tmp.ctl or .fmt
sp_mst_upd_store
mst_store_tab
Registers register.store.date.time
mst_register_tab.ctl or .fmt
mst_register_tab
SKUs sku.store.date.time
mst_sku_tab.ctl or .fmt mst_sku_tab
Banks mst_bank_tab.ctl or .fmt
mst_bank_tab
Taxes tax.date.time mst_tax_tab.ctl or .fmt mst_tax_tab
Store departments department.store.date.time
mst_department_tab.ctl or .fmt
mst_department_tab
Vendors vendor.date.time mst_vendor_tab.ctl or .fmt
mst_vendor_tab
DBProcess Manager Updates the Master Files 369

Appendix A: System Architecture XBR® 7.0.0
Master FilesIt is assumed that the master files that contain complete listings of all the records for the master tables they are updating. The content of the following master files that feed to XBR replaces everything that exists in corresponding master tables:
Register master
SKU master
Bank master
Tax master
Store department master
Vendor master
Store MasterDBProcess Manager clears the content from the MST_STORE_TMP table, to which it then writes the content of the store master file. The SP_MST_STORE_UPD procedure inserts any new stores that are in MST_STORE_TMP into the MST_STORE_TAB table.
Each store has its own unique ORGID, DIVISION, and STORENUM. If a store in MST_STORE_TMP already exists in MST_STORE_TAB, the store in MST_STORE_TAB is updated. If it does not exist in MST_STORE_TAB, it is added. No stores are deleted from MST_STORE_TAB.
During the store master update, SP_MST_UPD_STORE also looks at stores on the transactions that have moved into the XBR history tables. More specifically, the procedure looks in the transactions in the POS_STATISTICS view (which sits over the POS_STATISTICS_TAB table).
If on any transaction the SP_MST_UPD_STORE procedure finds a store that is not defined in the MST_STORE_TAB table, it adds the store's orgid, division, and storenum to the store master table with a store name of "Not on File". This entry is needed for performance issues in XBR queries. If there is a master file entry for the store at a later date, the SP_MST_UPD_STORE procedure updates the MST_STORE_TAB table with the new information about the store.
In Balance, if audit errors trap for error code 004 (Invalid Store), a store that is in the store master as "Not on File" is not considered a valid store. Transactions for a "Not of File" store are sent to the suspended transactions table with an Invalid Store error.
Employee MasterThe employee master is updated in the same way the store master is in that DBProcess Manager clears the content from the MST_EMPLOYEE_TMP table, to which it then writes the content of the employee master file. Then the SP_MST_EMP_UPD procedure inserts any new employees that are in MST_EMPLOYEE_TMP into the MST_EMPLOYEE_TAB table. No employees are deleted from MST_EMPLOYEE_TAB.
However there are some additional updates that are done for the employee master, which are described next.
An employee CASHIERNUM must be unique, but whether it must be unique at each store or across the entire chain is determined by a value set in the PRO_SP_VARIABLES table. This one entry in the PRO_SP_VARIABLES table applies to employees.
370 DBProcess Manager Updates the Master Files
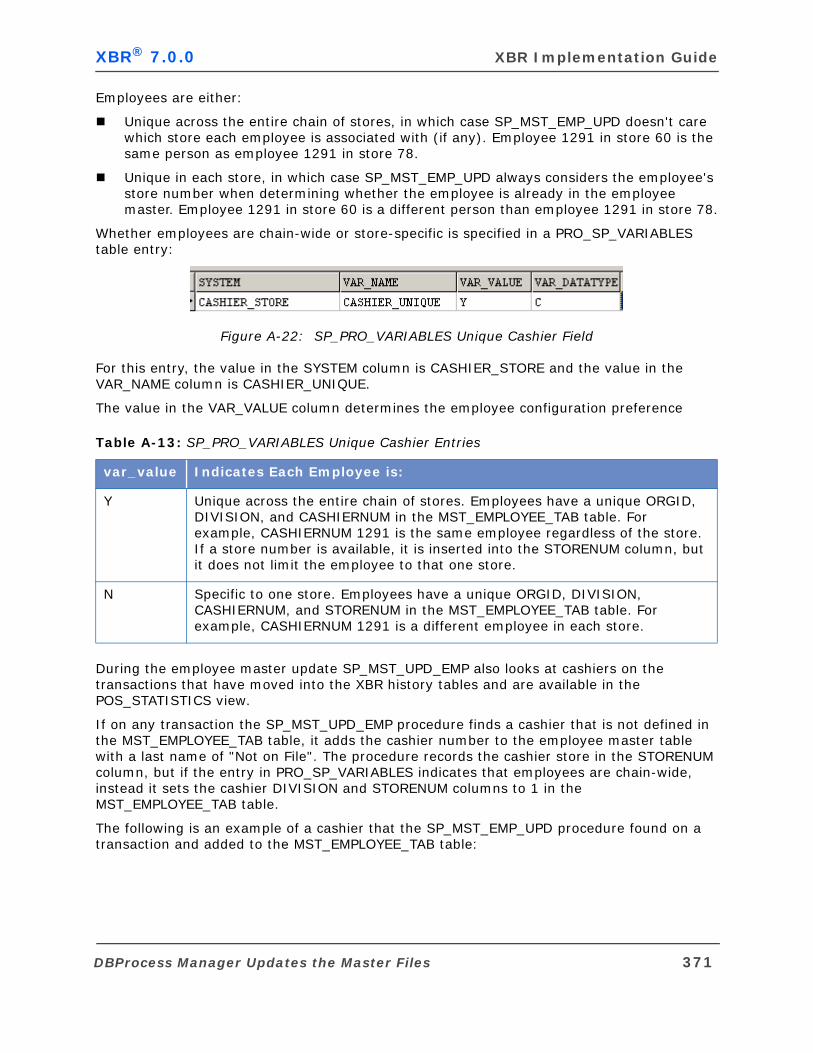
XBR® 7.0.0 XBR Implementation Guide
Employees are either:
Unique across the entire chain of stores, in which case SP_MST_EMP_UPD doesn't care which store each employee is associated with (if any). Employee 1291 in store 60 is the same person as employee 1291 in store 78.
Unique in each store, in which case SP_MST_EMP_UPD always considers the employee's store number when determining whether the employee is already in the employee master. Employee 1291 in store 60 is a different person than employee 1291 in store 78.
Whether employees are chain-wide or store-specific is specified in a PRO_SP_VARIABLES table entry:
Figure A-22: SP_PRO_VARIABLES Unique Cashier Field
For this entry, the value in the SYSTEM column is CASHIER_STORE and the value in the VAR_NAME column is CASHIER_UNIQUE.
The value in the VAR_VALUE column determines the employee configuration preference
During the employee master update SP_MST_UPD_EMP also looks at cashiers on the transactions that have moved into the XBR history tables and are available in the POS_STATISTICS view.
If on any transaction the SP_MST_UPD_EMP procedure finds a cashier that is not defined in the MST_EMPLOYEE_TAB table, it adds the cashier number to the employee master table with a last name of "Not on File". The procedure records the cashier store in the STORENUM column, but if the entry in PRO_SP_VARIABLES indicates that employees are chain-wide, instead it sets the cashier DIVISION and STORENUM columns to 1 in the MST_EMPLOYEE_TAB table.
The following is an example of a cashier that the SP_MST_EMP_UPD procedure found on a transaction and added to the MST_EMPLOYEE_TAB table:
Table A-13: SP_PRO_VARIABLES Unique Cashier Entries
var_value Indicates Each Employee is:
Y Unique across the entire chain of stores. Employees have a unique ORGID, DIVISION, and CASHIERNUM in the MST_EMPLOYEE_TAB table. For example, CASHIERNUM 1291 is the same employee regardless of the store. If a store number is available, it is inserted into the STORENUM column, but it does not limit the employee to that one store.
N Specific to one store. Employees have a unique ORGID, DIVISION, CASHIERNUM, and STORENUM in the MST_EMPLOYEE_TAB table. For example, CASHIERNUM 1291 is a different employee in each store.
DBProcess Manager Updates the Master Files 371
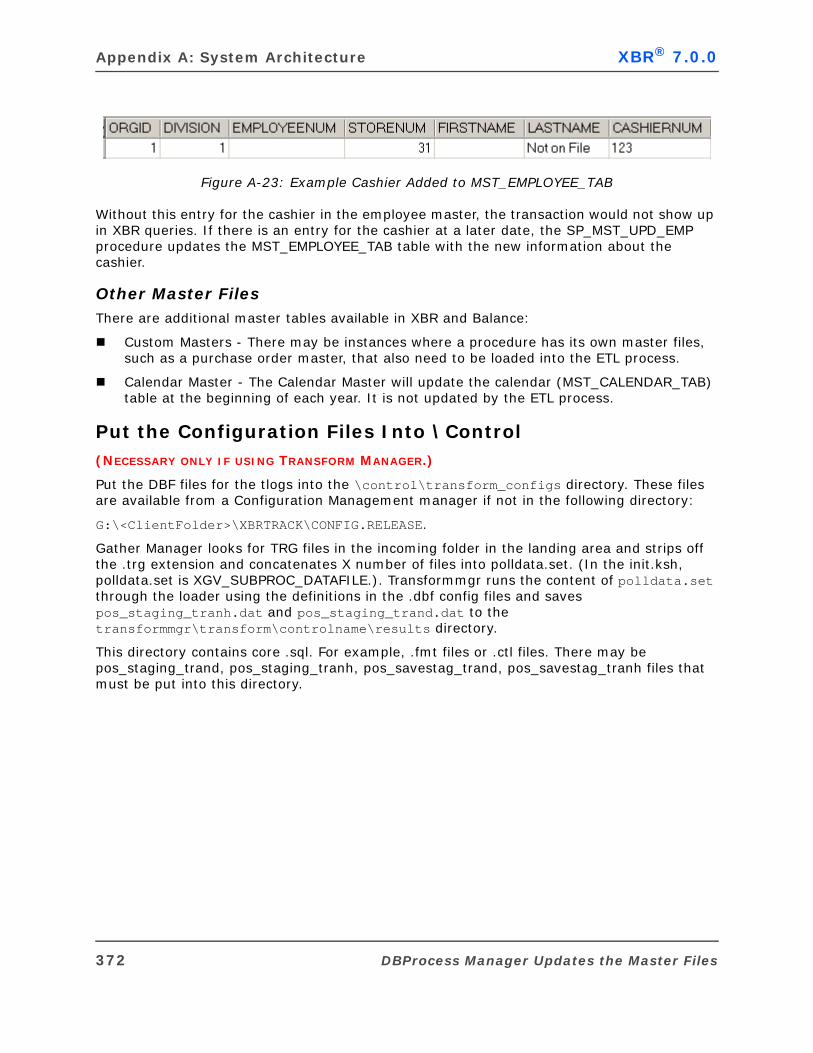
Appendix A: System Architecture XBR® 7.0.0
Figure A-23: Example Cashier Added to MST_EMPLOYEE_TAB
Without this entry for the cashier in the employee master, the transaction would not show up in XBR queries. If there is an entry for the cashier at a later date, the SP_MST_UPD_EMP procedure updates the MST_EMPLOYEE_TAB table with the new information about the cashier.
Other Master FilesThere are additional master tables available in XBR and Balance:
Custom Masters - There may be instances where a procedure has its own master files, such as a purchase order master, that also need to be loaded into the ETL process.
Calendar Master - The Calendar Master will update the calendar (MST_CALENDAR_TAB) table at the beginning of each year. It is not updated by the ETL process.
Put the Configuration Files Into \Control (NECESSARY ONLY IF USING TRANSFORM MANAGER.)
Put the DBF files for the tlogs into the \control\transform_configs directory. These files are available from a Configuration Management manager if not in the following directory:
G:\<ClientFolder>\XBRTRACK\CONFIG.RELEASE.
Gather Manager looks for TRG files in the incoming folder in the landing area and strips off the .trg extension and concatenates X number of files into polldata.set. (In the init.ksh, polldata.set is XGV_SUBPROC_DATAFILE.). Transformmgr runs the content of polldata.set through the loader using the definitions in the .dbf config files and saves pos_staging_tranh.dat and pos_staging_trand.dat to the transformmgr\transform\controlname\results directory.
This directory contains core .sql. For example, .fmt files or .ctl files. There may be pos_staging_trand, pos_staging_tranh, pos_savestag_trand, pos_savestag_tranh files that must be put into this directory.
372 DBProcess Manager Updates the Master Files
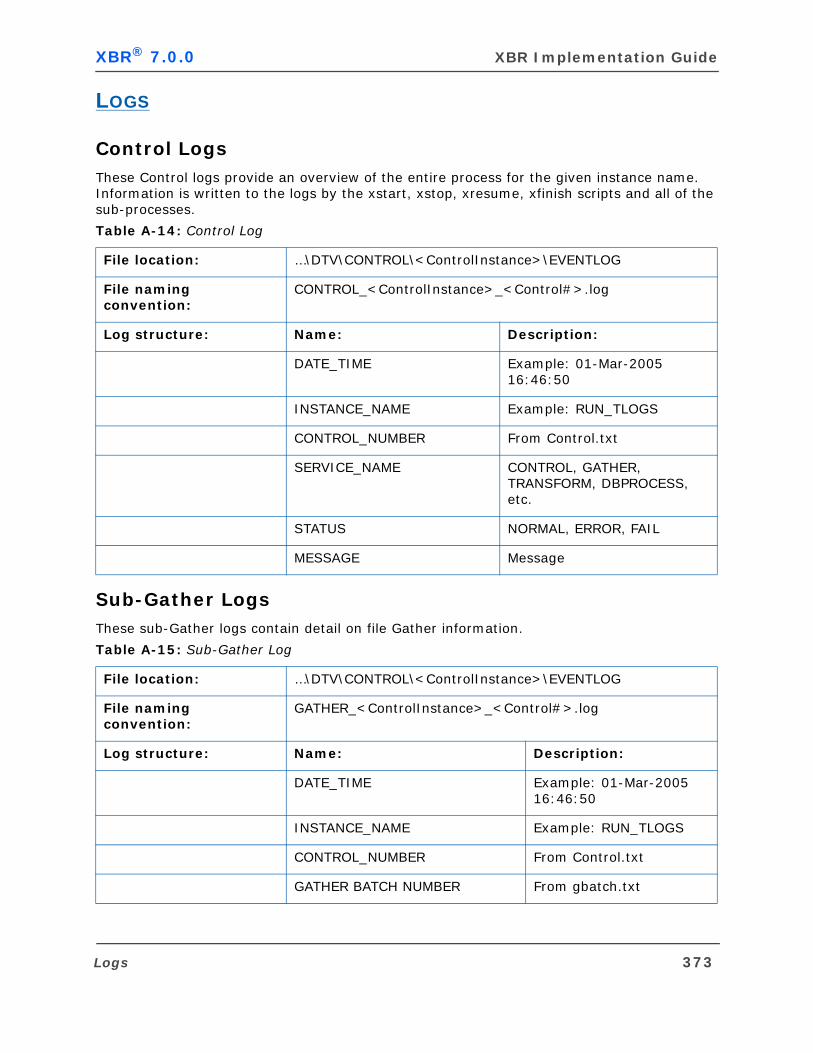
XBR® 7.0.0 XBR Implementation Guide
LOGS
Control LogsThese Control logs provide an overview of the entire process for the given instance name. Information is written to the logs by the xstart, xstop, xresume, xfinish scripts and all of the sub-processes.
Sub-Gather LogsThese sub-Gather logs contain detail on file Gather information.
Table A-14: Control Log
File location: …\DTV\CONTROL\<ControlInstance>\EVENTLOG
File naming convention:
CONTROL_<ControlInstance>_<Control#>.log
Log structure: Name: Description:
DATE_TIME Example: 01-Mar-2005 16:46:50
INSTANCE_NAME Example: RUN_TLOGS
CONTROL_NUMBER From Control.txt
SERVICE_NAME CONTROL, GATHER, TRANSFORM, DBPROCESS, etc.
STATUS NORMAL, ERROR, FAIL
MESSAGE Message
Table A-15: Sub-Gather Log
File location: …\DTV\CONTROL\<ControlInstance>\EVENTLOG
File naming convention:
GATHER_<ControlInstance>_<Control#>.log
Log structure: Name: Description:
DATE_TIME Example: 01-Mar-2005 16:46:50
INSTANCE_NAME Example: RUN_TLOGS
CONTROL_NUMBER From Control.txt
GATHER BATCH NUMBER From gbatch.txt
Logs 373

Appendix A: System Architecture XBR® 7.0.0
Sub-Transform LogsThese sub-Transform logs contain detail on file Transform information.
Sub-DBProcess LogsThese sub-DBProcess logs contain detail on file DBProcess information.
STATUS NORMAL, ERROR, FAIL
MESSAGE Message
Table A-16: Sub-Transform Log
File location: …\DTV\CONTROL\<ControlInstance>\EVENTLOG
File naming convention:
TRANSFORM_<ControlInstance>_<Control#>_<Gather#>.log
Log structure: Name: Description:
DATE_TIME Example: 01-Mar-2005 16:46:50
INSTANCE_NAME Example: RUN_TLOGS
CONTROL_NUMBER From Control.txt
GATHER BATCH NUMBER From gbatch.txt
STATUS NORMAL, ERROR, FAIL
MESSAGE Message
Table A-17: Sub-DBProcess Log
File location: …\DTV\CONTROL\<ControlInstance>\EVENTLOG
File naming convention:
DBPROCESS_<ControlInstance>_<Control#>_<Gather#>_<Subproc#>.log
Log structure: Name: Description:
DATE_TIME Example: 01-Mar-2005 16:46:50
INSTANCE_NAME Example: RUN_TLOGS
CONTROL_NUMBER From Control.txt
GATHER BATCH NUMBER From gbatch.txt
Table A-15: Sub-Gather Log (continued)
374 Logs
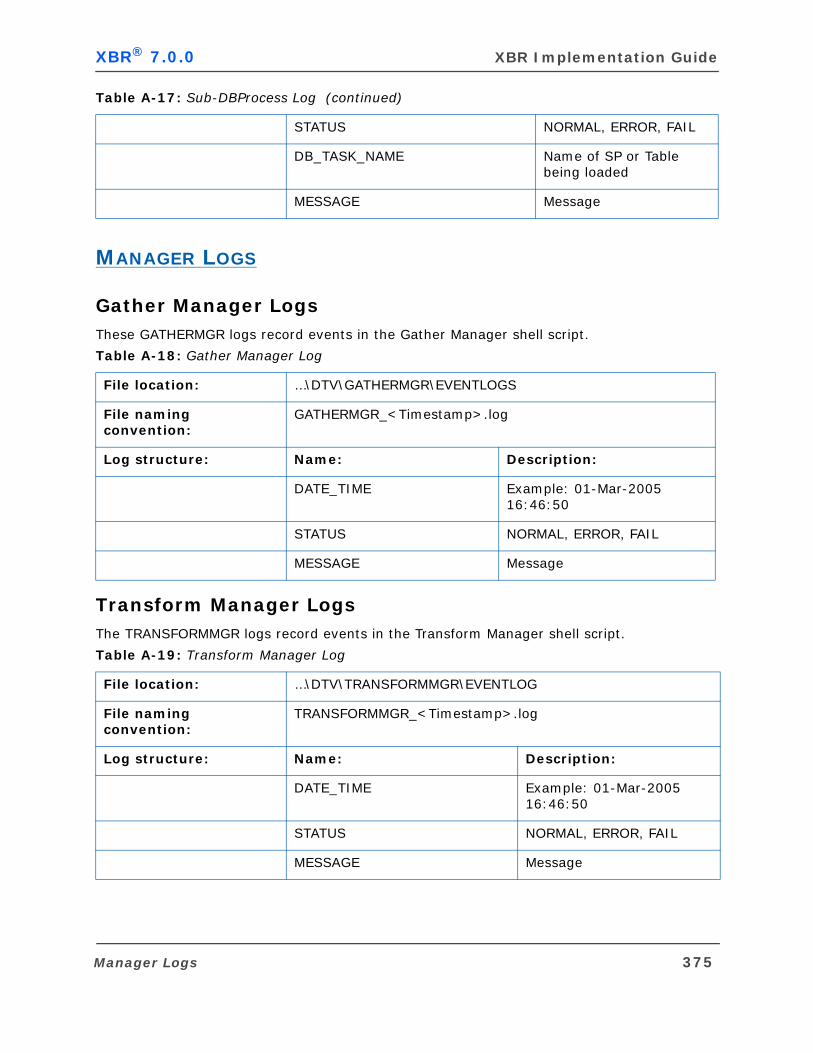
XBR® 7.0.0 XBR Implementation Guide
MANAGER LOGS
Gather Manager LogsThese GATHERMGR logs record events in the Gather Manager shell script.
Transform Manager LogsThe TRANSFORMMGR logs record events in the Transform Manager shell script.
STATUS NORMAL, ERROR, FAIL
DB_TASK_NAME Name of SP or Table being loaded
MESSAGE Message
Table A-18: Gather Manager Log
File location: …\DTV\GATHERMGR\EVENTLOGS
File naming convention:
GATHERMGR_<Timestamp>.log
Log structure: Name: Description:
DATE_TIME Example: 01-Mar-2005 16:46:50
STATUS NORMAL, ERROR, FAIL
MESSAGE Message
Table A-19: Transform Manager Log
File location: …\DTV\TRANSFORMMGR\EVENTLOG
File naming convention:
TRANSFORMMGR_<Timestamp>.log
Log structure: Name: Description:
DATE_TIME Example: 01-Mar-2005 16:46:50
STATUS NORMAL, ERROR, FAIL
MESSAGE Message
Table A-17: Sub-DBProcess Log (continued)
Manager Logs 375

Appendix A: System Architecture XBR® 7.0.0
DBProcess Manager LogsThese DBPROCESSMGR logs record events in the Database Process Manager shell script.
Table A-20: DBProcess Manager Log
File location: …\DTV\DBPROCESSMGR\EVENTLOG
File naming convention:
DBPROCESSMGR_<Timestamp>.log
Log structure: Name: Description:
DATE_TIME Example: 01-Mar-2005 16:46:50
STATUS NORMAL, ERROR, FAIL
MESSAGE Message
376 Manager Logs
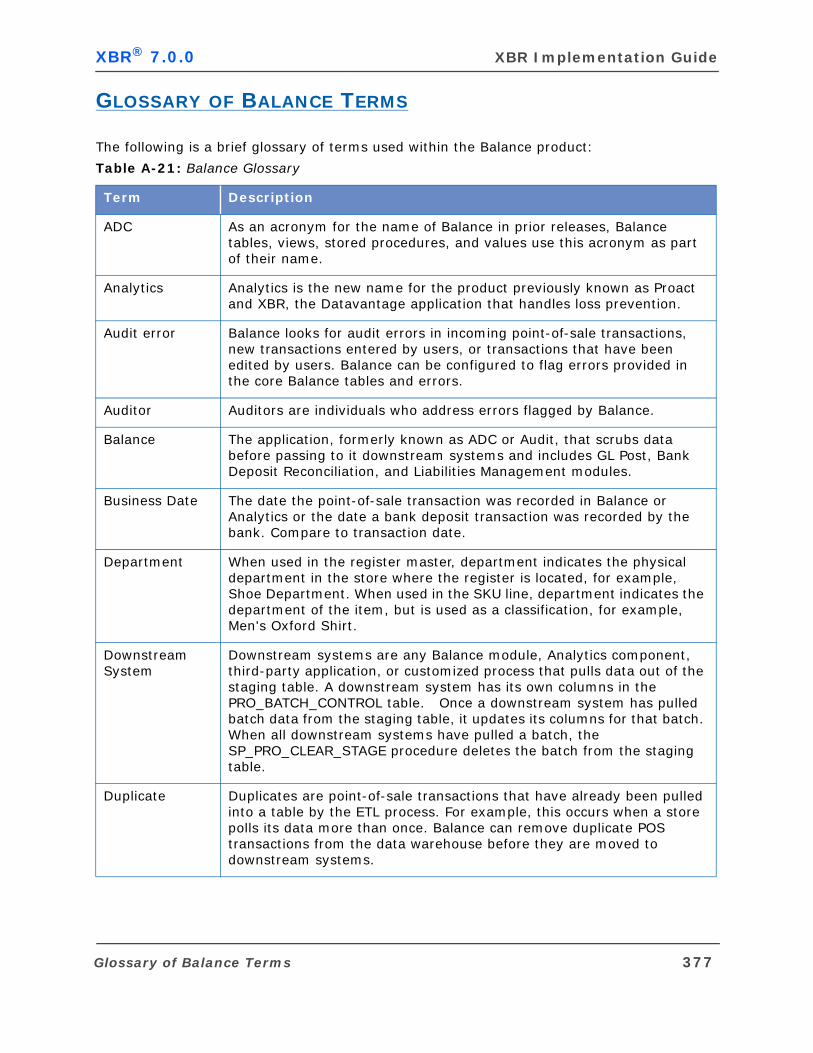
XBR® 7.0.0 XBR Implementation Guide
GLOSSARY OF BALANCE TERMS
The following is a brief glossary of terms used within the Balance product:
Table A-21: Balance Glossary
Term Description
ADC As an acronym for the name of Balance in prior releases, Balance tables, views, stored procedures, and values use this acronym as part of their name.
Analytics Analytics is the new name for the product previously known as Proact and XBR, the Datavantage application that handles loss prevention.
Audit error Balance looks for audit errors in incoming point-of-sale transactions, new transactions entered by users, or transactions that have been edited by users. Balance can be configured to flag errors provided in the core Balance tables and errors.
Auditor Auditors are individuals who address errors flagged by Balance.
Balance The application, formerly known as ADC or Audit, that scrubs data before passing to it downstream systems and includes GL Post, Bank Deposit Reconciliation, and Liabilities Management modules.
Business Date The date the point-of-sale transaction was recorded in Balance or Analytics or the date a bank deposit transaction was recorded by the bank. Compare to transaction date.
Department When used in the register master, department indicates the physical department in the store where the register is located, for example, Shoe Department. When used in the SKU line, department indicates the department of the item, but is used as a classification, for example, Men's Oxford Shirt.
Downstream System
Downstream systems are any Balance module, Analytics component, third-party application, or customized process that pulls data out of the staging table. A downstream system has its own columns in the PRO_BATCH_CONTROL table. Once a downstream system has pulled batch data from the staging table, it updates its columns for that batch. When all downstream systems have pulled a batch, the SP_PRO_CLEAR_STAGE procedure deletes the batch from the staging table.
Duplicate Duplicates are point-of-sale transactions that have already been pulled into a table by the ETL process. For example, this occurs when a store polls its data more than once. Balance can remove duplicate POS transactions from the data warehouse before they are moved to downstream systems.
Glossary of Balance Terms 377
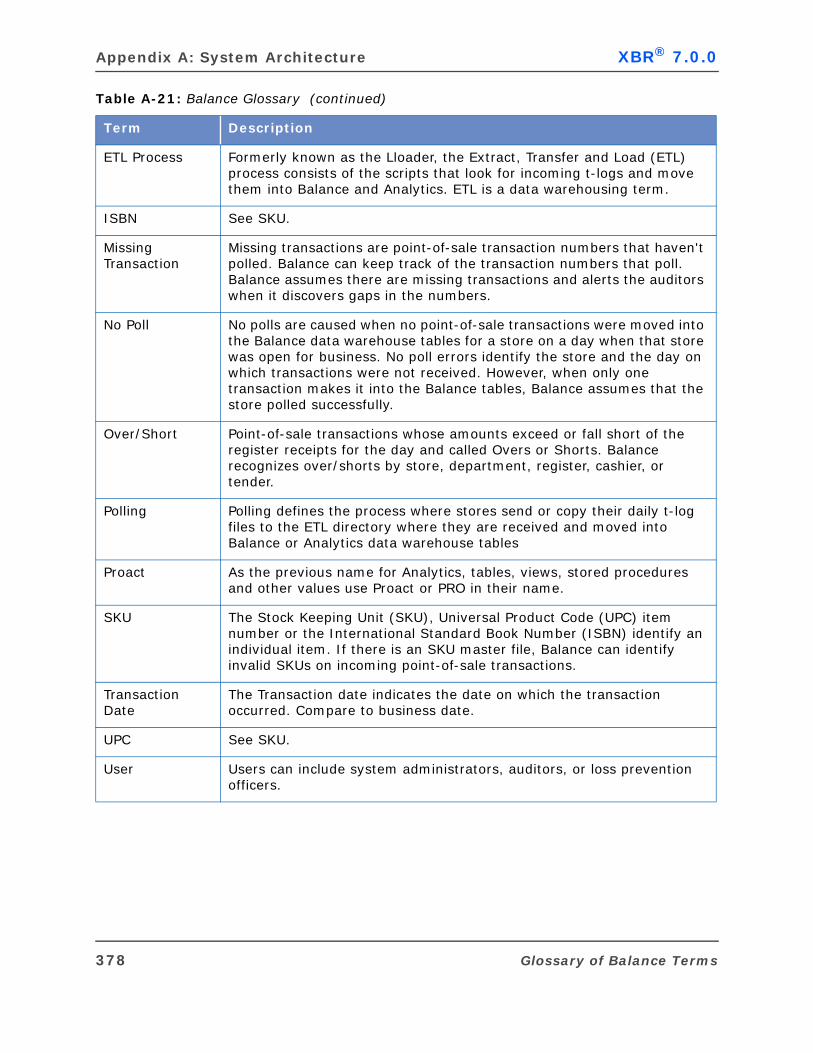
Appendix A: System Architecture XBR® 7.0.0
ETL Process Formerly known as the Lloader, the Extract, Transfer and Load (ETL) process consists of the scripts that look for incoming t-logs and move them into Balance and Analytics. ETL is a data warehousing term.
ISBN See SKU.
Missing Transaction
Missing transactions are point-of-sale transaction numbers that haven't polled. Balance can keep track of the transaction numbers that poll. Balance assumes there are missing transactions and alerts the auditors when it discovers gaps in the numbers.
No Poll No polls are caused when no point-of-sale transactions were moved into the Balance data warehouse tables for a store on a day when that store was open for business. No poll errors identify the store and the day on which transactions were not received. However, when only one transaction makes it into the Balance tables, Balance assumes that the store polled successfully.
Over/Short Point-of-sale transactions whose amounts exceed or fall short of the register receipts for the day and called Overs or Shorts. Balance recognizes over/shorts by store, department, register, cashier, or tender.
Polling Polling defines the process where stores send or copy their daily t-log files to the ETL directory where they are received and moved into Balance or Analytics data warehouse tables
Proact As the previous name for Analytics, tables, views, stored procedures and other values use Proact or PRO in their name.
SKU The Stock Keeping Unit (SKU), Universal Product Code (UPC) item number or the International Standard Book Number (ISBN) identify an individual item. If there is an SKU master file, Balance can identify invalid SKUs on incoming point-of-sale transactions.
Transaction Date
The Transaction date indicates the date on which the transaction occurred. Compare to business date.
UPC See SKU.
User Users can include system administrators, auditors, or loss prevention officers.
Table A-21: Balance Glossary (continued)
Term Description
378 Glossary of Balance Terms

XBR® 7.0.0 XBR Implementation Guide
HOSTED FOOD SERVICE ARCHITECTURE
Mymicros Data WarehouseThe Location Activity database (LOCATION_ACTIVITY_DB) is the main mymicros data warehouse. It contains both the summary and detail level transactional POS data needed by XBR to produce exception reporting and analysis. This database is populated utilizing a
Hosted Food Service Architecture 379

Appendix A: System Architecture XBR® 7.0.0
Remote Transfer Agent (RTA) that normalizes and posts the POS data to the database while also aggregating XBR statistics during the end of day procedure. The header and detail data is sent from the POS in 15 minute increments. The RTA and posting agents serve as the ETL function and avoid the necessity of a custom configuration loader. Although there are some subtle differences between the various MICROS POS platforms, the data structure is normalized for the most part.
The CORE database (COREDB) is a distinct database schema that contains core system information about organizations, organizational hierarchies, and locations. XBR utilizes this database as the source data for several of the fields in the XBR Store Master table.
XBR Database SchemaThe XBR application resides in a distinct database schema (XBRADMIN). This database maintains the application related tables (i.e. - ADM_*, PRO_*, QSC_*) that manage the functions of XBR as well as the application metadata (query definitions, scheduled reports, user profiles, etc.). The XBRADMIN schema also contains the POS database views (POS_*) that are selects on transactional tables within LOCATION_ACTIVITY_DB. There are several master views (MST_*) for textual information that reference the master tables used in mymicros. The views will be explained in greater detail in a later section.
In addition, there are three master tables: Location Master, Employee Master, and Register Master (MST_STORE, MST_EMPLOYEE, and MST_REGISTER). These are updated daily using stored procedures (SP_MST_UPD_STORE, SP_MST_UPD_EMP, and SP_MST_UPD_REGNUM), using temp views on mymicros tables as the data source. These are distinct tables in the XBRADMIN schema rather than views for performance purposes.
In the hosted environment (MICROS data center), the XBRADMIN schema lives in a separate Oracle database instance from mymicros and communicates to the LOCATION_ACTIVITY_DB via a database link (see diagram below). In a self-hosted customer implementation, it is recommended to install the XBRADMIN schema in the same instance as mymicros to achieve improved performance.
Starting with the XBR 6.8 release, the XBR application will support multiple organizations within the same database schema for hosted deployments. This will alleviate the need for separate schemas for each customer and instead, one XBRADMIN schema will serve all customers (organizations) hosted in the multi-tenant mymicros data warehouse. The customers will share the same database tables, view, and procedures; however the metadata will be cloned (via database scripts) in order to maintain the flexibility for customization with the front end XBR application.
380 Hosted Food Service Architecture
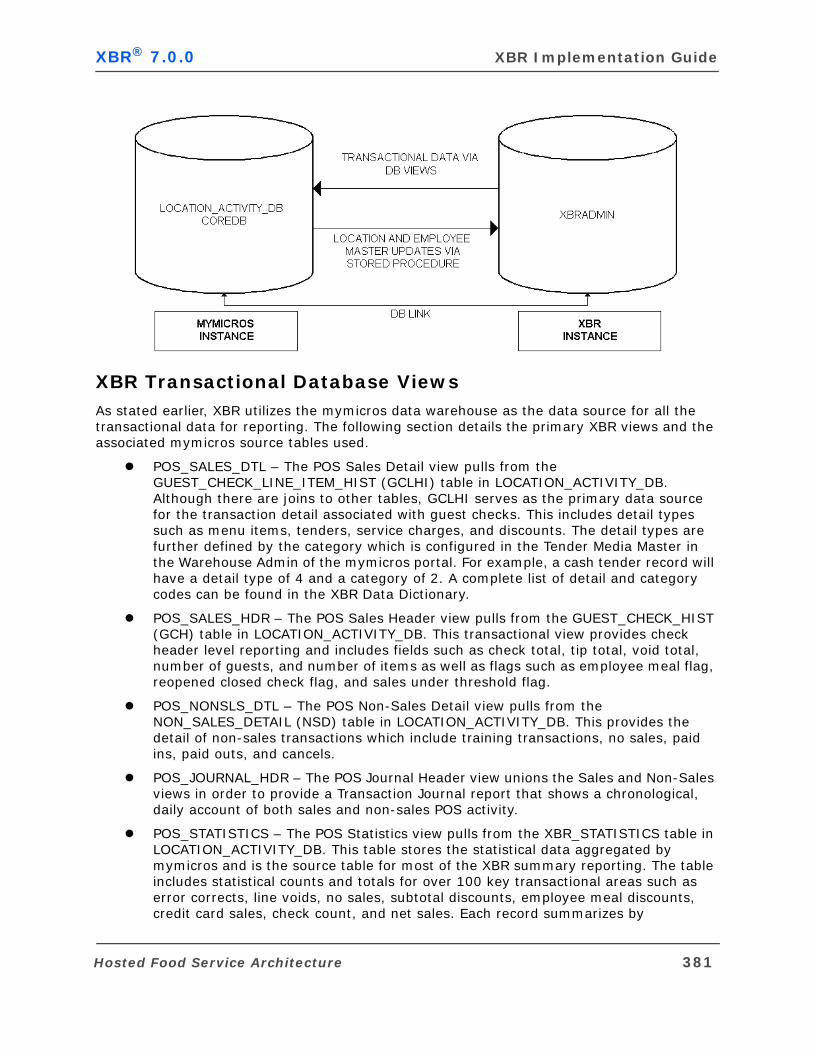
XBR® 7.0.0 XBR Implementation Guide
XBR Transactional Database ViewsAs stated earlier, XBR utilizes the mymicros data warehouse as the data source for all the transactional data for reporting. The following section details the primary XBR views and the associated mymicros source tables used.
POS_SALES_DTL – The POS Sales Detail view pulls from the GUEST_CHECK_LINE_ITEM_HIST (GCLHI) table in LOCATION_ACTIVITY_DB. Although there are joins to other tables, GCLHI serves as the primary data source for the transaction detail associated with guest checks. This includes detail types such as menu items, tenders, service charges, and discounts. The detail types are further defined by the category which is configured in the Tender Media Master in the Warehouse Admin of the mymicros portal. For example, a cash tender record will have a detail type of 4 and a category of 2. A complete list of detail and category codes can be found in the XBR Data Dictionary.
POS_SALES_HDR – The POS Sales Header view pulls from the GUEST_CHECK_HIST (GCH) table in LOCATION_ACTIVITY_DB. This transactional view provides check header level reporting and includes fields such as check total, tip total, void total, number of guests, and number of items as well as flags such as employee meal flag, reopened closed check flag, and sales under threshold flag.
POS_NONSLS_DTL – The POS Non-Sales Detail view pulls from the NON_SALES_DETAIL (NSD) table in LOCATION_ACTIVITY_DB. This provides the detail of non-sales transactions which include training transactions, no sales, paid ins, paid outs, and cancels.
POS_JOURNAL_HDR – The POS Journal Header view unions the Sales and Non-Sales views in order to provide a Transaction Journal report that shows a chronological, daily account of both sales and non-sales POS activity.
POS_STATISTICS – The POS Statistics view pulls from the XBR_STATISTICS table in LOCATION_ACTIVITY_DB. This table stores the statistical data aggregated by mymicros and is the source table for most of the XBR summary reporting. The table includes statistical counts and totals for over 100 key transactional areas such as error corrects, line voids, no sales, subtotal discounts, employee meal discounts, credit card sales, check count, and net sales. Each record summarizes by
Hosted Food Service Architecture 381
Appendix A: System Architecture XBR® 7.0.0
organization, location, revenue center, employee, business date, and day part. The formulas for the statistical calculations are controlled by the posting agent within mymicros.
POS_STATISTICS_MGR – POS Manager Statistics is a summary view from GCLIH that aggregates counts and totals for three high risk areas (error corrects, line voids, and discounts) by organization, location, revenue center, manager employee, and business date. Unlike POS_STATISTICS, this view is used to analyze and track transactions by the authorizing manager employee rather than the transaction employee.
POS_DISCOUNT_DAILY TOTAL – The POS Daily Discount Total view pulls from the DISCOUNT_DAILY_TOTAL table in LOCATION_ACTIVITY_DB. While POS_STATISTICS aggregates discount counts and totals by individual discount categories (coupon, employee meal, loyalty, other category 1, other category 2) as well as by type (line item and subtotal), this table provides summary statistics for each individual discount reason. The table provides a summary by organization, location, revenue center, and business date; it does not include employee information.
POS_MENU_ITEM_DAILY_TOTAL – The POS Daily Menu Item Total view pulls from the MENU_ITEM_DAILY_TOTAL table in LOCATION_ACTIVITY_DB. This aggregates sales count and totals as well as return and discount totals for individual menu items by location, revenue center, and business date.
POS_TIME_CARD_DTL – The POS Time Card Detail view pulls from the TIME_CARD_DETAIL and JOB_CODE tables in LOCATION_ACTIVITY_DB. This provides detail reporting of employee clock ins, clock outs, regular hours works, and overtime hours worked.
INV_SUMMARY - View on INV_ITEM_DAILY_TOTAL. This view gathers daily totals (net sales, open amount, delivery, waste, close amount, etc,) for each location.
INV_ITEM_DAILY_TOTAL - The Inventory Item Daily Total view pulls from the INVENTORY_ITEM_DAILY_TOTAL table and calculates the close amount, actual usage, ideal usage, waste, actual cost, and ideal cost for specific business dates, locations, cost centers, and item ID.
POS_SALES_HDR_TODAY - The POS Sales Header Today view pulls from the GUEST_CHECK table and provides check header level reporting and includes fields such as check total, tip total, void total, number of guests, and number of items as well as flags such as employee meal flag, reopened closed check flag, and sales under threshold flag for the current day.
POS_SALES_DTL_TODAY - The POS Sales Detail Today view pulls from the GUEST_CHECK_LINE_ITEM (GCLI) table. Although there are joins to other tables, GCLI serves as the primary data source for the transaction detail associated with guest checks for the current day. This includes detail types such as menu items, tenders, service charges, and discounts. The detail types are further defined by the category which is configured in the Tender Media Master in the Warehouse Admin of the mymicros portal. For example, a cash tender record will have a detail type of 4 and a category of 2. A complete list of detail and category codes can be found in the XBR Data Dictionary.
POS_VIDEO_DTL - This view is used for receipt detail information in the Video Queue.
382 Hosted Food Service Architecture

XBR® 7.0.0 XBR Implementation Guide
XBR Master (Reference) ViewsIn addition to the POS views above that are the source for the transactional data, there are several Master (MST_*) views that bring in meaningful values and descriptions from mymicros that can be included on XBR reporting. Since mymicros uses internal unique identifiers (xxxID) for all database tables, it is necessary to incorporate the POSRef value and/or the Name. In some cases, this is done in the transactional views themselves, but the following is a list of the additional master views that are used in dynamic lookups or as supplemental tables in a query.
MST_DAY_PART - View on DAY_PART. The Day Part Master is used in the Day Part dynamic lookup to display the textual day part, i.e. – Breakfast, Lunch, Dinner, Late Night, etc.
MST_FAMILY_GROUP - View on FAMILY_GROUP. The Family Group Master includes the Family Group of menu items, i.e. – Entrees, Appetizers, Desserts, Sides, etc.
MST_HR_EMPLOYEE - View on HR_EMPLOYEE. The HR Employee Master is used mainly for Time Card reporting.
MST_MAJOR_GROUP - View on MAJOR_GROUP. The Major Group Master includes the Major Group of menu items, i.e. – Food, Beverage, Merchandise, etc.
MST_MENU_ITEM - View on MENU_ITEM. The Menu Item Master allows for reporting on individual menu items across the organization by incorporating the MENUITEMREPORTID.
MST_ORDER_TYPE - View on ORDER_TYPE. The Order Type Master is used in the Order Types dynamic lookup to display the textual order type, i.e. – Dine In, To Go, Drive-Thru, etc.
MST_REASON_CODE - View on REASON_CODE. The Reason Code Master is used in the Reason Code dynamic lookup to display the textual reason codes for voids, returns, etc.
MST_REVENUE_CENTER - View on REVENUE_CENTER. Revenue Centers can be used to distinguish areas of a given restaurant (bar, delivery, takeout, etc.) or individual units within a complex location such as a stadium, airport, hotel, resort, etc.
XBR Location and Employee Master TablesThere are two master tables that physically reside within the XBRADMIN schema. The Location Master (MST_STORE) maintains additional location information such as location name, organizational hierarchy, address, phone, etc. The Employee Master (MST_EMPLOYEE) stores additional employee related information such as POSRef (customer employee number), employee name, job code, hire date, etc.
Temp views (MST_STORE_TMP and MST_EMPLOYEE_TMP) on specified mymicros tables are utilized to select pertinent data that is then loaded to database tables in the XBRADMIN schema, MST_STORE_TAB and MST_EMPLOYEE_TAB respectively. These tables are loaded using stored procedures (SP_MST_UPD_STORE and SP_MST_UPD_EMP). These procedures should be scheduled to run daily to ensure that these tables are kept up to date. These tables can also be modified through XBR using Table Editor to maintain fields that are included in the XBR table but are not available in the mymicros portal.
Hosted Food Service Architecture 383
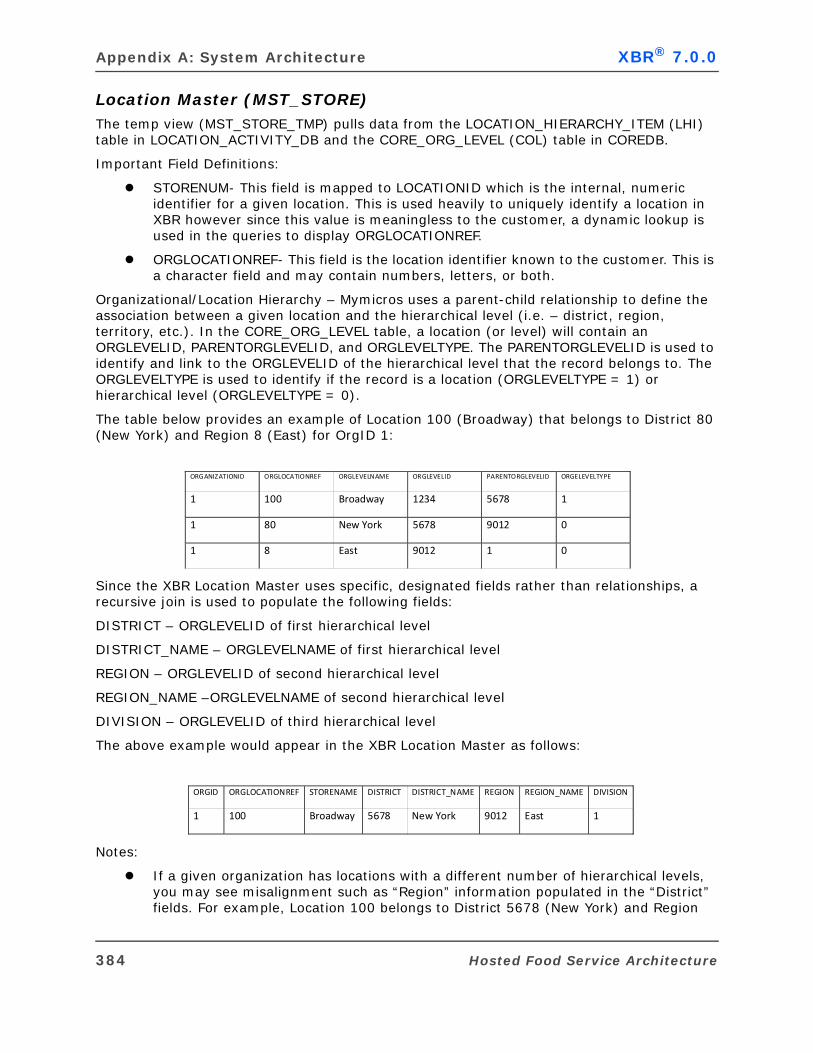
Appendix A: System Architecture XBR® 7.0.0
Location Master (MST_STORE)The temp view (MST_STORE_TMP) pulls data from the LOCATION_HIERARCHY_ITEM (LHI) table in LOCATION_ACTIVITY_DB and the CORE_ORG_LEVEL (COL) table in COREDB.
Important Field Definitions:
STORENUM- This field is mapped to LOCATIONID which is the internal, numeric identifier for a given location. This is used heavily to uniquely identify a location in XBR however since this value is meaningless to the customer, a dynamic lookup is used in the queries to display ORGLOCATIONREF.
ORGLOCATIONREF- This field is the location identifier known to the customer. This is a character field and may contain numbers, letters, or both.
Organizational/Location Hierarchy – Mymicros uses a parent-child relationship to define the association between a given location and the hierarchical level (i.e. – district, region, territory, etc.). In the CORE_ORG_LEVEL table, a location (or level) will contain an ORGLEVELID, PARENTORGLEVELID, and ORGLEVELTYPE. The PARENTORGLEVELID is used to identify and link to the ORGLEVELID of the hierarchical level that the record belongs to. The ORGLEVELTYPE is used to identify if the record is a location (ORGLEVELTYPE = 1) or hierarchical level (ORGLEVELTYPE = 0).
The table below provides an example of Location 100 (Broadway) that belongs to District 80 (New York) and Region 8 (East) for OrgID 1:
Since the XBR Location Master uses specific, designated fields rather than relationships, a recursive join is used to populate the following fields:
DISTRICT – ORGLEVELID of first hierarchical level
DISTRICT_NAME – ORGLEVELNAME of first hierarchical level
REGION – ORGLEVELID of second hierarchical level
REGION_NAME –ORGLEVELNAME of second hierarchical level
DIVISION – ORGLEVELID of third hierarchical level
The above example would appear in the XBR Location Master as follows:
Notes:
If a given organization has locations with a different number of hierarchical levels, you may see misalignment such as “Region” information populated in the “District” fields. For example, Location 100 belongs to District 5678 (New York) and Region
ORGANIZATIONID ORGLOCATIONREF ORGLEVELNAME ORGLEVELID PARENTORGLEVELID ORGELEVELTYPE
1 100 Broadway 1234 5678 1
1 80 New York 5678 9012 0
1 8 East 9012 1 0
ORGID ORGLOCATIONREF STORENAME DISTRICT DISTRICT_NAME REGION REGION_NAME DIVISION
1 100 Broadway 5678 New York 9012 East 1
384 Hosted Food Service Architecture
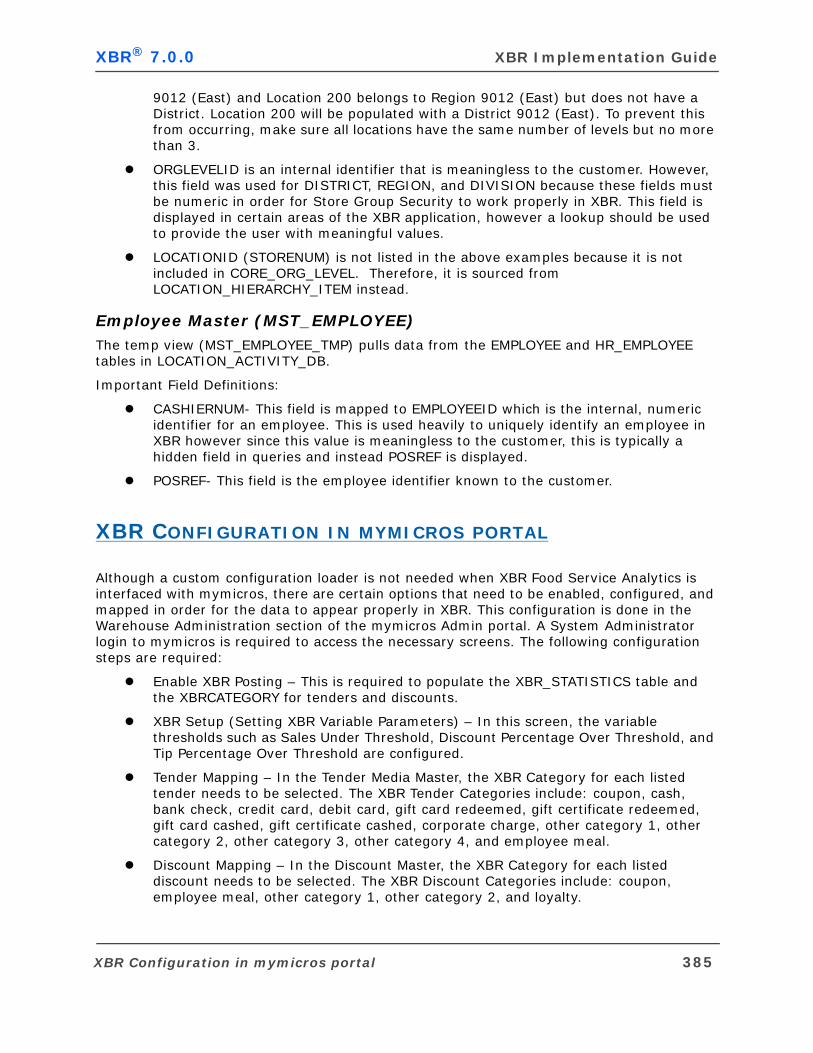
XBR® 7.0.0 XBR Implementation Guide
9012 (East) and Location 200 belongs to Region 9012 (East) but does not have a District. Location 200 will be populated with a District 9012 (East). To prevent this from occurring, make sure all locations have the same number of levels but no more than 3.
ORGLEVELID is an internal identifier that is meaningless to the customer. However, this field was used for DISTRICT, REGION, and DIVISION because these fields must be numeric in order for Store Group Security to work properly in XBR. This field is displayed in certain areas of the XBR application, however a lookup should be used to provide the user with meaningful values.
LOCATIONID (STORENUM) is not listed in the above examples because it is not included in CORE_ORG_LEVEL. Therefore, it is sourced from LOCATION_HIERARCHY_ITEM instead.
Employee Master (MST_EMPLOYEE) The temp view (MST_EMPLOYEE_TMP) pulls data from the EMPLOYEE and HR_EMPLOYEE tables in LOCATION_ACTIVITY_DB.
Important Field Definitions:
CASHIERNUM- This field is mapped to EMPLOYEEID which is the internal, numeric identifier for an employee. This is used heavily to uniquely identify an employee in XBR however since this value is meaningless to the customer, this is typically a hidden field in queries and instead POSREF is displayed.
POSREF- This field is the employee identifier known to the customer.
XBR CONFIGURATION IN MYMICROS PORTAL
Although a custom configuration loader is not needed when XBR Food Service Analytics is interfaced with mymicros, there are certain options that need to be enabled, configured, and mapped in order for the data to appear properly in XBR. This configuration is done in the Warehouse Administration section of the mymicros Admin portal. A System Administrator login to mymicros is required to access the necessary screens. The following configuration steps are required:
Enable XBR Posting – This is required to populate the XBR_STATISTICS table and the XBRCATEGORY for tenders and discounts.
XBR Setup (Setting XBR Variable Parameters) – In this screen, the variable thresholds such as Sales Under Threshold, Discount Percentage Over Threshold, and Tip Percentage Over Threshold are configured.
Tender Mapping – In the Tender Media Master, the XBR Category for each listed tender needs to be selected. The XBR Tender Categories include: coupon, cash, bank check, credit card, debit card, gift card redeemed, gift certificate redeemed, gift card cashed, gift certificate cashed, corporate charge, other category 1, other category 2, other category 3, other category 4, and employee meal.
Discount Mapping – In the Discount Master, the XBR Category for each listed discount needs to be selected. The XBR Discount Categories include: coupon, employee meal, other category 1, other category 2, and loyalty.
XBR Configuration in mymicros portal 385
Appendix A: System Architecture XBR® 7.0.0
Gift Cards/Certificates Mapping – Gift cards and gift certificates can be listed as either a Service Charge or Menu Item. Therefore, this configuration will be done in either the Service Charge Master or Menu Item Master. The XBR Category for these items needs to be mapped as either Gift Card or Gift Certificate.
See “XBR-mymicros Portal Configuration” for complete documentation on this process including screen shots.
XBR ReportingThe XBR Food Service Query Library provides over 250 canned reports that allow the user to identify, trend, and track suspicious POS activity. There are summary reports by Location, Revenue Center, and Employee for each query classification. XBR then has direct links to appropriate header and detail level reports that allow the user further investigate the activity.
There are also almost 300 control points that track exceptions at the Location, Revenue Center, Employee, or Manager level, identifying those with counts, totals, or percentages that exceed the company threshold.
Query classifications include: Coupons, Credit Cards, Current Day Reporting, Debit Cards, Discounts, Employee Meals, Gift Cards, Gift Certificates, Inventory, Menu Item Sales, No Sales, Productivity, Sales Under Threshold, Service Charges, Store Accountability, Tender Analysis, Tip Analysis, Transaction Analysis, and Voids & Cancels. For a complete list of available reporting, see CORE XBR Food Service Query List.
386 XBR Configuration in mymicros portal
A P P E N D I X
Extensibility
Appendix B: Extensibility XBR® 7.0.0
Overview
Often during an installation, a stored procedure or database view has to be modified to meet specific customer requirements. This can lead to problems during an upgrade trying to preserve the custom procedures or views.
This problem has been solved through the development of the Extensibility Module. This module allows the customization of stored procedures and views by extending (customizing) them and maintaining the integrity of the base code.
Certain views and stored procedures have been designated as core and, when extended, are saved as custom code and are marked as active. The corresponding core code is marked as inactive.
AudienceThis appendix is designed for those individuals who are responsible for extending (customizing) stored procedures and database views per customer requirements.
Before making any changes to core views or stored procedures, make sure you back up your database.
388 Overview
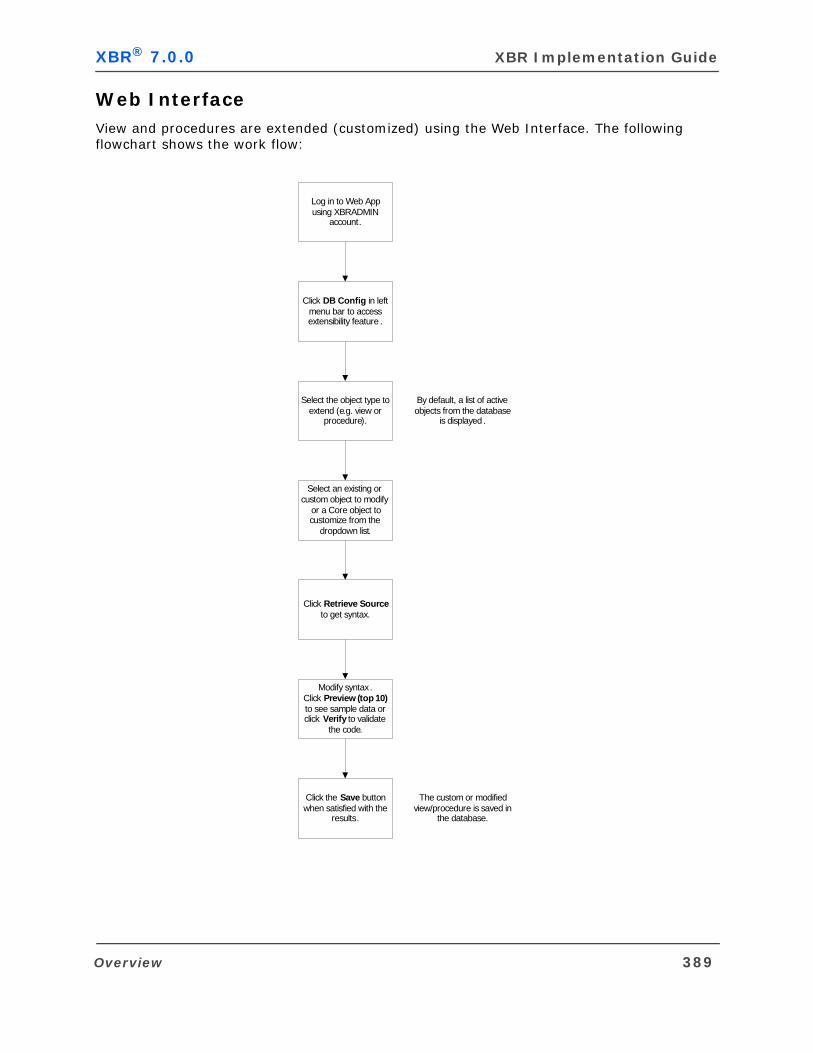
XBR® 7.0.0 XBR Implementation Guide
Web InterfaceView and procedures are extended (customized) using the Web Interface. The following flowchart shows the work flow:
Log in to Web App using XBRADMIN
account.
Click the Save button when satisfied with the
results.
Modify syntax.Click Preview (top 10)to see sample data or click Verify to validate
the code.
Click DB Config in left menu bar to access extensibility feature .
Select an existing or custom object to modify
or a Core object to customize from the
dropdown list.
Click Retrieve Sourceto get syntax.
Select the object type to extend (e.g. view or
procedure).
By default, a list of active objects from the database
is displayed .
The custom or modified view/procedure is saved in
the database.
Overview 389
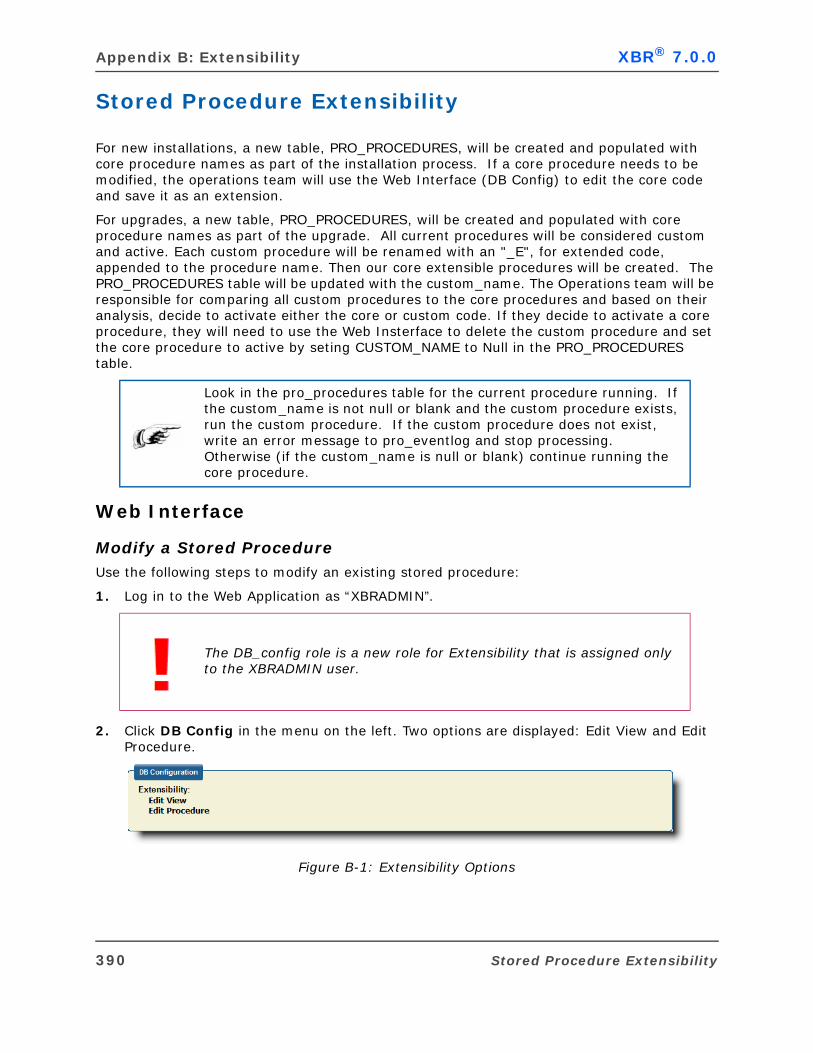
Appendix B: Extensibility XBR® 7.0.0
Stored Procedure Extensibility
For new installations, a new table, PRO_PROCEDURES, will be created and populated with core procedure names as part of the installation process. If a core procedure needs to be modified, the operations team will use the Web Interface (DB Config) to edit the core code and save it as an extension.
For upgrades, a new table, PRO_PROCEDURES, will be created and populated with core procedure names as part of the upgrade. All current procedures will be considered custom and active. Each custom procedure will be renamed with an "_E", for extended code, appended to the procedure name. Then our core extensible procedures will be created. The PRO_PROCEDURES table will be updated with the custom_name. The Operations team will be responsible for comparing all custom procedures to the core procedures and based on their analysis, decide to activate either the core or custom code. If they decide to activate a core procedure, they will need to use the Web Insterface to delete the custom procedure and set the core procedure to active by seting CUSTOM_NAME to Null in the PRO_PROCEDURES table.
Web Interface
Modify a Stored ProcedureUse the following steps to modify an existing stored procedure:
1. Log in to the Web Application as “XBRADMIN”.
2. Click DB Config in the menu on the left. Two options are displayed: Edit View and Edit Procedure.
Figure B-1: Extensibility Options
Look in the pro_procedures table for the current procedure running. If the custom_name is not null or blank and the custom procedure exists, run the custom procedure. If the custom procedure does not exist, write an error message to pro_eventlog and stop processing. Otherwise (if the custom_name is null or blank) continue running the core procedure.
The DB_config role is a new role for Extensibility that is assigned only to the XBRADMIN user.
390 Stored Procedure Extensibility
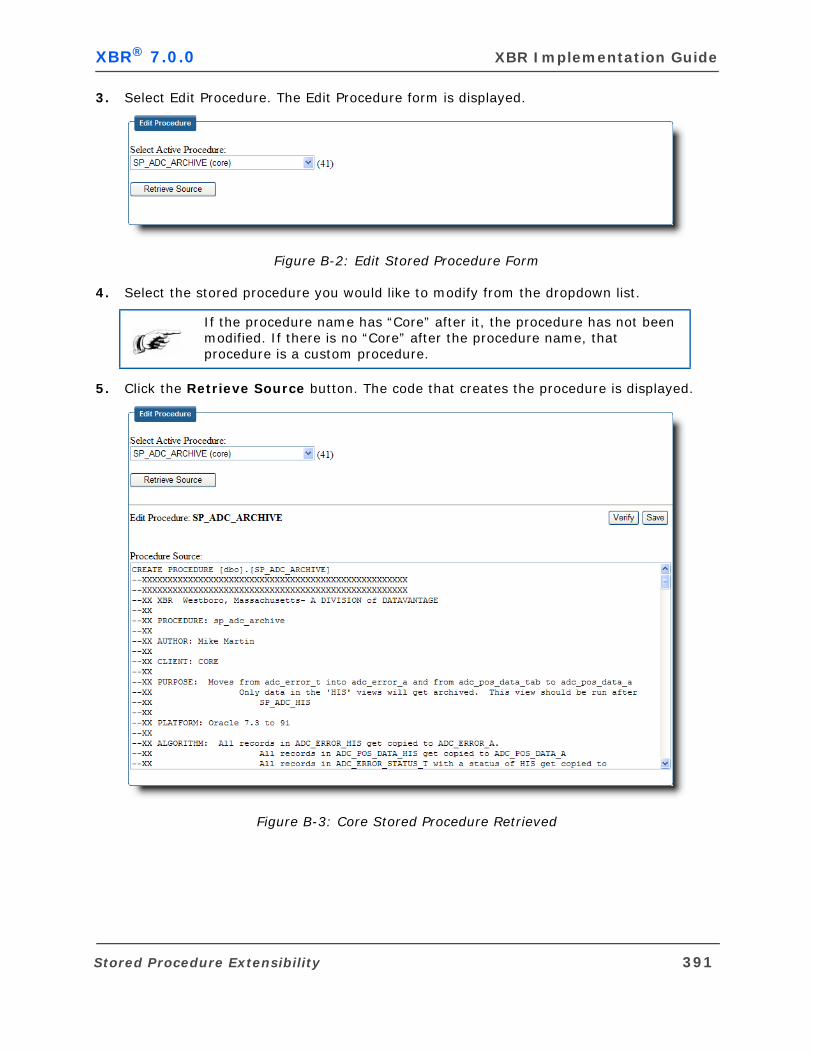
XBR® 7.0.0 XBR Implementation Guide
3. Select Edit Procedure. The Edit Procedure form is displayed.
Figure B-2: Edit Stored Procedure Form
4. Select the stored procedure you would like to modify from the dropdown list.
5. Click the Retrieve Source button. The code that creates the procedure is displayed.
Figure B-3: Core Stored Procedure Retrieved
If the procedure name has “Core” after it, the procedure has not been modified. If there is no “Core” after the procedure name, that procedure is a custom procedure.
Stored Procedure Extensibility 391
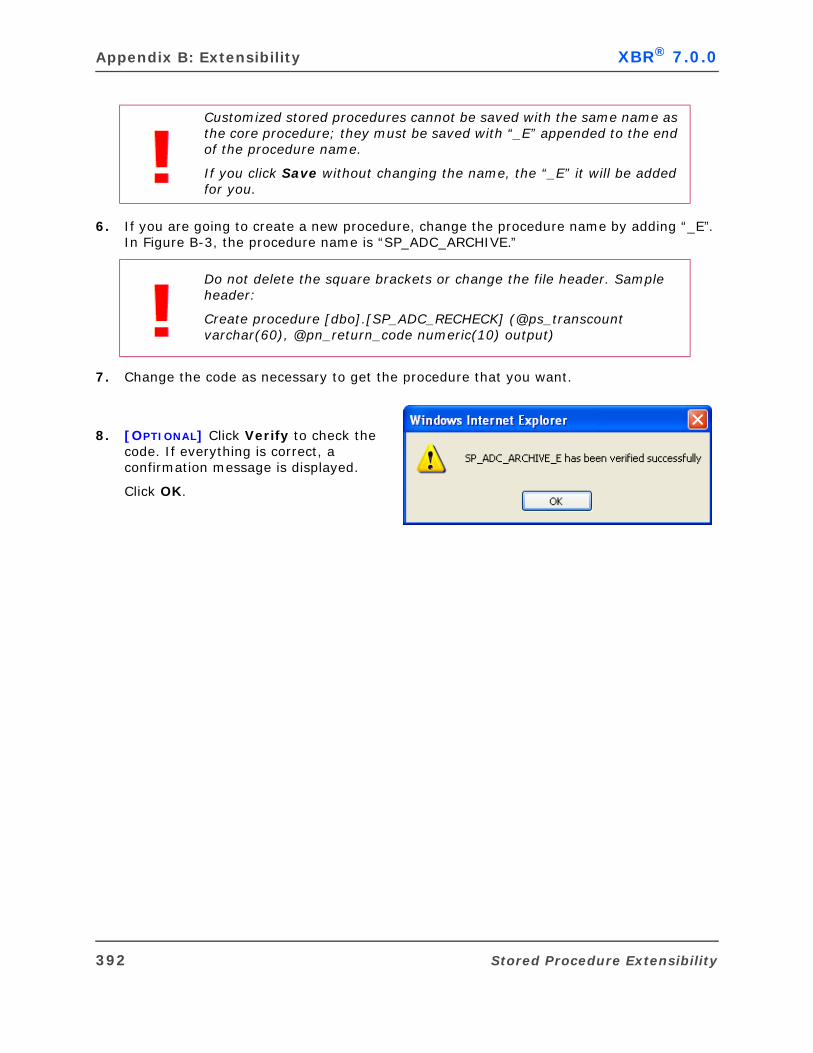
Appendix B: Extensibility XBR® 7.0.0
6. If you are going to create a new procedure, change the procedure name by adding “_E”. In Figure B-3, the procedure name is “SP_ADC_ARCHIVE.”
7. Change the code as necessary to get the procedure that you want.
8. [OPTIONAL] Click Verify to check the code. If everything is correct, a confirmation message is displayed.
Click OK.
Customized stored procedures cannot be saved with the same name as the core procedure; they must be saved with “_E” appended to the end of the procedure name.
If you click Save without changing the name, the “_E” it will be added for you.
Do not delete the square brackets or change the file header. Sample header:
Create procedure [dbo].[SP_ADC_RECHECK] (@ps_transcount varchar(60), @pn_return_code numeric(10) output)
392 Stored Procedure Extensibility
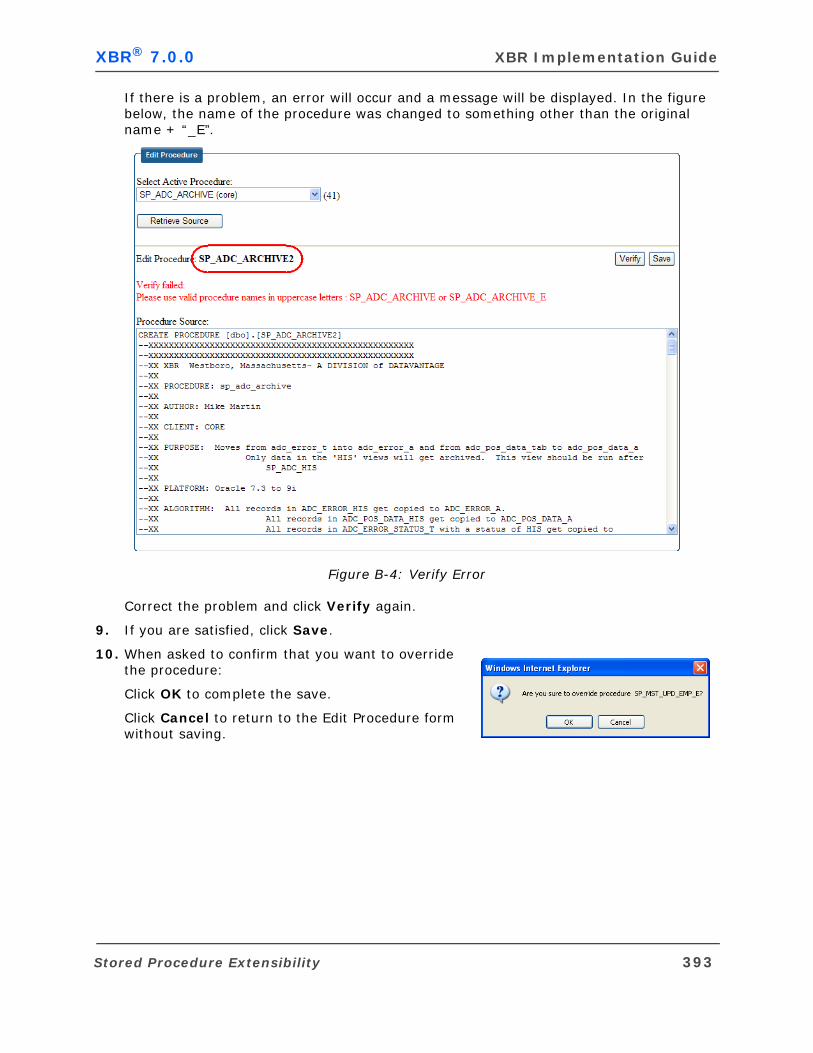
XBR® 7.0.0 XBR Implementation Guide
If there is a problem, an error will occur and a message will be displayed. In the figure below, the name of the procedure was changed to something other than the original name + “_E”.
Figure B-4: Verify Error
Correct the problem and click Verify again.
9. If you are satisfied, click Save.
10. When asked to confirm that you want to override the procedure:
Click OK to complete the save.
Click Cancel to return to the Edit Procedure form without saving.
Stored Procedure Extensibility 393
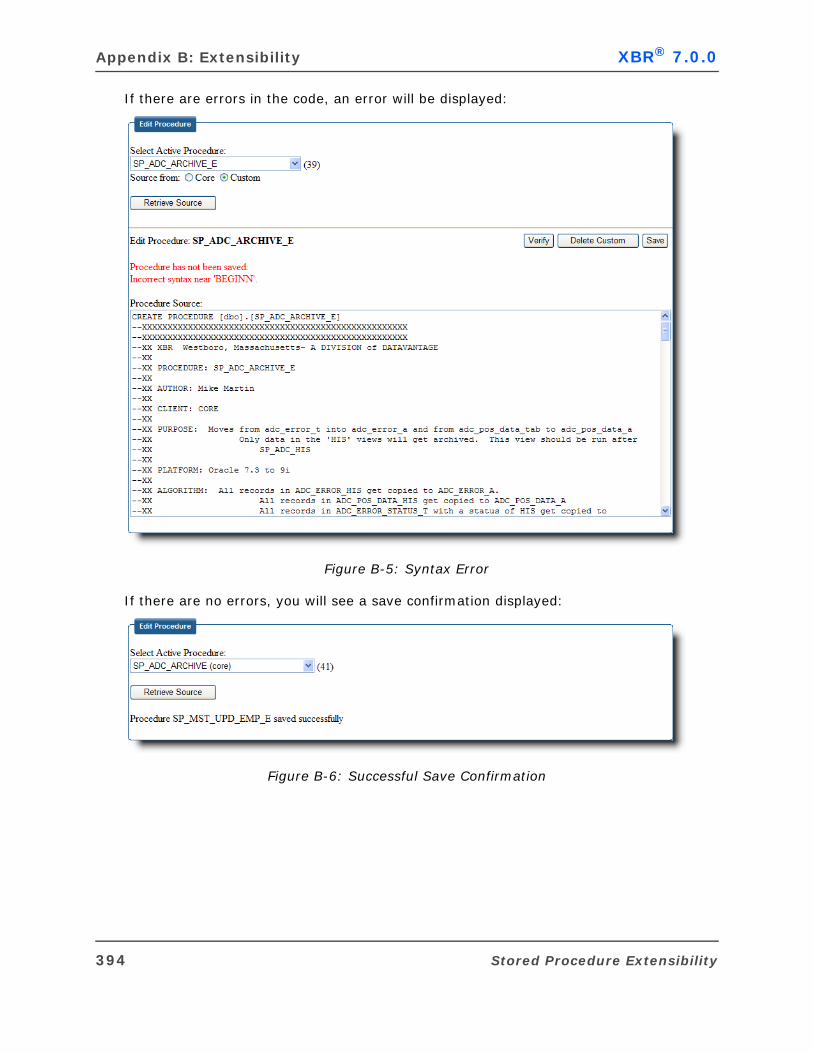
Appendix B: Extensibility XBR® 7.0.0
If there are errors in the code, an error will be displayed:
Figure B-5: Syntax Error
If there are no errors, you will see a save confirmation displayed:
Figure B-6: Successful Save Confirmation
394 Stored Procedure Extensibility
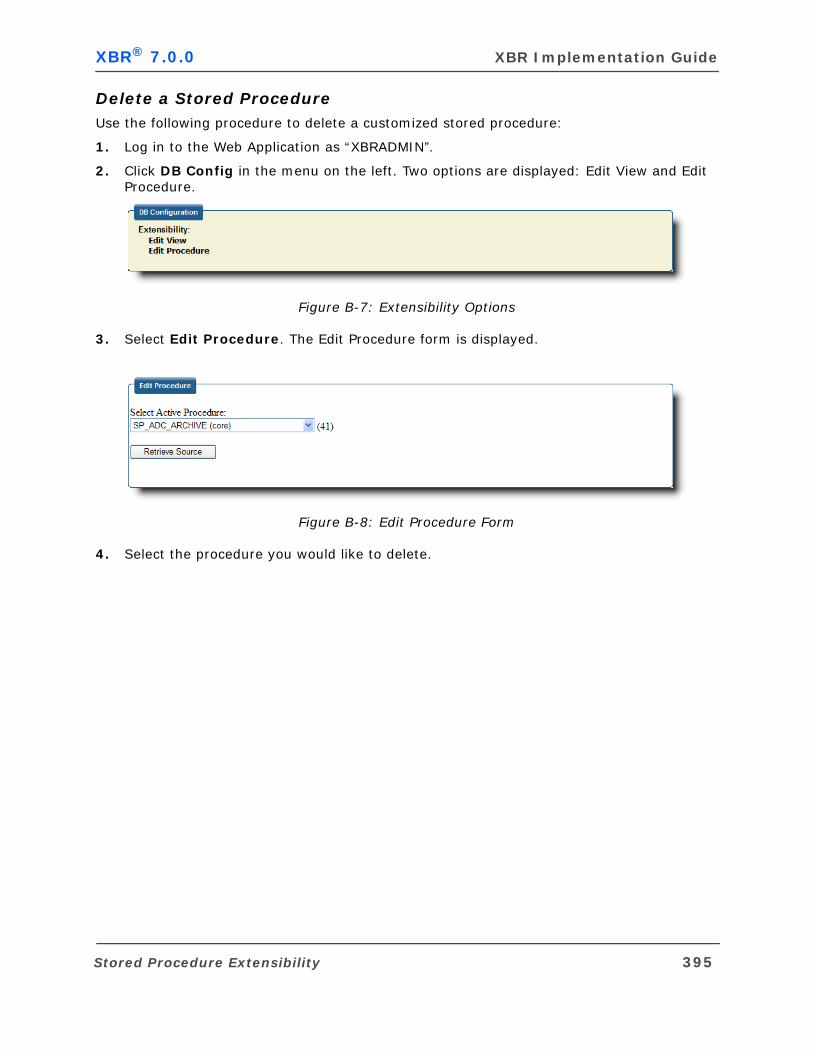
XBR® 7.0.0 XBR Implementation Guide
Delete a Stored ProcedureUse the following procedure to delete a customized stored procedure:
1. Log in to the Web Application as “XBRADMIN”.
2. Click DB Config in the menu on the left. Two options are displayed: Edit View and Edit Procedure.
Figure B-7: Extensibility Options
3. Select Edit Procedure. The Edit Procedure form is displayed.
Figure B-8: Edit Procedure Form
4. Select the procedure you would like to delete.
Stored Procedure Extensibility 395
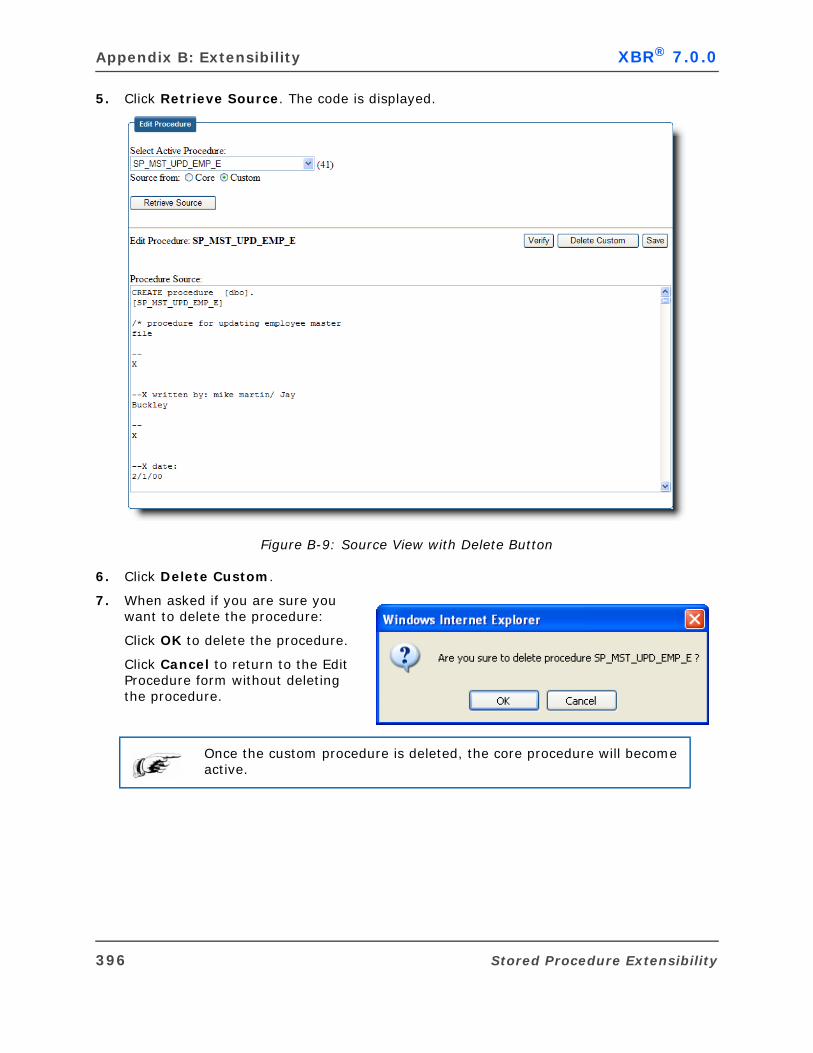
Appendix B: Extensibility XBR® 7.0.0
5. Click Retrieve Source. The code is displayed.
Figure B-9: Source View with Delete Button
6. Click Delete Custom.
7. When asked if you are sure you want to delete the procedure:
Click OK to delete the procedure.
Click Cancel to return to the Edit Procedure form without deleting the procedure.
Once the custom procedure is deleted, the core procedure will become active.
396 Stored Procedure Extensibility
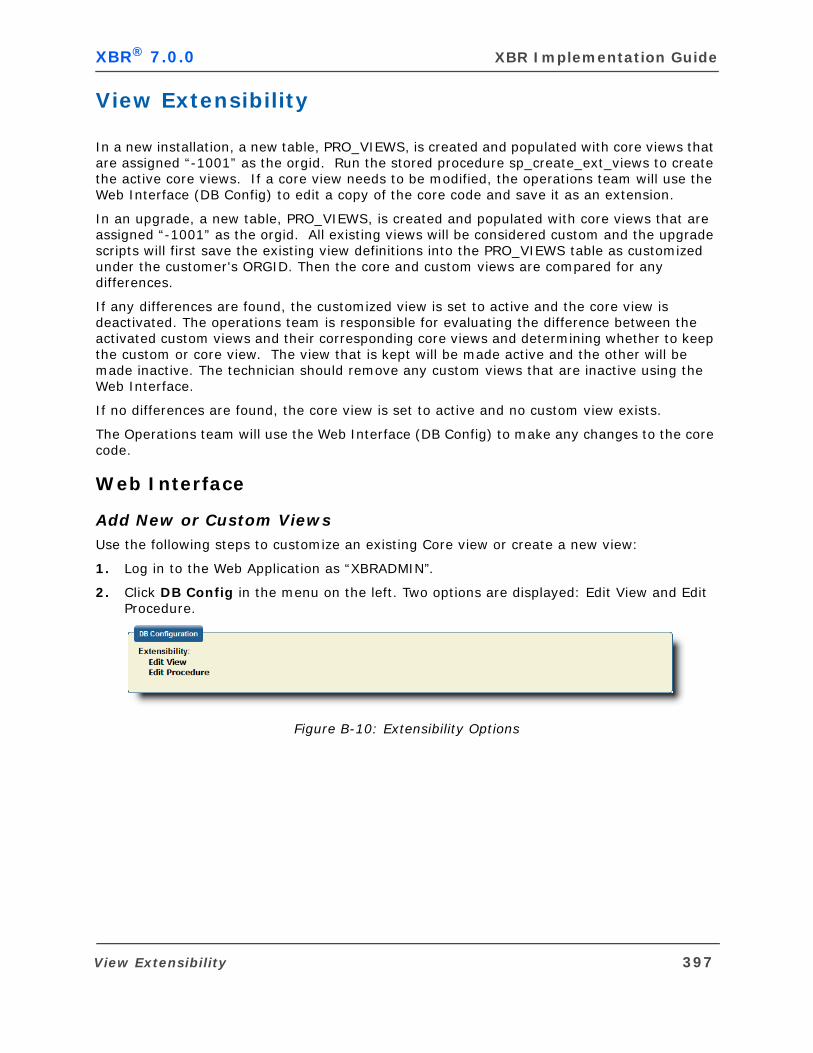
XBR® 7.0.0 XBR Implementation Guide
View Extensibility
In a new installation, a new table, PRO_VIEWS, is created and populated with core views that are assigned “-1001” as the orgid. Run the stored procedure sp_create_ext_views to create the active core views. If a core view needs to be modified, the operations team will use the Web Interface (DB Config) to edit a copy of the core code and save it as an extension.
In an upgrade, a new table, PRO_VIEWS, is created and populated with core views that are assigned “-1001” as the orgid. All existing views will be considered custom and the upgrade scripts will first save the existing view definitions into the PRO_VIEWS table as customized under the customer's ORGID. Then the core and custom views are compared for any differences.
If any differences are found, the customized view is set to active and the core view is deactivated. The operations team is responsible for evaluating the difference between the activated custom views and their corresponding core views and determining whether to keep the custom or core view. The view that is kept will be made active and the other will be made inactive. The technician should remove any custom views that are inactive using the Web Interface.
If no differences are found, the core view is set to active and no custom view exists.
The Operations team will use the Web Interface (DB Config) to make any changes to the core code.
Web Interface
Add New or Custom ViewsUse the following steps to customize an existing Core view or create a new view:
1. Log in to the Web Application as “XBRADMIN”.
2. Click DB Config in the menu on the left. Two options are displayed: Edit View and Edit Procedure.
Figure B-10: Extensibility Options
View Extensibility 397
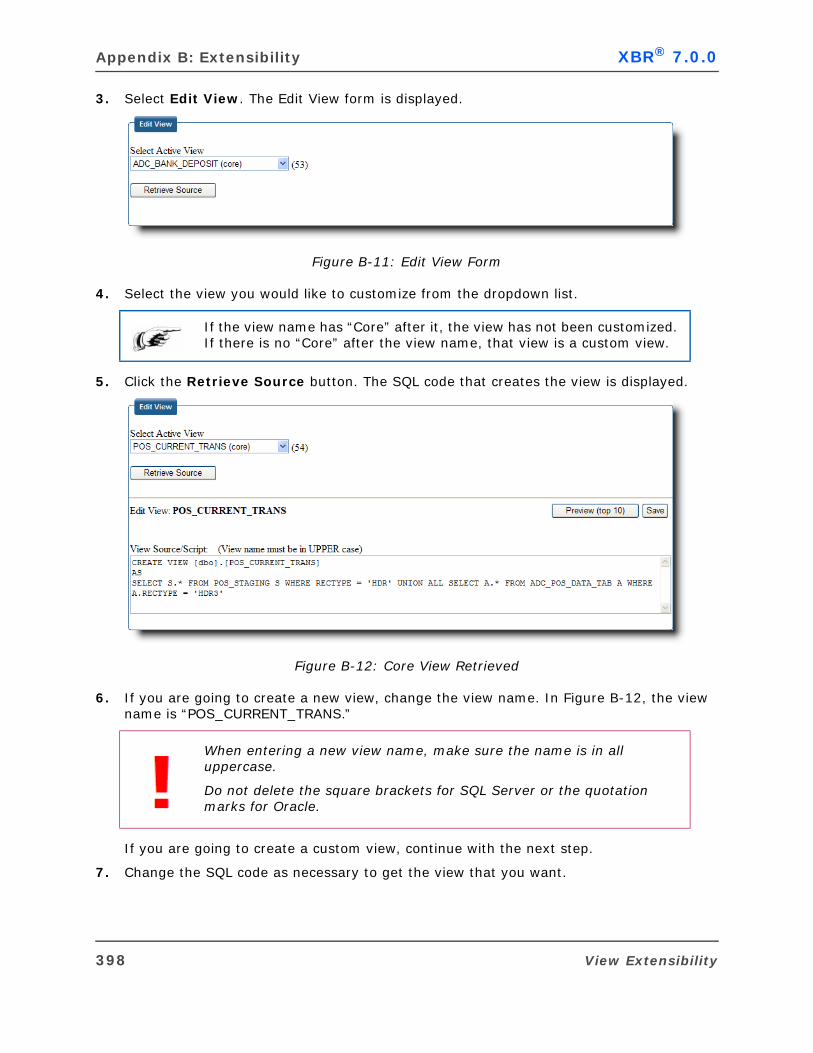
Appendix B: Extensibility XBR® 7.0.0
3. Select Edit View. The Edit View form is displayed.
Figure B-11: Edit View Form
4. Select the view you would like to customize from the dropdown list.
5. Click the Retrieve Source button. The SQL code that creates the view is displayed.
Figure B-12: Core View Retrieved
6. If you are going to create a new view, change the view name. In Figure B-12, the view name is “POS_CURRENT_TRANS.”
If you are going to create a custom view, continue with the next step.
7. Change the SQL code as necessary to get the view that you want.
If the view name has “Core” after it, the view has not been customized. If there is no “Core” after the view name, that view is a custom view.
When entering a new view name, make sure the name is in all uppercase.
Do not delete the square brackets for SQL Server or the quotation marks for Oracle.
398 View Extensibility
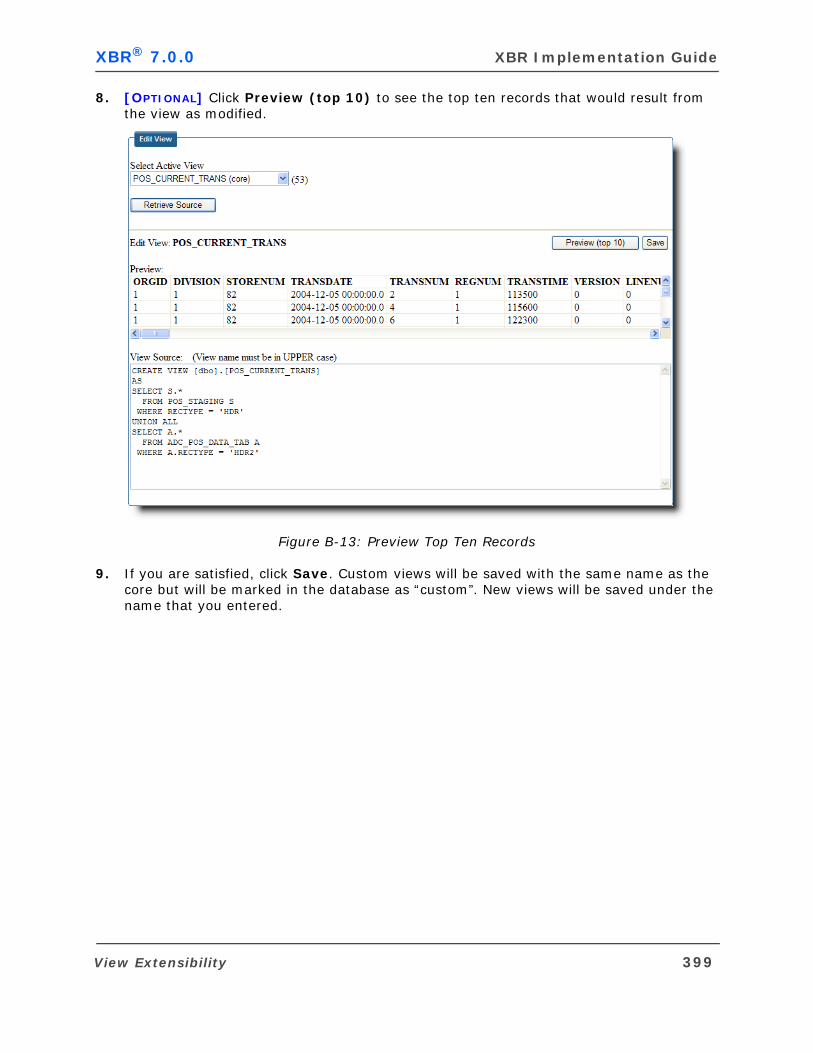
XBR® 7.0.0 XBR Implementation Guide
8. [OPTIONAL] Click Preview (top 10) to see the top ten records that would result from the view as modified.
Figure B-13: Preview Top Ten Records
9. If you are satisfied, click Save. Custom views will be saved with the same name as the core but will be marked in the database as “custom”. New views will be saved under the name that you entered.
View Extensibility 399
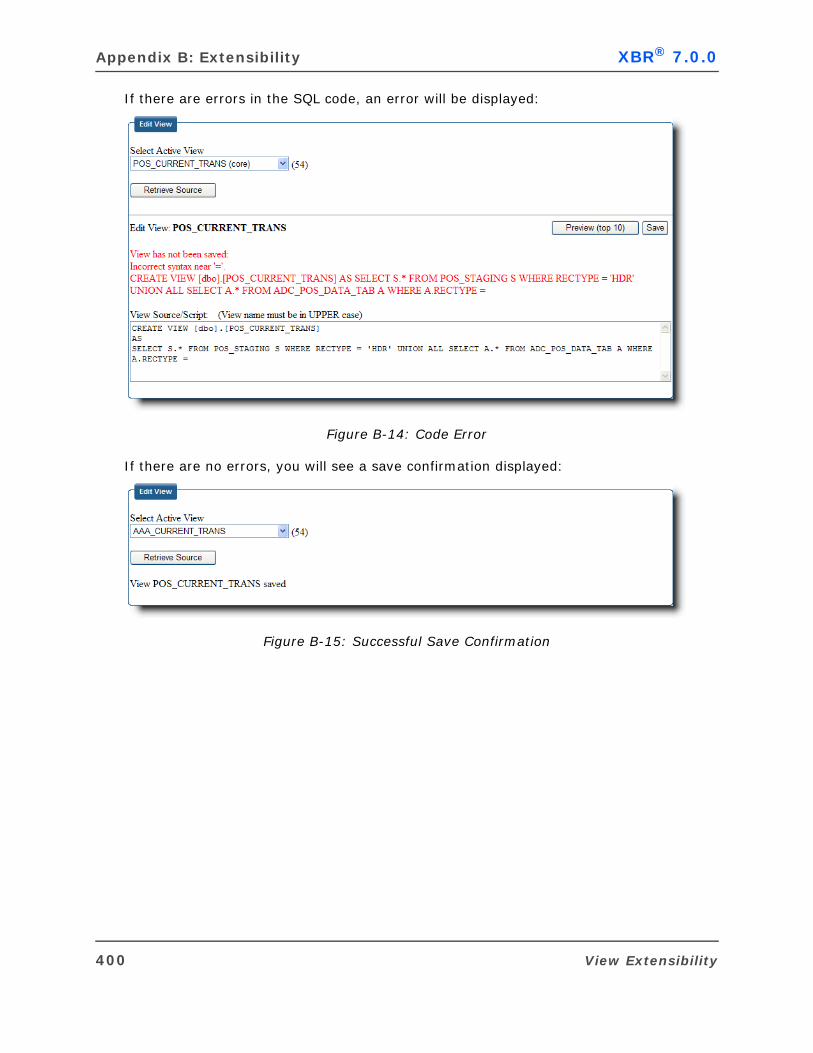
Appendix B: Extensibility XBR® 7.0.0
If there are errors in the SQL code, an error will be displayed:
Figure B-14: Code Error
If there are no errors, you will see a save confirmation displayed:
Figure B-15: Successful Save Confirmation
400 View Extensibility
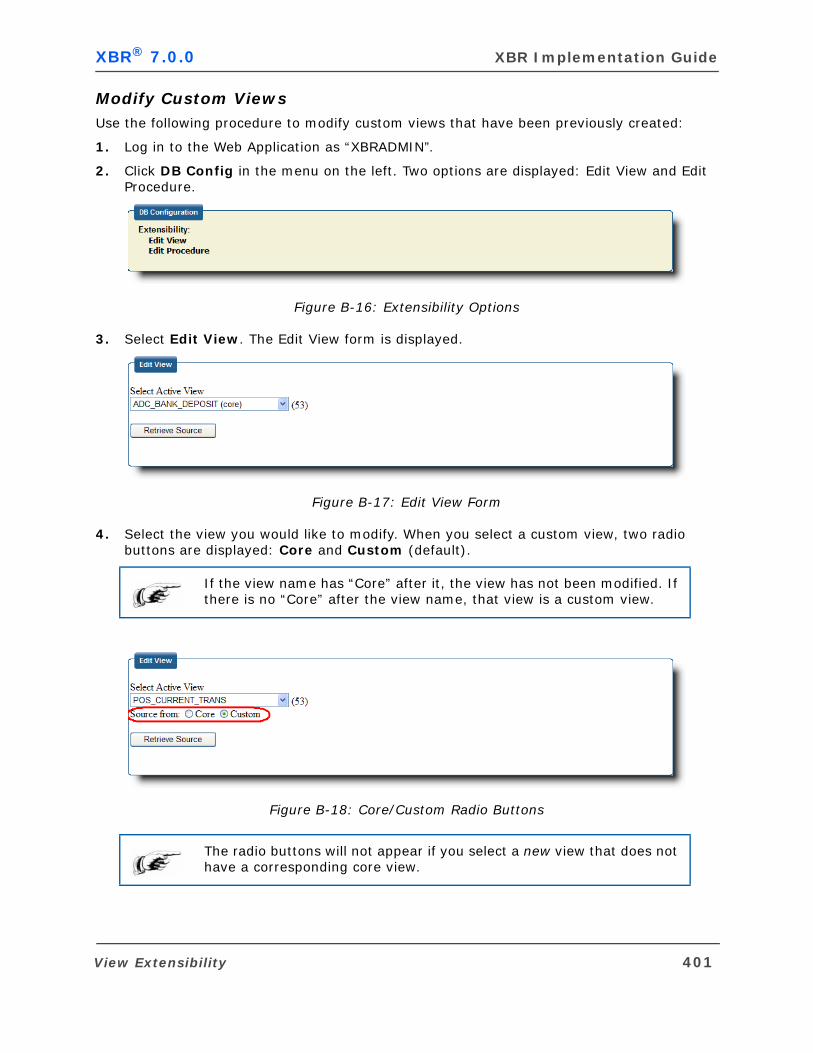
XBR® 7.0.0 XBR Implementation Guide
Modify Custom ViewsUse the following procedure to modify custom views that have been previously created:
1. Log in to the Web Application as “XBRADMIN”.
2. Click DB Config in the menu on the left. Two options are displayed: Edit View and Edit Procedure.
Figure B-16: Extensibility Options
3. Select Edit View. The Edit View form is displayed.
Figure B-17: Edit View Form
4. Select the view you would like to modify. When you select a custom view, two radio buttons are displayed: Core and Custom (default).
Figure B-18: Core/Custom Radio Buttons
If the view name has “Core” after it, the view has not been modified. If there is no “Core” after the view name, that view is a custom view.
The radio buttons will not appear if you select a new view that does not have a corresponding core view.
View Extensibility 401

Appendix B: Extensibility XBR® 7.0.0
5. Select Custom or Core (if available) and click Retrieve Source. The SQL code is displayed.
6. Make any modifications that are necessary.
7. When you are finished making changes, click Save.
8. When asked if you want to override the existing file, click OK.
Click Cancel to return to the edit screen.
Delete a Custom ViewUse the following procedure to delete custom views that have been previously created:
1. Log in to the Web Application as “XBRADMIN”.
2. Click DB Config in the menu on the left. Two options are displayed: Edit View and Edit Procedure.
Figure B-19: Extensibility Options
3. Select Edit View. The Edit View form is displayed.
Figure B-20: Edit View Form
4. Select the view you would like to delete.
402 View Extensibility
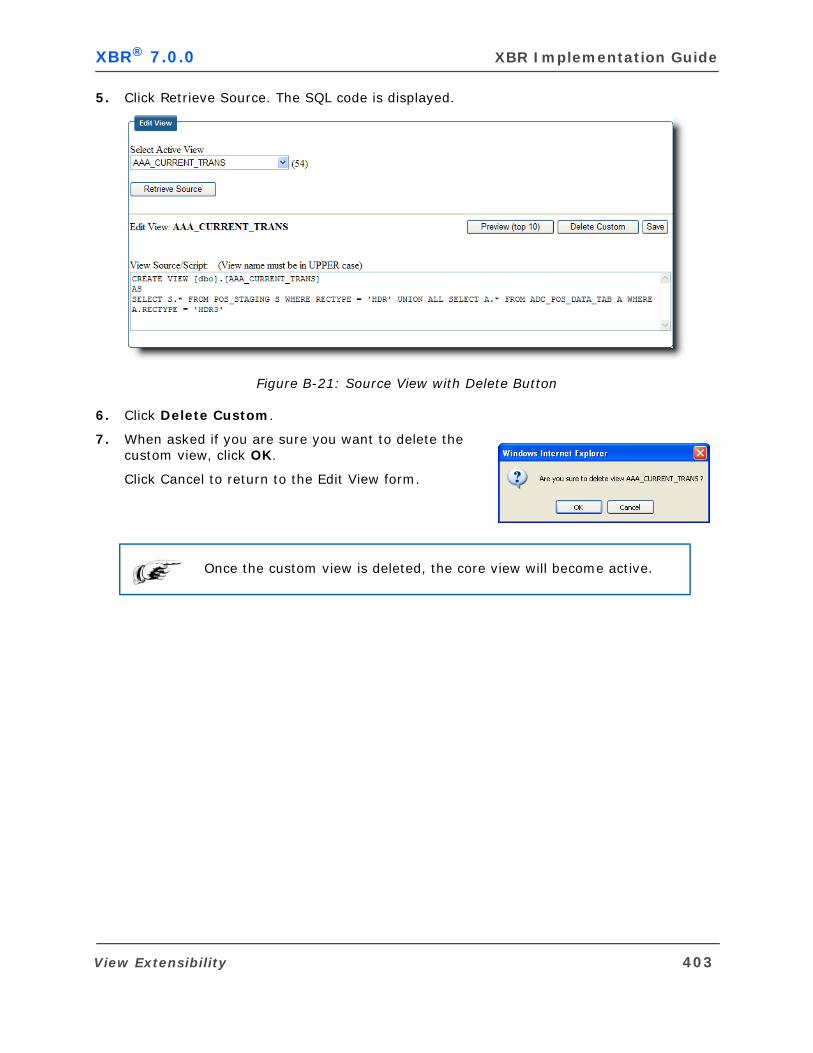
XBR® 7.0.0 XBR Implementation Guide
5. Click Retrieve Source. The SQL code is displayed.
Figure B-21: Source View with Delete Button
6. Click Delete Custom.
7. When asked if you are sure you want to delete the custom view, click OK.
Click Cancel to return to the Edit View form.
Once the custom view is deleted, the core view will become active.
View Extensibility 403


Contact Informationwww.micros-retail.com
30500 Bruce Industrial Parkway
Cleveland, OH 44139 USA
Toll Free: 888.328.2826
Tel: 440.498.4414
Fax: 440.542.3043
1800 West Park Drive
Westboro, MA 01581
Tel:508.655.7500
Fax:508.647.9495
MICROS Systems, Inc.
www.MICROS.com
7031 Columbia Gateway Drive
Columbia, MD 21046-2289
Tel: 443.285.6000
Related Documents