Oracle ® Retail MICROS TMS GUI Manual Release 5.6.01 April 2016

Welcome message from author
This document is posted to help you gain knowledge. Please leave a comment to let me know what you think about it! Share it to your friends and learn new things together.
Transcript
Oracle® Retail MICROS TMS
GUI Manual Release 5.6.01
April 2016

Oracle® Retail MICROS TMS GUI Manual, Release 5.6.01
Copyright © 2016, Oracle and/or its affiliates. All rights reserved.
Primary Author:
Contributors:
This software and related documentation are provided under a license agreement containing restrictions on use and disclosure and are protected by intellectual property laws. Except as expressly permitted in your license agreement or allowed by law, you may not use, copy, reproduce, translate, broadcast, modify, license, transmit, distribute, exhibit, perform, publish, or display any part, in any form, or by any means. Reverse engineering, disassembly, or decompilation of this software, unless required by law for interoperability, is prohibited.
The information contained herein is subject to change without notice and is not warranted to be error-free. If you find any errors, please report them to us in writing.
If this software or related documentation is delivered to the U.S. Government or anyone licensing it on behalf of the U.S. Government, then the following notice is applicable:
U.S. GOVERNMENT END USERS: Oracle programs, including any operating system, integrated software, any programs installed on the hardware, and/or documentation, delivered to U.S. Government end users are "commercial computer software" pursuant to the applicable Federal Acquisition Regulation and agency-specific supplemental regulations. As such, use, duplication, disclosure, modification, and adaptation of the programs, including any operating system, integrated software, any programs installed on the hardware, and/or documentation, shall be subject to license terms and license restrictions applicable to the programs. No other rights are granted to the U.S. Government.
This software or hardware is developed for general use in a variety of information management applications. It is not developed or intended for use in any inherently dangerous applications, including applications that may create a risk of personal injury. If you use this software or hardware in dangerous applications, then you shall be responsible to take all appropriate fail-safe, backup, redundancy, and other measures to ensure its safe use. Oracle Corporation and its affiliates disclaim any liability for any damages caused by use of this software or hardware in dangerous applications.
Oracle and Java are registered trademarks of Oracle and/or its affiliates. Other names may be trademarks of their respective owners.
Intel and Intel Xeon are trademarks or registered trademarks of Intel Corporation. All SPARC trademarks are used under license and are trademarks or registered trademarks of SPARC International, Inc. AMD, Opteron, the AMD logo, and the AMD Opteron logo are trademarks or registered trademarks of Advanced Micro Devices. UNIX is a registered trademark of The Open Group.
This software or hardware and documentation may provide access to or information on content, products, and services from third parties. Oracle Corporation and its affiliates are not responsible for and expressly disclaim all warranties of any kind with respect to third-party content, products, and services unless otherwise set forth in an applicable agreement between you and Oracle. Oracle Corporation and its affiliates will not be responsible for any loss, costs, or damages incurred due to your access to or use of third-party content, products, or services, except as set forth in an applicable agreement between you and Oracle.

iii
Value-Added Reseller (VAR) Language
Oracle Retail VAR Applications
The following restrictions and provisions only apply to the programs referred to in this section and licensed to you. You acknowledge that the programs may contain third party software (VAR applications) licensed to Oracle. Depending upon your product and its version number, the VAR applications may include:
(i) the MicroStrategy Components developed and licensed by MicroStrategy Services Corporation (MicroStrategy) of McLean, Virginia to Oracle and imbedded in the MicroStrategy for Oracle Retail Data Warehouse and MicroStrategy for Oracle Retail Planning & Optimization applications.
(ii) the Wavelink component developed and licensed by Wavelink Corporation (Wavelink) of Kirkland, Washington, to Oracle and imbedded in Oracle Retail Mobile Store Inventory Management.
(iii) the software component known as Access Via™ licensed by Access Via of Seattle, Washington, and imbedded in Oracle Retail Signs and Oracle Retail Labels and Tags.
(iv) the software component known as Adobe Flex™ licensed by Adobe Systems Incorporated of San Jose, California, and imbedded in Oracle Retail Promotion Planning & Optimization application.
You acknowledge and confirm that Oracle grants you use of only the object code of the VAR Applications. Oracle will not deliver source code to the VAR Applications to you. Notwithstanding any other term or condition of the agreement and this ordering document, you shall not cause or permit alteration of any VAR Applications. For purposes of this section, "alteration" refers to all alterations, translations, upgrades, enhancements, customizations or modifications of all or any portion of the VAR Applications including all reconfigurations, reassembly or reverse assembly, re-engineering or reverse engineering and recompilations or reverse compilations of the VAR Applications or any derivatives of the VAR Applications. You acknowledge that it shall be a breach of the agreement to utilize the relationship, and/or confidential information of the VAR Applications for purposes of competitive discovery.
The VAR Applications contain trade secrets of Oracle and Oracle's licensors and Customer shall not attempt, cause, or permit the alteration, decompilation, reverse engineering, disassembly or other reduction of the VAR Applications to a human perceivable form. Oracle reserves the right to replace, with functional equivalent software, any of the VAR Applications in future releases of the applicable program.


v
Contents Send Us Your Comments ............................................................................................... vii
Preface .............................................................................................................................. ix
Audience ................................................................................................................................ ix
Documentation Accessibility ............................................................................................... ix
Related Documents ............................................................................................................... ix
Customer Support ................................................................................................................. ix
Review Patch Documentation ............................................................................................. ix
Improved Process for Oracle Retail Documentation Corrections .................................... x
Oracle Retail Documentation on the Oracle Technology Network.................................. x
Conventions ............................................................................................................................. x
1 Introduction .................................................................................................................. 1
TMS Scalability ........................................................................................................................ 2
All on 1 machine .............................................................................................................. 2
Graphical User Interface(s) on other machine(s) ......................................................... 3
Fully distributed architecture ......................................................................................... 4
The types of actions of TMS ................................................................................................... 5
2 Login screen ................................................................................................................. 7
3 File menu ...................................................................................................................... 9
Station selection ....................................................................................................................... 9
Group selection ....................................................................................................................... 9
Quick action .................................................................................................................... 10
Print ................................................................................................................................. 11
Exit .......................................................................................................................................... 11
Icon bar ................................................................................................................................... 11
4 Schedule menu .......................................................................................................... 13
Add button ............................................................................................................................. 14
Quick button .......................................................................................................................... 19
Filter button ........................................................................................................................... 20
5 View menu .................................................................................................................. 23
Report ..................................................................................................................................... 23
Export ..................................................................................................................................... 24
Logging ................................................................................................................................... 26
Level details ........................................................................................................................... 27
Fuel price overview .............................................................................................................. 29
6 Edit menu .................................................................................................................... 31
Terminal/Dispenser management ..................................................................................... 31
Commercial profiles ............................................................................................................. 34
Create/Save button ....................................................................................................... 35
Show button .................................................................................................................... 36

vi
Linked sites button ........................................................................................................ 37
Fuel prices .............................................................................................................................. 38
Pre-init wet fuel prices ......................................................................................................... 40
Site parameters ...................................................................................................................... 44
7 Define menu ............................................................................................................... 45
Station ..................................................................................................................................... 45
Add button...................................................................................................................... 46
Delete button .................................................................................................................. 48
Groups .................................................................................................................................... 50
Add button...................................................................................................................... 51
Delete button .................................................................................................................. 52
Actions ............................................................................................................................. 52
Reports ............................................................................................................................ 52
Exports............................................................................................................................. 55
System services............................................................................................................... 57
Quick ............................................................................................................................... 59
Parameters ............................................................................................................................. 61
8 Setup menu ................................................................................................................ 63
Formulas ................................................................................................................................. 63
Show button .................................................................................................................... 63
EFT Default ............................................................................................................................ 65
User management ................................................................................................................. 65
User profiles.................................................................................................................... 66
Users ................................................................................................................................ 67
User management related information ....................................................................... 68
9 Window menu ............................................................................................................. 69
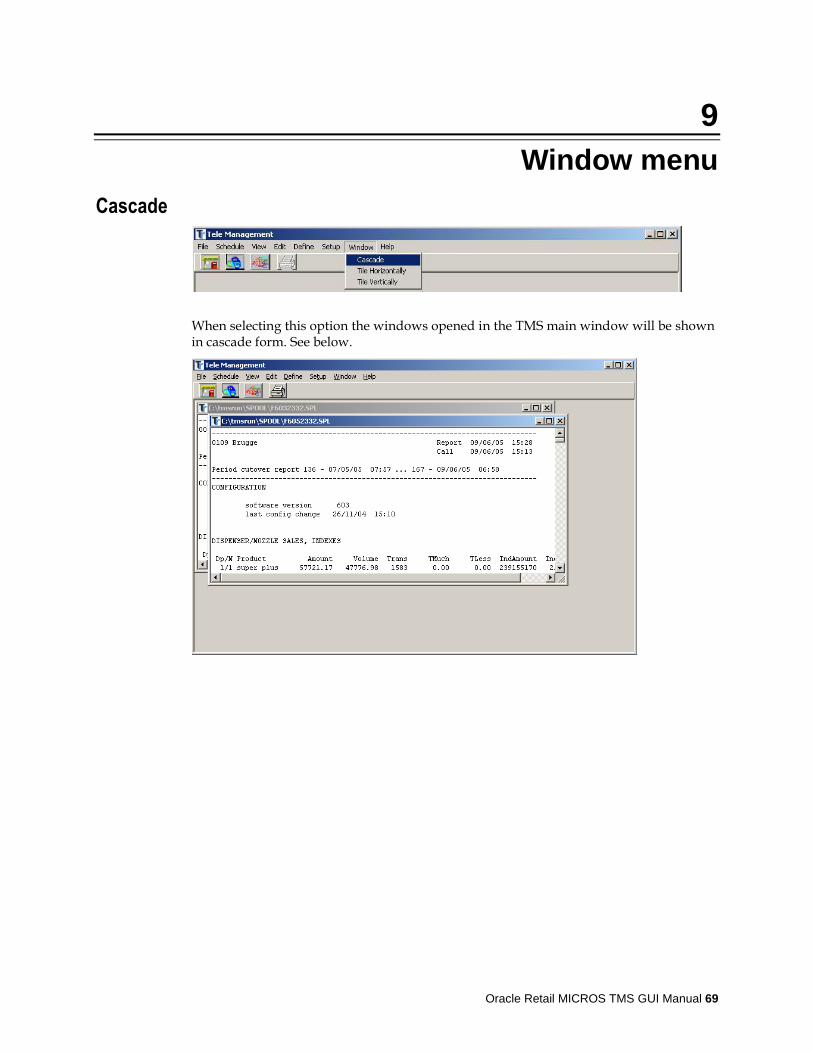
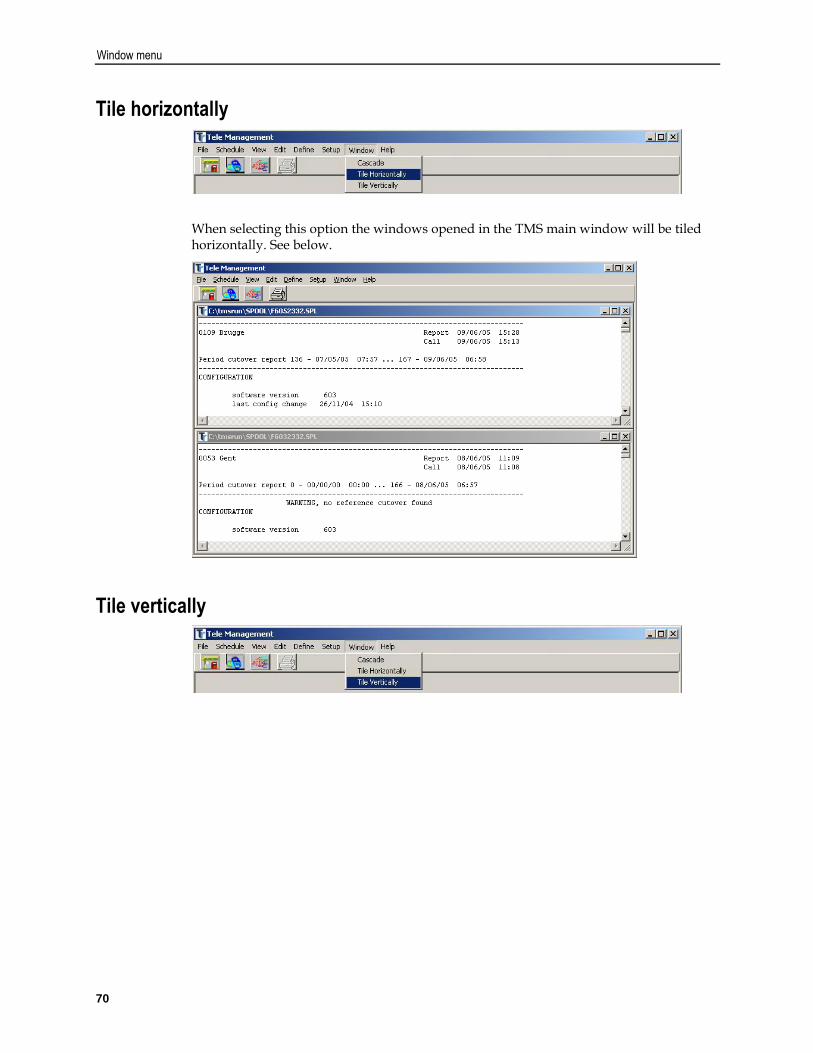
Cascade ................................................................................................................................... 69
Tile horizontally .................................................................................................................... 70
Tile vertically ......................................................................................................................... 70
10 Help menu ................................................................................................................... 73
About ...................................................................................................................................... 73
11 Calls - Examples ........................................................................................................ 75
12 Reporting Components ............................................................................................. 79
13 Exports ........................................................................................................................ 85
14 Services ...................................................................................................................... 97
Oracle Retail MICROS TMS GUI Manual vii
Send Us Your Comments
Oracle Retail MICROS TMS, GUI Manual, Release 5.6.01
Oracle welcomes customers' comments and suggestions on the quality and usefulness of this document.
Your feedback is important, and helps us to best meet your needs as a user of our products. For example:
Are the implementation steps correct and complete?
Did you understand the context of the procedures?
Did you find any errors in the information?
Does the structure of the information help you with your tasks?
Do you need different information or graphics? If so, where, and in what format?
Are the examples correct? Do you need more examples?
If you find any errors or have any other suggestions for improvement, then please tell us your name, the name of the company who has licensed our products, the title and part number of the documentation and the chapter, section, and page number (if available).
Note: Before sending us your comments, you might like to check that you have the latest version of the document and if any concerns are already addressed. To do this, access the Online Documentation available on the Oracle Technology Network Web site. It contains the most current Documentation Library plus all documents revised or released recently.
Send your comments to us using the electronic mail address: [email protected]
Please give your name, address, electronic mail address, and telephone number (optional).
If you need assistance with Oracle software, then please contact your support representative or Oracle Support Services.
If you require training or instruction in using Oracle software, then please contact your Oracle local office and inquire about our Oracle University offerings. A list of Oracle offices is available on our Web site at www.oracle.com.

Oracle Retail MICROS TMS GUI Manual ix
Preface
The Oracle Retail TMS GUI Guide describes the available features of the TMS user interface.
Audience This GUI (Graphical User Interface) Manual is for users and administrators of Oracle Retail TMS. This includes merchandisers, buyers, business analysts, and administrative personnel.
Documentation Accessibility For information about Oracle's commitment to accessibility, visit the Oracle Accessibility Program website at
.
Access to Oracle Support
Oracle customers that have purchased support have access to electronic support through My Oracle Support. For information, visit
or visit if you are
hearing impaired.
Related Documents For more information, see the following documents in the Oracle Retail TMS Release documentation set:
Oracle Retail Site Controller Events Overview
Oracle Retail TMS Sequential Export Guide
Customer Support To contact Oracle Customer Support, access My Oracle Support at the following URL:
https://support.oracle.com
When contacting Customer Support, please provide the following:
Product version and program/module name
Functional and technical description of the problem (include business impact)
Detailed step-by-step instructions to re-create
Exact error message received
Screen shots of each step you take
Review Patch Documentation When you install the application for the first time, you install either a base release (for example, 13.3) or a later patch release (for example, 13.3.1). If you are installing the base release or additional patch releases, read the documentation for all releases that have occurred since the base release before you begin installation. Documentation for patch releases can contain critical information related to the base release, as well as information about code changes since the base release.
x
Improved Process for Oracle Retail Documentation Corrections To more quickly address critical corrections to Oracle Retail documentation content, Oracle Retail documentation may be republished whenever a critical correction is needed. For critical corrections, the republication of an Oracle Retail document may at times not be attached to a numbered software release; instead, the Oracle Retail document will simply be replaced on the Oracle Technology Network Web site, or, in the case of Data Models, to the applicable My Oracle Support Documentation container where they reside.
This process will prevent delays in making critical corrections available to customers. For the customer, it means that before you begin installation, you must verify that you have the most recent version of the Oracle Retail documentation set. Oracle Retail documentation is available on the Oracle Technology Network at the following URL:
An updated version of the applicable Oracle Retail document is indicated by Oracle part number, as well as print date (month and year). An updated version uses the same part number, with a higher-numbered suffix. For example, part number E123456- is an updated version of a document with part number E123456- .
If a more recent version of a document is available, that version supersedes all previous versions.
Oracle Retail Documentation on the Oracle Technology Network Oracle Retail product documentation is available on the following web site:
(Data Model documents are not available through Oracle Technology Network. You can obtain them through My Oracle Support.)
Conventions
Navigate: This is a navigate statement. It tells you how to get to the start of the procedure and ends with a screen shot of the starting point and the statement “the Window Name window opens.”
This is a code sample
It is used to display examples of code

Oracle Retail MICROS TMS GUI Manual 1
1
Introduction
Note: The rebranding for the latest version of this documentation set is in development as part of post MICROS acquisition activities. References to former MICROS product names may exist throughout this existing documentation set.
TMS is a universal tool for seamless dataflow between the company specific IT headquarters infrastructure and the individual petrol stations. Even though foreseen with user interface, it is mainly meant to work 24 hours a day, all year long, without any need for user interference, automating all the dataflow between the sites and the central, in both directions. It is meant to be able to accept data in any format and provide data in any format in order to fit into as much as possible into the existing headquarter IT infrastructure.
TMS Scheduler(s) continuously check(s) if new actions have to be executed. It awaits triggers from various sources and acts upon them. Action scripts are located in the TMS database. Action scripts are managed through TMS GUI and or can be imported externally. Actions can be executed immediately or based on a time schedule, subject to an external or internal trigger. Actions are often recurrent, programmed to happen repeatedly (Every day but not in the weekend,…). Action completion can trigger other actions depending on the result of the action. Actions are station specific, or for a group of stations.
Various architectures of TMS installation are available. In its most distributed form, multiple user interfaces (TMS GUI) operate on client machines allowing users to control multiple action schedulers residing on other machines. More user interfaces are useful when various users need to supervise distinctive tasks (user possibilities can vary depending on attributed rights…). Multiple TMS Schedulers are useful in case of huge networks with hundreds of sites. The benefit of using more TMS Schedulers is increase of responsiveness, higher reliability and possibility to dedicate distinctive tasks to a specific
Introduction
2
TMS Scheduler. This can be needed in case of heterogeneous networks using various communication means only available from separate physical locations.
The TMS scheduler communicates with the sites using TCP/IP. Old networks using PSTN, ISDN and X25 are also supported. Volume of data transferred can be kept low in order to allow for fluent operation over communication networks with a very low throughput.
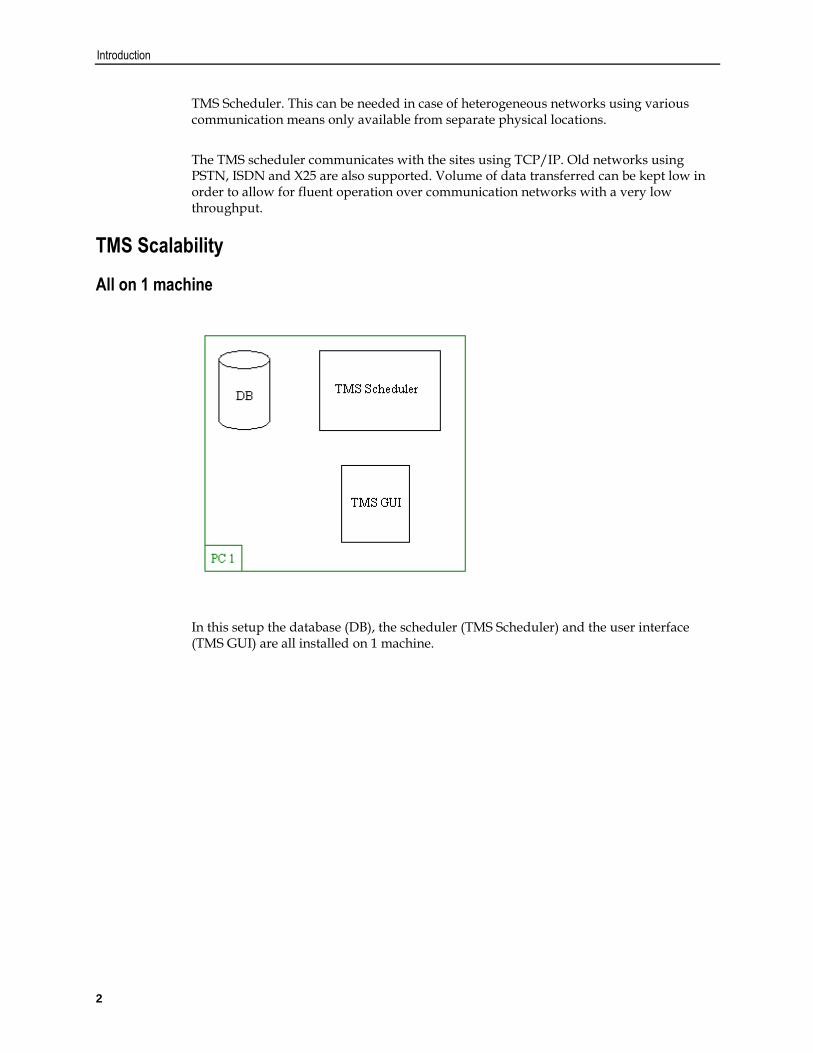
TMS Scalability
All on 1 machine
In this setup the database (DB), the scheduler (TMS Scheduler) and the user interface (TMS GUI) are all installed on 1 machine.
MICROS TMS 5.6.01
Oracle Retail MICROS TMS GUI Manual 3
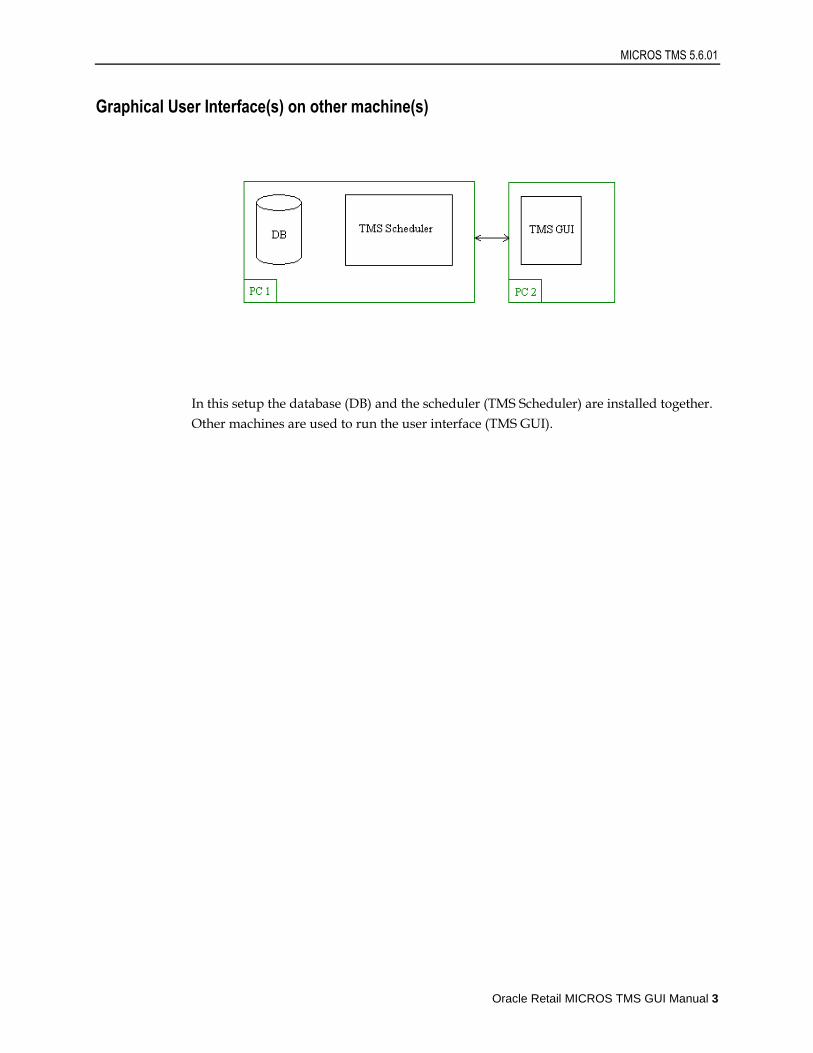
Graphical User Interface(s) on other machine(s)
In this setup the database (DB) and the scheduler (TMS Scheduler) are installed together.
Other machines are used to run the user interface (TMS GUI).
Introduction
4
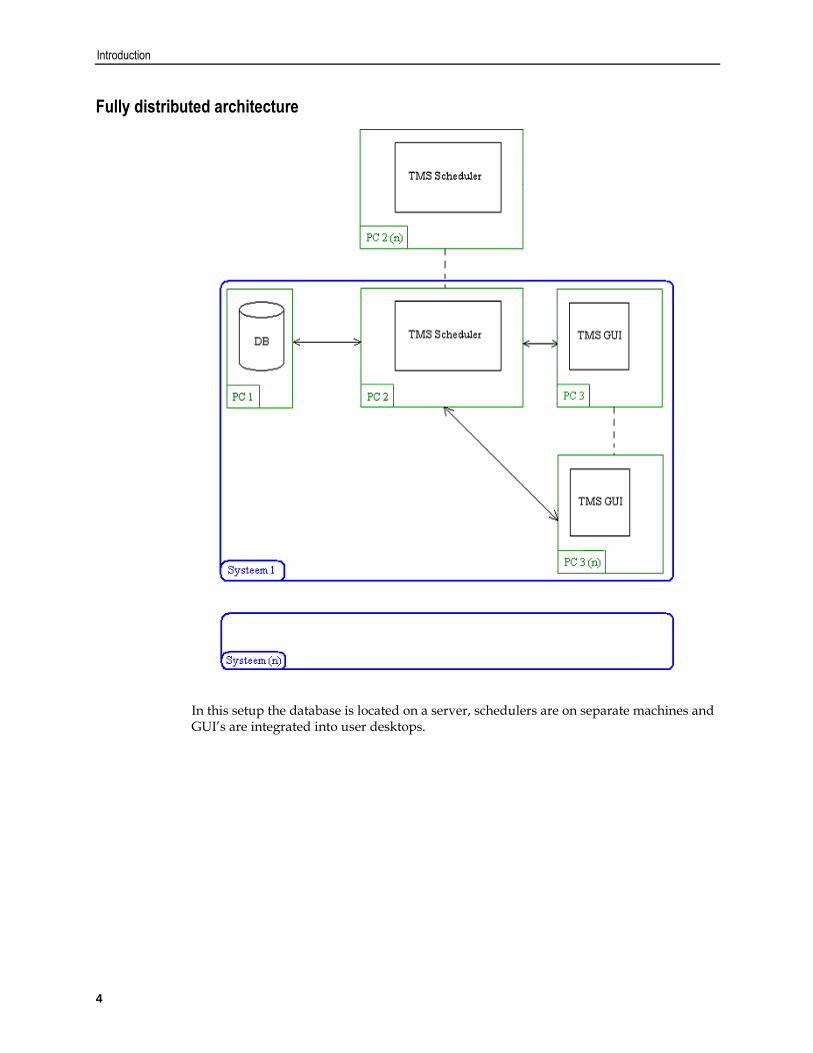
Fully distributed architecture
In this setup the database is located on a server, schedulers are on separate machines and GUI’s are integrated into user desktops.

MICROS TMS 5.6.01
Oracle Retail MICROS TMS GUI Manual 5
The types of actions of TMS
TMS is a universal tool for fully automated seamless dataflow between the company specific IT headquarters infrastructure and the petrol stations. It converts and transfers data between headquarter and sites.
There are following action types:
CALL Script based data exchange with sites
REPORT Generation of human readable reports of various kinds and formats
EXPORT Generation of machine readable data of various kinds and formats
SERVICE Data Import, conversion, processing and transport


Oracle Retail MICROS TMS GUI Manual 7
2
Login screen
When GUI starts a login screen will pop up. It’s mandatory to have a login and a password. (If you don’t have a login and a password you will have to contact an Administrator).
Enter your login and password to work with TMS.
It’s also possible to change your password when clicking the button Change password.
After entering the “New password” field and “Confirm password” field the button Write new password appears to save your new password.
Remark:
“Login” and “Password” are case sensitive.


Oracle Retail MICROS TMS GUI Manual 9
3
File menu
Station selection
By selecting a station, a default station is set up, every action is scheduled on this default station. The button Deselect is used for deselecting a station so the default station will be gone.
Group selection

File menu
10
Similar as the Station selection. When a group is selected and the user schedules an action then all the stations in this group are used for this action. The selected group is set as default when an action is scheduled. The button Deselect is used to deselect a group.
Note: This is the only way to define an action for a group of station.
Quick action
This is a fast way of defining an action (or several) for a certain station. These actions have been created by the user. For more information about these actions, see "Chapter 7, Quick".
This is a one-time action for immediate schedulation.
MICROS TMS 5.6.01
Oracle Retail MICROS TMS GUI Manual 11
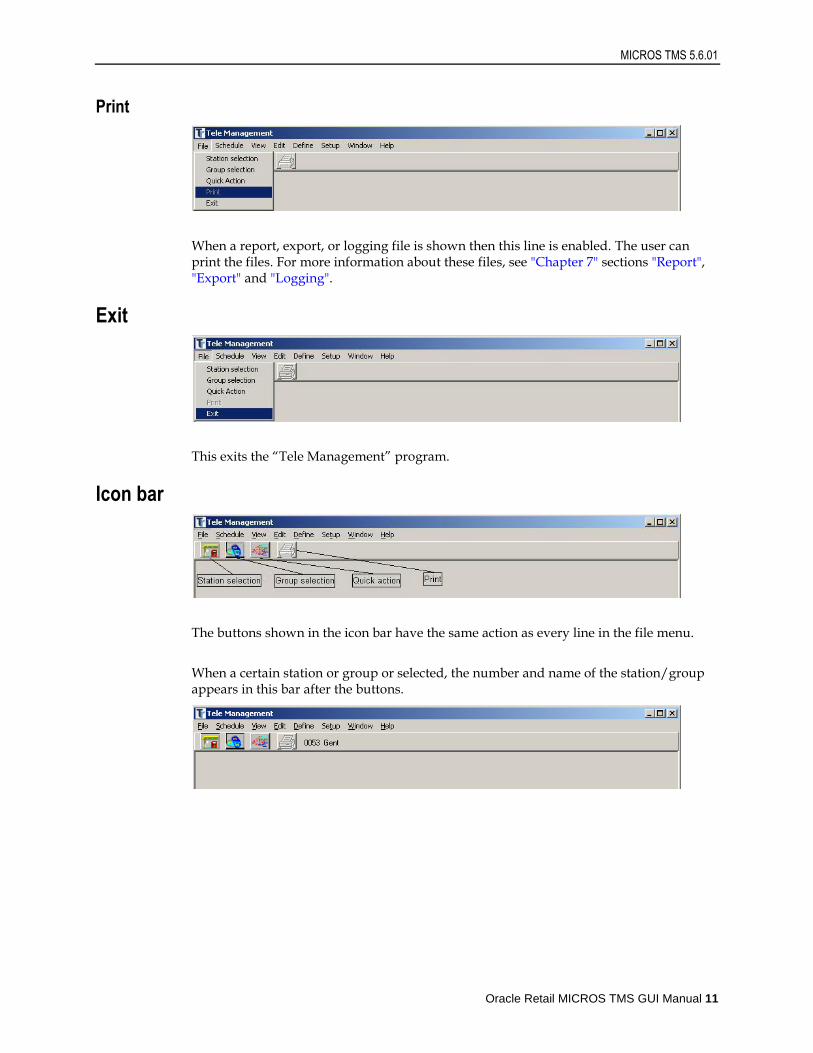
When a report, export, or logging file is shown then this line is enabled. The user can print the files. For more information about these files, see "Chapter 7" sections "Report", "Export" and "Logging".
Exit
This exits the “Tele Management” program.
Icon bar
The buttons shown in the icon bar have the same action as every line in the file menu.
When a certain station or group or selected, the number and name of the station/group appears in this bar after the buttons.


Oracle Retail MICROS TMS GUI Manual 13
4
Schedule menu
Add button: With this button an action can be added to the list.
Edit button: With this button an existing action can be edited in the list.
Hold button: With this button a scheduled action can be set in hold, or get it out of hold. When an action is “in hold” it is marked with a STOP sign at the beginning of the line.
Delete button: Deletes the selected action(s) after clicking “OK”.
Reschedule button: Reschedules the selected action(s) depending on the way this action is defined.
Filter button: Filters certain actions.
Quick button: This button is used to add a quick action to the schedule list.
Refresh button: Refreshes the list of actions and removes all the executed actions which have no meaning anymore.
Cancel button: Closes the schedule window.

Schedule menu
14
Add button
After clicking the Add button a pop-up window appears. In the section “Basic settings” the following options are available:
Do action at: The date and time when the action is going to be executed. If the date and time is earlier than the current date and time the action is executed immediately.
Station: The station used for the action.
Type: Type of action.
– Call: For more information about calls see "Appendix A: Calls - Examples".
– Report: For more information about reports see "Appendix B: Reporting Components".
– Export: For more information about exports see "Appendix C: Exports".
– Quit: Shuts the scheduler down.
– Service: For more information about Services see "Appendix D: Services".
MICROS TMS 5.6.01
Oracle Retail MICROS TMS GUI Manual 15
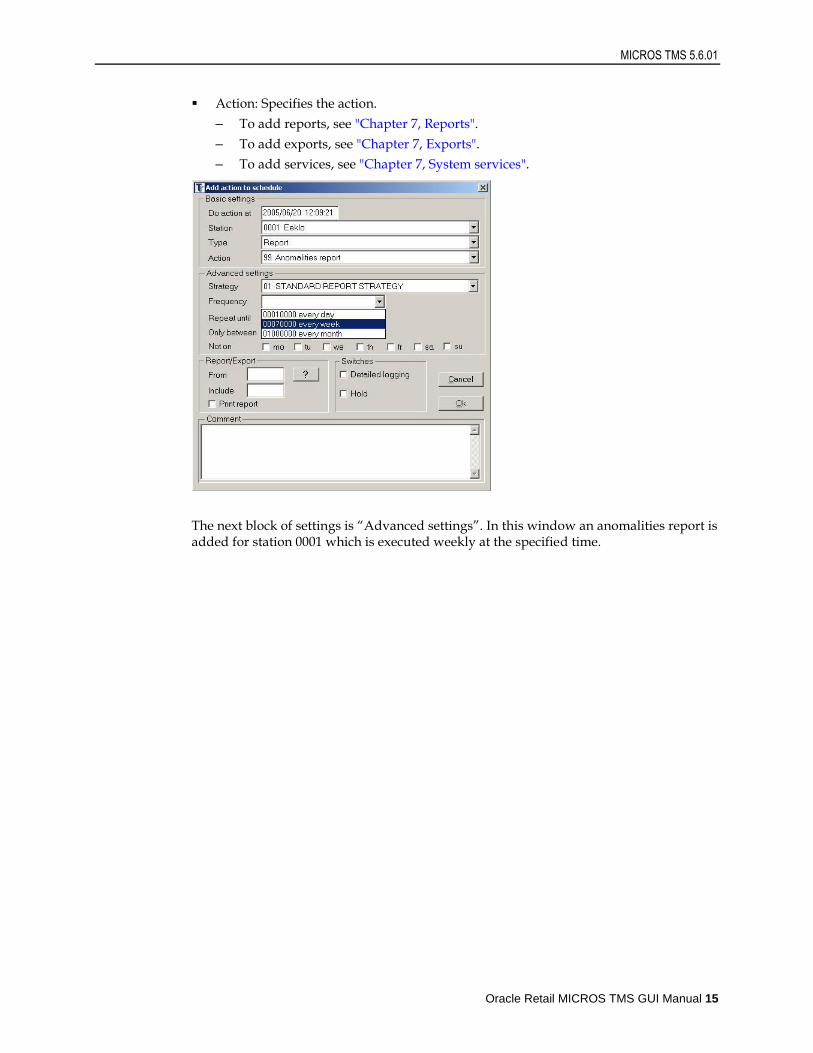
Action: Specifies the action.
– To add reports, see "Chapter 7, Reports".
– To add exports, see "Chapter 7, Exports".
– To add services, see "Chapter 7, System services".
The next block of settings is “Advanced settings”. In this window an anomalities report is added for station 0001 which is executed weekly at the specified time.

Schedule menu
16
The frequency field shows when the action has to be executed:
00010000: every day
00070000: every week
01000000: every month
When the user specifies a frequency, it’s mandatory to specify the “Repeat until” field. This means for how long TMS weekly has to execute this action.
Here the user specified to make a Level details report for station 0053 and also the “Only between” fields are specified. This action is executed every week if the action starts between 06:00 and 13:00.

MICROS TMS 5.6.01
Oracle Retail MICROS TMS GUI Manual 17
Another example is an action needs to be executed every 15 minutes every day from 08:00 till 16:00.
The frequency field has the following layout MMDDhhmm with:
MM: number of months (can go up to 12)
DD: number of days (can go up to 31)
hh: number of hours (can go up to 24)
mm: number of minutes (can go up to 60)
For example when an action needs to be executed every 2 days, 3 hours and 20 minutes, the value in the “Frequency” field has to be 20320.

Schedule menu
18
Here the user specified a Department export for station 0023 and also the “Not on” field is specified. This action is executed every day except on Saturday and Sunday.
The user can also specify to create a report or export for a certain number of cutovers by clicking the ? button in the “Report/Export” section.
The window “Cutover details” pops up. This is a list with all the cutovers with a start and end date/time.

MICROS TMS 5.6.01
Oracle Retail MICROS TMS GUI Manual 19
In this example an export file is created for all the cutovers starting from 24/05/2005 till (and including) 28/05/2005. To accomplish that it’s mandatory to select the cutover number 161.
It’s also mandatory to enter the amount of cutovers that is needed in the export file, in the field “Include”.
The comment field can be used when a certain action needs to be put on hold for some reason. The user enter the reason and the username in this field. (This is useful when different users are using the TMS to schedule actions.)
Quick button
Here the quick action “01 Level details information” for station 0577 Oostende is added to the scheduler.
This quick action contains a call and a report.
Schedule menu
20
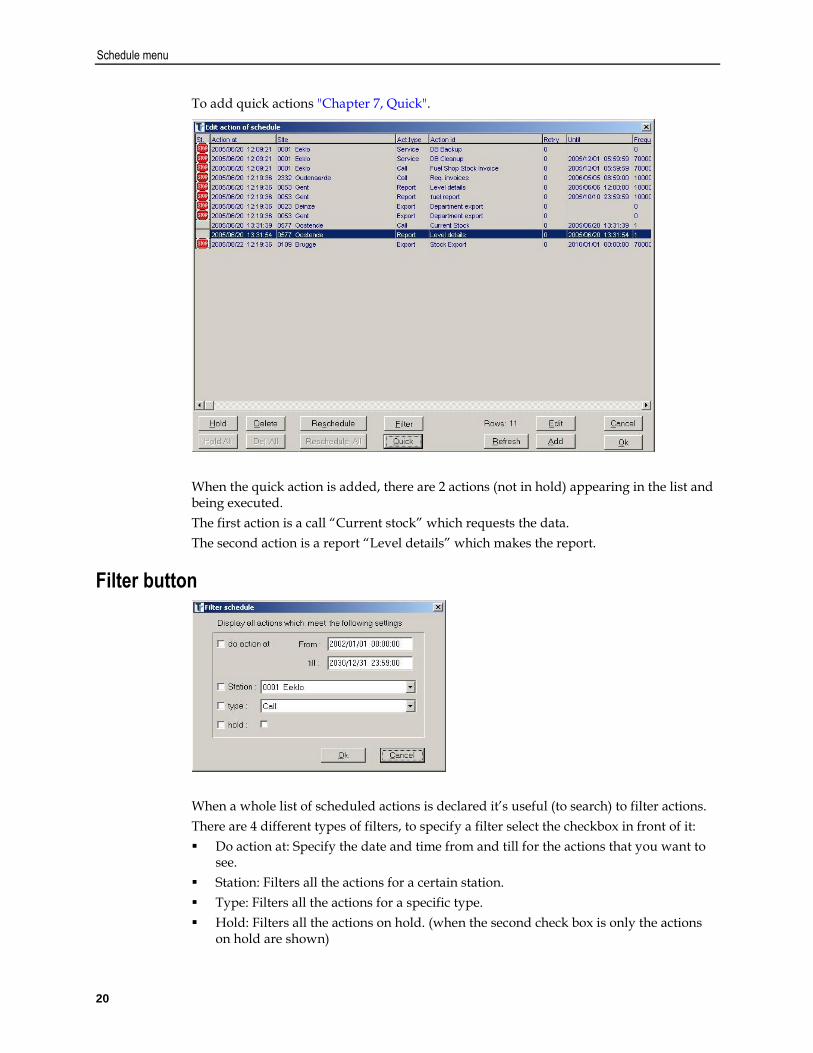
To add quick actions "Chapter 7, Quick".
When the quick action is added, there are 2 actions (not in hold) appearing in the list and being executed.
The first action is a call “Current stock” which requests the data.
The second action is a report “Level details” which makes the report.
Filter button
When a whole list of scheduled actions is declared it’s useful (to search) to filter actions.
There are 4 different types of filters, to specify a filter select the checkbox in front of it:
Do action at: Specify the date and time from and till for the actions that you want to see.
Station: Filters all the actions for a certain station.
Type: Filters all the actions for a specific type.
Hold: Filters all the actions on hold. (when the second check box is only the actions on hold are shown)

MICROS TMS 5.6.01
Oracle Retail MICROS TMS GUI Manual 21
The user can combine different filters.
In this example all the actions for station 0053 are shown.
This is the result of the filter. When the filter is used the text in the Filter button turns red. This is just an indication to know if the filter is being used or not.
Schedule menu
22
When a filter is used the buttons Hold All, Del. All and Reschedule All are available.
The usage of these buttons is similar as the ones above (except there is no need to select all the actions):
Hold All: Puts all the actions in hold (or out of hold).
Del. All: Deletes all the actions after clicking the OK button.
Reschedule All: Reschedules all possible actions.

Oracle Retail MICROS TMS GUI Manual 23
5
View menu
Report
When the user clicks “Report” in the View menu a report file is opened. Report files are located in the \spool directory from TMS.
Each report file has a specific starting character. (To make reports, see "Chapter 7, Reports".)
View menu
24
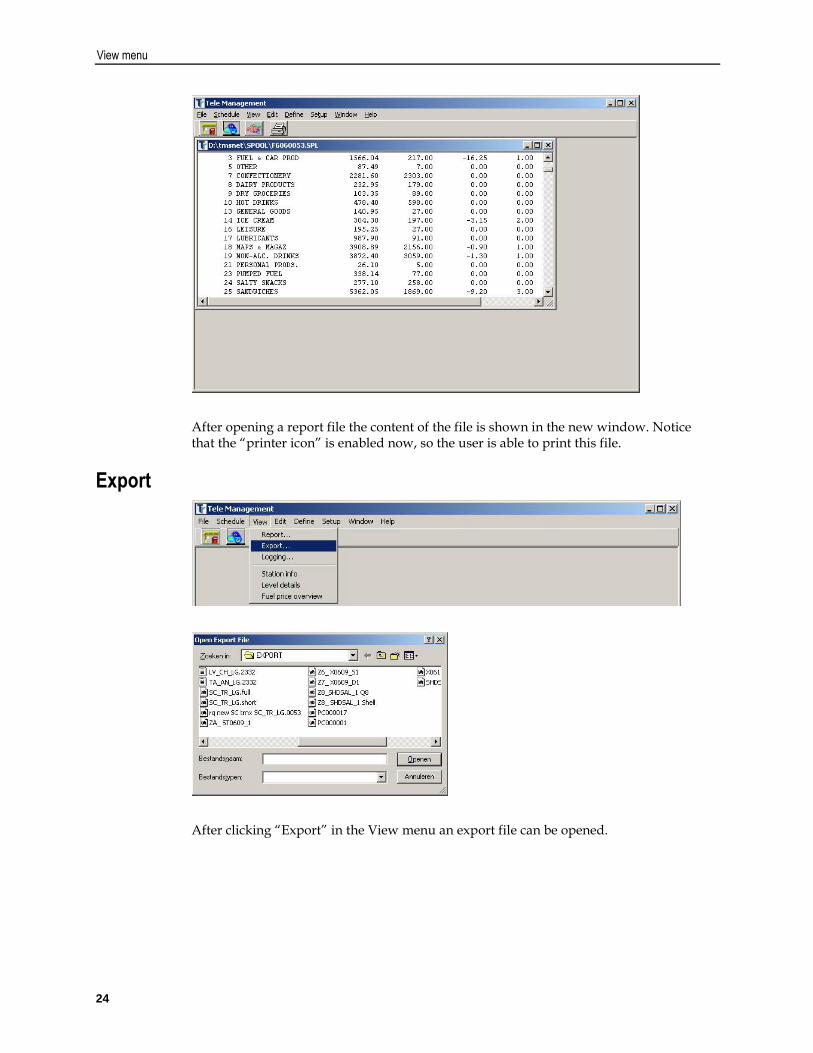
After opening a report file the content of the file is shown in the new window. Notice that the “printer icon” is enabled now, so the user is able to print this file.
Export
After clicking “Export” in the View menu an export file can be opened.

MICROS TMS 5.6.01
Oracle Retail MICROS TMS GUI Manual 25
This is a preview of an export file. Again notice that the “Print icon” on the icon bar and “Print” in the File menu are enabled.
View menu
26
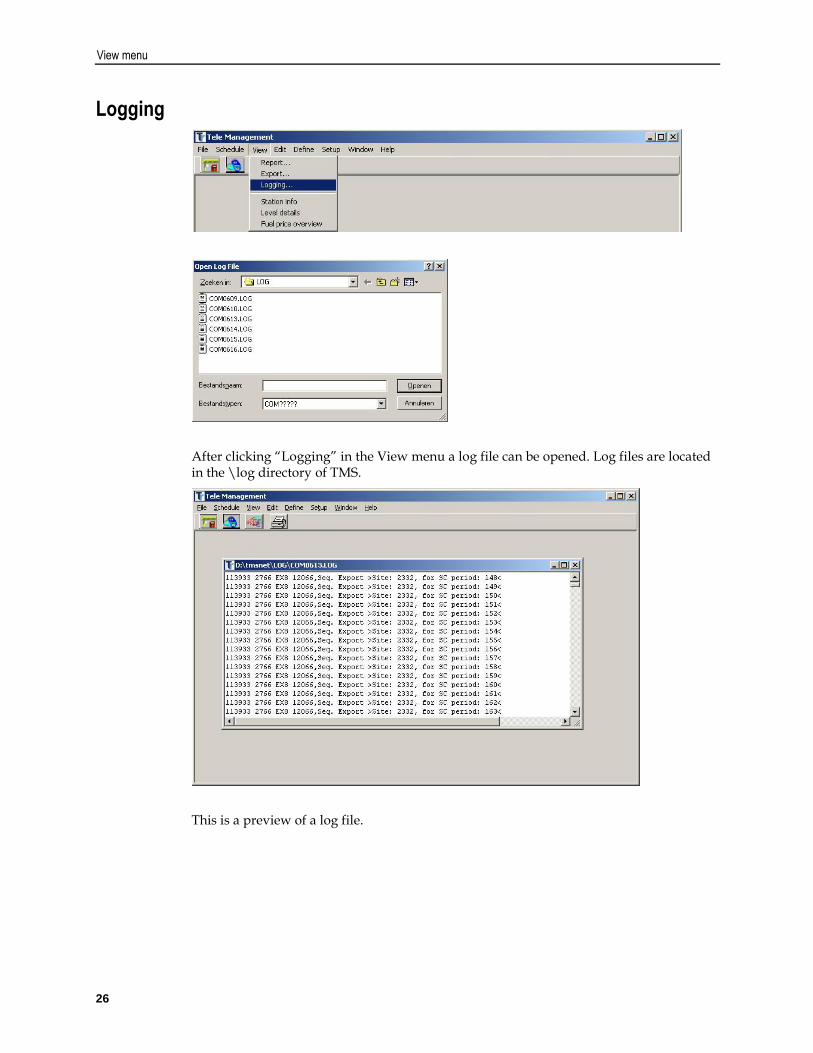
Logging
After clicking “Logging” in the View menu a log file can be opened. Log files are located in the \log directory of TMS.
This is a preview of a log file.

MICROS TMS 5.6.01
Oracle Retail MICROS TMS GUI Manual 27
Level details
After clicking “Level details” in the View menu for the first time TMS shows a system warning. It’s mandatory to select a station. This can be done with using the first icon on the icon bar or with clicking “Station selection” in the File menu. (For more information about the station selection, see "Chapter 3, Station selection".)
After selecting a station, the station number and name is displayed in the icon bar.
After clicking “Level details” again it’s possible that TMS shows another system warning.
This warning appears when there is no report in the spool directory matching “A???0053.SPL”. With 0053 as the specified station number.
TMS searches for a file starting with an A and ending with 0053 (station number) in the spool directory. You have to create this report file. For more details about how to create reports, see "Chapter 7, Reports")

View menu
28
When this report file is created the window will look like above.
Note: To create this report file the user needs to execute the call action – Current stock or call action – Fuel shop stock invoice to get the data needed for this report.
After one of those calls the user needs to create a report including the blocks A4 – Gauge details and AB – Actual level details. This report has to start with the character A. When more than one report with the form “A???0053.SPL” is located in the \spool directory then the one with the latest date/time is shown.
MICROS TMS 5.6.01
Oracle Retail MICROS TMS GUI Manual 29
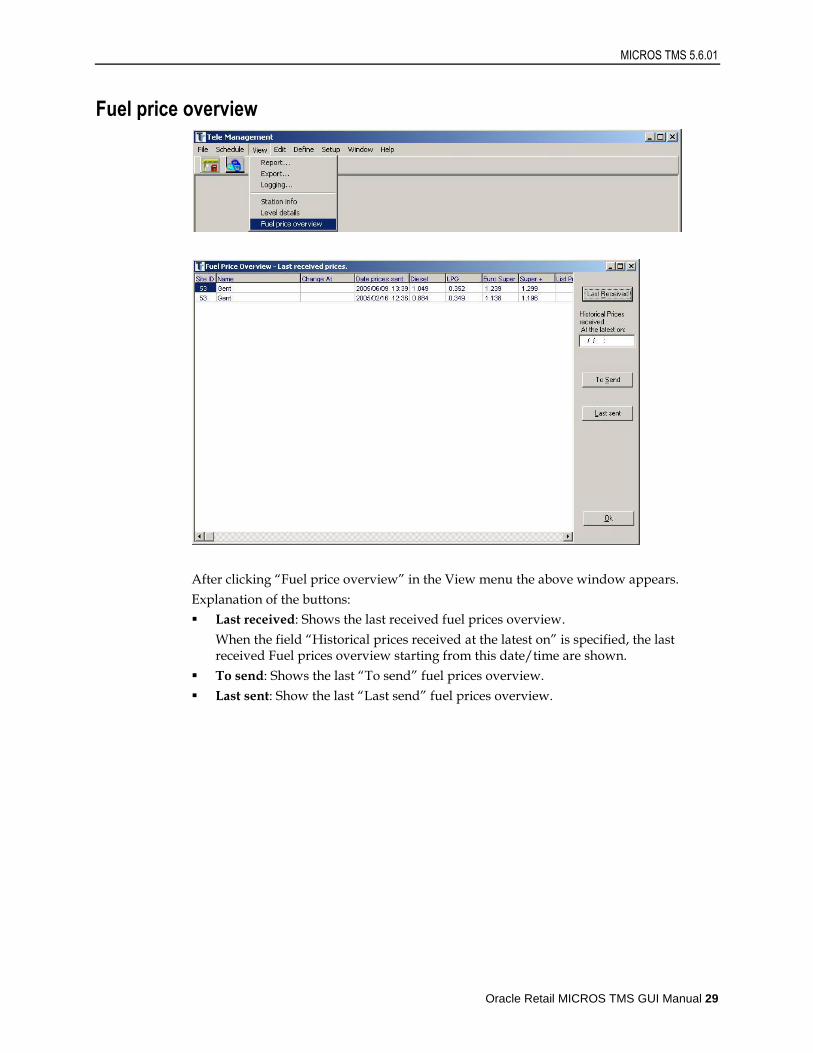
Fuel price overview
After clicking “Fuel price overview” in the View menu the above window appears.
Explanation of the buttons:
Last received: Shows the last received fuel prices overview.
When the field “Historical prices received at the latest on” is specified, the last received Fuel prices overview starting from this date/time are shown.
To send: Shows the last “To send” fuel prices overview.
Last sent: Show the last “Last send” fuel prices overview.


Oracle Retail MICROS TMS GUI Manual 31
6
Edit menu
Terminal/Dispenser management Purpose:
This is used to enable/disable terminals (OPT, Attended, Console, Test) and dispensers until nozzle level. This can be useful when a dispenser is broken or a hose needs to be replaced, then you can disable this nozzle using TMS. The SC configuration is required to be able to change this.
After the clicking “Teminal/Dispenser Management” in the Edit menu this window pops up.
The button Last Req./Send switches between the last send and the last requested information. The text under the menu bar specifies if the information shown is the requested information or the send information.

Edit menu
32
The button Undo undoes all the changes since the save.
It’s possible to disable or enable something in this list by clicking the item and use right click to disable or enable that item.
This is an example of disabling the OPT terminal.
When the OPT is disabled it’s shown as an X. The “Terminals” are also marked with an X and a grey background. This means that a sub item is disabled.
MICROS TMS 5.6.01
Oracle Retail MICROS TMS GUI Manual 33
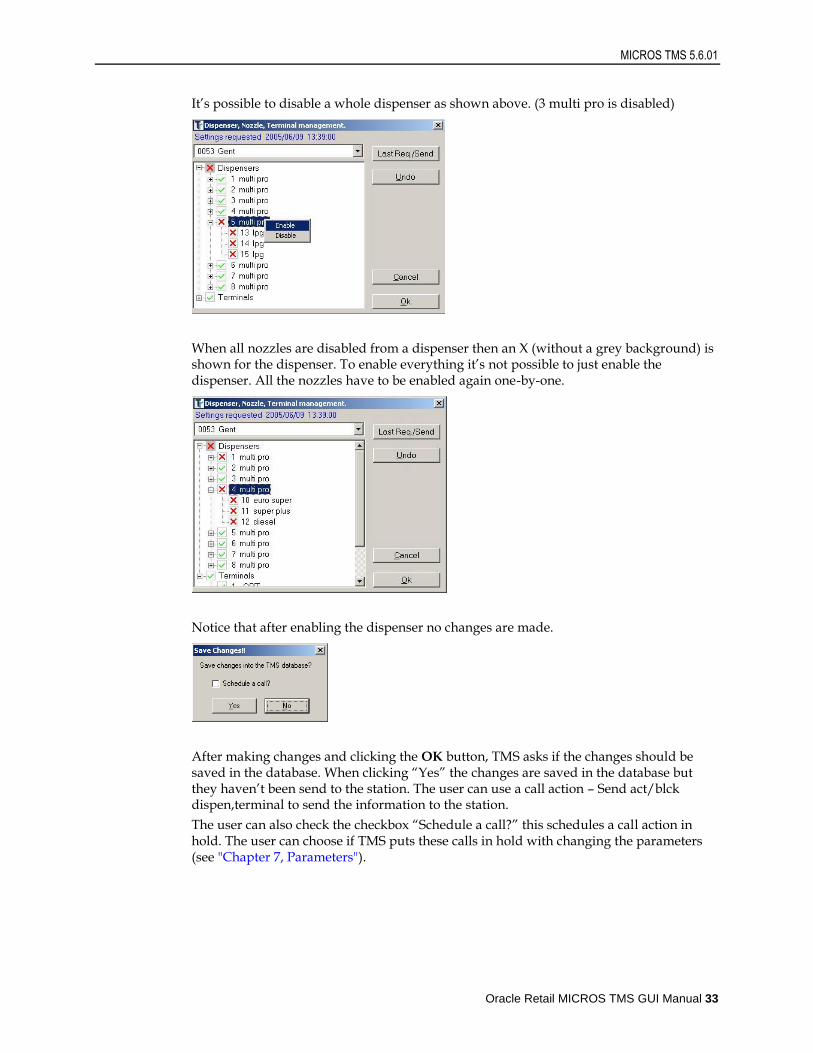
It’s possible to disable a whole dispenser as shown above. (3 multi pro is disabled)
When all nozzles are disabled from a dispenser then an X (without a grey background) is shown for the dispenser. To enable everything it’s not possible to just enable the dispenser. All the nozzles have to be enabled again one-by-one.
Notice that after enabling the dispenser no changes are made.
After making changes and clicking the OK button, TMS asks if the changes should be saved in the database. When clicking “Yes” the changes are saved in the database but they haven’t been send to the station. The user can use a call action – Send act/blck dispen,terminal to send the information to the station.
The user can also check the checkbox “Schedule a call?” this schedules a call action in hold. The user can choose if TMS puts these calls in hold with changing the parameters (see "Chapter 7, Parameters").

Edit menu
34
Warning: Dispensers or terminals blocked by TMS can only be unblocked by TMS!
Commercial profiles
Purpose:
Commercial profiles are an easy way to set a variety of prices on sites depending on their geographical location based on a set of official prices.
After clicking “Commercial profiles” in the Edit menu we see the window as above.
Show: Shows all the information from the selected profile.
Clear: Empties all the fields in the window (including profile).
Create/Save: Creates a new profile or saves an existing profile.
Delete: Deletes the existing selected profile. When deleting a profile the user only needs to select the profile.
Linked sites: Shows the sites linked to this profile.
To add a station to a commercial profile, see "Chapter 7, Station".
To add formulas, see "Chapter 8, Formulas".
MICROS TMS 5.6.01
Oracle Retail MICROS TMS GUI Manual 35
Create/Save button
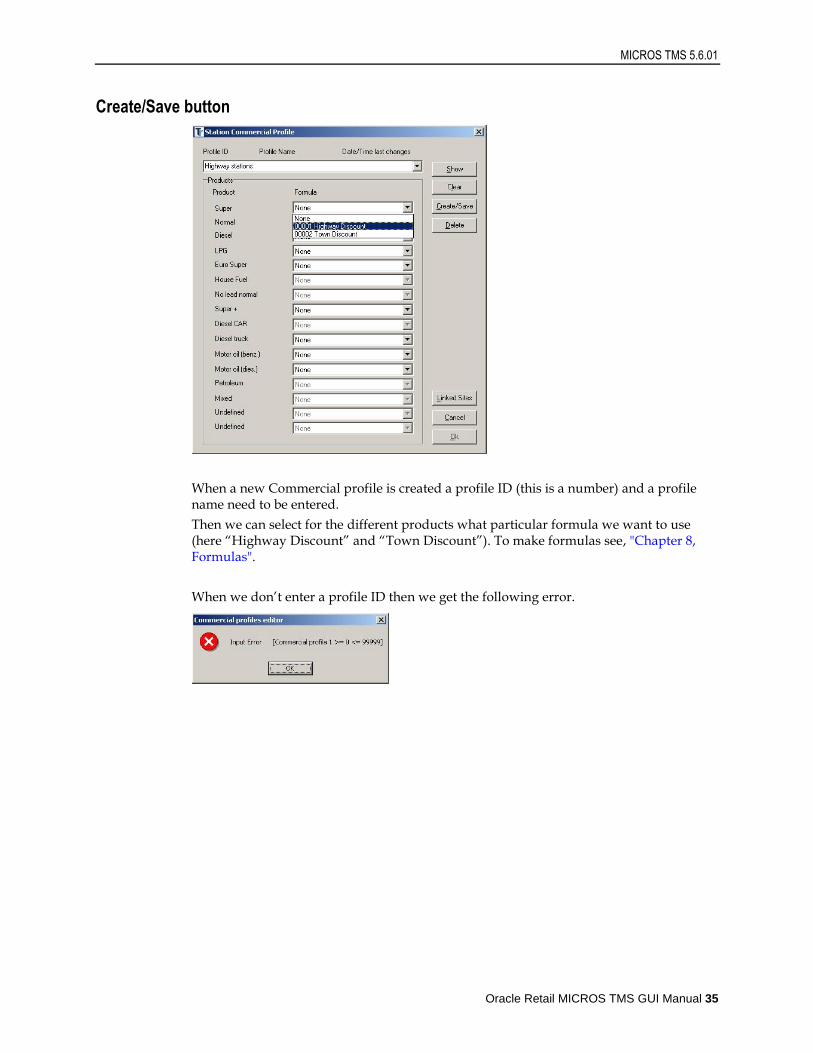
When a new Commercial profile is created a profile ID (this is a number) and a profile name need to be entered.
Then we can select for the different products what particular formula we want to use (here “Highway Discount” and “Town Discount”). To make formulas see, "Chapter 8, Formulas".
When we don’t enter a profile ID then we get the following error.

Edit menu
36
After entering all the correct formulas and the correct name and ID we click the Create/Save button to create or save the commercial profile.
Show button
To get all the information about a commercial profile the user can select the commercial profile in the list and click the Show button. After that all the information from the commercial profile including the date and time from the last changed made to this profile
MICROS TMS 5.6.01
Oracle Retail MICROS TMS GUI Manual 37
is shown. The result after clicking the Show button is shown in "Chapter 6, Linked sites button".
To delete a commercial profile there’s no need to click the Show button. The user can just select a profile and click the Delete button.
To save the changes made to a commercial profile the user can click the “Create/Save” button.
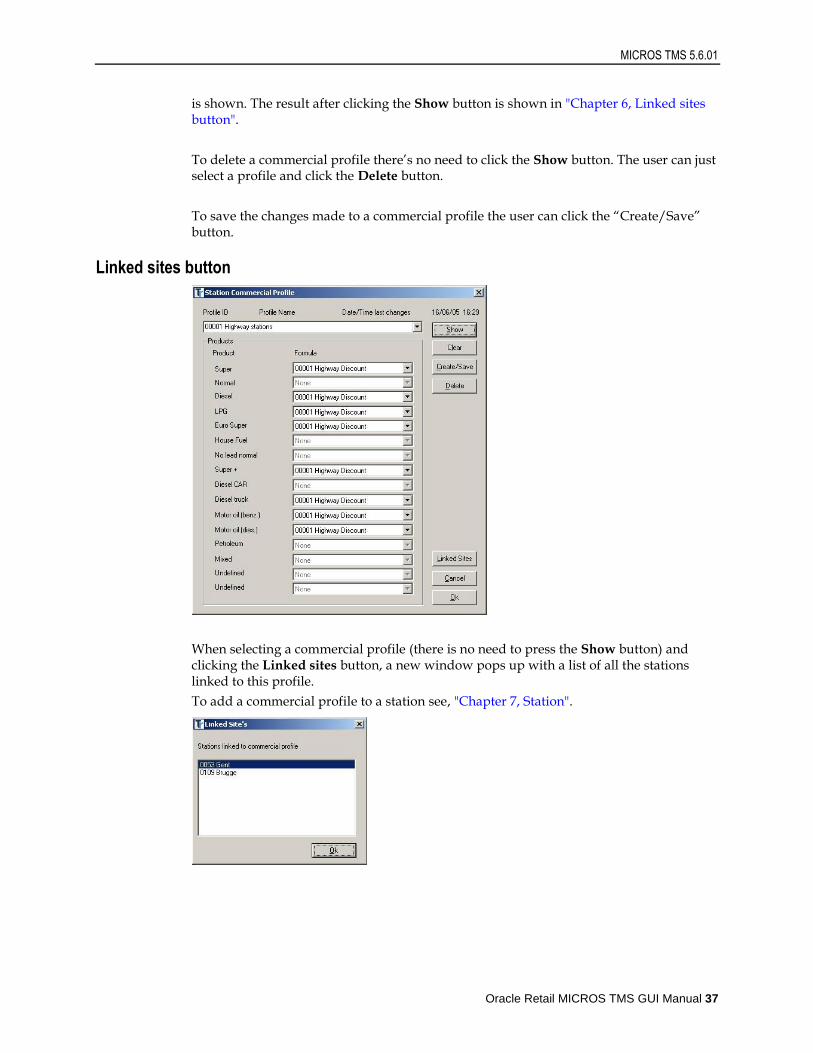
Linked sites button
When selecting a commercial profile (there is no need to press the Show button) and clicking the Linked sites button, a new window pops up with a list of all the stations linked to this profile.
To add a commercial profile to a station see, "Chapter 7, Station".

Edit menu
38
Fuel prices
Purpose:
This is used to send fuel prices to the site. When only 1 station is selected the exact fuel prices entered are adjusted. When a group of stations is selected then the fuel prices are send according to which commercial profile each station is linked to.
After clicking “Fuel prices” in the menu Edit, the above window pops up.
This window shows the last requested fuel prices, the last sent fuel prices and the date and time when they were last requested.
MICROS TMS 5.6.01
Oracle Retail MICROS TMS GUI Manual 39
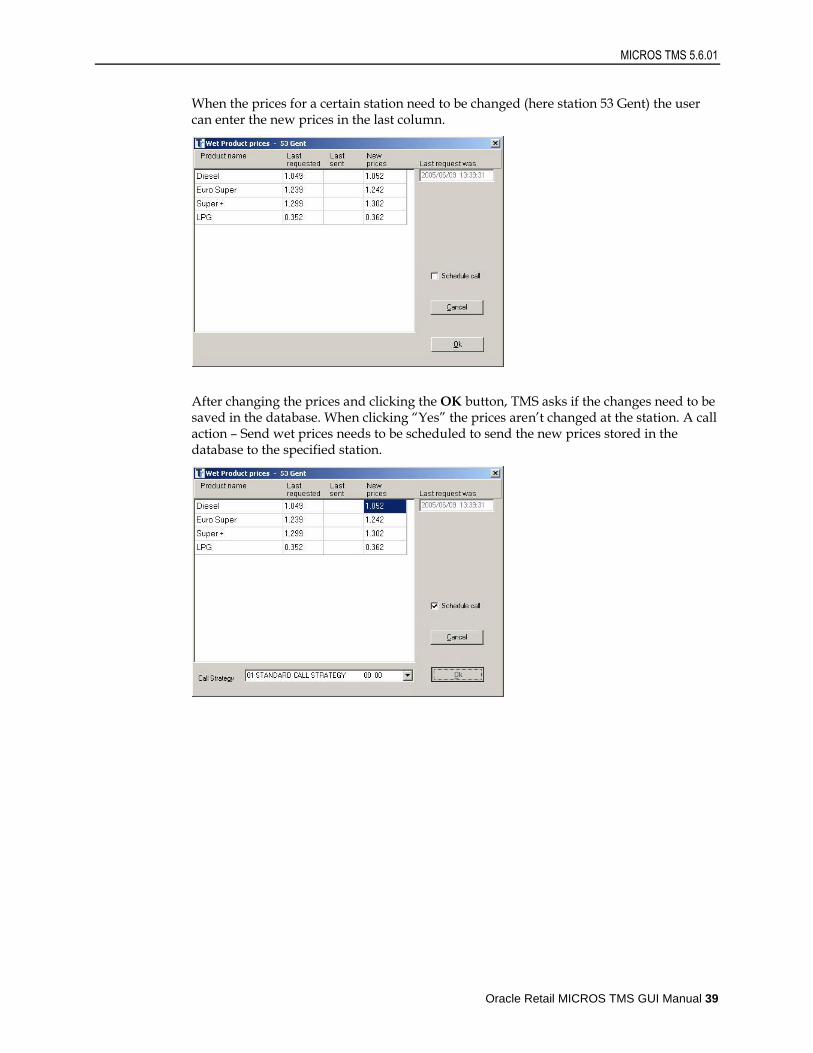
When the prices for a certain station need to be changed (here station 53 Gent) the user can enter the new prices in the last column.
After changing the prices and clicking the OK button, TMS asks if the changes need to be saved in the database. When clicking “Yes” the prices aren’t changed at the station. A call action – Send wet prices needs to be scheduled to send the new prices stored in the database to the specified station.

Edit menu
40
It’s also possible to send the prices to the station immediately with checking the checkbox “Schedule call”.
When the checkbox is checked the schedule shows that a call has been added in hold. With selecting the action and pressing the button Hold the call is executed and the prices are send to station 53.
The call is been put on hold because it changes something at the station. And it’s necessary to check again if everything is entered correctly.
There is a possibility to change this so the call isn’t put in hold. To change this setting "Chapter 7, Parameters".
Pre-init wet fuel prices
MICROS TMS 5.6.01
Oracle Retail MICROS TMS GUI Manual 41
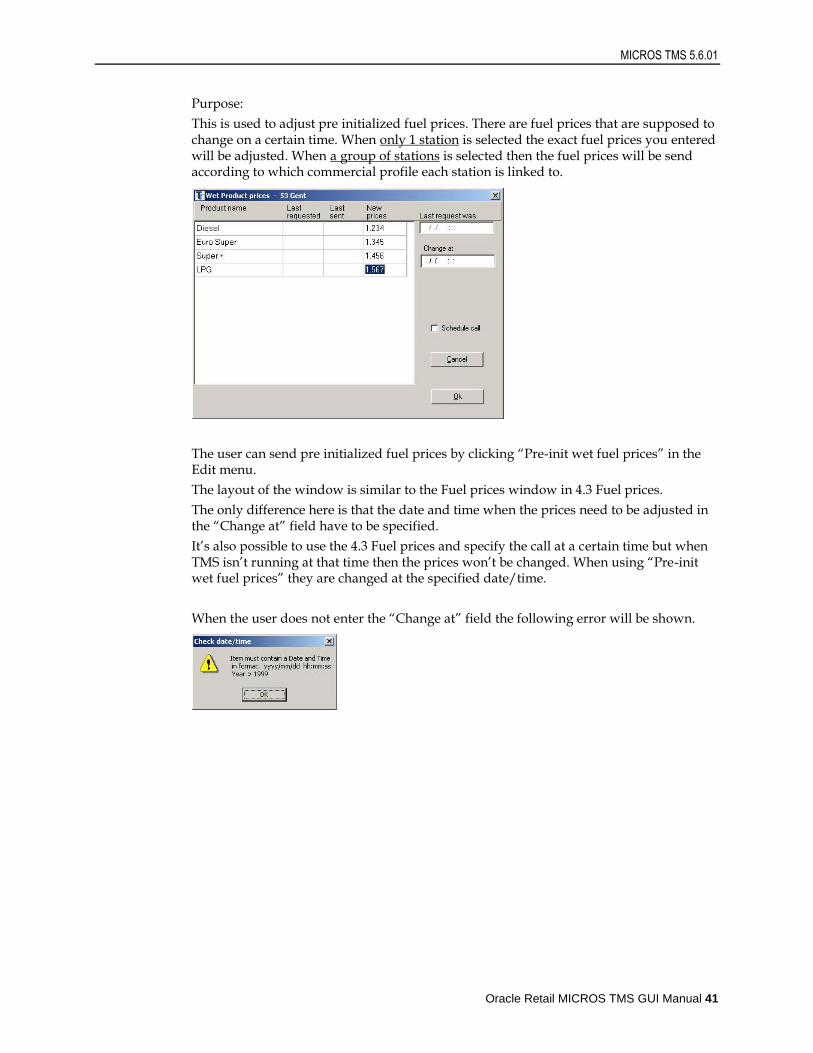
Purpose:
This is used to adjust pre initialized fuel prices. There are fuel prices that are supposed to change on a certain time. When only 1 station is selected the exact fuel prices you entered will be adjusted. When a group of stations is selected then the fuel prices will be send according to which commercial profile each station is linked to.
The user can send pre initialized fuel prices by clicking “Pre-init wet fuel prices” in the Edit menu.
The layout of the window is similar to the Fuel prices window in 4.3 Fuel prices.
The only difference here is that the date and time when the prices need to be adjusted in the “Change at” field have to be specified.
It’s also possible to use the 4.3 Fuel prices and specify the call at a certain time but when TMS isn’t running at that time then the prices won’t be changed. When using “Pre-init wet fuel prices” they are changed at the specified date/time.
When the user does not enter the “Change at” field the following error will be shown.
Edit menu
42
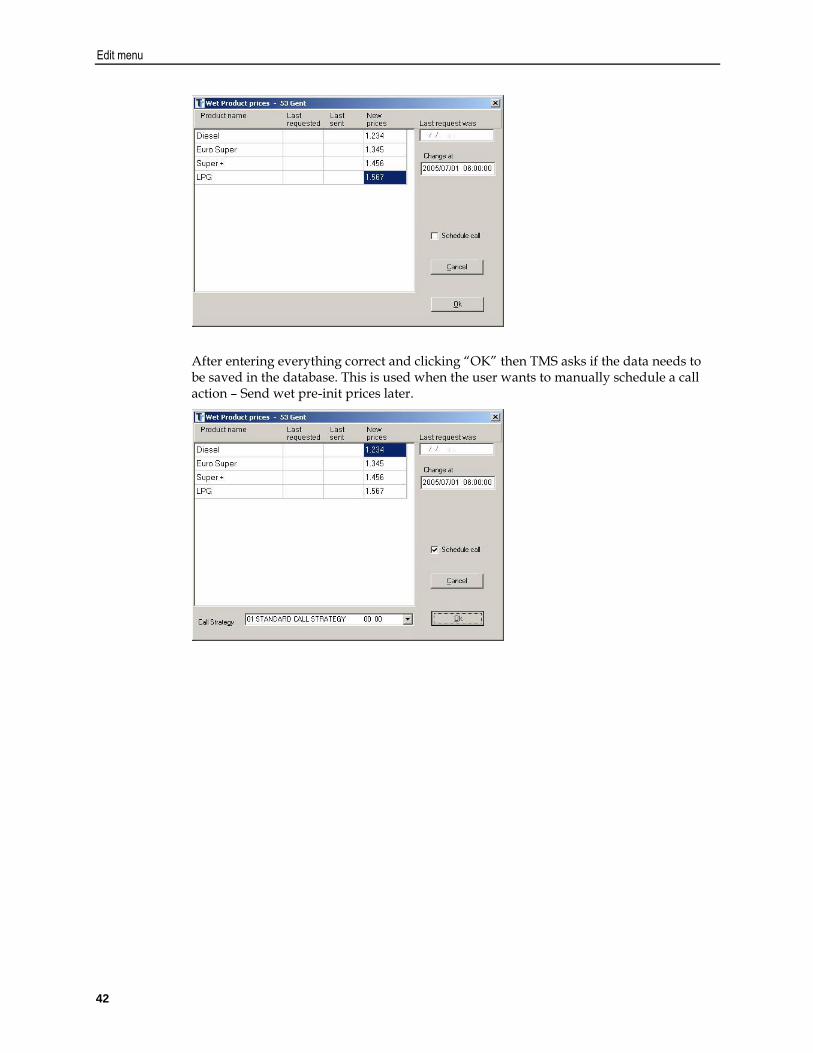
After entering everything correct and clicking “OK” then TMS asks if the data needs to be saved in the database. This is used when the user wants to manually schedule a call action – Send wet pre-init prices later.
MICROS TMS 5.6.01
Oracle Retail MICROS TMS GUI Manual 43
When checking the checkbox “Schedule call” the pre init fuel prices will be send immediately.
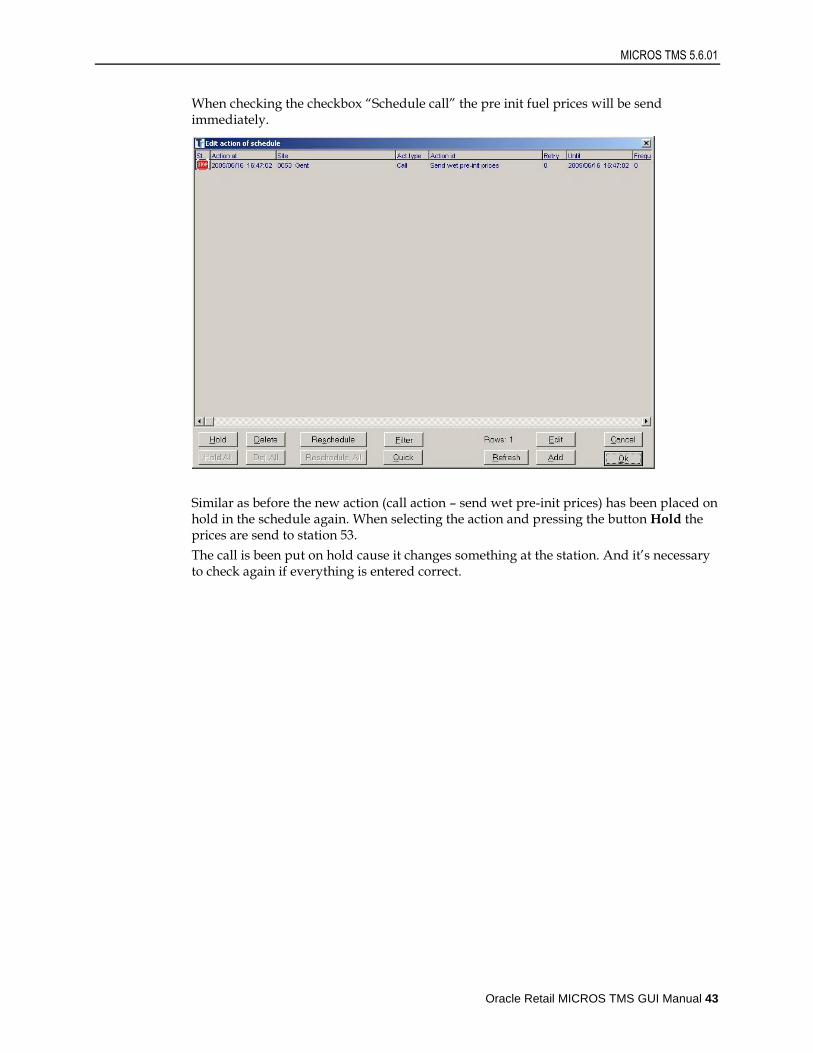
Similar as before the new action (call action – send wet pre-init prices) has been placed on hold in the schedule again. When selecting the action and pressing the button Hold the prices are send to station 53.
The call is been put on hold cause it changes something at the station. And it’s necessary to check again if everything is entered correct.
Edit menu
44
Site parameters
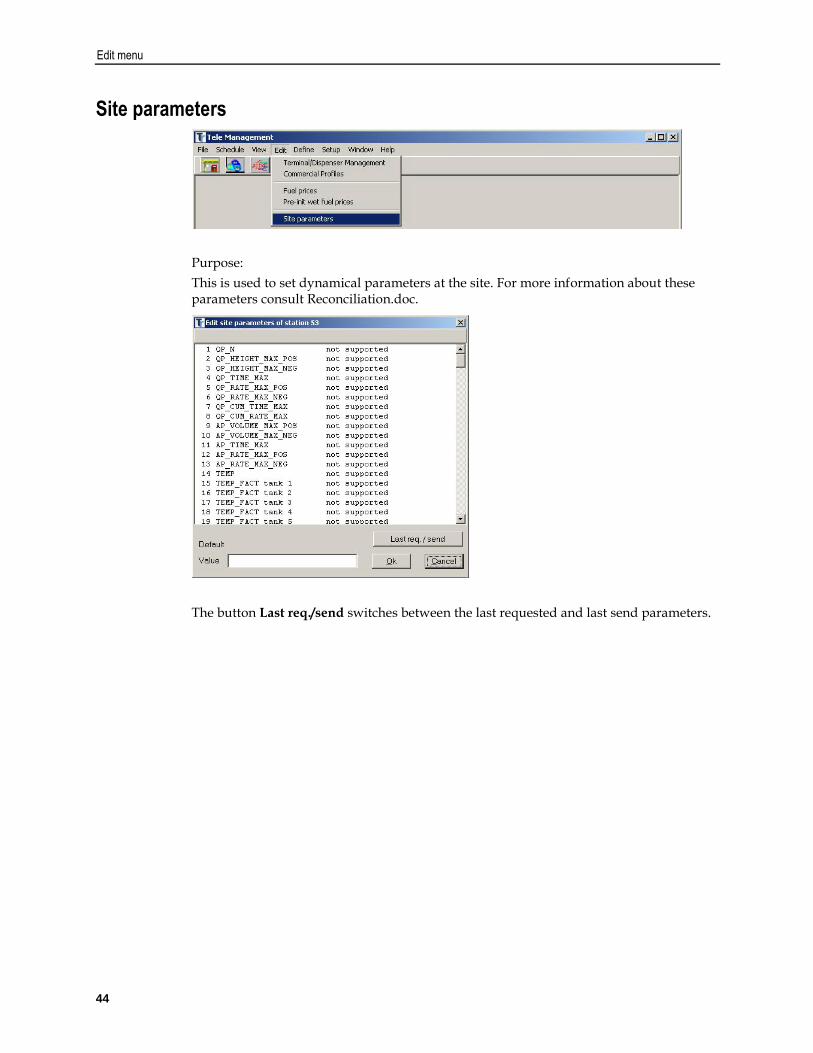
Purpose:
This is used to set dynamical parameters at the site. For more information about these parameters consult Reconciliation.doc.
The button Last req./send switches between the last requested and last send parameters.
Oracle Retail MICROS TMS GUI Manual 45
7
Define menu
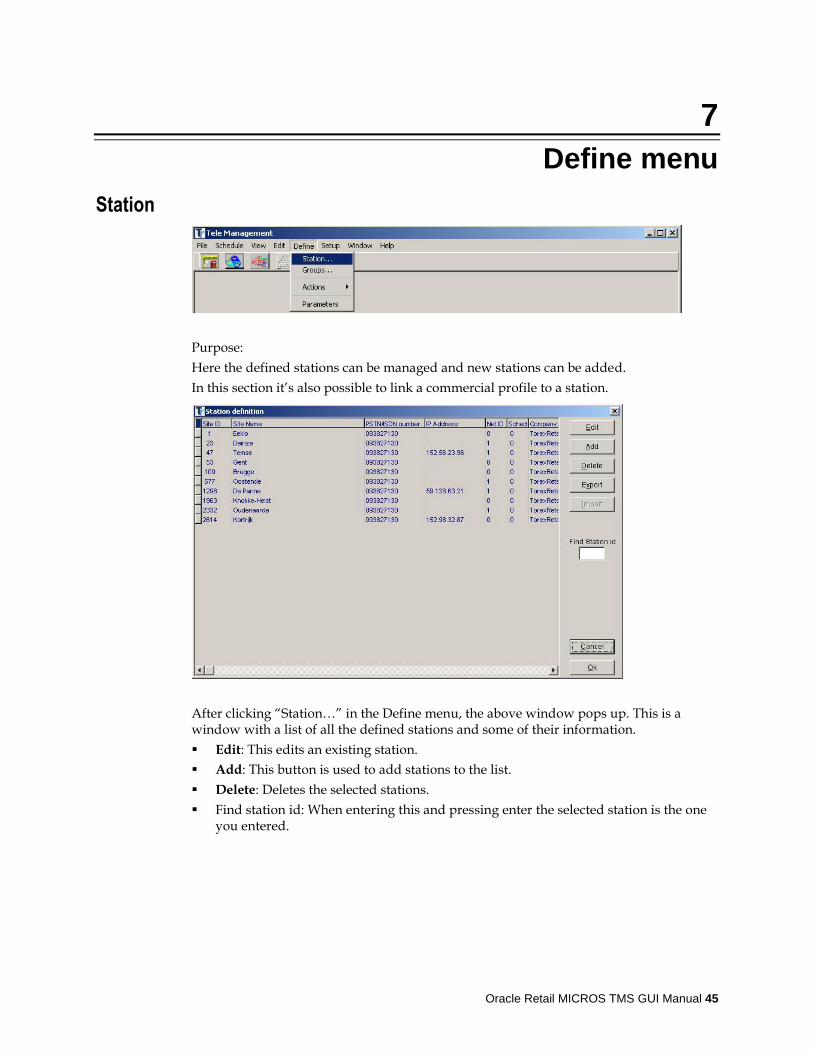
Station
Purpose:
Here the defined stations can be managed and new stations can be added.
In this section it’s also possible to link a commercial profile to a station.
After clicking “Station…” in the Define menu, the above window pops up. This is a window with a list of all the defined stations and some of their information.
Edit: This edits an existing station.
Add: This button is used to add stations to the list.
Delete: Deletes the selected stations.
Find station id: When entering this and pressing enter the selected station is the one you entered.
Define menu
46
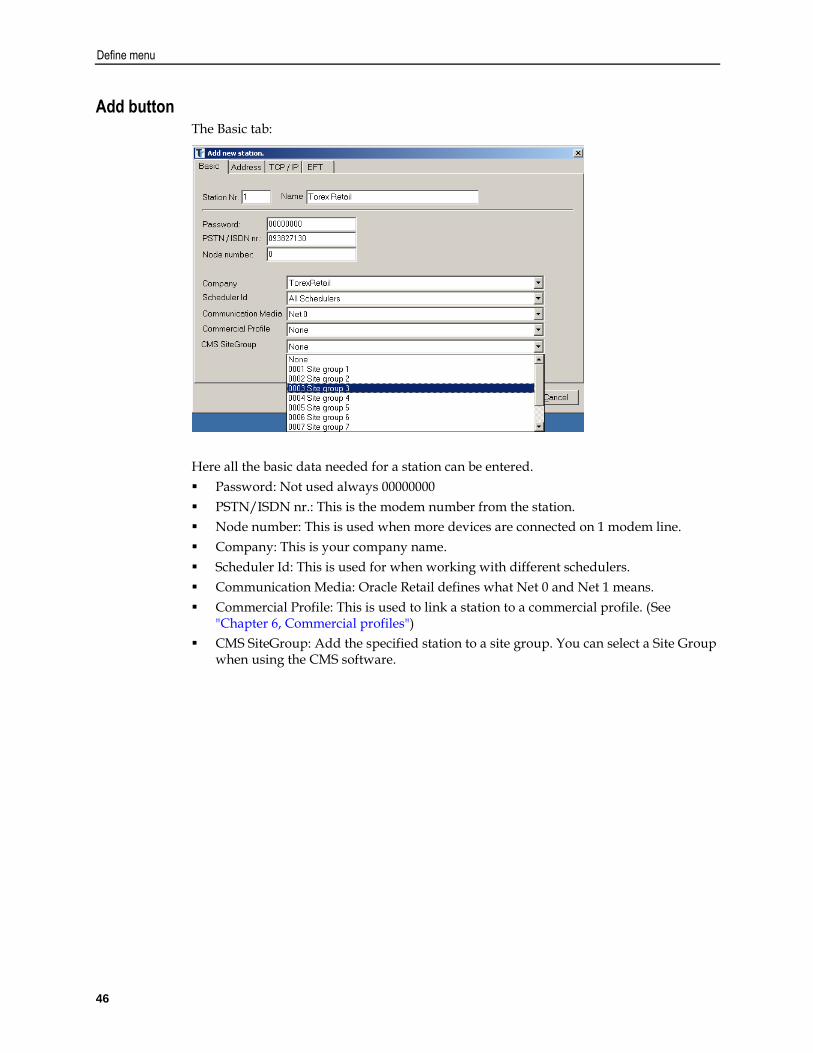
Add button The Basic tab:
Here all the basic data needed for a station can be entered.
Password: Not used always 00000000
PSTN/ISDN nr.: This is the modem number from the station.
Node number: This is used when more devices are connected on 1 modem line.
Company: This is your company name.
Scheduler Id: This is used for when working with different schedulers.
Communication Media: Oracle Retail defines what Net 0 and Net 1 means.
Commercial Profile: This is used to link a station to a commercial profile. (See "Chapter 6, Commercial profiles")
CMS SiteGroup: Add the specified station to a site group. You can select a Site Group when using the CMS software.
MICROS TMS 5.6.01
Oracle Retail MICROS TMS GUI Manual 47
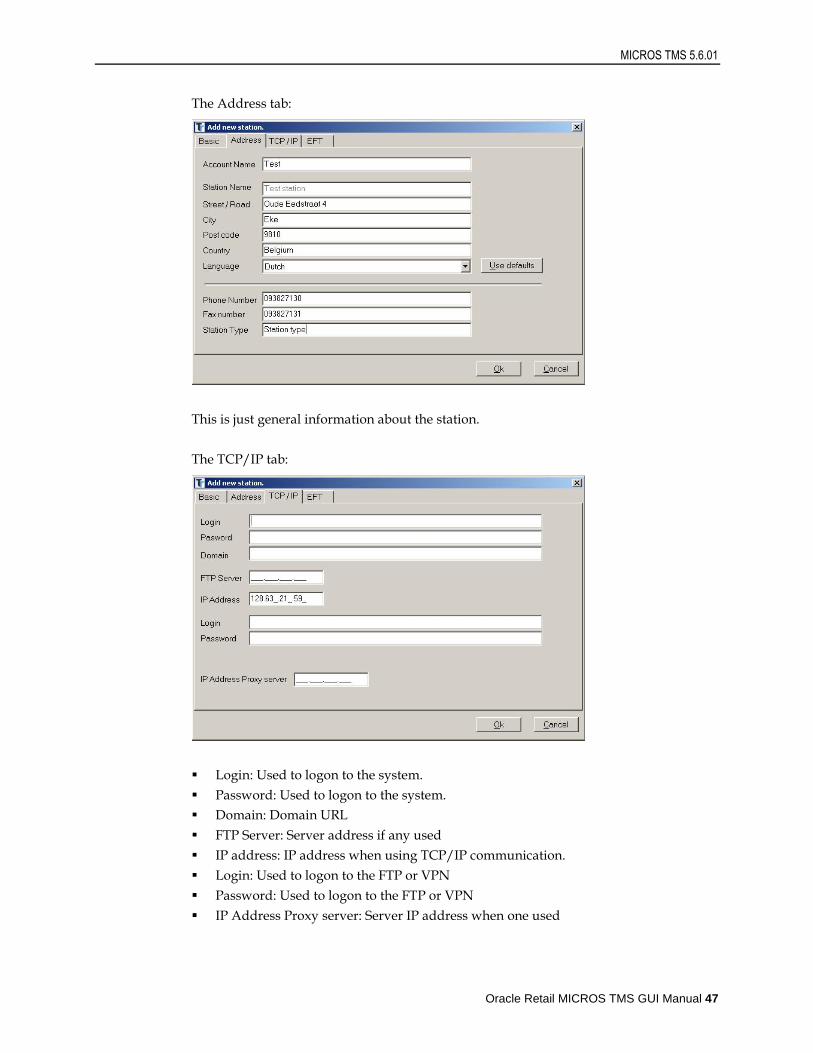
The Address tab:
This is just general information about the station.
The TCP/IP tab:
Login: Used to logon to the system.
Password: Used to logon to the system.
Domain: Domain URL
FTP Server: Server address if any used
IP address: IP address when using TCP/IP communication.
Login: Used to logon to the FTP or VPN
Password: Used to logon to the FTP or VPN
IP Address Proxy server: Server IP address when one used

Define menu
48
The EFT (tab):
This contains EFT related information.
Delete button
When deleting a station it’s not possible to select different stations at once for deletion. It’s mandatory to click the stations needed for deletion one-by-one. The marked stations will have a blue X at the beginning of the line. Click the OK button to confirm.

MICROS TMS 5.6.01
Oracle Retail MICROS TMS GUI Manual 49
Remark: All data about this station will be lost if a station is deleted.
Define menu
50
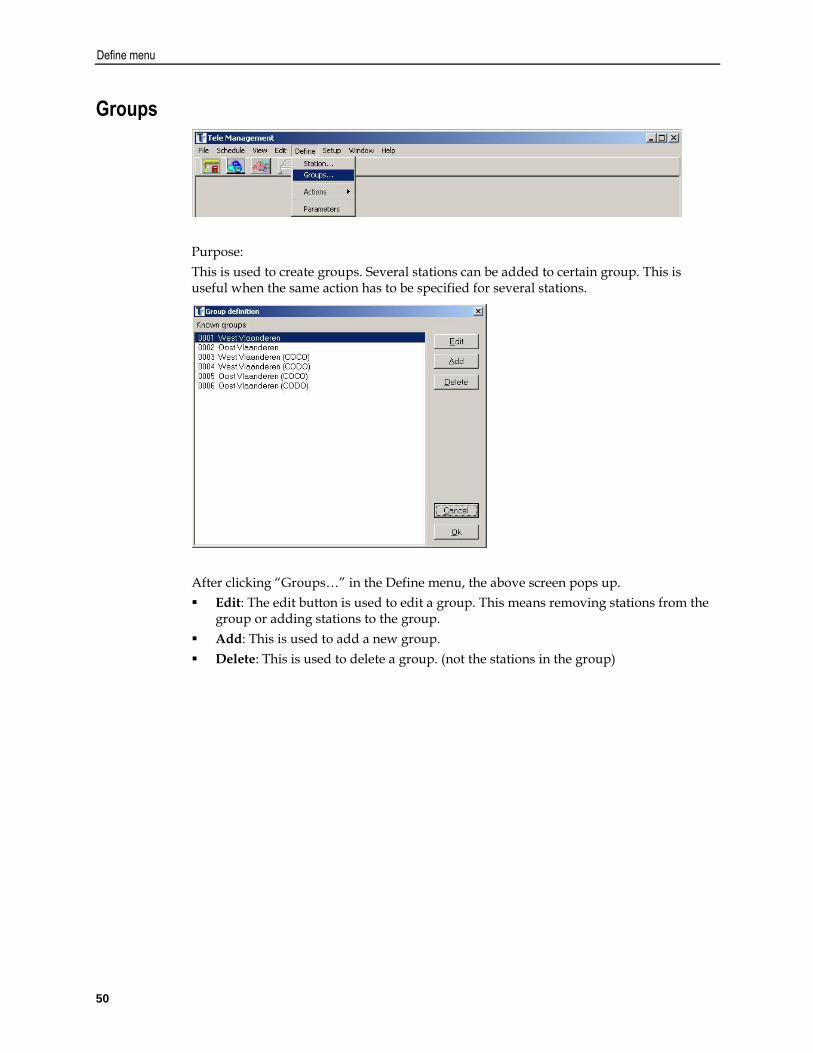
Groups
Purpose:
This is used to create groups. Several stations can be added to certain group. This is useful when the same action has to be specified for several stations.
After clicking “Groups…” in the Define menu, the above screen pops up.
Edit: The edit button is used to edit a group. This means removing stations from the group or adding stations to the group.
Add: This is used to add a new group.
Delete: This is used to delete a group. (not the stations in the group)

MICROS TMS 5.6.01
Oracle Retail MICROS TMS GUI Manual 51
Add button
When adding a group, specify the group name and the stations that need to be added to this group. Multiple stations can be selected with keeping the CTRL button on your keyboard pressed. By clicking the Arrow button ( → ) stations are added to the group. When the user selects stations under the group and clicks the a
Arrow button ( ← ) the user is removing stations from the group.
Define menu
52
Delete button
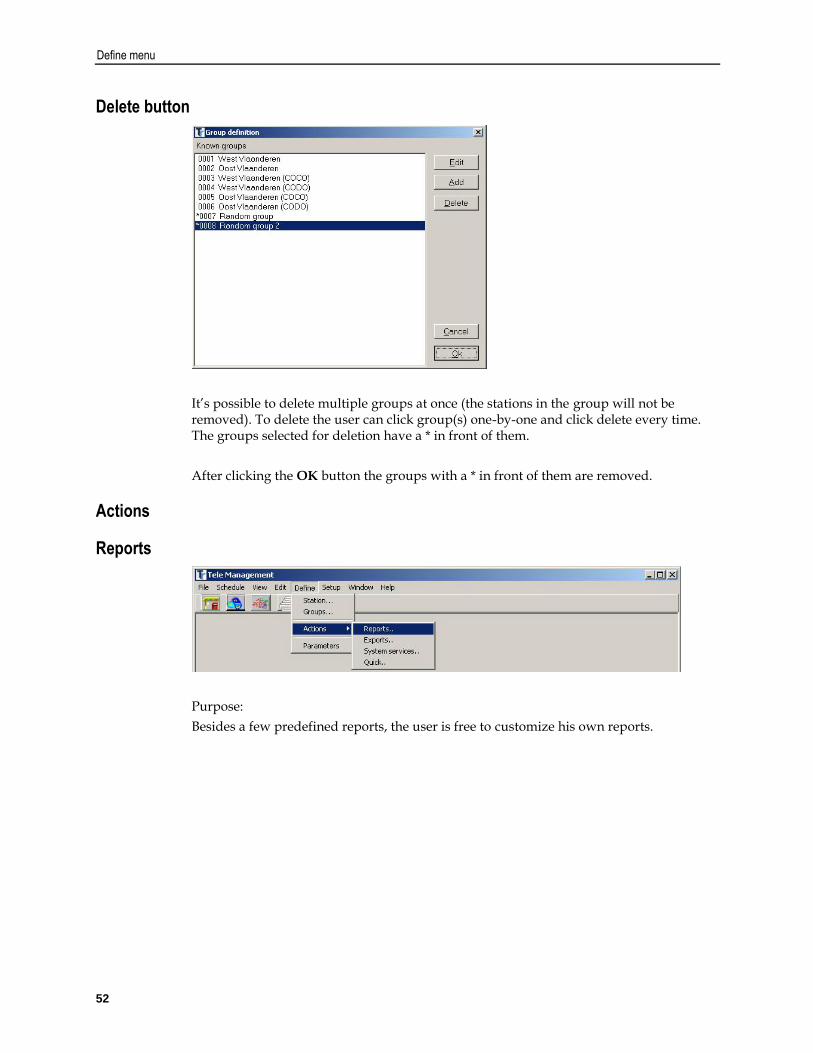
It’s possible to delete multiple groups at once (the stations in the group will not be removed). To delete the user can click group(s) one-by-one and click delete every time. The groups selected for deletion have a * in front of them.
After clicking the OK button the groups with a * in front of them are removed.
Actions
Reports
Purpose:
Besides a few predefined reports, the user is free to customize his own reports.
MICROS TMS 5.6.01
Oracle Retail MICROS TMS GUI Manual 53
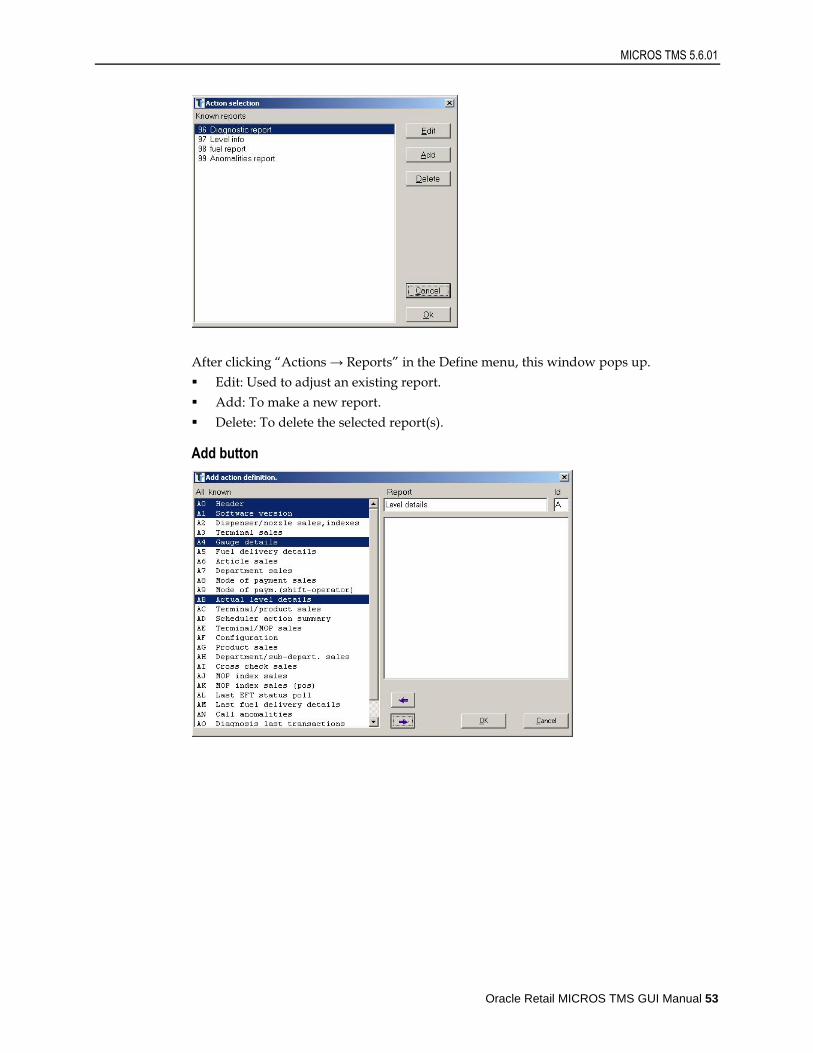
After clicking “Actions → Reports” in the Define menu, this window pops up.
Edit: Used to adjust an existing report.
Add: To make a new report.
Delete: To delete the selected report(s).
Add button
Define menu
54
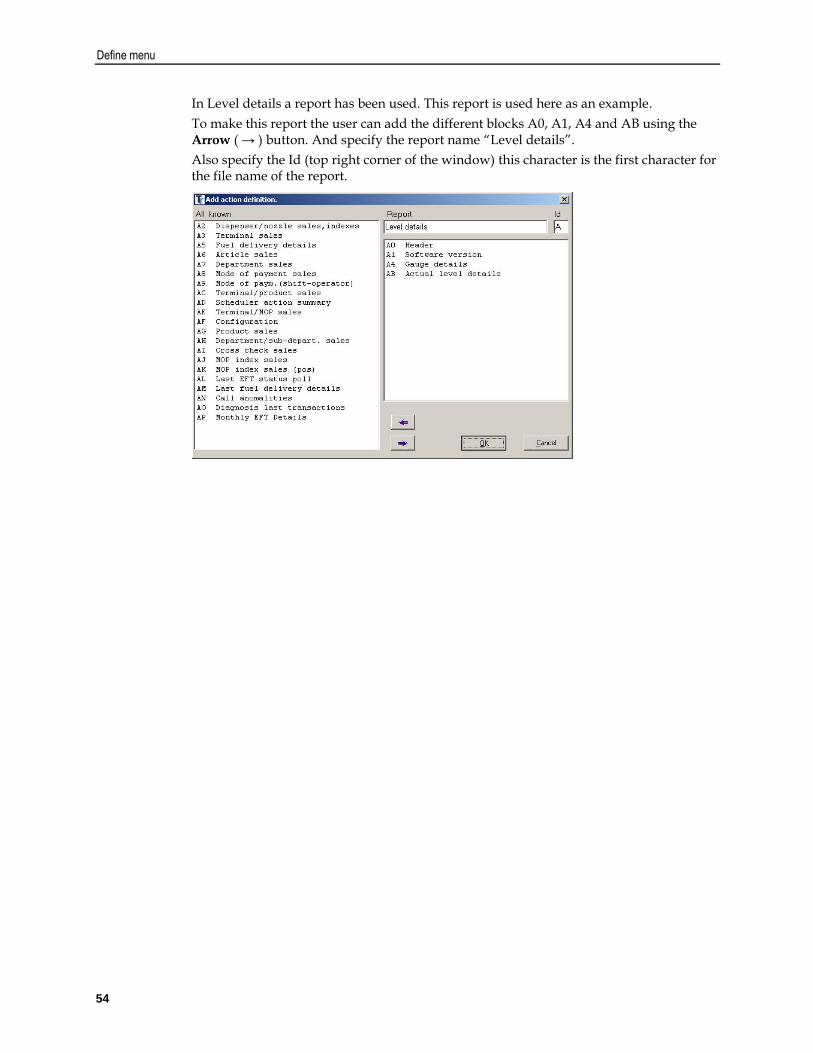
In Level details a report has been used. This report is used here as an example.
To make this report the user can add the different blocks A0, A1, A4 and AB using the Arrow ( → ) button. And specify the report name “Level details”.
Also specify the Id (top right corner of the window) this character is the first character for the file name of the report.

MICROS TMS 5.6.01
Oracle Retail MICROS TMS GUI Manual 55
After clicking the OK button the report name is added to the list of reports. The user can schedule this report now to be executed. (See "Chapter 4, Schedule menu")
For more information about the report blocks see "Appendix B: Reporting Components".
Exports
Purpose:
Besides a few predefined exports the user is free to customize his own reports. Exports are used to transfer data into a third party application (for example a bookkeeping program).
Define menu
56
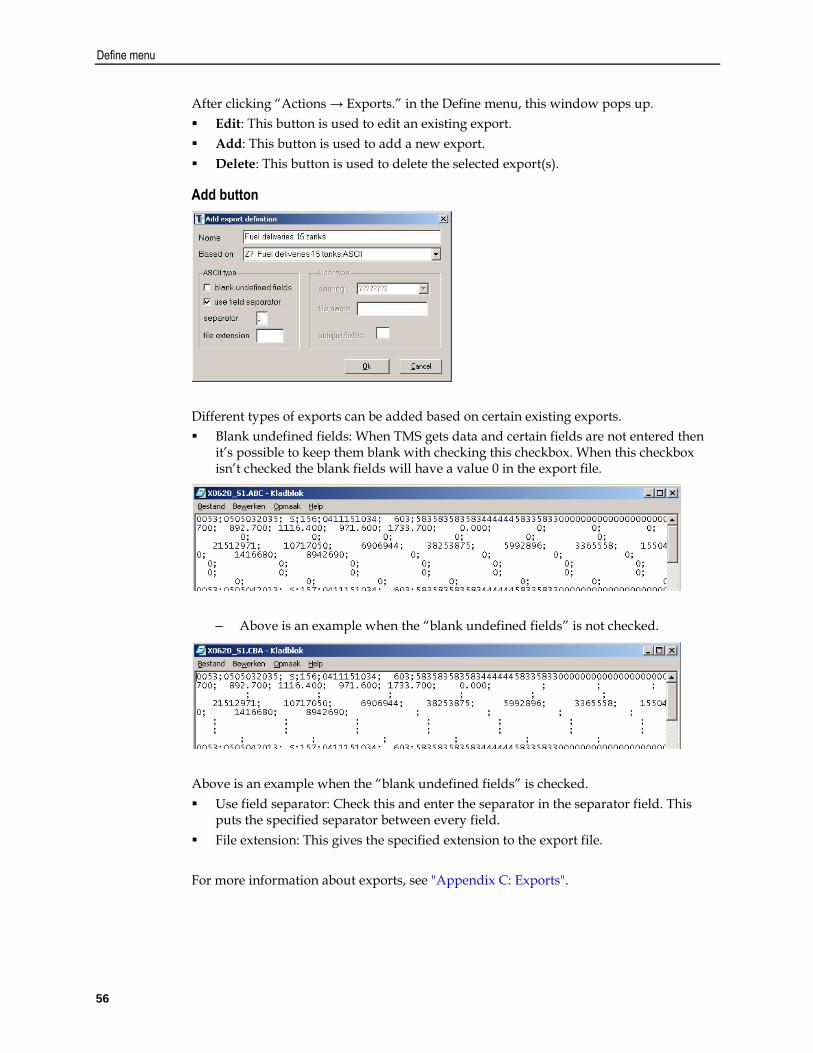
After clicking “Actions → Exports.” in the Define menu, this window pops up.
Edit: This button is used to edit an existing export.
Add: This button is used to add a new export.
Delete: This button is used to delete the selected export(s).
Add button
Different types of exports can be added based on certain existing exports.
Blank undefined fields: When TMS gets data and certain fields are not entered then it’s possible to keep them blank with checking this checkbox. When this checkbox isn’t checked the blank fields will have a value 0 in the export file.
– Above is an example when the “blank undefined fields” is not checked.
Above is an example when the “blank undefined fields” is checked.
Use field separator: Check this and enter the separator in the separator field. This puts the specified separator between every field.
File extension: This gives the specified extension to the export file.
For more information about exports, see "Appendix C: Exports".

MICROS TMS 5.6.01
Oracle Retail MICROS TMS GUI Manual 57
System services
Purpose:
Besides a few predefined system services the user is free to customize his own reports. System services are used for maintenance, backup, … .
After clicking “Actions → System services..” in the Define menu, this window pops up.
Edit: Edits an existing services.
Add: Is used to add a new services.
Delete: Deletes the selected service(s).
Define menu
58
Add button
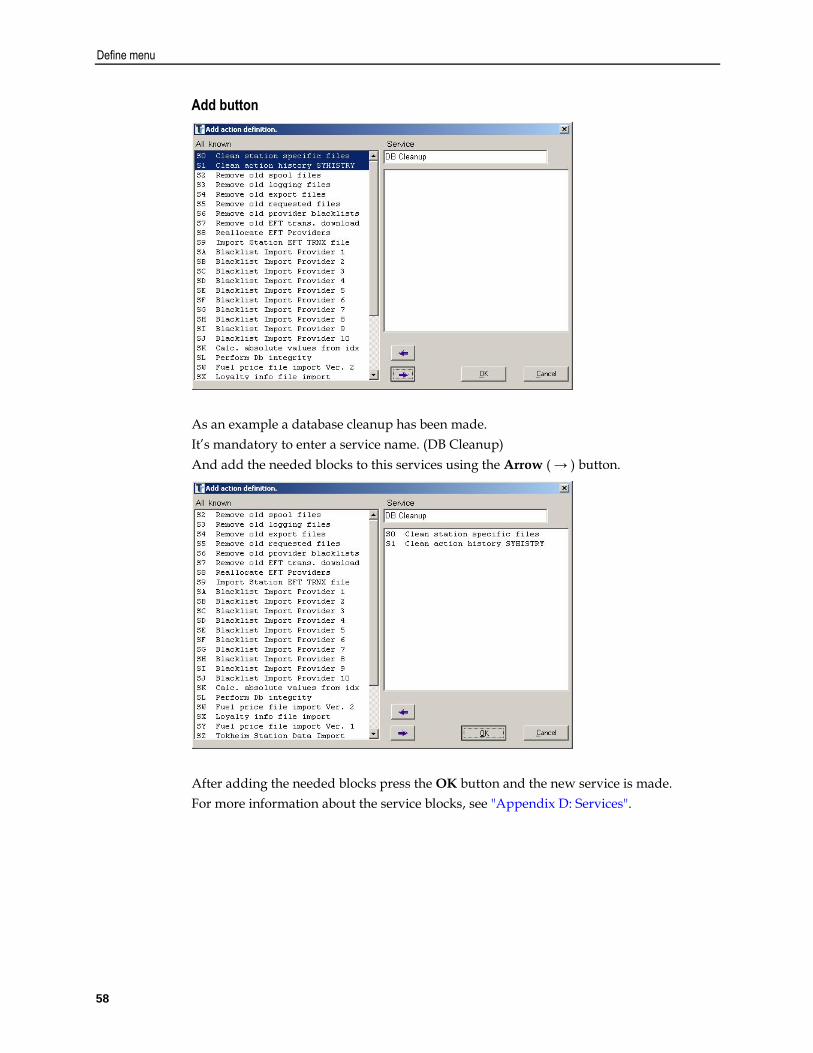
As an example a database cleanup has been made.
It’s mandatory to enter a service name. (DB Cleanup)
And add the needed blocks to this services using the Arrow ( → ) button.
After adding the needed blocks press the OK button and the new service is made.
For more information about the service blocks, see "Appendix D: Services".

MICROS TMS 5.6.01
Oracle Retail MICROS TMS GUI Manual 59
Quick
After clicking “Actions → Quick” in Define menu, this window pops up.
Edit: Edits an existing Quick action.
Add: This button is used to add a new Quick action.
Delete: Deletes the selected Quick action(s).
Add button
In "Chapter 3, Quick action" and "Chapter 4, Quick button" quick actions have been used. The following steps show how to make quick actions.
For example: in Level details a level details report has been made. To be able to make this report certain data from the station is needed. To get this data the user can schedule a call action – Current stock or call action – Fuel shop stock invoice. After this call the report, that has been made in Reports, needs to be executed.
With a quick action it’s possible to define up to 3 actions to be executed subsequent.

Define menu
60
In this example a quick action has been made that executes the call action – Current stock and after that the quick action will make the report Level details.
First the call action – Current stock has been added to the quick action as shown below.
When this is done the report Level details (the report we made in 5.3.1 Reports) needs to be added.
After pressing the OK button the quick action is added to the list.

MICROS TMS 5.6.01
Oracle Retail MICROS TMS GUI Manual 61
Parameters
Purpose:
This is used to adjust general settings in TMS.
After pressing “Parameters” in the Define menu, this window pops up.
General
Historical number of cutovers: This is the number of cutovers that TMS keeps the data for in the database of TMS. (after cleanup)
Requested dir/files: This is the number of days that TMS keeps the requested files. (after cleanup)
Communication – Net 1
Phone Zone: This is the number of the phone zone where the TMS computer is placed. (This is only used in countries where you don’t have to dial the phone zone number if calling in the same phone zone, else this is has the value 99)
Logging
Level: This specifies how detailed the log file should be. (the higher the more detailed)
Done action logging: Enabling or disabling logging.
Actions
Quick actions offset: When an action is added to the scheduler this is the number of minutes added to the current time for when the action will be executed.
Action with “changes” in hold: When actions are scheduled that change something at the station, those actions are put on hold if the checkbox is checked.

Define menu
62
Export
Session id: This is the ID of the TMS Scheduler. This is only useful when working with more schedulers. (sometimes the scheduler id is located in an export filename)
Oracle Retail MICROS TMS GUI Manual 63
8
Setup menu
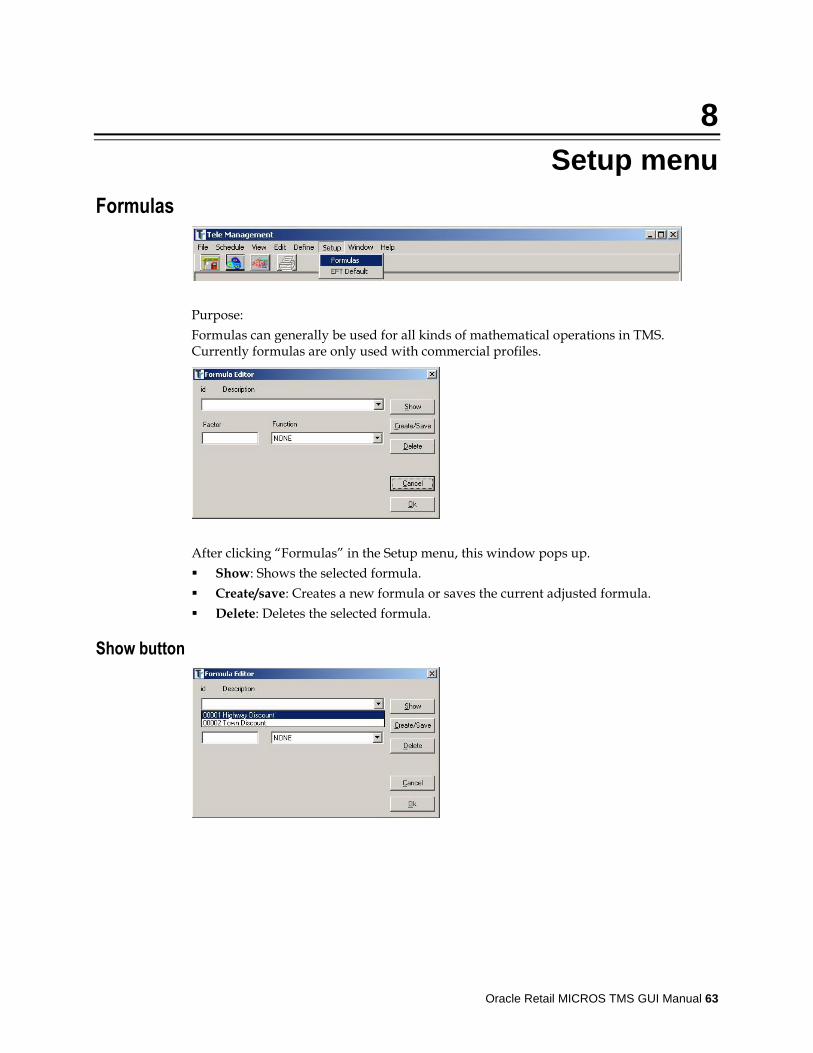
Formulas
Purpose:
Formulas can generally be used for all kinds of mathematical operations in TMS. Currently formulas are only used with commercial profiles.
After clicking “Formulas” in the Setup menu, this window pops up.
Show: Shows the selected formula.
Create/save: Creates a new formula or saves the current adjusted formula.
Delete: Deletes the selected formula.
Show button

Setup menu
64
After selecting the formula and clicking the Show button, the details of this formula is shown.
When a new formula needs to be created, for example “Discount test”, a NEW ID and a name must be entered. When entering an existing ID the existing formula is overwritten!
After this it’s mandatory to enter a value which needs to be added or subtracted from the official prices, then the user can select SUB (subtract) or ADD (add).
After pressing the Create/Save button the new formula is added to the list.
These formulas are used in the commercial profiles. (See "Chapter 6, Commercial profiles")
MICROS TMS 5.6.01
Oracle Retail MICROS TMS GUI Manual 65
Remark: When entering decimals make sure a “ , “ is entered instead of a “ . “. When entering a “ . “ TMS gives an error as shown below.
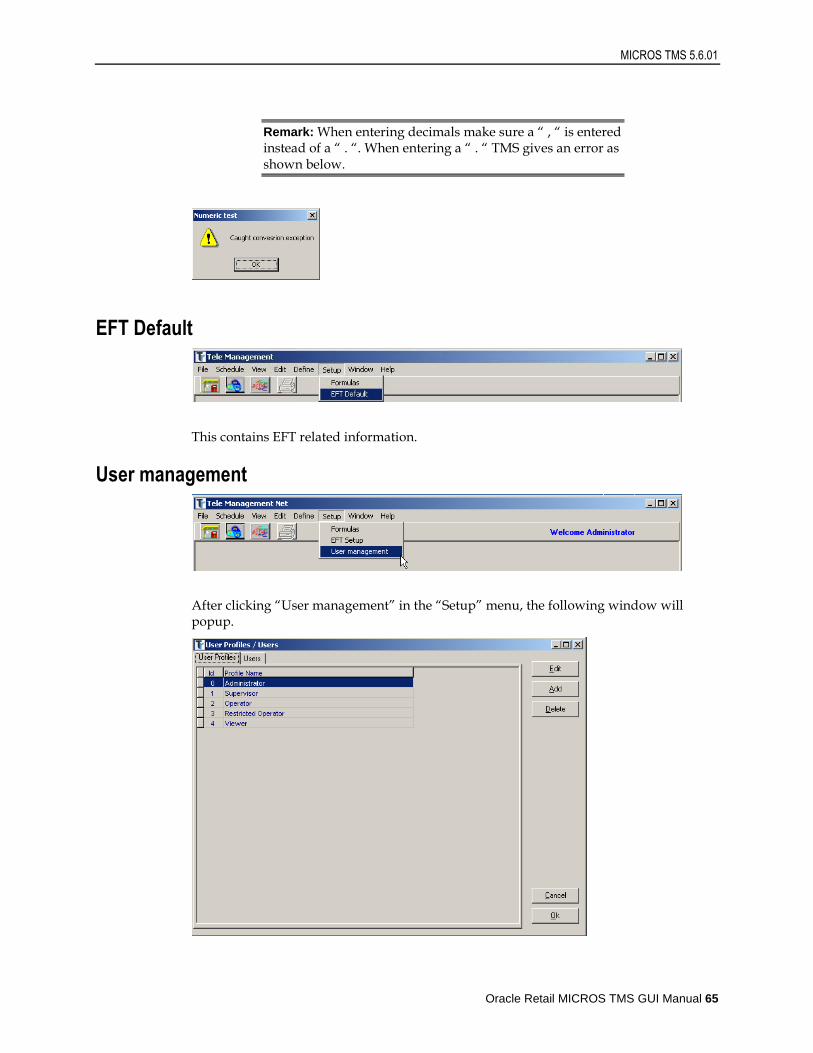
EFT Default
This contains EFT related information.
User management
After clicking “User management” in the “Setup” menu, the following window will popup.

Setup menu
66
In this window you can add user profiles and users (see tabs “User Profiles” and “Users”).
User profiles Default there are 5 different User Profiles:
Administrator profile:
highest level, access to all TMS GUI resources
Level 1 profile:
access to action schedulation, TMS parameter setup, station/action definition, fuel prices, SC parameters, Commercial profiles, viewing, action schedulation
Level 2 profile:
access to station/action definition, fuel prices, SC parameters, Commercial profiles, viewing, action schedulation
Level 3 profile:
access to fuel prices, SC parameters, Commercial profiles, viewing, action schedulation
Level 4 profile:
only access to view resources
Other profiles can be created through Administration profile.
Users can be created through administrator profile and linked to one or more existing profiles. A user must be linked to a profile to obtain access rights to TMS.
MICROS TMS 5.6.01
Oracle Retail MICROS TMS GUI Manual 67
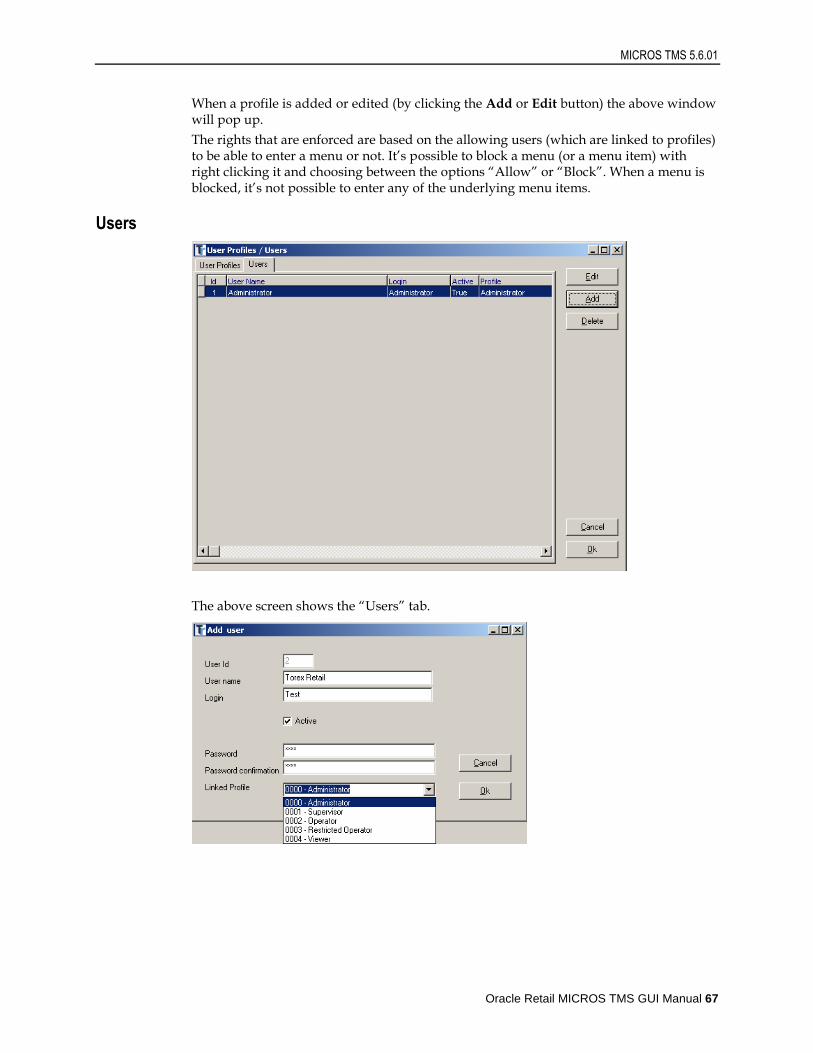
When a profile is added or edited (by clicking the Add or Edit button) the above window will pop up.
The rights that are enforced are based on the allowing users (which are linked to profiles) to be able to enter a menu or not. It’s possible to block a menu (or a menu item) with right clicking it and choosing between the options “Allow” or “Block”. When a menu is blocked, it’s not possible to enter any of the underlying menu items.
Users
The above screen shows the “Users” tab.

Setup menu
68
When you add or edit a user (by clicking the Add or Edit button) the above window will popup.
User Id: This number is generated automatically.
User name: For example the Name and Family name of the user.
Login: The login which will be used when logging. (when TMS_I.EXE starts)
Active: It’s possible to put a user “Active” or not. For example: when a user is on holiday and no one else is allowed to enter TMS_I.EXE with this user it’s possible to “uncheck” the “Active” field. By doing this the user will not be able to log in. The following message will appear when the user tries to log in.
Password: The password.
Password confirmation: The password confirmation.
Linked Profile: The user has to be linked to a profile. Based on this profile the user will be allowed to access certain menus and menu items.
User management related information
Logging into file
Per succeeded login of a user a file will be added in the %TMSROOT%\LOG directory with the following name format SYSMMDDhhmm.log where:
MM is the month number.
DD is the day number.
hh is the hour when the user logged in.
mm are the minutes when the user logged in.
User action logging
Following actions will be logged in TMS User logging:
User log in/out
Action scheduling: Add, Delete, Edit
Site controller parameter modifications
Terminal/dispenser/nozzle management
Fuel price editing + commercial profile editing
Station Definition: add, delete, modify
EFT related modifications
Admin tasks
Oracle Retail MICROS TMS GUI Manual 69
9
Window menu
Cascade
When selecting this option the windows opened in the TMS main window will be shown in cascade form. See below.
Window menu
70
Tile horizontally
When selecting this option the windows opened in the TMS main window will be tiled horizontally. See below.
Tile vertically

MICROS TMS 5.6.01
Oracle Retail MICROS TMS GUI Manual 71
When selecting this option the windows opened in the TMS main window will be tiled vertically. See below.

Oracle Retail MICROS TMS GUI Manual 73
10
Help menu
About
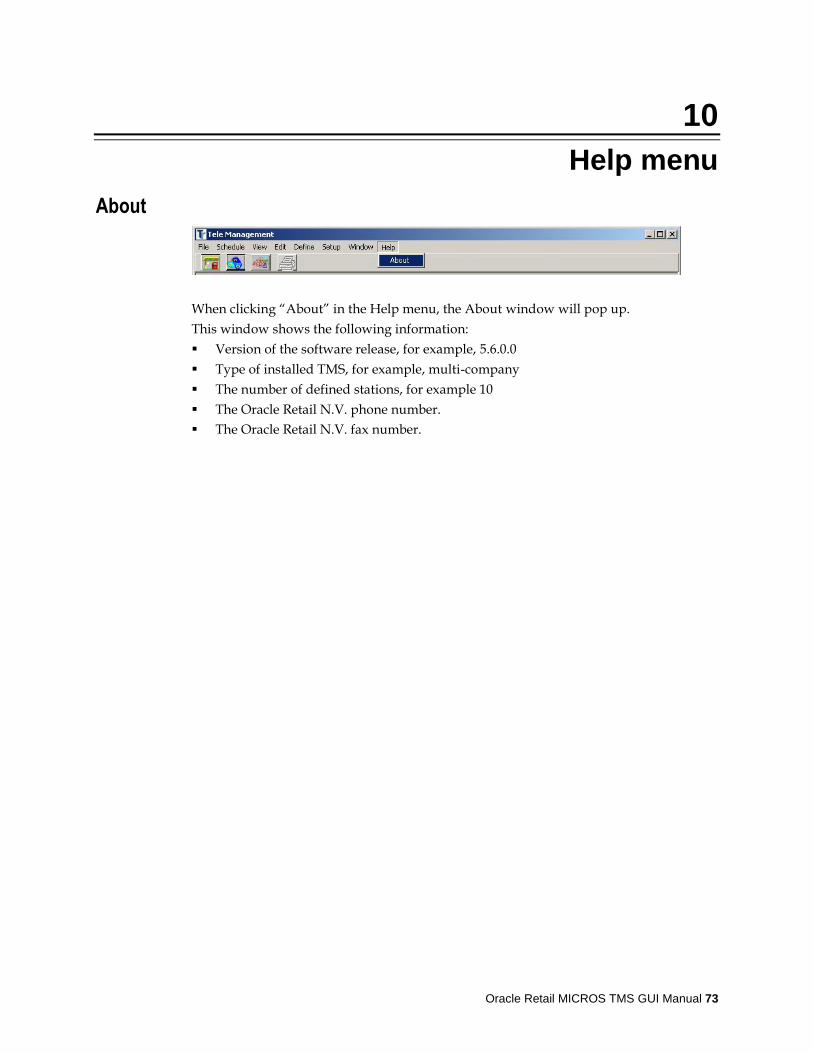
When clicking “About” in the Help menu, the About window will pop up.
This window shows the following information:
Version of the software release, for example, 5.6.0.0
Type of installed TMS, for example, multi-company
The number of defined stations, for example 10
The Oracle Retail N.V. phone number.
The Oracle Retail N.V. fax number.

Oracle Retail MICROS TMS GUI Manual 75
A
Appendix: Calls - Examples
99 Fuel Shop Stock Invoice
Requests all information about Fuel, Shop sales and Stock since the last ending of a period, that’s not captured yet by TMS.
98 Cutover Fuel Stock
Requests all the information available about Fuel and Stock.
This call also ends a period.
97 Fuel Shop Stock Art
Requests all the information about Fuel, Shop, Stock and Articles.
96 Fuel Shop Stock PI BE
Requests all the information about Fuel, Shop and Stock.
PI: POS Import – Remote control of POS parametrization (TMS -> Site)
BE: Binary Export of all POS period sales related data
95 Fuel Shop Stock Invoice PI
Requests all the information about Fuel, Shop and Stock.
(Request and confirms all invoices generated on Site controller)
PI: POS Import – Remote control of POS parametrization (TMS -> Site)
94 Fuel Stock Shop
Requests all the information about Fuel, Stock and Shop
All calls requesting Fuel information also pass the Site Configuration to TMS.
80 Get SC Events and Transactions
Get all new SC events and transactions – used to foresee Alarm expert system Petrol 247 with data
77 Request New LV_CH_LG
Requests new records of Level Change Log type
Mainly used for tank calibration purposes
76 Request New SC_TR_LG
Request new records from SC Transactions Log.
Acquire details of all new fuel sales. Used for various purposes.
75 Request New TA_AN_LG
Request new records of Tank Analysis Log. Used by Petrol 247 for follow up of the levels in the tanks.
Retrieval of records with data from SC Logs result (also) in direct export of the data concerned in station specific files in designated directories (..\trans or ..\export )
74 Send Tank Tables
Appendix: Calls - Examples
76
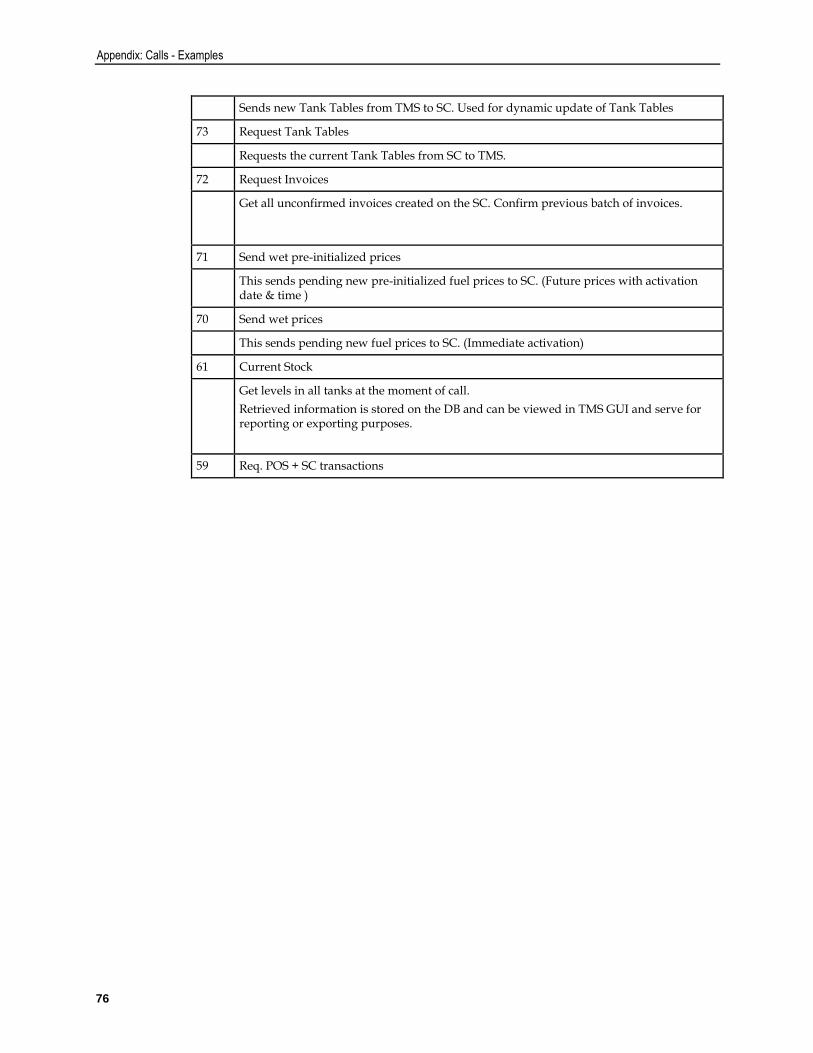
Sends new Tank Tables from TMS to SC. Used for dynamic update of Tank Tables
73 Request Tank Tables
Requests the current Tank Tables from SC to TMS.
72 Request Invoices
Get all unconfirmed invoices created on the SC. Confirm previous batch of invoices.
71 Send wet pre-initialized prices
This sends pending new pre-initialized fuel prices to SC. (Future prices with activation date & time )
70 Send wet prices
This sends pending new fuel prices to SC. (Immediate activation)
61 Current Stock
Get levels in all tanks at the moment of call.
Retrieved information is stored on the DB and can be viewed in TMS GUI and serve for reporting or exporting purposes.
59 Req. POS + SC transactions
MICROS TMS 5.6.01
Oracle Retail MICROS TMS GUI Manual 77
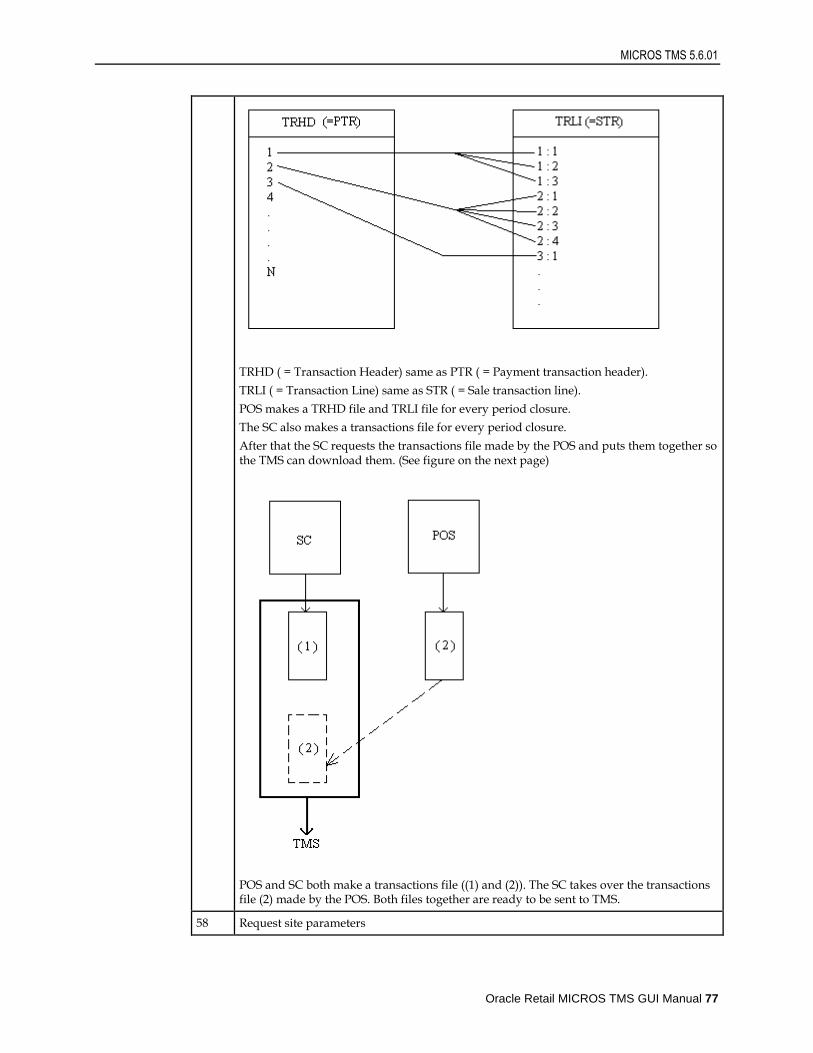
TRHD ( = Transaction Header) same as PTR ( = Payment transaction header).
TRLI ( = Transaction Line) same as STR ( = Sale transaction line).
POS makes a TRHD file and TRLI file for every period closure.
The SC also makes a transactions file for every period closure.
After that the SC requests the transactions file made by the POS and puts them together so the TMS can download them. (See figure on the next page)
POS and SC both make a transactions file ((1) and (2)). The SC takes over the transactions file (2) made by the POS. Both files together are ready to be sent to TMS.
58 Request site parameters
Appendix: Calls - Examples
78
Requests for the dynamically managed site parameters. Parameters are used fine tuning of the behaviour of tank alarms, leak detection, detection of water in the tank, ... Requested data is stored in the DB and can be later consulted adapted and passed back to site.
57 Send site parameters
This sends the changes made to the parameters in TMS GUI (Edit -> Site parameters) to the SC
56 Activate / block FP / terminal
This is used to activate or block terminals and/or dispensers and nozzles. See Edit -> Terminal/Dispenser Management feature.
55 Req. POS Transactions
This call is a part of the call action - Req. POS + SC transactions. This call requests the TRHD and TRLI files that are created by the POS.
53 POS DB Import (PI)
This call sends a prepared configuration update to POS DB (can contain various configuration data - departments, tenders, articles, prices,…).
15 Diagnostic call
Depending on the script, various diagnostic data can be requested from the SC.:
Last 20 transactions
Current dynamic status of all the forecourt (pumps, terminals, tanks,…)
Forecourt configuration
Data are used for reporting , export or passed to the Petrol 247 DB
Available calls and their exact behaviour is deployment specific.
View the company related documents for specific information.
Oracle Retail MICROS TMS GUI Manual 79
B
Appendix: Reporting Components
A0 Header
Shows from what station (or group) this report is created from.
Shows when this report is created (date and time).
Shows when the last data call is made to be able to make this report.
Shows start and end time/date from the last closed period.
A1 Software version
Sows the software version.
Shows when the configuration (SC) has been adapted for the last time.
A2 Dispenser/nozzle sales, indexes (non-resettable totalizers)
Shows per dispenser, per nozzle:
Total amount (Money)
Total volume of fuel dispensed
Total number of transactions
TooMuch: When the dispenser is pre-paid for 20€ of fuel but only 15€ is dispensed because the tank in your car is full, then the user is credited and remaining 5€ is put in TooMuch. (Usually Outdoor sales with BNA)
TooLess: When the dispenser is pre-paid for 20€ of fuel but it is unable to stop exactly and overshoots to 20,15 (Badly working valve,..) then the remaining 15c is put in TooLess.
IndexAmount: Amount of money from all the sales since the installation of the dispenser.
IndexVolume: Amount of fuel from all the sales since the installation of the dispenser.
A3 Terminal Sales
This shows the total amount, volume and number of transactions per terminal.
There’s also a general total shown of the amount, volume and transactions
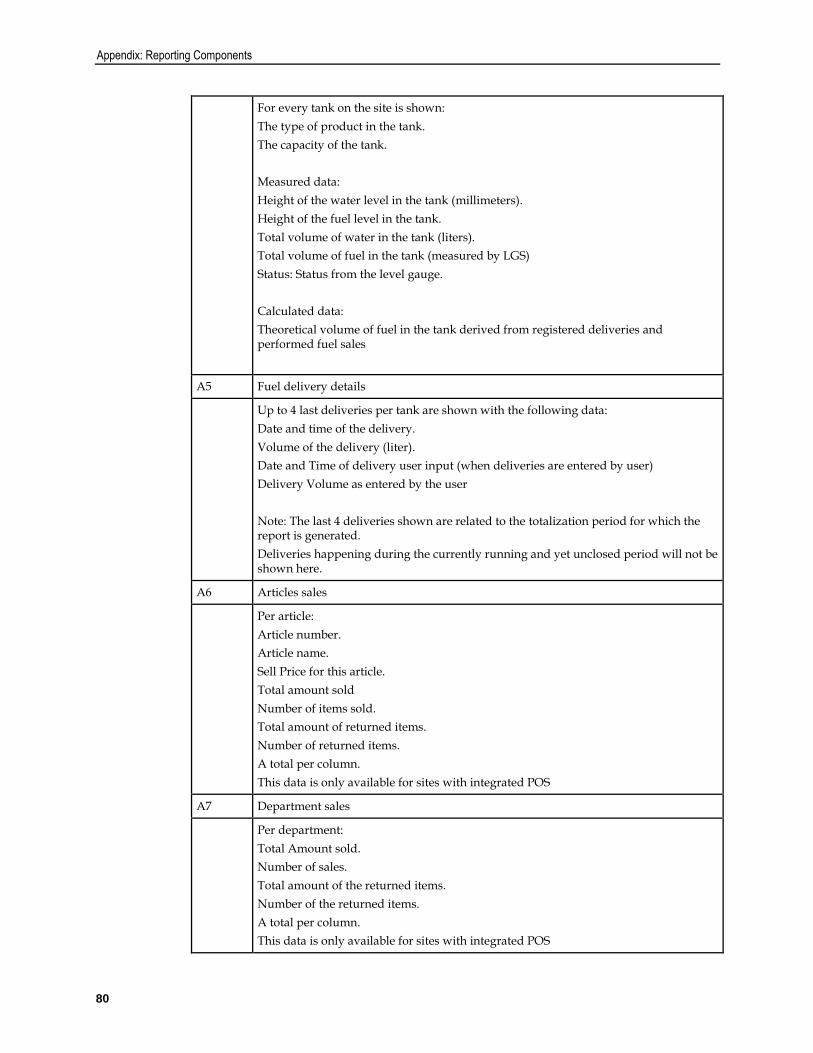
A4 Level Details (period related)
Appendix: Reporting Components
80
For every tank on the site is shown:
The type of product in the tank.
The capacity of the tank.
Measured data:
Height of the water level in the tank (millimeters).
Height of the fuel level in the tank.
Total volume of water in the tank (liters).
Total volume of fuel in the tank (measured by LGS)
Status: Status from the level gauge.
Calculated data:
Theoretical volume of fuel in the tank derived from registered deliveries and performed fuel sales
A5 Fuel delivery details
Up to 4 last deliveries per tank are shown with the following data:
Date and time of the delivery.
Volume of the delivery (liter).
Date and Time of delivery user input (when deliveries are entered by user)
Delivery Volume as entered by the user
Note: The last 4 deliveries shown are related to the totalization period for which the report is generated.
Deliveries happening during the currently running and yet unclosed period will not be shown here.
A6 Articles sales
Per article:
Article number.
Article name.
Sell Price for this article.
Total amount sold
Number of items sold.
Total amount of returned items.
Number of returned items.
A total per column.
This data is only available for sites with integrated POS
A7 Department sales
Per department:
Total Amount sold.
Number of sales.
Total amount of the returned items.
Number of the returned items.
A total per column.
This data is only available for sites with integrated POS

MICROS TMS 5.6.01
Oracle Retail MICROS TMS GUI Manual 81
A8 Mode of payment
Per mode of payment (MOP):
Number of the mode of payment.
Description of the mode of payment.
Exchange rate (in case of foreign currencies)
Total amount of money tendered with this MOP.
Number of transactions where MOP was used.
Total amount of returned money
Liters of fuel (if applicable)
A total per column.
This data is only available for sites with integrated POS
A9 Mode of payment (per operator shift)
Per period, per POS (Point of sale), per shift (operator number, operator name, shift number, date and time for start of the shift):
Number of the mode of payment.
Description of the mode of payment.
Exchange rate (in case of foreign currencies)
Total amount of money tendered with this MOP.
Number of transactions where MOP was used.
Total amount of returned money
Liters of fuel (if applicable)
A total per column.
This data is only available for sites with integrated POS
AB Actual level details
Last known tank level details per tank:
The type of product in the tank.
The capacity of the tank.
Measured data:
Height of the water level in the tank (millimeters).
Height of the fuel level in the tank.
Total volume of water in the tank (liters).
Total volume of fuel in the tank (measured by LGS)
Status: Status from the level gauge.
Calculated data:
Theoretical volume of fuel in the tank derived from registered deliveries and performed fuel sales
AC Terminal/Product sales
Appendix: Reporting Components
82
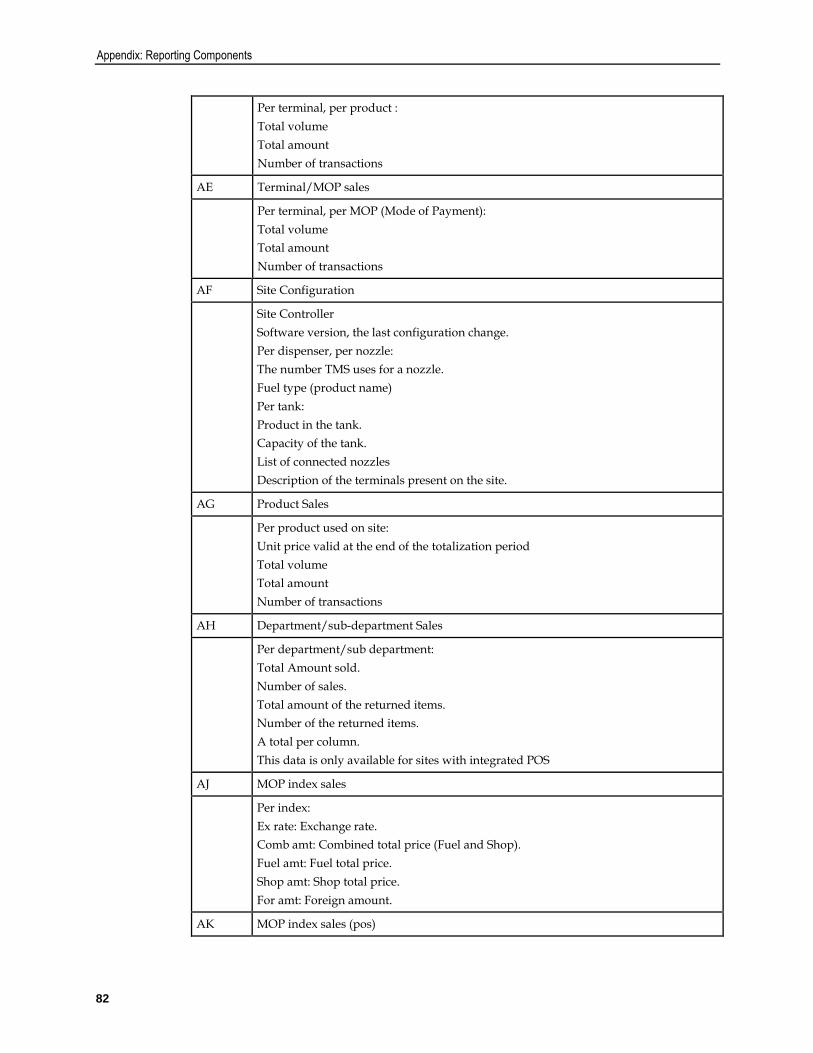
Per terminal, per product :
Total volume
Total amount
Number of transactions
AE Terminal/MOP sales
Per terminal, per MOP (Mode of Payment):
Total volume
Total amount
Number of transactions
AF Site Configuration
Site Controller
Software version, the last configuration change.
Per dispenser, per nozzle:
The number TMS uses for a nozzle.
Fuel type (product name)
Per tank:
Product in the tank.
Capacity of the tank.
List of connected nozzles
Description of the terminals present on the site.
AG Product Sales
Per product used on site:
Unit price valid at the end of the totalization period
Total volume
Total amount
Number of transactions
AH Department/sub-department Sales
Per department/sub department:
Total Amount sold.
Number of sales.
Total amount of the returned items.
Number of the returned items.
A total per column.
This data is only available for sites with integrated POS
AJ MOP index sales
Per index:
Ex rate: Exchange rate.
Comb amt: Combined total price (Fuel and Shop).
Fuel amt: Fuel total price.
Shop amt: Shop total price.
For amt: Foreign amount.
AK MOP index sales (pos)

MICROS TMS 5.6.01
Oracle Retail MICROS TMS GUI Manual 83
Per POS, per index:
Ex rate: Exchange rate.
Comb amt: Combined total price (Fuel and Shop).
Fuel amt: Fuel total price.
Shop amt: Shop total price.
For amt: Foreign amount.
AL Last eft status poll
EFT related report.
AM Last fuel delivery details
Last known 4 deliveries per tank are shown with the following data:
Date and time of the delivery.
Volume of the delivery (liter).
Date and Time of delivery user input (when deliveries are entered by user)
Delivery Volume as entered by the user
AN Call Anomalies (Station unspecific report)
Report with all what went wrong from the last time this report was last issued. Failed TMS actions, exceptions encountered during action execution,…
Using this report regularly allows for management by exception of all TMS related issues.
AO Diagnosis last transactions
Report with 20 last transactions as retrieved by the diagnostic call
AQ SC RF-id operator sales
Period totals split per operator (per RF-ID card)
(Available when Fuel Sales Tagging through RF-ID cards is active)

Oracle Retail MICROS TMS GUI Manual 85
C
Appendix: Exports
Exports made in the context of a call
During the call TMS fetches data and generates export file(s).
POS Data
SC Logging
Specific data exports during a call
Exports generated from data stored in the database
Various station calls fetch data from site and store it (also) in the database. Most of the data retrieved from site and stored is data related to a site period closure. A period on a site generally covers one day of operation. Stored data is then used to generate reports and exports. As only data already present in the DB can be exported, TMS is foreseen with features allowing the export to wait until the preceding data retrieval action(s) either succeeded or failed.
Station specific export files
Export file is on a per station basis. Export action needs to be scheduled for each station concerned.
Export files with data from all stations per type of data
Export file is on a data type basis and contains data from all sites. Only one station unspecific export action needs to be scheduled.

Appendix: Exports
86

MICROS TMS 5.6.01
Oracle Retail MICROS TMS GUI Manual 87
POS Data
POS DATA EXPORT FILES. (dynamic binary export)
Calls containing the BE script element retrieve and export the POS Binary Export files. The created files are located in the ..\trans directory.
File names follow following logic:
ZZZXXXXY.SSSS
ZZZ: Fixed, these 3 characters show what the content of the file is
XXXX: Period number from the SC.
Y: Sequence number of the POS period within the SC period (the last character).
SSSS: Number of the station.
All the information in the export files are obtained from the POS.
One file is created per station, per period, per type of data.
Content and types of available exports is configured on site on the POS.
(Can be done through a dedicated TMS call)
Exported files are located in the ..\trans directory.
This type of export is called binary export. The files are binary at the POS. TMS requests these files and converts them into CSV files.
Different types of the export files are:
MOP: Method of payment totals of the period.
DEP: Department totals of the period.
ART: Article movement (sales total per article) over the period.
VAT: VAT rates at the end of the period.
PTR: Payment details for each sale in the period.
STR: Sale details for each sale in the period.
DPO: Department totals per shift.
STK: Article stock at the end of the period.
COM: Manager commission calculation details for the period.
CAD: Details of credit account clients (Local accounts or LACC).
PCI: Period closure info.
NZS: Nozzle Sales
TAS: Tank Status and Levels
DSH: Dry Stock Operation Header
DSL: Dry Stock Operation Lines
LTY: Loyalty info file
For detailed information refer to the dedicated document about POS exports.
Appendix: Exports
88
Site Controller Logging
TA_AN_LG (= Tank Analysis Logging)
Export is generated by call actions with script element requesting new TA_AN_LG - new records of Tank Analysis Log. Used also by Petrol 247 for follow up of the levels in the tanks.
File is located in ..\export directory, format is CSV and file extension follows the TMS station number.
SC_TR_LG (= Site controller Transactions Logging)
Export is generated by call actions with script element requesting new SC_TR_LG.
File is located in the ..\export directory, format is CSV and file extension follows the TMS station number. This file contains detailed information about each fuel transaction happening on the SC.
There are 2 types of SC_TR_LG files, a short version and a full version.
Type is configurable trough the TMS.ini file in the root directory of TMS under the option ‘FullSCTRNXLogg’ in the block [EXPORT].
FullSCTRNXLogg=No is the short version
FullSCTRNXLogg=Yes is the full version
Full version contains more information, like payment and loyalty card numbers used,…
LV_CH_LG (= Level Change Logging)
Export is generated by call actions with script element requesting new LV_CH_LG.
File is located in the ..\export directory, format is CSV and file extension follows the TMS station number. This file contains detailed information about all level changes in all the tanks equipped with the level gauging system.
MICROS TMS 5.6.01
Oracle Retail MICROS TMS GUI Manual 89
Specific data exports during a call
Local invoices/credit notes
Export of invoices/credit notes created on the Site Controller in the sites. Export is generated by call actions with script element requesting new invoice records. In the same script, the previously obtained set of invoice records is confirmed to the SC.
As a side effect, TMS can re-generate the invoices as they were printed on the site. It can be switched on/off with ‘GenLocInvoice’ line in the block [REPORT] in the TMS.ini file.
When 1 is specified then the invoices are generated else only the export file is made.
After this call there is a file added in the \export directory.
The filename looks like this:
RTINV_s.PRN
RTINV: ReTail INVoice export file.
S: TMS session identification.
Tank calibration
The tank calibration files are used to analyse and calculate tank tables.
To request the tank calibration files the call action – Req tank X calibration log is needed.
After one of these calls there is a file added in the specified directory in TMS.ini
Using the separator also specified in TMS.ini, to separate the columns.
The filename looks like this:
TA_CA_xx.ssss
TA_CA_: Tank calibration file
Xx: Tank number.
Ssss: The station number.
Tank tables
Tank table contains the conversion of height in tank to corresponding volume for multiple points (called straps). Tank tables can be sent and requested. Usually a dedicated call is foreseen for each operation.
After requesting the tank tables the files are located in ..\temp directory.
The filename layout is:
TA_TB_xx.ssss
TA_TB_: Tank table file.
Xx : Ta nk number.
Ssss: The station number.
When new tank tables need to be send to the site, the files have to be located in the ..\Ssss\send directory of TMS with the correct filename.
Last 20000 SC fuel transactions
Appendix: Exports
90
This export file contains the last 20000 fuel transactions. If the file already exists new records are appended.
Use call action – Request SC transact logging.
After this call a file is created in the ..\trans directory.
The filename layout is:
TRNmmddn.ssss
TRN: SC fuel transactions.
Mm: Month number.
Dd: Day of month.
N: PC session number.
Ssss: The station number.
SC Period fuel transactions
This export file contains the details of all the fuel transactions within a period.
Use call action – Req. POS + SC transactions.
After this call files are created in the ..\trans directory.
The filename layout is:
TRSCcccc.ssss
TRSC: SC period fuel transactions.
Cccc: SC closure number.
Ssss: Station number.
POS period transactions: Headers and Lines
These export files contain data with all the POS transactions within a period. Header and Lines export files are always available together. Record key fields link content of the two files.
Use call action – Req. POS + SC transactions.
After this call files are created in the ..\trans directory.
Transaction Headers:
TRHDcccc.ssss
TRHD: POS period transaction headers.
Cccc: SC closure number.
Ssss: The station number.
Transaction Lines:
TRLIcccc.ssss

MICROS TMS 5.6.01
Oracle Retail MICROS TMS GUI Manual 91
TRLI: POS period transaction line details.
Cccc: SC closure number.
Ssss: Station number.
Period transaction headers and lines (both POS and SC)
Export integrates all the transactions done within a period (both SC and POS).
TMS merges the SC transactions details into the POS transaction details.
First the call action – Req. POS + SC transactions is needed, followed by an export of ZH type – Merge SC, POS transaction Files. Export files are created in the ..\trans directory.
TRHDcccc.ssss, TRLIcccc.ssss
Cccc: SC period closure number.
Ssss: Station number.
Periodical article movements
This file contains all the article sales within a period.
Use call action – Fuel Shop Stock Art. Export file is created in the ..\trans directory.
PARTcccc.ssss
PART: Periodical article movements.
Cccc: SC period closure number.
Ssss: Station number.
For more information see dedicated TMS export documentation. (Telmanxx-xxx.doc.)
Station specific export files
60 Nozzles, 15 tanks
Export contains periodic information about the tank levels and nozzle sales, and POS sales ordered by MOP index.
One of the following call actions are needed: Fuel Shop Stock Invoice, Cutover Fuel Stock, Fuel Shop Stock Art, Fuel Shop Stock Inv. PI BE, Fuel Shop Stock Inv. PI POSSAL or Fuel Stock Shop.
Export Type: Z6 Sales 60 nozzles 15 tanks, ASCII
Export file is created in the ..\export directory.
Filename layout:
Xmmdd_ts
X: eXport file.
Appendix: Exports
92
Mm: Month number.
Dd: Day of month.
T: File type, group of export by closure sources.
P: TMS. S: Closure started by operator, POS console, fuel console.
S: Session identification.
Last 4 fuel deliveries, 15 tanks
This gives the volume and start time of the last 4 fuel deliveries at the moment of the call.
Export Type: Z7 Fuel deliveries 15 tanks, ASCII
Export file is created in the ..\export directory.
Filename layout:
Xmmdd_ts
X: eXport file.
Mm: Month number.
Dd: Day of month.
T: File type.
D: Fuel delivery details.
S: Session identification.
Department export: department and sub department amount, 90 departments
Export of department sales (amounts) and sub-department sales (amounts) of every period.
Export Type: Z8 Department amounts, ASCII
Z9 Sub-department amounts, ASCII
Export file is created in the ..\export directory.
Filename layout:
SHDSAL_s
SHDSAL: Fixed part of name.
S: Session identification.
4 behaviours of this export are supported, selected through
TMS.ini file, option ‘ASCIIDeptsMode’ under the section [EXPORT].

MICROS TMS 5.6.01
Oracle Retail MICROS TMS GUI Manual 93
ASCIIDeptsMode Behaviour
1 Export without department 99 (fuel) information.
2 Export with department 99 (fuel) information.
4 Export without department 99 (fuel) information and with currency code information.
5 Export with department 99 (fuel) information and with currency code information.
Last tank reading, 15 tanks
Export of last collected tank details. The most recent available info from period closure or from collection of actual tank details are exported.
Export Type: ZA Last tank readings, ASCII
Export file is created in the ..\export directory.
Filename layout:
STmmdd_s
ST: Wet Stock details export file.
Mm: Month number.
Dd: Day of month number.
S: Session identification.
Last tank readings, XML&SQL
Export of last collected tank details from collection of actual tank details.
Export Type: X0 Last tank readings XML&SQL
Export file is created in a dedicated directory; at the same time can the data be inserted into an SQL database.
TMS DB Table(s) to CSV
Script dependent export capable of exporting content of various TMS DB tables for one site or for a given group of sites
Export Type: XA TMS DB Table(s) to CSV
Export file(s) can be found in the ..\export directory.

Appendix: Exports
94
For more information about the exports consult dedicated documentation (telmanxx-xxx.doc)
Sequential export files
These export files are generated per data type basis (record layout) and contain data from all sites. Only one station unspecific export action needs to be scheduled for each export type (file). The way the data is organized makes these exports most suitable as interface files for import into an SQL database meant for network wide reporting.
2 variants of the sequential export exist. Variant 1 is less extensive. The variant is setup through the TMS.ini file, section [EXPORT] option ‘SeqExpModifier’.
File name layout Export Action Basis Record Content
SSxxxxxx ZP Seq.cut.data, Shop Sales Period sales per (sub)department
TMxxxxxx ZQ Seq.cut.data, Terminal MOP Period payments per terminal
TSxxxxxx ZR Seq.cut.data, Tank Status Tank dipping related data
FSxxxxxx ZS Seq.cut.data, Nozzle sales Period nozzle sales
PCxxxxxx ZT Seq.cut.data, Info file Period closure generics
PFxxxxxx ZU Seq.cut.data, Period fuel sales Period fuel sales
COxxxxxx ZV Seq.cut.data, Commission Info Period commission details
FDxxxxxx ZW Seq.cut.data, Fuel Deliveries Fuel Deliveries
TPxxxxxx ZX Seq.cut.data,Period tank sales Period tank sales
RFxxxxxx ZY Seq.cut.data, Period Tag Sales Period sales per RF-ID tag
When using one of these exports the station in context of which the export is performed is not relevant. The resulting export file contains all available not yet exported information about all stations. An older already once exported sequential export file can be re-exported. To do so, export action must be re-launched but needs to specify the serial number of the export in the ‘FROM’ field (which is normally left blank).
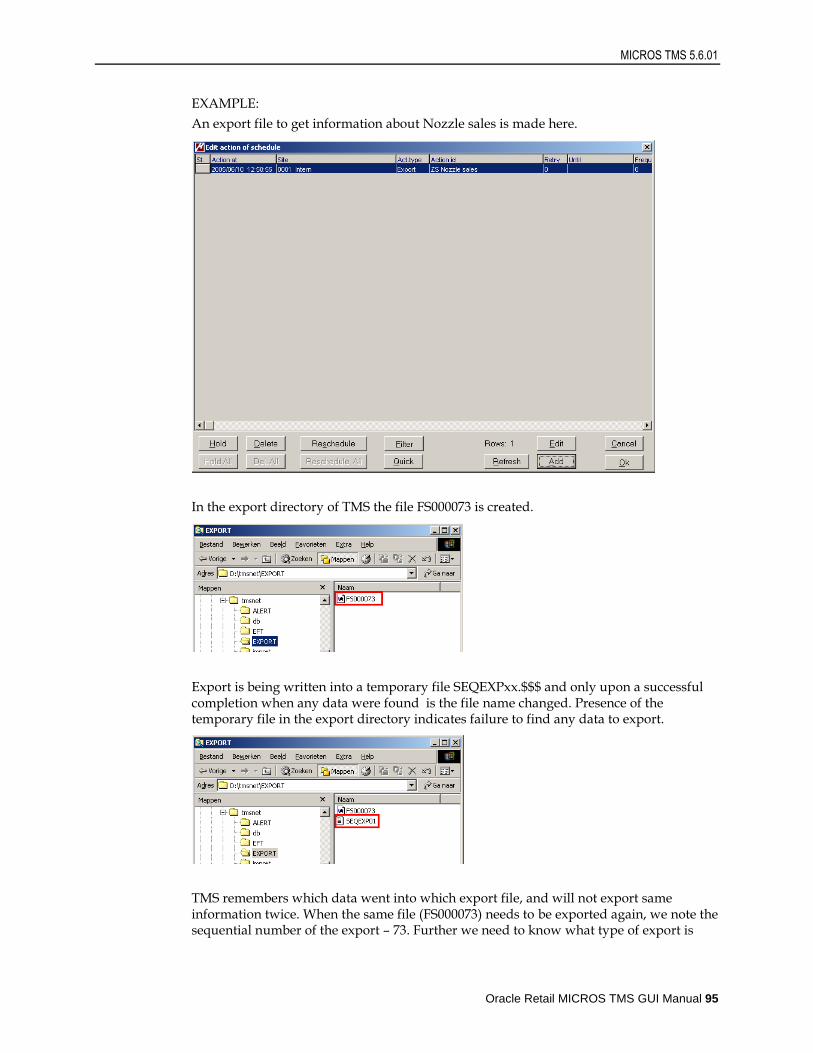
MICROS TMS 5.6.01
Oracle Retail MICROS TMS GUI Manual 95
EXAMPLE:
An export file to get information about Nozzle sales is made here.
In the export directory of TMS the file FS000073 is created.
Export is being written into a temporary file SEQEXPxx.$$$ and only upon a successful completion when any data were found is the file name changed. Presence of the temporary file in the export directory indicates failure to find any data to export.
TMS remembers which data went into which export file, and will not export same information twice. When the same file (FS000073) needs to be exported again, we note the sequential number of the export – 73. Further we need to know what type of export is

Appendix: Exports
96
required. First 2 characters of the file name FS means nozzle sales (see the table here above).
To remake the export file enter the sequence number in the “From:” field in section “Report/Export” and specify the right type of export, as shown below.
Upon completion the temporary file “SEQEXP01” is deleted and the original file FS000073 is overwritten with the re-generated export file.
For detailed information about sequential exports, see dedicated documentation (SequentialExport_x-x.doc)

Oracle Retail MICROS TMS GUI Manual 97
D
Appendix: Services
S0 Clean station specific files
DB cleanup.
Deletes historic cutover data in the database, the number of historic cutover info stored in the database depends on the setting of the TMS.ini parameter HistoryDepth = (number of cutovers).
S1 Clean action history SYHISTRY
DB cleanup.
Deletes user scheduled action history in the database, the number of deleted records depends on the setting of TMS.ini parameter CleanSyHistor = (number of days).
S2 Remove old spool files
Disk cleanup.
Deletes old spool files (reports => spool directory) from disk. How many files are kept depends on TMS.ini setting CleanSpool = (number of days).
S3 Remove old logging files
Disk cleanup.
Deletes old log files (log directory) from disk. How many files are kept on disk depends on TMS.ini setting CleanCOMLog = (number of days).
S4 Remove old export files
Disk cleanup.
Deletes old export files (export directory) from disk. Number of files kept on disk depends on TMS.ini setting CleanExport = (number of days).
S5 Remove old requested files
Disk cleanup.
Deletes all received files from stations on disk (\stations\xxxx\recv directories), number of old files kept on disk depends on the TMS.ini parameter CleanFileReq = (number of days).
S6 Remove old provider blacklists
EFT Server related service.
S7 Remove old EFT trans. Download
EFT Server related service.
S8 Reallocate EFT Providers
EFT Server related service.
S9 Import station EFT TRNX file
EFT Server related service.
SA Blacklist Import Provider 1
EFT Server related service.

Appendix: Services
98
SB Blacklist Import Provider 2
EFT Server related service.
SC Blacklist Import Provider 3
EFT Server related service.
SD Blacklist Import Provider 4
EFT Server related service.
SE Blacklist Import Provider 5
EFT Server related service.
SF Blacklist Import Provider 6
EFT Server related service.
SG Blacklist Import Provider 7
EFT Server related service.
SH Blacklist Import Provider 8
EFT Server related service.
SI Blacklist Import Provider 9
EFT Server related service.
SJ Blacklist Import Provider 10
EFT Server related service.
SM Tank Readings Trigger Import
Process file trigger for fetch and export of site Tank dipping info
SN Import TMS DB Table(s)
Import records of TMS DB tables (passed from other TMS)
SO Schedule IP Ping Actions
Scripted insertion of actions for site connectivity problems analysis
SQ IP Ping Station Node(s)
Use Ping to analyse site IP connectivity problems
SV Sum data to Virtual Station
Merge Period data from a group of sites as if all came from one virtual site
SW Fuel price file import ver. 2
Imports a fuel price file version 2.
SX Loyalty info file import
Imports a card – points relation file.
SY Fuel price file import ver. 1
Imports a fuel price file version 1.
SZ Tokheim Station Data Import
Import Tokheim period data from local file

MICROS TMS 5.6.01
Oracle Retail MICROS TMS GUI Manual 99
T0 Execute batch file tmsbat0.bat
Launch external batch file TMSBAT0.BAT
T1 Execute batch file tmsbat1.bat
Launch external batch file TMSBAT1.BAT
T2 Execute batch file tmsbat2.bat
Launch external batch file TMSBAT2.BAT
T3 FTP Fuelpos cutovers fetch
Import Tokheim FuelPOS period data using FTP
TB Backup database tables
Perform compressed and verified backup of the database
TC Transfer Files via FTP
Scripted file operation(s) with an FTP host
TD Execute Given Batch file
Execute scripted operation using command.exe
TL Access Site via LMS
Build Connection channel, pass control to LMS and wait upon its termination
TX Reinitialise Station(s)
Reinitialise one station or a group of stations – forget all old data
TY Re-index Historical Data Down
Compact DB entries for a given site
TZ Remove Station(s) from TMS
Delete one station or a group of stations and all the related data from TMS
Related Documents