Oracle ® Payment Interface Oracle Hospitality Simphony 2.9 Native Driver Installation Guide Release 6.1 E84591-01 January 2017

Welcome message from author
This document is posted to help you gain knowledge. Please leave a comment to let me know what you think about it! Share it to your friends and learn new things together.
Transcript

Oracle® Payment Interface
Oracle Hospitality Simphony 2.9 Native Driver Installation Guide Release 6.1 E84591-01
January 2017

Preface v
Copyright © 2010, 2017, Oracle and/or its affiliates. All rights reserved.
This software and related documentation are provided under a license agreement containing restrictions on use and disclosure and are protected by intellectual property laws. Except as expressly permitted in your license agreement or allowed by law, you may not use, copy, reproduce, translate, broadcast, modify, license, transmit, distribute, exhibit, perform, publish, or display any part, in any form, or by any means. Reverse engineering, disassembly, or decompilation of this software, unless required by law for interoperability, is prohibited.
The information contained herein is subject to change without notice and is not warranted to be error-free. If you find any errors, please report them to us in writing.
If this software or related documentation is delivered to the U.S. Government or anyone licensing it on behalf of the U.S. Government, then the following notice is applicable:
U.S. GOVERNMENT END USERS: Oracle programs, including any operating system, integrated software, any programs installed on the hardware, and/or documentation, delivered to U.S. Government end users are "commercial computer software" pursuant to the applicable Federal Acquisition Regulation and agency-specific supplemental regulations. As such, use, duplication, disclosure, modification, and adaptation of the programs, including any operating system, integrated software, any programs installed on the hardware, and/or documentation, shall be subject to license terms and license restrictions applicable to the programs. No other rights are granted to the U.S. Government.
This software or hardware is developed for general use in a variety of information management applications. It is not developed or intended for use in any inherently dangerous applications, including applications that may create a risk of personal injury. If you use this software or hardware in dangerous applications, then you shall be responsible to take all appropriate fail-safe, backup, redundancy, and other measures to ensure its safe use. Oracle Corporation and its affiliates disclaim any liability for any damages caused by use of this software or hardware in dangerous applications.
Oracle and Java are registered trademarks of Oracle and/or its affiliates. Other names may be trademarks of their respective owners.
Intel and Intel Xeon are trademarks or registered trademarks of Intel Corporation. All SPARC trademarks are used under license and are trademarks or registered trademarks of SPARC International, Inc. AMD, Opteron, the AMD logo, and the AMD Opteron logo are trademarks or registered trademarks of Advanced Micro Devices. UNIX is a registered trademark of The Open Group.
This software or hardware and documentation may provide access to or information about content, products, and services from third parties. Oracle Corporation and its affiliates are not responsible for and expressly disclaim all warranties of any kind with respect to third-party content, products, and services unless otherwise set forth in an applicable agreement between you and Oracle. Oracle Corporation and its affiliates will not be responsible for any loss, costs, or damages incurred due to your access to or use of third-party content, products, or services, except as set forth in an applicable agreement between you and Oracle.

Contents Preface .................................................................................................... 1-1
Audience .............................................................................................................................. 1-1 Customer Support ............................................................................................................... 1-1 Documentation .................................................................................................................... 1-1 Revision History .................................................................................................................. 1-1
1 Simphony Native Driver ................................................................... 1-1 Installing the Native Driver ............................................................................................... 1-1 Selecting the Native Driver Refund Method ................................................................... 1-1 Configuring the Native Driver .......................................................................................... 1-2
Adding the Payment Driver Configuration ............................................................. 1-2 Adding the Payment Module Configuration ........................................................... 1-4 Configuring the Default Payment Card Tender (Pre-Authorization Tender) ..... 1-6 Tender/Media ............................................................................................................... 1-6 Configuring the Tender Parameters .......................................................................... 1-8 Configuring the Payment Tenders ............................................................................ 1-9 Configuring the Page Design ................................................................................... 1-12 Scheduling the End-of-Day ...................................................................................... 1-15
2 Oracle Payment Interface ................................................................ 2-17 Introduction ....................................................................................................................... 2-17
Supported Currencies ............................................................................................... 2-17 Installing OPI ..................................................................................................................... 2-18 Configuring OPI ................................................................................................................ 2-19
3 Pay@Table ........................................................................................ 3-21 Configuring Simphony for Pay@Table........................................................................... 3-21
Configuring the POSAPI ........................................................................................... 3-21 Check and Posting ..................................................................................................... 3-21 Employee .................................................................................................................... 3-21 Gratuities ..................................................................................................................... 3-22
Configuring OPI Pay@Table ............................................................................................ 3-23
4 OPI Maintenance and FAQ ............................................................. 4-27 OPI Services ....................................................................................................................... 4-27
OPI Service .................................................................................................................. 4-27 OPI Service Utility ..................................................................................................... 4-27
OPI Uninstallation / Re-installation ................................................................................ 4-27 OPI Additional Configuration ................................................................................. 4-27

OPI Log Files ..................................................................................................................... 4-28 OPI Service Restart Task ........................................................................................... 4-28 OPI Password Maintenance ..................................................................................... 4-28 OPI Configuration Logs ............................................................................................ 4-29

Simphony Native Driver 1-1
Preface This document describes how to install the Oracle Payment Interface (OPI) Release 6.1 with Oracle Hospitality Simphony Release 2.9 or higher and contains the configuration for both Simphony and the Oracle Payment Interface systems.
Audience This document is intended for installers and system administrators of the Oracle Payment Interface and the Oracle Hospitality Simphony Point-of-Sale Release 2.9 or higher.
Customer Support To contact Oracle Customer Support, access My Oracle Support at the following URL: https://support.oracle.com When contacting Customer Support, please provide the following:
• Product version and program/module name • Functional and technical description of the problem (include business impact) • Detailed step-by-step instructions to re-create • Exact error message received and any associated log files • Screen shots of each step you take
Documentation Oracle Hospitality product documentation is available on the Oracle Help Center at http://docs.oracle.com/en/industries/hospitality/
Revision History Date Description of Change
January 2017 Initial publication

Simphony Native Driver 1-1
1 Simphony Native Driver
Installing the Native Driver The Simphony native driver provides connectivity functionality between Simphony and OPI. Equivalent functionality was provided by the MGDH software (MICROS Gateway Device Handler) in older versions of Simphony. To use the native driver you must upgrade Simphony to release 2.9 or higher.
Selecting the Native Driver Refund Method The native driver handles refunds in two ways, one method affects the sales figure in Simphony reports; the other method does not. The customer decides which method to use considering how they need refund amounts to appear in their Simphony sales reporting. When configuring OPI, you must also understand how the other credit card interfaces used by the enterprise or property are handling refunds. It may be necessary to match the native driver configuration in order to maintain consistent Simphony reporting to other properties across the Enterprise
Method 1 1. Create the refund check value by ringing in a non-revenue service charge. 2. Pay the check using the Native Driver | CreditCardRefund function.
Method 2 1. Start a negative check using the Function | Transaction Void key. 2. Enter the items to be refunded and raise the negative check value. 3. Pay the check using the Native Driver | CreditAuthAndPay function.
You cannot combine steps from the two different methods. For example, creating a negative check and trying to use the Native Driver | CreditCardRefund function does not work. If the non-revenue service charge method is required, configure a non-revenue service charge similar to the following example:

1-2 Simphony Native Driver
Configuring the Native Driver You can configure the native driver in the Enterprise Management Console (EMC). The screenshots and examples in this document refer to the configuration at an enterprise level.
Typically, the OPI host resides at property level, and as a result the host address may be different at each property or RVC, so the native driver configuration may need to be completed at property or the RVC level. In either case, the configuration steps are the same.
Adding the Payment Driver Configuration To configure the OPI payment driver: 1. Depending if the payment drivers are configured at enterprise, property, or RVC
level, select the required level in the locations hierarchy and then navigate to Setup | Payment Drivers.
2. If a record for the OPI payment driver does not exist, use the green Insert Record option.

Simphony Native Driver 1-3
1. For the initial setup, open the OPI record and select Import from a file. 2. Browse to:
:\MICROS\Simphony2\EgatewayService\handlers\OPIPayment.dll 3. Select the Open option.
4. Select the Configuration tab.
5. Configure the following options in each section. Assembly/Class

1-4 Simphony Native Driver
• Display Name: (Mandatory). This value appears in the driver display drop-down list later during the configuration.
Common Driver Properties • Merchant Number: (Mandatory) The value must match the Device Merchant
ID that has been configured in the OPI. Transport Service Properties
• Host Timeout: (Mandatory) The recommended value is 60 seconds. If the value configured is too low, the Ops client can timeout before a response is received from the payment service provider.
• Pass Phrase: Enter the pass phrase that is configured in OPI. • Primary Host: Enter the address of the OPI host. The host address must be
appended by the port number and the JSON interface.
Adding the Payment Module Configuration To configure the payment module: 1. Depending if the payment drivers are configured at enterprise, property, or RVC
level, select the required level in the locations hierarchy then navigate to Setup | Payments.
2. If a record for the OPI payment driver does not exist, use the green Insert Record option.
3. For the initial setup, open the OPI record and select Import from a file. 4. Browse to
:\MICROS\Simphony2\EgatewayService\handlers\Micros.Payment.LoadableCreditCardModule.dll
5. Select the Open option. 6. Select the Driver from the drop-down list of the payment drivers and display name
created previously. 7. Use the default settings for the Device and Content Type drop-down list. 8. Select the Configuration tab.

Simphony Native Driver 1-5
In the Common Driver Properties section, you must configure the following information. If the setting is not listed below, then you must retain the default value and the setting is not used with the OPI integration.
Setting Description Allow Manual Authorization Credit Card This indicates if the manual
authorization of credit cards is allowed. You must set this value to True unless the process guidelines state otherwise.

1-6 Simphony Native Driver
Do Not Batch You must define this value as True, preventing database tables from filling up with unnecessary data which may cause problems with other Simphony features for example, Clear Totals.
Configuring the Default Payment Card Tender (Pre-Authorization Tender) With the OPI, the credit card type is not known until the transaction processes and returns to the Point-of-Sale (POS). As a result, you must configure a pre-Authorization Tender/Media record as a placeholder until the transaction is processed. If multiple loadable payment drivers are used in the organization, set the following settings in the properties or revenue centers use OPI.
Tender/Media 1. In the relevant locations hierarchy, navigate to Configuration | Tender/Media. 2. Add a new Tender/Media record using the green Insert Record option. (This
becomes the default OPI Payment.) 3. Provide the Record Name(s) for example, Default OPI and select Ok. 4. Double-click the newly added Tender/Media row to open. 5. Select the Options tab. 6. Configure the following option bits for the OPI Default/Pre-authorization tender.
Tender Section
Area Parameter Notes State
2 - Options Interface Options
31 - ON=PMS and Credit Cards use 19 Digit Acct Number; OFF=16 Digits
Disable
2 - Options Credit Card Options
Estimated Tip Percentage
Unsupported in F&B
Disable
2 - Options Credit Card Options
Base Limit Obsolete with OPI
Disable
2 - Options Credit Card Options
Second Limit Unsupported in F&B
Disable
2 - Options Credit Card Options
Second Limit Percentage
Unsupported in F&B
Disable
2 - Options Credit Card Options
Offline Est Tip Percentage
Unsupported in F&B
Disable
2 - Options Credit Card Options
Unauthorized Authorization Threshold
Obsolete with OPI
Disable

Simphony Native Driver 1-7
2 - Options Credit Card Options
CA Offline Limit Obsolete with OPI
Disable
2 - Options Credit Card Options
Preambles 1 - [n] Leave blank for Pre-Authorization Tender
NULL
2 - Options Credit Card Options
7 - Use with Credit Card Recall
Obsolete with OPI
Disable
2 - Options Credit Card Options
17 - Check Credit Card Expiration Date
Obsolete with OPI
Disable
2 - Options Credit Card Options
27 - Credit Card Validity Test
Obsolete with OPI
Disable
2 - Options Credit Card Options
34 - Prompt for Debit or Credit Card
Obsolete with OPI
Disable
2 - Options Credit Card Options
49 - Require Credit Card Start Date
This information will be collected at the Electronic Payment Device (EPD)
Disable
2 - Options Credit Card Options
50 - Require Credit Card Issue Number
This information will be collected at the Electronic Payment Device (EPD)
Disable
2 - Options Credit Card Options
51 - No Credit Card Length Check
Obsolete with OPI
Disable
2 - Options Credit Card Options
60 - Do Not Retain Cardholder's Name
Obsolete with OPI
Disable
2 - Options Credit Card Options
61 - Require AVS on Manual Entry
Processor Defined
Disable
2 - Options Credit Card Options
62 - Require AVS on Auto Swipe
Processor Defined
Disable
2 - Options Credit Card Options
63 - AVS Must be Full Address
Processor Defined
Disable
2 - Options Credit Card Options
64 - Require CVV on Manual Entry
Processor Defined
Disable
2 - Options Credit Card Options
65 - Require CVV on Auto Swipe
Processor Defined
Disable
1-8 Simphony Native Driver
2 - Options Credit Card Options
80 - Enable Partial Authorization
Defined in SSL Configuration
Disable
2 - Options Ops Behavior > Amount Options
2 - Amount Required
Recommended Disable
2 - Options Ops Behavior > Amount Options
3 - Assume Paid in Full
Disable
2 - Options Ops Behavior > Security Options
68 - Mask Account Number
Disable
2 - Options Charge Tip Options
9 - Charged Tip Required
Disable
2 - Options Charge Tip Options
36 - ON = Charged Tip Must Be Less Than Pmt; OFF = Any Amount
Option bit cannot be enforced when OPI is active.
Disable
2 - Options Miscellaneous Options > Signature Capture Options
Default Tip % Unsupported in F&B
Disable
2 - Options Miscellaneous Options > Signature Capture Options
58 - Enable Signature Capture
Inclusion is provided by processor.
Disable
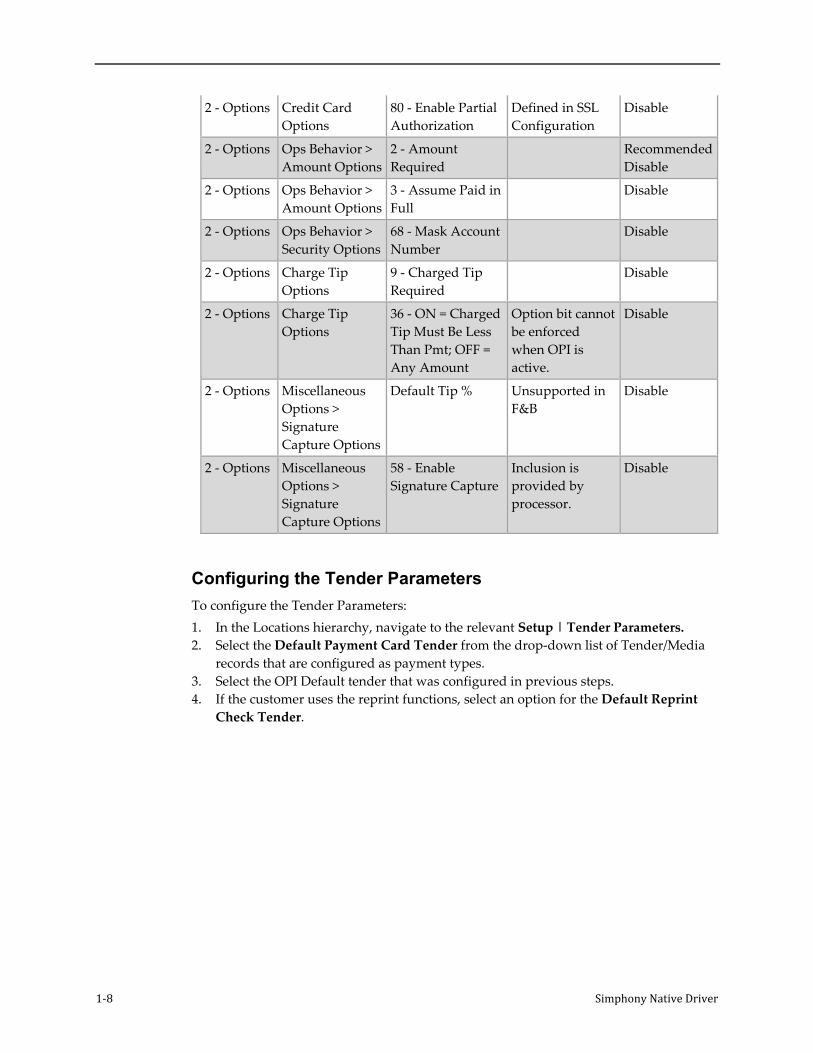
Configuring the Tender Parameters To configure the Tender Parameters: 1. In the Locations hierarchy, navigate to the relevant Setup | Tender Parameters. 2. Select the Default Payment Card Tender from the drop-down list of Tender/Media
records that are configured as payment types. 3. Select the OPI Default tender that was configured in previous steps. 4. If the customer uses the reprint functions, select an option for the Default Reprint
Check Tender.

Simphony Native Driver 1-9
Configuring the Payment Tenders This section assumes that the Credit Card Payment Tenders have already been configured and are defined at the Enterprise Level. Depending on the customer’s specific setup the Tender Media overrides may be required if OPI native drivers are not used at every property or RVC. To configure the credit card tenders: 1. Select the Options tab. 2. Configure the following option bits for the Credit Card Tenders to use with OPI. Tender Section
Area Parameter Notes Disable?
2 - Options Interface Options 31 - ON=PMS and Credit Cards use 19 Digit Acct Number; OFF=16 Digits
Disable Option Bit
2 - Options Credit Card Options
Estimated Tip Percentage
Unsupported in F&B
Disable Option Bit
2 - Options Credit Card Options
Base Limit Obsolete with OPI Disable Option Bit
2 - Options Credit Card Options
Second Limit Unsupported in F&B
Disable Option Bit

1-10 Simphony Native Driver
2 - Options Credit Card Options
Second Limit Percentage
Unsupported in F&B
Disable Option Bit
2 - Options Credit Card Options
Initial Authorization Amount
Part of default tender configuration only
Disable Option Bit
2 - Options Credit Card Options
Offline Est Tip Percentage
Unsupported in F&B
Disable Option Bit
2 - Options Credit Card Options
Unauthorized Authorization Threshold
Obsolete with OPI Disable Option Bit
2 - Options Credit Card Options
CA Offline Limit Obsolete with OPI Disable Option Bit
2 - Options Credit Card Options
7 - Use with Credit Card Recall
Obsolete with OPI Disable Option Bit
2 - Options Credit Card Options
17 - Check Credit Card Expiration Date
Obsolete with OPI Disable Option Bit
2 - Options Credit Card Options
27 - Credit Card Validity Test
Obsolete with OPI Disable Option Bit
2 - Options Credit Card Options
33 - Require Credit Auth Before Service Total
Part of default tender only
Disable Option Bit
2 - Options Credit Card Options
34 - Prompt for Debit or Credit Card
Obsolete with OPI Disable Option Bit
2 - Options Credit Card Options
49 - Require Credit Card Start Date
This information is now collected at the device
Disable Option Bit
2 - Options Credit Card Options
50 - Require Credit Card Issue Number
This information is now collected at the device
Disable Option Bit
2 - Options Credit Card Options
51 - No Credit Card Length Check
Obsolete with OPI Disable Option Bit
2 - Options Credit Card Options
60 - Do Not Retain Cardholder's Name
Obsolete with OPI Disable Option Bit

Simphony Native Driver 1-11
2 - Options Credit Card Options
61 - Require AVS on Manual Entry
Processor Defined Disable Option Bit
2 - Options Credit Card Options
62 - Require AVS on Auto Swipe
Processor Defined Disable Option Bit
2 - Options Credit Card Options
63 - AVS Must be Full Address
Processor Defined Disable Option Bit
2 - Options Credit Card Options
64 - Require CVV on Manual Entry
Processor Defined Disable Option Bit
2 - Options Credit Card Options
65 - Require CVV on Auto Swipe
Processor Defined Disable Option Bit
2 - Options Credit Card Options
80 - Enable Partial Authorization
Disable Option Bit
2 - Options Ops Behavior > Security Options
68 - Mask Account Number
Disable Option Bit
2 - Options Charge Tip Options
36 - ON = Charged Tip Must Be Less Than Pmt; OFF = Any Amount
This option bit cannot be enforced when OPI is active.
Disable Option Bit
2 - Options Miscellaneous Options > HALO Options
HALO Code Part of default tender only
Disable Option Bit
2 - Options Miscellaneous Options > HALO Options
18 - Enable HALO Part of default tender only
Disable Option Bit
2 - Options Miscellaneous Options > HALO Options
19 - ON=Use HALO on Amount Entered; OFF=Amount Overtendered
Part of default tender only
Disable Option Bit
2 - Options Miscellaneous Options > Signature Capture Options
Default Tip % Unsupported in F&B
Disable Option Bit
2 - Options Miscellaneous Options > Signature Capture Options
58 - Enable Signature Capture
Inclusion is provided by processor.
Disable Option Bit

1-12 Simphony Native Driver
2 - Options Credit Card Options
Preambles 1 - [n] Used to map the OPI payments to specific card types in Simphony
Refer to Table below
OPI uses the following preambles for the credit card payment types. These preambles are the internal POS Card Type numbers for OPI and are not the typical first six numbers of the Primary Account Number (PAN). Ensure the length of each preamble is also specified in the tender’s configuration record.
Tender Media Preamble Preamble Length Visa 00* 2 MasterCard 01* 2 Amex 02* 2 DINERs 03* 2 JCB 04* 2 CUP 10* 2 Store Value Card 08* 2 CUP Debit 14* 2 Discovery 26* 2 Local/Debit 11* 2 Others 11* 2 Bank Card 11* 2 Debit SMS 15* 2 Paypal 27* 2 UKDM/Switch 16* 2 VISA Electron 17* 2 Visa Debit 18* 2 Maestro 19* 2 VPAY 20* 2 Alliance 21* 2 EC Chip 22* 2 GiroCard 23* 2 MasterCard Debit 24* 2 VISA Electron 17* 2
Configuring the Page Design The credit card functionality is a combination of functionality provided by the OPI native drivers and core Simphony functionality. These instructions describe how to setup the front of house pages and buttons to use with the OPI payment card driver. 1. Navigate to the Configuration | Page Design. 2. To open the page, double-click the row.

Simphony Native Driver 1-13
3. Click the Insert (+) button to add a new credit card function button for the payment card driver.
4. In the General tab, select Payment Tenders from the type drop-down list. 5. Directly under the Payment Tenders drop-down, click the black arrow. 6. On the Select Tender/Media Payment window, select None or the desired payment
tender, and then select Ok. 7. On the Payment Configuration window, select CreditDebit:Loadable for the
Payment Type and your desired function in the functions drop-down list. Select the Ok.
8. Position and size the button wherever you want to place it on the page. 9. In the Legend field, type the name of the button. 10. Repeat the configuration steps for any additional supported functions. 11. Save the changes and close the Page Design tab. 12. Update the database on the Ops clients for the screen design changes to appear on
the workstations.
The following functions are provided by the native drivers.
Function Description CreditAuthOnly
This function obtains an authorization for the check value when the guest is ready to pay the bill.
CreditReversal
Internal function used by the native driver to handle an authorization release and void functionality. This is not a function that can be called manually, this function should not be linked to a touchscreen button.

1-14 Simphony Native Driver
CreditAuthAndPay
This function obtains an authorization and final transaction in one transaction, also known as a Sale transaction. This function is intended for counter service where the guest is present at the workstation and completes the payment on the PED (PIN Entry Device).
InitialAuthorization
This function allows the user to try authorizing a specific amount and may not reflect the value of the check. These transactions can be settled at a later time and do not require the credit card to be present.
ManualAuthorization
Use this function in situations when a transaction was attempted and a voice referral is returned. The Manual Authorization function is used to send the transaction to the payment service provider and can include the manual Authorization Code that was provided over the phone. This enables the payment service provider to include the pre-approved authorization code in their authorization transaction.
ManualEODSettlement
The Manual End-of-Day (EOD) Settlement function allows the user to send a message to the payment service provider indicating any un-batched transactions, up to the point when the button is pressed, should be marked as ready for settlement. This function can be used if the scheduled EOD did not run properly.
CreditCardRefund
Use this transaction to settle Non-Revenue Service Charge refund checks only. The Native Driver Refunds section contains more information. Depending on how the system is configured, you can also require some of the following buttons to use in conjunction with the native driver functions.
Function | CCard Finalize
This key finalizes a credit card through the Simphony system. This function key posts the previously-authorized credit card to the check as a payment typically closing the check, unless an amount less than the check total was entered first.
Function | Reprint Closed Check
Use this function to reprint the Guest Check of a closed transaction.
Function | Reprint Previous Closed Check
Use this function to reprint the receipt for the last check that was closed on the workstation.
Function | Popup Numeric Keyboard
This function causes the default numeric keypad screen to appear.
Function | Credit Voucher Reprint
This key reprints a credit card voucher.

Simphony Native Driver 1-15
Function | Adjust Closed Check
Use this key to adjust closed checks for the current business day. When a check is adjusted, the tenders and service charges on the check can be edited but the check itself is not reopened.
Function | Void Use this key to void items from the check such as Authorization or Final Tenders. Items can be voided by pressing this key twice (last item is removed), pressing Void and then entering a menu item, selecting an item in the check detail and then pressing Void.
Function | Transaction Void
This key is used to place the workstation into Void mode after pressing this key, every menu item purchased is a voided menu item.
Service Charge | Non-Revenue Service Charge Record
May be required depending on Refund Method selected. Refer to NATIVE DRIVER REFUNDS .
Scheduling the End-of-Day To schedule the End-of-Day task: 1. Navigate to Configuration | Task Schedules 2. Use the green plus symbol to add a new record for the OPI EOD. 3. Open the record and define the General and Recurrence values for the following
options: • From the Service Type drop-down list, select Check and Posting. • From the Task Type drop-down list, select the EOD Settlement. • From the Schedule type drop-down list, select Daily.
4. Select the Enabled checkbox, to enable the task. 5. Enter the date using the format MM/DD/YYYY.

1-16 Simphony Native Driver

Oracle Payment Interface 2-17
2 Oracle Payment Interface Introduction
The Oracle Payment Interface installs on premise and connects to third-party payment service providers (PSP) to process financial transactions from the Oracle Hospitality POS systems and the OPERA Property Management Systems.
Supported Currencies OPI supports the following currencies. AUD – Australian Dollars CNY - China Yuan Renminbi EUR - European Union FJD – Fiji Dollars IDR - Indonesia Rupiah GBP – UK HKD - Hong Kong Dollars INR - India Rupee JPY - Japanese Yen KRW – South Korea Won LKR - Sri Lanka Rupee NZD - New Zealand Dollar MOP – Macau Pataca MYR - Malaysia Ringgit MVR - Maldives Rufiyaa PHP - Philippines Peso PLN – Poland SGD – Singapore Dollars SEK – Sweden THB - Thailand Baht TWD - Taiwan Dollar USD – US Dollars

2-18 Oracle Payment Interface
Installing OPI Consider the following points before installing OPI:
• You cannot upgrade from earlier version of OPI to OPI release 6.1. If an earlier version of OPI already exists on the host machine, you must uninstall this version of OPI. The Uninstall / Reinstall section contains more information.
• Oracle Payment Interface requires 6 GB of free disk space to complete the installation.
• The configuration wizard requires Microsoft .Net framework. Confirm the Microsoft .Net Framework release 4.0 or higher is installed on the OPI host machine.
• The required C++ DLLs are now included in the OPI installation process.
To install Oracle Payment Interface: 1. Run the Oracle Payment Interface-6.1.0.9.exe file. 2. Select Next. The installer verifies the JRE version and the available space on the host
computer. • Java Runtime Environment (JRE) release 1.8 is required. If the JRE is already
installed, the installation wizard checks if the existing JRE version meets the minimum requirements and then installs a later version if required.
• Free Memory Size The installation wizard installs a .start file according to the free memory size on the machine, the minimum requirement is 1024MB of free disk space.
3. On the installer screen that confirms the components to install, select Next. The Oracle Payment Interface uses a MySQL database to store the configuration data. The database stores the transaction data to create the reprints of credit vouchers.
4. Enter and confirm the database password, and then select Next. • alpha characters • numeric character • special character
5. The installer configures the username and password for OPI to access the database Enter the database user name and password, select Next.
6. Select Native Driver as the installation type, and select Next. Selecting the native driver solution requires you to set a passphrase for the communication between Simphony and OPI. The passphrase must match the value entered earlier in Enterprise Management Console | Payment Drivers | Configuration | Transport Service Properties | Pass Phrase.
7. Enter and confirm the password, and select Next. The password is case sensitive, must contain at least 15 characters, and at least one of the following:
• alpha characters • numeric character • special character
8. Enter the date and time to restart the OPI Service. 9. Confirm the location to install OPI, and select Next. If there is insufficient space on
the selected drive, a following warning appears. Although the Oracle Payment Interface does not consume this space immediately, it uses the space over time as log files are created

Oracle Payment Interface 2-19
10. Confirm the path of the source code and software license files. By default the installation wizard populates uses the subdirectory of the OraclePaymentInterface folder. Select Next
11. Confirm the Start Menu folder name, and select Next. 12. Review the installation steps, and select Install. The installation wizard extracts the
files, and install the Java Runtime Environment and MySQL software 13. After OPI installs, the configuration wizard starts.
Configuring OPI 1. Log into the configuration wizard with a user name that has local administrator
rights to the host machine. Enter the user name and password, and select Login. OPI requires the Microsoft Windows user to use a password with at least 8 characters, and contain at least one letter, one number, and one special character. If the password of the user provided does not meet these requirements the password must be changed by the customer, or the customer must create a new user with the password requirements stated above
2. Enable the relevant merchant type, select the OPI Mode, and define the Host addresses if applicable.
3. Select the OPI Mode. The OPI Mode depends on the partner payment service
provider and uses the following guidelines. Terminal Mode
• OPI maintains the mapping between the POS workstation number and terminal IP address.
• You can configure the terminal mapping during the OPI configuration process.

2-20 Oracle Payment Interface
Middleware Mode • The partner maintains the mapping between the POS workstation number
and terminal IP address. • You cannot configure the terminal mapping during the OPI configuration
process. • All communication sends to the primary or secondary host configured. • If the Middleware connection to the partner payment service provider is
selected, HTTPS:// is used internally as the prefix. Only the HTTPS protocol is supported.
By default the port 8080 is configured for both the Terminal mode and the Middleware mode. If the port must be amended, use the \OraclePaymentInterface\bin\config.exe file to edit the Server0Q | Port parameter. 4. Select the radio button to select the Merchant Type to edit. 5. If you do not need to edit the Merchant configuration for an existing installation,
then you can select the Show Summary option to skip to the end of the configuration wizard.
6. Select Add New Property to configure a new Merchant. If Merchants were previously setup for OPI, you can select one of the existing Merchant configurations to edit from the list that appears on the screen.
7. Confirm the POS type to configure the POS Merchant. 8. Enter the Device Merchant ID for the merchant. The Merchant ID must match the
value configured in EMC | Payment Drivers | Configuration | Common Driver Properties| Merchant Number
9. Enter the Merchant Name and Merchant City and select the Merchant Country, select Next.
10. Enter the details of all PIN Entry Device (PED) mappings (If terminal mode was selected). Select the Device Type from the drop-down list if applicable, then select Add Terminal.
11. On the Terminal Configuration screen, enter the Workstation ID from the Enterprise Management Console and the PED Devices IP address and select OK.
12. Repeat the steps for each required TCP/IP device. 13. After all terminals are mapped, select Next. The Configuration Summary shows the
OPI configuration 14. Do not edit any values, select Exit and Save. 15. Reboot the host before running OPI. 16. After the OPI installation is complete use the
\OraclePaymentInterface\bin\config.exe utility to update the following parameter dll | Mode = 8.

Pay@Table 3-21
3 Pay@Table Configuring Simphony for Pay@Table
Configuring the POSAPI The Simphony 2.9 POSAPI Workstation runs as a second workstation instance on the same Service Host ID. You can no longer change the Workstation Type to POSAPI as you could in previous versions of Simphony. The exception to this is if the POSAPI runs on a machine that does not require OPS. In the Enterprise Management Console Workstation, add a record when prompted to select the Service Host ID of the Workstation where the POSAPI needs to run and set the Type to the POSAPI client. If the POSAPI machine is not available, Pay@Table will not work.
Check and Posting Calls from OPI to the POSAPI retrieve the check information from the CAPS database. If your CAPS machine is not available, Pay@Table will not work.
Employee OPI needs the object number of a Simphony employee to use to retrieve check values. It is not required for the employee to have an ID for signing into OPS.

3-22 Pay@Table
Gratuities If the Tip prompt is enabled on the Pay@Table devices, then a gratuity record must be linked to the Tender Medias in Simphony EMC. The charged tip configuration options on the Tender Media and the Tip records must be similar. For example, if the Option Post to Charged Tips Total on Tip Reports is enabled on the Tender/Media record, the option must also be enabled on the relevant Service Charge Tip record.

Pay@Table 3-23
Configuring OPI Pay@Table To configure the OPI Pay@Table:
1. Enable the OPI Pay@Table functionality by following the steps in the OPI section above to install and configure a Merchant.
2. Enable the Pay@Table interface on the Merchant configuration page. 3. Enter a certificate password for the Pay@Table PED’s to communicate with OPI.
The password is case sensitive, must contain at least 8 characters, and must contain at least one of the following an alpha character, a numeric character, and a special character.
4. Enter and confirm the certificate password, and select Next.

3-24 Pay@Table
5. With Pay@Table enabled you must enter the following: o Host – Enter the IP address of the Simphony POSAPI Client Workstation
host. o EmpObjNum – Enter the Employee object number from Simphony EMC
that OPI uses to pickup check values though the POSAPI. o Map the required payment types to the Tender Media object numbers
from Simphony EMC. 6. Select Next.

Pay@Table 3-25
7. Select the Add Pay@Table Terminal option, add the mapping details for each Pay@Table device that connects to OPI.
8. Enter a Mobile Device ID. This value is a unique identifier assigned to the Pay@Table device by the payment service provider.
9. Select a Query By value to define if the device picks-up checks by prompting for the Table number or Check number. The customer must decide which method suites their enterprise best.
10. Enter the RVC, enter the object number from the Simphony EMC of the RVC where the device will be used.
11. Select Ok to add the terminal mapping.

3-26 Pay@Table
12. Repeat the previous step for each required device, and select Next. The Configuration Summary shows the OPI configuration details.
13. Do not edit any values. Select Exit and Save. By default the Pay@Table port is set to 5023. If the port needs to be amended, use the :\OraclePaymentInterface\bin\config.exe file to edit the following parameter to the required value: Vx6702 | Port

OPI Maintenance and FAQ 4-27
4 OPI Maintenance and FAQ OPI Services
After the OPI installation completes there will be two OPI Services.
OPI Service The OPI Service deals with communication between the payment service provider and Simphony. The OPI Service must be restarted each time any configuration changes are made to the Oracle Payment Interface.
OPI Service Utility The OPI Service Utility handles communication between the OPI configuration tools and the MySQL database. If you are having trouble logging into the configuration wizards, make sure the OPI Service Utility is running.
OPI Uninstallation / Re-installation If you are uninstalling OPI with the intention of reinstalling it again, be sure to remove the :\ProgramData\MySQL\ folder manually, the uninstall of the MySQL database does not remove this automatically. If the folder is left the old schema information causes challenges during the re-install process. The :\ProgramData\ folder is typically hidden folder by default.
OPI Additional Configuration Additional configuration can be done using the configuration wizard. The configuration wizard should be used wherever possible to ensure configuration is performed to the same standard.

4-28 OPI Maintenance and FAQ
OPI Log Files The following guidelines apply to the OPI log files. The OPI log file location is :\OraclePaymentInterface\Log\
Log File Description debug.log The debug log is rotated by file size, not by date. The
maximum file size is 20MB. Gateway.log The file is rotated by file size; the maximum size is 20MB. System.log Use the System.log to check the Oracle Payment Interface
build number. The log file is rotated by file size; the maximum size is 20MB.
Transaction.log The Transaction.log is rotated daily, the current transaction log file name is transaction.log. The previous days transaction log file name is transaction.log.YYYY-MM-DD.
OPI Service Restart Task The OPI installer creates an OPI Service task. After you install and configure OPI, you can change the details of the OPI Service restart task using the Microsoft Windows Task Scheduler.
OPI Password Maintenance The passwords for the OPI database and the native driver passphrase are configured during the installation. If the passwords for the OPI database or the native driver passphrase must be updated after OPI is installed, use the rwregistry.exe utility to update these passwords in the OPI configuration by accessing the following file: :\OraclePaymentInterface\Bin\rwregistry.exe The rwregistry utility does not change the MySQL password within MySQL. The system administrator on site would change the MySQL password. 1. Run :\OraclePaymentInterface\bin\rwregistry.exe as system
administrator and login with local administrator user credentials. 2. Select the required function. 3. Enter the updated credentials in the OPI configuration and commit to save the
changes

OPI Maintenance and FAQ 4-29
OPI Configuration Logs The configAudit log file no longer tracks the configuration changes: :\OraclePaymentInterface\log\configAudit\ Configuration changes are now stored in the OPI MySQL database. An OPI system administrator can view the logs using the AuditLogTool.exe utility. To access the utility 1. Run the :\OraclePaymentInterface\bin\AuditLogTool.exe file. 2. Enter the date range and then select View to display the logs for a specific date
range.
Related Documents


