Oracle® Identity Manager Connector Guide for PeopleSoft Employee Reconciliation Release 9.1.1 E11205-13 September 2013

Welcome message from author
This document is posted to help you gain knowledge. Please leave a comment to let me know what you think about it! Share it to your friends and learn new things together.
Transcript

Oracle® Identity ManagerConnector Guide for PeopleSoft Employee Reconciliation
Release 9.1.1
E11205-13
September 2013

Oracle Identity Manager Connector Guide for PeopleSoft Employee Reconciliation, Release 9.1.1
E11205-13
Copyright © 2012, 2013, Oracle and/or its affiliates. All rights reserved.
Primary Author: Gauhar Khan
Contributing Authors: Gowri G.R, Prakash Hulikere, Sridhar Machani, Deena Purushothaman
Contributor: Sanjay Rallapalli
This software and related documentation are provided under a license agreement containing restrictions on use and disclosure and are protected by intellectual property laws. Except as expressly permitted in your license agreement or allowed by law, you may not use, copy, reproduce, translate, broadcast, modify, license, transmit, distribute, exhibit, perform, publish, or display any part, in any form, or by any means. Reverse engineering, disassembly, or decompilation of this software, unless required by law for interoperability, is prohibited.
The information contained herein is subject to change without notice and is not warranted to be error-free. If you find any errors, please report them to us in writing.
If this is software or related documentation that is delivered to the U.S. Government or anyone licensing it on behalf of the U.S. Government, the following notice is applicable:
U.S. GOVERNMENT END USERS: Oracle programs, including any operating system, integrated software, any programs installed on the hardware, and/or documentation, delivered to U.S. Government end users are "commercial computer software" pursuant to the applicable Federal Acquisition Regulation and agency-specific supplemental regulations. As such, use, duplication, disclosure, modification, and adaptation of the programs, including any operating system, integrated software, any programs installed on the hardware, and/or documentation, shall be subject to license terms and license restrictions applicable to the programs. No other rights are granted to the U.S. Government.
This software or hardware is developed for general use in a variety of information management applications. It is not developed or intended for use in any inherently dangerous applications, including applications that may create a risk of personal injury. If you use this software or hardware in dangerous applications, then you shall be responsible to take all appropriate failsafe, backup, redundancy, and other measures to ensure its safe use. Oracle Corporation and its affiliates disclaim any liability for any damages caused by use of this software or hardware in dangerous applications.
Oracle and Java are registered trademarks of Oracle and/or its affiliates. Other names may be trademarks of their respective owners.
Intel and Intel Xeon are trademarks or registered trademarks of Intel Corporation. All SPARC trademarks are used under license and are trademarks or registered trademarks of SPARC International, Inc. AMD, Opteron, the AMD logo, and the AMD Opteron logo are trademarks or registered trademarks of Advanced Micro Devices. UNIX is a registered trademark of The Open Group.
This software or hardware and documentation may provide access to or information on content, products, and services from third parties. Oracle Corporation and its affiliates are not responsible for and expressly disclaim all warranties of any kind with respect to third-party content, products, and services. Oracle Corporation and its affiliates will not be responsible for any loss, costs, or damages incurred due to your access to or use of third-party content, products, or services.

iii
Contents
Preface ................................................................................................................................................................. ix
Audience....................................................................................................................................................... ixDocumentation Accessibility ..................................................................................................................... ixRelated Documents ..................................................................................................................................... ixDocumentation Updates ............................................................................................................................ ixConventions ................................................................................................................................................. x
What's New in the Oracle Identity Manager Connector for PeopleSoft Employee Reconciliation?............................................................................................................................................... xi
Software Updates ........................................................................................................................................ xiDocumentation-Specific Updates........................................................................................................... xvii
1 About the Connector
1.1 Certified Components ................................................................................................................ 1-11.2 Certified Languages.................................................................................................................... 1-31.3 Connector Architecture.............................................................................................................. 1-31.3.1 Full Reconciliation ............................................................................................................... 1-41.3.2 Incremental Reconciliation ................................................................................................. 1-51.4 Features of the Connector .......................................................................................................... 1-51.4.1 Dedicated Support for Trusted Source Reconciliation................................................... 1-61.4.2 Full and Incremental Reconciliation ................................................................................. 1-61.4.3 Support for Major Person Lifecycle Events...................................................................... 1-61.4.4 Reconciliation of Effective-Dated Lifecycle Events ........................................................ 1-61.4.5 Support for Standard PeopleSoft Messages..................................................................... 1-71.4.6 Support for Resending Messages That Are Not Processed ........................................... 1-81.4.7 Validation and Transformation of Person Data .............................................................. 1-81.4.8 Reconciliation of the Manager ID Attribute .................................................................... 1-91.4.9 Target Authentication ...................................................................................................... 1-101.4.10 Support for Specifying Persons to Be Excluded from Reconciliation Operation .... 1-101.5 Connector Objects Used During Reconciliation .................................................................. 1-111.5.1 User Attributes for Reconciliation.................................................................................. 1-111.5.2 Reconciliation Rules ......................................................................................................... 1-121.5.2.1 Overview of the Reconciliation Rule ...................................................................... 1-121.5.2.2 Viewing the Reconciliation Rule in the Design Console ..................................... 1-121.5.3 Reconciliation Action Rules ............................................................................................ 1-13

iv
1.5.3.1 Overview of the Reconciliation Action Rules........................................................ 1-131.5.3.2 Viewing the Reconciliation Action Rules in the Design Console....................... 1-141.5.4 Predefined Lookup Definitions ...................................................................................... 1-141.5.4.1 Lookup Definitions Used to Process PERSON_BASIC_SYNC Messages......... 1-151.5.4.1.1 Lookup.PSFT.Message.PersonBasicSync.Configuration.............................. 1-151.5.4.1.2 Lookup.PSFT.HRMS.PersonBasicSync.AttributeMapping.......................... 1-171.5.4.1.3 Lookup.PSFT.HRMS.PersonBasicSync.Recon ............................................... 1-201.5.4.1.4 Lookup.PSFT.HRMS.PersonBasicSync.EmpType......................................... 1-221.5.4.1.5 Lookup.PSFT.HRMS.PersonBasicSync.Validation........................................ 1-221.5.4.1.6 Lookup.PSFT.HRMS.PersonBasicSync.Transformation............................... 1-221.5.4.2 Lookup Definitions Used to Process WORKFORCE_SYNC Messages............. 1-221.5.4.2.1 Lookup.PSFT.Message.WorkForceSync.Configuration ............................... 1-221.5.4.2.2 Lookup.PSFT.HRMS.WorkForceSync.AttributeMapping ........................... 1-251.5.4.2.3 Lookup.PSFT.HRMS.WorkForceSync.Recon................................................. 1-271.5.4.2.4 Lookup.PSFT.HRMS.WorkForceSync.EmpStatus......................................... 1-281.5.4.2.5 Lookup.PSFT.HRMS.WorkForceSync.EmpType .......................................... 1-301.5.4.2.6 Lookup.PSFT.HRMS.WorkForceSync.Validation ......................................... 1-311.5.4.2.7 Lookup.PSFT.HRMS.WorkForceSync.Transformation ................................ 1-311.5.4.3 Other Lookup Definitions ........................................................................................ 1-311.5.4.3.1 Lookup.PSFT.Configuration............................................................................. 1-311.5.4.3.2 Lookup.PSFT.HRMS.ExclusionList ................................................................. 1-341.5.4.3.3 Lookup.PSFT.HRMS.CustomQuery................................................................ 1-351.6 Roadmap for Deploying and Using the Connector ............................................................ 1-35
2 Deploying the Connector
2.1 Preinstallation.............................................................................................................................. 2-12.1.1 Preinstallation on Oracle Identity Manager..................................................................... 2-12.1.1.1 Files and Directories on the Installation Media ....................................................... 2-12.1.1.2 Determining the Release Number of the Connector ............................................... 2-32.1.1.3 Creating a Backup of the Existing Common.jar File ............................................... 2-42.1.2 Preinstallation on the Target System ................................................................................ 2-52.1.2.1 Importing a Project from Application Designer ...................................................... 2-62.1.2.2 Creating a Target System User Account for Connector Operations ..................... 2-82.1.2.2.1 Creating a Permission List ................................................................................... 2-82.1.2.2.2 Creating a Role for a Limited Rights User...................................................... 2-102.1.2.2.3 Assigning the Required Privileges to the Target System Account ............. 2-112.2 Installation ................................................................................................................................ 2-122.2.1 Installation on Oracle Identity Manager ....................................................................... 2-122.2.1.1 Running the Connector Installer ............................................................................. 2-122.2.1.2 Copying the Connector Files and External Code Files ........................................ 2-142.2.1.3 Configuring the IT Resource.................................................................................... 2-152.2.1.4 Deploying the PeopleSoft Listener.......................................................................... 2-162.2.1.4.1 Deploying the PeopleSoft Listener on Oracle Identity Manager Release 9.1.0.x .
2-162.2.1.4.2 Deploying the PeopleSoft Listener on Oracle Identity Manager Release 11.1.1 ..
2-212.2.1.5 Removing the PeopleSoft Listener .......................................................................... 2-23

v
2.2.2 Installation on the Target System................................................................................... 2-242.2.2.1 Configuring the Target System for Full Reconciliation ....................................... 2-252.2.2.1.1 Configuring the PeopleSoft Integration Broker ............................................. 2-252.2.2.1.2 Configuring the PERSON_BASIC_FULLSYNC Service Operation............ 2-272.2.2.1.3 Configuring the WORKFORCE_FULLSYNC Service Operation................ 2-342.2.2.2 Configuring the Target System for Incremental Reconciliation ......................... 2-412.2.2.2.1 Configuring PeopleSoft Integration Broker.................................................... 2-412.2.2.2.2 Configuring the PERSON_BASIC_SYNC Service Operation...................... 2-442.2.2.2.3 Configuring the WORKFORCE_SYNC Service Operation.......................... 2-522.2.2.2.4 Preventing Transmission of Unwanted Fields During Incremental
Reconciliation 2-592.3 Postinstallation ......................................................................................................................... 2-612.3.1 Postinstallation on Oracle Identity Manager................................................................ 2-622.3.1.1 Enabling Logging ...................................................................................................... 2-622.3.1.1.1 Enabling Logging on Oracle Identity Manager Release 9.1.0.x ................... 2-622.3.1.1.2 Enabling Logging on Oracle Identity Manager Release 11.1.1 .................... 2-652.3.1.2 Setting Up the Lookup.PSFT.HRMS.ExclusionList Lookup Definition ............ 2-682.3.1.3 Setting Up the Lookup.PSFT.Configuration Lookup Definition........................ 2-682.3.1.4 Configuring SSL......................................................................................................... 2-692.3.1.4.1 Configuring SSL on IBM WebSphere Application Server ........................... 2-692.3.1.4.2 Configuring SSL on JBoss Application Server ............................................... 2-712.3.1.4.3 Configuring SSL on Oracle WebLogic Server ................................................ 2-752.3.1.4.4 Configuring SSL on Oracle Application Server ............................................. 2-802.3.1.5 Creating an Authorization Policy for Job Code .................................................... 2-802.3.2 Postinstallation on the Target System............................................................................ 2-81
3 Using the Connector
3.1 Summary of Steps to Use the Connector ................................................................................. 3-13.2 Performing Full Reconciliation ................................................................................................. 3-23.2.1 Generating XML Files ......................................................................................................... 3-23.2.1.1 Running the PERSON_BASIC_FULLSYNC Message............................................. 3-23.2.1.2 Running the WORKFORCE_FULLSYNC Message................................................. 3-43.2.2 Importing XML Files into Oracle Identity Manager....................................................... 3-53.2.2.1 Configuring the Scheduled Task for Person Data Reconciliation ......................... 3-53.2.2.2 Running the PeopleSoft HRMS Manager Reconciliation Scheduled Task .......... 3-63.3 Performing Incremental Reconciliation................................................................................... 3-83.4 Limited Reconciliation ............................................................................................................... 3-83.5 Resending Messages That Are Not Received by the PeopleSoft Listener .......................... 3-93.6 Configuring Scheduled Tasks ................................................................................................ 3-11
4 Extending the Functionality of the Connector
4.1 Adding New Attributes for Full Reconciliation ..................................................................... 4-14.2 Adding New Attributes for Incremental Reconciliation....................................................... 4-44.3 Modifying Field Lengths on the OIM User Form .................................................................. 4-64.4 Configuring Validation of Data During Reconciliation ........................................................ 4-74.5 Configuring Transformation of Data During Reconciliation ............................................... 4-9

vi
4.6 Setting Up the Lookup.PSFT.HRMS.CustomQuery Lookup Definition ......................... 4-124.7 Setting Up the Lookup.PSFT.HRMS.WorkForceSync.EmpStatus Lookup Definition .. 4-134.8 Configuring the Connector for Multiple Installations of the Target System .................. 4-14
5 Testing and Troubleshooting
5.1 Testing Reconciliation ................................................................................................................ 5-15.2 Troubleshooting .......................................................................................................................... 5-3
6 Known Issues
A Determining the Root Audit Action Details
B Configuring the Connector Messages
C Setting Up SSL on Oracle WebLogic Server
Index

vii
List of Figures
1–1 Architecture of the Connector................................................................................................... 1-31–2 Reconciliation Rule .................................................................................................................. 1-131–3 Reconciliation Action Rules.................................................................................................... 1-141–4 Sample XML File for PERSON_BASIC_SYNC Message.................................................... 1-201–5 Sample XML File for WORKFORCE_SYNC Message........................................................ 1-26

viii
List of Tables
1–1 Certified Components ............................................................................................................... 1-21–2 User Attributes for Reconciliation........................................................................................ 1-111–3 Action Rules for Trusted Source Reconciliation................................................................. 1-132–1 Files and Directories on the Installation Media..................................................................... 2-22–2 Files Copied to Oracle Identity Manager ............................................................................ 2-142–3 Files to Be Copied to the Oracle Identity Manager Host Computer ............................... 2-142–4 IT Resource Parameters.......................................................................................................... 2-162–5 Log Levels and ODL Message Type:Level Combinations................................................ 2-663–1 Attributes of the Peoplesoft HRMS Trusted Reconciliation Scheduled Task ................... 3-63–2 Attributes of the PeopleSoft HRMS Manager Reconciliation Scheduled Task................. 3-73–3 Scheduled Tasks for Reconciliation...................................................................................... 3-114–1 Connector Objects and Their Associations.......................................................................... 4-15

ix
Preface
This guide describes the connector that is used to integrate Oracle Identity Manager with PeopleSoft Human Resources Management Systems (HRMS).
AudienceThis guide is intended for resource administrators and target system integration teams.
Documentation AccessibilityFor information about Oracle's commitment to accessibility, visit the Oracle Accessibility Program website at http://www.oracle.com/pls/topic/lookup?ctx=acc&id=docacc.
Access to Oracle SupportOracle customers have access to electronic support through My Oracle Support. For information, visit http://www.oracle.com/pls/topic/lookup?ctx=acc&id=info or visit http://www.oracle.com/pls/topic/lookup?ctx=acc&id=trs if you are hearing impaired.
Related DocumentsFor information about installing and using Oracle Identity Manager, see the Oracle Identity Manager documentation library.
For generic information about connectors, see Oracle Identity Manager Connector Concepts.
The following Oracle Technology Network page provides links to Oracle Identity Manager documentation:
http://www.oracle.com/technology/documentation/index.html
Documentation UpdatesOracle is committed to delivering the best and most recent information available. For information about updates to the Oracle Identity Manager Connectors documentation library, visit Oracle Technology Network at
http://www.oracle.com/technology/documentation/index.html

x
ConventionsThe following text conventions are used in this document:
Convention Meaning
boldface Boldface type indicates graphical user interface elements associated with an action, or terms defined in text or the glossary.
italic Italic type indicates book titles, emphasis, or placeholder variables for which you supply particular values.
monospace Monospace type indicates commands within a paragraph, URLs, code in examples, text that appears on the screen, or text that you enter.

xi
What's New in the Oracle Identity ManagerConnector for PeopleSoft Employee
Reconciliation?
This chapter provides an overview of the updates made to the software and documentation for release 9.1.1.6 of the PeopleSoft Employee Reconciliation connector.
The updates discussed in this chapter are divided into the following categories:
■ Software Updates
This section describes updates made to the connector software. This section also points out the sections of this guide that have been changed in response to each software update.
■ Documentation-Specific Updates
This section describes major changes made in this guide. These changes are not related to software updates.
Software UpdatesThe following sections discuss the software updates:
■ Software Updates in Release 9.1.0
■ Software Updates in Release 9.1.0.1
■ Software Updates in Release 9.1.0.2
■ Software Updates in Release 9.1.1
■ Software Updates in Release 9.1.1.4
■ Software Updates in Release 9.1.1.5
■ Software Updates in Release 9.1.1.6
Software Updates in Release 9.1.0The following software updates have been made in release 9.1.0:
■ From this release onward, PeopleTools 8.22, 8.45, 8.46, 8.47, and 8.48 are not supported. Information specific to these releases has been removed from the guide. The modified target system requirements information is documented in Section 1.1, "Certified Components."
■ The list of target system fields that are reconciled has changed. This is described in Section 1.5.1, "User Attributes for Reconciliation."

xii
■ The list of person types that are supported in this release of the connector has been modified. See "Valid Person Types" on page 16 for details.
■ The connector supports the Effective Dating feature of the target system. See Section 1.4.4, "Reconciliation of Effective-Dated Lifecycle Events" for details.
■ The connector supports person termination events. See Section 1.4.7, "Person Termination Events" for details.
■ Information about the files in which you set the log levels has changed. This information is available in Section 2.3.1.1, "Enabling Logging."
■ From this release onward, the connector is installed through the Connector Installer feature of the Oracle Identity Manager Administrative and User Console. Instructions to perform the installation are provided in Section 2.2.1.1, "Running the Connector Installer."
■ You can configure SSL connectivity between Oracle Identity Manager and the target system for this release of the connector. However, SSL is not supported for Oracle Application Server. For instructions to configure SSL, see Section 2.3, "Postinstallation."
Software Updates in Release 9.1.0.1The following software updates have been made in release 9.1.0.1:
■ Support for Oracle Identity Manager Release 9.1.0.1
■ Resolved Issues in Release 9.1.0.1
Support for Oracle Identity Manager Release 9.1.0.1From this release onward, the connector can be deployed on Oracle Identity Manager release 9.1.0.1.
Resolved Issues in Release 9.1.0.1The following table lists the issues resolved in this release:
Software Updates in Release 9.1.0.2There are no software updates in release 9.1.0.2.
Software Updates in Release 9.1.1The following software updates have been made in release 9.1.1:
■ Support for Major Person Lifecycle Events
■ Support for Standard PeopleSoft Messages
■ Enhanced Set of Lookup Definitions
■ Support for Resending Messages That Are Not Processed
Bug Number Issue Resolution
8246283 The deployment.properties file is bundled in the listener (PeopleSoftOIMListener.war) file. The default message name in this properties file was the one used during testing. You had to change the message name and redeploy the listener while testing the connector and again before you started using it in your production environment.
This issue has been resolved. The message name for both testing and production environments has been set to PSFT_OIM_ER_MSG.

xiii
■ Support for Effective-Dated Lifecycle Events
■ Support for the Multiple Trusted Source Reconciliation Feature of Oracle Identity Manager
■ Support for Validation and Transformation of Person Data
■ Support for Creating Copies of Connector Objects
■ Support for Specifying Persons to Be Excluded from Reconciliation Operation
■ Resolved Issues in Release 9.1.1
Support for Major Person Lifecycle EventsFrom this release onward, the connector helps you to manage all major person lifecycle events, from onboarding to termination and beyond a whole range of events that defines a long-term relationship a person establishes with an organization. This relationship can be defined as the person lifecycle.
The connector performs real-time reconciliation of changes in PeopleSoft including new person creation, changes to existing persons, and so on.
Whenever the status of a person changes in PeopleSoft, the status of the OIM User changes as defined in the Lookup.PSFT.HRMS.WorkForceSync.EmpStatus lookup definition.
See Section 1.5.4.2.4, "Lookup.PSFT.HRMS.WorkForceSync.EmpStatus" for more information.
Support for Standard PeopleSoft MessagesIn earlier releases, the connector made use of custom PeopleCode in PeopleSoft HRMS for full reconciliation and incremental reconciliation. From this release onward, the connector uses the following standard PeopleSoft messages that are delivered as part of PeopleSoft HRMS installation:
■ PERSON_BASIC_FULLSYNC
■ WORKFORCE_FULLSYNC
■ PERSON_BASIC_SYNC
■ WORKFORCE_SYNC
See Section 1.4.5, "Support for Standard PeopleSoft Messages" for more information.
Enhanced Set of Lookup DefinitionsLookup definitions have been added to support reconciliation based on standard message types.
See Section 1.5.4, "Predefined Lookup Definitions" for a complete listing of the lookup definitions.
Support for Resending Messages That Are Not ProcessedStandard messages provided by PeopleSoft are asynchronous. In other words, if a message is not delivered successfully, then the PeopleSoft Integration Broker marks that message as not delivered. The message can then be resent manually.
See Section 3.5, "Resending Messages That Are Not Received by the PeopleSoft Listener" for more information.

xiv
Support for Effective-Dated Lifecycle EventsThe connector can recognize and respond to both current-dated and effective-dated lifecycle events.
See Section 1.4.4, "Reconciliation of Effective-Dated Lifecycle Events" for more information.
Support for the Multiple Trusted Source Reconciliation Feature of Oracle Identity ManagerThe connector now supports the multiple trusted source reconciliation feature of Oracle Identity Manager. See Oracle Identity Manager Design Console Guide for detailed information about multiple trusted source reconciliation.
Support for Validation and Transformation of Person DataYou can configure validation of person data that is brought into Oracle Identity Manager during reconciliation. In addition, you can configure transformation of person data that is brought into Oracle Identity Manager during reconciliation.
See the following sections for more information:
■ Section 4.4, "Configuring Validation of Data During Reconciliation"
■ Section 4.5, "Configuring Transformation of Data During Reconciliation"
Support for Creating Copies of Connector ObjectsTo meet the requirements of specific use cases, you might need to create multiple copies of the Oracle Identity Manager objects that constitute the connector. The connector can work with multiple instances of these objects.
See Section 4.8, "Configuring the Connector for Multiple Installations of the Target System" for more information.
Support for Specifying Persons to Be Excluded from Reconciliation OperationFrom this release onward, you can specify a list of persons who must be excluded from all reconciliation operations.
See Section 1.5.4.3.2, "Lookup.PSFT.HRMS.ExclusionList" for more information.
Resolved Issues in Release 9.1.1The following issues are resolved in release 9.1.1:
Bug Number Issue Description
8351580 and 8718471 The connector supported a single PeopleSoft implementation for a single Oracle Identity Manager. The connector did not allow the reuse of the adapters with multiple objects, processes, and form names required for different implementations.
This issue has been resolved. The connector now makes use of the configuration lookup definitions. The Oracle Identity Manager object references can now be configured.
8315375 The properties file was loaded multiple times during reconciliation.
This issue has been resolved. From this release onward, the connector does not require the properties file. Instead, it makes use of lookup definitions.

xv
Software Updates in Release 9.1.1.4The following software updates have been made in release 9.1.1.4:
■ Support for New Target Systems
■ Resolved Issues in Release 9.1.1.4
Support for New Target SystemsFrom this release onward, the following target systems have been added to the list of target systems certified for the connector:
■ PeopleTools 8.50 with HRMS 9.0
■ PeopleTools 8.50 with HRMS 9.1
See Section 1.1, "Certified Components" for more information.
Resolved Issues in Release 9.1.1.4The following issues are resolved in release 9.1.1.4:
Software Updates in Release 9.1.1.5The following software updates have been made in release 9.1.1.5:
■ Support for New Oracle Identity Manager Release
■ Support for New Target System
Support for New Oracle Identity Manager ReleaseFrom this release onward, the connector can be installed and used on Oracle Identity Manager 11g release 1 (11.1.1). Where applicable, instructions specific to this Oracle Identity Manager release have been added in the guide.
8919647 The connector did not retrieve the OIM User status from HR Action. It made use of person job status (active or inactive) to mark the status of an OIM User.
This issue has been resolved. The connector now makes use of a lookup definition that maps the Action taken against a person with the OIM User status. The connector now handles major person lifecycle events.
8948098 The target system date format used during reconciliation was incorrect.
This issue has been resolved. You can now specify the target system date format as the value of the Target Date Format entry in the Lookup.PSFT.Configuration lookup definition.
See Section 1.5.4.3.1, "Lookup.PSFT.Configuration" for more information.
Bug Number Issue Resolution
9235222 The connector supported only the English language.
This issue has been resolved. The connector now supports the standard set of languages supported by Oracle Identity Manager. Resource bundles for the other languages are included in this release of the connector.
Bug Number Issue Description

xvi
See Section 1.1, "Certified Components" for the full list of certified Oracle Identity Manager releases.
Support for New Target SystemFrom this release onward, the following target system has been added to the list of target systems certified for the connector:
■ PeopleSoft HRMS 8.9 with PeopleTools 8.49
See Section 1.1, "Certified Components" for the full list of certified target system releases.
Software Updates in Release 9.1.1.6The following software updates have been made in release 9.1.1.6:
■ Support for New Target Systems
■ Resolved Issues in Release 9.1.1.6
Support for New Target SystemsFrom this release onward, the connector supports the following target systems:
■ PeopleSoft HRMS 9.1 with PeopleTools 8.51
■ PeopleSoft HRMS 8.9 with PeopleTools 8.50
See Section 1.1, "Certified Components" for the full list of certified target systems.
Resolved Issues in Release 9.1.1.6The following issue is resolved in release 9.1.1.6:
Bug Number Issue Resolution
10190939 PeopleSoft Employee Reconciliation connector displays FWKOO5 error
This issue has been resolved. PeopleSoft ER connector will not display FWK005 error, when multiple messages are sent simultaneously from the target system.
10117408 PeopleSoft message getting assigned to wrong user in Oracle Identity Manager
This issue has been resolved. The message that is sent to Oracle Identity Manager from PeopleSoft is now getting assigned to the correct user during incremental reconciliation.
10094460 Oracle Identity Manager not processing all PeopleSoft workforce messages
This issue has been resolved. PeopleSoft connector is now reconciling all PeopleSoft Workforce messages.

xvii
Documentation-Specific UpdatesThe following sections discuss documentation-specific updates:
■ Documentation-Specific Updates in Release 9.1.0
■ Documentation-Specific Updates in Release 9.1.0.1
■ Documentation-Specific Updates in release 9.1.0.2
■ Documentation-Specific Updates in release 9.1.1
■ Documentation-Specific Updates in release 9.1.1.4
■ Documentation-Specific Updates in release 9.1.1.5
■ Documentation-Specific Updates in release 9.1.1.6
Documentation-Specific Updates in Release 9.1.0The following are the documentation-specific updates in release 9.1.0:
■ Information about connector deployment has been modified in this document based on the different stages of connector deployment. This information is provided in Chapter 2, "Deploying the Connector."
■ The extended functionalities of the connector are described in Chapter 3, "Using the Connector."
■ The architecture of the connector has been included in this guide. This information is located at Section 1.3, "Connector Architecture."
■ The field mappings between the target system and Oracle Identity Manager have been moved from the appendix to the first chapter. For information about the field mappings for reconciliation, see Section 1.5.1, "User Attributes for Reconciliation."
■ The reconciliation rules and the corresponding actions for these rules have been added to the guide. For information about these rules, see Section 1.5.2, "Reconciliation Rules."
Documentation-Specific Updates in Release 9.1.0.1The following is a documentation-specific update in release 9.1.0.1:
■ In Section 2.2.1.4, "Deploying the PeopleSoft Listener" the steps to redeploy the PeopleSoftOIMListener.war file into the deployment directory of Oracle WebLogic Server have been modified.
Documentation-Specific Updates in release 9.1.0.2There are no documentation-specific updates in release 9.1.0.2.
Documentation-Specific Updates in release 9.1.1The following are documentation-specific update in release 9.1.1:
■ Major changes have been made to the structure of the guide. The objective of these changes is to synchronize the guide with the changes made to the connector and to improve the usability of the information provided by the guide.
■ In Section 2.2.1.4.2, "Deploying the PeopleSoft Listener on Oracle Identity Manager Release 11.1.1", step 8 has been updated.
Documentation-Specific Updates in release 9.1.1.4The following are documentation-specific update in release 9.1.1.4:

xviii
■ The following issue has been removed from the Known Issues chapter:
Bug 9235222
The connector supports only the English language. Resource bundles for the other languages are not included in this release of the connector.
■ Section 2.2.2.2.4, "Preventing Transmission of Unwanted Fields During Incremental Reconciliation" has been added in the guide.
■ Appendix C, "Setting Up SSL on Oracle WebLogic Server" has been added in the guide.
Documentation-Specific Updates in release 9.1.1.5There are no documentation-specific updates in release 9.1.1.5.
Documentation-Specific Updates in release 9.1.1.6The following documentation-specific updates have been made in the revision "13" of release 9.1.1.6:
■ Step 8.b has been added to Section 2.2.1.4.2, "Deploying the PeopleSoft Listener on Oracle Identity Manager Release 11.1.1."
■ A note has been added in the "Message Name" row of Table 3–1, " Attributes of the Peoplesoft HRMS Trusted Reconciliation Scheduled Task".
■ The last paragraph of step 4.f has been updated in Section 2.2.1.4.1, "Deploying the PeopleSoft Listener on Oracle Identity Manager Release 9.1.0.x."
The following documentation-specific updates have been made in the revision "12" of release 9.1.1.6:
■ From this release onward, the connector has been certified for OC4J configuration. The following sections have been updated for OC4J configuration.
– Section 2.2.1.4.1, "Deploying the PeopleSoft Listener on Oracle Identity Manager Release 9.1.0.x"
– Section 2.2.1.5, "Removing the PeopleSoft Listener"
– Section 2.3.1.1.1, "Enabling Logging on Oracle Identity Manager Release 9.1.0.x"
■ In Section 1.1, "Certified Components," the PeopleSoft HRMS 9.1 with PeopleTools 8.52 has been added as a newly certified target system.

1
About the Connector 1-1
1About the Connector
Oracle Identity Manager automates access rights management, and the security of resources to various target systems. Oracle Identity Manager connectors are used to integrate Oracle Identity Manager with target applications. This guide discusses the connector that enables you to use PeopleSoft HRMS as an authoritative (trusted) source of identity information for Oracle Identity Manager.
In the identity reconciliation (trusted source) configuration of the connector, persons are created or modified only on the target system and information about these persons is reconciled into Oracle Identity Manager.
This chapter contains the following sections:
■ Section 1.1, "Certified Components"
■ Section 1.2, "Certified Languages"
■ Section 1.3, "Connector Architecture"
■ Section 1.4, "Features of the Connector"
■ Section 1.5, "Connector Objects Used During Reconciliation"
■ Section 1.6, "Roadmap for Deploying and Using the Connector"
1.1 Certified ComponentsTable 1–1 lists the components certified for use with the connector.
Note: In this guide, PeopleSoft HRMS has been referred to as the target system.

Certified Components
1-2 Oracle Identity Manager Connector Guide for PeopleSoft Employee Reconciliation
Determining the Version of PeopleTools and the Target SystemYou might want to determine the versions of PeopleTools and the target system you are using to check whether this release of the connector supports that combination. To determine the versions of PeopleTools and the target system:
1. Open a Web browser and enter the URL of PeopleSoft Internet Architecture. The URL of PeopleSoft Internet Architecture is in the following format:
http://IPADDRESS:PORT/psp/ps/?cmd=login
For example:
http://172.21.109.69:9080/psp/ps/?cmd=login
Table 1–1 Certified Components
Item Requirement
Oracle Identity Manager You can use one of the following releases of Oracle Identity Manager:
■ Oracle Identity Manager release 9.1.0.2 BP05 or later
Note: In this guide, Oracle Identity Manager release 9.1.0.x has been used to denote Oracle Identity Manager release 9.1.0.2 BP05 and future releases in the 9.1.0.x series that the connector will support.
■ Oracle Identity Manager 11g release 1 (11.1.1)
Note: In this guide, Oracle Identity Manager release 11.1.1 has been used to denote Oracle Identity Manager 11g release 1 (11.1.1).
Target system PeopleSoft HRMS 8.9 with PeopleTools 8.49
PeopleSoft HRMS 8.9 with PeopleTools 8.50
PeopleSoft HRMS 9.0 with PeopleTools 8.49
PeopleSoft HRMS 9.0 with PeopleTools 8.50
PeopleSoft HRMS 9.1 with PeopleTools 8.50
PeopleSoft HRMS 9.1 with PeopleTools 8.51
PeopleSoft HRMS 9.1 with PeopleTools 8.52
You must ensure that the following components are installed and configured in the target system environment:
■ Tuxedo and Jolt (the application server)
■ PeopleSoft Internet Architecture
■ PeopleSoft Application Designer (2-tier mode)
The following standard PeopleSoft messages are available:
■ PERSON_BASIC_FULLSYNC
■ WORKFORCE_FULLSYNC
■ PERSON_BASIC_SYNC
■ WORKFORCE_SYNC
JDK The JDK requirement is as follows:
■ For Oracle Identity Manager release 9.1.0.x, use JDK 1.5 or later
■ For Oracle Identity Manager release 11.1.1, use JDK 1.6 or later, or JRockit 1.6 or later

Connector Architecture
About the Connector 1-3
2. Click Change My Password. On the page that is displayed, press Ctrl+J. The versions of PeopleTools and the target system that you are using are displayed.
1.2 Certified LanguagesThe connector supports the following languages:
■ Arabic
■ Chinese Simplified
■ Chinese Traditional
■ Danish
■ English
■ French
■ German
■ Italian
■ Japanese
■ Korean
■ Portuguese (Brazilian)
■ Spanish
1.3 Connector ArchitectureFigure 1–1 shows the architecture of the connector.
Figure 1–1 Architecture of the Connector
The target system is configured as a trusted source of identity data for Oracle Identity Manager. In other words, identity data that is created and updated on the target
See Also: Oracle Identity Manager Globalization Guide for information about supported special characters
Incremental Reconciliation
PeopleSoft Listener
Scheduled Task
PeopleSoft
PeopleSoft StandardXML File
(PERSON_BASIC_FULLSYNCand WORKFORCE_FULLSYNC)
PeopleSoft StandardXML Message
(PERSON_BASIC_SYNCand WORKFORCE_SYNC)
Oracle IdentityManager
Full Reconciliation
HRMS Components(PERSON Data and
JOB Data)
Integration Broker
Integration Broker

Connector Architecture
1-4 Oracle Identity Manager Connector Guide for PeopleSoft Employee Reconciliation
system is fetched into Oracle Identity Manager and used to create and update OIM Users.
Standard PeopleSoft XML files and messages are the medium of data interchange between PeopleSoft HRMS and Oracle Identity Manager.
The method by which person data is sent to Oracle Identity Manager depends on the type of reconciliation that you configure. It is listed as follows:
■ Section 1.3.1, "Full Reconciliation"
■ Section 1.3.2, "Incremental Reconciliation"
1.3.1 Full Reconciliation
PeopleSoft uses its standard message format PERSON_BASIC_FULLSYNC and WORKFORCE_FULLSYNC to send person data to external applications such as Oracle Identity Manager. Full reconciliation fetches all person records from the target system to reconcile records within Oracle Identity Manager. Full reconciliation within Oracle Identity Manager is implemented using the PERSON_BASIC_FULLSYNC and WORKFORCE_FULLSYNC XML files that PeopleSoft generates. See Section 1.4.5, "Support for Standard PeopleSoft Messages" for more information about these messages.
Full reconciliation involves the following steps:
See Section 3.2, "Performing Full Reconciliation" for the procedure to perform full reconciliation.
1. The PeopleSoft Integration Broker populates the XML files for the PERSON_BASIC_FULLSYNC and WORKFORCE_FULLSYNC messages with all the person data, such as biographical information and job information.
2. Copy these XML files to a directory on the Oracle Identity Manager host computer.
3. Configure the PeopleSoft HRMS Trusted Reconciliation scheduled task. The XML files are read by this scheduled task to generate reconciliation events.
Note: In Oracle Identity Manager release 11.1.1, a scheduled job is an instance of a scheduled task. In this guide, the term scheduled task used in the context of Oracle Identity Manager release 9.1.0.x is the same as the term scheduled job in the context of Oracle Identity Manager release 11.1.1.
See Oracle Fusion Middleware System Administrator's Guide for Oracle Identity Manager for more information about scheduled tasks and scheduled jobs.
Note: To reconcile all existing target system records into Oracle Identity Manager, you must run full reconciliation the first time you perform a reconciliation run after deploying the connector. This is to ensure that the target system and Oracle Identity Manager contain the same data.

Features of the Connector
About the Connector 1-5
1.3.2 Incremental ReconciliationIncremental reconciliation involves real-time reconciliation of newly created or modified person data. You use incremental reconciliation to reconcile individual data changes after an initial, full reconciliation run has been performed. PERSON_BASIC_SYNC or WORKFORCE_SYNC are standard PeopleSoft messages to initiate incremental reconciliation. See Section 1.4.5, "Support for Standard PeopleSoft Messages" for details. These messages are used to send specific person data for each transaction on the target system that involves addition or modification of person information. Incremental reconciliation is configured using PeopleSoft application messaging.
Incremental reconciliation involves the following steps:
Section 3.3, "Performing Incremental Reconciliation" describes the procedure to configure incremental reconciliation.
1. When person data is added or updated in the target system, a PeopleCode event is generated.
2. The PeopleCode event generates an XML message, PERSON_BASIC_SYNC or WORKFORCE_SYNC, containing the modified person data and sends it in real time to the PeopleSoft listener over HTTP. The PeopleSoft listener is a Web application that is deployed on an Oracle Identity Manager host computer. If SSL is configured, then the message is sent to the PeopleSoft listener over HTTPS.
3. The PeopleSoft listener parses the XML message and creates a reconciliation event in Oracle Identity Manager.
1.4 Features of the ConnectorThe following are the features of the connector:
■ Section 1.4.1, "Dedicated Support for Trusted Source Reconciliation"
■ Section 1.4.2, "Full and Incremental Reconciliation"
■ Section 1.4.3, "Support for Major Person Lifecycle Events"
■ Section 1.4.5, "Support for Standard PeopleSoft Messages"
■ Section 1.4.6, "Support for Resending Messages That Are Not Processed"
■ Section 1.4.4, "Reconciliation of Effective-Dated Lifecycle Events"
■ Section 1.4.7, "Validation and Transformation of Person Data"
■ Section 1.4.8, "Reconciliation of the Manager ID Attribute"
■ Section 1.4.9, "Target Authentication"
■ Section 1.4.10, "Support for Specifying Persons to Be Excluded from Reconciliation Operation"
Note: During connector deployment:
■ On Oracle Identity Manager release 9.1.0.x, the PeopleSoft listener is deployed as a WAR file.
■ On Oracle Identity Manager release 11.1.1, the PeopleSoft listener is deployed as an EAR file.

Features of the Connector
1-6 Oracle Identity Manager Connector Guide for PeopleSoft Employee Reconciliation
1.4.1 Dedicated Support for Trusted Source ReconciliationThe connector provides all the features required for setting up PeopleSoft HRMS as a trusted (authoritative) source of identity data for Oracle Identity Manager. Oracle Identity Manager uses this message for incremental reconciliation. In other words, the connector does not support provisioning operations and target resource reconciliation with PeopleSoft HRMS.
1.4.2 Full and Incremental ReconciliationThe connector supports reconciliation in two ways:
In a full reconciliation run, all records are fetched from the target system to Oracle Identity Manager in the form of XML files. In incremental reconciliation, records that are added or modified are directly sent to the listener deployed on the Oracle Identity Manager host computer. The listener parses the records and sends reconciliation events to Oracle Identity Manager.
1.4.3 Support for Major Person Lifecycle EventsThe connector helps you to manage all major person lifecycle events, from onboarding to termination and beyond a whole range of events that defines a long-term relationship a person establishes with an organization. This relationship can be defined as the person lifecycle.
The connector performs real-time reconciliation of changes in PeopleSoft including new person creation, changes to existing persons, and so on. Real-time reconciliation allows Oracle Identity Manager to immediately detect critical lifecycle events, such as job terminations, transfers, and so on. Oracle Identity Manager is thus able to take the appropriate action immediately.
Whenever the status of a person changes in PeopleSoft, the status of the OIM User changes as defined in the Lookup.PSFT.HRMS.WorkForceSync.EmpStatus lookup definition. See Section 1.5.4.2.4, "Lookup.PSFT.HRMS.WorkForceSync.EmpStatus" for more information.
1.4.4 Reconciliation of Effective-Dated Lifecycle EventsOn the target system, you can use the effective-dated feature to assign a future date to changes that you want to make to a person account.
The connector can distinguish between hire events and other events in the lifecycle of a person record on the target system. These events may be either current-dated or future-dated (in other words, effective-dated). A current-dated event is one in which the date of the event is prior to or same as the current date. A future-dated event is one in which the date the event will take effect is set in the future. For example, if the current date is 30-Jan-09 and if the date set for an event is 15-Feb-09, then the event is future-dated. During reconciliation, the manner in which an event is processed depends on the type of the event.
PeopleSoft uses two standard messages to reconcile a record. These are the PERSON_BASIC_SYNC and the WORKFORCE_SYNC messages. See Section 1.4.5, "Support for Standard PeopleSoft Messages" for more information about these messages.
You run the PERSON_BASIC_SYNC message to create an OIM User. The default status of an OIM User is Active. See the Employee Status Code Key in the lookup definition described in Section 1.5.4.1.1, "Lookup.PSFT.Message.PersonBasicSync.Configuration."

Features of the Connector
About the Connector 1-7
The job-related information of a person is updated through the WORKFORCE_SYNC message. In addition, the status is modified depending on the information fetched from the ACTION node of the WORKFORCE_SYNC message XML. For example, the value for hire event is retrieved from the ACTION node of the WORKFORCE_SYNC message XML as HIR.
The Lookup.PSFT.HRMS.WorkForceSync.EmpStatus lookup definition provides a mapping for the value retrieved from the ACTION node of the XML message. In the lookup definition, the Code Key defines the action performed, and the Decode value is either Active or Inactive. Depending on the Decode value, the status of the person appears as Active or Disabled in Oracle Identity Manager.
For example, in this case the data fetched from the XML message is HIR. The Lookup.PSFT.HRMS.WorkForceSync.EmpStatus lookup definition stores the mapping for the HIR action, in the Decode column. If you want to display Active on the Oracle Identity Manager console as against the HIR action then define the following mapping in the lookup definition:
Code Key: HIR
Decode: Active
See Section 1.5.4.2.4, "Lookup.PSFT.HRMS.WorkForceSync.EmpStatus" for more information about this lookup definition.
1.4.5 Support for Standard PeopleSoft MessagesPeopleSoft provides standard messages to send biographical data and job-related data to external applications, such as Oracle Identity Manager. The connector uses the following standard PeopleSoft messages that are delivered as part of PeopleSoft HRMS installation to achieve full reconciliation and incremental reconciliation:
■ PERSON_BASIC_FULLSYNC
This message contains all the basic biographical information of all persons. This information includes Employee ID, First Name, Last Name, and Employee Type. It is used for full reconciliation.
■ PERSON_BASIC_SYNC
This message contains the information about a particular person. This includes Employee ID and the information that is added or modified. During incremental reconciliation, PERSON_BASIC_SYNC messages are sent to Oracle Identity Manager.
Note: In the context of the Effective Date feature, records for a particular person on the target system can be categorized into the following types:
■ Current: The record with an effective date that is closest to or same as, but not greater than, the system date. There can be only one current record
■ History: Records with dates that are earlier than that of the current-dated record
■ Future: Records that have effective dates later than the system date

Features of the Connector
1-8 Oracle Identity Manager Connector Guide for PeopleSoft Employee Reconciliation
■ WORKFORCE_FULLSYNC
This message contains job-related details of all persons. This information includes Department, Supervisor ID, Manager ID, and Job Code. It is used for full reconciliation.
■ WORKFORCE_SYNC
This message contains job-related details of a particular person. This information includes Employee ID and the information that is added or modified. It is used in incremental reconciliation.
1.4.6 Support for Resending Messages That Are Not ProcessedStandard messages provided by PeopleSoft are asynchronous. In other words, if a message is not delivered successfully, then the PeopleSoft Integration Broker marks that message as not delivered. The message can then be resent manually.
If the connector is not able to process a message successfully, then it sends an error code and PeopleSoft Integration Broker marks that message as Failed. A message marked as Failed can be resent to the listener. See Section 3.5, "Resending Messages That Are Not Received by the PeopleSoft Listener" for details.
1.4.7 Validation and Transformation of Person DataYou can configure validation of person data that is brought into Oracle Identity Manager during reconciliation. In addition, you can configure transformation of person data that is brought into Oracle Identity Manager during reconciliation.
■ Section 4.4, "Configuring Validation of Data During Reconciliation" provides information about setting up the validation feature.
■ Section 4.5, "Configuring Transformation of Data During Reconciliation" provides information about setting up the transformation feature.
Note: It is only if a person is added in PeopleSoft that the triggering of PERSON_BASIC_SYNC creates an OIM User. But, if an OIM User has been created during full reconciliation, then the PERSON_BASIC_SYNC message contains modifications to personal data.
Note: When you reconcile records, it is mandatory to run the PERSON_BASIC_FULLSYNC message before WORKFORCE_FULLSYNC. If the WORKFORCE_FULLSYNC message is processed first, then Oracle Identity Manager stores the data for all those events in the Event Received state and processes them after person data is available through reconciliation performed using the PERSON_BASIC_FULLSYNC message.
See Also: Resubmitting and Canceling Service Operations for Processing topic in the PeopleBook Enterprise PeopleTools 8.49 PeopleBook: PeopleSoft Integration Broker available on Oracle Technology Network:
http://download.oracle.com/docs/cd/E13292_01/pt849pbr0/eng/psbooks/tibr/book.htm

Features of the Connector
About the Connector 1-9
1.4.8 Reconciliation of the Manager ID AttributeThe Manager ID attribute is one of the predefined OIM User form attributes. When you reconcile data while creating an OIM User, you can populate this field with manager details.
The connector reconciles the manager information based on the Supervisor ID in Oracle Identity Manager and the job information fetched through the WORKFORCE_SYNC message.
Steps in the Manager ID Reconciliation Process
To update the job details of a person:
1. The Supervisor details for a person are retrieved from the target system when you run the WORKFORCE_FULLSYNC or the WORKFORCE_SYNC message.
The Supervisor details are fetched from the SUPERVISOR_ID node of the message XML, as shown in the following screenshot:
2. The connector populates the Supervisor ID field in the process form.
Note: The target system also provides the Supervisor attribute, which is a lookup field on the target system UI. This value is populated in the Supervisor ID field, which is a UDF on the process form.

Features of the Connector
1-10 Oracle Identity Manager Connector Guide for PeopleSoft Employee Reconciliation
3. Run the PeopleSoft HRMS Manager Reconciliation scheduled task. See Section 3.2.2.2, "Running the PeopleSoft HRMS Manager Reconciliation Scheduled Task" for instructions on how to reconcile Manager ID values in this scenario.
4. The scheduled task checks for the existence of an OIM User with the same User ID as that of Supervisor ID value. If a match is found, the Manager ID attribute is updated with the value of the Supervisor ID.
This sequence of steps can be illustrated by the following example:
Suppose Richard is a person on the target system with the user ID 02. John Doe, his manager, with user ID 01 exists on Oracle Identity Manager. During reconciliation of Richard's person record:
1. The Supervisor ID of Richard is fetched from the target system using the WORKFORCE_FULLSYNC or the WORKFORCE_SYNC message. The value fetched is 01.
2. The Supervisor ID field of Richard is populated with 01.
3. The scheduled task looks for an OIM User with the same Supervisor ID value. John's record matches the criterion.
4. The Manager ID field pertaining to Richard is populated with 01.
1.4.9 Target AuthenticationTarget authentication is done to validate whether Oracle Identity Manager should accept messages from the target system or not. It is done by passing the name of the IT resource in the Integration Broker node. You must ensure that the correct value of the IT resource name is specified in the node. See Section 2.2.2.2.1, "Configuring PeopleSoft Integration Broker" for setting up the node. In addition, the flag IsActive is used to verify whether the IT Resource is active or not. The value of this flag is Yes, by default. When this value is Yes, target authentication is carried out. Target authentication fails if it is set to No.
1.4.10 Support for Specifying Persons to Be Excluded from Reconciliation OperationYou can specify a list of persons who must be excluded from all reconciliation operations. Persons whose User IDs you specify in the exclusion list are not affected by the reconciliation operation. See Section 1.5.4.3.2, "Lookup.PSFT.HRMS.ExclusionList" for more information.

Connector Objects Used During Reconciliation
About the Connector 1-11
1.5 Connector Objects Used During ReconciliationTrusted source reconciliation involves reconciling data of newly created or modified accounts on the target system into Oracle Identity Manager and adding or updating OIM Users.
This section discusses the following topics:
■ Section 1.5.1, "User Attributes for Reconciliation"
■ Section 1.5.2, "Reconciliation Rules"
■ Section 1.5.3, "Reconciliation Action Rules"
■ Section 1.5.4, "Predefined Lookup Definitions"
1.5.1 User Attributes for ReconciliationTable 1–2 lists the identity attributes whose values are fetched from the target system during reconciliation.
See Also: "Trusted Source Reconciliation" in Oracle Identity Manager Connector Concepts for conceptual information about trusted source reconciliation
Table 1–2 User Attributes for Reconciliation
OIM User Form Field PeopleSoft HRMS/HCM Field Description
User ID PS_PERSON.EMPLID The employee ID of the user
This is a mandatory field for the creation of an OIM User.
Last Name PS_NAMES.LAST_NAME The last name of the user
This is a mandatory field for the creation of an OIM User.
First Name PS_NAMES.FIRST_NAME The first name of the user
This is a mandatory field for the creation of an OIM User.
Employee Type PS_JOB.REG_TEMP
PS_JOB.FULL_PART_TIME
PS_JOB.PER_ORG
The employee type of the OIM User
The combination of the values of the PS_JOB.REG_TEMP, PS_JOB.FULL_PART_TIME, and the PS_JOB.PER_ORG fields are used to specify the employee type of the OIM User.
This is a mandatory field for the creation of an OIM User.
Status PS_JOB.ACTION The action to be taken for a person. It could be HIRE, TRANSFERED, and so on.
Start Date PS_JOB.EFFDT The effective date of a person's job record
Supervisor ID PS_JOB.SUPERVISOR_ID The supervisor ID of a person
Department PS_JOB.DEPTID The department ID of a person
Job ID PS_JOB.JOBCODE The job ID of a person

Connector Objects Used During Reconciliation
1-12 Oracle Identity Manager Connector Guide for PeopleSoft Employee Reconciliation
1.5.2 Reconciliation Rules
The following sections provide information about the reconciliation rules for this connector:
■ Section 1.5.2.1, "Overview of the Reconciliation Rule"
■ Section 1.5.2.2, "Viewing the Reconciliation Rule in the Design Console"
1.5.2.1 Overview of the Reconciliation RuleThe following is the process-matching rule:
Rule Name: Peoplesoft HRMS Recon Rule
Rule Element: User Login Equals User ID
In this rule:
■ User Login represents the User ID field on the OIM User form.
■ User ID represents the Employee ID field of the employee on the target system.
For trusted source reconciliation, the User ID field of the OIM User form is matched against the Employee ID field on the target system. These are the key fields in Oracle Identity Manager and the target system, respectively.
1.5.2.2 Viewing the Reconciliation Rule in the Design ConsoleAfter you deploy the connector, you can view the reconciliation rule by performing the following steps:
1. Log in to the Oracle Identity Manager Design Console.
2. Expand Development Tools.
3. Double-click Reconciliation Rules.
4. Search for and open PSFT ER. Figure 1–2 shows this reconciliation rule.
See Also: Oracle Identity Manager Connector Concepts for generic information about reconciliation matching and action rules
Note: Perform the following procedure only after the connector is deployed.

Connector Objects Used During Reconciliation
About the Connector 1-13
Figure 1–2 Reconciliation Rule
1.5.3 Reconciliation Action RulesApplication of the matching rule on reconciliation events would result in one of multiple possible outcomes. The action rules for reconciliation define the actions to be taken for these outcomes.
The following sections provide information about the reconciliation action rules for this connector:
■ Section 1.5.3.1, "Overview of the Reconciliation Action Rules"
■ Section 1.5.3.2, "Viewing the Reconciliation Action Rules in the Design Console"
1.5.3.1 Overview of the Reconciliation Action RulesTable 1–3 lists the reconciliation action rules for this connector:
See Also: Oracle Identity Manager Design Console Guide for information about modifying reconciliation rules
Note: For any rule condition that is not predefined for this connector, no action is performed and no error message is logged.
Table 1–3 Action Rules for Trusted Source Reconciliation
Rule Condition Action
No Matches Found Create User
One Entity Match Found Establish Link

Connector Objects Used During Reconciliation
1-14 Oracle Identity Manager Connector Guide for PeopleSoft Employee Reconciliation
1.5.3.2 Viewing the Reconciliation Action Rules in the Design ConsoleAfter you deploy the connector, you can view the reconciliation action rules by performing the following steps:
1. Log in to the Oracle Identity Manager Design Console.
2. Expand Resource Management.
3. Double-click Resource Objects.
4. Search for and open the Peoplesoft HRMS resource object.
5. Click the Object Reconciliation tab and then the Reconciliation Action Rules tab. The Reconciliation Action Rules tab displays the action rules defined for this connector. Figure 1–3 shows these reconciliation action rules.
Figure 1–3 Reconciliation Action Rules
1.5.4 Predefined Lookup DefinitionsThe predefined lookup definitions can be categorized as follows:
■ Section 1.5.4.1, "Lookup Definitions Used to Process PERSON_BASIC_SYNC Messages"
■ Section 1.5.4.2, "Lookup Definitions Used to Process WORKFORCE_SYNC Messages"
Note: Perform the following procedure only after the connector is deployed.
See Also: Oracle Identity Manager Design Console Guide for information about modifying reconciliation action rules

Connector Objects Used During Reconciliation
About the Connector 1-15
■ Section 1.5.4.3, "Other Lookup Definitions"
1.5.4.1 Lookup Definitions Used to Process PERSON_BASIC_SYNC MessagesThe following lookup definitions are used to process PERSON_BASIC_SYNC messages:
1.5.4.1.1 Lookup.PSFT.Message.PersonBasicSync.Configuration The Lookup.PSFT.Message.PersonBasicSync.Configuration lookup definition provides the configuration-related information for the PERSON_BASIC_SYNC and PERSON_BASIC_FULLSYNC messages.
The lookup definition has the following entries:
Code Key Decode Description
Attribute Mapping Lookup Lookup.PSFT.HRMS.PersonBasicSync.AttributeMapping
Name of the lookup definition that maps Oracle Identity Manager attributes with the attributes in the PERSON_BASIC_SYNC and PERSON_BASIC_FULLSYNC message XML
See Section 1.5.4.1.2, "Lookup.PSFT.HRMS.PersonBasicSync.AttributeMapping" for more information about this lookup definition.
Custom Query Enter a Value If you want to implement limited reconciliation, then enter the query condition that you create by following the instructions given in the Section 3.4, "Limited Reconciliation."
Custom Query Lookup Definition
Lookup.PSFT.HRMS.CustomQuery
This entry holds the name of the lookup definition that maps resource object fields with OIM User form fields. This lookup definition is used during application of the custom query.
See Section 3.4, "Limited Reconciliation" for more information.
Data Node Name Transaction Name of the node in the XML files to execute a transaction
Default value: Transaction
You must not change the default value.
Employee Status Active Default status of an employee during the creation of an OIM User
Note: You can change the status to Disabled, if you want the status to be Inactive when the OIM User is created.

Connector Objects Used During Reconciliation
1-16 Oracle Identity Manager Connector Guide for PeopleSoft Employee Reconciliation
Employee Type Lookup Lookup.PSFT.HRMS.PersonBasicSync.EmpType
Name of the lookup definition that maps Oracle Identity Manager attributes with employee type attributes obtained from XML message
See Section 1.5.4.1.4, "Lookup.PSFT.HRMS.PersonBasicSync.EmpType" for more information about this lookup definition.
Message Handler Class oracle.iam.connectors.psft.common.handler.impl.PSFTPersonSyncReconMessageHandlerImpl
Name of the Java class that accepts the XML payload, configuration information, and a handle to Oracle Identity Manager. Depending on the message type, it retrieves the appropriate configuration from Oracle Identity Manager and processes the message. To parse a specific message type, it relies on a Message Parser factory.
If you want a customized implementation of the message, then you must extend the MessageHandler.java class.
See Also: Appendix B, "Configuring the Connector Messages"
Message Parser oracle.iam.connectors.psft.common.parser.impl.PersonMessageParser
Name of the parser implementation class that contains the logic for message parsing
If you want a customized implementation of the message, then you must extend the MessageParser.java class.
See Also: Appendix B, "Configuring the Connector Messages"
Organization Xellerate Users Default organization in Oracle Identity Manager
Recon Lookup Definition Lookup.PSFT.HRMS.PersonBasicSync.Recon
Name of the lookup definition that maps Oracle Identity Manager attributes with the Resource Object attributes
See Section 1.5.4.1.3, "Lookup.PSFT.HRMS.PersonBasicSync.Recon" for more information about this lookup definition.
Resource Object Peoplesoft HRMS Name of the resource object
Code Key Decode Description

Connector Objects Used During Reconciliation
About the Connector 1-17
1.5.4.1.2 Lookup.PSFT.HRMS.PersonBasicSync.AttributeMapping The Lookup.PSFT.HRMS.PersonBasicSync.AttributeMapping lookup definition maps OIM User attributes with the attributes defined in the PERSON_BASIC_SYNC message. The following table provides the format of the values stored in this lookup definition:
Code Key: Name of the OIM User field
Decode: Combination of the following elements separated by the tilde (~) character:
NODE~PARENT NODE~TYPE NODE=Value~EFFECTIVE DATED NODE~PRIMARY
In this format:
NODE: Name of the node in the PERSON_BASIC_SYNC message XML file from which the value is read. You must specify the name of the NODE in the lookup definition. It is a mandatory field.
PARENT NODE: Name of the parent node for the NODE. You must specify the name of the parent node in the lookup definition. It is a mandatory field.
TYPE NODE=Value: Type of the node associated with the Node value. Value defines the type of the Node.
Transformation Lookup Definition
Lookup.PSFT.HRMS.PersonBasicSync.Transformation
Name of the transformation lookup definition
See Section 4.5, "Configuring Transformation of Data During Reconciliation" for more information about adding entries in this lookup definition.
User Type End-User It specifies the value with which a person is created in Oracle Identity Manager using the PERSON_BASIC_SYNC message.
Use Transformation No Enter yes to implement transformation while reconciling records. Otherwise, enter no.
Use Validation No Enter yes to implement validation while reconciling records. Otherwise, enter no.
Validation Lookup Definition
Lookup.PSFT.HRMS.PersonBasicSync.Validation
Name of the validation lookup definition
See Section 4.4, "Configuring Validation of Data During Reconciliation" for more information about adding entries in this lookup definition.
Code Key Decode
Emp Type PER_ORG~PERSON
First Name FIRST_NAME~NAMES~NAME_TYPE=PRI~EFFDT
Last Name LAST_NAME~NAMES~NAME_TYPE=PRI~EFFDT
User ID EMPLID~PERSON~None~None~PRIMARY
Code Key Decode Description

Connector Objects Used During Reconciliation
1-18 Oracle Identity Manager Connector Guide for PeopleSoft Employee Reconciliation
For example, in the PERSON_BASIC_SYNC message, the rowset NAME_TYPE_VW lists the names assigned to a person. The names assigned could be primary, secondary, or nickname, depending on how it is configured in PeopleSoft.
If you want to use the primary name to create an OIM User, then you must locate the NAME_TYPE node with the value PRI to fetch First Name and Last Name from the XML message. Therefore, you must provide the following mapping in Decode column for First Name:
FIRST_NAME~NAMES~NAME_TYPE=PRI~EFFDT
In this format, NAME_TYPE specifies the TYPE NODE to consider, and PRI specifies that name of type PRI (primary) must be considered while fetching data from the XML messages. All other names types are then ignored.
The NAME_TYPE node with PRI value is shown in the following screenshot:
EFFECTIVE DATED NODE: Effective-dated node for the NODE, if any.
PeopleSoft supports effective-dated events. The value refers to the name of the node that provides information about the date on which the event becomes effective.
For example, names can be effective-dated in PeopleSoft. The EFFDT node in XML provides the date on which the name becomes effective for the OIM User.

Connector Objects Used During Reconciliation
About the Connector 1-19
The EFFDT node is shown in the following screenshot:
Primary: Specifies if the node is a mandatory field on Oracle Identity Manager.
The following scenario illustrates how to map the entries in the lookup definition. On the target system, there is no direct equivalent for the First Name attribute of the OIM User. As a workaround, a combination of elements is used to decipher the value for each Code Key entry in the preceding table.
If you want to retrieve the value for the Code Key, First Name, then the name of the NODE will be FIRST_NAME as depicted in the XML file. See the sample XML file in Figure 1–4 for more information about each node in the PERSON_BASIC_SYNC message.

Connector Objects Used During Reconciliation
1-20 Oracle Identity Manager Connector Guide for PeopleSoft Employee Reconciliation
Figure 1–4 Sample XML File for PERSON_BASIC_SYNC Message
The PARENT NODE for the NODE FIRST_NAME will be NAMES. Now suppose, you have a scenario where you have multiple FIRST_NAME nodes in the XML file to support the effective-dated feature for this attribute. In this case, you must identify the TYPE NODE for the PARENT NODE that has the value PRI. In this example, the TYPE NODE is NAME_TYPE with the value PRI.
Next, you must locate the EFFECTIVE DATED NODE for FIRST_NAME in the XML file. This node provides the value when the event becomes effective-dated.
In Oracle Identity Manager, you must specify a mandatory field, such as User ID for reconciliation. This implies that to retrieve the value from XML, you must mention User ID as the primary node.
If you do not want to provide any element in the Decode column, then you must specify None. This is implemented for the User ID attribute.
Now, you can concatenate the various elements of the syntax using a tilde (~) to create the Decode entry for First Name as follows:
NODE: FIRST_NAME
PARENT NODE: NAMES
TYPE NODE=Value: NAME_TYPE=PRI
EFFECTIVE DATED NODE: EFFDT
So, the Decode column for First Name is as follows:
FIRST_NAME~NAMES~NAME_TYPE=PRI~EFFDT
1.5.4.1.3 Lookup.PSFT.HRMS.PersonBasicSync.Recon The Lookup.PSFT.HRMS.PersonBasicSync.Recon lookup definition maps the resource object field name with the value fetched from the Lookup.PSFT.HRMS.PersonBasicSync.AttributeMapping lookup definition. The following is the format of the values stored in this lookup definition:

Connector Objects Used During Reconciliation
About the Connector 1-21
Code Key: Name of the resource object field in Oracle Identity Manager
Decode: Combination of the following elements separated by a tilde (~) character:
ATTRIBUTE ~ LOOKUP DEF
In this format:
ATTRIBUTE: Refers to the Code Key of the Lookup.PSFT.HRMS.PersonBasicSync.AttributeMapping lookup definition
LOOKUP DEF: Name of the lookup definition, if the value of the attribute is retrieved from a lookup definition. This lookup is specified in the message-specific configuration lookup.
Consider the scenario discussed in Section 1.5.4.1.2, "Lookup.PSFT.HRMS.PersonBasicSync.AttributeMapping." In this example, you fetched First Name from the FIRST_NAME node of the XML file.
Now, you must map this First Name defined in the Lookup.PSFT.HRMS.PersonBasicSync.AttributeMapping lookup definition with the resource object attribute First Name defined in the Lookup.PSFT.HRMS.PersonBasicSync.Recon lookup definition Code Key.
For example, if the name of the Code Key column in the Lookup.PSFT.HRMS.PersonBasicSync.AttributeMapping lookup definition is First then you define the mapping in the Lookup.PSFT.HRMS.PersonBasicSync.Recon lookup definition as follows:
Code Key: First Name
Decode: First
In other words, the value for First Name in the Lookup.PSFT.HRMS.PersonBasicSync.Recon lookup definition is fetched from First, defined in the attribute mapping lookup definition.
The same process holds true for Last Name and User ID.
However, to fetch the value of the Employee Type resource object, you must consider the Employee Type lookup definition. Emp Type is defined in the message-specific attribute lookup, Lookup.PSFT.HRMS.PersonBasicSync.AttributeMapping, which has a value EMP, which is fetched from the PER_ORG node in the XML.
Now, Employee Type Lookup is defined in the message-specific configuration, Lookup.PSFT.Message.PersonBasicSync.Configuration lookup definition. The mapping is as follows:
Code Key: Employee Type Lookup
Decode: Lookup.PSFT.HRMS.PersonBasicSync.EmpType
In other words, you must search the value EMP in the Lookup.PSFT.HRMS.PersonBasicSync.EmpType lookup definition. The mapping in
Code Key Decode
Employee Type Emp Type~Employee Type Lookup
First Name First Name
Last Name Last Name
User ID User ID

Connector Objects Used During Reconciliation
1-22 Oracle Identity Manager Connector Guide for PeopleSoft Employee Reconciliation
the Lookup.PSFT.HRMS.PersonBasicSync.EmpType lookup definition is defined as follows:
Code Key: EMP
Decode: Full-Time
When you create an OIM User, the Employee Type field has Full-Time Employee as the value.
1.5.4.1.4 Lookup.PSFT.HRMS.PersonBasicSync.EmpType The Lookup.PSFT.HRMS.PersonBasicSync.EmpType lookup definition is used when person data is received for an account.
The lookup definition has the following entries:
In the preceding table:
■ CWR represents Contingent Worker.
■ EMP represents Employee.
■ POI represents Person of Interest.
1.5.4.1.5 Lookup.PSFT.HRMS.PersonBasicSync.Validation The Lookup.PSFT.HRMS.PersonBasicSync.Validation lookup definition is used to store the mapping between the attribute for which validation has to be applied and the validation implementation class.
The Lookup.PSFT.HRMS.PersonBasicSync.Validation lookup definition is empty by default.
See Section 4.4, "Configuring Validation of Data During Reconciliation" for more information about adding entries in this lookup definition.
1.5.4.1.6 Lookup.PSFT.HRMS.PersonBasicSync.Transformation The Lookup.PSFT.HRMS.PersonBasicSync.Transformation lookup definition is used to store the mapping between the attribute for which transformation has to be applied and the transformation implementation class.
The Lookup.PSFT.HRMS.PersonBasicSync.Transformation lookup definition is empty by default.
See Section 4.5, "Configuring Transformation of Data During Reconciliation" for more information about adding entries in this lookup definition.
1.5.4.2 Lookup Definitions Used to Process WORKFORCE_SYNC MessagesThe following lookup definitions are used to process the WORKFORCE_SYNC messages:
1.5.4.2.1 Lookup.PSFT.Message.WorkForceSync.Configuration The Lookup.PSFT.Message.WorkForceSync.Configuration lookup definition provides the
Code Key Decode
EMP Full-Time
CWR Part-Time
POI Temp

Connector Objects Used During Reconciliation
About the Connector 1-23
configuration-related information for the WORKFORCE_SYNC and WORKFORCE_FULLSYNC messages for reconciliation.
The Lookup.PSFT.Message.WorkForceSync.Configuration lookup definition has the following entries:
Code Key Decode Description
Attribute Mapping Lookup Lookup.PSFT.HRMS.WorkForceSync.AttributeMapping
Name of the lookup definition that maps Oracle Identity Manager attributes with attributes in the WORKFORCE_SYNC and WORKFORCE_FULLSYNC message XML
See Section 1.5.4.2.2, "Lookup.PSFT.HRMS.WorkForceSync.AttributeMapping" for more information about this lookup definition.
Custom Query Enter a Value If you want to implement limited reconciliation, then enter the query condition that you create by following the instructions given in Section 3.4, "Limited Reconciliation."
Custom Query Lookup Definition
Lookup.PSFT.HRMS.CustomQuery
This entry holds the name of the lookup definition that maps resource object fields with OIM User form fields. This lookup definition is used during application of the custom query.
See Section 3.4, "Limited Reconciliation" for more information.
Data Node Name Transaction Name of the node in the XML files to run a transaction
Employee Status Lookup Lookup.PSFT.HRMS.WorkForceSync.EmpStatus
Name of the lookup definition that maps the value of the ACTION node retrieved from the WORKFORCE_SYNC message XML with the status to be shown on Oracle Identity Manager for an employee
See Section 1.5.4.2.4, "Lookup.PSFT.HRMS.WorkForceSync.EmpStatus" for more information about this lookup definition.
Employee Type Lookup Lookup.PSFT.HRMS.WorkForceSync.EmpType
Name of the lookup definition that stores all valid person types and components of the Employee person type in the target system
See Section 1.5.4.2.5, "Lookup.PSFT.HRMS.WorkForceSync.EmpType" for more information about this lookup definition.

Connector Objects Used During Reconciliation
1-24 Oracle Identity Manager Connector Guide for PeopleSoft Employee Reconciliation
Manager Login RO Attribute
Manager ID Resource object field name of Manager ID
Manager Name RO Attribute
Manager Name Resource object field name of the Manager
Message Handler Class oracle.iam.connectors.psft.common.handler.impl.PSFTWorkForceSyncReconMessageHandlerImpl
Name of the Java class that accepts the XML payload, configuration information, and a handle to Oracle Identity Manager. Depending on the message type, it retrieves the appropriate configuration from Oracle Identity Manager and processes the message. To parse a specific message type, it relies on a Message Parser factory.
If you want a customized implementation of the message, then you must extend the MessageHandler.java class.
See Also: Appendix B, "Configuring the Connector Messages"
Message Parser oracle.iam.connectors.psft.common.parser.impl.JobMessageParser
Name of the parser implementation class that contains the logic for message parsing
If you want a customized implementation of the message, then you must extend the MessageParser.java class.
See Also: Appendix B, "Configuring the Connector Messages"
Recon Lookup Definition Lookup.PSFT.HRMS.WorkForceSync.Recon
Name of the lookup definition that maps Oracle Identity Manager attribute with Resource Object attribute
See Section 1.5.4.2.3, "Lookup.PSFT.HRMS.WorkForceSync.Recon" for more information about this lookup definition.
Resource Object Peoplesoft HRMS Name of the resource object
Transformation Lookup Definition
Lookup.PSFT.HRMS.WorkForceSync.Transformation
Name of the transformation lookup definition
It is empty by default.
See Section 1.5.4.2.7, "Lookup.PSFT.HRMS.WorkForceSync.Transformation" for more information about this lookup definition.
Use Transformation No Enter yes to implement transformation while reconciling records. Otherwise, enter no.
Code Key Decode Description

Connector Objects Used During Reconciliation
About the Connector 1-25
1.5.4.2.2 Lookup.PSFT.HRMS.WorkForceSync.AttributeMapping The Lookup.PSFT.HRMS.WorkForceSync.AttributeMapping lookup definition maps OIM User attributes with the attributes defined in the WORKFORCE_SYNC message XML. The following is the format of the values stored in this lookup definition:
Code Key: Name of the OIM User field
Decode: Combination of the following elements separated by a tilde (~) character:
NODE~PARENT NODE~TYPE NODE=Value~EFFECTIVE DATED NODE~PRIMARY
In this format:
NODE: Name of the node in the WORKFORCE_SYNC message XML file from which the value is read. You must specify the name of the NODE in the lookup definition. It is a mandatory field.
PARENT NODE: Name of the parent node for the NODE. You must specify the name of the PARENT NODE in the lookup definition. It is a mandatory field.
TYPE NODE=Value: Type of the node associated with the NODE value. Value defines the Type of the Node.
EFFECTIVE DATED NODE: Effective Dated Node for the NODE, if any.
PeopleSoft supports effective-dated events. The value refers to the name of the node that provides information about the date on which the event becomes effective.
For example, Department can be effective-dated in PeopleSoft. The EFFDT node in XML provides the date on which the name becomes effective for the OIM User.
Use Validation No Enter yes to implement validation while reconciling records. Otherwise, enter no.
Validation Lookup Definition
Lookup.PSFT.HRMS.WorkForceSync.Validation
Name of the validation lookup definition
It is empty by default.
See Section 1.5.4.2.6, "Lookup.PSFT.HRMS.WorkForceSync.Validation" for more information about this lookup definition.
Code Key Decode
Department DEPTID~JOB~None~EFFDT
Full Part Time FULL_PART_TIME~JOB~None~EFFDT
Job ID JOBCODE~JOB~None~EFFDT
Per Org PER_ORG~JOB~None~EFFDT
Reg Temp REG_TEMP~JOB~None~EFFDT
Start Date EFFDT~JOB~None~EFFDT
Status HR_STATUS~JOB~None~EFFDT
Supervisor ID SUPERVISOR_ID~JOB~NONE~EFFDT
User ID EMPLID~PER_ORG_ASGN~None~None~PRIMARY
Code Key Decode Description

Connector Objects Used During Reconciliation
1-26 Oracle Identity Manager Connector Guide for PeopleSoft Employee Reconciliation
PRIMARY: Specifies if the node is a mandatory field.
The following scenario illustrates how to map the entries in the lookup definition. On the target system, there is no direct equivalent for the Department attribute of the OIM User. As a workaround, a combination of elements is used to decipher the value. See the sample XML file in Figure 1–5 for more information about each node in the WORKFORCE_SYNC message XML.
Figure 1–5 Sample XML File for WORKFORCE_SYNC Message
If you want to fetch the value for the Department Code Key from the XML then the NODE is DEPTID. The PARENT NODE for DEPTID is JOB. There is no Type Node defined for this attribute. Therefore, the value None is specified in the Decode combination. But, you must locate the EFFDT node in the XML for that parent node. In Oracle Identity Manager, you must specify a mandatory field, such as User ID for reconciliation. In other words, it implies that you have to specify User ID as the primary node to retrieve the value from XML.

Connector Objects Used During Reconciliation
About the Connector 1-27
1.5.4.2.3 Lookup.PSFT.HRMS.WorkForceSync.Recon This Lookup.PSFT.HRMS.WorkForceSync.Recon lookup definition maps the resource object field name with the value fetched from the Lookup.PSFT.HRMS.WorkForceSync.AttributeMapping lookup definition. The following is the format of the values stored in this lookup definition:
Code Key: Name of the resource object field in Oracle Identity Manager
Decode: Combination of the following elements separated by a tilde (~) character:
ATTRIBUTE ~ LOOKUP DEF
In this format:
ATTRIBUTE: Refers to the Code Key of the Lookup.PSFT.HRMS.WorkForceSync.AttributeMapping lookup definition
LOOKUP DEF: Name of the lookup definition, if the value of the attribute is retrieved from a lookup. This lookup is specified in the message-specific configuration lookup.
Consider the scenario discussed in Section 1.5.4.2.2, "Lookup.PSFT.HRMS.WorkForceSync.AttributeMapping." In this example, you fetched the Department defined in the Code Key column from the DEPTID node of the XML file.
Now, you must map this Department defined in the Lookup.PSFT.HRMS.WorkForceSync.AttributeMapping lookup definition with the resource object attribute, Department defined in the Lookup.PSFT.HRMS.WorkForceSync.Recon lookup definition.
For example, if the name of the Code Key column in the Lookup.PSFT.HRMS.WorkForceSync.AttributeMapping lookup definition is Dept, then you must define the mapping as follows:
Code Key: Department
Decode: Dept
In other words, this implies that the value for Department in the Lookup.PSFT.HRMS.WorkForceSync.Recon lookup definition is fetched from Dept defined in the attribute mapping lookup.
Similarly, values for all other attributes are fetched from the XML.
However, to fetch the value of the Employee Type resource object, you must concatenate the values obtained from Per Org, Reg Temp, and Full Part Time
Code Key Decode
Department Department
Effective Start Date Start Date
Employee Type PER ORG##REG TEMP##FULL PART TIME~EMPLOYEE TYPE LOOKUP
Job Code Job ID
Manager ID Supervisor ID
Status STATUS~EMPLOYEE STATUS LOOKUP
Supervisor ID Supervisor ID
User ID User ID

Connector Objects Used During Reconciliation
1-28 Oracle Identity Manager Connector Guide for PeopleSoft Employee Reconciliation
resource objects defined in the attribute lookup. This value is then searched in the Employee Type Lookup. The values obtained from each node are combined using a double hash (##).
The Per Org defined in the Lookup.PSFT.HRMS.WorkForceSync.AttributeMapping lookup definition has a value EMP that is fetched from the PER_ORG node in the XML. Similarly, the values obtained for Reg Temp and Full Part Time from XML are T and P, respectively. If you combine these values, it becomes a concatenated string of the following format:
EMP##T##P
Now, you must locate this value in the Employee Type Lookup, which is defined in the message-specific configuration, Lookup.PSFT.Message.WorkForceSync.EmpType lookup definition. The mapping is as follows:
Code Key: EMP##T##P
Decode: Temp
Therefore, during reconciliation, the value for the EMP##T##P employee type is reconciled into the corresponding Employee Type field of Oracle Identity Manager.
1.5.4.2.4 Lookup.PSFT.HRMS.WorkForceSync.EmpStatus The Lookup.PSFT.HRMS.WorkForceSync.EmpStatus lookup definition maps the value retrieved from the ACTION node of the WORKFORCE_SYNC message XML with the status to be shown on Oracle Identity Manager for the employee.
The following is the format of the values stored in this table:
Code Key: ACTION value retrieved from the WORKFORCE_SYNC message XML
Decode: Active or Disabled in Oracle Identity Manager
Note: You must define the mapping for all Actions to be performed on the target system in this lookup definition.
Code Key Decode
ADD Active
ADL Active
ASG Disabled
BON Active
COM Disabled
DEM Disabled
DTA Disabled
FSC Disabled
HIR Active
JED Disabled
JRC Active
LOA Disabled
LOF Disabled
LTO Disabled

Connector Objects Used During Reconciliation
About the Connector 1-29
For example, for the action HIRE for an employee, the data fetched from the ACTION node of the XML message is HIR. The Decode column of the lookup definition stores the corresponding mapping for this action. To display Active on Oracle Identity Manager for the action HIRE, you must define the following mapping:
Code Key: HIR
Decode: Active
See Section 4.7, "Setting Up the Lookup.PSFT.HRMS.WorkForceSync.EmpStatus Lookup Definition" for adding an entry in this lookup definition.
The following screenshot displays all the actions:
PAY Active
PLA Disabled
POI Active
POS Disabled
PRB Disabled
PRO Active
REC Active
STD Disabled
SUB Disabled
TER Disabled
XFR Active
Code Key Decode

Connector Objects Used During Reconciliation
1-30 Oracle Identity Manager Connector Guide for PeopleSoft Employee Reconciliation
1.5.4.2.5 Lookup.PSFT.HRMS.WorkForceSync.EmpType The connector can reconcile all valid person types that are stored in the target system, and all components of the Employee person type. The following example describes how this is done.
The record of a temporary, part-time, Contingent Worker is reconciled from the target system. During reconciliation, you use the Lookup.PSFT.HRMS.WorkForceSync.EmpType lookup definition to determine the Employee Type field to which the person type is mapped. In this lookup definition, the person type value from the target system is used as the Code Key, and its corresponding Decode value is used to fill the specific Employee Type field. Therefore, during reconciliation, the value of the temporary, part-time, Contingent Worker person type is reconciled into the corresponding Employee Type field of Oracle Identity Manager.
The Lookup.PSFT.HRMS.WorkForceSync.EmpType lookup definition has the following entries:
In the preceding table:
■ CWR represents Contingent Worker.
■ EMP represents Employee.
■ POI represents Person of Interest.
■ R represents Regular.
Note: The Decode values are case-sensitive.
Code Key Decode
CWR##R##D Consultant
CWR##R##F Consultant
CWR##R##P Full-Time
CWR##T##D Consultant
CWR##T##F Temp
CWR#T##P Intern
EMP##R##D Consultant
EMP##R##F Full-Time
EMP##R##P Temp
EMP##T##D Consultant
EMP##T##F Part-Time
EMP##T##P Temp
POI##R##D Consultant
POI##R##F Full-Time
POI##R##P Temp
POI##T##D Consultant
POI##T##F Part-Time
POI##T##P Temp

Connector Objects Used During Reconciliation
About the Connector 1-31
■ T represents Temporary.
■ D represents On-Demand.
■ F represents Full Time.
■ P represents Part Time.
1.5.4.2.6 Lookup.PSFT.HRMS.WorkForceSync.Validation The Lookup.PSFT.HRMS.WorkForceSync.Validation lookup definition is used to store the mapping between the attribute for which validation has to be applied and the validation implementation class.
The Lookup.PSFT.HRMS.WorkForceSync.Validation lookup is empty by default.
1.5.4.2.7 Lookup.PSFT.HRMS.WorkForceSync.Transformation The Lookup.PSFT.HRMS.WorkForceSync.Transformation lookup definition is used to store the mapping between the attribute for which transformation has to be applied and the transformation implementation class.
The Lookup.PSFT.HRMS.WorkForceSync.Transformation lookup is empty by default.
1.5.4.3 Other Lookup DefinitionsThe following are the predefined generic lookup definitions:
1.5.4.3.1 Lookup.PSFT.Configuration The Lookup.PSFT.Configuration lookup definition is used to store configuration information that is used by the connector. See Section 2.2.1.3, "Configuring the IT Resource" for more information about the entries in this lookup definition.
The Lookup.PSFT.Configuration lookup definition has the following entries:
Note: This lookup definition is common to both, Employee Reconciliation and User Management connectors. Therefore, it has entries for both connector features.
Code Key Decode Description
Constants Lookup Lookup.PSFT.UM.Constants Name of the lookup definition that is used to store constants used by the connector
DELETE_USER_PROFILE Lookup.PSFT.Message.DeleteUserProfile.Configuration
Name of the lookup definition for the DELETE_USER_PROFILE message
This is used for the User Management functionality, and is not applicable in this context.

Connector Objects Used During Reconciliation
1-32 Oracle Identity Manager Connector Guide for PeopleSoft Employee Reconciliation
Delete User Profile Component Interface Name
DELETE_USER_PROFILE Name of Component interface that deletes user data in PeopleSoft Enterprise Applications
This is used for the User Management functionality, and is not applicable in this context.
HRMS Resource Exclusion List Lookup
Lookup.PSFT.HRMS.ExclusionList
Name of the Resource Exclusion lookup for PeopleSoft Employee Reconciliation
See Section 1.5.4.3.2, "Lookup.PSFT.HRMS.ExclusionList" for more information about this lookup definition.
ID Types Attribute Map Lookup
Lookup.PSFT.UM.AttrMap.IDTypes
Name of the lookup definition for ID Type attributes
This is used for the User Management functionality. You must not change this value.
Ignore Root Audit Action No Use this value if the Root PSCAMA audit action is required to be considered while parsing the XML message.
Enter Yes if PSCAMA Audit Action is not taken into account. Here, the Root Audit Action is considered as a Change event.
Enter No if PSCAMA Audit Action is taken into account. If Root PSCAMA Audit Action is NULL or Empty, then the Root Audit Action is considered as an ADD event.
See Also: Appendix A, "Determining the Root Audit Action Details"
Multiple Version Support NA It is used for provisioning operations, and not applicable in this context.
Code Key Decode Description

Connector Objects Used During Reconciliation
About the Connector 1-33
PERSON_BASIC_FULLSYNC
Lookup.PSFT.Message.PersonBasicSync.Configuration
Name of the lookup definition for PERSON_BASIC_FULLSYNC message
See Section 1.5.4.1.1, "Lookup.PSFT.Message.PersonBasicSync.Configuration" for more information about this lookup definition.
Note: The Decode value is the same as that of the PERSON_BASIC_SYNC message, because the data to be reconciled is the same for both messages.
PERSON_BASIC_SYNC Lookup.PSFT.Message.PersonBasicSync.Configuration
Name of the lookup definition for the PERSON_BASIC_SYNC message
See Section 1.5.4.1.1, "Lookup.PSFT.Message.PersonBasicSync.Configuration" for more information about this lookup definition.
Provisioning Attribute Map Lookup
Lookup.PSFT.UM.Attr.Map.Prov Name of the lookup definition that contains provisioning information
It is not applicable in this context.
Target Date Format yyyy-MM-dd Data format of the Date type data in the XML file and messages
You must not change this value.
UM Resource Exclusion List Lookup
Lookup.PSFT.UM.ExclusionList Name of the Resource Exclusion lookup for User Management operations
It is not applicable in this context.
USER_PROFILE Lookup.PSFT.Message.UserProfile.Configuration
Name of the lookup definition for the USER_PROFILE message
This is used for the User Management functionality, and is not applicable in this context.
User Profile Component Interface Name
USER_PROFILE Component interface that loads user data in PeopleSoft Enterprise Applications
This is used for the User Management functionality, and is not applicable in this context
Code Key Decode Description

Connector Objects Used During Reconciliation
1-34 Oracle Identity Manager Connector Guide for PeopleSoft Employee Reconciliation
You can configure the message names, such as the PERSON_BASIC_SYNC, WORKFORCE_SYNC, PERSON_BASIC_FULLSYNC, and WORKFORCE_FULLSYNC defined in this lookup definition. Section 2.3.1.3, "Setting Up the Lookup.PSFT.Configuration Lookup Definition" describes the procedure to configure these message names.
1.5.4.3.2 Lookup.PSFT.HRMS.ExclusionList The Lookup.PSFT.HRMS.ExclusionList lookup definition provides a list of user IDs or person IDs that cannot be created on Oracle Identity Manager.
The following is the format of the values stored in this table:
User Profile illegal Characters
,~;~ ~:~&~(~)~\~[~]~/~PPLSOFT
List of characters or strings that are not supported by PeopleSoft in the value specified for any user profile field
Use Validation For Prov No Validation flag for User Management provisioning
This is used for the User Management functionality, and is not applicable in this context.
Validation Lookup For Prov Lookup.PSFT.UM.Validation Name of the lookup definition required for performing validation while provisioning
This is used for the User Management functionality, and is not applicable in this context.
WORKFORCE_FULLSYNC Lookup.PSFT.Message.WorkForceSync.Configuration
Name of the lookup definition for the WORKFORCE_FULLSYNC message
See Section 1.5.4.2.1, "Lookup.PSFT.Message.WorkForceSync.Configuration" for more information about this lookup definition.
Note: The Decode value is the same as that of the WORKFORCE_ SYNC because the data to be reconciled is the same for both messages.
WORKFORCE_SYNC Lookup.PSFT.Message.WorkForceSync.Configuration
Name of the lookup definition for the WORKFORCE_SYNC message
See Section 1.5.4.2.1, "Lookup.PSFT.Message.WorkForceSync.Configuration" for more information about this lookup definition.
Code Key Decode Description

Roadmap for Deploying and Using the Connector
About the Connector 1-35
Code Key: User ID resource object field name
Decode: List of user IDs separated by the tilde character (~)
See Section 2.3.1.2, "Setting Up the Lookup.PSFT.HRMS.ExclusionList Lookup Definition" for more information.
1.5.4.3.3 Lookup.PSFT.HRMS.CustomQuery You can configure limited reconciliation to specify the subset of target system records that must be fetched into Oracle Identity Manager. This subset is defined on the basis of attribute values that you specify in a query condition, which is then applied during reconciliation.
The Lookup.PSFT.HRMS.CustomQuery lookup definition maps resource object fields with OIM User form fields. It is used during application of the query condition that you create. See Section 3.4, "Limited Reconciliation" for more information. Section 4.6, "Setting Up the Lookup.PSFT.HRMS.CustomQuery Lookup Definition" provides instructions on how to add an entry in this lookup definition.
The following is the format of the values stored in this table:
Code Key: Resource object field name
Decode: Column name of the USR table
1.6 Roadmap for Deploying and Using the ConnectorThe following shows how information is organized in the rest of the guide:
■ Chapter 2, "Deploying the Connector" describes procedures that you must perform on Oracle Identity Manager and the target system during each stage of connector deployment.
■ Chapter 3, "Using the Connector" provides information about the tasks that must be performed each time you want to run reconciliation.
■ Chapter 4, "Extending the Functionality of the Connector" describes procedures that you can perform to extend the functionality of the connector.
■ Chapter 5, "Testing and Troubleshooting" provides information about testing the connector.
Code Key Decode
Department USR_UDF_DEPARTMENT_ID
Employee Type Users.Role
First Name Users.First Name
Job Code USR_UDF_JOB_CODE
Last Name Users.Last Name
Manager ID Users.Manager Login
Organization Name Organizations.Organization Name
Status Users.Status
Supervisor ID USR_UDF_SUPERVISOR_ID
User ID Users.User ID
User Type Users.Xellerate Type

Roadmap for Deploying and Using the Connector
1-36 Oracle Identity Manager Connector Guide for PeopleSoft Employee Reconciliation
■ Chapter 6, "Known Issues" lists the known issues associated with this release of the connector.
■ Appendix A, "Determining the Root Audit Action Details" provides information about root audit action.
■ Appendix B, "Configuring the Connector Messages" describes the procedure to configure the connector messages of release 9.1.0.x.y with that of the current release.
■ Appendix C, "Setting Up SSL on Oracle WebLogic Server" describes how to configure SSL on Oracle WebLogic Server for PeopleTools 8.50.

2
Deploying the Connector 2-1
2Deploying the Connector
Deploying the connector involves the following steps:
■ Section 2.1, "Preinstallation"
■ Section 2.2, "Installation"
■ Section 2.3, "Postinstallation"
2.1 PreinstallationPreinstallation information is divided across the following sections:
■ Section 2.1.1, "Preinstallation on Oracle Identity Manager"
■ Section 2.1.2, "Preinstallation on the Target System"
2.1.1 Preinstallation on Oracle Identity ManagerThis section contains the following topics:
■ Section 2.1.1.1, "Files and Directories on the Installation Media"
■ Section 2.1.1.2, "Determining the Release Number of the Connector"
■ Section 2.1.1.3, "Creating a Backup of the Existing Common.jar File"
2.1.1.1 Files and Directories on the Installation MediaTable 2–1 lists the files and directories on the installation media.
Note: In this guide, PeopleSoft HRMS is referred to as the target system.

Preinstallation
2-2 Oracle Identity Manager Connector Guide for PeopleSoft Employee Reconciliation
Table 2–1 Files and Directories on the Installation Media
File in the Installation Media Directory Description
configuration/PSFT_Employee_Reconciliation-CI.xml
This XML file contains configuration information that is used during connector installation.
lib/PSFTER.jar This JAR file contains the class files that are specific to the PeopleSoft Employee Reconciliation connector.
During connector deployment, this file is copied to the following location:
■ For Oracle Identity Manager release 9.1.0.x:
OIM_HOME/xellerate/ScheduleTask
■ For Oracle Identity Manager release 11.1.1: Oracle Identity Manager database
lib/Common.jar This JAR file contains the class files that are common to all connectors.
During connector deployment, this file is copied to the following location:
■ For Oracle Identity Manager release 9.1.0.x:
OIM_HOME/xellerate/JavaTasks
■ For Oracle Identity Manager release 11.1.1: Oracle Identity Manager database
lib/PSFTCommon.jar This JAR file contains PeopleSoft-specific files common to both Employee Reconciliation and User Management versions of the connector.
During connector deployment, this file is copied to the following location:
■ For Oracle Identity Manager release 9.1.0.x:
OIM_HOME/xellerate/JavaTasks
■ For Oracle Identity Manager release 11.1.1: Oracle Identity Manager database
lib/PeopleSoftOIMListener.war
lib/PeopleSoftOIMListener.ear
This Web Archive (WAR) file contains the classes and configuration files required to implement incremental reconciliation.
This Enterprise Archive (EAR) file contains one or more entries representing the modules of the Web application to be deployed onto an application server.
During connector deployment:
■ On Oracle Identity Manager release 9.1.0.x, the PeopleSoft listener is deployed as a WAR file.
■ On Oracle Identity Manager release 11.1.1, the PeopleSoft listener is deployed as an EAR file.
test/scripts/InvokeListener.bat
test/scripts/InvokeListener.sh
This BAT file and the UNIX shell script call the testing utility for reconciliation.
test/config/reconConfig.properties
test/config/log.properties
These files are used by theInvokeListener.bat file. The reconConfig.properties file contains configuration information for running the InvokeListener.bat file. The log.properties file contains logger information.

Preinstallation
Deploying the Connector 2-3
2.1.1.2 Determining the Release Number of the Connector
xml/PeoplesoftHRMS-ConnectorConfig.xml This XML file contains definitions for the connector components.
■ Resource object
■ Process definition
■ IT resource type
■ Reconciliation rules
■ Scheduled tasks
■ Lookup definitions
Files in the resources directory Each of these resource bundles contains language-specific information that is used by the connector.
During connector deployment, this file is copied to the following location:
■ For Oracle Identity Manager release 9.1.0.x:
OIM_HOME/xellerate/ConnectorResources
■ For Oracle Identity Manager release 11.1.1: Oracle Identity Manager database
Note: A resource bundle is a file containing localized versions of the text strings that are displayed on the Administrative and User Console. These text strings include GUI element labels and messages.
The following project files in the peoplecode directory:
OIM_ER
OIM_ER_DELETE
These files contain the PeopleCode for the steps that you define for importing a project from Application Designer. This is explained in Section 2.1.2.1, "Importing a Project from Application Designer."
Each project file contains two files with .ini and .xml extension that has the same name as the project. They are listed as follows:
■ OIM_ER.ini
■ OIM_ER.xml
■ OIM_ER_DELETE.ini
■ OIM_ER_DELETE.xml
samples/PSFTXellerateUserReconMessageHandlerImpl.java
samples/XellerateUserMessageParser.java
These files are used for implementing Message Handler and Message Parser for PeopleSoft 9.1.0.x release-specific messages.
JavaDoc This directory contains information about the Java APIs used by the connector.
Note: If you are using Oracle Identity Manager release 9.1.0.x, then the procedure described in this section is optional.
If you are using Oracle Identity Manager release 11.1.1, then skip this section.
Table 2–1 (Cont.) Files and Directories on the Installation Media
File in the Installation Media Directory Description

Preinstallation
2-4 Oracle Identity Manager Connector Guide for PeopleSoft Employee Reconciliation
You might have a deployment of an earlier release of the connector. While deploying the current release, you might want to know the release number of the earlier release. To determine the release number of a connector that has been deployed:
1. In a temporary directory, extract the contents of the following JAR file:
OIM_HOME/xellerate/ScheduleTask/PSFTER.jar
2. Open the manifest.mf file in a text editor. The manifest.mf file is bundled inside the PSFTER.jar file.
In the Manifest.mf file, the release number of the connector is displayed as the value of the Version property.
2.1.1.3 Creating a Backup of the Existing Common.jar FileThe Common.jar file is in the deployment package of each 9.1.x release of the connector. With each new release, code corresponding to that particular release is added to the existing code in this file. For example, the Common.jar file shipped with Connector Y on 12-July contains:
■ Code specific to Connector Y
■ Code included in the Common.jar files shipped with all other 9.1.x release of the connectors that were released before 12-July
If you have installed a release 9.1.x connector that was released after the current release of the PeopleSoft Employee Reconciliation connector, back up the existing Common.jar file, install the PeopleSoft Employee Reconciliation connector, and then restore the Common.jar file. The steps to perform this procedure are as follows:
1. Determine the release date of your existing release 9.1.x connector as follows:
a. Extract the contents of the following file in a temporary directory:
OIM_HOME/xellerate/JavaTasks/Common.jar
b. Open the Manifest.mf file in a text editor.
c. Note down the Build Date and Build Version values.
2. Determine the Build Date and Build Version values of the current release of the PeopleSoft Employee Reconciliation connector as follows:
a. On the installation media for the connector, extract the contents of the lib/Common.jar and then open the Manifest.mf file in a text editor.
b. Note down the Build Date and Build Version values.
Caution: If you do not perform this procedure, then your release 9.1.x connectors might not work.
Note: On Oracle Identity Manager release 11.1.1, use either DownloadJars.sh or DownloadJars.bat to download the common.jar file from the database, and then extract the contents of this file into a temporary directory.
See Oracle Fusion Middleware Developer's Guide for Oracle Identity Manager for instructions about using the Download JARs utility.

Preinstallation
Deploying the Connector 2-5
3. If the Build Date and Build Version values for the PeopleSoft Employee Reconciliation connector are less than the Build Date and Build Version values for the connector that is installed, then:
■ If you are using Oracle Identity Manager release 9.1.0.x, then:
a. Copy the OIM_HOME/xellerate/JavaTasks/Common.jar to a temporary location.
b. After you perform the procedure described in Section 2.2, "Installation" overwrite the new Common.jar file in the OIM_HOME/xellerate/JavaTasks directory with the Common.jar file that you backed up in the preceding step.
■ If you are using Oracle Identity Manager release 11.1.1, then run the Oracle Identity Manager Upload JARs utility to post the Common.jar file to the Oracle Identity Manager database. This utility is copied into the following location when you install Oracle Identity Manager:
For Microsoft Windows:
OIM_HOME/server/bin/UploadJars.bat
For UNIX:
OIM_HOME/server/bin/UploadJars.sh
When you run the utility, you are prompted to enter the login credentials of the Oracle Identity Manager administrator, URL of the Oracle Identity Manager host computer, context factory value, type of JAR file being uploaded, and the location from which the JAR file is to be uploaded. Specify 1 as the value of the JAR type.
2.1.2 Preinstallation on the Target SystemPermission lists, roles, and user profiles are building blocks of PeopleSoft security. Each user of the system has an individual User Profile, which in turn is linked to one or more Roles. To each Role, you can add one or more Permission Lists, which defines what a user can access. So, a user inherits permissions through the role that is attached to a User Profile.
You must create limited rights users who have restricted rights to access resources in the production environment to perform PeopleSoft-specific installation or maintenance operations.
The preinstallation steps consist of creating a user account with limited rights. Permission lists may contain any number of accesses, such as the Web libraries permission, Web services permissions, page permissions, and so on. You attach this permission list to a role, which in turn is linked to a user profile.
Note: Before you use the utility, verify that the WL_HOME environment variable is set to the directory in which Oracle WebLogic Server is installed.
See Also: Oracle Fusion Middleware Developer's Guide for Oracle Identity Manager for detailed information about the Upload JARs utility

Preinstallation
2-6 Oracle Identity Manager Connector Guide for PeopleSoft Employee Reconciliation
This section describes the following procedures, which have to be performed on the target system to create a user account with limited rights:
■ Section 2.1.2.1, "Importing a Project from Application Designer"
■ Section 2.1.2.2, "Creating a Target System User Account for Connector Operations"
2.1.2.1 Importing a Project from Application DesignerA PeopleSoft Application Designer project is an efficient way to configure your application.
You can import the OIM_ER project created in Application Designer to automate the steps for creating a permission list. You can also create a permission list by manually performing the steps described in Section 2.1.2.2.1, "Creating a Permission List." If you import the project, OIM_ER then you need not perform the steps mentioned in this section.
To import a project from Application Designer:
1. To open Application Designer in 2-tier mode, click Start, Programs, Peoplesoft8.x, and then Application Designer.
2. From the Tools menu, click Copy Project and then From File.
Note: If you install, uninstall, or upgrade the same project repeatedly the earlier project definition will be overwritten in the database.
Note: You can access the project files from the following directories:
For Oracle Identity Manager release 9.1.0.x:
OIM_HOME/xellerate/XLIntegrations/PSFTER/peoplecode/OIM_ER
OIM_HOME/xellerate/XLIntegrations/PSFTER/peoplecode/OIM_ER_DELETE
For Oracle Identity Manager release 11.1.1:
OIM_HOME/server/XLIntegrations/PSFTER/peoplecode/OIM_ER
OIM_HOME/server/XLIntegrations/PSFTER/peoplecode/OIM_ER_DELETE
Copy these files to a directory on your computer from where you can access Application Designer.

Preinstallation
Deploying the Connector 2-7
The Copy From File : Select Project dialog box appears.
3. Navigate to the directory in which the PeopleSoft project file is placed.
The project files are present in the /peoplecode directory of the installation media. Place these files in a new folder so that is accessible by the Application Designer program. Ensure that the folder name is the same as that of the project you are importing.
For example, place the OIM_ER.ini and OIM_ER.xml files in OIM_ER folder.
4. Select the project from the Select Project from the List Below region. The name of the project file is OIM_ER.
5. Click Select.
6. Click Copy.

Preinstallation
2-8 Oracle Identity Manager Connector Guide for PeopleSoft Employee Reconciliation
2.1.2.2 Creating a Target System User Account for Connector OperationsYou must create a target system account with privileges required for connector operations. The user account created on the target system has the permission to perform all the configurations required for connector operations. This includes configuring the PeopleSoft Integration Broker for full reconciliation and incremental reconciliation. This account cannot access pages or components that are not required by the connector.
The following sections describe the procedures to create this target system account:
■ Section 2.1.2.2.1, "Creating a Permission List"
■ Section 2.1.2.2.2, "Creating a Role for a Limited Rights User"
■ Section 2.1.2.2.3, "Assigning the Required Privileges to the Target System Account"
2.1.2.2.1 Creating a Permission List
To create a permission list:
1. Open a Web browser and enter the URL for PeopleSoft Internet Architecture. The URL is in the following format:
http://IPADDRESS:PORT/psp/ps/?cmd=login
For example:
http://172.21.109.69:9080/psp/ps/?cmd=login
2. In the PeopleSoft Internet Architecture window, click PeopleTools, Security, Permissions & Roles, and then click Permission Lists.
3. Click Add a new Value. On the Add a New Value tab, enter the permission list name, for example, OIMER, and then click Add.
4. On the General tab, enter a description for the permission list in the Description field.
5. On the Pages tab, click the search icon for Menu Name and perform the following:
a. Click the plus sign (+) to add a row for Menu Name. Click the search icon for Menu Name. In the Menu Name lookup, enter IB_PROFILE and then click
Note: You can remove the PeopleSoft project file and all its objects from the target system. To do so, repeat the steps described in the preceding procedure. When you reach Step 4, select OIM_ER_DELETE from the Select Project from the List Below region.
Note: For creating the target system account, you must log in to PeopleSoft Internet Architecture with administrator credentials.
Note: You can skip this section if you have imported a project from Application Designer. See Section 2.1.2.1, "Importing a Project from Application Designer" for more information.

Preinstallation
Deploying the Connector 2-9
Lookup. From the list, select IB_PROFILE. The application returns to the Pages tab. Click Edit Components.
b. On the Component Permissions page, click Edit Pages for each of the following component names:
IB_GATEWAY
IB_MESSAGE_BUILDER
IB_MONITOR_QUEUES
IB_NODE
IB_OPERATION
IB_QUEUEDEFN
IB_ROUTINGDEFN
IB_SERVICE
IB_SERVICEDEFN
IB_MONITOR
c. Click Select All, and then click OK for each of the components. Click OK on the Components Permissions page.
d. On the Pages tab, click the plus sign (+) to add another row for Menu Name.
e. In the Menu Name lookup, enter PROCESSMONITOR and then click Lookup. From the list, select PROCESSMONITOR. The application returns to the Pages tab. Click Edit Components.
f. On the Component Permissions page, click Edit Pages for the PROCESSMONITOR component name.
g. Click Select All, and then click OK. Click OK on the Components Permissions page.
h. On the Pages tab, click the plus sign (+) to add another row for Menu Name.
i. In the Menu Name lookup, enter PROCESS_SCHEDULER and then click Lookup. From the list, select PROCESS_SCHEDULER. The application returns to the Pages tab. Click Edit Components.
j. On the Component Permissions page, click Edit Pages for the PRCSDEFN component name.
k. Click Select All, and then click OK. Click OK on the Components Permissions page.
l. On the Pages tab, click the plus sign (+) to add another row for Menu Name.
m. In the Menu Name lookup, enter MANAGE_INTEGRATION_RULES and then click Lookup. From the list, select MANAGE_INTEGRATION_RULES. The application returns to the Pages tab. Click Edit Components.
n. On the Component Permissions page, click Edit Pages for the EO_EFFDTPUB component name.
o. Click Select All, and then click OK. Click OK on the Components Permissions page. The application returns to the Pages tab.
6. On the People Tools tab, select the Application Designer Access check box and click the Definition Permissions link. The Definition Permissions page is displayed.

Preinstallation
2-10 Oracle Identity Manager Connector Guide for PeopleSoft Employee Reconciliation
7. On this page, grant full access to the following object types by selecting Full Access from the Access list:
■ App Engine Program
■ Message
■ Component
■ Project
■ Application Package
8. Click OK.
9. Click the Tools Permissions link. The Tools Permissions page is displayed. On this page, grant full access to the SQL Editor tool by selecting Full Access from the Access list.
10. Click OK. The application returns to the People Tools tab.
11. On the Process tab, click the Process Group Permissions link. The Process Group Permission page is displayed.
12. In the Process Group lookup, click the search icon. From the list, select TLSALL.
13. On the Process Group Permission page, click the plus sign (+) to add another row for Process Group.
14. In the Process Group lookup, click the search icon. From the list, select STALL. The application returns to the Process Group Permission page.
15. Click OK.
16. On the Web Libraries tab, click the search icon for the Web Library Name field and perform the following:
a. In the Web Library Name lookup, enter WEBLIB_PORTAL and then click Lookup. From the list, select WEBLIB_PORTAL. The application returns to the Web Libraries tab. Click the Edit link.
b. On the WebLib Permissions page, click Full Access(All).
c. Click OK and then click Save.
d. Click the plus sign (+) to add a row for the Web Library Name field and repeat Steps a through c for the WEBLIB_PT_NAV library.
e. Click Save to save all the settings specified for the permission list.
2.1.2.2.2 Creating a Role for a Limited Rights User
To create a role for a limited rights user:
1. Open a Web browser and enter the URL for PeopleSoft Internet Architecture. The URL is in the following format:
http://IPADDRESS:PORT/psp/ps/?cmd=login
For example:
http:/172.21.109.69:9080/psp/ps/?cmd=login
2. In the PeopleSoft Internet Architecture window, click PeopleTools, Security, Permissions & Roles, and then click Roles.
3. Click Add a new Value. On the Add a New Value tab, enter the role name, for example, OIMER, and then click Add.

Preinstallation
Deploying the Connector 2-11
4. On the General tab, enter a description for the role in the Description field.
5. On the Permission Lists tab, click the search icon and perform the following:
a. In the Permission Lists lookup, enter OIMER and then click Lookup. From the list, select OIMER.
b. Click the plus sign (+) to add another row.
c. In the Permission Lists lookup, enter EOEI9000 and then click Lookup. From the list, select EOEI9000.
d. Click the plus sign (+) to add another row.
e. In the Permission Lists lookup, enter EOCO9000 and then click Lookup. From the list, select EOCO9000.
6. Click Save.
2.1.2.2.3 Assigning the Required Privileges to the Target System Account To assign the required privileges to the target system account:
1. Open a Web browser and enter the URL for PeopleSoft Internet Architecture. The URL is in the following format:
http://IPADDRESS:PORT/psp/ps/?cmd=login
For example:
http://172.21.109.69:9080/psp/ps/?cmd=login
2. In the PeopleSoft Internet Architecture window, click PeopleTools, Security, User Profiles, and then click User Profiles.
3. Click Add a new Value. On the Add a New Value tab, enter the user profile name, for example, OIMER, and then click Add.
4. On the General tab, perform the following:
a. From the Symbolic ID list, select the value that is displayed. For example, SYSADM1.
b. Enter valid values for the Password and Confirm Password fields.
c. Click the search icon for the Process Profile permission list.
d. In the Process Profile lookup, enter OIMER and then click Lookup. From the list, select OIMER. The application returns to the General tab.
5. On the ID tab, select none as the value of the ID type.
6. On the Roles tab, click the search icon:
a. In the Roles lookup, enter OIMER and then click Lookup. From the list, select OIMER.
b. Click the plus sign (+) to add another row.
c. In the Roles lookup, enter ProcessSchedulerAdmin and then click Lookup. From the list, select ProcessSchedulerAdmin.
d. Click the plus sign (+) to add another row.
e. In the Roles lookup, enter EIR Administrator and then click Lookup. From the list, select EIR Administrator.

Installation
2-12 Oracle Identity Manager Connector Guide for PeopleSoft Employee Reconciliation
f. Click Save to save this user profile. This profile is also used for a person with limited rights in PeopleSoft for performing all reconciliation-related configurations.
2.2 InstallationInstallation information is divided across the following sections:
■ Section 2.2.1, "Installation on Oracle Identity Manager"
■ Section 2.2.2, "Installation on the Target System"
2.2.1 Installation on Oracle Identity ManagerInstallation on Oracle Identity Manager consists of the following procedures:
■ Section 2.2.1.1, "Running the Connector Installer"
■ Section 2.2.1.2, "Copying the Connector Files and External Code Files"
■ Section 2.2.1.3, "Configuring the IT Resource"
■ Section 2.2.1.4, "Deploying the PeopleSoft Listener"
■ Section 2.2.1.5, "Removing the PeopleSoft Listener"
2.2.1.1 Running the Connector Installer
To run the Connector Installer:
1. Copy the contents of the connector installation media directory into the following directory:
■ For Oracle Identity Manager release 9.1.0.x: OIM_HOME/xellerate/ConnectorDefaultDirectory
■ For Oracle Identity Manager release 11.1.1: OIM_HOME/server/ConnectorDefaultDirectory
2. Log in to the Administrative and User Console by using the user account described in the "Creating the User Account for Installing Connectors" section of Oracle Identity Manager Administrative and User Console Guide.
3. Depending on the Oracle Identity Manager release you are using, perform one of the following steps:
■ For Oracle Identity Manager release 9.1.0.x:
Click Deployment Management, and then click Install Connector.
■ For Oracle Identity Manager release 11.1.1:
Note: In this guide, the term Connector Installer has been used to refer to the Connector Installer feature of the Administrative and User Console.
Note: In an Oracle Identity Manager cluster, perform this step on each node of the cluster.

Installation
Deploying the Connector 2-13
On the Welcome to Identity Manager Advanced Administration page, under the System Management section, click Install Connector.
4. From the Connector List list, select PeopleSoft Employee Recon RELEASE_NUMBER This list displays the names and release numbers of connectors whose installation files you copy into the default connector installation directory in Step 1.
If you have copied the installation files into a different directory, then:
a. In the Alternative Directory field, enter the full path and name of that directory.
b. To repopulate the list of connectors in the Connector List list, click Refresh.
c. From the Connector List list, select PeopleSoft Employee Recon RELEASE_NUMBER.
5. Click Load.
6. To start the installation process, click Continue.
The following tasks are performed, in sequence:
a. Configuration of connector libraries
b. Import of the connector XML files (by using the Deployment Manager)
c. Compilation of adapters
On successful completion of a task, a check mark is displayed for the task. If a task fails, then an X mark and a message stating the reason for failure is displayed. Depending on the reason for the failure, make the required correction and then perform one of the following steps:
■ Retry the installation by clicking Retry.
■ Cancel the installation and begin again from Step 1.
7. If all three tasks of the connector installation process are successful, then a message indicating successful installation is displayed. In addition, a list of steps that you must perform after the installation is displayed. These steps are as follows:
a. Ensuring that the prerequisites for using the connector are addressed
b. Configuring the IT resource for the connector
Record the name of the IT resource displayed on this page. The procedure to configure the IT resource is described later in this guide.
c. Configuring the scheduled tasks
Record the names of the scheduled tasks displayed on this page. The procedure to configure these scheduled tasks is described later in this guide.
When you run the Connector Installer, it copies the connector files and external code files to destination directories on the Oracle Identity Manager host computer. These files are listed in Table 2–2.

Installation
2-14 Oracle Identity Manager Connector Guide for PeopleSoft Employee Reconciliation
Installing the Connector in an Oracle Identity Manager ClusterWhile installing Oracle Identity Manager in a cluster, you must copy all the JAR files and the contents of the connector Resources directory into the corresponding directories on each node of the cluster. Then, restart each node. See Table 2–2 for information about the files that you must copy and their destination locations on the Oracle Identity Manager server.
Restoring the Common.jar FileIf required, restore the Common.jar file that you had backed up by following the procedure described in Section 2.1.1.3, "Creating a Backup of the Existing Common.jar File."
2.2.1.2 Copying the Connector Files and External Code FilesTable 2–3 lists the files that you must copy manually and the directories on the Oracle Identity Manager host computer to which you must copy them.
Table 2–2 Files Copied to Oracle Identity Manager
File in the Installation Media Directory
Destination for Oracle Identity Manager Release 9.1.0.x
Destination for Oracle Identity Manager Release 11.1.1
lib/Common.jar OIM_HOME/xellerate/JavaTasks Oracle Identity Manager database
lib/PSFTCommon.jar OIM_HOME/xellerate/JavaTasks Oracle Identity Manager database
lib/PSFTER.jar OIM_HOME/xellerate/ScheduleTask Oracle Identity Manager database
lib/PesopleSoftOIMListener.war
lib/PesopleSoftOIMListener.ear
To be deployed on the application server
Section 2.2.1.4.1, "Deploying the PeopleSoft Listener on Oracle Identity Manager Release 9.1.0.x" describes the deployment procedure.
To be deployed on the application server
Section 2.2.1.4.2, "Deploying the PeopleSoft Listener on Oracle Identity Manager Release 11.1.1" describes the deployment procedure.
Note: The directory paths given in the first column of this table correspond to the location of the connector files in the PeopleSoft Employee Reconciliation directory on the installation media. See Section 2.1.1.1, "Files and Directories on the Installation Media" for more information about these files.
If a particular destination directory does not exist on the Oracle Identity Manager host computer, then create it.
Table 2–3 Files to Be Copied to the Oracle Identity Manager Host Computer
File in the Installation Media Directory
Destination for Oracle Identity Manager Release 9.1.0.x
Destination for Oracle Identity Manager Release 11.1.1
lib/PeopleSoftOIMListener.war
lib/PeopleSoftOIMListener.ear
OIM_HOME/xellerate/XLIntegrations/PSFTER/WAR
OIM_HOME/server/XLIntegrations/PSFTER/EAR
Files in the test/scripts directory OIM_HOME/xellerate/XLIntegrations/PSFTER/scripts
OIM_HOME/server/XLIntegrations/PSFTER/scripts
Files in the test/config directory OIM_HOME/xellerate/XLIntegrations/PSFTER/config
OIM_HOME/server/XLIntegrations/PSFTER/config

Installation
Deploying the Connector 2-15
2.2.1.3 Configuring the IT ResourceThe IT resource for the target system contains connection information about the target system. Oracle Identity Manager uses this information during reconciliation.
When you run the Connector Installer, the PSFT Server IT resource is automatically created in Oracle Identity Manager. You must specify values for the parameters of this IT resource as follows:
1. Log in to the Administrative and User Console.
2. Depending on the Oracle Identity Manager release you are using, perform one of the following steps:
■ If you are using Oracle Identity Manager release 9.1.0.x, expand Resource Management, and then click Manage IT Resource.
■ If you are using Oracle Identity Manager release 11.1.1, then:
– On the Welcome to Oracle Identity Manager Self Service page, click Advanced.
– On the Welcome to Oracle Identity Manager Advanced Administration page, in the Configuration region, click Manage IT Resource.
3. In the IT Resource Name field on the Manage IT Resource page, enter PSFT Server and then click Search.
4. Click the edit icon for the IT resource.
5. From the list at the top of the page, select Details and Parameters.
6. Specify values for the parameters discussed in Table 2–4. The remaining parameters of IT resource are not applicable for this connector.
Note: While installing Oracle Identity Manager in a cluster, you copy the contents of the installation directory to each node of the cluster. Then, restart each node. Similarly, after you install the connector, you must copy all the JAR files and the contents of the connectorResources directory into the corresponding directories on each node of the cluster.

Installation
2-16 Oracle Identity Manager Connector Guide for PeopleSoft Employee Reconciliation
7. To save the values, click Update.
2.2.1.4 Deploying the PeopleSoft ListenerThe PeopleSoft listener is a Web application that is deployed on an Oracle Identity Manager host computer. The PeopleSoft listener parses the XML message and creates a reconciliation event in Oracle Identity Manager.
This section is classified based on the Oracle Identity Manager releases. Perform the procedure described in one of the following sections:
■ Section 2.2.1.4.1, "Deploying the PeopleSoft Listener on Oracle Identity Manager Release 9.1.0.x"
■ Section 2.2.1.4.2, "Deploying the PeopleSoft Listener on Oracle Identity Manager Release 11.1.1"
2.2.1.4.1 Deploying the PeopleSoft Listener on Oracle Identity Manager Release 9.1.0.x
To deploy the PeopleSoft listener on Oracle Identity Manager release 9.1.0.x:
1. Copy the OIM_HOME/xellerate/XLIntegrations/PSFTER/WAR/PeopleSoftOIMListener.war file into a temporary folder. Enter the following command to extract the contents of the PeopleSoftOIMListener.war file.
jar -xvf PeopleSoftOIMListener.war
2. Copy the following files from the OIM_HOME/xellerate/lib directory to the WEB-INF/lib directory in the temporary folder:
Table 2–4 IT Resource Parameters
Parameter Description
Configuration Lookup This parameter holds the name of the lookup definition that contains configuration information.
Default value: Lookup.PSFT.Configuration
Note: You must not change the value of this parameter. However, if you create a copy of all the connector objects, then you can specify the unique name of the copy of this lookup definition as the value of the Configuration Lookup Name parameter in the copy of the IT resource.
IsActive This parameter is used to specify whether the specified IT Resource is in use or not. Enter one of the following as the value of the IsActive parameter:
Enter yes as the value to specify that the target system installation represented by this IT resource is active. If you specify yes as the value, then the connector processes messages sent from this target system installation.
Enter no as the value if you do not want the connector to process messages sent from this target system installation.
Default value: Yes
Note: All the files mentioned in the remaining steps of this procedure are extracted from the PeopleSoftOIMListener.war file.

Installation
Deploying the Connector 2-17
■ xlAPI.jar
■ xlAuthentication.jar
■ xlCache.jar
■ xlCrypto.jar
■ xlLogger.jar
■ xlVO.jar
■ xlDataObjectBeans.jar (For IBM WebSphere Application Server, copy this file from the OIM_CLIENT/xlclient/lib directory.)
■ xlUtils.jar (for Oracle Application Server)
3. Copy Common.jar from the /lib directory on the installation media to the WEB-INF/lib directory in the temporary folder.
4. Edit the web.xml file as follows:
a. Locate the Login Name of the OIM Admin User details.
<param-value>OIM_ADMIN_USER</param-value>
Replace OIM_ADMIN_USER with Oracle Identity Manager administrator credentials.
For example, if the administrative account on Oracle Identity Manager is xelsysadm, then update the line as follows:
<param-value>xelsysadm</param-value>
b. Locate the XL Home Dir details, and replace OIM_HOME with the Oracle Identity Manager Home location.
c. Locate the java security policy details.
<param-name>java.security.policy</param-name><param-value>OIM_HOME/config/xl.policy</param-value>
Here, java.security.policy property is used to specify the fully qualified file name of the policy file. Typically, this file is located in the OIM_HOME/designconsole/config directory.
Replace OIM_HOME with the path to the design console directory as specified in Step 4 b.
<param-value>E:/OIM11g_Installations/MAY1202010/Middleware/OIM_HOME/designconsole/config/xl.policy</param-value>
d. Locate the java security login config details.
<param-name>java.security.auth.login.config</param-name>
Note:
■ Before you copy these files from the OIM_HOME/xellerate/lib directory, check whether these files exist in the WEB-INF/lib directory of the temporary folder. If these files exist, then first delete them from the WEB-INF/lib directory.
■ If the lib folder does not exist in WEB-INF directory, then you must create it.

Installation
2-18 Oracle Identity Manager Connector Guide for PeopleSoft Employee Reconciliation
<param-value>OIM_HOME/xellerate/config/auth(ws/wl/oc4j).conf</param-value>
Here, java.security.auth.login.config property is used to specify the fully qualified file name of the authentication configuration file. Typically, this file is located in the OIM_HOME/xellerate/config directory.
Each application server uses a different authentication configuration file:
IBM WebSphere Application Server: authws.conf
JBoss Application Server: auth.conf
Oracle WebLogic Server: authwl.conf
Oracle Application Server: authoc4j.conf
You must edit the auth(ws/wl/oc4j).conf value in the preceding line to the application server-specific configuration file.
e. Locate the Message Handler Impl classes details.
<param-name>IT_RESOURCE_NAME</param-name>
Replace IT_RESOURCE_NAME with the name of the IT resource.
For example, if the name of IT resource is PSFT Server, then update the line as follows:
<param-name>PSFT Server</param-name>
f. Locate the following line:
<param-value>MESSAGE~IMPLEMENTATION_CLASS;MESSAGE~IMPLEMENTATION_CLASS;MESSAGE~IMPLEMENTATION_CLASS</param-value>
In this format, the message name and its implementation class must be separated by a tilde (~). For multiple messages, each pair must be separated with a semicolon (;). For default implementation, you must modify the line as follows:
<param-value>PERSON_BASIC_SYNC~oracle.iam.connectors.psft.common.handler.impl.PSFTPersonSyncReconMessageHandlerImpl;USER_PROFILE~oracle.iam.connectors.psft.common.handler.impl.PSFTUserProfileReconMessageHandlerImpl;WORKFORCE_SYNC~oracle.iam.connectors.psft.common.handler.impl.PSFTWorkForceSyncReconMessageHandlerImpl;DELETE_USER_PROFILE~oracle.iam.connectors.psft.common.handler.impl.PSFTDeleteUserReconMessageHandlerImpl</param-value>
If PeopleSoft is sending the PERSON_BASIC_SYNC.VERSION_3 message for PERSON_BASIC_SYNC, then modify the line as follows:
<param-value>PERSON_BASIC_SYNC.VERSION_3~oracle.iam.connectors.psft.common.handler.impl.PSFTPersonSyncReconMessageHandlerImpl;USER_PROFILE~oracle.iam.connectors.psft.common.handler.impl.PSFTUserProfileReconMessageHandlerImpl;WORKFORCE_SYNC.VERSION_2~oracle.iam.connectors.psft.common.handler.impl.PSFTWorkForceSyncReconMessageHandlerImpl;DELETE_USER_PROFILE~oracle.iam.connectors.psft.common.handler.impl.PSFTDeleteUserReconMessageHandlerImpl</param-value>
g. Locate the java provider details.
<param-name>java.naming.provider.url</param-name><param-value>For valid value Check xlConfig.xml</param-value>

Installation
Deploying the Connector 2-19
Typically, the xlConfig.xml file is located in the OIM_HOME/designconsole/config directory.
Replace For valid value Check xlConfig.xml with the value obtained from the XML file.
For example, is the value for Java provider in the XML file is t3://172.21.109.102:8003/oim, then update the line as follows:
<param-value>t3://172.21.109.102:8003/oim</param-value>
5. Delete the PeopleSoftOIMListener.war file from the temporary directory into which you extracted it, and then use the following command to re-create the file:
jar –cvf PeoplesoftOIMListener.war .
6. Ensure that the old version of the PeopleSoftOIMListener.war file is removed from the application server deployment directory.
7. Deploy the newly created PeopleSoftOIMListener.war file into the deployment directory of the application server as follows:
For IBM WebSphere Application Server:
a. Log in to the WebSphere Admin console.
b. Expand Applications.
c. Click Install New Application.
d. Click the Browse button to locate the WAR file.
e. Specify the Context root as PeopleSoftOIMListener.
f. Click Next.
g. In the Select installation options field, enter PeopleSoftOIMListener as the application name and click Next.
h. On the Map modules to servers page, select PeopleSoftOIMListener.war, and click Next.
i. On the Map virtual hosts page, select PeopleSoftOIMListener.war, and click Next.
j. Click Finish.
k. Click Save to save all the configurations to the master configuration in IBM WebSphere Application Server.
l. Click Enterprise Applications.
m. On the Enterprise Applications page, select PeopleSoftOIMListener and then click Start to restart the application.
For JBoss Application Server:
a. Copy the modified WAR file to the JBOSS_HOME/server/default/deploy directory.
In a JBoss cluster, copy the modified WAR file to the JBOSS_HOME/server/all/deploy directory.
b. Restart JBoss Application Server.
For Oracle WebLogic Server:
a. Log in to the Oracle WebLogic admin console.

Installation
2-20 Oracle Identity Manager Connector Guide for PeopleSoft Employee Reconciliation
b. From the Domain Structure list, select OIM_DOMAIN.
Where OIM_DOMAIN is the domain on which Oracle Identity Manager is installed.
c. Click the Deployments tab.
d. On Microsoft Windows, in the Change Centre window, click Lock & Edit. It enables the Install button of the Monitoring tab in the Summary Of Deployments section.
e. Click Install.
f. In the Install Application Assistant, enter the full path of the directory in which the WAR file is placed. Then, click Next.
g. Select the WAR file to install.
h. Click Next.
i. Select the Install this deployment as an application option, and then click Next.
j. In the Name of deployment field, enter PeopleSoftOIMListener.
k. In the Security section, select the DD Only: Use only roles and policies that are defined in the deployment descriptors option.
l. In the Source accessibility window, select the Use the defaults defined by the deployments targets option.
m. Click Finish.
On Microsoft Windows, a message that reads "The deployment has been successfully installed" is displayed.
n. On UNIX platforms, click Save. The following messages are displayed:
Success All changes have been activated. No restarts are necessary.
Success Settings updated successfully.
o. On Microsoft Windows, to activate the changes that you have made up to this point:
i. Select the check box corresponding to the newly installed application.
ii. In the Change centre window, click Activate Changes.
p. On Microsoft Windows, select the check box for the newly installed application, select the Servicing all requests option from the Start list, and then click Yes.
For Oracle Application Server:
a. Log in to the Oracle Application Server Control.
b. Click on OC4J instance where Oracle Identity Manager is deployed and running.
c. Click Applications, Deploy. The Select Archive step is displayed.
d. Enter PeopleSoftOIMListener.war file location and click Next.
e. In the Application Name field, enter PeopleSoftOIMListener and click Next.
f. Click Deploy.

Installation
Deploying the Connector 2-21
g. Click Return when the application "PeopleSoftOIMListener" has been successfully deployed.
8. Restart Oracle Identity Manager and the Design Console.
2.2.1.4.2 Deploying the PeopleSoft Listener on Oracle Identity Manager Release 11.1.1
To deploy the PeopleSoft listener on Oracle Identity Manager release 11.1.1:
1. Copy the OIM_HOME/server/XLIntegrations/PSFTER/EAR/PeopleSoftOIMListener.ear folder into a temporary folder, for example temp.
2. Copy the Common.jar file from the /lib directory on the installation media to the temp/PeopleSoftOIMListener.ear/PeopleSoftOIMListener.war/WEB-INF/lib folder.
3. Copy the following files from the OIM_HOME/server/client to the WEB-INF/lib folder in the temporary folder:
■ oimclient.jar
4. Copy the following files from the OIM_HOME/server/platform folders to the WEB-INF/lib folder in the temporary folder:
■ iam-platform-auth-client.jar
■ iam-platform-utils.jar
5. Edit the web.xml file present in temp/PeopleSoftOIMListener.ear/PeopleSoftOIMListener.war/WEB-INF folder as follows:
a. Locate the Login Name of the OIM Admin User details.
<param-name>oimLoginUserName</param-name><param-value>OIM_ADMIN_USER</param-value>
Replace OIM_ADMIN_USER with Oracle Identity Manager administrator credentials.
For example, if the administrative account on Oracle Identity Manager is xelsysadm, then update the line as follows:
<param-value>xelsysadm</param-value>
b. Locate the Message Handler Impl classes details.
<param-name>IT_RESOURCE_NAME</param-name>
Replace IT_RESOURCE_NAME with the name of the IT resource.
For example, if the name of IT resource is PSFT Server, then update the line as follows:
<param-name>PSFT Server</param-name>
c. Locate the following line:
<param-value>MESSAGE~IMPLEMENTATION_CLASS;MESSAGE~IMPLEMENTATION_CLASS;MESSAGE~IMPLEMENTATION_CLASS</param-value>
In this format, the message name and its implementation class must be separated by a tilde (~). For multiple messages, each pair must be separated

Installation
2-22 Oracle Identity Manager Connector Guide for PeopleSoft Employee Reconciliation
by a semicolon (;). For default implementation, you must modify the line as follows:
<param-value>PERSON_BASIC_SYNC~oracle.iam.connectors.psft.common.handler.impl.PSFTPersonSyncReconMessageHandlerImpl;USER_PROFILE~oracle.iam.connectors.psft.common.handler.impl.PSFTUserProfileReconMessageHandlerImpl;WORKFORCE_SYNC~oracle.iam.connectors.psft.common.handler.impl.PSFTWorkForceSyncReconMessageHandlerImpl;DELETE_USER_PROFILE~oracle.iam.connectors.psft.common.handler.impl.PSFTDeleteUserReconMessageHandlerImpl</param-value>
If PeopleSoft is sending the PERSON_BASIC_SYNC.VERSION_3 message for PERSON_BASIC_SYNC, then modify the line as follows:
<param-value>PERSON_BASIC_SYNC.VERSION_3~oracle.iam.connectors.psft.common.handler.impl.PSFTPersonSyncReconMessageHandlerImpl;USER_PROFILE~oracle.iam.connectors.psft.common.handler.impl.PSFTUserProfileReconMessageHandlerImpl;WORKFORCE_SYNC~oracle.iam.connectors.psft.common.handler.impl.PSFTWorkForceSyncReconMessageHandlerImpl;DELETE_USER_PROFILE~oracle.iam.connectors.psft.common.handler.impl.PSFTDeleteUserReconMessageHandlerImpl</param-value>
6. Ensure that the old version of the PeopleSoftOIMListener.ear file is deleted from the application server deployment directory.
7. Deploy the newly created PeopleSoftOIMListener.ear file in the deployment directory of the application server as follows:
a. Log in to the Oracle WebLogic admin console.
b. On the left navigation pane, expand Domain Structure, and then click Deployments.
c. Click Lock & Edit. It enables the Install button of the Monitoring tab in the Summary Of Deployments section.
d. Click Install.
e. On the Install Application Assistant page, in the Path field, enter the full path of the directory in which the EAR file is placed. Then, click Next.
f. Select the Install this deployment as an application option, and then click Next.
g. From the Servers list, select the server on which Oracle Identity Manager is deployed, for example oim_server1 and then click Next.
h. On the Optional Settings page, select I will make the deployment accessible from the following location, and then click Next.
i. Review your choices, and then click Finish.
j. Click Activate Changes.
On Microsoft Windows, a message that reads "All changes have been activated. No restarts are necessary" is displayed.
8. Edit the $DOMAIN_HOME/config/fmwconfig/system-jazn-data.xml file as follows:
a. In a text editor, open the system-jazn-data.xml file for editing.
b. Add the following block in the <jazn-policy> element that is present directly under the <jazn-data> element:
<grant> <grantee> <codesource>

Installation
Deploying the Connector 2-23
<url>file:{samplelocation}/PeopleSoftOIMListener.ear/PeopleSoftOIMListener.war/WEB-INF/lib/-</url> </codesource> </grantee> <permissions> <permission> <class>oracle.security.jps.service.credstore.CredentialAccessPermission</class> <name>context=SYSTEM,mapName=oim,keyName=*</name> <actions>read,write,delete</actions> </permission> </permissions> <permission-set-refs> </permission-set-refs> </grant>
c. Locate the sample location details, and replace it with the path of the PeopleSoftOIMListener.ear file location.
For example, if the EAR file is placed in the /temp folder, then replace {samplelocation} in the preceding block as follows:
<url>file:/temp/PeopleSoftOIMListener.ear/PeopleSoftOIMListener.war/WEB-INF/lib/-</url>
9. Restart Oracle Identity Manager and the Admin Server.
2.2.1.5 Removing the PeopleSoft Listener
To remove the PeopleSoft listener:
For IBM WebSphere Application Server:
1. Log in to the WebSphere Admin console.
2. Expand Applications.
3. Select Enterprise Applications from the list.
A list of deployed applications is shown in the right pane.
4. Select the PeopleSoftOIMListener.war check box.
5. Specify the Context root as PeopleSoftOIMListener.
6. Click Uninstall.
An Uninstall Application confirmation screen appears with the name of the application to be uninstalled. In this scenario, the application would be PeopleSoftOIMListener.
7. Click OK.
For JBoss Application Server:
1. Delete the WAR file from the JBOSS_HOME/server/default/deploy directory.
Note: This section is not a part of installation on Oracle Identity Manager. You might need this procedure to extend the connector.

Installation
2-24 Oracle Identity Manager Connector Guide for PeopleSoft Employee Reconciliation
In a JBoss cluster, delete the WAR file from the JBOSS_HOME/server/all/deploy directory.
2. Restart JBoss Application Server.
For Oracle WebLogic Server:
1. Log in to the Oracle WebLogic admin console.
2. From the Domain Structure list, select OIM_DOMAIN.
Where OIM_DOMAIN is the domain on which Oracle Identity Manager is installed.
3. Click the Deployments tab.
4. On Microsoft Windows, in the Change Centre window, click Lock & Edit.
5. Select PeopleSoftOIMListener.war or PeopleSoftOIMListener.ear depending on Oracle Identity Manager release. This enables the Delete button of the Control tab in the Summary Of Deployments region.
6. Click Stop. A list appears.
7. Select Force Stop Now.
The Force Stop Application confirmation screen appears.
8. Click Yes.
9. On the Control tab in the Summary Of Deployments region, select PeopleSoftOIMListener.war or PeopleSoftOIMListener.ear depending on Oracle Identity Manager release.
10. Click Delete.
A confirmation message appears on successful deletion of the WAR file.
11. On the left pane, click the Active Changes button.
For Oracle Application Server
1. Log in to the Oracle Application Server Control.
2. Click on OC4J instance where Oracle Identity Manager is deployed and running.
3. Click Applications.
4. Select the PeopleSoftOIMListener application and click Undeploy. You will be prompted to confirm the removal of PeopleSoftOIMListener application.
5. Click Yes. A message confirming the removal of PeopleSoftOIMListener application will be displayed.
6. Click Return.
2.2.2 Installation on the Target SystemDuring this stage, you configure the target system to enable it for reconciliation. This information is provided in the following sections:
■ Section 2.2.2.1, "Configuring the Target System for Full Reconciliation"
■ Section 2.2.2.2, "Configuring the Target System for Incremental Reconciliation"

Installation
Deploying the Connector 2-25
2.2.2.1 Configuring the Target System for Full ReconciliationAs described in Chapter 1, "About the Connector", full reconciliation is used to reconcile all existing person data into Oracle Identity Manager. The PeopleCode that is activated in response to these events extracts the required person data through the following components:
For PeopleSoft 9.0:
PERSONAL_DATA, JOB_DATA, JOB_DATA_EMP, JOB_DATA_CONCUR, and JOB_DATA_CWR
Configuring the target system for full reconciliation involves creation of XML files for full reconciliation by performing the following procedures:
■ Section 2.2.2.1.1, "Configuring the PeopleSoft Integration Broker"
■ Section 2.2.2.1.2, "Configuring the PERSON_BASIC_FULLSYNC Service Operation"
■ Section 2.2.2.1.3, "Configuring the WORKFORCE_FULLSYNC Service Operation"
2.2.2.1.1 Configuring the PeopleSoft Integration Broker The following sections explain the procedure to configure PeopleSoft Integration Broker:
Configuring PeopleSoft Integration Broker GatewayPeopleSoft Integration Broker is installed as part of the PeopleTools installation process. The Integration Broker Gateway is a component of PeopleSoft Integration Broker, which runs on the PeopleSoft Web Server. It is the physical hub between PeopleSoft and the third-party system. The integration gateway manages the receipt and delivery of messages passed among systems through PeopleSoft Integration Broker.
To configure the PeopleSoft Integration Broker gateway:
1. Open a Web browser and enter the URL for PeopleSoft Internet Architecture.
The URL for PeopleSoft Internet Architecture is in the following format:
http://IPADDRESS:PORT/psp/ps/?cmd=login
For example:
http://172.21.109.69:9080/psp/ps/?cmd=login
2. To display the Gateway component details, expand PeopleTools, Integration Broker, Configuration, and then Gateways. The Gateway component details are displayed.
3. In the Integration Gateway ID field, enter LOCAL, and then click Search. The LOCAL gateway is a default gateway that is created when you install PeopleSoft Internet Architecture.
4. Ensure that the IP address and host name specified in the URL of the PeopleSoft listener are those on which the target system is installed. The URL of the PeopleSoft listener is in one of the following formats:
http://HOSTNAME_of_the_PeopleSoft_Web_server orIPADDRESS:PORT/PSIGW/PeopleSoftListeningConnector
For example:
http://10.121.16.42:80/PSIGW/PeopleSoftListeningConnector

Installation
2-26 Oracle Identity Manager Connector Guide for PeopleSoft Employee Reconciliation
5. To load all target connectors that are registered with the LOCAL gateway, click Load Gateway Connectors. A window is displayed mentioning that the loading process is successful. Click OK.
6. Click Save.
7. Click Ping Gateway to check whether the gateway component is active. The PeopleTools version and the status of the PeopleSoft listener are displayed. The status should be ACTIVE.
Configuring PeopleSoft Integration BrokerPeopleSoft Integration Broker provides a mechanism for communicating with the outside world using XML files. Communication can take place between different PeopleSoft applications or between PeopleSoft and third-party systems. To subscribe to data, third-party applications can accept and process XML messages posted by PeopleSoft using the available PeopleSoft connectors. The Integration Broker routes messages to and from PeopleSoft.
To configure PeopleSoft Integration Broker:
1. Create a remote node as follows:
a. In PeopleSoft Internet Architecture, expand PeopleTools, Integration Broker, Integration Setup, and then click Nodes.
b. On the Add a New Value tab, enter the node name, for example, OIM_FILE_NODE, and then click Add.
c. On the Node Definition tab, provide the following values:
In the Description field, enter a description for the node.
In the Default User ID field, enter PS.
d. Make this node a remote node by deselecting the Local Node check box and selecting the Active Node check box.
e. Ensure that the Node Type is PIA.
f. On the Connectors tab, search for the following information by clicking the Lookup icon:
Gateway ID: LOCAL
Connector ID: FILEOUTPUT
g. On the Properties page in the Connectors tab, enter the following information:
Property ID: HEADER
Property Name: sendUncompressed
Required value: Y
Property ID: PROPERTY
Property Name: Method
Required value: PUT
Property ID: PROPERTY
Property Name: FilePath
Required value: Any location writable by the Integration Broker. This location is used to generate the full data publish files.

Installation
Deploying the Connector 2-27
Property ID: PROPERTY
Property Name: Password
Required value: Same value as of ig.fileconnector.password in the integrationGateway.properties file
h. Click Save.
i. Click Ping Node to check whether a connection is established with the specified IP address.
2.2.2.1.2 Configuring the PERSON_BASIC_FULLSYNC Service Operation The PERSON_BASIC_FULLSYNC message contains the basic personal information about all the persons. This information includes the Employee ID, First Name, Last Name, and Employee Type.
Configuring the PERSON_BASIC_FULLSYNC Service OperationTo configure the PERSON_BASIC_FULLSYNC service operation perform the following procedures:
■ Activating the PERSON_BASIC_FULLSYNC Service Operation
■ Verifying the Queue Status for the PERSON_BASIC_FULLSYNC Service Operation
■ Setting Up the Security for the PERSON_BASIC_FULLSYNC Service Operation
■ Defining the Routing for the PERSON_BASIC_FULLSYNC Service Operation
■ Displaying the EI Repository Folder
■ Activating the PERSON_BASIC_FULLSYNC Message
■ Activating the Full Data Publish Rule
Activating the PERSON_BASIC_FULLSYNC Service OperationThe service operation is a mechanism to trigger, receive, transform, and route messages that provide information about updates in PeopleSoft or an external
Note: To locate the intergrationGateway.properties file, perform the following steps using the PeopleSoft administrator credentials:
1. In PeopleSoft Internet Architecture, expand PeopleTools, Integration Broker, Configuration, and then click Gateways.
2. In the Integration Gateway ID field, enter LOCAL, and then click Search.
3. Click the Gateway Setup Properties link.
You are prompted to enter the user ID and password.
4. Specify the following values:
In the UserID field, enter the appropriate user ID.
In the Password field, enter the appropriate password.
Note: The procedure remains the same for PeopleTools 8.49 with HRMS 9.0 and for PeopleTools 8.50 with HRMS 9.1. The screenshots are taken on PeopleTools 8.49 version.

Installation
2-28 Oracle Identity Manager Connector Guide for PeopleSoft Employee Reconciliation
application. You must activate the service operation to successfully transfer or receive messages.
To activate the PERSON_BASIC_FULLSYNC service operation:
1. In PeopleSoft Internet Architecture, expand PeopleTools, Integration Broker, Integration Setup, and then click Service Operations.
2. On the Find Service Operation tab, enter PERSON_BASIC_FULLSYNC in the Service field, and then click Search.
3. Click the PERSON_BASIC_FULLSYNC link.
The following screenshot displays the default version associated with this service operation:
4. In the Default Service Operation Version region, click Active.
5. Click Save.
Note: In PeopleSoft HRMS, there are three versions of the message associated with this service operation. But, when you integrate PeopleSoft HRMS 9.0 and Oracle Identity Manager, you must use the default version VERSION_3.

Installation
Deploying the Connector 2-29
Verifying the Queue Status for the PERSON_BASIC_FULLSYNC Service OperationAll messages in PeopleSoft are sent through a queue. This is done to ensure that the messages are delivered in a correct sequence. Therefore, you must ensure that the queue is in the Run status.
To ensure that the status of the queue for the PERSON_BASIC_FULLSYNC service operation is Run:
1. In PeopleSoft Internet Architecture, expand PeopleTools, Integration Broker, Integration Setup, and then click Queues.
2. Search for the PERSON_DATA queue.
3. In the Queue Status list, ensure that Run is selected.
The queue status is highlighted in the following screenshot:
4. Click Return to Search.
Setting Up the Security for the PERSON_BASIC_FULLSYNC Service OperationA person on the target system who has permission to modify or add personal or job information of a person might not have access to send messages regarding these updates. Therefore, it is imperative to explicitly grant security to enable operations.
To set up the security for PERSON_BASIC_FULLSYNC service operation:
1. In PeopleSoft Internet Architecture, expand PeopleTools, Integration Broker, Integration Setup, and then click Service Operations.
Note: If the queue status is not Run:
1. From the Queue Status list, select Run.
2. Click Save.

Installation
2-30 Oracle Identity Manager Connector Guide for PeopleSoft Employee Reconciliation
2. Search for and open the PERSON_BASIC_FULLSYNC service operation.
3. On the General tab, click the Service Operation Security link.
The link is highlighted in the following screenshot:
4. Attach the OIMER permission list to the PERSON_BASIC_FULLSYNC service operation. This list is created in Step 3 of the preinstallation procedure discussed in Section 2.1.2.2.1, "Creating a Permission List."
To attach the permission list:
a. Click the plus sign (+) to add a row to the Permission List field.
b. In the Permission List field, enter OIMER and then click the Look up Permission List icon.
The OIMER permission list appears.
c. From the Access list, select Full Access.
The following screenshot displays the preceding steps:
d. Click Save.

Installation
Deploying the Connector 2-31
e. Click Return to Search.
Defining the Routing for the PERSON_BASIC_FULLSYNC Service OperationRouting is defined to inform PeopleSoft about the origin and intended recipient of the message. You might have to transform the message being sent or received according to the business rules.
To define the routing for PERSON_BASIC_FULLSYNC service operation:
1. On the Routing tab, enter PERSON_BASIC_FULLSYNC_HR_FILE as the routing name and then click Add.
2. On the Routing Definitions tab, enter the following:
Sender Node: PSFT_HR
Receiver Node: OIM_FILE_NODE
The following screenshot displays the Sender and Receiver nodes:
3. Click Save.
4. Click Return to go back to the Routings tab of the service operation, and verify whether your routing is active.
Note: The Sender Node is the default active local node. To locate the sender node:
1. Click the Look up icon.
2. Click Default to sort the results in descending order.
The default active local node should meet the following criteria:
Local Node: 1
Default Local Node: Y
Node Type: PIA
Only one node can meet all the above conditions at a time.
3. Select the node.
4. Click Save.

Installation
2-32 Oracle Identity Manager Connector Guide for PeopleSoft Employee Reconciliation
Displaying the EI Repository FolderEI Repository is a hidden folder in PeopleSoft. Therefore, you must display this folder.
To display the EI Repository folder:
1. In the PeopleSoft Internet Architecture, expand People Tools, Portal, and then Structure and Content.
2. Click the Enterprise Components link.
3. Click the Edit link for EI Repository, and then uncheck Hide from portal navigation.
The following screenshot displays the Hide from portal navigation check box:
4. Click Save.
5. Log out, and then log in.
Activating the PERSON_BASIC_FULLSYNC MessageYou must activate the PERSON_BASIC_FULLSYNC message so that it can be processed.
To activate the PERSON_BASIC_FULLSYNC message:
1. In the PeopleSoft Internet Architecture, expand Enterprise Components, EI Repository, and then click Message Properties.
2. Search for and open the PERSON_BASIC_FULLSYNC message.
Note: Perform this procedure using the PeopleSoft administrator credentials.

Installation
Deploying the Connector 2-33
3. Click Activate All.
The following screenshot displays the message to be activated:
4. Click the Subscription tab, and activate the Subscription PeopleCode if it exists.
Activating the Full Data Publish RuleYou must define and activate the Full Data Publish rule, because it acts as a catalyst for the full reconciliation process. This rule provides the full reconciliation process the desired information to initiate reconciliation.
To activate the full data publish rule:
1. In the PeopleSoft Internet Architecture, expand Enterprise Components, Integration Definitions, and then click Full Data Publish Rules.
2. Search for and open the PERSON_BASIC_FULLSYNC message.
3. In the Publish Rule Definition region:
a. In the Publish Rule ID field, enter PERSON_BASIC_FULLSYNC.
b. In the Description field, enter PERSON_BASIC_FULLSYNC.
c. From the Status list, select Active.
The following screenshot displays the preceding steps:
Note: To perform this step, your User Profile must have the EIR Administrator role consisting of EOEI9000 and EOCO9000 permission lists.

Installation
2-34 Oracle Identity Manager Connector Guide for PeopleSoft Employee Reconciliation
4. Click Save.
2.2.2.1.3 Configuring the WORKFORCE_FULLSYNC Service Operation The WORKFORCE_FULLSYNC message contains the job-related details of all persons. This information includes the Department, Supervisor ID, Manager ID, and Job Code.
Configuring the WORKFORCE_FULLSYNC Service Operation To configure the WORKFORCE_FULLSYNC service operation perform the following procedures:
■ Activating the WORKFORCE_FULLSYNC Service Operation
■ Verifying the Queue Status for the WORKFORCE_FULLSYNC Service Operation
■ Setting Up the Security for the WORKFORCE_FULLSYNC Service Operation
■ Defining the Routing for the WORKFORCE_FULLSYNC Service Operation
■ Displaying the EI Repository Folder
■ Activating the WORKFORCE_FULLSYNC Message
■ Activating the Full Data Publish Rule
Activating the WORKFORCE_FULLSYNC Service OperationTo activate the WORKFORCE_FULLSYNC service operation:
1. In PeopleSoft Internet Architecture, expand PeopleTools, Integration Broker, Integration Setup, and then click Service Operations.
2. On the Find Service Operation tab, enter WORKFORCE_FULLSYNC in the Service field, and then click Search.
3. Click the WORKFORCE_FULLSYNC link.
Note: The procedure remains the same for PeopleTools 8.49 with HRMS 9.0 and for PeopleTools 8.50 with HRMS 9.1. The screenshots are taken on version PeopleTools 8.49.

Installation
Deploying the Connector 2-35
The following screenshot displays the default version of the WORKFORCE_FULLSYNC service operation:
4. In the Default Service Operation Version region, click Active.
5. Click Save.
Verifying the Queue Status for the WORKFORCE_FULLSYNC Service OperationTo ensure that the status of the queue for the WORKFORCE_FULLSYNC service operation is Run:
1. In PeopleSoft Internet Architecture, expand PeopleTools, Integration Broker, Integration Setup, and then click Queues.
2. Search for the PERSON_DATA queue.
3. In the Queue Status list, ensure that Run is selected.
Note: In PeopleSoft HRMS, there are many versions of the message associated with this service operation. But, when you integrate PeopleSoft HRMS and Oracle Identity Manager, you must send the following versions depending on the version of HRMS:
■ Use WORKFORCE_FULLSYNC.INTERNAL for HRMS 8.9 Bundle 23 or later, HRMS 9.0 Bundle 14 or later, and HRMS 9.1 Bundle 3 or later.
■ Use WORKFORCE_FULLSYNC.VERSION_2 for other versions of HRMS.

Installation
2-36 Oracle Identity Manager Connector Guide for PeopleSoft Employee Reconciliation
The queue status is shown in the following screenshot:
4. Click Return to Search.
Setting Up the Security for the WORKFORCE_FULLSYNC Service OperationTo set up the security for the WORKFORCE_FULLSYNC service operation:
1. In PeopleSoft Internet Architecture, expand PeopleTools, Integration Broker, Integration Setup, and then click Service Operations.
2. Search for an open the WORKFORCE_FULLSYNC service operation.
3. On the General tab, click the Service Operation Security link.
The link is shown in the following screenshot:
Note: If the queue status is not Run:
1. From the Queue Status list, select Run.
2. Click Save.

Installation
Deploying the Connector 2-37
4. Attach the OIMER permission list to the WORKFORCE_FULLSYNC service operation. This list is created in Step 3 of the preinstallation procedure discussed in Section 2.1.2.2.1, "Creating a Permission List."
To attach the permission list:
a. Click the plus sign (+) to add a row to the Permission List field.
b. In the Permission List field, enter OIMER and then click the Look up Permission List icon.
The OIMER permission list appears.
c. From the Access list, select Full Access.
The following screenshot displays the Access list with Full Access:
d. Click Save.
e. Click Return to Search.
Defining the Routing for the WORKFORCE_FULLSYNC Service OperationTo define the routing for the WORKFORCE_FULLSYNC service operation:

Installation
2-38 Oracle Identity Manager Connector Guide for PeopleSoft Employee Reconciliation
1. On the Routing tab, enter WORKFORCE_FULLSYNC_HR_FILE as the routing name and then click Add.
2. On the Routing Definitions tab, enter the following:
Sender Node: PSFT_HR
Receiver Node: OIM_FILE_NODE
The following graphic displays both the Sender and the Receiver nodes:
3. Click Save.
4. Click Return to go back to the Routings tab of the Service Operation, and verify whether your routing is active.
Displaying the EI Repository FolderTo display the EI Repository folder:
Note: The Sender Node is the default active local node. To locate the sender node:
1. Click the Look up icon.
2. Click Default to sort the results in descending order.
The default active local node should meet the following criteria:
Local Node: 1
Default Local Node: Y
Node Type: PIA
Only one node can meet all the above conditions at a time.
3. Select the node.
4. Click Save.

Installation
Deploying the Connector 2-39
1. In the PeopleSoft Internet Architecture, expand People Tools, Portal, and then Structure and Content.
2. Click the Enterprise Components link.
3. Click the Edit link for EI Repository, and then uncheck Hide from portal navigation.
The following screenshot displays the Hide from portal navigation check box:
4. Click Save.
5. Log out, and then log in.
Activating the WORKFORCE_FULLSYNC MessageTo activate the WORKFORCE_FULLSYNC message:
1. In the PeopleSoft Internet Architecture, expand Enterprise Components, EI Repository, and then click Message Properties.
2. Search for and open the WORKFORCE_FULLSYNC message.
3. Click Activate All.
The following screenshot displays the message to be activated:
Note:
■ If you have performed this procedure as described in "Displaying the EI Repository Folder" on page 2-32, then you can skip this section.
■ Perform this procedure using the PeopleSoft administrator credentials.

Installation
2-40 Oracle Identity Manager Connector Guide for PeopleSoft Employee Reconciliation
4. Click the Subscription tab, and activate the Subscription PeopleCode if it exists.
Activating the Full Data Publish RuleTo activate the full data publish rule:
1. In the PeopleSoft Internet Architecture, expand Enterprise Components, Integration Definitions, and then click Full Data Publish Rules.
2. Search for and open the WORKFORCE_FULLSYNC message.
3. In the Publish Rule Definition region:
a. In the Publish Rule ID field, enter WORKFORCE_FULLSYNC.
b. In the Description field, enter WORKFORCE_FULLSYNC.
c. From the Status list, select Active.
The following screenshot displays the preceding steps:
4. Click Save.
Note: To perform this step, your User Profile must have the EIR Administrator role consisting of EOEI9000 and EOCO9000 permission lists.

Installation
Deploying the Connector 2-41
2.2.2.2 Configuring the Target System for Incremental ReconciliationConfiguring the target system for incremental reconciliation involves configuring PeopleSoft Integration Broker and configuring the PERSON_BASIC_SYNC and WORKFORCE_SYNC messages.
A message is the physical container for the XML data that is sent from the target system. Message definitions provide the physical description of data that is sent from the target system. This data includes fields, field types, and field lengths. A queue is used to carry messages. It is a mechanism for structuring data into logical groups. A message can belong to only one queue.
Setting the PeopleSoft Integration Broker gateway is mandatory when you configure PeopleSoft Integration Broker. To subscribe to XML data, Oracle Identity Manager can accept and process XML messages posted by PeopleSoft by using PeopleSoft connectors located in the PeopleSoft Integration Broker gateway. These connectors are Java programs that are controlled by the PeopleSoft Integration Broker gateway.
This gateway is a program that runs on the PeopleSoft Web server. It acts as a physical hub between PeopleSoft and PeopleSoft applications (or third-party systems, such as Oracle Identity Manager). The gateway manages the receipt and delivery of messages to external applications through PeopleSoft Integration Broker.
To configure the target system for incremental reconciliation, perform the following procedures:
■ Section 2.2.2.2.1, "Configuring PeopleSoft Integration Broker"
■ Section 2.2.2.2.2, "Configuring the PERSON_BASIC_SYNC Service Operation"
■ Section 2.2.2.2.3, "Configuring the WORKFORCE_SYNC Service Operation"
■ Section 2.2.2.2.4, "Preventing Transmission of Unwanted Fields During Incremental Reconciliation"
2.2.2.2.1 Configuring PeopleSoft Integration Broker The following sections explain the procedure to configure PeopleSoft Integration Broker:
Configuring PeopleSoft Integration Broker GatewaySection "Configuring PeopleSoft Integration Broker Gateway" on page 2-25 describes the procedure to configure the PeopleSoft Integration Broker gateway.
Configuring PeopleSoft Integration BrokerTo configure PeopleSoft Integration Broker:
1. Create a remote node by performing the following steps:
a. In PeopleSoft Internet Architecture, expand PeopleTools, Integration Broker, Integration Setup, and then click Nodes.
b. On the Add a New Value tab, enter the node name, for example, OIM_NODE, and then click Add.
c. On the Node Definition tab, enter a description for the node in the Description field. In addition, specify the SuperUserID in the Default User ID field. For example, PS.
Note: You must use an administrator account to perform the following procedures.

Installation
2-42 Oracle Identity Manager Connector Guide for PeopleSoft Employee Reconciliation
d. Make this node a remote node by deselecting the Local Node check box and selecting the Active Node check box.
e. Ensure Node Type is PIA.
f. On the Connectors tab, search for the following information by clicking the Lookup icon:
Gateway ID: LOCAL
Connector ID: HTTPTARGET
g. On the Properties page in the Connectors tab, enter the following information:
Property ID: HEADER
Property Name: sendUncompressed
Required value: Y
Property ID: HTTP PROPERTY
Property Name: Method
Required value: POST
Property ID: HEADER
Property Name: Host
Required value: Enter the value of the IT Resource name as configured for PeopleSoft HRMS
Sample value: PSFT Server
Property ID: PRIMARYURL
Property Name: URL
Required value: Enter the URL of the PeopleSoft listener that is configured to receive XML messages. This URL must be in the following format:
http://ORACLE_IDENTITY_MANAGER_SERVER_IPADDRESS:PORT/PeopleSoftOIMListener
The URL depends on the application server that you are using. For an environment on which SSL is not enabled, the URL must be in the following format:
For IBM WebSphere Application Server:
http://10.121.16.42:9080/PeopleSoftOIMListener
For JBoss Application Server:
http://10.121.16.42:8080/PeopleSoftOIMListener
For Oracle WebLogic Server:
http://10.121.16.42:7001/PeopleSoftOIMListener
For Oracle Application Server
http://10.121.16.42:7200/PeopleSoftOIMListener/
For an environment on which SSL is enabled, the URL must be in the following format:
https://COMMON_NAME:PORT/PeopleSoftOIMListener

Installation
Deploying the Connector 2-43
For IBM WebSphere Application Server:
https://example088196:9443/PeopleSoftOIMListener
For JBoss Application Server:
https://example088196:8443/PeopleSoftOIMListener
For Oracle WebLogic Server:
https://example088196:7002/PeopleSoftOIMListener
For Oracle Application Server
https://example088196:7200/PeopleSoftOIMListener/
h. Click Save to save the changes.
i. Click the Ping Node button to check whether a connection is established with the specified IP address.
Before the XML messages are sent from the target system to Oracle Identity Manager, you must verify whether the PeopleSoft node is running. You can do so by clicking the Ping Node button in the Connectors tab. To access the Connectors tab, click PeopleTools, Integration Broker, Integration Setup, and then Nodes.
Note: The ports may vary depending on the installation that you are using.

Installation
2-44 Oracle Identity Manager Connector Guide for PeopleSoft Employee Reconciliation
2.2.2.2.2 Configuring the PERSON_BASIC_SYNC Service Operation The PERSON_BASIC_SYNC message contains the updated information about a particular person. This information includes the Employee ID and the information that is added or modified.
Configuring the PERSON_BASIC_SYNC Service OperationTo configure the PERSON_BASIC_SYNC service operation perform the following procedures:
■ Activating the PERSON_BASIC_SYNC Service Operation
■ Verifying the Queue Status for the PERSON_BASIC_SYNC Service Operation
■ Setting Up the Security for the PERSON_BASIC_SYNC Service Operation
■ Defining the Routing for the PERSON_BASIC_SYNC Service Operation
■ Displaying the EI Repository Folder
■ Activating the PERSON_BASIC_SYNC Message
Note: You might encounter the following error when you send a message from PeopleSoft Integration Broker over HTTP PeopleTools 8.50 target system:
HttpTargetConnector:PSHttpFactory init or setCertificate failed
This happens because the Integration Broker Gateway Web server tries to access the keystore even if SSL is not enabled using the parameters defined in the integrationgateway.properties file as follows:
secureFileKeystorePath=<path to pskey>
secureFileKeystorePasswd=password
If either the <path to pskey> or the password (unencrypted) is incorrect, you will receive the preceding error message. Perform the following steps to resolve the error:
1. Verify if secureFileKeystorePath in the integrationgateway.properties file is correct.
2. Verify if secureFileKeystorePasswd in the integrationgateway.properties file is correct.
3. Access the pskeymanager to check the accuracy of the path and the password. You can access pskeymanager from the following location:
<PIA_HOME>\webserv\peoplesoft\bin
Usually, a new PeopleTools 8.50 instance throws the preceding error when you message over the HTTP target connector. The reason is that the default password is not in the encrypted format in the integrationgateway.properties file.
Note: The procedure remains the same for PeopleTools 8.49 with HRMS 9.0 and for PeopleTools 8.50 with HRMS 9.1. The screenshots are taken on PeopleTools 8.49 version.

Installation
Deploying the Connector 2-45
Activating the PERSON_BASIC_SYNC Service OperationTo activate the PERSON_BASIC_SYNC service operation:
1. In PeopleSoft Internet Architecture, expand PeopleTools, Integration Broker, Integration Setup, and then click Service Operations.
2. On the Find Service Operation tab, enter PERSON_BASIC_SYNC in the Service field, and then click Search.
3. Click the PERSON_BASIC_SYNC link.
4. In the Default Service Operation Version region, click Active.
The following screenshot displays the default version of the PERSON_BASIC_SYNC service operation:
5. Click Save.
Note: In PeopleSoft HRMS, there are four versions of the message associated with this service operation. But, when you integrate PeopleSoft HRMS 9.0 and Oracle Identity Manager, you must send VERSION_3. The default version for PeopleSoft HRMS is INTERNAL. Therefore, you must convert the default version to VERSION_3. This conversion is carried out using the transformation program HMTF_TR_OA.

Installation
2-46 Oracle Identity Manager Connector Guide for PeopleSoft Employee Reconciliation
Verifying the Queue Status for the PERSON_BASIC_SYNC Service OperationTo ensure that the status of the queue for the PERSON_BASIC_SYNC service operation is Run:
1. In PeopleSoft Internet Architecture, expand PeopleTools, Integration Broker, Integration Setup, and then click Queues.
2. Search for the PERSON_DATA queue.
3. In the Queue Status list, ensure that Run is selected.
The queue status is shown in the following screenshot:
4. Click Return to Search.
Setting Up the Security for the PERSON_BASIC_SYNC Service OperationTo set up the security for the PERSON_BASIC_SYNC service operation:
1. In PeopleSoft Internet Architecture, expand PeopleTools, Integration Broker, Integration Setup, and then click Service Operations.
2. Search for an open the PERSON_BASIC_SYNC service operation.
3. On the General tab, click the Service Operation Security link.
The link is shown in the following screenshot:
Note: If the queue status is not Run:
1. From the Queue Status list, select Run.
2. Click Save.

Installation
Deploying the Connector 2-47
4. Attach the OIMER permission list to the PERSON_BASIC_SYNC service operation. This list is created in Step 3 of the preinstallation procedure discussed in Section 2.1.2.2.1, "Creating a Permission List."
To attach the permission list:
a. Click the plus sign (+) to add a row for the Permission List field.
b. In the Permission List field, enter OIMER and then click the Look up Permission List icon.
The OIMER permission list appears.
c. From the Access list, select Full Access.
The following screenshot displays the permission list with Full Access:
Note: This procedure describes how to grant access to the OIMER permission list. The OIMER permission list is used as an example. But, to implement this procedure you must use the permission list (attached through a role) to the user profile that has the privilege to modify personal data in the target system.

Installation
2-48 Oracle Identity Manager Connector Guide for PeopleSoft Employee Reconciliation
d. Click Save.
e. Click Return to Search.
5. In the Non-Default Version region, click the VERSION_3 link to view the details.
a. Click Active.
b. Enter HMTF_TR_OA in the Transform From Default field.
The following screenshot displays the preceding steps:
c. Click Save, and then click Return.
6. On the Handlers Tab, ensure that the Status is Active for the Type column that contains OnNotify PeopleCode.
7. Click Save.
Note: If the Transform From Default field is not available in the region, you can ignore this step.

Installation
Deploying the Connector 2-49
Defining the Routing for the PERSON_BASIC_SYNC Service OperationTo define the routing for the PERSON_BASIC_SYNC service operation:
1. On the Routing tab, enter PERSON_BASIC_SYNC_HR_OIM as the routing name and then click Add.
2. On the Routing Definitions tab, enter the following:
Sender Node: PSFT_HR
Receiver Node: OIM_NODE
The following screenshot displays the Sender and Receiver nodes:
3. On the Parameters tab, enter the following information:
a. In the External Alias field, enter PERSON_BASIC_SYNC.VERSION_3.
b. In the Message.Ver into Transform 1 field, enter PERSON_BASIC_SYNC.INTERNAL.
Here, you specify the name of the default message that you must convert.
c. In the Transform Program 1 field, enter the name of the transformation program, HMTF_TR_OA.
d. In the Message.Ver out of Program field, enter PERSON_BASIC_SYNC.VERSION_3.
Note: The Sender Node is the default active local node. To locate the sender node:
1. Click the Look up icon.
2. Click Default to sort the results in descending order.
The default active local node should meet the following criteria:
Local Node: 1
Default Local Node: Y
Node Type: PIA
Only one node can meet all the above conditions at a time.
3. Select the node.
4. Click Save.

Installation
2-50 Oracle Identity Manager Connector Guide for PeopleSoft Employee Reconciliation
Here, you specify the name into which you want to transform the message mentioned in Step b.
The following screenshot displays the preceding steps:
e. Click Save.
f. Click Return to go back to the Routings tab of the Service Operation, and verify whether your routing is active.
The following graphic displays the routing PERSON_BASIC_SYNC_HR_OIM and its transformation:
Displaying the EI Repository FolderTo display the EI Repository folder:
Note:
■ If you have performed this procedure as described in "Displaying the EI Repository Folder" on page 2-32, then you can skip this section.
■ Perform this procedure using the PeopleSoft administrator credentials.

Installation
Deploying the Connector 2-51
1. In the PeopleSoft Internet Architecture, expand People Tools, Portal, and then Structure and Content.
2. Click the Enterprise Components link.
3. Click the Edit link for EI Repository, and then uncheck Hide from portal navigation.
The following screenshot displays the Hide from portal navigation check box:
4. Click Save.
5. Log out, and then log in.
Activating the PERSON_BASIC_SYNC MessageTo activate PERSON_BASIC_SYNC messages:
1. In the PeopleSoft Internet Architecture, expand Enterprise Components, EI Repository, and then click Message Properties.
2. Search for and open the PERSON_BASIC_SYNC message.
3. Click Activate All.
The following screenshot displays the message to be activated:

Installation
2-52 Oracle Identity Manager Connector Guide for PeopleSoft Employee Reconciliation
4. Click the Subscription tab, and activate the Subscription PeopleCode if it exists.
2.2.2.2.3 Configuring the WORKFORCE_SYNC Service Operation This message contains the job-related details of a particular person. This information includes Employee ID and the information that is added or modified.
To configure the WORKFORCE_SYNC service operation, perform the following procedures:
■ Activating the WORKFORCE_SYNC Service Operation
■ Verifying the Queue Status for the WORKFORCE_SYNC Service Operation
■ Setting Up the Security for the WORKFORCE_SYNC Service Operation
■ Defining the Routing for the WORKFORCE_SYNC Service Operation
■ Displaying the EI Repository Folder
■ Activating the WORKFORCE_SYNC Message
Activating the WORKFORCE_SYNC Service OperationTo activate the WORKFORCE_SYNC service operation:
1. In PeopleSoft Internet Architecture, expand PeopleTools, Integration Broker, Integration Setup, and then click Service Operations.
2. On the Find Service Operation tab, enter WORKFORCE_SYNC in the Service field, and then click Search.
3. Click the WORKFORCE_SYNC link.
Note: To perform this step, your User Profile must have the EIR Administrator role consisting of EOEI9000 and EOCO9000 permission lists.
Note: The procedure remains the same for PeopleTools 8.49 and HRMS 9.0 and for PeopleTools 8.50 and HRMS 9.1. The screenshots are taken on version PeopleTools 8.49.

Installation
Deploying the Connector 2-53
The following screenshot displays the default version of the WORKFORCE_SYNC service operation:
4. In the Default Service Operation Version region, click Active.
5. Click Save.
Verifying the Queue Status for the WORKFORCE_SYNC Service OperationTo ensure that the status of the queue for the WORKFORCE_SYNC service operation is Run:
1. In PeopleSoft Internet Architecture, expand PeopleTools, Integration Broker, Integration Setup, and then click Queues.
2. Search for the PERSON_DATA queue.
3. In the Queue Status list, ensure that Run is selected.
Note: In PeopleSoft HRMS, there are many versions of the message associated with this service operation. But, when you integrate PeopleSoft HRMS and Oracle Identity Manager, you must send the following versions depending on the version of HRMS:
■ Use WORKFORCE_SYNC.INTERNAL for HRMS 8.9 Bundle 23 or later, HRMS 9.0 Bundle 14 or later, and HRMS 9.1 Bundle 3 or later.
■ Use WORKFORCE_SYNC.VERSION_2 for other versions of HRMS.

Installation
2-54 Oracle Identity Manager Connector Guide for PeopleSoft Employee Reconciliation
The queue status is shown in the following screenshot:
4. Click Return to Search.
Setting Up the Security for the WORKFORCE_SYNC Service OperationTo set up the security for the WORKFORCE_SYNC service operation:
1. In PeopleSoft Internet Architecture, expand PeopleTools, Integration Broker, Integration Setup, and then click Service Operations.
2. Search for an open the WORKFORCE_SYNC service operation.
3. On the General tab, click Service Operation Security link.
The following screenshot displays the link:
Note: If the queue status is not Run:
1. From the Queue Status list, select Run.
2. Click Save.

Installation
Deploying the Connector 2-55
4. Attach the OIMER permission list to the WORKFORCE_SYNC service operation. This list is created in Step 3 of the preinstallation procedure discussed in Section 2.1.2.2.1, "Creating a Permission List."
To attach the permission list:
a. Click the plus sign (+) to add a row to the Permission List field.
b. In the Permission List field, enter OIMER and then click the Look up Permission List icon.
The OIMER permission list appears.
c. From the Access list, select Full Access.
The following screenshot displays the permission list with Full Access:
Note: This procedure describes how to grant access to the OIMER permission list. The OIMER permission list is used as an example. But, to implement this procedure you must use the permission list (attached through a role) to the user profile that has the privilege to modify job data in the target system.

Installation
2-56 Oracle Identity Manager Connector Guide for PeopleSoft Employee Reconciliation
d. Click Save.
e. Click Return to Search.
Defining the Routing for the WORKFORCE_SYNC Service OperationTo define the routing for the WORKFORCE_SYNC service operation:
1. On the Routing tab, enter WORKFORCE_SYNC_HR_OIM as the routing name and then click Add.
2. On the Routing Definitions tab, enter the following:
Sender Node: PSFT_HR
Receiver Node: OIM_NODE
The following screenshot displays the Sender and Receiver nodes:
Note: The Sender Node is the default active local node. To locate the sender node:
1. Click the Look up icon.
2. Click Default to sort the results in descending order.
The default active local node should meet the following criteria:
Local Node: 1
Default Local Node: Y
Node Type: PIA
Only one node can meet all the above conditions at a time.
3. Select the node.
4. Click Save.

Installation
Deploying the Connector 2-57
3. Click Save.
4. Click Return to go back to the Routings tab of the Service Operation, and verify whether your routing is active.
Displaying the EI Repository FolderTo display the EI Repository folder:
1. In the PeopleSoft Internet Architecture, expand People Tools, Portal, and then Structure and Content.
2. Click the Enterprise Components link.
3. Click the Edit link for EI Repository, and then uncheck Hide from portal navigation.
The following screenshot displays the Hide from portal navigation check box:
Note:
■ If you have performed this procedure as described in "Displaying the EI Repository Folder" on page 2-32, then you can skip this section.
■ Perform this procedure using the PeopleSoft administrator credentials.

Installation
2-58 Oracle Identity Manager Connector Guide for PeopleSoft Employee Reconciliation
4. Click Save.
5. Log out, and then log in.
Activating the WORKFORCE_SYNC MessageTo activate the WORKFORCE_SYNC message:
1. In the PeopleSoft Internet Architecture, expand Enterprise Components, EI Repository, and then click Message Properties.
2. Search for and open the WORKFORCE_SYNC message.
3. Click Activate All.
The following screenshot displays the message to be activated:

Installation
Deploying the Connector 2-59
4. Click the Subscription tab, and activate the Subscription PeopleCode.
2.2.2.2.4 Preventing Transmission of Unwanted Fields During Incremental Reconciliation
By default, Peoplesoft messages contain fields that are not needed in Oracle Identity Manager. If there is a strong use case that these fields should not be published to Oracle Identity Manager, then do the following:
Locate if there are any local-to-local or local-to-third party PeopleSoft active routings for the service operations using the message under study.
■ If none, then you can safely remove the unwanted fields at message level. See "Removing Unwanted Fields at Message Level" section for more information.
■ If active routings exist, analyze the subscription or handler code of the routing to determine the fields they are utilizing and the ones not needed in Oracle Identity Manager. If so, remove the unwanted fields at message level. See "Removing Unwanted Fields at Message Level" section for more information.
■ Lastly, if there are active routings that use these sensitive fields that you do not want to transmit to Oracle Identity Manager, then you need to write a transformation.
For more information about implementing transformation, refer to Chapter 21 of Integration Broker PeopleBook on Oracle Technology Network at the following location
http://download.oracle.com/docs/cd/E13292_01/pt849pbr0/eng/psbooks/tibr/book.htm
In addition, refer to Chapter 43 of PeopleCode API Reference PeopleBook on Oracle Technology Network at the following location
Note: To perform this step, your user profile must have the EIR Administrator role consisting of EOEI9000 and EOCO9000 permission lists.

Installation
2-60 Oracle Identity Manager Connector Guide for PeopleSoft Employee Reconciliation
http://download.oracle.com/docs/cd/E13292_01/pt849pbr0/eng/psbooks/tpcr/book.htm
Removing Unwanted Fields at Message Level1. Expand PeopleTools, Integration Broker, Integration Setup, and then click
Messages.
2. Search for and open the desired message, for example, PERSON_BASIC_SYNC.VERSION_3 used for incremental reconciliation.
3. Expand the message.
4. Navigate to the field that you do not want to transmit to Oracle Identity Manager, for example, NAME_ROYAL_PREFIX.

Postinstallation
Deploying the Connector 2-61
5. Click the field and clear the Include check box.
6. Click OK, return and save the message.
2.3 PostinstallationPostinstallation information is divided across the following sections:
■ Section 2.3.1, "Postinstallation on Oracle Identity Manager"
■ Section 2.3.2, "Postinstallation on the Target System"
Postinstallation
2-62 Oracle Identity Manager Connector Guide for PeopleSoft Employee Reconciliation
2.3.1 Postinstallation on Oracle Identity Manager
■ Section 2.3.1.1, "Enabling Logging"
■ Section 2.3.1.2, "Setting Up the Lookup.PSFT.HRMS.ExclusionList Lookup Definition"
■ Section 2.3.1.3, "Setting Up the Lookup.PSFT.Configuration Lookup Definition"
■ Section 2.3.1.4, "Configuring SSL"
■ Section 2.3.1.5, "Creating an Authorization Policy for Job Code"
2.3.1.1 Enabling LoggingDepending on the Oracle Identity Manager release you are using, perform instructions in one of the following sections:
■ Section 2.3.1.1.1, "Enabling Logging on Oracle Identity Manager Release 9.1.0.x"
■ Section 2.3.1.1.2, "Enabling Logging on Oracle Identity Manager Release 11.1.1"
2.3.1.1.1 Enabling Logging on Oracle Identity Manager Release 9.1.0.x
When you enable logging, Oracle Identity Manager automatically stores in a log file information about events that occur during reconciliation operations. To specify the type of event for which you want logging to take place, you can set the log level to one of the following:
■ ALL
This level enables logging for all events.
■ DEBUG
This level enables logging of information about fine-grained events that are useful for debugging.
■ INFO
This level enables logging of messages that highlight the progress of the application at a coarse-grained level.
■ WARN
This level enables logging of information about potentially harmful situations.
■ ERROR
This level enables logging of information about error events that might allow the application to continue running.
■ FATAL
This level enables logging of information about very severe error events that could cause the application to stop functioning.
Note: In an Oracle Identity Manager cluster, you must perform this step on each node of the cluster.
Note: In an Oracle Identity Manager cluster, perform this procedure on each node of the cluster. Then, restart each node.

Postinstallation
Deploying the Connector 2-63
■ OFF
This level disables logging for all events.
The file in which you set the log level depends on the application server that you use:
■ IBM WebSphere Application Server
To enable logging:
1. Make the following changes in the OIM_HOME/xellerate/config/log.properties:
– Search for the following line:
log4j.rootLogger=WARN,stdout
Make this line a comment and remove the comment the line preceding this line.
– Locate and remove the comment from the following lines:
#log4j.appender.logfile=org.apache.log4j.DailyRollingFileAppender#log4j.appender.logfile.DatePattern='.'yyyy-MM-dd#log4j.appender.logfile.File=c:/oracle/xellerate/logs/xel.log#log4j.appender.logfile.MaxBackupIndex=20#log4j.appender.logfile.layout=org.apache.log4j.PatternLayout#log4j.appender.logfile.layout.ConversionPattern=%p %t %c - %m%n
2. Specify the name and the location of the file to which the preceding logs have to be written. You can do this by changing the value of the following line:
log4j.appender.logfile.File=c:/oracle/xellerate/logs/xel.log
In this format, change the value of c:/oracle/xellerate/logs to a valid directory location.
3. Add the following line in the OIM_HOME/xellerate/config/log.properties file:
log4j.logger.OIMCP.PSFTER=LOG_LEVELlog4j.logger.OIMCP.PSFTCOMMON=LOG_LEVEL
4. In this line, replace LOG_LEVEL with the log level that you want to set.
For example:
log4j.logger.OIMCP.PSFTER=DEBUGlog4j.logger.OIMCP.PSFTCOMMON=DEBUG
After you enable logging, the log information is written to the following file:
DIRECTORY_PATH/xel.log
■ JBoss Application Server
To enable logging:
1. In the JBOSS_HOME/server/default/conf/jboss-log4j.xml file, add the following lines:
<category name="OIMCP.PSFTER"> <priority value="LOG_LEVEL"/></category><category name="OIMCP.PSFTCOMMON"> <priority value="LOG_LEVEL"/>

Postinstallation
2-64 Oracle Identity Manager Connector Guide for PeopleSoft Employee Reconciliation
</category>
In an Oracle Identity Manager cluster, make the changes in the following file:
JBOSS_HOME/server/all/conf/jboss-log4j.xml
2. In these lines, replace log_level with the log level that you want to set. For example:
<category name="OIMCP.PSFTER"> <priority value="DEBUG"/></category><category name="OIMCP.PSFTCOMMON"> <priority value="DEBUG"/></category>
After you enable logging, the log information is written to the following file:
JBOSS_HOME\server\default\log\server.log
In an Oracle Identity Manager cluster, the log information is written to the following file:
JBOSS_HOME\server\all\log\server.log
■ Oracle WebLogic Server
To enable logging:
1. Make the following changes in the OIM_HOME/xellerate/config/log.properties:
– Search for the following line:
log4j.rootLogger=WARN,stdout
Make this line a comment and remove the comment the line preceding this line.
– Locate and remove the comment from the following lines:
#log4j.appender.logfile=org.apache.log4j.DailyRollingFileAppender#log4j.appender.logfile.DatePattern='.'yyyy-MM-dd#log4j.appender.logfile.File=c:/oracle/xellerate/logs/xel.log#log4j.appender.logfile.MaxBackupIndex=20#log4j.appender.logfile.layout=org.apache.log4j.PatternLayout#log4j.appender.logfile.layout.ConversionPattern=%p %t %c - %m%n
2. Specify the name and the location of the file to which the preceding logs have to be written. You can do this by changing the value of the following line:
log4j.appender.logfile.File=c:/oracle/xellerate/logs/xel.log
In this format, change the value of c:/oracle/xellerate/logs to a valid directory location.
3. Add the following line in the OIM_HOME/xellerate/config/log.properties file:
log4j.logger.OIMCP.PSFTER=LOG_LEVEL
4. In this line, replace LOG_LEVEL with the log level that you want to set.
For example:

Postinstallation
Deploying the Connector 2-65
log4j.logger.OIMCP.PSFTER=DEBUG
After you enable logging, the log information is written to the following file:
DIRECTORY_PATH/xel.log
■ Oracle Application Server
To enable logging:
1. Make the following changes in the OIM_HOME/xellerate/config/log.properties:
– Search for the following line:
log4j.rootLogger=WARN,stdout
Make this line a comment and remove the comment the line preceding this line.
– Locate and remove the comment from the following lines:
#log4j.appender.logfile=org.apache.log4j.DailyRollingFileAppender#log4j.appender.logfile.DatePattern='.'yyyy-MM-dd#log4j.appender.logfile.File=c:/oracle/xellerate/logs/xel.log#log4j.appender.logfile.MaxBackupIndex=20#log4j.appender.logfile.layout=org.apache.log4j.PatternLayout#log4j.appender.logfile.layout.ConversionPattern=%p %t %c - %m%n
2. Specify the name and the location of the file to which the preceding logs have to be written. You can do this by changing the value of the following line:
log4j.appender.logfile.File=c:/oracle/xellerate/logs/xel.log
In this format, change the value of c:/oracle/xellerate/logs to a valid directory location.
3. Add the following line in the OIM_HOME/xellerate/config/log.properties file:
log4j.logger.OIMCP.PSFTER=LOG_LEVELlog4j.logger.OIMCP.PSFTCOMMON=LOG_LEVEL
4. In this line, replace LOG_LEVEL with the log level that you want to set.
For example:
log4j.logger.OIMCP.PSFTER=DEBUGlog4j.logger.OIMCP.PSFTCOMMON=DEBUG
After you enable logging, the log information is written to the following file:
DIRECTORY_PATH/xel.log
2.3.1.1.2 Enabling Logging on Oracle Identity Manager Release 11.1.1
Note: In an Oracle Identity Manager cluster, perform this procedure on each node of the cluster. Then, restart each node.

Postinstallation
2-66 Oracle Identity Manager Connector Guide for PeopleSoft Employee Reconciliation
Oracle Identity Manager release 11.1.1 uses Oracle Java Diagnostic Logging (OJDL) for logging. OJDL is based on java.util.logger. To specify the type of event for which you want logging to take place, you can set the log level to one of the following:
■ SEVERE.intValue()+100
This level enables logging of information about fatal errors.
■ SEVERE
This level enables logging of information about errors that may allow Oracle Identity Manager to continue running.
■ WARNING
This level enables logging of information about potentially harmful situations.
■ INFO
This level enables logging of messages that highlight the progress of the application.
■ CONFIG
This level enables logging of information about fine-grained events that are useful for debugging.
■ FINE, FINER, FINEST
These levels enable logging of information about fine-grained events, where FINEST logs information about all events.
These message types are mapped to ODL message type and level combinations as shown in Table 2–5.
The configuration file for OJDL is logging.xml, which is located at the following path:
DOMAIN_HOME/config/fmwconfig/servers/OIM_SERVER/logging.xml
Here, DOMAIN_HOME and OIM_SEVER are the domain name and server name specified during the installation of Oracle Identity Manager.
To enable logging in Oracle WebLogic Server:
1. Edit the logging.xml file as follows:
a. Add the following blocks in the file:
<log_handler name='psft-er-handler' level='[LOG_LEVEL]' class='oracle.core.ojdl.logging.ODLHandlerFactory'>
Table 2–5 Log Levels and ODL Message Type:Level Combinations
Java Level ODL Message Type:Level
SEVERE.intValue()+100 INCIDENT_ERROR:1
SEVERE ERROR:1
WARNING WARNING:1
INFO NOTIFICATION:1
CONFIG NOTIFICATION:16
FINE TRACE:1
FINER TRACE:16
FINEST TRACE:32

Postinstallation
Deploying the Connector 2-67
<property name='logreader:' value='off'/> <property name='path' value='[FILE_NAME]'/> <property name='format' value='ODL-Text'/> <property name='useThreadName' value='true'/> <property name='locale' value='en'/> <property name='maxFileSize' value='5242880'/> <property name='maxLogSize' value='52428800'/> <property name='encoding' value='UTF-8'/> </log_handler>
<logger name="OIMCP.PSFTCOMMON" level="[LOG_LEVEL]" useParentHandlers="false"> <handler name="psft-er-handler"/> <handler name="console-handler"/> </logger>
<logger name="OIMCP.PSFTER" level="[LOG_LEVEL]" useParentHandlers="false"><handler name="psft-er-handler"/><handler name="console-handler"/></logger>
b. Replace all occurrences of [LOG_LEVEL] with the ODL message type and level combination that you require. Table 2–5 lists the supported message type and level combinations.
Similarly, replace [FILE_NAME] with the full path and name of the log file in which you want log messages to be recorded.
The following blocks show sample values for [LOG_LEVEL] and [FILE_NAME]:
<log_handler name='psft-er-handler' level='NOTIFICATION:1' class='oracle.core.ojdl.logging.ODLHandlerFactory'><property name='logreader:' value='off'/> <property name='path' value='F:\MyMachine\middleware\user_projects\domains\base_domain1\servers\oim_server1\logs\oim_server1-diagnostic-1.log'/> <property name='format' value='ODL-Text'/> <property name='useThreadName' value='true'/> <property name='locale' value='en'/> <property name='maxFileSize' value='5242880'/> <property name='maxLogSize' value='52428800'/> <property name='encoding' value='UTF-8'/> </log_handler>
<logger name="OIMCP.PSFTCOMMON" level="NOTIFICATION:1" useParentHandlers="false"> <handler name="psft-er-handler"/> <handler name="console-handler"/> </logger>
<logger name="OIMCP.PSFTER" level="NOTIFICATION:1" useParentHandlers="false"><handler name="psft-er-handler"/><handler name="console-handler"/></logger>
With these sample values, when you use Oracle Identity Manager, all messages generated for this connector that are of a log level equal to or higher than the NOTIFICATION:1 level are recorded in the specified file.

Postinstallation
2-68 Oracle Identity Manager Connector Guide for PeopleSoft Employee Reconciliation
2. Save and close the file.
3. Set the following environment variable to redirect the server logs to a file:
For Microsoft Windows:
set WLS_REDIRECT_LOG=FILENAME
For UNIX:
export WLS_REDIRECT_LOG=FILENAME
Replace FILENAME with the actual name of the file to which you want to redirect the output.
4. Restart the application server.
2.3.1.2 Setting Up the Lookup.PSFT.HRMS.ExclusionList Lookup DefinitionIn the Lookup.PSFT.HRMS.ExclusionList lookup definition, enter the user IDs of target system accounts for which you do not want to perform reconciliation. See Section 1.5.4.3.2, "Lookup.PSFT.HRMS.ExclusionList" for more information about this lookup definition.
1. On the Design Console, expand Administration and then double-click Lookup Definition.
2. Search for and open the Lookup.PSFT.HRMS.ExclusionList lookup definition.
3. Click Add.
4. In the Code Key and Decode columns, enter the first user ID to exclude.
5. Repeat Steps 3 and 4 for all the user IDs you want to exclude.
For example, if you do not want to reconcile users with user ID 's User001, User002, and User088 then you must populate the lookup definition with the following values:
6. Click the Save icon.
2.3.1.3 Setting Up the Lookup.PSFT.Configuration Lookup DefinitionEvery standard PeopleSoft message has a message-specific configuration defined in the Lookup.PSFT.Configuration lookup definition. See Section 1.5.4.3.1, "Lookup.PSFT.Configuration" for more information about this lookup definition.
For example, the mapping for the PERSON_BASIC_SYNC message in this lookup definition is defined as follows:
Code Key: PERSON_BASIC_SYNC
Decode: Lookup.PSFT.Message.PersonBasicSync.Configuration
Note: The Code Key represents the resource object field name on which the exclusion list is applied during reconciliation.
Code Key Decode
User ID User001~User002~User088

Postinstallation
Deploying the Connector 2-69
You can configure the message names, such as PERSON_BASIC_SYNC, WORKFORCE_SYNC, PERSON_BASIC_FULLSYNC, and WORKFORCE_FULLSYNC defined in this lookup definition.
Consider a scenario in which the target system sends the PERSON_BASIC_SYNC.VERSION_3 message. You must change the Code Key value in this lookup definition to implement the message sent by the target system.
To modify or set the Code Key value:
1. On the Design Console, expand Administration and then double-click Lookup Definition.
2. Search for and open the Lookup.PSFT.Configuration lookup definition.
3. Click Add.
4. In the Code Key column, enter the name of the message you want to modify. In this scenario define the mapping as follows:
Code Key: PERSON_BASIC_SYNC.VERSION_3
Decode: Lookup.PSFT.Message.PersonBasicSync.Configuration
5. Repeat Steps 3 and 4 to modify the Code Key values for all the standard PeopleSoft messages you want to rename in this lookup definition.
6. Click the Save icon.
2.3.1.4 Configuring SSLThe following sections describe the procedure to configure SSL connectivity between Oracle Identity Manager and the target system:
■ Section 2.3.1.4.1, "Configuring SSL on IBM WebSphere Application Server"
■ Section 2.3.1.4.2, "Configuring SSL on JBoss Application Server"
■ Section 2.3.1.4.3, "Configuring SSL on Oracle WebLogic Server"
■ Section 2.3.1.4.4, "Configuring SSL on Oracle Application Server"
2.3.1.4.1 Configuring SSL on IBM WebSphere Application Server You can configure SSL connectivity on IBM WebSphere Application Server with either a self-signed certificate or a CA certificate. Perform the procedure described in one of the following sections:
■ Configuring SSL on IBM WebSphere Application Server with a Self-Signed Certificate
■ Configuring SSL on IBM WebSphere Application Server with a CA Certificate
Configuring SSL on IBM WebSphere Application Server with a Self-Signed CertificateTo configure SSL connectivity between Oracle Identity Manager on IBM WebSphere Application Server and the target system with a self-signed certificate, you must perform the following tasks:
1. Log in to the WebSphere Integrated Solutions Console. The URL may be similar to the following:
https://localhost:9043/ibm/console/logon.jsp
2. Click Security, SSL certificate and key management, Related items, Key stores and certificates, NodeDefaultKeyStore, and then click Personal certificates.

Postinstallation
2-70 Oracle Identity Manager Connector Guide for PeopleSoft Employee Reconciliation
3. Click Create a self-signed certificate.
4. In the Alias field, enter an alias name. You specify the alias name to identify the certificate request in the keystore.
5. In the CN field, enter a value for common name. The common name must be the fully qualified DNS host name or the name of the computer. The CN of the certificate must match the domain name or the name of the computer. For example, if the name of your domain is us.example.com, then the CN of the SSL certificate that you create for your domain must also be us.example.com.
6. In the Organization field, enter an organization name.
7. In the Organization unit field, specify the organization unit.
8. In the Locality field, enter the locality.
9. In the State or Province field, enter the state.
10. In the Zip Code field, enter the zip code.
11. From the Country or region list, select the country code.
12. Click Apply and then Save.
13. Click Security, SSL certificate and key management, Related items, Key stores and certificates, NodeDefaultKeyStore, and then click Personal certificates.
14. Select the check box for the new alias name.
15. Click Extract.
16. Specify the absolute file path where you want to extract the certificate under the certificate file name, for example, C:\SSLCerts\sslcert.cer.
17. Click Apply and then click OK.
Configuring SSL on IBM WebSphere Application Server with a CA CertificateTo configure SSL connectivity between Oracle Identity Manager on IBM WebSphere Application Server and the target system with a CA certificate, you must perform the following tasks:
1. Log in to the WebSphere Integrated Solutions Console. The URL may be similar to the following:
https://localhost:9043/ibm/console/logon.jsp
2. Click Security, SSL certificate and key management, Related items, Key stores and certificates, NodeDefaultKeyStore.
3. On the Additional Properties tab, click Personal certificate requests.
4. Click New.
5. In the File for certificate request field, enter the full path where the certificate request is to be stored, and a file name. For example: c:\servercertreq.arm (for a computer running on Microsoft Windows).
6. In the Key label field, enter an alias name. You specify the alias name to identify the certificate request in the keystore.
7. In the CN field, enter a value for common name. The common name must be the fully-qualified DNS host name or the name of the computer. The CN of the certificate must match the domain name of your community. For example, if the name of your domain is us.example.com, then the CN of the SSL certificate that you create for your community must also be us.example.com.

Postinstallation
Deploying the Connector 2-71
8. In the Organization field, enter an organization name.
9. In the Organization unit field, specify the organization unit.
10. In the Locality field, enter the locality.
11. In the State or Province field, enter the state.
12. In the Zip Code field, enter the zip code.
13. From the Country or region list, select the country code.
14. Click Apply and then Save. The certificate request is created in the specified file location in the keystore. This request functions as a temporary placeholder for the signed certificate until you manually receive the certificate in the keystore.
15. Send the certification request arm file to a CA for signing.
16. Create a backup of your keystore file. You must create this backup before receiving the CA-signed certificate into the keystore. The default password for the keystore is WebAS. The Integrated Solutions Console contains the path information for the location of the keystore. The path to the NodeDefaultKeyStore is listed in the Integrated Solutions Console as:
was_profile_root\config\cells\cell_name\nodes\node_name\key.p12
Now you can receive the CA-signed certificate into the keystore to complete the process of generating a signed certificate for IBM WebSphere Application Server.
To receive a signed certificate issued by a CA, perform the following tasks:
1. In the WebSphere Integrated Solutions Console, click Security, SSL certificate and key management, Related items, Key stores and certificates, NodeDefaultKeyStore, and then click Personal Certificates.
2. Click Receive a certificate from a certificate authority.
3. Enter the full path and name of the certificate file.
4. Select the default data type from the list.
5. Click Apply and then Save.
The keystore contains a new personal certificate that is issued by a CA. The SSL configuration is ready to use the new CA-signed personal certificate.
2.3.1.4.2 Configuring SSL on JBoss Application Server Before configuring SSL on JBoss Application Server, ensure that:
■ JBoss Application Server is installed on the Oracle Identity Manager host computer
■ Java Developer's Kit is installed on the JBoss Application Server host
You can configure SSL connectivity on JBoss Application Server with either a self-signed certificate or a CA certificate. The following sections describe this. If you
Note: Keystore tools such as iKeyman and keyTool cannot receive signed certificates that are generated by certificate requests from IBM WebSphere Application Server. Similarly, IBM WebSphere Application Server cannot accept certificates that are generated by certificate requests from other keystore utilities.

Postinstallation
2-72 Oracle Identity Manager Connector Guide for PeopleSoft Employee Reconciliation
are configuring SSL on JBoss Application Server with a self-signed certificate, then perform the following tasks:
■ Creating the Self-Signed Certificate
■ Moving the Keystore
■ Updating the Configuration File
If you are configuring SSL on JBoss Application Server with a CA certificate, then perform the following tasks:
■ Importing a CA Certificate
■ Moving the Keystore
■ Updating the Configuration File
Creating the Self-Signed CertificateTo create the self-signed certificate, see "Generating Keystore" on page 2-75.
Importing a CA CertificateTo import a CA certificate, perform the following tasks:
1. Run the following command:
keytool -genkey -alias ALIAS_NAME -keystore ABSOLUTE_KEYSTORE_PATH -keyalg KEY_ALGORITHM -storepass KEYSTORE_PASSWORD -keypass PRIVATE_KEY_PASS
For example:
keytool -genkey -alias example088196 -keystore c:\temp\keys\custom.keystore -keyalg RSA -storepass example1234 -keypass example1234
2. When prompted, enter the information about the certificate, such as company and contact name. This information is displayed to employees attempting to access a secure page in the application. This is illustrated in the following example:
What is your first and last name? [Unknown]: Must be the name or IP address of the computerWhat is the name of your organizational unit? [Unknown]: exampleWhat is the name of your organization? [Unknown]: exampleWhat is the name of your City or Locality? [Unknown]: New YorkWhat is the name of your State or Province? [Unknown]: New YorkWhat is the two-letter country code for this unit? [Unknown]: US
Note:
- The keystore password and the private key password must be the same.
- Typically, the alias is the name or the IP address of the computer on which you are configuring SSL.
- The alias used in the various commands of this procedure must be the same.

Postinstallation
Deploying the Connector 2-73
Is <CN=Name or IP address of the computer, OU=example, O=example, L=New York, ST=New York, C=US> correct? [no]: yes
When you enter yes in the last line of the preceding example, the custom keystore file is created in the c:\temp\keys\ directory.
3. Generate the certificate signing request by running the following command:
keytool -certreq -alias ALIAS_NAME -file ABSOLUTE_CSR_PATH -keystore ABSOLUTE_KEYSTORE_PATH
For example:
keytool -certreq -alias example088196 -file c:\temp\keys\certReq.csr -keystore c:\temp\keys\custom.keystore
4. Submit the certReq.csr file on a CA Web site for downloading the CA certificate.
Ensure that your %JAVA_HOME%\jre\lib\security\cacerts has the root certificate of the CA that has generated the CA certificate.
To check all the root certificates that %JAVA_HOME%\jre\lib\security\cacerts contains, run the following command:
keytool -list -keystore %JAVA_HOME%\jre\lib\security\cacerts -storepass cacerts_store_password
For example:
%JAVA_HOME%\jre\bin\keytool -list -keystore %JAVA_HOME%\jre\lib\security\cacerts -storepass changeit
If the %JAVA_HOME%\jre\lib\security\cacerts keystore does not contain the root certificate of CA that has generated the CA certificate, then you must import the root certificate of CA into %JAVA_HOME%\jre\lib\security\cacerts.
Run the following command to import the root certificate of CA:
keytool -import -alias <cacerts_key_entry_alias> -file <CARootCertificate.cer> -keystore %JAVA_HOME%\jre\lib\security\cacerts -storepass cacerts_store_password
For example:
keytool -import -alias cakey -file "C:\temp\Thawte Test Root.cer" -keystore %JAVA_HOME%\jre\lib\security\cacerts -storepass changeit
The certificate is added to the keystore.
5. Import the CA certificate by running the following command:
keytool -import -alias ALIAS_NAME -keystore ABSOLUTE_KEYSTORE_PATH -trustcacerts -file ABSOLUTE_CACERT_PATH
ABSOLUTE_CACERT_PATH represents the path in which you have stored the certificate downloaded from CA.
For example:
keytool -import -alias example088196 -keystore c:\temp\keys\custom.keystore -trustcacerts -file c:\temp\keys\CACert.cer
When you run this command, you are prompted for the keystore password, as shown:

Postinstallation
2-74 Oracle Identity Manager Connector Guide for PeopleSoft Employee Reconciliation
Enter keystore password: example1234 [Enter]Owner: CN=Thawte Test CA Root, OU=TEST TEST TEST, O=Thawte Certification, ST=FOR TESTING PURPOSES ONLY, C=ZAIssuer: CN=Thawte Test CA Root, OU=TEST TEST TEST, O=Thawte Certification, ST=FOR TESTING PURPOSES ONLY, C=ZASerial number: 0Valid from: Thu Aug 01 05:30:00 GMT+05:30 1996 until: Fri Jan 01 03:29:59 GMT+05:30 2021Certificate fingerprints: MD5: 5E:E0:0E:1D:17:B7:CA:A5:7D:36:D6:02:DF:4D:26:A4 SHA1: 39:C6:9D:27:AF:DC:EB:47:D6:33:36:6A:B2:05:F1:47:A9:B4:DA:EATrust this certificate? [no]: yes [Enter]
In this example, the instances when you can press Enter are shown in bold.
Moving the KeystoreTo move the certificate to a JBoss Application Server directory, copy the generated keystore to the conf directory of your JBoss installation. For example, the directory can be C:\Program Files\jboss-4.0.3\server\default\conf\.
Updating the Configuration FileBefore updating the configuration file, shut down JBoss Application Server. The JBOSS_HOME/server/default/deploy/jbossweb-tomcat55.sar/server.xml file contains information about what Web features to enable when the server starts. Inside this file, there is a part that looks similar to the following:
<!-- SSL/TLS Connector configuration using the admin devl guide keystore<Connector port="8443" address="${jboss.bind.address}" maxThreads="100" strategy="ms" maxHttpHeaderSize="8192" emptySessionPath="true" scheme="https" secure="true" clientAuth="false" keystoreFile="${jboss.server.home.dir}/conf/chap08.keystore" keystorePass="rmi+ssl" sslProtocol = "TLS" />-->
In the code, make the following changes:
■ Remove the comment from the block of code.
■ Change the value of Connector port to 443 (default SSL port).
■ Change the value of keystoreFile to the absolute path of the keystore generated in "Generating Keystore" on page 2-75.
■ Change the value of keystorePass to the password of the keystore.
After the changes are made, the code block looks similar to the following:
<!-- SSL/TLS Connector configuration using the admin devl guide keystore --><Connector port="443" address="${jboss.bind.address}"maxThreads="100" strategy="ms" maxHttpHeaderSize="8192"emptySessionPath="true"scheme="https" secure="true" clientAuth="false"keystoreFile="${jboss.server.home.dir}/conf/ custom.keystore"keystorePass=" example1234 " sslProtocol = "TLS" /><!-- -->
SSL is now enabled. You can restart JBoss Application Server and browse to the following URL to verify whether SSL is enabled:
https://localhost:443

Postinstallation
Deploying the Connector 2-75
2.3.1.4.3 Configuring SSL on Oracle WebLogic Server You can configure SSL connectivity on Oracle WebLogic Server with either a self-signed certificate or a CA certificate. Perform the procedure described in one of the following sections:
■ Configuring SSL on Oracle WebLogic Server with a Self-Signed Certificate
■ Configuring SSL on Oracle WebLogic Server with a CA Certificate
Configuring SSL on Oracle WebLogic Server with a Self-Signed CertificateTo configure SSL connectivity between Oracle Identity Manager on Oracle WebLogic Server and the target system with a self-signed certificate, you must perform the following tasks:
■ Generating Keystore
■ Configuring Oracle WebLogic Server
Generating KeystoreTo generate the keystore:
1. Run the following command:
keytool -genkey -keystore ABSOLUTE_KEYSTORE_PATH -alias ALIAS_NAME -keyalg KEY_ALGORITHM -storepass KEYSTORE_PASSWORD -keypass PRIVATE_KEY_PASSWORD
For example:
keytool -genkey -keystore c:\temp\keys\keystore.jks -alias example088196 -keyalg RSA -storepass example1234 -keypass example1234
2. When prompted, enter information about the certificate. This information is displayed to persons attempting to access a secure page in the application. This is illustrated in the following example:
keytool -genkey -keystore c:\temp\keys\keystore.jks -alias example088196 -keyalg RSA -storepass example1234 -keypass example1234What is your first and last name? [Unknown]: Must be the name or IP address of the computerWhat is the name of your organizational unit? [Unknown]: exampleWhat is the name of your organization? [Unknown]: exampleWhat is the name of your City or Locality? [Unknown]: New York
See Also: Appendix C, "Setting Up SSL on Oracle WebLogic Server"
Note:
- The keystore password and the private key password must be the same.
- Typically, the alias is the name or the IP address of the computer on which you are configuring SSL.
- The alias used in the various commands of this procedure must be the same.

Postinstallation
2-76 Oracle Identity Manager Connector Guide for PeopleSoft Employee Reconciliation
What is the name of your State or Province? [Unknown]: New YorkWhat is the two-letter country code for this unit? [Unknown]: USIs <CN=Name or IP address of the computer, OU=example, O=example, L=New York, ST=New York, C=US> correct? [no]: yes
When you enter yes in the last line of the preceding example, the keystore.jks file is created in the c:\temp\keys\directory.
3. Export the keystore to a certificate file by running the following command:
keytool -export -alias ALIAS_NAME -keystore ABSOLUTE_KEYSTORE_PATH -file CERTIFICATE_FILE_ABSOLUTE_PATH
For example:
keytool -export -alias example088196 -keystore c:\temp\keys\keystore.jks -file c:\temp\keys\keystore.cert
4. When prompted for the private key password, enter the same password used for the keystore, for example, example1234.
5. Import the keystore by running the following command:
keytool -import -alias ALIAS_NAME -keystore NEW_KEYSTORE_ABSOLUTE_PATH -file CERTIFICATE_FILE_ABSOLUTE_PATH
For example:
keytool -import -alias example088196 -keystore c:\temp\keys\new.jks -file c:\temp\keys\keystore.cert
When you run this command, it prompts for the keystore password, as shown in the following example:
Enter keystore password: example1234 [Enter]Trust this certificate? [no]: yes [Enter]Certificate was added to keystore
In this example, the instances when you can press Enter are shown in bold.
Configuring Oracle WebLogic ServerAfter generating and importing the keystore, start Oracle WebLogic Server. To configure Oracle WebLogic Server:
1. Log in to the Oracle WebLogic Server console at http://localhost:7001/console and perform the following:
a. Expand the servers node and select the oim server instance.
b. Select the General tab.
c. Select the SSL Listen Port Enabled option.
d. Ensure that a valid port is specified in the SSL Listen Port field. The default port is 7002.
e. Click Apply to save your changes.
2. Click the Keystore & SSL tab, and then click Change.

Postinstallation
Deploying the Connector 2-77
3. From the Keystores list, select Custom identity And Java Standard Trust, and then click Continue.
4. Configure the keystore properties. To do so:
a. In the Custom Identity Key Store File Name column, specify the full path of the keystore generated in Step 1 of "Generating Keystore" on page 2-75, for example, c:\temp\keys\keystore.jks. In the Custom Identity Key Store Type column, specify the type of keystore, for example, JKS. In the Custom Identity Key Store Pass Phrase and Confirm Custom Identity Key Store Pass Phrase columns, specify the keystore password.
b. Provide the Java standard trust keystore pass phrase and the Confirm Java standard trust keystore pass phrase. The default password is changeit, unless you change the password.
c. Click Continue.
5. Specify the private key alias, pass phrase and the confirm pass phrase as the keystore password. Click Continue.
6. Click Finish.
7. Restart Oracle WebLogic Server. If the server starts successfully with the SSL configuration, then lines similar to the following are recorded in the startup log:
<Apr 21, 2008 2:35:43 PM GMT+05:30> <Notice> <WebLogicServer> <BEA-000355> <Thread "ListenThread.Default" listening on port 7001, ip address *.*> <Apr 21, 2008 2:35:43 PM GMT+05:30> <Notice> <WebLogicServer> <BEA-000355> <Thread "SSLListenThread.Default" listening on port 7002, ip address *.*>
Configuring SSL on Oracle WebLogic Server with a CA CertificateTo configure SSL connectivity between Oracle Identity Manager on Oracle WebLogic Server and the target system with a CA certificate, you must perform the following tasks:
■ Generating Keystore
■ Configuring Oracle WebLogic Server
Generating KeystoreThe connector requires Certificate Services to be running on the host computer. To generate the keystore:
1. Run the following command:
keytool -genkey -keystore ABSOLUTE_KEYSTORE_PATH -alias ALIAS_NAME -keyalg KEY_ALGORITHM -storepass KEYSTORE_PASSWORD -keypass PRIVATE_KEY_PASSWORD
For example:
Note: 7002 is the default SSL port for Oracle WebLogic Server.
Note: Although this is an optional step in the deployment procedure, Oracle strongly recommends that you configure SSL communication between the target system and Oracle Identity Manager.

Postinstallation
2-78 Oracle Identity Manager Connector Guide for PeopleSoft Employee Reconciliation
keytool -genkey -keystore c:\temp\keys\keystore.jks -alias example088196 -keyalg RSA -storepass example1234 -keypass example1234
2. When prompted, enter the information about the certificate. This information is displayed to persons attempting to access a secure page in the application. This is illustrated in the following example:
keytool -genkey -keystore c:\temp\keys\keystore.jks -alias example088196 -keyalg RSA -storepass example1234 -keypass example1234What is your first and last name? [Unknown]: Must be the name or IP address of the computerWhat is the name of your organizational unit? [Unknown]: exampleWhat is the name of your organization? [Unknown]: exampleWhat is the name of your City or Locality? [Unknown]: New YorkWhat is the name of your State or Province? [Unknown]: New YorkWhat is the two-letter country code for this unit? [Unknown]: USIs <CN=Name or IP address of the computer, OU=example, O=example, L=New York, ST=New York, C=US> correct? [no]: yes
When you enter yes in the last line of the preceding example, the keystore.jks file is created in the c:\temp\keys\directory.
3. Generate the certificate signing request by running the following command:
keytool -certreq -keystore ABSOLUTE_KEYSTORE_PATH -alias ALIAS_NAME -keyalg KEY_ALGORITHM -file CERTIFICATE_FILE_ABSOLUTE_PATH
For example:
keytool -certreq -keystore c:\temp\keys\keystore.jks -alias example088196 -keyalg RSA -file c:\temp\keys\keystore.cert
When prompted for the keystore password, enter the same password used for the keystore in Step 1, for example example1234. This stores a certificate request in the file that you specified in the preceding command.
4. Get the certificate from a CA by using the certificate request generated in the previous step and store the certificate in a file.
5. Export the keystore generated in Step 1 to a new certificate file, for example, myCert.cer, by running the following command:
keytool –export –keystore ABSOLUTE_KEYSTORE_PATH -alias alias-name specified in step 1 -file CERTIFICATE_FILE_ABSOLUTE_PATH
For example:
Note:
The keystore password and the private key password must be the same.
Typically, the alias name is the name or the IP address of the computer on which you are configuring SSL.

Postinstallation
Deploying the Connector 2-79
keytool –export –keystore c:\temp\keys\keystore.jks -alias example088196 -file c:\temp\keys\myCert.cer
6. Import the CA certificate to a new keystore by running the following command:
keytool -import -alias ALIAS_NAME -file CERTIFICATE_FILE_ABSOLUTE_PATH -keystore NEW_KEYSTORE_ABSOLUTE_PATH -storepass KEYSTORE_PASSWORD generated in Step 1
For example:
keytool -import -alias example088196 -file c:\temp\keys\rootCert.cert -keystore c:\temp\keys\rootkeystore.jks
When you run this command, it prompts for the keystore password, as shown:
Enter keystore password: example1234 [Enter]Trust this certificate? [no]: yes [Enter]Certificate was added to keystore
In this example, the instances when you can press Enter are shown in bold.
Configuring Oracle WebLogic ServerAfter creating and importing the keystore to the system, start Oracle WebLogic Server. To configure Oracle WebLogic Server:
1. Log in to the Oracle WebLogic Server console ((http://localhost:7001/console) and perform the following:
a. Expand the server node and select the server instance.
b. Select the General tab.
c. Select the SSL Port Enabled option.
d. Ensure that a valid port is specified in the SSL Listen Port field. The default port is 7002.
e. Click Apply to save your changes.
2. Click the Keystore & SSL tab, and click the Change link.
3. From the Keystores list, select Custom Identity And Custom Trust, and then click Continue.
4. Configure the keystore properties. To do so:
a. In the Custom Identity Key Store File Name column, specify the full path of the keystore generated in Step 1 of "Generating Keystore" on page 2-77, for example, c:\temp\keys\keystore.jks. In the Custom Identity Key Store Type column, specify the type of keystore, for example, JKS. In the Custom Identity Key Store Pass Phrase and Confirm Custom Identity Key Store Pass Phrase columns, specify the keystore password.
b. In the Custom Trust and Custom Trust Key Store File Name column, specify the full path of the keystore generated in Step 1 of "Generating Keystore" on page 2-77, for example, c:\temp\keys\rootkeystore.jks. In the Custom Trust Key Store Type column, specify the type of keystore, for example, JKS. In the Custom Trust Key Store Pass Phrase and Confirm Custom Trust Key Store Pass Phrase columns, specify the keystore password.
c. Provide the Java standard trust keystore password. The default password is changeit, unless you change the password.

Postinstallation
2-80 Oracle Identity Manager Connector Guide for PeopleSoft Employee Reconciliation
d. Click Continue.
5. Specify the alias name and private key password. Click Continue.
6. Click Finish.
7. Restart Oracle WebLogic Server. If the server starts successfully with the SSL configuration, then lines similar to the following are recorded in the startup log:
<Apr 21, 2008 2:35:43 PM GMT+05:30> <Notice> <WebLogicServer> <BEA-000355> <Thread "ListenThread.Default" listening on port 7001, ip address *.*> <Apr 21, 2008 2:35:43 PM GMT+05:30> <Notice> <WebLogicServer> <BEA-000355> <Thread "SSLListenThread.Default" listening on port 7002, ip address *.*>
2.3.1.4.4 Configuring SSL on Oracle Application Server
See "Oracle Application Server Administrator's Guide" for information about Configuring SSL on Oracle Application server.
2.3.1.5 Creating an Authorization Policy for Job Code
To create an authorization policy for Job Code, refer to the instructions given in the "Managing Authorization Policies" chapter of Oracle Fusion Middleware User's Guide for Oracle Identity Manager. The following instructions are specific to individual steps of the procedure described in the "Creating an Authorization Policy for User Management" section of that chapter:
■ When you reach Step 3, then:
In the Policy Name field, enter Job Code Authorization Policy.
■ When you reach Step 4, then:
In the Description field, enter Job Code Authorization Policy.
■ When you reach Step 7, then:
In the Permissions table, select the following check boxes in the Enable column:
– Modify User Profile
– Search User
– View User Details
Click Edit Attributes.
On the Attribute Settings page, clear all the check boxes and select Job Code.
■ When you reach Step 14 c, then:
From the Available Roles list, select System Administrator, and then click the Move button to move the selected role to the Organizations to Add list.
Note: 7002 is the default SSL port for Oracle WebLogic Server.
Note: You must configure the authorization policy for Supervisor ID if you want to use PeopleSoft HRMS Manager Reconciliation scheduled task.

Postinstallation
Deploying the Connector 2-81
2.3.2 Postinstallation on the Target SystemPostinstallation on the target system consists of the following procedure:
Configuring SSLTo configure SSL:
1. Copy the certificate to the computer on which PeopleSoft HRMS/HCM is installed.
2. Run the following command:
PEOPLESOFT_HOME/webserv/peoplesoft/bin/pskeymanager.cmd -import
3. When prompted, enter the current keystore password.
4. When prompted, enter the alias of the certificate to import.
5. When prompted, enter the full path and name of the certificate and press Enter.
6. When prompted for the following:
Trust this certificate? [no]: yes
Select yes and press Enter.
7. Restart the Web server of the target system.
Note: Perform the preceding steps to create an authorization policy for any user-defined field that you want to add, for example Supervisor ID, Department, and so on.
Note: If you are using IBM WebSphere Application Server, then you must download the root certificate from a CA.
Note: The alias must be the same as the one created when the keystore was generated.
If you are using IBM WebSphere Application Server, then enter root as the alias.
Note: If you are using IBM WebSphere Application Server, then enter the path of the root certificate.

Postinstallation
2-82 Oracle Identity Manager Connector Guide for PeopleSoft Employee Reconciliation

3
Using the Connector 3-1
3Using the Connector
After you deploy the connector, you must configure it to meet your requirements. This chapter discusses the following connector configuration procedures:
■ Section 3.1, "Summary of Steps to Use the Connector"
■ Section 3.2, "Performing Full Reconciliation"
■ Section 3.3, "Performing Incremental Reconciliation"
■ Section 3.4, "Limited Reconciliation"
■ Section 3.5, "Resending Messages That Are Not Received by the PeopleSoft Listener"
■ Section 3.6, "Configuring Scheduled Tasks"
3.1 Summary of Steps to Use the ConnectorThe following is a summary of the steps to use the connector for full reconciliation:
1. Generate XML files for the PERSON_BASIC_FULLSYNC message for all persons. See Section 3.2.1.1, "Running the PERSON_BASIC_FULLSYNC Message" for more information.
2. Generate XML files for the WORKFORCE_FULLSYNC message for the same set of persons. See Section 3.2.1.2, "Running the WORKFORCE_FULLSYNC Message" for more information.
Note: It is assumed that you have performed all the procedures described in the preceding chapter.
In Oracle Identity Manager release 11.1.1, a scheduled job is an instance of a scheduled task. In this guide, the term scheduled task used in the context of Oracle Identity Manager release 9.1.0.x is the same as the term scheduled job in the context of Oracle Identity Manager release 11.1.1.
See Oracle Fusion Middleware System Administrator's Guide for Oracle Identity Manager for more information about scheduled tasks and scheduled jobs.
Note: The XML files that you generate in Steps 1 and 2 must reside in different directories.

Performing Full Reconciliation
3-2 Oracle Identity Manager Connector Guide for PeopleSoft Employee Reconciliation
3. Copy these XML files to a directory on the Oracle Identity Manager host computer.
4. Configure the Peoplesoft HRMS Trusted Reconciliation scheduled task for the PERSON_BASIC_FULLSYNC message. The XML files are read by this scheduled task to generate reconciliation events. See Section 3.2.2.1, "Configuring the Scheduled Task for Person Data Reconciliation" for more information.
5. Configure the Peoplesoft HRMS Trusted Reconciliation scheduled task for the WORKFORCE_FULLSYNC message. The XML files are read by this scheduled task to generate reconciliation events. See Section 3.2.2.1, "Configuring the Scheduled Task for Person Data Reconciliation" for more information.
Change from full reconciliation to incremental reconciliation. See Section 3.3, "Performing Incremental Reconciliation" for instructions.
3.2 Performing Full ReconciliationFull reconciliation involves reconciling all existing person records from the target system into Oracle Identity Manager. After you deploy the connector, you must first perform full reconciliation.
The following sections discuss the procedures involved in full reconciliation:
■ Section 3.2.1, "Generating XML Files"
■ Section 3.2.2, "Importing XML Files into Oracle Identity Manager"
3.2.1 Generating XML FilesYou must generate XML files for all existing persons in the target system.
To generate XML files for full reconciliation perform the procedures described in the following section:
Running the Messages for Full Data PublishThis section describes the procedures for generating XML files.
■ Section 3.2.1.1, "Running the PERSON_BASIC_FULLSYNC Message"
■ Section 3.2.1.2, "Running the WORKFORCE_FULLSYNC Message"
3.2.1.1 Running the PERSON_BASIC_FULLSYNC MessageTo run the PERSON_BASIC_FULLSYNC message:
Note: Before performing the procedure to generate XML files, you must ensure that you have configured the PERSON_BASIC_FULLSYNC and WORKFORCE_FULLSYNC messages. See Section 2.2.2, "Installation on the Target System" for more information.
Note: If you are using PeopleTools 8.50 and HCM 9.0, then before running Full Data Publish, you must apply the patch that addresses Bug 824529. This patch can be downloaded from Oracle Metalink.

Performing Full Reconciliation
Using the Connector 3-3
1. In PeopleSoft Internet Architecture, expand Enterprise Components, Integration Definitions, Initiate Processes, and then click Full Data Publish.
2. Click the Add a New Value tab.
3. In the Run Control ID field, enter a value and then click ADD.
4. In the Process Request region, provide the following values:
Request ID: Enter a request ID.
Description: Enter a description for the process request.
Process Frequency: Select Always.
Message Name: Select PERSON_BASIC_FULLSYNC.
The following screenshot displays the preceding steps:
5. Click Save to save the configuration.
6. Click Run.
The Process Scheduler Request page appears.
7. From the Server Name list, select the appropriate server.
8. Select Full Table Data Publish process list, and click OK.
The following screenshot displays the process list:
9. Click Process Monitor to verify the status of EOP_PUBLISHT Application Engine. The Run Status is Success if the transaction is successfully completed.

Performing Full Reconciliation
3-4 Oracle Identity Manager Connector Guide for PeopleSoft Employee Reconciliation
On successful completion of the transaction, XML files for the PERSON_BASIC_FULLSYNC message are generated at a location that you specified in the FilePath property while creating the OIM_FILE_NODE node for PeopleSoft Web Server. See "Configuring PeopleSoft Integration Broker" on page 2-26 section for more information.
You must copy these XML files to a directory on the Oracle Identity Manager host computer.
3.2.1.2 Running the WORKFORCE_FULLSYNC MessageTo run the WORKFORCE_FULLSYNC message:
1. In PeopleSoft Internet Architecture, expand Enterprise Components, Integration Definitions, Initiate Processes, and then click Full Data Publish.
2. Click the Add a New Value tab.
3. In the Run Control ID field, enter a value and then click ADD.
4. In the Process Request region, provide the following values:
Request ID: Enter a request ID.
Description: Enter a description for the process request.
Process Frequency: Select Always.
Message Name: Select WORKFORCE_FULLSYNC.
The following screenshot displays the preceding steps:
5. Click Save to save the configuration.
6. Click Run.
The Process Scheduler Request page appears.
7. From the Server Name list, select the appropriate server.
Note: After you have performed this procedure, remove the permission list created in "Setting Up the Security for the PERSON_BASIC_FULLSYNC Service Operation" on page 2-29 section. This is for security purposes.

Performing Full Reconciliation
Using the Connector 3-5
8. Select the Full Table Data Publish process list, and click OK.
The following screenshot displays the process list:
9. Click Process Monitor to verify the status of EOP_PUBLISHT Application Engine. The Run Status is Success if the transaction is successfully completed.
On successful completion of the transaction, XML files for the WORKFORCE_FULLSYNC message are generated at a location that you specified in the FilePath property while creating the OIM_FILE_NODE node for PeopleSoft Web Server. See "Configuring PeopleSoft Integration Broker" on page 2-26 section for more information.
You must copy these XML files to a directory on the Oracle Identity Manager host computer.
3.2.2 Importing XML Files into Oracle Identity ManagerSection 3.2.2.1, "Configuring the Scheduled Task for Person Data Reconciliation" section describes the procedure to configure the scheduled task.
Section 3.2.2.2, "Running the PeopleSoft HRMS Manager Reconciliation Scheduled Task" describes the procedure to configure the scheduled task for reconciliation of Manager ID values.
3.2.2.1 Configuring the Scheduled Task for Person Data ReconciliationWhen you run the Connector Installer, the PeopleSoft HRMS Trusted Reconciliation scheduled task is automatically created in Oracle Identity Manager.
To perform a full reconciliation run, you must configure the scheduled task to reconcile all person data into Oracle Identity Manager depending on the values that you specified in the scheduled task attributes. Table 3–1 describes the attributes of this scheduled task. See Section 3.6, "Configuring Scheduled Tasks" for instructions on running the scheduled task.
Note: After you have performed this procedure, remove the permission list created in "Setting Up the Security for the WORKFORCE_FULLSYNC Service Operation" on page 2-36 section. This is for security purposes.

Performing Full Reconciliation
3-6 Oracle Identity Manager Connector Guide for PeopleSoft Employee Reconciliation
The Peoplesoft HRMS Trusted Reconciliation scheduled task is used to transfer XML file data from the file to the parser. The parser then converts this data into reconciliation events.
3.2.2.2 Running the PeopleSoft HRMS Manager Reconciliation Scheduled TaskManager ID values is not reconciled during full reconciliation run.
You must configure and run the PeopleSoft HRMS Manager Reconciliation scheduled task. Table 3–2 describes the attributes of this scheduled task.
Note: Before you configure the scheduled task, you must ensure that the mapping for all Actions to be performed on the target system is defined in the Lookup.PSFT.HRMS.WorkForceSync.EmpStatus lookup definition. See Section 1.5.4.2.4, "Lookup.PSFT.HRMS.WorkForceSync.EmpStatus" for more information.
Table 3–1 Attributes of the Peoplesoft HRMS Trusted Reconciliation Scheduled Task
Attribute Description
Archive Mode Enter yes if you want XML files used during full reconciliation to be archived. After archival the file is deleted from the original location.
If no, the XML file is not archived.
Archive Path Enter the full path and name of the directory in which you want XML files used during full reconciliation to be archived.
You must enter a value for the Archive Path attribute only if you specify yes as the value for the Archive Mode attribute.
Sample value: /usr/archive
File Path Enter the path of the directory on the Oracle Identity Manager host computer into which you copy the file containing XML data.
Sample value: /usr/data
IT Resource Name Enter the name of the IT resource that you create by performing the procedure described in Section 2.2.1.3, "Configuring the IT Resource."
Default value: PSFT Server
Message Implementation Class
Enter the name of the Implementation class for the message handler required to process the message. For example, the implementation class for the following messages are provided by default:
For the PERSON_BASIC_FULLSYNC message:
oracle.iam.connectors.psft.common.handler.impl.PSFTPersonSyncReconMessageHandlerImpl
For the WORKFORCE_FULLSYNC message:
oracle.iam.connectors.psft.common.handler.impl.PSFTWorkForceSyncReconMessageHandlerImpl
Message Name Use this attribute to specify the name of the delivered message used for full reconciliation.
Sample value: PERSON_BASIC_FULLSYNC or WORKFORCE_FULLSYNC
Note: This value must be same as the code key value in the Lookup.PSFT.Configuration lookup definition.
Task Name This attribute holds the name of the scheduled task.
Value: Peoplesoft HRMS Trusted Reconciliation

Performing Full Reconciliation
Using the Connector 3-7
Before you run this scheduled task, you must specify a value for the Update Empty Manager Only attribute.
The attributes of the PeopleSoft HRMS Manager Reconciliation scheduled task are shown in the following screenshot:
■ Enter yes if you want the scheduled task to populate Manager ID values in OIM User records that do not have this value. Existing Manager ID values in other OIM User records are not modified.
■ Enter no if you want the scheduled task to fetch and populate Manager ID values for all OIM User records, regardless of whether the Manager ID attribute in these records currently contains a value.
When it is run, this scheduled task performs the process described in Section 1.4.8, "Reconciliation of the Manager ID Attribute."
Table 3–2 Attributes of the PeopleSoft HRMS Manager Reconciliation Scheduled Task
Attribute Description
Employee ID UDF This attribute holds the metadata of the field of the person form with which EMPL ID from the target system is mapped.
Sample value: Users.User ID
Manager UDF This attribute holds the metadata of the Supervisor ID field of the person form.
Sample value: USR_UDF_SUPERVISOR_ID
Resource Object Enter the name of the resource object.
Default value: Peoplesoft HRMS
Task Name This attribute holds the name of the scheduled task.
Default value: Peoplesoft HRMS Manager Reconciliation
Update Empty Manager Only
Set this value to Yes to update empty Manager ID of a Person.
Default value: No

Performing Incremental Reconciliation
3-8 Oracle Identity Manager Connector Guide for PeopleSoft Employee Reconciliation
3.3 Performing Incremental ReconciliationYou do not require additional configuration for incremental reconciliation.
It is assumed that you have deployed the PeopleSoft listener as described in Section 2.2.1.4, "Deploying the PeopleSoft Listener."
3.4 Limited ReconciliationBy default, all target system records that are added or modified after the last reconciliation run are reconciled during the current incremental reconciliation run. For full reconciliation, all target system records are fetched into Oracle Identity Manager.
You configure segment filtering to specify the attributes whose values you want to fetch into Oracle Identity Manager. Similarly, you can configure limited reconciliation to specify the subset of target system records that must be fetched into Oracle Identity Manager.
You configure limited reconciliation by specifying a query condition as the value of the Custom Query attribute in the message-specific configuration lookup.
You must use the following format to specify a value for the Custom Query attribute:
RESOURCE_OBJECT_ATTRIBUTE_NAME=VALUE
For example, suppose you specify the following as the value of the Custom Query attribute:
Last Name=Doe
With this query condition, only records for persons whose last name is Doe are considered for reconciliation.
You can add multiple query conditions by using the ampersand (&) as the AND operator and the vertical bar (|) as the OR operator. For example, the following query condition is used to limit reconciliation to records of those persons whose first name is John and last name is Doe:
First Name=John & Last Name=Doe
You can limit reconciliation to the records of those persons whose first name is either John or their User ID is 219786 using the following query:
First Name=John | User ID=219786
To configure limited reconciliation:
1. Ensure that the OIM User attribute to use in the query exists in the Lookup.PSFT.HRMS.CustomQuery lookup definition. This lookup definition maps the resource object attributes with OIM User form fields.
Note: You must ensure that you have defined the mapping for all Actions to be performed on the target system in the Lookup.PSFT.HRMS.WorkForceSync.EmpStatus lookup definition. See Section 1.5.4.2.4, "Lookup.PSFT.HRMS.WorkForceSync.EmpStatus" for more information.
See Also: Section 1.5.4.3.3, "Lookup.PSFT.HRMS.CustomQuery" for a listing of the default contents of this lookup definition

Resending Messages That Are Not Received by the PeopleSoft Listener
Using the Connector 3-9
You must add a new row in this lookup definition whenever you add a new UDF in the process form. See Section 4.6, "Setting Up the Lookup.PSFT.HRMS.CustomQuery Lookup Definition" for adding an entry in this lookup definition and Section 4.2, "Adding New Attributes for Incremental Reconciliation" for adding a UDF.
2. Create the query condition. Apply the following guidelines when you create the query condition:
■ Use only the equal sign (=), the ampersand (&), and the vertical bar (|) in the query condition. Do not include any other special characters in the query condition. Any other character that is included is treated as part of the value that you specify.
■ Add a space before and after the ampersand and vertical bar used in the query condition. For example:
First Name=John & Last Name=Doe
This is to help the system distinguish between ampersands and vertical bars used in the query and the same characters included as part of attribute values specified in the query condition.
■ You must not include unnecessary blank spaces between operators and values in the query condition.
A query condition with spaces separating values and operators would yield different results as compared to a query condition that does not contain spaces between values and operators. For example, the output of the following query conditions would be different:
First Name=John & Last Name=Doe
First Name= John & Last Name= Doe
In the second query condition, the reconciliation engine would look for first name and last name values that contain a space at the start.
■ Ensure that attribute names that you use in the query condition are in the same case (uppercase or lowercase) as the case of values in the Lookup.PSFT.HRMS.CustomQuery lookup definitions. For example, the following query condition would fail:
fiRst Name = John
3. Configure the message-specific configuration lookup with the query condition as the value of the Custom Query attribute. For example, to specify the query condition for the PERSON_BASIC_FULLSYNC message, search and open the Lookup.PSFT.Message.PersonBasicSync.Configuration lookup. Specify the query condition in the Decode column of the Custom Query attribute.
3.5 Resending Messages That Are Not Received by the PeopleSoft Listener
The messages are generated and sent to Oracle Identity Manager regardless of whether the WAR file is running or not. Reconciliation events are not created for the messages that are sent to Oracle Identity Manager while the WAR file is unavailable. To ensure that all the messages generated on the target system reach Oracle Identity Manager, perform the following procedure:

Resending Messages That Are Not Received by the PeopleSoft Listener
3-10 Oracle Identity Manager Connector Guide for PeopleSoft Employee Reconciliation
Manually Sending MessagesIf Oracle Identity Manager is not running when a message is published, then the message is added to a queue. You can check the status of the message in the queue in the Message Instance tab. This tab lists all the published messages in queue. When you check the details of a specific message, the status is listed as Timeout or Error.
To publish a message in the queue to Oracle Identity Manager, resubmit the message when Oracle Identity Manager is running.
If the status of the message is New or Started and it does not change to Timeout or Done, then you must restart the PeopleSoft application server after you restart Oracle Identity Manager.
To manually resend messages in Error or TimeOut status:
1. In PeopleSoft Internet Architecture, expand PeopleTools, Integration Broker, Service Operations Monitor, Monitoring, and then click Asynchronous Services.
2. From the Group By list, select Service Operation or Queue to view the number of messages in Error, TimeOut, Done, and so on.
The number is in the form of a link, which when clicked displays the details of the message.
3. Click the link pertaining to the message to be resent, for example, the link under the Error or the TimeOut column.
You are taken to the Operation Instance tab.
Note: PeopleSoft supports this functionality for a limited rights user created in Section 2.1.2.2.2, "Creating a Role for a Limited Rights User." But, you can specify persons who have rights to perform this task based on the security policy of your organization.

Configuring Scheduled Tasks
Using the Connector 3-11
4. Click the Details link of the message to be resent. A new window appears.
5. Click the Error Messages link to check the error description.
6. Click Resubmit after you have resolved the issue.
3.6 Configuring Scheduled TasksThis section describes the procedure to configure scheduled tasks. You can apply this procedure to configure the scheduled tasks for reconciliation.
Table 3–3 lists the scheduled tasks that you must configure.
Table 3–3 Scheduled Tasks for Reconciliation
Scheduled Task Description
PeopleSoft HRMS Trusted Reconciliation
This scheduled task is used during full reconciliation. It parses the contents of the XML files and then creates reconciliation events for each record. See Section 3.2.2.1, "Configuring the Scheduled Task for Person Data Reconciliation" for information about this scheduled task.
PeopleSoft HRMS Manager Reconciliation
This scheduled task is used for reconciling Manager ID values during full reconciliation. See Section 3.2.2.2, "Running the PeopleSoft HRMS Manager Reconciliation Scheduled Task" for information about this scheduled task.

Configuring Scheduled Tasks
3-12 Oracle Identity Manager Connector Guide for PeopleSoft Employee Reconciliation
To configure a scheduled task:
1. Log in to the Administrative and User Console.
2. Depending on the Oracle Identity Manager release you are using, perform one of the following steps:
■ If you are using Oracle Identity Manager release 9.1.0.x, expand Resource Management, and then click Manage Scheduled Task.
■ If you are using Oracle Identity Manager release 11.1.1, then:
a. On the Welcome to Oracle Identity Manager Self Service page, click Advanced.
b. Click the System Management tab, and then click Scheduler.
c. On the left pane, click Advanced Search.
3. On the page that is displayed, you can use any combination of the search options provided to locate a scheduled task. Click Search after you specify the search criteria.
The following screenshot shows the Scheduled Task Management page for Oracle Identity Manager release 9.1.0.x:
The list of scheduled tasks that match your search criteria is displayed in the search results table.
4. Depending on the Oracle Identity Manager release you are using, perform one of the following steps:
■ If you are using Oracle Identity Manager release 9.1.0.x, then in the search results table, click the Edit icon in the Edit column for the scheduled task.
The following screenshot shows the Scheduled Task Management page:

Configuring Scheduled Tasks
Using the Connector 3-13
■ If you are using Oracle Identity Manager release 11.1.1, then select the link for the scheduled task from the list of scheduled tasks displayed in the search results table.
5. Modify the details of the scheduled task. To do so:
■ If you are using Oracle Identity Manager release 9.1.0.x, then on the Edit Scheduled Task Details page, you can modify the following parameters:
- Status: Specify whether you want to leave the task in the enabled state. In the enabled state, the task is ready for use.
- Max Retries: Enter an integer value in this field. This number represents the number of times Oracle Identity Manager must attempt to complete the task before assigning the ERROR status to the task. The default value is 1.
- Next Start: Use the date editor to specify the date when you want the task to run. After you select a date value in the date editor, you can modify the time value that is automatically displayed in the Next Start field.
- Frequency: Specify the frequency at which you want the task to run.
■ If you are using Oracle Identity Manager release 11.1.1, then on the Job Details tab, you can modify the following parameters:
- Retries: Enter an integer value in this field. This number represents the number of times the scheduler tries to start the job before assigning the Stopped status to the job.
- Schedule Type: Depending on the frequency at which you want the job to run, select the appropriate schedule type.
Note: See Oracle Fusion Middleware System Administrator's Guide for Oracle Identity Manager for detailed information about schedule types.

Configuring Scheduled Tasks
3-14 Oracle Identity Manager Connector Guide for PeopleSoft Employee Reconciliation
6. After modifying the values for the scheduled task details listed in the previous step, perform one of the following steps:
■ If you are using Oracle Identity Manager release 9.1.0.x, then click Continue.
■ If you are using Oracle Identity Manager release 11.1.1, then perform the next step.
7. Specify values for the attributes of the scheduled task. To do so:
■ If you are using Oracle Identity Manager release 9.1.0.x, then select each attribute from the Attribute list, specify a value in the field provided, and then click Update. See Table 3–1 for more information about the attributes of the scheduled task.
The following screenshot shows the Attributes page. The attributes of the scheduled task that you select for modification are displayed on this page.
■ If you are using Oracle Identity Manager release 11.1.1, then on the Job Details tab, under the Parameters section, specify values for the attributes of the scheduled task. See Table 3–1 for more information about the attributes of the scheduled task.
Note:
■ Attribute values are predefined in the connector XML that is imported during the installation of the connector. Specify values only for the attributes to change.
■ If you want to stop a scheduled task while it is running, the process is terminated only after the complete processing of the file that is being run. For instance, you want to reconcile data from five XML files. But, if you stop the scheduled task when it is reconciling data from the third file, then the reconciliation will stop only after processing the third file completely.

Configuring Scheduled Tasks
Using the Connector 3-15
8. After specifying the attributes, perform one of the following steps:
■ If you are using Oracle Identity Manager release 9.1.0.x, then click Save Changes to save the changes.
■ If you are using Oracle Identity Manager release 11.1.1, then click Apply to save the changes.
Note: The Stop Execution option is not available in the Administrative and User Console. If you want to stop a task, then click Stop Execution on the Task Scheduler form of the Design Console.
Note: The Stop Execution option is available in the Administrative and User Console. You can use the Scheduler Status page to start, stop, or reinitialize the scheduler.

Configuring Scheduled Tasks
3-16 Oracle Identity Manager Connector Guide for PeopleSoft Employee Reconciliation

4
Extending the Functionality of the Connector 4-1
4Extending the Functionality of the Connector
This chapter discusses the following optional procedures:
■ Section 4.1, "Adding New Attributes for Full Reconciliation"
■ Section 4.2, "Adding New Attributes for Incremental Reconciliation"
■ Section 4.3, "Modifying Field Lengths on the OIM User Form"
■ Section 4.4, "Configuring Validation of Data During Reconciliation"
■ Section 4.5, "Configuring Transformation of Data During Reconciliation"
■ Section 4.6, "Setting Up the Lookup.PSFT.HRMS.CustomQuery Lookup Definition"
■ Section 4.7, "Setting Up the Lookup.PSFT.HRMS.WorkForceSync.EmpStatus Lookup Definition"
■ Section 4.8, "Configuring the Connector for Multiple Installations of the Target System"
4.1 Adding New Attributes for Full ReconciliationYou can modify the default field mappings between Oracle Identity Manager and the target system. For example, the Lookup.PSFT.HRMS.PersonBasicSync.AttributeMapping lookup definition for the PERSON_BASIC_FULLSYNC message holds the default attribute mappings. If required, you can add to this predefined set of attribute mappings.
To add a new attribute for full reconciliation:
1. In the Oracle Identity Manager Design Console, make the required changes as follows:
a. Create a new user-defined field. For the procedure to create a user-defined field, see "Creating a User-Defined Field" on page 4-5.
Note: If you do not want to add new attributes for full reconciliation, then you need not perform this procedure.
See Also: Oracle Identity Manager Design Console Guide for detailed instructions on performing the following steps

Adding New Attributes for Full Reconciliation
4-2 Oracle Identity Manager Connector Guide for PeopleSoft Employee Reconciliation
b. Add a reconciliation field corresponding to the new attribute in the Peoplesoft HRMS resource object. For example, you can add the Employee ID reconciliation field.
c. Modify the PeopleSoft HRMS Person process definition to include the mapping between the newly added field and the corresponding reconciliation field. For the example described earlier, the mapping is as follows:
Employee ID = Employee ID
d. If you are using Oracle Identity Manager release 11.1.1, then on the Object Reconciliation tab, click Create Reconciliation Profile. This copies changes made to the resource object into the MDS.
2. Add the new attribute in the message-specific attribute mapping lookup definition. For example, the Lookup.PSFT.HRMS.PersonBasicSync.AttributeMapping lookup definition for the PERSON_BASIC_FULLSYNC message.
The following is the format of the values stored in this table:
For example:
Code Key: Empl ID
Decode: EMPLID~PERSON
Code Key Decode
AttributeName NODE~PARENT NODE~NODE TYPE=Value~EFFECTIVE DATED NODE~PRIMARY

Adding New Attributes for Full Reconciliation
Extending the Functionality of the Connector 4-3
In this example, Empl ID is the reconciliation field and its equivalent target system field is EMPLID.
The mapping is shown in the following screenshot:
3. Add the new attribute in the Resource Object attribute reconciliation lookup definition. For example, the Lookup.PSFT.HRMS.PersonBasicSync.Recon lookup for the PERSON_BASIC_FULLSYNC message.
The following is the format of the values stored in this table:
For example:
Code Key: Employee ID
Decode: Empl ID
The following screenshot displays the mapping:
Code Key Decode
RO Attribute ATTRIBUTE FIELD~LOOKUP NAME

Adding New Attributes for Incremental Reconciliation
4-4 Oracle Identity Manager Connector Guide for PeopleSoft Employee Reconciliation
In this example, RO Attribute refers to the resource object attribute name added in the preceding steps. The decode value is the code key value in the message-specific attribute mapping lookup definition.
4. Add the new attribute in the Custom Query lookup definition. See Section 4.6, "Setting Up the Lookup.PSFT.HRMS.CustomQuery Lookup Definition" for more information.
4.2 Adding New Attributes for Incremental ReconciliationStandard incremental reconciliation involves the reconciliation of predefined attributes. If required, you can add new attributes to the list of attributes that are reconciled.
To add a new attribute for incremental reconciliation:
1. In the Oracle Identity Manager Design Console, make the required changes as follows:
a. Create a new user-defined field. For the procedure to create a user-defined field, see "Creating a User-Defined Field" on page 4-5.
b. Add a reconciliation field corresponding to the new attribute in the Peoplesoft HRMS resource object. For the example described earlier, you can add the Employee ID reconciliation field.
c. Modify the PeopleSoft HRMS Person process definition to include the mapping between the newly added field and the corresponding reconciliation field. For the example described earlier, the mapping is as follows:
Employee ID = Employee ID
Note: If you do not want to add new attributes for incremental reconciliation, then you can skip this section.
See Also: Oracle Identity Manager Design Console Guide for detailed instructions on performing the following steps

Adding New Attributes for Incremental Reconciliation
Extending the Functionality of the Connector 4-5
d. If you are using Oracle Identity Manager release 11.1.1, then on the Object Reconciliation tab, click Create Reconciliation Profile. This copies changes made to the resource object into the MDS.
2. Add the new attribute in the message-specific attribute mapping lookup definition, for example, the Lookup.PSFT.HRMS.PersonBasicSync.AttributeMapping lookup definition for the PERSON_BASIC_SYNC message.
The following is the format of the values stored in this table:
For example:
Code Key: Empl ID
Decode: EMPLID~PERSON
In this example, Empl ID is the reconciliation field and its equivalent target system field is EMPLID.
3. Add the new attribute in the Resource Object attribute reconciliation lookup definition, for example the Lookup.PSFT.HRMS.PersonBasicSync.Recon lookup for the PERSON_BASIC_SYNC message.
The following is the format of the values stored in this table:
For example:
Code Key: Employee ID
Decode: Empl ID
In this example, RO Attribute refers to the resource object attribute name added in the preceding steps. The Decode value is the Code Key value defined in the message-specific attribute mapping lookup definition.
4. Add the new attribute in the Custom Query lookup definition. See Section 4.6, "Setting Up the Lookup.PSFT.HRMS.CustomQuery Lookup Definition" for more information.
Creating a User-Defined FieldTo create a user-defined field (UDF) on Oracle Identity Manager release 9.1.0.x:
1. Log in to the Oracle Identity Manager Design Console.
2. Expand the Administration folder.
3. Double-click User Defined Field Definition.
Code Key Decode
AttributeName NODE~PARENT NODE~NODE TYPE=Value~EFFECTIVE DATED NODE~PRIMARY
Code Key Decode
RO Attribute ATTRIBUTE FIELD~LOOKUP NAME

Modifying Field Lengths on the OIM User Form
4-6 Oracle Identity Manager Connector Guide for PeopleSoft Employee Reconciliation
4. Search for and open the Users form.
5. Click Add.
6. Enter the details of the field.
For example, if you are adding the Employee ID field, then enter Employee ID in the Label field, set the data type to String, enter USR_UDF_EMPLOYEE_ID as the column name, and enter a field size value.
7. Click Save.
To create a UDF on Oracle Identity Manager release 11.1.1:
1. Log in to the Oracle Identity Management Administration Console.
2. Click Advanced.
3. On the Configuration tab, click User Configuration.
4. From the Actions menu, select User Attributes.
5. Click Create Attribute.
6. Enter details of the attribute (UDF) that you want to create. From the Category list, select Custom Attributes.
7. Set values for the attribute properties.
8. Review the data that you have entered, and then save the attribute.
4.3 Modifying Field Lengths on the OIM User FormYou might want to modify the lengths of the fields (attributes) on the OIM User form. For example, if you use the Japanese locale, then you might want to increase the lengths of OIM User form fields to accommodate multibyte data from the target system.
If you want to modify the length of a field on the OIM User form, then:
1. Log in to the Design Console.
2. Expand Administration, and double-click User Defined Field Definition.

Configuring Validation of Data During Reconciliation
Extending the Functionality of the Connector 4-7
3. Search for and open the Users form.
4. Modify the length of the required field.
5. Click the Save icon.
4.4 Configuring Validation of Data During ReconciliationYou can configure validation of reconciled single-valued data according to your requirements. For example, you can validate data fetched from the First Name attribute to ensure that it does not contain the number sign (#). In addition, you can validate data entered in the First Name field on the user form so that the number sign (#) is not sent to Oracle Identity Manager during reconciliation operations.
For data that fails the validation check, the following message is displayed or recorded in the log file:
Value returned for field FIELD_NAME is false.
To configure validation of data:
1. Write code that implements the required validation logic in a Java class.
This validation class must implement the oracle.iam.connectors.common.validate.Validator interface and the validate method.
The following sample validation class checks if the value in the First Name attribute contains the number sign (#):
public boolean validate(HashMap hmUserDetails, HashMap hmEntitlementDetails, String field) { /*
See Also: The Javadocs shipped with the connector for more information about this interface

Configuring Validation of Data During Reconciliation
4-8 Oracle Identity Manager Connector Guide for PeopleSoft Employee Reconciliation
* You must write code to validate attributes. Parent * data values can be fetched by using hmUserDetails.get(field) * For child data values, loop through the * ArrayList/Vector fetched by hmEntitlementDetails.get("Child Table") * Depending on the outcome of the validation operation, * the code must return true or false. */ /* * In this sample code, the value "false" is returned if the field * contains the number sign (#). Otherwise, the value "true" is * returned. */ boolean valid=true; String sFirstName=(String) hmUserDetails.get(field); for(int i=0;i<sFirstName.length();i++){ if (sFirstName.charAt(i) == '#'){ valid=false; break; } } return valid; }
2. Create a JAR file to hold the Java class.
3. Copy the JAR file into the JavaTasks or ScheduleTask directory.
4. If you created the Java class for validating a process form field for reconciliation, then:
a. Log in to the Design Console.
b. Search for and open the message-specific configuration lookup definition.
For example, locate the Lookup.PSFT.Message.WorkForceSync.Configuration lookup definition for the WORKFORCE_SYNC message. See Section 1.5.4.2.1, "Lookup.PSFT.Message.WorkForceSync.Configuration" for information about this lookup definition. Check for the parameter Validation Lookup Definition in this lookup definition. The Decode value specifies the name of the validation lookup. In this example, the Decode value is Lookup.PSFT.HRMS.WorkForceSync.Validation.
c. Search for and open the Lookup.PSFT.HRMS.WorkForceSync.Validation lookup definition.
d. In the Code Key column, enter the resource object field name. In the Decode column, enter the class name.
For example, to perform validation on the First Name attribute you must define the following mapping in the lookup definition:
Code Key: First Name
Decode: oracle.iam.connectors.recon.validation
Note: If you are using Oracle Identity Manager release 11.1.1, then see Oracle Fusion Middleware Developer's Guide for Oracle Identity Manager for steps to import the contents of JavaTasks directory into the Oracle Identity Manager database.

Configuring Transformation of Data During Reconciliation
Extending the Functionality of the Connector 4-9
Here, the Code Key value specifies the name of the resource object attribute on which validation is applied and Decode value is the complete package name of the Implementation class.
e. Save the changes to the lookup definition.
f. Search for and open the message-specific configuration lookup definition, in this example, the Lookup.PSFT.Message.WorkForceSync.Configuration lookup definition.
g. Set the value of the Use Validation entry to yes.
h. Save the changes to the lookup definition.
5. Remove the PeopleSoftOIMListener.war file or PeopleSoftOIMListener.ear file depending on the Oracle Identity Manager release from the application server.
6. Depending on the Oracle Identity Manager release that you are using, perform one of the following steps:
■ If you are using Oracle Identity Manager release 9.1.0.x, then:
a. Copy the OIM_HOME/xellerate/XLIntegrations/PSFTER/ WAR/PeopleSoftOIMListener.war file into a temporary folder. Enter the following command to extract the contents of the PeopleSoftOIMListener.war file:
jar -xvf PeopleSoftOIMListener.war
b. Copy the validation JAR file created in Step 2 to the following directory of the extracted PeopleSoftOIMListener.war file:
WEB-INF/lib
c. Delete the PeopleSoftOIMListener.war file from the temporary directory into which you extracted its contents.
d. Use the following command to re-create the file:
jar -cvf PeoplesoftOIMListener.war .
■ If you are using Oracle Identity Manager release 11.1.1, copy the validation JAR file created in Step 2 to the following directory:
PeoplSoftOIMListener.ear/PeoplSoftOIMListener.war/WEB-INF/lib
7. Depending on the Oracle Identity Manager release that you are using, perform one of the following steps:
■ If you are using Oracle Identity Manager release 9.1.0.x, then redeploy the PeopleSoftOIMListener.war file on the application server. See Section 2.2.1.4.1, "Deploying the PeopleSoft Listener on Oracle Identity Manager Release 9.1.0.x" for the procedure.
■ If you are using Oracle Identity Manager release 11.1.1, then redeploy the PeopleSoftOIMListener.ear file on the application server. See Section 2.2.1.4.2, "Deploying the PeopleSoft Listener on Oracle Identity Manager Release 11.1.1" for the procedure.
4.5 Configuring Transformation of Data During ReconciliationYou can configure the transformation of reconciled single-valued data according to your requirements. For example, you can use First Name and Last Name values to create a value for the Full Name field in Oracle Identity Manager.

Configuring Transformation of Data During Reconciliation
4-10 Oracle Identity Manager Connector Guide for PeopleSoft Employee Reconciliation
To configure the transformation of data:
1. Write code that implements the required transformation logic in a Java class.
This transformation class must implement the oracle.iam.connectors.common.transform.Transformation interface and the transform method.
The following sample transformation class creates a value for the Full Name attribute by using values fetched from the First Name and Last Name attributes of the target system:
package oracle.iam.connectors.common.transform; import java.util.HashMap; public class TransformAttribute1 implements Transformation { /* Description:Abstract method for transforming the attributes param hmUserDetails<String,Object> HashMap containing parent data details param hmEntitlementDetails <String,Object> HashMap containing child data details */ public Object transform(HashMap hmUserDetails, HashMap hmEntitlementDetails,String sField) { { /* * You must write code to transform the attributes. Parent data attribute values can be fetched by using hmUserDetails.get("Field Name"). *To fetch child data values, loop through the * ArrayList/Vector fetched by hmEntitlementDetails.get("Child Table") * Return the transformed attribute. */ System.out.println("sfield =" + sField); String sCurrencyCode= (String)hmUserDetails.get(sField); sCurrencyCode = "$"+sCurrencyCode; return sCurrencyCode; }}
2. Create a JAR file to hold the Java class.
3. Copy the JAR file into the JavaTasks or ScheduleTask directory.
4. If you created the Java class for validating a process form field for reconciliation, then:
a. Log in to the Design Console.
See Also: The Javadocs shipped with the connector for more information about this interface
Note: If you are using Oracle Identity Manager release 11.1.1, then see Oracle Fusion Middleware Developer's Guide for Oracle Identity Manager for steps to import the contents of JavaTasks directory into the Oracle Identity Manager database.

Configuring Transformation of Data During Reconciliation
Extending the Functionality of the Connector 4-11
b. Search for and open the message-specific configuration lookup definition, in this example, the Lookup.PSFT.Message.WorkForceSync.Configuration lookup definition for the WORKFORCE_SYNC message.
See Section 1.5.4.2.1, "Lookup.PSFT.Message.WorkForceSync.Configuration" for information about this lookup definition. Check for the parameter Transformation Lookup Definition in this lookup definition. The Decode value specifies the name of the transformation lookup. In this example, the Decode value is Lookup.PSFT.HRMS.WorkForceSync.Transformation.
c. Search for and open the Lookup.PSFT.HRMS.WorkForceSync.Transformation lookup definition.
d. In the Code Key column, enter the resource object field name. In the Decode column, enter the class name.
For example, to perform transformation on the First Name attribute, you must define the following mapping in the lookup definition:
Code Key: First Name
Decode: oracle.iam.connectors.common.transform.TransformAttribute1
Here, the Code Key specifies the name of the resource object attribute on which transformation is applied and Decode is the complete package name of the Implementation class.
e. Save the changes to the lookup definition.
f. Search for and open the message-specific configuration lookup definition, in this example, the Lookup.PSFT.Message.WorkForceSync.Configuration lookup definition.
g. Set the value of the Use Transformation entry to yes.
h. Save the changes to the lookup definition.
5. Remove the PeopleSoftOIMListener.war file or PeopleSoftOIMListener.ear file depending on the Oracle Identity Manager release from the application server.
6. Depending on the Oracle Identity Manager release that you are using, perform one of the following steps:
■ If you are using Oracle Identity Manager release 9.1.0.x, then:
a. Copy the OIM_HOME/xellerate/XLIntegrations/PSFTER/ WAR/PeopleSoftOIMListener.war file into a temporary folder. Enter the following command to extract the contents of the PeopleSoftOIMListener.war file:
jar -xvf PeopleSoftOIMListener.war
b. Copy the transformation JAR file created in Step 2 to the following directory of the extracted PeopleSoftOIMListener.war file:
WEB-INF/lib
c. Delete the PeopleSoftOIMListener.war file from the temporary directory into which you extracted its contents.
d. Use the following command to re-create the file:
jar -cvf PeoplesoftOIMListener.war .
■ If you are using Oracle Identity Manager release 11.1.1, then copy the transformation JAR file created in Step 2 to the following directory:

Setting Up the Lookup.PSFT.HRMS.CustomQuery Lookup Definition
4-12 Oracle Identity Manager Connector Guide for PeopleSoft Employee Reconciliation
PeoplSoftOIMListener.ear/PeoplSoftOIMListener.war/WEB-INF/lib
7. Depending on the Oracle Identity Manager release that you are using, perform one of the following steps:
■ If you are using Oracle Identity Manager release 9.1.0.x, then redeploy the PeopleSoftOIMListener.war file on the application server. See Section 2.2.1.4.1, "Deploying the PeopleSoft Listener on Oracle Identity Manager Release 9.1.0.x" for the procedure.
■ If you are using Oracle Identity Manager release 11.1.1, then redeploy the PeopleSoftOIMListener.ear file on the application server. See Section 2.2.1.4.2, "Deploying the PeopleSoft Listener on Oracle Identity Manager Release 11.1.1" for the procedure.
4.6 Setting Up the Lookup.PSFT.HRMS.CustomQuery Lookup DefinitionYou configure limited reconciliation by specifying a query condition as the value of the Custom Query attribute in the message-specific configuration lookup. See Section 1.5.4.3.3, "Lookup.PSFT.HRMS.CustomQuery" for more information about this lookup definition.
You must ensure that the OIM User attribute to use in the query exists in the Lookup.PSFT.HRMS.CustomQuery lookup definition. You must add a row in this lookup definition whenever you add a UDF in the user form.
To add a new UDF to this lookup definition:
1. On the Design Console, expand Administration and then double-click Lookup Definition.
2. Search for and open the Lookup.PSFT.HRMS.CustomQuery lookup definition.
3. Click Add.
4. In the Code Key and Decode columns, enter the values for the UDF.
The following is the format of the values stored in this table:
If you have added a UDF Empl ID with column name as USR_UDF_EMPLOYEE_ID, then define the following entry in this lookup definition:
Code Key: Empl ID
Decode: USR_UDF_EMPLOYEE_ID
5. Click the Save icon.
Note: The Code Key value represents the resource object field name and the Decode value specifies the column name of the USR table.
Code Key Decode
RO Attribute Name Column name of the USR table
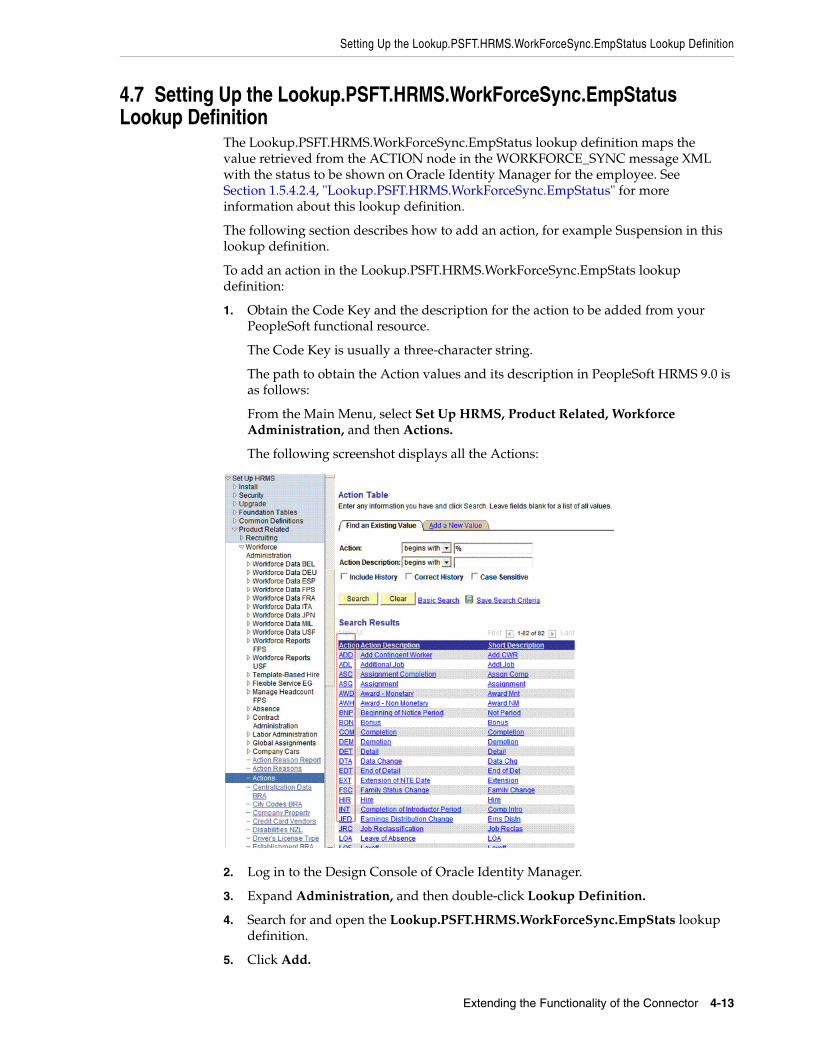
Setting Up the Lookup.PSFT.HRMS.WorkForceSync.EmpStatus Lookup Definition
Extending the Functionality of the Connector 4-13
4.7 Setting Up the Lookup.PSFT.HRMS.WorkForceSync.EmpStatus Lookup Definition
The Lookup.PSFT.HRMS.WorkForceSync.EmpStatus lookup definition maps the value retrieved from the ACTION node in the WORKFORCE_SYNC message XML with the status to be shown on Oracle Identity Manager for the employee. See Section 1.5.4.2.4, "Lookup.PSFT.HRMS.WorkForceSync.EmpStatus" for more information about this lookup definition.
The following section describes how to add an action, for example Suspension in this lookup definition.
To add an action in the Lookup.PSFT.HRMS.WorkForceSync.EmpStats lookup definition:
1. Obtain the Code Key and the description for the action to be added from your PeopleSoft functional resource.
The Code Key is usually a three-character string.
The path to obtain the Action values and its description in PeopleSoft HRMS 9.0 is as follows:
From the Main Menu, select Set Up HRMS, Product Related, Workforce Administration, and then Actions.
The following screenshot displays all the Actions:
2. Log in to the Design Console of Oracle Identity Manager.
3. Expand Administration, and then double-click Lookup Definition.
4. Search for and open the Lookup.PSFT.HRMS.WorkForceSync.EmpStats lookup definition.
5. Click Add.

Configuring the Connector for Multiple Installations of the Target System
4-14 Oracle Identity Manager Connector Guide for PeopleSoft Employee Reconciliation
6. In the Code Key and Decode columns, enter the values for the following values:
Code Key: SUS
Decode: Disabled
In this example, SUS is retrieved from the ACTION node of the WORKFORCE_SYNC message XML for the action suspension. The corresponding mapping for this action is defined as Disabled in Oracle Identity Manager.
7. Click the Save icon.
4.8 Configuring the Connector for Multiple Installations of the Target System
You might want to configure the connector for multiple installations of the target system. The following example illustrates this requirement:
The London and New York offices of Example Multinational Inc. have their own installations of the target system. The company has recently installed Oracle Identity Manager, and they want to configure Oracle Identity Manager to link all the installations of the target system.
To meet the requirement posed by such a scenario, you can create copies of connector objects, such as the IT resource and resource object.
The decision to create a copy of a connector object is based on a requirement. For example, an IT resource can hold connection information for one target system installation. Therefore, it is mandatory to create a copy of the IT resource for each target system installation.
With some other connector objects, you do not need to create copies at all. For example, a single attribute-mapping lookup definition can be used for all installations of the target system.
All connector objects are linked. For example, a scheduled task holds the name of the IT resource. Similarly, the IT resource holds the name of the common configuration lookup definition, which is Lookup.PSFT.Configuration. If you create a copy of an object, then you must specify the name of the copy in other connector object. Table 4–1 lists association between connector objects whose copies can be created and the other objects that reference these objects. When you create a copy of an object, use this information to change the associations of that object with other objects.
Note: The following is the format of the values stored in this lookup definition:
Code Key: ACTION value retrieved from the WORKFORCE_SYNC message XML
Decode: Active or Disabled in Oracle Identity Manager
Note: You must define the mapping for all Actions to be performed on the target system in this lookup definition.

Configuring the Connector for Multiple Installations of the Target System
Extending the Functionality of the Connector 4-15
Table 4–1 Connector Objects and Their Associations
Connector Object Name Referenced By Description
IT Resource PSFT Server ■ Scheduled Task: Peoplesoft HRMS Trusted Reconciliation
■ Resource Object: Peoplesoft HRMS
You need to create a copy of IT Resource with a different name.
Resource Object Peoplesoft HRMS
Message-specific configuration lookup definitions:
■ Lookup.PSFT.Message.PersonBasicSync.Configuration
■ Lookup. PSFT.Message.WorkForceSync.Configuration
It is optional to create a copy of a resource object. If you are reconciling the same set of attributes from the other target system, then you need not create a new resource object.
Note: Create copies of this resource object only if there are differences in attributes between the two installations of the target system.
Common Configuration Lookup Definition
Lookup.PSFT.Configuration
Message-specific configuration lookup definitions:
■ Lookup.PSFT.Message.PersonBasicSync.Configuration
■ Lookup. PSFT.Message.WorkForceSync.Configuration
It is optional to create a copy of the common configuration lookup definition.
Note: Create copies of this lookup definition only if there are differences in attributes between the two installations of the target system.
Message-specific Configuration Lookup Definition
■ Lookup.PSFT.Message.PersonBasicSync.Configuration
■ Lookup. PSFT.Message.WorkForceSync.Configuration
Attribute mapping lookup definitions:
■ Lookup.PSFT.HRMS.PersonBasicSync.AttributeMapping
■ Lookup.PSFT.HRMS.WorkForceSync.AttributeMapping
It is optional to create a copy of the message-specific lookup definitions.
Note: Create copies of this lookup definition only if there are differences in attributes between the two installations of the target system.
Attribute Mapping Lookup Definition
■ Lookup.PSFT.HRMS.PersonBasicSync.AttributeMapping
■ Lookup.PSFT.HRMS.WorkForceSync.AttributeMapping
NA This lookup definition holds the information of the attributes reconciled from the XML message file from the target system.
Note: Create copies of this lookup definition only if there are differences in attributes between the two installations of the target system.

Configuring the Connector for Multiple Installations of the Target System
4-16 Oracle Identity Manager Connector Guide for PeopleSoft Employee Reconciliation
To create copies of the connector objects:
1. Create a copy of the IT resource. See Section 2.2.1.3, "Configuring the IT Resource" for information about this IT resource.
2. Create a copy of the Peoplesoft HRMS resource object.
3. Create copy of the PERSON_BASIC_SYNC and WORKFORCE_SYNC message-specific configuration lookup.
4. Create a copy of the Lookup.PSFT.Configuration lookup definition. See Section 1.5.4.3.1, "Lookup.PSFT.Configuration" for information about this lookup definition.
5. Create a copy of the message-specific attribute mapping and Recon lookup definition, for example, the Lookup.PSFT.HRMS.PersonBasicSync.AttributeMapping and the Lookup.PSFT.HRMS.PersonBasicSync.Recon for PERSON_BASIC_SYNC message. Similarly, the Lookup.PSFT.HRMS.WorkForceSync.AttributeMapping and the Lookup.PSFT.HRMS.WorkForceSync.Recon for WORKFORCE_SYNC message.
6. Create a copy of the Peoplesoft HRMS Trusted Reconciliation scheduled task. See Section 3.2.2.1, "Configuring the Scheduled Task for Person Data Reconciliation" for information about this scheduled task.
7. Remove the PeopleSoftOIMListener.war file as described in Section 2.2.1.5, "Removing the PeopleSoft Listener."
8. Extract the removed PeopleSoftOIMListener.war file to a temporary folder.
9. Edit the web.xml file as follows:
a. Search for the </servlet> tag in the file.
b. Add the following lines above the </servlet> tag:
<init-param><!-- Specify Message Handler Impl classes --><param-name>IT_RESOURCE_NAME</param-name><param-value>MESSAGE~IMPLEMENTATION_CLASS;MESSAGE~IMPLEMENTATION_CLASS;MESSAGE~IMPLEMENTATION_CLASS</param-value></init-param>
Here, IT_RESOURCE_NAME refers to the new IT Resource name defined in Step 1 of this procedure.
Recon Map Lookup Definition
■ Lookup.PSFT.HRMS.PersonBasicSync.Recon
■ Lookup.PSFT.HRMS.WorkForceSync.Recon
NA This lookup definition maps the resource object field with the data reconciled from the message.
Note: Create copies of this lookup definition only if there are differences in attributes between the two installations of the target system.
Note: See the Oracle Identity Manager Design Console Guide for detailed information about the steps in this procedure.
Table 4–1 (Cont.) Connector Objects and Their Associations
Connector Object Name Referenced By Description

Configuring the Connector for Multiple Installations of the Target System
Extending the Functionality of the Connector 4-17
Modify the second line as described in Step 4 (e) of the procedure in Section 2.2.1.4, "Deploying the PeopleSoft Listener."
10. Deploy the PeopleSoftOIMListener.war file as described in Section 2.2.1.4, "Deploying the PeopleSoft Listener."
To reconcile data from a particular target system installation, specify the name of the IT resource for that target system installation as the value of the ITResource scheduled task attribute.

Configuring the Connector for Multiple Installations of the Target System
4-18 Oracle Identity Manager Connector Guide for PeopleSoft Employee Reconciliation

5
Testing and Troubleshooting 5-1
5Testing and Troubleshooting
After you deploy the connector, you must test it to ensure that it functions as expected. This chapter discusses the topics related to connector testing.
■ Section 5.1, "Testing Reconciliation"
■ Section 5.2, "Troubleshooting"
5.1 Testing ReconciliationThe testing utility enables you to test the functionality of the connector. The testing utility takes as input the XML file or message generated by the target system. It can be used for testing full and incremental reconciliation.
The testing utility is located in the test directory on the installation media. See Section 2.1.1.1, "Files and Directories on the Installation Media" for more information.
To run the testing utility:
1. Copy the testing utility files to the following directories:
■ If you are using Oracle Identity Manager release 9.1.0.x, then:
Copy files from the test/config directory on the installation media to the OIM_HOME/xellerate/XLIntegrations/PSFTER/config directory.
Copy files from the test/scripts directory on the installation media to the OIM_HOME/xellerate/XLIntegrations/PSFTER/scripts directory.
■ If you are using Oracle Identity Manager release 11.1.1, then:
Copy files from the test/config directory on the installation media to the OIM_HOME/server/XLIntegrations/PSFTER/config directory.
Copy files from the test/scripts directory on the installation media to the OIM_HOME/server/XLIntegrations/PSFTER/scripts directory.
2. Depending on the Oracle Identity Manager release you are using, perform one of the following steps:
■ If you are using Oracle Identity Manager release 9.1.0.x, then copy the log4j.jar file into the following directory:
OIM_HOME/xellerate/ThirdParty
Note: You must create the destination directories on the Oracle Identity Manager host computer if they are not present.

Testing Reconciliation
5-2 Oracle Identity Manager Connector Guide for PeopleSoft Employee Reconciliation
■ If you are using Oracle Identity Manager release 11.1.1, then copy the lib/PSFTCommon.jar and lib/Common.jar files from installation media into the following directory:
OIM_HOME/server/JavaTasks
3. Modify the files that you copy into the config directory as follows:
a. If you are using Oracle Identity Manager release 9.1.0.x, then modify the log.properties file as described in Section 2.3.1.1, "Enabling Logging."
b. Open and edit the reconConfig.properties file as follows:
i) Enter the PeopleSoftOIMListener servlet URL as the value of ListenerURL in following syntax:
http://HOSTNAME:PORT/PeopleSoftOIMListener
For example:
ListenerURL=http://10.1.6.83:8080/PeopleSoftOIMListener
ii) Enter the absolute XML message file path as the value of XMLFilePath as shown in the following example:
XMLFilePath=c:/xmlmessages/person_basic_sync.xml
iii) Enter a value for the MessageType. For a ping message, specify Ping, None, or otherwise as shown in the following example:
MessageType=None
iv) Enter a value for ITResourceName. This value must match the active IT resource in Oracle Identity Manager.
For example:
ITResourceName=PSFT Server
v) Enter the name of the message for which you run the testing utility.
For example:
MessageName=PERSON_BASIC_SYNC
c. Open a command window, and navigate to the following directory:
If you are using Oracle Identity Manager release 9.1.0.x, then:
OIM_HOME/xellerate/XLIntegrations/PSFTER/scripts
If you are using Oracle Identity Manager release 11.1.1, then:
OIM_HOME/server/XLIntegrations/PSFTER/scripts
d. Run the following script:
For Microsoft Windows:
InvokeListener.bat
Note: Ensure that there is no blank or white-space character in the directory path and file name that you specify.

Troubleshooting
Testing and Troubleshooting 5-3
For UNIX:
InvokeListener.sh
Verify that a reconciliation event is created in Oracle Identity Manager and that the event contains the data specified in the message-specific XML file.
5.2 TroubleshootingThe following table lists solutions to some commonly encountered issues associated with the PeopleSoft Employee Reconciliation connector:
Problem Description Solution
You might receive the following error message while reconciling job data:
ERROR [PSFTCOMMON] ===============================ERROR [PSFTCOMMON] oracle.iam.connectors.psft.common.handler.HandlerFactory:getMessageHandler: No Lookup defined for message WORKFORCE_SYNC.VERSION_2 ERROR [PSFTCOMMON] ===============================
ERROR [PSFTCOMMON] ===============================ERROR [PSFTCOMMON] oracle.iam.connectors.psft.common.listener.PeopleSoftOIMListener:process: Message specific handler couldn'tbe initialized. Please check if lookup definition has been specified for the message "WORKFORCE_SYNC.VERSION_2".ERROR [PSFTCOMMON] ================================
This indicates that the target system is sending the WORKFORCE_SYNC message with the name WORKFORCE_SYNC.VERSION_2.
You must modify the Code Key value of the WORKFORCE_SYNC attribute in the Lookup.PSFT.Configuration lookup definition as follows:
Code Key: WORKFORCE_SYNC.VERSION_2
Decode: Lookup.PSFT.Message.WorkForceSync.Configuration
If the WORKFORCE_FULLSYNC message is processed before the PERSON_BASIC_FULLSYNC message, then the Oracle Identity Manager stores the data for all those events in the Event Received state. You might receive an event in the Event Received state with an empty Status field.
You must check the value of the Action applicable for the Person in the Lookup.PSFT.HRMS.WorkForceSync.EmpStatus lookup definition. This lookup definition stores the mapping between the Action applicable for a Person and the OIM User status.

Troubleshooting
5-4 Oracle Identity Manager Connector Guide for PeopleSoft Employee Reconciliation

6
Known Issues 6-1
6Known Issues
The following is a known issue associated with this release of the connector:
■ Bug 8923935
The connector does not support direct deletion of Person records.

6-2 Oracle Identity Manager Connector Guide for PeopleSoft Employee Reconciliation

A
Determining the Root Audit Action Details A-1
ADetermining the Root Audit Action Details
An XML message that is published by PeopleSoft contains a Transaction node. In case of full reconciliation, the XML files for PERSON_BASIC_FULLSYNC and WORKFORCE_FULLSYNC messages have multiple transaction nodes. However, in case of incremental reconciliation, the XML messages PERSON_BASIC_SYNC and WORKFORCE_SYNC have only one transaction node.
Every transaction node has a PeopleSoft Common Application Messaging Attributes (PSCAMA) subnode.
The following screenshot shows the PSCAMA node:

A-2 Oracle Identity Manager Connector Guide for PeopleSoft Employee Reconciliation
PSCAMA is an XML tag that contains fields common to all messages. The PSCAMA tag is repeated for each row in each level of the Transaction section of the message. PSCAMA provides the following information about the message data:
■ Language in which the data is written
■ Type of transaction the row represents, such as add or update
When receiving a message, PeopleCode inspects the PSCAMA node for this information and responds accordingly.
The AUDIT_ACTN subnode of PSCAMA, known as Root Audit Action, filters the data records in an XML message. It indicates the action taken against a person, such as Add or Change in Oracle Identity Manager.
If the biographical information is changed for a person on the target system, then the Root Audit Action value is C. If a person is added, then the Root Audit Action is either A or empty.
The Add Root Audit Action is shown in the following screenshot:

Determining the Root Audit Action Details A-3
The nonzero level PSCAMA node and its Root Audit Action are shown in the following screenshot:

A-4 Oracle Identity Manager Connector Guide for PeopleSoft Employee Reconciliation

B
Configuring the Connector Messages B-1
BConfiguring the Connector Messages
You can configure the connector messages of release 9.1.0.x.y with that of the current release as follows:
To configure the messages:
1. Add the following lookup definitions:
■ Lookup.PSFT.Message.XellerateUser.Configuration
■ Lookup.PSFT.HRMS.XellerateUser.EmpStatus
■ Lookup.PSFT.HRMS.XellerateUser.EmpType
■ Lookup.PSFT.HRMS.XellerateUser.AttributeMapping
■ Lookup.PSFT.HRMS.XellerateUser.Recon
To add a lookup definition:
a. Log in to the Oracle Identity Manager Design Console.
b. Expand Administration and then double-click Lookup Definition.
c. In the Code field, enter the name of the lookup definition, for example, Lookup.PSFT.Message.XellerateUser.Configuration.
d. In the Group field, enter the name with which you want to associate the lookup definition, for example, PSFT HRMS.
e. Click the Save icon.
f. Add the Code Key and Decode values specified in "Lookup Definitions to Configure the Messages" section. To do so:
i) Click Add.
A new row is added.
ii) Enter the following values:
Code Key: Attribute Mapping Lookup
Decode: Lookup.PSFT.HRMS. XellerateUser.AttributeMapping
iii) Repeat Steps i) and ii) to add the remaining entries in the lookup definition.
iv) Click the Save icon.
2. Modify the Lookup.PSFT.Configuration lookup definition as follows:
a. Add the following entry in the lookup definition:

B-2 Oracle Identity Manager Connector Guide for PeopleSoft Employee Reconciliation
Code Key: Name of the message sent by PeopleSoft, for example, XELLERATE_USR_MSG
Decode: Lookup.PSFT.Message.XellerateUser.Configuration
b. Modify the value of the following entry in the lookup definition:
Code Key: Ignore Root Audit Action
Decode: Yes
c. Click the Save icon.
3. Write code that implements the required message handler or message parser logic in a Java class. See the following files in the /samples directory of the installation media for more information about the Java code.
■ PSFTXellerateUserReconMessageHandlerImpl.java
■ XellerateUserMessageParser.java
4. Create a JAR file to hold the Java class.
5. Copy the JAR file into the JavaTasks directory.
6. Remove PeopleSoftOIMListener.war file from the application server.
7. Depending on the Oracle Identity Manager release that you are using, perform one of the following steps:
■ If you are using Oracle Identity Manager release 9.1.0.x, then:
a. Copy the OIM_HOME/xellerate/XLIntegrations/PSFTER/ WAR/PeopleSoftOIMListener.war file into a temporary folder. Enter the following command to extract the contents of the PeopleSoftOIMListener.war file:
jar -xvf PeopleSoftOIMListener.war
b. Copy the validation JAR file created in Step 4 to the following directory of the extracted PeopleSoftOIMListener.war file:
WEB-INF/lib
c. Delete the PeopleSoftOIMListener.war file from the temporary directory into which you extracted its contents.
d. Use the following command to re-create the file:
jar -cvf PeoplesoftOIMListener.war .
■ If you are using Oracle Identity Manager release 11.1.1, copy the validation JAR file created in Step 4 to the following directory:
PeoplSoftOIMListener.ear/PeoplSoftOIMListener.war/WEB-INF/lib
8. Add the message name and the implementation class in the web.xml file as follows:
a. Search for the </servlet> tag in the file.
Note: If you are using Oracle Identity Manager release 11.1.1, then see Oracle Fusion Middleware Developer's Guide for Oracle Identity Manager for steps to import the contents of JavaTasks directory into the Oracle Identity Manager database.

Configuring the Connector Messages B-3
b. Edit the following lines above the </servlet> tag:
<init-param><!-- Specify Message Handler Impl classes --><param-name>IT_RESOURCE_NAME</param-name><param-value>MESSAGE~IMPLEMENTATION_CLASS;MESSAGE~IMPLEMENTATION_CLASS;MESSAGE~IMPLEMENTATION_CLASS</param-value></init-param>
Replace IT_RESOURCE_NAME with the name of the IT Resource, for example, PSFT Server.
Replace MESSAGE~IMPLEMENTATION_CLASS with the actual message name~message handler implementation class of the respective message.
9. Depending on the Oracle Identity Manager release that you are using, perform one of the following steps:
■ If you are using Oracle Identity Manager release 9.1.0.x, then redeploy the PeopleSoftOIMListener.war file on the application server. See Section 2.2.1.4.1, "Deploying the PeopleSoft Listener on Oracle Identity Manager Release 9.1.0.x" for the procedure.
■ If you are using Oracle Identity Manager release 11.1.1, then redeploy the PeopleSoftOIMListener.ear file on the application server. See Section 2.2.1.4.2, "Deploying the PeopleSoft Listener on Oracle Identity Manager Release 11.1.1" for the procedure.
10. Modify the PeopleSoft Integration Broker configuration as follows:
a. In PeopleSoft Internet Architecture, expand PeopleTools, Integration Broker, Integration Setup, and then click Nodes.
b. On the Find an Existing Value tab, enter the node name, for example, OIM_ER_NODE, and then click Search.
c. On the Connectors tab, search for the following information by clicking on the Lookup icon:
Gateway ID: LOCAL
Connector ID: HTTPTARGET
d. On the Properties page in the Connectors tab, enter the following information:
Property ID: HEADER
Property Name: sendUncompressed
Required value: Y
Property ID: HTTP PROPERTY
Property Name: Method
Required value: POST
Property ID: HEADER
Property Name: Host
Required value: Enter the value of IT Resource name as configured for PeopleSoft HRMS
Sample value: PSFT Server
Property ID: PRIMARYURL

B-4 Oracle Identity Manager Connector Guide for PeopleSoft Employee Reconciliation
Property Name: URL
Required value: Enter the URL of the PeopleSoft listener that is configured to receive XML messages. This URL must be in the following format:
http://ORACLE_IDENTITY_MANAGER_SERVER_IPADDRESS:PORT/PeopleSoftOIMListener
The URL depends on the application server that you are using. For an environment on which SSL is not enabled, the URL must be in the following format:
For IBM WebSphere Application Server:
http://10.121.16.42:9080/PeopleSoftOIMListener
For JBoss Application Server:
http://10.121.16.42:8080/PeopleSoftOIMListener
For Oracle WebLogic Server:
http://10.121.16.42:7001/PeopleSoftOIMListener
For an environment on which SSL is enabled, the URL must be in the following format:
https://COMMON_NAME:PORT/PeopleSoftOIMListener
For IBM WebSphere Application Server:
https://example088196:9443/PeopleSoftOIMListener
For JBoss Application Server:
https://example088196:8443/PeopleSoftOIMListener
For Oracle WebLogic Server:
https://example088196:7002/PeopleSoftOIMListener
e. Click Save to save the changes.
f. Click the Ping Node button to check whether a connection is established with the specified IP address.
Lookup Definitions to Configure the MessagesYou must add the following lookup definitions to configure the messages of release 9.1.0:
■ Lookup.PSFT.Message.XellerateUser.Configuration
■ Lookup.PSFT.HRMS.XellerateUser.EmpStatus
■ Lookup.PSFT.HRMS.XellerateUser.EmpType
■ Lookup.PSFT.HRMS.XellerateUser.AttributeMapping
■ Lookup.PSFT.HRMS.XellerateUser.Recon
Note: The ports may vary depending on the installation that you are using.

Configuring the Connector Messages B-5
Lookup.PSFT.Message.XellerateUser.Configuration
Lookup.PSFT.Message.XellerateUser.Configuration
Code Key Decode
Attribute Mapping Lookup Lookup.PSFT.HRMS. XellerateUser.AttributeMapping
Custom Query Enter a Value
Custom Query Lookup Definition Lookup.PSFT.HRMS.CustomQuery
Data Node Name Transaction
Employee Status Lookup Lookup.PSFT.HRMS.XellerateUser.EmpStatus
Employee Type Lookup Lookup.PSFT.HRMS.XellerateUser.EmpType
Recon Lookup Definition Lookup.PSFT.HRMS.XellerateUser.Recon
Message Handler Class oracle.iam.connectors.psft.common.handler.impl.PSFTXellerateUserReconMessageHandlerImpl
Message Parser oracle.iam.connectors.psft.common.parser.impl. XellerateUserMessageParser
Organization Xellerate Users
Resource Object Peoplesoft HRMS
Transformation Lookup Definition Lookup.PSFT.HRMS.XellerateUser.Transformation
User Type End-User
Use Transformation No
Use Validation No
Validation Lookup Definition Lookup.PSFT.HRMS.XellerateUser.Validation
Code Key Decode
Attribute Mapping Lookup Lookup.PSFT.HRMS. XellerateUser.AttributeMapping
Custom Query Enter a Value
Custom Query Lookup Definition Lookup.PSFT.HRMS.CustomQuery
Data Node Name Transaction
Employee Status Lookup Lookup.PSFT.HRMS.XellerateUser.EmpStatus
Employee Type Lookup Lookup.PSFT.HRMS.XellerateUser.EmpType
Recon Lookup Definition Lookup.PSFT.HRMS.XellerateUser.Recon
Message Handler Class oracle.iam.connectors.psft.common.handler.impl.PSFTXellerateUserReconMessageHandlerImpl
Message Parser oracle.iam.connectors.psft.common.parser.impl. XellerateUserMessageParser
Organization Xellerate Users
Resource Object Peoplesoft HRMS
Transformation Lookup Definition Lookup.PSFT.HRMS.XellerateUser.Transformation

B-6 Oracle Identity Manager Connector Guide for PeopleSoft Employee Reconciliation
Lookup.PSFT.HRMS.XellerateUser.EmpStatus
Lookup.PSFT.HRMS.XellerateUser.AttributeMapping
Lookup.PSFT.HRMS.XellerateUser.Recon
User Type End-User
Use Transformation No
Use Validation No
Validation Lookup Definition Lookup.PSFT.HRMS.XellerateUser.Validation
Code Key Decode
A Active
I Inactive
Code Key Decode
Department DEPTID~JOB
Emp Type EMPLOYEETYPE~JOB
First Name FIRST_NAME~PERSONAL_DATA
Last Name LAST_NAME~PERSONAL_DATA
Job ID JOBCODE~JOB
Status STATUS~JOB
User ID EMPLID~PERSONAL_DATA~None~None~PRIMARY
Code Key Decode
Department Department
Employee Type Emp Type~Employee Type Lookup
First Name First Name
Last Name Last Name
Job Code Job ID
Status Status~Employee Status Lookup
User ID User ID
Code Key Decode

C
Setting Up SSL on Oracle WebLogic Server C-1
CSetting Up SSL on Oracle WebLogic Server
This section describes how to configure SSL on Oracle WebLogic Server for PeopleTools 8.50.
To set up SSL on Oracle WebLogic Server:
1. Generate signed public encryption key and certificate signing request (CSR).
a. Start PSKeyManager by navigating to the appropriate directory on the MS-DOS command prompt.
b. Enter the following at the command line:
pskeymanager –create
The PSKeyManager opens.
c. Enter the following at the command line:
At the Enter current keystore password [press ENTER to quit] command prompt, enter the password. The default password is password.
At the Specify an alias for this certificate <host_name>? command prompt, enter the certificate alias and press Enter. The default certificate alias is the local machine name.
At the What is the common name for this certificate <host_name>? command prompt, enter the host name for the certificate, for example <host_name>.corp.myorg.com.
Press Enter.

C-2 Oracle Identity Manager Connector Guide for PeopleSoft Employee Reconciliation
Enter the appropriate information at the following command prompts:
Organization unit
Organization
City or Locality
State or Province
Country code
Number of days the certificate should be valid (Default is 90.)
Key size to use (Default is 1024.)
Key algorithm (Default is RSA.)
Signing algorithm (Default is MD5withRSA or SHA1withDSA.)
d. At the Enter a private key password <press ENTER to use keystore password> prompt, specify the password or press Enter.
e. Verify that the values you entered are correct, and press Enter.
The PSKeyManager generates a public key and provides the CSR that you must submit to the Certificate Authority (CA) for signing.
The following example shows a sample CSR:
-----BEGIN NEW CERTIFICATE REQUEST----- MIIBtDCCAR0CAQAwdDELMAkGA1UEBhMCVVMxEDAOBgNVBAgTB0FyaXpvbmExEDAOBgNVBAcTB1B

Setting Up SSL on Oracle WebLogic Server C-3
ob2VuaXgxFDASBgNVBAoTC1Blb3BsZVRvb2xzMRMwEQYDVQQLEwpZW9wbGVzb2Z0MRYwFAYDVQQDEw1NREFXU09OMDUxNTAzMIGfMA0GCSqGSIb3DQEBAQUAA4GNADCBiQKBgQC43lCZWxrsyxven5QethAdsLIEEPhhhl7TjA0r8pxpO+ukD8LI7TlTntPOMU535qMGfk/jYtG0QbvpwHDYePyNMtVou6wAs2yr1B+wJSp6Zm42m8PPihfMUXYLG9RiIqcmp2FzdIUi4M07J8ob8rf0W+Ni1bGW2dmXZ0jGvBmNHQIDAQABoAAwDQYJKoZIhvcNAQEEBQADgYEAKx/ugTt0soNVmiH0YcI8FyW8b81FWGIR0f1Cr2MeDiOQ2pty24dKKLUqIhogTZdFAN0ed6Ktc82/5xBoH1gv7YeqyPBJvAxW6ekMsgOEzLq9OU3ESezZorYFdrQTzqsEXUp1A+cZdfo0eKwZTFmjNAsh1kis+HOLoQQwyjgaxYI=-----END NEW CERTIFICATE REQUEST-----
The CSR is a text file, and is written to the <PSFT_HOME>\webserv\peoplesoft directory. The file name is <host_name>_certreq.txt.
2. Submit CSRs to CAs for signing:
a. Click Download a CA certificate, certificate chain, or CRL.
b. Click advanced certificate request.
Note: The set of pages are different depending on what CA you plan on using.

C-4 Oracle Identity Manager Connector Guide for PeopleSoft Employee Reconciliation
c. Click Submit a certificate request by using a base-64-encoded CMC or PKCS#10 file, or submit a renewal request by using a base-64-encoded PKCS #7 file.
The Submit a Certificate Request or Renewal page appears.
d. Paste the content of the CSR in the Saved Request list box.
The CA may send the signed public key (root) certificate to you by e-mail or require you to download it from a specified web page.
e. Download and save the signed public key on your local drive.

Setting Up SSL on Oracle WebLogic Server C-5
3. Download the root certificate.
a. Click Download a CA certificate, certificate chain, or CRL.
b. From the CA certificate list, select the certificate.
c. Download and save the root certificate on your local drive.
4. Import a server-side public key into a keystore.
a. Open PSKeyManager.
b. Navigate to the required directory on the MS-DOS command prompt.

C-6 Oracle Identity Manager Connector Guide for PeopleSoft Employee Reconciliation
c. Enter the following at the command line:
pskeymanager -import
d. At the Enter current keystore password command prompt, enter the password and press Enter.
e. At the Specify an alias for this certificate <host_name>? command prompt, enter the certificate alias and press Enter.
f. At the Enter the name of the certification file to import command prompt, enter the path and name of the certificate to import.
g. At the Trust this certificate command prompt, enter Yes and press Enter.

Setting Up SSL on Oracle WebLogic Server C-7
5. Generate and import public keys.
a. Place the public key from your CA in the keystore. The location of the keystore is as follows:
<PSFT_HOME>\webserv\peoplesoft\keystore
b. Install the certificate for server authentication SSL on Oracle WebLogic Server using the following command:
pskeymanager -import
c. At the Enter current keystore password command prompt, enter the password and press Enter.
d. At the Specify an alias for this certificate <host_name>? command prompt, enter the certificate alias and press Enter.
e. At the Enter the name of the certification file to import command prompt, enter the path and name of the certificate to import.

C-8 Oracle Identity Manager Connector Guide for PeopleSoft Employee Reconciliation
Certificate is successfully installed in the keystore.
6. Configuring the Oracle WebLogic Server to use the keystore.
a. Log in to Oracle WebLogic Administration Console.
b. Expand PeopleSoft, Environment, Servers, PIA to setup the SSL configuration for the PIA server.

Setting Up SSL on Oracle WebLogic Server C-9
c. Click the Keystores tab.
d. From the Keystores list, select Custom Identity and Custom Trust.
e. In the Identity region, complete the following fields:
- In the Custom Identity Keystore field, enter keystore/pskey.
- In the Custom Identity Keystore Type field, enter JKS.
- In the Custom Identity Keystore Passphrase field, enter password.
- In the Confirm Custom Identity Keystore Passphrase field, enter password again.

C-10 Oracle Identity Manager Connector Guide for PeopleSoft Employee Reconciliation
f. On the SSL tab, ensure that the parameter Two Way Client Cert Behavior is set to Client Certs Requested and Enforced.
g. Click the Activate Changes button.

Setting Up SSL on Oracle WebLogic Server C-11
7. Add root certificate.
a. Expand Security, Security Objects, and then click Digital Certificates.
b. Click Add Root.
8. Configure the Peoplesoft certificates.
a. Expand Security, Security Objects, and then click Digital Certificates.
b. Add a local node type certificate.
c. Set Alias to the default local node.
d. Click Request.
e. Send this certificate request to the CA to get a new certificate.
Note: You can use the same root certificate generated in Step 2.

C-12 Oracle Identity Manager Connector Guide for PeopleSoft Employee Reconciliation
f. Click OK.
g. Ensure that the local node appears on the Digital Certificates list.
h. Click Import.
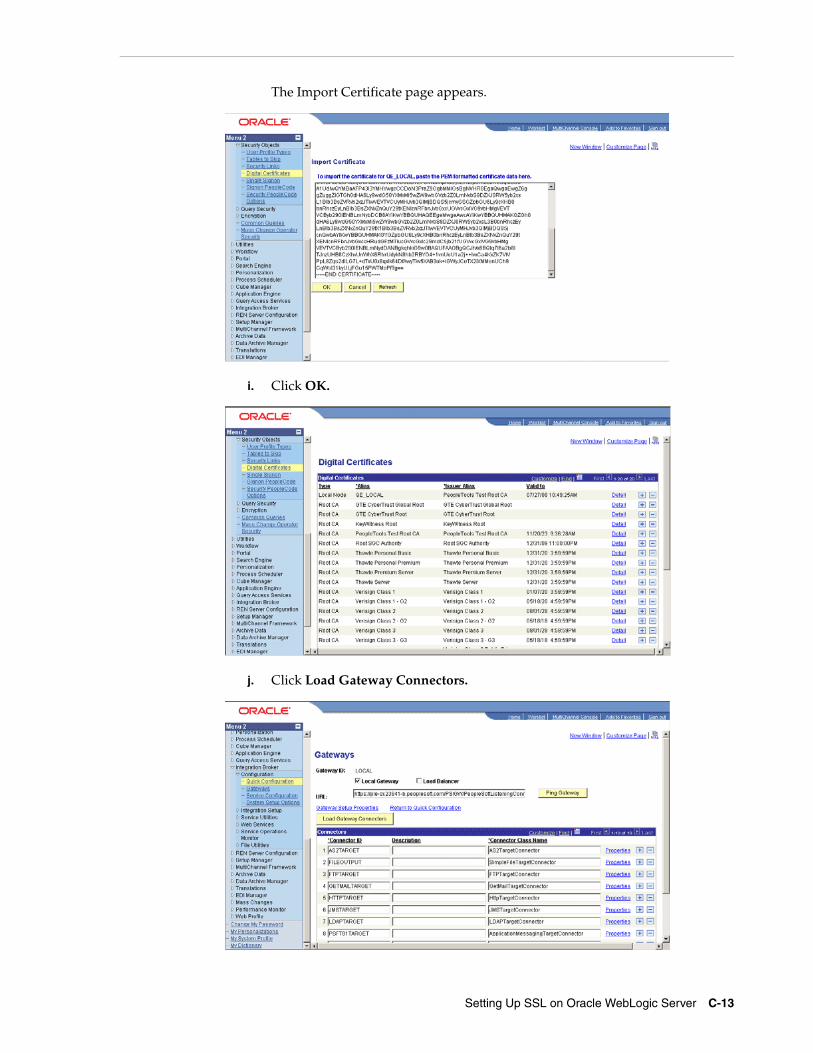
Setting Up SSL on Oracle WebLogic Server C-13
The Import Certificate page appears.
i. Click OK.
j. Click Load Gateway Connectors.

C-14 Oracle Identity Manager Connector Guide for PeopleSoft Employee Reconciliation
The following message appear:
Loading Process was successful. Number of connectors loaded:0. Number of Properties loaded:0. (158,42)
Click OK.
k. Click Ping Node to ping your local node.
Index-1
Index
Aadding new attributes
for full reconciliation, 4-1for incremental reconciliation, 4-4
Application Designerimporting a project, 2-6
architecture, 1-3
Ccertified components, 1-1clones, 4-14cloning connector, 4-14configuring
full reconciliation, 3-2PeopleSoft Internet Architecture, 2-41PeopleSoft listener, 2-16scheduled task
Manager ID recon, 3-6PeopleSoft HRMS Trusted Reconciliation, 3-5
transformationfor reconciliation, 4-9
validationfor reconciliation, 4-7
Configuring Scheduled Tasks, 3-11connector architecture, 1-3connector clones, 4-14connector customization, 4-1connector features, 1-5connector files and directories
copying, 2-14description, 2-1destination directories, 2-14
Connector Installer, 2-12connector testing, 5-1connector version number, determining, 2-3connector, copies, 4-14copies of connector, 4-14customizing connector, 4-1
Ddefining
IT resources, 2-15determining version number of connector, 2-3
Eenabling logging, 2-62errors, 5-3
Ffeatures of connector, 1-5files and directories of the connector
See connector files and directoriesfull reconciliation, 1-6, 3-2
configuring, 3-2
Ggenerating
XML files for full reconciliation, 3-2globalization features, 1-3
Iincremental reconciliation, 1-5, 1-6, 2-16, 3-8installation, 2-12
Oracle Identity Manager, 2-12Target System, 2-24
installing connector, 2-1, 2-12, 2-61issues, 6-1IT resources
defining, 2-15parameters, 2-15
Llimited reconciliation, 3-8logging enabling, 2-62
Mmodifying field length
on OIM User form, 4-6multilanguage support, 1-3
Pparameters of IT resources, 2-15PeopleSoft Internet Architecture, configuring, 2-41Person lifecycle events, 1-6

Index-2
postinstallationOracle Identity Manager, 2-62Target System, 2-81
preinstallationOracle Identity Manager, 2-1Target System, 2-5
problems, 5-3, 6-1
Rreconciliation
full, 1-6, 3-2incremental, 1-6trusted source mode, 2-3
reconciliation action rules, 1-13reconciliation rule, 1-12reconciliation type
full reconciliation, 1-4incremental, 1-5
removingPeopleSoft Listener, 2-23
requirements for deploying, 1-1resending messages
PeopleSoft Listener, 3-9
Ssetting up
Lookup.PSFT.HRMS.CustomQuery, 4-12Lookup.PSFT.HRMS.WorkForceSync.EmpStats,
4-13stages of connector deployment
postinstallation, 2-61summary of steps
full reconciliation, 3-1supported
languages, 1-3releases of JDK, 1-2releases of Oracle Identity Manager, 1-2target systems, 1-2
Ttarget system
configuring full reconciliation, 2-25configuring incremental reconciliation, 2-41
target system, multiple installations, 4-14target systems supported, 1-2testing, 5-1
reconciliation, 5-1troubleshooting, 5-3trusted source reconciliation, 1-11, 2-3
user fields, 1-11
Vversion number of connector, determining, 2-3
XXML files
description, 2-3for trusted source reconciliation, 2-3
Related Documents


