Start Oracle® Documaker Studio User Guide 12.5.0 Part number: E73730-01 April 2016

Welcome message from author
This document is posted to help you gain knowledge. Please leave a comment to let me know what you think about it! Share it to your friends and learn new things together.
Transcript

Start
Oracle® Documaker
Studio User Guide12.5.0
Part number: E73730-01
April 2016

copyright
Copyright © 2009, 2016, Oracle and/or its affiliates. All rights reserved.
The Programs (which include both the software and documentation) contain proprietary information; they are provided under a license agreement containing restrictions on use and disclosure and are also protected by copyright, patent, and other intellectual and industrial property laws. Reverse engineering, disassembly, or decompilation of the Programs, except to the extent required to obtain interoperability with other independently created software or as specified by law, is prohibited.
The information contained in this document is subject to change without notice. If you find any problems in the documentation, please report them to us in writing. This document is not warranted to be error-free. Except as may be expressly permitted in your license agreement for these Programs, no part of these Programs may be reproduced or transmitted in any form or by any means, electronic or mechanical, for any purpose.
If the Programs are delivered to the United States Government or anyone licensing or using the Programs on behalf of the United States Government, the following notice is applicable:
U.S. GOVERNMENT RIGHTS
Programs, software, databases, and related documentation and technical data delivered to U.S. Government customers are “commercial computer software” or “commercial technical data” pursuant to the applicable Federal Acquisition Regulation and agency-specific supplemental regulations. As such, use, duplication, disclosure, modification, and adaptation of the Programs, including documentation and technical data, shall be subject to the licensing restrictions set forth in the applicable Oracle license agreement, and, to the extent applicable, the additional rights set forth in FAR 52.227-19, Commercial Computer Software--Restricted Rights (June 1987). Oracle
USA, Inc., 500 Oracle Parkway, Redwood City, CA 94065.
The Programs are not intended for use in any nuclear, aviation, mass transit, medical, or other inherently dangerous applications. It shall be the licensee's responsibility to take all appropriate fail-safe, backup, redundancy and other measures to ensure the safe use of such applications if the Programs are used for such purposes, and we disclaim liability for any damages caused by such use of the Programs. The Programs may provide links to Web sites and access to content, products, and services from third parties. Oracle is not responsible for the availability of, or any content provided on, third-party Web sites. You bear all risks associated with the use of such content. If you choose to purchase any products or services from a third party, the relationship is directly between you and the third party. Oracle is not responsible for: (a) the quality of third-party products or services; or (b) fulfilling any of the terms of the agreement with the third party, including delivery of products or services and warranty obligations related to purchased products or services. Oracle is not responsible for any loss or damage of any sort that you may incur from dealing with any third party.
Oracle, JD Edwards, and PeopleSoft are registered trademarks of Oracle Corporation and/or its affiliates. Other names may be trademarks of their respective owners.
.

THIRD PARTY SOFTWARE NOTICES
This product includes software developed by Apache Software Foundation (http://www.apache.org/).
THIS SOFTWARE IS PROVIDED "AS IS" AND ANY EXPRESS OR IMPLIED WARRANTIES, INCLUDING, BUT NOT LIMITED TO, THE IMPLIED WARRANTIES OF MERCHANTABILITY AND FITNESS FOR A PARTICULAR PURPOSE ARE DISCLAIMED. IN NO EVENT SHALL THE AUTHOR OR CONTRIBUTORS BE LIABLE FOR ANY DIRECT, INDIRECT, INCIDENTAL, SPECIAL, EXEMPLARY, OR CONSEQUENTIAL DAMAGES (INCLUDING, BUT NOT LIMITED TO, PROCUREMENT OF SUBSTITUTE GOODS OR SERVICES; LOSS OF USE, DATA, OR PROFITS; OR BUSINESS INTERRUPTION) HOWEVER CAUSED AND ON ANY THEORY OF LIABILITY, WHETHER IN CONTRACT, STRICT LIABILITY, OR TORT (INCLUDING NEGLIGENCE OR OTHERWISE) ARISING IN ANY WAY OUT OF THE USE OF THIS SOFTWARE, EVEN IF ADVISED OF THE POSSIBILITY OF SUCH DAMAGE.
Copyright © 2000-2009 The Apache Software Foundation. All rights reserved.
Apache Commons Math Copyright 2001-2008 The Apache Software Foundation
This product includes software translated from the odex Fortran routine developed by E. Hairer and G. Wanner and distributed under the following license:
Copyright (c) 2004, Ernst Hairer
Apache License Version 2.0, January 2004 (http://www.apache.org/licenses/LICENSE-2.0)
THIS SOFTWARE IS PROVIDED "AS IS'' AND ANY EXPRESSED OR IMPLIED WARRANTIES, INCLUDING, BUT NOT LIMITED TO, THE IMPLIED WARRANTIES OF MERCHANTABILITY AND FITNESS FOR A PARTICULAR PURPOSE ARE DISCLAIMED. IN NO EVENT SHALL THE VISIGOTH SOFTWARE SOCIETY OR ITS CONTRIBUTORS BE LIABLE FOR ANY DIRECT, INDIRECT, INCIDENTAL, SPECIAL, EXEMPLARY, OR CONSEQUENTIAL DAMAGES (INCLUDING, BUT NOT LIMITED TO, PROCUREMENT OF SUBSTITUTE GOODS OR SERVICES; LOSS OF USE, DATA, OR PROFITS; OR BUSINESS INTERRUPTION) HOWEVER CAUSED AND ON ANY THEORY OF LIABILITY, WHETHER IN CONTRACT, STRICT LIABILITY, OR TORT (INCLUDING NEGLIGENCE OR OTHERWISE) ARISING IN ANY WAY OUT OF THE USE OF THIS SOFTWARE, EVEN IF ADVISED OF THE POSSIBILITY OF SUCH DAMAGE.
Apache Commons Codec Copyright 2002-2009 The Apache Software Foundation Copyright (C) 2002 Kevin Atkinson ([email protected])
Apache Commons Pool Copyright 2001-2011 The Apache Software Foundation
Apache Jakarta Commons LangCopyright 2001-2007 The Apache Software Foundation
Apache Jakarta Commons FileUploadCopyright 2002-2006 The Apache Software Foundation
Apache Commons CLICopyright 2001-2009 The Apache Software Foundation
Apache Commons CollectionsCopyright 2001-2008 The Apache Software Foundation
Apache Commons LoggingCopyright 2003-2013 The Apache Software Foundation
Barcode4JCopyright 2002-2010 Jeremias MärkiCopyright 2005-2006 Dietmar BürklePortions of this software were contributed under section 5 of theApache License. Contributors are listed under: (http://barcode4j.sourceforge.net/contributors.html)

Copyright 2002-2010 The Apache Software Foundation
This product includes software distributed via the Berkeley Software Distribution (BSD) and licensed for binary distribution under the Generic BSD license.
THIS SOFTWARE IS PROVIDED BY THE COPYRIGHT HOLDERS AND CONTRIBUTORS ``AS IS'' AND ANY EXPRESS OR IMPLIED WARRANTIES, INCLUDING, BUT NOT LIMITED TO, THE IMPLIED WARRANTIES OF MERCHANTABILITY AND FITNESS FOR A PARTICULAR PURPOSE ARE DISCLAIMED. IN NO EVENT SHALL THE COPYRIGHT OWNER OR CONTRIBUTORS BE LIABLE FOR ANY DIRECT, INDIRECT, INCIDENTAL, SPECIAL, EXEMPLARY, OR CONSEQUENTIAL DAMAGES (INCLUDING, BUT NOT LIMITED TO, PROCUREMENT OF SUBSTITUTE GOODS OR SERVICES; LOSS OF USE, DATA, OR PROFITS; OR BUSINESS INTERRUPTION) HOWEVER CAUSED AND ON ANY THEORY OF LIABILITY, WHETHER IN CONTRACT, STRICT LIABILITY, OR TORT (INCLUDING NEGLIGENCE OR OTHERWISE) ARISING IN ANY WAY OUT OF THE USE OF THIS SOFTWARE, EVEN IF ADVISED OF THE POSSIBILITY OF SUCH DAMAGE.
Copyright © 2009, Berkeley Software Distribution (BSD)
This product includes software developed by the JDOM Project (http://www.jdom.org/).
THIS SOFTWARE IS PROVIDED ``AS IS'' AND ANY EXPRESSED OR IMPLIED WARRANTIES, INCLUDING, BUT NOT LIMITED TO, THE IMPLIED WARRANTIES OF MERCHANTABILITY AND FITNESS FOR A PARTICULAR PURPOSE ARE DISCLAIMED. IN NO EVENT SHALL THE JDOM AUTHORS OR THE PROJECT CONTRIBUTORS BE LIABLE FOR ANY DIRECT, INDIRECT, INCIDENTAL, SPECIAL, EXEMPLARY, OR CONSEQUENTIAL DAMAGES (INCLUDING, BUT NOT LIMITED TO, PROCUREMENT OF SUBSTITUTE GOODS OR SERVICES; LOSS OF USE, DATA, OR PROFITS; OR BUSINESS INTERRUPTION) HOWEVER CAUSED AND ON ANY THEORY OF LIABILITY, WHETHER IN CONTRACT, STRICT LIABILITY, OR TORT (INCLUDING NEGLIGENCE OR OTHERWISE) ARISING IN ANY WAY OUT OF THE USE OF THIS SOFTWARE, EVEN IF ADVISED OF THE POSSIBILITY OF SUCH DAMAGE.
Copyright (C) 2000-2004 Jason Hunter & Brett McLaughlin. All rights reserved.
This product includes software developed by the Massachusetts Institute of Technology (MIT).
THE SOFTWARE IS PROVIDED "AS IS", WITHOUT WARRANTY OF ANY KIND, EXPRESS OR IMPLIED, INCLUDING BUT NOT LIMITED TO THE WARRANTIES OF MERCHANTABILITY, FITNESS FOR A PARTICULAR PURPOSE AND NONINFRINGEMENT. IN NO EVENT SHALL THE AUTHORS OR COPYRIGHT HOLDERS BE LIABLE FOR ANY CLAIM, DAMAGES OR OTHER LIABILITY, WHETHER IN AN ACTION OF CONTRACT, TORT OR OTHERWISE, ARISING FROM, OUT OF OR IN CONNECTION WITH THE SOFTWARE OR THE USE OR OTHER DEALINGS IN THE SOFTWARE.
Copyright © 2009 MIT
This product includes software developed by Jean-loup Gailly and Mark Adler. This software is provided 'as-is', without any express or implied warranty. In no event will the authors be held liable for any damages arising from the use of this software.
Copyright (c) 1995-2005 Jean-loup Gailly and Mark Adler
This software is based in part on the work of the Independent JPEG Group (http://www.ijg.org/).
This product includes software developed by the Dojo Foundation (http://dojotoolkit.org).
THIS SOFTWARE IS PROVIDED BY THE COPYRIGHT HOLDERS AND CONTRIBUTORS "AS IS" AND ANY EXPRESS OR IMPLIED WARRANTIES, INCLUDING, BUT NOT LIMITED TO, THE IMPLIED WARRANTIES OF MERCHANTABILITY AND FITNESS FOR A PARTICULAR PURPOSE ARE DISCLAIMED. IN NO EVENT SHALL THE COPYRIGHT OWNER OR CONTRIBUTORS BE LIABLE FOR ANY DIRECT, INDIRECT, INCIDENTAL, SPECIAL, EXEMPLARY, OR CONSEQUENTIAL DAMAGES (INCLUDING, BUT NOT LIMITED TO, PROCUREMENT OF SUBSTITUTE GOODS OR SERVICES; LOSS OF USE, DATA, OR PROFITS; OR BUSINESS INTERRUPTION) HOWEVER

CAUSED AND ON ANY THEORY OF LIABILITY, WHETHER IN CONTRACT, STRICT LIABILITY, OR TORT (INCLUDING NEGLIGENCE OR OTHERWISE) ARISING IN ANY WAY OUT OF THE USE OF THIS SOFTWARE, EVEN IF ADVISED OF THE POSSIBILITY OF SUCH DAMAGE.
Copyright (c) 2005-2009, The Dojo Foundation. All rights reserved.
This product includes software developed by W3C.
Copyright © 2009 World Wide Web Consortium, (Massachusetts Institute of Technology, Institut National de Recherche en Informatique et en Automatique, Keio University). All Rights Reserved. (http://www.w3.org/Consortium/Legal/)
This product includes software developed by Mathew R. Miller (http://www.bluecreststudios.com).
Copyright (c) 1999-2002 ComputerSmarts. All rights reserved.
This product includes software developed by Shaun Wilde and distributed via Code Project Open License (http://www.codeproject.com).
THIS WORK IS PROVIDED "AS IS", "WHERE IS" AND "AS AVAILABLE", WITHOUT ANY EXPRESS OR IMPLIED WARRANTIES OR CONDITIONS OR GUARANTEES. YOU, THE USER, ASSUME ALL RISK IN ITS USE, INCLUDING COPYRIGHT INFRINGEMENT, PATENT INFRINGEMENT, SUITABILITY, ETC. AUTHOR EXPRESSLY DISCLAIMS ALL EXPRESS, IMPLIED OR STATUTORY WARRANTIES OR CONDITIONS, INCLUDING WITHOUT LIMITATION, WARRANTIES OR CONDITIONS OF MERCHANTABILITY, MERCHANTABLE QUALITY OR FITNESS FOR A PARTICULAR PURPOSE, OR ANY WARRANTY OF TITLE OR NON-INFRINGEMENT, OR THAT THE WORK (OR ANY PORTION THEREOF) IS CORRECT, USEFUL, BUG-FREE OR FREE OF VIRUSES. YOU MUST PASS THIS DISCLAIMER ON WHENEVER YOU DISTRIBUTE THE WORK OR DERIVATIVE WORKS.
This product includes software developed by Chris Maunder and distributed via Code Project Open License (http://www.codeproject.com).
THIS WORK IS PROVIDED "AS IS", "WHERE IS" AND "AS AVAILABLE", WITHOUT ANY EXPRESS OR IMPLIED WARRANTIES OR CONDITIONS OR GUARANTEES. YOU, THE USER, ASSUME ALL RISK IN ITS USE, INCLUDING COPYRIGHT INFRINGEMENT, PATENT INFRINGEMENT, SUITABILITY, ETC. AUTHOR EXPRESSLY DISCLAIMS ALL EXPRESS, IMPLIED OR STATUTORY WARRANTIES OR CONDITIONS, INCLUDING WITHOUT LIMITATION, WARRANTIES OR CONDITIONS OF MERCHANTABILITY, MERCHANTABLE QUALITY OR FITNESS FOR A PARTICULAR PURPOSE, OR ANY WARRANTY OF TITLE OR NON-INFRINGEMENT, OR THAT THE WORK (OR ANY PORTION THEREOF) IS CORRECT, USEFUL, BUG-FREE OR FREE OF VIRUSES. YOU MUST PASS THIS DISCLAIMER ON WHENEVER YOU DISTRIBUTE THE WORK OR DERIVATIVE WORKS.
This product includes software developed by PJ Arends and distributed via Code Project Open License (http://www.codeproject.com).
THIS WORK IS PROVIDED "AS IS", "WHERE IS" AND "AS AVAILABLE", WITHOUT ANY EXPRESS OR IMPLIED WARRANTIES OR CONDITIONS OR GUARANTEES. YOU, THE USER, ASSUME ALL RISK IN ITS USE, INCLUDING COPYRIGHT INFRINGEMENT, PATENT INFRINGEMENT, SUITABILITY, ETC. AUTHOR EXPRESSLY DISCLAIMS ALL EXPRESS, IMPLIED OR STATUTORY WARRANTIES OR CONDITIONS, INCLUDING WITHOUT LIMITATION, WARRANTIES OR CONDITIONS OF MERCHANTABILITY, MERCHANTABLE QUALITY OR FITNESS FOR A PARTICULAR PURPOSE, OR ANY WARRANTY OF TITLE OR NON-INFRINGEMENT, OR THAT THE WORK (OR ANY PORTION THEREOF) IS CORRECT, USEFUL, BUG-FREE OR FREE OF VIRUSES. YOU MUST PASS THIS DISCLAIMER ON WHENEVER YOU DISTRIBUTE THE WORK OR DERIVATIVE WORKS.
This product includes software developed by Erwin Tratar. This source code and all accompanying material is copyright (c) 1998-1999 Erwin Tratar. All rights reserved.
THIS SOFTWARE IS PROVIDED "AS IS" WITHOUT EXPRESS OR IMPLIED WARRANTY. USE IT AT YOUR OWN RISK! THE AUTHOR ACCEPTS NO LIABILITY FOR ANY DAMAGE/LOSS OF BUSINESS THAT THIS PRODUCT MAY

CAUSE.
This product includes software developed by Sam Leffler of Silicon Graphics.
THE SOFTWARE IS PROVIDED "AS-IS" AND WITHOUT WARRANTY OF ANY KIND, EXPRESS, IMPLIED OR OTHERWISE, INCLUDING WITHOUT LIMITATION, ANY WARRANTY OF MERCHANTABILITY OR FITNESS FOR A PARTICULAR PURPOSE.
IN NO EVENT SHALL SAM LEFFLER OR SILICON GRAPHICS BE LIABLE FOR ANY SPECIAL, INCIDENTAL, INDIRECT OR CONSEQUENTIAL DAMAGES OF ANY KIND, OR ANY DAMAGES WHATSOEVER RESULTING FROM LOSS OF USE, DATA OR PROFITS, WHETHER OR NOT ADVISED OF THE POSSIBILITY OF DAMAGE, AND ON ANY THEORY OF LIABILITY, ARISING OUT OF OR IN CONNECTION WITH THE USE OR PERFORMANCE OF THIS SOFTWARE
Copyright (c) 1988-1997 Sam LefflerCopyright (c) 1991-1997 Silicon Graphics, Inc.
This product includes software developed by Guy Eric Schalnat, Andreas Dilger, Glenn Randers-Pehrson (current maintainer), and others. (http://www.libpng.org)
The PNG Reference Library is supplied "AS IS". The Contributing Authors and Group 42, Inc. disclaim all warranties, expressed or implied, including, without limitation, the warranties of merchantability and of fitness for any purpose. The Contributing Authors and Group 42, Inc. assume no liability for direct, indirect, incidental, special, exemplary, or consequential damages, which may result from the use of the PNG Reference Library, even if advised of the possibility of such damage.
This product includes software components distributed by the Cryptix Foundation.
THIS SOFTWARE IS PROVIDED BY THE CRYPTIX FOUNDATION LIMITED AND CONTRIBUTORS ``AS IS'' AND ANY EXPRESS OR IMPLIED WARRANTIES, INCLUDING, BUT NOT LIMITED TO, THE IMPLIED WARRANTIES OF MERCHANTABILITY AND FITNESS FOR A PARTICULAR PURPOSE ARE DISCLAIMED. IN NO EVENT SHALL THE CRYPTIX FOUNDATION LIMITED OR CONTRIBUTORS BE LIABLE FOR ANY DIRECT, INDIRECT, INCIDENTAL, SPECIAL, EXEMPLARY, OR CONSEQUENTIAL DAMAGES (INCLUDING, BUT NOT LIMITED TO, PROCUREMENT OF SUBSTITUTE GOODS OR SERVICES; LOSS OF USE, DATA, OR PROFITS; OR BUSINESS INTERRUPTION) HOWEVER CAUSED AND ON ANY THEORY OF LIABILITY, WHETHER IN CONTRACT, STRICT LIABILITY, OR TORT (INCLUDING NEGLIGENCE OR OTHERWISE) ARISING IN ANY WAY OUT OF THE USE OF THIS SOFTWARE, EVEN IF ADVISED OF THE POSSIBILITY OF SUCH DAMAGE
Copyright © 1995-2005 The Cryptix Foundation Limited. All rights reserved.
This product includes software components distributed by Sun Microsystems.
This software is provided "AS IS," without a warranty of any kind. ALLEXPRESS OR IMPLIED CONDITIONS, REPRESENTATIONS AND WARRANTIES, INCLUDING ANYIMPLIED WARRANTY OF MERCHANTABILITY, FITNESS FOR A PARTICULAR PURPOSE OR NON-INFRINGEMENT, ARE HEREBY EXCLUDED. SUN AND ITS LICENSORS SHALL NOT BELIABLE FOR ANY DAMAGES SUFFERED BY LICENSEE AS A RESULT OF USING, MODIFYING OR DISTRIBUTING THE SOFTWARE OR ITS DERIVATIVES. IN NO EVENT WILL SUN OR ITS LICENSORS BE LIABLE FOR ANY LOST REVENUE, PROFIT OR DATA, OR FOR DIRECT, INDIRECT, SPECIAL, CONSEQUENTIAL, INCIDENTAL OR PUNITIVE DAMAGES, HOWEVER CAUSED AND REGARDLESS OF THE THEORY OF LIABILITY, ARISING OUT OF THE USE OF OR INABILITY TO USE SOFTWARE, EVEN IF SUN HAS BEEN ADVISED OF THE POSSIBILITY OF SUCH DAMAGES.
Copyright (c) 1998 Sun Microsystems, Inc. All Rights Reserved.
This product includes software components distributed by Dennis M. Sosnoski.
THIS SOFTWARE IS PROVIDED BY THE COPYRIGHT HOLDERS AND CONTRIBUTORS "AS IS'" AND ANY EXPRESS OR IMPLIED WARRANTIES, INCLUDING, BUT NOT LIMITED TO, THE IMPLIED WARRANTIES OF

MERCHANTABILITY AND FITNESS FOR A PARTICULAR PURPOSE ARE DISCLAIMED. IN NO EVENT SHALL THE COPYRIGHT OWNER OR CONTRIBUTORS BE LIABLE FOR ANY DIRECT, INDIRECT, INCIDENTAL, SPECIAL, EXEMPLARY, OR CONSEQUENTIAL DAMAGES (INCLUDING, BUT NOT LIMITED TO, PROCUREMENT OF SUBSTITUTE GOODS OR SERVICES; LOSS OF USE, DATA, OR PROFITS; OR BUSINESS INTERRUPTION) HOWEVER CAUSED AND ON ANY THEORY OF LIABILITY, WHETHER IN CONTRACT, STRICT LIABILITY, OR TORT (INCLUDING NEGLIGENCE OR OTHERWISE) ARISING IN ANY WAY OUT OF THE USE OF THIS SOFTWARE, EVEN IF ADVISED OF THE POSSIBILITY OF SUCH DAMAGE.
Copyright © 2003-2007 Dennis M. Sosnoski. All Rights Reserved
It also includes materials licensed under Apache 1.1 and the following XPP3 license
THIS SOFTWARE IS PROVIDED "AS IS'" AND ANY EXPRESSED OR IMPLIED WARRANTIES, INCLUDING, BUT NOT LIMITED TO, THE IMPLIED WARRANTIES OF MERCHANTABILITY AND FITNESS FOR A PARTICULAR PURPOSE ARE DISCLAIMED. IN NO EVENT SHALL THE COPYRIGHT OWNER OR CONTRIBUTORS BE LIABLE FOR ANY DIRECT, INDIRECT, INCIDENTAL, SPECIAL, EXEMPLARY, OR CONSEQUENTIAL DAMAGES (INCLUDING, BUT NOT LIMITED TO, PROCUREMENT OF SUBSTITUTE GOODS OR SERVICES; LOSS OF USE, DATA, OR PROFITS; OR BUSINESS INTERRUPTION) HOWEVER CAUSED AND ON ANY THEORY OF LIABILITY, WHETHER IN CONTRACT, STRICT LIABILITY, OR TORT (INCLUDING NEGLIGENCE OR OTHERWISE) ARISING IN ANY WAY OUT OF THE USE OF THIS SOFTWARE, EVEN IF ADVISED OF THE POSSIBILITY OF SUCH DAMAGE.
Copyright © 2002 Extreme! Lab, Indiana University. All Rights Reserved
This product includes software components distributed by CodeProject. This software contains material that is © 1994-2005 The Ultimate Toolbox, all rights reserved.
This product includes software components distributed by Geir Landro.
Copyright © 2001-2003 Geir Landro ([email protected]) JavaScript Tree - www.destroydrop.com/hjavascripts/tree/version 0.96
This product includes software components distributed by the Hypersonic SQL Group.
THIS SOFTWARE IS PROVIDED BY THE COPYRIGHT HOLDERS AND CONTRIBUTORS "AS IS'" AND ANY EXPRESS OR IMPLIED WARRANTIES, INCLUDING, BUT NOT LIMITED TO, THE IMPLIED WARRANTIES OF MERCHANTABILITY AND FITNESS FOR A PARTICULAR PURPOSE ARE DISCLAIMED. IN NO EVENT SHALL THE COPYRIGHT OWNER OR CONTRIBUTORS BE LIABLE FOR ANY DIRECT, INDIRECT, INCIDENTAL, SPECIAL, EXEMPLARY, OR CONSEQUENTIAL DAMAGES (INCLUDING, BUT NOT LIMITED TO, PROCUREMENT OF SUBSTITUTE GOODS OR SERVICES; LOSS OF USE, DATA, OR PROFITS; OR BUSINESS INTERRUPTION) HOWEVER CAUSED AND ON ANY THEORY OF LIABILITY, WHETHER IN CONTRACT, STRICT LIABILITY, OR TORT (INCLUDING NEGLIGENCE OR OTHERWISE) ARISING IN ANY WAY OUT OF THE USE OF THIS SOFTWARE, EVEN IF ADVISED OF THE POSSIBILITY OF SUCH DAMAGE
Copyright © 1995-2000 by the Hypersonic SQL Group. All Rights Reserved
This product includes software components distributed by the International Business Machines Corporation and others.
THE SOFTWARE IS PROVIDED "AS IS", WITHOUT WARRANTY OF ANY KIND, EXPRESS OR IMPLIED, INCLUDING BUT NOT LIMITED TO THE WARRANTIES OF MERCHANTABILITY, FITNESS FOR A PARTICULAR PURPOSE AND NONINFRINGEMENT. IN NO EVENT SHALL THE AUTHORS OR COPYRIGHT HOLDERS BE LIABLE FOR ANY CLAIM, DAMAGES OR OTHER LIABILITY, WHETHER IN AN ACTION OF CONTRACT, TORT OR OTHERWISE, ARISING FROM, OUT OF OR IN CONNECTION WITH THE SOFTWARE OR THE USE OR OTHER DEALINGS IN THE SOFTWARE.
Copyright (c) 1995-2009 International Business Machines Corporation and others. All rights reserved.
This product includes software components distributed by the University of Coimbra.

University of Coimbra distributes this software in the hope that it will be useful but DISCLAIMS ALL WARRANTIES WITH REGARD TO IT, including all implied warranties of MERCHANTABILITY or FITNESS FOR A PARTICULAR PURPOSE. In no event shall University of Coimbra be liable for any special, indirect or consequential damages (or any damages whatsoever) resulting from loss of use, data or profits, whether in an action of contract, negligence or other tortious action, arising out of or in connection with the use or performance of this software.
Copyright (c) 2000 University of Coimbra, Portugal. All Rights Reserved.
This product includes software components distributed by Steve Souza.
THIS SOFTWARE IS PROVIDED BY THE AUTHOR AND CONTRIBUTORS "AS IS'" AND ANY EXPRESS OR IMPLIED WARRANTIES, INCLUDING, BUT NOT LIMITED TO, THE IMPLIED WARRANTIES OF MERCHANTABILITY AND FITNESS FOR A PARTICULAR PURPOSE ARE DISCLAIMED. IN NO EVENT SHALL THE COPYRIGHT OWNER OR CONTRIBUTORS BE LIABLE FOR ANY DIRECT, INDIRECT, INCIDENTAL, SPECIAL, EXEMPLARY, OR CONSEQUENTIAL DAMAGES (INCLUDING, BUT NOT LIMITED TO, PROCUREMENT OF SUBSTITUTE GOODS OR SERVICES; LOSS OF USE, DATA, OR PROFITS; OR BUSINESS INTERRUPTION) HOWEVER CAUSED AND ON ANY THEORY OF LIABILITY, WHETHER IN CONTRACT, STRICT LIABILITY, OR TORT (INCLUDING NEGLIGENCE OR OTHERWISE) ARISING IN ANY WAY OUT OF THE USE OF THIS SOFTWARE, EVEN IF ADVISED OF THE POSSIBILITY OF SUCH DAMAGE.
Copyright © 2002, Steve Souza ([email protected]). All Rights Reserved.
This product includes software developed by the OpenSymphony Group (http://www.opensymphony.com/.)"
Copyright © 2001-2004 The OpenSymphony Group. All Rights Reserved.
PANTONE (R) Colors displayed in the software application or in the user documentation may not match PANTONE-identified standards. Consult current PANTONE Color Publications for accurate color. PANTONE(R) and other Pantone LLC trademarks are the property of Pantone LLC. (C) Pantone LLC, 2011.
Pantone LLC is the copyright owner of color data and/or software which are licensed to Oracle to distribute for use only in combination with Oracle Documaker. PANTONE Color Data and/or Software shall not be copied onto another disk or into memory unless part of the execution of Oracle Documaker.
This product includes software developed by Dave Gamble and distributed via SourceForge.net (http://sourceforge.net/projects/cjson/)
THE SOFTWARE IS PROVIDED "AS IS", WITHOUT WARRANTY OF ANY KIND, EXPRESS OR IMPLIED, INCLUDING BUT NOT LIMITED TO THE WARRANTIES OF MERCHANTABILITY, FITNESS FOR A PARTICULAR PURPOSE AND NONINFRINGEMENT. IN NO EVENT SHALL THE AUTHORS OR COPYRIGHT HOLDERS BE LIABLE FOR ANY CLAIM, DAMAGES OR OTHER LIABILITY, WHETHER IN AN ACTION OF CONTRACT, TORT OR OTHERWISE, ARISING FROM, OUT OF OR IN CONNECTION WITH THE SOFTWARE OR THE USE OR OTHER DEALINGS IN THE SOFTWARE.
Copyright (c) 2009 Dave Gamble
This product includes software developed by the Zxing Project.
THE SOFTWARE IS PROVIDED "AS IS", WITHOUT WARRANTY OF ANY KIND, EXPRESS OR IMPLIED, INCLUDING BUT NOT LIMITED TO THE WARRANTIES OF MERCHANTABILITY, FITNESS FOR A PARTICULAR PURPOSE AND NONINFRINGEMENT. IN NO EVENT SHALL THE AUTHORS OR COPYRIGHT HOLDERS BE LIABLE FOR ANY CLAIM, DAMAGES OR OTHER LIABILITY, WHETHER IN AN ACTION OF CONTRACT, TORT OR OTHERWISE, ARISING FROM, OUT OF OR IN CONNECTION WITH THE SOFTWARE OR THE USE OR OTHER DEALINGS IN THE SOFTWARE.
Copyright (c) 2013 Zxing Project (https://github.com/zxing/zxing)

This product includes software developed by the Wintertree software.
THE SOFTWARE IS PROVIDED "AS IS", WITHOUT WARRANTY OF ANY KIND, EXPRESS OR IMPLIED, INCLUDING BUT NOT LIMITED TO THE WARRANTIES OF MERCHANTABILITY, FITNESS FOR A PARTICULAR PURPOSE AND NONINFRINGEMENT. IN NO EVENT SHALL THE AUTHORS OR COPYRIGHT HOLDERS BE LIABLE FOR ANY CLAIM, DAMAGES OR OTHER LIABILITY, WHETHER IN AN ACTION OF CONTRACT, TORT OR OTHERWISE, ARISING FROM, OUT OF OR IN CONNECTION WITH THE SOFTWARE OR THE USE OR OTHER DEALINGS IN THE SOFTWARE.
The Sentry Spelling-Checker Engine Copyright (c) 1993 Wintertree (https://wintertree-software.com/dev/ssce/windows/index.html )
Freemarker Copyright (c) 2003 The Visigoth Software Society. All rights reserved.
THIS SOFTWARE IS PROVIDED "AS IS'' AND ANY EXPRESSED OR IMPLIED WARRANTIES, INCLUDING, BUT NOT LIMITED TO, THE IMPLIED WARRANTIES OF MERCHANTABILITY AND FITNESS FOR A PARTICULAR PURPOSE ARE DISCLAIMED. IN NO EVENT SHALL THE VISIGOTH SOFTWARE SOCIETY OR ITS CONTRIBUTORS BE LIABLE FOR ANY DIRECT, INDIRECT, INCIDENTAL, SPECIAL, EXEMPLARY, OR CONSEQUENTIAL DAMAGES (INCLUDING, BUT NOT LIMITED TO,PROCUREMENT OF SUBSTITUTE GOODS OR SERVICES; LOSS OF USE,DATA, OR PROFITS; OR BUSINESS INTERRUPTION) HOWEVER CAUSED AND ON ANY THEORY OF LIABILITY, WHETHER IN CONTRACT, STRICT LIABILITY, OR TORT (INCLUDING NEGLIGENCE OR OTHERWISE) ARISING IN ANY WAY OUT OF THE USE OF THIS SOFTWARE, EVEN IF ADVISED OF THE POSSIBILITY OF SUCH DAMAGE.
This software consists of voluntary contributions made by many individuals on behalf of the Visigoth Software Society. For more information on the Visigoth Software Society, please see http://www.visigoths.org/
Copyright (c) 2000,2002,2003 INRIA, France Telecom ( http://asm.ow2.org/) All rights reserved.
THIS SOFTWARE IS PROVIDED BY THE COPYRIGHT HOLDERS AND CONTRIBUTORS "AS IS" AND ANY EXPRESS OR IMPLIED WARRANTIES, INCLUDING, BUT NOT LIMITED TO, THE IMPLIED WARRANTIES OF MERCHANTABILITY AND FITNESS FOR A PARTICULAR PURPOSE ARE DISCLAIMED. IN NO EVENT SHALL THE COPYRIGHT OWNER OR CONTRIBUTORS BE LIABLE FOR ANY DIRECT, INDIRECT, INCIDENTAL, SPECIAL, EXEMPLARY, OR CONSEQUENTIAL DAMAGES (INCLUDING, BUT NOT LIMITED TO, PROCUREMENT OF SUBSTITUTE GOODS OR SERVICES; LOSS OF USE, DATA, OR PROFITS; OR BUSINESS INTERRUPTION) HOWEVER CAUSED AND ON ANY THEORY OF LIABILITY, WHETHER IN CONTRACT, STRICT LIABILITY, OR TORT (INCLUDING NEGLIGENCE OR OTHERWISE) ARISING IN ANY WAY OUT OF THE USE OF THIS SOFTWARE, EVEN IF ADVISED OF THE POSSIBILITY OF SUCH DAMAGE.
Copyright© 2001-2016 ej-technologies GmbH (https://www.ej-technologies.com/products/install4j/overview.html) All rights reserved.
THIS SOFTWARE IS PROVIDED BY THE COPYRIGHT HOLDERS AND CONTRIBUTORS "AS IS" AND ANY EXPRESS OR IMPLIED WARRANTIES, INCLUDING, BUT NOT LIMITED TO, THE IMPLIED WARRANTIES OF MERCHANTABILITY AND FITNESS FOR A PARTICULAR PURPOSE ARE DISCLAIMED. IN NO EVENT SHALL THE COPYRIGHT OWNER OR CONTRIBUTORS BE LIABLE FOR ANY DIRECT, INDIRECT, INCIDENTAL, SPECIAL, EXEMPLARY, OR CONSEQUENTIAL DAMAGES (INCLUDING, BUT NOT LIMITED TO, PROCUREMENT OF SUBSTITUTE GOODS OR SERVICES; LOSS OF USE, DATA, OR PROFITS; OR BUSINESS INTERRUPTION) HOWEVER CAUSED AND ON ANY THEORY OF LIABILITY, WHETHER IN CONTRACT, STRICT LIABILITY, OR TORT (INCLUDING NEGLIGENCE OR OTHERWISE) ARISING IN ANY WAY OUT OF THE USE OF THIS SOFTWARE, EVEN IF ADVISED OF THE POSSIBILITY OF SUCH DAMAGE.

This component is distributed with the following third party components: (1) Third party components licensed under EPL v1.0; (2) JARGS (Stephen Purcell); JDOM (Brett McLaughlin & Jason Hunter); and (3) ORO (Apache Software Foundation). Please see EPL v1.0 and applicable components (#2072, 2686, 2074) for restrictions/requirements.
Copyright 2001-2005 (C) MetaStuff, Ltd.(http://www.dom4j.org ) All Rights Reserved.
THIS SOFTWARE IS PROVIDED BY METASTUFF, LTD. AND CONTRIBUTORS "AS IS'' AND ANY EXPRESSED OR IMPLIED WARRANTIES, INCLUDING, BUT NOT LIMITED TO, THE IMPLIED WARRANTIES OF MERCHANTABILITY AND FITNESS FOR A PARTICULAR PURPOSE ARE DISCLAIMED. IN NO EVENT SHALL METASTUFF, LTD. OR ITS CONTRIBUTORS BE LIABLE FOR ANY DIRECT, INDIRECT, INCIDENTAL, SPECIAL, EXEMPLARY, OR CONSEQUENTIAL DAMAGES (INCLUDING, BUT NOT LIMITED TO, PROCUREMENT OF SUBSTITUTE GOODS OR SERVICES; LOSS OF USE, DATA, OR PROFITS; OR BUSINESS INTERRUPTION) HOWEVER CAUSED AND ON ANY THEORY OF LIABILITY, WHETHER IN CONTRACT, STRICT LIABILITY, OR TORT (INCLUDING NEGLIGENCE OR OTHERWISE)ARISING IN ANY WAY OUT OF THE USE OF THIS SOFTWARE, EVEN IF ADVISED OF THE POSSIBILITY OF SUCH DAMAGE.
Little CMS Copyright (c) 1998-2011 (http://www.littlecms.com/) All Rights Reserved.
THE SOFTWARE IS PROVIDED "AS IS", WITHOUT WARRANTY OF ANY KIND, EXPRESS OR IMPLIED, INCLUDING BUT NOT LIMITED TO THE WARRANTIES OF MERCHANTABILITY, FITNESS FOR A PARTICULAR PURPOSE AND NONINFRINGEMENT. IN NO EVENT SHALL THE AUTHORS OR COPYRIGHT HOLDERS BE LIABLE FOR ANY CLAIM, DAMAGES OR OTHER LIABILITY, WHETHER IN AN ACTION OF CONTRACT, TORT OR OTHERWISE, ARISING FROM, OUT OF OR IN CONNECTION WITH THE SOFTWARE OR THE USE OR OTHER DEALINGS IN THE SOFTWARE.
Marti Maria Saguer Permission is hereby granted, free of charge, to any person obtaining a copy of this software and associated documentation files (the "Software"), to deal in the Software without restriction, including without limitation the rights to use, copy, modify, merge, publish, distribute, sublicense, and/or sell copies of the Software, and to permit persons to whom the Software is furnished to do so, subject to the following conditions: The above copyright notice and this permission notice shall be included in all copies or substantial portions of the Software.
Copyright (c) 2002-2007, Communications and Remote Sensing Laboratory, Universite catholique de Louvain (UCL), Belgium
Copyright (c) 2002-2007, Professor Benoit Macq
Copyright (c) 2001-2003, David Janssens
Copyright (c) 2002-2003, Yannick Verschueren
Copyright (c) 2003-2007, Francois-Olivier Devaux and Antonin Descampe
Copyright (c) 2005, Herve Drolon, FreeImage Team
All rights reserved.
THIS SOFTWARE IS PROVIDED BY THE COPYRIGHT HOLDERS AND CONTRIBUTORS "AS IS" AND ANY EXPRESS OR IMPLIED WARRANTIES, INCLUDING, BUT NOT LIMITED TO, THEIMPLIED WARRANTIES OF MERCHANTABILITY AND FITNESS FOR A PARTICULAR PURPOSE ARE DISCLAIMED. IN NO EVENT SHALL THE COPYRIGHT OWNER OR CONTRIBUTORS BE LIABLE FOR ANY DIRECT, INDIRECT, INCIDENTAL, SPECIAL, EXEMPLARY, OR CONSEQUENTIAL DAMAGES (INCLUDING, BUT NOT LIMITED TO, PROCUREMENT OF SUBSTITUTE GOODS OR SERVICES; LOSS OF USE, DATA, OR PROFITS; OR BUSINESS INTERRUPTION) HOWEVER CAUSED AND ON ANY THEORY OF LIABILITY, WHETHER IN CONTRACT, STRICT LIABILITY, OR TORT (INCLUDING NEGLIGENCE OR OTHERWISE) ARISING IN ANY WAY OUT OF THE USE OF THIS SOFTWARE, EVEN IF ADVISED OF THE POSSIBILITY OF SUCH DAMAGE.

Copyright (c) 2004-2013 QOS.ch (http://www.qos.ch/shop/index) All rights reserved.
THE SOFTWARE IS PROVIDED "AS IS", WITHOUT WARRANTY OF ANY KIND, EXPRESS OR IMPLIED, INCLUDING BUT NOT LIMITED TO THE WARRANTIES OF MERCHANTABILITY, FITNESS FOR A PARTICULAR PURPOSE AND NONINFRINGEMENT. IN NO EVENT SHALL THE AUTHORS OR COPYRIGHT HOLDERS BE LIABLE FOR ANY CLAIM, DAMAGES OR OTHER LIABILITY, WHETHER IN AN ACTION OF CONTRACT, TORT OR OTHERWISE, ARISING FROM, OUT OF OR IN CONNECTION WITH THE SOFTWARE OR THE USE OR OTHER DEALINGS IN THE SOFTWARE.
Permission is hereby granted, free of charge, to any person obtaining a copy of this software and associated documentation files (the "Software"), to deal in the Software without restriction, including without limitation the rights to use, copy, modify, merge, publish, distribute, sublicense, and/or sell copies of the Software, and to permit persons to whom the Software is furnished to do so, subject to the following conditions: The above copyright notice and this permission notice shall be included in all copies or substantial portions of the Software.
The Code Project Open License (CPOL) 1.02
Copyright © CodeProject, 1999-2016 (http://www.codeproject.com/info/cpol10.aspx) All Rights Reserved.
THE SOFTWARE IS PROVIDED "AS IS", WITHOUT WARRANTY OF ANY KIND, EXPRESS OR IMPLIED, INCLUDING BUT NOT LIMITED TO THE WARRANTIES OF MERCHANTABILITY, FITNESS FOR A PARTICULAR PURPOSE AND NONINFRINGEMENT. IN NO EVENT SHALL THE AUTHORS OR COPYRIGHT HOLDERS BE LIABLE FOR ANY CLAIM, DAMAGES OR OTHER LIABILITY, WHETHER IN AN ACTION OF CONTRACT, TORT OR OTHERWISE, ARISING FROM, OUT OF OR IN CONNECTION WITH THE SOFTWARE OR THE USE OR OTHER DEALINGS IN THE SOFTWARE.
Copyright (c) 1998, 1999, 2000 Thai Open Source Software Center Ltd and Clark Cooper
Copyright (c) 2001, 2002, 2003, 2004, 2005, 2006 Expat maintainers (http://expat.sourceforge.net/)
All Rights Reserved.
THE SOFTWARE IS PROVIDED "AS IS", WITHOUT WARRANTY OF ANY KIND, EXPRESS OR IMPLIED, INCLUDING BUT NOT LIMITED TO THE WARRANTIES OF MERCHANTABILITY, FITNESS FOR A PARTICULAR PURPOSE AND NONINFRINGEMENT. IN NO EVENT SHALL THE AUTHORS OR COPYRIGHT HOLDERS BE LIABLE FOR ANY CLAIM, DAMAGES OR OTHER LIABILITY, WHETHER IN AN ACTION OF CONTRACT, TORT OR OTHERWISE, ARISING FROM, OUT OF OR IN CONNECTION WITH THE SOFTWARE OR THE USE OR OTHER DEALINGS IN THE SOFTWARE.
Copyright (c) 2002-2010 Atsuhiko Yamanaka, JCraft,Inc(http://www.jcraft.com/jsch/ ) All rights reserved.
THIS SOFTWARE IS PROVIDED "AS IS'' AND ANY EXPRESSED OR IMPLIED WARRANTIES, INCLUDING, BUT NOT LIMITED TO, THE IMPLIED WARRANTIES OF MERCHANTABILITY AND FITNESS FOR A PARTICULAR PURPOSE ARE DISCLAIMED. IN NO EVENT SHALL JCRAFT,INC. OR ANY CONTRIBUTORS TO THIS SOFTWARE BE LIABLE FOR ANY DIRECT, INDIRECT, INCIDENTAL, SPECIAL, EXEMPLARY, OR CONSEQUENTIAL DAMAGES (INCLUDING, BUT NOT LIMITED TO, PROCUREMENT OF SUBSTITUTE GOODS OR SERVICES; LOSS OF USE, DATA, OR PROFITS; OR BUSINESS INTERRUPTION) HOWEVER CAUSED AND ON ANY THEORY OFLIABILITY, WHETHER IN CONTRACT, STRICT LIABILITY, OR TORT (INCLUDING NEGLIGENCE OR OTHERWISE) ARISING IN ANY WAY OUT OF THE USE OF THIS SOFTWARE, EVEN IF ADVISED OF THE POSSIBILITY OF SUCH DAMAGE.

This product includes software developed by Christian Bach and distributed via (http://tablesorter.com/docs/)
All rights reserved.
THE SOFTWARE IS PROVIDED "AS IS", WITHOUT WARRANTY OF ANY KIND, EXPRESS OR IMPLIED, INCLUDING BUT NOT LIMITED TO THE WARRANTIES OF MERCHANTABILITY, FITNESS FOR A PARTICULAR PURPOSE AND NONINFRINGEMENT. IN NO EVENT SHALL THE AUTHORS OR COPYRIGHT HOLDERS BE LIABLE FOR ANY CLAIM, DAMAGES OR OTHER LIABILITY, WHETHER IN AN ACTION OF CONTRACT, TORT OR OTHERWISE, ARISING FROM, OUT OF OR IN CONNECTION WITH THE SOFTWARE OR THE USE OR OTHER DEALINGS IN THE SOFTWARE.
Copyright (c) 2007 Christian Bach
This product includes software developed by Dmitry Baranovskiy and distributed via (https://github.com/DmitryBaranovskiy)
All rights reserved.
THE SOFTWARE IS PROVIDED “AS IS”, WITHOUT WARRANTY OF ANY KIND, EXPRESS OR IMPLIED, INCLUDING BUT NOT LIMITED TO THE WARRANTIES OF MERCHANTABILITY, FITNESS FOR A PARTICULAR PURPOSE AND NONINFRINGEMENT. IN NO EVENT SHALL THE AUTHORS OR COPYRIGHT HOLDERS BE LIABLE FOR ANY CLAIM, DAMAGES OR OTHER LIABILITY, WHETHER IN AN ACTION OF CONTRACT, TORT OR OTHERWISE, ARISING FROM, OUT OF OR IN CONNECTION WITH THE SOFTWARE OR THE USE OR OTHER DEALINGS IN THE SOFTWARE.
Copyright © 2008 Dmitry Baranovskiy.
This product includes software developed by John Resig and distributed via (http://jquery.com/) All rights reserved.
THE SOFTWARE IS PROVIDED "AS IS", WITHOUT WARRANTY OF ANY KIND,EXPRESS OR IMPLIED, INCLUDING BUT NOT LIMITED TO THE WARRANTIES OF MERCHANTABILITY, FITNESS FOR A PARTICULAR PURPOSE AND NONINFRINGEMENT. IN NO EVENT SHALL THE AUTHORS OR COPYRIGHT HOLDERS BE LIABLE FOR ANY CLAIM, DAMAGES OR OTHER LIABILITY, WHETHER IN AN ACTION OF CONTRACT, TORT OR OTHERWISE, ARISING FROM, OUT OF OR IN CONNECTION WITH THE SOFTWARE OR THE USE OR OTHER DEALINGS IN THE SOFTWARE.
Copyright (c) 2011 John Resig
Copyright (c) Monotype Imaging, Inc (http://www.monotype.com/) All rights reserved.
Monotype®, Albany®, Andale®, Cumberland®, Thorndale®, MT®, WorldType® is a trademark of Monotype Imaging, Inc., registered in U.S. Patent and Trademark Office and certain other jurisdictions.
THE SOFTWARE IS PROVIDED "AS IS", WITHOUT WARRANTY OF ANY KIND, EXPRESS OR IMPLIED, INCLUDING BUT NOT LIMITED TO THE WARRANTIES OF MERCHANTABILITY, FITNESS FOR A PARTICULAR PURPOSE AND NONINFRINGEMENT. IN NO EVENT SHALL THE AUTHORS OR COPYRIGHT HOLDERS BE LIABLE FOR ANY CLAIM, DAMAGES OR OTHER LIABILITY, WHETHER IN AN ACTION OF CONTRACT, TORT OR OTHERWISE, ARISING FROM, OUT OF OR IN CONNECTION WITH THE SOFTWARE OR THE USE OR OTHER DEALINGS IN THE SOFTWARE.
Contents
Preface ............................................................................................. 21Audience ............................................................................................................... 21Documentation Accessibility .............................................................................. 21Related Documents .............................................................................................. 23Conventions .......................................................................................................... 23
Using Documaker Studio ............................................................... 24Introduction ...............................................................................................25Documaker System Overview ............................................................................. 25Creating a Multiple User Development Environment and Workspace Managers .................................................31Studio Options ..........................................................................................38Starting Studio ..........................................................................................41Using System Menus ................................................................................45File Menu ............................................................................................................... 47Edit Menu .............................................................................................................. 49View Menu ............................................................................................................. 50Manage Menu ........................................................................................................ 52Help Menu ............................................................................................................. 54Using a DBMS to Manage Resources ................................................................. 55Creating a New Workspace ................................................................................. 57
Working with Settings, Users, and Security ................................. 76Working With INI Options .........................................................................77Setting INI Options ............................................................................................... 79Choosing Options by Topic ................................................................................. 81Defining Studio Settings ..........................................................................86Working with Configuration Options .................................................................. 87Defining Workspace Options .............................................................................. 90Working with Common/Document View Settings ............................................. 92Working with Form Options ................................................................................ 94Working with Template Options .......................................................................... 95Working with Template Section Options ............................................................ 98Working with Section Options ............................................................................ 103Working with Graphic Options ............................................................................ 108Working with Trigger Options ............................................................................. 110Setting HTML Style Options for Reports ............................................................ 112Setting Up Printstream Analyzer ......................................................................... 113Managing Users ........................................................................................115Adding Users ........................................................................................................ 117Changing User Information ................................................................................. 118Deleting Users ...................................................................................................... 119Setting Rights Using the Security Wizard .......................................................... 119Cloning User Rights ............................................................................................. 125Logging In ............................................................................................................. 125Storing User Information in Another Database ......................................126Adding Security at the Resource Level ..................................................127Using the LDAP Security Model ..............................................................129
Working with Application Definition Files .................................... 137Overview ....................................................................................................138Defining an Application Definition ..........................................................139Using Spot Colors .....................................................................................141Defining a Spot Color ........................................................................................... 141Manually Defining a Spot Color .......................................................................... 143Defining Form Lists ..................................................................................146Create Group ......................................................................................................... 146Adding a Form List ............................................................................................... 154Deleting a Form List ............................................................................................. 155Defining Recipients ..................................................................................157Adding a Recipient ............................................................................................... 158Deleting a Recipient ............................................................................................. 158Defining Categories ..................................................................................159Adding a Category ................................................................................................ 160Deleting a Category .............................................................................................. 160Defining Context Tags ..............................................................................161Defining Transaction Types .....................................................................163Adding a Transaction Code ................................................................................. 164Deleting a Transaction Code ............................................................................... 164Using Regional Date Processing .............................................................166Setting up Regional Date Processing ................................................................. 166Setting Up Regional Date Processing Rules ..................................................... 170Generating an Application Definition Report .........................................175
Working with Form Lists ................................................................ 179Creating a Form List .................................................................................180Adding a Form to a Form List ..................................................................182Setting Up Form Triggers .........................................................................184Assigning Form Level Triggers ........................................................................... 185Assigning Triggers at Key2 Levels ..................................................................... 187SetRecip Table ..........................................................................................189
Managing Forms ............................................................................. 194Overview ....................................................................................................195Using Embedded Sections .................................................................................. 196Using the Forms Screen ...........................................................................201Using the Menu Bar .............................................................................................. 202Using the Workspace Menu ................................................................................. 204Using the Toolbar ................................................................................................. 206Creating a Form ........................................................................................209Modifying Forms .......................................................................................215Dropping a Form ................................................................................................... 217SetOrigins ............................................................................................................. 218Setting Header and Footer Print Options ...............................................220Forcing Page Breaks in Subforms ...................................................................... 222Generating Readability Statistics ....................................................................... 223Using Form Templates .............................................................................226Setting Up Section Triggers .....................................................................234Editing a Trigger ................................................................................................... 237Using the Trigger Report ..................................................................................... 237
SetRecip Table Options ............................................................................241Understanding Recipient Counts ........................................................................ 244
Working with Sections ................................................................... 248Overview ....................................................................................................249Using the Screen .......................................................................................251Using the Menu Bar .............................................................................................. 252Using the Right-click Menus ............................................................................... 264Using the Toolbar ................................................................................................. 270Opening a Section ....................................................................................276Working with Group of Sections .............................................................279GroupBegin ........................................................................................................... 279Creating Bar Codes ..................................................................................292Adding a Bar Code Object ................................................................................... 293Adding Bookmarks ...................................................................................316CREATING Boxes .....................................................................................319Adding Charts ...........................................................................................322Creating a Chart .................................................................................................... 323Entering Chart Data .............................................................................................. 327Assigning Chart Fields ........................................................................................ 328Point Axis .............................................................................................................. 329Scale Axis .............................................................................................................. 332Adding a Series .................................................................................................... 334Setting Graph Properties ..................................................................................... 336Setting Legend Properties ................................................................................... 338Creating a Graphic ....................................................................................342CREATING A GUIDE .................................................................................345CREATING A LINE ....................................................................................347CREATING A NOTE ...................................................................................350USING NOTES AS HELP ...................................................................................... 352Creating a Shade .......................................................................................353Defining Tables .........................................................................................359Setting Table Options .......................................................................................... 364Working with Tables ............................................................................................. 368Creating Tables of Contents, Tables of Figures, and Indexes .............378Defining Tables of Contents, Tables of Figures, and Indexes ......................... 379Generating Tables of Contents, Tables of Figures, or an Index ...................... 384CREATING A VECTOR ..............................................................................385Adding Comments to Documaker Objects .............................................388Using the Task List ...................................................................................390Creating Text Areas ..................................................................................392Creating Text Labels .................................................................................399Inserting a Field ........................................................................................402Entry ...................................................................................................................... 409Inserting Signatures .................................................................................419AssureSign ............................................................................................................ 419Docusign ............................................................................................................... 425Silanis .................................................................................................................... 429PDF Placeholder ................................................................................................... 433Converting Multiline Text Fields to Paragraph Assembly ....................436TERSUB and Multiline Text Fields ...................................................................... 436Converting Multiline Text Fields ......................................................................... 436
Managing Conversion Errors .............................................................................. 439Printing a Form, Section, or Paragraph ..................................................441Printing Stubs ...........................................................................................443Defining the Stub .................................................................................................. 443Processing Headers and Footers ....................................................................... 445Setting Duplex and Tray Options ........................................................................ 445Using Printcommander to Create Sections ............................................446Example .....................................................................................................455
Creating Paragraph and Paragraphs Lists ................................... 458Creating Paragraphs .................................................................................459Inserting Fields in Paragraphs ............................................................................ 461Formatting Paragraphs ........................................................................................ 461Creating Paragraph Lists .........................................................................465
Using Library Project Management ............................................... 467Overview ....................................................................................................468Understanding LPM Concepts .................................................................469What Is a Role? ..................................................................................................... 469What is a Tier? ...................................................................................................... 469What is a Mode? ................................................................................................... 470What is an Action? ............................................................................................... 471What is the Status? .............................................................................................. 471What is the State? ................................................................................................ 472Setting Up Library Project Management .................................................473Enabling a Workspace to Use LPM ..................................................................... 473Assigning Project Roles and Permissions to Users ......................................... 475Defining Projects .................................................................................................. 477Defining Library Tiers .......................................................................................... 480Promoting Resources to New Tiers .................................................................... 485Using the Projects Manager .....................................................................486Using the Filter Option ......................................................................................... 486Using the Actions Option .................................................................................... 487Example Library Project Management Workflow ...................................491Editing a Resource ............................................................................................... 498Using the Project Status Report ..............................................................501
Working with Graphics ................................................................... 503Using the Screen .......................................................................................504Using the Menu Bar .............................................................................................. 505Using the Right-Click Menu ................................................................................. 507Using the Toolbar ................................................................................................. 510Managing Graphics ...................................................................................512Opening a Graphic ............................................................................................... 515Editing a Graphic .................................................................................................. 516Setting Rotation Names ....................................................................................... 518Setting Ruler and Grid Options ........................................................................... 519Creating a Text Watermark ......................................................................521
Using Styles .................................................................................... 523Creating a Style .........................................................................................524
Creating a Style Based On ................................................................................... 527Business Definition File - Defining the Style ..................................................... 531
Creating Scripts .............................................................................. 534Using the Screen .......................................................................................535Using the Menu Bar .............................................................................................. 536Using the Right-Click Menu ................................................................................. 537Using the Toolbar ................................................................................................. 538Overview ....................................................................................................540Checking Syntax .......................................................................................542
Managing Resources ...................................................................... 546Overview ....................................................................................................547Terminology .......................................................................................................... 548Concepts ............................................................................................................... 550How It All Works ................................................................................................... 559Managing Workflow .............................................................................................. 564Creating Libraries .....................................................................................565Using xBase and CARFiles .................................................................................. 566Using the DB2 Native Driver ................................................................................ 568Using the DB2 ODBC Driver ................................................................................ 573Using the SQL Server ODBC Driver .................................................................... 578Using the Oracle ODBC Driver ............................................................................ 581Using Oracle JDBC Driver ................................................................................... 586Using DB2 z/OS .................................................................................................... 591Working with Libraries .............................................................................600Opening a Library ................................................................................................. 601Adding Resources to a Library ........................................................................... 603Importing Files ...................................................................................................... 605Importing Libraries ............................................................................................... 606Migrating a Workspace Library ........................................................................... 607Checking Out Resources ..................................................................................... 609Checking In Resources ........................................................................................ 611Unlocking Resources ........................................................................................... 612Promoting Resources .......................................................................................... 614Filtering Resources .............................................................................................. 619Editing Resource Information ............................................................................. 621Deleting Resources .............................................................................................. 622Collapsing Resources .......................................................................................... 623Searching the Library ........................................................................................... 625Extracting Resources ........................................................................................... 629Expiring Resources .............................................................................................. 631Comparing Resources ......................................................................................... 631Reviewing a History of Resource Changes ....................................................... 639Running Response Files ...................................................................................... 640Defining Mode, Status, Class, and Project Options .......................................... 642Searching for Library Resources ........................................................................ 643Using the LBYPROC Utility ......................................................................648Troubleshooting ........................................................................................649Turning on Tracing ............................................................................................... 649Handling Error Messages .................................................................................... 650
Using Dictionaries .......................................................................... 652Working with the Extract Dictionary .......................................................653Opening an Extract Dictionary ................................................................654Sorting XDD Elements ......................................................................................... 655Importing CSV Files ............................................................................................. 656Importing XML Schemas into the XDD ............................................................... 657Importing XML Extract Files into the XDD ......................................................... 662Using Addressee Records ................................................................................... 665Adding Records to the XDD ................................................................................ 668Using the Common Fields Dictionary .....................................................675Working with the Common Fields Dictionary .................................................... 676Importing CSV Files ............................................................................................. 676Importing TGA Files ............................................................................................. 677Adding a field to the Common Field list ............................................................. 678Updating the Common Field List ........................................................................ 678
Creating Tables ............................................................................... 680Overview ....................................................................................................681Transaction File DFD ............................................................................................ 684Recipient Batch File DFD ..................................................................................... 684Application Index File DFD .................................................................................. 685Field Section ......................................................................................................... 686Key Section ........................................................................................................... 687
Converting Files .............................................................................. 688Overview ....................................................................................................689Converting Word and RTF Files ..............................................................692Converting Files into Sections ................................................................702Compiling Sections into Print Files ........................................................711Converting Sections into Paragraphs .....................................................713Converting Graphic Files .........................................................................714Making Changes to Multiple Forms ........................................................715Making Changes to Multiple Sections ....................................................718Converting Bitmap Files into LOG Files .................................................724Converting System Files into XML Files .................................................725Converting Documerge Resources .........................................................727Changing Recipient Information .............................................................731Importing XML Schemas into the XDD ...................................................733Changing Multiple Script Files ................................................................735Finishing a Conversion ............................................................................737
Producing Reports .......................................................................... 739Overview ....................................................................................................740Printing Reports ........................................................................................743Printing a Finishing Report ................................................................................. 749Printing the Documerge Field Report ................................................................. 753
Handling Fonts ................................................................................ 754Overview ....................................................................................................755Defining Basic Font Properties ...............................................................756Defining AFP Font Properties ............................................................................. 757
Defining Metacode Font Properties .................................................................... 758Defining PCL Font Properties ............................................................................. 759Defining PostScript Font Properties ................................................................... 761Defining PDF Font Properties ............................................................................. 765Defining Font Dimensions .......................................................................767Importing Fonts .........................................................................................769Importing Fonts .........................................................................................773Generating an FNT file ......................................................................................... 773Generating PFM files from an FXR file ............................................................... 774Generating Export CSS File ................................................................................. 778Converting Fonts ......................................................................................780Convert Fonts - Step 1 ......................................................................................... 780
Testing Your Work .......................................................................... 783Overview ....................................................................................................784Using the Screen .......................................................................................786Using the Menu Bar .............................................................................................. 788Using the Right-Click Menus ............................................................................... 791Using the Toolbar ................................................................................................. 793Creating a Test Profile ..............................................................................794Running a Test Scenario ..........................................................................796Running a Trigger-Run Only Test ....................................................................... 799Manually Triggering ............................................................................................. 799Changing Test Properties ........................................................................801Modifying the AFGJOB File .....................................................................802Deleting a Test ..........................................................................................803Using the Printstream Analyzer ...............................................................804Using the Record View and Display Panes ........................................................ 806Using the Find Option .......................................................................................... 807Finding a Specific Page or Record ..................................................................... 809Displaying Information about the Record .......................................................... 809Printing What is in the Panes .............................................................................. 810
Deploying Resources ..................................................................... 811Overview ....................................................................................................812Creating or Running a Deployment .........................................................813Creating a Library Deployment ........................................................................... 816Creating a Flat-File Deployment .......................................................................... 820Transferring Workspace Files Using FTP .......................................................... 821Additional Resources ...............................................................................823Modifying the INI Settings ........................................................................824Selecting Pre- or Post-Deployment Processes ......................................825Processing the Deployment .....................................................................826Using Printstream Analyzer ........................................................... 827Using the Record View and Display Panes ........................................................ 828Using the Find Option .......................................................................................... 830
Appendix A:Using the Documaker Add-in for Microsoft Word ............. 836Introduction ...............................................................................................837Candidate Document Types ................................................................................ 838Understanding the Workflow ...................................................................839

Finding Information .............................................................................................. 841Synchronizing Fonts ................................................................................842Providing Graphic Files to the Add-In ....................................................843Sharing Studio Resource Information with the Add-In .........................845Generating a Workspace Definition File ............................................................. 846Importing Documents Created in Word ..................................................849Understanding the Import Process ..................................................................... 856Completing Imported Documents ...........................................................859Summary ....................................................................................................863Appendix B:Studio skins: Overview ........................................................ 864Overview ................................................................................................................ 864
Appendix C:Handling Overflow................................................................ 869Appendix D:Sample XML used in Examples ........................................... 887Appendix E:Using Subforms .................................................................... 892Adding a Subform .....................................................................................893Accessing Data .........................................................................................894
Appendix F:Inserting State Stamps and Signatures .............................. 898Configuring your system ..................................................................................... 898How it Works in Documaker Desktop ................................................................. 899
Glossary............................................................................................ 901
21
Preface
Documaker Studio is a forms creation system that allows multiple users to work together to efficiently create form sets. Studio helps you manage the development process and maintain large electronic forms libraries.
Documaker Studio is designed for forms and business analysts who work to meet the requirements defined by the compliance group. It is used to create the dynamic document applications which are provided to production operations teams.
This document describes how to use Documaker Studio to create these documents.
AUDIENCEThis document is intended for the end users who will be using Documaker Studio to create, manage, and deploy the Documaker resource library.
DOCUMENTATION ACCESSIBILITY
Accessibility of Links to External Websites in Documentation
This documentation may contain links to Websites of other companies or organizations that Oracle does not own or control. Oracle neither evaluates nor makes any representations regarding the accessibility of these Websites.
Oracle Customer Support
If you have any questions about the installation or use of our products, please call +1.800.223.1711 or visit the My Oracle Support website:
http://www.oracle.com/us/support/index.html.
Go to My Oracle Support to find answers in the Oracle Support Knowledge Base, submit, update or review your Service Requests, engage the My Oracle Support Community, download software updates, and tap into Oracle proactive support tools and best practices.
Hearing impaired customers in the U.S. who need to speak with an Oracle Support representative may use a telecommunications relay service (TRS); information about TRS is available at http://www.fcc.gov/cgb/consumerfacts/trs.html, and a list of phone numbers is available at http://www.fcc.gov/cgb/dro/trsphonebk.html. International hearing impaired customers should use the TRS at 1.605.224.1837.

Preface
22
Contact
USA:+1.800.223.1711
Canada: 1.800.668.8921 or +1.905.890.6690
Latin America: 877.767.2253
For other regions including Latin America, Europe, Middle East, Africa, and Asia Pacific regions: Visit- http://www.oracle.com/us/support/contact/index.html.
Copyright ©2016 Oracle and/or its affiliates. All rights reserved.
Follow Us
https://blogs.oracle.com/insurance
https://www.facebook.com/oracleinsurance
https://twitter.com/oracleinsurance
https://www.linkedin.com/groups?gid=2271161
Preface
23
RELATED DOCUMENTSFor more information, refer to the following Oracle resources:
• Documaker Installation Guide
• Documaker Add-in for Microsoft Word Online Help
• Rules Reference
• DAL Reference
CONVENTIONSThe following text conventions are used in this document:
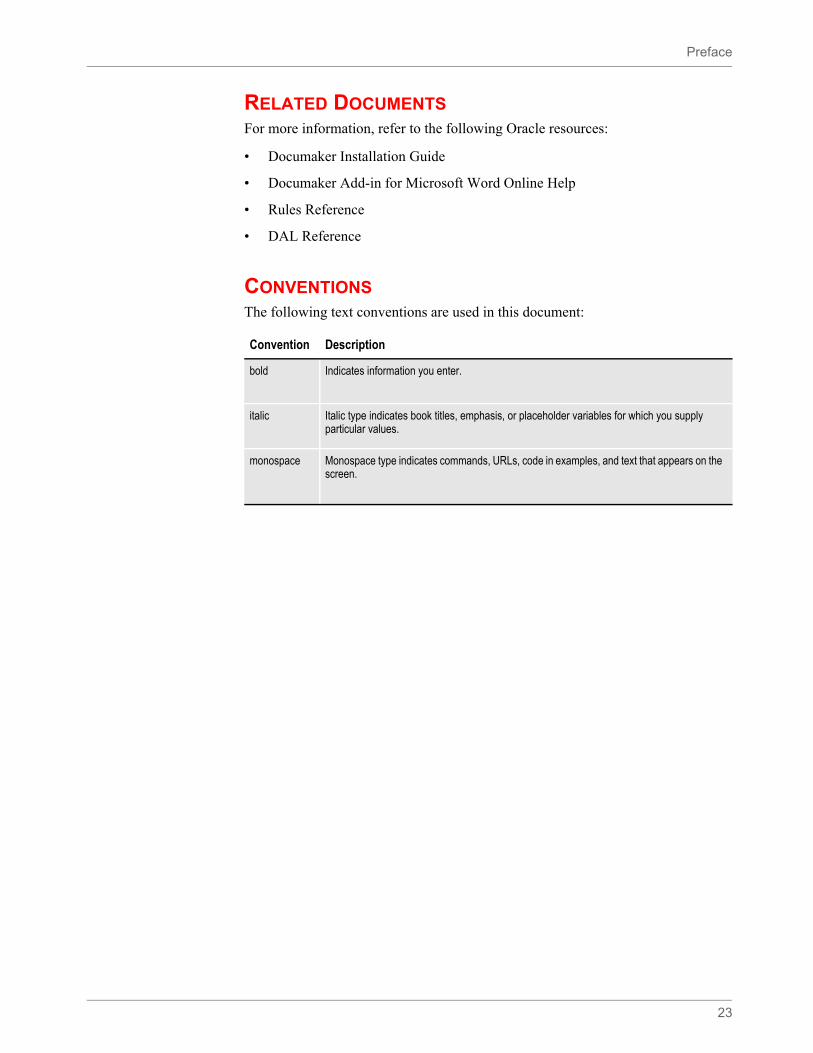
Convention Description
bold Indicates information you enter.
italic Italic type indicates book titles, emphasis, or placeholder variables for which you supply particular values.
monospace Monospace type indicates commands, URLs, code in examples, and text that appears on the screen.
24
Chapter 1
Using Documaker Studio
Documaker Studio is the design IDE (Integrated Design Environment) for Documaker Standard, Enterprise, and Mobile. Studio is the design tool where you can create your form and document templates, build your business rules, map data and complete other tasks to create the version controlled library of resources used by Documaker to produce personalized content (documents, email, etc.)
This chapter includes information on these topics:
• Introduction on page 25
• Creating a Multiple User Development Environment and Workspace Managers on page 31
• Using this Guide on page 33
• Example Form on page 35
• Starting Studio on page 41
• Using System Menus on page 45
• Using a DBMS to Manage Resources on page 55
Introduction
25
INTRODUCTION
Welcome to Documaker Studio, the application used for building source files for a Documaker implementation. Documaker Studio is a multi-user development system that promotes work-group and team-based development methodologies. Documaker Studio tackles the development process for building and maintaining large electronic forms libraries. Documaker Studio is designed for forms and business analysts who work to meet the requirements defined by the compliance group, and those who create the dynamic document applications provided to the production operations teams.
Studio lets multiple users work together in a library environment to construct graphics, documents, and rules for data and forms assembly. Studio lets you check in and check out the various resources you create so you don't have to worry about overwriting another user's work. Studio also lets you control who has access to the different tools within the product. Furthermore, Studio links user IDs to every resource you create and can track who made each modification. As a system administrator, you can even control who sets recipient copy counts, uses the scripting language, and runs testing scenarios. We will look at these features in greater detail throughout this guide.
DOCUMAKER SYSTEM OVERVIEWThere are many different ways to implement the Documaker Server system. Documaker Server can operate on multiple platforms, with other Oracle Corporation products, and with third-party applications. The simplest solution entails an administration system supplying data on a company’s customers to a Documaker system. The Documaker system incorporates these data elements into customized form sets, which will eventually produce a customer document set. These document sets include copies for other recipients, rendered in a variety of formats for different delivery methods (printers, online content, and fax).
Documaker can also change platforms and configuration settings as it moves from a test phase to a production phase. The typical Documaker implementation cycle includes the following:
• Building system resources
• Configuring the processing system
• Testing resources in a runtime environment
• Deploying the tested system in a production environment
Documaker Studio assists in all of these stages of construction, from building resources and the modification of configuration files, to the testing of form rules and recipient output and delivery options. Documaker Studio also has a deployment feature for moving resources to another location for use in production.
Note Documaker creates and processes documents for a variety of businesses, including insurance companies, utility companies, and financial companies. Throughout this guide an insurance analogy is often used to provide examples. The documents may differ, but the process of creating and processing the documents is similar.
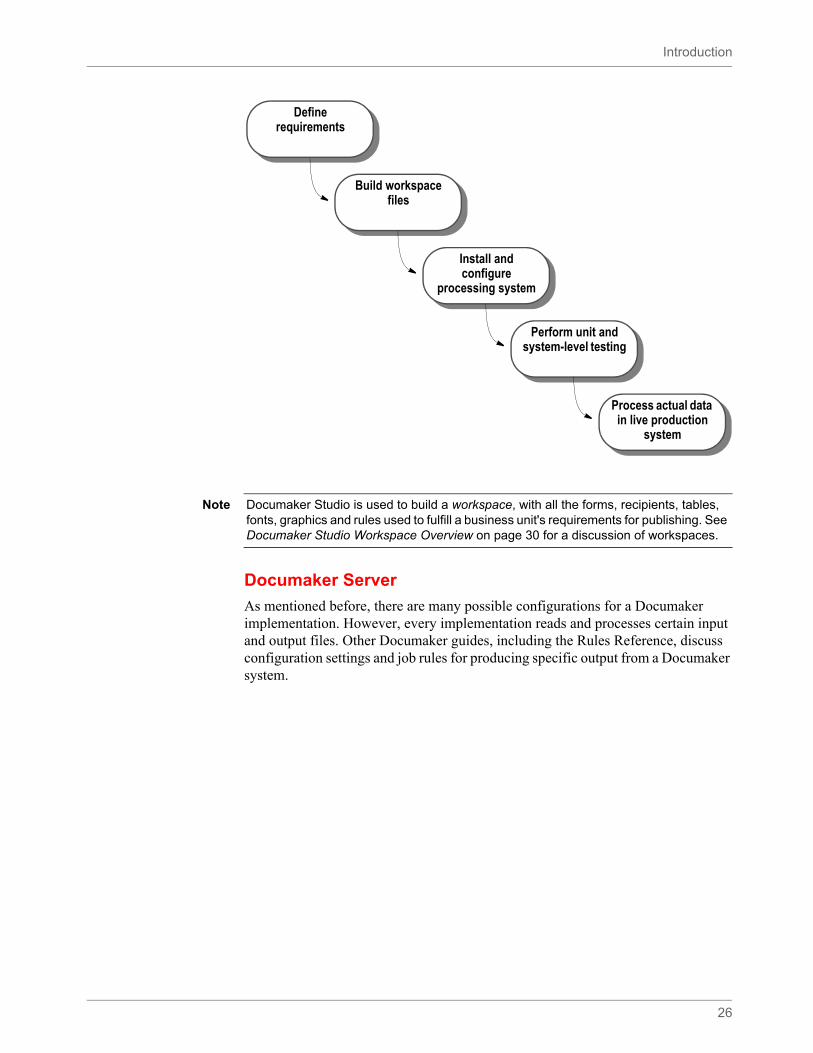
Introduction
26
Documaker Server
As mentioned before, there are many possible configurations for a Documaker implementation. However, every implementation reads and processes certain input and output files. Other Documaker guides, including the Rules Reference, discuss configuration settings and job rules for producing specific output from a Documaker system.
Define requirements
Build workspace files
Install and configure
processing system
Perform unit and system-level testing
Process actual data in live production
system
Note Documaker Studio is used to build a workspace, with all the forms, recipients, tables, fonts, graphics and rules used to fulfill a business unit's requirements for publishing. See Documaker Studio Workspace Overview on page 30 for a discussion of workspaces.
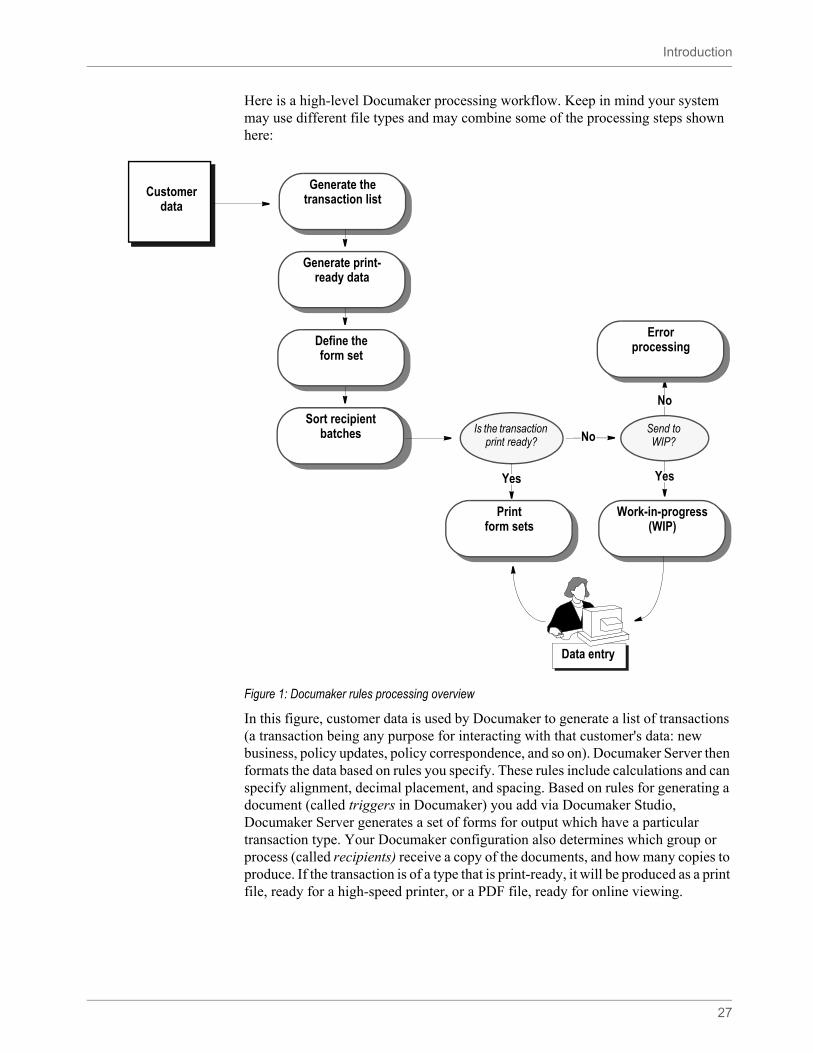
Introduction
27
Here is a high-level Documaker processing workflow. Keep in mind your system may use different file types and may combine some of the processing steps shown here:
Figure 1: Documaker rules processing overview
In this figure, customer data is used by Documaker to generate a list of transactions (a transaction being any purpose for interacting with that customer's data: new business, policy updates, policy correspondence, and so on). Documaker Server then formats the data based on rules you specify. These rules include calculations and can specify alignment, decimal placement, and spacing. Based on rules for generating a document (called triggers in Documaker) you add via Documaker Studio, Documaker Server generates a set of forms for output which have a particular transaction type. Your Documaker configuration also determines which group or process (called recipients) receive a copy of the documents, and how many copies to produce. If the transaction is of a type that is print-ready, it will be produced as a print file, ready for a high-speed printer, or a PDF file, ready for online viewing.
Customer data
Generate the transaction list
Generate print- ready data
Define theform set
Sort recipient batches Is the transaction
print ready?Send to WIP?
Errorprocessing
Sort recipient batches No
No
YesYes
Printform sets
Work-in-progress (WIP)
Data entry
Introduction
28
Another possibility is that the transaction needs to be viewed or further manipulated in an interactive system prior to publishing. This is done through the Documaker Interactive as well as Documaker Desktop. These transactions can simply be checked for accuracy or be completed manually (for missing data, or adding personal correspondence). Transactions in WIP can be printed directly from WIP queues, or sent back to the original print output stack.
Documaker Server Logical System flow
The rules processing part of Documaker Server consists of these main programs: GenTran, GenData, GenPrint, and GenWIP.
• GenTran reads an input data file generated by a policy administration system. Based on configuration settings in the Documaker system, GenTran will identify each transaction in the data file, and write it out to an output file: the TRNFILE.
• GenData reads the TRNFILE to interpret the data input file, produces a forms lists for each transaction, and writes output files: a batch file for each Recipient, a NAFILE containing transaction data, and a POLFILE with form and print information. Any WIP transactions are also written to a separate batch file.
• GenPrint reads the GenData output files, and produces the print file in the specified format (Metacode, AFP, PDF and so on), using available device fonts and printer settings to publish the documents.
• GenWip is an optional program that reads any WIP transactions flagged by GenData and allows manipulation of these files via Documaker Desktop programs.
Each program produces log, error, and message files. The Documaker Batch Processing classes offered through Oracle University discuss these output files in detail. In the figure below is a high-level process flow for the Documaker Server programs.

Introduction
29
Figure 2: Documaker Server logical system flow
External data
source
GenTranprogram
GenDataprogram
GenWIPprogramMANUAL.BCH
TRNFILE
WIPLOGFILE
ERRFILE
MSGFILENEWTRN
LOGFILE
ERRFILE
MSGFILE
NAFILE
POLFILE
GenPrintprogram Spool
files
RecipName.BCH
Introduction
30
Documaker Studio Workspace Overview
For most Documaker implementations, there is great flexibility in how resources are built: some may already exist in other formats, which can be easily used by Documaker Studio, either as is or through conversion wizards (See Converting Files on page 688).
Some resources can be built entirely within the Studio. A particular group within your organization may work exclusively on documents and graphics, while other groups can format data and test form assembly rules.
Regardless of how work is assigned in your organization, all business groups can use Studio to design and implement a Documaker system.
Documaker Studio uses workspaces to build and maintain the resources used for a Documaker implementation. A workspace can be defined as the files created within the Studio, as well as files generated by the Documaker Server programs discussed earlier.
Workspaces are based on a multiple user module, where user IDs are linked to resources, so different users can create and update resources within a workspace at the same time without overwriting each other's work.
Before you begin working in Documaker Studio you must create or join a workspace. You can create a workspace from scratch or build one based on the resources already defined in an existing master resource library (MRL). You can import MRLs created by legacy Documaker tools, such as Docucreate, or from another Studio workspace.
As you create a workspace you must determine the following:
• If the workspace will be shared
• Where the workspace will be located
• What type of storage method you want for the workspace files
See Using a DBMS to Manage Resources on page 55 for more information.
If the workspace was created on a shared drive for others to join, then anyone wanting to be added to the new workspace, with their own set of reference files, is required to go through a process similar to the creation step. See Working with Existing Run Time Documaker MRLs on page 73 more information.
After the workspace is created, you can begin using the various tools within Documaker Studio. However, before proceeding, define security for your workstation environment. By doing so, you can become familiar with the Documaker Studio options and the various ways you can limit access rights to functions within the software. See Managing Users on page 115 in this guide for details on establishing security.
Note MRL or Workspace from 12.4 will not work in prior versions as there is a change in the encryption algorithm. This can be resolved by updating the credentials manually in the INI file settings.

Creating a Multiple User Development Environment and Workspace Managers
31
CREATING A MULTIPLE USER DEVELOPMENT ENVIRONMENT AND WORKSPACE MANAGERS
Documaker Studio provides for multiple user development cycles. For several users to work on a given set of resources, the system must be able to manage the resources to prevent conflicts.
The key to effectively managing libraries of resources is in the files used to store information. These files are designed to facilitate multiple users throughout the life cycle of a project so you can move resources from development to testing and into production.
The workspace managers used in Documaker Studio facilitate a multiple user environment. Managers create file types in the workspace file system. These files are accessed via user rights, and in a multiple user environment, they are checked out of the master library. They are checked back in with version and revision numbers and dates to prevent other overwriting. The workspace managers, and the file types they create in the file system outside of Documaker Studio, are shown below.
Note File names, types, and extensions, as well as menu names, options, and screen names can change during the development cycle.
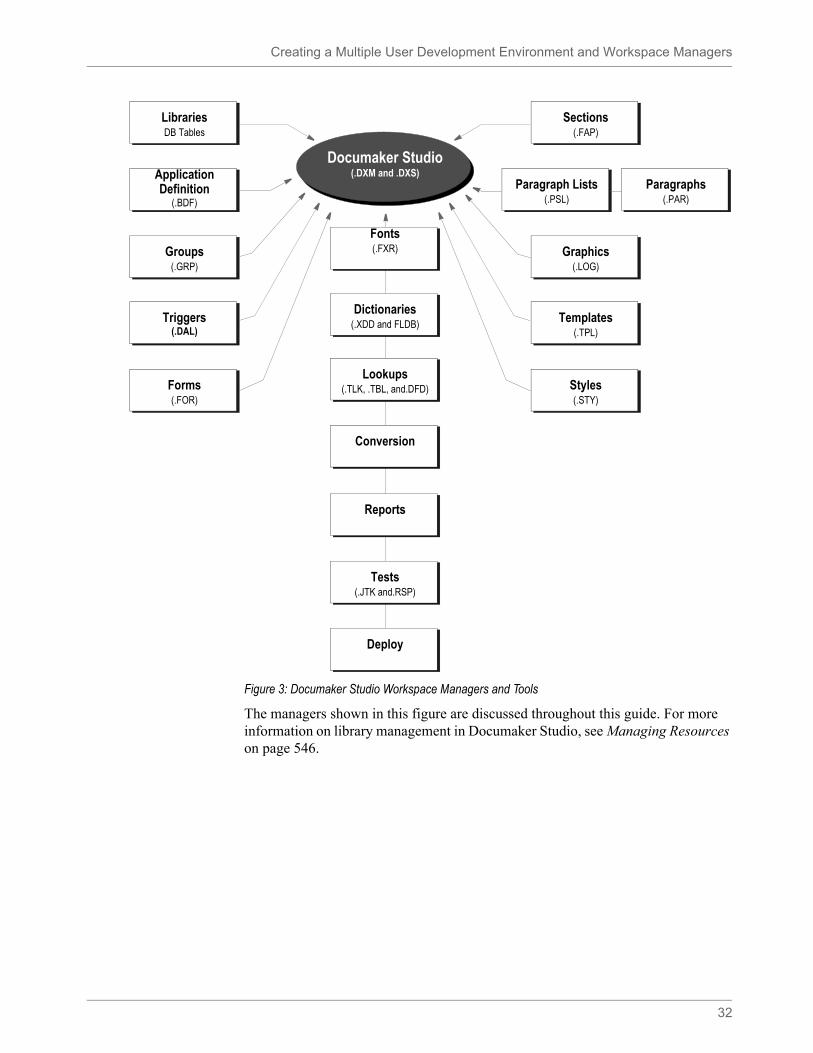
Creating a Multiple User Development Environment and Workspace Managers
32
Figure 3: Documaker Studio Workspace Managers and Tools
The managers shown in this figure are discussed throughout this guide. For more information on library management in Documaker Studio, see Managing Resources on page 546.
Documaker Studio(.DXM and .DXS)
LibrariesDB Tables
Application Definition
(.BDF)
Groups(.GRP)
Triggers(.DAL)
Forms(.FOR)
Styles(.STY)
Templates(.TPL)
Graphics(.LOG)
Paragraphs(.PAR)
Paragraph Lists(.PSL)
Sections(.FAP)
Fonts(.FXR)
Dictionaries(.XDD and FLDB)
Lookups(.TLK, .TBL, and.DFD)
Conversion
Reports
Tests(.JTK and.RSP)
Deploy
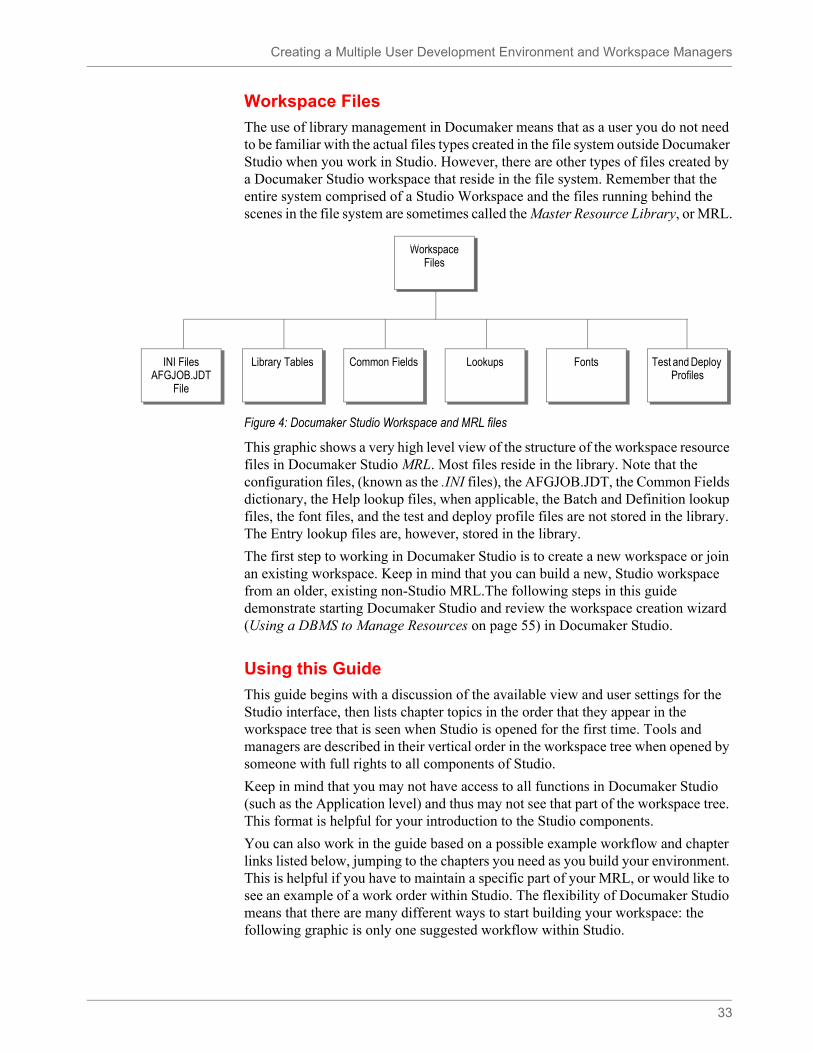
Creating a Multiple User Development Environment and Workspace Managers
33
Workspace Files
The use of library management in Documaker means that as a user you do not need to be familiar with the actual files types created in the file system outside Documaker Studio when you work in Studio. However, there are other types of files created by a Documaker Studio workspace that reside in the file system. Remember that the entire system comprised of a Studio Workspace and the files running behind the scenes in the file system are sometimes called the Master Resource Library, or MRL.
Figure 4: Documaker Studio Workspace and MRL files
This graphic shows a very high level view of the structure of the workspace resource files in Documaker Studio MRL. Most files reside in the library. Note that the configuration files, (known as the .INI files), the AFGJOB.JDT, the Common Fields dictionary, the Help lookup files, when applicable, the Batch and Definition lookup files, the font files, and the test and deploy profile files are not stored in the library. The Entry lookup files are, however, stored in the library.
The first step to working in Documaker Studio is to create a new workspace or join an existing workspace. Keep in mind that you can build a new, Studio workspace from an older, existing non-Studio MRL.The following steps in this guide demonstrate starting Documaker Studio and review the workspace creation wizard (Using a DBMS to Manage Resources on page 55) in Documaker Studio.
Using this Guide
This guide begins with a discussion of the available view and user settings for the Studio interface, then lists chapter topics in the order that they appear in the workspace tree that is seen when Studio is opened for the first time. Tools and managers are described in their vertical order in the workspace tree when opened by someone with full rights to all components of Studio.
Keep in mind that you may not have access to all functions in Documaker Studio (such as the Application level) and thus may not see that part of the workspace tree. This format is helpful for your introduction to the Studio components.
You can also work in the guide based on a possible example workflow and chapter links listed below, jumping to the chapters you need as you build your environment. This is helpful if you have to maintain a specific part of your MRL, or would like to see an example of a work order within Studio. The flexibility of Documaker Studio means that there are many different ways to start building your workspace: the following graphic is only one suggested workflow within Studio.
INI Files AFGJOB.JDT
File
Library Tables Common Fields Lookups Fonts Test and Deploy Profiles
Workspace Files
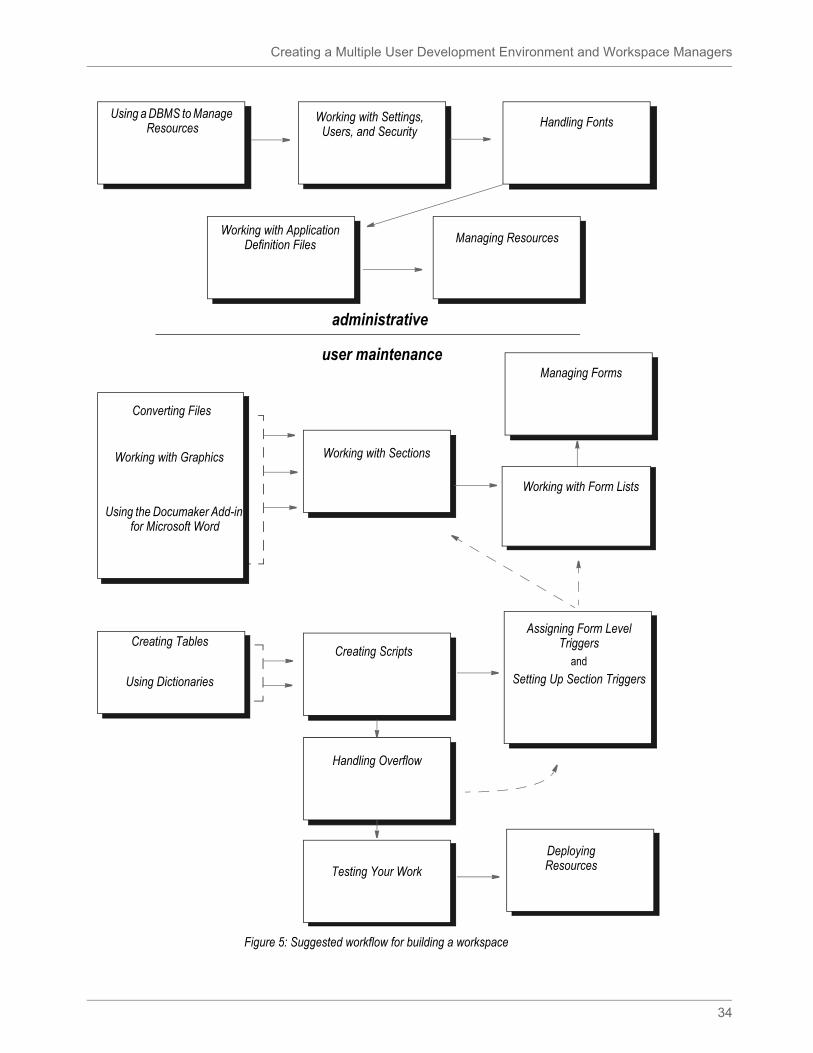
Creating a Multiple User Development Environment and Workspace Managers
34
Figure 5: Suggested workflow for building a workspace
Using a DBMS to Manage Resources
Working with Settings, Users, and Security
Working with Graphics Working with Sections
Managing Forms
Working with Application Definition Files
Working with Form Lists
Managing Resources
Creating Scripts
Using Dictionaries
Creating Tables
Converting Files
Testing Your Work
Deploying Resources
Assigning Form Level Triggers
and
Setting Up Section Triggers
Using the Documaker Add-in for Microsoft Word
Handling Overflow
Handling Fonts
administrative
user maintenance
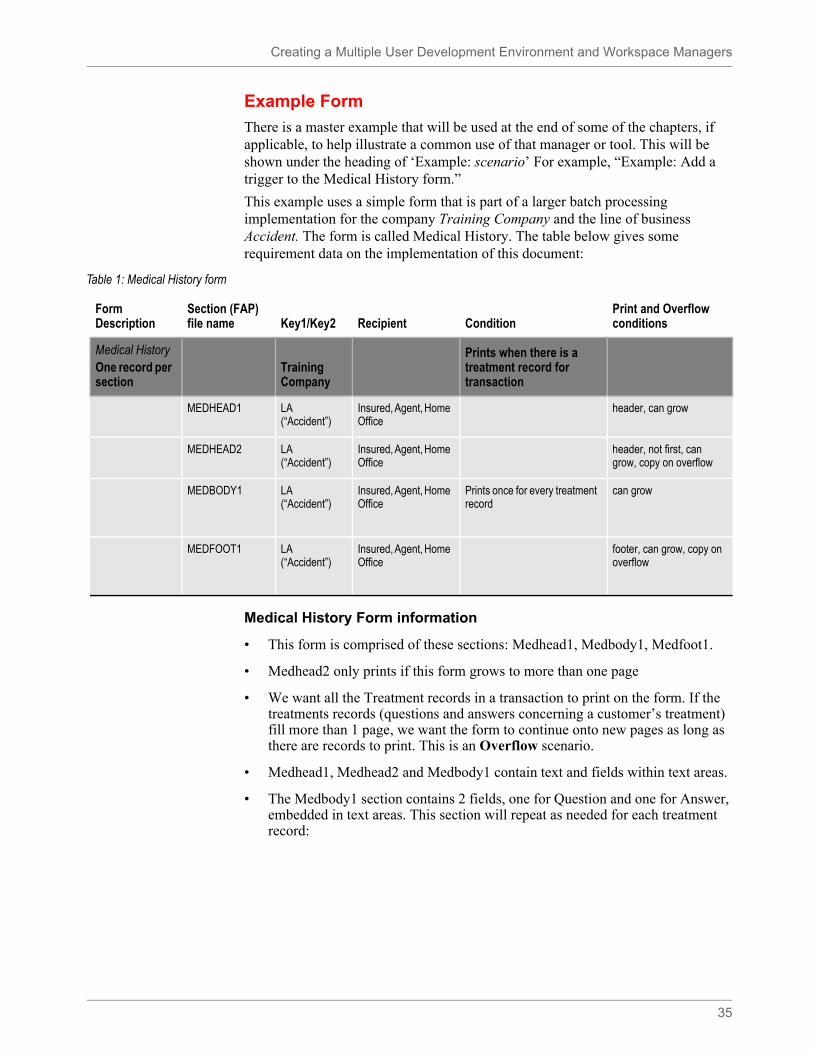
Creating a Multiple User Development Environment and Workspace Managers
35
Example Form
There is a master example that will be used at the end of some of the chapters, if applicable, to help illustrate a common use of that manager or tool. This will be shown under the heading of ‘Example: scenario’ For example, “Example: Add a trigger to the Medical History form.”
This example uses a simple form that is part of a larger batch processing implementation for the company Training Company and the line of business Accident. The form is called Medical History. The table below gives some requirement data on the implementation of this document:
Medical History Form information
• This form is comprised of these sections: Medhead1, Medbody1, Medfoot1.
• Medhead2 only prints if this form grows to more than one page
• We want all the Treatment records in a transaction to print on the form. If the treatments records (questions and answers concerning a customer’s treatment) fill more than 1 page, we want the form to continue onto new pages as long as there are records to print. This is an Overflow scenario.
• Medhead1, Medhead2 and Medbody1 contain text and fields within text areas.
• The Medbody1 section contains 2 fields, one for Question and one for Answer, embedded in text areas. This section will repeat as needed for each treatment record:
Table 1: Medical History form
Form Description
Section (FAP) file name Key1/Key2 Recipient Condition
Print and Overflow conditions
Medical HistoryOne record per section
Training Company
Prints when there is a treatment record for transaction
MEDHEAD1 LA (“Accident”)
Insured, Agent, Home Office
header, can grow
MEDHEAD2 LA (“Accident”)
Insured, Agent, Home Office
header, not first, can grow, copy on overflow
MEDBODY1 LA (“Accident”)
Insured, Agent, Home Office
Prints once for every treatment record
can grow
MEDFOOT1 LA (“Accident”)
Insured, Agent, Home Office
footer, can grow, copy on overflow

Creating a Multiple User Development Environment and Workspace Managers
36
• We will want the footer, Medfoot1, to copy onto any new pages that are generated for the form.
The data input file for this implementation is in the following XML tree structure:
!/MRL/RECORDNAME/FIELDNAME/DATAELEMENT
So a treatment record might be formatted in this way to pass the Treatment record information, such as UniqueID, and treatment questions and answers:
!/TRAININGCOMPANY/DATA/TREATMENT/RECORD!/TRAININGCOMPANY/DATA/TREATMENT/QUESTION/!/TRAININGCOMPANY/DATA/TREATMENT/ANSWER
For more information, see Sample XML used in Examples on page 887. Here is how the Medical History form looks when complete:

Creating a Multiple User Development Environment and Workspace Managers
37
Note Any examples in this guide usually demonstrate one possible configuration for a given process. In Documaker there are different ways to achieve the same results, and legacy methods are supported in current versions of Documaker Studio. If your implementation is set up differently than shown in documentation, but is working, do not alter your current configuration.
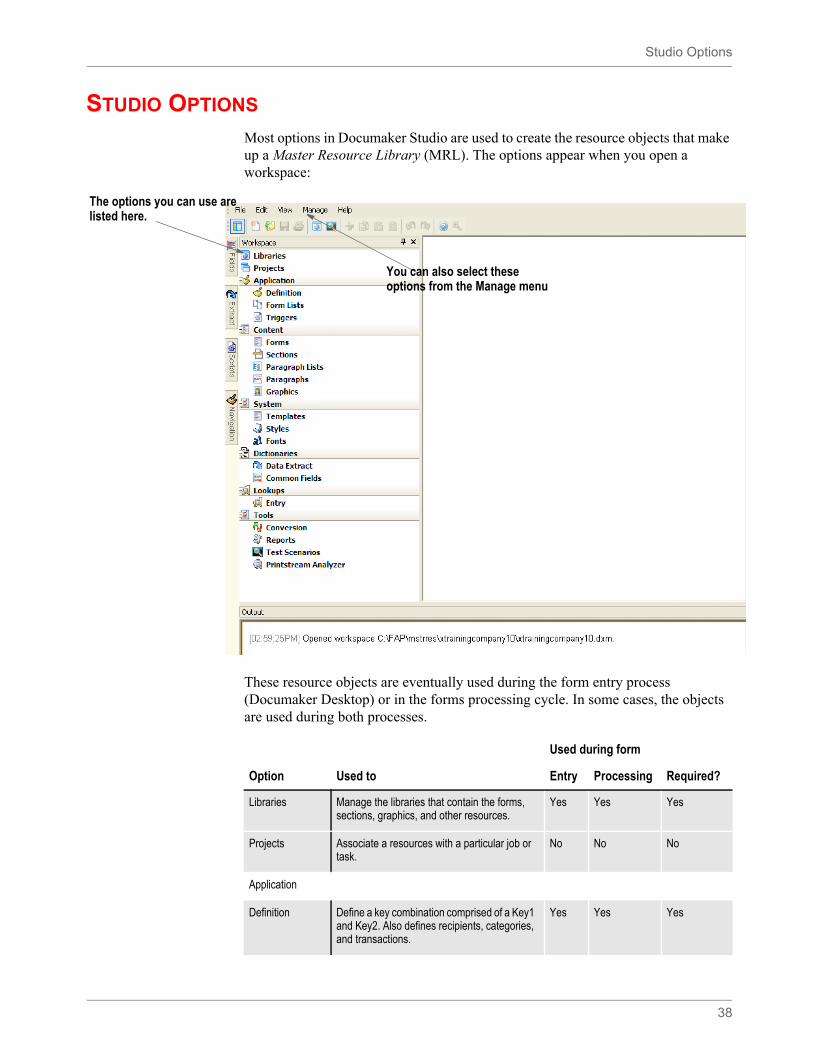
Studio Options
38
STUDIO OPTIONS
Most options in Documaker Studio are used to create the resource objects that make up a Master Resource Library (MRL). The options appear when you open a workspace:
These resource objects are eventually used during the form entry process (Documaker Desktop) or in the forms processing cycle. In some cases, the objects are used during both processes.
The options you can use are listed here.
You can also select these options from the Manage menu
Used during form
Option Used to Entry Processing Required?
Libraries Manage the libraries that contain the forms, sections, graphics, and other resources.
Yes Yes Yes
Projects Associate a resources with a particular job or task.
No No No
Application
Definition Define a key combination comprised of a Key1 and Key2. Also defines recipients, categories, and transactions.
Yes Yes Yes
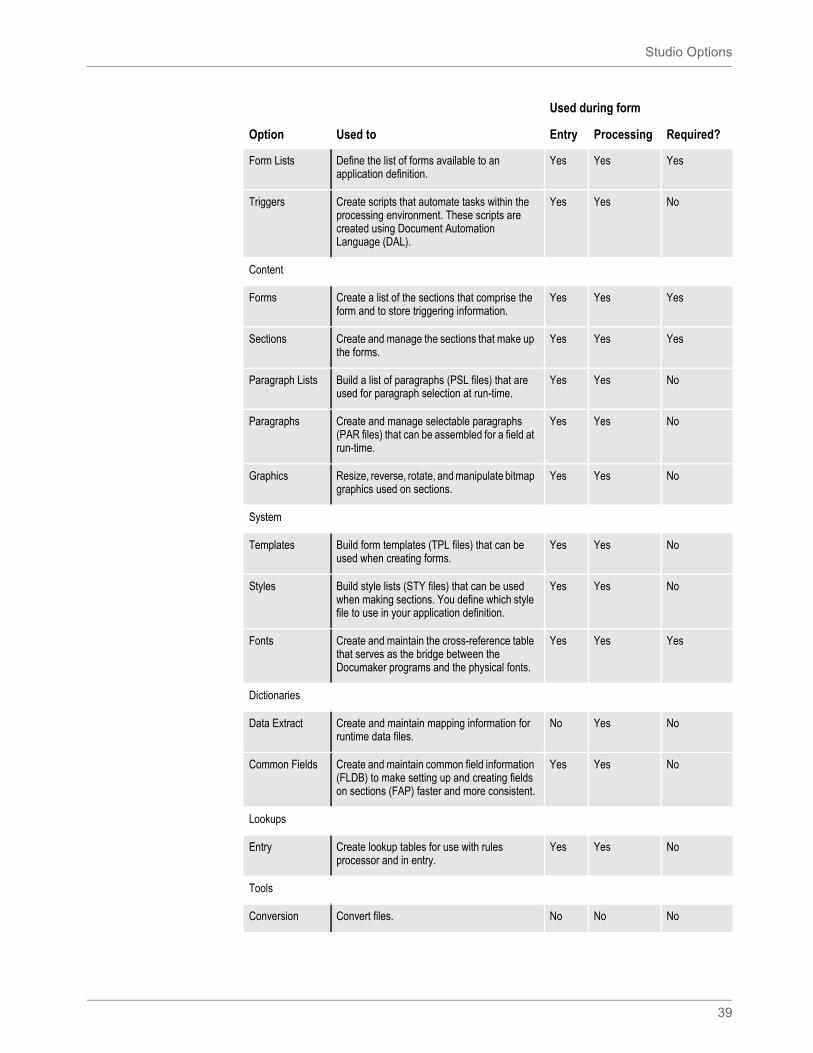
Studio Options
39
Form Lists Define the list of forms available to an application definition.
Yes Yes Yes
Triggers Create scripts that automate tasks within the processing environment. These scripts are created using Document Automation Language (DAL).
Yes Yes No
Content
Forms Create a list of the sections that comprise the form and to store triggering information.
Yes Yes Yes
Sections Create and manage the sections that make up the forms.
Yes Yes Yes
Paragraph Lists Build a list of paragraphs (PSL files) that are used for paragraph selection at run-time.
Yes Yes No
Paragraphs Create and manage selectable paragraphs (PAR files) that can be assembled for a field at run-time.
Yes Yes No
Graphics Resize, reverse, rotate, and manipulate bitmap graphics used on sections.
Yes Yes No
System
Templates Build form templates (TPL files) that can be used when creating forms.
Yes Yes No
Styles Build style lists (STY files) that can be used when making sections. You define which style file to use in your application definition.
Yes Yes No
Fonts Create and maintain the cross-reference table that serves as the bridge between the Documaker programs and the physical fonts.
Yes Yes Yes
Dictionaries
Data Extract Create and maintain mapping information for runtime data files.
No Yes No
Common Fields Create and maintain common field information (FLDB) to make setting up and creating fields on sections (FAP) faster and more consistent.
Yes Yes No
Lookups
Entry Create lookup tables for use with rules processor and in entry.
Yes Yes No
Tools
Conversion Convert files. No No No
Used during form
Option Used to Entry Processing Required?
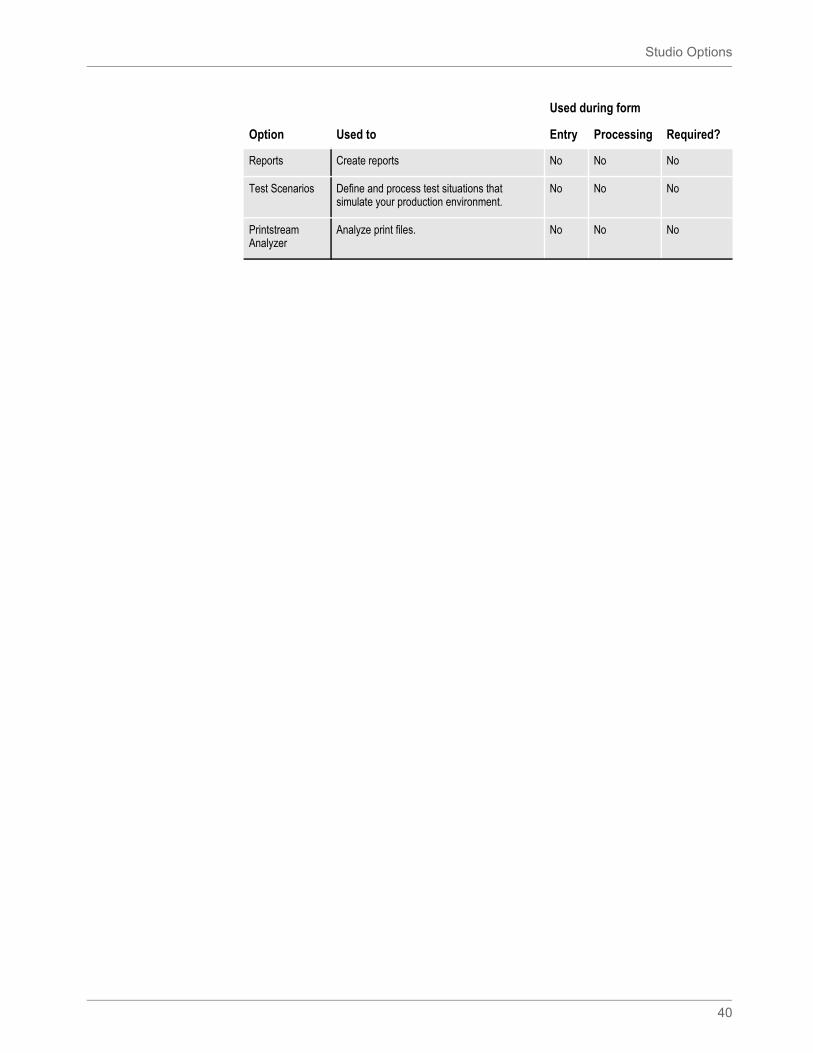
Studio Options
40
Reports Create reports No No No
Test Scenarios Define and process test situations that simulate your production environment.
No No No
Printstream Analyzer
Analyze print files. No No No
Used during form
Option Used to Entry Processing Required?
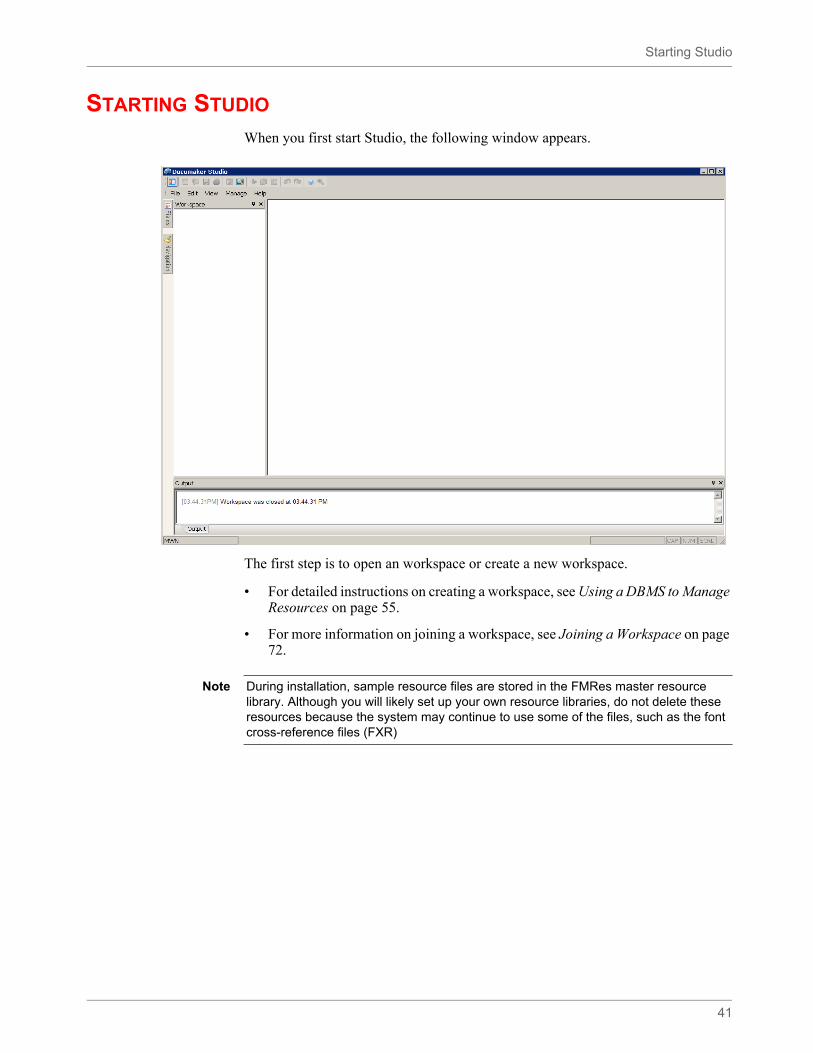
Starting Studio
41
STARTING STUDIO
When you first start Studio, the following window appears.
The first step is to open an workspace or create a new workspace.
• For detailed instructions on creating a workspace, see Using a DBMS to Manage Resources on page 55.
• For more information on joining a workspace, see Joining a Workspace on page 72.
Note During installation, sample resource files are stored in the FMRes master resource library. Although you will likely set up your own resource libraries, do not delete these resources because the system may continue to use some of the files, such as the font cross-reference files (FXR)
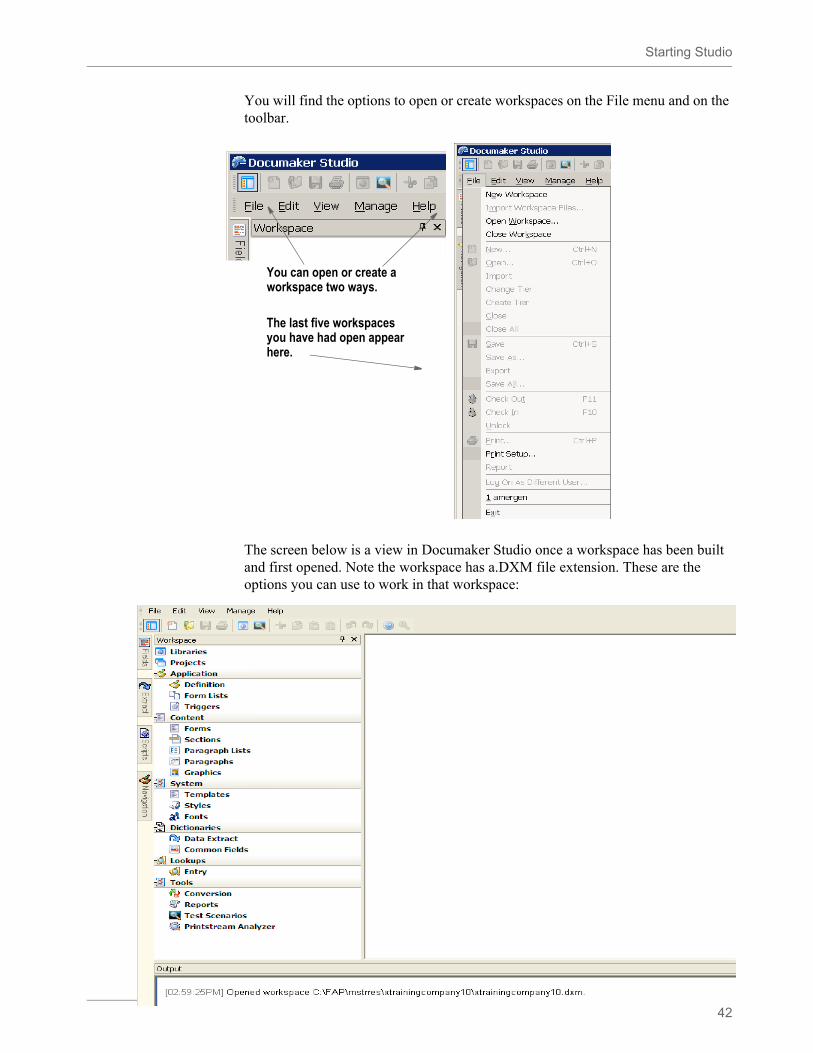
Starting Studio
42
You will find the options to open or create workspaces on the File menu and on the toolbar.
The screen below is a view in Documaker Studio once a workspace has been built and first opened. Note the workspace has a.DXM file extension. These are the options you can use to work in that workspace:
You can open or create a workspace two ways.
The last five workspaces you have had open appear here.
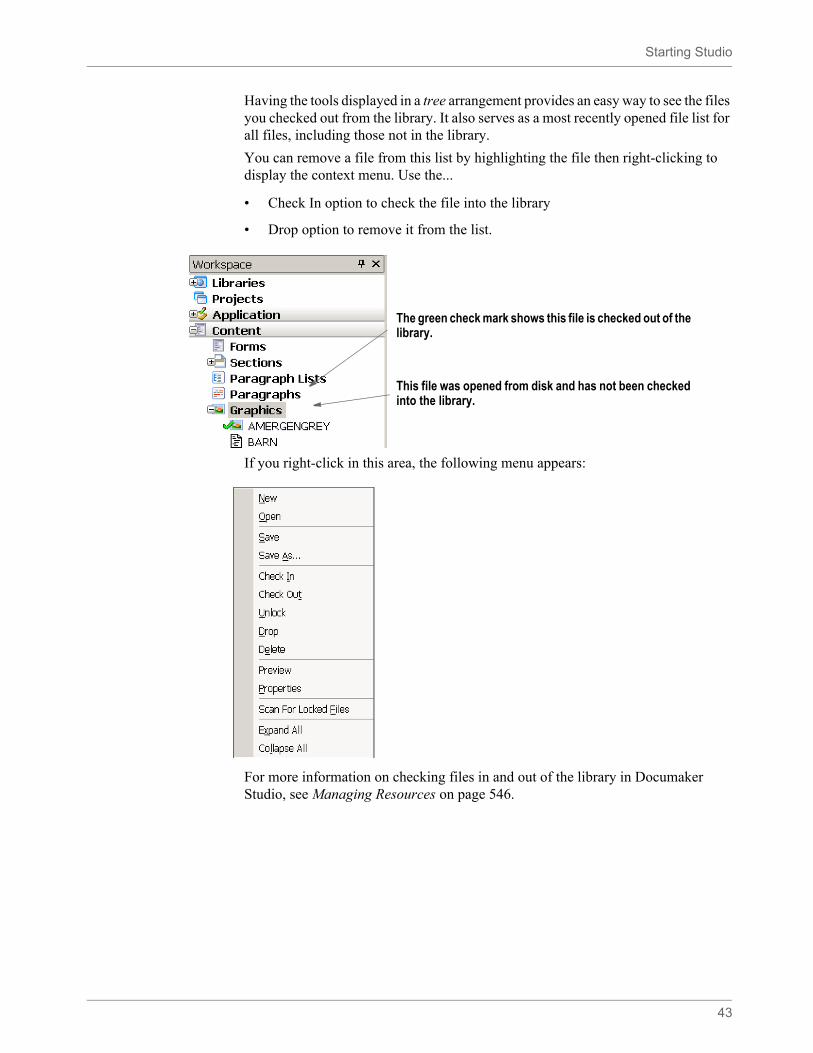
Starting Studio
43
Having the tools displayed in a tree arrangement provides an easy way to see the files you checked out from the library. It also serves as a most recently opened file list for all files, including those not in the library.
You can remove a file from this list by highlighting the file then right-clicking to display the context menu. Use the...
• Check In option to check the file into the library
• Drop option to remove it from the list.
If you right-click in this area, the following menu appears:
For more information on checking files in and out of the library in Documaker Studio, see Managing Resources on page 546.
The green check mark shows this file is checked out of the library.
This file was opened from disk and has not been checked into the library.
Starting Studio
44
Start-Up Tips
Here are some additional tips to help you get your system up and running:
Using long file names
In Windows, file names, including the path, can be up to 256 characters long. You should, however, limit the names of resource files, such as FAP (sections) and LOG (graphics) files, to 100 characters or less, excluding the path.
Documaker software imposes no limits on the length of the names use for the output files, such as print streams, so you can name those files however you like.
Naming conventions for printers in Windows
Windows does not use the LPT naming convention, such as LPT1, LPT2, and so on, for printers. Instead, it uses the \\server name\printer convention. For Documaker, you may need to modify the FSISYS.INI and FSIUSER.INI files. You must log on as the administrator and establish your printer connections to set up the naming conventions for your printers.
Using System Menus
45
USING SYSTEM MENUS
This topic discusses the pull down menus available when you are working in Documaker Studio. The following topics discuss the options on these menus. When you first start Studio, you see these menus:
These menus can change, depending on which tool you are working with. For instance, if you are working with sections, you have these additional menus to choose from:
In addition, some of the options on the standard menus change. For instance, if you are working with sections you will find additional Edit menu options which let you bold or italicize text. The chapters that discuss working with sections or form, for example, document the addition menus and options that become available.
Select To
File Create, open, close, save, check in, check out, unlock, create tiers, change tiers, print files and reports, and log on as a different user. You can also use this menu to exit the system.
Edit Perform normal editing functions such as undo, redo, cut, copy, paste, and delete.
View Set to turn on or off the display of the toolbar, workspace bar, output bar, status bar, field bar, extract bar, navigation bar, and scripts bar. You can also use this menu to define how documents appear on your screen.
Manage Work with various aspects of the project, including settings, libraries, dictionaries, scripts, fields, form sets, and other resources such as fonts, graphics, help, tables, and users. You can also use this menu to convert files, print reports, test forms, and work with user profiles.
Help Display Help contents, view the Help index, or search Help topics. You can also use this menu to check for system updates, go to the support web site, and view product information.
Select To
Insert Insert the various objects that comprise a section, such as boxes, text labels, text areas, charts, lines, graphics, fields, shade, and so on.
Format Convert objects into text labels or areas, or specify the formatting for paragraphs, including setting tabs, defining columns, numbering, specifying shading and borders, and so on.
Arrange Align, space, resize, and position objects.
Tools Run a spell or grammar checker, generate readability statistics, print a section report, run a data entry check or a section report, and compile or normalize the section.
Window Use to control the display of your windows. You can elect to have the windows display in tile, stack, or cascade format. You can also open a new window or arrange icons.
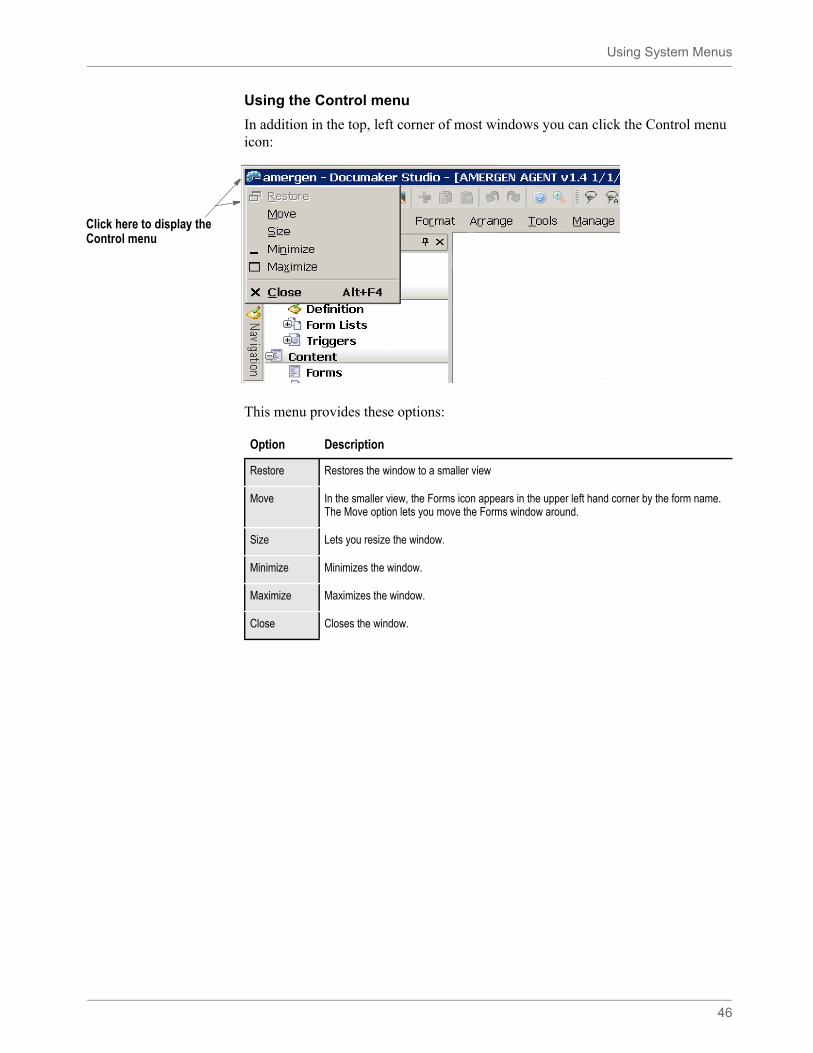
Using System Menus
46
Using the Control menu
In addition in the top, left corner of most windows you can click the Control menu icon:
This menu provides these options:
Click here to display the Control menu
Option Description
Restore Restores the window to a smaller view
Move In the smaller view, the Forms icon appears in the upper left hand corner by the form name. The Move option lets you move the Forms window around.
Size Lets you resize the window.
Minimize Minimizes the window.
Maximize Maximizes the window.
Close Closes the window.
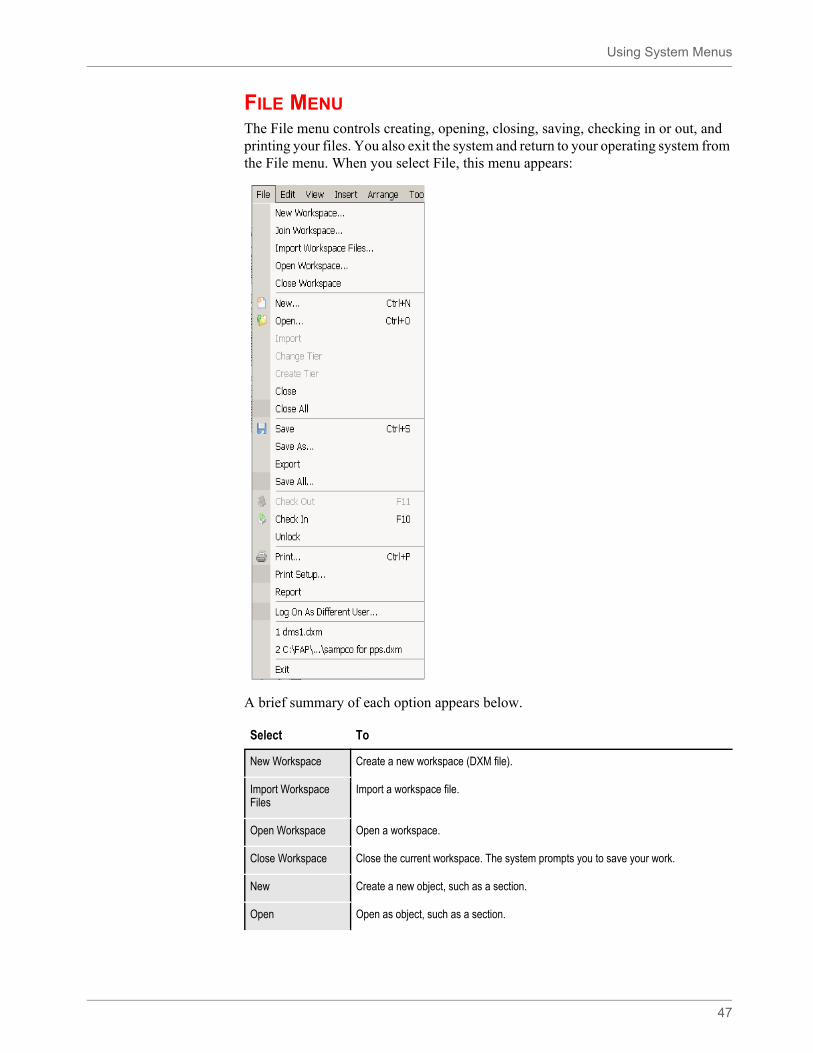
Using System Menus
47
FILE MENUThe File menu controls creating, opening, closing, saving, checking in or out, and printing your files. You also exit the system and return to your operating system from the File menu. When you select File, this menu appears:
A brief summary of each option appears below.
Select To
New Workspace Create a new workspace (DXM file).
Import Workspace Files
Import a workspace file.
Open Workspace Open a workspace.
Close Workspace Close the current workspace. The system prompts you to save your work.
New Create a new object, such as a section.
Open Open as object, such as a section.
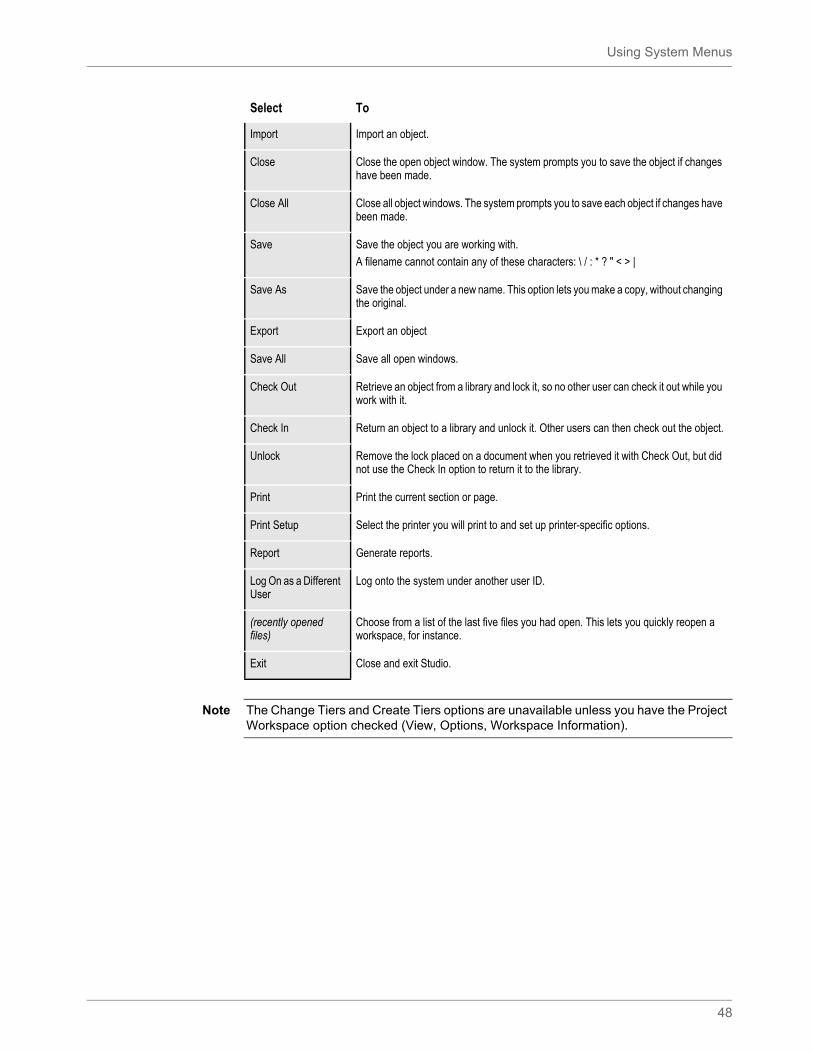
Using System Menus
48
Import Import an object.
Close Close the open object window. The system prompts you to save the object if changes have been made.
Close All Close all object windows. The system prompts you to save each object if changes have been made.
Save Save the object you are working with.
A filename cannot contain any of these characters: \ / : * ? " < > |
Save As Save the object under a new name. This option lets you make a copy, without changing the original.
Export Export an object
Save All Save all open windows.
Check Out Retrieve an object from a library and lock it, so no other user can check it out while you work with it.
Check In Return an object to a library and unlock it. Other users can then check out the object.
Unlock Remove the lock placed on a document when you retrieved it with Check Out, but did not use the Check In option to return it to the library.
Print Print the current section or page.
Print Setup Select the printer you will print to and set up printer-specific options.
Report Generate reports.
Log On as a Different User
Log onto the system under another user ID.
(recently opened files)
Choose from a list of the last five files you had open. This lets you quickly reopen a workspace, for instance.
Exit Close and exit Studio.
Select To
Note The Change Tiers and Create Tiers options are unavailable unless you have the Project Workspace option checked (View, Options, Workspace Information).
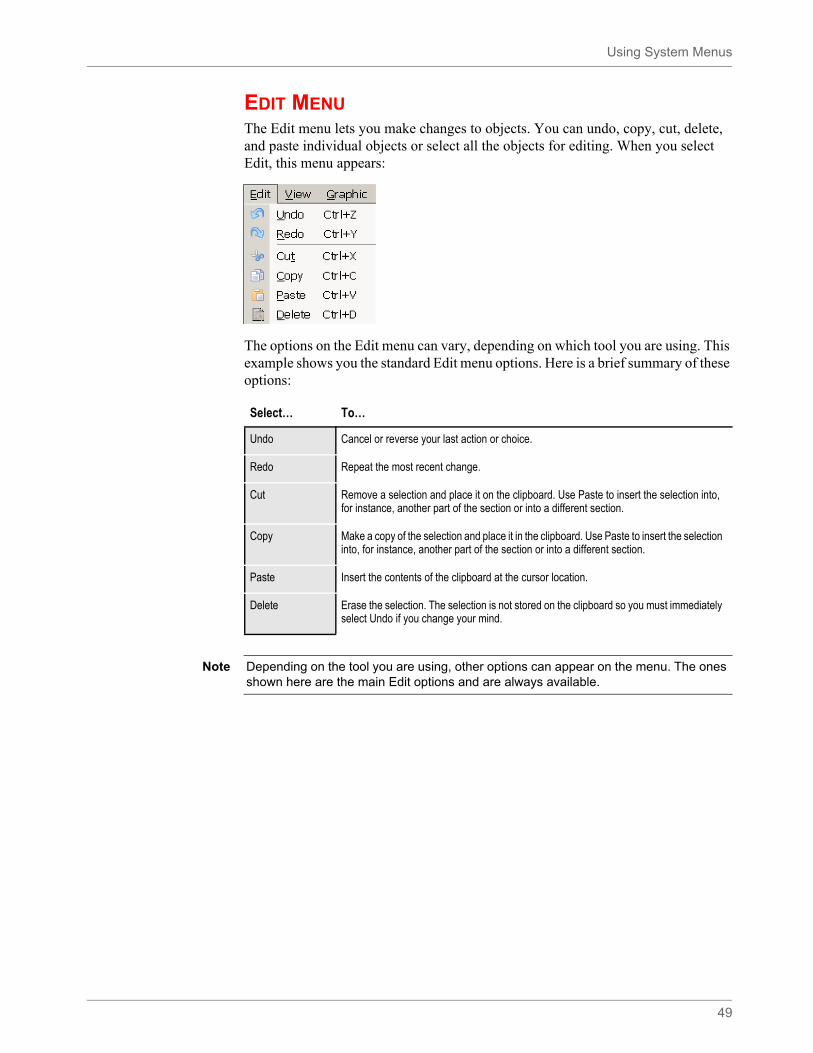
Using System Menus
49
EDIT MENUThe Edit menu lets you make changes to objects. You can undo, copy, cut, delete, and paste individual objects or select all the objects for editing. When you select Edit, this menu appears:
The options on the Edit menu can vary, depending on which tool you are using. This example shows you the standard Edit menu options. Here is a brief summary of these options:
Select… To…
Undo Cancel or reverse your last action or choice.
Redo Repeat the most recent change.
Cut Remove a selection and place it on the clipboard. Use Paste to insert the selection into, for instance, another part of the section or into a different section.
Copy Make a copy of the selection and place it in the clipboard. Use Paste to insert the selection into, for instance, another part of the section or into a different section.
Paste Insert the contents of the clipboard at the cursor location.
Delete Erase the selection. The selection is not stored on the clipboard so you must immediately select Undo if you change your mind.
Note Depending on the tool you are using, other options can appear on the menu. The ones shown here are the main Edit options and are always available.
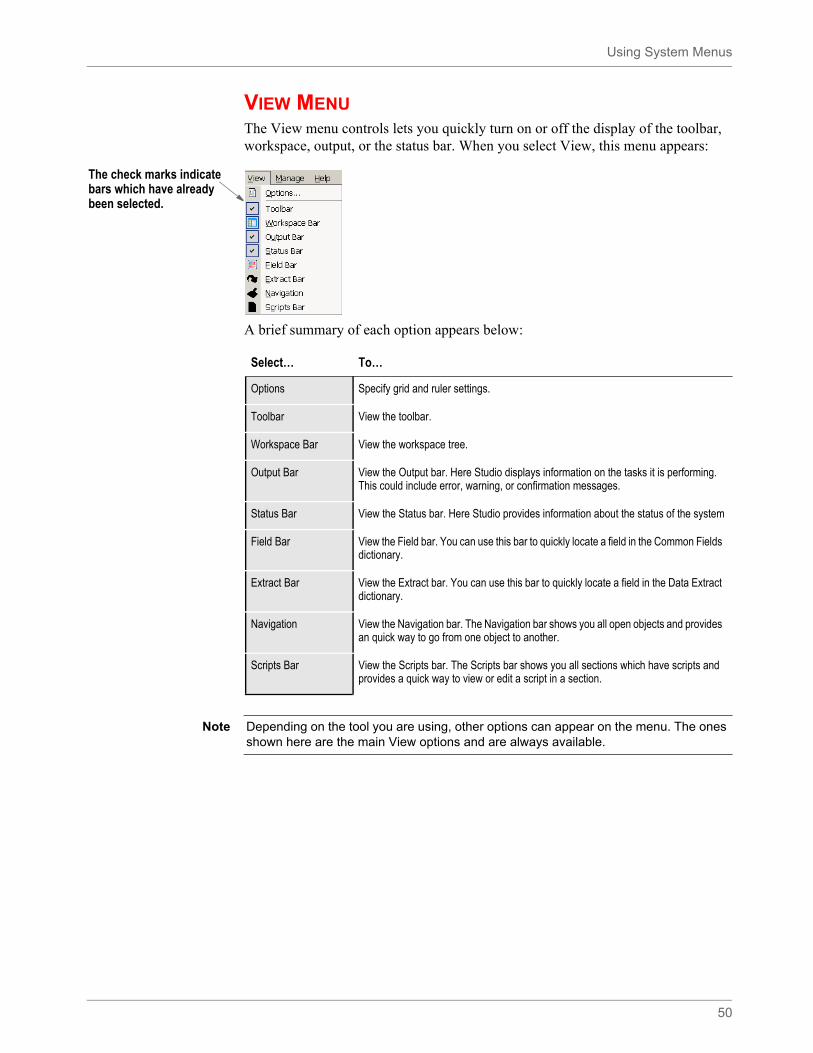
Using System Menus
50
VIEW MENUThe View menu controls lets you quickly turn on or off the display of the toolbar, workspace, output, or the status bar. When you select View, this menu appears:
A brief summary of each option appears below:
The check marks indicate bars which have already been selected.
Select… To…
Options Specify grid and ruler settings.
Toolbar View the toolbar.
Workspace Bar View the workspace tree.
Output Bar View the Output bar. Here Studio displays information on the tasks it is performing. This could include error, warning, or confirmation messages.
Status Bar View the Status bar. Here Studio provides information about the status of the system
Field Bar View the Field bar. You can use this bar to quickly locate a field in the Common Fields dictionary.
Extract Bar View the Extract bar. You can use this bar to quickly locate a field in the Data Extract dictionary.
Navigation View the Navigation bar. The Navigation bar shows you all open objects and provides an quick way to go from one object to another.
Scripts Bar View the Scripts bar. The Scripts bar shows you all sections which have scripts and provides a quick way to view or edit a script in a section.
Note Depending on the tool you are using, other options can appear on the menu. The ones shown here are the main View options and are always available.
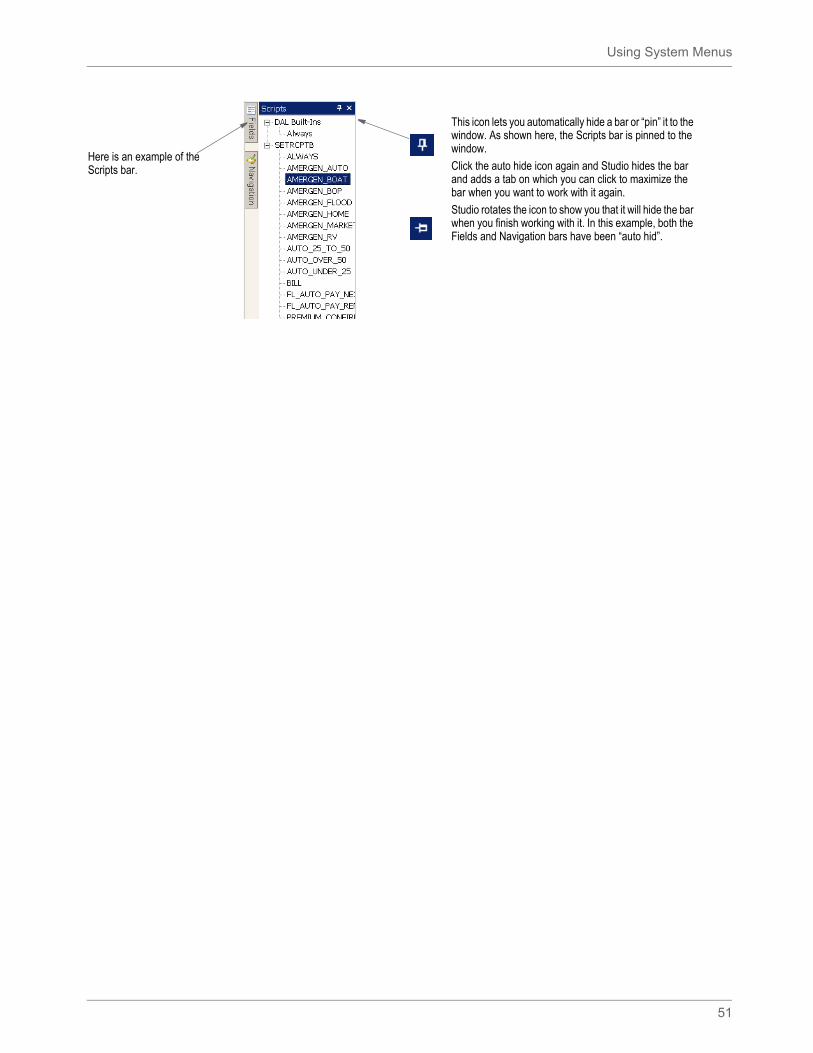
Using System Menus
51
Here is an example of the Scripts bar.
This icon lets you automatically hide a bar or “pin” it to the window. As shown here, the Scripts bar is pinned to the window.
Click the auto hide icon again and Studio hides the bar and adds a tab on which you can click to maximize the bar when you want to work with it again.
Studio rotates the icon to show you that it will hide the bar when you finish working with it. In this example, both the Fields and Navigation bars have been “auto hid”.
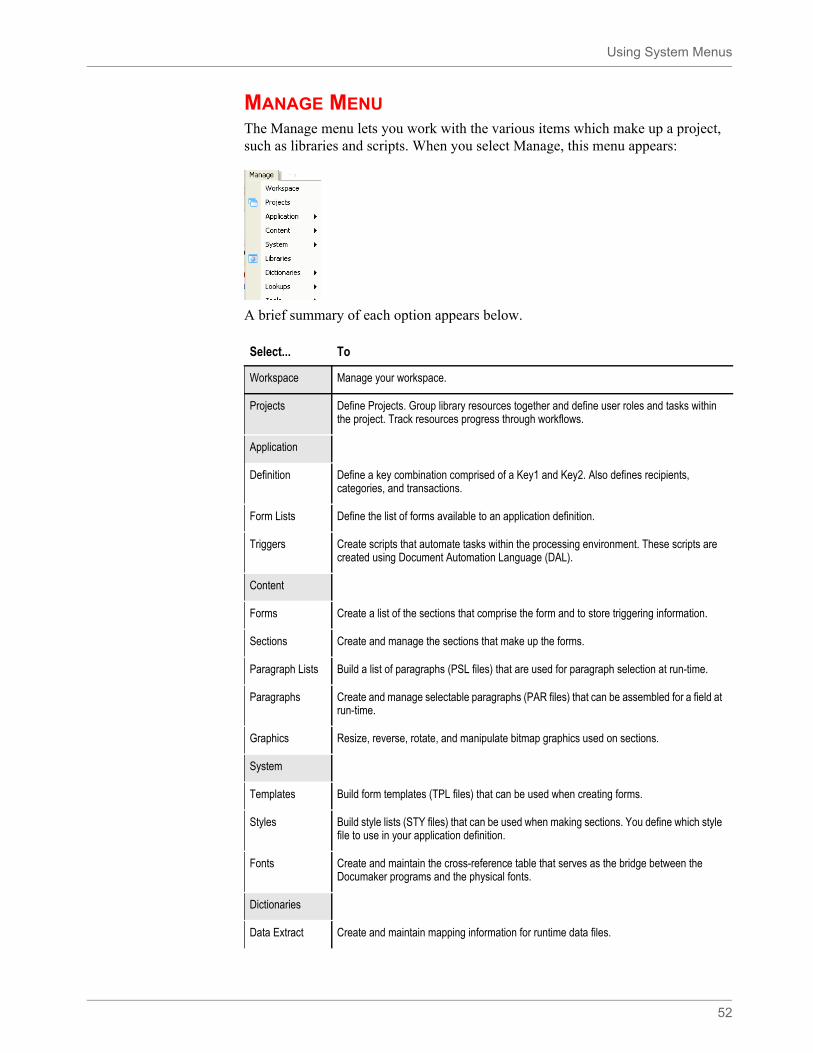
Using System Menus
52
MANAGE MENUThe Manage menu lets you work with the various items which make up a project, such as libraries and scripts. When you select Manage, this menu appears:
A brief summary of each option appears below.
Select... To
Workspace Manage your workspace.
Projects Define Projects. Group library resources together and define user roles and tasks within the project. Track resources progress through workflows.
Application
Definition Define a key combination comprised of a Key1 and Key2. Also defines recipients, categories, and transactions.
Form Lists Define the list of forms available to an application definition.
Triggers Create scripts that automate tasks within the processing environment. These scripts are created using Document Automation Language (DAL).
Content
Forms Create a list of the sections that comprise the form and to store triggering information.
Sections Create and manage the sections that make up the forms.
Paragraph Lists Build a list of paragraphs (PSL files) that are used for paragraph selection at run-time.
Paragraphs Create and manage selectable paragraphs (PAR files) that can be assembled for a field at run-time.
Graphics Resize, reverse, rotate, and manipulate bitmap graphics used on sections.
System
Templates Build form templates (TPL files) that can be used when creating forms.
Styles Build style lists (STY files) that can be used when making sections. You define which style file to use in your application definition.
Fonts Create and maintain the cross-reference table that serves as the bridge between the Documaker programs and the physical fonts.
Dictionaries
Data Extract Create and maintain mapping information for runtime data files.
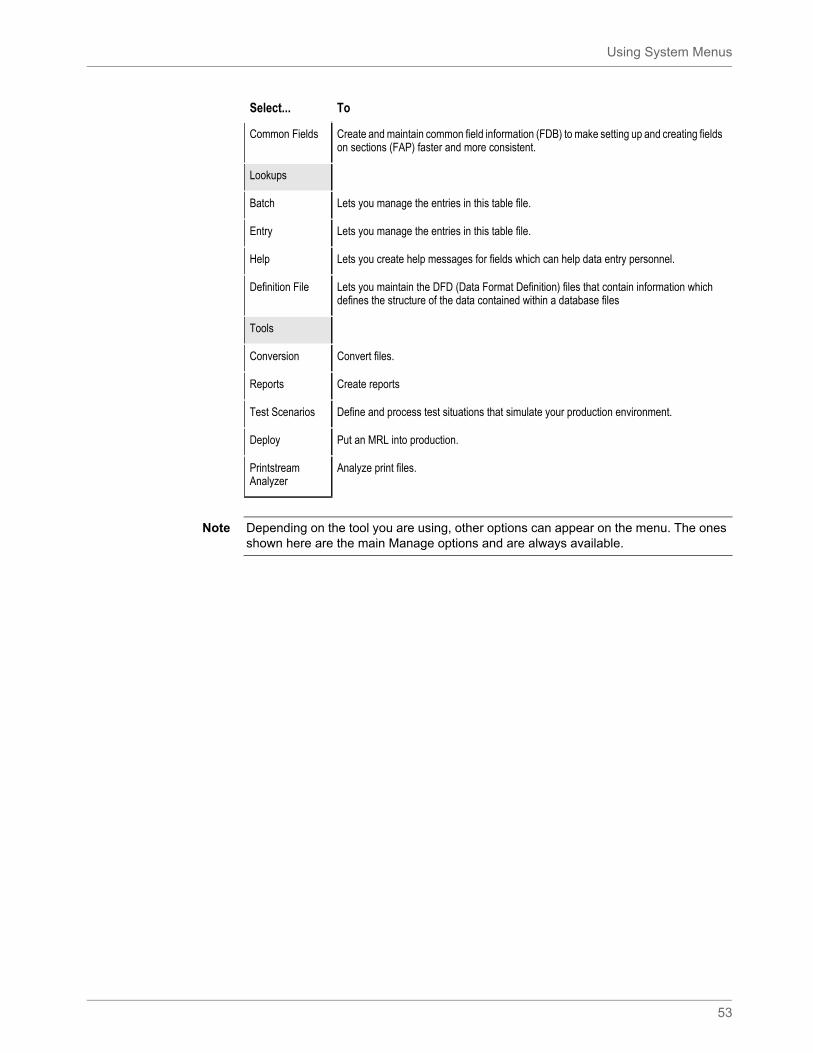
Using System Menus
53
Common Fields Create and maintain common field information (FDB) to make setting up and creating fields on sections (FAP) faster and more consistent.
Lookups
Batch Lets you manage the entries in this table file.
Entry Lets you manage the entries in this table file.
Help Lets you create help messages for fields which can help data entry personnel.
Definition File Lets you maintain the DFD (Data Format Definition) files that contain information which defines the structure of the data contained within a database files
Tools
Conversion Convert files.
Reports Create reports
Test Scenarios Define and process test situations that simulate your production environment.
Deploy Put an MRL into production.
Printstream Analyzer
Analyze print files.
Select... To
Note Depending on the tool you are using, other options can appear on the menu. The ones shown here are the main Manage options and are always available.
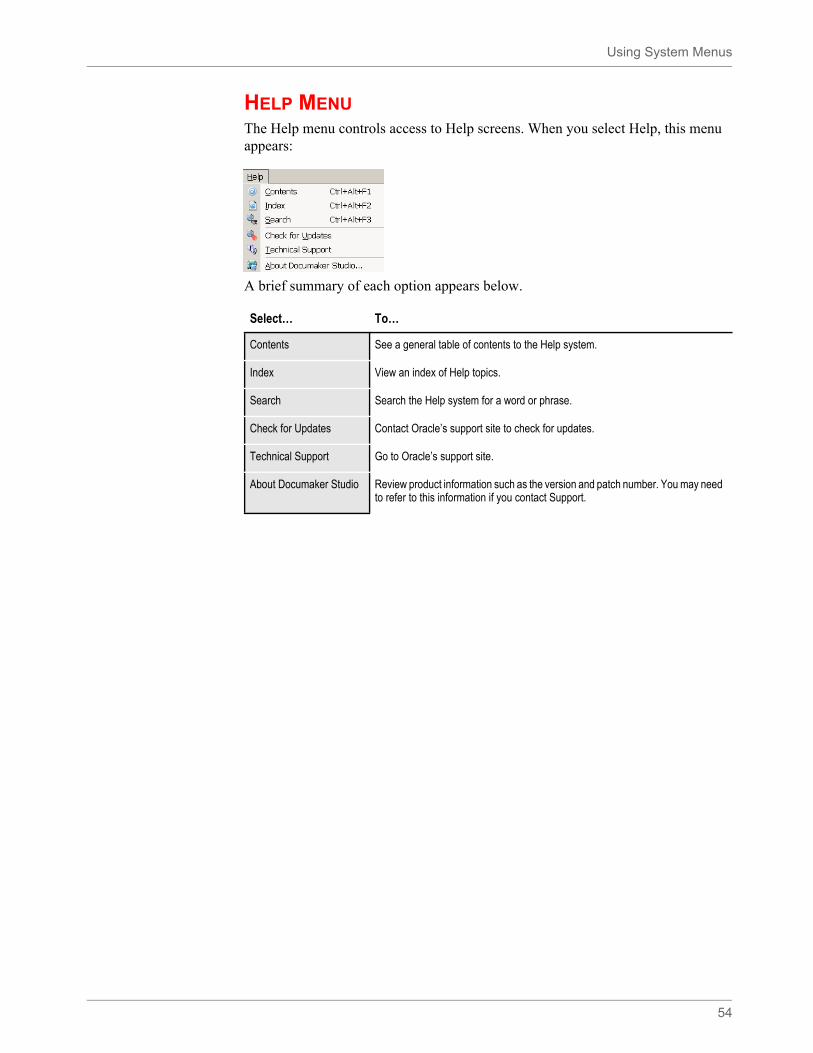
Using System Menus
54
HELP MENUThe Help menu controls access to Help screens. When you select Help, this menu appears:
A brief summary of each option appears below.
Select… To…
Contents See a general table of contents to the Help system.
Index View an index of Help topics.
Search Search the Help system for a word or phrase.
Check for Updates Contact Oracle’s support site to check for updates.
Technical Support Go to Oracle’s support site.
About Documaker Studio Review product information such as the version and patch number. You may need to refer to this information if you contact Support.
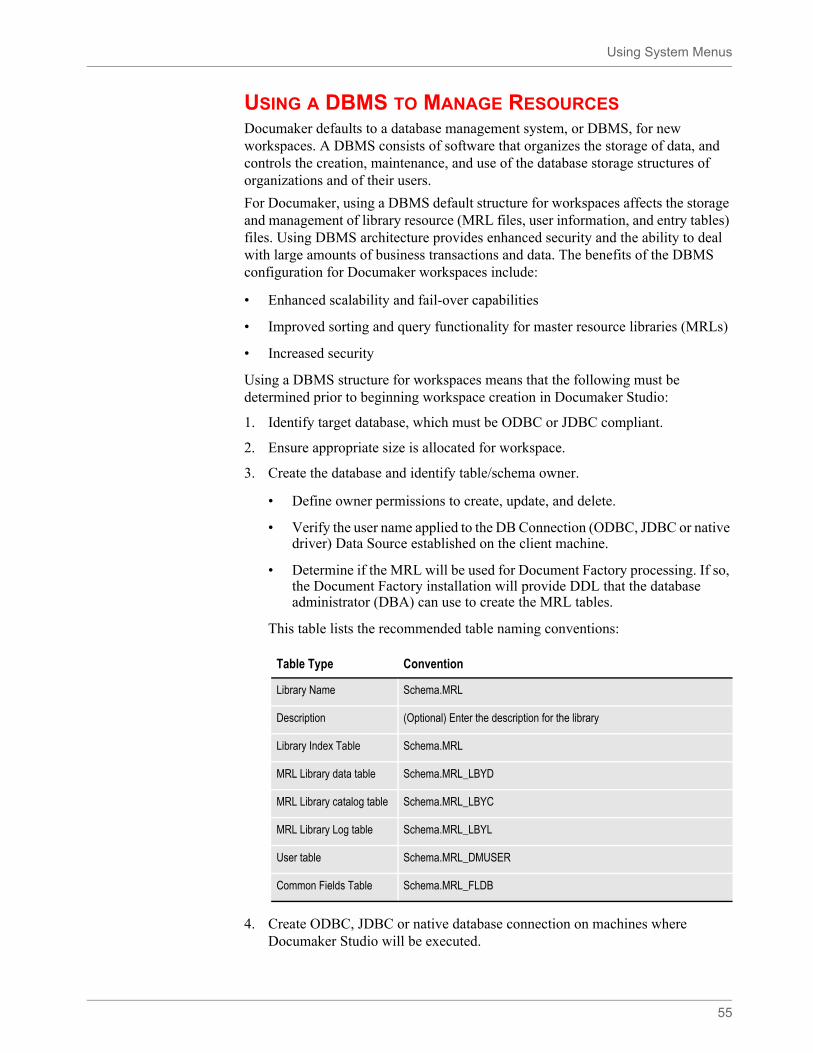
Using System Menus
55
USING A DBMS TO MANAGE RESOURCESDocumaker defaults to a database management system, or DBMS, for new workspaces. A DBMS consists of software that organizes the storage of data, and controls the creation, maintenance, and use of the database storage structures of organizations and of their users.
For Documaker, using a DBMS default structure for workspaces affects the storage and management of library resource (MRL files, user information, and entry tables) files. Using DBMS architecture provides enhanced security and the ability to deal with large amounts of business transactions and data. The benefits of the DBMS configuration for Documaker workspaces include:
• Enhanced scalability and fail-over capabilities
• Improved sorting and query functionality for master resource libraries (MRLs)
• Increased security
Using a DBMS structure for workspaces means that the following must be determined prior to beginning workspace creation in Documaker Studio:
1. Identify target database, which must be ODBC or JDBC compliant.
2. Ensure appropriate size is allocated for workspace.
3. Create the database and identify table/schema owner.
• Define owner permissions to create, update, and delete.
• Verify the user name applied to the DB Connection (ODBC, JDBC or native driver) Data Source established on the client machine.
• Determine if the MRL will be used for Document Factory processing. If so, the Document Factory installation will provide DDL that the database administrator (DBA) can use to create the MRL tables.
This table lists the recommended table naming conventions:
4. Create ODBC, JDBC or native database connection on machines where Documaker Studio will be executed.
Table Type Convention
Library Name Schema.MRL
Description (Optional) Enter the description for the library
Library Index Table Schema.MRL
MRL Library data table Schema.MRL_LBYD
MRL Library catalog table Schema.MRL_LBYC
MRL Library Log table Schema.MRL_LBYL
User table Schema.MRL_DMUSER
Common Fields Table Schema.MRL_FLDB
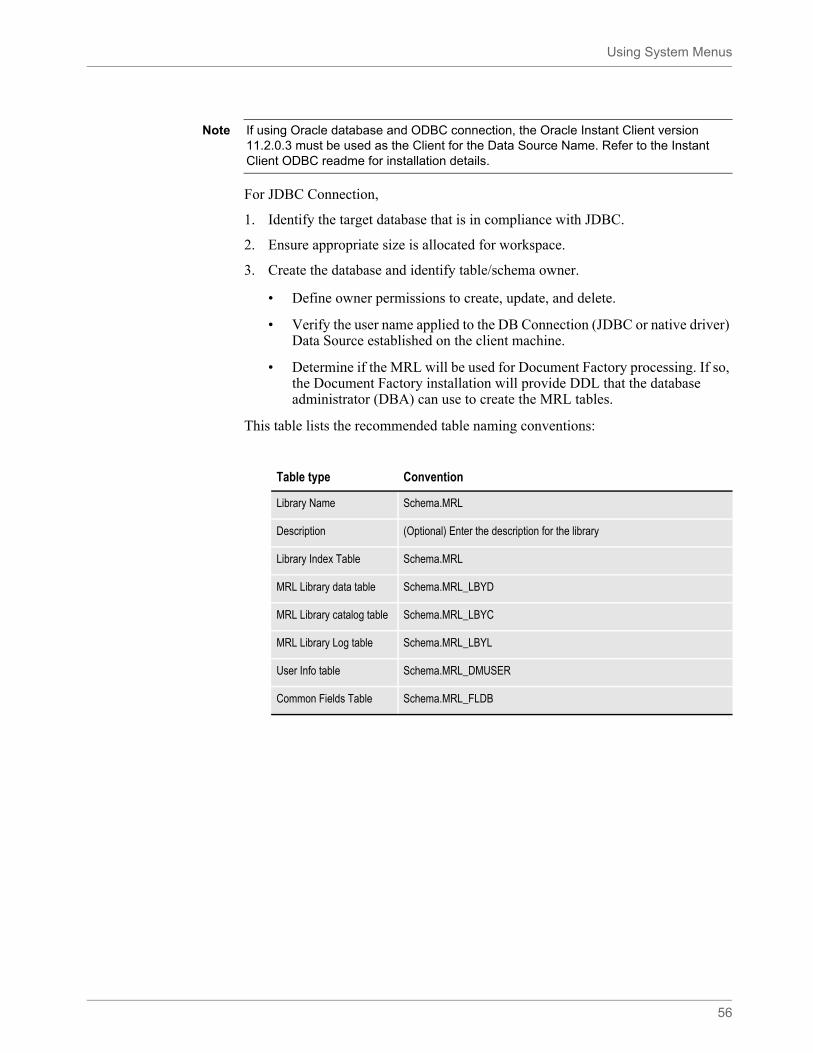
Using System Menus
56
For JDBC Connection,
1. Identify the target database that is in compliance with JDBC.
2. Ensure appropriate size is allocated for workspace.
3. Create the database and identify table/schema owner.
• Define owner permissions to create, update, and delete.
• Verify the user name applied to the DB Connection (JDBC or native driver) Data Source established on the client machine.
• Determine if the MRL will be used for Document Factory processing. If so, the Document Factory installation will provide DDL that the database administrator (DBA) can use to create the MRL tables.
This table lists the recommended table naming conventions:
Note If using Oracle database and ODBC connection, the Oracle Instant Client version 11.2.0.3 must be used as the Client for the Data Source Name. Refer to the Instant Client ODBC readme for installation details.
Table type Convention
Library Name Schema.MRL
Description (Optional) Enter the description for the library
Library Index Table Schema.MRL
MRL Library data table Schema.MRL_LBYD
MRL Library catalog table Schema.MRL_LBYC
MRL Library Log table Schema.MRL_LBYL
User Info table Schema.MRL_DMUSER
Common Fields Table Schema.MRL_FLDB
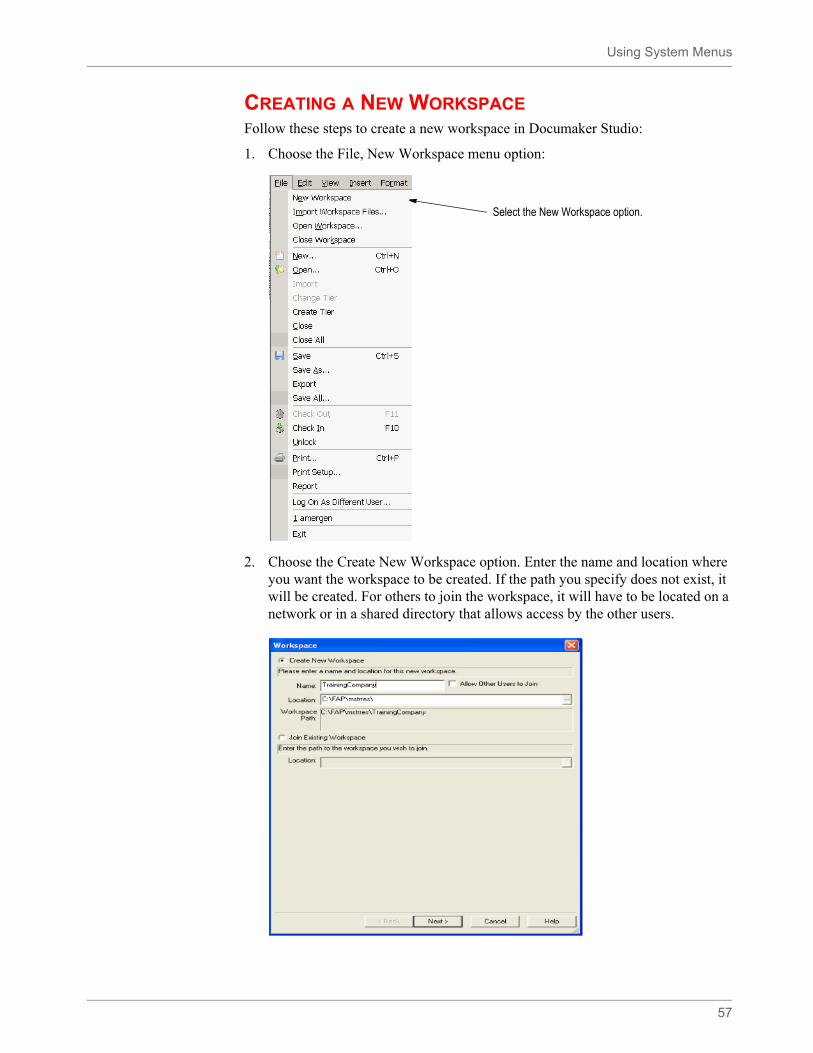
Using System Menus
57
CREATING A NEW WORKSPACEFollow these steps to create a new workspace in Documaker Studio:
1. Choose the File, New Workspace menu option:
2. Choose the Create New Workspace option. Enter the name and location where you want the workspace to be created. If the path you specify does not exist, it will be created. For others to join the workspace, it will have to be located on a network or in a shared directory that allows access by the other users.
Select the New Workspace option.
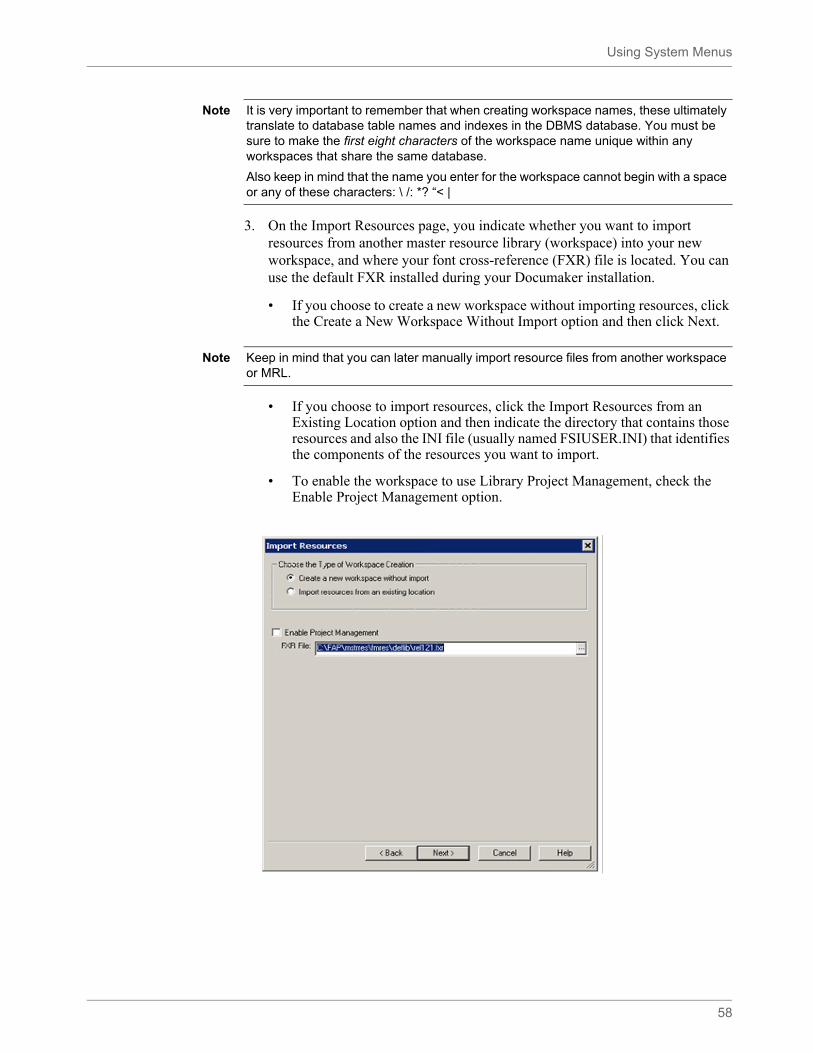
Using System Menus
58
3. On the Import Resources page, you indicate whether you want to import resources from another master resource library (workspace) into your new workspace, and where your font cross-reference (FXR) file is located. You can use the default FXR installed during your Documaker installation.
• If you choose to create a new workspace without importing resources, click the Create a New Workspace Without Import option and then click Next.
• If you choose to import resources, click the Import Resources from an Existing Location option and then indicate the directory that contains those resources and also the INI file (usually named FSIUSER.INI) that identifies the components of the resources you want to import.
• To enable the workspace to use Library Project Management, check the Enable Project Management option.
Note It is very important to remember that when creating workspace names, these ultimately translate to database table names and indexes in the DBMS database. You must be sure to make the first eight characters of the workspace name unique within any workspaces that share the same database.
Also keep in mind that the name you enter for the workspace cannot begin with a space or any of these characters: \ /: *? “< |
Note Keep in mind that you can later manually import resource files from another workspace or MRL.
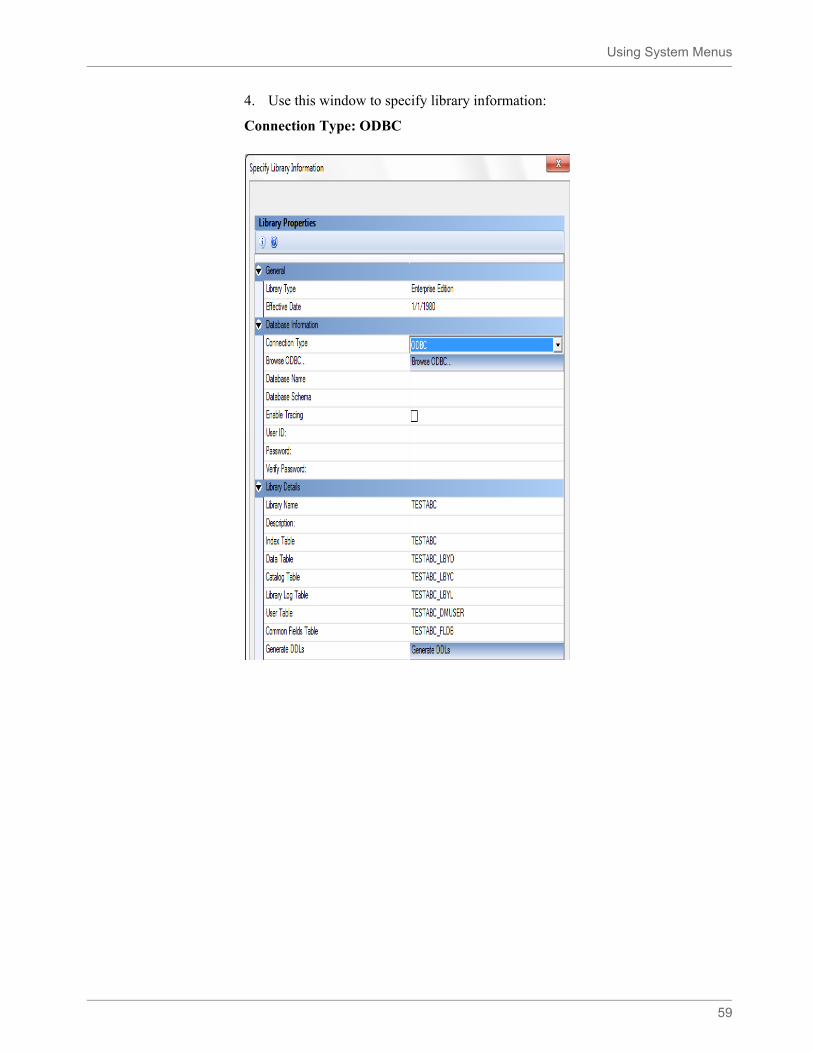
Using System Menus
59
4. Use this window to specify library information:
Connection Type: ODBC
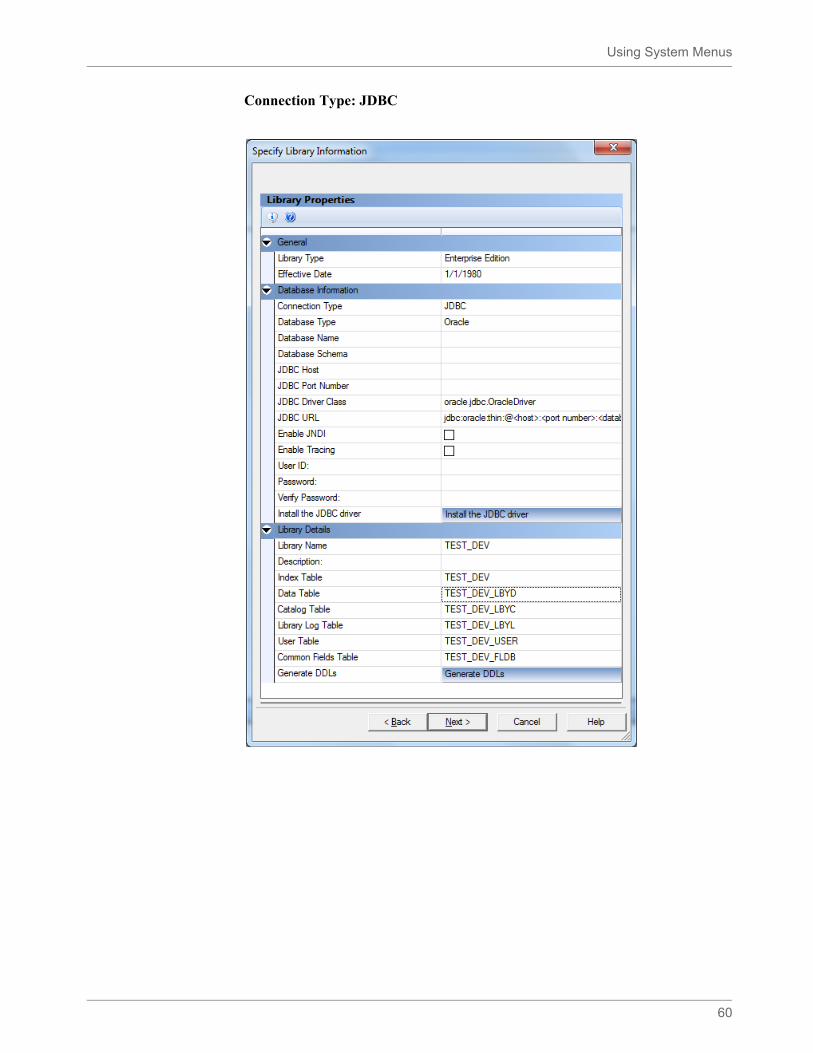
Using System Menus
60
Connection Type: JDBC
Using System Menus
61
The following table describes the library information:
Option Description
Library type Use the Library Type field to specify the library structure type for the resources. Using this field, you can select either Standard Edition or Enterprise Edition.
Selecting Standard Edition creates an ODSE (Oracle Documaker Standard Edition) structured library whereas selecting Enterprise Edition creates an ODEE (Oracle Documaker Enterprise Edition) structured library.
Based on your selection, Studio will create the appropriate table structures and other settings that differ between these two configurations. This will include creation or modification of the appropriate DFD files and ensuring that the DDL created or executed generates the proper structures.
Studio sets the default library type to Enterprise Edition for functions that create libraries such as creating a new workspace. Keep this option if you are using Enterprise Edition or plan to promote this library to an Enterprise Edition implementation.
Effective Date Use the Effective Date field to specify the default date for resources that can be imported or created for this new workspace. Remember that transactions are assumed to have a date-of-record — sometimes referred to as the run date, effective date, or policy date. Library management uses this transaction date to locate the proper resource version/revision that was effective on that date.
Note: When creating a new workspace, it is important to set the date on this page back far enough to cover the transaction date range that you expect to process.
Database Information
Connection Type The technology used for connecting to the database. Choices are JDBC (Java Database Connectivity) and ODBC (Open Database Connectivity).
Note: The Default connection type is JDBC.
Browse ODBC Use the Browse ODBC button to select a Data Source name. You are then prompted to enter Oracle ODBC Driver Connect information.
Note: Browse ODBC option is available only if the Connection Type selected is ODBC.
Database Type Select the database type from the dropdown list to open the JDBC connections dialog. You can select from the following available options:• DB2 for Linux, Unix and Windows
• DB2 for z/OS
• Microsoft SQL Server
• Oracle
• Other
Database Name The name of the database that is being connected to.
Note: The Database name field does not display when the Database Type is selected as Other.
Database Schema The name of the Database schema.
JDBC Host The name or the TCP/IP address of the server machine where the database server is running.
JDBC Port Number The port number on the server machine that the database server is listening to for connections.
Using System Menus
62
JDBC Driver Class The Java class name of the JDBC driver being used (for example, oracle.jdbc.OracleDriver). The wizard will provide defaults for supported databases types.
JDBC URL The connection string used by the user's JDBC driver. When the database type is one that is known, the wizard will supply a default URL based on the information provided by the user.
Enable JNDI When this box is checked, the configuration information is stored in a JNDI.bindings file instead of in the INI file. This is not enabled by default.
If checked, specify the JNDI Name and JNDI Context (location of binding file).
JNDI Name The connection name for storing the connection information in the JNDI.bindings file.
JNDI Context The folder where the JNDI.bindings file is located.Clicking on the button in this field opens a dialog that can be used to browse for the folder.
Enable Tracing Check the box to enable tracing. Tracing can help in monitoring and analyzing the Documaker application as it is running against the database.
User ID The Data Source user ID.
Password The Data Source password. The password is updated when you enter the password on the ODBC Driver Connect dialog Password field. The password will display as asterisks (***).
Verify Password The Data Source password again, to verify correct typing in Password entry.The verify password is updated when you enter the password on the ODBC Driver Connect dialog Password field. The verify password will display as asterisks (***).
Install the JDBC Driver Click this option to install the JDBC driver.
Library Name Defaults to the workspace name when creating a new workspace.
Description (Optional) Enter a description of the workspace library.
Library Table Names (Note: If your workspace name begins with a number, the create workspace process will automatically insert an L in front of the Library table names.)
Generate DDLs Generate DDLs opens a separate window with the SQL commands used to create the tables. If your Database Administrator has restricted the creation of tables, highlight the text and press Ctrl+C to copy it to your clipboard. You can then paste the information into an email or a text file to give to your DBA.
Note: You will not be able to proceed past this page if the tables are not created.
Index Table For Standard Edition library types, defaults as your workspace name, plus the suffix qualifier of _DEV.
Data Table For Standard Edition library types, defaults as your workspace name, plus the suffix qualifier of _DEV_LBYD.
Catalog Table For Standard Edition library types, defaults as your workspace name, plus the suffix qualifier of _DEV_LBYC.
Library Log Table For Standard Edition library types, defaults as your workspace name, plus the suffix qualifier of _DEV_LBYL.
Option Description
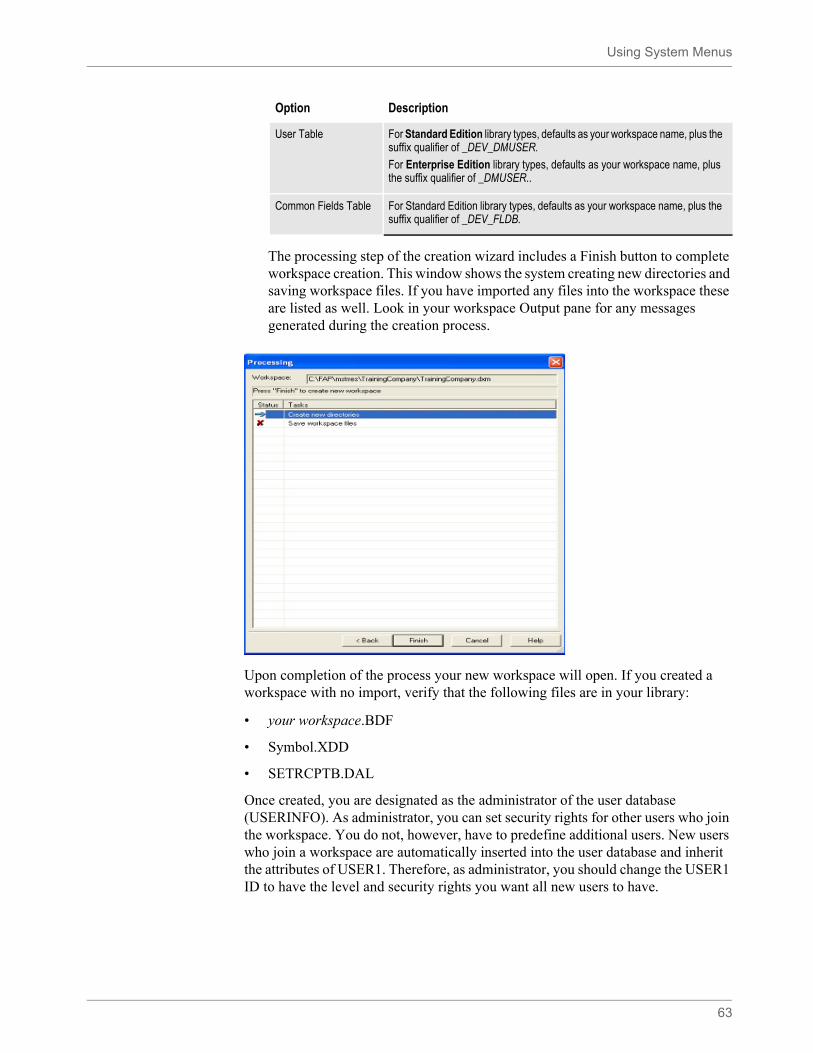
Using System Menus
63
The processing step of the creation wizard includes a Finish button to complete workspace creation. This window shows the system creating new directories and saving workspace files. If you have imported any files into the workspace these are listed as well. Look in your workspace Output pane for any messages generated during the creation process.
Upon completion of the process your new workspace will open. If you created a workspace with no import, verify that the following files are in your library:
• your workspace.BDF
• Symbol.XDD
• SETRCPTB.DAL
Once created, you are designated as the administrator of the user database (USERINFO). As administrator, you can set security rights for other users who join the workspace. You do not, however, have to predefine additional users. New users who join a workspace are automatically inserted into the user database and inherit the attributes of USER1. Therefore, as administrator, you should change the USER1 ID to have the level and security rights you want all new users to have.
User Table For Standard Edition library types, defaults as your workspace name, plus the suffix qualifier of _DEV_DMUSER.
For Enterprise Edition library types, defaults as your workspace name, plus the suffix qualifier of _DMUSER..
Common Fields Table For Standard Edition library types, defaults as your workspace name, plus the suffix qualifier of _DEV_FLDB.
Option Description

Using System Menus
64
Canceling Workspace Creation
To cancel the workspace creation process, click the Cancel button located in the lower right corner of any of the workspace dialogs (Workspace, Import Resources, Specify Library Information, Processing, etc.).
Workspace cancellation may not remove the workspace directory, subdirectories or files which are created as part of the workspace creation process. You may have to manually delete these directories and files.
Import an Existing MRL into a New DBMS Workspace
You may have an existing Documaker Studio workspace that uses an xBase (non-DBMS) library structure or another DBMS MRL that you want to import into a new workspace. These can be used in the DBMS format by creating a new workspace in Documaker Studio.
First, configure a DBMS that can be used by the new workspace. Please see Creating a New Workspace on page 57 for information on building the database tables for Documaker.
Next, create a new workspace in Documaker Studio. Follow these steps to create a new workspace in Documaker Studio:
1. Choose the File, New Workspace menu option:
2. Choose the Create New Workspace option. Enter the name and location where you want the workspace to be created. If the path you specify does not exist, the subdirectories you specify will be created. For others to join the workspace, it will have to be located on a network or in a shared directory that allows access by the other users.

Using System Menus
65
3. On the Import Resources page, you indicate whether you want to import resources from another master resource library (MRL) into your new workspace. Select Import Resources from an existing location. Specify the location of your existing MRL resources and your path information file (usually the FSIUSER.INI) here:
Note It is very important to remember that when creating workspace names, these ultimately translate to database table names and indexes in the DBMS database. You must be sure to make the first eight characters of the workspace name unique within any workspaces that share the same database.
Also keep in mind that the name you enter for the workspace cannot begin with a space or any of these characters: \ /: *? “< |
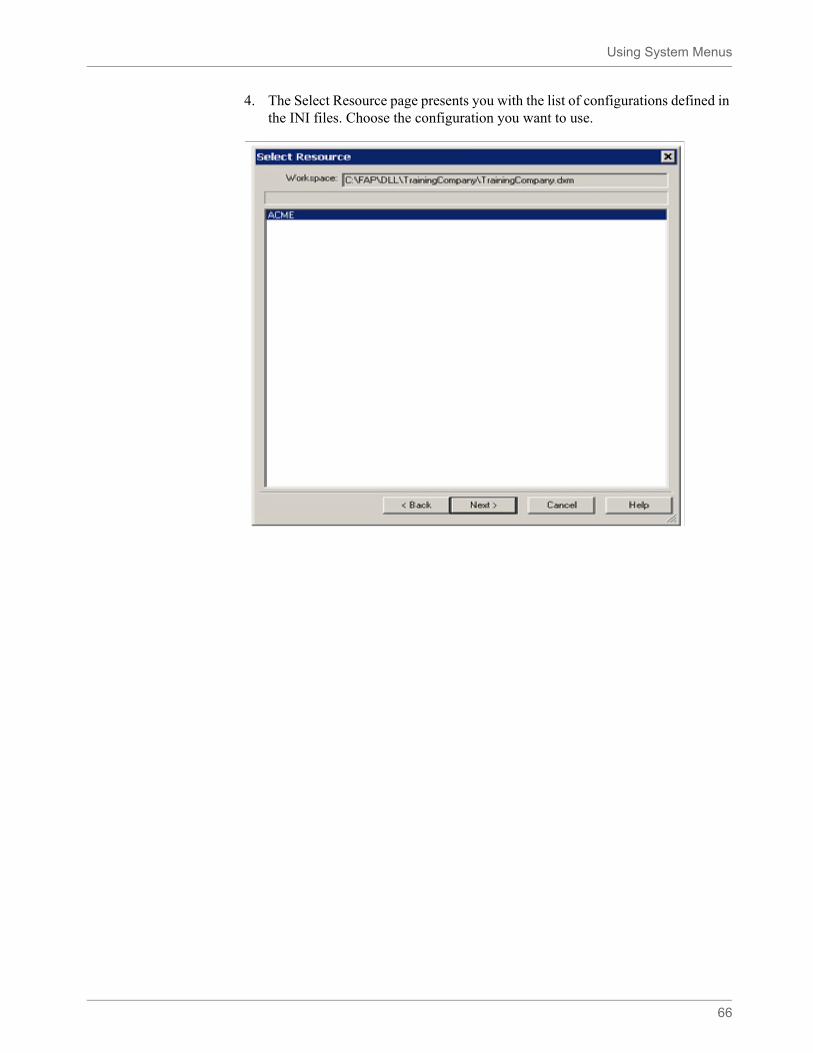
Using System Menus
66
4. The Select Resource page presents you with the list of configurations defined in the INI files. Choose the configuration you want to use.
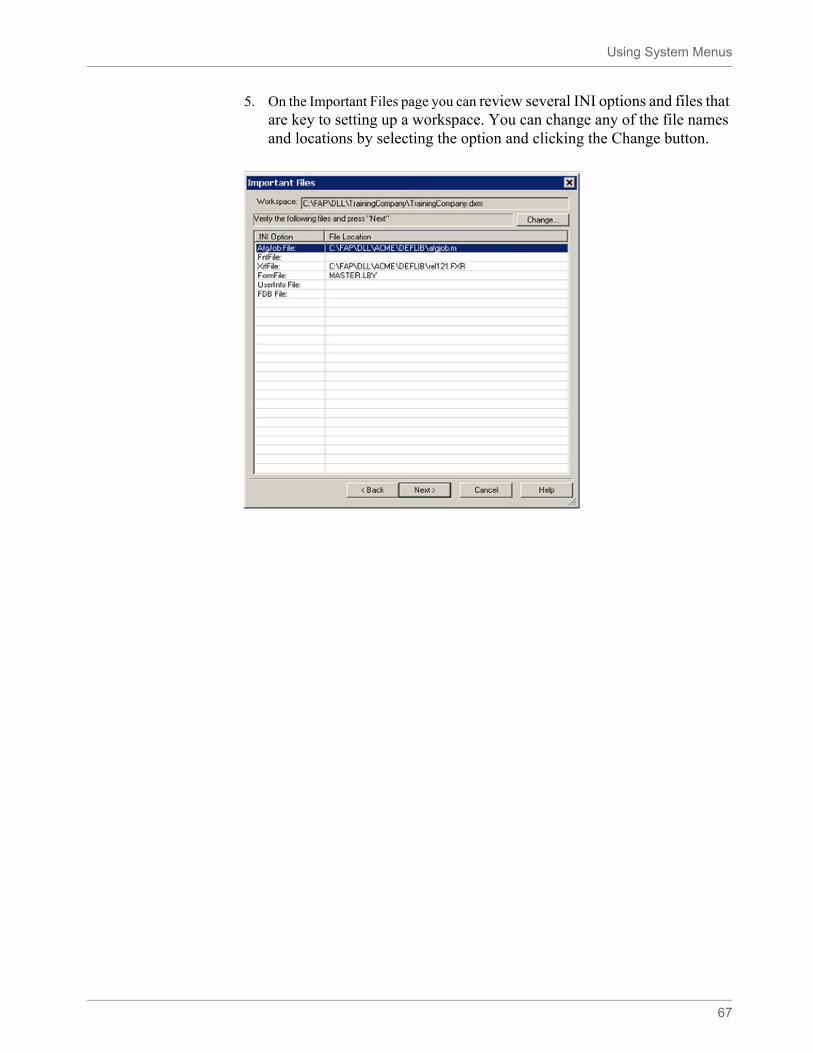
Using System Menus
67
5. On the Important Files page you can review several INI options and files that are key to setting up a workspace. You can change any of the file names and locations by selecting the option and clicking the Change button.
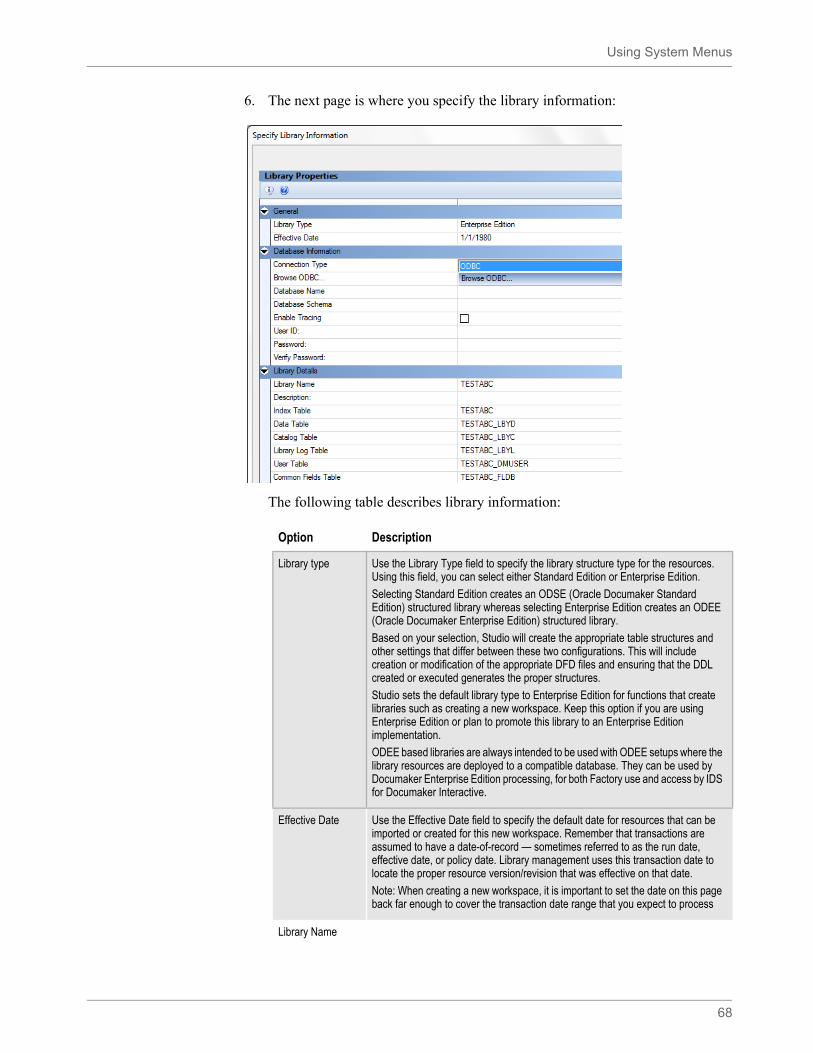
Using System Menus
68
6. The next page is where you specify the library information:
The following table describes library information:
Option Description
Library type Use the Library Type field to specify the library structure type for the resources. Using this field, you can select either Standard Edition or Enterprise Edition.
Selecting Standard Edition creates an ODSE (Oracle Documaker Standard Edition) structured library whereas selecting Enterprise Edition creates an ODEE (Oracle Documaker Enterprise Edition) structured library.
Based on your selection, Studio will create the appropriate table structures and other settings that differ between these two configurations. This will include creation or modification of the appropriate DFD files and ensuring that the DDL created or executed generates the proper structures.
Studio sets the default library type to Enterprise Edition for functions that create libraries such as creating a new workspace. Keep this option if you are using Enterprise Edition or plan to promote this library to an Enterprise Edition implementation.
ODEE based libraries are always intended to be used with ODEE setups where the library resources are deployed to a compatible database. They can be used by Documaker Enterprise Edition processing, for both Factory use and access by IDS for Documaker Interactive.
Effective Date Use the Effective Date field to specify the default date for resources that can be imported or created for this new workspace. Remember that transactions are assumed to have a date-of-record — sometimes referred to as the run date, effective date, or policy date. Library management uses this transaction date to locate the proper resource version/revision that was effective on that date.
Note: When creating a new workspace, it is important to set the date on this page back far enough to cover the transaction date range that you expect to process
Library Name
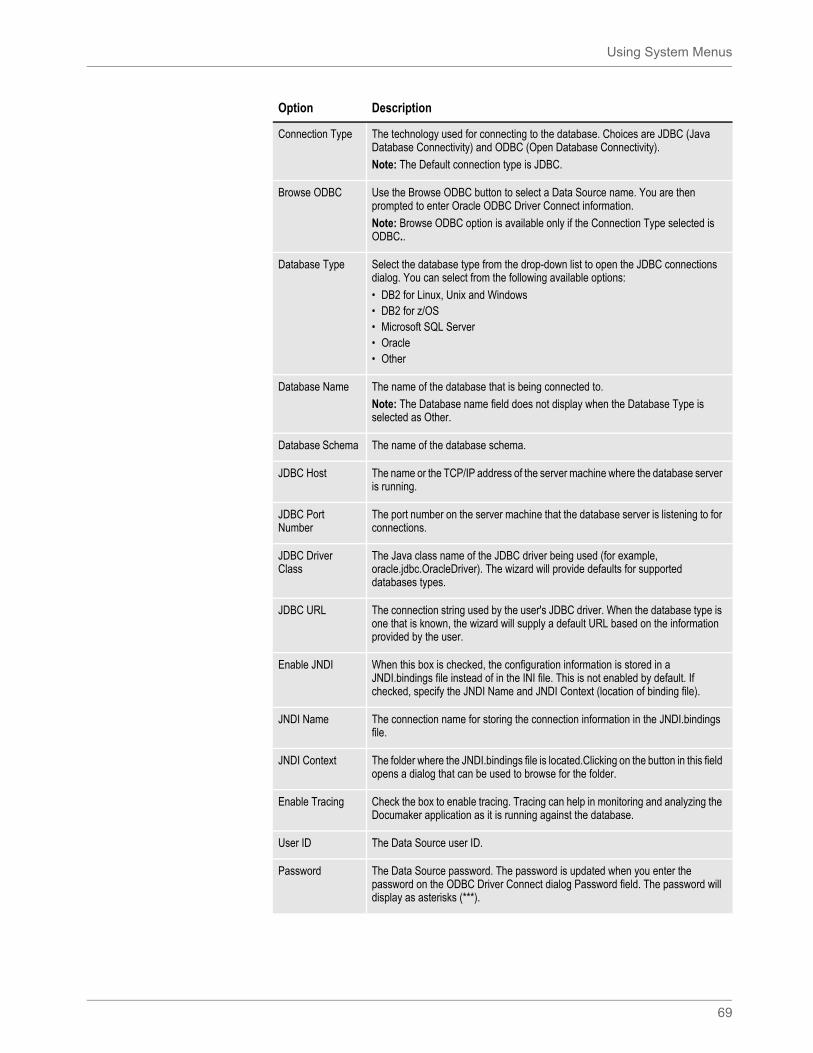
Using System Menus
69
Connection Type The technology used for connecting to the database. Choices are JDBC (Java Database Connectivity) and ODBC (Open Database Connectivity).
Note: The Default connection type is JDBC.
Browse ODBC Use the Browse ODBC button to select a Data Source name. You are then prompted to enter Oracle ODBC Driver Connect information.
Note: Browse ODBC option is available only if the Connection Type selected is ODBC..
Database Type Select the database type from the drop-down list to open the JDBC connections dialog. You can select from the following available options:
• DB2 for Linux, Unix and Windows• DB2 for z/OS• Microsoft SQL Server• Oracle• Other
Database Name The name of the database that is being connected to.
Note: The Database name field does not display when the Database Type is selected as Other.
Database Schema The name of the database schema.
JDBC Host The name or the TCP/IP address of the server machine where the database server is running.
JDBC Port Number
The port number on the server machine that the database server is listening to for connections.
JDBC Driver Class
The Java class name of the JDBC driver being used (for example, oracle.jdbc.OracleDriver). The wizard will provide defaults for supported databases types.
JDBC URL The connection string used by the user's JDBC driver. When the database type is one that is known, the wizard will supply a default URL based on the information provided by the user.
Enable JNDI When this box is checked, the configuration information is stored in a JNDI.bindings file instead of in the INI file. This is not enabled by default. If checked, specify the JNDI Name and JNDI Context (location of binding file).
JNDI Name The connection name for storing the connection information in the JNDI.bindings file.
JNDI Context The folder where the JNDI.bindings file is located.Clicking on the button in this field opens a dialog that can be used to browse for the folder.
Enable Tracing Check the box to enable tracing. Tracing can help in monitoring and analyzing the Documaker application as it is running against the database.
User ID The Data Source user ID.
Password The Data Source password. The password is updated when you enter the password on the ODBC Driver Connect dialog Password field. The password will display as asterisks (***).
Option Description
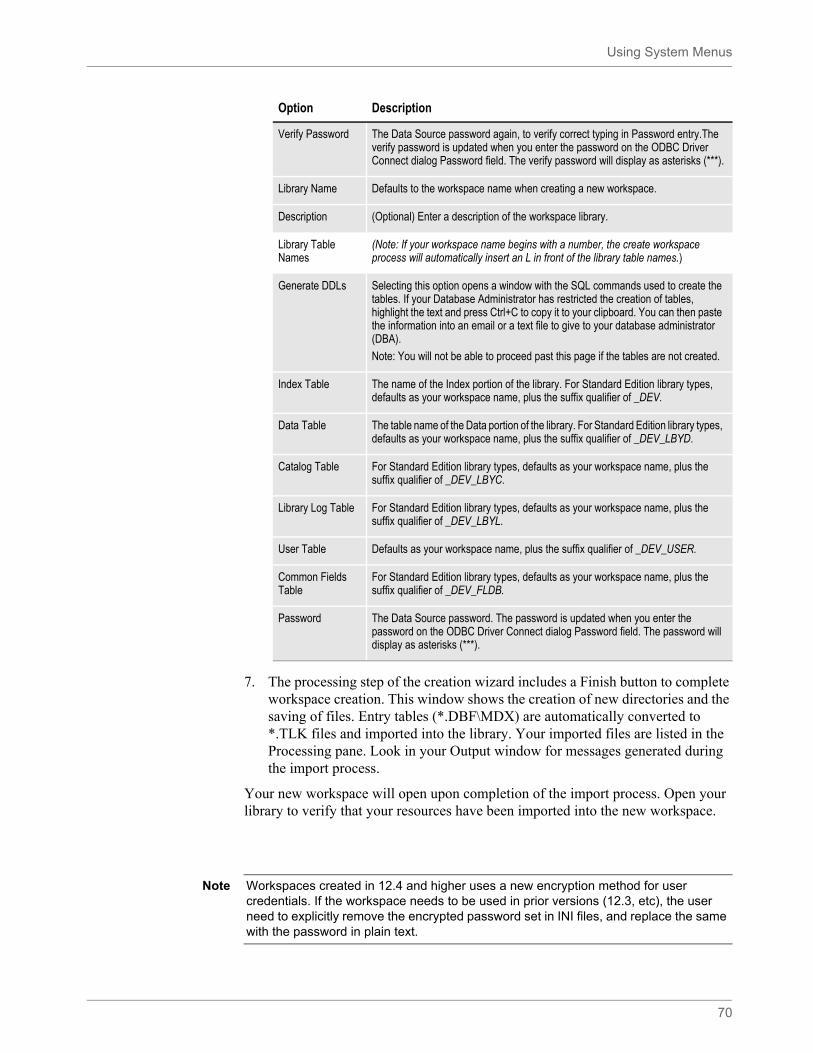
Using System Menus
70
7. The processing step of the creation wizard includes a Finish button to complete workspace creation. This window shows the creation of new directories and the saving of files. Entry tables (*.DBF\MDX) are automatically converted to *.TLK files and imported into the library. Your imported files are listed in the Processing pane. Look in your Output window for messages generated during the import process.
Your new workspace will open upon completion of the import process. Open your library to verify that your resources have been imported into the new workspace.
Verify Password The Data Source password again, to verify correct typing in Password entry.The verify password is updated when you enter the password on the ODBC Driver Connect dialog Password field. The verify password will display as asterisks (***).
Library Name Defaults to the workspace name when creating a new workspace.
Description (Optional) Enter a description of the workspace library.
Library Table Names
(Note: If your workspace name begins with a number, the create workspace process will automatically insert an L in front of the library table names.)
Generate DDLs Selecting this option opens a window with the SQL commands used to create the tables. If your Database Administrator has restricted the creation of tables, highlight the text and press Ctrl+C to copy it to your clipboard. You can then paste the information into an email or a text file to give to your database administrator (DBA).
Note: You will not be able to proceed past this page if the tables are not created.
Index Table The name of the Index portion of the library. For Standard Edition library types, defaults as your workspace name, plus the suffix qualifier of _DEV.
Data Table The table name of the Data portion of the library. For Standard Edition library types, defaults as your workspace name, plus the suffix qualifier of _DEV_LBYD.
Catalog Table For Standard Edition library types, defaults as your workspace name, plus the suffix qualifier of _DEV_LBYC.
Library Log Table For Standard Edition library types, defaults as your workspace name, plus the suffix qualifier of _DEV_LBYL.
User Table Defaults as your workspace name, plus the suffix qualifier of _DEV_USER.
Common Fields Table
For Standard Edition library types, defaults as your workspace name, plus the suffix qualifier of _DEV_FLDB.
Password The Data Source password. The password is updated when you enter the password on the ODBC Driver Connect dialog Password field. The password will display as asterisks (***).
Option Description
Note Workspaces created in 12.4 and higher uses a new encryption method for user credentials. If the workspace needs to be used in prior versions (12.3, etc), the user need to explicitly remove the encrypted password set in INI files, and replace the same with the password in plain text.
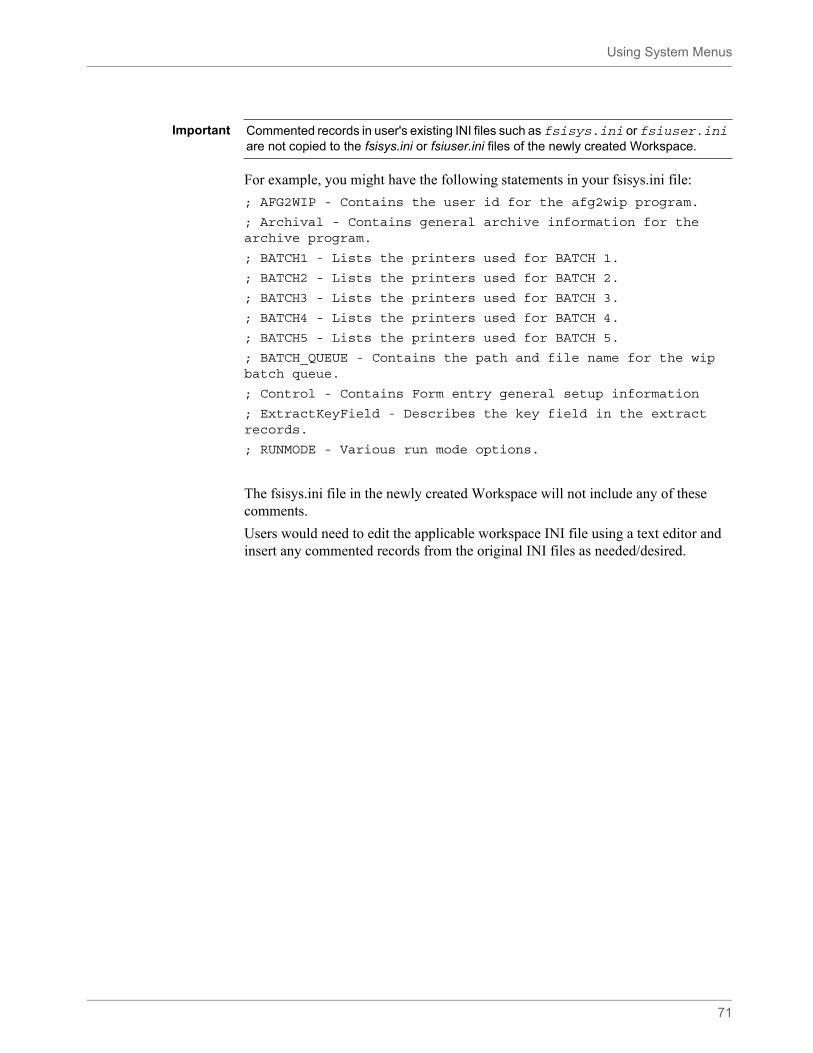
Using System Menus
71
For example, you might have the following statements in your fsisys.ini file:
; AFG2WIP - Contains the user id for the afg2wip program.
; Archival - Contains general archive information for the archive program.
; BATCH1 - Lists the printers used for BATCH 1.
; BATCH2 - Lists the printers used for BATCH 2.
; BATCH3 - Lists the printers used for BATCH 3.
; BATCH4 - Lists the printers used for BATCH 4.
; BATCH5 - Lists the printers used for BATCH 5.
; BATCH_QUEUE - Contains the path and file name for the wip batch queue.
; Control - Contains Form entry general setup information
; ExtractKeyField - Describes the key field in the extract records.
; RUNMODE - Various run mode options.
The fsisys.ini file in the newly created Workspace will not include any of these comments.
Users would need to edit the applicable workspace INI file using a text editor and insert any commented records from the original INI files as needed/desired.
Important Commented records in user's existing INI files such as fsisys.ini or fsiuser.ini are not copied to the fsisys.ini or fsiuser.ini files of the newly created Workspace.
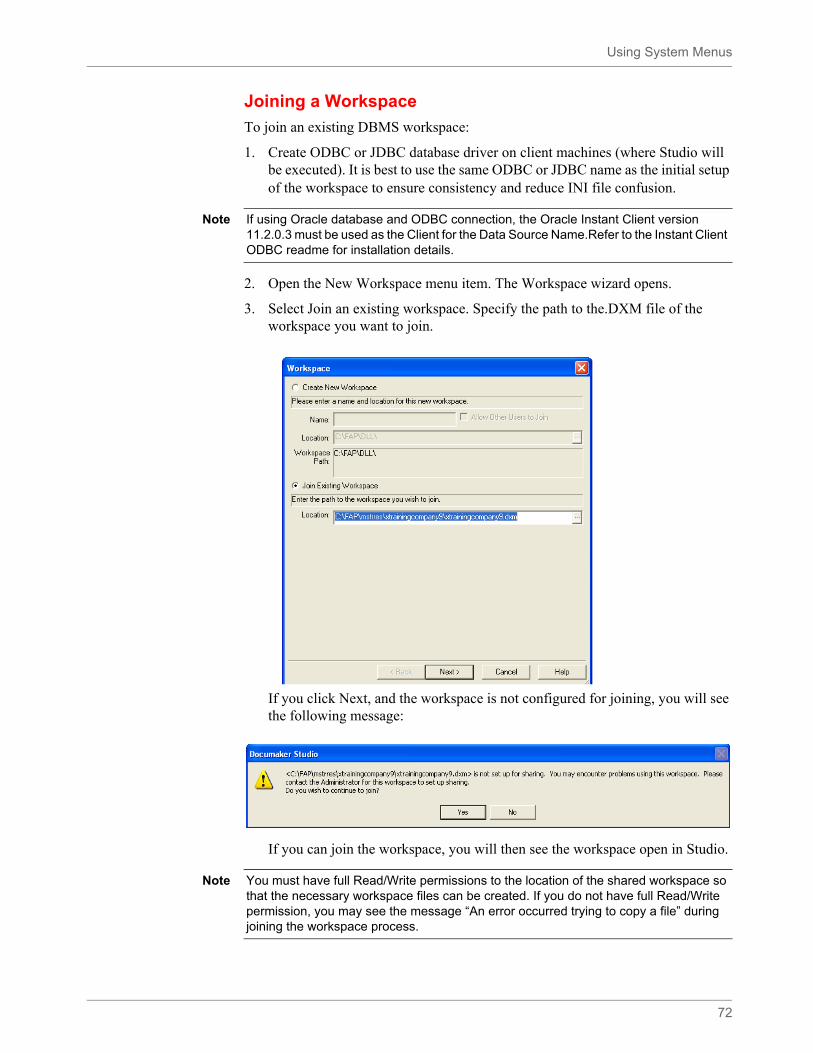
Using System Menus
72
Joining a Workspace
To join an existing DBMS workspace:
1. Create ODBC or JDBC database driver on client machines (where Studio will be executed). It is best to use the same ODBC or JDBC name as the initial setup of the workspace to ensure consistency and reduce INI file confusion.
2. Open the New Workspace menu item. The Workspace wizard opens.
3. Select Join an existing workspace. Specify the path to the.DXM file of the workspace you want to join.
If you click Next, and the workspace is not configured for joining, you will see the following message:
If you can join the workspace, you will then see the workspace open in Studio.
Note If using Oracle database and ODBC connection, the Oracle Instant Client version 11.2.0.3 must be used as the Client for the Data Source Name.Refer to the Instant Client ODBC readme for installation details.
Note You must have full Read/Write permissions to the location of the shared workspace so that the necessary workspace files can be created. If you do not have full Read/Write permission, you may see the message “An error occurred trying to copy a file” during joining the workspace process.
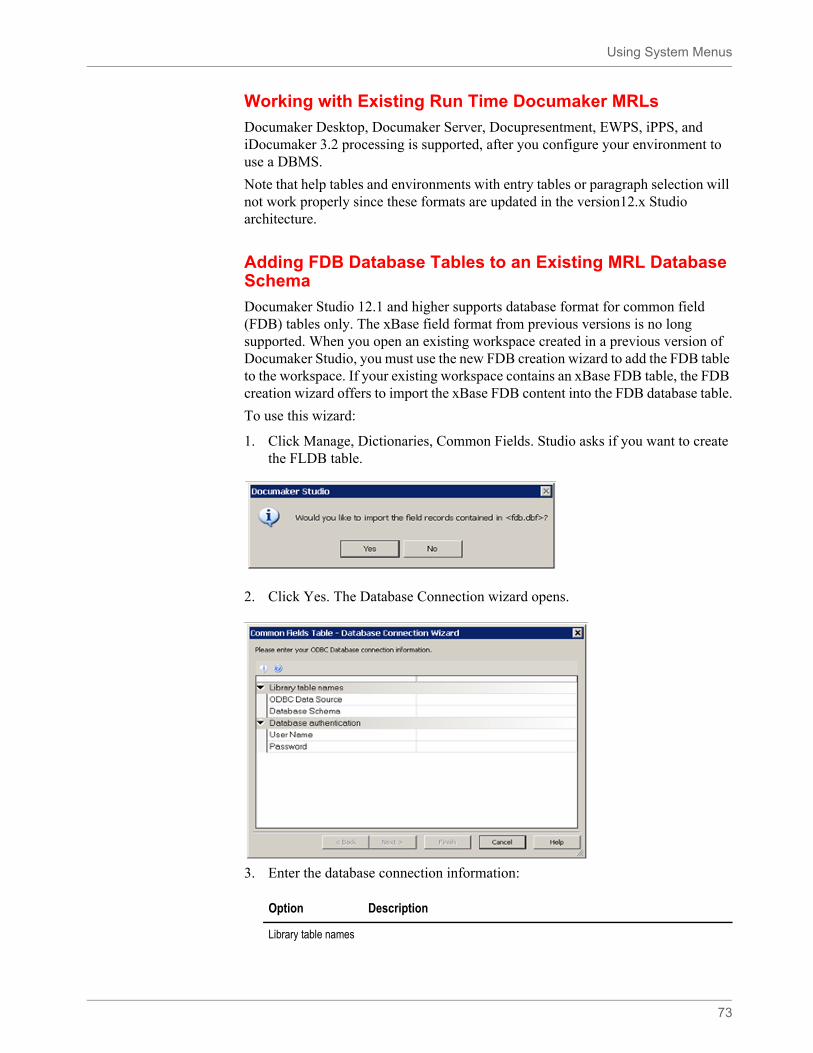
Using System Menus
73
Working with Existing Run Time Documaker MRLs
Documaker Desktop, Documaker Server, Docupresentment, EWPS, iPPS, and iDocumaker 3.2 processing is supported, after you configure your environment to use a DBMS.
Note that help tables and environments with entry tables or paragraph selection will not work properly since these formats are updated in the version12.x Studio architecture.
Adding FDB Database Tables to an Existing MRL Database Schema
Documaker Studio 12.1 and higher supports database format for common field (FDB) tables only. The xBase field format from previous versions is no long supported. When you open an existing workspace created in a previous version of Documaker Studio, you must use the new FDB creation wizard to add the FDB table to the workspace. If your existing workspace contains an xBase FDB table, the FDB creation wizard offers to import the xBase FDB content into the FDB database table.
To use this wizard:
1. Click Manage, Dictionaries, Common Fields. Studio asks if you want to create the FLDB table.
2. Click Yes. The Database Connection wizard opens.
3. Enter the database connection information:
Option Description
Library table names
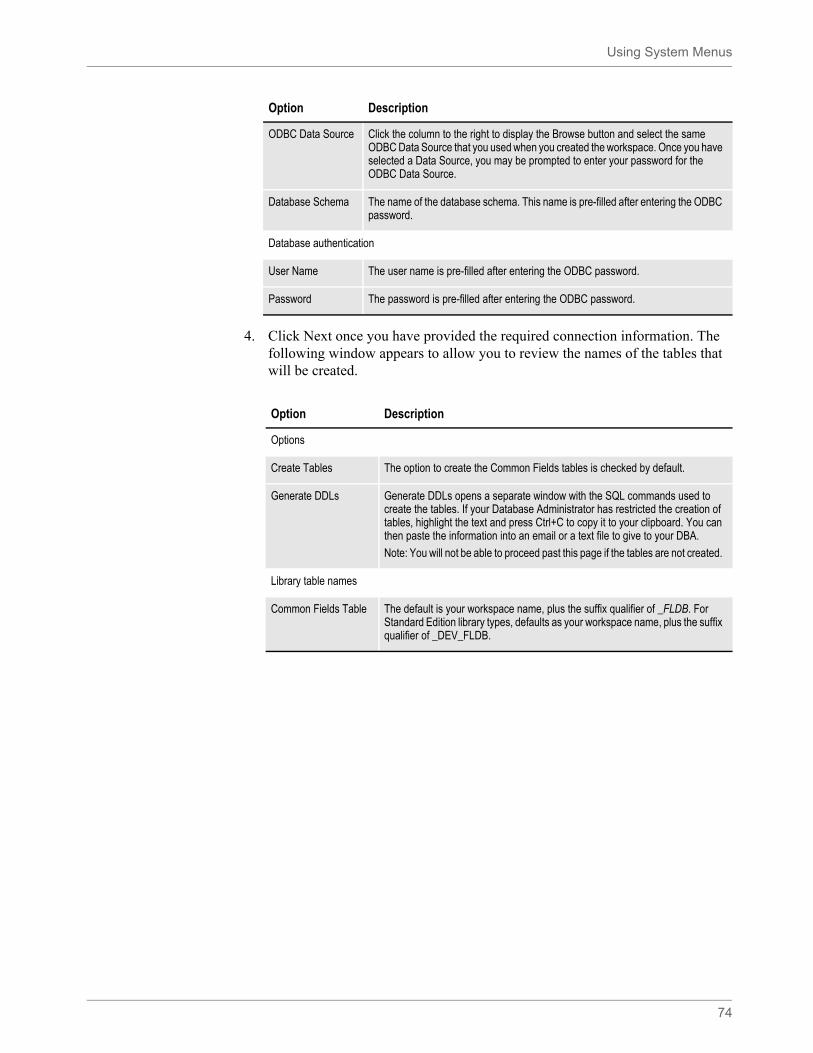
Using System Menus
74
4. Click Next once you have provided the required connection information. The following window appears to allow you to review the names of the tables that will be created.
ODBC Data Source Click the column to the right to display the Browse button and select the same ODBC Data Source that you used when you created the workspace. Once you have selected a Data Source, you may be prompted to enter your password for the ODBC Data Source.
Database Schema The name of the database schema. This name is pre-filled after entering the ODBC password.
Database authentication
User Name The user name is pre-filled after entering the ODBC password.
Password The password is pre-filled after entering the ODBC password.
Option Description
Options
Create Tables The option to create the Common Fields tables is checked by default.
Generate DDLs Generate DDLs opens a separate window with the SQL commands used to create the tables. If your Database Administrator has restricted the creation of tables, highlight the text and press Ctrl+C to copy it to your clipboard. You can then paste the information into an email or a text file to give to your DBA.
Note: You will not be able to proceed past this page if the tables are not created.
Library table names
Common Fields Table The default is your workspace name, plus the suffix qualifier of _FLDB. For Standard Edition library types, defaults as your workspace name, plus the suffix qualifier of _DEV_FLDB.
Option Description
Using System Menus
75
5. Click Finish to create the table:
• If the workspace has no existing FLDB table then the FLDB database table is created and opens in the Common Fields Dictionary shown in step 6.
• If the workspace currently has an existing xBase FDB file defined in the INI file, a message similar to the one below appears:
Click Yes to import the xBase FLDB content into the FLDB database table. The FDB table Common Fields Dictionary shown in step 6 opens.
6. The new table opens in the Common Fields Dictionary. The output area lists the number of records that were imported into the FDLB table.
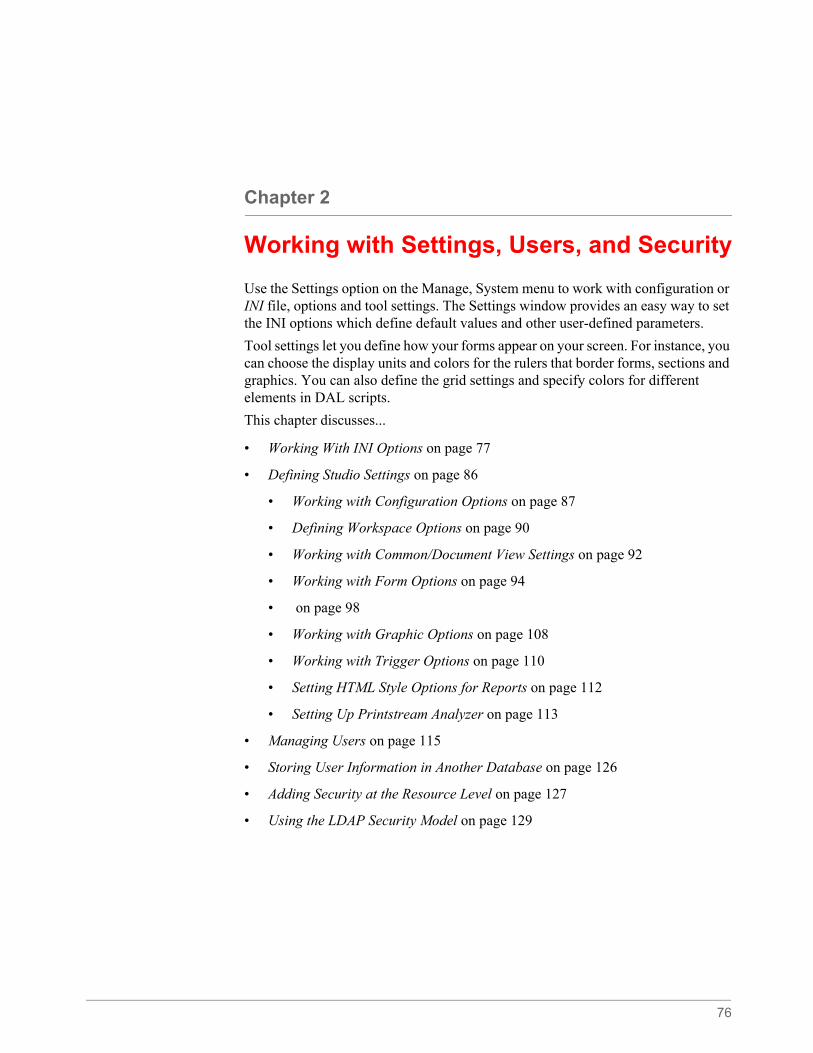
76
Chapter 2
Working with Settings, Users, and Security
Use the Settings option on the Manage, System menu to work with configuration or INI file, options and tool settings. The Settings window provides an easy way to set the INI options which define default values and other user-defined parameters.
Tool settings let you define how your forms appear on your screen. For instance, you can choose the display units and colors for the rulers that border forms, sections and graphics. You can also define the grid settings and specify colors for different elements in DAL scripts.
This chapter discusses...
• Working With INI Options on page 77
• Defining Studio Settings on page 86
• Working with Configuration Options on page 87
• Defining Workspace Options on page 90
• Working with Common/Document View Settings on page 92
• Working with Form Options on page 94
• on page 98
• Working with Graphic Options on page 108
• Working with Trigger Options on page 110
• Setting HTML Style Options for Reports on page 112
• Setting Up Printstream Analyzer on page 113
• Managing Users on page 115
• Storing User Information in Another Database on page 126
• Adding Security at the Resource Level on page 127
• Using the LDAP Security Model on page 129
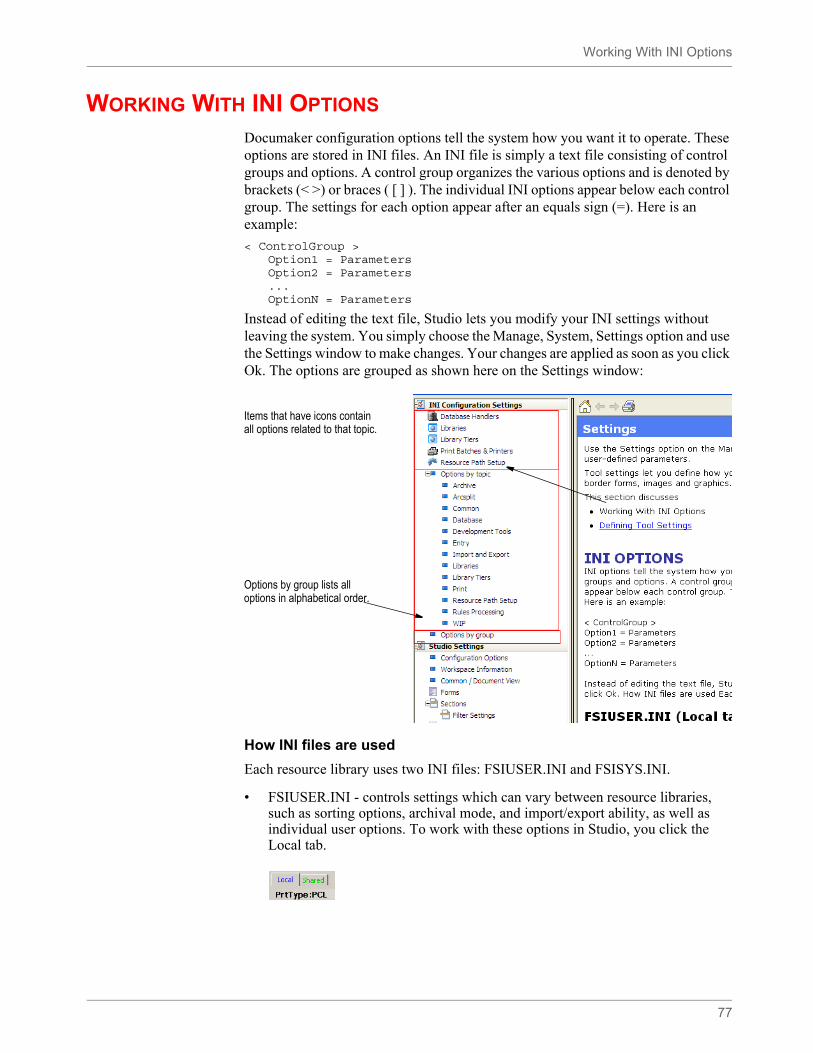
Working With INI Options
77
WORKING WITH INI OPTIONS
Documaker configuration options tell the system how you want it to operate. These options are stored in INI files. An INI file is simply a text file consisting of control groups and options. A control group organizes the various options and is denoted by brackets (< >) or braces ( [ ] ). The individual INI options appear below each control group. The settings for each option appear after an equals sign (=). Here is an example:
< ControlGroup >Option1 = ParametersOption2 = Parameters...OptionN = Parameters
Instead of editing the text file, Studio lets you modify your INI settings without leaving the system. You simply choose the Manage, System, Settings option and use the Settings window to make changes. Your changes are applied as soon as you click Ok. The options are grouped as shown here on the Settings window:
How INI files are used
Each resource library uses two INI files: FSIUSER.INI and FSISYS.INI.
• FSIUSER.INI - controls settings which can vary between resource libraries, such as sorting options, archival mode, and import/export ability, as well as individual user options. To work with these options in Studio, you click the Local tab.
Items that have icons contain all options related to that topic.
Options by group lists all options in alphabetical order.
Working With INI Options
78
• FSISYS.INI - controls information related to the entire system, such as system settings and program function calls. To work with these options in Studio, you click the System tab.
Studio loads the FSIUSER first, then finds the name and location of the FSISYS file from the ENVIRONMENT group, and loads it. Since the FSIUSER is loaded first, the options within this group usually override the FSISYS options.
In a multiple user environment, you may not want to let all users change system-level settings. In some cases, you may not want some users to change individual settings. The system lets you determine which configuration options are available to a specific user. This is done via security definitions which are assigned to these options by the system administrator.
For instance, you can allow a user to change local settings (FSIUSER), but not change the system settings (FSISYS). Or, you could let a user review these settings (local and system), but not change them. For more information, see Managing Users on page 115.
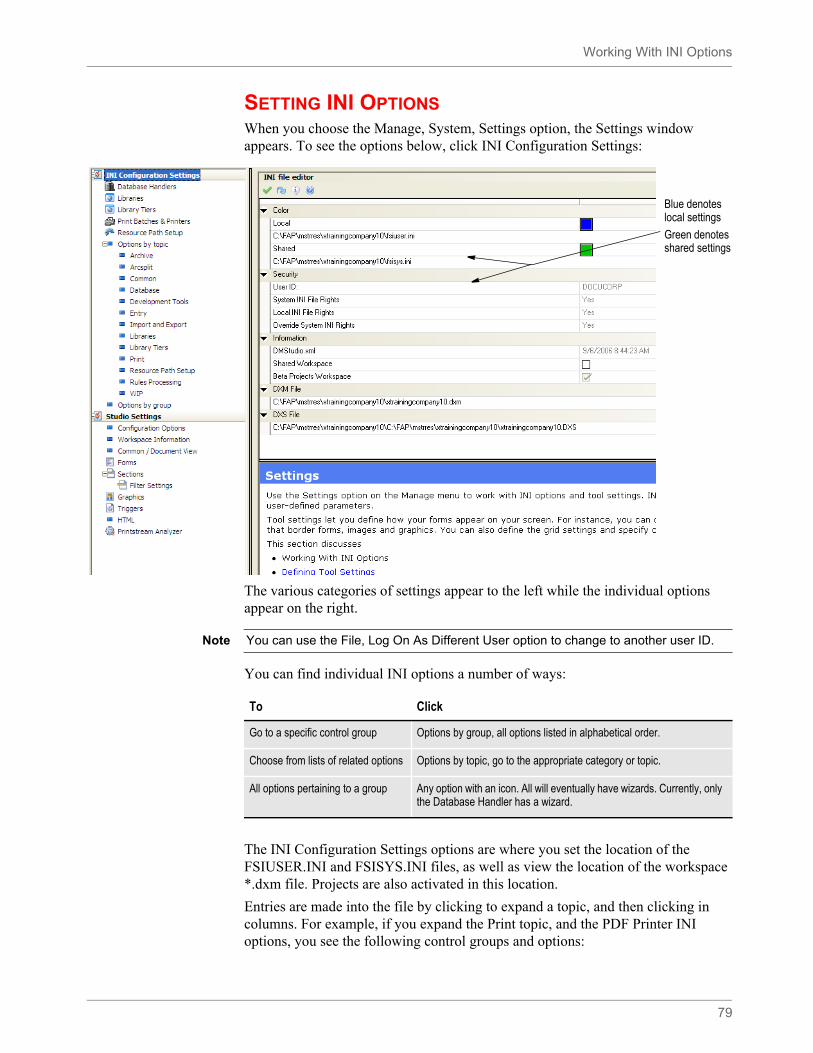
Working With INI Options
79
SETTING INI OPTIONSWhen you choose the Manage, System, Settings option, the Settings window appears. To see the options below, click INI Configuration Settings:
The various categories of settings appear to the left while the individual options appear on the right.
You can find individual INI options a number of ways:
The INI Configuration Settings options are where you set the location of the FSIUSER.INI and FSISYS.INI files, as well as view the location of the workspace *.dxm file. Projects are also activated in this location.
Entries are made into the file by clicking to expand a topic, and then clicking in columns. For example, if you expand the Print topic, and the PDF Printer INI options, you see the following control groups and options:
Blue denotes local settings
Green denotes shared settings
Note You can use the File, Log On As Different User option to change to another user ID.
To Click
Go to a specific control group Options by group, all options listed in alphabetical order.
Choose from lists of related options Options by topic, go to the appropriate category or topic.
All options pertaining to a group Any option with an icon. All will eventually have wizards. Currently, only the Database Handler has a wizard.
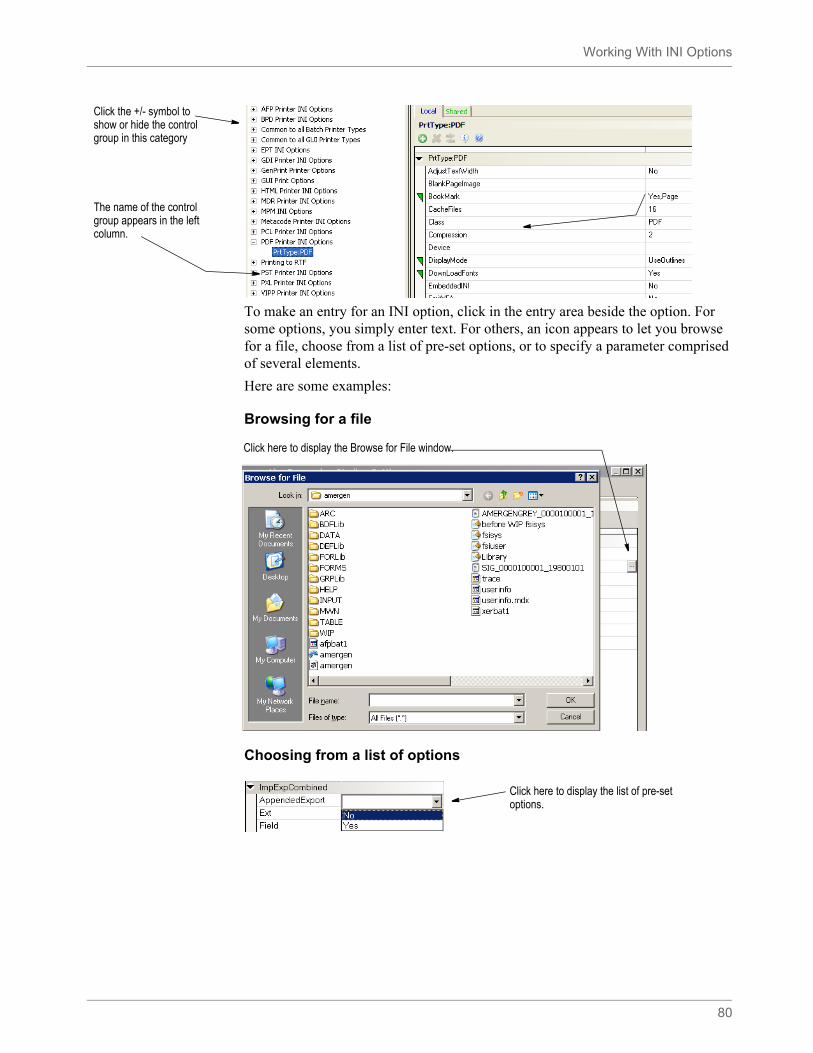
Working With INI Options
80
To make an entry for an INI option, click in the entry area beside the option. For some options, you simply enter text. For others, an icon appears to let you browse for a file, choose from a list of pre-set options, or to specify a parameter comprised of several elements.
Here are some examples:
Browsing for a file
Choosing from a list of options
Click the +/- symbol to show or hide the control group in this category
The name of the control group appears in the left column.
Click here to display the Browse for File window.
Click here to display the list of pre-set options.
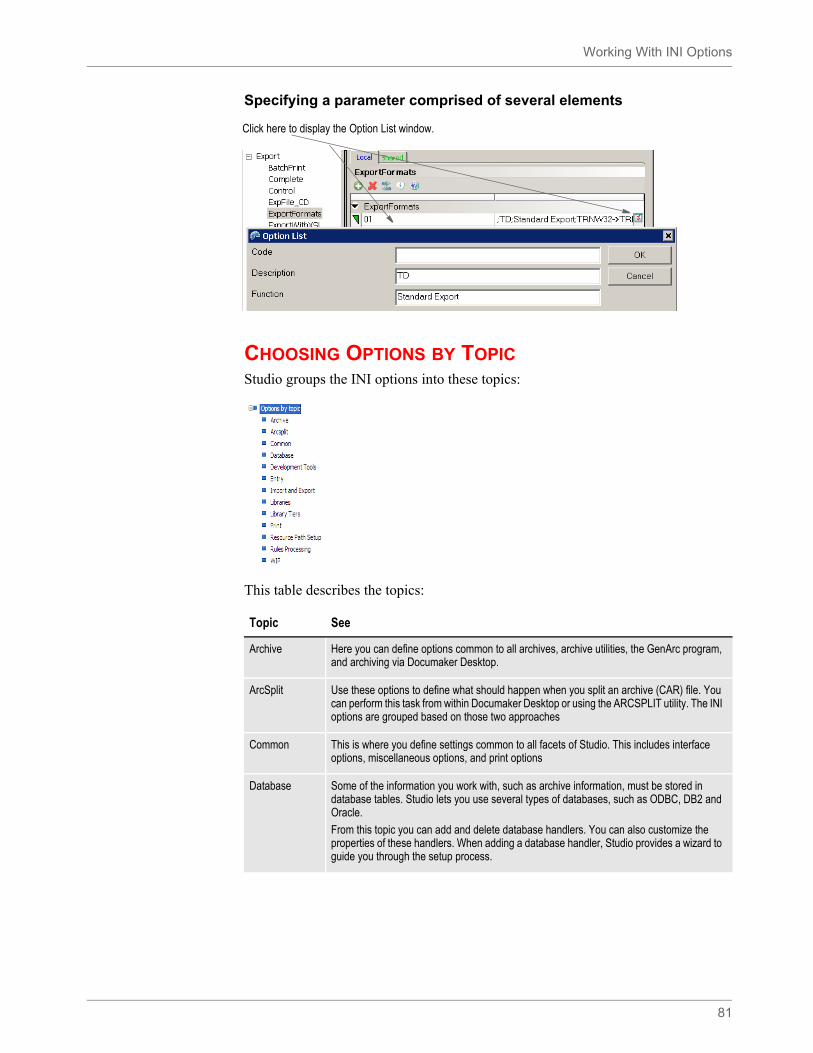
Working With INI Options
81
Specifying a parameter comprised of several elements
CHOOSING OPTIONS BY TOPICStudio groups the INI options into these topics:
This table describes the topics:
Click here to display the Option List window.
Topic See
Archive Here you can define options common to all archives, archive utilities, the GenArc program, and archiving via Documaker Desktop.
ArcSplit Use these options to define what should happen when you split an archive (CAR) file. You can perform this task from within Documaker Desktop or using the ARCSPLIT utility. The INI options are grouped based on those two approaches
Common This is where you define settings common to all facets of Studio. This includes interface options, miscellaneous options, and print options
Database Some of the information you work with, such as archive information, must be stored in database tables. Studio lets you use several types of databases, such as ODBC, DB2 and Oracle.
From this topic you can add and delete database handlers. You can also customize the properties of these handlers. When adding a database handler, Studio provides a wizard to guide you through the setup process.
Working With INI Options
82
For instance, if you choose Resource Path Setup, expand the Configuration category and highlight the Master Resource control group, you see these INI options:
Development Tools
These options let you control how you work with Studio From here you can set how often Studio should automatically save your work or if it should automatically run a spell check when you close an applicable object.
You can also set the default colors for the objects you place on sections, such as boxes and bar codes and set up font family matching.
Entry Use these options to define how the data entry facilities work.
Import and Export
This is where you define how Studio will import and export information.
Libraries Here you set up the library you want to work with. Libraries store the resources you use as you build and process information on form sets. These resources include sections, graphics, and forms. You can also set up modes, statuses, classes, and projects using these options.
Library Tiers The Library Tiers options are part of the project management tools.
Print Click the Print Batches & Printers options to set up the print batches and printer options you will use to publish your forms.
Resource Path Setup
This is where you tell Studio where to find the resources you will work with and it will use to build form sets.
This is also where you set the Locale option. The Locale option, in the Language control group, determines the default units of measure, date format, and so on.
Rules Processing
This is where you define options that affect how rules are processed via the GenData and GenTrn programs.
WIP This is where you define options that affect work-in-progress. This includes options for the GenWIP program and options that affect how WIP is handled via a workstation.
Topic See
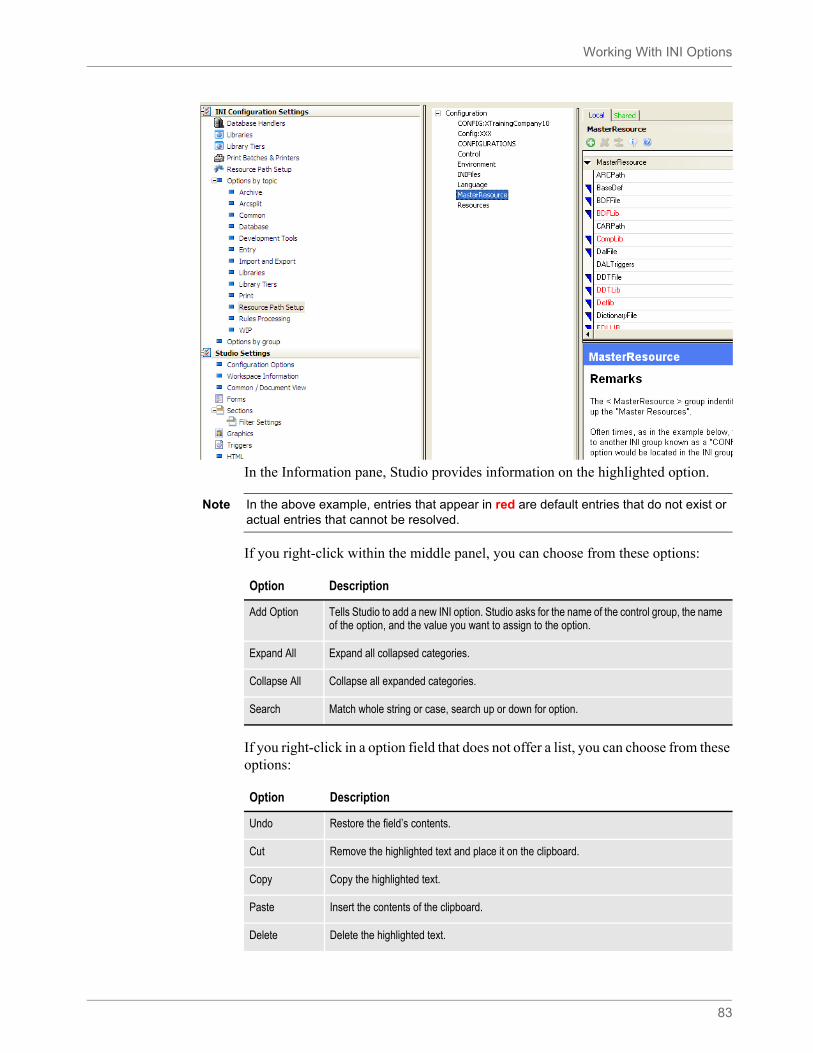
Working With INI Options
83
In the Information pane, Studio provides information on the highlighted option.
If you right-click within the middle panel, you can choose from these options:
If you right-click in a option field that does not offer a list, you can choose from these options:
Note In the above example, entries that appear in red are default entries that do not exist or actual entries that cannot be resolved.
Option Description
Add Option Tells Studio to add a new INI option. Studio asks for the name of the control group, the name of the option, and the value you want to assign to the option.
Expand All Expand all collapsed categories.
Collapse All Collapse all expanded categories.
Search Match whole string or case, search up or down for option.
Option Description
Undo Restore the field’s contents.
Cut Remove the highlighted text and place it on the clipboard.
Copy Copy the highlighted text.
Paste Insert the contents of the clipboard.
Delete Delete the highlighted text.
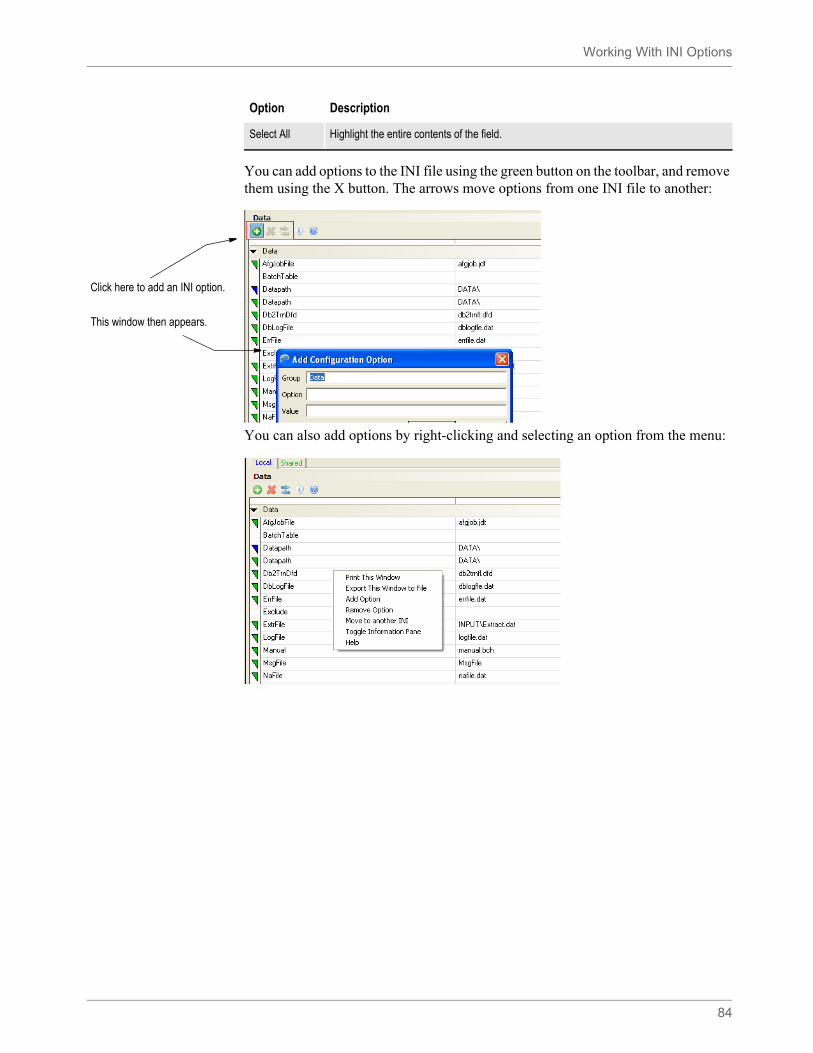
Working With INI Options
84
You can add options to the INI file using the green button on the toolbar, and remove them using the X button. The arrows move options from one INI file to another:
You can also add options by right-clicking and selecting an option from the menu:
Select All Highlight the entire contents of the field.
Option Description
Click here to add an INI option.
This window then appears.
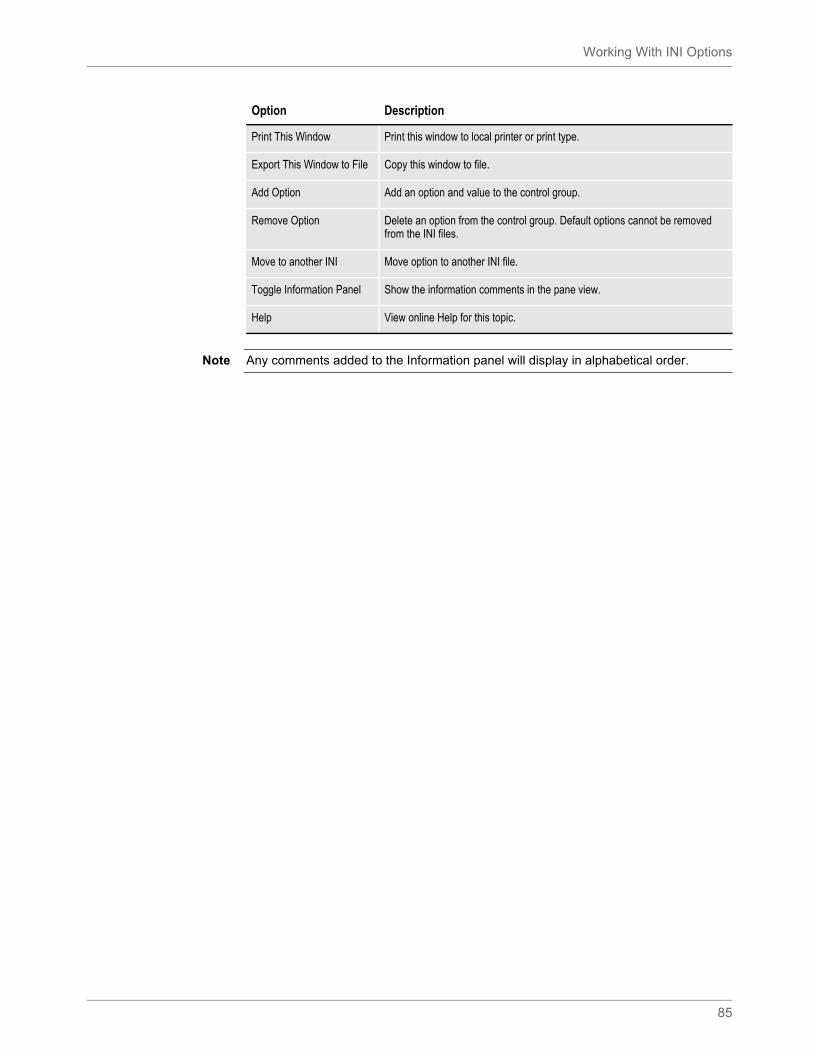
Working With INI Options
85
Option Description
Print This Window Print this window to local printer or print type.
Export This Window to File Copy this window to file.
Add Option Add an option and value to the control group.
Remove Option Delete an option from the control group. Default options cannot be removed from the INI files.
Move to another INI Move option to another INI file.
Toggle Information Panel Show the information comments in the pane view.
Help View online Help for this topic.
Note Any comments added to the Information panel will display in alphabetical order.
Defining Studio Settings
86
DEFINING STUDIO SETTINGS
Defining Studio settings is often one of the first tasks you will do. These settings affect how all documents appear on your screen. You can define Studio settings by choosing the Manage, System, Settings option from the main menu. Then click Studio Settings.
From Studio Settings you can also work with options that control the following:
To See
Set Studio configuration options Working with Configuration Options on page 87
Define workspace options Defining Workspace Options on page 90
Set common and document viewing options
Working with Common/Document View Settings on page 92
Work with form options Working with Form Options on page 94
Work with section options on page 98
Filter Settings Setting Section Filter Options on page 106
Work with graphic options Working with Graphic Options on page 108
Work with trigger options Working with Trigger Options on page 110
Set report style options Setting HTML Style Options for Reports on page 112
Set Printstream Analyzer options Setting Up Printstream Analyzer on page 113
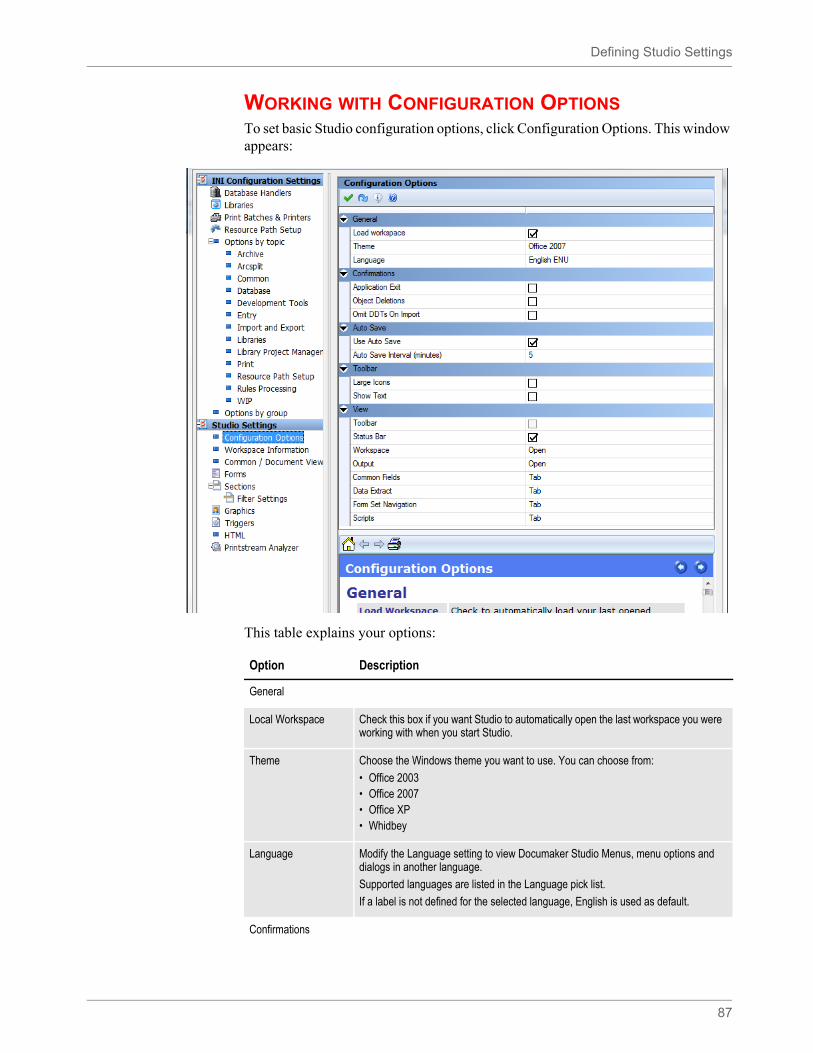
Defining Studio Settings
87
WORKING WITH CONFIGURATION OPTIONSTo set basic Studio configuration options, click Configuration Options. This window appears:
This table explains your options:
Option Description
General
Local Workspace Check this box if you want Studio to automatically open the last workspace you were working with when you start Studio.
Theme Choose the Windows theme you want to use. You can choose from:
• Office 2003• Office 2007• Office XP• Whidbey
Language Modify the Language setting to view Documaker Studio Menus, menu options and dialogs in another language.
Supported languages are listed in the Language pick list.
If a label is not defined for the selected language, English is used as default.
Confirmations
Defining Studio Settings
88
Application Exit Check this box if you want to see a confirmation message each time you exit an application.
Object Deletions Check this box if you want to see a confirmation message each time you delete an object.
Omit DDTs on Import Check this box if you want to omit DDT files on import. Some import systems do not have DDT files. This also applies to the trigger file when you are importing a form definition file.
Auto Save Use these options to define Studio’s Auto Save feature.
The naming convention Studio uses differs from the one used in Section manager. For instance, assume the name of the FAP file is test.fap.
• Section manager creates a file named test.fap~.• Studio creates a file named test.fap~$$.
Studio also automatically saves other file types such as BDF, GRP, and FOR files. The naming convention used for these files is the same, for example form1.for~$$.
Database files are not affected by the Use Auto Save option. Database files are updated after every record change.
Use Auto Save Check this box if you want Studio to automatically save your work at timed intervals.
Auto Save Interval If you checked the Use Auto Save box, enter the number of minutes you want to elapse between auto saves. The default is five minutes. The Auto Save interval is applied individually to each document you have open. For instance...
You open document A at 10:00
You open document B at 10:02
Studio saves document A at 10:05
Studio saves document B at 10:07
Toolbar
Large Icons Check this box if you want Studio to display large icons on the toolbars.
Show Text Check this box if you want Studio to display the names of the icons.
View
Toolbar Check this box if you want Studio to display the toolbar.
Status Bar Check this box if you want Studio to display the status bar.
Workspace Choose the window mode for your workspace. You can choose from these options:
• Closed• Open• Tab
Output Choose the window mode for the output area. You can choose from these options:
• Closed• Open• Tab
If an error occurs, Studio displays the corresponding message in the output area even if it was hidden.
Option Description
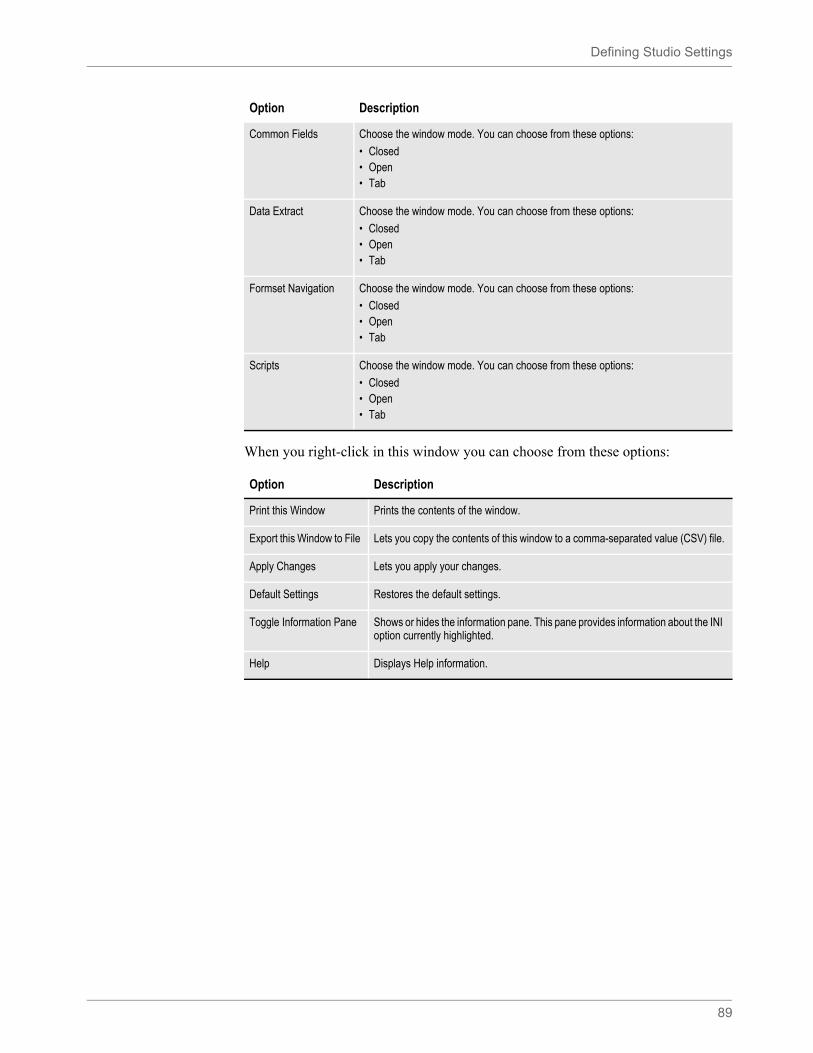
Defining Studio Settings
89
When you right-click in this window you can choose from these options:
Common Fields Choose the window mode. You can choose from these options:
• Closed• Open• Tab
Data Extract Choose the window mode. You can choose from these options:
• Closed• Open• Tab
Formset Navigation Choose the window mode. You can choose from these options:
• Closed• Open• Tab
Scripts Choose the window mode. You can choose from these options:
• Closed• Open• Tab
Option Description
Print this Window Prints the contents of the window.
Export this Window to File Lets you copy the contents of this window to a comma-separated value (CSV) file.
Apply Changes Lets you apply your changes.
Default Settings Restores the default settings.
Toggle Information Pane Shows or hides the information pane. This pane provides information about the INI option currently highlighted.
Help Displays Help information.
Option Description
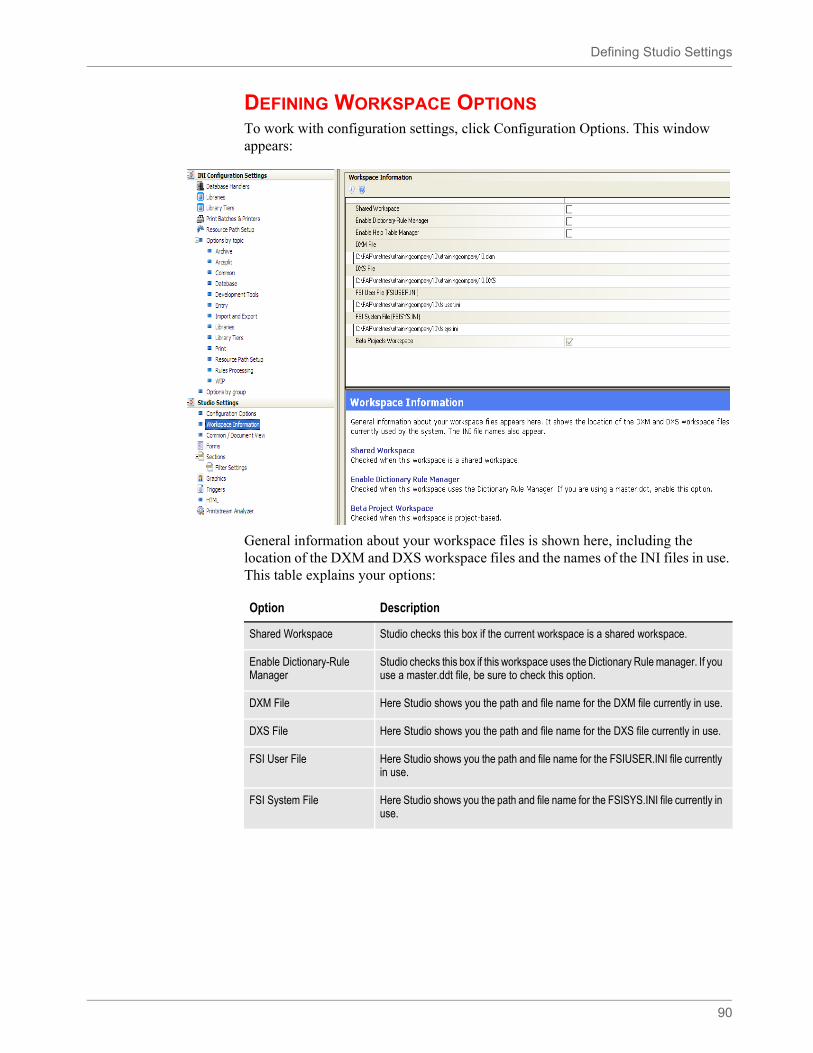
Defining Studio Settings
90
DEFINING WORKSPACE OPTIONSTo work with configuration settings, click Configuration Options. This window appears:
General information about your workspace files is shown here, including the location of the DXM and DXS workspace files and the names of the INI files in use. This table explains your options:
Option Description
Shared Workspace Studio checks this box if the current workspace is a shared workspace.
Enable Dictionary-Rule Manager
Studio checks this box if this workspace uses the Dictionary Rule manager. If you use a master.ddt file, be sure to check this option.
DXM File Here Studio shows you the path and file name for the DXM file currently in use.
DXS File Here Studio shows you the path and file name for the DXS file currently in use.
FSI User File Here Studio shows you the path and file name for the FSIUSER.INI file currently in use.
FSI System File Here Studio shows you the path and file name for the FSISYS.INI file currently in use.
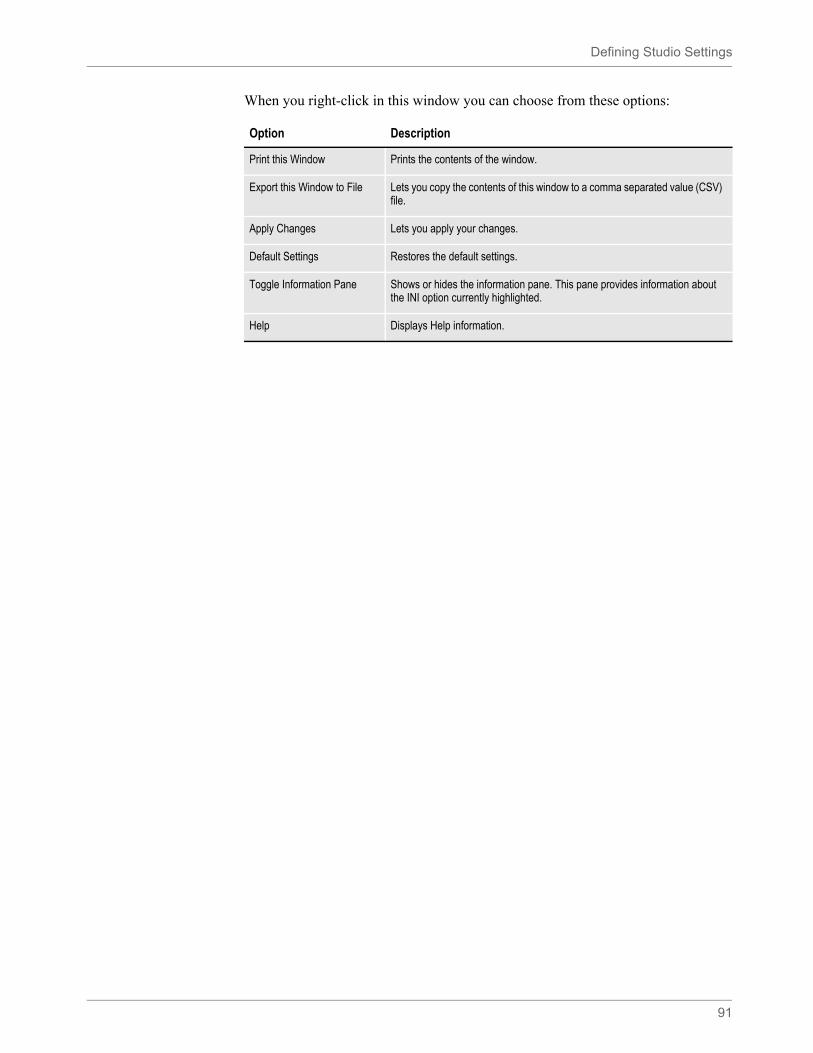
Defining Studio Settings
91
When you right-click in this window you can choose from these options:
Option Description
Print this Window Prints the contents of the window.
Export this Window to File Lets you copy the contents of this window to a comma separated value (CSV) file.
Apply Changes Lets you apply your changes.
Default Settings Restores the default settings.
Toggle Information Pane Shows or hides the information pane. This pane provides information about the INI option currently highlighted.
Help Displays Help information.
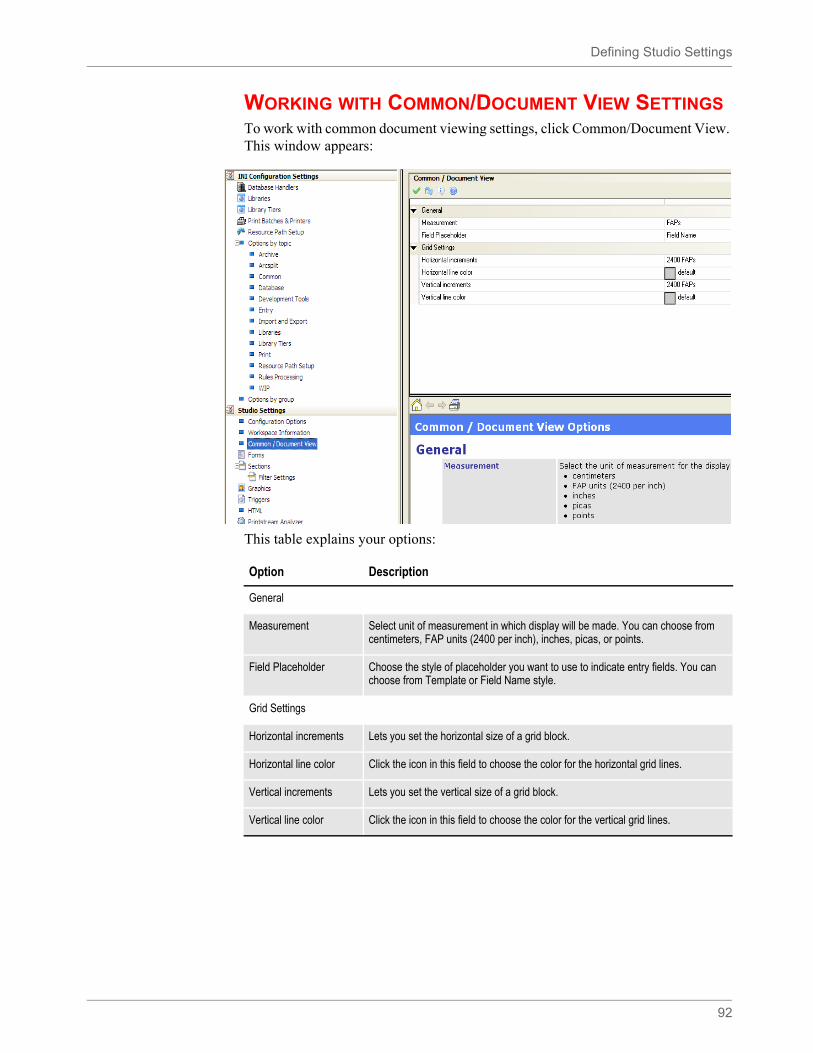
Defining Studio Settings
92
WORKING WITH COMMON/DOCUMENT VIEW SETTINGSTo work with common document viewing settings, click Common/Document View. This window appears:
This table explains your options:
Option Description
General
Measurement Select unit of measurement in which display will be made. You can choose from centimeters, FAP units (2400 per inch), inches, picas, or points.
Field Placeholder Choose the style of placeholder you want to use to indicate entry fields. You can choose from Template or Field Name style.
Grid Settings
Horizontal increments Lets you set the horizontal size of a grid block.
Horizontal line color Click the icon in this field to choose the color for the horizontal grid lines.
Vertical increments Lets you set the vertical size of a grid block.
Vertical line color Click the icon in this field to choose the color for the vertical grid lines.
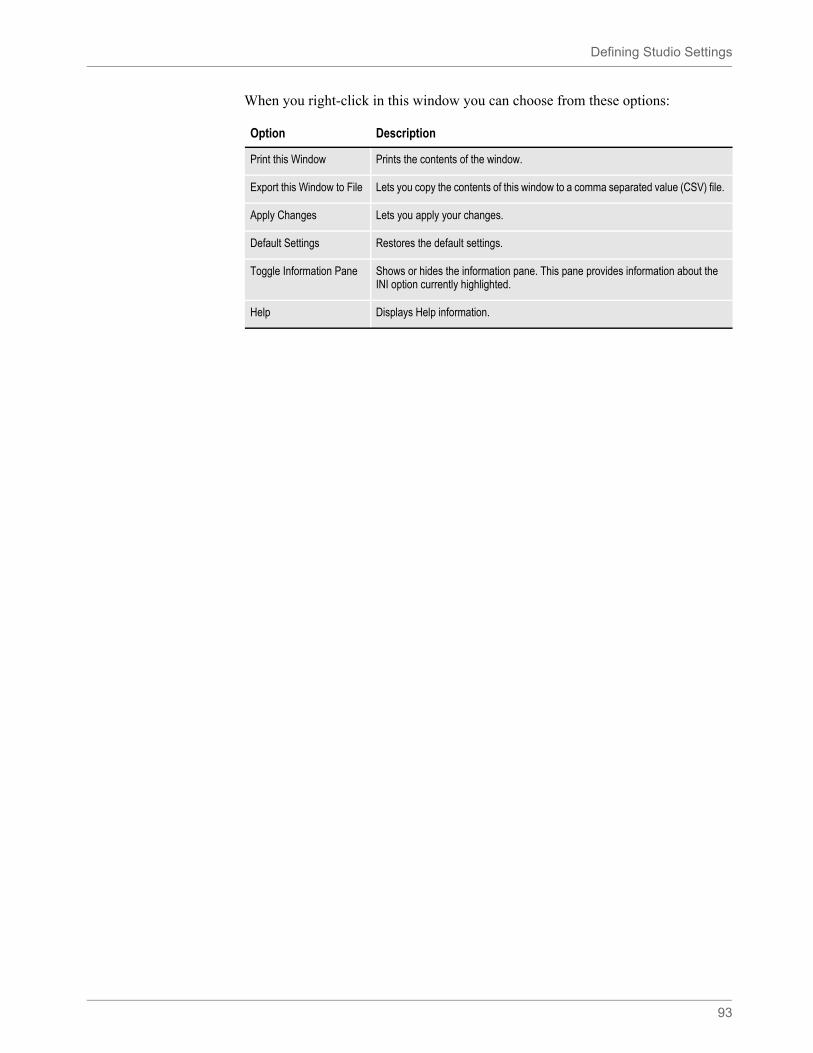
Defining Studio Settings
93
When you right-click in this window you can choose from these options:
Option Description
Print this Window Prints the contents of the window.
Export this Window to File Lets you copy the contents of this window to a comma separated value (CSV) file.
Apply Changes Lets you apply your changes.
Default Settings Restores the default settings.
Toggle Information Pane Shows or hides the information pane. This pane provides information about the INI option currently highlighted.
Help Displays Help information.
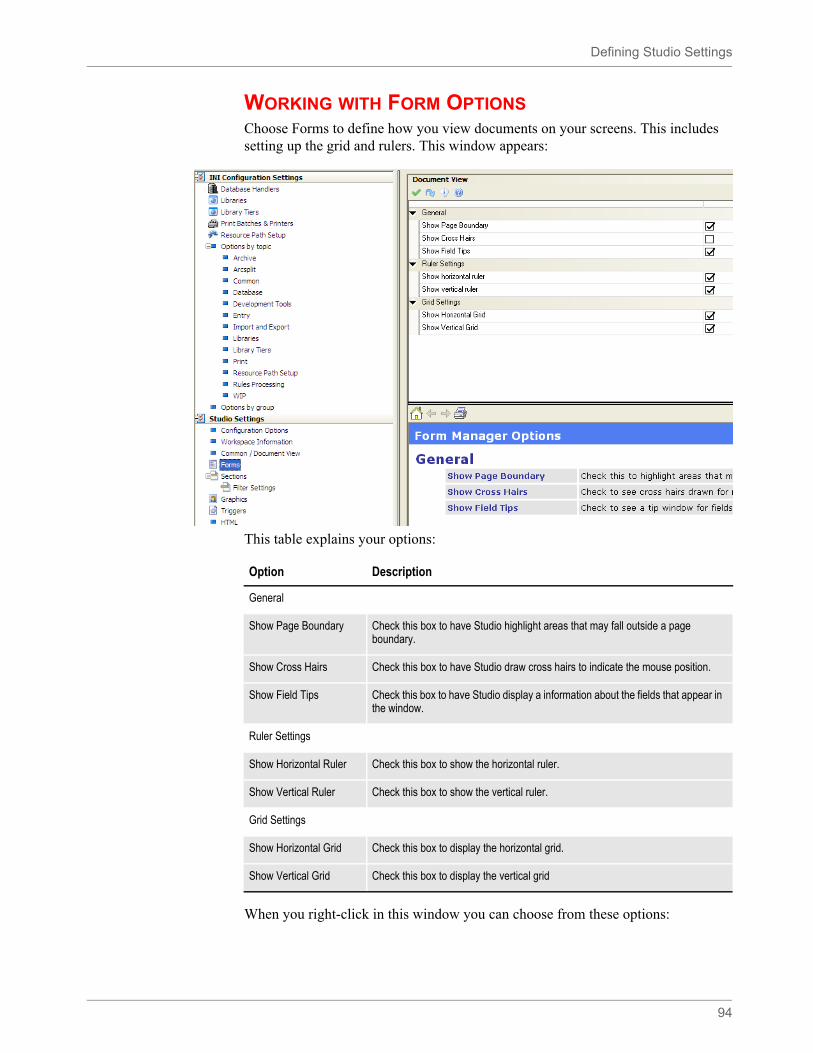
Defining Studio Settings
94
WORKING WITH FORM OPTIONSChoose Forms to define how you view documents on your screens. This includes setting up the grid and rulers. This window appears:
This table explains your options:
When you right-click in this window you can choose from these options:
Option Description
General
Show Page Boundary Check this box to have Studio highlight areas that may fall outside a page boundary.
Show Cross Hairs Check this box to have Studio draw cross hairs to indicate the mouse position.
Show Field Tips Check this box to have Studio display a information about the fields that appear in the window.
Ruler Settings
Show Horizontal Ruler Check this box to show the horizontal ruler.
Show Vertical Ruler Check this box to show the vertical ruler.
Grid Settings
Show Horizontal Grid Check this box to display the horizontal grid.
Show Vertical Grid Check this box to display the vertical grid
Defining Studio Settings
95
WORKING WITH TEMPLATE OPTIONSStudio lets you create templates for the forms you create with Studio. Templates can be used to implement and maintain document standards. They can also be used to quickly and efficiently create new forms.
Many of the Template Options and Template Section Options are identical to the Form Options and Form Section Options.
When a template is created from an existing form, the templates form and form section options are inherited from the form and forms sections. With a few exceptions (noted below) you can modify those settings to tailor the template to your specific needs.
General
General options are used to assign general information for the Template.
Options
Option Description
Print this Window Prints the contents of the window.
Export this Window to File Lets you copy the contents of this window to a comma separated value (CSV) file.
Apply Changes Lets you apply your changes.
Default Settings Restores the default settings.
Toggle Information Pane Shows or hides the information pane. This pane provides information about the INI option currently highlighted.
Help Displays Help information.
Option Description
Name Enter a name for the template.
The name cannot be modified if the template was created by saving a form to a template in Form Manager.
Description Enter a description for the template. The description is displayed on the Template Report.
Task Comments To do comments that will appear when generating the “Printing a Finishing Report” for Templates.
Defining Studio Settings
96
PagePage options define the page properties. Templates created by saving a form to a template will inherit the forms Page settings which cannot be modified in Template Manager. If changes to the page settings are needed, you can either change the page settings at the form level in Form Manager, then save the modified form to a template again or create a new Template.
Option Description
Multicopy This option indicates whether more than one copy of the form can be used for a transaction in Documaker Desktop.
Selecting this form option in Documaker Studio enables the Formset, Duplicate Option in Documaker Desktop for the form. Selecting Duplicate Form in Documaker Desktop will duplicate the form. Policy data and recipient copy information is propagated to appropriate fields.
Overflow For legacy use.
Pull Check this field to have a page print as a reminder to manually "pull" the form (from some physical location) and insert it into the resulting document set at the point indicated by this page. Policy jackets are often designated as Pull forms.
Pull form option is honored in Documaker Desktop. Pull forms are not applicable in Documaker Server as high-volume print does not lend itself to manual insertion of forms.
Hidden The form is hidden from view in Documaker Desktop; data can be embedded on the form for later use.
Staple Indicates whether the form is to be stapled when printing output to Metacode or PCL.
Email Body Indicates whether the form is to be included in the email body or attachment for email print (EPT). When enabled, the form is included in the email body and excluded from the email attachment. When not enabled, the form is excluded from the email body and included in the email attachment. Only the EPT driver looks for and responds to the email body option.
Form Metadata Metadata are user defined name+ value pairs assigned to the document.
Option Description
Size Choose the paper size from the pick list.
Orientation Choose from portrait or landscape. The default is portrait.
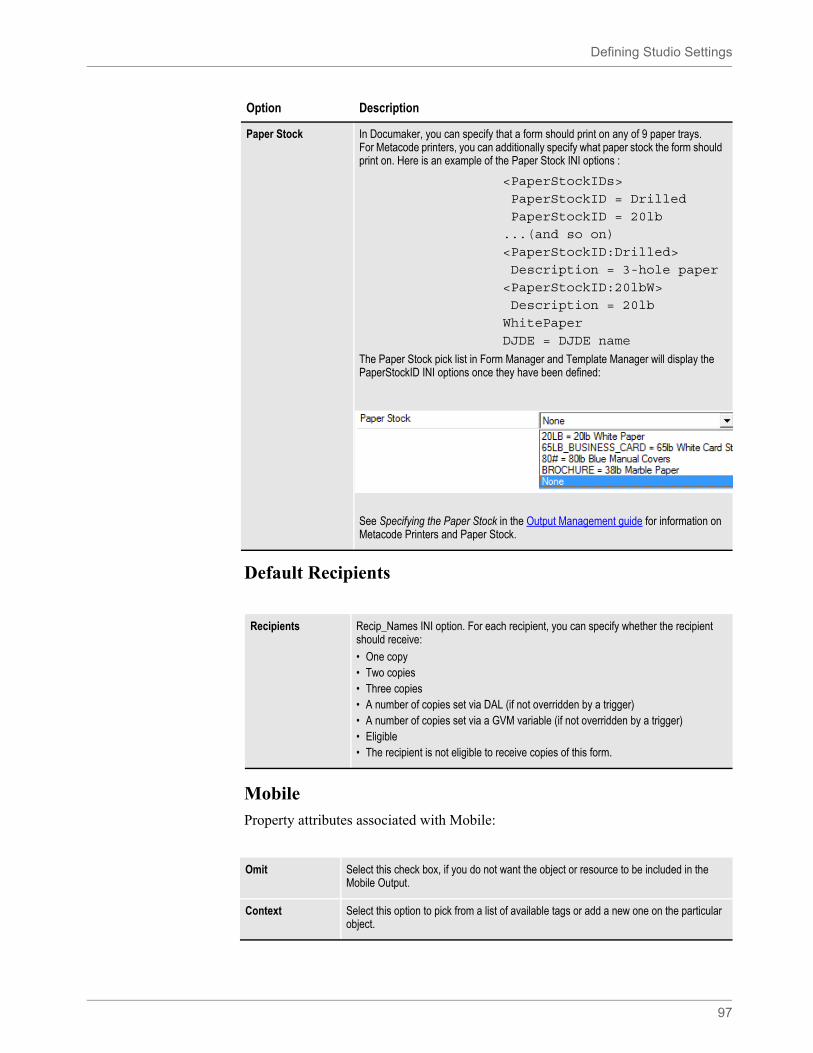
Defining Studio Settings
97
Default Recipients
MobileProperty attributes associated with Mobile:
Paper Stock In Documaker, you can specify that a form should print on any of 9 paper trays.For Metacode printers, you can additionally specify what paper stock the form should print on. Here is an example of the Paper Stock INI options :
<PaperStockIDs>
PaperStockID = Drilled
PaperStockID = 20lb
...(and so on)
<PaperStockID:Drilled>
Description = 3-hole paper
<PaperStockID:20lbW>
Description = 20lb
WhitePaper
DJDE = DJDE name
The Paper Stock pick list in Form Manager and Template Manager will display the PaperStockID INI options once they have been defined:
See Specifying the Paper Stock in the Output Management guide for information on Metacode Printers and Paper Stock.
Recipients Recip_Names INI option. For each recipient, you can specify whether the recipient should receive:
• One copy• Two copies• Three copies• A number of copies set via DAL (if not overridden by a trigger)• A number of copies set via a GVM variable (if not overridden by a trigger)• Eligible• The recipient is not eligible to receive copies of this form.
Omit Select this check box, if you do not want the object or resource to be included in the Mobile Output.
Context Select this option to pick from a list of available tags or add a new one on the particular object.
Option Description
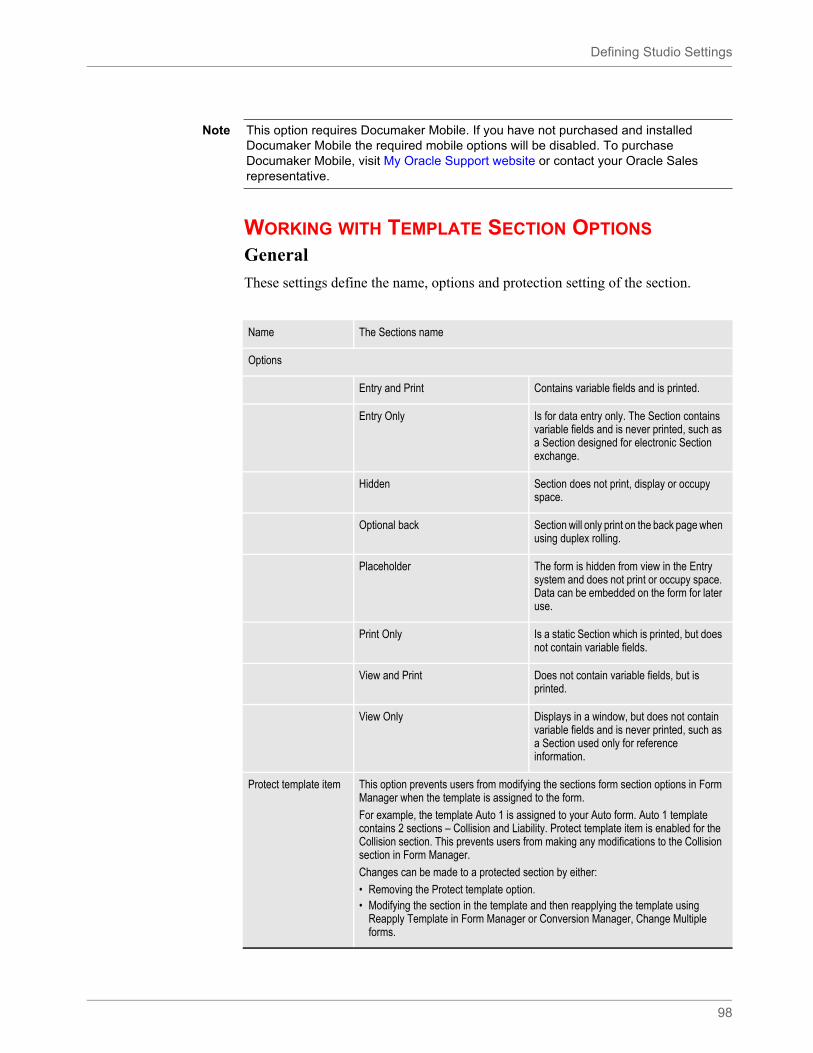
Defining Studio Settings
98
WORKING WITH TEMPLATE SECTION OPTIONS
General
These settings define the name, options and protection setting of the section.
Note This option requires Documaker Mobile. If you have not purchased and installed Documaker Mobile the required mobile options will be disabled. To purchase Documaker Mobile, visit My Oracle Support website or contact your Oracle Sales representative.
Name The Sections name
Options
Entry and Print Contains variable fields and is printed.
Entry Only Is for data entry only. The Section contains variable fields and is never printed, such as a Section designed for electronic Section exchange.
Hidden Section does not print, display or occupy space.
Optional back Section will only print on the back page when using duplex rolling.
Placeholder The form is hidden from view in the Entry system and does not print or occupy space. Data can be embedded on the form for later use.
Print Only Is a static Section which is printed, but does not contain variable fields.
View and Print Does not contain variable fields, but is printed.
View Only Displays in a window, but does not contain variable fields and is never printed, such as a Section used only for reference information.
Protect template item This option prevents users from modifying the sections form section options in Form Manager when the template is assigned to the form.
For example, the template Auto 1 is assigned to your Auto form. Auto 1 template contains 2 sections – Collision and Liability. Protect template item is enabled for the Collision section. This prevents users from making any modifications to the Collision section in Form Manager.
Changes can be made to a protected section by either:
• Removing the Protect template option. • Modifying the section in the template and then reapplying the template using
Reapply Template in Form Manager or Conversion Manager, Change Multiple forms.
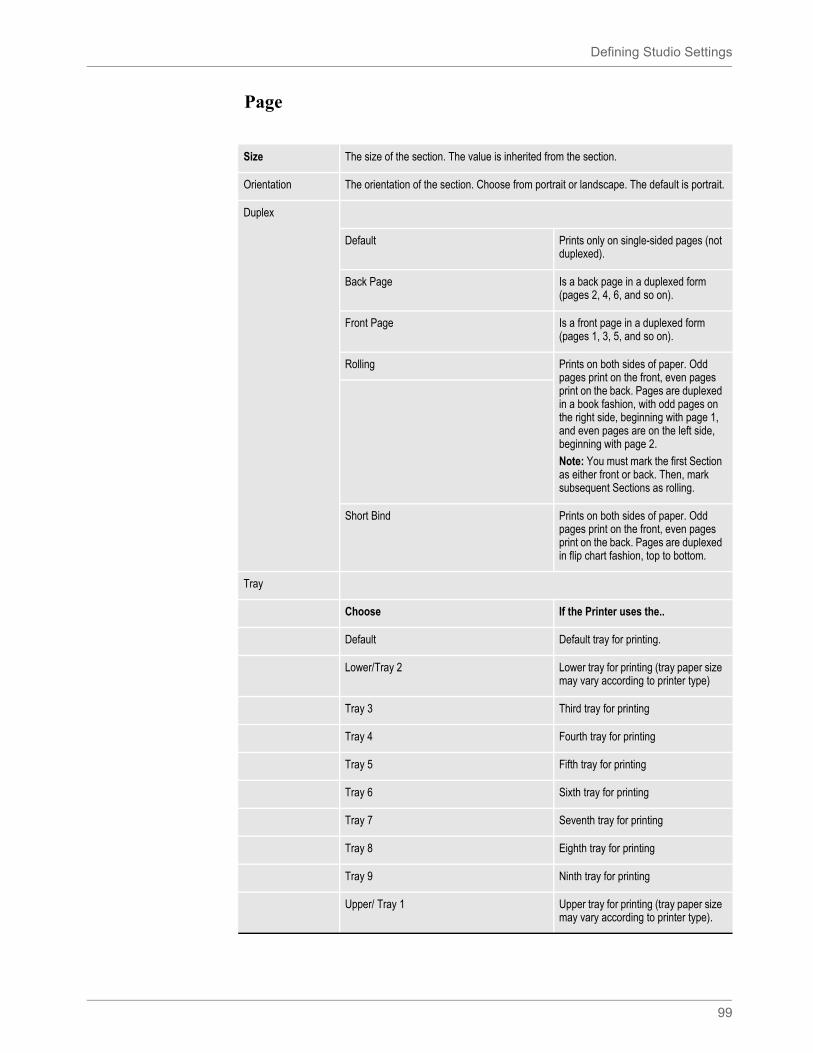
Defining Studio Settings
99
Page
Size The size of the section. The value is inherited from the section.
Orientation The orientation of the section. Choose from portrait or landscape. The default is portrait.
Duplex
Default Prints only on single-sided pages (not duplexed).
Back Page Is a back page in a duplexed form (pages 2, 4, 6, and so on).
Front Page Is a front page in a duplexed form (pages 1, 3, 5, and so on).
Rolling Prints on both sides of paper. Odd pages print on the front, even pages print on the back. Pages are duplexed in a book fashion, with odd pages on the right side, beginning with page 1, and even pages are on the left side, beginning with page 2.
Note: You must mark the first Section as either front or back. Then, mark subsequent Sections as rolling.
Short Bind Prints on both sides of paper. Odd pages print on the front, even pages print on the back. Pages are duplexed in flip chart fashion, top to bottom.
Tray
Choose If the Printer uses the..
Default Default tray for printing.
Lower/Tray 2 Lower tray for printing (tray paper size may vary according to printer type)
Tray 3 Third tray for printing
Tray 4 Fourth tray for printing
Tray 5 Fifth tray for printing
Tray 6 Sixth tray for printing
Tray 7 Seventh tray for printing
Tray 8 Eighth tray for printing
Tray 9 Ninth tray for printing
Upper/ Tray 1 Upper tray for printing (tray paper size may vary according to printer type).
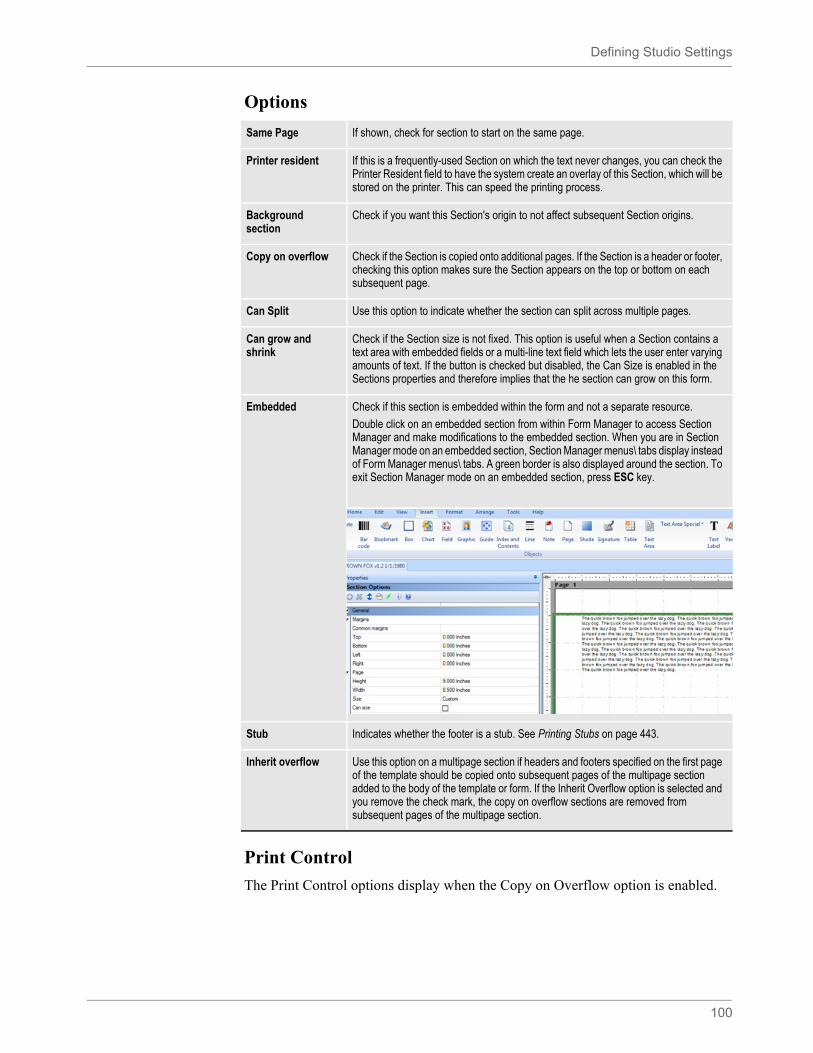
Defining Studio Settings
100
Options
Print Control
The Print Control options display when the Copy on Overflow option is enabled.
Same Page If shown, check for section to start on the same page.
Printer resident If this is a frequently-used Section on which the text never changes, you can check the Printer Resident field to have the system create an overlay of this Section, which will be stored on the printer. This can speed the printing process.
Background section
Check if you want this Section's origin to not affect subsequent Section origins.
Copy on overflow Check if the Section is copied onto additional pages. If the Section is a header or footer, checking this option makes sure the Section appears on the top or bottom on each subsequent page.
Can Split Use this option to indicate whether the section can split across multiple pages.
Can grow and shrink
Check if the Section size is not fixed. This option is useful when a Section contains a text area with embedded fields or a multi-line text field which lets the user enter varying amounts of text. If the button is checked but disabled, the Can Size is enabled in the Sections properties and therefore implies that the he section can grow on this form.
Embedded Check if this section is embedded within the form and not a separate resource.
Double click on an embedded section from within Form Manager to access Section Manager and make modifications to the embedded section. When you are in Section Manager mode on an embedded section, Section Manager menus\ tabs display instead of Form Manager menus\ tabs. A green border is also displayed around the section. To exit Section Manager mode on an embedded section, press ESC key.
Stub Indicates whether the footer is a stub. See Printing Stubs on page 443.
Inherit overflow Use this option on a multipage section if headers and footers specified on the first page of the template should be copied onto subsequent pages of the multipage section added to the body of the template or form. If the Inherit Overflow option is selected and you remove the check mark, the copy on overflow sections are removed from subsequent pages of the multipage section.
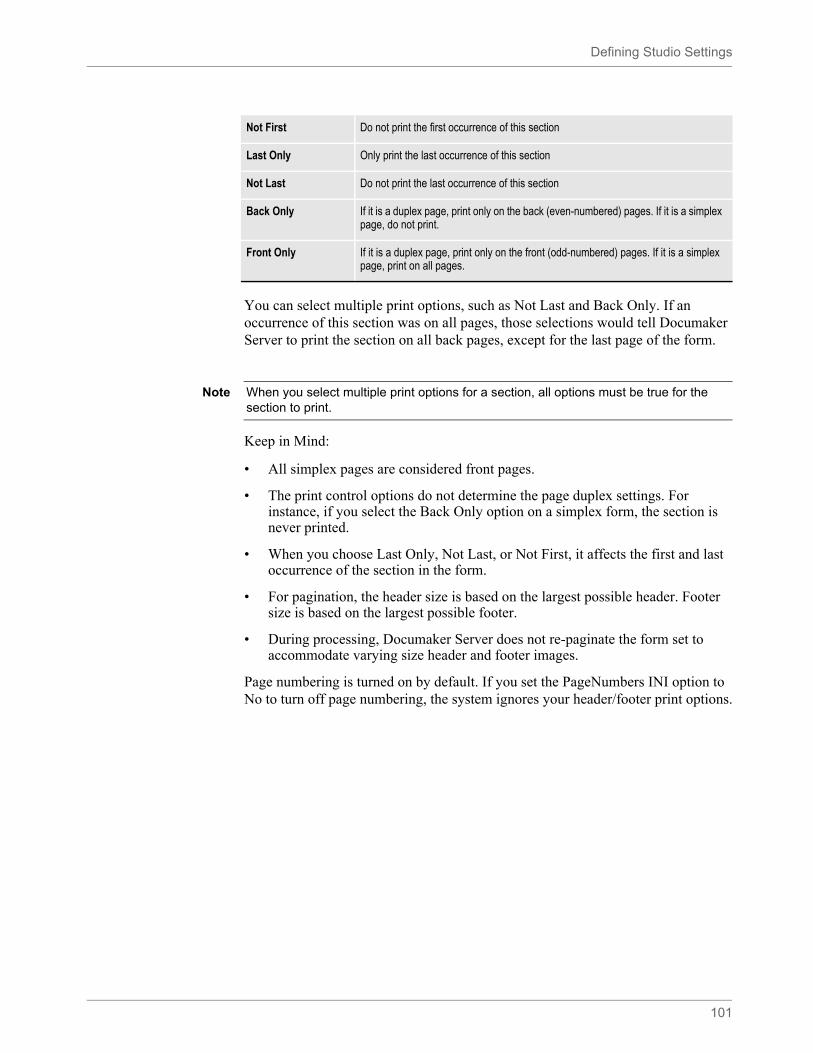
Defining Studio Settings
101
You can select multiple print options, such as Not Last and Back Only. If an occurrence of this section was on all pages, those selections would tell Documaker Server to print the section on all back pages, except for the last page of the form.
Keep in Mind:
• All simplex pages are considered front pages.
• The print control options do not determine the page duplex settings. For instance, if you select the Back Only option on a simplex form, the section is never printed.
• When you choose Last Only, Not Last, or Not First, it affects the first and last occurrence of the section in the form.
• For pagination, the header size is based on the largest possible header. Footer size is based on the largest possible footer.
• During processing, Documaker Server does not re-paginate the form set to accommodate varying size header and footer images.
Page numbering is turned on by default. If you set the PageNumbers INI option to No to turn off page numbering, the system ignores your header/footer print options.
Not First Do not print the first occurrence of this section
Last Only Only print the last occurrence of this section
Not Last Do not print the last occurrence of this section
Back Only If it is a duplex page, print only on the back (even-numbered) pages. If it is a simplex page, do not print.
Front Only If it is a duplex page, print only on the front (odd-numbered) pages. If it is a simplex page, print on all pages.
Note When you select multiple print options for a section, all options must be true for the section to print.
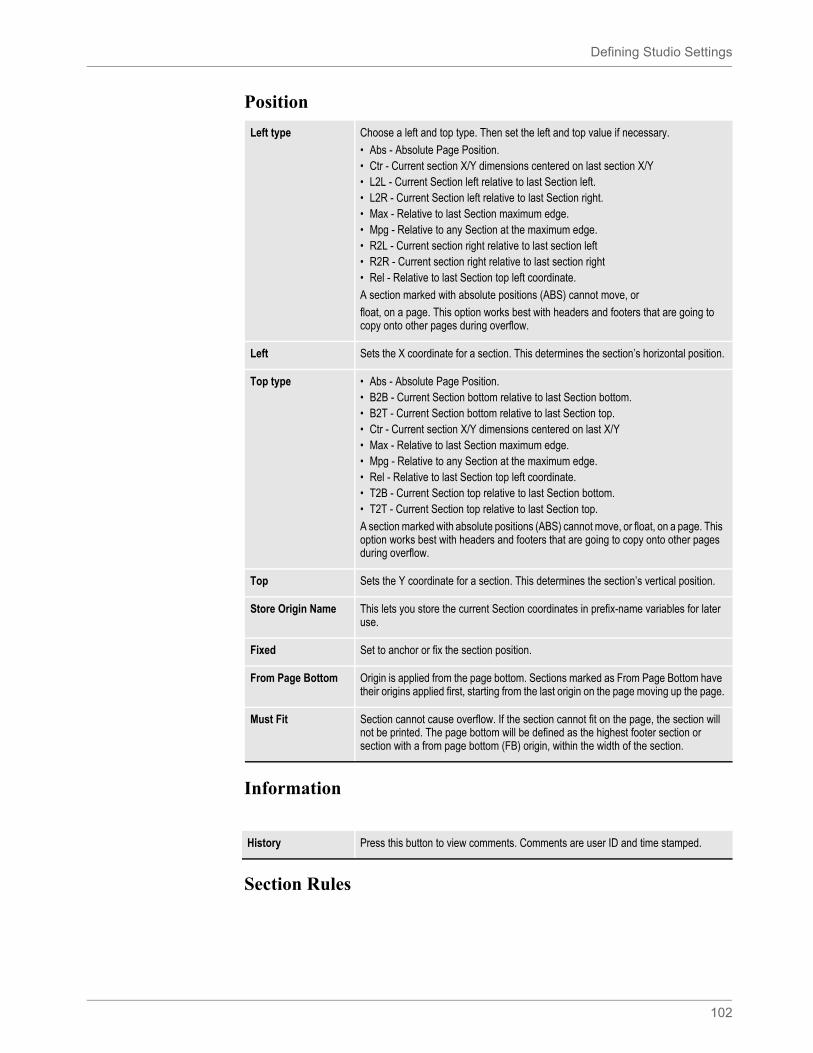
Defining Studio Settings
102
Position
Information
Section Rules
Left type Choose a left and top type. Then set the left and top value if necessary.
• Abs - Absolute Page Position. • Ctr - Current section X/Y dimensions centered on last section X/Y • L2L - Current Section left relative to last Section left. • L2R - Current Section left relative to last Section right. • Max - Relative to last Section maximum edge. • Mpg - Relative to any Section at the maximum edge. • R2L - Current section right relative to last section left • R2R - Current section right relative to last section right • Rel - Relative to last Section top left coordinate.
A section marked with absolute positions (ABS) cannot move, or
float, on a page. This option works best with headers and footers that are going to copy onto other pages during overflow.
Left Sets the X coordinate for a section. This determines the section’s horizontal position.
Top type • Abs - Absolute Page Position. • B2B - Current Section bottom relative to last Section bottom. • B2T - Current Section bottom relative to last Section top. • Ctr - Current section X/Y dimensions centered on last X/Y • Max - Relative to last Section maximum edge. • Mpg - Relative to any Section at the maximum edge. • Rel - Relative to last Section top left coordinate. • T2B - Current Section top relative to last Section bottom. • T2T - Current Section top relative to last Section top.
A section marked with absolute positions (ABS) cannot move, or float, on a page. This option works best with headers and footers that are going to copy onto other pages during overflow.
Top Sets the Y coordinate for a section. This determines the section’s vertical position.
Store Origin Name This lets you store the current Section coordinates in prefix-name variables for later use.
Fixed Set to anchor or fix the section position.
From Page Bottom Origin is applied from the page bottom. Sections marked as From Page Bottom have their origins applied first, starting from the last origin on the page moving up the page.
Must Fit Section cannot cause overflow. If the section cannot fit on the page, the section will not be printed. The page bottom will be defined as the highest footer section or section with a from page bottom (FB) origin, within the width of the section.
History Press this button to view comments. Comments are user ID and time stamped.
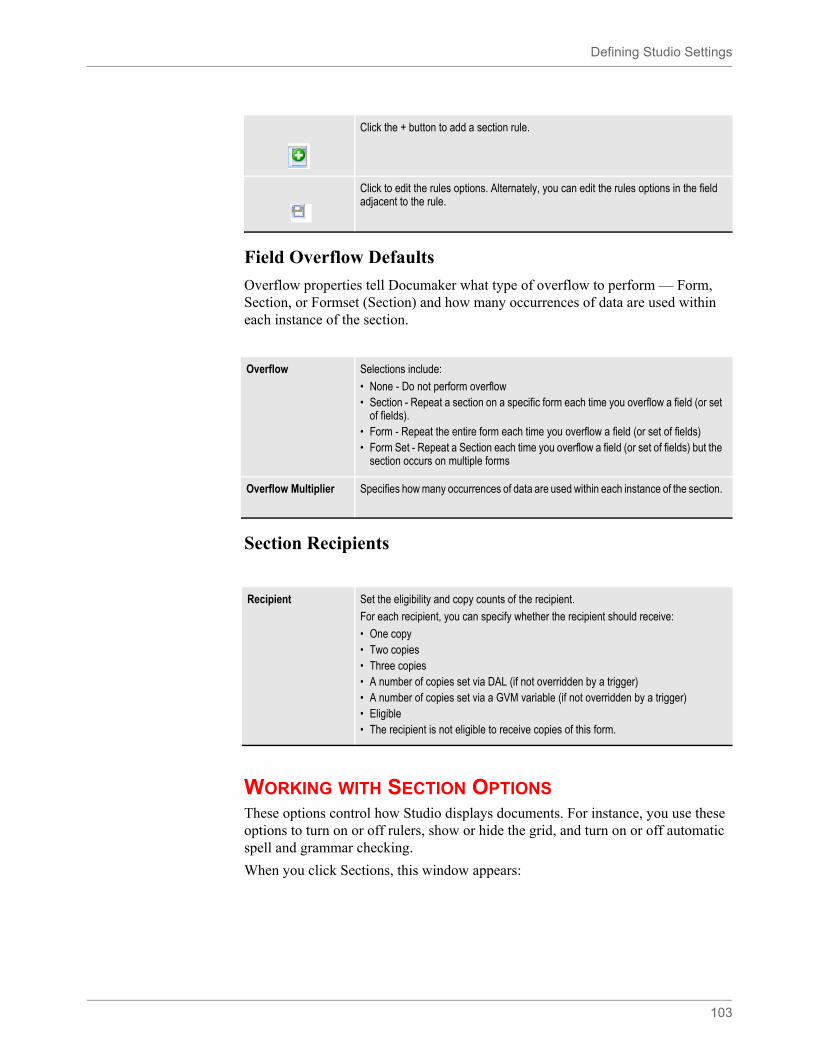
Defining Studio Settings
103
Field Overflow Defaults
Overflow properties tell Documaker what type of overflow to perform — Form, Section, or Formset (Section) and how many occurrences of data are used within each instance of the section.
Section Recipients
WORKING WITH SECTION OPTIONSThese options control how Studio displays documents. For instance, you use these options to turn on or off rulers, show or hide the grid, and turn on or off automatic spell and grammar checking.
When you click Sections, this window appears:
Click the + button to add a section rule.
Click to edit the rules options. Alternately, you can edit the rules options in the field adjacent to the rule.
Overflow Selections include:
• None - Do not perform overflow • Section - Repeat a section on a specific form each time you overflow a field (or set
of fields). • Form - Repeat the entire form each time you overflow a field (or set of fields) • Form Set - Repeat a Section each time you overflow a field (or set of fields) but the
section occurs on multiple forms
Overflow Multiplier Specifies how many occurrences of data are used within each instance of the section.
Recipient Set the eligibility and copy counts of the recipient.
For each recipient, you can specify whether the recipient should receive:
• One copy • Two copies • Three copies • A number of copies set via DAL (if not overridden by a trigger) • A number of copies set via a GVM variable (if not overridden by a trigger) • Eligible • The recipient is not eligible to receive copies of this form.
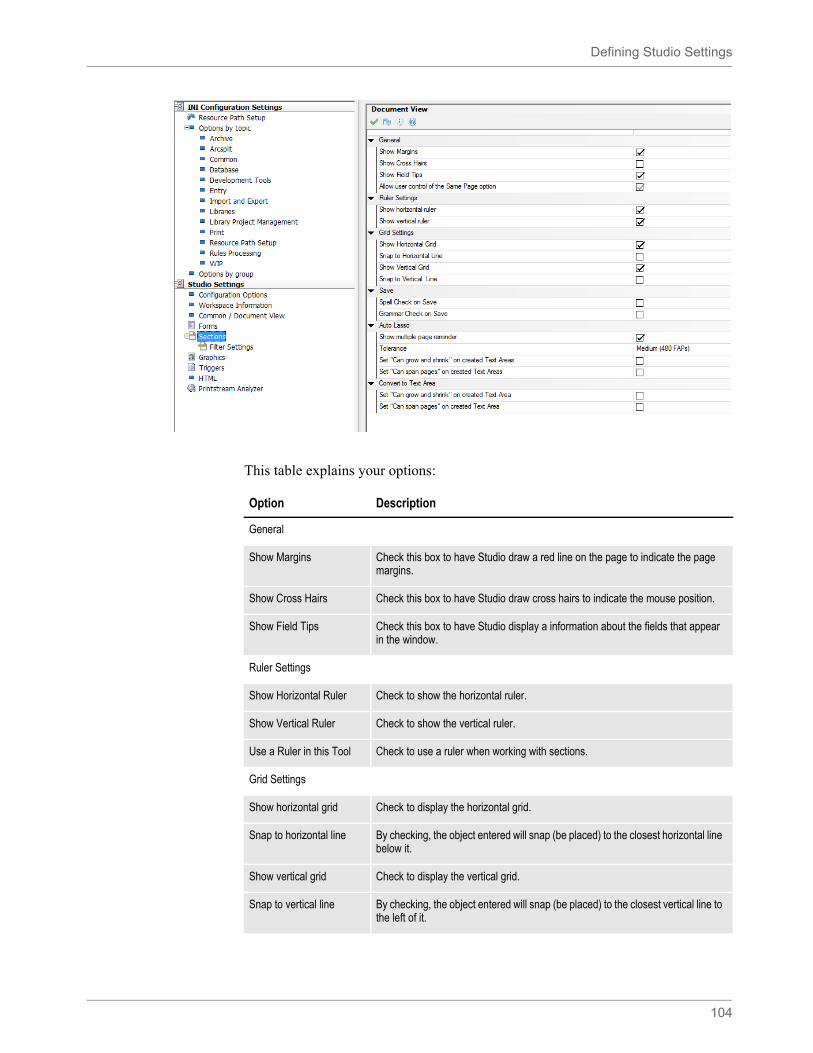
Defining Studio Settings
104
This table explains your options:
Option Description
General
Show Margins Check this box to have Studio draw a red line on the page to indicate the page margins.
Show Cross Hairs Check this box to have Studio draw cross hairs to indicate the mouse position.
Show Field Tips Check this box to have Studio display a information about the fields that appear in the window.
Ruler Settings
Show Horizontal Ruler Check to show the horizontal ruler.
Show Vertical Ruler Check to show the vertical ruler.
Use a Ruler in this Tool Check to use a ruler when working with sections.
Grid Settings
Show horizontal grid Check to display the horizontal grid.
Snap to horizontal line By checking, the object entered will snap (be placed) to the closest horizontal line below it.
Show vertical grid Check to display the vertical grid.
Snap to vertical line By checking, the object entered will snap (be placed) to the closest vertical line to the left of it.
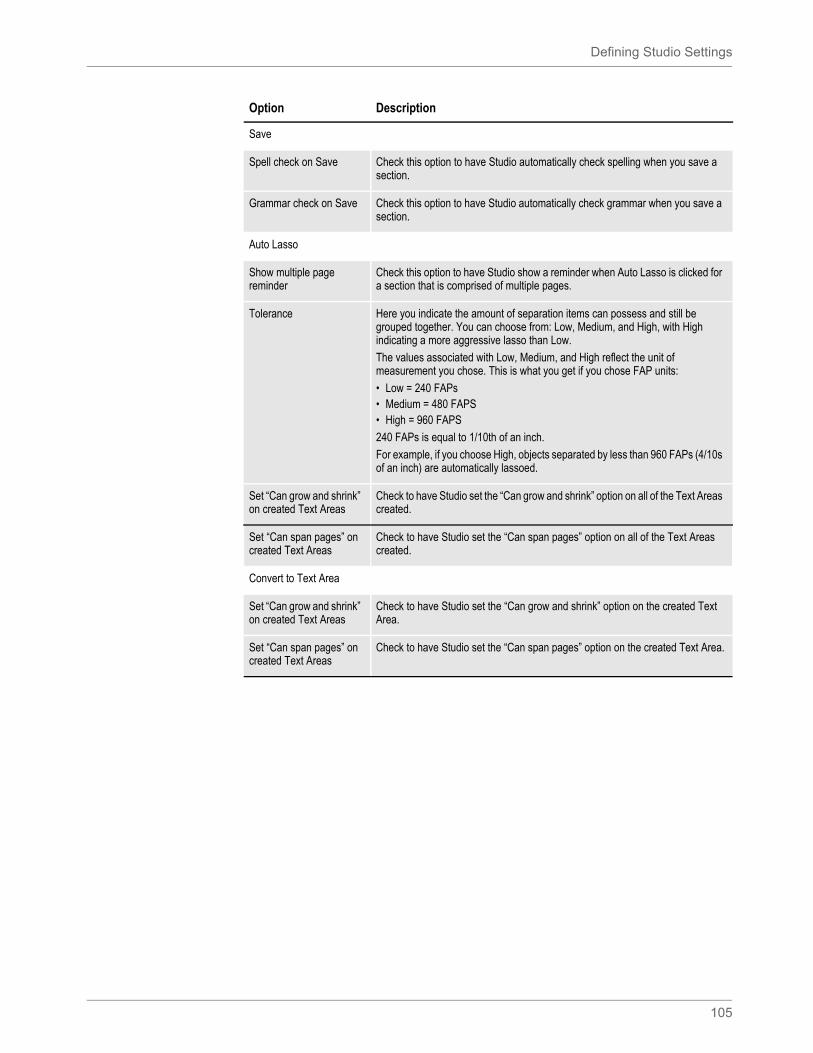
Defining Studio Settings
105
Save
Spell check on Save Check this option to have Studio automatically check spelling when you save a section.
Grammar check on Save Check this option to have Studio automatically check grammar when you save a section.
Auto Lasso
Show multiple page reminder
Check this option to have Studio show a reminder when Auto Lasso is clicked for a section that is comprised of multiple pages.
Tolerance Here you indicate the amount of separation items can possess and still be grouped together. You can choose from: Low, Medium, and High, with High indicating a more aggressive lasso than Low.
The values associated with Low, Medium, and High reflect the unit of measurement you chose. This is what you get if you chose FAP units:
• Low = 240 FAPs• Medium = 480 FAPS• High = 960 FAPS
240 FAPs is equal to 1/10th of an inch.
For example, if you choose High, objects separated by less than 960 FAPs (4/10s of an inch) are automatically lassoed.
Set “Can grow and shrink” on created Text Areas
Check to have Studio set the “Can grow and shrink” option on all of the Text Areas created.
Set “Can span pages” on created Text Areas
Check to have Studio set the “Can span pages” option on all of the Text Areas created.
Convert to Text Area
Set “Can grow and shrink” on created Text Areas
Check to have Studio set the “Can grow and shrink” option on the created Text Area.
Set “Can span pages” on created Text Areas
Check to have Studio set the “Can span pages” option on the created Text Area.
Option Description
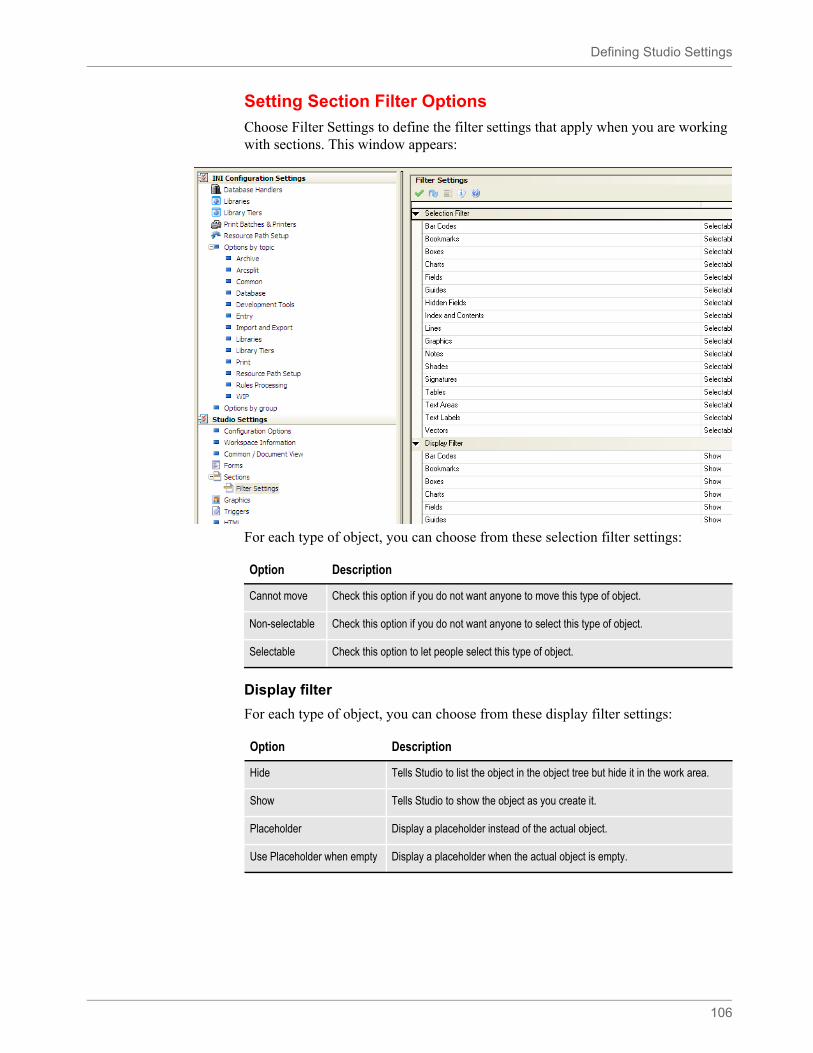
Defining Studio Settings
106
Setting Section Filter Options
Choose Filter Settings to define the filter settings that apply when you are working with sections. This window appears:
For each type of object, you can choose from these selection filter settings:
Display filter
For each type of object, you can choose from these display filter settings:
Option Description
Cannot move Check this option if you do not want anyone to move this type of object.
Non-selectable Check this option if you do not want anyone to select this type of object.
Selectable Check this option to let people select this type of object.
Option Description
Hide Tells Studio to list the object in the object tree but hide it in the work area.
Show Tells Studio to show the object as you create it.
Placeholder Display a placeholder instead of the actual object.
Use Placeholder when empty Display a placeholder when the actual object is empty.
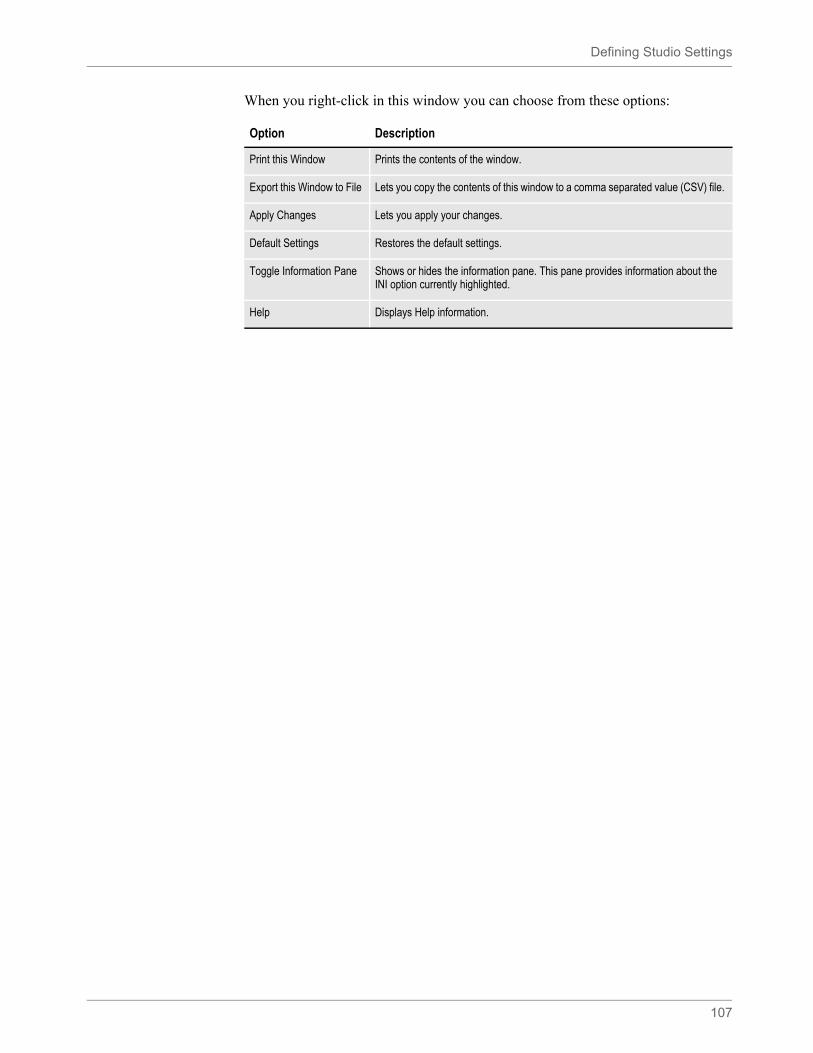
Defining Studio Settings
107
When you right-click in this window you can choose from these options:
Option Description
Print this Window Prints the contents of the window.
Export this Window to File Lets you copy the contents of this window to a comma separated value (CSV) file.
Apply Changes Lets you apply your changes.
Default Settings Restores the default settings.
Toggle Information Pane Shows or hides the information pane. This pane provides information about the INI option currently highlighted.
Help Displays Help information.
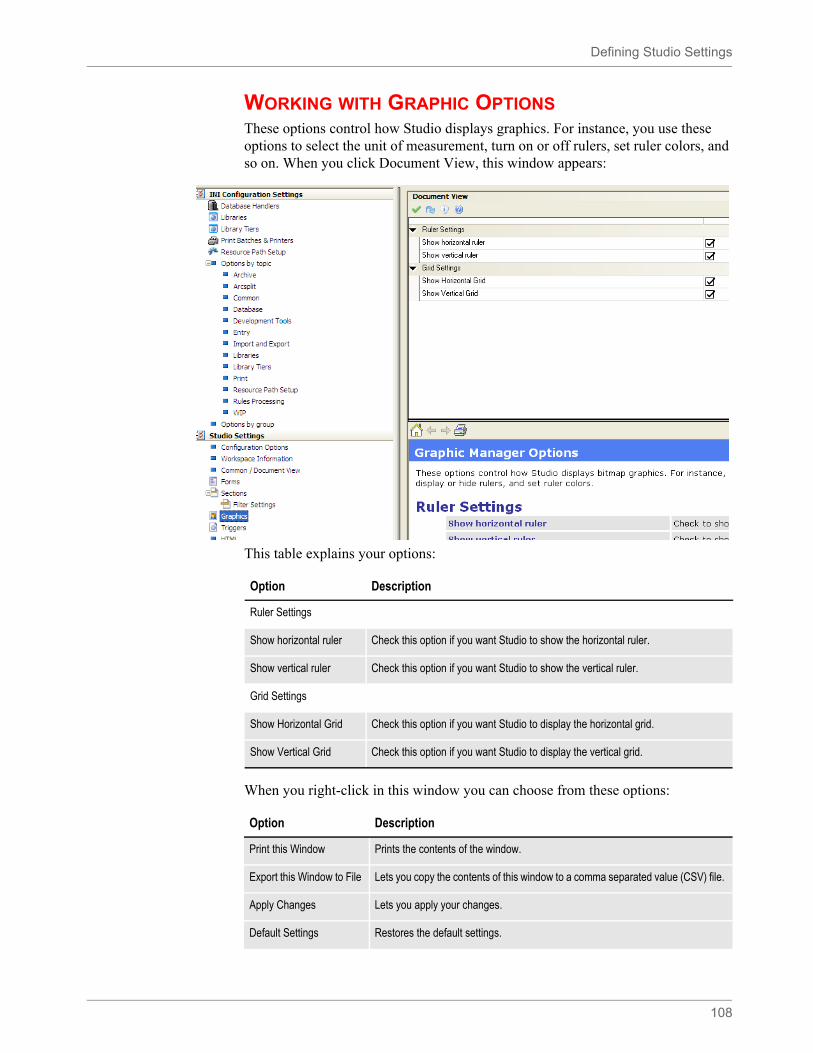
Defining Studio Settings
108
WORKING WITH GRAPHIC OPTIONSThese options control how Studio displays graphics. For instance, you use these options to select the unit of measurement, turn on or off rulers, set ruler colors, and so on. When you click Document View, this window appears:
This table explains your options:
When you right-click in this window you can choose from these options:
Option Description
Ruler Settings
Show horizontal ruler Check this option if you want Studio to show the horizontal ruler.
Show vertical ruler Check this option if you want Studio to show the vertical ruler.
Grid Settings
Show Horizontal Grid Check this option if you want Studio to display the horizontal grid.
Show Vertical Grid Check this option if you want Studio to display the vertical grid.
Option Description
Print this Window Prints the contents of the window.
Export this Window to File Lets you copy the contents of this window to a comma separated value (CSV) file.
Apply Changes Lets you apply your changes.
Default Settings Restores the default settings.

Defining Studio Settings
109
Toggle Information Pane Shows or hides the information pane. This pane provides information about the INI option currently highlighted.
Help Displays Help information.
Option Description
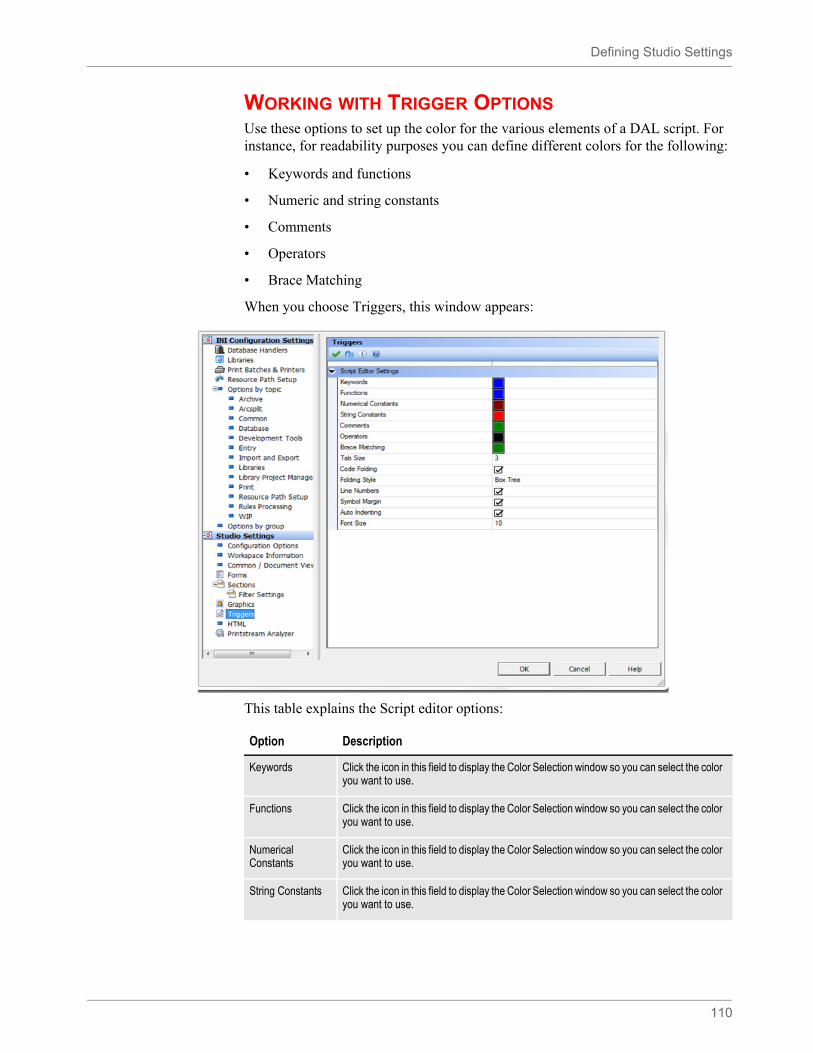
Defining Studio Settings
110
WORKING WITH TRIGGER OPTIONSUse these options to set up the color for the various elements of a DAL script. For instance, for readability purposes you can define different colors for the following:
• Keywords and functions
• Numeric and string constants
• Comments
• Operators
• Brace Matching
When you choose Triggers, this window appears:
This table explains the Script editor options:
Option Description
Keywords Click the icon in this field to display the Color Selection window so you can select the color you want to use.
Functions Click the icon in this field to display the Color Selection window so you can select the color you want to use.
Numerical Constants
Click the icon in this field to display the Color Selection window so you can select the color you want to use.
String Constants Click the icon in this field to display the Color Selection window so you can select the color you want to use.
Defining Studio Settings
111
When you right-click in this window you can choose from these options:
Comments Click the icon in this field to display the Color Selection screen and select the color you want to use.
Operators Click the icon in this field to display the Color Selection screen and select the color you want to use.
Brace Matching Click the icon in this field to display the Color Selection screen and select the color you want to use.
Tab Size Enter the number of spaces you want Studio to use to represent a TAB character. The default is three (3).
Code Folding Check this box to enable or disable code folding. Code folding lets you collapse or expand blocks of code.
Folding Style When code folding is enabled, use this option to select the folding style. You can choose from Arrow, Simple, Circle Tree, or Box Tree.
Line Numbers When selected, a line number appears to the left of each line of code. Remove this check mark to hide line numbers.
Symbol Margin When selected, a margin is reserved to the left of each line of code for symbol display. If not selected, then markers change the background color of the line rather than displaying a symbol.
Auto Indenting When selected and you press ENTER, the new line of text is automatically indented to the same tab stop as the line preceding it. Remove this check mark to tell Studio to turn off auto indenting.
Font Size Specifies the default font size when editing a script.
Option Description
Print this Window Prints the contents of the window.
Export this Window to File Lets you copy the contents of this window to a comma separated value (CSV) file.
Apply Changes Lets you apply your changes.
Default Settings Restores the default settings.
Toggle Information Pane Shows or hides the information pane. This pane provides information about the INI option currently highlighted.
Help Displays Help information.
Option Description
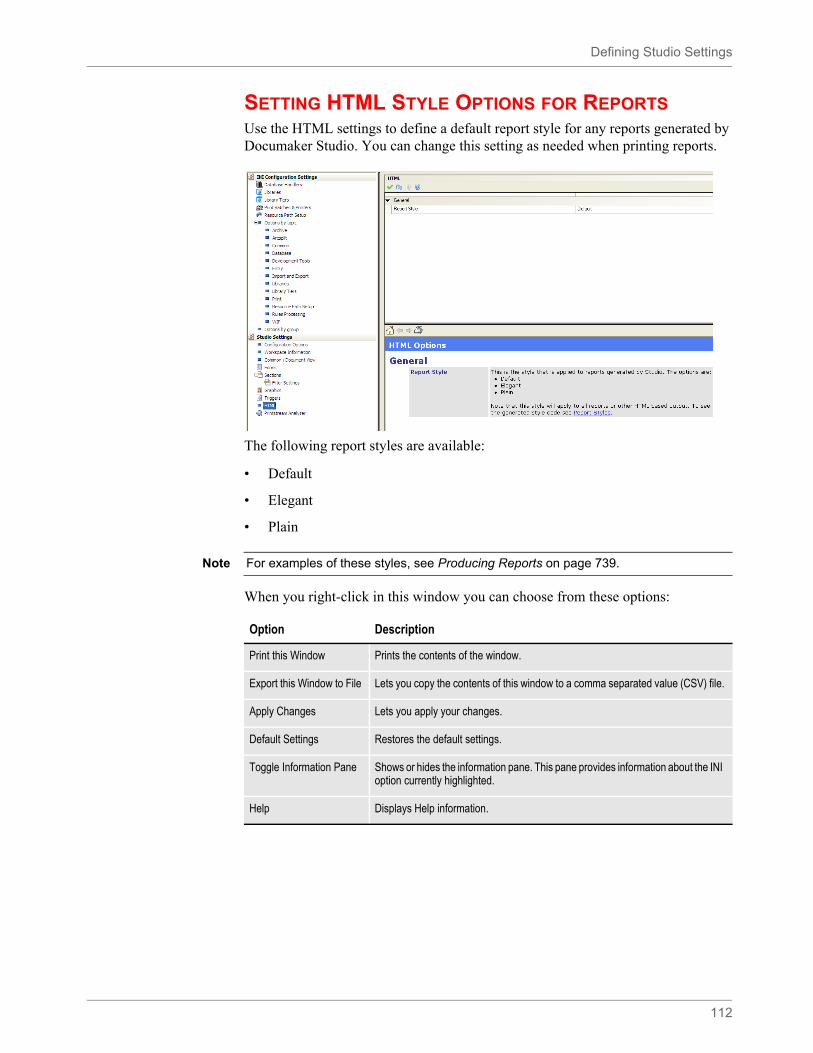
Defining Studio Settings
112
SETTING HTML STYLE OPTIONS FOR REPORTSUse the HTML settings to define a default report style for any reports generated by Documaker Studio. You can change this setting as needed when printing reports.
The following report styles are available:
• Default
• Elegant
• Plain
When you right-click in this window you can choose from these options:
Note For examples of these styles, see Producing Reports on page 739.
Option Description
Print this Window Prints the contents of the window.
Export this Window to File Lets you copy the contents of this window to a comma separated value (CSV) file.
Apply Changes Lets you apply your changes.
Default Settings Restores the default settings.
Toggle Information Pane Shows or hides the information pane. This pane provides information about the INI option currently highlighted.
Help Displays Help information.
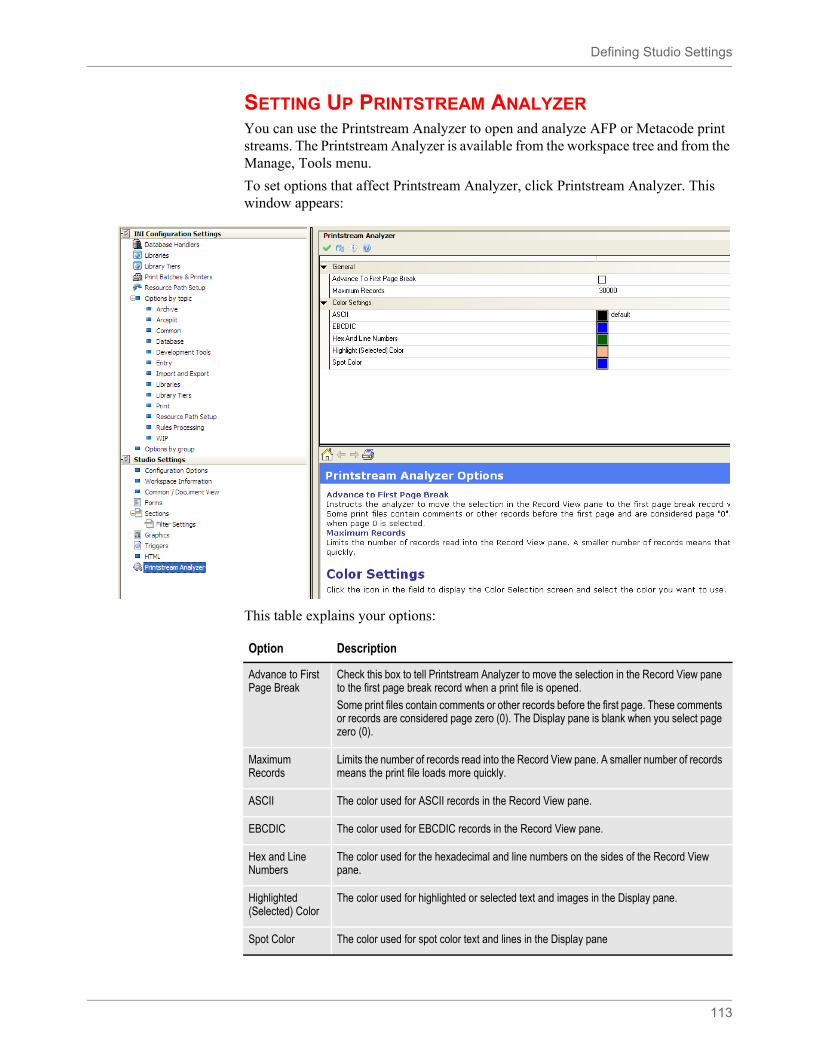
Defining Studio Settings
113
SETTING UP PRINTSTREAM ANALYZERYou can use the Printstream Analyzer to open and analyze AFP or Metacode print streams. The Printstream Analyzer is available from the workspace tree and from the Manage, Tools menu.
To set options that affect Printstream Analyzer, click Printstream Analyzer. This window appears:
This table explains your options:
Option Description
Advance to First Page Break
Check this box to tell Printstream Analyzer to move the selection in the Record View pane to the first page break record when a print file is opened.
Some print files contain comments or other records before the first page. These comments or records are considered page zero (0). The Display pane is blank when you select page zero (0).
Maximum Records
Limits the number of records read into the Record View pane. A smaller number of records means the print file loads more quickly.
ASCII The color used for ASCII records in the Record View pane.
EBCDIC The color used for EBCDIC records in the Record View pane.
Hex and Line Numbers
The color used for the hexadecimal and line numbers on the sides of the Record View pane.
Highlighted (Selected) Color
The color used for highlighted or selected text and images in the Display pane.
Spot Color The color used for spot color text and lines in the Display pane

Defining Studio Settings
114
When you right-click in this window you can choose from these options:
Option Description
Print this Window Prints the contents of the window.
Export this Window to File Lets you copy the contents of this window to a comma separated value (CSV) file.
Apply Changes Lets you apply your changes.
Default Settings Restores the default settings.
Toggle Information Pane Shows or hides the information pane. This pane provides information about the INI option currently highlighted.
Help Displays Help information.
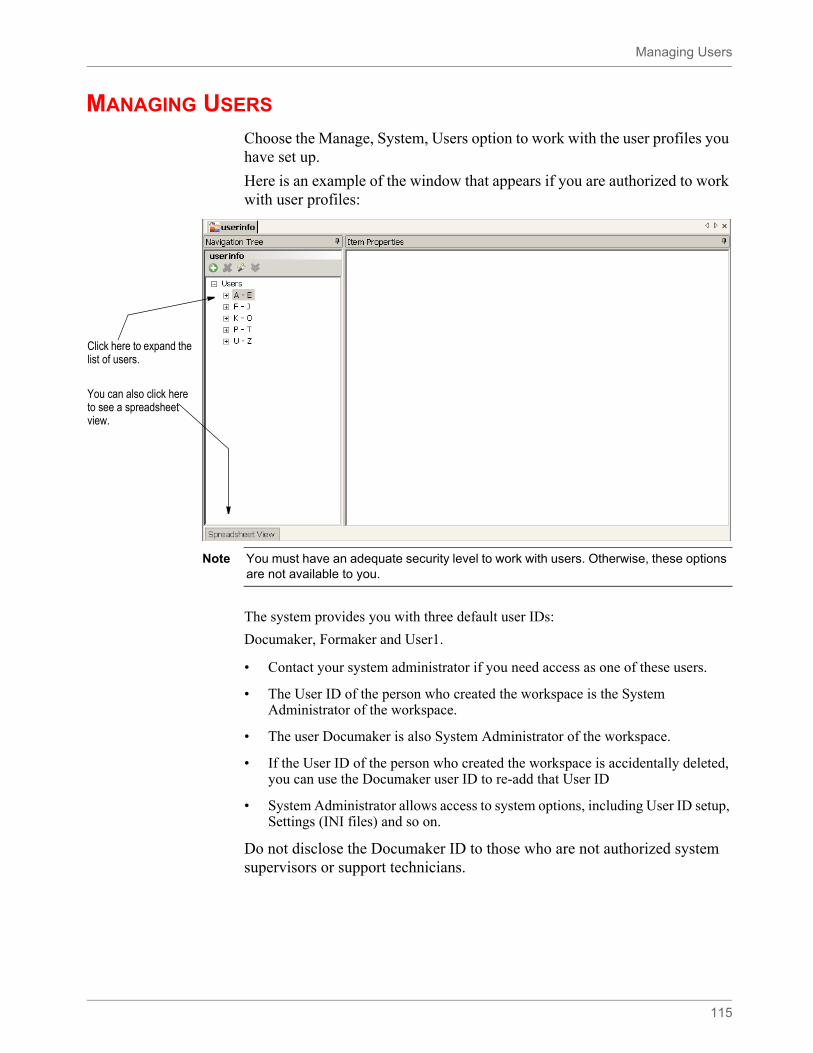
Managing Users
115
MANAGING USERS
Choose the Manage, System, Users option to work with the user profiles you have set up.
Here is an example of the window that appears if you are authorized to work with user profiles:
The system provides you with three default user IDs:
Documaker, Formaker and User1.
• Contact your system administrator if you need access as one of these users.
• The User ID of the person who created the workspace is the System Administrator of the workspace.
• The user Documaker is also System Administrator of the workspace.
• If the User ID of the person who created the workspace is accidentally deleted, you can use the Documaker user ID to re-add that User ID
• System Administrator allows access to system options, including User ID setup, Settings (INI files) and so on.
Do not disclose the Documaker ID to those who are not authorized system supervisors or support technicians.
Click here to expand the list of users.
You can also click here to see a spreadsheet view.
Note You must have an adequate security level to work with users. Otherwise, these options are not available to you.
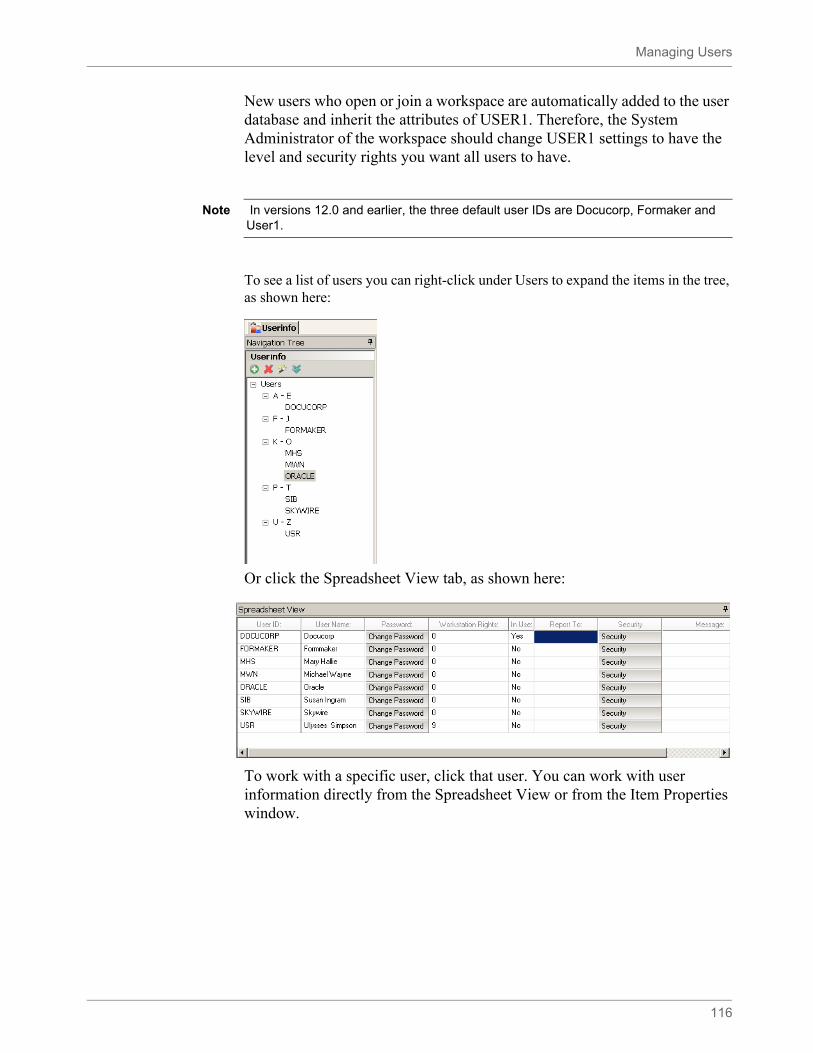
Managing Users
116
New users who open or join a workspace are automatically added to the user database and inherit the attributes of USER1. Therefore, the System Administrator of the workspace should change USER1 settings to have the level and security rights you want all users to have.
To see a list of users you can right-click under Users to expand the items in the tree, as shown here:
Or click the Spreadsheet View tab, as shown here:
To work with a specific user, click that user. You can work with user information directly from the Spreadsheet View or from the Item Properties window.
Note In versions 12.0 and earlier, the three default user IDs are Docucorp, Formaker and User1.
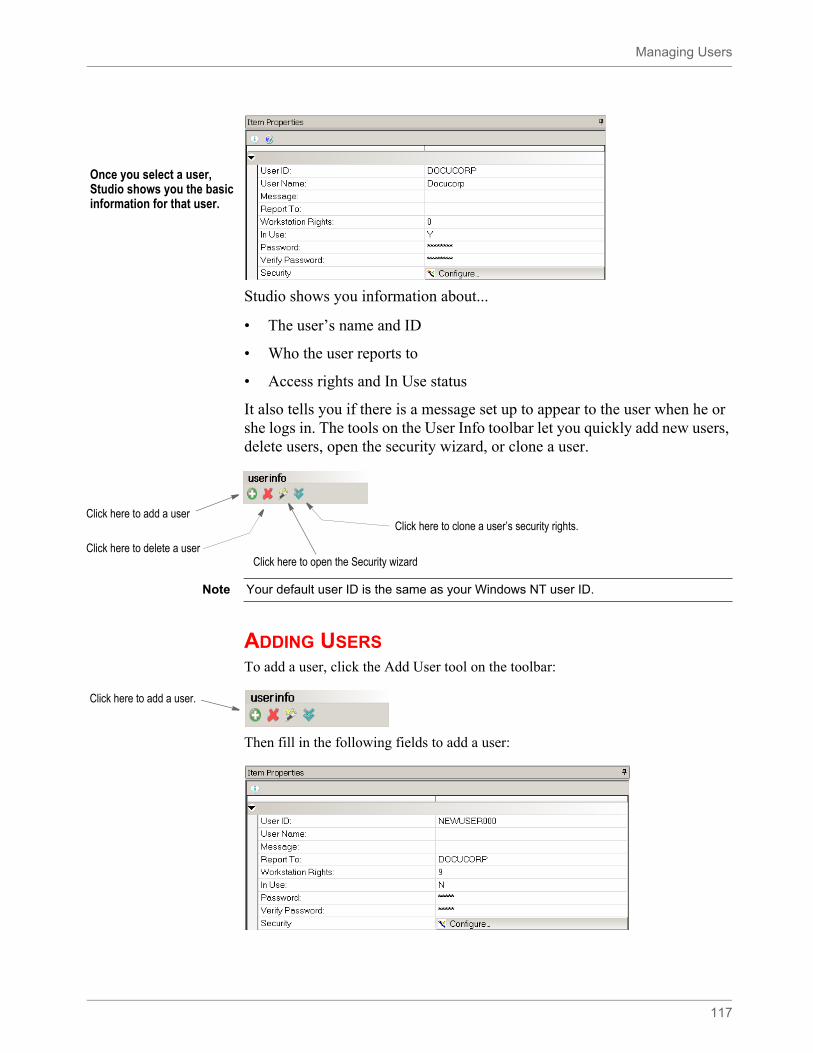
Managing Users
117
Studio shows you information about...
• The user’s name and ID
• Who the user reports to
• Access rights and In Use status
It also tells you if there is a message set up to appear to the user when he or she logs in. The tools on the User Info toolbar let you quickly add new users, delete users, open the security wizard, or clone a user.
ADDING USERSTo add a user, click the Add User tool on the toolbar:
Then fill in the following fields to add a user:
Once you select a user, Studio shows you the basic information for that user.
Click here to add a user
Click here to delete a userClick here to open the Security wizard
Click here to clone a user’s security rights.
Note Your default user ID is the same as your Windows NT user ID.
Click here to add a user.
Managing Users
118
CHANGING USER INFORMATIONTo change a user’s information, select the user and then simply type into the appropriate field. Studio records your changes when you click to another field or user.
Field Description
User ID Enter an ID for the user.
User IDs can contain up to 64 alphanumeric characters. Each ID must be unique.
User Name Enter the user’s full name.
Message Enter the message you want Studio to display to the user when he or she starts Studio.
Report To Select the user's supervisor from the list that appears when you click the arrow.
Workstation Rights
Enter a number between 1 and 9 for the workstation access level. Level zero (0) is reserved for the system supervisor. Docucorp is the default system supervisor.
Studio makes no distinction between levels 1-9, so you can define these levels any way you like.
In Use This field shows whether a user is logged into Studio.
With proper rights, you can change the In Use status, which can be necessary if you need to reset a locked user ID.
User IDs can become locked if the system is shut down inadvertently, such as when there is a loss of power. Once locked, Studio will display a message stating the user ID is already in use the next time that user attempts to log on.
Password Enter the password you want to assign to this user ID. Studio displays asterisks (*) as you type the password.
Verify Password Enter the password again to verify it.
Security Click the Configure button to open the Security wizard. From the Security wizard you can...
• Determine if the user is a system administrator.• Set general user rights, such as the right to manage other users, access your own
record, change passwords, and so on.• Grant access to INI options.• Control library access and the actions the user can perform within the library.• Limit access to the various managers, such as Forms, Section, and Trigger manager.• Define creation rights for fields, triggers, templates, or all resources.• Assign a project role, such as an administrator, developer, tester, reviewer, and so on.
For more information, see Setting Rights Using the Security Wizard on page 119.
Note Studio’s Conversion wizards check the user’s security settings before saving adjustments to INI files.
During conversions, Studio will still adjust INI values as necessary, but the security check prevents Studio from automatically saving those changes, unless you have the proper security settings.
For example, performing conversions from normalized Metacode or AFP to a section (FAP) can alter some INI settings. Those settings are not saved, however, unless the user has the appropriate security rights.
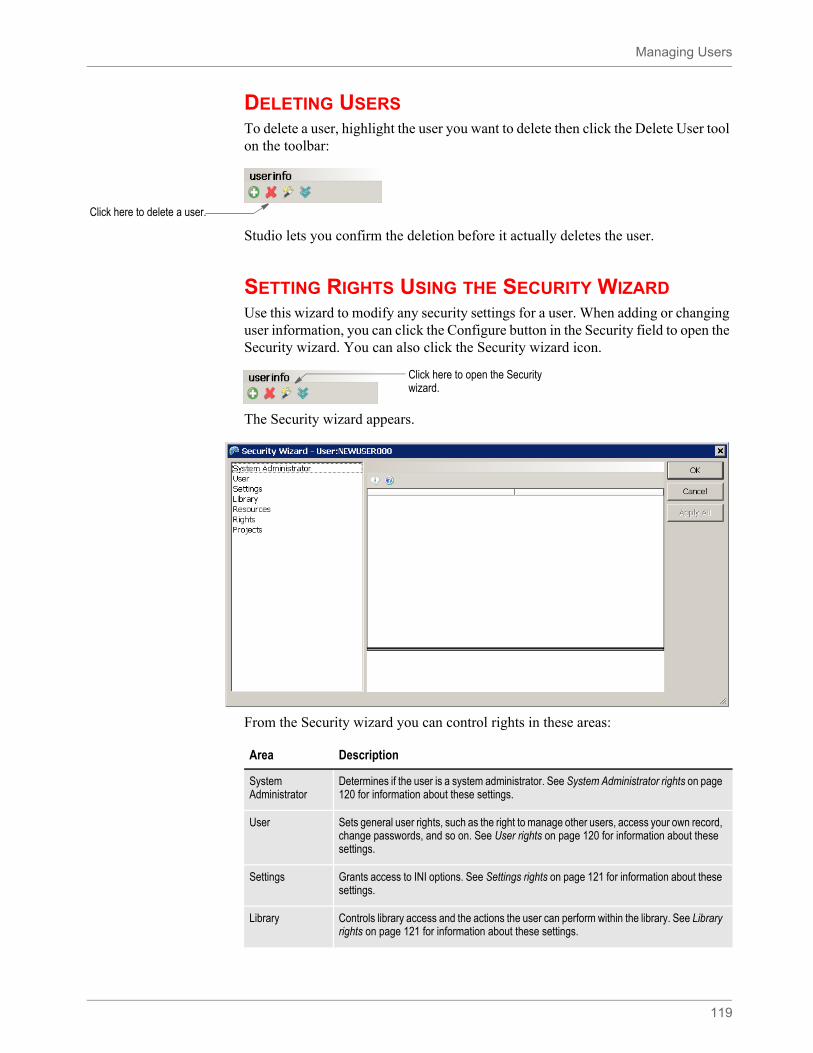
Managing Users
119
DELETING USERSTo delete a user, highlight the user you want to delete then click the Delete User tool on the toolbar:
Studio lets you confirm the deletion before it actually deletes the user.
SETTING RIGHTS USING THE SECURITY WIZARDUse this wizard to modify any security settings for a user. When adding or changing user information, you can click the Configure button in the Security field to open the Security wizard. You can also click the Security wizard icon.
The Security wizard appears.
From the Security wizard you can control rights in these areas:
Click here to delete a user.
Click here to open the Security wizard.
Area Description
System Administrator
Determines if the user is a system administrator. See System Administrator rights on page 120 for information about these settings.
User Sets general user rights, such as the right to manage other users, access your own record, change passwords, and so on. See User rights on page 120 for information about these settings.
Settings Grants access to INI options. See Settings rights on page 121 for information about these settings.
Library Controls library access and the actions the user can perform within the library. See Library rights on page 121 for information about these settings.
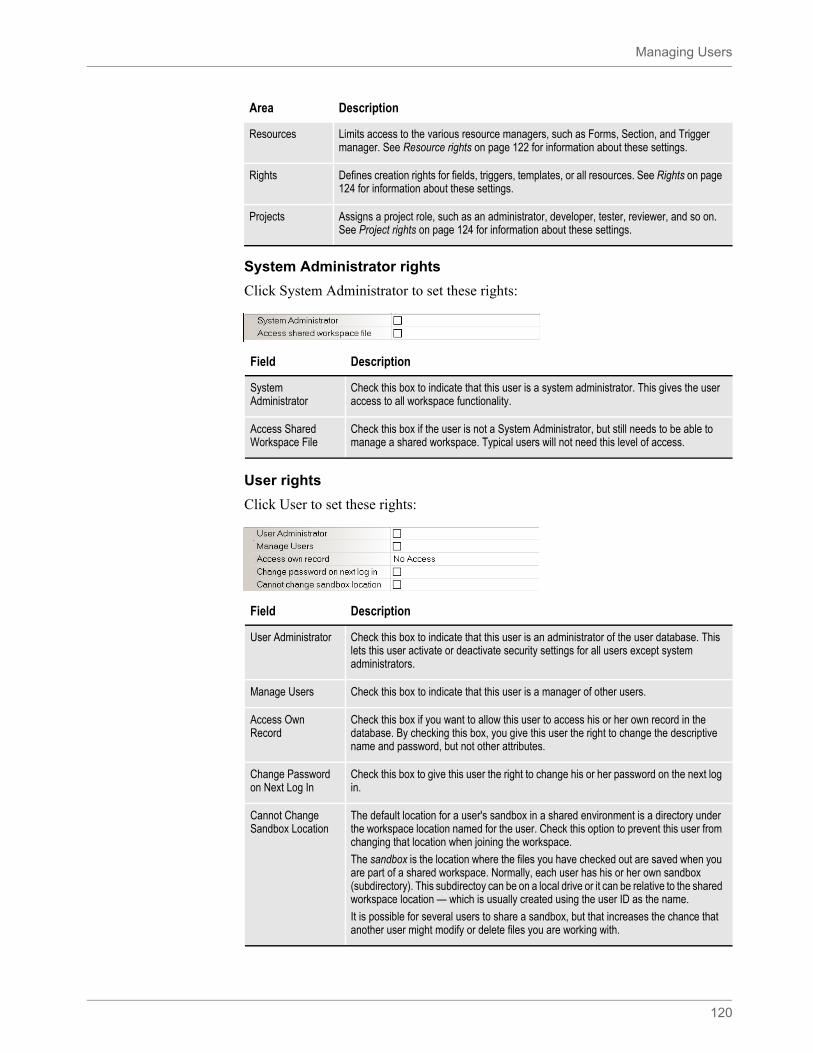
Managing Users
120
System Administrator rights
Click System Administrator to set these rights:
User rights
Click User to set these rights:
Resources Limits access to the various resource managers, such as Forms, Section, and Trigger manager. See Resource rights on page 122 for information about these settings.
Rights Defines creation rights for fields, triggers, templates, or all resources. See Rights on page 124 for information about these settings.
Projects Assigns a project role, such as an administrator, developer, tester, reviewer, and so on. See Project rights on page 124 for information about these settings.
Area Description
Field Description
System Administrator
Check this box to indicate that this user is a system administrator. This gives the user access to all workspace functionality.
Access Shared Workspace File
Check this box if the user is not a System Administrator, but still needs to be able to manage a shared workspace. Typical users will not need this level of access.
Field Description
User Administrator Check this box to indicate that this user is an administrator of the user database. This lets this user activate or deactivate security settings for all users except system administrators.
Manage Users Check this box to indicate that this user is a manager of other users.
Access Own Record
Check this box if you want to allow this user to access his or her own record in the database. By checking this box, you give this user the right to change the descriptive name and password, but not other attributes.
Change Password on Next Log In
Check this box to give this user the right to change his or her password on the next log in.
Cannot Change Sandbox Location
The default location for a user's sandbox in a shared environment is a directory under the workspace location named for the user. Check this option to prevent this user from changing that location when joining the workspace.
The sandbox is the location where the files you have checked out are saved when you are part of a shared workspace. Normally, each user has his or her own sandbox (subdirectory). This subdirectoy can be on a local drive or it can be relative to the shared workspace location — which is usually created using the user ID as the name.
It is possible for several users to share a sandbox, but that increases the chance that another user might modify or delete files you are working with.

Managing Users
121
Settings rights
Click Settings to set these rights:
Library rights
Click Library to set these rights:
Field Description
INI Access Check this box if you want this user to change INI option settings.
INI options tell the system how you want it to operate. These options are stored in these INI files: FSISYS.INI and FSIUSER.INI. For more information, see Working With INI Options on page 77.
Override Settings Check this box if you want to let this user override system settings by adding local settings.
Field Description
Library Administrator
Check this box if you want to make this user a library administrator. Library administrators have access to all library functionality.
Limited Property Modifications
Check this box if you want this user to modify the description, mode, status, class and project attributes of library resources.
Perform Promotions Check this box if you want this user to promote resources within the library.
Delete Library Entries
Check this box if you want this user to delete library entries.
Make Effective Date Changes
Check this box if you want this user to change the effective dates of resources stored in the library.
Modify Prior Versions
Check this box if you want this user to modify prior versions of a library resource.
Collapse Revisions Check this box if you want this user to collapse library revisions.
Note: Collapsing library revisions deletes those revisions.
Expire/Unexpire Versions
Check this box if you want this user to expire and unexpire library resources.
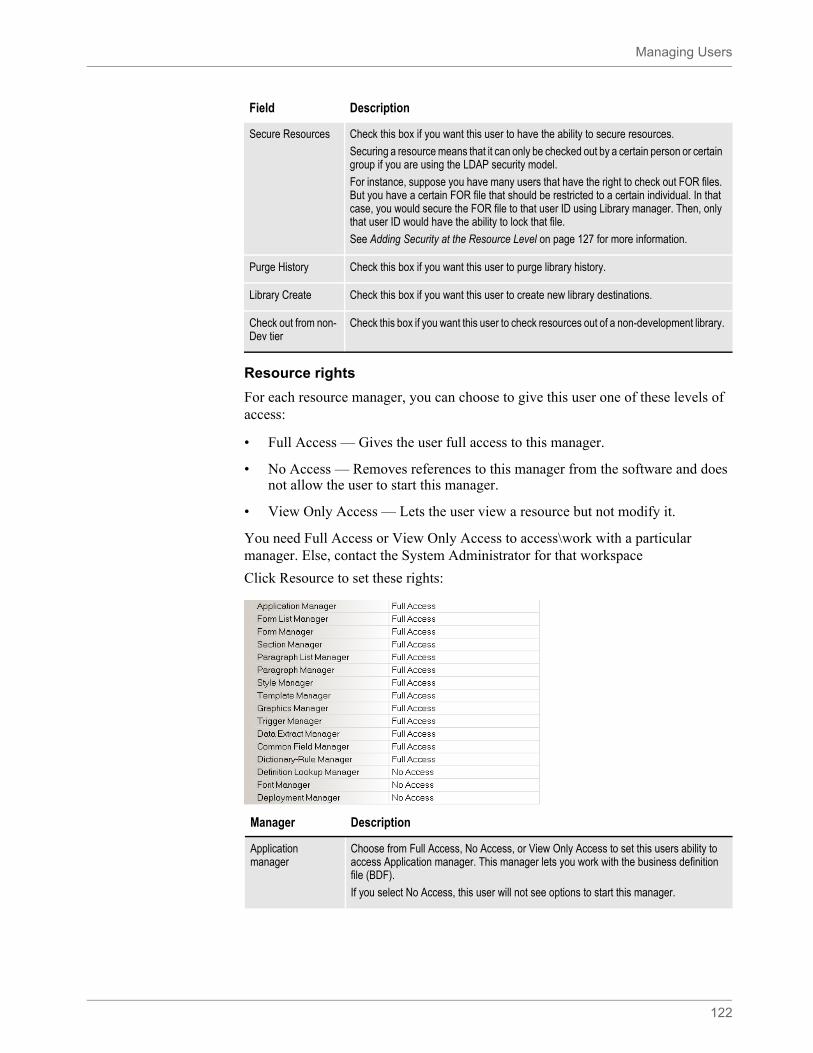
Managing Users
122
Resource rights
For each resource manager, you can choose to give this user one of these levels of access:
• Full Access — Gives the user full access to this manager.
• No Access — Removes references to this manager from the software and does not allow the user to start this manager.
• View Only Access — Lets the user view a resource but not modify it.
You need Full Access or View Only Access to access\work with a particular manager. Else, contact the System Administrator for that workspace
Click Resource to set these rights:
Secure Resources Check this box if you want this user to have the ability to secure resources.
Securing a resource means that it can only be checked out by a certain person or certain group if you are using the LDAP security model.
For instance, suppose you have many users that have the right to check out FOR files. But you have a certain FOR file that should be restricted to a certain individual. In that case, you would secure the FOR file to that user ID using Library manager. Then, only that user ID would have the ability to lock that file.
See Adding Security at the Resource Level on page 127 for more information.
Purge History Check this box if you want this user to purge library history.
Library Create Check this box if you want this user to create new library destinations.
Check out from non-Dev tier
Check this box if you want this user to check resources out of a non-development library.
Field Description
Manager Description
Application manager
Choose from Full Access, No Access, or View Only Access to set this users ability to access Application manager. This manager lets you work with the business definition file (BDF).
If you select No Access, this user will not see options to start this manager.
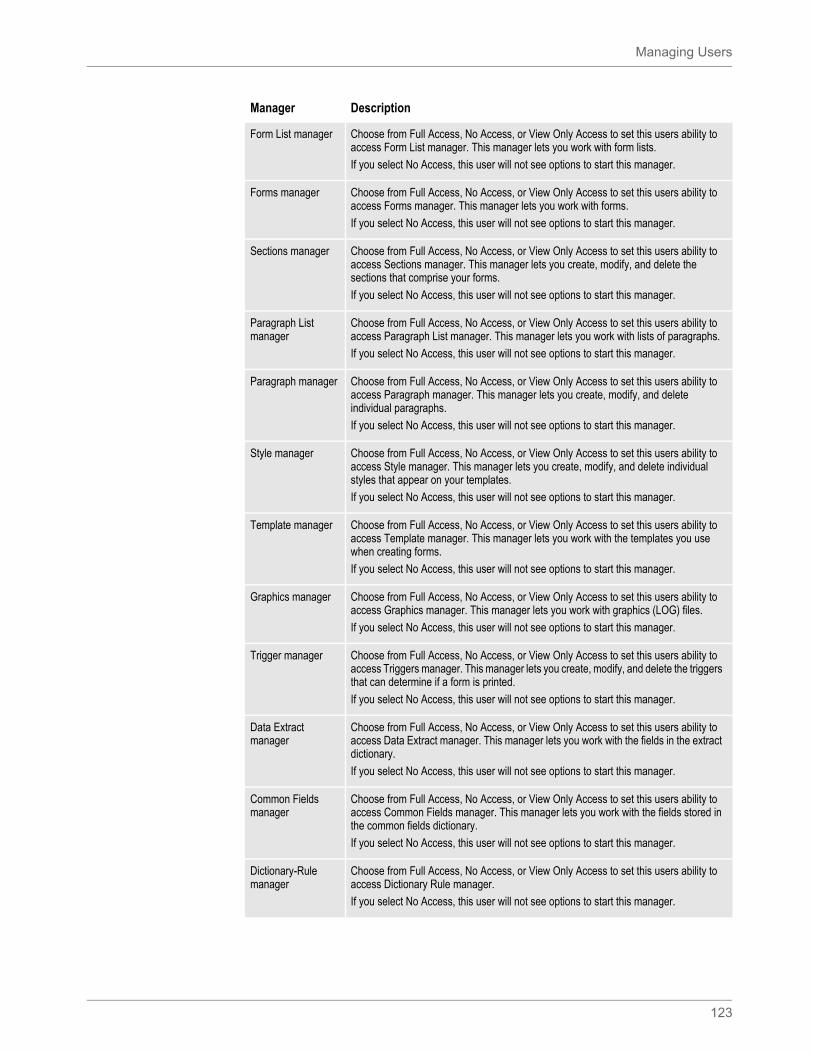
Managing Users
123
Form List manager Choose from Full Access, No Access, or View Only Access to set this users ability to access Form List manager. This manager lets you work with form lists.
If you select No Access, this user will not see options to start this manager.
Forms manager Choose from Full Access, No Access, or View Only Access to set this users ability to access Forms manager. This manager lets you work with forms.
If you select No Access, this user will not see options to start this manager.
Sections manager Choose from Full Access, No Access, or View Only Access to set this users ability to access Sections manager. This manager lets you create, modify, and delete the sections that comprise your forms.
If you select No Access, this user will not see options to start this manager.
Paragraph List manager
Choose from Full Access, No Access, or View Only Access to set this users ability to access Paragraph List manager. This manager lets you work with lists of paragraphs.
If you select No Access, this user will not see options to start this manager.
Paragraph manager Choose from Full Access, No Access, or View Only Access to set this users ability to access Paragraph manager. This manager lets you create, modify, and delete individual paragraphs.
If you select No Access, this user will not see options to start this manager.
Style manager Choose from Full Access, No Access, or View Only Access to set this users ability to access Style manager. This manager lets you create, modify, and delete individual styles that appear on your templates.
If you select No Access, this user will not see options to start this manager.
Template manager Choose from Full Access, No Access, or View Only Access to set this users ability to access Template manager. This manager lets you work with the templates you use when creating forms.
If you select No Access, this user will not see options to start this manager.
Graphics manager Choose from Full Access, No Access, or View Only Access to set this users ability to access Graphics manager. This manager lets you work with graphics (LOG) files.
If you select No Access, this user will not see options to start this manager.
Trigger manager Choose from Full Access, No Access, or View Only Access to set this users ability to access Triggers manager. This manager lets you create, modify, and delete the triggers that can determine if a form is printed.
If you select No Access, this user will not see options to start this manager.
Data Extract manager
Choose from Full Access, No Access, or View Only Access to set this users ability to access Data Extract manager. This manager lets you work with the fields in the extract dictionary.
If you select No Access, this user will not see options to start this manager.
Common Fields manager
Choose from Full Access, No Access, or View Only Access to set this users ability to access Common Fields manager. This manager lets you work with the fields stored in the common fields dictionary.
If you select No Access, this user will not see options to start this manager.
Dictionary-Rule manager
Choose from Full Access, No Access, or View Only Access to set this users ability to access Dictionary Rule manager.
If you select No Access, this user will not see options to start this manager.
Manager Description
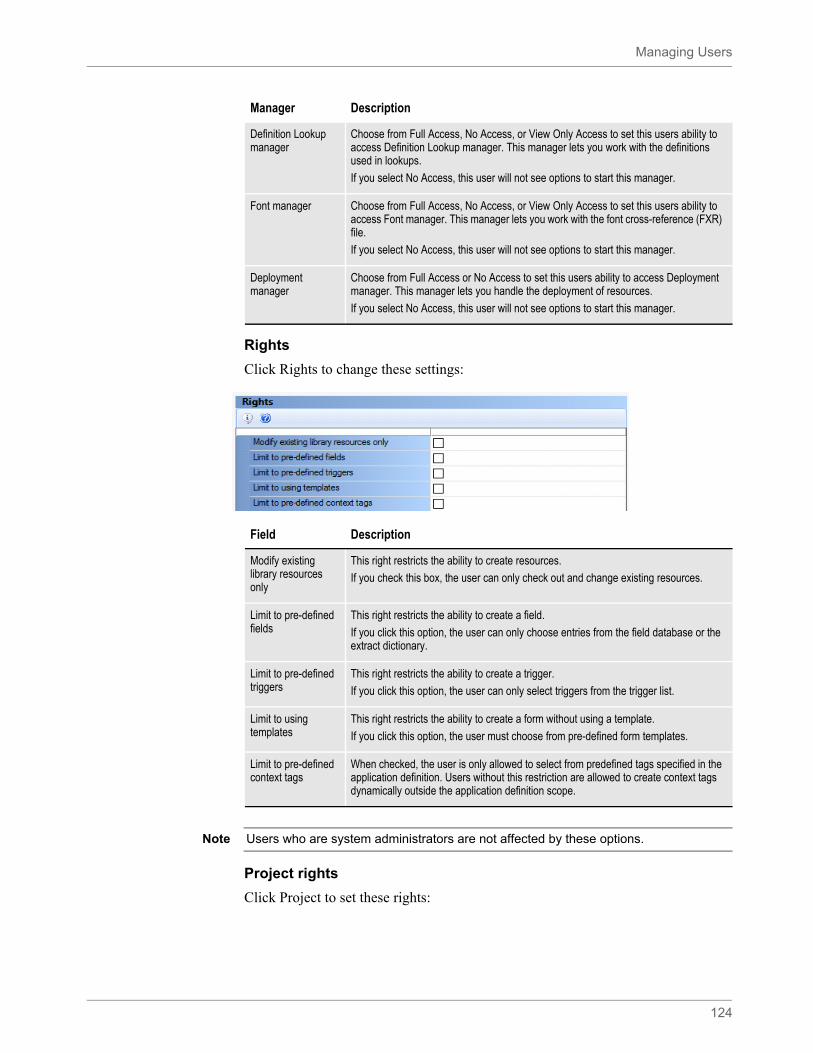
Managing Users
124
Rights
Click Rights to change these settings:
Project rights
Click Project to set these rights:
Definition Lookup manager
Choose from Full Access, No Access, or View Only Access to set this users ability to access Definition Lookup manager. This manager lets you work with the definitions used in lookups.
If you select No Access, this user will not see options to start this manager.
Font manager Choose from Full Access, No Access, or View Only Access to set this users ability to access Font manager. This manager lets you work with the font cross-reference (FXR) file.
If you select No Access, this user will not see options to start this manager.
Deployment manager
Choose from Full Access or No Access to set this users ability to access Deployment manager. This manager lets you handle the deployment of resources.
If you select No Access, this user will not see options to start this manager.
Manager Description
Field Description
Modify existing library resources only
This right restricts the ability to create resources.
If you check this box, the user can only check out and change existing resources.
Limit to pre-defined fields
This right restricts the ability to create a field.
If you click this option, the user can only choose entries from the field database or the extract dictionary.
Limit to pre-defined triggers
This right restricts the ability to create a trigger.
If you click this option, the user can only select triggers from the trigger list.
Limit to using templates
This right restricts the ability to create a form without using a template.
If you click this option, the user must choose from pre-defined form templates.
Limit to pre-defined context tags
When checked, the user is only allowed to select from predefined tags specified in the application definition. Users without this restriction are allowed to create context tags dynamically outside the application definition scope.
Note Users who are system administrators are not affected by these options.
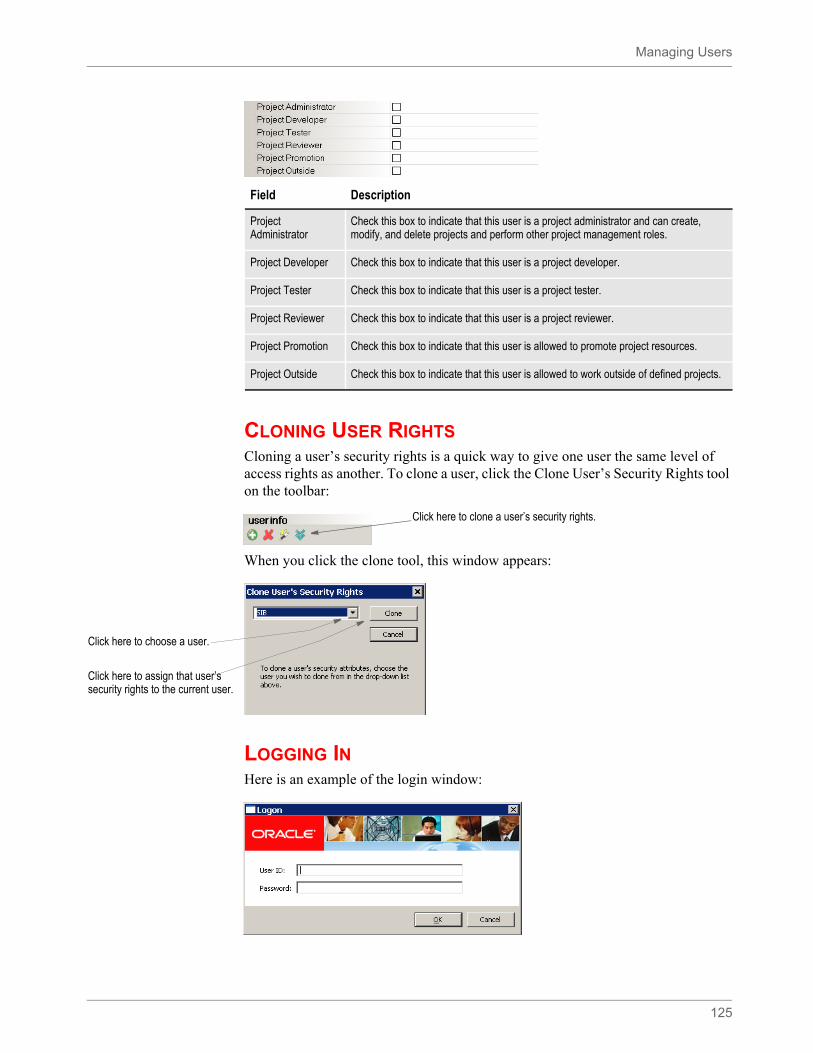
Managing Users
125
CLONING USER RIGHTSCloning a user’s security rights is a quick way to give one user the same level of access rights as another. To clone a user, click the Clone User’s Security Rights tool on the toolbar:
When you click the clone tool, this window appears:
LOGGING INHere is an example of the login window:
Field Description
Project Administrator
Check this box to indicate that this user is a project administrator and can create, modify, and delete projects and perform other project management roles.
Project Developer Check this box to indicate that this user is a project developer.
Project Tester Check this box to indicate that this user is a project tester.
Project Reviewer Check this box to indicate that this user is a project reviewer.
Project Promotion Check this box to indicate that this user is allowed to promote project resources.
Project Outside Check this box to indicate that this user is allowed to work outside of defined projects.
Click here to clone a user’s security rights.
Click here to choose a user.
Click here to assign that user’s security rights to the current user.
Storing User Information in Another Database
126
STORING USER INFORMATION IN ANOTHER DATABASE
By default, the system stores user information in xBase format. You can, however, store user information in SQL or another database format. For example, to use SQL via an ODBC connection to store user IDs, here is how you would set up your INI file:
< DBHandler:ODBC >Debug = YesInstallFunc = SQInstallHandlerInstallMod = SQW32CreateIndex = NoCreateTable = YesUserID = saPasswd = passwordQualifier = dms1Server = wipdata
Use these options to specify the database type:
The DBTable:USERINFOSQL control group defines the USERINFOSQL table. This is the custom SQL table the system will create if it does not already exist:
< DBTable:USERINFOSQL >DBHandler = ODBCUniqueIDTag = UNIQUEIDTAGUniqueTag = IDTAGDefaultTag = UNIQUEIDTAGDebug = Yes
If you are using ODBC, the File option should specify the name of the table in the database to use. USERINFOSQL is the custom SQL table that will be created if not present.
< UserInfo >File = USERINFOSQLSupportSuperUser = Yes
Use these options to import user IDs from a default xBase userinfo.dbf file, a comma-delimited text file, or an SQL table:
< UserImportFunctions >01 = ;Text file;USRMAINT->USRImportText;02 = ;Another UserInfo database;USRMAINT->USRImportDBF;03 = ;Another database using ODBC;USRMAINT->USRImportODBC;
\DBTable:UserInfo_1
Note that the 01 option specifies the name of the table you are importing.
Option Description
Qualifier Enter the name of the database that will hold the table.
Server Enter the name of the ODBC connection you made to connect to the database.
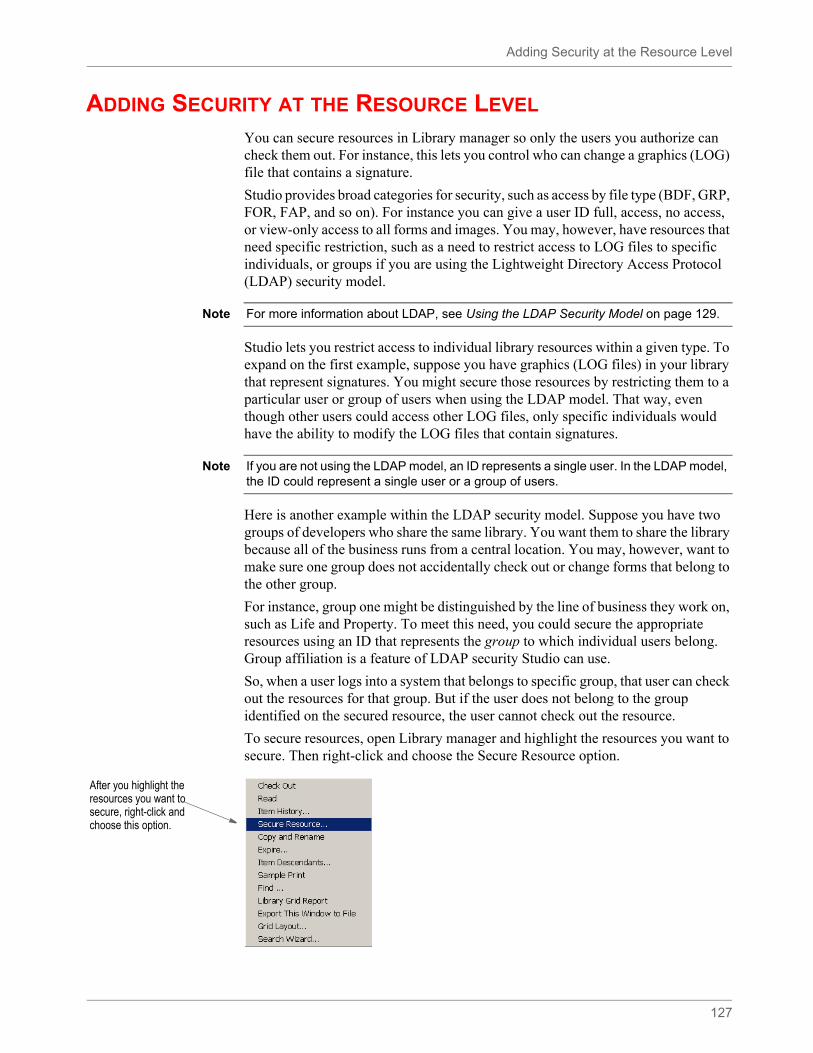
Adding Security at the Resource Level
127
ADDING SECURITY AT THE RESOURCE LEVEL
You can secure resources in Library manager so only the users you authorize can check them out. For instance, this lets you control who can change a graphics (LOG) file that contains a signature.
Studio provides broad categories for security, such as access by file type (BDF, GRP, FOR, FAP, and so on). For instance you can give a user ID full, access, no access, or view-only access to all forms and images. You may, however, have resources that need specific restriction, such as a need to restrict access to LOG files to specific individuals, or groups if you are using the Lightweight Directory Access Protocol (LDAP) security model.
Studio lets you restrict access to individual library resources within a given type. To expand on the first example, suppose you have graphics (LOG files) in your library that represent signatures. You might secure those resources by restricting them to a particular user or group of users when using the LDAP model. That way, even though other users could access other LOG files, only specific individuals would have the ability to modify the LOG files that contain signatures.
Here is another example within the LDAP security model. Suppose you have two groups of developers who share the same library. You want them to share the library because all of the business runs from a central location. You may, however, want to make sure one group does not accidentally check out or change forms that belong to the other group.
For instance, group one might be distinguished by the line of business they work on, such as Life and Property. To meet this need, you could secure the appropriate resources using an ID that represents the group to which individual users belong. Group affiliation is a feature of LDAP security Studio can use.
So, when a user logs into a system that belongs to specific group, that user can check out the resources for that group. But if the user does not belong to the group identified on the secured resource, the user cannot check out the resource.
To secure resources, open Library manager and highlight the resources you want to secure. Then right-click and choose the Secure Resource option.
Note For more information about LDAP, see Using the LDAP Security Model on page 129.
Note If you are not using the LDAP model, an ID represents a single user. In the LDAP model, the ID could represent a single user or a group of users.
After you highlight the resources you want to secure, right-click and choose this option.
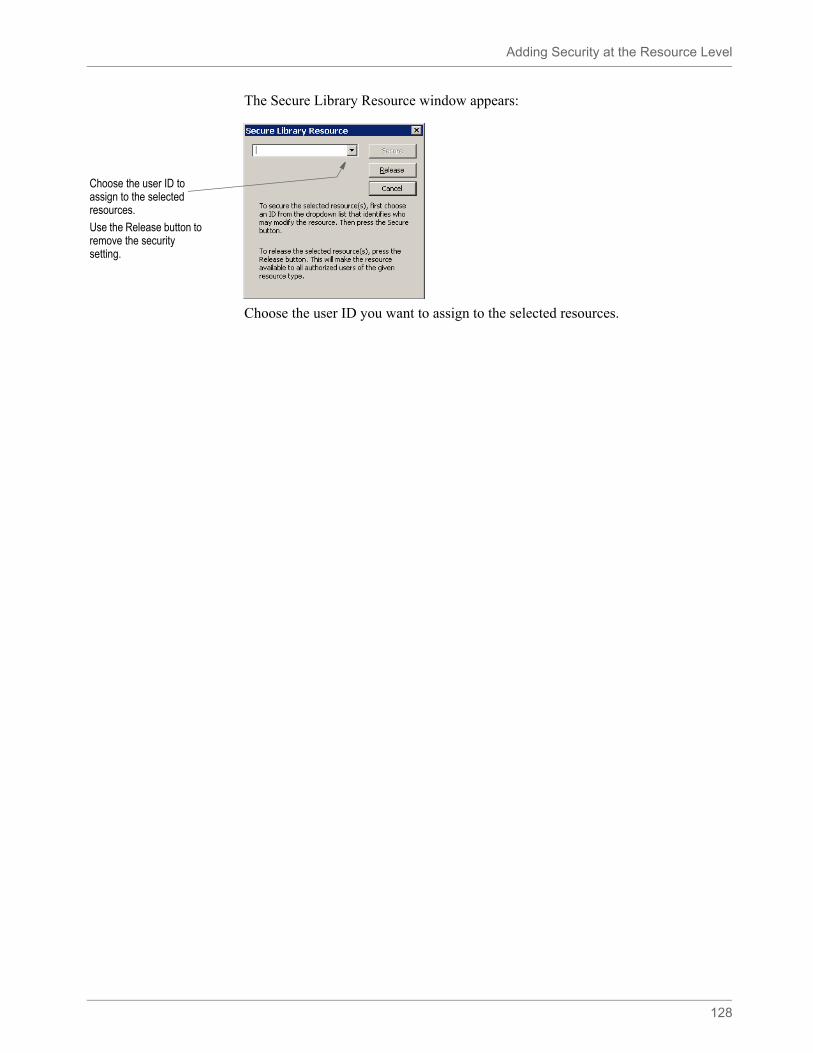
Adding Security at the Resource Level
128
The Secure Library Resource window appears:
Choose the user ID you want to assign to the selected resources.
Choose the user ID to assign to the selected resources.
Use the Release button to remove the security setting.
Using the LDAP Security Model
129
USING THE LDAP SECURITY MODEL
Documaker Studio works with LDAP (Lightweight Directory Access Protocol) to provide group-level security. Studio supports any LDAP-compliant Directory Information Tree, such as Active Directory.
When using LDAP security, Studio automatically queries the server for a list of groups to which the user belongs. Studio then looks up each of those group names in its USERINFO database.
For each group name that exists in the USERINFO database, Studio merges the security rights of that group into the current user. This way, you can belong to multiple groups and will end up with combined security options — so you get the most security rights possible.
If no matching group for a given user is found in the USERINFO database, that user will not be allowed into the workspace. This differs from the standard user model where an unknown user is permitted access by copying the USER1 security rights, which are presumably set with the lowest possible settings. Using the LDAP model, however, unknown users are not allowed into the workspace.
For instance, suppose when using LDAP that JOE is a member of these groups:
• USERS
• FORMDESIGN
• ADMIN
Further suppose the following LDAP group identities were defined in the USERINFO database. Next to each name is listed some security attributes assigned.
When JOE enters the workspace, Studio queries his groups from LDAP and gets USERS, FORMDESIGN, and ADMIN. USERS does nothing for him since it is not defined in the USERINFO database. After finding FORMDESIGN and ADMIN, JOE is accorded the rights of a library administrator and normal file access to the rest of the system. He is not, however, recognized as a system administrator and that might have other restrictions outside of library management — depending on the other settings applied.
Suppose tomorrow, JOE's job changes and you assign him to the SYSADMIN group, but remove him from the FORMDESIGN group. Now, when JOE logs in, he is assigned as a SYSADMIN, which gives him the ability to do anything in the system with no restrictions.
Note Any group name returned that does not exist in the USERINFO database is ignored.
Identity Description
FORMDESIGN Normal access to FOR, FAP, and other files, but not a library administrator, or system administrator.
ADMIN A library administrator, but not a system administrator
SYSADMIN A system administrator
Using the LDAP Security Model
130
But if you remove some groups from JOE and only leave him in USERS, then he would not be able to enter the workspace any longer because USERS is not a known user within Studio’s USERINFO database.
Setting up LDAP
To enable LDAP support, set the LDAP_Enabled option to Yes:
< Environment >LDAP_Enabled = Yes
After you set the LDAP_Enabled option, set up the following options in the LDAP control group:
Option Description
LDAP_Enabled Enter Yes to tell Studio to ignore its normal logon procedures and verify users via LDAP.
Option Description
LDAP.HOST (Optional) The host name or IP address of the LDAP server. The default is localhost.
LDAP.PORT (Optional) The port in which the LDAP server is listening on. The default is 389 when SSL is not used, 636 otherwise (see the LDAP.USE.SSL option).
LDAP.URL (Optional) The URL the LDAP server is listening on. If a value is specified for this option, it overrides the values specified for LDAP.HOST and LDAP.PORT.
LDAP.UID (Optional) The user ID for logging onto the LDAP server. If this value is provided and LDAP.USER is not provided, the user ID is derived from this value and the value provided for LDAP.DOMAIN option. Here is an example:
LDAP.USER (optional) An explicit value to use for the user ID for the purpose of login into the LDAP server. Define this option to override the behavior used to determine the user ID when LDAP.UID and LDAP.DOMAIN are defined — see LDAP.DOMAIN.
LDAP.PWD (Optional) The password used to login into the LDAP server.
LDAP.AUTHENTICATION.MODE
(Optional) The method of authentication used to login into the LDAP server. You can choose from these options:
• (simple) which provides clear-text password authentication • (none) which provides anonymous authentication.
The default is (simple).
LDAP.TIMEOUT (Optional) The amount of time (in milliseconds) after which a connection attempt or query should expire.
The default is 10000 (10 seconds).
LDAP.SEARCH.BASE (Optional) The base of the search in the DIT (Directory Information Tree). This is the starting point (node location) of a search in the DIT. If you omit this option, the system looks for the LDAP.DOMAIN option and builds a search base from it.
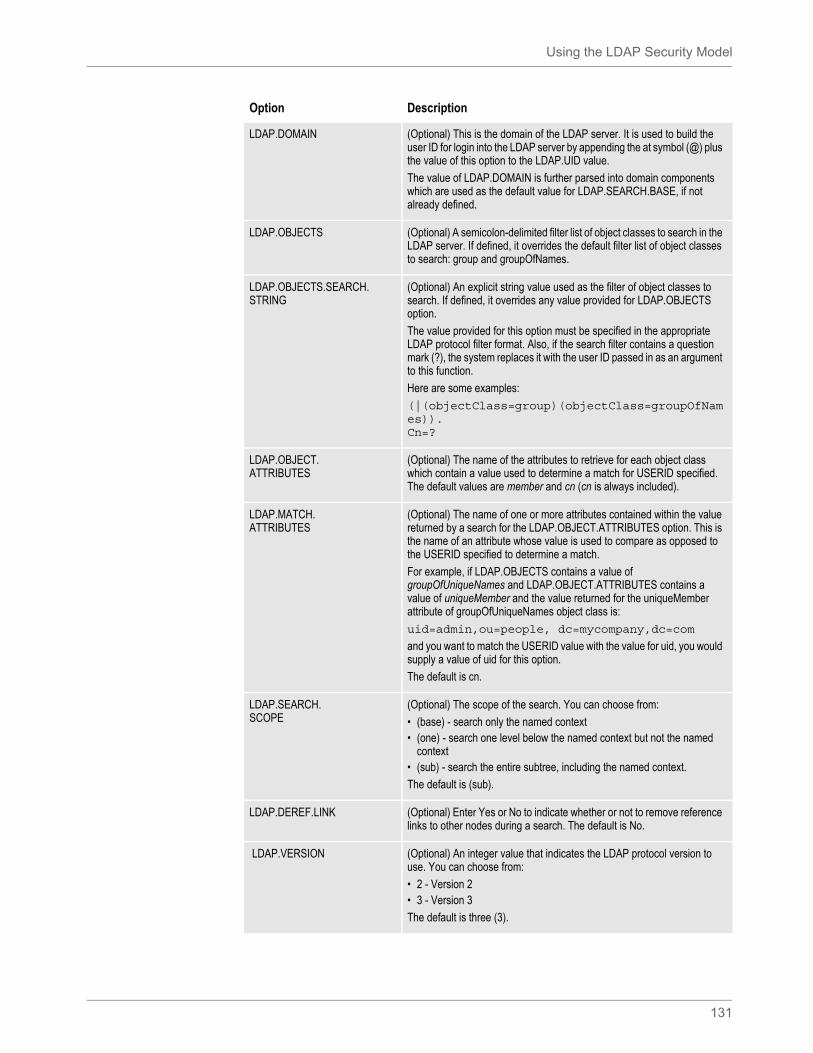
Using the LDAP Security Model
131
LDAP.DOMAIN (Optional) This is the domain of the LDAP server. It is used to build the user ID for login into the LDAP server by appending the at symbol (@) plus the value of this option to the LDAP.UID value.
The value of LDAP.DOMAIN is further parsed into domain components which are used as the default value for LDAP.SEARCH.BASE, if not already defined.
LDAP.OBJECTS (Optional) A semicolon-delimited filter list of object classes to search in the LDAP server. If defined, it overrides the default filter list of object classes to search: group and groupOfNames.
LDAP.OBJECTS.SEARCH.STRING
(Optional) An explicit string value used as the filter of object classes to search. If defined, it overrides any value provided for LDAP.OBJECTS option.
The value provided for this option must be specified in the appropriate LDAP protocol filter format. Also, if the search filter contains a question mark (?), the system replaces it with the user ID passed in as an argument to this function.
Here are some examples:
(|(objectClass=group)(objectClass=groupOfNames)).Cn=?
LDAP.OBJECT.ATTRIBUTES
(Optional) The name of the attributes to retrieve for each object class which contain a value used to determine a match for USERID specified. The default values are member and cn (cn is always included).
LDAP.MATCH.ATTRIBUTES
(Optional) The name of one or more attributes contained within the value returned by a search for the LDAP.OBJECT.ATTRIBUTES option. This is the name of an attribute whose value is used to compare as opposed to the USERID specified to determine a match.
For example, if LDAP.OBJECTS contains a value of groupOfUniqueNames and LDAP.OBJECT.ATTRIBUTES contains a value of uniqueMember and the value returned for the uniqueMember attribute of groupOfUniqueNames object class is:
uid=admin,ou=people, dc=mycompany,dc=com
and you want to match the USERID value with the value for uid, you would supply a value of uid for this option.
The default is cn.
LDAP.SEARCH.SCOPE
(Optional) The scope of the search. You can choose from:
• (base) - search only the named context• (one) - search one level below the named context but not the named
context• (sub) - search the entire subtree, including the named context.
The default is (sub).
LDAP.DEREF.LINK (Optional) Enter Yes or No to indicate whether or not to remove reference links to other nodes during a search. The default is No.
LDAP.VERSION (Optional) An integer value that indicates the LDAP protocol version to use. You can choose from:
• 2 - Version 2• 3 - Version 3
The default is three (3).
Option Description
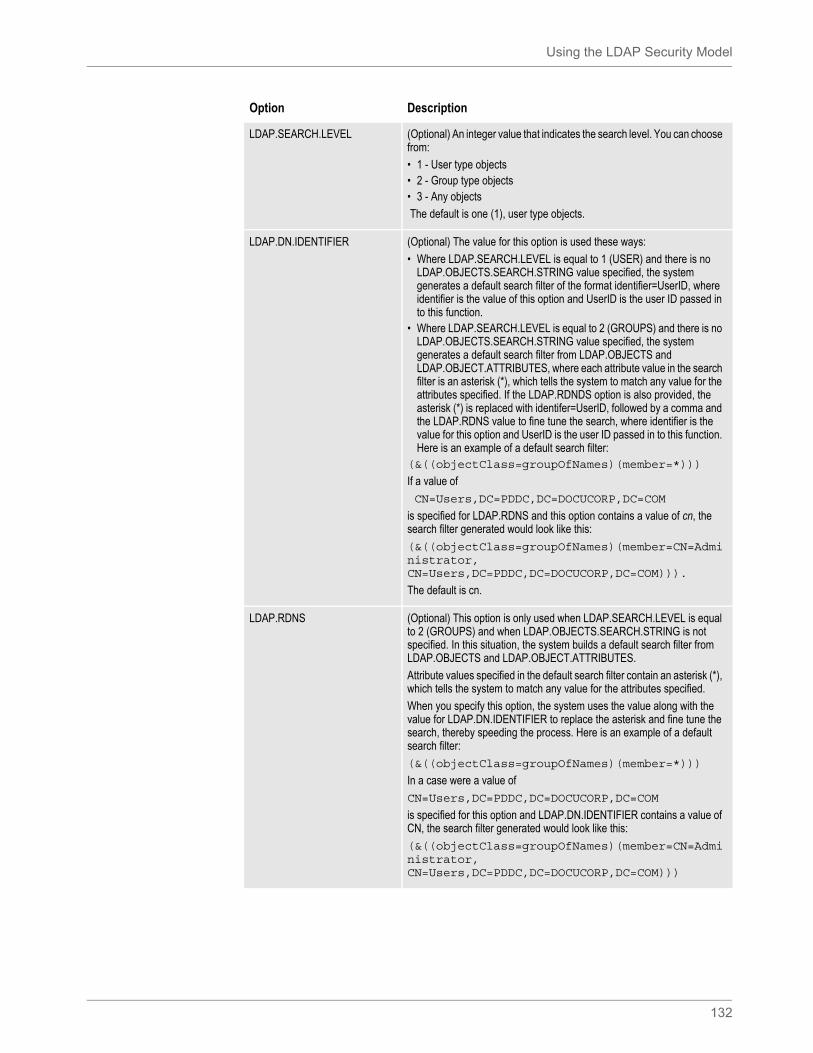
Using the LDAP Security Model
132
LDAP.SEARCH.LEVEL (Optional) An integer value that indicates the search level. You can choose from:
• 1 - User type objects• 2 - Group type objects• 3 - Any objects
The default is one (1), user type objects.
LDAP.DN.IDENTIFIER (Optional) The value for this option is used these ways:
• Where LDAP.SEARCH.LEVEL is equal to 1 (USER) and there is no LDAP.OBJECTS.SEARCH.STRING value specified, the system generates a default search filter of the format identifier=UserID, where identifier is the value of this option and UserID is the user ID passed in to this function.
• Where LDAP.SEARCH.LEVEL is equal to 2 (GROUPS) and there is no LDAP.OBJECTS.SEARCH.STRING value specified, the system generates a default search filter from LDAP.OBJECTS and LDAP.OBJECT.ATTRIBUTES, where each attribute value in the search filter is an asterisk (*), which tells the system to match any value for the attributes specified. If the LDAP.RDNDS option is also provided, the asterisk (*) is replaced with identifer=UserID, followed by a comma and the LDAP.RDNS value to fine tune the search, where identifier is the value for this option and UserID is the user ID passed in to this function. Here is an example of a default search filter:
(&((objectClass=groupOfNames)(member=*)))
If a value of
CN=Users,DC=PDDC,DC=DOCUCORP,DC=COM
is specified for LDAP.RDNS and this option contains a value of cn, the search filter generated would look like this:
(&((objectClass=groupOfNames)(member=CN=Administrator,CN=Users,DC=PDDC,DC=DOCUCORP,DC=COM))).
The default is cn.
LDAP.RDNS (Optional) This option is only used when LDAP.SEARCH.LEVEL is equal to 2 (GROUPS) and when LDAP.OBJECTS.SEARCH.STRING is not specified. In this situation, the system builds a default search filter from LDAP.OBJECTS and LDAP.OBJECT.ATTRIBUTES.
Attribute values specified in the default search filter contain an asterisk (*), which tells the system to match any value for the attributes specified.
When you specify this option, the system uses the value along with the value for LDAP.DN.IDENTIFIER to replace the asterisk and fine tune the search, thereby speeding the process. Here is an example of a default search filter:
(&((objectClass=groupOfNames)(member=*)))
In a case were a value of
CN=Users,DC=PDDC,DC=DOCUCORP,DC=COM
is specified for this option and LDAP.DN.IDENTIFIER contains a value of CN, the search filter generated would look like this:
(&((objectClass=groupOfNames)(member=CN=Administrator,CN=Users,DC=PDDC,DC=DOCUCORP,DC=COM)))
Option Description
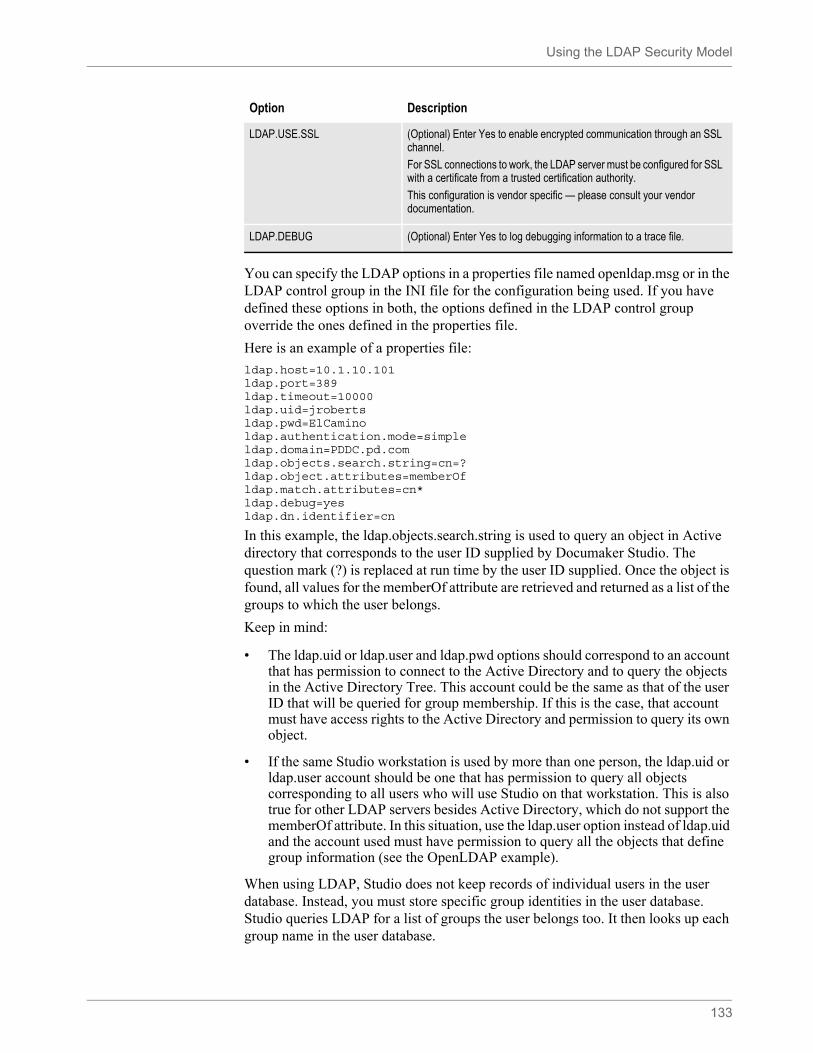
Using the LDAP Security Model
133
You can specify the LDAP options in a properties file named openldap.msg or in the LDAP control group in the INI file for the configuration being used. If you have defined these options in both, the options defined in the LDAP control group override the ones defined in the properties file.
Here is an example of a properties file:
ldap.host=10.1.10.101ldap.port=389ldap.timeout=10000ldap.uid=jrobertsldap.pwd=ElCaminoldap.authentication.mode=simpleldap.domain=PDDC.pd.comldap.objects.search.string=cn=?ldap.object.attributes=memberOfldap.match.attributes=cn*ldap.debug=yesldap.dn.identifier=cn
In this example, the ldap.objects.search.string is used to query an object in Active directory that corresponds to the user ID supplied by Documaker Studio. The question mark (?) is replaced at run time by the user ID supplied. Once the object is found, all values for the memberOf attribute are retrieved and returned as a list of the groups to which the user belongs.
Keep in mind:
• The ldap.uid or ldap.user and ldap.pwd options should correspond to an account that has permission to connect to the Active Directory and to query the objects in the Active Directory Tree. This account could be the same as that of the user ID that will be queried for group membership. If this is the case, that account must have access rights to the Active Directory and permission to query its own object.
• If the same Studio workstation is used by more than one person, the ldap.uid or ldap.user account should be one that has permission to query all objects corresponding to all users who will use Studio on that workstation. This is also true for other LDAP servers besides Active Directory, which do not support the memberOf attribute. In this situation, use the ldap.user option instead of ldap.uid and the account used must have permission to query all the objects that define group information (see the OpenLDAP example).
When using LDAP, Studio does not keep records of individual users in the user database. Instead, you must store specific group identities in the user database. Studio queries LDAP for a list of groups the user belongs too. It then looks up each group name in the user database.
LDAP.USE.SSL (Optional) Enter Yes to enable encrypted communication through an SSL channel.
For SSL connections to work, the LDAP server must be configured for SSL with a certificate from a trusted certification authority.
This configuration is vendor specific — please consult your vendor documentation.
LDAP.DEBUG (Optional) Enter Yes to log debugging information to a trace file.
Option Description
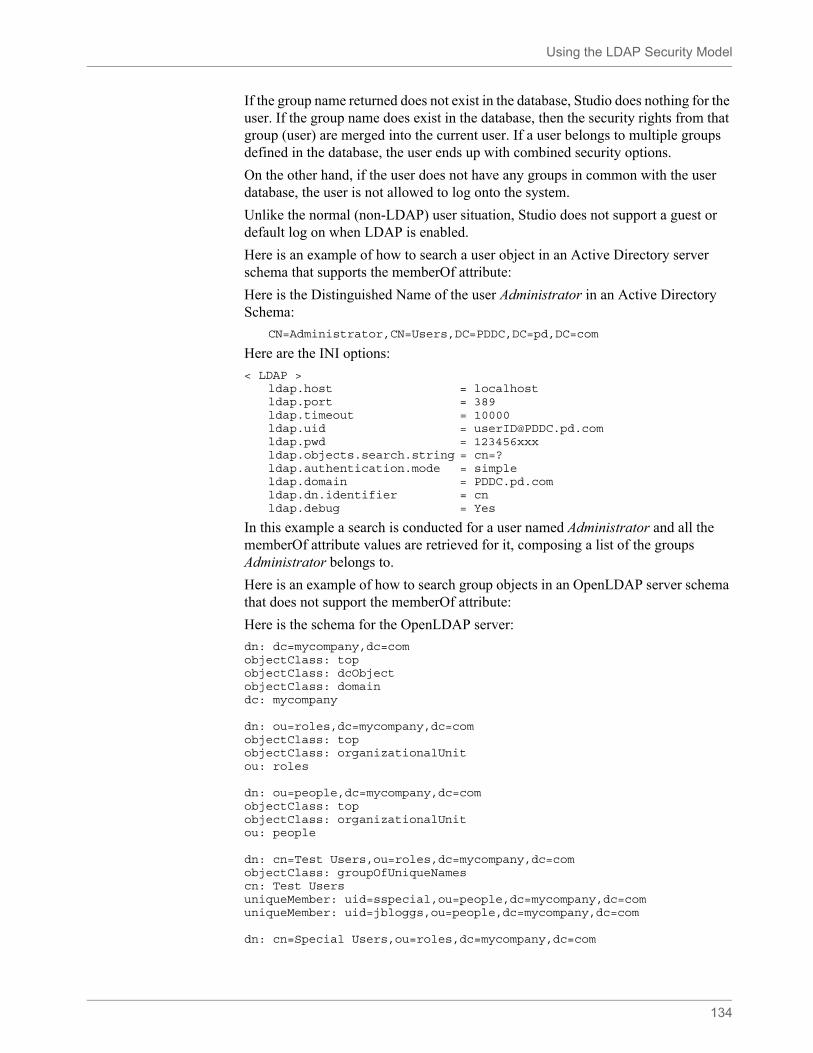
Using the LDAP Security Model
134
If the group name returned does not exist in the database, Studio does nothing for the user. If the group name does exist in the database, then the security rights from that group (user) are merged into the current user. If a user belongs to multiple groups defined in the database, the user ends up with combined security options.
On the other hand, if the user does not have any groups in common with the user database, the user is not allowed to log onto the system.
Unlike the normal (non-LDAP) user situation, Studio does not support a guest or default log on when LDAP is enabled.
Here is an example of how to search a user object in an Active Directory server schema that supports the memberOf attribute:
Here is the Distinguished Name of the user Administrator in an Active Directory Schema:
CN=Administrator,CN=Users,DC=PDDC,DC=pd,DC=com
Here are the INI options:
< LDAP >ldap.host = localhostldap.port = 389ldap.timeout = 10000ldap.uid = [email protected] = 123456xxxldap.objects.search.string = cn=?ldap.authentication.mode = simpleldap.domain = PDDC.pd.comldap.dn.identifier = cnldap.debug = Yes
In this example a search is conducted for a user named Administrator and all the memberOf attribute values are retrieved for it, composing a list of the groups Administrator belongs to.
Here is an example of how to search group objects in an OpenLDAP server schema that does not support the memberOf attribute:
Here is the schema for the OpenLDAP server:
dn: dc=mycompany,dc=comobjectClass: topobjectClass: dcObjectobjectClass: domaindc: mycompany
dn: ou=roles,dc=mycompany,dc=comobjectClass: topobjectClass: organizationalUnitou: roles
dn: ou=people,dc=mycompany,dc=comobjectClass: topobjectClass: organizationalUnitou: people
dn: cn=Test Users,ou=roles,dc=mycompany,dc=comobjectClass: groupOfUniqueNamescn: Test UsersuniqueMember: uid=sspecial,ou=people,dc=mycompany,dc=comuniqueMember: uid=jbloggs,ou=people,dc=mycompany,dc=com
dn: cn=Special Users,ou=roles,dc=mycompany,dc=com
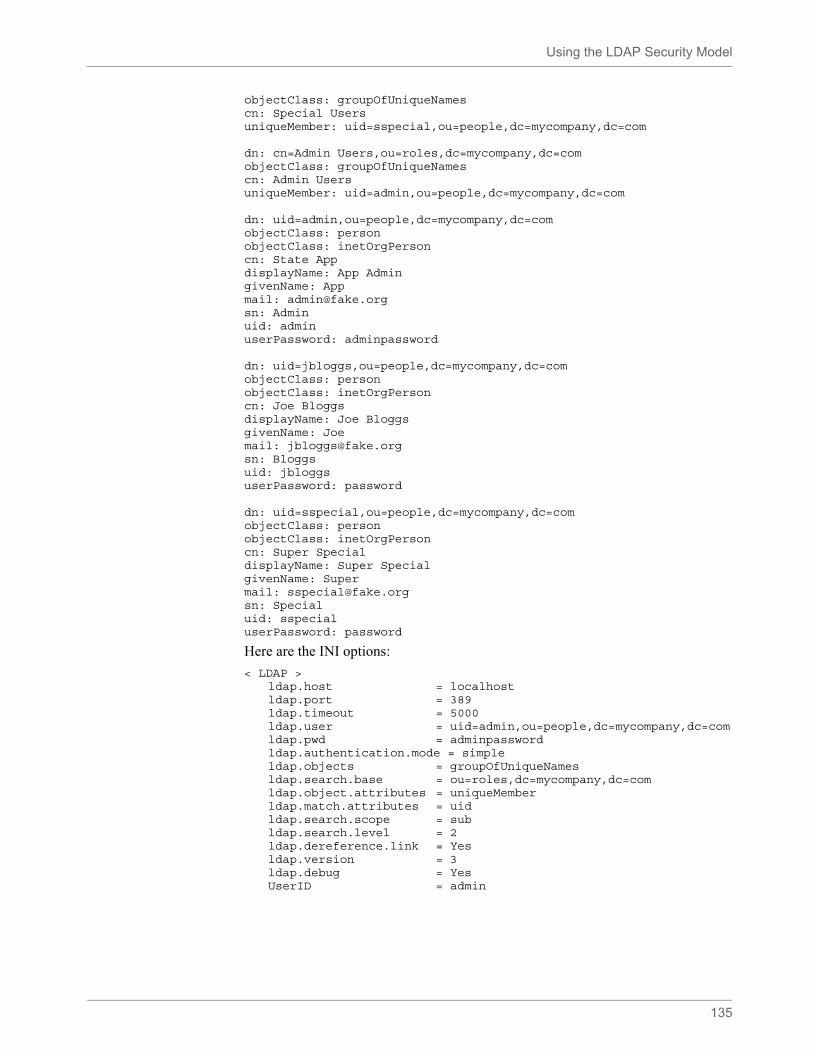
Using the LDAP Security Model
135
objectClass: groupOfUniqueNamescn: Special UsersuniqueMember: uid=sspecial,ou=people,dc=mycompany,dc=com
dn: cn=Admin Users,ou=roles,dc=mycompany,dc=comobjectClass: groupOfUniqueNamescn: Admin UsersuniqueMember: uid=admin,ou=people,dc=mycompany,dc=com
dn: uid=admin,ou=people,dc=mycompany,dc=comobjectClass: personobjectClass: inetOrgPersoncn: State AppdisplayName: App AdmingivenName: Appmail: [email protected]: Adminuid: adminuserPassword: adminpassword
dn: uid=jbloggs,ou=people,dc=mycompany,dc=comobjectClass: personobjectClass: inetOrgPersoncn: Joe BloggsdisplayName: Joe BloggsgivenName: Joemail: [email protected]: Bloggsuid: jbloggsuserPassword: password
dn: uid=sspecial,ou=people,dc=mycompany,dc=comobjectClass: personobjectClass: inetOrgPersoncn: Super SpecialdisplayName: Super SpecialgivenName: Supermail: [email protected]: Specialuid: sspecialuserPassword: password
Here are the INI options:
< LDAP >ldap.host = localhostldap.port = 389ldap.timeout = 5000ldap.user = uid=admin,ou=people,dc=mycompany,dc=comldap.pwd = adminpasswordldap.authentication.mode = simpleldap.objects = groupOfUniqueNamesldap.search.base = ou=roles,dc=mycompany,dc=comldap.object.attributes = uniqueMemberldap.match.attributes = uidldap.search.scope = subldap.search.level = 2ldap.dereference.link = Yesldap.version = 3ldap.debug = YesUserID = admin

Using the LDAP Security Model
136
In this example a search is conducted for all objects of type groupOfUniqueNames which contain attributes of name uniqueMember. All attribute values returned are then filtered matching the uid Distinguished Name part to the user ID supplied in the search. For example if the user ID searched was admin, then the list of groups returned would be Admin Users.
Using Documanage
If you are using DMILIB and Documanage, you must set up these INI options in the DMILIB:LDAP control group. Also make sure Documanage is set up to support LDAP authentication.
< DMILIB:LDAP >Server = 10.1.10.102Domain = bulldog1jrProtocol = ncacn_ip_tcpEndpoint = 4000UserID = demoPassword = demoDebug = Yes
Here are descriptions of these options:
If you set the following option to Yes, Studio tries to retrieve group information from Documanage. If Studio cannot retrieve this information from Documanage, it tries to retrieve the group information directly from LDAP.
< Environment >LDAP_Enabled =
Option Description
Server The IP address or the DNS name of the Documanage server.
Domain The domain of the Documanage server.
Protocol The RPC protocol. The default is ncacn_ip_tcp.
Endpoint The RPC end point. The default is 4000.
UserID The user ID needed to create a profile and session in Documanage.
Password The password needed to create a profile and session in Documanage.
Debug Enter Yes to enable placing debug information into the trace log in the current working directory. The default is No.
Note Use the LDAP.HOST and either the LDAP.UID or LDAP.USER options in the LDAP control group as the default fall back connection information if DMILIB is not present. The LDAP.UID option is normally used with LDAP.DOMAIN to talk to the active directory. The LDAP.USER option is normally used to talk to other LDAP servers
137
Chapter 3
Working with Application Definition Files
Choose Manage, Application, Definition to maintain your lines of business. For example, suppose you are creating forms for an insurance company which underwrites automobile and homeowners’ insurance. Each different type of insurance could be considered a separate line of business. Make sure you have the needed rights to perform the function, otherwise, contact your System Administrator to update.
This chapter discusses the following topics:
• Overview on page 138
• Defining an Application Definition on page 139
• Using Spot Colors on page 141
• Defining Recipients on page 157
• Defining Categories on page 159
• Defining Transaction Types on page 163
• Using Regional Date Processing on page 166
• Generating an Application Definition Report on page 175
• Example: Add the BDF information for the Medical History form on page 178
Overview
138
OVERVIEW
The application definition (BDF) file defines the key combinations used to locate a specific form set. These key combinations are comprised of a Key1 and Key2 (sometimes referred to as Unit1 and Unit2; or Group1 and Group2). In the insurance world, these keys are typically called: company and line of business (LOB).
Other information stored in the BDF file includes the following:
• List of recipients
• Form List Options
• Form categories (if used)
• Transaction codes (if used)
• Primary extract dictionary (XDD) file (if used)
• Default font cross-reference (FXR) file
• Default style (STY) file
Note You should always let Studio create and maintain BDF files. Do not manually edit this file.
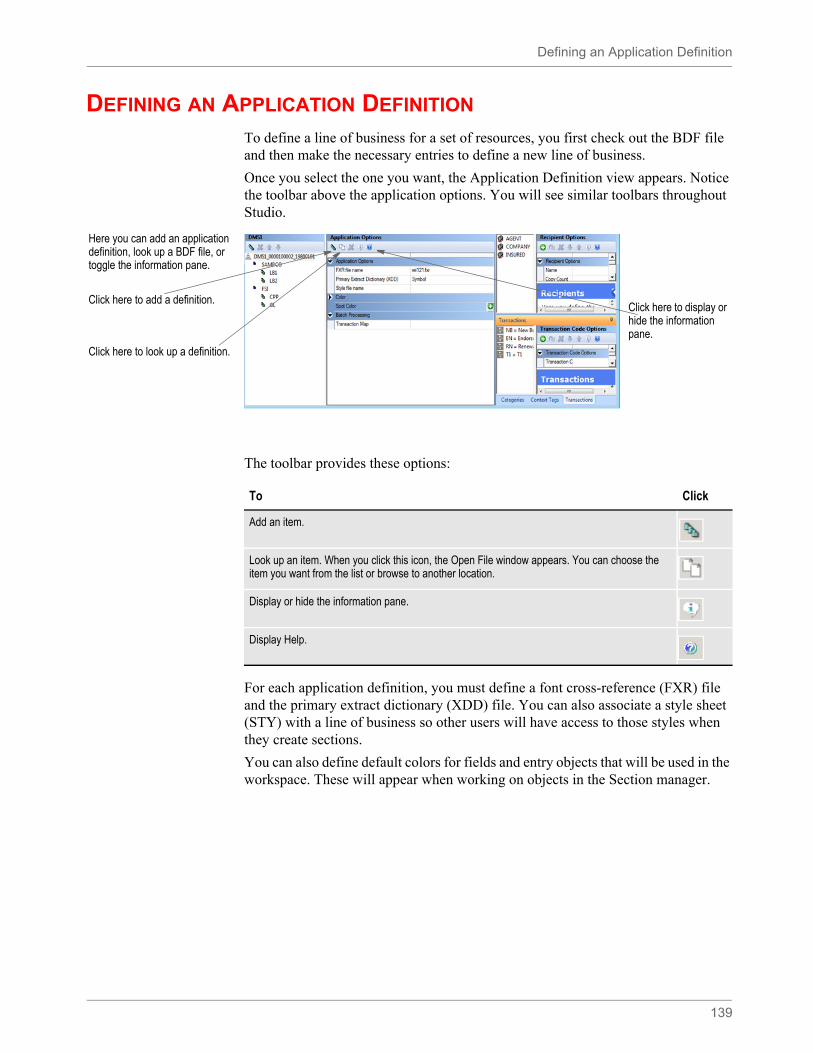
Defining an Application Definition
139
DEFINING AN APPLICATION DEFINITION
To define a line of business for a set of resources, you first check out the BDF file and then make the necessary entries to define a new line of business.
Once you select the one you want, the Application Definition view appears. Notice the toolbar above the application options. You will see similar toolbars throughout Studio.
The toolbar provides these options:
For each application definition, you must define a font cross-reference (FXR) file and the primary extract dictionary (XDD) file. You can also associate a style sheet (STY) with a line of business so other users will have access to those styles when they create sections.
You can also define default colors for fields and entry objects that will be used in the workspace. These will appear when working on objects in the Section manager.
Here you can add an application definition, look up a BDF file, or toggle the information pane.
Click here to add a definition.
Click here to look up a definition.
Click here to display or hide the information pane.
To Click
Add an item.
Look up an item. When you click this icon, the Open File window appears. You can choose the item you want from the list or browse to another location.
Display or hide the information pane.
Display Help.
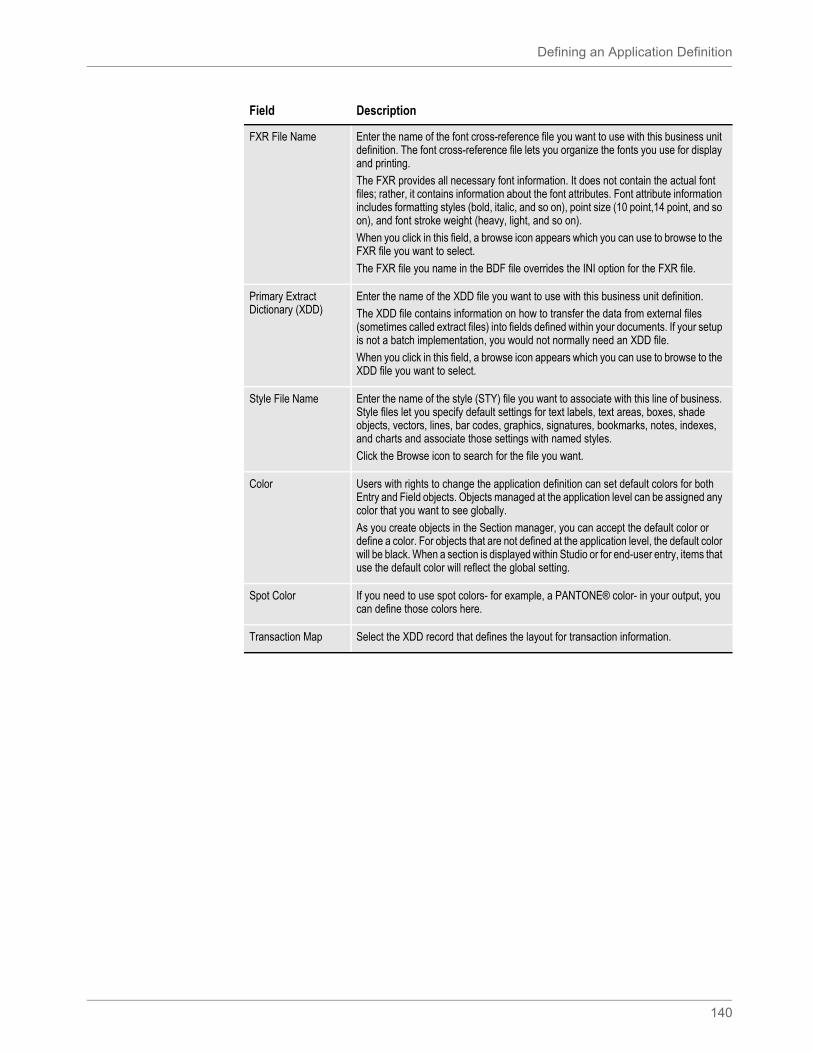
Defining an Application Definition
140
Field Description
FXR File Name Enter the name of the font cross-reference file you want to use with this business unit definition. The font cross-reference file lets you organize the fonts you use for display and printing.
The FXR provides all necessary font information. It does not contain the actual font files; rather, it contains information about the font attributes. Font attribute information includes formatting styles (bold, italic, and so on), point size (10 point,14 point, and so on), and font stroke weight (heavy, light, and so on).
When you click in this field, a browse icon appears which you can use to browse to the FXR file you want to select.
The FXR file you name in the BDF file overrides the INI option for the FXR file.
Primary Extract Dictionary (XDD)
Enter the name of the XDD file you want to use with this business unit definition.
The XDD file contains information on how to transfer the data from external files (sometimes called extract files) into fields defined within your documents. If your setup is not a batch implementation, you would not normally need an XDD file.
When you click in this field, a browse icon appears which you can use to browse to the XDD file you want to select.
Style File Name Enter the name of the style (STY) file you want to associate with this line of business. Style files let you specify default settings for text labels, text areas, boxes, shade objects, vectors, lines, bar codes, graphics, signatures, bookmarks, notes, indexes, and charts and associate those settings with named styles.
Click the Browse icon to search for the file you want.
Color Users with rights to change the application definition can set default colors for both Entry and Field objects. Objects managed at the application level can be assigned any color that you want to see globally.
As you create objects in the Section manager, you can accept the default color or define a color. For objects that are not defined at the application level, the default color will be black. When a section is displayed within Studio or for end-user entry, items that use the default color will reflect the global setting.
Spot Color If you need to use spot colors- for example, a PANTONE® color- in your output, you can define those colors here.
Transaction Map Select the XDD record that defines the layout for transaction information.
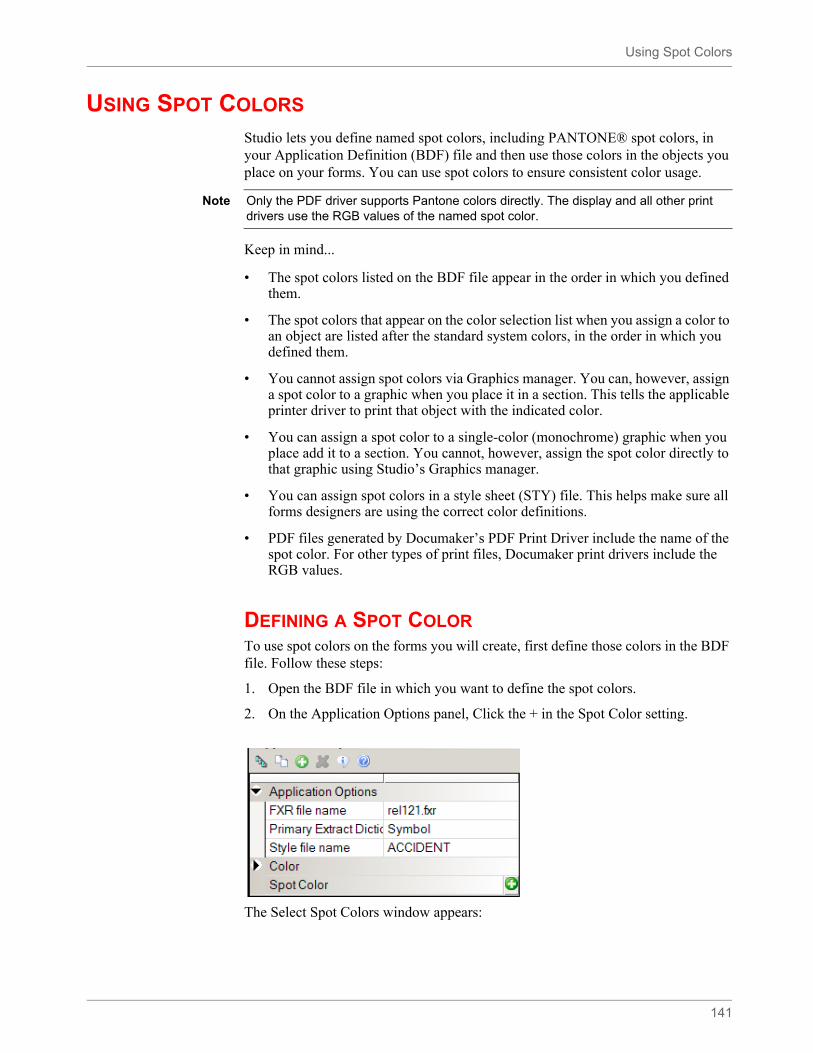
Using Spot Colors
141
USING SPOT COLORS
Studio lets you define named spot colors, including PANTONE® spot colors, in your Application Definition (BDF) file and then use those colors in the objects you place on your forms. You can use spot colors to ensure consistent color usage.
Keep in mind...
• The spot colors listed on the BDF file appear in the order in which you defined them.
• The spot colors that appear on the color selection list when you assign a color to an object are listed after the standard system colors, in the order in which you defined them.
• You cannot assign spot colors via Graphics manager. You can, however, assign a spot color to a graphic when you place it in a section. This tells the applicable printer driver to print that object with the indicated color.
• You can assign a spot color to a single-color (monochrome) graphic when you place add it to a section. You cannot, however, assign the spot color directly to that graphic using Studio’s Graphics manager.
• You can assign spot colors in a style sheet (STY) file. This helps make sure all forms designers are using the correct color definitions.
• PDF files generated by Documaker’s PDF Print Driver include the name of the spot color. For other types of print files, Documaker print drivers include the RGB values.
DEFINING A SPOT COLORTo use spot colors on the forms you will create, first define those colors in the BDF file. Follow these steps:
1. Open the BDF file in which you want to define the spot colors.
2. On the Application Options panel, Click the + in the Spot Color setting.
The Select Spot Colors window appears:
Note Only the PDF driver supports Pantone colors directly. The display and all other print drivers use the RGB values of the named spot color.
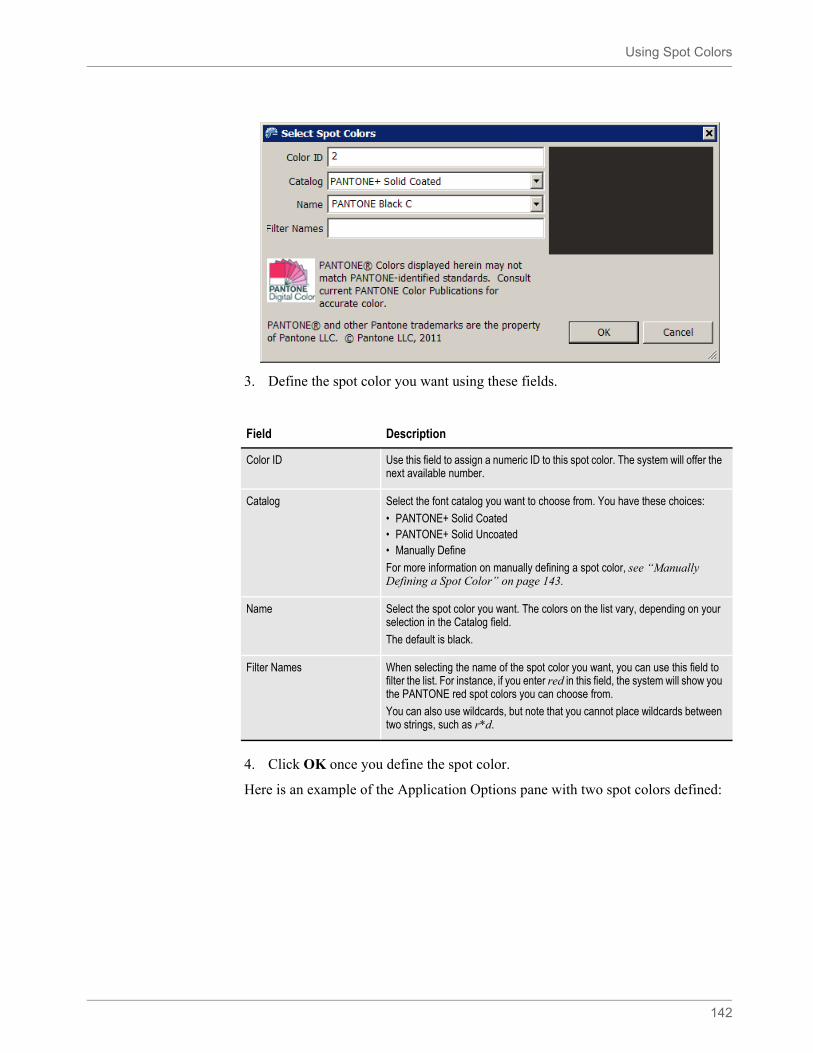
Using Spot Colors
142
3. Define the spot color you want using these fields.
4. Click OK once you define the spot color.
Here is an example of the Application Options pane with two spot colors defined:
Field Description
Color ID Use this field to assign a numeric ID to this spot color. The system will offer the next available number.
Catalog Select the font catalog you want to choose from. You have these choices:
• PANTONE+ Solid Coated• PANTONE+ Solid Uncoated• Manually Define
For more information on manually defining a spot color, see “Manually Defining a Spot Color” on page 143.
Name Select the spot color you want. The colors on the list vary, depending on your selection in the Catalog field.
The default is black.
Filter Names When selecting the name of the spot color you want, you can use this field to filter the list. For instance, if you enter red in this field, the system will show you the PANTONE red spot colors you can choose from.
You can also use wildcards, but note that you cannot place wildcards between two strings, such as r*d.
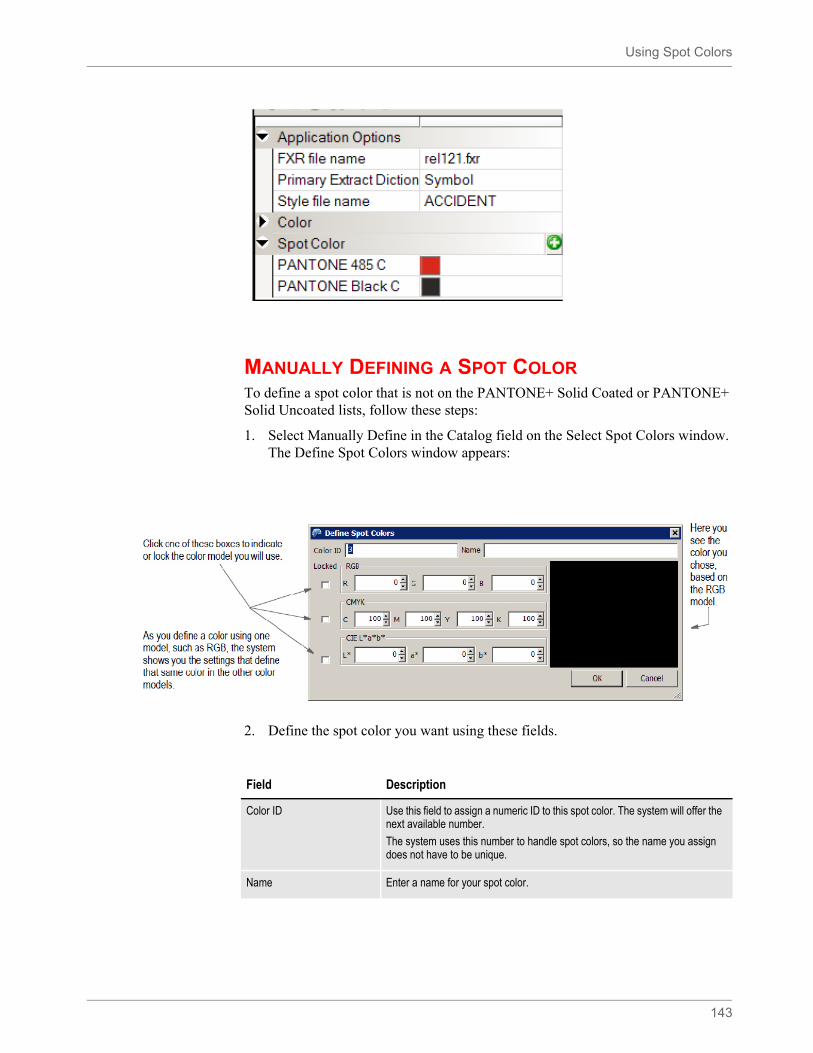
Using Spot Colors
143
MANUALLY DEFINING A SPOT COLORTo define a spot color that is not on the PANTONE+ Solid Coated or PANTONE+ Solid Uncoated lists, follow these steps:
1. Select Manually Define in the Catalog field on the Select Spot Colors window. The Define Spot Colors window appears:
2. Define the spot color you want using these fields.
Field Description
Color ID Use this field to assign a numeric ID to this spot color. The system will offer the next available number.
The system uses this number to handle spot colors, so the name you assign does not have to be unique.
Name Enter a name for your spot color.
Using Spot Colors
144
RGB is an additive color model in which white is the result of combining all of the primary colored lights, while black is represented by the absence of light.
The CMYK model takes the opposite approach and is considered a subtractive color model. In the CMYK model, white is the natural color of the paper or other background and black is the result of a full combination of the colored inks.
The CIE L*a*b color model plots visible colors on two axes. Each axis in the L*a*b* color space also represents an easily recognizable property of color, such as the red green and blue-yellow shifts. This model is useful when editing digital images.
3. Click OK once you define the spot color to add it to your BDF file.
Editing a Spot Color
To edit a spot color definition, simply delete it and redefine it.
Deleting a Spot Color
To delete a spot color you have defined, first click on the spot color you want to delete.
Locked The Define Spot Color window lets you see the color model you are entering converted into the other color models, while also letting you override the conversion and force the system to accept the values you enter.
So when you type into one of the color models, the other models are automatically updated unless the Locked checkbox is checked. Any time you update a color model manually, the system checks the Locked checkbox for you so that model is not updated when you type in another model.
If you have manually entered something in one of the color models but want it to be updated when you enter something in another model, simply uncheck the appropriate Locked checkbox..
RGB This field lets you define a spot color using the RGB (Red,Green,Blue) color model.
With this color model you define the amount of red, green, and blue light to add together to produce the color you want.
For red, green, and blue enter a number between 0 (zero) and 255. For instance, 0,0,0 is black and 255, 255, 255 is white.
Typical RGB output devices include TV sets, cell phone displays, and computer monitors.
CMYK This field lets you define a spot color using the CMYK color model. This model is also known as process color or four color) and is used in color printing. CMYK refers to the four inks typically used in color printing: cyan, magenta, yellow, and key (black).
For cyan, magenta, yellow, and key (black), enter a number between 0 (zero) and 100.
CIE L*a*b* This field lets you define a spot color using the CIE (Commission Internationale
d’Eclairage) L*a*b* color model. This model is sometimes known as the CIE 1976 color model, which reflects its year of origin.
For L, enter a number between 0 (zero) and 100.00. For a and b, enter a number between -327.68 to 327.67.
Field Description

Using Spot Colors
145
Then right-click and choose Delete the Selected Spot Color. You can also click the Delete icon.
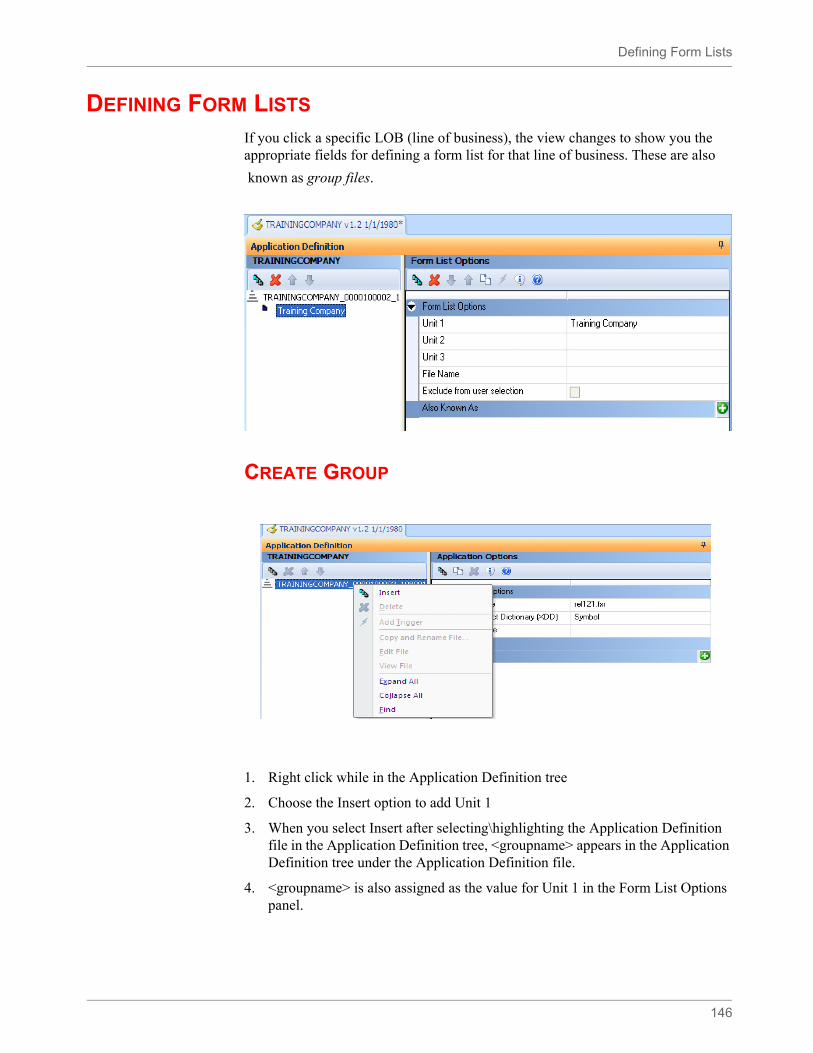
Defining Form Lists
146
DEFINING FORM LISTS
If you click a specific LOB (line of business), the view changes to show you the appropriate fields for defining a form list for that line of business. These are also
known as group files.
CREATE GROUP
1. Right click while in the Application Definition tree
2. Choose the Insert option to add Unit 1
3. When you select Insert after selecting\highlighting the Application Definition file in the Application Definition tree, <groupname> appears in the Application Definition tree under the Application Definition file.
4. <groupname> is also assigned as the value for Unit 1 in the Form List Options panel.
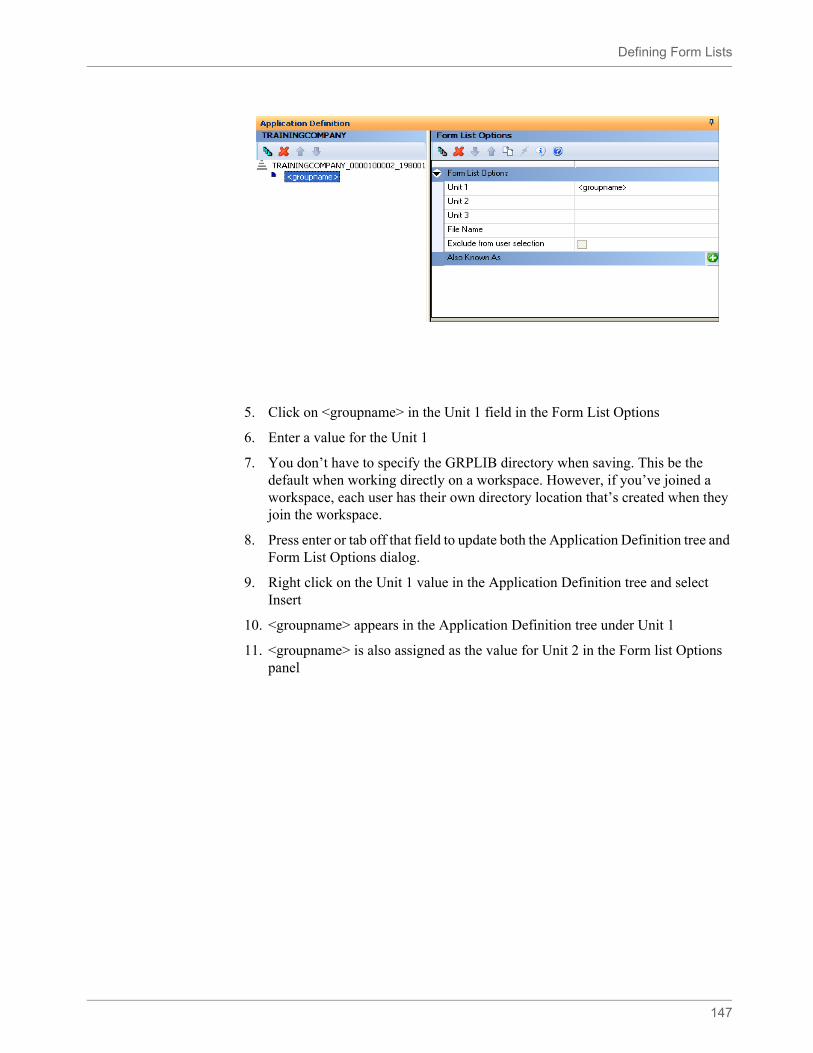
Defining Form Lists
147
5. Click on <groupname> in the Unit 1 field in the Form List Options
6. Enter a value for the Unit 1
7. You don’t have to specify the GRPLIB directory when saving. This be the default when working directly on a workspace. However, if you’ve joined a workspace, each user has their own directory location that’s created when they join the workspace.
8. Press enter or tab off that field to update both the Application Definition tree and Form List Options dialog.
9. Right click on the Unit 1 value in the Application Definition tree and select Insert
10. <groupname> appears in the Application Definition tree under Unit 1
11. <groupname> is also assigned as the value for Unit 2 in the Form list Options panel
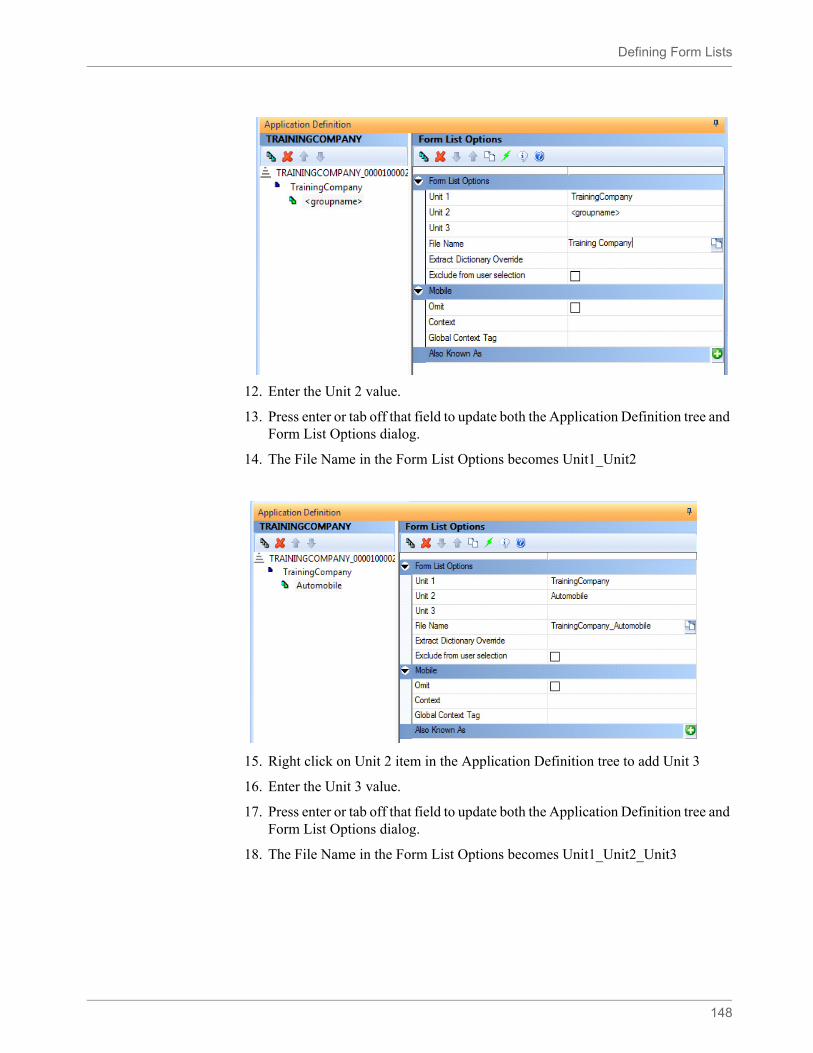
Defining Form Lists
148
12. Enter the Unit 2 value.
13. Press enter or tab off that field to update both the Application Definition tree and Form List Options dialog.
14. The File Name in the Form List Options becomes Unit1_Unit2
15. Right click on Unit 2 item in the Application Definition tree to add Unit 3
16. Enter the Unit 3 value.
17. Press enter or tab off that field to update both the Application Definition tree and Form List Options dialog.
18. The File Name in the Form List Options becomes Unit1_Unit2_Unit3
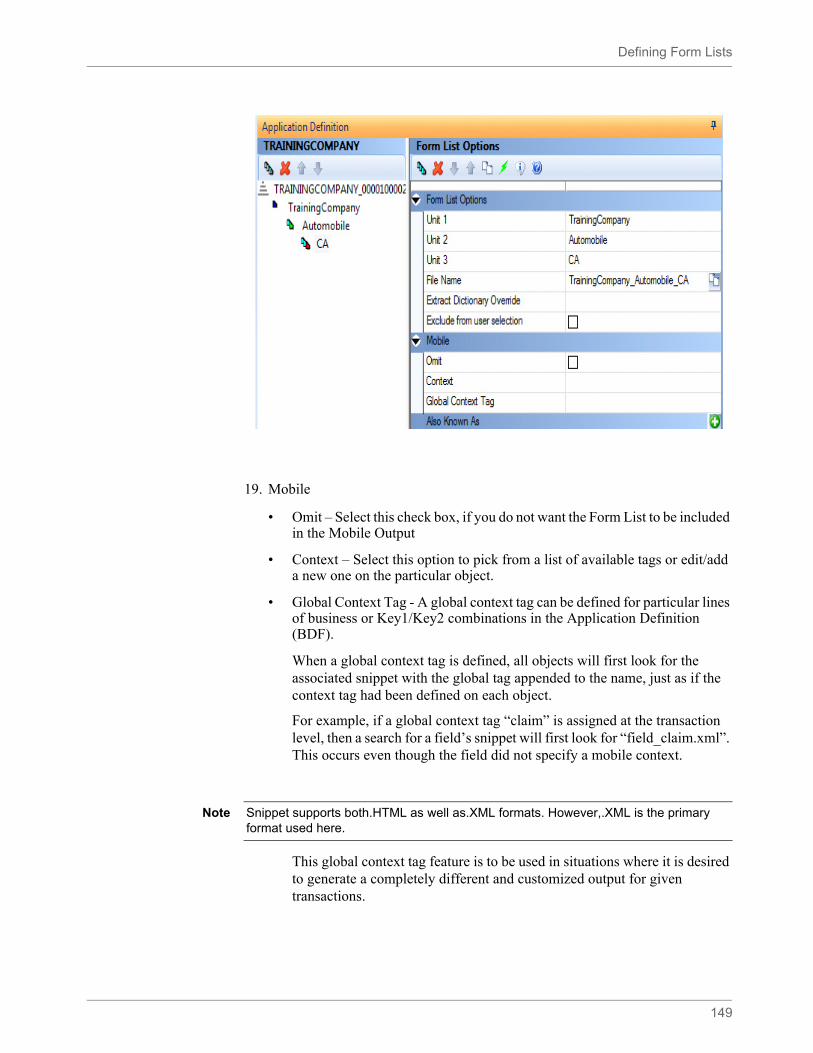
Defining Form Lists
149
19. Mobile
• Omit – Select this check box, if you do not want the Form List to be included in the Mobile Output
• Context – Select this option to pick from a list of available tags or edit/add a new one on the particular object.
• Global Context Tag - A global context tag can be defined for particular lines of business or Key1/Key2 combinations in the Application Definition (BDF).
When a global context tag is defined, all objects will first look for the associated snippet with the global tag appended to the name, just as if the context tag had been defined on each object.
For example, if a global context tag “claim” is assigned at the transaction level, then a search for a field’s snippet will first look for “field_claim.xml”. This occurs even though the field did not specify a mobile context.
This global context tag feature is to be used in situations where it is desired to generate a completely different and customized output for given transactions.
Note Snippet supports both.HTML as well as.XML formats. However,.XML is the primary format used here.
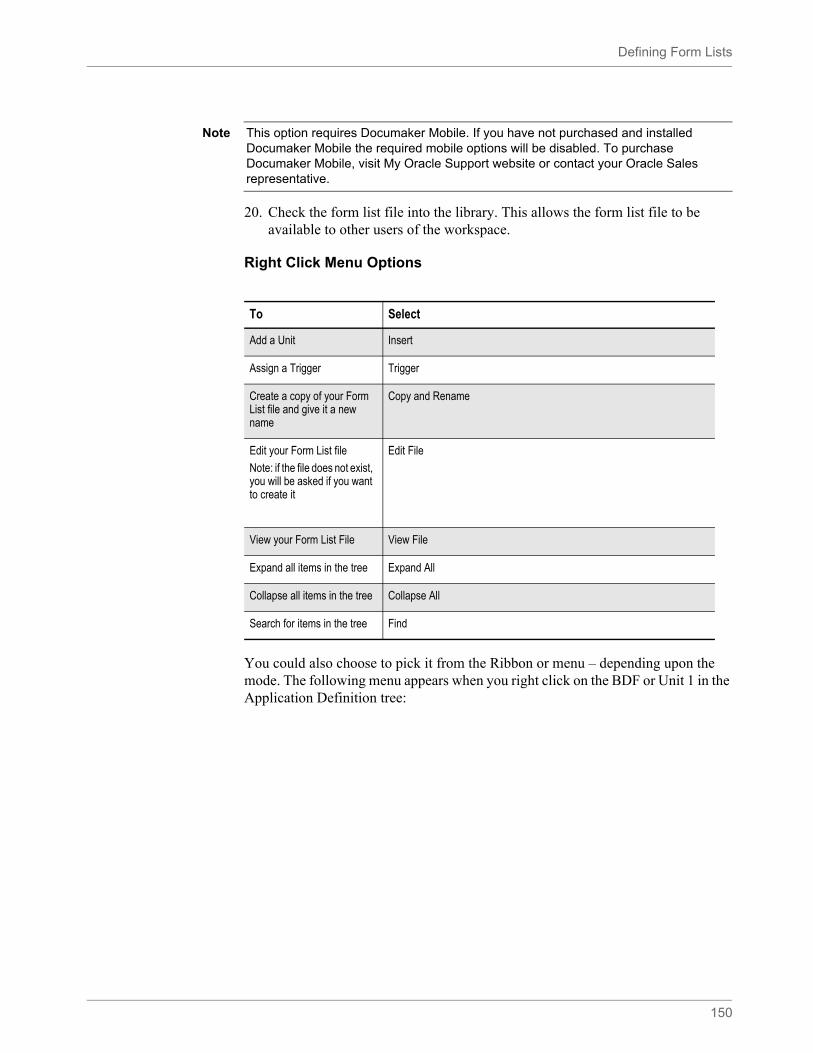
Defining Form Lists
150
20. Check the form list file into the library. This allows the form list file to be available to other users of the workspace.
Right Click Menu Options
You could also choose to pick it from the Ribbon or menu – depending upon the mode. The following menu appears when you right click on the BDF or Unit 1 in the Application Definition tree:
Note This option requires Documaker Mobile. If you have not purchased and installed Documaker Mobile the required mobile options will be disabled. To purchase Documaker Mobile, visit My Oracle Support website or contact your Oracle Sales representative.
To Select
Add a Unit Insert
Assign a Trigger Trigger
Create a copy of your Form List file and give it a new name
Copy and Rename
Edit your Form List file
Note: if the file does not exist, you will be asked if you want to create it
Edit File
View your Form List File View File
Expand all items in the tree Expand All
Collapse all items in the tree Collapse All
Search for items in the tree Find

Defining Form Lists
151
The following menu appears when you right click on Unit 2 in the Application Definition tree:
The following menu appears when you right click on Unit 3 in the Application Definition tree:
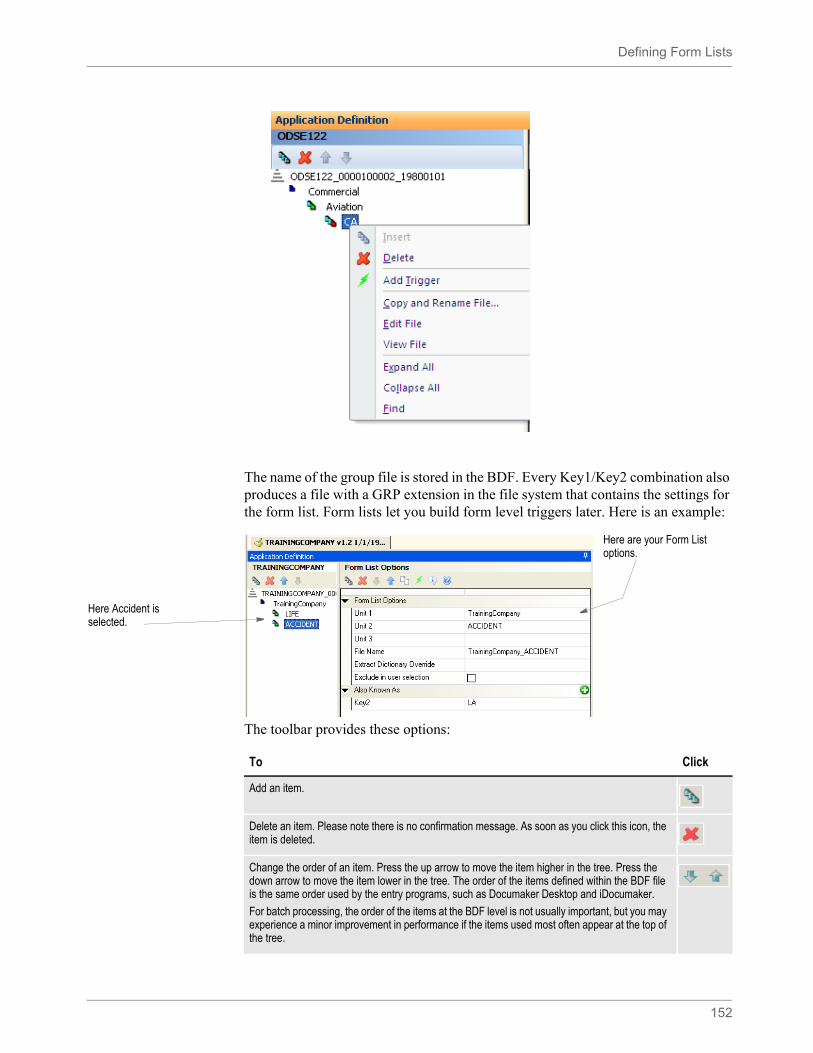
Defining Form Lists
152
The name of the group file is stored in the BDF. Every Key1/Key2 combination also produces a file with a GRP extension in the file system that contains the settings for the form list. Form lists let you build form level triggers later. Here is an example:
The toolbar provides these options:
Here Accident is selected.
Here are your Form List options.
To Click
Add an item.
Delete an item. Please note there is no confirmation message. As soon as you click this icon, the item is deleted.
Change the order of an item. Press the up arrow to move the item higher in the tree. Press the down arrow to move the item lower in the tree. The order of the items defined within the BDF file is the same order used by the entry programs, such as Documaker Desktop and iDocumaker.
For batch processing, the order of the items at the BDF level is not usually important, but you may experience a minor improvement in performance if the items used most often appear at the top of the tree.
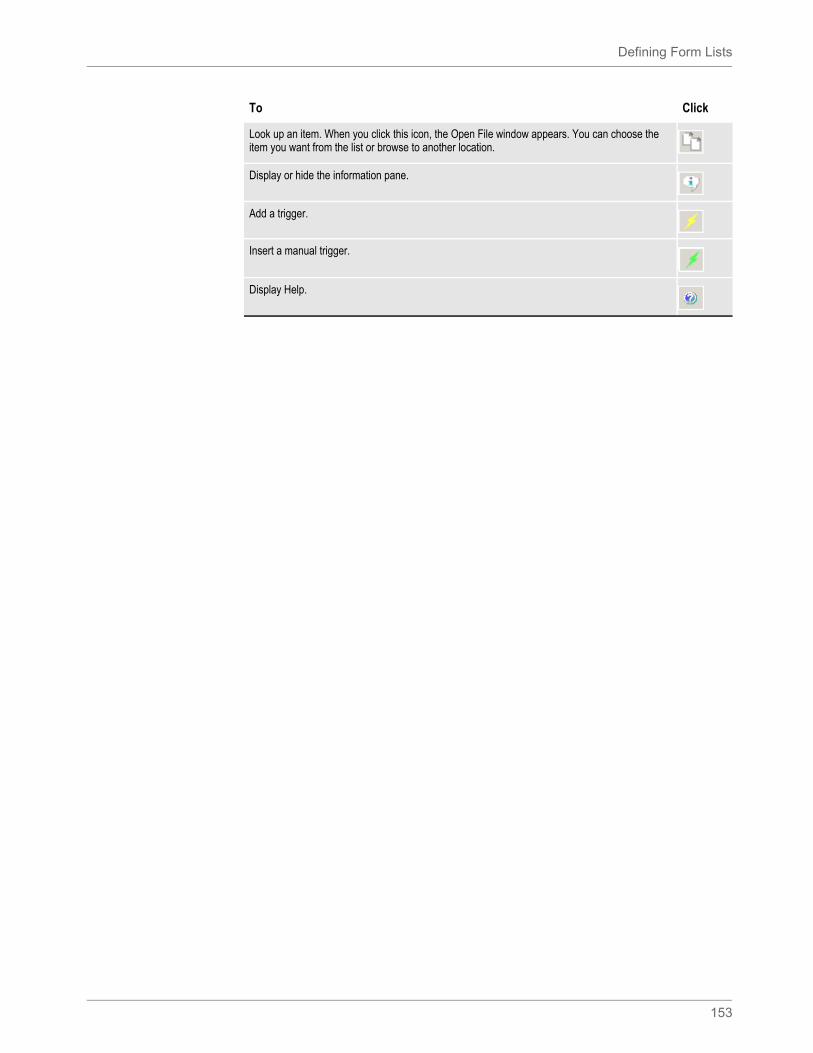
Defining Form Lists
153
Look up an item. When you click this icon, the Open File window appears. You can choose the item you want from the list or browse to another location.
Display or hide the information pane.
Add a trigger.
Insert a manual trigger.
Display Help.
To Click
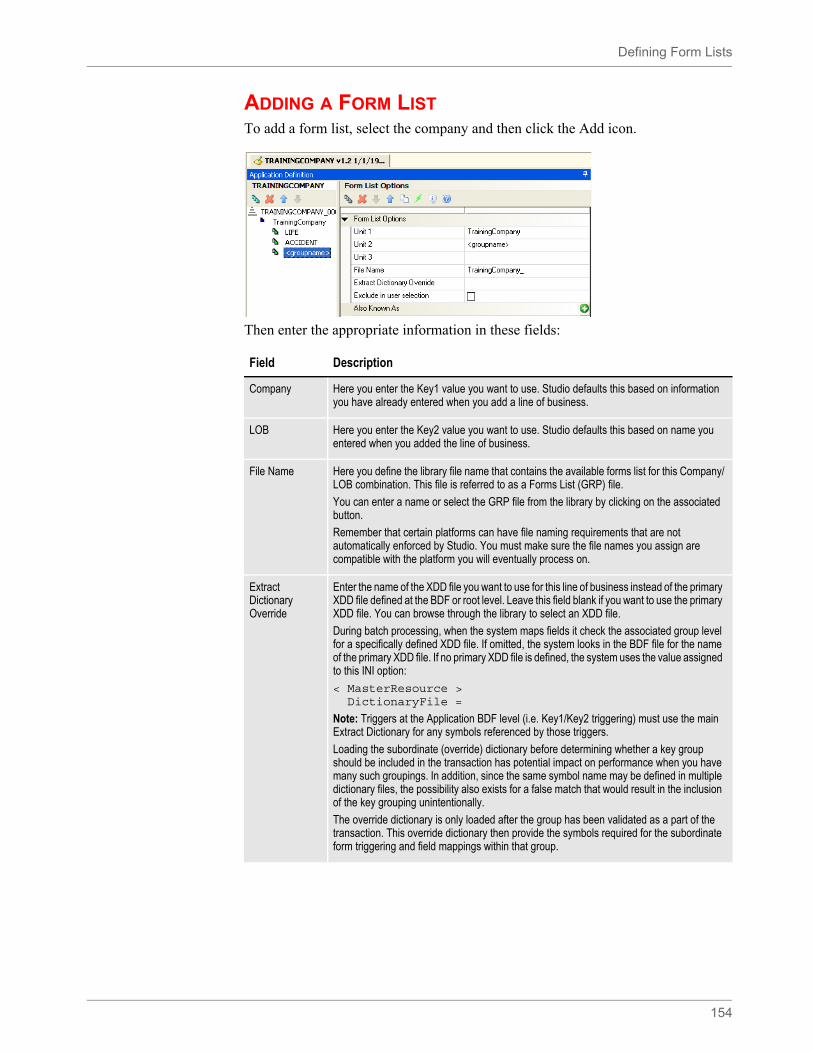
Defining Form Lists
154
ADDING A FORM LISTTo add a form list, select the company and then click the Add icon.
Then enter the appropriate information in these fields:
Field Description
Company Here you enter the Key1 value you want to use. Studio defaults this based on information you have already entered when you add a line of business.
LOB Here you enter the Key2 value you want to use. Studio defaults this based on name you entered when you added the line of business.
File Name Here you define the library file name that contains the available forms list for this Company/LOB combination. This file is referred to as a Forms List (GRP) file.
You can enter a name or select the GRP file from the library by clicking on the associated button.
Remember that certain platforms can have file naming requirements that are not automatically enforced by Studio. You must make sure the file names you assign are compatible with the platform you will eventually process on.
Extract Dictionary Override
Enter the name of the XDD file you want to use for this line of business instead of the primary XDD file defined at the BDF or root level. Leave this field blank if you want to use the primary XDD file. You can browse through the library to select an XDD file.
During batch processing, when the system maps fields it check the associated group level for a specifically defined XDD file. If omitted, the system looks in the BDF file for the name of the primary XDD file. If no primary XDD file is defined, the system uses the value assigned to this INI option:
< MasterResource > DictionaryFile =
Note: Triggers at the Application BDF level (i.e. Key1/Key2 triggering) must use the main Extract Dictionary for any symbols referenced by those triggers.
Loading the subordinate (override) dictionary before determining whether a key group should be included in the transaction has potential impact on performance when you have many such groupings. In addition, since the same symbol name may be defined in multiple dictionary files, the possibility also exists for a false match that would result in the inclusion of the key grouping unintentionally.
The override dictionary is only loaded after the group has been validated as a part of the transaction. This override dictionary then provide the symbols required for the subordinate form triggering and field mappings within that group.
Defining Form Lists
155
DELETING A FORM LISTIf you need to delete a form list, select the form list you want to delete and click the Delete Form List icon, as shown here:
Exclude from User Selection
Check this field to exclude this line of business and the forms associated with it from Documaker Desktop’s Form Selection window. This can reduce the clutter of having too many forms to choose from and it can lessen the chance users will forget to include some if otherwise triggered.
For example, you might want to exclude a cover letter, list of customer instructions, or addresses from the Forms Selection window yet still include them in the form set by triggering them.
A form excluded from the Forms Selection window can still be included in the form set for users to see and work with by, for example, marking the form Pre-selected in Studio’s Form List area.
Note that if you exclude from user selection all the Key2 children under a parent Key1, the Key1 is also excluded from the Forms Selection window.
Also Known As Click in this field to set up the automatic mapping of group alias names into the Key1Table and Key2Table control groups.
These groups are used to map a short name in your extract file to a long name in your BDF file. Studio lets you identify aliases that, when encountered in a batch operation, should map to the standard group name. When the system starts a batch run, it loads the BDF file and automatically assigns the defined alias names for each group to the appropriate INI option.
Field Description
Note You can use the DlgTitles control group to change the text that appears on the various windows. This includes field labels, window titles, column headings and button captions. You can use these options to change the text for the Key1 and Key2 fields:
< DlgTitles >Key1Title = CompanyKey2Title = LOB
If you leave these options blank, the text will be blank. If you omit these options, the system uses its defaults.
To change these options, choose Manage, System, Settings. Then, under Options by Topic, choose Entry and then Dialog Selections, as shown here:
Defining Form Lists
156
Studio deletes the form list immediately.
Click here to delete the selected form list.
Defining Recipients
157
DEFINING RECIPIENTS
Use the Recipient Options panel to set up recipients for this application definition. Recipients are those who will get copies of the various forms in the form set. Defining a recipient includes setting up the following:
• A recipient type name, such as Insured or Broker.
• A sorting code. This code is used in batch implementations. Documaker’s GenData program uses the code to know which recipient to queue at print time.
• A brief description. This description appears in any Send Copy To fields defined in your form when you print that form for that recipient. For instance, this is where the text Insured's Copy comes from when you print forms. This description is used by both entry systems, like Documaker Desktop or iDocumaker, and the GenPrint program.
The toolbar provides these options:
To Click
Add an item.
Clear the information for an item. Choose this option to delete all of the information entered in the various fields used to define this item.
Delete an item. Please note there is no confirmation message. As soon as you click this icon, the item is deleted.
Change the order of an item. Press the up arrow to move the item higher in the tree. Press the down arrow to move the item lower in the tree. The order of the items defined within the BDF file is the same order used by the entry programs.
For batch processing, the order of the groups at the BDF level is not usually important, but you may experience a minor improvement in performance if the items used most often appear at the top of the tree.
Display or hide the information pane.
Display Help.
Note When a batch processing cycle starts, the list of recipients defined in the Business Definition file is inserted into the Recip_Names control group. This control group is used by several of the Documaker programs.
Defining Recipients
158
ADDING A RECIPIENTIf you need to add a recipient, select the Recipients pane and click the Add Recipient icon, as shown here:
Then enter the appropriate information in these fields:
DELETING A RECIPIENTIf you need to delete a recipient, select the recipient you want to delete and click the Delete Recipient icon, as shown here:
Studio deletes the recipient immediately.
Click here to add a recipient.
Field Description
Name Enter the name of this recipient you want to add. For example, you might enter Home Office Insured, or Broker.
Code Use this field to assign a code to this recipient. This code is used by the GenData program.
Description Enter a description of this recipient. For instance, you could enter Insured’s Copy or Broker’s Copy.
Click here to delete a recipient.
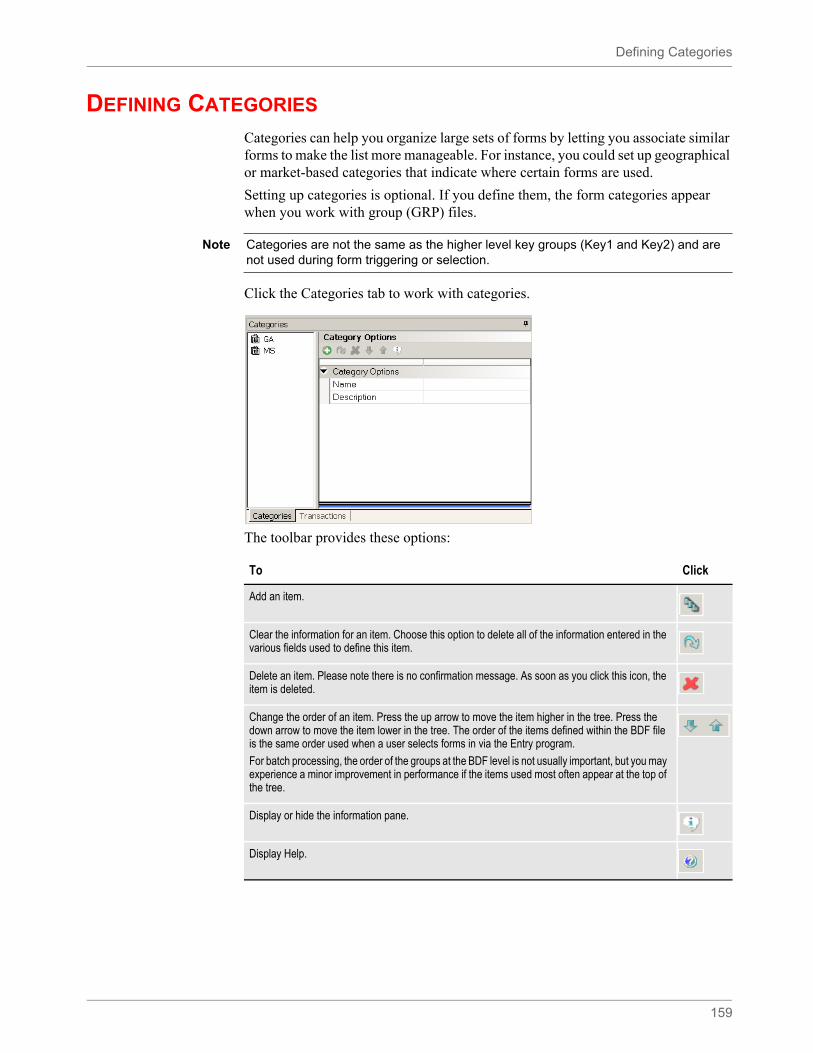
Defining Categories
159
DEFINING CATEGORIES
Categories can help you organize large sets of forms by letting you associate similar forms to make the list more manageable. For instance, you could set up geographical or market-based categories that indicate where certain forms are used.
Setting up categories is optional. If you define them, the form categories appear when you work with group (GRP) files.
Click the Categories tab to work with categories.
The toolbar provides these options:
Note Categories are not the same as the higher level key groups (Key1 and Key2) and are not used during form triggering or selection.
To Click
Add an item.
Clear the information for an item. Choose this option to delete all of the information entered in the various fields used to define this item.
Delete an item. Please note there is no confirmation message. As soon as you click this icon, the item is deleted.
Change the order of an item. Press the up arrow to move the item higher in the tree. Press the down arrow to move the item lower in the tree. The order of the items defined within the BDF file is the same order used when a user selects forms in via the Entry program.
For batch processing, the order of the groups at the BDF level is not usually important, but you may experience a minor improvement in performance if the items used most often appear at the top of the tree.
Display or hide the information pane.
Display Help.
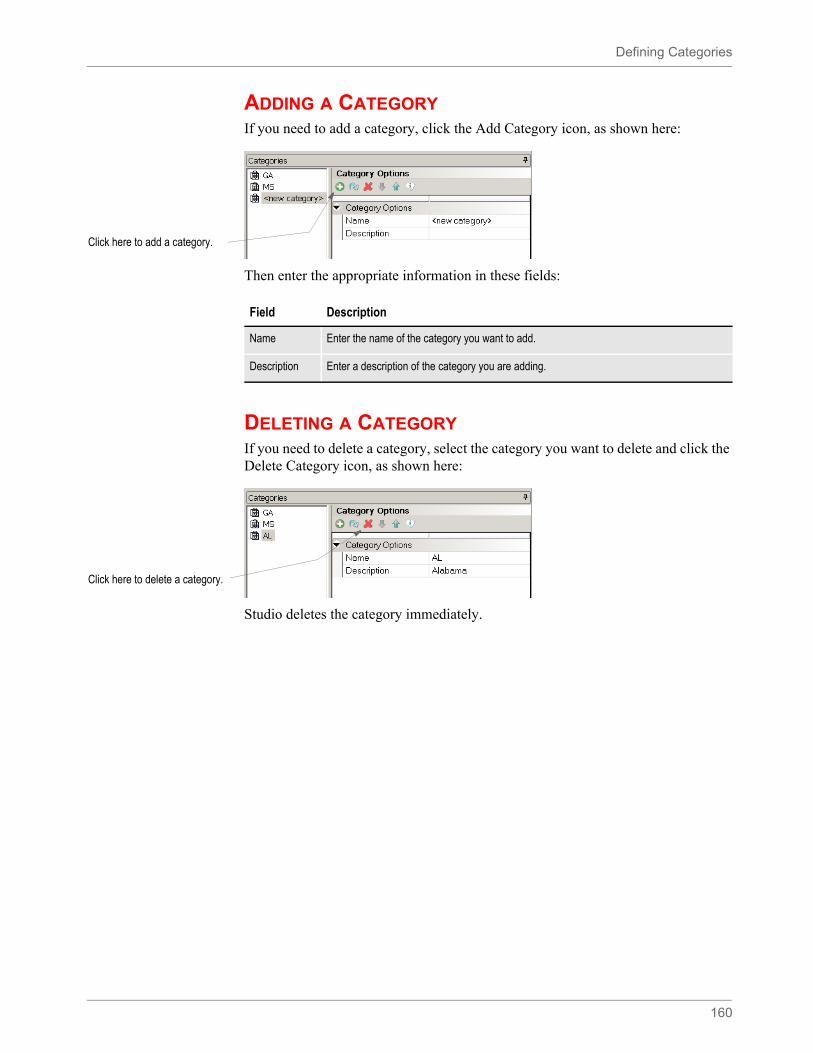
Defining Categories
160
ADDING A CATEGORYIf you need to add a category, click the Add Category icon, as shown here:
Then enter the appropriate information in these fields:
DELETING A CATEGORYIf you need to delete a category, select the category you want to delete and click the Delete Category icon, as shown here:
Studio deletes the category immediately.
Click here to add a category.
Field Description
Name Enter the name of the category you want to add.
Description Enter a description of the category you are adding.
Click here to delete a category.
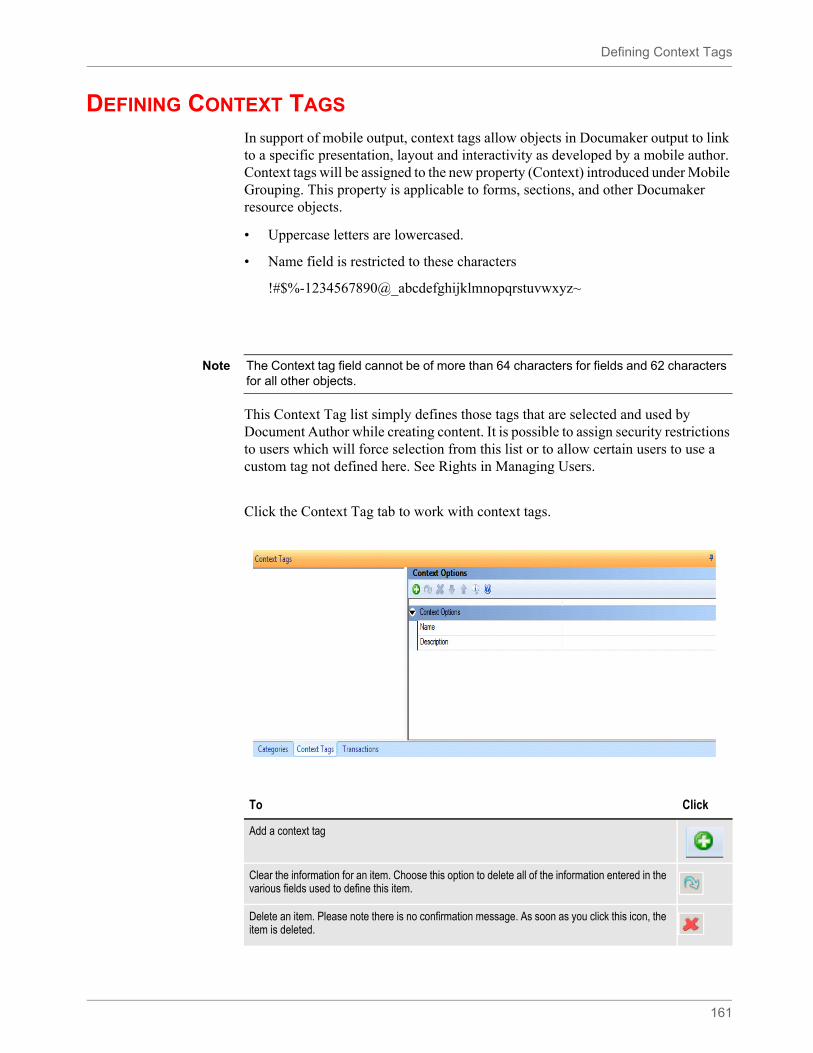
Defining Context Tags
161
DEFINING CONTEXT TAGS
In support of mobile output, context tags allow objects in Documaker output to link to a specific presentation, layout and interactivity as developed by a mobile author. Context tags will be assigned to the new property (Context) introduced under Mobile Grouping. This property is applicable to forms, sections, and other Documaker resource objects.
• Uppercase letters are lowercased.
• Name field is restricted to these characters
!#$%-1234567890@_abcdefghijklmnopqrstuvwxyz~
This Context Tag list simply defines those tags that are selected and used by Document Author while creating content. It is possible to assign security restrictions to users which will force selection from this list or to allow certain users to use a custom tag not defined here. See Rights in Managing Users.
Click the Context Tag tab to work with context tags.
Note The Context tag field cannot be of more than 64 characters for fields and 62 characters for all other objects.
To Click
Add a context tag
Clear the information for an item. Choose this option to delete all of the information entered in the various fields used to define this item.
Delete an item. Please note there is no confirmation message. As soon as you click this icon, the item is deleted.

Defining Context Tags
162
Change the order of an item. Press the up arrow to move the item higher in the tree. Press the down arrow to move the item lower in the tree.
Display or hide the information pane.
Display Help.
To Click
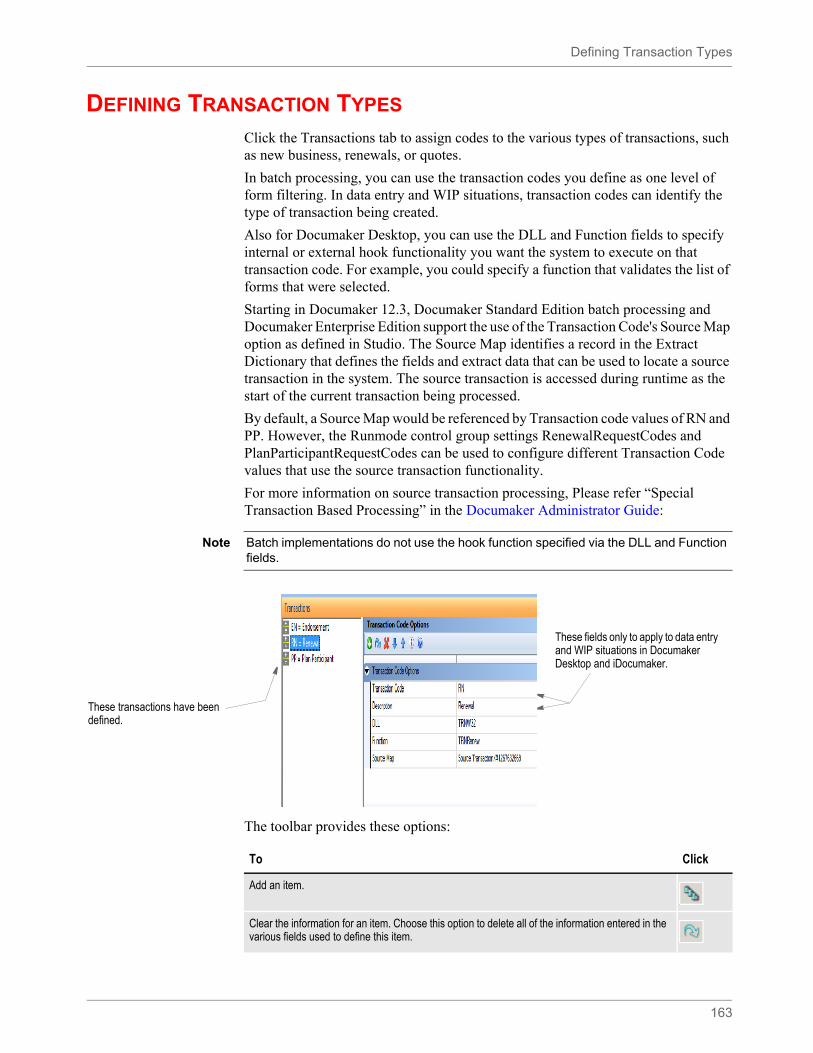
Defining Transaction Types
163
DEFINING TRANSACTION TYPES
Click the Transactions tab to assign codes to the various types of transactions, such as new business, renewals, or quotes.
In batch processing, you can use the transaction codes you define as one level of form filtering. In data entry and WIP situations, transaction codes can identify the type of transaction being created.
Also for Documaker Desktop, you can use the DLL and Function fields to specify internal or external hook functionality you want the system to execute on that transaction code. For example, you could specify a function that validates the list of forms that were selected.
Starting in Documaker 12.3, Documaker Standard Edition batch processing and Documaker Enterprise Edition support the use of the Transaction Code's Source Map option as defined in Studio. The Source Map identifies a record in the Extract Dictionary that defines the fields and extract data that can be used to locate a source transaction in the system. The source transaction is accessed during runtime as the start of the current transaction being processed.
By default, a Source Map would be referenced by Transaction code values of RN and PP. However, the Runmode control group settings RenewalRequestCodes and PlanParticipantRequestCodes can be used to configure different Transaction Code values that use the source transaction functionality.
For more information on source transaction processing, Please refer “Special Transaction Based Processing” in the Documaker Administrator Guide:
The toolbar provides these options:
Note Batch implementations do not use the hook function specified via the DLL and Function fields.
These transactions have been defined.
These fields only to apply to data entry and WIP situations in Documaker Desktop and iDocumaker.
To Click
Add an item.
Clear the information for an item. Choose this option to delete all of the information entered in the various fields used to define this item.
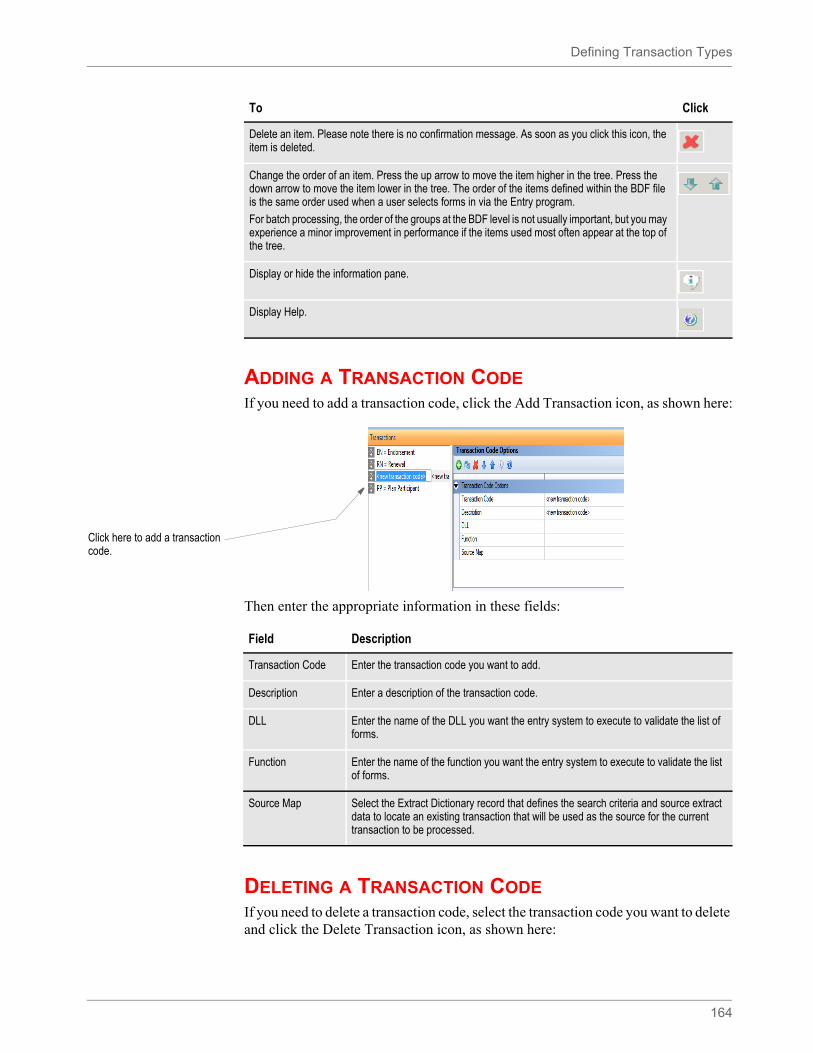
Defining Transaction Types
164
ADDING A TRANSACTION CODEIf you need to add a transaction code, click the Add Transaction icon, as shown here:
Then enter the appropriate information in these fields:
DELETING A TRANSACTION CODEIf you need to delete a transaction code, select the transaction code you want to delete and click the Delete Transaction icon, as shown here:
Delete an item. Please note there is no confirmation message. As soon as you click this icon, the item is deleted.
Change the order of an item. Press the up arrow to move the item higher in the tree. Press the down arrow to move the item lower in the tree. The order of the items defined within the BDF file is the same order used when a user selects forms in via the Entry program.
For batch processing, the order of the groups at the BDF level is not usually important, but you may experience a minor improvement in performance if the items used most often appear at the top of the tree.
Display or hide the information pane.
Display Help.
To Click
Click here to add a transaction code.
Field Description
Transaction Code Enter the transaction code you want to add.
Description Enter a description of the transaction code.
DLL Enter the name of the DLL you want the entry system to execute to validate the list of forms.
Function Enter the name of the function you want the entry system to execute to validate the list of forms.
Source Map Select the Extract Dictionary record that defines the search criteria and source extract data to locate an existing transaction that will be used as the source for the current transaction to be processed.
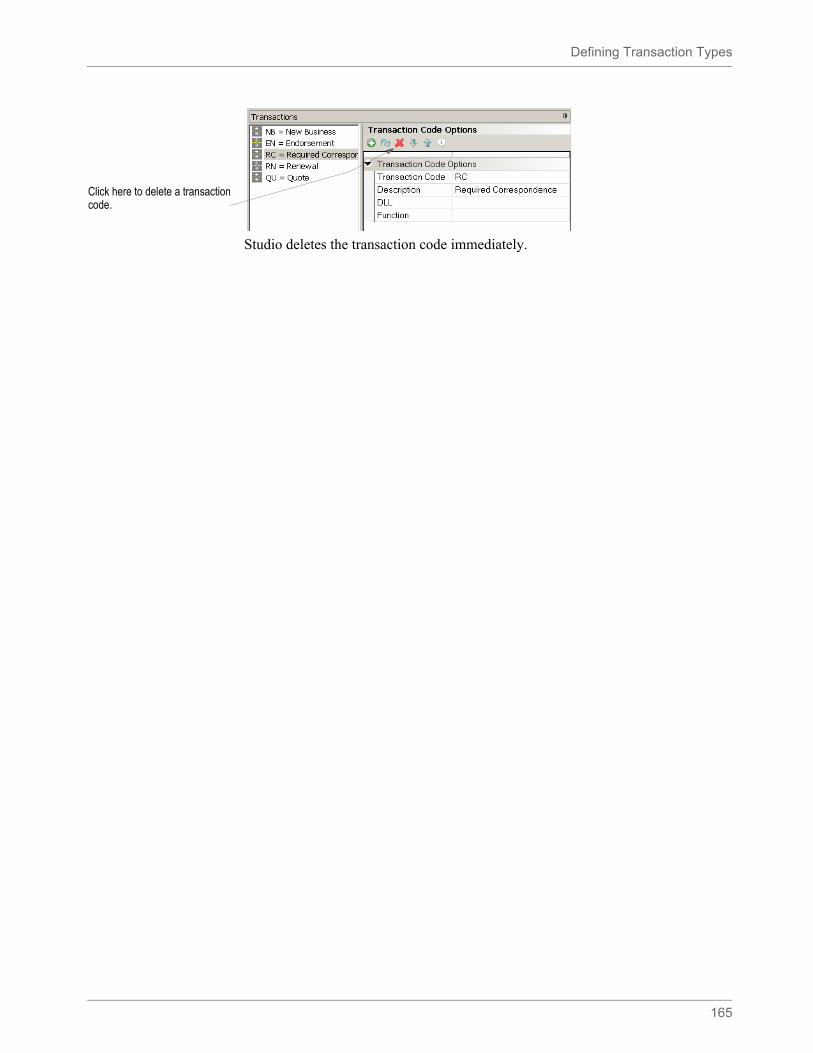
Defining Transaction Types
165
Studio deletes the transaction code immediately.
Click here to delete a transaction code.
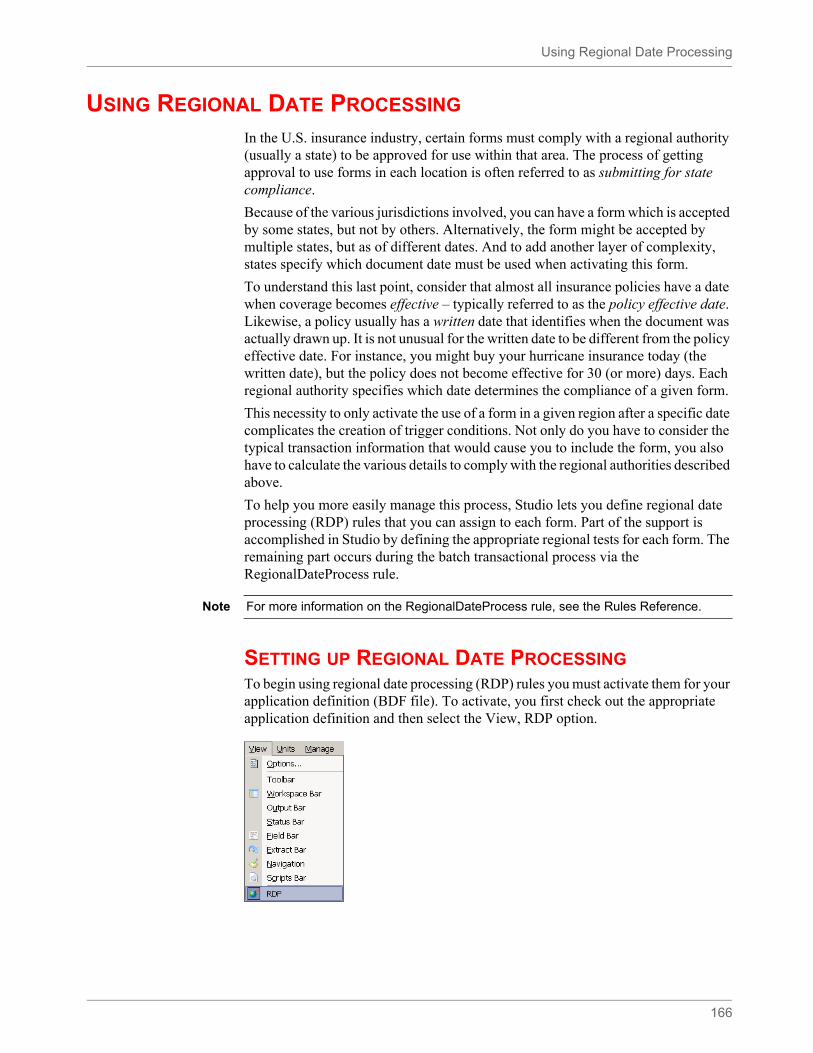
Using Regional Date Processing
166
USING REGIONAL DATE PROCESSING
In the U.S. insurance industry, certain forms must comply with a regional authority (usually a state) to be approved for use within that area. The process of getting approval to use forms in each location is often referred to as submitting for state compliance.
Because of the various jurisdictions involved, you can have a form which is accepted by some states, but not by others. Alternatively, the form might be accepted by multiple states, but as of different dates. And to add another layer of complexity, states specify which document date must be used when activating this form.
To understand this last point, consider that almost all insurance policies have a date when coverage becomes effective – typically referred to as the policy effective date. Likewise, a policy usually has a written date that identifies when the document was actually drawn up. It is not unusual for the written date to be different from the policy effective date. For instance, you might buy your hurricane insurance today (the written date), but the policy does not become effective for 30 (or more) days. Each regional authority specifies which date determines the compliance of a given form.
This necessity to only activate the use of a form in a given region after a specific date complicates the creation of trigger conditions. Not only do you have to consider the typical transaction information that would cause you to include the form, you also have to calculate the various details to comply with the regional authorities described above.
To help you more easily manage this process, Studio lets you define regional date processing (RDP) rules that you can assign to each form. Part of the support is accomplished in Studio by defining the appropriate regional tests for each form. The remaining part occurs during the batch transactional process via the RegionalDateProcess rule.
SETTING UP REGIONAL DATE PROCESSINGTo begin using regional date processing (RDP) rules you must activate them for your application definition (BDF file). To activate, you first check out the appropriate application definition and then select the View, RDP option.
Note For more information on the RegionalDateProcess rule, see the Rules Reference.
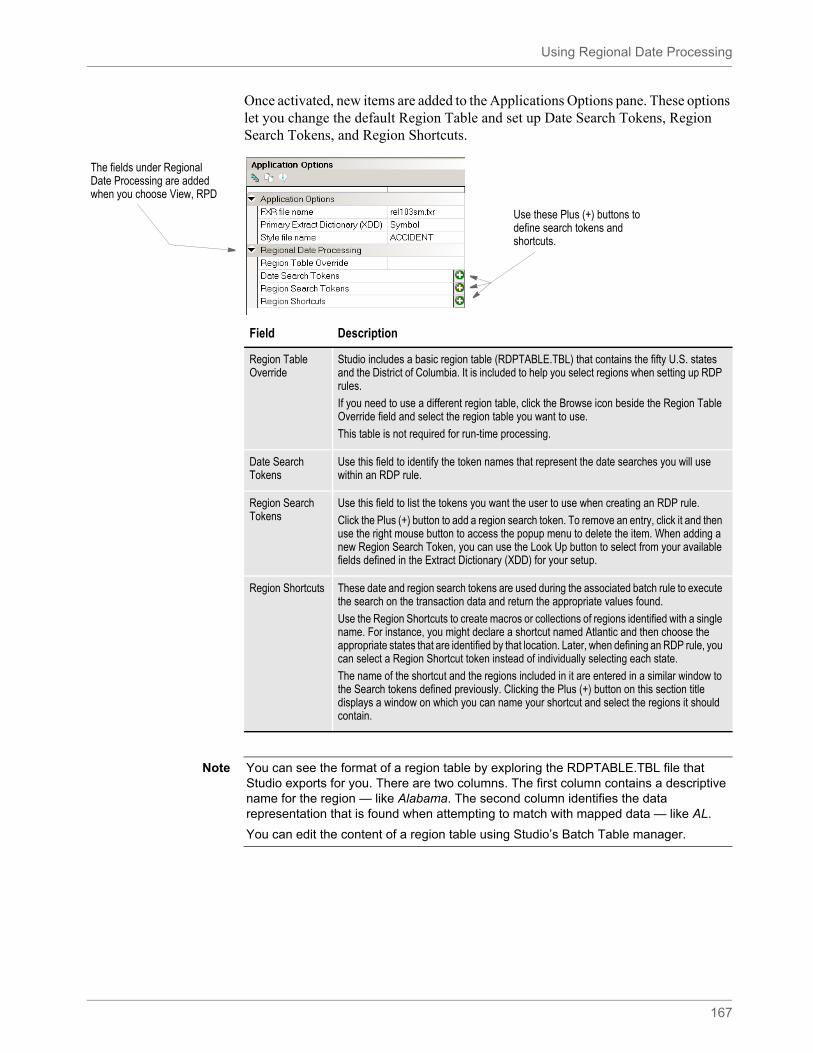
Using Regional Date Processing
167
Once activated, new items are added to the Applications Options pane. These options let you change the default Region Table and set up Date Search Tokens, Region Search Tokens, and Region Shortcuts.
The fields under Regional Date Processing are added when you choose View, RPD
Use these Plus (+) buttons to define search tokens and shortcuts.
Field Description
Region Table Override
Studio includes a basic region table (RDPTABLE.TBL) that contains the fifty U.S. states and the District of Columbia. It is included to help you select regions when setting up RDP rules.
If you need to use a different region table, click the Browse icon beside the Region Table Override field and select the region table you want to use.
This table is not required for run-time processing.
Date Search Tokens
Use this field to identify the token names that represent the date searches you will use within an RDP rule.
Region Search Tokens
Use this field to list the tokens you want the user to use when creating an RDP rule.
Click the Plus (+) button to add a region search token. To remove an entry, click it and then use the right mouse button to access the popup menu to delete the item. When adding a new Region Search Token, you can use the Look Up button to select from your available fields defined in the Extract Dictionary (XDD) for your setup.
Region Shortcuts These date and region search tokens are used during the associated batch rule to execute the search on the transaction data and return the appropriate values found.
Use the Region Shortcuts to create macros or collections of regions identified with a single name. For instance, you might declare a shortcut named Atlantic and then choose the appropriate states that are identified by that location. Later, when defining an RDP rule, you can select a Region Shortcut token instead of individually selecting each state.
The name of the shortcut and the regions included in it are entered in a similar window to the Search tokens defined previously. Clicking the Plus (+) button on this section title displays a window on which you can name your shortcut and select the regions it should contain.
Note You can see the format of a region table by exploring the RDPTABLE.TBL file that Studio exports for you. There are two columns. The first column contains a descriptive name for the region — like Alabama. The second column identifies the data representation that is found when attempting to match with mapped data — like AL.
You can edit the content of a region table using Studio’s Batch Table manager.
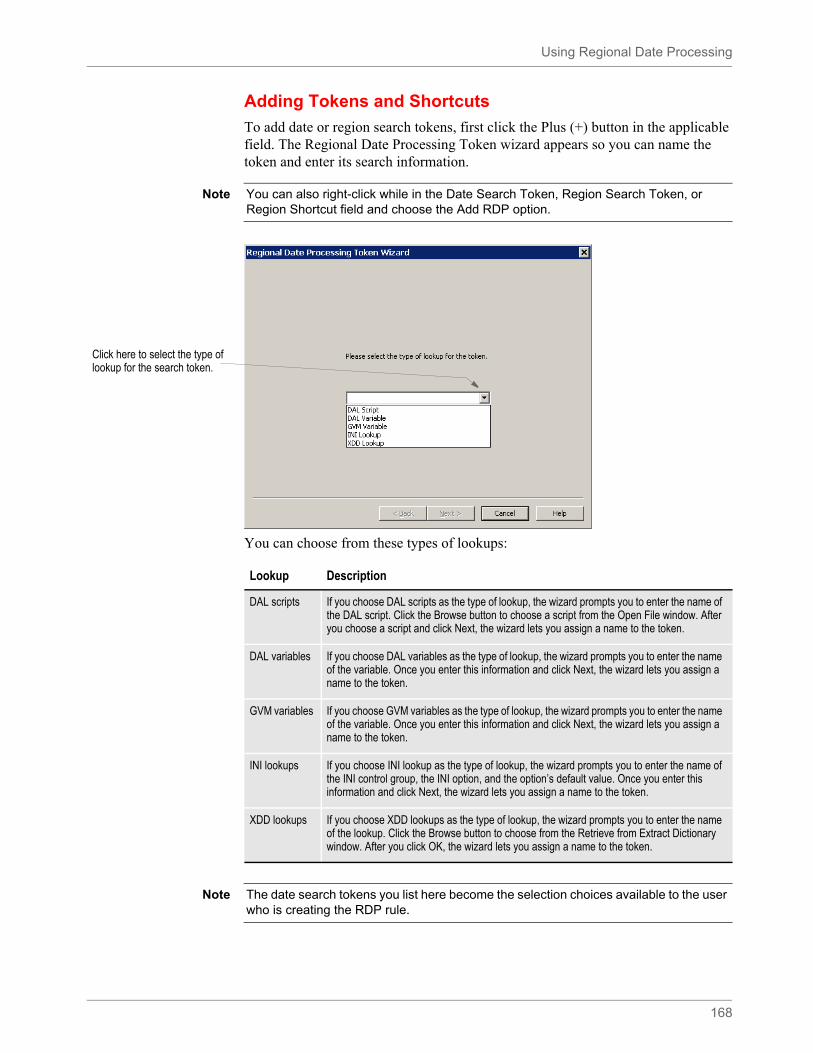
Using Regional Date Processing
168
Adding Tokens and Shortcuts
To add date or region search tokens, first click the Plus (+) button in the applicable field. The Regional Date Processing Token wizard appears so you can name the token and enter its search information.
You can choose from these types of lookups:
Note You can also right-click while in the Date Search Token, Region Search Token, or Region Shortcut field and choose the Add RDP option.
Click here to select the type of lookup for the search token.
Lookup Description
DAL scripts If you choose DAL scripts as the type of lookup, the wizard prompts you to enter the name of the DAL script. Click the Browse button to choose a script from the Open File window. After you choose a script and click Next, the wizard lets you assign a name to the token.
DAL variables If you choose DAL variables as the type of lookup, the wizard prompts you to enter the name of the variable. Once you enter this information and click Next, the wizard lets you assign a name to the token.
GVM variables If you choose GVM variables as the type of lookup, the wizard prompts you to enter the name of the variable. Once you enter this information and click Next, the wizard lets you assign a name to the token.
INI lookups If you choose INI lookup as the type of lookup, the wizard prompts you to enter the name of the INI control group, the INI option, and the option’s default value. Once you enter this information and click Next, the wizard lets you assign a name to the token.
XDD lookups If you choose XDD lookups as the type of lookup, the wizard prompts you to enter the name of the lookup. Click the Browse button to choose from the Retrieve from Extract Dictionary window. After you click OK, the wizard lets you assign a name to the token.
Note The date search tokens you list here become the selection choices available to the user who is creating the RDP rule.
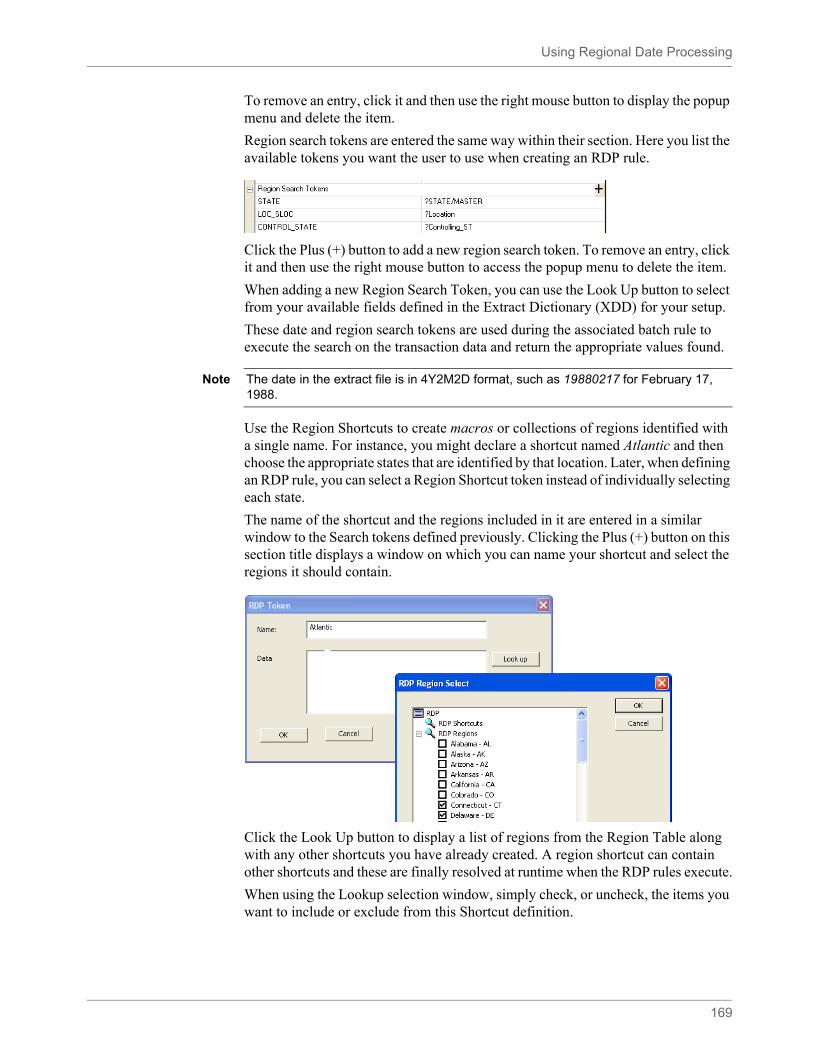
Using Regional Date Processing
169
To remove an entry, click it and then use the right mouse button to display the popup menu and delete the item.
Region search tokens are entered the same way within their section. Here you list the available tokens you want the user to use when creating an RDP rule.
Click the Plus (+) button to add a new region search token. To remove an entry, click it and then use the right mouse button to access the popup menu to delete the item.
When adding a new Region Search Token, you can use the Look Up button to select from your available fields defined in the Extract Dictionary (XDD) for your setup.
These date and region search tokens are used during the associated batch rule to execute the search on the transaction data and return the appropriate values found.
Use the Region Shortcuts to create macros or collections of regions identified with a single name. For instance, you might declare a shortcut named Atlantic and then choose the appropriate states that are identified by that location. Later, when defining an RDP rule, you can select a Region Shortcut token instead of individually selecting each state.
The name of the shortcut and the regions included in it are entered in a similar window to the Search tokens defined previously. Clicking the Plus (+) button on this section title displays a window on which you can name your shortcut and select the regions it should contain.
Click the Look Up button to display a list of regions from the Region Table along with any other shortcuts you have already created. A region shortcut can contain other shortcuts and these are finally resolved at runtime when the RDP rules execute.
When using the Lookup selection window, simply check, or uncheck, the items you want to include or exclude from this Shortcut definition.
Note The date in the extract file is in 4Y2M2D format, such as 19880217 for February 17, 1988.

Using Regional Date Processing
170
Once you have created all your necessary Date and Region Search tokens and optionally created any Regional Shortcut names you want to provide, save your BDF and check the file back into the library.
SETTING UP REGIONAL DATE PROCESSING RULESRegional date processing (RDP) rules are defined at the form level using the Form Lists manager. Once you have added date and region search tokens in the RDP settings in the Business Definition manager (and saved your Business Definition File) a new tab appears in your Form Lists manager for RDP rules.
Regional date processing rules are separate from normal trigger rules you might assign to forms. RDP rules operate as a filter that occurs before normal form triggering commences. Thus, RDP rules are specified separate to any necessary trigger condition you also would use to identify when you want to include this form.
Select the RDP Rules tab to manage your RDP rules assigned to forms. RPD rules are optional. Any form that does not specify an RDP rule is not subject to filtering before the triggering process begins. Also, a form can have multiple RDP rules if necessary. During runtime, each rule will execute in sequence until a matching condition is found, or until the list is exhausted. At that point, the form is excluded form further triggering.
Select the form you want to add a rule to and click the Plus (+) button in the properties area. This adds a rule to the form and starts the RDP Rule wizard.
The first page of the wizard will ask for the Date Search Token (DST) you want to use for this rule. Only one Date Search Token can be used per rule.
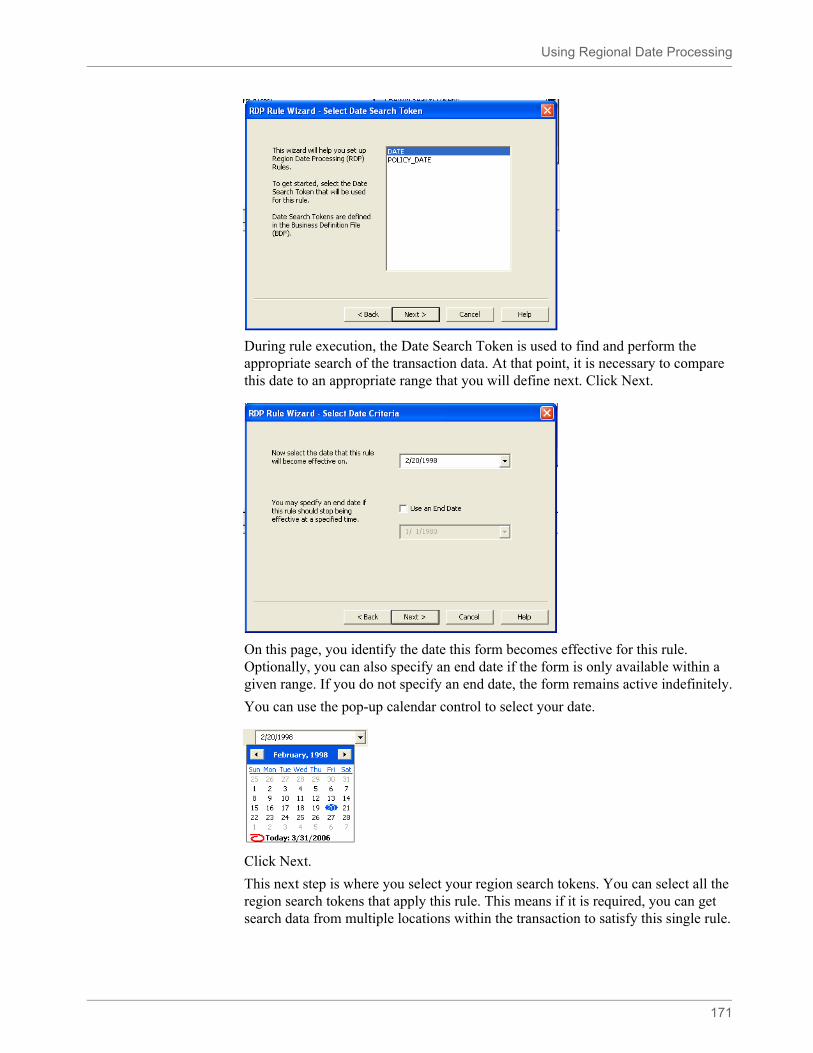
Using Regional Date Processing
171
During rule execution, the Date Search Token is used to find and perform the appropriate search of the transaction data. At that point, it is necessary to compare this date to an appropriate range that you will define next. Click Next.
On this page, you identify the date this form becomes effective for this rule. Optionally, you can also specify an end date if the form is only available within a given range. If you do not specify an end date, the form remains active indefinitely.
You can use the pop-up calendar control to select your date.
Click Next.
This next step is where you select your region search tokens. You can select all the region search tokens that apply this rule. This means if it is required, you can get search data from multiple locations within the transaction to satisfy this single rule.
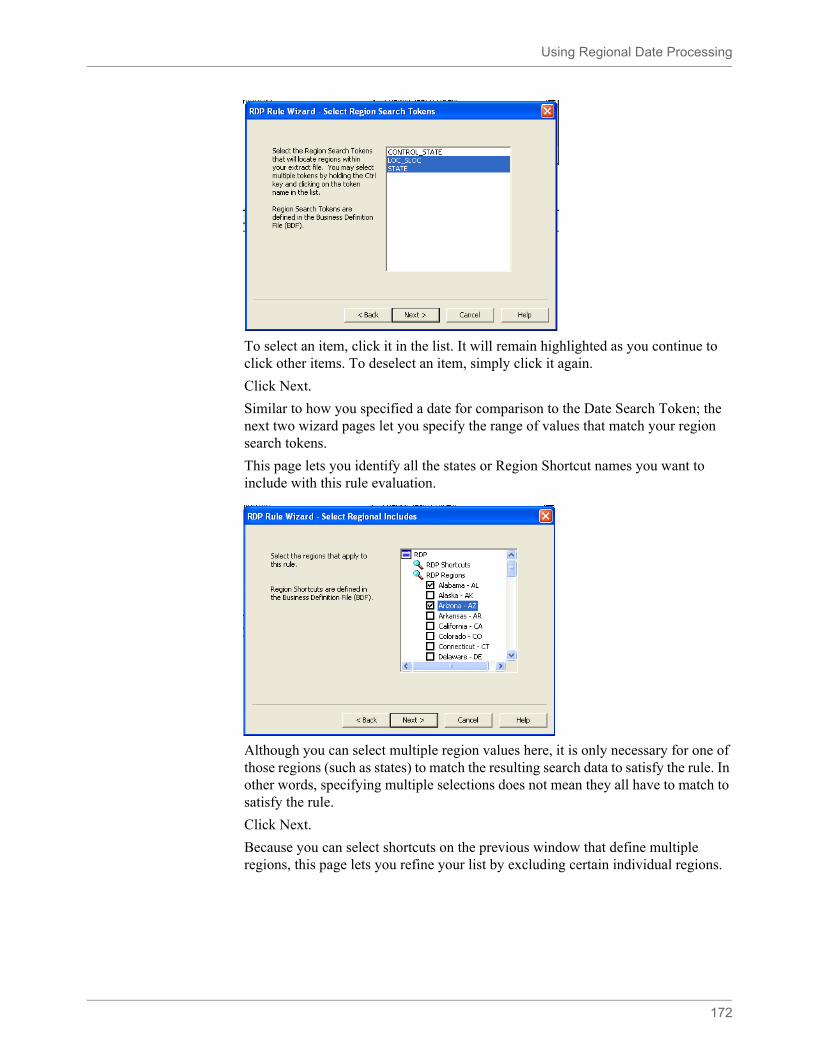
Using Regional Date Processing
172
To select an item, click it in the list. It will remain highlighted as you continue to click other items. To deselect an item, simply click it again.
Click Next.
Similar to how you specified a date for comparison to the Date Search Token; the next two wizard pages let you specify the range of values that match your region search tokens.
This page lets you identify all the states or Region Shortcut names you want to include with this rule evaluation.
Although you can select multiple region values here, it is only necessary for one of those regions (such as states) to match the resulting search data to satisfy the rule. In other words, specifying multiple selections does not mean they all have to match to satisfy the rule.
Click Next.
Because you can select shortcuts on the previous window that define multiple regions, this page lets you refine your list by excluding certain individual regions.
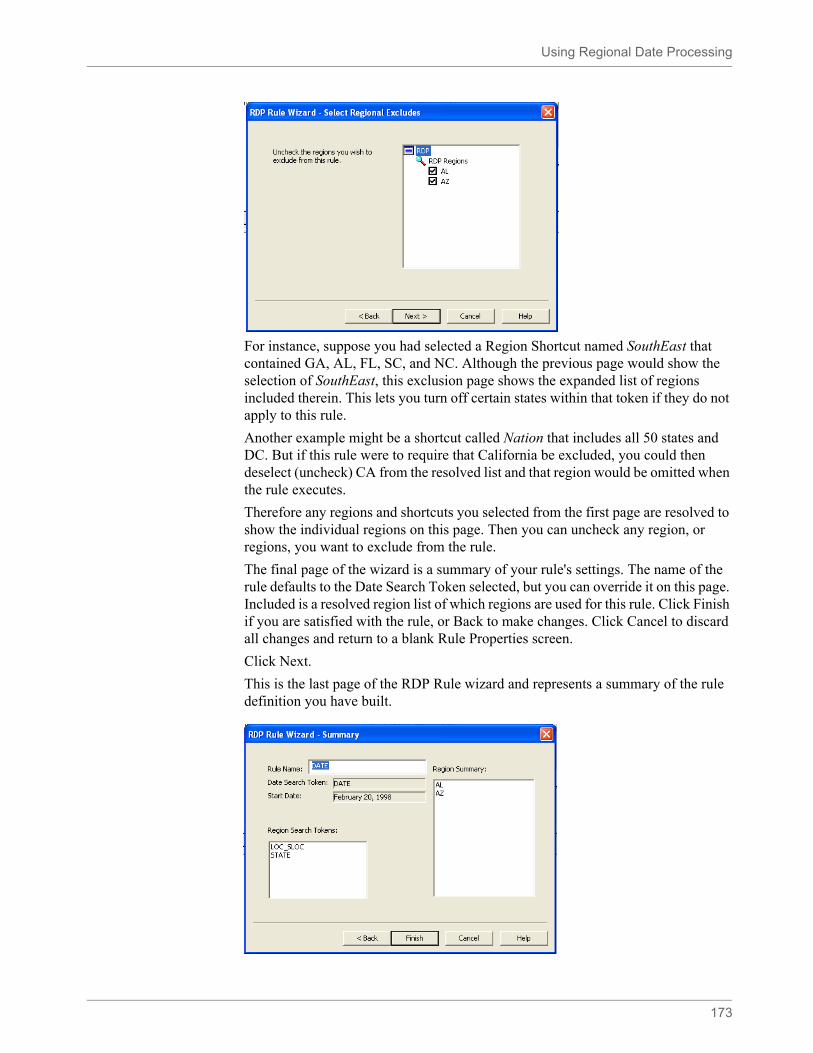
Using Regional Date Processing
173
For instance, suppose you had selected a Region Shortcut named SouthEast that contained GA, AL, FL, SC, and NC. Although the previous page would show the selection of SouthEast, this exclusion page shows the expanded list of regions included therein. This lets you turn off certain states within that token if they do not apply to this rule.
Another example might be a shortcut called Nation that includes all 50 states and DC. But if this rule were to require that California be excluded, you could then deselect (uncheck) CA from the resolved list and that region would be omitted when the rule executes.
Therefore any regions and shortcuts you selected from the first page are resolved to show the individual regions on this page. Then you can uncheck any region, or regions, you want to exclude from the rule.
The final page of the wizard is a summary of your rule's settings. The name of the rule defaults to the Date Search Token selected, but you can override it on this page. Included is a resolved region list of which regions are used for this rule. Click Finish if you are satisfied with the rule, or Back to make changes. Click Cancel to discard all changes and return to a blank Rule Properties screen.
Click Next.
This is the last page of the RDP Rule wizard and represents a summary of the rule definition you have built.
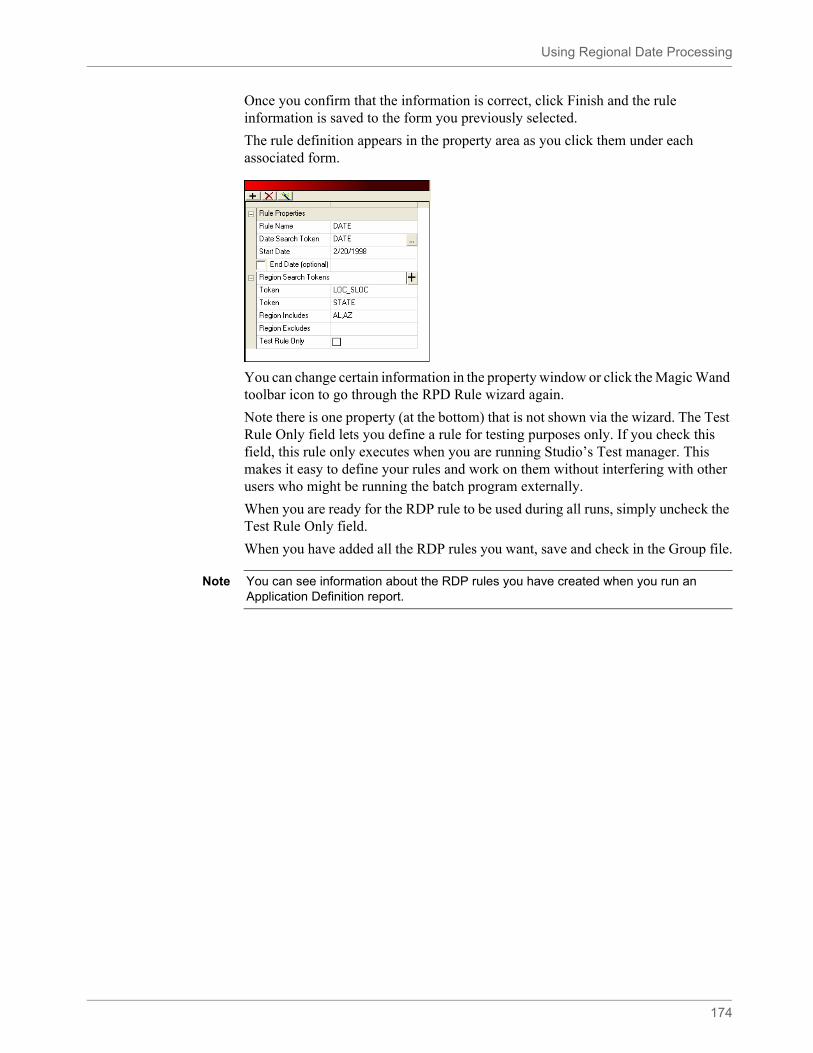
Using Regional Date Processing
174
Once you confirm that the information is correct, click Finish and the rule information is saved to the form you previously selected.
The rule definition appears in the property area as you click them under each associated form.
You can change certain information in the property window or click the Magic Wand toolbar icon to go through the RPD Rule wizard again.
Note there is one property (at the bottom) that is not shown via the wizard. The Test Rule Only field lets you define a rule for testing purposes only. If you check this field, this rule only executes when you are running Studio’s Test manager. This makes it easy to define your rules and work on them without interfering with other users who might be running the batch program externally.
When you are ready for the RDP rule to be used during all runs, simply uncheck the Test Rule Only field.
When you have added all the RDP rules you want, save and check in the Group file.
Note You can see information about the RDP rules you have created when you run an Application Definition report.
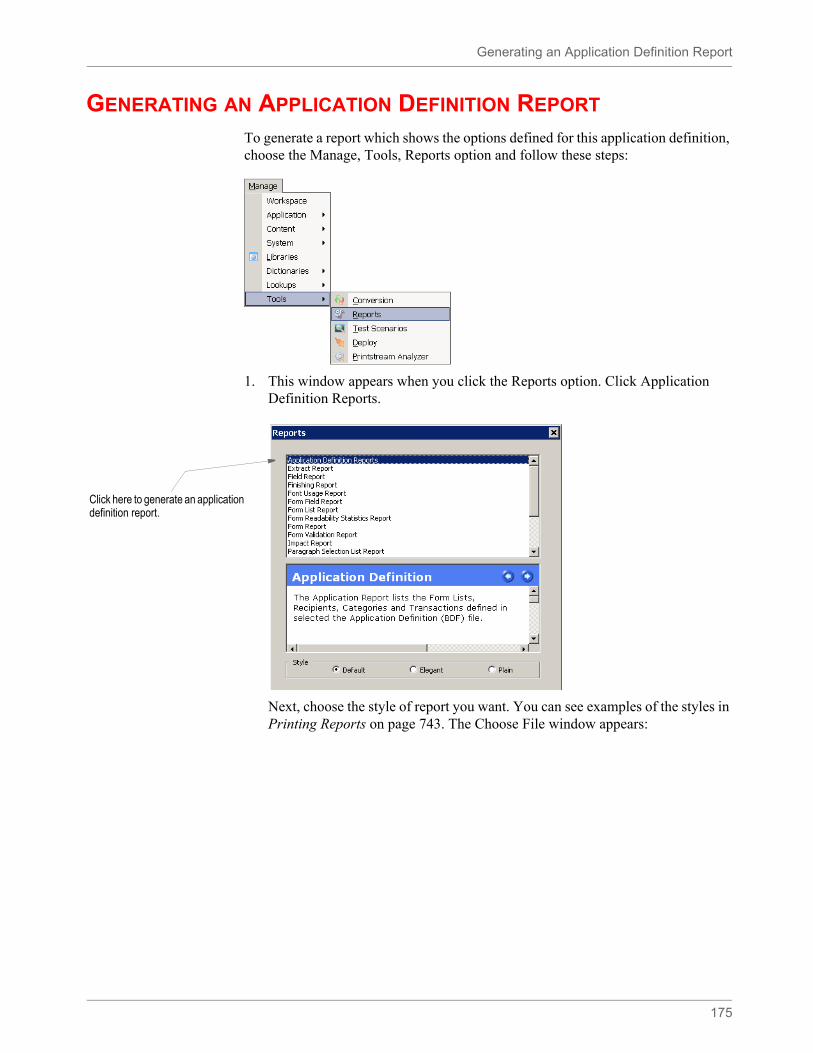
Generating an Application Definition Report
175
GENERATING AN APPLICATION DEFINITION REPORT
To generate a report which shows the options defined for this application definition, choose the Manage, Tools, Reports option and follow these steps:
1. This window appears when you click the Reports option. Click Application Definition Reports.
Next, choose the style of report you want. You can see examples of the styles in Printing Reports on page 743. The Choose File window appears:
Click here to generate an application definition report.

Generating an Application Definition Report
176
2. Choose the application definition file you want and click Next. The Generate Report window appears.
3. Click Finish to generate the report. Here is a sample report:
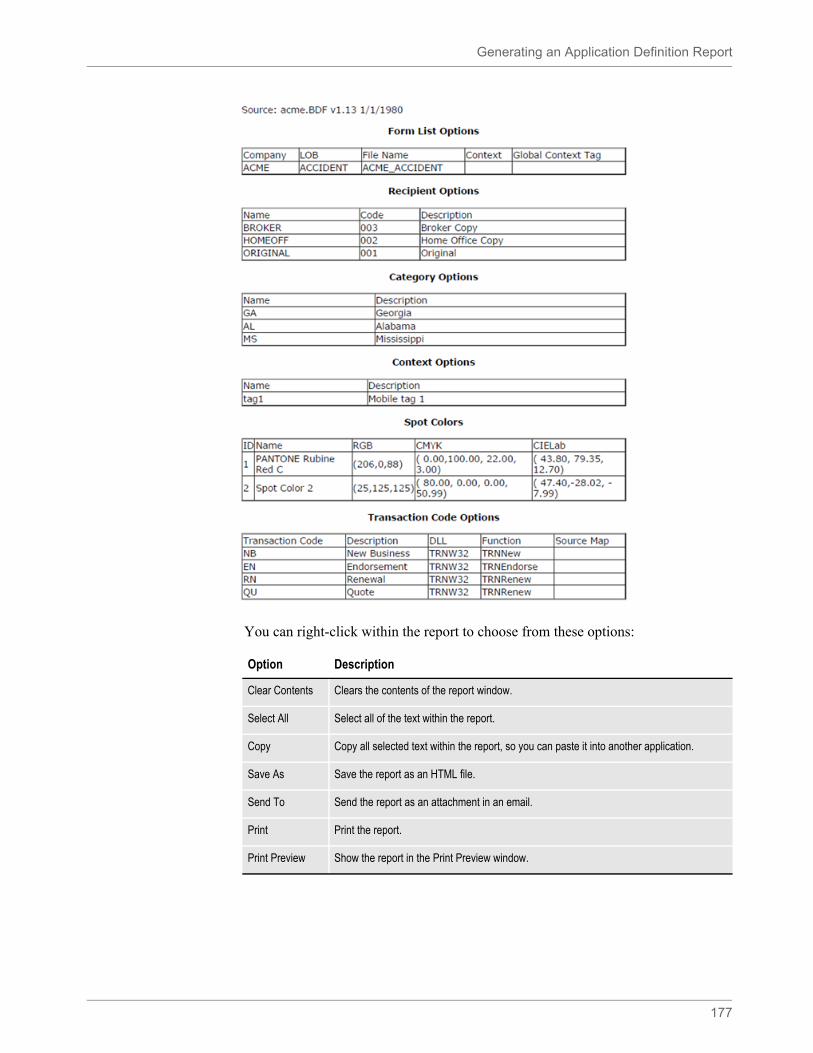
Generating an Application Definition Report
177
You can right-click within the report to choose from these options:
Option Description
Clear Contents Clears the contents of the report window.
Select All Select all of the text within the report.
Copy Copy all selected text within the report, so you can paste it into another application.
Save As Save the report as an HTML file.
Send To Send the report as an attachment in an email.
Print Print the report.
Print Preview Show the report in the Print Preview window.
Generating an Application Definition Report
178
Example: Add the BDF information for the Medical History form
First remember you must have rights to work in the Application Definition of your workspace. For information on the Key1/Key2 combination of this implementation, see Example Form on page 35.
1. If you do have rights to do so, right-click the Application level of the workspace tree and select New.
2. Click the Add Unit Name icon, and then type the Key1 name in the Unit 1 section of the Forms List Options. In our example, Training Company.
3. Save the new file and name it.
4. Click the Add Unit Name icon again, or right-click the Group name and click Insert to add a Key2, or LOB. In our example, Accident.
5. Go back and select the new Group name, and enter the FXR and XDD information.
6. To add recipients, click the Add Recipient icon in the Recipient pane. Add INSURED, AGENT, AND HOMEOFFICE.
7. Save the file and check it back into the Library.
Note Any examples in this guide usually demonstrate one possible configuration for a given process. In Documaker there are different ways to achieve the same results, and legacy methods are supported in current versions of Documaker Studio. If your implementation is set up differently than shown in documentation, but is working, do not alter your current configuration.
179
Chapter 4
Working with Form Lists
Click Form Lists to define a list of the forms that apply to each business unit and to maintain form-level triggering information. You can also define the order in which these forms should be provided.
Information about each group of forms is stored in a file with a GRP extension. For each group (Key1/Key2), you have a separate GRP file. Group name (Key1/Key2) information is stored in the BDF file, whereas specific information for each of the forms that make up the group is stored in a GRP file. Make sure you have the needed rights to perform the function, otherwise, contact your System Administrator to update.
This topic discusses:
• Creating a Form List on page 180
• Adding a Form to a Form List on page 182
• Setting Up Form Triggers on page 184
• Triggers Manager on page 190
• Example 1: Adding DAL Triggers to the Medical History Form on page 191
Creating a Form List
180
CREATING A FORM LIST
To begin the process of grouping forms, you must first create a form list. Follow these steps:
1. To create the group, double click Form Lists. Then click New on the Open File window. You can also right-click the Form Lists option and select New.
The Form List options appear.
2. Enter the following information to set up the forms you want included in the group in the following fields. Keep in mind that the forms do not have to exist at this point, you are merely creating a list of form names and defining some of the options that apply to those forms.
3. Choose File, Save to save your work. The Save As window appears.
Field Description
Form Name Enter the name of the form you want to include in the group. You can enter up to 100 characters. This name appears on the Forms Selection window in Documaker Desktop
Form Description
Enter a description of the form. You can enter up to 100 characters. This description appears in the object tree beside the form name. This description can help a Documaker Desktop user select the correct form.
Dec Options Choose the appropriate declaration page option. Your choices are:
• None - Any page other than a policy declaration page• Dec Page - A policy declaration page• Master Dec - A master declaration page for the form set (package policy)• Sub Dec - A sub dec page for one group in the form set
This option is only used by Documaker Desktop. What you select here determines the manner in which Documaker Desktop presents declaration pages during entry.This option is ignored during batch processing.
Pre-selected Check this option if you want Documaker Desktop to automatically select this form during entry.
File Name Enter a file name for this form. You don’t have to name your files in exactly the same way that Studio might default them and that you can change that file name property to be the name you choose for your library resource. However, some platforms will not let you use certain characters in file names.
Note Because Dec Options and the Pre-selected fields are stored at the group level, you can reuse the same form in different groups.
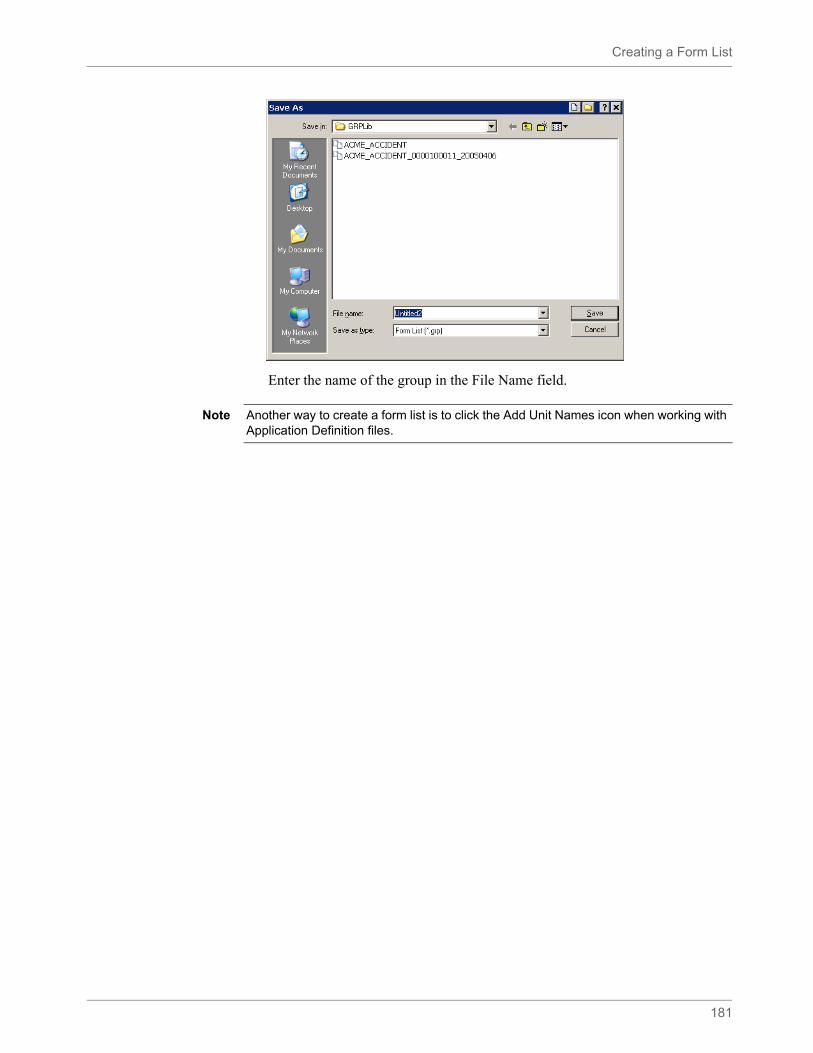
Creating a Form List
181
Enter the name of the group in the File Name field.
Note Another way to create a form list is to click the Add Unit Names icon when working with Application Definition files.
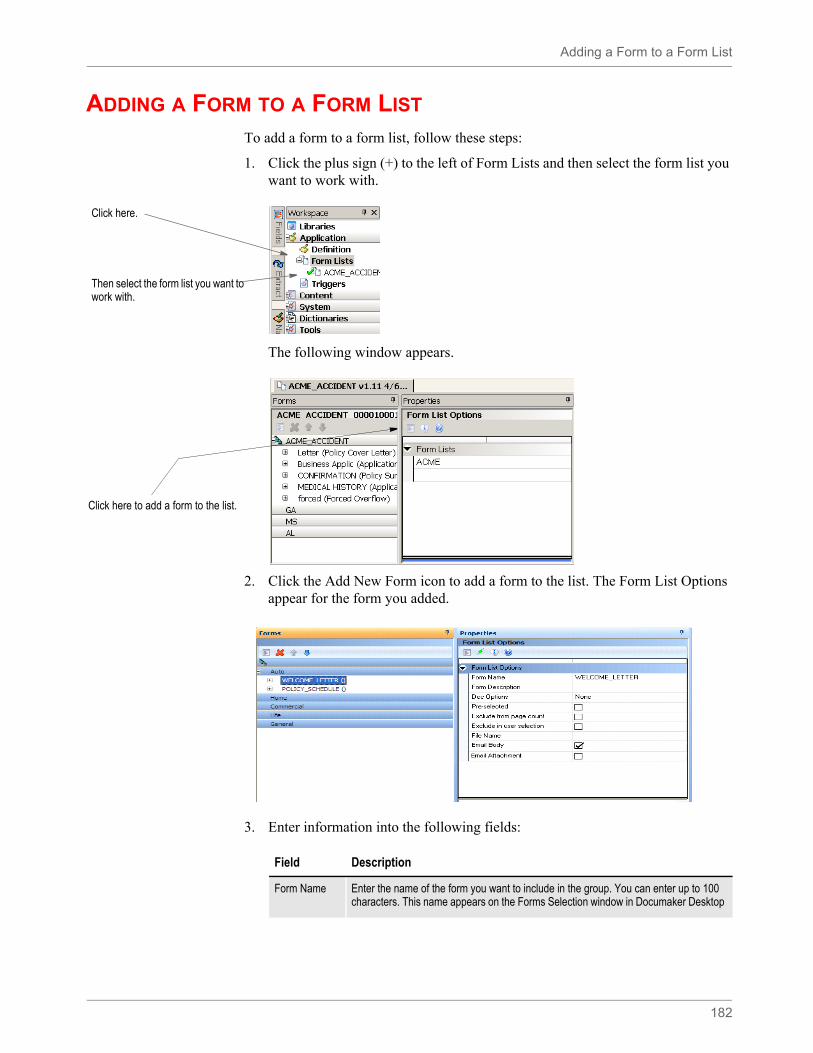
Adding a Form to a Form List
182
ADDING A FORM TO A FORM LIST
To add a form to a form list, follow these steps:
1. Click the plus sign (+) to the left of Form Lists and then select the form list you want to work with.
The following window appears.
2. Click the Add New Form icon to add a form to the list. The Form List Options appear for the form you added.
3. Enter information into the following fields:
Click here.
Then select the form list you want to work with.
Click here to add a form to the list.
Field Description
Form Name Enter the name of the form you want to include in the group. You can enter up to 100 characters. This name appears on the Forms Selection window in Documaker Desktop
Adding a Form to a Form List
183
Form Description
Enter a description of the form. You can enter up to 100 characters. This description appears in the object tree beside the form name. This description can help a Documaker Desktop user select the correct form.
Dec Options Choose the appropriate declaration page option. Your choices are:
• None - Any page other than a policy declaration page• Dec Page - A policy declaration page• Master Dec - A master declaration page for the form set (package policy)• Sub Dec - A sub dec page for one group in the form set
This option is only used by Documaker Desktop. What you select here determines the manner in which Documaker Desktop presents declaration pages during entry.This option is ignored during batch processing.
Pre-Selected Check this option if you want Documaker Desktop to automatically select this form during entry.
Exclude from Page Count
Check this option to exclude the form from the page count. Then it will not be counted in the page numbering for the entire document. Also, any Page Num fields that you place on the pages of this form will be blank.
Exclude from User Selection
Check this option to prevent end users from selecting this form.
File Name Enter a file name for this form. Usually, you would keep the form name and the file name the same, but some platforms will not let you use certain characters in file names.
Field Description
Note Because Dec Options and the Pre-selected fields are stored at the group level, you can reuse the same form in different groups.
Setting Up Form Triggers
184
SETTING UP FORM TRIGGERS
You can create triggers at both the form and section level. Form level triggers are stored at the group level and specify the condition that would cause a form to be included (or triggered) with a transaction. You should always specify a trigger for a form.
You can assign triggers to include or exclude:
• An entire form
• Sections within a form
• Text areas within a section
• Optional paragraphs in a paragraph list
You can apply triggers to sections on forms, text areas on sections, and paragraphs in paragraph list files. This table summarizes assigning triggers in both Studio and the Documaker Add-In for Word.
Note Section level triggers are stored at the form level and specify the condition that would cause the section to be included on the form. Only set up section level triggers if the section's presence on the form is conditional.
Studio assumes you do not want to trigger any of the sections that comprise a form if the form level trigger is false. Therefore, section level triggers are automatically ignored when the form level trigger for the transaction being processed is false. This makes the legacy use of an M occurrence flag unnecessary if you want the system to only evaluate section level triggers when the form level trigger is true, as was the case in Docucreate’s Image Editor.
If you omit a form level trigger, the system does not operate as efficiently since every section level trigger must then be evaluated by the system.
To trigger Type Studio Documaker Add-In for Word
An entire form Add the converted form to the Form List file using Form List manager.
Apply the Form level trigger to the Form in Form List manager.
n\a
Sections within a form
Form Create a for which includes sections.
Section triggers are listed against the sections to which they were applied.
Insert a section.
Apply triggers to applicable sections.
Text areas within a section
Section Create a section which includes text areas.
Text area triggers are listed against the sections to which they were applied in the Word Add-In
Insert a text area.
Apply triggers to applicable text areas.
Optional paragraphs in a paragraph list
Paragraph list
Create a paragraph list file which includes paragraphs.
Paragraph triggers are listed against the paragraphs to which they were applied in the Word Add-In.
Add paragraphs.
Apply triggers to the applicable paragraphs.
Setting Up Form Triggers
185
In Studio you cannot assign a trigger to a standalone section, a standalone form or a standalone paragraph list. Form triggers are applied to forms in the Form List manager. Section triggers are applied to sections in Form manager. Triggers cannot be applied to a paragraph list file because there is no triggering at the paragraph list level.
If, when using the Add-In, you assign a trigger at the form, section, or paragraph list level on Documaker documents with the type of form, section, and paragraph list respectively, Studio removes these triggers during the conversion to Studio.
DAL or Manual Trigger Entries
There are several types of triggers in Documaker Studio. Legacy Documaker users will often use what are called manual triggers. These triggers build a SetRecip table entry on the form or section. For more information, see SetRecip Table on page 189.
Users that are new to Documaker can begin building their system with DAL triggers. This also builds a SETRCTB entry, but this file contains scripting functions specific to DAL use. The DAL SETRCTB file is seen in the Triggers manager in the Application level of the workspace tree. Using the DAL wizard in the Triggers manager requires the use of the Extract Data Dictionary, or XDD, as well. Writing DAL triggers using the Script View does not require XDD configuration.
The tables below specify which options pertain to manual vs. DAL trigger options. Trigger functionality, and its use in overflow and other processes, is supported in either scenario.
ASSIGNING FORM LEVEL TRIGGERSFollow these steps to add form level triggers.
1. Highlight Form Lists, right-click and select Open.
2. Select the group file in which the form is located and click Ok.
3. Choose the Insert, Triggers option. By default, this inserts a DAL trigger.
Note DAL stands for Document Automation Language. It is proprietary to Documaker, and is a flexible scripting language that can be used for triggering, customizing data elements, insert form objects, entry form inclusion, and other functions. Please see the DAL Reference for more information.
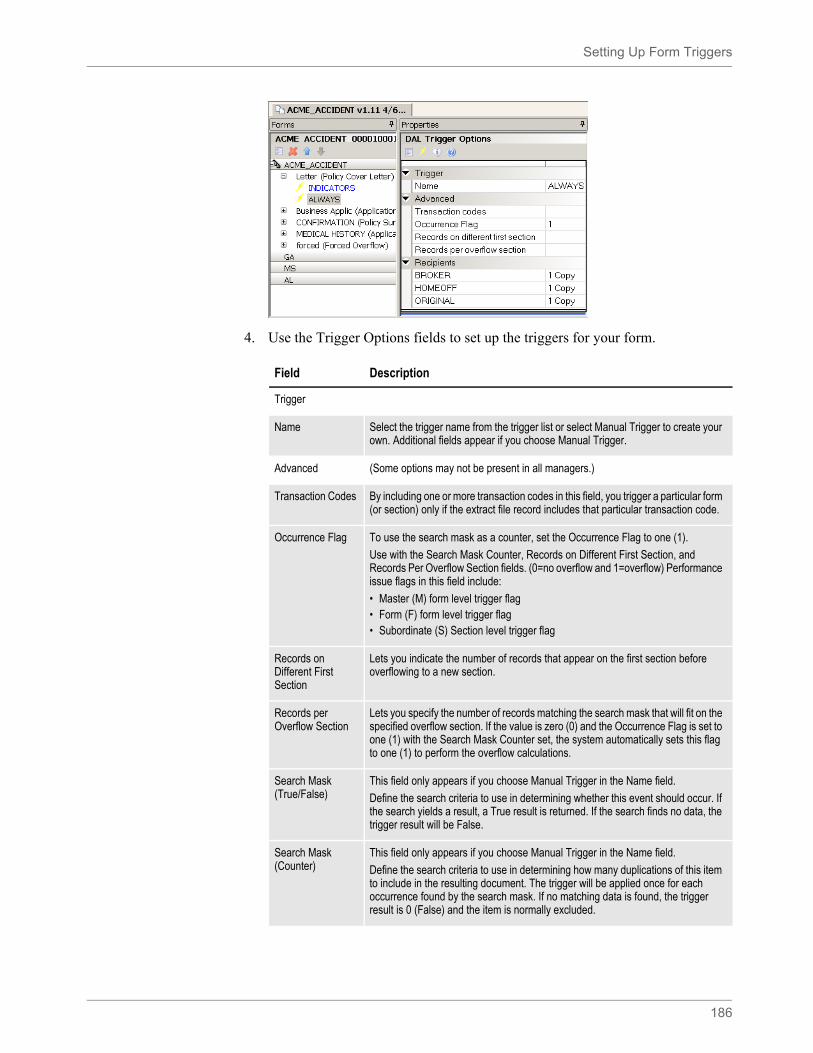
Setting Up Form Triggers
186
4. Use the Trigger Options fields to set up the triggers for your form.
Field Description
Trigger
Name Select the trigger name from the trigger list or select Manual Trigger to create your own. Additional fields appear if you choose Manual Trigger.
Advanced (Some options may not be present in all managers.)
Transaction Codes By including one or more transaction codes in this field, you trigger a particular form (or section) only if the extract file record includes that particular transaction code.
Occurrence Flag To use the search mask as a counter, set the Occurrence Flag to one (1).
Use with the Search Mask Counter, Records on Different First Section, and Records Per Overflow Section fields. (0=no overflow and 1=overflow) Performance issue flags in this field include:
• Master (M) form level trigger flag • Form (F) form level trigger flag • Subordinate (S) Section level trigger flag
Records on Different First Section
Lets you indicate the number of records that appear on the first section before overflowing to a new section.
Records per Overflow Section
Lets you specify the number of records matching the search mask that will fit on the specified overflow section. If the value is zero (0) and the Occurrence Flag is set to one (1) with the Search Mask Counter set, the system automatically sets this flag to one (1) to perform the overflow calculations.
Search Mask (True/False)
This field only appears if you choose Manual Trigger in the Name field.
Define the search criteria to use in determining whether this event should occur. If the search yields a result, a True result is returned. If the search finds no data, the trigger result will be False.
Search Mask (Counter)
This field only appears if you choose Manual Trigger in the Name field.
Define the search criteria to use in determining how many duplications of this item to include in the resulting document. The trigger will be applied once for each occurrence found by the search mask. If no matching data is found, the trigger result is 0 (False) and the item is normally excluded.
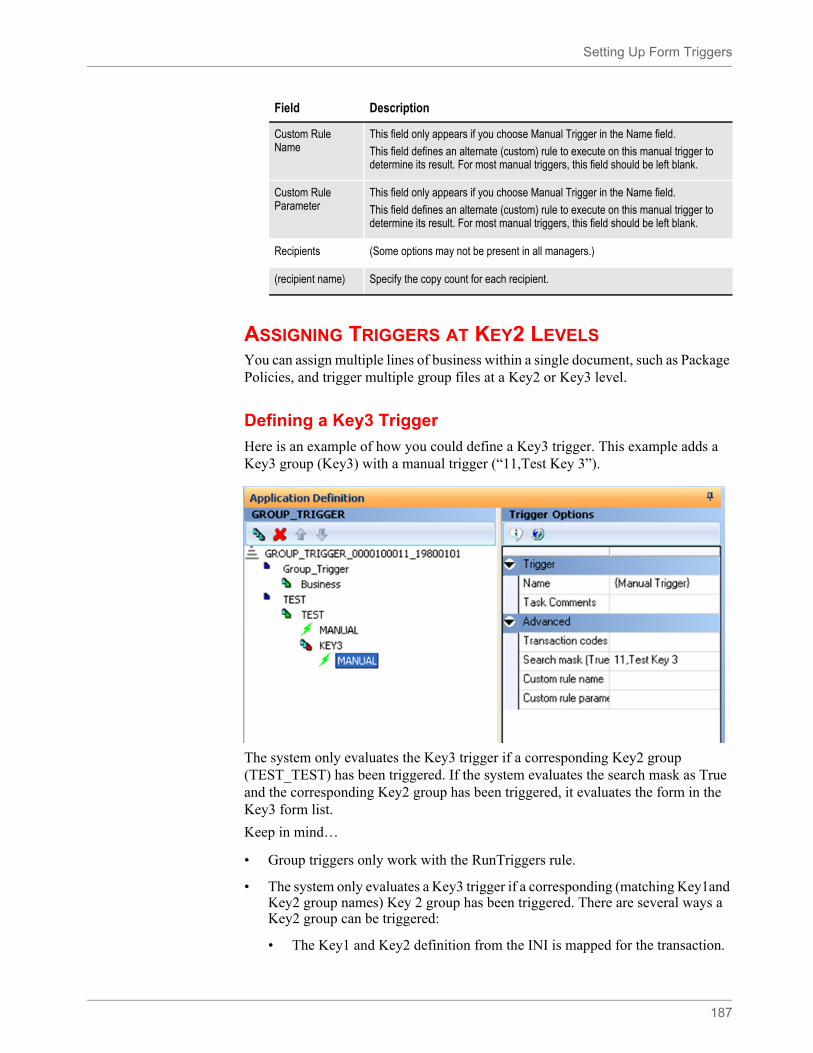
Setting Up Form Triggers
187
ASSIGNING TRIGGERS AT KEY2 LEVELSYou can assign multiple lines of business within a single document, such as Package Policies, and trigger multiple group files at a Key2 or Key3 level.
Defining a Key3 Trigger
Here is an example of how you could define a Key3 trigger. This example adds a Key3 group (Key3) with a manual trigger (“11,Test Key 3”).
The system only evaluates the Key3 trigger if a corresponding Key2 group (TEST_TEST) has been triggered. If the system evaluates the search mask as True and the corresponding Key2 group has been triggered, it evaluates the form in the Key3 form list.
Keep in mind…
• Group triggers only work with the RunTriggers rule.
• The system only evaluates a Key3 trigger if a corresponding (matching Key1and Key2 group names) Key 2 group has been triggered. There are several ways a Key2 group can be triggered:
• The Key1 and Key2 definition from the INI is mapped for the transaction.
Custom Rule Name
This field only appears if you choose Manual Trigger in the Name field.
This field defines an alternate (custom) rule to execute on this manual trigger to determine its result. For most manual triggers, this field should be left blank.
Custom Rule Parameter
This field only appears if you choose Manual Trigger in the Name field.
This field defines an alternate (custom) rule to execute on this manual trigger to determine its result. For most manual triggers, this field should be left blank.
Recipients (Some options may not be present in all managers.)
(recipient name) Specify the copy count for each recipient.
Field Description

Setting Up Form Triggers
188
• Key2 triggers can explicitly include the group.
• An import adds a Key2 group. If the system then executes the RunTriggers rule to get more forms, it would then be able to run the Key3 triggers for any Key2s brought in via import.
SetRecip Table
189
SETRECIP TABLE
The SetRecip table lets you specify the conditions under which a form or a section will get triggered when building manual trigger entries. To create a manual trigger, first add a trigger to a form. In the Trigger Name field select Manual Trigger. Depending upon the requirement, not every field is completed. This table discusses each field:
Section Field Description
SetRecip Transaction Codes
<TRANSCDS>
By including one or more Transaction codes in this field, you trigger a particular form (or section) only if the extract file record includes that particular Transaction Code.
<RECIPS>
Search Mask (Counter)
<MASK1>
Lets you set the criteria to determine whether or not a form (or section) belongs in the form set. The criteria allows the Rules Processor to get specific data from the extract file.
Adds one form (or section) for every occurrence of the search mask per transaction. The Occurrence Flag must be set to one (1) for the search mask to act as a counter.
Occurrence Flag
<OCCURRENCE>
To use the search mask as a counter, the Occurrence Flag (overflow) must be set to one (1). Use with the Search Mask Counter, Records on Different First Section, and Records Per Overflow Section fields. (0=no overflow and 1=overflow)
Performance issue flags in this field include:
- Master (M) form level trigger flag
- Form (F) form level trigger flag
- Subordinate (S) section level trigger flag
Records on different first section
<RECSPER1ST>
Lets you indicate the number of records that appear on the first section before overflowing to a new section.
Records per overflow section
<RECSPERIMG>
Lets you specify the number of records matching the search mask that will fit on the specified overflow section. If the value is zero (0) and the Occurrence Flag is set to one (1) with the Search Mask Counter set, the system automatically sets this flag to one (1) to perform the overflow calculations.
Search Mask (True/False)
<CONDITIONAL>
Similar to Search Mask (Counter), but only one form (or section) is triggered, regardless of how many occurrences of the condition exists.
Custom Rule Name
<FUNCTIONNAME>
Normally used for custom implementation requirements. Only exceptions are RECIPIF and RECIPCONDITION rules.
Custom Rule Parameters
<DATA>
Specifies parameters for the custom rule used in the Custom Rule Name field.
Recipient Form Level Trigger
Recipient Copy Count
<RECIPCPYCT>
Section Level Trigger
Recipient Copy Count
<RECIPCPYCT>
Recipient names listed with no check or a check
Defaults the recipient copy of each recipient defined at the form level
If recipient was eligible in the form file, it is checked here.
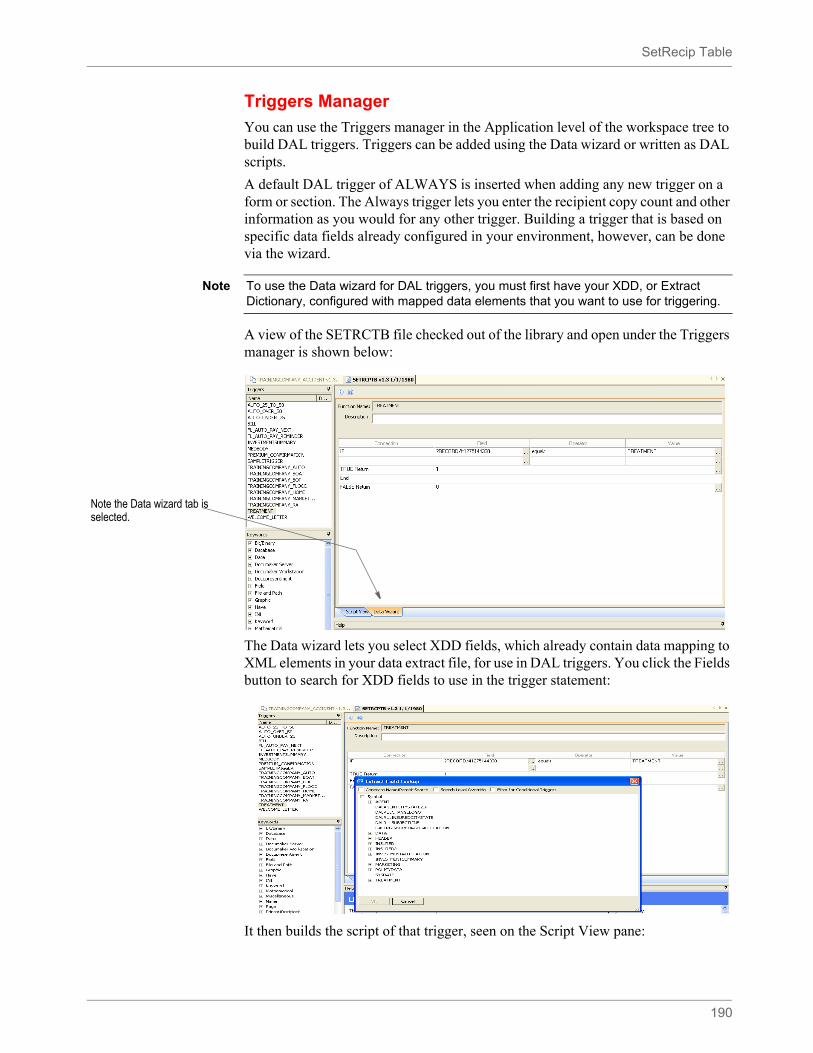
SetRecip Table
190
Triggers Manager
You can use the Triggers manager in the Application level of the workspace tree to build DAL triggers. Triggers can be added using the Data wizard or written as DAL scripts.
A default DAL trigger of ALWAYS is inserted when adding any new trigger on a form or section. The Always trigger lets you enter the recipient copy count and other information as you would for any other trigger. Building a trigger that is based on specific data fields already configured in your environment, however, can be done via the wizard.
A view of the SETRCTB file checked out of the library and open under the Triggers manager is shown below:
The Data wizard lets you select XDD fields, which already contain data mapping to XML elements in your data extract file, for use in DAL triggers. You click the Fields button to search for XDD fields to use in the trigger statement:
It then builds the script of that trigger, seen on the Script View pane:
Note To use the Data wizard for DAL triggers, you must first have your XDD, or Extract Dictionary, configured with mapped data elements that you want to use for triggering.
Note the Data wizard tab is selected.
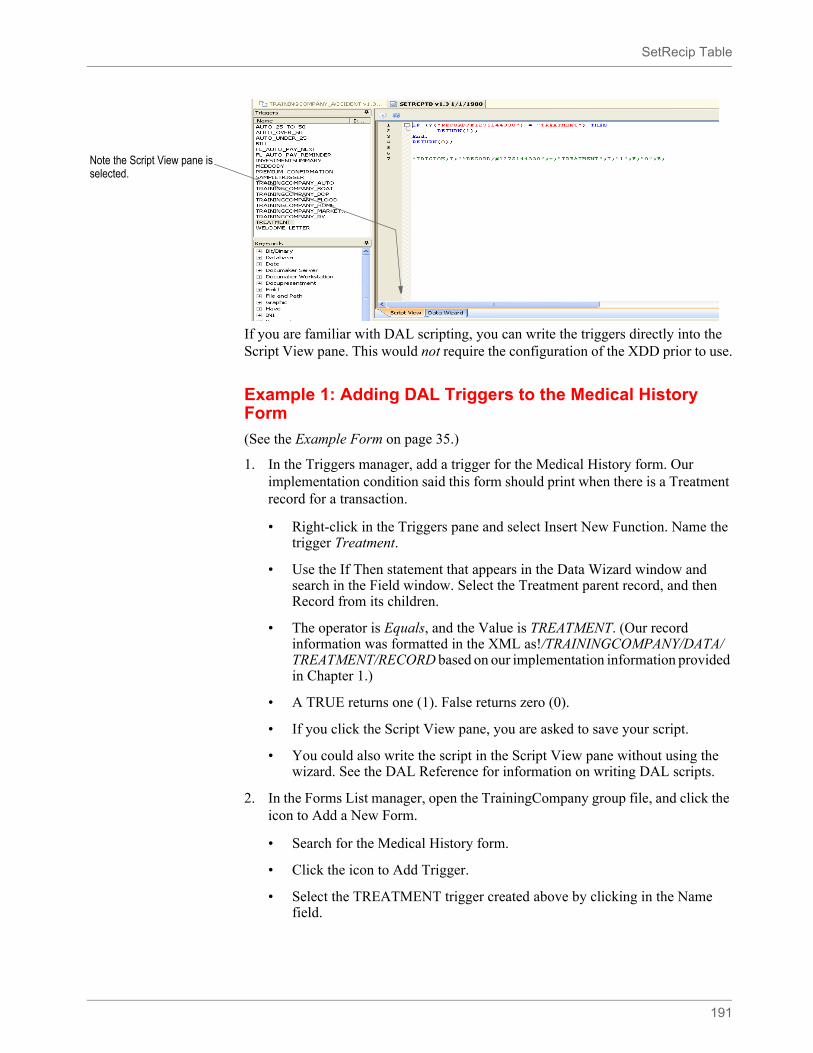
SetRecip Table
191
If you are familiar with DAL scripting, you can write the triggers directly into the Script View pane. This would not require the configuration of the XDD prior to use.
Example 1: Adding DAL Triggers to the Medical History Form
(See the Example Form on page 35.)
1. In the Triggers manager, add a trigger for the Medical History form. Our implementation condition said this form should print when there is a Treatment record for a transaction.
• Right-click in the Triggers pane and select Insert New Function. Name the trigger Treatment.
• Use the If Then statement that appears in the Data Wizard window and search in the Field window. Select the Treatment parent record, and then Record from its children.
• The operator is Equals, and the Value is TREATMENT. (Our record information was formatted in the XML as!/TRAININGCOMPANY/DATA/TREATMENT/RECORD based on our implementation information provided in Chapter 1.)
• A TRUE returns one (1). False returns zero (0).
• If you click the Script View pane, you are asked to save your script.
• You could also write the script in the Script View pane without using the wizard. See the DAL Reference for information on writing DAL scripts.
2. In the Forms List manager, open the TrainingCompany group file, and click the icon to Add a New Form.
• Search for the Medical History form.
• Click the icon to Add Trigger.
• Select the TREATMENT trigger created above by clicking in the Name field.
Note the Script View pane is selected.
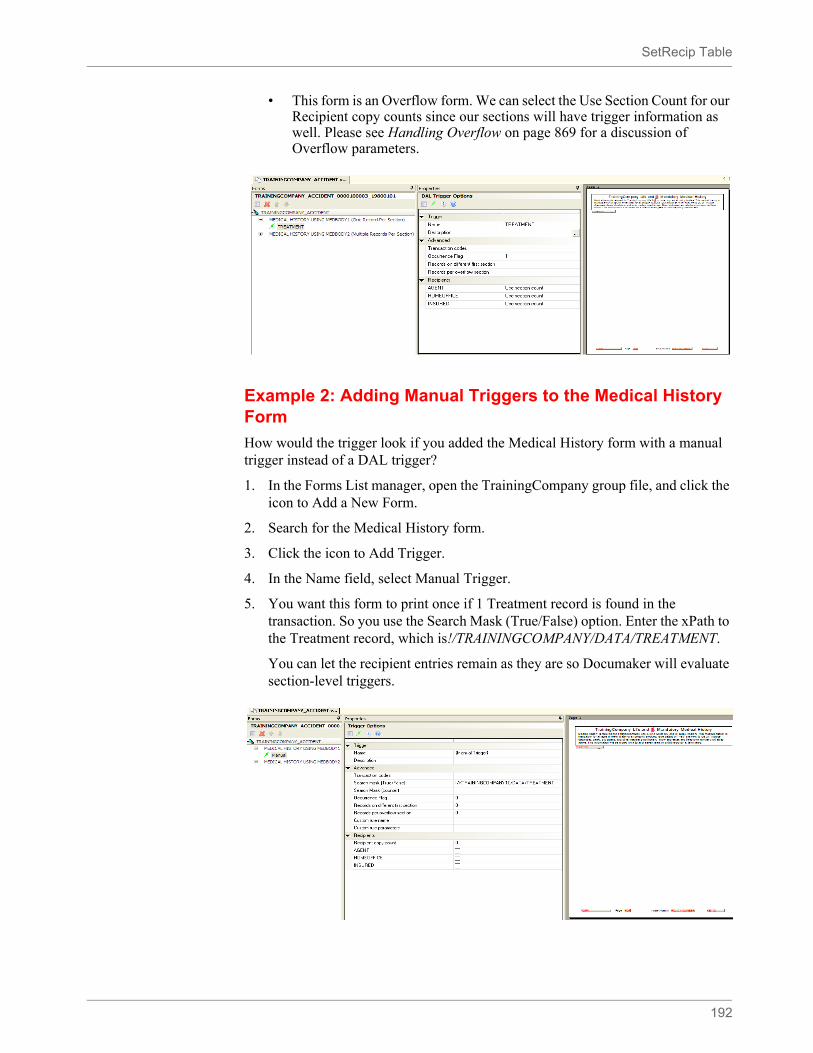
SetRecip Table
192
• This form is an Overflow form. We can select the Use Section Count for our Recipient copy counts since our sections will have trigger information as well. Please see Handling Overflow on page 869 for a discussion of Overflow parameters.
Example 2: Adding Manual Triggers to the Medical History Form
How would the trigger look if you added the Medical History form with a manual trigger instead of a DAL trigger?
1. In the Forms List manager, open the TrainingCompany group file, and click the icon to Add a New Form.
2. Search for the Medical History form.
3. Click the icon to Add Trigger.
4. In the Name field, select Manual Trigger.
5. You want this form to print once if 1 Treatment record is found in the transaction. So you use the Search Mask (True/False) option. Enter the xPath to the Treatment record, which is!/TRAININGCOMPANY/DATA/TREATMENT.
You can let the recipient entries remain as they are so Documaker will evaluate section-level triggers.

SetRecip Table
193
Note Any examples in this guide usually demonstrate one possible configuration for a given process. In Documaker there are different ways to achieve the same results, and legacy methods are supported in current versions of Documaker Studio. If your implementation is set up differently than shown in documentation, but is working, do not alter your current configuration.
194
Chapter 5
Managing Forms
Click Forms to work with the list of sections that comprise the form and maintain section-level triggering information. The triggering information determines what criteria must exist for this form to be included in a form set. Make sure you have the needed rights to perform the function, otherwise, contact your System Administrator to update.
This chapter discusses the following topics:
• Overview on page 195
• Using the Forms Screen on page 201
• Creating a Form on page 209
• SetOrigins on page 218
• Using Form Templates on page 226
• Setting Up Section Triggers on page 234
• Example 1: Add the Medical History Form on page 232
• Example 2: Add a DAL Section trigger to the Medical History Form on page 239
• Example 3: Add a Manual Section trigger to the Medical History Form on page 243
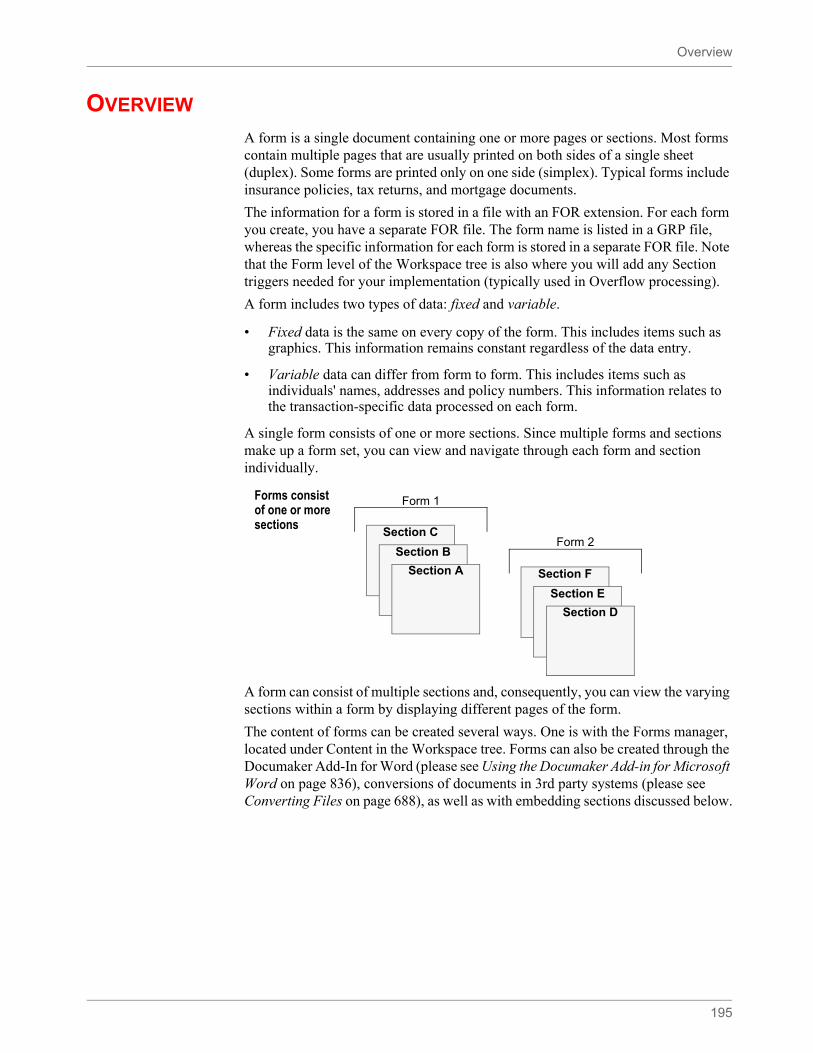
Overview
195
OVERVIEW
A form is a single document containing one or more pages or sections. Most forms contain multiple pages that are usually printed on both sides of a single sheet (duplex). Some forms are printed only on one side (simplex). Typical forms include insurance policies, tax returns, and mortgage documents.
The information for a form is stored in a file with an FOR extension. For each form you create, you have a separate FOR file. The form name is listed in a GRP file, whereas the specific information for each form is stored in a separate FOR file. Note that the Form level of the Workspace tree is also where you will add any Section triggers needed for your implementation (typically used in Overflow processing).
A form includes two types of data: fixed and variable.
• Fixed data is the same on every copy of the form. This includes items such as graphics. This information remains constant regardless of the data entry.
• Variable data can differ from form to form. This includes items such as individuals' names, addresses and policy numbers. This information relates to the transaction-specific data processed on each form.
A single form consists of one or more sections. Since multiple forms and sections make up a form set, you can view and navigate through each form and section individually.
A form can consist of multiple sections and, consequently, you can view the varying sections within a form by displaying different pages of the form.
The content of forms can be created several ways. One is with the Forms manager, located under Content in the Workspace tree. Forms can also be created through the Documaker Add-In for Word (please see Using the Documaker Add-in for Microsoft Word on page 836), conversions of documents in 3rd party systems (please see Converting Files on page 688), as well as with embedding sections discussed below.
Forms consist of one or more sections
Section A
Section B
Section C
Section D
Section E
Section F
Form 1
Form 2
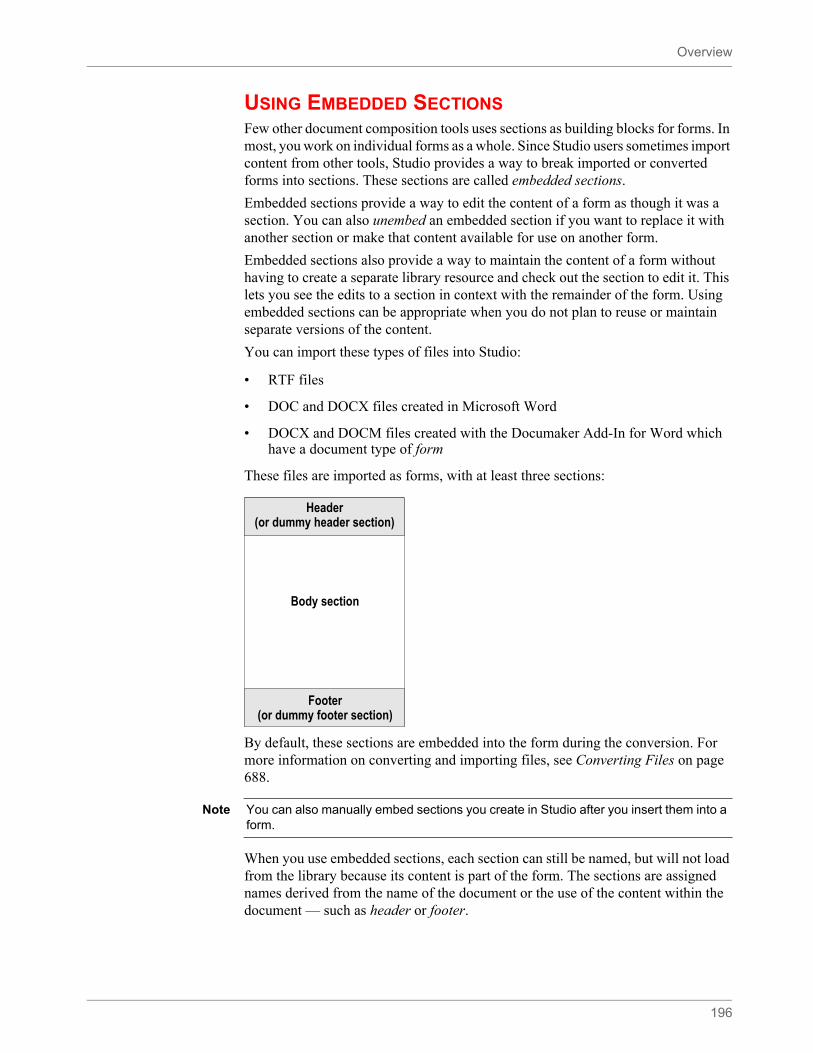
Overview
196
USING EMBEDDED SECTIONSFew other document composition tools uses sections as building blocks for forms. In most, you work on individual forms as a whole. Since Studio users sometimes import content from other tools, Studio provides a way to break imported or converted forms into sections. These sections are called embedded sections.
Embedded sections provide a way to edit the content of a form as though it was a section. You can also unembed an embedded section if you want to replace it with another section or make that content available for use on another form.
Embedded sections also provide a way to maintain the content of a form without having to create a separate library resource and check out the section to edit it. This lets you see the edits to a section in context with the remainder of the form. Using embedded sections can be appropriate when you do not plan to reuse or maintain separate versions of the content.
You can import these types of files into Studio:
• RTF files
• DOC and DOCX files created in Microsoft Word
• DOCX and DOCM files created with the Documaker Add-In for Word which have a document type of form
These files are imported as forms, with at least three sections:
By default, these sections are embedded into the form during the conversion. For more information on converting and importing files, see Converting Files on page 688.
When you use embedded sections, each section can still be named, but will not load from the library because its content is part of the form. The sections are assigned names derived from the name of the document or the use of the content within the document — such as header or footer.
Header (or dummy header section)
Footer (or dummy footer section)
Body section
Note You can also manually embed sections you create in Studio after you insert them into a form.
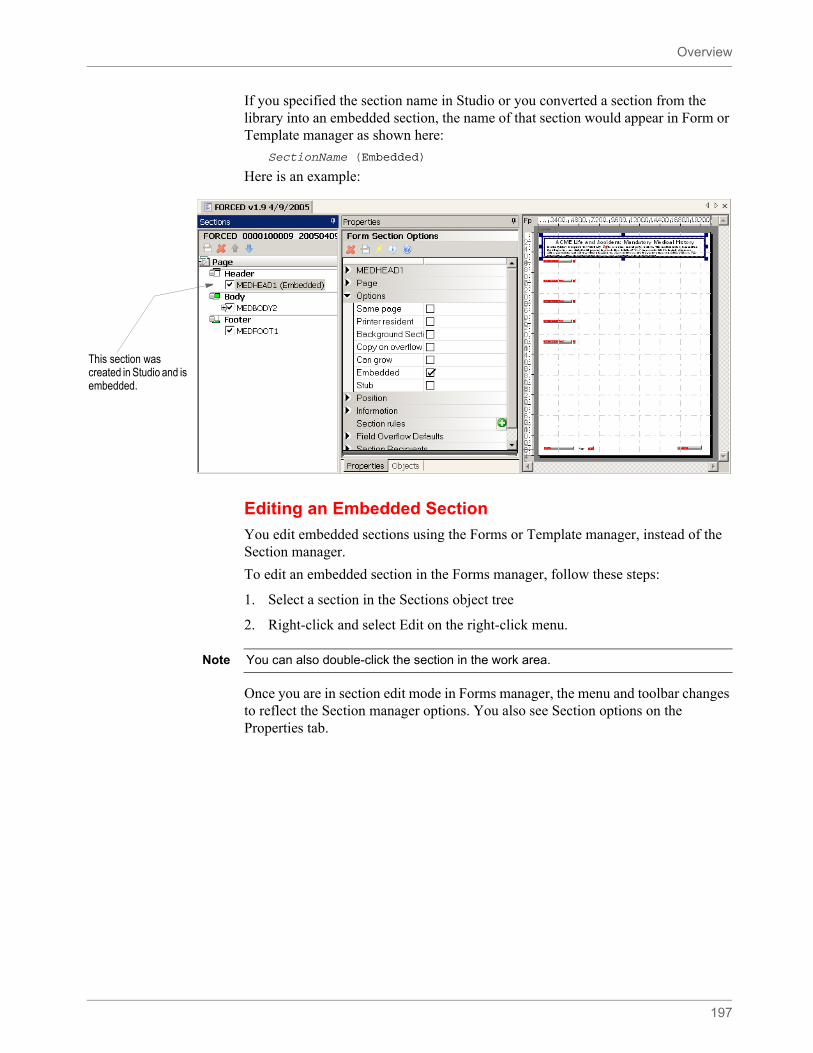
Overview
197
If you specified the section name in Studio or you converted a section from the library into an embedded section, the name of that section would appear in Form or Template manager as shown here:
SectionName (Embedded)
Here is an example:
Editing an Embedded Section
You edit embedded sections using the Forms or Template manager, instead of the Section manager.
To edit an embedded section in the Forms manager, follow these steps:
1. Select a section in the Sections object tree
2. Right-click and select Edit on the right-click menu.
Once you are in section edit mode in Forms manager, the menu and toolbar changes to reflect the Section manager options. You also see Section options on the Properties tab.
This section was created in Studio and is embedded.
Note You can also double-click the section in the work area.
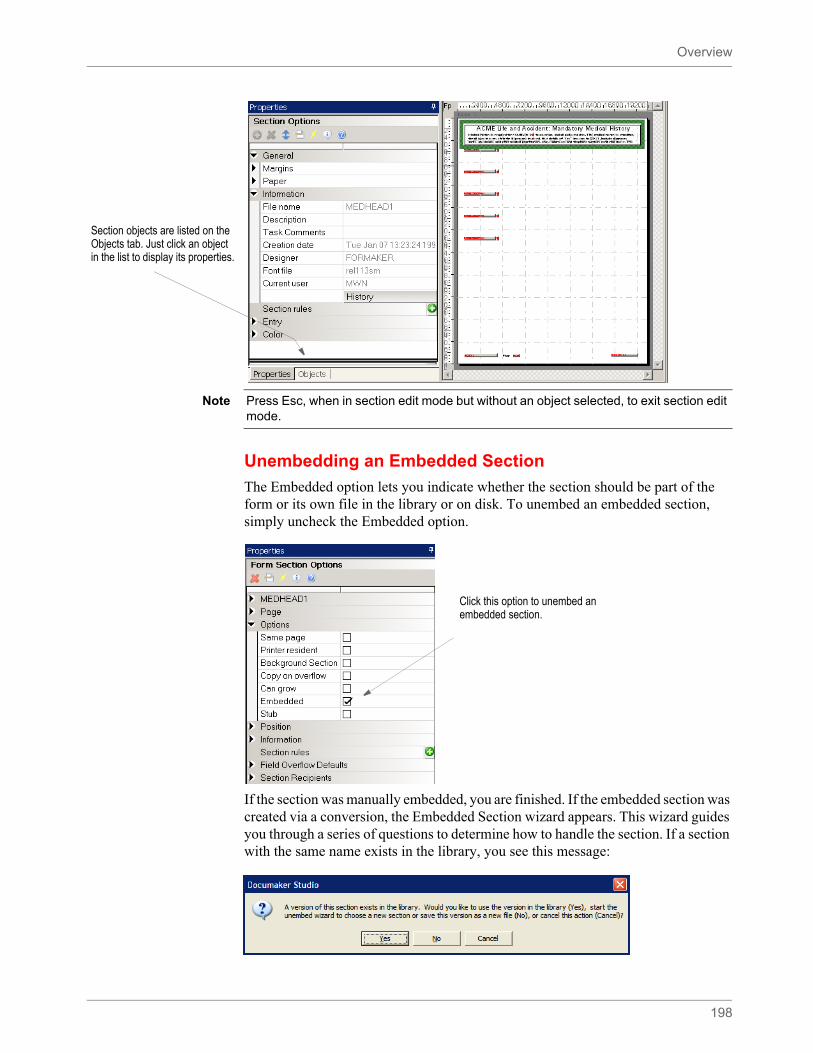
Overview
198
Unembedding an Embedded Section
The Embedded option lets you indicate whether the section should be part of the form or its own file in the library or on disk. To unembed an embedded section, simply uncheck the Embedded option.
If the section was manually embedded, you are finished. If the embedded section was created via a conversion, the Embedded Section wizard appears. This wizard guides you through a series of questions to determine how to handle the section. If a section with the same name exists in the library, you see this message:
Section objects are listed on the Objects tab. Just click an object in the list to display its properties.
Note Press Esc, when in section edit mode but without an object selected, to exit section edit mode.
Click this option to unembed an embedded section.

Overview
199
You have these options:
If you click No, or if there was no section already in the library by that name, the Embedded Section wizard appears:
You have these choices:
• Replace the embedded section with one from the library or disk.
If you choose to replace the section with another section from the library or disk, the Open File window appears:
Choose the section you want and click Ok. Click Browse to choose a section from disk.
• Save this section.
If you want to Click
Replace the section on the form with the one found in the library Yes
Start the wizard to determine what to do No
Leave as embedded Cancel

Overview
200
This option creates a section in the library with the currently embedded content. You provide a name for the section and tell Studio whether it should check this new section into the library or have it remain on disk.
• Unembed the section.
By choosing to unembed the section, the content is removed and not replaced. You will see the result after you close the form and then reopen it.
Enter the name for the section here.
Remove this check mark if you want the section to remain on disk and not be checked into the library.
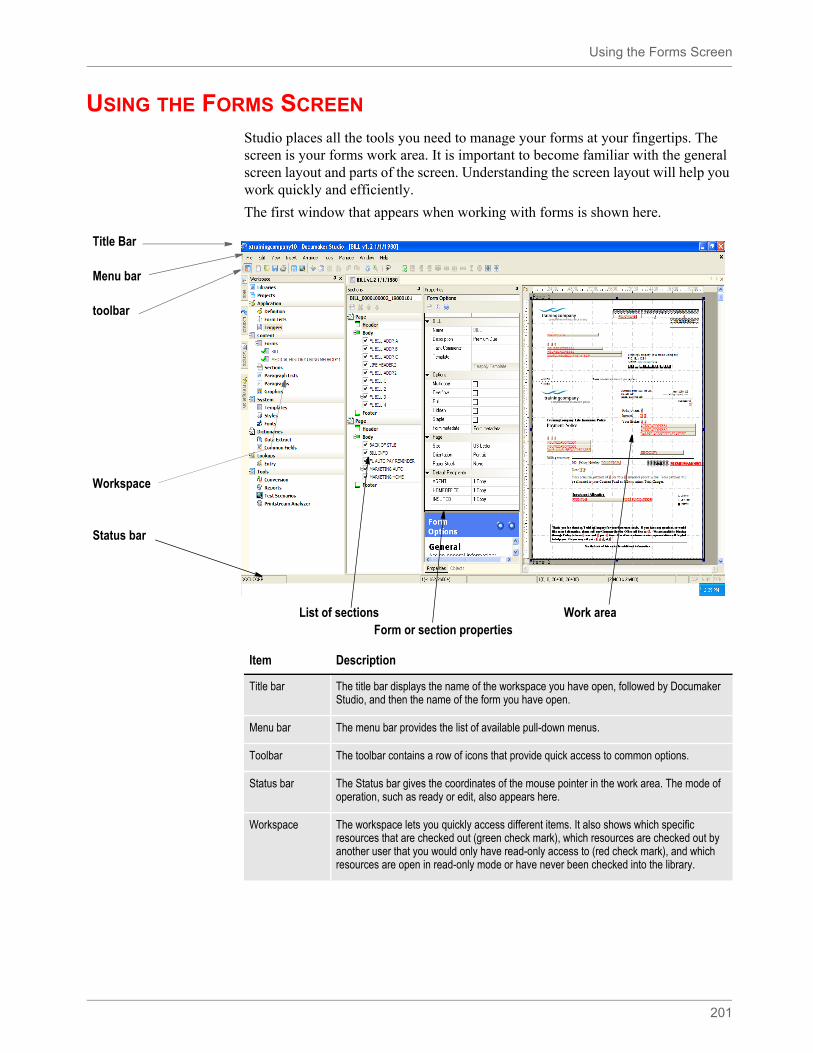
Using the Forms Screen
201
USING THE FORMS SCREEN
Studio places all the tools you need to manage your forms at your fingertips. The screen is your forms work area. It is important to become familiar with the general screen layout and parts of the screen. Understanding the screen layout will help you work quickly and efficiently.
The first window that appears when working with forms is shown here.
Title Bar
Menu bar
toolbar
Workspace
Status bar
List of sections Work area Form or section properties
Item Description
Title bar The title bar displays the name of the workspace you have open, followed by Documaker Studio, and then the name of the form you have open.
Menu bar The menu bar provides the list of available pull-down menus.
Toolbar The toolbar contains a row of icons that provide quick access to common options.
Status bar The Status bar gives the coordinates of the mouse pointer in the work area. The mode of operation, such as ready or edit, also appears here.
Workspace The workspace lets you quickly access different items. It also shows which specific resources that are checked out (green check mark), which resources are checked out by another user that you would only have read-only access to (red check mark), and which resources are open in read-only mode or have never been checked into the library.
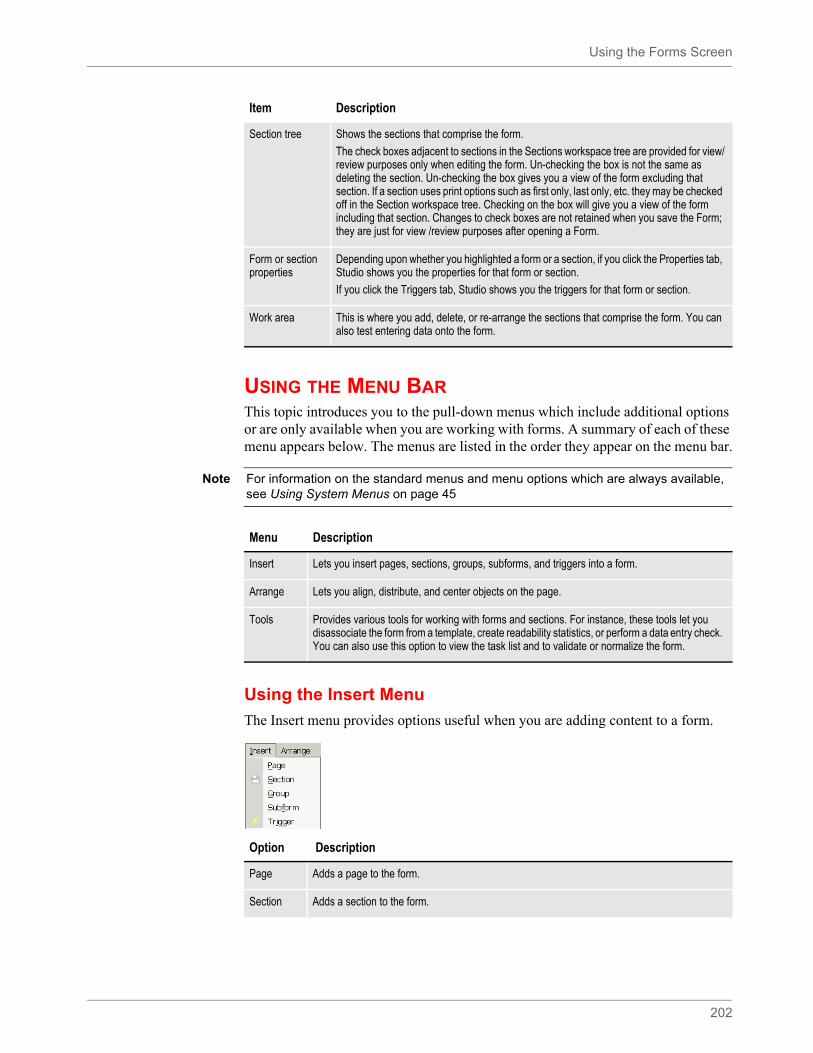
Using the Forms Screen
202
USING THE MENU BARThis topic introduces you to the pull-down menus which include additional options or are only available when you are working with forms. A summary of each of these menu appears below. The menus are listed in the order they appear on the menu bar.
.
Using the Insert Menu
The Insert menu provides options useful when you are adding content to a form.
Section tree Shows the sections that comprise the form.
The check boxes adjacent to sections in the Sections workspace tree are provided for view/review purposes only when editing the form. Un-checking the box is not the same as deleting the section. Un-checking the box gives you a view of the form excluding that section. If a section uses print options such as first only, last only, etc. they may be checked off in the Section workspace tree. Checking on the box will give you a view of the form including that section. Changes to check boxes are not retained when you save the Form; they are just for view /review purposes after opening a Form.
Form or section properties
Depending upon whether you highlighted a form or a section, if you click the Properties tab, Studio shows you the properties for that form or section.
If you click the Triggers tab, Studio shows you the triggers for that form or section.
Work area This is where you add, delete, or re-arrange the sections that comprise the form. You can also test entering data onto the form.
Item Description
Note For information on the standard menus and menu options which are always available, see Using System Menus on page 45
Menu Description
Insert Lets you insert pages, sections, groups, subforms, and triggers into a form.
Arrange Lets you align, distribute, and center objects on the page.
Tools Provides various tools for working with forms and sections. For instance, these tools let you disassociate the form from a template, create readability statistics, or perform a data entry check. You can also use this option to view the task list and to validate or normalize the form.
Option Description
Page Adds a page to the form.
Section Adds a section to the form.
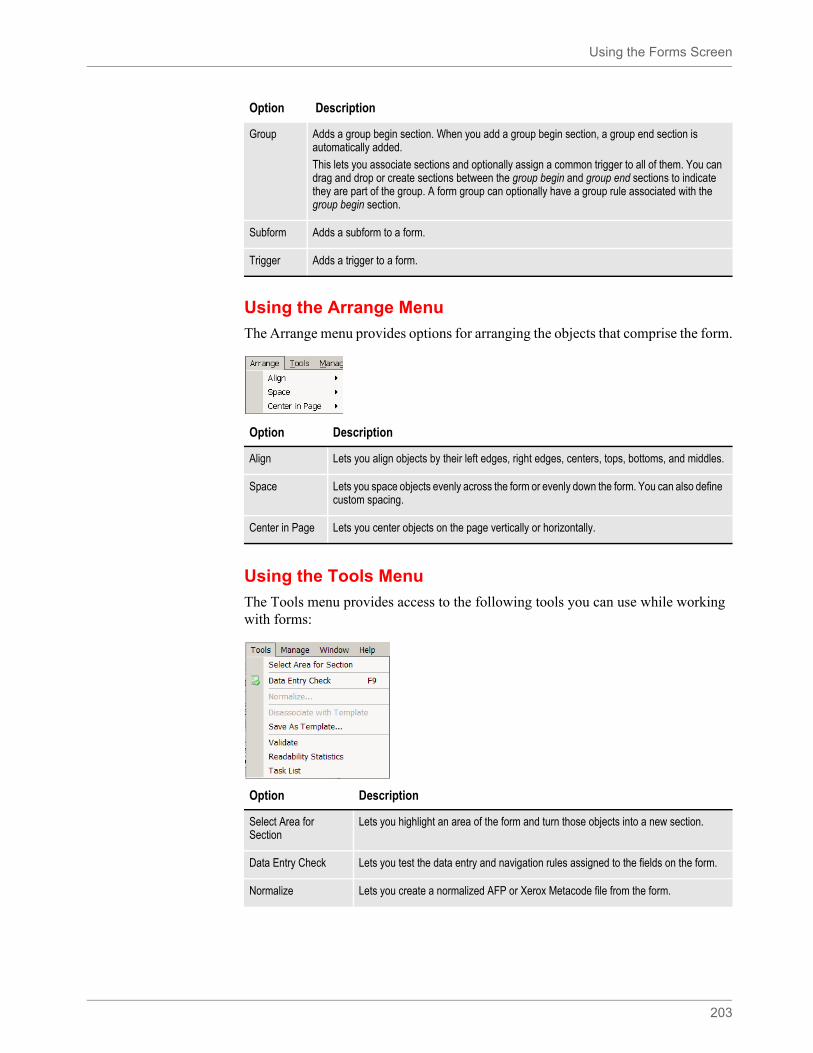
Using the Forms Screen
203
Using the Arrange Menu
The Arrange menu provides options for arranging the objects that comprise the form.
Using the Tools Menu
The Tools menu provides access to the following tools you can use while working with forms:
Group Adds a group begin section. When you add a group begin section, a group end section is automatically added.
This lets you associate sections and optionally assign a common trigger to all of them. You can drag and drop or create sections between the group begin and group end sections to indicate they are part of the group. A form group can optionally have a group rule associated with the group begin section.
Subform Adds a subform to a form.
Trigger Adds a trigger to a form.
Option Description
Option Description
Align Lets you align objects by their left edges, right edges, centers, tops, bottoms, and middles.
Space Lets you space objects evenly across the form or evenly down the form. You can also define custom spacing.
Center in Page Lets you center objects on the page vertically or horizontally.
Option Description
Select Area for Section
Lets you highlight an area of the form and turn those objects into a new section.
Data Entry Check Lets you test the data entry and navigation rules assigned to the fields on the form.
Normalize Lets you create a normalized AFP or Xerox Metacode file from the form.

Using the Forms Screen
204
USING THE WORKSPACE MENUThe workspace area is the area to the far left of the screen. From the workspace, you can open different modules within Documaker Studio. It shows which resources are...
• Checked out (green check mark) by you
• Checked out by another user and you would only have read-only access to (red check mark)
• Open in read-only mode or have never been checked into the library
Disassociate with Template
Lets you disassociate this form from the template assigned to it. When disassociating a template, only the template name reference is removed. The system does not remove any sections that came from the template.
Save as Template Lets you save this form as a template. For more information, see Using Form Templates on page 226.
Validate Lets you run a Form Validation Report on this form. This report can tell you...
• Whether sections referenced in the form (FAP files) exist in the library • If the sections defined in the form have assigned recipients• Any sections with assigned recipients and a copy count of zero• Any sections that contain text areas or multiline text fields marked as Can Grow, but
the Can Grow attribute is not specified at the form level
Readability Statistics Lets you generate readability statistics for the form. For more information, see Generating Readability Statistics on page 223.
Task List Lets you view the task list for this form.For more information, see Using the Task List on page 390.
Option Description
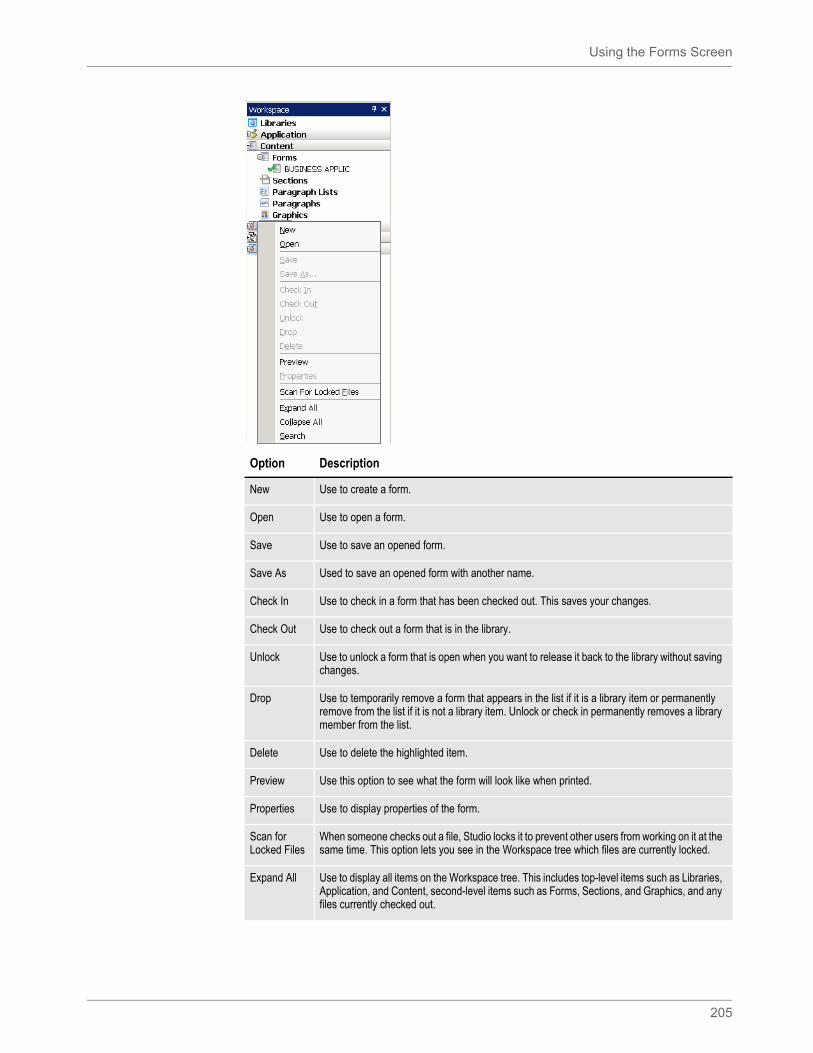
Using the Forms Screen
205
Option Description
New Use to create a form.
Open Use to open a form.
Save Use to save an opened form.
Save As Used to save an opened form with another name.
Check In Use to check in a form that has been checked out. This saves your changes.
Check Out Use to check out a form that is in the library.
Unlock Use to unlock a form that is open when you want to release it back to the library without saving changes.
Drop Use to temporarily remove a form that appears in the list if it is a library item or permanently remove from the list if it is not a library item. Unlock or check in permanently removes a library member from the list.
Delete Use to delete the highlighted item.
Preview Use this option to see what the form will look like when printed.
Properties Use to display properties of the form.
Scan for Locked Files
When someone checks out a file, Studio locks it to prevent other users from working on it at the same time. This option lets you see in the Workspace tree which files are currently locked.
Expand All Use to display all items on the Workspace tree. This includes top-level items such as Libraries, Application, and Content, second-level items such as Forms, Sections, and Graphics, and any files currently checked out.
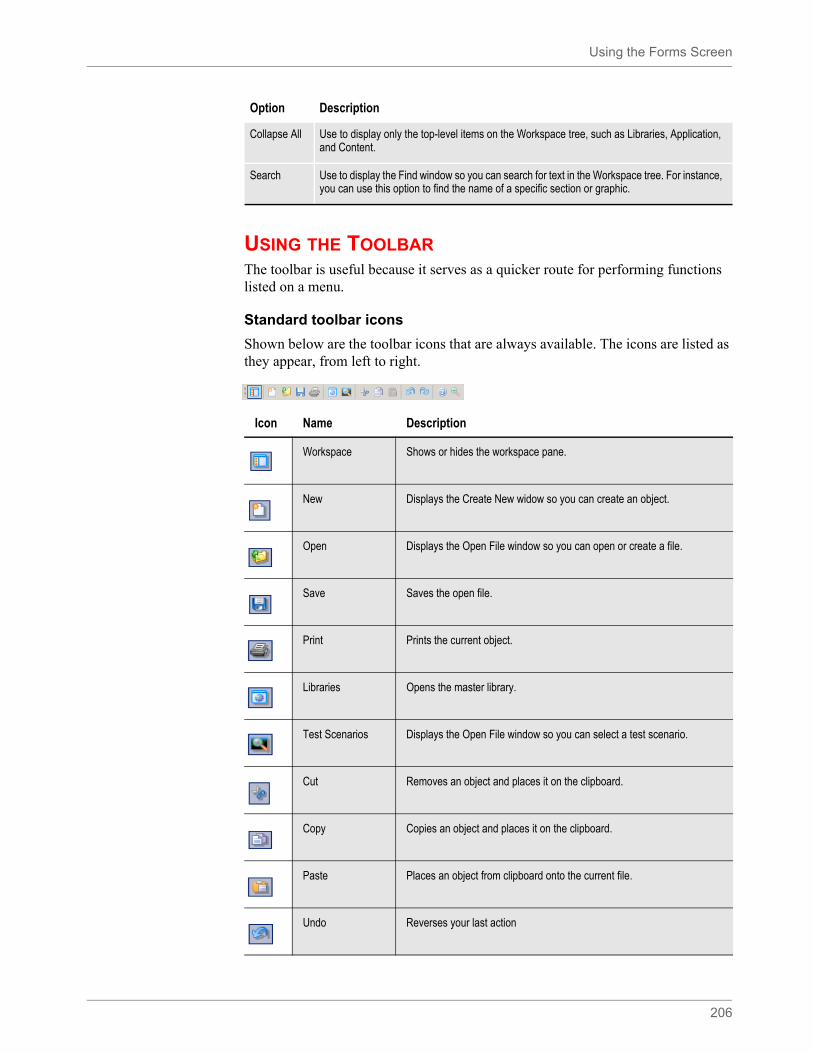
Using the Forms Screen
206
USING THE TOOLBARThe toolbar is useful because it serves as a quicker route for performing functions listed on a menu.
Standard toolbar icons
Shown below are the toolbar icons that are always available. The icons are listed as they appear, from left to right.
Collapse All Use to display only the top-level items on the Workspace tree, such as Libraries, Application, and Content.
Search Use to display the Find window so you can search for text in the Workspace tree. For instance, you can use this option to find the name of a specific section or graphic.
Option Description
Icon Name Description
Workspace Shows or hides the workspace pane.
New Displays the Create New widow so you can create an object.
Open Displays the Open File window so you can open or create a file.
Save Saves the open file.
Print Prints the current object.
Libraries Opens the master library.
Test Scenarios Displays the Open File window so you can select a test scenario.
Cut Removes an object and places it on the clipboard.
Copy Copies an object and places it on the clipboard.
Paste Places an object from clipboard onto the current file.
Undo Reverses your last action
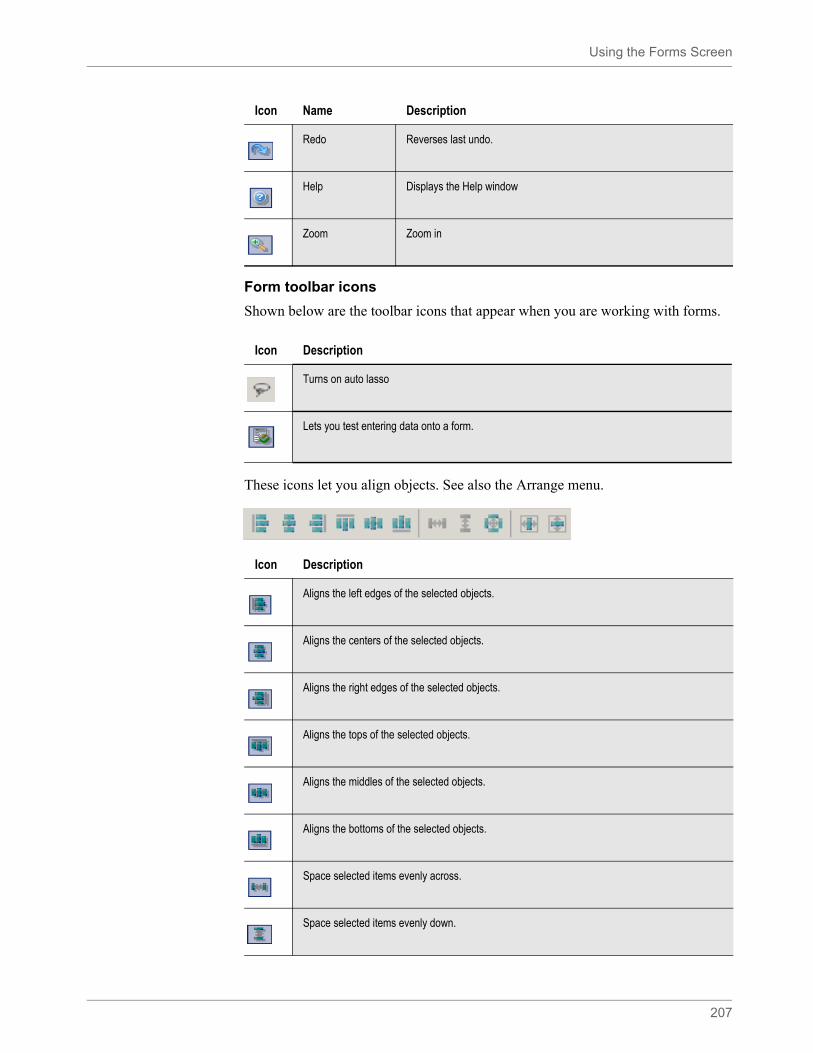
Using the Forms Screen
207
Form toolbar icons
Shown below are the toolbar icons that appear when you are working with forms.
These icons let you align objects. See also the Arrange menu.
Redo Reverses last undo.
Help Displays the Help window
Zoom Zoom in
Icon Description
Turns on auto lasso
Lets you test entering data onto a form.
Icon Name Description
Icon Description
Aligns the left edges of the selected objects.
Aligns the centers of the selected objects.
Aligns the right edges of the selected objects.
Aligns the tops of the selected objects.
Aligns the middles of the selected objects.
Aligns the bottoms of the selected objects.
Space selected items evenly across.
Space selected items evenly down.
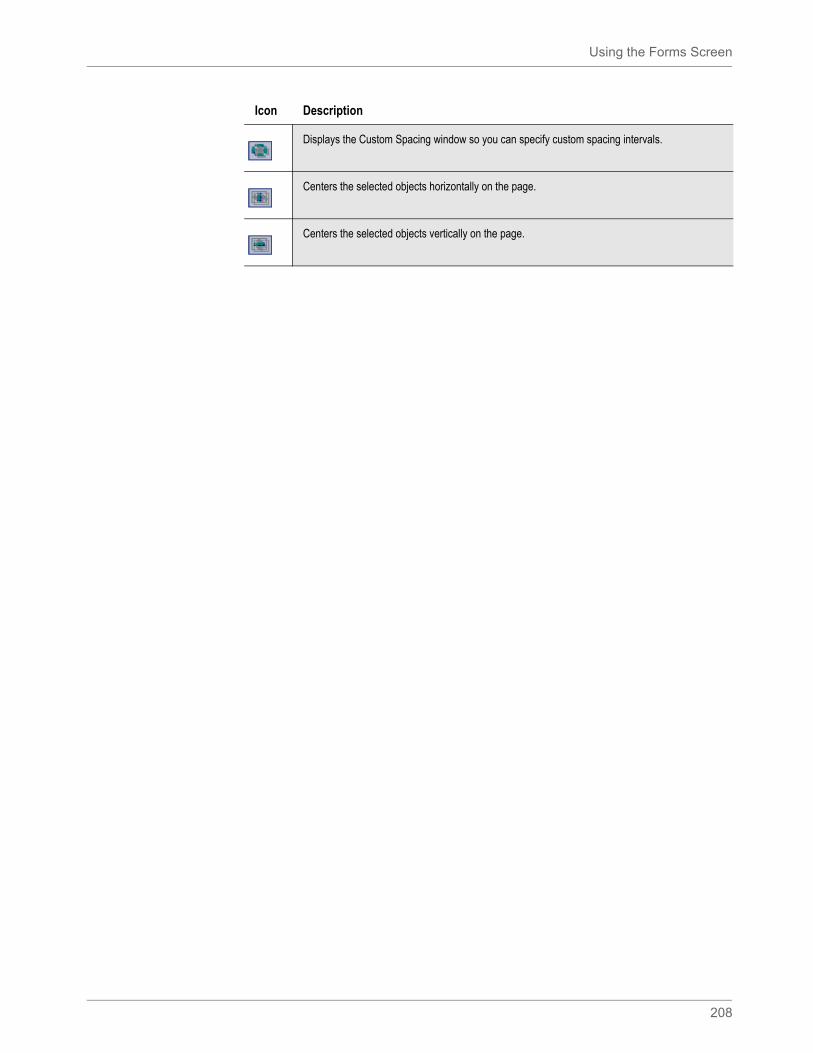
Using the Forms Screen
208
Displays the Custom Spacing window so you can specify custom spacing intervals.
Centers the selected objects horizontally on the page.
Centers the selected objects vertically on the page.
Icon Description

Creating a Form
209
CREATING A FORM
It is possible to create an empty form in the Form manager. You can create a new form with either no sections added or with a section name that does not yet exist in the library. When you do this, you will see a message in your Status bar, such as the one shown here:
Error: Platform error: Error loading FAP, Empty_Section.FAP
This indicates the section cannot be found in the library.
It is, however, best to build your forms after your sections have been created or brought into the workspace’s library. This way the Form wizard can help you build a form with sections in the body and headers and footers where applicable.
So, to create a form, follow these steps:
1. Double click Forms. The Open File window appears. This shows a list of existing forms.
2. Click New on the Open File window to create a New form. The Form Wizard - Select Header window appears. This wizard helps you select the sections which will comprise the header, body, and footer of the form.
Note You can also right-click Forms and select New, then click OK on the Forms window.
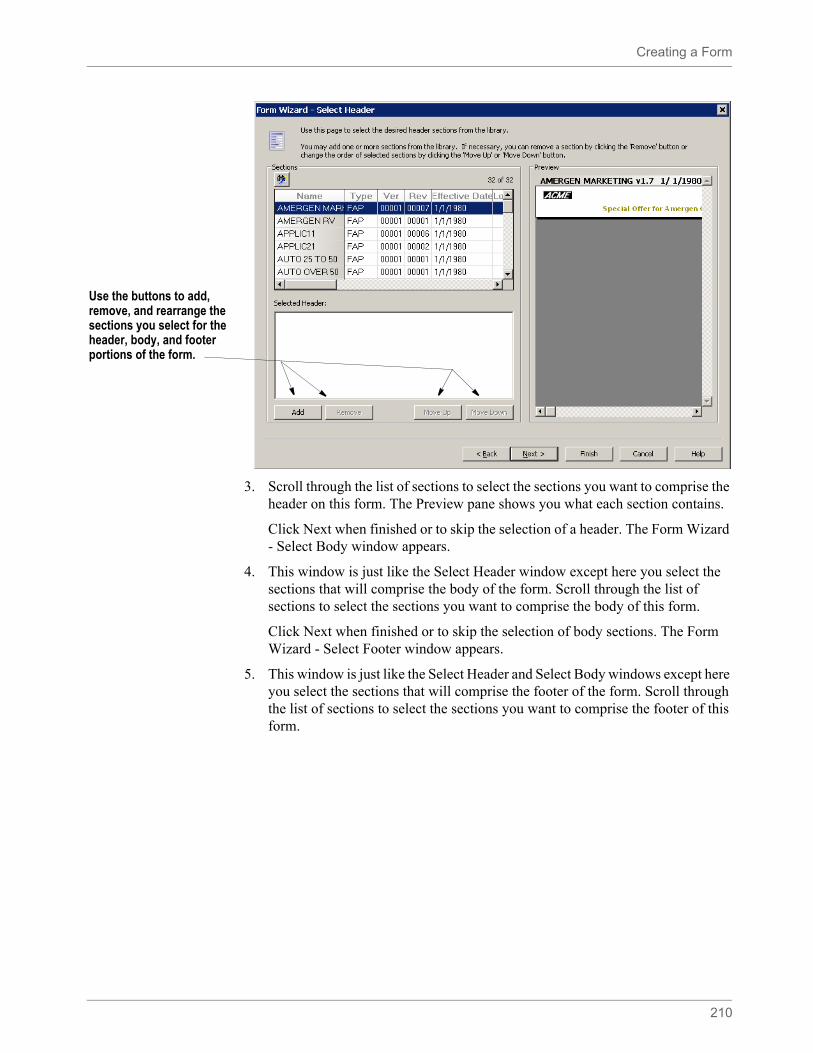
Creating a Form
210
3. Scroll through the list of sections to select the sections you want to comprise the header on this form. The Preview pane shows you what each section contains.
Click Next when finished or to skip the selection of a header. The Form Wizard - Select Body window appears.
4. This window is just like the Select Header window except here you select the sections that will comprise the body of the form. Scroll through the list of sections to select the sections you want to comprise the body of this form.
Click Next when finished or to skip the selection of body sections. The Form Wizard - Select Footer window appears.
5. This window is just like the Select Header and Select Body windows except here you select the sections that will comprise the footer of the form. Scroll through the list of sections to select the sections you want to comprise the footer of this form.
Use the buttons to add, remove, and rearrange the sections you select for the header, body, and footer portions of the form.
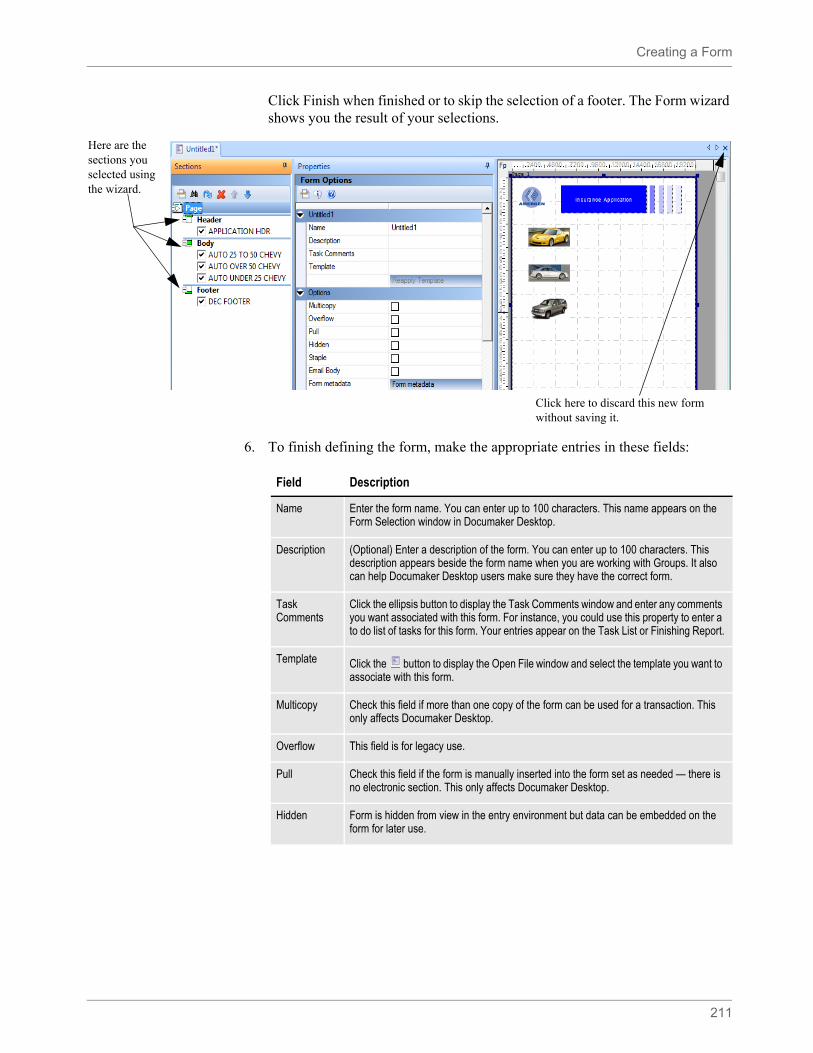
Creating a Form
211
Click Finish when finished or to skip the selection of a footer. The Form wizard shows you the result of your selections.
6. To finish defining the form, make the appropriate entries in these fields:
Here are the sections you selected using the wizard.
Click here to discard this new form without saving it.
Field Description
Name Enter the form name. You can enter up to 100 characters. This name appears on the Form Selection window in Documaker Desktop.
Description (Optional) Enter a description of the form. You can enter up to 100 characters. This description appears beside the form name when you are working with Groups. It also can help Documaker Desktop users make sure they have the correct form.
Task Comments
Click the ellipsis button to display the Task Comments window and enter any comments you want associated with this form. For instance, you could use this property to enter a to do list of tasks for this form. Your entries appear on the Task List or Finishing Report.
Template Click the button to display the Open File window and select the template you want to associate with this form.
Multicopy Check this field if more than one copy of the form can be used for a transaction. This only affects Documaker Desktop.
Overflow This field is for legacy use.
Pull Check this field if the form is manually inserted into the form set as needed — there is no electronic section. This only affects Documaker Desktop.
Hidden Form is hidden from view in the entry environment but data can be embedded on the form for later use.
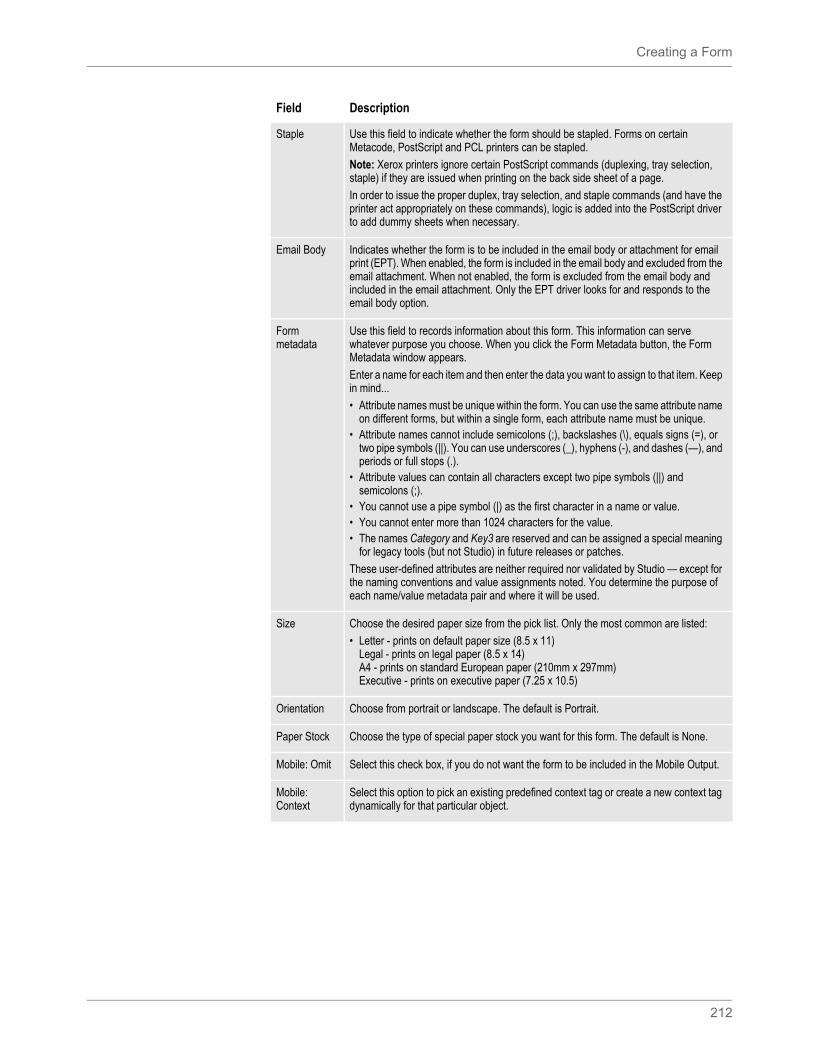
Creating a Form
212
Staple Use this field to indicate whether the form should be stapled. Forms on certain Metacode, PostScript and PCL printers can be stapled.
Note: Xerox printers ignore certain PostScript commands (duplexing, tray selection, staple) if they are issued when printing on the back side sheet of a page.
In order to issue the proper duplex, tray selection, and staple commands (and have the printer act appropriately on these commands), logic is added into the PostScript driver to add dummy sheets when necessary.
Email Body Indicates whether the form is to be included in the email body or attachment for email print (EPT). When enabled, the form is included in the email body and excluded from the email attachment. When not enabled, the form is excluded from the email body and included in the email attachment. Only the EPT driver looks for and responds to the email body option.
Form metadata
Use this field to records information about this form. This information can serve whatever purpose you choose. When you click the Form Metadata button, the Form Metadata window appears.
Enter a name for each item and then enter the data you want to assign to that item. Keep in mind...
• Attribute names must be unique within the form. You can use the same attribute name on different forms, but within a single form, each attribute name must be unique.
• Attribute names cannot include semicolons (;), backslashes (\), equals signs (=), or two pipe symbols (||). You can use underscores (_), hyphens (-), and dashes (—), and periods or full stops (.).
• Attribute values can contain all characters except two pipe symbols (||) and semicolons (;).
• You cannot use a pipe symbol (|) as the first character in a name or value. • You cannot enter more than 1024 characters for the value.• The names Category and Key3 are reserved and can be assigned a special meaning
for legacy tools (but not Studio) in future releases or patches.
These user-defined attributes are neither required nor validated by Studio — except for the naming conventions and value assignments noted. You determine the purpose of each name/value metadata pair and where it will be used.
Size Choose the desired paper size from the pick list. Only the most common are listed:
• Letter - prints on default paper size (8.5 x 11)Legal - prints on legal paper (8.5 x 14)A4 - prints on standard European paper (210mm x 297mm)Executive - prints on executive paper (7.25 x 10.5)
Orientation Choose from portrait or landscape. The default is Portrait.
Paper Stock Choose the type of special paper stock you want for this form. The default is None.
Mobile: Omit Select this check box, if you do not want the form to be included in the Mobile Output.
Mobile: Context
Select this option to pick an existing predefined context tag or create a new context tag dynamically for that particular object.
Field Description
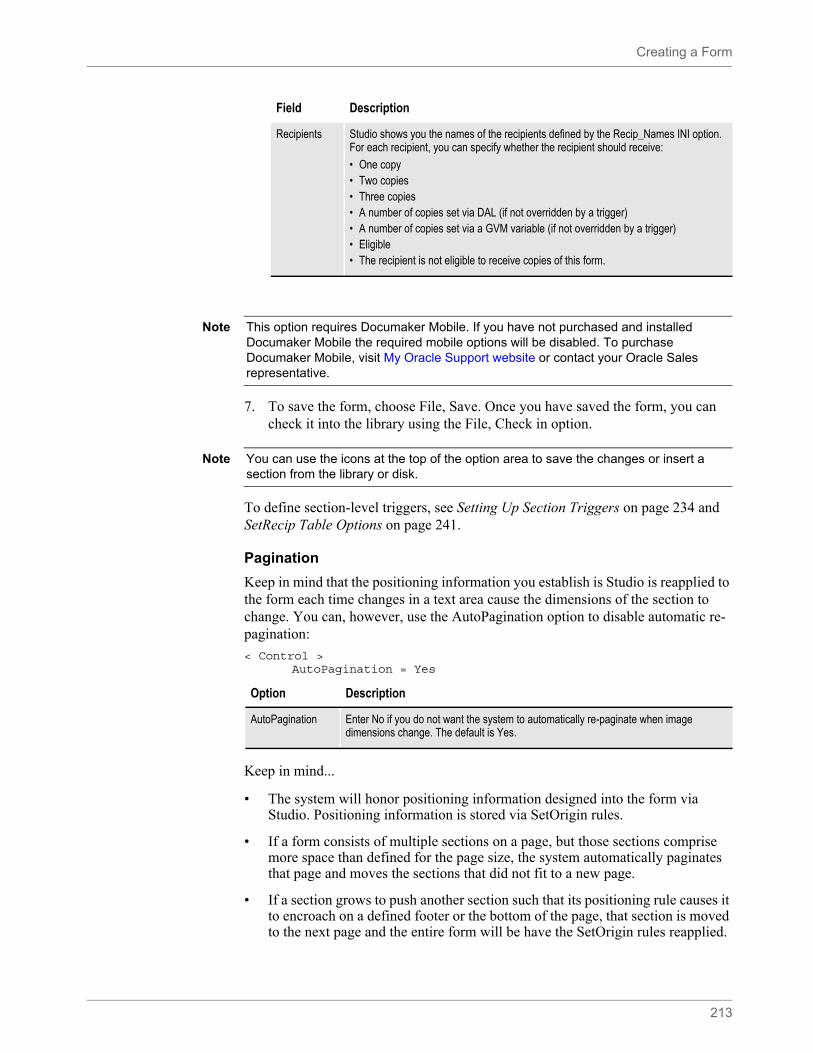
Creating a Form
213
7. To save the form, choose File, Save. Once you have saved the form, you can check it into the library using the File, Check in option.
To define section-level triggers, see Setting Up Section Triggers on page 234 and SetRecip Table Options on page 241.
Pagination
Keep in mind that the positioning information you establish is Studio is reapplied to the form each time changes in a text area cause the dimensions of the section to change. You can, however, use the AutoPagination option to disable automatic re-pagination:
< Control >AutoPagination = Yes
Keep in mind...
• The system will honor positioning information designed into the form via Studio. Positioning information is stored via SetOrigin rules.
• If a form consists of multiple sections on a page, but those sections comprise more space than defined for the page size, the system automatically paginates that page and moves the sections that did not fit to a new page.
• If a section grows to push another section such that its positioning rule causes it to encroach on a defined footer or the bottom of the page, that section is moved to the next page and the entire form will be have the SetOrigin rules reapplied.
Recipients Studio shows you the names of the recipients defined by the Recip_Names INI option. For each recipient, you can specify whether the recipient should receive:
• One copy• Two copies• Three copies• A number of copies set via DAL (if not overridden by a trigger)• A number of copies set via a GVM variable (if not overridden by a trigger)• Eligible• The recipient is not eligible to receive copies of this form.
Field Description
Note This option requires Documaker Mobile. If you have not purchased and installed Documaker Mobile the required mobile options will be disabled. To purchase Documaker Mobile, visit My Oracle Support website or contact your Oracle Sales representative.
Note You can use the icons at the top of the option area to save the changes or insert a section from the library or disk.
Option Description
AutoPagination Enter No if you do not want the system to automatically re-paginate when image dimensions change. The default is Yes.

Creating a Form
214
• When designing a form, avoid having a footer section that uses a relative position. This ultimately means there can only be one section on the page that is not a header or footer. Typically, Footers should be placed using a rule that makes sure it has an absolute position set to the bottom of the page.
• When sections shrink (due to text area shrinking) a section from the next page may be brought back to the current page. In other words, sections can not only flow to the next page, but they can come back when space allows.
• Remember that the positioning (SetOrigin) defined in the form is applied. So although there may appear to be a space large enough to hold a section, you also have to account for any additional adjustments applied by the SetOrigin rules.
For example, suppose you have a section that is two inches in height, but the SetOrigin rule for that image specifies a relative placement 1/2 inch from the previous section. In this case, 2 ½ inches of space is required for that section to fit on the page. If there is less than 2 ½ inches remaining before encountering a footer section or the bottom of the page layout, then that section moves to the next page. Please see SetOrigins on page 218.
• Sections can only flow to and from pages that were created during pagination. If a page was specifically designed into the form via Studio, then no sections will move onto that page from a prior page. Sections can only move to or from pages that were created by overflowing their defined page.
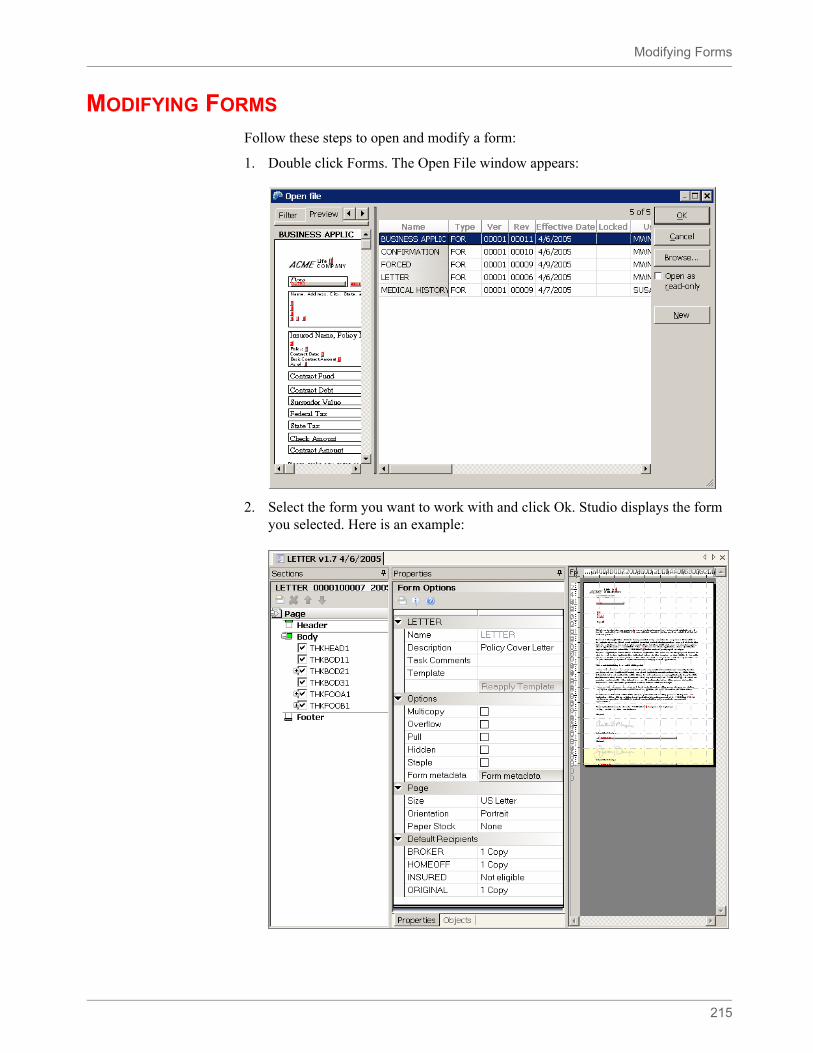
Modifying Forms
215
MODIFYING FORMS
Follow these steps to open and modify a form:
1. Double click Forms. The Open File window appears:
2. Select the form you want to work with and click Ok. Studio displays the form you selected. Here is an example:
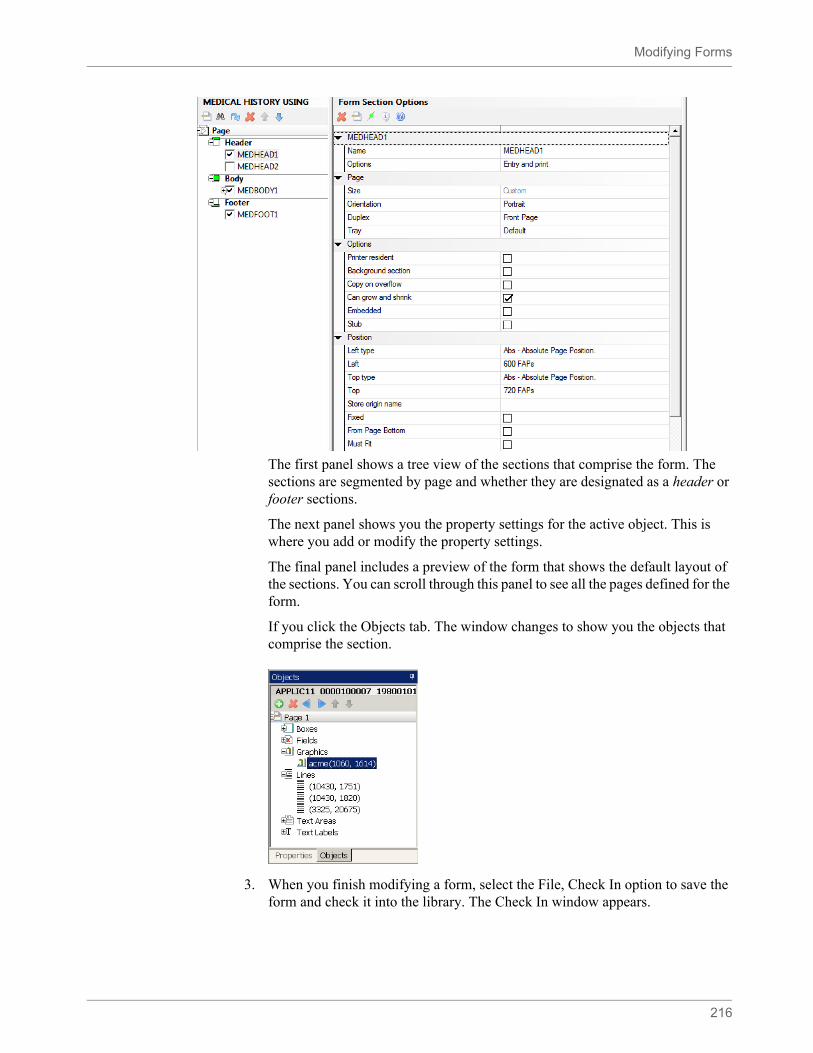
Modifying Forms
216
The first panel shows a tree view of the sections that comprise the form. The sections are segmented by page and whether they are designated as a header or footer sections.
The next panel shows you the property settings for the active object. This is where you add or modify the property settings.
The final panel includes a preview of the form that shows the default layout of the sections. You can scroll through this panel to see all the pages defined for the form.
If you click the Objects tab. The window changes to show you the objects that comprise the section.
3. When you finish modifying a form, select the File, Check In option to save the form and check it into the library. The Check In window appears.
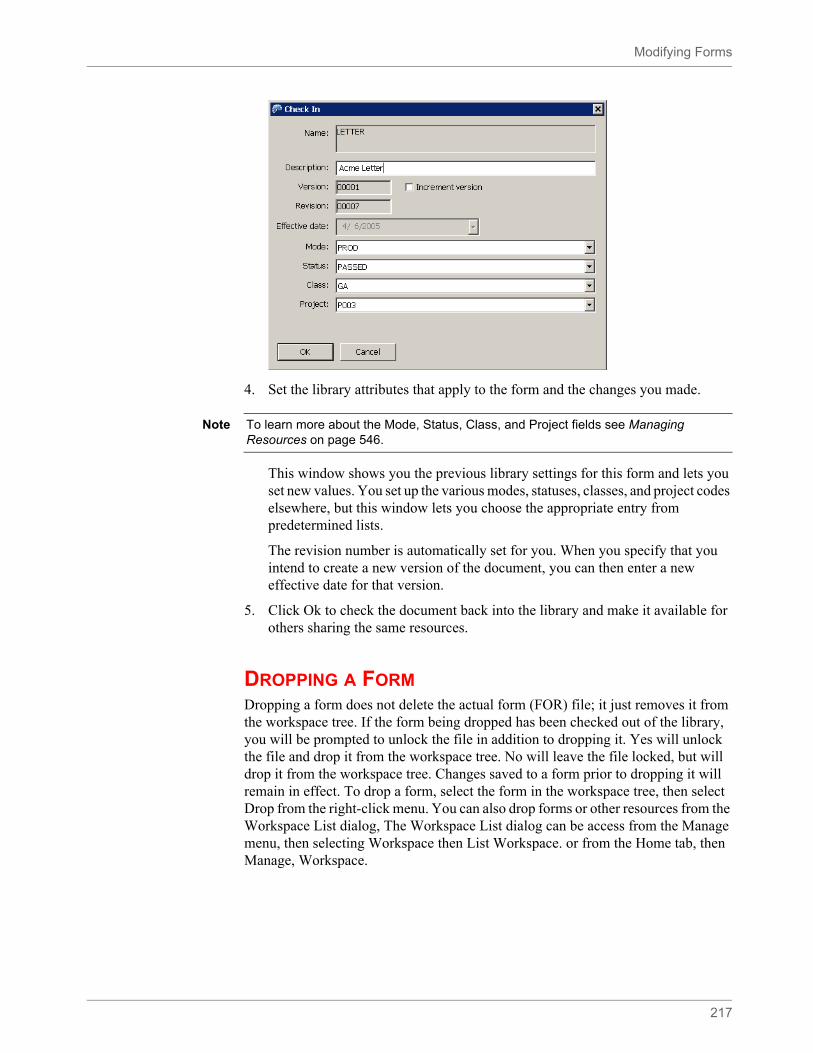
Modifying Forms
217
4. Set the library attributes that apply to the form and the changes you made.
This window shows you the previous library settings for this form and lets you set new values. You set up the various modes, statuses, classes, and project codes elsewhere, but this window lets you choose the appropriate entry from predetermined lists.
The revision number is automatically set for you. When you specify that you intend to create a new version of the document, you can then enter a new effective date for that version.
5. Click Ok to check the document back into the library and make it available for others sharing the same resources.
DROPPING A FORMDropping a form does not delete the actual form (FOR) file; it just removes it from the workspace tree. If the form being dropped has been checked out of the library, you will be prompted to unlock the file in addition to dropping it. Yes will unlock the file and drop it from the workspace tree. No will leave the file locked, but will drop it from the workspace tree. Changes saved to a form prior to dropping it will remain in effect. To drop a form, select the form in the workspace tree, then select Drop from the right-click menu. You can also drop forms or other resources from the Workspace List dialog, The Workspace List dialog can be access from the Manage menu, then selecting Workspace then List Workspace. or from the Home tab, then Manage, Workspace.
Note To learn more about the Mode, Status, Class, and Project fields see Managing Resources on page 546.
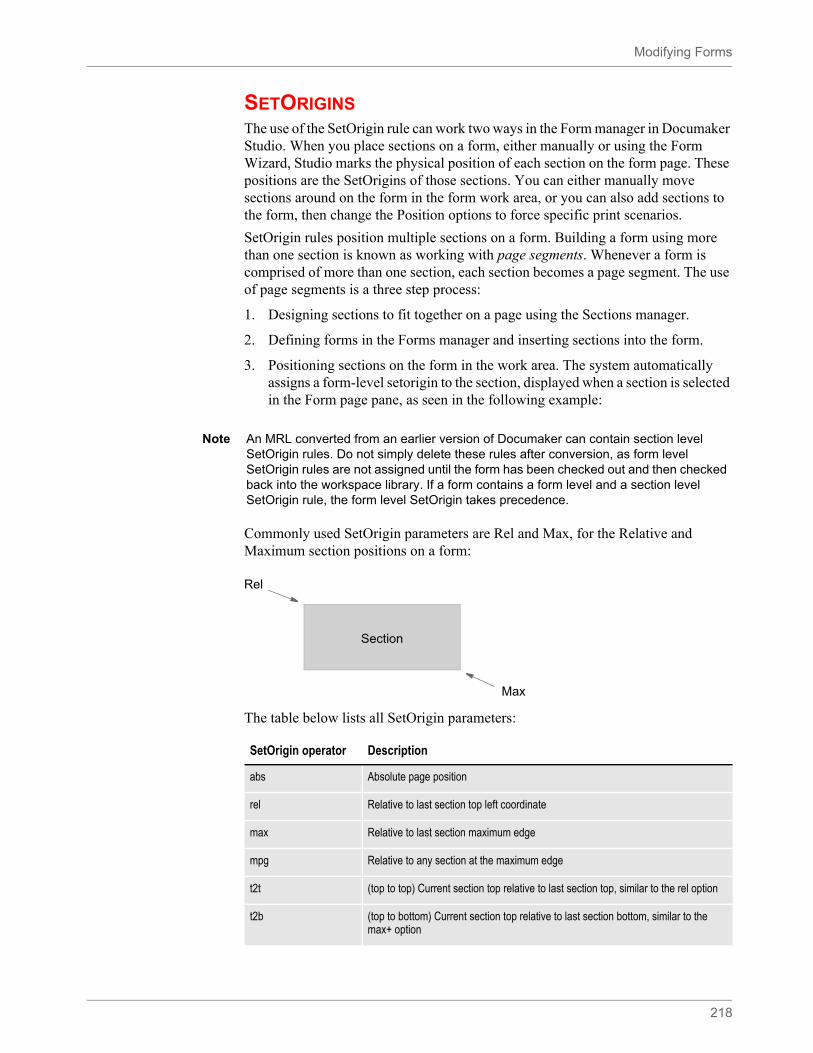
Modifying Forms
218
SETORIGINSThe use of the SetOrigin rule can work two ways in the Form manager in Documaker Studio. When you place sections on a form, either manually or using the Form Wizard, Studio marks the physical position of each section on the form page. These positions are the SetOrigins of those sections. You can either manually move sections around on the form in the form work area, or you can also add sections to the form, then change the Position options to force specific print scenarios.
SetOrigin rules position multiple sections on a form. Building a form using more than one section is known as working with page segments. Whenever a form is comprised of more than one section, each section becomes a page segment. The use of page segments is a three step process:
1. Designing sections to fit together on a page using the Sections manager.
2. Defining forms in the Forms manager and inserting sections into the form.
3. Positioning sections on the form in the work area. The system automatically assigns a form-level setorigin to the section, displayed when a section is selected in the Form page pane, as seen in the following example:
Commonly used SetOrigin parameters are Rel and Max, for the Relative and Maximum section positions on a form:
The table below lists all SetOrigin parameters:
Note An MRL converted from an earlier version of Documaker can contain section level SetOrigin rules. Do not simply delete these rules after conversion, as form level SetOrigin rules are not assigned until the form has been checked out and then checked back into the workspace library. If a form contains a form level and a section level SetOrigin rule, the form level SetOrigin takes precedence.
Section
Max
Rel
SetOrigin operator Description
abs Absolute page position
rel Relative to last section top left coordinate
max Relative to last section maximum edge
mpg Relative to any section at the maximum edge
t2t (top to top) Current section top relative to last section top, similar to the rel option
t2b (top to bottom) Current section top relative to last section bottom, similar to the max+ option
Modifying Forms
219
SetOrigin operators are not case-sensitive. You can use them in any combination, and to put space between sections, you can also use the + or - options as well. These will increment space between sections on a page based on the default unit of measurement set up in Studio.
Keep in mind that a section marked with absolute positions (ABS) cannot move, or float, on a page. This option works best with headers and footers that are going to copy onto other pages during overflow.
b2t Current section bottom relative to last section top, similar to the max- option
b2b Current section bottom relative to last section bottom
l2l (left to left) Current section left relative to last section left
l2r (left to right) Current section left relative to last section right
r2l (right to left) Current section right relative to last section left
r2r Current section right relative to last section right
ctr Current section x,y dimensions centered on last section x,y
store origin name field Place a section on the form in relationship to a section other than the previous section
Fixed Set to anchor or fix the section position
From Page Bottom Origin is applied from the page bottom.Sections marked as From Page Bottom have their origins applied first, starting from the last origin on the page moving up the page
Must fit Section cannot cause overflow. If the section cannot fit on the page, the section will not be printed. The page bottom will be defined as the highest footer section or section with a from page bottom (FB) origin. within the width of the section
SetOrigin operator Description
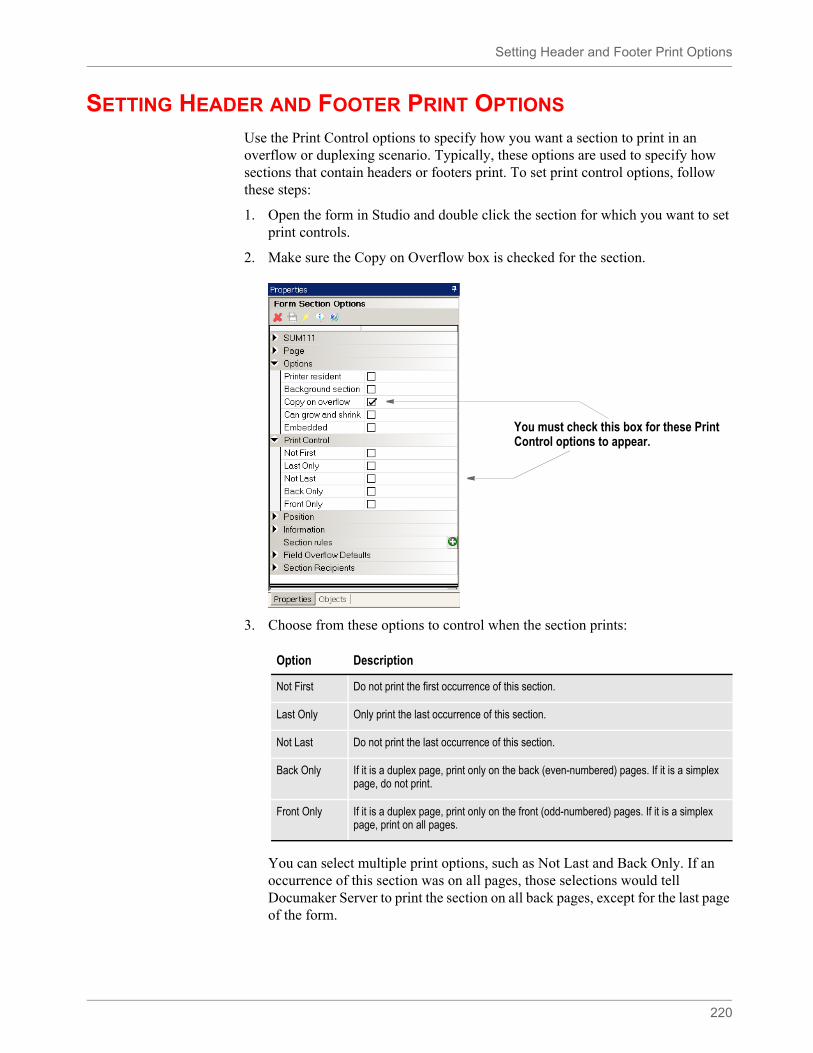
Setting Header and Footer Print Options
220
SETTING HEADER AND FOOTER PRINT OPTIONS
Use the Print Control options to specify how you want a section to print in an overflow or duplexing scenario. Typically, these options are used to specify how sections that contain headers or footers print. To set print control options, follow these steps:
1. Open the form in Studio and double click the section for which you want to set print controls.
2. Make sure the Copy on Overflow box is checked for the section.
3. Choose from these options to control when the section prints:
You can select multiple print options, such as Not Last and Back Only. If an occurrence of this section was on all pages, those selections would tell Documaker Server to print the section on all back pages, except for the last page of the form.
You must check this box for these Print Control options to appear.
Option Description
Not First Do not print the first occurrence of this section.
Last Only Only print the last occurrence of this section.
Not Last Do not print the last occurrence of this section.
Back Only If it is a duplex page, print only on the back (even-numbered) pages. If it is a simplex page, do not print.
Front Only If it is a duplex page, print only on the front (odd-numbered) pages. If it is a simplex page, print on all pages.
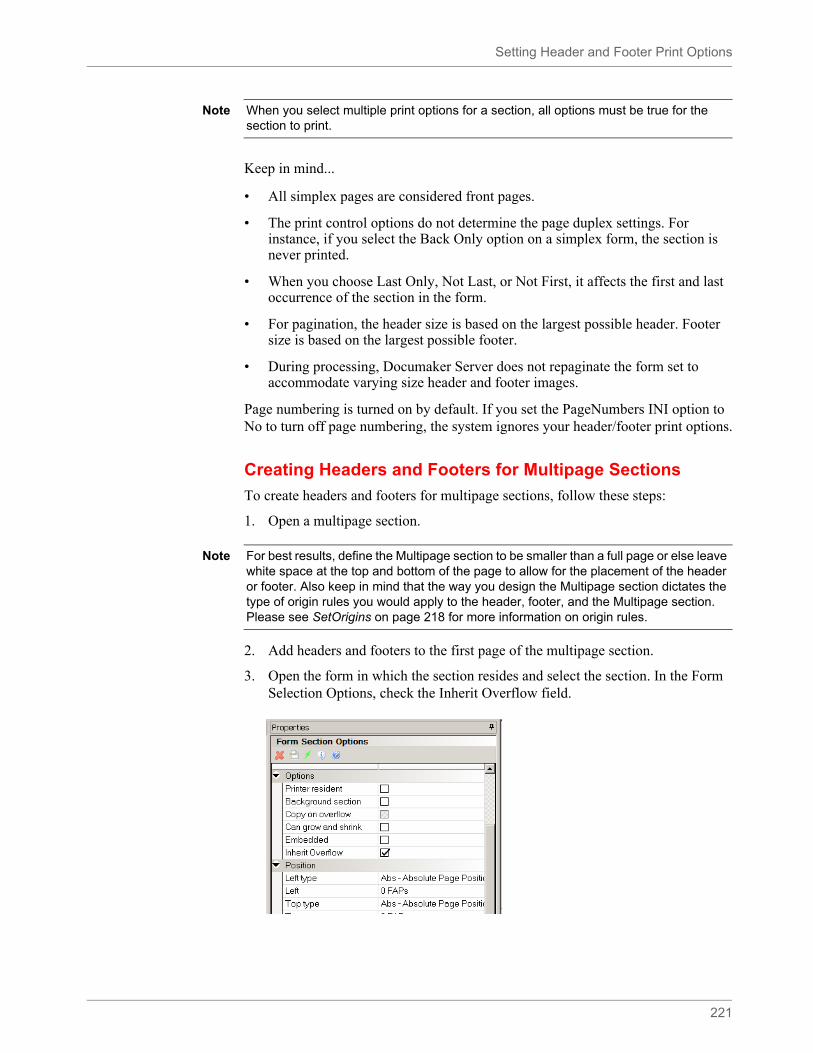
Setting Header and Footer Print Options
221
Keep in mind...
• All simplex pages are considered front pages.
• The print control options do not determine the page duplex settings. For instance, if you select the Back Only option on a simplex form, the section is never printed.
• When you choose Last Only, Not Last, or Not First, it affects the first and last occurrence of the section in the form.
• For pagination, the header size is based on the largest possible header. Footer size is based on the largest possible footer.
• During processing, Documaker Server does not repaginate the form set to accommodate varying size header and footer images.
Page numbering is turned on by default. If you set the PageNumbers INI option to No to turn off page numbering, the system ignores your header/footer print options.
Creating Headers and Footers for Multipage Sections
To create headers and footers for multipage sections, follow these steps:
1. Open a multipage section.
2. Add headers and footers to the first page of the multipage section.
3. Open the form in which the section resides and select the section. In the Form Selection Options, check the Inherit Overflow field.
Note When you select multiple print options for a section, all options must be true for the section to print.
Note For best results, define the Multipage section to be smaller than a full page or else leave white space at the top and bottom of the page to allow for the placement of the header or footer. Also keep in mind that the way you design the Multipage section dictates the type of origin rules you would apply to the header, footer, and the Multipage section. Please see SetOrigins on page 218 for more information on origin rules.

Setting Header and Footer Print Options
222
With this setting, during processing Documaker Server will add the copy on overflow sections defined on the first page to all subsequent pages of the multipage section.
FORCING PAGE BREAKS IN SUBFORMSUse the Force Page Break form-level option to force a page break on the second occurrence of a subform, within the current form or parent subform.
Studio treats any header or footer sections added to the subform as group headers and footers for the subform.
You add headers and footers to subforms just as you would to a normal form. In addition, you can also specify the print control options. Keep in mind, however, that if you select the Not First, Not Last, or Last Only print control option, your selection affects the subform, not the form.
Option Description
Inherit Overflow Check this box if the headers and footers on the first page of a multipage section should be copied onto the subsequent pages of the multipage section.
Note If the Inherit Overflow option is checked and you remove the check mark, the copy on overflow sections are removed from subsequent pages of the multipage section.
Option Description
Stay Together If you check this box for a subform, the system will not split the subform between pages unless the subform is larger than the calculated page size (page size minus headers and footers). If the subform is larger than the page size, the system splits the subform.
Note: The Stay Together check box is only honored by newer standard pagination of subforms. If you need to use the Group Pagination rule(s), then you would have to use the “StayTogether” method that is affiliated with those rules.
Force Page Break Check this box to force a page break on the second occurrence of the subform, within the current form or parent subform.
Setting Header and Footer Print Options
223
GENERATING READABILITY STATISTICSStudio lets you generate readability statistics, including Flesch scoring, when you are previewing a form or section in Library manager or when working with sections, forms, tests, and reports.
.In Studio, Flesch scoring considers information in text areas and multiline text (MLT) fields. Since the Flesch scoring formula works on sentences, text labels are ignored. Sentences are typically entered within a text area or multiline text field but generally not in a text label.
Flesch/Flesch–Kincaid Readability tests are designed to indicate how difficult a reading passage is to understand. Readability is based on factors such as the number of words in sentences and the number of letters or syllables per word.
Higher scores indicate material that is easier to read; lower numbers indicate harder-to-read passages. Here is the formula for the Flesch Reading Ease Score test:
where total syllables/total words = average number of syllables per word (ASW) and total words/total sentences = average sentence length (ASL).
Readability with Forms and Sections
When working with a form or section or running a test scenario, you can generate readability statistics by right-clicking and choosing the Readability Statistics option.
When running a test scenario, this option is only available when sections and forms are displayed as part of the test run. When generated during a test run, the readability statistics are based on all of the forms and sections in the form set.
If you are working in a specific text area, right-click, then choose this option from the Tools menu:
Note The Force Page Break option is not supported by the GroupBegin rule’s GroupPagination function. It is supported by the UpdatePOLFile and PaginateAndPropagate rules.
Please refer Rules Reference Manual for more information on GroupBegin rule.
Note You can also generate readability statistics when working in Documaker Desktop or the WIP Edit plug-in.
Note This test is designed for English. The scores may not be valid when you run the test on non-English text.
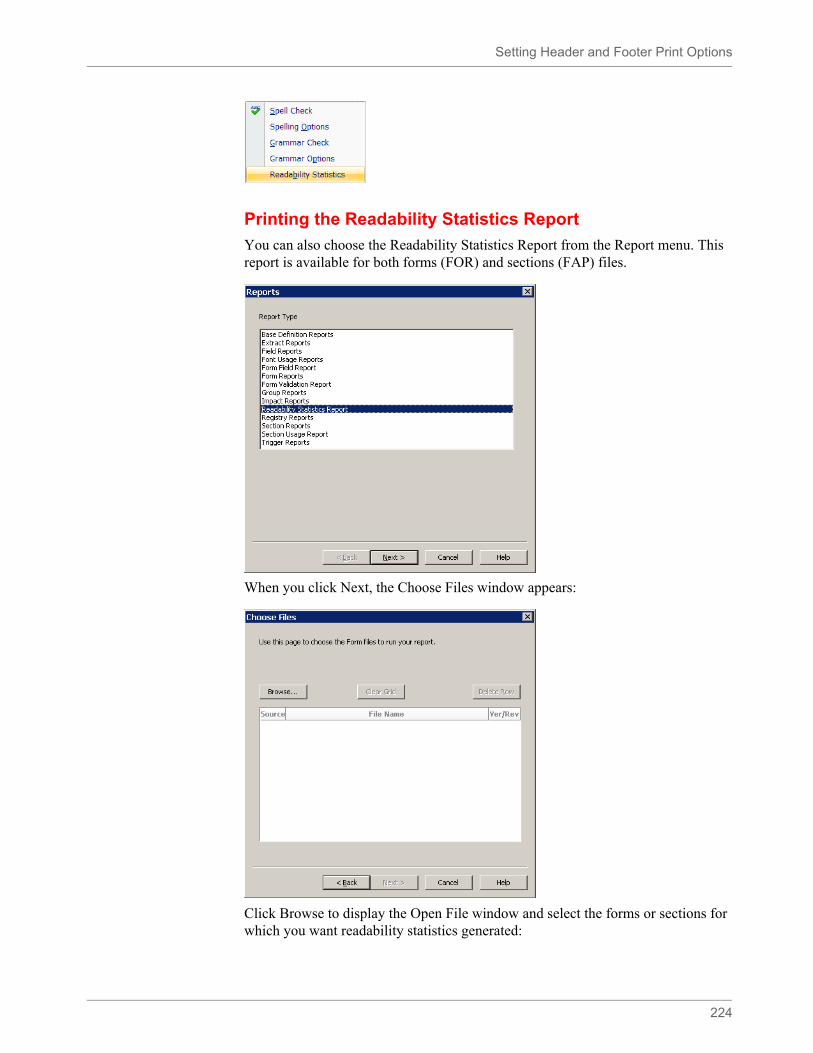
Setting Header and Footer Print Options
224
Printing the Readability Statistics Report
You can also choose the Readability Statistics Report from the Report menu. This report is available for both forms (FOR) and sections (FAP) files.
When you click Next, the Choose Files window appears:
Click Browse to display the Open File window and select the forms or sections for which you want readability statistics generated:
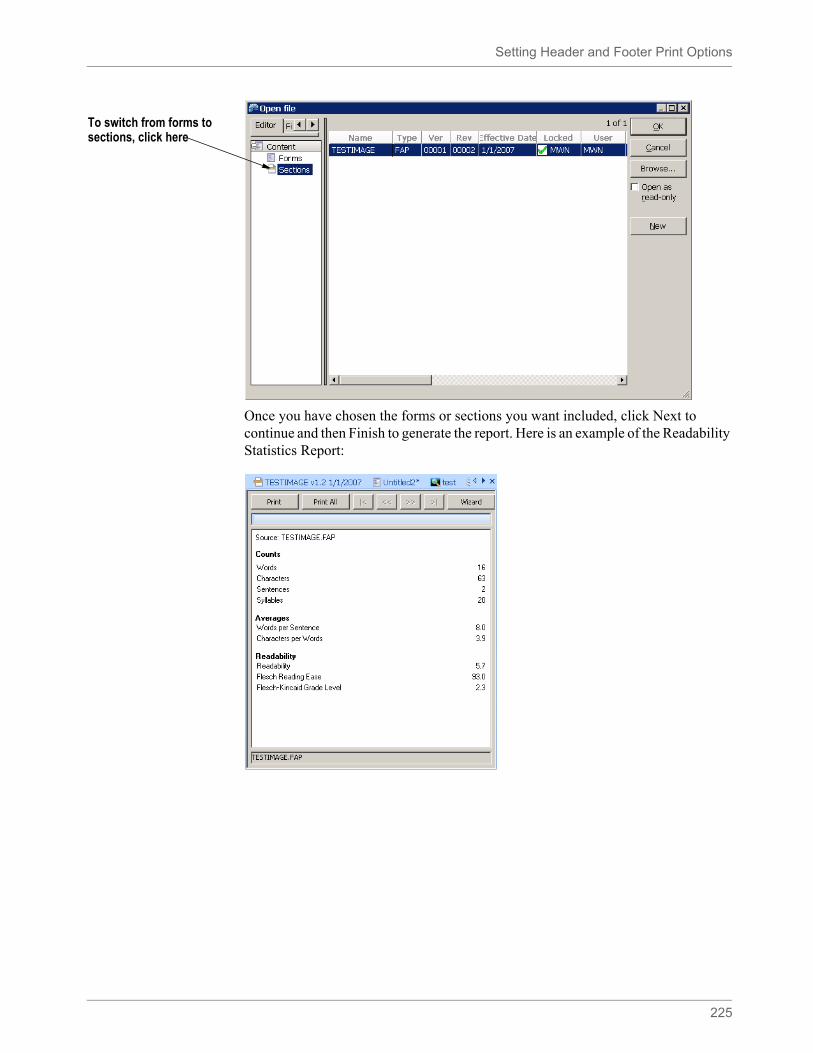
Setting Header and Footer Print Options
225
Once you have chosen the forms or sections you want included, click Next to continue and then Finish to generate the report. Here is an example of the Readability Statistics Report:
To switch from forms to sections, click here
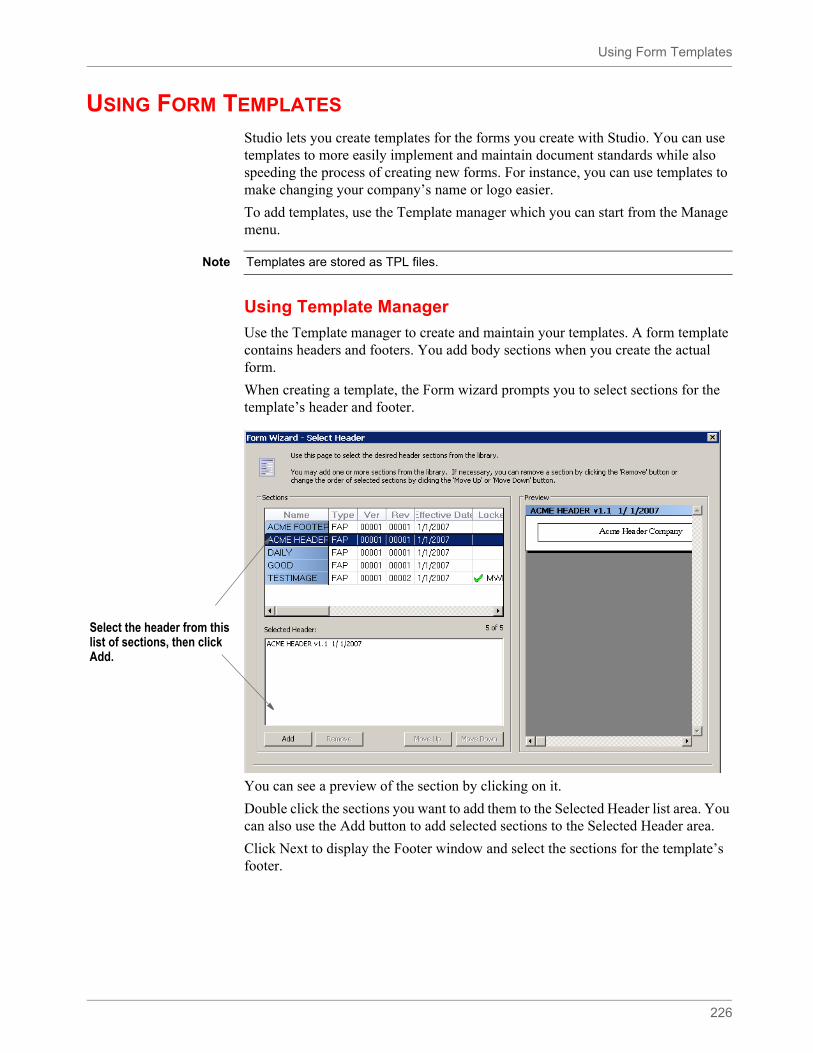
Using Form Templates
226
USING FORM TEMPLATES
Studio lets you create templates for the forms you create with Studio. You can use templates to more easily implement and maintain document standards while also speeding the process of creating new forms. For instance, you can use templates to make changing your company’s name or logo easier.
To add templates, use the Template manager which you can start from the Manage menu.
Using Template Manager
Use the Template manager to create and maintain your templates. A form template contains headers and footers. You add body sections when you create the actual form.
When creating a template, the Form wizard prompts you to select sections for the template’s header and footer.
You can see a preview of the section by clicking on it.
Double click the sections you want to add them to the Selected Header list area. You can also use the Add button to add selected sections to the Selected Header area.
Click Next to display the Footer window and select the sections for the template’s footer.
Note Templates are stored as TPL files.
Select the header from this list of sections, then click Add.
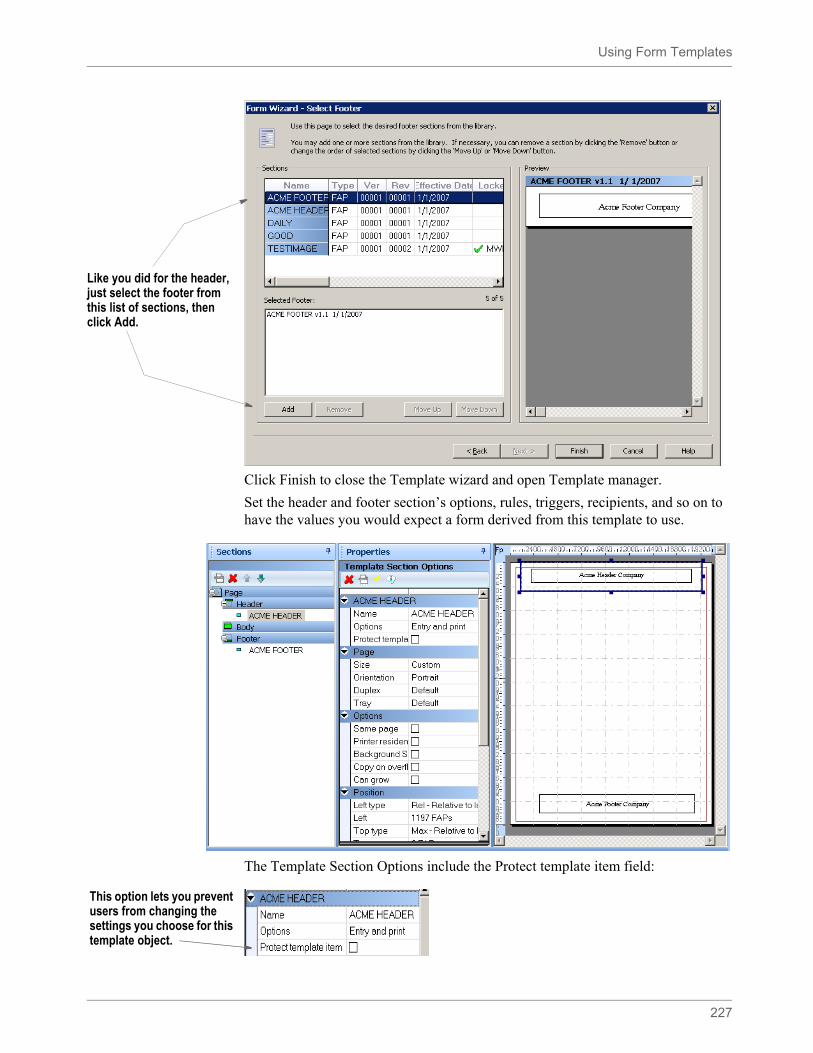
Using Form Templates
227
Click Finish to close the Template wizard and open Template manager.
Set the header and footer section’s options, rules, triggers, recipients, and so on to have the values you would expect a form derived from this template to use.
The Template Section Options include the Protect template item field:
Like you did for the header, just select the footer from this list of sections, then click Add.
This option lets you prevent users from changing the settings you choose for this template object.
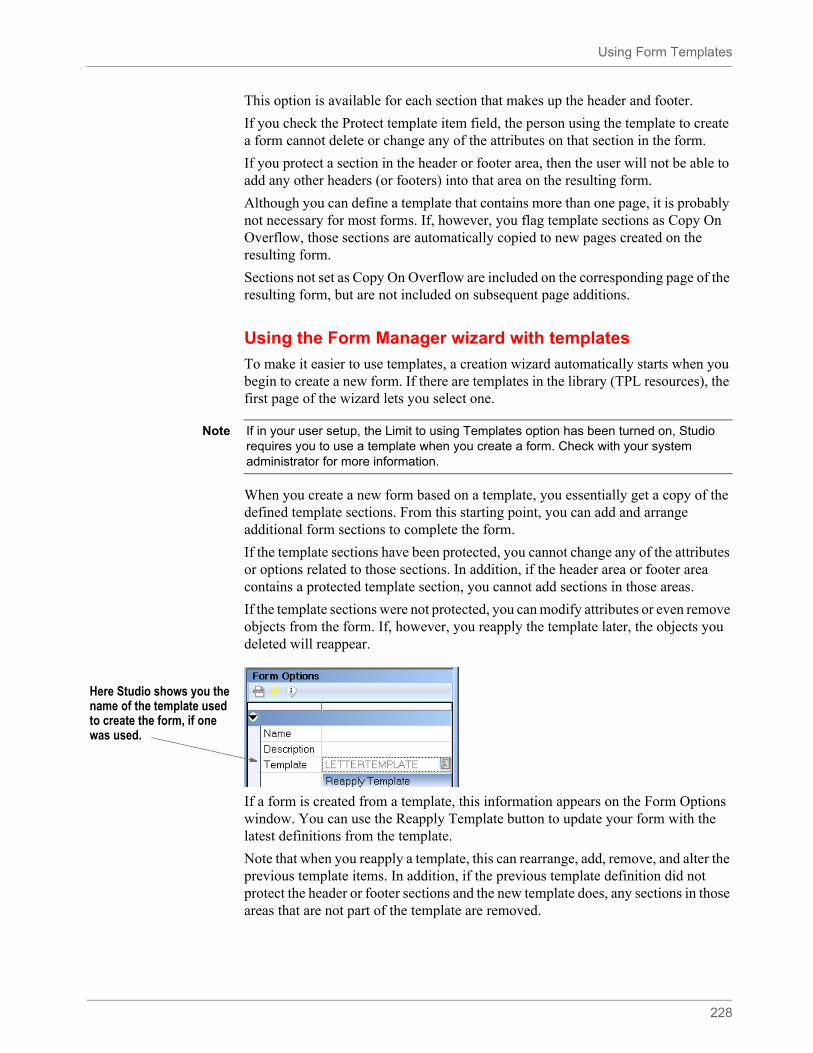
Using Form Templates
228
This option is available for each section that makes up the header and footer.
If you check the Protect template item field, the person using the template to create a form cannot delete or change any of the attributes on that section in the form.
If you protect a section in the header or footer area, then the user will not be able to add any other headers (or footers) into that area on the resulting form.
Although you can define a template that contains more than one page, it is probably not necessary for most forms. If, however, you flag template sections as Copy On Overflow, those sections are automatically copied to new pages created on the resulting form.
Sections not set as Copy On Overflow are included on the corresponding page of the resulting form, but are not included on subsequent page additions.
Using the Form Manager wizard with templates
To make it easier to use templates, a creation wizard automatically starts when you begin to create a new form. If there are templates in the library (TPL resources), the first page of the wizard lets you select one.
When you create a new form based on a template, you essentially get a copy of the defined template sections. From this starting point, you can add and arrange additional form sections to complete the form.
If the template sections have been protected, you cannot change any of the attributes or options related to those sections. In addition, if the header area or footer area contains a protected template section, you cannot add sections in those areas.
If the template sections were not protected, you can modify attributes or even remove objects from the form. If, however, you reapply the template later, the objects you deleted will reappear.
If a form is created from a template, this information appears on the Form Options window. You can use the Reapply Template button to update your form with the latest definitions from the template.
Note that when you reapply a template, this can rearrange, add, remove, and alter the previous template items. In addition, if the previous template definition did not protect the header or footer sections and the new template does, any sections in those areas that are not part of the template are removed.
Note If in your user setup, the Limit to using Templates option has been turned on, Studio requires you to use a template when you create a form. Check with your system administrator for more information.
Here Studio shows you the name of the template used to create the form, if one was used.
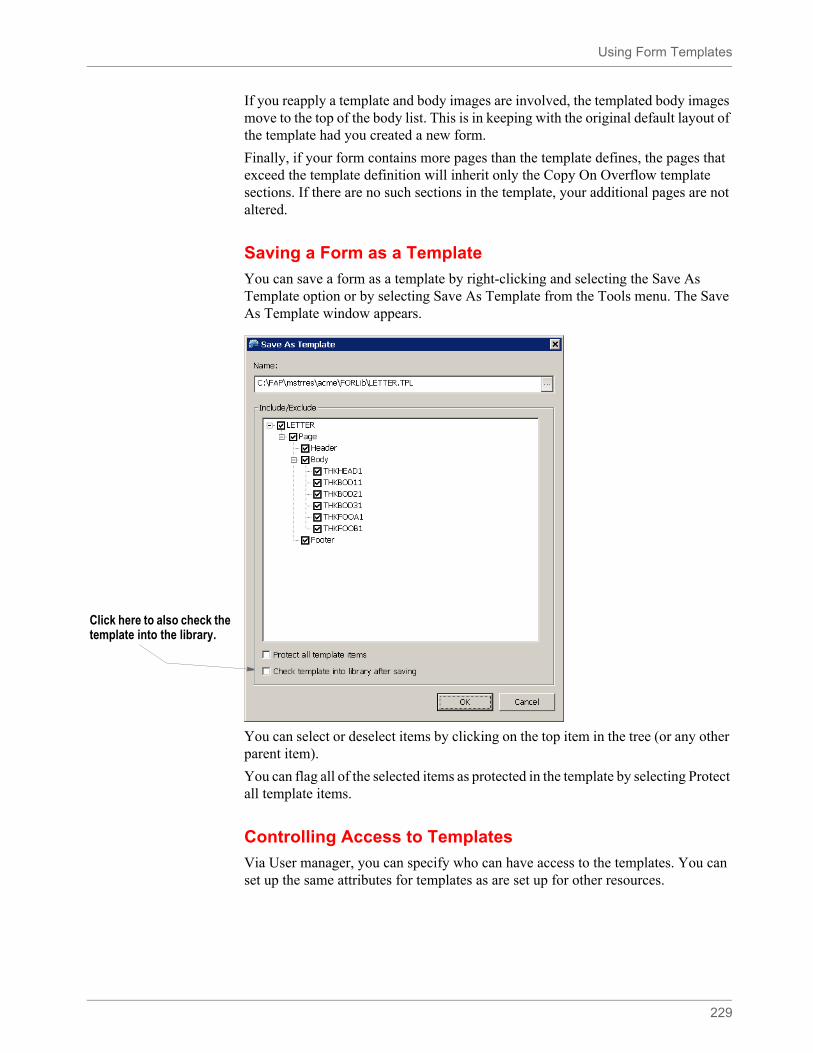
Using Form Templates
229
If you reapply a template and body images are involved, the templated body images move to the top of the body list. This is in keeping with the original default layout of the template had you created a new form.
Finally, if your form contains more pages than the template defines, the pages that exceed the template definition will inherit only the Copy On Overflow template sections. If there are no such sections in the template, your additional pages are not altered.
Saving a Form as a Template
You can save a form as a template by right-clicking and selecting the Save As Template option or by selecting Save As Template from the Tools menu. The Save As Template window appears.
You can select or deselect items by clicking on the top item in the tree (or any other parent item).
You can flag all of the selected items as protected in the template by selecting Protect all template items.
Controlling Access to Templates
Via User manager, you can specify who can have access to the templates. You can set up the same attributes for templates as are set up for other resources.
Click here to also check the template into the library.

Using Form Templates
230
You can also specify whether a user must use a template when creating a new form by checking the Limit to using Templates field. This field is available under Rights:
Option Description
Full Access Choose this option if you want the user to check out templates and modify them.
No Access Choose this option if you want to prevent the user from checking out templates. If you choose this option, the user cannot open Template manager.
View Only Access
Choose this option if you want to prevent the user from checking out templates, but allow the user to open Template manager in read-only mode and view the contents of the template.
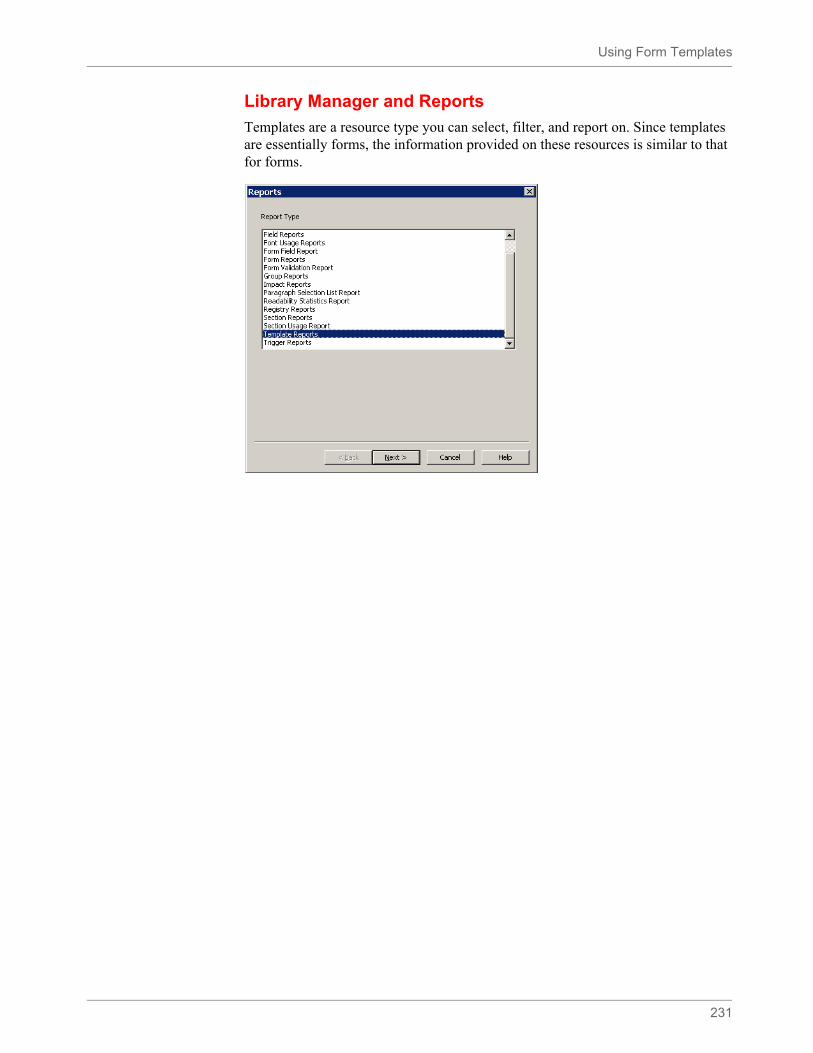
Using Form Templates
231
Library Manager and Reports
Templates are a resource type you can select, filter, and report on. Since templates are essentially forms, the information provided on these resources is similar to that for forms.
Using Form Templates
232
Example 1: Add the Medical History Form
If a transaction has enough medical history treatment records to fill more than one page, we want this form to grow to another page. This means we want this form to overflow, or repeat the Medbody1 section once for each Treatment record it finds for a given transaction. We will look at the Overflow settings later. For now, we need to build the form so that we can repeat or reuse sections as stated in our implementation’s requirements. (Please see Example Form on page 35.)
Step A:Add the Form in the Form manager
• First, open the Form manager. This example assumes that the sections that comprise the Medical History form (Medhead1, Medhead2, Medbody1, and Medfoot1, according to our implementation study) already exist in the workspace library.
• Using the wizard, select the FAP Medhead1 and Medhead 2 for the Header, Medbody1 for the Body and Medfoot1 for the Footer.
• If you click the words Header, Body and Footer one at a time in the Page pane, you will be able to select 1 Copy for each Recipient (Agent, Homeoffice, Insured).
• Next, click the actual Header section name, Medhead1. The main option we want to select here is Can Grow. This is because we have fields in the text of this header than can grow depending on the data that is placed in them at Documaker processing time, and we want the rest of the section to perform word wrapping around that data. (In other words, we have data fields in a text area on the form. Please see Working with Sections on page 248). Note that the Recipients should all have 1 copy count.
• Click Medhead2. This section only prints if the form grows to more than 1 page, so it prints for pages 2-end of the form. So first, we want to check Copy on Overflow, so that it will repeat as needed if our form overflows to more than 1 page.
Then, under the Print Control section, check Not First. Now Medhead2 will only be printed on any page of the form that is not the first page.
• Highlight Medbody1.Again, because of the use of text area data elements that are on the section, we want to mark ‘Can Grow’ for this section as well. Note that the Recipients should all have 1 Copy count as well.
• Last, click the Medfoot1 footer. Mark this as ‘Copy on Overflow’. Note that the Recipients should all have 1 Copy count.
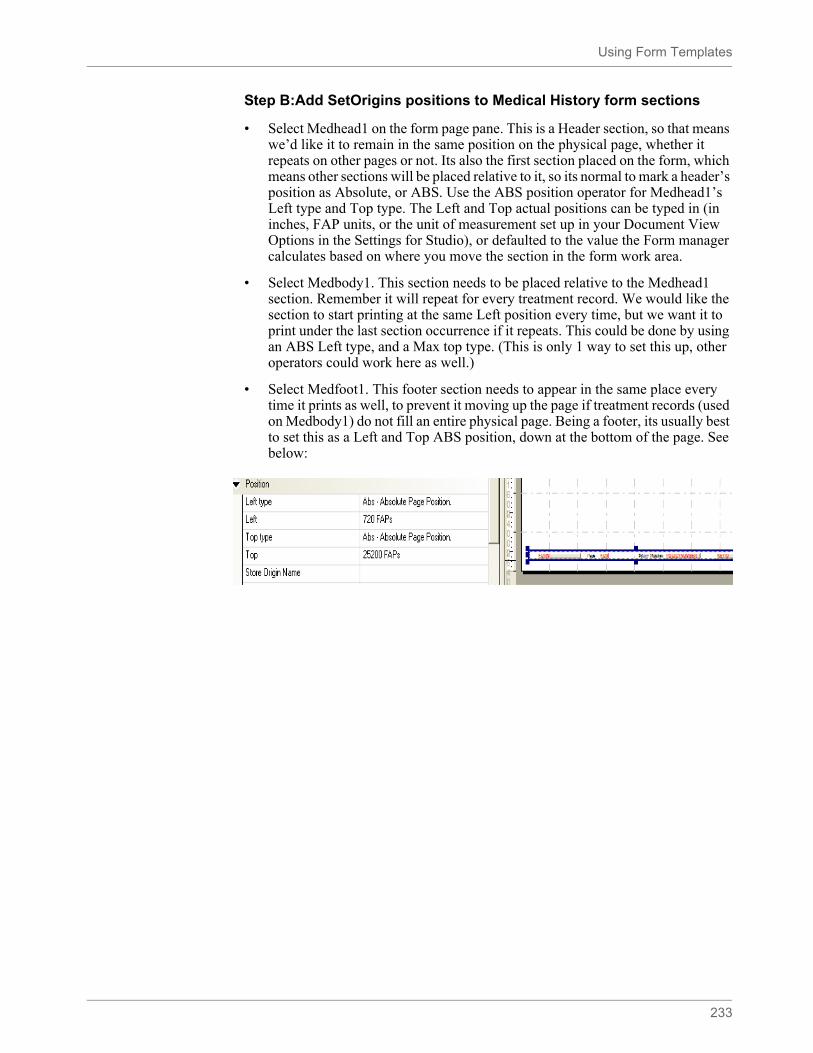
Using Form Templates
233
Step B:Add SetOrigins positions to Medical History form sections
• Select Medhead1 on the form page pane. This is a Header section, so that means we’d like it to remain in the same position on the physical page, whether it repeats on other pages or not. Its also the first section placed on the form, which means other sections will be placed relative to it, so its normal to mark a header’s position as Absolute, or ABS. Use the ABS position operator for Medhead1’s Left type and Top type. The Left and Top actual positions can be typed in (in inches, FAP units, or the unit of measurement set up in your Document View Options in the Settings for Studio), or defaulted to the value the Form manager calculates based on where you move the section in the form work area.
• Select Medbody1. This section needs to be placed relative to the Medhead1 section. Remember it will repeat for every treatment record. We would like the section to start printing at the same Left position every time, but we want it to print under the last section occurrence if it repeats. This could be done by using an ABS Left type, and a Max top type. (This is only 1 way to set this up, other operators could work here as well.)
• Select Medfoot1. This footer section needs to appear in the same place every time it prints as well, to prevent it moving up the page if treatment records (used on Medbody1) do not fill an entire physical page. Being a footer, its usually best to set this as a Left and Top ABS position, down at the bottom of the page. See below:
Setting Up Section Triggers
234
SETTING UP SECTION TRIGGERS
You can create triggers at both the form and section level. Section-level triggers are stored at the form level and specify the condition that would cause a section to be included (or triggered) with a transaction. Only set up section level triggers if the section's presence on the form is conditional. That means that every section in a form will not require a trigger.
Studio assumes you do not want to trigger any of the sections that comprise a form if the form-level trigger is false. Therefore, section level triggers are automatically ignored when the form-level trigger for the transaction being processed is false. For more information, see Assigning Form Level Triggers on page 185.
DAL or Manual Trigger entries
There several types of triggers in Documaker Studio. Legacy Documaker users will often use what are called manual triggers. These triggers build a SetRecip table entry on the form or section. For more information, see SetRecip Table Options on page 241.
New users can begin building their system with DAL triggers. This also builds a SETRCTB entry, but this file contains scripting functions specific to DAL use. The DAL SETRCTB file is seen in the Triggers manager in the Application level of the workspace tree. Using DAL wizard in the Triggers manager requires the use of the Extract Data Dictionary, or XDD, as well. Writing DAL triggers using the Script View does not require XDD configuration.
The tables below specify which options pertain to manual vs. DAL trigger options. Trigger functionality, and its use in Overflow and other processes, is supported in either scenario. For more information, see Triggers Manager on page 190.
Add a DAL trigger to a section
1. With a form open, highlight a section, then choose the Insert, Triggers option. You can also right-click and choose Add Trigger.
Note If you omit a form-level trigger, the system does not operate as efficiently since every section-level trigger must then be evaluated by the system.
Note DAL stands for Document Automation Language. It is proprietary to Documaker, and is a flexible scripting language that can be used for triggering, customizing data elements, insert form objects, Entry form inclusion, and other functions. See the DAL Reference for more information.
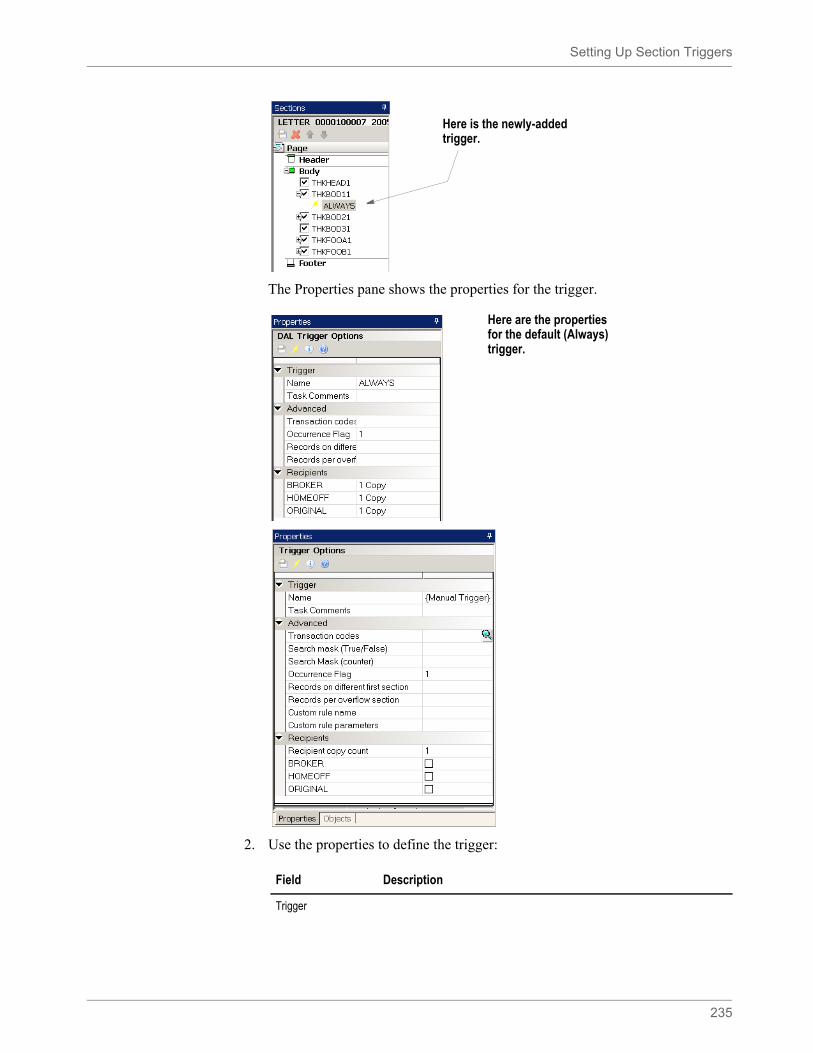
Setting Up Section Triggers
235
The Properties pane shows the properties for the trigger.
2. Use the properties to define the trigger:
Here is the newly-added trigger.
Here are the properties for the default (Always) trigger.
Field Description
Trigger

Setting Up Section Triggers
236
Name Select a trigger from the list or select the Manual Trigger option to create a trigger.
Task Comments Enter comments about this trigger. These comments will appear on the Task List. For more information, see Using the Task List on page 390.
Advanced
Transaction Codes By including one or more transaction codes in this field, you trigger a particular form (or section) only if the extract file record includes that Transaction Code.
Search Mask (True/False)
(Manual trigger only
Define the search criteria to use in determining whether this event should occur. If the search yields a result, a True result is returned. If the search finds no data, the trigger result will be False.
Search Mask (Counter)
(Manual trigger only
Define the search criteria to use in determining how many duplications of this item to include in the resulting document. The trigger is applied once for each occurrence found by the search mask. If no matching data is found, the trigger result is 0 (False) and the item is normally excluded.
Occurrence Flag To use the search mask as a counter, set the Occurrence Flag to one (1). Use with the Search Mask (Counter), Records on Different First Section, and Records Per Overflow Section fields. (0=no overflow and 1=overflow)
Performance issue flags in this field include:
• Master (M) form-level trigger flag • Form (F) form-level trigger flag • Subordinate (S) Section-level trigger flag
Records on Different First Section
Lets you indicate the number of records that appear on the first section before the data should overflow to a new section.
Records per Overflow Section
Lets you specify the number of records matching the search mask that will fit in the specified overflow section.
If the value is zero (0) and the Occurrence Flag is set to one (1) with the Search Mask (Counter) field set, the system automatically sets this flag to one (1) to perform the overflow calculations.
Custom Rule Name
(Manual trigger only
This field defines an alternate (custom) rule to execute on this manual trigger to determine its result. For most manual triggers, leave this field blank.
Custom Rule Parameters
(Manual trigger only
This field defines the parameters for the rule named in the Custom Rule Name field.
Recipients
Recipient Copy Count
(Manual trigger only)
Use this field to specify the number of copies each recipient should receive.
(recipient name) Click check box to indicate the recipient receives the number of copies you specified in the Recipient Copy Count field.
Field Description

Setting Up Section Triggers
237
EDITING A TRIGGERIf you need to modify a trigger, highlight the trigger and then make any necessary changes to its properties.
USING THE TRIGGER REPORTYou can use the Trigger Report to see which triggers have been referenced and which have not been referenced in the application definition you select.
You can print this report by choosing the Manage, Tools, Reports option and then choosing the Trigger Reports option from the Reports window.
The Reports wizard then takes you through the steps necessary to identify the application definition (BDF) file from which to pull the information and to generate the report.
Click here to display this trigger’s properties.
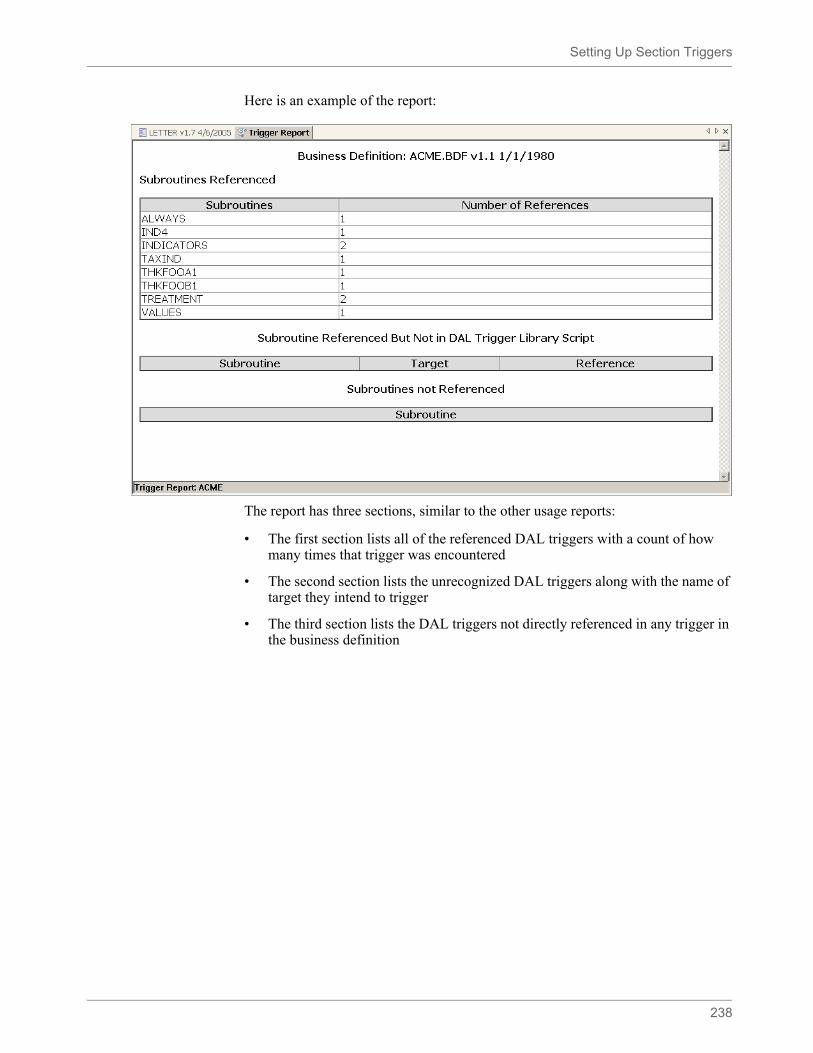
Setting Up Section Triggers
238
Here is an example of the report:
The report has three sections, similar to the other usage reports:
• The first section lists all of the referenced DAL triggers with a count of how many times that trigger was encountered
• The second section lists the unrecognized DAL triggers along with the name of target they intend to trigger
• The third section lists the DAL triggers not directly referenced in any trigger in the business definition
Setting Up Section Triggers
239
Example 2: Add a DAL Section trigger to the Medical History Form
Based on the implementation information for the Medical History form, we know that the Medbody1 section needs to reprint every time a Treatment record is found in a transaction. This means that the section is conditional to that Treatment record, so we not only need our normal Form level trigger for the Medical History Form, but we also need a trigger to be evaluated on the Medbody1 Section of that form, so the Documaker Server will pull that section as many times as needed. This is an overflow scenario. See Example Form on page 35 for information on the Medical History form.
Step A:Add the DAL trigger to the SETRCBTB file
• Using the Triggers manager, check out the SETRCPTB file.
• Create a new trigger, called MEDBODY.
• If using the XDD, set up an If, Then statement in the DAL wizard to say that If the Treatment record is found, True else False. Or, the DAL script for this would look like this:
• Save this file.
Step B:Add the DAL trigger to the Section
• Select the Medbody1 section on the Page pane of the Medical History form in the Form manager.
• Click the Add Trigger icon, or use the Insert, Trigger menu option.
• In the Name field in the DAL Trigger Options pane, click the drop-down to get MEDBODY.
• Occurrence flag is 1. (We will also use the Records Per Overflow Section to 1 for Overflow later.)
• One way to set up Recipients on Section triggers is for the trigger Recipients to be marked as Use Section Count. This means that the section trigger settings on the main section properties pane will have the recipients count.
• Click back on the Medbody1 section in the Page pane. The Recipient copy counts can be marked as 1 Copy.
• Check the form back in the library to save.

Setting Up Section Triggers
240
Note Any examples in this guide usually demonstrate one possible configuration for a given process. In Documaker there are different ways to achieve the same results, and legacy methods are supported in current versions of Documaker Studio. If your implementation is set up differently than shown in documentation, but is working, do not alter your current configuration.
SetRecip Table Options
241
SETRECIP TABLE OPTIONS
The SetRecip Table lets you specify the conditions under which a form or a section will get triggered when building Manual trigger entries. To create a Manual trigger, add a trigger to a form, and then in the Trigger Name field, click the list and select {Manual Trigger}.Depending upon the requirement, not every field is completed. This table discusses each field:
Field Description
SetRecip Information
Transaction Codes
<TRANSCDS>
By including one or more Transaction codes in this field, you trigger a particular form (or section) only if the extract file record includes that particular Transaction Code.
<RECIPS>
Search Mask (Counter)
<MASK1>
Lets you set the criteria to determine whether or not a form (or section) belongs in the form set. The criteria allows the Rules Processor to get specific data from the extract file.
Adds one form (or section) for every occurrence of the search mask per transaction. The Occurrence Flag must be set to one (1) for the search mask to act as a counter.
Occurrence Flag
<OCCURRENCE>
To use the search mask as a counter, the Occurrence Flag (overflow) must be set to one (1). Use with the Search Mask Counter, Records on Different First Section, and Records Per Overflow Section fields. (0=no overflow and 1=overflow)
Performance issue flags in this field include:
- Master (M) form level trigger flag
- Form (F) form level trigger flag
- Subordinate (S) section level trigger flag
Records on different first section
<RECSPER1ST>
Lets you indicate the number of records that appear on the first section before overflowing to a new section.
Records per overflow section
<RECSPERIMG>
Lets you specify the number of records matching the search mask that will fit on the specified overflow section. If the value is zero (0) and the Occurrence Flag is set to one (1) with the Search Mask Counter set, the system automatically sets this flag to one (1) to perform the overflow calculations.
Search Mask (True/False)
<CONDITIONAL>
Similar to Search Mask (Counter), but only one form (or section) is triggered, regardless of how many occurrences of the condition exists.
Custom Rule Name
<FUNCTIONNAME>
Normally used for custom implementation requirements. Only exceptions are RECIPIF and RECIPCONDITION rules.
Custom Rule Parameters
<DATA>
Specifies parameters for the custom rule used in the Custom Rule Name field.
Recipient Information
Form Level Trigger
Recipient Copy Count
<RECIPCPYCT>

SetRecip Table Options
242
Section Level Trigger
Recipient Copy Count
<RECIPCPYCT>
Recipient names listed with no check or a check
Defaults the recipient copy of each recipient defined at the form level
If recipient was eligible in the form file, it is checked here.
Field Description
SetRecip Table Options
243
Example 3: Add a Manual Section trigger to the Medical History Form
What if we want to use Manual triggers instead of DAL triggers? The following steps outline adding a Manual trigger to the Medbody1 section.
• Click the Medbody1 section on the Page pane of the Medical History form in the Forms manager.
• Use the Add Trigger icon, or the Insert, Trigger menu option.
• In the Name field of the Trigger pane, click the drop-down and select {Manual Trigger}.
• This section needs to print on the occurrence of any Treatment record in the transaction. Our implementation information (see Example Form on page 35) says that the XML element for the Treatment records are set up like this:
!/TRAININGCOMPANY/DATA/TREATMENT
• This is added to the Search Mast (Counter) field. We use the Counter (instead of True/False) on this section because we want our section record to be counted and printed for each occurrence, not just the first occurrence.
• Mark the Occurrence Flag and the Records Per Overflow Section as 1. (We will discuss this with Overflow later.)
• Mark Recipient Copy Count as 1, then check the box next to each Recipient on the trigger (Agent, Homeoffice, Insured).
• Using the above Recipient settings on the trigger, we can have Recipients marked as Eligible on the section level, which tells the system to look at the count on the actual trigger. In this case, we checked a copy for each Recipient on the trigger.
• Check the form back into the library to save.
Note Any examples in this guide usually demonstrate one possible configuration for a given process. In Documaker there are different ways to achieve the same results, and legacy methods are supported in current versions of Documaker Studio. If your implementation is set up differently than shown in documentation, but is working, do not alter your current configuration.
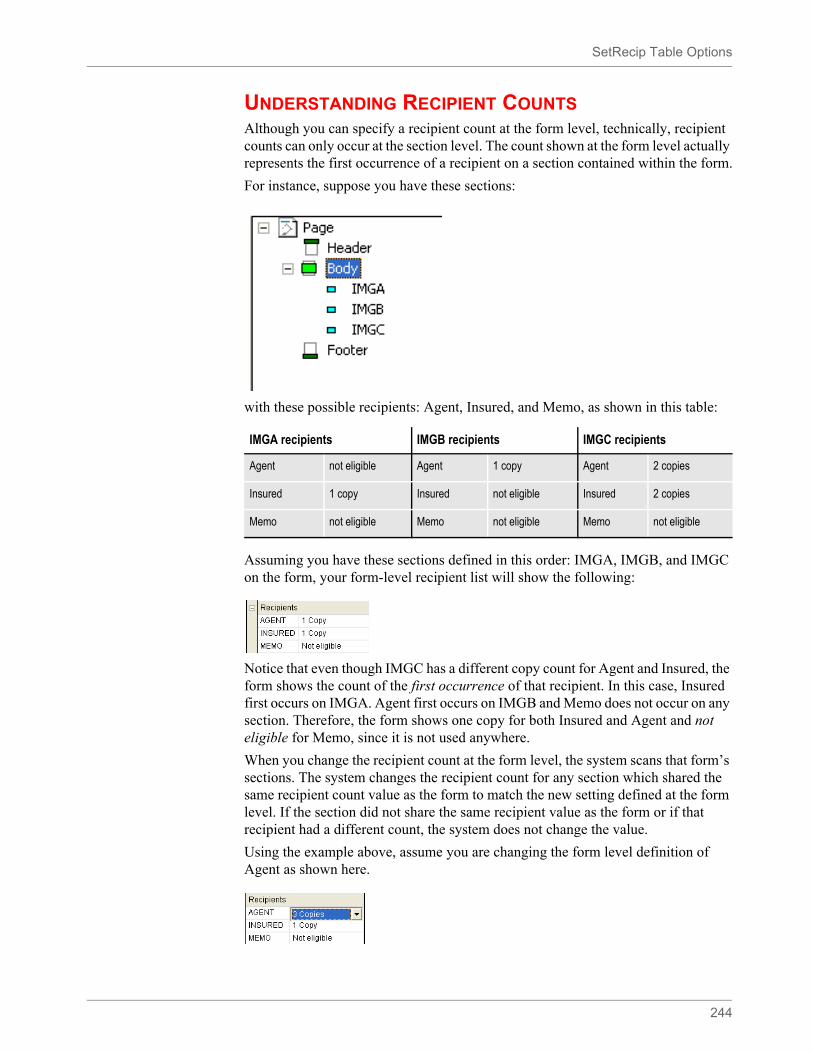
SetRecip Table Options
244
UNDERSTANDING RECIPIENT COUNTSAlthough you can specify a recipient count at the form level, technically, recipient counts can only occur at the section level. The count shown at the form level actually represents the first occurrence of a recipient on a section contained within the form.
For instance, suppose you have these sections:
with these possible recipients: Agent, Insured, and Memo, as shown in this table:
Assuming you have these sections defined in this order: IMGA, IMGB, and IMGC on the form, your form-level recipient list will show the following:
Notice that even though IMGC has a different copy count for Agent and Insured, the form shows the count of the first occurrence of that recipient. In this case, Insured first occurs on IMGA. Agent first occurs on IMGB and Memo does not occur on any section. Therefore, the form shows one copy for both Insured and Agent and not eligible for Memo, since it is not used anywhere.
When you change the recipient count at the form level, the system scans that form’s sections. The system changes the recipient count for any section which shared the same recipient count value as the form to match the new setting defined at the form level. If the section did not share the same recipient value as the form or if that recipient had a different count, the system does not change the value.
Using the example above, assume you are changing the form level definition of Agent as shown here.
IMGA recipients IMGB recipients IMGC recipients
Agent not eligible Agent 1 copy Agent 2 copies
Insured 1 copy Insured not eligible Insured 2 copies
Memo not eligible Memo not eligible Memo not eligible
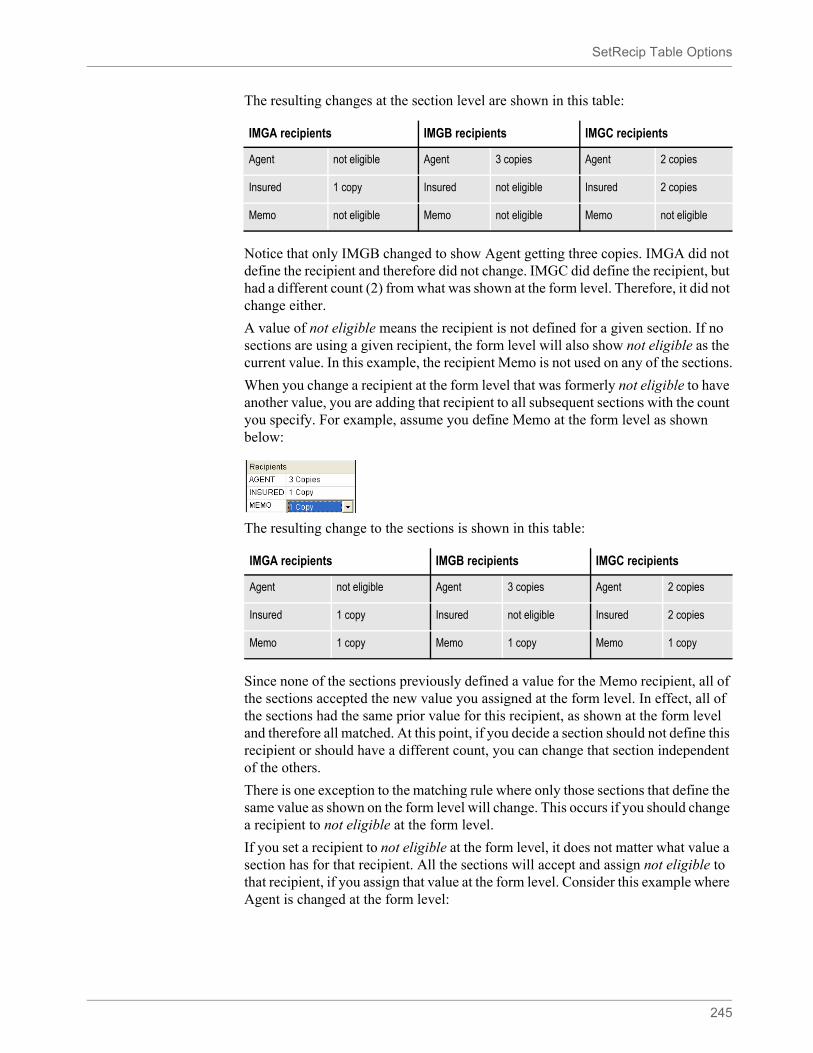
SetRecip Table Options
245
The resulting changes at the section level are shown in this table:
Notice that only IMGB changed to show Agent getting three copies. IMGA did not define the recipient and therefore did not change. IMGC did define the recipient, but had a different count (2) from what was shown at the form level. Therefore, it did not change either.
A value of not eligible means the recipient is not defined for a given section. If no sections are using a given recipient, the form level will also show not eligible as the current value. In this example, the recipient Memo is not used on any of the sections.
When you change a recipient at the form level that was formerly not eligible to have another value, you are adding that recipient to all subsequent sections with the count you specify. For example, assume you define Memo at the form level as shown below:
The resulting change to the sections is shown in this table:
Since none of the sections previously defined a value for the Memo recipient, all of the sections accepted the new value you assigned at the form level. In effect, all of the sections had the same prior value for this recipient, as shown at the form level and therefore all matched. At this point, if you decide a section should not define this recipient or should have a different count, you can change that section independent of the others.
There is one exception to the matching rule where only those sections that define the same value as shown on the form level will change. This occurs if you should change a recipient to not eligible at the form level.
If you set a recipient to not eligible at the form level, it does not matter what value a section has for that recipient. All the sections will accept and assign not eligible to that recipient, if you assign that value at the form level. Consider this example where Agent is changed at the form level:
IMGA recipients IMGB recipients IMGC recipients
Agent not eligible Agent 3 copies Agent 2 copies
Insured 1 copy Insured not eligible Insured 2 copies
Memo not eligible Memo not eligible Memo not eligible
IMGA recipients IMGB recipients IMGC recipients
Agent not eligible Agent 3 copies Agent 2 copies
Insured 1 copy Insured not eligible Insured 2 copies
Memo 1 copy Memo 1 copy Memo 1 copy
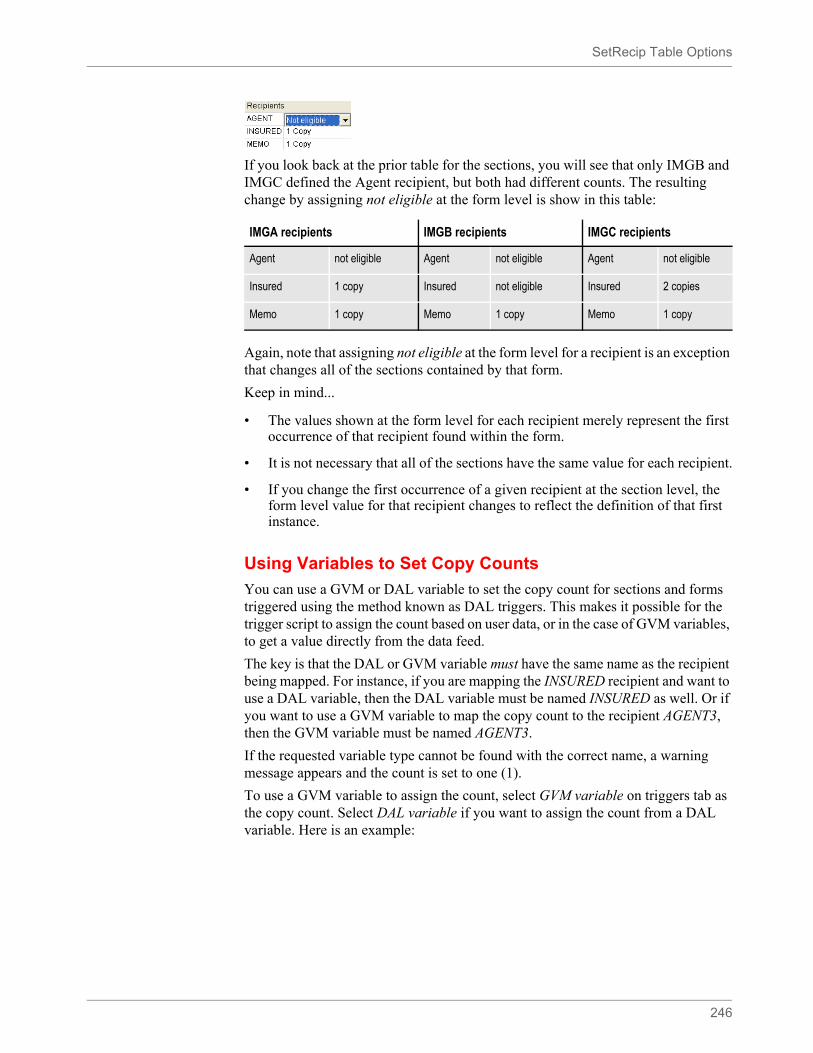
SetRecip Table Options
246
If you look back at the prior table for the sections, you will see that only IMGB and IMGC defined the Agent recipient, but both had different counts. The resulting change by assigning not eligible at the form level is show in this table:
Again, note that assigning not eligible at the form level for a recipient is an exception that changes all of the sections contained by that form.
Keep in mind...
• The values shown at the form level for each recipient merely represent the first occurrence of that recipient found within the form.
• It is not necessary that all of the sections have the same value for each recipient.
• If you change the first occurrence of a given recipient at the section level, the form level value for that recipient changes to reflect the definition of that first instance.
Using Variables to Set Copy Counts
You can use a GVM or DAL variable to set the copy count for sections and forms triggered using the method known as DAL triggers. This makes it possible for the trigger script to assign the count based on user data, or in the case of GVM variables, to get a value directly from the data feed.
The key is that the DAL or GVM variable must have the same name as the recipient being mapped. For instance, if you are mapping the INSURED recipient and want to use a DAL variable, then the DAL variable must be named INSURED as well. Or if you want to use a GVM variable to map the copy count to the recipient AGENT3, then the GVM variable must be named AGENT3.
If the requested variable type cannot be found with the correct name, a warning message appears and the count is set to one (1).
To use a GVM variable to assign the count, select GVM variable on triggers tab as the copy count. Select DAL variable if you want to assign the count from a DAL variable. Here is an example:
IMGA recipients IMGB recipients IMGC recipients
Agent not eligible Agent not eligible Agent not eligible
Insured 1 copy Insured not eligible Insured 2 copies
Memo 1 copy Memo 1 copy Memo 1 copy
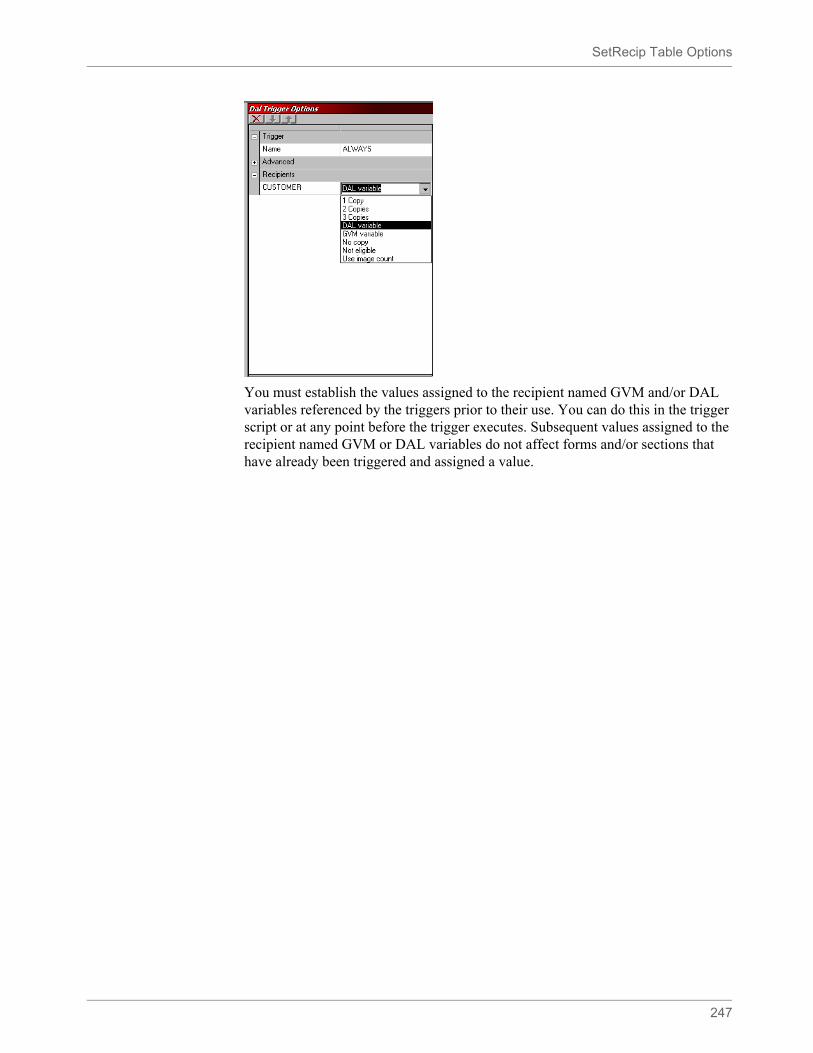
SetRecip Table Options
247
You must establish the values assigned to the recipient named GVM and/or DAL variables referenced by the triggers prior to their use. You can do this in the trigger script or at any point before the trigger executes. Subsequent values assigned to the recipient named GVM or DAL variables do not affect forms and/or sections that have already been triggered and assigned a value.
248
Chapter 6
Working with Sections
Studio makes it easy to create and maintain the sections that comprise your forms.
A section (image) is a group of text or graphics or both which make up all or part of a form. You create sections with the Sections option. Each section is stored in a separate file, so you can reuse sections in multiple forms and form sets. Make sure you have the needed rights to perform the function, otherwise, contact your System Administrator to update.
For example, a three-page form with text and graphics printed on both sides of each page, could contain a total of six sections.
This topic discusses:
• Overview on page 249
• Using the Screen on page 251
• Opening a Section on page 276
• Adding Objects on page 290
• Creating Bar Codes on page 292
• Adding Bookmarks on page 316
• Adding Charts on page 322
• Defining Tab Stops on page 354
• Defining Tables on page 359
• Paragraph options on page 404
• Creating Tables of Contents, Tables of Figures, and Indexes on page 378
• Adding Comments to Documaker Objects on page 388
• Using the Task List on page 390
• Creating Text Areas on page 392
• Creating Text Labels on page 399
• Inserting a Field on page 402
• Inserting Signatures on page 419
• Converting Multiline Text Fields to Paragraph Assembly on page 436
• Printing a Form, Section, or Paragraph on page 441
• Printing Stubs on page 443
• Using Printcommander to Create Sections on page 446
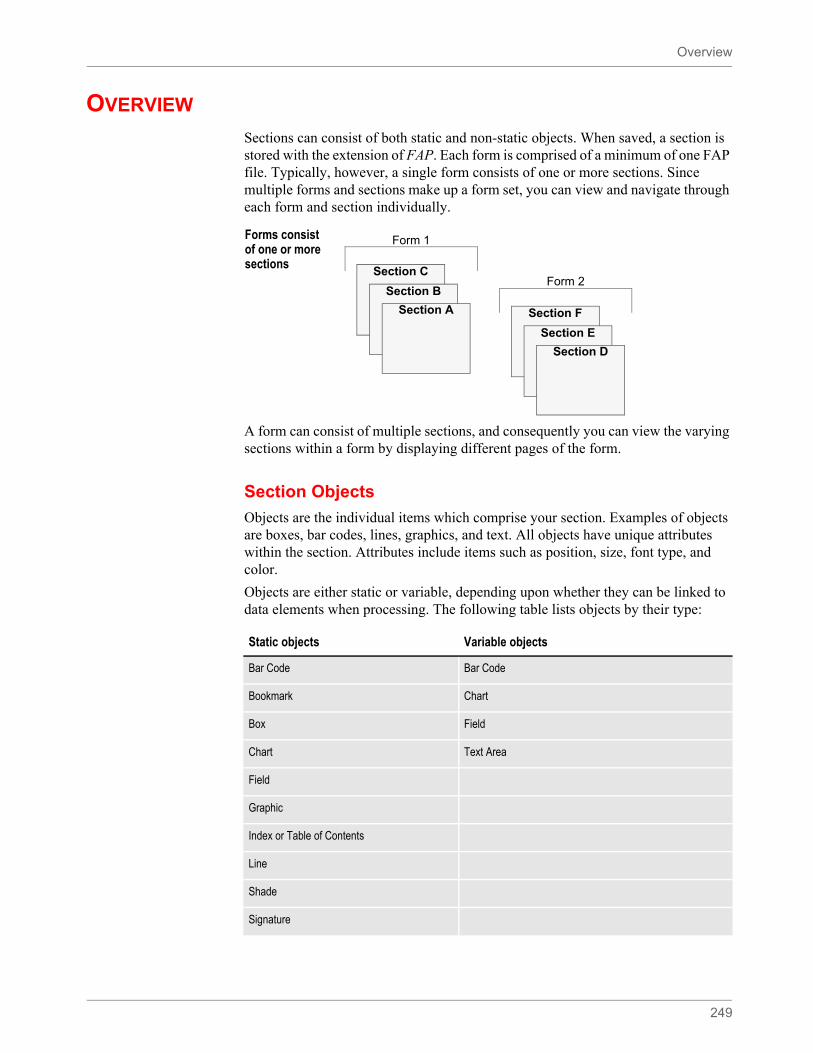
Overview
249
OVERVIEW
Sections can consist of both static and non-static objects. When saved, a section is stored with the extension of FAP. Each form is comprised of a minimum of one FAP file. Typically, however, a single form consists of one or more sections. Since multiple forms and sections make up a form set, you can view and navigate through each form and section individually.
A form can consist of multiple sections, and consequently you can view the varying sections within a form by displaying different pages of the form.
Section Objects
Objects are the individual items which comprise your section. Examples of objects are boxes, bar codes, lines, graphics, and text. All objects have unique attributes within the section. Attributes include items such as position, size, font type, and color.
Objects are either static or variable, depending upon whether they can be linked to data elements when processing. The following table lists objects by their type:
Forms consist of one or more sections
Section A
Section B
Section C
Section D
Section E
Section F
Form 1
Form 2
Static objects Variable objects
Bar Code Bar Code
Bookmark Chart
Box Field
Chart Text Area
Field
Graphic
Index or Table of Contents
Line
Shade
Signature

Overview
250
Table
Text Label
Vector
Guide (section composition only)
Note (section composition only)
Static objects Variable objects
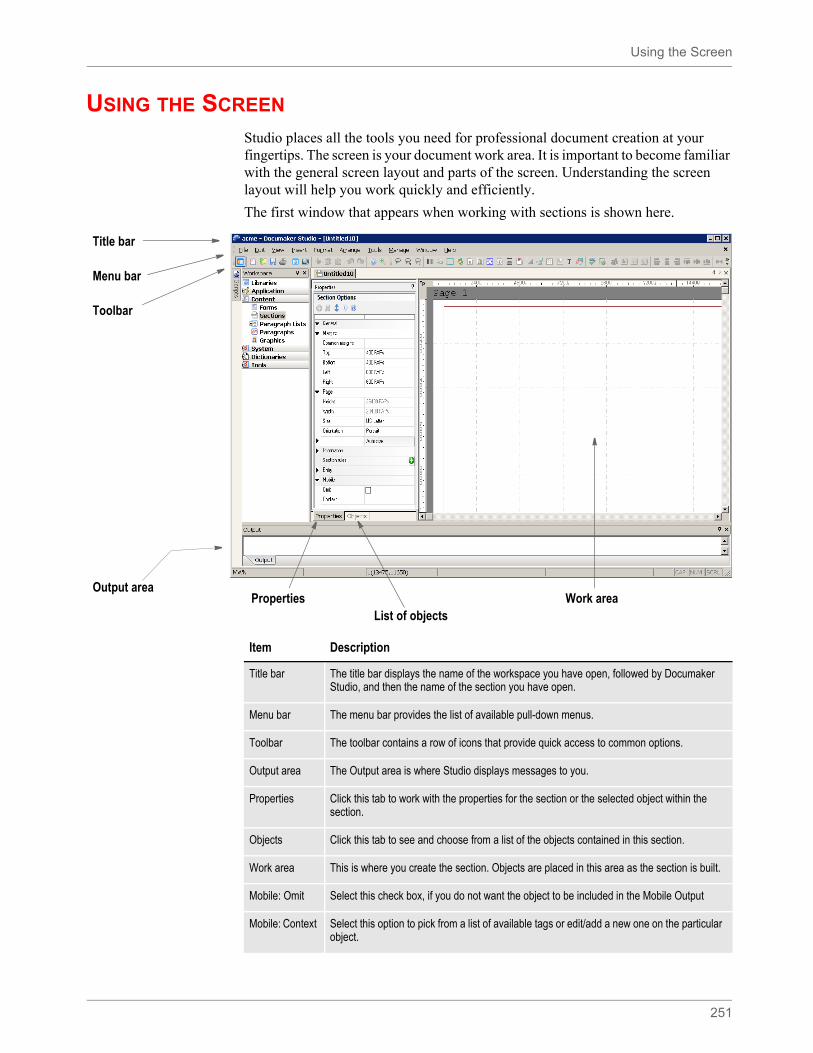
Using the Screen
251
USING THE SCREEN
Studio places all the tools you need for professional document creation at your fingertips. The screen is your document work area. It is important to become familiar with the general screen layout and parts of the screen. Understanding the screen layout will help you work quickly and efficiently.
The first window that appears when working with sections is shown here.
Properties Work area List of objects
Title bar
Menu bar
Toolbar
Output area
Item Description
Title bar The title bar displays the name of the workspace you have open, followed by Documaker Studio, and then the name of the section you have open.
Menu bar The menu bar provides the list of available pull-down menus.
Toolbar The toolbar contains a row of icons that provide quick access to common options.
Output area The Output area is where Studio displays messages to you.
Properties Click this tab to work with the properties for the section or the selected object within the section.
Objects Click this tab to see and choose from a list of the objects contained in this section.
Work area This is where you create the section. Objects are placed in this area as the section is built.
Mobile: Omit Select this check box, if you do not want the object to be included in the Mobile Output
Mobile: Context Select this option to pick from a list of available tags or edit/add a new one on the particular object.
Using the Screen
252
USING THE MENU BARThis section introduces you to the pull-down menus which include additional options or are only available when you are working with sections. A summary of each of these menu appears below. The menus are listed in the order they appear on the menu bar.
Enable Sections to Split across page breaks during entry
This feature adds support to WIP Edit Plug-In and DM Studio's data entry check to allow for section content to dynamically split across pages as it's pushed down by added content above and to merge back onto a single page as content is removed above the targeted section.
This version of the split image function will not support any of the legacy group pagination options such as GroupPagination, Box, List, StayTogether, Column, PaginateBeforeThisImage, etc. In addition, Sub Form pagination options are not supported.
Note This option requires Documaker Mobile. If you have not purchased and installed Documaker Mobile the required mobile options will be disabled. To purchase Documaker Mobile, visit My Oracle Support website or contact your Oracle Sales representative.
Note For information on the standard menus and menu options which are always available, see Using System Menus on page 45.
Menu Description
Edit The Edit menu provides options you use as you create and modify sections and the objects that make up sections. You copy, cut, delete, and paste individual objects, or select all objects for editing. You can also delete pages and undo changes from the Edit menu.
View The View menu controls the appearance of your window as you create or edit sections. It lets you hide or show various toolbars and panes.
Insert The Insert menu lets you create objects and place them in your section. You can also insert objects by clicking on the object icon on the toolbar.
Format The Format menu provides options that let you format objects and text and set up the specific formatting properties.
Arrange The Arrange menu lets you align, space, size, and center objects.
Tools The Tools menu controls features used to check spelling and grammar on sections and lets you enter the data entry check option. These types of features are used most often when a section is complete or near completion.
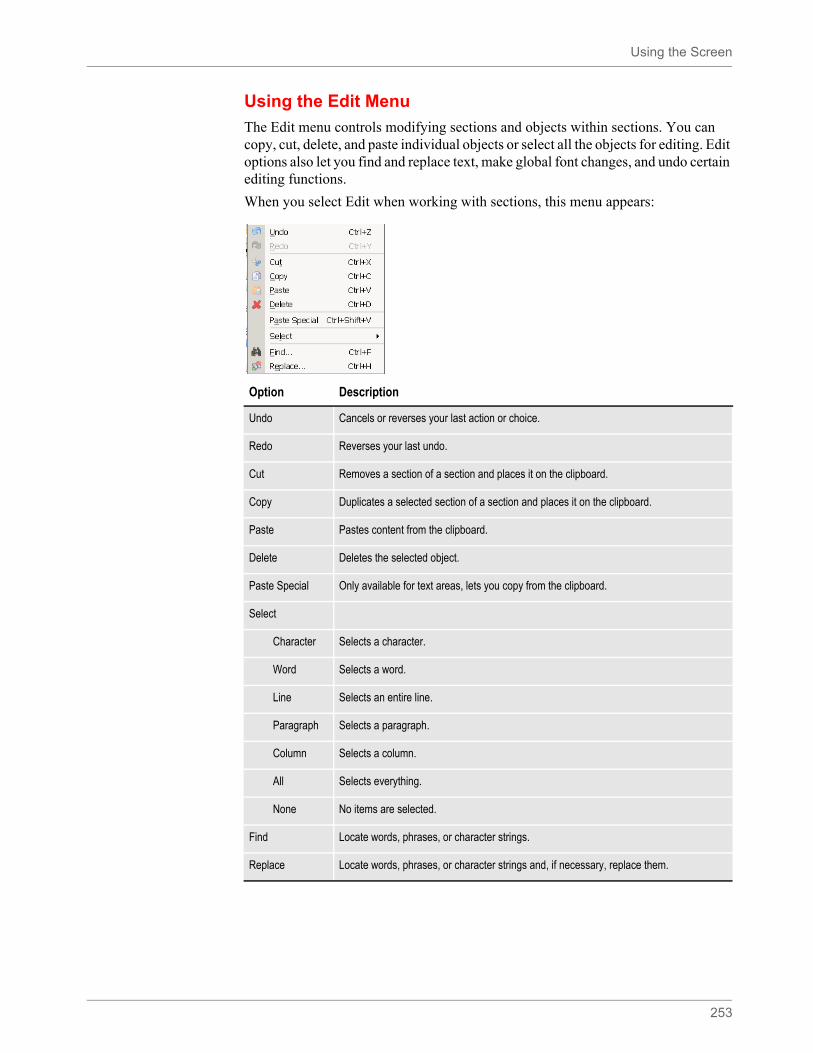
Using the Screen
253
Using the Edit Menu
The Edit menu controls modifying sections and objects within sections. You can copy, cut, delete, and paste individual objects or select all the objects for editing. Edit options also let you find and replace text, make global font changes, and undo certain editing functions.
When you select Edit when working with sections, this menu appears:
Option Description
Undo Cancels or reverses your last action or choice.
Redo Reverses your last undo.
Cut Removes a section of a section and places it on the clipboard.
Copy Duplicates a selected section of a section and places it on the clipboard.
Paste Pastes content from the clipboard.
Delete Deletes the selected object.
Paste Special Only available for text areas, lets you copy from the clipboard.
Select
Character Selects a character.
Word Selects a word.
Line Selects an entire line.
Paragraph Selects a paragraph.
Column Selects a column.
All Selects everything.
None No items are selected.
Find Locate words, phrases, or character strings.
Replace Locate words, phrases, or character strings and, if necessary, replace them.
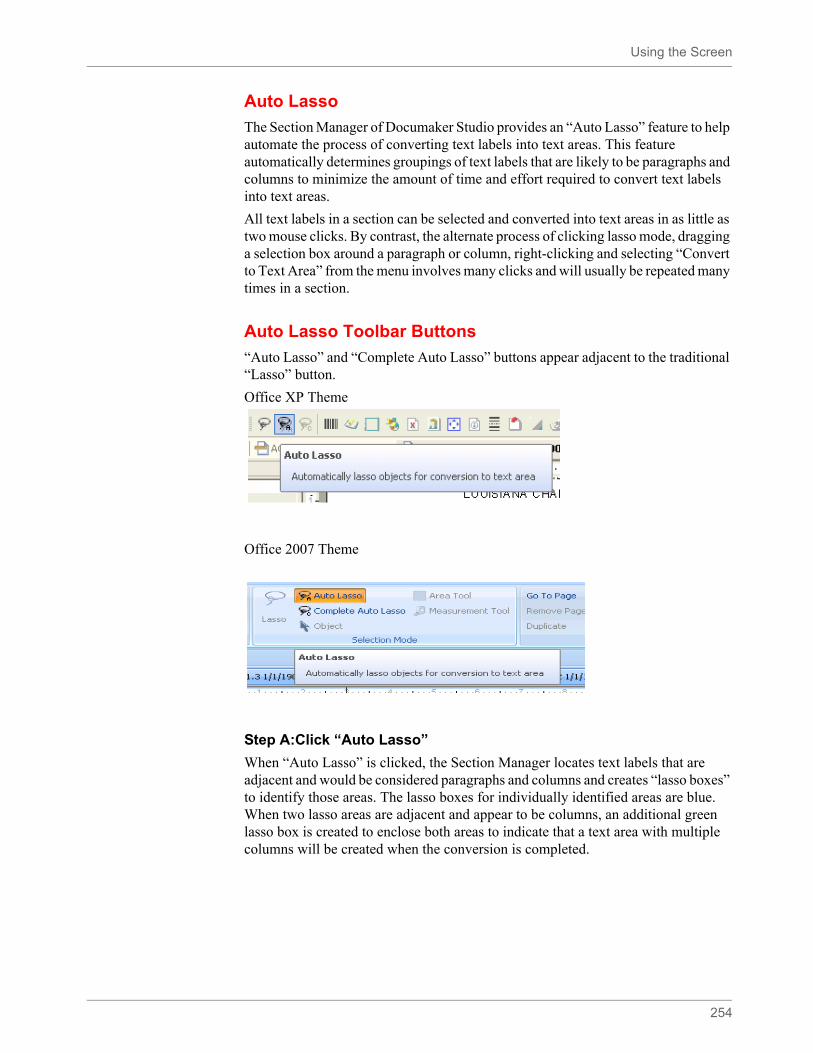
Using the Screen
254
Auto Lasso
The Section Manager of Documaker Studio provides an “Auto Lasso” feature to help automate the process of converting text labels into text areas. This feature automatically determines groupings of text labels that are likely to be paragraphs and columns to minimize the amount of time and effort required to convert text labels into text areas.
All text labels in a section can be selected and converted into text areas in as little as two mouse clicks. By contrast, the alternate process of clicking lasso mode, dragging a selection box around a paragraph or column, right-clicking and selecting “Convert to Text Area” from the menu involves many clicks and will usually be repeated many times in a section.
Auto Lasso Toolbar Buttons
“Auto Lasso” and “Complete Auto Lasso” buttons appear adjacent to the traditional “Lasso” button.
Office XP Theme
Office 2007 Theme
Step A:Click “Auto Lasso”
When “Auto Lasso” is clicked, the Section Manager locates text labels that are adjacent and would be considered paragraphs and columns and creates “lasso boxes” to identify those areas. The lasso boxes for individually identified areas are blue. When two lasso areas are adjacent and appear to be columns, an additional green lasso box is created to enclose both areas to indicate that a text area with multiple columns will be created when the conversion is completed.
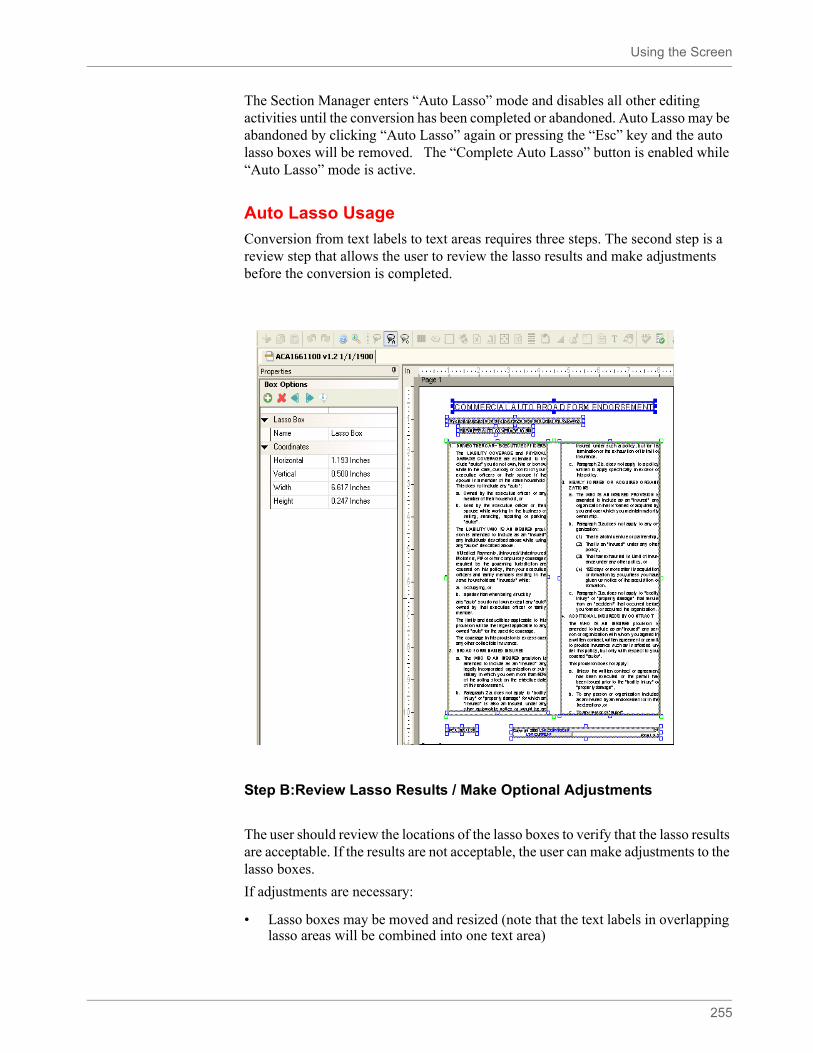
Using the Screen
255
The Section Manager enters “Auto Lasso” mode and disables all other editing activities until the conversion has been completed or abandoned. Auto Lasso may be abandoned by clicking “Auto Lasso” again or pressing the “Esc” key and the auto lasso boxes will be removed. The “Complete Auto Lasso” button is enabled while “Auto Lasso” mode is active.
Auto Lasso Usage
Conversion from text labels to text areas requires three steps. The second step is a review step that allows the user to review the lasso results and make adjustments before the conversion is completed.
Step B:Review Lasso Results / Make Optional Adjustments
The user should review the locations of the lasso boxes to verify that the lasso results are acceptable. If the results are not acceptable, the user can make adjustments to the lasso boxes.
If adjustments are necessary:
• Lasso boxes may be moved and resized (note that the text labels in overlapping lasso areas will be combined into one text area)
Using the Screen
256
• Lasso boxes may be deleted. This may be useful when:
• there is no need to convert the given portion of the section
• columns are identified, but the user does not wish them to be joined into one text area
For sections with larger gaps between bullets (or numbers) and paragraphs, the bullets may be occasionally identified by their own lasso boxes. Having a bullet appear in its own text area would not be desirable and this may be corrected by dragging the lasso box for the paragraph to be larger and enclose the bullet. It is also possible to increase the lasso “tolerance” to reduce the occurrences of orphaned bullets (see Tolerance in “Auto Lasso Settings”).
For sections with multiple pages, the user is reminded to review all of the pages. Depending on the zoom mode, the user may only see one page at a time and forget to review the other pages. The reminder may be dismissed once the user becomes accustomed to reviewing all pages.
Step C:Click “Complete Auto Lasso”
When “Complete Auto Lasso” is clicked, the Section Manager visits each of the lasso boxes and converts the enclosed text labels into text areas. The result of the Auto Lasso process is a section with text areas that are more easily maintained than text labels.
Auto Lasso Settings
Studio’s “Sections/Document View” Settings provides configuration for Auto Lasso. These are also documented in the “Working with Section Options” section of this manual.
“Show multiple page warning” is a check box to indicate whether the multiple page reminder is displayed when “Auto Lasso” is clicked for a multiple page section.
“Tolerance” is the amount of separation that items may possess and still be grouped together. The tolerance value is provided in a combo box list that contains three levels: Low, Medium and High. Each level is associated with an increasing tolerance value - a larger value indicates a more aggressive lasso.
The values shown in the combo box depend on the system measurement units chosen by the user.
Using the Screen
257
The “Can grow and shrink” and “Can span pages” check boxes control what options are set on the text areas created when “Complete Auto Lasso” is invoked.
Using the View Menu
The View menu controls the appearance of your screen as you work on a section. You toggle on and toggle off the display of various features through the use of items on the View menu.
When you select View, this menu appears:
Units Low Medium High
Centimeters 0.254 0.508 1.016
FAPs 240 480 960
Inches 0.100 0.200 0.400
Picas 0.600 1.200 2.400
Points 7.200 14.400 2.400
Option Description
Options Lets you change general document view options. (Manage, System, Settings, Sections)
Toolbar Lets you show or hide the Toolbar
Workspace Bar Lets you show or hide the Workspace pane
Output Bar Lets you show or hide the Output area
Using the Screen
258
Using the Insert Menu
The Insert menu controls the creation and placement of objects in your section. Boxes, bar codes, lines, and other types of objects are drawn and positioned in your section. You can also import a page, whether it is blank or full of text. You can select to create an object from the Insert menu or you select to create an object from the toolbar.
When you select Insert, this menu appears:
Status Bar Lets you show or hide the Status bar
Field Bar Lets you show or hide the Common Fields pane
Extract Bar Lets you show or hide the Data Extract pane
Navigation Lets you show or hide the Form Set Navigation pane
Scripts Bar Lets you show or hide the Scripts pane
Refresh Lets you update and redisplay the section.
Zoom... Displays the Zoom dialog which allows you to adjust the current zoom.
Option Description
Option Description
Autocreate Lets you create objects repeatedly without entering the object’s options.
Bar Code Lets you insert a bar code.
Bookmark Used to add bookmarks to FAP files. A bookmark defines the text you want to print in the table of contents. A level number (TOC1, TOC2, and so on) can be used to determine the formatting to use. You specify whether the bookmark is to be used by a table of contents, table of figures, or index.
Box Lets you insert a box.
Using the Screen
259
Using the Format Menu
The Format menu controls formatting functions associated with the section and the objects in the section. You can view or change the properties for the page, section, or individual objects from this menu.
When you select Format, this menu appears:
Break Lets you insert a break into a text area.
Chart Starts the Chart wizard so you can insert a chart.
Field Lets you insert a field.
Graphic Lets you insert a graphic.
Guide Lets you create a guide box, which you can use to help you align objects.
Index and Contents Lets you insert a add an index or a table of contents or figures.
Line Lets you insert a line.
Note Lets you insert a note.
Page Lets you insert a page.
Shade Lets you insert a shaded area.
Signature Lets you insert a signature.
Table Starts the Table wizard so you can create a table.
Text Area Lets you insert a text area.
Text Area Special Activates text area draw to insert from a file or the clipboard.
Text Label Lets you insert a text label.
Vector Lets you insert a vector.
Option Description
Duplicate Duplicates the selected object
Color Change the color of the selected text to the selected color.
Font Select or change fonts.
Bold Bold the selected text.
Italic Italicize the selected font.
Underline Underline the selected text. Underline selections include Single, Double, Single Word and Double Word
Strike-out Strikes out (draws a horizontal line through) the selected text.
Option Description
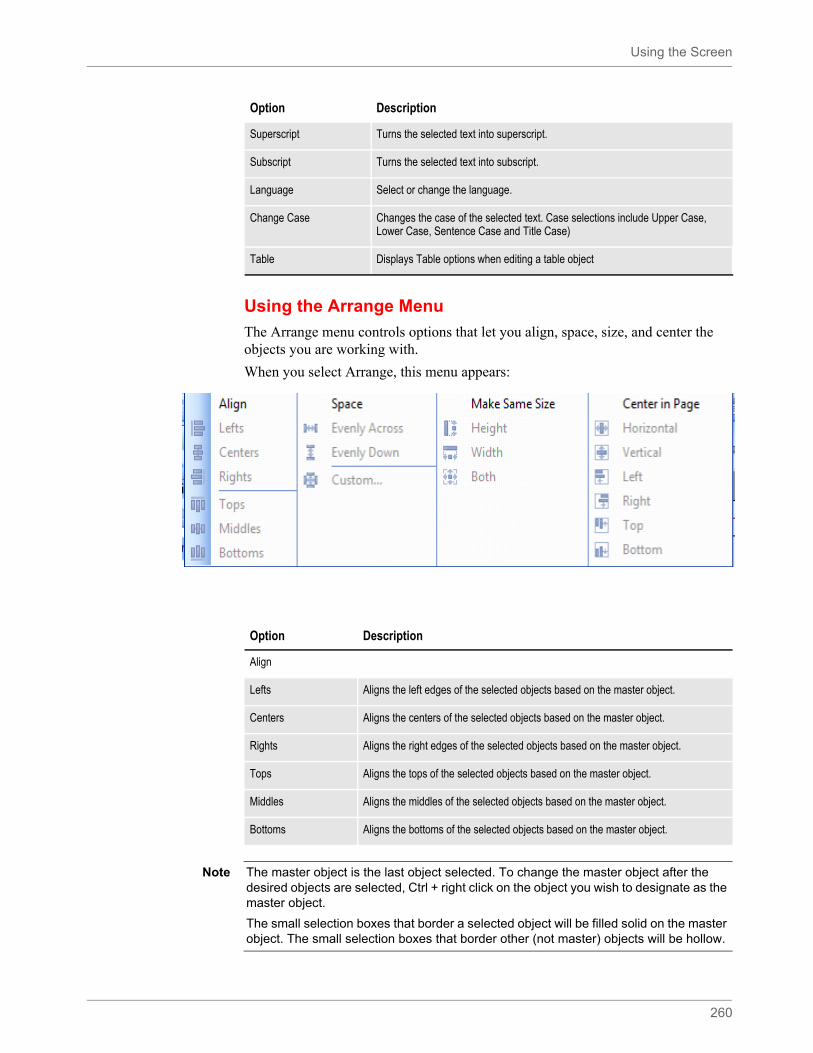
Using the Screen
260
Using the Arrange Menu
The Arrange menu controls options that let you align, space, size, and center the objects you are working with.
When you select Arrange, this menu appears:
Superscript Turns the selected text into superscript.
Subscript Turns the selected text into subscript.
Language Select or change the language.
Change Case Changes the case of the selected text. Case selections include Upper Case, Lower Case, Sentence Case and Title Case)
Table Displays Table options when editing a table object
Option Description
Option Description
Align
Lefts Aligns the left edges of the selected objects based on the master object.
Centers Aligns the centers of the selected objects based on the master object.
Rights Aligns the right edges of the selected objects based on the master object.
Tops Aligns the tops of the selected objects based on the master object.
Middles Aligns the middles of the selected objects based on the master object.
Bottoms Aligns the bottoms of the selected objects based on the master object.
Note The master object is the last object selected. To change the master object after the desired objects are selected, Ctrl + right click on the object you wish to designate as the master object.
The small selection boxes that border a selected object will be filled solid on the master object. The small selection boxes that border other (not master) objects will be hollow.
Using the Screen
261
These icons let you align objects. See also the Arrange menu.
Using the Tools Menu
The Tools menu controls options often used when your section is complete or near completion. Spell check and Data Entry check are some of the features available.
When you select Tools, this menu appears:
Space
Evenly Across Spaces the selected objects evenly across the section.
Evenly Down Spaces the selected objects evenly down the section.
Custom Displays the Custom Spacing window so you can specify custom spacing intervals.
Make Same Size
Height Makes the selected objects the same height.
Width Makes the selected objects the same width.
Both Makes the selected objects the same height and width.
Center in Page
Horizontal Centers the selected objects horizontally on the page.
Vertical Centers the selected objects vertically on the page.
Left Aligns the selected object to the left edge of the margin. If the section has no margins, the selected objects are aligned to the left edge of the page.
Right Aligns the selected object to the right edge of the margin. If the section has no margins, the selected objects are aligned to the right edge of the page.
Top Aligns the selected object to the top edge of the margin. If the section has no margins, the selected objects are aligned to the top edge of the page.
Bottom Aligns the selected object to the bottom edge of the margin. If the section has no margins, the selected objects are aligned to the bottom edge of the page.

Using the Screen
262
Option Description
Validate Lets you validate your section.
Task List Displays the task list for the selected object.
Data Entry Check Activates the section check feature. Lets you test the data entry and navigation rules you assigned to fields.
Spell Check Turns on the spell check feature. Lets you check the spelling of all text in your current section.
Spelling Options Lets you specify spell check options.
Grammar Check Performs Grammar check on the entire document or on the selected items.
Grammar Options Let you choose the grammar checking options you want to use.
Readability Statistics Generates readability statistics for the text in the selected objects.
Section Report Generate a report about the current section. You can view and print the report.
Auto Lasso Automatically groups text labels that are likely to be paragraphs.
Complete Auto Lasso Converts the text labels selected using Auto Lasso into paragraphs.
Select Area for Section Lets you select an area in the current section and convert it to a new section.
Convert to Text Area Combines selected text labels or text areas into a single text area.
Convert to Text Label Combines selected text labels into a single text label.
Split Text Splits a single text area into individual text labels.
Convert to Field Converts a text label into a field.
Convert with Area Tool Converts selected objects or a selected area to a new section.
Compile Lets you compile your section file for a particular printer. Compile creates a section file for a PCL, AFP, PostScript, or Metacode printer.

Using the Screen
263
Normalize Lets you convert a FAP file into a normalized Metacode or AFP file.
Option Description
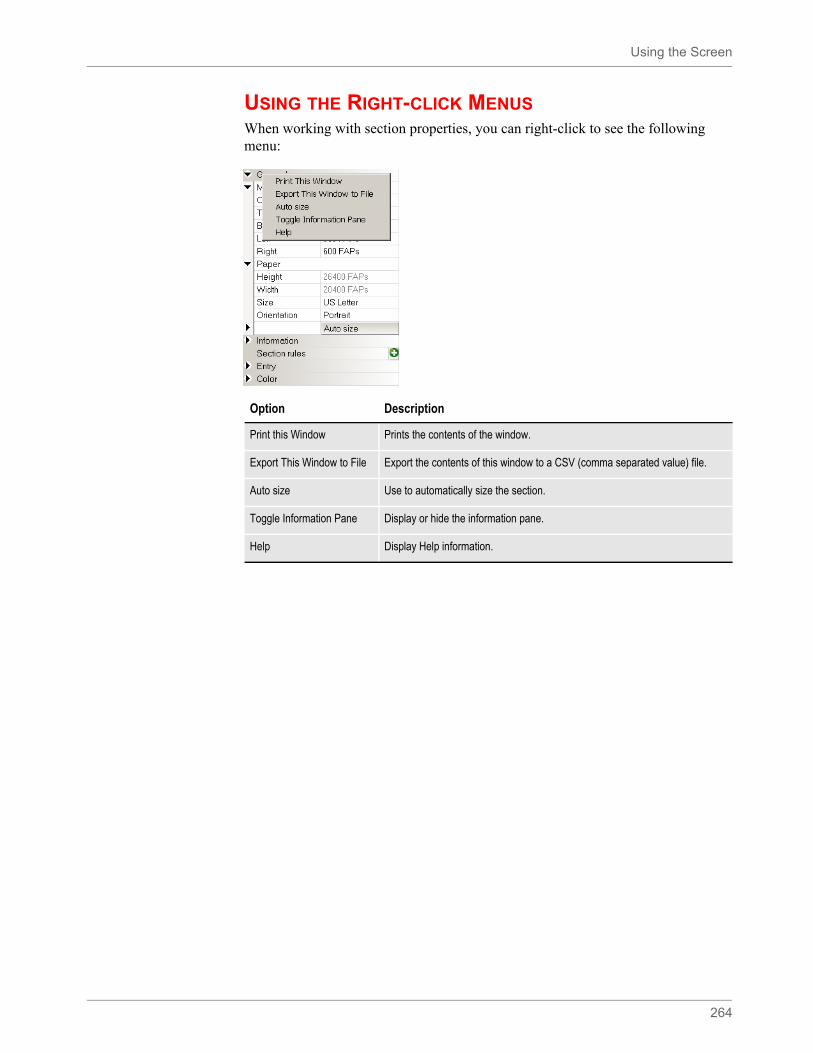
Using the Screen
264
USING THE RIGHT-CLICK MENUSWhen working with section properties, you can right-click to see the following menu:
Option Description
Print this Window Prints the contents of the window.
Export This Window to File Export the contents of this window to a CSV (comma separated value) file.
Auto size Use to automatically size the section.
Toggle Information Pane Display or hide the information pane.
Help Display Help information.
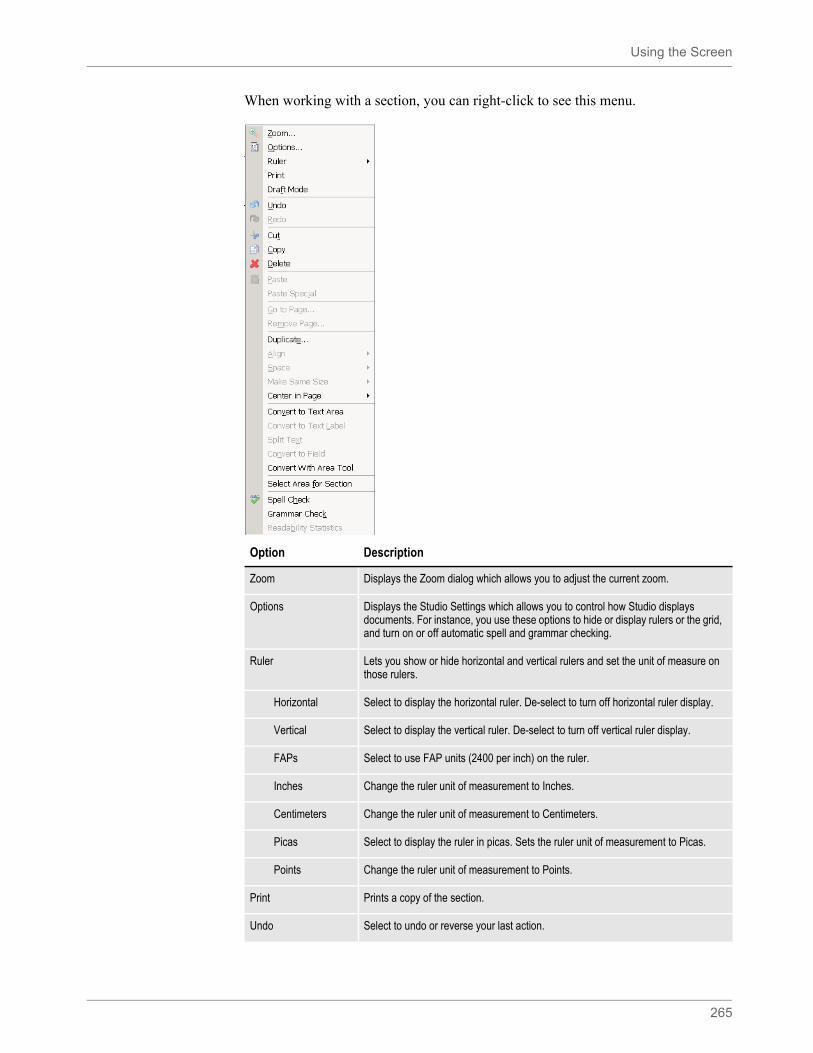
Using the Screen
265
When working with a section, you can right-click to see this menu.
Option Description
Zoom Displays the Zoom dialog which allows you to adjust the current zoom.
Options Displays the Studio Settings which allows you to control how Studio displays documents. For instance, you use these options to hide or display rulers or the grid, and turn on or off automatic spell and grammar checking.
Ruler Lets you show or hide horizontal and vertical rulers and set the unit of measure on those rulers.
Horizontal Select to display the horizontal ruler. De-select to turn off horizontal ruler display.
Vertical Select to display the vertical ruler. De-select to turn off vertical ruler display.
FAPs Select to use FAP units (2400 per inch) on the ruler.
Inches Change the ruler unit of measurement to Inches.
Centimeters Change the ruler unit of measurement to Centimeters.
Picas Select to display the ruler in picas. Sets the ruler unit of measurement to Picas.
Points Change the ruler unit of measurement to Points.
Print Prints a copy of the section.
Undo Select to undo or reverse your last action.
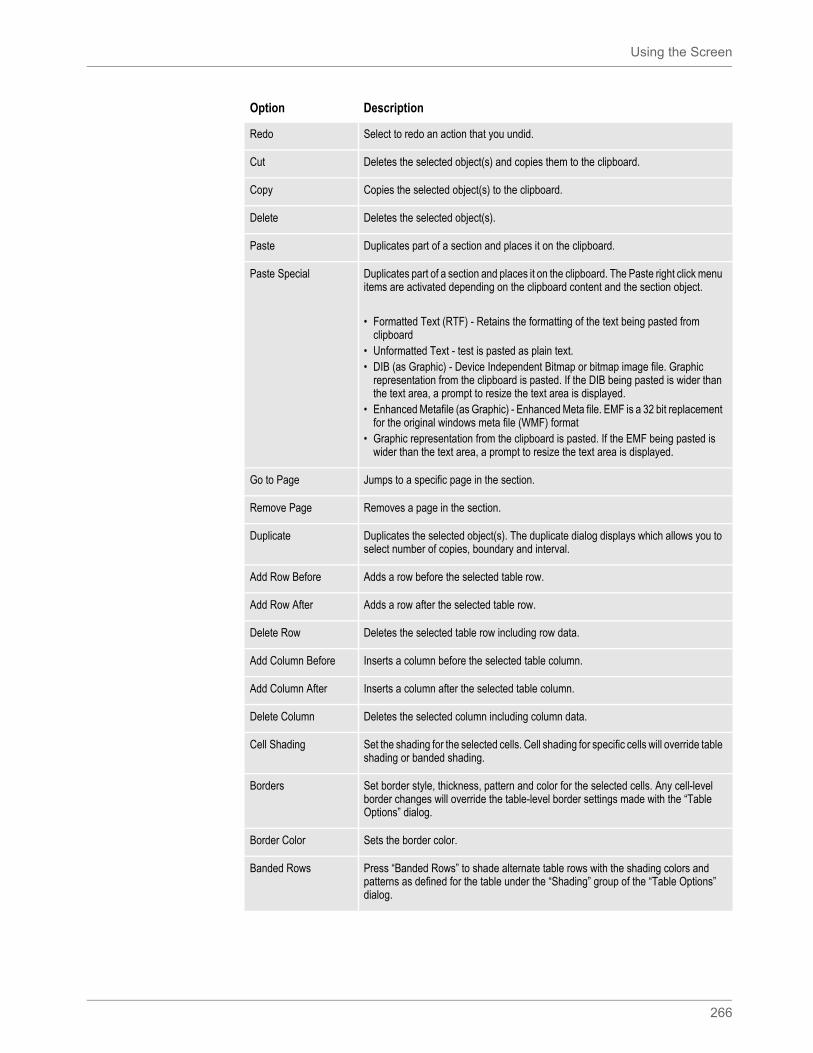
Using the Screen
266
Redo Select to redo an action that you undid.
Cut Deletes the selected object(s) and copies them to the clipboard.
Copy Copies the selected object(s) to the clipboard.
Delete Deletes the selected object(s).
Paste Duplicates part of a section and places it on the clipboard.
Paste Special Duplicates part of a section and places it on the clipboard. The Paste right click menu items are activated depending on the clipboard content and the section object.
• Formatted Text (RTF) - Retains the formatting of the text being pasted from clipboard
• Unformatted Text - test is pasted as plain text.• DIB (as Graphic) - Device Independent Bitmap or bitmap image file. Graphic
representation from the clipboard is pasted. If the DIB being pasted is wider than the text area, a prompt to resize the text area is displayed.
• Enhanced Metafile (as Graphic) - Enhanced Meta file. EMF is a 32 bit replacement for the original windows meta file (WMF) format
• Graphic representation from the clipboard is pasted. If the EMF being pasted is wider than the text area, a prompt to resize the text area is displayed.
Go to Page Jumps to a specific page in the section.
Remove Page Removes a page in the section.
Duplicate Duplicates the selected object(s). The duplicate dialog displays which allows you to select number of copies, boundary and interval.
Add Row Before Adds a row before the selected table row.
Add Row After Adds a row after the selected table row.
Delete Row Deletes the selected table row including row data.
Add Column Before Inserts a column before the selected table column.
Add Column After Inserts a column after the selected table column.
Delete Column Deletes the selected column including column data.
Cell Shading Set the shading for the selected cells. Cell shading for specific cells will override table shading or banded shading.
Borders Set border style, thickness, pattern and color for the selected cells. Any cell-level border changes will override the table-level border settings made with the “Table Options” dialog.
Border Color Sets the border color.
Banded Rows Press “Banded Rows” to shade alternate table rows with the shading colors and patterns as defined for the table under the “Shading” group of the “Table Options” dialog.
Option Description
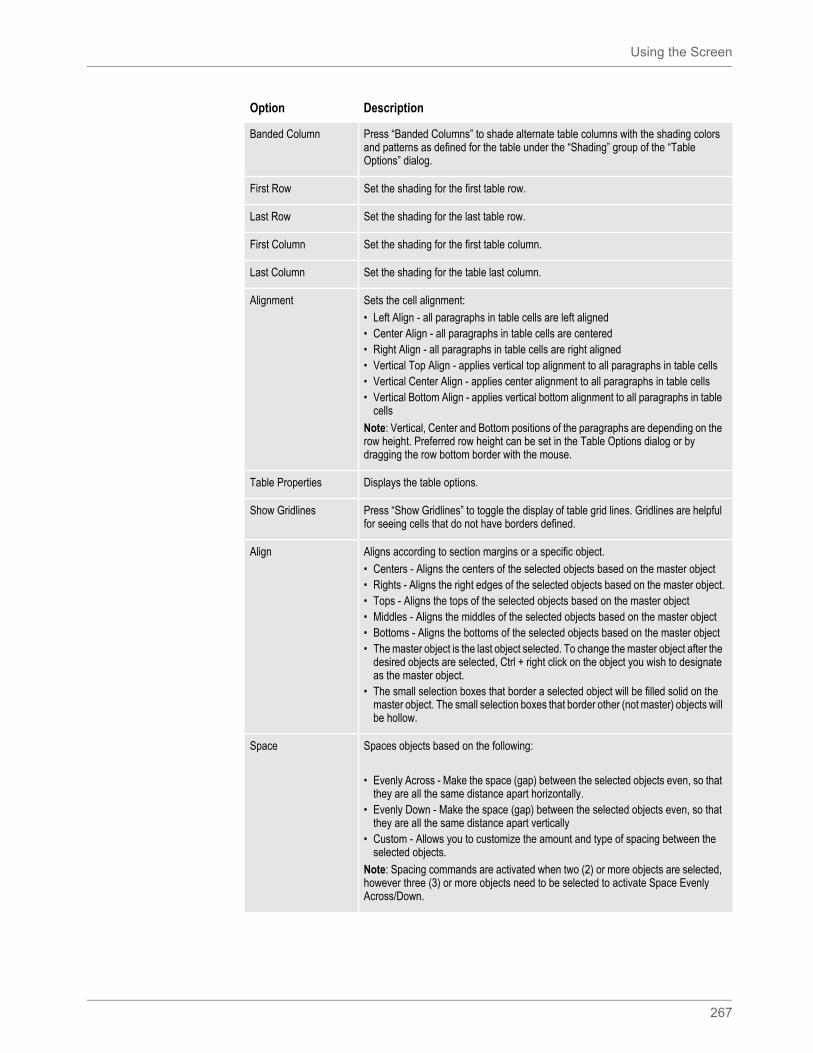
Using the Screen
267
Banded Column Press “Banded Columns” to shade alternate table columns with the shading colors and patterns as defined for the table under the “Shading” group of the “Table Options” dialog.
First Row Set the shading for the first table row.
Last Row Set the shading for the last table row.
First Column Set the shading for the first table column.
Last Column Set the shading for the table last column.
Alignment Sets the cell alignment:
• Left Align - all paragraphs in table cells are left aligned• Center Align - all paragraphs in table cells are centered • Right Align - all paragraphs in table cells are right aligned• Vertical Top Align - applies vertical top alignment to all paragraphs in table cells• Vertical Center Align - applies center alignment to all paragraphs in table cells• Vertical Bottom Align - applies vertical bottom alignment to all paragraphs in table
cells
Note: Vertical, Center and Bottom positions of the paragraphs are depending on the row height. Preferred row height can be set in the Table Options dialog or by dragging the row bottom border with the mouse.
Table Properties Displays the table options.
Show Gridlines Press “Show Gridlines” to toggle the display of table grid lines. Gridlines are helpful for seeing cells that do not have borders defined.
Align Aligns according to section margins or a specific object.
• Centers - Aligns the centers of the selected objects based on the master object• Rights - Aligns the right edges of the selected objects based on the master object.• Tops - Aligns the tops of the selected objects based on the master object• Middles - Aligns the middles of the selected objects based on the master object• Bottoms - Aligns the bottoms of the selected objects based on the master object• The master object is the last object selected. To change the master object after the
desired objects are selected, Ctrl + right click on the object you wish to designate as the master object.
• The small selection boxes that border a selected object will be filled solid on the master object. The small selection boxes that border other (not master) objects will be hollow.
Space Spaces objects based on the following:
• Evenly Across - Make the space (gap) between the selected objects even, so that they are all the same distance apart horizontally.
• Evenly Down - Make the space (gap) between the selected objects even, so that they are all the same distance apart vertically
• Custom - Allows you to customize the amount and type of spacing between the selected objects.
Note: Spacing commands are activated when two (2) or more objects are selected, however three (3) or more objects need to be selected to activate Space Evenly Across/Down.
Option Description
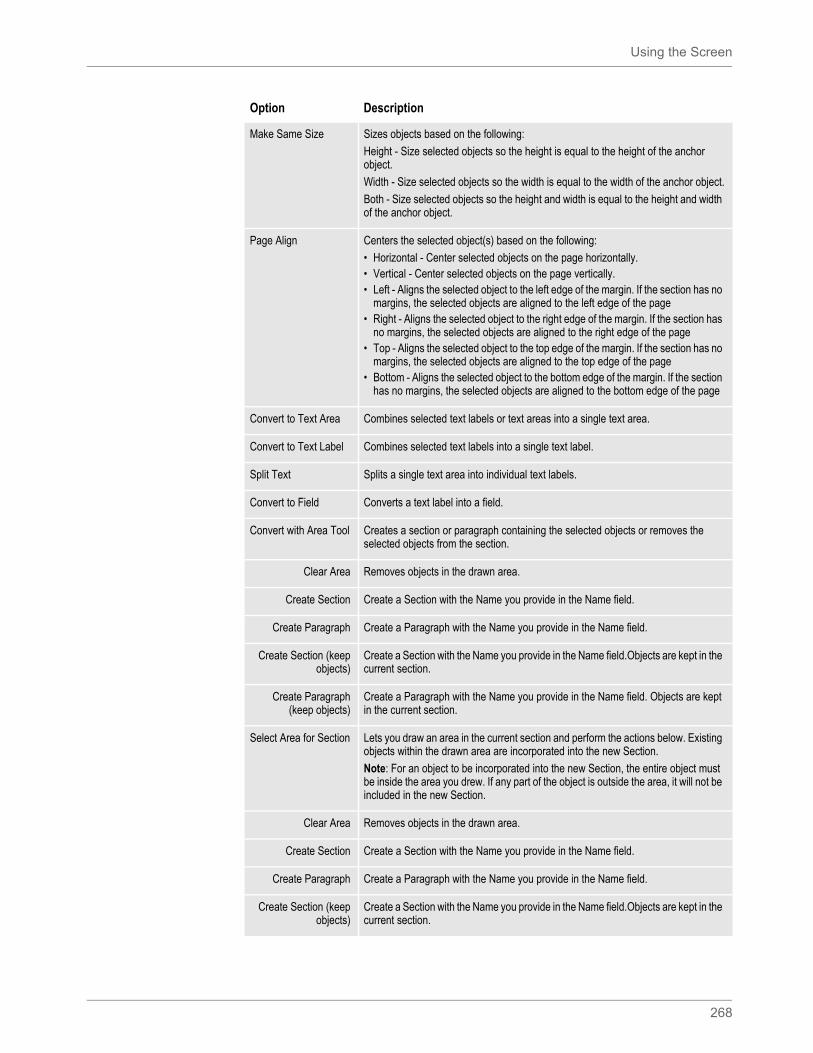
Using the Screen
268
Make Same Size Sizes objects based on the following:
Height - Size selected objects so the height is equal to the height of the anchor object.
Width - Size selected objects so the width is equal to the width of the anchor object.
Both - Size selected objects so the height and width is equal to the height and width of the anchor object.
Page Align Centers the selected object(s) based on the following:
• Horizontal - Center selected objects on the page horizontally.• Vertical - Center selected objects on the page vertically.• Left - Aligns the selected object to the left edge of the margin. If the section has no
margins, the selected objects are aligned to the left edge of the page• Right - Aligns the selected object to the right edge of the margin. If the section has
no margins, the selected objects are aligned to the right edge of the page• Top - Aligns the selected object to the top edge of the margin. If the section has no
margins, the selected objects are aligned to the top edge of the page• Bottom - Aligns the selected object to the bottom edge of the margin. If the section
has no margins, the selected objects are aligned to the bottom edge of the page
Convert to Text Area Combines selected text labels or text areas into a single text area.
Convert to Text Label Combines selected text labels into a single text label.
Split Text Splits a single text area into individual text labels.
Convert to Field Converts a text label into a field.
Convert with Area Tool Creates a section or paragraph containing the selected objects or removes the selected objects from the section.
Clear Area Removes objects in the drawn area.
Create Section Create a Section with the Name you provide in the Name field.
Create Paragraph Create a Paragraph with the Name you provide in the Name field.
Create Section (keepobjects)
Create a Section with the Name you provide in the Name field.Objects are kept in the current section.
Create Paragraph(keep objects)
Create a Paragraph with the Name you provide in the Name field. Objects are kept in the current section.
Select Area for Section Lets you draw an area in the current section and perform the actions below. Existing objects within the drawn area are incorporated into the new Section.
Note: For an object to be incorporated into the new Section, the entire object must be inside the area you drew. If any part of the object is outside the area, it will not be included in the new Section.
Clear Area Removes objects in the drawn area.
Create Section Create a Section with the Name you provide in the Name field.
Create Paragraph Create a Paragraph with the Name you provide in the Name field.
Create Section (keepobjects)
Create a Section with the Name you provide in the Name field.Objects are kept in the current section.
Option Description

Using the Screen
269
Create Paragraph(keep objects)
Create a Paragraph with the Name you provide in the Name field. Objects are kept in the current section.
Spell Check Performs a spell check based on the Spelling Options.
Grammar Check Performs a grammar check based on the Grammar Options.
Readability Statistics Provides statistics on the readability of the selected text.
Option Description
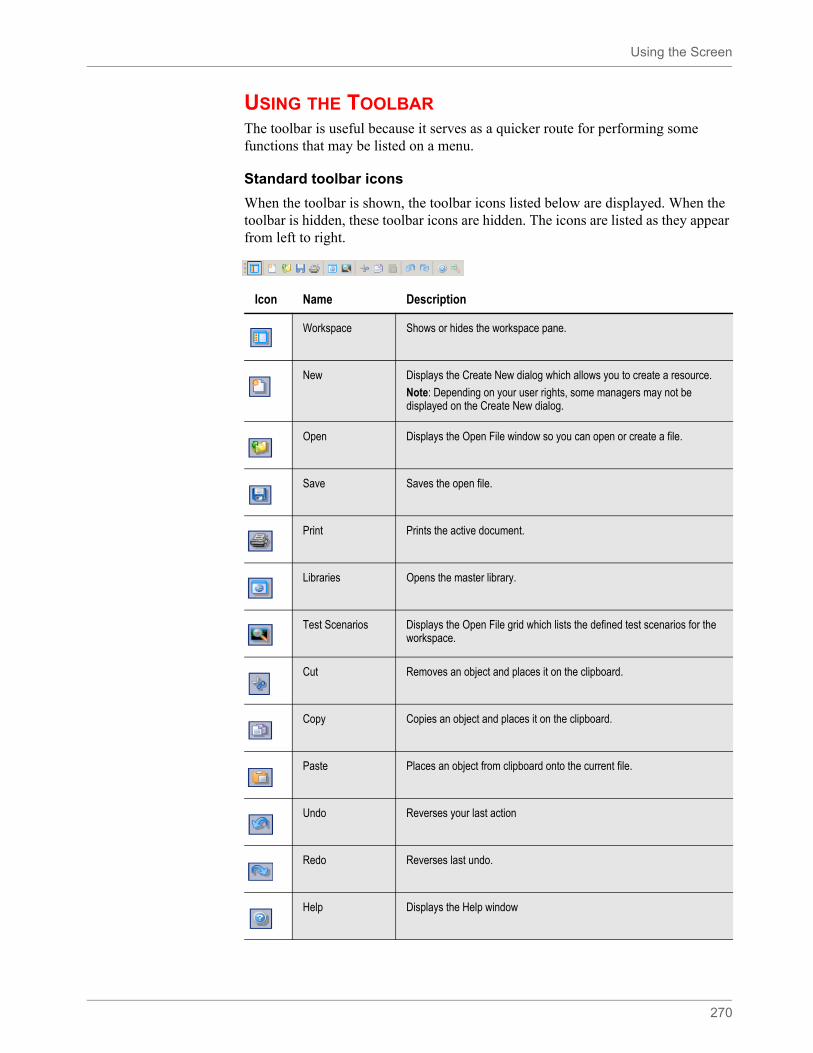
Using the Screen
270
USING THE TOOLBARThe toolbar is useful because it serves as a quicker route for performing some functions that may be listed on a menu.
Standard toolbar icons
When the toolbar is shown, the toolbar icons listed below are displayed. When the toolbar is hidden, these toolbar icons are hidden. The icons are listed as they appear from left to right.
Icon Name Description
Workspace Shows or hides the workspace pane.
New Displays the Create New dialog which allows you to create a resource.
Note: Depending on your user rights, some managers may not be displayed on the Create New dialog.
Open Displays the Open File window so you can open or create a file.
Save Saves the open file.
Print Prints the active document.
Libraries Opens the master library.
Test Scenarios Displays the Open File grid which lists the defined test scenarios for the workspace.
Cut Removes an object and places it on the clipboard.
Copy Copies an object and places it on the clipboard.
Paste Places an object from clipboard onto the current file.
Undo Reverses your last action
Redo Reverses last undo.
Help Displays the Help window
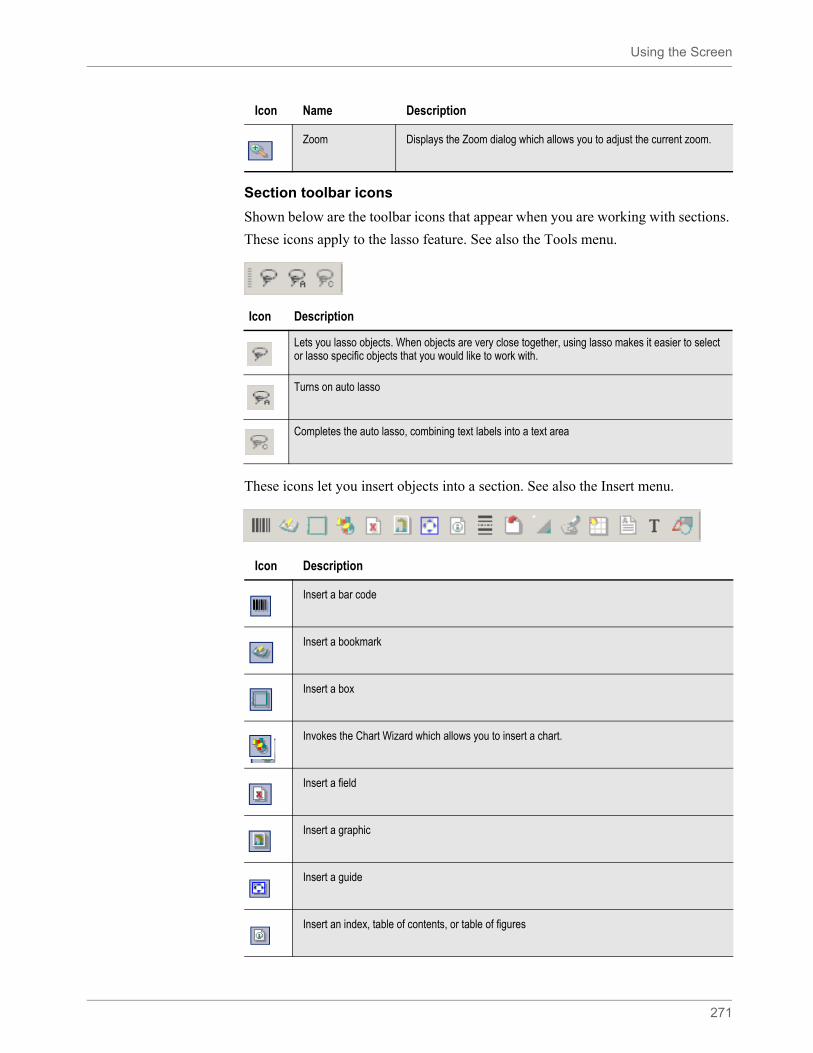
Using the Screen
271
Section toolbar icons
Shown below are the toolbar icons that appear when you are working with sections.
These icons apply to the lasso feature. See also the Tools menu.
These icons let you insert objects into a section. See also the Insert menu.
Zoom Displays the Zoom dialog which allows you to adjust the current zoom.
Icon Name Description
Icon Description
Lets you lasso objects. When objects are very close together, using lasso makes it easier to select or lasso specific objects that you would like to work with.
Turns on auto lasso
Completes the auto lasso, combining text labels into a text area
Icon Description
Insert a bar code
Insert a bookmark
Insert a box
Invokes the Chart Wizard which allows you to insert a chart.
Insert a field
Insert a graphic
Insert a guide
Insert an index, table of contents, or table of figures

Using the Screen
272
These icons execute spell check, data entry check and perform various formatting functions. Also see the Format menu topic.
These icons let you align objects. See also the Arrange menu.
Insert a horizontal or vertical line
Insert a memo or sticky note
Insert a shaded area
Insert a signature
Insert a table
Insert a text area
Insert a text label
Insert a vector drawing
Icon Description
Icon Description
Performs spell check based on your spelling options against the entire document or selected objects in the document.
Runs data entry check against the document.
Opens the Select Font window so you can change fonts.
Changes the font of the selected text to a bold version of that font.
Changes the font of the selected text to an italic version of that font.
Underlines the selected text.
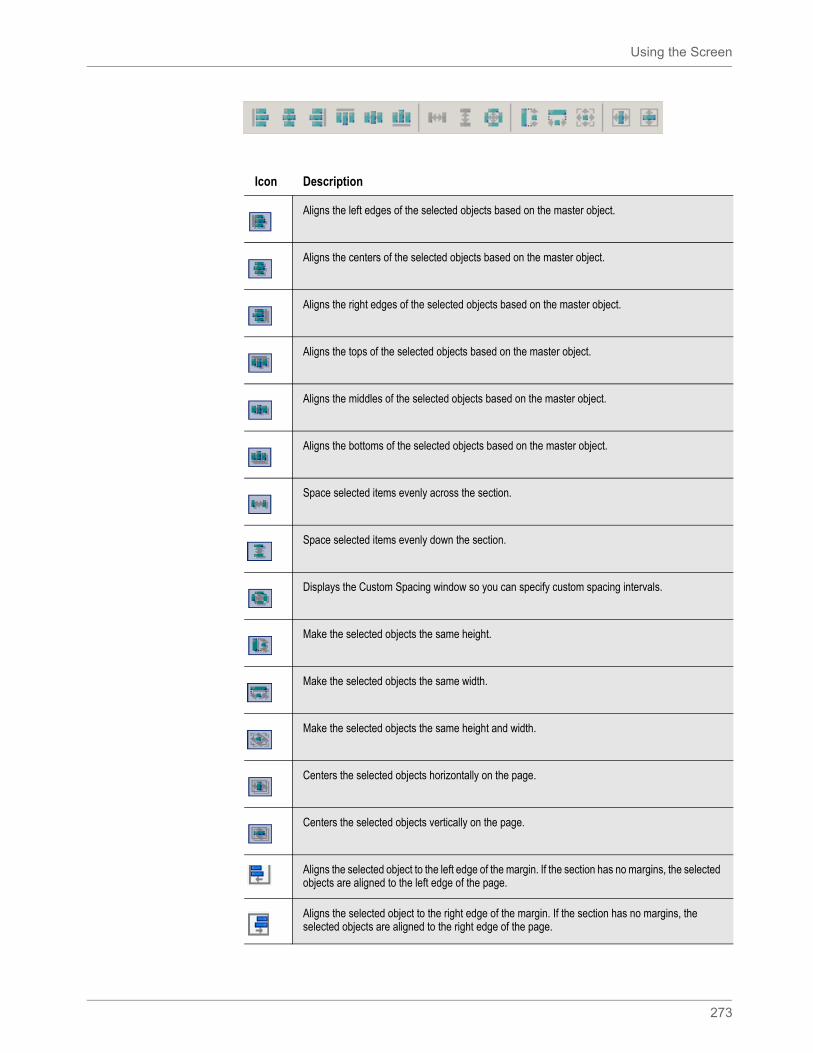
Using the Screen
273
Icon Description
Aligns the left edges of the selected objects based on the master object.
Aligns the centers of the selected objects based on the master object.
Aligns the right edges of the selected objects based on the master object.
Aligns the tops of the selected objects based on the master object.
Aligns the middles of the selected objects based on the master object.
Aligns the bottoms of the selected objects based on the master object.
Space selected items evenly across the section.
Space selected items evenly down the section.
Displays the Custom Spacing window so you can specify custom spacing intervals.
Make the selected objects the same height.
Make the selected objects the same width.
Make the selected objects the same height and width.
Centers the selected objects horizontally on the page.
Centers the selected objects vertically on the page.
Aligns the selected object to the left edge of the margin. If the section has no margins, the selected objects are aligned to the left edge of the page.
Aligns the selected object to the right edge of the margin. If the section has no margins, the selected objects are aligned to the right edge of the page.
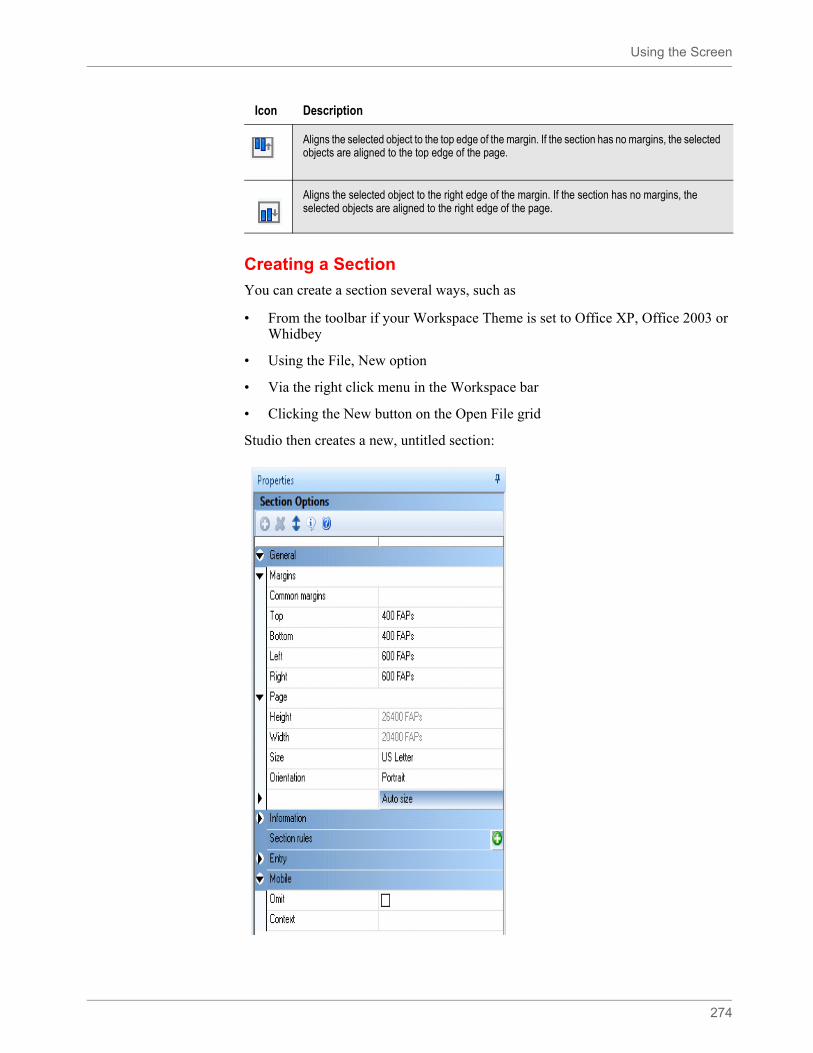
Using the Screen
274
Creating a Section
You can create a section several ways, such as
• From the toolbar if your Workspace Theme is set to Office XP, Office 2003 or Whidbey
• Using the File, New option
• Via the right click menu in the Workspace bar
• Clicking the New button on the Open File grid
Studio then creates a new, untitled section:
Aligns the selected object to the top edge of the margin. If the section has no margins, the selected objects are aligned to the top edge of the page.
Aligns the selected object to the right edge of the margin. If the section has no margins, the selected objects are aligned to the right edge of the page.
Icon Description

Using the Screen
275
Modify the section properties as necessary and begin adding the objects that will comprise your section. See Adding Objects on page 290 for more information.
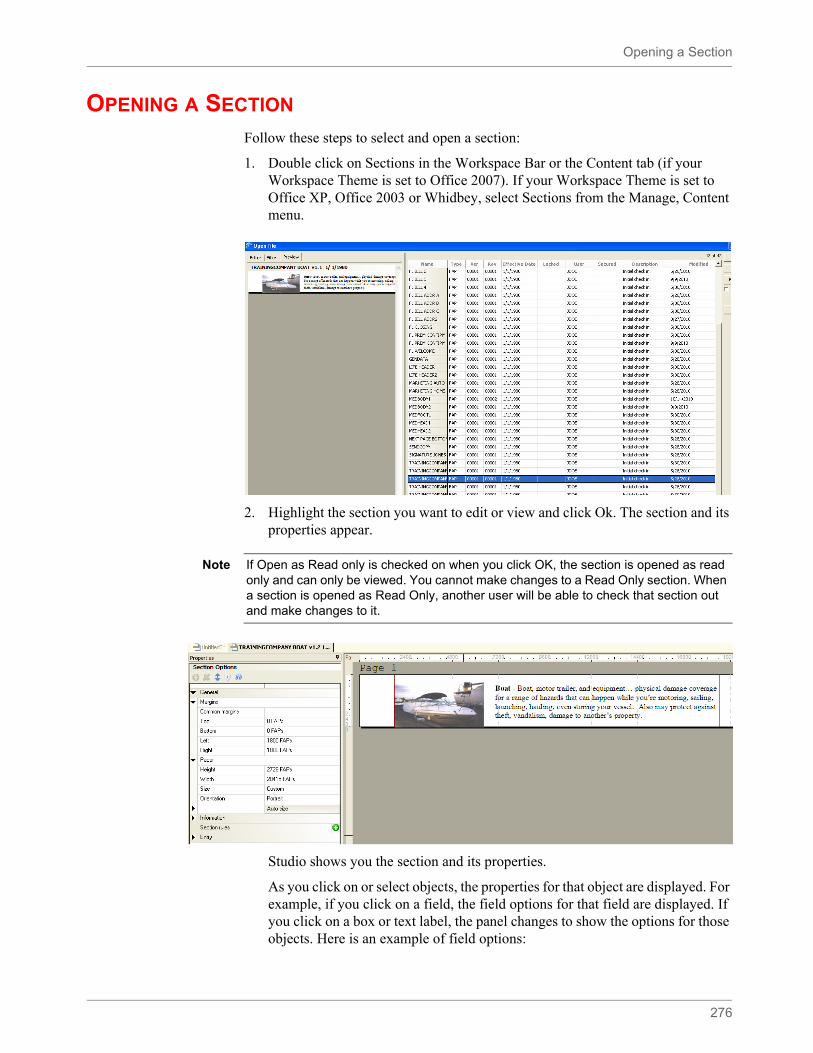
Opening a Section
276
OPENING A SECTION
Follow these steps to select and open a section:
1. Double click on Sections in the Workspace Bar or the Content tab (if your Workspace Theme is set to Office 2007). If your Workspace Theme is set to Office XP, Office 2003 or Whidbey, select Sections from the Manage, Content menu.
2. Highlight the section you want to edit or view and click Ok. The section and its properties appear.
Studio shows you the section and its properties.
As you click on or select objects, the properties for that object are displayed. For example, if you click on a field, the field options for that field are displayed. If you click on a box or text label, the panel changes to show the options for those objects. Here is an example of field options:
Note If Open as Read only is checked on when you click OK, the section is opened as read only and can only be viewed. You cannot make changes to a Read Only section. When a section is opened as Read Only, another user will be able to check that section out and make changes to it.
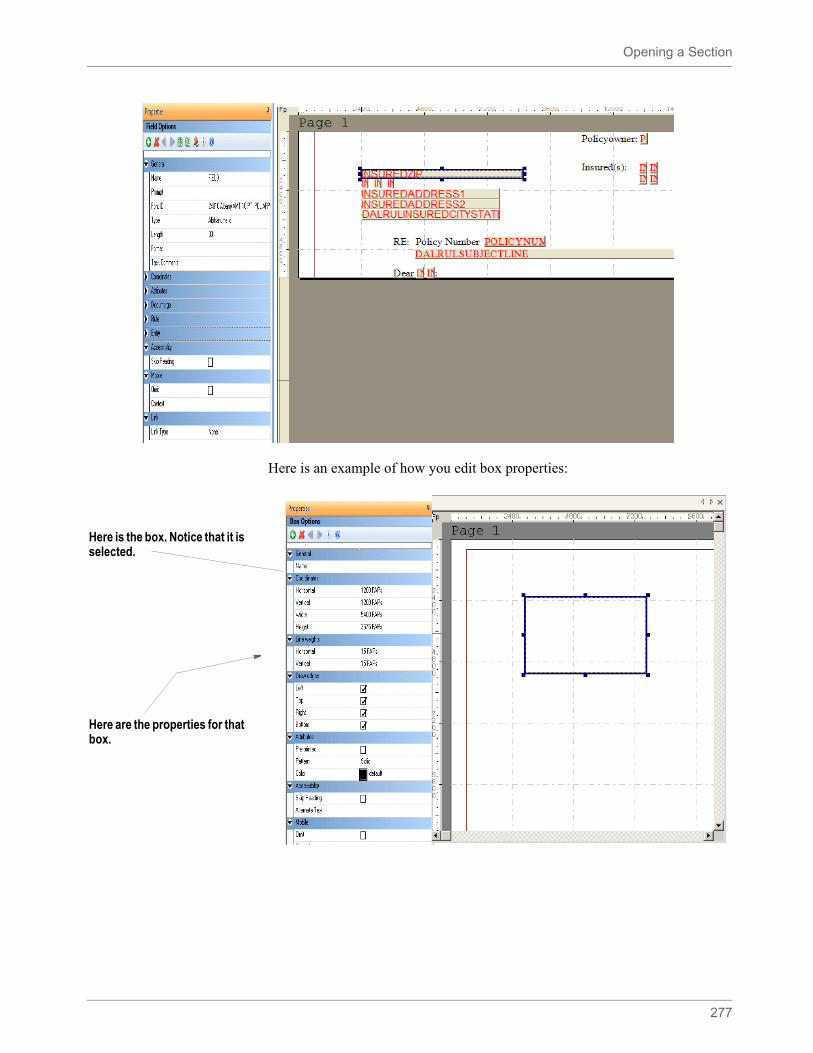
Opening a Section
277
Here is an example of how you edit box properties:
Here is the box. Notice that it is selected.
Here are the properties for that box.
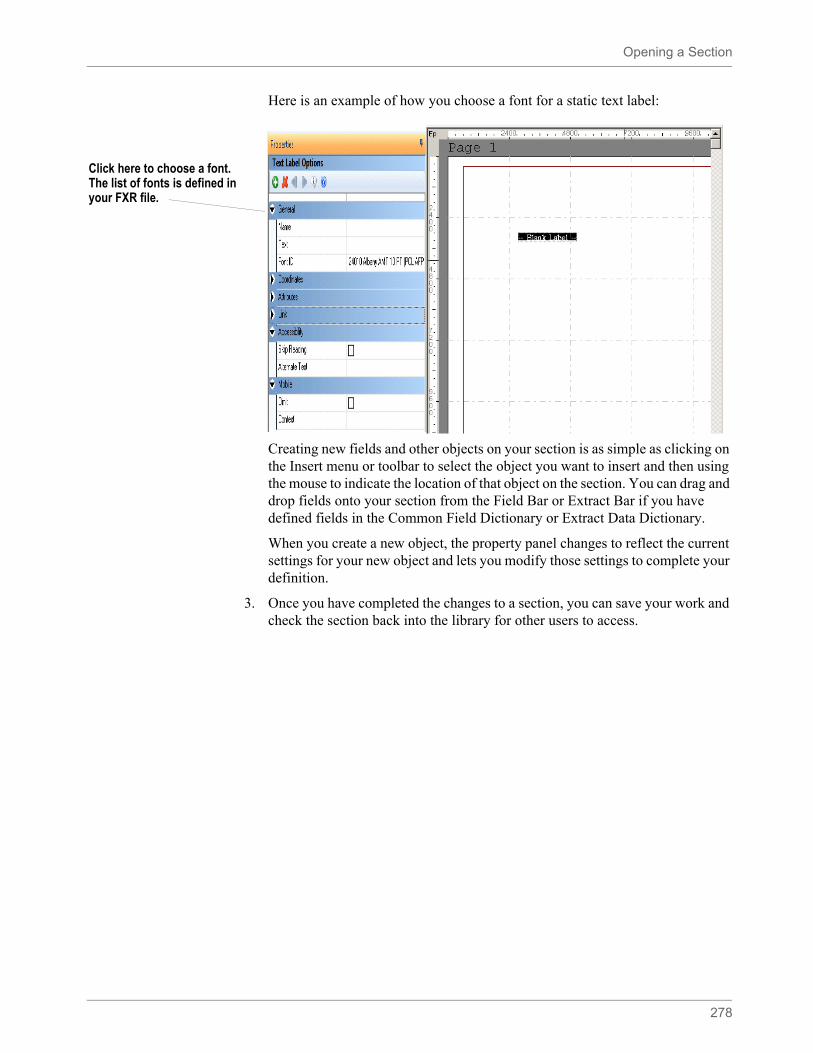
Opening a Section
278
Here is an example of how you choose a font for a static text label:
Creating new fields and other objects on your section is as simple as clicking on the Insert menu or toolbar to select the object you want to insert and then using the mouse to indicate the location of that object on the section. You can drag and drop fields onto your section from the Field Bar or Extract Bar if you have defined fields in the Common Field Dictionary or Extract Data Dictionary.
When you create a new object, the property panel changes to reflect the current settings for your new object and lets you modify those settings to complete your definition.
3. Once you have completed the changes to a section, you can save your work and check the section back into the library for other users to access.
Click here to choose a font. The list of fonts is defined in your FXR file.
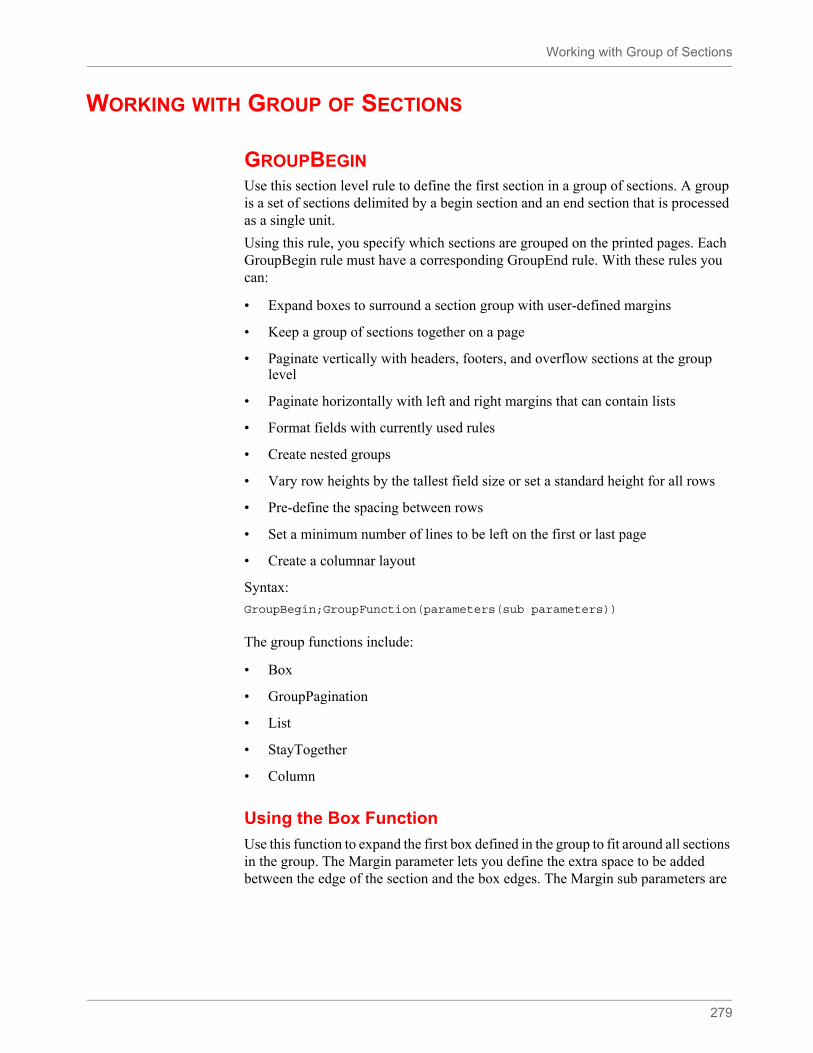
Working with Group of Sections
279
WORKING WITH GROUP OF SECTIONS
GROUPBEGINUse this section level rule to define the first section in a group of sections. A group is a set of sections delimited by a begin section and an end section that is processed as a single unit.
Using this rule, you specify which sections are grouped on the printed pages. Each GroupBegin rule must have a corresponding GroupEnd rule. With these rules you can:
• Expand boxes to surround a section group with user-defined margins
• Keep a group of sections together on a page
• Paginate vertically with headers, footers, and overflow sections at the group level
• Paginate horizontally with left and right margins that can contain lists
• Format fields with currently used rules
• Create nested groups
• Vary row heights by the tallest field size or set a standard height for all rows
• Pre-define the spacing between rows
• Set a minimum number of lines to be left on the first or last page
• Create a columnar layout
Syntax:
GroupBegin;GroupFunction(parameters(sub parameters))
The group functions include:
• Box
• GroupPagination
• List
• StayTogether
• Column
Using the Box Function
Use this function to expand the first box defined in the group to fit around all sections in the group. The Margin parameter lets you define the extra space to be added between the edge of the section and the box edges. The Margin sub parameters are
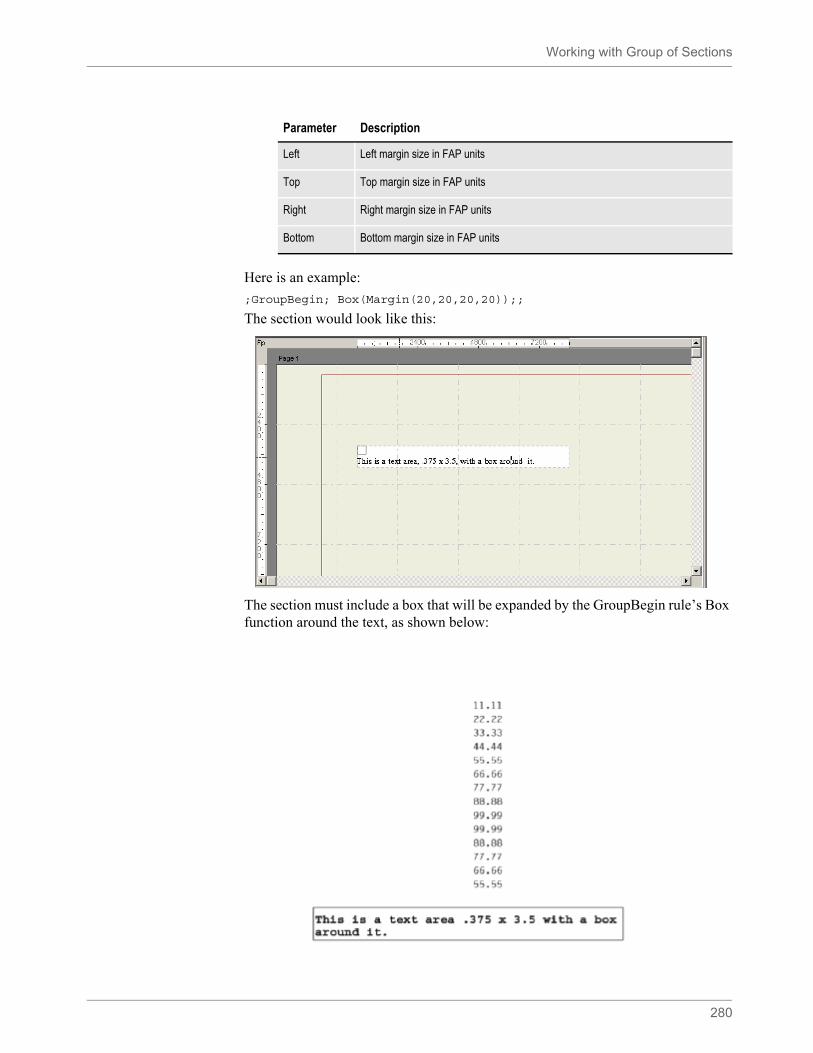
Working with Group of Sections
280
Here is an example:
;GroupBegin; Box(Margin(20,20,20,20));;
The section would look like this:
The section must include a box that will be expanded by the GroupBegin rule’s Box function around the text, as shown below:
Parameter Description
Left Left margin size in FAP units
Top Top margin size in FAP units
Right Right margin size in FAP units
Bottom Bottom margin size in FAP units
Working with Group of Sections
281
This example expands the box around a section group and sets the margin to 20 FAP units between the outer edge of the section and the outer edge of the box. There are 2400 FAP units per inch.
Using the GroupPagination Function
Use this group function to define the requirements for keeping certain sections (groups) together on pagination. The GroupPagination parameters are:
The following example requires that a minimum of two sections appear on the current page, and a minimum of three sections appear on any subsequent pages. This example also requires that the next page be checked to confirm that the entire group cannot fit on the next page before splitting can occur. In addition, the second section is defined as the header for the group and is to be copied on overflow. Plus the fourth section is defined as the footer for this group.
Here’s an excerpt from the DDT file for the first section:
/* This section uses these rules */<Image Rules>;SetImageDimensions;98,0,936,19718,0,0,0,0;;SetOrigin;Rel+0,Max+100;;GroupBegin;GroupPagination(MinImagesOnCurrent(2),MinImagesOnNext(3));… … …
Here’s an excerpt from the DDT file for the second section:
/* This section uses these rules */<Image Rules>;SetImageDimensions;98,0,1142,19718,0,0,0,0;;SetOrigin;Rel+0,Max+100;;SetGroupOptions;header,copyonoverflow;
Here’s an excerpt from the DDT file for the third section:
/* This section uses these rules */<Image Rules>;SetImageDimensions;98,0,357,19699,0,0,0,0;;SetOrigin;Rel+0,Max+100;
Parameter Description
MinImagesOnCurrent Defines the minimum number of sections required on the current page. The default is zero (0).
This rule counts all sections triggered in the group, even if a section has no size. It totals the section sizes to determine the minimum number of sections which can be placed in the remaining space on the page.
If a section has no size or is flagged as view only, the section is placed on the page.
MinImagesOnNext Defines the minimum number of sections required for new and next page. The default is one (1).
NeverSplit Requires that all sections within the group must remain together on same page—pagination can never occur within the group. The default is No.
CheckNextPage Requires that the next page be checked to confirm that the entire group cannot fit on the next page before splitting can occur. The default is No.
Working with Group of Sections
282
… … … …
Here’s an excerpt from the DDT file for the fourth section:
/* This section uses these rules */<Image Rules>;SetImageDimensions;98,0,621,6124,0,0,0,0;;SetOrigin;Rel+0,Max+100;…. … … …;SetGroupOptions;footer;;GroupEnd;;
Using the List Function
A list is a column of data on a section that is defined as a single field in the data definition table (DDT) and is populated by the BldGrpList rule.
The List function works with the BldGrpList rule to print sections containing lists, or columns, side by side in rows. The tallest field in the row and the GroupBegin:List parameters, MinSpacing and AddSpacing, determine the row height. The List sub parameters are:
Here is an example:
GroupBegin;List (MinSpacing(800) AddSpacing(200) MinLines(12)MinLinesCont(5) );;; GroupBegin;List(AddSpacing(65));;
This example causes 65 FAP units to be inserted between the groups of sections.
Using the StayTogether Function
Use this function if you do not want the group of sections to be split between pages and overflow onto a new page if there is room on the current page for the entire group. The dimensions of the group of sections cannot be larger than the dimensions of the page.
Here is an example:
;GroupBegin;StayTogether;;
Parameter Description
AddSpacing Adds additional spacing in FAP units between rows of data. There are 2400 FAP units per inch.
MinSpacing Defines the minimum size in FAP units for each row of data.
MinLines Defines the minimum number of lines to be printed on the first page of a section. When pagination occurs, if the number of lines printed on the first page is less than the MinLines amount, the entire section is moved to the second page.
MinLinesCont Defines the minimum number of lines to be printed on the last page of a section. When pagination occurs, if the number of lines printed on the last page is less than the MinLinesCont amount, lines are taken from the preceding page to meet the minimum.
Note Also keep in mind that you cannot nest a StayTogether with a column to keep the column section together. If you try to use a StayTogether over all the sections you want to organize into columns, the results will not be what you expect.
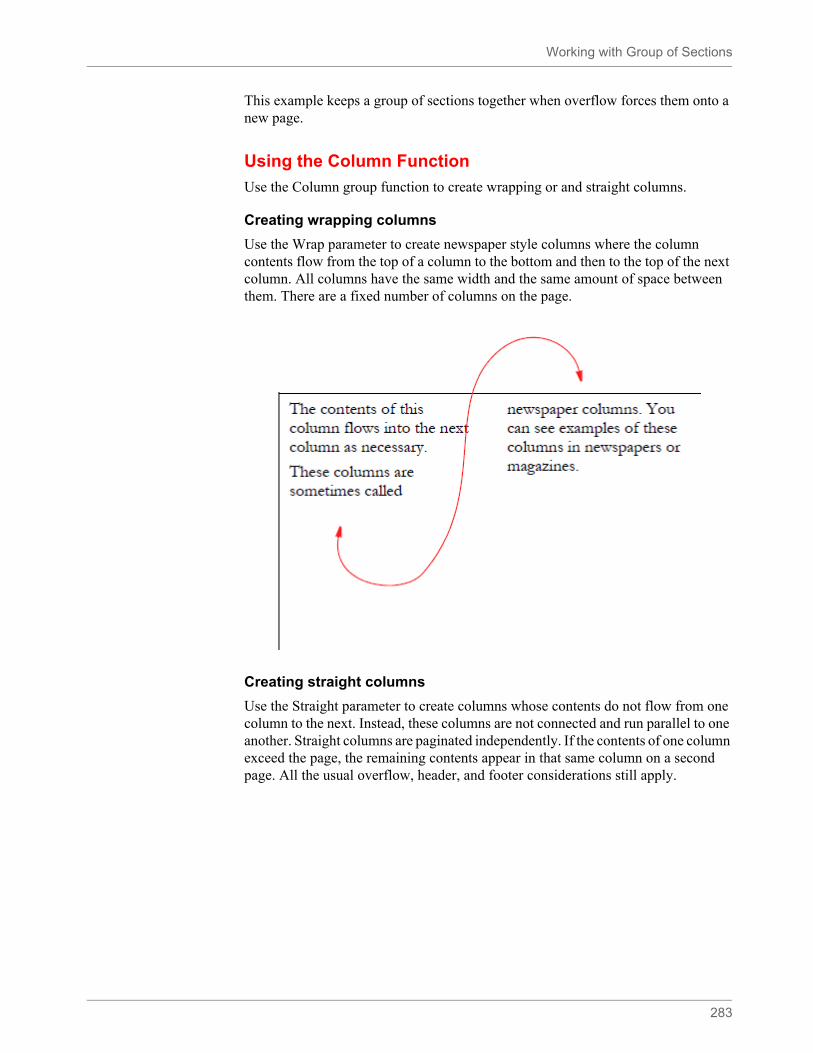
Working with Group of Sections
283
This example keeps a group of sections together when overflow forces them onto a new page.
Using the Column Function
Use the Column group function to create wrapping or and straight columns.
Creating wrapping columns
Use the Wrap parameter to create newspaper style columns where the column contents flow from the top of a column to the bottom and then to the top of the next column. All columns have the same width and the same amount of space between them. There are a fixed number of columns on the page.
Creating straight columns
Use the Straight parameter to create columns whose contents do not flow from one column to the next. Instead, these columns are not connected and run parallel to one another. Straight columns are paginated independently. If the contents of one column exceed the page, the remaining contents appear in that same column on a second page. All the usual overflow, header, and footer considerations still apply.
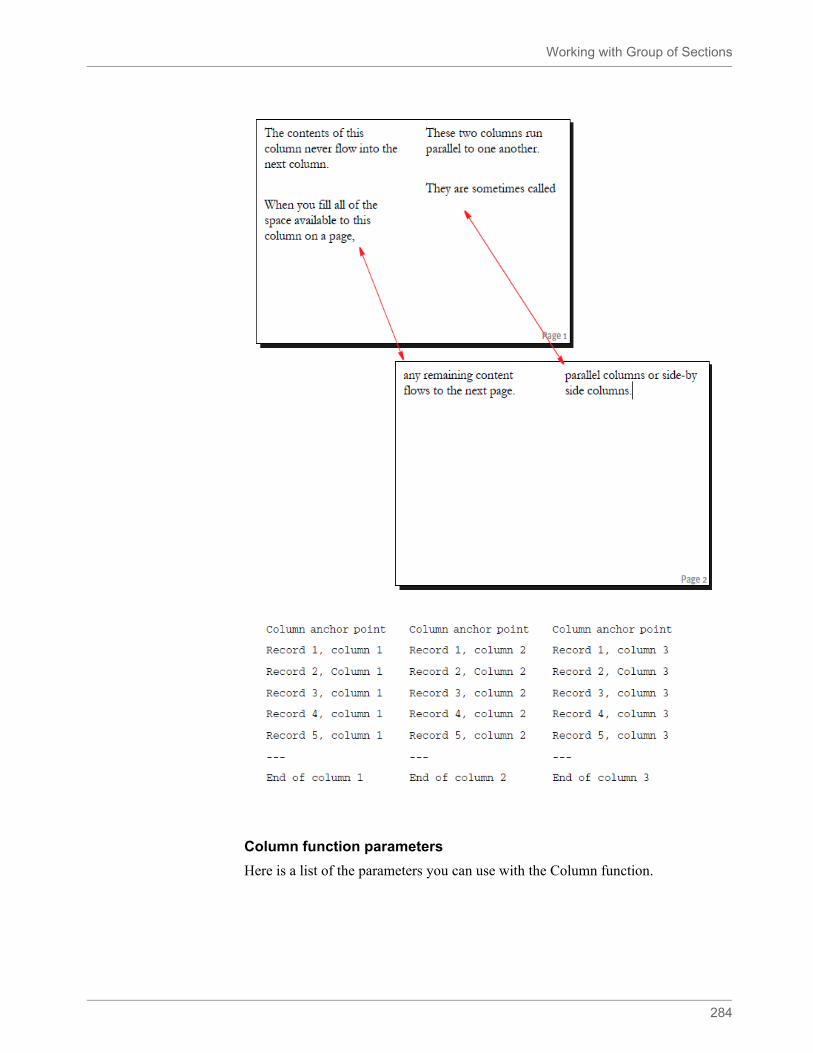
Working with Group of Sections
284
Column function parameters
Here is a list of the parameters you can use with the Column function.

Working with Group of Sections
285
Keep in mind that...
• Wrap and Straight are mutually exclusive.
• Multiple and Single are mutually exclusive.
• Straight is mutually exclusive with Balanced, ColCount, ColWidth, and ColSeparation.
• Multiple is mutually exclusive with Wrap, Straight, Balanced, ColCount, ColWidth, and ColSeparation.
• You cannot nest a Wrap within a Wrap, Straight, or Multiple.
• You cannot nest a Straight within a Wrap or Straight.
• You cannot nest a Straight within a Multiple.
• You cannot nest a Multiple within a Multiple.
Parameter Description
Wrap Indicates the text in the columns will wrap. No other parameters are required. Wrapping is done by default, unless you use the Multiple or Straight parameter.
Straight Indicates the text will not be wrapped from one column to the next. No other parameters are required. The section definition controls the width and separation of the columns. When you use straight columns, you define the starting columns with a GroupBegin and the ending column with an GroupEnd.
Balanced() The balanced sub-parameters determine how sections are processed if there is less than a full page of sections. The default is Left.
Left
Use this sub-parameter to equally divide the sections between the columns on the page. If there is a remainder, the left most column will be the longest column.
Unbalanced
Use this sub-parameter to add sections to a column until there is no more room in that column on that page. The system then places remaining sections in the second column of that same page. The system repeats this process until all columns on the page are filled. The system then places any remaining sections in the first column of the next page and continues filling the columns in this manner.
ColCount() Defines how many columns will be on a page. You must enter a positive number.
ColSeparation()
Defines, in FAP units, how much space is between columns. You must enter a positive number. The default is zero. There are 2400 FAP units per inch.
ColWidth() Defines, in FAP units, the width of each column. If you omit the width, the system uses the width of the widest section in the group. You cannot enter a negative number. There are 2400 FAP units per inch.
Single Indicated there will be a single straight column on the page. Single is the default unless you specify Multiple.
Multiple Indicates there will be multiple straight columns on the page. You must embed the straight groups within a group. You do this using the Multiple group parameter.
Debug Use this parameter to write column-processing information into the log file for debugging purposes.
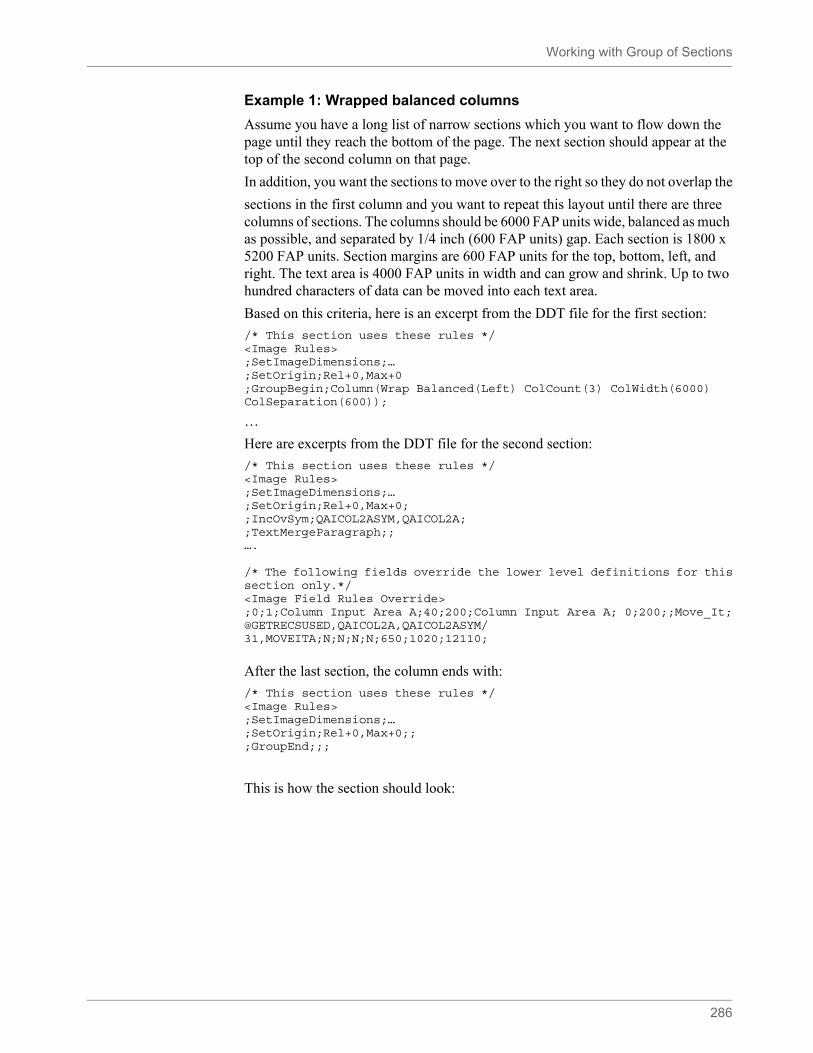
Working with Group of Sections
286
Example 1: Wrapped balanced columns
Assume you have a long list of narrow sections which you want to flow down the page until they reach the bottom of the page. The next section should appear at the top of the second column on that page.
In addition, you want the sections to move over to the right so they do not overlap the
sections in the first column and you want to repeat this layout until there are three columns of sections. The columns should be 6000 FAP units wide, balanced as much as possible, and separated by 1/4 inch (600 FAP units) gap. Each section is 1800 x 5200 FAP units. Section margins are 600 FAP units for the top, bottom, left, and right. The text area is 4000 FAP units in width and can grow and shrink. Up to two hundred characters of data can be moved into each text area.
Based on this criteria, here is an excerpt from the DDT file for the first section:
/* This section uses these rules */<Image Rules>;SetImageDimensions;…;SetOrigin;Rel+0,Max+0;GroupBegin;Column(Wrap Balanced(Left) ColCount(3) ColWidth(6000)ColSeparation(600));
…
Here are excerpts from the DDT file for the second section:
/* This section uses these rules */<Image Rules>;SetImageDimensions;…;SetOrigin;Rel+0,Max+0;;IncOvSym;QAICOL2ASYM,QAICOL2A;;TextMergeParagraph;;….
/* The following fields override the lower level definitions for thissection only.*/<Image Field Rules Override>;0;1;Column Input Area A;40;200;Column Input Area A; 0;200;;Move_It;@GETRECSUSED,QAICOL2A,QAICOL2ASYM/31,MOVEITA;N;N;N;N;650;1020;12110;
After the last section, the column ends with:
/* This section uses these rules */<Image Rules>;SetImageDimensions;…;SetOrigin;Rel+0,Max+0;;;GroupEnd;;;
This is how the section should look:
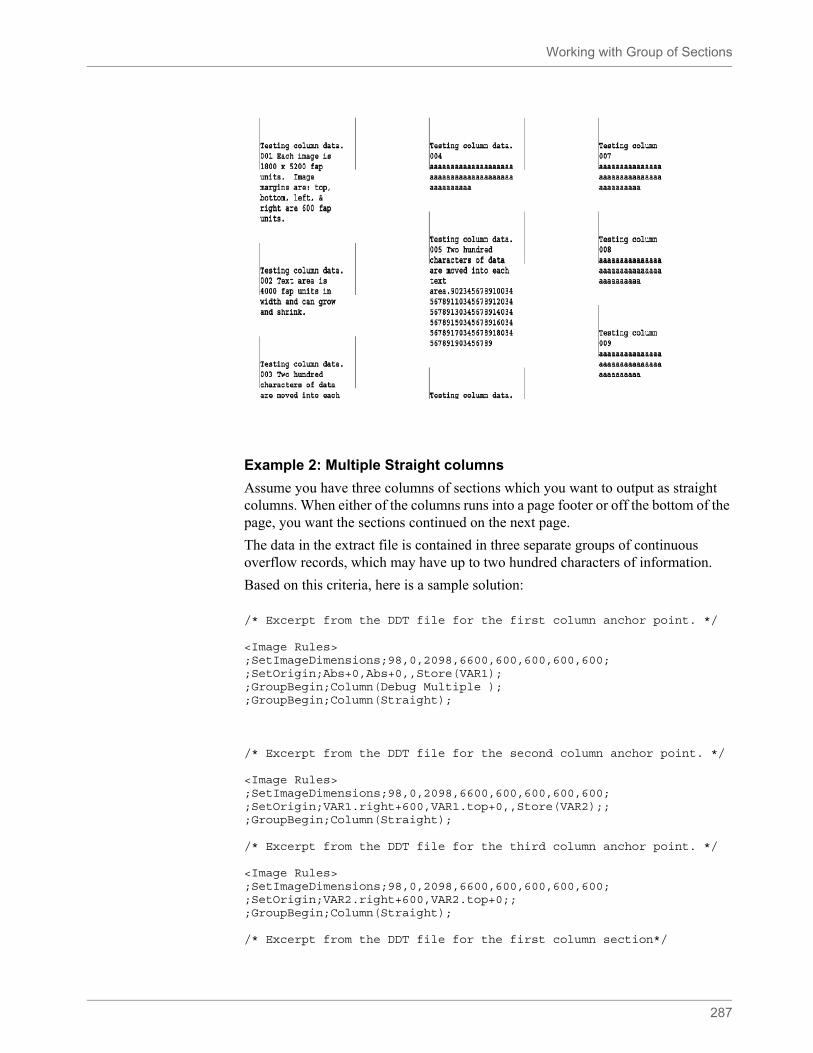
Working with Group of Sections
287
Example 2: Multiple Straight columns
Assume you have three columns of sections which you want to output as straight columns. When either of the columns runs into a page footer or off the bottom of the page, you want the sections continued on the next page.
The data in the extract file is contained in three separate groups of continuous overflow records, which may have up to two hundred characters of information.
Based on this criteria, here is a sample solution:
/* Excerpt from the DDT file for the first column anchor point. */
<Image Rules>;SetImageDimensions;98,0,2098,6600,600,600,600,600;;SetOrigin;Abs+0,Abs+0,,Store(VAR1);;GroupBegin;Column(Debug Multiple );;GroupBegin;Column(Straight);
/* Excerpt from the DDT file for the second column anchor point. */
<Image Rules>;SetImageDimensions;98,0,2098,6600,600,600,600,600;;SetOrigin;VAR1.right+600,VAR1.top+0,,Store(VAR2);;;GroupBegin;Column(Straight);
/* Excerpt from the DDT file for the third column anchor point. */
<Image Rules>;SetImageDimensions;98,0,2098,6600,600,600,600,600;;SetOrigin;VAR2.right+600,VAR2.top+0;;;GroupBegin;Column(Straight);
/* Excerpt from the DDT file for the first column section*/
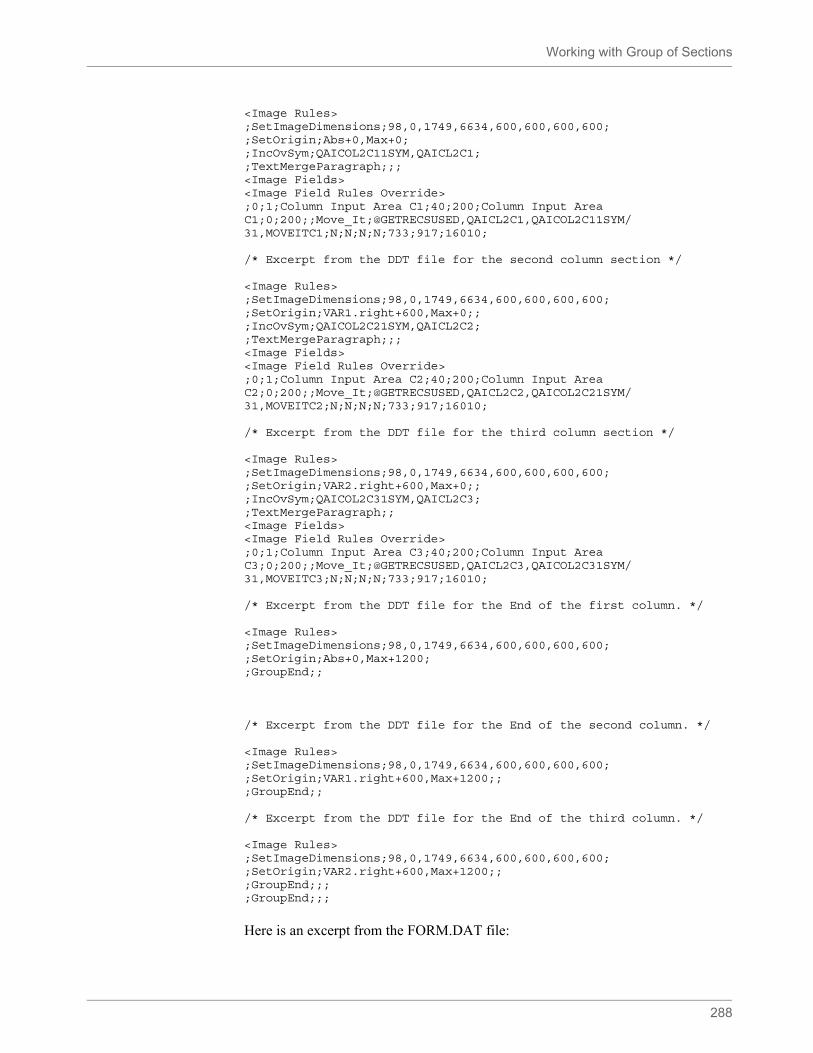
Working with Group of Sections
288
<Image Rules>;SetImageDimensions;98,0,1749,6634,600,600,600,600;;SetOrigin;Abs+0,Max+0;;IncOvSym;QAICOL2C11SYM,QAICL2C1;;TextMergeParagraph;;;<Image Fields><Image Field Rules Override>;0;1;Column Input Area C1;40;200;Column Input AreaC1;0;200;;Move_It;@GETRECSUSED,QAICL2C1,QAICOL2C11SYM/31,MOVEITC1;N;N;N;N;733;917;16010;
/* Excerpt from the DDT file for the second column section */
<Image Rules>;SetImageDimensions;98,0,1749,6634,600,600,600,600;;SetOrigin;VAR1.right+600,Max+0;;;IncOvSym;QAICOL2C21SYM,QAICL2C2;;TextMergeParagraph;;;<Image Fields><Image Field Rules Override>;0;1;Column Input Area C2;40;200;Column Input AreaC2;0;200;;Move_It;@GETRECSUSED,QAICL2C2,QAICOL2C21SYM/31,MOVEITC2;N;N;N;N;733;917;16010;
/* Excerpt from the DDT file for the third column section */
<Image Rules>;SetImageDimensions;98,0,1749,6634,600,600,600,600;;SetOrigin;VAR2.right+600,Max+0;;;IncOvSym;QAICOL2C31SYM,QAICL2C3;;TextMergeParagraph;;<Image Fields><Image Field Rules Override>;0;1;Column Input Area C3;40;200;Column Input AreaC3;0;200;;Move_It;@GETRECSUSED,QAICL2C3,QAICOL2C31SYM/31,MOVEITC3;N;N;N;N;733;917;16010;
/* Excerpt from the DDT file for the End of the first column. */
<Image Rules>;SetImageDimensions;98,0,1749,6634,600,600,600,600;;SetOrigin;Abs+0,Max+1200;;GroupEnd;;
/* Excerpt from the DDT file for the End of the second column. */
<Image Rules>;SetImageDimensions;98,0,1749,6634,600,600,600,600;;SetOrigin;VAR1.right+600,Max+1200;;;GroupEnd;;
/* Excerpt from the DDT file for the End of the third column. */
<Image Rules>;SetImageDimensions;98,0,1749,6634,600,600,600,600;;SetOrigin;VAR2.right+600,Max+1200;;;GroupEnd;;;;GroupEnd;;;
Here is an excerpt from the FORM.DAT file:
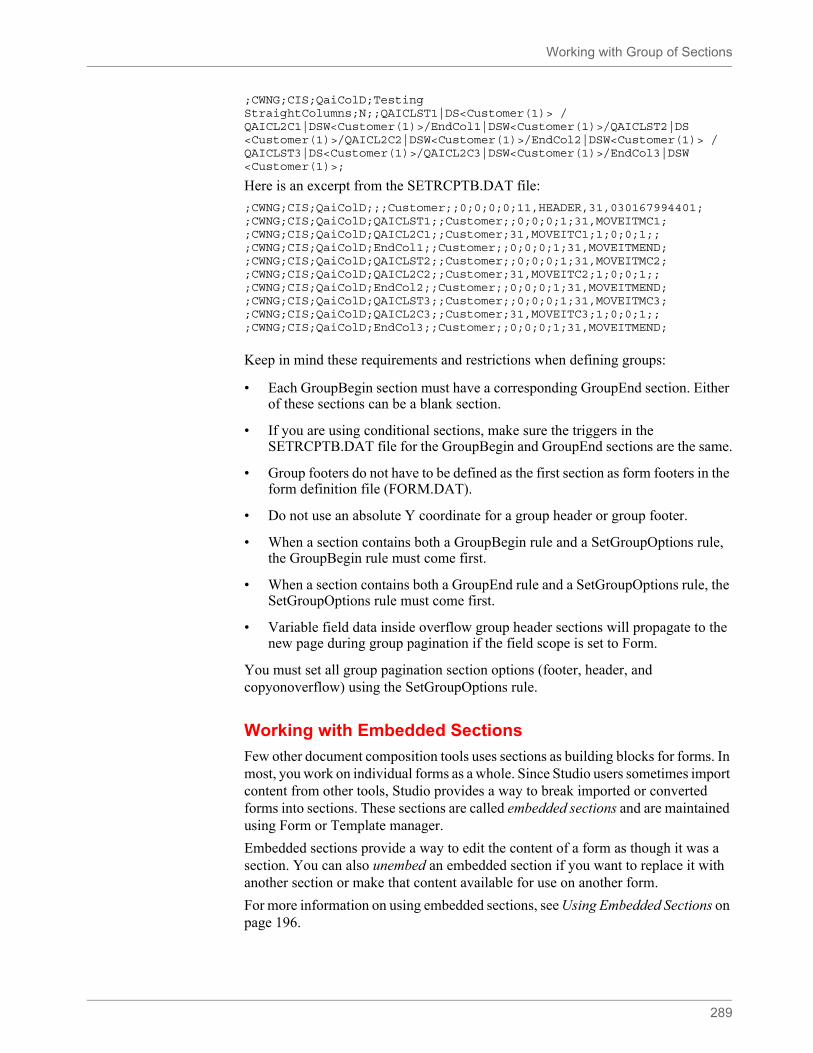
Working with Group of Sections
289
;CWNG;CIS;QaiColD;TestingStraightColumns;N;;QAICLST1|DS<Customer(1)> /QAICL2C1|DSW<Customer(1)>/EndCol1|DSW<Customer(1)>/QAICLST2|DS<Customer(1)>/QAICL2C2|DSW<Customer(1)>/EndCol2|DSW<Customer(1)> /QAICLST3|DS<Customer(1)>/QAICL2C3|DSW<Customer(1)>/EndCol3|DSW<Customer(1)>;
Here is an excerpt from the SETRCPTB.DAT file:
;CWNG;CIS;QaiColD;;;Customer;;0;0;0;0;11,HEADER,31,030167994401;;CWNG;CIS;QaiColD;QAICLST1;;Customer;;0;0;0;1;31,MOVEITMC1;;CWNG;CIS;QaiColD;QAICL2C1;;Customer;31,MOVEITC1;1;0;0;1;;;CWNG;CIS;QaiColD;EndCol1;;Customer;;0;0;0;1;31,MOVEITMEND;;CWNG;CIS;QaiColD;QAICLST2;;Customer;;0;0;0;1;31,MOVEITMC2;;CWNG;CIS;QaiColD;QAICL2C2;;Customer;31,MOVEITC2;1;0;0;1;;;CWNG;CIS;QaiColD;EndCol2;;Customer;;0;0;0;1;31,MOVEITMEND;;CWNG;CIS;QaiColD;QAICLST3;;Customer;;0;0;0;1;31,MOVEITMC3;;CWNG;CIS;QaiColD;QAICL2C3;;Customer;31,MOVEITC3;1;0;0;1;;;CWNG;CIS;QaiColD;EndCol3;;Customer;;0;0;0;1;31,MOVEITMEND;
Keep in mind these requirements and restrictions when defining groups:
• Each GroupBegin section must have a corresponding GroupEnd section. Either of these sections can be a blank section.
• If you are using conditional sections, make sure the triggers in the SETRCPTB.DAT file for the GroupBegin and GroupEnd sections are the same.
• Group footers do not have to be defined as the first section as form footers in the form definition file (FORM.DAT).
• Do not use an absolute Y coordinate for a group header or group footer.
• When a section contains both a GroupBegin rule and a SetGroupOptions rule, the GroupBegin rule must come first.
• When a section contains both a GroupEnd rule and a SetGroupOptions rule, the SetGroupOptions rule must come first.
• Variable field data inside overflow group header sections will propagate to the new page during group pagination if the field scope is set to Form.
You must set all group pagination section options (footer, header, and copyonoverflow) using the SetGroupOptions rule.
Working with Embedded Sections
Few other document composition tools uses sections as building blocks for forms. In most, you work on individual forms as a whole. Since Studio users sometimes import content from other tools, Studio provides a way to break imported or converted forms into sections. These sections are called embedded sections and are maintained using Form or Template manager.
Embedded sections provide a way to edit the content of a form as though it was a section. You can also unembed an embedded section if you want to replace it with another section or make that content available for use on another form.
For more information on using embedded sections, see Using Embedded Sections on page 196.

Working with Group of Sections
290
Adding Objects
Adding objects to a section is easy in Studio. You simply open a section or create a new section, then follow the steps below. You can select the type of object you want to add two ways:
• From the Insert menu
• From the toolbar
From the Insert menu
Select the desired object you wish to insert from the Insert menu. Draw it out in the desired location on your section. You can reposition that object by clicking on it to select it, then using your mouse to move it or by changing it's location in the objects options or by clicking on the object to select it, then using your keyboard arrows to move it.
From the toolbar
Use these icons:
Click To
Insert a bar code
Insert a bookmark
Insert a box
Insert a chart
Insert a field
Insert a graphic
Insert a guide
Insert an index, table of contents, or table of figures
Insert a line
Insert a note
Insert a shaded area
Insert a signature
Insert a table

Working with Group of Sections
291
Once you select the object and position it in your section, use the options to customize the object to meet your needs. Here is an example of the options for a field:
Insert a text area
Insert a text label
Insert a vector drawing
Click To
Note All section objects have default settings. You can override these settings by using the Manage, System, Settings option. Select Options by Group and scroll down to the Default groups, such as DefaultBarCode or DefaultBox.
Creating Bar Codes
292
CREATING BAR CODES
Studio lets you add the following types of bar codes to a section:
• Australia Post Bar Code on page 297
• Codabar Compressed
• Codabar Standard
• Code 39 1:1:2:2
• Code 39 1:1:3:3
• Code 39 1:2:4:5
• Code 39 3:1 Mod 43 Check Digit
• Code 93
• Code 128 Automatic Add-On
• Code 128 Start Code A
• Code 128 Start Code B
• Code 128 Start Code C
• Data Matrix. For more information, see Printing Bar Codes in PDF Files on page 315.
• EAN-13 Digit
• EAN-8 Digit
• Intelligent Mail Bar Code (4-State Customer Bar Code). For more information, see Data Matrix 2-D Bar Codes on page 301.
• PLANET Code Bar Codes on page 311
• Interleaved 2 of 5 1:1:3:3
• Interleaved 2 of 5 Mod 10
• Japan Post. For more information, see Japan Post Bar Code on page 308
• MSI Mod 10 Check Digits
• MSI Mod 10/10 Check Digits
• MSI Mod 11/10 Check Digits
• MSI no Check Digit
• PDF417. For more information, see Printing Bar Codes in PDF Files on page 315.
• PLANET Code® bar codes. For more information, see PLANET Code Bar Codes on page 311.
• UPC 2 Digit Add-On
• UPC 5-Digit Add-On
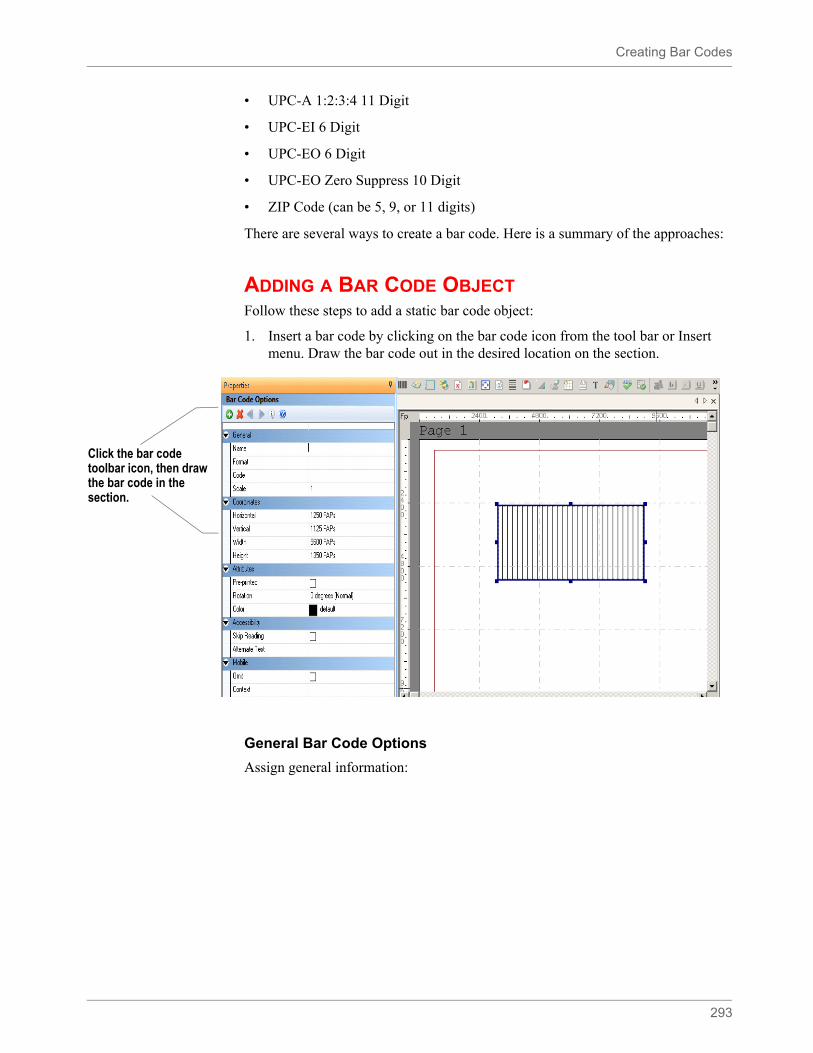
Creating Bar Codes
293
• UPC-A 1:2:3:4 11 Digit
• UPC-EI 6 Digit
• UPC-EO 6 Digit
• UPC-EO Zero Suppress 10 Digit
• ZIP Code (can be 5, 9, or 11 digits)
There are several ways to create a bar code. Here is a summary of the approaches:
ADDING A BAR CODE OBJECTFollow these steps to add a static bar code object:
1. Insert a bar code by clicking on the bar code icon from the tool bar or Insert menu. Draw the bar code out in the desired location on the section.
General Bar Code Options
Assign general information:
Click the bar code toolbar icon, then draw the bar code in the section.
Creating Bar Codes
294
Name (Optional) Enter a name for the bar code. Assign a unique name to facilitate reference to the bar code for editing or other purposes. Although a bar code name is not required, it is recommended that a name be provided. In the absence of a name, the horizontal and vertical coordinates of the bar code are used to locate\reference the bar code. These coordinates may not have significance or meaning to users.
Format Select the bar code format
• Code 39 1:1:3:3 • Code 39 1:1:2:2 • Code 39 1:2:4:5 • Code 39 3:1 Mod 43 Check Digit
Note: Choose the one that best meets your requirements. In the absence of a specification, try a sample of all three and choose the one that comes the closest to your needs.
• Code 93 • Code 128 Start Code A • Code 128 Start Code B • Code 128 Start Code C • Code 128 Automatic Add-On • Codabar Standard • Codabar Compressed • Data Matrix• EAN-8 Digit • EAN-13 Digit • Intelligent Mail bar code (USPS 4CB)• Intelligent Mail Package Barcode (IMpb)• Interleaved 2 of 5 1:1:3:3 • Interleaved 2 of 5 Mod 10 • Japan Post• MSI no Check Digit • MSI Mod 10 Check Digits • MSI Mod 10/10 Check Digits • MSI Mod 11/10 Check Digits • PDF417• PLANET Code® bar codes• UPC-A 1:2:3:4 11 Digit • UPC-EO Zero Suppress 10 Digit • UPC-EO 6 Digit • UPC-EI 6 Digit • UPC 2 Digit Add-On • UPC 5-Digit Add-On • Zip Codes (can be 5, 9, or 11 digits)
Symbol Size Select the desired symbol size. Symbol size displays when the format is set to Data Matrix.
Font ID Select the desired font. The Font ID option displays when the format is set to either Data Matrix or PDF
Creating Bar Codes
295
Coordinates
Assign coordinates:
Attributes
Assign attributes:
Accessibility
Property attributes associated with Bar codes:
Code Enter the bar code data.
Scale Select a scale factor from 0.5 to 5.0. The scale factor affects the bar code width. For example, a scale factor of 2 doubles the width of the bar code but maintains the same ratio of bars and spaces.
Horizontal The horizontal (left) starting position
Vertical The vertical (top) starting position
Width Set the width.
Note: The width on some bar code formats such as zip code is based on the data entered and cannot be changed.
Height Set the height
Note: The height for some bar code formats such as zip code and cannot be changed.
Pre-printed Click this option to tell the system NOT to print this object when you print the Section
Rotation Select a rotation.
• 0 degrees: Normal • 90 degrees: Downward • 180 degrees: Upside down • 270 degrees: Upward.
Color Select the color or use the default. If you want the object to print in this color, click in the Print in color field. Otherwise, the system will print it in black
Note Using a preprinted flag on an object can be useful during forms creation or when test printing your forms. You may be using letterhead or special paper that has the company name or logo already embossed on the paper. Inserting a text label or logo on your form in the same location as the company name or logo helps to ensure that space isn't inadvertently written over by other objects. These objects would ‘reserve’ that space on the form. You may wish to include Pre-printed objects when test printing the form to compare against your special paper to make sure that there is enough space on the special paper for the non Pre-printed objects. By default, the Print dialog will not display a Pre-printed option. Any objects flagged with Pre-printed will not print on the form.
Creating Bar Codes
296
Mobile
Property attributes associated with Mobile:
Adding a Bar Code as a Field
Follow these steps to add a bar code as a field:
1. Add a field to your section.
2. As you specify the property information for the field, select Bar Code in the Type field and then choose from numerous bar code types in the Format field. If the bar code requires a font (for example Data Matrix bar code), specify the Font ID. Enter the data for the bar code.
Here is an example:
Skip Reading If checked on, the object is excluded from being read by assistive technology.
Alternate Text Enter the alternate text to use.
Omit Select this check box, if you do not want the object or resource to be included in the Mobile Output.
Context Select this option to pick from a list of available tags or add a new one on the particular object.
Note This option requires Documaker Mobile. If you have not purchased and installed Documaker Mobile the
required mobile options will be disabled. To purchase Documaker Mobile, visit My Oracle Support website or contact your Oracle Sales representative.
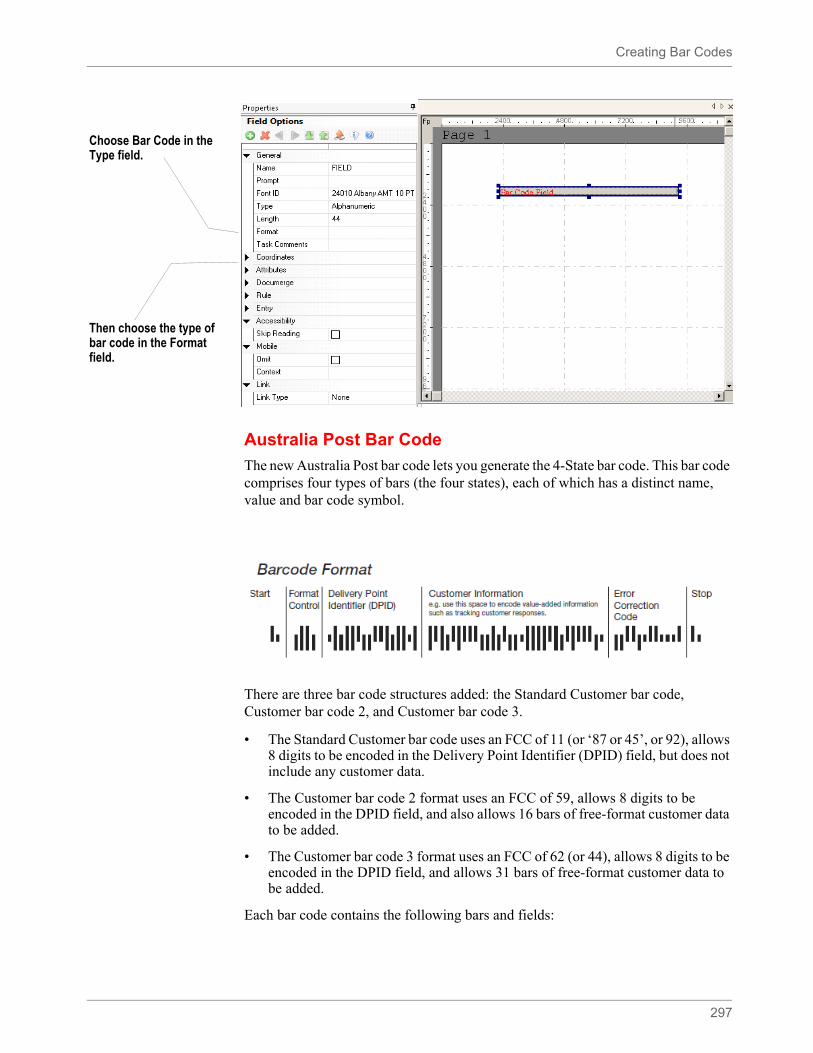
Creating Bar Codes
297
Australia Post Bar Code
The new Australia Post bar code lets you generate the 4-State bar code. This bar code comprises four types of bars (the four states), each of which has a distinct name, value and bar code symbol.
There are three bar code structures added: the Standard Customer bar code, Customer bar code 2, and Customer bar code 3.
• The Standard Customer bar code uses an FCC of 11 (or ‘87 or 45’, or 92), allows 8 digits to be encoded in the Delivery Point Identifier (DPID) field, but does not include any customer data.
• The Customer bar code 2 format uses an FCC of 59, allows 8 digits to be encoded in the DPID field, and also allows 16 bars of free-format customer data to be added.
• The Customer bar code 3 format uses an FCC of 62 (or 44), allows 8 digits to be encoded in the DPID field, and allows 31 bars of free-format customer data to be added.
Each bar code contains the following bars and fields:
Choose Bar Code in the Type field.
Then choose the type of bar code in the Format field.
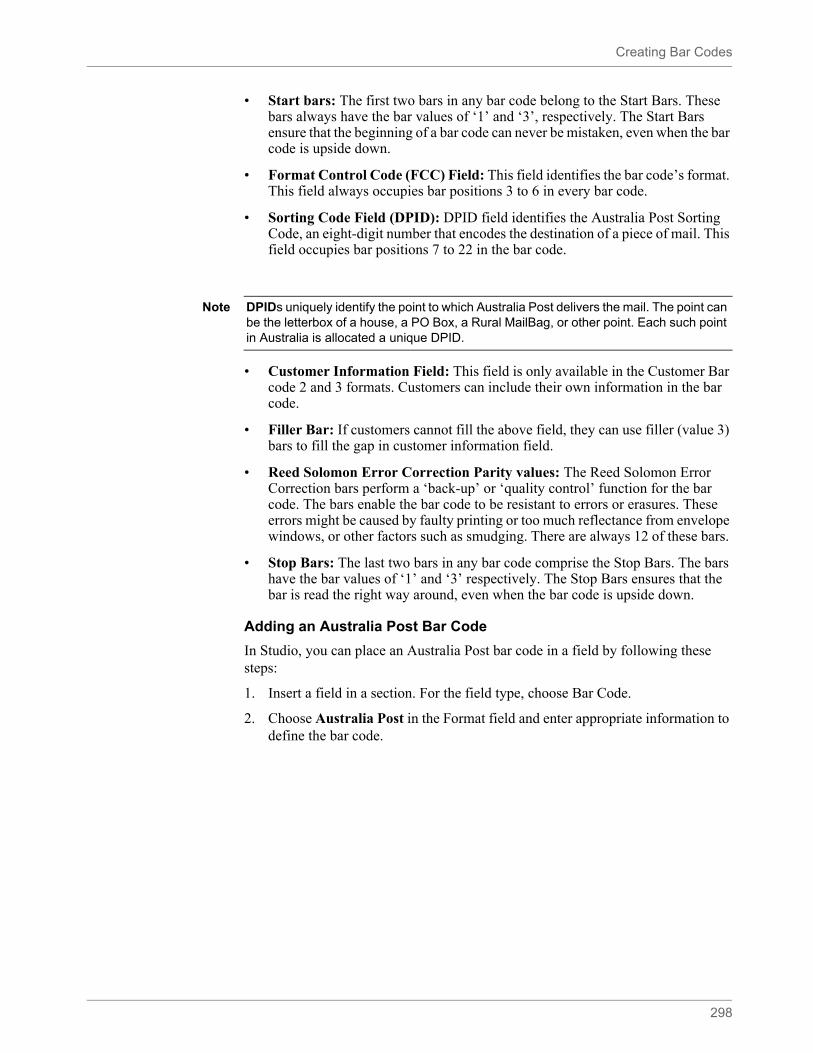
Creating Bar Codes
298
• Start bars: The first two bars in any bar code belong to the Start Bars. These bars always have the bar values of ‘1’ and ‘3’, respectively. The Start Bars ensure that the beginning of a bar code can never be mistaken, even when the bar code is upside down.
• Format Control Code (FCC) Field: This field identifies the bar code’s format. This field always occupies bar positions 3 to 6 in every bar code.
• Sorting Code Field (DPID): DPID field identifies the Australia Post Sorting Code, an eight-digit number that encodes the destination of a piece of mail. This field occupies bar positions 7 to 22 in the bar code.
• Customer Information Field: This field is only available in the Customer Bar code 2 and 3 formats. Customers can include their own information in the bar code.
• Filler Bar: If customers cannot fill the above field, they can use filler (value 3) bars to fill the gap in customer information field.
• Reed Solomon Error Correction Parity values: The Reed Solomon Error Correction bars perform a ‘back-up’ or ‘quality control’ function for the bar code. The bars enable the bar code to be resistant to errors or erasures. These errors might be caused by faulty printing or too much reflectance from envelope windows, or other factors such as smudging. There are always 12 of these bars.
• Stop Bars: The last two bars in any bar code comprise the Stop Bars. The bars have the bar values of ‘1’ and ‘3’ respectively. The Stop Bars ensures that the bar is read the right way around, even when the bar code is upside down.
Adding an Australia Post Bar Code
In Studio, you can place an Australia Post bar code in a field by following these steps:
1. Insert a field in a section. For the field type, choose Bar Code.
2. Choose Australia Post in the Format field and enter appropriate information to define the bar code.
Note DPIDs uniquely identify the point to which Australia Post delivers the mail. The point can be the letterbox of a house, a PO Box, a Rural MailBag, or other point. Each such point in Australia is allocated a unique DPID.
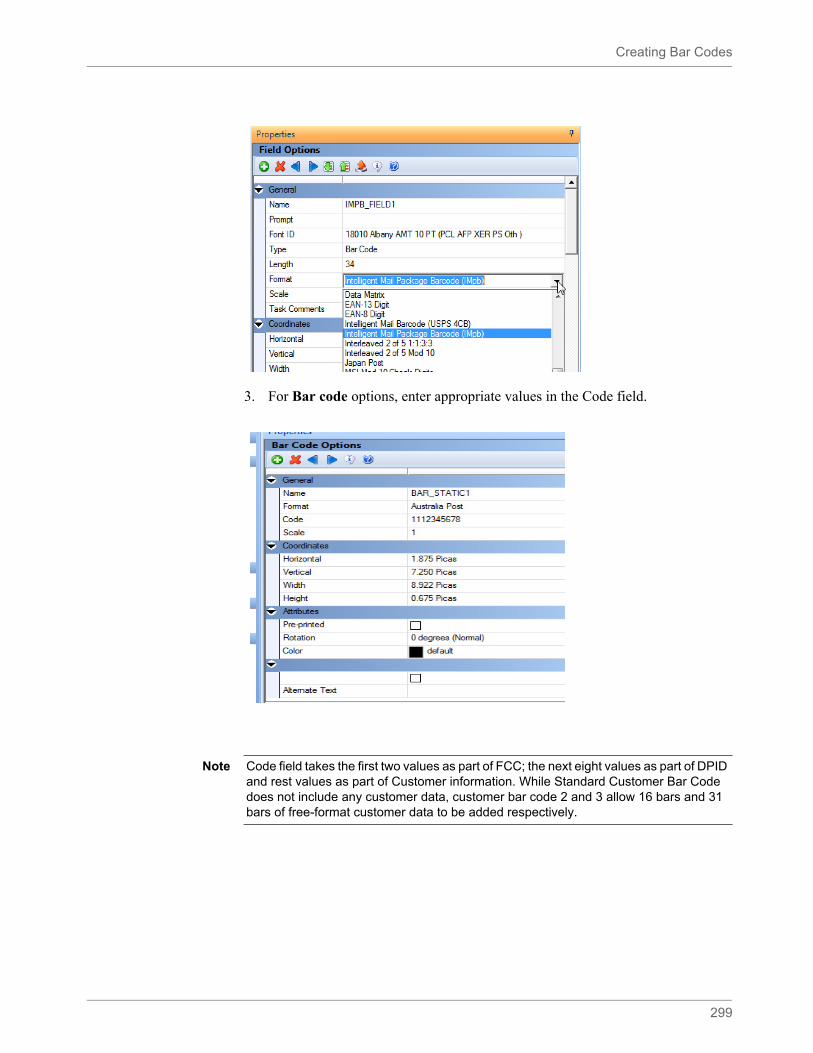
Creating Bar Codes
299
3. For Bar code options, enter appropriate values in the Code field.
Note Code field takes the first two values as part of FCC; the next eight values as part of DPID and rest values as part of Customer information. While Standard Customer Bar Code does not include any customer data, customer bar code 2 and 3 allow 16 bars and 31 bars of free-format customer data to be added respectively.
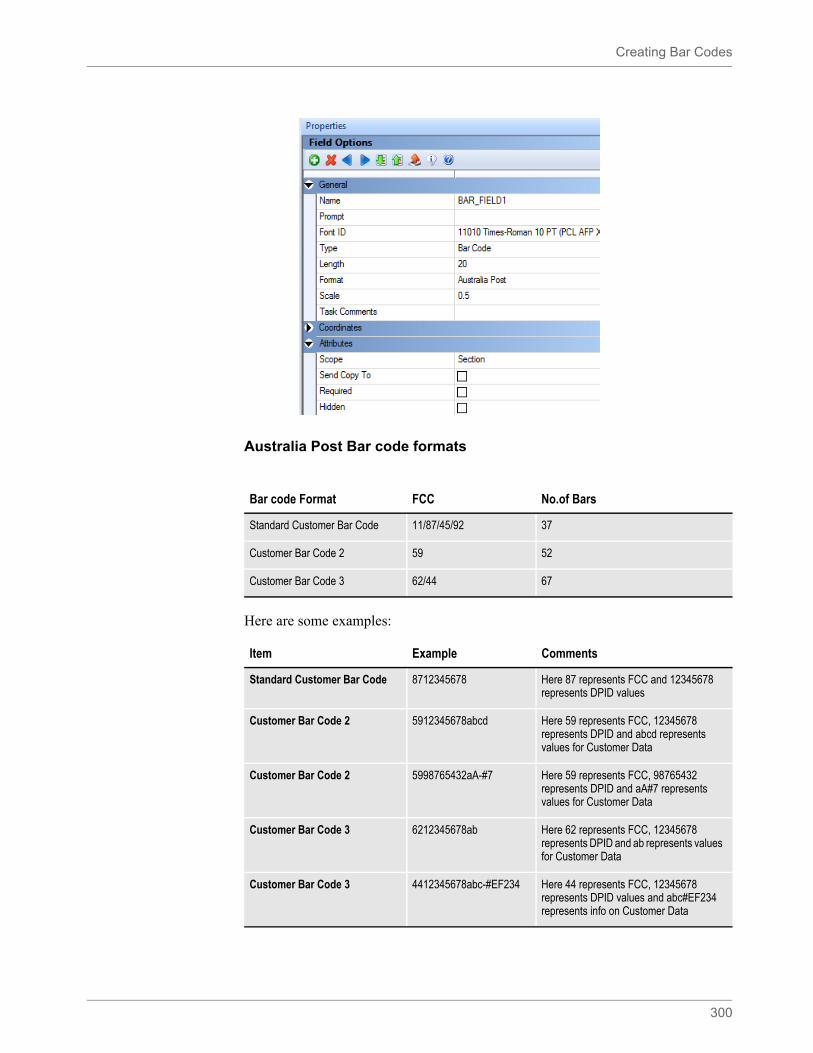
Creating Bar Codes
300
Australia Post Bar code formats
Here are some examples:
Bar code Format FCC No.of Bars
Standard Customer Bar Code 11/87/45/92 37
Customer Bar Code 2 59 52
Customer Bar Code 3 62/44 67
Item Example Comments
Standard Customer Bar Code 8712345678 Here 87 represents FCC and 12345678 represents DPID values
Customer Bar Code 2 5912345678abcd Here 59 represents FCC, 12345678 represents DPID and abcd represents values for Customer Data
Customer Bar Code 2 5998765432aA-#7 Here 59 represents FCC, 98765432 represents DPID and aA#7 represents values for Customer Data
Customer Bar Code 3 6212345678ab Here 62 represents FCC, 12345678 represents DPID and ab represents values for Customer Data
Customer Bar Code 3 4412345678abc-#EF234 Here 44 represents FCC, 12345678 represents DPID values and abc#EF234 represents info on Customer Data
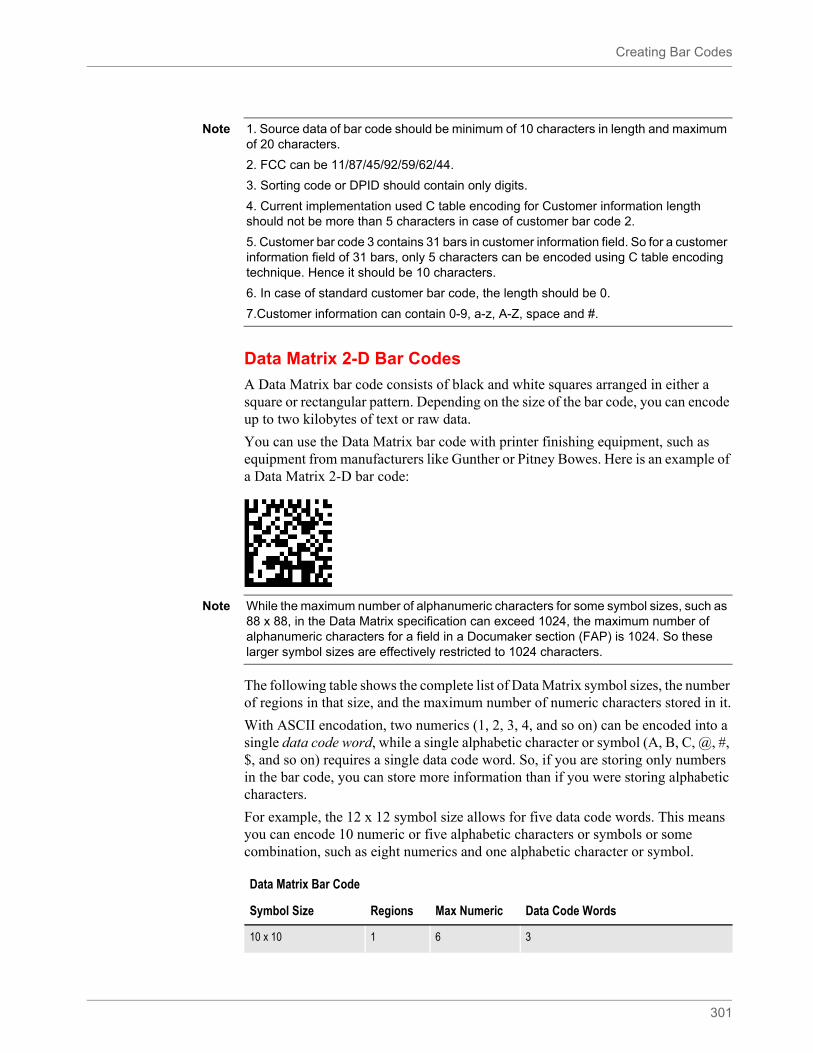
Creating Bar Codes
301
Data Matrix 2-D Bar Codes
A Data Matrix bar code consists of black and white squares arranged in either a square or rectangular pattern. Depending on the size of the bar code, you can encode up to two kilobytes of text or raw data.
You can use the Data Matrix bar code with printer finishing equipment, such as equipment from manufacturers like Gunther or Pitney Bowes. Here is an example of a Data Matrix 2-D bar code:
The following table shows the complete list of Data Matrix symbol sizes, the number of regions in that size, and the maximum number of numeric characters stored in it.
With ASCII encodation, two numerics (1, 2, 3, 4, and so on) can be encoded into a single data code word, while a single alphabetic character or symbol (A, B, C, @, #, $, and so on) requires a single data code word. So, if you are storing only numbers in the bar code, you can store more information than if you were storing alphabetic characters.
For example, the 12 x 12 symbol size allows for five data code words. This means you can encode 10 numeric or five alphabetic characters or symbols or some combination, such as eight numerics and one alphabetic character or symbol.
Note 1. Source data of bar code should be minimum of 10 characters in length and maximum of 20 characters.
2. FCC can be 11/87/45/92/59/62/44.
3. Sorting code or DPID should contain only digits.
4. Current implementation used C table encoding for Customer information length should not be more than 5 characters in case of customer bar code 2.
5. Customer bar code 3 contains 31 bars in customer information field. So for a customer information field of 31 bars, only 5 characters can be encoded using C table encoding technique. Hence it should be 10 characters.
6. In case of standard customer bar code, the length should be 0.
7.Customer information can contain 0-9, a-z, A-Z, space and #.
Note While the maximum number of alphanumeric characters for some symbol sizes, such as 88 x 88, in the Data Matrix specification can exceed 1024, the maximum number of alphanumeric characters for a field in a Documaker section (FAP) is 1024. So these larger symbol sizes are effectively restricted to 1024 characters.
Data Matrix Bar Code
Symbol Size Regions Max Numeric Data Code Words
10 x 10 1 6 3
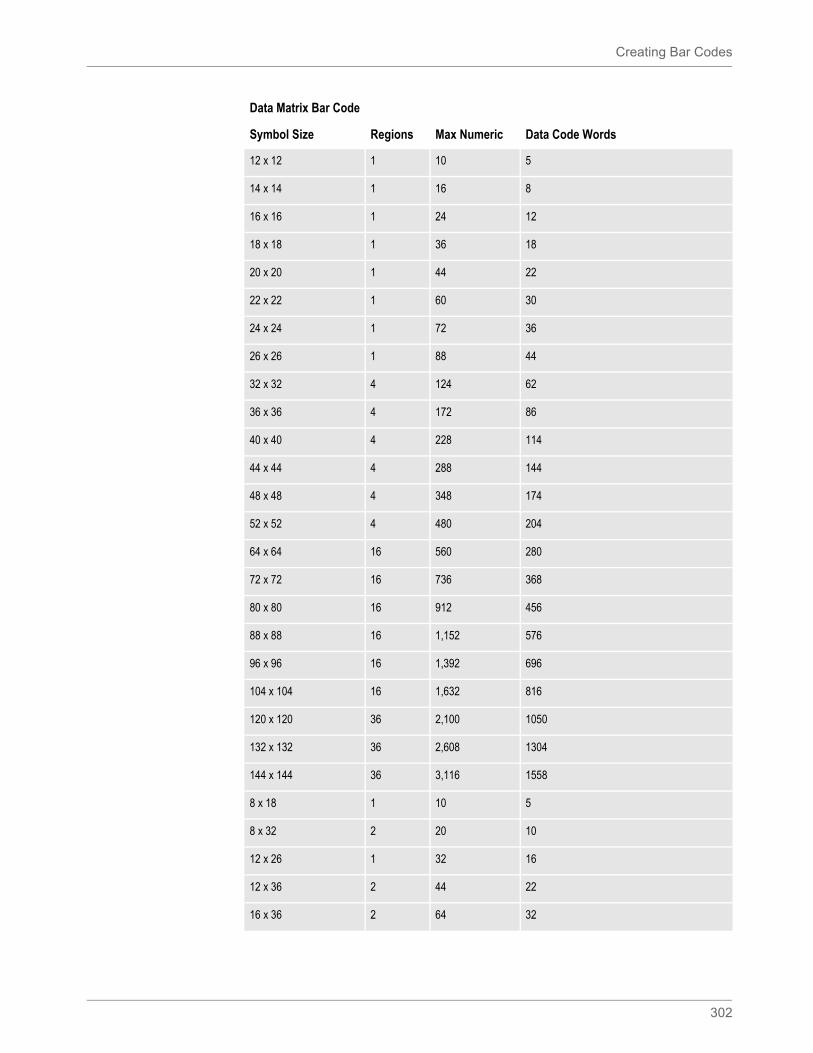
Creating Bar Codes
302
12 x 12 1 10 5
14 x 14 1 16 8
16 x 16 1 24 12
18 x 18 1 36 18
20 x 20 1 44 22
22 x 22 1 60 30
24 x 24 1 72 36
26 x 26 1 88 44
32 x 32 4 124 62
36 x 36 4 172 86
40 x 40 4 228 114
44 x 44 4 288 144
48 x 48 4 348 174
52 x 52 4 480 204
64 x 64 16 560 280
72 x 72 16 736 368
80 x 80 16 912 456
88 x 88 16 1,152 576
96 x 96 16 1,392 696
104 x 104 16 1,632 816
120 x 120 36 2,100 1050
132 x 132 36 2,608 1304
144 x 144 36 3,116 1558
8 x 18 1 10 5
8 x 32 2 20 10
12 x 26 1 32 16
12 x 36 2 44 22
16 x 36 2 64 32
Data Matrix Bar Code
Symbol Size Regions Max Numeric Data Code Words
Creating Bar Codes
303
Data encoding
Data mapped to the bar code symbol is encoded using ASCII encodation. The error-correcting code ECC 200 is used so damaged bar code symbols can still be read.
Standard ASCII characters (those at code points 0 – 127), as well as extended ASCII characters (those at code points 128 – 255), can be encoded in the bar code. Extended ASCII characters may contain, for example, accented characters needed for French, German, and a few other European languages. Each extended ASCII character requires an additional byte of storage in the bar code, so this must be considered when determining how many characters might need to be encoded in the bar code, and which symbol size to use.
Fonts
Documaker draws the Data Matrix bar code using fonts instead of graphic commands. The fonts are listed below and referenced in the REL121.FXR font cross-reference (FXR) file. The font IDs for the Data Matrix fonts are numbered 13504, 13505, and 13506.
The TrueType, PostScript, PCL, AFP (240 and 300 DPI), and Metacode fonts you need to produce the bar code are included in version 11.3 and listed below:
16 x 48 2 98 49
Data Matrix Bar Code
Symbol Size Regions Max Numeric Data Code Words
Note Many handheld bar code scanners are not capable of scanning Data Matrix bar codes that contain extended ASCII characters.
Size Font name
TrueType
All sizes dm______.ttf
Postscript
All sizes dm______.pfb
PCL
4 point fpdmn4.pcl
5 point fpdmn5.pcl
6 point fpdmn6.pcl
AFP 240 DPI
4 point x0dadmn4.fnt, c0fadmn4.240 (Coded Font, Character Set)
5 point x0dadmn5.fnt, c0fadmn5.240
Creating Bar Codes
304
Adding a Data Matrix bar code
In Studio, you can place a Data Matrix bar code in a field by following these steps:
1. Insert a field in a section. For the field type, choose Bar Code.
2. Choose Data Matrix in the Format field.
3. Select the symbol size.
4. In the Font ID field, select one of the Data Matrix bar code fonts (13504, 13505, or 13506) which are included with Documaker.
5. Use the Move_It rule to map data to this field.
6 point x0dadmn6.fnt, c0fadmn6.240
AFP 300 DPI
4 point x0dadmn4.fnt, c0fadmn4.300 (Coded Font, Character Set)
5 point x0dadmn5.fnt, c0fadmn5.300
6 point x0dadmn6.fnt, c0fadmn6.300
Metacode
4 point fxdmn4.fntRotations: f9dmn4.fnt, f1dmn4.fnt, f2dmn4.fnt (90, 180, 270)
5 point fxdmn5.fntRotations: f9dmn5.fnt, f1dmn5.fnt, f2dmn5.fnt
6 point fxdmn6.fntRotations: f9dmn6.fnt, f1dmn6.fnt, f2dmn6.fnt
Size Font name
Select the symbol size.
Creating Bar Codes
305
Intelligent Mail Package Bar Code
Documaker now supports the Intelligent Mail Package Barcode (IMpb) bar code.
The Intelligent Mail Package Barcode used by the United States Postal Service (USPS) provides information about the mailing package, the payment channel information, the mail class and any extra services offered with the mail piece. The IMpb should not be confused with the Intelligent Mail Barcode (USPS 4CB) The Intelligent Mail barcode is a height modulated barcode, consisting of bars of 4 heights while the Intelligent Mail Package barcode has a consistent height and is based on the Code 128 barcode.
Please refer to the BarcodePackageImSpec.pdf publication at https://ribbs.usps.gov/index.cfm?page=intellmailpackage for full details on the specification. Information herein is sourced from that document for convenience.
This is an example of an Intelligent Mail Package Barcode (iMpb). In this sample the barcode is drawn to include the optional solid black identification bars and human readable representation of the barcode but these items are not required:
To use the IMpb in Documaker, apply a barcode object or a variable field with a type of barcode to the desired Section within Documaker Studio. Choose the Intelligent Mail Package Barcode (IMpb) from the Format pick list. The Format pick list selection is the same for both static barcodes and field barcodes.
The current USPS Intelligent Mail Package bar code specification allows for 3 types or “constructs” of the bar code: Commercial, Online, and Retail. Depending on the type of bar code being constructed, its length can be 22, 26, 30, or 34 digits long.
This figure shows the details of Format C01 of the Commercial barcode construct:
Note Do not use figures shown here as a basis for exact measurement as they are not produced to scale in this document.
Note The barcode object is typically used for static barcodes whose value is known at design time while a variable field with a type of barcode is generally used when a dynamic barcode is required whose value is obtained from recipient data.
Note The IMpb does not require a specialized font.
Creating Bar Codes
306
In general, the bar code contains routing information and tracking information.
As noted, the length of the code will vary depending on its construct. Commercial, Retail, On-line, etc require certain content with varying lengths as outlined in the chart below.
Data Field Field Length Description
Postal code Application ID
3 3-digit GS1 Application Identifier that is used to designate the presence of a delivery Postal
Code within a single Postal Authority. This field shall always be “420” and, shall precede the
Destination ZIP Code if such routing information is provided.
Zip Code 5 or 9
Channel Application ID 2 Valid Channel Application Identifiers are “91”, “92”, “93”, “94”, and “95”.
Service Type Code 3
Source Identifier 2 Used only in conjunction with Channel Application Identifier “94”.
Channel Identifier 1 Used and encoded only in Postal Service-created barcodes (Channel Application Identifier “95”).
Device ID 6 Used within the retail barcode construct to help maintain uniqueness and help with traceability to an exact printing source.
Creating Bar Codes
307
Once a bar code has been placed on a section, you can provide data to be mapped to the bar code. If the bar code is to contain both routing information and tracking information, you must separate the digits that make up the routing information, and the digits that makeup the tracking information, with an asterisk (*).
Example: 420123456789*921239123456781234567
Documaker will automatically generate the MOD 10 check digit if you do not supply it along with the other data. In the above example, the routing information consists of 12 digits: 420123456789. These digits are followed by an asterisk, which is a place-holder for the FNC1 code. The asterisk is followed by the tracking information, which consists of 21 digits:
921239123456781234567
Since an odd number of digits are provided for the tracking information, Documaker knows that the MOD 10 check digit has not been provided, so Documaker will generate the check digit at run-time as the digits are encoded into the barcode symbol.
The IMpb can be printed within a container that encompasses the barcode itself. These container items include a top horizontal line, a label that reads USPS TRACKING #, the barcode symbol, a human readable representation of the barcode data and a bottom horizontal line.
Mailer Identifier 6 or 9 Most mailers will be assigned a 9- digit Mailer Identifier, which is used in conjunction with AI “92”. On an individual basis, some mailers or consolidators will be assigned a 6-digit Mailer Identifier, and would then use AI “93”.
Julian Date 4 Used within the retail barcode construct to aid in establishing uniqueness.
Serial Number 5, 7, 8, 10, 11 or 14 Every barcode shall contain a serial number. Retail barcodes shall use a 5-digit serial number. Online mailers / systems shall have the option of using a 5 or 8- digit serial number, based on mail volume and uniqueness requirements. Commercial mailers, depending upon length of their Mailer Identifier, may use a
7, 10, 11, or 14-digit serial number.
Mod 10 Check Digit 1 Final digit in the barcode data string
Data Field Field Length Description
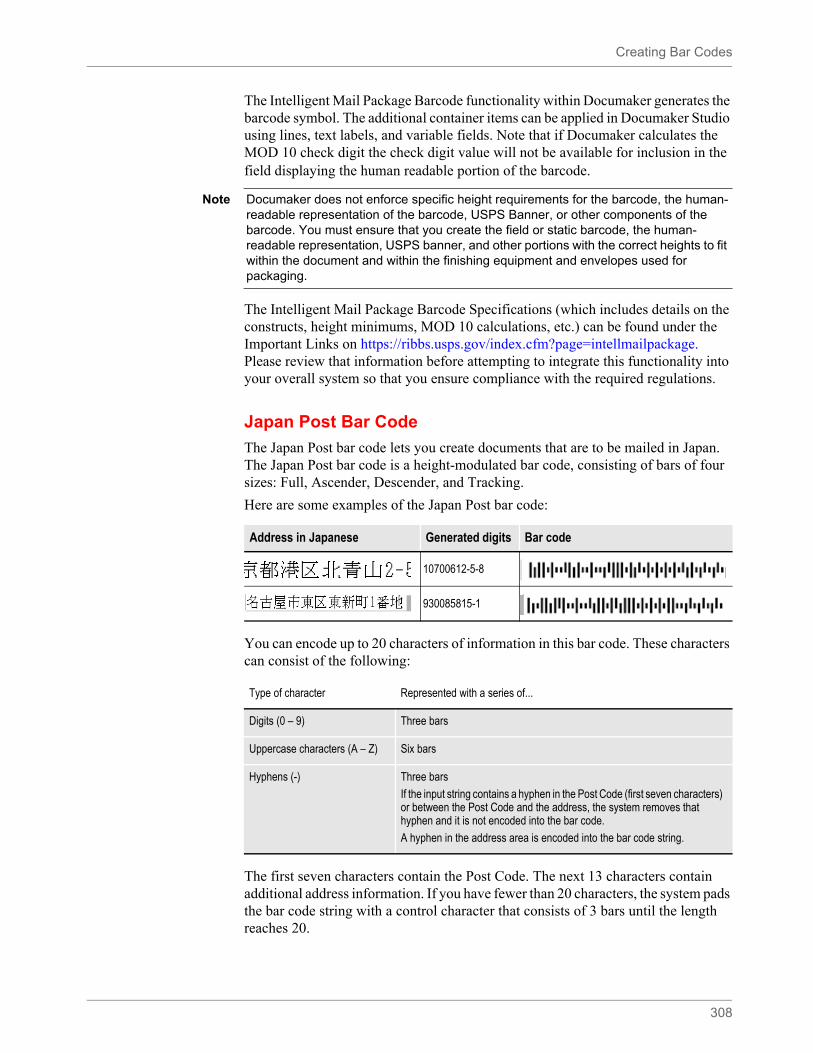
Creating Bar Codes
308
The Intelligent Mail Package Barcode functionality within Documaker generates the barcode symbol. The additional container items can be applied in Documaker Studio using lines, text labels, and variable fields. Note that if Documaker calculates the MOD 10 check digit the check digit value will not be available for inclusion in the field displaying the human readable portion of the barcode.
The Intelligent Mail Package Barcode Specifications (which includes details on the constructs, height minimums, MOD 10 calculations, etc.) can be found under the Important Links on https://ribbs.usps.gov/index.cfm?page=intellmailpackage. Please review that information before attempting to integrate this functionality into your overall system so that you ensure compliance with the required regulations.
Japan Post Bar Code
The Japan Post bar code lets you create documents that are to be mailed in Japan. The Japan Post bar code is a height-modulated bar code, consisting of bars of four sizes: Full, Ascender, Descender, and Tracking.
Here are some examples of the Japan Post bar code:
You can encode up to 20 characters of information in this bar code. These characters can consist of the following:
The first seven characters contain the Post Code. The next 13 characters contain additional address information. If you have fewer than 20 characters, the system pads the bar code string with a control character that consists of 3 bars until the length reaches 20.
Note Documaker does not enforce specific height requirements for the barcode, the human-readable representation of the barcode, USPS Banner, or other components of the barcode. You must ensure that you create the field or static barcode, the human-readable representation, USPS banner, and other portions with the correct heights to fit within the document and within the finishing equipment and envelopes used for packaging.
Address in Japanese Generated digits Bar code
10700612-5-8
930085815-1
Type of character Represented with a series of...
Digits (0 – 9) Three bars
Uppercase characters (A – Z) Six bars
Hyphens (-) Three bars
If the input string contains a hyphen in the Post Code (first seven characters) or between the Post Code and the address, the system removes that hyphen and it is not encoded into the bar code.
A hyphen in the address area is encoded into the bar code string.
Creating Bar Codes
309
Because digits are represented with three bars and alphabetic characters are represented with six bars, the final number of bars in the bar code varies and depends on the number of digits and the number of alphabetic characters in the information string.
The final bar code string consists of a start code, the Post Code, the address, a check digit, and a stop code, as shown here:
Here is an example:
Adding a Japan Post bar code
In Studio, you can place a Japan Post bar code in a field by following these steps:
1. Insert a field in a section. For the field type, choose Bar Code.
2. Enter the appropriate information to define the bar code, choosing Japan Post in the Format field.
Type of information Start Code Post Code Address Number Check Digit Stop Code
Number of characters 1 7 13 1 1
Item Example Comments
Postal code 2730102 no hyphen (-)
Address 3-20-5B604
Bar code format Postal code + Address No space between the two items
Bar code text 27301023-20-5B604
Data encoded in the bar code text 27301023-20-5B604
Note For more information about the Japan Post bar code, visit this web site:
http://www.post.japanpost.jp/zipcode/zipmanual/index.html
This site is in Japanese. You can use an on-line translation web site, such as Google Translate, to translate the information on the site. Keep in mind the quality of the translation can vary from site to site.
Note Studio does not translate a standard address to a 20-character or less address for the bar code. You must handle the translation. Note too that the Japan Post bar code is drawn using graphical commands and is not created using a font.
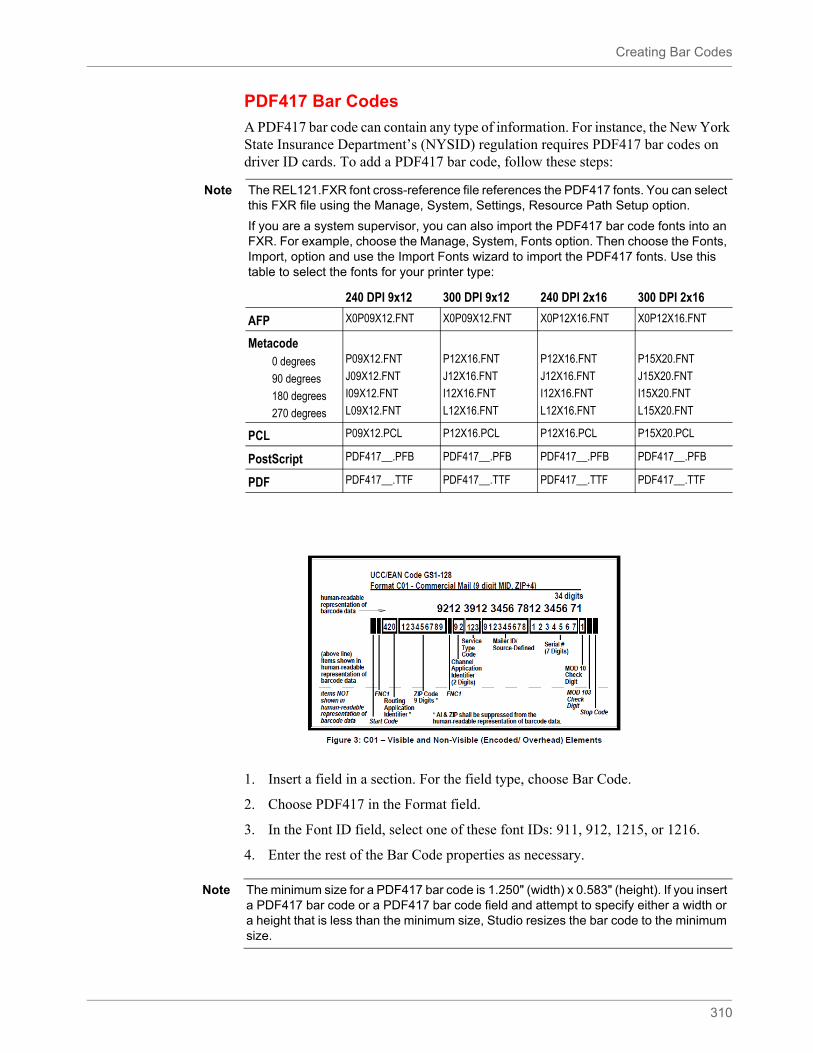
Creating Bar Codes
310
PDF417 Bar Codes
A PDF417 bar code can contain any type of information. For instance, the New York State Insurance Department’s (NYSID) regulation requires PDF417 bar codes on driver ID cards. To add a PDF417 bar code, follow these steps:
1. Insert a field in a section. For the field type, choose Bar Code.
2. Choose PDF417 in the Format field.
3. In the Font ID field, select one of these font IDs: 911, 912, 1215, or 1216.
4. Enter the rest of the Bar Code properties as necessary.
Note The REL121.FXR font cross-reference file references the PDF417 fonts. You can select this FXR file using the Manage, System, Settings, Resource Path Setup option.
If you are a system supervisor, you can also import the PDF417 bar code fonts into an FXR. For example, choose the Manage, System, Fonts option. Then choose the Fonts, Import, option and use the Import Fonts wizard to import the PDF417 fonts. Use this table to select the fonts for your printer type:
240 DPI 9x12 300 DPI 9x12 240 DPI 2x16 300 DPI 2x16
AFP X0P09X12.FNT X0P09X12.FNT X0P12X16.FNT X0P12X16.FNT
Metacode0 degrees
90 degrees
180 degrees
270 degrees
P09X12.FNT
J09X12.FNT
I09X12.FNT
L09X12.FNT
P12X16.FNT
J12X16.FNT
I12X16.FNT
L12X16.FNT
P12X16.FNT
J12X16.FNT
I12X16.FNT
L12X16.FNT
P15X20.FNT
J15X20.FNT
I15X20.FNT
L15X20.FNT
PCL P09X12.PCL P12X16.PCL P12X16.PCL P15X20.PCL
PostScript PDF417__.PFB PDF417__.PFB PDF417__.PFB PDF417__.PFB
PDF PDF417__.TTF PDF417__.TTF PDF417__.TTF PDF417__.TTF
Note The minimum size for a PDF417 bar code is 1.250" (width) x 0.583" (height). If you insert a PDF417 bar code or a PDF417 bar code field and attempt to specify either a width or a height that is less than the minimum size, Studio resizes the bar code to the minimum size.
Creating Bar Codes
311
Using Code 39
Code 39, also known as the “3 of 9 code” is the first alphanumeric symbol to be developed. It is widely used, and is considered the de facto standard in non-retail symbol. It is discrete, self-checking, and of variable length.
Every Code 39 character has five bars and four spaces, making a total of nine elements. Of the nine elements, three are wide and six are narrow, making Code 39 a two-width code.
Code 39 is self-checking and is normally not used with a self-check character. An optional mod-43 check character is defined and often used in the healthcare industry.
Variants of the standard Code 39 bar codes are often defined by series of four values, which represent a number of dot-rows:
narrow bar: narrow space: wide bar: wide space
The system includes the following variants of the standard code 39 bar code:
1:1:3:3
1:1:2:2
1:2:4:5
PLANET Code Bar Codes
You can add PLANET Code® bar codes to your forms. These bar codes, along with the Confirm® service offered by the United States Postal Service (USPS), let you track your mail electronically.
You uniquely identify and track your mail by placing the PLANET Code bar code on the front of the mail piece. As the mail piece moves through the postal system, USPS sorting equipment notes the processing facility, operation number, and processing date and time. This information is returned to you in the form of a response file.
For more information, see the PLANET Codes web site:
www.planetcodes.com
The PLANET Code is essentially an inverse image of the POSTNET bar code and is defined as follows:
Like POSTNET Codes, PLANET Codes have 14 digits and consist of tall and short bars. PLANET symbology is the inverse of POSTNET because each POSTNET digit has a combination of two tall and three short bars and each PLANET digit had three tall and two short bars.
All PLANET bar codes include a five-bar checksum digit or correction character. This digit is always the number which, when added to the sum of the other digits in the bar code, results in a total that is a multiple of 10.
Here is an example of the PLANET Code bar code:
Note Choose the one that best meets your requirements. In the absence of a specification, try a sample of all three and choose the one that comes the closest to your needs.
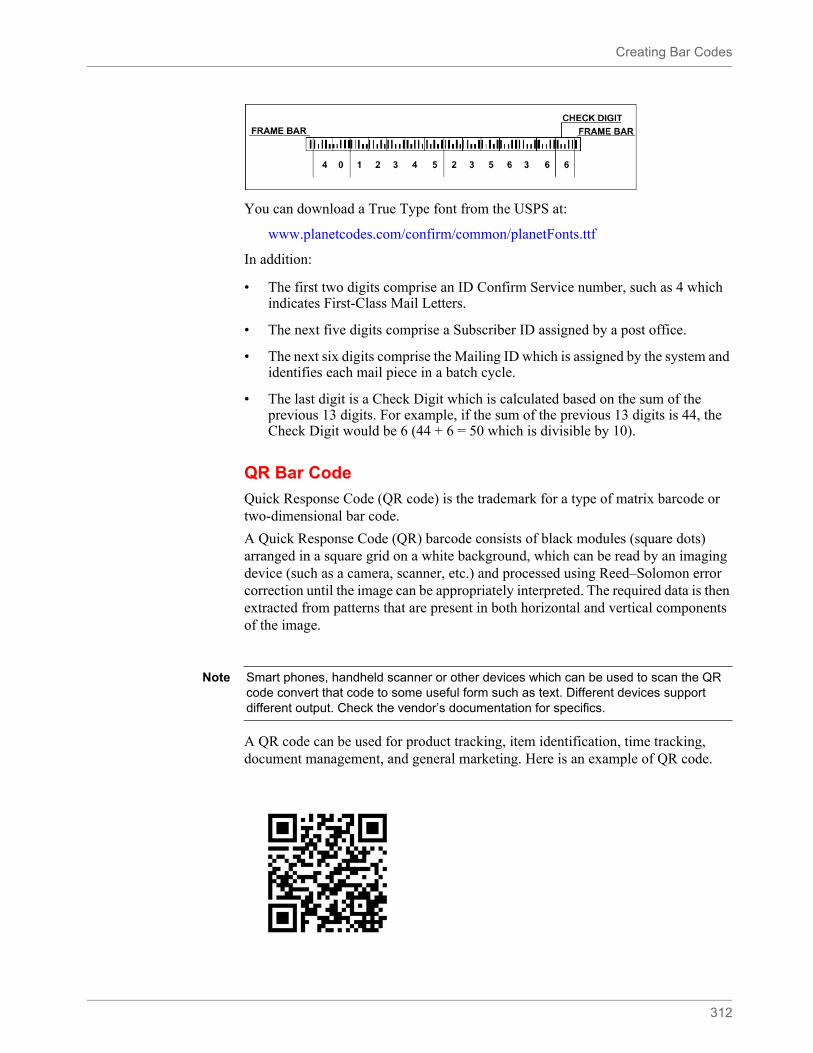
Creating Bar Codes
312
You can download a True Type font from the USPS at:
www.planetcodes.com/confirm/common/planetFonts.ttf
In addition:
• The first two digits comprise an ID Confirm Service number, such as 4 which indicates First-Class Mail Letters.
• The next five digits comprise a Subscriber ID assigned by a post office.
• The next six digits comprise the Mailing ID which is assigned by the system and identifies each mail piece in a batch cycle.
• The last digit is a Check Digit which is calculated based on the sum of the previous 13 digits. For example, if the sum of the previous 13 digits is 44, the Check Digit would be 6 (44 + 6 = 50 which is divisible by 10).
QR Bar Code
Quick Response Code (QR code) is the trademark for a type of matrix barcode or two-dimensional bar code.
A Quick Response Code (QR) barcode consists of black modules (square dots) arranged in a square grid on a white background, which can be read by an imaging device (such as a camera, scanner, etc.) and processed using Reed–Solomon error correction until the image can be appropriately interpreted. The required data is then extracted from patterns that are present in both horizontal and vertical components of the image.
A QR code can be used for product tracking, item identification, time tracking, document management, and general marketing. Here is an example of QR code.
Note Smart phones, handheld scanner or other devices which can be used to scan the QR code convert that code to some useful form such as text. Different devices support different output. Check the vendor’s documentation for specifics.
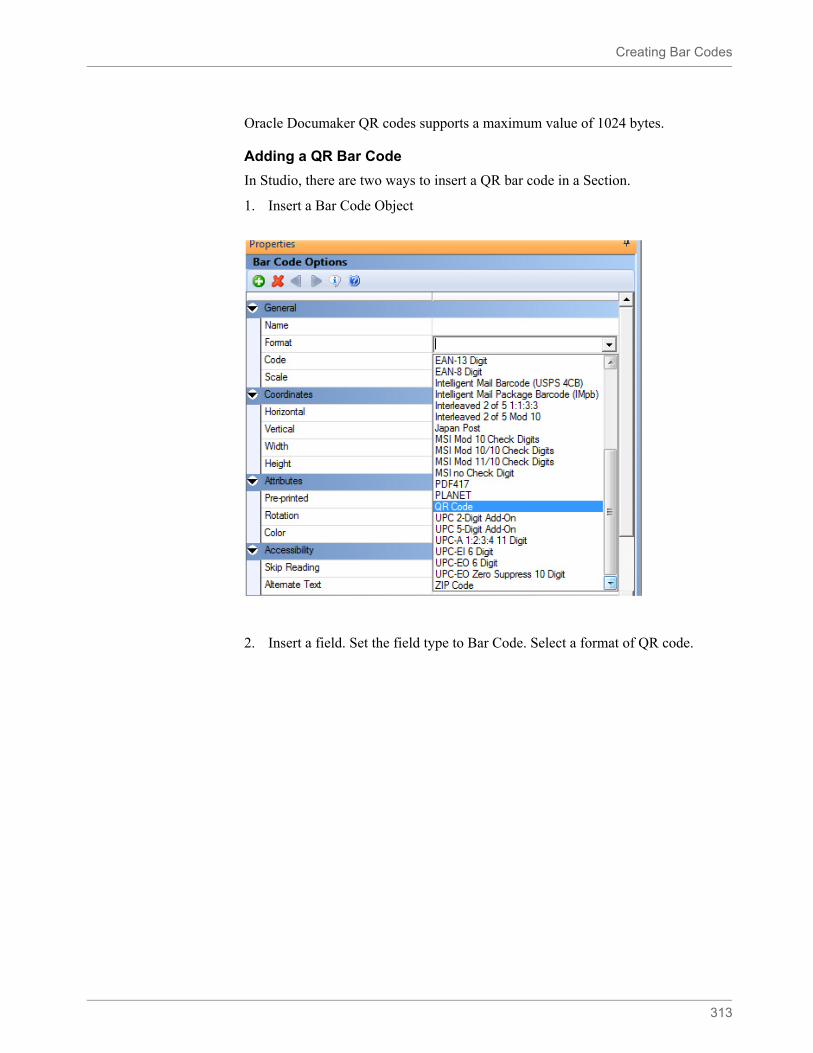
Creating Bar Codes
313
Oracle Documaker QR codes supports a maximum value of 1024 bytes.
Adding a QR Bar Code
In Studio, there are two ways to insert a QR bar code in a Section.
1. Insert a Bar Code Object
2. Insert a field. Set the field type to Bar Code. Select a format of QR code.
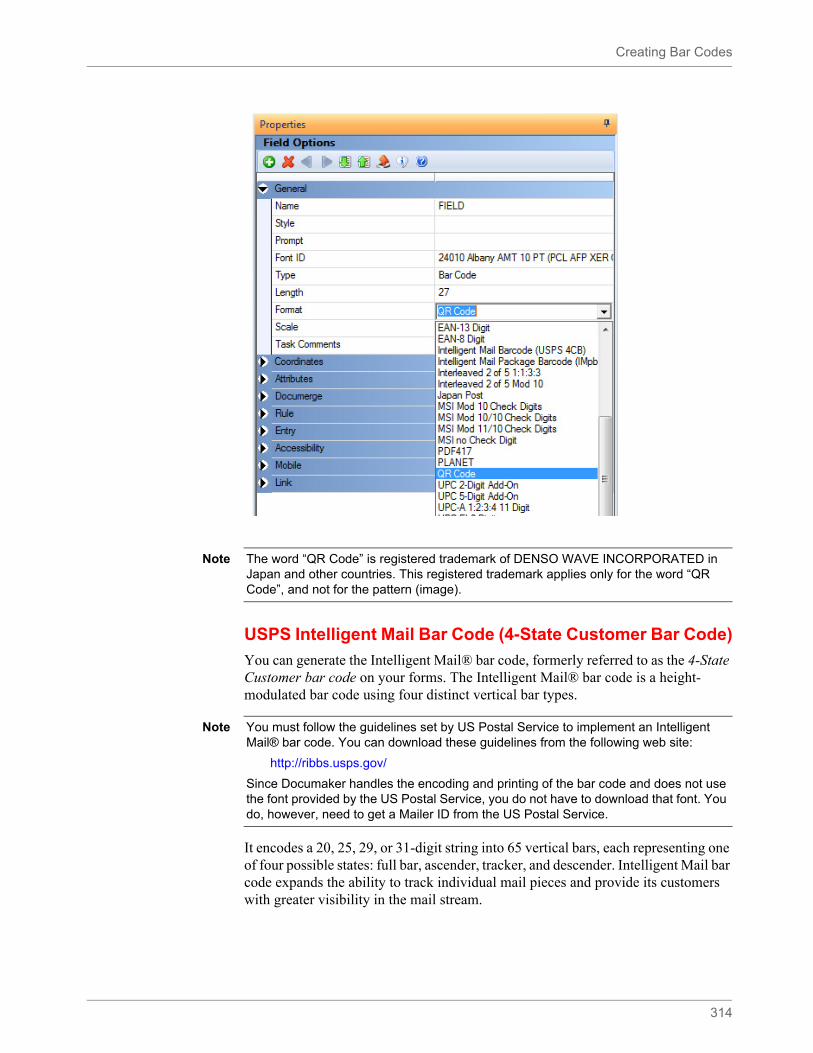
Creating Bar Codes
314
USPS Intelligent Mail Bar Code (4-State Customer Bar Code)
You can generate the Intelligent Mail® bar code, formerly referred to as the 4-State Customer bar code on your forms. The Intelligent Mail® bar code is a height-modulated bar code using four distinct vertical bar types.
It encodes a 20, 25, 29, or 31-digit string into 65 vertical bars, each representing one of four possible states: full bar, ascender, tracker, and descender. Intelligent Mail bar code expands the ability to track individual mail pieces and provide its customers with greater visibility in the mail stream.
Note The word “QR Code” is registered trademark of DENSO WAVE INCORPORATED in Japan and other countries. This registered trademark applies only for the word “QR Code”, and not for the pattern (image).
Note You must follow the guidelines set by US Postal Service to implement an Intelligent Mail® bar code. You can download these guidelines from the following web site:
http://ribbs.usps.gov/
Since Documaker handles the encoding and printing of the bar code and does not use the font provided by the US Postal Service, you do not have to download that font. You do, however, need to get a Mailer ID from the US Postal Service.
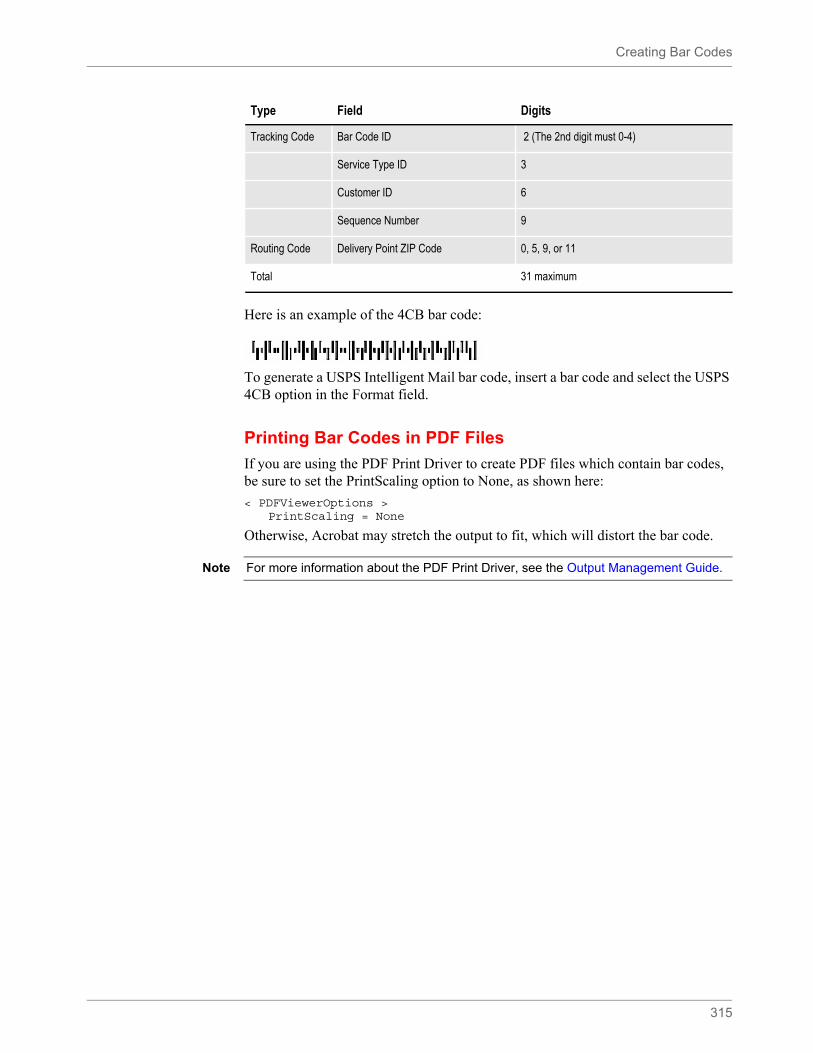
Creating Bar Codes
315
Here is an example of the 4CB bar code:
To generate a USPS Intelligent Mail bar code, insert a bar code and select the USPS 4CB option in the Format field.
Printing Bar Codes in PDF Files
If you are using the PDF Print Driver to create PDF files which contain bar codes, be sure to set the PrintScaling option to None, as shown here:
< PDFViewerOptions >PrintScaling = None
Otherwise, Acrobat may stretch the output to fit, which will distort the bar code.
Type Field Digits
Tracking Code Bar Code ID 2 (The 2nd digit must 0-4)
Service Type ID 3
Customer ID 6
Sequence Number 9
Routing Code Delivery Point ZIP Code 0, 5, 9, or 11
Total 31 maximum
Note For more information about the PDF Print Driver, see the Output Management Guide.
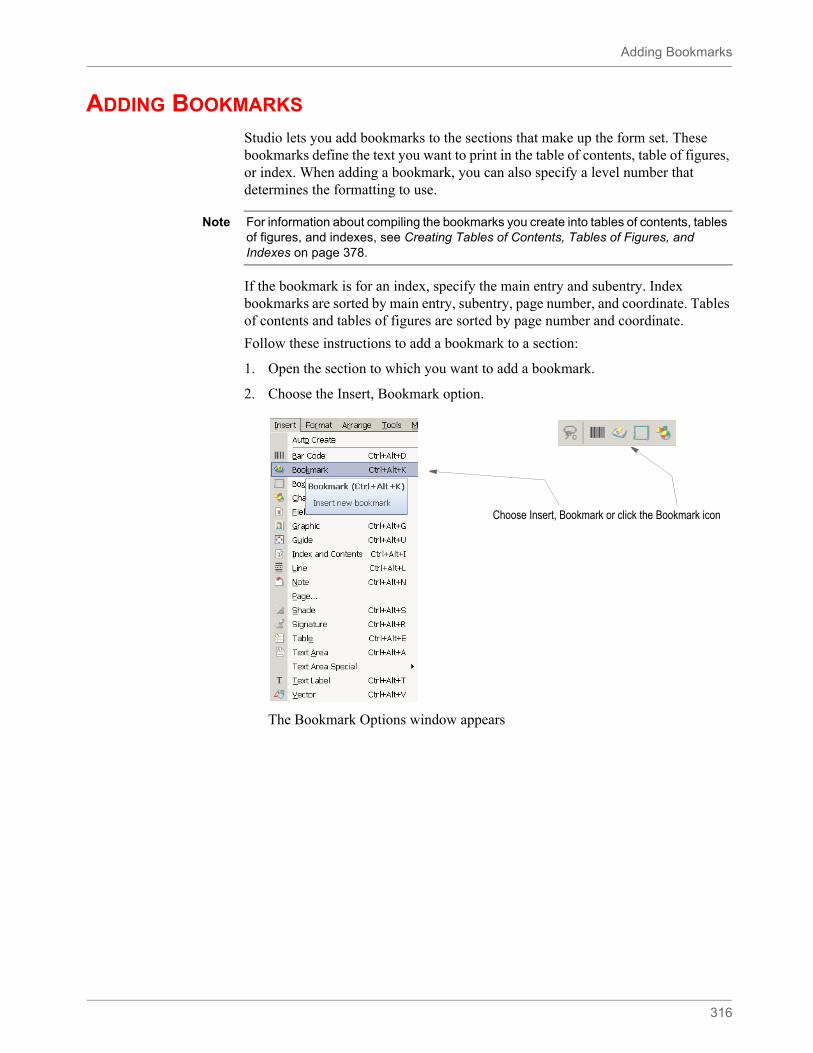
Adding Bookmarks
316
ADDING BOOKMARKS
Studio lets you add bookmarks to the sections that make up the form set. These bookmarks define the text you want to print in the table of contents, table of figures, or index. When adding a bookmark, you can also specify a level number that determines the formatting to use.
If the bookmark is for an index, specify the main entry and subentry. Index bookmarks are sorted by main entry, subentry, page number, and coordinate. Tables of contents and tables of figures are sorted by page number and coordinate.
Follow these instructions to add a bookmark to a section:
1. Open the section to which you want to add a bookmark.
2. Choose the Insert, Bookmark option.
The Bookmark Options window appears
Note For information about compiling the bookmarks you create into tables of contents, tables of figures, and indexes, see Creating Tables of Contents, Tables of Figures, and Indexes on page 378.
Choose Insert, Bookmark or click the Bookmark icon

Adding Bookmarks
317
3. Use these fields to define the bookmark:
Property Description
General
Name (Optional) Enter the name for the bookmark. Assign a unique name to facilitate reference to the bookmark for editing or other purposes. Although a bookmark name is not required, it is recommended that a name be provided. In the absence of a name, the horizontal and vertical coordinates of the bookmark are used to locate\ reference the bookmark. These coordinates may not have significance or meaning to users.
Style This field only appears if you specified a style file in the BDF file. Select the style you want to use.
Note Define the text you want to print within your index, or table of contents.
Level Define a level number which determines the formatting to use (like ToC1, ToC2, and so on).
Table of Contents Check this property if this bookmark is used by the table of contents.
Table of Figures Check this property if this bookmark is used by the table of figures.
Index Check this property if this bookmark is used by the index.
Main Entry (Index only) Enter the text to appear as the main entry of the index.
Sub Entry (Index only) Enter the text to appear as the sub entry of the index.
Coordinates
Horizontal Set the horizontal (left) starting position.
Vertical Set the vertical (top) starting position.
Note If you later need to edit the bookmark, just double-click the bookmark icon in your section and then modify its properties as needed.

Adding Bookmarks
318
Converting RTF, DOC, and DOCX files
You can also import Rich Text Files (RTF), DOC, or DOCX files from Word to be used in Studio. When doing so, any level commands in those files are added to the properties of the converted paragraphs. You can also manually set the level property to a value of 0-9.
A paragraph level value of 1-9 requests that the text of the paragraph appears in the table of contents. This is done without you creating a bookmark. A level of zero (0) indicates that no automatic table of contents entry is requested. The default is zero (0). For more information, see Creating Paragraphs on page 459.
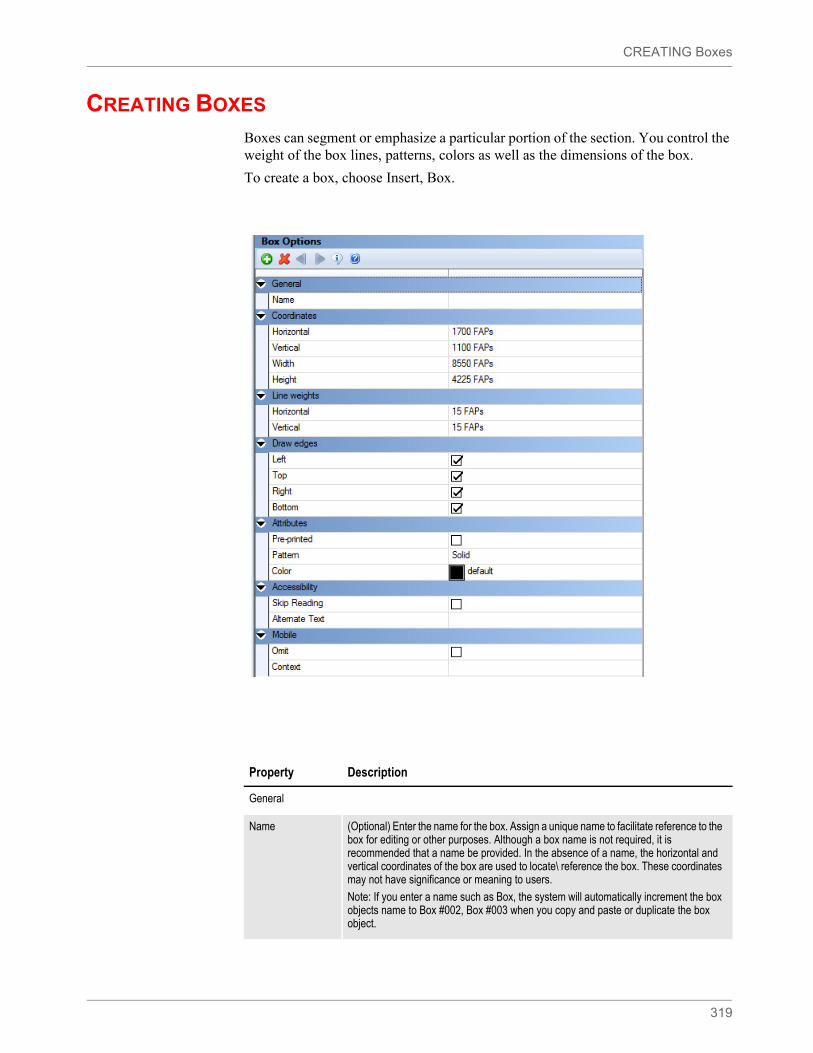
CREATING Boxes
319
CREATING BOXES
Boxes can segment or emphasize a particular portion of the section. You control the weight of the box lines, patterns, colors as well as the dimensions of the box.
To create a box, choose Insert, Box.
Property Description
General
Name (Optional) Enter the name for the box. Assign a unique name to facilitate reference to the box for editing or other purposes. Although a box name is not required, it is recommended that a name be provided. In the absence of a name, the horizontal and vertical coordinates of the box are used to locate\ reference the box. These coordinates may not have significance or meaning to users.
Note: If you enter a name such as Box, the system will automatically increment the box objects name to Box #002, Box #003 when you copy and paste or duplicate the box object.
CREATING Boxes
320
Using a pre-printed flag on an object can be useful during forms creation or when test printing your forms. You may be using letterhead or special paper that has the company name or logo already embossed on the paper. Inserting a text label or logo on your form in the same location as the company name or logo helps to ensure that space isn't inadvertently written over by other objects. These objects would ‘reserve’ that space on the form.
You may wish to include pre-printed objects when test printing the form to compare against your special paper to make sure that there is enough space on the special paper for the non pre-printed objects. By default, the Print dialog will not display a Pre-printed option. Any objects flagged with Pre-printed will not print on the form.
Coordinates
Horizontal Set the horizontal (left) starting position.
Vertical Set the vertical (top) starting position.
Width Width of the box
Height Height of the box
Line weights
Horizontal Horizontal line width.
Vertical Vertical line width.
Draw edges
Left Check on if the left side of the box should be drawn
Top Check on if the top of the box should be drawn
Right Check on if the right side of the box should be drawn
Bottom Check on if the bottom of the box should be drawn
Attributes
Pre-printed Check on to tell the system NOT to print this object when you print the Section.
Pattern Select the pattern of the lines
Color Select the color or use the default. If you want the object to print in this color, check the Print in color field. Otherwise, the system will print the box in black.
Property Description
Accessibility
Skip Reading If checked on, the box is excluded from being read by assistive technology. This setting is not used for boxes.
Alternate Text Enter the alternate text to use.
Property Description
CREATING Boxes
321
Property Description
Mobile
Omit Select this check box if you do not want the box to be included in the Mobile Output.
Context Pick from a list of available tags or add a new one for the box object.
Note Mobile options require Documaker Mobile. If you have not purchased and installed Documaker Mobile, the required Mobile options will be disabled. To purchase Documaker Mobile, visit My Oracle Support website or contact your Oracle Sales representative.
Adding Charts
322
ADDING CHARTS
Studio lets you include graphical charts in your sections. You can choose from a variety of 2-dimensional and 3-dimensional charts including pie charts, bar charts, area charts, and percentage charts. You can customize the look of your chart by selecting various properties to change positioning, dimensions, line characteristics, chart background, chart colors, and so on.
Studio provides two ways for you to show data on your charts: statically or dynamically. A chart can show static data you enter when you create the chart. This data does not change. A chart can also show dynamic data added via Documaker Server at run time or during data entry.
After the chart has been created and the look of the chart is established, you can fill the chart with data. There are several ways to populate a chart with data. You can...
• Enter static data onto the chart by entering permanent data values when you create the chart. These data values are stored along with the chart as part of the image file.
• Populate the fields with data at runtime or when using the Entry module to update the dynamic data.
These are some questions to consider when creating a chart:
1. Determine which chart type best meets your needs.
2. Determine which type of data will be used to populate the chart - static, dynamic or a mix of static and dynamic data.
3. Determine which, if any, Chart rules are needed for to populate the chart with dynamic data.
4. Consider what type of data will fill the chart.
5. Consider what type of chart best shows the data.
Note There are several rules you can use with dynamic data. These rules let you populate the chart with data from an extract file or from data in fields on the section. You can find more information on these rules in the Rules Reference Manuals:
• CreateChartSeries
• FieldVarsToChartSeries
• PurgeChartSeries
• SetCustChartAxisLabels
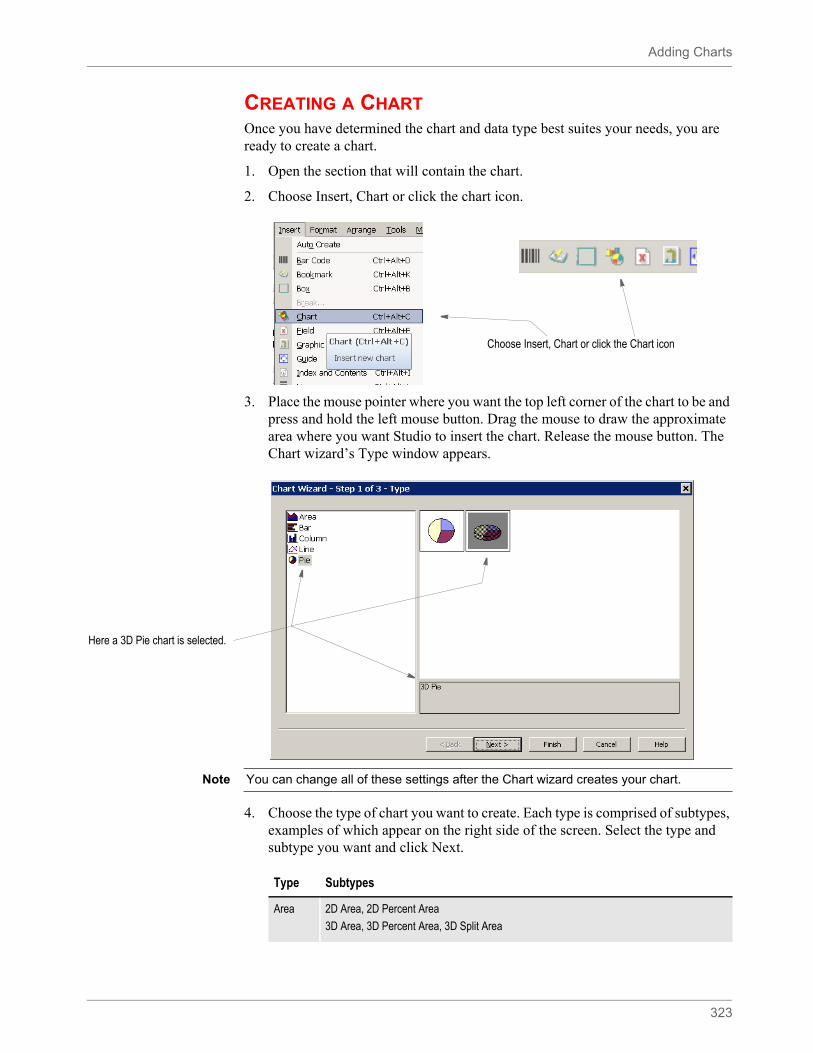
Adding Charts
323
CREATING A CHARTOnce you have determined the chart and data type best suites your needs, you are ready to create a chart.
1. Open the section that will contain the chart.
2. Choose Insert, Chart or click the chart icon.
3. Place the mouse pointer where you want the top left corner of the chart to be and press and hold the left mouse button. Drag the mouse to draw the approximate area where you want Studio to insert the chart. Release the mouse button. The Chart wizard’s Type window appears.
4. Choose the type of chart you want to create. Each type is comprised of subtypes, examples of which appear on the right side of the screen. Select the type and subtype you want and click Next.
Choose Insert, Chart or click the Chart icon
Here a 3D Pie chart is selected.
Note You can change all of these settings after the Chart wizard creates your chart.
Type Subtypes
Area 2D Area, 2D Percent Area
3D Area, 3D Percent Area, 3D Split Area
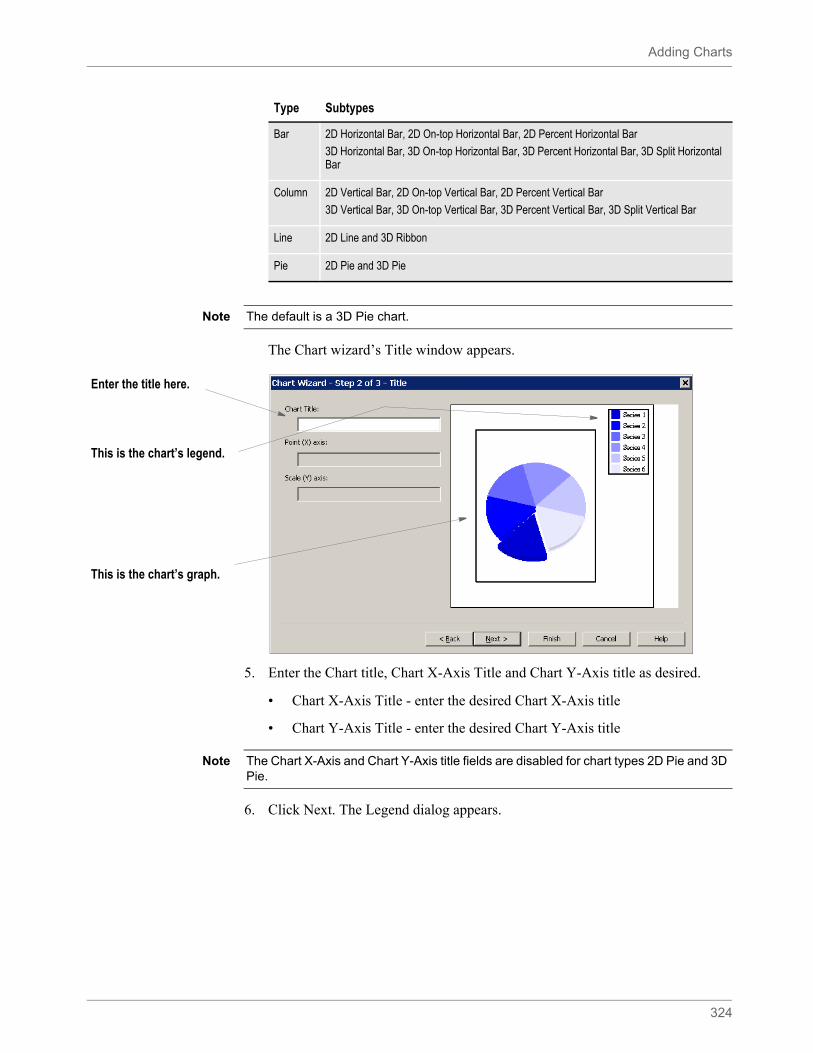
Adding Charts
324
The Chart wizard’s Title window appears.
5. Enter the Chart title, Chart X-Axis Title and Chart Y-Axis title as desired.
• Chart X-Axis Title - enter the desired Chart X-Axis title
• Chart Y-Axis Title - enter the desired Chart Y-Axis title
6. Click Next. The Legend dialog appears.
Bar 2D Horizontal Bar, 2D On-top Horizontal Bar, 2D Percent Horizontal Bar
3D Horizontal Bar, 3D On-top Horizontal Bar, 3D Percent Horizontal Bar, 3D Split Horizontal Bar
Column 2D Vertical Bar, 2D On-top Vertical Bar, 2D Percent Vertical Bar
3D Vertical Bar, 3D On-top Vertical Bar, 3D Percent Vertical Bar, 3D Split Vertical Bar
Line 2D Line and 3D Ribbon
Pie 2D Pie and 3D Pie
Type Subtypes
Note The default is a 3D Pie chart.
Enter the title here.
This is the chart’s legend.
This is the chart’s graph.
Note The Chart X-Axis and Chart Y-Axis title fields are disabled for chart types 2D Pie and 3D Pie.
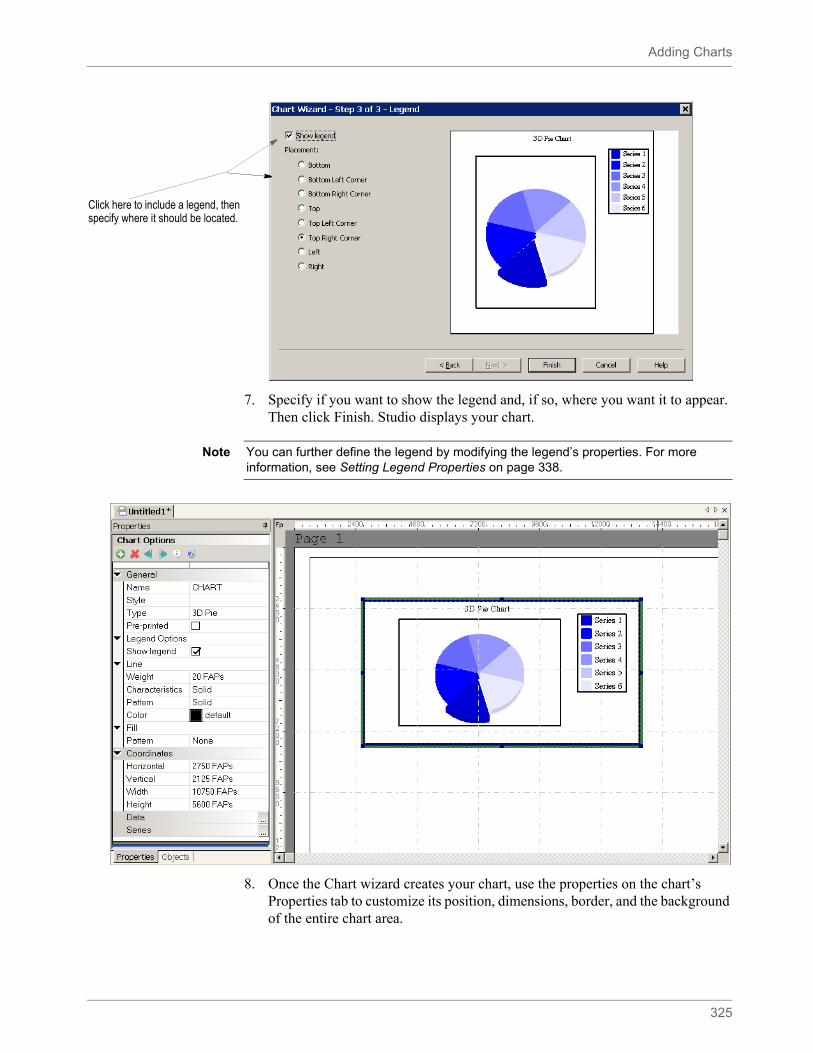
Adding Charts
325
7. Specify if you want to show the legend and, if so, where you want it to appear. Then click Finish. Studio displays your chart.
8. Once the Chart wizard creates your chart, use the properties on the chart’s Properties tab to customize its position, dimensions, border, and the background of the entire chart area.
Click here to include a legend, then specify where it should be located.
Note You can further define the legend by modifying the legend’s properties. For more information, see Setting Legend Properties on page 338.
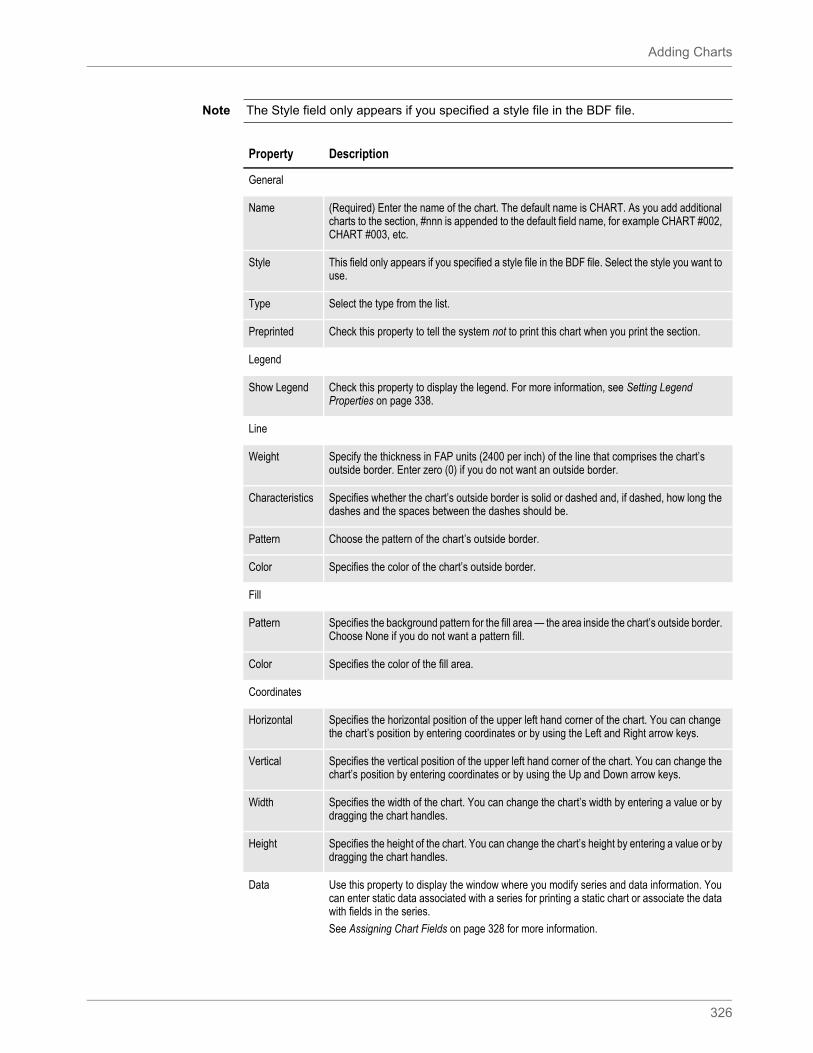
Adding Charts
326
Note The Style field only appears if you specified a style file in the BDF file.
Property Description
General
Name (Required) Enter the name of the chart. The default name is CHART. As you add additional charts to the section, #nnn is appended to the default field name, for example CHART #002, CHART #003, etc.
Style This field only appears if you specified a style file in the BDF file. Select the style you want to use.
Type Select the type from the list.
Preprinted Check this property to tell the system not to print this chart when you print the section.
Legend
Show Legend Check this property to display the legend. For more information, see Setting Legend Properties on page 338.
Line
Weight Specify the thickness in FAP units (2400 per inch) of the line that comprises the chart’s outside border. Enter zero (0) if you do not want an outside border.
Characteristics Specifies whether the chart’s outside border is solid or dashed and, if dashed, how long the dashes and the spaces between the dashes should be.
Pattern Choose the pattern of the chart’s outside border.
Color Specifies the color of the chart’s outside border.
Fill
Pattern Specifies the background pattern for the fill area — the area inside the chart’s outside border. Choose None if you do not want a pattern fill.
Color Specifies the color of the fill area.
Coordinates
Horizontal Specifies the horizontal position of the upper left hand corner of the chart. You can change the chart’s position by entering coordinates or by using the Left and Right arrow keys.
Vertical Specifies the vertical position of the upper left hand corner of the chart. You can change the chart’s position by entering coordinates or by using the Up and Down arrow keys.
Width Specifies the width of the chart. You can change the chart’s width by entering a value or by dragging the chart handles.
Height Specifies the height of the chart. You can change the chart’s height by entering a value or by dragging the chart handles.
Data Use this property to display the window where you modify series and data information. You can enter static data associated with a series for printing a static chart or associate the data with fields in the series.
See Assigning Chart Fields on page 328 for more information.
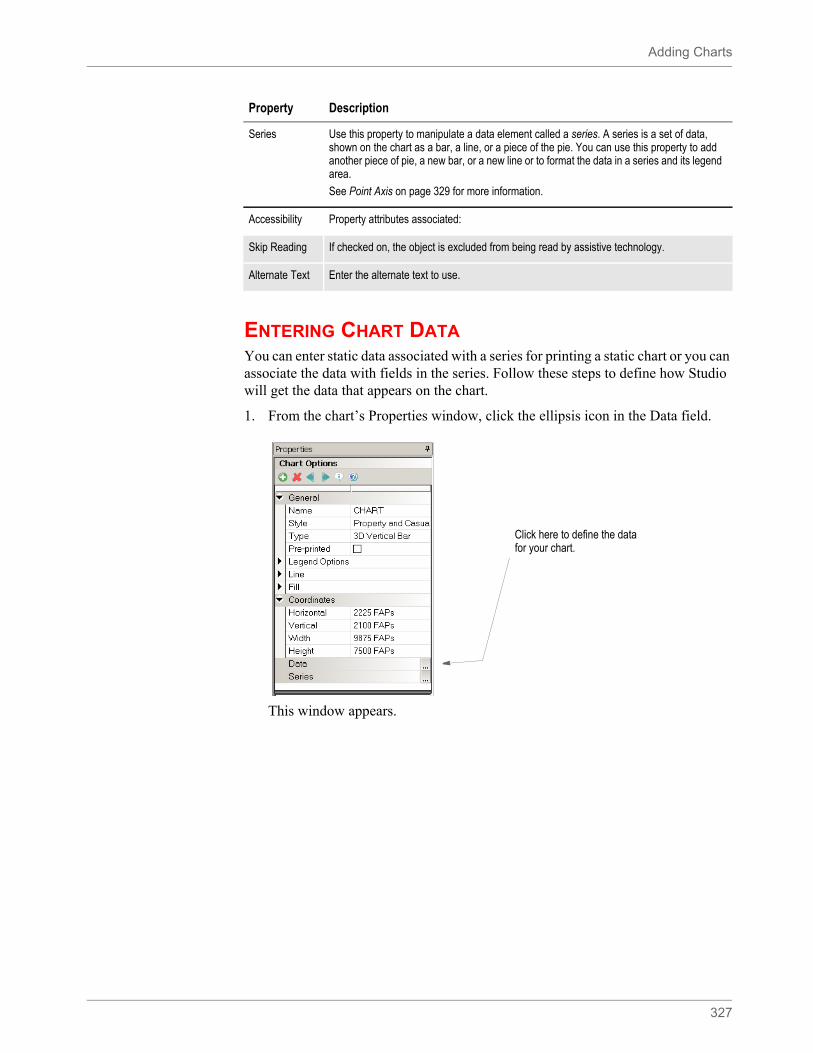
Adding Charts
327
ENTERING CHART DATAYou can enter static data associated with a series for printing a static chart or you can associate the data with fields in the series. Follow these steps to define how Studio will get the data that appears on the chart.
1. From the chart’s Properties window, click the ellipsis icon in the Data field.
This window appears.
Series Use this property to manipulate a data element called a series. A series is a set of data, shown on the chart as a bar, a line, or a piece of the pie. You can use this property to add another piece of pie, a new bar, or a new line or to format the data in a series and its legend area.
See Point Axis on page 329 for more information.
Accessibility Property attributes associated:
Skip Reading If checked on, the object is excluded from being read by assistive technology.
Alternate Text Enter the alternate text to use.
Property Description
Click here to define the data for your chart.
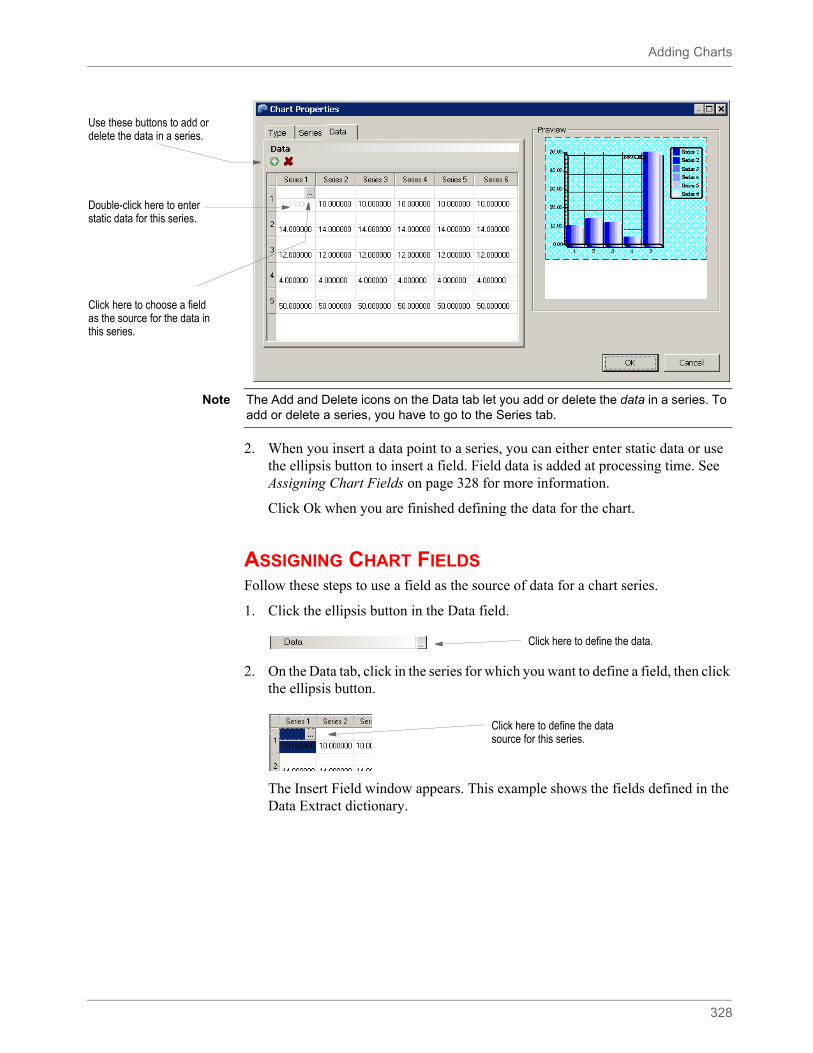
Adding Charts
328
2. When you insert a data point to a series, you can either enter static data or use the ellipsis button to insert a field. Field data is added at processing time. See Assigning Chart Fields on page 328 for more information.
Click Ok when you are finished defining the data for the chart.
ASSIGNING CHART FIELDSFollow these steps to use a field as the source of data for a chart series.
1. Click the ellipsis button in the Data field.
2. On the Data tab, click in the series for which you want to define a field, then click the ellipsis button.
The Insert Field window appears. This example shows the fields defined in the Data Extract dictionary.
Use these buttons to add or delete the data in a series.
Double-click here to enter static data for this series.
Click here to choose a field as the source for the data in this series.
Note The Add and Delete icons on the Data tab let you add or delete the data in a series. To add or delete a series, you have to go to the Series tab.
Click here to define the data.
Click here to define the data source for this series.
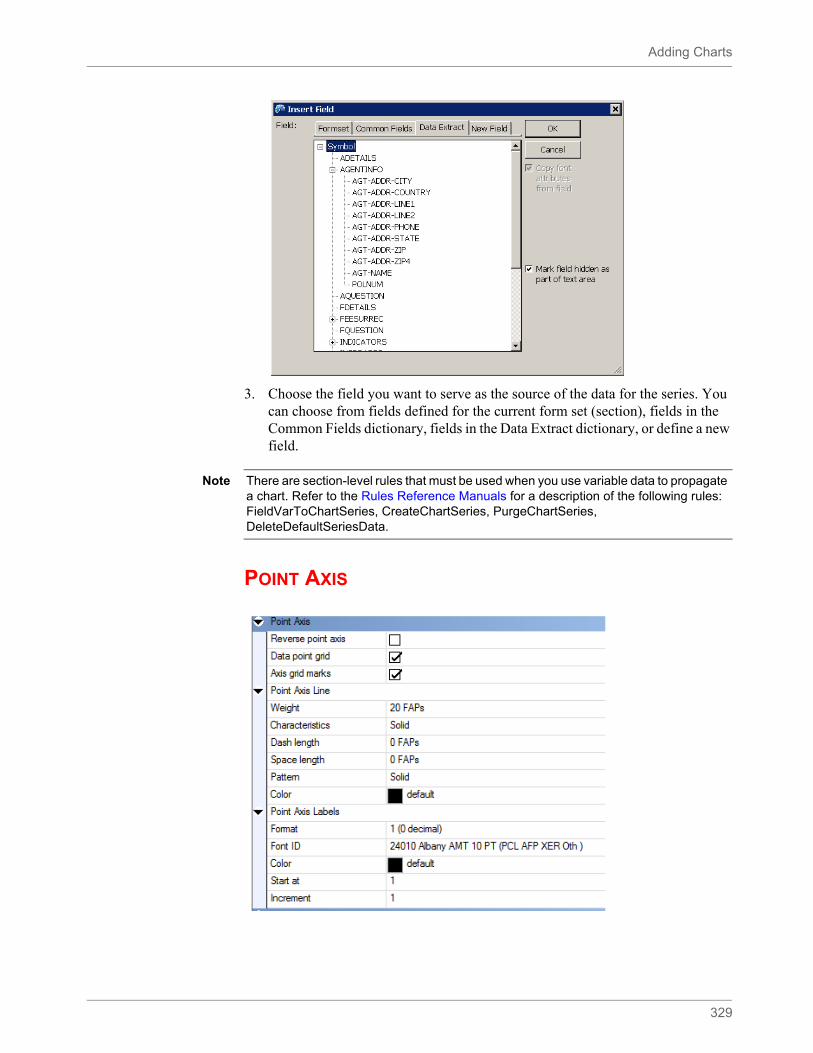
Adding Charts
329
3. Choose the field you want to serve as the source of the data for the series. You can choose from fields defined for the current form set (section), fields in the Common Fields dictionary, fields in the Data Extract dictionary, or define a new field.
POINT AXIS
Note There are section-level rules that must be used when you use variable data to propagate a chart. Refer to the Rules Reference Manuals for a description of the following rules: FieldVarToChartSeries, CreateChartSeries, PurgeChartSeries, DeleteDefaultSeriesData.
Adding Charts
330
Point Axis
Point Axis line
Defines the appearance of the point axis line.
Point Axis Labels
You can define the desired custom labels through the Custom dialog. The Custom dialog can be accessed by clicking the ellipses on the Custom Point Labels.
Parameter Description
Reverse Point Axis Reverses the order of the point axis values.
Data point grid Click this option to have the system display grids that can be used for alignment purposes.
Axis grid marks Click this option to have the system display grids you can use for alignment purposes.
Parameter Description
Weight Defines the thickness of the point axis line.
Characteristics Defines the line type of the point axis grid line. Select from Solid (point axis line is a solid line) or Dashed. (point axis line is a dashed line).
Dash length Defines the length of Dash line when Characteristics value is set to Dashed.
Space length Defines the length of the space when Characteristics value is set to Dashed.
Pattern Choose the desired line pattern for the pont axis line. Selections include solid, diagonal hatched, light, etc.
Color Choose the desired color for the point axis line.
Parameter Description
Format Use the Format field to select the way you want the system to format the text for the labels. If you want to define your own format, choose Custom and click the Custom button. If you do not want point axis labels, select None.
Note: When the format is set to Custom or None, Start At and Increment settings are not shown.
Font ID Select the desired font id for the point axis labels.
Color Select the desired color for the point axis labels.
Start At Enter a starting value in the Start Value field for the Point Axis label. The Start At value is based on the selected Format.
Increment Enter an increment value for the Point Axis Labels.
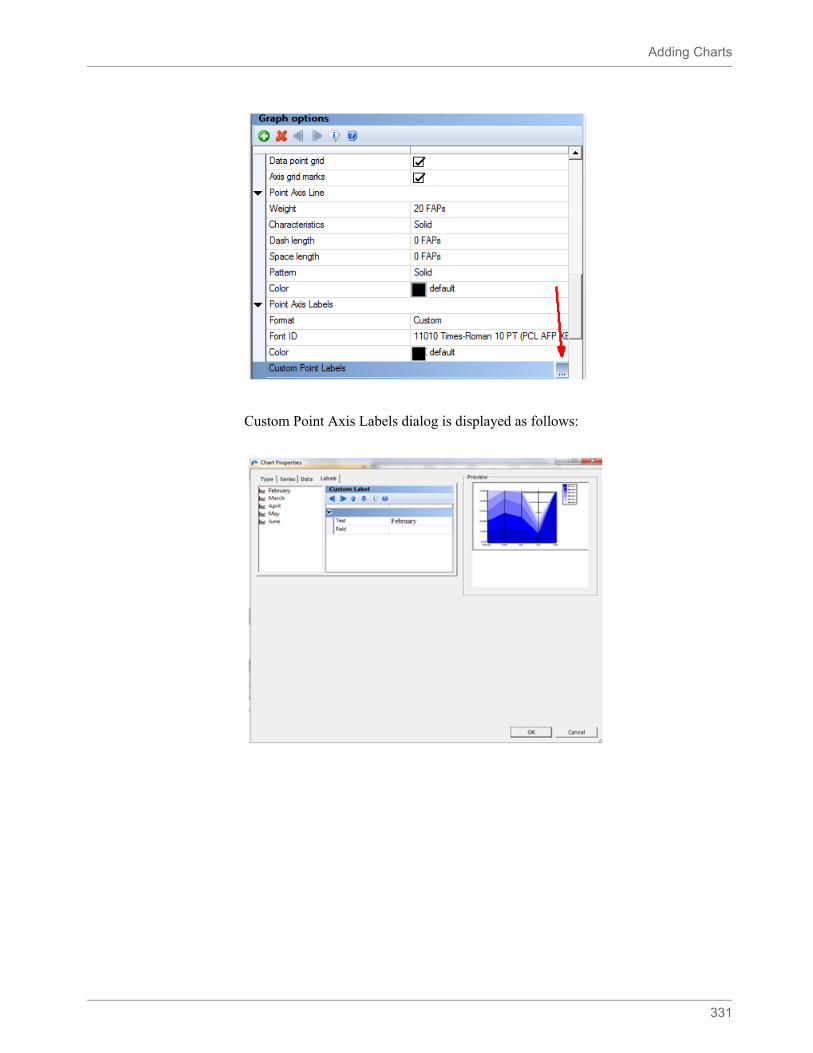
Adding Charts
331
Custom Point Axis Labels dialog is displayed as follows:
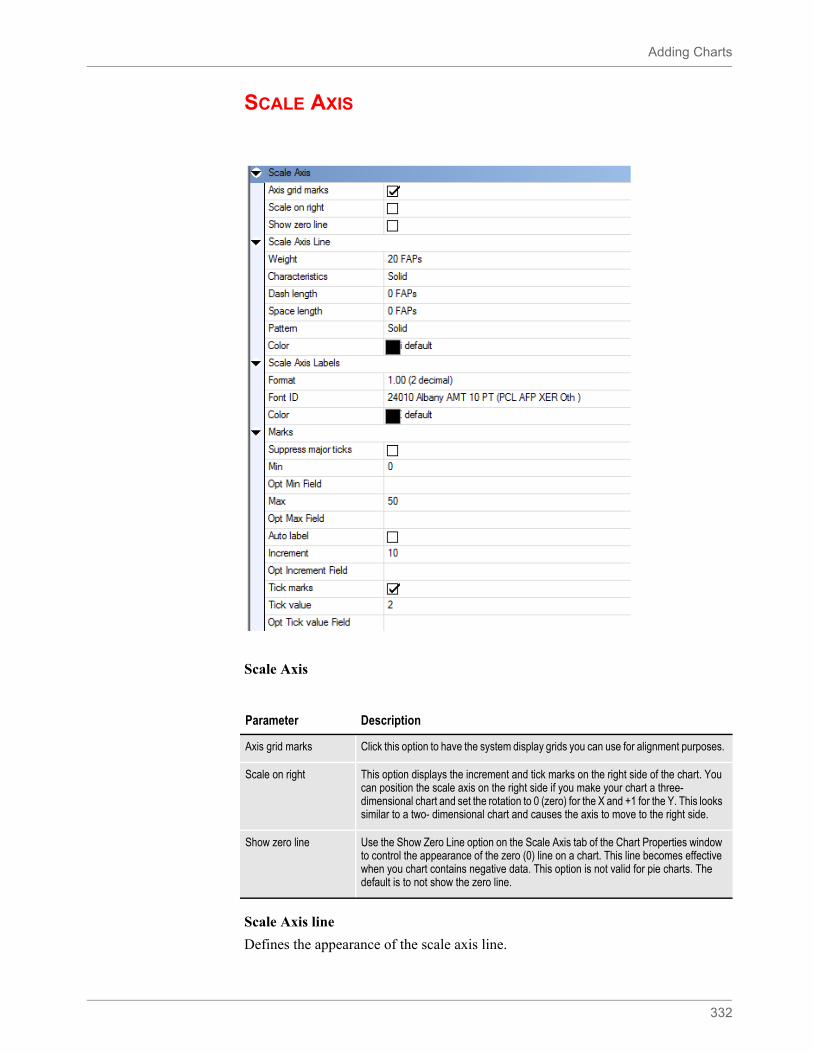
Adding Charts
332
SCALE AXIS
Scale Axis
Scale Axis line
Defines the appearance of the scale axis line.
Parameter Description
Axis grid marks Click this option to have the system display grids you can use for alignment purposes.
Scale on right This option displays the increment and tick marks on the right side of the chart. You can position the scale axis on the right side if you make your chart a three-dimensional chart and set the rotation to 0 (zero) for the X and +1 for the Y. This looks similar to a two- dimensional chart and causes the axis to move to the right side.
Show zero line Use the Show Zero Line option on the Scale Axis tab of the Chart Properties window to control the appearance of the zero (0) line on a chart. This line becomes effective when you chart contains negative data. This option is not valid for pie charts. The default is to not show the zero line.
Adding Charts
333
Scale Axis Labels
Marks
Parameter Description
Weight Defines the thickness of the scale axis line.
Characteristics Defines the line type of the scale axis grid line. Select from Solid (scale axis line is a solid line) or Dashed.
(scale axis line is a dashed line).
Dash length Defines the length of Dash line when Characteristics value is set to Dashed.
Space length Defines the length of the space when Characteristics value is set to Dashed.
Pattern Choose the desired line pattern for the scale axis line. Selections include solid, diagonal hatched, light, etc.
Color Choose the desired color for the point axis line.
Parameter Description
Format Use the Format field to select the way you want the system to format the text for the labels.
Font ID Choose the desired font ID for the point axis labels.
Color Choose the desired color for the point axis labels.
Parameter Description
Suppress major ticks Select this option to suppress the tick marks which appear between the increment labels and the scale axis.
Min Specify the minimum tick mark value
Opt Min Field Specify the field whose value will be used for the minimum tick value.
Max Specify the maximum tick value.
Opt Max Field Specify the field whose value will be used for the maximum tick value.
Auto Label Lets you choose the number of labels to display beside a chart. You can use this feature for all charts, except pie and percent charts.
You must enter a value other than zero in the Increments field.
The range is divided up to determine a suitable increment. It is unlikely that the range will always divide evenly. This means the increment may vary between lines.
Increment Used in conjunction with Auto label setting. Specifies the incremental value for labels.
Opt increment field Specify the field whose value will be used for the incremental value.
Tick mark Select this option to suppress minimum tick marks.
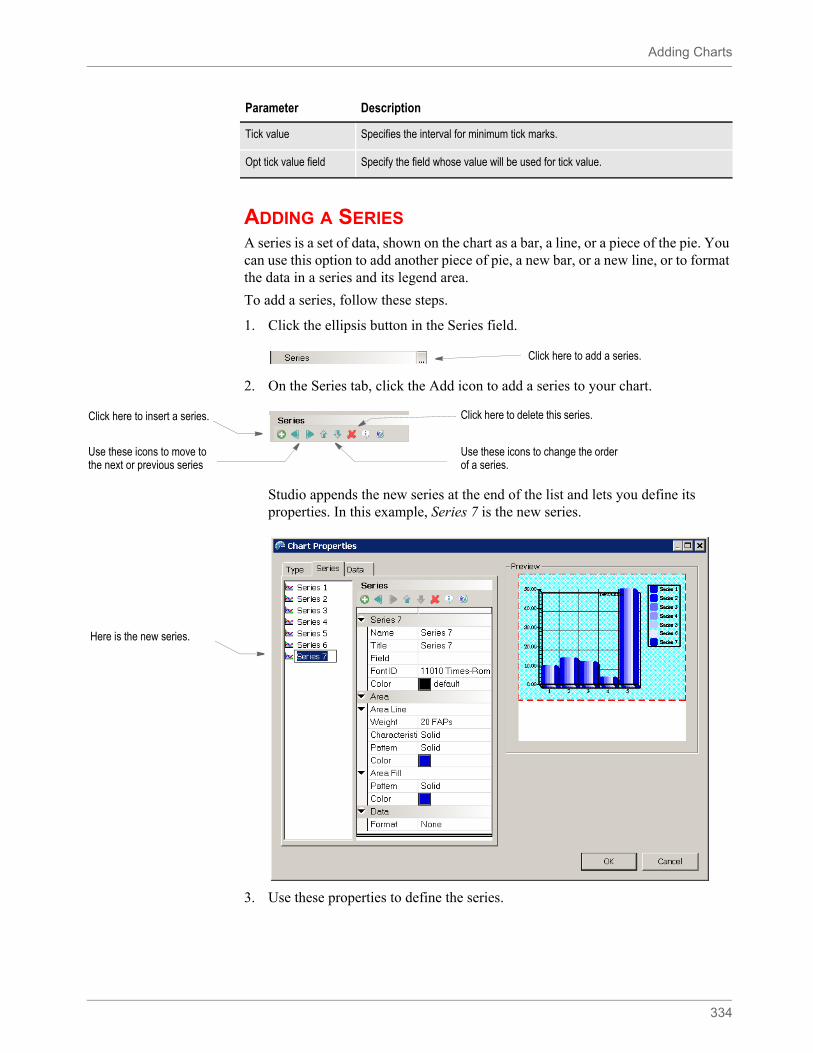
Adding Charts
334
ADDING A SERIESA series is a set of data, shown on the chart as a bar, a line, or a piece of the pie. You can use this option to add another piece of pie, a new bar, or a new line, or to format the data in a series and its legend area.
To add a series, follow these steps.
1. Click the ellipsis button in the Series field.
2. On the Series tab, click the Add icon to add a series to your chart.
Studio appends the new series at the end of the list and lets you define its properties. In this example, Series 7 is the new series.
3. Use these properties to define the series.
Tick value Specifies the interval for minimum tick marks.
Opt tick value field Specify the field whose value will be used for tick value.
Parameter Description
Click here to add a series.
Click here to delete this series.Click here to insert a series.
Use these icons to move to the next or previous series
Use these icons to change the order of a series.
Here is the new series.
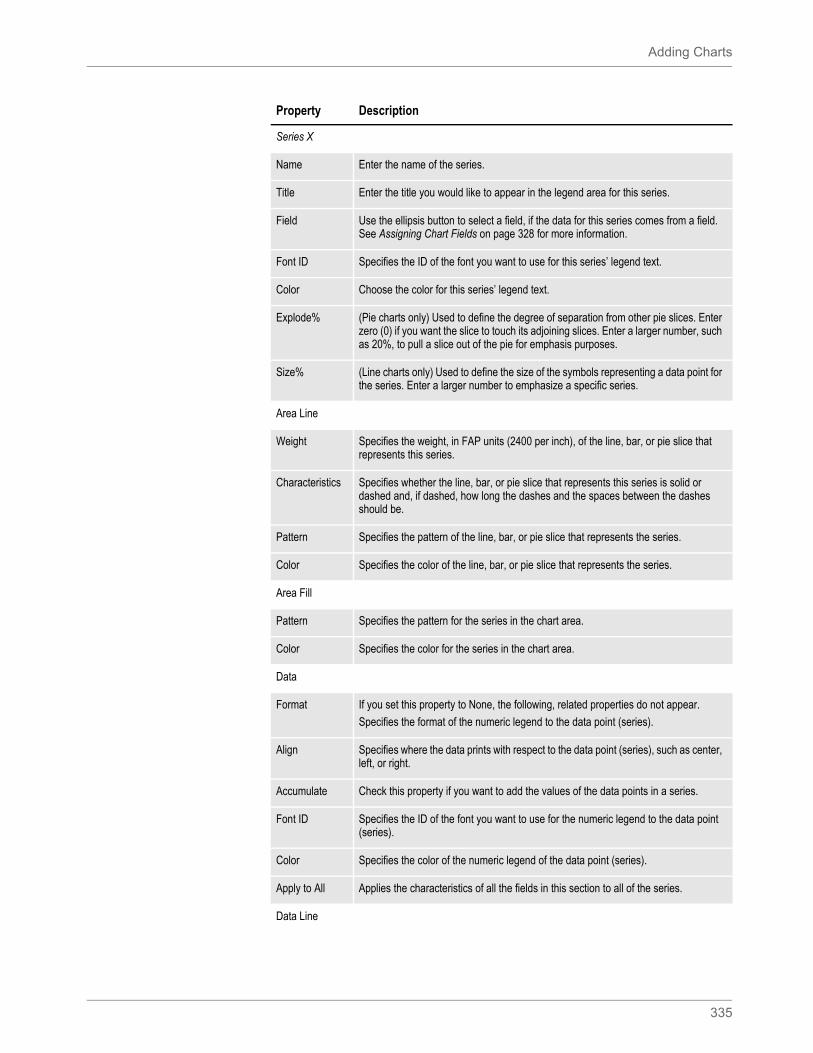
Adding Charts
335
Property Description
Series X
Name Enter the name of the series.
Title Enter the title you would like to appear in the legend area for this series.
Field Use the ellipsis button to select a field, if the data for this series comes from a field. See Assigning Chart Fields on page 328 for more information.
Font ID Specifies the ID of the font you want to use for this series’ legend text.
Color Choose the color for this series’ legend text.
Explode% (Pie charts only) Used to define the degree of separation from other pie slices. Enter zero (0) if you want the slice to touch its adjoining slices. Enter a larger number, such as 20%, to pull a slice out of the pie for emphasis purposes.
Size% (Line charts only) Used to define the size of the symbols representing a data point for the series. Enter a larger number to emphasize a specific series.
Area Line
Weight Specifies the weight, in FAP units (2400 per inch), of the line, bar, or pie slice that represents this series.
Characteristics Specifies whether the line, bar, or pie slice that represents this series is solid or dashed and, if dashed, how long the dashes and the spaces between the dashes should be.
Pattern Specifies the pattern of the line, bar, or pie slice that represents the series.
Color Specifies the color of the line, bar, or pie slice that represents the series.
Area Fill
Pattern Specifies the pattern for the series in the chart area.
Color Specifies the color for the series in the chart area.
Data
Format If you set this property to None, the following, related properties do not appear.
Specifies the format of the numeric legend to the data point (series).
Align Specifies where the data prints with respect to the data point (series), such as center, left, or right.
Accumulate Check this property if you want to add the values of the data points in a series.
Font ID Specifies the ID of the font you want to use for the numeric legend to the data point (series).
Color Specifies the color of the numeric legend of the data point (series).
Apply to All Applies the characteristics of all the fields in this section to all of the series.
Data Line
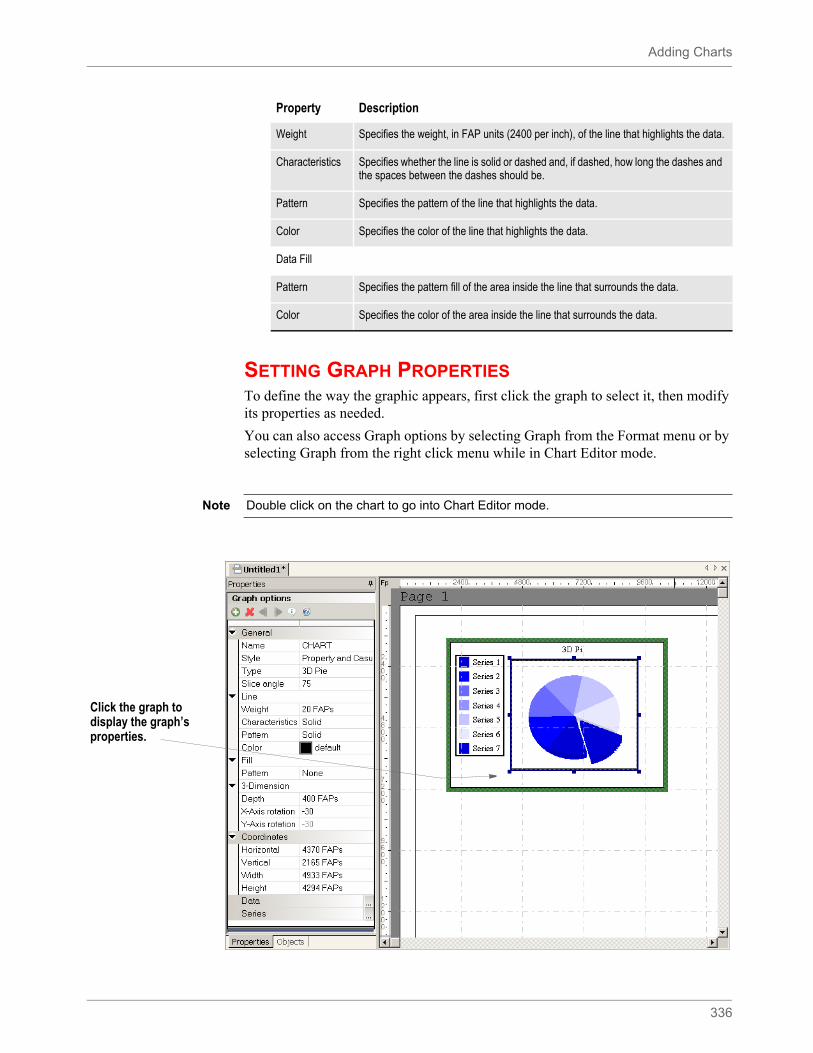
Adding Charts
336
SETTING GRAPH PROPERTIESTo define the way the graphic appears, first click the graph to select it, then modify its properties as needed.
You can also access Graph options by selecting Graph from the Format menu or by selecting Graph from the right click menu while in Chart Editor mode.
Weight Specifies the weight, in FAP units (2400 per inch), of the line that highlights the data.
Characteristics Specifies whether the line is solid or dashed and, if dashed, how long the dashes and the spaces between the dashes should be.
Pattern Specifies the pattern of the line that highlights the data.
Color Specifies the color of the line that highlights the data.
Data Fill
Pattern Specifies the pattern fill of the area inside the line that surrounds the data.
Color Specifies the color of the area inside the line that surrounds the data.
Property Description
Note Double click on the chart to go into Chart Editor mode.
Click the graph to display the graph’s properties.
Adding Charts
337
Use these properties to define the chart’s graph:
Property Description
General
Name The chart name appears here.
Style This field only appears if you specified a style file in the BDF file. Select the style you want to use.
Type Select the type from the list.
Slice Angle Use the First Slice Angle field for 2D and 3D pie charts. Enter the degree at which you want the first slice to begin in the First Slice Angle field. The default is zero (0), which means the first slice begins at the 3 o'clock position. If you enter 90, the first slice begins at the 6 o'clock position. Entering 180 starts the slice at the 9 o'clock position, and so on.
Line
Weight Specifies the weight, in FAP units (2400 per inch), of the line around the graph.
Characteristics Specifies whether the line is solid or dashed and, if dashed, how long the dashes and the spaces between the dashes should be.
Pattern Specifies the pattern of the line.
Color Specifies the color of the line.
Fill
Pattern Specifies the pattern of fill area for the graph.
3-Dimension The 3-Dimension group and settings display when the chart type is one of the 3D chart types.
Depth The depth refers to the thickness of the 3D object to be drawn. The thickness determines the size of the profile revealed during rotation of the X- or Y-axis.
X-Axis rotation Enter a value between 0 and -90.
Y-Axis rotation Enter a value between 0 and -90.
Note: The 3D pie chart only allows zero (0) degree to -90 degree rotation on X direction. No Y rotation is allowed. If you choose zero degrees, the result looks like a 2D pie chart. Negative 90 (-90) degrees looks like a flat line.
Coordinates
Horizontal Specifies the horizontal position of the upper left hand corner of the graph. You can change the graph’s position by entering coordinates or by using the Left and Right arrow keys.
Vertical Specifies the vertical position of the upper left hand corner of the graph. You can change the graph’s position by entering coordinates or by using the Up and Down arrow keys.
Width Specifies the width of the graph. You can change the graph’s width by entering a value or by dragging the graph’s handles.
Height Specifies the height of the graph. You can change the graph’s height by entering a value or by dragging the graph’s handles.

Adding Charts
338
Rotating the Axis
Charts typically have two axes that are used to measure and categorize data: a vertical value (y) axis, and a horizontal category (x) axis. The rotation follows the right hand rule with the X axis pointing to the right and the Y axis pointing up. When both the X and Y rotations are set to zero (0) degrees, the 3D chart looks like a 2D chart.
To understand the system of 3-dimensional rotation, imagine that you are holding a book in front of you such that you can only see the front cover. This is equivalent to 2-D or zero (0) degree axis rotation.
• If you tip the book backwards, you begin to see the bottom of the book. This is negative X axis rotation. A -90 degree X axis rotation is analogous to tipping the book backward until you can only see the bottom of the book.
• Return the book to vertical (0 degrees). If you begin tipping forwards, you begin to see the top of the book. This is positive X axis rotation. A +90 degree X-axis rotation is analogous to rotating the book so that you can only see the top of the book.
• Now return the book to vertical again. If you begin turning the book counter-clockwise, you will see the bound side of the book. This is positive Y axis rotation.
• Conversely, if you turned clockwise, you would begin to see the pages side of the book. This is negative Y axis rotation.
• Continuing until you can only see the bound or pages side of the book is analogous to a plus or minus 90 degrees rotation of the Y axis.
• The split type of charts allow -90 to 90 degree rotation in both X and Y directions. The rotation is done by first applying X rotation then applying Y rotation on the rotated Y axis.
• The remaining 3D charts also allow -90 to 90 degree rotation in both X and Y directions. The two rotations are, however, independent of each other. The chart’s Y axis will be drawn at the left hand side for negative Y rotation and drawn at the right hand side for positive Y rotation.
• For X rotation, positive degree is more common. You will see the bottom surface (X axis) if you have a negative X rotation (because you are looking the chart from under its bottom).
SETTING LEGEND PROPERTIESTo set properties for the chart’s legend, first click the legend to select it, then modify its properties as necessary.
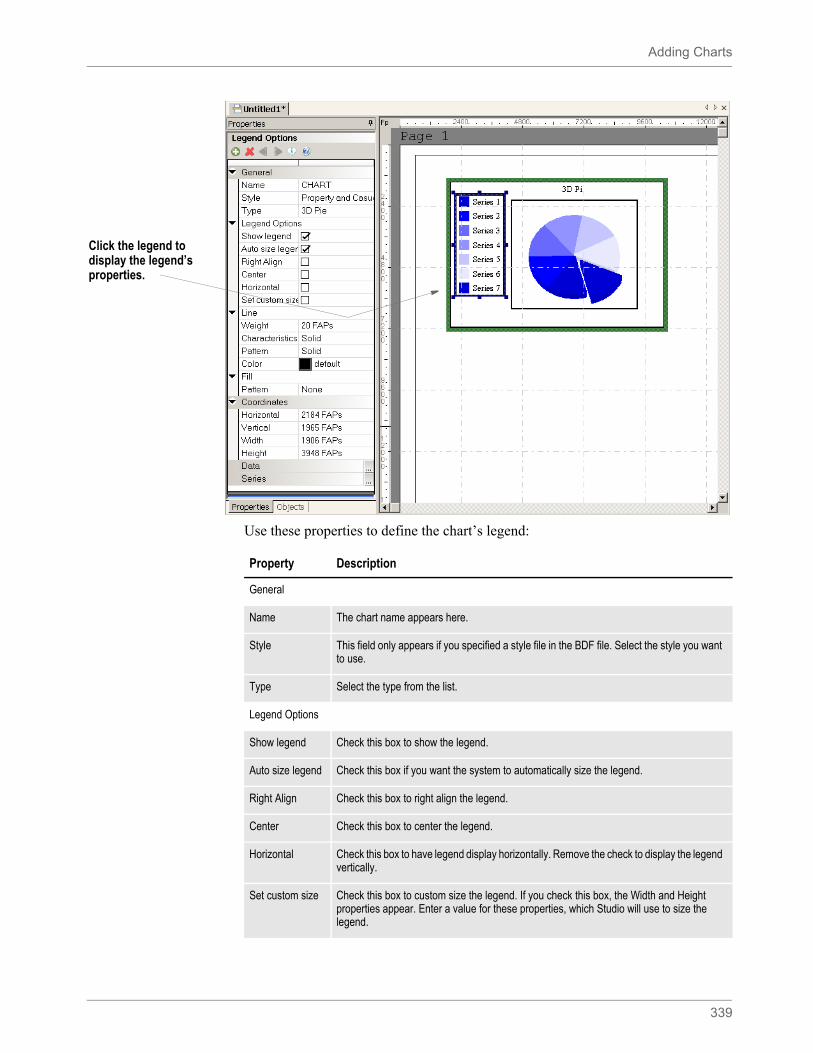
Adding Charts
339
Use these properties to define the chart’s legend:
Click the legend to display the legend’s properties.
Property Description
General
Name The chart name appears here.
Style This field only appears if you specified a style file in the BDF file. Select the style you want to use.
Type Select the type from the list.
Legend Options
Show legend Check this box to show the legend.
Auto size legend Check this box if you want the system to automatically size the legend.
Right Align Check this box to right align the legend.
Center Check this box to center the legend.
Horizontal Check this box to have legend display horizontally. Remove the check to display the legend vertically.
Set custom size Check this box to custom size the legend. If you check this box, the Width and Height properties appear. Enter a value for these properties, which Studio will use to size the legend.
Adding Charts
340
Combining Charts
Studio lets you generate output that combines certain types of charts. For instance, you can link a 2D line chart to a 2D vertical bar, 2D line, or a 3D vertical bar chart.
To combine charts, create the two charts you want to link then follow these instructions:
1. Double click of the charts to display the chart’s properties.
Line
Weight Specifies the weight, in FAP units (2400 per inch), of the line around the legend.
Characteristics Specifies whether the line is solid or dashed and, if dashed, how long the dashes and the spaces between the dashes should be.
Pattern Specifies the pattern of the line.
Color Specifies the color of the line.
Fill
Pattern Specifies the pattern of fill in legend area.
Coordinates
Horizontal Specifies the horizontal position of the upper left hand corner of the legend. You can change the legend’s position by entering coordinates or by using the Left and Right arrow keys.
Vertical Specifies the vertical position of the upper left hand corner of the legend. You can change the legend’s position by entering coordinates or by using the Up and Down arrow keys.
Width Specifies the width of the legend. You can change the legend’s width by entering a value or by dragging the legend’s handles.
Height Specifies the height of the legend. You can change the legend’s height by entering a value or by dragging the legend’s handles.
Property Description
Note At runtime, the system starts drawing the first slice of a pie chart at zero (0) degrees.To specify the angle at which the system starts drawing slices, make the following entry in the INI file:
< Control >FirstPieSliceAngle = XXX
Where XXX represents the angle degree, from zero (0) to 359.
You can use the Manage, System, Settings option to set this INI option.
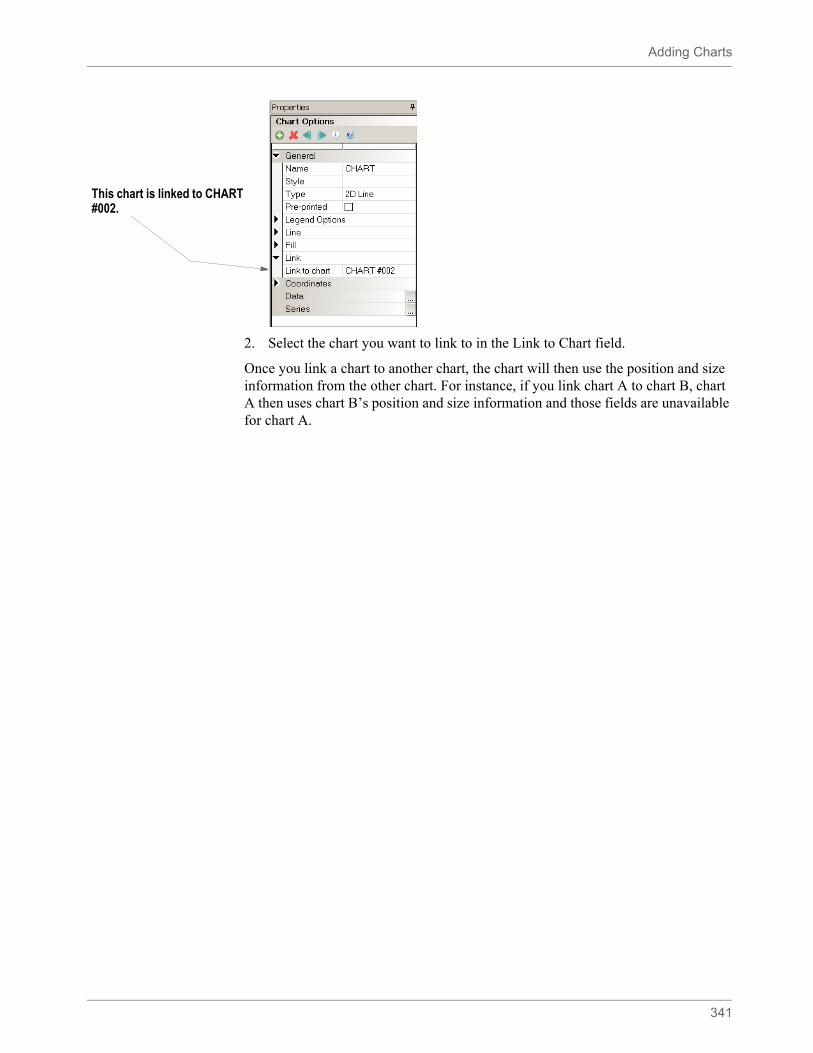
Adding Charts
341
2. Select the chart you want to link to in the Link to Chart field.
Once you link a chart to another chart, the chart will then use the position and size information from the other chart. For instance, if you link chart A to chart B, chart A then uses chart B’s position and size information and those fields are unavailable for chart A.
This chart is linked to CHART #002.
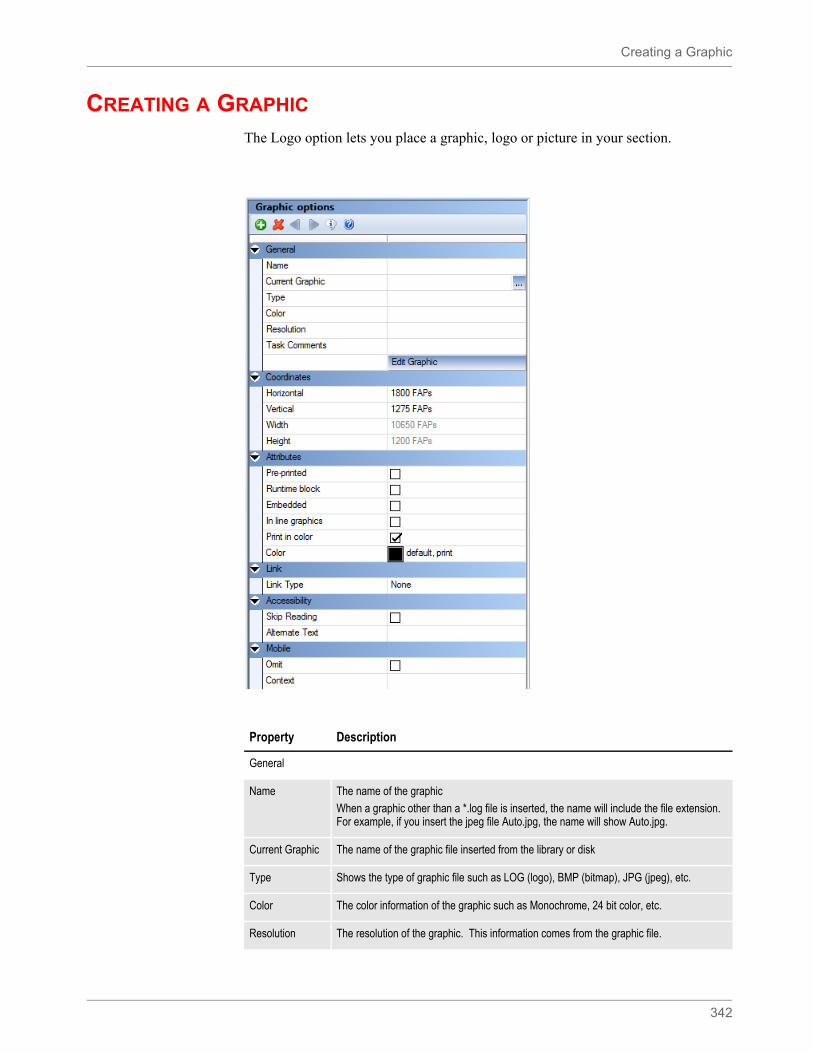
Creating a Graphic
342
CREATING A GRAPHIC The Logo option lets you place a graphic, logo or picture in your section.
Property Description
General
Name The name of the graphic
When a graphic other than a *.log file is inserted, the name will include the file extension. For example, if you insert the jpeg file Auto.jpg, the name will show Auto.jpg.
Current Graphic The name of the graphic file inserted from the library or disk
Type Shows the type of graphic file such as LOG (logo), BMP (bitmap), JPG (jpeg), etc.
Color The color information of the graphic such as Monochrome, 24 bit color, etc.
Resolution The resolution of the graphic. This information comes from the graphic file.
Creating a Graphic
343
Task Comments (Optional) Can be used to provide additional information about the graphic to other individuals or for notes about the graphic. Task comments can also be added to graphics inserted in a Documaker document using the Oracle Word Ad-In product. Those comments are listed on the graphic in the converted section or paragraph created by converting the Documaker document using Studio’s Conversion Manager.
Edit Graphic Launches Graphic Manager
Coordinates
Horizontal The horizontal (left) starting position
Vertical The vertical (top) starting position
Width The width of the graphic
Height The height of the graphic
Attributes
Preprinted Click this option to tell the system NOT to print the graphic when the Section is printed
Runtime block Check the Runtime Block field to prevent the logo from being merged with the section when the form is processed by Documaker Server. By blocking the logo, you can prevent someone from cutting the logo from the form and pasting it into another document.
Embedded When this option is checked, the graphic is embedded within this section. Remove the checkmark to invoke the Unembed Resource Wizard which will allow you to select a graphic from disk or library, save the graphic to disk or unembed the graphic only
In line graphics Check this option if you do not wish to use pre-existing renderings of the bitmap on the printer where stock resources are stored.
Print in color If you want the object to print in this color, click in the Print in color field.
Color The color to use for single-color bitmaps.
Link
Link Type Choose from none, external, internal or target hyperlinks.
Link Border Select the type of border (if any) to draw around the hyperlink (PDF only).
Border options include Dash, Solid, Underline or None.
HTML Reference
The web page address, for example http://www.oracle.com
Parameters Use this field when producing HTML output to specify additional parameters to an HREF type link such as a target frame or mouse over behavior.
Property Description
Accessibility
Skip Reading If checked on, the graphic is excluded from being read by assistive technology. This setting is not used for graphics.
Property Description

Creating a Graphic
344
Alternate Text Enter the alternate text to use.
Property Description
Mobile
Omit Select this check box if you do not want the graphic to be included in the Mobile Output.
Context Pick from a list of available tags or add a new one for the graphic object.
Property Description
Note Mobile options require Documaker Mobile. If you have not purchased and installed Documaker Mobile, the required Mobile options will be disabled. To purchase Documaker Mobile, visit My Oracle Support website or contact your Oracle Sales representative.
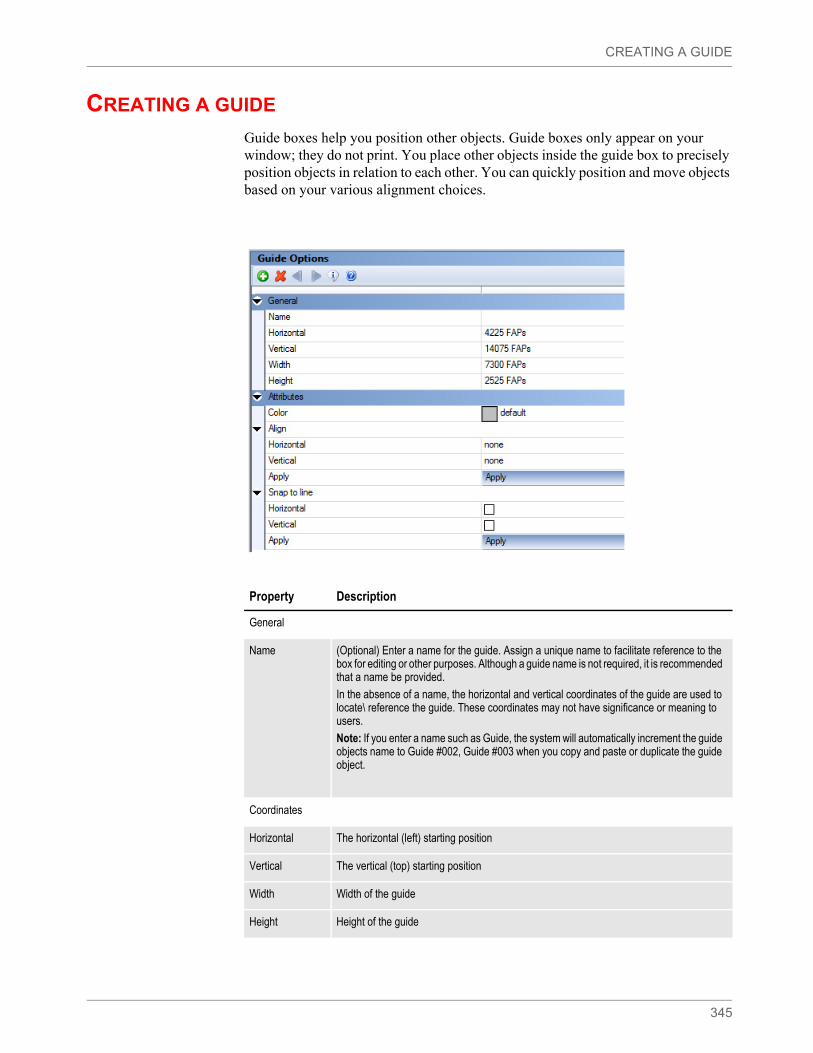
CREATING A GUIDE
345
CREATING A GUIDE
Guide boxes help you position other objects. Guide boxes only appear on your window; they do not print. You place other objects inside the guide box to precisely position objects in relation to each other. You can quickly position and move objects based on your various alignment choices.
Property Description
General
Name (Optional) Enter a name for the guide. Assign a unique name to facilitate reference to the box for editing or other purposes. Although a guide name is not required, it is recommended that a name be provided.
In the absence of a name, the horizontal and vertical coordinates of the guide are used to locate\ reference the guide. These coordinates may not have significance or meaning to users.
Note: If you enter a name such as Guide, the system will automatically increment the guide objects name to Guide #002, Guide #003 when you copy and paste or duplicate the guide object.
Coordinates
Horizontal The horizontal (left) starting position
Vertical The vertical (top) starting position
Width Width of the guide
Height Height of the guide
CREATING A GUIDE
346
Attributes
Color Select the color or use the default.
Align
Horizontal Center - centers the object horizontally within the guide. The object’s vertical position remains the same.
Left - moves objects to the far left border of the guide. The object will retain its original vertical position, only the horizontal position changes.
None – the object remains where it is placed in the guide.
Right - moves objects to the far right border of the guide. The object will retain its original vertical position, only the horizontal position changes.
Vertical Bottom - moves the object to the bottom of the guide. The bottom-most part of the object(s) rest on the bottom of the guide. The object retains it original horizontal position, only the vertical position changes.
Center - centers the object vertically within the guide. The object’s horizontal position remains the same.
None - the object remains where it is placed in the guide.
Top - moves the object to the top of the guide. The object retains its original horizontal position, only the vertical position changes.
Apply Click Apply after making changes to the changes to Align (Vertical and\ or Horizontal) to apply those changes
If you do not click Apply after making changes, those changes are applied only to the newly inserted objects within the guide box.
Subsequent changes to Align (Vertical and\ or Horizontal) settings will need to have Apply selected again to have those revisions take effect.
Snap to line
Horizontal Snaps the object to the width of the guide. Does not apply to, bar codes, charts, fields, logos, notes, text areas, text labels and vertical lines.
Vertical Snaps the object to the length of the guide box. Does not apply to bar codes, charts, horizontal lines, fields, logos, notes, text areas and text labels.
Apply Click Apply after making changes to the changes to Snap to Line (Vertical and\ or Horizontal) to apply those changes
If you do not click Apply after making changes, those changes are applied only to the newly inserted objects within the guide box.
Subsequent changes to Snap to Line (Vertical and\ or Horizontal) settings will need to have Apply selected again to have those revisions take effect.
Property Description
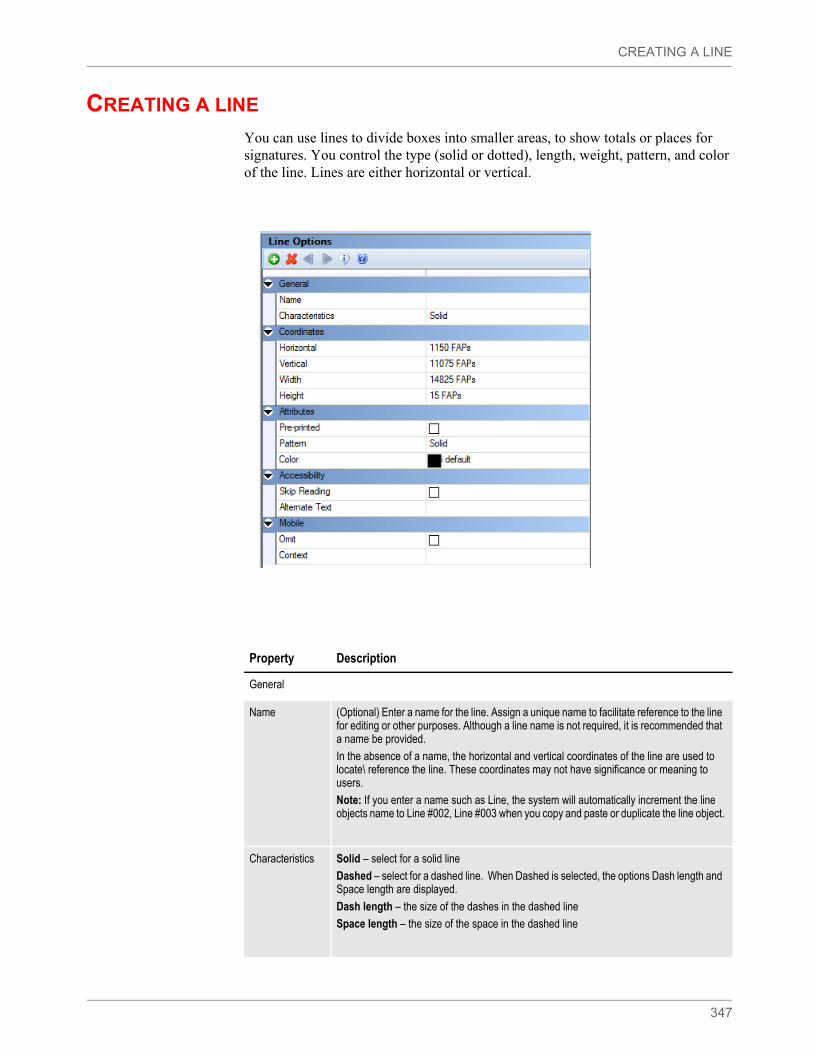
CREATING A LINE
347
CREATING A LINE
You can use lines to divide boxes into smaller areas, to show totals or places for signatures. You control the type (solid or dotted), length, weight, pattern, and color of the line. Lines are either horizontal or vertical.
Property Description
General
Name (Optional) Enter a name for the line. Assign a unique name to facilitate reference to the line for editing or other purposes. Although a line name is not required, it is recommended that a name be provided.
In the absence of a name, the horizontal and vertical coordinates of the line are used to locate\ reference the line. These coordinates may not have significance or meaning to users.
Note: If you enter a name such as Line, the system will automatically increment the line objects name to Line #002, Line #003 when you copy and paste or duplicate the line object.
Characteristics Solid – select for a solid line
Dashed – select for a dashed line. When Dashed is selected, the options Dash length and Space length are displayed.
Dash length – the size of the dashes in the dashed line
Space length – the size of the space in the dashed line
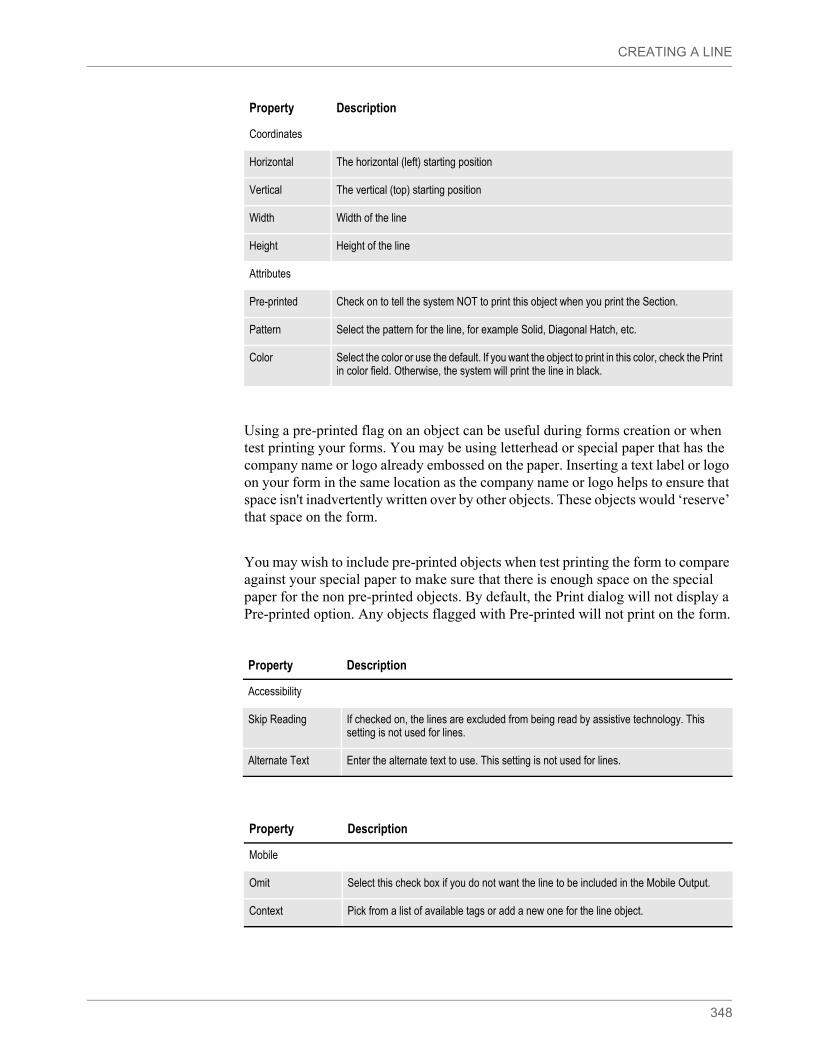
CREATING A LINE
348
Using a pre-printed flag on an object can be useful during forms creation or when test printing your forms. You may be using letterhead or special paper that has the company name or logo already embossed on the paper. Inserting a text label or logo on your form in the same location as the company name or logo helps to ensure that space isn't inadvertently written over by other objects. These objects would ‘reserve’ that space on the form.
You may wish to include pre-printed objects when test printing the form to compare against your special paper to make sure that there is enough space on the special paper for the non pre-printed objects. By default, the Print dialog will not display a Pre-printed option. Any objects flagged with Pre-printed will not print on the form.
Coordinates
Horizontal The horizontal (left) starting position
Vertical The vertical (top) starting position
Width Width of the line
Height Height of the line
Attributes
Pre-printed Check on to tell the system NOT to print this object when you print the Section.
Pattern Select the pattern for the line, for example Solid, Diagonal Hatch, etc.
Color Select the color or use the default. If you want the object to print in this color, check the Print in color field. Otherwise, the system will print the line in black.
Property Description
Accessibility
Skip Reading If checked on, the lines are excluded from being read by assistive technology. This setting is not used for lines.
Alternate Text Enter the alternate text to use. This setting is not used for lines.
Property Description
Mobile
Omit Select this check box if you do not want the line to be included in the Mobile Output.
Context Pick from a list of available tags or add a new one for the line object.
Property Description

CREATING A LINE
349
Note Mobile options require Documaker Mobile. If you have not purchased and installed Documaker Mobile, the required Mobile options will be disabled. To purchase Documaker Mobile, visit My Oracle Support website or contact your Oracle Sales representative.
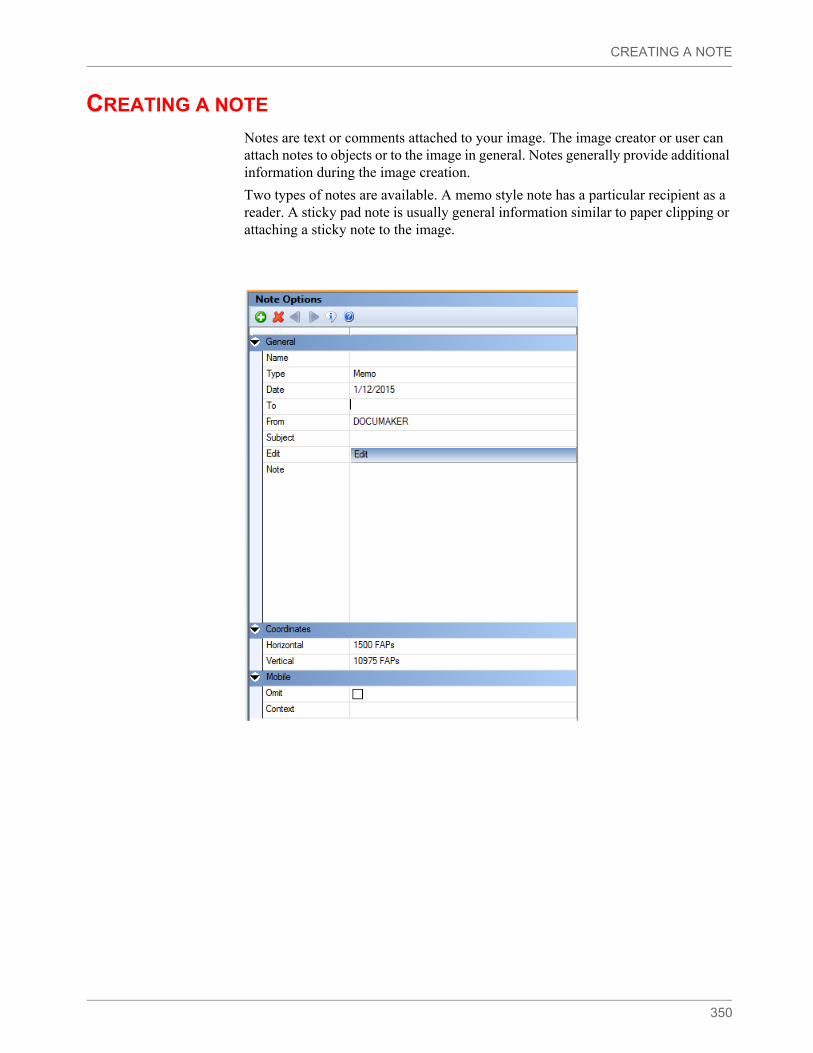
CREATING A NOTE
350
CREATING A NOTE
Notes are text or comments attached to your image. The image creator or user can attach notes to objects or to the image in general. Notes generally provide additional information during the image creation.
Two types of notes are available. A memo style note has a particular recipient as a reader. A sticky pad note is usually general information similar to paper clipping or attaching a sticky note to the image.
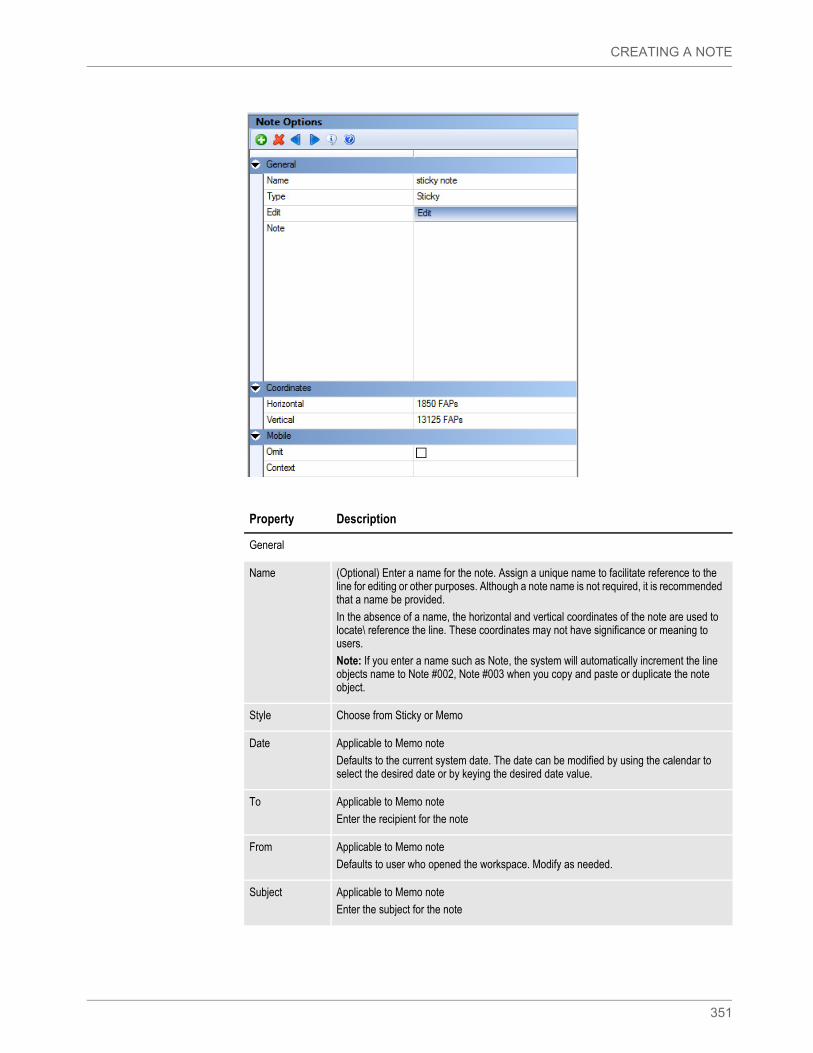
CREATING A NOTE
351
Property Description
General
Name (Optional) Enter a name for the note. Assign a unique name to facilitate reference to the line for editing or other purposes. Although a note name is not required, it is recommended that a name be provided.
In the absence of a name, the horizontal and vertical coordinates of the note are used to locate\ reference the line. These coordinates may not have significance or meaning to users.
Note: If you enter a name such as Note, the system will automatically increment the line objects name to Note #002, Note #003 when you copy and paste or duplicate the note object.
Style Choose from Sticky or Memo
Date Applicable to Memo note
Defaults to the current system date. The date can be modified by using the calendar to select the desired date or by keying the desired date value.
To Applicable to Memo note
Enter the recipient for the note
From Applicable to Memo note
Defaults to user who opened the workspace. Modify as needed.
Subject Applicable to Memo note
Enter the subject for the note
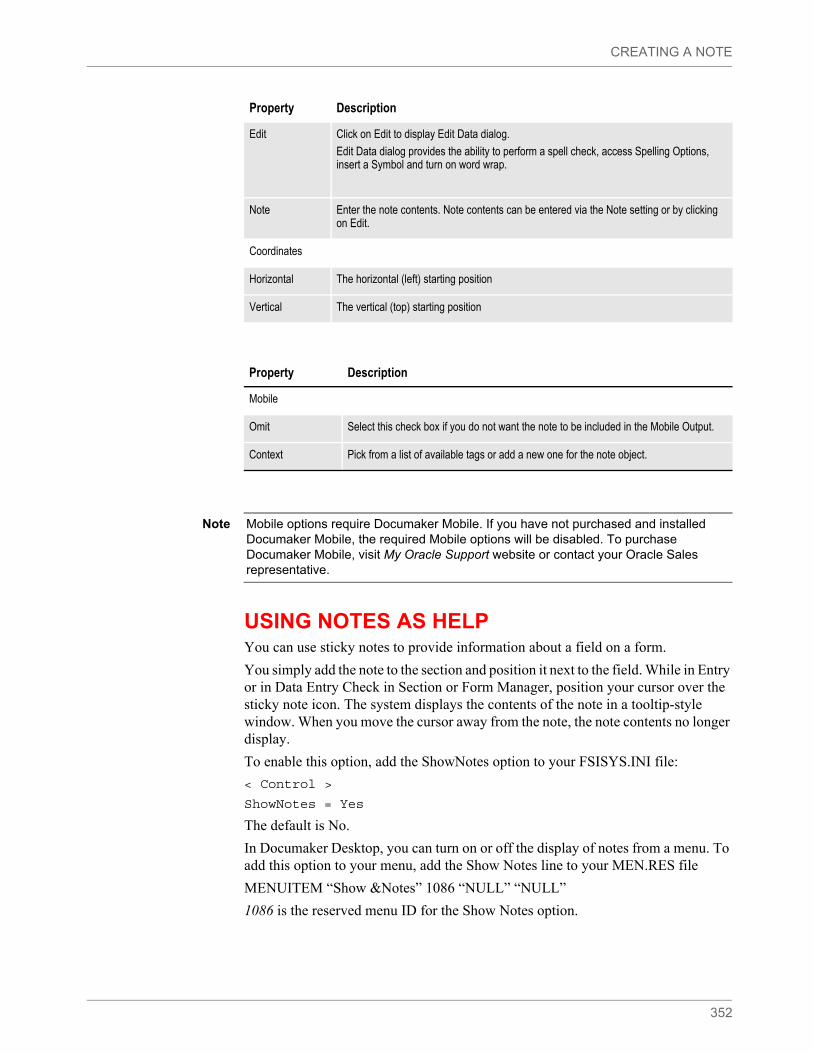
CREATING A NOTE
352
USING NOTES AS HELP You can use sticky notes to provide information about a field on a form.
You simply add the note to the section and position it next to the field. While in Entry or in Data Entry Check in Section or Form Manager, position your cursor over the sticky note icon. The system displays the contents of the note in a tooltip-style window. When you move the cursor away from the note, the note contents no longer display.
To enable this option, add the ShowNotes option to your FSISYS.INI file:
< Control >
ShowNotes = Yes
The default is No.
In Documaker Desktop, you can turn on or off the display of notes from a menu. To add this option to your menu, add the Show Notes line to your MEN.RES file
MENUITEM “Show &Notes” 1086 “NULL” “NULL”
1086 is the reserved menu ID for the Show Notes option.
Edit Click on Edit to display Edit Data dialog.
Edit Data dialog provides the ability to perform a spell check, access Spelling Options, insert a Symbol and turn on word wrap.
Note Enter the note contents. Note contents can be entered via the Note setting or by clicking on Edit.
Coordinates
Horizontal The horizontal (left) starting position
Vertical The vertical (top) starting position
Property Description
Mobile
Omit Select this check box if you do not want the note to be included in the Mobile Output.
Context Pick from a list of available tags or add a new one for the note object.
Property Description
Note Mobile options require Documaker Mobile. If you have not purchased and installed Documaker Mobile, the required Mobile options will be disabled. To purchase Documaker Mobile, visit My Oracle Support website or contact your Oracle Sales representative.
Creating a Shade
353
CREATING A SHADE
A shaded area lets you segment or emphasize image sections. Several patterns and halftones are available. Patterns include horizontal, vertical, diagonal and hatch; halftones range from very dark to very light. You control the color and dimensions of the shaded area.
Property Description
General
Name (Optional) Enter a name for the shade. Assign a unique name to facilitate reference to the shade for editing or other purposes. Although a shade name is not required, it is recommended that a name be provided.
In the absence of a name, the horizontal and vertical coordinates of the shade used to locate\ reference the shade. These coordinates may not have significance or meaning to users.
Note: If you enter a name such as Shade, the system will automatically increment the shade objects name to Shade #002, Shade #003 when you copy and paste or duplicate the shade object.
Coordinates
Horizontal The horizontal (left) starting position
Vertical The vertical (top) starting position
Width Width of the shade
Creating a Shade
354
Using a pre-printed flag on an object can be useful during forms creation or when test printing your forms. You may be using letterhead or special paper that has the company name or logo already embossed on the paper. Inserting a text label or logo on your form in the same location as the company name or logo helps to ensure that space isn't inadvertently written over by other objects. These objects would ‘reserve’ that space on the form.
You may wish to include pre-printed objects when test printing the form to compare against your special paper to make sure that there is enough space on the special paper for the non pre-printed objects. By default, the Print dialog will not display a Pre-printed option. Any objects flagged with Pre-printed will not print on the form.
Defining Tab Stops
Use these properties on the Tab Stops tab to define tab settings for your paragraph.
Height Height of the shade
Attributes
Pre-printed Check on to tell the system NOT to print this object when you print the Section.
Pattern Select the pattern for the shade, for example Solid, Diagonal Hatch, etc.
Color Select the color or use the default. If you want the object to print in this color, check the Print in color field. Otherwise, the system will print the shade in black.
Property Description
Accessibility
Skip Reading If checked on, the shade is excluded from being read by assistive technology. This setting is not used for shades.
Alternate Text Enter the alternate text to use. This setting is not used for shades.
Property Description
Mobile
Omit Select this check box if you do not want the shade to be included in the Mobile Output.
Context Pick from a list of available tags or add a new one for the shade object.
Property Description
Note Mobile options require Documaker Mobile. If you have not purchased and installed Documaker Mobile, the required Mobile options will be disabled. To purchase Documaker Mobile, visit My Oracle Support website or contact your Oracle Sales representative.
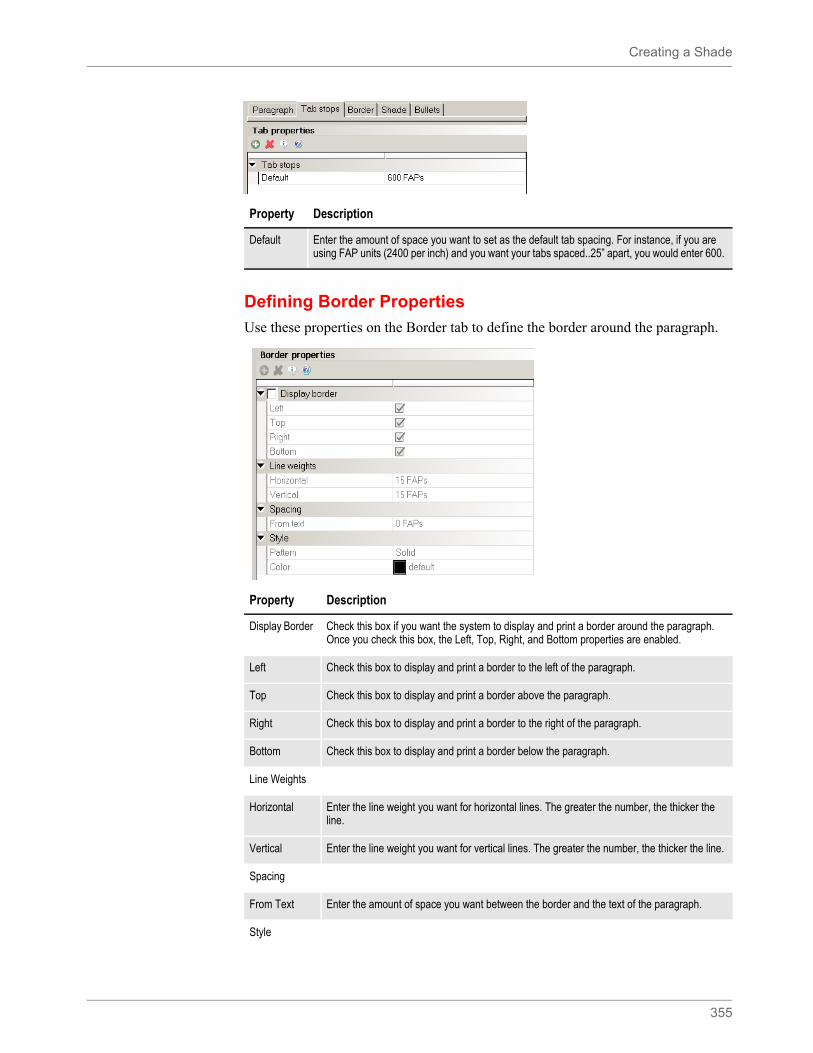
Creating a Shade
355
Defining Border Properties
Use these properties on the Border tab to define the border around the paragraph.
Property Description
Default Enter the amount of space you want to set as the default tab spacing. For instance, if you are using FAP units (2400 per inch) and you want your tabs spaced..25” apart, you would enter 600.
Property Description
Display Border Check this box if you want the system to display and print a border around the paragraph. Once you check this box, the Left, Top, Right, and Bottom properties are enabled.
Left Check this box to display and print a border to the left of the paragraph.
Top Check this box to display and print a border above the paragraph.
Right Check this box to display and print a border to the right of the paragraph.
Bottom Check this box to display and print a border below the paragraph.
Line Weights
Horizontal Enter the line weight you want for horizontal lines. The greater the number, the thicker the line.
Vertical Enter the line weight you want for vertical lines. The greater the number, the thicker the line.
Spacing
From Text Enter the amount of space you want between the border and the text of the paragraph.
Style
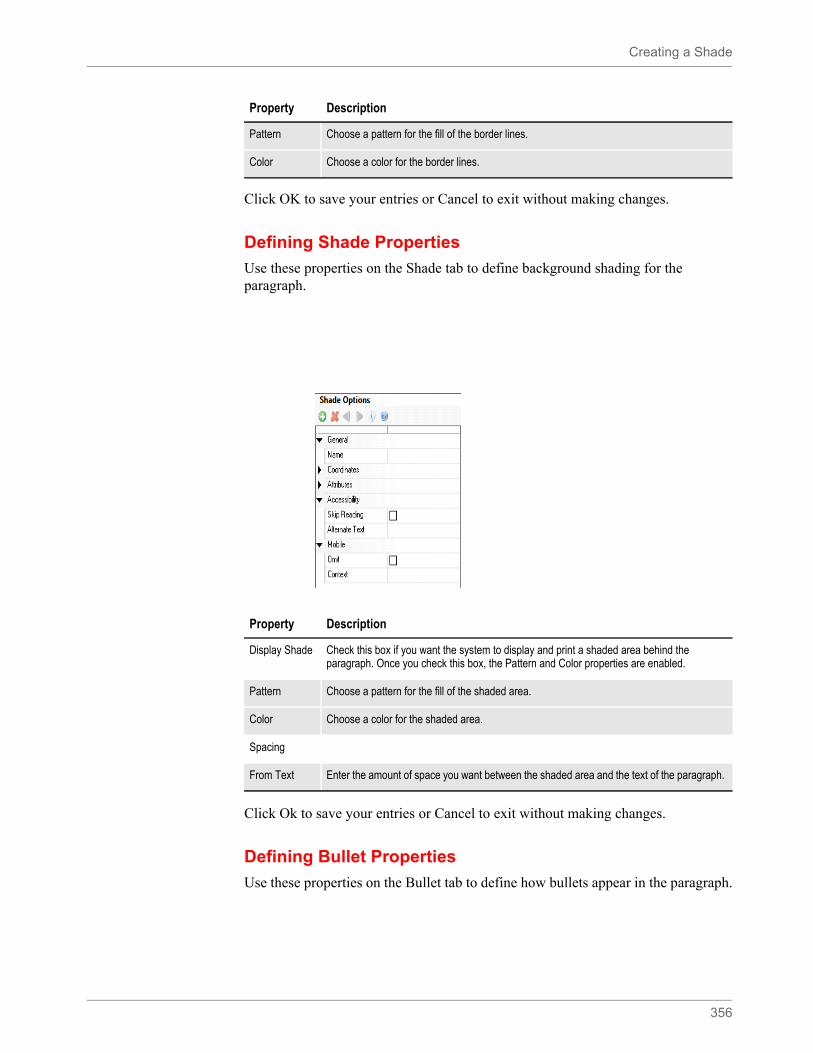
Creating a Shade
356
Click OK to save your entries or Cancel to exit without making changes.
Defining Shade Properties
Use these properties on the Shade tab to define background shading for the paragraph.
Click Ok to save your entries or Cancel to exit without making changes.
Defining Bullet Properties
Use these properties on the Bullet tab to define how bullets appear in the paragraph.
Pattern Choose a pattern for the fill of the border lines.
Color Choose a color for the border lines.
Property Description
Display Shade Check this box if you want the system to display and print a shaded area behind the paragraph. Once you check this box, the Pattern and Color properties are enabled.
Pattern Choose a pattern for the fill of the shaded area.
Color Choose a color for the shaded area.
Spacing
From Text Enter the amount of space you want between the shaded area and the text of the paragraph.
Property Description
Creating a Shade
357
Depending on your entry in the Special field, different properties appear. Shown here are the properties for Number bullets.
Property Description
Bullets
Special Choose the kind of bullet you want. You can choose from None, Font, Graphic, Number, or Symbol.
Attributes
Font (Font, Number, and Symbol bullets only) Select the ID of the font you want to use
Character (Font bullets only) Enter the bullet character. Click the ellipsis button to display the Symbol window and choose a character from the ones shown there.
Graphic (Graphic bullets only) Enter the name of the graphic file you want to use as a bullet. Click the button to select a file from the library.
Symbol (Symbol bullets only) Click the ellipsis button to select from a list of system-supplied symbol bullets. Your choices include filled and hollow round bullets and filled and hollow square bullets.
Style (Number bullets only) Select the numbering style you want to use. You can choose from numeric (1, 2, 3), lowercase alphabetic (a, b, c,), uppercase alphabetic (A, B, C), lowercase roman numerals (i, ii, iii) or uppercase roman numerals (I, II, III).
Prefix With (Number bullets only) Enter up to two characters to precede the number, letter, or roman numeral.
Postfix With (Number bullets only) Enter up to two characters to follow the number, letter, or roman numeral.
Start At (Number bullets only) Check this box and then enter the number, letter, or roman numeral at which you want the system to start numbering. The default is 1, a, A, i, or I, depending on your choice in the Style property.
Align Specify the alignment for the bullet. You can choose from Center, Decimal, Left, and Right.
Vertical Align Specify the vertical alignment for the bullet. You can choose from the default or Top.
Creating a Shade
358
Click OK to save your entries or Cancel to exit without making changes.
Indent Enter the amount of space you want to indent the bullet from the left.
Text Indent Enter the amount of space you want to indent the text from the bullet.
Color Choose a color for the bullet. Click the ellipsis button to display the Color Selection window. On this window you can choose a color and specify whether you want the system to print the bullet in that color.
Underline (Font and Number bullets only) Check this box if you want an underline beneath the bullet.
Property Description
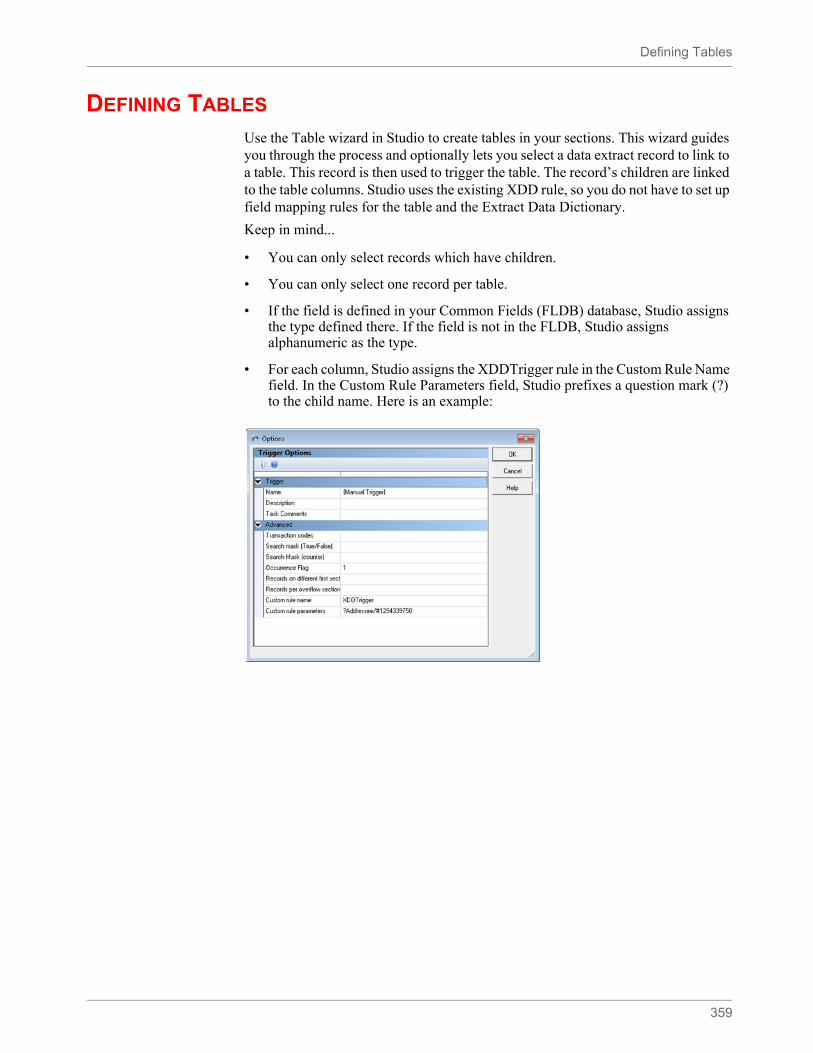
Defining Tables
359
DEFINING TABLES
Use the Table wizard in Studio to create tables in your sections. This wizard guides you through the process and optionally lets you select a data extract record to link to a table. This record is then used to trigger the table. The record’s children are linked to the table columns. Studio uses the existing XDD rule, so you do not have to set up field mapping rules for the table and the Extract Data Dictionary.
Keep in mind...
• You can only select records which have children.
• You can only select one record per table.
• If the field is defined in your Common Fields (FLDB) database, Studio assigns the type defined there. If the field is not in the FLDB, Studio assigns alphanumeric as the type.
• For each column, Studio assigns the XDDTrigger rule in the Custom Rule Name field. In the Custom Rule Parameters field, Studio prefixes a question mark (?) to the child name. Here is an example:
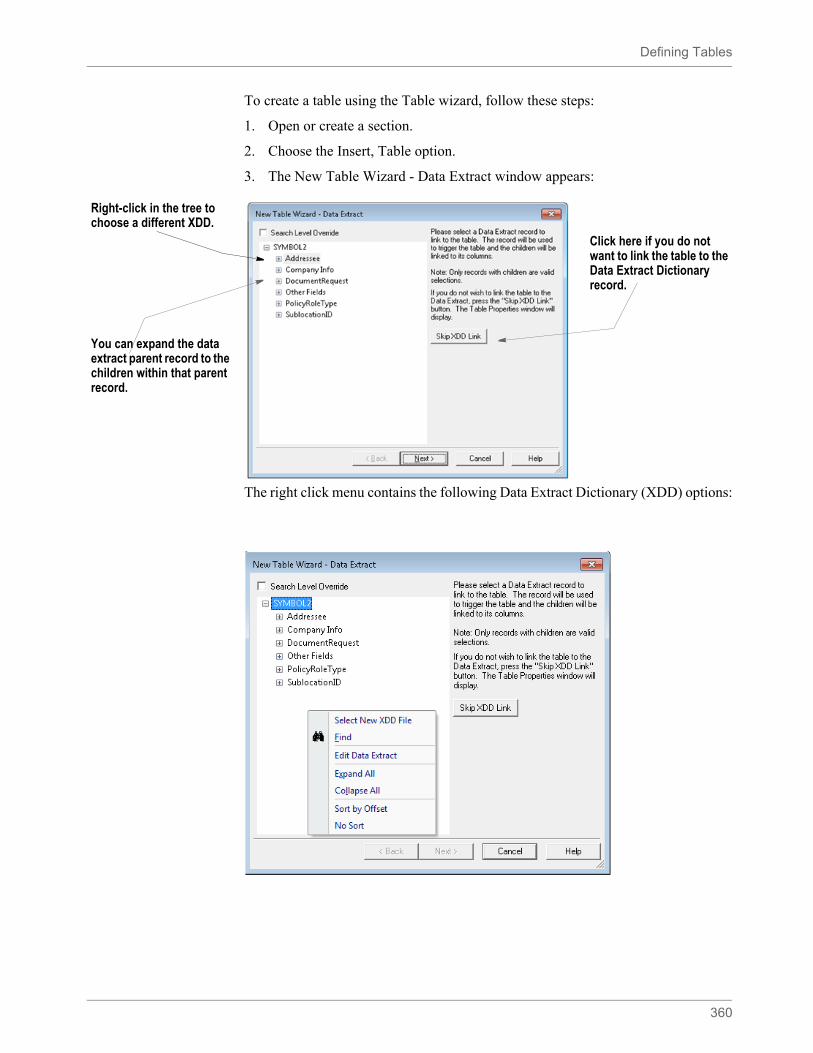
Defining Tables
360
To create a table using the Table wizard, follow these steps:
1. Open or create a section.
2. Choose the Insert, Table option.
3. The New Table Wizard - Data Extract window appears:
The right click menu contains the following Data Extract Dictionary (XDD) options:
Right-click in the tree to choose a different XDD.
You can expand the data extract parent record to the children within that parent record.
Click here if you do not want to link the table to the Data Extract Dictionary record.
Defining Tables
361
The right click menu can be accessed by pressing right mouse button or by holding down the Shift key on the keyboard and then pressing the F10 key.
Select Skip XDD Link if you do not want to link the table to Data Extract Dictionary record.
4. Highlight the data extract parent record you want to link to the table, then click Next.
5. The New Table Wizard - Column Layout window appears.
6. Use this window to choose the fields you want to display or hide and to specify the order in which the fields appear on the table. Keep in mind you have to display at least one field to have a table linked to the XDD.
Select New XDD File Select a different Data Extract Dictionary file from the library.
Find Displays the Find dialog. You can search by Name, Parent and\ or Rule
Edit Data Extract Checks the Data Extract Dictionary out of the library for editing
Expand All Expands the list of Data Extract Dictionary records on the Table Wizard dialog
Collapse All Collapses the expanded list of Data Extract Dictionary records on the Table Wizard dialog
Sort by Offset Sort items in the Data Extract Dictionary by offset key
Sort by Parent Sort items in the Data Extract Dictionary by parent
No sort Sort items by field name
Note If you click the Skip XDD Link button, Studio takes you to the Table window where you can define the appearance of the table. For more information, see Setting Table Options on page 364.
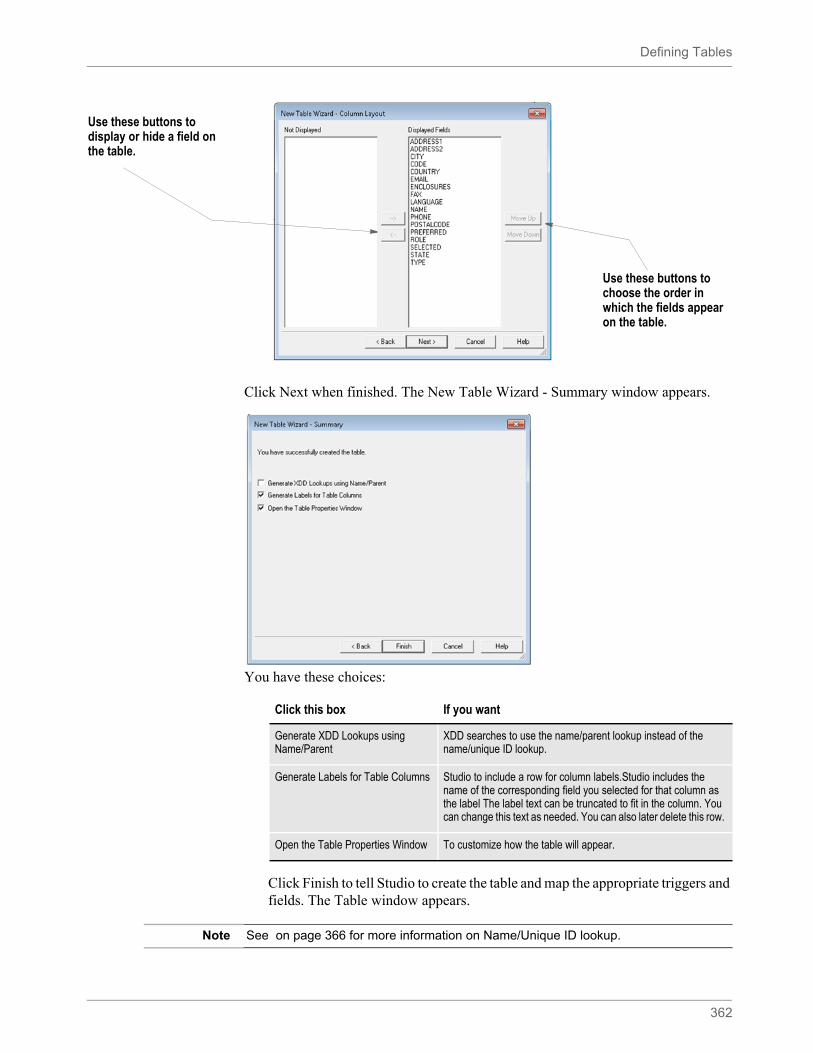
Defining Tables
362
Click Next when finished. The New Table Wizard - Summary window appears.
You have these choices:
Click Finish to tell Studio to create the table and map the appropriate triggers and fields. The Table window appears.
Use these buttons to display or hide a field on the table.
Use these buttons to choose the order in which the fields appear on the table.
Click this box If you want
Generate XDD Lookups using Name/Parent
XDD searches to use the name/parent lookup instead of the name/unique ID lookup.
Generate Labels for Table Columns Studio to include a row for column labels.Studio includes the name of the corresponding field you selected for that column as the label The label text can be truncated to fit in the column. You can change this text as needed. You can also later delete this row.
Open the Table Properties Window To customize how the table will appear.
Note See on page 366 for more information on Name/Unique ID lookup.
Defining Tables
363
Use the properties on the Table window to customize the appearance of your table. See Setting Table Options on page 364 for more information.
Understanding XDD Name References
To have fully-qualified names, a Unique ID field was added in version 11.5. The system generates this value and you cannot edit it. When you open an XDD file that has not been converted to include the Unique ID, the system automatically generates this entry.
When you select an XDD item to map, the item appears with the name of the child, a forward slash (/), a number sign (#), and the Unique ID. Here is an example:
CHILD/#UNIQUEID
The lookup wizards in Studio automatically fill in the proper syntax for you.
The system supports previously-defined mappings that use the name or child/parent naming convention. Documaker Server caches child/parent combinations for legacy support, and also caches the child/#unique ID identifier to enhance performance.
If you are using multiple XDDs with the same child/parent combinations, you will still want to use child/parent search masks. For example, you would use the XDD override at the form list level if a section with XDD mapping appears in multiple lines of business and the extract differs for each line of business. In this case, use the child/parent combination to make sure the proper nodes are found in each file.
Note If you do not use XDD overrides at the form list level and are certain you are not using the older, Child/Parent mapping method, you can add this INI option for better performance:
< SymLookup >UniqueID = Yes
This option tells the system you do not need child/parent name caching for XDD members and therefore saves some time when the system is loading and parsing the extract dictionary during processing.
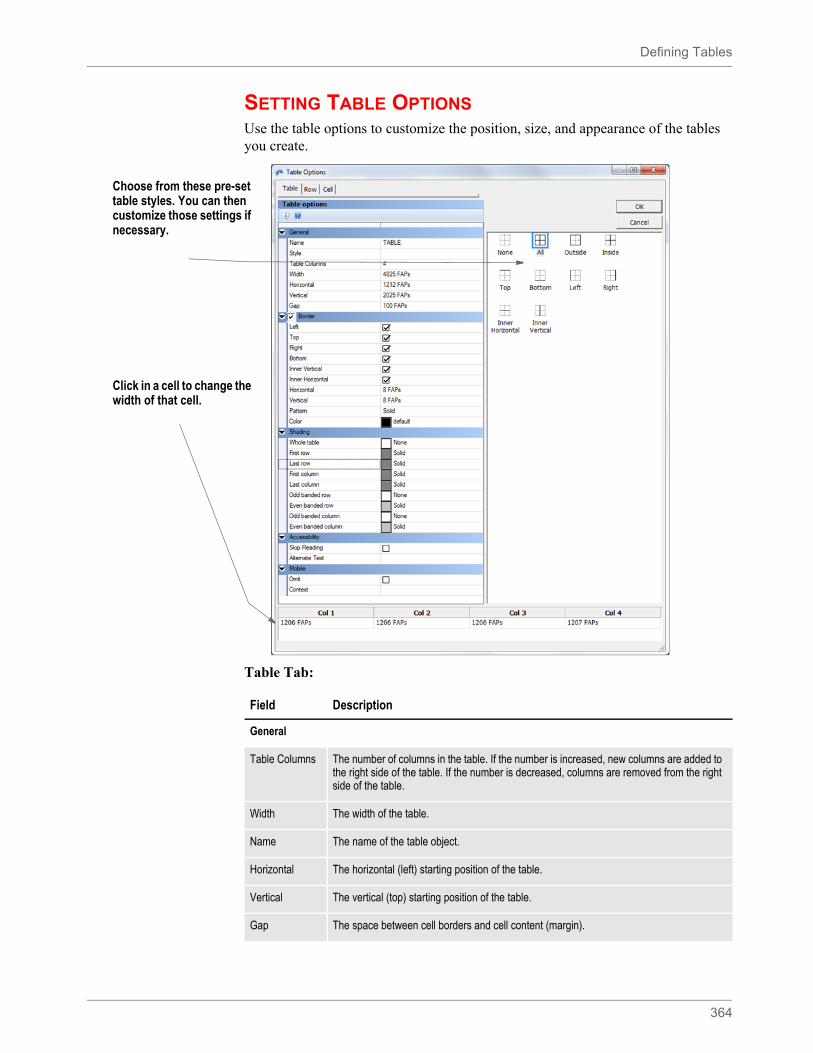
Defining Tables
364
SETTING TABLE OPTIONSUse the table options to customize the position, size, and appearance of the tables you create.
Table Tab:
Choose from these pre-set table styles. You can then customize those settings if necessary.
Click in a cell to change the width of that cell.
Field Description
General
Table Columns The number of columns in the table. If the number is increased, new columns are added to the right side of the table. If the number is decreased, columns are removed from the right side of the table.
Width The width of the table.
Name The name of the table object.
Horizontal The horizontal (left) starting position of the table.
Vertical The vertical (top) starting position of the table.
Gap The space between cell borders and cell content (margin).
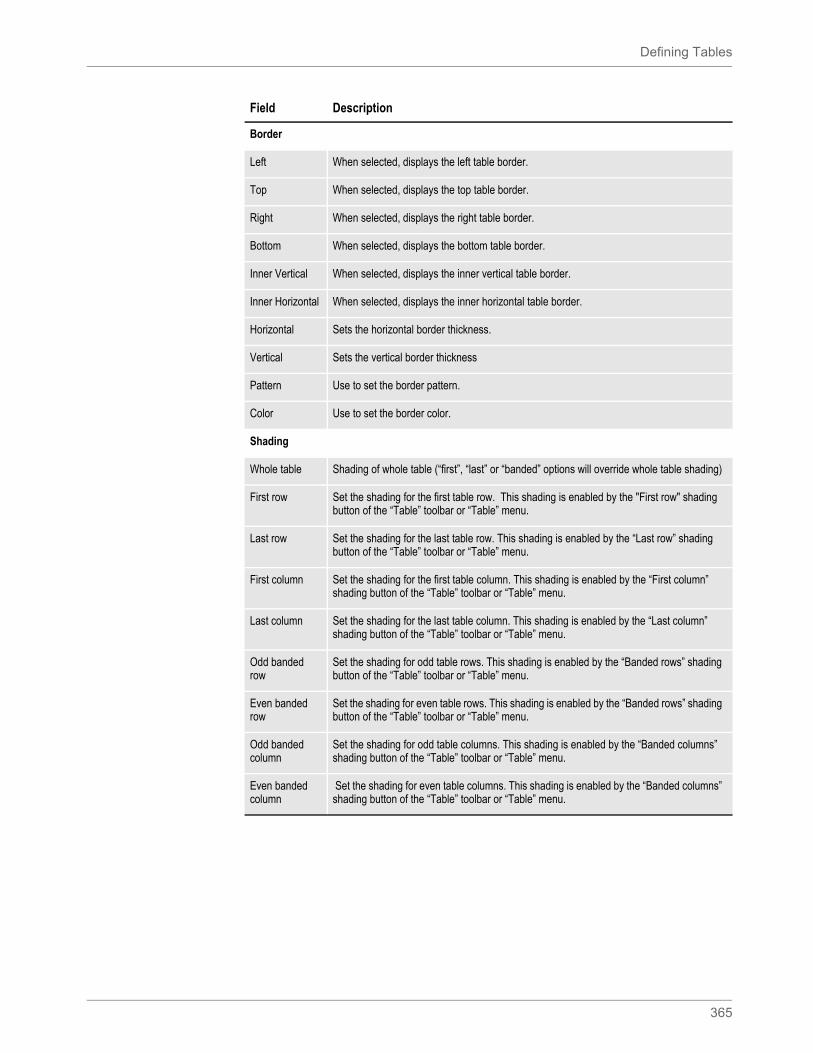
Defining Tables
365
Border
Left When selected, displays the left table border.
Top When selected, displays the top table border.
Right When selected, displays the right table border.
Bottom When selected, displays the bottom table border.
Inner Vertical When selected, displays the inner vertical table border.
Inner Horizontal When selected, displays the inner horizontal table border.
Horizontal Sets the horizontal border thickness.
Vertical Sets the vertical border thickness
Pattern Use to set the border pattern.
Color Use to set the border color.
Shading
Whole table Shading of whole table (“first”, “last” or “banded” options will override whole table shading)
First row Set the shading for the first table row. This shading is enabled by the "First row" shading button of the “Table” toolbar or “Table” menu.
Last row Set the shading for the last table row. This shading is enabled by the “Last row” shading button of the “Table” toolbar or “Table” menu.
First column Set the shading for the first table column. This shading is enabled by the “First column” shading button of the “Table” toolbar or “Table” menu.
Last column Set the shading for the last table column. This shading is enabled by the “Last column” shading button of the “Table” toolbar or “Table” menu.
Odd banded row
Set the shading for odd table rows. This shading is enabled by the “Banded rows” shading button of the “Table” toolbar or “Table” menu.
Even banded row
Set the shading for even table rows. This shading is enabled by the “Banded rows” shading button of the “Table” toolbar or “Table” menu.
Odd banded column
Set the shading for odd table columns. This shading is enabled by the “Banded columns” shading button of the “Table” toolbar or “Table” menu.
Even banded column
Set the shading for even table columns. This shading is enabled by the “Banded columns” shading button of the “Table” toolbar or “Table” menu.
Field Description
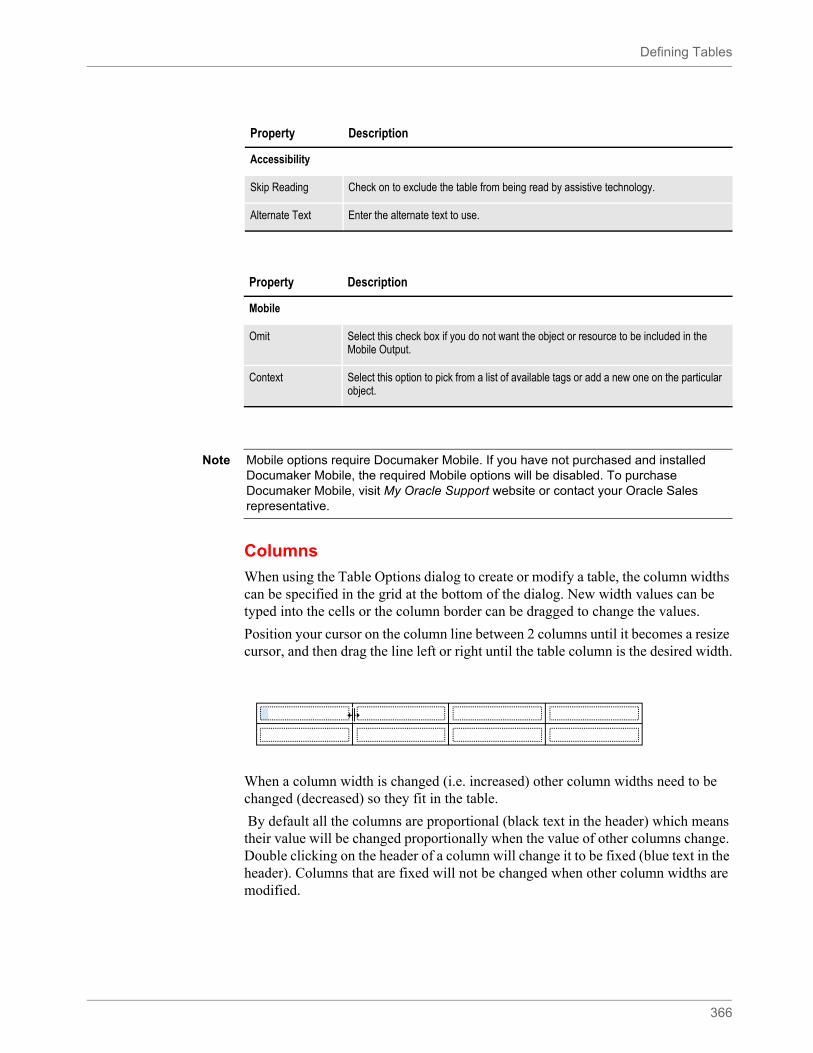
Defining Tables
366
Columns
When using the Table Options dialog to create or modify a table, the column widths can be specified in the grid at the bottom of the dialog. New width values can be typed into the cells or the column border can be dragged to change the values.
Position your cursor on the column line between 2 columns until it becomes a resize cursor, and then drag the line left or right until the table column is the desired width.
When a column width is changed (i.e. increased) other column widths need to be changed (decreased) so they fit in the table.
By default all the columns are proportional (black text in the header) which means their value will be changed proportionally when the value of other columns change. Double clicking on the header of a column will change it to be fixed (blue text in the header). Columns that are fixed will not be changed when other column widths are modified.
Property Description
Accessibility
Skip Reading Check on to exclude the table from being read by assistive technology.
Alternate Text Enter the alternate text to use.
Property Description
Mobile
Omit Select this check box if you do not want the object or resource to be included in the Mobile Output.
Context Select this option to pick from a list of available tags or add a new one on the particular object.
Note Mobile options require Documaker Mobile. If you have not purchased and installed Documaker Mobile, the required Mobile options will be disabled. To purchase Documaker Mobile, visit My Oracle Support website or contact your Oracle Sales representative.
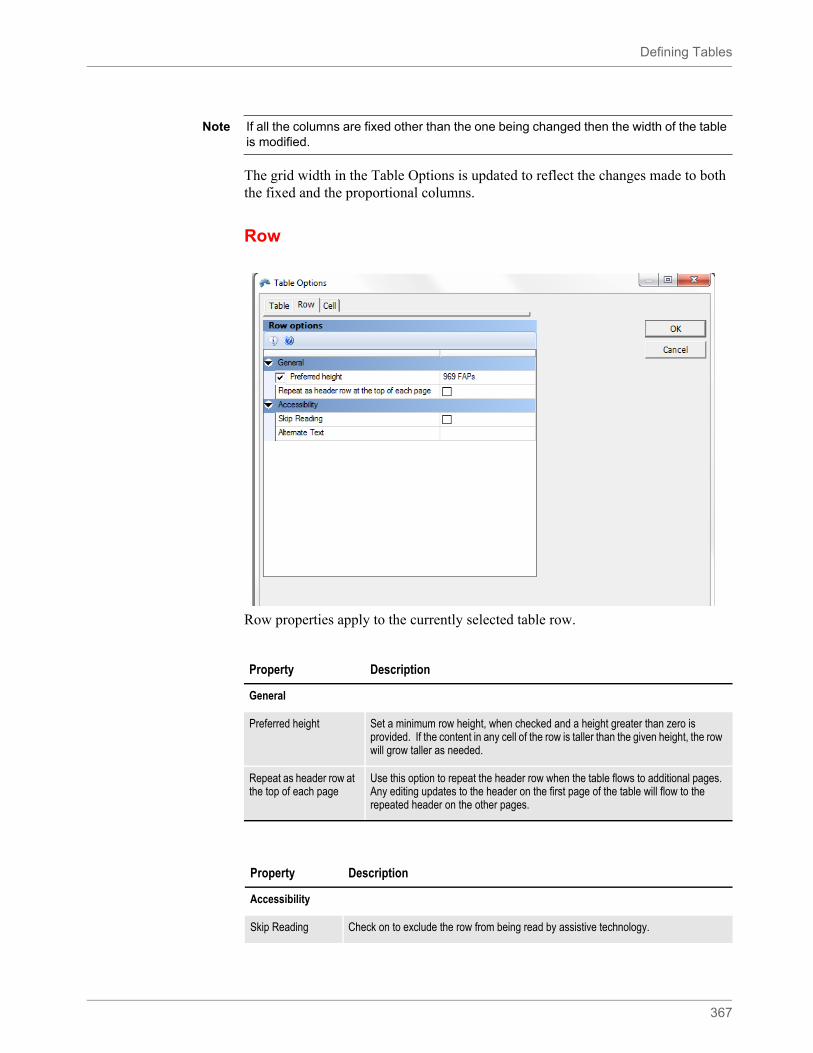
Defining Tables
367
The grid width in the Table Options is updated to reflect the changes made to both the fixed and the proportional columns.
Row
Row properties apply to the currently selected table row.
Note If all the columns are fixed other than the one being changed then the width of the table is modified.
Property Description
General
Preferred height Set a minimum row height, when checked and a height greater than zero is provided. If the content in any cell of the row is taller than the given height, the row will grow taller as needed.
Repeat as header row at the top of each page
Use this option to repeat the header row when the table flows to additional pages. Any editing updates to the header on the first page of the table will flow to the repeated header on the other pages.
Property Description
Accessibility
Skip Reading Check on to exclude the row from being read by assistive technology.
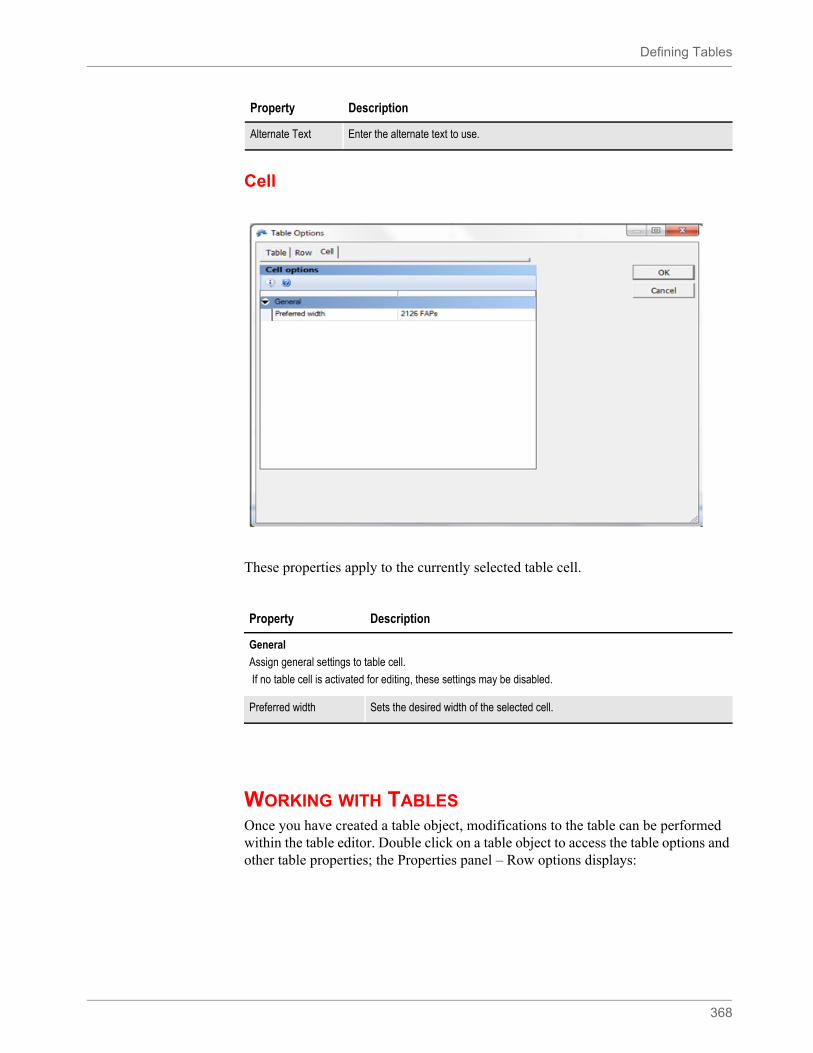
Defining Tables
368
Cell
These properties apply to the currently selected table cell.
WORKING WITH TABLESOnce you have created a table object, modifications to the table can be performed within the table editor. Double click on a table object to access the table options and other table properties; the Properties panel – Row options displays:
Alternate Text Enter the alternate text to use.
Property Description
General
Assign general settings to table cell.
If no table cell is activated for editing, these settings may be disabled.
Preferred width Sets the desired width of the selected cell.
Property Description
Defining Tables
369
Row Options
Triggers
Assigns a trigger to the selected row.
Property Description
General
Style (Optional) Assign a style to the table.
Table options See the discussion on Table properties.
Property Description
General
Name Select the trigger name from the trigger list or select Manual Trigger to create your own search conditions.
Description Enter an optional description of the trigger. Selecting a predefined trigger will bring any description defined for the routine.
Task Comments To do comments that will appear in Finishing Report.
Advanced
Defining Tables
370
The table menu includes several table settings as well as table actions such as Add Row Before and Add Row After.
These same settings and actions are also available from the right click menu when in table editor mode.
Transaction codes By including one or more Transaction codes in this field, you trigger a particular form (or Section) only if the extract file record includes that particular Transaction Code.
Occurrence flag To use the search mask as a counter, the Occurrence Flag (overflow) must be set to one (1). Use with the Search Mask Counter, Records on Different First Section, and Records Per Overflow Section fields. (0=no overflow and 1=overflow)
Performance issue flags in this field include:
• Master (M) form level trigger flag • Form (F) form level trigger flag • Subordinate (S) Section level trigger flag
Records on different first section
Lets you indicate the number of records that appear on the first Section before overflowing to a new Section.
Records per overflow section
Lets you specify the number of records matching the search mask that will fit on the specified overflow Section.
The following apply to Manual Triggers only
Search Mask (Counter) Define the search criteria to use in determining how many duplications of this item to include in the resulting document. The trigger will be applied once for each occurrence found by the search mask. If no matching data is found, the trigger result is 0 (False) and the item is normally excluded.
Search Mask (True/False)
Define the search criteria to use in determining whether this event should occur. If the search yields a result, a True result is returned. If the search finds no data, the trigger result will be False.
Custom Rule Name This field defines an alternate (custom) rule to execute on this manual trigger to determine its result. For most manual triggers, this field should be left blank.
Custom Rule Parameter This field defines an alternate (custom) rule to execute on this manual trigger to determine its result. For most manual triggers, this field should be left blank.
Default
Font ID Sets the font ID that will be used for text that is typed in the table cell. To change the Font ID for text already in the text area, use the “Format” toolbar.
Tab Stops Set the default tab position.
Property Description
Defining Tables
371
Note The right click menu can be accessed by pressing right mouse button or by holding down the Shift key on the keyboard and then pressing the F10 key.
Option Description
Add Row Before Add a row before the selected table row.
Add Row After Add a row after the selected table row.
Delete Row Deletes the selected table row including row data
Add Column Before Insert a column before the selected table column
Add Column After Insert a column after the selected table column
Defining Tables
372
Merging Table Cells
Studio provides support for merging column and row spans within tables.
The Merge Cells Format option is used to merge sequential cells within a table.
When in table editor mode on a table, the Merge Cells option is available from the right click menu (Table, Merge Cells), the table tab (Table, Merge, Merge Cells) and the table menu (Format, Table, Merge Cells).
The right click menu can be accessed by pressing right mouse button or by holding down the Shift key on the keyboard and then pressing the F10 key.
Delete Column Deletes the selected column including column data
Merge Cells Merges (combines) the selected cells into one cell including cell data
Cell Shading Set the shading for the selected cells. Cell shading for specific cells will override table shading or banded shading.
Borders Set the border style, thickness, patter and color for the selected cells. Any cell level border changes will override the table level border settings in Table Options
Border Color Sets the border color
Banded Rows Shades alternate table rows with the shading colors and patterns defined under the Shading group in Table Options
Banded Columns Shades alternate table columns with the shading colors and patterns defined under the Shading group in Table Options
First Row Sets the shading for the first table row
Last Row Sets the shading for the last table row
First Column Sets the shading for the first table column
Last Column Sets the shading for the last table column
Alignment Sets the cell alignment:
• Left Align - all paragraphs in table cells are left aligned • Center Align - all paragraphs in table cells are centered • Right Align - all paragraphs in table cells are right aligned • Vertical Top Align - applies vertical top alignment to all paragraphs in table
cells • Vertical Center Align - applies center alignment to all paragraphs in table cells • Vertical Bottom Align - applies vertical bottom alignment to all paragraphs in
table cells
Note: Vertical, Center and Bottom positions of the paragraphs are depending on the row height. Preferred row height can be set in the Table Options dialog or by dragging the row bottom border with the mouse.
Table Properties Displays Table Options
Show Gridlines Toggles the display of table grid lines. Gridlines are helpful for seeing cells that do not have borders defined.
Option Description
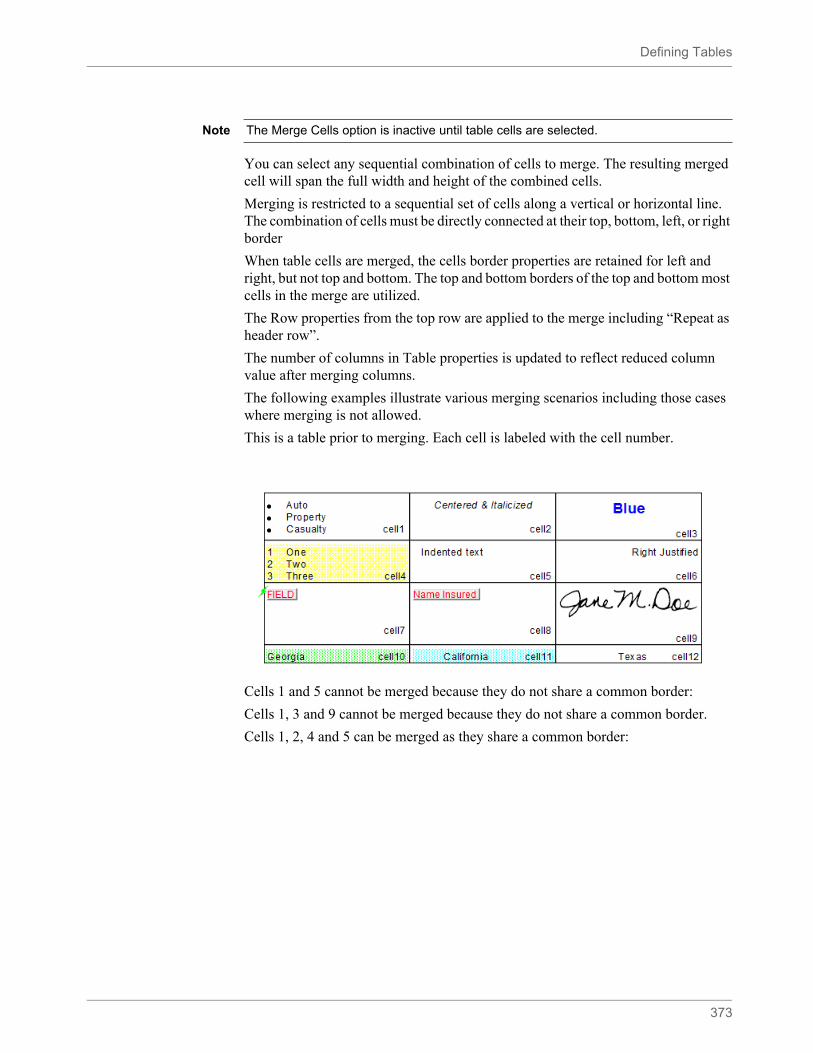
Defining Tables
373
You can select any sequential combination of cells to merge. The resulting merged cell will span the full width and height of the combined cells.
Merging is restricted to a sequential set of cells along a vertical or horizontal line. The combination of cells must be directly connected at their top, bottom, left, or right border
When table cells are merged, the cells border properties are retained for left and right, but not top and bottom. The top and bottom borders of the top and bottom most cells in the merge are utilized.
The Row properties from the top row are applied to the merge including “Repeat as header row”.
The number of columns in Table properties is updated to reflect reduced column value after merging columns.
The following examples illustrate various merging scenarios including those cases where merging is not allowed.
This is a table prior to merging. Each cell is labeled with the cell number.
Cells 1 and 5 cannot be merged because they do not share a common border:
Cells 1, 3 and 9 cannot be merged because they do not share a common border.
Cells 1, 2, 4 and 5 can be merged as they share a common border:
Note The Merge Cells option is inactive until table cells are selected.
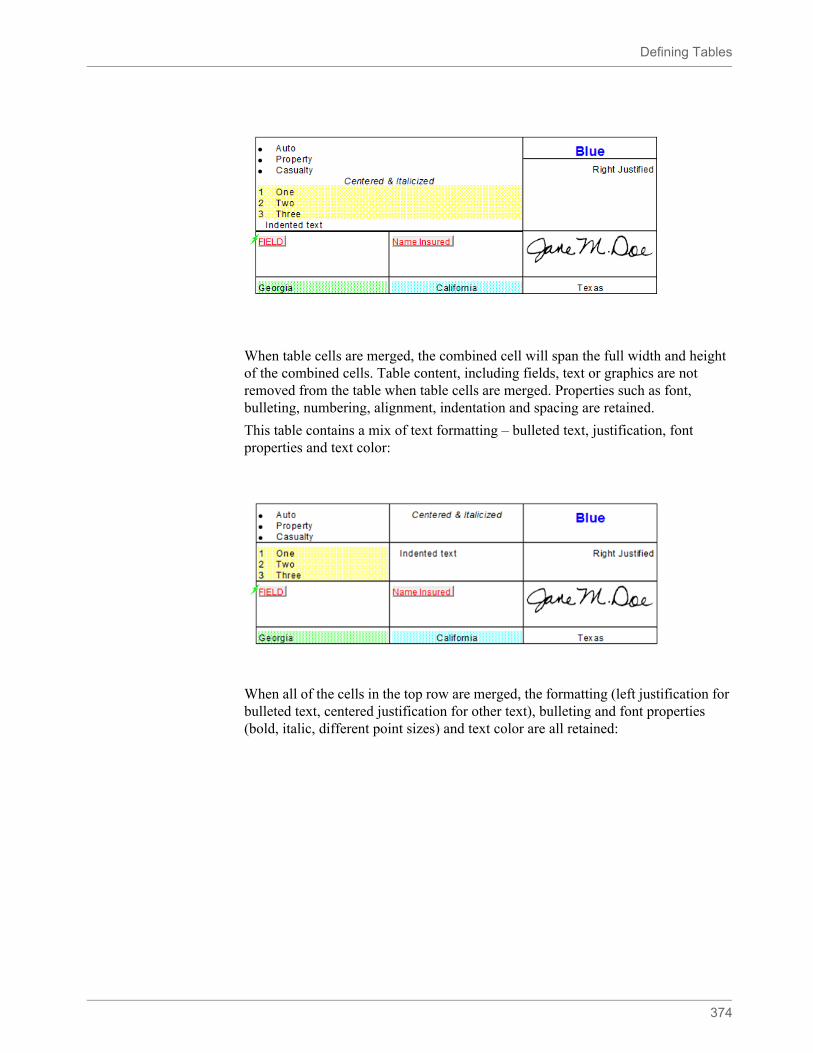
Defining Tables
374
When table cells are merged, the combined cell will span the full width and height of the combined cells. Table content, including fields, text or graphics are not removed from the table when table cells are merged. Properties such as font, bulleting, numbering, alignment, indentation and spacing are retained.
This table contains a mix of text formatting – bulleted text, justification, font properties and text color:
When all of the cells in the top row are merged, the formatting (left justification for bulleted text, centered justification for other text), bulleting and font properties (bold, italic, different point sizes) and text color are all retained:
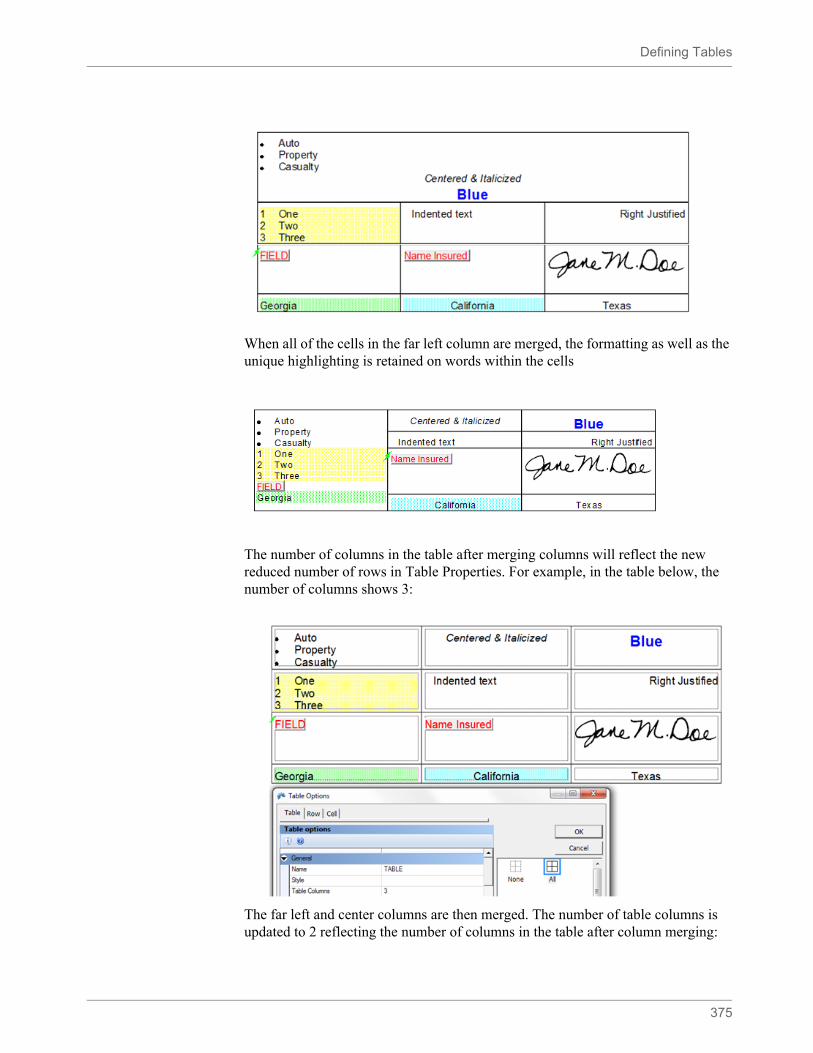
Defining Tables
375
When all of the cells in the far left column are merged, the formatting as well as the unique highlighting is retained on words within the cells
The number of columns in the table after merging columns will reflect the new reduced number of rows in Table Properties. For example, in the table below, the number of columns shows 3:
The far left and center columns are then merged. The number of table columns is updated to 2 reflecting the number of columns in the table after column merging:
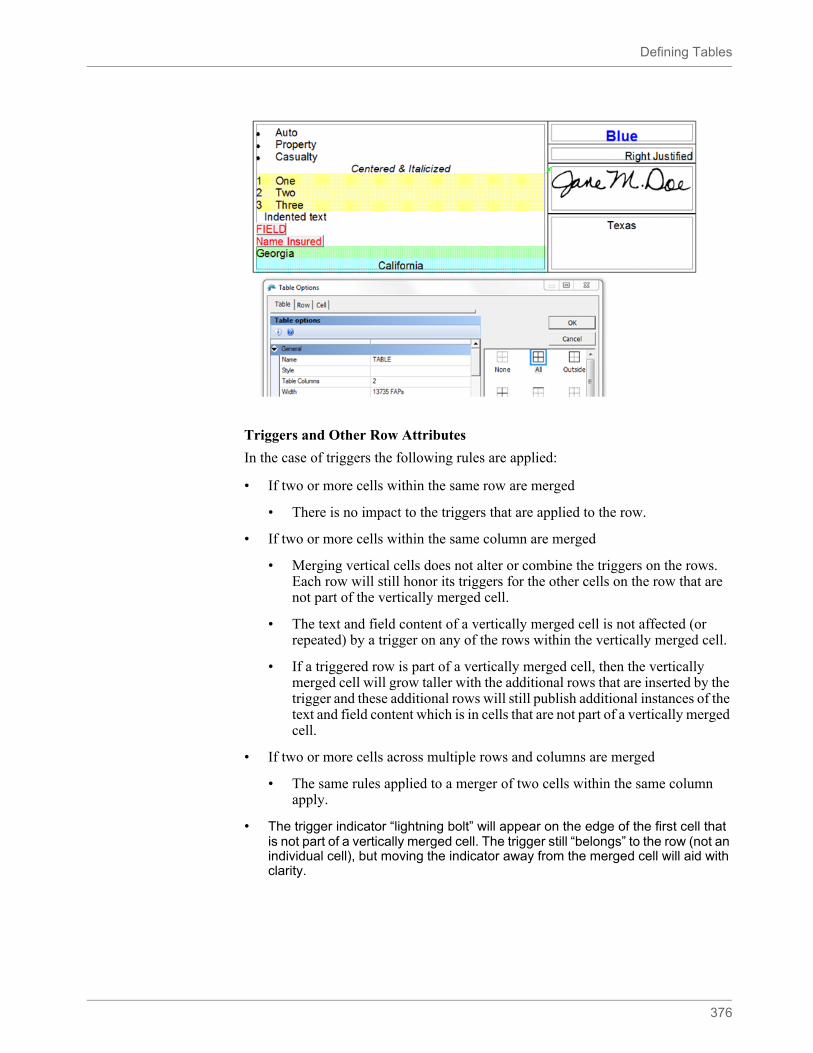
Defining Tables
376
Triggers and Other Row Attributes
In the case of triggers the following rules are applied:
• If two or more cells within the same row are merged
• There is no impact to the triggers that are applied to the row.
• If two or more cells within the same column are merged
• Merging vertical cells does not alter or combine the triggers on the rows. Each row will still honor its triggers for the other cells on the row that are not part of the vertically merged cell.
• The text and field content of a vertically merged cell is not affected (or repeated) by a trigger on any of the rows within the vertically merged cell.
• If a triggered row is part of a vertically merged cell, then the vertically merged cell will grow taller with the additional rows that are inserted by the trigger and these additional rows will still publish additional instances of the text and field content which is in cells that are not part of a vertically merged cell.
• If two or more cells across multiple rows and columns are merged
• The same rules applied to a merger of two cells within the same column apply.
• The trigger indicator “lightning bolt” will appear on the edge of the first cell that is not part of a vertically merged cell. The trigger still “belongs” to the row (not an individual cell), but moving the indicator away from the merged cell will aid with clarity.
Defining Tables
377
Rich Text File Conversion and Section Objects
Rich Text Format (RTF) is supported in many document composition systems. Documaker supports RTF as a print output type. When using RTF output, Studio section objects are editable upon conversion to RTF files, with the exception of logos, vectors, and TOC entries.
In addition, table objects defined in the sections are output as RTF table objects when you use the non-framed output mode. Where possible, the attributes defined for the Documaker table are carried over to the table generated in RTF output. This includes the current size and layout of the columns, as well as the “grid” lines used to border the cells.
Not all documents are good candidates for non-framed RTF output, the purpose of which is to provide an output for RTF users to edit text-based content within a document. Documents such as correspondence where the output is structured with a header, footer, and a body consisting of paragraph text are candidates for non-framed output. Applying the non-framed output option should be used in situations where the document fidelity is secondary to the ability to edit.
Documents that make use of numerous lines and boxes and overlapping content are generally not good candidates for non-framed RTF output. For these document types, RTF frames are used to control the precise placement of content. This means that when it is important to maintain the fidelity of the original Documaker document, you should use the frames output option.
To configure the RTF driver use the Manage, System, Settings menu option. The INI file entry that affects table objects is Write_Frames:
< PrtType = RTF >WriteFrames = No
The default setting is Yes, which writes framed RTF output.

Creating Tables of Contents, Tables of Figures, and Indexes
378
CREATING TABLES OF CONTENTS, TABLES OF FIGURES, AND INDEXES
You can add tables of contents, tables of figures, and indexes to your form sets to help readers navigate to specific topics. This process consists of these main steps:
• Adding bookmarks to the sections that comprise the form set. Adding bookmarks is the process of placing markers in the places you want to appear in the table of contents, table of figures, or index and adding the appropriate text for those markers. For more information, see Adding Bookmarks on page 316.
• Defining the how you want the generated result to appear.
• Generating the table of contents, table of figures, or index. For more information, see Generating Tables of Contents, Tables of Figures, or an Index on page 384.
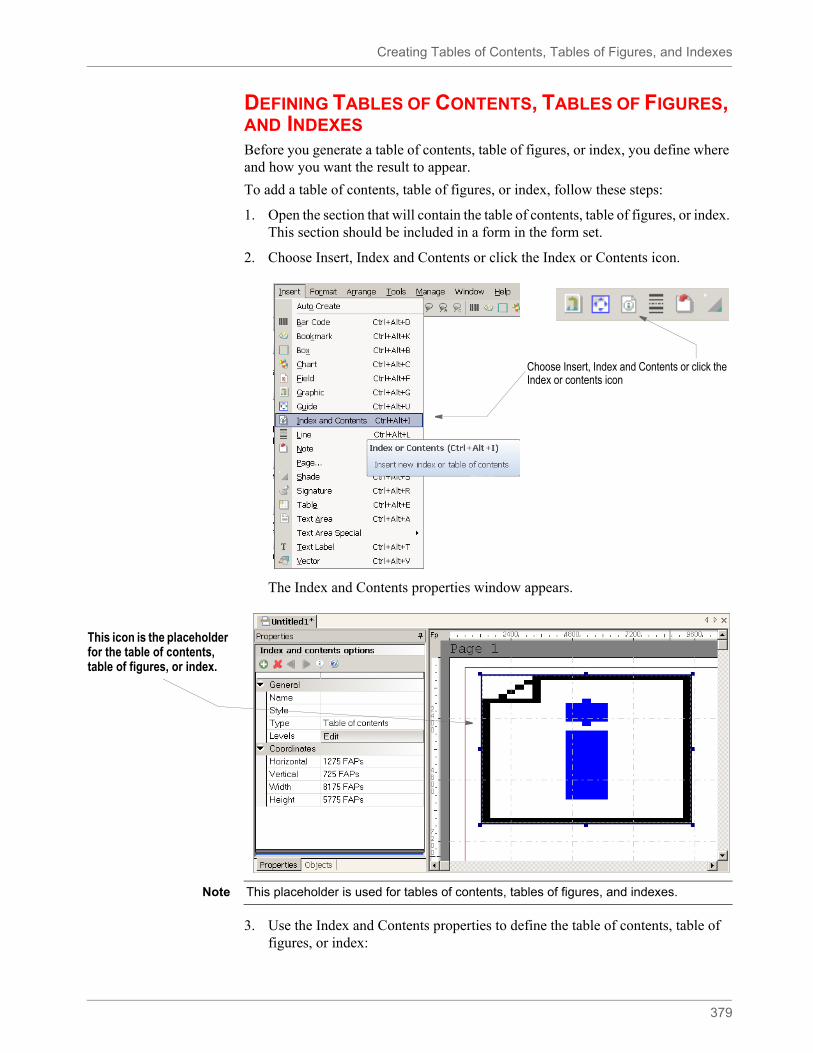
Creating Tables of Contents, Tables of Figures, and Indexes
379
DEFINING TABLES OF CONTENTS, TABLES OF FIGURES, AND INDEXESBefore you generate a table of contents, table of figures, or index, you define where and how you want the result to appear.
To add a table of contents, table of figures, or index, follow these steps:
1. Open the section that will contain the table of contents, table of figures, or index. This section should be included in a form in the form set.
2. Choose Insert, Index and Contents or click the Index or Contents icon.
The Index and Contents properties window appears.
3. Use the Index and Contents properties to define the table of contents, table of figures, or index:
Choose Insert, Index and Contents or click the Index or contents icon
This icon is the placeholder for the table of contents, table of figures, or index.
Note This placeholder is used for tables of contents, tables of figures, and indexes.
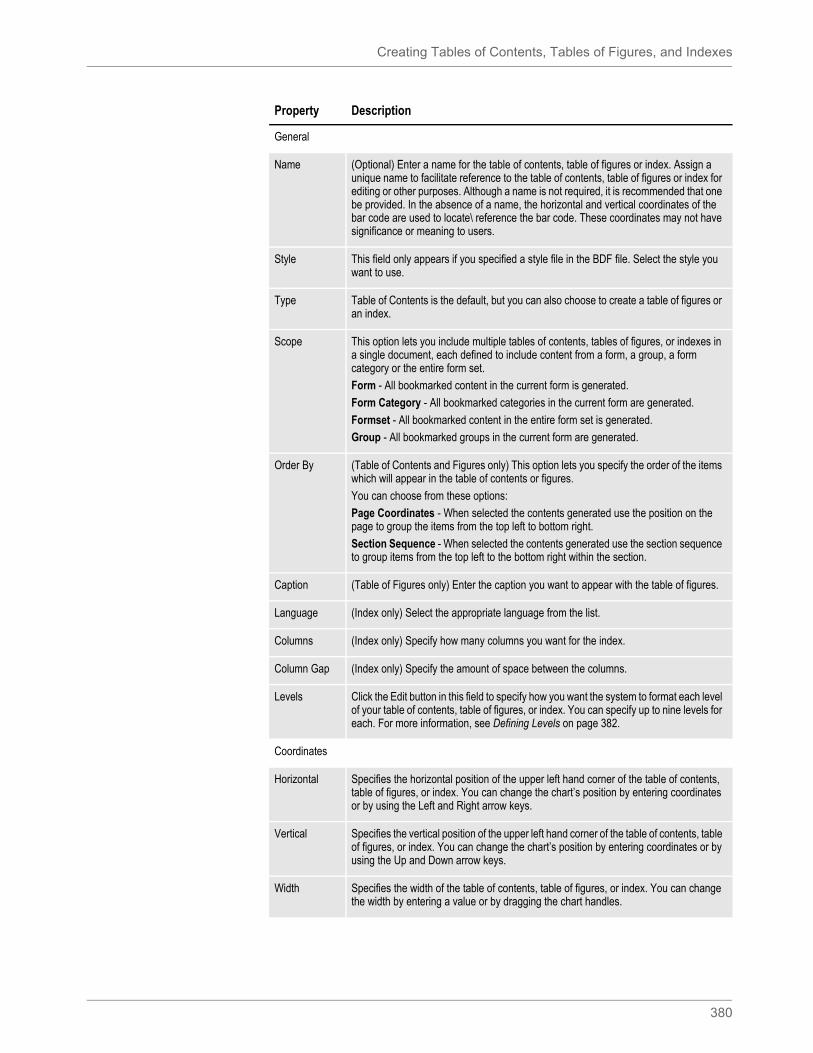
Creating Tables of Contents, Tables of Figures, and Indexes
380
Property Description
General
Name (Optional) Enter a name for the table of contents, table of figures or index. Assign a unique name to facilitate reference to the table of contents, table of figures or index for editing or other purposes. Although a name is not required, it is recommended that one be provided. In the absence of a name, the horizontal and vertical coordinates of the bar code are used to locate\ reference the bar code. These coordinates may not have significance or meaning to users.
Style This field only appears if you specified a style file in the BDF file. Select the style you want to use.
Type Table of Contents is the default, but you can also choose to create a table of figures or an index.
Scope This option lets you include multiple tables of contents, tables of figures, or indexes in a single document, each defined to include content from a form, a group, a form category or the entire form set.
Form - All bookmarked content in the current form is generated.
Form Category - All bookmarked categories in the current form are generated.
Formset - All bookmarked content in the entire form set is generated.
Group - All bookmarked groups in the current form are generated.
Order By (Table of Contents and Figures only) This option lets you specify the order of the items which will appear in the table of contents or figures.
You can choose from these options:
Page Coordinates - When selected the contents generated use the position on the page to group the items from the top left to bottom right.
Section Sequence - When selected the contents generated use the section sequence to group items from the top left to the bottom right within the section.
Caption (Table of Figures only) Enter the caption you want to appear with the table of figures.
Language (Index only) Select the appropriate language from the list.
Columns (Index only) Specify how many columns you want for the index.
Column Gap (Index only) Specify the amount of space between the columns.
Levels Click the Edit button in this field to specify how you want the system to format each level of your table of contents, table of figures, or index. You can specify up to nine levels for each. For more information, see Defining Levels on page 382.
Coordinates
Horizontal Specifies the horizontal position of the upper left hand corner of the table of contents, table of figures, or index. You can change the chart’s position by entering coordinates or by using the Left and Right arrow keys.
Vertical Specifies the vertical position of the upper left hand corner of the table of contents, table of figures, or index. You can change the chart’s position by entering coordinates or by using the Up and Down arrow keys.
Width Specifies the width of the table of contents, table of figures, or index. You can change the width by entering a value or by dragging the chart handles.
Creating Tables of Contents, Tables of Figures, and Indexes
381
4. Click OK to save your entries or Cancel to exit without making changes.
Height Specifies the height of the table of contents, table of figures, or index. You can change the height by entering a value or by dragging the chart handles.
Property Description
Note The Coordinates properties define where the tables or index are generated. You can size the table based on how large you want it to be. The system creates additional pages when necessary, but the table does not flow dynamically.
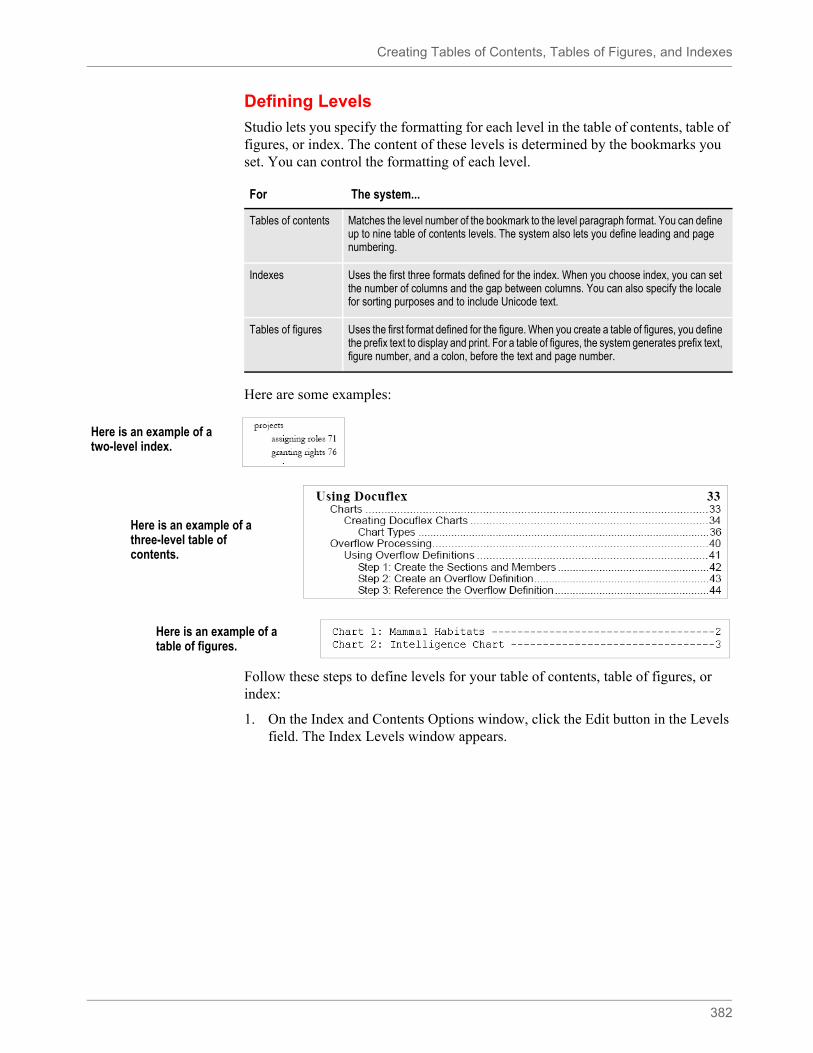
Creating Tables of Contents, Tables of Figures, and Indexes
382
Defining Levels
Studio lets you specify the formatting for each level in the table of contents, table of figures, or index. The content of these levels is determined by the bookmarks you set. You can control the formatting of each level.
Here are some examples:
Follow these steps to define levels for your table of contents, table of figures, or index:
1. On the Index and Contents Options window, click the Edit button in the Levels field. The Index Levels window appears.
For The system...
Tables of contents Matches the level number of the bookmark to the level paragraph format. You can define up to nine table of contents levels. The system also lets you define leading and page numbering.
Indexes Uses the first three formats defined for the index. When you choose index, you can set the number of columns and the gap between columns. You can also specify the locale for sorting purposes and to include Unicode text.
Tables of figures Uses the first format defined for the figure. When you create a table of figures, you define the prefix text to display and print. For a table of figures, the system generates prefix text, figure number, and a colon, before the text and page number.
Here is an example of a two-level index.
Here is an example of a three-level table of contents.
Here is an example of a table of figures.
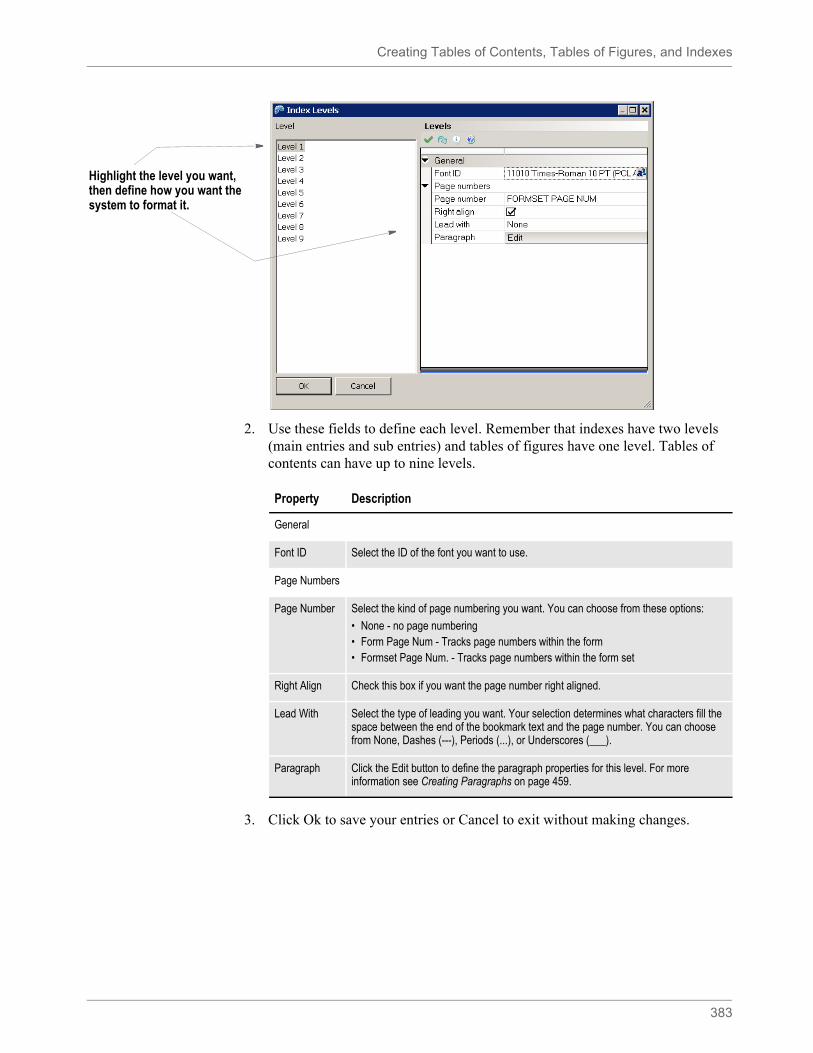
Creating Tables of Contents, Tables of Figures, and Indexes
383
2. Use these fields to define each level. Remember that indexes have two levels (main entries and sub entries) and tables of figures have one level. Tables of contents can have up to nine levels.
3. Click Ok to save your entries or Cancel to exit without making changes.
Highlight the level you want, then define how you want the system to format it.
Property Description
General
Font ID Select the ID of the font you want to use.
Page Numbers
Page Number Select the kind of page numbering you want. You can choose from these options:
• None - no page numbering• Form Page Num - Tracks page numbers within the form• Formset Page Num. - Tracks page numbers within the form set
Right Align Check this box if you want the page number right aligned.
Lead With Select the type of leading you want. Your selection determines what characters fill the space between the end of the bookmark text and the page number. You can choose from None, Dashes (---), Periods (...), or Underscores (___).
Paragraph Click the Edit button to define the paragraph properties for this level. For more information see Creating Paragraphs on page 459.
Creating Tables of Contents, Tables of Figures, and Indexes
384
GENERATING TABLES OF CONTENTS, TABLES OF FIGURES, OR AN INDEXOnce you add your bookmarks, or assign levels to your paragraphs, and then define where and how you want the compiled table or index to appear, the system will generate the table of contents, table of figures, or index for you when the form set is processed.
Keep in mind that to create tables of contents or figures or an index, all sections must be loaded before the print operation executes. Otherwise, the system does not have all the content available and cannot create a complete table of contents, table of figures, or index.
Because some print drivers do not force the loading of all sections until necessary, this means you may have to include an additional INI option.
For Documaker Desktop, you would include this option:
< Control >LoadPrintOnly = Yes
For Documaker Server (GenPrint), you would include this option:
< RunMode >DownloadFAP = Yes
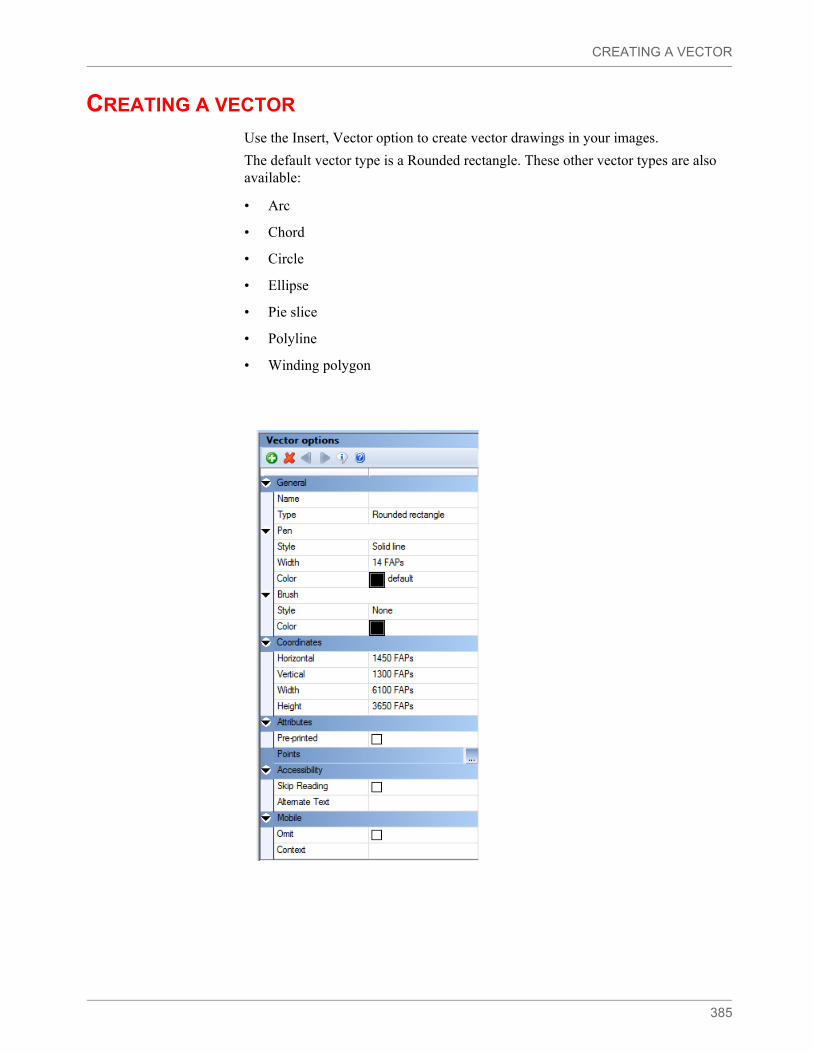
CREATING A VECTOR
385
CREATING A VECTOR
Use the Insert, Vector option to create vector drawings in your images.
The default vector type is a Rounded rectangle. These other vector types are also available:
• Arc
• Chord
• Circle
• Ellipse
• Pie slice
• Polyline
• Winding polygon
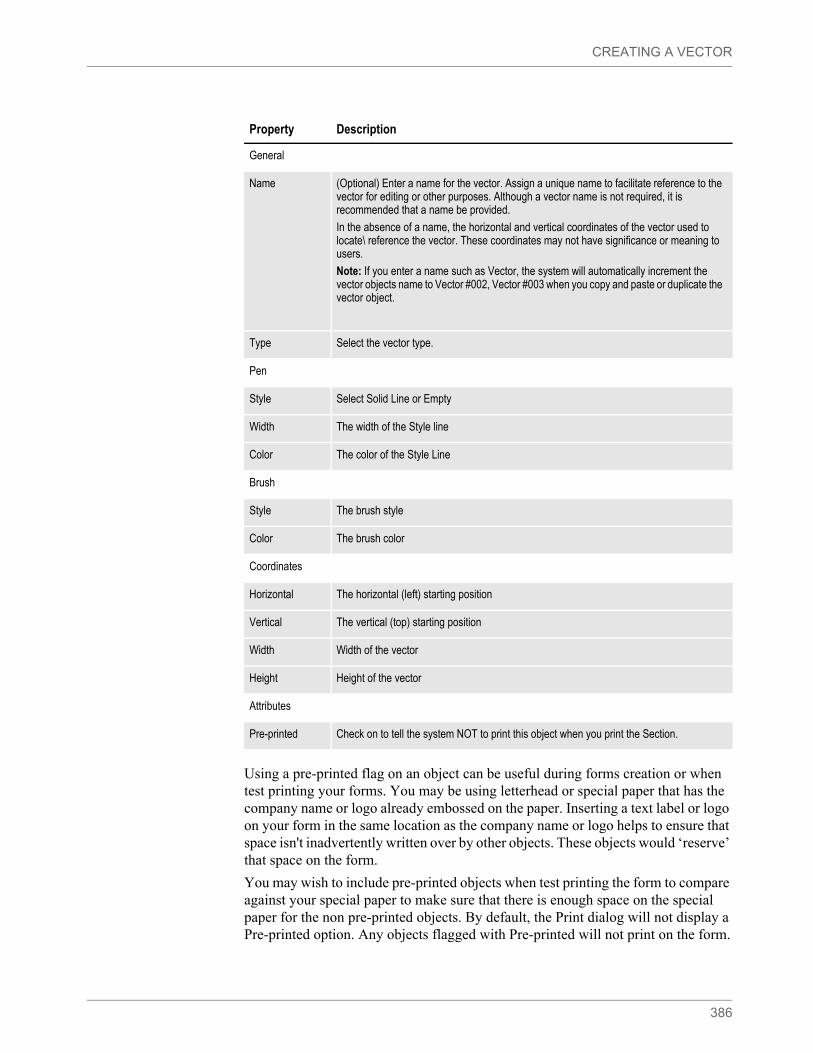
CREATING A VECTOR
386
Using a pre-printed flag on an object can be useful during forms creation or when test printing your forms. You may be using letterhead or special paper that has the company name or logo already embossed on the paper. Inserting a text label or logo on your form in the same location as the company name or logo helps to ensure that space isn't inadvertently written over by other objects. These objects would ‘reserve’ that space on the form.
You may wish to include pre-printed objects when test printing the form to compare against your special paper to make sure that there is enough space on the special paper for the non pre-printed objects. By default, the Print dialog will not display a Pre-printed option. Any objects flagged with Pre-printed will not print on the form.
Property Description
General
Name (Optional) Enter a name for the vector. Assign a unique name to facilitate reference to the vector for editing or other purposes. Although a vector name is not required, it is recommended that a name be provided.
In the absence of a name, the horizontal and vertical coordinates of the vector used to locate\ reference the vector. These coordinates may not have significance or meaning to users.
Note: If you enter a name such as Vector, the system will automatically increment the vector objects name to Vector #002, Vector #003 when you copy and paste or duplicate the vector object.
Type Select the vector type.
Pen
Style Select Solid Line or Empty
Width The width of the Style line
Color The color of the Style Line
Brush
Style The brush style
Color The brush color
Coordinates
Horizontal The horizontal (left) starting position
Vertical The vertical (top) starting position
Width Width of the vector
Height Height of the vector
Attributes
Pre-printed Check on to tell the system NOT to print this object when you print the Section.
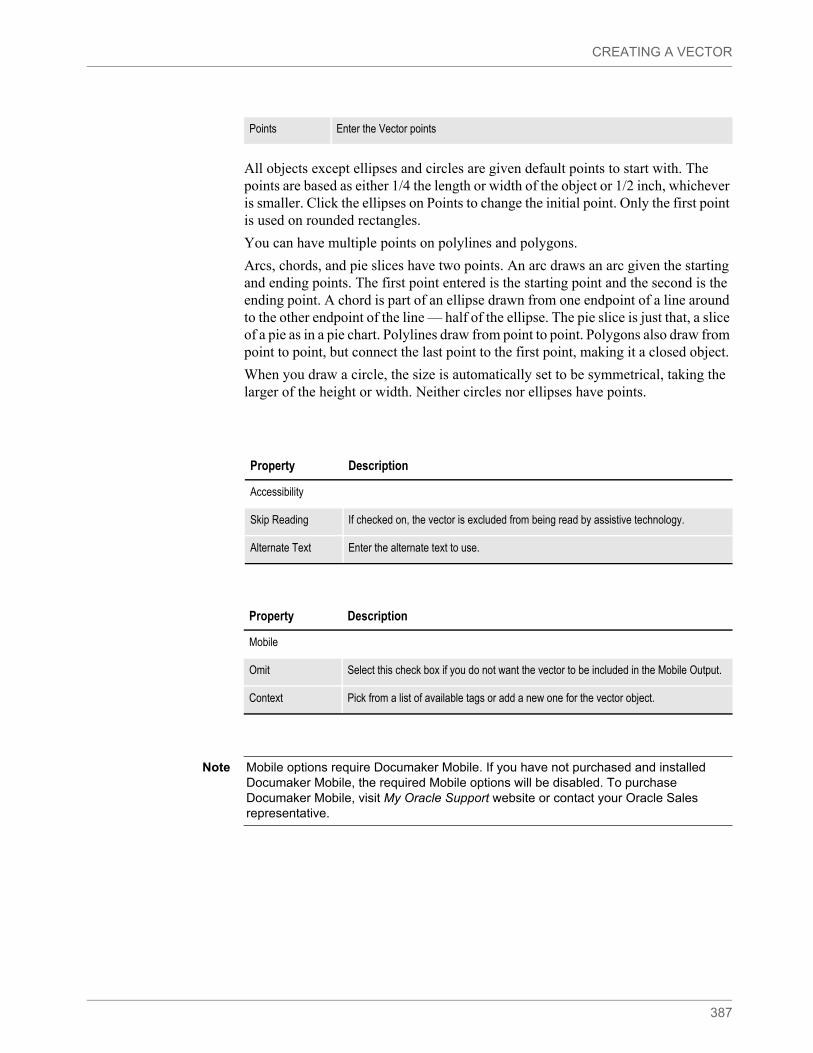
CREATING A VECTOR
387
All objects except ellipses and circles are given default points to start with. The points are based as either 1/4 the length or width of the object or 1/2 inch, whichever is smaller. Click the ellipses on Points to change the initial point. Only the first point is used on rounded rectangles.
You can have multiple points on polylines and polygons.
Arcs, chords, and pie slices have two points. An arc draws an arc given the starting and ending points. The first point entered is the starting point and the second is the ending point. A chord is part of an ellipse drawn from one endpoint of a line around to the other endpoint of the line — half of the ellipse. The pie slice is just that, a slice of a pie as in a pie chart. Polylines draw from point to point. Polygons also draw from point to point, but connect the last point to the first point, making it a closed object.
When you draw a circle, the size is automatically set to be symmetrical, taking the larger of the height or width. Neither circles nor ellipses have points.
Points Enter the Vector points
Property Description
Accessibility
Skip Reading If checked on, the vector is excluded from being read by assistive technology.
Alternate Text Enter the alternate text to use.
Property Description
Mobile
Omit Select this check box if you do not want the vector to be included in the Mobile Output.
Context Pick from a list of available tags or add a new one for the vector object.
Note Mobile options require Documaker Mobile. If you have not purchased and installed Documaker Mobile, the required Mobile options will be disabled. To purchase Documaker Mobile, visit My Oracle Support website or contact your Oracle Sales representative.
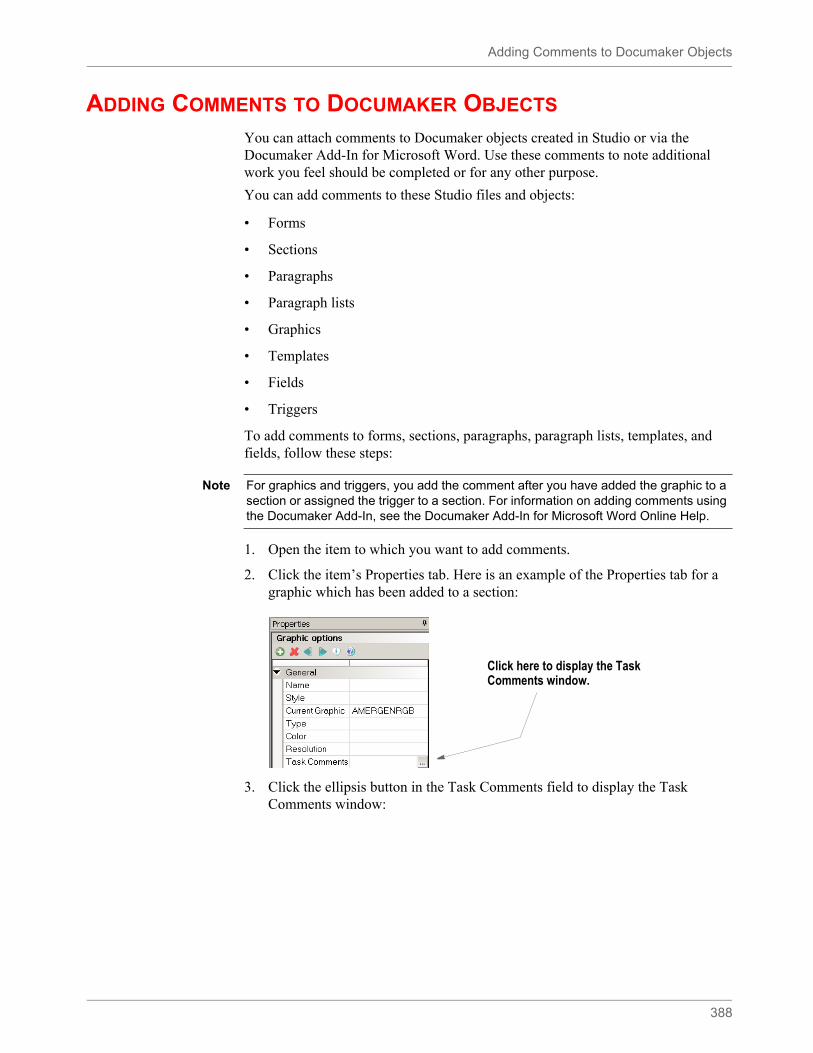
Adding Comments to Documaker Objects
388
ADDING COMMENTS TO DOCUMAKER OBJECTS
You can attach comments to Documaker objects created in Studio or via the Documaker Add-In for Microsoft Word. Use these comments to note additional work you feel should be completed or for any other purpose.
You can add comments to these Studio files and objects:
• Forms
• Sections
• Paragraphs
• Paragraph lists
• Graphics
• Templates
• Fields
• Triggers
To add comments to forms, sections, paragraphs, paragraph lists, templates, and fields, follow these steps:
1. Open the item to which you want to add comments.
2. Click the item’s Properties tab. Here is an example of the Properties tab for a graphic which has been added to a section:
3. Click the ellipsis button in the Task Comments field to display the Task Comments window:
Note For graphics and triggers, you add the comment after you have added the graphic to a section or assigned the trigger to a section. For information on adding comments using the Documaker Add-In, see the Documaker Add-In for Microsoft Word Online Help.
Click here to display the Task Comments window.
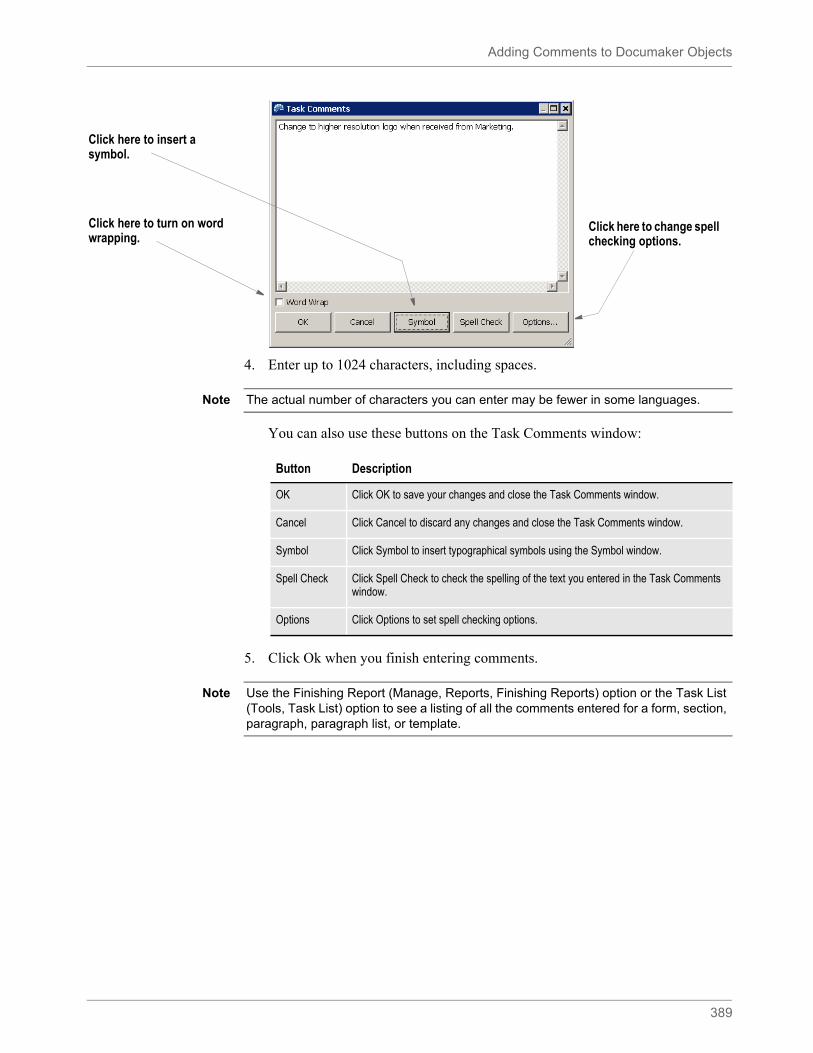
Adding Comments to Documaker Objects
389
4. Enter up to 1024 characters, including spaces.
You can also use these buttons on the Task Comments window:
5. Click Ok when you finish entering comments.
Click here to insert a symbol.
Click here to turn on word wrapping.
Click here to change spell checking options.
Note The actual number of characters you can enter may be fewer in some languages.
Button Description
OK Click OK to save your changes and close the Task Comments window.
Cancel Click Cancel to discard any changes and close the Task Comments window.
Symbol Click Symbol to insert typographical symbols using the Symbol window.
Spell Check Click Spell Check to check the spelling of the text you entered in the Task Comments window.
Options Click Options to set spell checking options.
Note Use the Finishing Report (Manage, Reports, Finishing Reports) option or the Task List (Tools, Task List) option to see a listing of all the comments entered for a form, section, paragraph, paragraph list, or template.
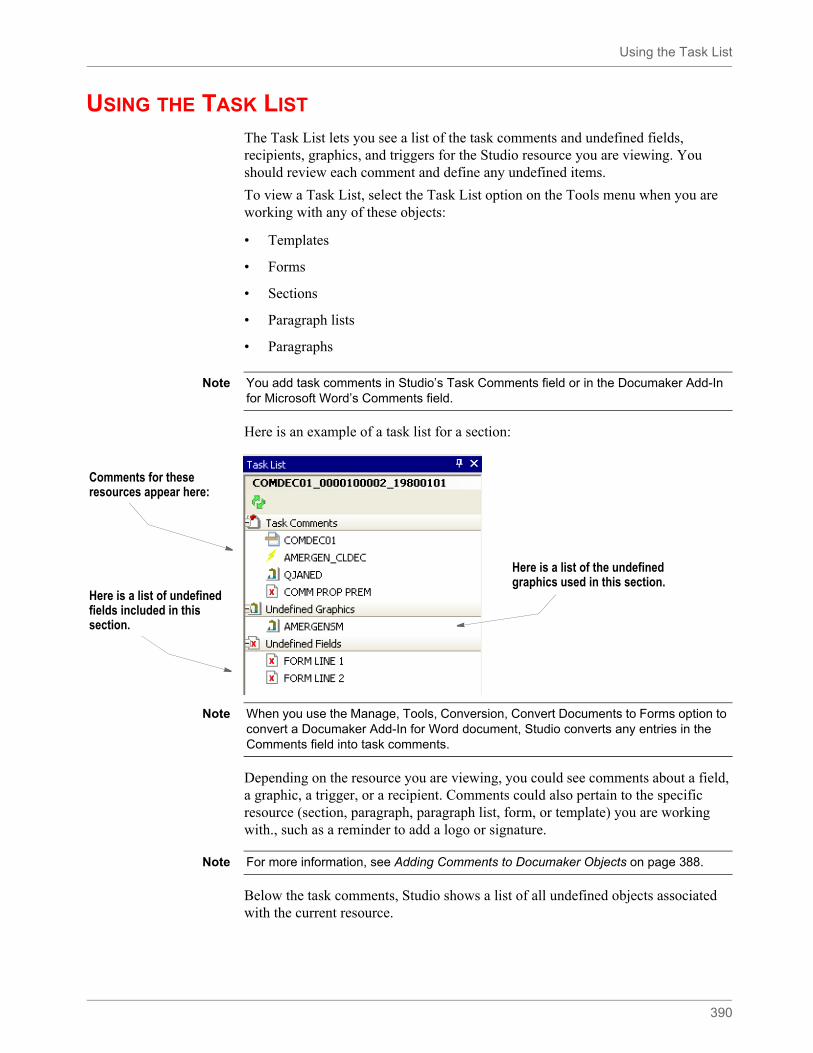
Using the Task List
390
USING THE TASK LIST
The Task List lets you see a list of the task comments and undefined fields, recipients, graphics, and triggers for the Studio resource you are viewing. You should review each comment and define any undefined items.
To view a Task List, select the Task List option on the Tools menu when you are working with any of these objects:
• Templates
• Forms
• Sections
• Paragraph lists
• Paragraphs
Here is an example of a task list for a section:
Depending on the resource you are viewing, you could see comments about a field, a graphic, a trigger, or a recipient. Comments could also pertain to the specific resource (section, paragraph, paragraph list, form, or template) you are working with., such as a reminder to add a logo or signature.
Below the task comments, Studio shows a list of all undefined objects associated with the current resource.
Note You add task comments in Studio’s Task Comments field or in the Documaker Add-In for Microsoft Word’s Comments field.
Comments for these resources appear here:
Here is a list of undefined fields included in this section.
Here is a list of the undefined graphics used in this section.
Note When you use the Manage, Tools, Conversion, Convert Documents to Forms option to convert a Documaker Add-In for Word document, Studio converts any entries in the Comments field into task comments.
Note For more information, see Adding Comments to Documaker Objects on page 388.
Using the Task List
391
Object Appears on the task list if...
Field An entry for the field does not exist in the Common Fields Dictionary.
Trigger The trigger is not defined in the SETRCPTB.DAL trigger file.
Recipient The recipient is not defined in the Business Definition (BDF) file.
Graphic The graphic does not exist in the workspace library.
Note The Finishing Report provides another way to view task comments. For more information, see Printing a Finishing Report on page 749.
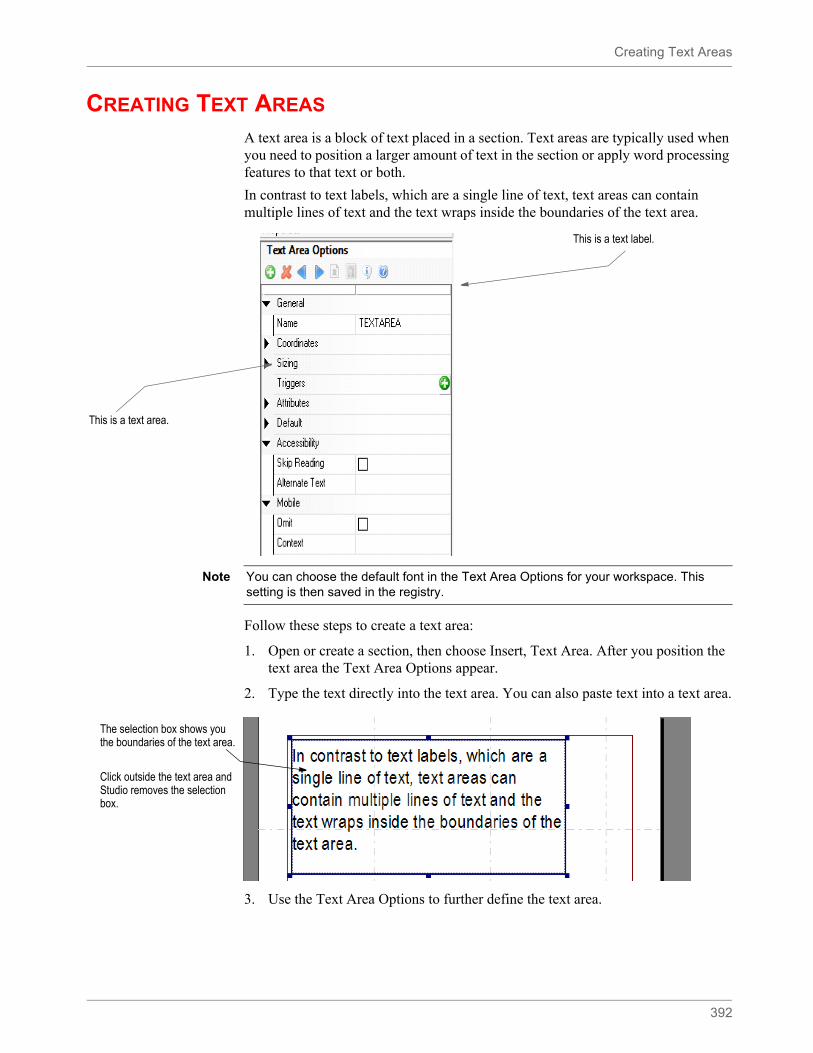
Creating Text Areas
392
CREATING TEXT AREAS
A text area is a block of text placed in a section. Text areas are typically used when you need to position a larger amount of text in the section or apply word processing features to that text or both.
In contrast to text labels, which are a single line of text, text areas can contain multiple lines of text and the text wraps inside the boundaries of the text area.
Follow these steps to create a text area:
1. Open or create a section, then choose Insert, Text Area. After you position the text area the Text Area Options appear.
2. Type the text directly into the text area. You can also paste text into a text area.
3. Use the Text Area Options to further define the text area.
This is a text label.
This is a text area.
Note You can choose the default font in the Text Area Options for your workspace. This setting is then saved in the registry.
The selection box shows you the boundaries of the text area.
Click outside the text area and Studio removes the selection box.

Creating Text Areas
393
Option Description
General
Name (Optional) Enter a name for the text area in this property. Assign a unique name to facilitate future reference to the text area for editing or other purposes. Although a name is not required for a text area, unless the Interactive Editing or Can Span options are enabled, it is recommended a name be provided. In the absence of a name, the horizontal and vertical coordinates of the bar code are used to locate\reference the bar code. These coordinates may not have significance or meaning to users.
Note: You must enter a name if you are going to select the Interactive Editing property or if the text area is allowed to span pages.
Style (Optional) This property only appears if you specified a style file in the BDF file. Select the style you want to use. Studio applies the font ID defined in the style to all of the text in the text area.
Coordinates
Horizontal Use this property to set the left edge of where you want the text area to begin.
Vertical Use this property to set the top edge of where you want the text area to begin.
Width Use this property to set the width of the text area.
Height Use this property to set the height of the text area.
Sizing
Can Grow and Shrink
Check this property to let the system expand the text area as content as entered and reduce the text area as content is removed.
Note: If you check the Can Grow and Shrink property, the Can Size property, which is a section property, is automatically turned on. You can manually turn off the Can Size property if you do not want to allow the size of the section to change as the text area grows. The Can Size property is only available on custom sized sections.
Can Span Pages
Check this property to let the system span the text area across pages.
Note: A text area that is allowed to span pages must have a name.
Must fit on page
Use this property to prevent the text area from splitting or overlaying the section or page boundary. If the text area grows to the section or page boundary, the system moves the entire text area to the next page.
Suppress variable lines
This property causes paragraphs containing field references that are blank during print operations to be suppressed.
During print, the field references are evaluated and removed if blank. If all of the variable references are blank, then the entire paragraph is suppressed, including any static text that is not a field reference.
Although this operation will format the text area, other properties related to grow, span, and fit are not honored during print and will not cause re-pagination to occur.
This is most useful when the entire paragraph is comprised of single-line field references, such as when defining a postal address block of fields. In addition, you should not use this property on a large, or multipage text area as it could affect performance and presentation. For best results, limit the use of this property to small text areas which contain only fields.
Creating Text Areas
394
Adjust top line Use this property to make the top line of the text area use the same calculation for vertical coordinate placement that text labels do, when using the same font.
Normally, the top line of the text area is positioned based on the font's height instead of its baseline value. This is done so text areas that are stacked do not overlap.
Text labels are positioned based on the font's baseline value. This could cause a problem when trying to (horizontally) align a text label with the top line of the text area. This can occur if you have converted text labels into a text area.
Triggers Click here to open the DAL Trigger Options window and define a trigger for this text area.
Attributes
Hyphenation Use this property to hyphenate words at the end of a line when applicable. Choose None if you do not want Studio to hyphenate words, otherwise select the language you want to determine the hyphenation rules, such as US English. The default is None.
This property sets hyphenation when you create the text area and is saved to the registry. You can use the Hyphenation property in the Paragraph properties to set hyphenation for each paragraph you create.
Pre-printed Check this property if you do not want the text area to be printed.
Use this property to tell the system that you want to see the content when working with the form, but the content of this text area should not print because pre-printed paper is instead used for final document output.
Interactive editing
Check this property to indicate the text area content should be treated as a multiline text field, which allows editing when the document is processed. The resulting field will be named using the text area name.
If you select this property, at run time the system converts the text area into a multiline text field with the original text area data as editable content of the multiline text field. The default tab order of the multiline text field is set by its placement on the section.
Note: To further control tab sequencing, you can add a dummy field to the section which has the same name as the text area with interactive editing enabled. Mark this dummy field as Hidden in the Field Options. At run time, when the text area is converted into a multiline text field, it will acquire the tab sequence specified for the dummy hidden field.
Required This property only appears if you selected the Interactive Editing property.
Checking this property means the text area cannot be empty. If there is already content in the text area, the end user is not required to enter any additional content.
Default
Font ID When the text area is empty, set the font ID you want to use for text that is typed.
To change the font for text already in the text area, highlight the text and choose the Format, Font option.
Tab stops Use this property to set the default tab position.
Accessibility Property attributes associated
Skip Reading If checked on, the object is excluded from being read by assistive technology.
Alternate Text Enter the alternate text to use.
Mobile
Omit Select this check box, if you do not want the object to be included in the Mobile Output.
Option Description
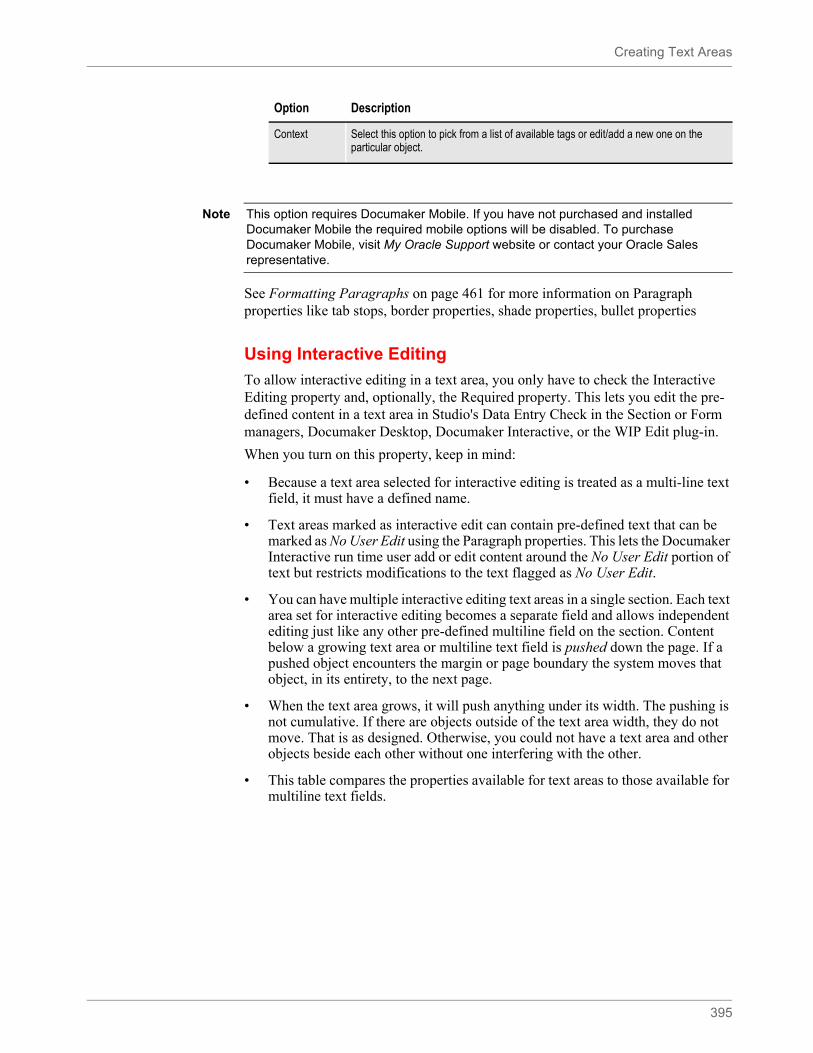
Creating Text Areas
395
See Formatting Paragraphs on page 461 for more information on Paragraph properties like tab stops, border properties, shade properties, bullet properties
Using Interactive Editing
To allow interactive editing in a text area, you only have to check the Interactive Editing property and, optionally, the Required property. This lets you edit the pre-defined content in a text area in Studio's Data Entry Check in the Section or Form managers, Documaker Desktop, Documaker Interactive, or the WIP Edit plug-in.
When you turn on this property, keep in mind:
• Because a text area selected for interactive editing is treated as a multi-line text field, it must have a defined name.
• Text areas marked as interactive edit can contain pre-defined text that can be marked as No User Edit using the Paragraph properties. This lets the Documaker Interactive run time user add or edit content around the No User Edit portion of text but restricts modifications to the text flagged as No User Edit.
• You can have multiple interactive editing text areas in a single section. Each text area set for interactive editing becomes a separate field and allows independent editing just like any other pre-defined multiline field on the section. Content below a growing text area or multiline text field is pushed down the page. If a pushed object encounters the margin or page boundary the system moves that object, in its entirety, to the next page.
• When the text area grows, it will push anything under its width. The pushing is not cumulative. If there are objects outside of the text area width, they do not move. That is as designed. Otherwise, you could not have a text area and other objects beside each other without one interfering with the other.
• This table compares the properties available for text areas to those available for multiline text fields.
Context Select this option to pick from a list of available tags or edit/add a new one on the particular object.
Option Description
Note This option requires Documaker Mobile. If you have not purchased and installed Documaker Mobile the required mobile options will be disabled. To purchase Documaker Mobile, visit My Oracle Support website or contact your Oracle Sales representative.
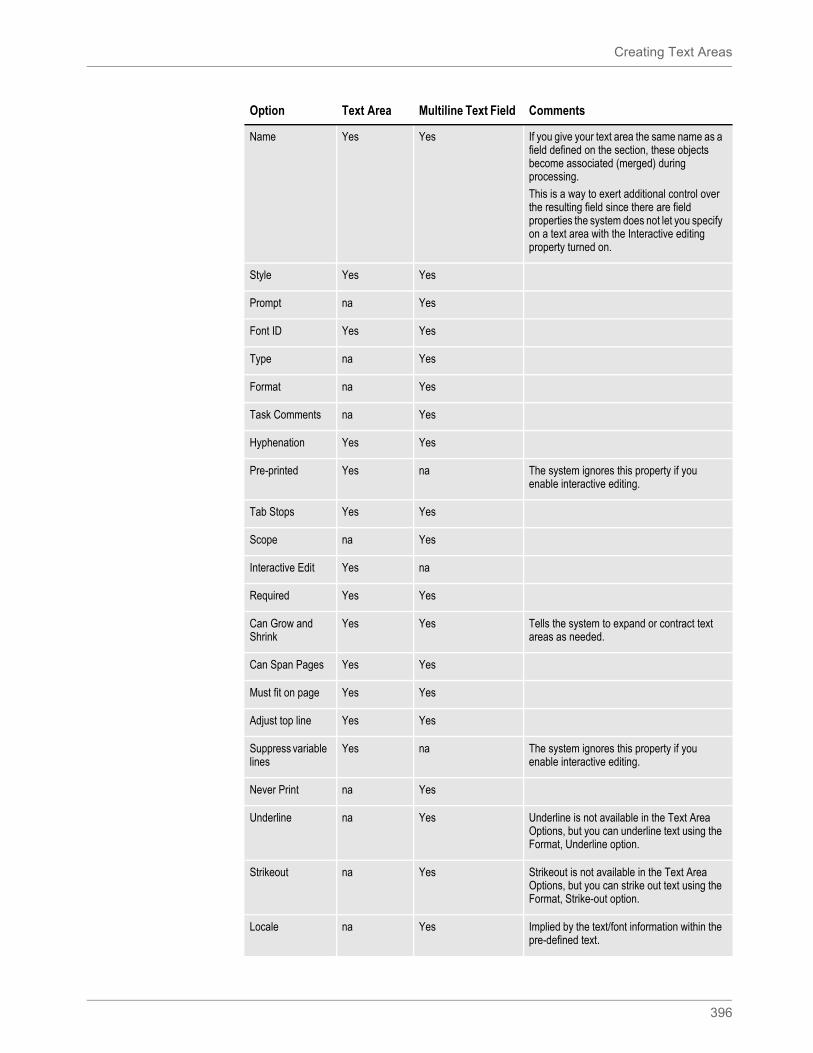
Creating Text Areas
396
Option Text Area Multiline Text Field Comments
Name Yes Yes If you give your text area the same name as a field defined on the section, these objects become associated (merged) during processing.
This is a way to exert additional control over the resulting field since there are field properties the system does not let you specify on a text area with the Interactive editing property turned on.
Style Yes Yes
Prompt na Yes
Font ID Yes Yes
Type na Yes
Format na Yes
Task Comments na Yes
Hyphenation Yes Yes
Pre-printed Yes na The system ignores this property if you enable interactive editing.
Tab Stops Yes Yes
Scope na Yes
Interactive Edit Yes na
Required Yes Yes
Can Grow and Shrink
Yes Yes Tells the system to expand or contract text areas as needed.
Can Span Pages Yes Yes
Must fit on page Yes Yes
Adjust top line Yes Yes
Suppress variable lines
Yes na The system ignores this property if you enable interactive editing.
Never Print na Yes
Underline na Yes Underline is not available in the Text Area Options, but you can underline text using the Format, Underline option.
Strikeout na Yes Strikeout is not available in the Text Area Options, but you can strike out text using the Format, Strike-out option.
Locale na Yes Implied by the text/font information within the pre-defined text.
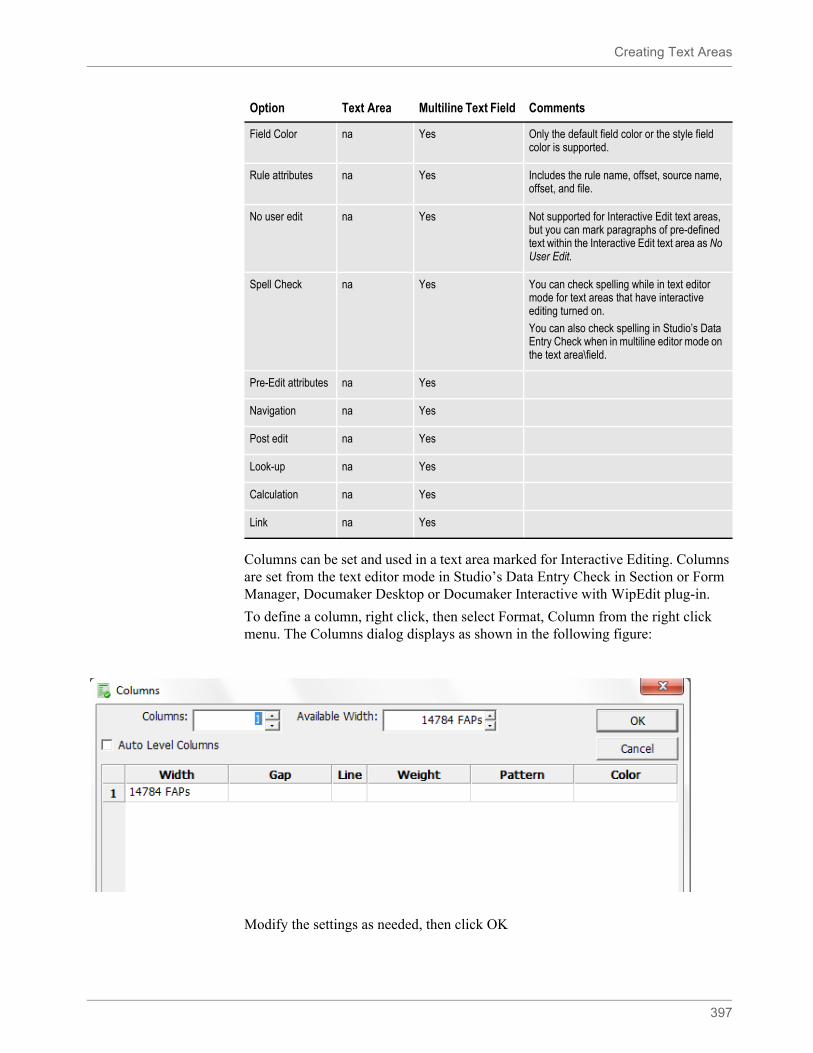
Creating Text Areas
397
Columns can be set and used in a text area marked for Interactive Editing. Columns are set from the text editor mode in Studio’s Data Entry Check in Section or Form Manager, Documaker Desktop or Documaker Interactive with WipEdit plug-in.
To define a column, right click, then select Format, Column from the right click menu. The Columns dialog displays as shown in the following figure:
Modify the settings as needed, then click OK
Field Color na Yes Only the default field color or the style field color is supported.
Rule attributes na Yes Includes the rule name, offset, source name, offset, and file.
No user edit na Yes Not supported for Interactive Edit text areas, but you can mark paragraphs of pre-defined text within the Interactive Edit text area as No User Edit.
Spell Check na Yes You can check spelling while in text editor mode for text areas that have interactive editing turned on.
You can also check spelling in Studio’s Data Entry Check when in multiline editor mode on the text area\field.
Pre-Edit attributes na Yes
Navigation na Yes
Post edit na Yes
Look-up na Yes
Calculation na Yes
Link na Yes
Option Text Area Multiline Text Field Comments
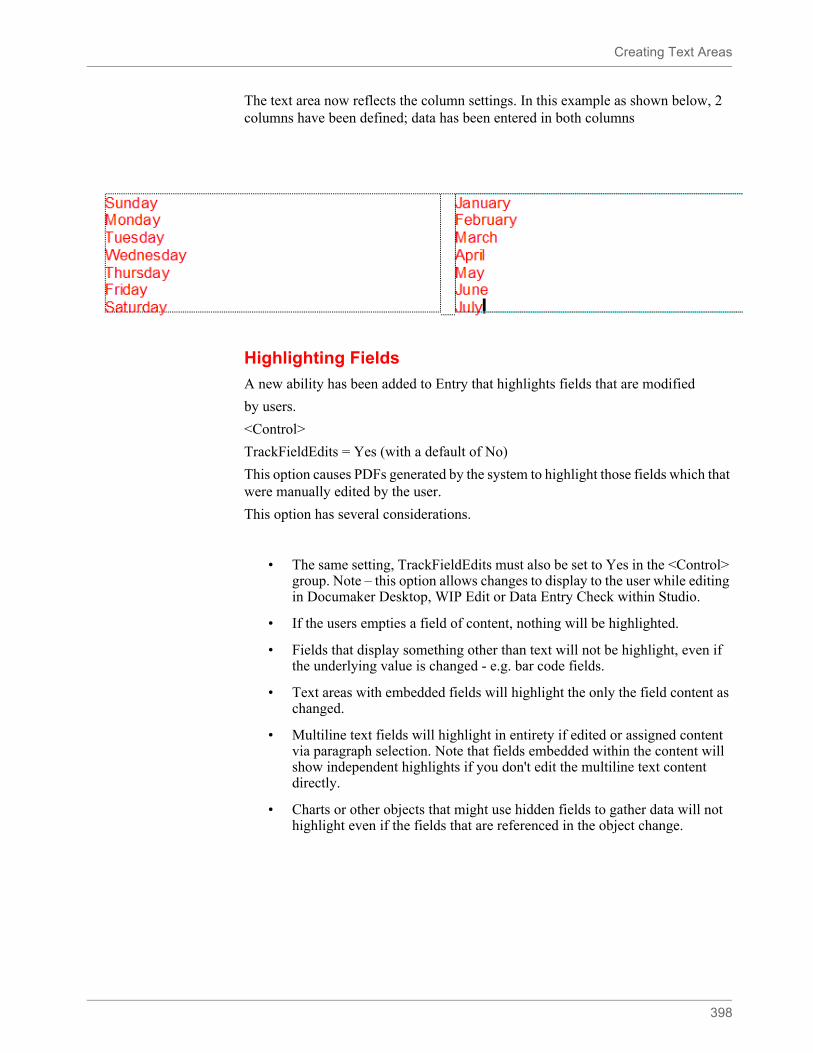
Creating Text Areas
398
The text area now reflects the column settings. In this example as shown below, 2 columns have been defined; data has been entered in both columns
Highlighting Fields
A new ability has been added to Entry that highlights fields that are modified
by users.
<Control>
TrackFieldEdits = Yes (with a default of No)
This option causes PDFs generated by the system to highlight those fields which that were manually edited by the user.
This option has several considerations.
• The same setting, TrackFieldEdits must also be set to Yes in the <Control> group. Note – this option allows changes to display to the user while editing in Documaker Desktop, WIP Edit or Data Entry Check within Studio.
• If the users empties a field of content, nothing will be highlighted.
• Fields that display something other than text will not be highlight, even if the underlying value is changed - e.g. bar code fields.
• Text areas with embedded fields will highlight the only the field content as changed.
• Multiline text fields will highlight in entirety if edited or assigned content via paragraph selection. Note that fields embedded within the content will show independent highlights if you don't edit the multiline text content directly.
• Charts or other objects that might use hidden fields to gather data will not highlight even if the fields that are referenced in the object change.
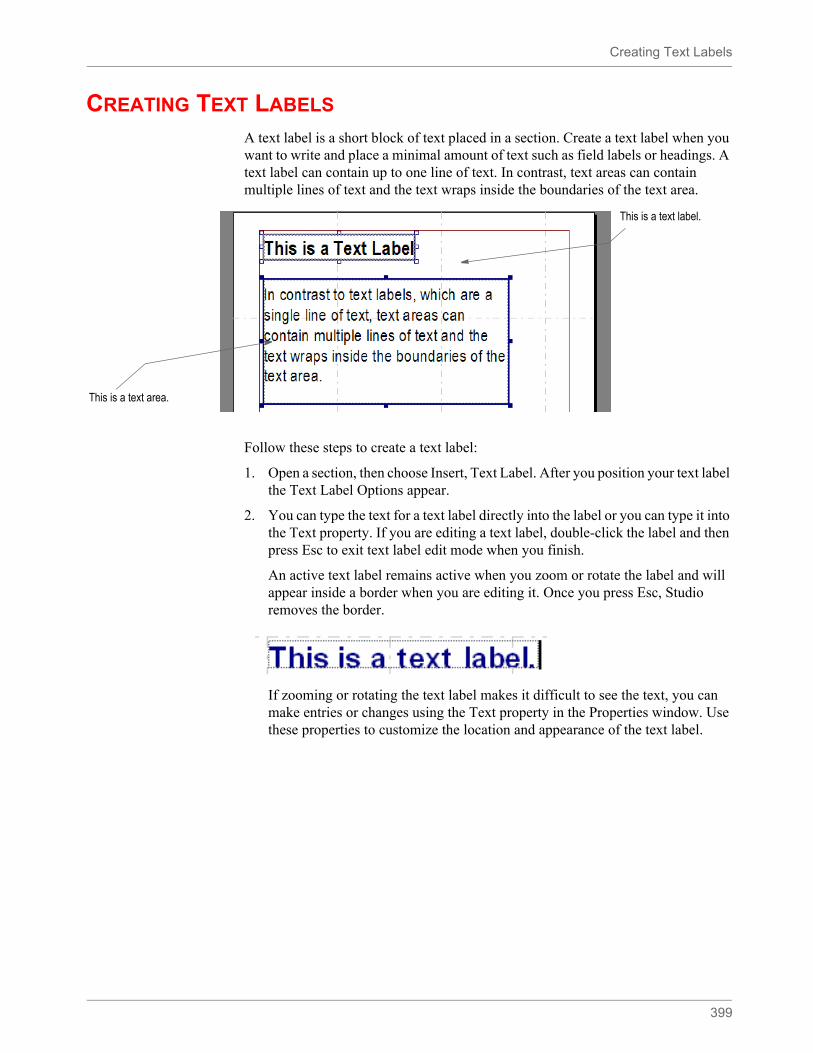
Creating Text Labels
399
CREATING TEXT LABELS
A text label is a short block of text placed in a section. Create a text label when you want to write and place a minimal amount of text such as field labels or headings. A text label can contain up to one line of text. In contrast, text areas can contain multiple lines of text and the text wraps inside the boundaries of the text area.
Follow these steps to create a text label:
1. Open a section, then choose Insert, Text Label. After you position your text label the Text Label Options appear.
2. You can type the text for a text label directly into the label or you can type it into the Text property. If you are editing a text label, double-click the label and then press Esc to exit text label edit mode when you finish.
An active text label remains active when you zoom or rotate the label and will appear inside a border when you are editing it. Once you press Esc, Studio removes the border.
If zooming or rotating the text label makes it difficult to see the text, you can make entries or changes using the Text property in the Properties window. Use these properties to customize the location and appearance of the text label.
This is a text label.
This is a text area.
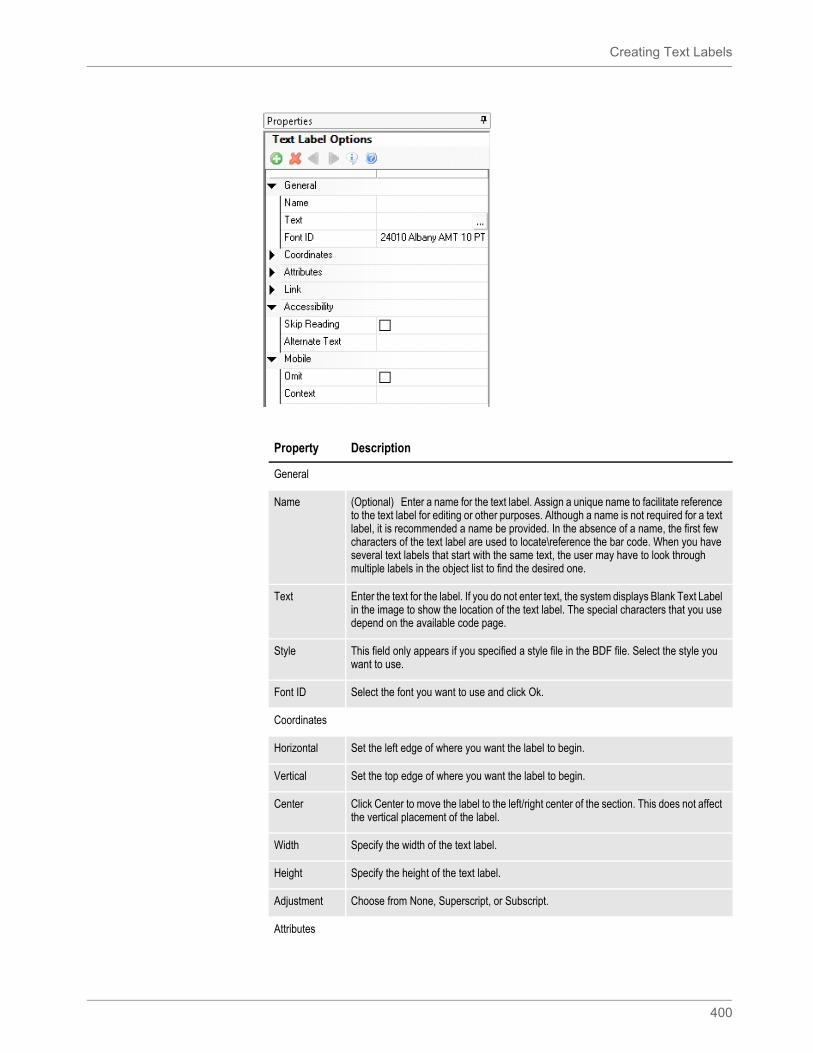
Creating Text Labels
400
Property Description
General
Name (Optional) Enter a name for the text label. Assign a unique name to facilitate reference to the text label for editing or other purposes. Although a name is not required for a text label, it is recommended a name be provided. In the absence of a name, the first few characters of the text label are used to locate\reference the bar code. When you have several text labels that start with the same text, the user may have to look through multiple labels in the object list to find the desired one.
Text Enter the text for the label. If you do not enter text, the system displays Blank Text Label in the image to show the location of the text label. The special characters that you use depend on the available code page.
Style This field only appears if you specified a style file in the BDF file. Select the style you want to use.
Font ID Select the font you want to use and click Ok.
Coordinates
Horizontal Set the left edge of where you want the label to begin.
Vertical Set the top edge of where you want the label to begin.
Center Click Center to move the label to the left/right center of the section. This does not affect the vertical placement of the label.
Width Specify the width of the text label.
Height Specify the height of the text label.
Adjustment Choose from None, Superscript, or Subscript.
Attributes
Creating Text Labels
401
Underline Choose from None, Double line, Single line, Double line (words only) or Single line (words only).
Strikeout Check this box if you want the text stricken.
Pre-printed Check this box to tell the system not to print this object when you print the section.
Checking this box can be useful during forms creation or when test printing your forms. You may be using letterhead or special paper that has the company name or logo already embossed on the paper. Inserting a text label or graphic on your form in the same location as the company name or logo helps to make sure the space is not inadvertently written over by other objects. These objects would reserve that space on the form.
Rotation This lets you rotate the text label. You can choose from zero (0), 90, 180, or 270 degree rotation.
Color Click the ellipsis button to select the color for the label text.
Link
Link Type Choose from either none, external, internal, or target hyperlinks. If you chose an option other than none, additional properties appear.
Link Border Select the type of border (if any) to draw around the hyperlink (affects PDF output only). You can choose from Dash, Solid, Underline, or None.
HTML Reference
Enter the address of the web page. Here is an example:
http://www.oracle.com
Parameters Use this field when producing HTML output to specify additional parameters to an HREF type link, such as a target frame or mouseover behavior. This example causes a web page to open in a new browser window:
target="new"
Mobile
Omit Select this check box, if you do not want the object to be included in the Mobile Output.
Context Select this option to pick from a list of available tags or edit/add a new one on the particular object.
Property Description
Note This option requires Documaker Mobile. If you have not purchased and installed Documaker Mobile the required mobile options will be disabled. To purchase Documaker Mobile, visit My Oracle Support website or contact your Oracle Sales
representative.
Inserting a Field
402
INSERTING A FIELD
Fields are the placeholders for data that you put on a section. They can be found placed independently on a section, or within other objects, such as charts or text areas.
The following table illustrates whether a Field property is used in Documaker Server processing, or in Documaker Entry editing, or both.
General field options
The General tab records basic information about the variable field such as field name, dimensions, and position.
Field Property Server Entry
General X X
Coordinates X X
Attributes X X
Documerge
Rule X
Entry X
Pre and Post Edit X
Navigation X
Lookup X X
Calculation X
Links X X
Paragraph X X
Paragraph Selection X X
Mobile
Name (Required) Enter the name of the field. The default name is FIELD. As you add additional fields to the section, #nnn is appended to the default field name, for example FIELD #002, FIELD #003, etc.
Style Set the style to be used with the field.
The Style option is displayed when a Style is defined in the Application Definition file.
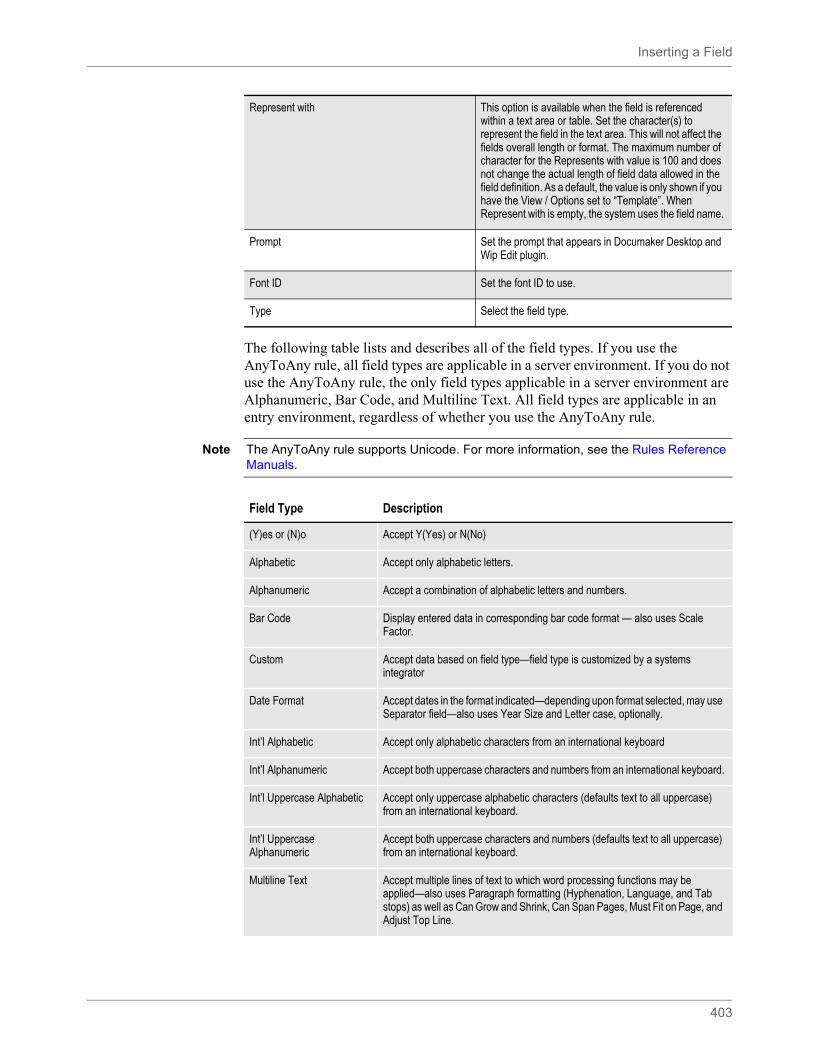
Inserting a Field
403
The following table lists and describes all of the field types. If you use the AnyToAny rule, all field types are applicable in a server environment. If you do not use the AnyToAny rule, the only field types applicable in a server environment are Alphanumeric, Bar Code, and Multiline Text. All field types are applicable in an entry environment, regardless of whether you use the AnyToAny rule.
Represent with This option is available when the field is referenced within a text area or table. Set the character(s) to represent the field in the text area. This will not affect the fields overall length or format. The maximum number of character for the Represents with value is 100 and does not change the actual length of field data allowed in the field definition. As a default, the value is only shown if you have the View / Options set to “Template”. When Represent with is empty, the system uses the field name.
Prompt Set the prompt that appears in Documaker Desktop and Wip Edit plugin.
Font ID Set the font ID to use.
Type Select the field type.
Note The AnyToAny rule supports Unicode. For more information, see the Rules Reference Manuals.
Field Type Description
(Y)es or (N)o Accept Y(Yes) or N(No)
Alphabetic Accept only alphabetic letters.
Alphanumeric Accept a combination of alphabetic letters and numbers.
Bar Code Display entered data in corresponding bar code format — also uses Scale Factor.
Custom Accept data based on field type—field type is customized by a systems integrator
Date Format Accept dates in the format indicated—depending upon format selected, may use Separator field—also uses Year Size and Letter case, optionally.
Int’l Alphabetic Accept only alphabetic characters from an international keyboard
Int’l Alphanumeric Accept both uppercase characters and numbers from an international keyboard.
Int’l Uppercase Alphabetic Accept only uppercase alphabetic characters (defaults text to all uppercase) from an international keyboard.
Int’l Uppercase Alphanumeric
Accept both uppercase characters and numbers (defaults text to all uppercase) from an international keyboard.
Multiline Text Accept multiple lines of text to which word processing functions may be applied—also uses Paragraph formatting (Hyphenation, Language, and Tab stops) as well as Can Grow and Shrink, Can Span Pages, Must Fit on Page, and Adjust Top Line.
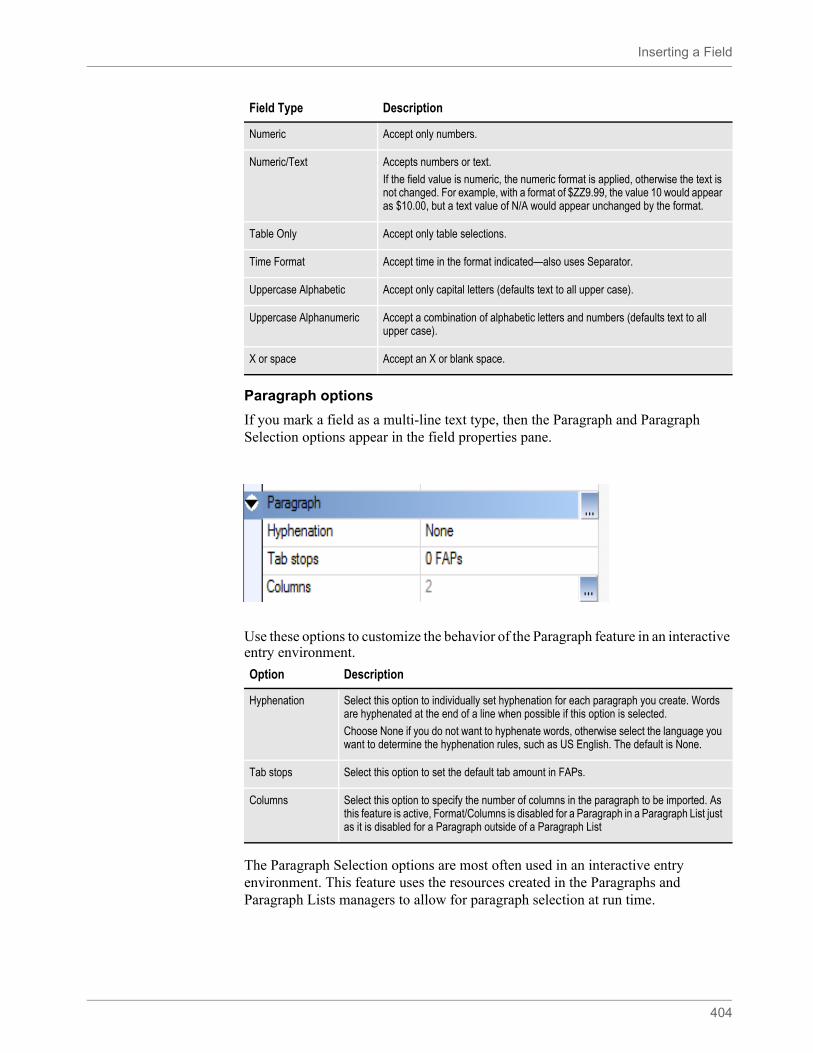
Inserting a Field
404
Paragraph options
If you mark a field as a multi-line text type, then the Paragraph and Paragraph Selection options appear in the field properties pane.
Use these options to customize the behavior of the Paragraph feature in an interactive entry environment.
The Paragraph Selection options are most often used in an interactive entry environment. This feature uses the resources created in the Paragraphs and Paragraph Lists managers to allow for paragraph selection at run time.
Numeric Accept only numbers.
Numeric/Text Accepts numbers or text.
If the field value is numeric, the numeric format is applied, otherwise the text is not changed. For example, with a format of $ZZ9.99, the value 10 would appear as $10.00, but a text value of N/A would appear unchanged by the format.
Table Only Accept only table selections.
Time Format Accept time in the format indicated—also uses Separator.
Uppercase Alphabetic Accept only capital letters (defaults text to all upper case).
Uppercase Alphanumeric Accept a combination of alphabetic letters and numbers (defaults text to all upper case).
X or space Accept an X or blank space.
Field Type Description
Option Description
Hyphenation Select this option to individually set hyphenation for each paragraph you create. Words are hyphenated at the end of a line when possible if this option is selected.
Choose None if you do not want to hyphenate words, otherwise select the language you want to determine the hyphenation rules, such as US English. The default is None.
Tab stops Select this option to set the default tab amount in FAPs.
Columns Select this option to specify the number of columns in the paragraph to be imported. As this feature is active, Format/Columns is disabled for a Paragraph in a Paragraph List just as it is disabled for a Paragraph outside of a Paragraph List
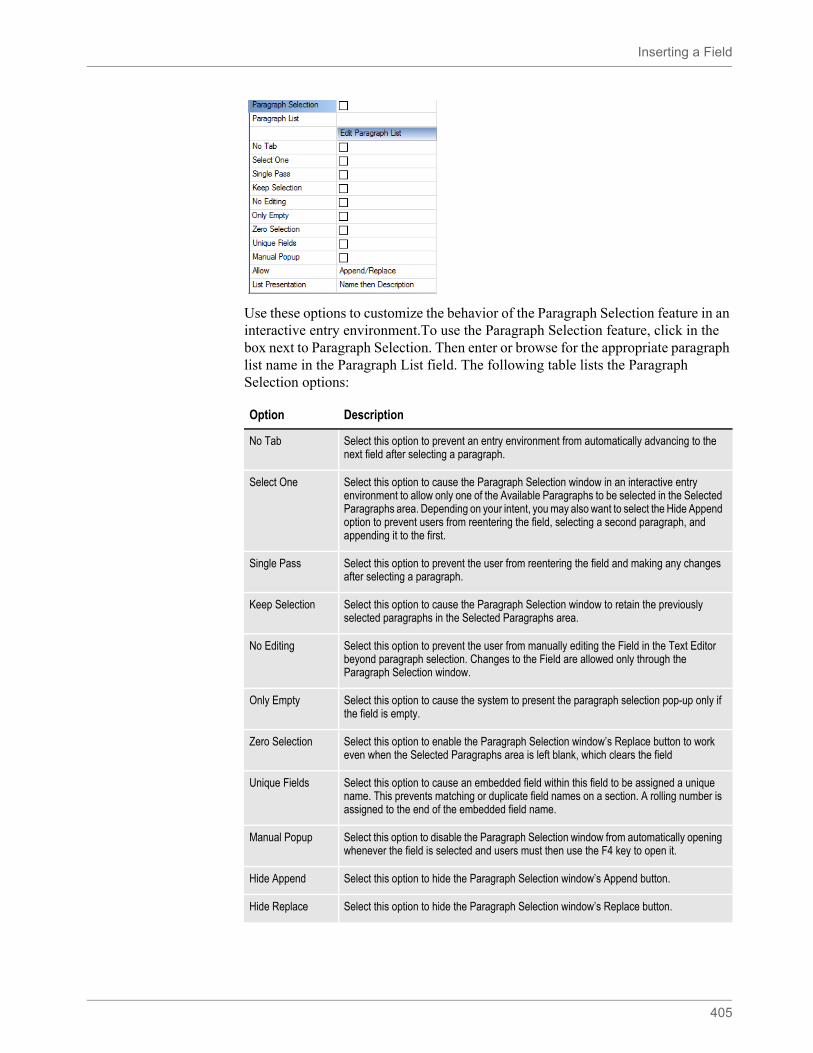
Inserting a Field
405
Use these options to customize the behavior of the Paragraph Selection feature in an interactive entry environment.To use the Paragraph Selection feature, click in the box next to Paragraph Selection. Then enter or browse for the appropriate paragraph list name in the Paragraph List field. The following table lists the Paragraph Selection options:
Option Description
No Tab Select this option to prevent an entry environment from automatically advancing to the next field after selecting a paragraph.
Select One Select this option to cause the Paragraph Selection window in an interactive entry environment to allow only one of the Available Paragraphs to be selected in the Selected Paragraphs area. Depending on your intent, you may also want to select the Hide Append option to prevent users from reentering the field, selecting a second paragraph, and appending it to the first.
Single Pass Select this option to prevent the user from reentering the field and making any changes after selecting a paragraph.
Keep Selection Select this option to cause the Paragraph Selection window to retain the previously selected paragraphs in the Selected Paragraphs area.
No Editing Select this option to prevent the user from manually editing the Field in the Text Editor beyond paragraph selection. Changes to the Field are allowed only through the Paragraph Selection window.
Only Empty Select this option to cause the system to present the paragraph selection pop-up only if the field is empty.
Zero Selection Select this option to enable the Paragraph Selection window’s Replace button to work even when the Selected Paragraphs area is left blank, which clears the field
Unique Fields Select this option to cause an embedded field within this field to be assigned a unique name. This prevents matching or duplicate field names on a section. A rolling number is assigned to the end of the embedded field name.
Manual Popup Select this option to disable the Paragraph Selection window from automatically opening whenever the field is selected and users must then use the F4 key to open it.
Hide Append Select this option to hide the Paragraph Selection window’s Append button.
Hide Replace Select this option to hide the Paragraph Selection window’s Replace button.

Inserting a Field
406
See Formatting Paragraphs on page 461 for more information on Paragraph properties like tab stops, border properties, shade properties, bullet properties
Coordinates
Coordinate options include:
Attributes
The following table lists the Attribute options for a field.
List Presentation Select how the Paragraph Selection window displays Paragraphs within an interactive entry environment. Choices include Description Only, Description then Name, Name only, or Name then Description. Description and Name are specified for each paragraph in the Paragraph List manager.
Option Description
Note In the Attributes area for this field, you must have the Can Grow and Shrink property selected. If it is possible for the paragraphs you select to span to another page, you must also select the Can Span Pages property.
Option Description
Horizontal Upper-left X coordinate
Vertical Upper-left Y coordinate
Width System-calculated and based on font/length
Height System-calculated and based on font
Adjustment None, subscript, or superscript
Attribute Description
Scope The scope controls the distribution or propagation of entered data to all fields with identical names. The three types of scope are applicable only in an entry environment. In a server environment, always use Section as the scope, with one exception—if a field is overflowing in a server environment, use Form as the scope.
Section—Data written only to the field within a single section
Form—Data automatically written to all identically named fields throughout all sections within a form
Global—Data automatically written to all identically named fields throughout all sections and forms within a form set
Send copy to Data defined in the BDF file for the selected recipient propagates this field (not valid for multiline text fields).
Required When selected, the entry operator must enter data in this field. This option is only applicable in entry environments such as Oracle Documaker Studios’ Data Entry Check, Oracle Documaker Desktop and Oracle Documaker Interactive.
Can Grow and Shrink
Only used only with multiline text fields, where the field expands as text is entered.
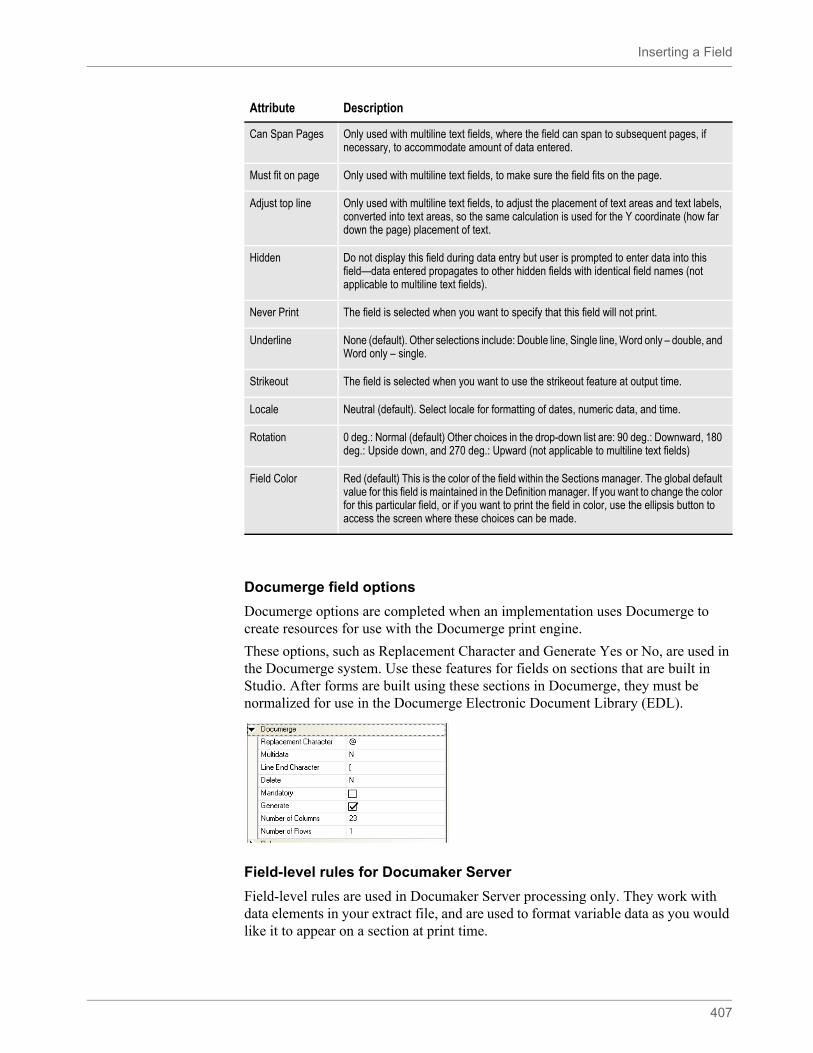
Inserting a Field
407
Documerge field options
Documerge options are completed when an implementation uses Documerge to create resources for use with the Documerge print engine.
These options, such as Replacement Character and Generate Yes or No, are used in the Documerge system. Use these features for fields on sections that are built in Studio. After forms are built using these sections in Documerge, they must be normalized for use in the Documerge Electronic Document Library (EDL).
Field-level rules for Documaker Server
Field-level rules are used in Documaker Server processing only. They work with data elements in your extract file, and are used to format variable data as you would like it to appear on a section at print time.
Can Span Pages Only used with multiline text fields, where the field can span to subsequent pages, if necessary, to accommodate amount of data entered.
Must fit on page Only used with multiline text fields, to make sure the field fits on the page.
Adjust top line Only used with multiline text fields, to adjust the placement of text areas and text labels, converted into text areas, so the same calculation is used for the Y coordinate (how far down the page) placement of text.
Hidden Do not display this field during data entry but user is prompted to enter data into this field—data entered propagates to other hidden fields with identical field names (not applicable to multiline text fields).
Never Print The field is selected when you want to specify that this field will not print.
Underline None (default). Other selections include: Double line, Single line, Word only – double, and Word only – single.
Strikeout The field is selected when you want to use the strikeout feature at output time.
Locale Neutral (default). Select locale for formatting of dates, numeric data, and time.
Rotation 0 deg.: Normal (default) Other choices in the drop-down list are: 90 deg.: Downward, 180 deg.: Upside down, and 270 deg.: Upward (not applicable to multiline text fields)
Field Color Red (default) This is the color of the field within the Sections manager. The global default value for this field is maintained in the Definition manager. If you want to change the color for this particular field, or if you want to print the field in color, use the ellipsis button to access the screen where these choices can be made.
Attribute Description
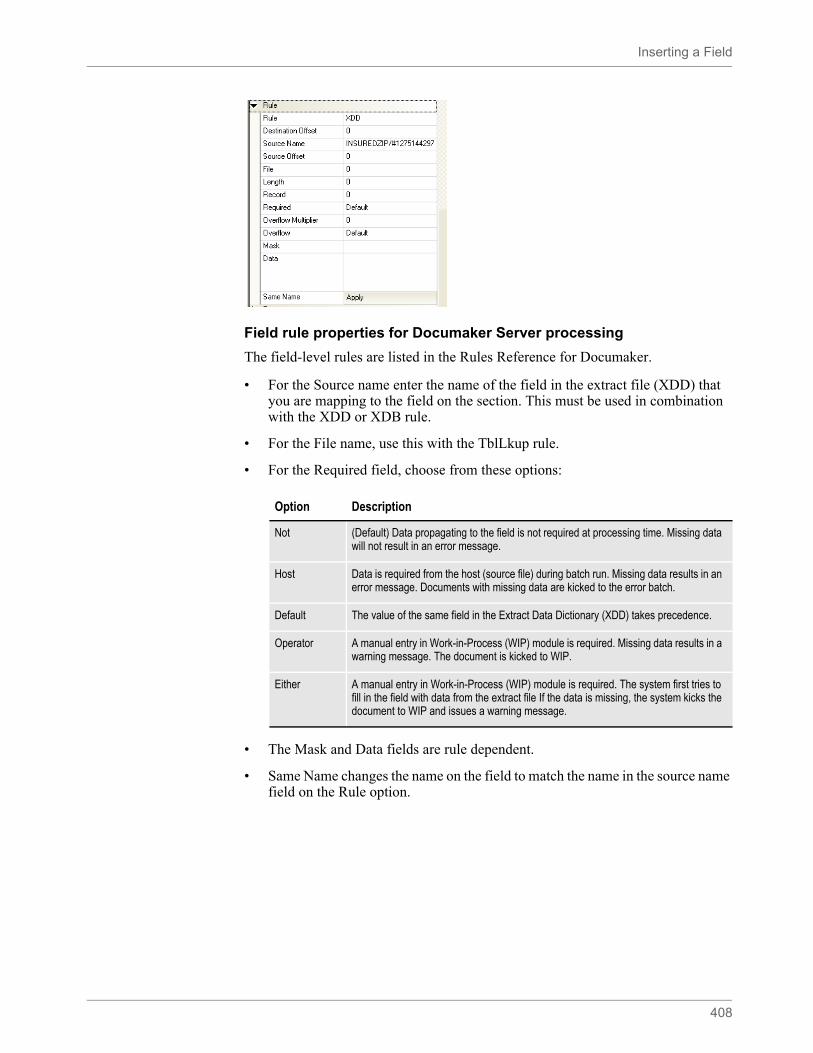
Inserting a Field
408
Field rule properties for Documaker Server processing
The field-level rules are listed in the Rules Reference for Documaker.
• For the Source name enter the name of the field in the extract file (XDD) that you are mapping to the field on the section. This must be used in combination with the XDD or XDB rule.
• For the File name, use this with the TblLkup rule.
• For the Required field, choose from these options:
• The Mask and Data fields are rule dependent.
• Same Name changes the name on the field to match the name in the source name field on the Rule option.
Option Description
Not (Default) Data propagating to the field is not required at processing time. Missing data will not result in an error message.
Host Data is required from the host (source file) during batch run. Missing data results in an error message. Documents with missing data are kicked to the error batch.
Default The value of the same field in the Extract Data Dictionary (XDD) takes precedence.
Operator A manual entry in Work-in-Process (WIP) module is required. Missing data results in a warning message. The document is kicked to WIP.
Either A manual entry in Work-in-Process (WIP) module is required. The system first tries to fill in the field with data from the extract file If the data is missing, the system kicks the document to WIP and issues a warning message.
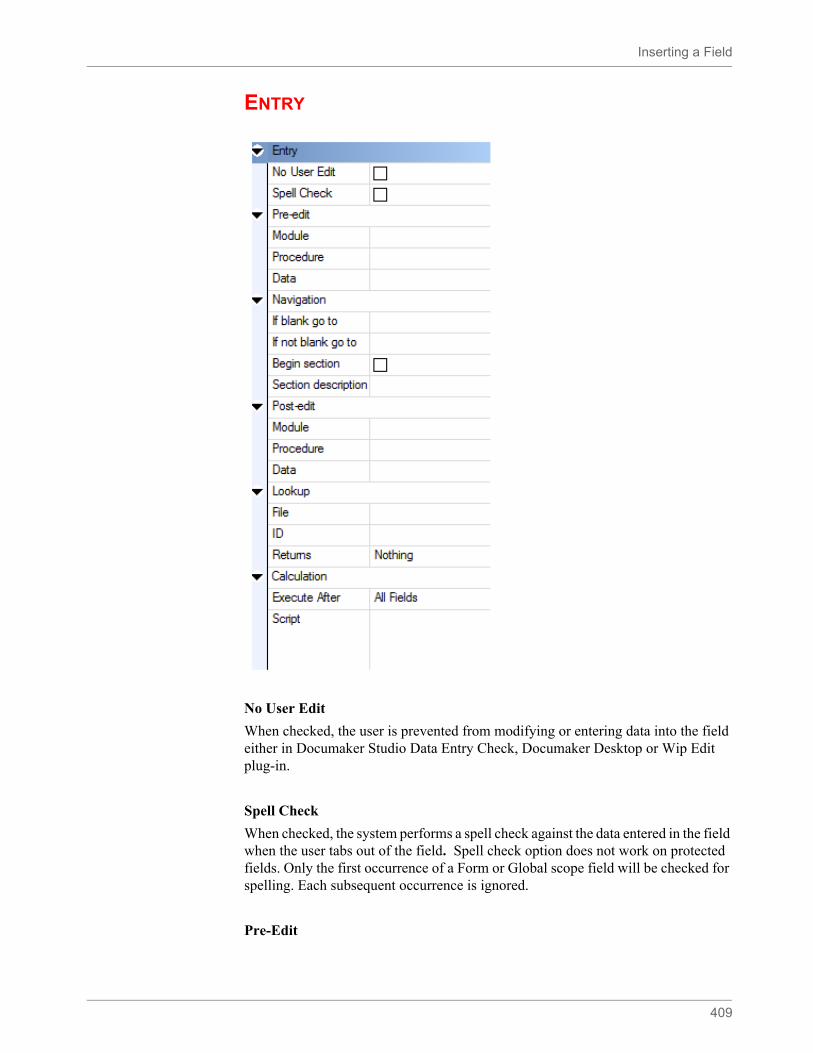
Inserting a Field
409
ENTRY
No User Edit
When checked, the user is prevented from modifying or entering data into the field either in Documaker Studio Data Entry Check, Documaker Desktop or Wip Edit plug-in.
Spell Check
When checked, the system performs a spell check against the data entered in the field when the user tabs out of the field. Spell check option does not work on protected fields. Only the first occurrence of a Form or Global scope field will be checked for spelling. Each subsequent occurrence is ignored.
Pre-Edit
Inserting a Field
410
By assigning edit functions to a field, you can have the system execute specific functions before (pre-edit) or after (post-edit) an entry operator enters data into the field, exits the field, or both.
When you assign a pre-edit function to a variable field, the system executes that function before the entry operator enters information in the field.
Module
Select the applicable module in the Module field. The module is the name of the DLL which contains the pre-edit procedure.
Procedure
Select the pre-edit procedure associated with the selected module.
Data
Enter any data required to run the procedure in the Data field
TerSubstitute Data Options
Select To
CSTW32 This module has 2 applications:
- Fills a blank variable field with the specified character.
- Opens Microsoft Word for data entry when in Documaker Desktop.
DALW32 Have the system execute a DAL script.
TERSW32 Use paragraph assembly. Paragraph assembly is available only for multi-line text variable fields.
Select To
CSTFillField Fill a blank variable field with a character you specify. See the topic CSTFillField for additional information.
CSTRunWord Use this procedure to have the entry system open Microsoft Word for data entry in the variable field. . See the topic CSTRunWord, for additional information.
DALExecMsgScript Have the system execute a DAL script.
TerSubstitute Use paragraph assembly. Paragraph assembly is available only for multi-line text variable fields. See Additional Paragraph Assembly (TerSub) Options for additional information.
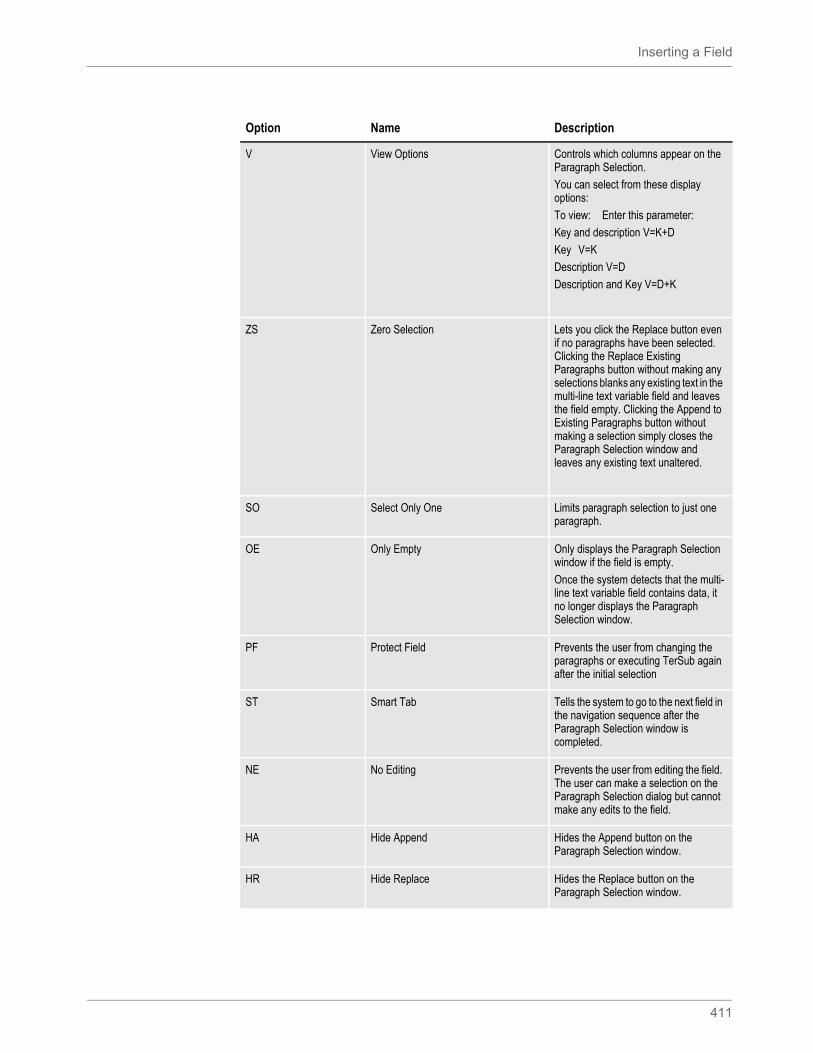
Inserting a Field
411
Option Name Description
V View Options Controls which columns appear on the Paragraph Selection.
You can select from these display options:
To view: Enter this parameter:
Key and description V=K+D
Key V=K
Description V=D
Description and Key V=D+K
ZS Zero Selection Lets you click the Replace button even if no paragraphs have been selected. Clicking the Replace Existing Paragraphs button without making any selections blanks any existing text in the multi-line text variable field and leaves the field empty. Clicking the Append to Existing Paragraphs button without making a selection simply closes the Paragraph Selection window and leaves any existing text unaltered.
SO Select Only One Limits paragraph selection to just one paragraph.
OE Only Empty Only displays the Paragraph Selection window if the field is empty.
Once the system detects that the multi-line text variable field contains data, it no longer displays the Paragraph Selection window.
PF Protect Field Prevents the user from changing the paragraphs or executing TerSub again after the initial selection
ST Smart Tab Tells the system to go to the next field in the navigation sequence after the Paragraph Selection window is completed.
NE No Editing Prevents the user from editing the field. The user can make a selection on the Paragraph Selection dialog but cannot make any edits to the field.
HA Hide Append Hides the Append button on the Paragraph Selection window.
HR Hide Replace Hides the Replace button on the Paragraph Selection window.
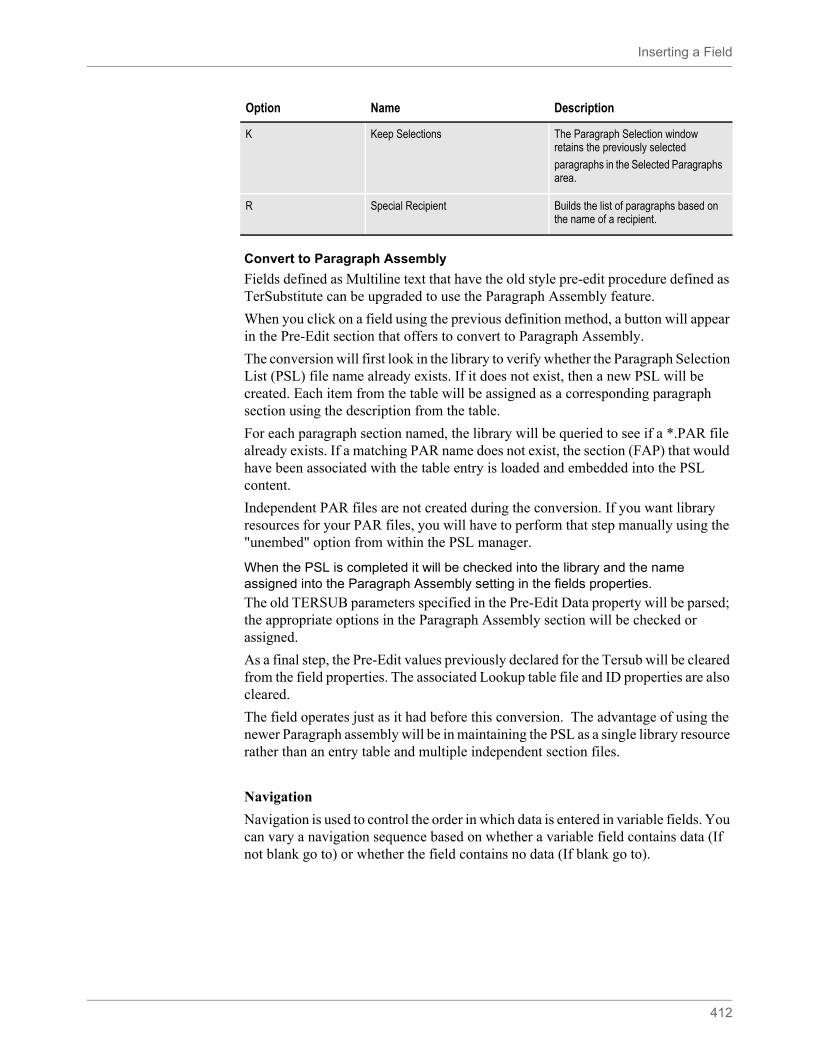
Inserting a Field
412
Convert to Paragraph Assembly
Fields defined as Multiline text that have the old style pre-edit procedure defined as TerSubstitute can be upgraded to use the Paragraph Assembly feature.
When you click on a field using the previous definition method, a button will appear in the Pre-Edit section that offers to convert to Paragraph Assembly.
The conversion will first look in the library to verify whether the Paragraph Selection List (PSL) file name already exists. If it does not exist, then a new PSL will be created. Each item from the table will be assigned as a corresponding paragraph section using the description from the table.
For each paragraph section named, the library will be queried to see if a *.PAR file already exists. If a matching PAR name does not exist, the section (FAP) that would have been associated with the table entry is loaded and embedded into the PSL content.
Independent PAR files are not created during the conversion. If you want library resources for your PAR files, you will have to perform that step manually using the "unembed" option from within the PSL manager.
When the PSL is completed it will be checked into the library and the name assigned into the Paragraph Assembly setting in the fields properties.
The old TERSUB parameters specified in the Pre-Edit Data property will be parsed; the appropriate options in the Paragraph Assembly section will be checked or assigned.
As a final step, the Pre-Edit values previously declared for the Tersub will be cleared from the field properties. The associated Lookup table file and ID properties are also cleared.
The field operates just as it had before this conversion. The advantage of using the newer Paragraph assembly will be in maintaining the PSL as a single library resource rather than an entry table and multiple independent section files.
Navigation
Navigation is used to control the order in which data is entered in variable fields. You can vary a navigation sequence based on whether a variable field contains data (If not blank go to) or whether the field contains no data (If blank go to).
K Keep Selections The Paragraph Selection window retains the previously selected
paragraphs in the Selected Paragraphs area.
R Special Recipient Builds the list of paragraphs based on the name of a recipient.
Option Name Description

Inserting a Field
413
From the Navigation tab you also designate a field as the beginning field in an image section. Create different image sections if you want to group logical units of information. Sections provide the user a quick way to move around in the image during data entry. For example, in a homeowner's policy you might create a section for the home description and a separate section for the policy limits.
If blank go to
Select the field the system should move to if this field is left blank. If a user leaves the variable field blank, the system does not default to the next sequential field. You must select a field.
If not blank go to
Select the field the system should move to if a user enters data into this variable field. If you leave the If Not Blank Go To field blank, the system defaults to the next sequential field.
Begin Section
Check if you want the field to begin a section.
Section Description
Enter the section description. Section descriptions are displayed during data entry.
Post-edit
By assigning edit functions to a variable field, you can have the system execute specific functions before (pre-edit) or after (post-edit) an entry operator enters data into the field, exits the field, or both
The system applies post-edit functions after the entry operator finishes entering data in the field. For example, you might assign a post-edit procedure that tells the system to create a cover letter using the name and address entered into the variable field.
Post-Edit Modules
The module is the name of the DLL where the post-edit procedure resides.
Post-Edit Procedures
Select the procedure name in the Procedure field.
Field Description
CSTW32 Choose CSTW32 to use CSTFillField or CSTParseJustify functions
DALW32 Choose DALW32 to use DALExecMsgScript function.
TERSW32 Choose TERSW32 to use the Paragraph Assembly feature.
Field Description
CSTFillField Fill a blank variable field with a character you specify.
CSTParseJustify Control the justification of variable fields in the entry system.
Inserting a Field
414
Post-Edit Data
Enter any data required to run the procedure in the Data field.
Separate the DAL script statements with semicolons (;).
If the text of the script will not fit in the field, create the script as an external text file and then use CALL or CHAIN to tell the system to run your script. For more information, see the DAL Reference.
CSTFillField
Use the CSTFillField procedure to fill a blank variable field with the specified character. This procedure works in either or both pre-edit and post-edit modes. To use this procedure, make the following entries on the Edits tab of the field’s Properties window:
Where Num is equal to the number of instances of the fill character and Char is equal to the fill character. If you omit Num, the system uses the full field length. If you omit Char, the system uses an underline character.
As a pre-edit procedure, this function checks to see if the entry field matches the data specification from the post-edit. If it does, the system clears the field so the user can begin a clean entry. The entry length is then set to the value in the pre-edit data field of the Edits tab. If the fill data is longer than the field length, the pre-edit data must contain the field length to reset it from the longer fill data. For example, if the field length is 10 and you want 20 Xs, the data would be: Pre-edit data: 10 Post-edit data: 20;X.
When used as a post-edit procedure, this procedure checks the entry field to see if it is empty. If it is, the system fills the field with Num instances of the Char. For example, 20;_ tells the system to insert 20 underline characters in the field and 10;X tells it to insert 10 Xs. If the fill data is longer than the field length, the post-edit data must contain the field length (Num) to increase the variable field’s length.
CSTRunWord
Use this procedure to have the entry system open Microsoft Word for data entry in the field. The field cannot be a multi-line text or a bar code field. You may want mark this field as hidden since it will not contain any information. If the field remains visible, keep in mind that its position on the page may move relative to the document information that is imported back from Word and that the text contained in the field is not imported into Word.
Images declared on the form that are not headers or footers and not the image which contains the Pre-Edit field, are lost the first time Word is used.
DALExecMsgScript Have the system run a DAL script.
TerPropagate Propagate data into multiline text field using Paragraph Assembly feature also known as TerSub or TerSubstitute. Paragraph Assembly is only available for multiline text fields.
Field Description

Inserting a Field
415
The form which contains the CSTRunWord field does not have to be blank. You can have as many other fields on the form as may be needed. These fields would typically have a global scope fields and are filled in from elsewhere in the form set. The data in these fields is imported into Word when the user begins editing; however, the field definitions are lost when the user imports the changed document back into the form set. This means you can pass information already entered on the form set, like name, address, city, account numbers, and descriptions, to Word and then work with this information in Word.
Just remember that when the user returns from Word, all of the objects on the original form (not just the section) will be gone except for the field that starts Word and any header or footer Images declared on the form.
The data which was contained in these removed objects before Word started still appears unless the user deleted that data while in Word. After the user closes Word and imports the document back into the form set, those objects will no longer exist. So, the only way to change that data is by editing it in Word again.
CSTParseJustify
This function’s effects can be seen in either Data Entry Check or Documaker Desktop system.
CSTParseJustify is set up in the Edits tab of the Properties window. The module is CSTW32, the procedure is CSTParseJustify. The data can contain up to three parameters. The data is comma delimited, meaning that you will need to put a comma between each parameter should you specify more than one parameter.
In this Field Enter
Module CSTW32
Function CSTRunWord
Parameter Description
Justification mode The first parameter specifies the Justification mode. Justification mode tells the system how you want to align or justify the data in the variable field. Valid settings for the Justification mode are: L = left, R = right, and C = center.
To align a column of numbers, use R (right).
X coordinate This parameter positions the data. Enter this parameter in FAP units (2400 FAP units equal one inch). If no X coordinate is given, the system uses a default value of 0 (zero). The default assumes the left field coordinate (of the variable field itself) if your justification mode is left; the right field coordinate (of the variable field) is used if the justification mode is right and the midpoint of left and right (of the variable field) is used for a justification mode of center.
Justification character This parameter is the justification character. This lets you center data on a specified character such as a period (.). This might be useful when you want to line up a series of numbers.
Inserting a Field
416
The effect of the CSTParseJustify feature is most noticeable at print time. To see the effects in data entry check or in the Entry system, turn on the Options, Fixed Edits option. The system moves the position of the variable field relative to its original position, length, and the data information you gave it.
This feature does not work for bar code and multi-line text fields.
CSTParseJustify does not work on fields that rely upon DAL to return a value. You must make DAL justify your field using DAL functions.
TerPropagate
Select TerPropagate to propagate data between multi-line text fields with the same name. This data can be entered either manually or by using the Paragraph Assembly feature, also known as TerSub. To propagate data between multi-line text fields, those fields must have a scope of global. Additionally, the first occurrence of the multi-line text variable field must have a Post-Edit module of TERSW32 and Post-Edit procedure of TerPropagate.
The TerPropagate procedure does not support propagation between multi-line fields (with the same name) on the same form. This includes having the same named multi-line field on different pages of the same form. The reason is that multi-line fields on the same form with the same name are considered associated with each other—one is a continuation of the other. Therefore, propagation within the same form in this manner would cause a recursive loop.
This function provides a type of mail merge capability. When you use it on an image, the function scans each text area on the image and substitutes field data into the text. This is not the same as embedded fields, because the field data must exist prior to execution. Using the TerSubImage function, the system looks through the text for field tokens in the form of \FIELDNAME\ where the name between the slashes is a field name in your form set. When it finds this, the field’s data is inserted directly into the text, not as a reference. If the field changes values later, the text area is not updated.
Additional Paragraph Assembly (TerSub) Options
Paragraph Assembly (TerSub) is a Pre- and Post-edit function which selects and assembles pre-written, standardized paragraphs as a time-saving feature for end users.
There are two Paragraph Assembly methods.
Note PCL print will show the effects of CSTParseJustify, GDI will not show the effect.
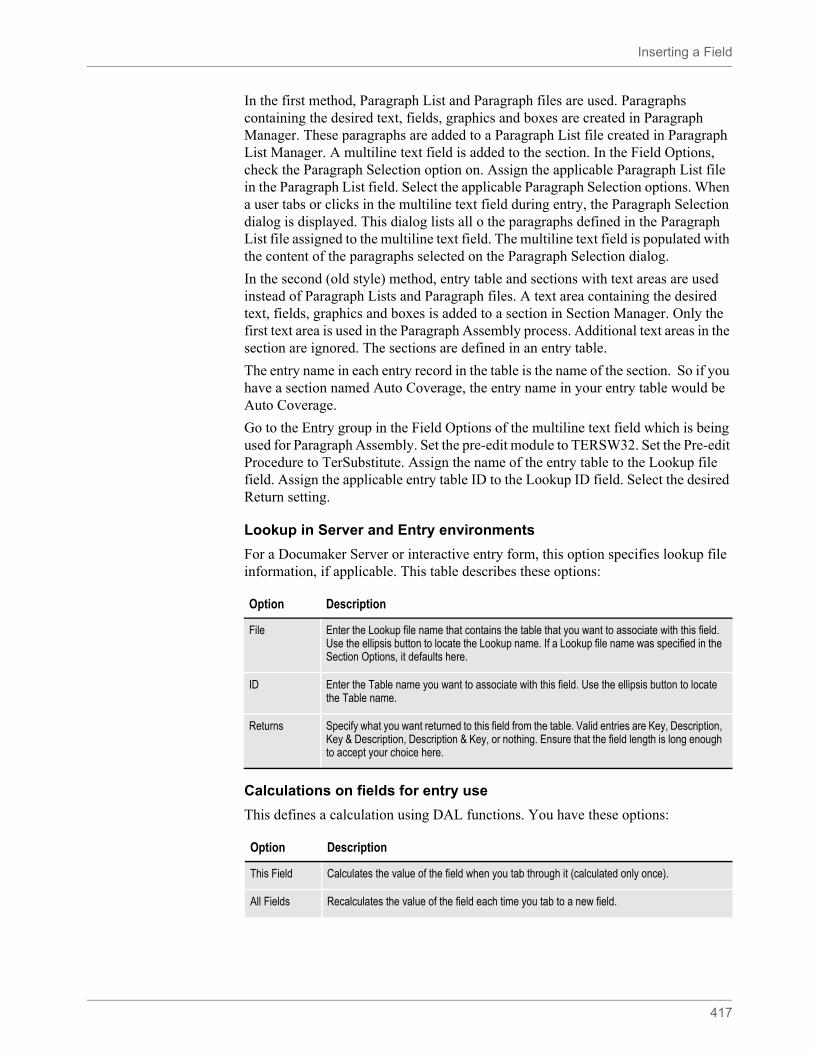
Inserting a Field
417
In the first method, Paragraph List and Paragraph files are used. Paragraphs containing the desired text, fields, graphics and boxes are created in Paragraph Manager. These paragraphs are added to a Paragraph List file created in Paragraph List Manager. A multiline text field is added to the section. In the Field Options, check the Paragraph Selection option on. Assign the applicable Paragraph List file in the Paragraph List field. Select the applicable Paragraph Selection options. When a user tabs or clicks in the multiline text field during entry, the Paragraph Selection dialog is displayed. This dialog lists all o the paragraphs defined in the Paragraph List file assigned to the multiline text field. The multiline text field is populated with the content of the paragraphs selected on the Paragraph Selection dialog.
In the second (old style) method, entry table and sections with text areas are used instead of Paragraph Lists and Paragraph files. A text area containing the desired text, fields, graphics and boxes is added to a section in Section Manager. Only the first text area is used in the Paragraph Assembly process. Additional text areas in the section are ignored. The sections are defined in an entry table.
The entry name in each entry record in the table is the name of the section. So if you have a section named Auto Coverage, the entry name in your entry table would be Auto Coverage.
Go to the Entry group in the Field Options of the multiline text field which is being used for Paragraph Assembly. Set the pre-edit module to TERSW32. Set the Pre-edit Procedure to TerSubstitute. Assign the name of the entry table to the Lookup file field. Assign the applicable entry table ID to the Lookup ID field. Select the desired Return setting.
Lookup in Server and Entry environments
For a Documaker Server or interactive entry form, this option specifies lookup file information, if applicable. This table describes these options:
Calculations on fields for entry use
This defines a calculation using DAL functions. You have these options:
Option Description
File Enter the Lookup file name that contains the table that you want to associate with this field. Use the ellipsis button to locate the Lookup name. If a Lookup file name was specified in the Section Options, it defaults here.
ID Enter the Table name you want to associate with this field. Use the ellipsis button to locate the Table name.
Returns Specify what you want returned to this field from the table. Valid entries are Key, Description, Key & Description, Description & Key, or nothing. Ensure that the field length is long enough to accept your choice here.
Option Description
This Field Calculates the value of the field when you tab through it (calculated only once).
All Fields Recalculates the value of the field each time you tab to a new field.
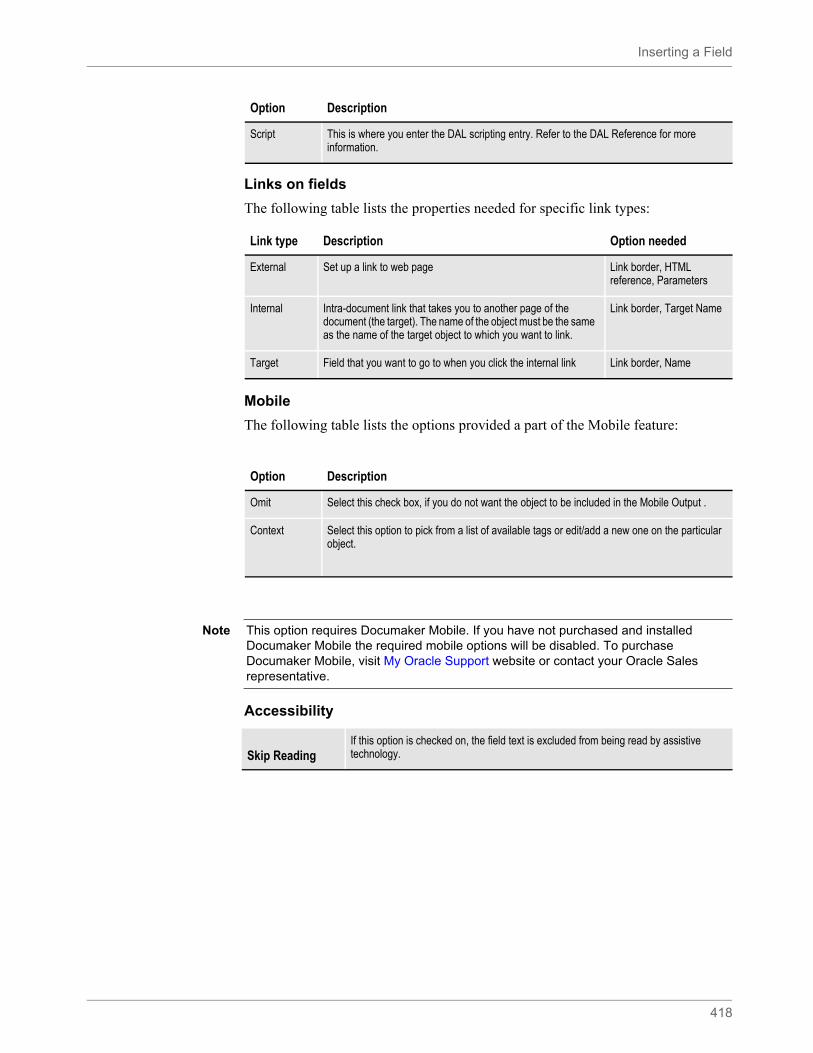
Inserting a Field
418
Links on fields
The following table lists the properties needed for specific link types:
Mobile
The following table lists the options provided a part of the Mobile feature:
Accessibility
Script This is where you enter the DAL scripting entry. Refer to the DAL Reference for more information.
Link type Description Option needed
External Set up a link to web page Link border, HTML reference, Parameters
Internal Intra-document link that takes you to another page of the document (the target). The name of the object must be the same as the name of the target object to which you want to link.
Link border, Target Name
Target Field that you want to go to when you click the internal link Link border, Name
Option Description
Omit Select this check box, if you do not want the object to be included in the Mobile Output .
Context Select this option to pick from a list of available tags or edit/add a new one on the particular object.
Option Description
Note This option requires Documaker Mobile. If you have not purchased and installed Documaker Mobile the required mobile options will be disabled. To purchase Documaker Mobile, visit My Oracle Support website or contact your Oracle Sales representative.
Skip Reading If this option is checked on, the field text is excluded from being read by assistive technology.
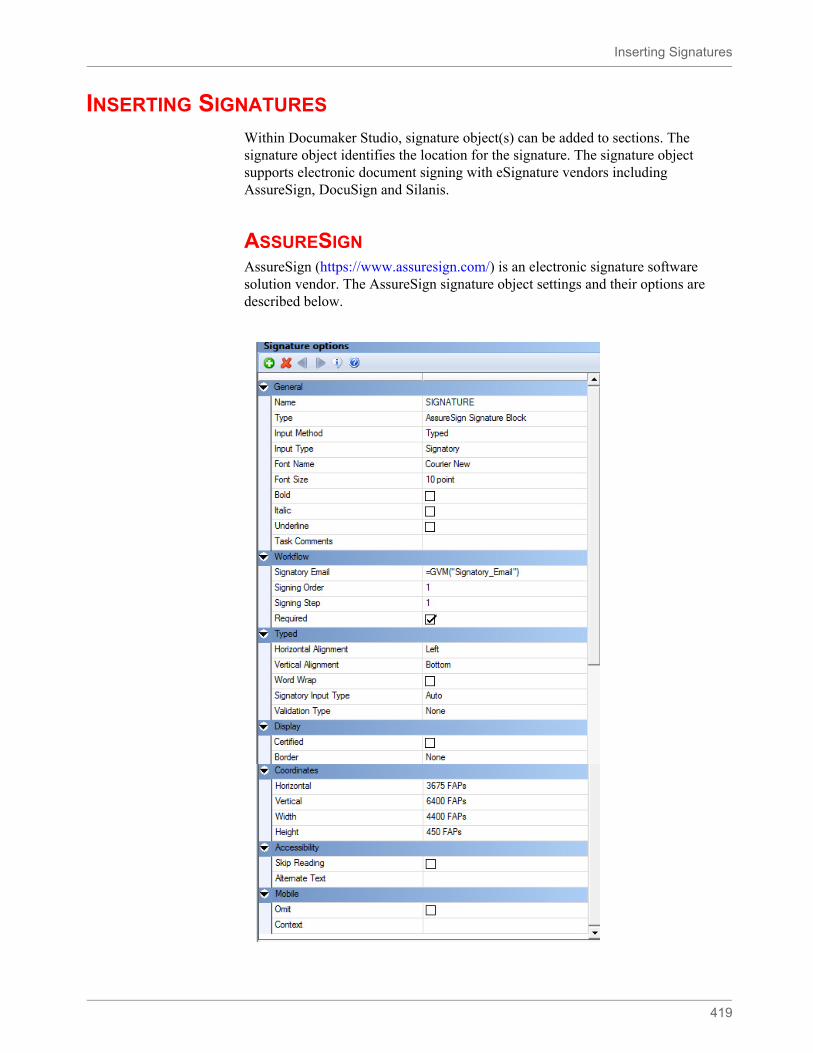
Inserting Signatures
419
INSERTING SIGNATURES
Within Documaker Studio, signature object(s) can be added to sections. The signature object identifies the location for the signature. The signature object supports electronic document signing with eSignature vendors including AssureSign, DocuSign and Silanis.
ASSURESIGNAssureSign (https://www.assuresign.com/) is an electronic signature software solution vendor. The AssureSign signature object settings and their options are described below.
Inserting Signatures
420
General
Assign general information:
Workflow
Property attributes associated with AssureSign Signature Block:
Name
(Required) The default name is SIGNATURE. Enter a name for the AssureSign signature. Assign a unique name to facilitate reference to the AssureSign signature for editing or other purposes. As you add additional AssureSign signatures to the section, #nnn is appended to the name, for example MY SIGNATURE #002, MY SIGNATURE #003, etc.
Note: Some signature vendors have specific naming requirements and/or limitations. Check the vendor’s documentation for specifics.
Style(Optional) Assign a style to the signature object. The Style setting displays when a style is defined in the Application Definition file.
Type Select AssureSign signature block for AssureSign signature.
Input Method
The document offers a place to ‘sign” the document with signatures or initials. Signature properties are shown based on the selected Input Method.
Written – creates a signature JotBlock which asks the signer to use their mouse, finger or stylus sign.
Typed – creates a signature JotBlock that allows the signers to type their input using a keyboard.
Input Type
The Input type for the selected Input Method.
For Input Method of Written, the Input Type is Signatory; the signature JotBlock is filled by the signatory
For Input Method of Typed, selections include Fixed, Parameter or Signatory.
Ink ColorApplicable for Input Method of Written. The Ink Color specifies the signature text color. Available selections are Blue or Black.
Font NameApplicable for Input Method of Typed. The Font Name specifies the font name for the signature. Available selections include Arial, Courier New and Times New Roman.
Font SizeApplicable for Input Method of Typed. Select the font size that you wish to use when presenting the signature. The selection is limited to those font sizes supported by AssureSign.
Bold Applicable for Input Method of Typed. When enabled, the signature area is bolded.
Italic Applicable for Input Method of Typed. When enabled, the signature area is italicized.
Underline Applicable for Input Method of Typed. When enabled, the signature area is underlined.
Signatory Email
(Required) Used to assign how the signer’s email is mapped to the signature block. Select from DAL Script, DAL Variable, GVM variable, INI Lookup or XDD Lookup.
The default value is = GVM("Signatory_Email").
It is critical that you ensure that the proper signatory email name is inserted as Documaker has no way to know whether a particular GVM will exist at runtime.
Signing OrderThe signing order defines the signing sequence when there are multiple signatures. This may be important if numerous signature blocks will not be signed in the top-down left-right order.
Signing Step
The signing step defines the number of steps. Generally, if only one signature will be signing, signing occurs in a single step. If there are multiple signatories, JotBlocks may be signed in a single step or in multiple (sequential) steps.
Required The Required flag indicates whether the signatory’s signature is required.
Inserting Signatures
421
Typed
Property attributes associated with AssureSign Signature Block using an Input Method = Typed.
Options
Horizontal Alignment Determines the signature text display. Selections include Left, Center or Right.
Vertical Alignment Determines the signature text display. Selections include Top, Center or Bottom.
Word WrapWhen selected, the contents will wrap text within the defined area. When not selected, the text may display beyond the border of the defined area.
Signatory Input Type
Indicates the type of method of input the signer will be prompted to use for this JotBlock. If not specified this value defaults to Auto. Possible values are:
Auto – the application will attempt to determine the appropriate signatory input type based on other provided information. The Timestamp type must be explicitly set, however.
FreeText – for typed JotBlocks for which there is no Validation Type specified.
Prefill – for typed JotBlocks for which a Validation Type is specified.
Multiple Choice Text – for JotBlocks for which a selection will be made from a drop down list and where the applied information will be text. An Options element must be specified.
Multiple Choice Graphic – for JotBlocks for which a selection will be made from a drop down list and where the applied information will be a graphic. An Options element must be specified and each TypedJotBlockOption must have a GraphicRenderType set.
Timestamp – renders a Timestamp based on the detected client machine date and time at the conclusion of the assigned signatory’s signing step.
Validation Type
ValidationType may only be specified when the Input Type is set to Typed. Possible values are:
Current Date Prefill – the JotBlock contents entered by the signatory must be a date, and it will be initially populated with the current date.
Date – the JotBlock contents must be a date.
Email Prefill – the JotBlock contents must be a valid email address, and it will be initially populated with the email of the signatory.
First Name Prefill – the JotBlock contents must be alphanumeric, and it will be initially populated with the first name of the signatory.
Full Name Prefill – the JotBlock contents must be alphanumeric, and it will be initially populated with the full name of the signatory.
Last Name Prefill – the JotBlock contents must be alphanumeric, and it will be initially populated with the last name of the signatory.
Long Date Prefill – the JotBlock contents entered by the signatory must be a date, and it will be initially populated with the current date in the form MMMM DD. YYYY.
None - no validation is performed.
Numeric – the JotBlock contents must be numeric.
Short Date Prefill – the JotBlock contents entered by the signatory must be a date, and it will be initially populated with the current date in the form MM/DD/YYYY.
Ten Digit Phone Number – the JotBlock contents must be a valid 10 digit phone number.
Value(Required) When the Input Type is set to Fixed, the Value field is required. By default, Documaker Studio will set this field’s value to “Value”.
Parameter Name(Required) When Input Type is set to Parameter, a Parameter Name is required. By default, Documaker Studio will set this field’s value to the creative value “Parameter_Name”.
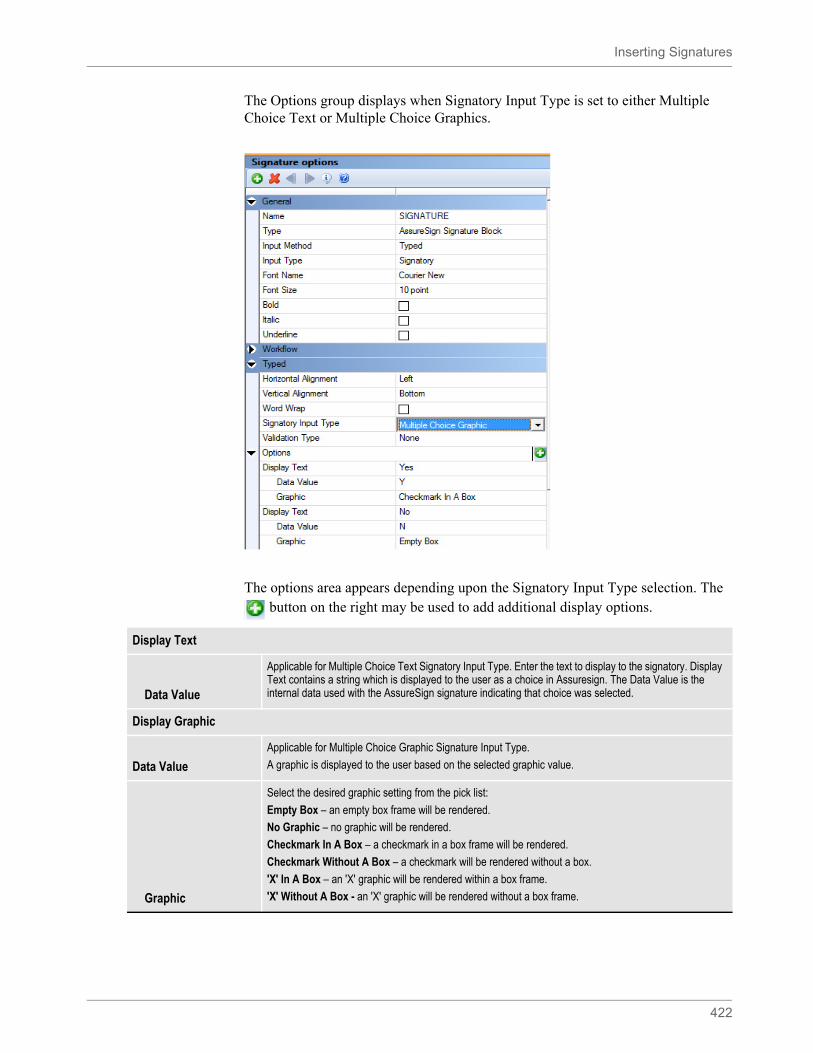
Inserting Signatures
422
The Options group displays when Signatory Input Type is set to either Multiple Choice Text or Multiple Choice Graphics.
The options area appears depending upon the Signatory Input Type selection. The button on the right may be used to add additional display options.
Display Text
Data Value
Applicable for Multiple Choice Text Signatory Input Type. Enter the text to display to the signatory. Display Text contains a string which is displayed to the user as a choice in Assuresign. The Data Value is the internal data used with the AssureSign signature indicating that choice was selected.
Display Graphic
Data Value
Applicable for Multiple Choice Graphic Signature Input Type.
A graphic is displayed to the user based on the selected graphic value.
Graphic
Select the desired graphic setting from the pick list:
Empty Box – an empty box frame will be rendered.
No Graphic – no graphic will be rendered.
Checkmark In A Box – a checkmark in a box frame will be rendered.
Checkmark Without A Box – a checkmark will be rendered without a box.
'X' In A Box – an 'X' graphic will be rendered within a box frame.
'X' Without A Box - an 'X' graphic will be rendered without a box frame.
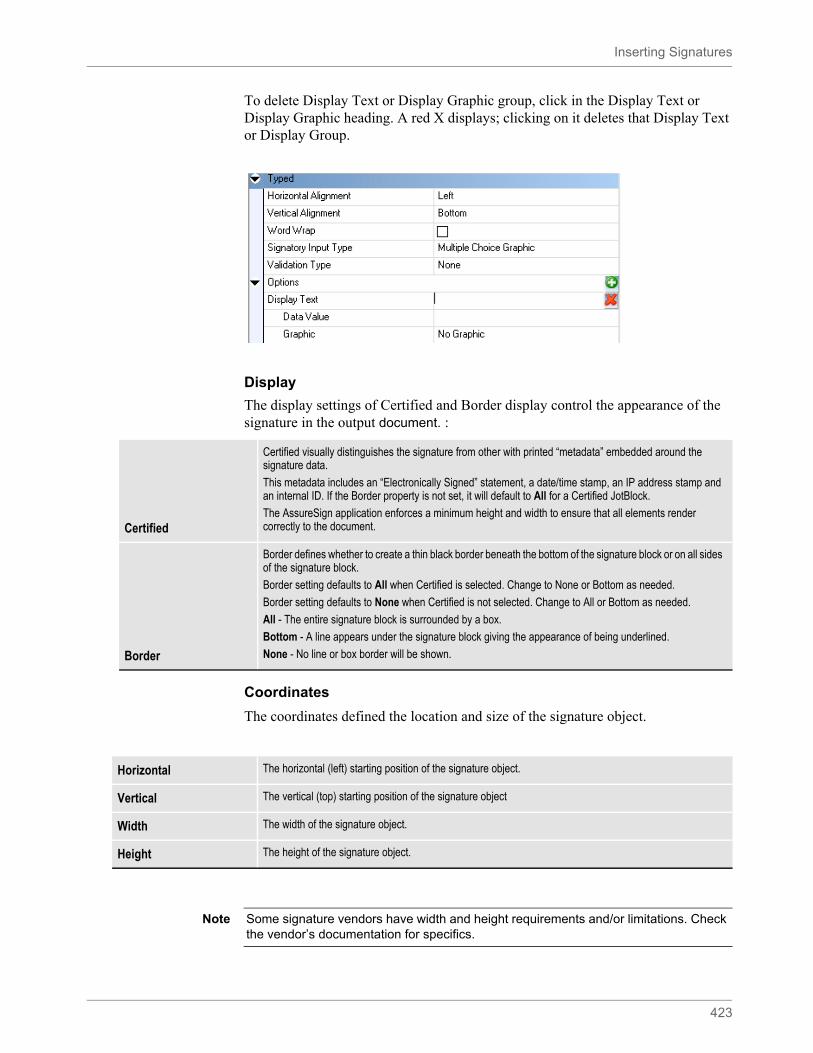
Inserting Signatures
423
To delete Display Text or Display Graphic group, click in the Display Text or Display Graphic heading. A red X displays; clicking on it deletes that Display Text or Display Group.
Display
The display settings of Certified and Border display control the appearance of the signature in the output document. :
Coordinates
The coordinates defined the location and size of the signature object.
Certified
Certified visually distinguishes the signature from other with printed “metadata” embedded around the signature data.
This metadata includes an “Electronically Signed” statement, a date/time stamp, an IP address stamp and an internal ID. If the Border property is not set, it will default to All for a Certified JotBlock.
The AssureSign application enforces a minimum height and width to ensure that all elements render correctly to the document.
Border
Border defines whether to create a thin black border beneath the bottom of the signature block or on all sides of the signature block.
Border setting defaults to All when Certified is selected. Change to None or Bottom as needed.
Border setting defaults to None when Certified is not selected. Change to All or Bottom as needed.
All - The entire signature block is surrounded by a box.
Bottom - A line appears under the signature block giving the appearance of being underlined.
None - No line or box border will be shown.
Horizontal The horizontal (left) starting position of the signature object.
Vertical The vertical (top) starting position of the signature object
Width The width of the signature object.
Height The height of the signature object.
Note Some signature vendors have width and height requirements and/or limitations. Check the vendor’s documentation for specifics.
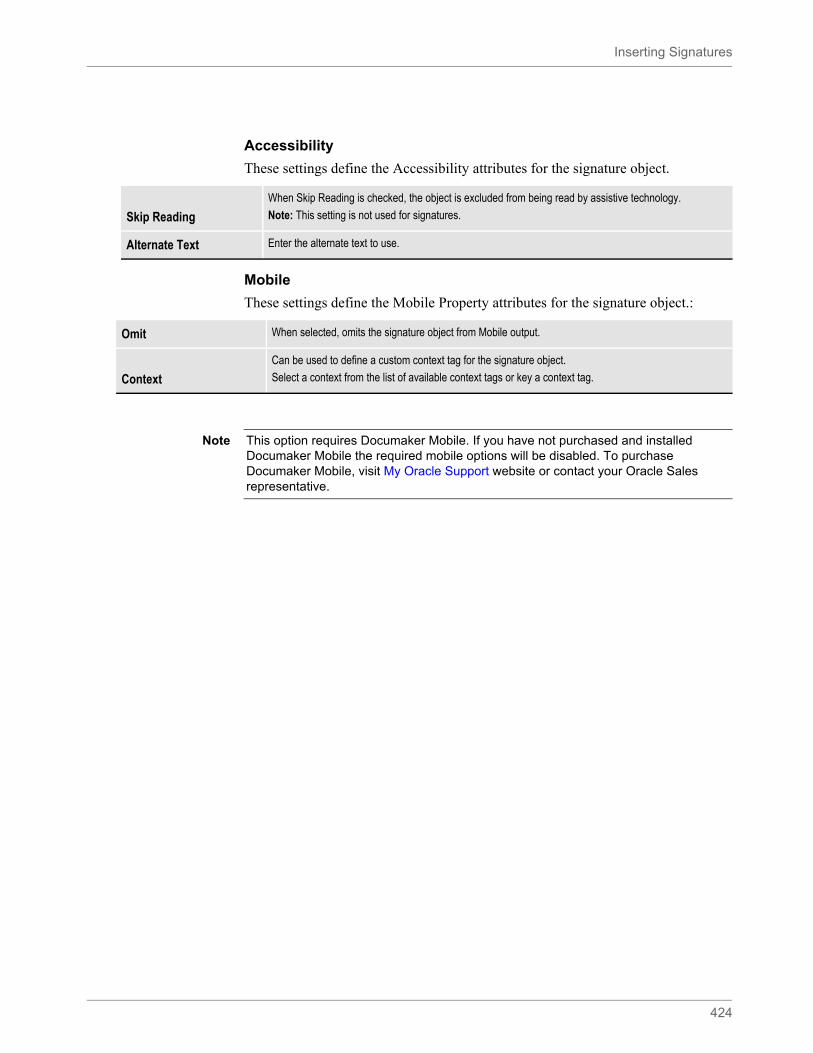
Inserting Signatures
424
Accessibility
These settings define the Accessibility attributes for the signature object.
Mobile
These settings define the Mobile Property attributes for the signature object.:
Skip Reading
When Skip Reading is checked, the object is excluded from being read by assistive technology.
Note: This setting is not used for signatures.
Alternate Text Enter the alternate text to use.
Omit When selected, omits the signature object from Mobile output.
Context
Can be used to define a custom context tag for the signature object.
Select a context from the list of available context tags or key a context tag.
Note This option requires Documaker Mobile. If you have not purchased and installed Documaker Mobile the required mobile options will be disabled. To purchase Documaker Mobile, visit My Oracle Support website or contact your Oracle Sales representative.
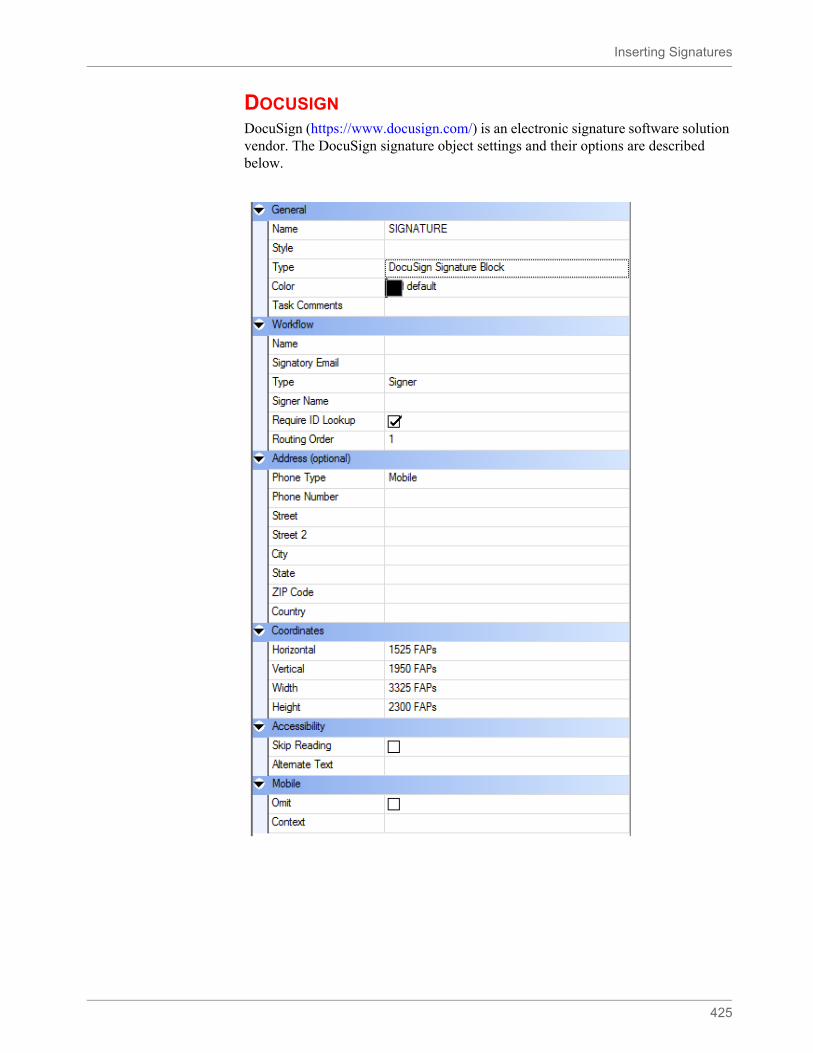
Inserting Signatures
425
DOCUSIGNDocuSign (https://www.docusign.com/) is an electronic signature software solution vendor. The DocuSign signature object settings and their options are described below.
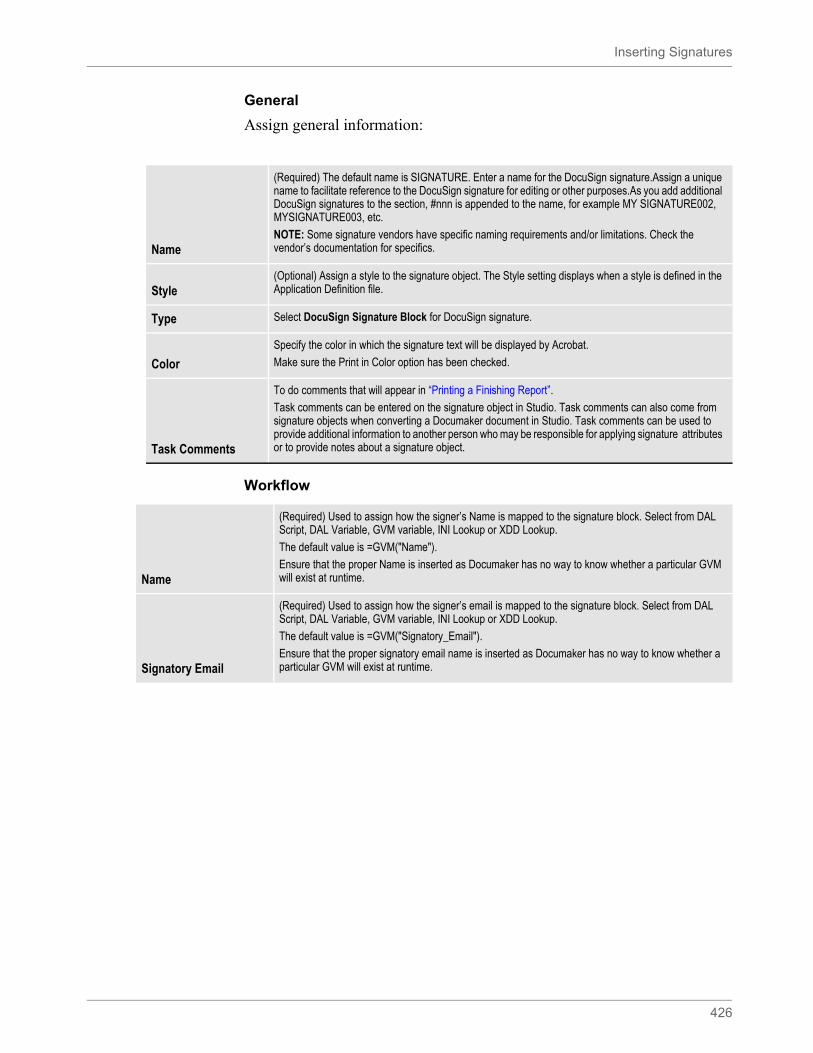
Inserting Signatures
426
General
Assign general information:
Workflow
Name
(Required) The default name is SIGNATURE. Enter a name for the DocuSign signature.Assign a unique name to facilitate reference to the DocuSign signature for editing or other purposes.As you add additional DocuSign signatures to the section, #nnn is appended to the name, for example MY SIGNATURE002, MYSIGNATURE003, etc.
NOTE: Some signature vendors have specific naming requirements and/or limitations. Check the vendor’s documentation for specifics.
Style(Optional) Assign a style to the signature object. The Style setting displays when a style is defined in the Application Definition file.
Type Select DocuSign Signature Block for DocuSign signature.
Color
Specify the color in which the signature text will be displayed by Acrobat.
Make sure the Print in Color option has been checked.
Task Comments
To do comments that will appear in “Printing a Finishing Report”.
Task comments can be entered on the signature object in Studio. Task comments can also come from signature objects when converting a Documaker document in Studio. Task comments can be used to provide additional information to another person who may be responsible for applying signature attributes or to provide notes about a signature object.
Name
(Required) Used to assign how the signer’s Name is mapped to the signature block. Select from DAL Script, DAL Variable, GVM variable, INI Lookup or XDD Lookup.
The default value is =GVM("Name").
Ensure that the proper Name is inserted as Documaker has no way to know whether a particular GVM will exist at runtime.
Signatory Email
(Required) Used to assign how the signer’s email is mapped to the signature block. Select from DAL Script, DAL Variable, GVM variable, INI Lookup or XDD Lookup.
The default value is =GVM("Signatory_Email").
Ensure that the proper signatory email name is inserted as Documaker has no way to know whether a particular GVM will exist at runtime.
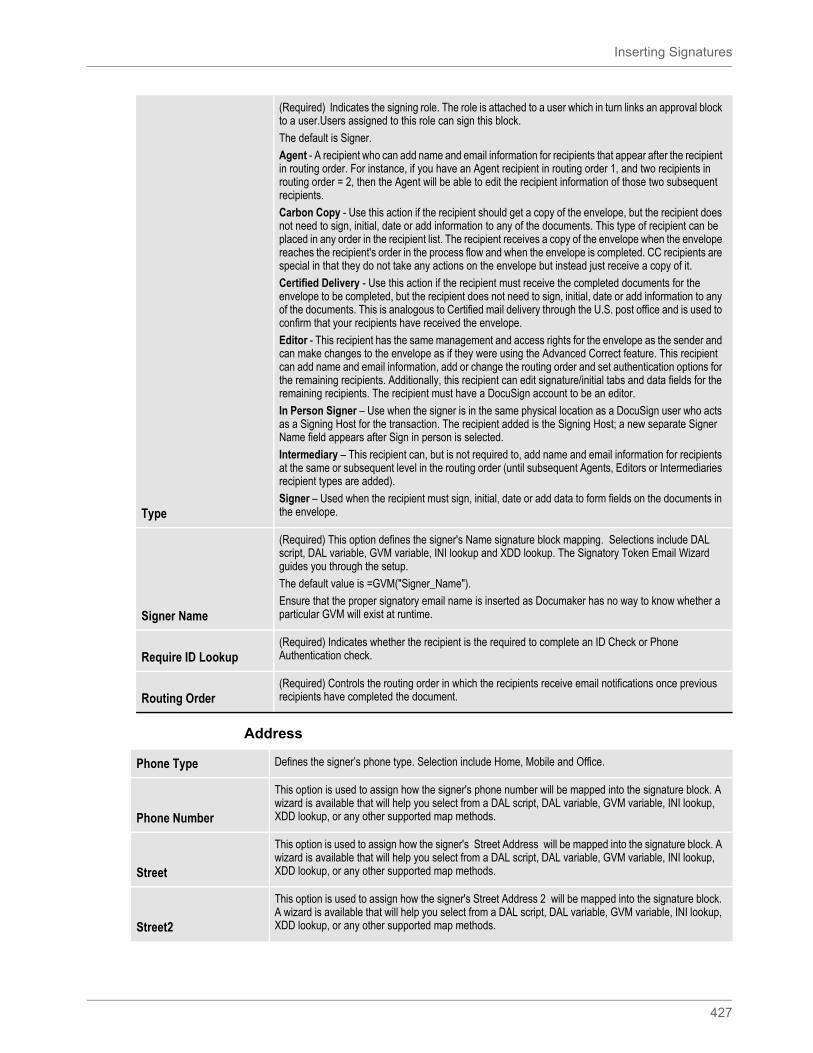
Inserting Signatures
427
Address
Type
(Required) Indicates the signing role. The role is attached to a user which in turn links an approval block to a user.Users assigned to this role can sign this block.
The default is Signer.
Agent - A recipient who can add name and email information for recipients that appear after the recipient in routing order. For instance, if you have an Agent recipient in routing order 1, and two recipients in routing order = 2, then the Agent will be able to edit the recipient information of those two subsequent recipients.
Carbon Copy - Use this action if the recipient should get a copy of the envelope, but the recipient does not need to sign, initial, date or add information to any of the documents. This type of recipient can be placed in any order in the recipient list. The recipient receives a copy of the envelope when the envelope reaches the recipient's order in the process flow and when the envelope is completed. CC recipients are special in that they do not take any actions on the envelope but instead just receive a copy of it.
Certified Delivery - Use this action if the recipient must receive the completed documents for the envelope to be completed, but the recipient does not need to sign, initial, date or add information to any of the documents. This is analogous to Certified mail delivery through the U.S. post office and is used to confirm that your recipients have received the envelope.
Editor - This recipient has the same management and access rights for the envelope as the sender and can make changes to the envelope as if they were using the Advanced Correct feature. This recipient can add name and email information, add or change the routing order and set authentication options for the remaining recipients. Additionally, this recipient can edit signature/initial tabs and data fields for the remaining recipients. The recipient must have a DocuSign account to be an editor.
In Person Signer – Use when the signer is in the same physical location as a DocuSign user who acts as a Signing Host for the transaction. The recipient added is the Signing Host; a new separate Signer Name field appears after Sign in person is selected.
Intermediary – This recipient can, but is not required to, add name and email information for recipients at the same or subsequent level in the routing order (until subsequent Agents, Editors or Intermediaries recipient types are added).
Signer – Used when the recipient must sign, initial, date or add data to form fields on the documents in the envelope.
Signer Name
(Required) This option defines the signer's Name signature block mapping. Selections include DAL script, DAL variable, GVM variable, INI lookup and XDD lookup. The Signatory Token Email Wizard guides you through the setup.
The default value is =GVM("Signer_Name").
Ensure that the proper signatory email name is inserted as Documaker has no way to know whether a particular GVM will exist at runtime.
Require ID Lookup(Required) Indicates whether the recipient is the required to complete an ID Check or Phone Authentication check.
Routing Order(Required) Controls the routing order in which the recipients receive email notifications once previous recipients have completed the document.
Phone Type Defines the signer’s phone type. Selection include Home, Mobile and Office.
Phone Number
This option is used to assign how the signer's phone number will be mapped into the signature block. A wizard is available that will help you select from a DAL script, DAL variable, GVM variable, INI lookup, XDD lookup, or any other supported map methods.
Street
This option is used to assign how the signer's Street Address will be mapped into the signature block. A wizard is available that will help you select from a DAL script, DAL variable, GVM variable, INI lookup, XDD lookup, or any other supported map methods.
Street2
This option is used to assign how the signer's Street Address 2 will be mapped into the signature block. A wizard is available that will help you select from a DAL script, DAL variable, GVM variable, INI lookup, XDD lookup, or any other supported map methods.
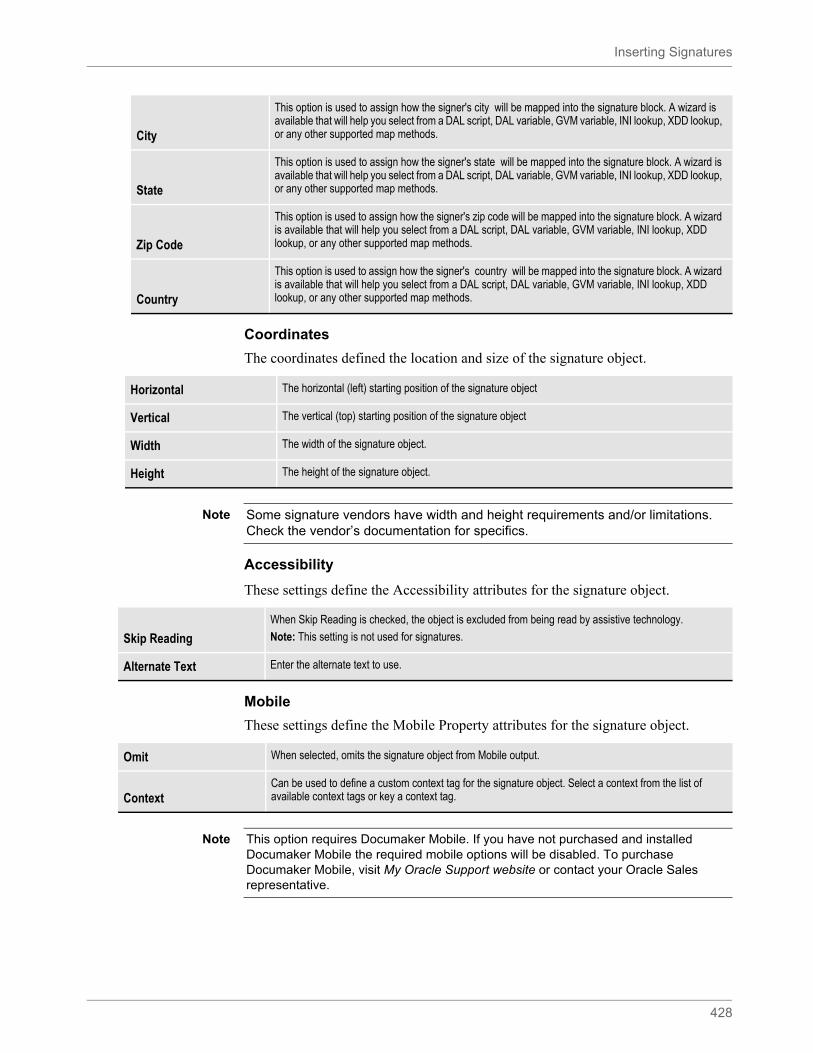
Inserting Signatures
428
Coordinates
The coordinates defined the location and size of the signature object.
Accessibility
These settings define the Accessibility attributes for the signature object.
Mobile
These settings define the Mobile Property attributes for the signature object.
City
This option is used to assign how the signer's city will be mapped into the signature block. A wizard is available that will help you select from a DAL script, DAL variable, GVM variable, INI lookup, XDD lookup, or any other supported map methods.
State
This option is used to assign how the signer's state will be mapped into the signature block. A wizard is available that will help you select from a DAL script, DAL variable, GVM variable, INI lookup, XDD lookup, or any other supported map methods.
Zip Code
This option is used to assign how the signer's zip code will be mapped into the signature block. A wizard is available that will help you select from a DAL script, DAL variable, GVM variable, INI lookup, XDD lookup, or any other supported map methods.
Country
This option is used to assign how the signer's country will be mapped into the signature block. A wizard is available that will help you select from a DAL script, DAL variable, GVM variable, INI lookup, XDD lookup, or any other supported map methods.
Horizontal The horizontal (left) starting position of the signature object
Vertical The vertical (top) starting position of the signature object
Width The width of the signature object.
Height The height of the signature object.
Note Some signature vendors have width and height requirements and/or limitations. Check the vendor’s documentation for specifics.
Skip Reading
When Skip Reading is checked, the object is excluded from being read by assistive technology.
Note: This setting is not used for signatures.
Alternate Text Enter the alternate text to use.
Omit When selected, omits the signature object from Mobile output.
ContextCan be used to define a custom context tag for the signature object. Select a context from the list of available context tags or key a context tag.
Note This option requires Documaker Mobile. If you have not purchased and installed Documaker Mobile the required mobile options will be disabled. To purchase Documaker Mobile, visit My Oracle Support website or contact your Oracle Sales representative.
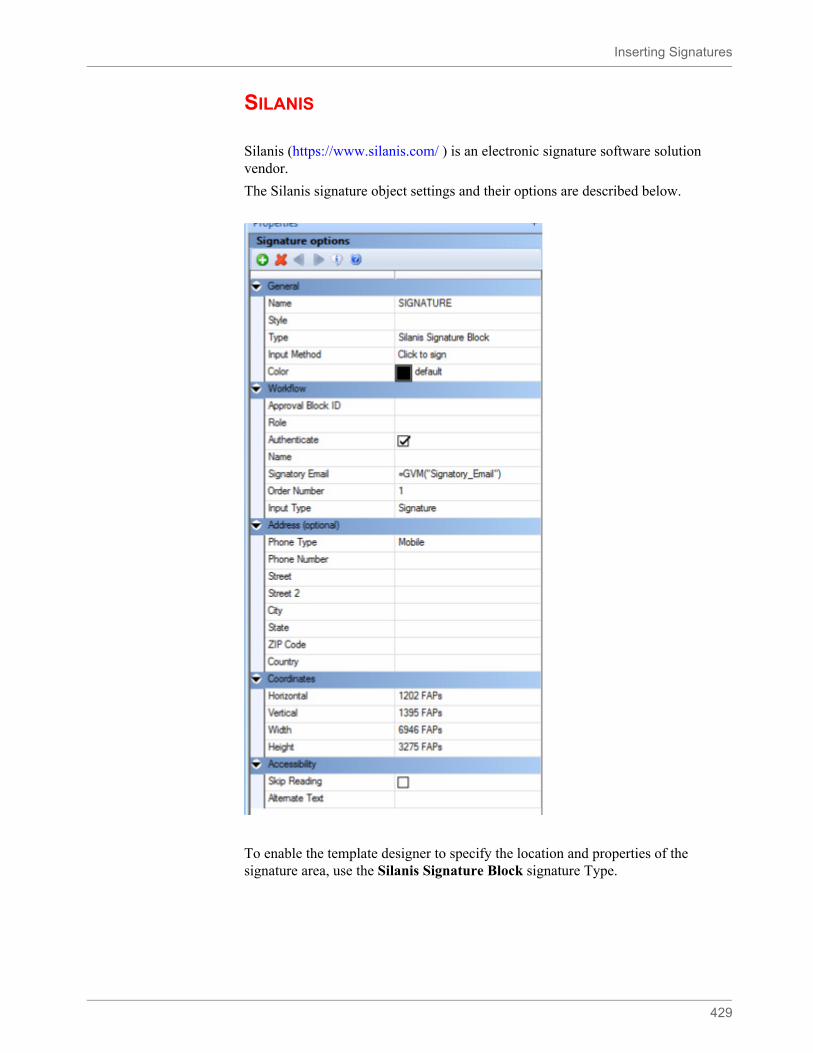
Inserting Signatures
429
SILANIS
Silanis (https://www.silanis.com/ ) is an electronic signature software solution vendor.
The Silanis signature object settings and their options are described below.
To enable the template designer to specify the location and properties of the signature area, use the Silanis Signature Block signature Type.
Inserting Signatures
430
The following items are mandatory to the template designer when creating a form in Documaker Studio that requires to be signed using Silanis.
General
Assign general information:
Name
(Required) Enter a name for the Silanis signature object. Assign a unique name to facilitate reference to the Silanis signature for editing or other purposes.
The default name is SIGNATURE. As you add additional Silanis signature objects to the section, nnn is appended to the name. For example SIGNATURE002, SIGNATURE003, etc.
NOTE: Some signature vendors have specific naming requirements and/or limitations. Check the vendor’s documentation for specifics.
Style(Optional) Assign a style to the signature object. The Style setting displays when a style is defined in the Application Definition file.
Type Select Silanis Signature Block for Silanis Signatures.
Input Method
The document offers a place to ‘sign” the document with signatures or initials. Signature properties are shown based on the selected Input Method.
Click to Sign: Select this option when the document recipient clicks a box to sign the document.
Input Device: Use this property in order to use one of two signature input types; Signature or Initials.
Color Color is used if the document is signed within Adobe Acrobat.
Inserting Signatures
431
Workflow
Property attributes associated with Silanis Signature Block:
Address (Optional)
Property attributes associated with Silanis Signature Block:
Approval Block ID
Represents a set or grouping of one or more signature placeholders.
It is important to note within Silanis, an Approval is a grouping of one or more signature placeholders as illustrated below.
Approval: An approval can contain one or more approval blocks
Each individual Approval Block ID (signing placeholder) should be assigned a role. An approval can have multiple approval blocks (multiple users).
Role
A generic value which is defined in Silanis. Examples include signer001, signer002 or viewer001, viewer002. Assign a role which matches list of possible signer roles known to Silanis.
A role is attached to a user which links the approval block to a user. Users assigned to this role can sign this approval.
Authenticate Enables the authentication option; the signer will need to prove their identity to access e-sign session.
Name
The name of the approver.
The default value is = GVM("Name")
Ensure that the proper signatory email name is inserted as Documaker has no way to know whether a particular GVM will exist at runtime.
Signatory Email
(Required) Defines the mapping of signer's email into the signature block. Selections include DAL script, DAL variable, GVM variable, INI lookup and XDD lookup. A wizard guides you through the Signatory Email setup.
The default value is = GVM (“Signatory_Email”).
Ensure that the proper signatory email name is inserted as Documaker has no way to know whether a particular GVM will exist at runtime.
Order Number
(Integer value) Defines the signing order of multiple signature blocks if they are not being signed in a top-down/left-right order.
If multiple blocks all have the same order value, the application will present signature blocks in the reading order they appear in the document.
Input TypeIndicates the input type. Choose from SIGNATURE (hand-scripted signature) or INITIALS (click to Initial).
Phone Type Defines the signer’s phone type. Selections include Home, Mobile and Office.
Phone Number
This option defines the signer's Phone Number signature block mapping. Selections include DAL script, DAL variable, GVM variable, INI lookup and XDD lookup. The Signatory Token Email Wizard guides you through the setup.
Inserting Signatures
432
Coordinates
The coordinates define the location and size of the signature object.
Accessibility
These settings define the Accessibility attributes for the signature object.
Mobile
These settings define the Mobile Property attributes for the signature object..
Street
This option defines the signer’s Street Address signature block mapping. Selections include DAL script, DAL variable, GVM variable, INI lookup and XDD lookup. The Signatory Token Email Wizard guides you through the setup.
Street2
This option defines the signer's Street Address 2 signature block mapping. Selections include DAL script, DAL variable, GVM variable, INI lookup and XDD lookup. The Signatory Token Email Wizard guides you through the setup.
City
This option defines the signer's City signature block mapping. Selections include DAL script, DAL variable, GVM variable, INI lookup and XDD lookup. The Signatory Token Email Wizard guides you through the setup.
State
This option defines the signer's State signature block mapping. Selections include DAL script, DAL variable, GVM variable, INI lookup and XDD lookup. The Signatory Token Email Wizard guides you through the setup.
Zip Code
This option defines the signer's Zip Code signature block mapping. Selections include DAL script, DAL variable, GVM variable, INI lookup and XDD lookup. The Signatory Token Email Wizard guides you through the setup.
Country
This option defines the signer's Country signature block mapping. Selections include DAL script, DAL variable, GVM variable, INI lookup and XDD lookup. The Signatory Token Email Wizard guides you through the setup.
Horizontal The horizontal (left) starting position of the signature object.
Vertical The vertical (top) starting position of the signature object.
Width The width of the signature object.
Height The height of the signature object.
Note Some signature vendors have width and height requirements and/or limitations. Check the vendor’s documentation for specifics.
Skip Reading
When Skip Reading is checked, the object is excluded from being read by assistive technology.
Note: This setting is not used for signatures.
Alternate Text Enter the alternate text to use.
Omit When selected, omits the signature object from Mobile output.
ContextCan be used to define a custom context tag for the signature object. Select a context from the list of available context tags or key a context tag.
Inserting Signatures
433
PDF PLACEHOLDERPlaceholder signatures are empty placeholders where a digital signature can be added later (PDF only).
Adobe’s PDF format lets you add digital signatures to documents. Some vendors and companies use PDF-based software solutions as a way of implementing electronic document signatures.
In Documaker, these empty signature fields are called PDF signature placeholders.
When you open a PDF file that contains a signature placeholder in Adobe Acrobat, the signature field appears as shown below. When you click on the signature field, Acrobat displays a window that lets you sign the document electronically.
While Documaker and the PDF standard allow for any number of signatures to be placed in a document, the PDF standard does not provide for signing only sections of a document. That means the digital signatures will apply to the entire document.
Signature Option Panel
Note This option requires Documaker Mobile. If you have not purchased and installed Documaker Mobile the required mobile options will be disabled. To purchase Documaker Mobile, visit My Oracle Support website or contact your Oracle Sales representative.
Note In order to process documents enabled for Silanis electronic signing you will need to activate an eSignLive account with Silanis. This release of Documaker entitles you to a free 30 day account with Silanis. You can activate your account by clicking:
http://secure.silanis.com/OracleDocumaker.html
For further details on this capability and this offer please go here:
http://docs.oracle.com/cd/E51710_01/silanissetupanduse_viewlet_swf.html
Note Other third-party signing tools, typically sold as plug-in extensions to Acrobat, may support multiple signatures in a document. The Documaker solution can be used with third-party signing tools, but Documaker itself does not manage the signing process for this type of signature.
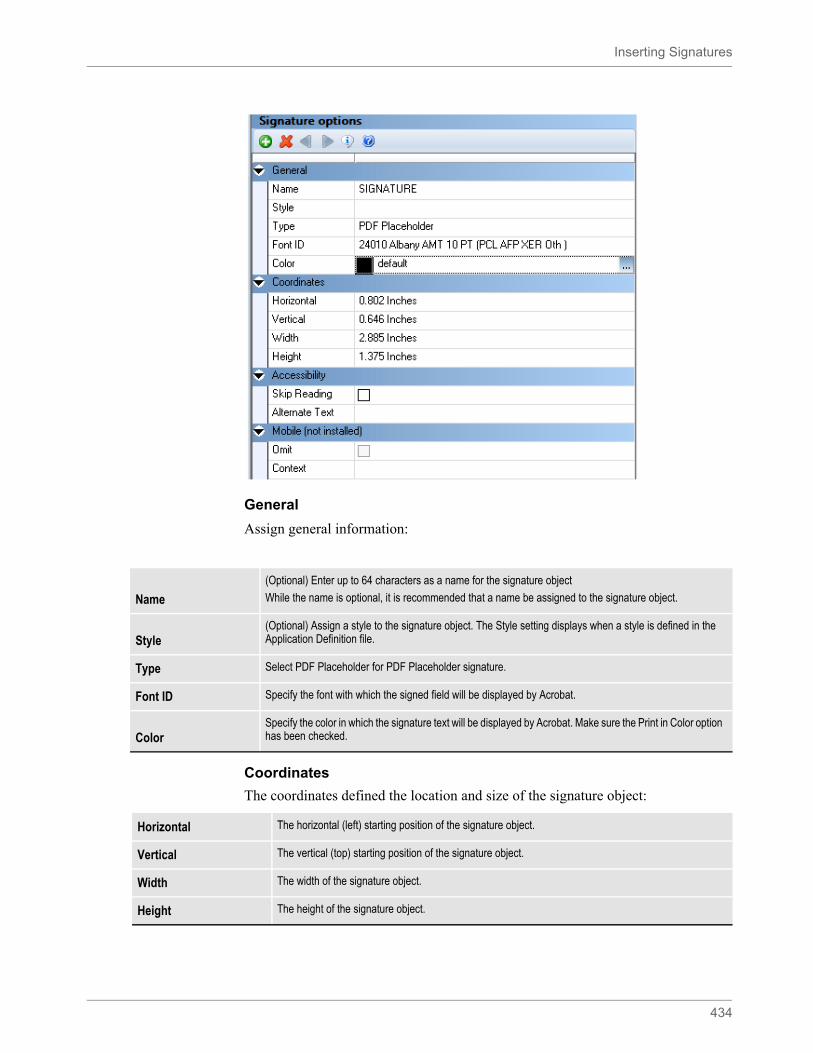
Inserting Signatures
434
General
Assign general information:
Coordinates
The coordinates defined the location and size of the signature object:
Name
(Optional) Enter up to 64 characters as a name for the signature object
While the name is optional, it is recommended that a name be assigned to the signature object.
Style(Optional) Assign a style to the signature object. The Style setting displays when a style is defined in the Application Definition file.
Type Select PDF Placeholder for PDF Placeholder signature.
Font ID Specify the font with which the signed field will be displayed by Acrobat.
ColorSpecify the color in which the signature text will be displayed by Acrobat. Make sure the Print in Color option has been checked.
Horizontal The horizontal (left) starting position of the signature object.
Vertical The vertical (top) starting position of the signature object.
Width The width of the signature object.
Height The height of the signature object.
Inserting Signatures
435
Accessibility
These settings define the Accessibility attributes for the signature object.
Mobile
These settings define the Mobile Property attributes for the signature object:.
Note Some signature vendors have width and height requirements and/or limitations. Check the vendor’s documentation for specifics.
Skip Reading
When Skip Reading is checked, the object is excluded from being read by assistive technology.
Note: This setting is not used for signatures.
Alternate Text Enter the alternate text to use.
Omit When selected, omits the signature object from Mobile output.
ContextCan be used to define a custom context tag for the signature object. Select a context from the list of available context tags or key a context tag.
Note This option requires Documaker Mobile. If you have not purchased and installed Documaker Mobile the required mobile options will be disabled. To purchase Documaker Mobile, visit My Oracle Support website or contact your Oracle Sales representative.
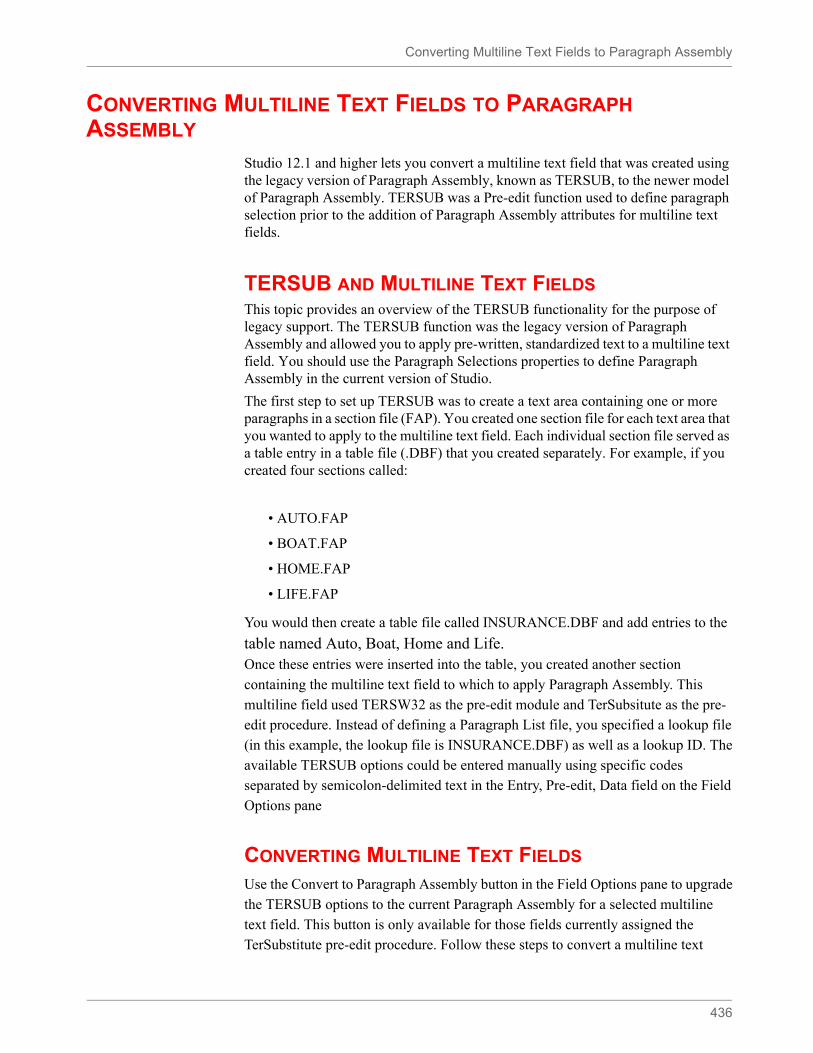
Converting Multiline Text Fields to Paragraph Assembly
436
CONVERTING MULTILINE TEXT FIELDS TO PARAGRAPH ASSEMBLY
Studio 12.1 and higher lets you convert a multiline text field that was created using the legacy version of Paragraph Assembly, known as TERSUB, to the newer model of Paragraph Assembly. TERSUB was a Pre-edit function used to define paragraph selection prior to the addition of Paragraph Assembly attributes for multiline text fields.
TERSUB AND MULTILINE TEXT FIELDSThis topic provides an overview of the TERSUB functionality for the purpose of legacy support. The TERSUB function was the legacy version of Paragraph Assembly and allowed you to apply pre-written, standardized text to a multiline text field. You should use the Paragraph Selections properties to define Paragraph Assembly in the current version of Studio.
The first step to set up TERSUB was to create a text area containing one or more paragraphs in a section file (FAP). You created one section file for each text area that you wanted to apply to the multiline text field. Each individual section file served as a table entry in a table file (.DBF) that you created separately. For example, if you created four sections called:
• AUTO.FAP
• BOAT.FAP
• HOME.FAP
• LIFE.FAP
You would then create a table file called INSURANCE.DBF and add entries to the
table named Auto, Boat, Home and Life.Once these entries were inserted into the table, you created another sectioncontaining the multiline text field to which to apply Paragraph Assembly. Thismultiline field used TERSW32 as the pre-edit module and TerSubsitute as the pre-edit procedure. Instead of defining a Paragraph List file, you specified a lookup file(in this example, the lookup file is INSURANCE.DBF) as well as a lookup ID. Theavailable TERSUB options could be entered manually using specific codesseparated by semicolon-delimited text in the Entry, Pre-edit, Data field on the FieldOptions pane
CONVERTING MULTILINE TEXT FIELDS
Use the Convert to Paragraph Assembly button in the Field Options pane to upgradethe TERSUB options to the current Paragraph Assembly for a selected multiline text field. This button is only available for those fields currently assigned theTerSubstitute pre-edit procedure. Follow these steps to convert a multiline text
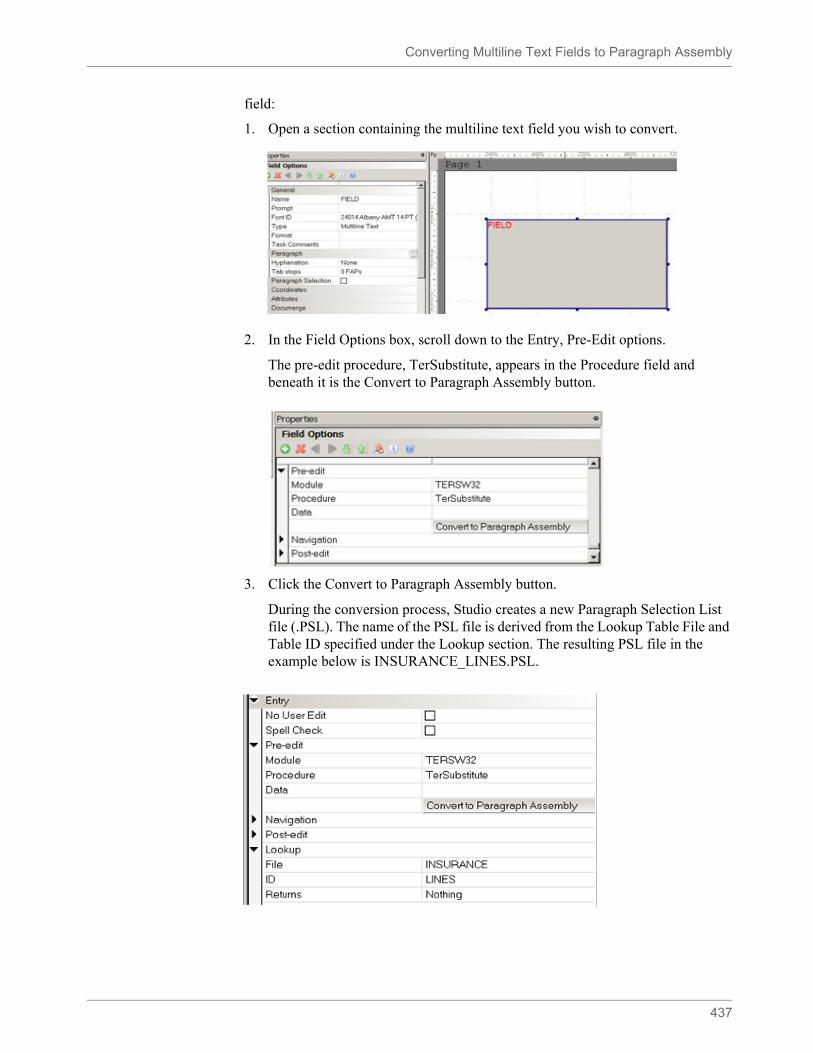
Converting Multiline Text Fields to Paragraph Assembly
437
field:
1. Open a section containing the multiline text field you wish to convert.
2. In the Field Options box, scroll down to the Entry, Pre-Edit options.
The pre-edit procedure, TerSubstitute, appears in the Procedure field and beneath it is the Convert to Paragraph Assembly button.
3. Click the Convert to Paragraph Assembly button.
During the conversion process, Studio creates a new Paragraph Selection List file (.PSL). The name of the PSL file is derived from the Lookup Table File and Table ID specified under the Lookup section. The resulting PSL file in the example below is INSURANCE_LINES.PSL.
Converting Multiline Text Fields to Paragraph Assembly
438
• If this PSL file is not found in the library a new file is created and the Check In window appears. Enter the file attributes and click OK.
.
• Enter the file attributes and click OK to check the new PSL into the library. If the conversion is successful:
• The Pre-Edit and Lookup values are cleared from under the Entry section.
• The name of the PSL file appears in the Paragraph List field.
• The options under the Paragraph Selection are selected to match the corresponding TERSUB options that were defined for the text field.
• If the conversion is successful, the Pre-Edit and Lookup properties will be cleared and the Paragraph Assembly properties will now reflect the new settings.
If the conversion fails, a message appears in the Output section and identifies the
Note You must have proper administrative level access to check in the PSL file. If you lack the required access, contact your system administrator.
Converting Multiline Text Fields to Paragraph Assembly
439
field and section where the error occurred.
• Select the Edit Paragraph List button to open the PSL file in the Paragraph List manager.
During the PSL file creation, the table entries in the lookup table are read and thelist of paragraphs determined. A library search occurs to determine whether thatresource already exists as a paragraph file defined in the library. Based on thesearch, the following occurs:
• If the paragraph file already exists in the library, a reference to the file is
created in the paragraph list.
• If the paragraph file does not exist, then the previously associated section
file (FAP) is loaded and stored within the PSL file as an embedded
paragraph file.
MANAGING CONVERSION ERRORSThese errors messages can appear if the conversion fails:
• An error message appears if you don’t have the proper administrative level access to create and check in the PSL file. The message also informs you to contact your system administrator to obtain the correct permissions.
Note To learn more about the Mode, Status, Class, and Project fields see Managing Resources on page 325.
Note If you want to reuse the embedded paragraph file as a separate physical file then you
must manually unembed the resource from the PSL file. To do so, follow these steps:
1. In the Paragraph List manager, select the paragraph from the paragraph list.
2. Remove the checkmark from the Embedded field. This starts the Unembed
Resource wizard.
3. Use the Unembed Resource wizard to unembed the resource.
See Working with Embedded Paragraphs on page 285 for more information.

Converting Multiline Text Fields to Paragraph Assembly
440
• An error message appears if the TerSubstitute parameters includes the recipient (R=) option. The conversion will not take place as there is not enough information in the fields definition to identify what Form contains the relevant recipient.
Printing a Form, Section, or Paragraph
441
PRINTING A FORM, SECTION, OR PARAGRAPH
To print a form, section, paragraph, or other object you have open, right-click and choose the Print option. Studio shows you the Print window:
You can use these fields to define your print job:
Click here to see the INI options for this printer type.
Note The fields on this window can vary, depending on the type of printer you chose. This discussion focuses on the PCL printer type.
Field Description
Print Type Select the printer type. Your choices include: PCL, AFP, Metacode, PostScript, VIPP.
Device Select the name of the file or device (LPT1) where the print stream should be written.
Form/Form Set Choose whether you want to print the current form or the entire form set.
Download Fonts Downloads to the printer the fonts needed to correctly print the format
Template Fields Displays the name of the field instead of actual field data on the printed form.
Send Overlays Overlays are FAP images compiled into HP printer language. This enhances print speed. Usually, this option is automatically selected.
Select Recipients Click this box to select recipients.
Fit to Width Prints the full width of the image on the page.
Send Color Enables color printing if a supported color printer is used.
Pre-printed Paper Check this box to include objects marked as pre-printed. All objects except fields can be marked pre-printed on the object’s Properties window.
Recipients Here Studio shows you the recipients selected
Number of Copies Enter the number of copies you want to print.
Printing a Form, Section, or Paragraph
442
Click the Additional Print Options button to see the INI options associated with the current printer type.
Once you finish reviewing the INI settings and making any necessary changes, click Ok to return to the Print window.
When you have the print options set the way you want them, click Ok to print or Cancel to exit without printing.
The Local tab lets you view and change settings that apply to your computer. The Shared tab lets you view and change settings that serve as defaults for all of your Studio users.
Here Studio provides information about the various INI options.
Note You can also modify these INI options by choosing, Manage, System, Settings. Under Options by Topic, choose Print, the select the printer type you want to modify. The Additional Print Options button just provides a shortcut to these settings from the Print window.
You must be logged in with a user ID which has the appropriate rights to change these settings. Contact your system administrator for more information.
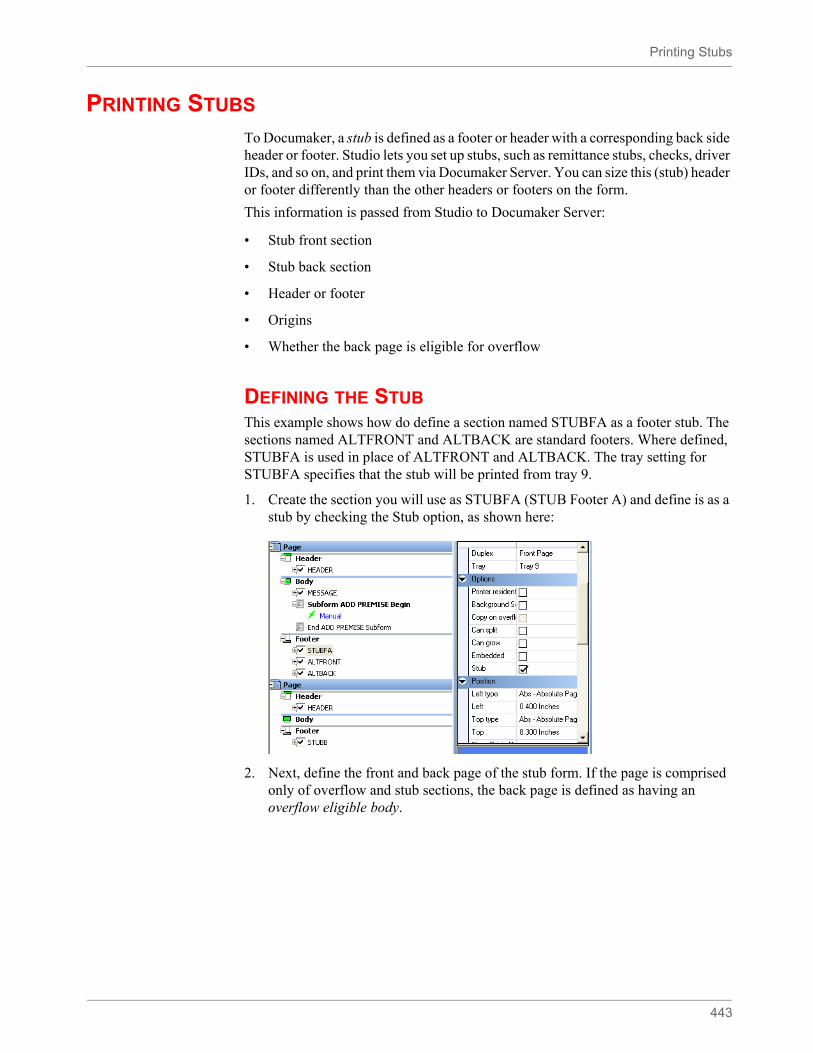
Printing Stubs
443
PRINTING STUBS
To Documaker, a stub is defined as a footer or header with a corresponding back side header or footer. Studio lets you set up stubs, such as remittance stubs, checks, driver IDs, and so on, and print them via Documaker Server. You can size this (stub) header or footer differently than the other headers or footers on the form.
This information is passed from Studio to Documaker Server:
• Stub front section
• Stub back section
• Header or footer
• Origins
• Whether the back page is eligible for overflow
DEFINING THE STUBThis example shows how do define a section named STUBFA as a footer stub. The sections named ALTFRONT and ALTBACK are standard footers. Where defined, STUBFA is used in place of ALTFRONT and ALTBACK. The tray setting for STUBFA specifies that the stub will be printed from tray 9.
1. Create the section you will use as STUBFA (STUB Footer A) and define is as a stub by checking the Stub option, as shown here:
2. Next, define the front and back page of the stub form. If the page is comprised only of overflow and stub sections, the back page is defined as having an overflow eligible body.
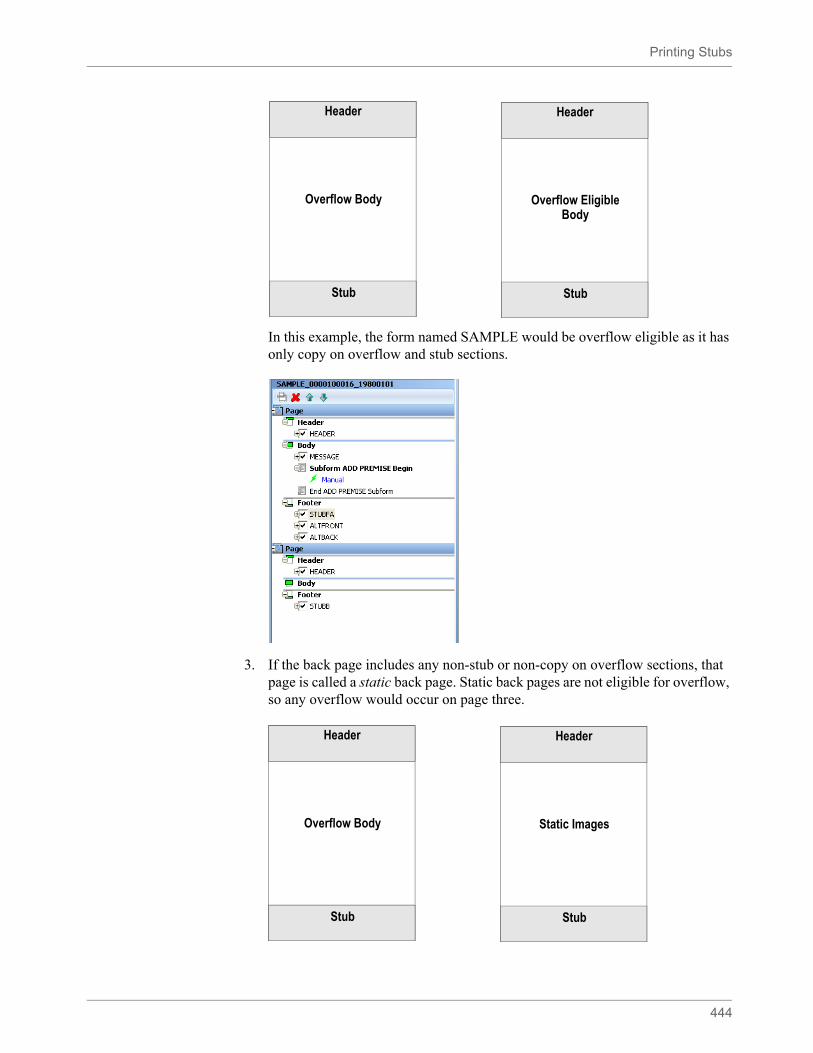
Printing Stubs
444
In this example, the form named SAMPLE would be overflow eligible as it has only copy on overflow and stub sections.
3. If the back page includes any non-stub or non-copy on overflow sections, that page is called a static back page. Static back pages are not eligible for overflow, so any overflow would occur on page three.
Header
Stub
Overflow Body
Header
Stub
Overflow Eligible Body
Header
Stub
Overflow Body
Header
Stub
Static Images
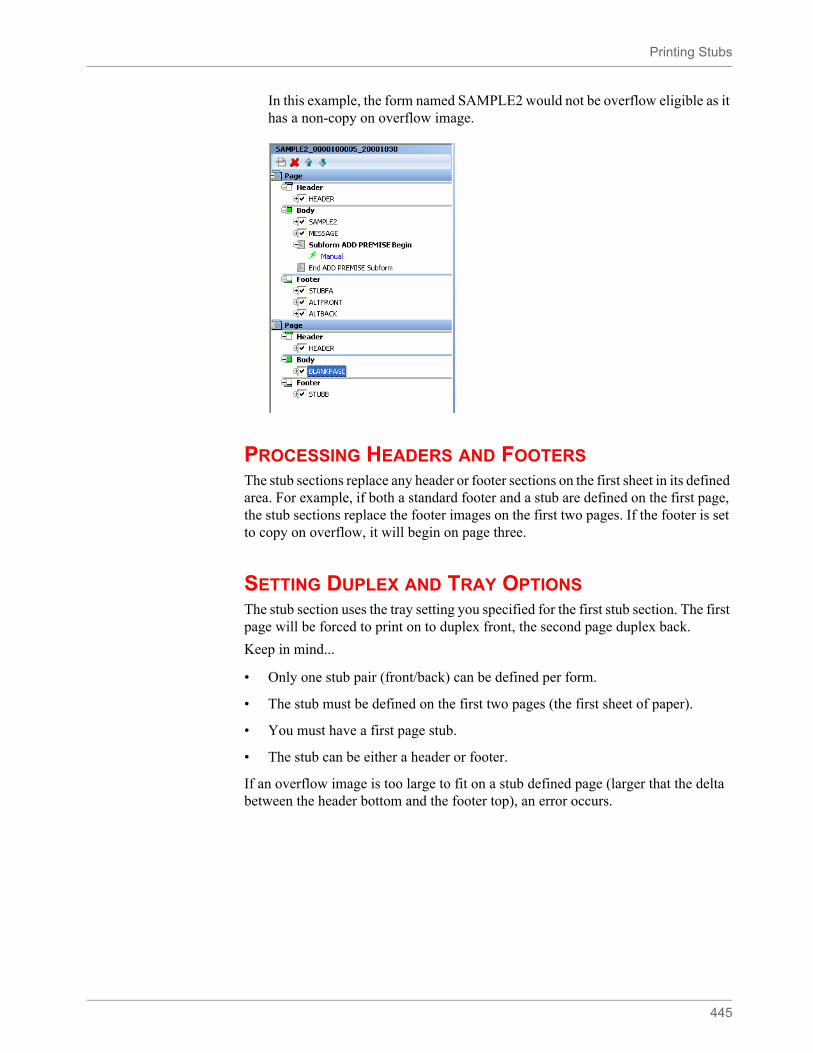
Printing Stubs
445
In this example, the form named SAMPLE2 would not be overflow eligible as it has a non-copy on overflow image.
PROCESSING HEADERS AND FOOTERSThe stub sections replace any header or footer sections on the first sheet in its defined area. For example, if both a standard footer and a stub are defined on the first page, the stub sections replace the footer images on the first two pages. If the footer is set to copy on overflow, it will begin on page three.
SETTING DUPLEX AND TRAY OPTIONSThe stub section uses the tray setting you specified for the first stub section. The first page will be forced to print on to duplex front, the second page duplex back.
Keep in mind...
• Only one stub pair (front/back) can be defined per form.
• The stub must be defined on the first two pages (the first sheet of paper).
• You must have a first page stub.
• The stub can be either a header or footer.
If an overflow image is too large to fit on a stub defined page (larger that the delta between the header bottom and the footer top), an error occurs.
Using Printcommander to Create Sections
446
USING PRINTCOMMANDER TO CREATE SECTIONS
To use Printcommander to create FAP files (sections), your system must meet the following requirements:
• Windows NT 4.0 or Windows 2000 or higher
• Administrator rights
Setting up Printcommander to create FAP files involves these steps:
• Downloading and installing Printcommander
• Creating a virtual printer
• Configuring the virtual printer
• Installing Tagcommander
• Installing Studio (if not already installed)
• Configuring NetMove
Once you have performed these steps, you can open a Windows document processor, create a file, and then convert that file into a FAP file by simply printing it to the virtual printer you set up. The following topics guide you through the set up process.
See the Printcommander documentation for additional information.
Downloading and Installing Printcommander
Follow these steps to download and install Printcommander:
1. Open a browser and go to the My Oracle Support site:
https://support.oracle.com
2. Sign in, then click the Patches and Updates tab.
3. Search for patch number 8483517.
4. Then click Go. The search results appear.
5. Click Read Me to read information about this patch. Click Download to download the patch.
6. Once downloaded, unzip the file, then go to the following directory and run the setup.exe program:
..\Docucreate_Workstation_FP_6_0_10\Printcommander\6.0.10 - 20090309
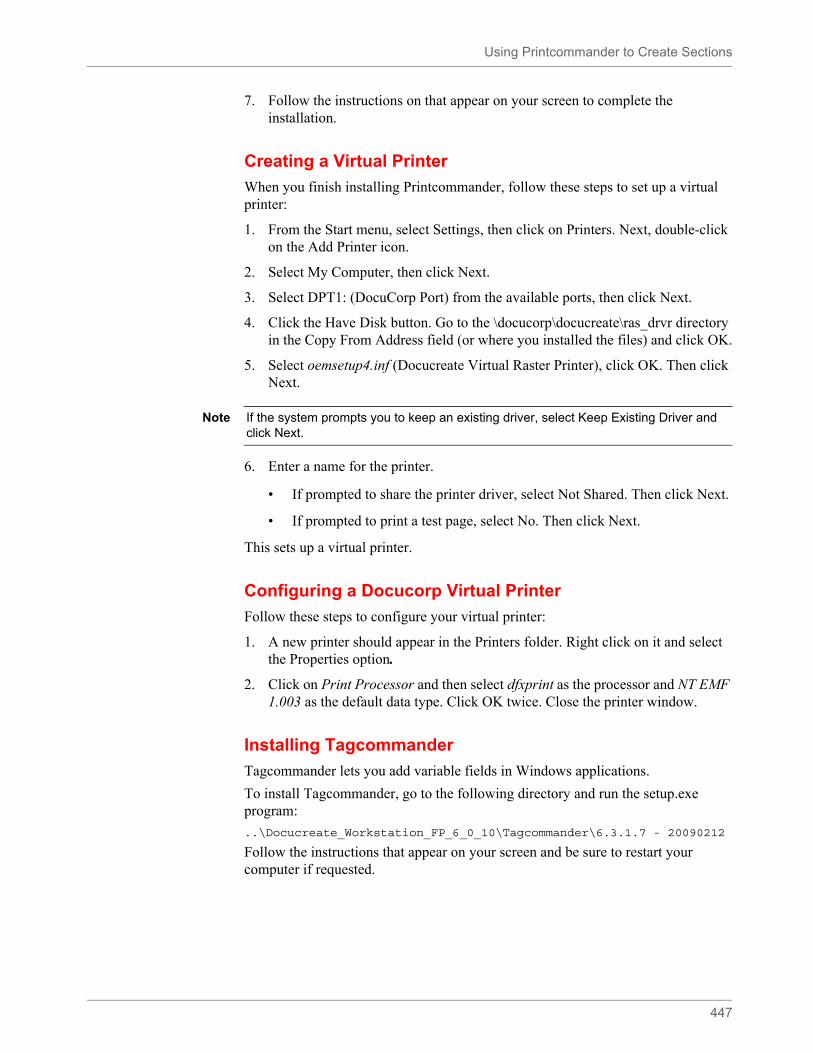
Using Printcommander to Create Sections
447
7. Follow the instructions on that appear on your screen to complete the installation.
Creating a Virtual Printer
When you finish installing Printcommander, follow these steps to set up a virtual printer:
1. From the Start menu, select Settings, then click on Printers. Next, double-click on the Add Printer icon.
2. Select My Computer, then click Next.
3. Select DPT1: (DocuCorp Port) from the available ports, then click Next.
4. Click the Have Disk button. Go to the \docucorp\docucreate\ras_drvr directory in the Copy From Address field (or where you installed the files) and click OK.
5. Select oemsetup4.inf (Docucreate Virtual Raster Printer), click OK. Then click Next.
6. Enter a name for the printer.
• If prompted to share the printer driver, select Not Shared. Then click Next.
• If prompted to print a test page, select No. Then click Next.
This sets up a virtual printer.
Configuring a Docucorp Virtual Printer
Follow these steps to configure your virtual printer:
1. A new printer should appear in the Printers folder. Right click on it and select the Properties option.
2. Click on Print Processor and then select dfxprint as the processor and NT EMF 1.003 as the default data type. Click OK twice. Close the printer window.
Installing Tagcommander
Tagcommander lets you add variable fields in Windows applications.
To install Tagcommander, go to the following directory and run the setup.exe program:
..\Docucreate_Workstation_FP_6_0_10\Tagcommander\6.3.1.7 - 20090212
Follow the instructions that appear on your screen and be sure to restart your computer if requested.
Note If the system prompts you to keep an existing driver, select Keep Existing Driver and click Next.

Using Printcommander to Create Sections
448
Installing Studio
If you have not installed Documaker Studio, go to the Oracle Software Delivery Cloud and select the options required to download and install Oracle Documaker.
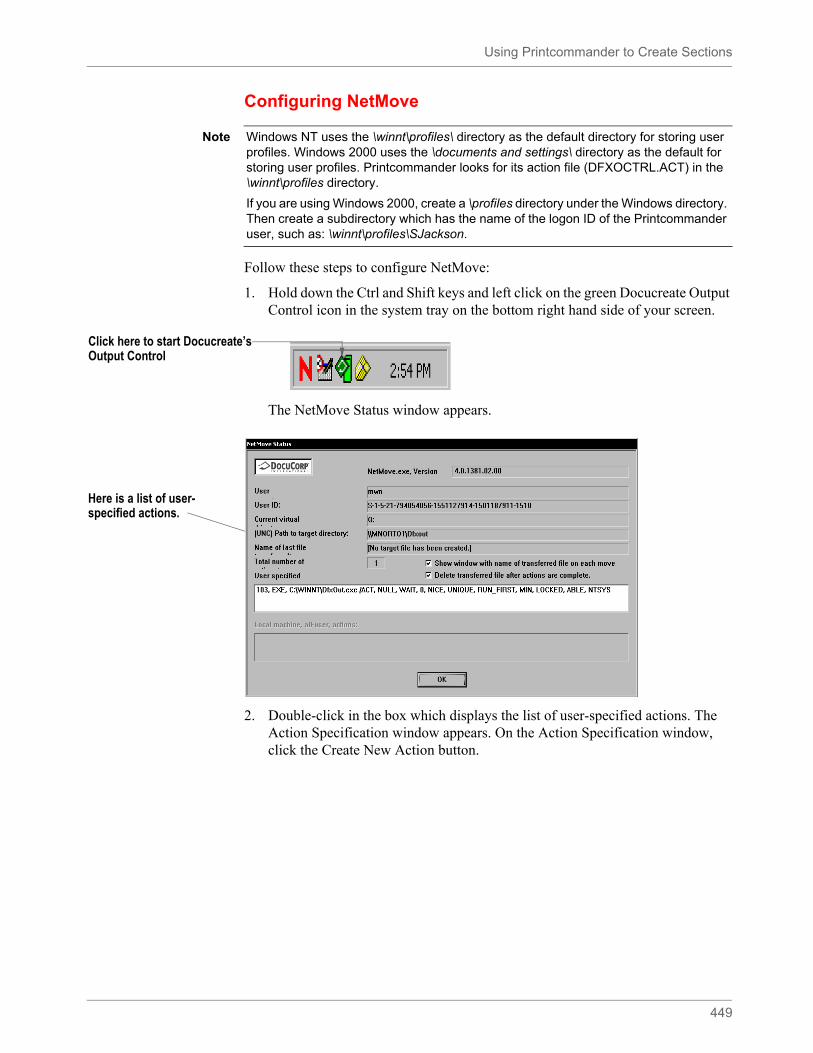
Using Printcommander to Create Sections
449
Configuring NetMove
Follow these steps to configure NetMove:
1. Hold down the Ctrl and Shift keys and left click on the green Docucreate Output Control icon in the system tray on the bottom right hand side of your screen.
The NetMove Status window appears.
2. Double-click in the box which displays the list of user-specified actions. The Action Specification window appears. On the Action Specification window, click the Create New Action button.
Note Windows NT uses the \winnt\profiles\ directory as the default directory for storing user profiles. Windows 2000 uses the \documents and settings\ directory as the default for storing user profiles. Printcommander looks for its action file (DFXOCTRL.ACT) in the \winnt\profiles directory.
If you are using Windows 2000, create a \profiles directory under the Windows directory. Then create a subdirectory which has the name of the logon ID of the Printcommander user, such as: \winnt\profiles\SJackson.
Click here to start Docucreate’s Output Control
Here is a list of user-specified actions.
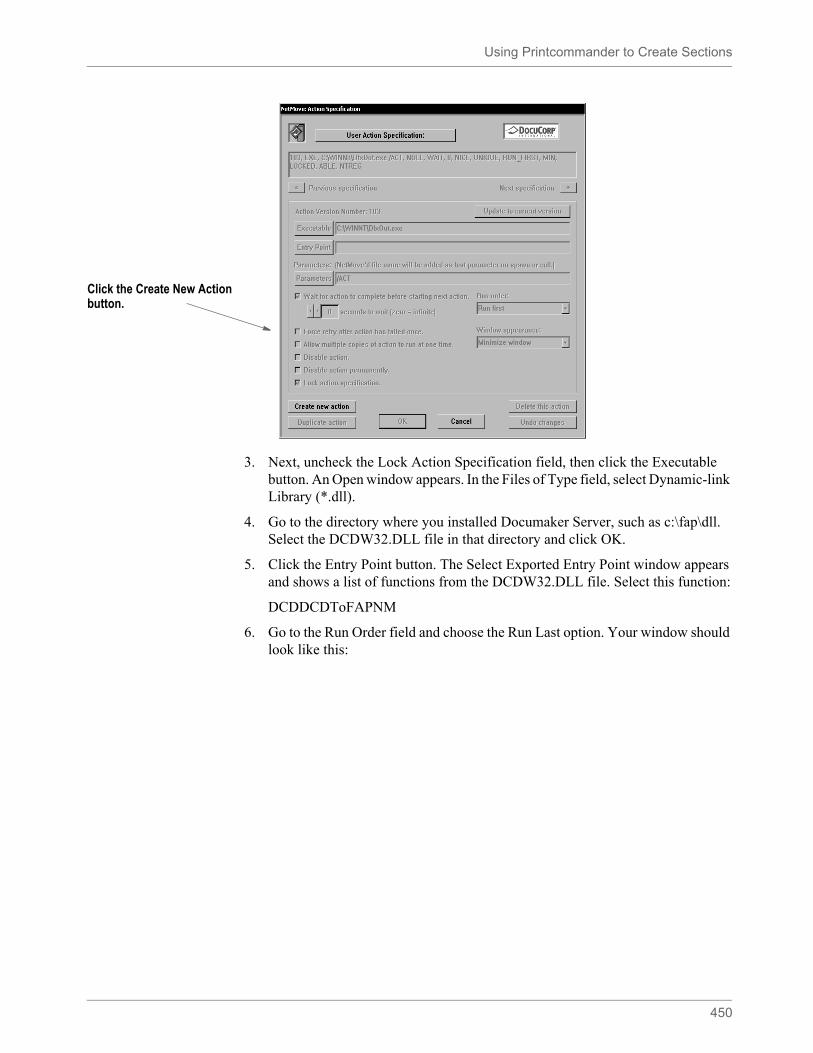
Using Printcommander to Create Sections
450
3. Next, uncheck the Lock Action Specification field, then click the Executable button. An Open window appears. In the Files of Type field, select Dynamic-link Library (*.dll).
4. Go to the directory where you installed Documaker Server, such as c:\fap\dll. Select the DCDW32.DLL file in that directory and click OK.
5. Click the Entry Point button. The Select Exported Entry Point window appears and shows a list of functions from the DCDW32.DLL file. Select this function:
DCDDCDToFAPNM
6. Go to the Run Order field and choose the Run Last option. Your window should look like this:
Click the Create New Action button.
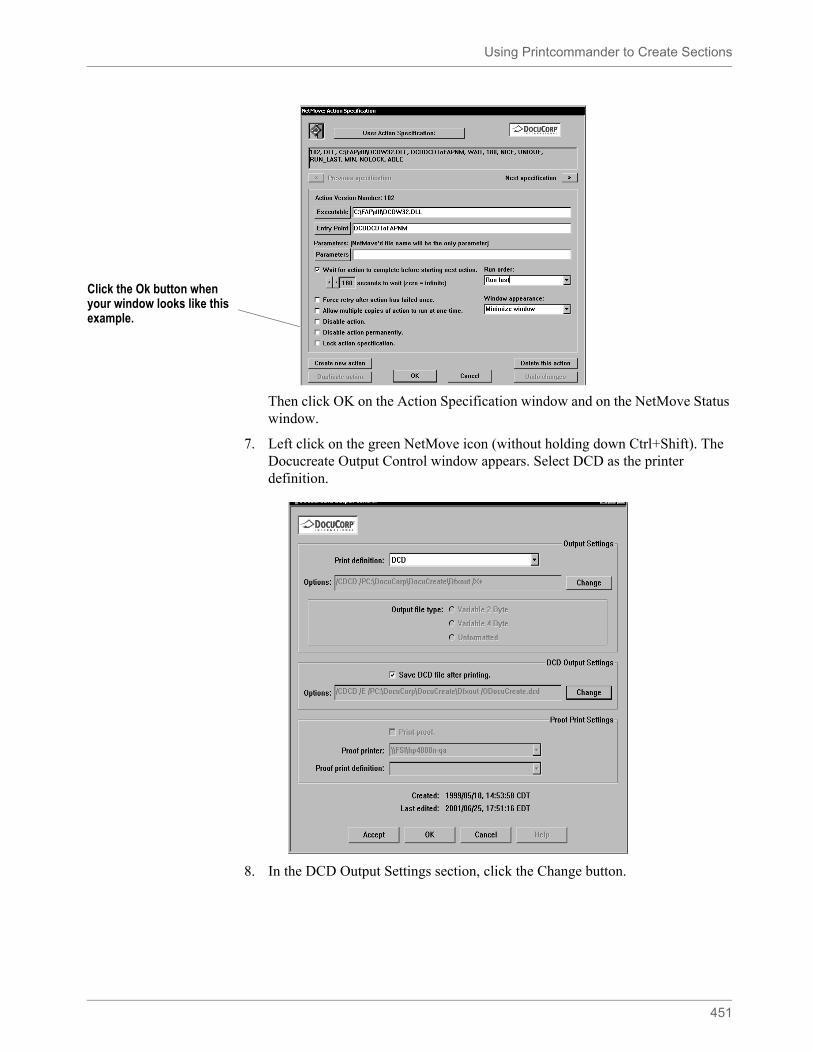
Using Printcommander to Create Sections
451
Then click OK on the Action Specification window and on the NetMove Status window.
7. Left click on the green NetMove icon (without holding down Ctrl+Shift). The Docucreate Output Control window appears. Select DCD as the printer definition.
8. In the DCD Output Settings section, click the Change button.
Click the Ok button when your window looks like this example.
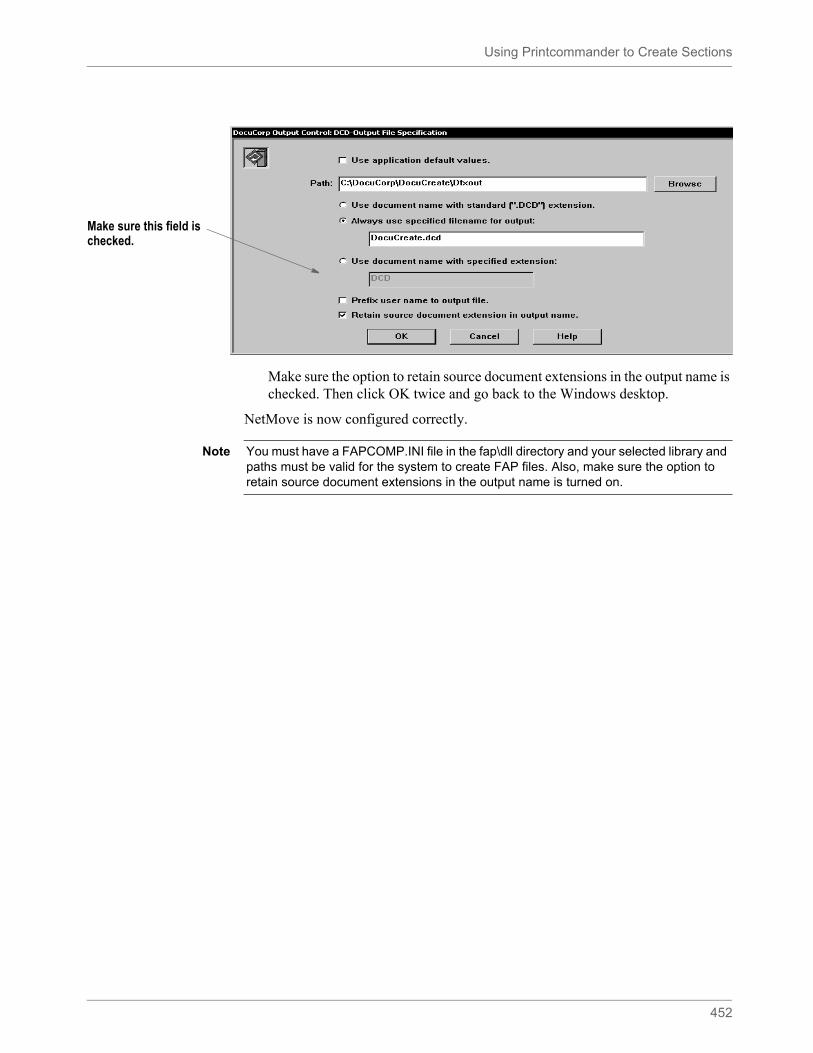
Using Printcommander to Create Sections
452
Make sure the option to retain source document extensions in the output name is checked. Then click OK twice and go back to the Windows desktop.
NetMove is now configured correctly.
Make sure this field is checked.
Note You must have a FAPCOMP.INI file in the fap\dll directory and your selected library and paths must be valid for the system to create FAP files. Also, make sure the option to retain source document extensions in the output name is turned on.
Using Printcommander to Create Sections
453
Creating a FAP File
Follow these steps to create a FAP file using Printcommander:
1. Start Studio and make sure a valid master resource library (MRL) is selected. In Studio, after opening a workspace, you can check this by choosing Manage, System, Settings and then looking under the Resource Path Setup settings.
2. Open a Windows application such as Microsoft Word. Open or create a sample document.
3. Select Print from the File menu and change the printer to the Docucorp virtual printer. Select OK. This generates a FAP file. You will see the green NetMove program added to the status bar at the bottom of the screen.
The new FAP file will be created in the c:\docucorp\docucreate\dfxout directory. If you installed to a drive other than C:, FAP and DCD files will be located on that drive.
4. Using a tool such as Windows Explorer, move the FAP file to the forms\ directory of your MRL.
Once you have moved the FAP file, you can delete the DCD files and any SPL files. Docucreate no longer needs these files.
If you receive an error similar to...
PFMNAM . Error: Font Not Present for Orientation 0 in PFM: ...
Left click on the Netmove icon on the task bar and change the printer definition to DCD. See the topic, Operating DocuCreate Output Control, in the Printcommander documentation for more information.
Note Printcommander is designed to work with word processing systems such as Word, WordPad, WordPerfect, WordPro, and so on. You can also use Excel as long as you do not include BPSD tag references. Inserted objects cannot be viewed by Tagcommander.
Note For optimal fidelity when converting Printcommander DCD files to FAP files, the system uses static text labels for every word instead of for every line. This helps make sure justified paragraphs come out looking justified in the FAP files. This can also increase the size of the FAP files.
After you convert the file and open it in Documaker Studio, you can select a group of text labels, right click, and choose the Convert to Text Area option to combine the individual text labels into larger, more manageable text areas.
If you notice problems with underlined text, go to the printer settings (File, Print, Properties) and turn on the option to print text as graphics.
The location of this option varies, depending on the type of printer you have selected. This tells the system to treat the underlined text as a graphic and to append the FORMSX.FNT file to the Metacode. A side effect is that by having this option checked, as well as the option to use printer metrics to display the document (Tools, Options, Compatibility), you may see some garbage at the top of a tag. This will not appear in the print out.
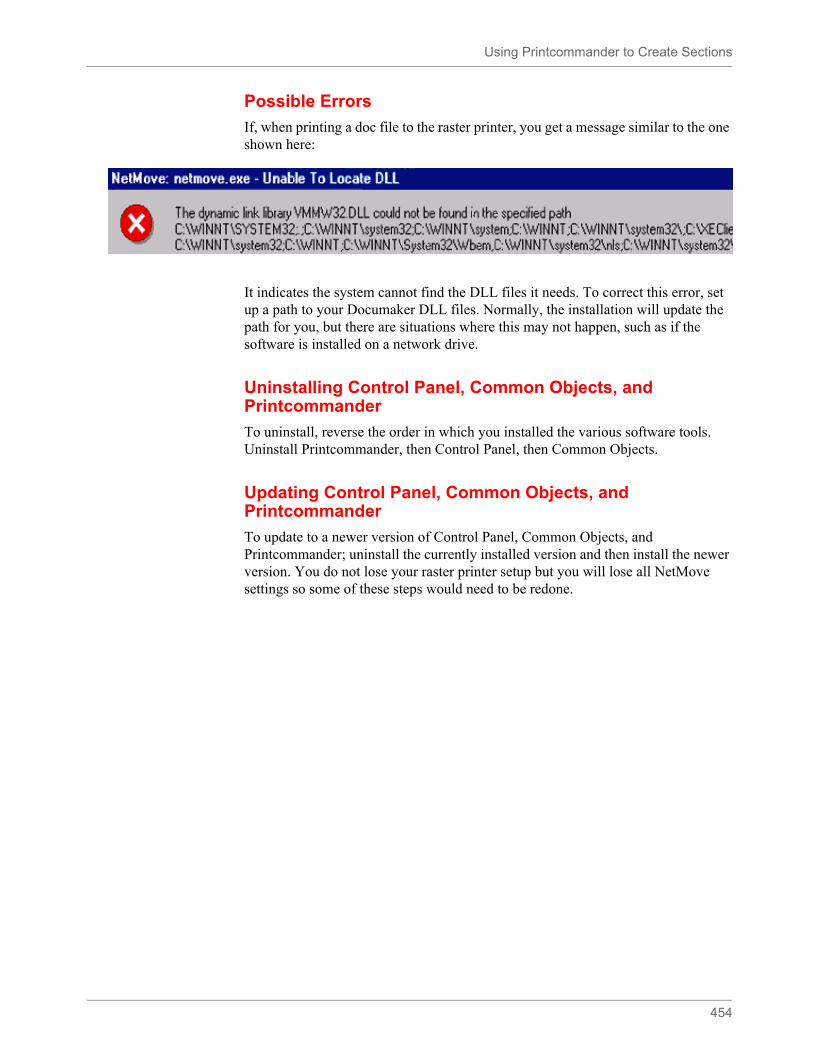
Using Printcommander to Create Sections
454
Possible Errors
If, when printing a doc file to the raster printer, you get a message similar to the one shown here:
It indicates the system cannot find the DLL files it needs. To correct this error, set up a path to your Documaker DLL files. Normally, the installation will update the path for you, but there are situations where this may not happen, such as if the software is installed on a network drive.
Uninstalling Control Panel, Common Objects, and Printcommander
To uninstall, reverse the order in which you installed the various software tools. Uninstall Printcommander, then Control Panel, then Common Objects.
Updating Control Panel, Common Objects, and Printcommander
To update to a newer version of Control Panel, Common Objects, and Printcommander; uninstall the currently installed version and then install the newer version. You do not lose your raster printer setup but you will lose all NetMove settings so some of these steps would need to be redone.
Example
455
EXAMPLE
This example describes how to build medical history sections in the Section manager
The Medical History form includes these sections: Medhead1, Medbody1, and Medfoot1. We need to create new sections, and then customize the size of the sections so they will fit on one physical page.
The three ways to create a custom sized section are:
• Use the area tool to select a portion of an existing section to make another section.
• Create the custom sized section by specifying the size of Custom and entering the correct height and width for the paper when first creating a section.
• Create the custom sized section by using the auto size feature after creating the desired objects in the section.
We will create a new full page section, add the objects needed for each part (header, body, footer), then split the section into three individual sections using the first method above.
Step A:Design a new section:
• In the Section manager, right-click Section and select New in the floating menu. An untitled section appears on the right.
• The Medhead1 section has a box surrounding the text. Add a box to the new work area.
• The rest of the text is actually in a text area: this is because we want to perform word and line wrapping around the Key2 (Line of Business) name that will flood the data fields in the header. If we knew the name would always be the same, we could use text labels to add our lines. But we want both a paragraph, and we know the Line of Business (LOB) may change, so it is best to use text areas instead.
• Insert a Text Area for the first line of the section, the title, inside the box created above.
• Insert a field in the text area that links to the LOB field.
• If you are using and XDD, you would select the XDD rule on the field and click the Source button to retrieve the field name from the XDD. If you are not using the XDD, you can put any field rules in the Rule field, and then the mapping to that data element in the extract file on the Data field. See the Rules Reference for information on data formatting rules.
• Insert a second text area, this one containing the paragraph information. (Note for both text areas, if you plan to use this section in an Entry environment you would want to select the Can Grow and Shrink property for the text areas: this will expand the text field length in an Entry environment as a use types. It is not necessary for a Documaker Server (batch processing) environment.)
• Insert the LOB field into this second text area paragraph as well.
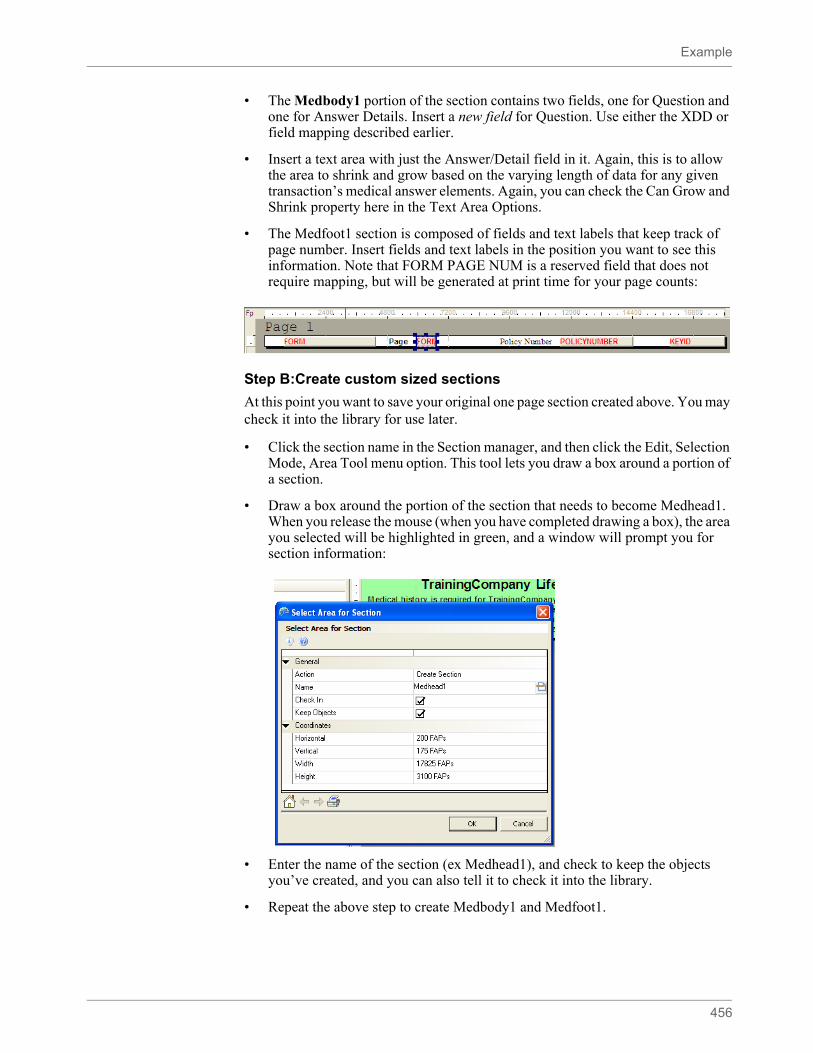
Example
456
• The Medbody1 portion of the section contains two fields, one for Question and one for Answer Details. Insert a new field for Question. Use either the XDD or field mapping described earlier.
• Insert a text area with just the Answer/Detail field in it. Again, this is to allow the area to shrink and grow based on the varying length of data for any given transaction’s medical answer elements. Again, you can check the Can Grow and Shrink property here in the Text Area Options.
• The Medfoot1 section is composed of fields and text labels that keep track of page number. Insert fields and text labels in the position you want to see this information. Note that FORM PAGE NUM is a reserved field that does not require mapping, but will be generated at print time for your page counts:
Step B:Create custom sized sections
At this point you want to save your original one page section created above. You may check it into the library for use later.
• Click the section name in the Section manager, and then click the Edit, Selection Mode, Area Tool menu option. This tool lets you draw a box around a portion of a section.
• Draw a box around the portion of the section that needs to become Medhead1. When you release the mouse (when you have completed drawing a box), the area you selected will be highlighted in green, and a window will prompt you for section information:
• Enter the name of the section (ex Medhead1), and check to keep the objects you’ve created, and you can also tell it to check it into the library.
• Repeat the above step to create Medbody1 and Medfoot1.
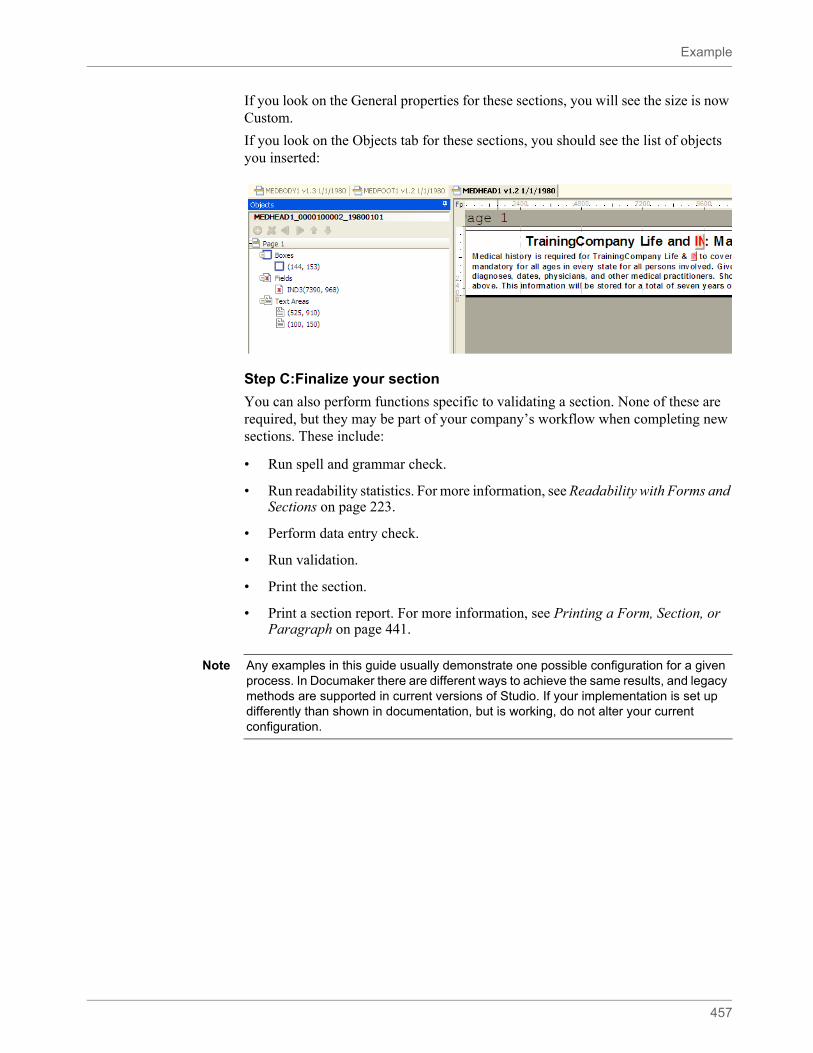
Example
457
If you look on the General properties for these sections, you will see the size is now Custom.
If you look on the Objects tab for these sections, you should see the list of objects you inserted:
Step C:Finalize your section
You can also perform functions specific to validating a section. None of these are required, but they may be part of your company’s workflow when completing new sections. These include:
• Run spell and grammar check.
• Run readability statistics. For more information, see Readability with Forms and Sections on page 223.
• Perform data entry check.
• Run validation.
• Print the section.
• Print a section report. For more information, see Printing a Form, Section, or Paragraph on page 441.
Note Any examples in this guide usually demonstrate one possible configuration for a given process. In Documaker there are different ways to achieve the same results, and legacy methods are supported in current versions of Studio. If your implementation is set up differently than shown in documentation, but is working, do not alter your current configuration.
458
Chapter 7
Creating Paragraph and Paragraphs Lists
Studio Lets you create Paragraph and Paragraph lists. This chapter includes the following topics:
• Creating Paragraphs on page 459
• Creating Paragraph Lists on page 465
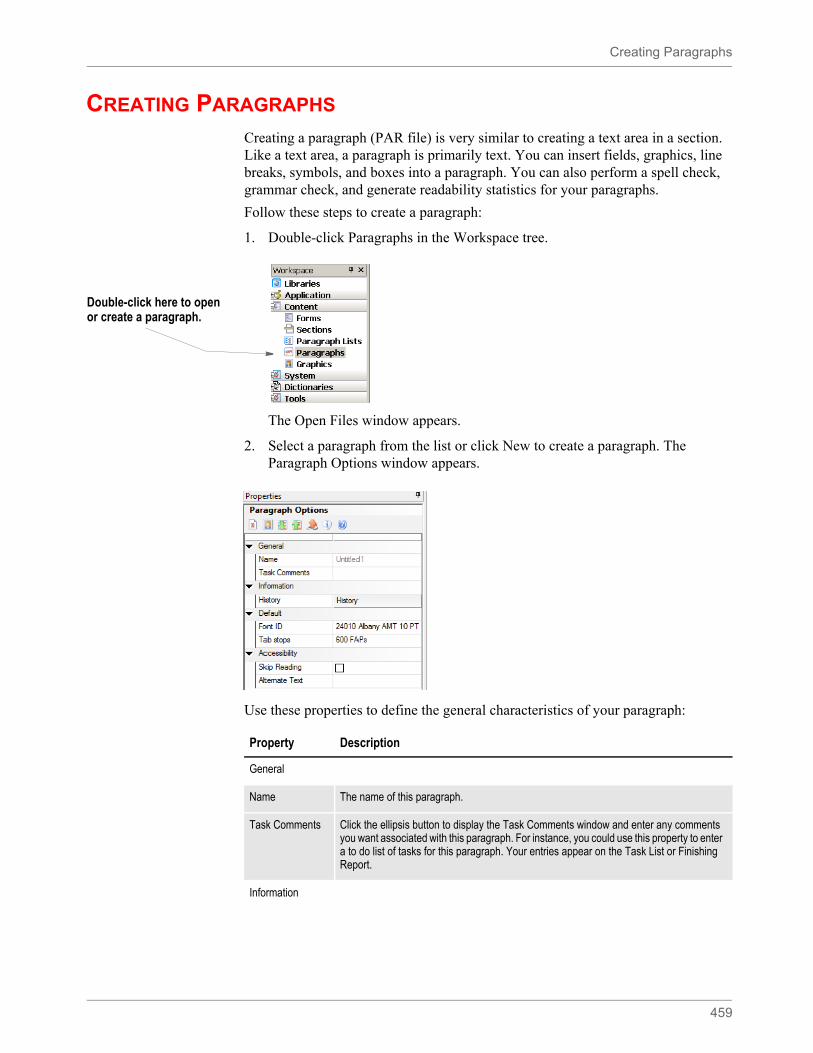
Creating Paragraphs
459
CREATING PARAGRAPHS
Creating a paragraph (PAR file) is very similar to creating a text area in a section. Like a text area, a paragraph is primarily text. You can insert fields, graphics, line breaks, symbols, and boxes into a paragraph. You can also perform a spell check, grammar check, and generate readability statistics for your paragraphs.
Follow these steps to create a paragraph:
1. Double-click Paragraphs in the Workspace tree.
The Open Files window appears.
2. Select a paragraph from the list or click New to create a paragraph. The Paragraph Options window appears.
Use these properties to define the general characteristics of your paragraph:
Double-click here to open or create a paragraph.
Property Description
General
Name The name of this paragraph.
Task Comments Click the ellipsis button to display the Task Comments window and enter any comments you want associated with this paragraph. For instance, you could use this property to enter a to do list of tasks for this paragraph. Your entries appear on the Task List or Finishing Report.
Information
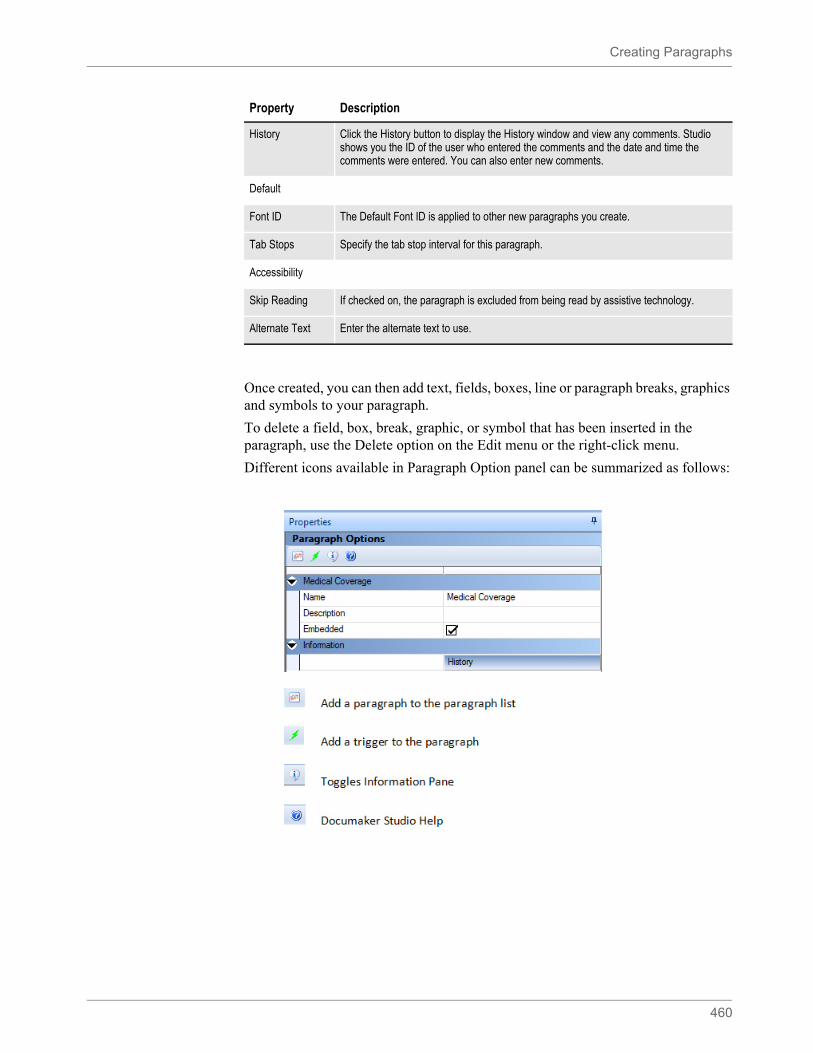
Creating Paragraphs
460
Once created, you can then add text, fields, boxes, line or paragraph breaks, graphics and symbols to your paragraph.
To delete a field, box, break, graphic, or symbol that has been inserted in the paragraph, use the Delete option on the Edit menu or the right-click menu.
Different icons available in Paragraph Option panel can be summarized as follows:
History Click the History button to display the History window and view any comments. Studio shows you the ID of the user who entered the comments and the date and time the comments were entered. You can also enter new comments.
Default
Font ID The Default Font ID is applied to other new paragraphs you create.
Tab Stops Specify the tab stop interval for this paragraph.
Accessibility
Skip Reading If checked on, the paragraph is excluded from being read by assistive technology.
Alternate Text Enter the alternate text to use.
Property Description
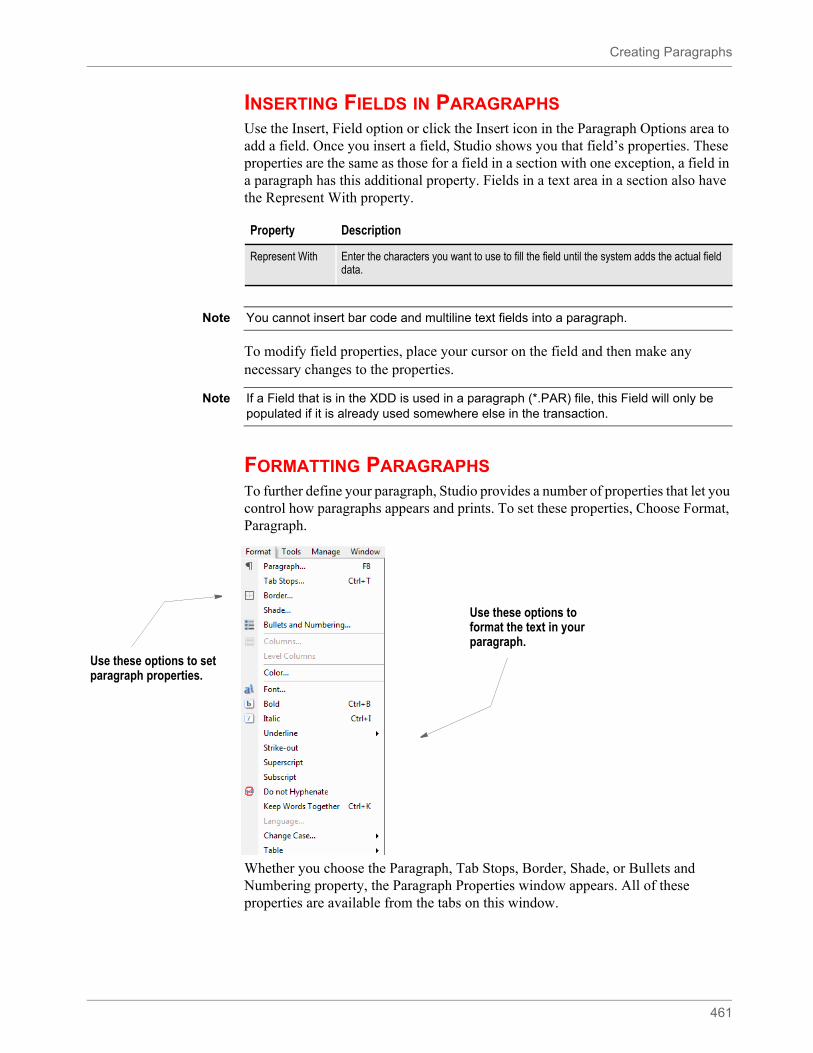
Creating Paragraphs
461
INSERTING FIELDS IN PARAGRAPHSUse the Insert, Field option or click the Insert icon in the Paragraph Options area to add a field. Once you insert a field, Studio shows you that field’s properties. These properties are the same as those for a field in a section with one exception, a field in a paragraph has this additional property. Fields in a text area in a section also have the Represent With property.
To modify field properties, place your cursor on the field and then make any necessary changes to the properties.
FORMATTING PARAGRAPHSTo further define your paragraph, Studio provides a number of properties that let you control how paragraphs appears and prints. To set these properties, Choose Format, Paragraph.
Whether you choose the Paragraph, Tab Stops, Border, Shade, or Bullets and Numbering property, the Paragraph Properties window appears. All of these properties are available from the tabs on this window.
Property Description
Represent With Enter the characters you want to use to fill the field until the system adds the actual field data.
Note You cannot insert bar code and multiline text fields into a paragraph.
Note If a Field that is in the XDD is used in a paragraph (*.PAR) file, this Field will only be populated if it is already used somewhere else in the transaction.
Use these options to format the text in your paragraph.
Use these options to set paragraph properties.
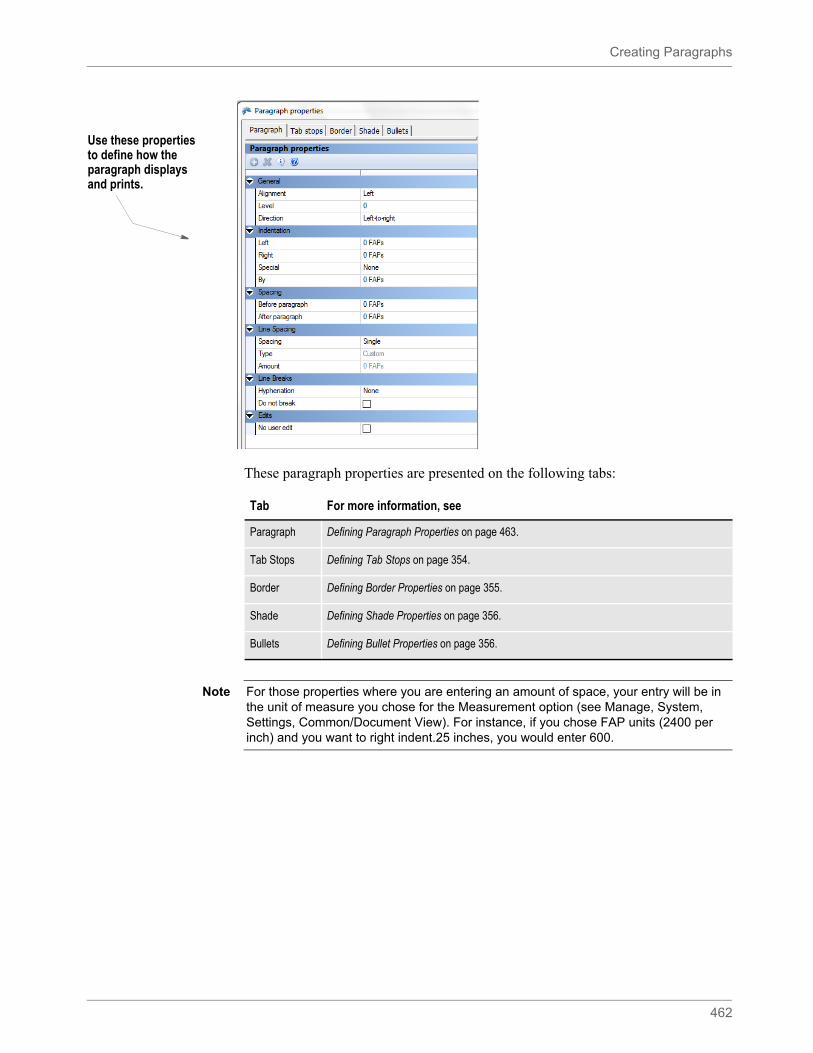
Creating Paragraphs
462
These paragraph properties are presented on the following tabs:
Use these properties to define how the paragraph displays and prints.
Tab For more information, see
Paragraph Defining Paragraph Properties on page 463.
Tab Stops Defining Tab Stops on page 354.
Border Defining Border Properties on page 355.
Shade Defining Shade Properties on page 356.
Bullets Defining Bullet Properties on page 356.
Note For those properties where you are entering an amount of space, your entry will be in the unit of measure you chose for the Measurement option (see Manage, System, Settings, Common/Document View). For instance, if you chose FAP units (2400 per inch) and you want to right indent.25 inches, you would enter 600.
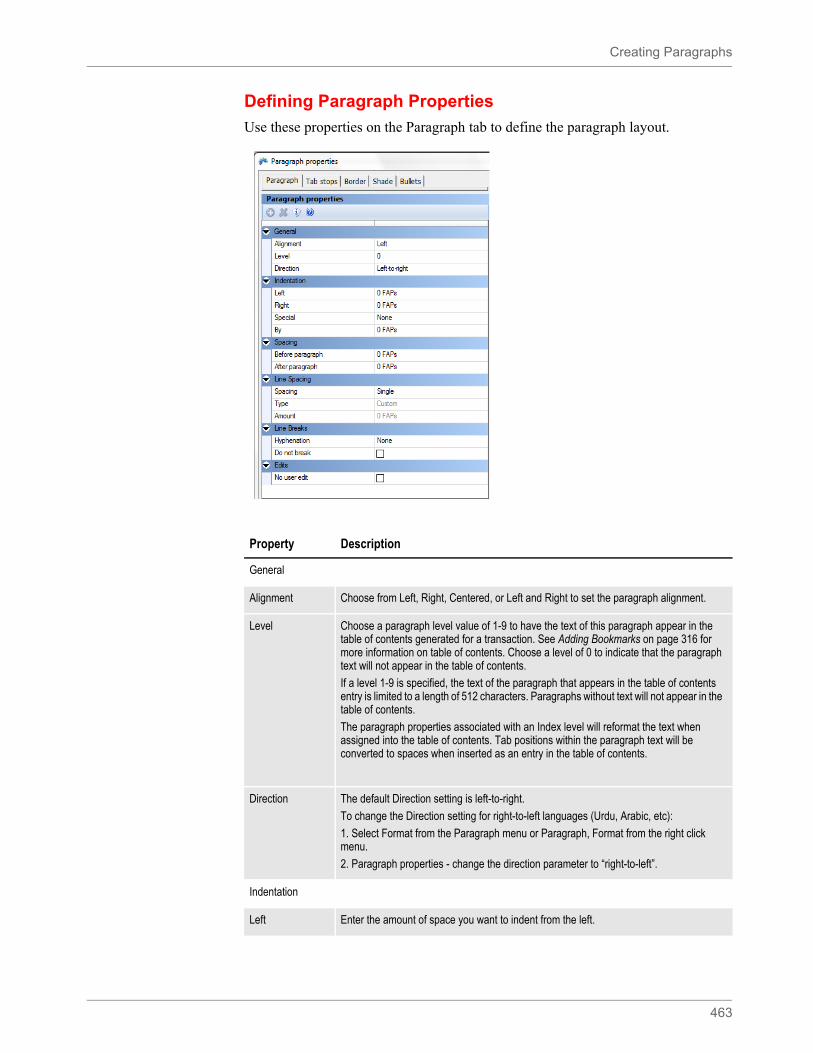
Creating Paragraphs
463
Defining Paragraph Properties
Use these properties on the Paragraph tab to define the paragraph layout.
Property Description
General
Alignment Choose from Left, Right, Centered, or Left and Right to set the paragraph alignment.
Level Choose a paragraph level value of 1-9 to have the text of this paragraph appear in the table of contents generated for a transaction. See Adding Bookmarks on page 316 for more information on table of contents. Choose a level of 0 to indicate that the paragraph text will not appear in the table of contents.
If a level 1-9 is specified, the text of the paragraph that appears in the table of contents entry is limited to a length of 512 characters. Paragraphs without text will not appear in the table of contents.
The paragraph properties associated with an Index level will reformat the text when assigned into the table of contents. Tab positions within the paragraph text will be converted to spaces when inserted as an entry in the table of contents.
Direction The default Direction setting is left-to-right.
To change the Direction setting for right-to-left languages (Urdu, Arabic, etc):
1. Select Format from the Paragraph menu or Paragraph, Format from the right click menu.
2. Paragraph properties - change the direction parameter to “right-to-left”.
Indentation
Left Enter the amount of space you want to indent from the left.
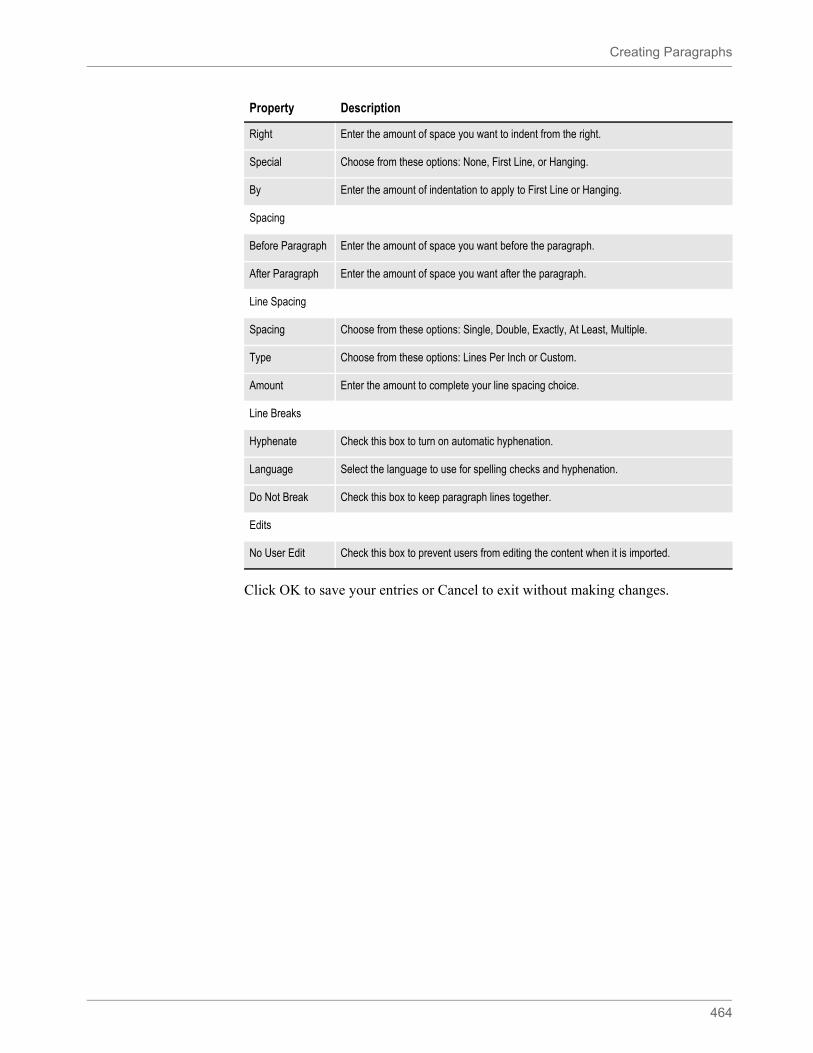
Creating Paragraphs
464
Click OK to save your entries or Cancel to exit without making changes.
Right Enter the amount of space you want to indent from the right.
Special Choose from these options: None, First Line, or Hanging.
By Enter the amount of indentation to apply to First Line or Hanging.
Spacing
Before Paragraph Enter the amount of space you want before the paragraph.
After Paragraph Enter the amount of space you want after the paragraph.
Line Spacing
Spacing Choose from these options: Single, Double, Exactly, At Least, Multiple.
Type Choose from these options: Lines Per Inch or Custom.
Amount Enter the amount to complete your line spacing choice.
Line Breaks
Hyphenate Check this box to turn on automatic hyphenation.
Language Select the language to use for spelling checks and hyphenation.
Do Not Break Check this box to keep paragraph lines together.
Edits
No User Edit Check this box to prevent users from editing the content when it is imported.
Property Description
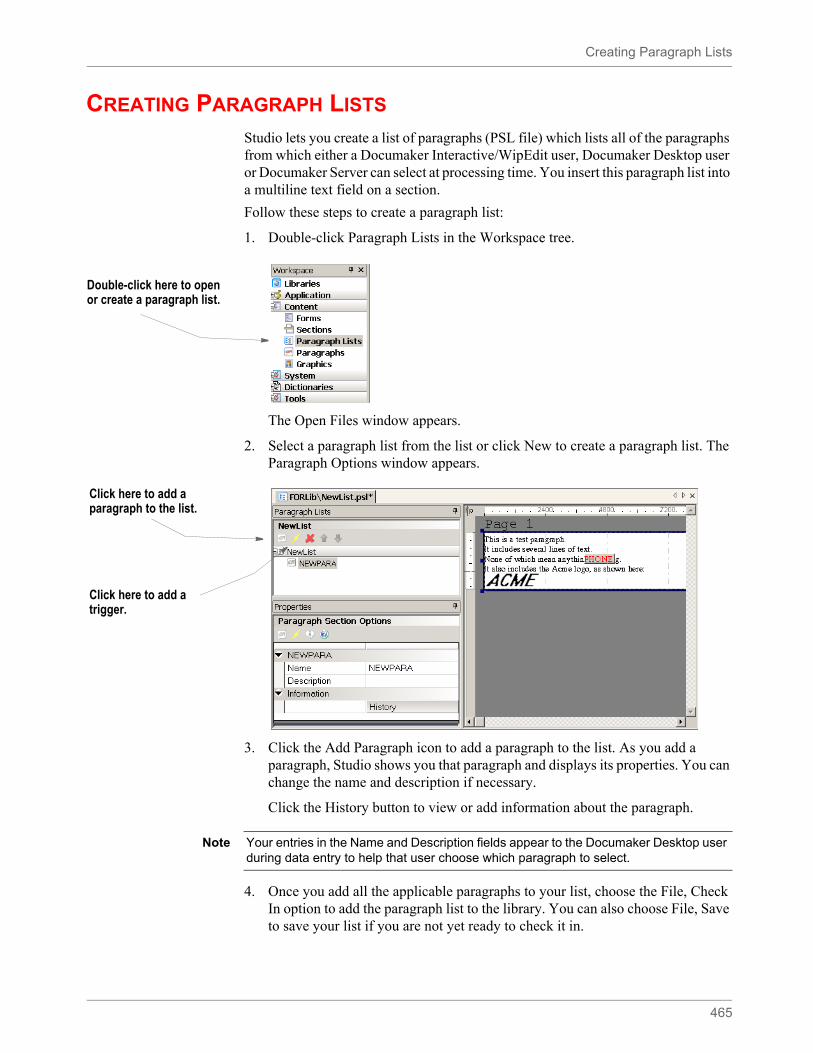
Creating Paragraph Lists
465
CREATING PARAGRAPH LISTS
Studio lets you create a list of paragraphs (PSL file) which lists all of the paragraphs from which either a Documaker Interactive/WipEdit user, Documaker Desktop user or Documaker Server can select at processing time. You insert this paragraph list into a multiline text field on a section.
Follow these steps to create a paragraph list:
1. Double-click Paragraph Lists in the Workspace tree.
The Open Files window appears.
2. Select a paragraph list from the list or click New to create a paragraph list. The Paragraph Options window appears.
3. Click the Add Paragraph icon to add a paragraph to the list. As you add a paragraph, Studio shows you that paragraph and displays its properties. You can change the name and description if necessary.
Click the History button to view or add information about the paragraph.
4. Once you add all the applicable paragraphs to your list, choose the File, Check In option to add the paragraph list to the library. You can also choose File, Save to save your list if you are not yet ready to check it in.
Double-click here to open or create a paragraph list.
Click here to add a paragraph to the list.
Click here to add a trigger.
Note Your entries in the Name and Description fields appear to the Documaker Desktop user during data entry to help that user choose which paragraph to select.
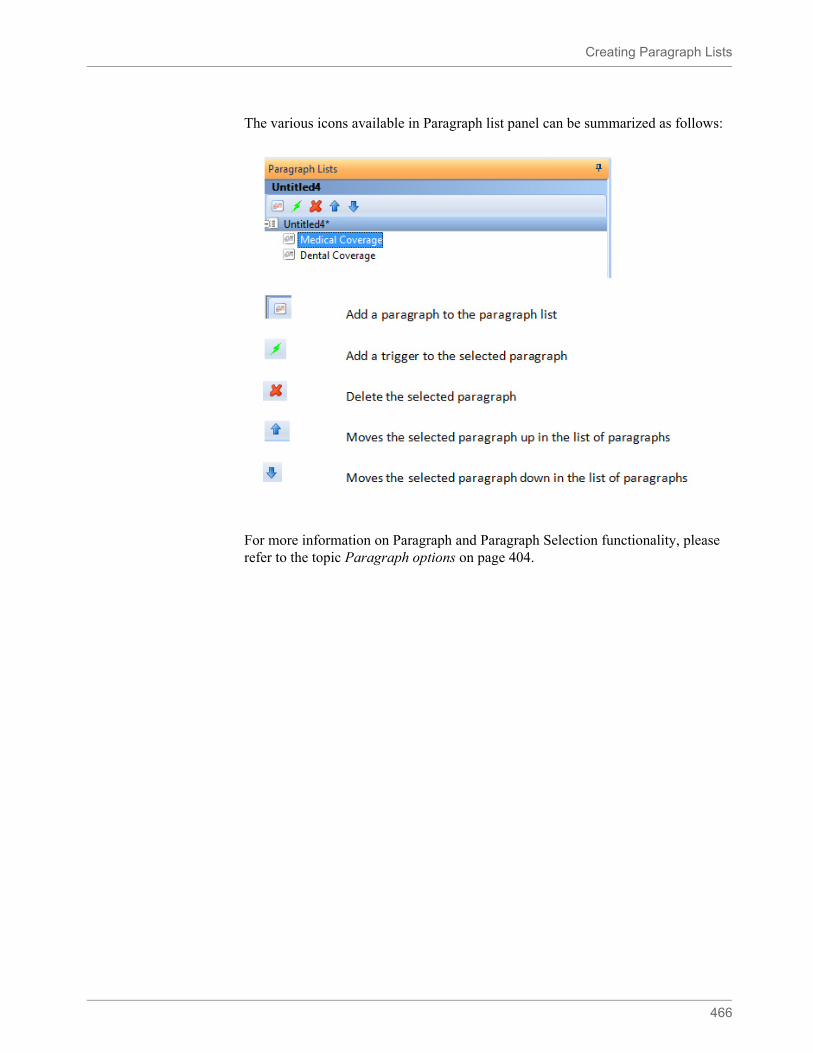
Creating Paragraph Lists
466
The various icons available in Paragraph list panel can be summarized as follows:
For more information on Paragraph and Paragraph Selection functionality, please refer to the topic Paragraph options on page 404.
467
Chapter 8
Using Library Project Management
Library Project Management (LPM) is an optional feature of Studio that provides you with a workflow for managing the development and distribution of library resources related to a project.
This chapter explains the LPM process and includes the following topics:
• Understanding LPM Concepts on page 469
• Setting Up Library Project Management on page 473
• Using the Projects Manager on page 486
• Example Library Project Management Workflow on page 491
• Using the Project Status Report on page 501
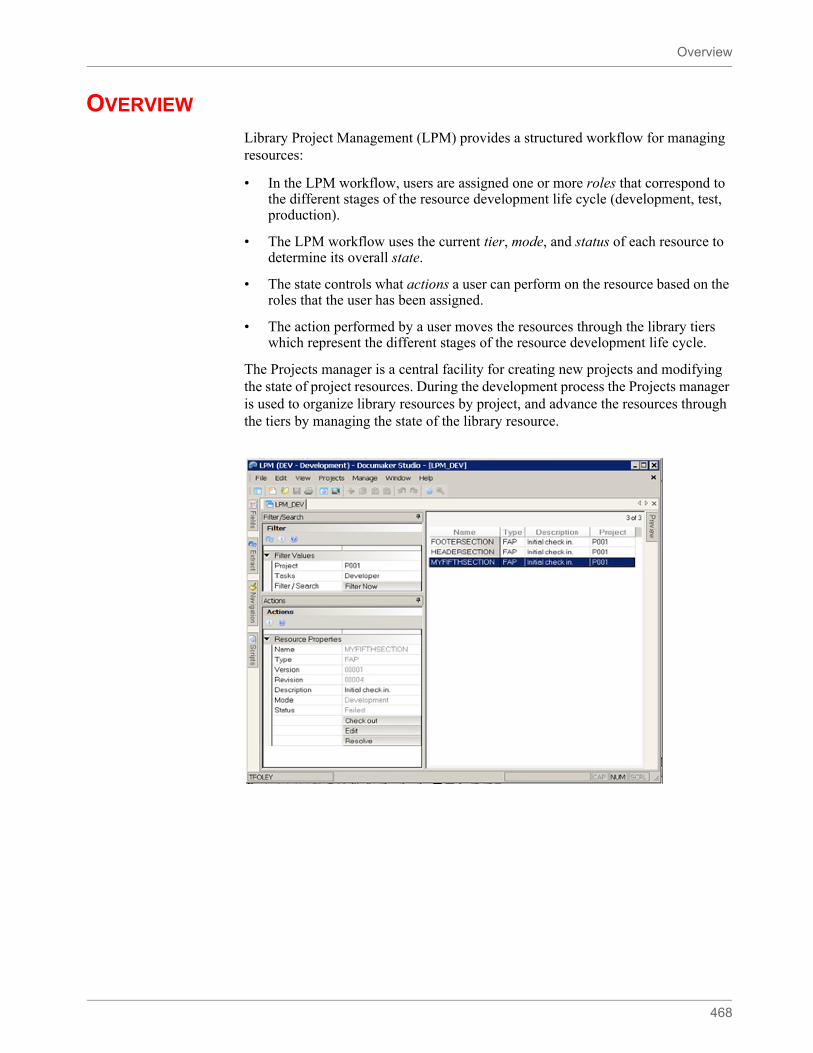
Overview
468
OVERVIEW
Library Project Management (LPM) provides a structured workflow for managing resources:
• In the LPM workflow, users are assigned one or more roles that correspond to the different stages of the resource development life cycle (development, test, production).
• The LPM workflow uses the current tier, mode, and status of each resource to determine its overall state.
• The state controls what actions a user can perform on the resource based on the roles that the user has been assigned.
• The action performed by a user moves the resources through the library tiers which represent the different stages of the resource development life cycle.
The Projects manager is a central facility for creating new projects and modifying the state of project resources. During the development process the Projects manager is used to organize library resources by project, and advance the resources through the tiers by managing the state of the library resource.
Understanding LPM Concepts
469
UNDERSTANDING LPM CONCEPTS
Before you begin using LPM, there are some concepts you need to understand.
WHAT IS A ROLE?The roles a user is assigned determine what actions they can perform on a resource as it moves through the LPM workflow. There are four roles in the LPM process:
• Developer - the developer is responsible for creating and editing resources.
• Reviewer - the reviewer is responsible for the initial approval of a resource in each of the tiers prior to it entering the next testing phase.
• Tester - the tester is responsible for verifying that a resource functions properly.
• Administrator - the administrator is responsible for overall coordination of the project as well as promoting resources to the next tier.
Use the Settings option on the Manage, System menu to assign roles to a user. See Assigning Project Roles and Permissions to Users on page 475 for more information.
WHAT IS A TIER?The tier of a library represents a separate physical library repository corresponding to a logical phase in the development process. There are five library tiers in the LPM process:
• Development - in which developers create and modify resources.
• Unit Test - in which testers test individual resources.
• System Test - in which testers perform integration testing of all resources for a project or release.
• Model Office - in which testers perform final user acceptance testing of all resources.
• Production - in which consumer documents are produced.
Use the Settings option on the Manage, System menu to define the library tiers. See Defining Library Tiers on page 480 for more information.
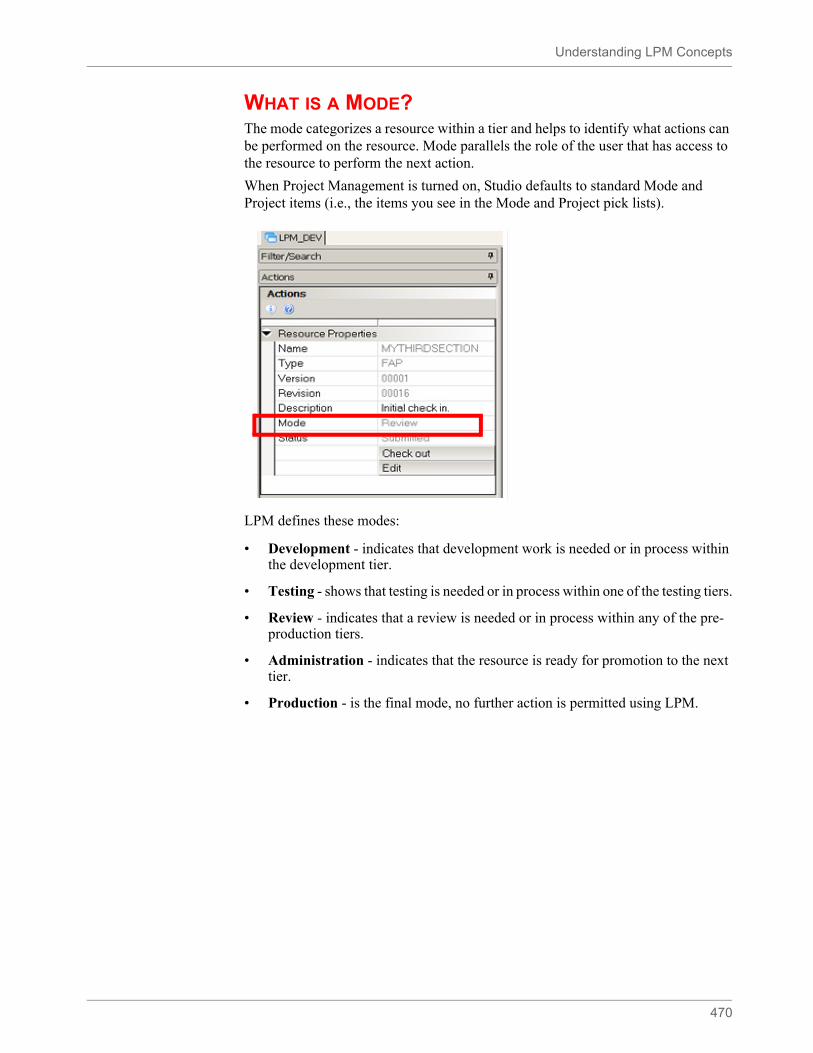
Understanding LPM Concepts
470
WHAT IS A MODE?The mode categorizes a resource within a tier and helps to identify what actions can be performed on the resource. Mode parallels the role of the user that has access to the resource to perform the next action.
When Project Management is turned on, Studio defaults to standard Mode and Project items (i.e., the items you see in the Mode and Project pick lists).
LPM defines these modes:
• Development - indicates that development work is needed or in process within the development tier.
• Testing - shows that testing is needed or in process within one of the testing tiers.
• Review - indicates that a review is needed or in process within any of the pre-production tiers.
• Administration - indicates that the resource is ready for promotion to the next tier.
• Production - is the final mode, no further action is permitted using LPM.
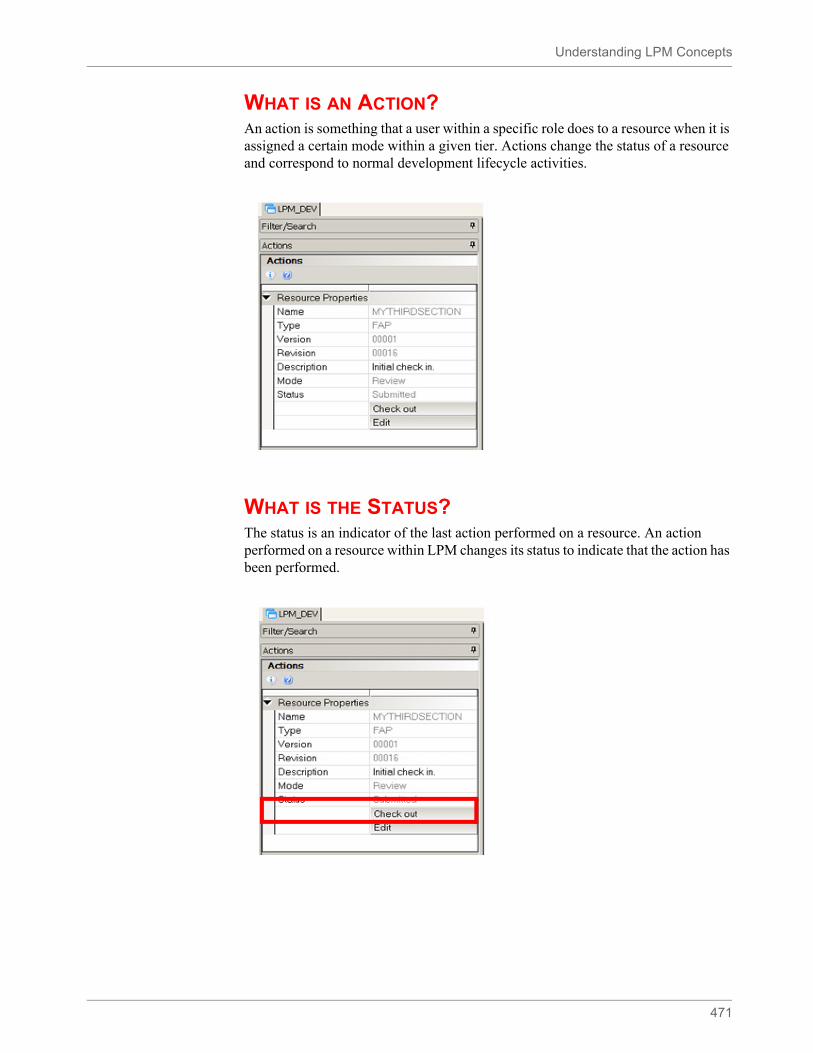
Understanding LPM Concepts
471
WHAT IS AN ACTION?An action is something that a user within a specific role does to a resource when it is assigned a certain mode within a given tier. Actions change the status of a resource and correspond to normal development lifecycle activities.
WHAT IS THE STATUS?The status is an indicator of the last action performed on a resource. An action performed on a resource within LPM changes its status to indicate that the action has been performed.

Understanding LPM Concepts
472
WHAT IS THE STATE?The current state of a resource is comprised of its current operational tier, mode, and status. The state determines what roles have access to a resource and what actions can be performed on it. A resource’s state is used to precisely identify its position within the project management workflow.
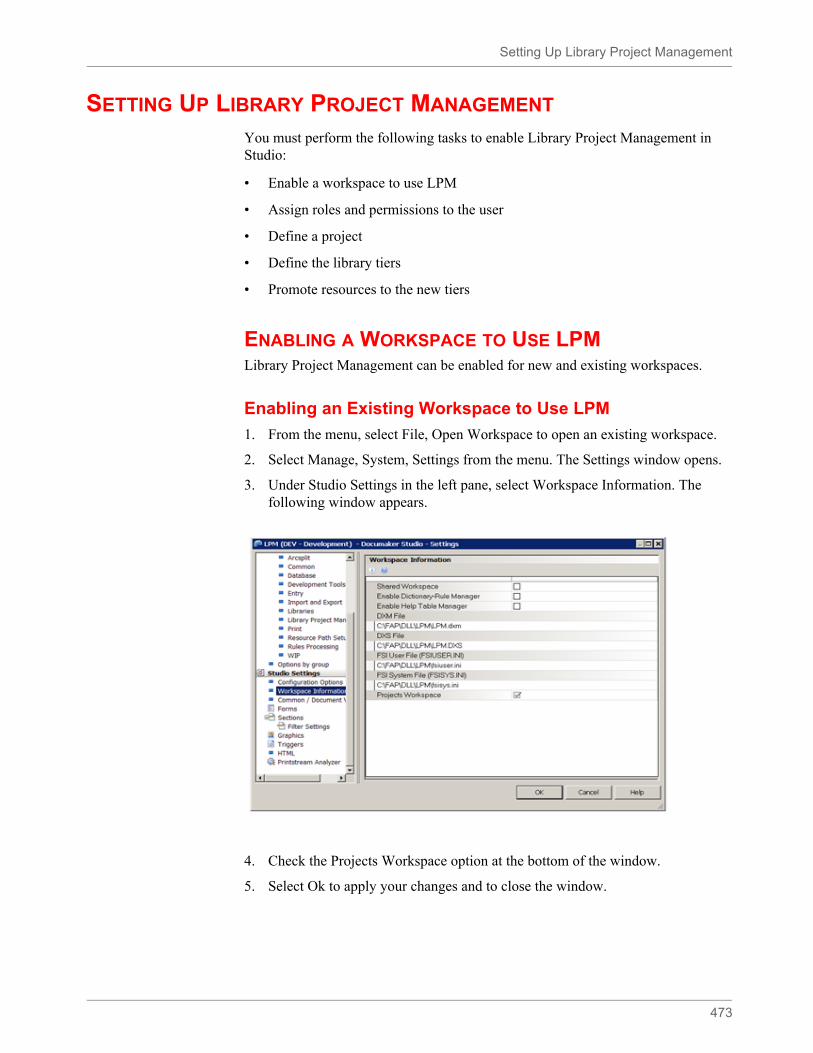
Setting Up Library Project Management
473
SETTING UP LIBRARY PROJECT MANAGEMENT
You must perform the following tasks to enable Library Project Management in Studio:
• Enable a workspace to use LPM
• Assign roles and permissions to the user
• Define a project
• Define the library tiers
• Promote resources to the new tiers
ENABLING A WORKSPACE TO USE LPMLibrary Project Management can be enabled for new and existing workspaces.
Enabling an Existing Workspace to Use LPM
1. From the menu, select File, Open Workspace to open an existing workspace.
2. Select Manage, System, Settings from the menu. The Settings window opens.
3. Under Studio Settings in the left pane, select Workspace Information. The following window appears.
4. Check the Projects Workspace option at the bottom of the window.
5. Select Ok to apply your changes and to close the window.
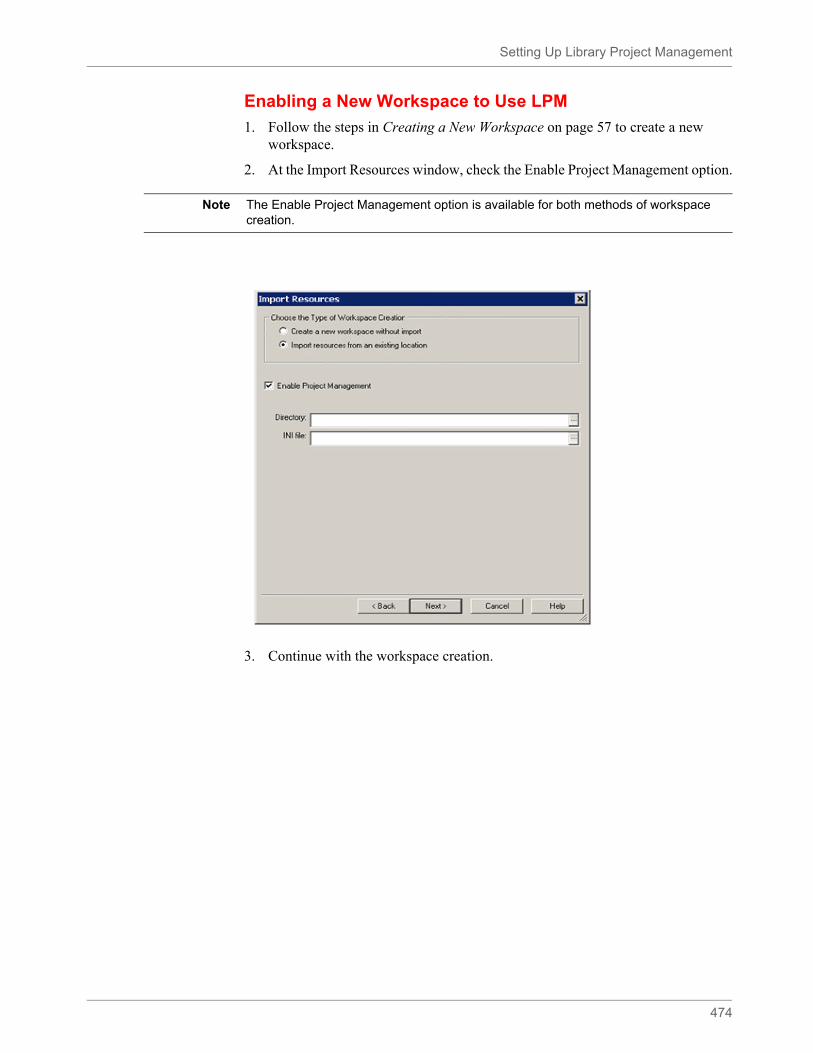
Setting Up Library Project Management
474
Enabling a New Workspace to Use LPM
1. Follow the steps in Creating a New Workspace on page 57 to create a new workspace.
2. At the Import Resources window, check the Enable Project Management option.
3. Continue with the workspace creation.
Note The Enable Project Management option is available for both methods of workspace creation.
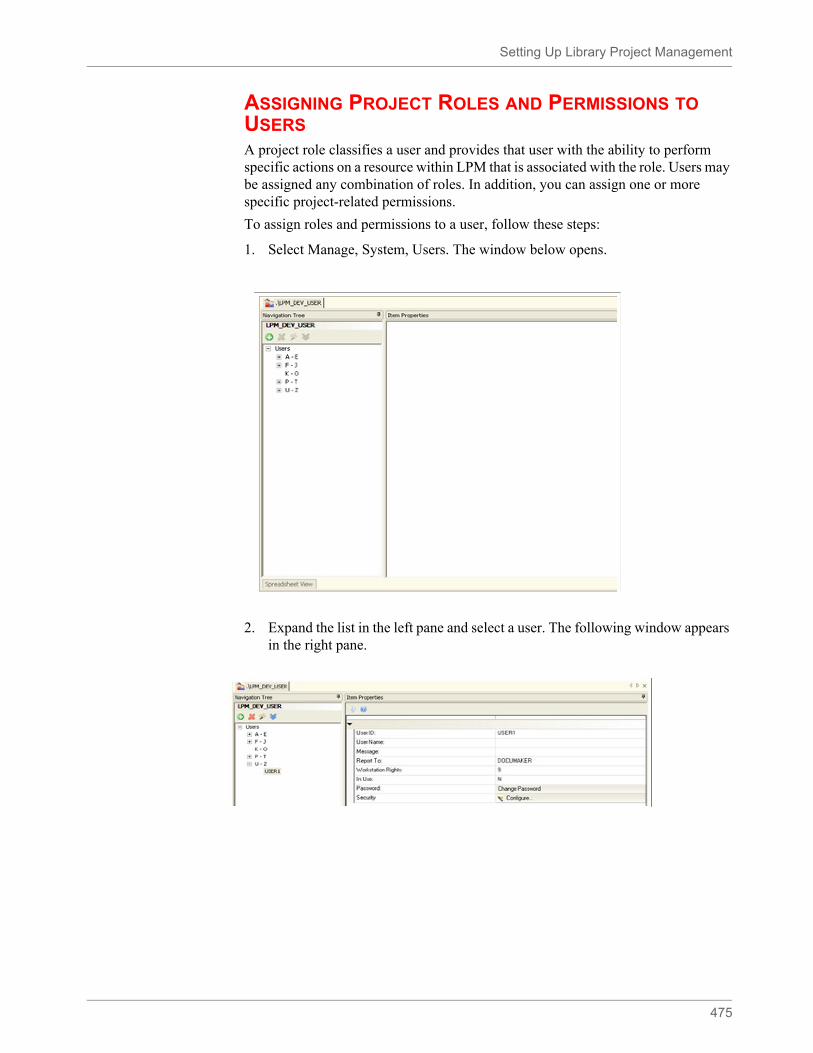
Setting Up Library Project Management
475
ASSIGNING PROJECT ROLES AND PERMISSIONS TO USERSA project role classifies a user and provides that user with the ability to perform specific actions on a resource within LPM that is associated with the role. Users may be assigned any combination of roles. In addition, you can assign one or more specific project-related permissions.
To assign roles and permissions to a user, follow these steps:
1. Select Manage, System, Users. The window below opens.
2. Expand the list in the left pane and select a user. The following window appears in the right pane.
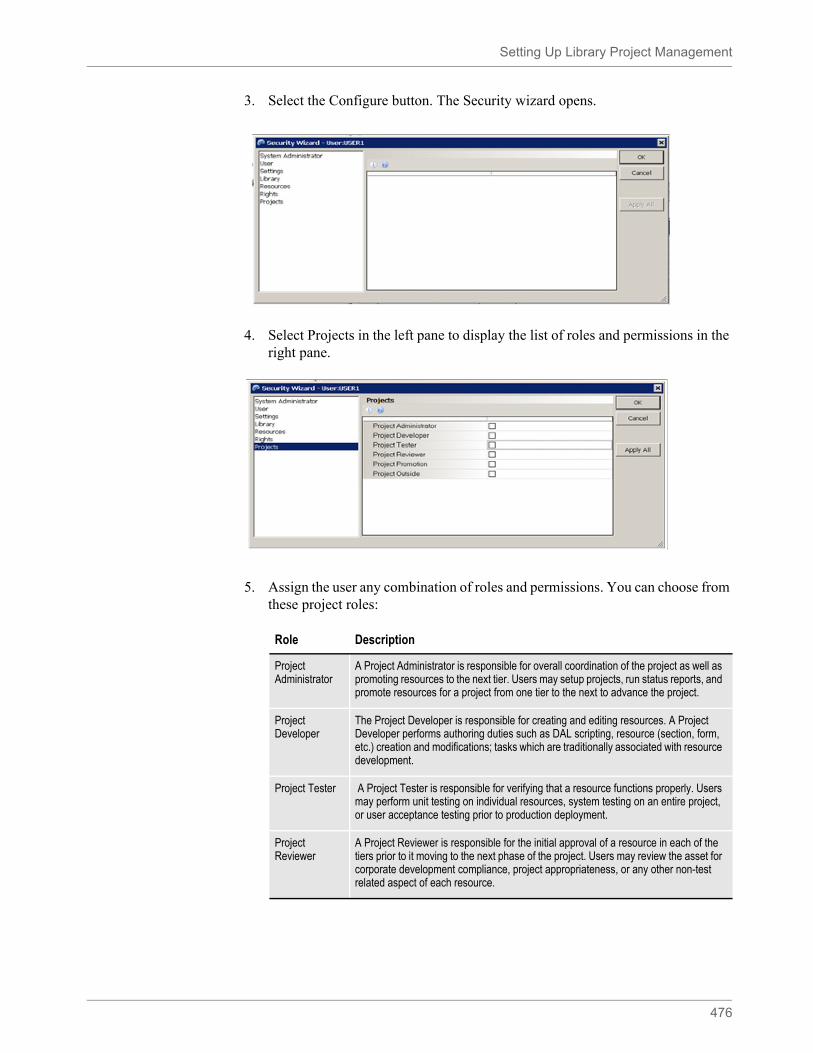
Setting Up Library Project Management
476
3. Select the Configure button. The Security wizard opens.
4. Select Projects in the left pane to display the list of roles and permissions in the right pane.
5. Assign the user any combination of roles and permissions. You can choose from these project roles:
Role Description
Project Administrator
A Project Administrator is responsible for overall coordination of the project as well as promoting resources to the next tier. Users may setup projects, run status reports, and promote resources for a project from one tier to the next to advance the project.
Project Developer
The Project Developer is responsible for creating and editing resources. A Project Developer performs authoring duties such as DAL scripting, resource (section, form, etc.) creation and modifications; tasks which are traditionally associated with resource development.
Project Tester A Project Tester is responsible for verifying that a resource functions properly. Users may perform unit testing on individual resources, system testing on an entire project, or user acceptance testing prior to production deployment.
Project Reviewer
A Project Reviewer is responsible for the initial approval of a resource in each of the tiers prior to it moving to the next phase of the project. Users may review the asset for corporate development compliance, project appropriateness, or any other non-test related aspect of each resource.
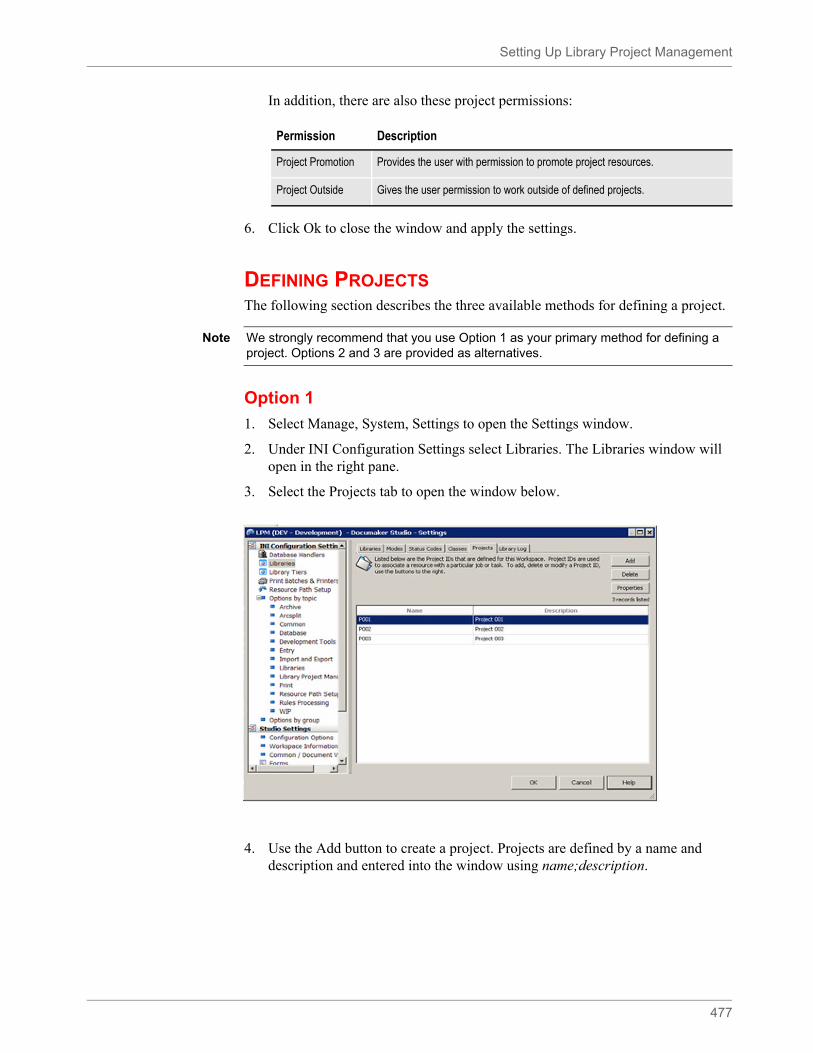
Setting Up Library Project Management
477
In addition, there are also these project permissions:
6. Click Ok to close the window and apply the settings.
DEFINING PROJECTSThe following section describes the three available methods for defining a project.
Option 1
1. Select Manage, System, Settings to open the Settings window.
2. Under INI Configuration Settings select Libraries. The Libraries window will open in the right pane.
3. Select the Projects tab to open the window below.
4. Use the Add button to create a project. Projects are defined by a name and description and entered into the window using name;description.
Permission Description
Project Promotion Provides the user with permission to promote project resources.
Project Outside Gives the user permission to work outside of defined projects.
Note We strongly recommend that you use Option 1 as your primary method for defining a project. Options 2 and 3 are provided as alternatives.

Setting Up Library Project Management
478
5. Click Finish to create the project.
Field Description
Name Project names can be a maximum of 25 characters. All characters are valid but are limited to ANSI character set.
Description Descriptions can be a maximum of 101 characters.
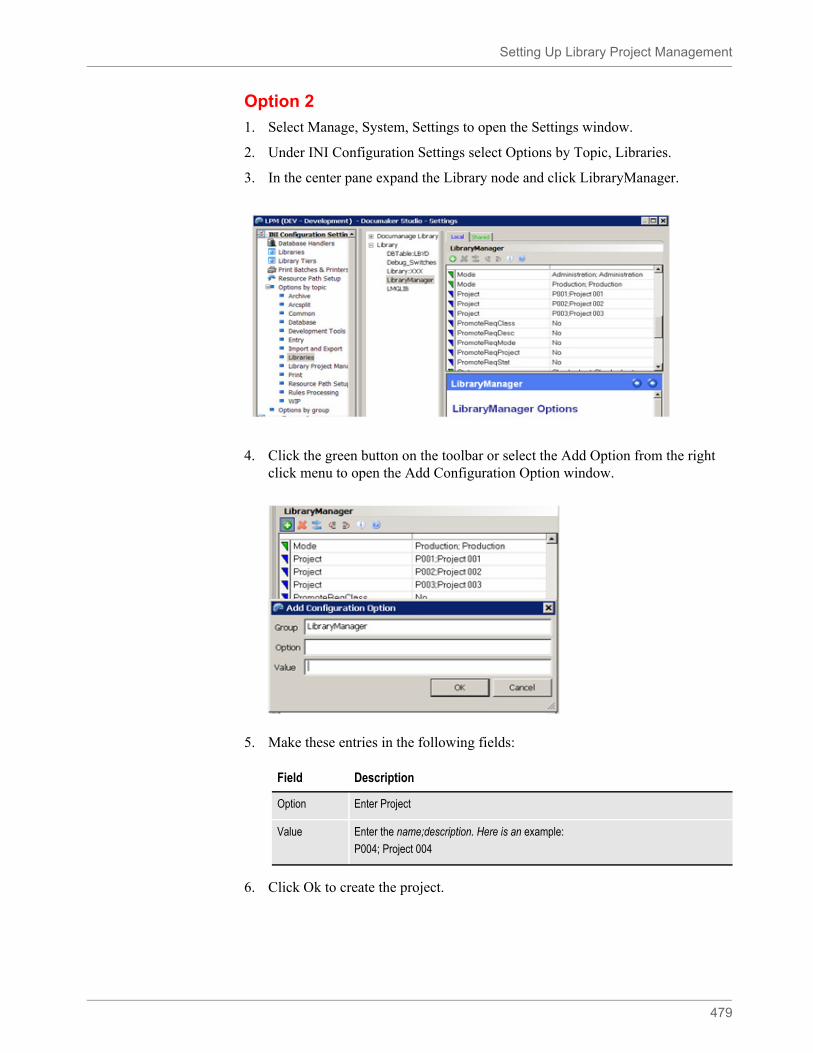
Setting Up Library Project Management
479
Option 2
1. Select Manage, System, Settings to open the Settings window.
2. Under INI Configuration Settings select Options by Topic, Libraries.
3. In the center pane expand the Library node and click LibraryManager.
4. Click the green button on the toolbar or select the Add Option from the right click menu to open the Add Configuration Option window.
5. Make these entries in the following fields:
6. Click Ok to create the project.
Field Description
Option Enter Project
Value Enter the name;description. Here is an example:
P004; Project 004
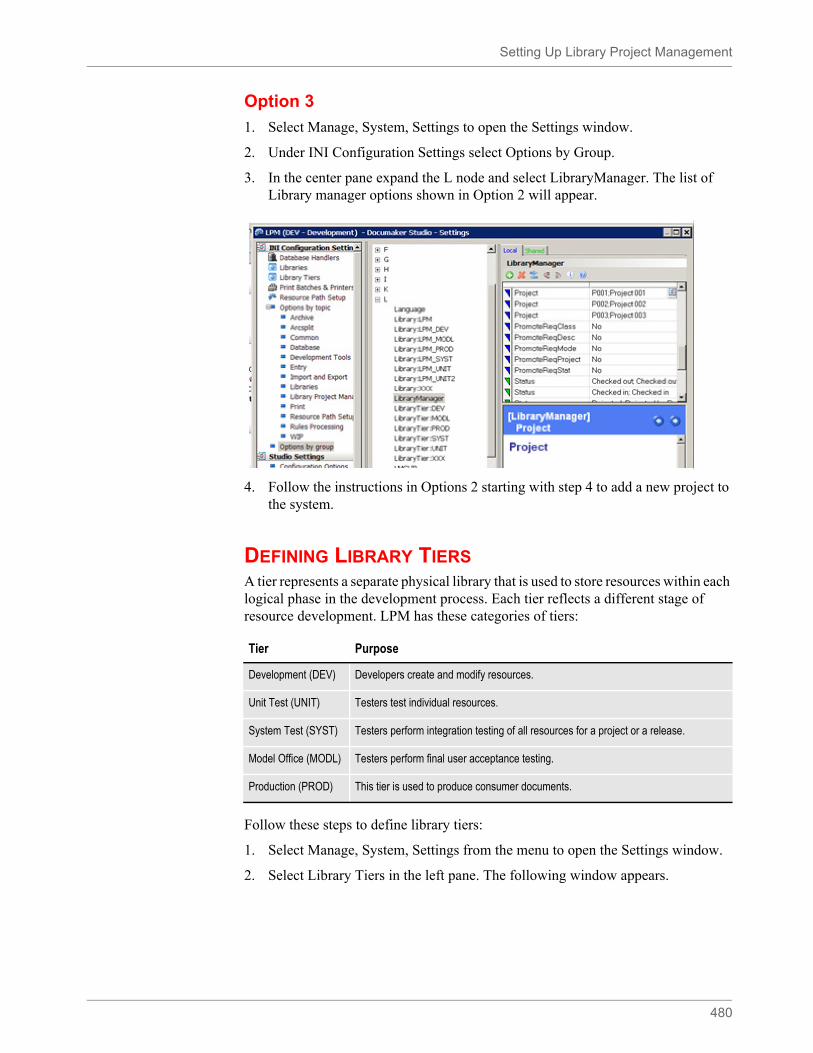
Setting Up Library Project Management
480
Option 3
1. Select Manage, System, Settings to open the Settings window.
2. Under INI Configuration Settings select Options by Group.
3. In the center pane expand the L node and select LibraryManager. The list of Library manager options shown in Option 2 will appear.
4. Follow the instructions in Options 2 starting with step 4 to add a new project to the system.
DEFINING LIBRARY TIERSA tier represents a separate physical library that is used to store resources within each logical phase in the development process. Each tier reflects a different stage of resource development. LPM has these categories of tiers:
Follow these steps to define library tiers:
1. Select Manage, System, Settings from the menu to open the Settings window.
2. Select Library Tiers in the left pane. The following window appears.
Tier Purpose
Development (DEV) Developers create and modify resources.
Unit Test (UNIT) Testers test individual resources.
System Test (SYST) Testers perform integration testing of all resources for a project or a release.
Model Office (MODL) Testers perform final user acceptance testing.
Production (PROD) This tier is used to produce consumer documents.
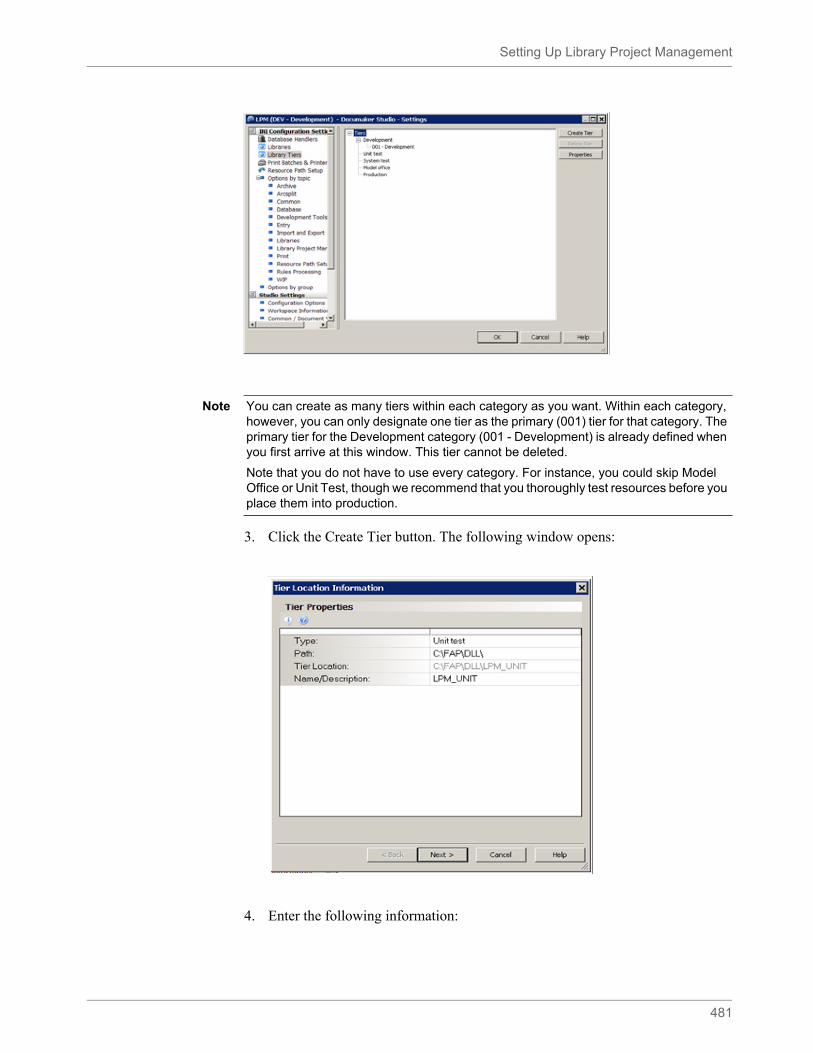
Setting Up Library Project Management
481
3. Click the Create Tier button. The following window opens:
4. Enter the following information:
Note You can create as many tiers within each category as you want. Within each category, however, you can only designate one tier as the primary (001) tier for that category. The primary tier for the Development category (001 - Development) is already defined when you first arrive at this window. This tier cannot be deleted.
Note that you do not have to use every category. For instance, you could skip Model Office or Unit Test, though we recommend that you thoroughly test resources before you place them into production.
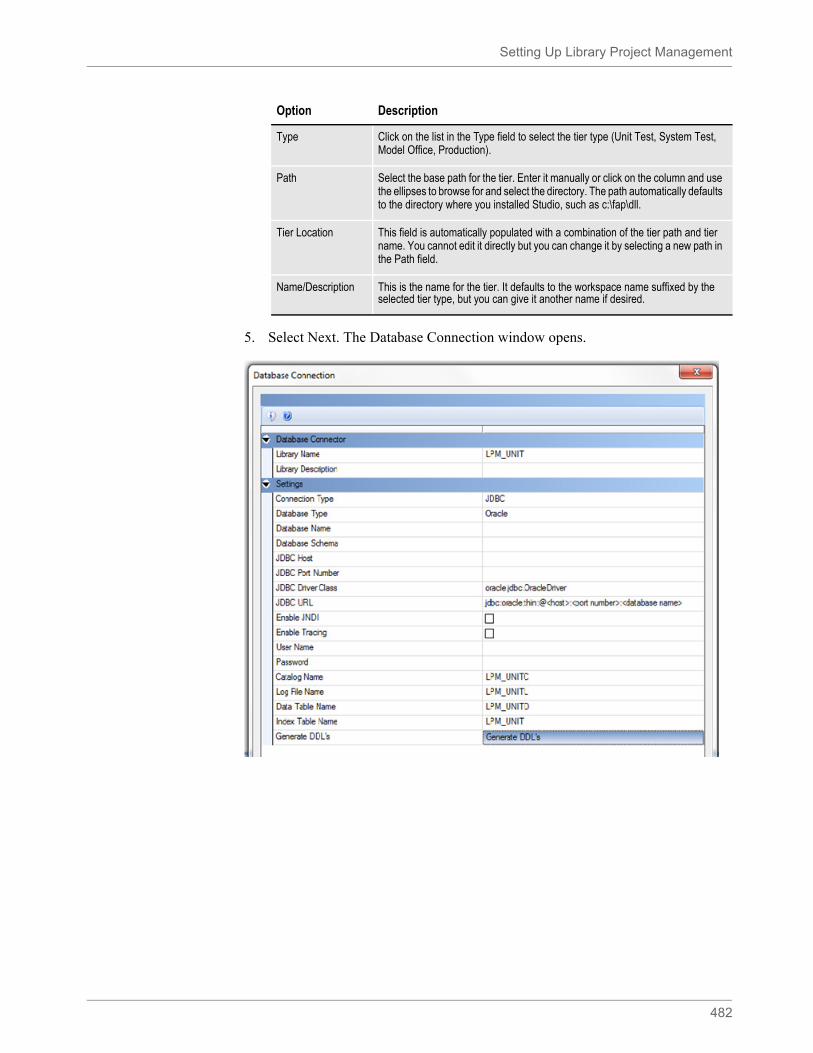
Setting Up Library Project Management
482
5. Select Next. The Database Connection window opens.
Option Description
Type Click on the list in the Type field to select the tier type (Unit Test, System Test, Model Office, Production).
Path Select the base path for the tier. Enter it manually or click on the column and use the ellipses to browse for and select the directory. The path automatically defaults to the directory where you installed Studio, such as c:\fap\dll.
Tier Location This field is automatically populated with a combination of the tier path and tier name. You cannot edit it directly but you can change it by selecting a new path in the Path field.
Name/Description This is the name for the tier. It defaults to the workspace name suffixed by the selected tier type, but you can give it another name if desired.
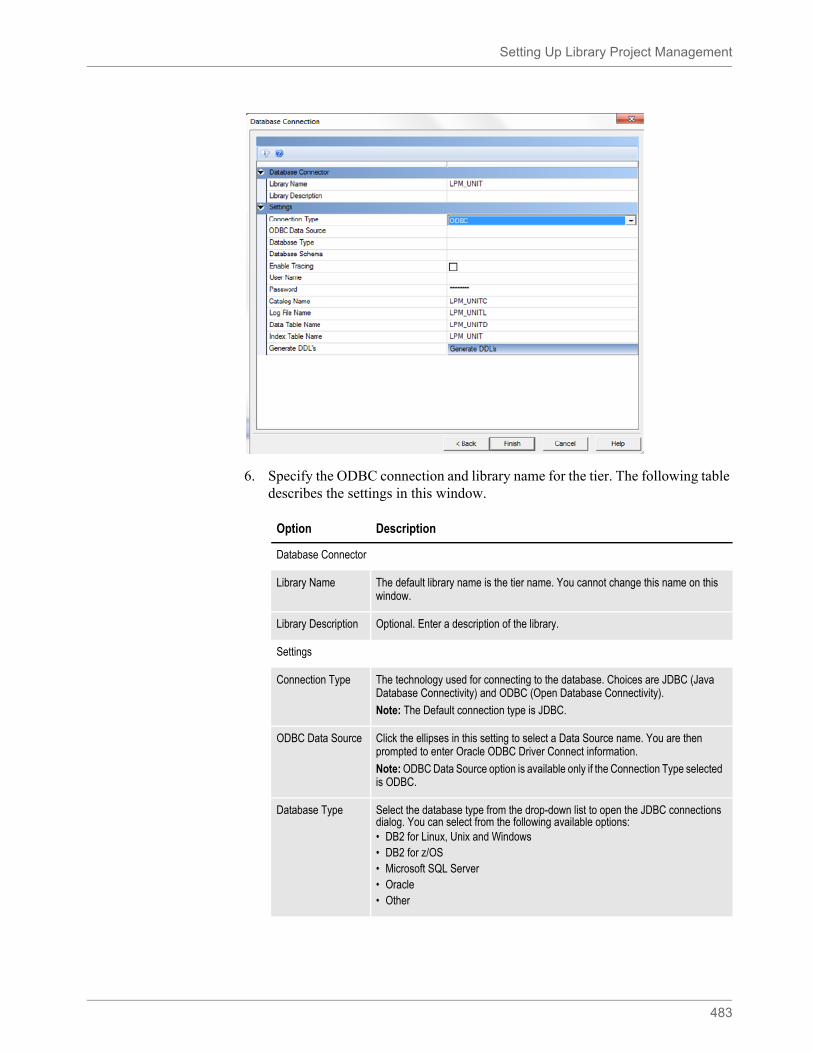
Setting Up Library Project Management
483
6. Specify the ODBC connection and library name for the tier. The following table describes the settings in this window.
Option Description
Database Connector
Library Name The default library name is the tier name. You cannot change this name on this window.
Library Description Optional. Enter a description of the library.
Settings
Connection Type The technology used for connecting to the database. Choices are JDBC (Java Database Connectivity) and ODBC (Open Database Connectivity).
Note: The Default connection type is JDBC.
ODBC Data Source Click the ellipses in this setting to select a Data Source name. You are then prompted to enter Oracle ODBC Driver Connect information.
Note: ODBC Data Source option is available only if the Connection Type selected is ODBC.
Database Type Select the database type from the drop-down list to open the JDBC connections dialog. You can select from the following available options:• DB2 for Linux, Unix and Windows• DB2 for z/OS• Microsoft SQL Server• Oracle• Other
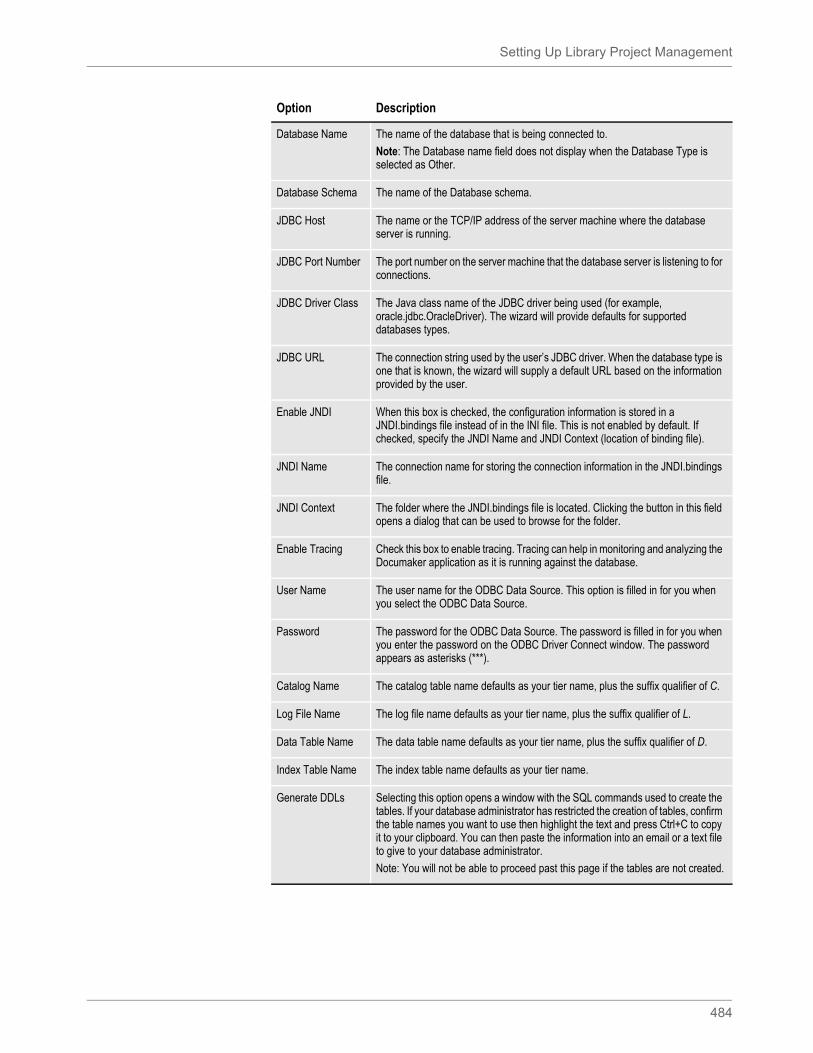
Setting Up Library Project Management
484
Database Name The name of the database that is being connected to.
Note: The Database name field does not display when the Database Type is selected as Other.
Database Schema The name of the Database schema.
JDBC Host The name or the TCP/IP address of the server machine where the database server is running.
JDBC Port Number The port number on the server machine that the database server is listening to for connections.
JDBC Driver Class The Java class name of the JDBC driver being used (for example, oracle.jdbc.OracleDriver). The wizard will provide defaults for supported databases types.
JDBC URL The connection string used by the user’s JDBC driver. When the database type is one that is known, the wizard will supply a default URL based on the information provided by the user.
Enable JNDI When this box is checked, the configuration information is stored in a JNDI.bindings file instead of in the INI file. This is not enabled by default. If checked, specify the JNDI Name and JNDI Context (location of binding file).
JNDI Name The connection name for storing the connection information in the JNDI.bindings file.
JNDI Context The folder where the JNDI.bindings file is located. Clicking the button in this field opens a dialog that can be used to browse for the folder.
Enable Tracing Check this box to enable tracing. Tracing can help in monitoring and analyzing the Documaker application as it is running against the database.
User Name The user name for the ODBC Data Source. This option is filled in for you when you select the ODBC Data Source.
Password The password for the ODBC Data Source. The password is filled in for you when you enter the password on the ODBC Driver Connect window. The password appears as asterisks (***).
Catalog Name The catalog table name defaults as your tier name, plus the suffix qualifier of C.
Log File Name The log file name defaults as your tier name, plus the suffix qualifier of L.
Data Table Name The data table name defaults as your tier name, plus the suffix qualifier of D.
Index Table Name The index table name defaults as your tier name.
Generate DDLs Selecting this option opens a window with the SQL commands used to create the tables. If your database administrator has restricted the creation of tables, confirm the table names you want to use then highlight the text and press Ctrl+C to copy it to your clipboard. You can then paste the information into an email or a text file to give to your database administrator.
Note: You will not be able to proceed past this page if the tables are not created.
Option Description
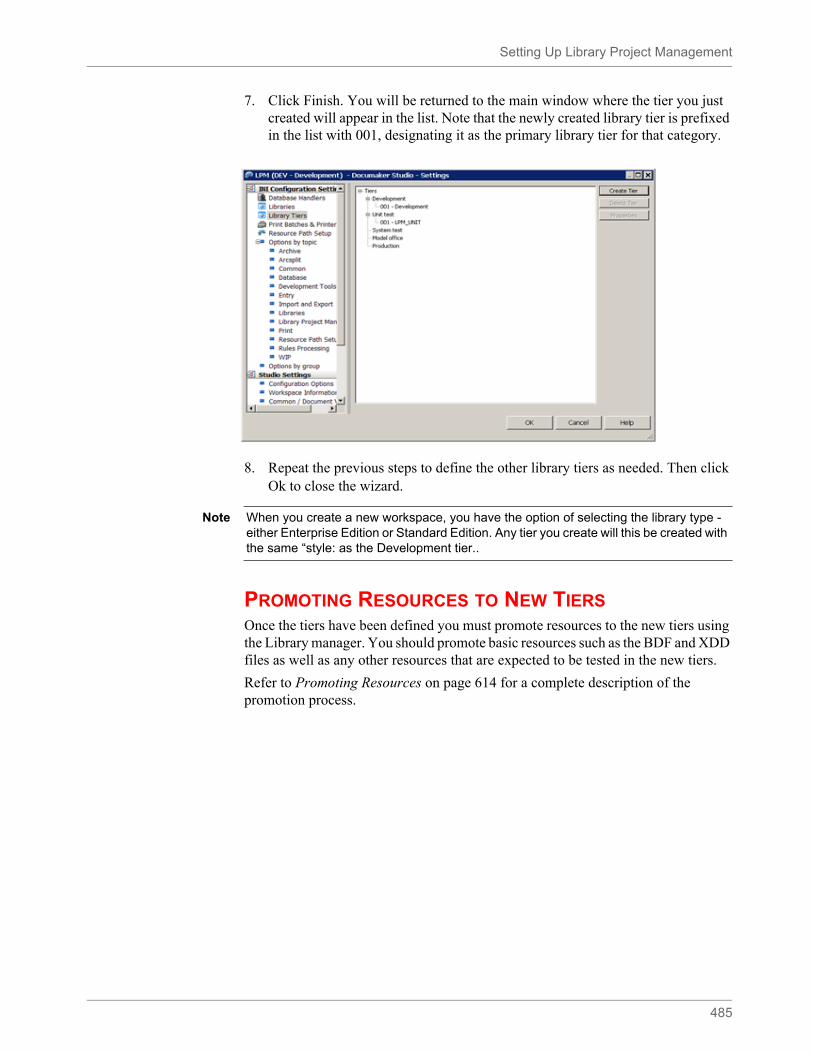
Setting Up Library Project Management
485
7. Click Finish. You will be returned to the main window where the tier you just created will appear in the list. Note that the newly created library tier is prefixed in the list with 001, designating it as the primary library tier for that category.
8. Repeat the previous steps to define the other library tiers as needed. Then click Ok to close the wizard.
PROMOTING RESOURCES TO NEW TIERSOnce the tiers have been defined you must promote resources to the new tiers using the Library manager. You should promote basic resources such as the BDF and XDD files as well as any other resources that are expected to be tested in the new tiers.
Refer to Promoting Resources on page 614 for a complete description of the promotion process.
Note When you create a new workspace, you have the option of selecting the library type - either Enterprise Edition or Standard Edition. Any tier you create will this be created with the same “style: as the Development tier..
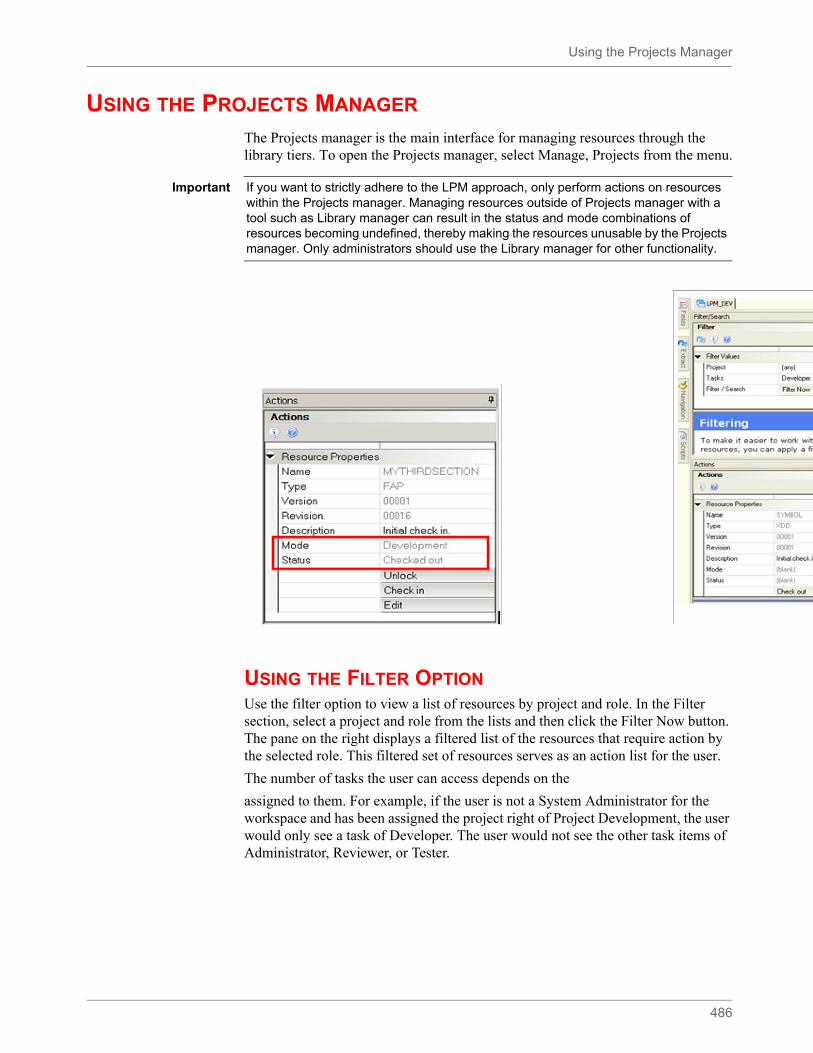
Using the Projects Manager
486
USING THE PROJECTS MANAGER
The Projects manager is the main interface for managing resources through the library tiers. To open the Projects manager, select Manage, Projects from the menu.
USING THE FILTER OPTIONUse the filter option to view a list of resources by project and role. In the Filter section, select a project and role from the lists and then click the Filter Now button. The pane on the right displays a filtered list of the resources that require action by the selected role. This filtered set of resources serves as an action list for the user.
The number of tasks the user can access depends on the
assigned to them. For example, if the user is not a System Administrator for the workspace and has been assigned the project right of Project Development, the user would only see a task of Developer. The user would not see the other task items of Administrator, Reviewer, or Tester.
Important If you want to strictly adhere to the LPM approach, only perform actions on resources within the Projects manager. Managing resources outside of Projects manager with a tool such as Library manager can result in the status and mode combinations of resources becoming undefined, thereby making the resources unusable by the Projects manager. Only administrators should use the Library manager for other functionality.
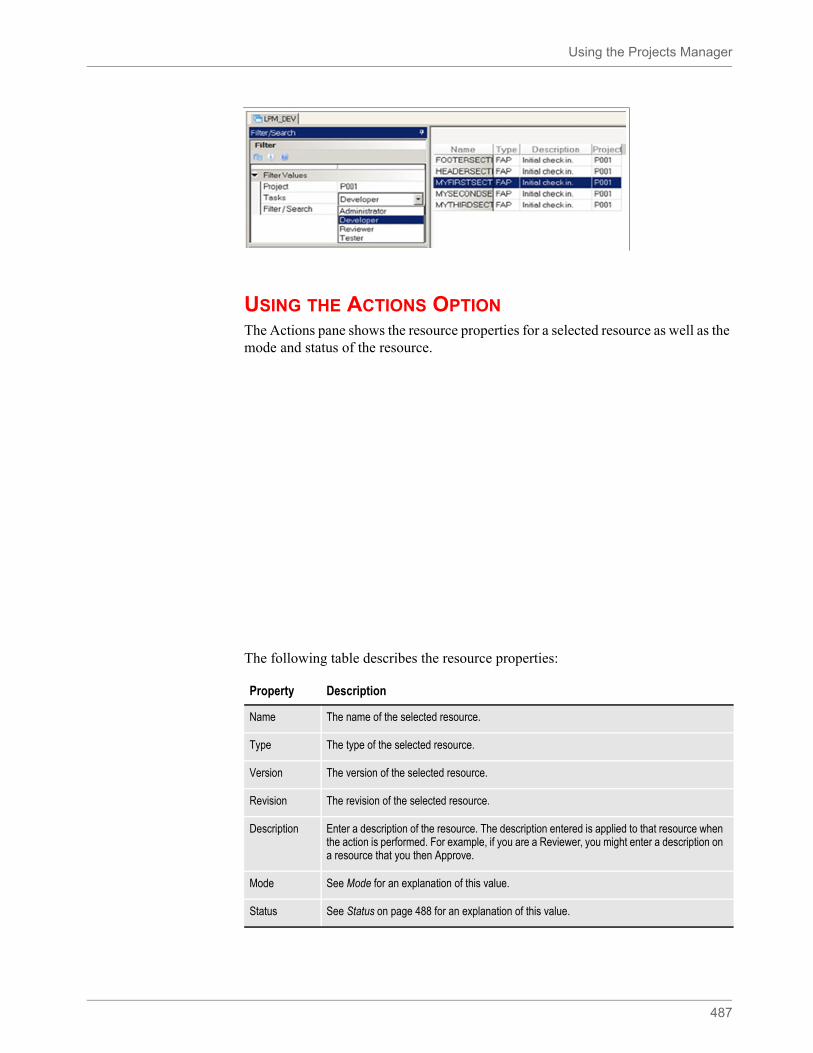
Using the Projects Manager
487
USING THE ACTIONS OPTIONThe Actions pane shows the resource properties for a selected resource as well as the mode and status of the resource.
The following table describes the resource properties:
Property Description
Name The name of the selected resource.
Type The type of the selected resource.
Version The version of the selected resource.
Revision The revision of the selected resource.
Description Enter a description of the resource. The description entered is applied to that resource when the action is performed. For example, if you are a Reviewer, you might enter a description on a resource that you then Approve.
Mode See Mode for an explanation of this value.
Status See Status on page 488 for an explanation of this value.

Using the Projects Manager
488
Mode
The mode categorizes a resource within a tier and helps to identify what actions can be performed on the resource. The mode corresponds to the role of the user that has access to the resource. LPM defines these modes:
Status
After an action has been performed, the status of the resource is changed to reflect that action. Status indicates the most recent action performed on a resource.
LPM defines the following statuses:
• Checked out
• Checked in
• Resolved
• Submitted
• Passed
• Failed
• Approved
Mode Description
Development Indicates that development work is needed or in process within the development tier.
Testing Shows that testing is needed or in process within one of the testing tiers.
Review Indicates that a review is needed or in process within any of the pre-production tiers.
Administration Indicates that the resource is ready for promotion to the next tier.
Production This is the final mode, no further action is permitted using LPM
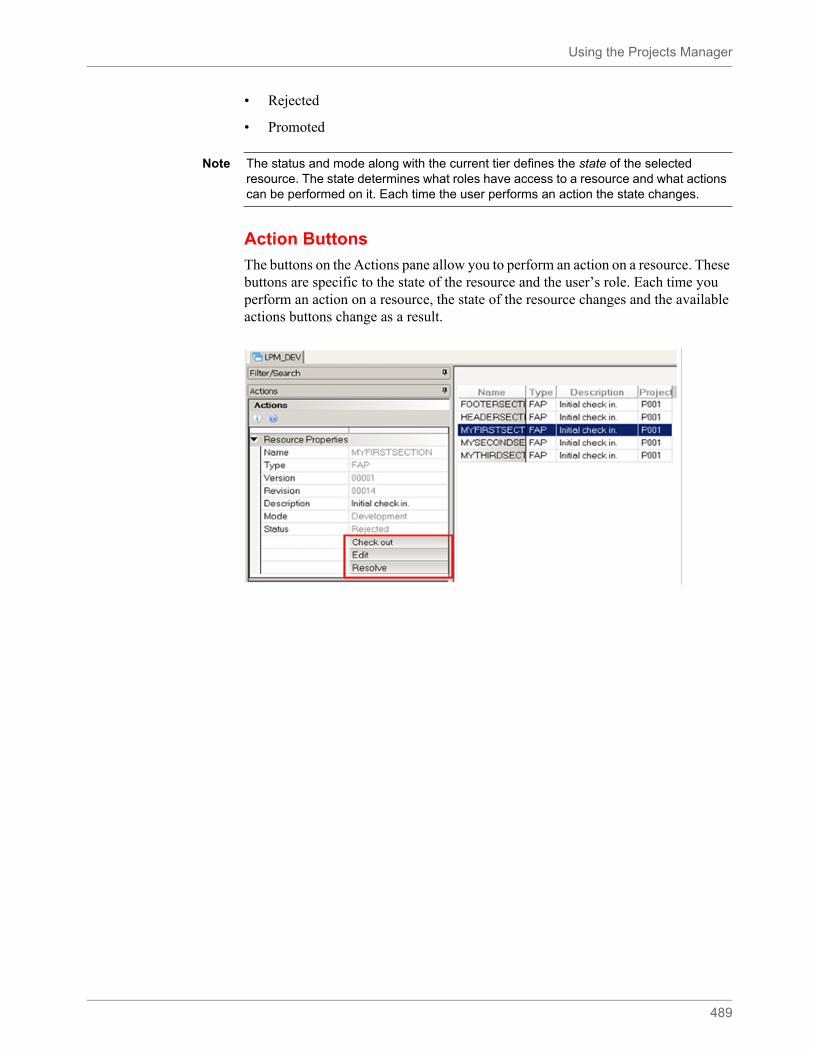
Using the Projects Manager
489
• Rejected
• Promoted
Action Buttons
The buttons on the Actions pane allow you to perform an action on a resource. These buttons are specific to the state of the resource and the user’s role. Each time you perform an action on a resource, the state of the resource changes and the available actions buttons change as a result.
Note The status and mode along with the current tier defines the state of the selected resource. The state determines what roles have access to a resource and what actions can be performed on it. Each time the user performs an action the state changes.
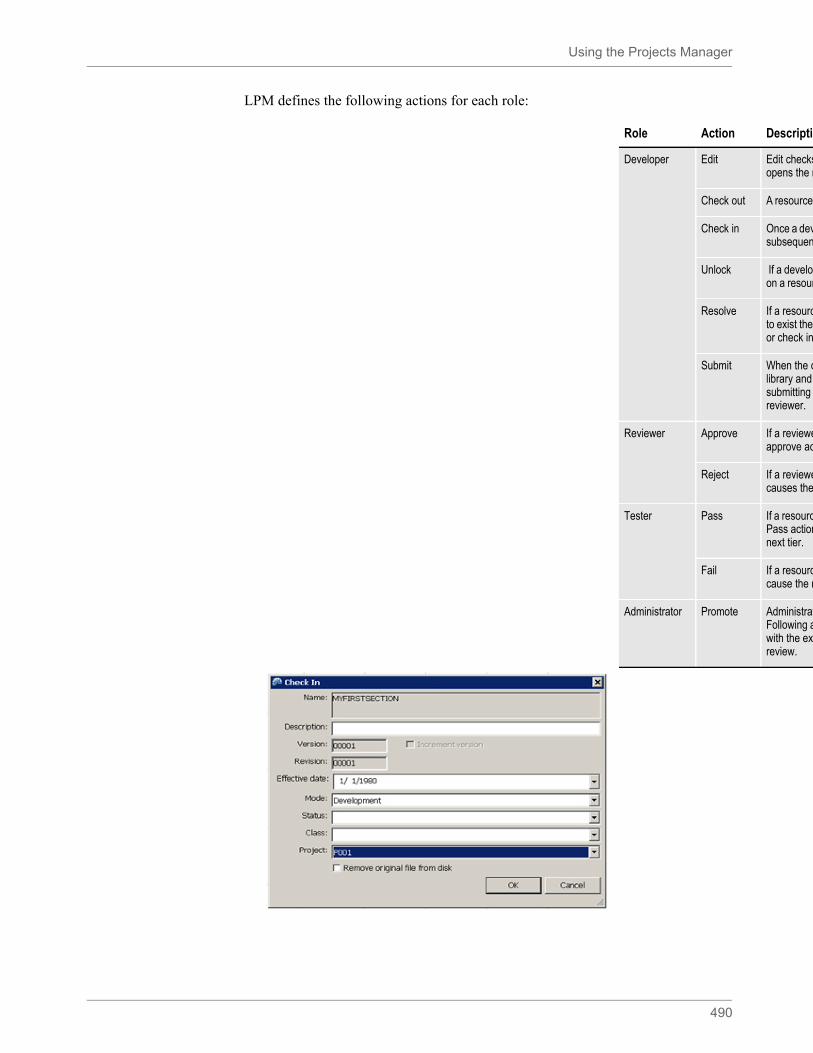
Using the Projects Manager
490
LPM defines the following actions for each role:
Role Action Descriptio
Developer Edit Edit checksopens the r
Check out A resource
Check in Once a devsubsequen
Unlock If a developon a resour
Resolve If a resourcto exist thenor check in
Submit When the dlibrary and submitting reviewer.
Reviewer Approve If a revieweapprove ac
Reject If a reviewecauses the
Tester Pass If a resourcPass actionnext tier.
Fail If a resourccause the r
Administrator Promote AdministratFollowing awith the excreview.
Example Library Project Management Workflow
491
EXAMPLE LIBRARY PROJECT MANAGEMENT WORKFLOW
This example follows a resource as it moves through the Library Project Management workflow.
Phase 1: Developer’s Role
1. The project developer initially creates a resource. For example, select File, New Sections to create a section.
2. One you save the section, from the menu select File, Check In to perform a check in. The Check In window opens.
Example Library Project Management Workflow
492
3. On the Check In window:
a. Assign the resource to a project.
b. Set the mode to Development.
c. Set the status to Checked in.
d. Click Ok.
4. From the menu select Manage, Projects to open the Projects manager. If the resource you created in the previous steps does not appear in the pane on the right:
a. In the Filter section select the project you assigned the resource to in the Project list.
b. Select Developer from the Task list.
c. Click Filter Now. The resource appears in the right pane.
Example Library Project Management Workflow
493
5. Select the resource you just created in the pane on the right and select Submit.
The resource is submitted to a reviewer.
6. See Phase 2: Reviewer’s Role on page 494 for the next step in the workflow.
Example Library Project Management Workflow
494
Phase 2: Reviewer’s Role
1. A designated reviewer now logs into Studio and opens the Projects manager.
2. In the Filter section, select Reviewer from the Tasks list and click Filter Now.
The resource the developer submitted appears in the pane on the right.
Example Library Project Management Workflow
495
3. The reviewer reviews the resource to determine if it ready for testing and then either approves or rejects the resource:
Phase 3: Administrator’s Role
1. A designated administrator now logs into Studio and opens the Projects manager.
2. In the Filter section, select Administrator in the Tasks list and click Filter Now. The approved resource appears in the right pane.
3. Highlight the resource in the pane on the right and click Promote. This action promotes the resource to the next appropriate tier for further testing.
4. See Phase 4: Tester’s Role on page 495.
Phase 4: Tester’s Role
The tester tests all resources that have been reviewed and approved for further testing by the administrator.
1. The designated tester logs into Studio.
2. The tester changes the current tier to the Unit Test tier. From the menu, select File, Change Tier. The following window appears.
Choose If the resource is
Approve Ready for testing. This action passes the resource on to the Administrator to promote the resource for further testing or production to the next appropriate tier.
Choosing Approve does not promote to the next tier (typically the Unit testing tier) but instead updates the resource state so an administrator can promote the resource for further testing. Depending on the defined projects in the workspace, Unit testing may not have been defined; only Model office may have defined.
See Phase 3: Administrator’s Role on page 495 for more information.
Reject Not ready for resting. Enter information about why the resource was rejected in the Description field. This action returns the resource to the developer to edit and resubmit to the reviewer.
See Editing a Resource on page 498 for more information.
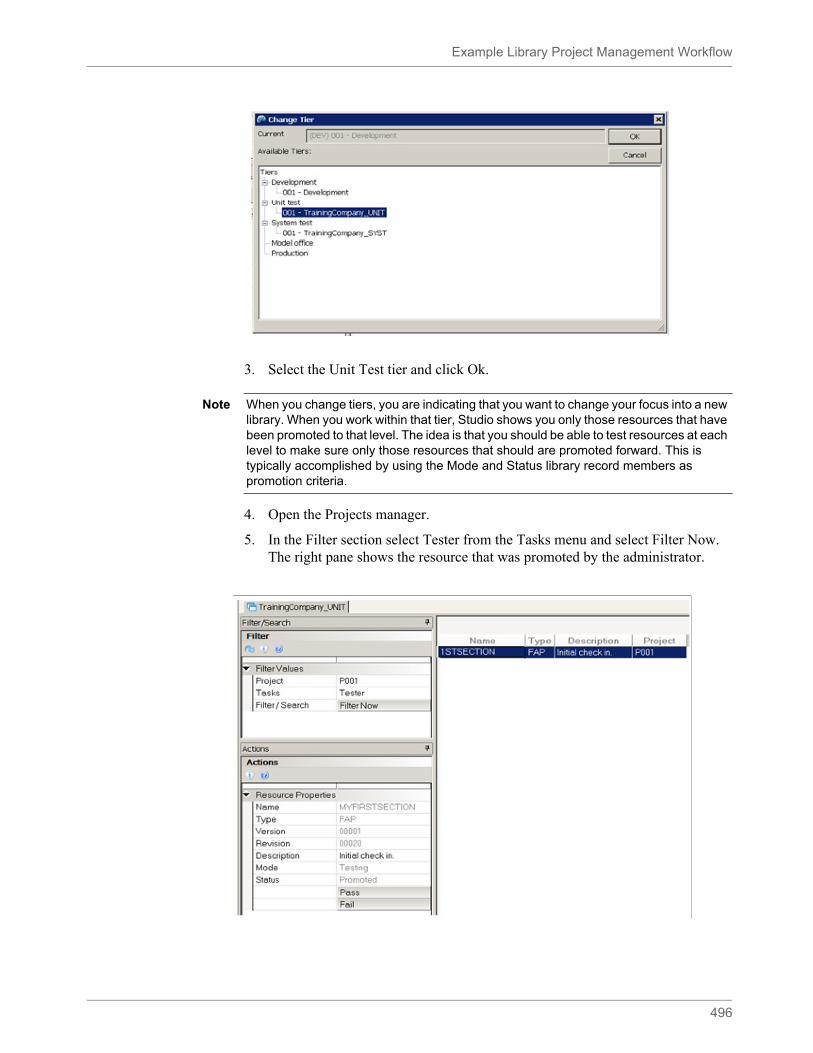
Example Library Project Management Workflow
496
3. Select the Unit Test tier and click Ok.
4. Open the Projects manager.
5. In the Filter section select Tester from the Tasks menu and select Filter Now. The right pane shows the resource that was promoted by the administrator.
Note When you change tiers, you are indicating that you want to change your focus into a new library. When you work within that tier, Studio shows you only those resources that have been promoted to that level. The idea is that you should be able to test resources at each level to make sure only those resources that should are promoted forward. This is typically accomplished by using the Mode and Status library record members as promotion criteria.
Example Library Project Management Workflow
497
6. The tester now must choose to pass or fail the resource:
See Editing a Resource on page 498 for more information.
Choose To
Pass Move the resource to the Administrator’s queue. The Administrator can then promote the resource to the next available tier.
Fail Return the resource to the developer’s tier. Enter information explaining why the resource was rejected in the Description field. Failed resources must be corrected by the developer and resubmitted for review and testing.
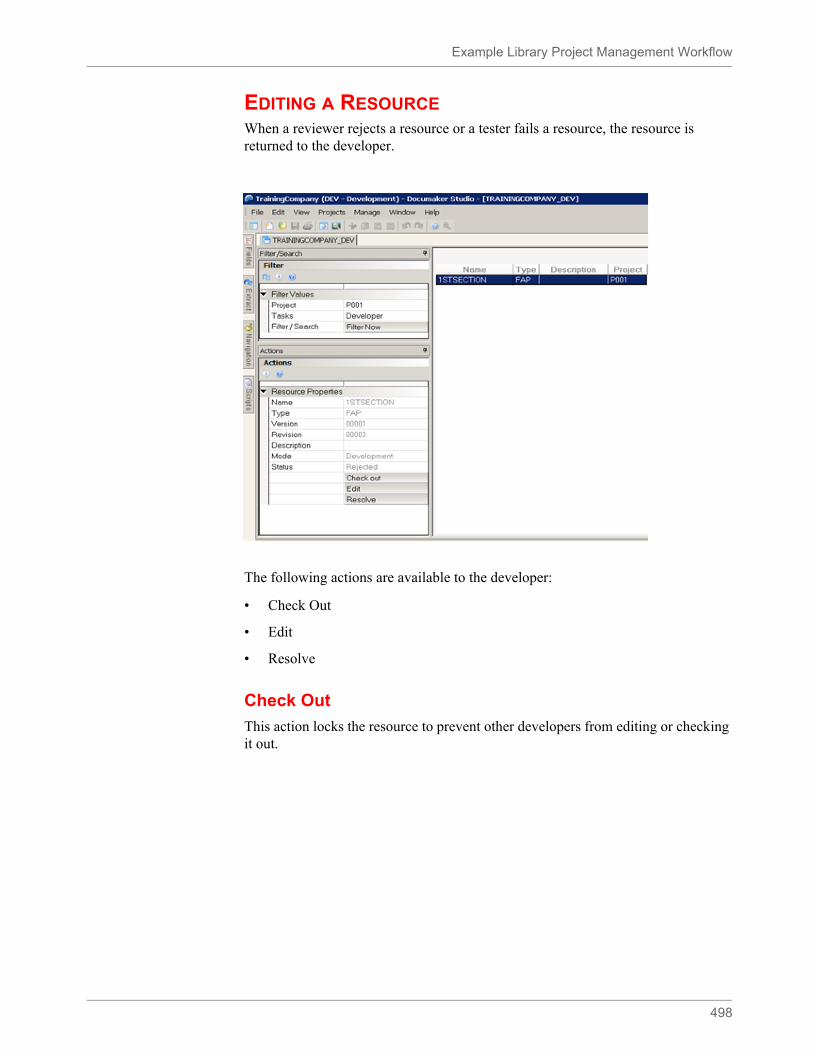
Example Library Project Management Workflow
498
EDITING A RESOURCEWhen a reviewer rejects a resource or a tester fails a resource, the resource is returned to the developer.
The following actions are available to the developer:
• Check Out
• Edit
• Resolve
Check Out
This action locks the resource to prevent other developers from editing or checking it out.
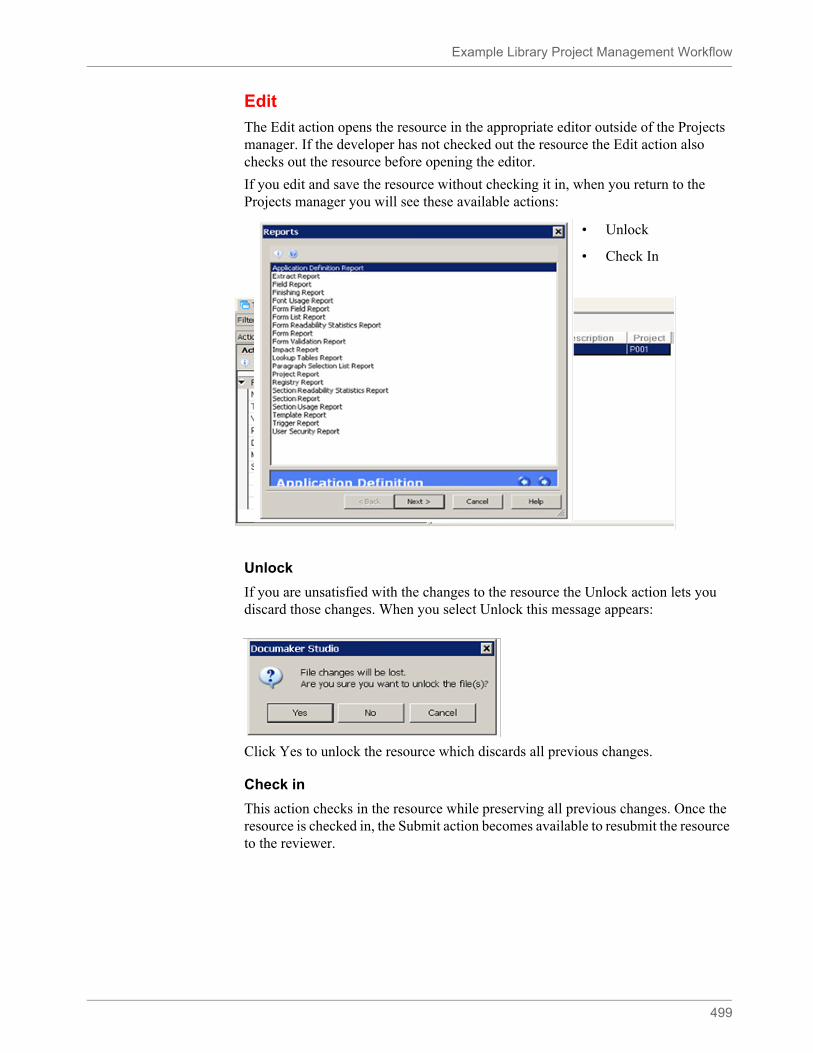
Example Library Project Management Workflow
499
Edit
The Edit action opens the resource in the appropriate editor outside of the Projects manager. If the developer has not checked out the resource the Edit action also checks out the resource before opening the editor.
If you edit and save the resource without checking it in, when you return to the Projects manager you will see these available actions:
• Unlock
• Check In
Unlock
If you are unsatisfied with the changes to the resource the Unlock action lets you discard those changes. When you select Unlock this message appears:
Click Yes to unlock the resource which discards all previous changes.
Check in
This action checks in the resource while preserving all previous changes. Once the resource is checked in, the Submit action becomes available to resubmit the resource to the reviewer.

Example Library Project Management Workflow
500
Resolve
The developer uses the Resolve action when the resource is failed by a tester but the reported issue associated with the resource is determined to not exist. The developer can resolve the failure without further changes or check in.
Select the resource in the pane on the right and click Resolve. The resource is removed from the developer’s workflow and moved to the administrator’s workflow. The developer can optionally add information to the description of that resource before clicking Submit to provide information to the Administrator as to why the resource was resolved without change.
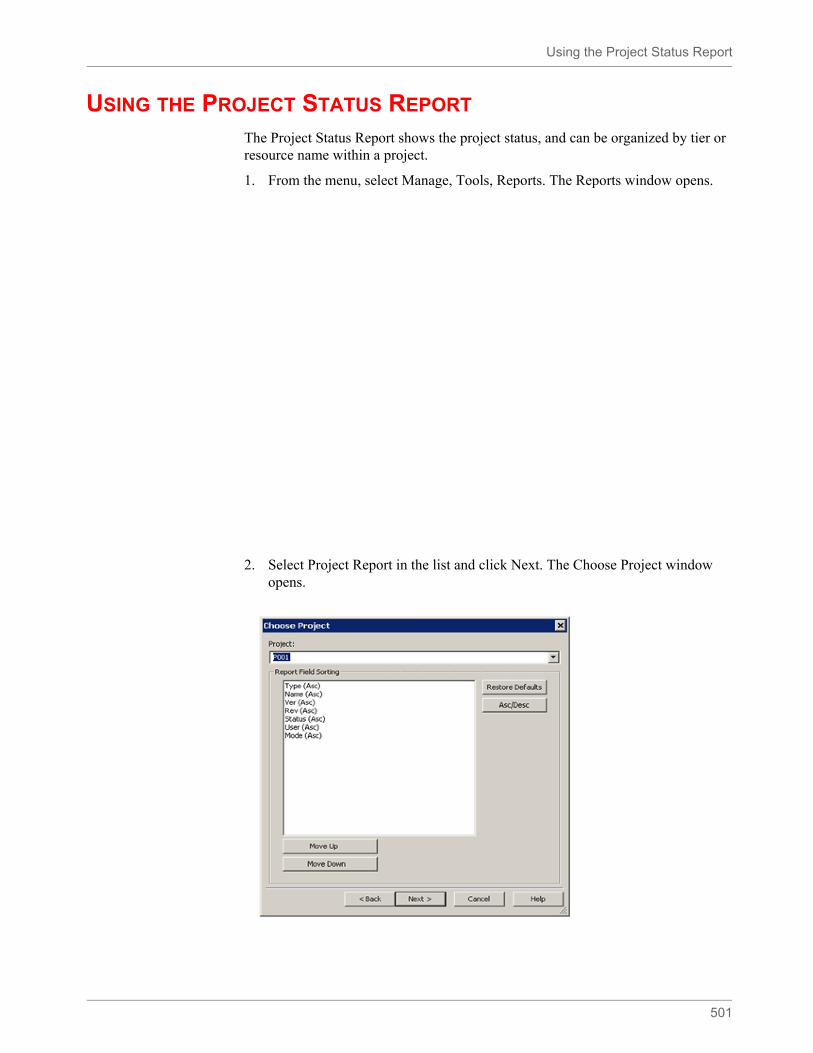
Using the Project Status Report
501
USING THE PROJECT STATUS REPORT
The Project Status Report shows the project status, and can be organized by tier or resource name within a project.
1. From the menu, select Manage, Tools, Reports. The Reports window opens.
2. Select Project Report in the list and click Next. The Choose Project window opens.
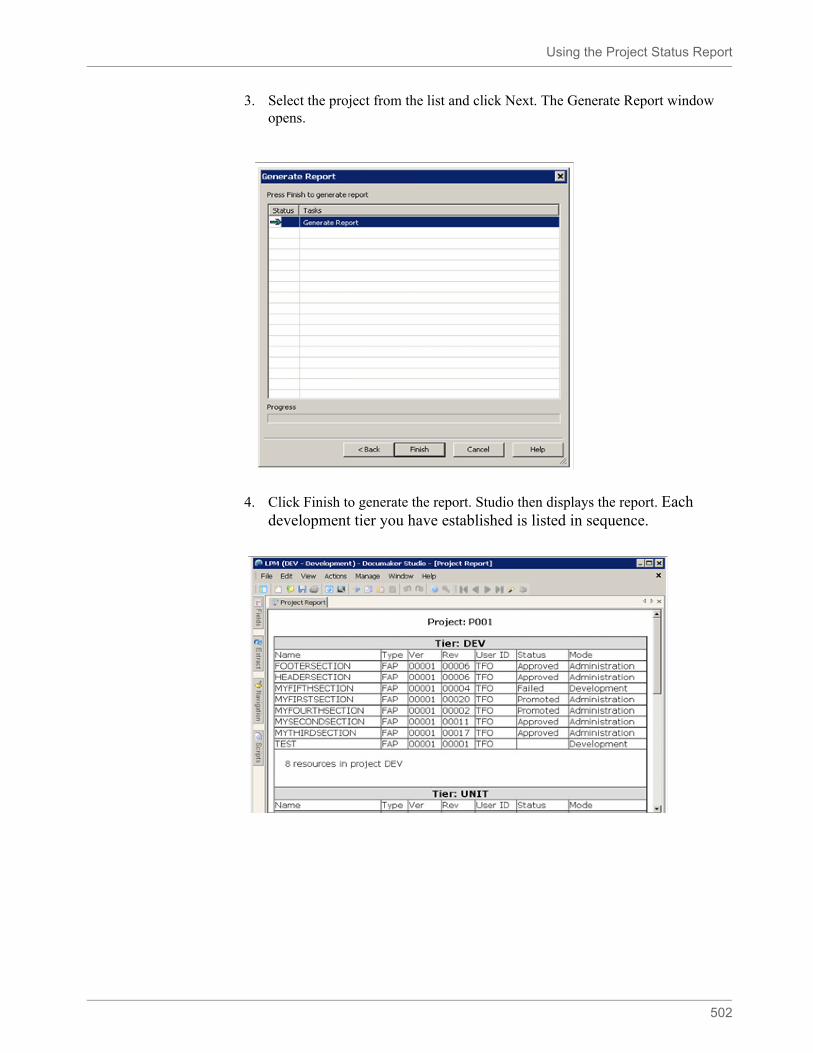
Using the Project Status Report
502
3. Select the project from the list and click Next. The Generate Report window opens.
4. Click Finish to generate the report. Studio then displays the report. Each development tier you have established is listed in sequence.
503
Chapter 9
Working with Graphics
Graphics are bitmap objects you can place on a section. Studio does not create graphics, but it does let you manipulate them. Graphics are created in graphics applications such as Microsoft Paint or by scanning artwork. Make sure you have the needed rights to perform the function, otherwise, contact your System Administrator to update.
Click Graphics to work with graphics.
This chapter discusses these topics:
• Using the Screen on page 504
• Managing Graphics on page 512
• Creating a Text Watermark on page 521
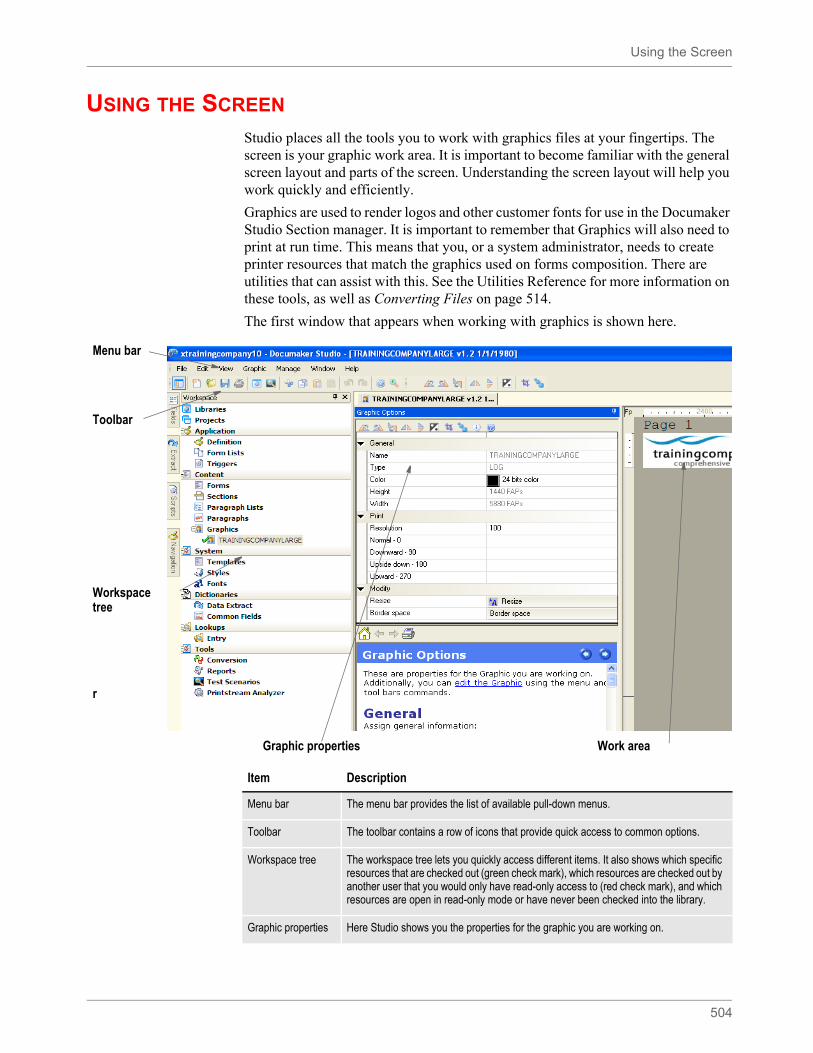
Using the Screen
504
USING THE SCREEN
Studio places all the tools you to work with graphics files at your fingertips. The screen is your graphic work area. It is important to become familiar with the general screen layout and parts of the screen. Understanding the screen layout will help you work quickly and efficiently.
Graphics are used to render logos and other customer fonts for use in the Documaker Studio Section manager. It is important to remember that Graphics will also need to print at run time. This means that you, or a system administrator, needs to create printer resources that match the graphics used on forms composition. There are utilities that can assist with this. See the Utilities Reference for more information on these tools, as well as Converting Files on page 514.
The first window that appears when working with graphics is shown here.
Menu bar
Toolbar
Workspace tree
r
Graphic properties Work area
Item Description
Menu bar The menu bar provides the list of available pull-down menus.
Toolbar The toolbar contains a row of icons that provide quick access to common options.
Workspace tree The workspace tree lets you quickly access different items. It also shows which specific resources that are checked out (green check mark), which resources are checked out by another user that you would only have read-only access to (red check mark), and which resources are open in read-only mode or have never been checked into the library.
Graphic properties Here Studio shows you the properties for the graphic you are working on.
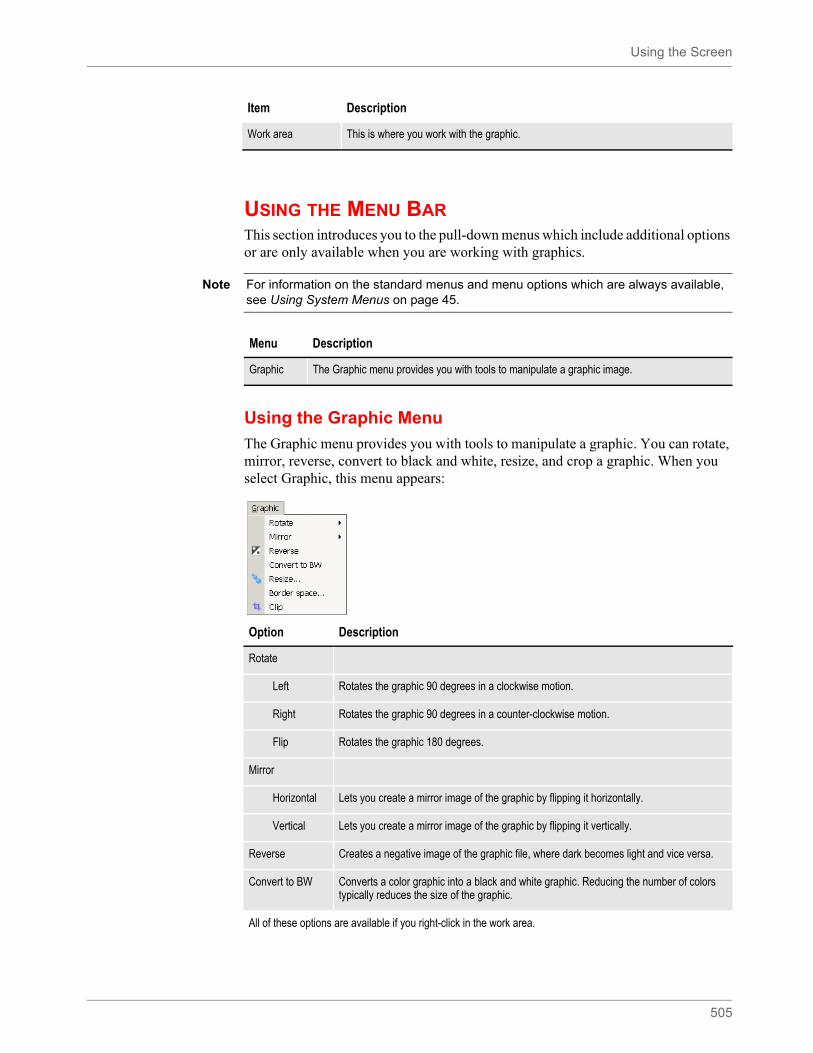
Using the Screen
505
USING THE MENU BARThis section introduces you to the pull-down menus which include additional options or are only available when you are working with graphics.
Using the Graphic Menu
The Graphic menu provides you with tools to manipulate a graphic. You can rotate, mirror, reverse, convert to black and white, resize, and crop a graphic. When you select Graphic, this menu appears:
Work area This is where you work with the graphic.
Item Description
Note For information on the standard menus and menu options which are always available, see Using System Menus on page 45.
Menu Description
Graphic The Graphic menu provides you with tools to manipulate a graphic image.
Option Description
Rotate
Left Rotates the graphic 90 degrees in a clockwise motion.
Right Rotates the graphic 90 degrees in a counter-clockwise motion.
Flip Rotates the graphic 180 degrees.
Mirror
Horizontal Lets you create a mirror image of the graphic by flipping it horizontally.
Vertical Lets you create a mirror image of the graphic by flipping it vertically.
Reverse Creates a negative image of the graphic file, where dark becomes light and vice versa.
Convert to BW Converts a color graphic into a black and white graphic. Reducing the number of colors typically reduces the size of the graphic.
All of these options are available if you right-click in the work area.
Using the Screen
506
Resize Lets you change the size of the graphic, either by entering a new height and width or by entering a percentage. For instance, if you enter 200%, Studio makes the graphic twice as big.
If you enter a new height and width, make your entry in FAP units (2400 per inch).
Border Space Lets you specify the size of the border that surrounds the graphic. You enter the size of the top, bottom, left, and right borders in FAP units (2400 per inch).
Clip Lets you crop a graphic. Using the Clip option, you draw a box around the part of the graphic you want to keep. Studio deletes everything outside the box.
Option Description
All of these options are available if you right-click in the work area.
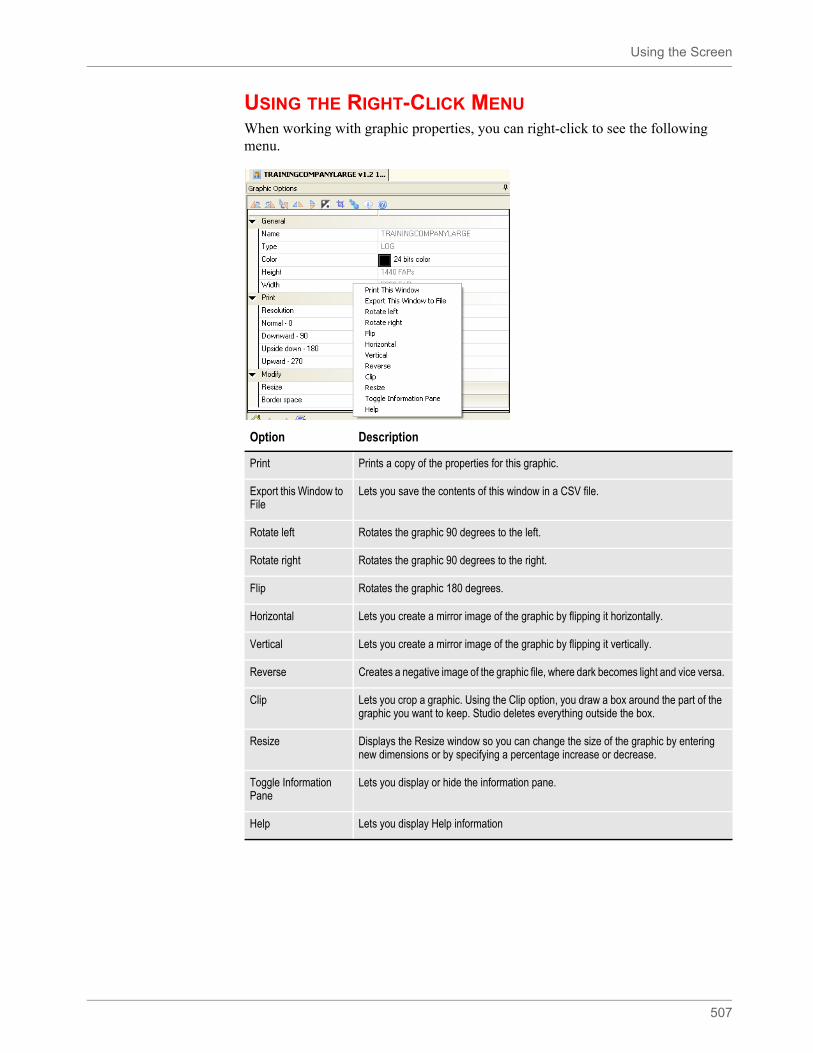
Using the Screen
507
USING THE RIGHT-CLICK MENUWhen working with graphic properties, you can right-click to see the following menu.
Option Description
Print Prints a copy of the properties for this graphic.
Export this Window to File
Lets you save the contents of this window in a CSV file.
Rotate left Rotates the graphic 90 degrees to the left.
Rotate right Rotates the graphic 90 degrees to the right.
Flip Rotates the graphic 180 degrees.
Horizontal Lets you create a mirror image of the graphic by flipping it horizontally.
Vertical Lets you create a mirror image of the graphic by flipping it vertically.
Reverse Creates a negative image of the graphic file, where dark becomes light and vice versa.
Clip Lets you crop a graphic. Using the Clip option, you draw a box around the part of the graphic you want to keep. Studio deletes everything outside the box.
Resize Displays the Resize window so you can change the size of the graphic by entering new dimensions or by specifying a percentage increase or decrease.
Toggle Information Pane
Lets you display or hide the information pane.
Help Lets you display Help information
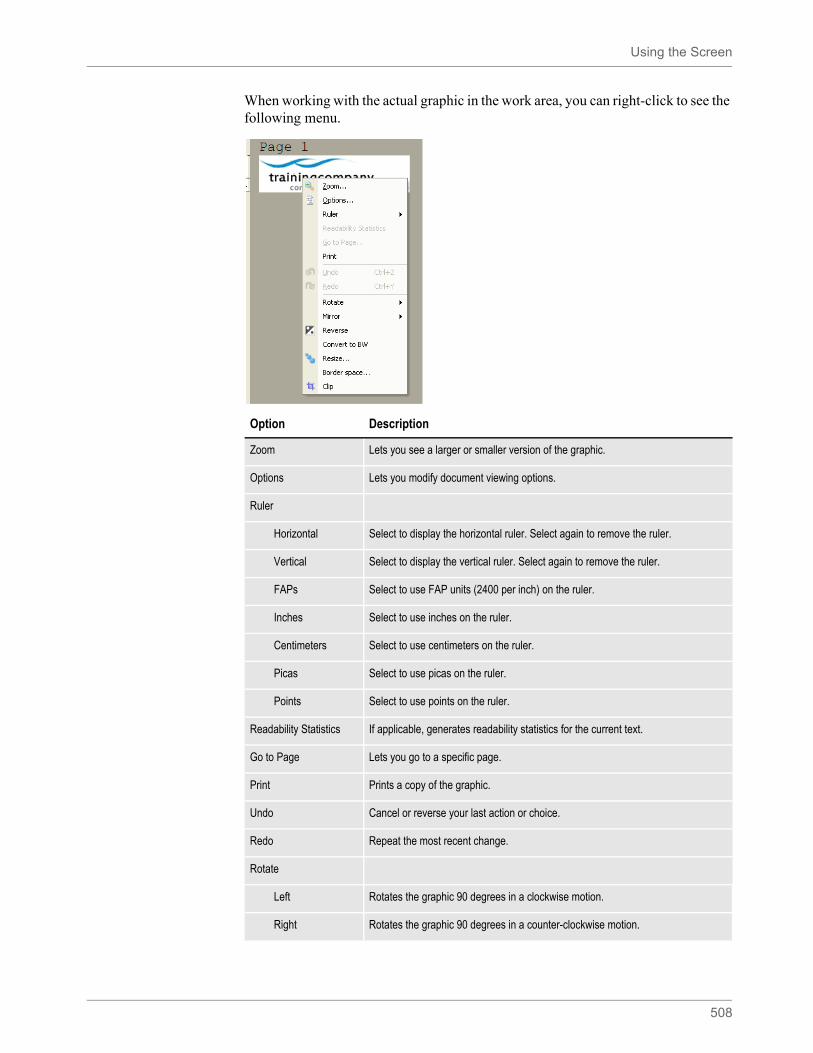
Using the Screen
508
When working with the actual graphic in the work area, you can right-click to see the following menu.
Option Description
Zoom Lets you see a larger or smaller version of the graphic.
Options Lets you modify document viewing options.
Ruler
Horizontal Select to display the horizontal ruler. Select again to remove the ruler.
Vertical Select to display the vertical ruler. Select again to remove the ruler.
FAPs Select to use FAP units (2400 per inch) on the ruler.
Inches Select to use inches on the ruler.
Centimeters Select to use centimeters on the ruler.
Picas Select to use picas on the ruler.
Points Select to use points on the ruler.
Readability Statistics If applicable, generates readability statistics for the current text.
Go to Page Lets you go to a specific page.
Print Prints a copy of the graphic.
Undo Cancel or reverse your last action or choice.
Redo Repeat the most recent change.
Rotate
Left Rotates the graphic 90 degrees in a clockwise motion.
Right Rotates the graphic 90 degrees in a counter-clockwise motion.
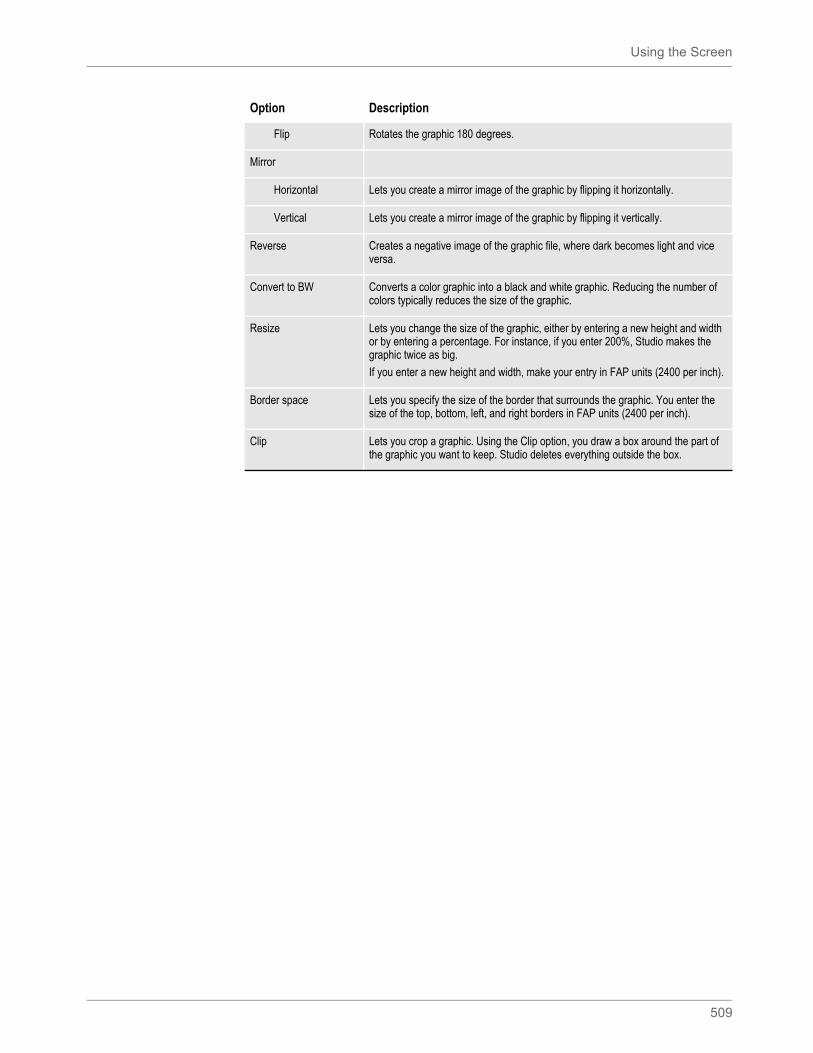
Using the Screen
509
Flip Rotates the graphic 180 degrees.
Mirror
Horizontal Lets you create a mirror image of the graphic by flipping it horizontally.
Vertical Lets you create a mirror image of the graphic by flipping it vertically.
Reverse Creates a negative image of the graphic file, where dark becomes light and vice versa.
Convert to BW Converts a color graphic into a black and white graphic. Reducing the number of colors typically reduces the size of the graphic.
Resize Lets you change the size of the graphic, either by entering a new height and width or by entering a percentage. For instance, if you enter 200%, Studio makes the graphic twice as big.
If you enter a new height and width, make your entry in FAP units (2400 per inch).
Border space Lets you specify the size of the border that surrounds the graphic. You enter the size of the top, bottom, left, and right borders in FAP units (2400 per inch).
Clip Lets you crop a graphic. Using the Clip option, you draw a box around the part of the graphic you want to keep. Studio deletes everything outside the box.
Option Description
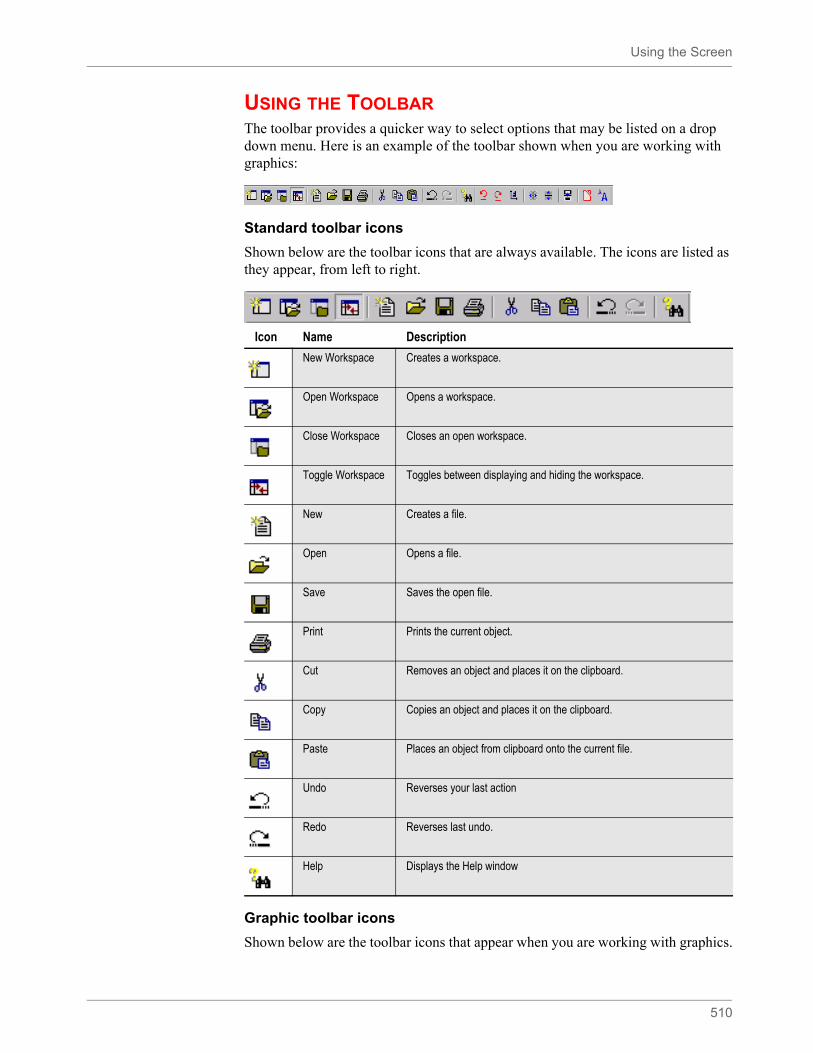
Using the Screen
510
USING THE TOOLBARThe toolbar provides a quicker way to select options that may be listed on a drop down menu. Here is an example of the toolbar shown when you are working with graphics:
Standard toolbar icons
Shown below are the toolbar icons that are always available. The icons are listed as they appear, from left to right.
Graphic toolbar icons
Shown below are the toolbar icons that appear when you are working with graphics.
Icon Name Description
New Workspace Creates a workspace.
Open Workspace Opens a workspace.
Close Workspace Closes an open workspace.
Toggle Workspace Toggles between displaying and hiding the workspace.
New Creates a file.
Open Opens a file.
Save Saves the open file.
Print Prints the current object.
Cut Removes an object and places it on the clipboard.
Copy Copies an object and places it on the clipboard.
Paste Places an object from clipboard onto the current file.
Undo Reverses your last action
Redo Reverses last undo.
Help Displays the Help window
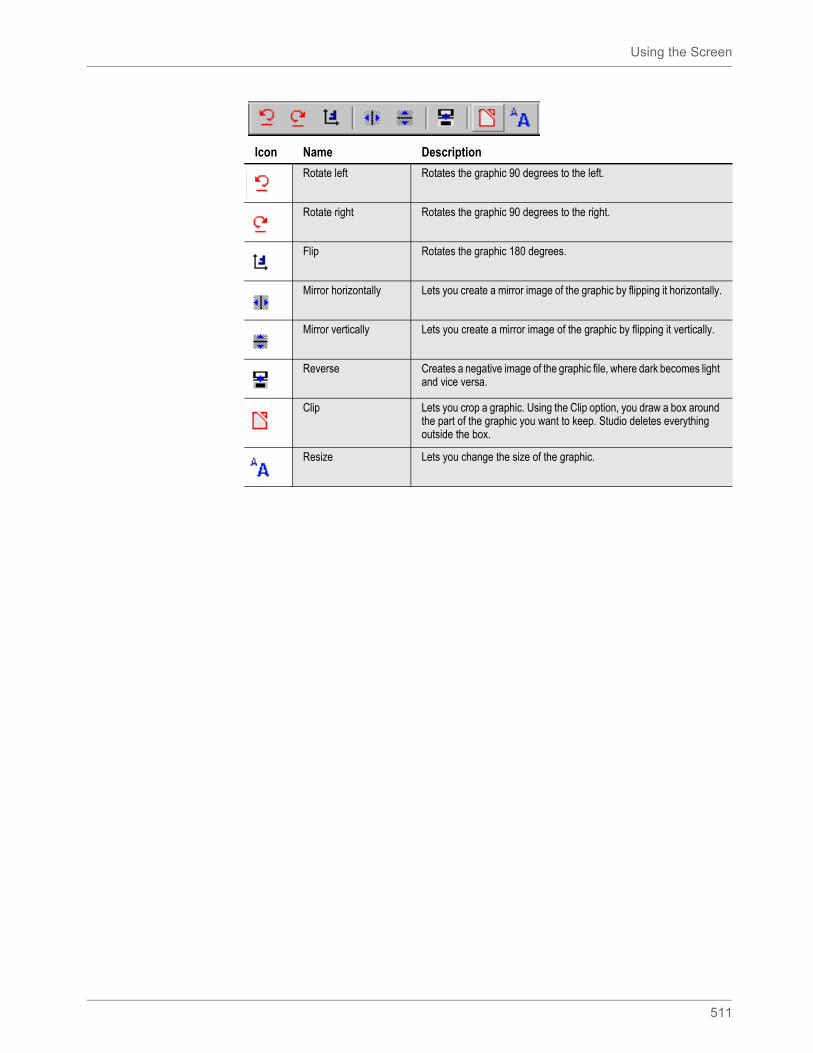
Using the Screen
511
Icon Name Description
Rotate left Rotates the graphic 90 degrees to the left.
Rotate right Rotates the graphic 90 degrees to the right.
Flip Rotates the graphic 180 degrees.
Mirror horizontally Lets you create a mirror image of the graphic by flipping it horizontally.
Mirror vertically Lets you create a mirror image of the graphic by flipping it vertically.
Reverse Creates a negative image of the graphic file, where dark becomes light and vice versa.
Clip Lets you crop a graphic. Using the Clip option, you draw a box around the part of the graphic you want to keep. Studio deletes everything outside the box.
Resize Lets you change the size of the graphic.
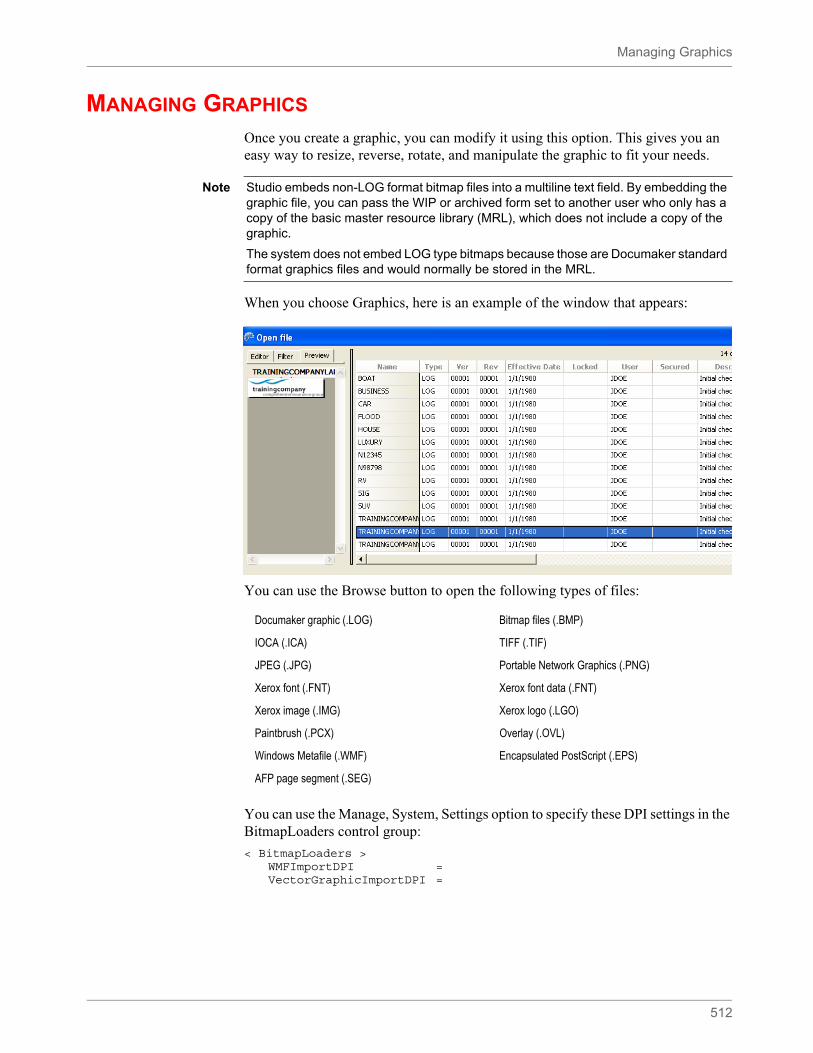
Managing Graphics
512
MANAGING GRAPHICS
Once you create a graphic, you can modify it using this option. This gives you an easy way to resize, reverse, rotate, and manipulate the graphic to fit your needs.
When you choose Graphics, here is an example of the window that appears:
You can use the Browse button to open the following types of files:
You can use the Manage, System, Settings option to specify these DPI settings in the BitmapLoaders control group:
< BitmapLoaders >WMFImportDPI = VectorGraphicImportDPI =
Note Studio embeds non-LOG format bitmap files into a multiline text field. By embedding the graphic file, you can pass the WIP or archived form set to another user who only has a copy of the basic master resource library (MRL), which does not include a copy of the graphic.
The system does not embed LOG type bitmaps because those are Documaker standard format graphics files and would normally be stored in the MRL.
Documaker graphic (.LOG) Bitmap files (.BMP)
IOCA (.ICA) TIFF (.TIF)
JPEG (.JPG) Portable Network Graphics (.PNG)
Xerox font (.FNT) Xerox font data (.FNT)
Xerox image (.IMG) Xerox logo (.LGO)
Paintbrush (.PCX) Overlay (.OVL)
Windows Metafile (.WMF) Encapsulated PostScript (.EPS)
AFP page segment (.SEG)
Managing Graphics
513
Positioning JPEG Objects
You can use the Z-Index option to position JPG objects:
< PrtType:HTML >IMG_ZIndex = 100
The z-index indicates the stacking order of objects based on the order in which those objects appear in the HTML file. Higher values place objects closer to the front while lower values place them further to the back. Objects with the same value are stacked based on the order in which they appear in the HTML source.
For instance, a positive value positions an object above text that has no defined z-index. A negative value would place the object below the same text.
If you omit this option or leave it blank, Studio will not layer objects.
Opening Color Bitmaps
Studio can open the following types of color bitmaps:
• TIFF
• BMP
• LOG
• JPEG
To open another type of bitmap, first convert it to monochrome (black and white). Both gray-scale and color bitmaps can be converted to monochrome bitmaps.
Option Description
WMFImportDPI (Optional) Enter the DPI (dots per inch) at which the graphic will be rendered into raster format. The default is 100. The maximum DPI is 2400.
VectorGraphicImportDPI (Optional) Enter the DPI (dots per inch) at which the graphic will be rendered into vector format. The default is 100. The maximum DPI is 2400.
Note The level of support varies from format to format.
Not all PNG formats are supported. Specifically, PNG supports a transparency attribute that is not supported. Studio only supports opaque (non-transparent) bitmaps.
PNG also supports a variety of color bit patterns, such as - 1, 2, 4, 8, 16, 24, and 32 bits per pixel. Studio does not support all of these formats, but a 3rd-party PNG library included with Studio will convert the bitmaps into a pixel format the system does support.
Studio converts PNG files into bitmaps when printing. It handles monochrome (1 bit), 16-color (4-bit), 256-color (8-bit), and full color (24-bit) bitmaps. However, not all printers can support these, so make sure you use bitmaps appropriate for your printer.
PDF only supports 1-bit and 24-bit bitmaps. So, some types of PNG files may look different when you create PDF files.
Managing Graphics
514
GDI and PCL print support color printing. Select File, Print to display the Print window. Select the printer type and device and click the Send Color option to print in color.
Reverse black and white file types
Studio can also open reversed black and white bits. A flag tells you whether a bitmap was stored in the opposite method. You can automatically reverse the bit if necessary.
Converting Files
You can use the File, Save As, option to convert a graphic to one of the following file types:
• Documaker graphic file (*.LOG)
• TIFF (*.TIF)
• Bitmap (*.BMP)
• Xerox font (*.FNT)
• Xerox image (*.IMG)
• VIPP image (*.VPP)
• AFP page segment (*.SEG)
• JPEG (*.JPG)
To do so, open the graphic and choose the File, Save As option. Select the type of file you want to convert to in the Save File As Type field. You can also convert files using the Manage, Conversion, Convert Graphic Files option. If you have a large number of LOG files to convert into JPEG files, see the Utilities Reference for information on using the LOG2JPG utility.
Note While Studio can open TIFF, BMP, LOG, and JPEG files, it can only import LOG files into a workspace library (MRL). To import a TIFF, BMP, and JPEG files into an MRL, first save the file as a LOG file, then import it. You can convert multiple bitmap files into LOG files using Conversion manager.
Note Color bitmap and JPG files are only supported on Windows and UNIX systems if you are using the GenPrint program to print to color GDI, PCL, or PostScript printers or if you are producing color PDF or RTF output.
Color graphics and TIF files are converted to monochrome for Metacode and AFP output, but are supported on Windows, UNIX, and z/OS systems.
Note An AFP page segment can contain a mixture of text, section objects, and graphics data objects and can be placed anywhere on a presentation page. Programs can request page segments for presentation in a page or overlay. Page segments are used for graphics, signatures, and boilerplate. A Xerox font can also include multiple graphics or signatures.
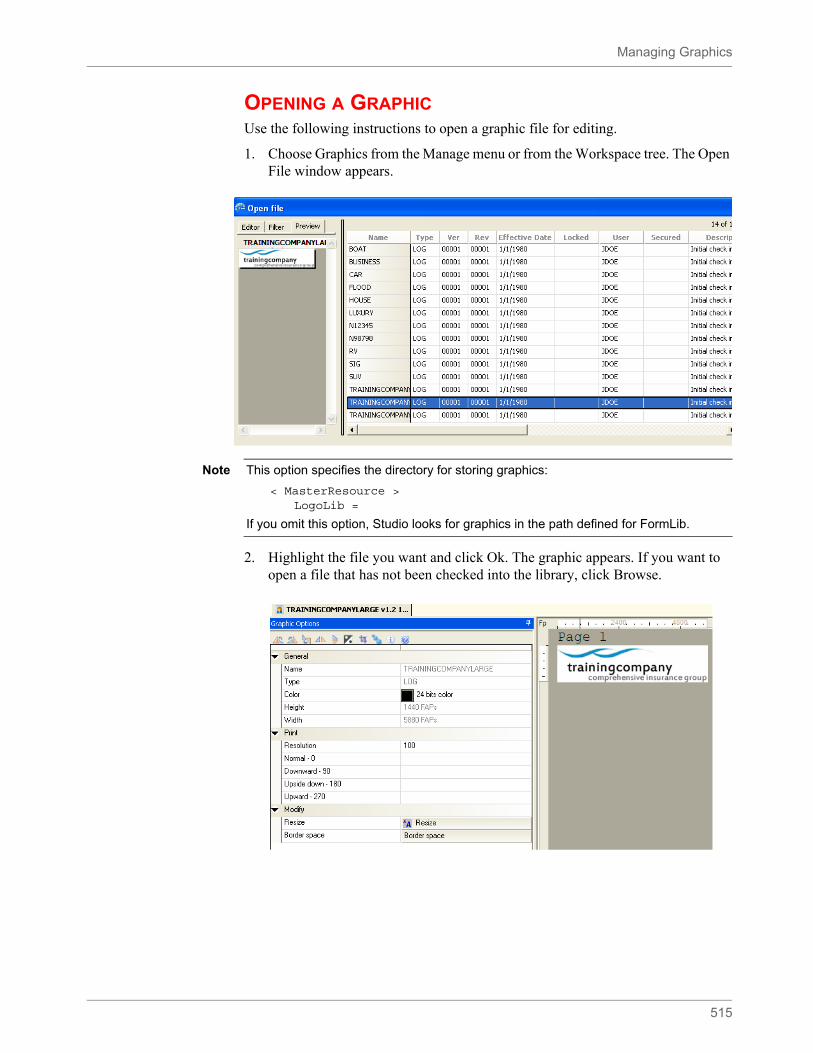
Managing Graphics
515
OPENING A GRAPHICUse the following instructions to open a graphic file for editing.
1. Choose Graphics from the Manage menu or from the Workspace tree. The Open File window appears.
2. Highlight the file you want and click Ok. The graphic appears. If you want to open a file that has not been checked into the library, click Browse.
Note This option specifies the directory for storing graphics:
< MasterResource >LogoLib =
If you omit this option, Studio looks for graphics in the path defined for FormLib.
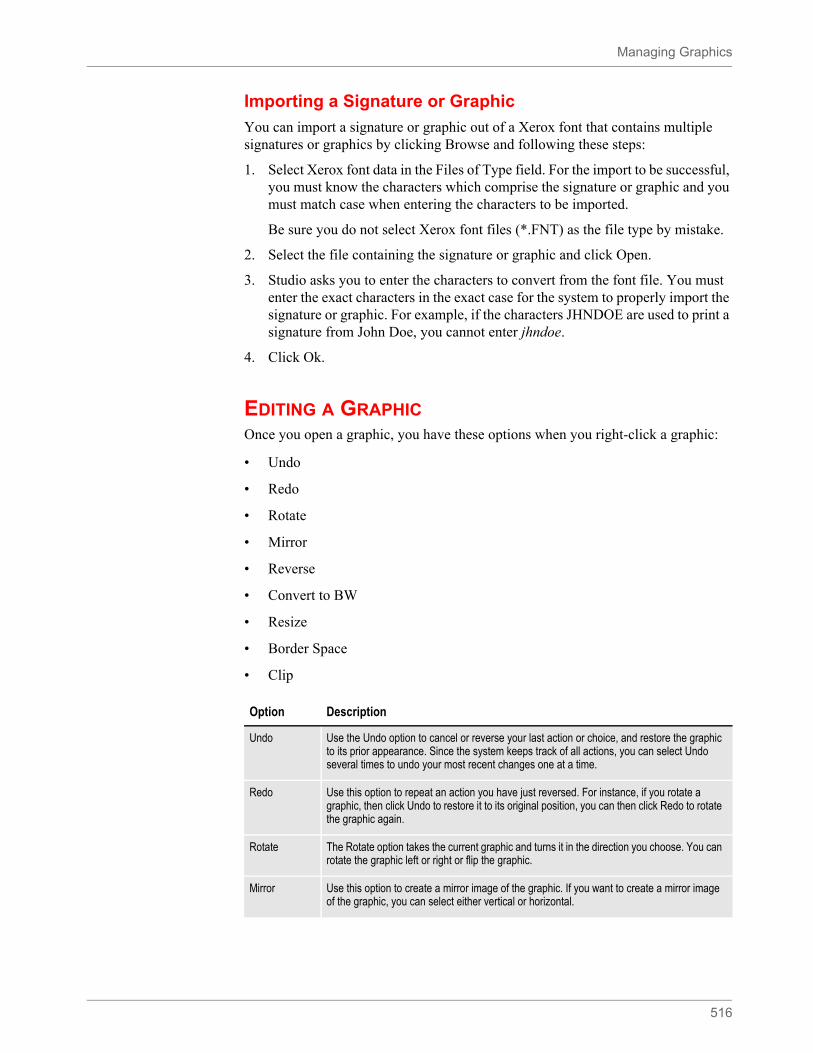
Managing Graphics
516
Importing a Signature or Graphic
You can import a signature or graphic out of a Xerox font that contains multiple signatures or graphics by clicking Browse and following these steps:
1. Select Xerox font data in the Files of Type field. For the import to be successful, you must know the characters which comprise the signature or graphic and you must match case when entering the characters to be imported.
Be sure you do not select Xerox font files (*.FNT) as the file type by mistake.
2. Select the file containing the signature or graphic and click Open.
3. Studio asks you to enter the characters to convert from the font file. You must enter the exact characters in the exact case for the system to properly import the signature or graphic. For example, if the characters JHNDOE are used to print a signature from John Doe, you cannot enter jhndoe.
4. Click Ok.
EDITING A GRAPHICOnce you open a graphic, you have these options when you right-click a graphic:
• Undo
• Redo
• Rotate
• Mirror
• Reverse
• Convert to BW
• Resize
• Border Space
• Clip
Option Description
Undo Use the Undo option to cancel or reverse your last action or choice, and restore the graphic to its prior appearance. Since the system keeps track of all actions, you can select Undo several times to undo your most recent changes one at a time.
Redo Use this option to repeat an action you have just reversed. For instance, if you rotate a graphic, then click Undo to restore it to its original position, you can then click Redo to rotate the graphic again.
Rotate The Rotate option takes the current graphic and turns it in the direction you choose. You can rotate the graphic left or right or flip the graphic.
Mirror Use this option to create a mirror image of the graphic. If you want to create a mirror image of the graphic, you can select either vertical or horizontal.
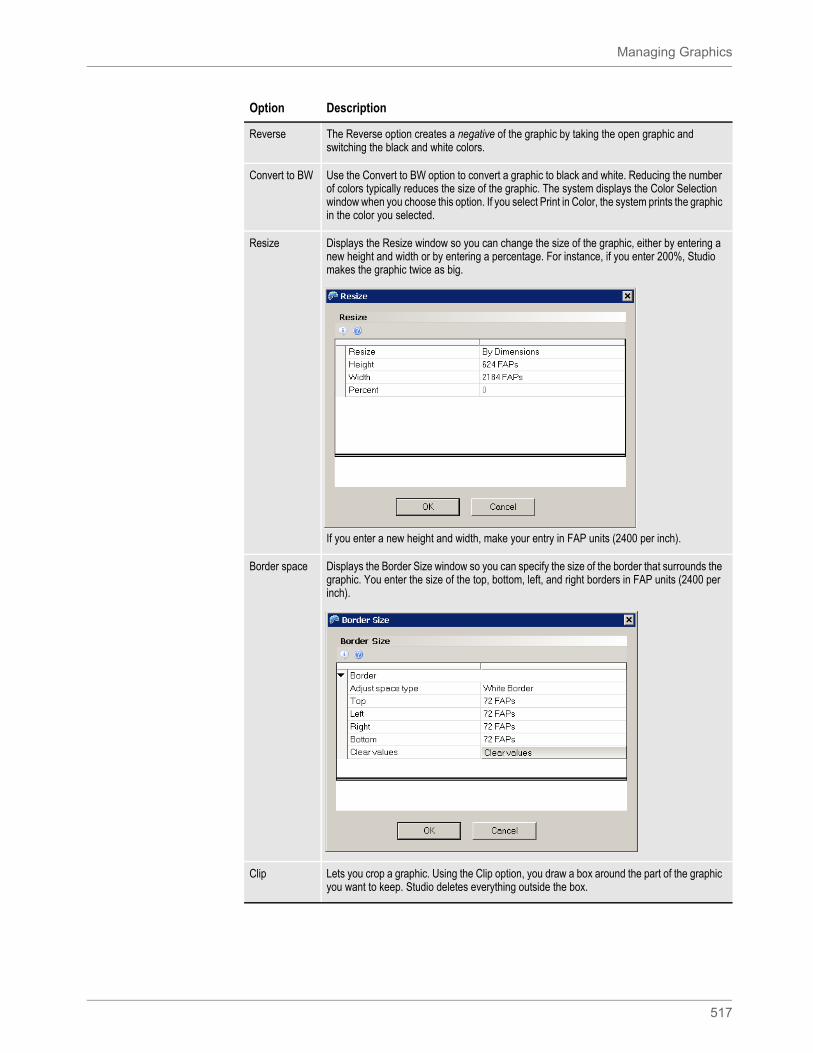
Managing Graphics
517
Reverse The Reverse option creates a negative of the graphic by taking the open graphic and switching the black and white colors.
Convert to BW Use the Convert to BW option to convert a graphic to black and white. Reducing the number of colors typically reduces the size of the graphic. The system displays the Color Selection window when you choose this option. If you select Print in Color, the system prints the graphic in the color you selected.
Resize Displays the Resize window so you can change the size of the graphic, either by entering a new height and width or by entering a percentage. For instance, if you enter 200%, Studio makes the graphic twice as big.
If you enter a new height and width, make your entry in FAP units (2400 per inch).
Border space Displays the Border Size window so you can specify the size of the border that surrounds the graphic. You enter the size of the top, bottom, left, and right borders in FAP units (2400 per inch).
Clip Lets you crop a graphic. Using the Clip option, you draw a box around the part of the graphic you want to keep. Studio deletes everything outside the box.
Option Description
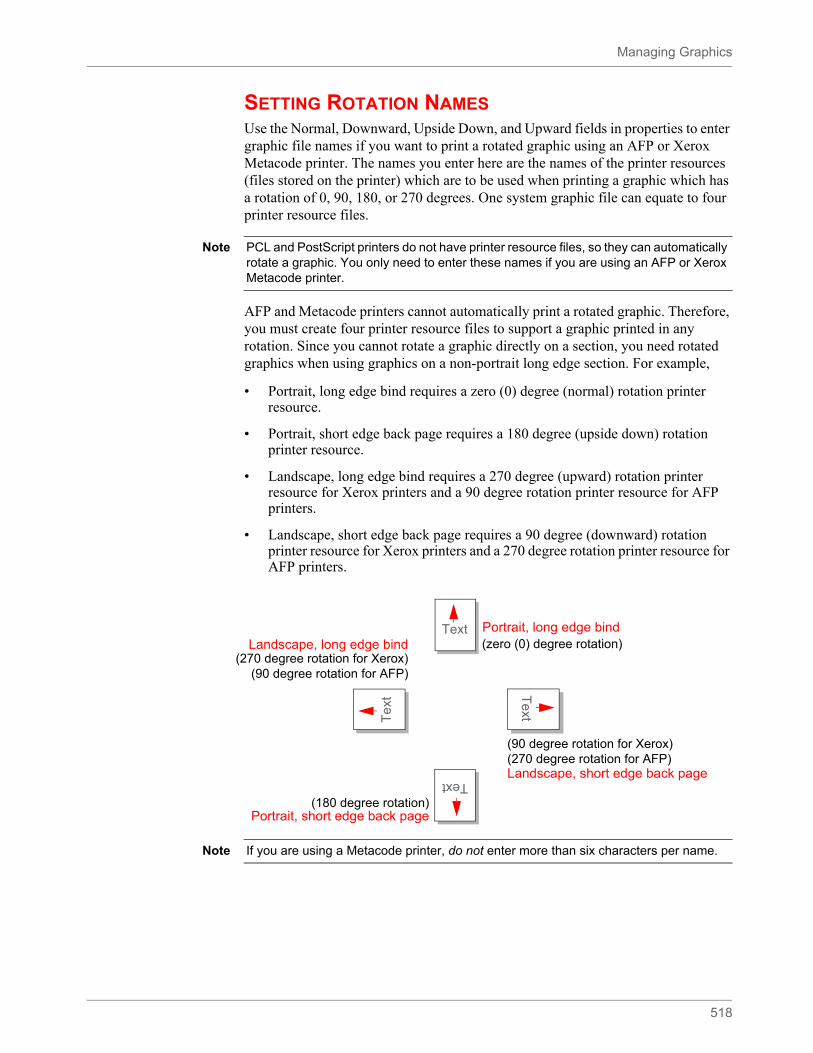
Managing Graphics
518
SETTING ROTATION NAMESUse the Normal, Downward, Upside Down, and Upward fields in properties to enter graphic file names if you want to print a rotated graphic using an AFP or Xerox Metacode printer. The names you enter here are the names of the printer resources (files stored on the printer) which are to be used when printing a graphic which has a rotation of 0, 90, 180, or 270 degrees. One system graphic file can equate to four printer resource files.
AFP and Metacode printers cannot automatically print a rotated graphic. Therefore, you must create four printer resource files to support a graphic printed in any rotation. Since you cannot rotate a graphic directly on a section, you need rotated graphics when using graphics on a non-portrait long edge section. For example,
• Portrait, long edge bind requires a zero (0) degree (normal) rotation printer resource.
• Portrait, short edge back page requires a 180 degree (upside down) rotation printer resource.
• Landscape, long edge bind requires a 270 degree (upward) rotation printer resource for Xerox printers and a 90 degree rotation printer resource for AFP printers.
• Landscape, short edge back page requires a 90 degree (downward) rotation printer resource for Xerox printers and a 270 degree rotation printer resource for AFP printers.
Note PCL and PostScript printers do not have printer resource files, so they can automatically rotate a graphic. You only need to enter these names if you are using an AFP or Xerox Metacode printer.
Portrait, long edge bind
Portrait, short edge back page
Landscape, short edge back page
Landscape, long edge bindText
Text
Text
Tex
t
(270 degree rotation for Xerox)
(180 degree rotation)
(zero (0) degree rotation)
(90 degree rotation for Xerox)
(90 degree rotation for AFP)
(270 degree rotation for AFP)
Note If you are using a Metacode printer, do not enter more than six characters per name.
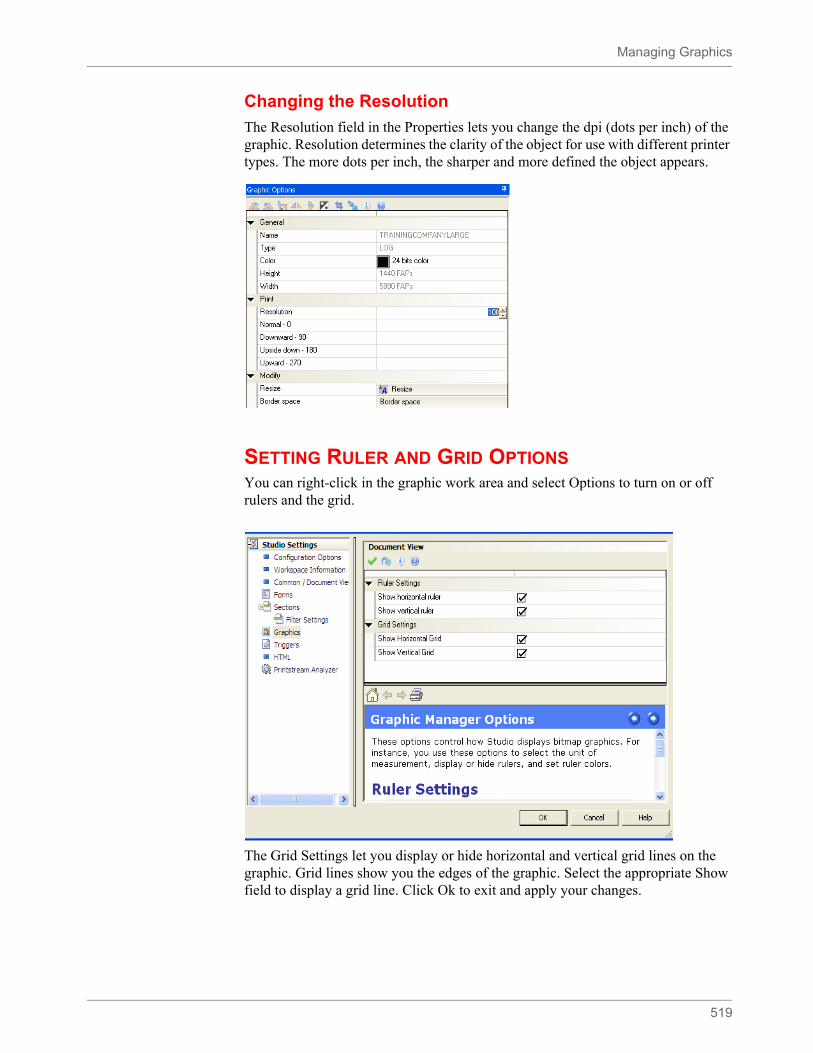
Managing Graphics
519
Changing the Resolution
The Resolution field in the Properties lets you change the dpi (dots per inch) of the graphic. Resolution determines the clarity of the object for use with different printer types. The more dots per inch, the sharper and more defined the object appears.
SETTING RULER AND GRID OPTIONSYou can right-click in the graphic work area and select Options to turn on or off rulers and the grid.
The Grid Settings let you display or hide horizontal and vertical grid lines on the graphic. Grid lines show you the edges of the graphic. Select the appropriate Show field to display a grid line. Click Ok to exit and apply your changes.

Managing Graphics
520
By right-clicking on a graphic and choose the Rulers option, you can set the display options for the horizontal and vertical rulers. Select the ruler’s units of measure in the field to the right. You can choose between FAP units (1/2400 of an inch), points, inches (1/6, 1/8, or 1/10), centimeters, or picas.
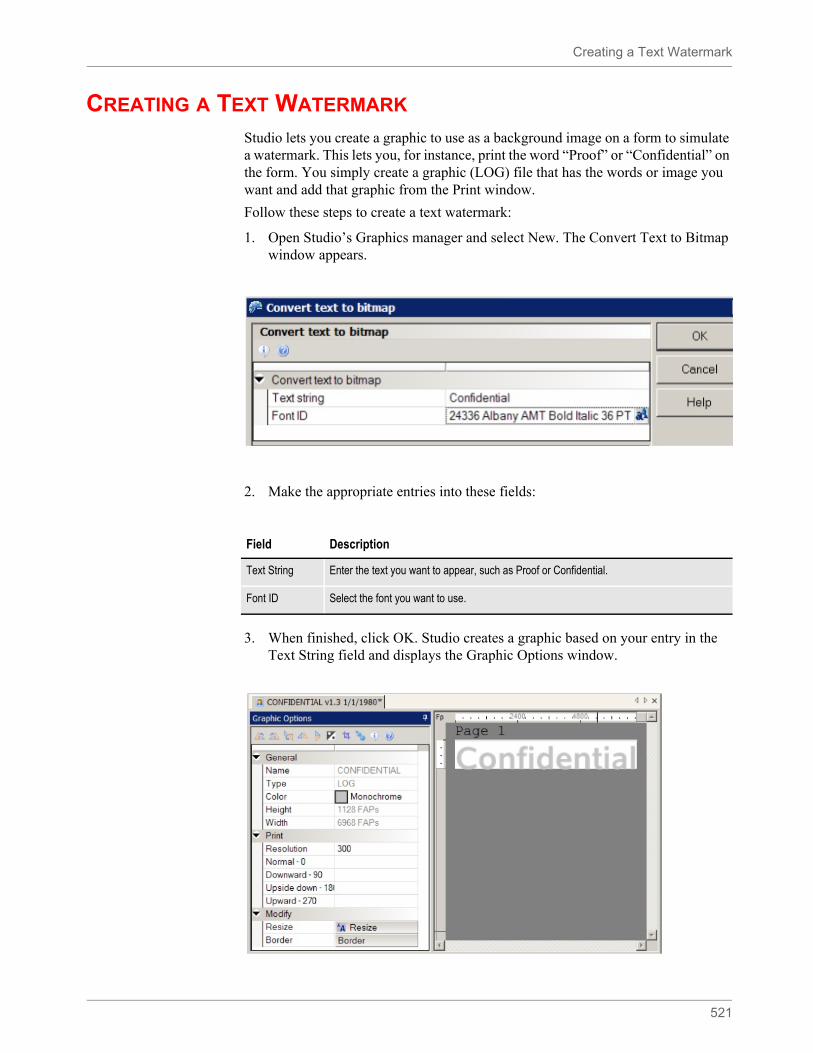
Creating a Text Watermark
521
CREATING A TEXT WATERMARK
Studio lets you create a graphic to use as a background image on a form to simulate a watermark. This lets you, for instance, print the word “Proof” or “Confidential” on the form. You simply create a graphic (LOG) file that has the words or image you want and add that graphic from the Print window.
Follow these steps to create a text watermark:
1. Open Studio’s Graphics manager and select New. The Convert Text to Bitmap window appears.
2. Make the appropriate entries into these fields:
3. When finished, click OK. Studio creates a graphic based on your entry in the Text String field and displays the Graphic Options window.
Field Description
Text String Enter the text you want to appear, such as Proof or Confidential.
Font ID Select the font you want to use.
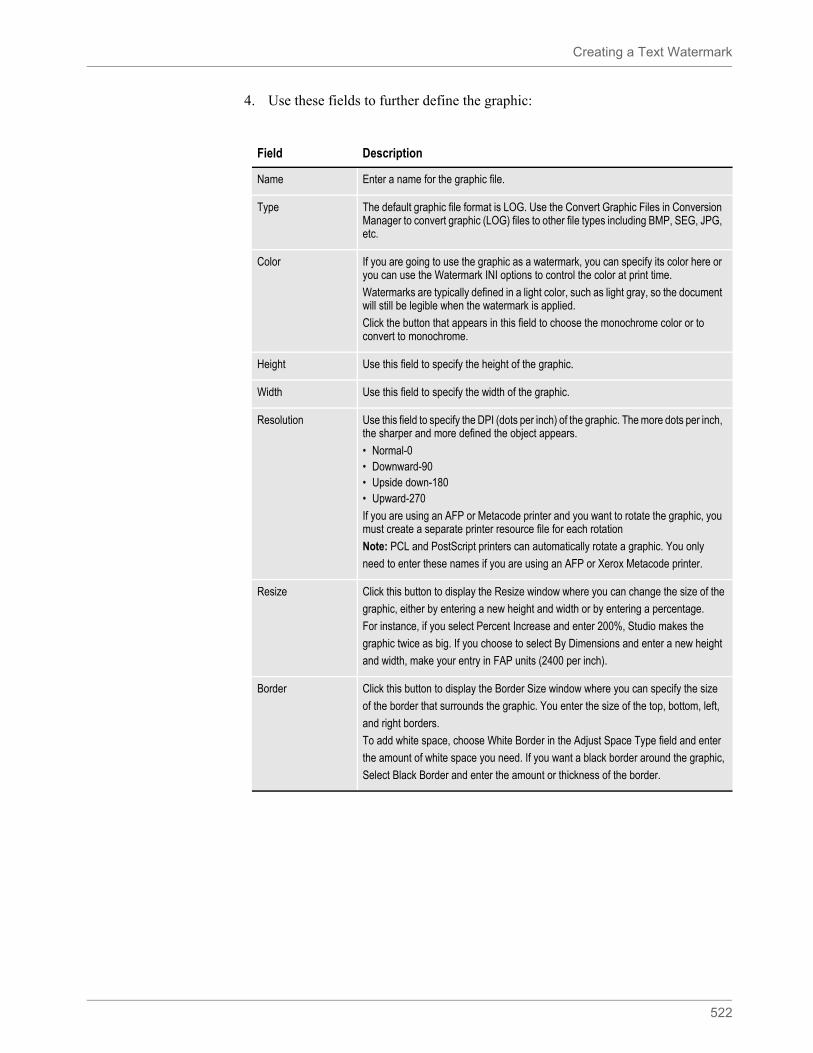
Creating a Text Watermark
522
4. Use these fields to further define the graphic:
Field Description
Name Enter a name for the graphic file.
Type The default graphic file format is LOG. Use the Convert Graphic Files in Conversion Manager to convert graphic (LOG) files to other file types including BMP, SEG, JPG, etc.
Color If you are going to use the graphic as a watermark, you can specify its color here or you can use the Watermark INI options to control the color at print time.
Watermarks are typically defined in a light color, such as light gray, so the document will still be legible when the watermark is applied.
Click the button that appears in this field to choose the monochrome color or to convert to monochrome.
Height Use this field to specify the height of the graphic.
Width Use this field to specify the width of the graphic.
Resolution Use this field to specify the DPI (dots per inch) of the graphic. The more dots per inch, the sharper and more defined the object appears.
• Normal-0• Downward-90• Upside down-180• Upward-270
If you are using an AFP or Metacode printer and you want to rotate the graphic, you must create a separate printer resource file for each rotation
Note: PCL and PostScript printers can automatically rotate a graphic. You only
need to enter these names if you are using an AFP or Xerox Metacode printer.
Resize Click this button to display the Resize window where you can change the size of the
graphic, either by entering a new height and width or by entering a percentage.
For instance, if you select Percent Increase and enter 200%, Studio makes the
graphic twice as big. If you choose to select By Dimensions and enter a new height
and width, make your entry in FAP units (2400 per inch).
Border Click this button to display the Border Size window where you can specify the size
of the border that surrounds the graphic. You enter the size of the top, bottom, left,
and right borders.
To add white space, choose White Border in the Adjust Space Type field and enter
the amount of white space you need. If you want a black border around the graphic,
Select Black Border and enter the amount or thickness of the border.
523
Chapter 10
Using Styles
A style is a set of formatting characteristics. Style sheets let you specify default settings for objects such as text labels, text areas, boxes, etc. and associate those settings with named styles. This saves time and provides a convenient way to enforce a particular look and feel across many different sections and forms.
Styles can also be based on other styles. For example, if you base Style B on Style A, then all of Style B’s objects will inherit the properties of the corresponding object in Style A. You can then adjust the settings on selected objects in Style B to override Style A’s behavior as needed. This is useful when creating a series of styles that are mostly identical but vary from each other in small ways.
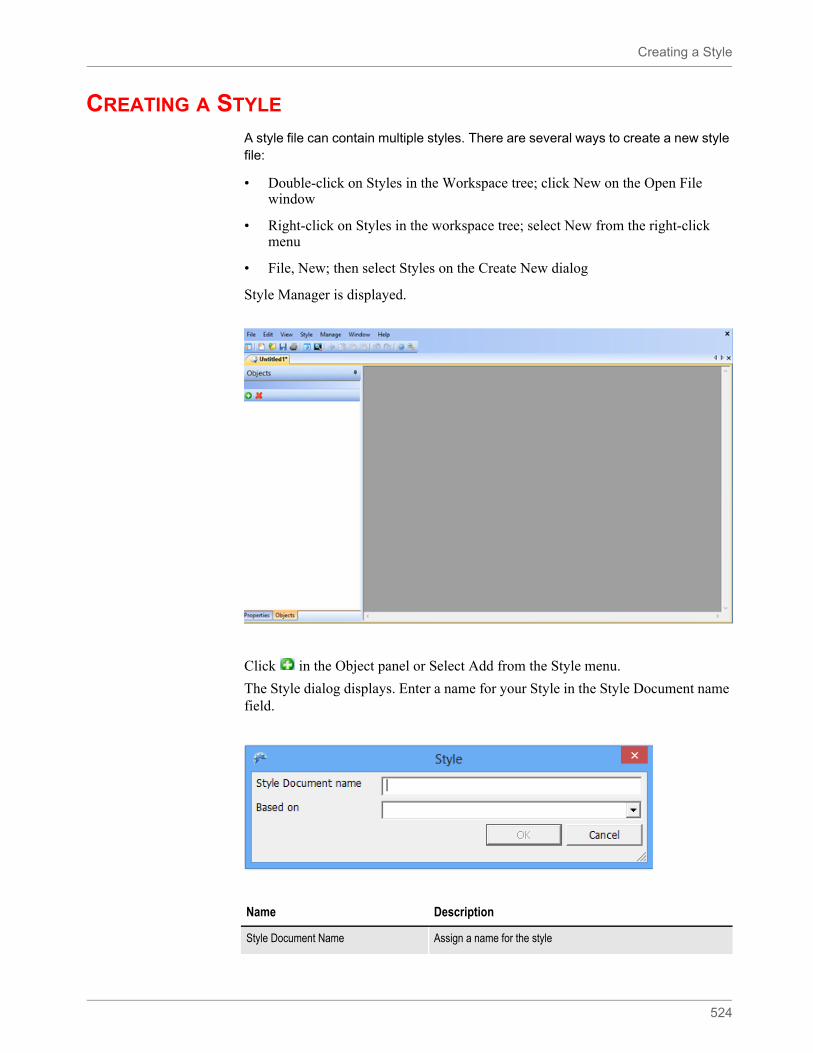
Creating a Style
524
CREATING A STYLE A style file can contain multiple styles. There are several ways to create a new style file:
• Double-click on Styles in the Workspace tree; click New on the Open File window
• Right-click on Styles in the workspace tree; select New from the right-click menu
• File, New; then select Styles on the Create New dialog
Style Manager is displayed.
Click in the Object panel or Select Add from the Style menu.
The Style dialog displays. Enter a name for your Style in the Style Document name field.
Name Description
Style Document Name Assign a name for the style
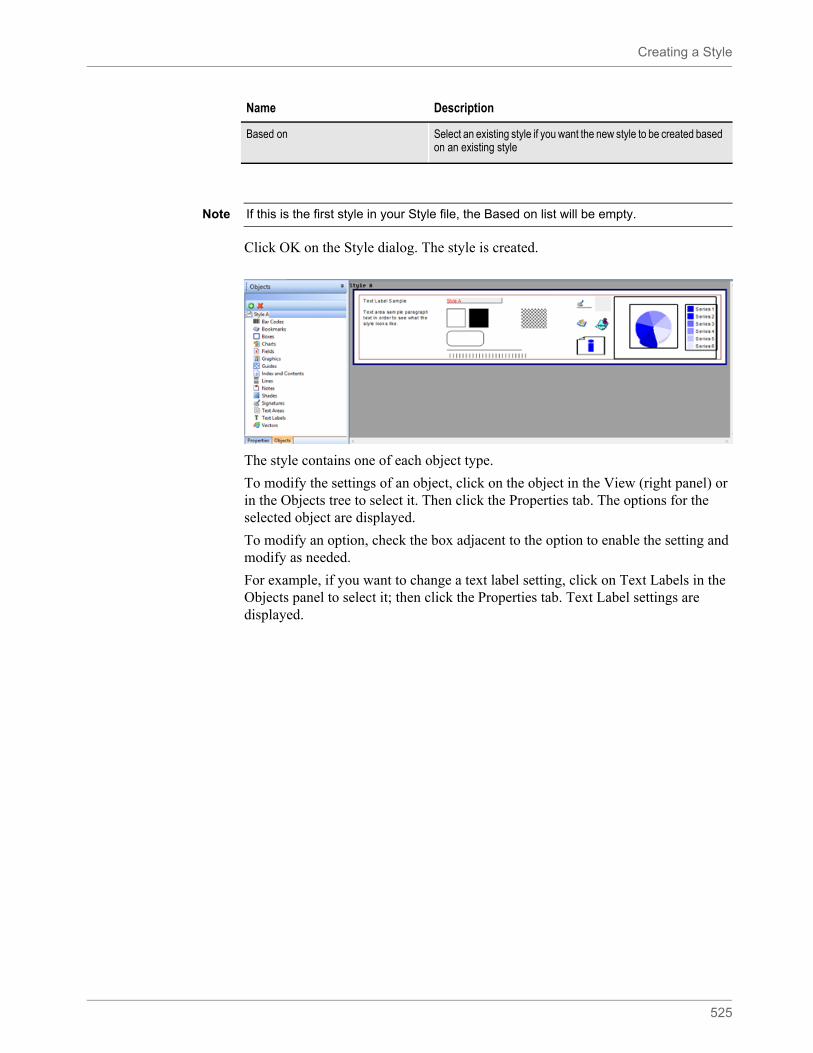
Creating a Style
525
Click OK on the Style dialog. The style is created.
The style contains one of each object type.
To modify the settings of an object, click on the object in the View (right panel) or in the Objects tree to select it. Then click the Properties tab. The options for the selected object are displayed.
To modify an option, check the box adjacent to the option to enable the setting and modify as needed.
For example, if you want to change a text label setting, click on Text Labels in the Objects panel to select it; then click the Properties tab. Text Label settings are displayed.
Based on Select an existing style if you want the new style to be created based on an existing style
Name Description
Note If this is the first style in your Style file, the Based on list will be empty.
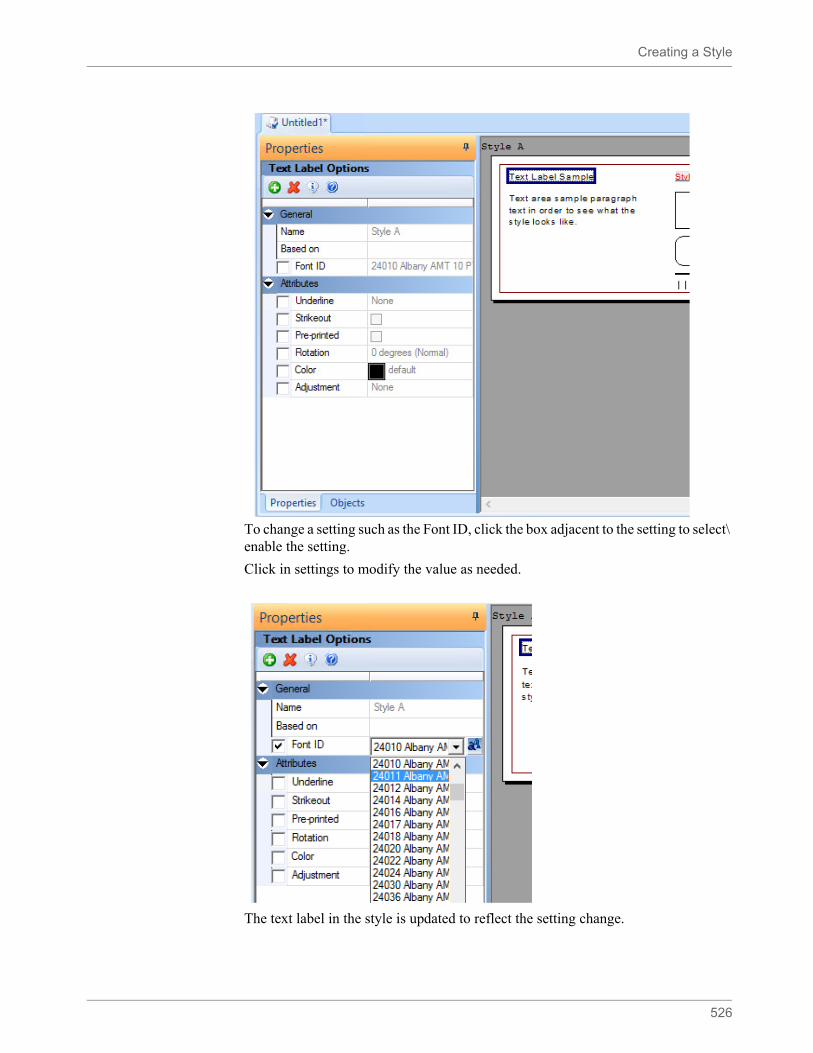
Creating a Style
526
To change a setting such as the Font ID, click the box adjacent to the setting to select\ enable the setting.
Click in settings to modify the value as needed.
The text label in the style is updated to reflect the setting change.
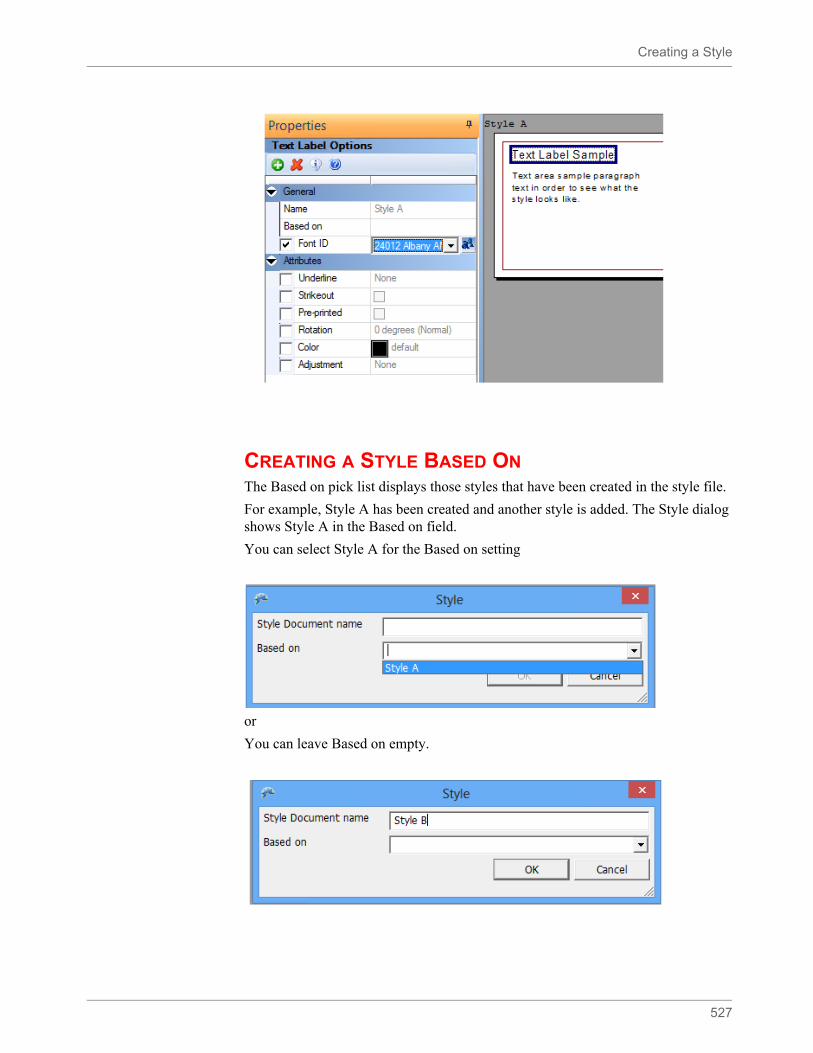
Creating a Style
527
CREATING A STYLE BASED ONThe Based on pick list displays those styles that have been created in the style file.
For example, Style A has been created and another style is added. The Style dialog shows Style A in the Based on field.
You can select Style A for the Based on setting
or
You can leave Based on empty.

Creating a Style
528
If you set Based to Style A when you create Style B, the objects in Style B inherit the settings of Style A’s objects.
For example, the text label object in Style A has a Font ID of 24012. Since Style B’s objects inherit Style A’s objects settings when Style B is created, Style B’s text label object will also have a Font ID of 24012. After Style B has been created, its’ object settings can be modified as needed.
Style Modifications
Existing Styles do not automatically inherit changes that are made to their Based on Styles.
For example, Style B was created based on Style A. After Style B was created, a change was made to the Font ID in Style A’s text label object. The Font ID in Style B’s text label object is unaffected by this change.
You have two ways to update apply Style A’s text label font id change to Style B’s text label:
1. Edit the text label setting in Style B, changing the Font ID from 24012 to 24112
2. Reapply Style A in the Based on field in Style B’s text label properties
To change Style B’s text label font id setting:
Check the Style file out of the library
Click the Text label object to select it
Click the Properties tab
Based on setting - reselect Style A from the picklist
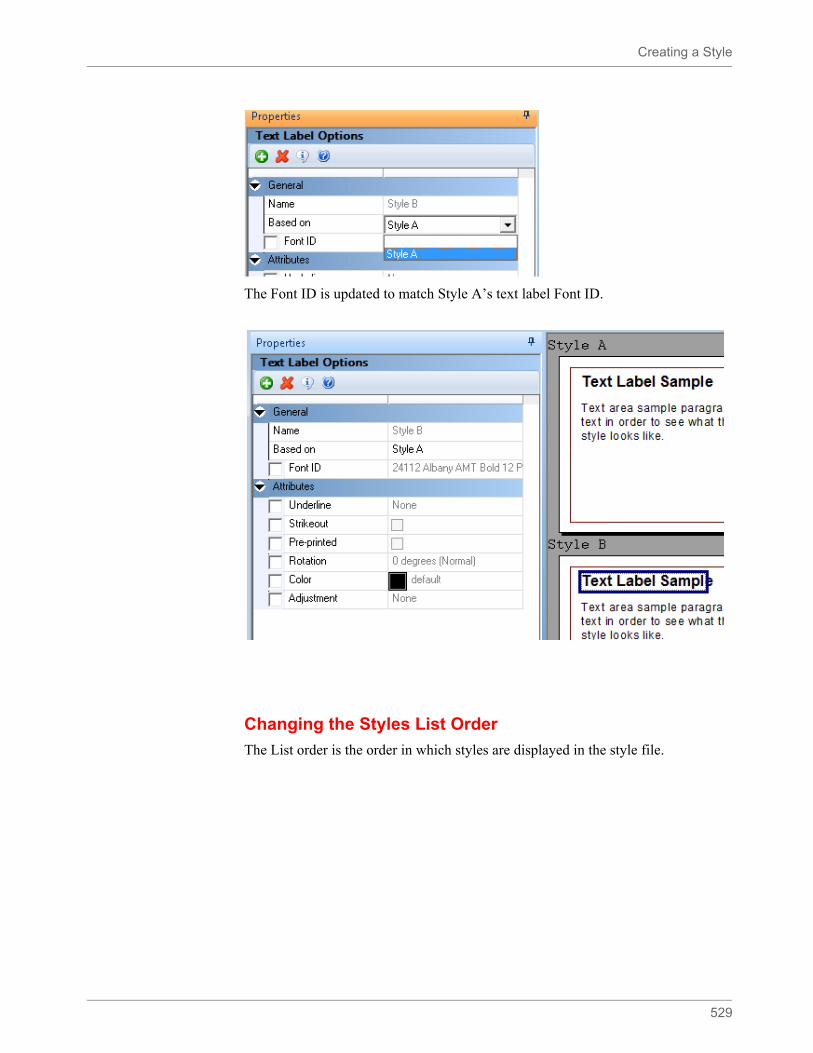
Creating a Style
529
The Font ID is updated to match Style A’s text label Font ID.
Changing the Styles List Order
The List order is the order in which styles are displayed in the style file.
Creating a Style
530
This order can be modified in Style Manager.
To modify the list order, open or check the style file out of the library:
To change the list order of Styles in the style file, right-click and select Move Up or
Move Down or use the move icons on the toolbar.
Creating a Style
531
BUSINESS DEFINITION FILE - DEFINING THE STYLEA style file must be defined in the Business Application Definition file (*.BDF) to assign styles in the style file to section or paragraph objects.
To assign a style, check the Business Application Definition file out of the library.
Click in the Style file name located under the Application Options group in the Application Options panel.
Select the file from the library that you wish to have available as default styles for section design.
The style field is populated with your selection
Creating a Style
532
Save and check the Business Application Definition file into the library.
Styles pick list on section and paragraph objects lists styles contained in the Style file defined in the Business Application Definition file. For example:
The object inherits the settings of that object from the selected Style file
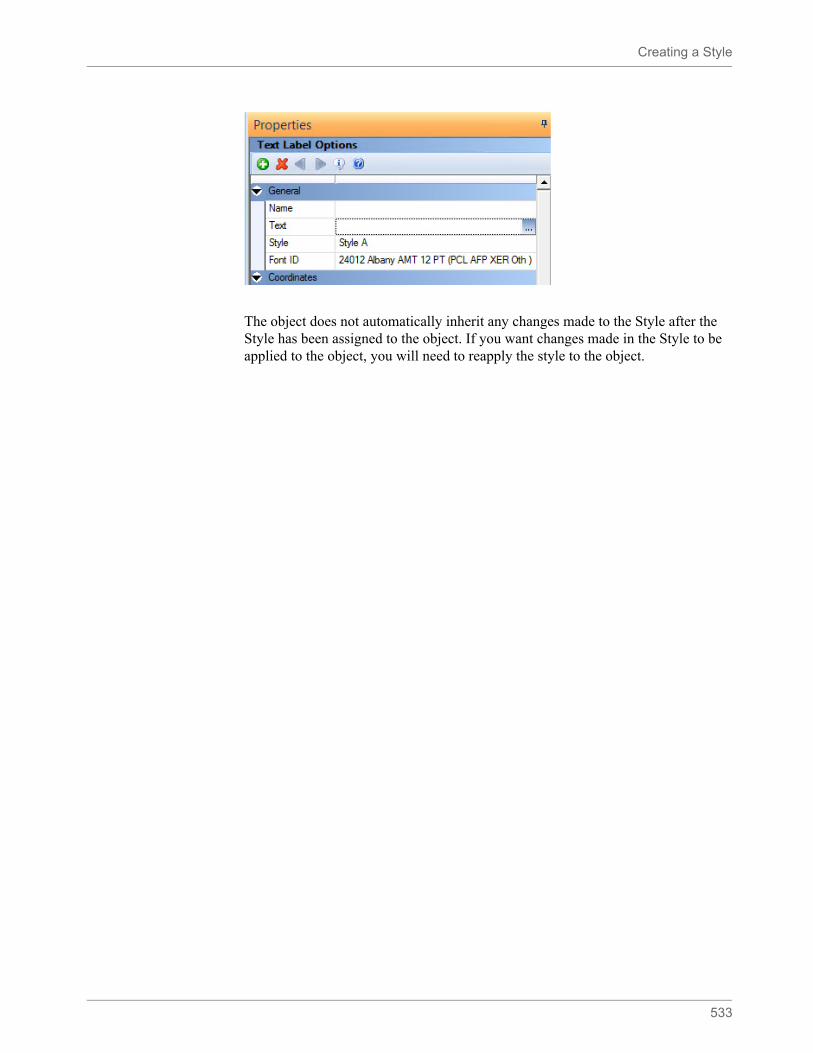
Creating a Style
533
The object does not automatically inherit any changes made to the Style after the Style has been assigned to the object. If you want changes made in the Style to be applied to the object, you will need to reapply the style to the object.
534
Chapter 11
Creating Scripts
You can write DAL scripts to automate system tasks. Click Scripts to open the DAL script editor.
This chapter discusses the following topics:
• Using the Screen on page 535
• Overview on page 540
• Checking Syntax on page 542
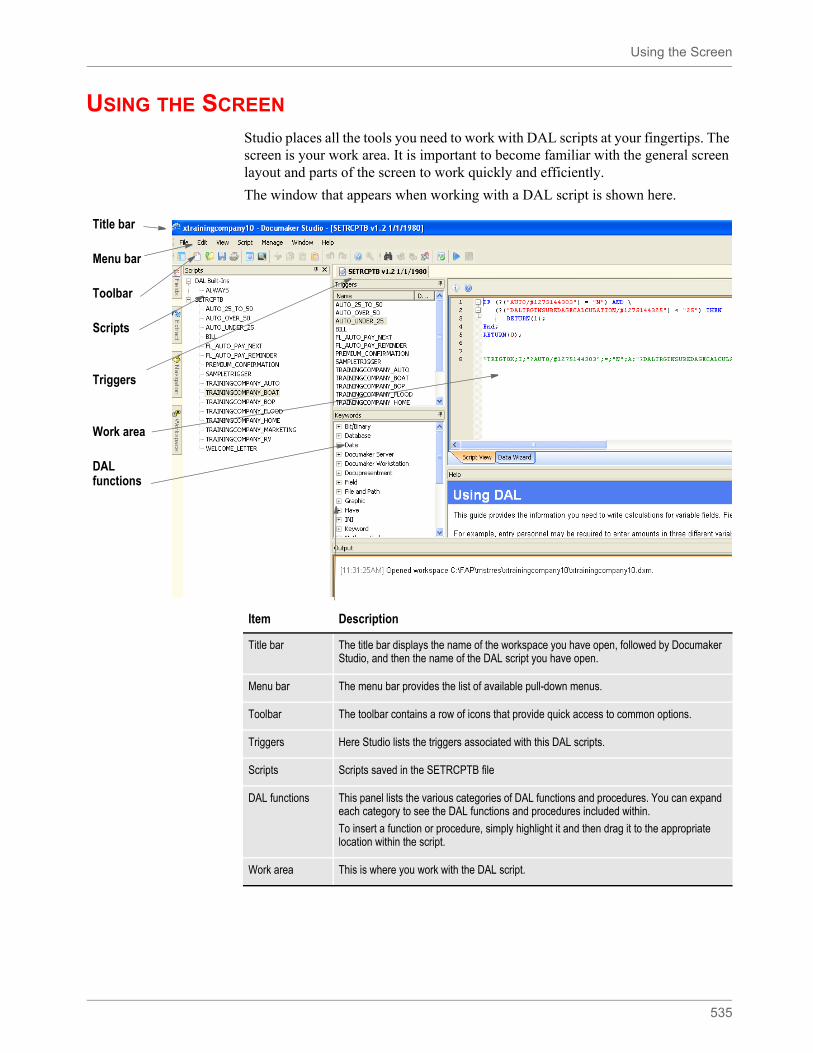
Using the Screen
535
USING THE SCREEN
Studio places all the tools you need to work with DAL scripts at your fingertips. The screen is your work area. It is important to become familiar with the general screen layout and parts of the screen to work quickly and efficiently.
The window that appears when working with a DAL script is shown here.
Title bar
Menu bar
Toolbar
Scripts
Triggers
Work area
DAL functions
Item Description
Title bar The title bar displays the name of the workspace you have open, followed by Documaker Studio, and then the name of the DAL script you have open.
Menu bar The menu bar provides the list of available pull-down menus.
Toolbar The toolbar contains a row of icons that provide quick access to common options.
Triggers Here Studio lists the triggers associated with this DAL scripts.
Scripts Scripts saved in the SETRCPTB file
DAL functions This panel lists the various categories of DAL functions and procedures. You can expand each category to see the DAL functions and procedures included within.
To insert a function or procedure, simply highlight it and then drag it to the appropriate location within the script.
Work area This is where you work with the DAL script.
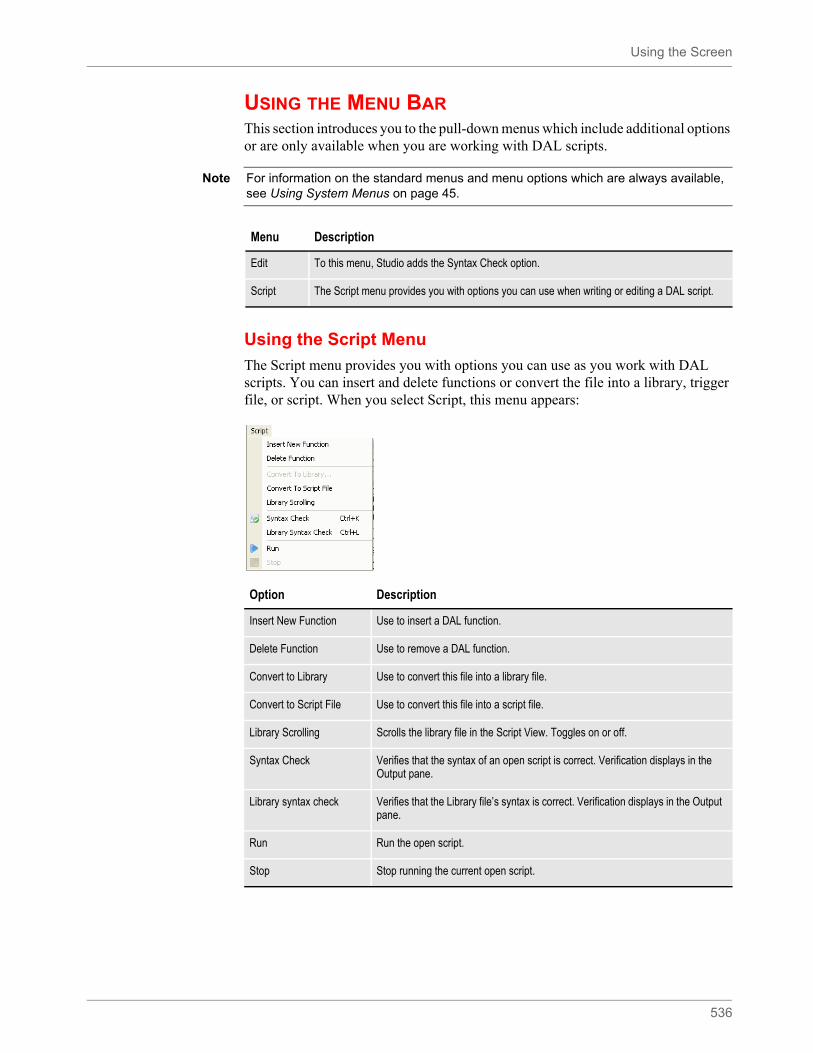
Using the Screen
536
USING THE MENU BARThis section introduces you to the pull-down menus which include additional options or are only available when you are working with DAL scripts.
Using the Script Menu
The Script menu provides you with options you can use as you work with DAL scripts. You can insert and delete functions or convert the file into a library, trigger file, or script. When you select Script, this menu appears:
Note For information on the standard menus and menu options which are always available, see Using System Menus on page 45.
Menu Description
Edit To this menu, Studio adds the Syntax Check option.
Script The Script menu provides you with options you can use when writing or editing a DAL script.
Option Description
Insert New Function Use to insert a DAL function.
Delete Function Use to remove a DAL function.
Convert to Library Use to convert this file into a library file.
Convert to Script File Use to convert this file into a script file.
Library Scrolling Scrolls the library file in the Script View. Toggles on or off.
Syntax Check Verifies that the syntax of an open script is correct. Verification displays in the Output pane.
Library syntax check Verifies that the Library file’s syntax is correct. Verification displays in the Output pane.
Run Run the open script.
Stop Stop running the current open script.
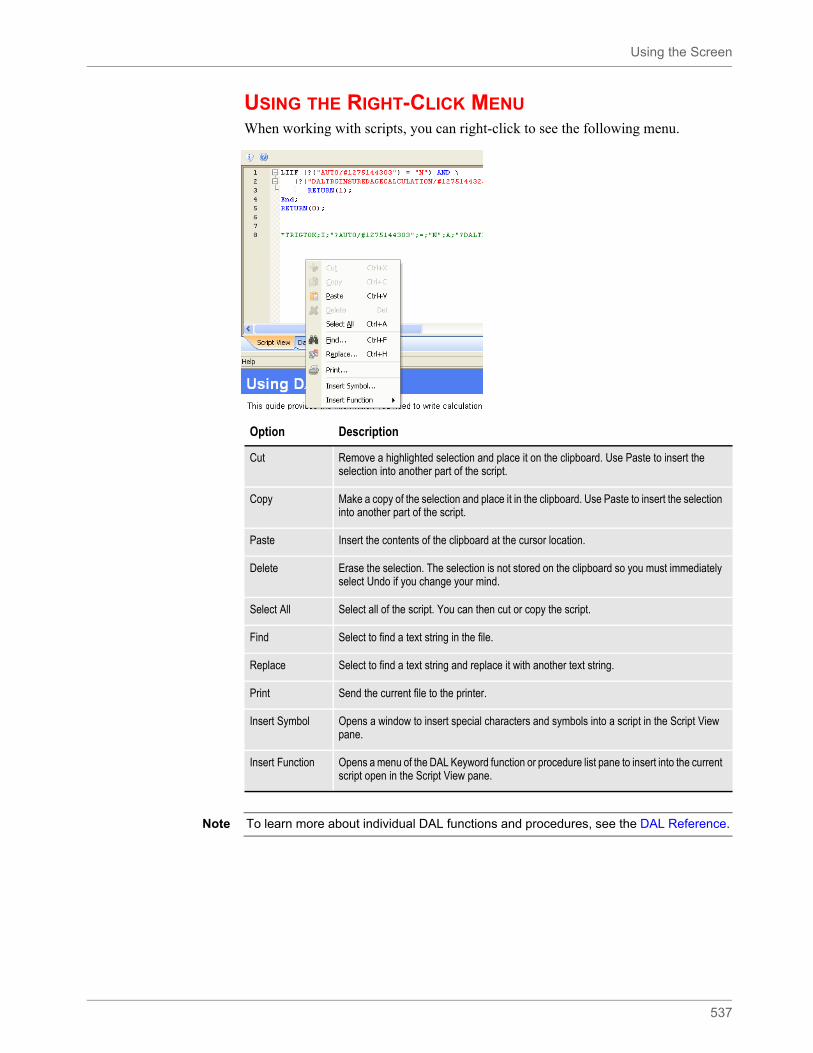
Using the Screen
537
USING THE RIGHT-CLICK MENUWhen working with scripts, you can right-click to see the following menu.
Option Description
Cut Remove a highlighted selection and place it on the clipboard. Use Paste to insert the selection into another part of the script.
Copy Make a copy of the selection and place it in the clipboard. Use Paste to insert the selection into another part of the script.
Paste Insert the contents of the clipboard at the cursor location.
Delete Erase the selection. The selection is not stored on the clipboard so you must immediately select Undo if you change your mind.
Select All Select all of the script. You can then cut or copy the script.
Find Select to find a text string in the file.
Replace Select to find a text string and replace it with another text string.
Print Send the current file to the printer.
Insert Symbol Opens a window to insert special characters and symbols into a script in the Script View pane.
Insert Function Opens a menu of the DAL Keyword function or procedure list pane to insert into the current script open in the Script View pane.
Note To learn more about individual DAL functions and procedures, see the DAL Reference.
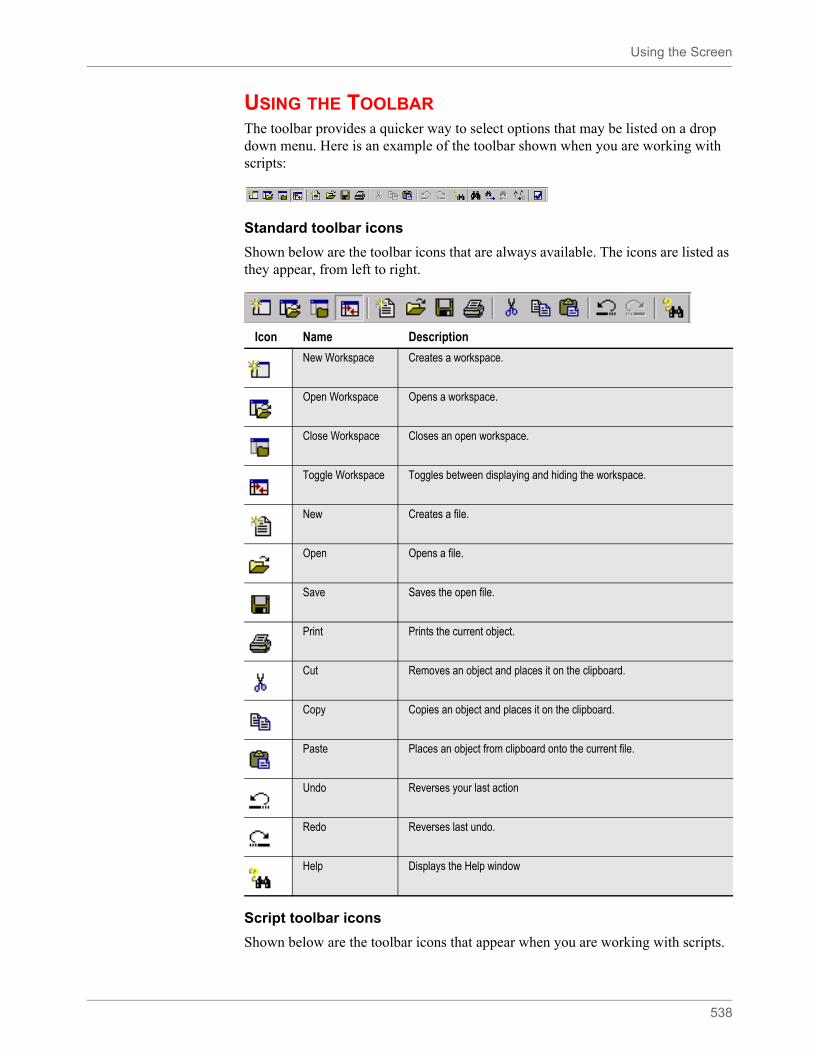
Using the Screen
538
USING THE TOOLBARThe toolbar provides a quicker way to select options that may be listed on a drop down menu. Here is an example of the toolbar shown when you are working with scripts:
Standard toolbar icons
Shown below are the toolbar icons that are always available. The icons are listed as they appear, from left to right.
Script toolbar icons
Shown below are the toolbar icons that appear when you are working with scripts.
Icon Name Description
New Workspace Creates a workspace.
Open Workspace Opens a workspace.
Close Workspace Closes an open workspace.
Toggle Workspace Toggles between displaying and hiding the workspace.
New Creates a file.
Open Opens a file.
Save Saves the open file.
Print Prints the current object.
Cut Removes an object and places it on the clipboard.
Copy Copies an object and places it on the clipboard.
Paste Places an object from clipboard onto the current file.
Undo Reverses your last action
Redo Reverses last undo.
Help Displays the Help window

Using the Screen
539
Icon Name Description
Find Select to find a text string in the file.
Repeat Select to repeat the last action.
Find previous Select to return to reverse the search.
Replace Select to find a text string and replace it with another text string.
Check syntax Select to check your script for syntax errors.
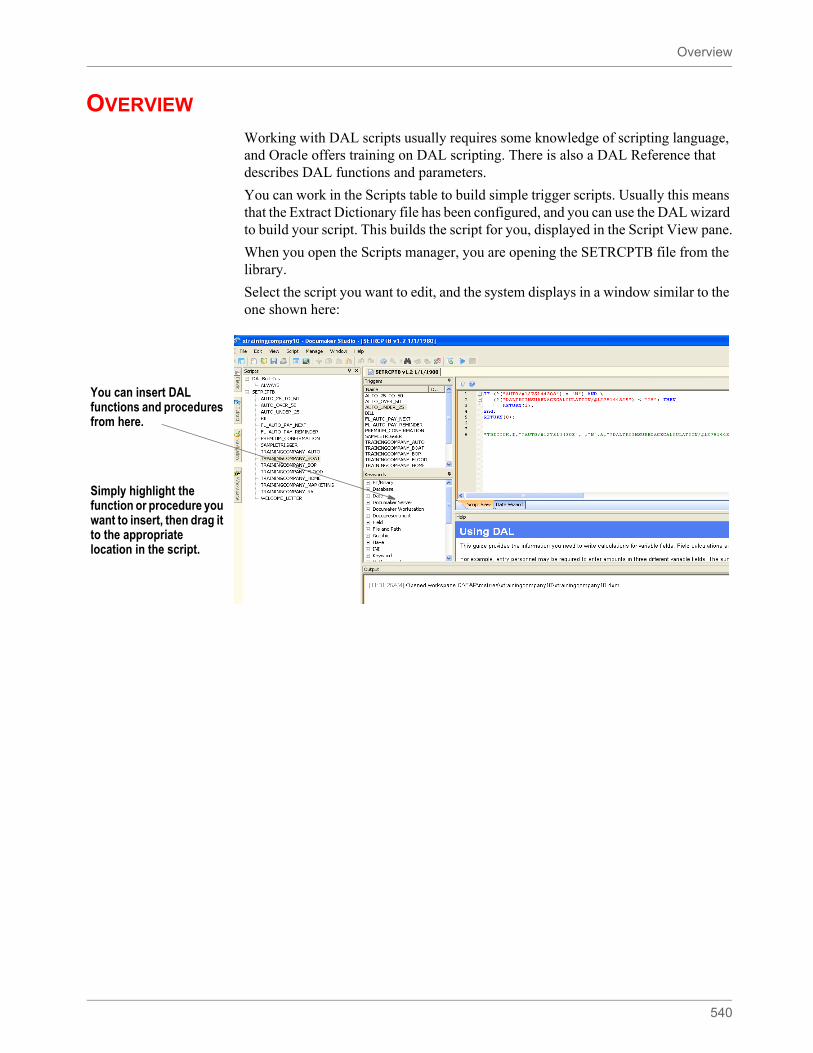
Overview
540
OVERVIEW
Working with DAL scripts usually requires some knowledge of scripting language, and Oracle offers training on DAL scripting. There is also a DAL Reference that describes DAL functions and parameters.
You can work in the Scripts table to build simple trigger scripts. Usually this means that the Extract Dictionary file has been configured, and you can use the DAL wizard to build your script. This builds the script for you, displayed in the Script View pane.
When you open the Scripts manager, you are opening the SETRCPTB file from the library.
Select the script you want to edit, and the system displays in a window similar to the one shown here:
You can insert DAL functions and procedures from here.
Simply highlight the function or procedure you want to insert, then drag it to the appropriate location in the script.
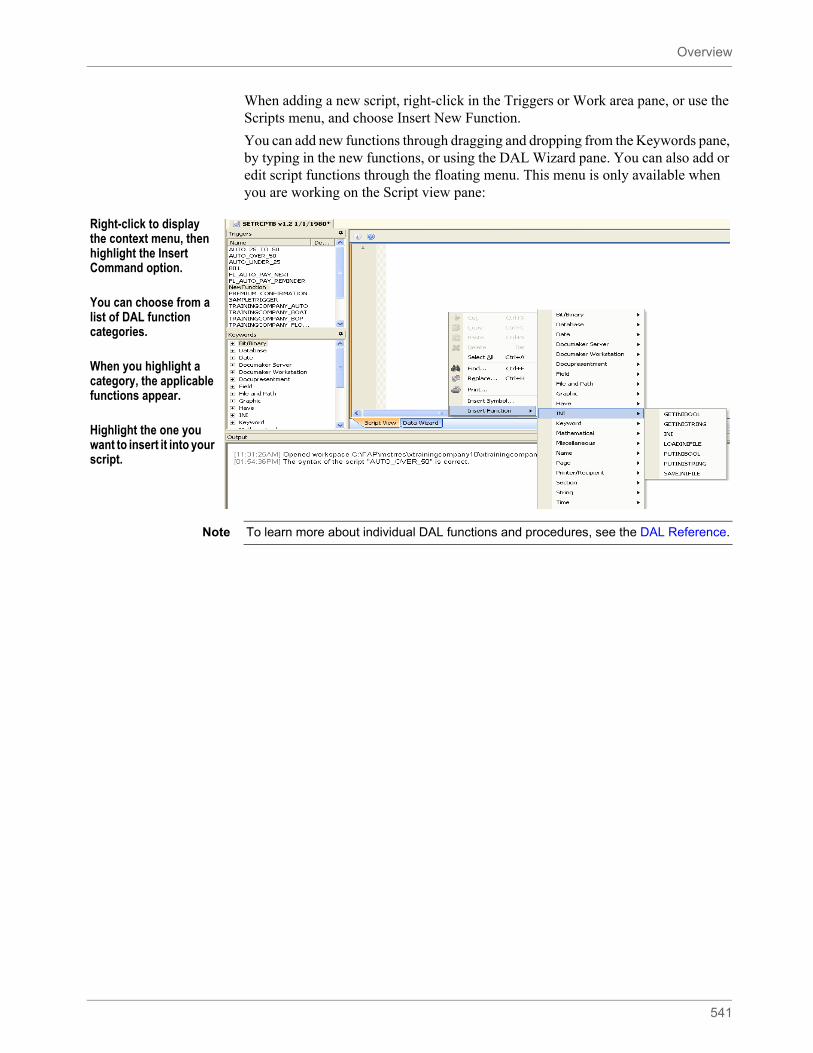
Overview
541
When adding a new script, right-click in the Triggers or Work area pane, or use the Scripts menu, and choose Insert New Function.
You can add new functions through dragging and dropping from the Keywords pane, by typing in the new functions, or using the DAL Wizard pane. You can also add or edit script functions through the floating menu. This menu is only available when you are working on the Script view pane:
Right-click to display the context menu, then highlight the Insert Command option.
You can choose from a list of DAL function categories.
When you highlight a category, the applicable functions appear.
Highlight the one you want to insert it into your script.
Note To learn more about individual DAL functions and procedures, see the DAL Reference.
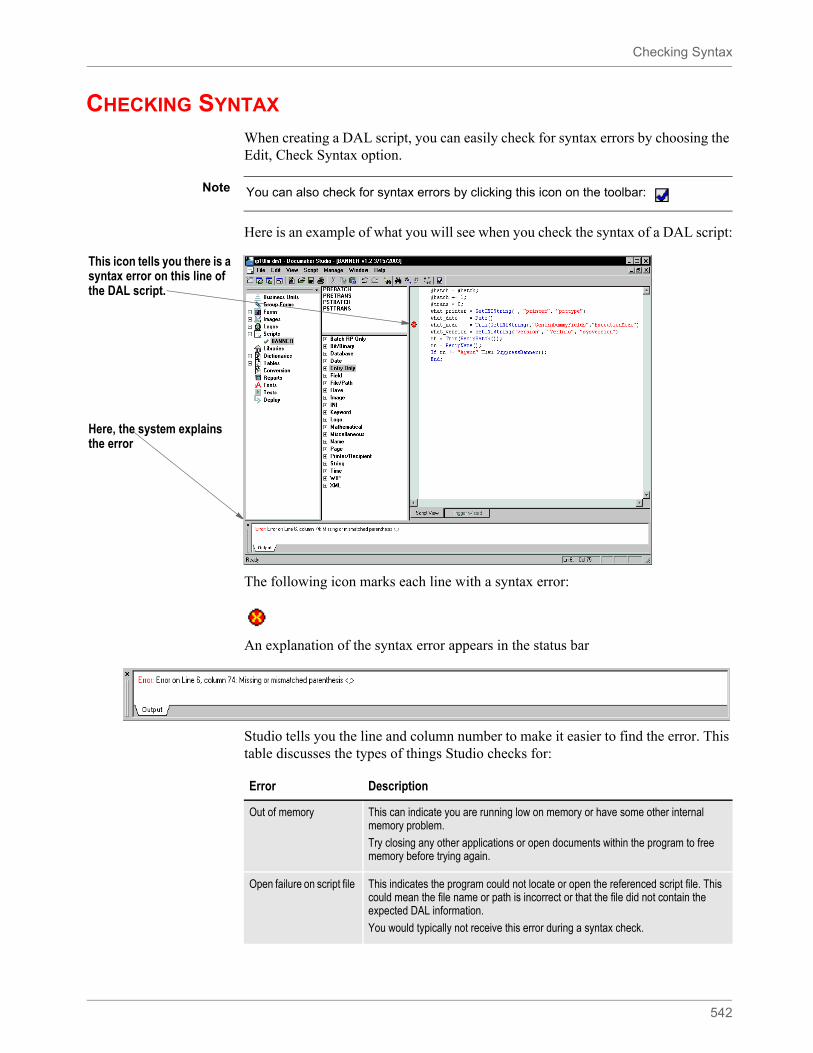
Checking Syntax
542
CHECKING SYNTAX
When creating a DAL script, you can easily check for syntax errors by choosing the Edit, Check Syntax option.
Here is an example of what you will see when you check the syntax of a DAL script:
The following icon marks each line with a syntax error:
An explanation of the syntax error appears in the status bar
Studio tells you the line and column number to make it easier to find the error. This table discusses the types of things Studio checks for:
Note You can also check for syntax errors by clicking this icon on the toolbar:
This icon tells you there is a syntax error on this line of the DAL script.
Here, the system explains the error
Error Description
Out of memory This can indicate you are running low on memory or have some other internal memory problem.
Try closing any other applications or open documents within the program to free memory before trying again.
Open failure on script file This indicates the program could not locate or open the referenced script file. This could mean the file name or path is incorrect or that the file did not contain the expected DAL information.
You would typically not receive this error during a syntax check.
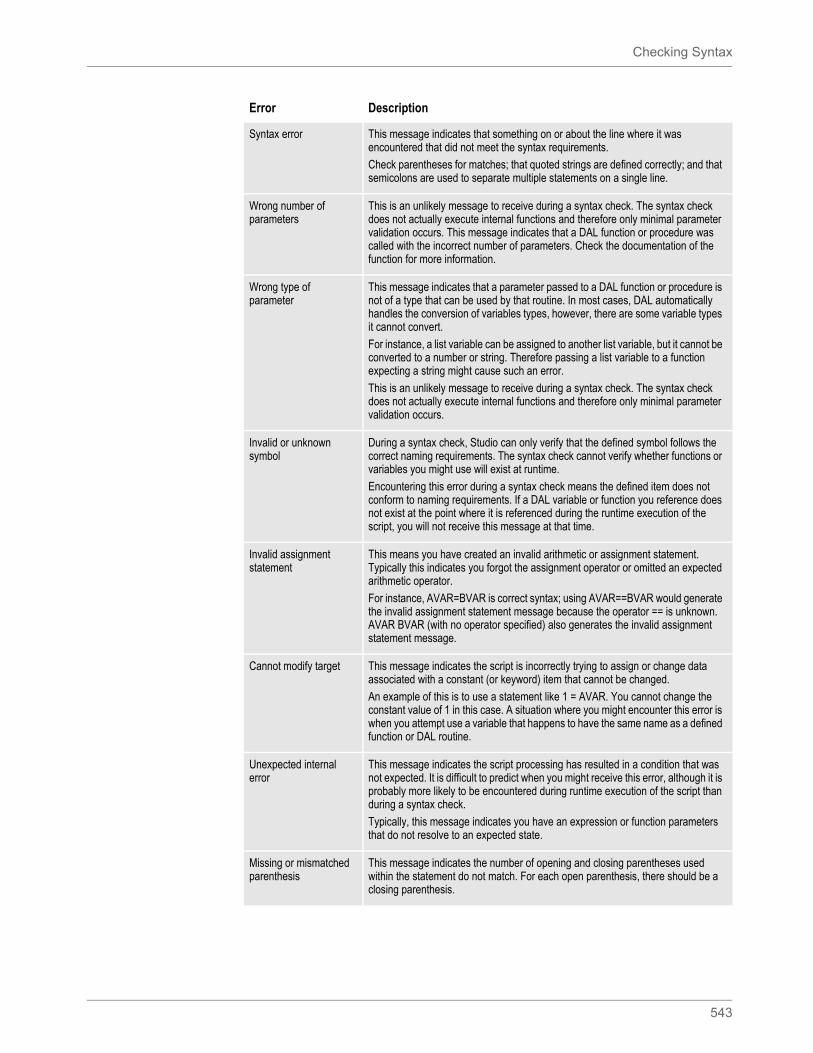
Checking Syntax
543
Syntax error This message indicates that something on or about the line where it was encountered that did not meet the syntax requirements.
Check parentheses for matches; that quoted strings are defined correctly; and that semicolons are used to separate multiple statements on a single line.
Wrong number of parameters
This is an unlikely message to receive during a syntax check. The syntax check does not actually execute internal functions and therefore only minimal parameter validation occurs. This message indicates that a DAL function or procedure was called with the incorrect number of parameters. Check the documentation of the function for more information.
Wrong type of parameter
This message indicates that a parameter passed to a DAL function or procedure is not of a type that can be used by that routine. In most cases, DAL automatically handles the conversion of variables types, however, there are some variable types it cannot convert.
For instance, a list variable can be assigned to another list variable, but it cannot be converted to a number or string. Therefore passing a list variable to a function expecting a string might cause such an error.
This is an unlikely message to receive during a syntax check. The syntax check does not actually execute internal functions and therefore only minimal parameter validation occurs.
Invalid or unknown symbol
During a syntax check, Studio can only verify that the defined symbol follows the correct naming requirements. The syntax check cannot verify whether functions or variables you might use will exist at runtime.
Encountering this error during a syntax check means the defined item does not conform to naming requirements. If a DAL variable or function you reference does not exist at the point where it is referenced during the runtime execution of the script, you will not receive this message at that time.
Invalid assignment statement
This means you have created an invalid arithmetic or assignment statement. Typically this indicates you forgot the assignment operator or omitted an expected arithmetic operator.
For instance, AVAR=BVAR is correct syntax; using AVAR==BVAR would generate the invalid assignment statement message because the operator == is unknown. AVAR BVAR (with no operator specified) also generates the invalid assignment statement message.
Cannot modify target This message indicates the script is incorrectly trying to assign or change data associated with a constant (or keyword) item that cannot be changed.
An example of this is to use a statement like 1 = AVAR. You cannot change the constant value of 1 in this case. A situation where you might encounter this error is when you attempt use a variable that happens to have the same name as a defined function or DAL routine.
Unexpected internal error
This message indicates the script processing has resulted in a condition that was not expected. It is difficult to predict when you might receive this error, although it is probably more likely to be encountered during runtime execution of the script than during a syntax check.
Typically, this message indicates you have an expression or function parameters that do not resolve to an expected state.
Missing or mismatched parenthesis
This message indicates the number of opening and closing parentheses used within the statement do not match. For each open parenthesis, there should be a closing parenthesis.
Error Description
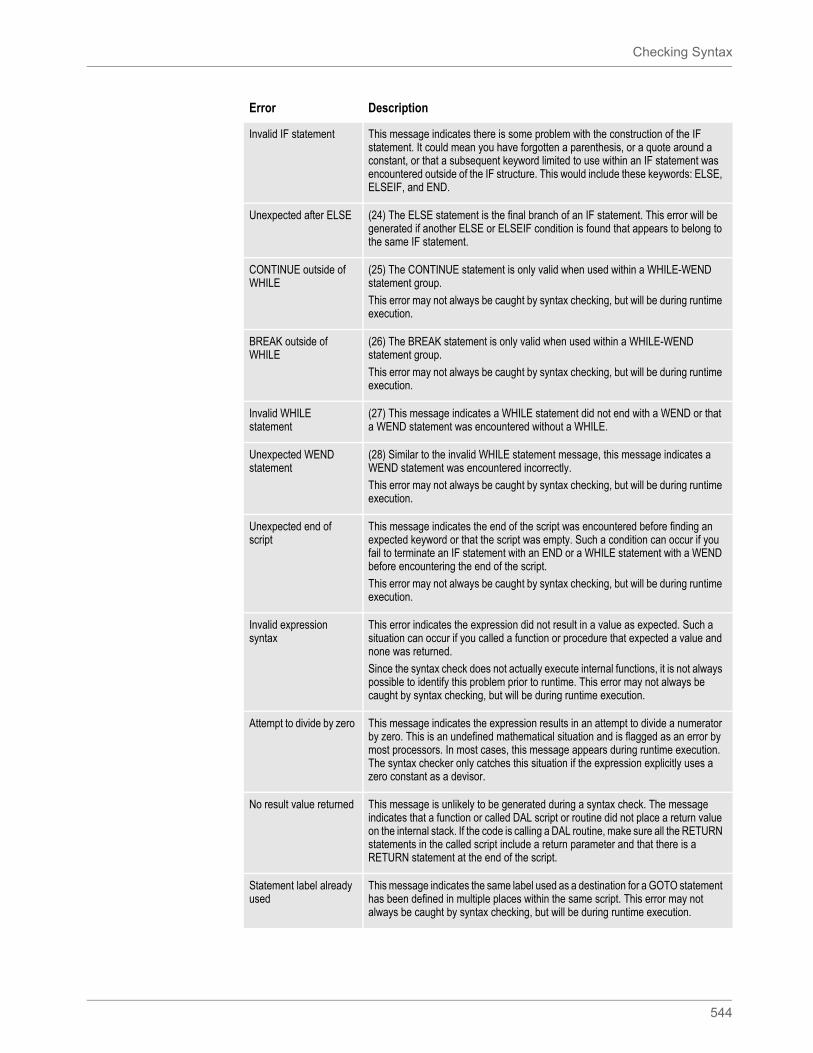
Checking Syntax
544
Invalid IF statement This message indicates there is some problem with the construction of the IF statement. It could mean you have forgotten a parenthesis, or a quote around a constant, or that a subsequent keyword limited to use within an IF statement was encountered outside of the IF structure. This would include these keywords: ELSE, ELSEIF, and END.
Unexpected after ELSE (24) The ELSE statement is the final branch of an IF statement. This error will be generated if another ELSE or ELSEIF condition is found that appears to belong to the same IF statement.
CONTINUE outside of WHILE
(25) The CONTINUE statement is only valid when used within a WHILE-WEND statement group.
This error may not always be caught by syntax checking, but will be during runtime execution.
BREAK outside of WHILE
(26) The BREAK statement is only valid when used within a WHILE-WEND statement group.
This error may not always be caught by syntax checking, but will be during runtime execution.
Invalid WHILE statement
(27) This message indicates a WHILE statement did not end with a WEND or that a WEND statement was encountered without a WHILE.
Unexpected WEND statement
(28) Similar to the invalid WHILE statement message, this message indicates a WEND statement was encountered incorrectly.
This error may not always be caught by syntax checking, but will be during runtime execution.
Unexpected end of script
This message indicates the end of the script was encountered before finding an expected keyword or that the script was empty. Such a condition can occur if you fail to terminate an IF statement with an END or a WHILE statement with a WEND before encountering the end of the script.
This error may not always be caught by syntax checking, but will be during runtime execution.
Invalid expression syntax
This error indicates the expression did not result in a value as expected. Such a situation can occur if you called a function or procedure that expected a value and none was returned.
Since the syntax check does not actually execute internal functions, it is not always possible to identify this problem prior to runtime. This error may not always be caught by syntax checking, but will be during runtime execution.
Attempt to divide by zero This message indicates the expression results in an attempt to divide a numerator by zero. This is an undefined mathematical situation and is flagged as an error by most processors. In most cases, this message appears during runtime execution. The syntax checker only catches this situation if the expression explicitly uses a zero constant as a devisor.
No result value returned This message is unlikely to be generated during a syntax check. The message indicates that a function or called DAL script or routine did not place a return value on the internal stack. If the code is calling a DAL routine, make sure all the RETURN statements in the called script include a return parameter and that there is a RETURN statement at the end of the script.
Statement label already used
This message indicates the same label used as a destination for a GOTO statement has been defined in multiple places within the same script. This error may not always be caught by syntax checking, but will be during runtime execution.
Error Description

Checking Syntax
545
Unknown statement label
This message indicates the label defined as the destination for a GOTO statement could not be located within the defined script. Typically, this means you have incorrectly identified the label in the GOTO statement or have omitted the label destination in the script. Make sure to name the destination label on the GOTO statement with the tailing colon.
GOTO BOB (incorrect)GOTO BOB: (correct)
Invalid statement label This message indicates the defined label does not conform to the definition requirements of a GOTO label. Statement labels have the same requirement as string variables and must begin with a letter and be no more than 64 characters in length, including the terminating colon on the end of the name.
Function out of place This message indicates you have called a function which must return a value, but did not define the expression in a way to use the resulting value.
For instance, the HaveForm function must return a zero or one to indicate if the defined form is included in the document set. If you use this function without capturing or testing the returned value, this message appears.
Since the syntax checker does not actually execute internal functions, it is unable to identify when such a situation might exist. These errors occur during the runtime execution of the script.
Illegal parameter value This message indicates you have called a function or procedure with an invalid parameter value.
Since the syntax checker does not actually execute internal functions, it is unable to identify when such a situation might exist. These errors occur during the runtime execution of the script.
Table has not been opened
(22) This message indicates a function or procedure was called with a parameter naming a table, such as a database file, that was not explicitly opened.
Since the syntax checker does not actually execute internal functions, it is unable to identify when such a situation might exist. These errors occur during the runtime execution of the script.
If you encounter this error, make sure that the DBOPEN statement was not skipped due to an IF statement or GOTO operation.
Error Description
546
Chapter 12
Managing Resources
This chapter discusses how you can store the resources that comprise your forms in libraries and use Studio and other tools to manage those resources.
Included in this chapter is information on:
• Overview on page 547
• Creating Libraries on page 565
• Working with Libraries on page 600
• Using the LBYPROC Utility on page 648
• Troubleshooting on page 649
Overview
547
OVERVIEW
You use a variety of resources to build a form set. These resources can include sections (FAP files), graphics (LOG files), and processing scripts (DAL scripts).
Studio creates a library that stores these resources and provides features that let you manage those resources. For instance, Studio lets you date stamp a resource so it will not be used until its effective date is reached.
As you work with resources, such as sections or graphics, Studio lets you check resources into and out of the library. When a resource is checked out, Studio marks that resource as being locked and prevents others from checking it out until it is checked back in. In this way Documaker Studio facilitates a multiple user work environment.
Documaker Entry environments use the library management capabilities to get the appropriate version of a resource, based on the effective date of the documents being generated.
Likewise, Documaker Server uses the library management capabilities to load the correct resources from the library when needed. And, the Documaker Bridge for Docupresentment uses library management capabilities to retrieve the correct version of each of the resources used when the document was archived.
To better understand library management, it is important for you to become familiar with the following topics:
• Terminology on page 548
• Concepts on page 550
• How It All Works on page 559
• Managing Workflow on page 564
• Working with Libraries on page 600
Overview
548
TERMINOLOGYBefore you begin managing your resources in libraries, there are some terms you should understand and concepts you should be familiar with.
Check in
The process of putting a resource into the library initially, or back into the library after you have checked that resource out.
Check out
The process of selecting a resource from a library. When you select the resource, it is locked to your User ID. It remains locked until you check the resource back in.
Effective dates
A field in the library index that is associated with a resource in the library. This field indicates the date at which the resource is available for use, or when it will become effective.
Default effective dates
A default effective date can be set for new resources being checked into a workspace. Documaker Studio remembers the last date used for a new resource and uses that date as the default for the next new resource.
Expire
The process of designating a library resource as being unavailable for use beginning with a supplied expiration date.
Extract
The process of making a copy of a resource in a library and writing that copy to disk.
Libraries
Refers to the physical files in which the resources are stored. Logically, a library is divided into an index portion and a data portion.
Modification dates
A field in the library index that contains a timestamp indicating the date and time the resource was last modified or checked in to the library. This field is in hexadecimal format in the index but is formatted to a more readable format when displayed in the tools.
Revisions
A field in the library index that indicates the minor change number. The revision number is generally incremented by one each time a resource is checked out and back in. If, however, the version number is incremented, the revision number is reset to 1 for that version. A revision number consists of five digits, such as 00001.
Note When a resource is expired, the revision field is set to EXP.
Overview
549
Response files
In Documaker terms, a file created by the LBRYMGR utility that contains commands and data. These commands and data are then read by Studio (or the LBRYMGR utility) and processed accordingly.
Promotion
The process of copying (or promoting) resources from one library to another library, based on criteria you specify. Resources from the source library that have a newer modification date than resources, with a corresponding name, in the target library, are copied to the target library.
Unlock
The process of removing the lock from a resource that you have previously checked out. Only the user who locked the resource can unlock it.
Versions
A field in the library index that indicates the major change number. The version number is only incremented upon check in when you check the Increment Version field. If you want to change the effective date for the resource you are checking in, you are forced to check the Increment Version field before you are allowed to type a new effective date.
In Documaker 10.2 and higher, a version number consists of five digits, such as 00001.
Overview
550
CONCEPTSIn addition to the terminology you should be familiar with, there are several concepts:
• Understanding Library File Structure on page 550
• Processing with Effective Dates on page 552
• Setting the Default Effective Date on page 553
• Stringently Checking Resources on page 555
• Understanding Run Dates on page 557
• Refreshing the Display on page 558
To begin working in the library, please to go Working with Libraries on page 600.
Understanding Library File Structure
Documaker library model is a Structured Query Language (SQL) index with an Open Database Connectivity (ODBC) file repository. The library has these components:
• Index table
• Data table
• Catalog table
• Library Log table
The index table includes these fields. The maximum length is indicated in parentheses:
Note You are only concerned with the library type when you are creating a new workspace or using Manage, Settings, Libraries to define a new library.
Field Description
FileType(3)
This field can contains a value that defines the type of resource this row refers to, such as FAP, LOG, BDF, GRP, or DAL.
FileSTyp(3)
This field indicates the sub type of the resource this row refers to. This field is not currently used and is usually set to the value of the FileType field.
FileName(100)
This field indicates the name of the resource, such as Q1SNAM, Q1ADDR, or IMAGE1. The name can consist of up to 100 characters.
Resource(25)
Reserved for future use.
Descript(100)
This field contains a description of the resource or the last change made to it. You can enter up to 100 characters.
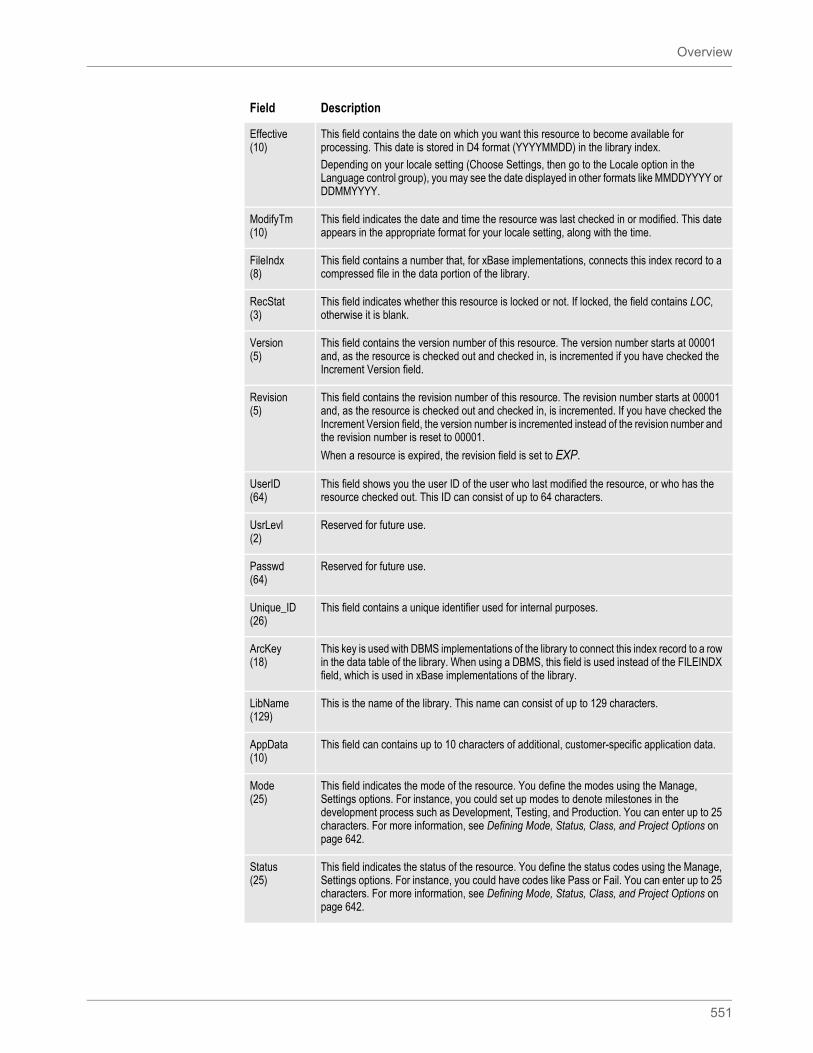
Overview
551
Effective(10)
This field contains the date on which you want this resource to become available for processing. This date is stored in D4 format (YYYYMMDD) in the library index.
Depending on your locale setting (Choose Settings, then go to the Locale option in the Language control group), you may see the date displayed in other formats like MMDDYYYY or DDMMYYYY.
ModifyTm(10)
This field indicates the date and time the resource was last checked in or modified. This date appears in the appropriate format for your locale setting, along with the time.
FileIndx(8)
This field contains a number that, for xBase implementations, connects this index record to a compressed file in the data portion of the library.
RecStat(3)
This field indicates whether this resource is locked or not. If locked, the field contains LOC, otherwise it is blank.
Version(5)
This field contains the version number of this resource. The version number starts at 00001 and, as the resource is checked out and checked in, is incremented if you have checked the Increment Version field.
Revision(5)
This field contains the revision number of this resource. The revision number starts at 00001 and, as the resource is checked out and checked in, is incremented. If you have checked the Increment Version field, the version number is incremented instead of the revision number and the revision number is reset to 00001.
When a resource is expired, the revision field is set to EXP.
UserID(64)
This field shows you the user ID of the user who last modified the resource, or who has the resource checked out. This ID can consist of up to 64 characters.
UsrLevl(2)
Reserved for future use.
Passwd(64)
Reserved for future use.
Unique_ID(26)
This field contains a unique identifier used for internal purposes.
ArcKey(18)
This key is used with DBMS implementations of the library to connect this index record to a row in the data table of the library. When using a DBMS, this field is used instead of the FILEINDX field, which is used in xBase implementations of the library.
LibName(129)
This is the name of the library. This name can consist of up to 129 characters.
AppData(10)
This field can contains up to 10 characters of additional, customer-specific application data.
Mode(25)
This field indicates the mode of the resource. You define the modes using the Manage, Settings options. For instance, you could set up modes to denote milestones in the development process such as Development, Testing, and Production. You can enter up to 25 characters. For more information, see Defining Mode, Status, Class, and Project Options on page 642.
Status(25)
This field indicates the status of the resource. You define the status codes using the Manage, Settings options. For instance, you could have codes like Pass or Fail. You can enter up to 25 characters. For more information, see Defining Mode, Status, Class, and Project Options on page 642.
Field Description
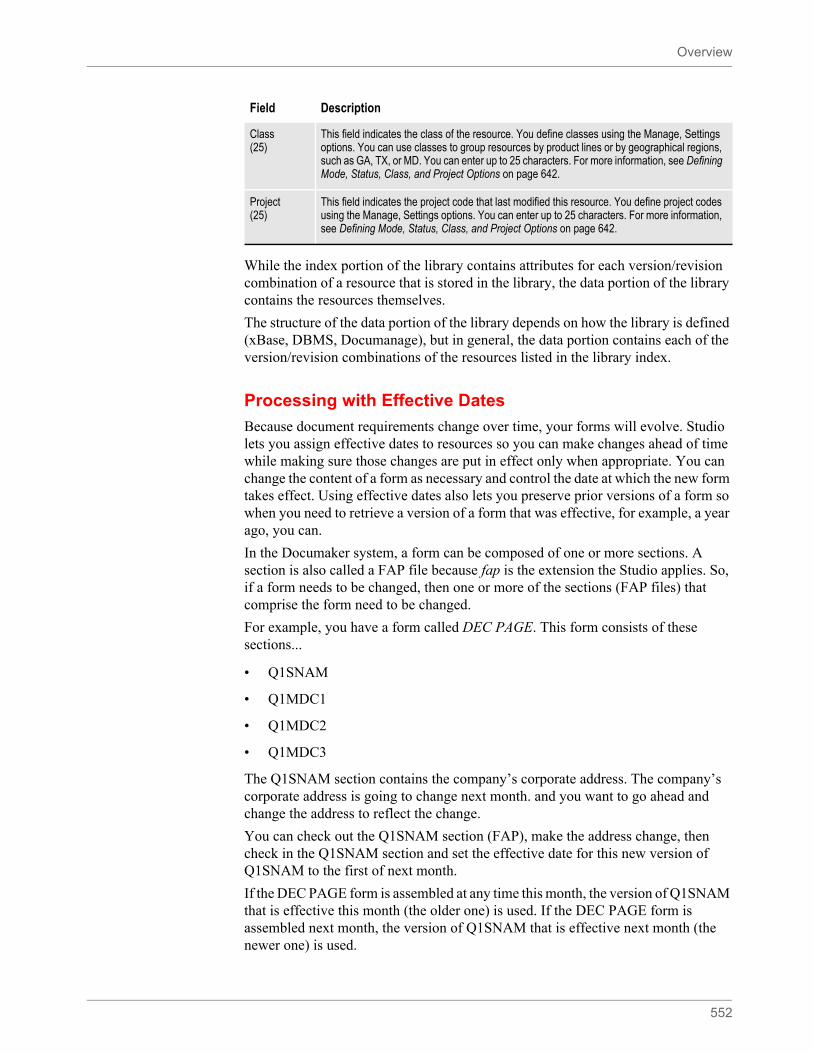
Overview
552
While the index portion of the library contains attributes for each version/revision combination of a resource that is stored in the library, the data portion of the library contains the resources themselves.
The structure of the data portion of the library depends on how the library is defined (xBase, DBMS, Documanage), but in general, the data portion contains each of the version/revision combinations of the resources listed in the library index.
Processing with Effective Dates
Because document requirements change over time, your forms will evolve. Studio lets you assign effective dates to resources so you can make changes ahead of time while making sure those changes are put in effect only when appropriate. You can change the content of a form as necessary and control the date at which the new form takes effect. Using effective dates also lets you preserve prior versions of a form so when you need to retrieve a version of a form that was effective, for example, a year ago, you can.
In the Documaker system, a form can be composed of one or more sections. A section is also called a FAP file because fap is the extension the Studio applies. So, if a form needs to be changed, then one or more of the sections (FAP files) that comprise the form need to be changed.
For example, you have a form called DEC PAGE. This form consists of these sections...
• Q1SNAM
• Q1MDC1
• Q1MDC2
• Q1MDC3
The Q1SNAM section contains the company’s corporate address. The company’s corporate address is going to change next month. and you want to go ahead and change the address to reflect the change.
You can check out the Q1SNAM section (FAP), make the address change, then check in the Q1SNAM section and set the effective date for this new version of Q1SNAM to the first of next month.
If the DEC PAGE form is assembled at any time this month, the version of Q1SNAM that is effective this month (the older one) is used. If the DEC PAGE form is assembled next month, the version of Q1SNAM that is effective next month (the newer one) is used.
Class(25)
This field indicates the class of the resource. You define classes using the Manage, Settings options. You can use classes to group resources by product lines or by geographical regions, such as GA, TX, or MD. You can enter up to 25 characters. For more information, see Defining Mode, Status, Class, and Project Options on page 642.
Project(25)
This field indicates the project code that last modified this resource. You define project codes using the Manage, Settings options. You can enter up to 25 characters. For more information, see Defining Mode, Status, Class, and Project Options on page 642.
Field Description
Overview
553
This example uses a FAP file to demonstrate how the effective date of a resource can be used to cause a different version of that resource to be used at the appropriate time. You can also manage graphics (LOG files) and DAL scripts in the same way.
Setting the Default Effective Date
You can set a default effective date for new resources being checked into a workspace. Previously, workspace creation and import would default the date to
1-1-1980, while the check-in window for a new resource would default to the current date.
Studio now remembers the last date used for a new resource or workspace creation and uses that date as the default for the next new resource. You can, of course, override the date.
The default date is stored as a registry item by workspace name so if you have more than one workspace, each can have a different default. The date string is stored in
YYYYMMDD format.
When a workspace is created, the default library date is stored in the registry. When new resources are checked into the workspace, the library effective date field defaults to the last value used for a new resource.
Studio does not update the registry for existing library items that you give a new version effective date. To modify the default date for a workspace, change the effective date on a new library resource.
Also, other locations that query for a default effective date will use this same value. This includes the various import and conversion features where resources are checked into the library.
Retrieving Resources with Version and Revision Numbers
When a resource is added to the library it is assigned a version number and a revision number. A resource added to the library for the first time is given a version number of 00001 and a revision number of 00001. The version number and revision number change as the resource is checked out, changed, and checked back in.
Generally, if you check out a resource to make a small change, the revision number of the resource is incremented by one when you check in the resource. If you make a major change to the resource, or if this change requires you also change the effective date, the version number is incremented by one. The version number is considered a major number and the revision number is considered a minor number.
Note Keep in mind if you are triggering forms based on effective date processing:
If possible, avoid creating forms with effective dates that require updated printer resource files, such as fonts, form overlays, bitmap files, and so on.
Otherwise, make sure you have the corresponding set of printer resource files for the forms based on the effective date to be processed.
Note If no default value is found for the workspace, Studio uses Jan 1, 1980.
Overview
554
Typically, version/revision numbers are shown in this format:
version.revision
and leading zeros are omitted. So version 00001, revision 00003 is referred to as 1.3.
When you request a resource, the request generally supplies a resource type (FAP, LOG, or DAL), a name (such as Q1SNAM) and a run date (such as 20071225, which is December 25, 2007). Studio searches the library index for items that match that name and type, then chooses the one which has an effective date closest to, but not exceeding, the run date.
If Studio finds there are two or more versions of the same resource with the same effective date, it chooses the one with the higher version/revision number. For instance, the version/revision 2.1 is considered to be higher than the version/revision 1.2, so between these two resources, Studio would choose 2.1.
Note Documaker (versions 10.2 and higher) enforces the rule that all revisions of a particular version of a resource must have the same effective date. Prior to version 10.2, Documaker allowed revisions of a particular version of a resource to have different effective dates.
Overview
555
Stringently Checking Resources
In Documaker 10.3
In Documaker 10.3 and higher, the StringentChecking option defaults to Yes. Stringent checking means that if Studio finds versions of a resource in the library but none are effective yet — their effective date is greater than the run date being used— it will not return any of those resources.
Although you should leave the StringentChecking option set to Yes, you can, however, override it, as shown here:
< LibraryManager >StringentChecking = No
When StringentChecking is set to No, Studio tries to return some version of the resource, even if that resource is not yet effective. If Studio finds versions of a resource in the library but none are effective yet, Studio returns the resource with the oldest effective date.
If the StringentChecking option is set to No and Studio does not find any versions of the resource in the library, it tries to find the resource on disk, in the location designated for that resource type in the INI file. If it finds the resource on disk, it returns that resource.
In Documaker 10.2 and earlier
In Documaker 10.2 and earlier, the StringentChecking option defaults to No. If the system finds versions of a resource in the library but none of those versions are effective yet, it returns the oldest version/revision of that resource.
If the system does not find any versions of the resource in the library, it tries to find the resource on disk, in the location designated for that resource type in the INI file. If it finds the resource on disk, it returns that resource.
For DDT files only, if you want the system to issue an error message or to perform specialized processing, you can set the StringentChecking option to Yes. In Documaker 10.2, stringent checking is only available for DDT resources and only affects the GenData program.
You can use these INI options to control the stringent checking of DDT resources:
< DDTResource >ErrorOnMissingFile = YesRemoveImageMissingDDT = NoStringentChecking = NoWarnOnMissingFile = Yes
Option Description
ErrorOnMissingFile The system normally generates an error if a DDT file cannot be found for a triggered section. Errors are written to a file, named using the ErrFile option in the Data control group.
This file is typically called ERRFILE.DAT. Set this option to No to prevent the system from generating an error message when it cannot find the DDT file. The default is Yes.

Overview
556
RemoveImageMissingDDT A DDT file is normally required for any triggered section and not finding a section is a fatal error for a transaction. Setting this option to Yes tells the system that when it cannot find a DDT file for a triggered section, it should remove the section from the form set.
This can result in the removal of the form as well if all sections are removed. An empty form set can result if all of the forms are removed. If this results in an empty form set, the system generates an error message. The default is No.
StringentChecking Normally, if the system does not find an effective version of the file, it returns the oldest version/revision of the file.
If, however, you set this option to Yes, only an effective version of the file will be returned. If no such file exists, nothing is returned. Stringent checking is only applicable when you use the system to control effective date eligibility of DDT files. The default is No.
WarnOnMissingFile Normally, the system generates an error if it cannot find a DDT file for a triggered section. You can, however, suppress this error by setting the ErrorOnMissingFile option to No.
When you suppress this type of error, the system assumes you still want a warning message but by setting this option to No, even the warning message is suppressed. The default is Yes.
Option Description
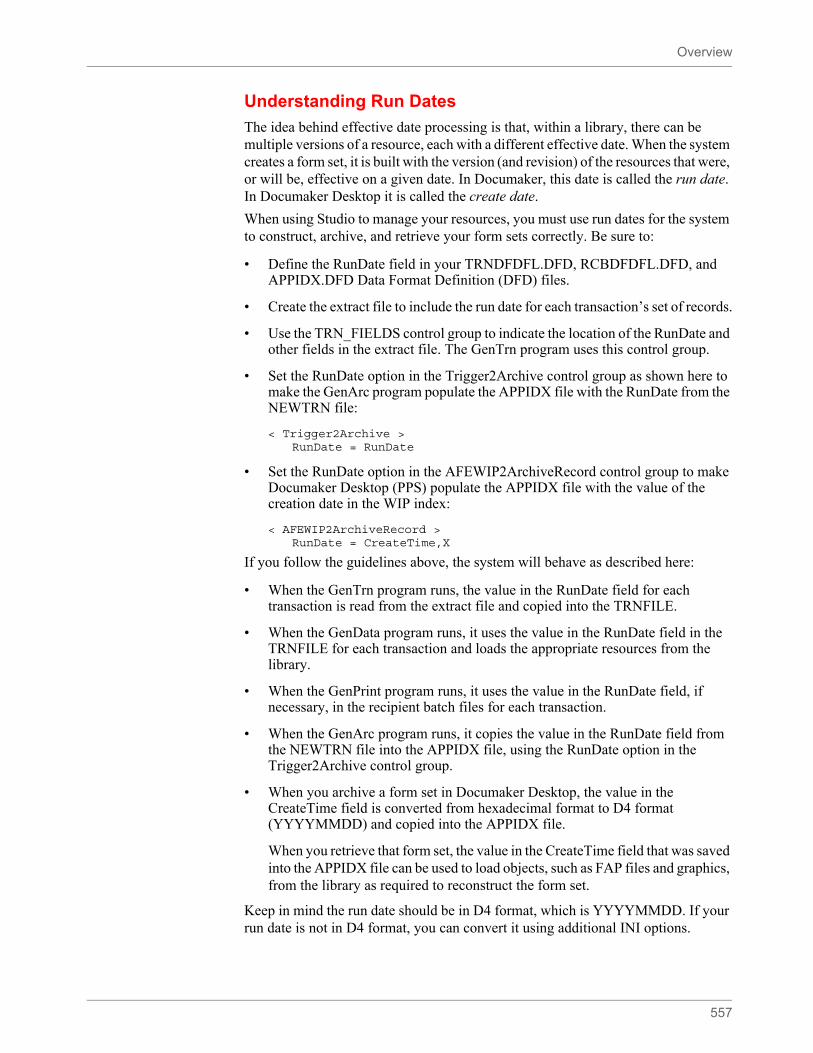
Overview
557
Understanding Run Dates
The idea behind effective date processing is that, within a library, there can be multiple versions of a resource, each with a different effective date. When the system creates a form set, it is built with the version (and revision) of the resources that were, or will be, effective on a given date. In Documaker, this date is called the run date. In Documaker Desktop it is called the create date.
When using Studio to manage your resources, you must use run dates for the system to construct, archive, and retrieve your form sets correctly. Be sure to:
• Define the RunDate field in your TRNDFDFL.DFD, RCBDFDFL.DFD, and APPIDX.DFD Data Format Definition (DFD) files.
• Create the extract file to include the run date for each transaction’s set of records.
• Use the TRN_FIELDS control group to indicate the location of the RunDate and other fields in the extract file. The GenTrn program uses this control group.
• Set the RunDate option in the Trigger2Archive control group as shown here to make the GenArc program populate the APPIDX file with the RunDate from the NEWTRN file:
< Trigger2Archive >RunDate = RunDate
• Set the RunDate option in the AFEWIP2ArchiveRecord control group to make Documaker Desktop (PPS) populate the APPIDX file with the value of the creation date in the WIP index:
< AFEWIP2ArchiveRecord >RunDate = CreateTime,X
If you follow the guidelines above, the system will behave as described here:
• When the GenTrn program runs, the value in the RunDate field for each transaction is read from the extract file and copied into the TRNFILE.
• When the GenData program runs, it uses the value in the RunDate field in the TRNFILE for each transaction and loads the appropriate resources from the library.
• When the GenPrint program runs, it uses the value in the RunDate field, if necessary, in the recipient batch files for each transaction.
• When the GenArc program runs, it copies the value in the RunDate field from the NEWTRN file into the APPIDX file, using the RunDate option in the Trigger2Archive control group.
• When you archive a form set in Documaker Desktop, the value in the CreateTime field is converted from hexadecimal format to D4 format (YYYYMMDD) and copied into the APPIDX file.
When you retrieve that form set, the value in the CreateTime field that was saved into the APPIDX file can be used to load objects, such as FAP files and graphics, from the library as required to reconstruct the form set.
Keep in mind the run date should be in D4 format, which is YYYYMMDD. If your run date is not in D4 format, you can convert it using additional INI options.
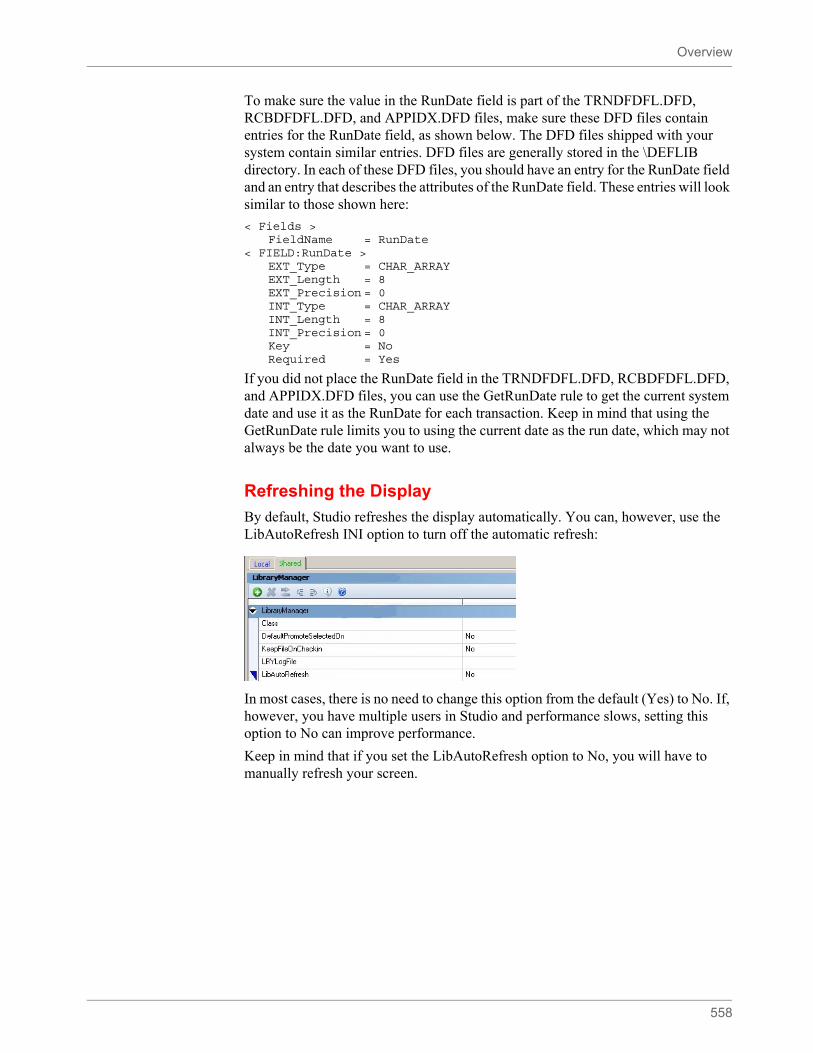
Overview
558
To make sure the value in the RunDate field is part of the TRNDFDFL.DFD, RCBDFDFL.DFD, and APPIDX.DFD files, make sure these DFD files contain entries for the RunDate field, as shown below. The DFD files shipped with your system contain similar entries. DFD files are generally stored in the \DEFLIB directory. In each of these DFD files, you should have an entry for the RunDate field and an entry that describes the attributes of the RunDate field. These entries will look similar to those shown here:
< Fields >FieldName = RunDate
< FIELD:RunDate >EXT_Type = CHAR_ARRAYEXT_Length = 8EXT_Precision = 0INT_Type = CHAR_ARRAYINT_Length = 8INT_Precision = 0Key = NoRequired = Yes
If you did not place the RunDate field in the TRNDFDFL.DFD, RCBDFDFL.DFD, and APPIDX.DFD files, you can use the GetRunDate rule to get the current system date and use it as the RunDate for each transaction. Keep in mind that using the GetRunDate rule limits you to using the current date as the run date, which may not always be the date you want to use.
Refreshing the Display
By default, Studio refreshes the display automatically. You can, however, use the LibAutoRefresh INI option to turn off the automatic refresh:
In most cases, there is no need to change this option from the default (Yes) to No. If, however, you have multiple users in Studio and performance slows, setting this option to No can improve performance.
Keep in mind that if you set the LibAutoRefresh option to No, you will have to manually refresh your screen.
Overview
559
HOW IT ALL WORKSThe following topics describe how Documaker software uses these concepts in everyday processing.
In Documaker Desktop
Entry
When you use Documaker Desktop (or PPS) to create a new form set or transaction, the current system date is used to note when the form set was created. This value is stored in the CreateTime field, which is equivalent to the RunDate field in Documaker.
You can change this date by clicking on the Effective Date control and choosing a different date from the calendar. You can hide the Effective Date control using this option:
< Control >ShowEffectiveDate = No
The effective date specified — whether the current date or another date — is the date compared against the effective dates associated with the resources, such as FAP files and graphics, pulled from the library.
Example 1 - Multiple versions, different effective dates
Say today’s date is 10/25/2007 and the form set you are creating requires a form called DEC PAGE. The DEC PAGE form is comprised of these FAP files:
• Q1SNAM
• Q1MDC1
• Q1MDC2
• Q1MDC3
Assume the following versions of the Q1SNAM FAP are in the library:
Since the run date is 20071025 (10/25/2007), Studio chooses version 00001, revision 00002 (version 1.2) of Q1SNAM because it has an effective date (20070731) and that is the latest date that does not exceed the run date (20071025).
Form set Version Revision Effective Date
Q1SNAM 00001 00001 20070131
Q1SNAM 00001 00002 20070731
Q1SNAM 00002 00001 20071231
Note This example shows two revisions, 1.1 and 1.2, of version 1 which contain different effective dates. Though Documaker 10.2 and higher enforce the rule that all revisions of a particular version of a resource must have the same effective date, if you have migrated a library from a prior version, your library can contain resources that do not adhere to this restriction. This situation will not cause errors.
Overview
560
Example 2 - Multiple versions, same effective dates
Say today’s date is 10/25/2007 and the form set you are creating requires a form called DEC PAGE. The DEC PAGE form is comprised of these FAP files:
• Q1SNAM
• Q1MDC1
• Q1MDC2
• Q1MDC3
Assume the following versions of the Q1SNAM FAP are in the library:
The run date is 20071025 (10/25/2007), so the latest effective for Q1SNAM that does not exceed the run date is 20070731. There are three version/revisions of Q1SNAM that have the most correct effective date, versions 1.1, 1.2, and 1.3. Studio chooses version 1.3 because it has the highest version/revision number.
Sometimes, you might create a form set and decide to base that new form set on an older one from archive. To do this, you first choose the New, Retrieve Data option to select the form set from archive. By default, the new form set would consist of the same version/revisions of the forms from the archived form set.
If, instead, you want the new form set to be comprised of the same forms as the archived form set, but with newer versions/revisions of those forms — if they exist — you must use this INI option:
< FormSelection >RetrieveVersionInfo = No
Form set Version Revision Effective Date
Q1SNAM 00001 00001 20070731
Q1SNAM 00001 00002 20070731
Q1SNAM 00001 00003 20070731
Q1SNAM 00002 00001 20071231
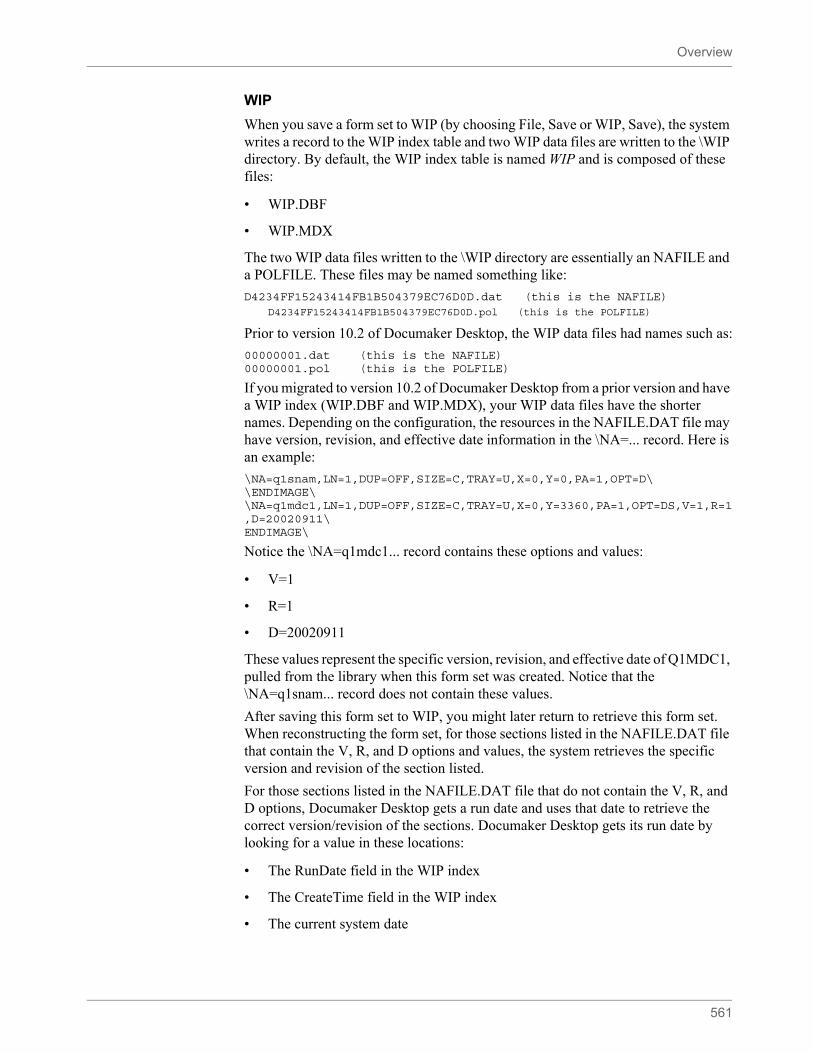
Overview
561
WIP
When you save a form set to WIP (by choosing File, Save or WIP, Save), the system writes a record to the WIP index table and two WIP data files are written to the \WIP directory. By default, the WIP index table is named WIP and is composed of these files:
• WIP.DBF
• WIP.MDX
The two WIP data files written to the \WIP directory are essentially an NAFILE and a POLFILE. These files may be named something like:
D4234FF15243414FB1B504379EC76D0D.dat (this is the NAFILE)D4234FF15243414FB1B504379EC76D0D.pol (this is the POLFILE)
Prior to version 10.2 of Documaker Desktop, the WIP data files had names such as:
00000001.dat (this is the NAFILE)00000001.pol (this is the POLFILE)
If you migrated to version 10.2 of Documaker Desktop from a prior version and have a WIP index (WIP.DBF and WIP.MDX), your WIP data files have the shorter names. Depending on the configuration, the resources in the NAFILE.DAT file may have version, revision, and effective date information in the \NA=... record. Here is an example:
\NA=q1snam,LN=1,DUP=OFF,SIZE=C,TRAY=U,X=0,Y=0,PA=1,OPT=D\\ENDIMAGE\\NA=q1mdc1,LN=1,DUP=OFF,SIZE=C,TRAY=U,X=0,Y=3360,PA=1,OPT=DS,V=1,R=1,D=20020911\ENDIMAGE\
Notice the \NA=q1mdc1... record contains these options and values:
• V=1
• R=1
• D=20020911
These values represent the specific version, revision, and effective date of Q1MDC1, pulled from the library when this form set was created. Notice that the \NA=q1snam... record does not contain these values.
After saving this form set to WIP, you might later return to retrieve this form set. When reconstructing the form set, for those sections listed in the NAFILE.DAT file that contain the V, R, and D options and values, the system retrieves the specific version and revision of the section listed.
For those sections listed in the NAFILE.DAT file that do not contain the V, R, and D options, Documaker Desktop gets a run date and uses that date to retrieve the correct version/revision of the sections. Documaker Desktop gets its run date by looking for a value in these locations:
• The RunDate field in the WIP index
• The CreateTime field in the WIP index
• The current system date
Overview
562
If the RunDate field does not exist or is empty, Documaker Desktop looks in the CreateTime field. If the CreateTime field does not exist or is empty, it uses the current system date.
Archive and retrieval
When a form set is archived, its NAFILE and POLFILE contents are stored in an archive file or table (called a CARFile — Compressed Archive File) and some (or all) of the information that was in the WIP index (if it was archived from WIP) or in the NEWTRN file (if it was archived using the GenArc program) is stored into the application index (APPIDX) table. One of the fields in the APPIDX table is called RunDate.
You can retrieve a form set from archive in Documaker Desktop by choosing the Retrieve, Formset option. When reconstructing the form set, for those sections listed in the NAFILE file that contain the V, R, and D options and values, the system retrieves the specific version and revision of the section that is listed.
For those sections listed in the NAFILE that do not contain the V, R, and D options, Documaker Desktop gets a run date and uses that date to retrieve the correct version/revision of the sections. Documaker Desktop gets its run date by looking for a value in these locations:
• The RunDate field in the application index (APPIDX)
• The CreateTime field in the application index
• The current system date
If the RunDate field does not exist or is empty, Documaker Desktop looks in the CreateTime field. If the CreateTime field does not exist or is empty, it uses the current system date.
In Documaker Server
The GenData and GenPrint programs in Documaker Server will generally need to load resources (such as FAP files, LOG files, and DAL scripts). To retrieve the resource with the appropriate effective date, the system needs to know the run date for each form set to be generated.
The GenTrn program gets the run date from the extract file, for each transaction and writes the run date to the TRNFILE.
The GenData program gets the run date from a Global Variable Manager (GVM) variable named RunDate. The RunDate GVM is set by:
• A value in the TRNFILE file
or
• The GetRunDate rule, which copies the current system date into the RunDate GVM
As the GenData program processes transactions, the run date is written to the NEWTRN file and to the recipient batch files, provided the TRNDFDFL.DFD and RCBDFDFL.DFD files contain the RunDate field.
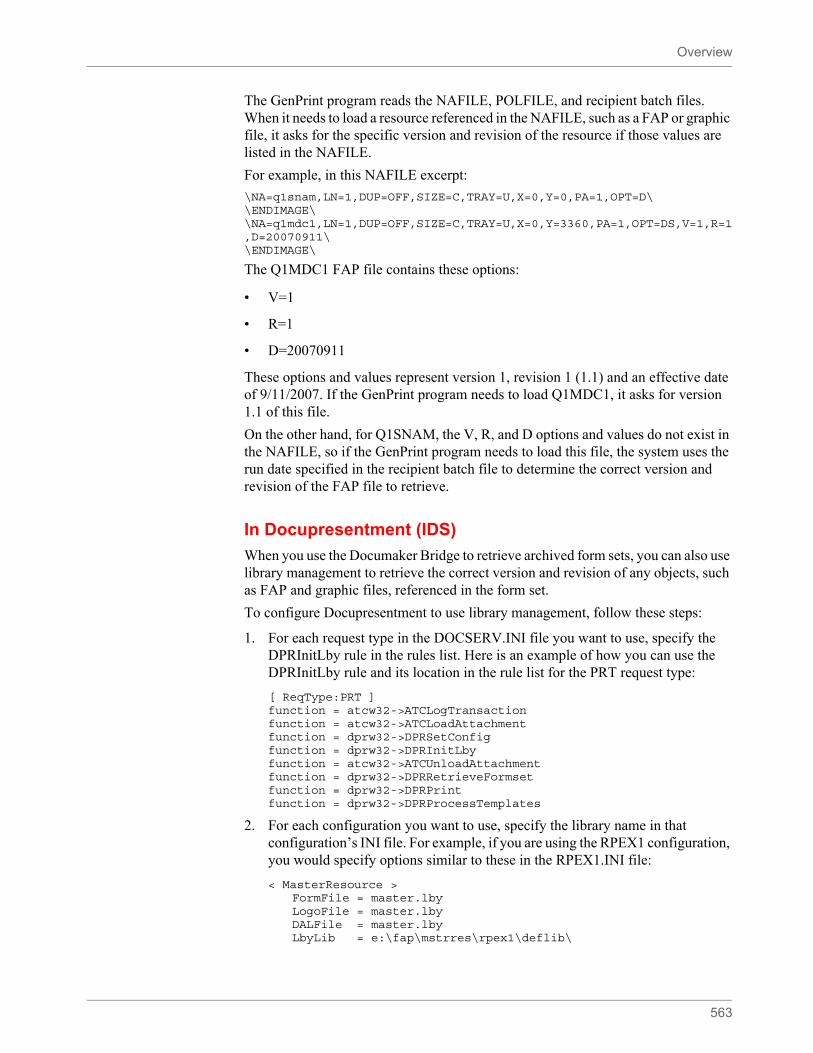
Overview
563
The GenPrint program reads the NAFILE, POLFILE, and recipient batch files. When it needs to load a resource referenced in the NAFILE, such as a FAP or graphic file, it asks for the specific version and revision of the resource if those values are listed in the NAFILE.
For example, in this NAFILE excerpt:
\NA=q1snam,LN=1,DUP=OFF,SIZE=C,TRAY=U,X=0,Y=0,PA=1,OPT=D\\ENDIMAGE\\NA=q1mdc1,LN=1,DUP=OFF,SIZE=C,TRAY=U,X=0,Y=3360,PA=1,OPT=DS,V=1,R=1,D=20070911\\ENDIMAGE\
The Q1MDC1 FAP file contains these options:
• V=1
• R=1
• D=20070911
These options and values represent version 1, revision 1 (1.1) and an effective date of 9/11/2007. If the GenPrint program needs to load Q1MDC1, it asks for version 1.1 of this file.
On the other hand, for Q1SNAM, the V, R, and D options and values do not exist in the NAFILE, so if the GenPrint program needs to load this file, the system uses the run date specified in the recipient batch file to determine the correct version and revision of the FAP file to retrieve.
In Docupresentment (IDS)
When you use the Documaker Bridge to retrieve archived form sets, you can also use library management to retrieve the correct version and revision of any objects, such as FAP and graphic files, referenced in the form set.
To configure Docupresentment to use library management, follow these steps:
1. For each request type in the DOCSERV.INI file you want to use, specify the DPRInitLby rule in the rules list. Here is an example of how you can use the DPRInitLby rule and its location in the rule list for the PRT request type:
[ ReqType:PRT ]function = atcw32->ATCLogTransactionfunction = atcw32->ATCLoadAttachmentfunction = dprw32->DPRSetConfigfunction = dprw32->DPRInitLbyfunction = atcw32->ATCUnloadAttachmentfunction = dprw32->DPRRetrieveFormsetfunction = dprw32->DPRPrintfunction = dprw32->DPRProcessTemplates
2. For each configuration you want to use, specify the library name in that configuration’s INI file. For example, if you are using the RPEX1 configuration, you would specify options similar to these in the RPEX1.INI file:
< MasterResource >FormFile = master.lbyLogoFile = master.lbyDALFile = master.lbyLbyLib = e:\fap\mstrres\rpex1\deflib\
Overview
564
The FormFile, LogoFile, and DALFile options name the library and the LbyLib option names the location of the library.
3. Set the ARCEFFECTIVEDATE attachment variable before calling any rules that use the library, such as DPRRetrieveFormset. Refer to the Documaker SDK Reference Guide to determine which rules use the ARCEFFECTIVEDATE attachment variable.
The ARCEFFECTIVEDATE attachment variable is used by the Documaker Bridge to locate the appropriate version/revision of a resource if a specific version/revision is not indicated in the retrieved NAFILE. If you are using the Docupresentment CGI client, you can set the ARCEFFECTIVEDATE by specifying the following in the appropriate HTML templates:
<FORM METHOD="POST" ACTION="#EXENAME,#"><INPUT NAME="USERID" VALUE="#USERID,%s#" TYPE="HIDDEN"><INPUT NAME="DOCTYPE" VALUE="#DOCTYPE,%s#" TYPE="HIDDEN"><INPUT NAME="REQTYPE" VALUE="PRT" TYPE="HIDDEN"><INPUT NAME="CONFIG" VALUE="#CONFIG,%s#" TYPE="HIDDEN"><INPUT NAME="ARCEFFECTIVEDATE" VALUE="#RUNDATE,%s#" TYPE="HIDDEN"> <-- sets the ARCEFFECTIVEDATE attachment variable
This copies the value of the RunDate attachment variable into the ARCEFFECTIVEDATE attachment variable. The RunDate attachment variable comes from the RunDate field of the archive application index (APPIDX) file. See Understanding Run Dates on page 557 to see how to make sure the APPIDX RunDate field is populated correctly.
MANAGING WORKFLOWYou can also manage the development, testing, and promotion of resources. Using one or more libraries, you can coordinate the creation and modification of section (FAP), graphics (LOG), and DAL script files. Locking of resources as they are checked out prevents multiple users from trying to change a particular resource at the same time. Prior versions of a resource are kept safe and can be restored if necessary.
As you test resources checked into a library, you can mark the resources as having passed or failed using the Status field on the File Information window. You can also promote them to another library for additional testing or for production use.
Creating Libraries
565
CREATING LIBRARIES
The way you create a resource library differs depending on how the library is stored. You have these choices:
• Using xBase and CARFiles on page 566
• Using the DB2 Native Driver on page 568
• Using the DB2 ODBC Driver on page 573
• Using the SQL Server ODBC Driver on page 578
• Using the Oracle ODBC Driver on page 581
• Using Oracle JDBC Driver on page 586
Specifying a catalog table for each library
You can specify a catalog table for each library stored in a database management system (DBMS). If you do this, Studio will only update the catalog table once per library per session, which reduces the chances of you receiving the duplicate index or -803 SQL error message.
You specify the catalog table using INI options. Here is an example:
< Library:LBYI >Catalog = LBYC
< DBTable:LBYC >DBHandler = DB2
< DB2_FileConvert >Catalog = DAP112_LBYC_R1
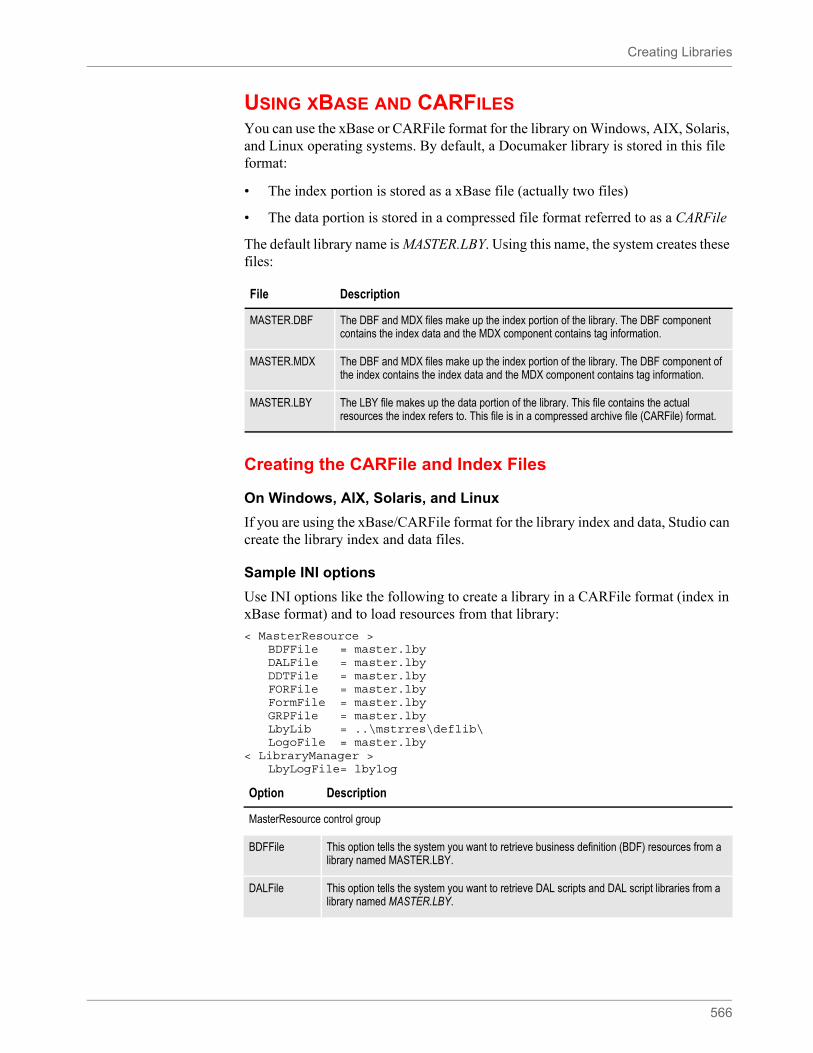
Creating Libraries
566
USING XBASE AND CARFILESYou can use the xBase or CARFile format for the library on Windows, AIX, Solaris, and Linux operating systems. By default, a Documaker library is stored in this file format:
• The index portion is stored as a xBase file (actually two files)
• The data portion is stored in a compressed file format referred to as a CARFile
The default library name is MASTER.LBY. Using this name, the system creates these files:
Creating the CARFile and Index Files
On Windows, AIX, Solaris, and Linux
If you are using the xBase/CARFile format for the library index and data, Studio can create the library index and data files.
Sample INI options
Use INI options like the following to create a library in a CARFile format (index in xBase format) and to load resources from that library:
< MasterResource >BDFFile = master.lbyDALFile = master.lbyDDTFile = master.lbyFORFile = master.lbyFormFile = master.lbyGRPFile = master.lbyLbyLib = ..\mstrres\deflib\LogoFile = master.lby
< LibraryManager >LbyLogFile= lbylog
File Description
MASTER.DBF The DBF and MDX files make up the index portion of the library. The DBF component contains the index data and the MDX component contains tag information.
MASTER.MDX The DBF and MDX files make up the index portion of the library. The DBF component of the index contains the index data and the MDX component contains tag information.
MASTER.LBY The LBY file makes up the data portion of the library. This file contains the actual resources the index refers to. This file is in a compressed archive file (CARFile) format.
Option Description
MasterResource control group
BDFFile This option tells the system you want to retrieve business definition (BDF) resources from a library named MASTER.LBY.
DALFile This option tells the system you want to retrieve DAL scripts and DAL script libraries from a library named MASTER.LBY.
Creating Libraries
567
Specifying a DFD file for the library data table
A Data Format Definition (DFD) file is used to describe the layout of the fields in another file. The description includes the name, data type, and length of each field in the file.
Several files used by Documaker adhere to pre-defined internal structure definitions so there is usually no need to create and specify DFD files for those files. The library's data and index portions are two examples of files that usually adhere to a pre-defined internal structure.
There are cases, however, when you must specify the structure of the data portion of the library using a DFD file. Prior to version 11.2, you made this DFD specification via the CARFileDFD option. For example, if your library data table was called LBYD and the DFD was named CARDB2.DFD, you would have specified the DFD as shown here:
< ArcRet >CARFileDFD= DEFLIB\cardb2.dfd
This CarFileDFD option, however, is also used by the GenArc program and if a different value was needed for archival purposes, you had to maintain a different INI file for that process. In version 11.2 and in subsequent versions, instead of using the CARFileDFD option, you can specify the library data file's DFD using the DFD option, as shown here:
< DBTable:LBYD >DBHandler = DB2DFD = DEFLIB\LBYD_DB2.dfd
This DFD option does not conflict with the CARFileDFD option used by the GenArc program.
DDTFile This option tells the system you want to retrieve DDT files from a library named MASTER.LBY.
FORFile This option tells the system you want to retrieve form (FOR) resources from a library named MASTER.LBY.
FormFile This option tells the system you want to retrieve FAP files from a library named MASTER.LBY.
GRPFile This option tells the system you want to retrieve group form (GRP) resources from a library named MASTER.LBY.
LbyLib This option tells the system that the MASTER.LBY file and the two files that make up its index (MASTER.DBF and MASTER.MDX), reside in the location specified by the relative path ..\mstrres\deflib\.
LogoFile This option tells the system you want to retrieve graphics (LOG) files from a library named MASTER.LBY.
LibraryManager control group
LbyLogFile This option tells the system the name of the library log file is LBYLOG. The library log contains information about resources added to, deleted from, or updated in the library. The library log file does not have to use the same type of database handler as the library index and data portions.
Option Description
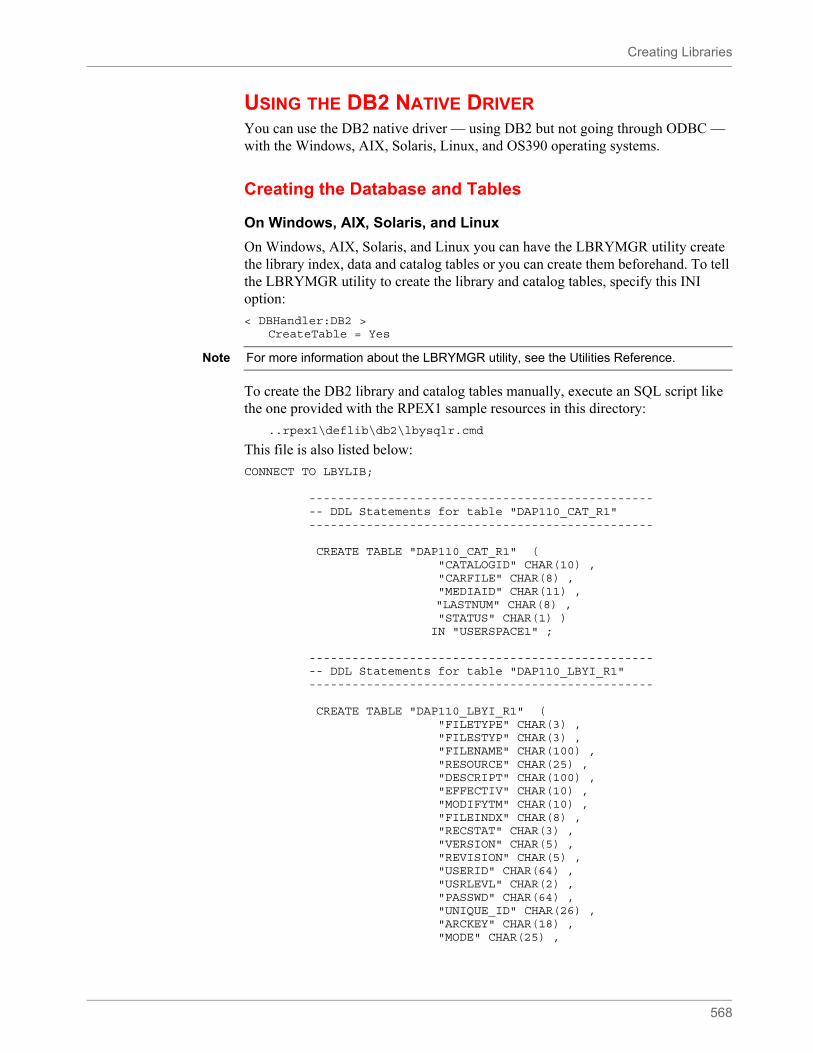
Creating Libraries
568
USING THE DB2 NATIVE DRIVERYou can use the DB2 native driver — using DB2 but not going through ODBC — with the Windows, AIX, Solaris, Linux, and OS390 operating systems.
Creating the Database and Tables
On Windows, AIX, Solaris, and Linux
On Windows, AIX, Solaris, and Linux you can have the LBRYMGR utility create the library index, data and catalog tables or you can create them beforehand. To tell the LBRYMGR utility to create the library and catalog tables, specify this INI option:
< DBHandler:DB2 >CreateTable = Yes
To create the DB2 library and catalog tables manually, execute an SQL script like the one provided with the RPEX1 sample resources in this directory:
..rpex1\deflib\db2\lbysqlr.cmd
This file is also listed below:
CONNECT TO LBYLIB;
------------------------------------------------ -- DDL Statements for table "DAP110_CAT_R1" ------------------------------------------------
CREATE TABLE "DAP110_CAT_R1" ( "CATALOGID" CHAR(10) , "CARFILE" CHAR(8) , "MEDIAID" CHAR(11) ,
"LASTNUM" CHAR(8) , "STATUS" CHAR(1) ) IN "USERSPACE1" ;
------------------------------------------------ -- DDL Statements for table "DAP110_LBYI_R1" ------------------------------------------------
CREATE TABLE "DAP110_LBYI_R1" ( "FILETYPE" CHAR(3) , "FILESTYP" CHAR(3) , "FILENAME" CHAR(100) , "RESOURCE" CHAR(25) , "DESCRIPT" CHAR(100) , "EFFECTIV" CHAR(10) , "MODIFYTM" CHAR(10) , "FILEINDX" CHAR(8) , "RECSTAT" CHAR(3) , "VERSION" CHAR(5) , "REVISION" CHAR(5) , "USERID" CHAR(64) , "USRLEVL" CHAR(2) , "PASSWD" CHAR(64) , "UNIQUE_ID" CHAR(26) , "ARCKEY" CHAR(18) , "MODE" CHAR(25) ,
Note For more information about the LBRYMGR utility, see the Utilities Reference.
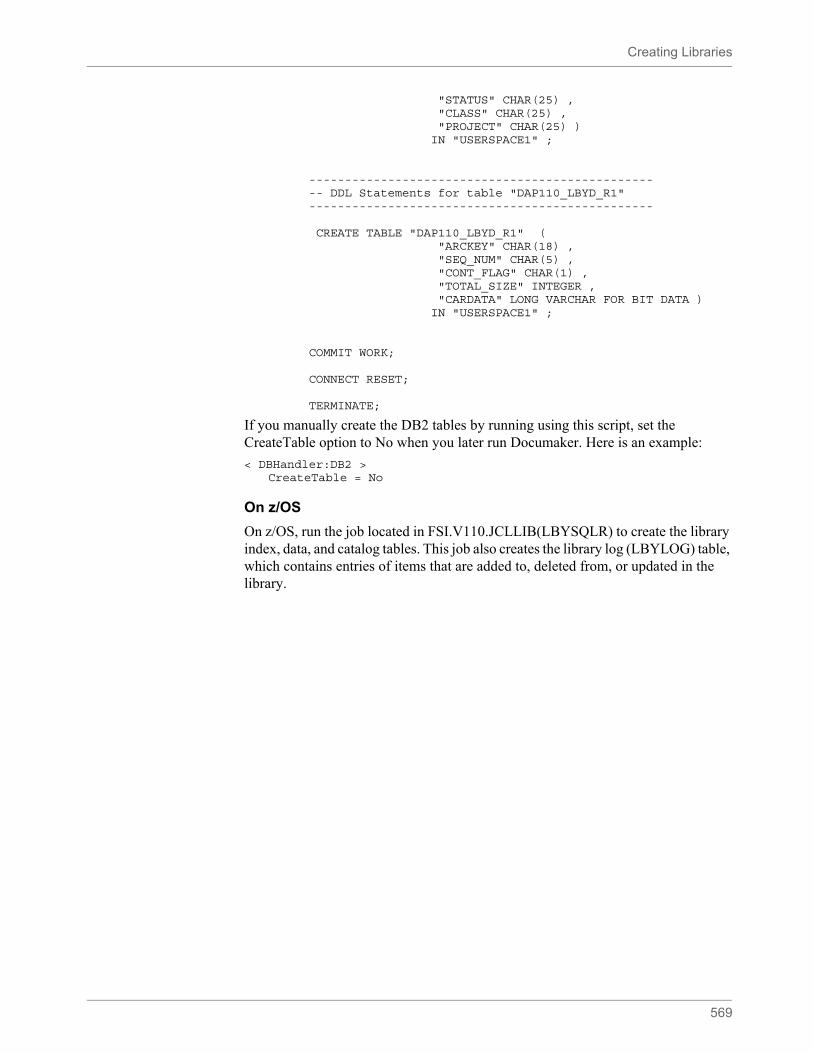
Creating Libraries
569
"STATUS" CHAR(25) , "CLASS" CHAR(25) , "PROJECT" CHAR(25) ) IN "USERSPACE1" ;
------------------------------------------------ -- DDL Statements for table "DAP110_LBYD_R1" ------------------------------------------------
CREATE TABLE "DAP110_LBYD_R1" ( "ARCKEY" CHAR(18) , "SEQ_NUM" CHAR(5) , "CONT_FLAG" CHAR(1) , "TOTAL_SIZE" INTEGER , "CARDATA" LONG VARCHAR FOR BIT DATA ) IN "USERSPACE1" ;
COMMIT WORK;
CONNECT RESET;
TERMINATE;
If you manually create the DB2 tables by running using this script, set the CreateTable option to No when you later run Documaker. Here is an example:
< DBHandler:DB2 >CreateTable = No
On z/OS
On z/OS, run the job located in FSI.V110.JCLLIB(LBYSQLR) to create the library index, data, and catalog tables. This job also creates the library log (LBYLOG) table, which contains entries of items that are added to, deleted from, or updated in the library.
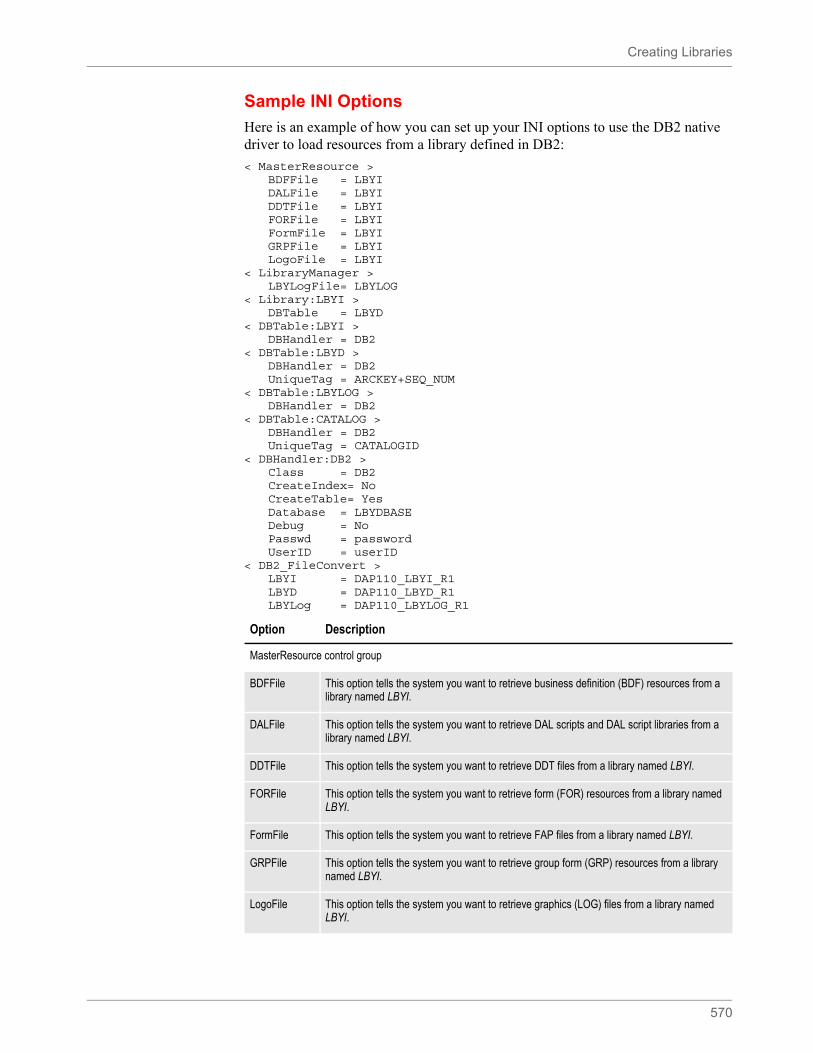
Creating Libraries
570
Sample INI Options
Here is an example of how you can set up your INI options to use the DB2 native driver to load resources from a library defined in DB2:
< MasterResource >BDFFile = LBYIDALFile = LBYIDDTFile = LBYIFORFile = LBYIFormFile = LBYIGRPFile = LBYILogoFile = LBYI
< LibraryManager >LBYLogFile= LBYLOG
< Library:LBYI >DBTable = LBYD
< DBTable:LBYI >DBHandler = DB2
< DBTable:LBYD >DBHandler = DB2UniqueTag = ARCKEY+SEQ_NUM
< DBTable:LBYLOG >DBHandler = DB2
< DBTable:CATALOG >DBHandler = DB2UniqueTag = CATALOGID
< DBHandler:DB2 >Class = DB2CreateIndex= NoCreateTable= YesDatabase = LBYDBASEDebug = NoPasswd = passwordUserID = userID
< DB2_FileConvert >LBYI = DAP110_LBYI_R1LBYD = DAP110_LBYD_R1LBYLog = DAP110_LBYLOG_R1
Option Description
MasterResource control group
BDFFile This option tells the system you want to retrieve business definition (BDF) resources from a library named LBYI.
DALFile This option tells the system you want to retrieve DAL scripts and DAL script libraries from a library named LBYI.
DDTFile This option tells the system you want to retrieve DDT files from a library named LBYI.
FORFile This option tells the system you want to retrieve form (FOR) resources from a library named LBYI.
FormFile This option tells the system you want to retrieve FAP files from a library named LBYI.
GRPFile This option tells the system you want to retrieve group form (GRP) resources from a library named LBYI.
LogoFile This option tells the system you want to retrieve graphics (LOG) files from a library named LBYI.
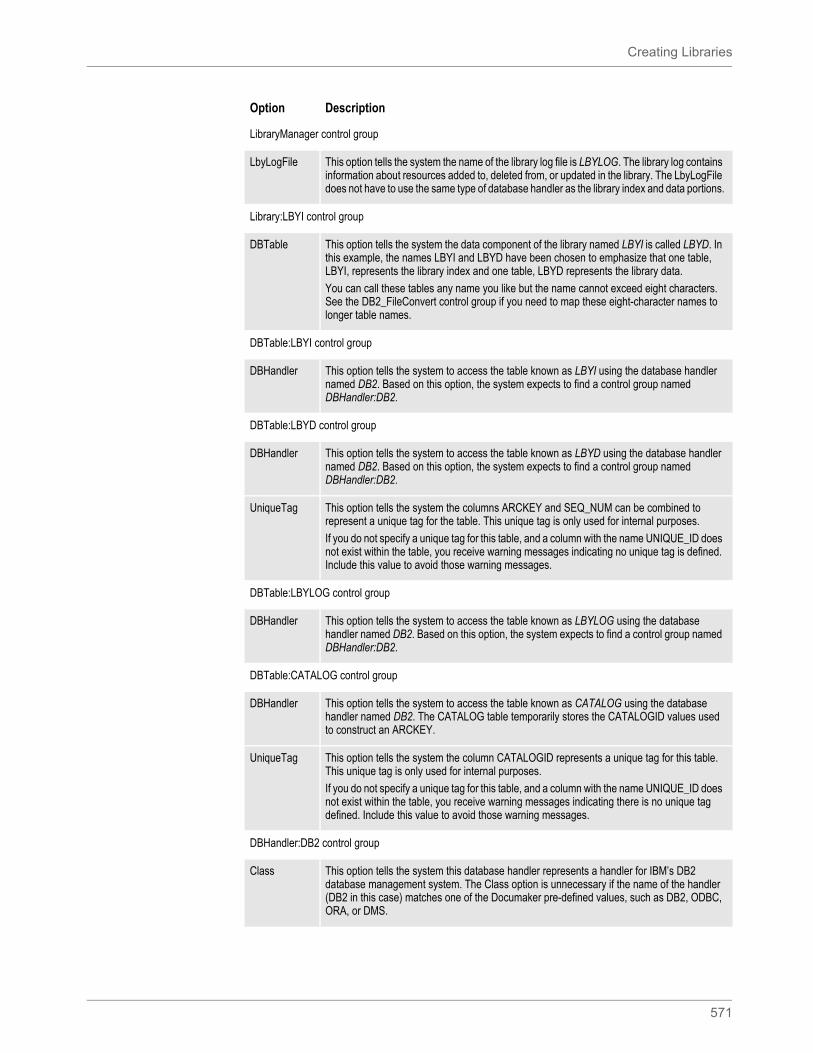
Creating Libraries
571
LibraryManager control group
LbyLogFile This option tells the system the name of the library log file is LBYLOG. The library log contains information about resources added to, deleted from, or updated in the library. The LbyLogFile does not have to use the same type of database handler as the library index and data portions.
Library:LBYI control group
DBTable This option tells the system the data component of the library named LBYI is called LBYD. In this example, the names LBYI and LBYD have been chosen to emphasize that one table, LBYI, represents the library index and one table, LBYD represents the library data.
You can call these tables any name you like but the name cannot exceed eight characters. See the DB2_FileConvert control group if you need to map these eight-character names to longer table names.
DBTable:LBYI control group
DBHandler This option tells the system to access the table known as LBYI using the database handler named DB2. Based on this option, the system expects to find a control group named DBHandler:DB2.
DBTable:LBYD control group
DBHandler This option tells the system to access the table known as LBYD using the database handler named DB2. Based on this option, the system expects to find a control group named DBHandler:DB2.
UniqueTag This option tells the system the columns ARCKEY and SEQ_NUM can be combined to represent a unique tag for the table. This unique tag is only used for internal purposes.
If you do not specify a unique tag for this table, and a column with the name UNIQUE_ID does not exist within the table, you receive warning messages indicating no unique tag is defined. Include this value to avoid those warning messages.
DBTable:LBYLOG control group
DBHandler This option tells the system to access the table known as LBYLOG using the database handler named DB2. Based on this option, the system expects to find a control group named DBHandler:DB2.
DBTable:CATALOG control group
DBHandler This option tells the system to access the table known as CATALOG using the database handler named DB2. The CATALOG table temporarily stores the CATALOGID values used to construct an ARCKEY.
UniqueTag This option tells the system the column CATALOGID represents a unique tag for this table. This unique tag is only used for internal purposes.
If you do not specify a unique tag for this table, and a column with the name UNIQUE_ID does not exist within the table, you receive warning messages indicating there is no unique tag defined. Include this value to avoid those warning messages.
DBHandler:DB2 control group
Class This option tells the system this database handler represents a handler for IBM’s DB2 database management system. The Class option is unnecessary if the name of the handler (DB2 in this case) matches one of the Documaker pre-defined values, such as DB2, ODBC, ORA, or DMS.
Option Description
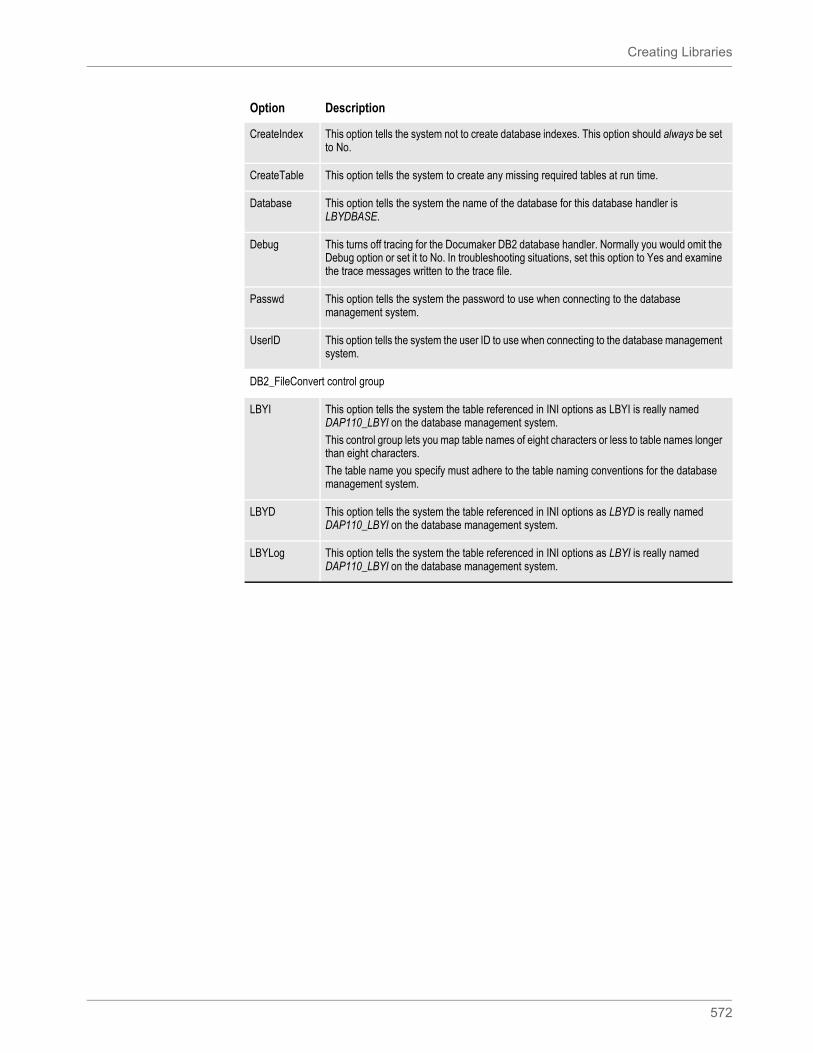
Creating Libraries
572
CreateIndex This option tells the system not to create database indexes. This option should always be set to No.
CreateTable This option tells the system to create any missing required tables at run time.
Database This option tells the system the name of the database for this database handler is LBYDBASE.
Debug This turns off tracing for the Documaker DB2 database handler. Normally you would omit the Debug option or set it to No. In troubleshooting situations, set this option to Yes and examine the trace messages written to the trace file.
Passwd This option tells the system the password to use when connecting to the database management system.
UserID This option tells the system the user ID to use when connecting to the database management system.
DB2_FileConvert control group
LBYI This option tells the system the table referenced in INI options as LBYI is really named DAP110_LBYI on the database management system.
This control group lets you map table names of eight characters or less to table names longer than eight characters.
The table name you specify must adhere to the table naming conventions for the database management system.
LBYD This option tells the system the table referenced in INI options as LBYD is really named DAP110_LBYI on the database management system.
LBYLog This option tells the system the table referenced in INI options as LBYI is really named DAP110_LBYI on the database management system.
Option Description
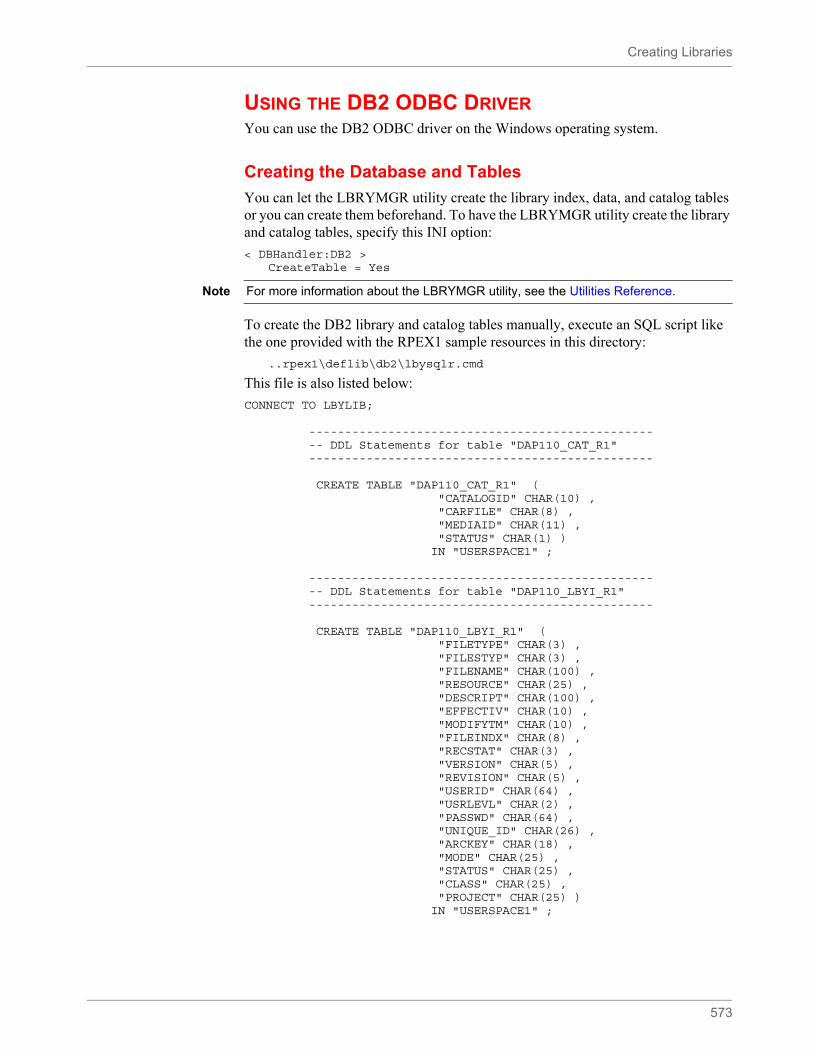
Creating Libraries
573
USING THE DB2 ODBC DRIVERYou can use the DB2 ODBC driver on the Windows operating system.
Creating the Database and Tables
You can let the LBRYMGR utility create the library index, data, and catalog tables or you can create them beforehand. To have the LBRYMGR utility create the library and catalog tables, specify this INI option:
< DBHandler:DB2 >CreateTable = Yes
To create the DB2 library and catalog tables manually, execute an SQL script like the one provided with the RPEX1 sample resources in this directory:
..rpex1\deflib\db2\lbysqlr.cmd
This file is also listed below:
CONNECT TO LBYLIB;
------------------------------------------------ -- DDL Statements for table "DAP110_CAT_R1" ------------------------------------------------
CREATE TABLE "DAP110_CAT_R1" ( "CATALOGID" CHAR(10) , "CARFILE" CHAR(8) , "MEDIAID" CHAR(11) , "STATUS" CHAR(1) ) IN "USERSPACE1" ;
------------------------------------------------ -- DDL Statements for table "DAP110_LBYI_R1" ------------------------------------------------
CREATE TABLE "DAP110_LBYI_R1" ( "FILETYPE" CHAR(3) , "FILESTYP" CHAR(3) , "FILENAME" CHAR(100) , "RESOURCE" CHAR(25) , "DESCRIPT" CHAR(100) , "EFFECTIV" CHAR(10) , "MODIFYTM" CHAR(10) , "FILEINDX" CHAR(8) , "RECSTAT" CHAR(3) , "VERSION" CHAR(5) , "REVISION" CHAR(5) , "USERID" CHAR(64) , "USRLEVL" CHAR(2) , "PASSWD" CHAR(64) , "UNIQUE_ID" CHAR(26) , "ARCKEY" CHAR(18) , "MODE" CHAR(25) , "STATUS" CHAR(25) , "CLASS" CHAR(25) , "PROJECT" CHAR(25) ) IN "USERSPACE1" ;
Note For more information about the LBRYMGR utility, see the Utilities Reference.
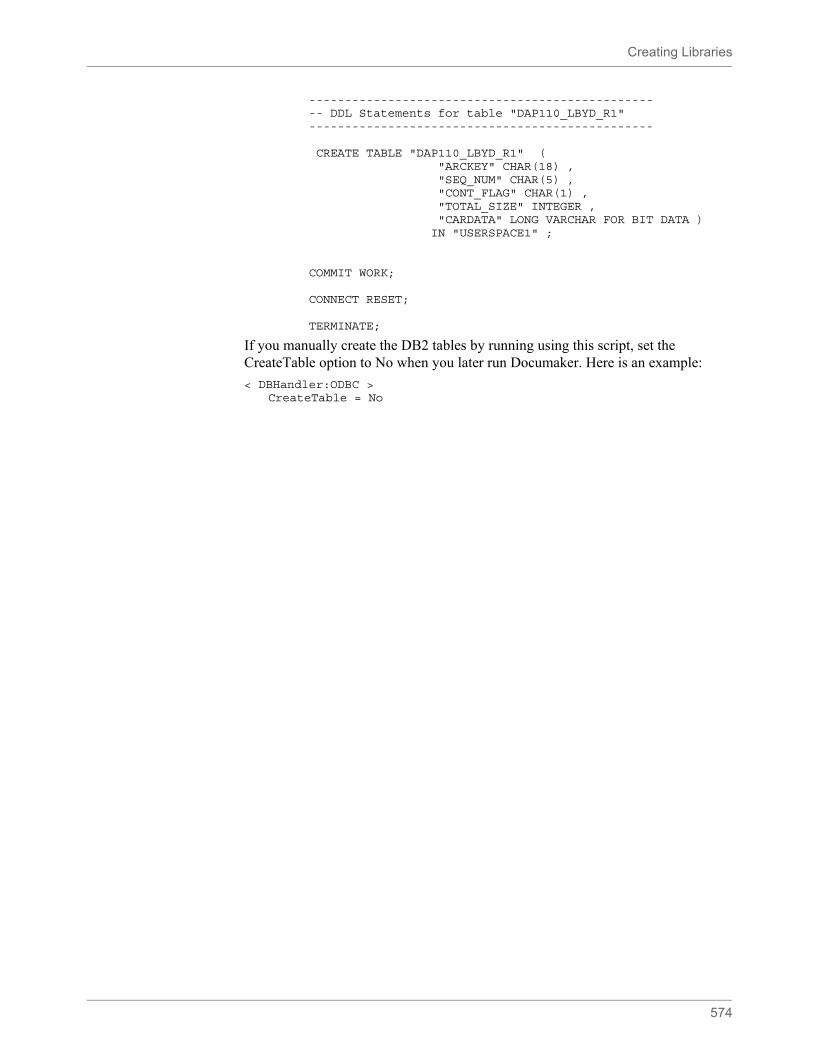
Creating Libraries
574
------------------------------------------------ -- DDL Statements for table "DAP110_LBYD_R1" ------------------------------------------------
CREATE TABLE "DAP110_LBYD_R1" ( "ARCKEY" CHAR(18) , "SEQ_NUM" CHAR(5) , "CONT_FLAG" CHAR(1) , "TOTAL_SIZE" INTEGER , "CARDATA" LONG VARCHAR FOR BIT DATA ) IN "USERSPACE1" ;
COMMIT WORK;
CONNECT RESET;
TERMINATE;
If you manually create the DB2 tables by running using this script, set the CreateTable option to No when you later run Documaker. Here is an example:
< DBHandler:ODBC >CreateTable = No
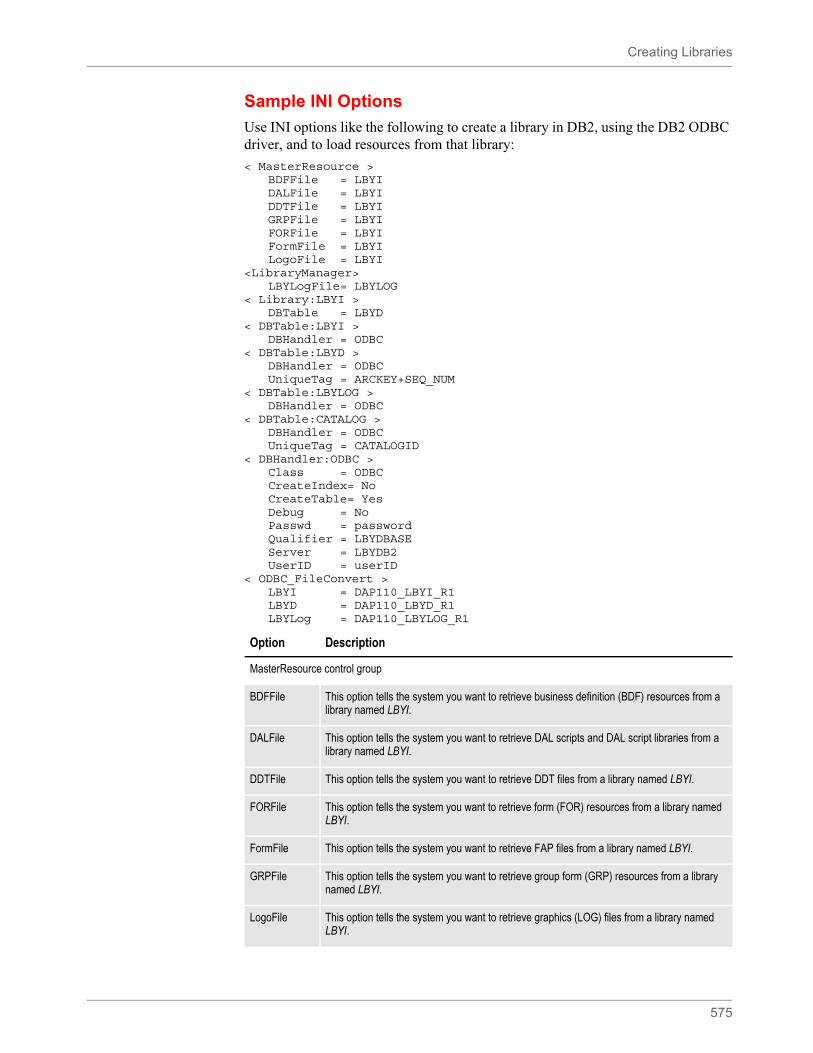
Creating Libraries
575
Sample INI Options
Use INI options like the following to create a library in DB2, using the DB2 ODBC driver, and to load resources from that library:
< MasterResource >BDFFile = LBYIDALFile = LBYIDDTFile = LBYIGRPFile = LBYIFORFile = LBYIFormFile = LBYILogoFile = LBYI
<LibraryManager>LBYLogFile= LBYLOG
< Library:LBYI >DBTable = LBYD
< DBTable:LBYI >DBHandler = ODBC
< DBTable:LBYD >DBHandler = ODBCUniqueTag = ARCKEY+SEQ_NUM
< DBTable:LBYLOG >DBHandler = ODBC
< DBTable:CATALOG >DBHandler = ODBCUniqueTag = CATALOGID
< DBHandler:ODBC >Class = ODBCCreateIndex= NoCreateTable= YesDebug = NoPasswd = passwordQualifier = LBYDBASEServer = LBYDB2UserID = userID
< ODBC_FileConvert >LBYI = DAP110_LBYI_R1LBYD = DAP110_LBYD_R1LBYLog = DAP110_LBYLOG_R1
Option Description
MasterResource control group
BDFFile This option tells the system you want to retrieve business definition (BDF) resources from a library named LBYI.
DALFile This option tells the system you want to retrieve DAL scripts and DAL script libraries from a library named LBYI.
DDTFile This option tells the system you want to retrieve DDT files from a library named LBYI.
FORFile This option tells the system you want to retrieve form (FOR) resources from a library named LBYI.
FormFile This option tells the system you want to retrieve FAP files from a library named LBYI.
GRPFile This option tells the system you want to retrieve group form (GRP) resources from a library named LBYI.
LogoFile This option tells the system you want to retrieve graphics (LOG) files from a library named LBYI.
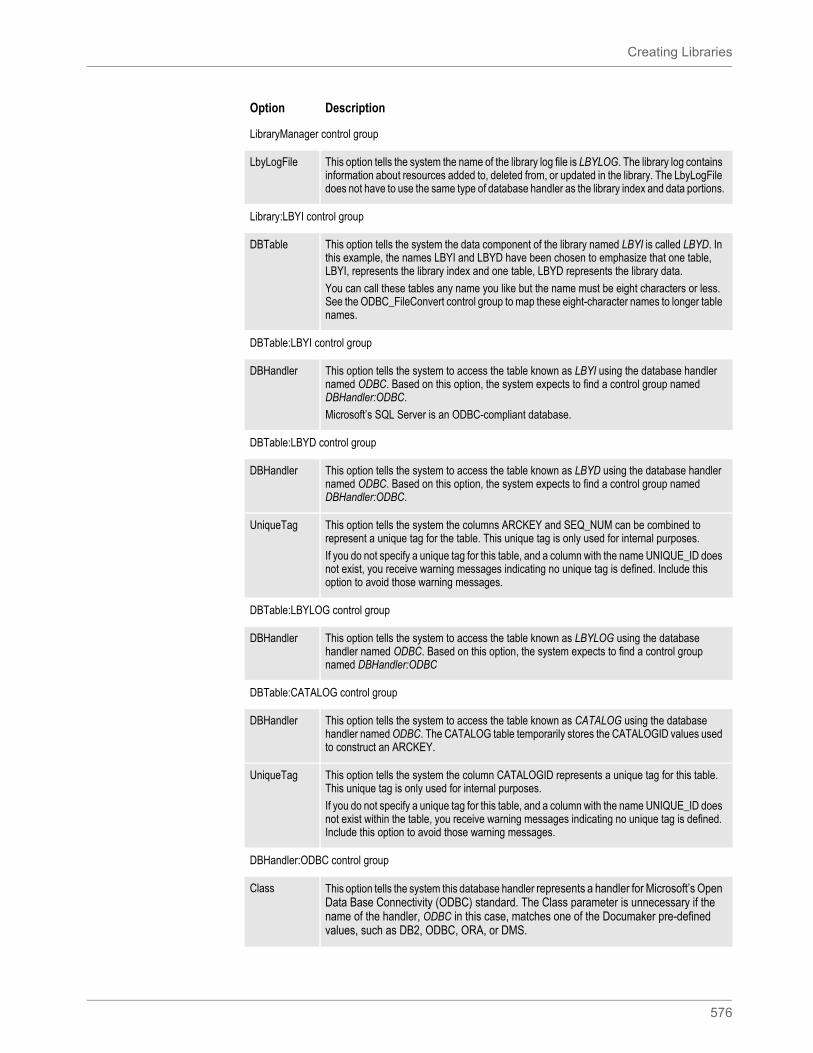
Creating Libraries
576
LibraryManager control group
LbyLogFile This option tells the system the name of the library log file is LBYLOG. The library log contains information about resources added to, deleted from, or updated in the library. The LbyLogFile does not have to use the same type of database handler as the library index and data portions.
Library:LBYI control group
DBTable This option tells the system the data component of the library named LBYI is called LBYD. In this example, the names LBYI and LBYD have been chosen to emphasize that one table, LBYI, represents the library index and one table, LBYD represents the library data.
You can call these tables any name you like but the name must be eight characters or less. See the ODBC_FileConvert control group to map these eight-character names to longer table names.
DBTable:LBYI control group
DBHandler This option tells the system to access the table known as LBYI using the database handler named ODBC. Based on this option, the system expects to find a control group named DBHandler:ODBC.
Microsoft’s SQL Server is an ODBC-compliant database.
DBTable:LBYD control group
DBHandler This option tells the system to access the table known as LBYD using the database handler named ODBC. Based on this option, the system expects to find a control group named DBHandler:ODBC.
UniqueTag This option tells the system the columns ARCKEY and SEQ_NUM can be combined to represent a unique tag for the table. This unique tag is only used for internal purposes.
If you do not specify a unique tag for this table, and a column with the name UNIQUE_ID does not exist, you receive warning messages indicating no unique tag is defined. Include this option to avoid those warning messages.
DBTable:LBYLOG control group
DBHandler This option tells the system to access the table known as LBYLOG using the database handler named ODBC. Based on this option, the system expects to find a control group named DBHandler:ODBC
DBTable:CATALOG control group
DBHandler This option tells the system to access the table known as CATALOG using the database handler named ODBC. The CATALOG table temporarily stores the CATALOGID values used to construct an ARCKEY.
UniqueTag This option tells the system the column CATALOGID represents a unique tag for this table. This unique tag is only used for internal purposes.
If you do not specify a unique tag for this table, and a column with the name UNIQUE_ID does not exist within the table, you receive warning messages indicating no unique tag is defined. Include this option to avoid those warning messages.
DBHandler:ODBC control group
Class This option tells the system this database handler represents a handler for Microsoft’s Open Data Base Connectivity (ODBC) standard. The Class parameter is unnecessary if the name of the handler, ODBC in this case, matches one of the Documaker pre-defined values, such as DB2, ODBC, ORA, or DMS.
Option Description
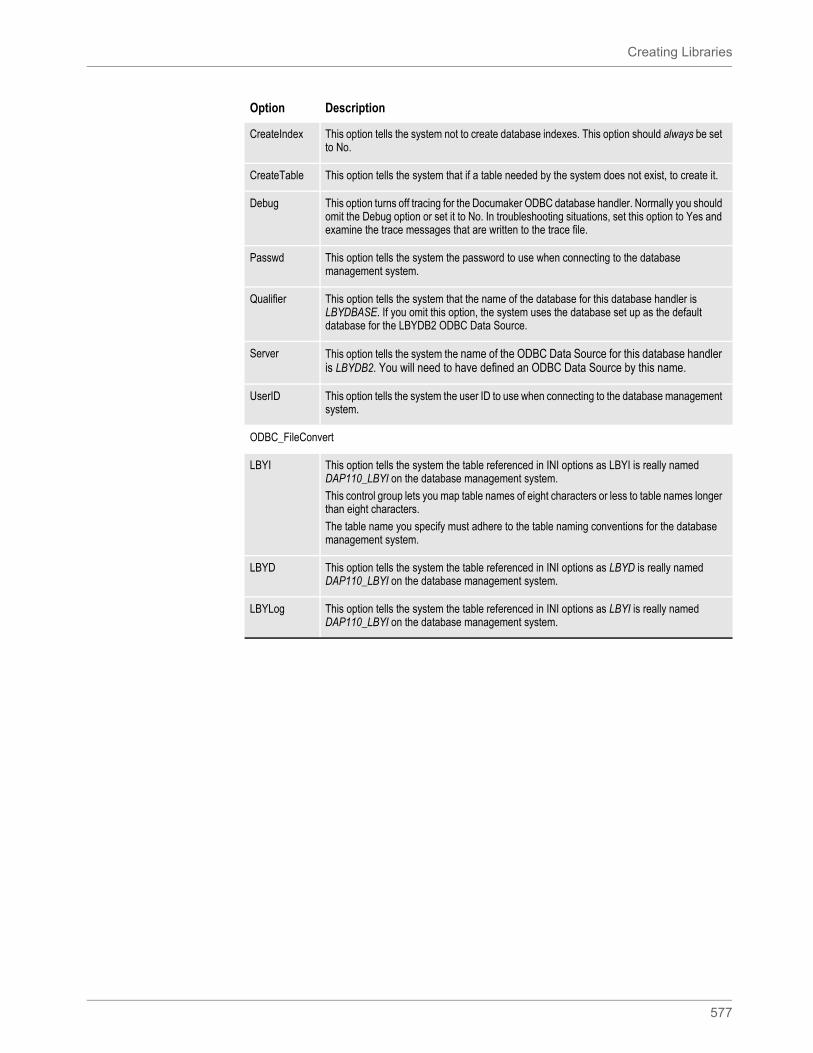
Creating Libraries
577
CreateIndex This option tells the system not to create database indexes. This option should always be set to No.
CreateTable This option tells the system that if a table needed by the system does not exist, to create it.
Debug This option turns off tracing for the Documaker ODBC database handler. Normally you should omit the Debug option or set it to No. In troubleshooting situations, set this option to Yes and examine the trace messages that are written to the trace file.
Passwd This option tells the system the password to use when connecting to the database management system.
Qualifier This option tells the system that the name of the database for this database handler is LBYDBASE. If you omit this option, the system uses the database set up as the default database for the LBYDB2 ODBC Data Source.
Server This option tells the system the name of the ODBC Data Source for this database handler is LBYDB2. You will need to have defined an ODBC Data Source by this name.
UserID This option tells the system the user ID to use when connecting to the database management system.
ODBC_FileConvert
LBYI This option tells the system the table referenced in INI options as LBYI is really named DAP110_LBYI on the database management system.
This control group lets you map table names of eight characters or less to table names longer than eight characters.
The table name you specify must adhere to the table naming conventions for the database management system.
LBYD This option tells the system the table referenced in INI options as LBYD is really named DAP110_LBYI on the database management system.
LBYLog This option tells the system the table referenced in INI options as LBYI is really named DAP110_LBYI on the database management system.
Option Description
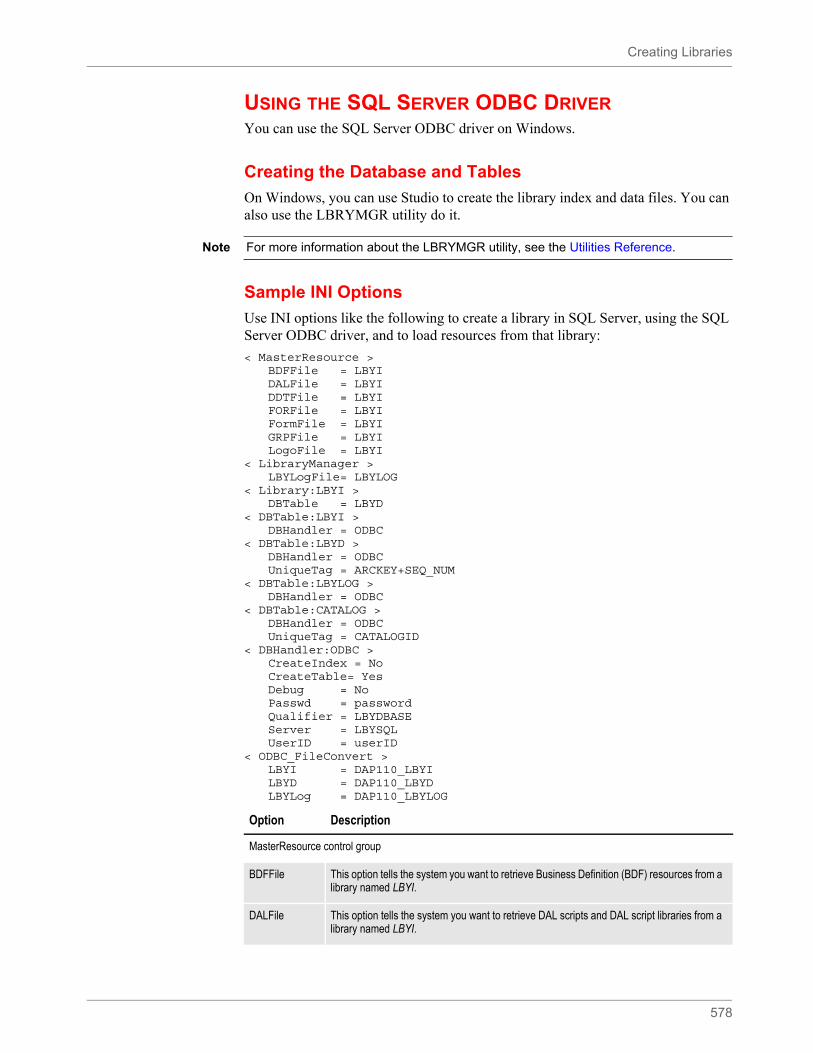
Creating Libraries
578
USING THE SQL SERVER ODBC DRIVERYou can use the SQL Server ODBC driver on Windows.
Creating the Database and Tables
On Windows, you can use Studio to create the library index and data files. You can also use the LBRYMGR utility do it.
Sample INI Options
Use INI options like the following to create a library in SQL Server, using the SQL Server ODBC driver, and to load resources from that library:
< MasterResource >BDFFile = LBYIDALFile = LBYIDDTFile = LBYIFORFile = LBYIFormFile = LBYIGRPFile = LBYILogoFile = LBYI
< LibraryManager >LBYLogFile= LBYLOG
< Library:LBYI >DBTable = LBYD
< DBTable:LBYI >DBHandler = ODBC
< DBTable:LBYD >DBHandler = ODBCUniqueTag = ARCKEY+SEQ_NUM
< DBTable:LBYLOG >DBHandler = ODBC
< DBTable:CATALOG >DBHandler = ODBCUniqueTag = CATALOGID
< DBHandler:ODBC >CreateIndex = NoCreateTable= YesDebug = NoPasswd = passwordQualifier = LBYDBASEServer = LBYSQLUserID = userID
< ODBC_FileConvert >LBYI = DAP110_LBYILBYD = DAP110_LBYDLBYLog = DAP110_LBYLOG
Note For more information about the LBRYMGR utility, see the Utilities Reference.
Option Description
MasterResource control group
BDFFile This option tells the system you want to retrieve Business Definition (BDF) resources from a library named LBYI.
DALFile This option tells the system you want to retrieve DAL scripts and DAL script libraries from a library named LBYI.
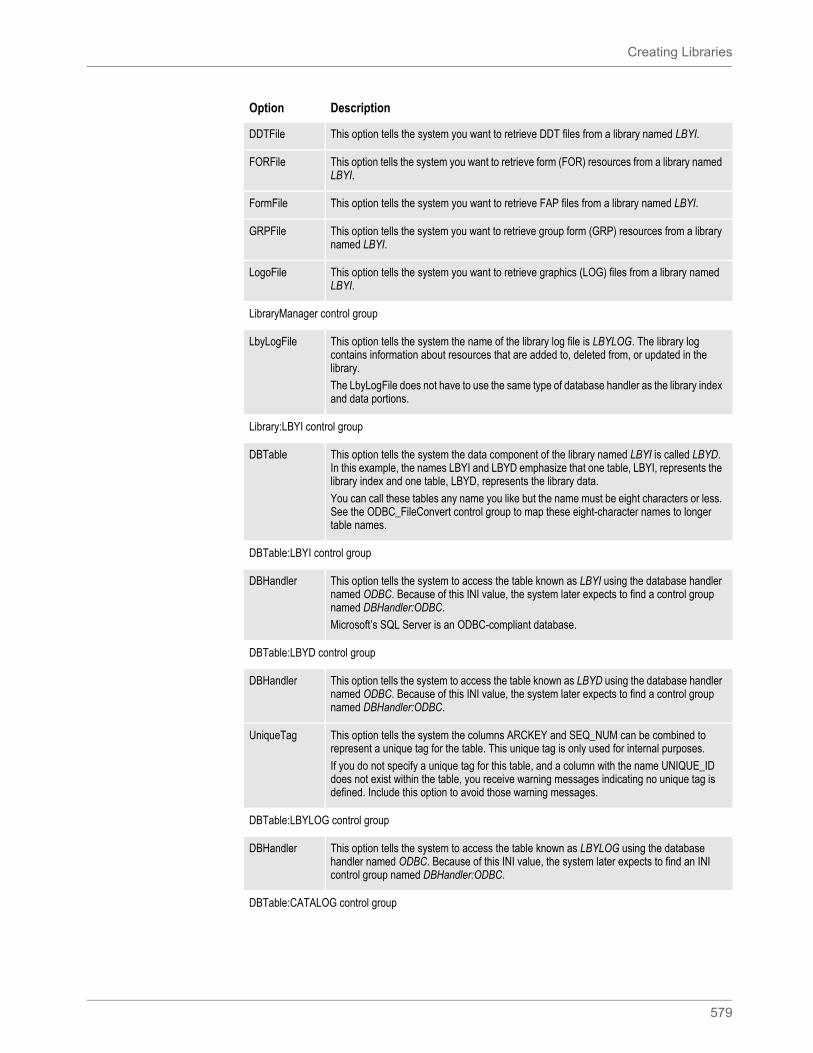
Creating Libraries
579
DDTFile This option tells the system you want to retrieve DDT files from a library named LBYI.
FORFile This option tells the system you want to retrieve form (FOR) resources from a library named LBYI.
FormFile This option tells the system you want to retrieve FAP files from a library named LBYI.
GRPFile This option tells the system you want to retrieve group form (GRP) resources from a library named LBYI.
LogoFile This option tells the system you want to retrieve graphics (LOG) files from a library named LBYI.
LibraryManager control group
LbyLogFile This option tells the system the name of the library log file is LBYLOG. The library log contains information about resources that are added to, deleted from, or updated in the library.
The LbyLogFile does not have to use the same type of database handler as the library index and data portions.
Library:LBYI control group
DBTable This option tells the system the data component of the library named LBYI is called LBYD. In this example, the names LBYI and LBYD emphasize that one table, LBYI, represents the library index and one table, LBYD, represents the library data.
You can call these tables any name you like but the name must be eight characters or less. See the ODBC_FileConvert control group to map these eight-character names to longer table names.
DBTable:LBYI control group
DBHandler This option tells the system to access the table known as LBYI using the database handler named ODBC. Because of this INI value, the system later expects to find a control group named DBHandler:ODBC.
Microsoft’s SQL Server is an ODBC-compliant database.
DBTable:LBYD control group
DBHandler This option tells the system to access the table known as LBYD using the database handler named ODBC. Because of this INI value, the system later expects to find a control group named DBHandler:ODBC.
UniqueTag This option tells the system the columns ARCKEY and SEQ_NUM can be combined to represent a unique tag for the table. This unique tag is only used for internal purposes.
If you do not specify a unique tag for this table, and a column with the name UNIQUE_ID does not exist within the table, you receive warning messages indicating no unique tag is defined. Include this option to avoid those warning messages.
DBTable:LBYLOG control group
DBHandler This option tells the system to access the table known as LBYLOG using the database handler named ODBC. Because of this INI value, the system later expects to find an INI control group named DBHandler:ODBC.
DBTable:CATALOG control group
Option Description
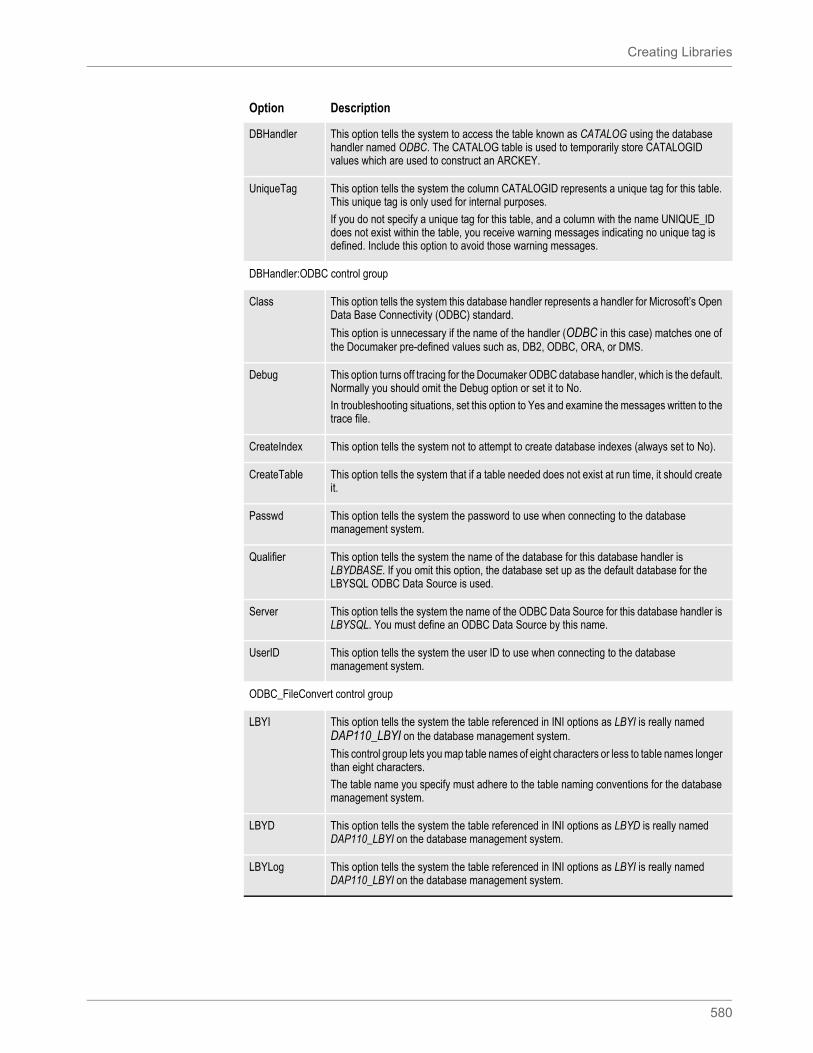
Creating Libraries
580
DBHandler This option tells the system to access the table known as CATALOG using the database handler named ODBC. The CATALOG table is used to temporarily store CATALOGID values which are used to construct an ARCKEY.
UniqueTag This option tells the system the column CATALOGID represents a unique tag for this table. This unique tag is only used for internal purposes.
If you do not specify a unique tag for this table, and a column with the name UNIQUE_ID does not exist within the table, you receive warning messages indicating no unique tag is defined. Include this option to avoid those warning messages.
DBHandler:ODBC control group
Class This option tells the system this database handler represents a handler for Microsoft’s Open Data Base Connectivity (ODBC) standard.
This option is unnecessary if the name of the handler (ODBC in this case) matches one of the Documaker pre-defined values such as, DB2, ODBC, ORA, or DMS.
Debug This option turns off tracing for the Documaker ODBC database handler, which is the default. Normally you should omit the Debug option or set it to No.
In troubleshooting situations, set this option to Yes and examine the messages written to the trace file.
CreateIndex This option tells the system not to attempt to create database indexes (always set to No).
CreateTable This option tells the system that if a table needed does not exist at run time, it should create it.
Passwd This option tells the system the password to use when connecting to the database management system.
Qualifier This option tells the system the name of the database for this database handler is LBYDBASE. If you omit this option, the database set up as the default database for the LBYSQL ODBC Data Source is used.
Server This option tells the system the name of the ODBC Data Source for this database handler is LBYSQL. You must define an ODBC Data Source by this name.
UserID This option tells the system the user ID to use when connecting to the database management system.
ODBC_FileConvert control group
LBYI This option tells the system the table referenced in INI options as LBYI is really named DAP110_LBYI on the database management system.
This control group lets you map table names of eight characters or less to table names longer than eight characters.
The table name you specify must adhere to the table naming conventions for the database management system.
LBYD This option tells the system the table referenced in INI options as LBYD is really named DAP110_LBYI on the database management system.
LBYLog This option tells the system the table referenced in INI options as LBYI is really named DAP110_LBYI on the database management system.
Option Description
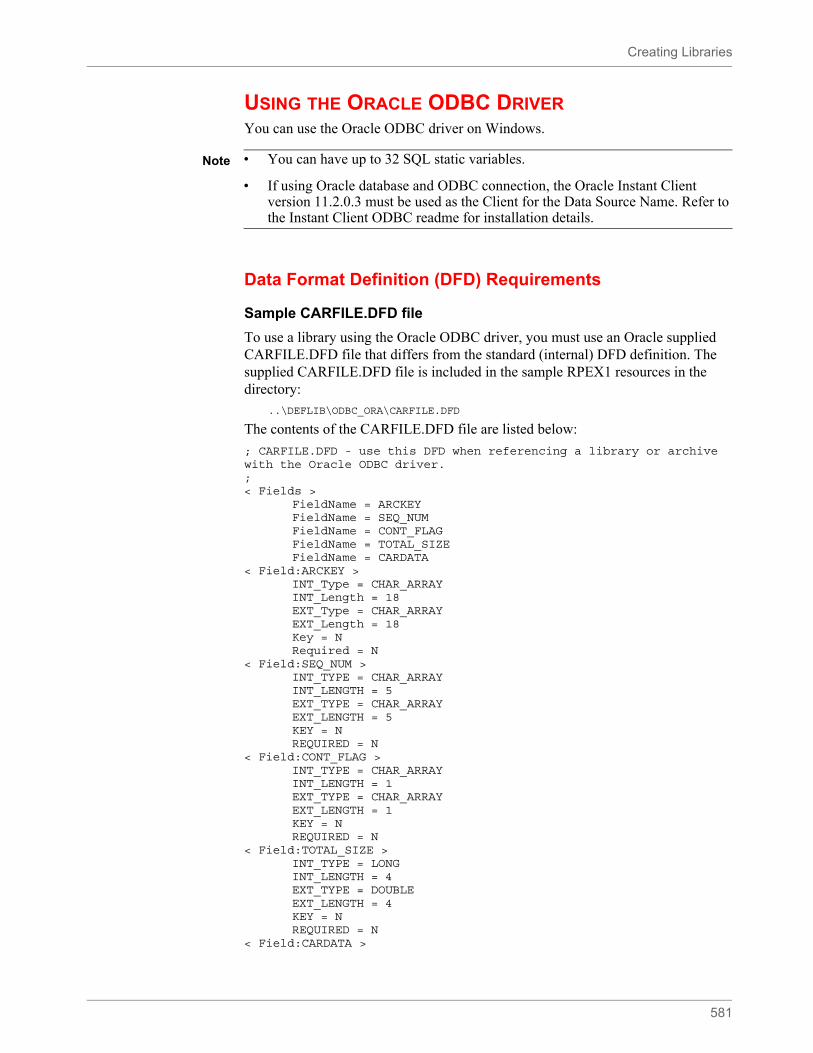
Creating Libraries
581
USING THE ORACLE ODBC DRIVERYou can use the Oracle ODBC driver on Windows.
Data Format Definition (DFD) Requirements
Sample CARFILE.DFD file
To use a library using the Oracle ODBC driver, you must use an Oracle supplied CARFILE.DFD file that differs from the standard (internal) DFD definition. The supplied CARFILE.DFD file is included in the sample RPEX1 resources in the directory:
..\DEFLIB\ODBC_ORA\CARFILE.DFD
The contents of the CARFILE.DFD file are listed below:
; CARFILE.DFD - use this DFD when referencing a library or archive with the Oracle ODBC driver.;< Fields >
FieldName = ARCKEYFieldName = SEQ_NUMFieldName = CONT_FLAGFieldName = TOTAL_SIZEFieldName = CARDATA
< Field:ARCKEY >INT_Type = CHAR_ARRAYINT_Length = 18EXT_Type = CHAR_ARRAYEXT_Length = 18Key = NRequired = N
< Field:SEQ_NUM >INT_TYPE = CHAR_ARRAYINT_LENGTH = 5EXT_TYPE = CHAR_ARRAYEXT_LENGTH = 5KEY = NREQUIRED = N
< Field:CONT_FLAG >INT_TYPE = CHAR_ARRAYINT_LENGTH = 1EXT_TYPE = CHAR_ARRAYEXT_LENGTH = 1KEY = NREQUIRED = N
< Field:TOTAL_SIZE >INT_TYPE = LONGINT_LENGTH = 4EXT_TYPE = DOUBLEEXT_LENGTH = 4KEY = NREQUIRED = N
< Field:CARDATA >
Note • You can have up to 32 SQL static variables.
• If using Oracle database and ODBC connection, the Oracle Instant Client version 11.2.0.3 must be used as the Client for the Data Source Name. Refer to the Instant Client ODBC readme for installation details.
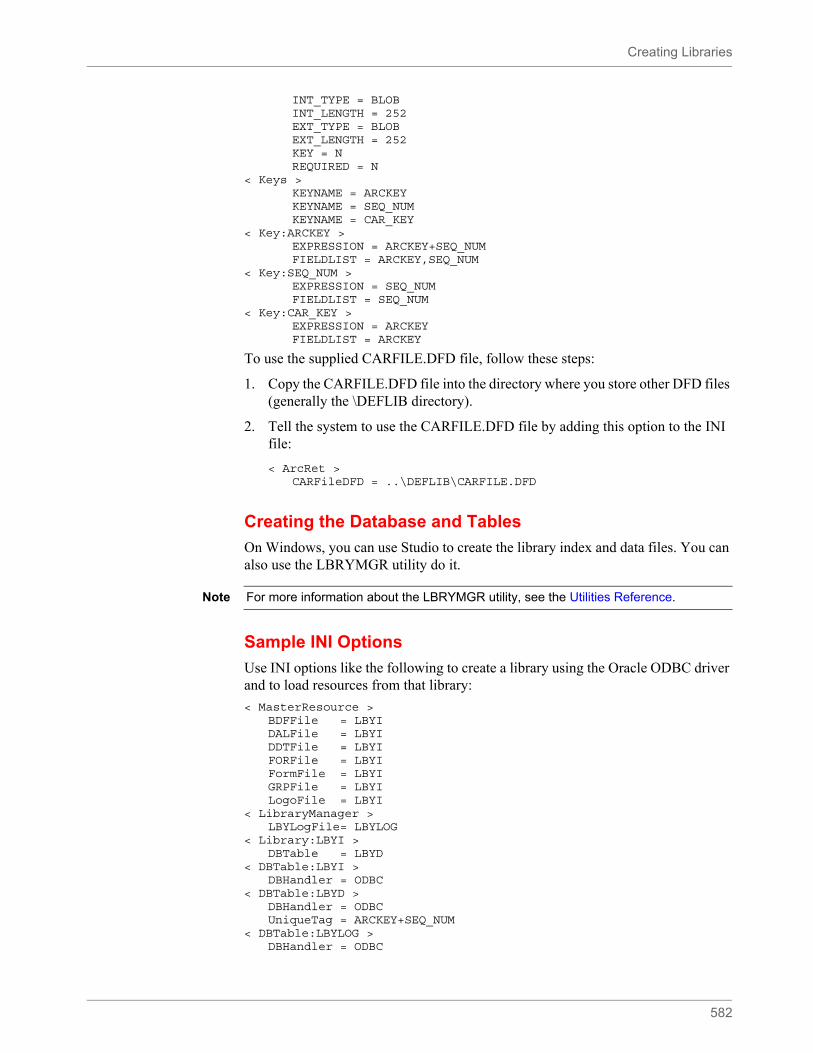
Creating Libraries
582
INT_TYPE = BLOBINT_LENGTH = 252EXT_TYPE = BLOBEXT_LENGTH = 252KEY = NREQUIRED = N
< Keys >KEYNAME = ARCKEYKEYNAME = SEQ_NUMKEYNAME = CAR_KEY
< Key:ARCKEY >EXPRESSION = ARCKEY+SEQ_NUMFIELDLIST = ARCKEY,SEQ_NUM
< Key:SEQ_NUM >EXPRESSION = SEQ_NUMFIELDLIST = SEQ_NUM
< Key:CAR_KEY >EXPRESSION = ARCKEYFIELDLIST = ARCKEY
To use the supplied CARFILE.DFD file, follow these steps:
1. Copy the CARFILE.DFD file into the directory where you store other DFD files (generally the \DEFLIB directory).
2. Tell the system to use the CARFILE.DFD file by adding this option to the INI file:
< ArcRet >CARFileDFD = ..\DEFLIB\CARFILE.DFD
Creating the Database and Tables
On Windows, you can use Studio to create the library index and data files. You can also use the LBRYMGR utility do it.
Sample INI Options
Use INI options like the following to create a library using the Oracle ODBC driver and to load resources from that library:
< MasterResource >BDFFile = LBYIDALFile = LBYIDDTFile = LBYIFORFile = LBYIFormFile = LBYIGRPFile = LBYILogoFile = LBYI
< LibraryManager >LBYLogFile= LBYLOG
< Library:LBYI >DBTable = LBYD
< DBTable:LBYI >DBHandler = ODBC
< DBTable:LBYD >DBHandler = ODBCUniqueTag = ARCKEY+SEQ_NUM
< DBTable:LBYLOG >DBHandler = ODBC
Note For more information about the LBRYMGR utility, see the Utilities Reference.
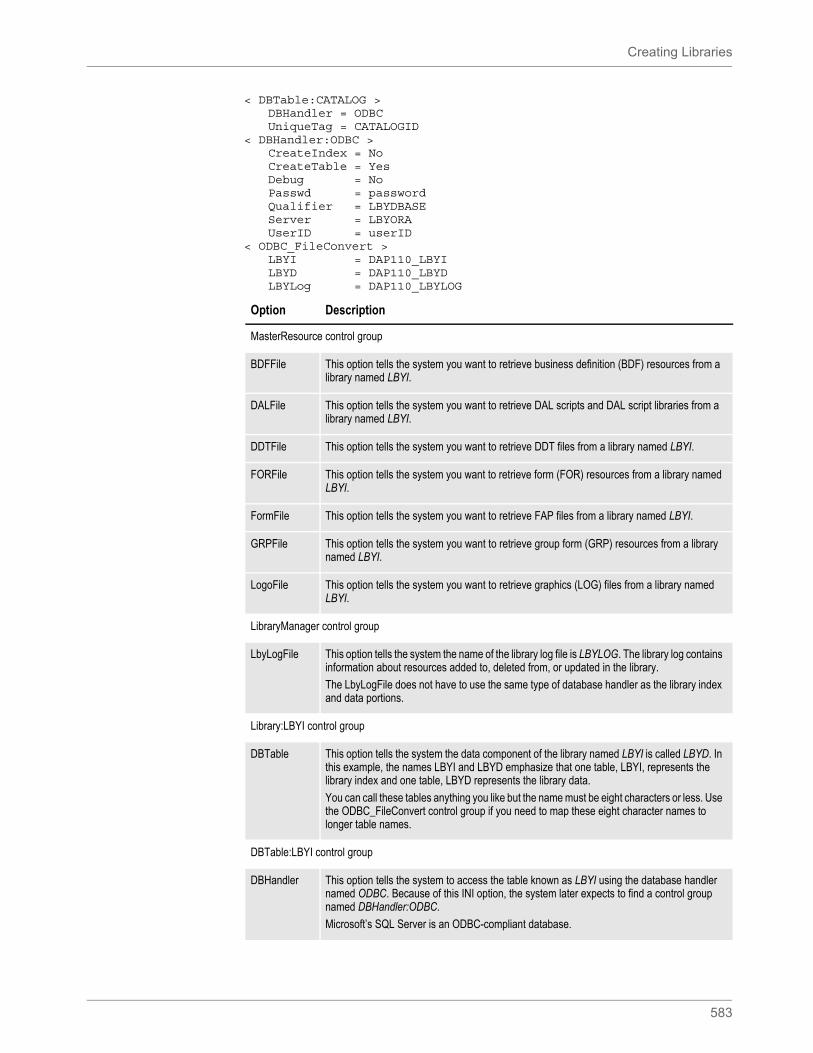
Creating Libraries
583
< DBTable:CATALOG >DBHandler = ODBCUniqueTag = CATALOGID
< DBHandler:ODBC >CreateIndex = NoCreateTable = YesDebug = NoPasswd = passwordQualifier = LBYDBASEServer = LBYORAUserID = userID
< ODBC_FileConvert >LBYI = DAP110_LBYILBYD = DAP110_LBYDLBYLog = DAP110_LBYLOG
Option Description
MasterResource control group
BDFFile This option tells the system you want to retrieve business definition (BDF) resources from a library named LBYI.
DALFile This option tells the system you want to retrieve DAL scripts and DAL script libraries from a library named LBYI.
DDTFile This option tells the system you want to retrieve DDT files from a library named LBYI.
FORFile This option tells the system you want to retrieve form (FOR) resources from a library named LBYI.
FormFile This option tells the system you want to retrieve FAP files from a library named LBYI.
GRPFile This option tells the system you want to retrieve group form (GRP) resources from a library named LBYI.
LogoFile This option tells the system you want to retrieve graphics (LOG) files from a library named LBYI.
LibraryManager control group
LbyLogFile This option tells the system the name of the library log file is LBYLOG. The library log contains information about resources added to, deleted from, or updated in the library.
The LbyLogFile does not have to use the same type of database handler as the library index and data portions.
Library:LBYI control group
DBTable This option tells the system the data component of the library named LBYI is called LBYD. In this example, the names LBYI and LBYD emphasize that one table, LBYI, represents the library index and one table, LBYD represents the library data.
You can call these tables anything you like but the name must be eight characters or less. Use the ODBC_FileConvert control group if you need to map these eight character names to longer table names.
DBTable:LBYI control group
DBHandler This option tells the system to access the table known as LBYI using the database handler named ODBC. Because of this INI option, the system later expects to find a control group named DBHandler:ODBC.
Microsoft’s SQL Server is an ODBC-compliant database.
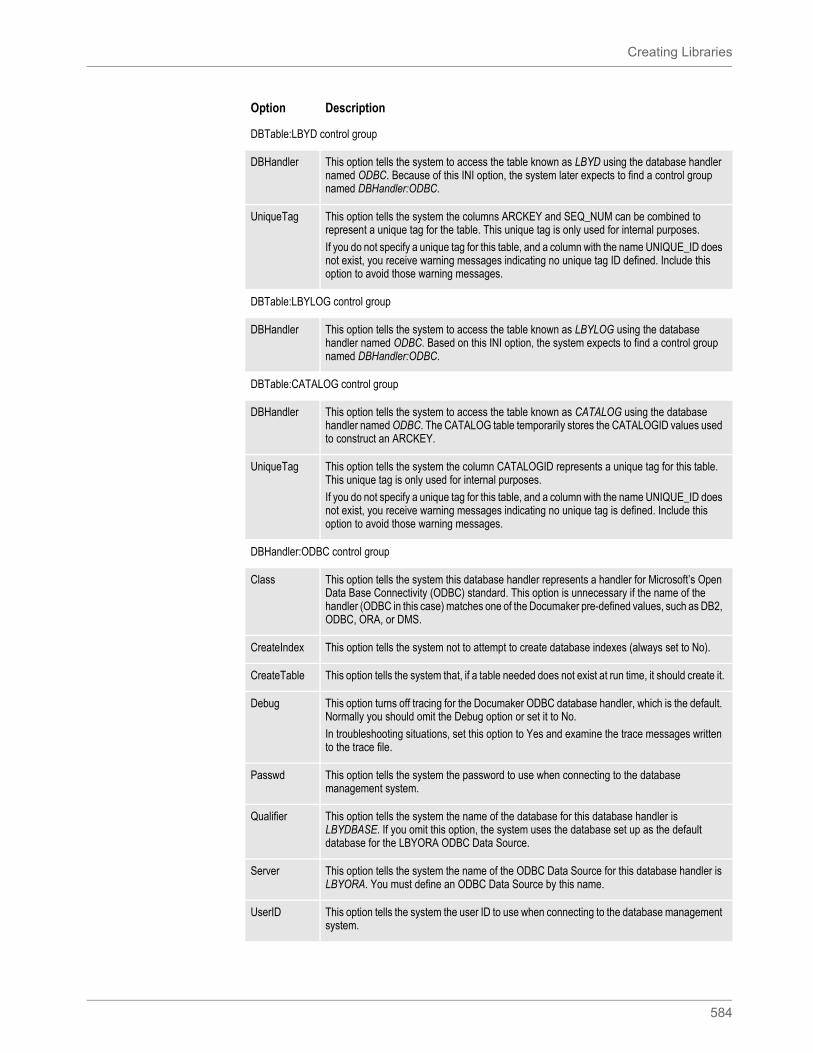
Creating Libraries
584
DBTable:LBYD control group
DBHandler This option tells the system to access the table known as LBYD using the database handler named ODBC. Because of this INI option, the system later expects to find a control group named DBHandler:ODBC.
UniqueTag This option tells the system the columns ARCKEY and SEQ_NUM can be combined to represent a unique tag for the table. This unique tag is only used for internal purposes.
If you do not specify a unique tag for this table, and a column with the name UNIQUE_ID does not exist, you receive warning messages indicating no unique tag ID defined. Include this option to avoid those warning messages.
DBTable:LBYLOG control group
DBHandler This option tells the system to access the table known as LBYLOG using the database handler named ODBC. Based on this INI option, the system expects to find a control group named DBHandler:ODBC.
DBTable:CATALOG control group
DBHandler This option tells the system to access the table known as CATALOG using the database handler named ODBC. The CATALOG table temporarily stores the CATALOGID values used to construct an ARCKEY.
UniqueTag This option tells the system the column CATALOGID represents a unique tag for this table. This unique tag is only used for internal purposes.
If you do not specify a unique tag for this table, and a column with the name UNIQUE_ID does not exist, you receive warning messages indicating no unique tag is defined. Include this option to avoid those warning messages.
DBHandler:ODBC control group
Class This option tells the system this database handler represents a handler for Microsoft’s Open Data Base Connectivity (ODBC) standard. This option is unnecessary if the name of the handler (ODBC in this case) matches one of the Documaker pre-defined values, such as DB2, ODBC, ORA, or DMS.
CreateIndex This option tells the system not to attempt to create database indexes (always set to No).
CreateTable This option tells the system that, if a table needed does not exist at run time, it should create it.
Debug This option turns off tracing for the Documaker ODBC database handler, which is the default. Normally you should omit the Debug option or set it to No.
In troubleshooting situations, set this option to Yes and examine the trace messages written to the trace file.
Passwd This option tells the system the password to use when connecting to the database management system.
Qualifier This option tells the system the name of the database for this database handler is LBYDBASE. If you omit this option, the system uses the database set up as the default database for the LBYORA ODBC Data Source.
Server This option tells the system the name of the ODBC Data Source for this database handler is LBYORA. You must define an ODBC Data Source by this name.
UserID This option tells the system the user ID to use when connecting to the database management system.
Option Description
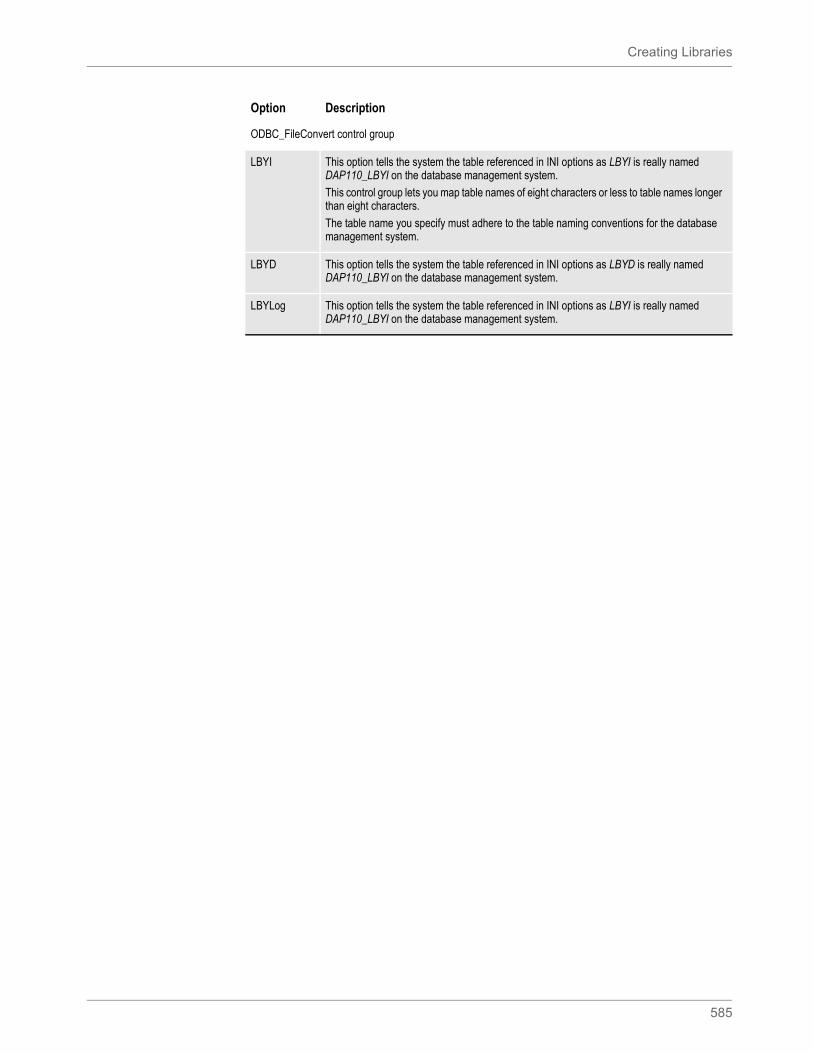
Creating Libraries
585
ODBC_FileConvert control group
LBYI This option tells the system the table referenced in INI options as LBYI is really named DAP110_LBYI on the database management system.
This control group lets you map table names of eight characters or less to table names longer than eight characters.
The table name you specify must adhere to the table naming conventions for the database management system.
LBYD This option tells the system the table referenced in INI options as LBYD is really named DAP110_LBYI on the database management system.
LBYLog This option tells the system the table referenced in INI options as LBYI is really named DAP110_LBYI on the database management system.
Option Description
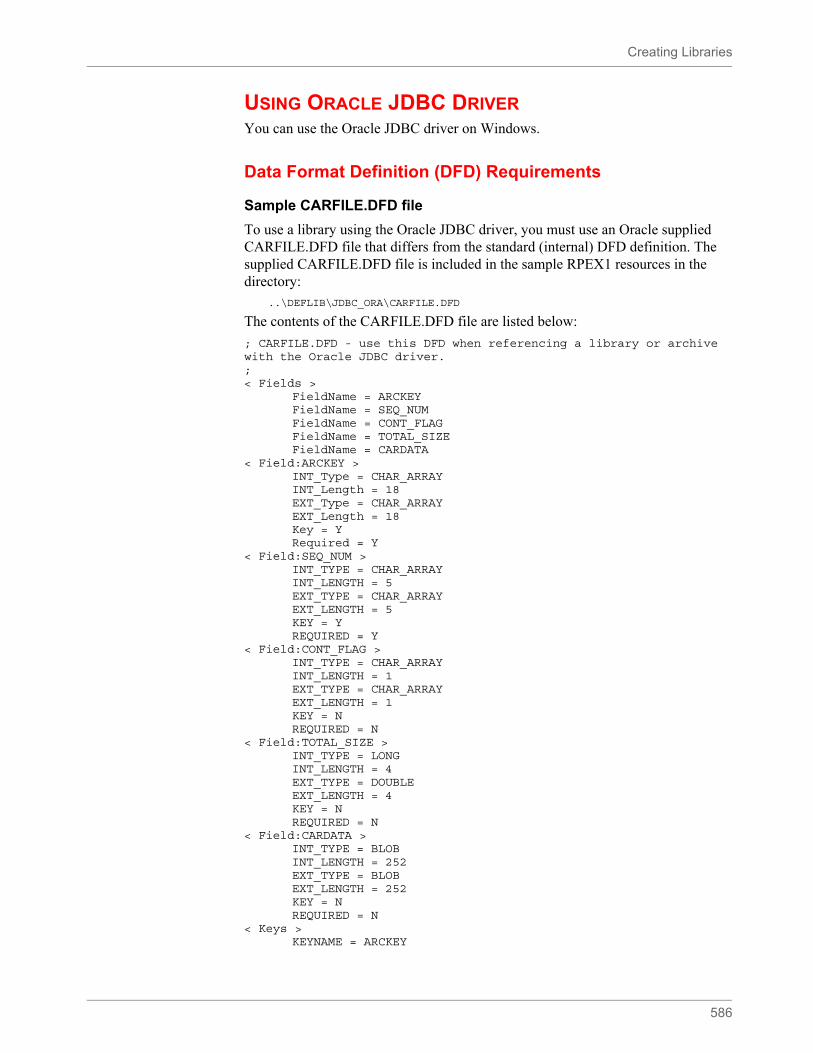
Creating Libraries
586
USING ORACLE JDBC DRIVERYou can use the Oracle JDBC driver on Windows.
Data Format Definition (DFD) Requirements
Sample CARFILE.DFD file
To use a library using the Oracle JDBC driver, you must use an Oracle supplied CARFILE.DFD file that differs from the standard (internal) DFD definition. The supplied CARFILE.DFD file is included in the sample RPEX1 resources in the directory:
..\DEFLIB\JDBC_ORA\CARFILE.DFD
The contents of the CARFILE.DFD file are listed below:
; CARFILE.DFD - use this DFD when referencing a library or archive with the Oracle JDBC driver.;< Fields >
FieldName = ARCKEYFieldName = SEQ_NUMFieldName = CONT_FLAGFieldName = TOTAL_SIZEFieldName = CARDATA
< Field:ARCKEY >INT_Type = CHAR_ARRAYINT_Length = 18EXT_Type = CHAR_ARRAYEXT_Length = 18Key = YRequired = Y
< Field:SEQ_NUM >INT_TYPE = CHAR_ARRAYINT_LENGTH = 5EXT_TYPE = CHAR_ARRAYEXT_LENGTH = 5KEY = YREQUIRED = Y
< Field:CONT_FLAG >INT_TYPE = CHAR_ARRAYINT_LENGTH = 1EXT_TYPE = CHAR_ARRAYEXT_LENGTH = 1KEY = NREQUIRED = N
< Field:TOTAL_SIZE >INT_TYPE = LONGINT_LENGTH = 4EXT_TYPE = DOUBLEEXT_LENGTH = 4KEY = NREQUIRED = N
< Field:CARDATA >INT_TYPE = BLOBINT_LENGTH = 252EXT_TYPE = BLOBEXT_LENGTH = 252KEY = NREQUIRED = N
< Keys >KEYNAME = ARCKEY
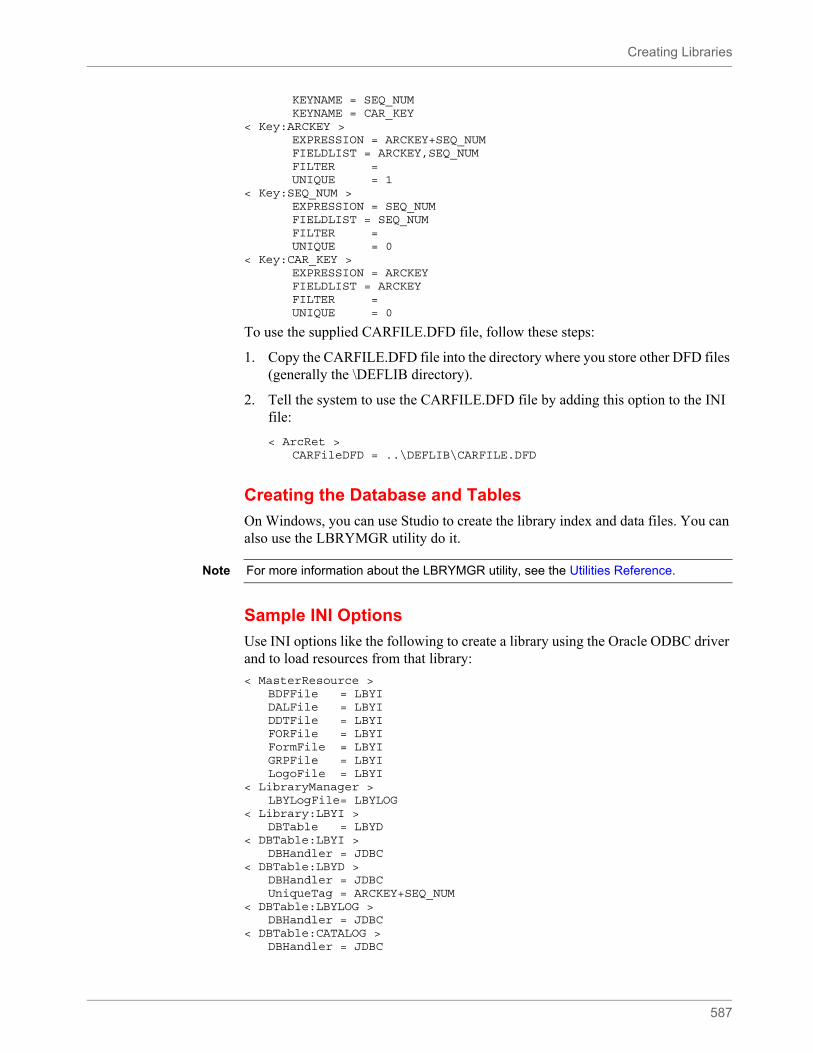
Creating Libraries
587
KEYNAME = SEQ_NUMKEYNAME = CAR_KEY
< Key:ARCKEY >EXPRESSION = ARCKEY+SEQ_NUMFIELDLIST = ARCKEY,SEQ_NUMFILTER =
UNIQUE = 1< Key:SEQ_NUM >
EXPRESSION = SEQ_NUMFIELDLIST = SEQ_NUMFILTER =
UNIQUE = 0< Key:CAR_KEY >
EXPRESSION = ARCKEYFIELDLIST = ARCKEYFILTER =
UNIQUE = 0
To use the supplied CARFILE.DFD file, follow these steps:
1. Copy the CARFILE.DFD file into the directory where you store other DFD files (generally the \DEFLIB directory).
2. Tell the system to use the CARFILE.DFD file by adding this option to the INI file:
< ArcRet >CARFileDFD = ..\DEFLIB\CARFILE.DFD
Creating the Database and Tables
On Windows, you can use Studio to create the library index and data files. You can also use the LBRYMGR utility do it.
Sample INI Options
Use INI options like the following to create a library using the Oracle ODBC driver and to load resources from that library:
< MasterResource >BDFFile = LBYIDALFile = LBYIDDTFile = LBYIFORFile = LBYIFormFile = LBYIGRPFile = LBYILogoFile = LBYI
< LibraryManager >LBYLogFile= LBYLOG
< Library:LBYI >DBTable = LBYD
< DBTable:LBYI >DBHandler = JDBC
< DBTable:LBYD >DBHandler = JDBCUniqueTag = ARCKEY+SEQ_NUM
< DBTable:LBYLOG >DBHandler = JDBC
< DBTable:CATALOG >DBHandler = JDBC
Note For more information about the LBRYMGR utility, see the Utilities Reference.

Creating Libraries
588
UniqueTag = CATALOGID< DBHandler:JDBC >
CreateIndex = NoCreateTable = YesDebug = NoPasswd = passwordQualifier = LBYDBASEServer = oracle.jdbc.OracleDriver;jdbc:oracle:thin@dbHost:1521:XEUserID = userID
< JDBC_FileConvert >LBYI = DAP110_LBYILBYD = DAP110_LBYDLBYLog = DAP110_LBYLOG
Option Description
MasterResource control group
BDFFile This option tells the system you want to retrieve business definition (BDF) resources from a library named LBYI.
DALFile This option tells the system you want to retrieve DAL scripts and DAL script libraries from a library named LBYI.
DDTFile This option tells the system you want to retrieve DDT files from a library named LBYI.
FORFile This option tells the system you want to retrieve form (FOR) resources from a library named LBYI.
FormFile This option tells the system you want to retrieve FAP files from a library named LBYI.
GRPFile This option tells the system you want to retrieve group form (GRP) resources from a library named LBYI.
LogoFile This option tells the system you want to retrieve graphics (LOG) files from a library named LBYI.
LibraryManager control group
LbyLogFile This option tells the system the name of the library log file is LBYLOG. The library log contains information about resources added to, deleted from, or updated in the library.
The LbyLogFile does not have to use the same type of database handler as the library index and data portions.
Library:LBYI control group
DBTable This option tells the system the data component of the library named LBYI is called LBYD. In this example, the names LBYI and LBYD emphasize that one table, LBYI, represents the library index and one table, LBYD represents the library data.
You can call these tables anything you like but the name must be eight characters or less. Use the JDBC_FileConvert control group if you need to map these eight character names to longer table names.
DBTable:LBYI control group
DBHandler This option tells the system to access the table known as LBYI using the database handler named JDBC. Because of this INI option, the system later expects to find a control group named DBHandler:JDBC.
Microsoft’s SQL Server is an JDBC-compliant database.
DBTable:LBYD control group
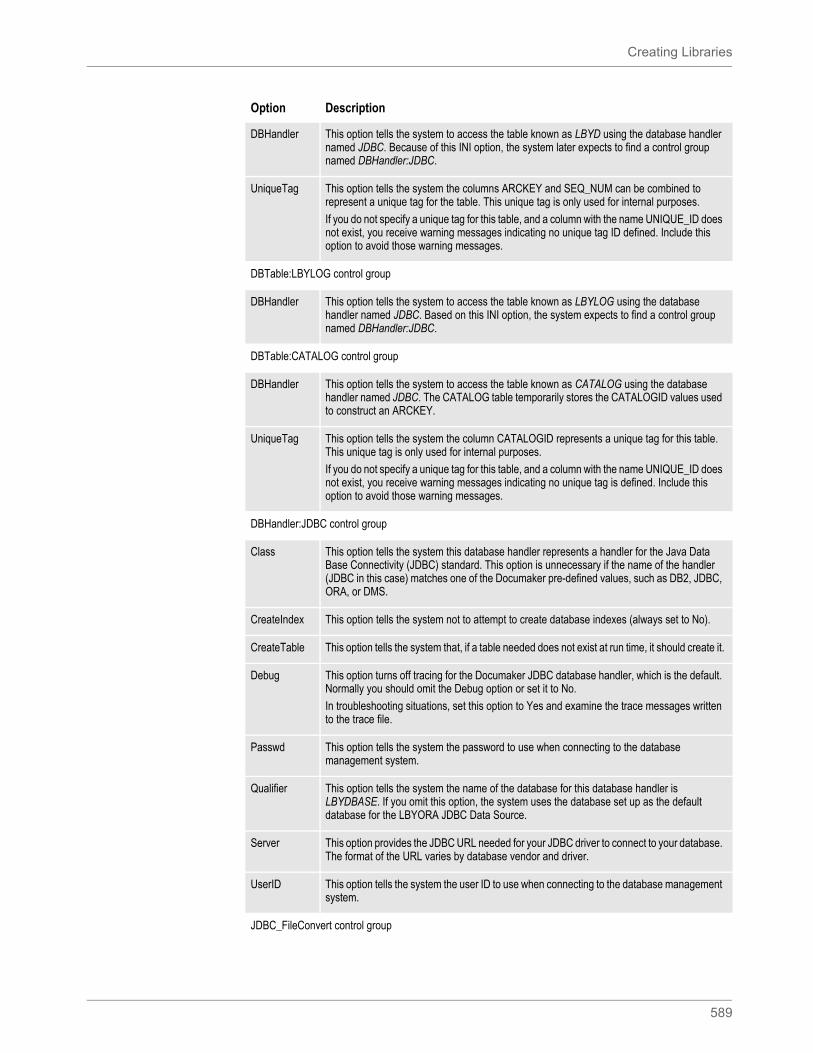
Creating Libraries
589
DBHandler This option tells the system to access the table known as LBYD using the database handler named JDBC. Because of this INI option, the system later expects to find a control group named DBHandler:JDBC.
UniqueTag This option tells the system the columns ARCKEY and SEQ_NUM can be combined to represent a unique tag for the table. This unique tag is only used for internal purposes.
If you do not specify a unique tag for this table, and a column with the name UNIQUE_ID does not exist, you receive warning messages indicating no unique tag ID defined. Include this option to avoid those warning messages.
DBTable:LBYLOG control group
DBHandler This option tells the system to access the table known as LBYLOG using the database handler named JDBC. Based on this INI option, the system expects to find a control group named DBHandler:JDBC.
DBTable:CATALOG control group
DBHandler This option tells the system to access the table known as CATALOG using the database handler named JDBC. The CATALOG table temporarily stores the CATALOGID values used to construct an ARCKEY.
UniqueTag This option tells the system the column CATALOGID represents a unique tag for this table. This unique tag is only used for internal purposes.
If you do not specify a unique tag for this table, and a column with the name UNIQUE_ID does not exist, you receive warning messages indicating no unique tag is defined. Include this option to avoid those warning messages.
DBHandler:JDBC control group
Class This option tells the system this database handler represents a handler for the Java Data Base Connectivity (JDBC) standard. This option is unnecessary if the name of the handler (JDBC in this case) matches one of the Documaker pre-defined values, such as DB2, JDBC, ORA, or DMS.
CreateIndex This option tells the system not to attempt to create database indexes (always set to No).
CreateTable This option tells the system that, if a table needed does not exist at run time, it should create it.
Debug This option turns off tracing for the Documaker JDBC database handler, which is the default. Normally you should omit the Debug option or set it to No.
In troubleshooting situations, set this option to Yes and examine the trace messages written to the trace file.
Passwd This option tells the system the password to use when connecting to the database management system.
Qualifier This option tells the system the name of the database for this database handler is LBYDBASE. If you omit this option, the system uses the database set up as the default database for the LBYORA JDBC Data Source.
Server This option provides the JDBC URL needed for your JDBC driver to connect to your database. The format of the URL varies by database vendor and driver.
UserID This option tells the system the user ID to use when connecting to the database management system.
JDBC_FileConvert control group
Option Description
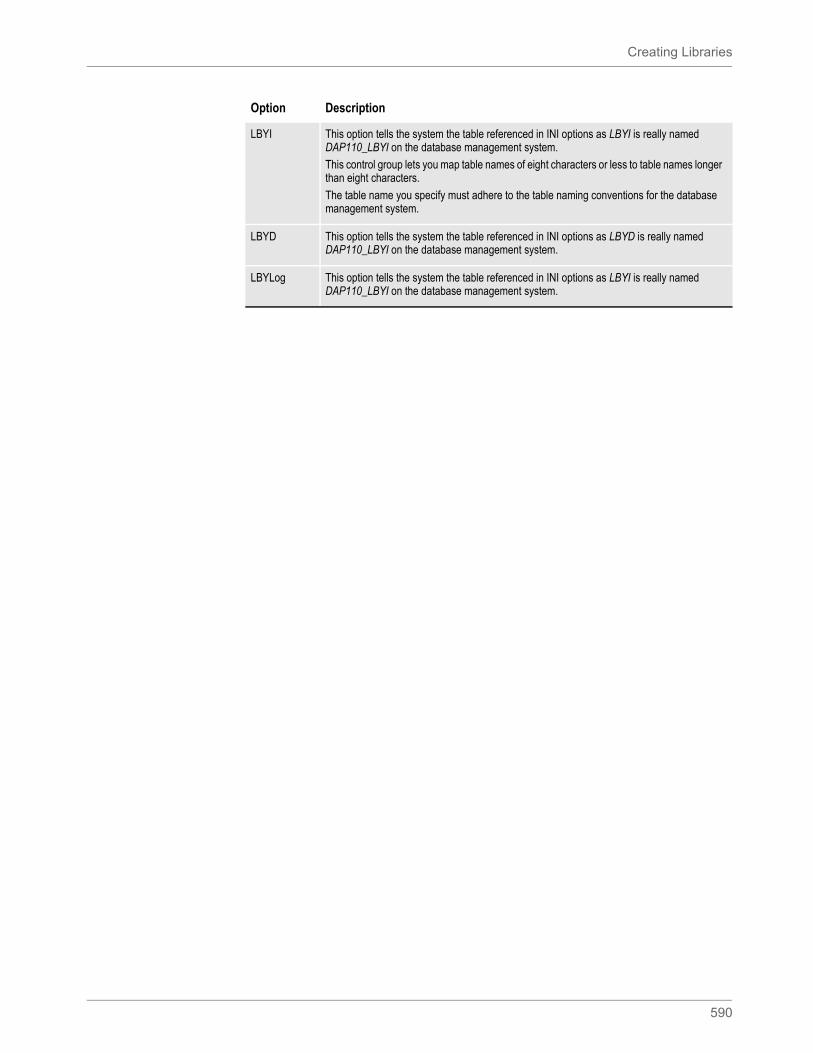
Creating Libraries
590
LBYI This option tells the system the table referenced in INI options as LBYI is really named DAP110_LBYI on the database management system.
This control group lets you map table names of eight characters or less to table names longer than eight characters.
The table name you specify must adhere to the table naming conventions for the database management system.
LBYD This option tells the system the table referenced in INI options as LBYD is really named DAP110_LBYI on the database management system.
LBYLog This option tells the system the table referenced in INI options as LBYI is really named DAP110_LBYI on the database management system.
Option Description
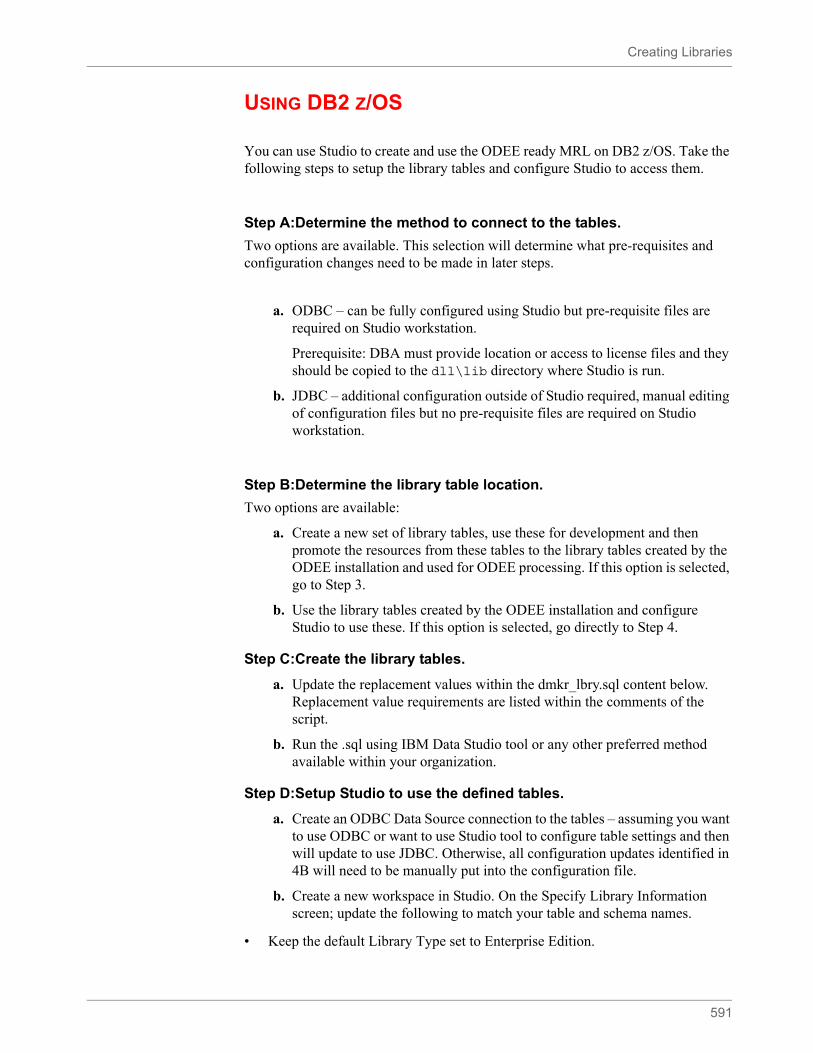
Creating Libraries
591
USING DB2 Z/OS
You can use Studio to create and use the ODEE ready MRL on DB2 z/OS. Take the following steps to setup the library tables and configure Studio to access them.
Step A:Determine the method to connect to the tables.
Two options are available. This selection will determine what pre-requisites and configuration changes need to be made in later steps.
a. ODBC – can be fully configured using Studio but pre-requisite files are required on Studio workstation.
Prerequisite: DBA must provide location or access to license files and they should be copied to the dll\lib directory where Studio is run.
b. JDBC – additional configuration outside of Studio required, manual editing of configuration files but no pre-requisite files are required on Studio workstation.
Step B:Determine the library table location.
Two options are available:
a. Create a new set of library tables, use these for development and then promote the resources from these tables to the library tables created by the ODEE installation and used for ODEE processing. If this option is selected, go to Step 3.
b. Use the library tables created by the ODEE installation and configure Studio to use these. If this option is selected, go directly to Step 4.
Step C:Create the library tables.
a. Update the replacement values within the dmkr_lbry.sql content below. Replacement value requirements are listed within the comments of the script.
b. Run the .sql using IBM Data Studio tool or any other preferred method available within your organization.
Step D:Setup Studio to use the defined tables.
a. Create an ODBC Data Source connection to the tables – assuming you want to use ODBC or want to use Studio tool to configure table settings and then will update to use JDBC. Otherwise, all configuration updates identified in 4B will need to be manually put into the configuration file.
b. Create a new workspace in Studio. On the Specify Library Information screen; update the following to match your table and schema names.
• Keep the default Library Type set to Enterprise Edition.
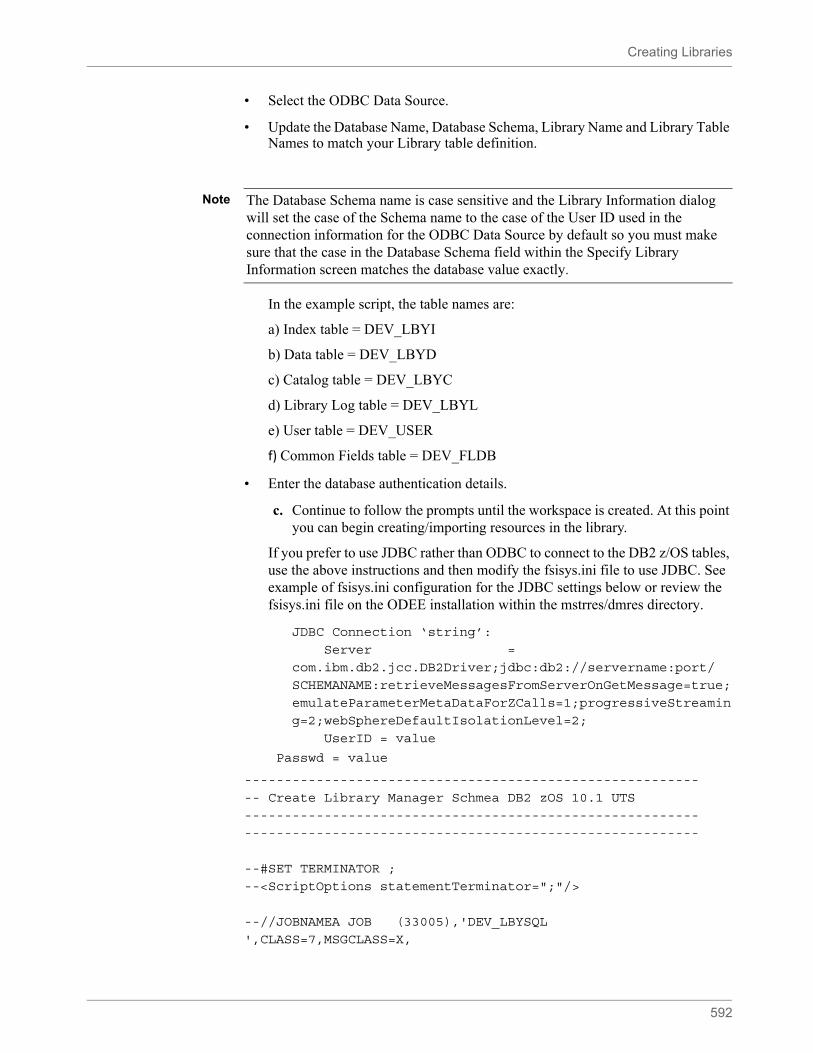
Creating Libraries
592
• Select the ODBC Data Source.
• Update the Database Name, Database Schema, Library Name and Library Table Names to match your Library table definition.
In the example script, the table names are:
a) Index table = DEV_LBYI
b) Data table = DEV_LBYD
c) Catalog table = DEV_LBYC
d) Library Log table = DEV_LBYL
e) User table = DEV_USER
f) Common Fields table = DEV_FLDB
• Enter the database authentication details.
c. Continue to follow the prompts until the workspace is created. At this point you can begin creating/importing resources in the library.
If you prefer to use JDBC rather than ODBC to connect to the DB2 z/OS tables, use the above instructions and then modify the fsisys.ini file to use JDBC. See example of fsisys.ini configuration for the JDBC settings below or review the fsisys.ini file on the ODEE installation within the mstrres/dmres directory.
JDBC Connection ‘string’:
Server =
com.ibm.db2.jcc.DB2Driver;jdbc:db2://servername:port/
SCHEMANAME:retrieveMessagesFromServerOnGetMessage=true;
emulateParameterMetaDataForZCalls=1;progressiveStreamin
g=2;webSphereDefaultIsolationLevel=2;
UserID = value
Passwd = value
---------------------------------------------------------
-- Create Library Manager Schmea DB2 zOS 10.1 UTS
---------------------------------------------------------
---------------------------------------------------------
--#SET TERMINATOR ;
--<ScriptOptions statementTerminator=";"/>
--//JOBNAMEA JOB (33005),'DEV_LBYSQL
',CLASS=7,MSGCLASS=X,
Note The Database Schema name is case sensitive and the Library Information dialog will set the case of the Schema name to the case of the User ID used in the connection information for the ODBC Data Source by default so you must make sure that the case in the Database Schema field within the Specify Library Information screen matches the database value exactly.
Creating Libraries
593
--// NOTIFY=&SYSUID
--//*
--//
*************************************************************
*****
--//*
--//* DEV_LBYSQL- CONTAINS SQL DATA DEFINITION LANGUAGE
STATEMENTS
--//* TO CREATE DB2 TABLES AND INDEXES USED FOR A
--//* DOCUMAKER LIBRARY.
--//*
--//
*************************************************************
*****
--//*
--//LBYSQL EXEC PGM=IKJEFT01,DYNAMNBR=20
--//STEPLIB DD DSN=CEE.SCEERUN,DISP=SHR
--// DD DSN=DSN1010.SDSNLOAD,DISP=SHR
--//*
--//SYSPRINT DD SYSOUT=*
--//SYSTSPRT DD SYSOUT=*
--//SYSOUT DD SYSOUT=*
--//SYSTSIN DD *
-- DSN SYSTEM(DBLOC)
-- RUN PROGRAM(DSNTIAD) PLAN(DSNTIA101) -
-- LIB('DSN1010.RUNLIB.LOAD')
-- END
--//*
--//SYSIN DD *
-- Replace "DBLOC" with Location
-- Replace "DBNAME" with Database Name
-- Replace "DBUSER" with Schema/User name
-- Replace "DEV" with Prefix used by Documaker Studio but
limit to 3 max characters, e.g. DEV, TET, PRD
-- Replace "VOLUMES('*') VCAT" with Storage Group volume(s)
-- Replace "BP7" with 4K BufferPool
-- Replace "BP16K0" with 16K BufferPool
-- Replace "BP32K0" with 32K BufferPool
--BEGIN: Drop Library Manager Schmea DB2 zOS 10.1 UTS
--SET CURRENT RULES = 'STD';
--SET CURRENT SQLID = 'DBUSER';
--SET SCHEMA DBUSER;
--SET CURRENT SCHEMA = DBUSER;
--SET CURRENT PATH = DBUSER,SYSFUN,SYSPROC;
--DROP TABLESPACE DBNAME.DEVLLTS;
--DROP TABLESPACE DBNAME.DEVLITS;
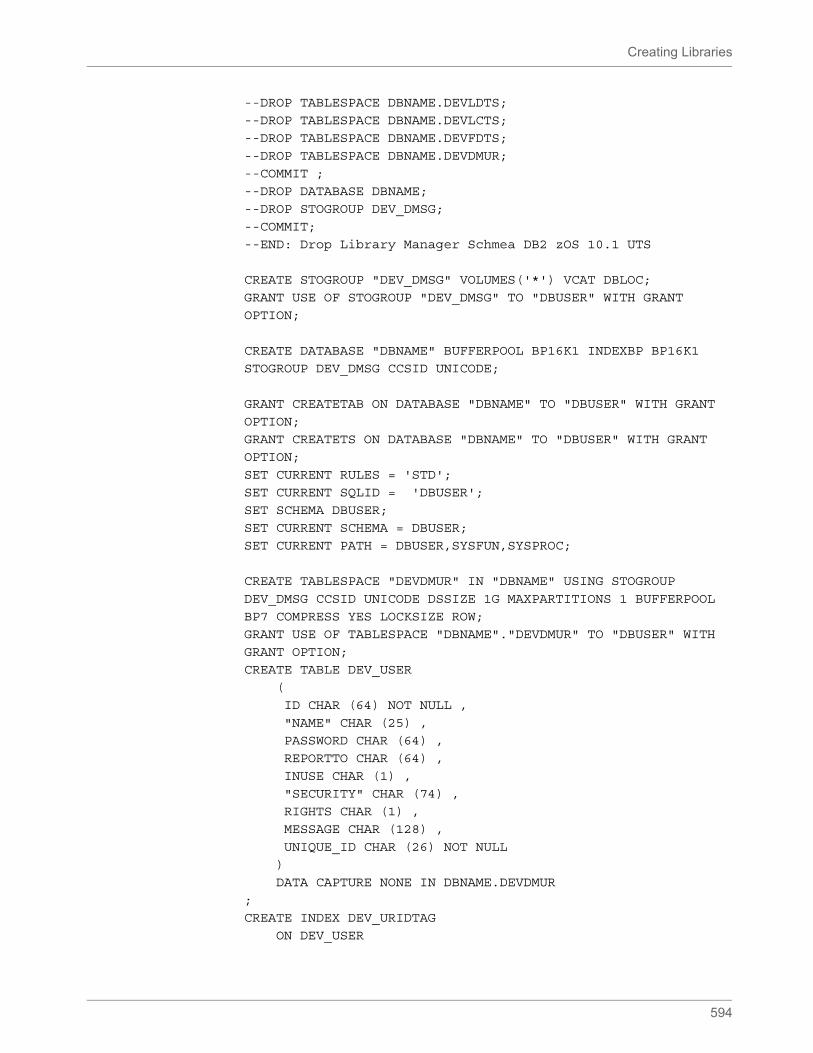
Creating Libraries
594
--DROP TABLESPACE DBNAME.DEVLDTS;
--DROP TABLESPACE DBNAME.DEVLCTS;
--DROP TABLESPACE DBNAME.DEVFDTS;
--DROP TABLESPACE DBNAME.DEVDMUR;
--COMMIT ;
--DROP DATABASE DBNAME;
--DROP STOGROUP DEV_DMSG;
--COMMIT;
--END: Drop Library Manager Schmea DB2 zOS 10.1 UTS
CREATE STOGROUP "DEV_DMSG" VOLUMES('*') VCAT DBLOC;
GRANT USE OF STOGROUP "DEV_DMSG" TO "DBUSER" WITH GRANT
OPTION;
CREATE DATABASE "DBNAME" BUFFERPOOL BP16K1 INDEXBP BP16K1
STOGROUP DEV_DMSG CCSID UNICODE;
GRANT CREATETAB ON DATABASE "DBNAME" TO "DBUSER" WITH GRANT
OPTION;
GRANT CREATETS ON DATABASE "DBNAME" TO "DBUSER" WITH GRANT
OPTION;
SET CURRENT RULES = 'STD';
SET CURRENT SQLID = 'DBUSER';
SET SCHEMA DBUSER;
SET CURRENT SCHEMA = DBUSER;
SET CURRENT PATH = DBUSER,SYSFUN,SYSPROC;
CREATE TABLESPACE "DEVDMUR" IN "DBNAME" USING STOGROUP
DEV_DMSG CCSID UNICODE DSSIZE 1G MAXPARTITIONS 1 BUFFERPOOL
BP7 COMPRESS YES LOCKSIZE ROW;
GRANT USE OF TABLESPACE "DBNAME"."DEVDMUR" TO "DBUSER" WITH
GRANT OPTION;
CREATE TABLE DEV_USER
(
ID CHAR (64) NOT NULL ,
"NAME" CHAR (25) ,
PASSWORD CHAR (64) ,
REPORTTO CHAR (64) ,
INUSE CHAR (1) ,
"SECURITY" CHAR (74) ,
RIGHTS CHAR (1) ,
MESSAGE CHAR (128) ,
UNIQUE_ID CHAR (26) NOT NULL
)
DATA CAPTURE NONE IN DBNAME.DEVDMUR
;
CREATE INDEX DEV_URIDTAG
ON DEV_USER
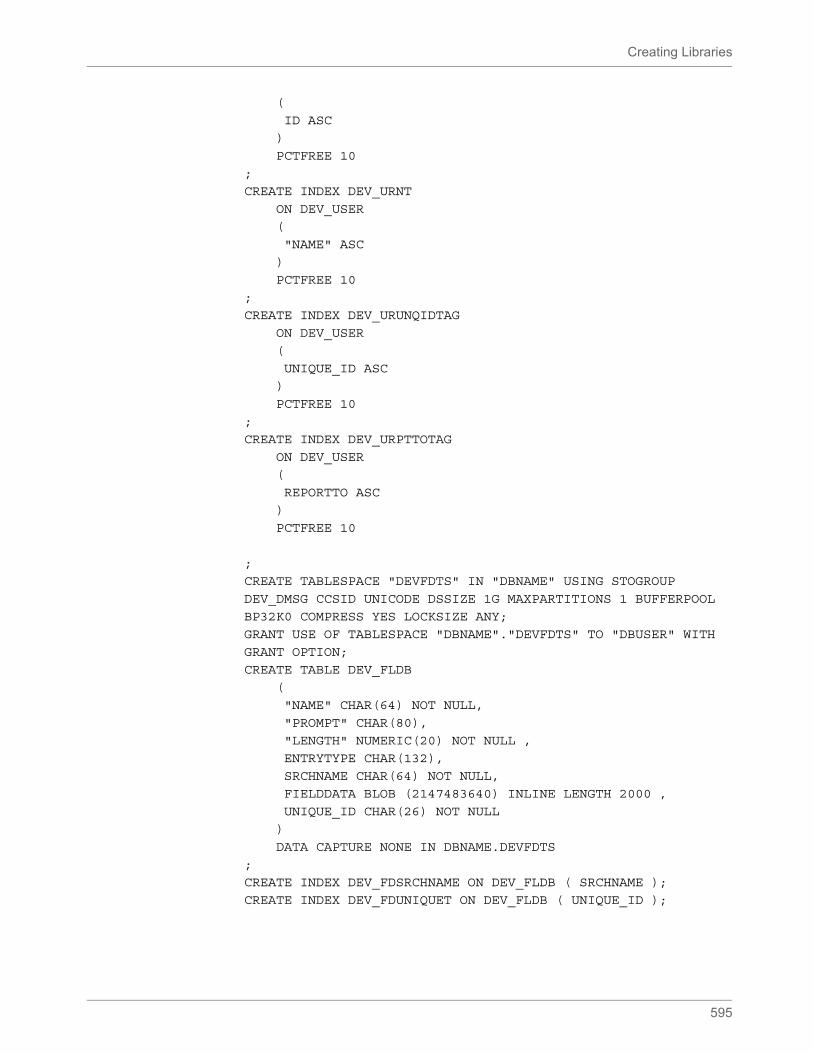
Creating Libraries
595
(
ID ASC
)
PCTFREE 10
;
CREATE INDEX DEV_URNT
ON DEV_USER
(
"NAME" ASC
)
PCTFREE 10
;
CREATE INDEX DEV_URUNQIDTAG
ON DEV_USER
(
UNIQUE_ID ASC
)
PCTFREE 10
;
CREATE INDEX DEV_URPTTOTAG
ON DEV_USER
(
REPORTTO ASC
)
PCTFREE 10
;
CREATE TABLESPACE "DEVFDTS" IN "DBNAME" USING STOGROUP
DEV_DMSG CCSID UNICODE DSSIZE 1G MAXPARTITIONS 1 BUFFERPOOL
BP32K0 COMPRESS YES LOCKSIZE ANY;
GRANT USE OF TABLESPACE "DBNAME"."DEVFDTS" TO "DBUSER" WITH
GRANT OPTION;
CREATE TABLE DEV_FLDB
(
"NAME" CHAR(64) NOT NULL,
"PROMPT" CHAR(80),
"LENGTH" NUMERIC(20) NOT NULL ,
ENTRYTYPE CHAR(132),
SRCHNAME CHAR(64) NOT NULL,
FIELDDATA BLOB (2147483640) INLINE LENGTH 2000 ,
UNIQUE_ID CHAR(26) NOT NULL
)
DATA CAPTURE NONE IN DBNAME.DEVFDTS
;
CREATE INDEX DEV_FDSRCHNAME ON DEV_FLDB ( SRCHNAME );
CREATE INDEX DEV_FDUNIQUET ON DEV_FLDB ( UNIQUE_ID );
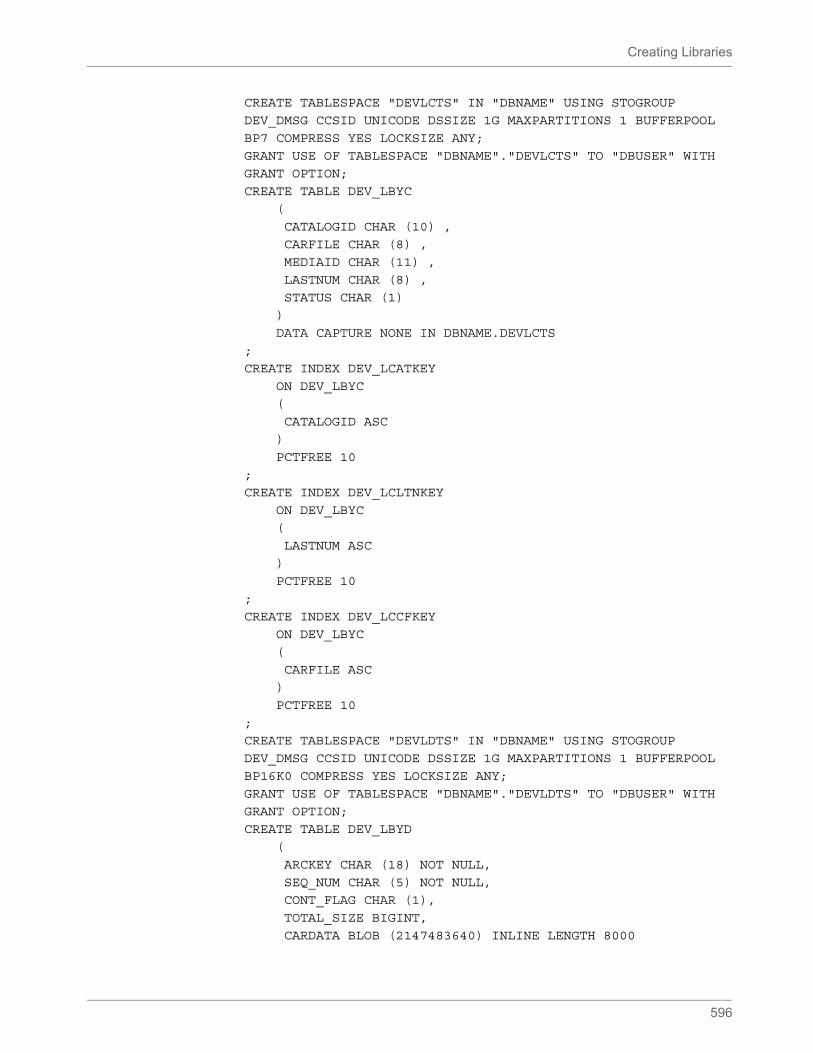
Creating Libraries
596
CREATE TABLESPACE "DEVLCTS" IN "DBNAME" USING STOGROUP
DEV_DMSG CCSID UNICODE DSSIZE 1G MAXPARTITIONS 1 BUFFERPOOL
BP7 COMPRESS YES LOCKSIZE ANY;
GRANT USE OF TABLESPACE "DBNAME"."DEVLCTS" TO "DBUSER" WITH
GRANT OPTION;
CREATE TABLE DEV_LBYC
(
CATALOGID CHAR (10) ,
CARFILE CHAR (8) ,
MEDIAID CHAR (11) ,
LASTNUM CHAR (8) ,
STATUS CHAR (1)
)
DATA CAPTURE NONE IN DBNAME.DEVLCTS
;
CREATE INDEX DEV_LCATKEY
ON DEV_LBYC
(
CATALOGID ASC
)
PCTFREE 10
;
CREATE INDEX DEV_LCLTNKEY
ON DEV_LBYC
(
LASTNUM ASC
)
PCTFREE 10
;
CREATE INDEX DEV_LCCFKEY
ON DEV_LBYC
(
CARFILE ASC
)
PCTFREE 10
;
CREATE TABLESPACE "DEVLDTS" IN "DBNAME" USING STOGROUP
DEV_DMSG CCSID UNICODE DSSIZE 1G MAXPARTITIONS 1 BUFFERPOOL
BP16K0 COMPRESS YES LOCKSIZE ANY;
GRANT USE OF TABLESPACE "DBNAME"."DEVLDTS" TO "DBUSER" WITH
GRANT OPTION;
CREATE TABLE DEV_LBYD
(
ARCKEY CHAR (18) NOT NULL,
SEQ_NUM CHAR (5) NOT NULL,
CONT_FLAG CHAR (1),
TOTAL_SIZE BIGINT,
CARDATA BLOB (2147483640) INLINE LENGTH 8000
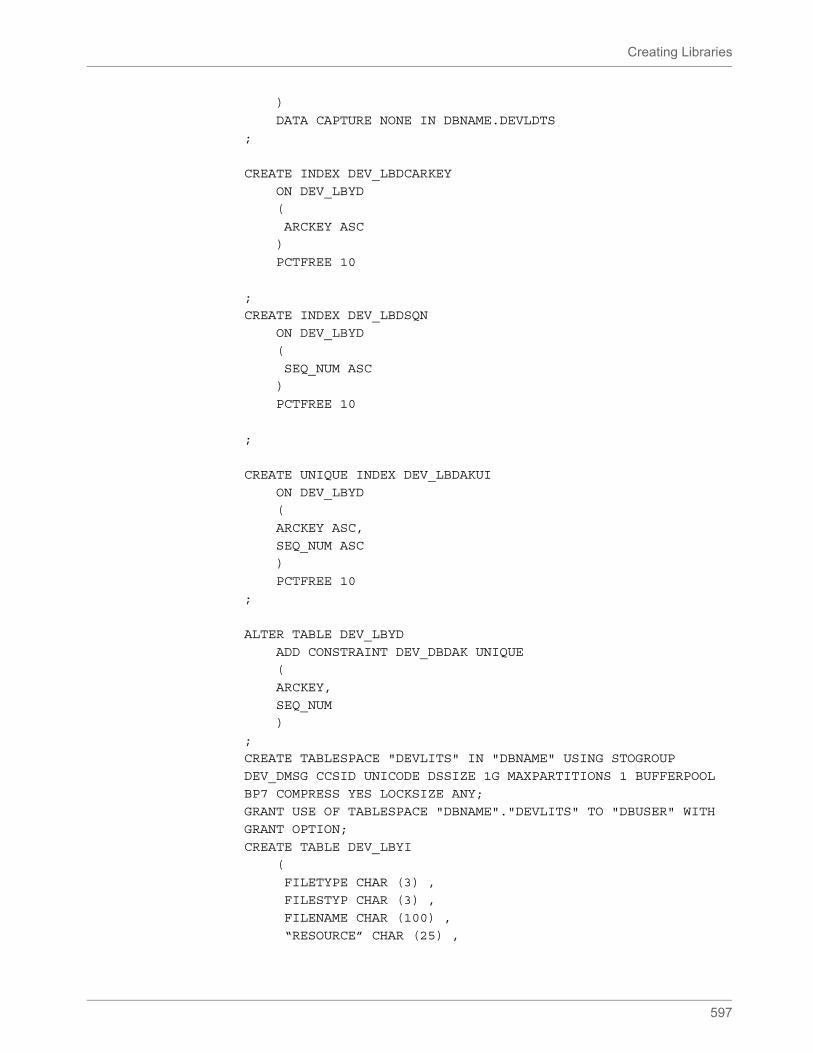
Creating Libraries
597
)
DATA CAPTURE NONE IN DBNAME.DEVLDTS
;
CREATE INDEX DEV_LBDCARKEY
ON DEV_LBYD
(
ARCKEY ASC
)
PCTFREE 10
;
CREATE INDEX DEV_LBDSQN
ON DEV_LBYD
(
SEQ_NUM ASC
)
PCTFREE 10
;
CREATE UNIQUE INDEX DEV_LBDAKUI
ON DEV_LBYD
(
ARCKEY ASC,
SEQ_NUM ASC
)
PCTFREE 10
;
ALTER TABLE DEV_LBYD
ADD CONSTRAINT DEV_DBDAK UNIQUE
(
ARCKEY,
SEQ_NUM
)
;
CREATE TABLESPACE "DEVLITS" IN "DBNAME" USING STOGROUP
DEV_DMSG CCSID UNICODE DSSIZE 1G MAXPARTITIONS 1 BUFFERPOOL
BP7 COMPRESS YES LOCKSIZE ANY;
GRANT USE OF TABLESPACE "DBNAME"."DEVLITS" TO "DBUSER" WITH
GRANT OPTION;
CREATE TABLE DEV_LBYI
(
FILETYPE CHAR (3) ,
FILESTYP CHAR (3) ,
FILENAME CHAR (100) ,
“RESOURCE” CHAR (25) ,
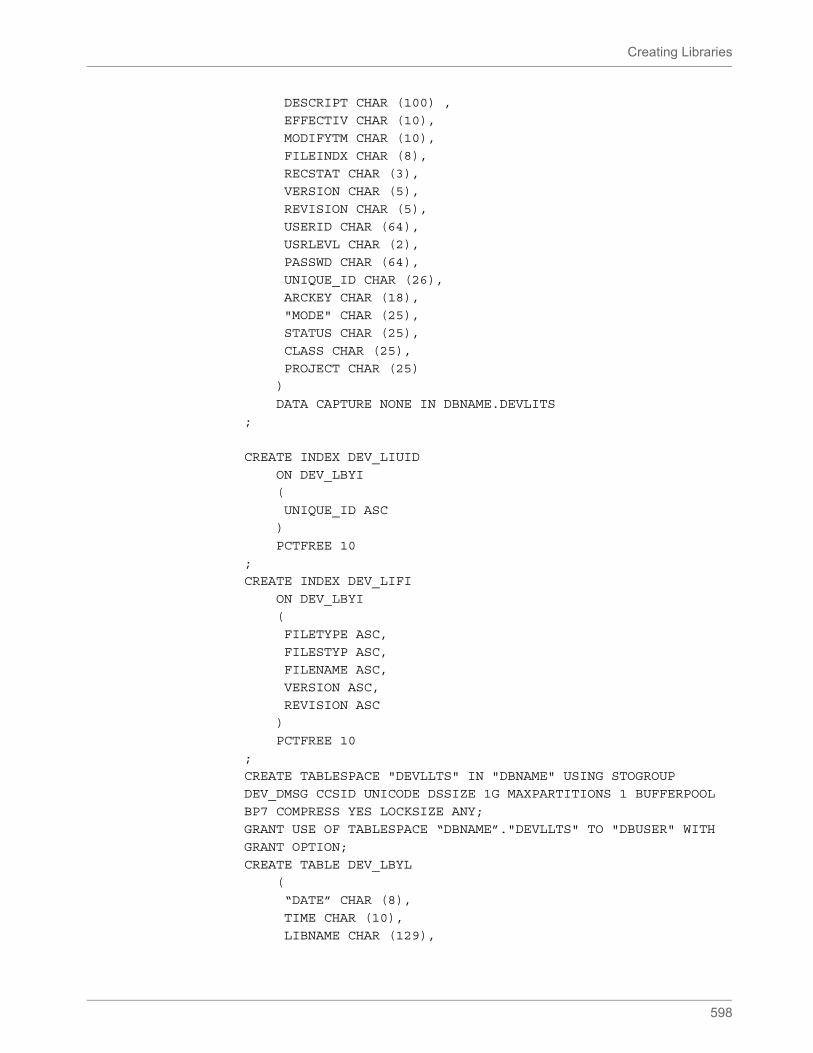
Creating Libraries
598
DESCRIPT CHAR (100) ,
EFFECTIV CHAR (10),
MODIFYTM CHAR (10),
FILEINDX CHAR (8),
RECSTAT CHAR (3),
VERSION CHAR (5),
REVISION CHAR (5),
USERID CHAR (64),
USRLEVL CHAR (2),
PASSWD CHAR (64),
UNIQUE_ID CHAR (26),
ARCKEY CHAR (18),
"MODE" CHAR (25),
STATUS CHAR (25),
CLASS CHAR (25),
PROJECT CHAR (25)
)
DATA CAPTURE NONE IN DBNAME.DEVLITS
;
CREATE INDEX DEV_LIUID
ON DEV_LBYI
(
UNIQUE_ID ASC
)
PCTFREE 10
;
CREATE INDEX DEV_LIFI
ON DEV_LBYI
(
FILETYPE ASC,
FILESTYP ASC,
FILENAME ASC,
VERSION ASC,
REVISION ASC
)
PCTFREE 10
;
CREATE TABLESPACE "DEVLLTS" IN "DBNAME" USING STOGROUP
DEV_DMSG CCSID UNICODE DSSIZE 1G MAXPARTITIONS 1 BUFFERPOOL
BP7 COMPRESS YES LOCKSIZE ANY;
GRANT USE OF TABLESPACE “DBNAME”."DEVLLTS" TO "DBUSER" WITH
GRANT OPTION;
CREATE TABLE DEV_LBYL
(
“DATE” CHAR (8),
TIME CHAR (10),
LIBNAME CHAR (129),

Creating Libraries
599
ACTION CHAR (20),
FILENAME CHAR (100),
FILETYPE CHAR (3),
VERSION CHAR (5),
REVISION CHAR (5),
EFFECTIV CHAR (10),
“MODE” CHAR (25),
STATUS CHAR (25),
CLASS CHAR (25),
PROJECT CHAR (25),
USERID CHAR (64),
PROCESS CHAR (20)
)
DATA CAPTURE NONE IN DBNAME.DEVLLTS
;
CREATE INDEX DEV_LLUNIQT
ON DEV_LBYL
(
“DATE” ASC,
TIME ASC,
LIBNAME ASC,
ACTION ASC,
FILENAME ASC,
FILETYPE ASC,
VERSION ASC,
REVISION ASC,
EFFECTIV ASC
)
PCTFREE 10
;
CREATE INDEX DEV_LLLTAG
ON DEV_LBYL
(
"DATE" ASC,
TIME ASC
)
PCTFREE 10
;
Working with Libraries
600
WORKING WITH LIBRARIES
Studio lets you open a library, add resources to a library, delete, or extract resources from a library and edit some of the properties of a resource. You can also run a response file, print a list of resources, and view a history of changes made to a resource. For initialization settings, Studio uses the INI files referenced in the Studio workspace file. The Studio workspace file usually references the FSIUSER.INI and FSISYS.INI INI files.
• Opening a Library on page 601
• Adding Resources to a Library on page 603
• Importing Files on page 605
• Importing Libraries on page 606
• Checking Out Resources on page 609
• Checking In Resources on page 611
• Unlocking Resources on page 612
• Promoting Resources on page 614
• Filtering Resources on page 619
• Editing Resource Information on page 621
• Deleting Resources on page 622
• Collapsing Resources on page 623
• Extracting Resources on page 629
• Expiring Resources on page 631
• Comparing Resources on page 631
• Reviewing a History of Resource Changes on page 639
• Running Response Files on page 640
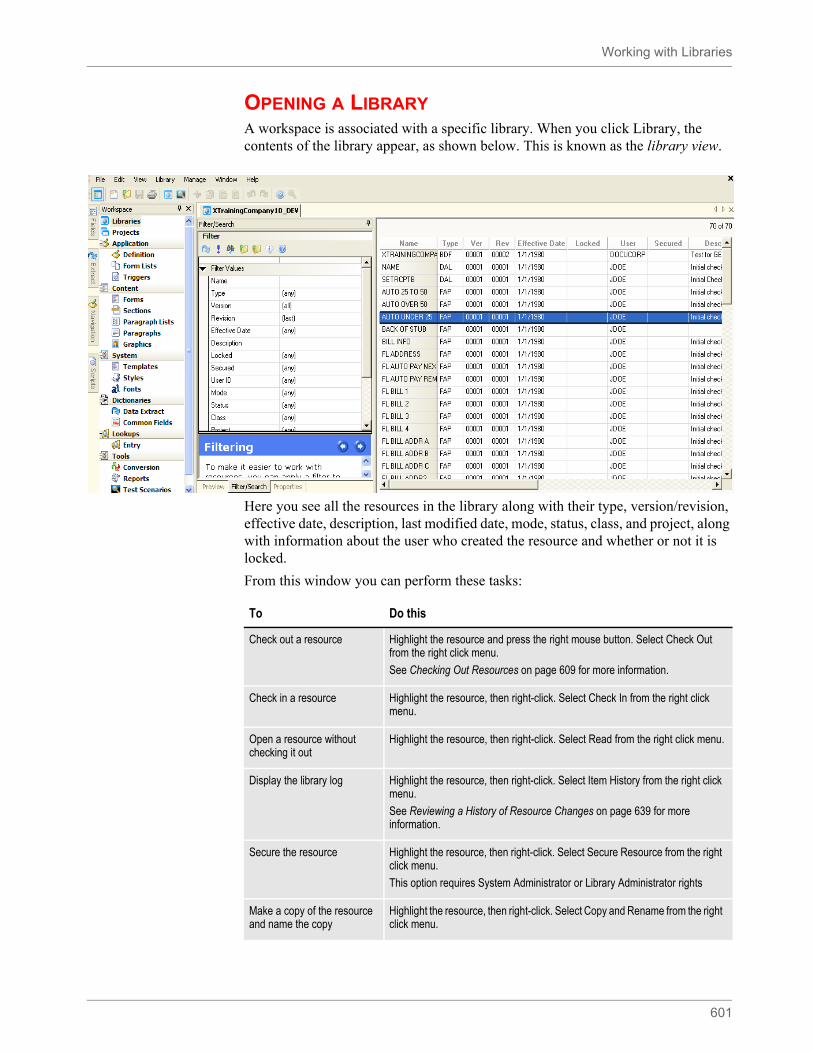
Working with Libraries
601
OPENING A LIBRARYA workspace is associated with a specific library. When you click Library, the contents of the library appear, as shown below. This is known as the library view.
Here you see all the resources in the library along with their type, version/revision, effective date, description, last modified date, mode, status, class, and project, along with information about the user who created the resource and whether or not it is locked.
From this window you can perform these tasks:
To Do this
Check out a resource Highlight the resource and press the right mouse button. Select Check Out from the right click menu.
See Checking Out Resources on page 609 for more information.
Check in a resource Highlight the resource, then right-click. Select Check In from the right click menu.
Open a resource without checking it out
Highlight the resource, then right-click. Select Read from the right click menu.
Display the library log Highlight the resource, then right-click. Select Item History from the right click menu.
See Reviewing a History of Resource Changes on page 639 for more information.
Secure the resource Highlight the resource, then right-click. Select Secure Resource from the right click menu.
This option requires System Administrator or Library Administrator rights
Make a copy of the resource and name the copy
Highlight the resource, then right-click. Select Copy and Rename from the right click menu.
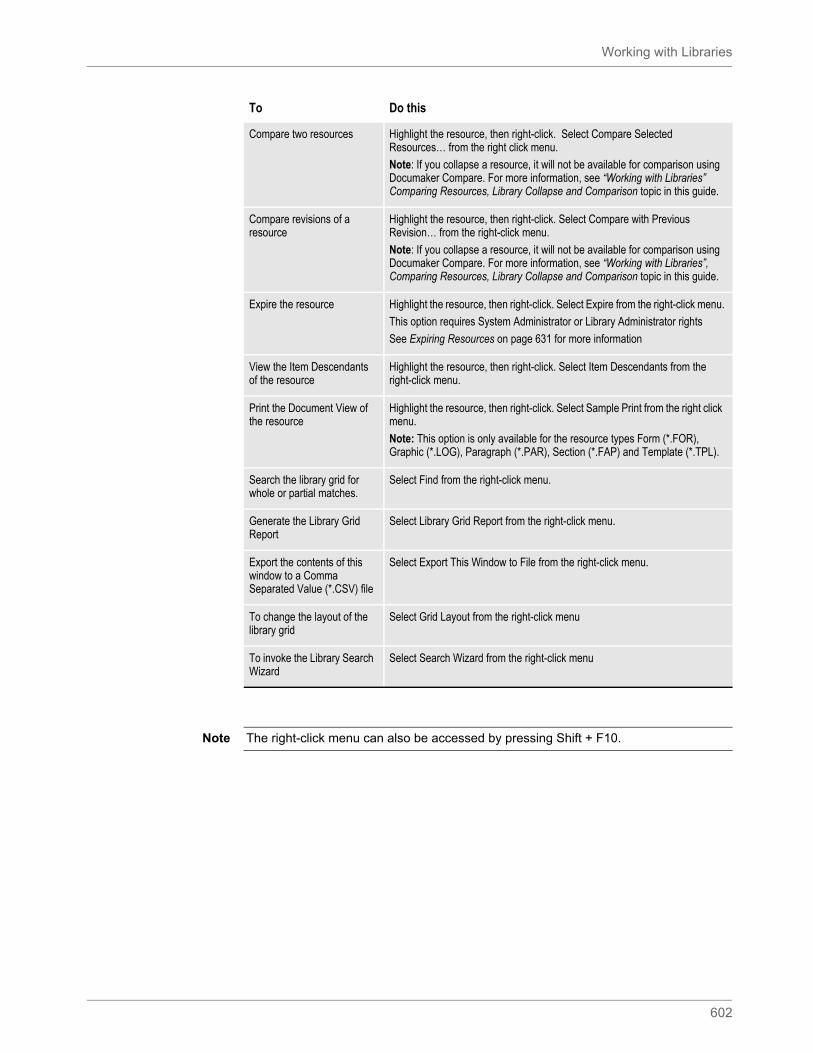
Working with Libraries
602
Compare two resources Highlight the resource, then right-click. Select Compare Selected Resources… from the right click menu.
Note: If you collapse a resource, it will not be available for comparison using Documaker Compare. For more information, see “Working with Libraries” Comparing Resources, Library Collapse and Comparison topic in this guide.
Compare revisions of a resource
Highlight the resource, then right-click. Select Compare with Previous Revision… from the right-click menu.
Note: If you collapse a resource, it will not be available for comparison using Documaker Compare. For more information, see “Working with Libraries”, Comparing Resources, Library Collapse and Comparison topic in this guide.
Expire the resource Highlight the resource, then right-click. Select Expire from the right-click menu.
This option requires System Administrator or Library Administrator rights
See Expiring Resources on page 631 for more information
View the Item Descendants of the resource
Highlight the resource, then right-click. Select Item Descendants from the right-click menu.
Print the Document View of the resource
Highlight the resource, then right-click. Select Sample Print from the right click menu.
Note: This option is only available for the resource types Form (*.FOR), Graphic (*.LOG), Paragraph (*.PAR), Section (*.FAP) and Template (*.TPL).
Search the library grid for whole or partial matches.
Select Find from the right-click menu.
Generate the Library Grid Report
Select Library Grid Report from the right-click menu.
Export the contents of this window to a Comma Separated Value (*.CSV) file
Select Export This Window to File from the right-click menu.
To change the layout of the library grid
Select Grid Layout from the right-click menu
To invoke the Library Search Wizard
Select Search Wizard from the right-click menu
To Do this
Note The right-click menu can also be accessed by pressing Shift + F10.
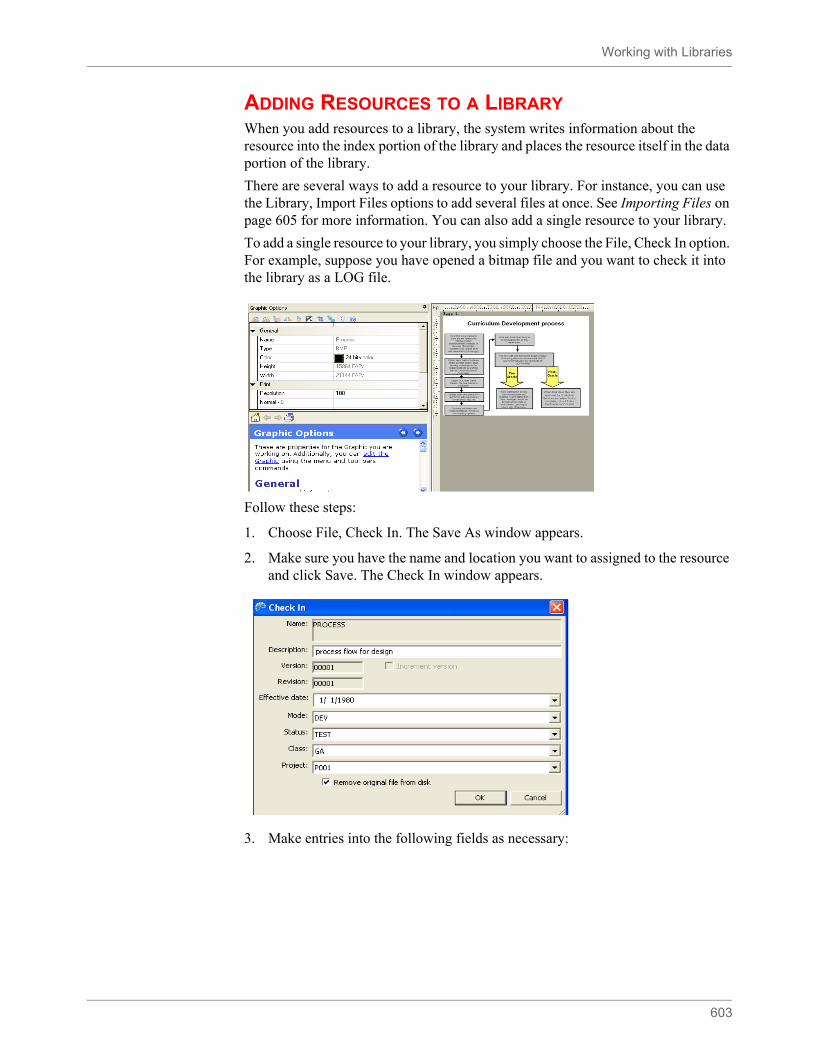
Working with Libraries
603
ADDING RESOURCES TO A LIBRARYWhen you add resources to a library, the system writes information about the resource into the index portion of the library and places the resource itself in the data portion of the library.
There are several ways to add a resource to your library. For instance, you can use the Library, Import Files options to add several files at once. See Importing Files on page 605 for more information. You can also add a single resource to your library.
To add a single resource to your library, you simply choose the File, Check In option. For example, suppose you have opened a bitmap file and you want to check it into the library as a LOG file.
Follow these steps:
1. Choose File, Check In. The Save As window appears.
2. Make sure you have the name and location you want to assigned to the resource and click Save. The Check In window appears.
3. Make entries into the following fields as necessary:
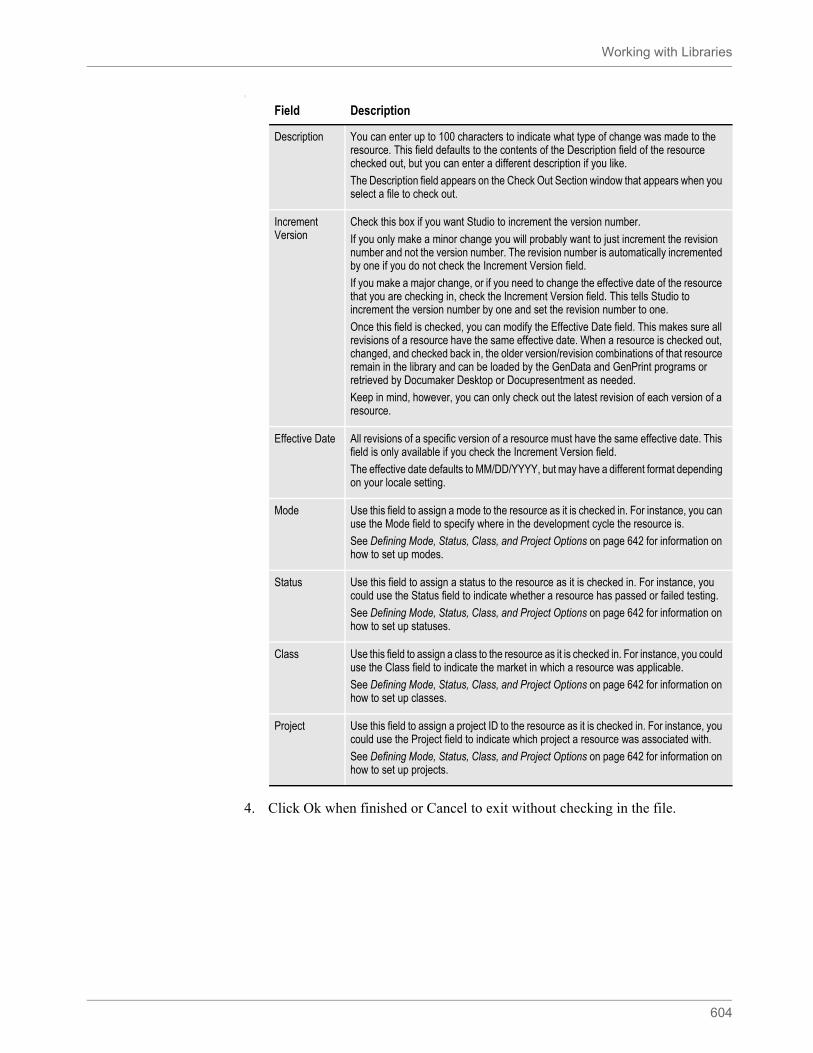
Working with Libraries
604
Y
4. Click Ok when finished or Cancel to exit without checking in the file.
Field Description
Description You can enter up to 100 characters to indicate what type of change was made to the resource. This field defaults to the contents of the Description field of the resource checked out, but you can enter a different description if you like.
The Description field appears on the Check Out Section window that appears when you select a file to check out.
Increment Version
Check this box if you want Studio to increment the version number.
If you only make a minor change you will probably want to just increment the revision number and not the version number. The revision number is automatically incremented by one if you do not check the Increment Version field.
If you make a major change, or if you need to change the effective date of the resource that you are checking in, check the Increment Version field. This tells Studio to increment the version number by one and set the revision number to one.
Once this field is checked, you can modify the Effective Date field. This makes sure all revisions of a resource have the same effective date. When a resource is checked out, changed, and checked back in, the older version/revision combinations of that resource remain in the library and can be loaded by the GenData and GenPrint programs or retrieved by Documaker Desktop or Docupresentment as needed.
Keep in mind, however, you can only check out the latest revision of each version of a resource.
Effective Date All revisions of a specific version of a resource must have the same effective date. This field is only available if you check the Increment Version field.
The effective date defaults to MM/DD/YYYY, but may have a different format depending on your locale setting.
Mode Use this field to assign a mode to the resource as it is checked in. For instance, you can use the Mode field to specify where in the development cycle the resource is.
See Defining Mode, Status, Class, and Project Options on page 642 for information on how to set up modes.
Status Use this field to assign a status to the resource as it is checked in. For instance, you could use the Status field to indicate whether a resource has passed or failed testing.
See Defining Mode, Status, Class, and Project Options on page 642 for information on how to set up statuses.
Class Use this field to assign a class to the resource as it is checked in. For instance, you could use the Class field to indicate the market in which a resource was applicable.
See Defining Mode, Status, Class, and Project Options on page 642 for information on how to set up classes.
Project Use this field to assign a project ID to the resource as it is checked in. For instance, you could use the Project field to indicate which project a resource was associated with.
See Defining Mode, Status, Class, and Project Options on page 642 for information on how to set up projects.
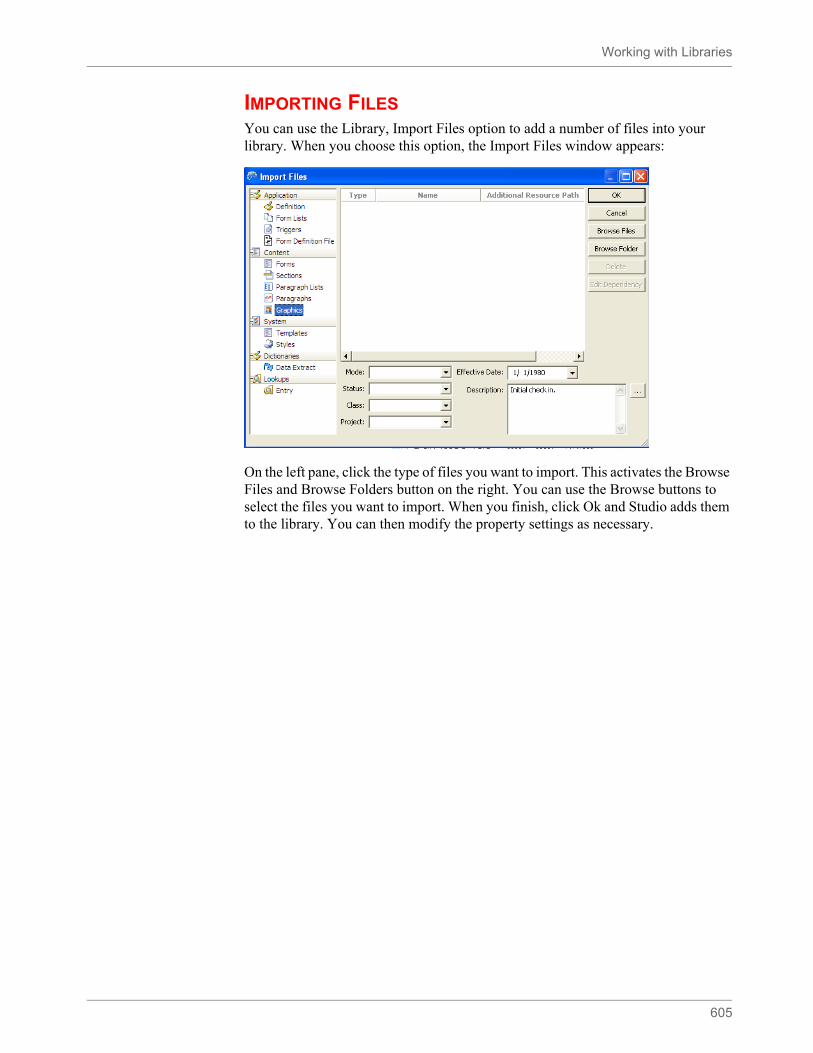
Working with Libraries
605
IMPORTING FILESYou can use the Library, Import Files option to add a number of files into your library. When you choose this option, the Import Files window appears:
On the left pane, click the type of files you want to import. This activates the Browse Files and Browse Folders button on the right. You can use the Browse buttons to select the files you want to import. When you finish, click Ok and Studio adds them to the library. You can then modify the property settings as necessary.
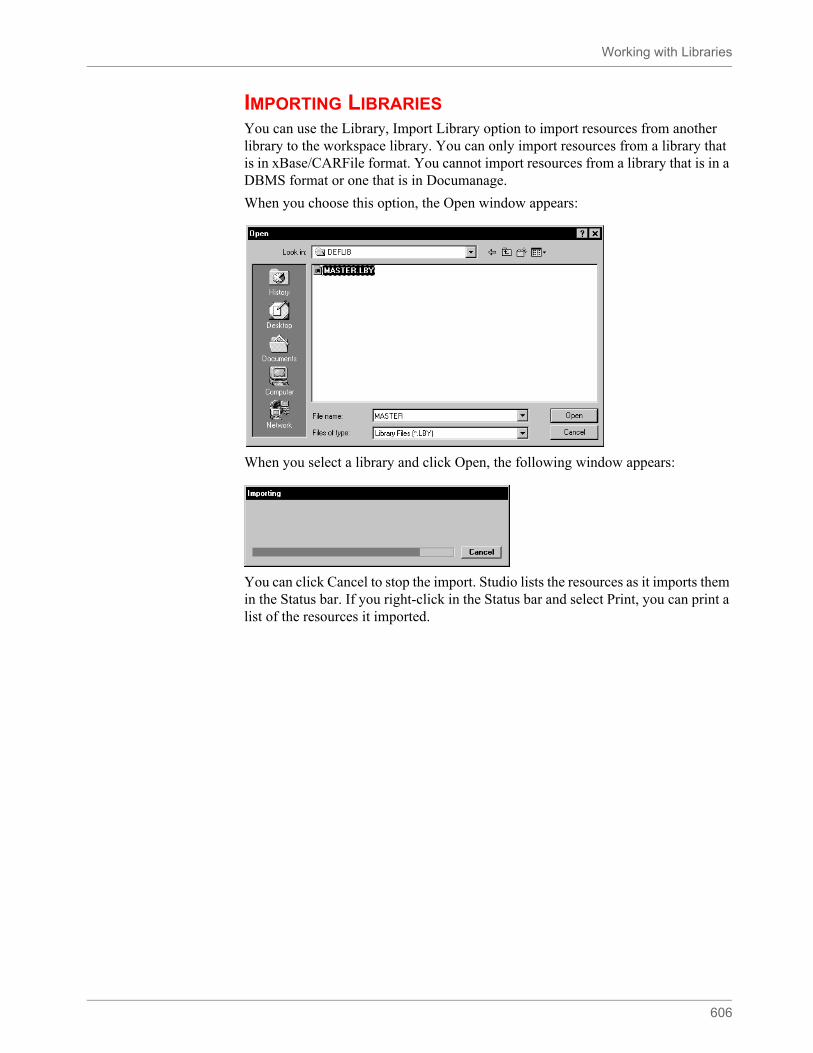
Working with Libraries
606
IMPORTING LIBRARIESYou can use the Library, Import Library option to import resources from another library to the workspace library. You can only import resources from a library that is in xBase/CARFile format. You cannot import resources from a library that is in a DBMS format or one that is in Documanage.
When you choose this option, the Open window appears:
When you select a library and click Open, the following window appears:
You can click Cancel to stop the import. Studio lists the resources as it imports them in the Status bar. If you right-click in the Status bar and select Print, you can print a list of the resources it imported.
Working with Libraries
607
MIGRATING A WORKSPACE LIBRARYYou can easily change the format of a library within a workspace. For instance, if you have administrator level security, you can use the migration wizard to quickly change a library from xBase to SQL or Documanage.
In addition to moving the contents of the library, the wizard changes the applicable workspace INI options so the new location becomes the primary library for the workspace. This is often useful if you find the default library is too limited for the solution you are creating.
To migrate a library, choose the Migrate option from the Library menu. The Library Migration window appears.
You can choose from these options:
After you choose the appropriate migration option, click Next. The Migration Options window appears so you can select the library you want to migrate.
Note Be sure to back up your library and workspace settings before migrating a library. Also, make user no users are actively using the system. Once the library changes, users will need to load the new workspace settings.
Choose from these options to tell Studio how you would like to migrate the library
Migration option Description
Create a new library and copy the current library contents
When creating a new library, you specify the name, location, and description. If you specify an existing library, Studio copies all of the resources into that library. If there are existing resources with the same name, Studio treats this occurrence the same as a promotion and will not migrate the resource if it has the same modification date.
Merge the current library contents into an existing library
Keep in mind the library must exist on disk or in the workspace’s list of associated libraries. If there are existing resources with the same name, Studio treats this occurrence the same as a promotion and will not migrate the resource if it has the same modification date.
Change the associated workspace library without copying contents
When choosing a library, you can choose from the workspace’s list of associated libraries or browse for another library on disk. Studio does not try to migrate resources but assumes the library is already populated for this workspace.
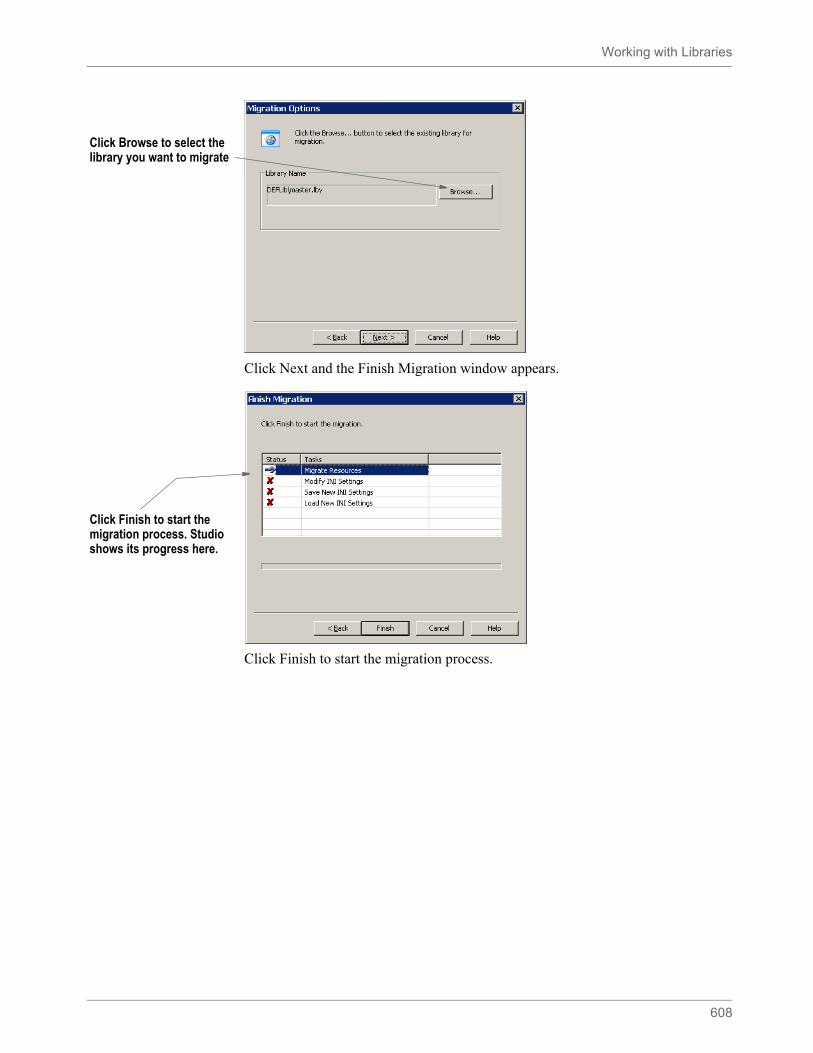
Working with Libraries
608
Click Next and the Finish Migration window appears.
Click Finish to start the migration process.
Click Browse to select the library you want to migrate
Click Finish to start the migration process. Studio shows its progress here.
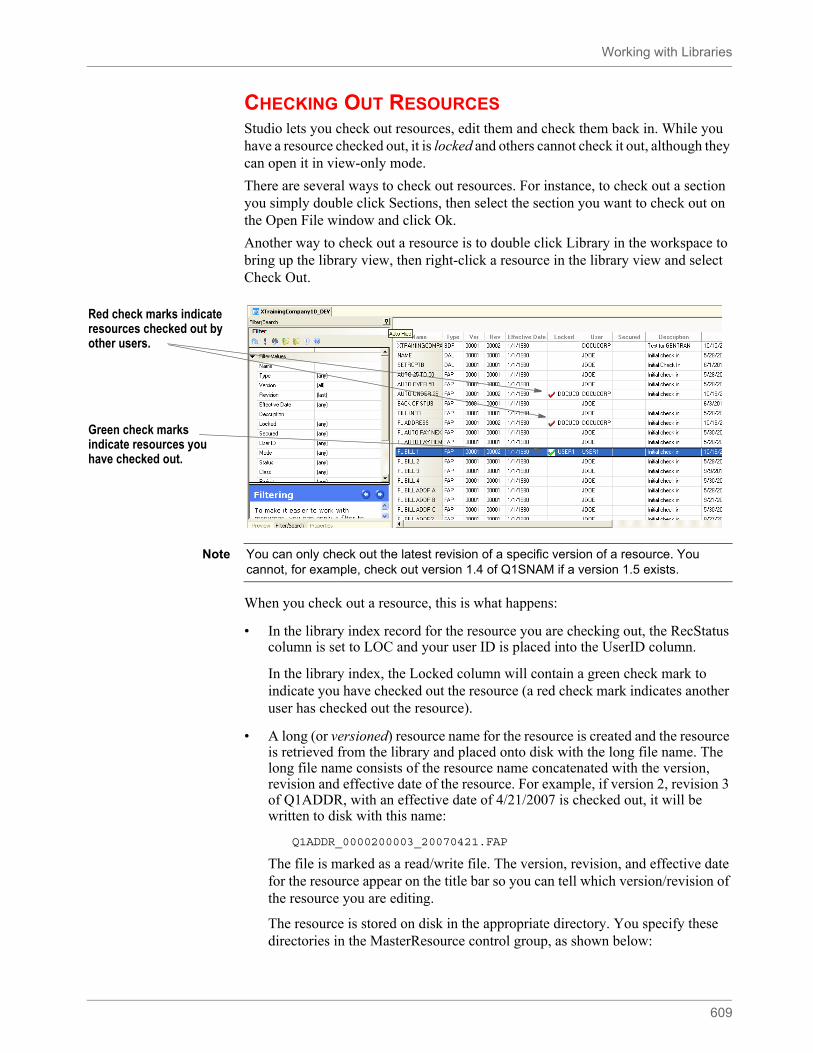
Working with Libraries
609
CHECKING OUT RESOURCESStudio lets you check out resources, edit them and check them back in. While you have a resource checked out, it is locked and others cannot check it out, although they can open it in view-only mode.
There are several ways to check out resources. For instance, to check out a section you simply double click Sections, then select the section you want to check out on the Open File window and click Ok.
Another way to check out a resource is to double click Library in the workspace to bring up the library view, then right-click a resource in the library view and select Check Out.
When you check out a resource, this is what happens:
• In the library index record for the resource you are checking out, the RecStatus column is set to LOC and your user ID is placed into the UserID column.
In the library index, the Locked column will contain a green check mark to indicate you have checked out the resource (a red check mark indicates another user has checked out the resource).
• A long (or versioned) resource name for the resource is created and the resource is retrieved from the library and placed onto disk with the long file name. The long file name consists of the resource name concatenated with the version, revision and effective date of the resource. For example, if version 2, revision 3 of Q1ADDR, with an effective date of 4/21/2007 is checked out, it will be written to disk with this name:
Q1ADDR_0000200003_20070421.FAP
The file is marked as a read/write file. The version, revision, and effective date for the resource appear on the title bar so you can tell which version/revision of the resource you are editing.
The resource is stored on disk in the appropriate directory. You specify these directories in the MasterResource control group, as shown below:
Red check marks indicate resources checked out by other users.
Green check marks indicate resources you have checked out.
Note You can only check out the latest revision of a specific version of a resource. You cannot, for example, check out version 1.4 of Q1SNAM if a version 1.5 exists.

Working with Libraries
610
< MasterResource >BDFLib = \BDFLIBGRPLib = \GRPLIBFORLib = \FORLIBFormLib= \FORMSDDTLib = \DEFLIBLogoLib= \FORMSDEFLib = \DEFLIB
D
Option Description
BDFLib BDF (business definition) files are stored here.
GRPLib GRP (group) files are stored here.
FORLib FOR (form) files are stored here.
FormLib FAP files (sections) are stored here.
DDTLib DDT files are stored here. (Legacy systems only)
LogoLib Graphics (LOG) files are stored here. This is often the same directory used for FAP files.
DEFLib DAL (Document Automation Language) files are stored here.
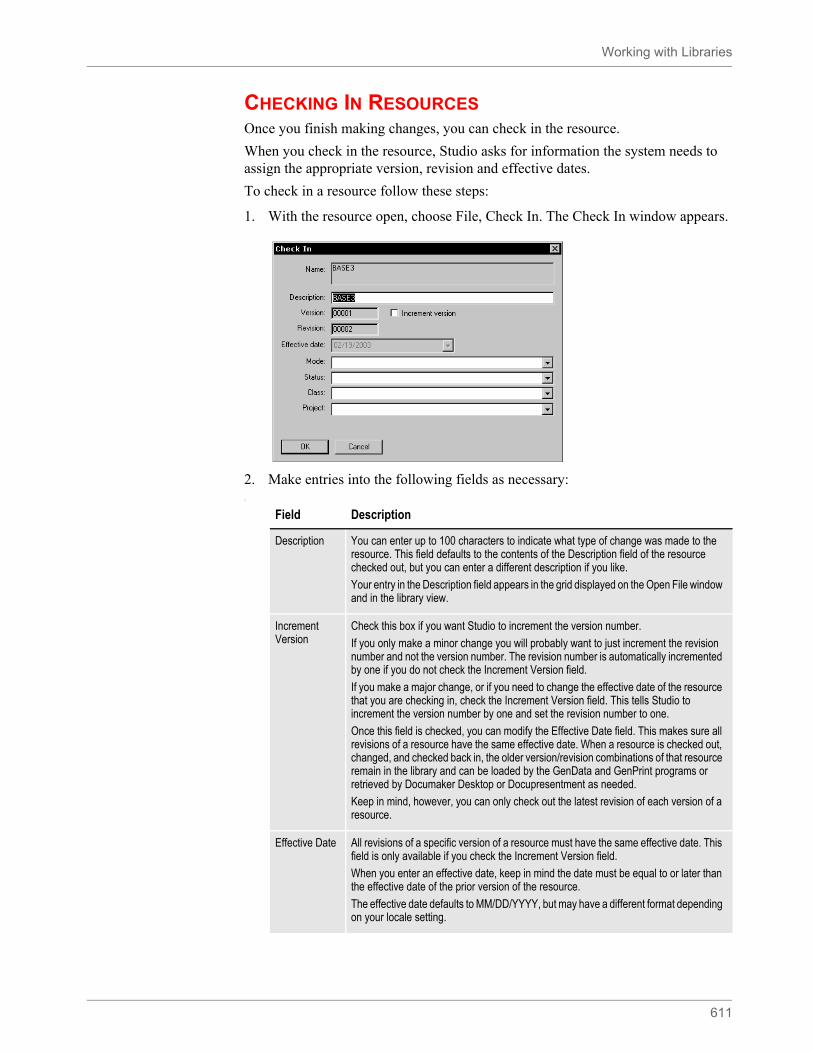
Working with Libraries
611
CHECKING IN RESOURCESOnce you finish making changes, you can check in the resource.
When you check in the resource, Studio asks for information the system needs to assign the appropriate version, revision and effective dates.
To check in a resource follow these steps:
1. With the resource open, choose File, Check In. The Check In window appears.
2. Make entries into the following fields as necessary:Y
Field Description
Description You can enter up to 100 characters to indicate what type of change was made to the resource. This field defaults to the contents of the Description field of the resource checked out, but you can enter a different description if you like.
Your entry in the Description field appears in the grid displayed on the Open File window and in the library view.
Increment Version
Check this box if you want Studio to increment the version number.
If you only make a minor change you will probably want to just increment the revision number and not the version number. The revision number is automatically incremented by one if you do not check the Increment Version field.
If you make a major change, or if you need to change the effective date of the resource that you are checking in, check the Increment Version field. This tells Studio to increment the version number by one and set the revision number to one.
Once this field is checked, you can modify the Effective Date field. This makes sure all revisions of a resource have the same effective date. When a resource is checked out, changed, and checked back in, the older version/revision combinations of that resource remain in the library and can be loaded by the GenData and GenPrint programs or retrieved by Documaker Desktop or Docupresentment as needed.
Keep in mind, however, you can only check out the latest revision of each version of a resource.
Effective Date All revisions of a specific version of a resource must have the same effective date. This field is only available if you check the Increment Version field.
When you enter an effective date, keep in mind the date must be equal to or later than the effective date of the prior version of the resource.
The effective date defaults to MM/DD/YYYY, but may have a different format depending on your locale setting.
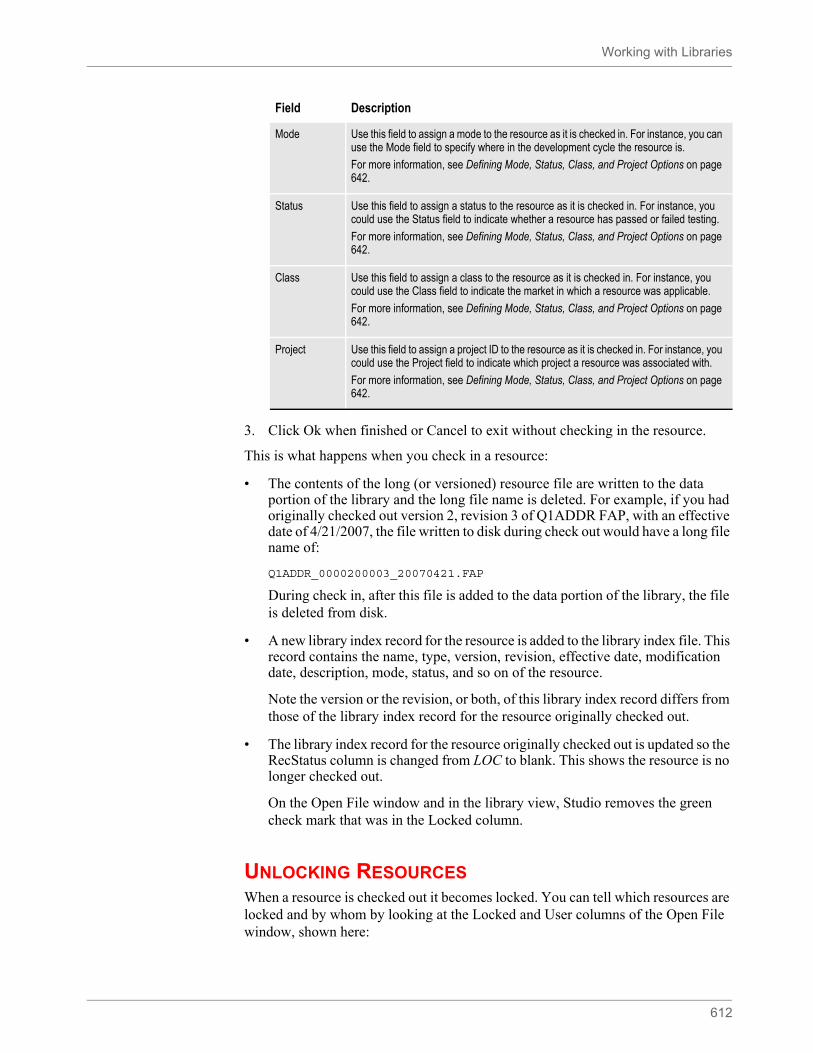
Working with Libraries
612
3. Click Ok when finished or Cancel to exit without checking in the resource.
This is what happens when you check in a resource:
• The contents of the long (or versioned) resource file are written to the data portion of the library and the long file name is deleted. For example, if you had originally checked out version 2, revision 3 of Q1ADDR FAP, with an effective date of 4/21/2007, the file written to disk during check out would have a long file name of:
Q1ADDR_0000200003_20070421.FAP
During check in, after this file is added to the data portion of the library, the file is deleted from disk.
• A new library index record for the resource is added to the library index file. This record contains the name, type, version, revision, effective date, modification date, description, mode, status, and so on of the resource.
Note the version or the revision, or both, of this library index record differs from those of the library index record for the resource originally checked out.
• The library index record for the resource originally checked out is updated so the RecStatus column is changed from LOC to blank. This shows the resource is no longer checked out.
On the Open File window and in the library view, Studio removes the green check mark that was in the Locked column.
UNLOCKING RESOURCESWhen a resource is checked out it becomes locked. You can tell which resources are locked and by whom by looking at the Locked and User columns of the Open File window, shown here:
Mode Use this field to assign a mode to the resource as it is checked in. For instance, you can use the Mode field to specify where in the development cycle the resource is.
For more information, see Defining Mode, Status, Class, and Project Options on page 642.
Status Use this field to assign a status to the resource as it is checked in. For instance, you could use the Status field to indicate whether a resource has passed or failed testing.
For more information, see Defining Mode, Status, Class, and Project Options on page 642.
Class Use this field to assign a class to the resource as it is checked in. For instance, you could use the Class field to indicate the market in which a resource was applicable.
For more information, see Defining Mode, Status, Class, and Project Options on page 642.
Project Use this field to assign a project ID to the resource as it is checked in. For instance, you could use the Project field to indicate which project a resource was associated with.
For more information, see Defining Mode, Status, Class, and Project Options on page 642.
Field Description
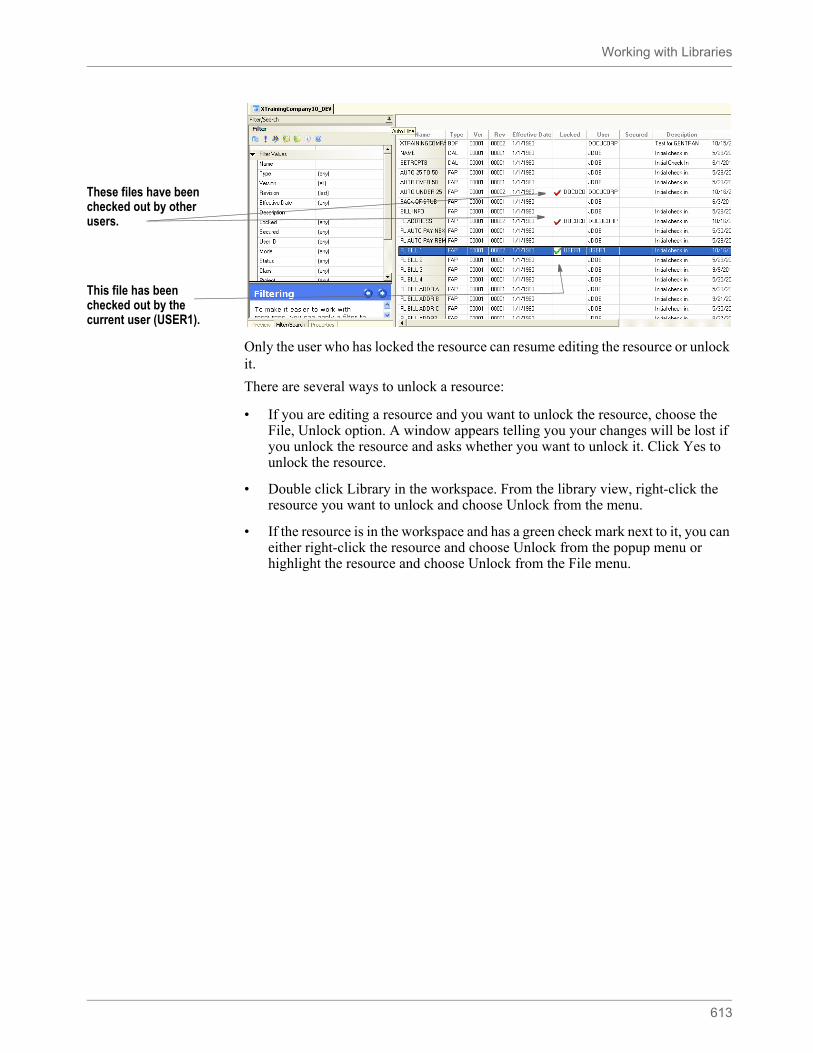
Working with Libraries
613
Only the user who has locked the resource can resume editing the resource or unlock it.
There are several ways to unlock a resource:
• If you are editing a resource and you want to unlock the resource, choose the File, Unlock option. A window appears telling you your changes will be lost if you unlock the resource and asks whether you want to unlock it. Click Yes to unlock the resource.
• Double click Library in the workspace. From the library view, right-click the resource you want to unlock and choose Unlock from the menu.
• If the resource is in the workspace and has a green check mark next to it, you can either right-click the resource and choose Unlock from the popup menu or highlight the resource and choose Unlock from the File menu.
These files have been checked out by other users.
This file has been checked out by the current user (USER1).

Working with Libraries
614
PROMOTING RESOURCESYou can promote one or more resources from one library to another and in the process have Studio modify the Mode, Status, Class, and Project fields. When you choose the Library, Promote option, the Promote Resources window appears.
Changing properties of resources after promotion in the target library
On the Promote Resources window, you enter the Target Library Values you want the resources to have after they have been promoted to the new library. If you do not want to change these values, leave these fields blank.
The Promote Panel - Target Library Values group now displays the setting Target Tier. The Target Tier pick list will contain a listing of all defined library tiers for that workspace and this list depends on the current tier. The system populates the Target Tier name based on the current tiers and defined tiers.
If you do not want these values to change, simple ignore these Target Library fields.
Note You must have sufficient access rights to promote resources. If this option is unavailable to you, contact your system administrator.
Field Description
Library Select the name of the library that contains the resources you want to promote.
Mode Select which mode you want Studio to look for when selecting resources to promote. For more information, see Defining Mode, Status, Class, and Project Options on page 642.
Status Select which status you want Studio to look for when selecting resources to promote. For more information, see Defining Mode, Status, Class, and Project Options on page 642.

Working with Libraries
615
Class Select which class you want Studio to look for when selecting resources to promote. For more information, see Defining Mode, Status, Class, and Project Options on page 642.
Project Select which project ID you want Studio to look for when selecting resources to promote. For more information, see Defining Mode, Status, Class, and Project Options on page 642.
Field Description
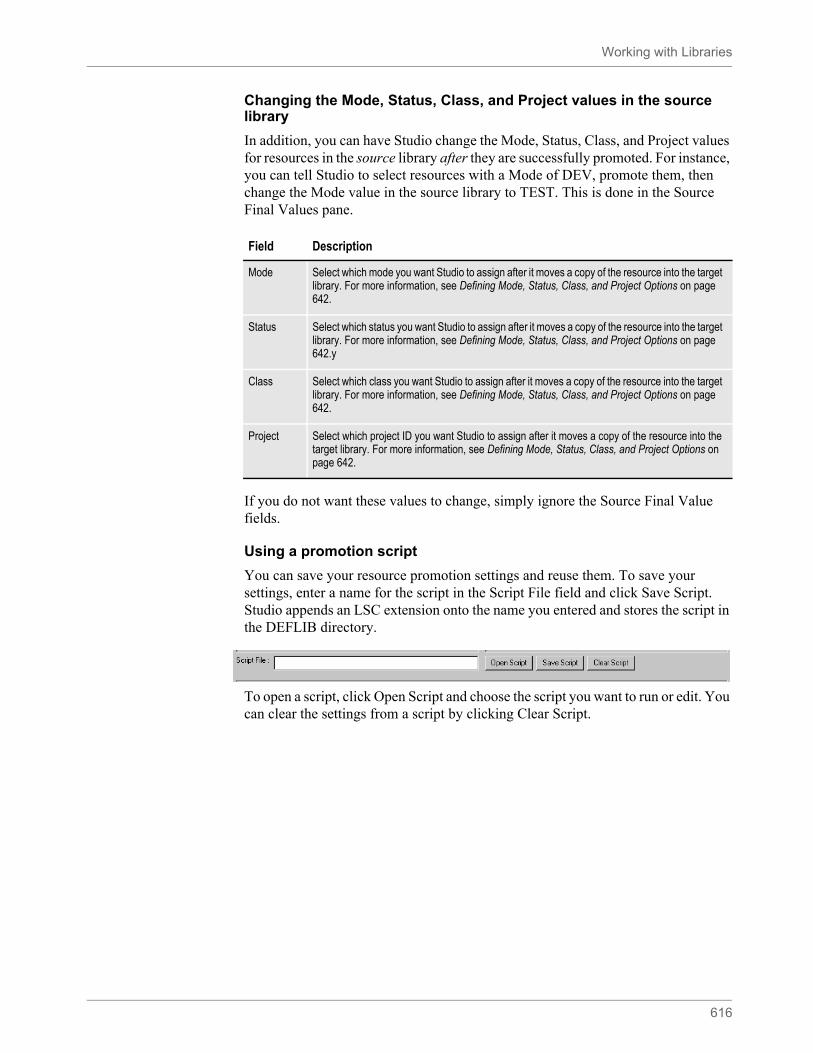
Working with Libraries
616
Changing the Mode, Status, Class, and Project values in the source library
In addition, you can have Studio change the Mode, Status, Class, and Project values for resources in the source library after they are successfully promoted. For instance, you can tell Studio to select resources with a Mode of DEV, promote them, then change the Mode value in the source library to TEST. This is done in the Source Final Values pane.
If you do not want these values to change, simply ignore the Source Final Value fields.
Using a promotion script
You can save your resource promotion settings and reuse them. To save your settings, enter a name for the script in the Script File field and click Save Script. Studio appends an LSC extension onto the name you entered and stores the script in the DEFLIB directory.
To open a script, click Open Script and choose the script you want to run or edit. You can clear the settings from a script by clicking Clear Script.
Field Description
Mode Select which mode you want Studio to assign after it moves a copy of the resource into the target library. For more information, see Defining Mode, Status, Class, and Project Options on page 642.
Status Select which status you want Studio to assign after it moves a copy of the resource into the target library. For more information, see Defining Mode, Status, Class, and Project Options on page 642.y
Class Select which class you want Studio to assign after it moves a copy of the resource into the target library. For more information, see Defining Mode, Status, Class, and Project Options on page 642.
Project Select which project ID you want Studio to assign after it moves a copy of the resource into the target library. For more information, see Defining Mode, Status, Class, and Project Options on page 642.
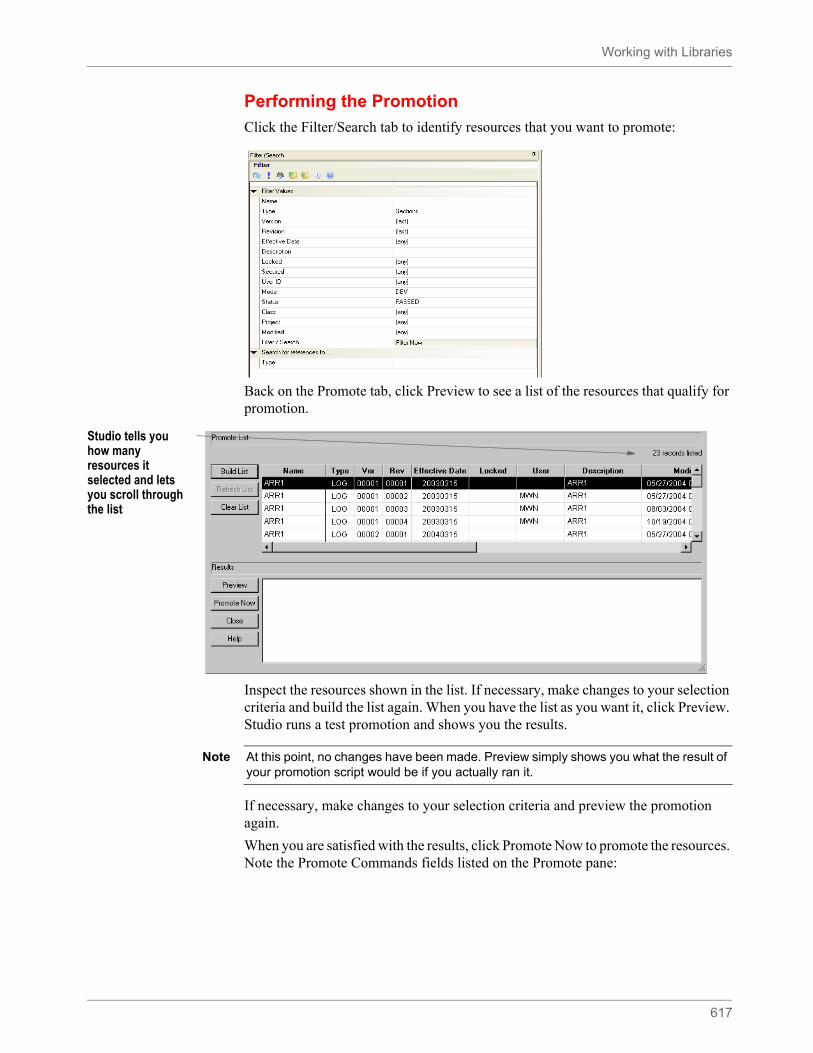
Working with Libraries
617
Performing the Promotion
Click the Filter/Search tab to identify resources that you want to promote:
Back on the Promote tab, click Preview to see a list of the resources that qualify for promotion.
Inspect the resources shown in the list. If necessary, make changes to your selection criteria and build the list again. When you have the list as you want it, click Preview. Studio runs a test promotion and shows you the results.
If necessary, make changes to your selection criteria and preview the promotion again.
When you are satisfied with the results, click Promote Now to promote the resources. Note the Promote Commands fields listed on the Promote pane:
Studio tells you how many resources it selected and lets you scroll through the list
Note At this point, no changes have been made. Preview simply shows you what the result of your promotion script would be if you actually ran it.
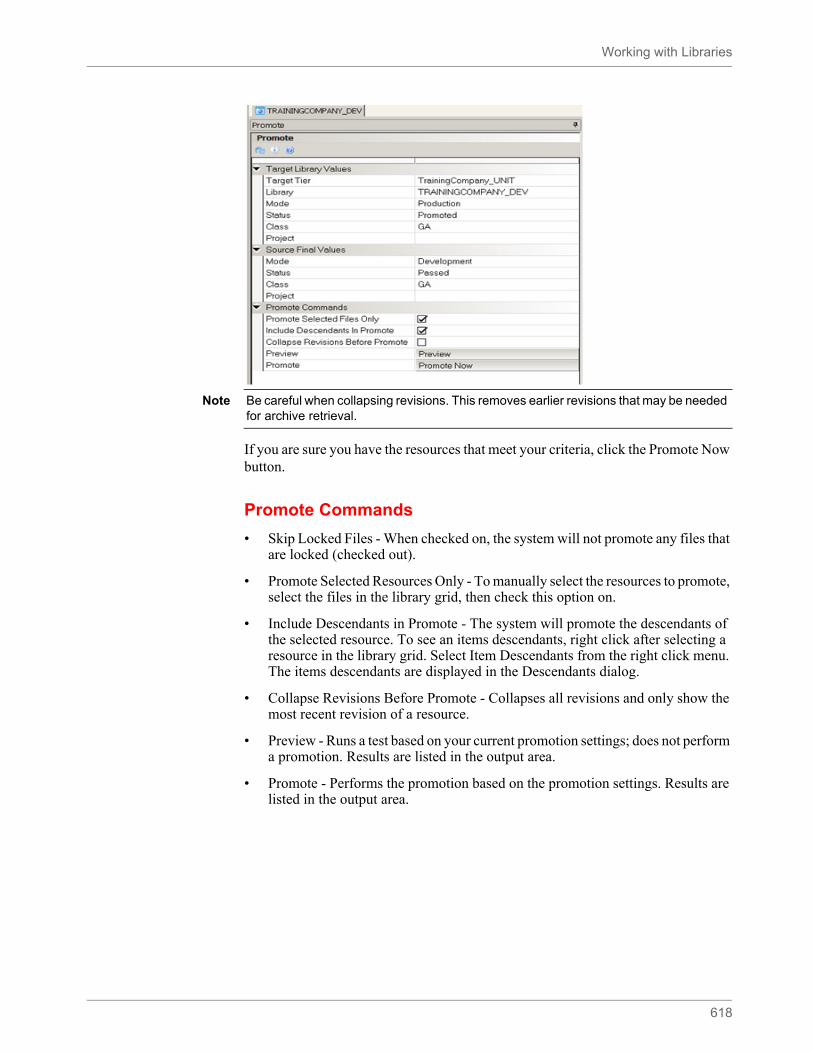
Working with Libraries
618
If you are sure you have the resources that meet your criteria, click the Promote Now button.
Promote Commands
• Skip Locked Files - When checked on, the system will not promote any files that are locked (checked out).
• Promote Selected Resources Only - To manually select the resources to promote, select the files in the library grid, then check this option on.
• Include Descendants in Promote - The system will promote the descendants of the selected resource. To see an items descendants, right click after selecting a resource in the library grid. Select Item Descendants from the right click menu. The items descendants are displayed in the Descendants dialog.
• Collapse Revisions Before Promote - Collapses all revisions and only show the most recent revision of a resource.
• Preview - Runs a test based on your current promotion settings; does not perform a promotion. Results are listed in the output area.
• Promote - Performs the promotion based on the promotion settings. Results are listed in the output area.
Note Be careful when collapsing revisions. This removes earlier revisions that may be needed for archive retrieval.

Working with Libraries
619
FILTERING RESOURCESTo make it easier to work with resources, you can apply a filter to select a subset of your resources. For instance, you can apply a filter to see only FAP files (sections) or only graphics with a given effective date. The filter tab is available on the Open File window and in the library view.
To create a filter, click the Filter tab:
Click Save Script to save this filter script so you can reuse it.
Field Description
Name Enter the name or partial name of a resource or group of resources. You can use wildcards in your entry. For instance, bil*.fap will give you all the FAP files with names beginning with bil.
Type Select the type of file you want to filter on. You can choose from all types of files stored in the library.
Version Choose either all or last to see all versions or only the last version.
Revision Choose all, last, or EXP to see all revisions, only the last revision, or only expired revisions
Effective Date Check this field and then select the effective date you want to filter on.
Locked Choose from yes, no, or any to see only locked files, only files that are not locked, or any file.
User ID Enter a user ID to see only files assigned to that user.
Mode Select which mode you want to filter on.
Status Select which status you want to filter on.
Class Select which class you want to filter on.
Project Select which project ID you want to filter on.
Script Name Enter a name for the filter script you are creating or enter the name of the script you want to retrieve.

Working with Libraries
620
Note • If you save a filter script, Studio remembers the script name and tries to use that script the next time you open the Open File window or the library view. To prevent Studio from remembering the script and trying to use it the next time, remove the script name before you exit this window.
• Beginning with 12.4, Context tag is added as one of the items in “search for references to” drop-down box.
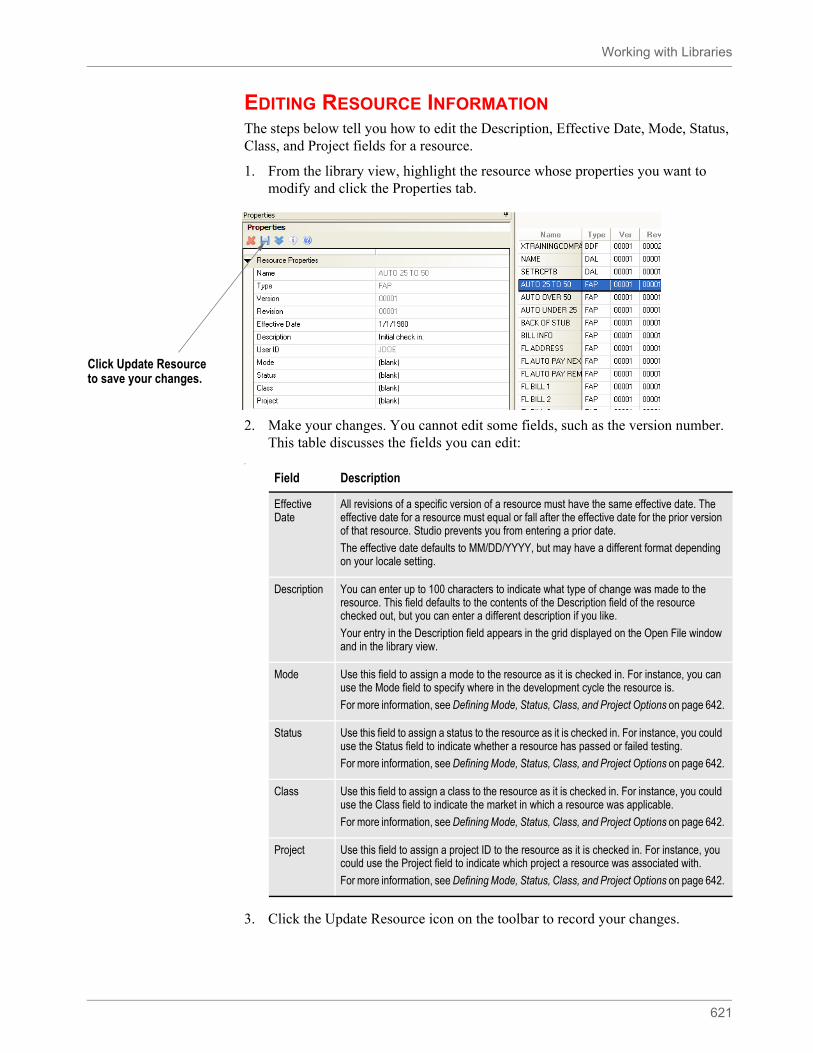
Working with Libraries
621
EDITING RESOURCE INFORMATIONThe steps below tell you how to edit the Description, Effective Date, Mode, Status, Class, and Project fields for a resource.
1. From the library view, highlight the resource whose properties you want to modify and click the Properties tab.
2. Make your changes. You cannot edit some fields, such as the version number. This table discusses the fields you can edit:
Y
3. Click the Update Resource icon on the toolbar to record your changes.
Click Update Resource to save your changes.
Field Description
Effective Date
All revisions of a specific version of a resource must have the same effective date. The effective date for a resource must equal or fall after the effective date for the prior version of that resource. Studio prevents you from entering a prior date.
The effective date defaults to MM/DD/YYYY, but may have a different format depending on your locale setting.
Description You can enter up to 100 characters to indicate what type of change was made to the resource. This field defaults to the contents of the Description field of the resource checked out, but you can enter a different description if you like.
Your entry in the Description field appears in the grid displayed on the Open File window and in the library view.
Mode Use this field to assign a mode to the resource as it is checked in. For instance, you can use the Mode field to specify where in the development cycle the resource is.
For more information, see Defining Mode, Status, Class, and Project Options on page 642.
Status Use this field to assign a status to the resource as it is checked in. For instance, you could use the Status field to indicate whether a resource has passed or failed testing.
For more information, see Defining Mode, Status, Class, and Project Options on page 642.
Class Use this field to assign a class to the resource as it is checked in. For instance, you could use the Class field to indicate the market in which a resource was applicable.
For more information, see Defining Mode, Status, Class, and Project Options on page 642.
Project Use this field to assign a project ID to the resource as it is checked in. For instance, you could use the Project field to indicate which project a resource was associated with.
For more information, see Defining Mode, Status, Class, and Project Options on page 642.
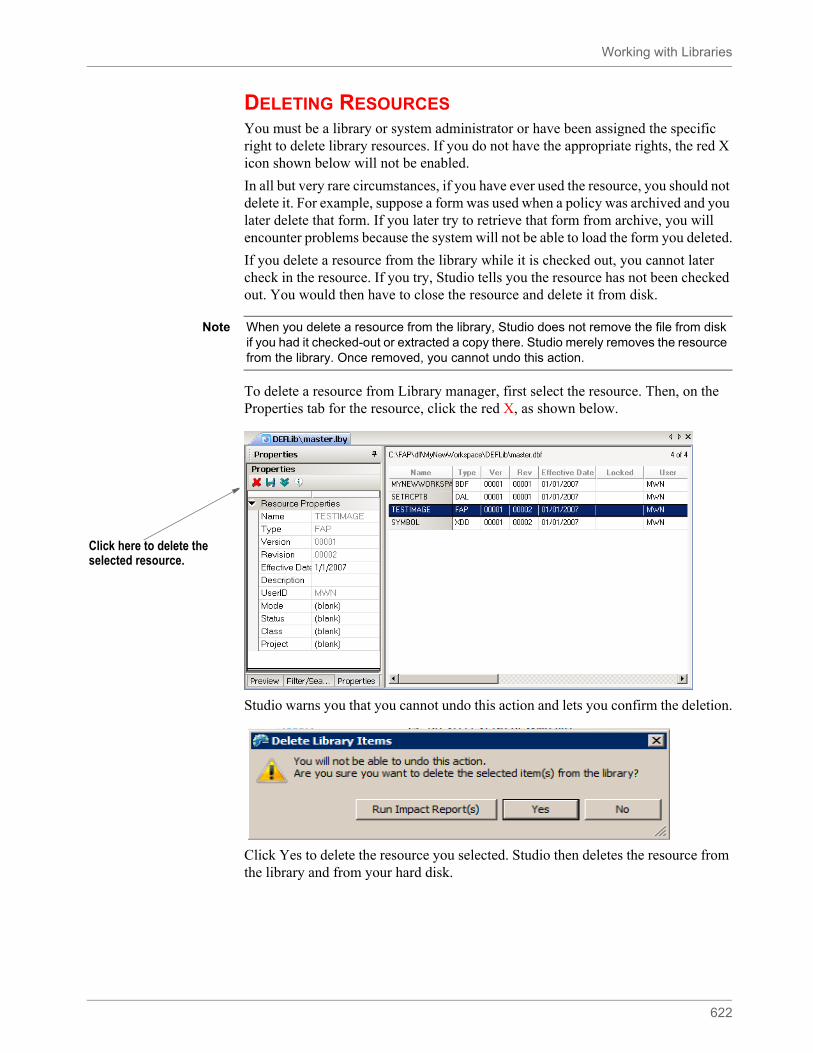
Working with Libraries
622
DELETING RESOURCESYou must be a library or system administrator or have been assigned the specific right to delete library resources. If you do not have the appropriate rights, the red X icon shown below will not be enabled.
In all but very rare circumstances, if you have ever used the resource, you should not delete it. For example, suppose a form was used when a policy was archived and you later delete that form. If you later try to retrieve that form from archive, you will encounter problems because the system will not be able to load the form you deleted.
If you delete a resource from the library while it is checked out, you cannot later check in the resource. If you try, Studio tells you the resource has not been checked out. You would then have to close the resource and delete it from disk.
To delete a resource from Library manager, first select the resource. Then, on the Properties tab for the resource, click the red X, as shown below.
Studio warns you that you cannot undo this action and lets you confirm the deletion.
Click Yes to delete the resource you selected. Studio then deletes the resource from the library and from your hard disk.
Note When you delete a resource from the library, Studio does not remove the file from disk if you had it checked-out or extracted a copy there. Studio merely removes the resource from the library. Once removed, you cannot undo this action.
Click here to delete the selected resource.
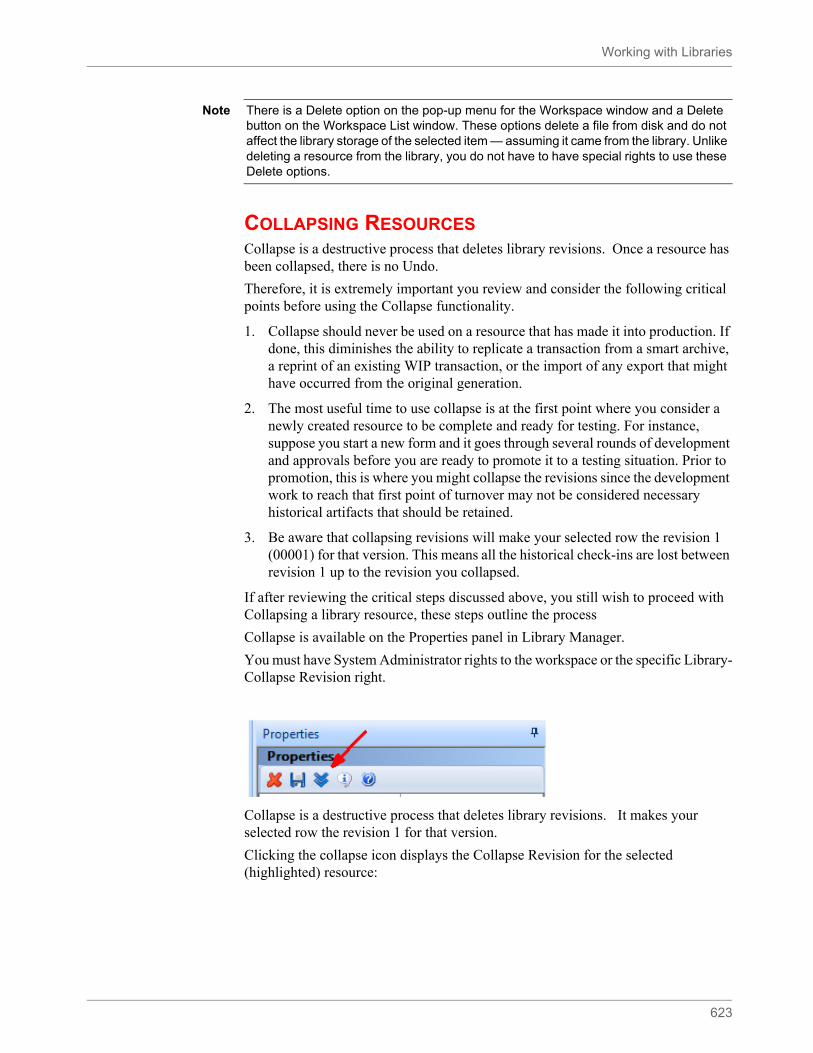
Working with Libraries
623
COLLAPSING RESOURCESCollapse is a destructive process that deletes library revisions. Once a resource has been collapsed, there is no Undo.
Therefore, it is extremely important you review and consider the following critical points before using the Collapse functionality.
1. Collapse should never be used on a resource that has made it into production. If done, this diminishes the ability to replicate a transaction from a smart archive, a reprint of an existing WIP transaction, or the import of any export that might have occurred from the original generation.
2. The most useful time to use collapse is at the first point where you consider a newly created resource to be complete and ready for testing. For instance, suppose you start a new form and it goes through several rounds of development and approvals before you are ready to promote it to a testing situation. Prior to promotion, this is where you might collapse the revisions since the development work to reach that first point of turnover may not be considered necessary historical artifacts that should be retained.
3. Be aware that collapsing revisions will make your selected row the revision 1 (00001) for that version. This means all the historical check-ins are lost between revision 1 up to the revision you collapsed.
If after reviewing the critical steps discussed above, you still wish to proceed with Collapsing a library resource, these steps outline the process
Collapse is available on the Properties panel in Library Manager.
You must have System Administrator rights to the workspace or the specific Library-Collapse Revision right.
Collapse is a destructive process that deletes library revisions. It makes your selected row the revision 1 for that version.
Clicking the collapse icon displays the Collapse Revision for the selected (highlighted) resource:
Note There is a Delete option on the pop-up menu for the Workspace window and a Delete button on the Workspace List window. These options delete a file from disk and do not affect the library storage of the selected item — assuming it came from the library. Unlike deleting a resource from the library, you do not have to have special rights to use these Delete options.
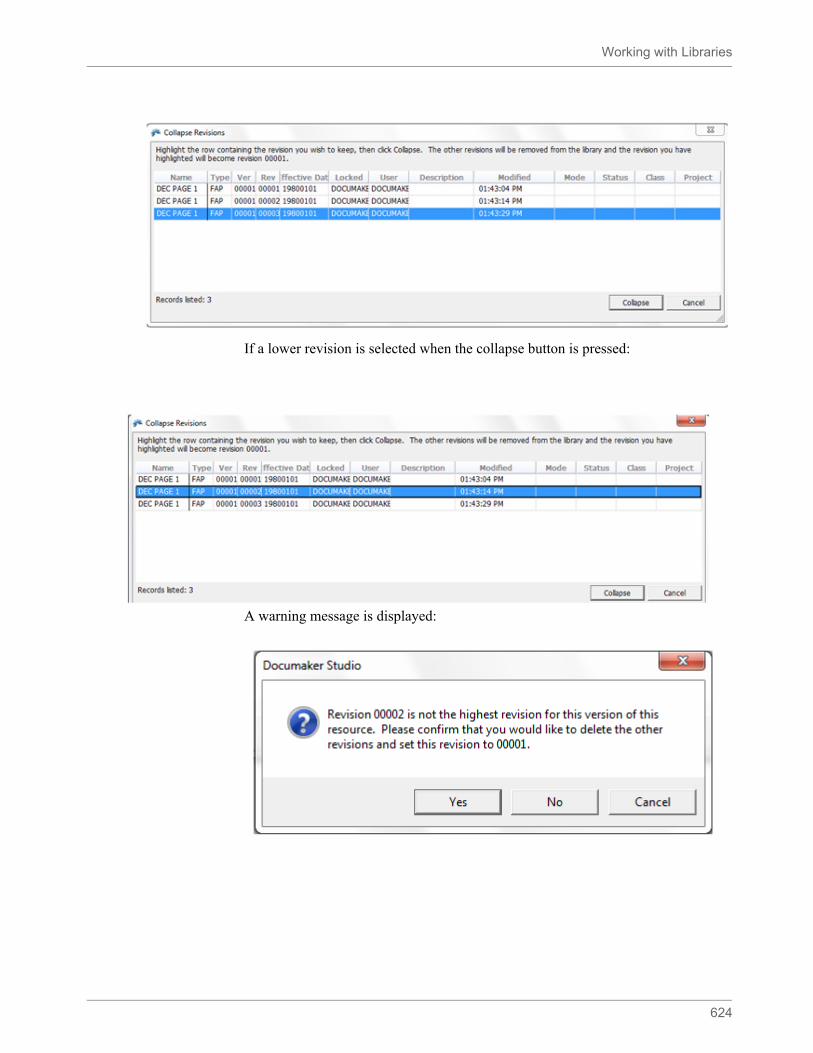
Working with Libraries
624
If a lower revision is selected when the collapse button is pressed:
A warning message is displayed:
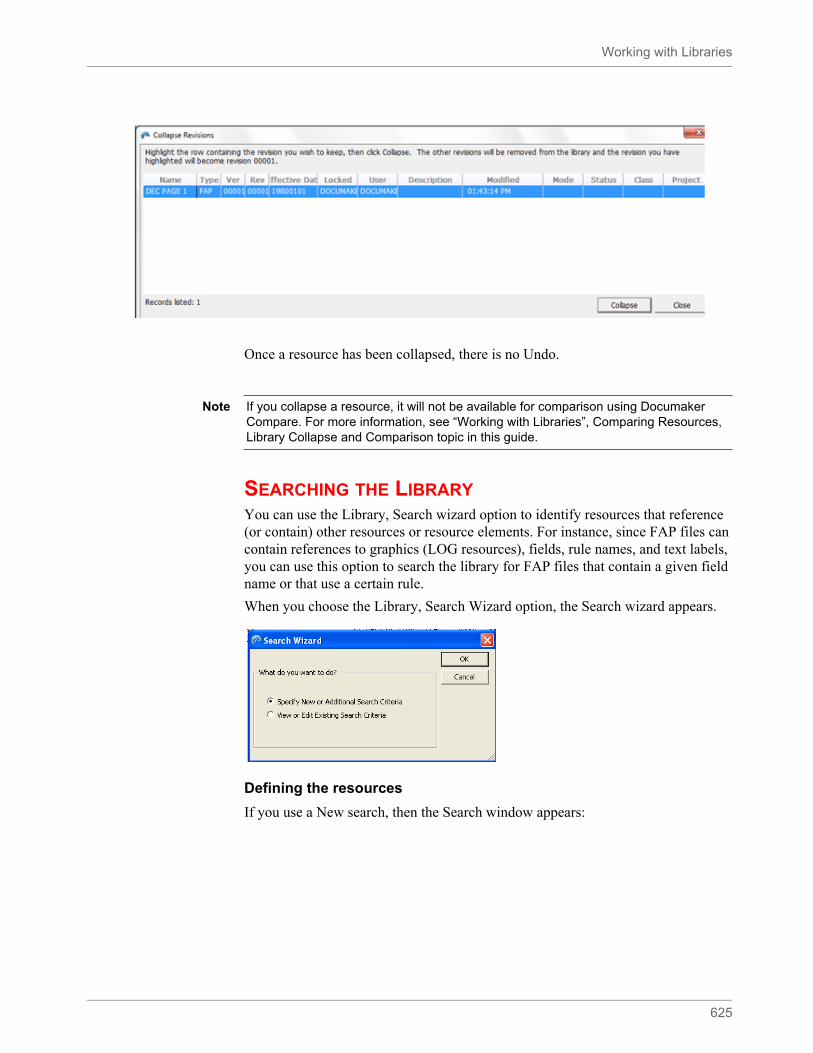
Working with Libraries
625
Once a resource has been collapsed, there is no Undo.
SEARCHING THE LIBRARYYou can use the Library, Search wizard option to identify resources that reference (or contain) other resources or resource elements. For instance, since FAP files can contain references to graphics (LOG resources), fields, rule names, and text labels, you can use this option to search the library for FAP files that contain a given field name or that use a certain rule.
When you choose the Library, Search Wizard option, the Search wizard appears.
Defining the resources
If you use a New search, then the Search window appears:
Note If you collapse a resource, it will not be available for comparison using Documaker Compare. For more information, see “Working with Libraries”, Comparing Resources, Library Collapse and Comparison topic in this guide.
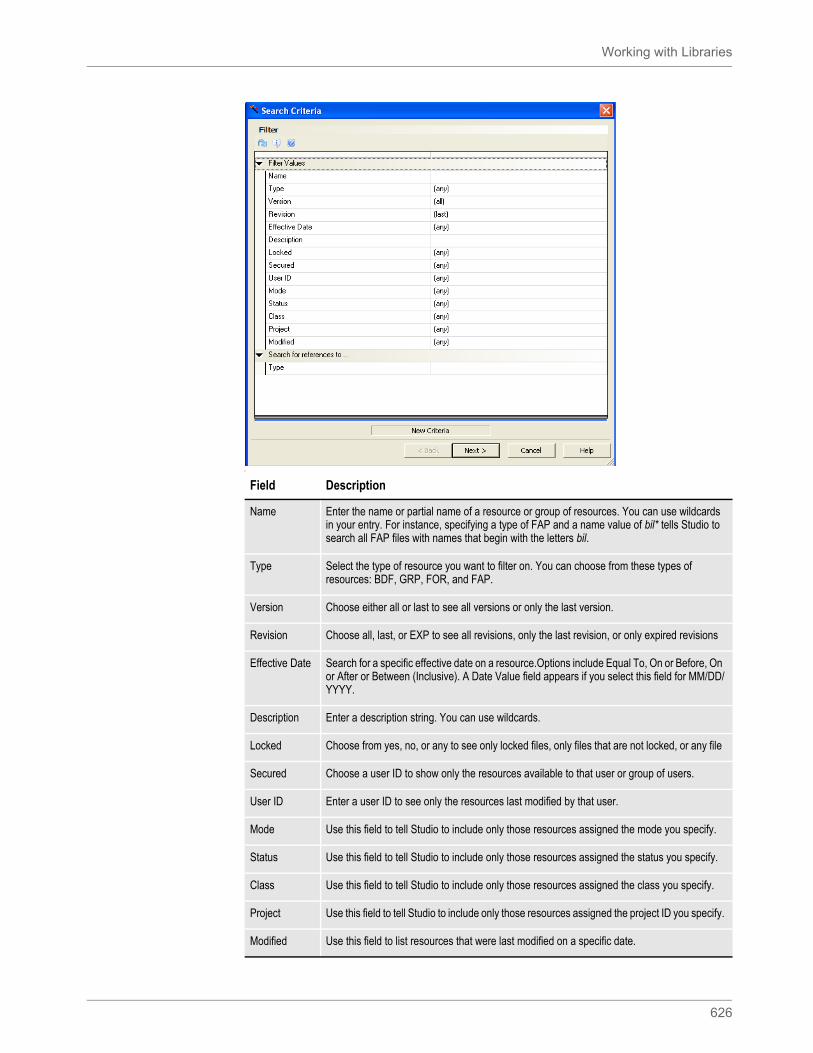
Working with Libraries
626
Y
Field Description
Name Enter the name or partial name of a resource or group of resources. You can use wildcards in your entry. For instance, specifying a type of FAP and a name value of bil* tells Studio to search all FAP files with names that begin with the letters bil.
Type Select the type of resource you want to filter on. You can choose from these types of resources: BDF, GRP, FOR, and FAP.
Version Choose either all or last to see all versions or only the last version.
Revision Choose all, last, or EXP to see all revisions, only the last revision, or only expired revisions
Effective Date Search for a specific effective date on a resource.Options include Equal To, On or Before, On or After or Between (Inclusive). A Date Value field appears if you select this field for MM/DD/YYYY.
Description Enter a description string. You can use wildcards.
Locked Choose from yes, no, or any to see only locked files, only files that are not locked, or any file
Secured Choose a user ID to show only the resources available to that user or group of users.
User ID Enter a user ID to see only the resources last modified by that user.
Mode Use this field to tell Studio to include only those resources assigned the mode you specify.
Status Use this field to tell Studio to include only those resources assigned the status you specify.
Class Use this field to tell Studio to include only those resources assigned the class you specify.
Project Use this field to tell Studio to include only those resources assigned the project ID you specify.
Modified Use this field to list resources that were last modified on a specific date.
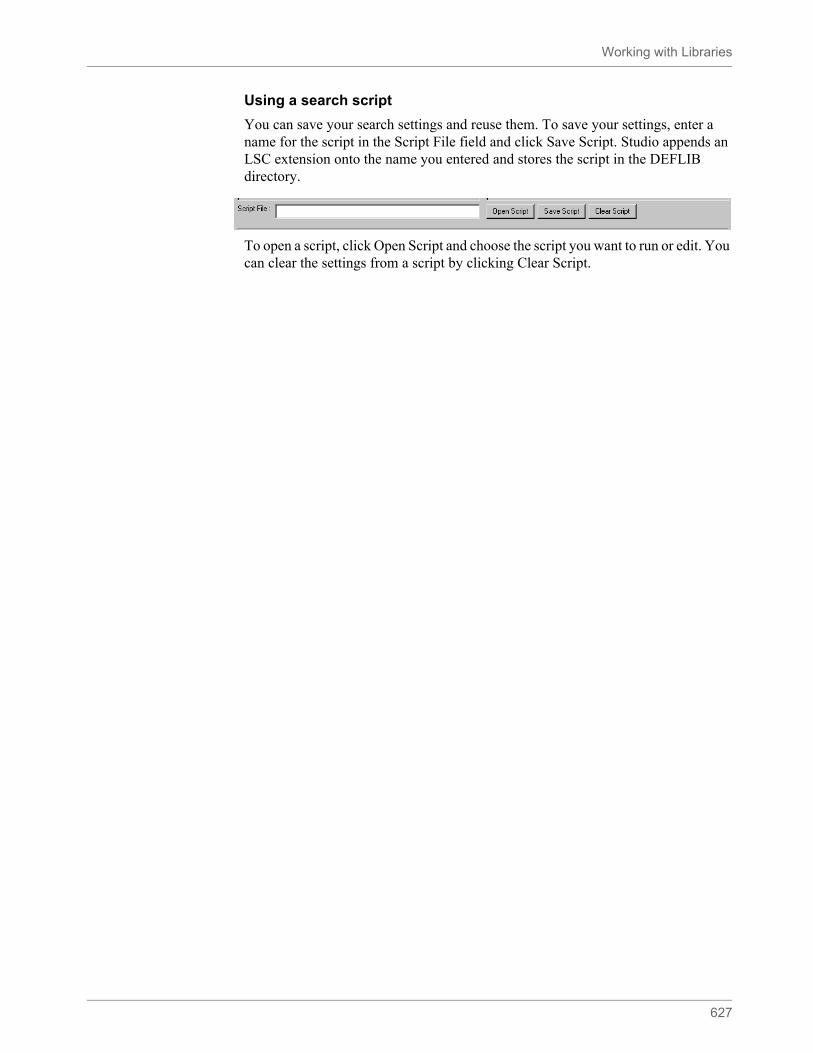
Working with Libraries
627
Using a search script
You can save your search settings and reuse them. To save your settings, enter a name for the script in the Script File field and click Save Script. Studio appends an LSC extension onto the name you entered and stores the script in the DEFLIB directory.
To open a script, click Open Script and choose the script you want to run or edit. You can clear the settings from a script by clicking Clear Script.
Working with Libraries
628
Performing the Search
Once you define the search settings, click Next to see the following screen:
If you click Finish, the resources matching the search results appear in the library view list.
You can highlight on any selected resource, then right-click and perform the desired task: See Opening a Library on page 601 for a list of tasks and their descriptions.

Working with Libraries
629
EXTRACTING RESOURCESYou can extract a resource from a library using the Library, Extract option. The Extract Library Resources window appears.
Identifying the resources to extract
Click the Filter/Search pane to identify the resources to extract.
Extract options
Other Extraction options appear when you expand the view in the Extract pane:
Field Description
Path Enter a path to extract the selected resources to a specific path.
Working with Libraries
630
Performing the Extraction
Once you define the extraction settings, click Preview to have Studio create a list of the resources that qualify for extraction.
Inspect the resources shown in the list. If necessary, make changes to your selection criteria and build the list again. When you have the list as you want it, click Preview. Studio runs a test extraction and shows you the results.
If necessary, make changes to your selection criteria and preview the extraction again. When you are satisfied with the results, click Extract Now to extract the resources.
Extract to different directories
Click to display fields into which you can define individual directories for each type of resource.
Extract to long file name
Select Yes to use long file names. Select No to use the 8.3 file naming convention on extracted resources.
Long file names are created by taking the resource name, appending an underscore followed by the version and revision, then appending another underscore followed by the date in YYYYMMDD format, and then adding an extension to indicate the resource type. Here is an example:
FileName_0000100001_20041201.fap
Field Description
Note At this point, no changes have been made. Preview simply shows you what the result of your extraction script would be if you actually ran it.
Working with Libraries
631
EXPIRING RESOURCESYou can expire a resource you no longer want to maintain. In essence, expiring a resource is like retiring a resource. The resource remains in the library, but has EXP as its revision number. To expire a resource, highlight the resource on the library view or from a search list and right-click. Then choose the Expire option. The Expire window appears.
Expiring a resource tells Studio to check into the library another revision of the resource, but with EXP as the value of the Revision field.
By default, the expiration date is set to today's date but you can change this date if necessary. The expiration date you specify must be greater than or equal to the effective date of other revisions within this version and must be less than or equal to the effective date of the next version of the resource, if one exists.
On the Expire window, you can also enter a description and set the Mode, Status, Class, and Project fields. Once you are satisfied with the values, click Ok to expire the resource.
COMPARING RESOURCESStarting in 12.5, Documaker introduces a comparison tool called Documaker Compare in Documaker Studio that helps a user compare two documents to determine where the differences occur. A user selects the resources to be compared from the Library Manager grid in Library Manager. The selected resources are loaded in the Documaker Compare views for comparison.
To launch Compare, go to the Library Manager grid in Documaker Studio's Library Manager. Select the resource(s) you want to compare and right-click on the selected resource(s).
Note The right-click menu can be accessed by pressing Shift + F10.
Working with Libraries
632
The following two options from the right-click menu are used to launch Compare:
• Compare selected resources – offers to compare the two resources selected in the Library Grid. If you select more than two resources or only one resource to compare, the system will display a dialog notifying the user to select only two files for comparison.
• Compare with previous revision – will compare the selected resource with a prior revision of the same resource name. When this option is selected, the system displays the Compare Revision Dialog. All revisions that exist in the library at the time of initiation of the comparison are displayed.
If there is no revision of the selected resource, Studio displays a dialog stating the same.

Working with Libraries
633
The Compare Toolbar
The Compare toolbar is composed of the following Tabs:
Navigation Tab – allows you to quickly see and navigate through the entire document. Following Navigation Options are available from the Navigation Tab:
Options Tab – lists the following commands:
Command Description
Previous Page Takes you to the previous page of a multi-page document.
Next Page Takes you to the next page of a multi-page document.
Previous Change Takes you back to the previous change in the document.
Next Change Takes you back to the next change in the document.
Command Description
Swap Sides Swaps the upper-left and upper-right panels.
Link Scroll Keeps the documents in sync when moving around in the panels. When Link Scroll is active, scrolling horizontally or vertically will impact both the upper-left and upper-right panels. When Link Scroll is turned off, horizontal or vertical scrolling affects only the panel that has focus.
Link Zoom Keeps the documents in sync when changing zoom levels in the panels. When Link Zoom is active, zooming In or Out will impact both the upper-left and upper-right panels. When Link Zoom is turned off, changes made to zooming levels affect only the panel that has focus.
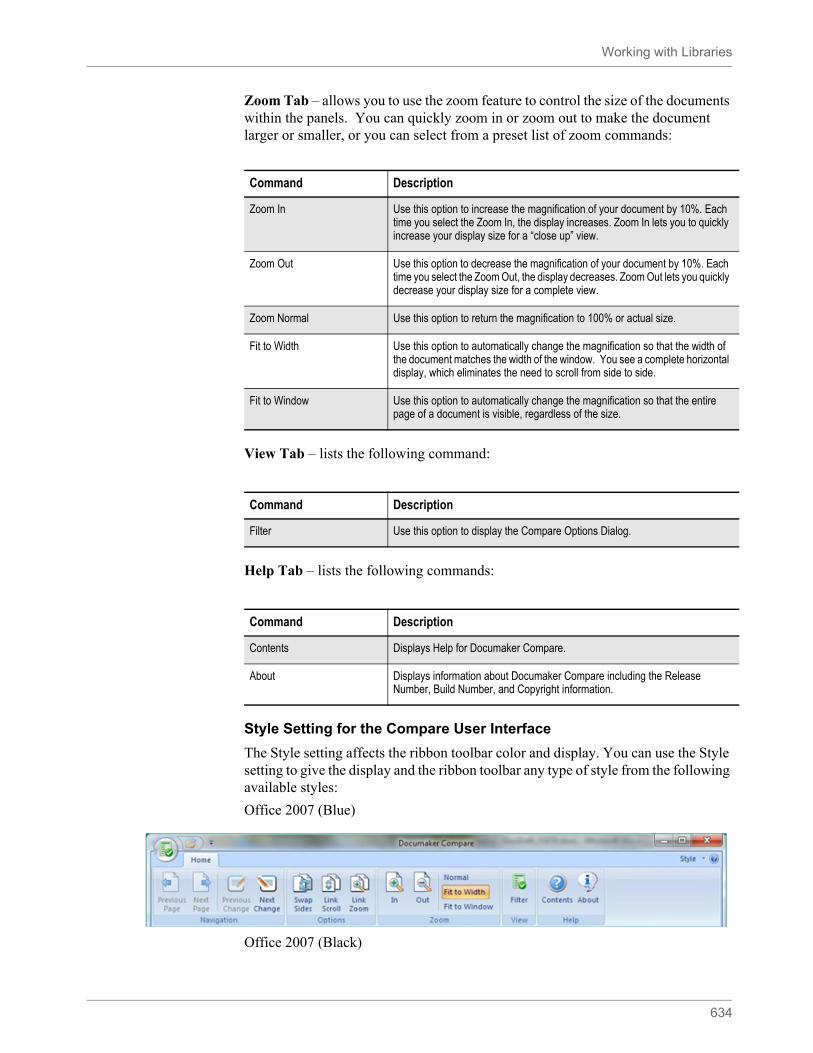
Working with Libraries
634
Zoom Tab – allows you to use the zoom feature to control the size of the documents within the panels. You can quickly zoom in or zoom out to make the document larger or smaller, or you can select from a preset list of zoom commands:
View Tab – lists the following command:
Help Tab – lists the following commands:
Style Setting for the Compare User Interface
The Style setting affects the ribbon toolbar color and display. You can use the Style setting to give the display and the ribbon toolbar any type of style from the following available styles:
Office 2007 (Blue)
Office 2007 (Black)
Command Description
Zoom In Use this option to increase the magnification of your document by 10%. Each time you select the Zoom In, the display increases. Zoom In lets you to quickly increase your display size for a “close up” view.
Zoom Out Use this option to decrease the magnification of your document by 10%. Each time you select the Zoom Out, the display decreases. Zoom Out lets you quickly decrease your display size for a complete view.
Zoom Normal Use this option to return the magnification to 100% or actual size.
Fit to Width Use this option to automatically change the magnification so that the width of the document matches the width of the window. You see a complete horizontal display, which eliminates the need to scroll from side to side.
Fit to Window Use this option to automatically change the magnification so that the entire page of a document is visible, regardless of the size.
Command Description
Filter Use this option to display the Compare Options Dialog.
Command Description
Contents Displays Help for Documaker Compare.
About Displays information about Documaker Compare including the Release Number, Build Number, and Copyright information.
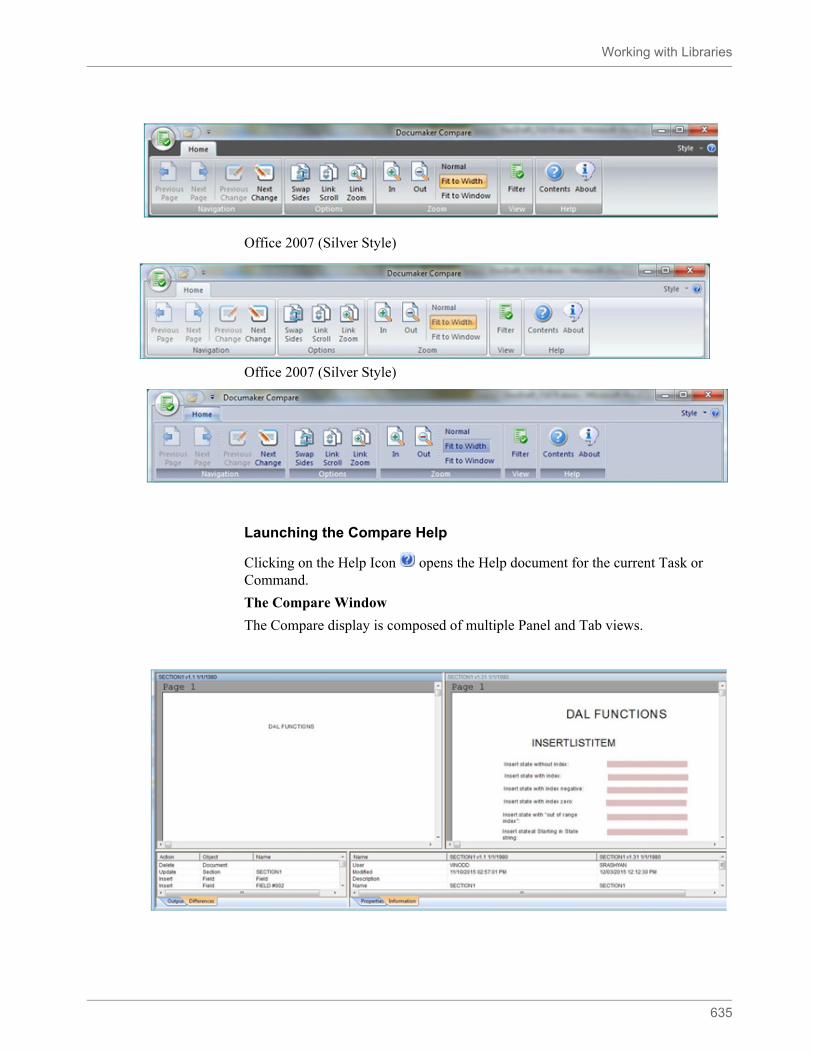
Working with Libraries
635
Office 2007 (Silver Style)
Office 2007 (Silver Style)
Launching the Compare Help
Clicking on the Help Icon opens the Help document for the current Task or Command.
The Compare Window
The Compare display is composed of multiple Panel and Tab views.
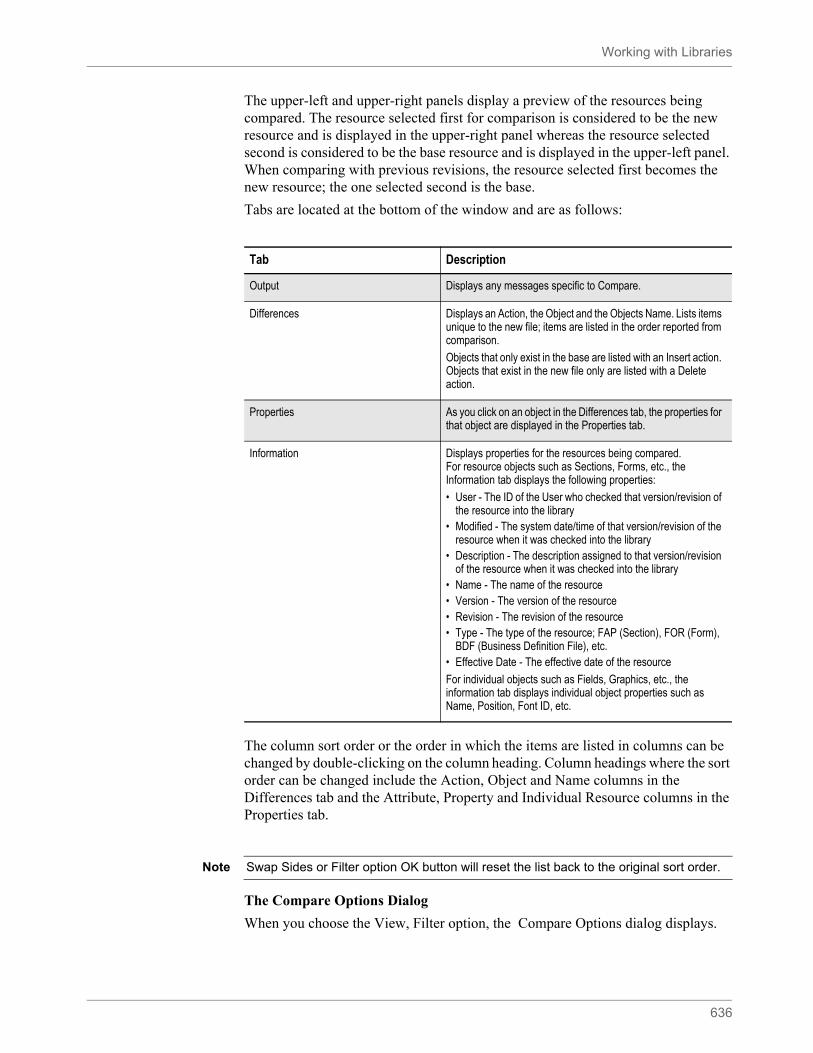
Working with Libraries
636
The upper-left and upper-right panels display a preview of the resources being compared. The resource selected first for comparison is considered to be the new resource and is displayed in the upper-right panel whereas the resource selected second is considered to be the base resource and is displayed in the upper-left panel. When comparing with previous revisions, the resource selected first becomes the new resource; the one selected second is the base.
Tabs are located at the bottom of the window and are as follows:
The column sort order or the order in which the items are listed in columns can be changed by double-clicking on the column heading. Column headings where the sort order can be changed include the Action, Object and Name columns in the Differences tab and the Attribute, Property and Individual Resource columns in the Properties tab.
The Compare Options Dialog
When you choose the View, Filter option, the Compare Options dialog displays.
Tab Description
Output Displays any messages specific to Compare.
Differences Displays an Action, the Object and the Objects Name. Lists items unique to the new file; items are listed in the order reported from comparison.
Objects that only exist in the base are listed with an Insert action. Objects that exist in the new file only are listed with a Delete action.
Properties As you click on an object in the Differences tab, the properties for that object are displayed in the Properties tab.
Information Displays properties for the resources being compared. For resource objects such as Sections, Forms, etc., the Information tab displays the following properties:
• User - The ID of the User who checked that version/revision of the resource into the library
• Modified - The system date/time of that version/revision of the resource when it was checked into the library
• Description - The description assigned to that version/revision of the resource when it was checked into the library
• Name - The name of the resource • Version - The version of the resource • Revision - The revision of the resource • Type - The type of the resource; FAP (Section), FOR (Form),
BDF (Business Definition File), etc. • Effective Date - The effective date of the resource
For individual objects such as Fields, Graphics, etc., the information tab displays individual object properties such as Name, Position, Font ID, etc.
Note Swap Sides or Filter option OK button will reset the list back to the original sort order.
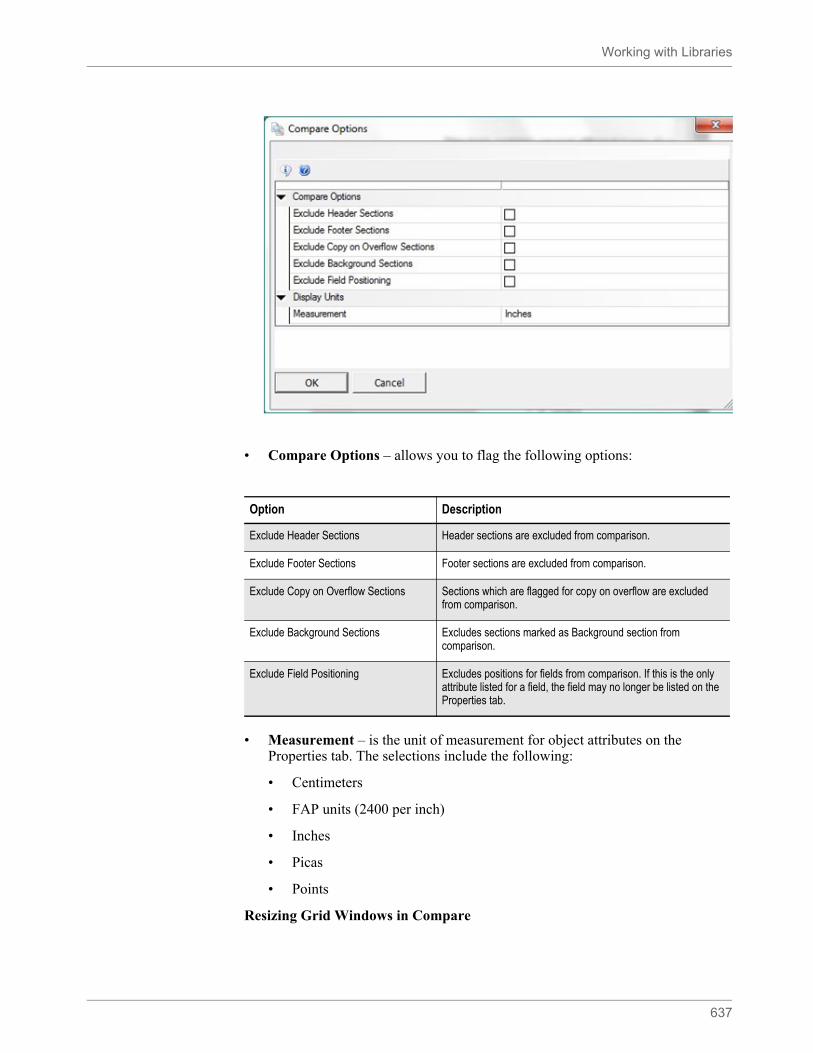
Working with Libraries
637
• Compare Options – allows you to flag the following options:
• Measurement – is the unit of measurement for object attributes on the Properties tab. The selections include the following:
• Centimeters
• FAP units (2400 per inch)
• Inches
• Picas
• Points
Resizing Grid Windows in Compare
Option Description
Exclude Header Sections Header sections are excluded from comparison.
Exclude Footer Sections Footer sections are excluded from comparison.
Exclude Copy on Overflow Sections Sections which are flagged for copy on overflow are excluded from comparison.
Exclude Background Sections Excludes sections marked as Background section from comparison.
Exclude Field Positioning Excludes positions for fields from comparison. If this is the only attribute listed for a field, the field may no longer be listed on the Properties tab.
Working with Libraries
638
You can resize certain grid windows containing the Panels and Tabs. This lets you customize the display of information.
To size the window, simply place your cursor on the horizontal or vertical edge of the window. The pointer will change to the sizing cursor. Then click and drag the window to the size you want. When you release the mouse, the system remembers the size you have selected and displays the window using that size in the current dialog. However, these changes are not preserved, i.e. if you close that Compare dialog and then select a new set of resources to compare, the grid windows in the new Compare dialog have the default size.
Also, if you have multiple Compare dialogs open, the size changes made in one dialog do not affect the other dialogs that are open.
Resources not eligible for comparison
Files such as Table (*.TLK), Data Dictionary (*.XDD) and Triggers (*.DAL) are not eligible for comparison. Data Definition Table (*.DDT) files are also not eligible for comparison.
Comparing Different file types in Compare
Compare does not restrict you from comparing different types of resources. You can compare a section (*.FAP) to a Form (*FOR). However, this type of comparison may not be useful. Generally, you would compare the same type of resources, for example a section (*.FAP) to a section (*.FAP).
Comparing Locked Files in Compare
Files that are locked (checked out) by either you or other users can be compared. However, the comparison is simply a 'state' of the files at the time you launched it. Compare does not have any way to know after it was initiated, that one or both files being compared were changed. Changes can include unlocking the file, checking the file in or modifying the checked out file and saving it without checking it in.
If you are the one with the file locked, Compare will pick up the local changes you saved for comparison. Compare would only compare what was saved up to that point.
Comparing Expired Files in Compare
Files that are expired can be compared. Expired resources have a revision of EXP. When comparing an Expired resource to a previous revision, the expired resource will match the last revision that was checked in. So, for example, if you have Version 1 Revision 1, Version 1 Revision 2 and Version 1 Revision EXP of a resource, Version 1 Revision 2 and Version 1 Revision EXP will be a match to each other.
Library Collapse and Comparison
Comparison can be performed by either Comparing Selected Resources or Comparing with Previous Revision of that resource. In order to perform Compare with previous revisions, those revisions must be available in the library for selection.
Note Each window has a minimum size.
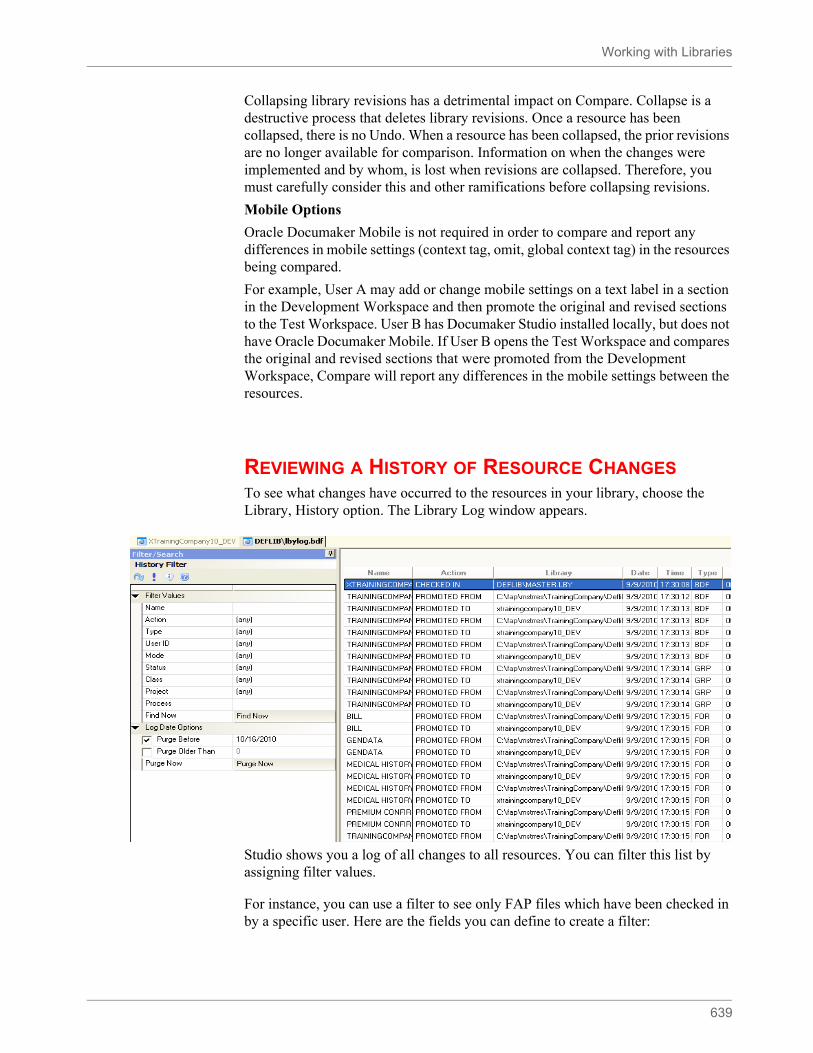
Working with Libraries
639
Collapsing library revisions has a detrimental impact on Compare. Collapse is a destructive process that deletes library revisions. Once a resource has been collapsed, there is no Undo. When a resource has been collapsed, the prior revisions are no longer available for comparison. Information on when the changes were implemented and by whom, is lost when revisions are collapsed. Therefore, you must carefully consider this and other ramifications before collapsing revisions.
Mobile Options
Oracle Documaker Mobile is not required in order to compare and report any differences in mobile settings (context tag, omit, global context tag) in the resources being compared.
For example, User A may add or change mobile settings on a text label in a section in the Development Workspace and then promote the original and revised sections to the Test Workspace. User B has Documaker Studio installed locally, but does not have Oracle Documaker Mobile. If User B opens the Test Workspace and compares the original and revised sections that were promoted from the Development Workspace, Compare will report any differences in the mobile settings between the resources.
REVIEWING A HISTORY OF RESOURCE CHANGESTo see what changes have occurred to the resources in your library, choose the Library, History option. The Library Log window appears.
Studio shows you a log of all changes to all resources. You can filter this list by assigning filter values.
For instance, you can use a filter to see only FAP files which have been checked in by a specific user. Here are the fields you can define to create a filter:
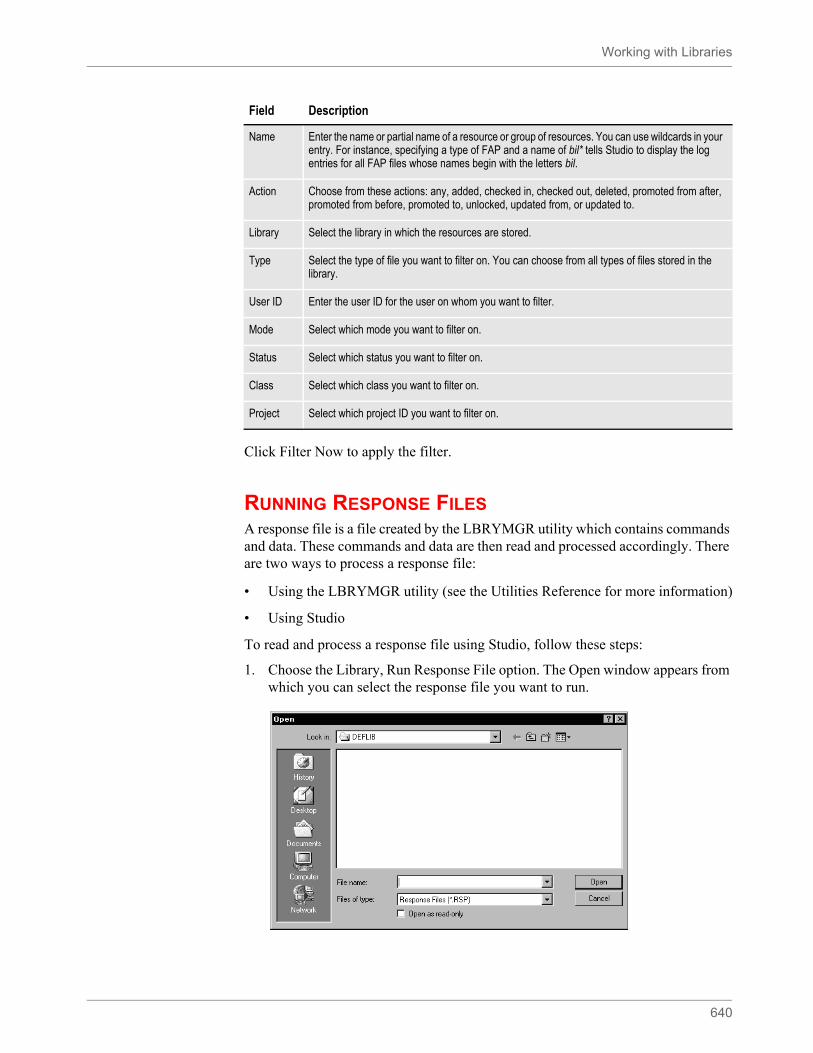
Working with Libraries
640
Click Filter Now to apply the filter.
RUNNING RESPONSE FILESA response file is a file created by the LBRYMGR utility which contains commands and data. These commands and data are then read and processed accordingly. There are two ways to process a response file:
• Using the LBRYMGR utility (see the Utilities Reference for more information)
• Using Studio
To read and process a response file using Studio, follow these steps:
1. Choose the Library, Run Response File option. The Open window appears from which you can select the response file you want to run.
Field Description
Name Enter the name or partial name of a resource or group of resources. You can use wildcards in your entry. For instance, specifying a type of FAP and a name of bil* tells Studio to display the log entries for all FAP files whose names begin with the letters bil.
Action Choose from these actions: any, added, checked in, checked out, deleted, promoted from after, promoted from before, promoted to, unlocked, updated from, or updated to.
Library Select the library in which the resources are stored.
Type Select the type of file you want to filter on. You can choose from all types of files stored in the library.
User ID Enter the user ID for the user on whom you want to filter.
Mode Select which mode you want to filter on.
Status Select which status you want to filter on.
Class Select which class you want to filter on.
Project Select which project ID you want to filter on.

Working with Libraries
641
2. Select the response file to process and click Ok. Studio displays messages to show you its progress.
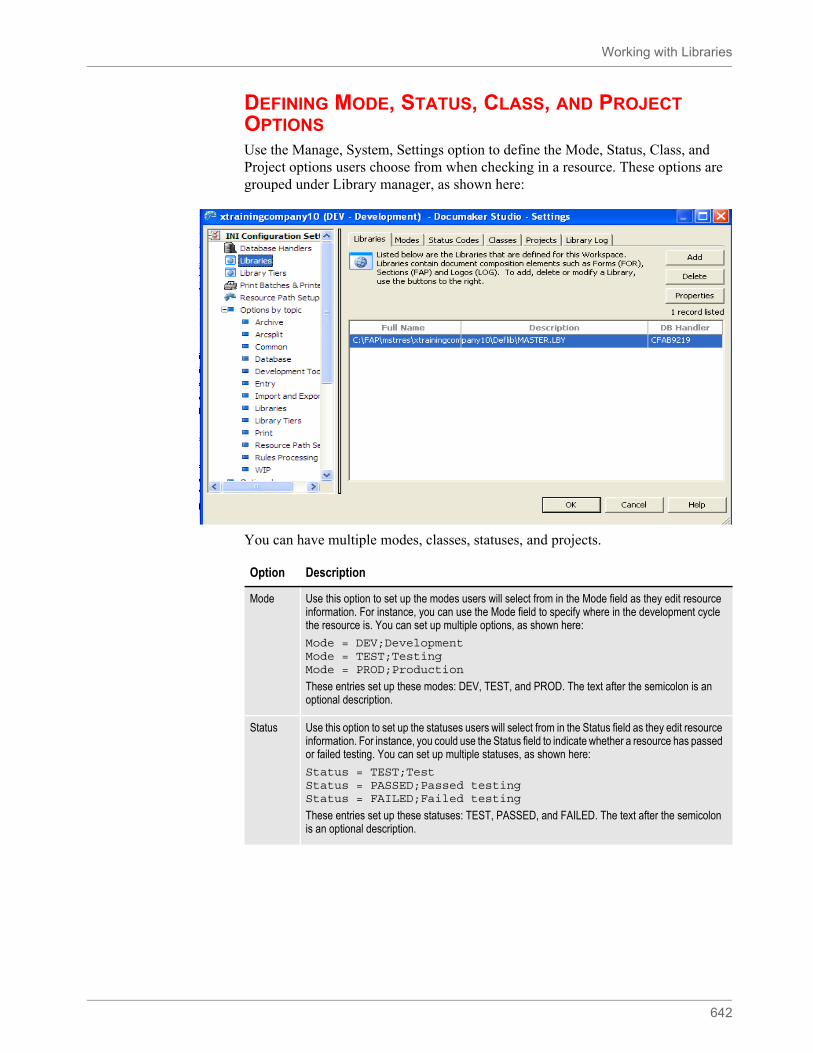
Working with Libraries
642
DEFINING MODE, STATUS, CLASS, AND PROJECT OPTIONSUse the Manage, System, Settings option to define the Mode, Status, Class, and Project options users choose from when checking in a resource. These options are grouped under Library manager, as shown here:
You can have multiple modes, classes, statuses, and projects.
Option Description
Mode Use this option to set up the modes users will select from in the Mode field as they edit resource information. For instance, you can use the Mode field to specify where in the development cycle the resource is. You can set up multiple options, as shown here:
Mode = DEV;DevelopmentMode = TEST;TestingMode = PROD;Production
These entries set up these modes: DEV, TEST, and PROD. The text after the semicolon is an optional description.
Status Use this option to set up the statuses users will select from in the Status field as they edit resource information. For instance, you could use the Status field to indicate whether a resource has passed or failed testing. You can set up multiple statuses, as shown here:
Status = TEST;TestStatus = PASSED;Passed testingStatus = FAILED;Failed testing
These entries set up these statuses: TEST, PASSED, and FAILED. The text after the semicolon is an optional description.
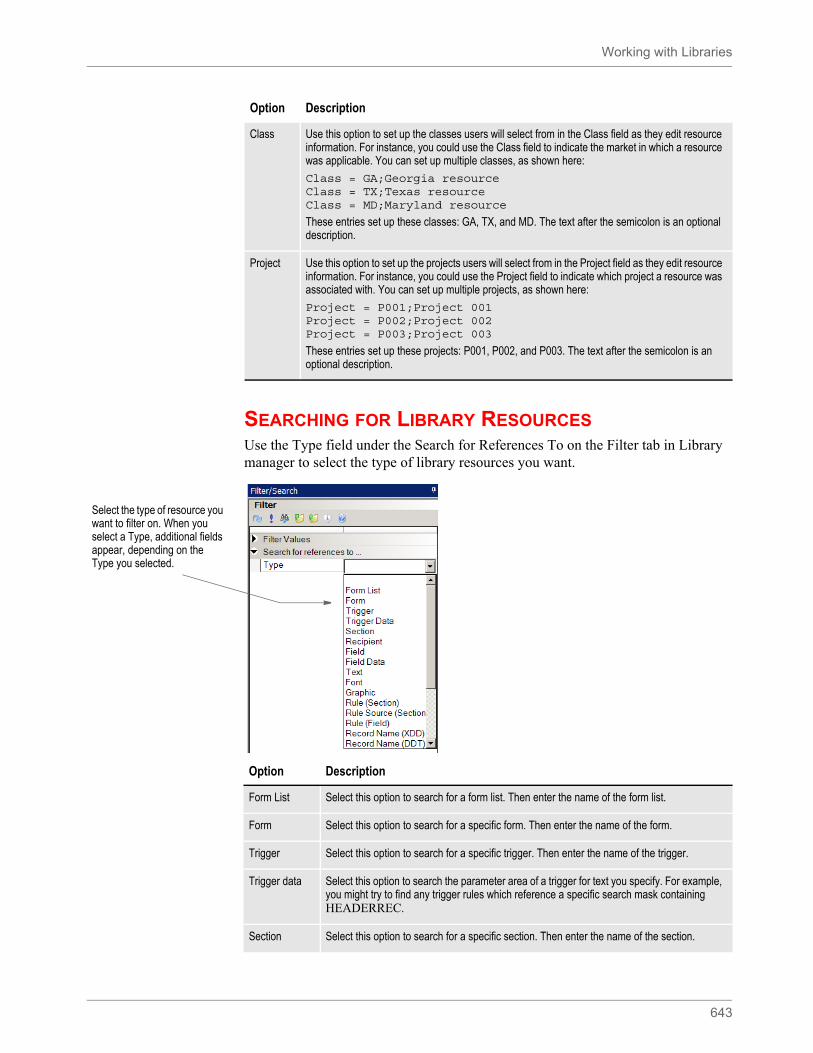
Working with Libraries
643
SEARCHING FOR LIBRARY RESOURCESUse the Type field under the Search for References To on the Filter tab in Library manager to select the type of library resources you want.
Class Use this option to set up the classes users will select from in the Class field as they edit resource information. For instance, you could use the Class field to indicate the market in which a resource was applicable. You can set up multiple classes, as shown here:
Class = GA;Georgia resourceClass = TX;Texas resourceClass = MD;Maryland resource
These entries set up these classes: GA, TX, and MD. The text after the semicolon is an optional description.
Project Use this option to set up the projects users will select from in the Project field as they edit resource information. For instance, you could use the Project field to indicate which project a resource was associated with. You can set up multiple projects, as shown here:
Project = P001;Project 001Project = P002;Project 002Project = P003;Project 003
These entries set up these projects: P001, P002, and P003. The text after the semicolon is an optional description.
Option Description
Select the type of resource you want to filter on. When you select a Type, additional fields appear, depending on the Type you selected.
Option Description
Form List Select this option to search for a form list. Then enter the name of the form list.
Form Select this option to search for a specific form. Then enter the name of the form.
Trigger Select this option to search for a specific trigger. Then enter the name of the trigger.
Trigger data Select this option to search the parameter area of a trigger for text you specify. For example, you might try to find any trigger rules which reference a specific search mask containing HEADERREC.
Section Select this option to search for a specific section. Then enter the name of the section.
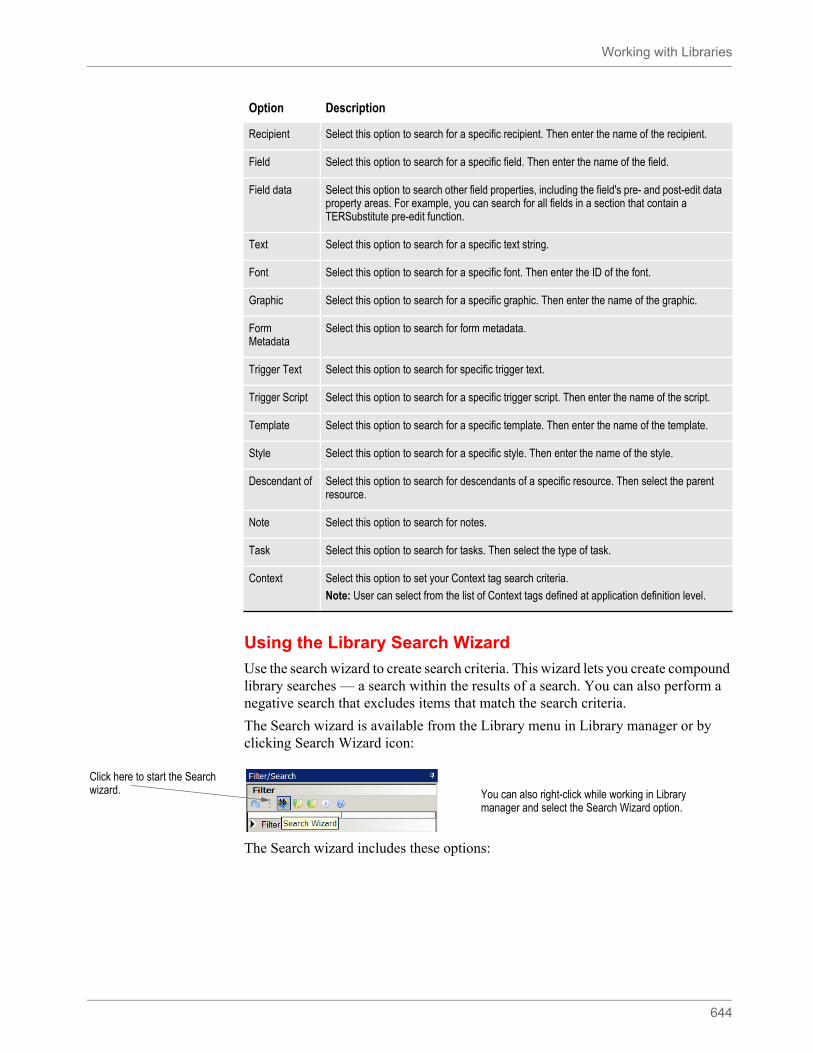
Working with Libraries
644
Using the Library Search Wizard
Use the search wizard to create search criteria. This wizard lets you create compound library searches — a search within the results of a search. You can also perform a negative search that excludes items that match the search criteria.
The Search wizard is available from the Library menu in Library manager or by clicking Search Wizard icon:
The Search wizard includes these options:
Recipient Select this option to search for a specific recipient. Then enter the name of the recipient.
Field Select this option to search for a specific field. Then enter the name of the field.
Field data Select this option to search other field properties, including the field's pre- and post-edit data property areas. For example, you can search for all fields in a section that contain a TERSubstitute pre-edit function.
Text Select this option to search for a specific text string.
Font Select this option to search for a specific font. Then enter the ID of the font.
Graphic Select this option to search for a specific graphic. Then enter the name of the graphic.
Form Metadata
Select this option to search for form metadata.
Trigger Text Select this option to search for specific trigger text.
Trigger Script Select this option to search for a specific trigger script. Then enter the name of the script.
Template Select this option to search for a specific template. Then enter the name of the template.
Style Select this option to search for a specific style. Then enter the name of the style.
Descendant of Select this option to search for descendants of a specific resource. Then select the parent resource.
Note Select this option to search for notes.
Task Select this option to search for tasks. Then select the type of task.
Context Select this option to set your Context tag search criteria.
Note: User can select from the list of Context tags defined at application definition level.
Option Description
Click here to start the Search wizard. You can also right-click while working in Library
manager and select the Search Wizard option.
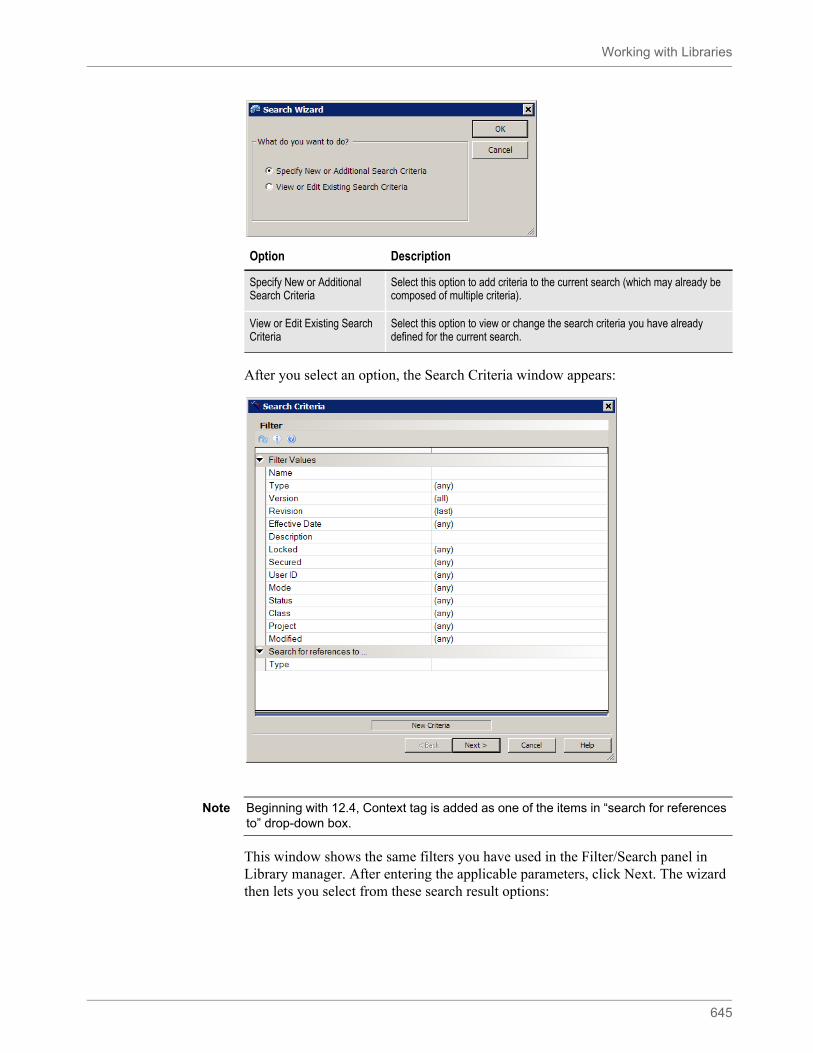
Working with Libraries
645
After you select an option, the Search Criteria window appears:
This window shows the same filters you have used in the Filter/Search panel in Library manager. After entering the applicable parameters, click Next. The wizard then lets you select from these search result options:
Option Description
Specify New or Additional Search Criteria
Select this option to add criteria to the current search (which may already be composed of multiple criteria).
View or Edit Existing Search Criteria
Select this option to view or change the search criteria you have already defined for the current search.
Note Beginning with 12.4, Context tag is added as one of the items in “search for references to” drop-down box.
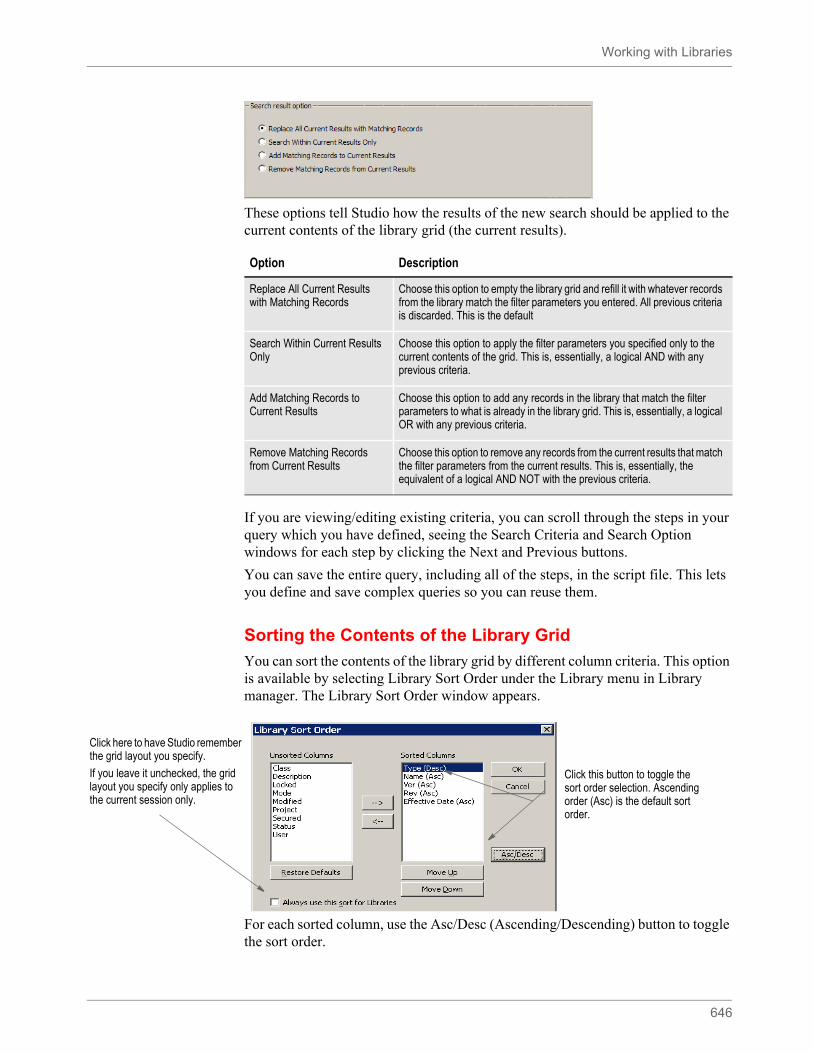
Working with Libraries
646
These options tell Studio how the results of the new search should be applied to the current contents of the library grid (the current results).
If you are viewing/editing existing criteria, you can scroll through the steps in your query which you have defined, seeing the Search Criteria and Search Option windows for each step by clicking the Next and Previous buttons.
You can save the entire query, including all of the steps, in the script file. This lets you define and save complex queries so you can reuse them.
Sorting the Contents of the Library Grid
You can sort the contents of the library grid by different column criteria. This option is available by selecting Library Sort Order under the Library menu in Library manager. The Library Sort Order window appears.
For each sorted column, use the Asc/Desc (Ascending/Descending) button to toggle the sort order.
Option Description
Replace All Current Results with Matching Records
Choose this option to empty the library grid and refill it with whatever records from the library match the filter parameters you entered. All previous criteria is discarded. This is the default
Search Within Current Results Only
Choose this option to apply the filter parameters you specified only to the current contents of the grid. This is, essentially, a logical AND with any previous criteria.
Add Matching Records to Current Results
Choose this option to add any records in the library that match the filter parameters to what is already in the library grid. This is, essentially, a logical OR with any previous criteria.
Remove Matching Records from Current Results
Choose this option to remove any records from the current results that match the filter parameters from the current results. This is, essentially, the equivalent of a logical AND NOT with the previous criteria.
Click here to have Studio remember the grid layout you specify.
If you leave it unchecked, the grid layout you specify only applies to the current session only.
Click this button to toggle the sort order selection. Ascending order (Asc) is the default sort order.
Working with Libraries
647
Also keep in mind:
• The sorting process occurs after the completed library list is loaded. The display during the loading process appears in the standard library sort order — type, name, version, revision.
• If you enter several letters in quick succession, you can go to the library resource that contains those letters. If, however, you pause between keystrokes, the system takes you to the first library resource that begins with the first letter you entered.
• You can right-click in Library manager and select Stop Loading to make Studio stop loading library records. This can be useful if you enter a search or filter criteria in error and you do not want to continue the process.
If you select Stop Loading to stop the process, click Filter Now or Search to start over using the current criteria. Keep in mind, you can change criteria while the system is loading items and then click Filter Now or Search to have Studio immediately begin a new search with the new criteria.
• When searching for a resource name, you can use asterisks before and after the search criteria. For example, if you wanted to search for names which contain cg2, you can enter *cg2* in the Name field.
Note If you are using a relational database, such as Oracle, the records normally load in the specified sort order. Sorting only occurs after loading if you execute a multistep query containing an OR condition or if you are sorting on a field which must be translated after it is loaded, such as Mode or Status.
If you are using xBase, the sorting process occurs after the completed library list is loaded. The system displays items during the loading process in the standard library sort order - type, name, version, and revision.
Note You do not have to wait for Studio to load all items before you can select an item and begin to work with it.

Using the LBYPROC Utility
648
USING THE LBYPROC UTILITY
The LBYPROC utility processes library scripts. Library scripts are XML-based files that let you perform actions on a resource library. You can use these scripts for...
• Adding resources to a library
• Deleting resources from a library
• Extracting resources from a library (writing the contents to a disk file)
• Promoting resources from one library to another
• Searching a library for specific elements
• Producing a list of resources that match a designated set of filter values
The scripts are designed so a script can cause the indicated action to be performed on more than one resource. For example, a single Promote script can cause many resources to be promoted from one library to another and an Extract script can cause many resources in a library to be extracted from the library and written to disk.
Note For more information on the LBYPROC utility, see the Utilities Reference.
Troubleshooting
649
TROUBLESHOOTING
To help you resolve problems, this topic discusses how to turn on tracing and various error messages you may encounter.
TURNING ON TRACINGIf you feel Studio is not retrieving the correct version/revision of a resource, or if you are experiencing other problems that seem to be related to the use of a library, you can use INI options to create a trace file.
You can then use the trace file to determine the date of the resource you requested and the effective date of the resource returned by Studio, as well as other library-related information. To turn on tracing, specify these options:
< Debug_Switches >Enable_Debug_Options= YesLbyLib = Yes
This table shows you where to place the options and the default file name.
For Documaker, Documaker Desktop, and Docupresentment, you can specify the name of the trace file using this option:
< Data >TraceFile =
You may also want to retain the NAFILE.DAT and the POLFILE.DAT files. During retrieval, these files are retrieved from archive and are initially written to disk then later deleted. To keep these files on disk during retrieval from Documaker Desktop, include this option:
< ArcRet >KeepFiles = Yes
To keep the NAFILE and POLFILE on disk during retrieval from Docupresentment (IDS), include this option:
< Attachments >Debug = Yes
For Specify the options in Default file name
Documaker (GenData) FSIUSER.INI or FSISYS.INI trace
Documaker Desktop FSIUSER.INI or FSISYS.INI trace
Docupresentment (IDS) DAP.INI or a custom INI file dprtrc.log
Note Turning on the tracing causes a large amount of data to be written to the trace file. For optimal performance, only do this when you are testing or troubleshooting an implementation.
Note For optimal performance, only turn on the KeepFiles or Debug option when you are testing or troubleshooting a system.
Troubleshooting
650
Checking the Code Page
You can tell the system to write the code page specification into the trace file produced by the system by adding this INI option:
< Debug_Switches >CodePage = Yes
The default is No.
HANDLING ERROR MESSAGESHere are some of the common error messages you may encounter:
ORA-00904
The following error message:
[Oracle][ODBC][Ora]ORA-00904: invalid column name
indicates one of the column names in the table is invalid. To determine which table is invalid, turn on LBYLIB tracing (See Turning on Tracing on page 649), recreate the problem, then examine the trace file and look for the ORA-00904 error message. The table referenced immediately before the ORA-00904 message is the one with the invalid column.
Note there are column names reserved by Oracle which cannot be used. To remap a column name use the ODBC_FieldConvert control group as described in a previous section. If you are setting up the tables for the first time, after re-mapping the column, you may need to remove the existing table so it can be recreated with the correct column names.
This message can also indicate you are trying to reference a column in the table that does not exist. Look closely at the trace file and compare the columns referenced in the SQL statement, such as SELECT, to the columns of the table as it is defined in the database.
ORA-01401
The following error message:
[Oracle][ODBC][Ora]ORA-01401: inserted value too large for column
indicates you are trying to insert a value that is too large for the column. To try to determine which table the problem is with, turn on LBYLIB tracing (See Turning on Tracing on page 649), recreate the problem, then examine the trace file and look for the ORA-01401 error message. The table referenced immediately before the ORA-01401 message should be the table that contains the column with the problem.
SQL0104N
The following DB2 ODBC error message:
42601 -104 [IBM][CLI Driver][DB2/NT] SQL0104N An unexpected token ")" was found following "on DAP110_LBYI_R1 (".Expected tokens may include: "<index_col_list>". SQLSTATE=42601

Troubleshooting
651
indicates that the DB2 driver attempted to create an index for the table. When using the DB2 ODBC driver, you should always set the following INI option to No.
< DBHandler:ODBC >CreateIndex = No
652
Chapter 13
Using Dictionaries
Use the Dictionaries option to work with the fields, rule files, and extract files you will use in your implementation. This topic discusses the following topics:
• Working with the Extract Dictionary on page 653
• Sorting XDD Elements on page 655
• Importing XML Schemas into the XDD on page 657
• Importing XML Extract Files into the XDD on page 662
• Using Addressee Records on page 665
• Using the Common Fields Dictionary on page 675
• Importing CSV Files on page 676
• Importing TGA Files on page 677
• Adding a field to the Common Field list on page 678
• Example: Adding a Field to the Extract Dictionary on page 673
Working with the Extract Dictionary
653
WORKING WITH THE EXTRACT DICTIONARY
The extract dictionary (also known as the SYMBOL.XDD) lets you store information about extract file records, as well as fields within records, in a database file format. Each record in this database contains all of the information that appears in the rule section for a field. Other information is also stored in the XDD. You can use the extract dictionary in both the field mapping process and the triggering process. This topic discusses the creation of and the use of the XDD in the mapping process.
Use of the XDD increases productivity and reliability when mapping since each field does not have to be mapped at a detailed level. Instead of entering information for all the fields in the Rule section for each field on a section, all that is required is that the rule XDD be specified for the field rule.
Typically, there is one (see note below) SYMBOL.XDD file per resource library. It is stored by default in the DEFLIB directory, under the specified workspace. The XDD is used with the rule section of the section at rules processing time. The link to the XDD database from the rule section of the section is the use of the XDD rule.
When the rules processor runs, items for the XDD are stored in cache. A thousand entries is the default cache number. There are INI options to change this number and to control the order of fields being removed (less frequent ore less recent) from cache. Use the extract dictionaries option to build the SYMBOL.XDD file.
The XDD file is laid out in a parent-child structure. The top level, parents, are individual records in the extract file. Fields within the record are children.
When adding a field to a section and the source of that field is the Extract Dictionary the rule assigned to the newly created field is the XDD rule if the following INI setting is present:
[ FixOptions ]
UseXDBRule = Yes
If the value for “UseXDBRule” is “No” then the rule and all of its parameters will be taken from the field’s Extract Dictionary entry.
When a new workspace is created the value for “UseXDBRule” is set to “Yes” unless it was already set to “No” in any INI file that may have been imported.
Note You can have a separate XDD file for each line of business. This is specified in the BDF file. At conversion time, the MASTER.DDT file, if one exists, and the XDB.DBF file, if one exists, automatically import into the SYMBOL.XDD file.
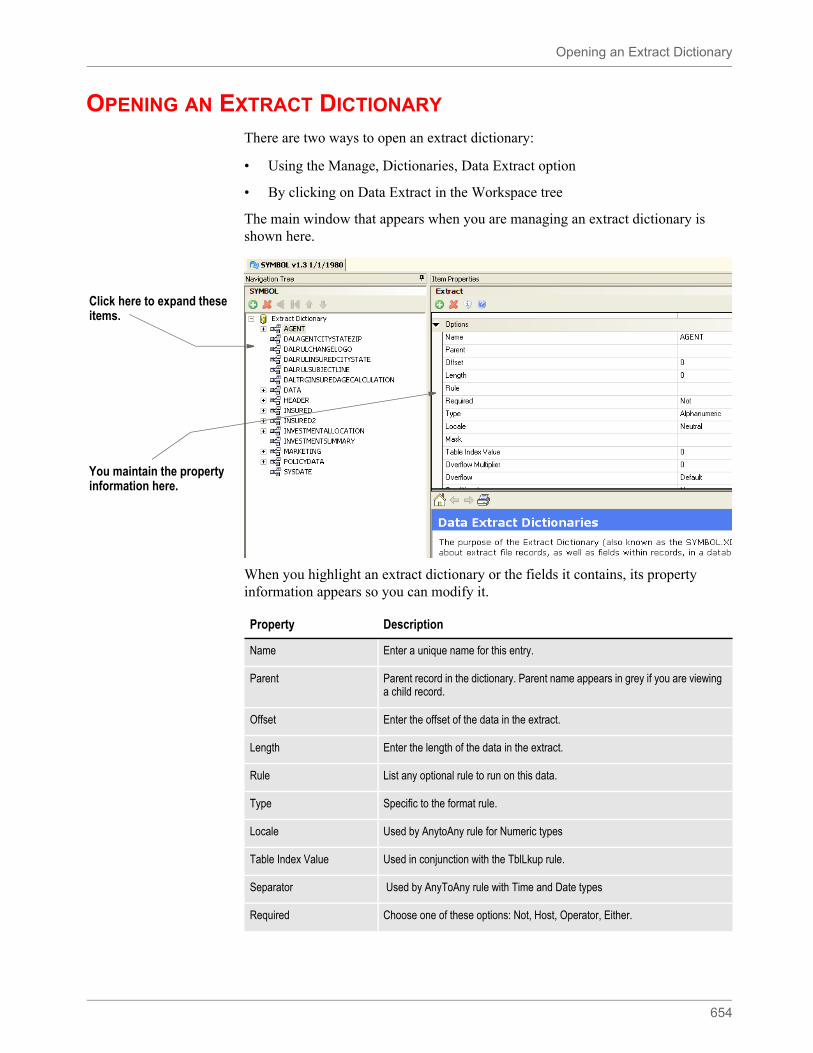
Opening an Extract Dictionary
654
OPENING AN EXTRACT DICTIONARY
There are two ways to open an extract dictionary:
• Using the Manage, Dictionaries, Data Extract option
• By clicking on Data Extract in the Workspace tree
The main window that appears when you are managing an extract dictionary is shown here.
When you highlight an extract dictionary or the fields it contains, its property information appears so you can modify it.
Click here to expand these items.
You maintain the property information here.
Property Description
Name Enter a unique name for this entry.
Parent Parent record in the dictionary. Parent name appears in grey if you are viewing a child record.
Offset Enter the offset of the data in the extract.
Length Enter the length of the data in the extract.
Rule List any optional rule to run on this data.
Type Specific to the format rule.
Locale Used by AnytoAny rule for Numeric types
Table Index Value Used in conjunction with the TblLkup rule.
Separator Used by AnyToAny rule with Time and Date types
Required Choose one of these options: Not, Host, Operator, Either.
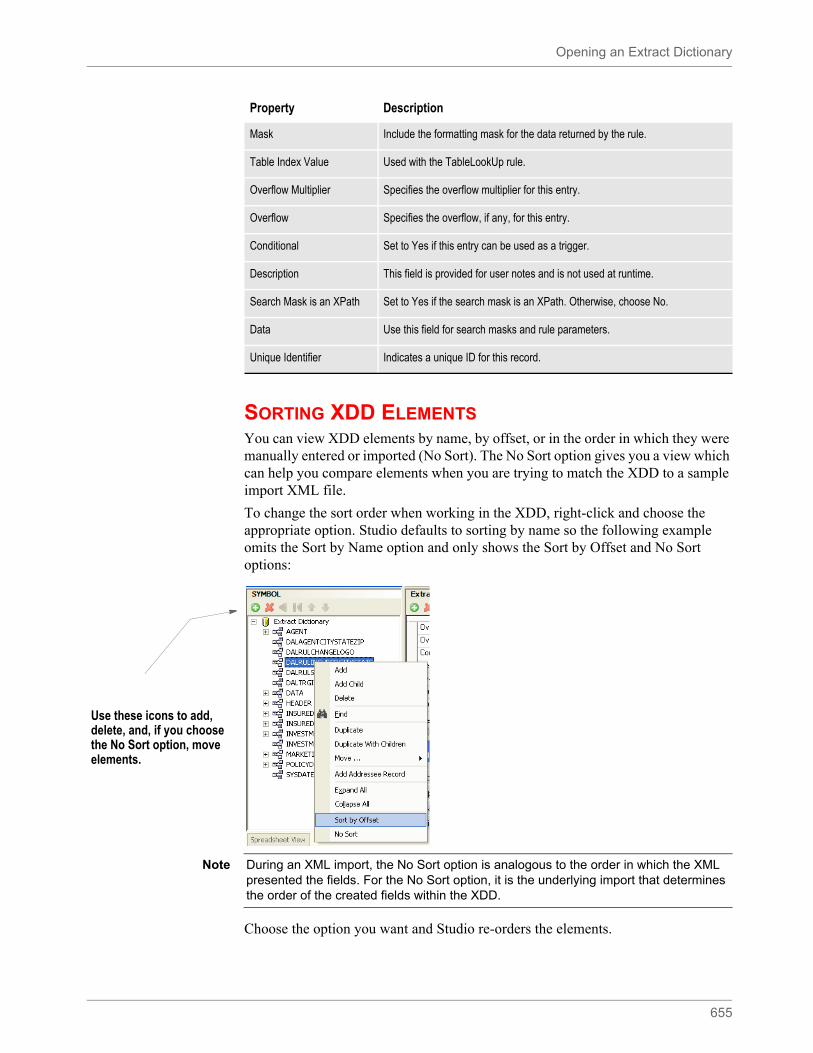
Opening an Extract Dictionary
655
SORTING XDD ELEMENTSYou can view XDD elements by name, by offset, or in the order in which they were manually entered or imported (No Sort). The No Sort option gives you a view which can help you compare elements when you are trying to match the XDD to a sample import XML file.
To change the sort order when working in the XDD, right-click and choose the appropriate option. Studio defaults to sorting by name so the following example omits the Sort by Name option and only shows the Sort by Offset and No Sort options:
Choose the option you want and Studio re-orders the elements.
Mask Include the formatting mask for the data returned by the rule.
Table Index Value Used with the TableLookUp rule.
Overflow Multiplier Specifies the overflow multiplier for this entry.
Overflow Specifies the overflow, if any, for this entry.
Conditional Set to Yes if this entry can be used as a trigger.
Description This field is provided for user notes and is not used at runtime.
Search Mask is an XPath Set to Yes if the search mask is an XPath. Otherwise, choose No.
Data Use this field for search masks and rule parameters.
Unique Identifier Indicates a unique ID for this record.
Property Description
Use these icons to add, delete, and, if you choose the No Sort option, move elements.
Note During an XML import, the No Sort option is analogous to the order in which the XML presented the fields. For the No Sort option, it is the underlying import that determines the order of the created fields within the XDD.
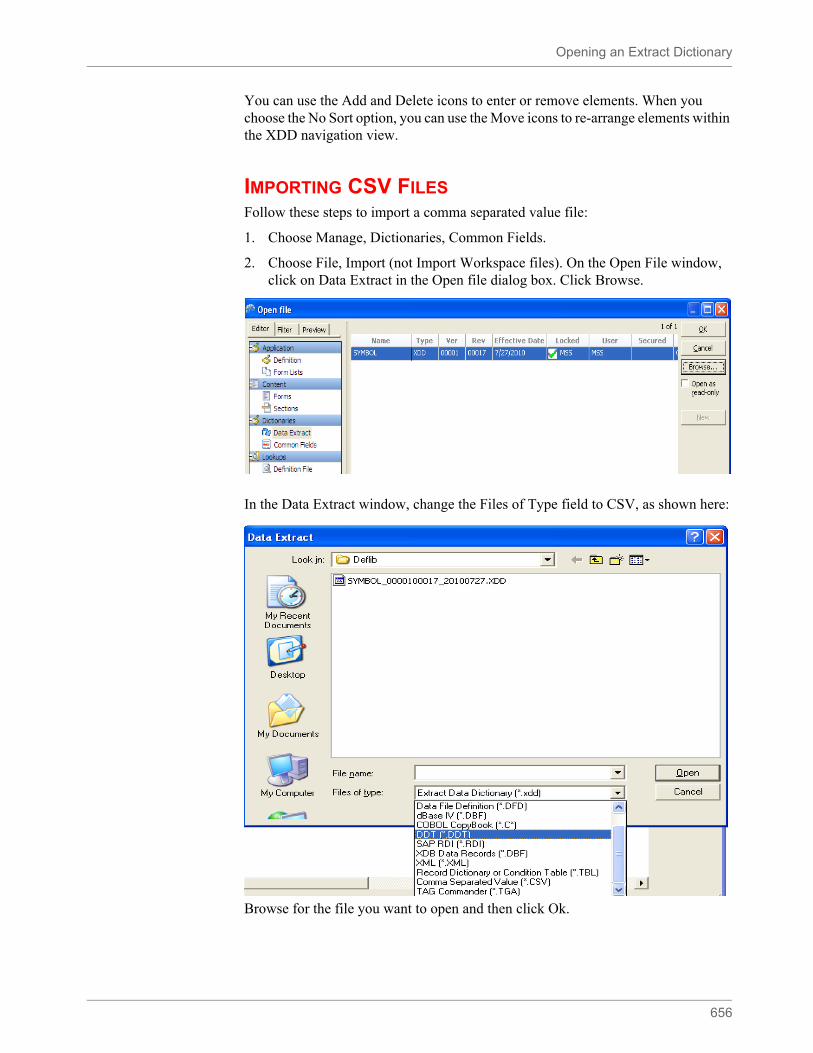
Opening an Extract Dictionary
656
You can use the Add and Delete icons to enter or remove elements. When you choose the No Sort option, you can use the Move icons to re-arrange elements within the XDD navigation view.
IMPORTING CSV FILESFollow these steps to import a comma separated value file:
1. Choose Manage, Dictionaries, Common Fields.
2. Choose File, Import (not Import Workspace files). On the Open File window, click on Data Extract in the Open file dialog box. Click Browse.
In the Data Extract window, change the Files of Type field to CSV, as shown here:
Browse for the file you want to open and then click Ok.
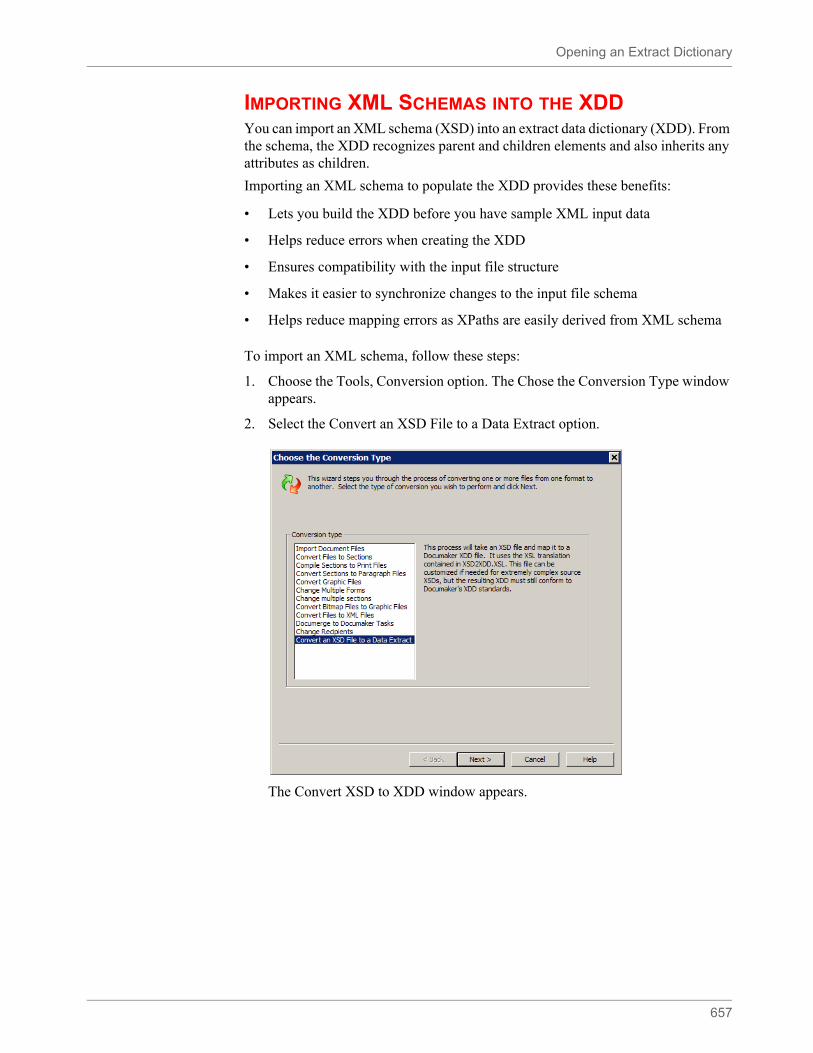
Opening an Extract Dictionary
657
IMPORTING XML SCHEMAS INTO THE XDDYou can import an XML schema (XSD) into an extract data dictionary (XDD). From the schema, the XDD recognizes parent and children elements and also inherits any attributes as children.
Importing an XML schema to populate the XDD provides these benefits:
• Lets you build the XDD before you have sample XML input data
• Helps reduce errors when creating the XDD
• Ensures compatibility with the input file structure
• Makes it easier to synchronize changes to the input file schema
• Helps reduce mapping errors as XPaths are easily derived from XML schema
To import an XML schema, follow these steps:
1. Choose the Tools, Conversion option. The Chose the Conversion Type window appears.
2. Select the Convert an XSD File to a Data Extract option.
The Convert XSD to XDD window appears.
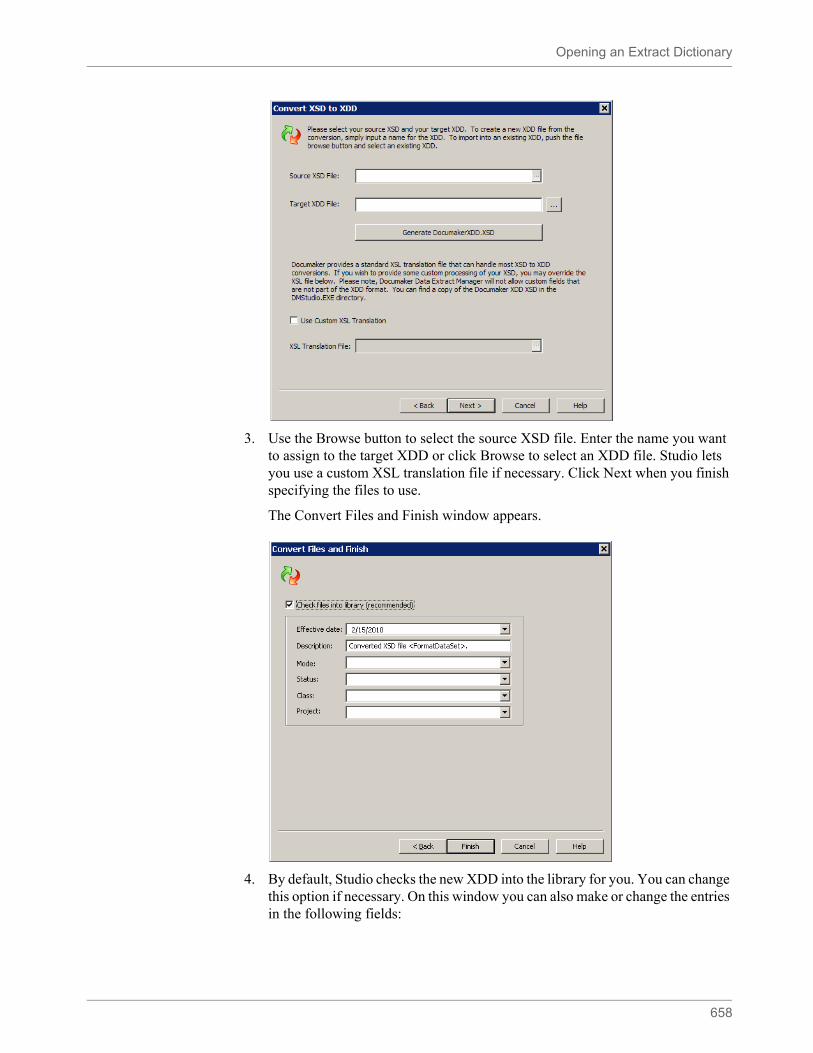
Opening an Extract Dictionary
658
3. Use the Browse button to select the source XSD file. Enter the name you want to assign to the target XDD or click Browse to select an XDD file. Studio lets you use a custom XSL translation file if necessary. Click Next when you finish specifying the files to use.
The Convert Files and Finish window appears.
4. By default, Studio checks the new XDD into the library for you. You can change this option if necessary. On this window you can also make or change the entries in the following fields:
Opening an Extract Dictionary
659
5. Click Finish to convert the XML schema file.
Keep in mind...
• Studio imports all XDD fields as strings
• Studio assigns the AnyToAny rule to these fields in the XDD
• Documaker does not validate the XSD file during processing
Customizing Your Conversion
When converting an XSD file, the system will create the file template.xls in your \DLL directory. This file can be used to build a custom translation if needed.
This can be done in one of the following two ways.
Method 1:
1. Select Generate Documaker XDD.XSD file on the Convert XSD to XDD dialog.
Field Description
Effective Date Studio shows you the current date as a default. You can enter another date if necessary.
Description Change the default description if necessary.
Mode Use this field to assign a mode to the resource as it is checked in. For instance, you can use the Mode field to specify where in the development cycle the resource is.
Status Use this field to assign a status to the resource as it is checked in. For instance, you could use the Status field to indicate whether a resource has passed or failed testing.
Class Use this field to assign a class to the resource as it is checked in. For instance, you could use the Class field to indicate the market in which a resource was applicable.
Project Use this field to assign a project ID to the resource as it is checked in. For instance, you could use the Project field to indicate which project a resource was associated with.
You define modes, statuses, classes, and projects using the Manage, Settings options. For instance, you could set up modes to denote milestones in the development process such as Development, Testing, and Production. For more information, see Defining Mode, Status, Class, and Project Options on page 642.
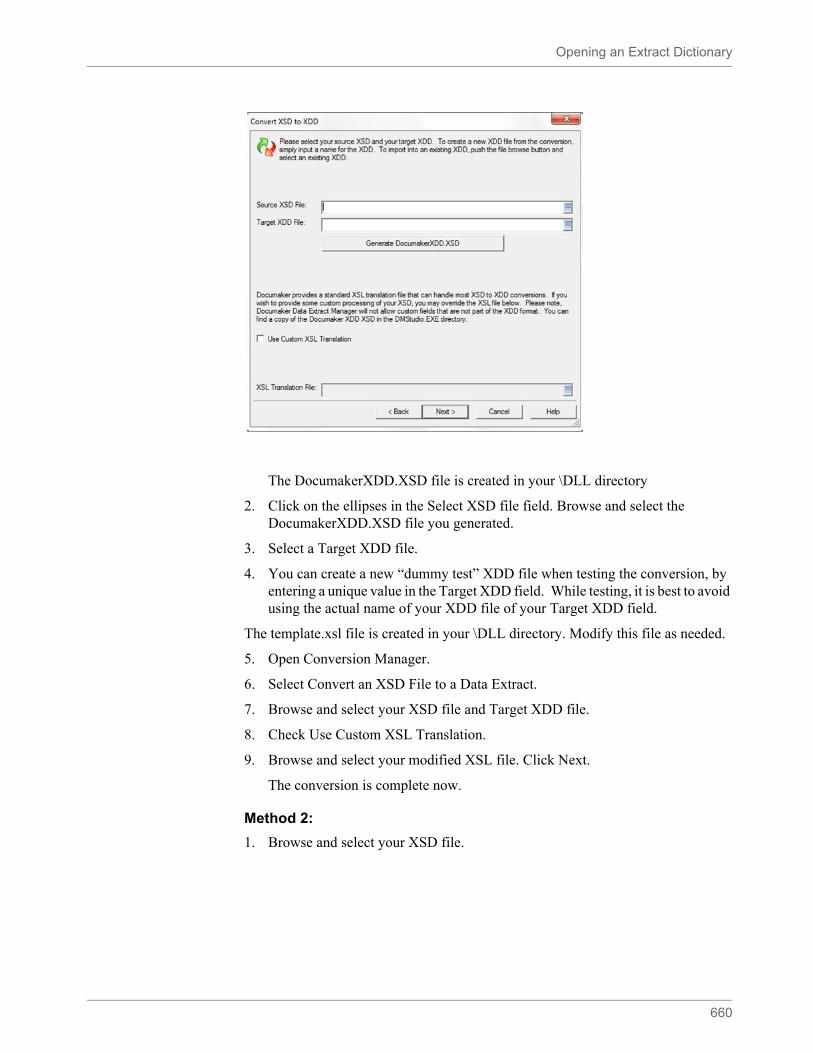
Opening an Extract Dictionary
660
The DocumakerXDD.XSD file is created in your \DLL directory
2. Click on the ellipses in the Select XSD file field. Browse and select the DocumakerXDD.XSD file you generated.
3. Select a Target XDD file.
4. You can create a new “dummy test” XDD file when testing the conversion, by entering a unique value in the Target XDD field. While testing, it is best to avoid using the actual name of your XDD file of your Target XDD field.
The template.xsl file is created in your \DLL directory. Modify this file as needed.
5. Open Conversion Manager.
6. Select Convert an XSD File to a Data Extract.
7. Browse and select your XSD file and Target XDD file.
8. Check Use Custom XSL Translation.
9. Browse and select your modified XSL file. Click Next.
The conversion is complete now.
Method 2:
1. Browse and select your XSD file.
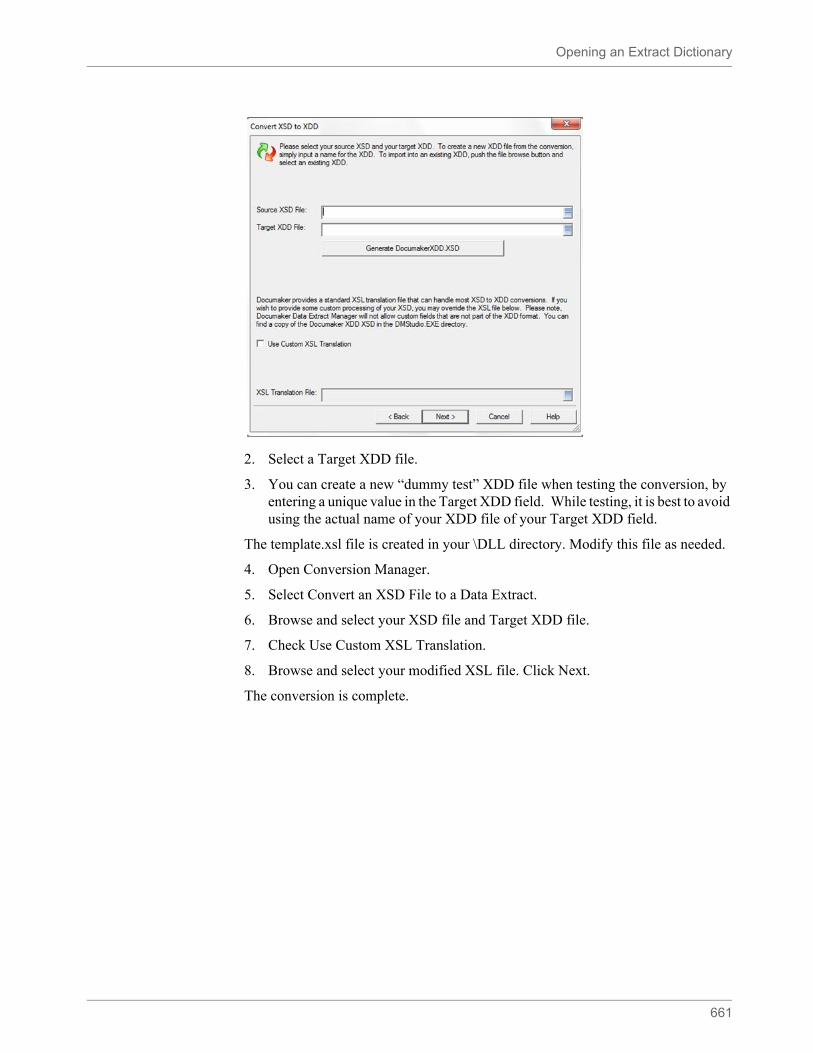
Opening an Extract Dictionary
661
2. Select a Target XDD file.
3. You can create a new “dummy test” XDD file when testing the conversion, by entering a unique value in the Target XDD field. While testing, it is best to avoid using the actual name of your XDD file of your Target XDD field.
The template.xsl file is created in your \DLL directory. Modify this file as needed.
4. Open Conversion Manager.
5. Select Convert an XSD File to a Data Extract.
6. Browse and select your XSD file and Target XDD file.
7. Check Use Custom XSL Translation.
8. Browse and select your modified XSL file. Click Next.
The conversion is complete.
Opening an Extract Dictionary
662
IMPORTING XML EXTRACT FILES INTO THE XDDIf you are using an XML extract files, there are two main ways to represent data. The first minimizes the use of attributes in favor of explicit nodes. Here's an example.
< Transaction ><Customer>
< Name >Your Name Here</Name><Phone>111-222-3333</Phone>
</Customer></Transaction
The second minimizes the number of nodes by using attributes. Here's the same data reformatted to use attributes:
< Transaction > <Customer Name="Your Name Here" Phone="111-222-3333" </Customer></Transaction
Depending upon how your XML extract file is defined, you may need to modify the ImportXMLAttributes option.
< Symbol >ImportXMLAttributes = Yes
Importing XML Attributes
If your XML extract file is defined to use attributes when representing data, make sure the ImportXMLAttributes option is set to Yes. Once set, follow these steps to import XML attributes and have the node attributes become fields:
1. Open the Extract Dictionary and select the File, Import option. The Open File window appears.
2. Click Browse and load the XML file you want to import into the XDD file.
Option Description
ImportXMLAttributes Enter Yes if you want Studio to import XML attributes into your extract dictionary (XDD) and automatically generate the proper mappings. The default is No.
Use the default if your XML files minimize the use of attributes in favor of explicit nodes.
Note You can check this option using the Manage, System, Settings option and then selecting Options by Group.
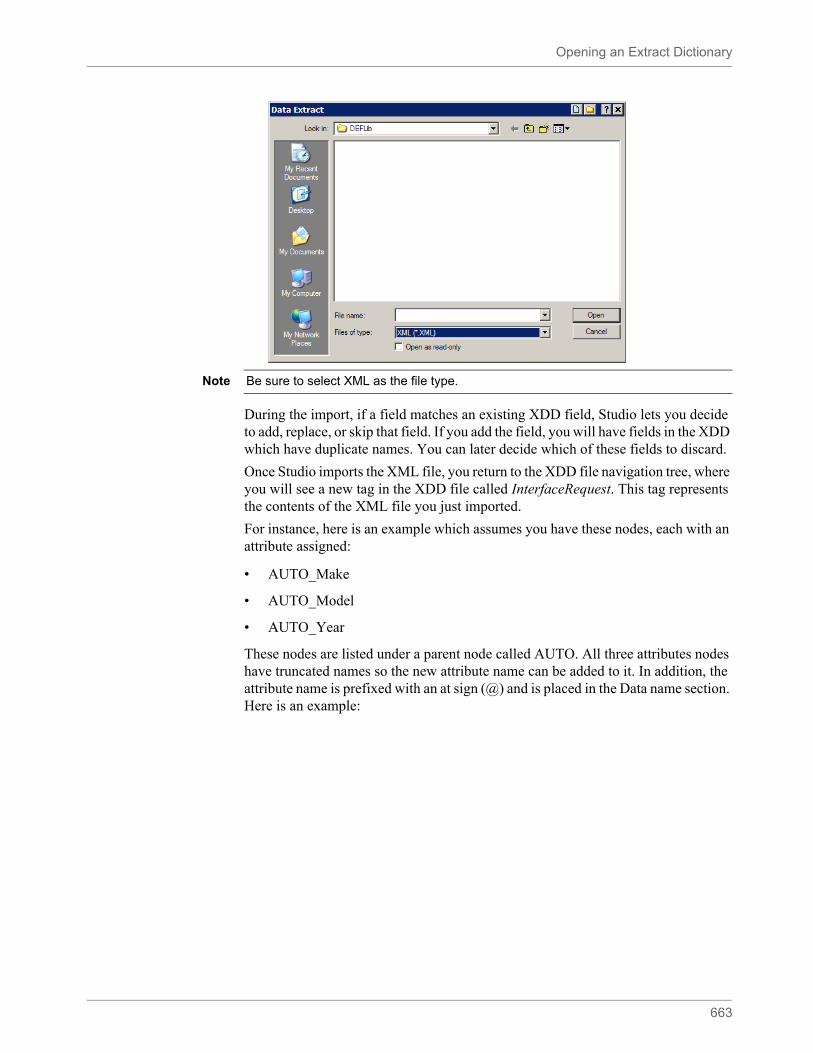
Opening an Extract Dictionary
663
During the import, if a field matches an existing XDD field, Studio lets you decide to add, replace, or skip that field. If you add the field, you will have fields in the XDD which have duplicate names. You can later decide which of these fields to discard.
Once Studio imports the XML file, you return to the XDD file navigation tree, where you will see a new tag in the XDD file called InterfaceRequest. This tag represents the contents of the XML file you just imported.
For instance, here is an example which assumes you have these nodes, each with an attribute assigned:
• AUTO_Make
• AUTO_Model
• AUTO_Year
These nodes are listed under a parent node called AUTO. All three attributes nodes have truncated names so the new attribute name can be added to it. In addition, the attribute name is prefixed with an at sign (@) and is placed in the Data name section. Here is an example:
Note Be sure to select XML as the file type.
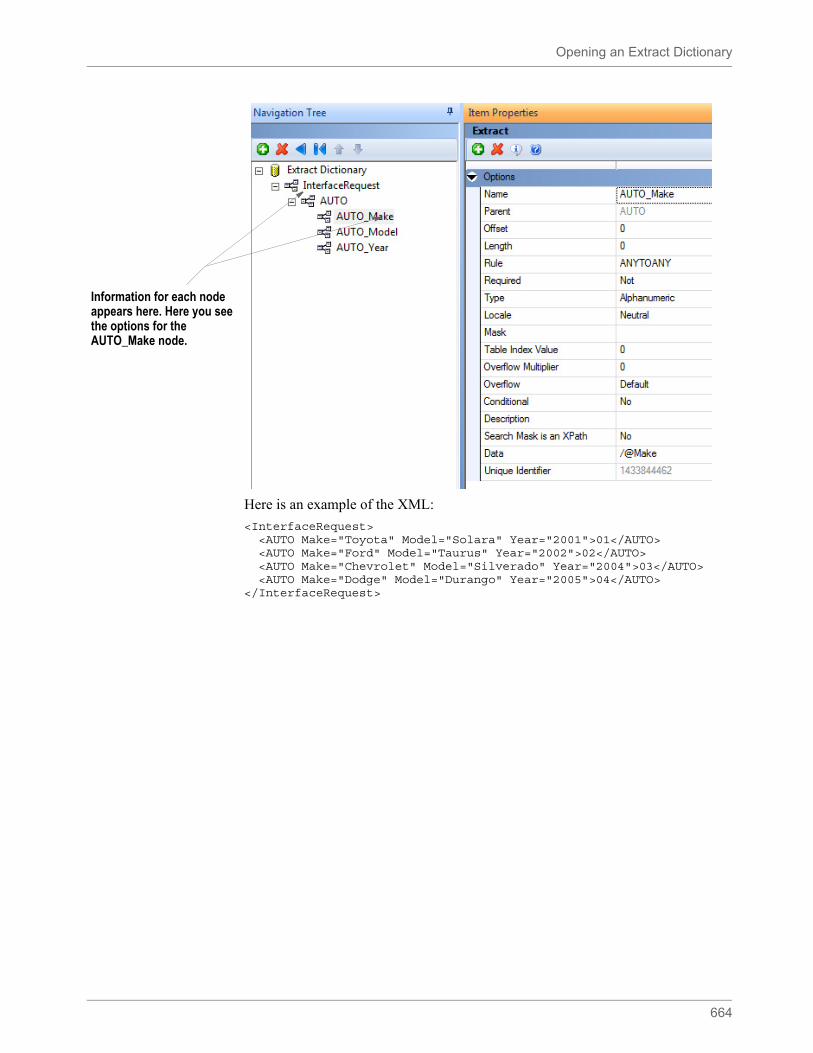
Opening an Extract Dictionary
664
Here is an example of the XML:
<InterfaceRequest> <AUTO Make="Toyota" Model="Solara" Year="2001">01</AUTO> <AUTO Make="Ford" Model="Taurus" Year="2002">02</AUTO> <AUTO Make="Chevrolet" Model="Silverado" Year="2004">03</AUTO> <AUTO Make="Dodge" Model="Durango" Year="2005">04</AUTO> </InterfaceRequest>
Information for each node appears here. Here you see the options for the AUTO_Make node.
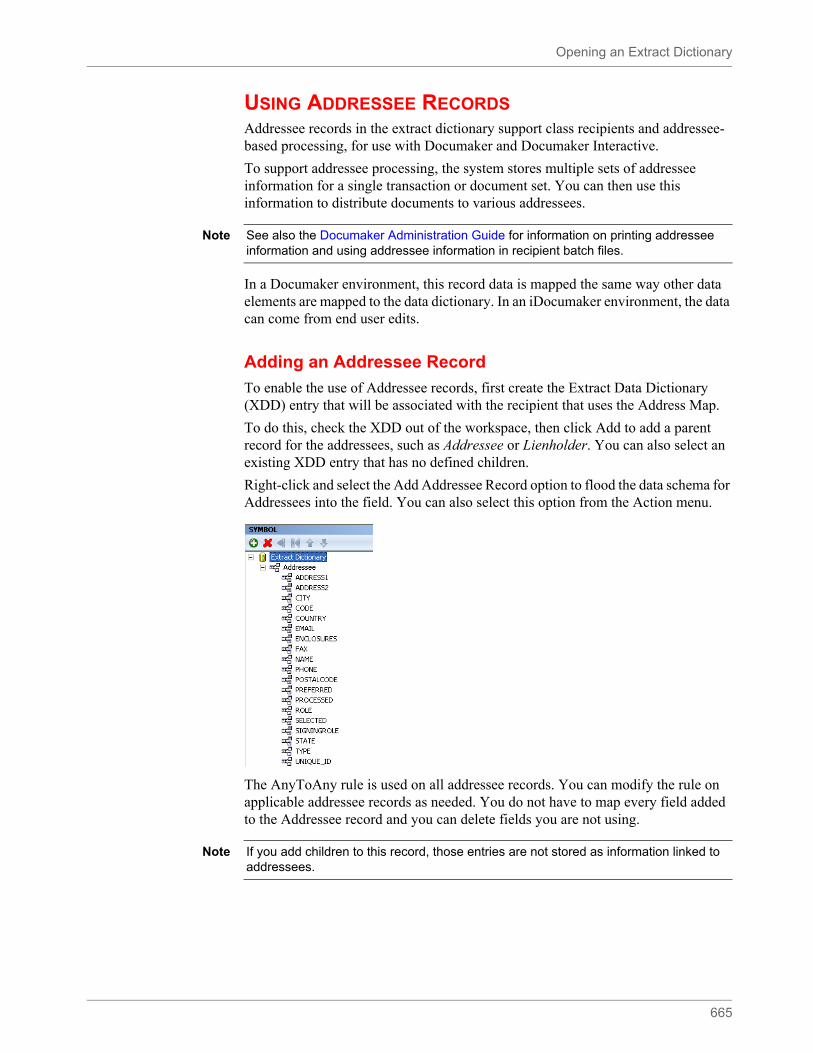
Opening an Extract Dictionary
665
USING ADDRESSEE RECORDSAddressee records in the extract dictionary support class recipients and addressee-based processing, for use with Documaker and Documaker Interactive.
To support addressee processing, the system stores multiple sets of addressee information for a single transaction or document set. You can then use this information to distribute documents to various addressees.
In a Documaker environment, this record data is mapped the same way other data elements are mapped to the data dictionary. In an iDocumaker environment, the data can come from end user edits.
Adding an Addressee Record
To enable the use of Addressee records, first create the Extract Data Dictionary (XDD) entry that will be associated with the recipient that uses the Address Map.
To do this, check the XDD out of the workspace, then click Add to add a parent record for the addressees, such as Addressee or Lienholder. You can also select an existing XDD entry that has no defined children.
Right-click and select the Add Addressee Record option to flood the data schema for Addressees into the field. You can also select this option from the Action menu.
The AnyToAny rule is used on all addressee records. You can modify the rule on applicable addressee records as needed. You do not have to map every field added to the Addressee record and you can delete fields you are not using.
Note See also the Documaker Administration Guide for information on printing addressee information and using addressee information in recipient batch files.
Note If you add children to this record, those entries are not stored as information linked to addressees.
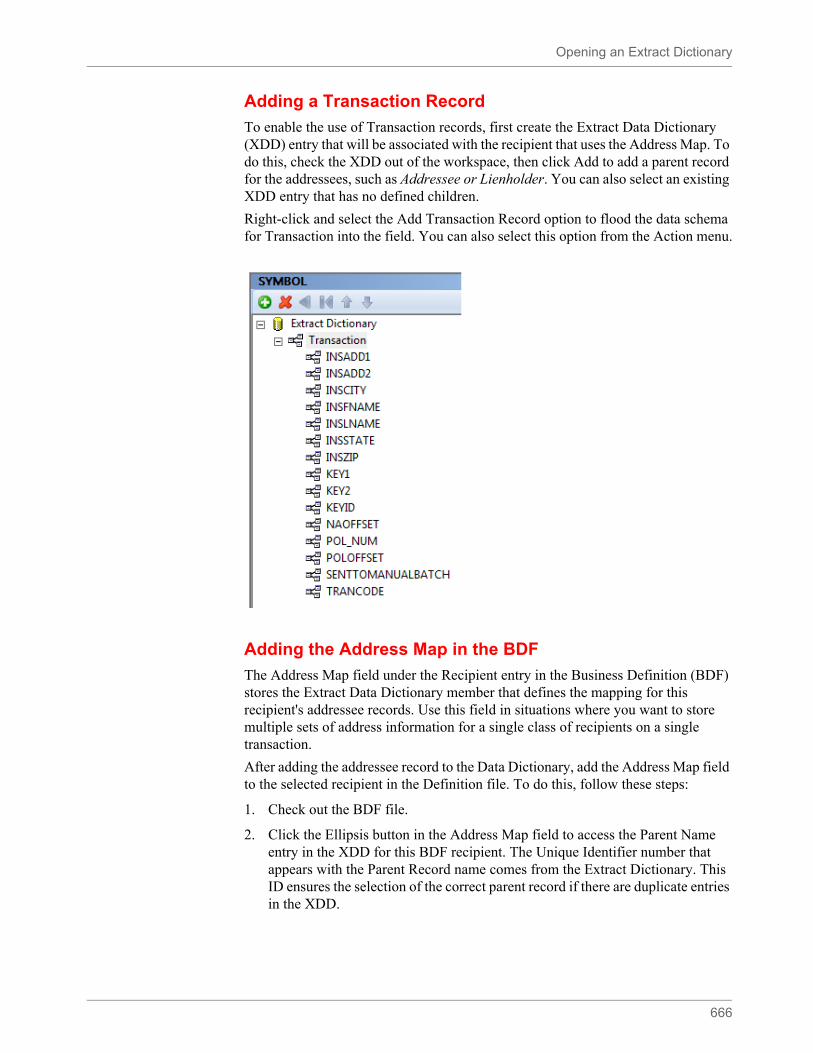
Opening an Extract Dictionary
666
Adding a Transaction Record
To enable the use of Transaction records, first create the Extract Data Dictionary (XDD) entry that will be associated with the recipient that uses the Address Map. To do this, check the XDD out of the workspace, then click Add to add a parent record for the addressees, such as Addressee or Lienholder. You can also select an existing XDD entry that has no defined children.
Right-click and select the Add Transaction Record option to flood the data schema for Transaction into the field. You can also select this option from the Action menu.
Adding the Address Map in the BDF
The Address Map field under the Recipient entry in the Business Definition (BDF) stores the Extract Data Dictionary member that defines the mapping for this recipient's addressee records. Use this field in situations where you want to store multiple sets of address information for a single class of recipients on a single transaction.
After adding the addressee record to the Data Dictionary, add the Address Map field to the selected recipient in the Definition file. To do this, follow these steps:
1. Check out the BDF file.
2. Click the Ellipsis button in the Address Map field to access the Parent Name entry in the XDD for this BDF recipient. The Unique Identifier number that appears with the Parent Record name comes from the Extract Dictionary. This ID ensures the selection of the correct parent record if there are duplicate entries in the XDD.
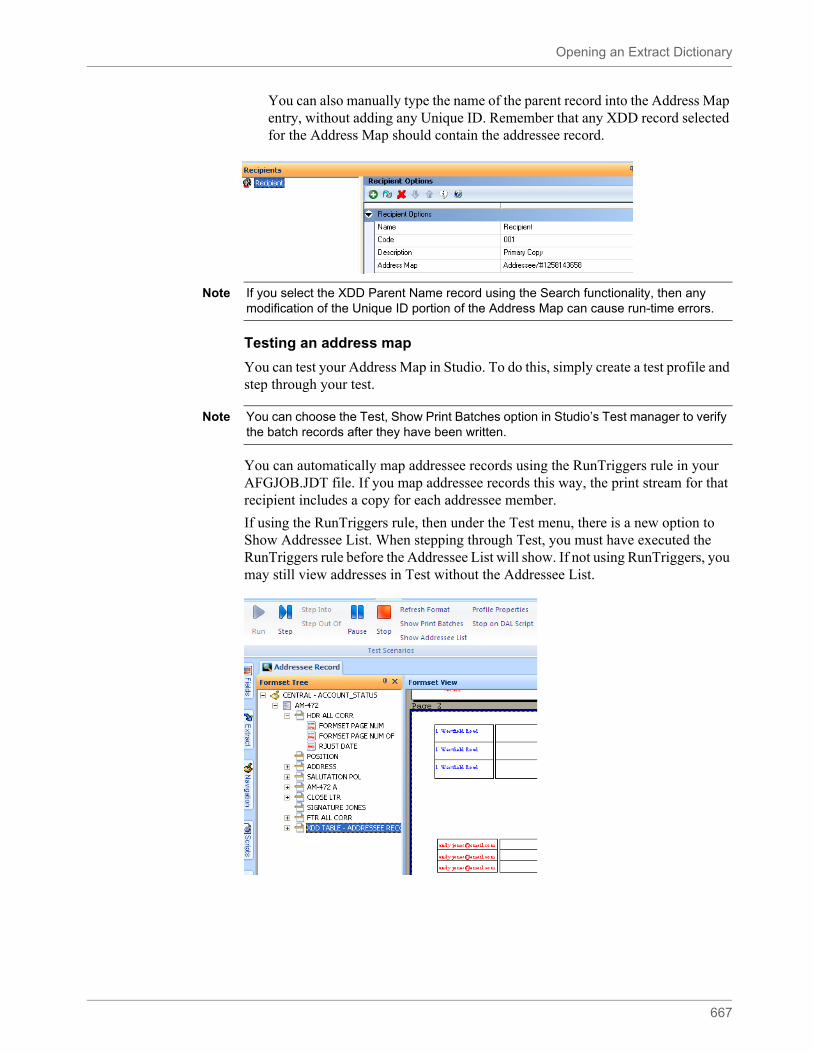
Opening an Extract Dictionary
667
You can also manually type the name of the parent record into the Address Map entry, without adding any Unique ID. Remember that any XDD record selected for the Address Map should contain the addressee record.
Testing an address map
You can test your Address Map in Studio. To do this, simply create a test profile and step through your test.
You can automatically map addressee records using the RunTriggers rule in your AFGJOB.JDT file. If you map addressee records this way, the print stream for that recipient includes a copy for each addressee member.
If using the RunTriggers rule, then under the Test menu, there is a new option to Show Addressee List. When stepping through Test, you must have executed the RunTriggers rule before the Addressee List will show. If not using RunTriggers, you may still view addresses in Test without the Addressee List..
Note If you select the XDD Parent Name record using the Search functionality, then any modification of the Unique ID portion of the Address Map can cause run-time errors.
Note You can choose the Test, Show Print Batches option in Studio’s Test manager to verify the batch records after they have been written.
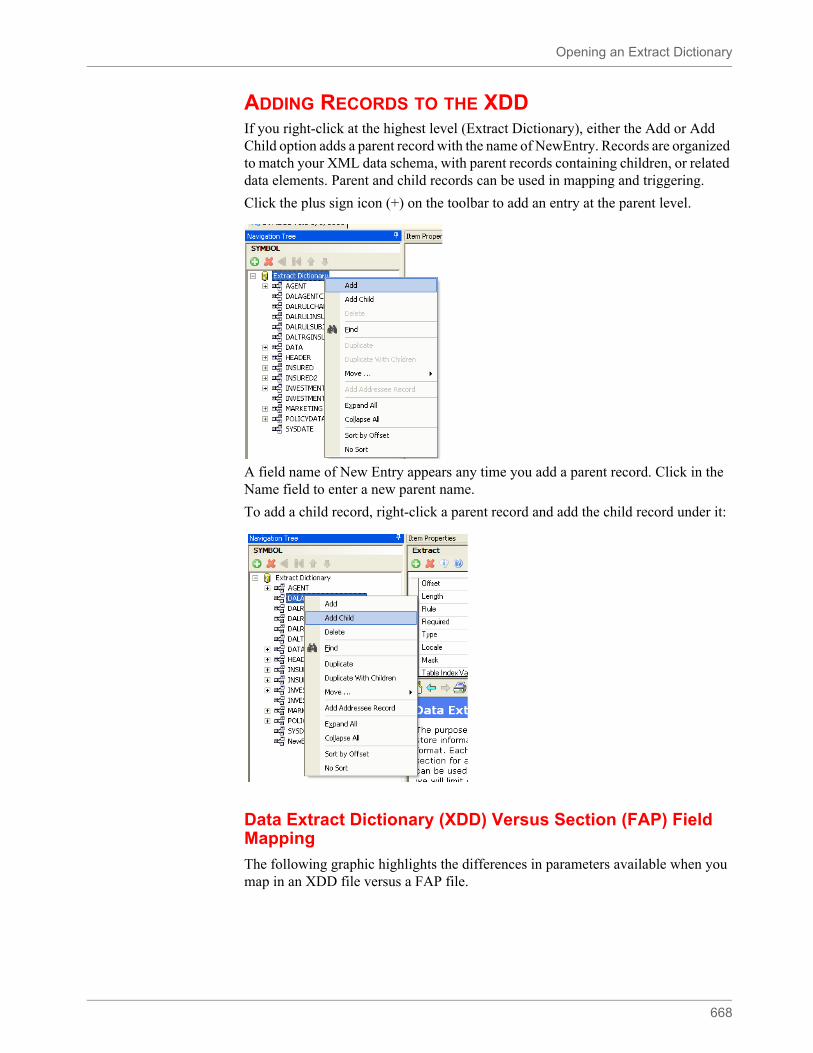
Opening an Extract Dictionary
668
ADDING RECORDS TO THE XDDIf you right-click at the highest level (Extract Dictionary), either the Add or Add Child option adds a parent record with the name of NewEntry. Records are organized to match your XML data schema, with parent records containing children, or related data elements. Parent and child records can be used in mapping and triggering.
Click the plus sign icon (+) on the toolbar to add an entry at the parent level.
A field name of New Entry appears any time you add a parent record. Click in the Name field to enter a new parent name.
To add a child record, right-click a parent record and add the child record under it:
Data Extract Dictionary (XDD) Versus Section (FAP) Field Mapping
The following graphic highlights the differences in parameters available when you map in an XDD file versus a FAP file.
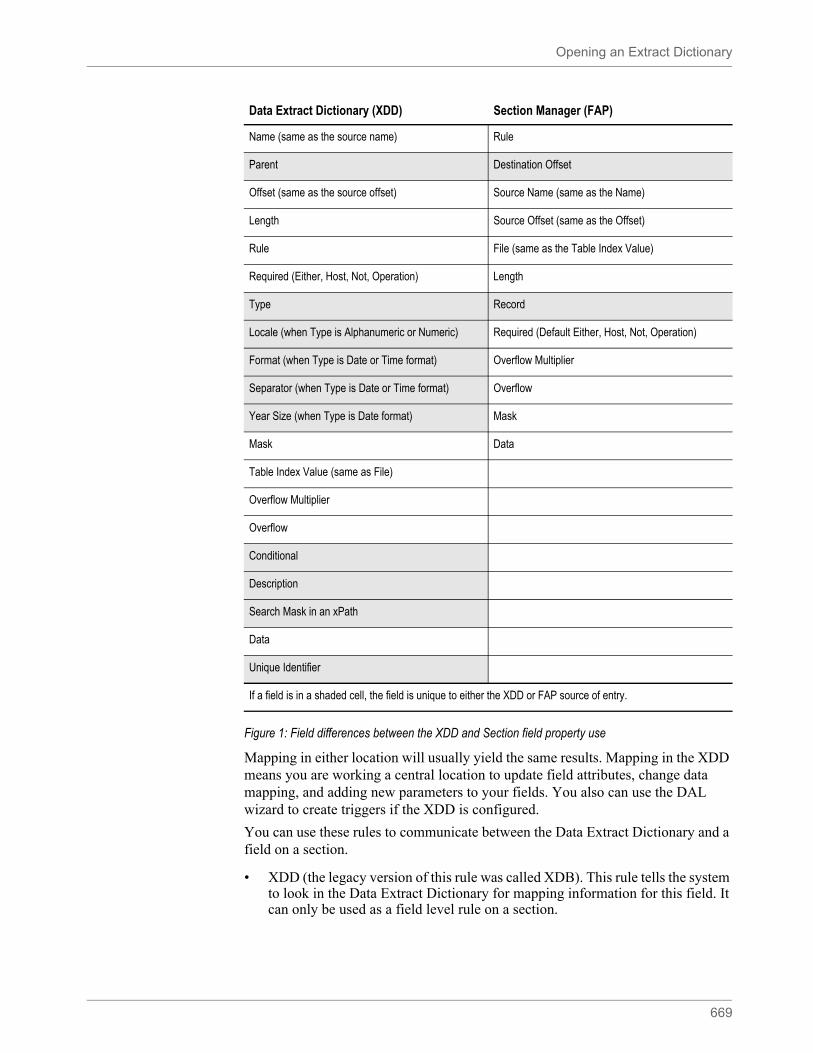
Opening an Extract Dictionary
669
Figure 1: Field differences between the XDD and Section field property use
Mapping in either location will usually yield the same results. Mapping in the XDD means you are working a central location to update field attributes, change data mapping, and adding new parameters to your fields. You also can use the DAL wizard to create triggers if the XDD is configured.
You can use these rules to communicate between the Data Extract Dictionary and a field on a section.
• XDD (the legacy version of this rule was called XDB). This rule tells the system to look in the Data Extract Dictionary for mapping information for this field. It can only be used as a field level rule on a section.
Data Extract Dictionary (XDD) Section Manager (FAP)
Name (same as the source name) Rule
Parent Destination Offset
Offset (same as the source offset) Source Name (same as the Name)
Length Source Offset (same as the Offset)
Rule File (same as the Table Index Value)
Required (Either, Host, Not, Operation) Length
Type Record
Locale (when Type is Alphanumeric or Numeric) Required (Default Either, Host, Not, Operation)
Format (when Type is Date or Time format) Overflow Multiplier
Separator (when Type is Date or Time format) Overflow
Year Size (when Type is Date format) Mask
Mask Data
Table Index Value (same as File)
Overflow Multiplier
Overflow
Conditional
Description
Search Mask in an xPath
Data
Unique Identifier
If a field is in a shaded cell, the field is unique to either the XDD or FAP source of entry.
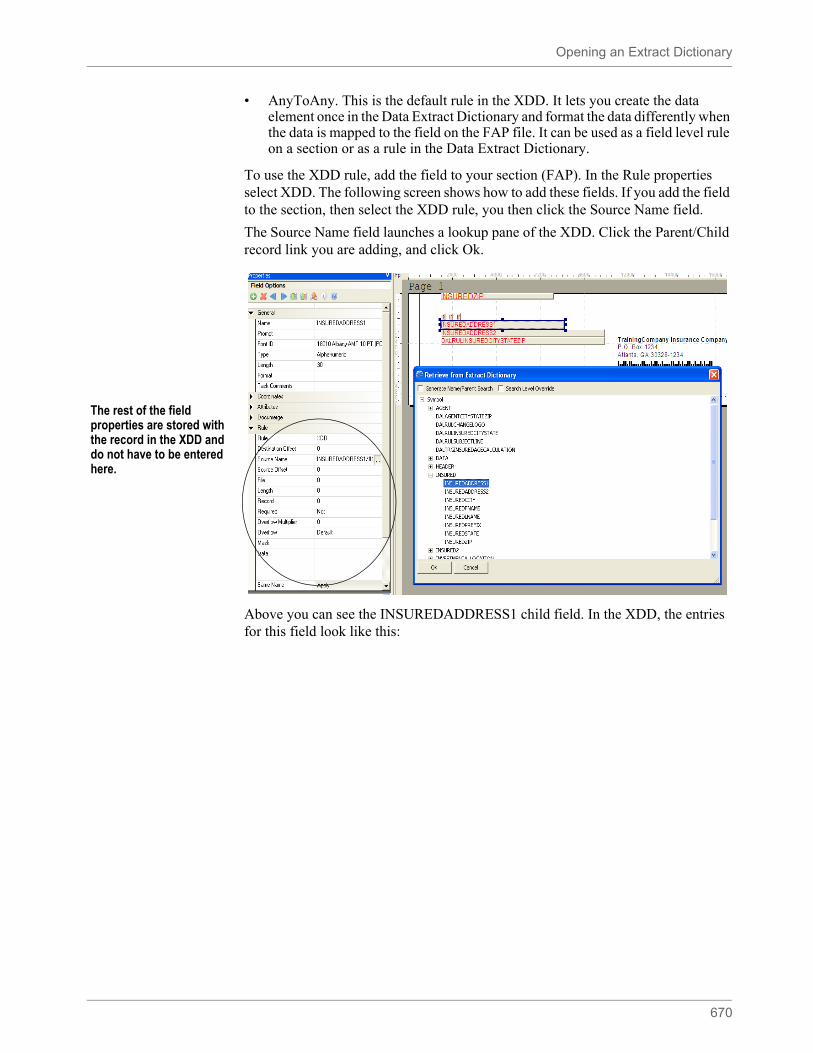
Opening an Extract Dictionary
670
• AnyToAny. This is the default rule in the XDD. It lets you create the data element once in the Data Extract Dictionary and format the data differently when the data is mapped to the field on the FAP file. It can be used as a field level rule on a section or as a rule in the Data Extract Dictionary.
To use the XDD rule, add the field to your section (FAP). In the Rule properties select XDD. The following screen shows how to add these fields. If you add the field to the section, then select the XDD rule, you then click the Source Name field.
The Source Name field launches a lookup pane of the XDD. Click the Parent/Child record link you are adding, and click Ok.
Above you can see the INSUREDADDRESS1 child field. In the XDD, the entries for this field look like this:
The rest of the field properties are stored with the record in the XDD and do not have to be entered here.
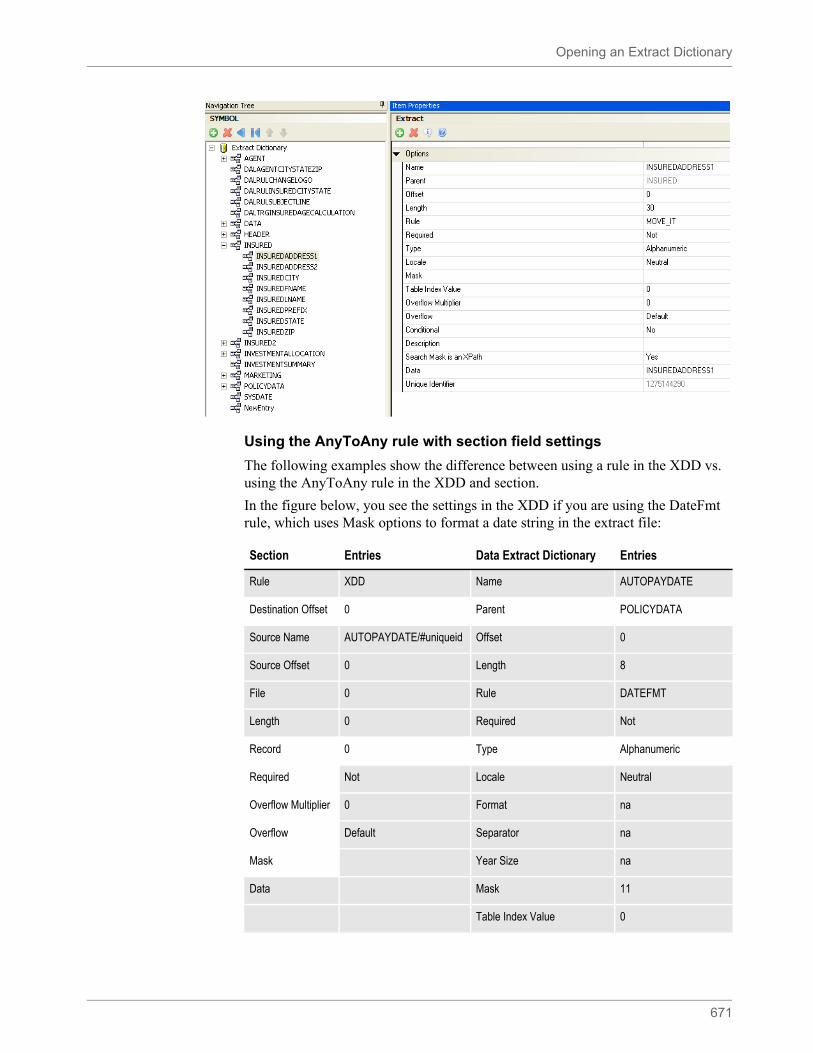
Opening an Extract Dictionary
671
Using the AnyToAny rule with section field settings
The following examples show the difference between using a rule in the XDD vs. using the AnyToAny rule in the XDD and section.
In the figure below, you see the settings in the XDD if you are using the DateFmt rule, which uses Mask options to format a date string in the extract file:
Section Entries Data Extract Dictionary Entries
Rule XDD Name AUTOPAYDATE
Destination Offset 0 Parent POLICYDATA
Source Name AUTOPAYDATE/#uniqueid Offset 0
Source Offset 0 Length 8
File 0 Rule DATEFMT
Length 0 Required Not
Record 0 Type Alphanumeric
Required Not Locale Neutral
Overflow Multiplier 0 Format na
Overflow Default Separator na
Mask Year Size na
Data Mask 11
Table Index Value 0
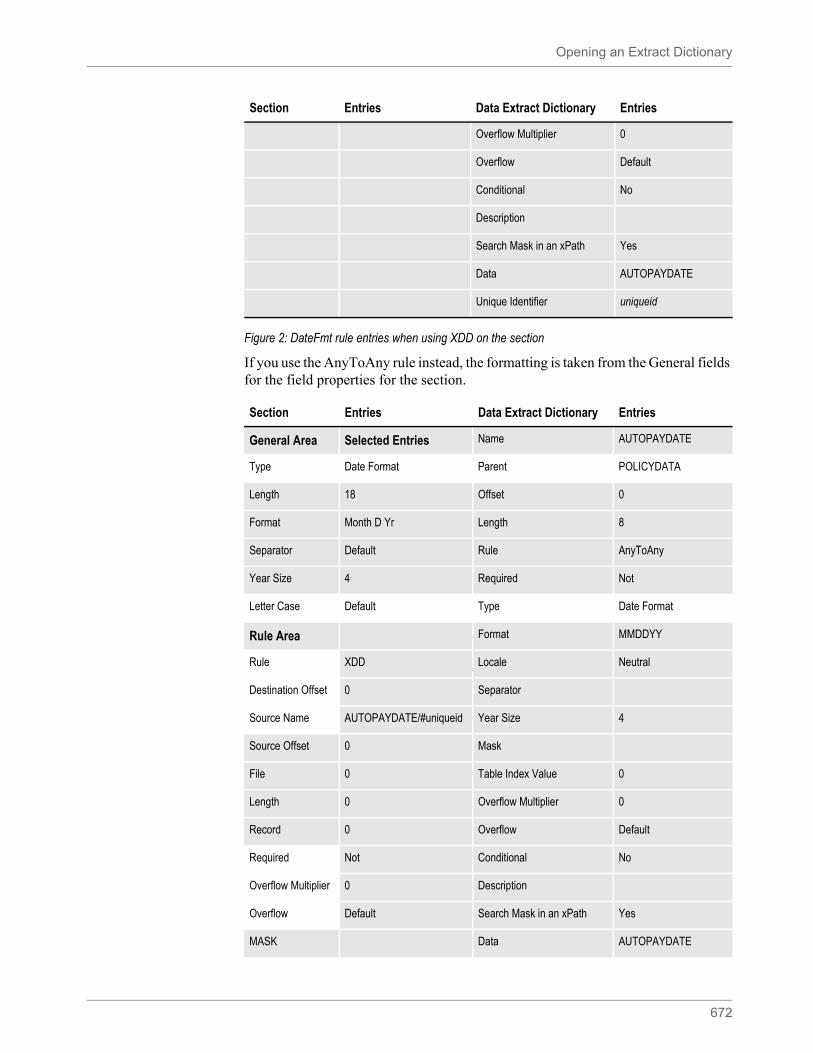
Opening an Extract Dictionary
672
Figure 2: DateFmt rule entries when using XDD on the section
If you use the AnyToAny rule instead, the formatting is taken from the General fields for the field properties for the section.
Overflow Multiplier 0
Overflow Default
Conditional No
Description
Search Mask in an xPath Yes
Data AUTOPAYDATE
Unique Identifier uniqueid
Section Entries Data Extract Dictionary Entries
General Area Selected Entries Name AUTOPAYDATE
Type Date Format Parent POLICYDATA
Length 18 Offset 0
Format Month D Yr Length 8
Separator Default Rule AnyToAny
Year Size 4 Required Not
Letter Case Default Type Date Format
Rule Area Format MMDDYY
Rule XDD Locale Neutral
Destination Offset 0 Separator
Source Name AUTOPAYDATE/#uniqueid Year Size 4
Source Offset 0 Mask
File 0 Table Index Value 0
Length 0 Overflow Multiplier 0
Record 0 Overflow Default
Required Not Conditional No
Overflow Multiplier 0 Description
Overflow Default Search Mask in an xPath Yes
MASK Data AUTOPAYDATE
Section Entries Data Extract Dictionary Entries
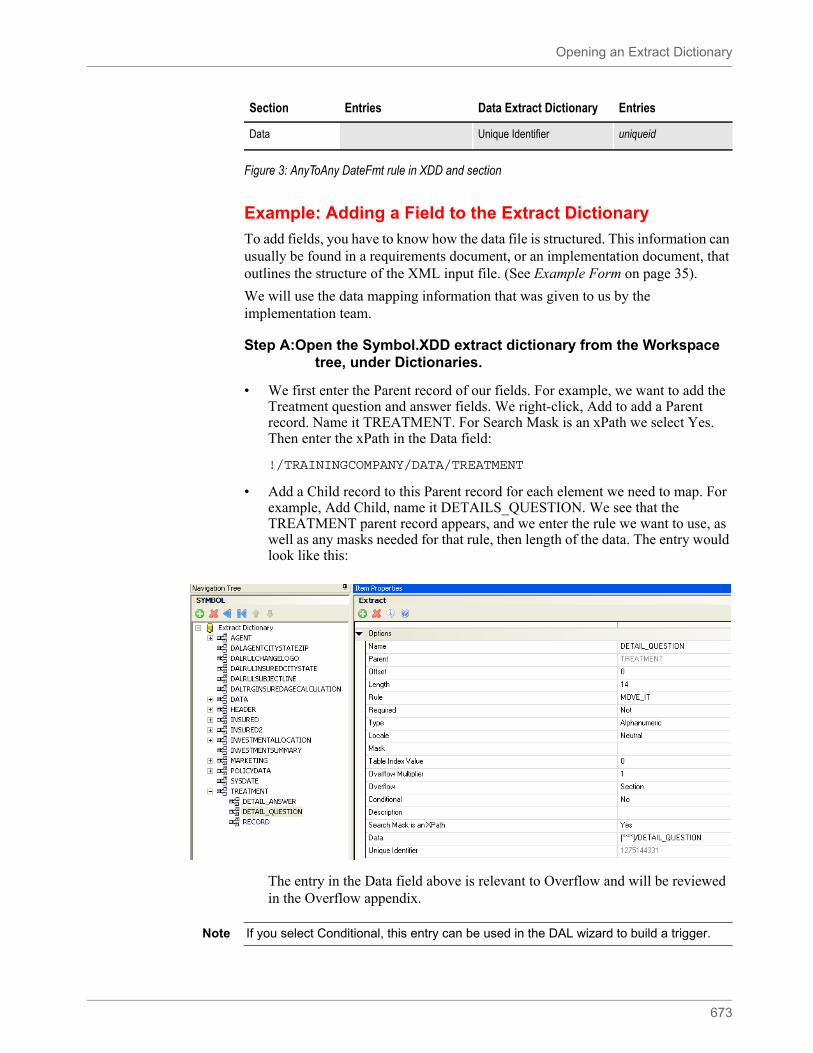
Opening an Extract Dictionary
673
Figure 3: AnyToAny DateFmt rule in XDD and section
Example: Adding a Field to the Extract Dictionary
To add fields, you have to know how the data file is structured. This information can usually be found in a requirements document, or an implementation document, that outlines the structure of the XML input file. (See Example Form on page 35).
We will use the data mapping information that was given to us by the implementation team.
Step A:Open the Symbol.XDD extract dictionary from the Workspace tree, under Dictionaries.
• We first enter the Parent record of our fields. For example, we want to add the Treatment question and answer fields. We right-click, Add to add a Parent record. Name it TREATMENT. For Search Mask is an xPath we select Yes. Then enter the xPath in the Data field:
!/TRAININGCOMPANY/DATA/TREATMENT
• Add a Child record to this Parent record for each element we need to map. For example, Add Child, name it DETAILS_QUESTION. We see that the TREATMENT parent record appears, and we enter the rule we want to use, as well as any masks needed for that rule, then length of the data. The entry would look like this:
The entry in the Data field above is relevant to Overflow and will be reviewed in the Overflow appendix.
Data Unique Identifier uniqueid
Section Entries Data Extract Dictionary Entries
Note If you select Conditional, this entry can be used in the DAL wizard to build a trigger.
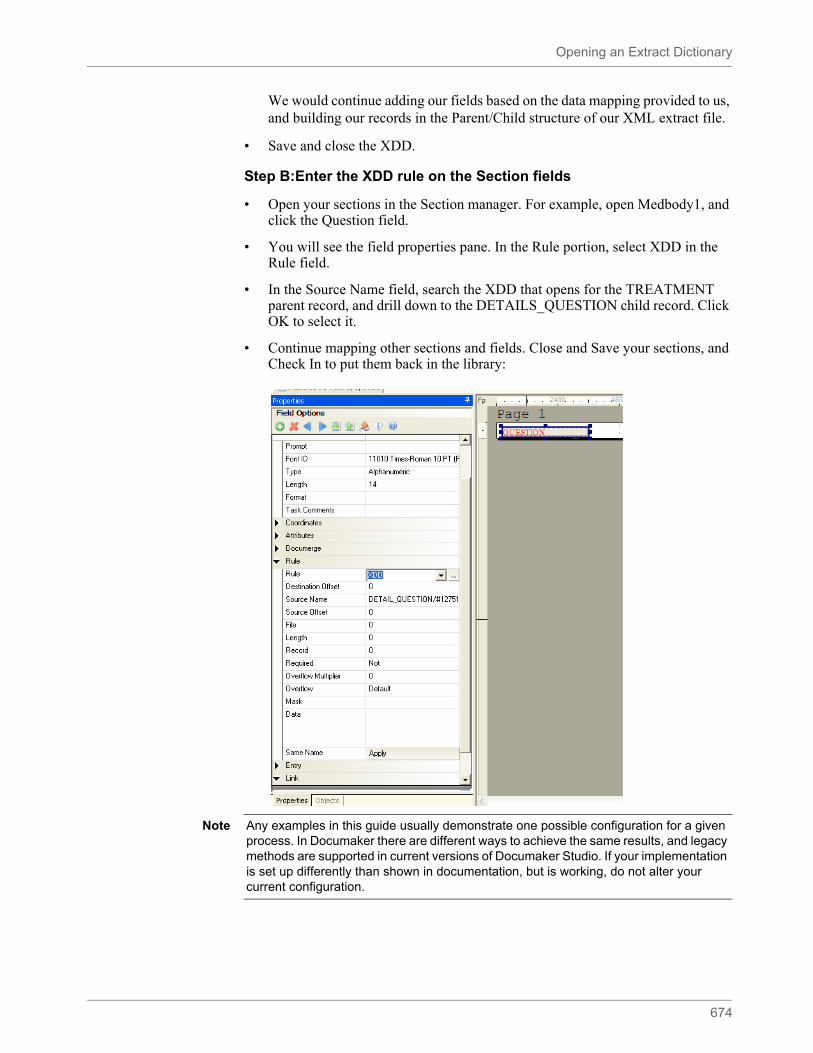
Opening an Extract Dictionary
674
We would continue adding our fields based on the data mapping provided to us, and building our records in the Parent/Child structure of our XML extract file.
• Save and close the XDD.
Step B:Enter the XDD rule on the Section fields
• Open your sections in the Section manager. For example, open Medbody1, and click the Question field.
• You will see the field properties pane. In the Rule portion, select XDD in the Rule field.
• In the Source Name field, search the XDD that opens for the TREATMENT parent record, and drill down to the DETAILS_QUESTION child record. Click OK to select it.
• Continue mapping other sections and fields. Close and Save your sections, and Check In to put them back in the library:
Note Any examples in this guide usually demonstrate one possible configuration for a given process. In Documaker there are different ways to achieve the same results, and legacy methods are supported in current versions of Documaker Studio. If your implementation is set up differently than shown in documentation, but is working, do not alter your current configuration.
Using the Common Fields Dictionary
675
USING THE COMMON FIELDS DICTIONARY
The Common Fields Dictionary provides an easy way to store common field information to make setting up and creating sections and paragraphs faster and more consistent. This file contains a record for each unique field name. Each record contains information such as...
• Field name
• Field length
• Field type
• Font ID
Adding all known fields to the Common Field Dictionary lessens the need to create fields when building sections, either in Studio or in the Documaker Add-In for Word.
When naming fields, avoid using cryptic abbreviations. When possible, use easily identifiable, field names that others who work with Studio can quickly recognize, This makes selecting the correct field in Studio or the Documaker Add-In for Word easier.
You can enter field information directly into Studio’s Common Field Dictionary or by use the File, Import option to import various files, such as comma separated value (CSV) or Tagcommander (TGA) files.
.
Note Remember, the Common Fields list is helpful for form composition. It also lets you store General field information, which can be used in the AnyToAny rule. However, the FDB file itself, which is the Common Field list, does not contain rule information, and thus is not used in Documaker Server processing at run time.
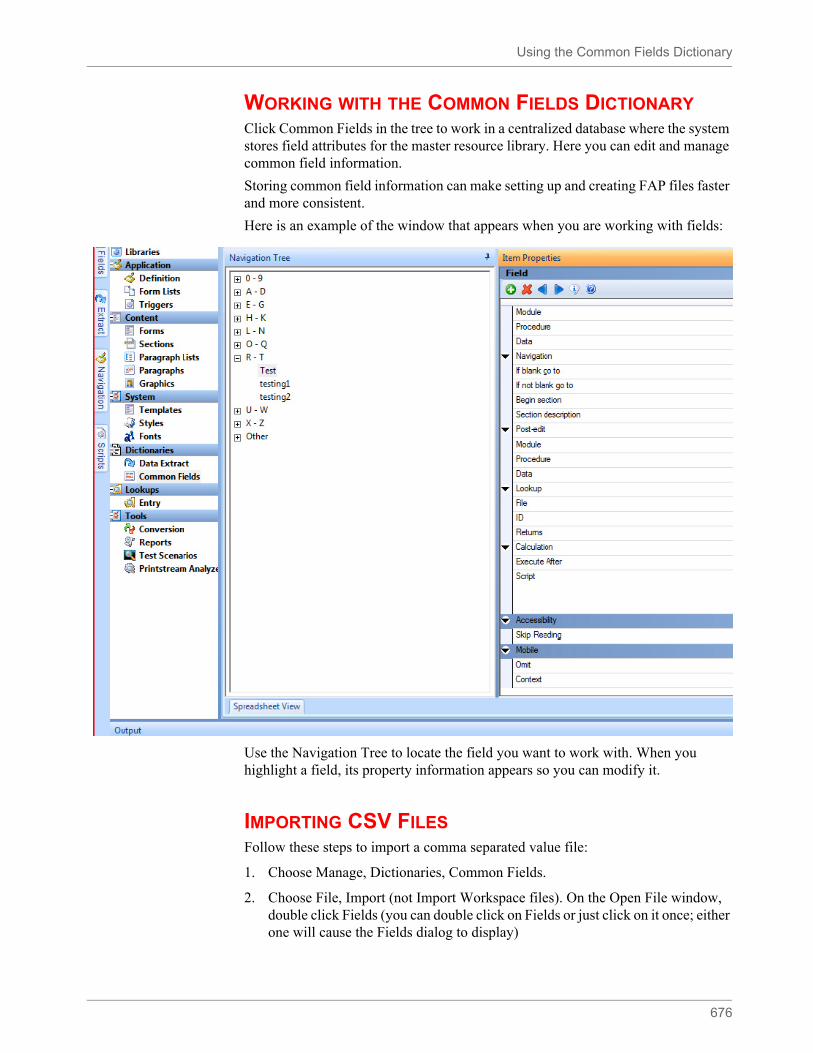
Using the Common Fields Dictionary
676
WORKING WITH THE COMMON FIELDS DICTIONARYClick Common Fields in the tree to work in a centralized database where the system stores field attributes for the master resource library. Here you can edit and manage common field information.
Storing common field information can make setting up and creating FAP files faster and more consistent.
Here is an example of the window that appears when you are working with fields:
Use the Navigation Tree to locate the field you want to work with. When you highlight a field, its property information appears so you can modify it.
IMPORTING CSV FILESFollow these steps to import a comma separated value file:
1. Choose Manage, Dictionaries, Common Fields.
2. Choose File, Import (not Import Workspace files). On the Open File window, double click Fields (you can double click on Fields or just click on it once; either one will cause the Fields dialog to display)
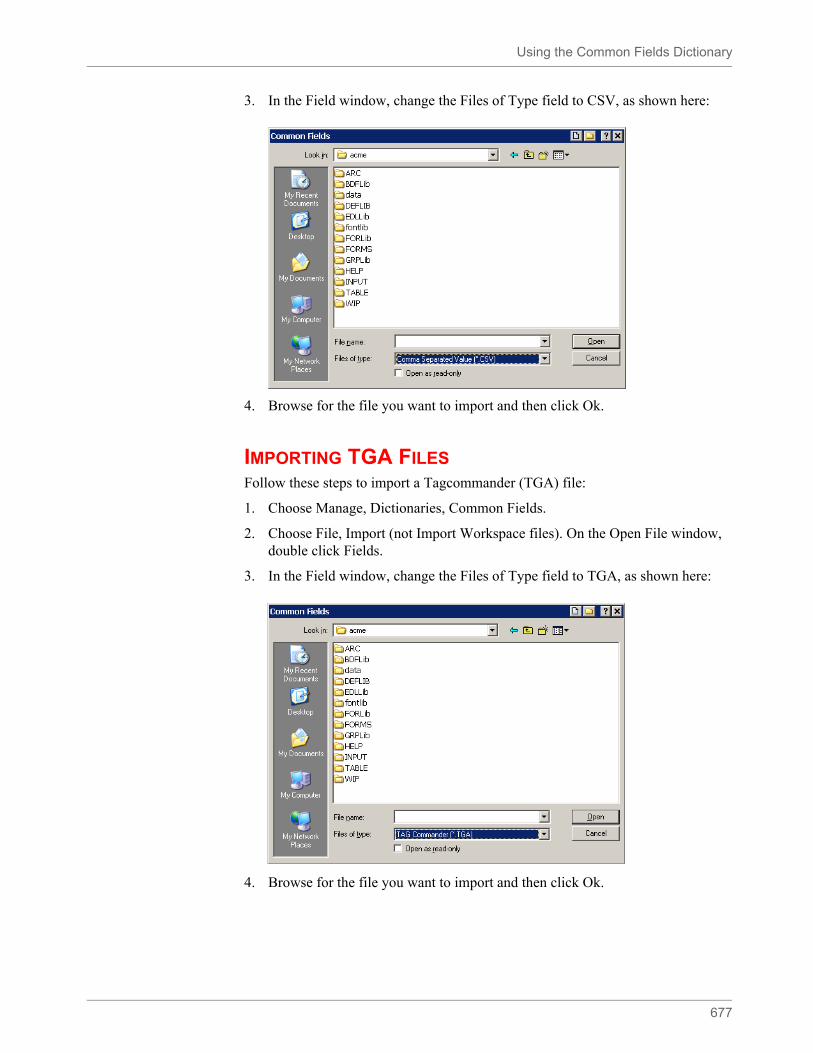
Using the Common Fields Dictionary
677
3. In the Field window, change the Files of Type field to CSV, as shown here:
4. Browse for the file you want to import and then click Ok.
IMPORTING TGA FILESFollow these steps to import a Tagcommander (TGA) file:
1. Choose Manage, Dictionaries, Common Fields.
2. Choose File, Import (not Import Workspace files). On the Open File window, double click Fields.
3. In the Field window, change the Files of Type field to TGA, as shown here:
4. Browse for the file you want to import and then click Ok.
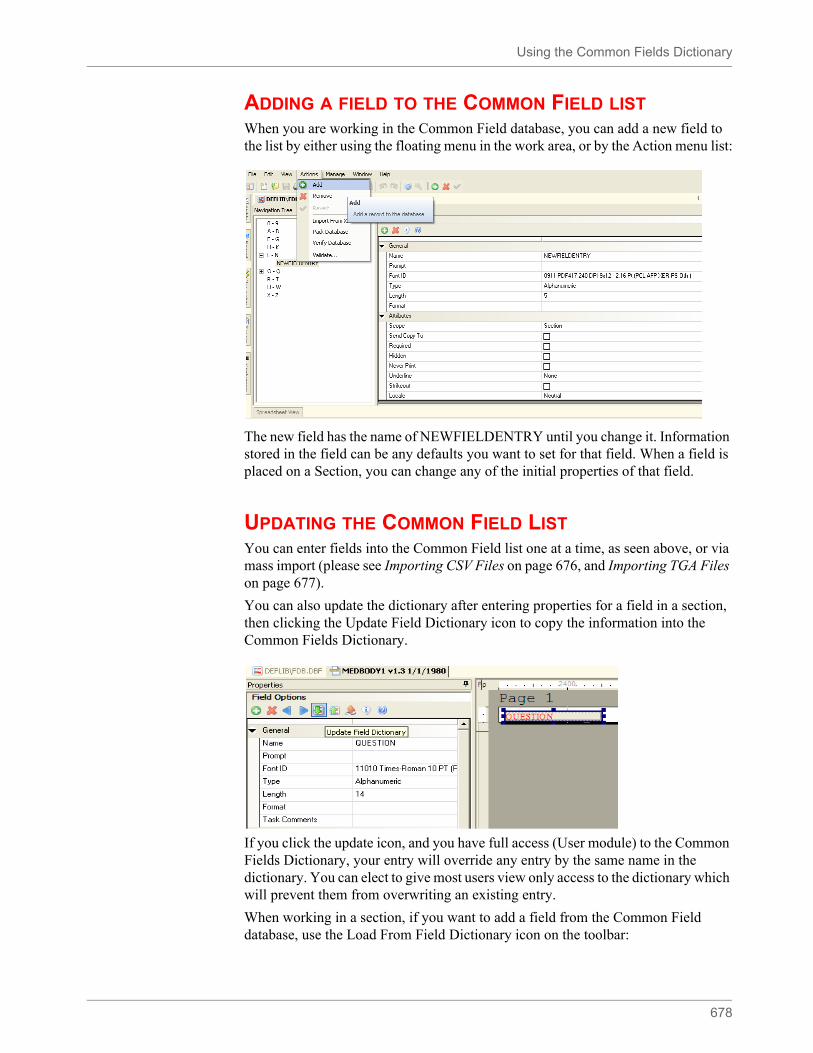
Using the Common Fields Dictionary
678
ADDING A FIELD TO THE COMMON FIELD LISTWhen you are working in the Common Field database, you can add a new field to the list by either using the floating menu in the work area, or by the Action menu list:
The new field has the name of NEWFIELDENTRY until you change it. Information stored in the field can be any defaults you want to set for that field. When a field is placed on a Section, you can change any of the initial properties of that field.
UPDATING THE COMMON FIELD LISTYou can enter fields into the Common Field list one at a time, as seen above, or via mass import (please see Importing CSV Files on page 676, and Importing TGA Files on page 677).
You can also update the dictionary after entering properties for a field in a section, then clicking the Update Field Dictionary icon to copy the information into the Common Fields Dictionary.
If you click the update icon, and you have full access (User module) to the Common Fields Dictionary, your entry will override any entry by the same name in the dictionary. You can elect to give most users view only access to the dictionary which will prevent them from overwriting an existing entry.
When working in a section, if you want to add a field from the Common Field database, use the Load From Field Dictionary icon on the toolbar:
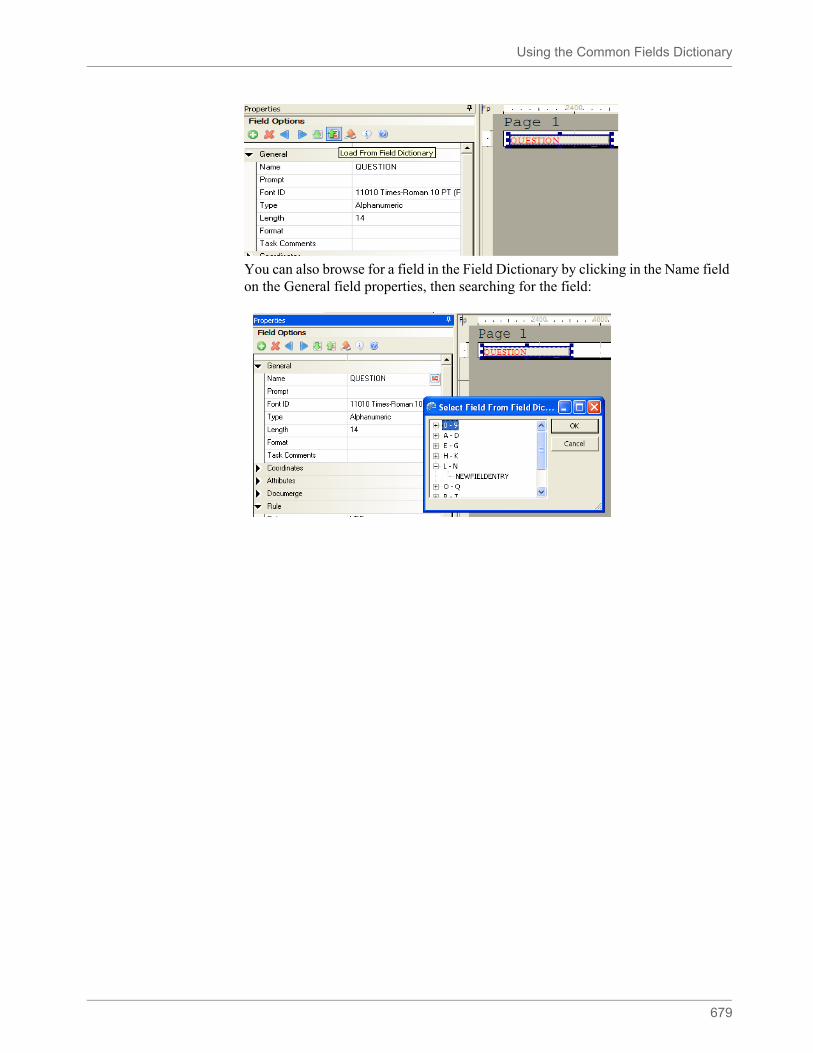
Using the Common Fields Dictionary
679
You can also browse for a field in the Field Dictionary by clicking in the Name field on the General field properties, then searching for the field:
680
Chapter 14
Creating Tables
Click Tables to attach table data to a field so it is available during data entry. This chapter includes these topics:
• Overview on page 681
• Transaction File DFD on page 684
• Recipient Batch File DFD on page 684
• Application Index File DFD on page 685
• Field Section on page 686
• Key Section on page 687
Overview
681
OVERVIEW
Tables make the entry process quicker and more efficient for the end user. Users choose from data in a table rather than keying in information. This is especially useful, for example, when entering lengthy codes. Tables reduce data entry errors and increase speed.
The data for a table can either be manually entered or merged from a client data source. A table file can contain many tables. Each table contains many entries. The entries in the tables are the choices available to the data entry user. Each table entry contains two parts: a key and a description. A key might be a short abbreviation, such as GA, and the description provides a longer and more complete explanation of the key, such as Georgia.
Table files reside in the selected master resource library (typically in the Table directory). A table file (DBF) can contain multiple tables identified by unique names. You can create a new table file, or you can open an existing table file to correspond with your section and its fields. After you open or create a file, you can add or edit tables in the file to meet the particular requirements of the section.
Documaker uses a variety of database files as input and output for various software modules. For example, the GenTrn program outputs a transaction file that serves as an input to the GenData program. The transaction file is stored as a database file, and as such, the transaction file has a pre-defined record structure. This record structure specifies the length, type, and order of the fields that contain the information in the file.
The software modules that use these database files must have access to the record structure to write data in the proper format and to read that data correctly. This is true for all database files. The purpose of DFD (data format definition or just definition) files is to provide record structure information to the software modules.
DFD (Data Format Definition) files contain information defining the structure of the data contained within a database file. Many common system files are stored in database format. For example, in addition to the transaction file already discussed, the new transaction, application index, recipient batch, WIP (Work In Progress), help, and table files are all stored in database format. These system database files can be in a variety of formats, including xBase, DB/2, ODBC, and standard sequential files (such as flat ASCII files). The record structure defined in the DFD files remains independent, regardless of the type of database being used — although there are occasionally exceptions for some database specific records.
Not all of these database files require an external DFD file. In some cases, the file’s record structure is coded directly into the software modules that access the file. There are currently no external DFD files for Documaker help and table database files for this reason. However, external DFD files are used with other system database files, in many cases, because DFD files allow for easier modification of the database file’s record structure, without having to modify the software modules directly.
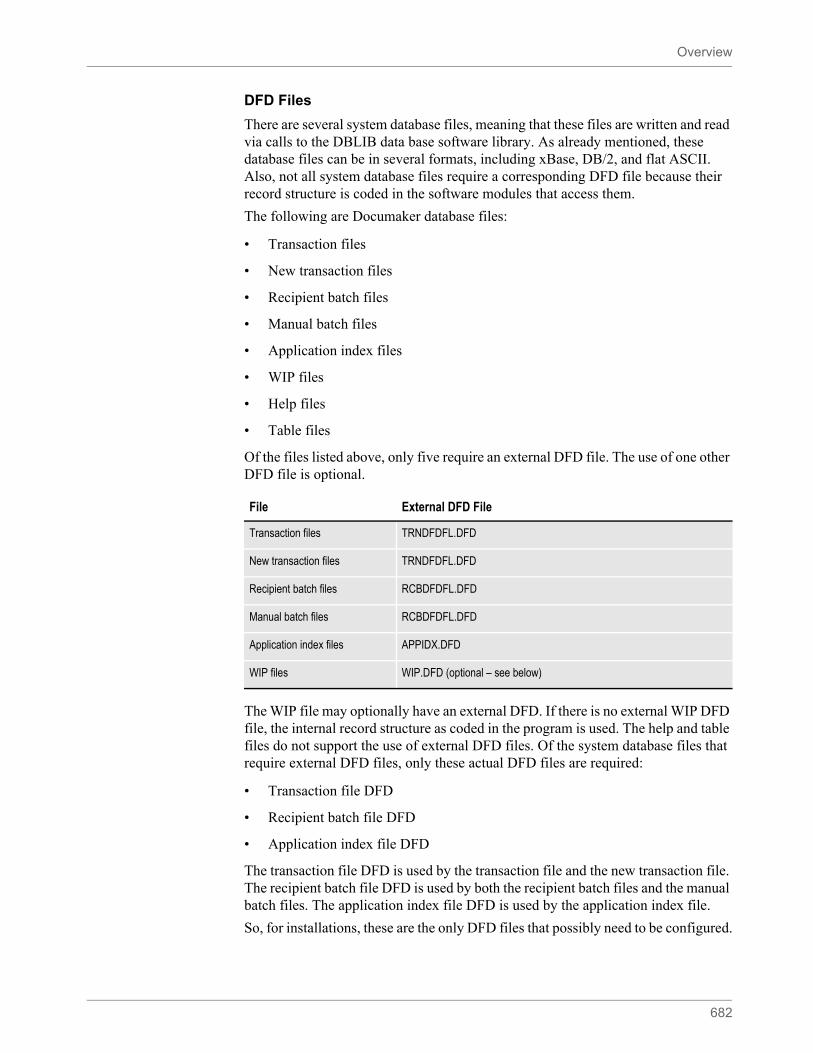
Overview
682
DFD Files
There are several system database files, meaning that these files are written and read via calls to the DBLIB data base software library. As already mentioned, these database files can be in several formats, including xBase, DB/2, and flat ASCII. Also, not all system database files require a corresponding DFD file because their record structure is coded in the software modules that access them.
The following are Documaker database files:
• Transaction files
• New transaction files
• Recipient batch files
• Manual batch files
• Application index files
• WIP files
• Help files
• Table files
Of the files listed above, only five require an external DFD file. The use of one other DFD file is optional.
The WIP file may optionally have an external DFD. If there is no external WIP DFD file, the internal record structure as coded in the program is used. The help and table files do not support the use of external DFD files. Of the system database files that require external DFD files, only these actual DFD files are required:
• Transaction file DFD
• Recipient batch file DFD
• Application index file DFD
The transaction file DFD is used by the transaction file and the new transaction file. The recipient batch file DFD is used by both the recipient batch files and the manual batch files. The application index file DFD is used by the application index file.
So, for installations, these are the only DFD files that possibly need to be configured.
File External DFD File
Transaction files TRNDFDFL.DFD
New transaction files TRNDFDFL.DFD
Recipient batch files RCBDFDFL.DFD
Manual batch files RCBDFDFL.DFD
Application index files APPIDX.DFD
WIP files WIP.DFD (optional – see below)

Overview
683
There are two ways to create a table file:
• Via the Tables option
• When creating a field using the Properties window
The screens you use are the same. The Tables option lets you create tables for the fields you create.
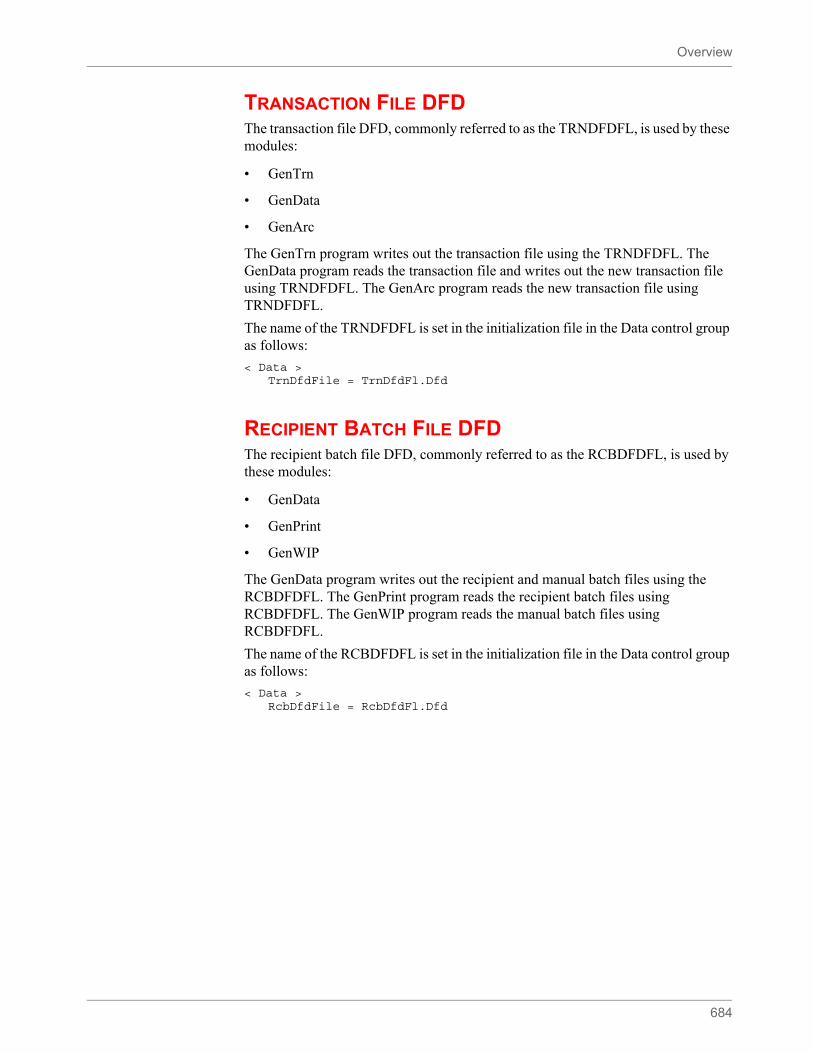
Overview
684
TRANSACTION FILE DFDThe transaction file DFD, commonly referred to as the TRNDFDFL, is used by these modules:
• GenTrn
• GenData
• GenArc
The GenTrn program writes out the transaction file using the TRNDFDFL. The GenData program reads the transaction file and writes out the new transaction file using TRNDFDFL. The GenArc program reads the new transaction file using TRNDFDFL.
The name of the TRNDFDFL is set in the initialization file in the Data control group as follows:
< Data >TrnDfdFile = TrnDfdFl.Dfd
RECIPIENT BATCH FILE DFDThe recipient batch file DFD, commonly referred to as the RCBDFDFL, is used by these modules:
• GenData
• GenPrint
• GenWIP
The GenData program writes out the recipient and manual batch files using the RCBDFDFL. The GenPrint program reads the recipient batch files using RCBDFDFL. The GenWIP program reads the manual batch files using RCBDFDFL.
The name of the RCBDFDFL is set in the initialization file in the Data control group as follows:
< Data >RcbDfdFile = RcbDfdFl.Dfd
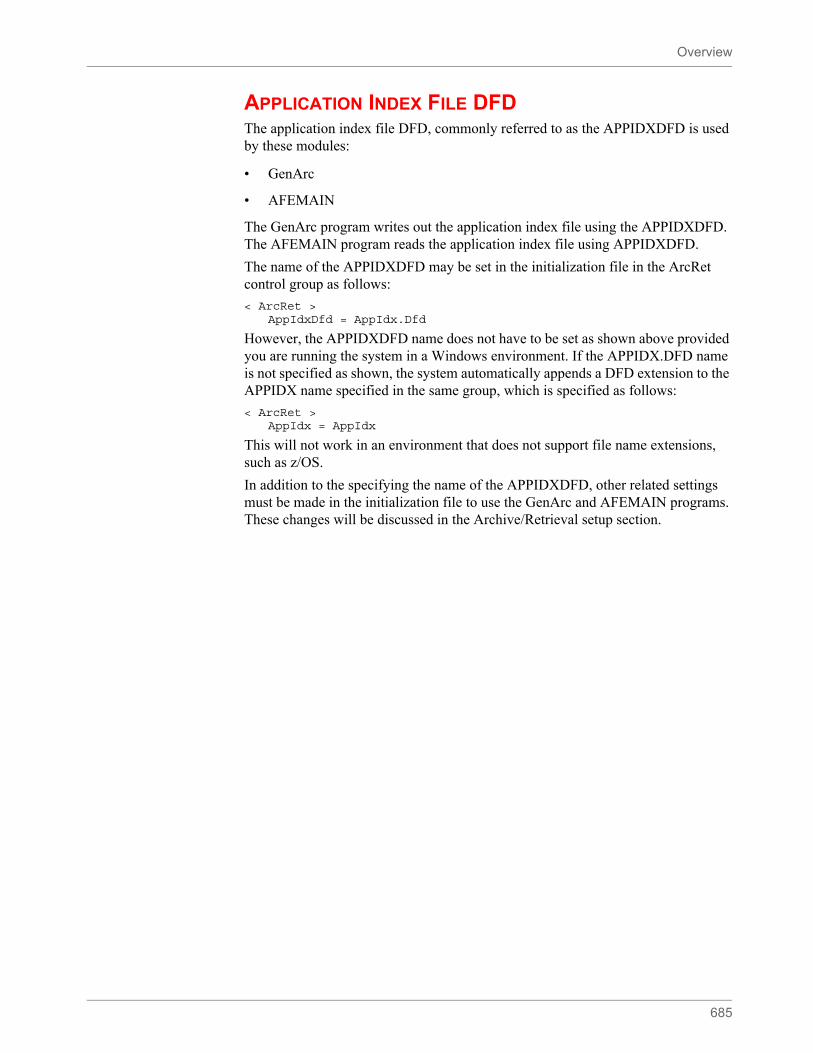
Overview
685
APPLICATION INDEX FILE DFDThe application index file DFD, commonly referred to as the APPIDXDFD is used by these modules:
• GenArc
• AFEMAIN
The GenArc program writes out the application index file using the APPIDXDFD. The AFEMAIN program reads the application index file using APPIDXDFD.
The name of the APPIDXDFD may be set in the initialization file in the ArcRet control group as follows:
< ArcRet >AppIdxDfd = AppIdx.Dfd
However, the APPIDXDFD name does not have to be set as shown above provided you are running the system in a Windows environment. If the APPIDX.DFD name is not specified as shown, the system automatically appends a DFD extension to the APPIDX name specified in the same group, which is specified as follows:
< ArcRet >AppIdx = AppIdx
This will not work in an environment that does not support file name extensions, such as z/OS.
In addition to the specifying the name of the APPIDXDFD, other related settings must be made in the initialization file to use the GenArc and AFEMAIN programs. These changes will be discussed in the Archive/Retrieval setup section.
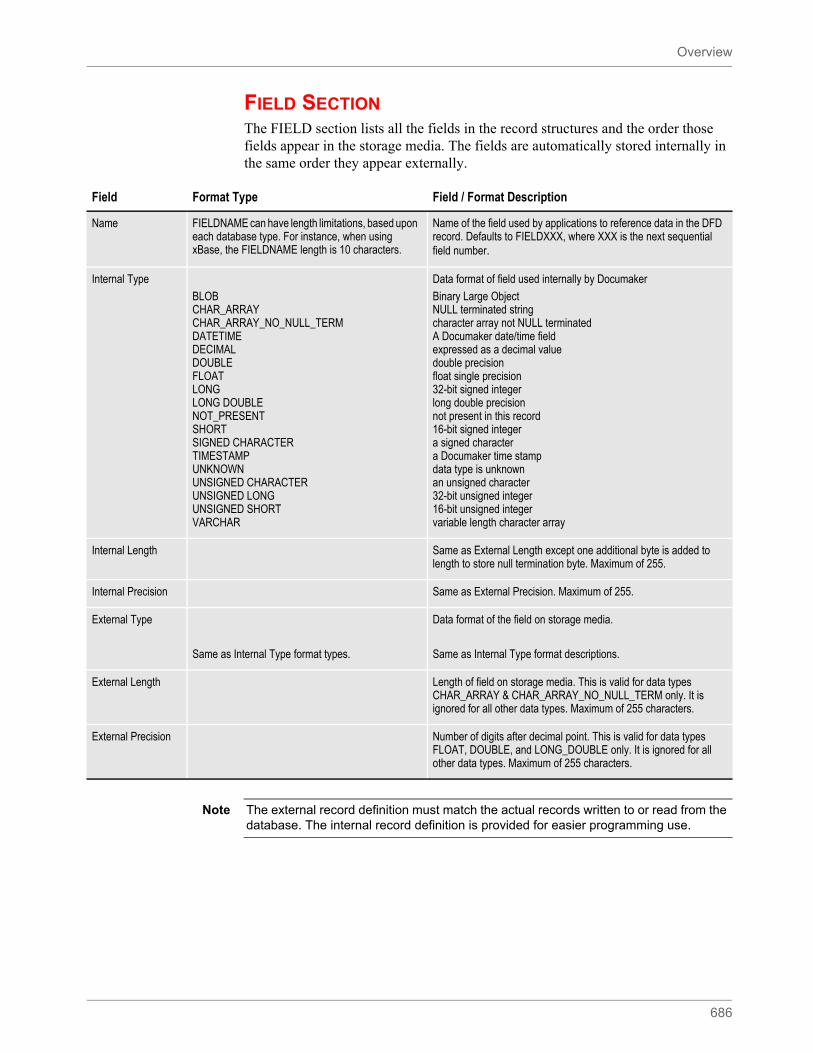
Overview
686
FIELD SECTIONThe FIELD section lists all the fields in the record structures and the order those fields appear in the storage media. The fields are automatically stored internally in the same order they appear externally.
Field Format Type Field / Format Description
Name FIELDNAME can have length limitations, based upon each database type. For instance, when using xBase, the FIELDNAME length is 10 characters.
Name of the field used by applications to reference data in the DFD record. Defaults to FIELDXXX, where XXX is the next sequential field number.
Internal Type
BLOBCHAR_ARRAYCHAR_ARRAY_NO_NULL_TERMDATETIMEDECIMALDOUBLEFLOATLONGLONG DOUBLENOT_PRESENT SHORTSIGNED CHARACTERTIMESTAMPUNKNOWNUNSIGNED CHARACTERUNSIGNED LONGUNSIGNED SHORTVARCHAR
Data format of field used internally by Documaker
Binary Large ObjectNULL terminated stringcharacter array not NULL terminatedA Documaker date/time fieldexpressed as a decimal valuedouble precisionfloat single precision32-bit signed integerlong double precisionnot present in this record16-bit signed integera signed charactera Documaker time stampdata type is unknownan unsigned character32-bit unsigned integer16-bit unsigned integervariable length character array
Internal Length Same as External Length except one additional byte is added to length to store null termination byte. Maximum of 255.
Internal Precision Same as External Precision. Maximum of 255.
External Type
Same as Internal Type format types.
Data format of the field on storage media.
Same as Internal Type format descriptions.
External Length Length of field on storage media. This is valid for data types CHAR_ARRAY & CHAR_ARRAY_NO_NULL_TERM only. It is ignored for all other data types. Maximum of 255 characters.
External Precision Number of digits after decimal point. This is valid for data types FLOAT, DOUBLE, and LONG_DOUBLE only. It is ignored for all other data types. Maximum of 255 characters.
Note The external record definition must match the actual records written to or read from the database. The internal record definition is provided for easier programming use.
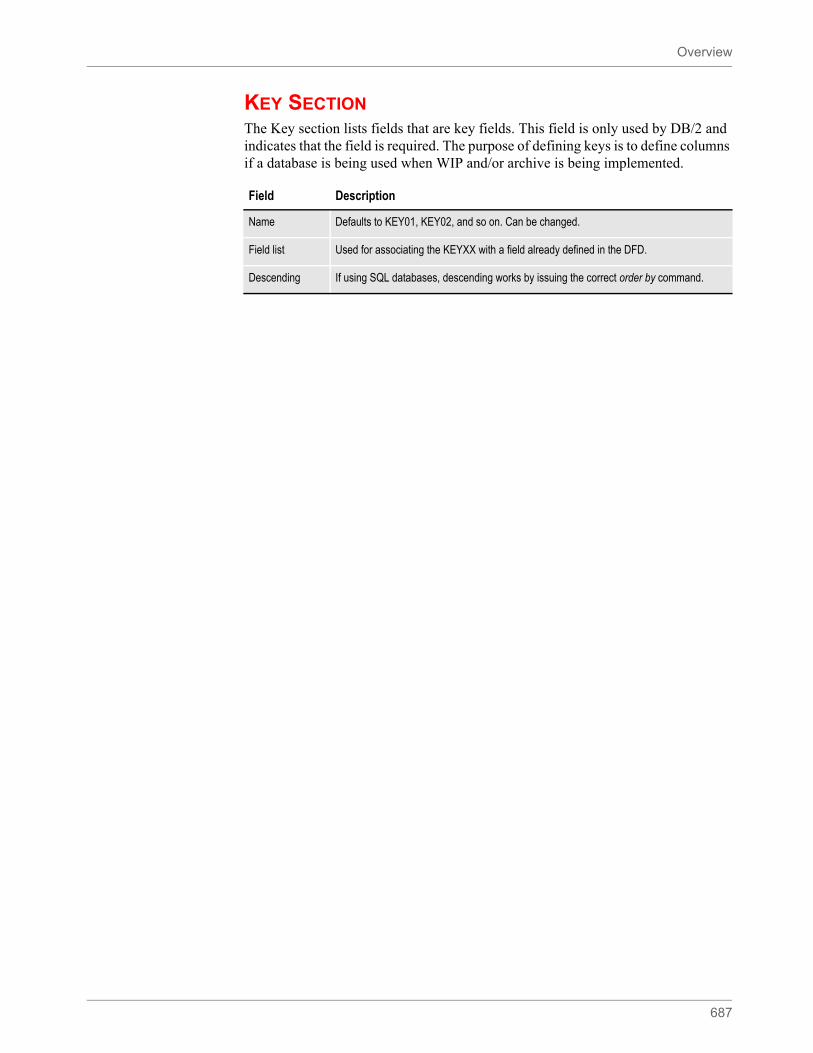
Overview
687
KEY SECTIONThe Key section lists fields that are key fields. This field is only used by DB/2 and indicates that the field is required. The purpose of defining keys is to define columns if a database is being used when WIP and/or archive is being implemented.
Field Description
Name Defaults to KEY01, KEY02, and so on. Can be changed.
Field list Used for associating the KEYXX with a field already defined in the DFD.
Descending If using SQL databases, descending works by issuing the correct order by command.
688
Chapter 15
Converting Files
Use the Conversion option to convert, change, or compile one or more files.
This chapter covers these topics:
• Overview on page 689
• Converting Word and RTF Files on page 692
• Converting Files into Sections on page 702
• Compiling Sections into Print Files on page 711
• Converting Sections into Paragraphs on page 713
• Converting Graphic Files on page 714
• Making Changes to Multiple Forms on page 715
• Making Changes to Multiple Sections on page 718
• Converting Bitmap Files into LOG Files on page 724
• Converting System Files into XML Files on page 725
• Converting Documerge Resources on page 727
• Changing Recipient Information on page 731
• Importing XML Schemas into the XDD on page 733
• Using the Common Fields Dictionary on page 675
• Changing Multiple Script Files on page 735
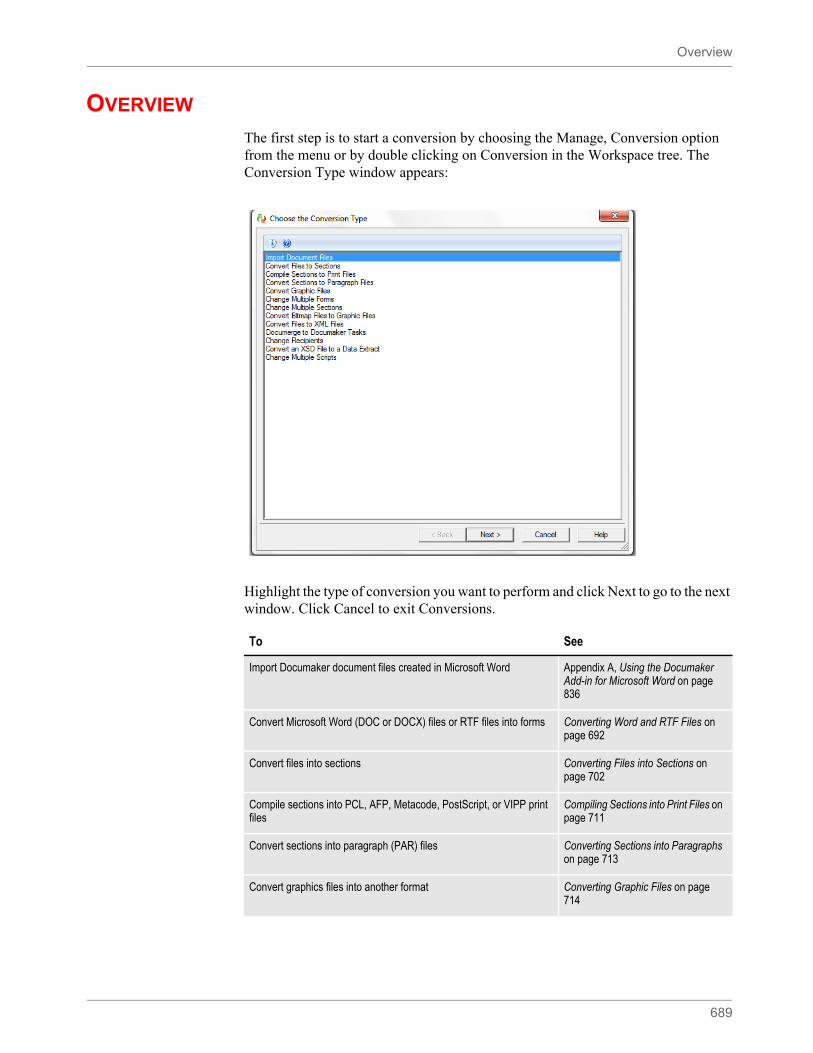
Overview
689
OVERVIEW
The first step is to start a conversion by choosing the Manage, Conversion option from the menu or by double clicking on Conversion in the Workspace tree. The Conversion Type window appears:
Highlight the type of conversion you want to perform and click Next to go to the next window. Click Cancel to exit Conversions.
To See
Import Documaker document files created in Microsoft Word Appendix A, Using the Documaker Add-in for Microsoft Word on page 836
Convert Microsoft Word (DOC or DOCX) files or RTF files into forms Converting Word and RTF Files on page 692
Convert files into sections Converting Files into Sections on page 702
Compile sections into PCL, AFP, Metacode, PostScript, or VIPP print files
Compiling Sections into Print Files on page 711
Convert sections into paragraph (PAR) files Converting Sections into Paragraphs on page 713
Convert graphics files into another format Converting Graphic Files on page 714
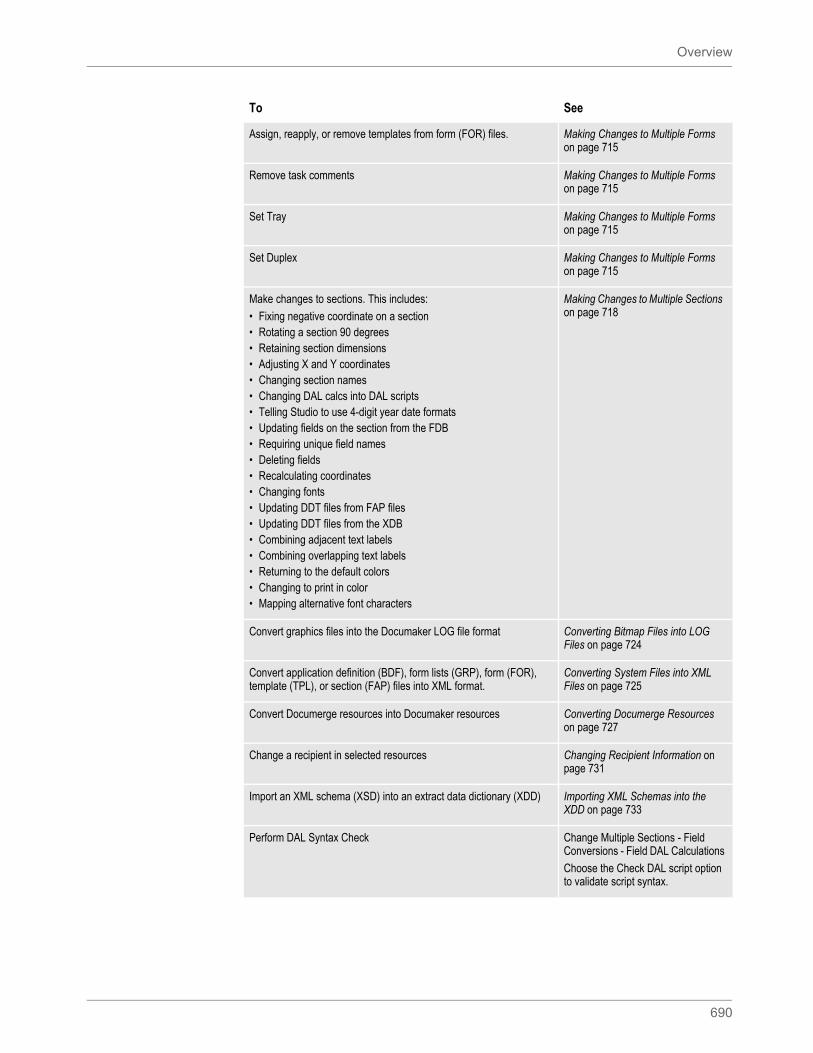
Overview
690
Assign, reapply, or remove templates from form (FOR) files. Making Changes to Multiple Forms on page 715
Remove task comments Making Changes to Multiple Forms on page 715
Set Tray Making Changes to Multiple Forms on page 715
Set Duplex Making Changes to Multiple Forms on page 715
Make changes to sections. This includes:
• Fixing negative coordinate on a section• Rotating a section 90 degrees• Retaining section dimensions • Adjusting X and Y coordinates • Changing section names • Changing DAL calcs into DAL scripts • Telling Studio to use 4-digit year date formats • Updating fields on the section from the FDB • Requiring unique field names • Deleting fields• Recalculating coordinates • Changing fonts • Updating DDT files from FAP files• Updating DDT files from the XDB• Combining adjacent text labels• Combining overlapping text labels• Returning to the default colors• Changing to print in color• Mapping alternative font characters
Making Changes to Multiple Sections on page 718
Convert graphics files into the Documaker LOG file format Converting Bitmap Files into LOG Files on page 724
Convert application definition (BDF), form lists (GRP), form (FOR), template (TPL), or section (FAP) files into XML format.
Converting System Files into XML Files on page 725
Convert Documerge resources into Documaker resources Converting Documerge Resources on page 727
Change a recipient in selected resources Changing Recipient Information on page 731
Import an XML schema (XSD) into an extract data dictionary (XDD) Importing XML Schemas into the XDD on page 733
Perform DAL Syntax Check Change Multiple Sections - Field Conversions - Field DAL Calculations
Choose the Check DAL script option to validate script syntax.
To See
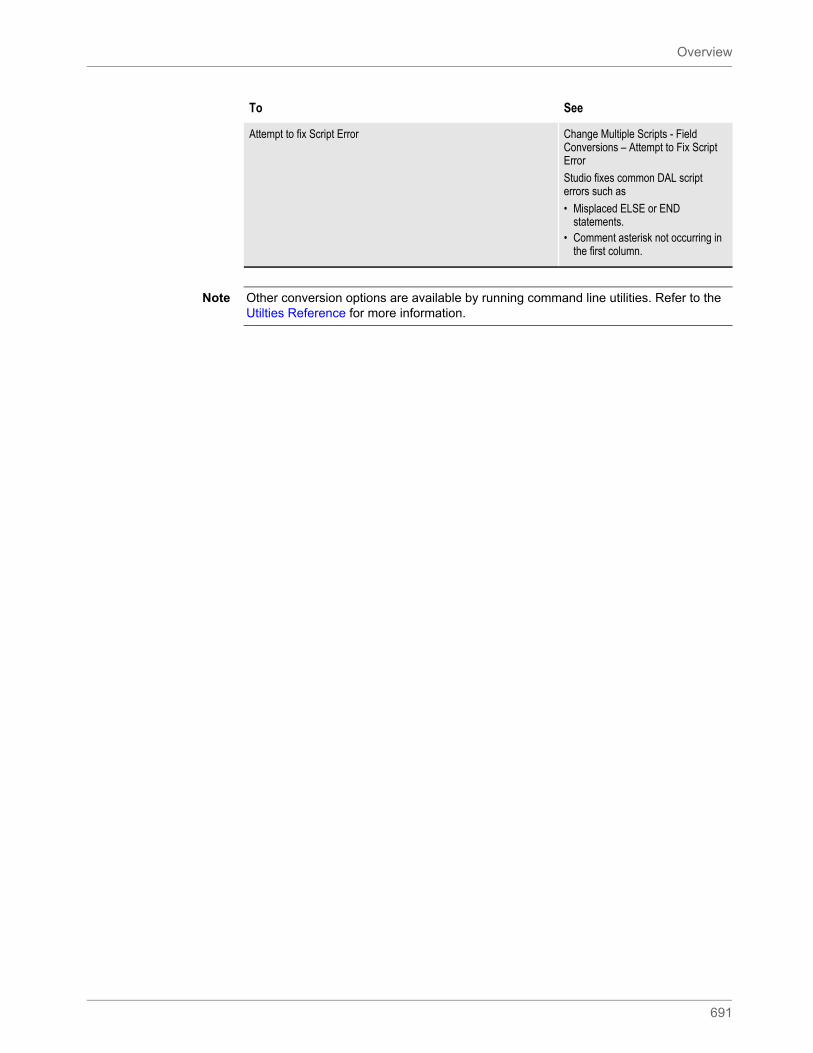
Overview
691
Attempt to fix Script Error Change Multiple Scripts - Field Conversions – Attempt to Fix Script Error
Studio fixes common DAL script errors such as
• Misplaced ELSE or END statements.
• Comment asterisk not occurring in the first column.
To See
Note Other conversion options are available by running command line utilities. Refer to the Utilties Reference for more information.

Converting Word and RTF Files
692
CONVERTING WORD AND RTF FILES
You can convert Microsoft Word (DOC or DOCX) and Rich Text Files (RTF) into Documaker form (FOR) files. And optionally, during the conversion Studio can create separate files (FAP files) for each section and separate files (LOG files) for each graphic in the converted form.
Understanding the Import Process on page 856 provides general information on what is and is not converted. For information on how fonts are handled, see Understanding Font Mapping on page 699.
Follow these steps to convert Word and RTF files into Documaker forms:
1. Choose the Import Document Files option on the Choose the Conversion Type window. The Choose Files to Convert window appears.
2. Select the type of conversion you want, then select the files you want to convert.
Note Microsoft Word must be available on the workstation when you use Studio to convert DOC or DOCX files. If Word is not available, the convert process will fail and you will see this message in the output area:
Failed to Start Microsoft Word.
To open Word 2007 DOCX files with Word 2003, Word 2002, or Word 2000, install the Microsoft Office Compatibility Pack for Word 2007. For more information, go to this web site:
www.microsoft.com
Note You can also use the RTF2FAP utility to convert RTF, DOC, or DOCX files into FAP files. See the Utilties Reference for more information.
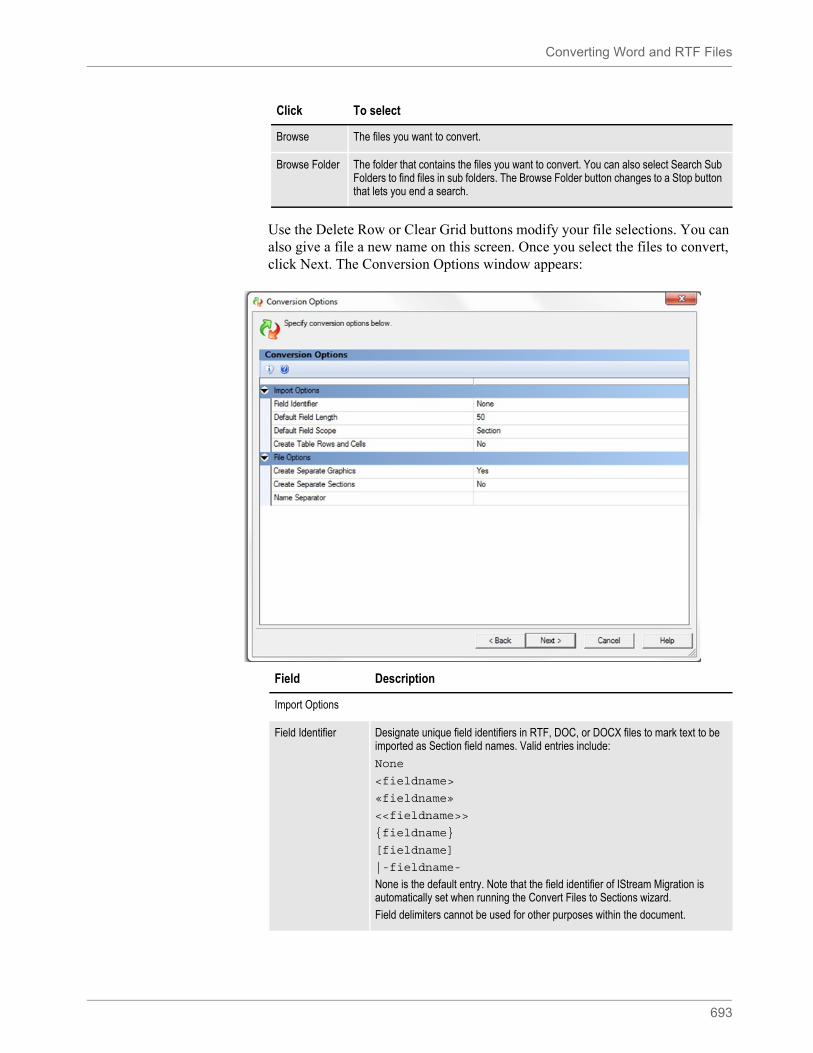
Converting Word and RTF Files
693
Use the Delete Row or Clear Grid buttons modify your file selections. You can also give a file a new name on this screen. Once you select the files to convert, click Next. The Conversion Options window appears:
Click To select
Browse The files you want to convert.
Browse Folder The folder that contains the files you want to convert. You can also select Search Sub Folders to find files in sub folders. The Browse Folder button changes to a Stop button that lets you end a search.
Field Description
Import Options
Field Identifier Designate unique field identifiers in RTF, DOC, or DOCX files to mark text to be imported as Section field names. Valid entries include:
None
<fieldname>
«fieldname»
<<fieldname>>
{fieldname}
[fieldname]
|-fieldname-
None is the default entry. Note that the field identifier of IStream Migration is automatically set when running the Convert Files to Sections wizard.
Field delimiters cannot be used for other purposes within the document.
Converting Word and RTF Files
694
Click Next when finished. The Field and XDD Options window appears:
Default Field Length Enter the field length you want Studio to assign to the fields it finds during the conversion. The default is 50 characters.
Default Field Scope Choose the field scope you want Studio to assign to the fields it finds during the conversion. You can choose from these options:
• Section – data is only written to the same named field within a section.• Form – data is written to the same named field throughout all sections within the
form.• Global – data is written to the same named field throughout all sections and all
forms in the form set.
The default is Section.
Create Table Rows and Cells
When importing a Word table, create Documaker table rows and cells with borders rather than simple lines and boxes.
File Options
Create Separate Graphics
Enter Yes if you want Studio to create separate graphic (LOG) files and assign a name based on the name of the input document and the separator you specify in the Name Separator field.
Enter No if you want Studio to embed any graphics into the section. You can later remove embedded graphics by editing the file and replacing the graphic or unchecking the embedded option for the graphic.
The default is Yes.
Create Separate Sections
Enter Yes if you want Studio to create a FAP file (section) for each page and for each header and footer in the input document. If you answer Yes, Studio assigns a name to each page of the document based on the name of the input document and the separator you specify in the Name Separator field.
Enter No if you want Studio to place the content into embedded sections on the form. You can later unembed these sections in the Form manager by unchecking the Embedded option.
The default is No.
Name Separator Enter the character you want Studio to insert between elements of the file name. The separator can be nothing, a blank, an underscore, or any other valid Windows file name character.
For example, if the name of the input document is Declaration and you choose to create separate sections you would get these results for page 1:
Separator Result----------------------------------------------------------------------
(nothing) Declaration1.FAPBlank Declaration 1.FAP_ Declaration_1.FAP# Declaration#1.FAP
Field Description
Note For IStream conversions, the field identifier of IStream Migration is automatically chosen when you run the Convert Files to Sections wizard.
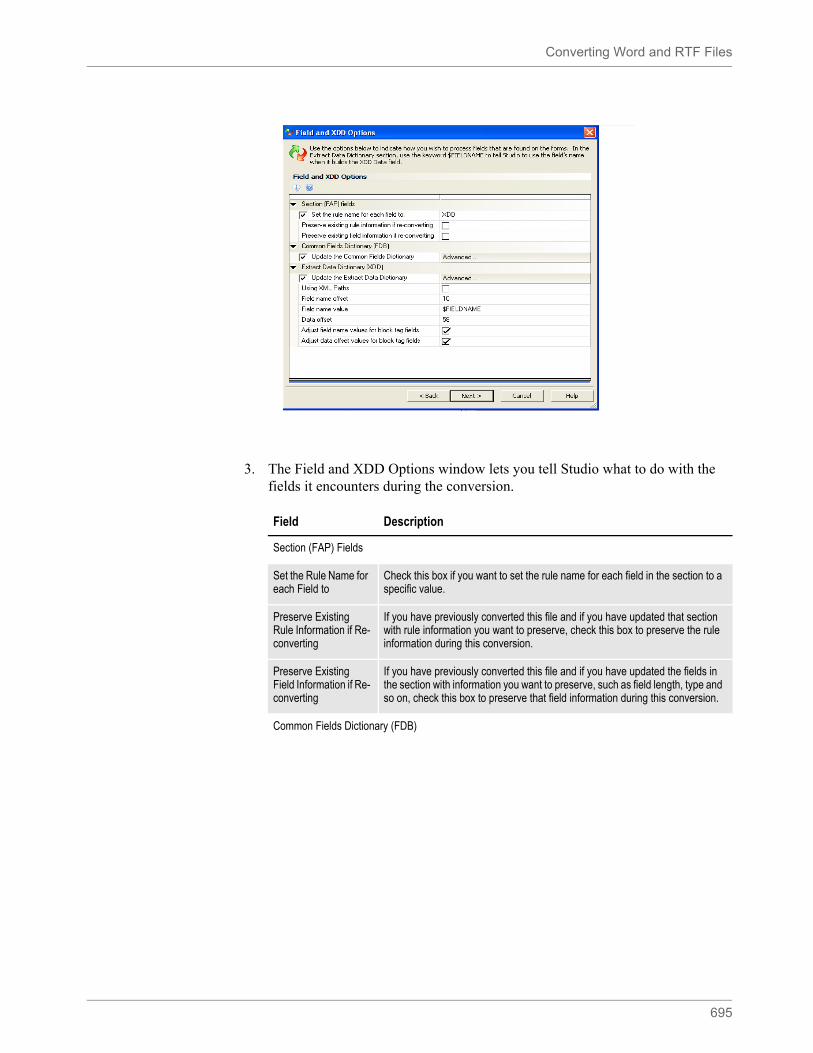
Converting Word and RTF Files
695
3. The Field and XDD Options window lets you tell Studio what to do with the fields it encounters during the conversion.
Field Description
Section (FAP) Fields
Set the Rule Name for each Field to
Check this box if you want to set the rule name for each field in the section to a specific value.
Preserve Existing Rule Information if Re-converting
If you have previously converted this file and if you have updated that section with rule information you want to preserve, check this box to preserve the rule information during this conversion.
Preserve Existing Field Information if Re-converting
If you have previously converted this file and if you have updated the fields in the section with information you want to preserve, such as field length, type and so on, check this box to preserve that field information during this conversion.
Common Fields Dictionary (FDB)
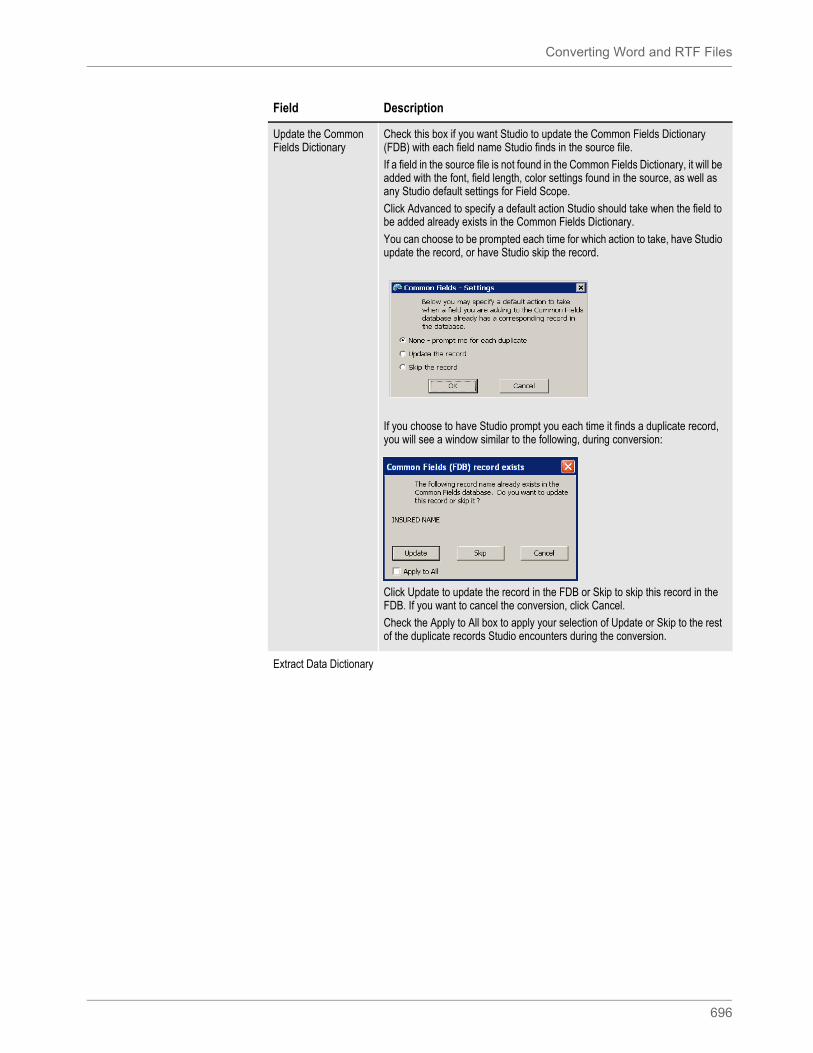
Converting Word and RTF Files
696
Update the Common Fields Dictionary
Check this box if you want Studio to update the Common Fields Dictionary (FDB) with each field name Studio finds in the source file.
If a field in the source file is not found in the Common Fields Dictionary, it will be added with the font, field length, color settings found in the source, as well as any Studio default settings for Field Scope.
Click Advanced to specify a default action Studio should take when the field to be added already exists in the Common Fields Dictionary.
You can choose to be prompted each time for which action to take, have Studio update the record, or have Studio skip the record.
If you choose to have Studio prompt you each time it finds a duplicate record, you will see a window similar to the following, during conversion:
Click Update to update the record in the FDB or Skip to skip this record in the FDB. If you want to cancel the conversion, click Cancel.
Check the Apply to All box to apply your selection of Update or Skip to the rest of the duplicate records Studio encounters during the conversion.
Extract Data Dictionary
Field Description
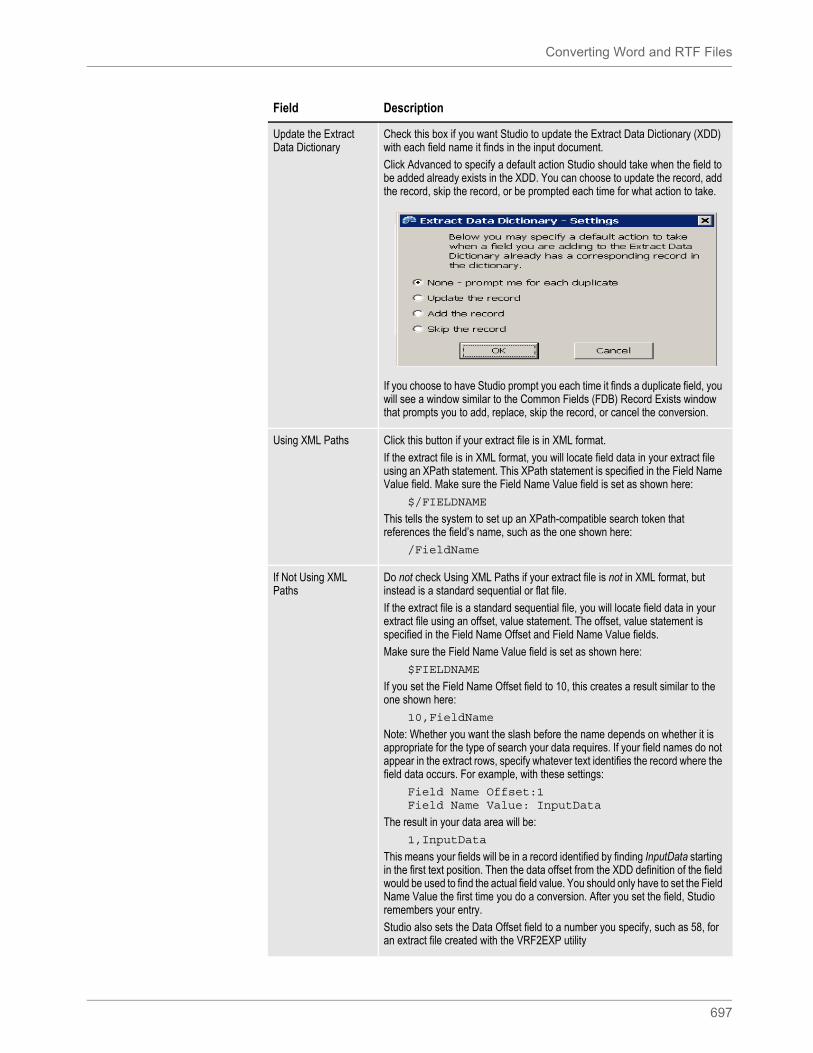
Converting Word and RTF Files
697
Update the Extract Data Dictionary
Check this box if you want Studio to update the Extract Data Dictionary (XDD) with each field name it finds in the input document.
Click Advanced to specify a default action Studio should take when the field to be added already exists in the XDD. You can choose to update the record, add the record, skip the record, or be prompted each time for what action to take.
If you choose to have Studio prompt you each time it finds a duplicate field, you will see a window similar to the Common Fields (FDB) Record Exists window that prompts you to add, replace, skip the record, or cancel the conversion.
Using XML Paths Click this button if your extract file is in XML format.
If the extract file is in XML format, you will locate field data in your extract file using an XPath statement. This XPath statement is specified in the Field Name Value field. Make sure the Field Name Value field is set as shown here:
$/FIELDNAME
This tells the system to set up an XPath-compatible search token that references the field’s name, such as the one shown here:
/FieldName
If Not Using XML Paths
Do not check Using XML Paths if your extract file is not in XML format, but instead is a standard sequential or flat file.
If the extract file is a standard sequential file, you will locate field data in your extract file using an offset, value statement. The offset, value statement is specified in the Field Name Offset and Field Name Value fields.
Make sure the Field Name Value field is set as shown here:
$FIELDNAME
If you set the Field Name Offset field to 10, this creates a result similar to the one shown here:
10,FieldName
Note: Whether you want the slash before the name depends on whether it is appropriate for the type of search your data requires. If your field names do not appear in the extract rows, specify whatever text identifies the record where the field data occurs. For example, with these settings:
Field Name Offset:1Field Name Value: InputData
The result in your data area will be:
1,InputData
This means your fields will be in a record identified by finding InputData starting in the first text position. Then the data offset from the XDD definition of the field would be used to find the actual field value. You should only have to set the Field Name Value the first time you do a conversion. After you set the field, Studio remembers your entry.
Studio also sets the Data Offset field to a number you specify, such as 58, for an extract file created with the VRF2EXP utility
Field Description
Converting Word and RTF Files
698
Once you have selected the files you want to convert, click Next to go to the Convert Files and Finish window. See Changing Multiple Script Files on page 735 for more information.
Field Name Offset This field is only applicable if your extract file is not in XML format.
Here you can specify the offset at which the system can expect (or test for) a particular value. You specify the value the system should test for in the Field Name Value field. The default is 10.
Field Name Value This field is applicable for both types of extract file.
If your extract file is not in XML format, the Field Name Value field lets you specify the value to test for at the offset specified in the Field Name Offset field. For example, if the Field Name Offset field contains 10 and the Field Name Value field contains MYFIELD, the Data field in the XDD is set to 10,MYFIELD. When Documaker processes this field, it looks at offset 10 in the record in the extract file and tests for the string MYFIELD at that offset. If the test is successful, Documaker goes to the offset specified in the Data Offset field and copies the data at that offset into the field.
If your extract file is in XML format, the Field Name Value field lets you specify the XPath to use to search for data for the field.
For example, if the Field Name Value field contains /MYFIELD, the Data field in the XDD is set to /MYFIELD. When Documaker processes this field, it would use this XPath (/MYFIELD) to locate data to copy into the field being processed.
Data Offset This field is only applicable when your extract file is not in XML format.
Use this field to indicate the offset in the record in the extract file at which to expect field data.
For example, if you enter 58 here, the Field Name Offset field contains 10, and the Field Name Value field contains $FIELDNAME, during conversion, an XDD record would be created whose Data portion contains 10,fieldname, where fieldname is the actual field name (since the $FIELDNAME keyword parameter was used) and the whose Offset portion contains 58.
Documaker would process the field named ADDRESS1 by reading the contents of the XDD record for that field (ADDRESS1), then looking in the extract file at offset 10 for the value ADDRESS1. If the string ADDRESS1 is found at offset 10, Documaker would look at offset 58 and copy the data at that offset to the field on the section.
Use these boxes when you are performing a Documerge to Documaker conversion and you are using the VRF2EXP utility to generate a Documaker extract file from a Documerge VRF file.
Adjust Field Name Values for Block Tag Fields
Check this box if you want the system to update the Data field in the XDD with the field's root name (for example, ADDRESS) rather than with the unique field name (ADDRESS #001_01) that Documaker uses. The extract file produced by the VRF2EXP utility generates records that contain the root field name for the field at offset 10, then multiple data values concatenated one after the other beginning at offset 58.
Adjust Data Offset Values for Block Tag Fields
Check this box if you want the system to increment the Offset field in the XDD to the next portion of the block tag's data.
Field Description
Converting Word and RTF Files
699
Documerge to Documaker implementations
When the wizard encounters a block tag in a normalized file, it creates a field for each line of the block. Each field is given a name consisting of the tag name followed by:
• A space
• An octothorpe (#)
• A three-digit number that corresponds to the numerical sequence of that line in the block
• An underscore (_)
• A two-digit number, incremented for each block tag on the page that has the same name
When the wizard creates the Data Extract Dictionary (XDD) entry for this field, the renamed field, along with an offset value, is placed into the Data portion of the XDD record. If you are planning to use this XDD as part of a Documerge to Documaker Tier 2 implementation, the name placed into the Data portion of the record should be the original tag name, not the renamed field. To set the field name to the original tag name, check the Adjust field name values for the block tag fields field.
Additionally, when the wizard creates the XDD entry for this record, the Offset portion of the XDD record is assigned the value you provide in the Data Offset field on this page of the wizard. In a Documerge to Documaker Tier 2 implementation, the offset is usually 58, so this value is provided as the default.
In some Documerge to Documaker Tier 2 implementations, a single record in the extract file that this XDD entry is mapped to may contain values for all the lines of a block tag field rather than just the value for a particular line of the block tag field. If that is the case, you would want the Offset portion of the XDD record to be incremented (by the tag length) for each field corresponding to lines two and higher of the block tag. To make this adjustment, check the Adjust data offset values for a block tag field's field.
Understanding Font Mapping
Handling fonts is an important part of all conversion options available when you choose the Import Document Files option. When converting Word (DOC or DOCX) and Word Documaker document files from the Documaker Add-In for Word, Studio temporarily converts the source files into RTF format. While in RTF format, Studio compares the fonts used in the source document to fonts in the font cross-reference (FXR) file. To find the best match, Studio evaluates font attributes and calculates a score that reflects how well the attributes match. It then uses the font with the highest score.
Note Studio saves your choices so they will be available the next time you run this conversion.
Note If you choose the Rich Text (RTF) Files to Forms option, no initial conversion to RTF format is required, but the font matching process is the same.
Converting Word and RTF Files
700
The most important criteria in calculating the font score is the ability to display text in the RTF file. Matching the font name to the font family name is the second highest priority is calculating a font score. Matching the point size of the text with a font in the FXR is considered next. Matching the bold or italic attribute is one of the lowest priorities in calculating the font substitution score for a font.
Here is a description of how the font matching process works:
For example purposes, the font Studio is trying to match from the RTF file will be called the RTF font. The fonts in the FXR will be called FXR fonts.
• Studio first compares the RTF font name to the font family name of the FXR font. If a full match is not found, partial matches are allowed for some fonts, such as Times and Courier.
You can specify matches in the RTFFontSubs control group. Here is an example of an entry:
< RTFFontSubs > Arial = Albany AMT:UNIVERS:HELV
The name on the left is the facename of the RTF font. On the right, each matching FXR font’s family name is separated with a colon (:). Preference is given to the names in the order they are listed.
You can specify a default font name in the INI file. If there is a tie for the best match, this font name is used if possible. Here is an example of how you could set this INI option:
< RTFDefaultFont >RTFDefaultFont = Courier
If you omit this INI option or leave it blank, Studio uses Albany AMT as the default.
• Studio next evaluates font sizes and considers the difference between the font sizes. If the difference is too large — over 2 points in most cases— then a facename match is disregarded. This allows fonts with different names to be substituted if their font size is a closer match.
• Studio evaluates other attributes, such as if the font is bold or italic.
If there is no exact match between a font in the RTF file and a font in the FXR, Studio substitutes the font in the FXR that has the highest score for the font in the RTF file.
Note If a font uses Unicode characters, a Unicode font in the FXR is always chosen over a non-Unicode font.
Note Studio places font substitution messages in the Output area and the trace file if you set the following options to Yes:
< Debug_Switches >Enable_Debug_Options = YesDebug_FontSubs = Yes
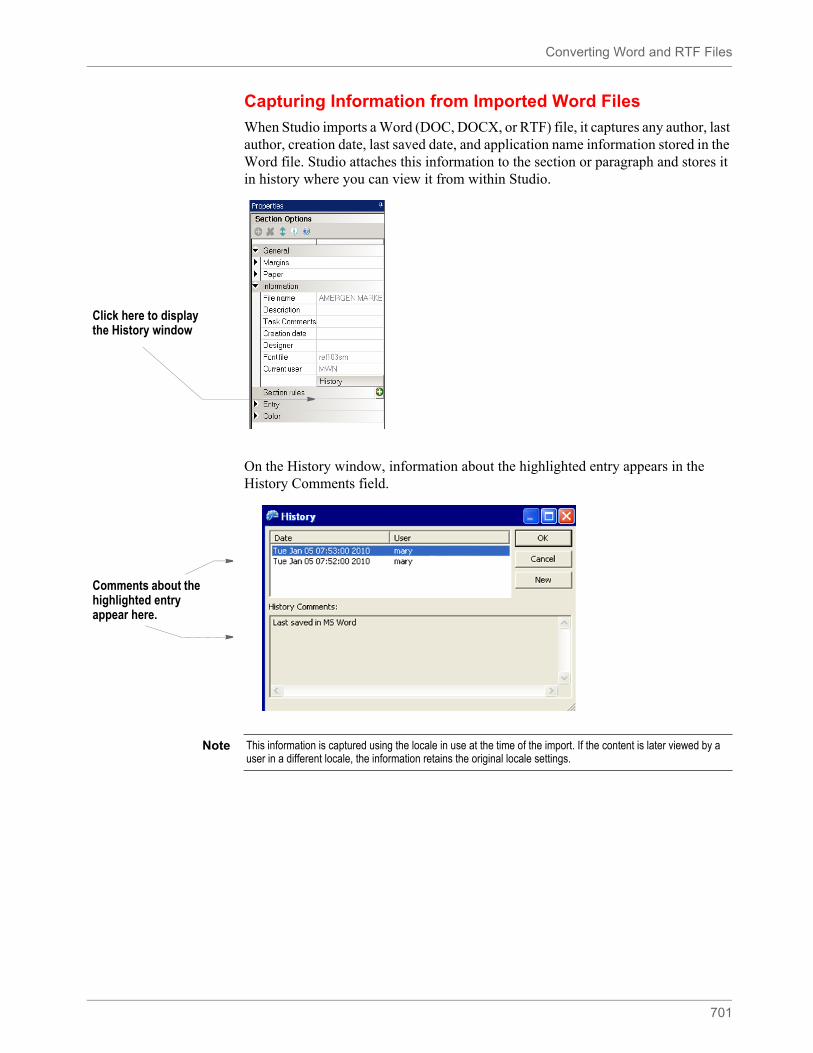
Converting Word and RTF Files
701
Capturing Information from Imported Word Files
When Studio imports a Word (DOC, DOCX, or RTF) file, it captures any author, last author, creation date, last saved date, and application name information stored in the Word file. Studio attaches this information to the section or paragraph and stores it in history where you can view it from within Studio.
On the History window, information about the highlighted entry appears in the History Comments field.
Click here to display the History window
Comments about the highlighted entry appear here.
Note This information is captured using the locale in use at the time of the import. If the content is later viewed by a user in a different locale, the information retains the original locale settings.
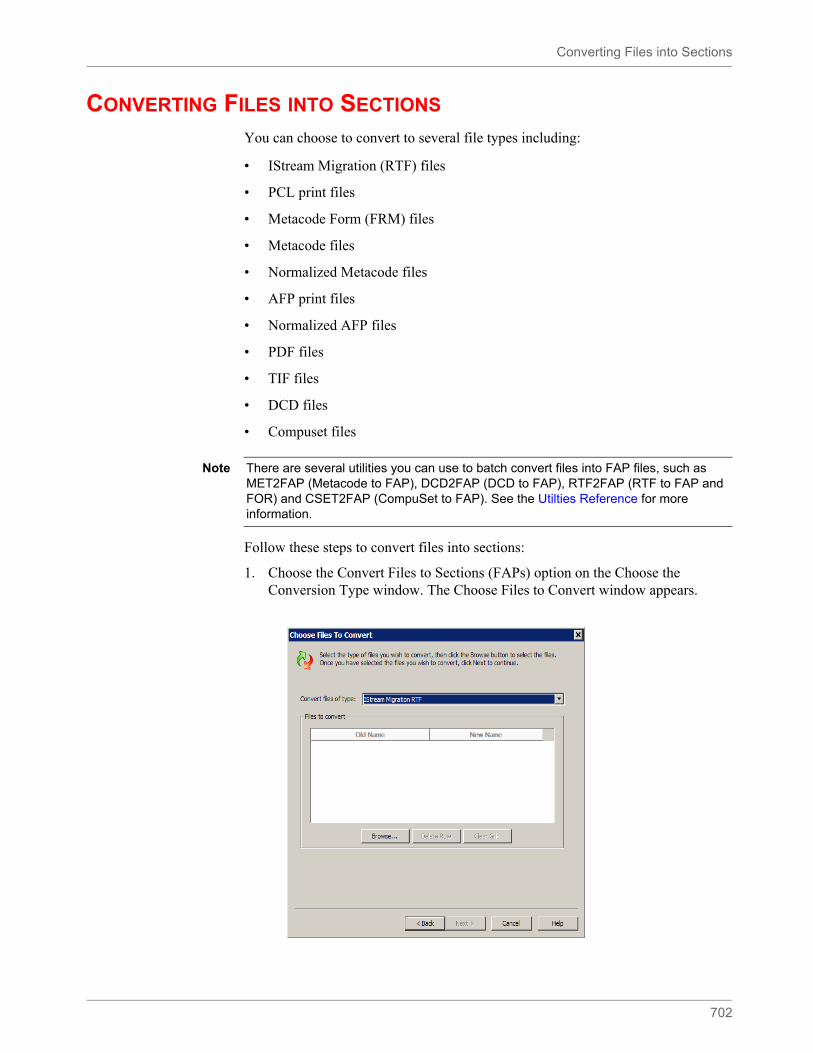
Converting Files into Sections
702
CONVERTING FILES INTO SECTIONS
You can choose to convert to several file types including:
• IStream Migration (RTF) files
• PCL print files
• Metacode Form (FRM) files
• Metacode files
• Normalized Metacode files
• AFP print files
• Normalized AFP files
• PDF files
• TIF files
• DCD files
• Compuset files
Follow these steps to convert files into sections:
1. Choose the Convert Files to Sections (FAPs) option on the Choose the Conversion Type window. The Choose Files to Convert window appears.
Note There are several utilities you can use to batch convert files into FAP files, such as MET2FAP (Metacode to FAP), DCD2FAP (DCD to FAP), RTF2FAP (RTF to FAP and FOR) and CSET2FAP (CompuSet to FAP). See the Utilties Reference for more information.
Converting Files into Sections
703
2. Select the type of conversion you want, then click Browse to select the files you want to convert.
3. Once you have selected the files you want to convert and set any applicable options, click Next to go to the Convert Files and Finish window. See Changing Multiple Script Files on page 735 for more information.
Converting IStream Migration RTF Files
You can use the IStream Migration Utility to convert IStream model documents into RTF files. You can then use Studio’s option to import an IStream Migration RTF file to convert those RTF files into sections. During this conversion, Studio automatically sets the size of the section, recognizes tags as fields from the RTF, and creates XDD entries. Studio also imports property information for these fields from the FDB, if available.
During the conversion, Studio...
• Creates a section to match the text in the IStream RTF file.
• Sizes the resulting section to the height of the text.
• Recognizes text surrounded by brackets (<>) as fields. Duplicate field names are not permitted in a single section. Therefore, if duplicates are found in the IStream Migration RTF file, Studio appends a suffix to the duplicate field names to make them unique. If the brackets are in a different font than the text, the text inside the brackets are not recognized as a field.
• Looks up the field in the FDB and gets the field length. Sets the type to alphanumeric. If the field is not found, Studio uses the default length set for the conversion and assigns a type based on tag name prefix:
Note Some conversions, such as IStream Migration and PDF conversions, offer additional options specific to that conversion. Refer to the these topics or the Help for additional information:
• Converting IStream Migration RTF Files on page 703
• Converting PDF Files on page 710
Note You can also use the RTF2FAP utility to convert IStream Migration RTF files. For more information on the RTF2FAP utility and the IStream Migration Utility, see the Utilities Reference.
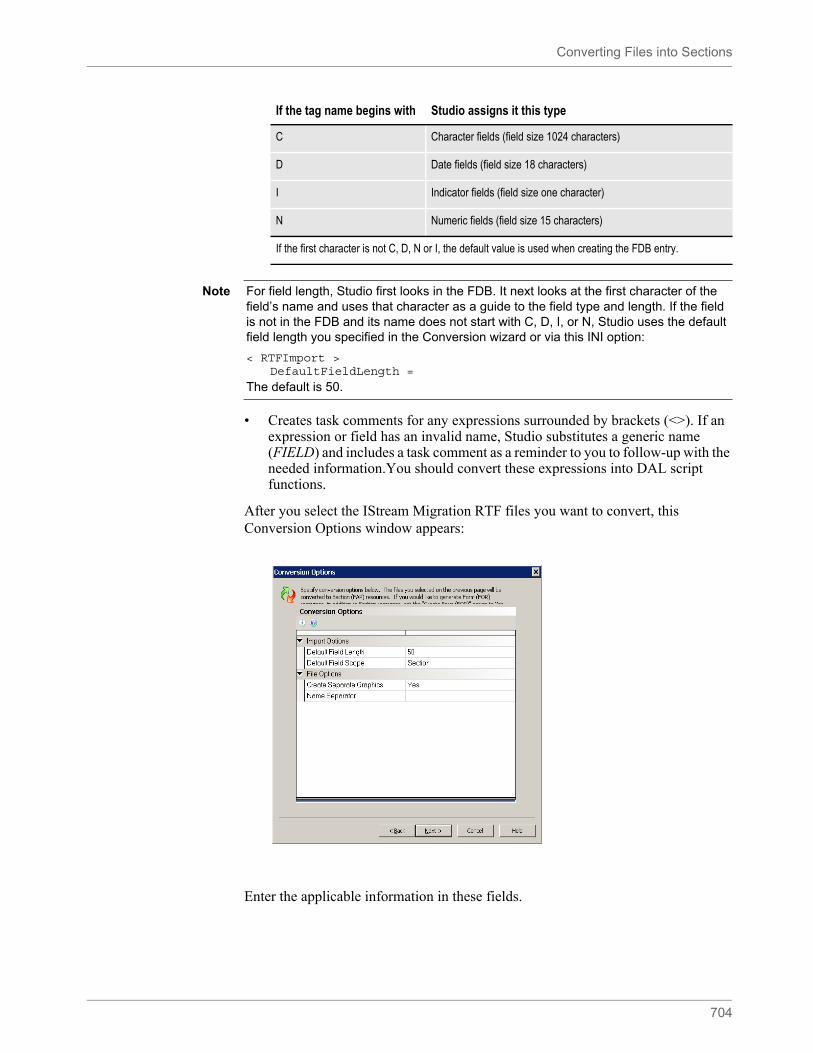
Converting Files into Sections
704
• Creates task comments for any expressions surrounded by brackets (<>). If an expression or field has an invalid name, Studio substitutes a generic name (FIELD) and includes a task comment as a reminder to you to follow-up with the needed information.You should convert these expressions into DAL script functions.
After you select the IStream Migration RTF files you want to convert, this Conversion Options window appears:
Enter the applicable information in these fields.
If the tag name begins with Studio assigns it this type
C Character fields (field size 1024 characters)
D Date fields (field size 18 characters)
I Indicator fields (field size one character)
N Numeric fields (field size 15 characters)
If the first character is not C, D, N or I, the default value is used when creating the FDB entry.
Note For field length, Studio first looks in the FDB. It next looks at the first character of the field’s name and uses that character as a guide to the field type and length. If the field is not in the FDB and its name does not start with C, D, I, or N, Studio uses the default field length you specified in the Conversion wizard or via this INI option:
< RTFImport >DefaultFieldLength =
The default is 50.
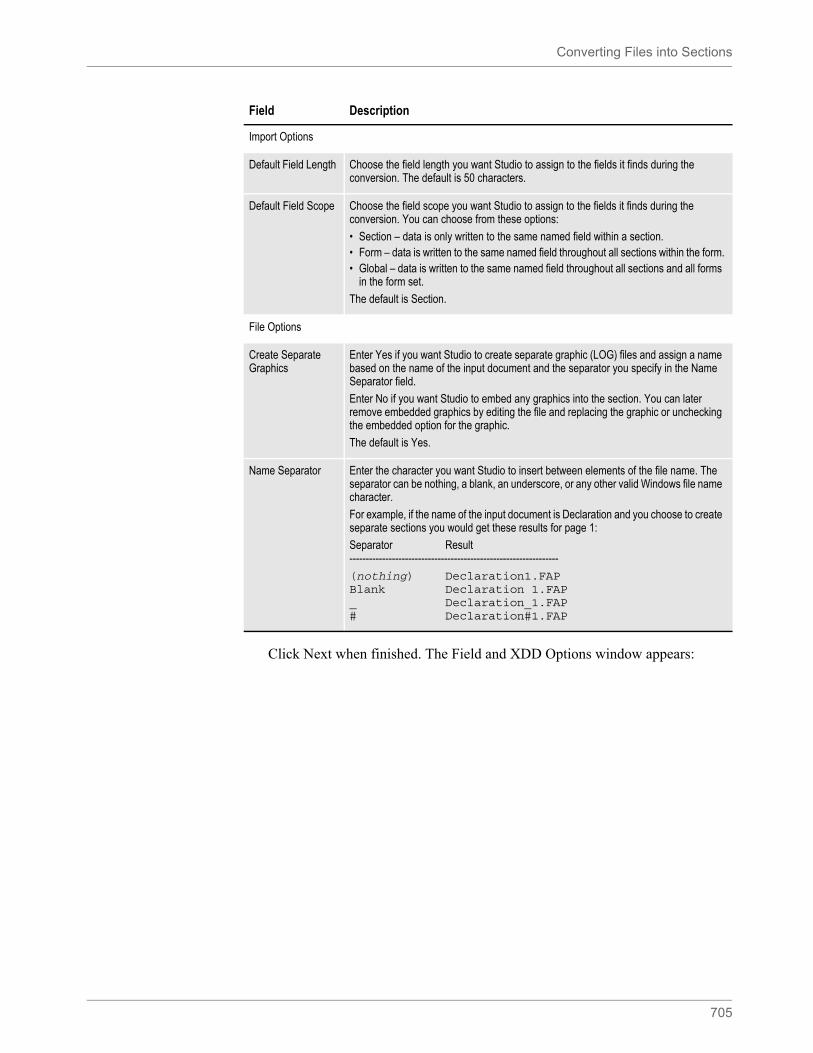
Converting Files into Sections
705
Click Next when finished. The Field and XDD Options window appears:
Field Description
Import Options
Default Field Length Choose the field length you want Studio to assign to the fields it finds during the conversion. The default is 50 characters.
Default Field Scope Choose the field scope you want Studio to assign to the fields it finds during the conversion. You can choose from these options:
• Section – data is only written to the same named field within a section.• Form – data is written to the same named field throughout all sections within the form.• Global – data is written to the same named field throughout all sections and all forms
in the form set.
The default is Section.
File Options
Create Separate Graphics
Enter Yes if you want Studio to create separate graphic (LOG) files and assign a name based on the name of the input document and the separator you specify in the Name Separator field.
Enter No if you want Studio to embed any graphics into the section. You can later remove embedded graphics by editing the file and replacing the graphic or unchecking the embedded option for the graphic.
The default is Yes.
Name Separator Enter the character you want Studio to insert between elements of the file name. The separator can be nothing, a blank, an underscore, or any other valid Windows file name character.
For example, if the name of the input document is Declaration and you choose to create separate sections you would get these results for page 1:
Separator Result----------------------------------------------------------------
(nothing) Declaration1.FAPBlank Declaration 1.FAP_ Declaration_1.FAP# Declaration#1.FAP
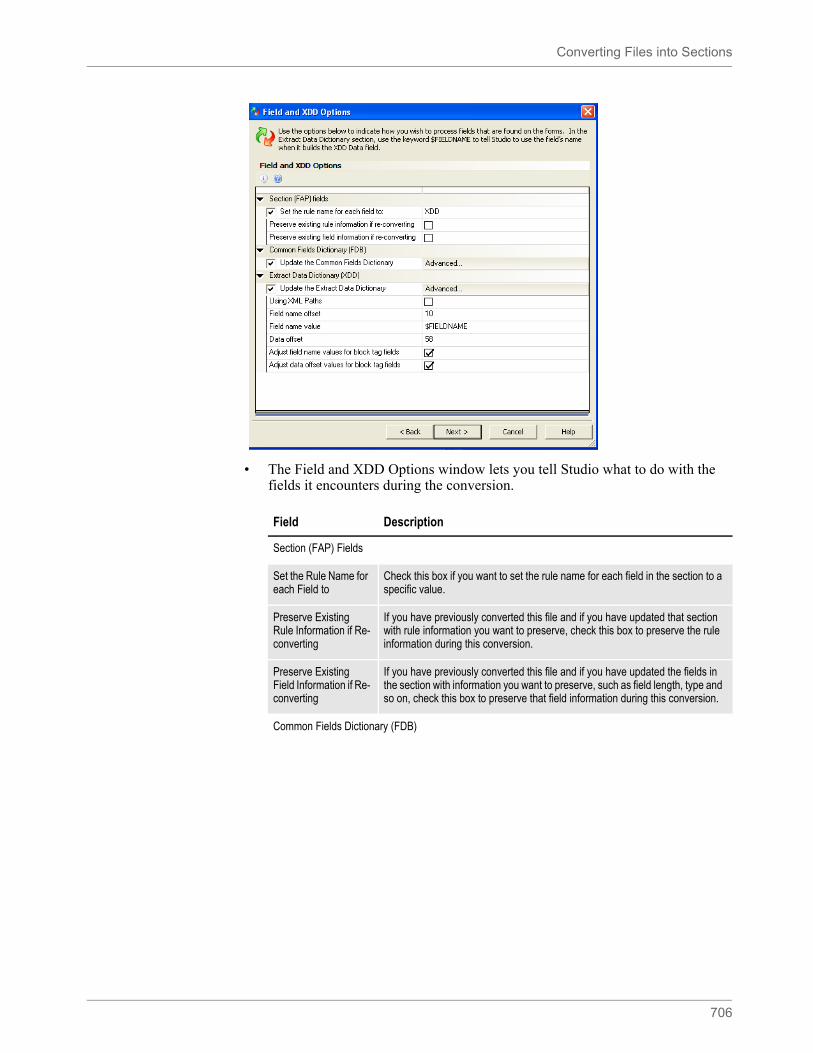
Converting Files into Sections
706
• The Field and XDD Options window lets you tell Studio what to do with the fields it encounters during the conversion.
Field Description
Section (FAP) Fields
Set the Rule Name for each Field to
Check this box if you want to set the rule name for each field in the section to a specific value.
Preserve Existing Rule Information if Re-converting
If you have previously converted this file and if you have updated that section with rule information you want to preserve, check this box to preserve the rule information during this conversion.
Preserve Existing Field Information if Re-converting
If you have previously converted this file and if you have updated the fields in the section with information you want to preserve, such as field length, type and so on, check this box to preserve that field information during this conversion.
Common Fields Dictionary (FDB)
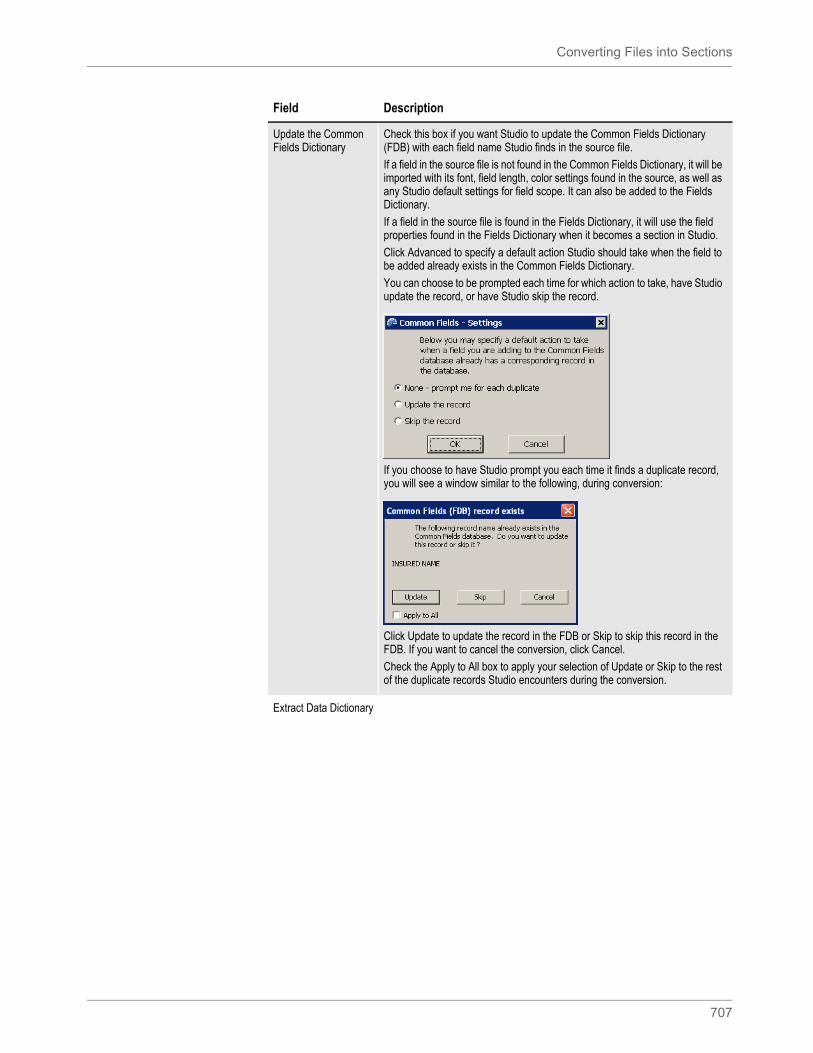
Converting Files into Sections
707
Update the Common Fields Dictionary
Check this box if you want Studio to update the Common Fields Dictionary (FDB) with each field name Studio finds in the source file.
If a field in the source file is not found in the Common Fields Dictionary, it will be imported with its font, field length, color settings found in the source, as well as any Studio default settings for field scope. It can also be added to the Fields Dictionary.
If a field in the source file is found in the Fields Dictionary, it will use the field properties found in the Fields Dictionary when it becomes a section in Studio.
Click Advanced to specify a default action Studio should take when the field to be added already exists in the Common Fields Dictionary.
You can choose to be prompted each time for which action to take, have Studio update the record, or have Studio skip the record.
If you choose to have Studio prompt you each time it finds a duplicate record, you will see a window similar to the following, during conversion:
Click Update to update the record in the FDB or Skip to skip this record in the FDB. If you want to cancel the conversion, click Cancel.
Check the Apply to All box to apply your selection of Update or Skip to the rest of the duplicate records Studio encounters during the conversion.
Extract Data Dictionary
Field Description
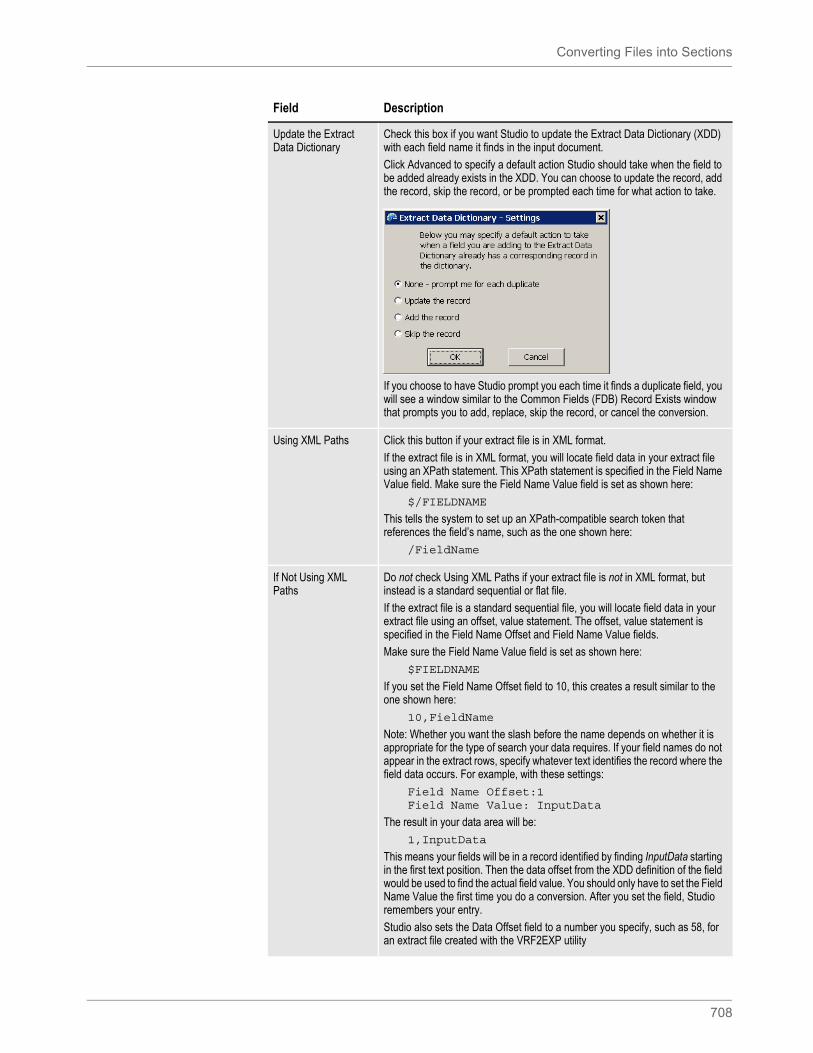
Converting Files into Sections
708
Update the Extract Data Dictionary
Check this box if you want Studio to update the Extract Data Dictionary (XDD) with each field name it finds in the input document.
Click Advanced to specify a default action Studio should take when the field to be added already exists in the XDD. You can choose to update the record, add the record, skip the record, or be prompted each time for what action to take.
If you choose to have Studio prompt you each time it finds a duplicate field, you will see a window similar to the Common Fields (FDB) Record Exists window that prompts you to add, replace, skip the record, or cancel the conversion.
Using XML Paths Click this button if your extract file is in XML format.
If the extract file is in XML format, you will locate field data in your extract file using an XPath statement. This XPath statement is specified in the Field Name Value field. Make sure the Field Name Value field is set as shown here:
$/FIELDNAME
This tells the system to set up an XPath-compatible search token that references the field’s name, such as the one shown here:
/FieldName
If Not Using XML Paths
Do not check Using XML Paths if your extract file is not in XML format, but instead is a standard sequential or flat file.
If the extract file is a standard sequential file, you will locate field data in your extract file using an offset, value statement. The offset, value statement is specified in the Field Name Offset and Field Name Value fields.
Make sure the Field Name Value field is set as shown here:
$FIELDNAME
If you set the Field Name Offset field to 10, this creates a result similar to the one shown here:
10,FieldName
Note: Whether you want the slash before the name depends on whether it is appropriate for the type of search your data requires. If your field names do not appear in the extract rows, specify whatever text identifies the record where the field data occurs. For example, with these settings:
Field Name Offset:1Field Name Value: InputData
The result in your data area will be:
1,InputData
This means your fields will be in a record identified by finding InputData starting in the first text position. Then the data offset from the XDD definition of the field would be used to find the actual field value. You should only have to set the Field Name Value the first time you do a conversion. After you set the field, Studio remembers your entry.
Studio also sets the Data Offset field to a number you specify, such as 58, for an extract file created with the VRF2EXP utility
Field Description
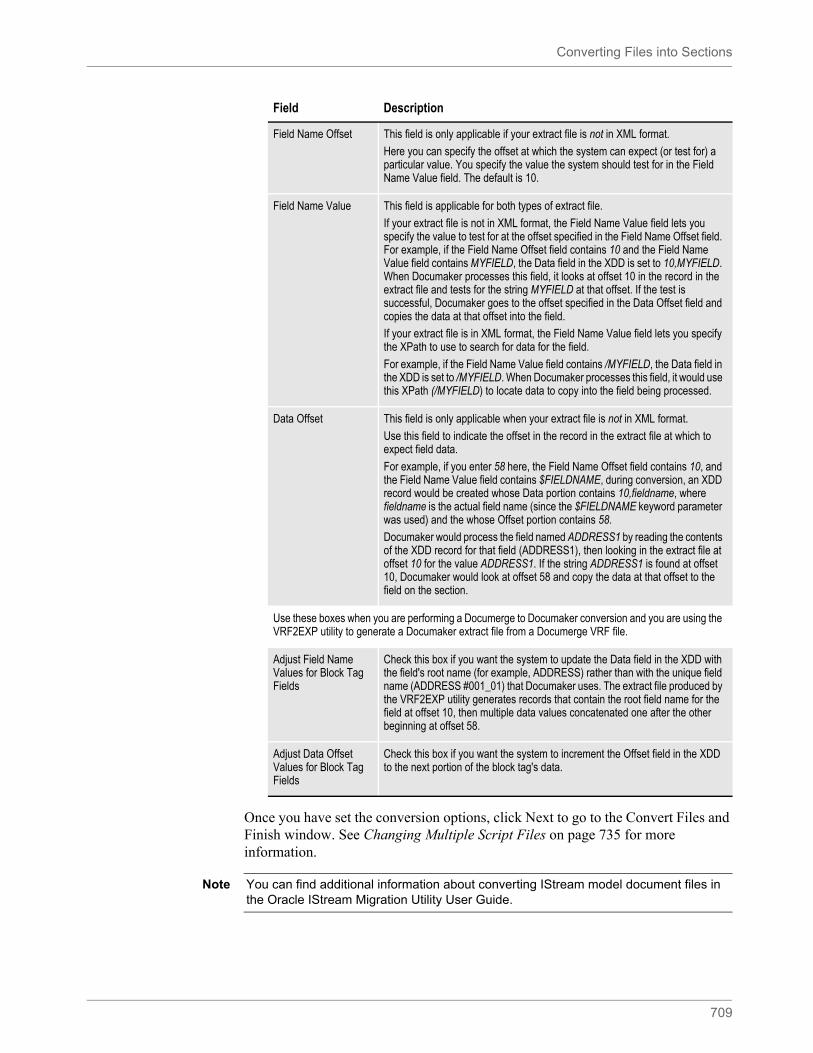
Converting Files into Sections
709
Once you have set the conversion options, click Next to go to the Convert Files and Finish window. See Changing Multiple Script Files on page 735 for more information.
Field Name Offset This field is only applicable if your extract file is not in XML format.
Here you can specify the offset at which the system can expect (or test for) a particular value. You specify the value the system should test for in the Field Name Value field. The default is 10.
Field Name Value This field is applicable for both types of extract file.
If your extract file is not in XML format, the Field Name Value field lets you specify the value to test for at the offset specified in the Field Name Offset field. For example, if the Field Name Offset field contains 10 and the Field Name Value field contains MYFIELD, the Data field in the XDD is set to 10,MYFIELD. When Documaker processes this field, it looks at offset 10 in the record in the extract file and tests for the string MYFIELD at that offset. If the test is successful, Documaker goes to the offset specified in the Data Offset field and copies the data at that offset into the field.
If your extract file is in XML format, the Field Name Value field lets you specify the XPath to use to search for data for the field.
For example, if the Field Name Value field contains /MYFIELD, the Data field in the XDD is set to /MYFIELD. When Documaker processes this field, it would use this XPath (/MYFIELD) to locate data to copy into the field being processed.
Data Offset This field is only applicable when your extract file is not in XML format.
Use this field to indicate the offset in the record in the extract file at which to expect field data.
For example, if you enter 58 here, the Field Name Offset field contains 10, and the Field Name Value field contains $FIELDNAME, during conversion, an XDD record would be created whose Data portion contains 10,fieldname, where fieldname is the actual field name (since the $FIELDNAME keyword parameter was used) and the whose Offset portion contains 58.
Documaker would process the field named ADDRESS1 by reading the contents of the XDD record for that field (ADDRESS1), then looking in the extract file at offset 10 for the value ADDRESS1. If the string ADDRESS1 is found at offset 10, Documaker would look at offset 58 and copy the data at that offset to the field on the section.
Use these boxes when you are performing a Documerge to Documaker conversion and you are using the VRF2EXP utility to generate a Documaker extract file from a Documerge VRF file.
Adjust Field Name Values for Block Tag Fields
Check this box if you want the system to update the Data field in the XDD with the field's root name (for example, ADDRESS) rather than with the unique field name (ADDRESS #001_01) that Documaker uses. The extract file produced by the VRF2EXP utility generates records that contain the root field name for the field at offset 10, then multiple data values concatenated one after the other beginning at offset 58.
Adjust Data Offset Values for Block Tag Fields
Check this box if you want the system to increment the Offset field in the XDD to the next portion of the block tag's data.
Field Description
Note You can find additional information about converting IStream model document files in the Oracle IStream Migration Utility User Guide.
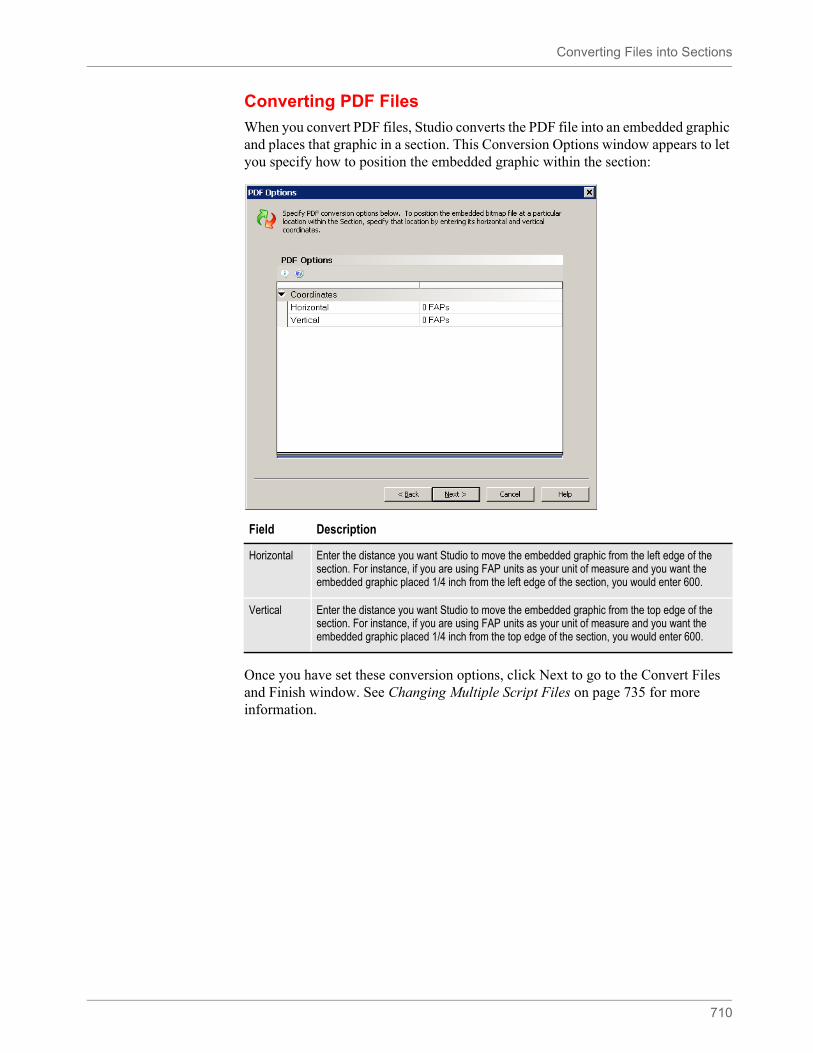
Converting Files into Sections
710
Converting PDF Files
When you convert PDF files, Studio converts the PDF file into an embedded graphic and places that graphic in a section. This Conversion Options window appears to let you specify how to position the embedded graphic within the section:
Once you have set these conversion options, click Next to go to the Convert Files and Finish window. See Changing Multiple Script Files on page 735 for more information.
Field Description
Horizontal Enter the distance you want Studio to move the embedded graphic from the left edge of the section. For instance, if you are using FAP units as your unit of measure and you want the embedded graphic placed 1/4 inch from the left edge of the section, you would enter 600.
Vertical Enter the distance you want Studio to move the embedded graphic from the top edge of the section. For instance, if you are using FAP units as your unit of measure and you want the embedded graphic placed 1/4 inch from the top edge of the section, you would enter 600.
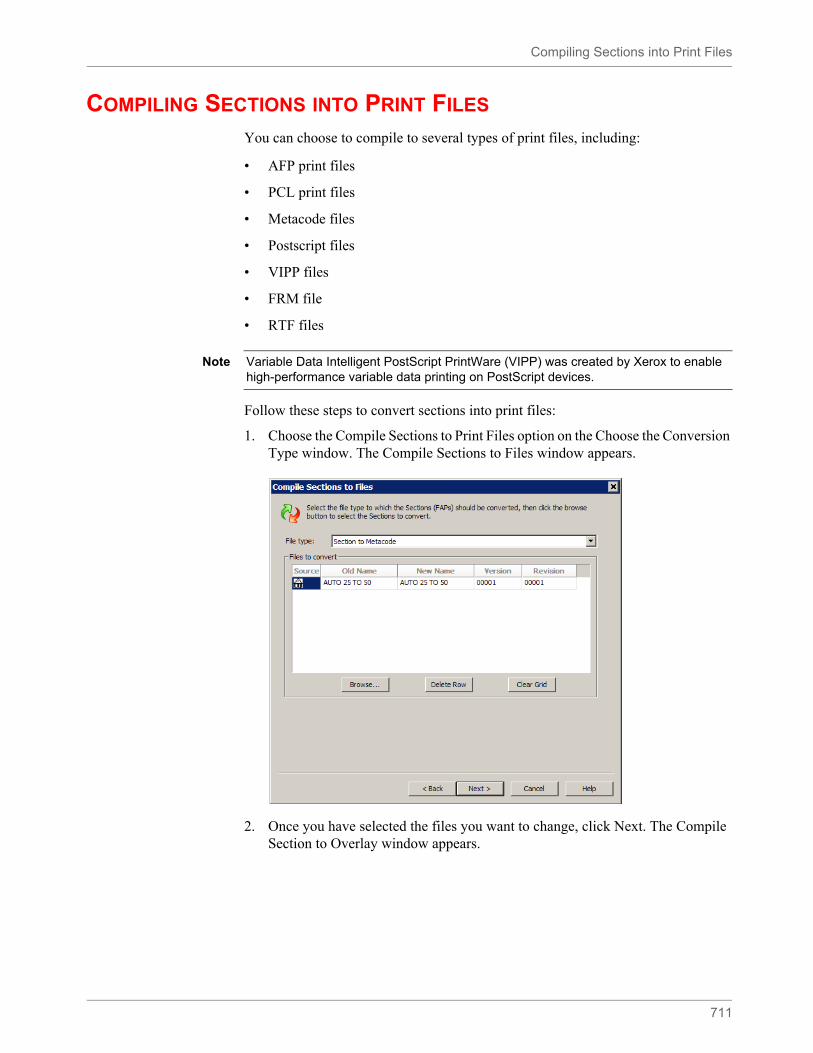
Compiling Sections into Print Files
711
COMPILING SECTIONS INTO PRINT FILES
You can choose to compile to several types of print files, including:
• AFP print files
• PCL print files
• Metacode files
• Postscript files
• VIPP files
• FRM file
• RTF files
Follow these steps to convert sections into print files:
1. Choose the Compile Sections to Print Files option on the Choose the Conversion Type window. The Compile Sections to Files window appears.
2. Once you have selected the files you want to change, click Next. The Compile Section to Overlay window appears.
Note Variable Data Intelligent PostScript PrintWare (VIPP) was created by Xerox to enable high-performance variable data printing on PostScript devices.
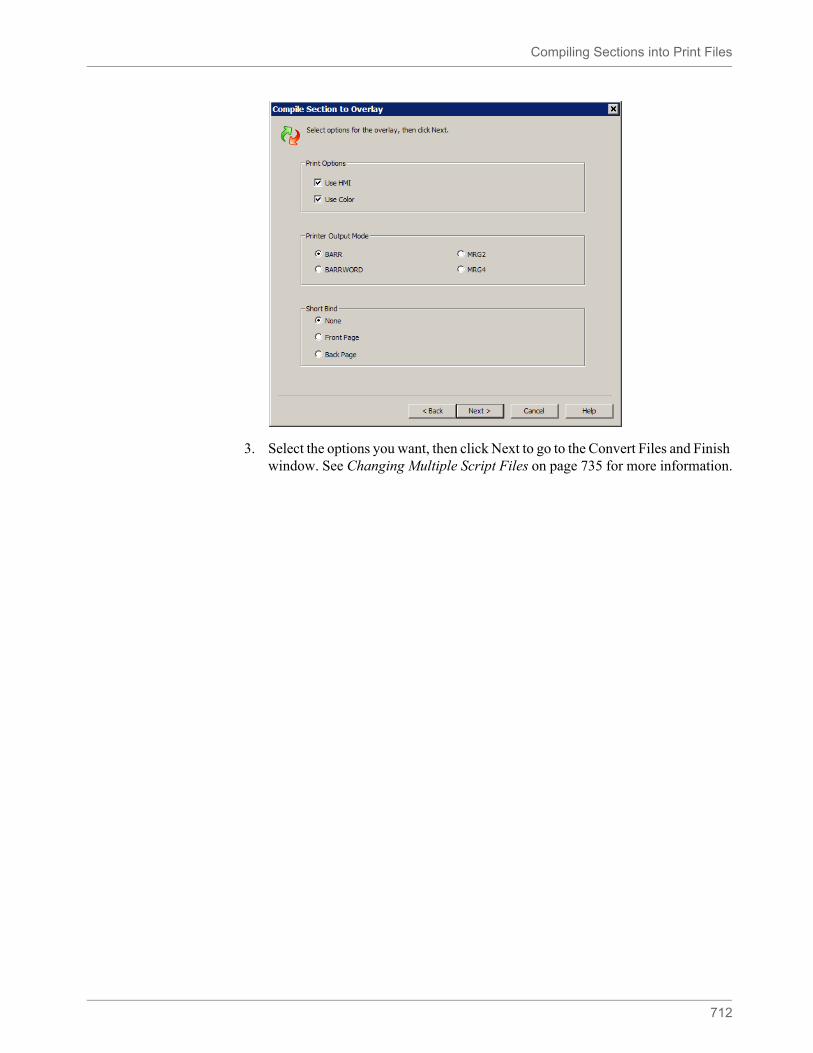
Compiling Sections into Print Files
712
3. Select the options you want, then click Next to go to the Convert Files and Finish window. See Changing Multiple Script Files on page 735 for more information.
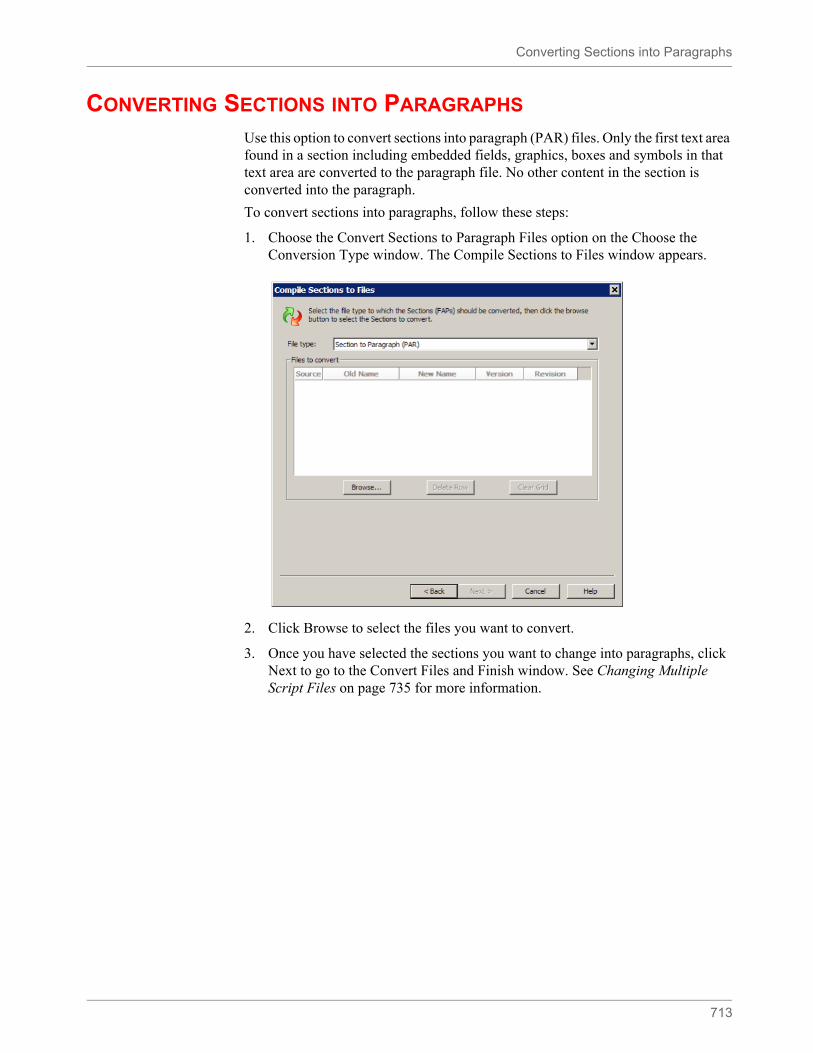
Converting Sections into Paragraphs
713
CONVERTING SECTIONS INTO PARAGRAPHS
Use this option to convert sections into paragraph (PAR) files. Only the first text area found in a section including embedded fields, graphics, boxes and symbols in that text area are converted to the paragraph file. No other content in the section is converted into the paragraph.
To convert sections into paragraphs, follow these steps:
1. Choose the Convert Sections to Paragraph Files option on the Choose the Conversion Type window. The Compile Sections to Files window appears.
2. Click Browse to select the files you want to convert.
3. Once you have selected the sections you want to change into paragraphs, click Next to go to the Convert Files and Finish window. See Changing Multiple Script Files on page 735 for more information.
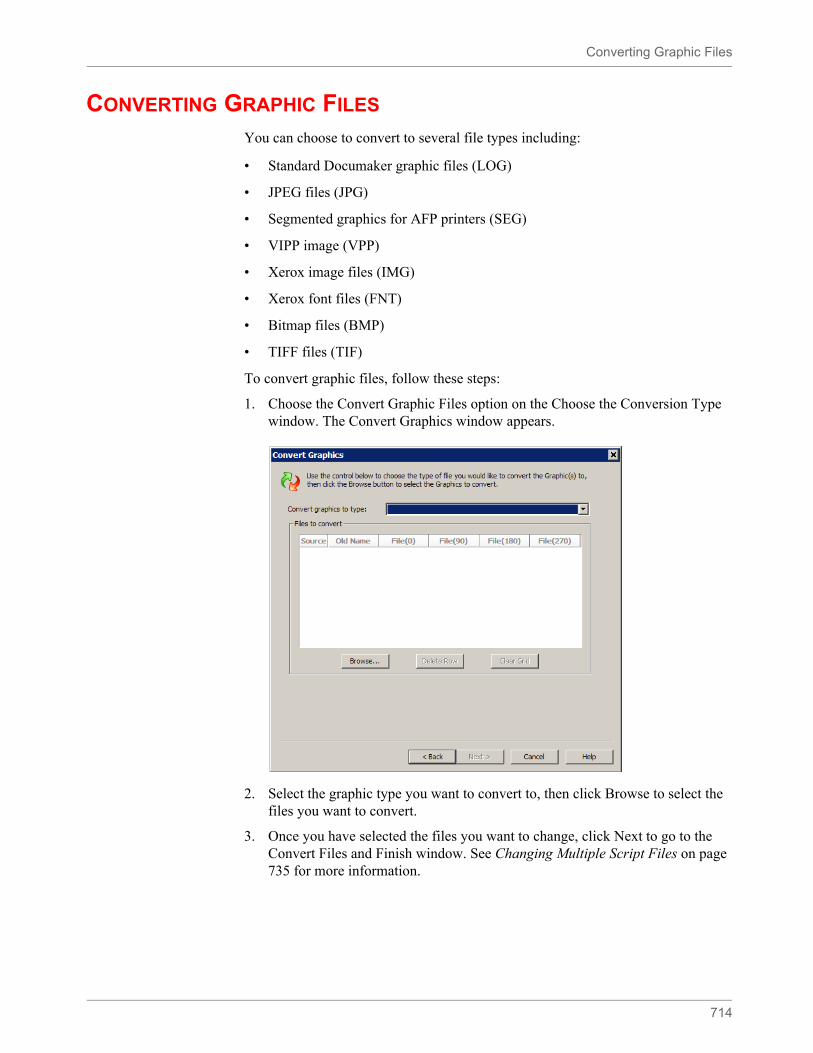
Converting Graphic Files
714
CONVERTING GRAPHIC FILES
You can choose to convert to several file types including:
• Standard Documaker graphic files (LOG)
• JPEG files (JPG)
• Segmented graphics for AFP printers (SEG)
• VIPP image (VPP)
• Xerox image files (IMG)
• Xerox font files (FNT)
• Bitmap files (BMP)
• TIFF files (TIF)
To convert graphic files, follow these steps:
1. Choose the Convert Graphic Files option on the Choose the Conversion Type window. The Convert Graphics window appears.
2. Select the graphic type you want to convert to, then click Browse to select the files you want to convert.
3. Once you have selected the files you want to change, click Next to go to the Convert Files and Finish window. See Changing Multiple Script Files on page 735 for more information.
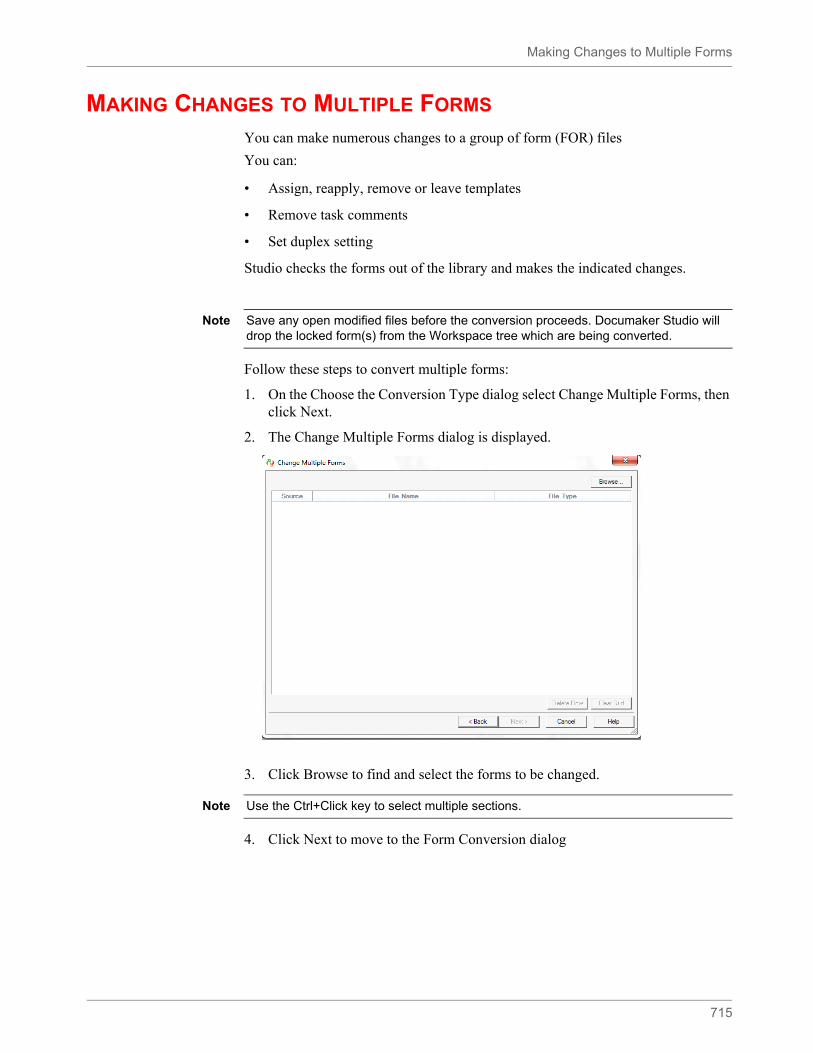
Making Changes to Multiple Forms
715
MAKING CHANGES TO MULTIPLE FORMS
You can make numerous changes to a group of form (FOR) files
You can:
• Assign, reapply, remove or leave templates
• Remove task comments
• Set duplex setting
Studio checks the forms out of the library and makes the indicated changes.
Follow these steps to convert multiple forms:
1. On the Choose the Conversion Type dialog select Change Multiple Forms, then click Next.
2. The Change Multiple Forms dialog is displayed.
3. Click Browse to find and select the forms to be changed.
4. Click Next to move to the Form Conversion dialog
Note Save any open modified files before the conversion proceeds. Documaker Studio will drop the locked form(s) from the Workspace tree which are being converted.
Note Use the Ctrl+Click key to select multiple sections.
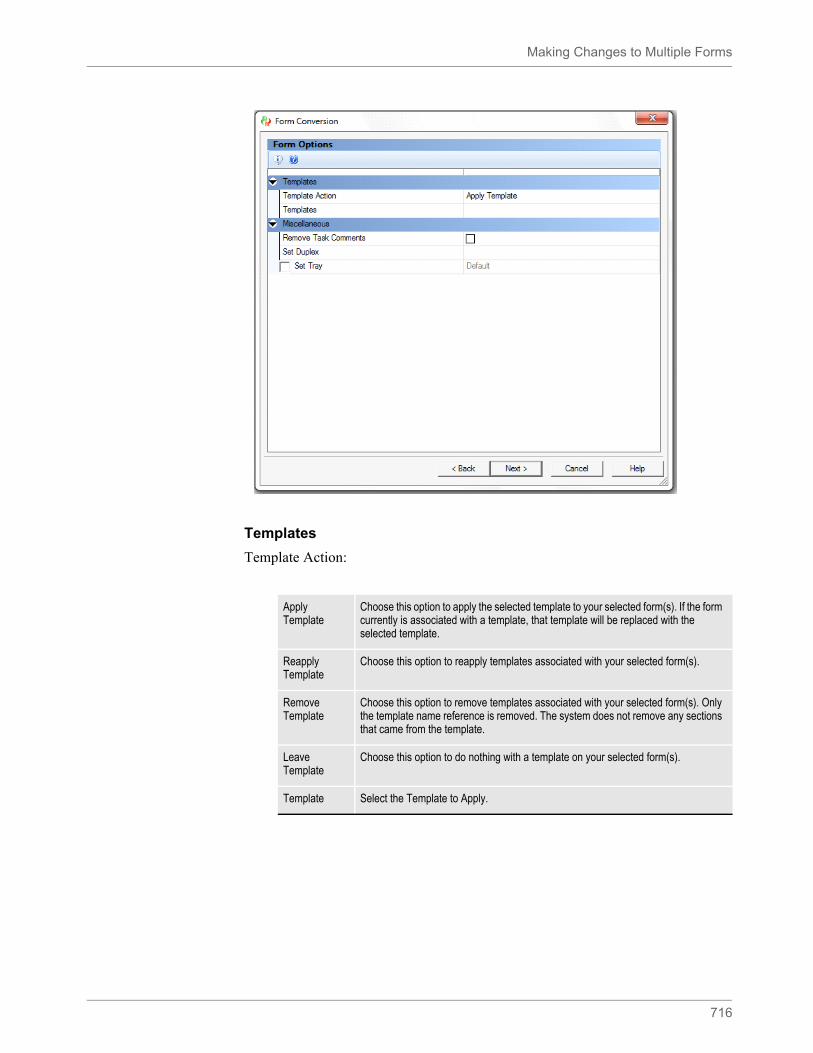
Making Changes to Multiple Forms
716
Templates
Template Action:
Apply Template
Choose this option to apply the selected template to your selected form(s). If the form currently is associated with a template, that template will be replaced with the selected template.
Reapply Template
Choose this option to reapply templates associated with your selected form(s).
Remove Template
Choose this option to remove templates associated with your selected form(s). Only the template name reference is removed. The system does not remove any sections that came from the template.
Leave Template
Choose this option to do nothing with a template on your selected form(s).
Template Select the Template to Apply.
Making Changes to Multiple Forms
717
Miscellaneous
Duplex Settings
If the form contains header sections, each of those header sections is set to the selected duplex value, as long as the section is not "View-only", "Hidden" or “Optional Back”.
If there are no header sections, or no header sections eligible to be set to the duplex value, then the first non-header section (which is not "View-only, "Hidden" or “Optional Back”) is set to the selected duplex value.
If there are no eligible header or body sections, but there is an eligible footer section, the duplex setting will be updated for the footer section.
Once you have selected the options you want, click Next to go to the Convert Files and Finish window. See Changing Multiple Script Files on page 735 for more information.
Note If you choose to either Apply, Reapply, or Remove a template, the form is updated with these template changes first, then any remaining changes are made. For example, if you apply a template which contains a header section whose Duplex value is set to “Default”, and you also change the “Set Duplex” value on the Form Conversion page to “Rolling”, the Duplex value for the header section will ultimately be set to “Rolling”.
Remove Task Comments
Choose this option to remove task comments from your selected form(s).
Set Tray Check the checkbox to the left of the Set Tray label, then choose the appropriate tray value from the dropdown box to the right to change the tray selection for the sections within the form.
Set Duplex Select the Duplex setting from the pick list to apply to the selected form(s).
Default Prints only on single-sided pages (not duplexed).
Back Page Is a back page in a duplexed form (pages 2, 4, 6, and so on).
Front Page Is a front page in a duplexed form (pages 1, 3, 5, and so on).
Rolling Prints on both sides of paper. Odd pages print on the front, even pages print on the back. Pages are duplexed in a book fashion, with odd pages on the right side, beginning with page 1, and even pages are on the left side, beginning with page 2.
Note: You must mark the first Section as either front or back. Then, mark subsequent Sections as rolling.
Short Bind Prints on both sides of paper. Odd pages print on the front, even pages print on the back. Pages are duplexed in flip chart fashion, top to bottom.
Note Entry only sections are not updated by this conversion as entry only sections do not print.
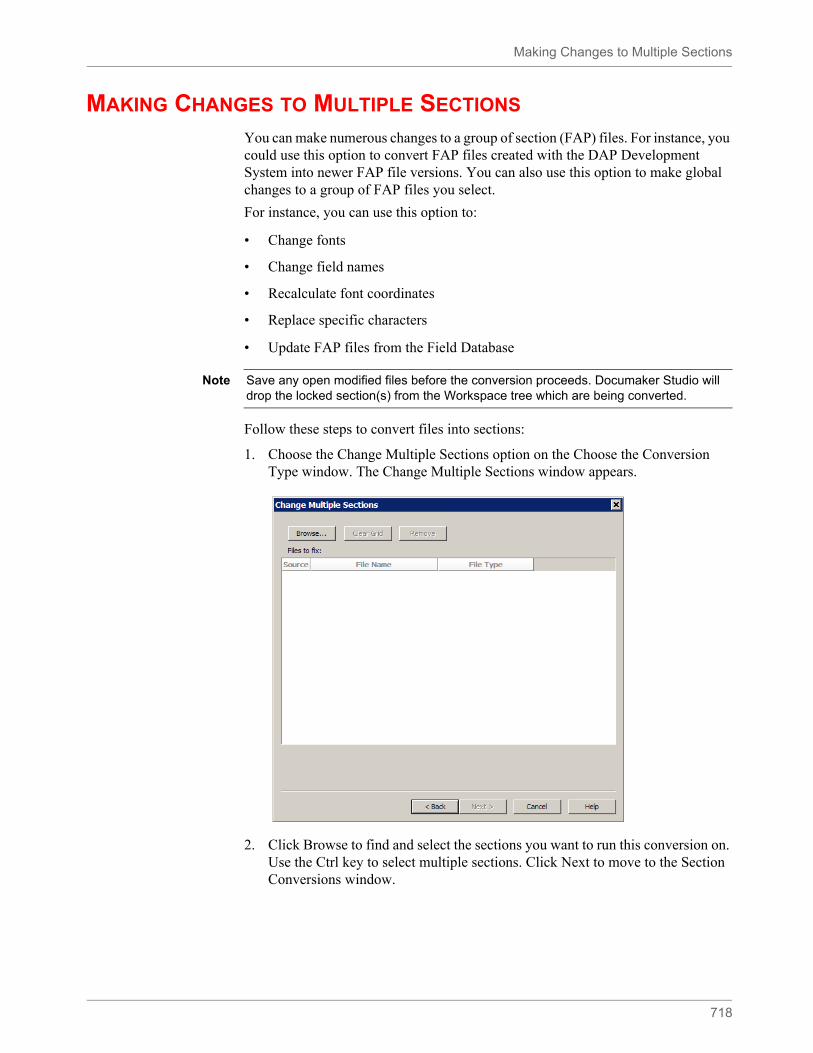
Making Changes to Multiple Sections
718
MAKING CHANGES TO MULTIPLE SECTIONS
You can make numerous changes to a group of section (FAP) files. For instance, you could use this option to convert FAP files created with the DAP Development System into newer FAP file versions. You can also use this option to make global changes to a group of FAP files you select.
For instance, you can use this option to:
• Change fonts
• Change field names
• Recalculate font coordinates
• Replace specific characters
• Update FAP files from the Field Database
Follow these steps to convert files into sections:
1. Choose the Change Multiple Sections option on the Choose the Conversion Type window. The Change Multiple Sections window appears.
2. Click Browse to find and select the sections you want to run this conversion on. Use the Ctrl key to select multiple sections. Click Next to move to the Section Conversions window.
Note Save any open modified files before the conversion proceeds. Documaker Studio will drop the locked section(s) from the Workspace tree which are being converted.
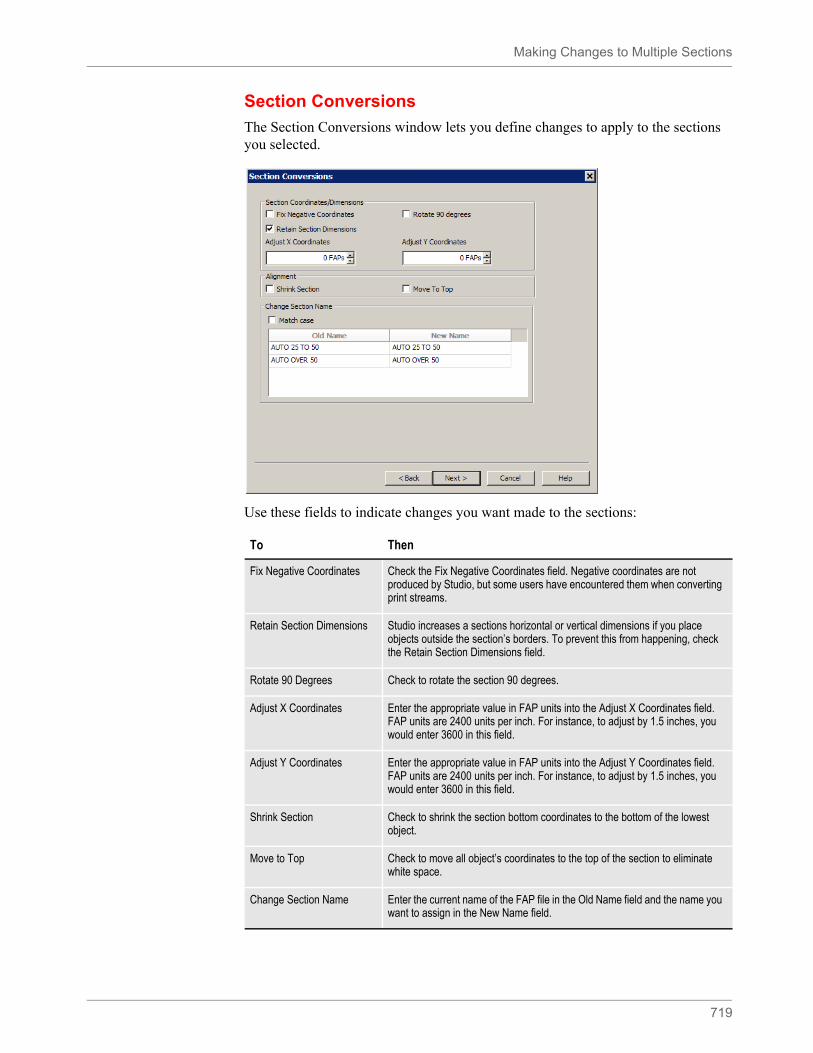
Making Changes to Multiple Sections
719
Section Conversions
The Section Conversions window lets you define changes to apply to the sections you selected.
Use these fields to indicate changes you want made to the sections:
To Then
Fix Negative Coordinates Check the Fix Negative Coordinates field. Negative coordinates are not produced by Studio, but some users have encountered them when converting print streams.
Retain Section Dimensions Studio increases a sections horizontal or vertical dimensions if you place objects outside the section’s borders. To prevent this from happening, check the Retain Section Dimensions field.
Rotate 90 Degrees Check to rotate the section 90 degrees.
Adjust X Coordinates Enter the appropriate value in FAP units into the Adjust X Coordinates field. FAP units are 2400 units per inch. For instance, to adjust by 1.5 inches, you would enter 3600 in this field.
Adjust Y Coordinates Enter the appropriate value in FAP units into the Adjust Y Coordinates field. FAP units are 2400 units per inch. For instance, to adjust by 1.5 inches, you would enter 3600 in this field.
Shrink Section Check to shrink the section bottom coordinates to the bottom of the lowest object.
Move to Top Check to move all object’s coordinates to the top of the section to eliminate white space.
Change Section Name Enter the current name of the FAP file in the Old Name field and the name you want to assign in the New Name field.
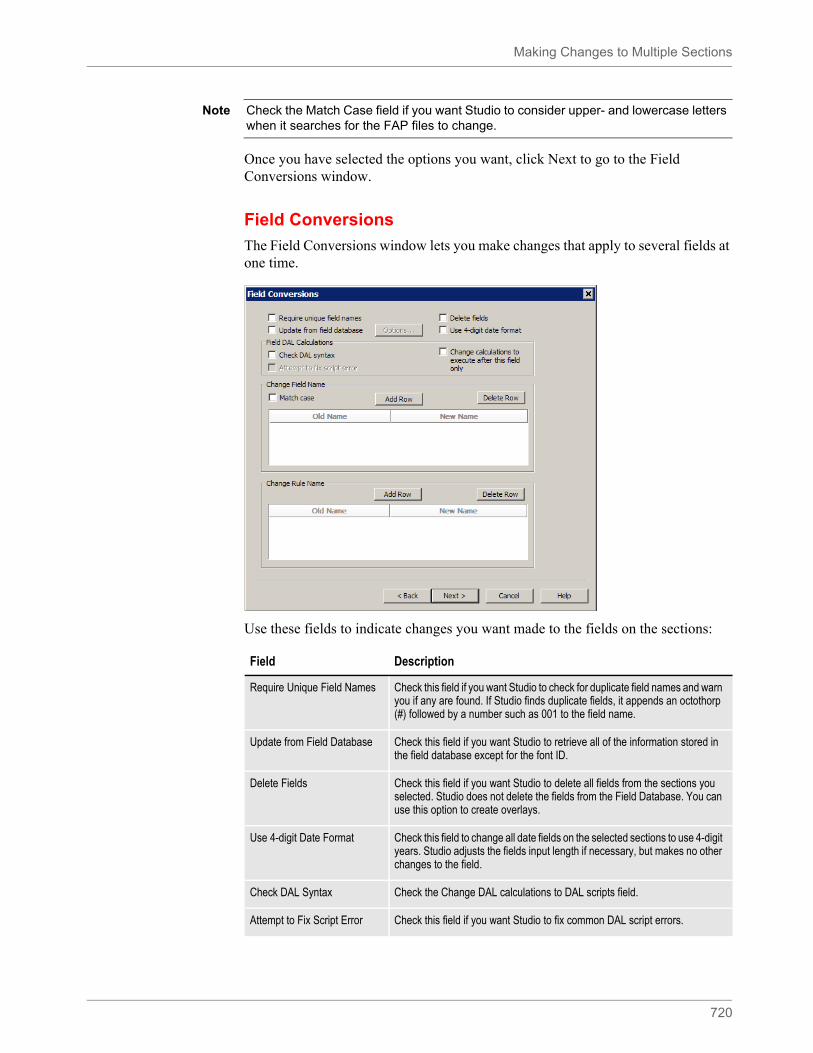
Making Changes to Multiple Sections
720
Once you have selected the options you want, click Next to go to the Field Conversions window.
Field Conversions
The Field Conversions window lets you make changes that apply to several fields at one time.
Use these fields to indicate changes you want made to the fields on the sections:
Note Check the Match Case field if you want Studio to consider upper- and lowercase letters when it searches for the FAP files to change.
Field Description
Require Unique Field Names Check this field if you want Studio to check for duplicate field names and warn you if any are found. If Studio finds duplicate fields, it appends an octothorp (#) followed by a number such as 001 to the field name.
Update from Field Database Check this field if you want Studio to retrieve all of the information stored in the field database except for the font ID.
Delete Fields Check this field if you want Studio to delete all fields from the sections you selected. Studio does not delete the fields from the Field Database. You can use this option to create overlays.
Use 4-digit Date Format Check this field to change all date fields on the selected sections to use 4-digit years. Studio adjusts the fields input length if necessary, but makes no other changes to the field.
Check DAL Syntax Check the Change DAL calculations to DAL scripts field.
Attempt to Fix Script Error Check this field if you want Studio to fix common DAL script errors.
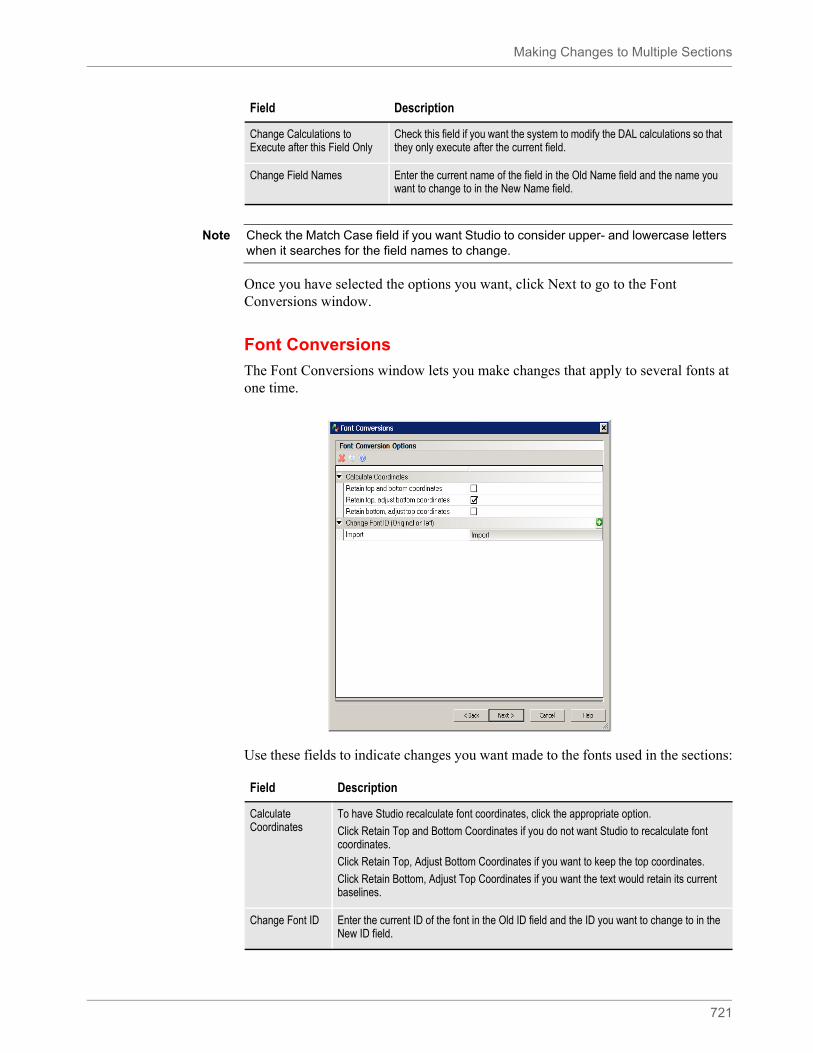
Making Changes to Multiple Sections
721
Once you have selected the options you want, click Next to go to the Font Conversions window.
Font Conversions
The Font Conversions window lets you make changes that apply to several fonts at one time.
Use these fields to indicate changes you want made to the fonts used in the sections:
Change Calculations to Execute after this Field Only
Check this field if you want the system to modify the DAL calculations so that they only execute after the current field.
Change Field Names Enter the current name of the field in the Old Name field and the name you want to change to in the New Name field.
Field Description
Note Check the Match Case field if you want Studio to consider upper- and lowercase letters when it searches for the field names to change.
Field Description
Calculate Coordinates
To have Studio recalculate font coordinates, click the appropriate option.
Click Retain Top and Bottom Coordinates if you do not want Studio to recalculate font coordinates.
Click Retain Top, Adjust Bottom Coordinates if you want to keep the top coordinates.
Click Retain Bottom, Adjust Top Coordinates if you want the text would retain its current baselines.
Change Font ID Enter the current ID of the font in the Old ID field and the ID you want to change to in the New ID field.
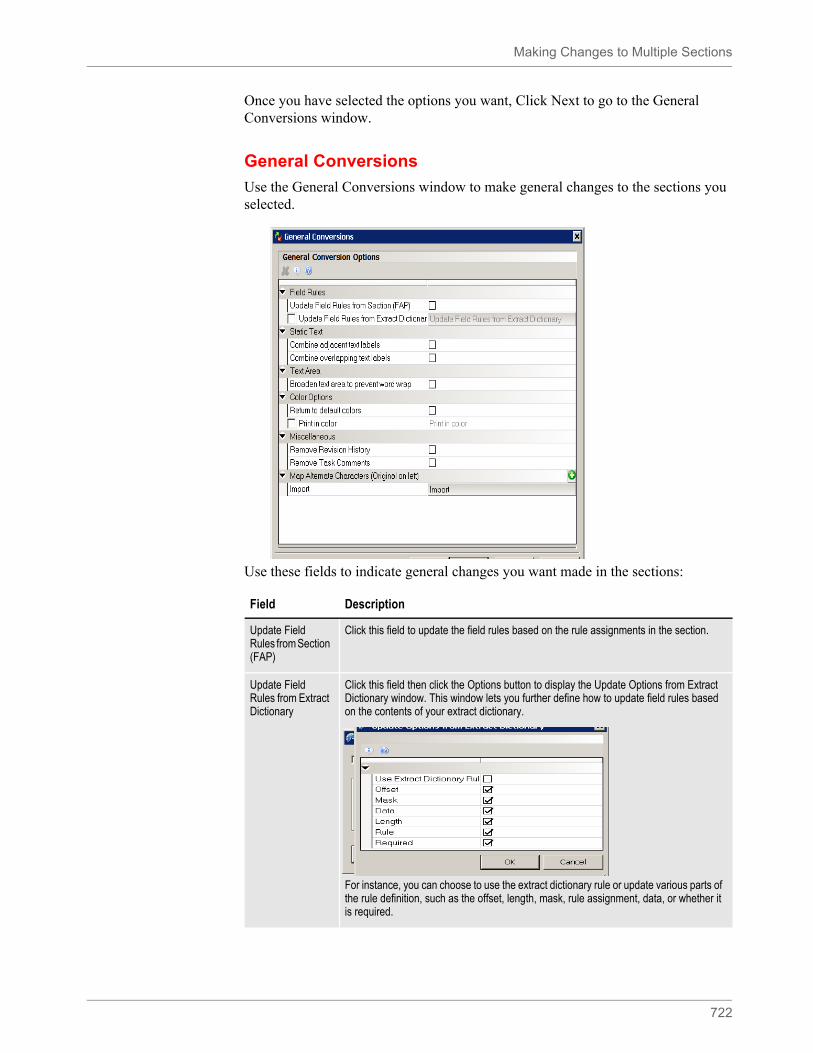
Making Changes to Multiple Sections
722
Once you have selected the options you want, Click Next to go to the General Conversions window.
General Conversions
Use the General Conversions window to make general changes to the sections you selected.
Use these fields to indicate general changes you want made in the sections:
Field Description
Update Field Rules from Section (FAP)
Click this field to update the field rules based on the rule assignments in the section.
Update Field Rules from Extract Dictionary
Click this field then click the Options button to display the Update Options from Extract Dictionary window. This window lets you further define how to update field rules based on the contents of your extract dictionary.
For instance, you can choose to use the extract dictionary rule or update various parts of the rule definition, such as the offset, length, mask, rule assignment, data, or whether it is required.
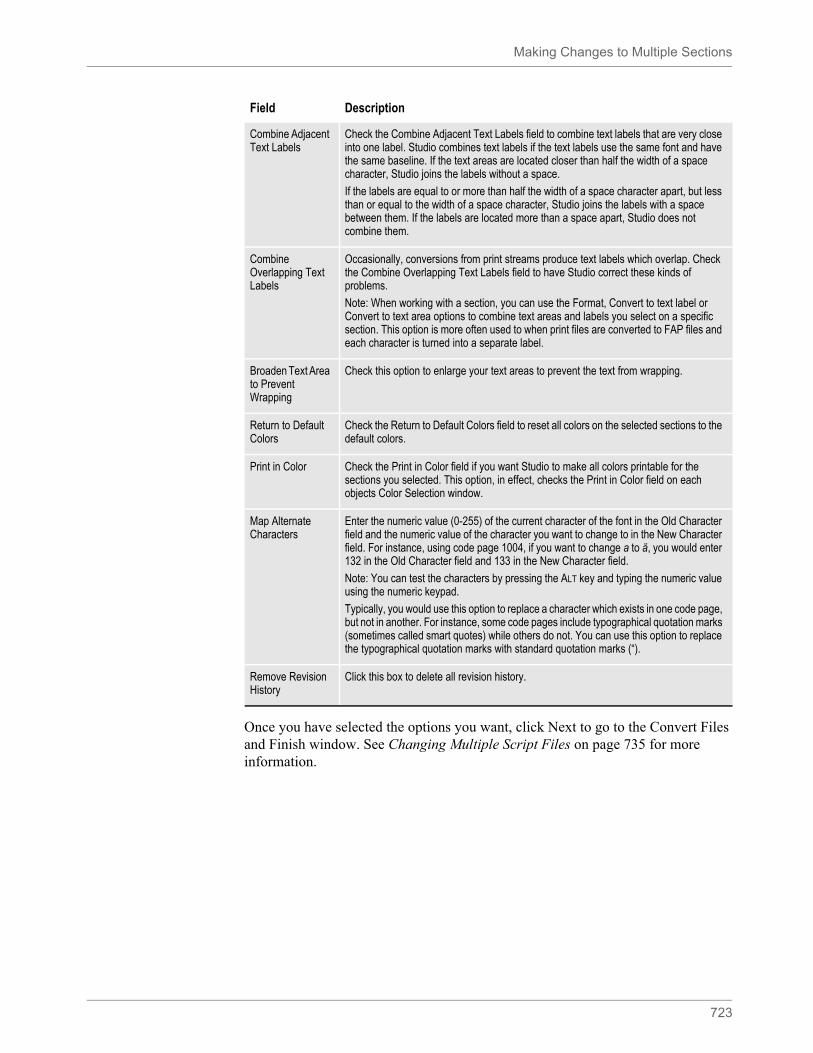
Making Changes to Multiple Sections
723
Once you have selected the options you want, click Next to go to the Convert Files and Finish window. See Changing Multiple Script Files on page 735 for more information.
Combine Adjacent Text Labels
Check the Combine Adjacent Text Labels field to combine text labels that are very close into one label. Studio combines text labels if the text labels use the same font and have the same baseline. If the text areas are located closer than half the width of a space character, Studio joins the labels without a space.
If the labels are equal to or more than half the width of a space character apart, but less than or equal to the width of a space character, Studio joins the labels with a space between them. If the labels are located more than a space apart, Studio does not combine them.
Combine Overlapping Text Labels
Occasionally, conversions from print streams produce text labels which overlap. Check the Combine Overlapping Text Labels field to have Studio correct these kinds of problems.
Note: When working with a section, you can use the Format, Convert to text label or Convert to text area options to combine text areas and labels you select on a specific section. This option is more often used to when print files are converted to FAP files and each character is turned into a separate label.
Broaden Text Area to Prevent Wrapping
Check this option to enlarge your text areas to prevent the text from wrapping.
Return to Default Colors
Check the Return to Default Colors field to reset all colors on the selected sections to the default colors.
Print in Color Check the Print in Color field if you want Studio to make all colors printable for the sections you selected. This option, in effect, checks the Print in Color field on each objects Color Selection window.
Map Alternate Characters
Enter the numeric value (0-255) of the current character of the font in the Old Character field and the numeric value of the character you want to change to in the New Character field. For instance, using code page 1004, if you want to change a to ä, you would enter 132 in the Old Character field and 133 in the New Character field.
Note: You can test the characters by pressing the ALT key and typing the numeric value using the numeric keypad.
Typically, you would use this option to replace a character which exists in one code page, but not in another. For instance, some code pages include typographical quotation marks (sometimes called smart quotes) while others do not. You can use this option to replace the typographical quotation marks with standard quotation marks (“).
Remove Revision History
Click this box to delete all revision history.
Field Description
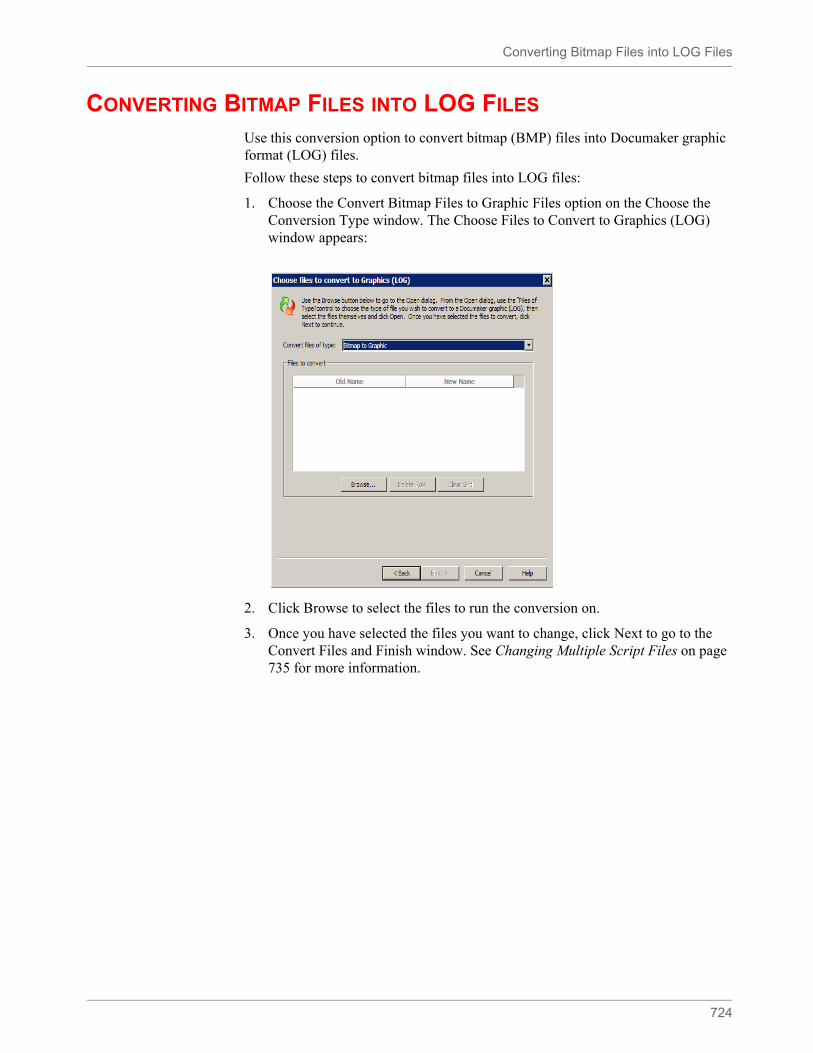
Converting Bitmap Files into LOG Files
724
CONVERTING BITMAP FILES INTO LOG FILES
Use this conversion option to convert bitmap (BMP) files into Documaker graphic format (LOG) files.
Follow these steps to convert bitmap files into LOG files:
1. Choose the Convert Bitmap Files to Graphic Files option on the Choose the Conversion Type window. The Choose Files to Convert to Graphics (LOG) window appears:
2. Click Browse to select the files to run the conversion on.
3. Once you have selected the files you want to change, click Next to go to the Convert Files and Finish window. See Changing Multiple Script Files on page 735 for more information.
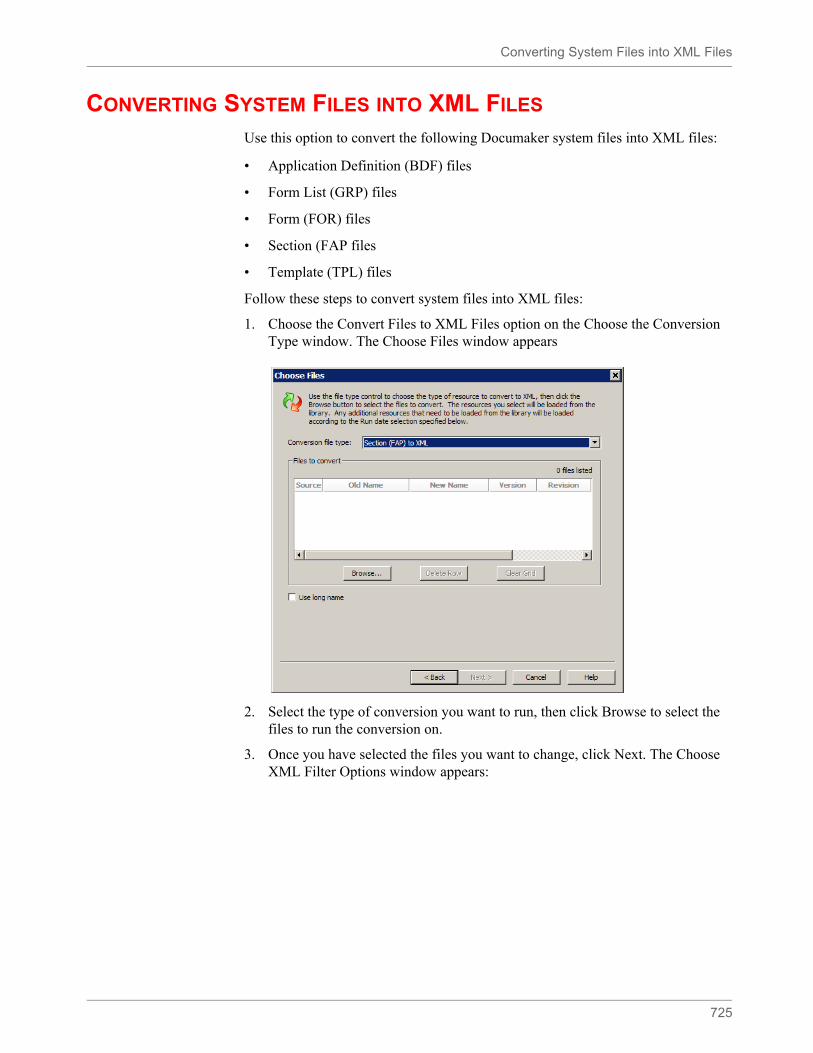
Converting System Files into XML Files
725
CONVERTING SYSTEM FILES INTO XML FILES
Use this option to convert the following Documaker system files into XML files:
• Application Definition (BDF) files
• Form List (GRP) files
• Form (FOR) files
• Section (FAP files
• Template (TPL) files
Follow these steps to convert system files into XML files:
1. Choose the Convert Files to XML Files option on the Choose the Conversion Type window. The Choose Files window appears
2. Select the type of conversion you want to run, then click Browse to select the files to run the conversion on.
3. Once you have selected the files you want to change, click Next. The Choose XML Filter Options window appears:
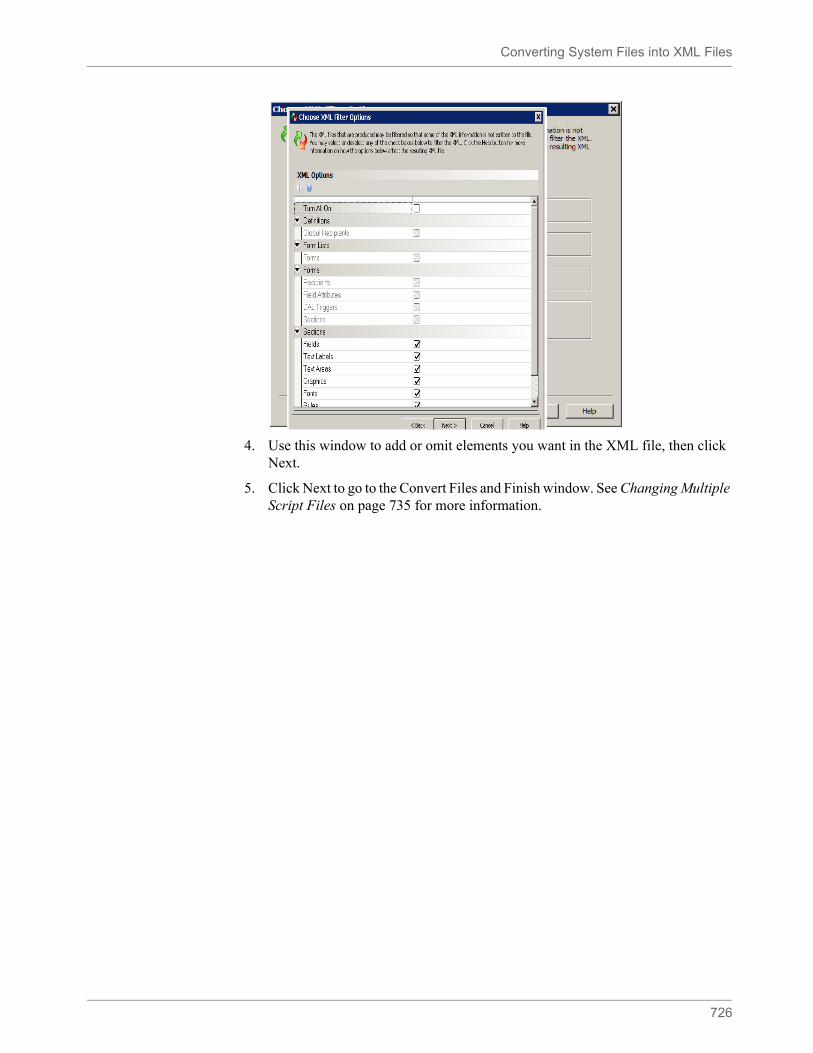
Converting System Files into XML Files
726
4. Use this window to add or omit elements you want in the XML file, then click Next.
5. Click Next to go to the Convert Files and Finish window. See Changing Multiple Script Files on page 735 for more information.
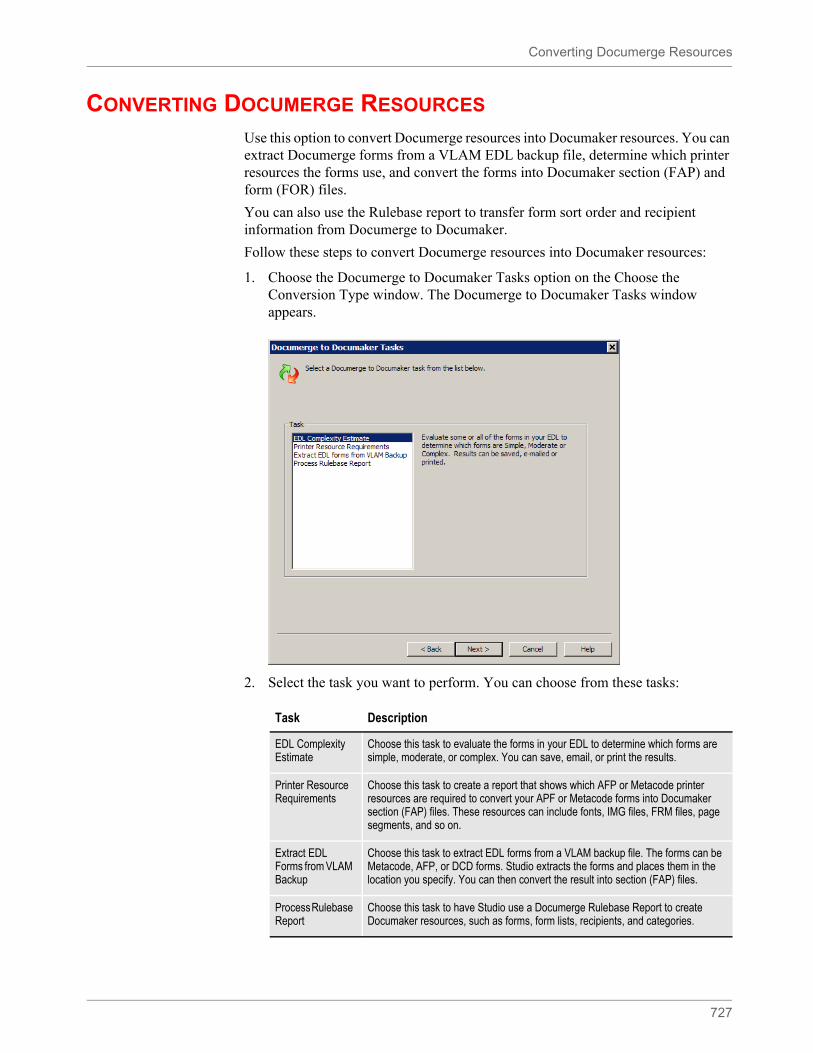
Converting Documerge Resources
727
CONVERTING DOCUMERGE RESOURCES
Use this option to convert Documerge resources into Documaker resources. You can extract Documerge forms from a VLAM EDL backup file, determine which printer resources the forms use, and convert the forms into Documaker section (FAP) and form (FOR) files.
You can also use the Rulebase report to transfer form sort order and recipient information from Documerge to Documaker.
Follow these steps to convert Documerge resources into Documaker resources:
1. Choose the Documerge to Documaker Tasks option on the Choose the Conversion Type window. The Documerge to Documaker Tasks window appears.
2. Select the task you want to perform. You can choose from these tasks:
Task Description
EDL Complexity Estimate
Choose this task to evaluate the forms in your EDL to determine which forms are simple, moderate, or complex. You can save, email, or print the results.
Printer Resource Requirements
Choose this task to create a report that shows which AFP or Metacode printer resources are required to convert your APF or Metacode forms into Documaker section (FAP) files. These resources can include fonts, IMG files, FRM files, page segments, and so on.
Extract EDL Forms from VLAM Backup
Choose this task to extract EDL forms from a VLAM backup file. The forms can be Metacode, AFP, or DCD forms. Studio extracts the forms and places them in the location you specify. You can then convert the result into section (FAP) files.
Process Rulebase Report
Choose this task to have Studio use a Documerge Rulebase Report to create Documaker resources, such as forms, form lists, recipients, and categories.
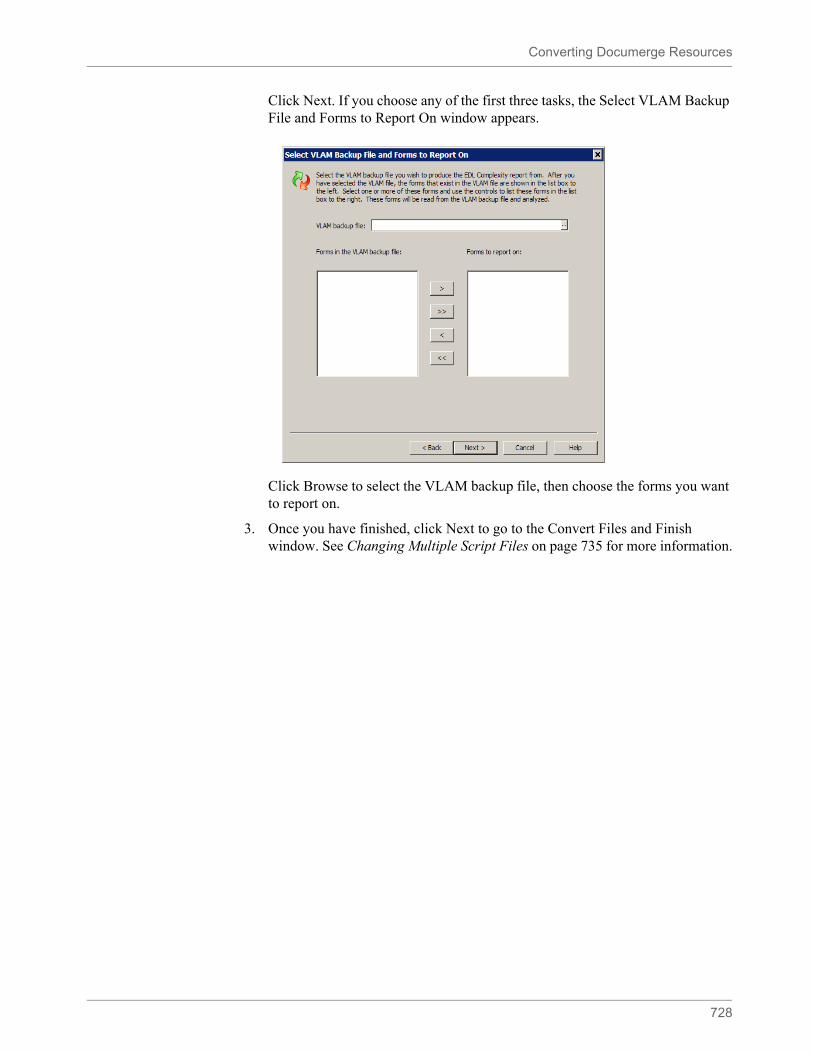
Converting Documerge Resources
728
Click Next. If you choose any of the first three tasks, the Select VLAM Backup File and Forms to Report On window appears.
Click Browse to select the VLAM backup file, then choose the forms you want to report on.
3. Once you have finished, click Next to go to the Convert Files and Finish window. See Changing Multiple Script Files on page 735 for more information.
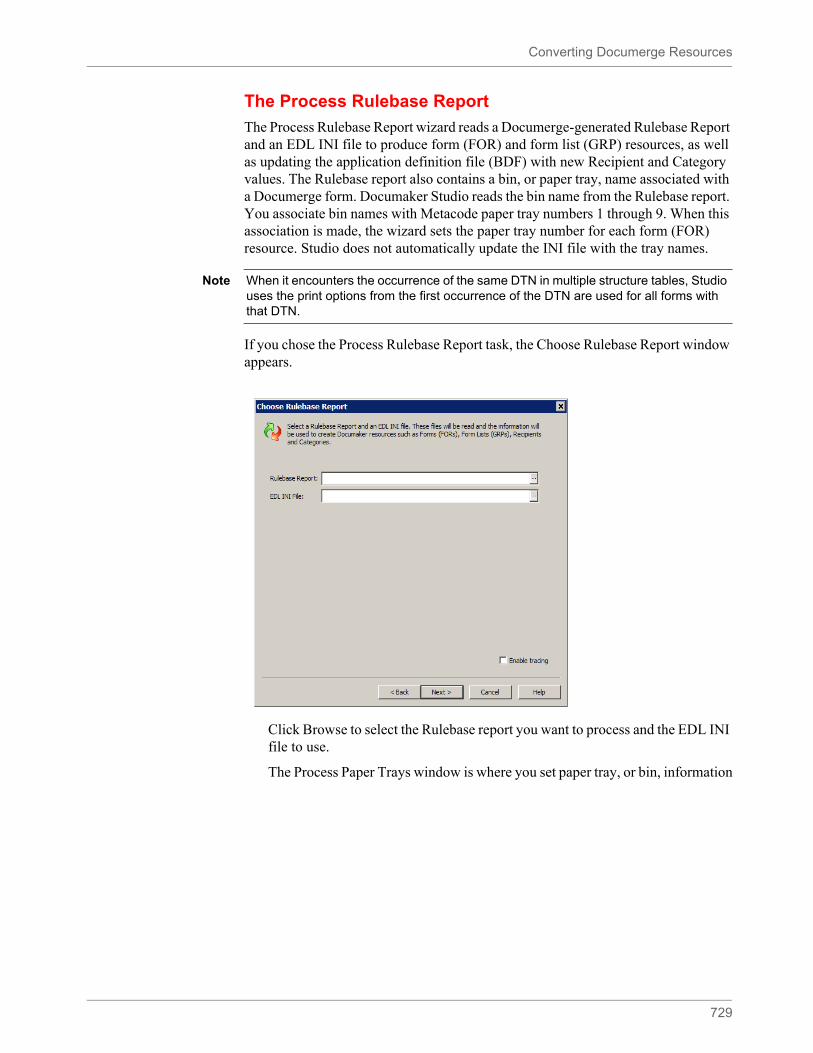
Converting Documerge Resources
729
The Process Rulebase Report
The Process Rulebase Report wizard reads a Documerge-generated Rulebase Report and an EDL INI file to produce form (FOR) and form list (GRP) resources, as well as updating the application definition file (BDF) with new Recipient and Category values. The Rulebase report also contains a bin, or paper tray, name associated with a Documerge form. Documaker Studio reads the bin name from the Rulebase report. You associate bin names with Metacode paper tray numbers 1 through 9. When this association is made, the wizard sets the paper tray number for each form (FOR) resource. Studio does not automatically update the INI file with the tray names.
If you chose the Process Rulebase Report task, the Choose Rulebase Report window appears.
Click Browse to select the Rulebase report you want to process and the EDL INI file to use.
The Process Paper Trays window is where you set paper tray, or bin, information
Note When it encounters the occurrence of the same DTN in multiple structure tables, Studio uses the print options from the first occurrence of the DTN are used for all forms with that DTN.
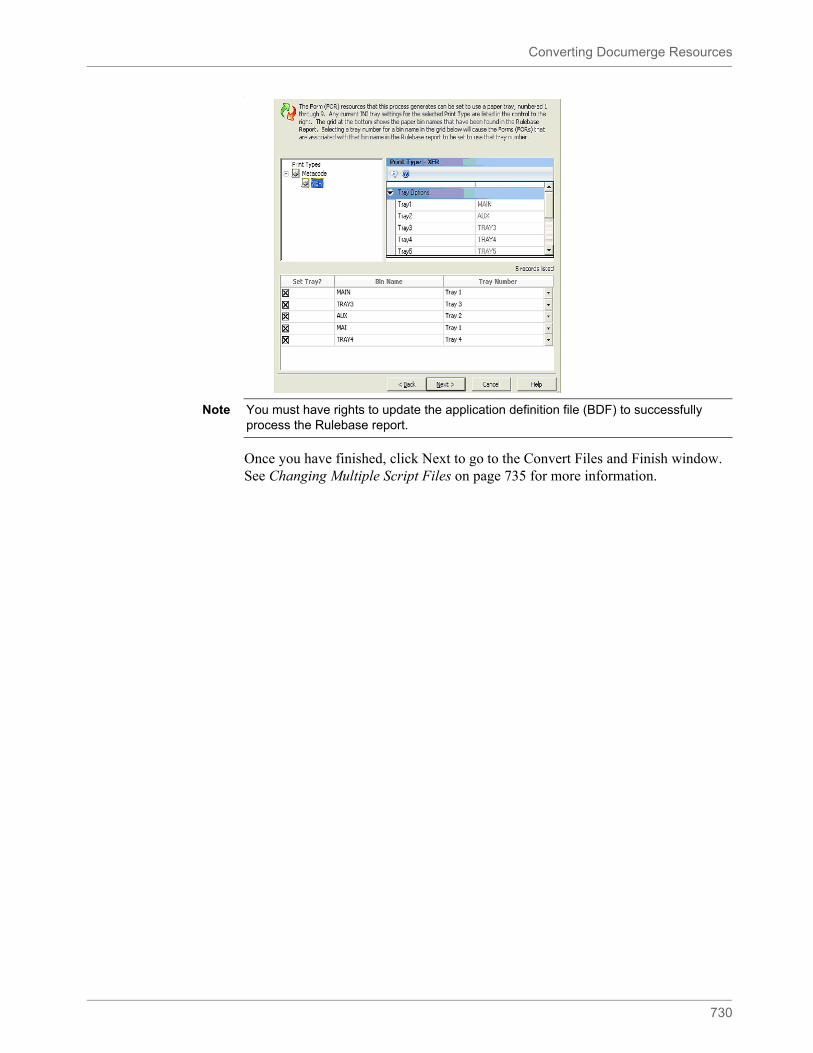
Converting Documerge Resources
730
:
Once you have finished, click Next to go to the Convert Files and Finish window. See Changing Multiple Script Files on page 735 for more information.
Note You must have rights to update the application definition file (BDF) to successfully process the Rulebase report.
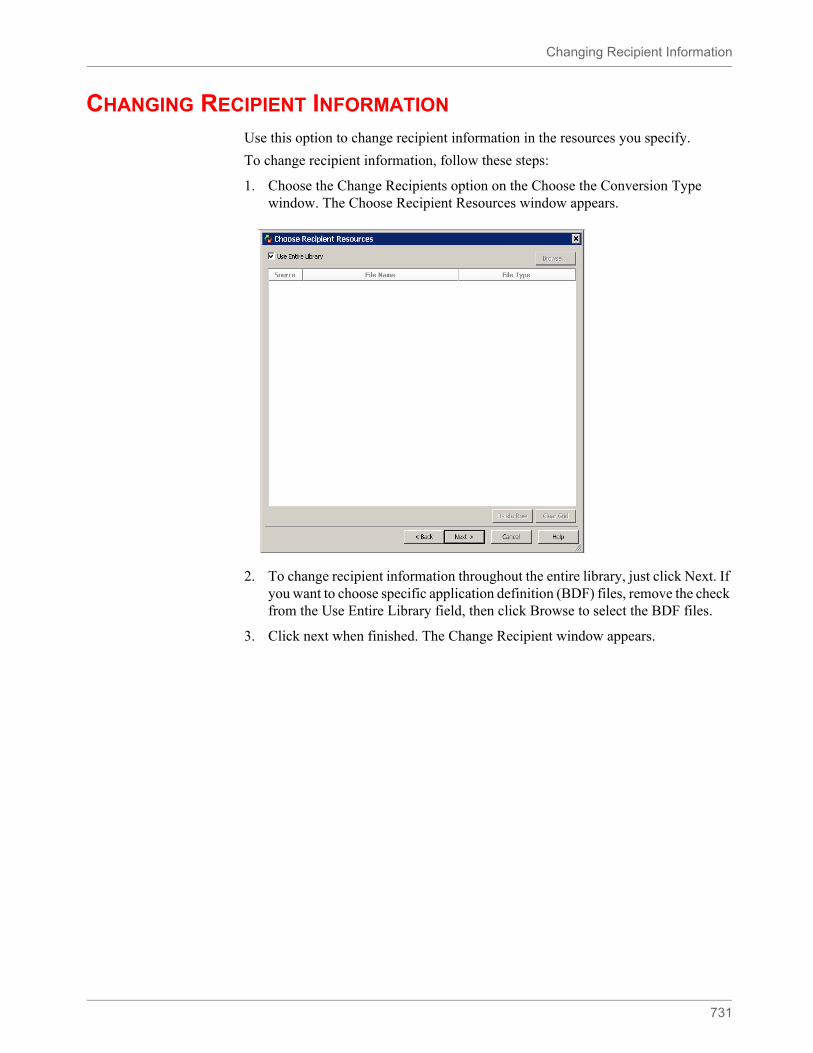
Changing Recipient Information
731
CHANGING RECIPIENT INFORMATION
Use this option to change recipient information in the resources you specify.
To change recipient information, follow these steps:
1. Choose the Change Recipients option on the Choose the Conversion Type window. The Choose Recipient Resources window appears.
2. To change recipient information throughout the entire library, just click Next. If you want to choose specific application definition (BDF) files, remove the check from the Use Entire Library field, then click Browse to select the BDF files.
3. Click next when finished. The Change Recipient window appears.
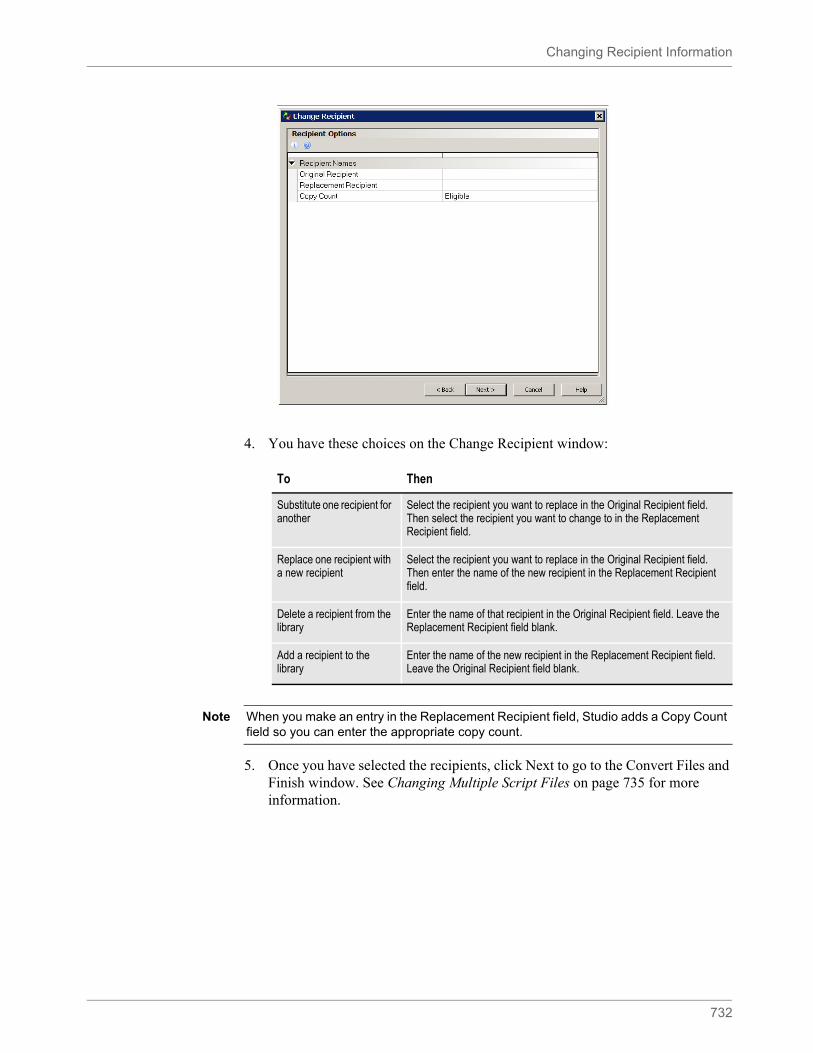
Changing Recipient Information
732
4. You have these choices on the Change Recipient window:
5. Once you have selected the recipients, click Next to go to the Convert Files and Finish window. See Changing Multiple Script Files on page 735 for more information.
To Then
Substitute one recipient for another
Select the recipient you want to replace in the Original Recipient field. Then select the recipient you want to change to in the Replacement Recipient field.
Replace one recipient with a new recipient
Select the recipient you want to replace in the Original Recipient field. Then enter the name of the new recipient in the Replacement Recipient field.
Delete a recipient from the library
Enter the name of that recipient in the Original Recipient field. Leave the Replacement Recipient field blank.
Add a recipient to the library
Enter the name of the new recipient in the Replacement Recipient field. Leave the Original Recipient field blank.
Note When you make an entry in the Replacement Recipient field, Studio adds a Copy Count field so you can enter the appropriate copy count.
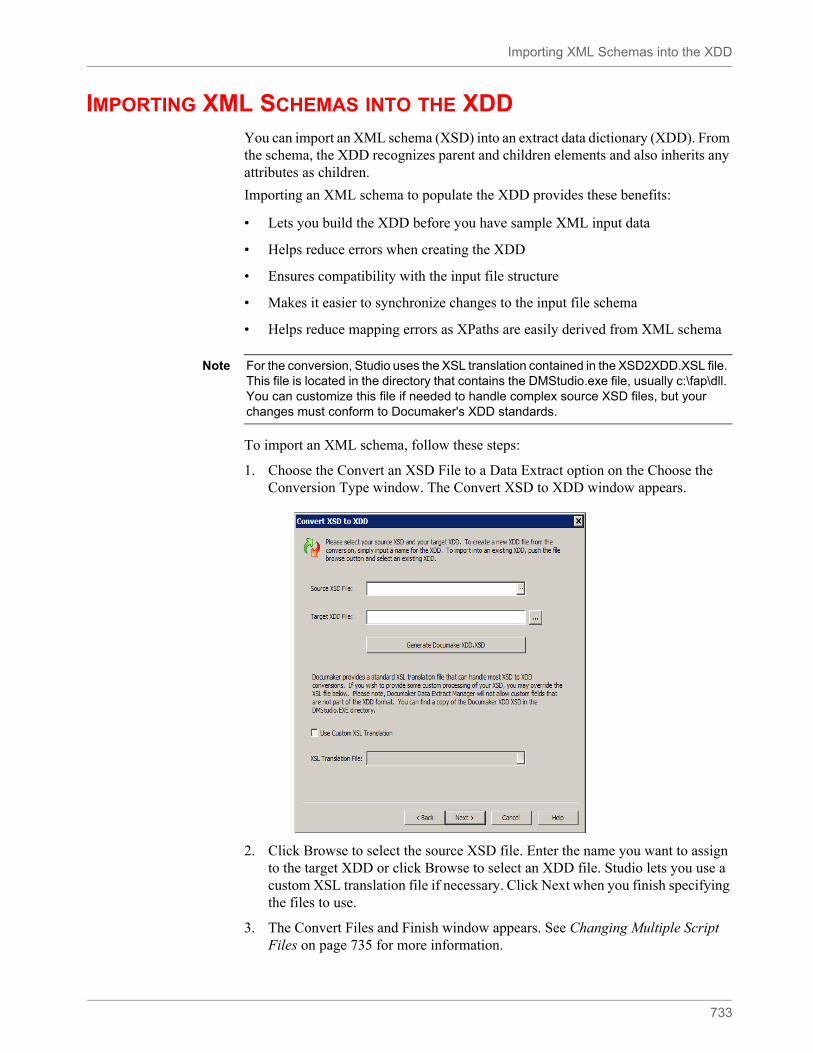
Importing XML Schemas into the XDD
733
IMPORTING XML SCHEMAS INTO THE XDDYou can import an XML schema (XSD) into an extract data dictionary (XDD). From the schema, the XDD recognizes parent and children elements and also inherits any attributes as children.
Importing an XML schema to populate the XDD provides these benefits:
• Lets you build the XDD before you have sample XML input data
• Helps reduce errors when creating the XDD
• Ensures compatibility with the input file structure
• Makes it easier to synchronize changes to the input file schema
• Helps reduce mapping errors as XPaths are easily derived from XML schema
To import an XML schema, follow these steps:
1. Choose the Convert an XSD File to a Data Extract option on the Choose the Conversion Type window. The Convert XSD to XDD window appears.
2. Click Browse to select the source XSD file. Enter the name you want to assign to the target XDD or click Browse to select an XDD file. Studio lets you use a custom XSL translation file if necessary. Click Next when you finish specifying the files to use.
3. The Convert Files and Finish window appears. See Changing Multiple Script Files on page 735 for more information.
Note For the conversion, Studio uses the XSL translation contained in the XSD2XDD.XSL file. This file is located in the directory that contains the DMStudio.exe file, usually c:\fap\dll. You can customize this file if needed to handle complex source XSD files, but your changes must conform to Documaker's XDD standards.

Importing XML Schemas into the XDD
734
Keep in mind...
• Studio imports all XDD fields as strings.
• Studio assigns the AnyToAny rule to these fields in the XDD
• Documaker does not validate the XSD file during processing
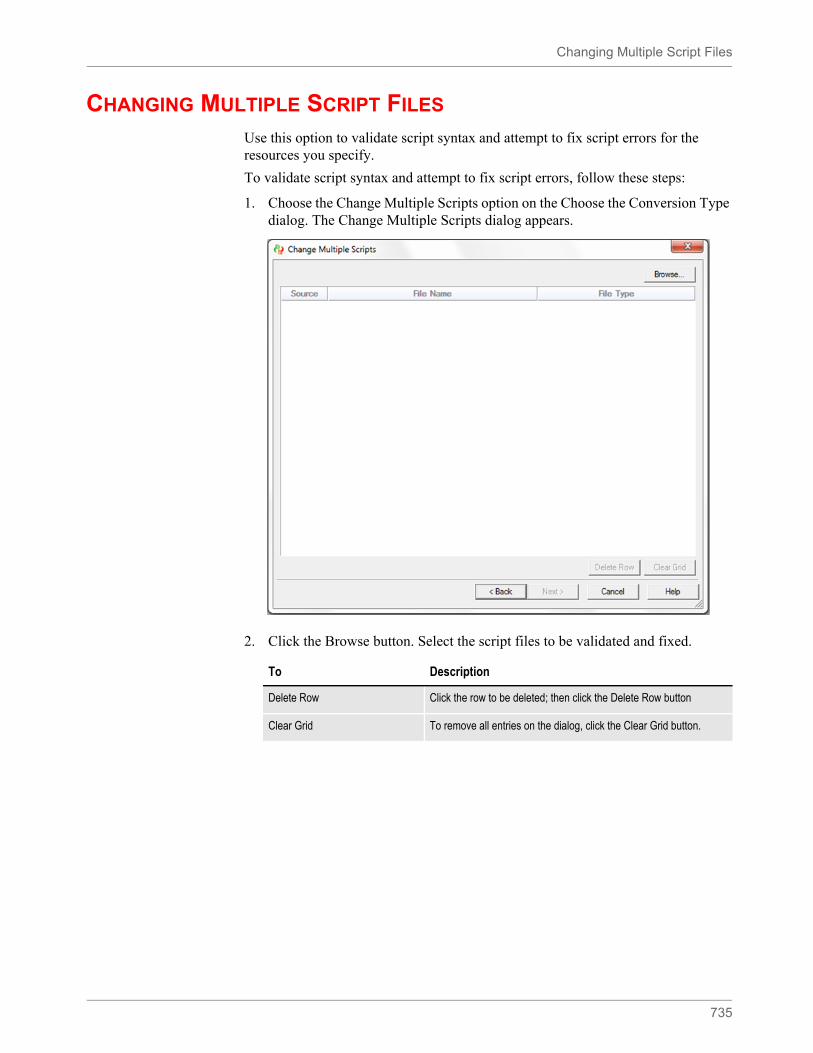
Changing Multiple Script Files
735
CHANGING MULTIPLE SCRIPT FILES
Use this option to validate script syntax and attempt to fix script errors for the resources you specify.
To validate script syntax and attempt to fix script errors, follow these steps:
1. Choose the Change Multiple Scripts option on the Choose the Conversion Type dialog. The Change Multiple Scripts dialog appears.
2. Click the Browse button. Select the script files to be validated and fixed.
To Description
Delete Row Click the row to be deleted; then click the Delete Row button
Clear Grid To remove all entries on the dialog, click the Clear Grid button.
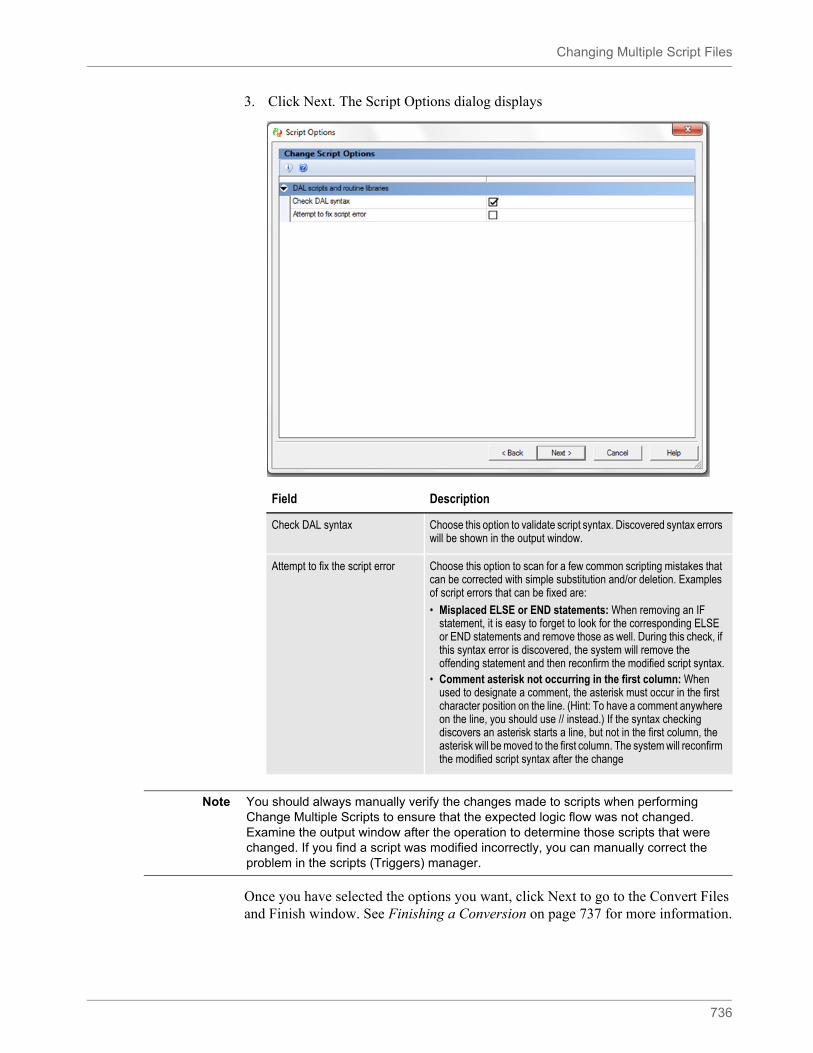
Changing Multiple Script Files
736
3. Click Next. The Script Options dialog displays
Once you have selected the options you want, click Next to go to the Convert Files and Finish window. See Finishing a Conversion on page 737 for more information.
Field Description
Check DAL syntax Choose this option to validate script syntax. Discovered syntax errors will be shown in the output window.
Attempt to fix the script error Choose this option to scan for a few common scripting mistakes that can be corrected with simple substitution and/or deletion. Examples of script errors that can be fixed are:
• Misplaced ELSE or END statements: When removing an IF statement, it is easy to forget to look for the corresponding ELSE or END statements and remove those as well. During this check, if this syntax error is discovered, the system will remove the offending statement and then reconfirm the modified script syntax.
• Comment asterisk not occurring in the first column: When used to designate a comment, the asterisk must occur in the first character position on the line. (Hint: To have a comment anywhere on the line, you should use // instead.) If the syntax checking discovers an asterisk starts a line, but not in the first column, the asterisk will be moved to the first column. The system will reconfirm the modified script syntax after the change
Note You should always manually verify the changes made to scripts when performing Change Multiple Scripts to ensure that the expected logic flow was not changed. Examine the output window after the operation to determine those scripts that were changed. If you find a script was modified incorrectly, you can manually correct the problem in the scripts (Triggers) manager.
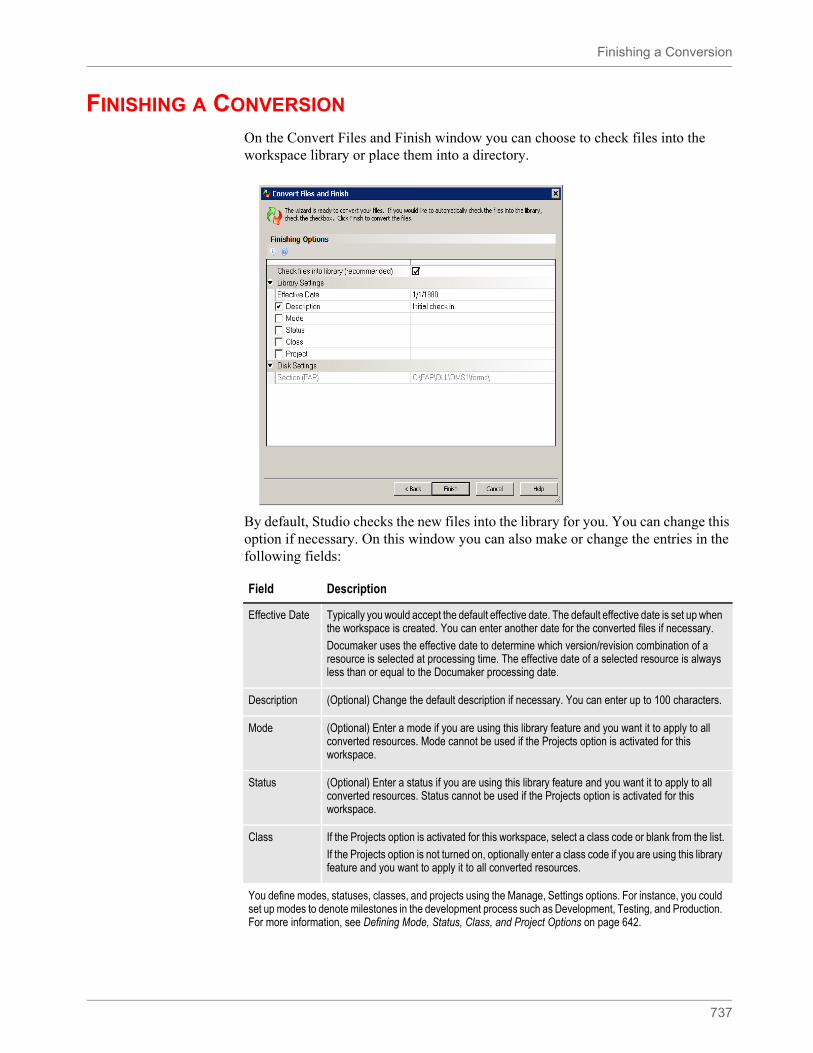
Finishing a Conversion
737
FINISHING A CONVERSION
On the Convert Files and Finish window you can choose to check files into the workspace library or place them into a directory.
By default, Studio checks the new files into the library for you. You can change this option if necessary. On this window you can also make or change the entries in the following fields:
Field Description
Effective Date Typically you would accept the default effective date. The default effective date is set up when the workspace is created. You can enter another date for the converted files if necessary.
Documaker uses the effective date to determine which version/revision combination of a resource is selected at processing time. The effective date of a selected resource is always less than or equal to the Documaker processing date.
Description (Optional) Change the default description if necessary. You can enter up to 100 characters.
Mode (Optional) Enter a mode if you are using this library feature and you want it to apply to all converted resources. Mode cannot be used if the Projects option is activated for this workspace.
Status (Optional) Enter a status if you are using this library feature and you want it to apply to all converted resources. Status cannot be used if the Projects option is activated for this workspace.
Class If the Projects option is activated for this workspace, select a class code or blank from the list.
If the Projects option is not turned on, optionally enter a class code if you are using this library feature and you want to apply it to all converted resources.
You define modes, statuses, classes, and projects using the Manage, Settings options. For instance, you could set up modes to denote milestones in the development process such as Development, Testing, and Production. For more information, see Defining Mode, Status, Class, and Project Options on page 642.
Finishing a Conversion
738
Click Finish to convert the files.
Project If the Projects option is turned on for this workspace, select a project code or a value of blank from the list.
If the Projects option is not turned on, optionally enter a project code if you are using this library feature and you want to apply it to all converted resources.
Save Files to Disk at Location
This field is only available when the Check File into Library box is not selected.
Files from a conversion that could be saved to this location are FAP files (sections) and LOG files (graphics).
Form (FOR) This option is only available when the Check File into Library box is not selected.
Files from a conversion that could be saved to this location are FOR files (forms).
Graphic (LOG) This option is only available when the Check File into Library box is not selected.
Files from a conversion that could be saved to this location are LOG files (graphics). Use this option to specify the location for LOG files when LOG files are not stored in the same folder as FAP files (sections).
Save the FXR This option is only available when a normalized AFP or Metacode file, where the fonts are embedded in a print stream, is being converted.
Field Description
You define modes, statuses, classes, and projects using the Manage, Settings options. For instance, you could set up modes to denote milestones in the development process such as Development, Testing, and Production. For more information, see Defining Mode, Status, Class, and Project Options on page 642.
739
Chapter 16
Producing Reports
The Reports option in the Workspace tree lets you print a variety of system reports. A wizard guides you through the process of selecting the information you want to appear on the report.
Studio displays the result and gives you the option of viewing it on your screen, sending it to your printer, saving it in HTML format, or emailing the report.
This chapter includes the following topics:
• Overview on page 740
• Printing Reports on page 743
• Printing a Finishing Report on page 749
• Printing the Documerge Field Report on page 753
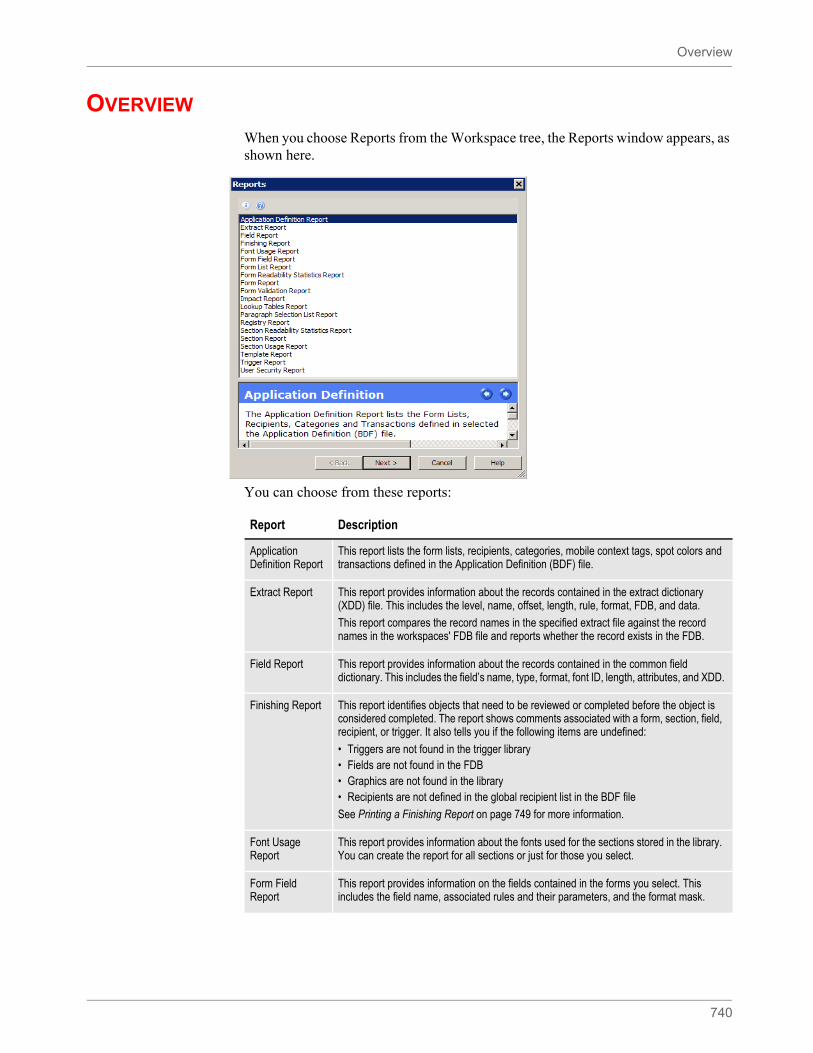
Overview
740
OVERVIEW
When you choose Reports from the Workspace tree, the Reports window appears, as shown here.
You can choose from these reports:
Report Description
Application Definition Report
This report lists the form lists, recipients, categories, mobile context tags, spot colors and transactions defined in the Application Definition (BDF) file.
Extract Report This report provides information about the records contained in the extract dictionary (XDD) file. This includes the level, name, offset, length, rule, format, FDB, and data.
This report compares the record names in the specified extract file against the record names in the workspaces' FDB file and reports whether the record exists in the FDB.
Field Report This report provides information about the records contained in the common field dictionary. This includes the field’s name, type, format, font ID, length, attributes, and XDD.
Finishing Report This report identifies objects that need to be reviewed or completed before the object is considered completed. The report shows comments associated with a form, section, field, recipient, or trigger. It also tells you if the following items are undefined:
• Triggers are not found in the trigger library • Fields are not found in the FDB • Graphics are not found in the library• Recipients are not defined in the global recipient list in the BDF file
See Printing a Finishing Report on page 749 for more information.
Font Usage Report
This report provides information about the fonts used for the sections stored in the library. You can create the report for all sections or just for those you select.
Form Field Report
This report provides information on the fields contained in the forms you select. This includes the field name, associated rules and their parameters, and the format mask.
Overview
741
Form List Report This report provides information for the form list files you select. This includes the form name, form description, DEC options, pre-selected options, file names, triggers, and regional date processing (RDP) rules.
Form Readability Statistics Report
This report shows readability statistics and Flesch score information for the sections that comprise the forms you select. This includes character, sentence, and syllable counts for the text areas contained in the sections defined in the form as well as averages for words per sentence and characters per word,
Form Report This report provides information about the sections in the forms you selected. This includes information about the sections (name, options, size, orientation and number of pages) and the fields contained in the section (name, rule name, format mask, and rule parameters). The report also provides form section options, such as recipient names, copy counts, and section rule names and parameters.
Form Validation Report
This report provides validation information about the sections defined in the forms you selected. This report can tell you...
• Whether sections referenced in the form (FAP files) exist in the library • If the sections defined in the form have assigned recipients• Any sections with assigned recipients and a copy count of zero• Any sections that contain text areas or multiline text fields marked as Can Grow, but the
Can Grow attribute is not specified at the form level
Impact Report This report provides information based on the selected object type (form list, form, trigger, section, and so on) and which areas would be affected if that object were changed or deleted. For example, if you select a form list file, this report lists references to that form list file in the application file (BDF).
Paragraph Selection List Report
The report provides information about the selected Paragraph List files.It includes the Paragraph List file name and description, the names and descriptions of the paragraphs contained in the paragraph list file and Triggers (if any) assigned to the paragraphs in the paragraph list.
Registry Report This report provides information about Studio’s registry settings. This report may be requested by Support.
Section Readability Statistics Report
This report shows readability statistics and Flesch score information for the sections you select. This includes character, sentence, and syllable counts for the text areas contained in each sections as well as averages for words per sentence and characters per word.
Section Report This report provides information about the sections you select. This includes information about the margins (top, bottom, left, and right); paper (height, width, size, and orientation); section rules (rule name and parameters), fields (name, type, format, font ID, length, rules, and style), graphics (name, graphic, and style) and the fonts used (font ID and description).
Section Usage Report
This report lists all of the sections associated with the application definition (BDF) file you selected. The report lists all sections in use and sections which are not directly referenced on any form.
Template Report This report provides information about the template including options (name, description, size, and orientation), the sections defined in the template (name, options, size, orientation, number of pages, and protect template item flags), and recipient and copy counts for the sections in the template.
Trigger Report This report shows which DAL triggers are referenced and which are not referenced in the application definition (BDF) file you selected.
User Security Report
This report shows user security rights.
Report Description

Overview
742
Documerge Field Report
Only available in Documerge Studio.
This report shows you information about the Documerge resources you are maintaining. For more information, see Printing the Documerge Field Report on page 753.
Report Description
Note Studio writes these reports using the HTML 4.01 standard so the report and all formatting can be in a single file. All reports are validated for HTML and CSS compliance and each style is written as CSS embedded in the header. If you are comfortable with HTML, you can edit the style in the report files you generate to suit your needs.
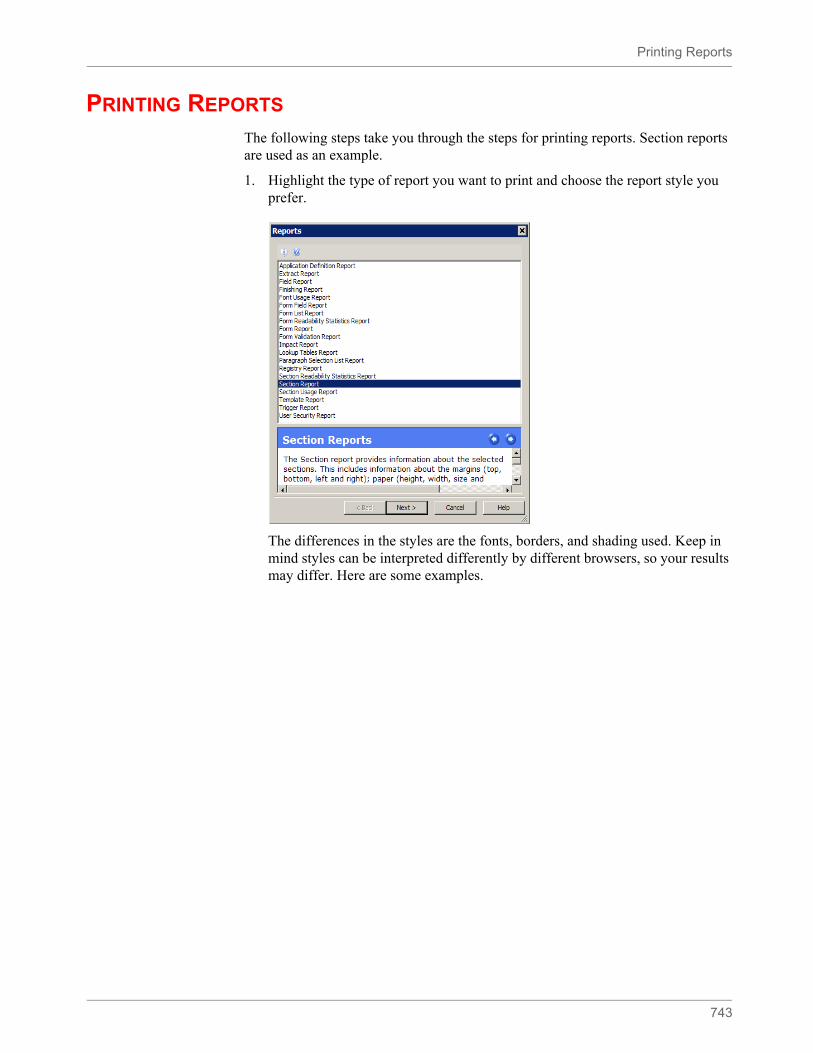
Printing Reports
743
PRINTING REPORTS
The following steps take you through the steps for printing reports. Section reports are used as an example.
1. Highlight the type of report you want to print and choose the report style you prefer.
The differences in the styles are the fonts, borders, and shading used. Keep in mind styles can be interpreted differently by different browsers, so your results may differ. Here are some examples.
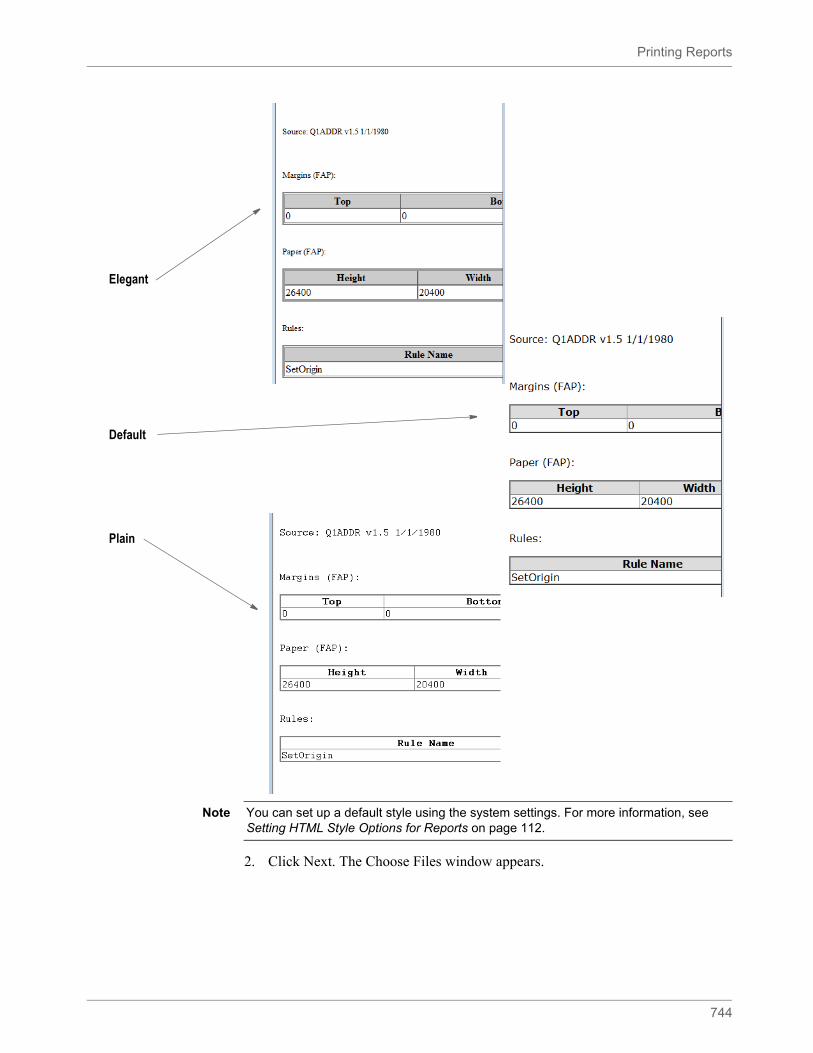
Printing Reports
744
2. Click Next. The Choose Files window appears.
Elegant
Default
Plain
Note You can set up a default style using the system settings. For more information, see Setting HTML Style Options for Reports on page 112.
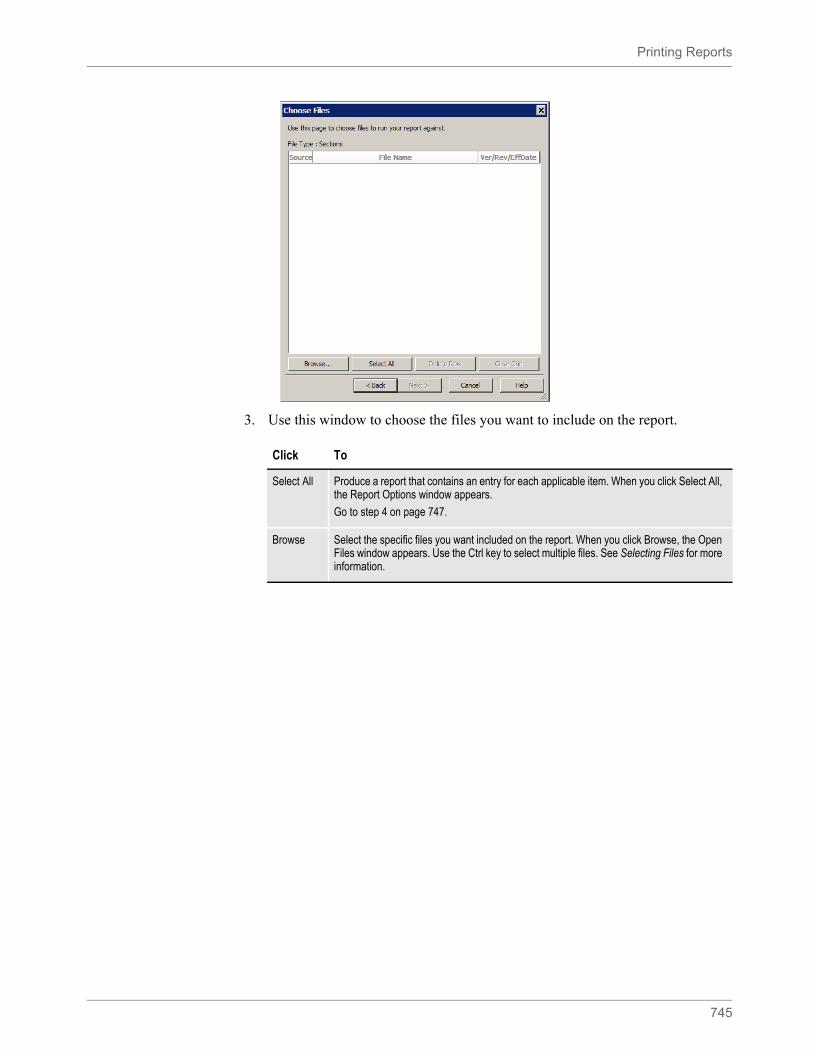
Printing Reports
745
3. Use this window to choose the files you want to include on the report.
Click To
Select All Produce a report that contains an entry for each applicable item. When you click Select All, the Report Options window appears.
Go to step 4 on page 747.
Browse Select the specific files you want included on the report. When you click Browse, the Open Files window appears. Use the Ctrl key to select multiple files. See Selecting Files for more information.
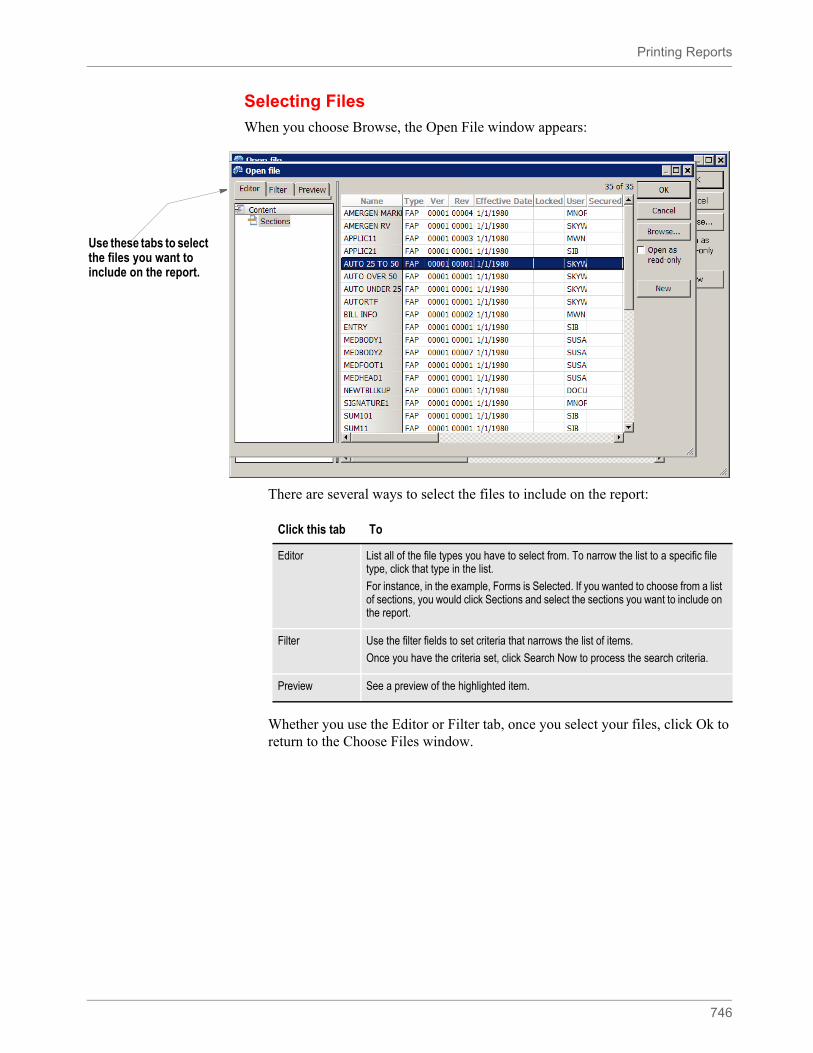
Printing Reports
746
Selecting Files
When you choose Browse, the Open File window appears:
There are several ways to select the files to include on the report:
Whether you use the Editor or Filter tab, once you select your files, click Ok to return to the Choose Files window.
Use these tabs to select the files you want to include on the report.
Click this tab To
Editor List all of the file types you have to select from. To narrow the list to a specific file type, click that type in the list.
For instance, in the example, Forms is Selected. If you wanted to choose from a list of sections, you would click Sections and select the sections you want to include on the report.
Filter Use the filter fields to set criteria that narrows the list of items.
Once you have the criteria set, click Search Now to process the search criteria.
Preview See a preview of the highlighted item.
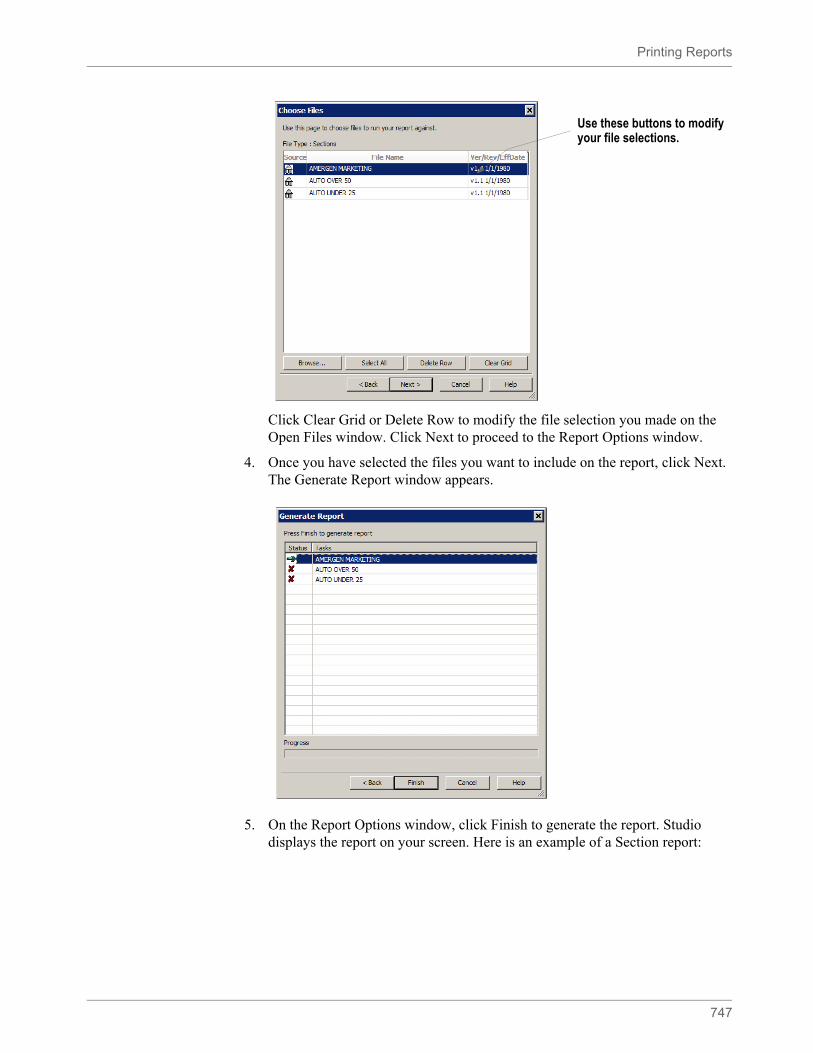
Printing Reports
747
Click Clear Grid or Delete Row to modify the file selection you made on the Open Files window. Click Next to proceed to the Report Options window.
4. Once you have selected the files you want to include on the report, click Next. The Generate Report window appears.
5. On the Report Options window, click Finish to generate the report. Studio displays the report on your screen. Here is an example of a Section report:
Use these buttons to modify your file selections.
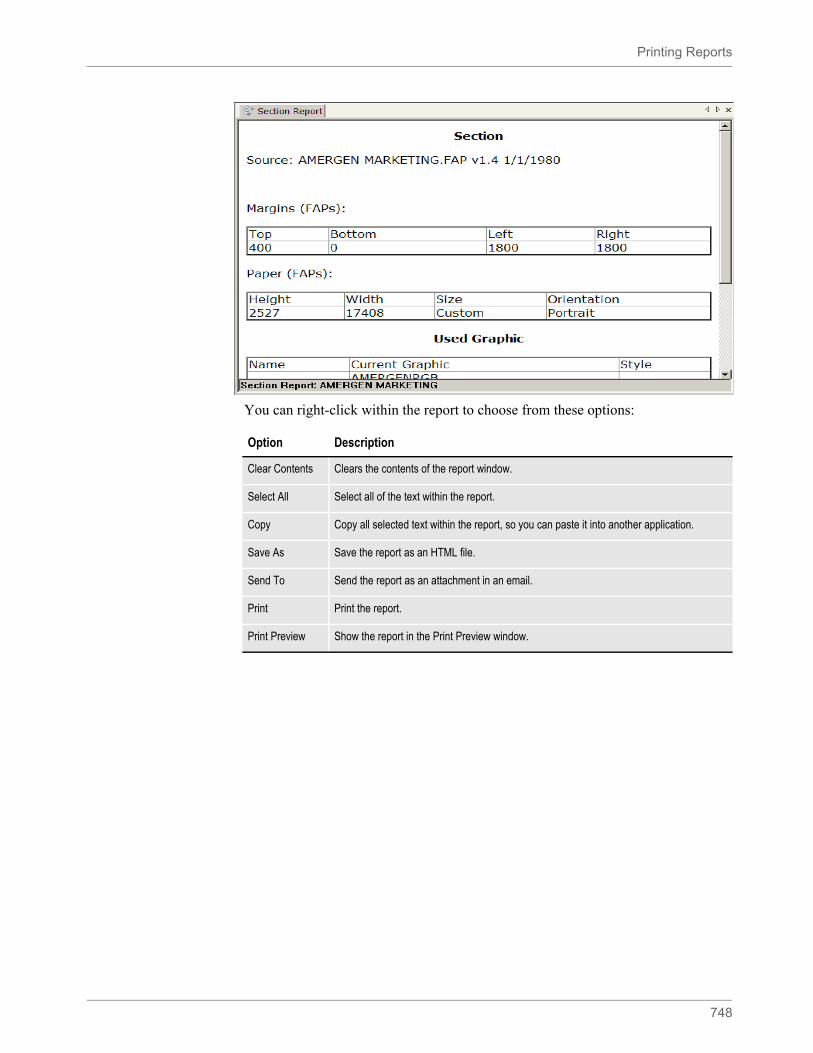
Printing Reports
748
You can right-click within the report to choose from these options:
Option Description
Clear Contents Clears the contents of the report window.
Select All Select all of the text within the report.
Copy Copy all selected text within the report, so you can paste it into another application.
Save As Save the report as an HTML file.
Send To Send the report as an attachment in an email.
Print Print the report.
Print Preview Show the report in the Print Preview window.
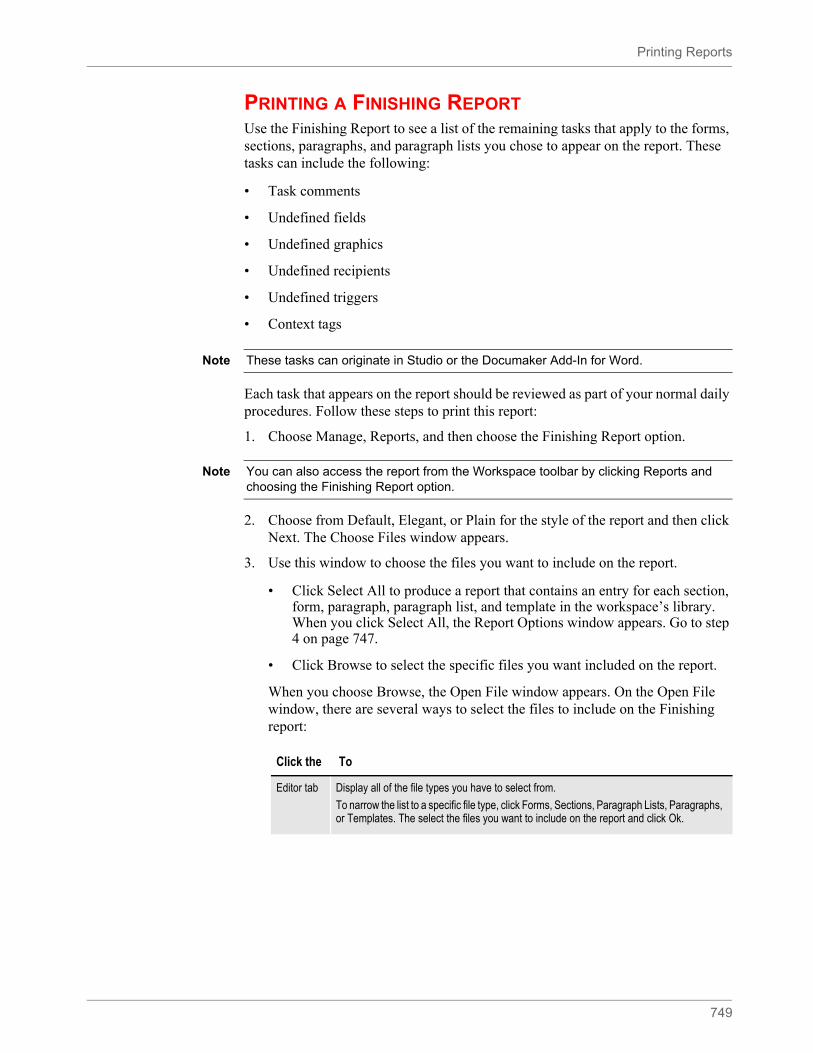
Printing Reports
749
PRINTING A FINISHING REPORTUse the Finishing Report to see a list of the remaining tasks that apply to the forms, sections, paragraphs, and paragraph lists you chose to appear on the report. These tasks can include the following:
• Task comments
• Undefined fields
• Undefined graphics
• Undefined recipients
• Undefined triggers
• Context tags
Each task that appears on the report should be reviewed as part of your normal daily procedures. Follow these steps to print this report:
1. Choose Manage, Reports, and then choose the Finishing Report option.
2. Choose from Default, Elegant, or Plain for the style of the report and then click Next. The Choose Files window appears.
3. Use this window to choose the files you want to include on the report.
• Click Select All to produce a report that contains an entry for each section, form, paragraph, paragraph list, and template in the workspace’s library. When you click Select All, the Report Options window appears. Go to step 4 on page 747.
• Click Browse to select the specific files you want included on the report.
When you choose Browse, the Open File window appears. On the Open File window, there are several ways to select the files to include on the Finishing report:
Note These tasks can originate in Studio or the Documaker Add-In for Word.
Note You can also access the report from the Workspace toolbar by clicking Reports and choosing the Finishing Report option.
Click the To
Editor tab Display all of the file types you have to select from.
To narrow the list to a specific file type, click Forms, Sections, Paragraph Lists, Paragraphs, or Templates. The select the files you want to include on the report and click Ok.
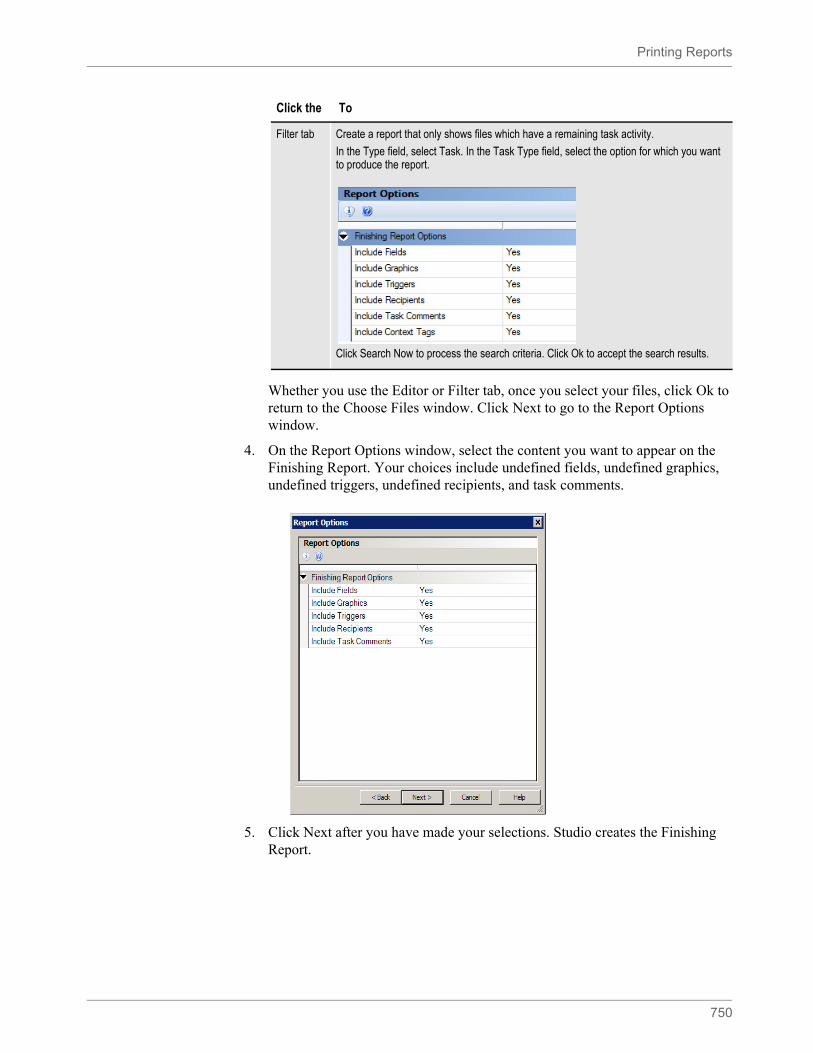
Printing Reports
750
Whether you use the Editor or Filter tab, once you select your files, click Ok to return to the Choose Files window. Click Next to go to the Report Options window.
4. On the Report Options window, select the content you want to appear on the Finishing Report. Your choices include undefined fields, undefined graphics, undefined triggers, undefined recipients, and task comments.
5. Click Next after you have made your selections. Studio creates the Finishing Report.
Filter tab Create a report that only shows files which have a remaining task activity.
In the Type field, select Task. In the Task Type field, select the option for which you want to produce the report.
Click Search Now to process the search criteria. Click Ok to accept the search results.
Click the To
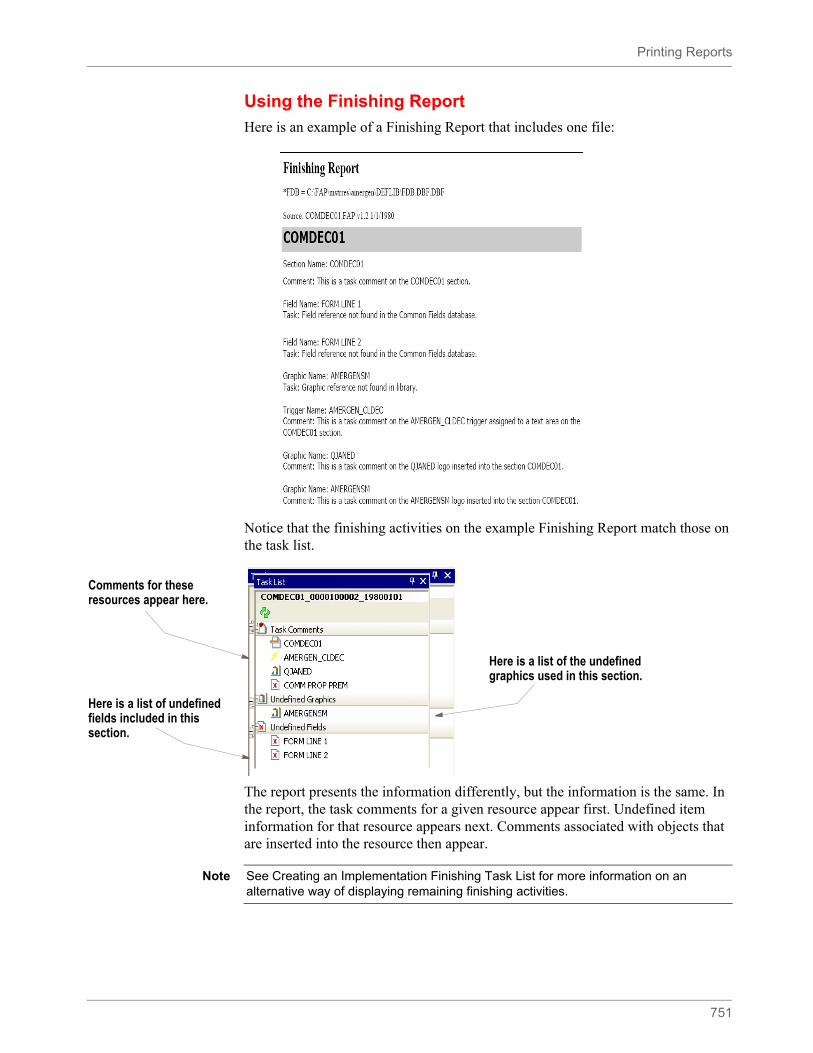
Printing Reports
751
Using the Finishing Report
Here is an example of a Finishing Report that includes one file:
Notice that the finishing activities on the example Finishing Report match those on the task list.
The report presents the information differently, but the information is the same. In the report, the task comments for a given resource appear first. Undefined item information for that resource appears next. Comments associated with objects that are inserted into the resource then appear.
Here is a list of the undefined graphics used in this section.
Comments for these resources appear here.
Here is a list of undefined fields included in this section.
Note See Creating an Implementation Finishing Task List for more information on an alternative way of displaying remaining finishing activities.
Printing Reports
752
For task comments, you should open or check out the resource (section, form, paragraph, paragraph list, or template) review the comment and take the appropriate action.
This table shows you what to do with the various undefined items that can appear on the Finishing Report.
Item Add undefined
Undefined recipients Recipients to the Application Definition (BDF) file.
Undefined fields Fields to the Common Fields dictionary.
Undefined graphics Graphics to the library.
Undefined triggers Triggers to the SETRCPTB.DAL file.
Note You can add the undefined item as stated or select a previously-defined element from the appropriate location.
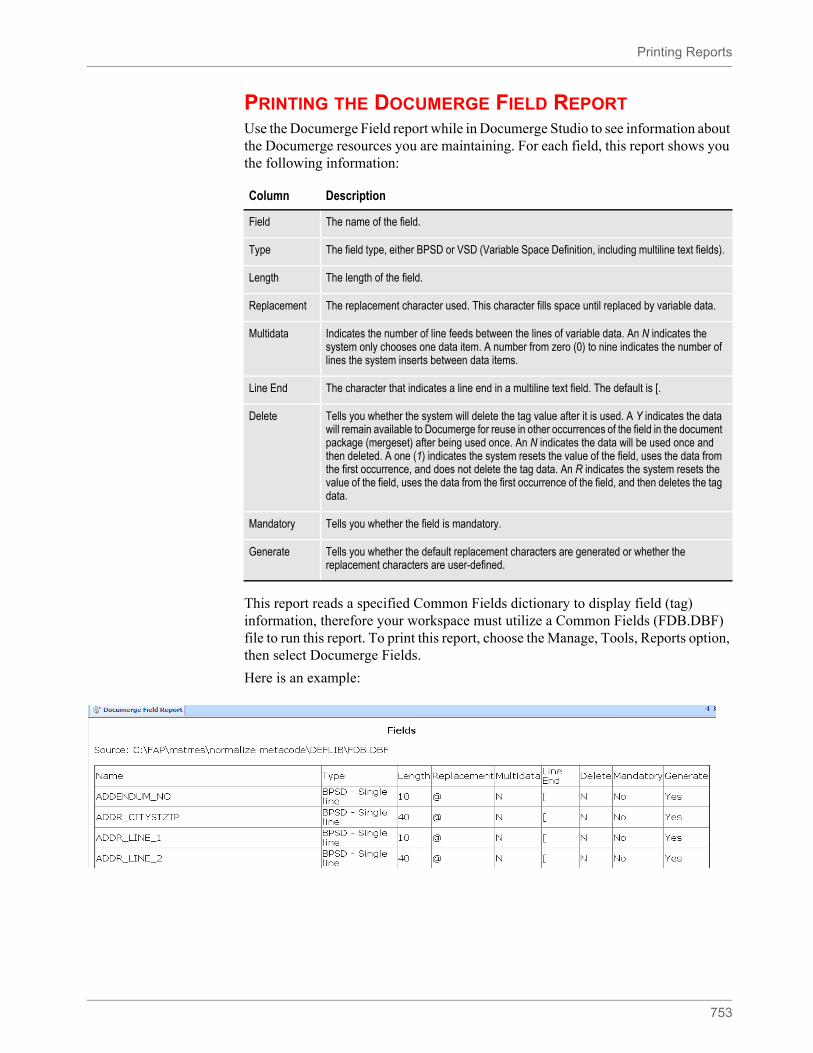
Printing Reports
753
PRINTING THE DOCUMERGE FIELD REPORTUse the Documerge Field report while in Documerge Studio to see information about the Documerge resources you are maintaining. For each field, this report shows you the following information:
This report reads a specified Common Fields dictionary to display field (tag) information, therefore your workspace must utilize a Common Fields (FDB.DBF) file to run this report. To print this report, choose the Manage, Tools, Reports option, then select Documerge Fields.
Here is an example:
Column Description
Field The name of the field.
Type The field type, either BPSD or VSD (Variable Space Definition, including multiline text fields).
Length The length of the field.
Replacement The replacement character used. This character fills space until replaced by variable data.
Multidata Indicates the number of line feeds between the lines of variable data. An N indicates the system only chooses one data item. A number from zero (0) to nine indicates the number of lines the system inserts between data items.
Line End The character that indicates a line end in a multiline text field. The default is [.
Delete Tells you whether the system will delete the tag value after it is used. A Y indicates the data will remain available to Documerge for reuse in other occurrences of the field in the document package (mergeset) after being used once. An N indicates the data will be used once and then deleted. A one (1) indicates the system resets the value of the field, uses the data from the first occurrence, and does not delete the tag data. An R indicates the system resets the value of the field, uses the data from the first occurrence of the field, and then deletes the tag data.
Mandatory Tells you whether the field is mandatory.
Generate Tells you whether the default replacement characters are generated or whether the replacement characters are user-defined.
754
Chapter 17
Handling Fonts
A font is a collection of letters, symbols, and numbers which share a particular design. Studio provides a font manager which lets you organize sets of fonts for section creation and printing needs. This chapter provides general information on font concepts and types.
For general information on font concepts and types, see the Fonts Reference Guide. This chapter provides information about setting up fonts using Studio’s Font manager. Make sure you have the needed rights to perform the function, otherwise, contact your System Administrator to update.
This chapter includes the following topics
• Overview on page 755
• Defining Basic Font Properties on page 756
• Defining Font Dimensions on page 767
• Importing Fonts on page 769
Note The Documaker system also includes several utilities you can use to work with fonts. These utilities are mentioned where appropriate throughout this chapter and are discussed in detail in the Utilities Reference.
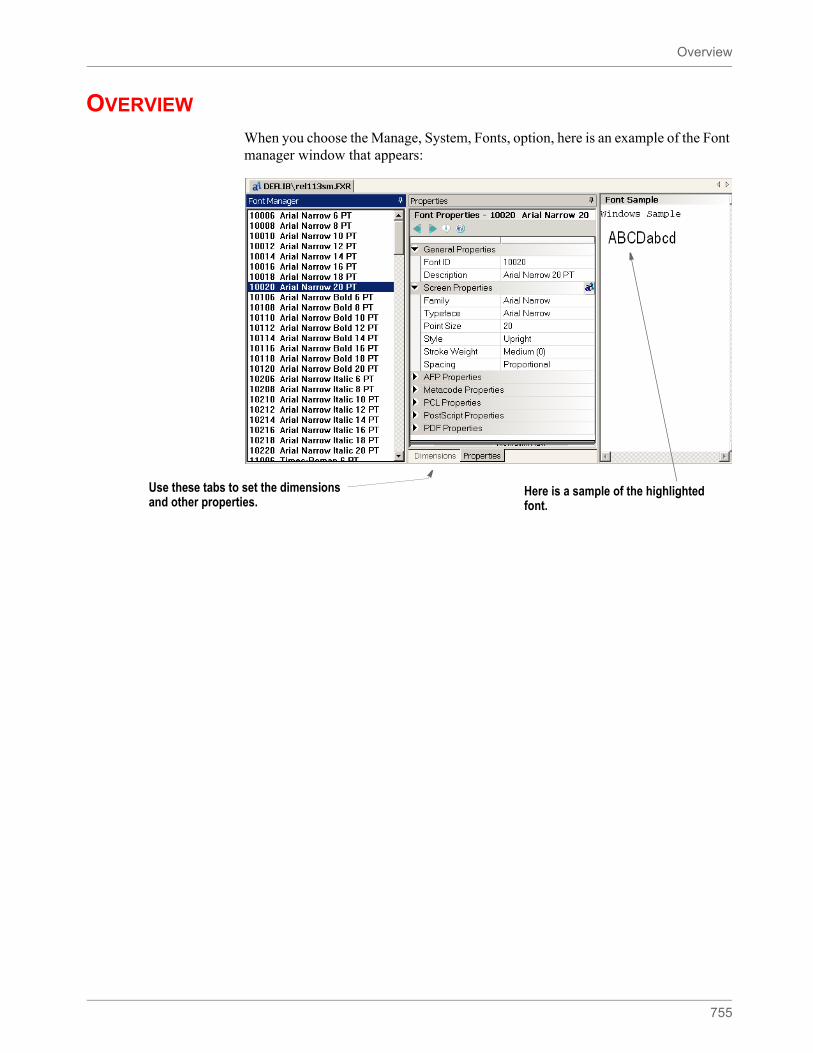
Overview
755
OVERVIEW
When you choose the Manage, System, Fonts, option, here is an example of the Font manager window that appears:
Use these tabs to set the dimensions and other properties.
Here is a sample of the highlighted font.
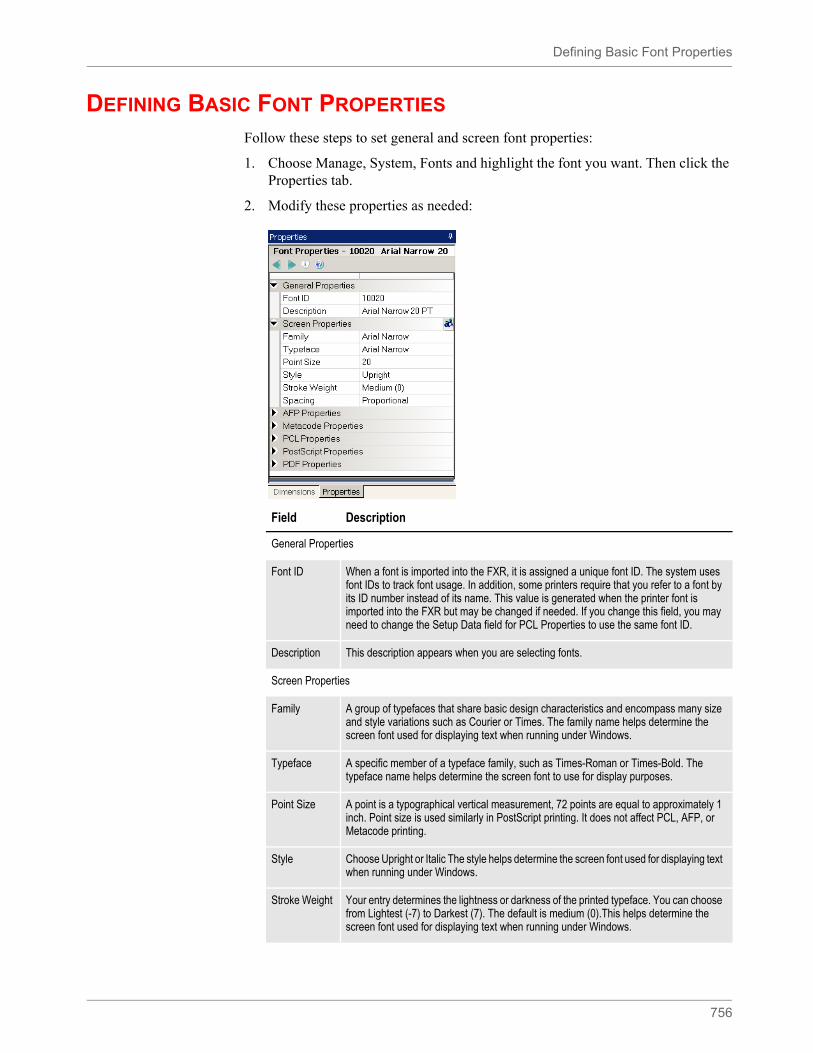
Defining Basic Font Properties
756
DEFINING BASIC FONT PROPERTIES
Follow these steps to set general and screen font properties:
1. Choose Manage, System, Fonts and highlight the font you want. Then click the Properties tab.
2. Modify these properties as needed:
Field Description
General Properties
Font ID When a font is imported into the FXR, it is assigned a unique font ID. The system uses font IDs to track font usage. In addition, some printers require that you refer to a font by its ID number instead of its name. This value is generated when the printer font is imported into the FXR but may be changed if needed. If you change this field, you may need to change the Setup Data field for PCL Properties to use the same font ID.
Description This description appears when you are selecting fonts.
Screen Properties
Family A group of typefaces that share basic design characteristics and encompass many size and style variations such as Courier or Times. The family name helps determine the screen font used for displaying text when running under Windows.
Typeface A specific member of a typeface family, such as Times-Roman or Times-Bold. The typeface name helps determine the screen font to use for display purposes.
Point Size A point is a typographical vertical measurement, 72 points are equal to approximately 1 inch. Point size is used similarly in PostScript printing. It does not affect PCL, AFP, or Metacode printing.
Style Choose Upright or Italic The style helps determine the screen font used for displaying text when running under Windows.
Stroke Weight Your entry determines the lightness or darkness of the printed typeface. You can choose from Lightest (-7) to Darkest (7). The default is medium (0).This helps determine the screen font used for displaying text when running under Windows.
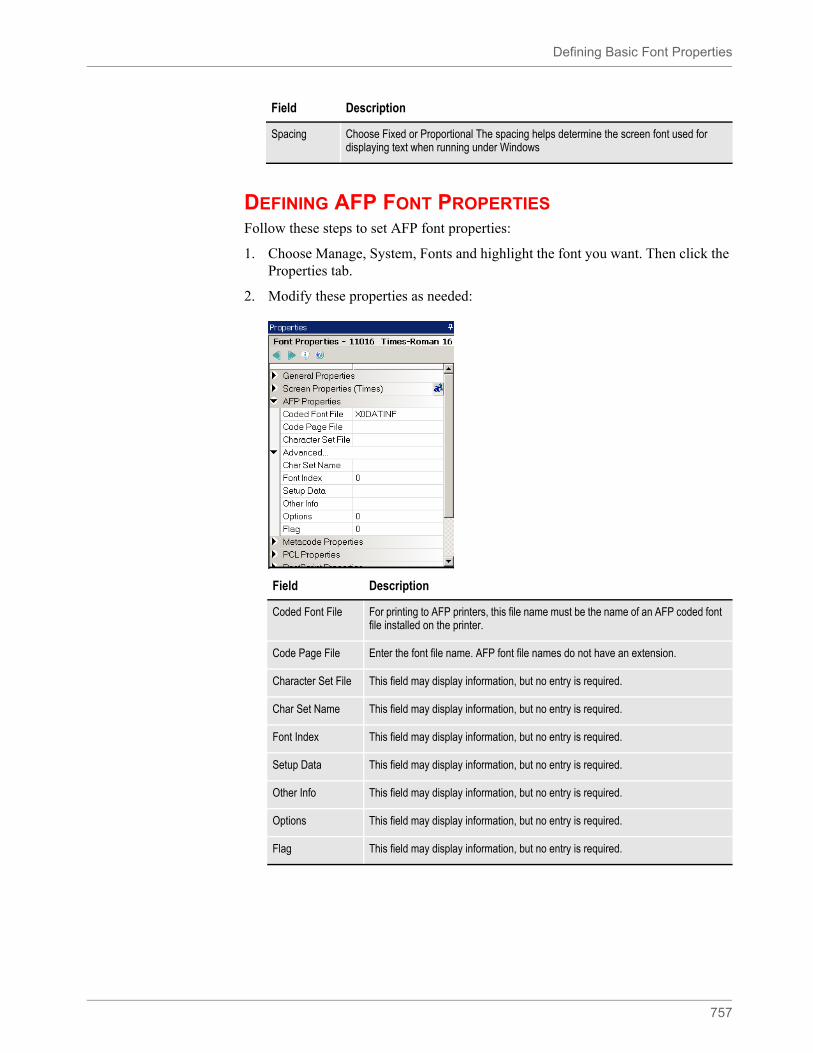
Defining Basic Font Properties
757
DEFINING AFP FONT PROPERTIESFollow these steps to set AFP font properties:
1. Choose Manage, System, Fonts and highlight the font you want. Then click the Properties tab.
2. Modify these properties as needed:
Spacing Choose Fixed or Proportional The spacing helps determine the screen font used for displaying text when running under Windows
Field Description
Field Description
Coded Font File For printing to AFP printers, this file name must be the name of an AFP coded font file installed on the printer.
Code Page File Enter the font file name. AFP font file names do not have an extension.
Character Set File This field may display information, but no entry is required.
Char Set Name This field may display information, but no entry is required.
Font Index This field may display information, but no entry is required.
Setup Data This field may display information, but no entry is required.
Other Info This field may display information, but no entry is required.
Options This field may display information, but no entry is required.
Flag This field may display information, but no entry is required.
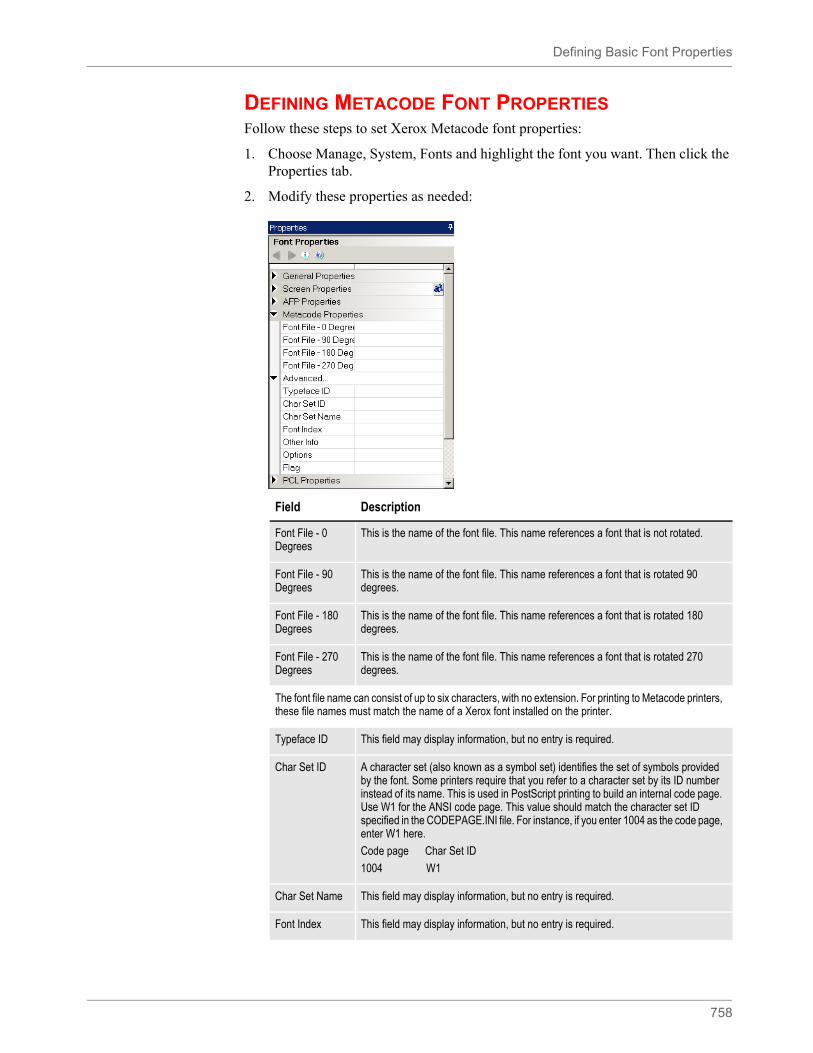
Defining Basic Font Properties
758
DEFINING METACODE FONT PROPERTIESFollow these steps to set Xerox Metacode font properties:
1. Choose Manage, System, Fonts and highlight the font you want. Then click the Properties tab.
2. Modify these properties as needed:
Field Description
Font File - 0 Degrees
This is the name of the font file. This name references a font that is not rotated.
Font File - 90 Degrees
This is the name of the font file. This name references a font that is rotated 90 degrees.
Font File - 180 Degrees
This is the name of the font file. This name references a font that is rotated 180 degrees.
Font File - 270 Degrees
This is the name of the font file. This name references a font that is rotated 270 degrees.
The font file name can consist of up to six characters, with no extension. For printing to Metacode printers, these file names must match the name of a Xerox font installed on the printer.
Typeface ID This field may display information, but no entry is required.
Char Set ID A character set (also known as a symbol set) identifies the set of symbols provided by the font. Some printers require that you refer to a character set by its ID number instead of its name. This is used in PostScript printing to build an internal code page. Use W1 for the ANSI code page. This value should match the character set ID specified in the CODEPAGE.INI file. For instance, if you enter 1004 as the code page, enter W1 here.
Code page Char Set ID
1004 W1
Char Set Name This field may display information, but no entry is required.
Font Index This field may display information, but no entry is required.
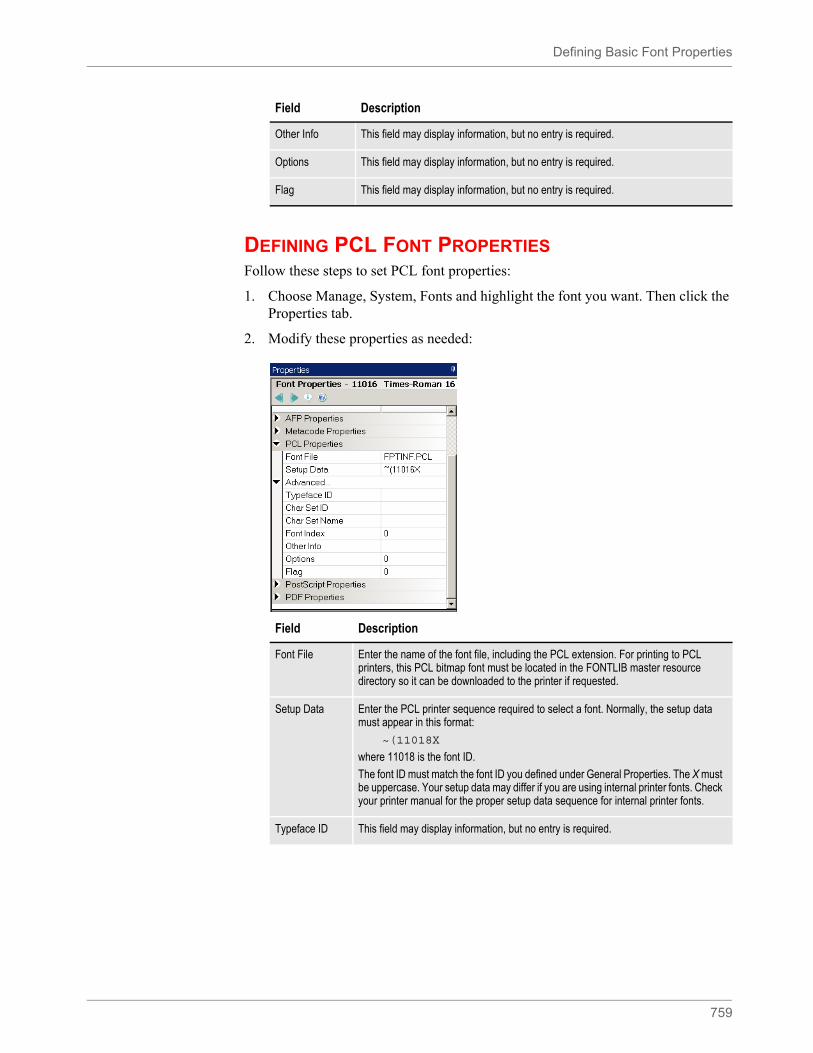
Defining Basic Font Properties
759
DEFINING PCL FONT PROPERTIESFollow these steps to set PCL font properties:
1. Choose Manage, System, Fonts and highlight the font you want. Then click the Properties tab.
2. Modify these properties as needed:
Other Info This field may display information, but no entry is required.
Options This field may display information, but no entry is required.
Flag This field may display information, but no entry is required.
Field Description
Field Description
Font File Enter the name of the font file, including the PCL extension. For printing to PCL printers, this PCL bitmap font must be located in the FONTLIB master resource directory so it can be downloaded to the printer if requested.
Setup Data Enter the PCL printer sequence required to select a font. Normally, the setup data must appear in this format:
~(11018X
where 11018 is the font ID.
The font ID must match the font ID you defined under General Properties. The X must be uppercase. Your setup data may differ if you are using internal printer fonts. Check your printer manual for the proper setup data sequence for internal printer fonts.
Typeface ID This field may display information, but no entry is required.
Defining Basic Font Properties
760
Char Set ID A character set (also known as a symbol set) identifies the set of symbols provided by the font. Some printers require that you refer to a character set by its ID number instead of its name. This is used in PostScript printing to build an internal code page. Use W1 for the ANSI code page. This value should match the character set ID specified in the CODEPAGE.INI file. For instance, if you enter 1004 as the code page, enter W1 here.
Code page Char Set ID
1004 W1
Char Set Name This field may display information, but no entry is required.
Font Index This field may display information, but no entry is required.
Other Info This field may display information, but no entry is required.
Options This field may display information, but no entry is required.
Flag This field may display information, but no entry is required.
Field Description

Defining Basic Font Properties
761
DEFINING POSTSCRIPT FONT PROPERTIESFollow these steps to set PostScript font properties:
1. Choose Manage, System, Fonts and highlight the font you want. Then click the Properties tab.
2. Modify these properties as needed:
Field Description
Font File Enter the name of the font file, including the PFB extension. For printing to PostScript printers, this PostScript Type 1 font must be located in the FONTLIB master resource directory so that it can be downloaded to the printer if requested.
Font Name Enter the name of the font, such as Times-Roman. Studio fills this field when you insert a PostScript font. The font name also appears in the font AFM file. All type 1 PostScript fonts require two files for each font family name: *.AFM and *.PFB.
Char Set ID A character set (also known as a symbol set) identifies the set of symbols provided by the font. Some printers require that you refer to a character set by its ID number instead of its name. This is used in PostScript printing to build an internal code page. Use W1 for the ANSI code page. This value should match the character set ID specified in the CODEPAGE.INI file. For instance, if you enter 1004 as the code page, enter W1 here.
Code page Char Set ID
1004 W1
Typeface ID This field may display information, but no entry is required.
Char Set Name This field may display information, but no entry is required.
Font Index This field may display information, but no entry is required.
Other Info This field may display information, but no entry is required.
Options This field may display information, but no entry is required.
Flag This field may display information, but no entry is required.
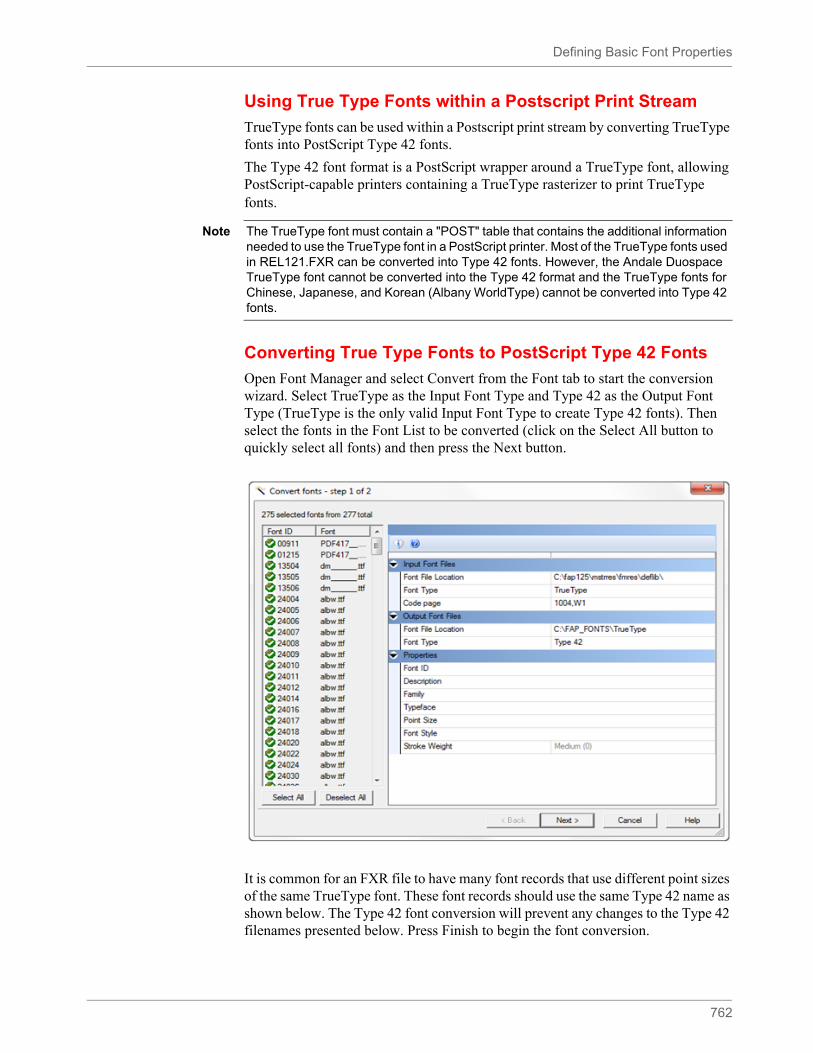
Defining Basic Font Properties
762
Using True Type Fonts within a Postscript Print Stream
TrueType fonts can be used within a Postscript print stream by converting TrueType fonts into PostScript Type 42 fonts.
The Type 42 font format is a PostScript wrapper around a TrueType font, allowing PostScript-capable printers containing a TrueType rasterizer to print TrueType fonts.
Converting True Type Fonts to PostScript Type 42 Fonts
Open Font Manager and select Convert from the Font tab to start the conversion wizard. Select TrueType as the Input Font Type and Type 42 as the Output Font Type (TrueType is the only valid Input Font Type to create Type 42 fonts). Then select the fonts in the Font List to be converted (click on the Select All button to quickly select all fonts) and then press the Next button.
It is common for an FXR file to have many font records that use different point sizes of the same TrueType font. These font records should use the same Type 42 name as shown below. The Type 42 font conversion will prevent any changes to the Type 42 filenames presented below. Press Finish to begin the font conversion.
Note The TrueType font must contain a "POST" table that contains the additional information needed to use the TrueType font in a PostScript printer. Most of the TrueType fonts used in REL121.FXR can be converted into Type 42 fonts. However, the Andale Duospace TrueType font cannot be converted into the Type 42 format and the TrueType fonts for Chinese, Japanese, and Korean (Albany WorldType) cannot be converted into Type 42 fonts.
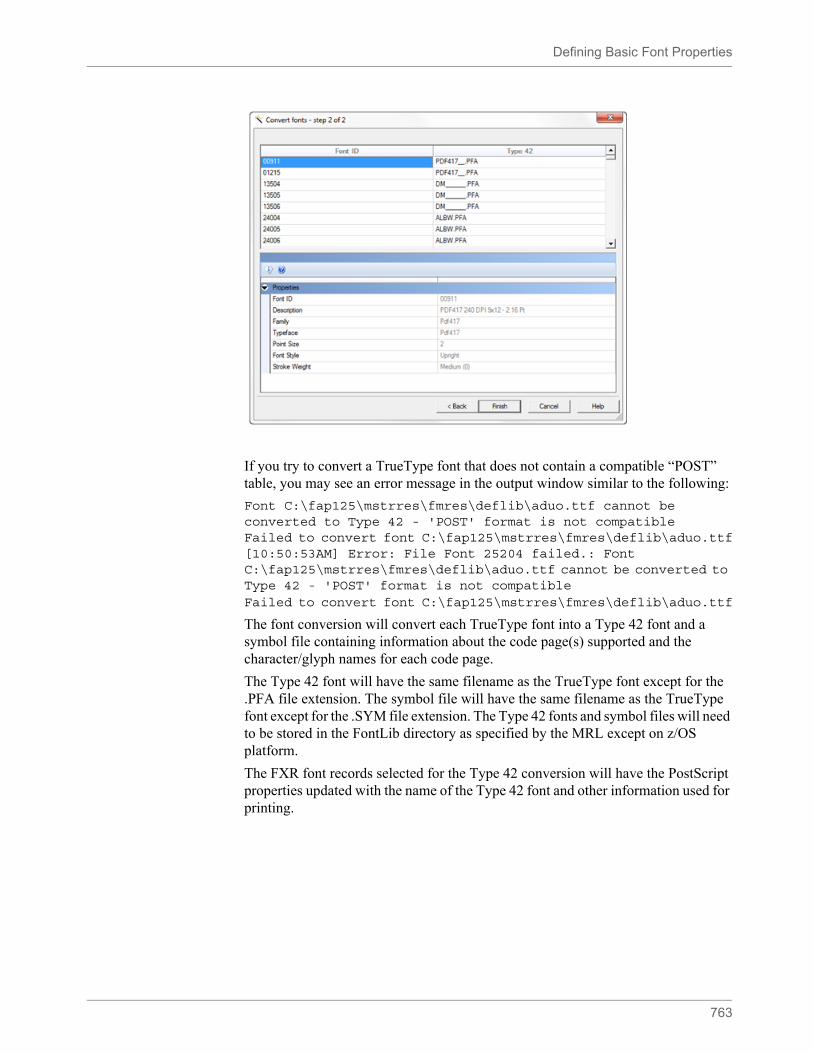
Defining Basic Font Properties
763
If you try to convert a TrueType font that does not contain a compatible “POST” table, you may see an error message in the output window similar to the following:
Font C:\fap125\mstrres\fmres\deflib\aduo.ttf cannot be converted to Type 42 - 'POST' format is not compatibleFailed to convert font C:\fap125\mstrres\fmres\deflib\aduo.ttf[10:50:53AM] Error: File Font 25204 failed.: Font C:\fap125\mstrres\fmres\deflib\aduo.ttf cannot be converted to Type 42 - 'POST' format is not compatibleFailed to convert font C:\fap125\mstrres\fmres\deflib\aduo.ttf
The font conversion will convert each TrueType font into a Type 42 font and a symbol file containing information about the code page(s) supported and the character/glyph names for each code page.
The Type 42 font will have the same filename as the TrueType font except for the .PFA file extension. The symbol file will have the same filename as the TrueType font except for the .SYM file extension. The Type 42 fonts and symbol files will need to be stored in the FontLib directory as specified by the MRL except on z/OS platform.
The FXR font records selected for the Type 42 conversion will have the PostScript properties updated with the name of the Type 42 font and other information used for printing.
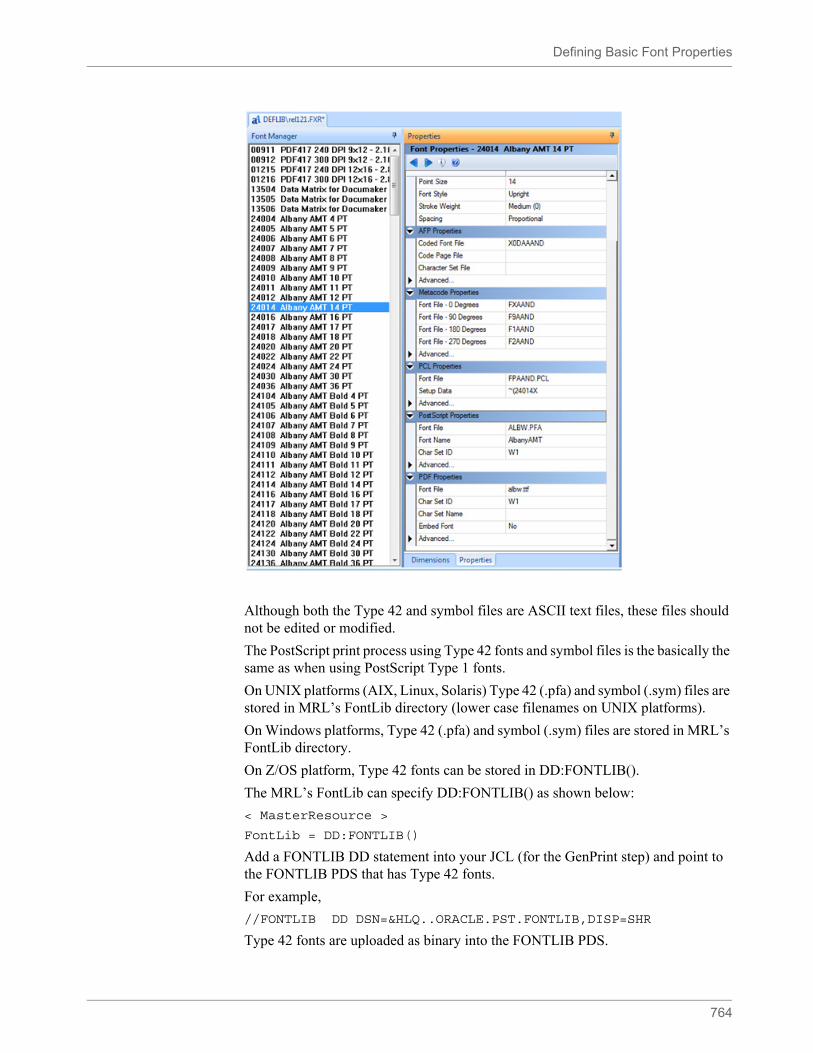
Defining Basic Font Properties
764
Although both the Type 42 and symbol files are ASCII text files, these files should not be edited or modified.
The PostScript print process using Type 42 fonts and symbol files is the basically the same as when using PostScript Type 1 fonts.
On UNIX platforms (AIX, Linux, Solaris) Type 42 (.pfa) and symbol (.sym) files are stored in MRL’s FontLib directory (lower case filenames on UNIX platforms).
On Windows platforms, Type 42 (.pfa) and symbol (.sym) files are stored in MRL’s FontLib directory.
On Z/OS platform, Type 42 fonts can be stored in DD:FONTLIB().
The MRL’s FontLib can specify DD:FONTLIB() as shown below:
< MasterResource >
FontLib = DD:FONTLIB()
Add a FONTLIB DD statement into your JCL (for the GenPrint step) and point to the FONTLIB PDS that has Type 42 fonts.
For example,
//FONTLIB DD DSN=&HLQ..ORACLE.PST.FONTLIB,DISP=SHR
Type 42 fonts are uploaded as binary into the FONTLIB PDS.

Defining Basic Font Properties
765
The FONTLIB for Type 42 fonts can have a record format (RECFM) of FB and logical record length (LRECL) of 128.
Symbol files are stored in DD:SYMLIB().
Symbol files are uploaded using ASCII with CRLF translation into the SYMLIB PDS.
The SYMLIB can have a record format (RECFM) of FB and logical record length (LRECL) of 80.
DEFINING PDF FONT PROPERTIESFollow these steps to set PDF font properties:
Note You should change underscores ( _ ) in the font name to @ characters when uploading, for example, THOWR___.PFA (or THOWR___.SYM) is uploaded as THOWR@@@ since z/OS cannot have underscore in the member name.
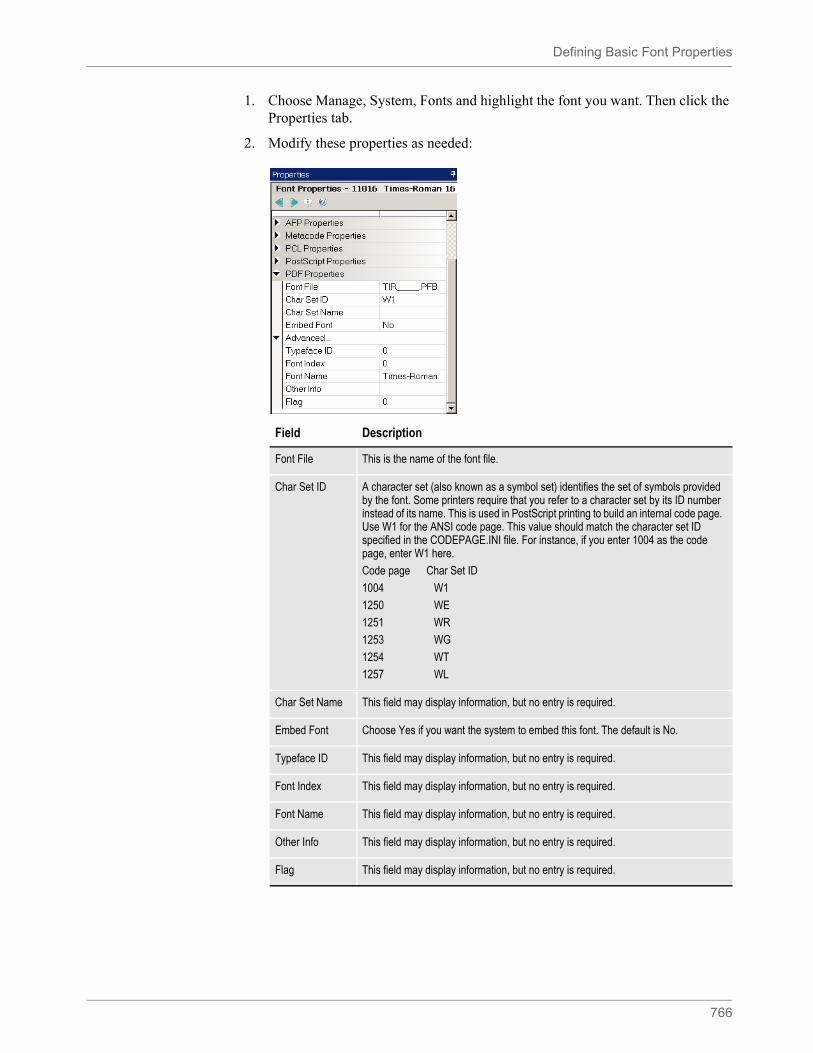
Defining Basic Font Properties
766
1. Choose Manage, System, Fonts and highlight the font you want. Then click the Properties tab.
2. Modify these properties as needed:
Field Description
Font File This is the name of the font file.
Char Set ID A character set (also known as a symbol set) identifies the set of symbols provided by the font. Some printers require that you refer to a character set by its ID number instead of its name. This is used in PostScript printing to build an internal code page. Use W1 for the ANSI code page. This value should match the character set ID specified in the CODEPAGE.INI file. For instance, if you enter 1004 as the code page, enter W1 here.
Code page Char Set ID
1004 W1
1250 WE
1251 WR
1253 WG
1254 WT
1257 WL
Char Set Name This field may display information, but no entry is required.
Embed Font Choose Yes if you want the system to embed this font. The default is No.
Typeface ID This field may display information, but no entry is required.
Font Index This field may display information, but no entry is required.
Font Name This field may display information, but no entry is required.
Other Info This field may display information, but no entry is required.
Flag This field may display information, but no entry is required.

Defining Font Dimensions
767
DEFINING FONT DIMENSIONS
Follow these steps to define font dimensions:
1. Choose Manage, System, Fonts and highlight the font you want. Then click the Dimensions tab.
2. Modify these properties as needed:
Field Description
FAP Height This is the largest font character height (in FAP units, 2400 dots/inch) The font height affects the size of text displayed when running under Windows.
FAP Width This is the largest font character width (in FAP units) The font width affects the width of text displayed when running under Windows.
FAP Baseline This is the largest font character base line (in FAP units) The baseline is measured from the top of the largest character to the imaginary line that the character appears to rest on. The font baseline affects the positioning of text displayed when running under Windows.
FXR File Under Windows, the font file name has the extension FNT. This field is not currently used.
FON File Under Windows, the font width table file name has the extension FON. This field is not currently used.
Code Page Under Windows, the system uses the ANSI code page. Normally, this field is set to 1004 or is left blank.
Width Table The width table is calculated from the printer font file and is used to determine character spacing when displaying text. Fixed pitch fonts use the same width for each character. The width is measured in FAP units (2400 to an inch).

Defining Font Dimensions
768
The Dimensions tab provides information about the font file. Information on this window should match the characteristics in the font file. If you enter dimension information which does not match the actual font file, only the bitmap font window display changes. The actual dimensions of the font in the font file do not change, nor do print dimensions of the font change.
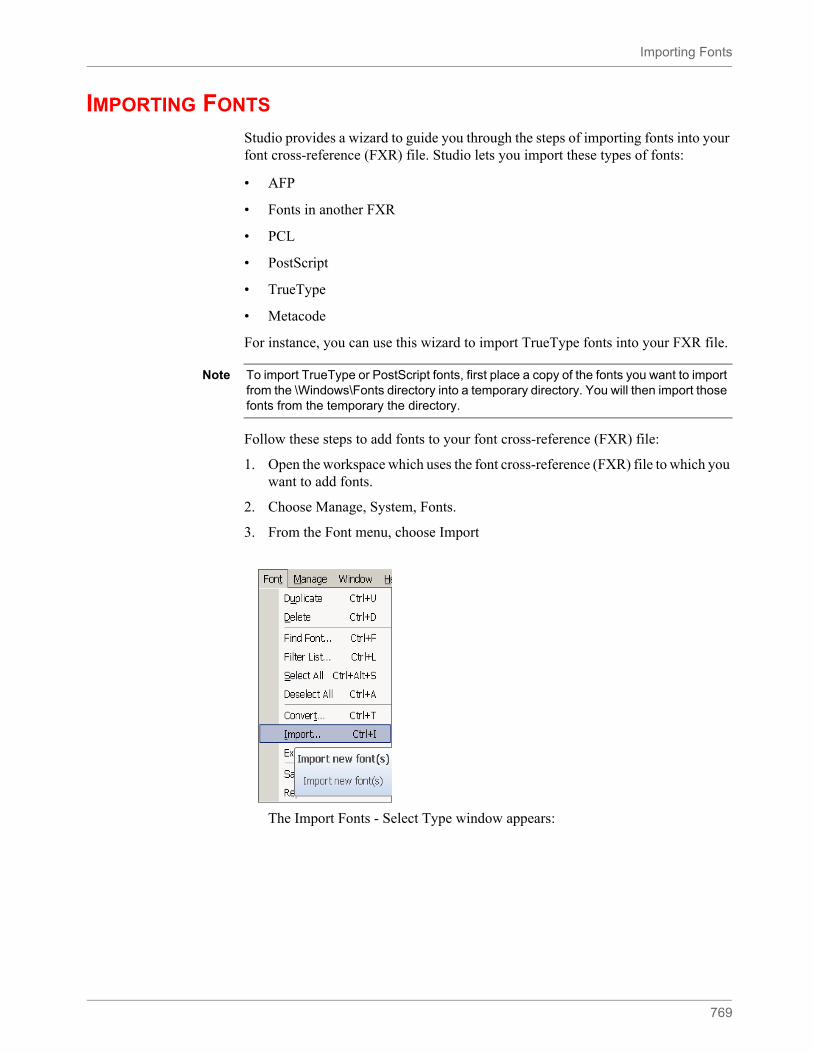
Importing Fonts
769
IMPORTING FONTS
Studio provides a wizard to guide you through the steps of importing fonts into your font cross-reference (FXR) file. Studio lets you import these types of fonts:
• AFP
• Fonts in another FXR
• PCL
• PostScript
• TrueType
• Metacode
For instance, you can use this wizard to import TrueType fonts into your FXR file.
Follow these steps to add fonts to your font cross-reference (FXR) file:
1. Open the workspace which uses the font cross-reference (FXR) file to which you want to add fonts.
2. Choose Manage, System, Fonts.
3. From the Font menu, choose Import
The Import Fonts - Select Type window appears:
Note To import TrueType or PostScript fonts, first place a copy of the fonts you want to import from the \Windows\Fonts directory into a temporary directory. You will then import those fonts from the temporary the directory.
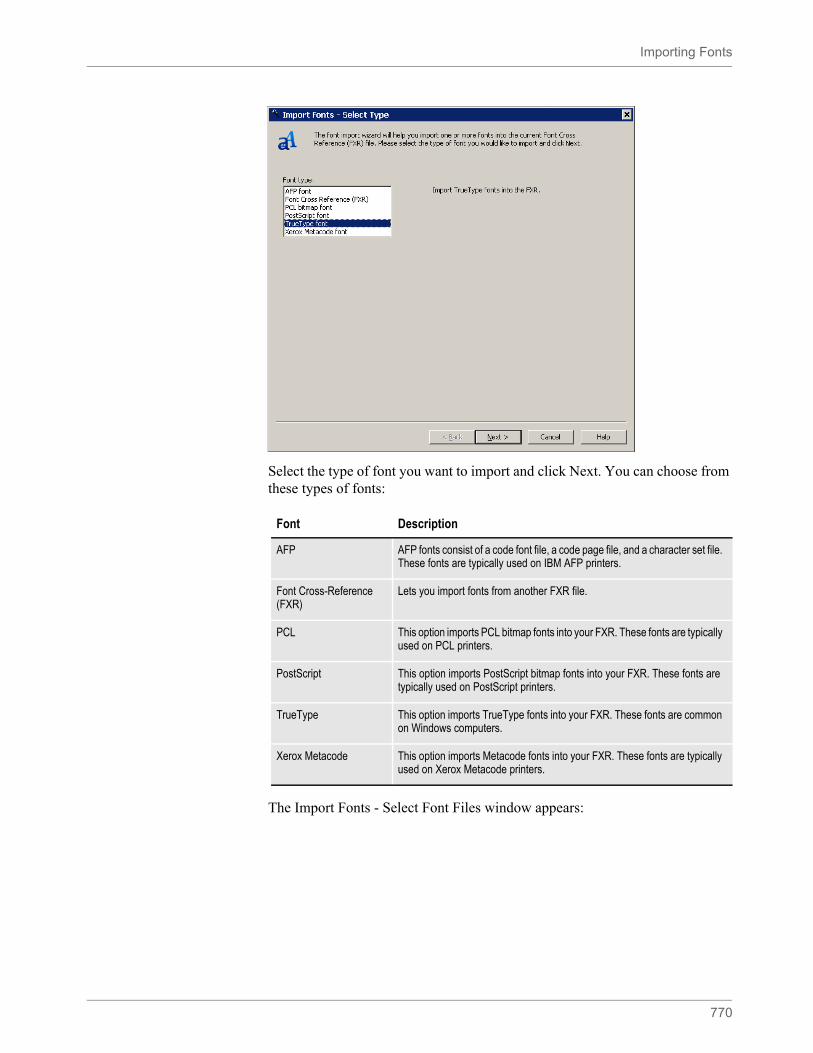
Importing Fonts
770
Select the type of font you want to import and click Next. You can choose from these types of fonts:
The Import Fonts - Select Font Files window appears:
Font Description
AFP AFP fonts consist of a code font file, a code page file, and a character set file. These fonts are typically used on IBM AFP printers.
Font Cross-Reference (FXR)
Lets you import fonts from another FXR file.
PCL This option imports PCL bitmap fonts into your FXR. These fonts are typically used on PCL printers.
PostScript This option imports PostScript bitmap fonts into your FXR. These fonts are typically used on PostScript printers.
TrueType This option imports TrueType fonts into your FXR. These fonts are common on Windows computers.
Xerox Metacode This option imports Metacode fonts into your FXR. These fonts are typically used on Xerox Metacode printers.
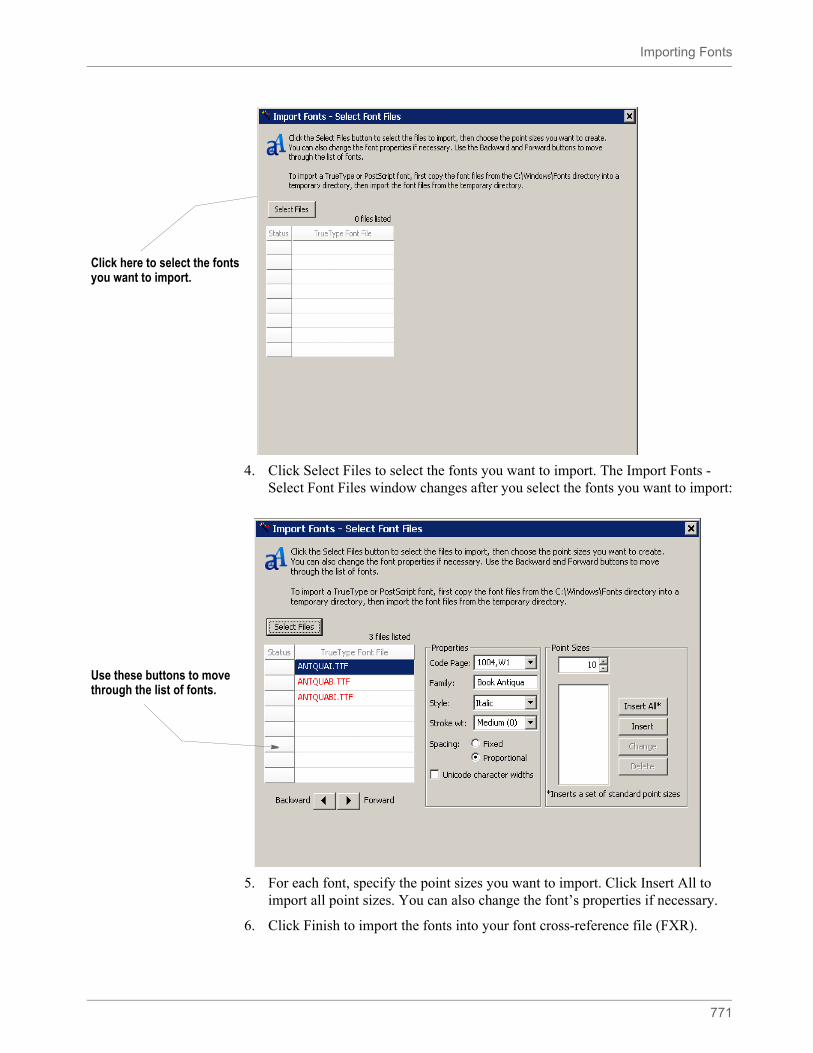
Importing Fonts
771
4. Click Select Files to select the fonts you want to import. The Import Fonts - Select Font Files window changes after you select the fonts you want to import:
5. For each font, specify the point sizes you want to import. Click Insert All to import all point sizes. You can also change the font’s properties if necessary.
6. Click Finish to import the fonts into your font cross-reference file (FXR).
Click here to select the fonts you want to import.
Use these buttons to move through the list of fonts.
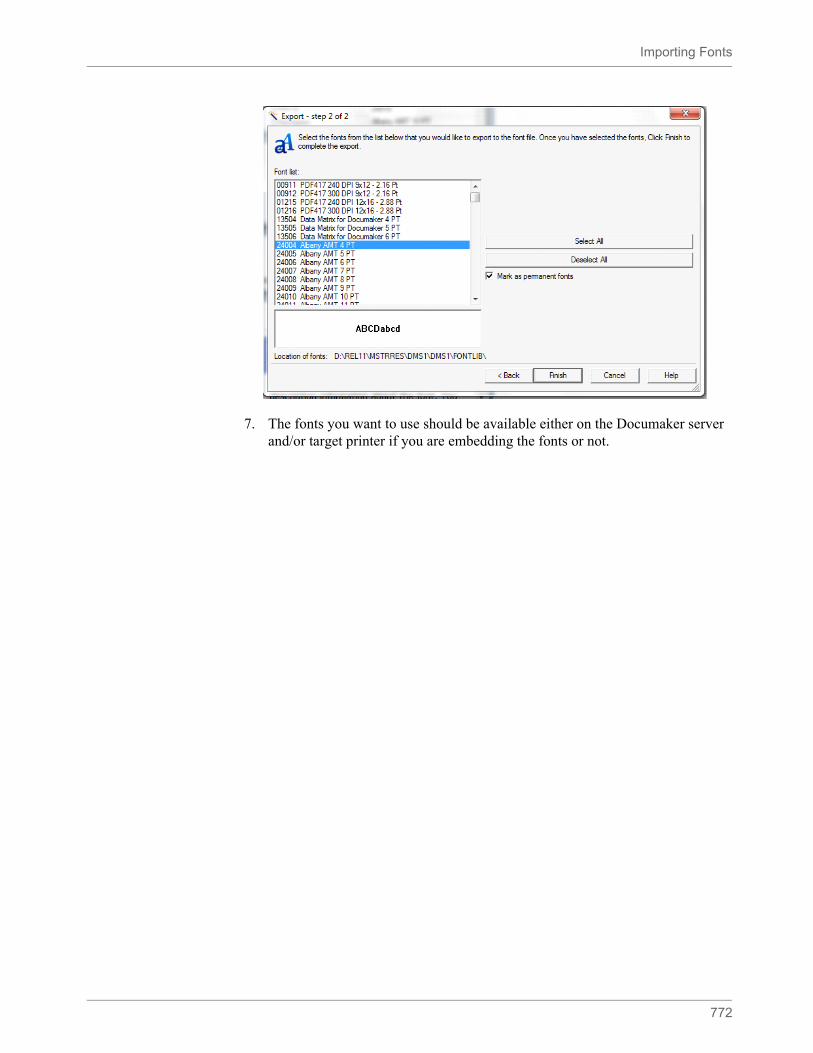
Importing Fonts
772
7. The fonts you want to use should be available either on the Documaker server and/or target printer if you are embedding the fonts or not.
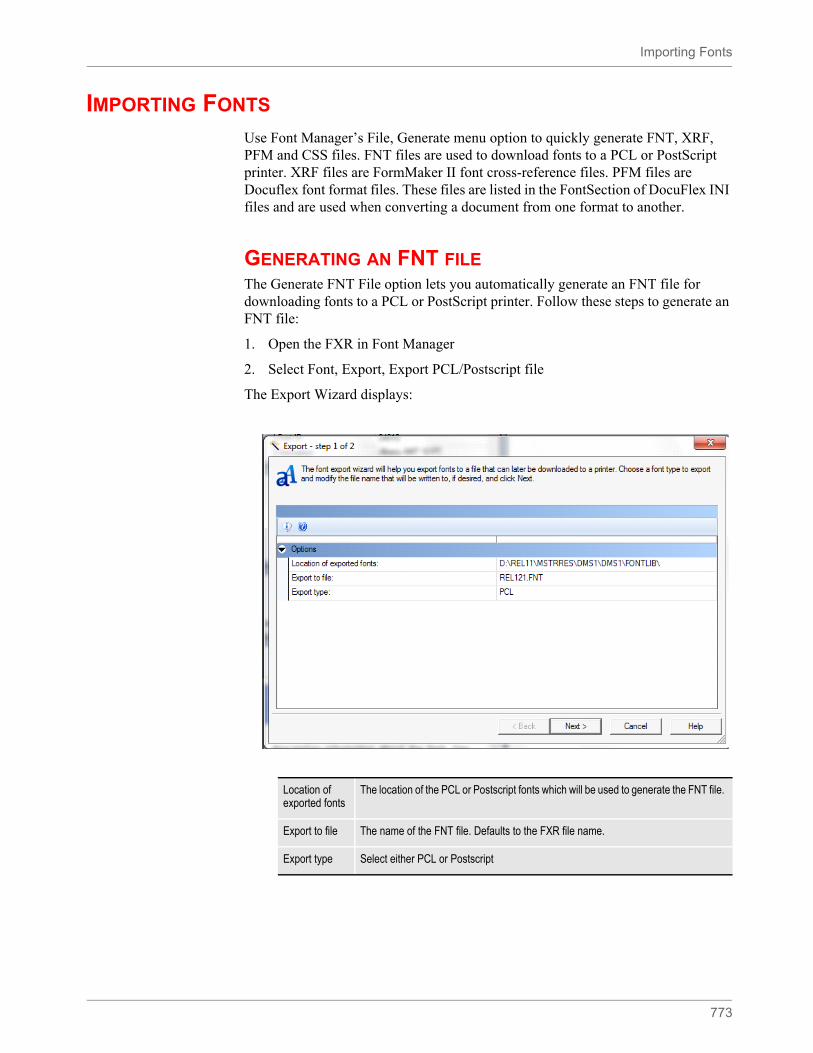
Importing Fonts
773
IMPORTING FONTS
Use Font Manager’s File, Generate menu option to quickly generate FNT, XRF, PFM and CSS files. FNT files are used to download fonts to a PCL or PostScript printer. XRF files are FormMaker II font cross-reference files. PFM files are Docuflex font format files. These files are listed in the FontSection of DocuFlex INI files and are used when converting a document from one format to another.
GENERATING AN FNT FILEThe Generate FNT File option lets you automatically generate an FNT file for downloading fonts to a PCL or PostScript printer. Follow these steps to generate an FNT file:
1. Open the FXR in Font Manager
2. Select Font, Export, Export PCL/Postscript file
The Export Wizard displays:
Location of exported fonts
The location of the PCL or Postscript fonts which will be used to generate the FNT file.
Export to file The name of the FNT file. Defaults to the FXR file name.
Export type Select either PCL or Postscript
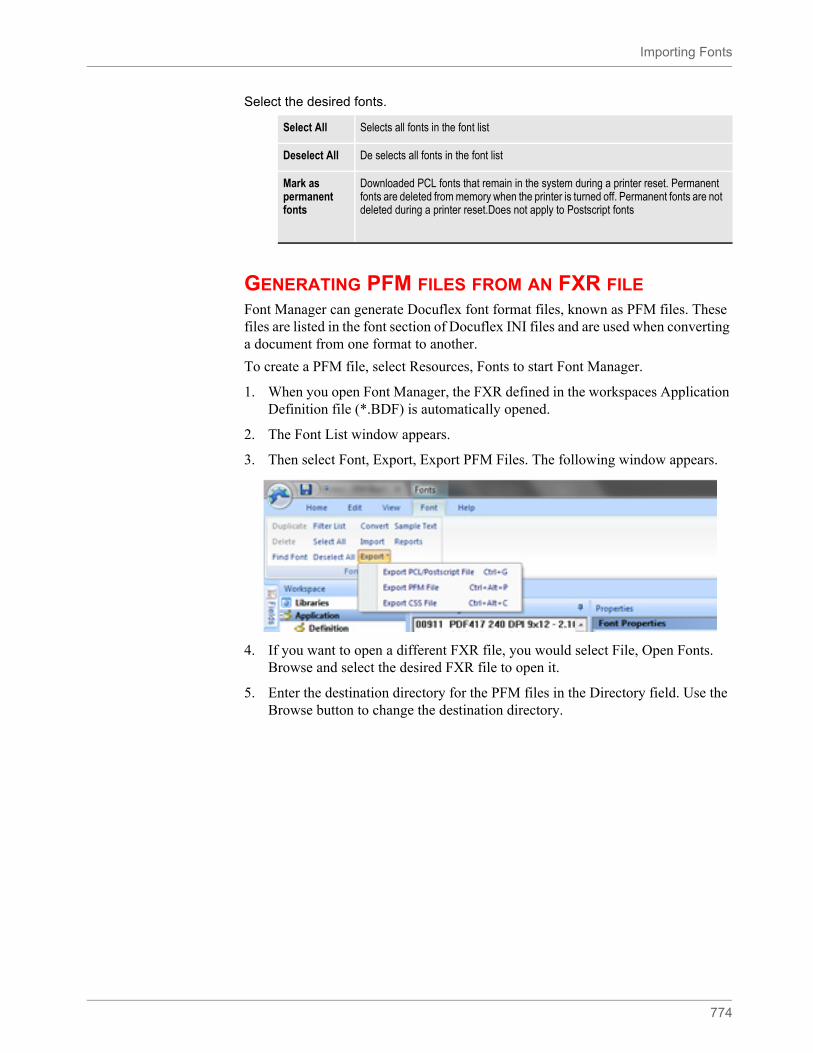
Importing Fonts
774
Select the desired fonts.
GENERATING PFM FILES FROM AN FXR FILEFont Manager can generate Docuflex font format files, known as PFM files. These files are listed in the font section of Docuflex INI files and are used when converting a document from one format to another.
To create a PFM file, select Resources, Fonts to start Font Manager.
1. When you open Font Manager, the FXR defined in the workspaces Application Definition file (*.BDF) is automatically opened.
2. The Font List window appears.
3. Then select Font, Export, Export PFM Files. The following window appears.
4. If you want to open a different FXR file, you would select File, Open Fonts. Browse and select the desired FXR file to open it.
5. Enter the destination directory for the PFM files in the Directory field. Use the Browse button to change the destination directory.
Select All Selects all fonts in the font list
Deselect All De selects all fonts in the font list
Mark as permanent fonts
Downloaded PCL fonts that remain in the system during a printer reset. Permanent fonts are deleted from memory when the printer is turned off. Permanent fonts are not deleted during a printer reset.Does not apply to Postscript fonts
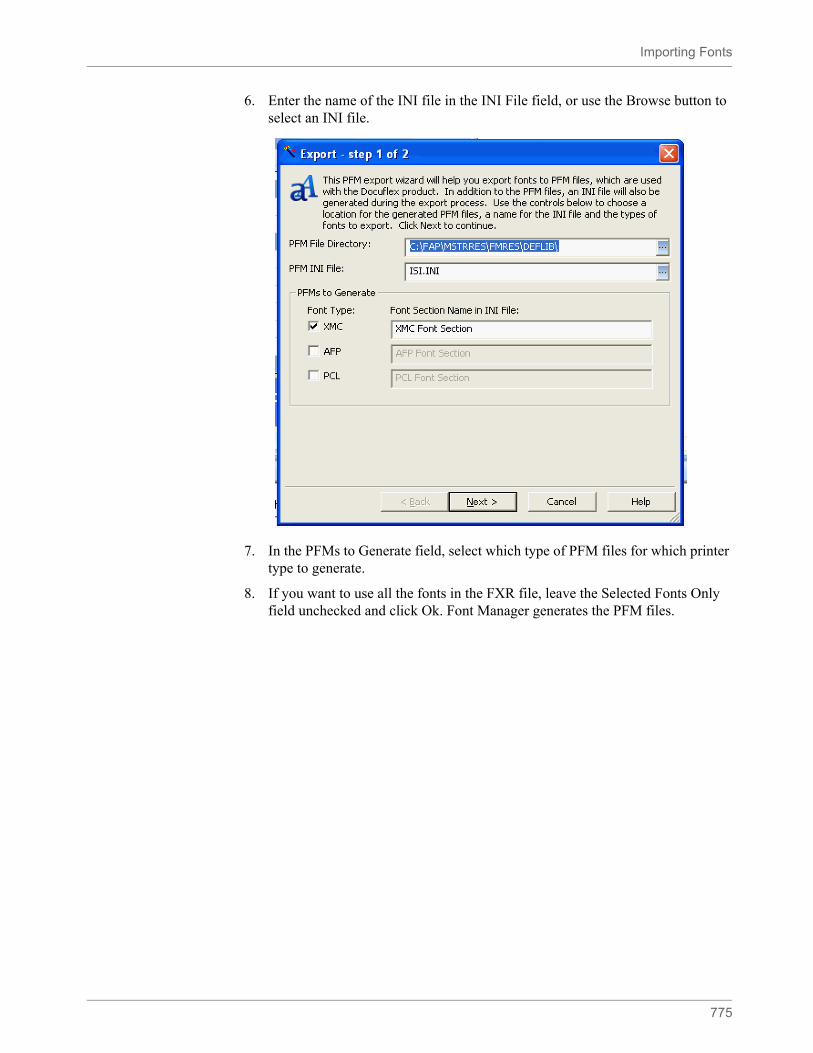
Importing Fonts
775
6. Enter the name of the INI file in the INI File field, or use the Browse button to select an INI file.
7. In the PFMs to Generate field, select which type of PFM files for which printer type to generate.
8. If you want to use all the fonts in the FXR file, leave the Selected Fonts Only field unchecked and click Ok. Font Manager generates the PFM files.
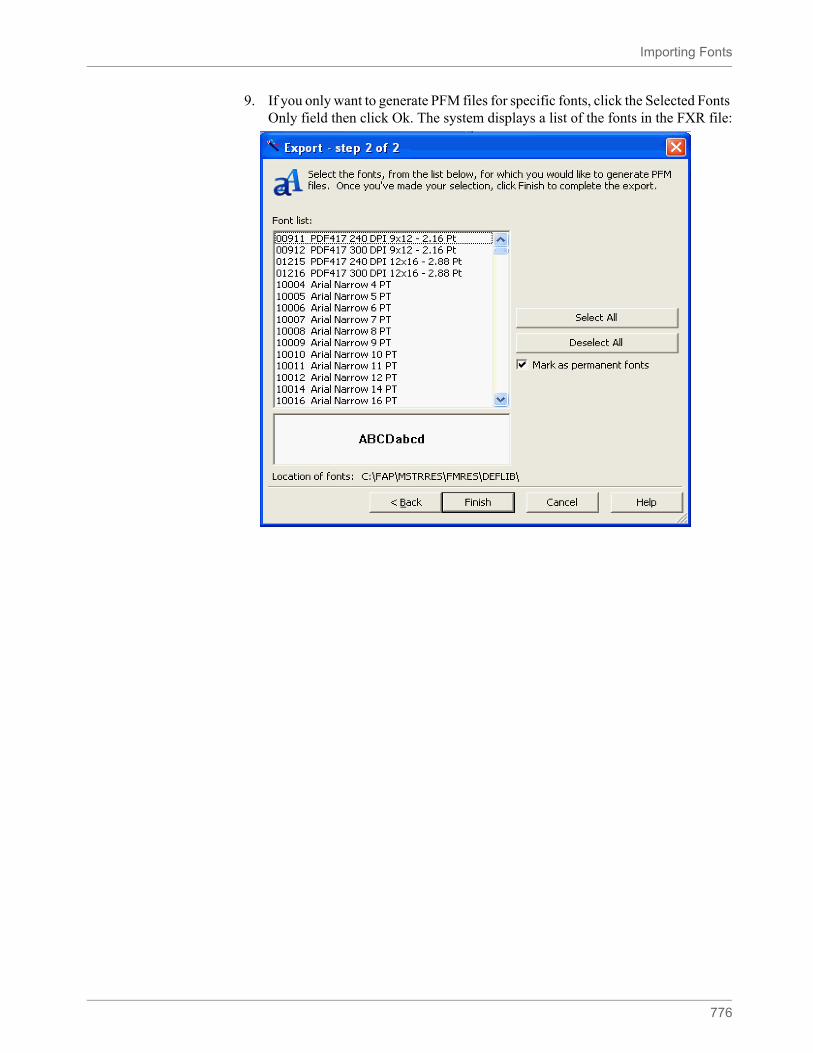
Importing Fonts
776
9. If you only want to generate PFM files for specific fonts, click the Selected Fonts Only field then click Ok. The system displays a list of the fonts in the FXR file:
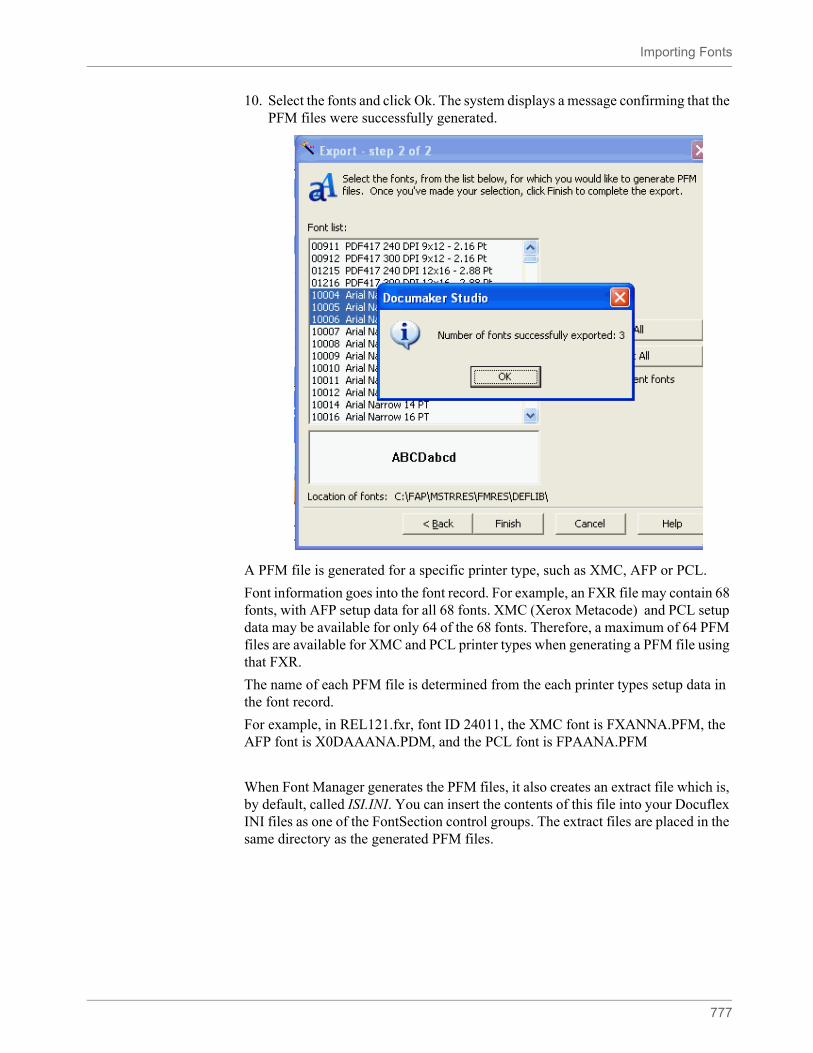
Importing Fonts
777
10. Select the fonts and click Ok. The system displays a message confirming that the PFM files were successfully generated.
A PFM file is generated for a specific printer type, such as XMC, AFP or PCL.
Font information goes into the font record. For example, an FXR file may contain 68 fonts, with AFP setup data for all 68 fonts. XMC (Xerox Metacode) and PCL setup data may be available for only 64 of the 68 fonts. Therefore, a maximum of 64 PFM files are available for XMC and PCL printer types when generating a PFM file using that FXR.
The name of each PFM file is determined from the each printer types setup data in the font record.
For example, in REL121.fxr, font ID 24011, the XMC font is FXANNA.PFM, the AFP font is X0DAAANA.PDM, and the PCL font is FPAANA.PFM
When Font Manager generates the PFM files, it also creates an extract file which is, by default, called ISI.INI. You can insert the contents of this file into your Docuflex INI files as one of the FontSection control groups. The extract files are placed in the same directory as the generated PFM files.
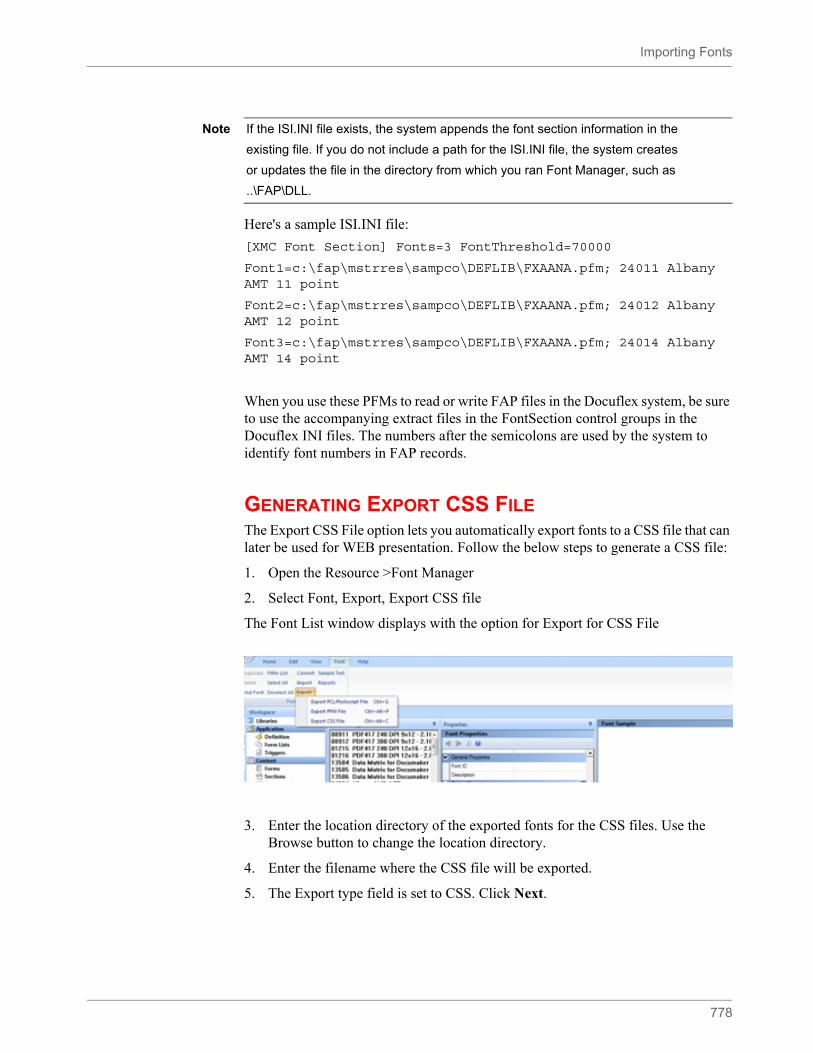
Importing Fonts
778
Here's a sample ISI.INI file:
[XMC Font Section] Fonts=3 FontThreshold=70000
Font1=c:\fap\mstrres\sampco\DEFLIB\FXAANA.pfm; 24011 Albany AMT 11 point
Font2=c:\fap\mstrres\sampco\DEFLIB\FXAANA.pfm; 24012 Albany AMT 12 point
Font3=c:\fap\mstrres\sampco\DEFLIB\FXAANA.pfm; 24014 Albany AMT 14 point
When you use these PFMs to read or write FAP files in the Docuflex system, be sure to use the accompanying extract files in the FontSection control groups in the Docuflex INI files. The numbers after the semicolons are used by the system to identify font numbers in FAP records.
GENERATING EXPORT CSS FILEThe Export CSS File option lets you automatically export fonts to a CSS file that can later be used for WEB presentation. Follow the below steps to generate a CSS file:
1. Open the Resource >Font Manager
2. Select Font, Export, Export CSS file
The Font List window displays with the option for Export for CSS File
3. Enter the location directory of the exported fonts for the CSS files. Use the Browse button to change the location directory.
4. Enter the filename where the CSS file will be exported.
5. The Export type field is set to CSS. Click Next.
Note If the ISI.INI file exists, the system appends the font section information in the
existing file. If you do not include a path for the ISI.INI file, the system creates
or updates the file in the directory from which you ran Font Manager, such as
..\FAP\DLL.

Importing Fonts
779
6. You can generate a CSS file for specific fonts or all fonts. To generate a CSS file for specific fonts, click the desired fonts. To generate a CSS file for all listed fonts, use the Select All Button. Use the Deselect All button to deselect the selected fonts.
7. Once you've made your selection, click Finish to complete the export.
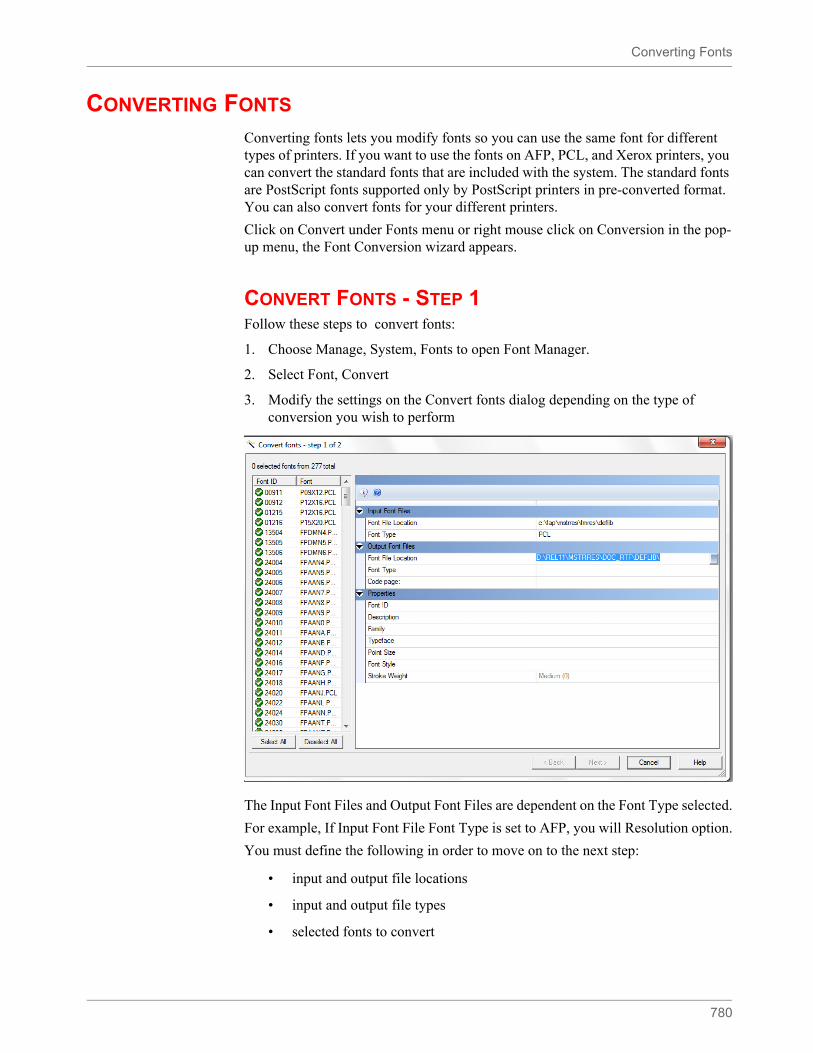
Converting Fonts
780
CONVERTING FONTS
Converting fonts lets you modify fonts so you can use the same font for different types of printers. If you want to use the fonts on AFP, PCL, and Xerox printers, you can convert the standard fonts that are included with the system. The standard fonts are PostScript fonts supported only by PostScript printers in pre-converted format. You can also convert fonts for your different printers.
Click on Convert under Fonts menu or right mouse click on Conversion in the pop-up menu, the Font Conversion wizard appears.
CONVERT FONTS - STEP 1Follow these steps to convert fonts:
1. Choose Manage, System, Fonts to open Font Manager.
2. Select Font, Convert
3. Modify the settings on the Convert fonts dialog depending on the type of conversion you wish to perform
The Input Font Files and Output Font Files are dependent on the Font Type selected.
For example, If Input Font File Font Type is set to AFP, you will Resolution option.
You must define the following in order to move on to the next step:
• input and output file locations
• input and output file types
• selected fonts to convert
Converting Fonts
781
Fonts list
Select fonts to convert. Items in the list are marked with an icon indicating if the input file has been found. Only items with a check icon can be selected for conversion.
Input Font Files
Output Font Files
Properties
The properties for the font selected are shown and non-editable.
Click Next to continue.
Font File Location Choose the directory to find the files. The font selection list will update icons with files found that match when a different path is chosen.
Font Type Choose the file type to use. The font selection list will update icons with files found that match when a different type is chosen.
Resolution Choose the resolution if shown. Resolution is only shown for some file types.
Code Page Choose the code page if shown. Code page is only shown for some file type.
Font File Location Choose the directory to write the new files.
Font Type Choose the new file type.
Resolution Choose the resolution if shown. Resolution is only shown for some file types.
Code Page Choose the code page if shown. Code page is only shown for some file type.
Adjust font for negative left offset
Adjust character bitmaps with negative left offsets in order to prevent character crowding (which may occasionally occur when creating Xerox italic fonts).
Font ID Unique font ID in font cross reference file.
Description The description
Family The family name
Type Face The type face name
Font Size The font size
Font Style The style. For example upright or italic.
Stroke Weight The weight. For example: medium.
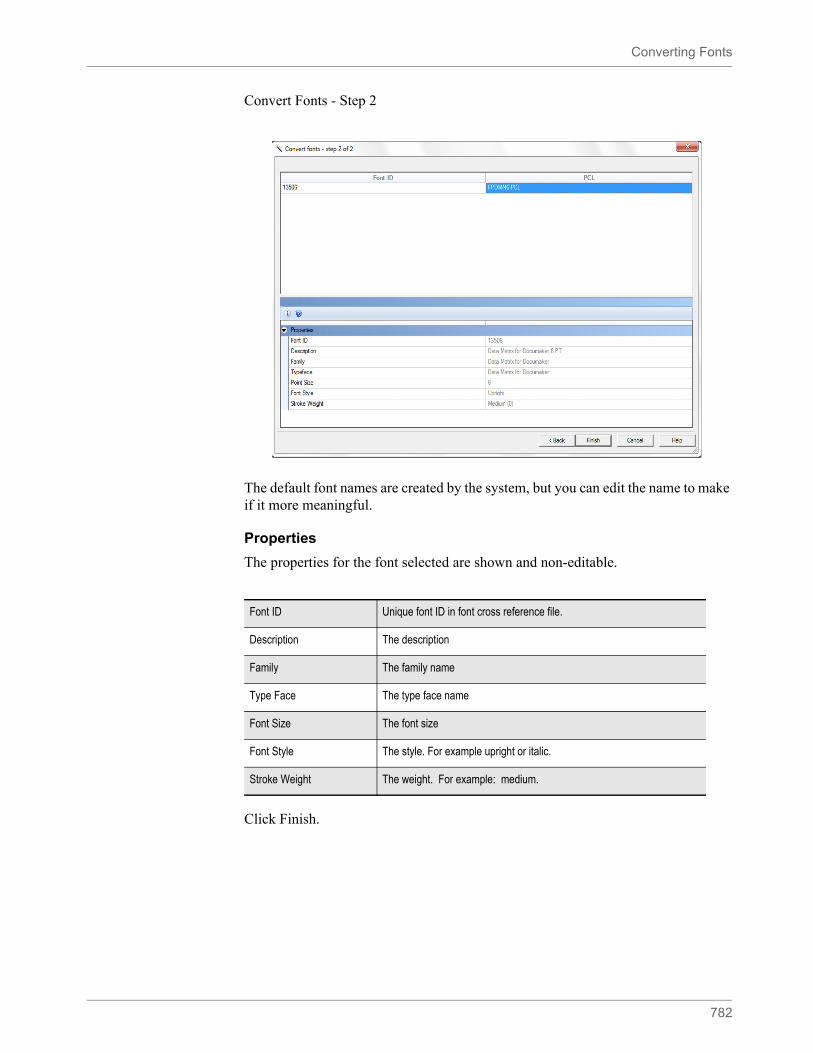
Converting Fonts
782
Convert Fonts - Step 2
The default font names are created by the system, but you can edit the name to make if it more meaningful.
Properties
The properties for the font selected are shown and non-editable.
Click Finish.
Font ID Unique font ID in font cross reference file.
Description The description
Family The family name
Type Face The type face name
Font Size The font size
Font Style The style. For example upright or italic.
Stroke Weight The weight. For example: medium.
783
Chapter 18
Testing Your Work
This chapter discusses how you can test the forms you have created and analyze system output. Testing the forms involves using the Test Scenarios manager. Analyzing the output involves using Printstream Analyzer.
This chapter includes these topics:
• Overview on page 784
• Using the Screen on page 786
• Creating a Test Profile on page 794
• Running a Test Scenario on page 796
• Changing Test Properties on page 801
• Modifying the AFGJOB File on page 802
• Deleting a Test on page 803
• Using the Printstream Analyzer on page 804

Overview
784
OVERVIEW
When you use the Test Scenario manager to run a test, keep in mind Studio does not execute the GenTrn and GenPrint processing steps. When you select an AFGJOB.JDT file you want to use for test, Studio creates a copy of that file and modifies it to exclude some rules and include others. One of the included rules eliminates the GenTrn requirement. Aside from those top level rules replaced in the AFGJOB sections, all the other rules remain where they are.
These rules are not imported into the AFGJOB.JDT file for a test run:
• LoadExtractData
• UpdatePOLFile
• ServerJobProc
• InitPrint
• InsNAHdr
• PrintFormset
• WriteOutput
• WriteNAFile
They could cause problems with the way Studio runs the test or else are simply not applicable in the case of the ServerJobProc rule.
Also keep in mind that you do not have to check in resources to include them in a test run. This lets you easily experiment with resources you are developing and only check them in once you have corrected any problems.
Breakpoints
The breakpoint process stops on most other rules defined in the AFGJOB.JDT file. The LoadExtractData rule is, however, an exception. Since a test has no GenTrn processing step, the extract data is already loaded. If you execute another LoadExtractData rule, it means you are reading a second transaction before processing the first — effectively skipping ever other transaction in your extract.
Establishing origins and pagination are tasks that happen sequentially. The origin for each is determined when processing encounters that section, until that time the section may appear in an incorrect position. Furthermore, the final pagination process does not take place until you get to a form set- or transaction-level rule on the reverse processing, such as the PaginateAndPropagate rule. This means you may see some really long pages. in comparison to your page\paper setting, until this occurs.
Note Please note that your original AFGJOB.JDT file is not changed. Studio makes a copy of this file and modifies it for testing purposes. Also, unlike an actual run, no files are saved to disk.
Note The Test Scenarios option does not support custom Proc rules in the JDT file.

Overview
785
A breakpoint also occurs when form set reloads. This happens any time the list of form set sections changes outside the normal triggering process. So, if you have a DAL rule or some other rule that adds or deletes a form or section beyond normal triggering, this event will be a breakpoint.
Messaging can give you more feedback of exactly what processed and in what order. When things are going along nicely, you may want to turn messaging off to reduce the clutter you see on the screen. When things are not working as expected, you would probably turn on more messaging to get an idea of what is happening.
Note Changes to a graphic via DAL or a rule may not appear in the Test view until the final document pagination occurs. The change can appear earlier if the section that contains the graphic is also forced in-lined due to the growth of a text area.
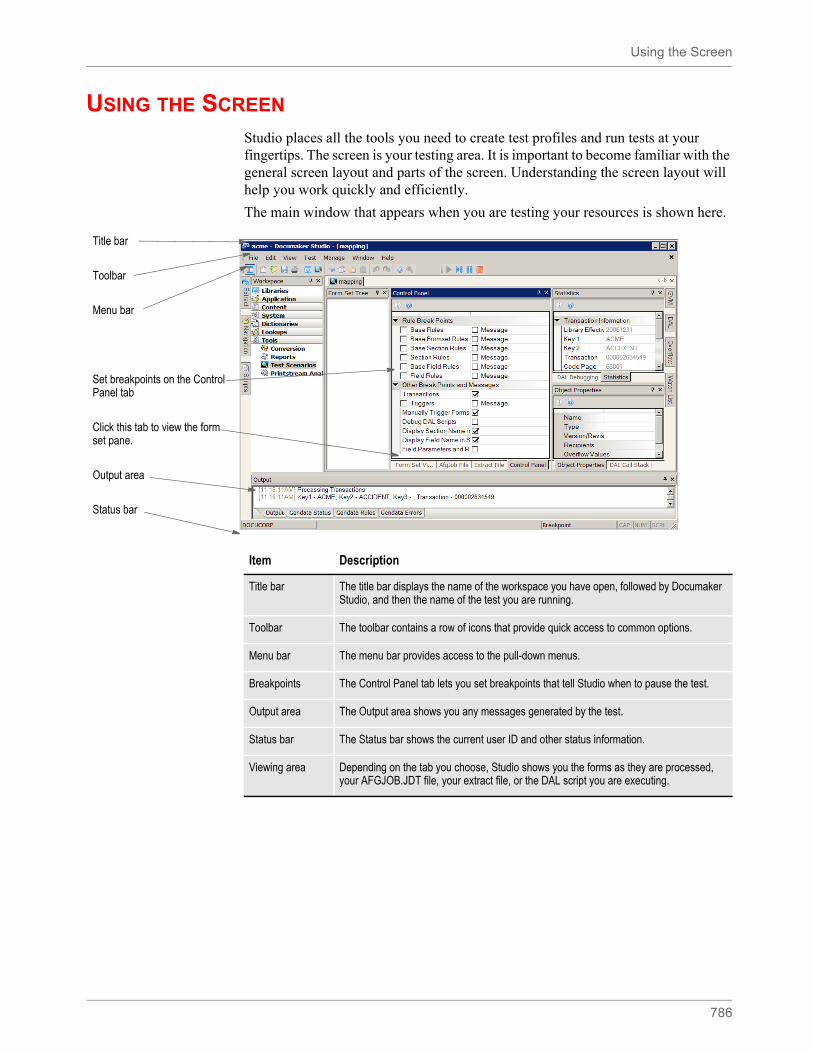
Using the Screen
786
USING THE SCREEN
Studio places all the tools you need to create test profiles and run tests at your fingertips. The screen is your testing area. It is important to become familiar with the general screen layout and parts of the screen. Understanding the screen layout will help you work quickly and efficiently.
The main window that appears when you are testing your resources is shown here.
Title bar
Toolbar
Menu bar
Set breakpoints on the Control Panel tab
Click this tab to view the form set pane.
Output area
Status bar
Item Description
Title bar The title bar displays the name of the workspace you have open, followed by Documaker Studio, and then the name of the test you are running.
Toolbar The toolbar contains a row of icons that provide quick access to common options.
Menu bar The menu bar provides access to the pull-down menus.
Breakpoints The Control Panel tab lets you set breakpoints that tell Studio when to pause the test.
Output area The Output area shows you any messages generated by the test.
Status bar The Status bar shows the current user ID and other status information.
Viewing area Depending on the tab you choose, Studio shows you the forms as they are processed, your AFGJOB.JDT file, your extract file, or the DAL script you are executing.
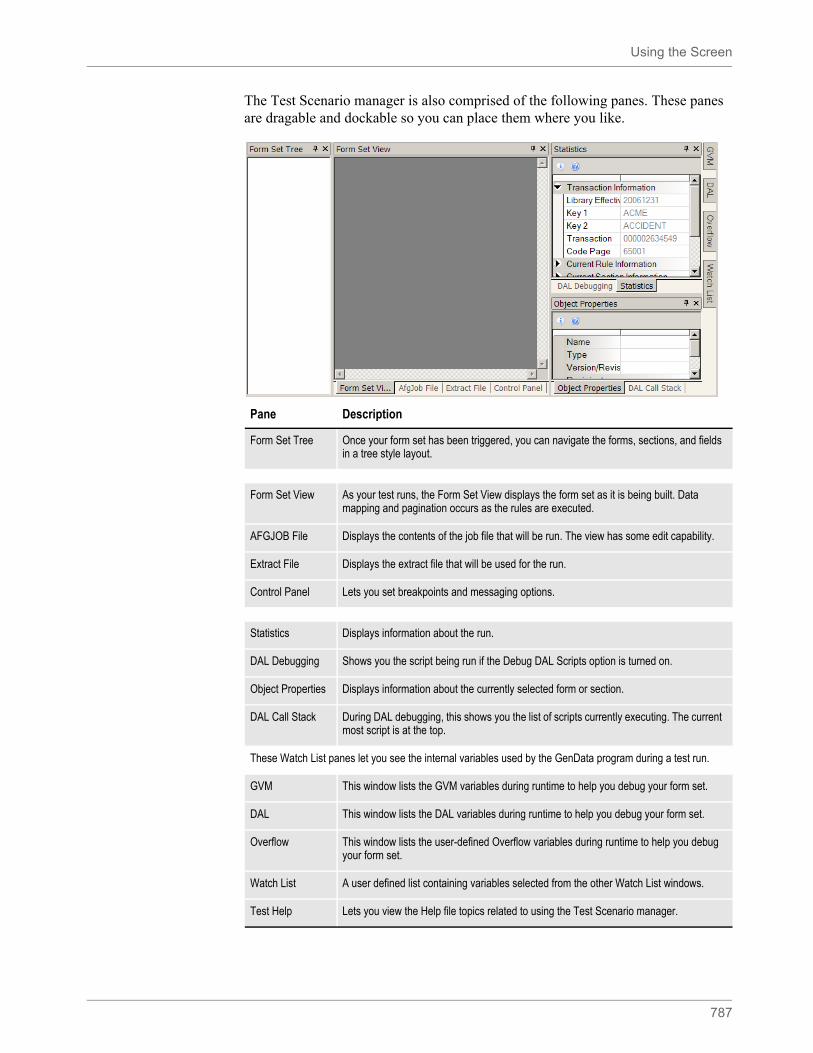
Using the Screen
787
The Test Scenario manager is also comprised of the following panes. These panes are dragable and dockable so you can place them where you like.
Pane Description
Form Set Tree Once your form set has been triggered, you can navigate the forms, sections, and fields in a tree style layout.
Form Set View As your test runs, the Form Set View displays the form set as it is being built. Data mapping and pagination occurs as the rules are executed.
AFGJOB File Displays the contents of the job file that will be run. The view has some edit capability.
Extract File Displays the extract file that will be used for the run.
Control Panel Lets you set breakpoints and messaging options.
Statistics Displays information about the run.
DAL Debugging Shows you the script being run if the Debug DAL Scripts option is turned on.
Object Properties Displays information about the currently selected form or section.
DAL Call Stack During DAL debugging, this shows you the list of scripts currently executing. The current most script is at the top.
These Watch List panes let you see the internal variables used by the GenData program during a test run.
GVM This window lists the GVM variables during runtime to help you debug your form set.
DAL This window lists the DAL variables during runtime to help you debug your form set.
Overflow This window lists the user-defined Overflow variables during runtime to help you debug your form set.
Watch List A user defined list containing variables selected from the other Watch List windows.
Test Help Lets you view the Help file topics related to using the Test Scenario manager.
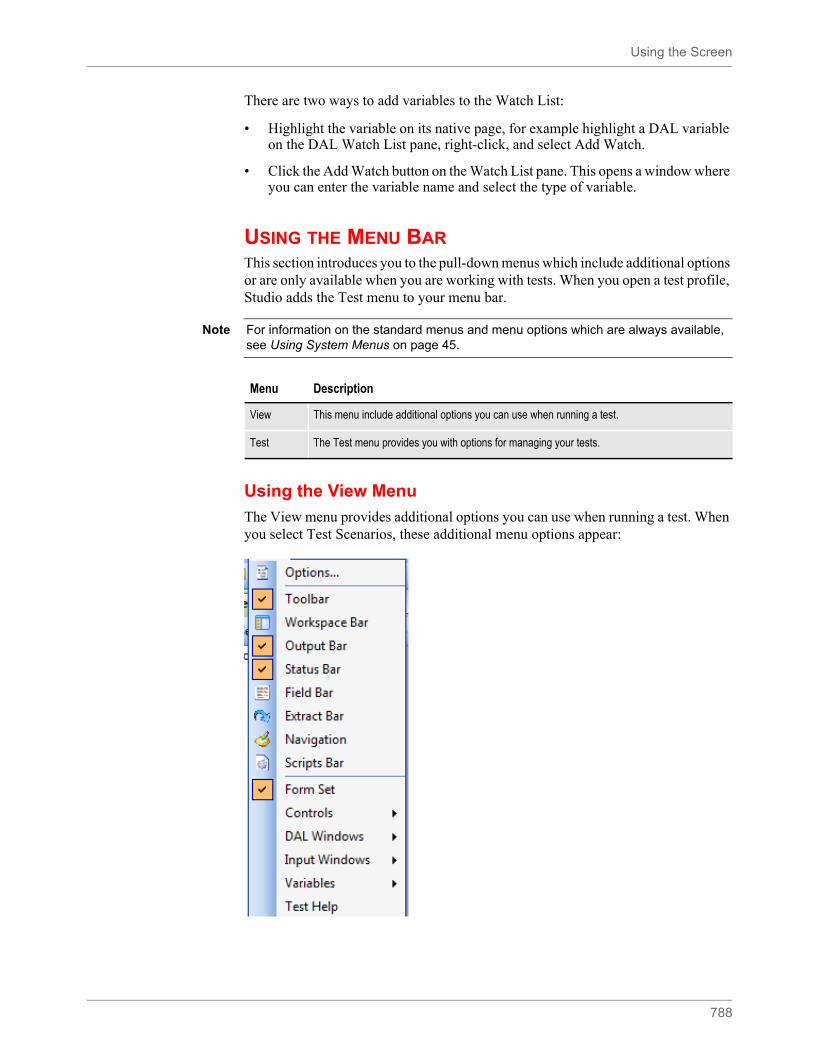
Using the Screen
788
There are two ways to add variables to the Watch List:
• Highlight the variable on its native page, for example highlight a DAL variable on the DAL Watch List pane, right-click, and select Add Watch.
• Click the Add Watch button on the Watch List pane. This opens a window where you can enter the variable name and select the type of variable.
USING THE MENU BARThis section introduces you to the pull-down menus which include additional options or are only available when you are working with tests. When you open a test profile, Studio adds the Test menu to your menu bar.
Using the View Menu
The View menu provides additional options you can use when running a test. When you select Test Scenarios, these additional menu options appear:
Note For information on the standard menus and menu options which are always available, see Using System Menus on page 45.
Menu Description
View This menu include additional options you can use when running a test.
Test The Test menu provides you with options for managing your tests.
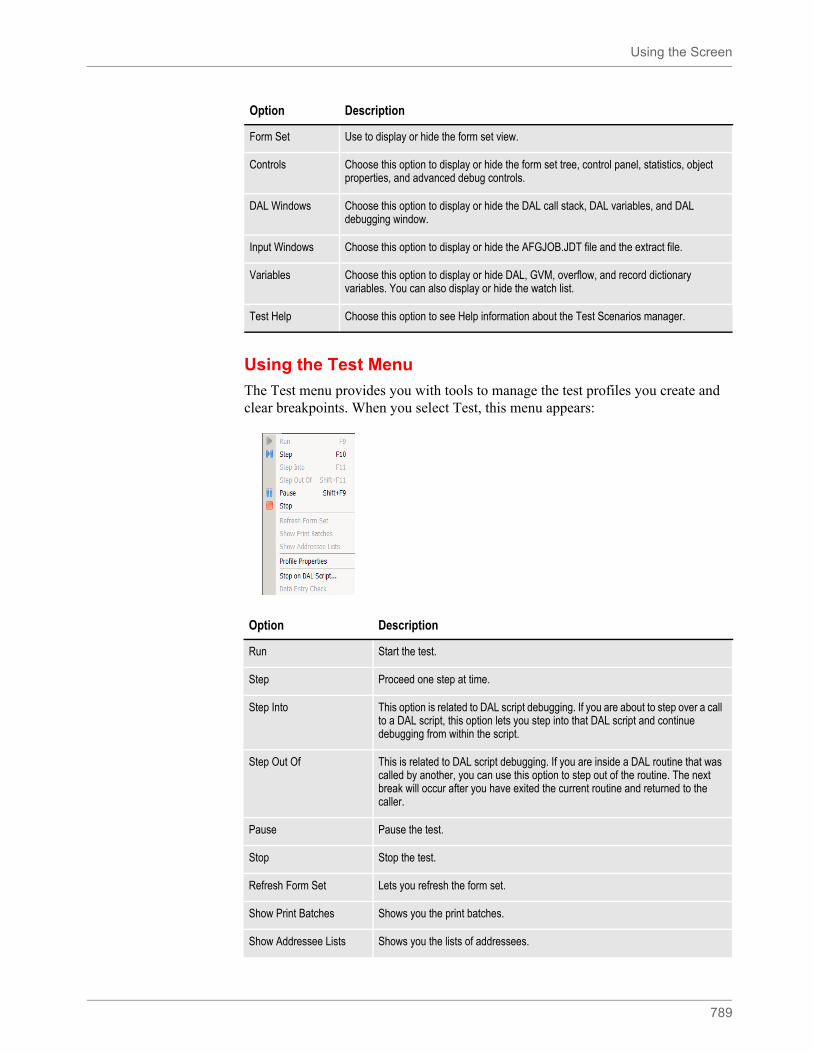
Using the Screen
789
Using the Test Menu
The Test menu provides you with tools to manage the test profiles you create and clear breakpoints. When you select Test, this menu appears:
Option Description
Form Set Use to display or hide the form set view.
Controls Choose this option to display or hide the form set tree, control panel, statistics, object properties, and advanced debug controls.
DAL Windows Choose this option to display or hide the DAL call stack, DAL variables, and DAL debugging window.
Input Windows Choose this option to display or hide the AFGJOB.JDT file and the extract file.
Variables Choose this option to display or hide DAL, GVM, overflow, and record dictionary variables. You can also display or hide the watch list.
Test Help Choose this option to see Help information about the Test Scenarios manager.
Option Description
Run Start the test.
Step Proceed one step at time.
Step Into This option is related to DAL script debugging. If you are about to step over a call to a DAL script, this option lets you step into that DAL script and continue debugging from within the script.
Step Out Of This is related to DAL script debugging. If you are inside a DAL routine that was called by another, you can use this option to step out of the routine. The next break will occur after you have exited the current routine and returned to the caller.
Pause Pause the test.
Stop Stop the test.
Refresh Form Set Lets you refresh the form set.
Show Print Batches Shows you the print batches.
Show Addressee Lists Shows you the lists of addressees.
Using the Screen
790
Profile Properties Use to edit the properties you have defined for a test profile.
Stop on DAL Script Stop execution when reaching a DAL script.
Data Entry Check This option is available once a form set has been triggered. The current NA/POL data is loaded into Data Entry Check. Keep in mind that if you make changes, those changes will not be reflected in Test manager.
Option Description
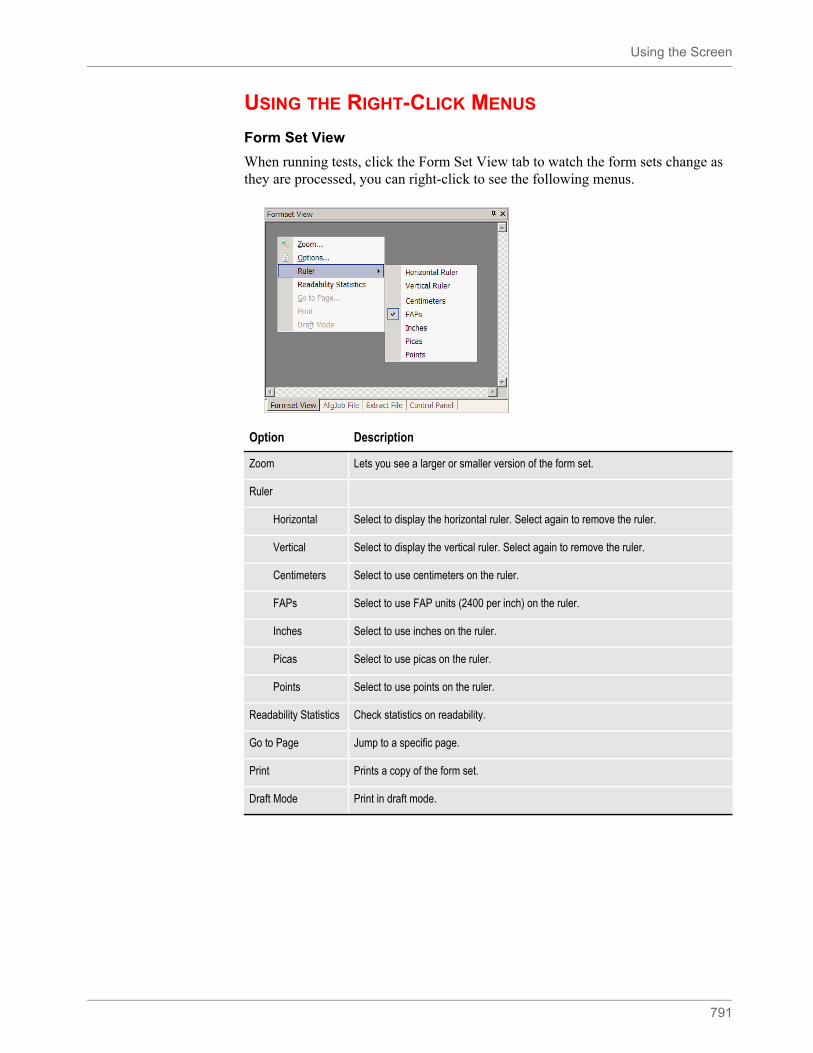
Using the Screen
791
USING THE RIGHT-CLICK MENUS
Form Set View
When running tests, click the Form Set View tab to watch the form sets change as they are processed, you can right-click to see the following menus.
Option Description
Zoom Lets you see a larger or smaller version of the form set.
Ruler
Horizontal Select to display the horizontal ruler. Select again to remove the ruler.
Vertical Select to display the vertical ruler. Select again to remove the ruler.
Centimeters Select to use centimeters on the ruler.
FAPs Select to use FAP units (2400 per inch) on the ruler.
Inches Select to use inches on the ruler.
Picas Select to use picas on the ruler.
Points Select to use points on the ruler.
Readability Statistics Check statistics on readability.
Go to Page Jump to a specific page.
Print Prints a copy of the form set.
Draft Mode Print in draft mode.
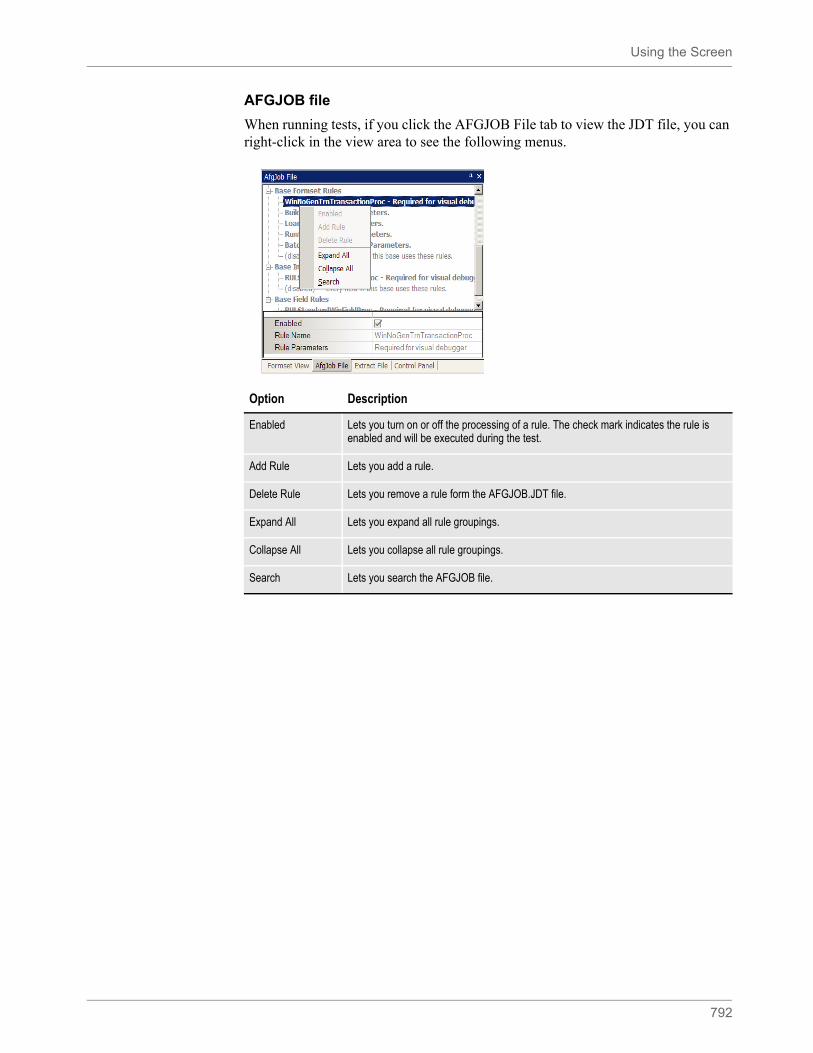
Using the Screen
792
AFGJOB file
When running tests, if you click the AFGJOB File tab to view the JDT file, you can right-click in the view area to see the following menus.
Option Description
Enabled Lets you turn on or off the processing of a rule. The check mark indicates the rule is enabled and will be executed during the test.
Add Rule Lets you add a rule.
Delete Rule Lets you remove a rule form the AFGJOB.JDT file.
Expand All Lets you expand all rule groupings.
Collapse All Lets you collapse all rule groupings.
Search Lets you search the AFGJOB file.
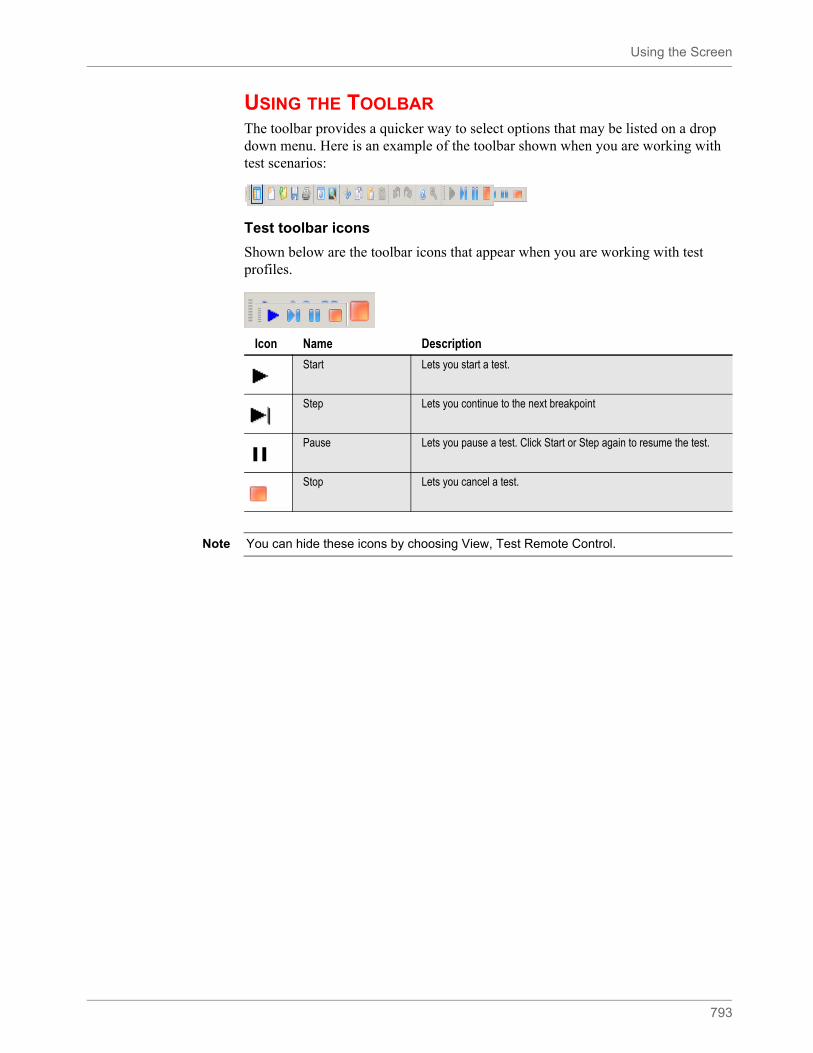
Using the Screen
793
USING THE TOOLBARThe toolbar provides a quicker way to select options that may be listed on a drop down menu. Here is an example of the toolbar shown when you are working with test scenarios:
Test toolbar icons
Shown below are the toolbar icons that appear when you are working with test profiles.
Icon Name Description
Start Lets you start a test.
Step Lets you continue to the next breakpoint
Pause Lets you pause a test. Click Start or Step again to resume the test.
Stop Lets you cancel a test.
Note You can hide these icons by choosing View, Test Remote Control.
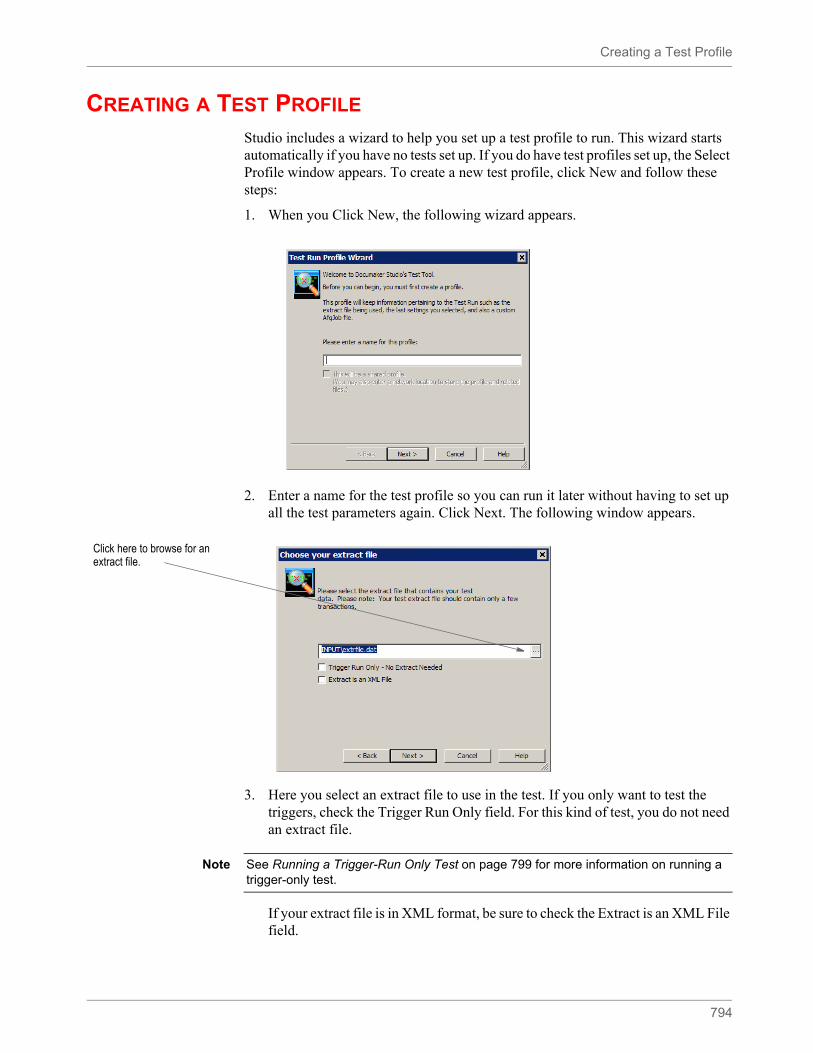
Creating a Test Profile
794
CREATING A TEST PROFILE
Studio includes a wizard to help you set up a test profile to run. This wizard starts automatically if you have no tests set up. If you do have test profiles set up, the Select Profile window appears. To create a new test profile, click New and follow these steps:
1. When you Click New, the following wizard appears.
2. Enter a name for the test profile so you can run it later without having to set up all the test parameters again. Click Next. The following window appears.
3. Here you select an extract file to use in the test. If you only want to test the triggers, check the Trigger Run Only field. For this kind of test, you do not need an extract file.
If your extract file is in XML format, be sure to check the Extract is an XML File field.
Click here to browse for an extract file.
Note See Running a Trigger-Run Only Test on page 799 for more information on running a trigger-only test.
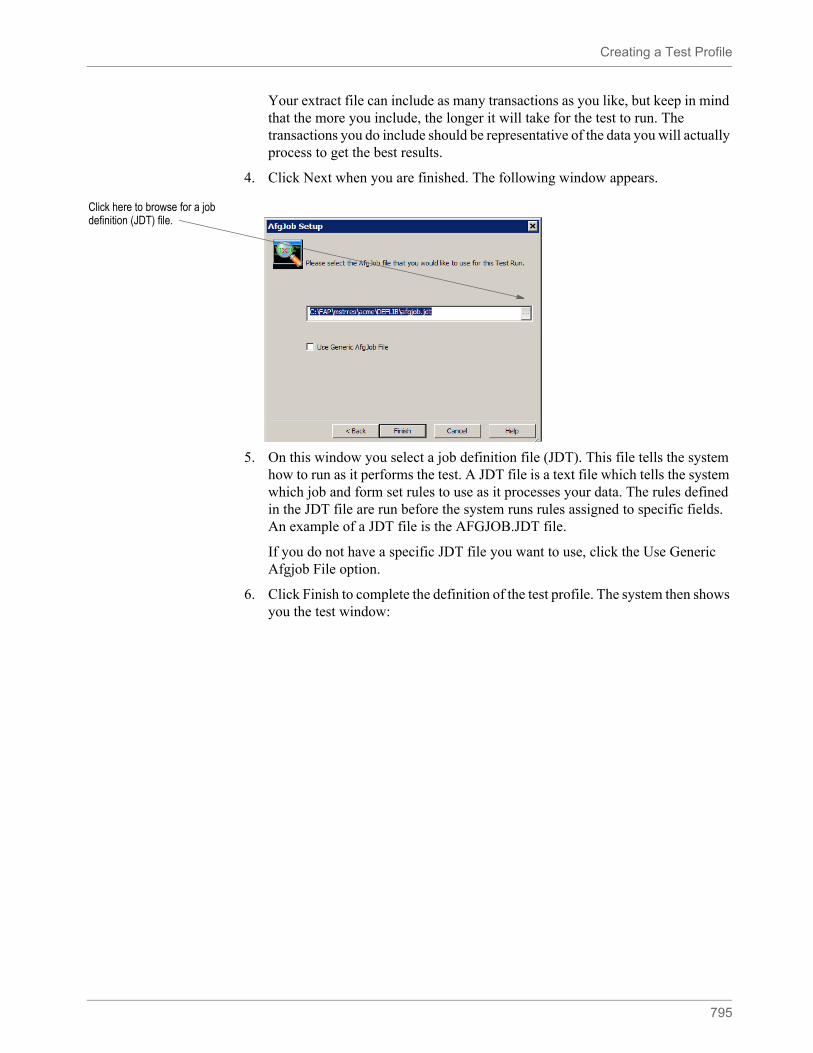
Creating a Test Profile
795
Your extract file can include as many transactions as you like, but keep in mind that the more you include, the longer it will take for the test to run. The transactions you do include should be representative of the data you will actually process to get the best results.
4. Click Next when you are finished. The following window appears.
5. On this window you select a job definition file (JDT). This file tells the system how to run as it performs the test. A JDT file is a text file which tells the system which job and form set rules to use as it processes your data. The rules defined in the JDT file are run before the system runs rules assigned to specific fields. An example of a JDT file is the AFGJOB.JDT file.
If you do not have a specific JDT file you want to use, click the Use Generic Afgjob File option.
6. Click Finish to complete the definition of the test profile. The system then shows you the test window:
Click here to browse for a job definition (JDT) file.
Running a Test Scenario
796
RUNNING A TEST SCENARIO
Follow these steps to run a test profile you have already defined.
1. Open a workspace, then click Test Scenarios. The following window appears.
2. Highlight the test profile you want to run, then click Ok. Studio displays a window similar to this one.
To better monitor the test, you may want to resize some of the components of the window, like this:
This test scenario has already been set up.
Note These examples only show the Test window itself. You can close the workspace to get additional room. When you need to restore the workspace, just click View, Workspace.
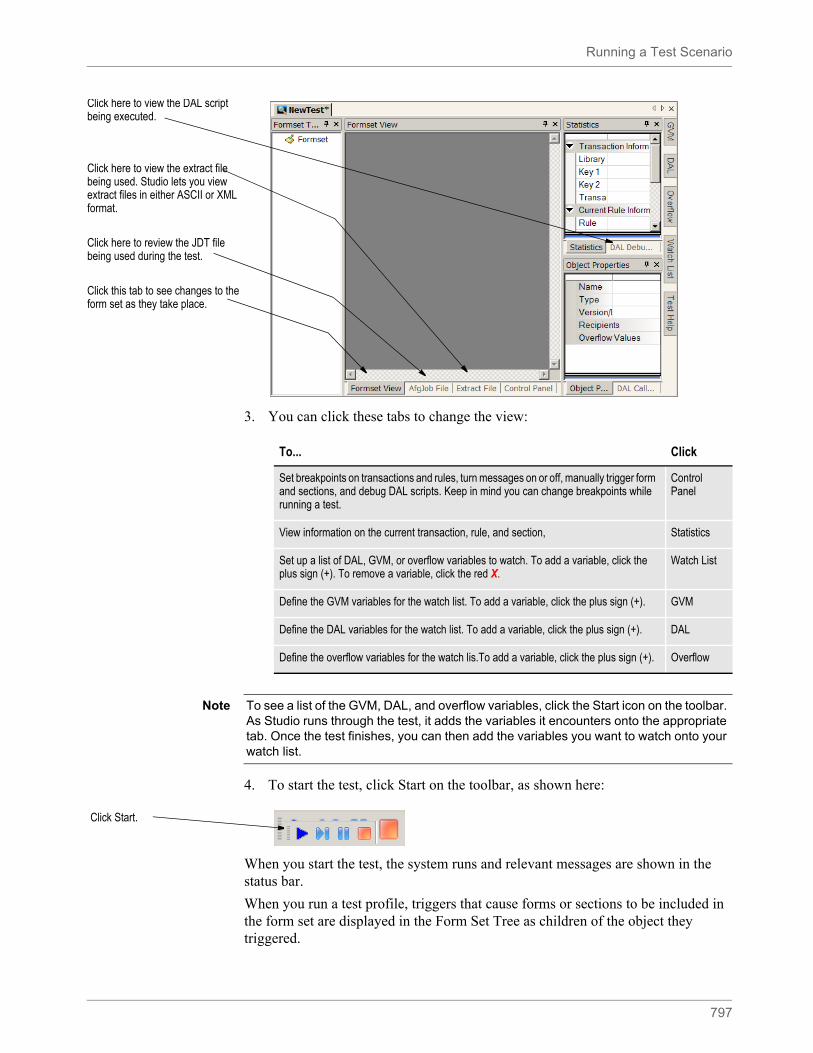
Running a Test Scenario
797
3. You can click these tabs to change the view:
4. To start the test, click Start on the toolbar, as shown here:
When you start the test, the system runs and relevant messages are shown in the status bar.
When you run a test profile, triggers that cause forms or sections to be included in the form set are displayed in the Form Set Tree as children of the object they triggered.
Click here to view the DAL script being executed.
Click here to view the extract file being used. Studio lets you view extract files in either ASCII or XML format.
Click here to review the JDT file being used during the test.
Click this tab to see changes to the form set as they take place.
To... Click
Set breakpoints on transactions and rules, turn messages on or off, manually trigger form and sections, and debug DAL scripts. Keep in mind you can change breakpoints while running a test.
Control Panel
View information on the current transaction, rule, and section, Statistics
Set up a list of DAL, GVM, or overflow variables to watch. To add a variable, click the plus sign (+). To remove a variable, click the red X.
Watch List
Define the GVM variables for the watch list. To add a variable, click the plus sign (+). GVM
Define the DAL variables for the watch list. To add a variable, click the plus sign (+). DAL
Define the overflow variables for the watch lis.To add a variable, click the plus sign (+). Overflow
Note To see a list of the GVM, DAL, and overflow variables, click the Start icon on the toolbar. As Studio runs through the test, it adds the variables it encounters onto the appropriate tab. Once the test finishes, you can then add the variables you want to watch onto your watch list.
Click Start.
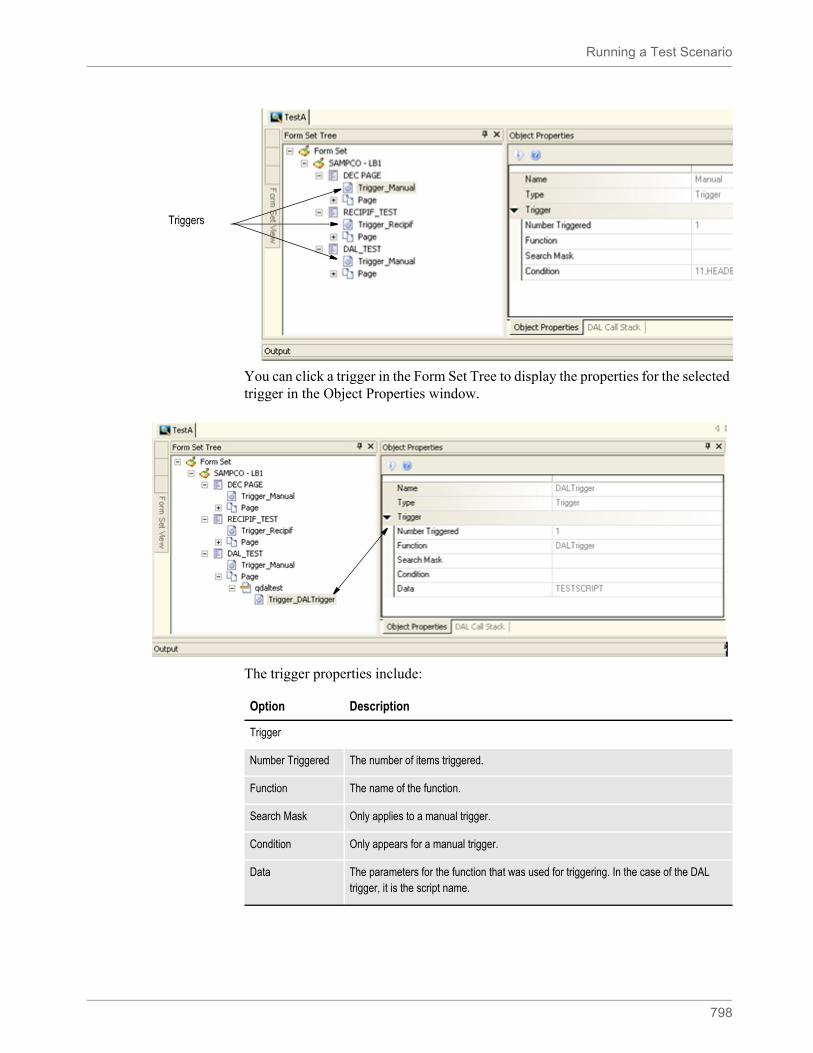
Running a Test Scenario
798
You can click a trigger in the Form Set Tree to display the properties for the selected trigger in the Object Properties window.
The trigger properties include:
Triggers
Option Description
Trigger
Number Triggered The number of items triggered.
Function The name of the function.
Search Mask Only applies to a manual trigger.
Condition Only appears for a manual trigger.
Data The parameters for the function that was used for triggering. In the case of the DAL trigger, it is the script name.
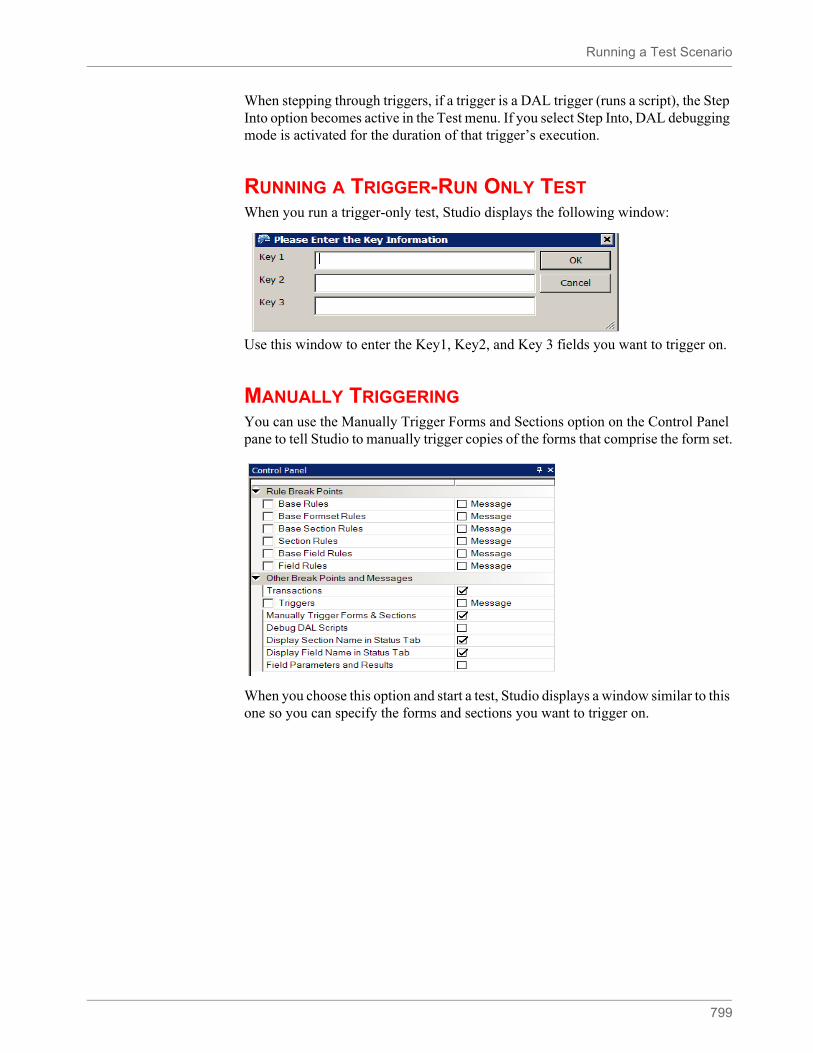
Running a Test Scenario
799
When stepping through triggers, if a trigger is a DAL trigger (runs a script), the Step Into option becomes active in the Test menu. If you select Step Into, DAL debugging mode is activated for the duration of that trigger’s execution.
RUNNING A TRIGGER-RUN ONLY TESTWhen you run a trigger-only test, Studio displays the following window:
Use this window to enter the Key1, Key2, and Key 3 fields you want to trigger on.
MANUALLY TRIGGERINGYou can use the Manually Trigger Forms and Sections option on the Control Panel pane to tell Studio to manually trigger copies of the forms that comprise the form set.
When you choose this option and start a test, Studio displays a window similar to this one so you can specify the forms and sections you want to trigger on.
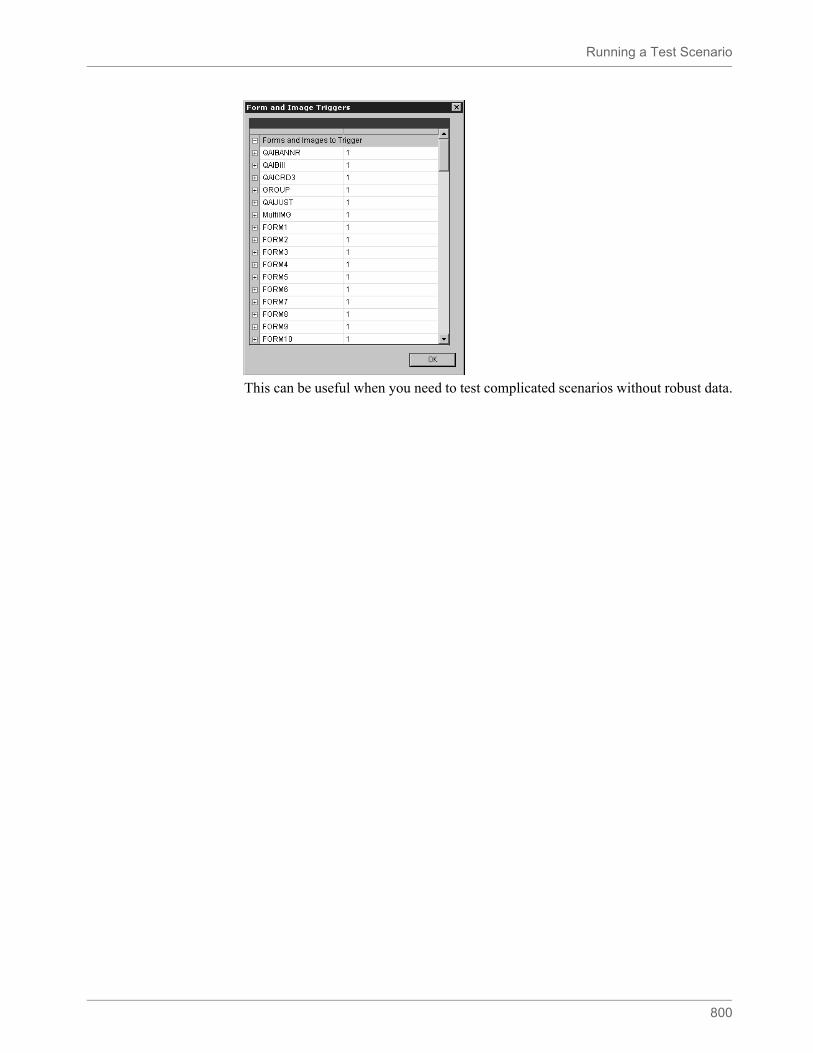
Running a Test Scenario
800
This can be useful when you need to test complicated scenarios without robust data.
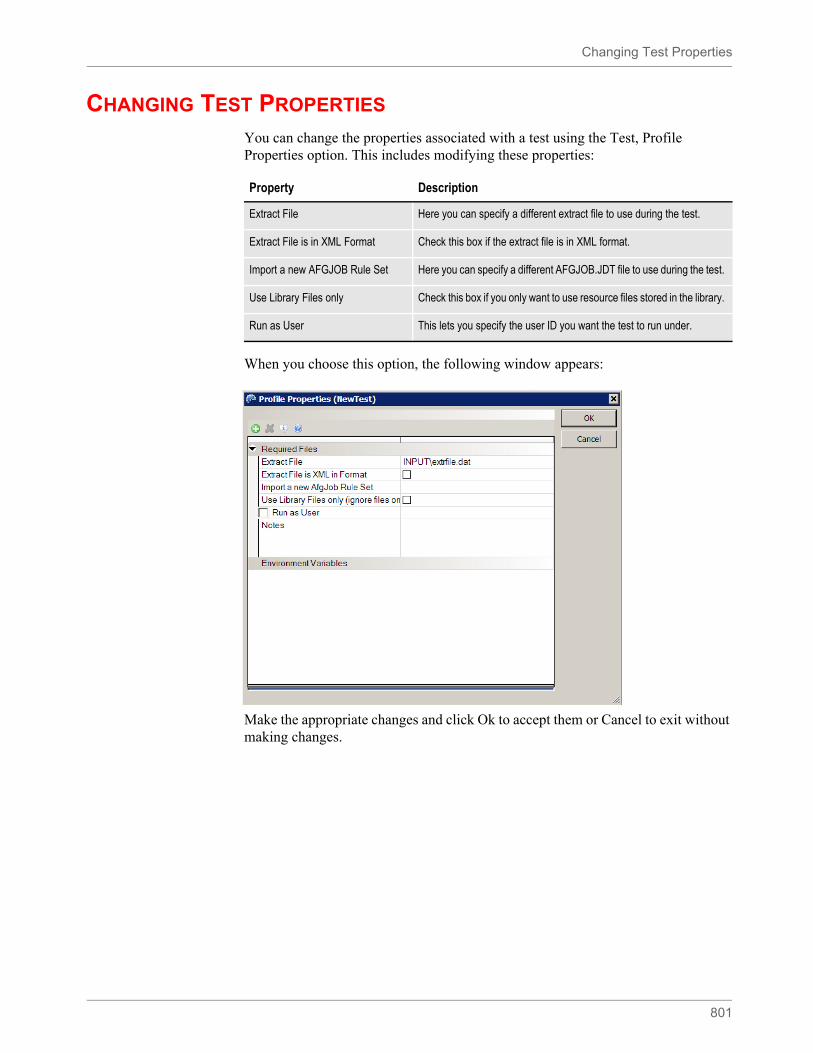
Changing Test Properties
801
CHANGING TEST PROPERTIES
You can change the properties associated with a test using the Test, Profile Properties option. This includes modifying these properties:
When you choose this option, the following window appears:
Make the appropriate changes and click Ok to accept them or Cancel to exit without making changes.
Property Description
Extract File Here you can specify a different extract file to use during the test.
Extract File is in XML Format Check this box if the extract file is in XML format.
Import a new AFGJOB Rule Set Here you can specify a different AFGJOB.JDT file to use during the test.
Use Library Files only Check this box if you only want to use resource files stored in the library.
Run as User This lets you specify the user ID you want the test to run under.
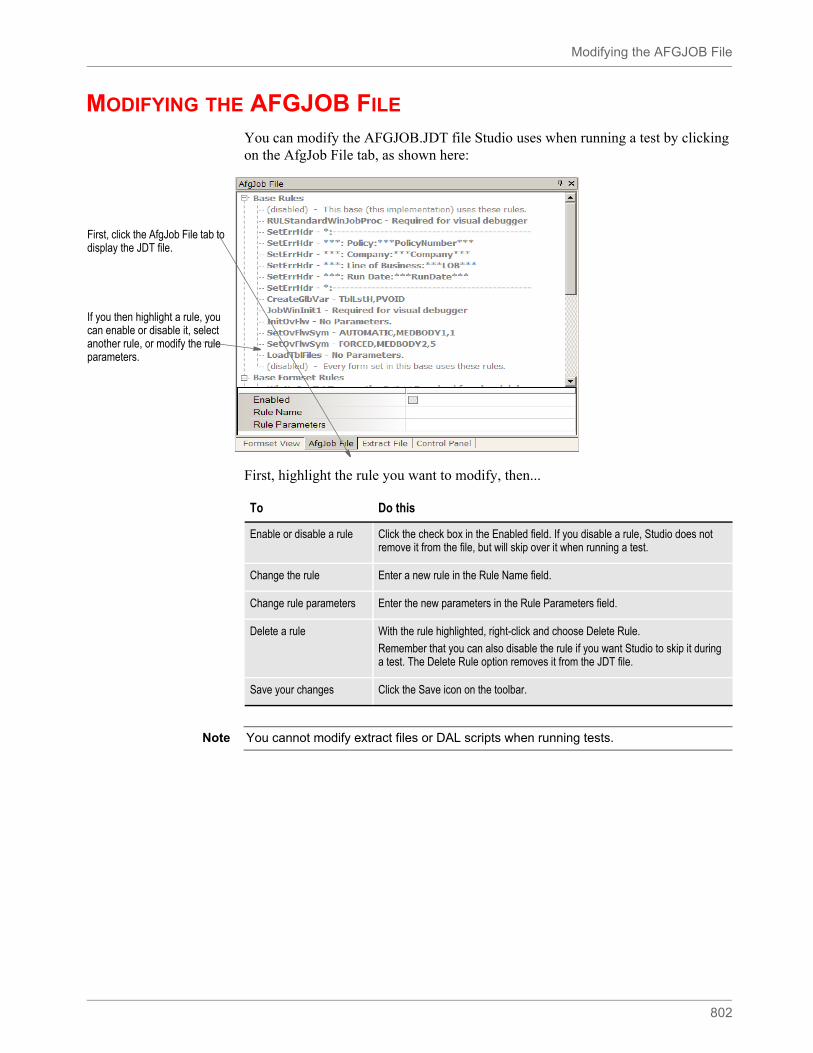
Modifying the AFGJOB File
802
MODIFYING THE AFGJOB FILE
You can modify the AFGJOB.JDT file Studio uses when running a test by clicking on the AfgJob File tab, as shown here:
First, highlight the rule you want to modify, then...
First, click the AfgJob File tab to display the JDT file.
If you then highlight a rule, you can enable or disable it, select another rule, or modify the rule parameters.
To Do this
Enable or disable a rule Click the check box in the Enabled field. If you disable a rule, Studio does not remove it from the file, but will skip over it when running a test.
Change the rule Enter a new rule in the Rule Name field.
Change rule parameters Enter the new parameters in the Rule Parameters field.
Delete a rule With the rule highlighted, right-click and choose Delete Rule.
Remember that you can also disable the rule if you want Studio to skip it during a test. The Delete Rule option removes it from the JDT file.
Save your changes Click the Save icon on the toolbar.
Note You cannot modify extract files or DAL scripts when running tests.
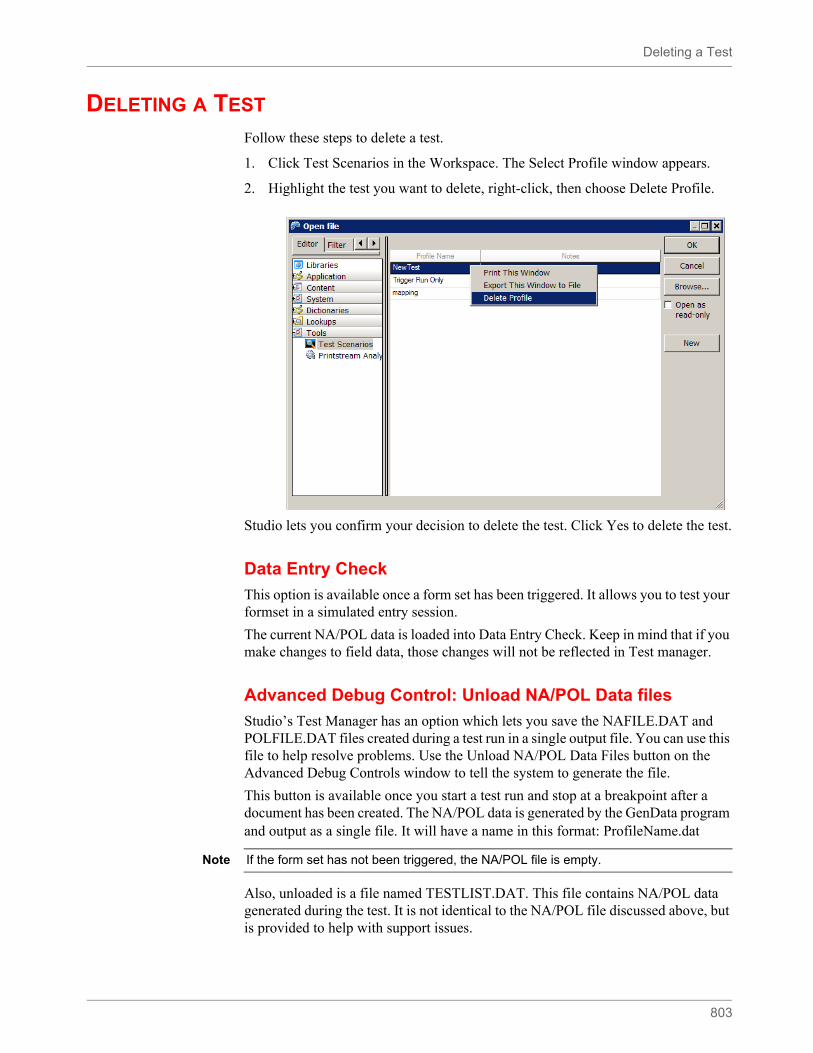
Deleting a Test
803
DELETING A TEST
Follow these steps to delete a test.
1. Click Test Scenarios in the Workspace. The Select Profile window appears.
2. Highlight the test you want to delete, right-click, then choose Delete Profile.
Studio lets you confirm your decision to delete the test. Click Yes to delete the test.
Data Entry Check
This option is available once a form set has been triggered. It allows you to test your formset in a simulated entry session.
The current NA/POL data is loaded into Data Entry Check. Keep in mind that if you make changes to field data, those changes will not be reflected in Test manager.
Advanced Debug Control: Unload NA/POL Data files
Studio’s Test Manager has an option which lets you save the NAFILE.DAT and POLFILE.DAT files created during a test run in a single output file. You can use this file to help resolve problems. Use the Unload NA/POL Data Files button on the Advanced Debug Controls window to tell the system to generate the file.
This button is available once you start a test run and stop at a breakpoint after a document has been created. The NA/POL data is generated by the GenData program and output as a single file. It will have a name in this format: ProfileName.dat
Also, unloaded is a file named TESTLIST.DAT. This file contains NA/POL data generated during the test. It is not identical to the NA/POL file discussed above, but is provided to help with support issues.
Note If the form set has not been triggered, the NA/POL file is empty.
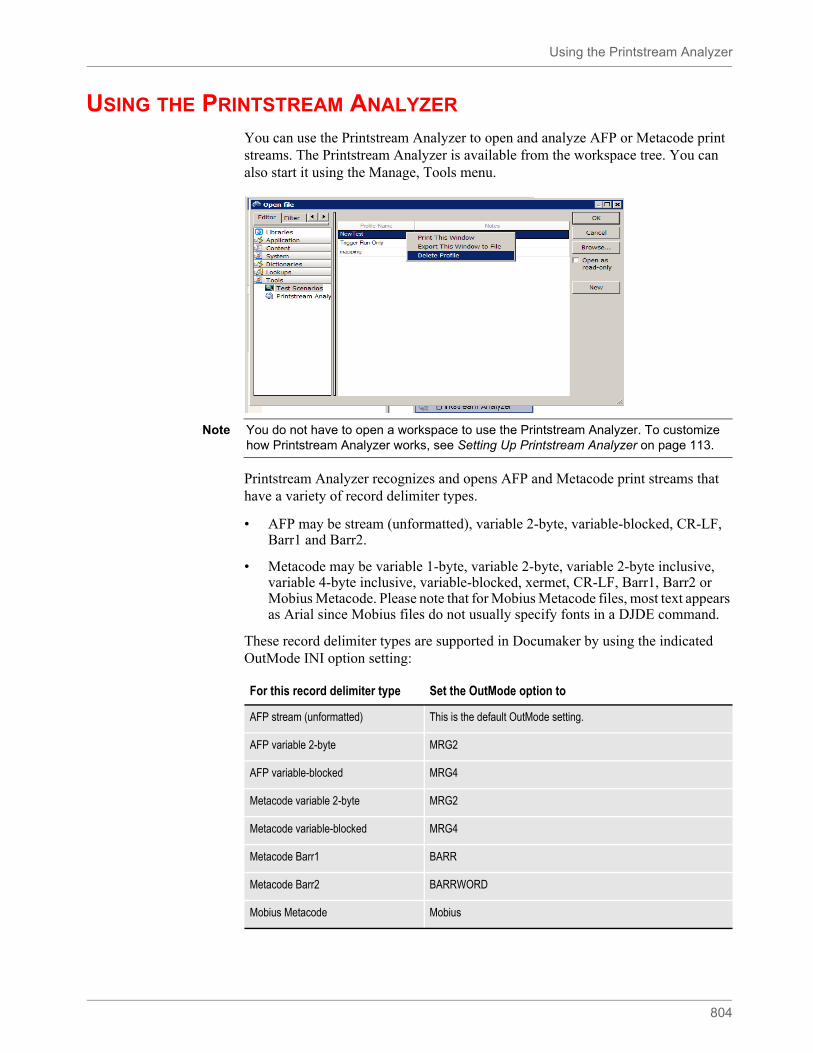
Using the Printstream Analyzer
804
USING THE PRINTSTREAM ANALYZER
You can use the Printstream Analyzer to open and analyze AFP or Metacode print streams. The Printstream Analyzer is available from the workspace tree. You can also start it using the Manage, Tools menu.
Printstream Analyzer recognizes and opens AFP and Metacode print streams that have a variety of record delimiter types.
• AFP may be stream (unformatted), variable 2-byte, variable-blocked, CR-LF, Barr1 and Barr2.
• Metacode may be variable 1-byte, variable 2-byte, variable 2-byte inclusive, variable 4-byte inclusive, variable-blocked, xermet, CR-LF, Barr1, Barr2 or Mobius Metacode. Please note that for Mobius Metacode files, most text appears as Arial since Mobius files do not usually specify fonts in a DJDE command.
These record delimiter types are supported in Documaker by using the indicated OutMode INI option setting:
Note You do not have to open a workspace to use the Printstream Analyzer. To customize how Printstream Analyzer works, see Setting Up Printstream Analyzer on page 113.
For this record delimiter type Set the OutMode option to
AFP stream (unformatted) This is the default OutMode setting.
AFP variable 2-byte MRG2
AFP variable-blocked MRG4
Metacode variable 2-byte MRG2
Metacode variable-blocked MRG4
Metacode Barr1 BARR
Metacode Barr2 BARRWORD
Mobius Metacode Mobius
Using the Printstream Analyzer
805
Printstream Analyzer does not require or access device fonts. It depends on font naming conventions to determine the characteristics of a Windows display font. When a font has an unknown naming convention, Printstream Analyzer uses Arial.
Naming conventions
Note You do not need to make changes to the OutMode setting so Printstream Analyzer can analyze an AFP or Metacode print stream. You only need to set the OutMode option in Documaker so the GenPrint program will produce an AFP or Metacode print stream using a specific record type delimiter.
Type Example
AFP
System fonts X0DAAAN6, C0FAAAN8
Expanded core fonts C1N20800
Compatibility fonts X0GT12, X0AOA
Others C1TR110, C1COD39P
Metacode
System fonts FXAAN8
Xerox 9700 fonts P07TDC, L0112B
Xerox Arial MT fonts A003GP
Others UN110E, TR212E, COD39P
Note Printstream Analyzer does not use device font metrics. Size differences between device fonts and Windows display fonts can cause positioning errors. This is expected behavior that will be most apparent in print stream files that contain many relative moves.
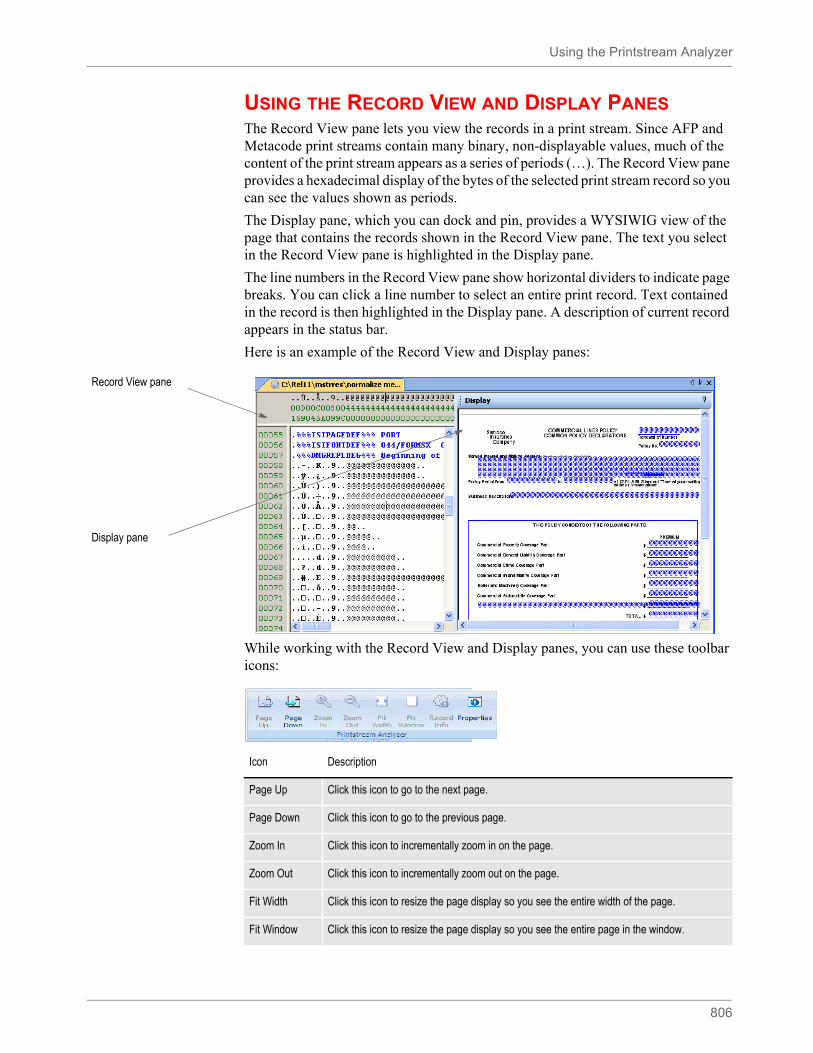
Using the Printstream Analyzer
806
USING THE RECORD VIEW AND DISPLAY PANESThe Record View pane lets you view the records in a print stream. Since AFP and Metacode print streams contain many binary, non-displayable values, much of the content of the print stream appears as a series of periods (…). The Record View pane provides a hexadecimal display of the bytes of the selected print stream record so you can see the values shown as periods.
The Display pane, which you can dock and pin, provides a WYSIWIG view of the page that contains the records shown in the Record View pane. The text you select in the Record View pane is highlighted in the Display pane.
The line numbers in the Record View pane show horizontal dividers to indicate page breaks. You can click a line number to select an entire print record. Text contained in the record is then highlighted in the Display pane. A description of current record appears in the status bar.
Here is an example of the Record View and Display panes:
While working with the Record View and Display panes, you can use these toolbar icons:
Record View pane
Display pane
Icon Description
Page Up Click this icon to go to the next page.
Page Down Click this icon to go to the previous page.
Zoom In Click this icon to incrementally zoom in on the page.
Zoom Out Click this icon to incrementally zoom out on the page.
Fit Width Click this icon to resize the page display so you see the entire width of the page.
Fit Window Click this icon to resize the page display so you see the entire page in the window.
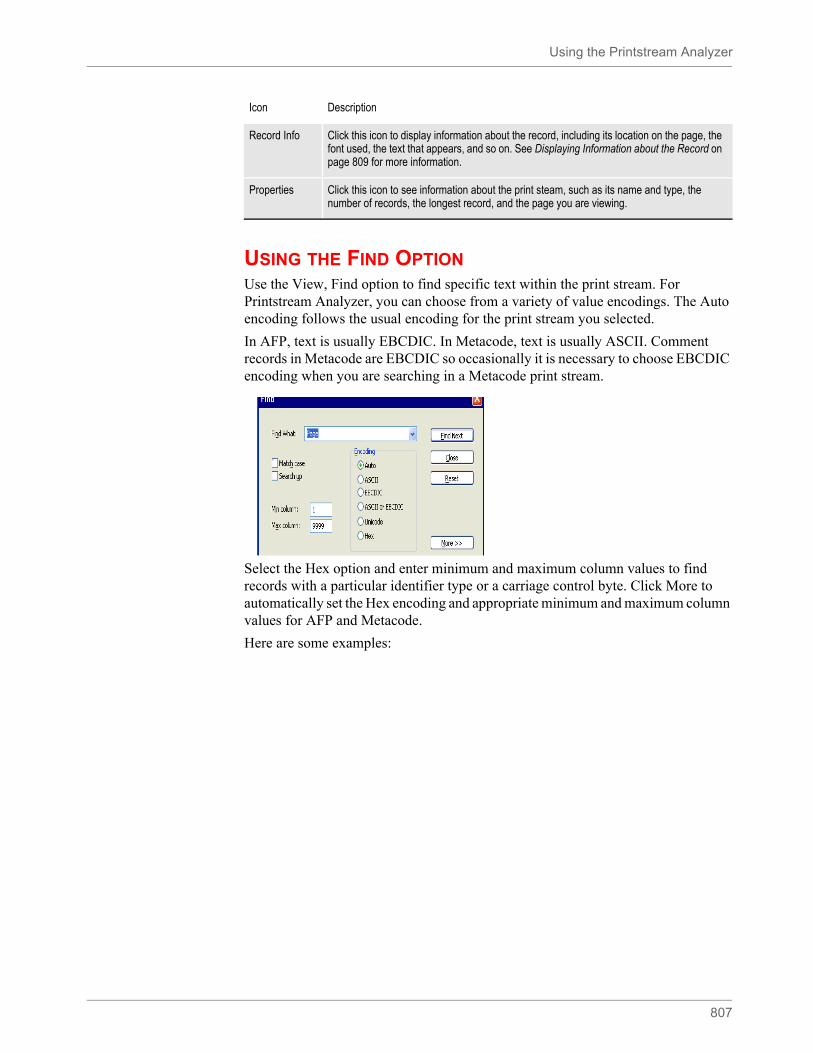
Using the Printstream Analyzer
807
USING THE FIND OPTIONUse the View, Find option to find specific text within the print stream. For Printstream Analyzer, you can choose from a variety of value encodings. The Auto encoding follows the usual encoding for the print stream you selected.
In AFP, text is usually EBCDIC. In Metacode, text is usually ASCII. Comment records in Metacode are EBCDIC so occasionally it is necessary to choose EBCDIC encoding when you are searching in a Metacode print stream.
Select the Hex option and enter minimum and maximum column values to find records with a particular identifier type or a carriage control byte. Click More to automatically set the Hex encoding and appropriate minimum and maximum column values for AFP and Metacode.
Here are some examples:
Record Info Click this icon to display information about the record, including its location on the page, the font used, the text that appears, and so on. See Displaying Information about the Record on page 809 for more information.
Properties Click this icon to see information about the print steam, such as its name and type, the number of records, the longest record, and the page you are viewing.
Icon Description
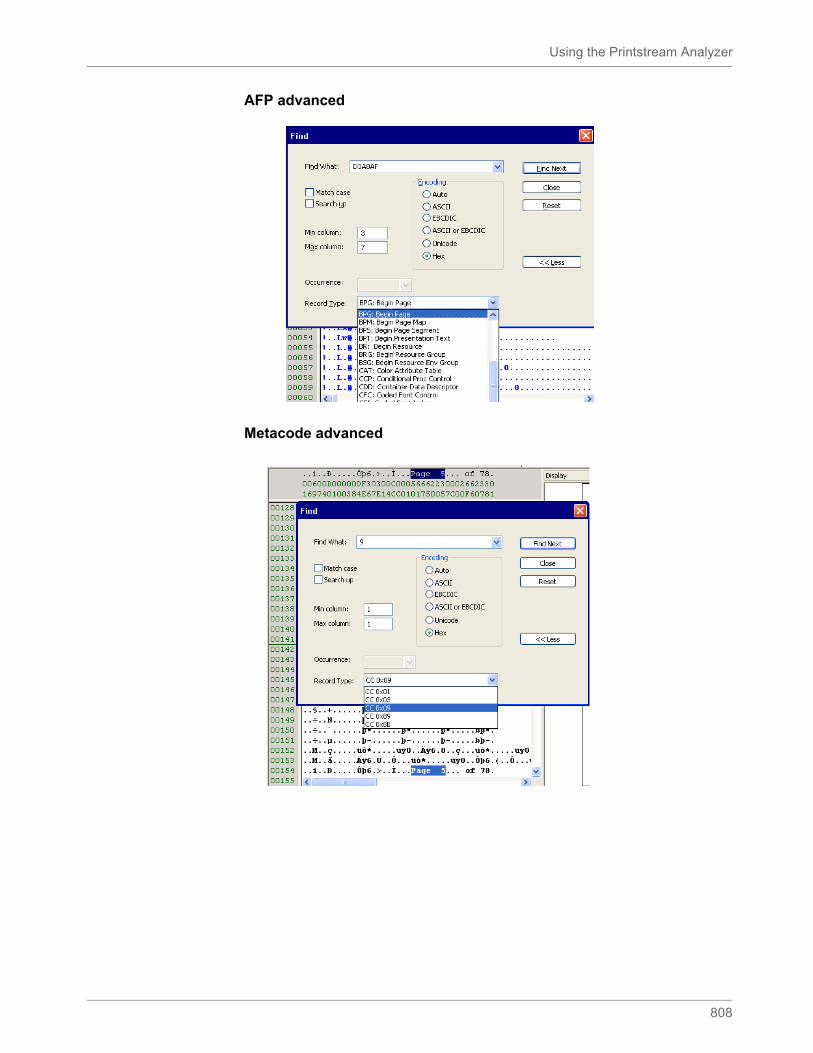
Using the Printstream Analyzer
808
AFP advanced
Metacode advanced
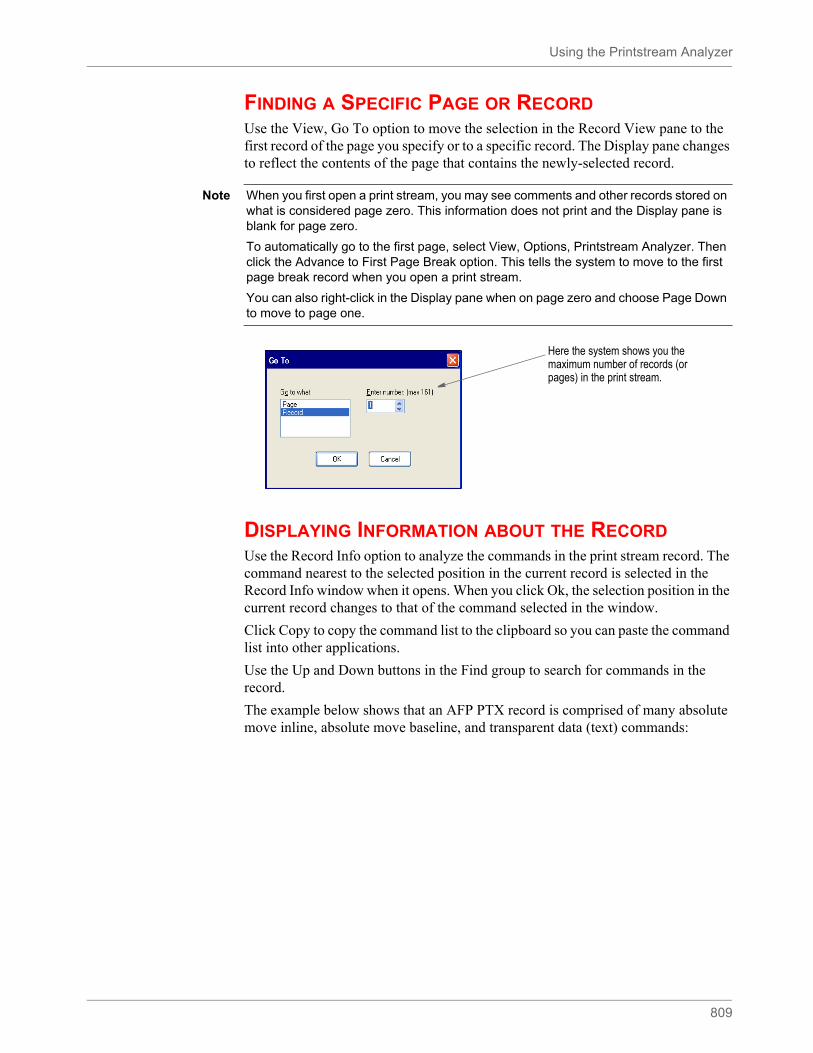
Using the Printstream Analyzer
809
FINDING A SPECIFIC PAGE OR RECORDUse the View, Go To option to move the selection in the Record View pane to the first record of the page you specify or to a specific record. The Display pane changes to reflect the contents of the page that contains the newly-selected record.
DISPLAYING INFORMATION ABOUT THE RECORDUse the Record Info option to analyze the commands in the print stream record. The command nearest to the selected position in the current record is selected in the Record Info window when it opens. When you click Ok, the selection position in the current record changes to that of the command selected in the window.
Click Copy to copy the command list to the clipboard so you can paste the command list into other applications.
Use the Up and Down buttons in the Find group to search for commands in the record.
The example below shows that an AFP PTX record is comprised of many absolute move inline, absolute move baseline, and transparent data (text) commands:
Note When you first open a print stream, you may see comments and other records stored on what is considered page zero. This information does not print and the Display pane is blank for page zero.
To automatically go to the first page, select View, Options, Printstream Analyzer. Then click the Advance to First Page Break option. This tells the system to move to the first page break record when you open a print stream.
You can also right-click in the Display pane when on page zero and choose Page Down to move to page one.
Here the system shows you the maximum number of records (or pages) in the print stream.
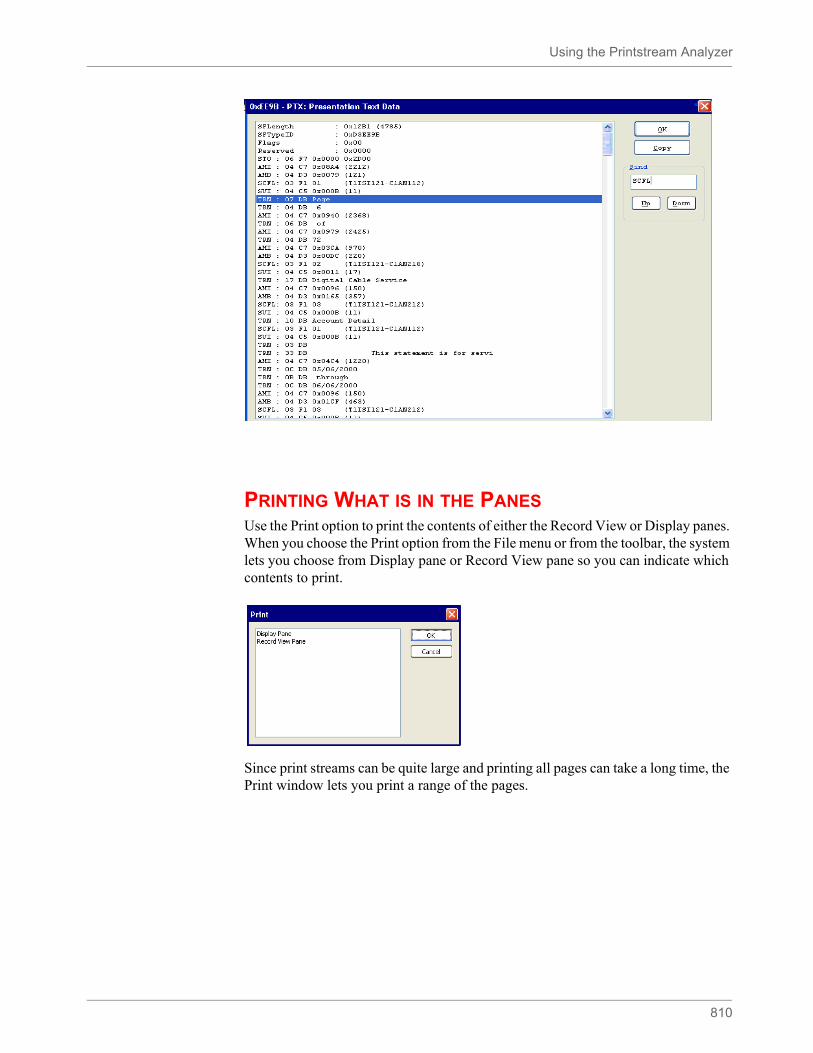
Using the Printstream Analyzer
810
PRINTING WHAT IS IN THE PANESUse the Print option to print the contents of either the Record View or Display panes. When you choose the Print option from the File menu or from the toolbar, the system lets you choose from Display pane or Record View pane so you can indicate which contents to print.
Since print streams can be quite large and printing all pages can take a long time, the Print window lets you print a range of the pages.
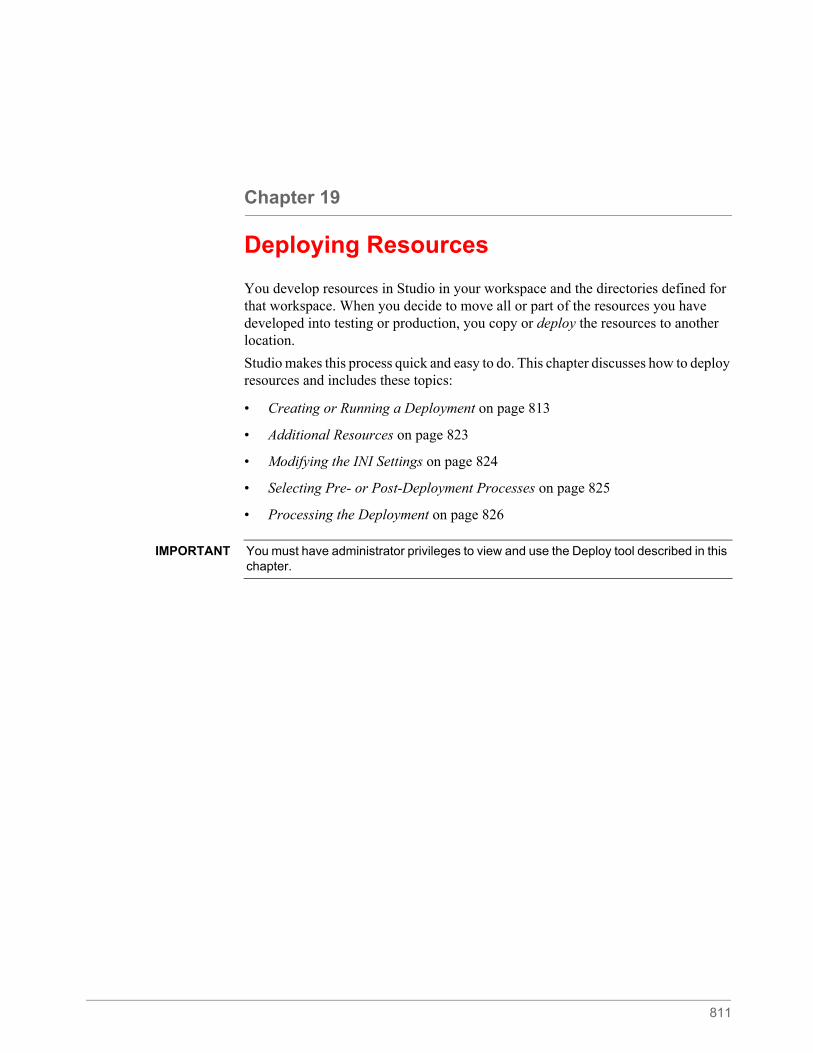
811
Chapter 19
Deploying Resources
You develop resources in Studio in your workspace and the directories defined for that workspace. When you decide to move all or part of the resources you have developed into testing or production, you copy or deploy the resources to another location.
Studio makes this process quick and easy to do. This chapter discusses how to deploy resources and includes these topics:
• Creating or Running a Deployment on page 813
• Additional Resources on page 823
• Modifying the INI Settings on page 824
• Selecting Pre- or Post-Deployment Processes on page 825
• Processing the Deployment on page 826
IMPORTANT You must have administrator privileges to view and use the Deploy tool described in this chapter.
Overview
812
OVERVIEW
You can have as many deployments as you need. For instance, you might have the following deployments:
• An initial test location
• A secondary test site
• A pre-production site
• A production location
Using the deployment features of Studio, you can easily manage these deployments.
You may also do temporary or occasional deployments for reasons other than testing and production. For instance, you might do a deployment to a secondary location like a backup server or a CD writer.
Also, you might deploy to a laptop drive when you are going to take a trip and need to take resources with you. Anytime you intend to make a copy of development resources, it is a deployment.
In addition, you can deploy a portable workspace that you can submit to Oracle customer support for analysis.
Note A deployment only copies resources that have been checked into the library.
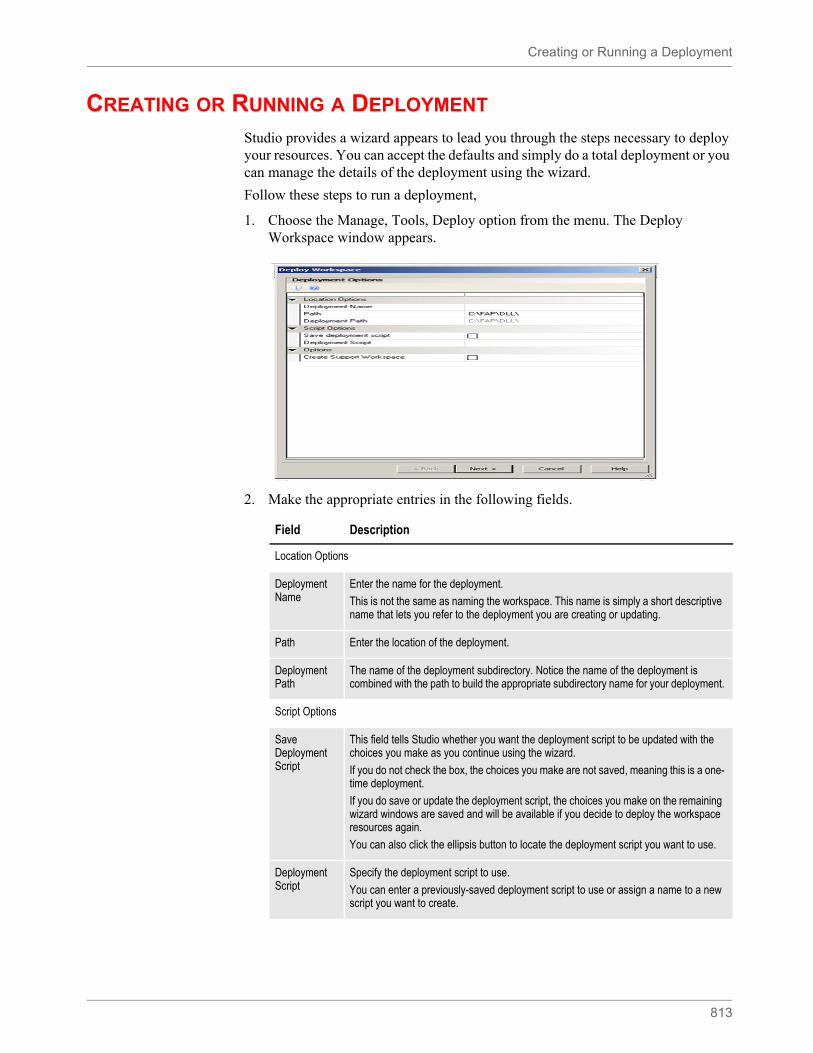
Creating or Running a Deployment
813
CREATING OR RUNNING A DEPLOYMENT
Studio provides a wizard appears to lead you through the steps necessary to deploy your resources. You can accept the defaults and simply do a total deployment or you can manage the details of the deployment using the wizard.
Follow these steps to run a deployment,
1. Choose the Manage, Tools, Deploy option from the menu. The Deploy Workspace window appears.
2. Make the appropriate entries in the following fields.
Field Description
Location Options
Deployment Name
Enter the name for the deployment.
This is not the same as naming the workspace. This name is simply a short descriptive name that lets you refer to the deployment you are creating or updating.
Path Enter the location of the deployment.
Deployment Path
The name of the deployment subdirectory. Notice the name of the deployment is combined with the path to build the appropriate subdirectory name for your deployment.
Script Options
Save Deployment Script
This field tells Studio whether you want the deployment script to be updated with the choices you make as you continue using the wizard.
If you do not check the box, the choices you make are not saved, meaning this is a one-time deployment.
If you do save or update the deployment script, the choices you make on the remaining wizard windows are saved and will be available if you decide to deploy the workspace resources again.
You can also click the ellipsis button to locate the deployment script you want to use.
Deployment Script
Specify the deployment script to use.
You can enter a previously-saved deployment script to use or assign a name to a new script you want to create.
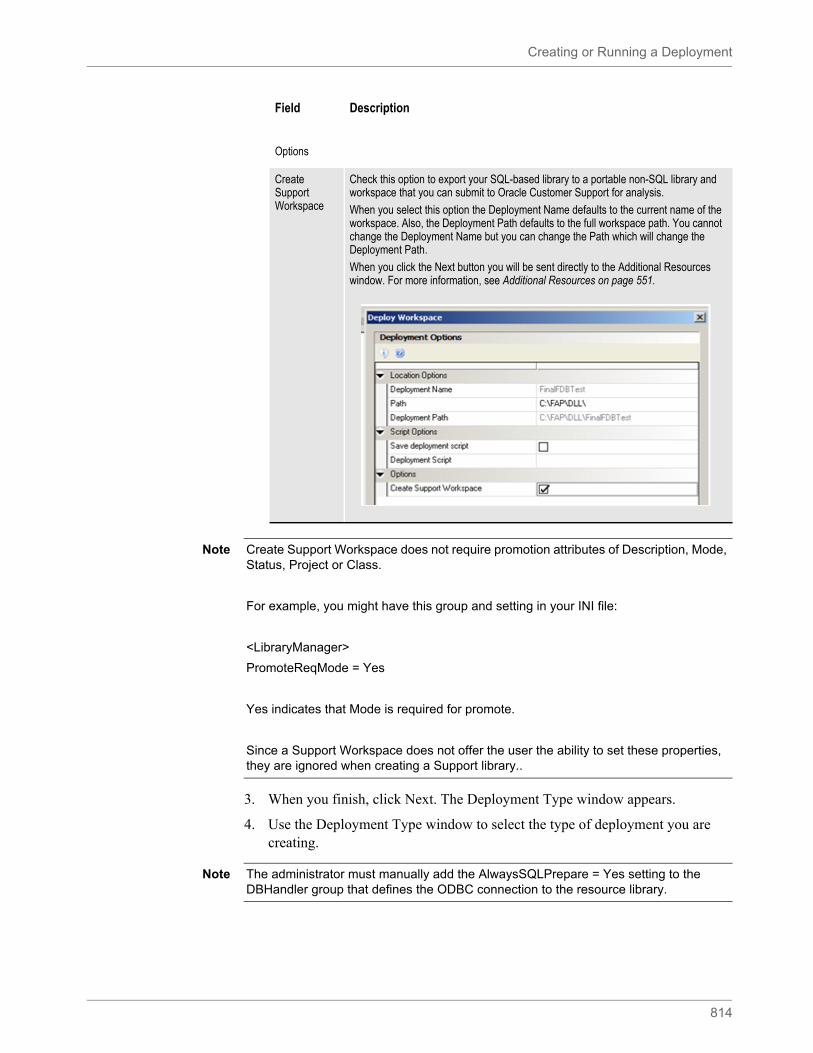
Creating or Running a Deployment
814
3. When you finish, click Next. The Deployment Type window appears.
4. Use the Deployment Type window to select the type of deployment you are creating.
Options
Create Support Workspace
Check this option to export your SQL-based library to a portable non-SQL library and workspace that you can submit to Oracle Customer Support for analysis.
When you select this option the Deployment Name defaults to the current name of the workspace. Also, the Deployment Path defaults to the full workspace path. You cannot change the Deployment Name but you can change the Path which will change the Deployment Path.
When you click the Next button you will be sent directly to the Additional Resources window. For more information, see Additional Resources on page 551.
Field Description
Note Create Support Workspace does not require promotion attributes of Description, Mode, Status, Project or Class.
For example, you might have this group and setting in your INI file:
<LibraryManager>
PromoteReqMode = Yes
Yes indicates that Mode is required for promote.
Since a Support Workspace does not offer the user the ability to set these properties, they are ignored when creating a Support library..
Note The administrator must manually add the AlwaysSQLPrepare = Yes setting to the DBHandler group that defines the ODBC connection to the resource library.
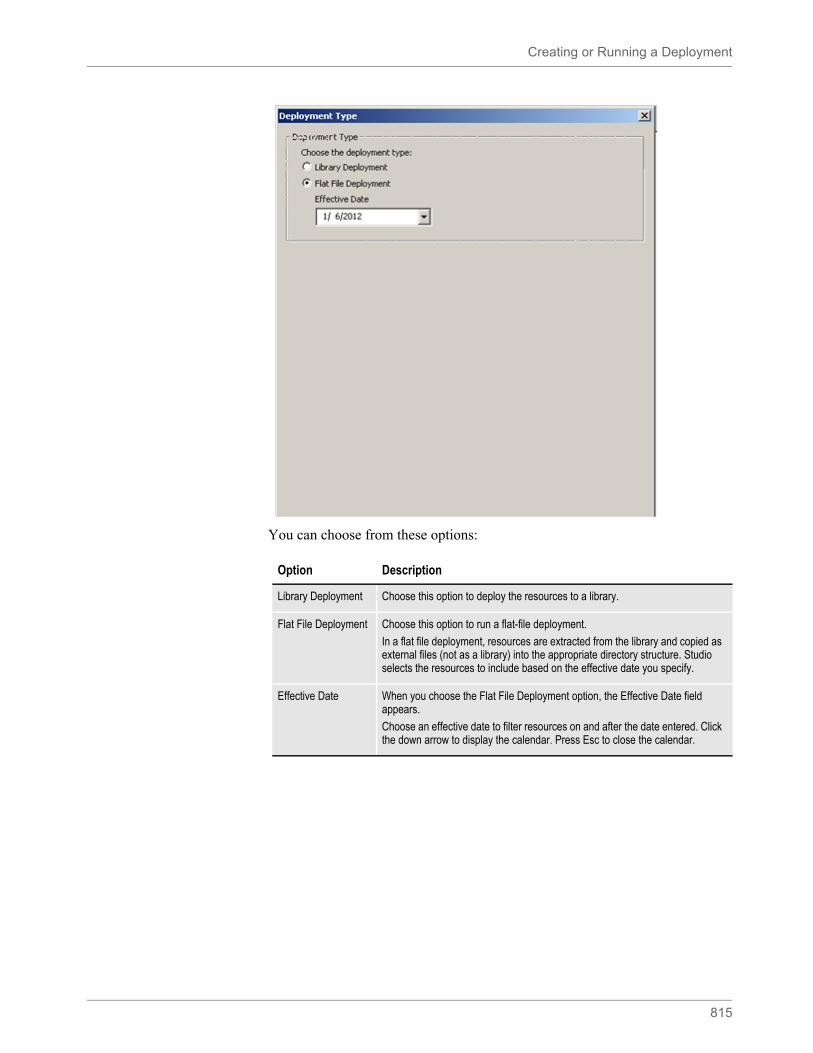
Creating or Running a Deployment
815
You can choose from these options:
Option Description
Library Deployment Choose this option to deploy the resources to a library.
Flat File Deployment Choose this option to run a flat-file deployment.
In a flat file deployment, resources are extracted from the library and copied as external files (not as a library) into the appropriate directory structure. Studio selects the resources to include based on the effective date you specify.
Effective Date When you choose the Flat File Deployment option, the Effective Date field appears.
Choose an effective date to filter resources on and after the date entered. Click the down arrow to display the calendar. Press Esc to close the calendar.
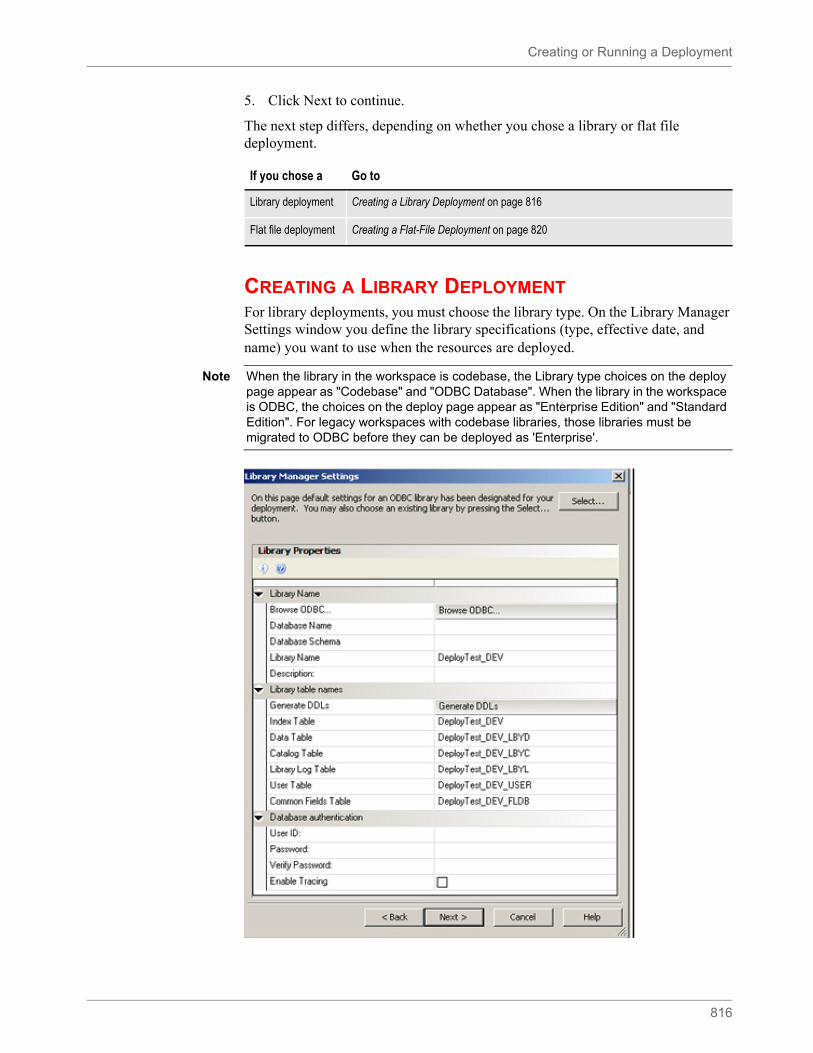
Creating or Running a Deployment
816
5. Click Next to continue.
The next step differs, depending on whether you chose a library or flat file deployment.
CREATING A LIBRARY DEPLOYMENTFor library deployments, you must choose the library type. On the Library Manager Settings window you define the library specifications (type, effective date, and name) you want to use when the resources are deployed.
If you chose a Go to
Library deployment Creating a Library Deployment on page 816
Flat file deployment Creating a Flat-File Deployment on page 820
Note When the library in the workspace is codebase, the Library type choices on the deploy page appear as "Codebase" and "ODBC Database". When the library in the workspace is ODBC, the choices on the deploy page appear as "Enterprise Edition" and "Standard Edition". For legacy workspaces with codebase libraries, those libraries must be migrated to ODBC before they can be deployed as 'Enterprise'.
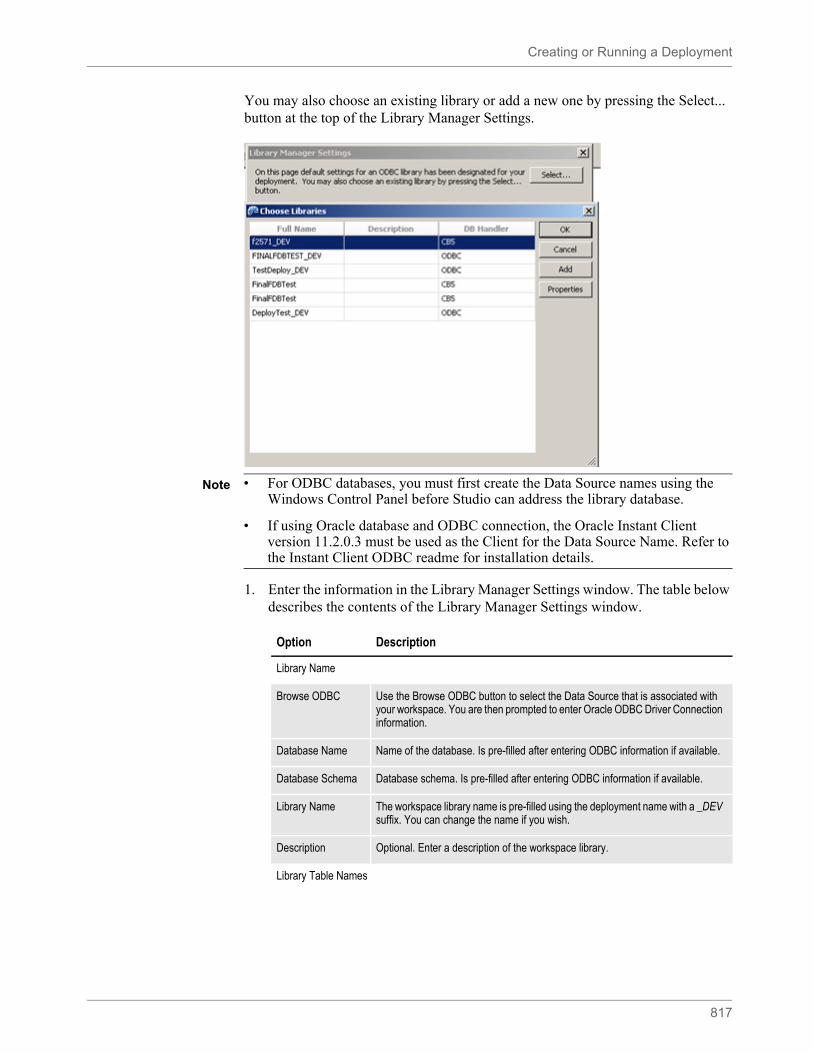
Creating or Running a Deployment
817
You may also choose an existing library or add a new one by pressing the Select... button at the top of the Library Manager Settings.
1. Enter the information in the Library Manager Settings window. The table below describes the contents of the Library Manager Settings window.
Note • For ODBC databases, you must first create the Data Source names using the Windows Control Panel before Studio can address the library database.
• If using Oracle database and ODBC connection, the Oracle Instant Client version 11.2.0.3 must be used as the Client for the Data Source Name. Refer to the Instant Client ODBC readme for installation details.
Option Description
Library Name
Browse ODBC Use the Browse ODBC button to select the Data Source that is associated with your workspace. You are then prompted to enter Oracle ODBC Driver Connection information.
Database Name Name of the database. Is pre-filled after entering ODBC information if available.
Database Schema Database schema. Is pre-filled after entering ODBC information if available.
Library Name The workspace library name is pre-filled using the deployment name with a _DEV suffix. You can change the name if you wish.
Description Optional. Enter a description of the workspace library.
Library Table Names
Creating or Running a Deployment
818
2. Once you have made your selections, click Next. The Library Resources window appears.
Generate DDLs Selecting this option opens a window with the SQL commands used to create the tables. If your database administrator has restricted the creation of tables, confirm the table names you want to use then highlight the text and press Ctrl+C to copy it to your clipboard. You can then paste the information into an email or a text file to give to your database administrator.
Note: You will not be able to proceed past this page if the tables are not created.
Index Table Defaults as your deployment name, plus the suffix qualifier of _DEV. You may enter a different name if you wish.
Data Table Defaults as your deployment name, plus the suffix qualifier of _DEV_LBYD. You may enter a different name if you wish.
Catalog Table Defaults as your deployment name, plus the suffix qualifier of _DEV_LBYC. You may enter a different name if you wish.
Library Log Table Defaults as your deployment name, plus the suffix qualifier of _DEV_LBYL. You may enter a different name if you wish.
User Table Defaults as your deployment name, plus the suffix qualifier of _DEV_USER. You may enter a different name if you wish.
Common Fields Table
Defaults as your deployment name, plus the suffix qualifier of _DEV_FLDB. You may enter a different name if you wish.
Database Authentication
User ID The Data Source user ID. This option is filled in for you when you are selecting ODBC Data Source.
Password Enter the Data Source password. The password is updated when you enter the password on the ODBC Driver Connect dialog Password field. The password appears as asterisks (***).
Verify Password Enter the Data Source password again, to verify correct typing in Password entry. The verify password is updated when you enter the password on the ODBC Driver Connect dialog Password field. The password displays as asterisks (***)
Enable Tracing Check this box to enable tracing. Tracing can help in monitoring and analyzing the Documaker application as it is running against the database.
Option Description
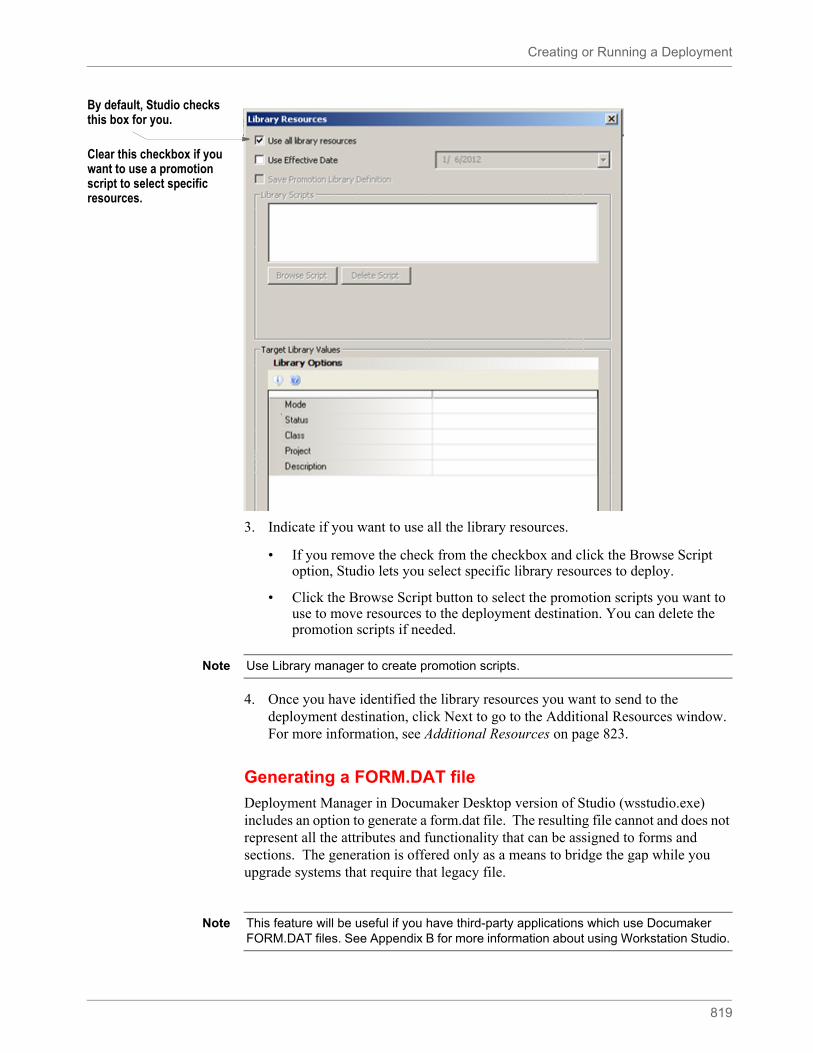
Creating or Running a Deployment
819
3. Indicate if you want to use all the library resources.
• If you remove the check from the checkbox and click the Browse Script option, Studio lets you select specific library resources to deploy.
• Click the Browse Script button to select the promotion scripts you want to use to move resources to the deployment destination. You can delete the promotion scripts if needed.
4. Once you have identified the library resources you want to send to the deployment destination, click Next to go to the Additional Resources window. For more information, see Additional Resources on page 823.
Generating a FORM.DAT file
Deployment Manager in Documaker Desktop version of Studio (wsstudio.exe) includes an option to generate a form.dat file. The resulting file cannot and does not represent all the attributes and functionality that can be assigned to forms and sections. The generation is offered only as a means to bridge the gap while you upgrade systems that require that legacy file.
By default, Studio checks this box for you.
Clear this checkbox if you want to use a promotion script to select specific resources.
Note Use Library manager to create promotion scripts.
Note This feature will be useful if you have third-party applications which use Documaker FORM.DAT files. See Appendix B for more information about using Workstation Studio.
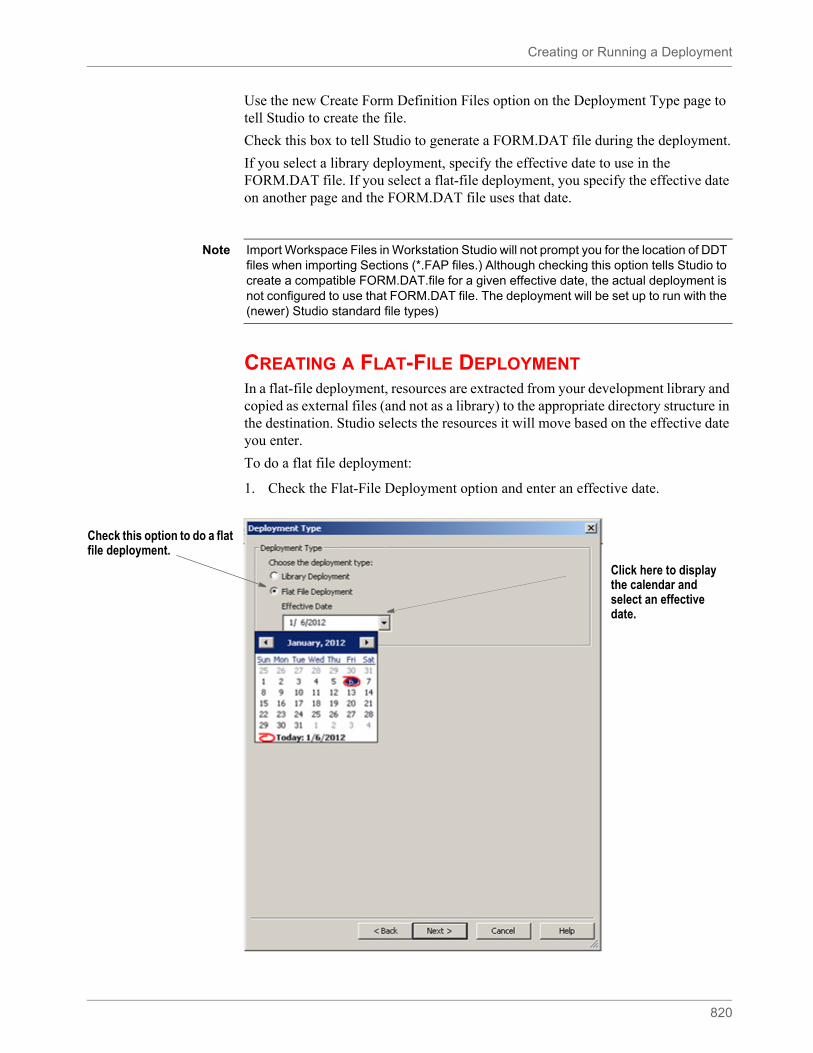
Creating or Running a Deployment
820
Use the new Create Form Definition Files option on the Deployment Type page to tell Studio to create the file.
Check this box to tell Studio to generate a FORM.DAT file during the deployment.
If you select a library deployment, specify the effective date to use in the FORM.DAT file. If you select a flat-file deployment, you specify the effective date on another page and the FORM.DAT file uses that date.
CREATING A FLAT-FILE DEPLOYMENTIn a flat-file deployment, resources are extracted from your development library and copied as external files (and not as a library) to the appropriate directory structure in the destination. Studio selects the resources it will move based on the effective date you enter.
To do a flat file deployment:
1. Check the Flat-File Deployment option and enter an effective date.
Note Import Workspace Files in Workstation Studio will not prompt you for the location of DDT files when importing Sections (*.FAP files.) Although checking this option tells Studio to create a compatible FORM.DAT.file for a given effective date, the actual deployment is not configured to use that FORM.DAT file. The deployment will be set up to run with the (newer) Studio standard file types)
Check this option to do a flat file deployment.
Click here to display the calendar and select an effective date.
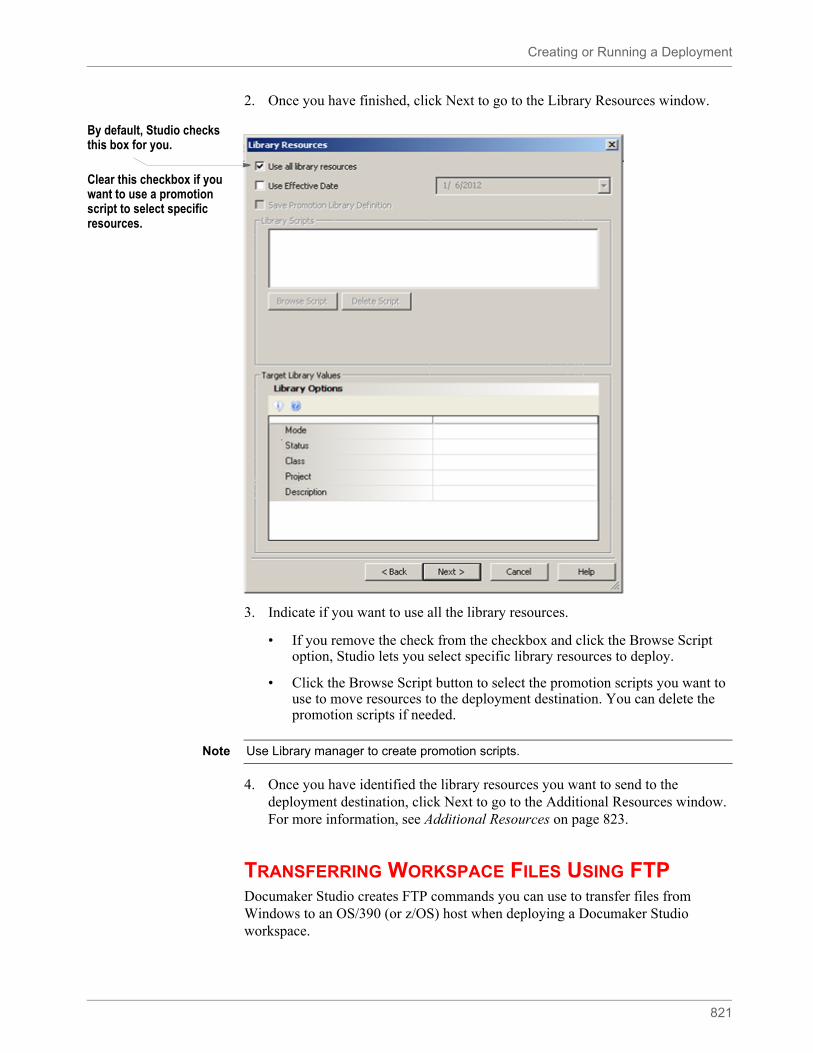
Creating or Running a Deployment
821
2. Once you have finished, click Next to go to the Library Resources window.
3. Indicate if you want to use all the library resources.
• If you remove the check from the checkbox and click the Browse Script option, Studio lets you select specific library resources to deploy.
• Click the Browse Script button to select the promotion scripts you want to use to move resources to the deployment destination. You can delete the promotion scripts if needed.
4. Once you have identified the library resources you want to send to the deployment destination, click Next to go to the Additional Resources window. For more information, see Additional Resources on page 823.
TRANSFERRING WORKSPACE FILES USING FTPDocumaker Studio creates FTP commands you can use to transfer files from Windows to an OS/390 (or z/OS) host when deploying a Documaker Studio workspace.
By default, Studio checks this box for you.
Clear this checkbox if you want to use a promotion script to select specific resources.
Note Use Library manager to create promotion scripts.
Creating or Running a Deployment
822
For instance, you can deploy a workspace using the flat file option and, during deployment, the system will create a file called ftpcmds.txt in the deployed directory. The contents of this file look similar to this:
open hostuserpasswordput C:\fapdemo\dms\RPEX1_deploy\BDFLib\RPEX1.BDF'HLQ.BDFLIB(RPEX1)'put C:\fapdemo\dms\RPEX1_deploy\FORMS\Q1ADDR.FAP'HLQ.FAPLIB(Q1ADDR)'
You can then use this file to FTP the files listed in it from Windows to OS/390. Before doing so, you need to make the following edits to the ftpcmds.txt file:
• Change host to the name of the OS/390 host or to the IP address of the host.
• Change user to your OS/390 user ID.
• Change password to your OS/390 password.
• Change all occurrences of the value HLQ to the high level qualifier of the OS/390 datasets to which you want to upload. For example, if you want to upload to a FAPLIB called QAREL.V110.RPEX1.FAPLIB, you would change all occurrences of HLQ to QAREL.V110.RPEX1.
Once you have edited the ftpcmds.txt file and verified that the OS/390 host datasets exist, you are ready to run FTP to transfer the files from Windows to OS/390.
To run the ftpcmds.txt file using FTP, open a Windows Command Prompt window and go to the directory where the ftpcmds.txt file is located. Then enter this command:
ftp -s:ftpcmds.txt
This command starts FTP and tells it to read the file called ftpcmds.txt and execute the commands in that file. FTP will connect to the host you specified, sign on using the user ID and password you specified, and will put each of the files specified from Windows to OS/390.
Once the transfer finishes, enter quit to exit FTP.
Note Also, make sure the OS/390 datasets specified in the ftpcmds.txt file exist on OS/390. The members do not have to exist but the PDS dataset should.
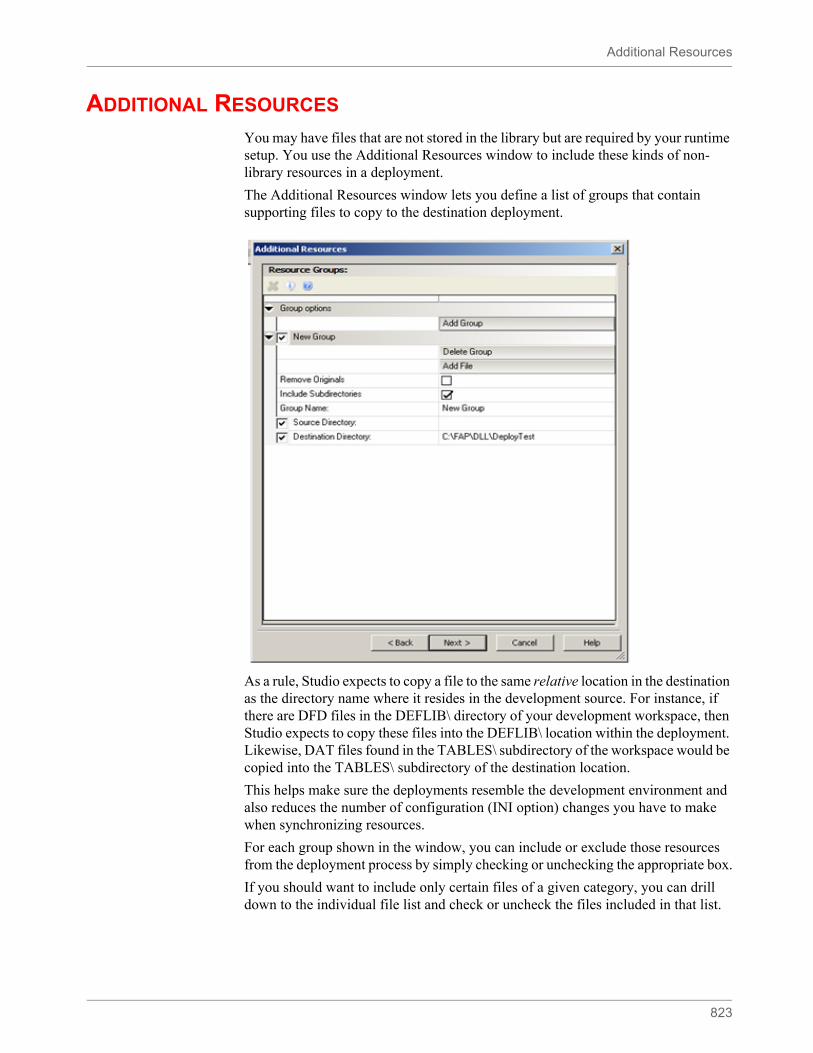
Additional Resources
823
ADDITIONAL RESOURCES
You may have files that are not stored in the library but are required by your runtime setup. You use the Additional Resources window to include these kinds of non-library resources in a deployment.
The Additional Resources window lets you define a list of groups that contain supporting files to copy to the destination deployment.
As a rule, Studio expects to copy a file to the same relative location in the destination as the directory name where it resides in the development source. For instance, if there are DFD files in the DEFLIB\ directory of your development workspace, then Studio expects to copy these files into the DEFLIB\ location within the deployment. Likewise, DAT files found in the TABLES\ subdirectory of the workspace would be copied into the TABLES\ subdirectory of the destination location.
This helps make sure the deployments resemble the development environment and also reduces the number of configuration (INI option) changes you have to make when synchronizing resources.
For each group shown in the window, you can include or exclude those resources from the deployment process by simply checking or unchecking the appropriate box.
If you should want to include only certain files of a given category, you can drill down to the individual file list and check or uncheck the files included in that list.
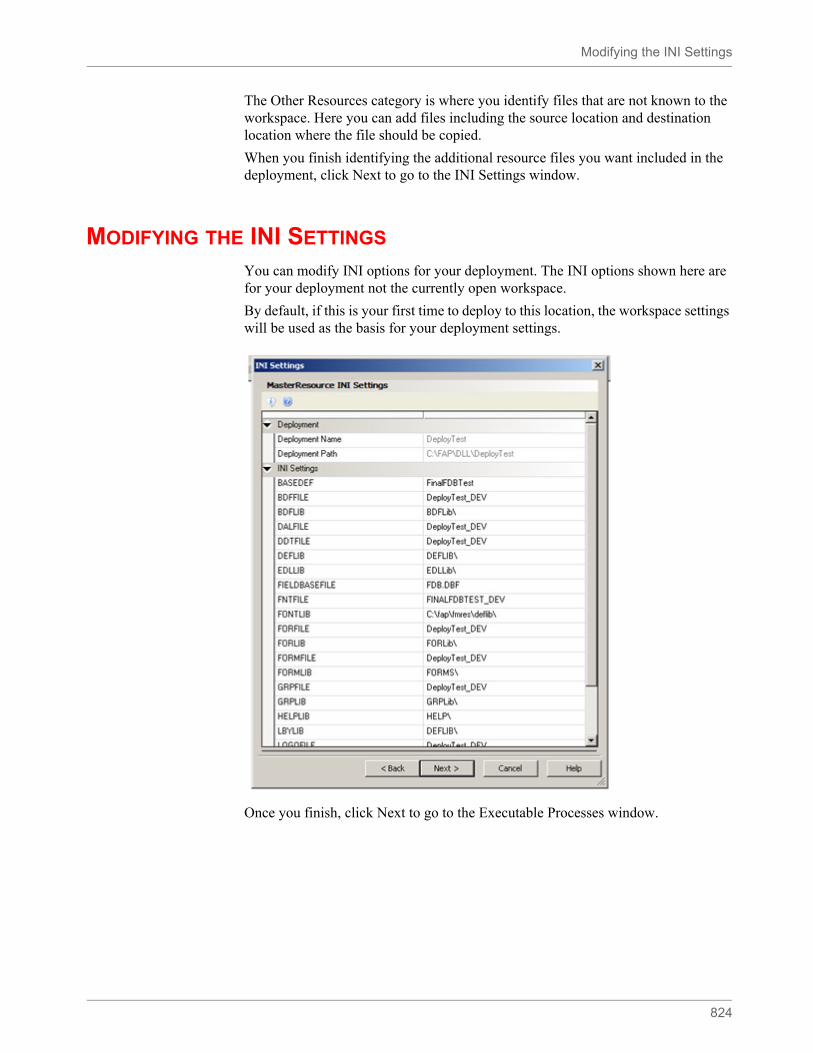
Modifying the INI Settings
824
The Other Resources category is where you identify files that are not known to the workspace. Here you can add files including the source location and destination location where the file should be copied.
When you finish identifying the additional resource files you want included in the deployment, click Next to go to the INI Settings window.
MODIFYING THE INI SETTINGS
You can modify INI options for your deployment. The INI options shown here are for your deployment not the currently open workspace.
By default, if this is your first time to deploy to this location, the workspace settings will be used as the basis for your deployment settings.
Once you finish, click Next to go to the Executable Processes window.
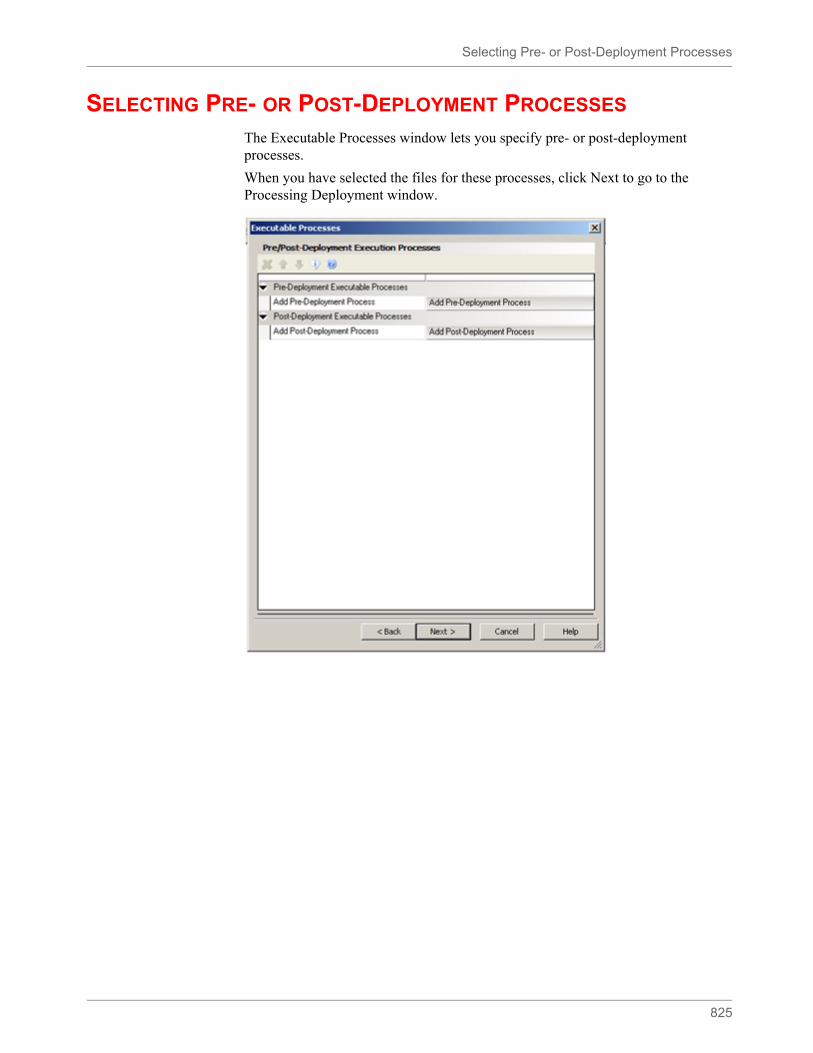
Selecting Pre- or Post-Deployment Processes
825
SELECTING PRE- OR POST-DEPLOYMENT PROCESSES
The Executable Processes window lets you specify pre- or post-deployment processes.
When you have selected the files for these processes, click Next to go to the Processing Deployment window.
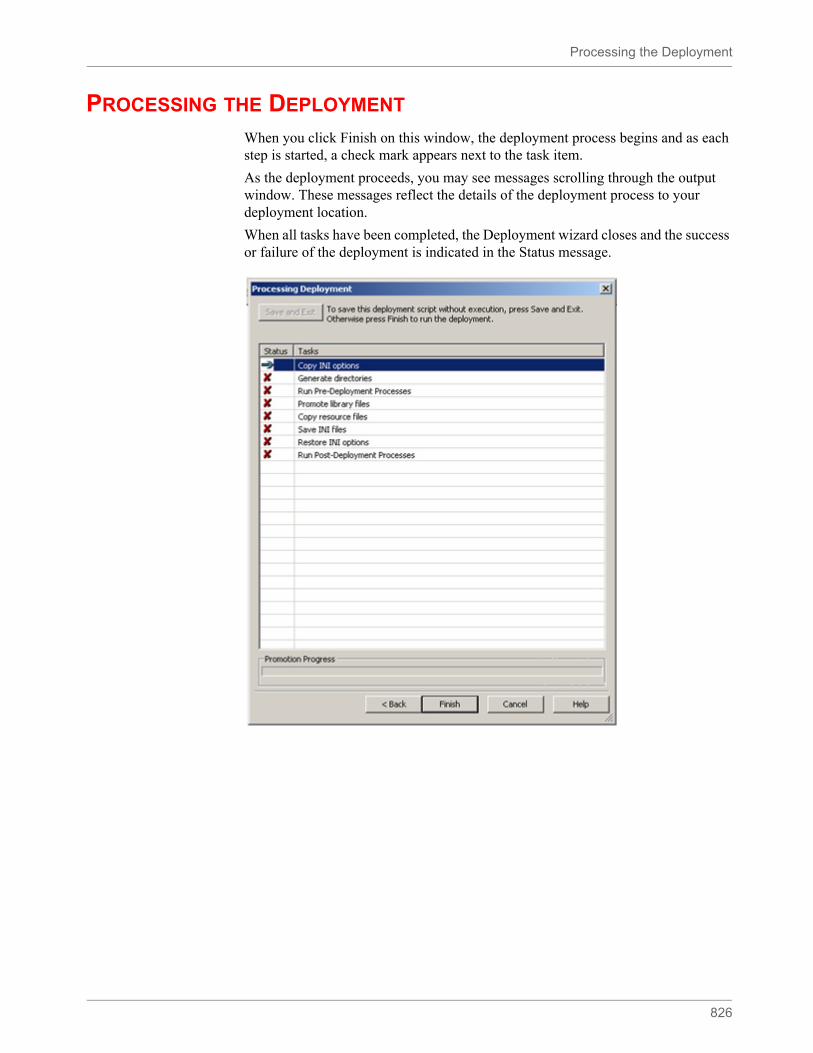
Processing the Deployment
826
PROCESSING THE DEPLOYMENT
When you click Finish on this window, the deployment process begins and as each step is started, a check mark appears next to the task item.
As the deployment proceeds, you may see messages scrolling through the output window. These messages reflect the details of the deployment process to your deployment location.
When all tasks have been completed, the Deployment wizard closes and the success or failure of the deployment is indicated in the Status message.
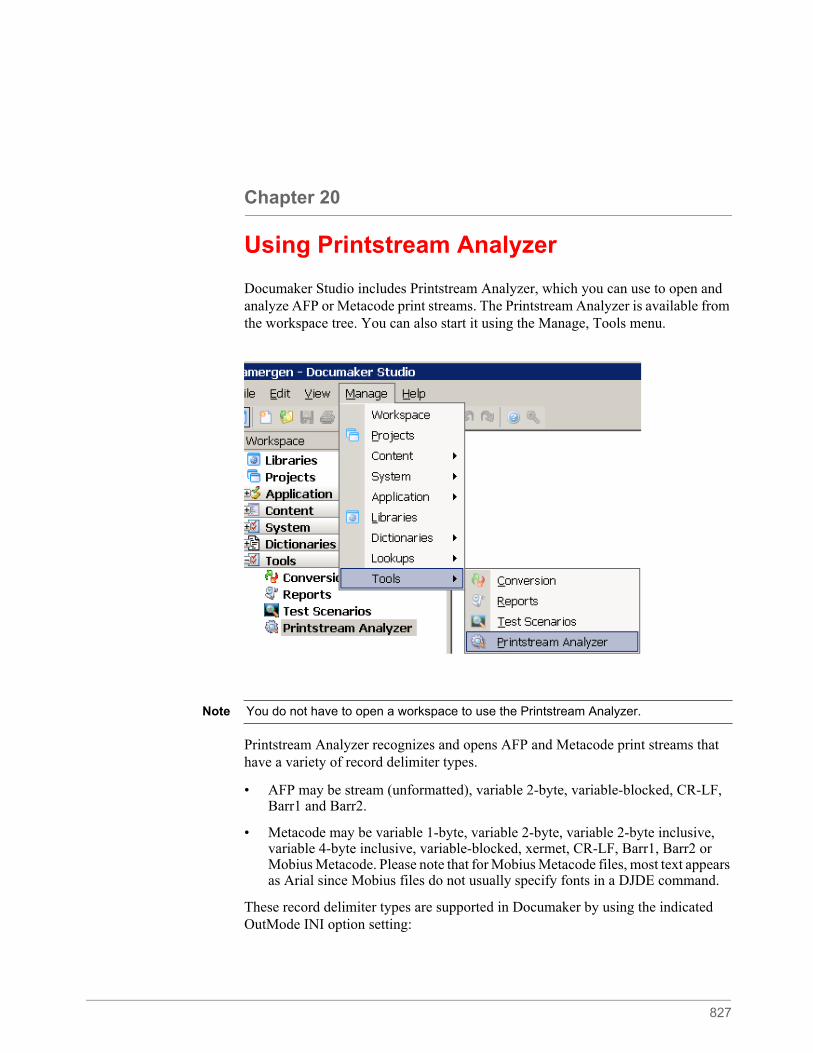
827
Chapter 20
Using Printstream Analyzer
Documaker Studio includes Printstream Analyzer, which you can use to open and analyze AFP or Metacode print streams. The Printstream Analyzer is available from the workspace tree. You can also start it using the Manage, Tools menu.
Printstream Analyzer recognizes and opens AFP and Metacode print streams that have a variety of record delimiter types.
• AFP may be stream (unformatted), variable 2-byte, variable-blocked, CR-LF, Barr1 and Barr2.
• Metacode may be variable 1-byte, variable 2-byte, variable 2-byte inclusive, variable 4-byte inclusive, variable-blocked, xermet, CR-LF, Barr1, Barr2 or Mobius Metacode. Please note that for Mobius Metacode files, most text appears as Arial since Mobius files do not usually specify fonts in a DJDE command.
These record delimiter types are supported in Documaker by using the indicated OutMode INI option setting:
Note You do not have to open a workspace to use the Printstream Analyzer.
828
Printstream Analyzer does not require or access device fonts. It depends on font naming conventions to determine the characteristics of a Windows display font. When a font has an unknown naming convention, Printstream Analyzer uses Arial.
USING THE RECORD VIEW AND DISPLAY PANESThe Record View pane lets you view the records in a print stream. Since AFP and Metacode print streams contain many binary, non-displayable values, much of the content of the print stream appears as a series of periods (…). The Record View pane provides a hexadecimal display of the bytes of the selected print stream record so you can see the values shown as periods.
The Display pane, which you can dock and pin, provides a WYSIWIG view of the page that contains the records shown in the Record View pane. The text you select in the Record View pane is highlighted in the Display pane.
The line numbers in the Record View pane show horizontal dividers to indicate page breaks. You can click a line number to select an entire print record. Text contained in the record is then highlighted in the Display pane. A description of current record appears in the status bar.
Here is an example of the Record View and Display panes:
For this record delimiter type Set the OutMode option to
AFP stream (unformatted) This is the default OutMode setting.
AFP variable 2-byte MRG2
AFP variable-blocked MRG4
Metacode variable 2-byte MRG2
Metacode variable-blocked MRG4
Metacode Barr1 BARR
Metacode Barr2 BARRWORD
Mobius Metacode Mobius
Note You do not need to make changes to the OutMode setting so Printstream Analyzer can analyze an AFP or Metacode print stream. You only need to set the OutMode option in Documaker so the GenPrint program will produce an AFP or Metacode print stream using a specific record type delimiter.
Note Printstream Analyzer does not use device font metrics. Size differences between device fonts and Windows display fonts can cause positioning errors. This is expected behavior that will be most apparent in print stream files that contain many relative moves.
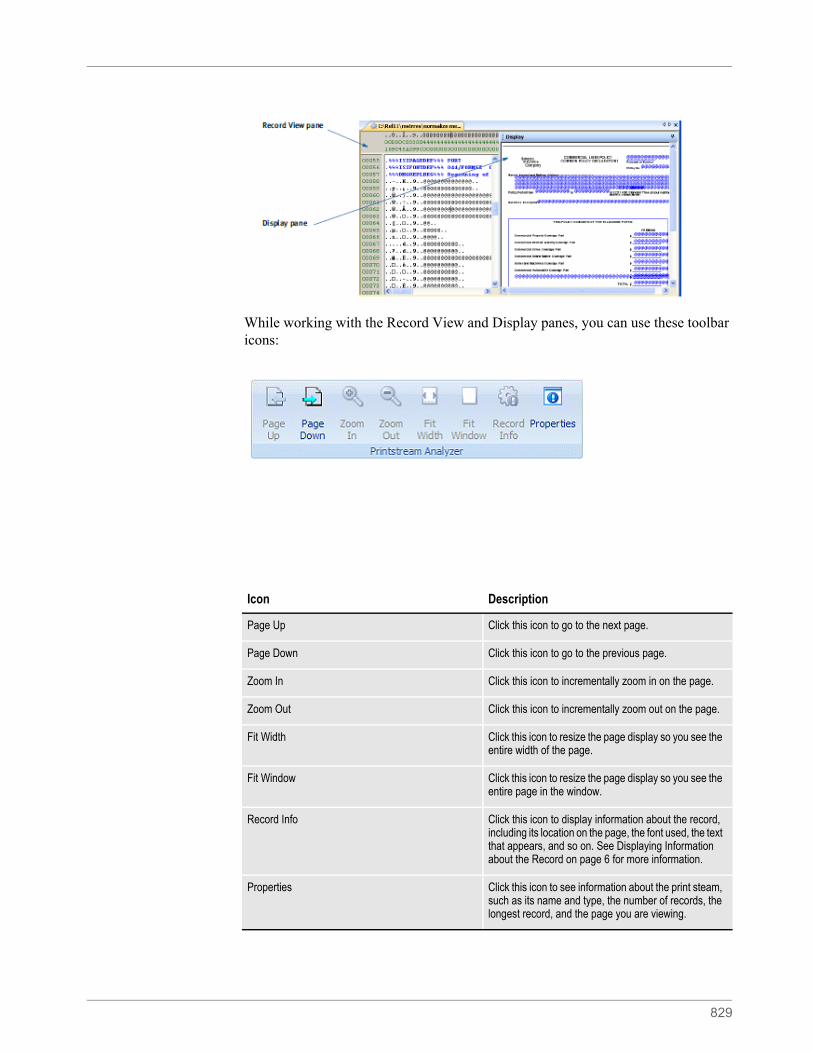
829
While working with the Record View and Display panes, you can use these toolbar icons:
Icon Description
Page Up Click this icon to go to the next page.
Page Down Click this icon to go to the previous page.
Zoom In Click this icon to incrementally zoom in on the page.
Zoom Out Click this icon to incrementally zoom out on the page.
Fit Width Click this icon to resize the page display so you see the entire width of the page.
Fit Window Click this icon to resize the page display so you see the entire page in the window.
Record Info Click this icon to display information about the record, including its location on the page, the font used, the text that appears, and so on. See Displaying Information about the Record on page 6 for more information.
Properties Click this icon to see information about the print steam, such as its name and type, the number of records, the longest record, and the page you are viewing.
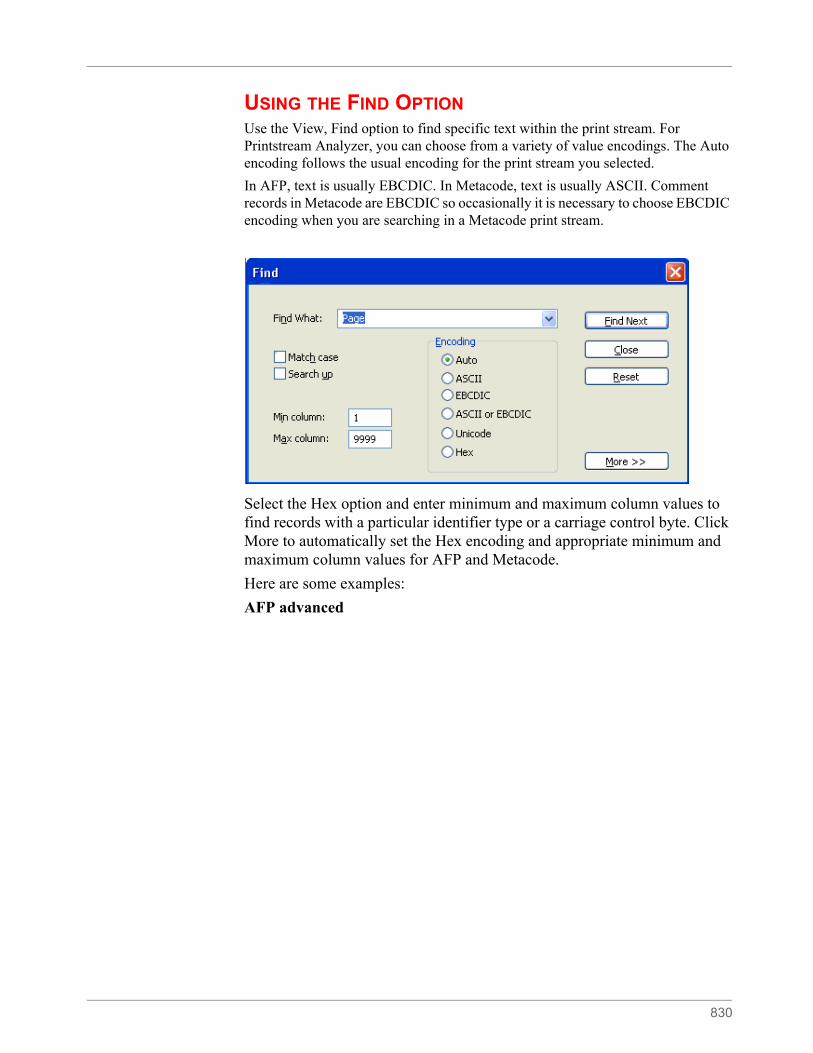
830
USING THE FIND OPTIONUse the View, Find option to find specific text within the print stream. For Printstream Analyzer, you can choose from a variety of value encodings. The Auto encoding follows the usual encoding for the print stream you selected.
In AFP, text is usually EBCDIC. In Metacode, text is usually ASCII. Comment records in Metacode are EBCDIC so occasionally it is necessary to choose EBCDIC encoding when you are searching in a Metacode print stream.
Select the Hex option and enter minimum and maximum column values to find records with a particular identifier type or a carriage control byte. Click More to automatically set the Hex encoding and appropriate minimum and maximum column values for AFP and Metacode.
Here are some examples:
AFP advanced
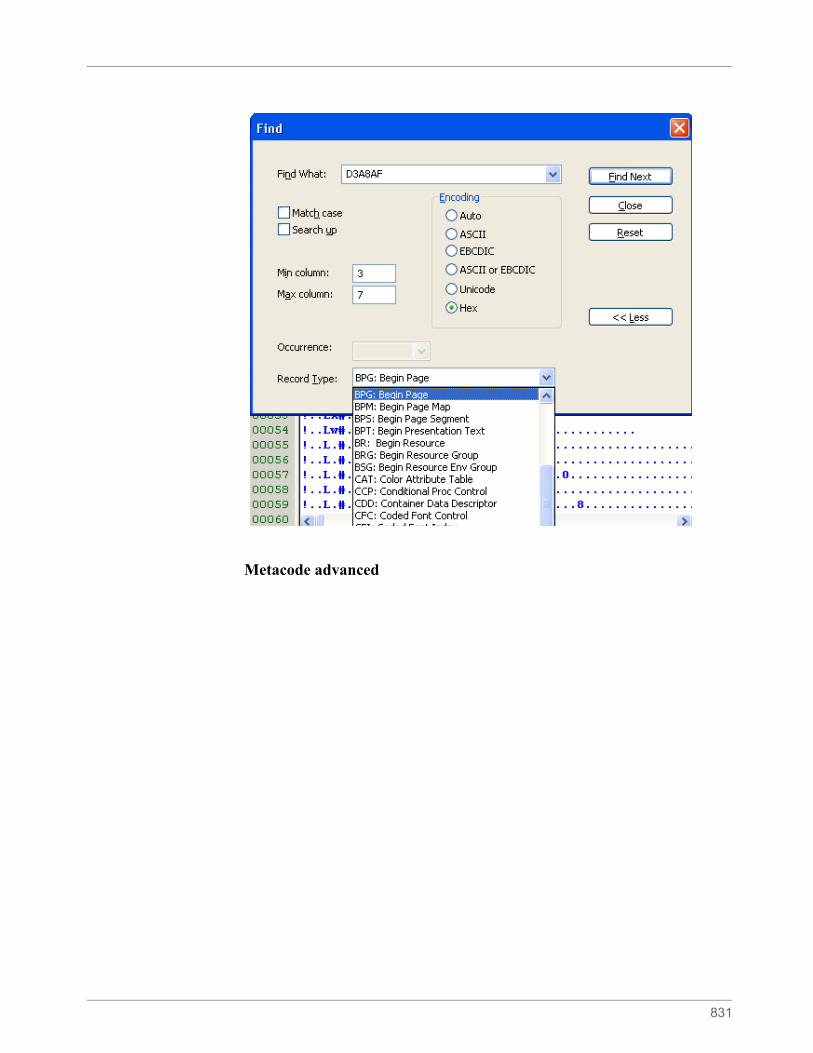
831
Metacode advanced
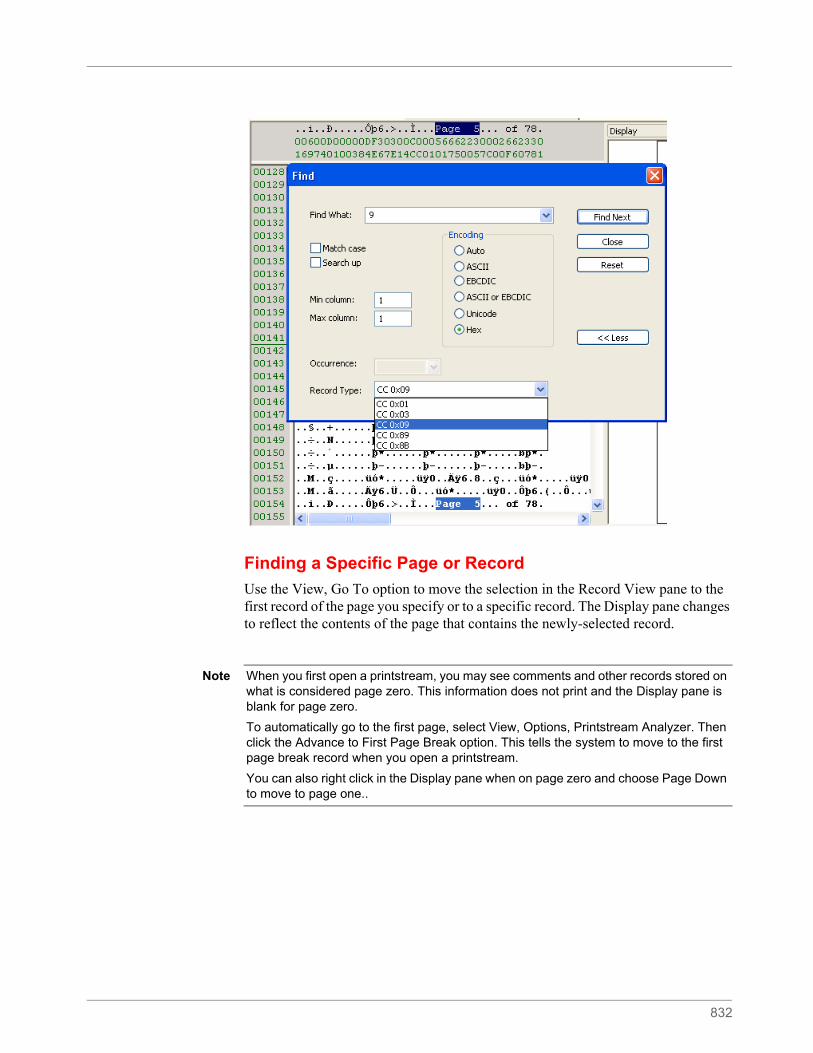
832
Finding a Specific Page or Record
Use the View, Go To option to move the selection in the Record View pane to the first record of the page you specify or to a specific record. The Display pane changes to reflect the contents of the page that contains the newly-selected record.
Note When you first open a printstream, you may see comments and other records stored on what is considered page zero. This information does not print and the Display pane is blank for page zero.
To automatically go to the first page, select View, Options, Printstream Analyzer. Then click the Advance to First Page Break option. This tells the system to move to the first page break record when you open a printstream.
You can also right click in the Display pane when on page zero and choose Page Down to move to page one..
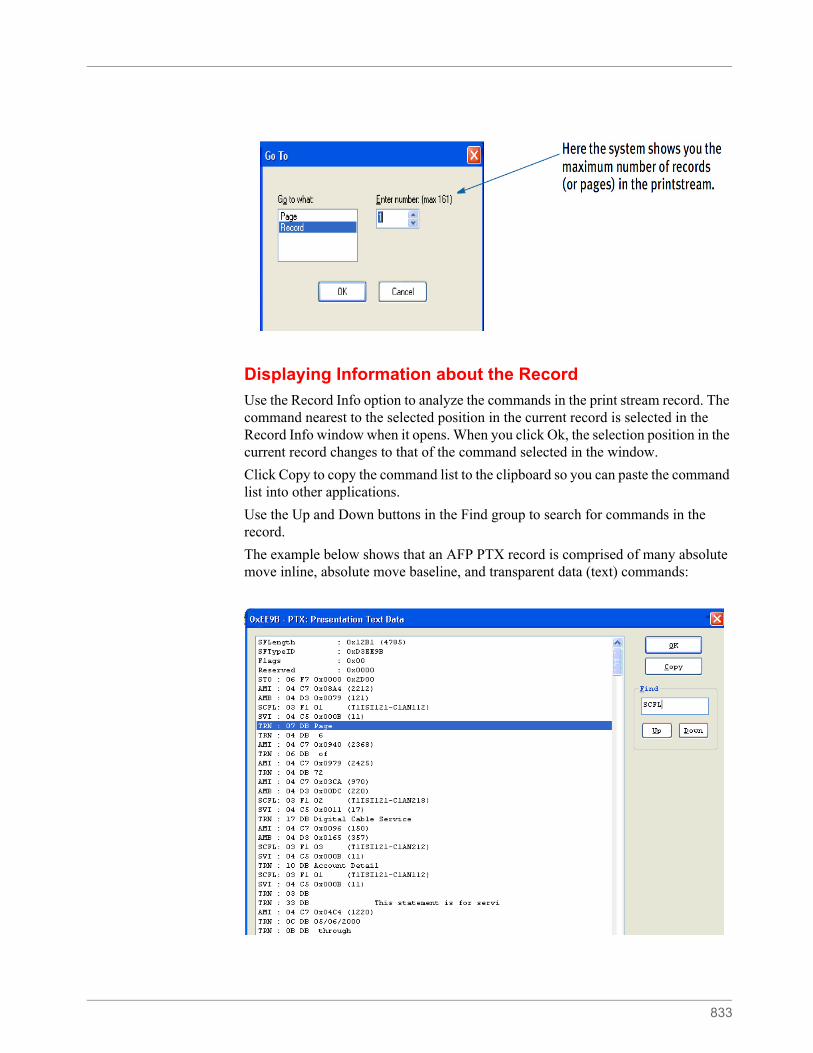
833
Displaying Information about the Record
Use the Record Info option to analyze the commands in the print stream record. The command nearest to the selected position in the current record is selected in the Record Info window when it opens. When you click Ok, the selection position in the current record changes to that of the command selected in the window.
Click Copy to copy the command list to the clipboard so you can paste the command list into other applications.
Use the Up and Down buttons in the Find group to search for commands in the record.
The example below shows that an AFP PTX record is comprised of many absolute move inline, absolute move baseline, and transparent data (text) commands:
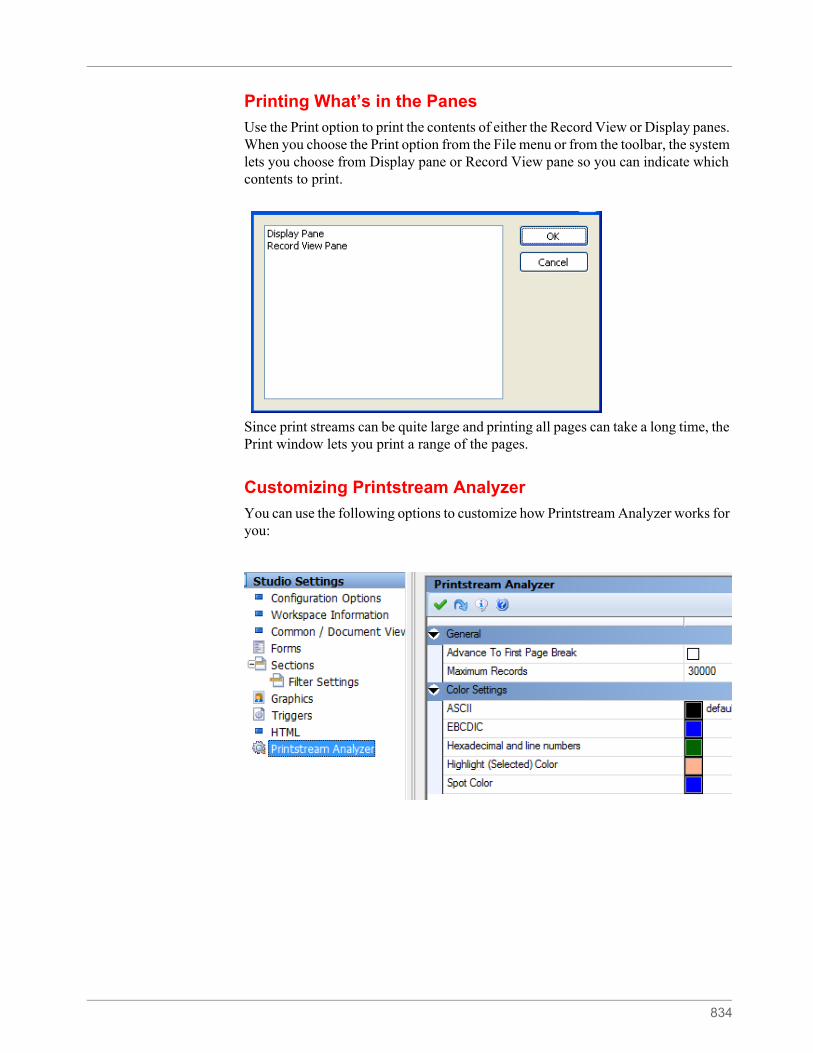
834
Printing What’s in the Panes
Use the Print option to print the contents of either the Record View or Display panes. When you choose the Print option from the File menu or from the toolbar, the system lets you choose from Display pane or Record View pane so you can indicate which contents to print.
Since print streams can be quite large and printing all pages can take a long time, the Print window lets you print a range of the pages.
Customizing Printstream Analyzer
You can use the following options to customize how Printstream Analyzer works for you:
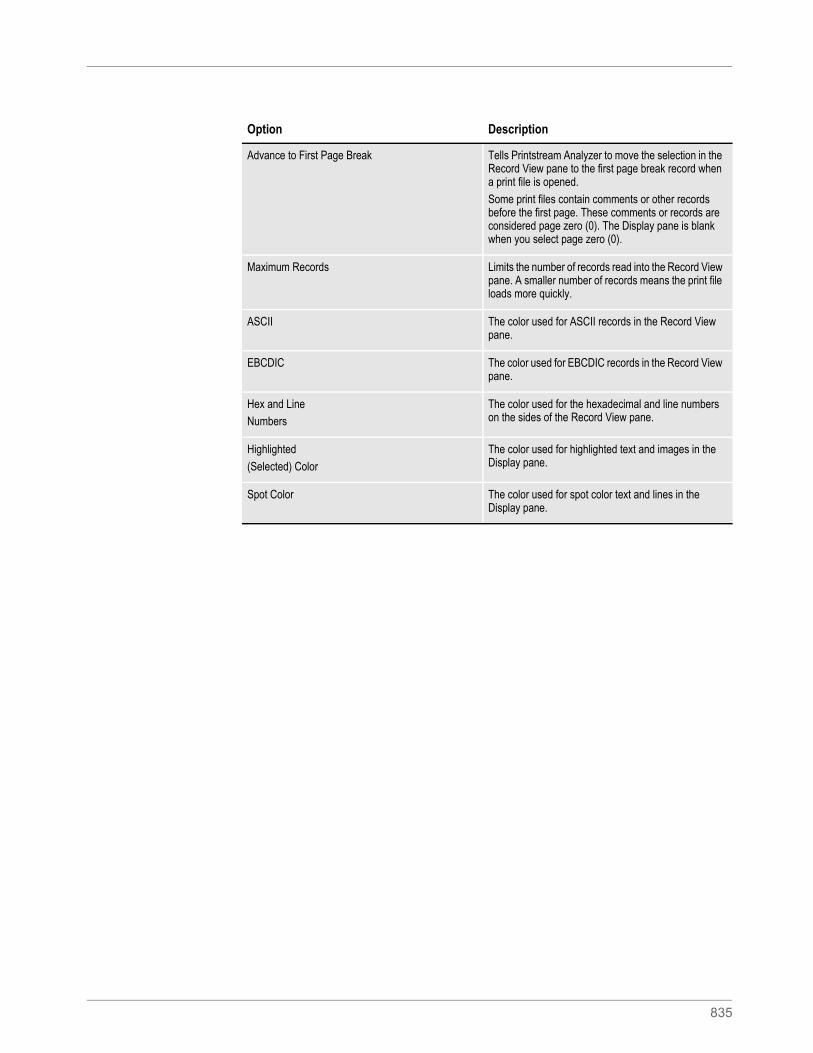
835
Option Description
Advance to First Page Break Tells Printstream Analyzer to move the selection in the Record View pane to the first page break record when a print file is opened.
Some print files contain comments or other records before the first page. These comments or records are considered page zero (0). The Display pane is blank when you select page zero (0).
Maximum Records Limits the number of records read into the Record View pane. A smaller number of records means the print file loads more quickly.
ASCII The color used for ASCII records in the Record View pane.
EBCDIC The color used for EBCDIC records in the Record View pane.
Hex and Line
Numbers
The color used for the hexadecimal and line numbers on the sides of the Record View pane.
Highlighted
(Selected) Color
The color used for highlighted text and images in the Display pane.
Spot Color The color used for spot color text and lines in the Display pane.

836
Appendix A
Using the Documaker Add-in for Microsoft Word
The Documaker Add-In for Microsoft Word lets you use Word to create Documaker forms, sections, paragraphs and paragraph lists. You can then import your Word Documaker documents into Studio.
With a workspace definition file (WDF), which contains information used in the creation of Documaker documents in Word, you have access to various Studio resources while using the Documaker Add-In for Word. These resources include fields, recipients, fonts, graphics, and triggers. You can use these resources in the documents you create with the Documaker Add-In for Word, which helps promote consistency and efficiency.
This appendix is designed for:
• Project managers implementing the use of the Documaker Add-In for Word
• Personnel responsible for incorporating files imported from the Documaker Add-In into a Studio workspace
• Documaker Add-In users who want to learn what happens when the documents they create in Word are imported into Studio
This appendix discusses these topics...
• Introduction on page 837
• Understanding the Workflow on page 839
• Finding Information on page 841
• Synchronizing Fonts on page 842
• Providing Graphic Files to the Add-In on page 843
• Sharing Studio Resource Information with the Add-In on page 845
• Importing Documents Created in Word on page 849
• Completing Imported Documents on page 859
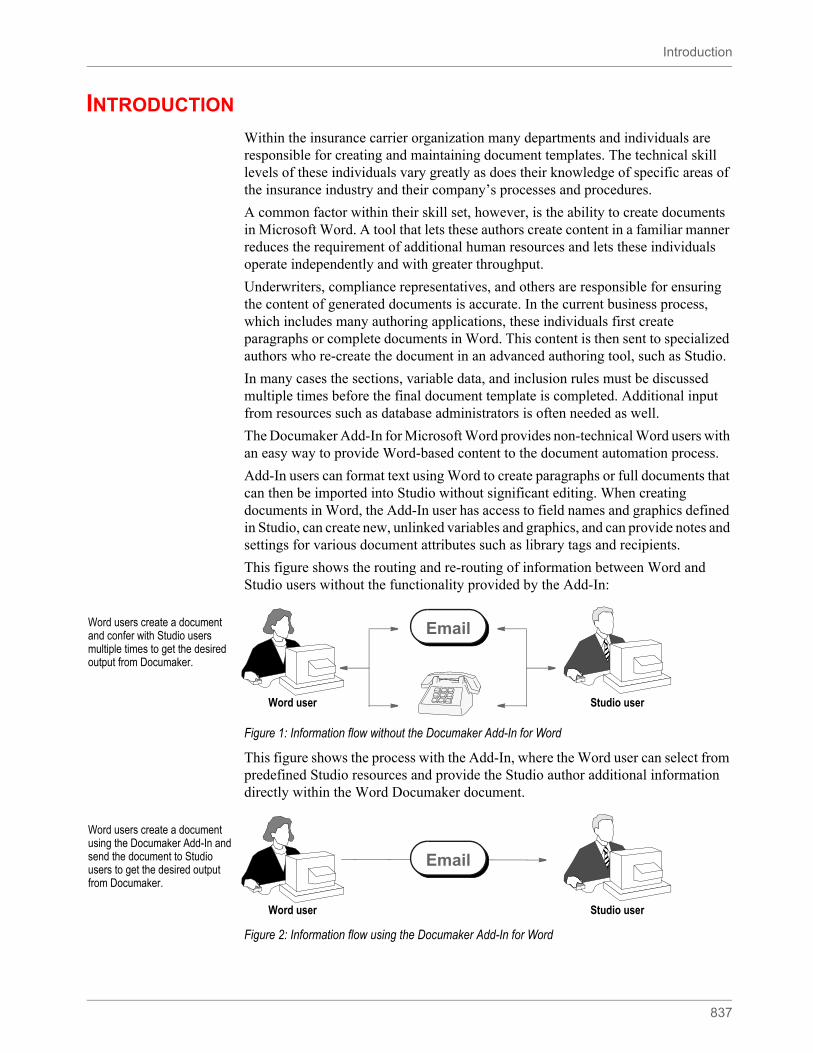
Introduction
837
INTRODUCTION
Within the insurance carrier organization many departments and individuals are responsible for creating and maintaining document templates. The technical skill levels of these individuals vary greatly as does their knowledge of specific areas of the insurance industry and their company’s processes and procedures.
A common factor within their skill set, however, is the ability to create documents in Microsoft Word. A tool that lets these authors create content in a familiar manner reduces the requirement of additional human resources and lets these individuals operate independently and with greater throughput.
Underwriters, compliance representatives, and others are responsible for ensuring the content of generated documents is accurate. In the current business process, which includes many authoring applications, these individuals first create paragraphs or complete documents in Word. This content is then sent to specialized authors who re-create the document in an advanced authoring tool, such as Studio.
In many cases the sections, variable data, and inclusion rules must be discussed multiple times before the final document template is completed. Additional input from resources such as database administrators is often needed as well.
The Documaker Add-In for Microsoft Word provides non-technical Word users with an easy way to provide Word-based content to the document automation process.
Add-In users can format text using Word to create paragraphs or full documents that can then be imported into Studio without significant editing. When creating documents in Word, the Add-In user has access to field names and graphics defined in Studio, can create new, unlinked variables and graphics, and can provide notes and settings for various document attributes such as library tags and recipients.
This figure shows the routing and re-routing of information between Word and Studio users without the functionality provided by the Add-In:
Figure 1: Information flow without the Documaker Add-In for Word
This figure shows the process with the Add-In, where the Word user can select from predefined Studio resources and provide the Studio author additional information directly within the Word Documaker document.
Figure 2: Information flow using the Documaker Add-In for Word
Word users create a document and confer with Studio users multiple times to get the desired output from Documaker.
Word user Studio user
Word users create a document using the Documaker Add-In and send the document to Studio users to get the desired output from Documaker.
Word user Studio user
Introduction
838
CANDIDATE DOCUMENT TYPESThe Documaker Add-In for Microsoft Word is intended to be used for documents that are predominantly flowing text or distinct blocks of content. The Add-In is intended to provide an alternate authoring environment for the text of documents. It is not intended to be a complete form design tool. Documaker Studio provides excellent, user-friendly form design functionality. The Add-In extends Word functionality to provide its user with access to non-text entities such as pre-defined variables and graphics.
There are several common document types produced within the insurance industry that suggest particular features and accompanying functionality or authoring requirements.
• Bills and statements are typically very structured documents that contain a large number of data variables laid out in a specific structure. These documents tend to include calculations and overflow logic. These documents are generally very form-like and are best authored in Studio.
• Marketing material varies between simple, short text blurbs and highly-structured, full color documents. Simple marketing statements are good candidates for Word authoring, however, the more highly-structured documents should be authored in Studio (or another design tool). The inclusion logic that determines when material is included is, of course, managed within Studio.
• Declarations are often long-flowing documents that contain highly flexible and dynamic tables. These documents may be good candidates for dual-authoring in which the text areas are authored in Word and the dynamic tables are created and managed within Studio. This is the case with many documents in which certain portions that deal with the layout of multiple data items should be authored in Studio.
• Policy documents and contracts generally contain a lot of text and very few areas of heavy data variable inclusion. Like declarations, these documents should be separated into appropriate authoring areas so long paragraphs of flowing text are authored in Word, while dynamic tables based on data variables are authored in Studio.
• Correspondence style documents may be free-flowing or highly structured and as such are candidates for either authoring tool based on the document’s structure.
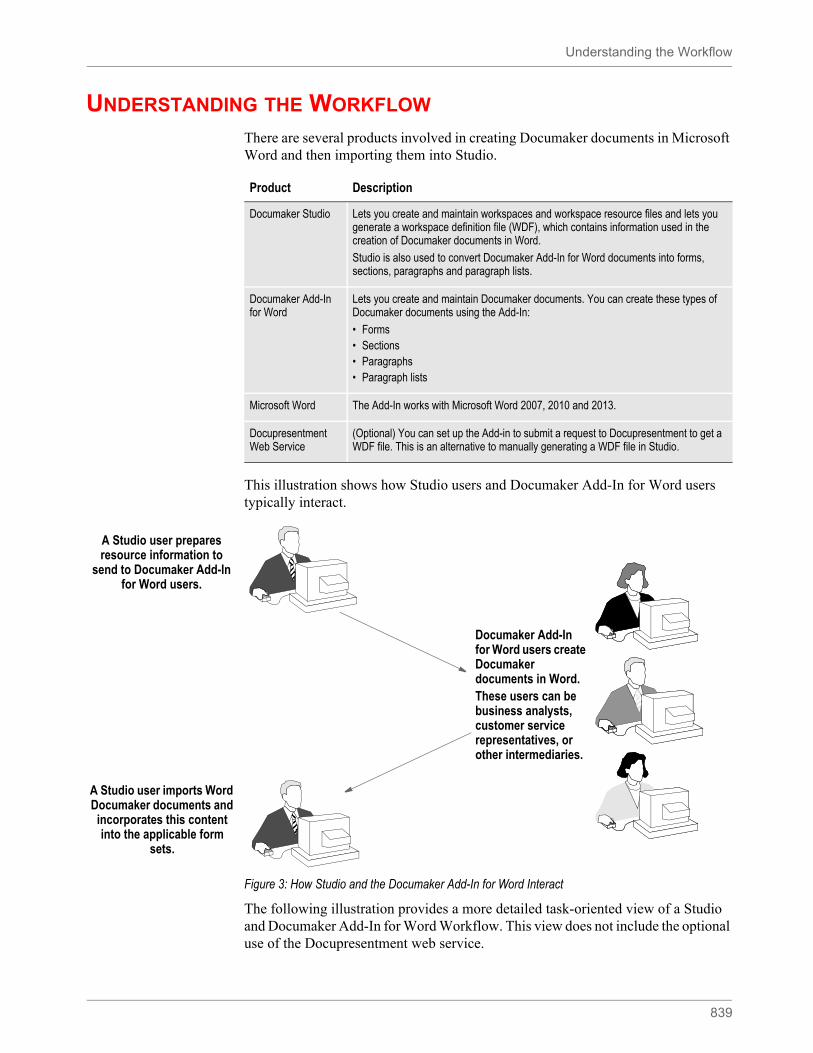
Understanding the Workflow
839
UNDERSTANDING THE WORKFLOW
There are several products involved in creating Documaker documents in Microsoft Word and then importing them into Studio.
This illustration shows how Studio users and Documaker Add-In for Word users typically interact.
Figure 3: How Studio and the Documaker Add-In for Word Interact
The following illustration provides a more detailed task-oriented view of a Studio and Documaker Add-In for Word Workflow. This view does not include the optional use of the Docupresentment web service.
Product Description
Documaker Studio Lets you create and maintain workspaces and workspace resource files and lets you generate a workspace definition file (WDF), which contains information used in the creation of Documaker documents in Word.
Studio is also used to convert Documaker Add-In for Word documents into forms, sections, paragraphs and paragraph lists.
Documaker Add-In for Word
Lets you create and maintain Documaker documents. You can create these types of Documaker documents using the Add-In:
• Forms• Sections• Paragraphs• Paragraph lists
Microsoft Word The Add-In works with Microsoft Word 2007, 2010 and 2013.
Docupresentment Web Service
(Optional) You can set up the Add-in to submit a request to Docupresentment to get a WDF file. This is an alternative to manually generating a WDF file in Studio.
A Studio user prepares resource information to
send to Documaker Add-In for Word users.
A Studio user imports Word Documaker documents and
incorporates this content into the applicable form
sets.
Documaker Add-In for Word users create Documaker documents in Word.These users can be business analysts, customer service representatives, or other intermediaries.
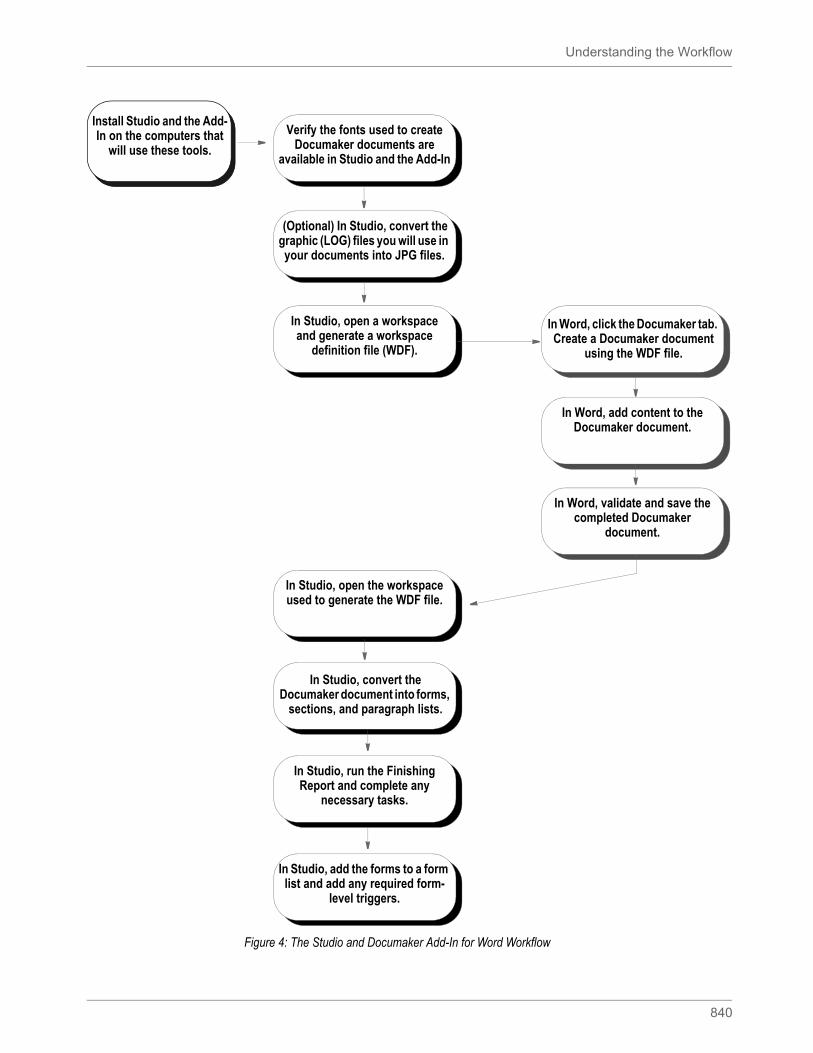
Understanding the Workflow
840
Figure 4: The Studio and Documaker Add-In for Word Workflow
Verify the fonts used to create Documaker documents are
available in Studio and the Add-In
In Studio, open a workspaceand generate a workspace
definition file (WDF).
In Word, click the Documaker tab. Create a Documaker document
using the WDF file.
In Word, add content to the Documaker document.
In Word, validate and save the completed Documaker
document.
In Studio, open the workspace used to generate the WDF file.
In Studio, convert theDocumaker document into forms,
sections, and paragraph lists.
In Studio, run the Finishing Report and complete any
necessary tasks.
In Studio, add the forms to a form list and add any required form-
level triggers.
(Optional) In Studio, convert the graphic (LOG) files you will use in your documents into JPG files.
Install Studio and the Add-In on the computers that
will use these tools.
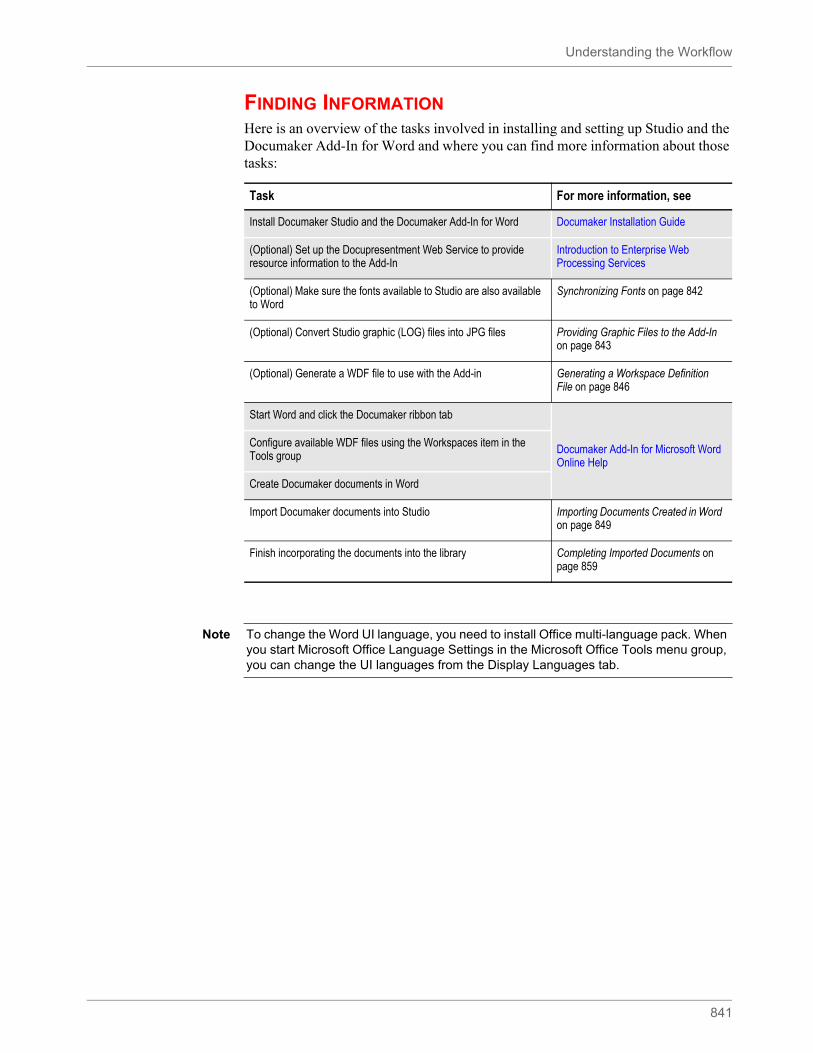
Understanding the Workflow
841
FINDING INFORMATIONHere is an overview of the tasks involved in installing and setting up Studio and the Documaker Add-In for Word and where you can find more information about those tasks:
Task For more information, see
Install Documaker Studio and the Documaker Add-In for Word Documaker Installation Guide
(Optional) Set up the Docupresentment Web Service to provide resource information to the Add-In
Introduction to Enterprise Web Processing Services
(Optional) Make sure the fonts available to Studio are also available to Word
Synchronizing Fonts on page 842
(Optional) Convert Studio graphic (LOG) files into JPG files Providing Graphic Files to the Add-In on page 843
(Optional) Generate a WDF file to use with the Add-in Generating a Workspace Definition File on page 846
Start Word and click the Documaker ribbon tab
Documaker Add-In for Microsoft Word Online Help
Configure available WDF files using the Workspaces item in the Tools group
Create Documaker documents in Word
Import Documaker documents into Studio Importing Documents Created in Word on page 849
Finish incorporating the documents into the library Completing Imported Documents on page 859
Note To change the Word UI language, you need to install Office multi-language pack. When you start Microsoft Office Language Settings in the Microsoft Office Tools menu group, you can change the UI languages from the Display Languages tab.
Synchronizing Fonts
842
SYNCHRONIZING FONTS
When you import Documaker documents created using the Add-In, Studio uses the font cross-reference (FXR) file specified in your application definition file (BDF). Since document layout heavily depends on the choice of fonts, Studio tries to match the fonts in the source document to those defined in the FXR, but substitution can occur and may affect the layout. The best way to avoid layout changes is to make sure all fonts used by the Add-In are referenced in your FXR file.
To ensure font consistency across all documents, review the font family names and make sure all fonts you will use in document creation are available to both Studio and the Add-In. If there is a discrepancy, you can resolve it by using one or both of these options:
• Import the TrueType fonts included with the Documaker installation into the Font Palette on the computers that run the Add-In.
• Import the Windows TrueType fonts available to the Add-In into your FXR file. For more information, see Importing Fonts on page 769.
If you import TrueType fonts into the FXR and you plan to produce those forms on AFP or Metacode printers, you should also import the AFP and Metacode equivalents of those TrueType fonts into your FXR.
In addition, the Add-In provides a validation tool you can use to check the Documaker documents you create. As part of the validation process, it compares the font names defined in the Word Documaker document with the font family names defined in the WDF file imported from Studio. For more information, see the Documaker Add-In for Microsoft Word Online Help.
Note The FXR file contains information about fonts, such as the font family name, typeface, and point size. You specify the FXR you will use for a workspace in the BDF file. When you create a workspace definition file (WDF) in Studio for use by the Add-In, Studio looks in the FXR file specified in the BDF file to get font information. This includes the font family name and the font point size. For more information, see Generating a Workspace Definition File on page 846. For more information on BDF files, see Working with Application Definition Files on page 137.
Note There are legal issues to consider when using fonts from other vendors. Font vendors generally copyright the fonts they create. Make sure your license lets you use the font on more than one computer at a time. Also make sure your license lets you copy converted fonts to other platforms running on the same computer.
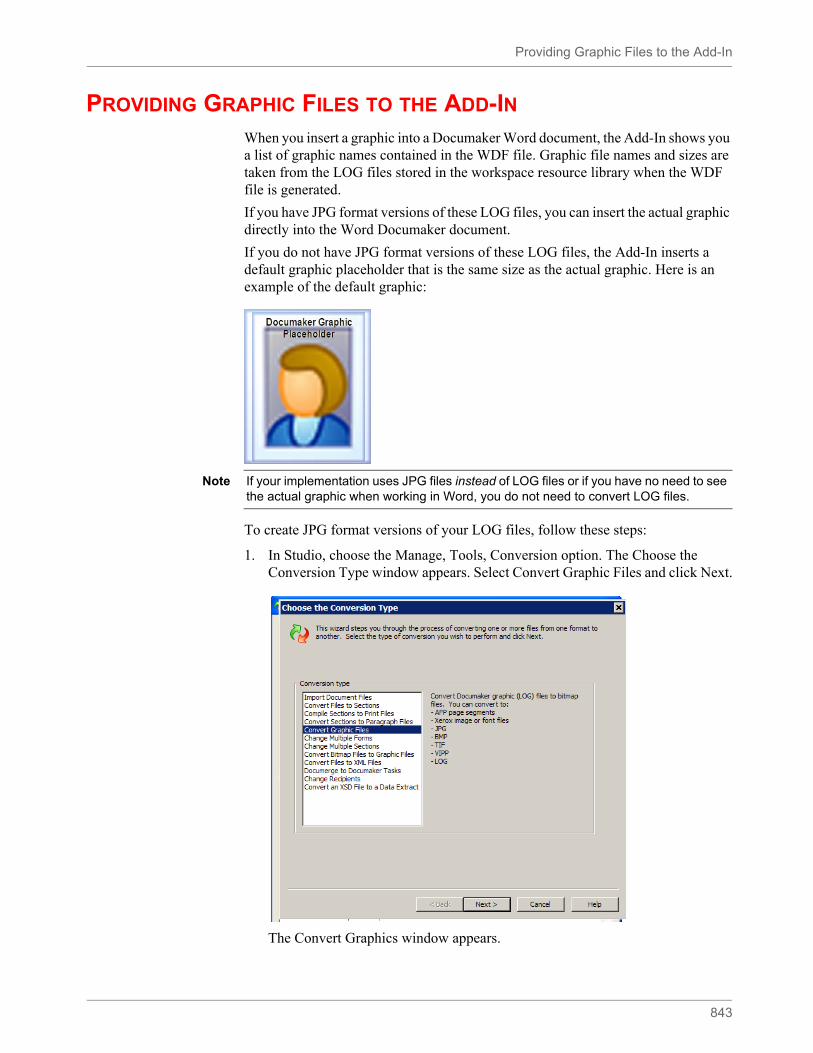
Providing Graphic Files to the Add-In
843
PROVIDING GRAPHIC FILES TO THE ADD-INWhen you insert a graphic into a Documaker Word document, the Add-In shows you a list of graphic names contained in the WDF file. Graphic file names and sizes are taken from the LOG files stored in the workspace resource library when the WDF file is generated.
If you have JPG format versions of these LOG files, you can insert the actual graphic directly into the Word Documaker document.
If you do not have JPG format versions of these LOG files, the Add-In inserts a default graphic placeholder that is the same size as the actual graphic. Here is an example of the default graphic:
To create JPG format versions of your LOG files, follow these steps:
1. In Studio, choose the Manage, Tools, Conversion option. The Choose the Conversion Type window appears. Select Convert Graphic Files and click Next.
The Convert Graphics window appears.
Note If your implementation uses JPG files instead of LOG files or if you have no need to see the actual graphic when working in Word, you do not need to convert LOG files.
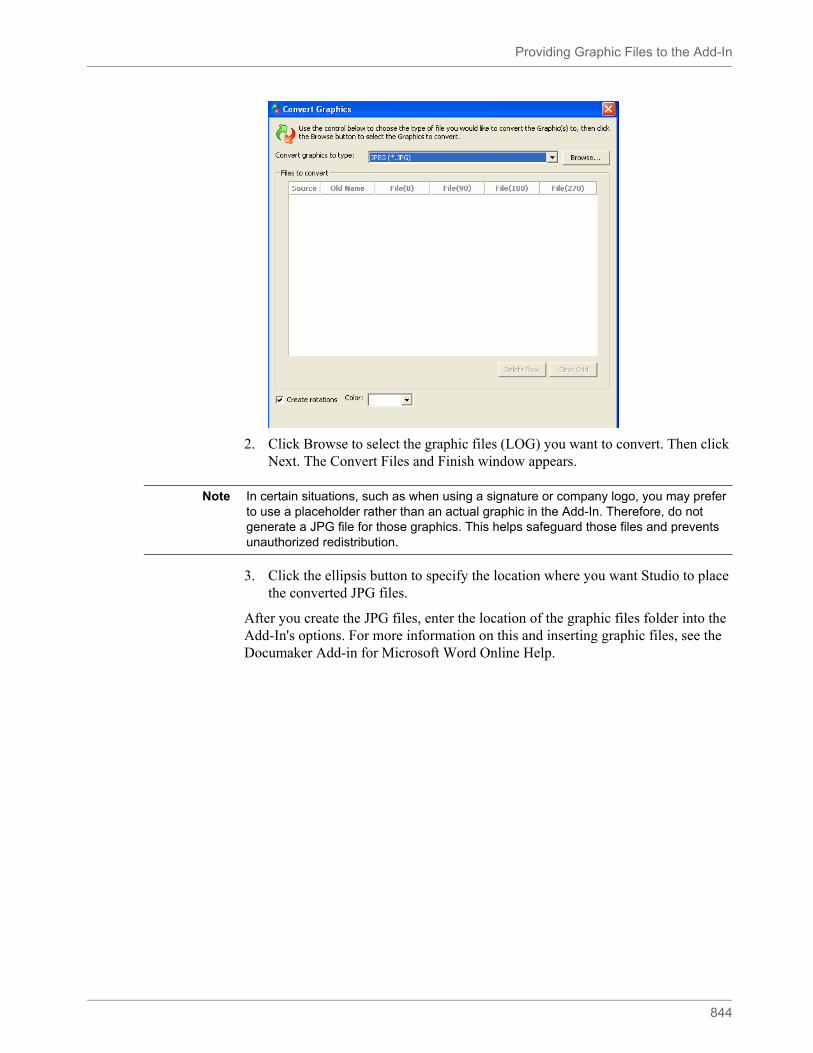
Providing Graphic Files to the Add-In
844
2. Click Browse to select the graphic files (LOG) you want to convert. Then click Next. The Convert Files and Finish window appears.
3. Click the ellipsis button to specify the location where you want Studio to place the converted JPG files.
After you create the JPG files, enter the location of the graphic files folder into the Add-In's options. For more information on this and inserting graphic files, see the Documaker Add-in for Microsoft Word Online Help.
Note In certain situations, such as when using a signature or company logo, you may prefer to use a placeholder rather than an actual graphic in the Add-In. Therefore, do not generate a JPG file for those graphics. This helps safeguard those files and prevents unauthorized redistribution.
Sharing Studio Resource Information with the Add-In
845
SHARING STUDIO RESOURCE INFORMATION WITH THE ADD-INUsing Studio resource information in the Add-In makes the document creation process easier and gives you better results when you convert those documents into Studio forms, sections, and paragraph lists.
You can provide Word with these types of Studio resource information:
• Library class values
• Fields
• Fonts
• Graphics
• Form metadata
• Library project values
• Recipients
• Triggers
The Add-In uses this information to provide lists of options which are available when you are creating forms, sections, or paragraph lists in Word. This lets you insert most of the Studio resources directly into a document at creation time, which makes the process quicker and provides more consistent results.
There are two ways to provide this information to the Add-In. You can...
• Provide Add-In users with access to Studio information via a Docupresentment web service. For more information on connecting the Add-In to Docupresentment web services, see the Documaker Add-in for Microsoft Word Online Help.
• Generate a workspace definition file (WDF) in Studio and access it in the Add-In. For more information, see Generating a Workspace Definition File on page 846.
Note Although highly recommended, you do not have to generate a workspace definition file (WDF) to use the Add-In.
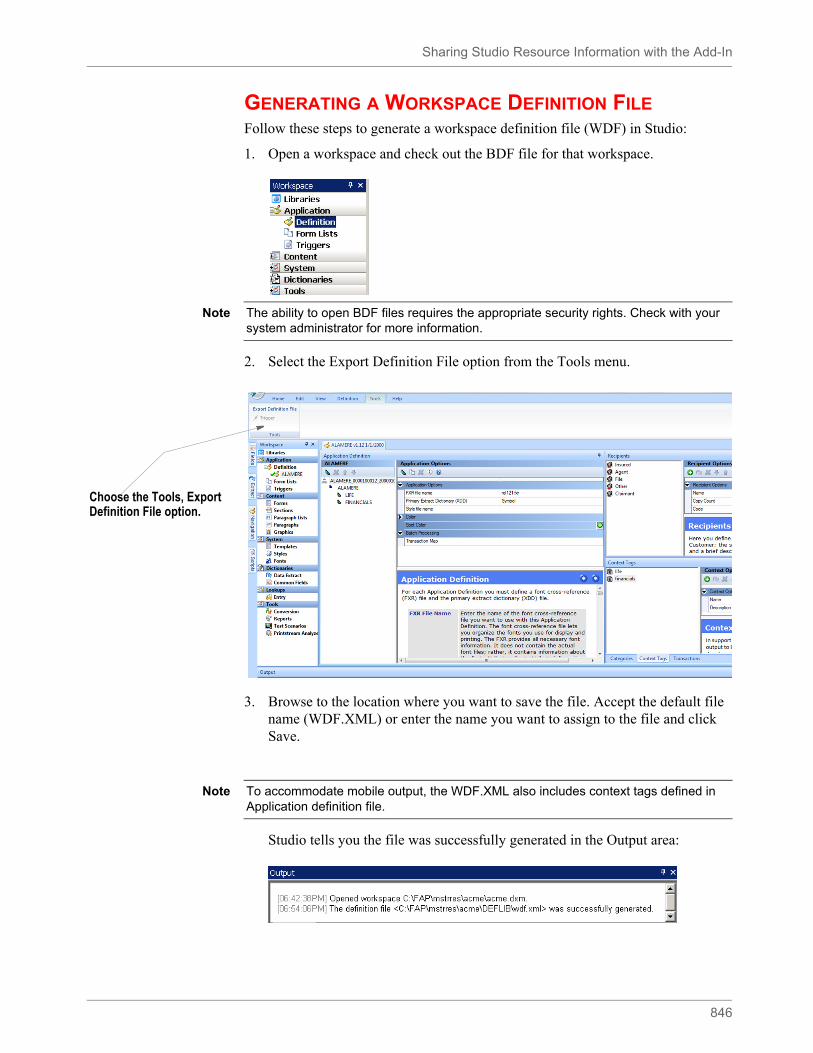
Sharing Studio Resource Information with the Add-In
846
GENERATING A WORKSPACE DEFINITION FILEFollow these steps to generate a workspace definition file (WDF) in Studio:
1. Open a workspace and check out the BDF file for that workspace.
2. Select the Export Definition File option from the Tools menu.
3. Browse to the location where you want to save the file. Accept the default file name (WDF.XML) or enter the name you want to assign to the file and click Save.
Studio tells you the file was successfully generated in the Output area:
Note The ability to open BDF files requires the appropriate security rights. Check with your system administrator for more information.
Choose the Tools, Export Definition File option.
Note To accommodate mobile output, the WDF.XML also includes context tags defined in Application definition file.
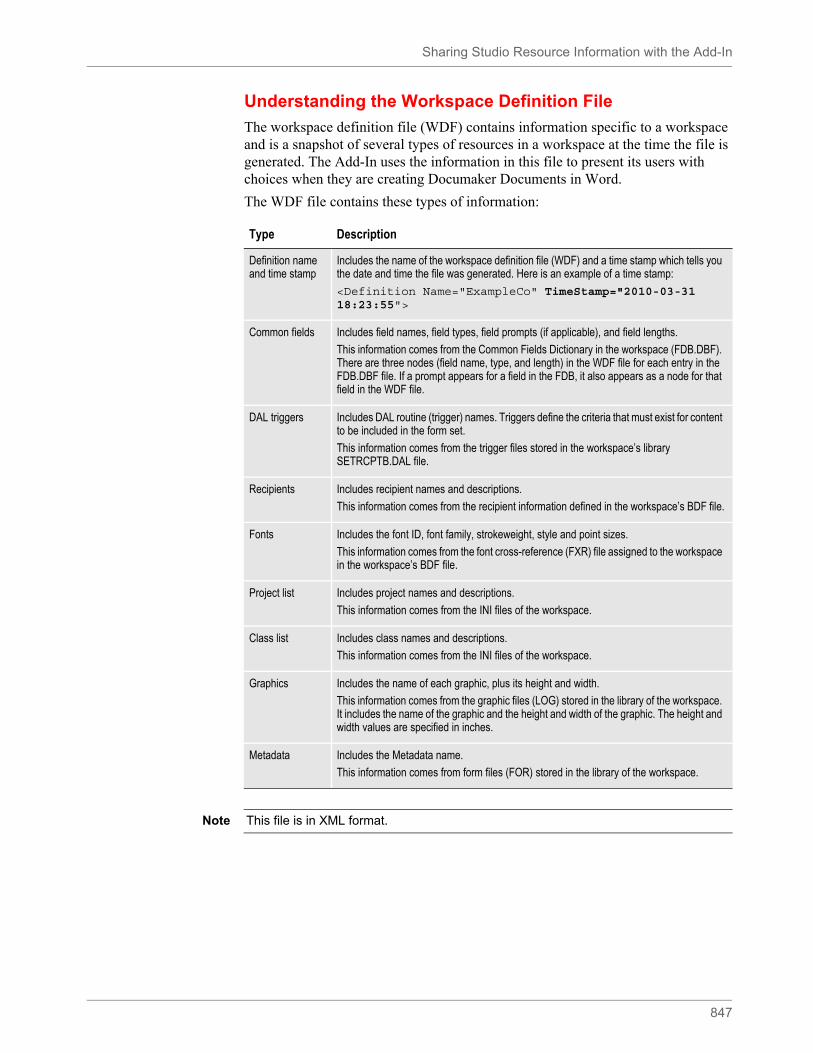
Sharing Studio Resource Information with the Add-In
847
Understanding the Workspace Definition File
The workspace definition file (WDF) contains information specific to a workspace and is a snapshot of several types of resources in a workspace at the time the file is generated. The Add-In uses the information in this file to present its users with choices when they are creating Documaker Documents in Word.
The WDF file contains these types of information:
Type Description
Definition name and time stamp
Includes the name of the workspace definition file (WDF) and a time stamp which tells you the date and time the file was generated. Here is an example of a time stamp:
<Definition Name="ExampleCo" TimeStamp="2010-03-31 18:23:55">
Common fields Includes field names, field types, field prompts (if applicable), and field lengths.
This information comes from the Common Fields Dictionary in the workspace (FDB.DBF). There are three nodes (field name, type, and length) in the WDF file for each entry in the FDB.DBF file. If a prompt appears for a field in the FDB, it also appears as a node for that field in the WDF file.
DAL triggers Includes DAL routine (trigger) names. Triggers define the criteria that must exist for content to be included in the form set.
This information comes from the trigger files stored in the workspace’s library SETRCPTB.DAL file.
Recipients Includes recipient names and descriptions.
This information comes from the recipient information defined in the workspace’s BDF file.
Fonts Includes the font ID, font family, strokeweight, style and point sizes.
This information comes from the font cross-reference (FXR) file assigned to the workspace in the workspace’s BDF file.
Project list Includes project names and descriptions.
This information comes from the INI files of the workspace.
Class list Includes class names and descriptions.
This information comes from the INI files of the workspace.
Graphics Includes the name of each graphic, plus its height and width.
This information comes from the graphic files (LOG) stored in the library of the workspace. It includes the name of the graphic and the height and width of the graphic. The height and width values are specified in inches.
Metadata Includes the Metadata name.
This information comes from form files (FOR) stored in the library of the workspace.
Note This file is in XML format.
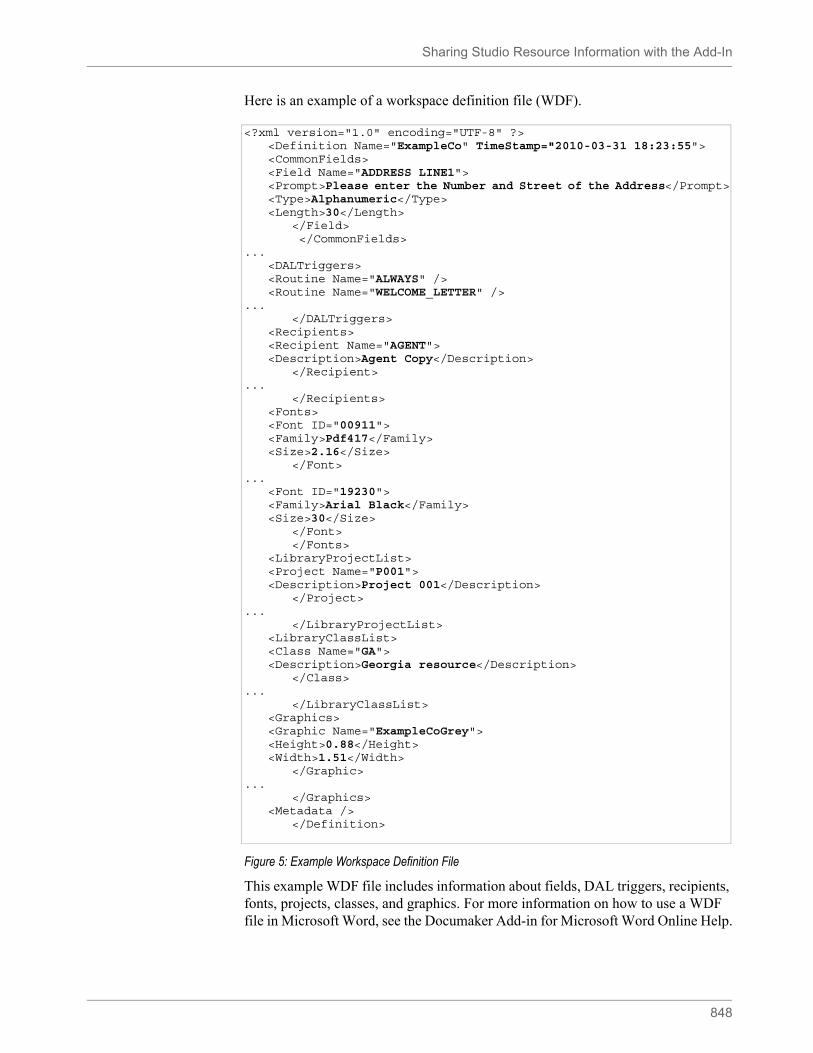
Sharing Studio Resource Information with the Add-In
848
Here is an example of a workspace definition file (WDF).
Figure 5: Example Workspace Definition File
This example WDF file includes information about fields, DAL triggers, recipients, fonts, projects, classes, and graphics. For more information on how to use a WDF file in Microsoft Word, see the Documaker Add-in for Microsoft Word Online Help.
<?xml version="1.0" encoding="UTF-8" ?><Definition Name="ExampleCo" TimeStamp="2010-03-31 18:23:55"><CommonFields><Field Name="ADDRESS LINE1"><Prompt>Please enter the Number and Street of the Address</Prompt><Type>Alphanumeric</Type><Length>30</Length>
</Field> </CommonFields>
...<DALTriggers><Routine Name="ALWAYS" /><Routine Name="WELCOME_LETTER" />
...</DALTriggers>
<Recipients><Recipient Name="AGENT"><Description>Agent Copy</Description>
</Recipient>...
</Recipients><Fonts><Font ID="00911"><Family>Pdf417</Family><Size>2.16</Size>
</Font>...
<Font ID="19230"><Family>Arial Black</Family><Size>30</Size>
</Font></Fonts>
<LibraryProjectList><Project Name="P001"><Description>Project 001</Description>
</Project>...
</LibraryProjectList><LibraryClassList><Class Name="GA"><Description>Georgia resource</Description>
</Class>...
</LibraryClassList><Graphics><Graphic Name="ExampleCoGrey"><Height>0.88</Height> <Width>1.51</Width>
</Graphic>...
</Graphics><Metadata />
</Definition>
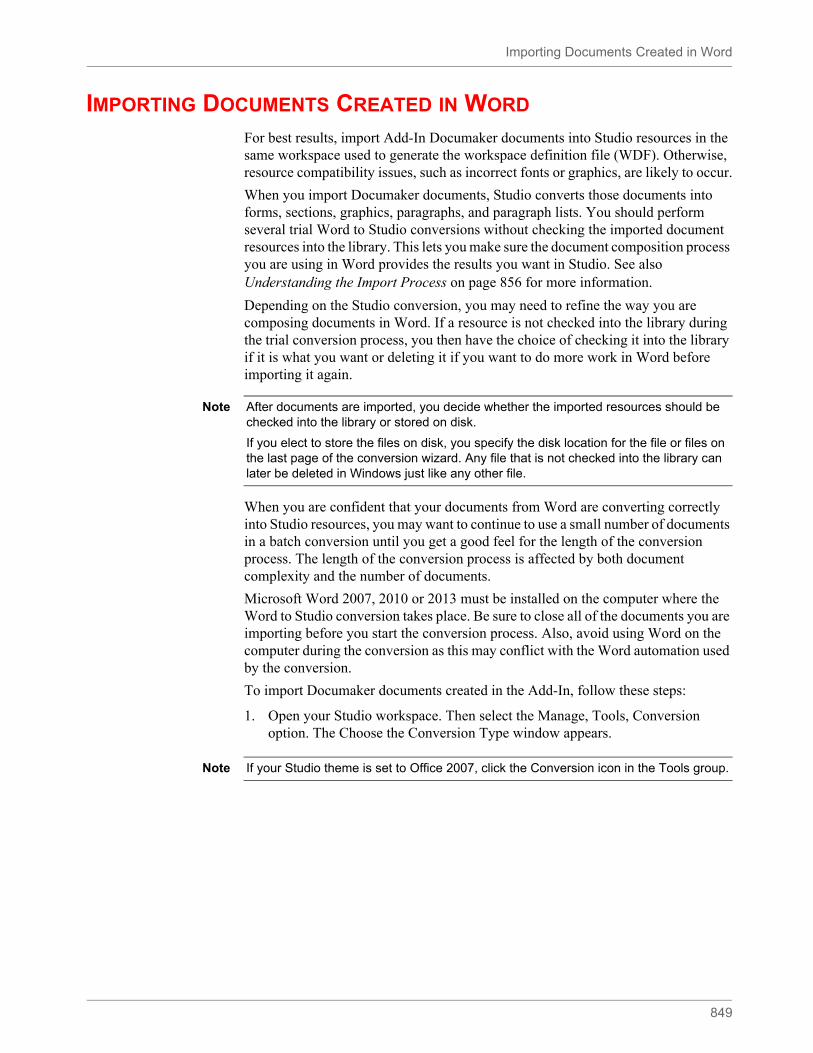
Importing Documents Created in Word
849
IMPORTING DOCUMENTS CREATED IN WORD
For best results, import Add-In Documaker documents into Studio resources in the same workspace used to generate the workspace definition file (WDF). Otherwise, resource compatibility issues, such as incorrect fonts or graphics, are likely to occur.
When you import Documaker documents, Studio converts those documents into forms, sections, graphics, paragraphs, and paragraph lists. You should perform several trial Word to Studio conversions without checking the imported document resources into the library. This lets you make sure the document composition process you are using in Word provides the results you want in Studio. See also Understanding the Import Process on page 856 for more information.
Depending on the Studio conversion, you may need to refine the way you are composing documents in Word. If a resource is not checked into the library during the trial conversion process, you then have the choice of checking it into the library if it is what you want or deleting it if you want to do more work in Word before importing it again.
When you are confident that your documents from Word are converting correctly into Studio resources, you may want to continue to use a small number of documents in a batch conversion until you get a good feel for the length of the conversion process. The length of the conversion process is affected by both document complexity and the number of documents.
Microsoft Word 2007, 2010 or 2013 must be installed on the computer where the Word to Studio conversion takes place. Be sure to close all of the documents you are importing before you start the conversion process. Also, avoid using Word on the computer during the conversion as this may conflict with the Word automation used by the conversion.
To import Documaker documents created in the Add-In, follow these steps:
1. Open your Studio workspace. Then select the Manage, Tools, Conversion option. The Choose the Conversion Type window appears.
Note After documents are imported, you decide whether the imported resources should be checked into the library or stored on disk.
If you elect to store the files on disk, you specify the disk location for the file or files on the last page of the conversion wizard. Any file that is not checked into the library can later be deleted in Windows just like any other file.
Note If your Studio theme is set to Office 2007, click the Conversion icon in the Tools group.
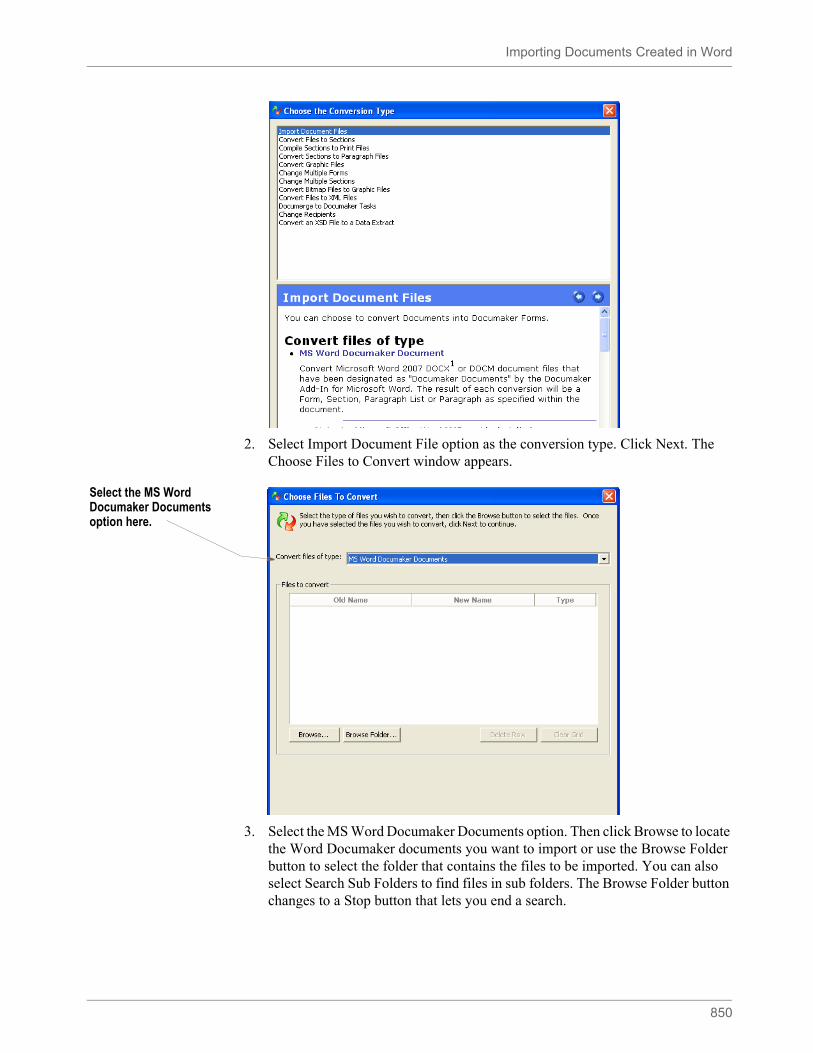
Importing Documents Created in Word
850
2. Select Import Document File option as the conversion type. Click Next. The Choose Files to Convert window appears.
3. Select the MS Word Documaker Documents option. Then click Browse to locate the Word Documaker documents you want to import or use the Browse Folder button to select the folder that contains the files to be imported. You can also select Search Sub Folders to find files in sub folders. The Browse Folder button changes to a Stop button that lets you end a search.
Select the MS Word Documaker Documents option here.
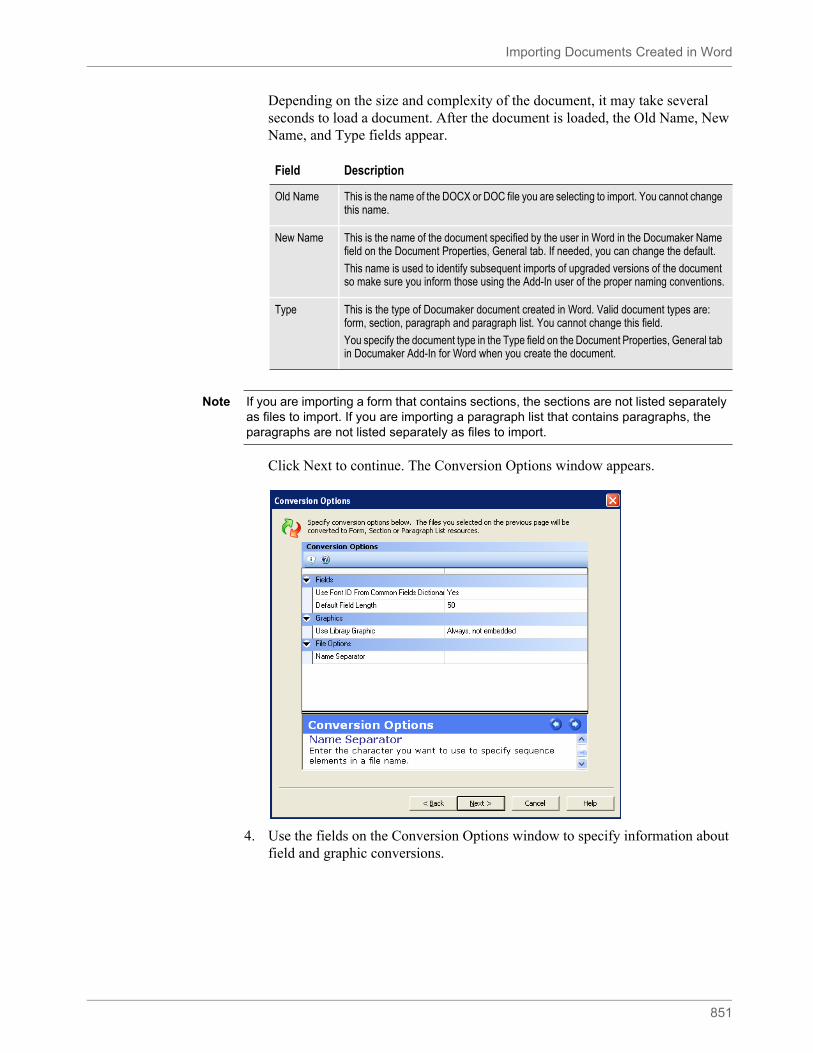
Importing Documents Created in Word
851
Depending on the size and complexity of the document, it may take several seconds to load a document. After the document is loaded, the Old Name, New Name, and Type fields appear.
Click Next to continue. The Conversion Options window appears.
4. Use the fields on the Conversion Options window to specify information about field and graphic conversions.
Field Description
Old Name This is the name of the DOCX or DOC file you are selecting to import. You cannot change this name.
New Name This is the name of the document specified by the user in Word in the Documaker Name field on the Document Properties, General tab. If needed, you can change the default.
This name is used to identify subsequent imports of upgraded versions of the document so make sure you inform those using the Add-In user of the proper naming conventions.
Type This is the type of Documaker document created in Word. Valid document types are: form, section, paragraph and paragraph list. You cannot change this field.
You specify the document type in the Type field on the Document Properties, General tab in Documaker Add-In for Word when you create the document.
Note If you are importing a form that contains sections, the sections are not listed separately as files to import. If you are importing a paragraph list that contains paragraphs, the paragraphs are not listed separately as files to import.
Importing Documents Created in Word
852
To continue, click Next. The Convert Files and Finish window appears.
Option Description
Use Font ID from Commons Fields Dictionary
Yes - The conversion checks the fields inserted on the Documaker document against fields in the Common Field Dictionary. The font ID of the matching field in the Common Field Dictionary is used for the field in the imported document.
No - The font ID of the field in the Documaker document is used for the field in the imported document.
Default Field Length Numeric Value - The conversion checks fields contained on the Documaker document against fields in the Common Field Dictionary. The length of the matching field in the Common Field Dictionary is used for the field in the imported document. If there is no matching record in the Common Field Dictionary, the value specified in the default field length is used.
Use Library Graphic Always, not embedded - The conversion checks graphics contained on the Documaker document against graphics in the workspace’s resource library. If a matching name is found, this option directs the system to use the Studio library graphic including its size. Any placeholder graphics will be replaced with the graphic from the library. The graphic is not embedded in the imported file.
If same size, not embedded - The conversion checks graphics contained on the Documaker document against graphics in the workspace’s resource library. This option tells the conversion to use the Studio library graphic if it is the same size as the one in the Documaker document, but not to embed it. If the graphics are not the same size, use the graphic inserted in the Documaker Word document but do not embed it.
Always, embedded - The conversion checks graphics contained on the Documaker document against graphics in the workspace’s resource library. If a matching name is found, this option directs the system to use the Studio library graphic including its size. Any placeholder graphics will be replaced with the graphic from the library. The graphic is embedded in the imported file.
Name Separator Enter the character you want Studio to insert between elements of the file name. The separator can be nothing, a blank, an underscore, or any other valid Windows file name character.
For example, if the name of the input document is Declaration and you choose to create separate sections you would get these results for page 1:
Separator Result----------------------------------------------------------------------
(nothing) Declaration1.FAPBlank Declaration1 .FAP_ Declaration_1.FAP# Declaration#1.FAP
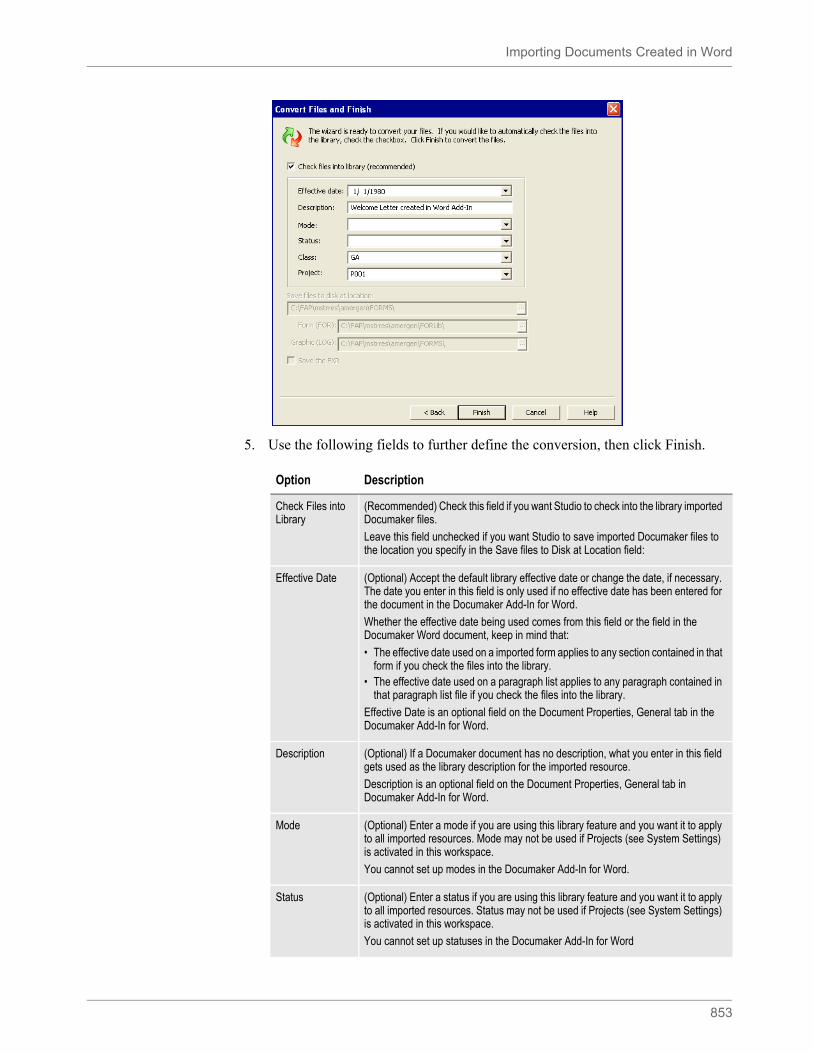
Importing Documents Created in Word
853
5. Use the following fields to further define the conversion, then click Finish.
Option Description
Check Files into Library
(Recommended) Check this field if you want Studio to check into the library imported Documaker files.
Leave this field unchecked if you want Studio to save imported Documaker files to the location you specify in the Save files to Disk at Location field:
Effective Date (Optional) Accept the default library effective date or change the date, if necessary. The date you enter in this field is only used if no effective date has been entered for the document in the Documaker Add-In for Word.
Whether the effective date being used comes from this field or the field in the Documaker Word document, keep in mind that:
• The effective date used on a imported form applies to any section contained in that form if you check the files into the library.
• The effective date used on a paragraph list applies to any paragraph contained in that paragraph list file if you check the files into the library.
Effective Date is an optional field on the Document Properties, General tab in the Documaker Add-In for Word.
Description (Optional) If a Documaker document has no description, what you enter in this field gets used as the library description for the imported resource.
Description is an optional field on the Document Properties, General tab in Documaker Add-In for Word.
Mode (Optional) Enter a mode if you are using this library feature and you want it to apply to all imported resources. Mode may not be used if Projects (see System Settings) is activated in this workspace.
You cannot set up modes in the Documaker Add-In for Word.
Status (Optional) Enter a status if you are using this library feature and you want it to apply to all imported resources. Status may not be used if Projects (see System Settings) is activated in this workspace.
You cannot set up statuses in the Documaker Add-In for Word
Importing Documents Created in Word
854
Class If a Documaker document has no value for Class, then what you enter in this field is used as the library class value. If the Projects option (see System Settings) is turned on for this workspace, you should select a class or blank from the list.
Class is an optional field on the Document Properties, Advanced tab in the Documaker Add-In for Word.
Project If a Documaker document has no value for Project, then what you enter in this field gets used as the library project value. If the Projects option (see System Settings) is turned on for this workspace, you should select a project or blank from the list.
Project is an optional field on the Document Properties, Advanced tab in the Documaker Add-In for Word.
Save files to disk at location:
This option is available only when Check File into Library is not selected. Files from a conversion that could potentially be saved to this location are FAP files (sections), PAR files (paragraphs), and LOG files (graphics).
Form (FOR) This option is available only when Check File into Library is not selected. Files from a conversion that could potentially be saved to this location are FOR files (forms) and PSL files (paragraph lists).
Graphic (LOG) This option is available only when Check File into Library is not selected. Files from a conversion that could potentially be saved to this location are LOG files (graphics). Use this option to specify the pathing location for LOG files when LOG files do not reside in the same folder as FAP files (sections) and PAR files (paragraphs).
Save the FXR This option is activated only when a normalized AFP or Metacode file, where the fonts are embedded in a print stream, is being converted.
Option Description
Note Files imported and saved to disk do not retain the values entered into the following fields: Effective Date, Description, Mode, Status, Class, or Project. If you check one of the imported resources into the library at a later time, you will need to specify any applicable information again.
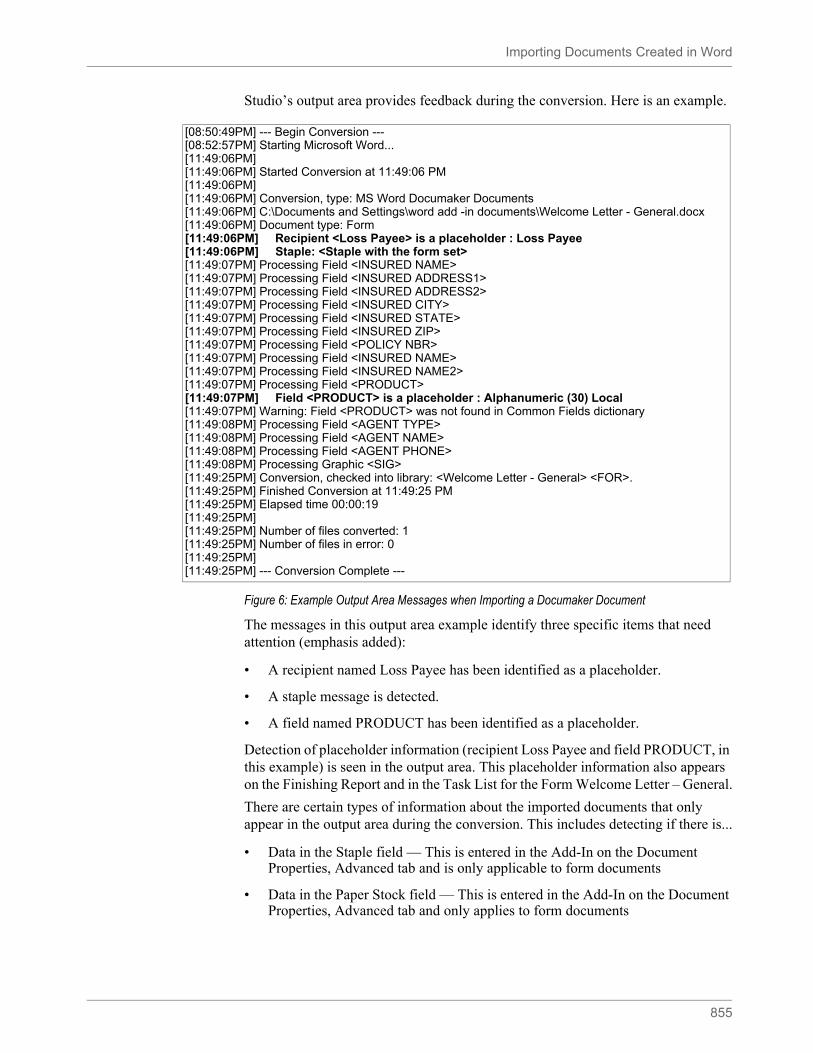
Importing Documents Created in Word
855
Studio’s output area provides feedback during the conversion. Here is an example.
Figure 6: Example Output Area Messages when Importing a Documaker Document
The messages in this output area example identify three specific items that need attention (emphasis added):
• A recipient named Loss Payee has been identified as a placeholder.
• A staple message is detected.
• A field named PRODUCT has been identified as a placeholder.
Detection of placeholder information (recipient Loss Payee and field PRODUCT, in this example) is seen in the output area. This placeholder information also appears on the Finishing Report and in the Task List for the Form Welcome Letter – General.
There are certain types of information about the imported documents that only appear in the output area during the conversion. This includes detecting if there is...
• Data in the Staple field — This is entered in the Add-In on the Document Properties, Advanced tab and is only applicable to form documents
• Data in the Paper Stock field — This is entered in the Add-In on the Document Properties, Advanced tab and only applies to form documents
[08:50:49PM] --- Begin Conversion ---[08:52:57PM] Starting Microsoft Word...[11:49:06PM] [11:49:06PM] Started Conversion at 11:49:06 PM[11:49:06PM] [11:49:06PM] Conversion, type: MS Word Documaker Documents[11:49:06PM] C:\Documents and Settings\word add -in documents\Welcome Letter - General.docx[11:49:06PM] Document type: Form[11:49:06PM] Recipient <Loss Payee> is a placeholder : Loss Payee[11:49:06PM] Staple: <Staple with the form set>[11:49:07PM] Processing Field <INSURED NAME>[11:49:07PM] Processing Field <INSURED ADDRESS1>[11:49:07PM] Processing Field <INSURED ADDRESS2>[11:49:07PM] Processing Field <INSURED CITY>[11:49:07PM] Processing Field <INSURED STATE>[11:49:07PM] Processing Field <INSURED ZIP>[11:49:07PM] Processing Field <POLICY NBR>[11:49:07PM] Processing Field <INSURED NAME>[11:49:07PM] Processing Field <INSURED NAME2>[11:49:07PM] Processing Field <PRODUCT>[11:49:07PM] Field <PRODUCT> is a placeholder : Alphanumeric (30) Local[11:49:07PM] Warning: Field <PRODUCT> was not found in Common Fields dictionary[11:49:08PM] Processing Field <AGENT TYPE>[11:49:08PM] Processing Field <AGENT NAME>[11:49:08PM] Processing Field <AGENT PHONE>[11:49:08PM] Processing Graphic <SIG>[11:49:25PM] Conversion, checked into library: <Welcome Letter - General> <FOR>.[11:49:25PM] Finished Conversion at 11:49:25 PM[11:49:25PM] Elapsed time 00:00:19[11:49:25PM] [11:49:25PM] Number of files converted: 1[11:49:25PM] Number of files in error: 0[11:49:25PM] [11:49:25PM] --- Conversion Complete ---
Importing Documents Created in Word
856
• Undefined Context tags — Context tags can be entered in the Add-In in Advanced Tab of the Document Properties of a Form or Section and New Field and Edit Field dialog
When information is written to the output area concerning the Staple field, Paper Stock field or Context tag, someone on the Studio side of the implementation needs to make the necessary adjustments. Staple and paper stock options appear in the list of form options in the Forms manager. Context tags are defined in the Application Definition File.
Comments entered via the Add-In are converted to Task Comments during the conversion process. Comments do not appear in the output area during the conversion process. They are shown, however, in Studio on task lists and on Finishing Reports. See Completing Imported Documents on page 859 for more information.
UNDERSTANDING THE IMPORT PROCESS
When you import a Word Documaker document into Studio, some formatting, font, and other changes can occur during the import process.
Note Undefined resources can also originate from within Documaker Studio.
Note Task comments can also originate from within Documaker Studio.
This item in the Add-In Is converted this way
Fonts When importing Word Documaker document files, Studio compares the fonts used in the source document to the fonts described in the FXR file. If there is no exact match, Studio calculates a score based on several font attributes. This score reflects how well the attributes match. It then selects the font with the highest score.
For more information, see Understanding Font Mapping on page 699.
Underlines Underlines are converted.
Superscript Superscripted text is converted to superscripted text, provided there is a corresponding font in the appropriate point size.
Subscript Subscripted text is converted to subscripted text, provided there is a corresponding font in the appropriate point size.
Strikethrough Stricken text is converted to stricken text.
All caps Capital letters are converted, provided there is a corresponding font in the appropriate font size.
Small caps Converted as upper and lowercase letters, provided there is a corresponding font in the appropriate font size.
Hidden text Not converted.
Hyphenation Hyphenation settings are converted.
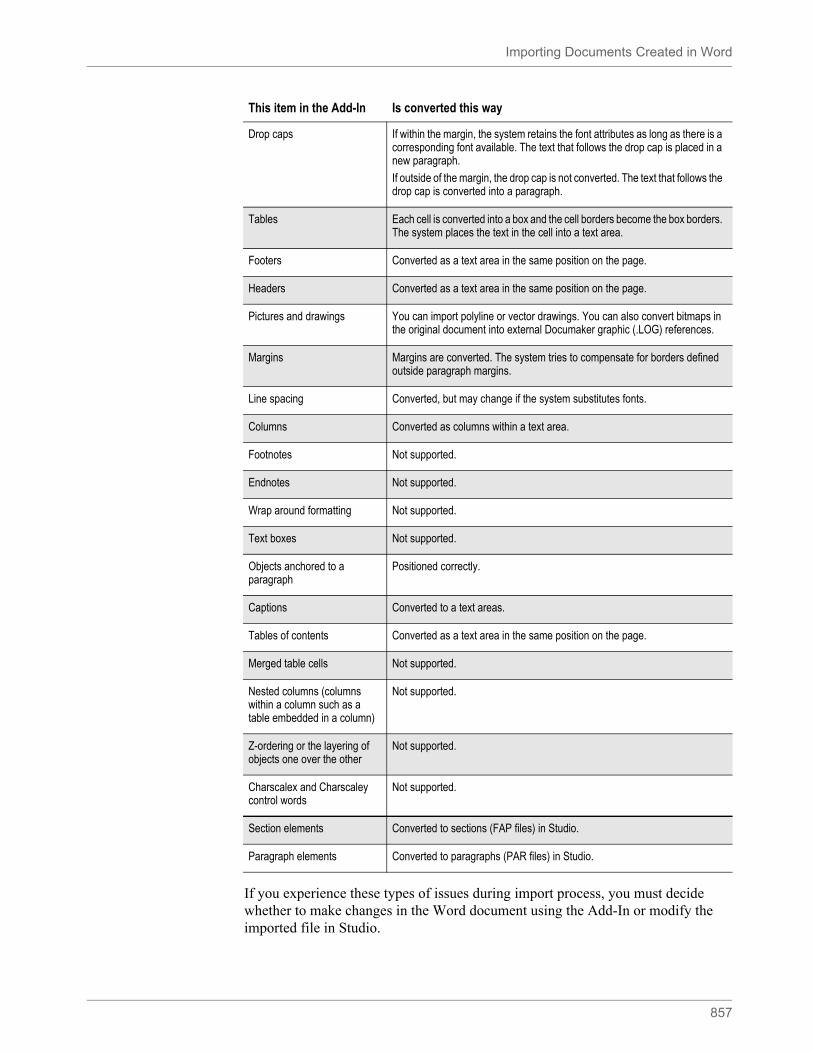
Importing Documents Created in Word
857
If you experience these types of issues during import process, you must decide whether to make changes in the Word document using the Add-In or modify the imported file in Studio.
Drop caps If within the margin, the system retains the font attributes as long as there is a corresponding font available. The text that follows the drop cap is placed in a new paragraph.
If outside of the margin, the drop cap is not converted. The text that follows the drop cap is converted into a paragraph.
Tables Each cell is converted into a box and the cell borders become the box borders. The system places the text in the cell into a text area.
Footers Converted as a text area in the same position on the page.
Headers Converted as a text area in the same position on the page.
Pictures and drawings You can import polyline or vector drawings. You can also convert bitmaps in the original document into external Documaker graphic (.LOG) references.
Margins Margins are converted. The system tries to compensate for borders defined outside paragraph margins.
Line spacing Converted, but may change if the system substitutes fonts.
Columns Converted as columns within a text area.
Footnotes Not supported.
Endnotes Not supported.
Wrap around formatting Not supported.
Text boxes Not supported.
Objects anchored to a paragraph
Positioned correctly.
Captions Converted to a text areas.
Tables of contents Converted as a text area in the same position on the page.
Merged table cells Not supported.
Nested columns (columns within a column such as a table embedded in a column)
Not supported.
Z-ordering or the layering of objects one over the other
Not supported.
Charscalex and Charscaley control words
Not supported.
Section elements Converted to sections (FAP files) in Studio.
Paragraph elements Converted to paragraphs (PAR files) in Studio.
This item in the Add-In Is converted this way
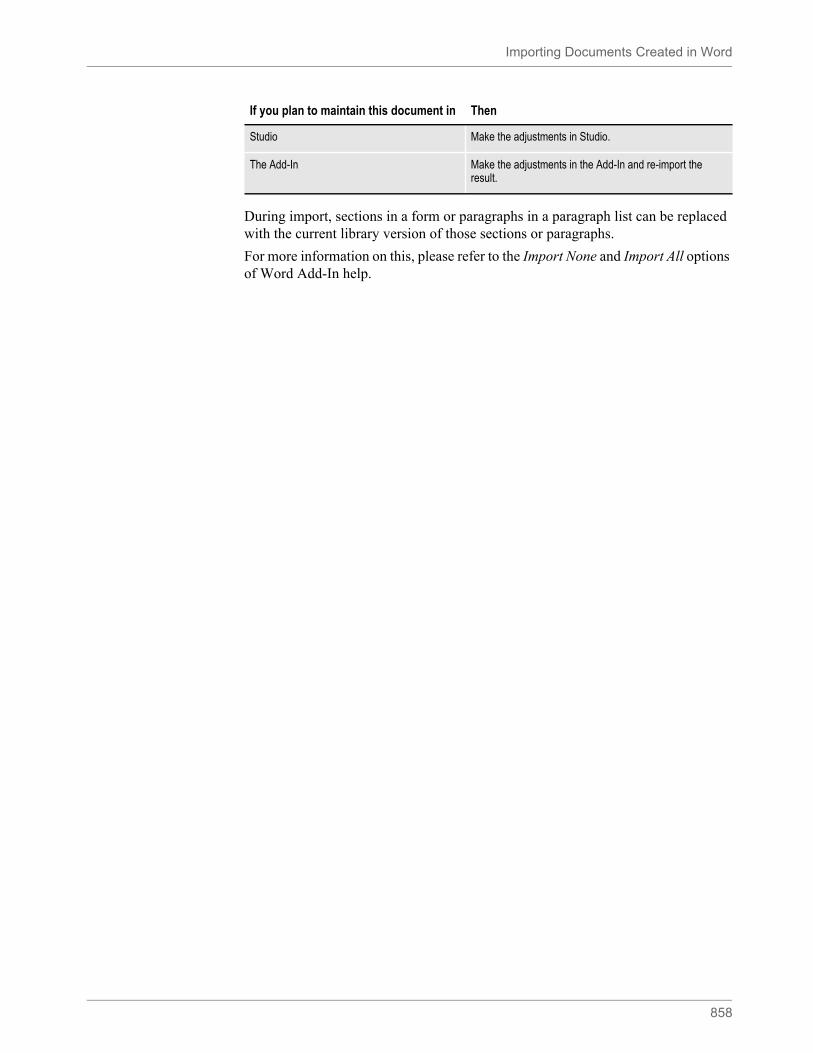
Importing Documents Created in Word
858
During import, sections in a form or paragraphs in a paragraph list can be replaced with the current library version of those sections or paragraphs.
For more information on this, please refer to the Import None and Import All options of Word Add-In help.
If you plan to maintain this document in Then
Studio Make the adjustments in Studio.
The Add-In Make the adjustments in the Add-In and re-import the result.
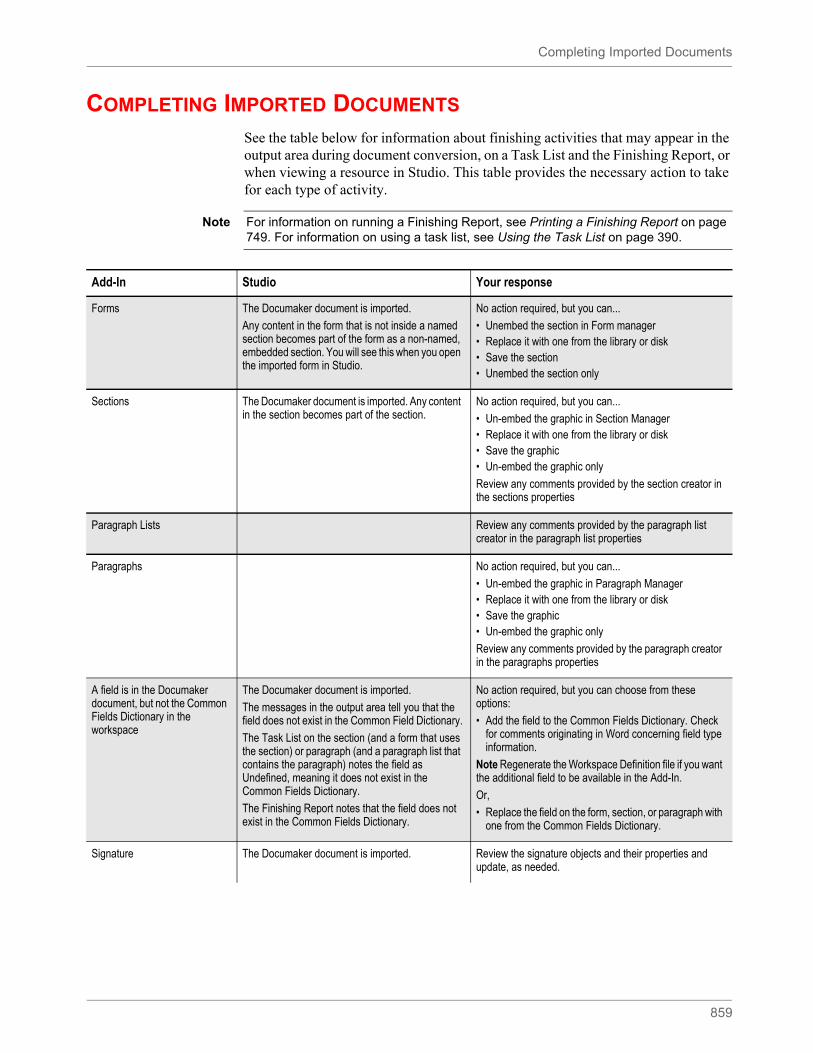
Completing Imported Documents
859
COMPLETING IMPORTED DOCUMENTS
See the table below for information about finishing activities that may appear in the output area during document conversion, on a Task List and the Finishing Report, or when viewing a resource in Studio. This table provides the necessary action to take for each type of activity.
Note For information on running a Finishing Report, see Printing a Finishing Report on page 749. For information on using a task list, see Using the Task List on page 390.
Add-In Studio Your response
Forms The Documaker document is imported.
Any content in the form that is not inside a named section becomes part of the form as a non-named, embedded section. You will see this when you open the imported form in Studio.
No action required, but you can...
• Unembed the section in Form manager• Replace it with one from the library or disk• Save the section• Unembed the section only
Sections The Documaker document is imported. Any content in the section becomes part of the section.
No action required, but you can...
• Un-embed the graphic in Section Manager• Replace it with one from the library or disk• Save the graphic• Un-embed the graphic only
Review any comments provided by the section creator in the sections properties
Paragraph Lists Review any comments provided by the paragraph list creator in the paragraph list properties
Paragraphs No action required, but you can...
• Un-embed the graphic in Paragraph Manager• Replace it with one from the library or disk• Save the graphic• Un-embed the graphic only
Review any comments provided by the paragraph creator in the paragraphs properties
A field is in the Documaker document, but not the Common Fields Dictionary in the workspace
The Documaker document is imported.
The messages in the output area tell you that the field does not exist in the Common Field Dictionary.
The Task List on the section (and a form that uses the section) or paragraph (and a paragraph list that contains the paragraph) notes the field as Undefined, meaning it does not exist in the Common Fields Dictionary.
The Finishing Report notes that the field does not exist in the Common Fields Dictionary.
No action required, but you can choose from these options:
• Add the field to the Common Fields Dictionary. Check for comments originating in Word concerning field type information.
Note Regenerate the Workspace Definition file if you want the additional field to be available in the Add-In.
Or,
• Replace the field on the form, section, or paragraph with one from the Common Fields Dictionary.
Signature The Documaker document is imported. Review the signature objects and their properties and update, as needed.
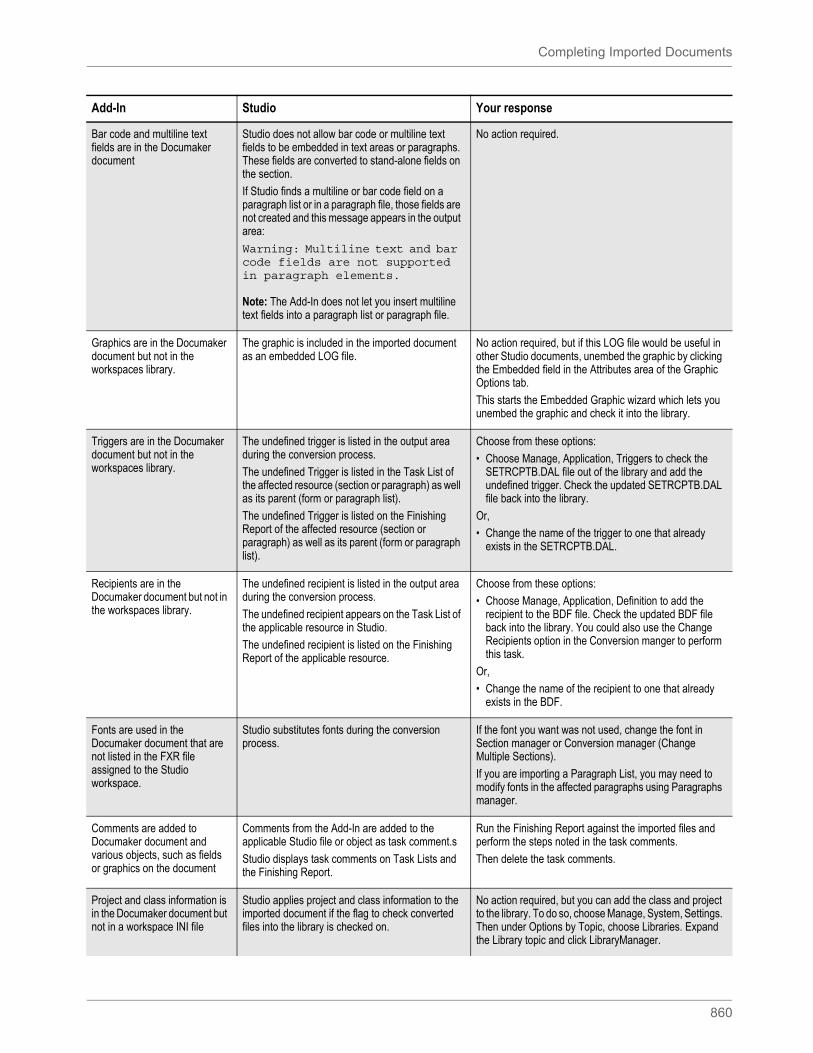
Completing Imported Documents
860
Bar code and multiline text fields are in the Documaker document
Studio does not allow bar code or multiline text fields to be embedded in text areas or paragraphs. These fields are converted to stand-alone fields on the section.
If Studio finds a multiline or bar code field on a paragraph list or in a paragraph file, those fields are not created and this message appears in the output area:
Warning: Multiline text and bar code fields are not supported in paragraph elements.
Note: The Add-In does not let you insert multiline text fields into a paragraph list or paragraph file.
No action required.
Graphics are in the Documaker document but not in the workspaces library.
The graphic is included in the imported document as an embedded LOG file.
No action required, but if this LOG file would be useful in other Studio documents, unembed the graphic by clicking the Embedded field in the Attributes area of the Graphic Options tab.
This starts the Embedded Graphic wizard which lets you unembed the graphic and check it into the library.
Triggers are in the Documaker document but not in the workspaces library.
The undefined trigger is listed in the output area during the conversion process.
The undefined Trigger is listed in the Task List of the affected resource (section or paragraph) as well as its parent (form or paragraph list).
The undefined Trigger is listed on the Finishing Report of the affected resource (section or paragraph) as well as its parent (form or paragraph list).
Choose from these options:
• Choose Manage, Application, Triggers to check the SETRCPTB.DAL file out of the library and add the undefined trigger. Check the updated SETRCPTB.DAL file back into the library.
Or,
• Change the name of the trigger to one that already exists in the SETRCPTB.DAL.
Recipients are in the Documaker document but not in the workspaces library.
The undefined recipient is listed in the output area during the conversion process.
The undefined recipient appears on the Task List of the applicable resource in Studio.
The undefined recipient is listed on the Finishing Report of the applicable resource.
Choose from these options:
• Choose Manage, Application, Definition to add the recipient to the BDF file. Check the updated BDF file back into the library. You could also use the Change Recipients option in the Conversion manger to perform this task.
Or,
• Change the name of the recipient to one that already exists in the BDF.
Fonts are used in the Documaker document that are not listed in the FXR file assigned to the Studio workspace.
Studio substitutes fonts during the conversion process.
If the font you want was not used, change the font in Section manager or Conversion manager (Change Multiple Sections).
If you are importing a Paragraph List, you may need to modify fonts in the affected paragraphs using Paragraphs manager.
Comments are added to Documaker document and various objects, such as fields or graphics on the document
Comments from the Add-In are added to the applicable Studio file or object as task comment.s
Studio displays task comments on Task Lists and the Finishing Report.
Run the Finishing Report against the imported files and perform the steps noted in the task comments.
Then delete the task comments.
Project and class information is in the Documaker document but not in a workspace INI file
Studio applies project and class information to the imported document if the flag to check converted files into the library is checked on.
No action required, but you can add the class and project to the library. To do so, choose Manage, System, Settings. Then under Options by Topic, choose Libraries. Expand the Library topic and click LibraryManager.
Add-In Studio Your response
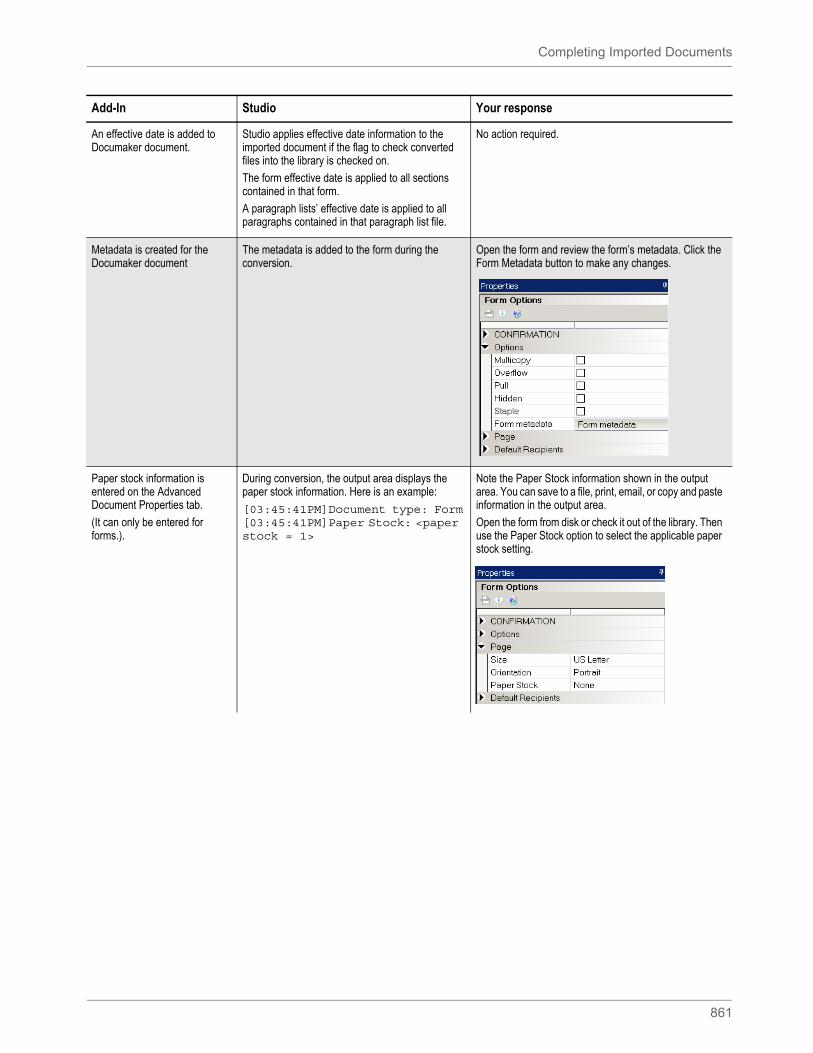
Completing Imported Documents
861
An effective date is added to Documaker document.
Studio applies effective date information to the imported document if the flag to check converted files into the library is checked on.
The form effective date is applied to all sections contained in that form.
A paragraph lists’ effective date is applied to all paragraphs contained in that paragraph list file.
No action required.
Metadata is created for the Documaker document
The metadata is added to the form during the conversion.
Open the form and review the form’s metadata. Click the Form Metadata button to make any changes.
Paper stock information is entered on the Advanced Document Properties tab.
(It can only be entered for forms.).
During conversion, the output area displays the paper stock information. Here is an example:
[03:45:41PM]Document type: Form[03:45:41PM]Paper Stock: <paper stock = 1>
Note the Paper Stock information shown in the output area. You can save to a file, print, email, or copy and paste information in the output area.
Open the form from disk or check it out of the library. Then use the Paper Stock option to select the applicable paper stock setting.
Add-In Studio Your response
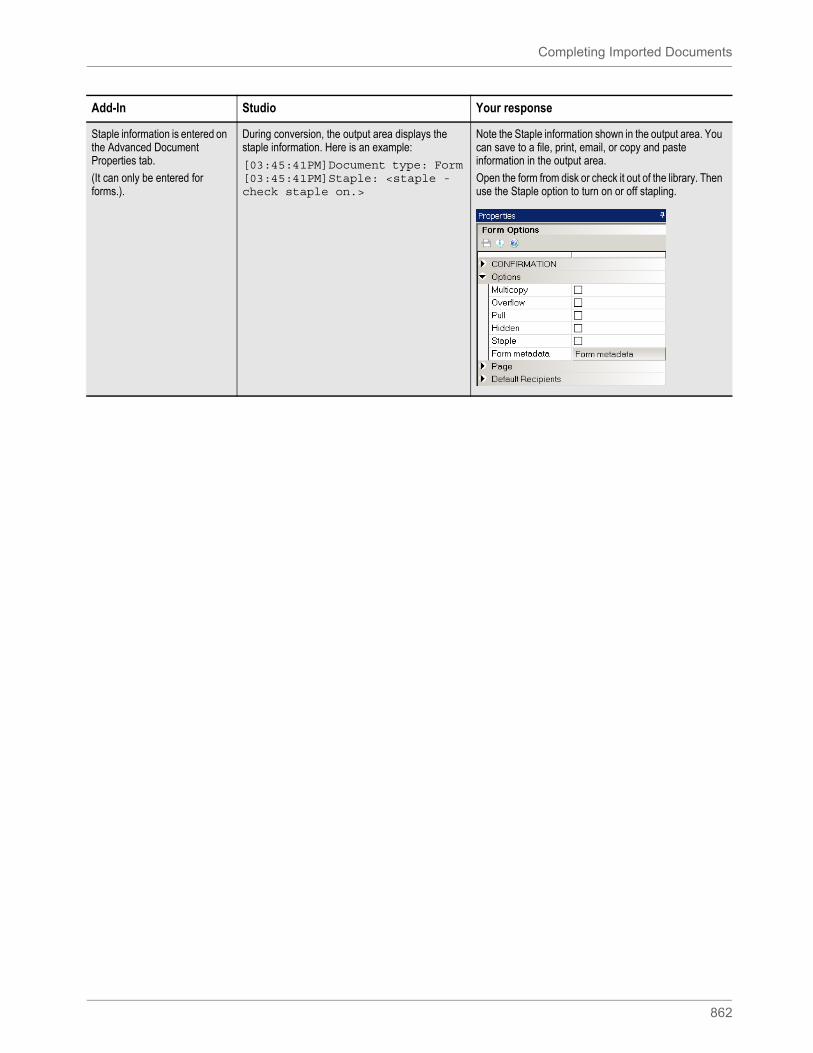
Completing Imported Documents
862
Staple information is entered on the Advanced Document Properties tab.
(It can only be entered for forms.).
During conversion, the output area displays the staple information. Here is an example:
[03:45:41PM]Document type: Form[03:45:41PM]Staple: <staple - check staple on.>
Note the Staple information shown in the output area. You can save to a file, print, email, or copy and paste information in the output area.
Open the form from disk or check it out of the library. Then use the Staple option to turn on or off stapling.
Add-In Studio Your response

Summary
863
SUMMARY
The Documaker Add-In for Word is a powerful complement to the Documaker suite to help empower business users to create documents in a fast and efficient manner. With the Add-In, users can operate in a familiar environment while leveraging the power of the Documaker publishing engine.
For more information please refer to the Documaker Add-in for Microsoft Word Online Help.
864
Appendix B
Studio skins: Overview
OVERVIEW Most options within Documaker Studio are used to create components of the Master Resource Library (MRL). Some components of the MRL, however, are built using text editors. Most components of a MRL are eventually used by the processing system, whether in a batch, a workstation, or combined batch and workstation environment.
Some components of a MRL apply to both a batch and entry environment, while others apply to one or the other. That means that, depending upon your processing environment, some of the tools may not be used in your environment.
Studio Skins: DMStudio, WSStudio, FPStudio
Documaker Studio releases 11.4 and higher include additional executables which can be used to start and use Documaker Studio with a specific personality or skin. These skins include:
• A Documaker Desktop version of Studio (wsstudio.exe)
• A version of Studio you can use to maintain Documerge EDL files (fpstudio.exe)
These skins hide functionary in some areas and add it in others. For example, there is no need for Metacode normalization in the Documaker Desktop version of Studio — Documaker Desktop does not support Documerge output — so this version hides those related field properties.
The following tables outline what is hidden and added in each of the two skins:
Workstation Studio (wsstudio.exe)
The Documaker Desktop version of Studio hides the following functionality:
• In Data Extract Dictionary
• XDD pane
• XDD buttons on field properties
Note .These skins do not remove every unnecessary option from the interface, but only the most visible ones.
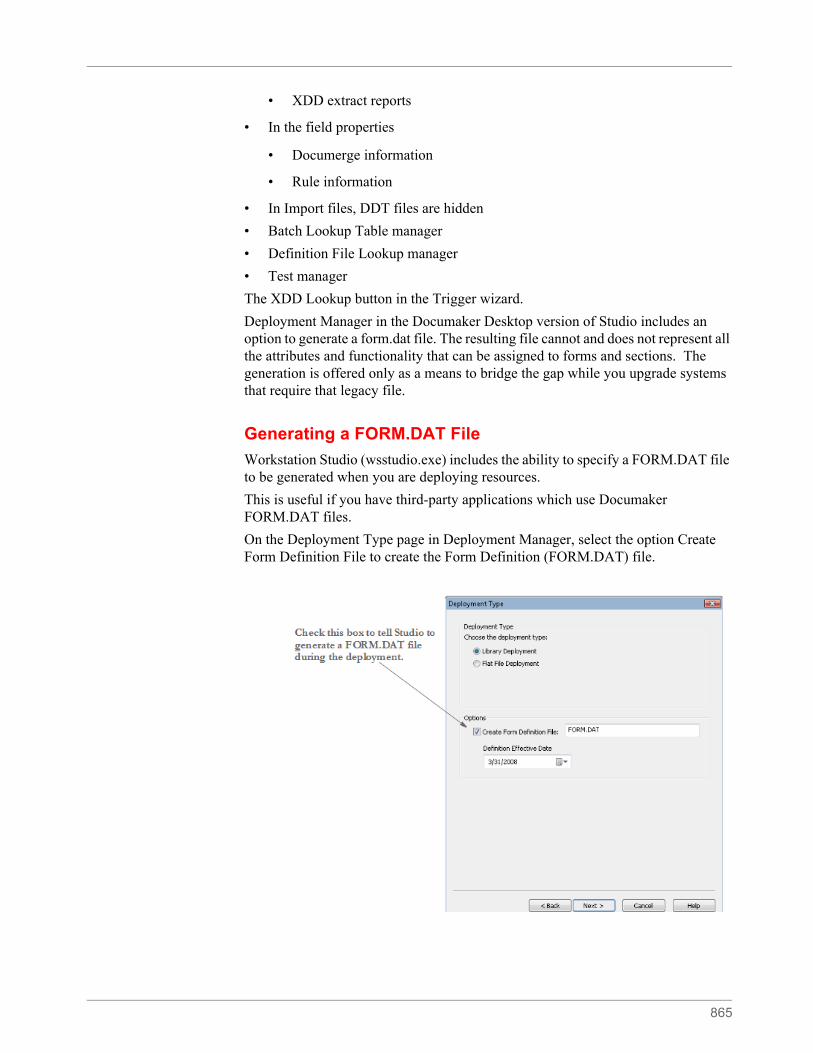
865
• XDD extract reports
• In the field properties
• Documerge information
• Rule information
• In Import files, DDT files are hidden
• Batch Lookup Table manager
• Definition File Lookup manager
• Test manager
The XDD Lookup button in the Trigger wizard.
Deployment Manager in the Documaker Desktop version of Studio includes an option to generate a form.dat file. The resulting file cannot and does not represent all the attributes and functionality that can be assigned to forms and sections. The generation is offered only as a means to bridge the gap while you upgrade systems that require that legacy file.
Generating a FORM.DAT File
Workstation Studio (wsstudio.exe) includes the ability to specify a FORM.DAT file to be generated when you are deploying resources.
This is useful if you have third-party applications which use Documaker FORM.DAT files.
On the Deployment Type page in Deployment Manager, select the option Create Form Definition File to create the Form Definition (FORM.DAT) file.

866
Deployment Type:
Library Deployment:
Choose this option to deploy the resources to a library. When Library Deployment and Create Form Definition File are both selected, the system displays the Definition Effective Date Field which allows you to specify the effective date to use for the FORM DAT file.
Flat-File Deployment
In a flat-file deployment, resources are extracted from your development library and copied as external files to the appropriate directory structure in the destination. The selection of the proper resources from the development library will depend upon the effective date that you specify.
Check the Flat-File deployment option if you choose to not to deploy a library and enter an effective date. You can use the effective date to filter resources on and after the date entered. Click the down arrow to display a calendar from which you can select the effective date you want to use. Press Esc key to remove the calendar.
Note The Create Form Definition File option allows Studio to create a compatible FORM.DAT file for the given effective date. The actual deployment is not configured to use the FORM.DAT file. The deployment will be set to run with Studio standard file types.
867
Documerge Studio (fpstudio.exe)
This version of Studio for Documerge hides the following functionality:
• In Data Extract Dictionary
• XDD pane
• XDD buttons on field properties
• XDD extract reports
• In the field properties
• Rule information
• Entry options
• Paragraph List manager
• Paragraph manager
• Paragraph assembly
• Date information
• Time information
• Bar code information
• The following attribute information:
• Scope
• Send copy to
• Required
• Text Area/MLE options
• Hidden
• No Print
• Underline
• Strikeout
• Locale
• In Section manager
• Bookmarks
• Charts
• Guides
• Indexes
• Notes
• Vectors
868
• Signature objects
• Links for all objects
• The Import Workspace files option skips DDT files
• Batch Lookup Table manager
• Entry Lookup Table manager
• Definition File Lookup manager
• Help Lookup Table manager
• Test manager
• Business Definition manager
• The Group Begin/End options in Form manager
• Trigger manager
• Form Lists manager
• Deployment manager
• The Report manager hides these reports:
• Application Definition
• Paragraph Selection List
• Form List
• Section Usage
• Trigger
869
Appendix C
Handling Overflow
Overflow is defined as the manner in which Documaker handles having multiple records of the same type, and the need to output information from each of the multiple records at print time.The use of overflow is based upon the assumption that there is usually a relationship between the data occurrence you want to map and the form and/or page segment (FAP file) occurrence where the fields are defined. Setting up for overflow involves both special triggering and special data mapping requirements.
Overflow printing can be any number of different print scenarios, for example:
• Overflow Scenario A: Customer A has 35 treatment records. The Medical History form needs three pages to completely print all the Treatment records for Customer A’s transaction. The first two pages have the Treatment record section (ex. ‘Medbody1’) repeated 15 times, but the third page only needs to reuse it 5 times. This would be Section overflow.
or
• Overflow Scenario B: Customer A has 35 treatment records. The Medical History form should only print 5 records per form page. Therefore, it will take 7 pages to print all of Customer A’s medical history. This would be Section overflow.
or
• Overflow Scenario C: You want the Medical History form itself to be produced every time it needs to overflow, or print, more than 5 records per page. In other words, records 1-5 print on the first Medical History form, then it prints the footer with a Page 1 on it. Then, Documaker prints another entire Medical History form, with records 6-10 on it, and then the footer with Page 1 on it again, and so on. This would be Form overflow.
or
• Overflow Scenario D: The Medbody1 section contains overflow fields. Every time this section is used, on any form, you want it to overflow as needed to print Treatment records. This would be Formset(Section) overflow.
The options for overflow allow a record count to be used to generate a set number of sections per page of one single form, or to trigger a repeat printing of an entire form (headers, footers and other non-overflow sections included) at a set record count.
Therefore the three types of overflow configuration are:
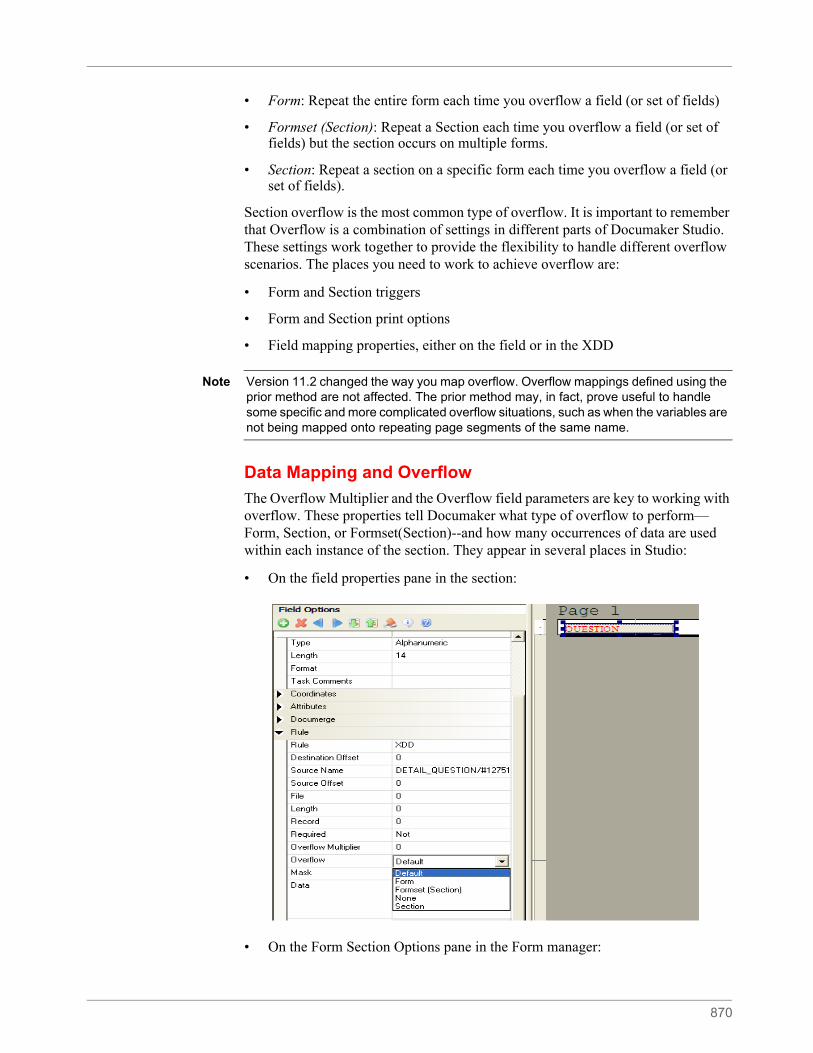
870
• Form: Repeat the entire form each time you overflow a field (or set of fields)
• Formset (Section): Repeat a Section each time you overflow a field (or set of fields) but the section occurs on multiple forms.
• Section: Repeat a section on a specific form each time you overflow a field (or set of fields).
Section overflow is the most common type of overflow. It is important to remember that Overflow is a combination of settings in different parts of Documaker Studio. These settings work together to provide the flexibility to handle different overflow scenarios. The places you need to work to achieve overflow are:
• Form and Section triggers
• Form and Section print options
• Field mapping properties, either on the field or in the XDD
Data Mapping and Overflow
The Overflow Multiplier and the Overflow field parameters are key to working with overflow. These properties tell Documaker what type of overflow to perform— Form, Section, or Formset(Section)--and how many occurrences of data are used within each instance of the section. They appear in several places in Studio:
• On the field properties pane in the section:
• On the Form Section Options pane in the Form manager:
Note Version 11.2 changed the way you map overflow. Overflow mappings defined using the prior method are not affected. The prior method may, in fact, prove useful to handle some specific and more complicated overflow situations, such as when the variables are not being mapped onto repeating page segments of the same name.
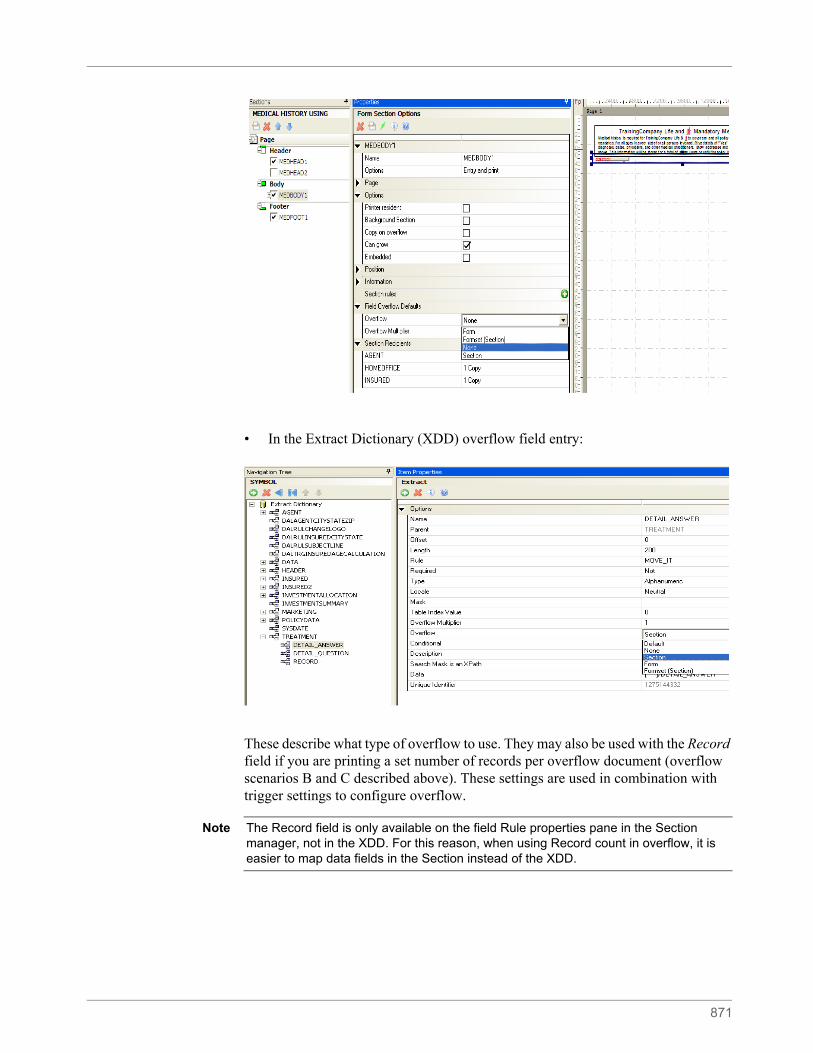
871
• In the Extract Dictionary (XDD) overflow field entry:
These describe what type of overflow to use. They may also be used with the Record field if you are printing a set number of records per overflow document (overflow scenarios B and C described above). These settings are used in combination with trigger settings to configure overflow.
Note The Record field is only available on the field Rule properties pane in the Section manager, not in the XDD. For this reason, when using Record count in overflow, it is easier to map data fields in the Section instead of the XDD.
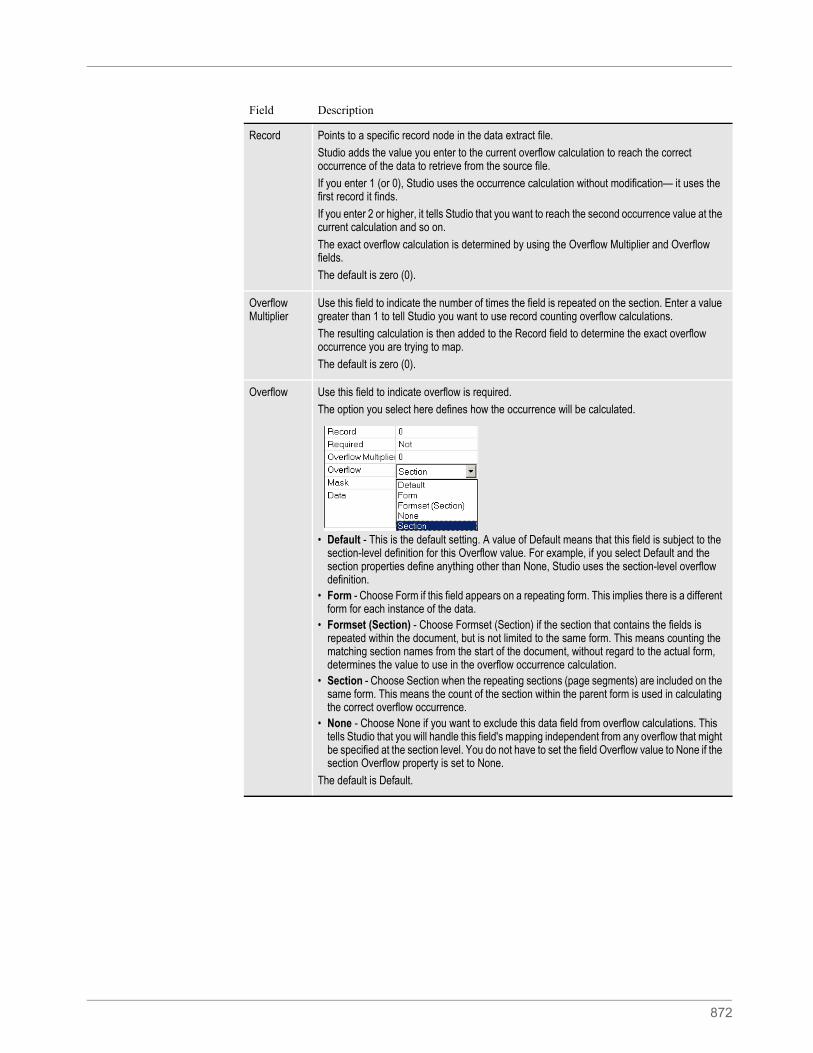
872
Field Description
Record Points to a specific record node in the data extract file.
Studio adds the value you enter to the current overflow calculation to reach the correct occurrence of the data to retrieve from the source file.
If you enter 1 (or 0), Studio uses the occurrence calculation without modification— it uses the first record it finds.
If you enter 2 or higher, it tells Studio that you want to reach the second occurrence value at the current calculation and so on.
The exact overflow calculation is determined by using the Overflow Multiplier and Overflow fields.
The default is zero (0).
Overflow Multiplier
Use this field to indicate the number of times the field is repeated on the section. Enter a value greater than 1 to tell Studio you want to use record counting overflow calculations.
The resulting calculation is then added to the Record field to determine the exact overflow occurrence you are trying to map.
The default is zero (0).
Overflow Use this field to indicate overflow is required.
The option you select here defines how the occurrence will be calculated.
• Default - This is the default setting. A value of Default means that this field is subject to the section-level definition for this Overflow value. For example, if you select Default and the section properties define anything other than None, Studio uses the section-level overflow definition.
• Form - Choose Form if this field appears on a repeating form. This implies there is a different form for each instance of the data.
• Formset (Section) - Choose Formset (Section) if the section that contains the fields is repeated within the document, but is not limited to the same form. This means counting the matching section names from the start of the document, without regard to the actual form, determines the value to use in the overflow occurrence calculation.
• Section - Choose Section when the repeating sections (page segments) are included on the same form. This means the count of the section within the parent form is used in calculating the correct overflow occurrence.
• None - Choose None if you want to exclude this data field from overflow calculations. This tells Studio that you will handle this field's mapping independent from any overflow that might be specified at the section level. You do not have to set the field Overflow value to None if the section Overflow property is set to None.
The default is Default.
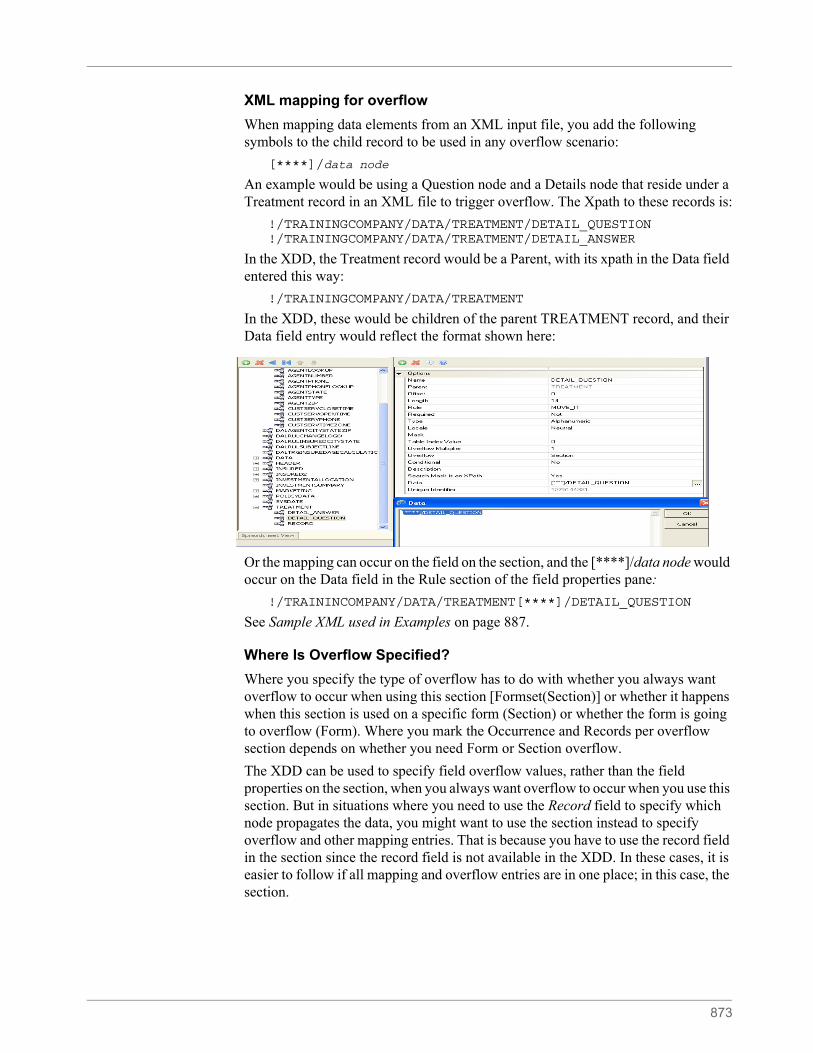
873
XML mapping for overflow
When mapping data elements from an XML input file, you add the following symbols to the child record to be used in any overflow scenario:
[****]/data node
An example would be using a Question node and a Details node that reside under a Treatment record in an XML file to trigger overflow. The Xpath to these records is:
!/TRAININGCOMPANY/DATA/TREATMENT/DETAIL_QUESTION!/TRAININGCOMPANY/DATA/TREATMENT/DETAIL_ANSWER
In the XDD, the Treatment record would be a Parent, with its xpath in the Data field entered this way:
!/TRAININGCOMPANY/DATA/TREATMENT
In the XDD, these would be children of the parent TREATMENT record, and their Data field entry would reflect the format shown here:
Or the mapping can occur on the field on the section, and the [****]/data node would occur on the Data field in the Rule section of the field properties pane:
!/TRAININCOMPANY/DATA/TREATMENT[****]/DETAIL_QUESTION
See Sample XML used in Examples on page 887.
Where Is Overflow Specified?
Where you specify the type of overflow has to do with whether you always want overflow to occur when using this section [Formset(Section)] or whether it happens when this section is used on a specific form (Section) or whether the form is going to overflow (Form). Where you mark the Occurrence and Records per overflow section depends on whether you need Form or Section overflow.
The XDD can be used to specify field overflow values, rather than the field properties on the section, when you always want overflow to occur when you use this section. But in situations where you need to use the Record field to specify which node propagates the data, you might want to use the section instead to specify overflow and other mapping entries. That is because you have to use the record field in the section since the record field is not available in the XDD. In these cases, it is easier to follow if all mapping and overflow entries are in one place; in this case, the section.
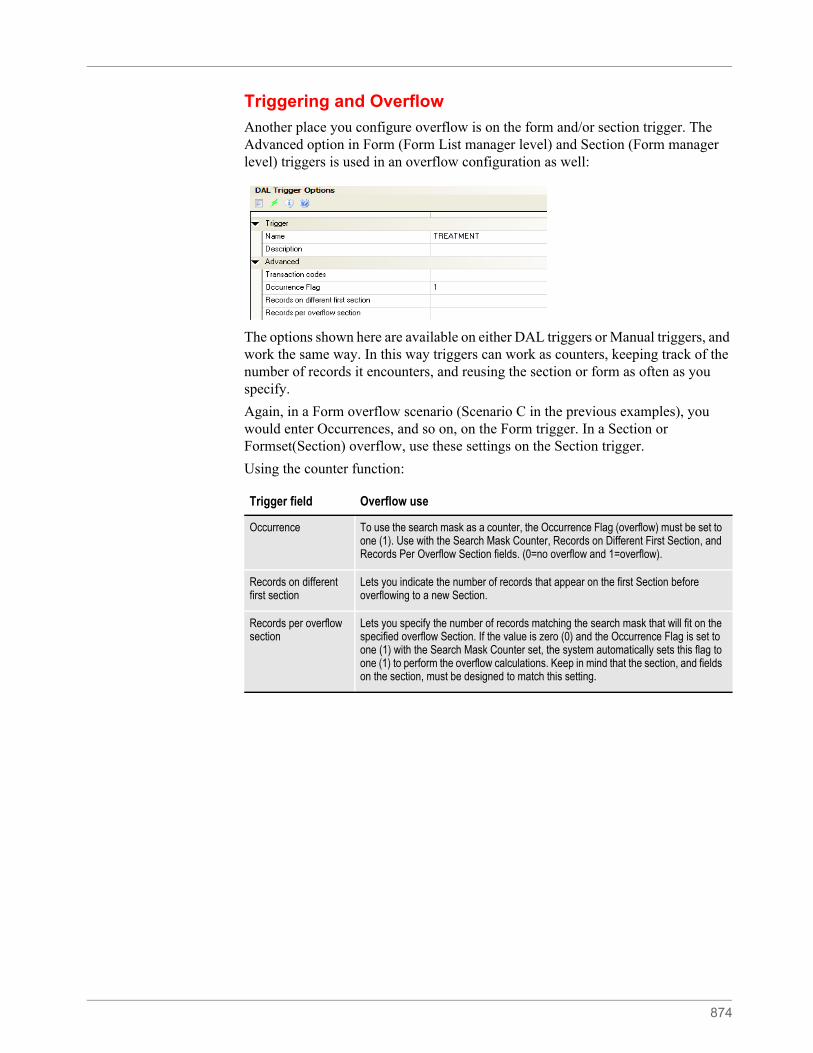
874
Triggering and Overflow
Another place you configure overflow is on the form and/or section trigger. The Advanced option in Form (Form List manager level) and Section (Form manager level) triggers is used in an overflow configuration as well:
The options shown here are available on either DAL triggers or Manual triggers, and work the same way. In this way triggers can work as counters, keeping track of the number of records it encounters, and reusing the section or form as often as you specify.
Again, in a Form overflow scenario (Scenario C in the previous examples), you would enter Occurrences, and so on, on the Form trigger. In a Section or Formset(Section) overflow, use these settings on the Section trigger.
Using the counter function:
Trigger field Overflow use
Occurrence To use the search mask as a counter, the Occurrence Flag (overflow) must be set to one (1). Use with the Search Mask Counter, Records on Different First Section, and Records Per Overflow Section fields. (0=no overflow and 1=overflow).
Records on different first section
Lets you indicate the number of records that appear on the first Section before overflowing to a new Section.
Records per overflow section
Lets you specify the number of records matching the search mask that will fit on the specified overflow Section. If the value is zero (0) and the Occurrence Flag is set to one (1) with the Search Mask Counter set, the system automatically sets this flag to one (1) to perform the overflow calculations. Keep in mind that the section, and fields on the section, must be designed to match this setting.
875
Section overflow example
In this example of section-level overflow, Field_xxx_1 repeats on Section_1.
User Functions
In addition, you can use these user functions:
If you are using XML extract files, you can use these user functions to set up incrementers at the form and section level. Otherwise, Studio handles the use of these functions for you when you enter overflow information on the properties window.
You can assign these user functions to fields. There are additional options when assigning them to fields:
In the Form manager, you can assign overflow at the section level. The three user functions and the None option are available to the section. Any function set for a section will be used on all overflow fields that are set to Default.
Form 1, Page 1Form 1, Page 1
First occurrence
Second occurrence
Third occurrence
Image 1Field_xxxx_1
Field Value
Record 1
Overflow Section
Overflow Multiplier 1Section 1Field_xxxx_1
Section 1Field_xxxx_1
Section 1Field_xxxx_1
Function Description
GetImage Use this function to return the image’s sequence number of like named sections within the current form. For compatibility with the field rule record functionality, all counts are zero (0) based.
GetForm Use this function to return the form’s sequence number of like named forms within the form set.
GetFormSetImage Use this function to return the section’s sequence number of like named sections within the form set.
Note These functions correspond to the options you can choose for the Overflow field: Section, Form, Formset(Section).
Option Description
None Choose None to indicate the field does not use overflow.
Default Choose Default to use overflow assigned at the section level.
876
Keep in mind that the value for @GetImage, @GetForm, and @GetFormSet, is not the section or form sequence number, but the section or form sequence number for sections or forms with the same name. For example, if you have a form set with these forms:
These values are returned when using the @GetImage (“Image”), @GetFormsetImage (“Formset(Image)”) and @GetForm:
Form [001]
Section_a
Section_b
Section_a
Section_c
Section_a
Form [002]
Section_a
Section_b
Section_a
Section_c
Section_a
Form [001]
Section_a
Section_b
Section_a
Section_c
Section_a
Form Section GetImage GetFormsetImage GetForm
001
a 1 1 1
b 1 1 1
a 2 2 1
c 1 1 1
a 3 3 1
002
a 1 4 1
b 1 2 1
a 2 5 1
c 1 2 1
a 3 6 1
001
a 1 7 2
b 1 3 2
a 2 8 2
c 1 3 2
877
The RunTriggers rule evaluates the form trigger, if the form is triggered. The rule then triggers each of the section triggers before it evaluates the next form trigger. This lets you do regressive form triggers from the section level.
These examples show the rule data entry for an XML file:
!/status/summary/staff[**@GETIMAGE**]/inProcess
This returns the inProcess data element for the X occurrence of the staff section where X is equal to the section’s sequence number in the form (zero based) plus the field rule record count.
!/status/summary/staff[**@GETFORMSETIMAGE**]/assigned
This returns the assigned data element for the X occurrence of the staff section where X is equal to the section’s sequence number in the form set (zero based) plus the field rule record count.
!/status/summary/staff[**@GETFORM**]/onHold
This returns the onHold data element for the X occurrence of the staff section where X is equal to the form’s sequence number (zero based) plus the field rule record count.
!/status/summary[**GETFORM**]/staff[**@GETIMAGE**]/closed
This returns the closed data element for the X occurrence of the summary section where X is equal to the form’s sequence number (zero based) plus the field rule record count and the Y occurrence of the staff section where Y is equal to the section is equal to the section’s sequence number in the form (zero based) plus the field rule record count.
Legacy Overflow Variables
With Studio, overflow variables that require only a single increment per use are created for you. You no longer have to declare an overflow variable for your form sets in the AFGJOB.JDT file.
For example, you no longer need to enter these lines from your AFGJOB.JDT file:
;SetOvFlwSym;1;DATI0OVF,QDATI0,1;;SetOvFlwSym;1;MNUM1OVF,QMVNUM,4;;SetOvFlwSym;1;AGDTDATAOVF,QAGDTD,1;;SetOvFlwSym;1;CGDECBDOVF,QCGDCB,1;
Each of these lines declares a simple overflow variable with a single increment step. When using Studio, these variables are automatically created if you omit them from the AFGJOB.JDT file.
The system creates single increment overflow symbols regardless of whether you are using the legacy or Studio model.
a 3 9 2
Form Section GetImage GetFormsetImage GetForm
878
If all of your overflow situations can be handled using this overflow methodology, you may no longer need the InitOvFlw and ResetOvFlw rules from the AFGJOB.JDT file. These rules are only necessary if you have an overflow situation that uses the legacy method of handling overflow -- not the method described in this topic. For instance, even if you are only using the legacy method in one scenario, you must still include the SetOvFlwSym, InitOvFlw, and ResetOvFlw rules in your AFGJOB.JDT file.
Example1: Configure section overflow for Medical History form, overflow multiplier = 1
We want to set up the Medical History form to repeat the Medbody1 section (the treatment questions and answer records) as many times as needed until they are all printed. Remember we are using another header (Medhead2) for pages 2-end of the form if it flows to more than one page. (See Example Form on page 35).
Step A:Set up the data fields to overflow
• We already have our XDD configured with our data mapping, so we can specify field overflow there as well. Open the Symbol.XDD file from the library.
• Under the parent Treatment record, click the DETAIL_QUESTION record. Mark the Overflow Multiplier to 1 and the Overflow field to Section.
• Repeat for the DETAIL_ANSWER field that also appears on the Medbody1 section.
• Save your XDD and check it back into the library.
Step B:Set up section trigger for overflow
• Check the Medical History form out of the library in the Form manager.
• Click the Medbody1 section on the page pane.This is our overflow section that contains the Treatment records that are our overflow fields:
Note You may also no longer need the IncOvSym section-level rule.
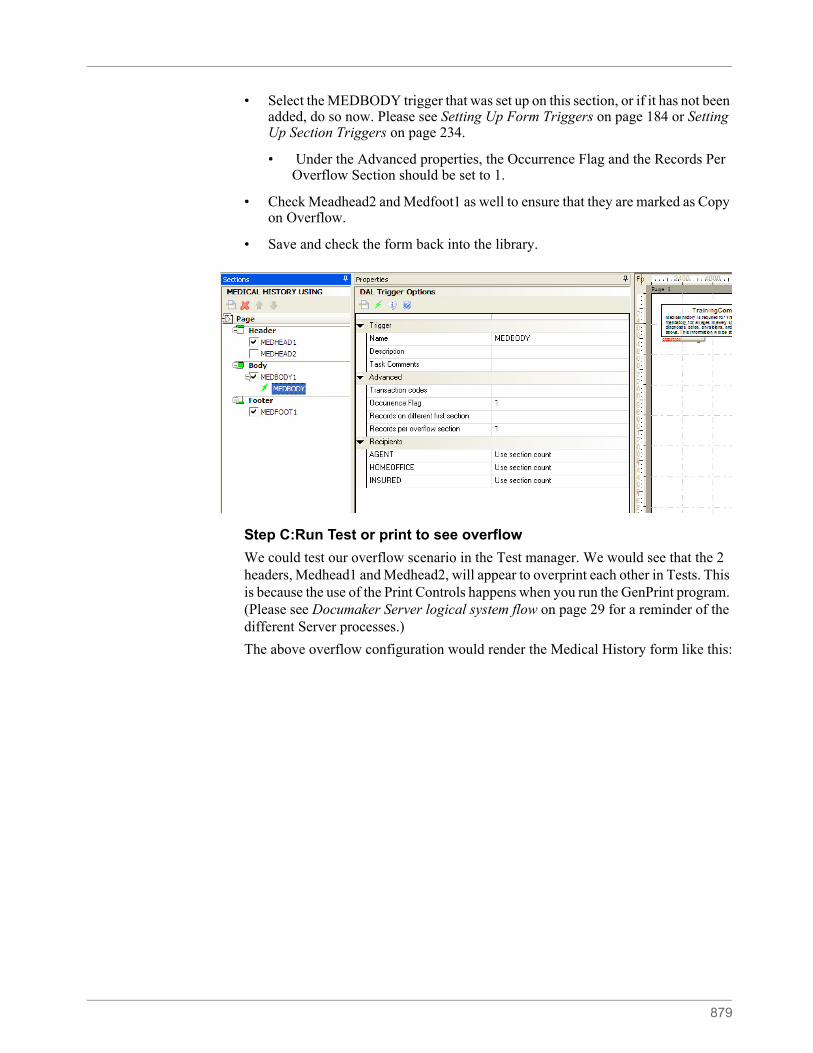
879
• Select the MEDBODY trigger that was set up on this section, or if it has not been added, do so now. Please see Setting Up Form Triggers on page 184 or Setting Up Section Triggers on page 234.
• Under the Advanced properties, the Occurrence Flag and the Records Per Overflow Section should be set to 1.
• Check Meadhead2 and Medfoot1 as well to ensure that they are marked as Copy on Overflow.
• Save and check the form back into the library.
Step C:Run Test or print to see overflow
We could test our overflow scenario in the Test manager. We would see that the 2 headers, Medhead1 and Medhead2, will appear to overprint each other in Tests. This is because the use of the Print Controls happens when you run the GenPrint program. (Please see Documaker Server logical system flow on page 29 for a reminder of the different Server processes.)
The above overflow configuration would render the Medical History form like this:
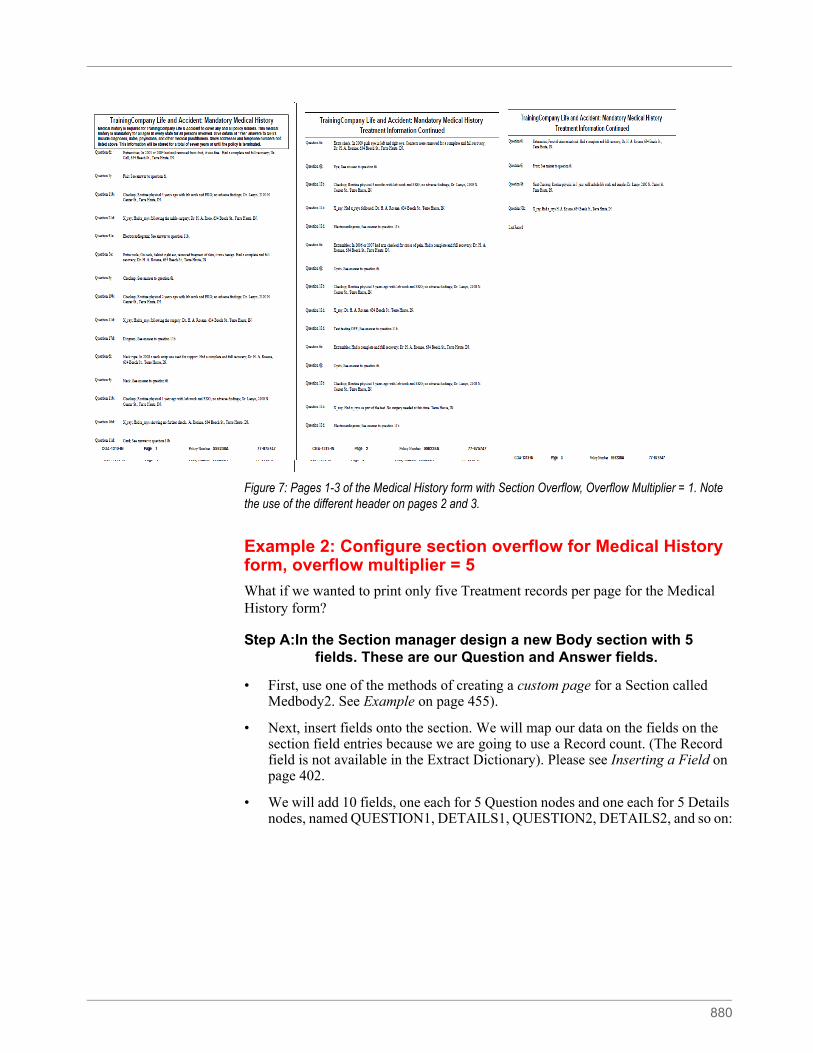
880
Figure 7: Pages 1-3 of the Medical History form with Section Overflow, Overflow Multiplier = 1. Note the use of the different header on pages 2 and 3.
Example 2: Configure section overflow for Medical History form, overflow multiplier = 5
What if we wanted to print only five Treatment records per page for the Medical History form?
Step A:In the Section manager design a new Body section with 5 fields. These are our Question and Answer fields.
• First, use one of the methods of creating a custom page for a Section called Medbody2. See Example on page 455).
• Next, insert fields onto the section. We will map our data on the fields on the section field entries because we are going to use a Record count. (The Record field is not available in the Extract Dictionary). Please see Inserting a Field on page 402.
• We will add 10 fields, one each for 5 Question nodes and one each for 5 Details nodes, named QUESTION1, DETAILS1, QUESTION2, DETAILS2, and so on:

881
Just as we did with Medbody1, we will put the DETAILS fields in a text area for shrink and grow capabilities.
Step B:Add data mapping on the section fields
• Add data mapping on each field on the section.
• Each field could use the Move_It rule in the Rule field to move data over with no formatting needed.
• Question fields have a length of 14, Details fields are a max length of 200.
• The Data field will have the mapping. Remember the [****]/is used in overflow data mapping with XML:
• Each field must be mapped to the correct Record count. So Question1 and Details1 fields will have the Record set to 1. Question2 and Details2 would have the Record set to 2, and so on. This tells the overflow function to count the nodes in the data and assign the occurrence number accordingly.
Step C:Enter the overflow settings on the fields:
• How many records per overflow occurrence? We want 5 records per section. So our Overflow field needs to be set to Section, and our Overflow Multiplier needs to be set to 5, on each field on the Medbody2 section.
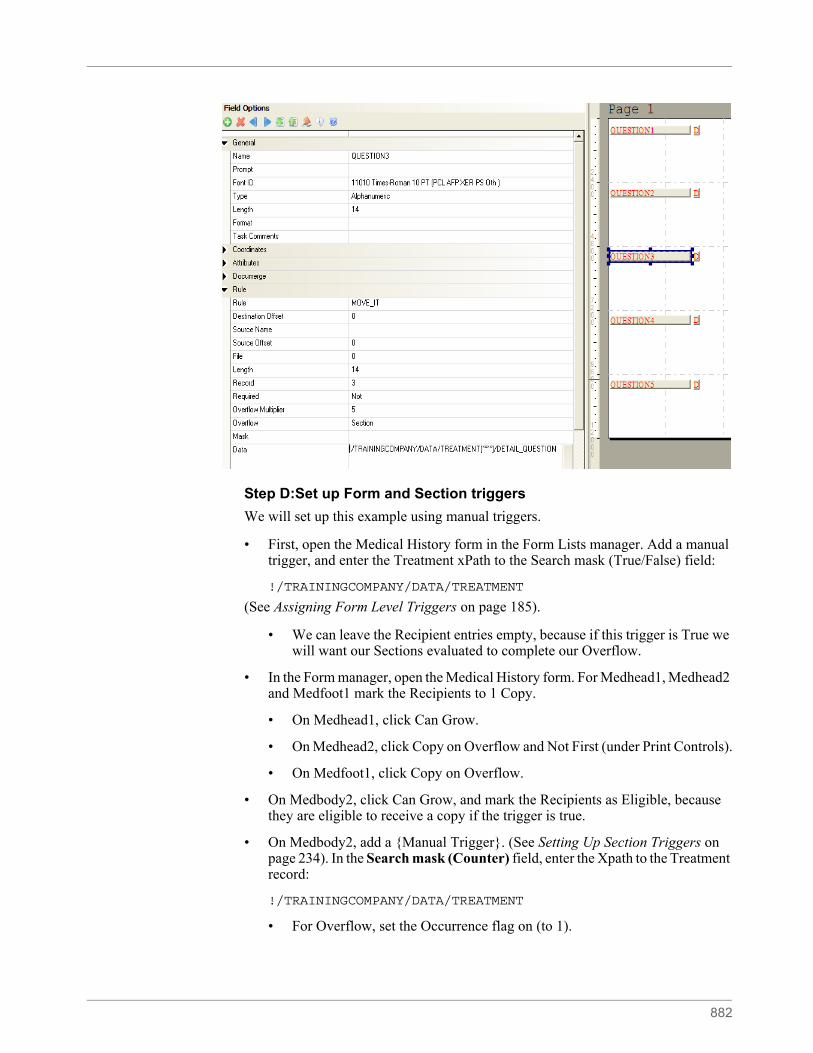
882
Step D:Set up Form and Section triggers
We will set up this example using manual triggers.
• First, open the Medical History form in the Form Lists manager. Add a manual trigger, and enter the Treatment xPath to the Search mask (True/False) field:
!/TRAININGCOMPANY/DATA/TREATMENT
(See Assigning Form Level Triggers on page 185).
• We can leave the Recipient entries empty, because if this trigger is True we will want our Sections evaluated to complete our Overflow.
• In the Form manager, open the Medical History form. For Medhead1, Medhead2 and Medfoot1 mark the Recipients to 1 Copy.
• On Medhead1, click Can Grow.
• On Medhead2, click Copy on Overflow and Not First (under Print Controls).
• On Medfoot1, click Copy on Overflow.
• On Medbody2, click Can Grow, and mark the Recipients as Eligible, because they are eligible to receive a copy if the trigger is true.
• On Medbody2, add a {Manual Trigger}. (See Setting Up Section Triggers on page 234). In the Search mask (Counter) field, enter the Xpath to the Treatment record:
!/TRAININGCOMPANY/DATA/TREATMENT
• For Overflow, set the Occurrence flag on (to 1).
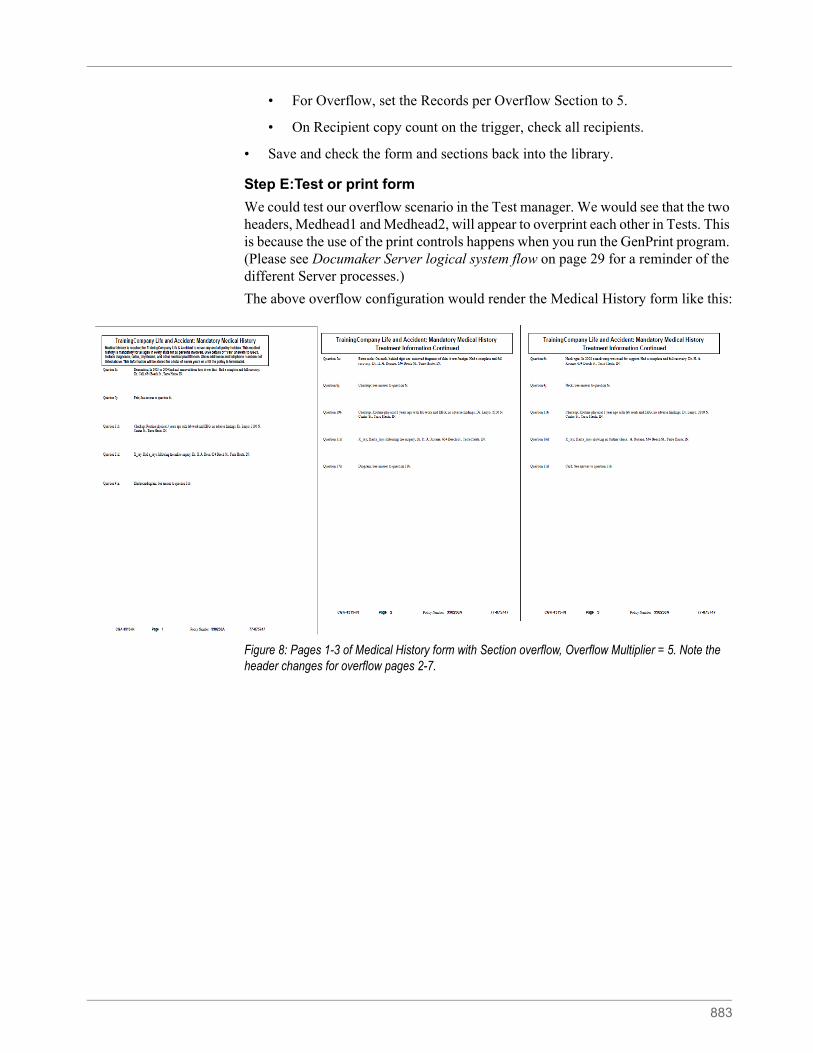
883
• For Overflow, set the Records per Overflow Section to 5.
• On Recipient copy count on the trigger, check all recipients.
• Save and check the form and sections back into the library.
Step E:Test or print form
We could test our overflow scenario in the Test manager. We would see that the two headers, Medhead1 and Medhead2, will appear to overprint each other in Tests. This is because the use of the print controls happens when you run the GenPrint program. (Please see Documaker Server logical system flow on page 29 for a reminder of the different Server processes.)
The above overflow configuration would render the Medical History form like this:
Figure 8: Pages 1-3 of Medical History form with Section overflow, Overflow Multiplier = 5. Note the header changes for overflow pages 2-7.
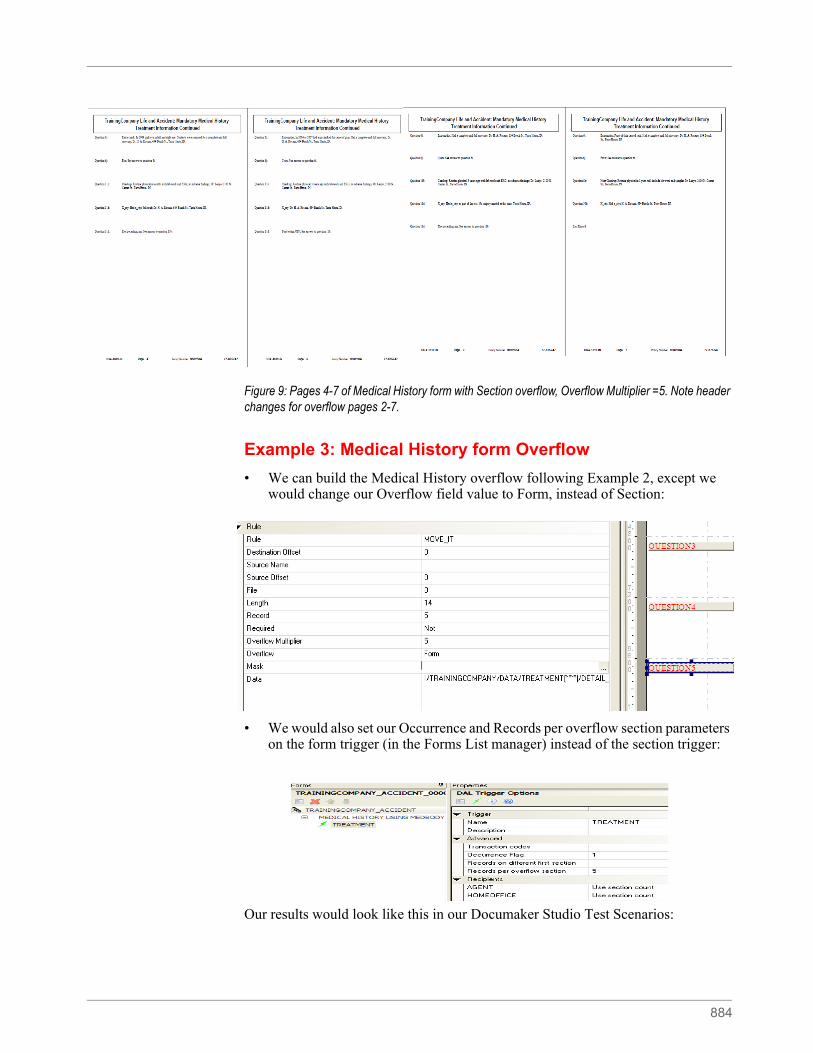
884
Figure 9: Pages 4-7 of Medical History form with Section overflow, Overflow Multiplier =5. Note header changes for overflow pages 2-7.
Example 3: Medical History form Overflow
• We can build the Medical History overflow following Example 2, except we would change our Overflow field value to Form, instead of Section:
• We would also set our Occurrence and Records per overflow section parameters on the form trigger (in the Forms List manager) instead of the section trigger:
Our results would look like this in our Documaker Studio Test Scenarios:
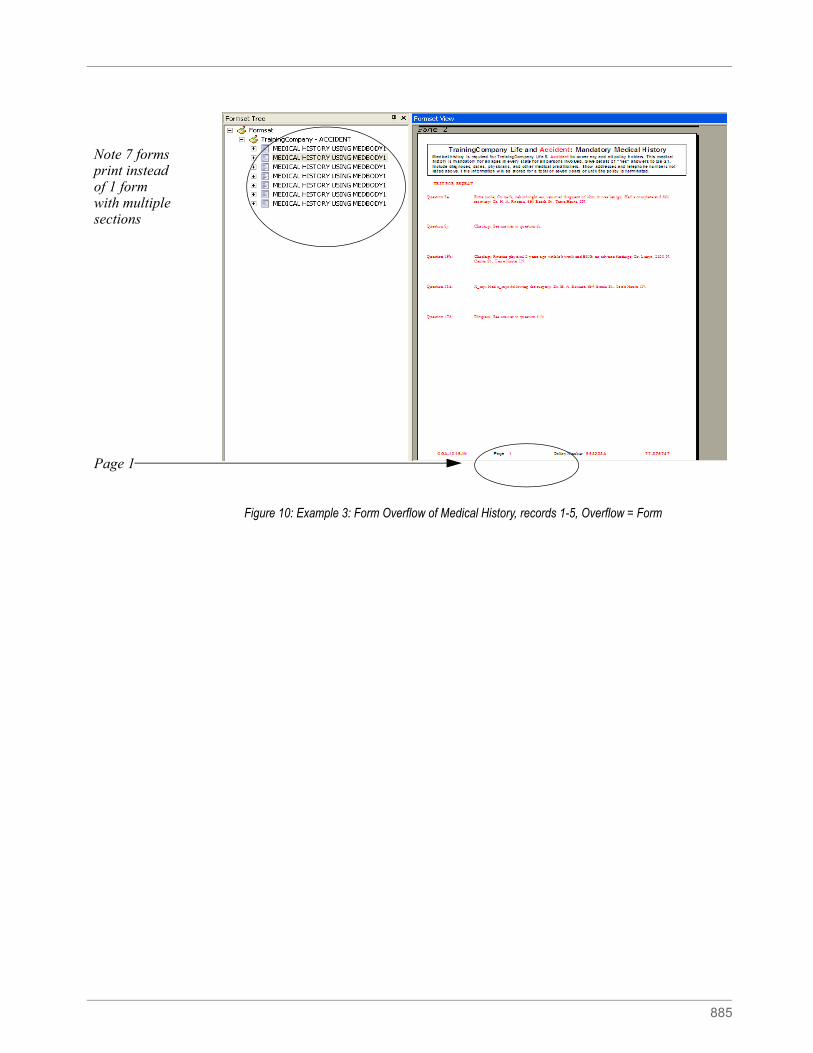
885
Figure 10: Example 3: Form Overflow of Medical History, records 1-5, Overflow = Form
Note 7 formsprint instead of 1 form with multiple sections
Page 1
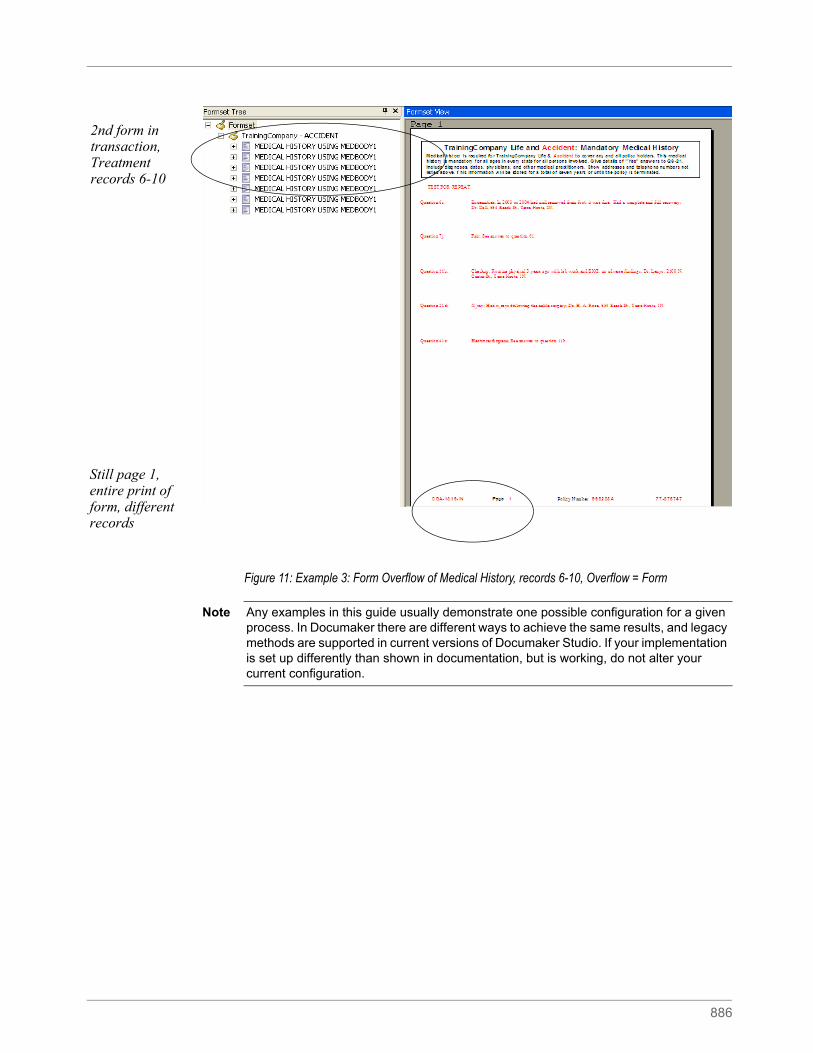
886
Figure 11: Example 3: Form Overflow of Medical History, records 6-10, Overflow = Form
2nd form in transaction, Treatment records 6-10
Still page 1, entire print of form, different records
Note Any examples in this guide usually demonstrate one possible configuration for a given process. In Documaker there are different ways to achieve the same results, and legacy methods are supported in current versions of Documaker Studio. If your implementation is set up differently than shown in documentation, but is working, do not alter your current configuration.
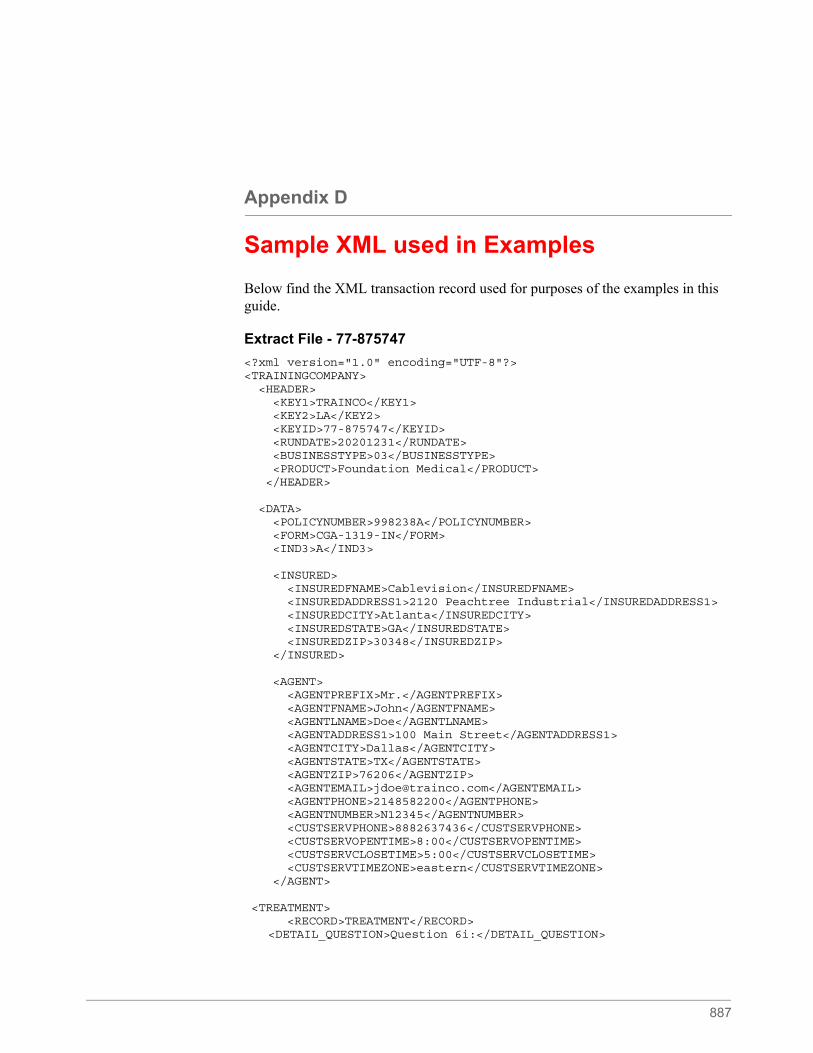
887
Appendix D
Sample XML used in Examples
Below find the XML transaction record used for purposes of the examples in this guide.
Extract File - 77-875747
<?xml version="1.0" encoding="UTF-8"?><TRAININGCOMPANY> <HEADER> <KEY1>TRAINCO</KEY1> <KEY2>LA</KEY2> <KEYID>77-875747</KEYID> <RUNDATE>20201231</RUNDATE> <BUSINESSTYPE>03</BUSINESSTYPE> <PRODUCT>Foundation Medical</PRODUCT> </HEADER>
<DATA> <POLICYNUMBER>998238A</POLICYNUMBER> <FORM>CGA-1319-IN</FORM> <IND3>A</IND3>
<INSURED> <INSUREDFNAME>Cablevision</INSUREDFNAME> <INSUREDADDRESS1>2120 Peachtree Industrial</INSUREDADDRESS1> <INSUREDCITY>Atlanta</INSUREDCITY> <INSUREDSTATE>GA</INSUREDSTATE> <INSUREDZIP>30348</INSUREDZIP> </INSURED> <AGENT> <AGENTPREFIX>Mr.</AGENTPREFIX> <AGENTFNAME>John</AGENTFNAME> <AGENTLNAME>Doe</AGENTLNAME> <AGENTADDRESS1>100 Main Street</AGENTADDRESS1> <AGENTCITY>Dallas</AGENTCITY> <AGENTSTATE>TX</AGENTSTATE> <AGENTZIP>76206</AGENTZIP> <AGENTEMAIL>[email protected]</AGENTEMAIL> <AGENTPHONE>2148582200</AGENTPHONE> <AGENTNUMBER>N12345</AGENTNUMBER> <CUSTSERVPHONE>8882637436</CUSTSERVPHONE> <CUSTSERVOPENTIME>8:00</CUSTSERVOPENTIME> <CUSTSERVCLOSETIME>5:00</CUSTSERVCLOSETIME> <CUSTSERVTIMEZONE>eastern</CUSTSERVTIMEZONE> </AGENT>
<TREATMENT> <RECORD>TREATMENT</RECORD>
<DETAIL_QUESTION>Question 6i:</DETAIL_QUESTION>
888
<DETAIL_ANSWER>Extremities; In 2003 or 2004 had nail removed from foot, it was fine. Had a complete and full recovery; Dr. Call, 634 Beech St., Terre Haute, IN.</DETAIL_ANSWER> </TREATMENT> <TREATMENT> <RECORD>TREATMENT</RECORD>
<DETAIL_QUESTION>Question 7j:</DETAIL_QUESTION><DETAIL_ANSWER>Fair; See answer to question 6i.</DETAIL_ANSWER>
</TREATMENT> <TREATMENT> <RECORD>TREATMENT</RECORD>
<DETAIL_QUESTION>Question 11b:</DETAIL_QUESTION><DETAIL_ANSWER>Checkup; Routine physical 3 years ago with lab work
and EKG; no adverse findings; Dr. Lenyo, 2100 N. Center St., Terre Haute, IN.</DETAIL_ANSWER> </TREATMENT> <TREATMENT> <RECORD>TREATMENT</RECORD>
<DETAIL_QUESTION>Question 21d:</DETAIL_QUESTION><DETAIL_ANSWER>X_ray; Had x_rays following the ankle surgery; Dr.
H. A. Rose, 634 Beech St., Terre Haute, IN.</DETAIL_ANSWER> </TREATMENT> <TREATMENT> <RECORD>TREATMENT</RECORD> <DETAIL_QUESTION>Question 41z:</DETAIL_QUESTION>
<DETAIL_ANSWER>Electrocardiogram; See answer to question 11b.</DETAIL_ANSWER> </TREATMENT> <TREATMENT> <RECORD>TREATMENT</RECORD> <DETAIL_QUESTION>Question 5e:</DETAIL_QUESTION>
<DETAIL_ANSWER>Extra mole; On neck, behind right ear, removed fragment of skin, it was benign. Had a complete and full recovery; Dr. H. A. Rosane, 634 Beech St., Terre Haute, IN.</DETAIL_ANSWER> </TREATMENT> <TREATMENT> <RECORD>TREATMENT</RECORD> <DETAIL_QUESTION>Question 8j:</DETAIL_QUESTION>
<DETAIL_ANSWER>Checkup; See answer to question 6i.</DETAIL_ANSWER> </TREATMENT> <TREATMENT> <RECORD>TREATMENT</RECORD>
<DETAIL_QUESTION>Question 19b:</DETAIL_QUESTION><DETAIL_ANSWER>Checkup; Routine physical 2 years ago with lab work
and EKG; no adverse findings; Dr. Lenyo, 2100 N. Center St., Terre Haute, IN.</DETAIL_ANSWER> </TREATMENT> <TREATMENT> <RECORD>TREATMENT</RECORD> <DETAIL_QUESTION>Question 11d:</DETAIL_QUESTION>
<DETAIL_ANSWER>X_ray; Had x_rays following the surgery; Dr. H. A. Rosane, 634 Beech St., Terre Haute, IN.</DETAIL_ANSWER> </TREATMENT> <TREATMENT> <RECORD>TREATMENT</RECORD> <DETAIL_QUESTION>Question 17d:</DETAIL_QUESTION>
<DETAIL_ANSWER>Diogram; See answer to question 11b.</DETAIL_ANSWER> </TREATMENT> <TREATMENT> <RECORD>TREATMENT</RECORD> <DETAIL_QUESTION>Question 6i:</DETAIL_QUESTION>
889
<DETAIL_ANSWER>Neck type; In 2008 a neck wrap was used for support. Had a complete and full recovery; Dr. H. A. Rosane, 634 Beech St., Terre Haute, IN.</DETAIL_ANSWER> </TREATMENT> <TREATMENT> <RECORD>TREATMENT</RECORD> <DETAIL_QUESTION>Question 4j:</DETAIL_QUESTION>
<DETAIL_ANSWER>Neck; See answer to question 6i.</DETAIL_ANSWER> </TREATMENT> <TREATMENT> <RECORD>TREATMENT</RECORD> <DETAIL_QUESTION>Question 11b:</DETAIL_QUESTION>
<DETAIL_ANSWER>Checkup; Routine physical 1 year ago with lab work and EKG; no adverse findings; Dr. Lenyo, 2100 N. Center St., Terre Haute, IN.</DETAIL_ANSWER> </TREATMENT> <TREATMENT> <RECORD>TREATMENT</RECORD> <DETAIL_QUESTION>Question 16d:</DETAIL_QUESTION>
<DETAIL_ANSWER>X_ray; Had x_rays showing no further check. A. Rosane, 634 Beech St., Terre Haute, IN.</DETAIL_ANSWER> </TREATMENT> <TREATMENT> <RECORD>TREATMENT</RECORD> <DETAIL_QUESTION>Question 11d:</DETAIL_QUESTION>
<DETAIL_ANSWER>Card; See answer to question 11b.</DETAIL_ANSWER> </TREATMENT> <TREATMENT> <RECORD>TREATMENT</RECORD> <DETAIL_QUESTION>Question 6i:</DETAIL_QUESTION>
<DETAIL_ANSWER>Extra check; In 2009 pink eye in left and right eye. Contacts were removed for a complete and full recovery; Dr. H. A. Rosane, 634 Beech St., Terre Haute, IN.</DETAIL_ANSWER> </TREATMENT> <TREATMENT> <RECORD>TREATMENT</RECORD> <DETAIL_QUESTION>Question 6j:</DETAIL_QUESTION>
<DETAIL_ANSWER>Eye; See answer to question 6i.</DETAIL_ANSWER> </TREATMENT> <TREATMENT> <RECORD>TREATMENT</RECORD> <DETAIL_QUESTION>Question 11b:</DETAIL_QUESTION>
<DETAIL_ANSWER>Checkup; Routine physical 6 months with lab work and EKG; no adverse findings; Dr. Lenyo, 2100 N. Center St., Terre Haute, IN.</DETAIL_ANSWER> </TREATMENT> <TREATMENT> <RECORD>TREATMENT</RECORD> <DETAIL_QUESTION>Question 11d:</DETAIL_QUESTION>
<DETAIL_ANSWER>X_ray; Had x_rays followed; Dr. H. A. Rosane, 634 Beech St., Terre Haute, IN.</DETAIL_ANSWER> </TREATMENT> <TREATMENT> <RECORD>TREATMENT</RECORD> <DETAIL_QUESTION>Question 11d:</DETAIL_QUESTION>
<DETAIL_ANSWER>Electrocardiogram; See answer to question 11b.</DETAIL_ANSWER> </TREATMENT> <TREATMENT> <RECORD>TREATMENT</RECORD> <DETAIL_QUESTION>Question 6i:</DETAIL_QUESTION>
<DETAIL_ANSWER>Extremities; In 2006 or 2007 had arm checked for cause of pain. Had a complete and full recovery; Dr. H. A. Rosane, 634 Beech St., Terre Haute, IN.</DETAIL_ANSWER>
890
</TREATMENT> <TREATMENT> <RECORD>TREATMENT</RECORD> <DETAIL_QUESTION>Question 6j:</DETAIL_QUESTION>
<DETAIL_ANSWER>Cysts; See answer to question 6i.</DETAIL_ANSWER> </TREATMENT> <TREATMENT> <RECORD>TREATMENT</RECORD> <DETAIL_QUESTION>Question 11b:</DETAIL_QUESTION>
<DETAIL_ANSWER>Checkup; Routine physical 3 years ago with lab work and EKG; no adverse findings; Dr. Lenyo, 2100 N. Center St., Terre Haute, IN.</DETAIL_ANSWER> </TREATMENT> <TREATMENT> <RECORD>TREATMENT</RECORD> <DETAIL_QUESTION>Question 11d:</DETAIL_QUESTION>
<DETAIL_ANSWER>X_ray; Dr. H. A. Rosane, 634 Beech St., Terre Haute, IN.</DETAIL_ANSWER> </TREATMENT> <TREATMENT> <RECORD>TREATMENT</RECORD> <DETAIL_QUESTION>Question 11d:</DETAIL_QUESTION>
<DETAIL_ANSWER>Text testing OFF; See answer to question 11b.</DETAIL_ANSWER> </TREATMENT> <TREATMENT> <RECORD>TREATMENT</RECORD> <DETAIL_QUESTION>Question 6i:</DETAIL_QUESTION>
<DETAIL_ANSWER>Extremities; Had a complete and full recovery; Dr. H. A. Rosane, 634 Beech St., Terre Haute, IN.</DETAIL_ANSWER> </TREATMENT> <TREATMENT> <RECORD>TREATMENT</RECORD> <DETAIL_QUESTION>Question 6j:</DETAIL_QUESTION>
<DETAIL_ANSWER>Cysts; See answer to question 6i.</DETAIL_ANSWER> </TREATMENT> <TREATMENT> <RECORD>TREATMENT</RECORD> <DETAIL_QUESTION>Question 11b:</DETAIL_QUESTION>
<DETAIL_ANSWER>Checkup; Routine physical 3 years ago with lab work and EKG; no adverse findings; Dr. Lenyo, 2100 N. Center St., Terre Haute, IN.</DETAIL_ANSWER> </TREATMENT> <TREATMENT> <RECORD>TREATMENT</RECORD> <DETAIL_QUESTION>Question 11d:</DETAIL_QUESTION>
<DETAIL_ANSWER>X_ray; Had x_rays as part of the test. No surgery needed at this time. Terre Haute, IN.</DETAIL_ANSWER> </TREATMENT> <TREATMENT> <RECORD>TREATMENT</RECORD> <DETAIL_QUESTION>Question 11d:</DETAIL_QUESTION>
<DETAIL_ANSWER>Electrocardiogram; See answer to question 11b.</DETAIL_ANSWER> </TREATMENT> <TREATMENT> <RECORD>TREATMENT</RECORD> <DETAIL_QUESTION>Question 6i:</DETAIL_QUESTION>
<DETAIL_ANSWER>Extremities; Frost of skin caused rash. Had a complete and full recovery; Dr. H. A. Rosane, 634 Beech St., Terre Haute, IN.</DETAIL_ANSWER> </TREATMENT> <TREATMENT> <RECORD>TREATMENT</RECORD>
891
<DETAIL_QUESTION>Question 6j:</DETAIL_QUESTION><DETAIL_ANSWER>Frost; See answer to question 6i.</DETAIL_ANSWER>
</TREATMENT> <TREATMENT> <RECORD>TREATMENT</RECORD> <DETAIL_QUESTION>Question 8b:</DETAIL_QUESTION>
<DETAIL_ANSWER>Next Checkup; Routine physical in 1 year, will include lab work and samples Dr. Lenyo, 2100 N. Center St., Terre Haute, IN.</DETAIL_ANSWER> </TREATMENT> <TREATMENT> <RECORD>TREATMENT</RECORD> <DETAIL_QUESTION>Question 50k:</DETAIL_QUESTION>
<DETAIL_ANSWER>X_ray; Had x_rays H. A. Rosane, 634 Beech St., Terre Haute, IN.</DETAIL_ANSWER> </TREATMENT> <TREATMENT> <RECORD>TREATMENT</RECORD> <DETAIL_QUESTION>Last Record</DETAIL_QUESTION>
<DETAIL_ANSWER></DETAIL_ANSWER> </TREATMENT></DATA></TRAININGCOMPANY>
892
Appendix E
Using Subforms
Studio lets you include forms within forms. The embedded forms are called subforms. Using subforms eliminates the need to use the SetRecipFromImage rule which simplifies triggering and populating data on sections when you are processing repeating patterns of hierarchical or nested data.
Subforms are not intended to be inserted pages, but rather inserted sections. Normal pagination takes place after the sections have been inserted.
Subforms are stored as version 11.x FOR resource files. Subforms are supported in version 11.3 or higher runtime configured to run with Documaker Studio model resources. To use or process subforms, the AFGJOB.JDT file must include the RunTriggers rule. The RunTriggers rule replaces the RunSetRcpTbl and LoadRcpTbl rules. If your AFGJOB.JDT file includes the RunSetRcpTbl and LoadRcpTbl rules, you must modify it before you can use subforms.
Subforms have begin and end sections and trigger the same as any other group. The difference is that once the subform is triggered, the section triggers within the specified form are executed, once for each time the subform is triggered.
After triggering sections within the subform, all of the sections will be moved onto the page where the subform is declared. Subsequent pagination determines the final layout of the form. Therefore, you should not expect the pages explicitly defined in the subform to be represented in the same fashion within the resulting form where included.
When processing non-XML input files with subforms triggered by a counter search mask, the triggered sections are processed against a subset of the extract file. The subset is based on the search mask and the occurrence of the triggered subform.
Any form in the library may be referenced as a subform. When a form is included as a subform, all of the triggered sections (from all pages) are inserted into the resulting form at the point where the subform is designated. Therefore the final paginated layout will not have the layout designated in the original form used a subform.
This appendix covers these topics:
• Adding a Subform on page 893
• Accessing Data on page 894
Note Using subforms eliminates the need to use the SetRecipFromImage rule which simplifies triggering and populating data on sections when you are processing repeating patterns of hierarchical or nested data.
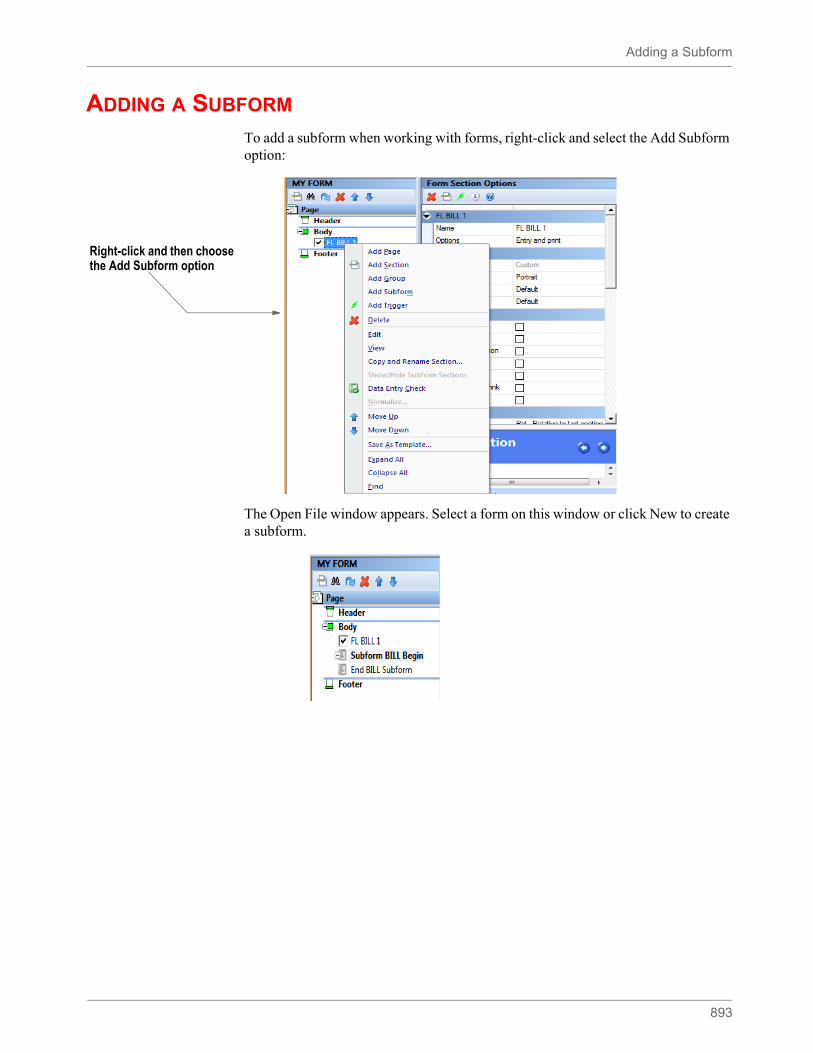
Adding a Subform
893
ADDING A SUBFORM
To add a subform when working with forms, right-click and select the Add Subform option:
The Open File window appears. Select a form on this window or click New to create a subform.
Right-click and then choose the Add Subform option
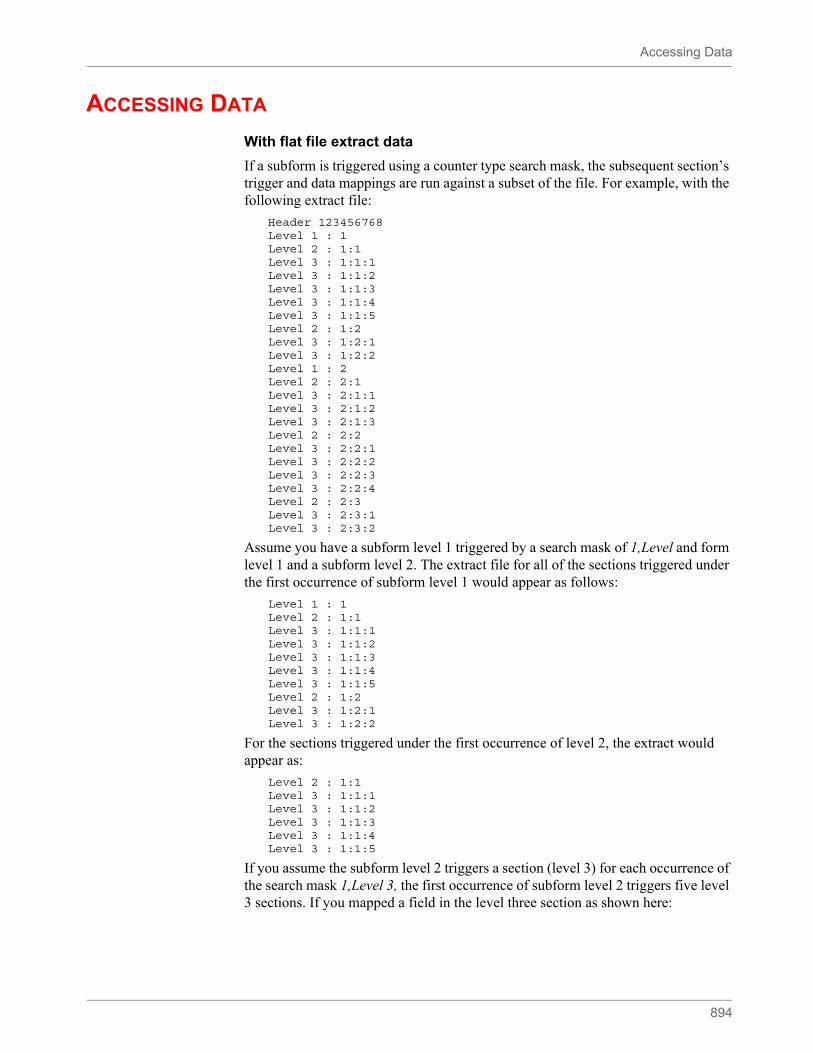
Accessing Data
894
ACCESSING DATA
With flat file extract data
If a subform is triggered using a counter type search mask, the subsequent section’s trigger and data mappings are run against a subset of the file. For example, with the following extract file:
Header 123456768Level 1 : 1Level 2 : 1:1Level 3 : 1:1:1Level 3 : 1:1:2Level 3 : 1:1:3Level 3 : 1:1:4Level 3 : 1:1:5Level 2 : 1:2Level 3 : 1:2:1Level 3 : 1:2:2Level 1 : 2Level 2 : 2:1Level 3 : 2:1:1Level 3 : 2:1:2Level 3 : 2:1:3Level 2 : 2:2Level 3 : 2:2:1Level 3 : 2:2:2Level 3 : 2:2:3Level 3 : 2:2:4Level 2 : 2:3Level 3 : 2:3:1Level 3 : 2:3:2
Assume you have a subform level 1 triggered by a search mask of 1,Level and form level 1 and a subform level 2. The extract file for all of the sections triggered under the first occurrence of subform level 1 would appear as follows:
Level 1 : 1Level 2 : 1:1Level 3 : 1:1:1Level 3 : 1:1:2Level 3 : 1:1:3Level 3 : 1:1:4Level 3 : 1:1:5Level 2 : 1:2Level 3 : 1:2:1Level 3 : 1:2:2
For the sections triggered under the first occurrence of level 2, the extract would appear as:
Level 2 : 1:1Level 3 : 1:1:1Level 3 : 1:1:2Level 3 : 1:1:3Level 3 : 1:1:4Level 3 : 1:1:5
If you assume the subform level 2 triggers a section (level 3) for each occurrence of the search mask 1,Level 3, the first occurrence of subform level 2 triggers five level 3 sections. If you mapped a field in the level three section as shown here:
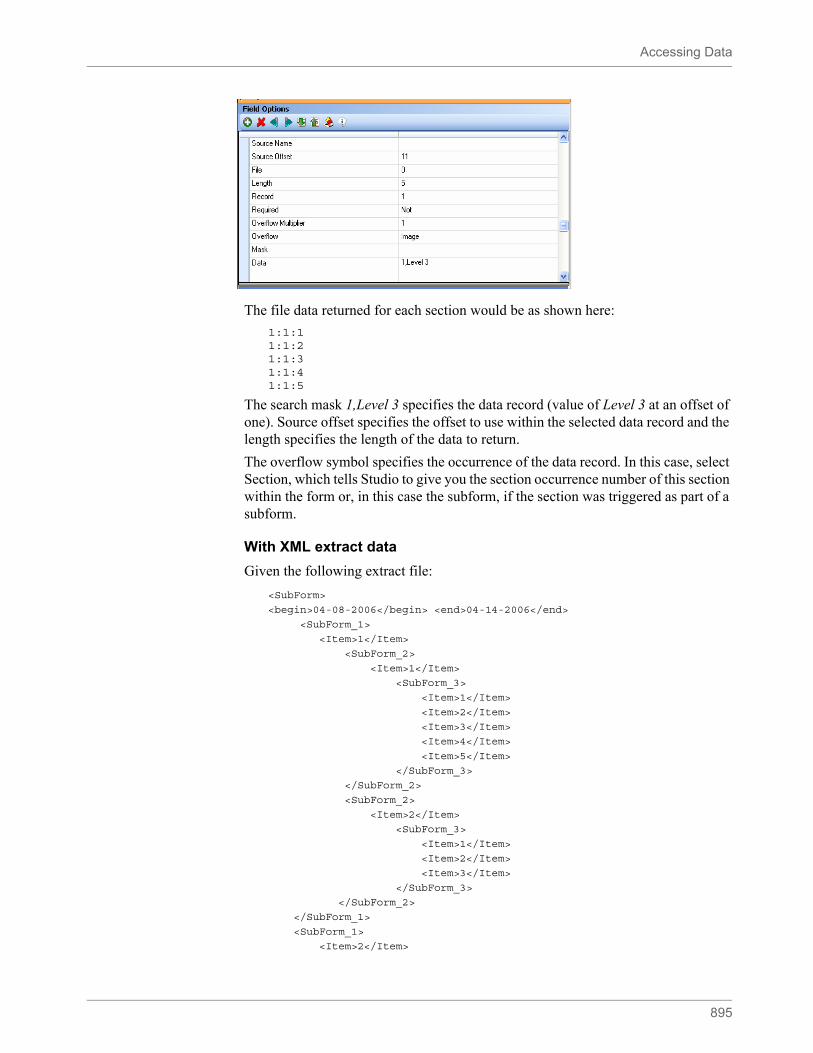
Accessing Data
895
The file data returned for each section would be as shown here:
1:1:11:1:21:1:31:1:41:1:5
The search mask 1,Level 3 specifies the data record (value of Level 3 at an offset of one). Source offset specifies the offset to use within the selected data record and the length specifies the length of the data to return.
The overflow symbol specifies the occurrence of the data record. In this case, select Section, which tells Studio to give you the section occurrence number of this section within the form or, in this case the subform, if the section was triggered as part of a subform.
With XML extract data
Given the following extract file:
<SubForm>
<begin>04-08-2006</begin> <end>04-14-2006</end>
<SubForm_1>
<Item>1</Item>
<SubForm_2>
<Item>1</Item>
<SubForm_3>
<Item>1</Item>
<Item>2</Item>
<Item>3</Item>
<Item>4</Item>
<Item>5</Item>
</SubForm_3>
</SubForm_2>
<SubForm_2>
<Item>2</Item>
<SubForm_3>
<Item>1</Item>
<Item>2</Item>
<Item>3</Item>
</SubForm_3>
</SubForm_2>
</SubForm_1>
<SubForm_1>
<Item>2</Item>
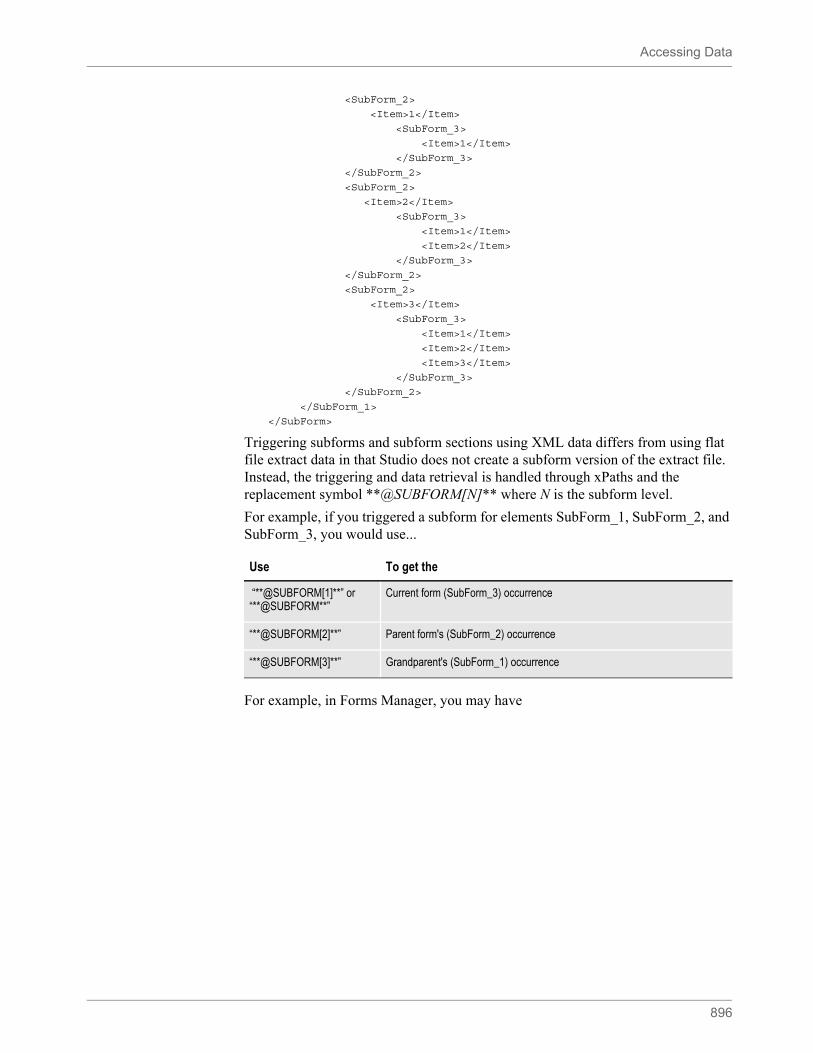
Accessing Data
896
<SubForm_2>
<Item>1</Item>
<SubForm_3>
<Item>1</Item>
</SubForm_3>
</SubForm_2>
<SubForm_2>
<Item>2</Item>
<SubForm_3>
<Item>1</Item>
<Item>2</Item>
</SubForm_3>
</SubForm_2>
<SubForm_2>
<Item>3</Item>
<SubForm_3>
<Item>1</Item>
<Item>2</Item>
<Item>3</Item>
</SubForm_3>
</SubForm_2>
</SubForm_1>
</SubForm>
Triggering subforms and subform sections using XML data differs from using flat file extract data in that Studio does not create a subform version of the extract file. Instead, the triggering and data retrieval is handled through xPaths and the replacement symbol **@SUBFORM[N]** where N is the subform level.
For example, if you triggered a subform for elements SubForm_1, SubForm_2, and SubForm_3, you would use...
For example, in Forms Manager, you may have
Use To get the
“**@SUBFORM[1]**” or “**@SUBFORM**”
Current form (SubForm_3) occurrence
“**@SUBFORM[2]**” Parent form's (SubForm_2) occurrence
“**@SUBFORM[3]**” Grandparent's (SubForm_1) occurrence

Accessing Data
897
Data for Field3 in the SubForm3 section you may have:
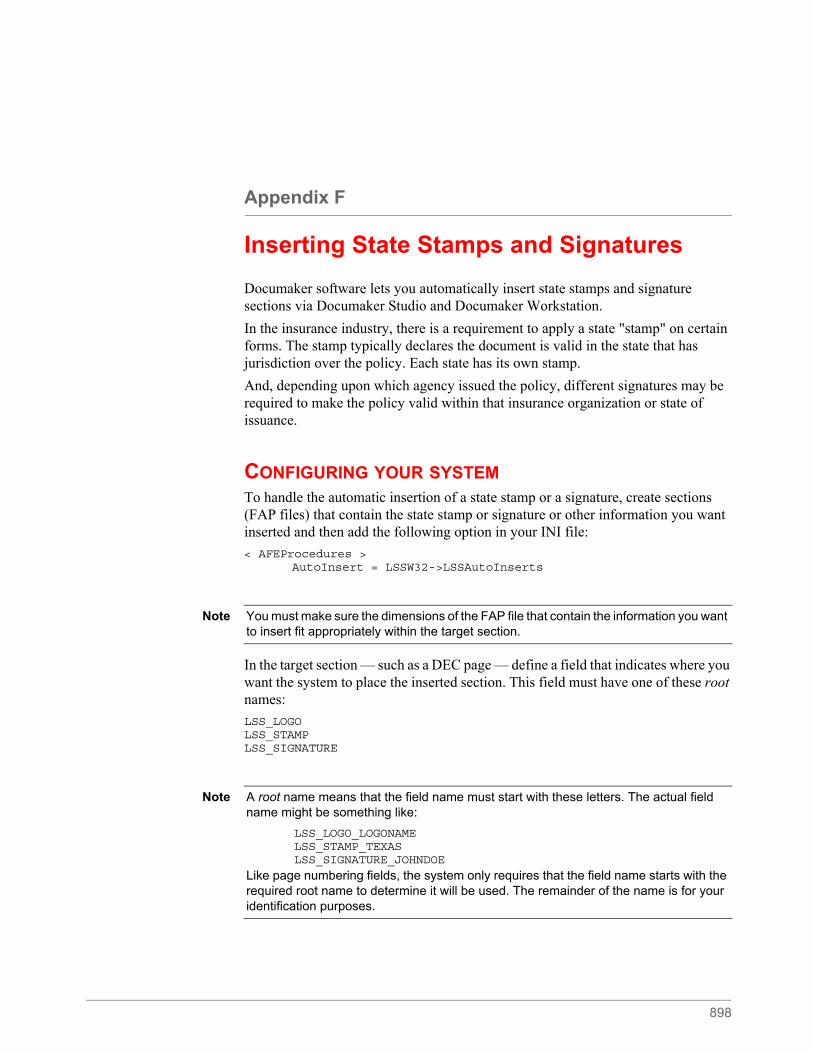
898
Appendix F
Inserting State Stamps and Signatures
Documaker software lets you automatically insert state stamps and signature sections via Documaker Studio and Documaker Workstation.
In the insurance industry, there is a requirement to apply a state "stamp" on certain forms. The stamp typically declares the document is valid in the state that has jurisdiction over the policy. Each state has its own stamp.
And, depending upon which agency issued the policy, different signatures may be required to make the policy valid within that insurance organization or state of issuance.
CONFIGURING YOUR SYSTEMTo handle the automatic insertion of a state stamp or a signature, create sections (FAP files) that contain the state stamp or signature or other information you want inserted and then add the following option in your INI file:
< AFEProcedures >AutoInsert = LSSW32->LSSAutoInserts
In the target section — such as a DEC page — define a field that indicates where you want the system to place the inserted section. This field must have one of these root names:
LSS_LOGOLSS_STAMPLSS_SIGNATURE
Note You must make sure the dimensions of the FAP file that contain the information you want to insert fit appropriately within the target section.
Note A root name means that the field name must start with these letters. The actual field name might be something like:
LSS_LOGO_LOGONAMELSS_STAMP_TEXASLSS_SIGNATURE_JOHNDOE
Like page numbering fields, the system only requires that the field name starts with the required root name to determine it will be used. The remainder of the name is for your identification purposes.
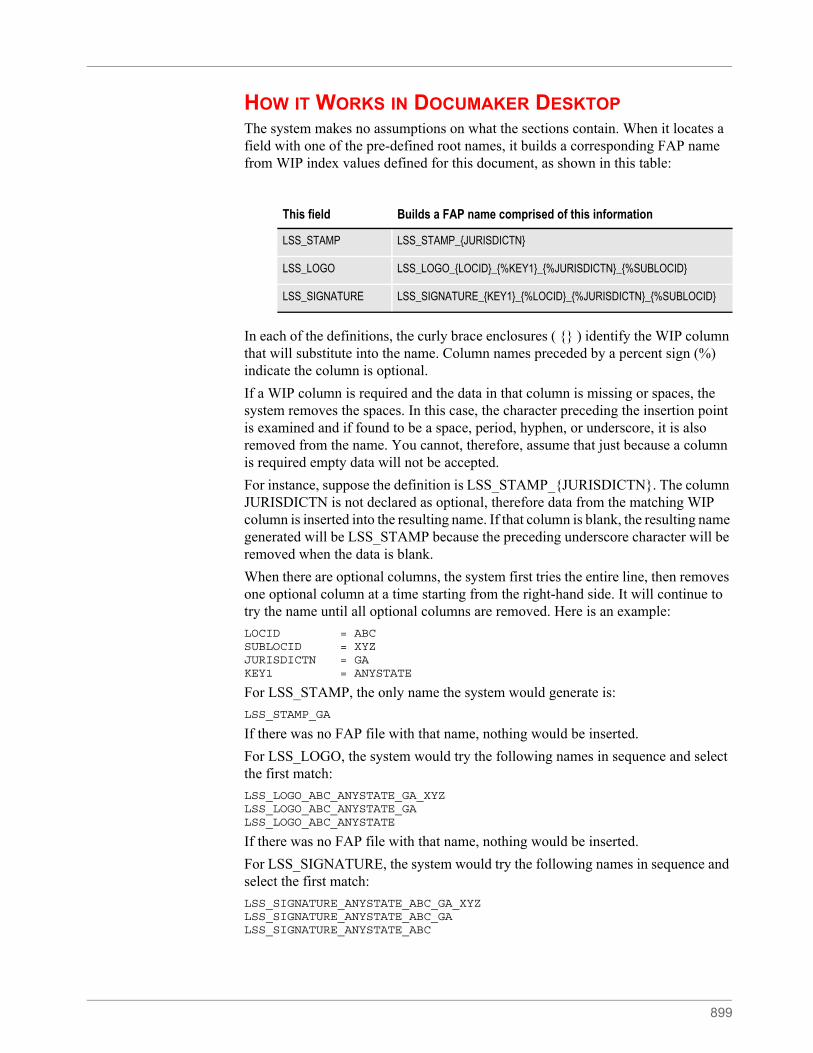
899
HOW IT WORKS IN DOCUMAKER DESKTOPThe system makes no assumptions on what the sections contain. When it locates a field with one of the pre-defined root names, it builds a corresponding FAP name from WIP index values defined for this document, as shown in this table:
In each of the definitions, the curly brace enclosures ( {} ) identify the WIP column that will substitute into the name. Column names preceded by a percent sign (%) indicate the column is optional.
If a WIP column is required and the data in that column is missing or spaces, the system removes the spaces. In this case, the character preceding the insertion point is examined and if found to be a space, period, hyphen, or underscore, it is also removed from the name. You cannot, therefore, assume that just because a column is required empty data will not be accepted.
For instance, suppose the definition is LSS_STAMP_{JURISDICTN}. The column JURISDICTN is not declared as optional, therefore data from the matching WIP column is inserted into the resulting name. If that column is blank, the resulting name generated will be LSS_STAMP because the preceding underscore character will be removed when the data is blank.
When there are optional columns, the system first tries the entire line, then removes one optional column at a time starting from the right-hand side. It will continue to try the name until all optional columns are removed. Here is an example:
LOCID = ABCSUBLOCID = XYZJURISDICTN = GAKEY1 = ANYSTATE
For LSS_STAMP, the only name the system would generate is:
LSS_STAMP_GA
If there was no FAP file with that name, nothing would be inserted.
For LSS_LOGO, the system would try the following names in sequence and select the first match:
LSS_LOGO_ABC_ANYSTATE_GA_XYZLSS_LOGO_ABC_ANYSTATE_GALSS_LOGO_ABC_ANYSTATE
If there was no FAP file with that name, nothing would be inserted.
For LSS_SIGNATURE, the system would try the following names in sequence and select the first match:
LSS_SIGNATURE_ANYSTATE_ABC_GA_XYZLSS_SIGNATURE_ANYSTATE_ABC_GALSS_SIGNATURE_ANYSTATE_ABC
This field Builds a FAP name comprised of this information
LSS_STAMP LSS_STAMP_{JURISDICTN}
LSS_LOGO LSS_LOGO_{LOCID}_{%KEY1}_{%JURISDICTN}_{%SUBLOCID}
LSS_SIGNATURE LSS_SIGNATURE_{KEY1}_{%LOCID}_{%JURISDICTN}_{%SUBLOCID}
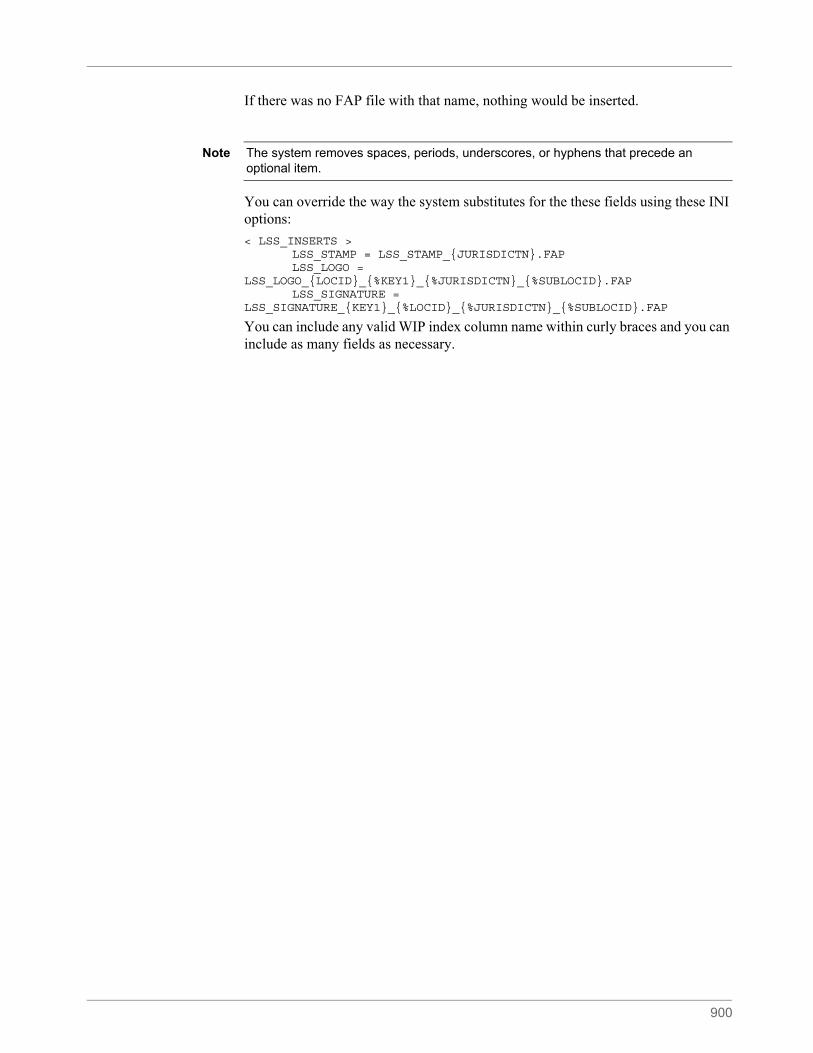
900
If there was no FAP file with that name, nothing would be inserted.
You can override the way the system substitutes for the these fields using these INI options:
< LSS_INSERTS >LSS_STAMP = LSS_STAMP_{JURISDICTN}.FAPLSS_LOGO =
LSS_LOGO_{LOCID}_{%KEY1}_{%JURISDICTN}_{%SUBLOCID}.FAPLSS_SIGNATURE =
LSS_SIGNATURE_{KEY1}_{%LOCID}_{%JURISDICTN}_{%SUBLOCID}.FAP
You can include any valid WIP index column name within curly braces and you can include as many fields as necessary.
Note The system removes spaces, periods, underscores, or hyphens that precede an optional item.
901
Glossary
The following terms include definitions of system files as well as commonly-used terms.
AFP Advanced Function Printing (AFP), developed by IBM, is a print server language that generates data streams of objects. The data streams merge with print controls and system commands to generate Intelligent Printer Data Stream (IPDS). Your system then sends the IPDS to the AFP printer for printing. The GenPrint program can create spool files for AFP printers.
Application definition file Application definition files defines the key combinations used to locate a specific form set. These key combinations are comprised of a Key1 and Key2 (sometimes referred to as Unit1 and Unit2; or Group1 and Group2). In the insurance world, these keys are typically called: company and line of business (LOB). Other information stored in the BDF file includes the following:
• List of recipients
• Form categories (if used)
• Transaction type information
• Primary extract dictionary (XDD) file (if used)
• Default font cross-reference (FXR) file
• Default style (STY) file
Application definition files have an extension of BDF.
Class Indicates the class of the resource. Forms, sections, paragraph lists, paragraphs and graphics are all library resources which can optionally have classes assigned to them. Classes are defined via INI options in Studio and are optional. Class can be used to group resources by product lines or geographical regions such as GA, TX, or MD.
DAL Document Automation Language (DAL) is the language you use when you tell the system how to calculate fields. This calculation is also called a script. When you select calculation options for a field, you can choose from:
• DAL Calc. Recalculates the value of all fields each time a user tabs to a new field in the section.
• DAL Script. Recalculates the value of the fields to which you assign the script only when a user tabs out of that field
Glossary
902
.DAT files Data table (DAT) files define various information the system uses as it processes information. All DAT are text files which have the extension DAT. Some DAT files are comma-delimited text files.
The NAFILE.DAT file contains the variable data generated by the GenData program. This file, along with the POLFILE.DAT file, tell the GenPrint program what to print. This file also tells the GenWIP and GenArc programs what to place into WIP and what to archive.
The GenWIP program also creates DAT files for each incomplete transaction it must process. These files are numbered sequentially and for each file there is a corresponding POL file which contains information about the forms to use.
.DBF files Database files (DBF) are used in several places in the Documaker system. For each DBF file, there is a corresponding MDX file which serves as its index. Examples of DBF files are FDB.DBF, which is created by Studio’s Common Fields manager and WIP.DBF, which is created by the GenWIP program.
.DFD files Data field definition (DFD) files define to the system the file formats of the files generated by the system.
An example of a DFD file is the TRNDFDFL file which the GenTrn program creates. The GenData program uses this file to read the TRNFILE which contains the actual transactions GenTrn creates.
Duplex A form printed on both the front and back sides of a sheet of paper is printed in duplex mode.
See also Simplex on page 906.
Effective date The date on which you want the resource (forms, sections, paragraph lists, paragraphs and graphics are all resources) to become available for processing or selection in Documaker Server or Documaker Desktop. The effective date is also used in Studio’s Library manager to aid in the versioning and revisioning of a resource.
Embedded All of the attributes of an embedded item are included in the file in which the item is embedded vs. a reference to that item to an external file. For example, when a graphic is embedded in a section, all of the attributes of that graphic are written or included in the section file. The graphic is neither shared nor loaded from the library.
Extract files Extract files are typically text files which contain the data the system processes. Extract files are created by another program, typically a database program, in a format the system can read. The text file format provides a standard interface into the system. For example, your data may be stored in a DB/2 or VSAM database from which you extract the data you want to process in the system in text format.
Note You can find detailed information about the DAL language in the DAL Reference.
Glossary
903
You can customize the system to read almost any type of file layout. The GenTrn program first reads the extract file and, using that extract data and TRNDFDFL.DFD file, creates transaction files (TRN files) the GenData program can use as it applies the processing rules and creates batch files, the NAFILE.DAT, and the POLFILE.DAT file.
The system includes a base extract file, called EXTRFILE.DAT, which serves as an example of the type of file the base system can read. You can use this file to experiment with the base system and determine how you want to set up your system.
.FAP files The information which defines each section is stored in a FAP file. FAP files are text files with the extension FAP. You can edit FAP files using Studio.
FDB.DBF file The FDB.DBF file is the default name of the database file created by the Common Fields manager which contains a record for each unique field you create. You can use any name you prefer as long as the extension is DBF. You can add records (fields) using the Common Fields manager or as you create sections in Studio.
Fields A field is a blank space in your section or paragraph into which data is entered. The variable data can be entered manually during entry (Documaker Desktop) or merged during runtime (Documaker Server). Fields have attributes assigned to them including type, font, length, and so on.
Form lists Form lists define a list of the forms that apply to each business unit and to maintain form-level triggering information. You can also define the order in which these forms should be provided.
Information about each group of forms is stored in a file with a GRP extension. For each group (Key1/Key2), you have a separate GRP file. Group name (Key1/Key2) information is stored in the application definition (BDF) file, whereas specific information for each of the forms that make up the group is stored in a GRP file.
Forms A form is a single document containing one or more pages or sections. Most forms contain multiple pages that are usually printed on both sides of a single sheet (duplex). Some forms are printed only on one side (simplex). Typical forms include insurance policies, tax returns, and mortgage documents.
Forms include two types of data: fixed and variable.
• Fixed data is the same on every copy of the form. This includes items such as graphics, headers, and titles. This information remains constant regardless of the data entry.
• Variable data may differ from form to form. This includes items such as individuals' names, addresses, and policy numbers. This information relates to the specific data processed on each form.
Form files have an extension of FOR.
Form sets A form set is a group of logically related forms required to process a single transaction. A form set may contain one or many forms. You can group forms any way you want as you create form sets.
Glossary
904
FSISYS.INI file The FSISYS.INI file is a one of the initialization (INI) files used by the system to set system parameters and to enable or disable system features.
FSIUSER.INI file The FSIUSER.INI file is one of the initialization (INI) files used by the system to set system parameters. For example, the FSIUSER.INI file contains information specific to each user, such as the location of files.
.FXR files Font cross-reference (FXR) files are used by the system so you can make sure your documents print the same way, regardless of which printer you choose. These files contain information about the various fonts you use and their equivalents on various printers.
Graphics A picture or image. Graphics can include a company logo, a signature, pictures, photos, and so on. Graphic files are typically stored in the workspace’s library and have a file extension of LOG.
.INI files Initialization (INI) files are used by the system to set system parameters and to enable or disable system features. Some examples of system INI files are: FSISYS.INI and FSIUSER.INI. For example, the FSISYS.INI file contains information the GenTrn program uses to determine when a new record starts and other information about the extract files the GenTrn program processes. The FSIUSER.INI file contains information specific to each user, such as the location of files and so on.
Libraries Studio lets you maintain multiple versions of various resources in a library. Libraries let you set up your master resource libraries and their associated files and resources, and then use those resources when you need them.
Libraries can record descriptions when files are updated to a new version and provide file-lock capability to ensure that multiple users do not modify the same files. Libraries control resources much in the same way a traditional book library operates.
You check out files to use them and check in files when you are done. You can also create versions that are for future use and date stamp them so they become active or are activated on the effective date. This lets you create a resource such as a form before it goes into effect. Libraries work with your master resource libraries to manage versions.
Within any given resource library, you can have multiple versions of the same resource. The system identifies form versions by the effective date. The effective date is the date used in the processing environment (Documaker Desktop and/or Documaker Server to determine which version of a resource to use.
.LOG files Logos and other graphics, such as scanned signatures, are stored as LOG files in the system. You use the Graphics manager to manage and manipulate LOG files.
Master resource library The master resource library provides a central repository into which you can place all reusable resources such as sections, fonts, graphic files, data definitions, processing rules, and processing procedures.
Glossary
905
Metacode A printer definition language developed by Xerox. Metacode is the native language of Xerox’s Centralized Printing Systems. The GenPrint program can create spool files for Metacode printers.
Metadata Metadata is data that provides information about or documentation of other data that is managed in an application or environment. The purpose and use of these values is left to the user. A catalogue might be considered metadata because it describes books, clothes, and so on.
Objects Objects are the individual items which comprise your image. Examples of objects are boxes, bar codes, lines, graphics, and text. All objects have unique attributes within the image. Attributes include items such as position, size, font type, and color.
Pages Pages are the printed result of a section or a group of sections. You can have one section per page, several sections per page, or even a section that spans several pages. You determine the size of a page based on the size of your printed output. You can design forms for any size page your printer can print.
Paper stock Paper stock allows users who have more than nine types of paper stocks to specify what paper stock the form should print on. Paper stock is used for Metacode printers only. In Studio, paper stock is defined at the form level. Data entered on a Documaker documents paper stock field is put onto a forms task comments when the Documaker document is converted.
Paragraph lists Studio lets you create a list of paragraphs which lists all of the paragraphs from which either a Documaker Desktop user or Documaker Server can select at processing time. You insert this paragraph list into a multiline text field on a section. paragraph lists are stored in PSL files.
Paragraphs Studio lets you create canned paragraphs of text that can be inserted into a form. The system then uses the selected paragraph to fill a multiline text field. The way paragraphs are selected differs between Documaker Desktop and Documaker Server. With Documaker Desktop, a user selects which paragraph to use. With Documaker Server, trigger processing makes that determination. Paragraphs are stored in PAR files.
PCL PCL (Printer Control Language) is a printer definition language developed by the Hewlett-Packard company. The GenPrint program can create spool files for PCL printers.
PostScript PostScript is a printer definition language developed by Adobe Systems which you can use on various printers. The GenPrint program can create spool files for PostScript printers.
Projects Indicates the project code assigned to a resource. Forms, sections, paragraph lists, paragraphs and graphics are all examples of library resources which can optionally have project codes assigned to them. Project codes are defined via INI options in Studio and are optional.
Glossary
906
Recipients A recipient is any person, company, or other entity who receives a copy or copies of a form set, or any part of a form set such as a single form, or image. Examples of recipients are insurance policy owners (insured), agents, lien holders, and mortgage companies. Recipients are stored in the Application Definition file (BDF) of the workspace.
Sections A section is a group of text or graphics or both that make up a part of a form. You create sections using Studio. Each section is stored in a separate file (FAP file), so you can reuse sections in several forms and form sets. Multiple sections can comprise a single form. For instance, a three-page form with text and graphics, printed on both sides of each page, could contain a total of six sections. Some examples of sections include an insurance policy declaration page, the return portion of a bill, and page one of a 1040 Federal tax return form.
You can choose to create a single page containing multiple sections, especially if you develop a page with graphics.
SETRCPTB.DAT file This file, also known as the form set trigger table, contains information which tells the GenData program which recipients receive which forms or sections.
This file also contains the information the GenData program needs to determine whether or not to include or exclude a form.
Simplex A form printed on only one side of a sheet of paper is printed in simplex mode.
See also Duplex on page 902.
Style Use styles to define default characteristics of objects such as font attributes, background color, and so on.
In general, all of the objects you can use in a section have a series of properties that define the behavior and appearance of the object. With styles, you can pre-configure theses options and store them for later use. This can both save time and allow a convenient way to enforce a particular look and feel across many different sections and forms.
Each style sheet contains one of each type of section object. Select an object property as being included in the style by checking the box next to the property. Thereafter, any object of the given type will inherit this property setting when the style is selected for that object.
You can also base one style on another. If you base style B on style A, then all of style B’s objects will inherit the included (checked) properties of the corresponding object in style A. You can then override this behavior for any property in style B by checking the box next to the property and setting it to your desired value. This is useful when creating a series of styles that are mostly identical but vary from each other in small ways.
Glossary
907
Triggers Triggers define the criteria that must exist for content to be included in the form set. Triggers may be assigned to include or exclude:
• An entire form
• Sections within a form
• Text areas within a section
• Optional paragraphs in a paragraph list
Triggers are typically stored in the workspace’s library and have an extension of DAL.
Variable data Variable data may differ from form to form. This includes items such as individuals' names, addresses, and policy numbers. This information relates to the specific data processed on each form.
Workspace A workspace, sometimes referred to as an MRL (master resource library) which contains all of the resources (such as forms, sections, paragraphs) and definition files (such as INI files) needed to compose and maintain the resources and files used in products such as Documaker Desktop or Documaker. Documaker Desktop and Documaker provide functionality to create policies (Insurance), letters and forms (Correspondence), and so on. A workspace is created using Studio.
Workspace definitionfiles
A workspace definition file contains information specific to a workspace and is a snapshot of several types of resources in a workspace at the time the file is generated. This file contains information about the following:
• Common fields
• DAL triggers
• Recipients
• Fonts
• Project lists
• Class lists
• Graphics
• Metadata
The Documaker Add-In for Word uses the information in this file to present its users with choices when they are creating Documaker documents in Word. Workspace definition files have an extension of WDF.
xBase A generic term for industry-standard dBase IV file format.
Related Documents