1

Welcome message from author
This document is posted to help you gain knowledge. Please leave a comment to let me know what you think about it! Share it to your friends and learn new things together.
Transcript

1

2

3

4

5

6

7

8

9

10
Causes of Data Loss

11
DG’s role in MAA Fault Tolerance

12

Oracle Database 11g: Data Guard Administration 1 - 13
What Is Oracle Data Guard? Oracle Data Guard is a central component of an integrated Oracle Database High Availability (HA) solution set that helps organizations ensure business continuity by minimizing the various kinds of planned and unplanned down time that can affect their businesses. Oracle Data Guard is a management, monitoring, and automation software infrastructure that works with a production database and one or more standby databases to protect your data against failures, errors, and corruptions that might otherwise destroy your database. It protects critical data by providing facilities to automate the creation, management, and monitoring of the databases and other components in a Data Guard configuration. It automates the process of maintaining a copy of an Oracle production database (called a standby database) that can be used if the production database is taken offline for routine maintenance or becomes damaged. In a Data Guard configuration, a production database is referred to as a primary database. A standby database is a synchronized copy of the primary database. Using a backup copy of the primary database, you can create from one to nine standby databases. The standby databases, together with the primary database, make up a Data Guard configuration. All Data Guard standby databases can enable up-to-date read access to the

standby database while redo being received from the primary database is applied. This makes all standby databases excellent candidates for relieving the primary database of the overhead of supporting read-only queries and reporting.
13

Oracle Database 11g: Data Guard Administration 1 - 14
Benefits of Implementing Oracle Data Guard
Continuous service: With the use of switchover and failover between systems, your business does not need to halt because of a disaster at one location. Complete data protection: Data Guard guarantees that there is no data loss and provides a safeguard against data corruption and user errors. Redo data is validated when applied to the standby database. Elimination of idle standby systems: Standby databases can be used for reporting and ad hoc queries in addition to providing a safeguard for disaster recovery. You can also use the physical standby database to off-load backups of the primary database. Flexible configurations: You can use Data Guard to configure the system to your needs by using the protection modes and several tunable parameters. Centralized management: You can use Enterprise Manager Grid Control to manage all configurations in your enterprise.
Oracle Database 11g: Data Guard Administration 1 - 15
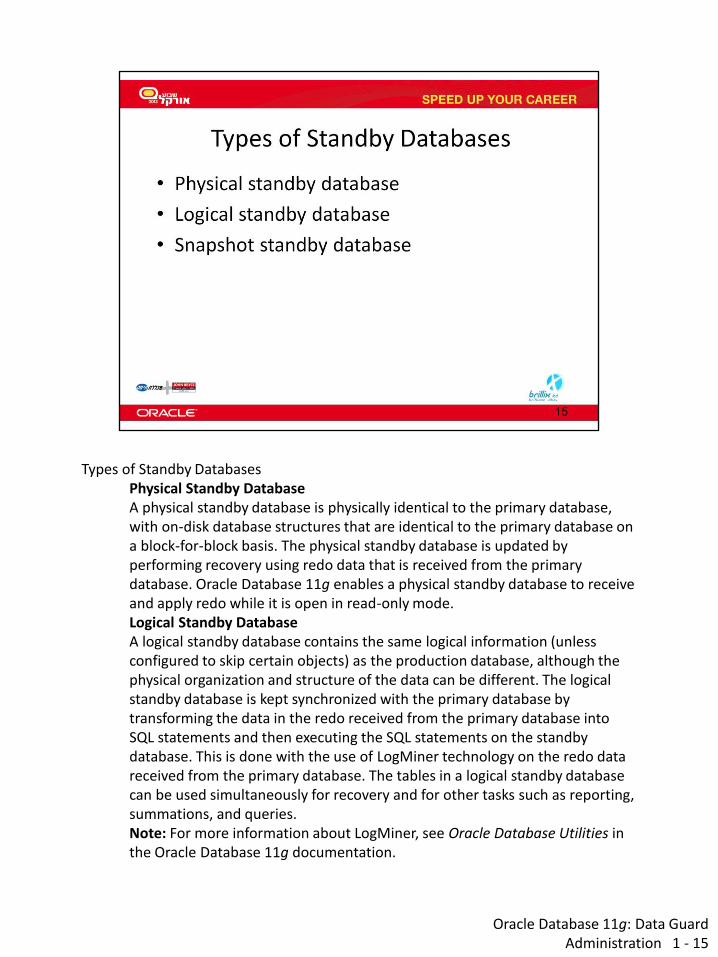
Types of Standby Databases Physical Standby Database A physical standby database is physically identical to the primary database, with on-disk database structures that are identical to the primary database on a block-for-block basis. The physical standby database is updated by performing recovery using redo data that is received from the primary database. Oracle Database 11g enables a physical standby database to receive and apply redo while it is open in read-only mode. Logical Standby Database A logical standby database contains the same logical information (unless configured to skip certain objects) as the production database, although the physical organization and structure of the data can be different. The logical standby database is kept synchronized with the primary database by transforming the data in the redo received from the primary database into SQL statements and then executing the SQL statements on the standby database. This is done with the use of LogMiner technology on the redo data received from the primary database. The tables in a logical standby database can be used simultaneously for recovery and for other tasks such as reporting, summations, and queries. Note: For more information about LogMiner, see Oracle Database Utilities in the Oracle Database 11g documentation.

Oracle Database 11g: Data Guard Administration 1 - 16
Types of Standby Databases Physical Standby Database A physical standby database is physically identical to the primary database, with on-disk database structures that are identical to the primary database on a block-for-block basis. The physical standby database is updated by performing recovery using redo data that is received from the primary database. Oracle Database 11g enables a physical standby database to receive and apply redo while it is open in read-only mode.

Types of Standby Databases (continued) Logical Standby Database A logical standby database contains the same logical information (unless configured to skip certain objects) as the production database, although the physical organization and structure of the data can be different. The logical standby database is kept synchronized with the primary database by transforming the data in the redo received from the primary database into SQL statements and then executing the SQL statements on the standby database. This is done with the use of LogMiner technology on the redo data received from the primary database. The tables in a logical standby database can be used simultaneously for recovery and for other tasks such as reporting, summations, and queries. Note: For more information about LogMiner, see Oracle Database Utilities in the Oracle Database 11g documentation.
17

Oracle Database 11g: Data Guard Administration 1 - 18
Types of Standby Databases (continued) Snapshot Standby Database A snapshot standby database is a database that is created by converting a physical standby database into a snapshot standby database. The snapshot standby database receives redo from the primary database, but does not apply the redo data until it is converted back into a physical standby database. The snapshot standby database can be used for updates, but those updates are discarded before the snapshot standby database is converted back into a physical standby database. The snapshot standby database is appropriate when you require a temporary, updatable version of a physical standby database.

Oracle Database 11g: Data Guard Administration 1 - 19
Types of Data Guard Services The following types of services are available with Data Guard:
Redo transport services: Control the automated transmittal of redo information from the primary database to one or more standby databases or archival destinations. Apply services: Control when and how data is applied to the standby database.
Redo Apply: Technology used for physical standby databases. Redo data is applied on the standby database by using Oracle media recovery. SQL Apply: Technology used for logical standby databases. The received redo data is first transformed into SQL statements, and then the generated SQL statements are executed on the logical standby database.
Role management services: A database operates in one of two mutually exclusive roles: primary or standby. Role management services operate in conjunction with redo transport services and apply services to change these roles dynamically as a planned transition (called a switchover operation) or as a result of database failure due to a failover operation.

Oracle Database 11g: Data Guard Administration 1 - 20
Oracle Data Guard: Architecture (Overview) Oracle Data Guard leverages the existing database redo-generation architecture to keep the standby databases in the configuration synchronized with the primary database. By using the existing architecture, Oracle Data Guard minimizes its impact on the primary database. Oracle Data Guard uses several processes to achieve the automation that is necessary for disaster recovery and high availability. Some of these processes existed before the introduction of Data Guard; others were created specifically to support Oracle Data Guard. These processes are discussed in more detail on the next few pages.

Oracle Database 11g: Data Guard Administration 1 - 21
Primary Database Processes On the primary database, Data Guard uses the following processes:
Log writer (LGWR): LGWR collects transaction redo information and updates the online redo logs. For each synchronous (SYNC) standby database, LGWR passes the redo to an LNS (Log Writer Network Server) process, which ships the redo directly to the remote file server (RFS) process on the standby database. LGWR waits for confirmation from the LNS process before acknowledging the commit. For asynchronous (ASYNC) standby databases, independent LNS processes read the redo from either the redo log buffer in memory or the online redo log file, and then ship the redo to its standby database. Other than starting the asynchronous LNS processes, LGWR has no interaction with any asynchronous standby destination. Archiver (ARCn): The ARCn process creates a copy of the online redo log files locally for use in a primary database recovery operation. ARCn is also responsible for shipping redo data to an RFS process at a standby database and for proactively detecting and resolving gaps on all standby databases.

Oracle Database 11g: Data Guard Administration 1 - 22
Standby Database Processes On the standby database, Data Guard uses the following processes:
Remote file server (RFS): RFS receives redo information from the primary database and can write the redo into standby redo logs or directly to archived redo logs. Each LNSn and ARCn process from the primary database has its own RFS process. Note: The use of standby redo logs is discussed in more detail in the lesson titled “Creating a Physical Standby Database by Using SQL and RMAN Commands.” Archiver (ARCn): The ARCn process archives the standby redo logs. Managed recovery (MRP): For physical standby databases only, MRP applies archived redo log information to the physical standby database. If you start the managed recovery with the ALTER DATABASE RECOVER MANAGED STANDBY DATABASE SQL statement, this foreground session performs the recovery. If you use the optional DISCONNECT [FROM SESSION] clause, the MRP background process starts. If you use the Data Guard broker to manage your standby databases, the broker always starts the MRP background process for a physical standby database. Logical standby (LSP): For logical standby databases only, LSP controls the application of archived redo log information to the logical standby

database.
22

Oracle Database 11g: Data Guard Administration 1 - 23
Physical Standby Database: Redo Apply Architecture The Data Guard physical standby Redo Apply architecture consists of:
A production (primary) database, which is linked to one or more standby databases (up to nine) that are identical copies of the production database. The limit of nine standby databases is imposed by the LOG_ARCHIVE_DEST_n parameter. In Oracle Database 11g, the maximum number of destinations is 10. One is used as the local archive destination, leaving the other nine for uses such as the standby database. Note: You can use the Cascaded Redo Log Destinations feature to incorporate more than nine standby databases in your configuration. The standby database, which is updated by redo that is automatically shipped from the primary database. The redo can be shipped as it is generated or archived on the primary database. Redo is applied to each standby database by using Oracle media recovery. During planned down time, you can perform a switchover to a standby database. When a failure occurs, you can perform a failover to one of the standby databases.The physical standby database can also be used to back up the primary database.

Oracle Database 11g: Data Guard Administration 1 - 24
Logical Standby Database: SQL Apply Architecture In a logical standby database configuration, Data Guard SQL Apply uses redo information shipped from the primary system. However, instead of using media recovery to apply changes (as in the physical standby database configuration), the redo data is transformed into equivalent SQL statements by using LogMiner technology. These SQL statements are then applied to the logical standby database. The logical standby database is open in read/write mode and is available for reporting capabilities. A logical standby database can be used to perform rolling database upgrades, thereby minimizing down time when upgrading to new database patch sets or full database releases.

Oracle Database 11g: Data Guard Administration 1 - 25
Automatic Gap Detection and Resolution If connectivity is lost between the primary database and one or more standby databases, redo data that is being generated on the primary database cannot be sent to those standby databases. When a connection is reestablished, Data Guard automatically detects that there are missing archived redo log files (referred to as a gap), and then automatically transmits the missing archived redo log files to the standby databases by using the ARCn processes. The standby databases are synchronized with the primary database without manual intervention by the DBA.

Oracle Database 11g: Data Guard Administration 1 - 26
Data Protection Modes Data Guard provides three high-level modes of data protection that you can configure to balance cost, availability, performance, and transaction protection. You can configure the Data Guard environment to maximize data protection, availability, or performance. Maximum Protection This protection mode guarantees that no data loss occurs if the primary database fails. For this level of protection, the redo data that is needed to recover each transaction must be written to both the local online redo log and the standby redo log (used to store redo data received from another database) on at least one standby database before the transaction commits. To ensure that data loss does not occur, the primary database shuts down if a fault prevents it from writing its redo stream to at least one remote standby redo log.
Data Protection Modes (continued) Maximum Availability This protection mode provides the highest possible level of data protection without compromising the availability of the primary database. As with maximum protection mode, a transaction does not commit until the redo needed to recover that transaction is written to the local online redo log and to at least one remote standby redo log. Unlike maximum protection mode, the primary database does not shut down if a fault prevents it from writing its

redo stream to a remote standby redo log. Instead, the primary database operates in an unsynchronized mode until the fault is corrected and all the gaps in the redo log files are resolved. When all the gaps are resolved and the primary database is synchronized with the standby database, the primary database automatically resumes operating in maximum availability mode. This mode guarantees that no data loss occurs if the primary database fails, but only if a second fault does not prevent a complete set of redo data from being sent from the primary database to at least one standby database. Maximum Performance (Default) The default protection mode provides the highest possible level of data protection without affecting the performance of the primary database. This is accomplished by allowing a transaction to commit as soon as the redo data needed to recover that transaction is written to the local online redo log. The primary database’s redo data stream is also written to all ASYNC standby databases and is written asynchronously with respect to the commitment of the transactions that create the redo data
26

Oracle Database 11g: Data Guard Administration 1 - 27
Data Guard Operational Requirements: Oracle Database Software
You must install the same release of Oracle Database Enterprise Edition for the primary database and all standby databases in your Data Guard configuration. Oracle Data Guard is available only as a feature of Oracle Database Enterprise Edition; it is not available with Oracle Database Standard Edition. Note: See the course titled Oracle Data Guard Concepts and Administration for information about simulating a standby database environment when using Oracle Database Standard Edition.
If you use Oracle Automatic Storage Management (ASM) and Oracle Managed Files (OMF) in a Data Guard configuration, you should use ASM and OMF symmetrically on the primary and standby database. If any database in your Data Guard configuration uses ASM, OMF, or both, then every database in the configuration should use the same combination (that is, ASM, OMF, or both). Note: An exception to this guideline is if you are using Data Guard as a technique to migrate to ASM and/or OMF.

Oracle Database 11g: Data Guard Administration 1 - 28
Hardware and Operating System Requirements These are the requirements for Data Guard:
The hardware for the primary and standby database systems can be different. For example, the number of CPUs, the memory size, and the storage configuration can differ. The operating systems for both databases and operating system binaries can be different. If the primary and standby databases are both on the same server, you must ensure that the operating system enables you to mount two databases with the same name on the same system simultaneously. Certain parameters must be specified to support this configuration, as discussed in the lesson titled “Creating a Physical Standby Database by Using SQL.”
Refer to Oracle MetaLink Note 413484.1 for additional information.

Oracle Database 11g: Data Guard Administration 1 - 29
Hardware and Operating System Requirements These are the requirements for Data Guard:
The hardware for the primary and standby database systems can be different. For example, the number of CPUs, the memory size, and the storage configuration can differ. The operating systems for both databases and operating system binaries can be different. If the primary and standby databases are both on the same server, you must ensure that the operating system enables you to mount two databases with the same name on the same system simultaneously. Certain parameters must be specified to support this configuration, as discussed in the lesson titled “Creating a Physical Standby Database by Using SQL.”
Refer to Oracle MetaLink Note 413484.1 for additional information.

Oracle Database 11g: Data Guard Administration 1 - 30
Role Transitions: Switchover and Failover Data Guard enables you to change the role of a database dynamically by issuing SQL statements or by using either of the Data Guard broker’s interfaces. Data Guard supports two role-transition operations:
Switchover: The switchover feature enables you to switch the role of the primary database to one of the available standby databases. The chosen standby database becomes the primary database, and the original primary database then becomes a standby database. Failover: You invoke a failover operation when a catastrophic failure occurs on the primary database. During a failover operation, the failed primary database is removed from the Data Guard environment, and a standby database assumes the primary database role. You invoke the failover operation on the standby database that you want to fail over to the primary role. You can also enable fast-start failover, which allows Data Guard to automatically and quickly fail over to a previously chosen synchronized standby database. Note: Fast-start failover is discussed in detail in the lesson titled “Enabling Fast-Start Failover.”
Role Transitions: Switchover and Failover (continued) Databases that are disabled after a role transition are not removed from the broker configuration, but they are disabled in the sense that the databases are no longer managed by the broker. To reenable broker management of these

databases, you must reinstate or re-create the databases. Note: See the lesson titled “Performing Switchover and Failover” for detailed information.
30

Oracle Database 11g: Data Guard Administration 11 - 31
Switchover A switchover operation transitions the primary database to the standby role and transitions the standby database to the primary role, without resetting the online redo logs of the new primary database. If the switchover operation involves a physical standby database, both the primary database and the physical standby database that is switching over to the primary role are shut down and restarted. However, there is no need to shut down and restart any other standby databases that are not participants in the switchover operation. If the switchover operation involves a logical standby database, there is no need to shut down and restart either the primary database or any of the standby databases. Logical standby databases do not need to be shut down and restarted. Note: When necessary, the broker automatically starts and stops all but one instance in a Real Application Clusters environment. If the broker is not used, this must be done manually.

Oracle Database 11g: Data Guard Administration 11 - 32
Switchover: Before As an example, suppose that the primary database is located in San Francisco and the physical standby database is located in Boston. Switchovers are started only on the primary database and completed on the target standby database. You can be connected to any database in the configuration through DGMGRL to execute the SWITCHOVER command.

Oracle Database 11g: Data Guard Administration 11 - 33
Switchover: After After the switchover is completed, each database has the role opposite to the one that it had before the switchover. In our example, Boston is now the primary database and San Francisco is the standby database. Because Data Guard does not automatically switch over sessions from one database to the other, active sessions for each system need to reconnect. See the lesson titled “Managing Client Connectivity” for information about configuring automatic methods to reconnect sessions.

Oracle Database 11g: Data Guard Administration 11 - 34
Performing a Switchover by Using DGMGRL After verifying the conditions required for executing a switchover, execute the SWITCHOVER command to perform the switchover operation. The Data Guard broker performs the following operations:
1. Verifies that the primary database and target standby database are in the correct states 2. Shuts down all instances as necessary 3. Switches roles between the primary and standby databases 4. Updates the broker configuration file with the new role information 5. Restarts the new standby database 6. Opens the new primary database in read/write mode and starts redo transport services
Note: For detailed information about each step, see Oracle Data Guard Broker.

Oracle Database 11g: Data Guard Administration 11 - 35
Situations That Prevent a Switchover
You cannot perform a switchover if: Archived redo log files are unavailable: If there is a gap in the archived redo log files on the standby database, you cannot switch over to that standby database. Point-in-time recovery is required: When you perform a switchover to a standby database, you always switch over to the current state of the primary database. You cannot switch over to a time in the past. The production database is not open and cannot be opened: A switchover is initiated on the primary database while it is in the open state. If you cannot open the primary database, a switchover is not possible.

Oracle Database 11g: Data Guard Administration 11 - 36
Failover You invoke a failover operation when a failure occurs on the primary database and there is no possibility of recovering the primary database in a timely manner. During a failover operation, the primary database is removed from the Data Guard environment and a standby database assumes the primary database role. Failing over to a standby database is a permanent operation. You cannot undo the failover and return the database to its former role as a standby database. Because of this, you should invoke a failover operation only in an emergency. It is not always necessary to fail over to the standby database. In some cases, recovery of the primary database may be faster. Most failures can be resolved at a primary database in a reasonable amount of time. In a failover operation:
The original primary database is presumed to be lost. (If you want, you can reinstate or re-create the original primary database as a new standby database.) Standby databases that are online at the time of the failover operation, but are not involved in the role transition, do not need to be shut down and restarted.

Oracle Database 11g: Data Guard Administration 11 - 37
Types of Failovers A manual failover is invoked through DGMGRL or Enterprise Manager. There are two types of manual failover:
Complete: The maximum amount of redo data for the protection mode is recovered. In this type of failover, the broker avoids disabling any standby databases that are not the failover target. Complete failover is the default and recommended type of failover. Immediate: No additional redo data is applied to the standby database after the failover is invoked. This is the fastest type of failover. After an immediate failover, you must reenable the original primary database and all standby databases that were not a target of the failover.
Note: You should always try to perform a complete failover. Perform an immediate failover only when a complete failover is unsuccessful. Depending on the destination attributes of redo transport services, a complete failover can take place without incurring any data loss, while an immediate failover usually results in the loss of data. You can configure fast-start failover so that the broker automatically fails over to a chosen standby database in the event of the loss of the primary database. For details, see the lesson titled “Enabling Fast-Start Failover.”

Oracle Database 11g: Data Guard Administration 11 - 38
Failover Considerations During a failover operation, a standby database transitions to the primary role and the old primary database is rendered unable to participate in the configuration. Depending on the protection mode under which the old primary database was operating before the failover, there may be some or no data loss during a failover. A failover is typically used only when a primary database becomes incapacitated and there is no possibility of performing a switchover or successfully repairing the primary database in a reasonable amount of time. The specific actions that are performed during a failover vary, depending on:
Whether a logical or physical standby database is involved in the failover operation The state of the configuration at the time of the failover The specific SQL commands that are used to initiate the failover

Oracle Database 11g: Data Guard Administration 11 - 39
Performing a Failover by Using DGMGRL After determining that the primary database cannot be recovered in a timely manner, execute the FAILOVER command to perform the failover operation. If you specify the IMMEDIATE option, no attempt is made to apply any unapplied redo that has been received. The Data Guard broker performs the following operations for a complete failover:
a. Verifies that the target standby database is enabled b. Stops Redo Apply after all unapplied redo data is applied to the target standby database c. Transitions the target standby database to the primary database role by:
Opening the new primary database in read/write mode Determining if any standby databases need to be reenabled Starting redo transport services
For an immediate failover, the broker does not wait for all available redo data to be applied (as described in step b). For details about each step, see Oracle Data Guard Broker.

Oracle Database 11g: Data Guard Administration 11 - 40
Reenabling Disabled Databases by Using DGMGRL After a failover, you may need to reinstate or re-create databases in your configuration. If a database can be reinstated, the database has the following status after a complete failover:
ORA-16661: the standby database needs to be reinstated
Note: To reinstate a database, Flashback Database must have been enabled on the database prior to the failover and flashback logs must be available. To reinstate the database:
1. Start the database instance and mount the database. 2. Invoke DGMGRL and connect to the new primary database. 3. Use the REINSTATE DATABASE DGMGRL command to reinstate the database.
If a database must be re-created, it has the following status after the failover: ORA-16795: the standby database needs to be re-created
You must re-create the standby database from a copy of the primary database and then reenable it by using the ENABLE DATABASE DGMGRL command.
Oracle Database 11g: Data Guard Administration 1 - 41
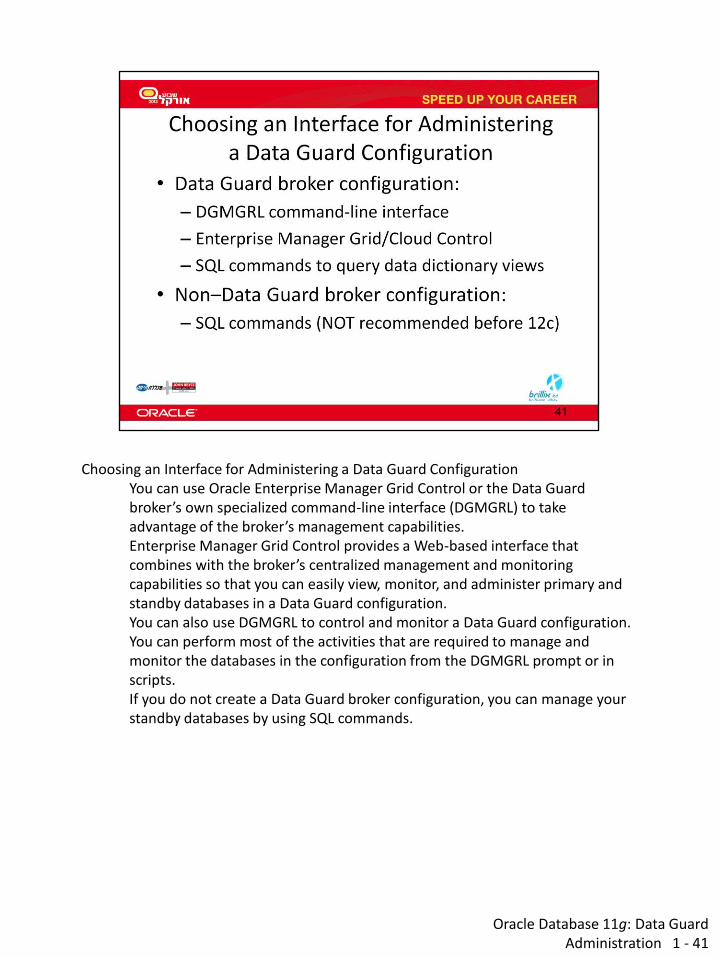
Choosing an Interface for Administering a Data Guard Configuration You can use Oracle Enterprise Manager Grid Control or the Data Guard broker’s own specialized command-line interface (DGMGRL) to take advantage of the broker’s management capabilities. Enterprise Manager Grid Control provides a Web-based interface that combines with the broker’s centralized management and monitoring capabilities so that you can easily view, monitor, and administer primary and standby databases in a Data Guard configuration. You can also use DGMGRL to control and monitor a Data Guard configuration. You can perform most of the activities that are required to manage and monitor the databases in the configuration from the DGMGRL prompt or in scripts. If you do not create a Data Guard broker configuration, you can manage your standby databases by using SQL commands.

Oracle Database 11g: Data Guard Administration 1 - 42
Oracle Data Guard Broker The Oracle Data Guard broker is a distributed management framework that automates and centralizes the creation, maintenance, and monitoring of Data Guard configurations. After creating the Data Guard configuration, the broker monitors the activity, health, and availability of all systems in the configuration.


Oracle Database 11g: Data Guard
Administration 2 - 44
Steps to Create a Physical Standby Database
You perform the steps listed in the slide to use SQL and RMAN commands to
create a physical standby database. Detailed information about each step is
provided in the remaining slides of the lesson.
Note: See Oracle Data Guard Concepts and Administration for detailed
information about creating a physical standby database by using only SQL
commands.

Oracle Database 11g: Data Guard
Administration 2 - 45
Preparing the Primary Database The FORCE LOGGING mode determines whether the Oracle database server
logs all changes in the database (except for changes to temporary tablespaces
and temporary segments). Note: Additional information about enabling FORCE LOGGING follows in this
lesson.
Unless you have configured Oracle Advanced Security and public key
infrastructure (PKI) certificates, every database in a Data Guard configuration must use a password file, and the password for the SYS user must be identical
on every system for redo data transmission to succeed. For details about
creating a password file, see the Oracle Database Administrator’s Guide.
A standby redo log is used to store redo received from another Oracle
database.
Note: Additional information about creating standby redo log files is provided
in this lesson.
On the primary database, you define initialization parameters that control redo
transport services while the database is in the primary role. There are other
parameters that you need to add that control the receipt of the redo data and
log apply services when the primary database is transitioned to the standby
role. Additional information about setting initialization parameters is provided
in this lesson. Note: The Data Guard broker requires the use of a server
parameter file.

If archiving is not enabled, issue the ALTER DATABASE ARCHIVELOG
command to put the primary database in ARCHIVELOG mode and enable
automatic archiving. See the Oracle Database Administrator’s Guide for
additional information about archiving.
45
Oracle Database 11g: Data Guard
Administration 2 - 46
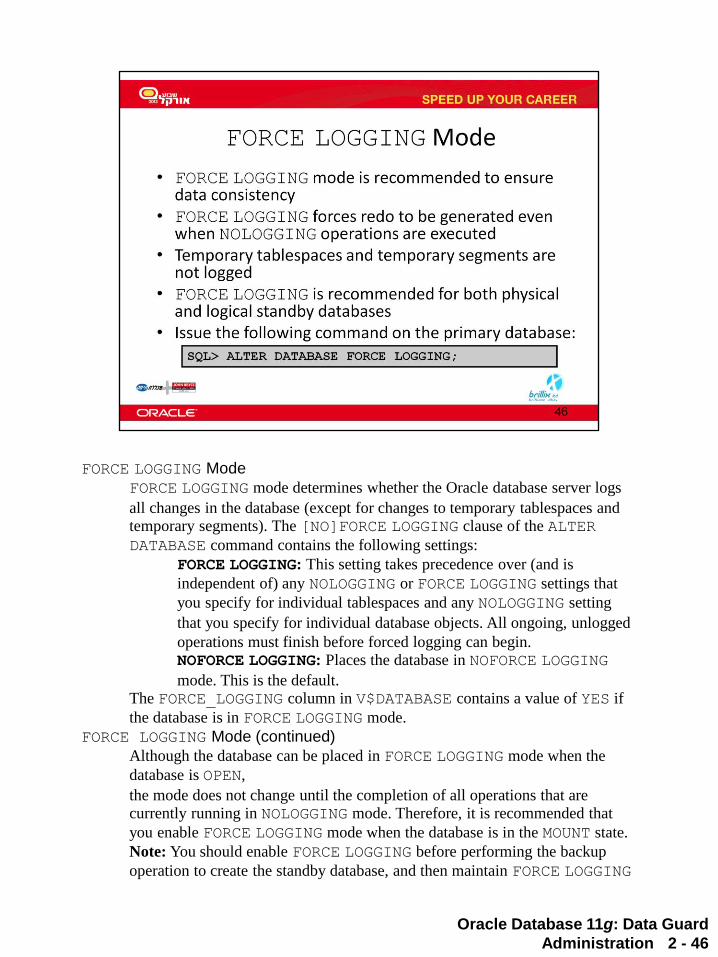
FORCE LOGGING Mode
FORCE LOGGING mode determines whether the Oracle database server logs
all changes in the database (except for changes to temporary tablespaces and temporary segments). The [NO]FORCE LOGGING clause of the ALTER
DATABASE command contains the following settings:
FORCE LOGGING: This setting takes precedence over (and is
independent of) any NOLOGGING or FORCE LOGGING settings that
you specify for individual tablespaces and any NOLOGGING setting
that you specify for individual database objects. All ongoing, unlogged
operations must finish before forced logging can begin. NOFORCE LOGGING: Places the database in NOFORCE LOGGING
mode. This is the default. The FORCE_LOGGING column in V$DATABASE contains a value of YES if
the database is in FORCE LOGGING mode.
FORCE LOGGING Mode (continued)
Although the database can be placed in FORCE LOGGING mode when the
database is OPEN,
the mode does not change until the completion of all operations that are currently running in NOLOGGING mode. Therefore, it is recommended that
you enable FORCE LOGGING mode when the database is in the MOUNT state.
Note: You should enable FORCE LOGGING before performing the backup
operation to create the standby database, and then maintain FORCE LOGGING

mode for as long as the Data Guard configuration exists.
46

Oracle Database 11g: Data Guard
Administration 2 - 47
Configuring Standby Redo Logs
A standby redo log is used only when the database is in the standby role to
store redo data received from the primary database. Standby redo logs form a
separate pool of log file groups.
Configuring standby redo log files is highly recommended for all databases in
a Data Guard configuration to aid in role reversal.
A standby redo log is required to implement:
Real-time apply
Cascaded redo log destinations
Note: By configuring the standby redo log on the primary database, the
standby redo log is created automatically on the standby database when you execute the DUPLICATE TARGET DATABASE FOR STANDBY FROM
ACTIVE DATABASE RMAN command.

Oracle Database 11g: Data Guard
Administration 2 - 48
Creating Standby Redo Logs
You must create at least the same number of standby redo log file groups as
there are online redo log file groups on the primary database. It is highly
recommended that you have one more standby redo log group than you have
online redo log groups as the primary database. In addition, the files should be
the same size as the primary database’s online redo logs. If your online redo
log files are of different sizes, the remote file server (RFS) process
automatically uses the same size standby redo log as the online redo log file.
The RFS process writes to an archive redo log file if any of the following
conditions are met:
There are no standby redo logs.
It cannot find a standby redo log that is the same size as the incoming
online redo log file.
All standby redo logs of the correct size have not yet been archived.

Oracle Database 11g: Data Guard
Administration 2 - 49
Using SQL to Create Standby Redo Logs You can create standby redo logs by using the ADD STANDBY LOGFILE
clause of the ALTER DATABASE statement. Although standby redo logs are
used only when the database is operating in the standby role, you should create
standby redo logs on the primary database so that switching roles does not
require additional DBA intervention.
You should create standby redo log files on the primary database prior to using the DUPLICATE TARGET DATABASE FOR STANDBY FROM ACTIVE
DATABASE RMAN command so that RMAN creates standby redo log files
automatically on the standby database.
Create standby redo log file groups by using the following guidelines:
Each standby redo log file must be at least as large as the largest redo
log file in the redo source database. For administrative ease, Oracle
recommends that all redo log files in the redo source database and the
redo transport destination be of the same size.
The standby redo log should have at least one more redo log group than
the redo log on the redo source database.

Oracle Database 11g: Data Guard
Administration 2 - 50
Viewing Standby Redo Log Information To verify that standby redo logs were created, query V$STANDBY_LOG or
V$LOGFILE.

Oracle Database 11g: Data Guard
Administration 2 - 51
Setting Initialization Parameters on the Primary Database
On the primary database, you define initialization parameters that control redo
transport services while the database is in the primary role. These parameters
are described in more detail in the following slides.

Oracle Database 11g: Data Guard
Administration 2 - 52
Setting LOG_ARCHIVE_CONFIG
Specify the DG_CONFIG attribute of the LOG_ARCHIVE_CONFIG parameter
to list the DB_UNIQUE_NAME of the primary and standby databases in the
Data Guard configuration. By default, the LOG_ARCHIVE_CONFIG
parameter enables the database to send and receive redo. Use the V$DATAGUARD_CONFIG view to see the unique database names
defined with the DB_UNIQUE_NAME and LOG_ARCHIVE_CONFIG
initialization parameters; you can thus view
the Data Guard environment from any database in the configuration. The first
row of the view lists the unique database name of the current database that was specified with the DB_UNIQUE_NAME initialization parameter. Additional
rows reflect the unique database names of the other databases in the configuration that were specified with the DG_CONFIG keyword of the
LOG_ARCHIVE_CONFIG initialization parameter.
Setting LOG_ARCHIVE_CONFIG (continued)
The following example illustrates the use of V$DATAGUARD_CONFIG:
SQL> show parameter log_archive_config
NAME TYPE VALUE
------------------- ------- ------------------------
---

log_archive_config string
dg_config=(pc00prmy,pc00sby1)
SQL> SELECT * FROM v$dataguard_config;
DB_UNIQUE_NAME
------------------------------
pc00prmy
pc00sby1
52
Oracle Database 11g: Data Guard
Administration 2 - 53
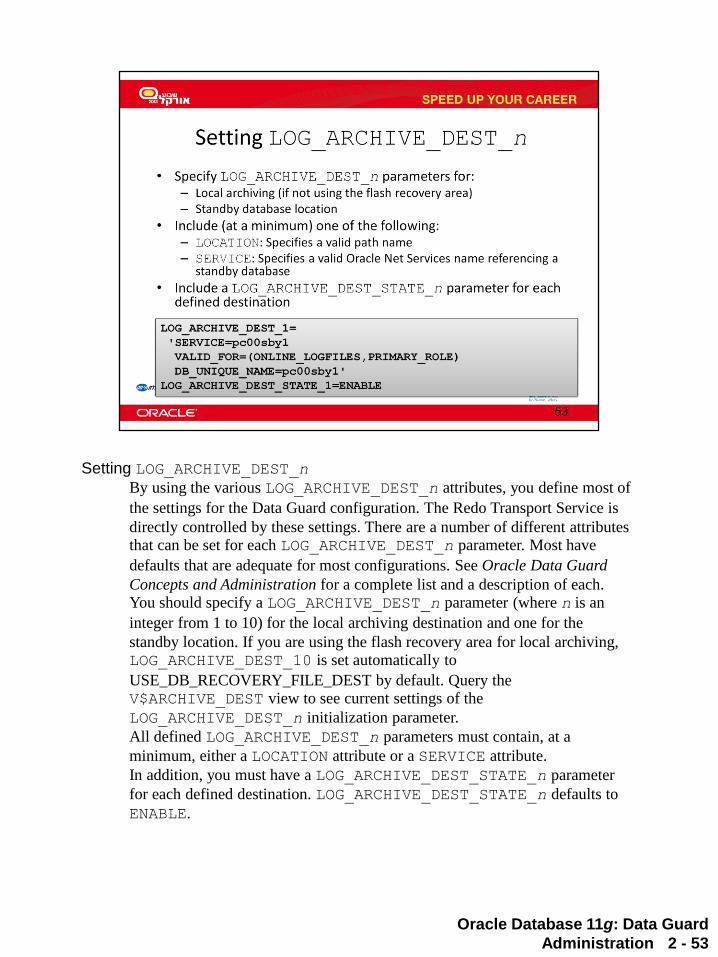
Setting LOG_ARCHIVE_DEST_n
By using the various LOG_ARCHIVE_DEST_n attributes, you define most of
the settings for the Data Guard configuration. The Redo Transport Service is
directly controlled by these settings. There are a number of different attributes that can be set for each LOG_ARCHIVE_DEST_n parameter. Most have
defaults that are adequate for most configurations. See Oracle Data Guard
Concepts and Administration for a complete list and a description of each. You should specify a LOG_ARCHIVE_DEST_n parameter (where n is an
integer from 1 to 10) for the local archiving destination and one for the
standby location. If you are using the flash recovery area for local archiving, LOG_ARCHIVE_DEST_10 is set automatically to
USE_DB_RECOVERY_FILE_DEST by default. Query the V$ARCHIVE_DEST view to see current settings of the
LOG_ARCHIVE_DEST_n initialization parameter.
All defined LOG_ARCHIVE_DEST_n parameters must contain, at a
minimum, either a LOCATION attribute or a SERVICE attribute.
In addition, you must have a LOG_ARCHIVE_DEST_STATE_n parameter
for each defined destination. LOG_ARCHIVE_DEST_STATE_n defaults to
ENABLE.

Oracle Database 11g: Data Guard
Administration 2 - 54
Specifying Role-Based Destinations The VALID_FOR attribute of the LOG_ARCHIVE_DEST_n initialization
parameter enables you
to identify exactly when the archive destination is to be used, as well as which
type of log file it is used for. The attribute uses a keyword pair to identify the
redo log type as well as the database role. Using this attribute enables you to
set up parameters in anticipation of switchover and failover operations.
In the example in the slide, there is a destination on the standby database and the primary database defined with the VALID_FOR setting shown. This
destination is to be used on the standby database only after a switchover, when
the standby becomes a primary. The destination on the old primary is ignored
when it becomes a standby. You supply two values for the VALID_FOR attribute: redo_log_type and
database_role.
The redo_log_type keywords are:
ONLINE_LOGFILE: This destination is used only when archiving
online redo log files. STANDBY_LOGFILE: This destination is used only when archiving
standby redo log files or receiving archive logs from another database. ALL_LOGFILES: This destination is used when archiving either
online or standby redo log files.
Specifying Role-Based Destinations (continued)

The database_role keywords are the following:
PRIMARY_ROLE: This destination is used only when the database is
in the primary database role. STANDBY_ROLE: This destination is used only when the database is
in the standby (logical or physical) role. ALL_ROLES: This destination is used when the database is in either
the primary or the standby (logical or physical) role. Note: Because the keywords are unique, the archival_source and
database_role values can be specified in any order.
For example, VALID_FOR=(PRIMARY_ROLE,ONLINE_LOGFILE) is
functionally equivalent to VALID_FOR=(ONLINE_LOGFILE,PRIMARY_ROLE).
54

Oracle Database 11g: Data Guard
Administration 2 - 55
Combinations for VALID_FOR
In the table in the slide, Valid indicates that the archive log destination is used
in a database that is in the role defined by the column heading. Ignored means
that the archive log destination is not appropriate and that a destination of this
type is ignored. An ignored destination does not generate an error. There is only one invalid combination: STANDBY_LOGFILE,
PRIMARY_ROLE. Specifying this combination causes an error for all database
roles. If it is set, you receive the following error at startup:
ORA-16026: The parameter LOG_ARCHIVE_DEST_n contains an invalid attribute value
Note: Both single and plural forms of the keywords are valid. For example, you can specify either PRIMARY_ROLE or PRIMARY_ROLES, as well as
ONLINE_LOGFILE or ONLINE_LOGFILES.

Oracle Database 11g: Data Guard
Administration 2 - 56
Defining the Redo Transport Mode The following attributes of the LOG_ARCHIVE_DEST_n initialization
parameter define the redo transport mode that is used by the primary database
to send redo to the standby database. SYNC: Specifies that redo data generated by a transaction must have
been received at a destination that has this attribute before the
transaction can commit; otherwise, the destination is deemed to have failed. In a configuration with multiple SYNC destinations, the redo
must be processed as described here for every SYNC destination.
ASYNC (default): Specifies that redo data generated by a transaction
need not have been received at a destination that has this attribute
before the transaction can commit AFFIRM: Specifies that a redo transport destination acknowledges
received redo data after writing it to the standby redo log NOAFFIRM: Specifies that a redo transport destination acknowledges
received redo data before writing it to the standby redo log If neither the AFFIRM nor the NOAFFIRM attribute is specified, the default is
AFFIRM when the SYNC attribute is specified and NOAFFIRM when the
ASYNC attribute is specified.

Oracle Database 11g: Data Guard
Administration 2 - 57
Setting Initialization Parameters on the Primary Database
The parameters listed in the slide are required if the disk configuration is not
the same for the primary and standby databases. The parameters are also
applicable when the primary database is transitioned to a standby database.

Oracle Database 11g: Data Guard
Administration 2 - 58
Specifying Values for DB_FILE_NAME_CONVERT
When files are added to the standby database, the DB_FILE_NAME_CONVERT parameter is used to convert the data file name
on the primary database to a data file name on the standby database. The file
must exist and be writable on the physical standby database; if it is not, the
recovery process halts with an error.
You specify the path name and file name location of the primary database data
files followed by the standby location by setting the value of this parameter to
two strings. The first string is the pattern found in the data file names on the
primary database. The second string is the pattern found in the data file names
on the physical standby database. You can use as many pairs of primary and
standby replacement strings as required. You can use single or double
quotation marks. Parentheses are optional. In the example in the slide, /oracle1/dba/ and /oracle2/dba/ are
used to match file names coming from the primary database. /ora1/stby_dba/ and /ora2/stby_dba/ are the corresponding
strings for the physical standby database. A file on the primary database named /oracle1/dba/system01.dbf is converted to
/ora1/stby_dba/system01.dbf on the standby database.
Note: If the standby database uses Oracle Managed Files (OMF), do not set the DB_FILE_NAME_CONVERT parameter.

Oracle Database 11g: Data Guard
Administration 2 - 59
Specifying Values for LOG_FILE_NAME_CONVERT
The LOG_FILE_NAME_CONVERT parameter is used to convert the name of a
redo log file on the primary database to the name of a redo log file on the
standby database. Adding a redo log file to the primary database requires
adding a corresponding file to the standby database. When the standby
database is updated, this parameter is used to convert the log file name from
the primary database to the log file name on the standby database. This
parameter is required if the standby database is on the same system as the
primary database or on a separate system that uses different path names.
Specify the location of the primary database online redo log files followed by
the standby location. The use of parentheses is optional.
Note: If the standby database uses OMF, do not set the LOG_FILE_NAME_CONVERT parameter.

Oracle Database 11g: Data Guard
Administration 2 - 60
Specifying a Value for STANDBY_FILE_MANAGEMENT
When STANDBY_FILE_MANAGEMENT is set to AUTO, you cannot execute
the following commands on the standby database: ALTER DATABASE RENAME
ALTER DATABASE ADD/DROP LOGFILE [MEMBER]
ALTER DATABASE ADD/DROP STANDBY LOGFILE MEMBER
ALTER DATABASE CREATE DATAFILE AS ...
When you add a log file to the primary database and want to add it to the
physical standby database as well (or when you drop a log file from the
primary and want to drop it from the physical), you must do the following: 1. Set STANDBY_FILE_MANAGEMENT to MANUAL on the physical
standby database.
2. Add the redo log files to (or drop them from) the primary database.
3. Add them to (or drop them from) the standby database. 4. Reset to AUTO afterward on the standby database.

Oracle Database 11g: Data Guard
Administration 2 - 61
Setting Initialization Parameters on the Primary Database
In the example in the slide, assume that the primary database is named pc00prmy and the standby is named pc00sby1. For each, there is an
Oracle Net Services name defined.
There are additional parameters you need to add that control the receipt of the
redo data and log apply services when the primary database is transitioned to
the standby role:
DB_FILE_NAME_CONVERT='/u01/app/oracle/oradata/pc00sby1/', '/u01/app/oracle/oradata/pc00prmy/' LOG_FILE_NAME_CONVERT='/u01/app/oracle/oradata/pc00sby1/', '/u01/app/oracle/oradata/pc00prmy/' STANDBY_FILE_MANAGEMENT=AUTO
Specifying these initialization parameters configures the primary database to
resolve gaps, converts new data file and log file path names from a new
primary database, and archives the incoming redo data when this database is in
the standby role.

Oracle Database 11g: Data Guard
Administration 2 - 62
Creating an Oracle Net Service Name for Your Physical Standby Database
Use Oracle Net Manager to define a network service name for your physical
standby database. The slide shows the entry in the tnsnames.ora file that was generated by
Oracle Net Manager.
Note: This entry is used to connect to the standby database when invoking
RMAN and executing the DUPLICATE TARGET DATABASE FOR STANDBY FROM ACTIVE
DATABASE command.

63

Oracle Database 11g: Data Guard
Administration 2 - 64
Creating an Entry for Your Standby Database for the Listener
Use Oracle Net Manager to configure a new listener (if necessary) or to update the listener.ora file with an entry for your physical standby database.
The slide shows the entry in the listener.ora file that was generated by
Oracle Net Manager. Note: This entry is needed because we start the instance in NOMOUNT mode.

Oracle Database 11g: Data Guard
Administration 2 - 65
Copying Your Primary Database Password File to the Physical Standby
Database Host
You must create a password file for your physical standby database by copying
the primary database password file to the physical standby database host and
renaming it.

Oracle Database 11g: Data Guard
Administration 2 - 66
Creating an Initialization Parameter File for the Physical Standby Database Create a text initialization parameter file containing only the DB_NAME
initialization parameter.
This initialization parameter file is used to start the physical standby database in NOMOUNT mode prior to the execution of the DUPLICATE TARGET
DATABASE FOR STANDBY FROM ACTIVE DATABASE RMAN command.
When you execute this command, RMAN creates a server parameter file for
the standby database.

Oracle Database 11g: Data Guard
Administration 2 - 67
Creating Directories for the Physical Standby Database
Create a directory for the physical standby database in the $ORACLE_BASE/admin directory. Create the audit trail directory named
adump under the database directory in $ORACLE_BASE/admin.
Create a directory for the physical standby database data files in the $ORACLE_BASE/oradata directory.

Oracle Database 11g: Data Guard
Administration 2 - 68
Starting the Physical Standby Database Set the ORACLE_SID environment variable to your physical standby
database. Start the physical standby database in NOMOUNT mode by using the
text initialization parameter file.

Oracle Database 11g: Data Guard
Administration 2 - 69
Setting FAL_CLIENT and FAL_SERVER Initialization Parameters
On physical standby databases, fetch archive log (FAL) provides a
client/server mechanism for resolving gaps detected in the range of archived
redo logs that are generated at the primary database and received at the
standby database. The FAL process is started only when needed, and shuts
down as soon as it is finished. It is very likely you will not see this process
running.
The FAL_CLIENT initialization parameter specifies the FAL client name
(Oracle Net service name) that is used by the FAL service, configured through
the FAL_SERVER parameter, to refer to the FAL client.
The FAL_SERVER initialization parameter specifies the FAL server (Oracle
Net service name) for a standby database.

Oracle Database 11g: Data Guard
Administration 2 - 70
Creating an RMAN Script to Create the Physical Standby Database Create an RMAN script containing the DUPLICATE TARGET DATABASE
FOR STANDBY FROM ACTIVE DATABASE command.
Note: You can use the CONFIGURE … PARALLELISM integer
command to configure automatic channels for the specified device type. For
additional information, see the Oracle Database Backup and Recovery
Reference.

Oracle Database 11g: Data Guard
Administration 2 - 71
Creating an RMAN Script to Create the Physical Standby Database
(continued)
In the RMAN script, specify the settings for the physical standby initialization
parameters.

Oracle Database 11g: Data Guard
Administration 2 - 72
Creating the Physical Standby Database
Connect to the primary database instance (target) and physical standby
database instance (auxiliary). Execute the script that you created.

Oracle Database 11g: Data Guard
Administration 2 - 73
Starting Redo Apply On the standby database, issue the ALTER DATABASE RECOVER MANAGED
STANDBY DATABASE USING CURRENT LOGFILE SQL command to start
Redo Apply. This statement automatically mounts the database. In addition, include the DISCONNECT FROM SESSION option so that Redo Apply runs in
a background session.
The transmission of redo data to the remote standby location does not occur
until after a log switch. Issue the following command on the primary database
to force a log switch:
SQL> ALTER SYSTEM SWITCH LOGFILE;

Oracle Database 11g: Data Guard
Administration 2 - 74
Enabling Real-Time Apply
When you enable the optional real-time apply feature, log apply services apply
the redo data from standby redo log files in real time (at the same time the log
files are being written to) as opposed to recovering redo from archived redo
log files when a log switch occurs. If for some reason the apply service is
unable to keep up (for example, if you have a physical standby in read-only
mode for a period of time), then the apply service automatically goes to the
archived redo log files as needed. The apply service also tries to catch up and
go back to reading the standby redo log files as soon as possible.
Real-time application of redo information provides a number of benefits,
including faster switchover and failover operations, up-to-date results after you
change a physical standby database to read-only, up-to-date reporting from a
logical standby database, and the ability to leverage larger log files.
Having larger log files with real-time apply is desirable because the apply
service stays with a log longer and the overhead of switching has less impact
on the real-time apply processing. The RECOVERY_MODE column of the V$ARCHIVE_DEST_STATUS view
contains the value MANAGED REAL TIME APPLY when log apply services are
running in real-time apply mode.
Enabling Real-Time Apply (continued) If you define a delay on a destination (with the DELAY attribute) and use real-
time apply, the delay is ignored.

For physical standby databases, the managed recovery process (MRP) applies
the redo from the standby redo log files after the remote file server (RFS)
process finishes writing. To start real-time apply for a physical standby
database, issue the following command:
ALTER DATABASE RECOVER MANAGED STANDBY DATABASE USING CURRENT LOGFILE;
Note: Standby redo log files are required for real-time apply. It is highly
recommended that you have one more standby redo log group than the number
of online log groups on the primary database.
Real-time apply is supported and automatically enabled by the broker.
74

75
Real Time Apply

76

Oracle Database 11g: Data Guard
Administration 2 - 77
Special Note: Standby Database on the Same System
If you have a standby database on the same system as the primary database,
you must use the following guidelines:
The data files must be renamed. The actual file names can be the same,
but at least the directory path must be different. This means that you must use the DB_FILE_NAME_CONVERT and
LOG_FILE_NAME_CONVERT parameters.
Note: If the standby database uses Oracle Managed Files (OMF), do not set the DB_FILE_NAME_CONVERT or
LOG_FILE_NAME_CONVERT parameters.
If a standby database is located on the same system as the primary
database, the archival directories for the standby database must use a
different directory structure than the primary database. Otherwise, the
standby database may overwrite the primary database files.
If you do not explicitly specify unique service names and if the primary
and standby databases are located on the same system, the same default
global name (consisting of the database name and domain name from the DB_NAME and DB_DOMAIN parameters) will be in effect for both
the databases.
If the standby database is on the same system as the primary database,
it does not protect against disaster. A disaster is defined as total loss of
the primary database system. If the standby database is on the same

system, it will be lost as well. This configuration should be used only
for testing and training purposes.
77
Oracle Database 11g: Data Guard
Administration 2 - 78
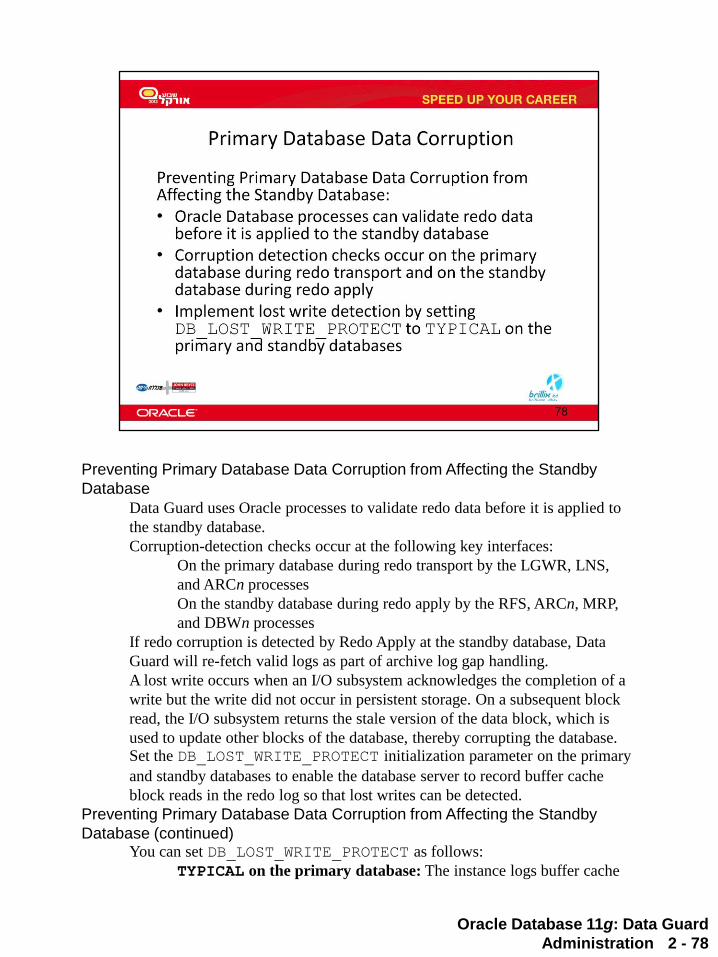
Preventing Primary Database Data Corruption from Affecting the Standby
Database
Data Guard uses Oracle processes to validate redo data before it is applied to
the standby database.
Corruption-detection checks occur at the following key interfaces:
On the primary database during redo transport by the LGWR, LNS,
and ARCn processes
On the standby database during redo apply by the RFS, ARCn, MRP,
and DBWn processes
If redo corruption is detected by Redo Apply at the standby database, Data
Guard will re-fetch valid logs as part of archive log gap handling.
A lost write occurs when an I/O subsystem acknowledges the completion of a
write but the write did not occur in persistent storage. On a subsequent block
read, the I/O subsystem returns the stale version of the data block, which is
used to update other blocks of the database, thereby corrupting the database. Set the DB_LOST_WRITE_PROTECT initialization parameter on the primary
and standby databases to enable the database server to record buffer cache
block reads in the redo log so that lost writes can be detected.
Preventing Primary Database Data Corruption from Affecting the Standby
Database (continued) You can set DB_LOST_WRITE_PROTECT as follows:
TYPICAL on the primary database: The instance logs buffer cache

reads for read/write tablespaces in the redo log FULL on the primary database: The instance logs reads for read-only
tablespaces as well as read/write tablespaces TYPICAL or FULL on the standby database or on the primary
database during media recovery: The instance performs lost write
detection NONE on either the primary database or the standby database (the
default): No lost write detection functionality is enabled
When a standby database applies redo during managed recovery, it reads the
corresponding blocks and compares the system change numbers (SCNs) with
the SCNs in the redo log before doing the following:
If the block SCN on the primary database is lower than on the standby
database, it detects a lost write on the primary database and returns an external error (ORA-752).
If the SCN is higher, it detects a lost write on the standby database and returns an internal error (ORA-600 3020).
In both cases, the standby database writes the reason for the failure in the alert
log and trace file.
The recommended procedure to repair a lost write on a primary database is to
fail over to the physical standby and re-create the primary. To repair a lost
write on a standby database, you must re-create the standby database or
affected files.
78


Oracle Database 11g: Data Guard Administration 3 - 80
Oracle Data Guard Broker: Features The following are some of the operations that the broker automates and simplifies:
Automated creation of Data Guard configurations incorporating a primary database, a new or existing standby database, redo transport services, and log apply services Note: Any of the databases in the configuration can be a Real Application Clusters (RAC) database. Adding up to eight new or existing standby databases to each existing Data Guard configuration, for a total of one primary database and from one to nine standby databases in the same configuration Managing an entire Data Guard configuration (including all databases, redo transport services, and log apply services) through a client connection to any database in the configuration Invoking switchover or failover with a single command to initiate and control complex role changes across all databases in the configuration Monitoring the status of the entire configuration, capturing diagnostic information, reporting statistics (such as the log apply rate and the redo generation rate), and detecting problems quickly with centralized monitoring, testing, and performance tools

Oracle Database 11g: Data Guard Administration 3 - 81
Benefits of Using the Data Guard Broker By automating the tasks required to configure and monitor a Data Guard configuration, the broker enhances the high-availability, data protection, and disaster protection capabilities that are inherent in Oracle Data Guard. If the primary database fails, the broker streamlines the process for any one of the standby databases to replace the primary database and take over production processing. The broker enables easy configuration of additional standby databases. After creating a Data Guard configuration consisting of a primary and a standby database, you can add up to eight standby databases to each Data Guard configuration.

Oracle Database 11g: Data Guard Administration 3 - 82
Comparing Configuration Management With and Without the Data Guard Broker The table in the slide provides an overview of configuration management with and without the Data Guard broker (source: Table 1-1, “Configuration Management With and Without the Broker,” in Oracle Data Guard Broker).

Oracle Database 11g: Data Guard Administration 3 - 83
Data Guard Broker: Components The Oracle Data Guard broker consists of both client-side and server-side components. On the client, you can use the following Data Guard components to define and manage a configuration:
Oracle Enterprise Manager DGMGRL, which is the Data Guard command-line interface (CLI)
On the server, the Data Guard monitor is a broker component that is integrated with the Oracle database. The Data Guard monitor comprises the Data Guard monitor (DMON) process and broker configuration files, with which you can control the databases of that configuration, modify their behavior at run time, monitor the overall health of the configuration, and provide notification of other operational characteristics. The configuration file contains profiles that describe the current state and properties of each database in the configuration. Associated with each database are various properties that the DMON process uses to control the database’s behavior. The properties are recorded in the configuration file as a part of the database’s object profile that is stored there. Many database properties are used to control database initialization parameters related to the Data Guard environment.

Oracle Database 11g: Data Guard Administration 3 - 84
Data Guard Broker: Configurations A Data Guard configuration consists of one primary database and up to nine standby databases. The databases in a Data Guard configuration are typically dispersed geographically and are connected by Oracle Net. A Data Guard broker configuration is a logical grouping of the primary and standby databases in a Data Guard configuration. The broker’s DMON process configures and maintains the broker configuration components as a unified group of resource objects that you can manage and monitor as a single unit.

Oracle Database 11g: Data Guard Administration 3 - 85
Data Guard Broker: Management Model The Data Guard broker performs operations on the following logical objects:
Configuration of databases Single database
A broker configuration consists of: Configuration object A named collection of database profiles. A database profile is a description of a database object, including its current state, current status, and properties. Database objects Objects corresponding to primary or standby databases Instance objects A database object may comprise one or more instance objects if it is a RAC database.
The broker supports one or more Data Guard configurations, each of which includes a profile for one primary database as well as profiles for up to nine physical, logical, RAC or non-RAC standby databases.

Oracle Database 11g: Data Guard Administration 3 - 86
Data Guard Broker: Architecture The Data Guard broker helps you create, control, and monitor a Data Guard configuration. This configuration consists of a primary database that is protected by one or more standby databases. After the broker has created the Data Guard configuration, the broker monitors the activity, health, and availability of all systems in that configuration. The Data Guard monitor process (DMON) is an Oracle background process that runs on every instance that is managed by the broker. When you start the Data Guard broker, a DMON process is created. When you use Enterprise Manager or the Data Guard command-line interface (CLI), the DMON process is the server-side component that interacts with the local instance and the DMON processes that are running on other sites to perform the requested function. The DMON process is also responsible for monitoring the health of the broker configuration and for ensuring that every instance has a consistent copy of the configuration files in which the DMON process stores its configuration data. There are two multiplexed versions of the configuration file on each instance.
Oracle Database 11g: Data Guard Administration 3 - 87
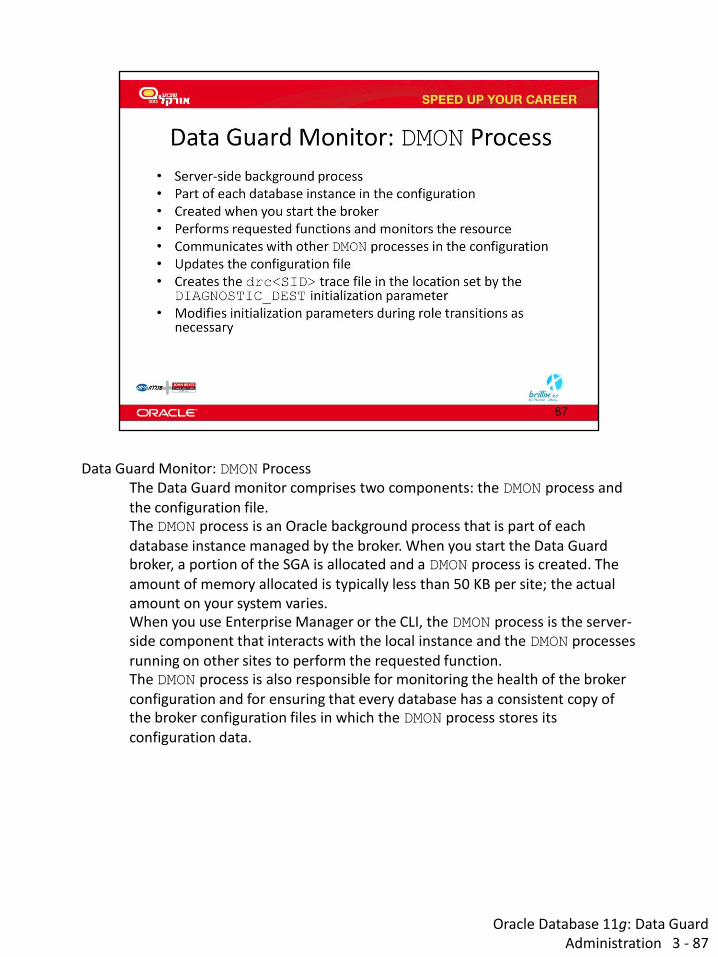
Data Guard Monitor: DMON Process The Data Guard monitor comprises two components: the DMON process and the configuration file. The DMON process is an Oracle background process that is part of each database instance managed by the broker. When you start the Data Guard broker, a portion of the SGA is allocated and a DMON process is created. The amount of memory allocated is typically less than 50 KB per site; the actual amount on your system varies. When you use Enterprise Manager or the CLI, the DMON process is the server-side component that interacts with the local instance and the DMON processes running on other sites to perform the requested function. The DMON process is also responsible for monitoring the health of the broker configuration and for ensuring that every database has a consistent copy of the broker configuration files in which the DMON process stores its configuration data.

Oracle Database 11g: Data Guard Administration 3 - 88
Data Guard Broker Interfaces The DGMGRL command-line interface includes:
Configuration and setup tasks Management and control of the configuration Commands to check the status and health of the configuration Commands to execute role changes
Oracle Enterprise Manager Grid Control includes the following Data Guard features:
Wizard-driven creation of standby databases Wizard-driven creation of a broker configuration based on an existing primary and standby database Complete monitoring and proactive event reporting through email or pagers Simplified control of the databases through their potential states. For example, with Enterprise Manager you can start or stop the redo transport services, start or stop the log apply services, and place a standby database in read-only mode. “Pushbutton” switchover and failover. Grid Control enables you to execute a switchover or failover between a primary and a standby database by simply clicking a button.
Note: After defining a Data Guard broker configuration, you should use DGMGRL or Enterprise Manager Grid Control to manage your configuration.

You should not use SQL commands to manage the databases because you could cause a conflict with the broker.
88

Oracle Database 11g: Data Guard Administration 3 - 89
DGMGRL Commands The following commands are available in DGMGRL (the Data Guard CLI). Note: Many of these commands have additional arguments that are not described here. See Oracle Data Guard Broker for detailed information.
ADD: Adds a standby database to the broker configuration CONNECT: Connects a given username to the specified instance CREATE: Enables you to create broker configurations DISABLE: Enables you to disable broker control of a configuration or database so that the object is no longer managed by the broker EDIT: Used to edit a configuration, database, or instance ENABLE: Enables you to enable broker control of a configuration or database EXIT/QUIT: Exits DGMGRL FAILOVER: Performs a database failover operation in which one of the standby databases changes to the role of primary database (This is an unplanned transition that may result in the loss of application data.) HELP: Displays online help for the commands in DGMGRL REINSTATE: Changes a disabled database into a viable standby database REMOVE: Removes a broker configuration, including all of its database profiles, a specified standby database profile, or knowledge of an instance

DGMGRL Commands (continued)
SHOW: Displays either a brief or a detailed summary of information about the broker configuration, database, or instance; can also display the dependency tree and default online states for the broker configuration, as well as the configuration log or the Oracle database alert log SHUTDOWN: Shuts down a currently running Oracle database instance START: Starts the Fast-Start Failover Observer STARTUP: Starts an Oracle instance with several options, including mounting and opening a database STOP: Stops the Fast-Start Failover Observer SWITCHOVER: Performs a switchover operation in which the current primary database becomes a standby database and the standby database to which the CLI is currently connected becomes the primary database
89

Oracle Database 11g: Data Guard Administration 3 - 90
Using Oracle Enterprise Manager 10g Grid Control To access the Data Guard features in Grid Control:
1. Click the Targets tab to go to the Targets page. 2. Click Databases to go to the Databases page, where you can see a list of all discovered databases, including the primary database. 3. Click the primary database to go to the primary database home page. 4. Click Maintenance. 5. Click “Setup and Manage” in the Data Guard section of the Maintenance page to open the Data Guard Overview page.

Oracle Database 11g: Data Guard Administration 3 - 91
Data Guard Overview Page On the Data Guard Overview page, you can:
View the protection mode and access the page to edit the protection mode View a summary showing the amount of data that the standby database has not received View information about the primary database View or access pages to change information for the standby databases:
Add a standby database to the broker configuration Change the state or properties Discontinue Data Guard broker control Switch the role from standby to primary Transition the standby database to the role of primary database
Access pages to view performance information for the configuration and status of online redo log files for each standby database Perform a verification process on the Data Guard configuration
Click Help to access information about each page. Note: You access the Data Guard Overview page by clicking “Setup and Manage” in the Data Guard section of the database Maintenance page.

Oracle Database 11g: Data Guard Administration 4 - 93
Data Guard Broker: Requirements To use the Data Guard broker, you must comply with the following requirements:
Use the Enterprise Edition of Oracle Database. Use a single-instance or multi-instance environment. Set the COMPATIBLE initialization parameter to 11.0.0 to take advantage of new Oracle Database 11g features. Enterprise Manager automatically configures the Oracle Net network files when it creates a standby database. If you configure an existing standby database in the broker configuration, you must configure the network files. You must use TCP/IP. To enable the Data Guard broker to restart instances during the course of broker operations, a service with a specific name must be statically registered with the local listener of each instance. The value of the GLOBAL_DBNAME attribute must be set to a concatenation of db_unique_name_DGMGRL.db_domain.

Oracle Database 11g: Data Guard Administration 4 - 94
Data Guard Broker: Requirements (continued)
Set the DG_BROKER_START initialization parameter to TRUE. This starts the DMON process. Note: When you use Enterprise Manager to create your configuration, this parameter is automatically set to TRUE. The primary database must be in ARCHIVELOG mode. Any database that is managed by the broker (including, for a RAC database, all instances of the database) must be mounted or open. The broker cannot start an instance. If any database in your configuration is a RAC database, you must configure the DG_BROKER_CONFIG_FILEn initialization parameters for that database so that they point to the same shared files for all instances of that database. You cannot use the default values for these parameters. Note: The shared files could be files on a cluster file system or on raw devices, or the files could be stored using Automatic Storage Management (ASM). For details, see the section titled “Managing Broker Configuration Files in an Oracle RAC Environment” in Oracle Data Guard Broker.

Oracle Database 11g: Data Guard Administration 4 - 95
Data Guard Broker and the SPFILE To ensure that the broker can update the values of parameters in both the database instance and the configuration file, you must use the persistent server parameter file (SPFILE) to control static and dynamic initialization parameters. Use of the SPFILE gives the broker a mechanism that enables it to reconcile property values that you have selected when using the broker with any related initialization parameter values that are recorded in the SPFILE. In addition, the SPFILE permits persistent Data Guard settings so that Data Guard continues to work even after the broker is disabled. When you set definitions or values for database properties in the broker configuration, the broker records the changes in the configuration file and also propagates the changes to the related initialization parameters in the server parameter file in the Data Guard configuration. When the configuration is enabled, the broker keeps the database property values in the Data Guard configuration file consistent with the values of the database initialization parameters in the SPFILE. Even when the configuration is disabled, you can update database property values through the broker. The broker retains the property settings (without validating the values) and updates the database initialization parameters in the SPFILE and the in-memory settings the next time you enable the broker configuration. For dynamic initialization parameters, the broker keeps the value of the

database parameter consistent in the System Global Area (SGA) for the instance, in the Data Guard configuration files and in the SPFILE. For static initialization parameters, the value in the SGA may differ from what is in the configuration files and in the SPFILE. Typically, the broker reconciles the differences by updating all parameter and property values the next time the database instance is stopped and restarted. Note: When using the broker (with Enterprise Manager or DGMGRL), do not attempt to manually set the parameters that the broker controls. If you set them manually, either you render your configuration inoperable or the broker simply takes the next opportunity to reset the parameter to the recorded setting. If you want to change a parameter value, you must change it by using one of the broker interfaces.
95

Oracle Database 11g: Data Guard Administration 4 - 96
Data Guard Monitor: Configuration File The DMON process maintains persistent configuration data about all the databases in the broker configuration in a broker configuration file. Every database that is part of the Data Guard broker configuration has two broker configuration files that are maintained and synchronized for each database in the broker configuration. One of the files is in use and the other acts as a backup. The configuration files are binary files and cannot be edited. When the broker is started for the first time, the configuration files are created and named automatically by using a default name. You can override this default name by setting the DG_BROKER_CONFIG_FILEn initialization parameters. You can also change the configuration file names dynamically by issuing the ALTER SYSTEM SQL statement. You must disable the broker configuration and stop the DMON process before changing the names. The configuration files contain entries that describe the state and properties of the databases in the configuration. For example, the files record the databases that are part of the configuration, the roles and properties of each of the databases, and the state of each of the databases in the configuration. Two files are maintained so that there is always a record of the last-known valid state of the configuration. The broker uses the data in the configuration file to configure and start the databases, control each database’s behavior, and provide information to DGMGRL and Enterprise Manager.

Oracle Database 11g: Data Guard Administration 4 - 97
Data Guard Broker Log Files The DMON process records operational and status information in the broker log file for each database in the Data Guard broker configuration.

Oracle Database 11g: Data Guard Administration 4 - 98
Creating a Broker Configuration To create a broker configuration by using DGMGRL, you first define the configuration, and then add each database to the configuration and enable the configuration. Each step is discussed in detail in the following slides. Note: The databases must exist before you add them to the configuration.
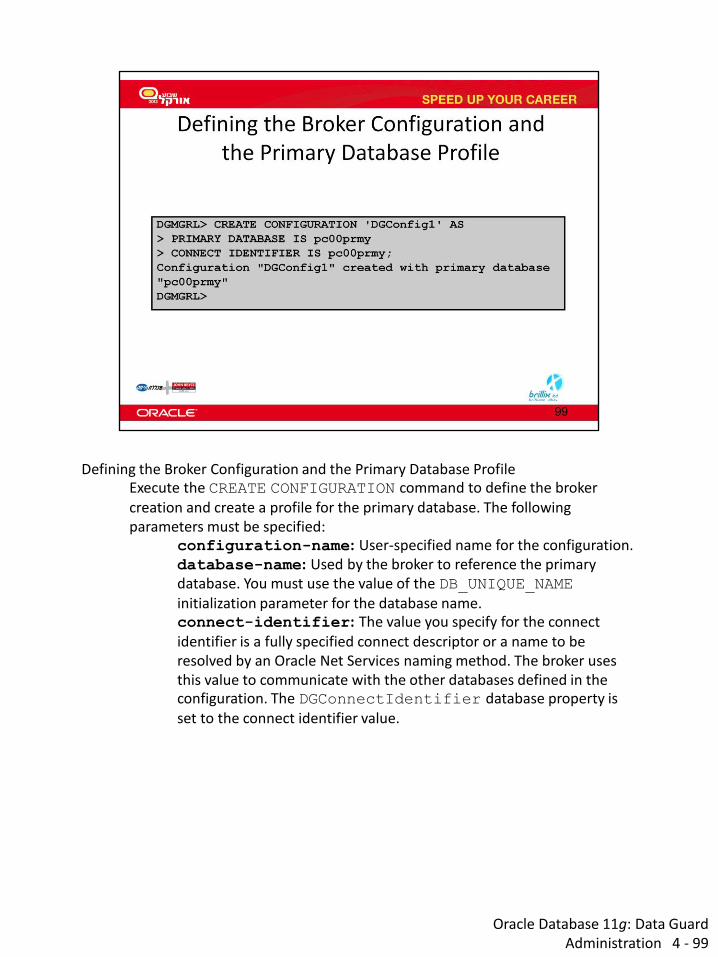
Oracle Database 11g: Data Guard Administration 4 - 99
Defining the Broker Configuration and the Primary Database Profile Execute the CREATE CONFIGURATION command to define the broker creation and create a profile for the primary database. The following parameters must be specified:
configuration-name: User-specified name for the configuration. database-name: Used by the broker to reference the primary database. You must use the value of the DB_UNIQUE_NAME initialization parameter for the database name. connect-identifier: The value you specify for the connect identifier is a fully specified connect descriptor or a name to be resolved by an Oracle Net Services naming method. The broker uses this value to communicate with the other databases defined in the configuration. The DGConnectIdentifier database property is set to the connect identifier value.

Oracle Database 11g: Data Guard Administration 4 - 100
Adding a Standby Database to the Configuration Use the ADD DATABASE DGMGRL command to define the standby database and create a broker configuration profile. The database name specified must be the same as the value of the DB_UNIQUE_NAME initialization parameter. The connect identifier is used by Oracle Net Services to access the database from all other databases in the configuration.

Oracle Database 11g: Data Guard Administration 4 - 101
Enabling the Configuration After defining the databases in the configuration, you enable the configuration and its databases by executing the ENABLE CONFIGURATION DGMGRL command.

102

Oracle Database 11g: Data Guard Administration 4 - 103
Changing Database Properties and States Configurable database properties can be viewed and dynamically updated by using the EDIT DATABASE SET PROPERTY DGMGRL command. Use the SHOW DATABASE VERBOSE command to obtain a complete list of database properties. The EDIT DATABASE SET STATE DGMGRL command is used to change the state of the primary database and standby databases. When the broker configuration is enabled, the databases are in one of four states:
TRANSPORT-ON (applicable only to the primary database): Redo transport services transmit redo data to the standby databases when the primary database is open in read/write mode. TRANSPORT-OFF (applicable only to the primary database): Redo transport services are stopped on the primary database. APPLY-ON (applicable only to a physical or logical standby database): Redo Apply is started on the physical standby database when it is mounted or in open read-only mode. SQL Apply is started on a logical standby database when it is opened and the logical standby database guard is on. APPLY-OFF (applicable only to a physical or logical standby database): Redo Apply is stopped on a physical standby database. SQL Apply is not running on a logical standby database.

Oracle Database 11g: Data Guard Administration 4 - 104
Managing Redo Transport Services by Using DGMGRL Use the DGConnectIdentifier, LogXptMode, and LogShipping configurable database properties to manage redo transport services. Details about each database property are provided in the next few slides. Note: See Oracle Data Guard Broker for information about additional properties that are used to manage redo transport services.
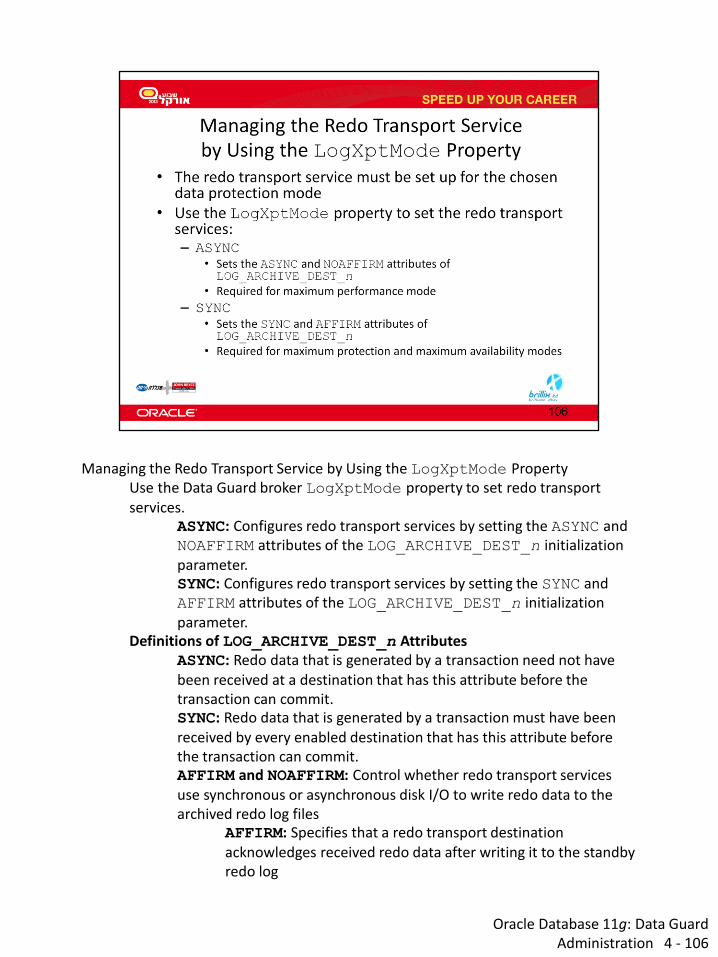
Oracle Database 11g: Data Guard Administration 4 - 106
Managing the Redo Transport Service by Using the LogXptMode Property Use the Data Guard broker LogXptMode property to set redo transport services.
ASYNC: Configures redo transport services by setting the ASYNC and NOAFFIRM attributes of the LOG_ARCHIVE_DEST_n initialization parameter. SYNC: Configures redo transport services by setting the SYNC and AFFIRM attributes of the LOG_ARCHIVE_DEST_n initialization parameter.
Definitions of LOG_ARCHIVE_DEST_n Attributes ASYNC: Redo data that is generated by a transaction need not have been received at a destination that has this attribute before the transaction can commit. SYNC: Redo data that is generated by a transaction must have been received by every enabled destination that has this attribute before the transaction can commit. AFFIRM and NOAFFIRM: Control whether redo transport services use synchronous or asynchronous disk I/O to write redo data to the archived redo log files
AFFIRM: Specifies that a redo transport destination acknowledges received redo data after writing it to the standby redo log

NOAFFIRM: Specifies that a redo transport destination acknowledges received redo data before writing it to the standby redo log
106

Oracle Database 11g: Data Guard Administration 4 - 107
Setting LogXptMode to ASYNC When you set the LogXptMode property to ASYNC, the broker configures redo transport services for this standby database by using the ASYNC and NOAFFIRM attributes of the LOG_ARCHIVE_DEST_n initialization parameter. ASYNC mode enables a moderate level of data protection for the primary database with a lower performance impact than SYNC mode. Standby redo log files are required for ASYNC mode. In the diagram in the slide, the solid line represents a synchronous operation (writing locally to the primary database online redo log files). The broken lines represent asynchronous operations with respect to the transaction commit on the primary database.

Oracle Database 11g: Data Guard Administration 4 - 108
Setting LogXptMode to SYNC When you set the LogXptMode database property to SYNC, the broker configures redo transport services for this standby database by using the SYNC and AFFIRM attributes of the LOG_ARCHIVE_DEST_n initialization parameter. SYNC mode is required for maximum protection and maximum availability data protection modes. This mode enables the highest level of data protection to the primary database but also incurs the highest performance overhead. Standby redo log files are required for SYNC mode. In the diagram in the slide, the solid line represents a synchronous operation (writing locally to the primary database online redo log files). The broken lines represent asynchronous operations with respect to the transaction commit on the primary database.

Oracle Database 11g: Data Guard Administration 4 - 109
Controlling the Shipping of Redo Data by Using the LogShipping Property Use the LogShipping configurable database property to specify whether redo transport services can send archived redo log files to a particular standby database. The value specified for the LogShipping property is applicable only when the primary database is in the TRANSPORT-ON state. If the value of the LogShipping property is ON, redo transport services are enabled for that standby database. If the LogShipping property is set to OFF, redo transport services are disabled for that standby database.

Oracle Database 11g: Data Guard Administration 4 - 110
Disabling Broker Management of the Configuration or Standby Database You can disable broker management of a configuration or a specific standby database. You may want to disable broker management to perform maintenance or to temporarily prevent automated actions for testing. Disabling broker management does not affect the underlying Data Guard configuration. Rather, it removes the ability for you to manage the configuration by using DGMGRL or Enterprise Manager Grid Control. Use the DISABLE CONFIGURATION DGMGRL command to disable broker management of the configuration. Use the DISABLE DATABASE DGMGRL command to disable broker management of the named standby database. Note: You must use the DISABLE CONFIGURATION command to disable broker management of a primary database.
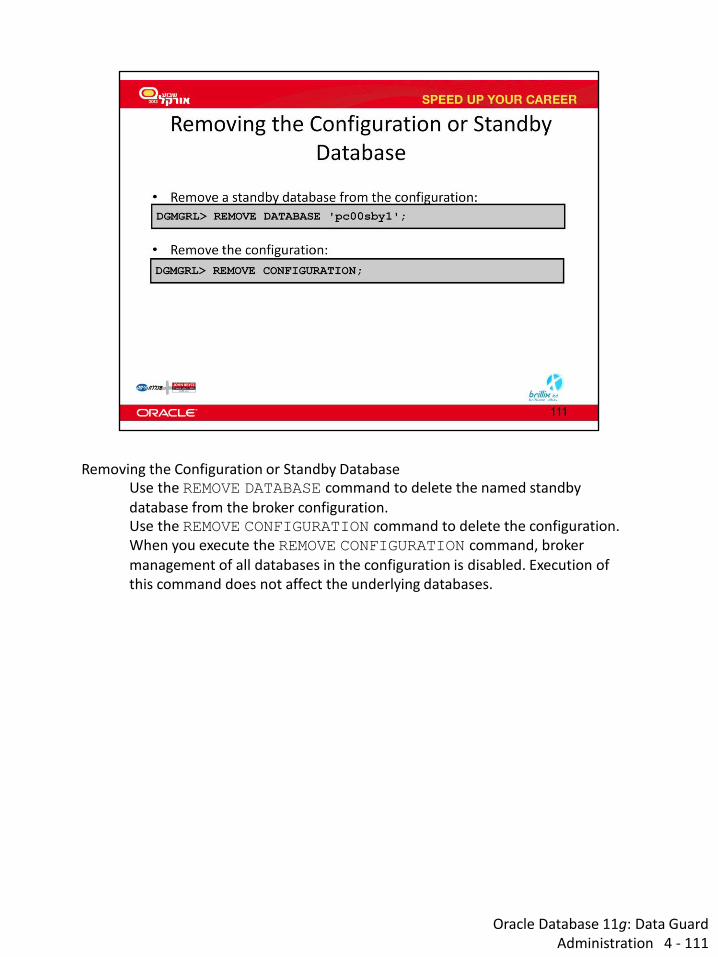
Oracle Database 11g: Data Guard Administration 4 - 111
Removing the Configuration or Standby Database Use the REMOVE DATABASE command to delete the named standby database from the broker configuration. Use the REMOVE CONFIGURATION command to delete the configuration. When you execute the REMOVE CONFIGURATION command, broker management of all databases in the configuration is disabled. Execution of this command does not affect the underlying databases.


Oracle Database 11g: Data Guard Administration 6 - 113
Benefits of Implementing a Logical Standby Database A logical standby database provides benefits in disaster recovery, high availability, and data protection that are similar to those of a physical standby database. It also provides the following specialized benefits:
Efficient utilization of system resources: A logical standby database is an open, independent, and active production database. It can include data that is not part of the primary database, and users can perform data manipulation operations on tables in schemas that are not updated from the primary database. It remains open while the tables are updated from the primary database, and those tables are simultaneously available for read access. Because the data can be presented with a different physical layout, additional indexes and materialized views can be created to improve your reporting and query requirements and to suit your specific business requirements. Note: Oracle Database 11g includes the Active Data Guard option. Active Data Guard includes the Real-Time Query feature, which enables you to open a physical standby database in read-only mode while Redo Apply is active. However, you cannot add additional structures to the physical standby database as you can with a logical standby database. (See the lesson titled “Using Oracle Active Data Guard” for detailed information.) Reduction in primary database workload: The logical standby tables

that are updated from the primary database can be used for other tasks (such as reporting, summations, and queries), thereby reducing the primary database workload.
113
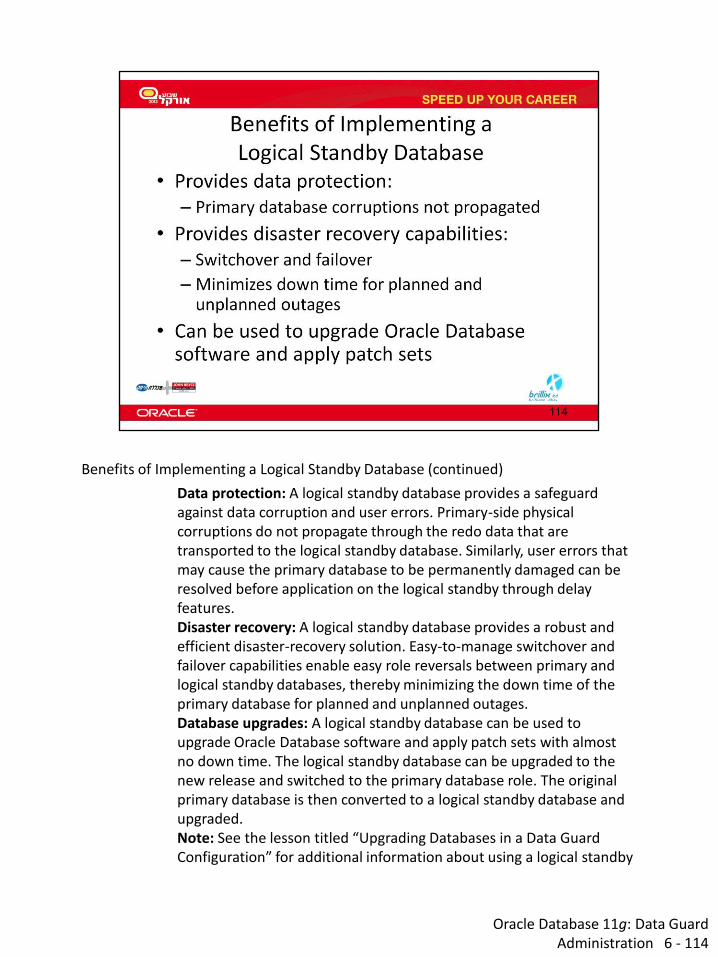
Oracle Database 11g: Data Guard Administration 6 - 114
Benefits of Implementing a Logical Standby Database (continued)
Data protection: A logical standby database provides a safeguard against data corruption and user errors. Primary-side physical corruptions do not propagate through the redo data that are transported to the logical standby database. Similarly, user errors that may cause the primary database to be permanently damaged can be resolved before application on the logical standby through delay features. Disaster recovery: A logical standby database provides a robust and efficient disaster-recovery solution. Easy-to-manage switchover and failover capabilities enable easy role reversals between primary and logical standby databases, thereby minimizing the down time of the primary database for planned and unplanned outages. Database upgrades: A logical standby database can be used to upgrade Oracle Database software and apply patch sets with almost no down time. The logical standby database can be upgraded to the new release and switched to the primary database role. The original primary database is then converted to a logical standby database and upgraded. Note: See the lesson titled “Upgrading Databases in a Data Guard Configuration” for additional information about using a logical standby

database to perform upgrades.
114

Oracle Database 11g: Data Guard Administration 6 - 115
Logical Standby Database: SQL Apply Architecture In a logical standby database configuration, Data Guard SQL Apply uses redo information shipped from the primary system. However, instead of using media recovery to apply changes (as in the physical standby database configuration), archived redo log information is transformed into equivalent SQL statements by using LogMiner technology. These SQL statements are then applied to the logical standby database. The logical standby database is open in read/write mode and is available for reporting capabilities.

Oracle Database 11g: Data Guard Administration 6 - 116
SQL Apply Process: Architecture SQL Apply uses a collection of parallel execution servers and background processes that apply changes from the primary database to the logical standby database as follows:
The reader process reads redo records from the archived redo log files. The preparer processes convert the block changes into table changes or logical change records (LCRs). At this point, the LCRs do not represent any specific transactions. The builder process assembles completed transactions from the individual LCRs. The analyzer process examines the records, possibly eliminating transactions and identifying dependencies between the different transactions. The coordinator process (LSP):
Assigns transactions Monitors dependencies between transactions and coordinates scheduling Authorizes the commitment of changes to the logical standby database
The applier process: Applies the LCRs to the database Asks the coordinator process to approve transactions with

unresolved dependencies (The transactions are scheduled appropriately so that the dependencies are resolved.) Commits the transactions
116
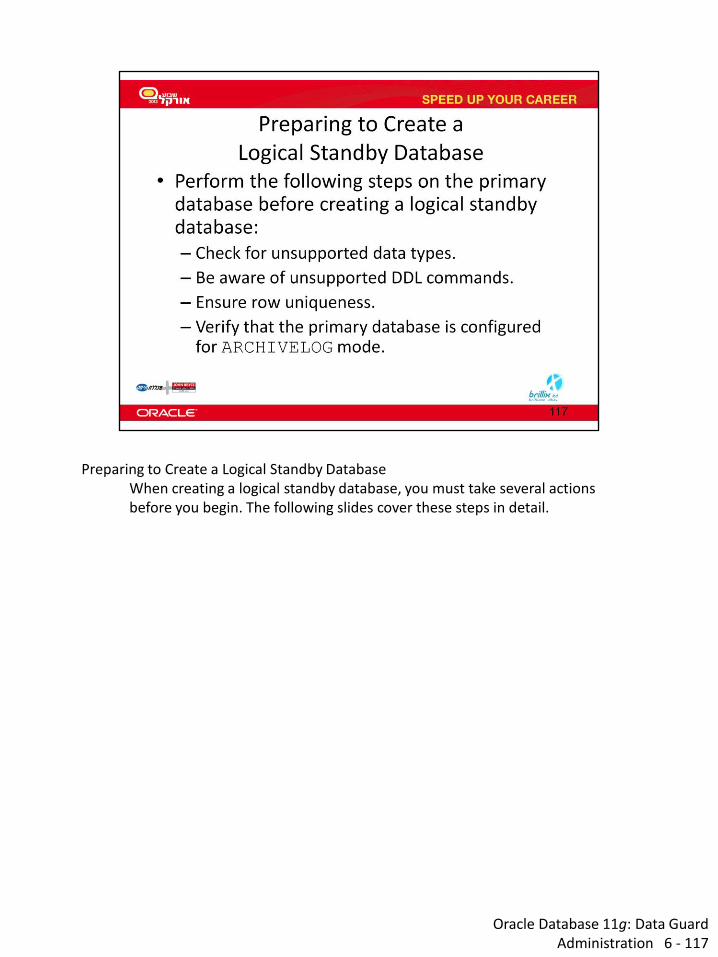
Oracle Database 11g: Data Guard Administration 6 - 117
Preparing to Create a Logical Standby Database When creating a logical standby database, you must take several actions before you begin. The following slides cover these steps in detail.
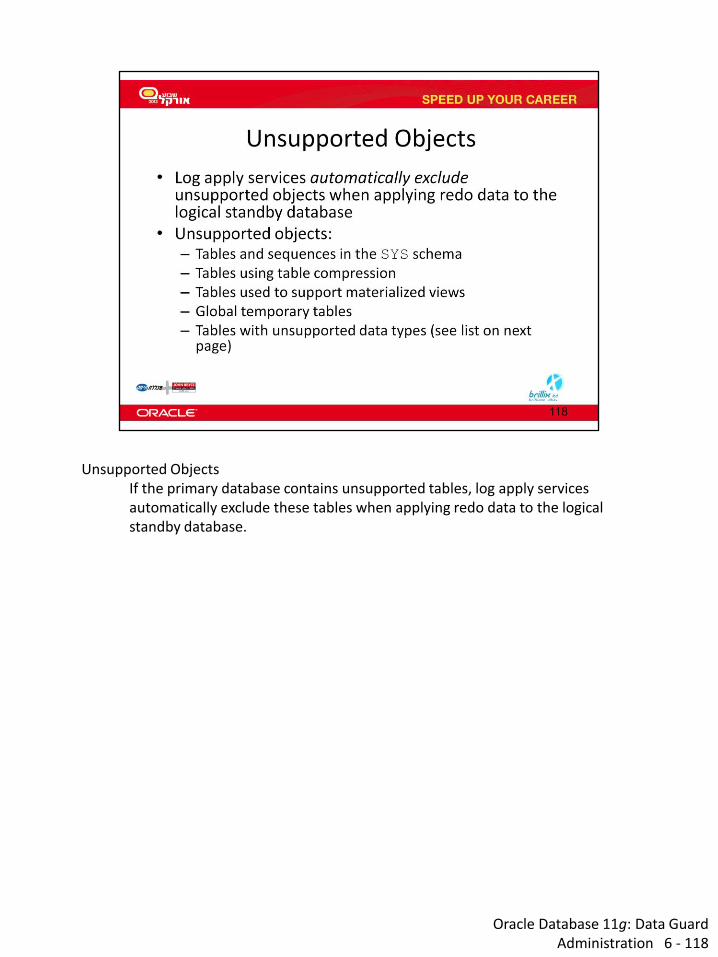
Oracle Database 11g: Data Guard Administration 6 - 118
Unsupported Objects If the primary database contains unsupported tables, log apply services automatically exclude these tables when applying redo data to the logical standby database.

Oracle Database 11g: Data Guard Administration 6 - 119
Unsupported Data Types Ensure that your logical standby database can support the data types of the database objects that are defined in your primary database. Note: See Oracle Data Guard Concepts and Administration for additional information about unsupported data types and objects.
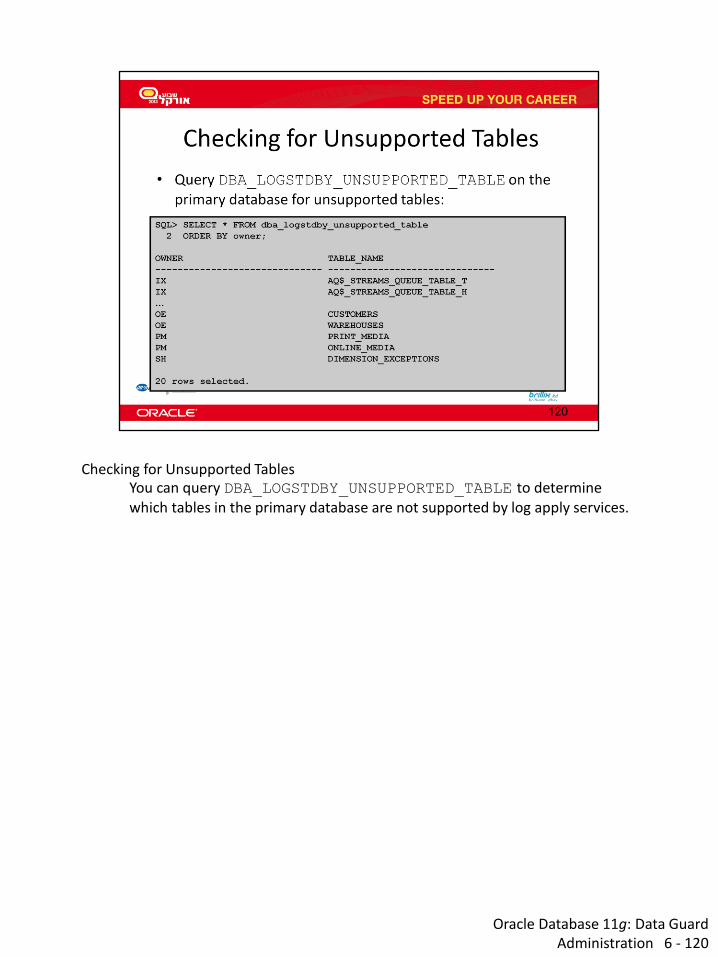
Oracle Database 11g: Data Guard Administration 6 - 120
Checking for Unsupported Tables You can query DBA_LOGSTDBY_UNSUPPORTED_TABLE to determine which tables in the primary database are not supported by log apply services.

Oracle Database 11g: Data Guard Administration 6 - 121
Checking for Tables with Unsupported Data Types You can query the DBA_LOGSTDBY_UNSUPPORTED data dictionary view to see all tables that contain data types that are not supported by logical standby databases. These tables are not maintained (that is, they do not have DML applied) in the logical standby database. Changes made to unsupported data types, tables, sequences, or views on the primary database are not propagated to the logical standby database, and no error message is returned. It is a good idea to query this view on the primary database to ensure that those tables that are necessary for critical applications are not in this list before you create the logical standby database. If the primary database includes unsupported tables that are critical, consider using a physical standby database instead. Note: This view does not show any tables from the SYS schema because changes to the SYS schema object are not applied to the logical standby database. In addition, this view does not show tables with table compression.

Oracle Database 11g: Data Guard Administration 6 - 122
SQL Commands That Do Not Execute on the Standby Database Not all data SQL commands that are executed on the primary database are applied to the logical standby database. If you execute any of the commands (shown in the slide) on the primary database, they are not executed on any logical standby database in your configuration. You must execute them on the logical standby database to maintain consistency between the primary database and the logical standby database.

Oracle Database 11g: Data Guard Administration 6 - 123
Ensuring Unique Row Identifiers Because the row IDs on a logical standby database might not be the same as the row IDs on the primary database, a different mechanism must be used to match the updated row on the primary database to its corresponding row on the logical standby database. Primary keys and unique indexes can be used to match the corresponding rows. It is recommended that you add a primary key or a unique index to tables on the primary database (whenever appropriate and possible) to ensure that SQL Apply can efficiently apply data updates to the logical standby database. You can query the DBA_LOGSTDBY_NOT_UNIQUE view to identify tables in the primary database that do not have a primary key or unique index with NOT NULL columns. Issue the following query to display a list of tables that SQL Apply might not be able to uniquely identify:
SQL> SELECT OWNER, TABLE_NAME,BAD_COLUMN 2 FROM DBA_LOGSTDBY_NOT_UNIQUE 3 WHERE TABLE_NAME NOT IN 4 (SELECT TABLE_NAME FROM DBA_LOGSTDBY_UNSUPPORTED);
Ensuring Unique Row Identifiers (continued) The key column in this view is BAD_COLUMN. If the view returns a row for a given table, you may want to consider adding a primary or unique key constraint on the
table. A value of Y indicates that the table does not have a primary or unique constraint and that the column is defined using an unbounded data type (such as CLOB). If two rows in the table match except for values in their LOB columns, the table cannot be maintained properly and SQL Apply stops. A value of N indicates that the table does not have a primary or unique constraint, but that it contains enough column information to maintain the table in the logical standby database. However, the redo transport services and log apply services run more efficiently if you add a primary key. You should consider adding a disabled RELY constraint to these tables (as described in the next slide).
123

Oracle Database 11g: Data Guard Administration 6 - 124
Adding a Disabled Primary Key RELY Constraint If your application ensures that the rows in a table are unique, you can create a disabled primary key RELY constraint on the table without incurring the overhead of maintaining a primary key on the primary database. The RELY constraint tells the system to log the named columns (in this example, EMPLOYEE_ID and LAST_NAME) to identify rows in this table. Be careful to select columns for the disabled RELY constraint that uniquely identify the row. If the columns selected for the RELY constraint do not uniquely identify the row, SQL Apply does not apply redo information to the logical standby database. Note: For this example, assume that the HR.EMPLOYEES table does not have a primary key.

Oracle Database 11g: Data Guard Administration 6 - 125
Creating a Logical Standby Database by Using SQL Commands The remainder of this lesson covers each of these steps in detail.

Oracle Database 11g: Data Guard Administration 6 - 126
Step 1: Create a Physical Standby Database You create a logical standby database by first creating a physical standby database. Then you convert the physical standby database into a logical standby database. To create the physical standby database:
a. Create a physical standby database as described in the lesson titled “Creating a Physical Standby Database by Using SQL and RMAN Commands.” b. Ensure that the physical standby database is current with the primary database by allowing recovery to continue until the physical standby database is consistent with the primary database, including all database structural changes (such as adding or dropping data files).

Oracle Database 11g: Data Guard Administration 6 - 127
Step 2: Stop Redo Apply on the Physical Standby Database To stop Redo Apply, issue one of the following commands:
If the configuration is not managed by the broker SQL > ALTER DATABASE RECOVER MANAGED STANDBY DATABASE CANCEL; If the configuration is managed by the broker DGMGRL > EDIT DATABASE '<database name>' set state='apply-off';

Oracle Database 11g: Data Guard Administration 6 - 128
Step 3: Prepare the Primary Database to Support a Logical Standby Database
a. To transition the primary database to the logical standby role, you must modify the initialization parameters on the primary database so that no parameters need to change after a role transition. To do this, include the LOG_ARCHIVE_DEST_2 destination on the primary database. This parameter takes effect only when the primary database is transitioned to the standby database role.
b. Set the UNDO_RETENTION initialization parameter to 3600. The UNDO_RETENTION parameter specifies (in seconds) the amount of committed undo information to retain in the database. The value of 3600 is recommended for best results when building a LogMiner dictionary for the logical standby database to prevent ora-1555 errors when there are a number of active transactions.

Oracle Database 11g: Data Guard Administration 6 - 129
Step 4: Build a LogMiner Dictionary in the Redo Data SQL Apply requires a LogMiner dictionary in the redo data so that it can properly interpret changes in the redo. When you execute the DBMS_LOGSTDBY.BUILD procedure, the LogMiner dictionary is built and supplemental logging is automatically enabled for logging primary key and unique key columns. Supplemental logging ensures that each update contains enough information to logically identify the affected row. Note: The DBMS_LOGSTDBY.BUILD procedure waits for all existing transactions to complete so that long-running transactions executing on the primary database will affect its operation.

Oracle Database 11g: Data Guard Administration 6 - 130
Step 5: Transition to a Logical Standby Database To prepare the physical standby database to transition to a logical standby database:
a. Issue the ALTER DATABASE RECOVER TO LOGICAL STANDBY db_name command to continue applying redo data to the physical standby database until it is ready to convert to a logical standby database. Specify a database name (db_name) to identify the new logical standby database. The redo log files contain the information needed to convert your physical standby database to a logical standby database. The statement applies redo data until the LogMiner dictionary is found in the redo log files. b. Shut down the logical standby database instance and restart it in MOUNT mode. c. Modify the LOG_ARCHIVE_DEST_n parameters to specify separate local destinations for:
Archived redo log files that store redo data generated by the logical standby database Archived redo log files that store redo data received from the primary database

Oracle Database 11g: Data Guard Administration 6 - 131
Step 6: Open the Logical Standby Database To open the logical standby database and start SQL Apply:
a. On the logical standby database, issue the ALTER DATABASE OPEN RESETLOGS command to open the database. b. On the logical standby database, issue the following command to start SQL Apply:
ALTER DATABASE START LOGICAL STANDBY APPLY IMMEDIATE
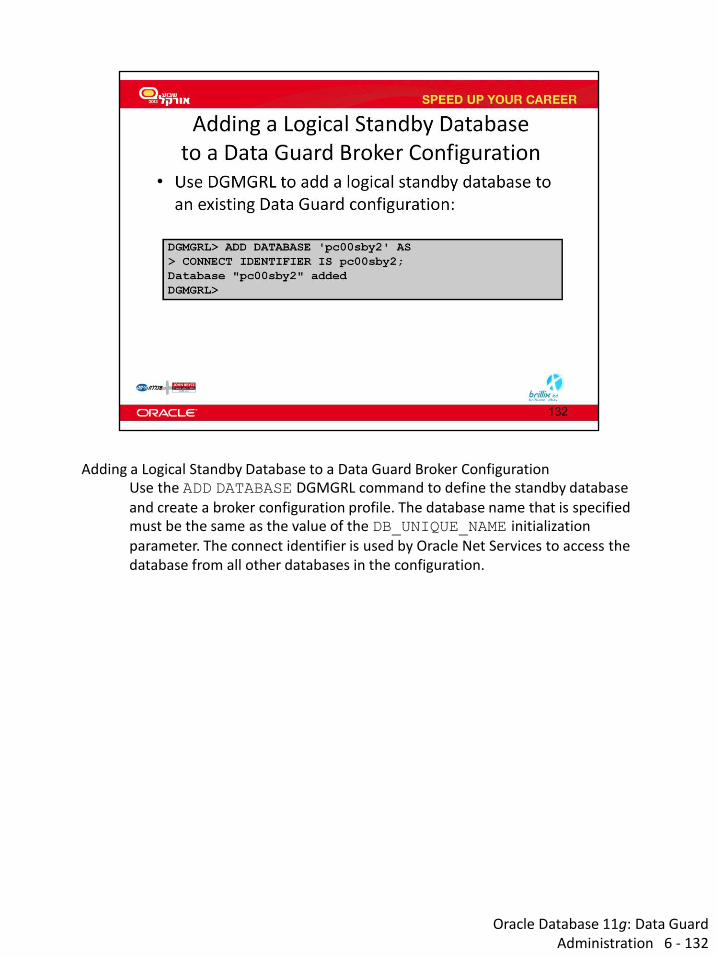
Oracle Database 11g: Data Guard Administration 6 - 132
Adding a Logical Standby Database to a Data Guard Broker Configuration Use the ADD DATABASE DGMGRL command to define the standby database and create a broker configuration profile. The database name that is specified must be the same as the value of the DB_UNIQUE_NAME initialization parameter. The connect identifier is used by Oracle Net Services to access the database from all other databases in the configuration.

Oracle Database 11g: Data Guard Administration 6 - 133
Step 7: Verify That the Logical Standby Database Is Performing Properly After creating your logical standby database and setting up redo transport services and log apply services, you should verify that redo data is being transmitted from the primary database and applied to the standby database. To verify that the logical standby database is functioning properly:
a. Connect to the logical standby database and query the DBA_LOGSTDBY_LOG view to verify that the archived redo log files were registered on the logical standby system:
SQL> SELECT SEQUENCE#, FIRST_TIME, NEXT_TIME, 2 DICT_BEGIN,DICT_END 3 FROM DBA_LOGSTDBY_LOG ORDER BY SEQUENCE#;
b. Connect to the primary database and issue the following command to begin sending redo data to the standby database:
SQL> ALTER SYSTEM ARCHIVE LOG CURRENT; c. Connect to the logical standby database and requery the DBA_LOGSTDBY_LOG view as shown in step a. This enables you to verify that the new archived redo log files were registered.

Oracle Database 11g: Data Guard Administration 6 - 134
Step 7: Verify That the Logical Standby Database Is Performing Properly (continued)
d. On the logical standby database, query the V$LOGSTDBY_STATS view to verify that redo data is being applied correctly:
SQL> SELECT NAME, VALUE FROM V$LOGSTDBY_STATS 2 WHERE NAME = 'coordinator state';
A value of INITIALIZING in the VALUE column indicates that log apply services are preparing to begin SQL Apply, but that data from the archived redo log files is not being applied to the logical standby database. e. Query the V$LOGSTDBY_PROCESS view to see information about the current state of the SQL Apply processes. f. Query the V$LOGSTDBY_PROGRESS view on the logical standby database to check the overall progress of SQL Apply:
SQL> SELECT APPLIED_SCN, LATEST_SCN 2 FROM V$LOGSTDBY_PROGRESS;

Oracle Database 11g: Data Guard Administration 6 - 135
Creating a Logical Standby Database by Using Enterprise Manager To create a logical standby database by using Enterprise Manager:
1. Click Add Standby Database on the Data Guard overview page to invoke the Add Standby Database Wizard. Note: If the logical standby database is the first database to be created in your configuration, access the Add Standby Database Wizard by clicking “Setup and Manage” in the Data Guard section on the Maintenance page. Next, click the Add Standby Database link to invoke the Add Standby Database Wizard.
2. Select “Create a new logical standby database” on the Add Standby Database page, and click Continue.
3. The wizard guides you through a procedure that is similar to adding a physical standby database.

Oracle Database 11g: Data Guard Administration 6 - 136
Using the Add Standby Database Wizard On the Add Standby Database: Backup Type page, you determine if you have tables or columns that are not supported by SQL Apply. In the SQL Apply Unsupported Tables section, select “Table Columns and Data Types” in the drop-down list and click Go to see the unsupported tables.

Oracle Database 11g: Data Guard Administration 6 - 137
Using the Add Standby Database Wizard (continued) On the Add Standby Database: Configuration page, specify the values for the DB_NAME and DB_UNIQUE_NAME parameters for your logical standby database. In addition, specify the target name to be used by Enterprise Manager Grid Control.

Oracle Database 11g: Data Guard Administration 6 - 138
Using the Add Standby Database Wizard (continued) After completing all pages in the wizard, you see the Add Standby Database Review page. Review the information on this page and click Finish to submit a job to create your logical standby database.

Oracle Database 11g: Data Guard Administration 6 - 139
Securing Your Logical Standby Database The database guard controls user access to tables in a logical standby database. Use the ALTER DATABASE GUARD command to configure the database guard. By default, it is not possible for a nonprivileged user to modify data on a Data Guard SQL Apply database, because the database guard is automatically set to ALL. With this level of security, only the SYS user can modify data. When you set the security level to STANDBY, users are able to modify data that is not maintained by the logical apply engine. A security level of NONE permits any users to access the standby database if they have the appropriate privileges. When creating a logical standby database manually with SQL commands, you must issue the ALTER DATABASE GUARD ALL command before opening the database. Failure to do so allows jobs that are submitted through DBMS_JOB.SUBMIT to be scheduled and to potentially modify tables in the logical standby database.

Oracle Database 11g: Data Guard Administration 6 - 140
Automatic Deletion of Redo Log Files by SQL Apply Archived redo logs on the logical standby database are automatically deleted by SQL Apply after they are applied. This feature reduces the amount of space consumed on the logical standby database and eliminates the manual step of deleting the archived redo log files. You can enable and disable the auto-delete feature for archived redo logs by using the DBMS_LOGSTDBY.APPLY_SET procedure. By default, the auto-delete feature is enabled. Note: If you are using a flash recovery area, auto deletion is based on the flash recovery area’s space pressure.

Oracle Database 11g: Data Guard Administration 6 - 141
Managing Remote Archived Log File Retention By default, SQL Apply deletes an archived redo log file after applying the contents. This behavior is controlled by the LOG_AUTO_DELETE parameter. During a flashback operation or point-in-time recovery of the logical standby database, SQL Apply must stop and re-fetch all remote archived redo log files. In Oracle Database 11g, you use the LOG_AUTO_DEL_RETENTION_TARGET parameter to specify a retention period for remote archived redo log files. You can modify LOG_AUTO_DEL_RETENTION_TARGET by using the DBMS_LOGSTDBY.APPLY_SET and DBMS_LOGSTDBY.APPLY_UNSET procedures. Note: This parameter is applicable only when you are not using the flash recovery area.

Oracle Database 11g: Data Guard Administration 6 - 142
Managing SQL Apply Filtering You can use SQL Apply filters to control what to apply and what not to apply. To define a SQL Apply filter, use the following configurable database properties:
LsbyASkipCfgPr: Provides a way to indicate to SQL Apply that it should ignore (skip) SQL statements that you do not want to apply to the logical standby database. Valid values for this property are a valid set of arguments to the DBMS_LOGSTDBY.SKIP procedure. LsbyASkipErrorCfgPr: Provides criteria to determine if an error should cause SQL Apply to stop. All errors to be skipped are stored in system tables that describe how exceptions should be handled. Valid values for this property are a valid set of arguments to the DBMS_LOGSTDBY.SKIP_ERROR procedure. The string must contain comma separators between the arguments. LsbyASkipTxnCfgPr: Enables you to specify the transaction ID (XIDSQN NUMBER) of a problematic transaction that you want SQL Apply to ignore. Valid values for this property are a valid set of arguments to the DBMS_LOGSTDBY.SKIP_TRANSACTION procedure.
See the Oracle Database PL/SQL Packages and Types Reference for detailed information about the DBMS_LOGSTDBY package and its procedures.
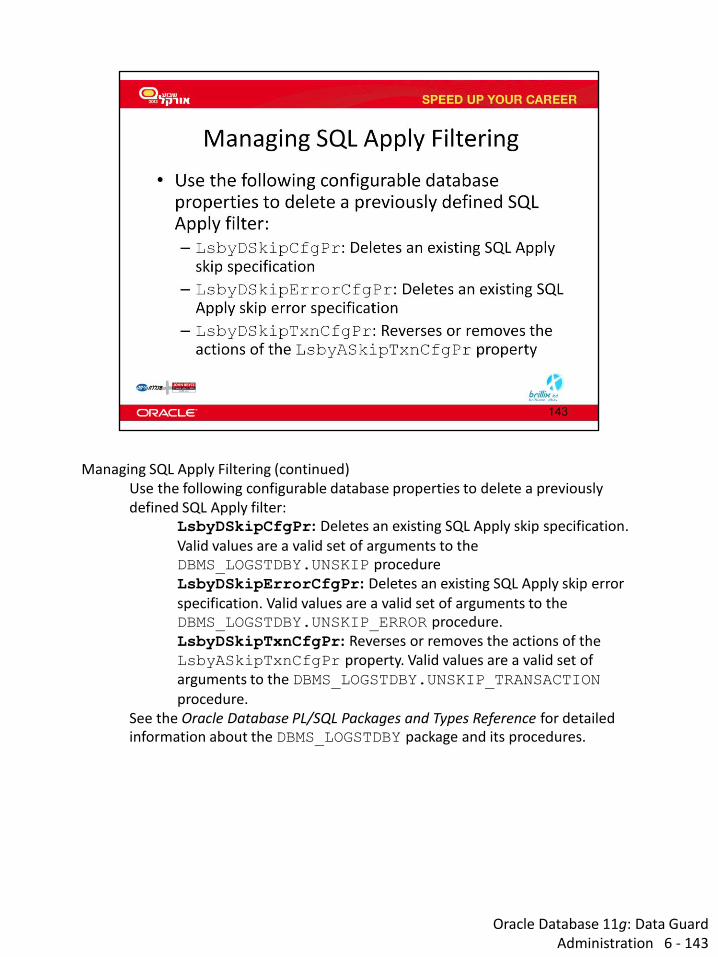
Oracle Database 11g: Data Guard Administration 6 - 143
Managing SQL Apply Filtering (continued) Use the following configurable database properties to delete a previously defined SQL Apply filter:
LsbyDSkipCfgPr: Deletes an existing SQL Apply skip specification. Valid values are a valid set of arguments to the DBMS_LOGSTDBY.UNSKIP procedure LsbyDSkipErrorCfgPr: Deletes an existing SQL Apply skip error specification. Valid values are a valid set of arguments to the DBMS_LOGSTDBY.UNSKIP_ERROR procedure. LsbyDSkipTxnCfgPr: Reverses or removes the actions of the LsbyASkipTxnCfgPr property. Valid values are a valid set of arguments to the DBMS_LOGSTDBY.UNSKIP_TRANSACTION procedure.
See the Oracle Database PL/SQL Packages and Types Reference for detailed information about the DBMS_LOGSTDBY package and its procedures.

Oracle Database 11g: Data Guard Administration 6 - 144
Viewing SQL Apply Filtering Settings You can query the DBA_LOGSTDBY_SKIP view on the logical standby database to determine the SQL Apply filtering settings. The view contains the following columns:
ERROR: Indicates whether the statement should be skipped or should return an error for the statement STATEMENT_OPT: Specifies the type of statement that should be skipped (It must be one of the SYSTEM_AUDIT statement options.) OWNER: Name of the schema under which the skip option is used NAME: Name of the table that is being skipped USE_LIKE: Indicates whether the statement uses a SQL wildcard search when matching names ESC: Escape character to be used when performing wildcard matches PROC: Name of a stored procedure that is executed when processing the skip option
You can query DBA_LOGSTDBY_SKIP_TRANSACTION to view settings for transactions to be skipped.

Oracle Database 11g: Data Guard Administration 6 - 145
Managing SQL Apply Filtering by Using Enterprise Manager You can use Enterprise Manager to implement SQL Apply filtering by navigating to the Edit Standby Database Properties page. On the Standby Role Properties tabbed page, expand Advanced Properties to access the Skip Table Entries section. Use the Add Skip Table Entry page to specify the following skip criteria:
Identify SQL statements that are not applied to the standby database by specifying the schema and database object to be skipped. Specify criteria to be used to determine if an error should cause log apply services to stop. All errors to be skipped are stored in system tables that describe how exceptions should be handled. Specify additional processing that should be done (such as execution of a stored procedure).

Oracle Database 11g: Data Guard Administration 6 - 146
Using DBMS_SCHEDULER to Create Jobs on a Logical Standby Database Use the DBMS_SCHEDULER package to create Scheduler jobs so that they are executed when intended. Scheduler jobs can be created on a standby database. When a Scheduler job is created, it defaults to the local role. If the job is created on the standby database, it defaults to the role of a logical standby. The Scheduler executes jobs that are specific to the current database role. Following a role transition (switchover or failover), the Scheduler automatically switches to executing jobs that are specific to a new role. Scheduler jobs are not replicated to the standby. However, existing jobs can be activated under the new role by using the DBMS_SCHEDULER.SET_ATTRIBUTE procedure. Alternatively, jobs that should run in both roles can be cloned and the copy can be made specific to the other role. Query the DBA_SCHEDULER_JOB_ROLES view to determine which jobs are specific to which role. See the Oracle Database PL/SQL Packages and Types Reference for detailed information about using the DBMS_SCHEDULER package.

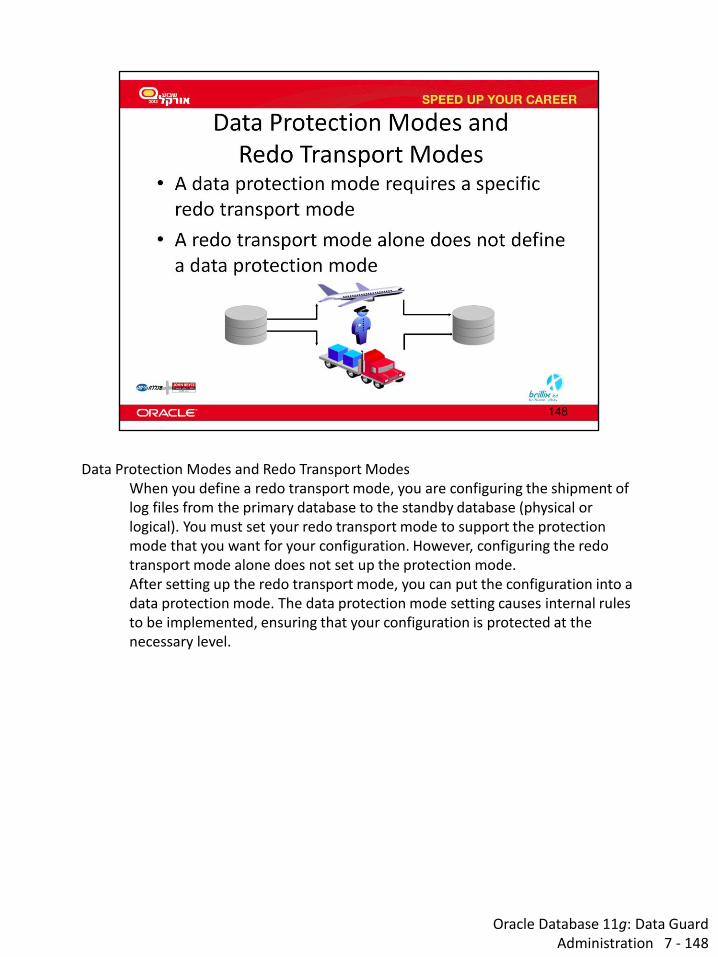
Oracle Database 11g: Data Guard Administration 7 - 148
Data Protection Modes and Redo Transport Modes When you define a redo transport mode, you are configuring the shipment of log files from the primary database to the standby database (physical or logical). You must set your redo transport mode to support the protection mode that you want for your configuration. However, configuring the redo transport mode alone does not set up the protection mode. After setting up the redo transport mode, you can put the configuration into a data protection mode. The data protection mode setting causes internal rules to be implemented, ensuring that your configuration is protected at the necessary level.

Oracle Database 11g: Data Guard Administration 7 - 149
Data Protection Modes Oracle Data Guard offers maximum protection, maximum availability, and maximum performance modes to help enterprises balance data availability against system performance requirements. In some situations, a business cannot afford to lose data. In other situations, the availability of the database may be more important than the loss of data. Some applications require maximum database performance and can tolerate the potential loss of data.

Oracle Database 11g: Data Guard Administration 7 - 150
Maximum Protection Mode This protection mode ensures that no data loss occurs if the primary database fails. To provide this level of protection, the redo data that is needed to recover each transaction must be written to both the local online redo log and the standby redo log on at least one standby database before the transaction commits. To ensure that data loss cannot occur, the primary database shuts down if a fault prevents it from writing its redo stream to at least one remote standby redo log. For multiple-instance RAC databases, Data Guard shuts down the primary database if it is unable to write the redo records to at least one properly configured database instance. Maximum protection mode requirements:
Configure standby redo log files on at least one standby database. Set the SYNC and AFFIRM attributes of the LOG_ARCHIVE_DEST_n parameter for at least one standby database destination.
Note: Oracle recommends a minimum of two standby databases for maximum protection mode.

Oracle Database 11g: Data Guard Administration 7 - 151
Maximum Availability Mode This protection mode provides the highest possible level of data protection without compromising the availability of the primary database. A transaction does not commit until the redo that is needed to recover that transaction is written to the local online redo log and to at least one remote standby redo log. The primary database does not shut down if a fault prevents it from writing its redo stream to a remote standby redo log. Instead, the primary database operates in an unsynchronized mode until the fault is corrected and all gaps in redo log files are resolved. When all gaps are resolved and the standby database is synchronized, the primary database automatically resumes operating in maximum availability mode. This mode guarantees that no data loss occurs if the primary database fails—but only if a second fault does not prevent a complete set of redo data from being sent from the primary database to at least one standby database. Maximum availability mode requirements:
Configure standby redo log files on at least one standby database. Set the SYNC and AFFIRM attributes of the LOG_ARCHIVE_DEST_n parameter for at least one standby database.
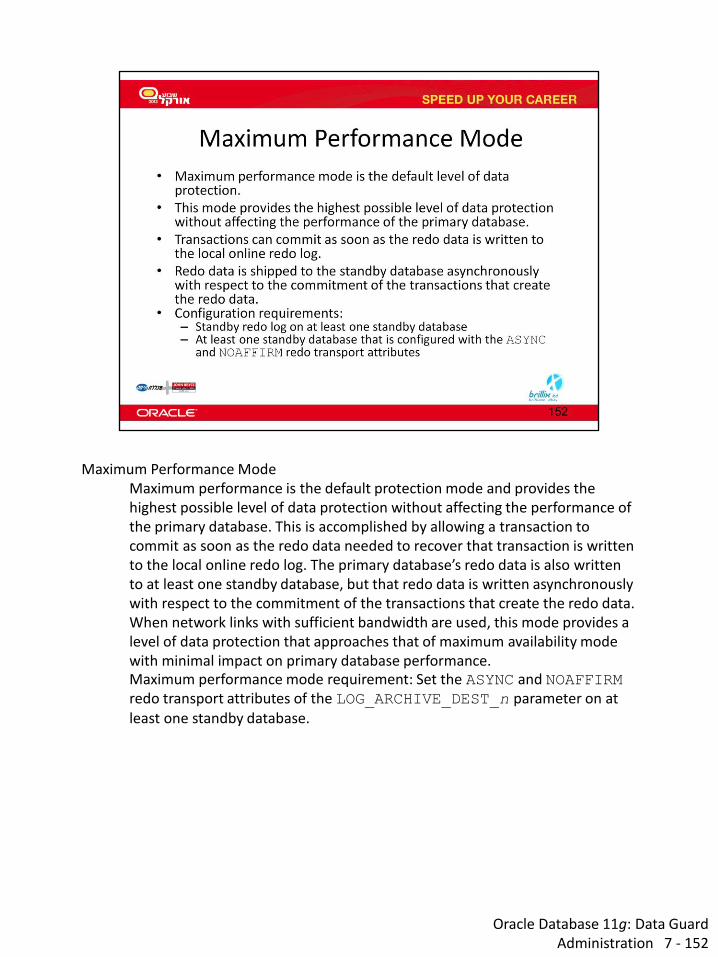
Oracle Database 11g: Data Guard Administration 7 - 152
Maximum Performance Mode Maximum performance is the default protection mode and provides the highest possible level of data protection without affecting the performance of the primary database. This is accomplished by allowing a transaction to commit as soon as the redo data needed to recover that transaction is written to the local online redo log. The primary database’s redo data is also written to at least one standby database, but that redo data is written asynchronously with respect to the commitment of the transactions that create the redo data. When network links with sufficient bandwidth are used, this mode provides a level of data protection that approaches that of maximum availability mode with minimal impact on primary database performance. Maximum performance mode requirement: Set the ASYNC and NOAFFIRM redo transport attributes of the LOG_ARCHIVE_DEST_n parameter on at least one standby database.

Oracle Database 11g: Data Guard Administration 7 - 153
Comparing Data Protection Modes Consider the characteristics of each protection mode. You must balance cost, availability, performance, and transaction protection when choosing the protection mode. Note: If you plan to enable fast-start failover, you must set the protection mode to maximum availability or maximum performance. See the lesson titled “Enabling Fast-Start Failover” for additional information.

Oracle Database 11g: Data Guard Administration 7 - 154
Setting the Data Protection Mode by Using DGMGRL
1. If you are setting the protection mode to maximum protection or maximum availability, ensure that standby redo log files are configured on the standby database. You must also configure standby redo log files for the primary database or another standby database in the configuration to ensure that it can support the chosen protection mode after a switchover. 2. Use the EDIT DATABASE SET PROPERTY command to set the redo transport mode for the standby database. For example, if you are changing the data protection mode to maximum availability, use the EDIT DATABASE command to specify SYNC for redo transport services:
DGMGRL> EDIT DATABASE 'DR_Sales' SET PROPERTY 'LogXptMode'='SYNC';
You must also set the redo transport services for the primary database or another standby database in the configuration to ensure that it can support the chosen protection mode after a switchover. 3. Use the EDIT CONFIGURATION SET PROTECTION MODE AS command to set the overall configuration protection mode. To set the protection mode to maximum availability, use the following

command: DGMGRL> EDIT CONFIGURATION SET PROTECTION MODE AS MAXAVAILABILITY;
154

Oracle Database 11g: Data Guard Administration 7 - 155
Setting the Data Protection Mode If the data protection mode that you need requires a standby database to use the SYNC or ASYNC redo transport mode, Enterprise Manager automatically sets the redo transport mode for the primary database and the selected standby databases. Enterprise Manager automatically determines the correct number and size of standby redo log files that are needed for all databases in the configuration and adds those log files using the directory locations that you specify. To set the data protection mode with Enterprise Manager:
1. Navigate to the Data Guard page. 2. Click the link in the Protection Mode field to access the Change Protection Mode: Select Mode page.

Oracle Database 11g: Data Guard Administration 7 - 156
Setting the Data Protection Mode (continued)
3. Select Maximum Protection, Maximum Availability, or Maximum Performance, and click Continue. 4. If prompted, enter the username and password of a user with SYSDBA privileges. Click Login. 5. Select one or more standby databases to support the protection mode that you selected. (If standby redo log files are needed, verify the names of the log files.) Click OK. 6. On the Confirmation page, click Yes.


Oracle Database 11g: Data Guard Administration 8 - 158
Monitoring the Data Guard Configuration by Using Enterprise Manager Grid Control Enterprise Manager Grid Control provides a graphical user interface for monitoring the Data Guard configuration. The following pages in this lesson describes the information that you can view on the Data Guard Overview page and its related pages.

Oracle Database 11g: Data Guard Administration 8 - 159
Viewing the Data Guard Configuration Status On the Data Guard Overview page, you can view the status of the primary database and the standby databases in a configuration. In the Standby Progress Summary section, you can view information about transport and apply lags. The apply lag shows the approximate number of seconds that the standby database is behind the primary database. A large apply lag may indicate that Redo Apply needs to be tuned or that there is a gap. The transport lag shows the approximate number of seconds of redo not yet available on the standby database and provides an indication of potential data loss in the event of a disaster. A significant transport lag may be caused by:
A gap in the redo Network bandwidth constraints An overloaded log writer network server (LNS) process on the primary database Redo generation that is faster than the LNS and network can handle I/O issues on the remote file server (RFS) process side An overloaded RFS process An inadequate number of standby redo log files causing the RFS process to stall or to use archived log files

Oracle Database 11g: Data Guard Administration 8 - 160
Viewing Data Guard Performance Click Performance Overview in the Performance section of the Data Guard Overview page to access the Performance Overview page. The Performance Overview page displays detailed performance-related statistics for the Data Guard configuration. The performance charts provide a graphical summary of all redo log activity in the configuration. You can set the collection interval (which causes the charts to be refreshed) to determine the rate of sampling of the primary database in the View Data field. The following charts display performance information for all databases in the configuration:
Redo Generation Rate: Redo generation rate (in KB per second). Lag Times: Approximate amount of potential data loss. Lag Times -- Shows the Transport Lag (the approximate number seconds of redo not yet available on the standby database) and Apply Lag (The approximate number of seconds the standby is behind the primary database). Apply Rate: Data applied on each standby database in the configuration. Each point on the chart represents the amount of redo data that has been applied since the last time it was refreshed.
Click any of the charts to obtain historical information.

Oracle Database 11g: Data Guard Administration 8 - 161
Viewing Log File Details The Log File Details page displays information about the log files that were generated on the primary database and received by the standby database. The information is presented in a tabular format for each standby database in the configuration. The table contains the following columns:
Log: Contains the log file sequence number Status: “Partially Applied,” “Not Applied,” “Not Received” ResetLogs ID: Identifier that changes after a terminal recovery and an open with RESETLOGS First Change # (SCN): First system change number (SCN) in the log file Last Change # (SCN): Last SCN in the log file Size (KB): Size of the log file Time Generated: Time at which the log file was generated Time Completed: Time at which the log file completed

Oracle Database 11g: Data Guard Administration 8 - 162
Viewing Data Guard Diagnostic Information The Data Guard broker records activity information in the Oracle database alert log file and in the Data Guard broker log files. The broker log files are named drc<$ORACLE_SID>.log and are located in the same directory as the alert log file. You can obtain information about the health of the database (referred to as the database status) by issuing the SHOW DATABASE DGMGRL command. The following monitorable database properties can be used to query the database status:
StatusReport: Lists all problems detected by the broker during a database health check LogXptStatus: Lists all log transport errors detected on all instances of the primary database InconsistentProperties: Lists all properties that have inconsistent values between the broker configuration file and the database settings InconsistentLogXptProps: Lists all redo transport–related properties of standby databases that have inconsistent values between the broker configuration file and the redo transport settings

Oracle Database 11g: Data Guard Administration 8 - 163
Using Monitorable Database Properties to Identify a Failure You can use the SHOW CONFIGURATION and SHOW DATABASE commands and the monitorable database properties to identify and determine an appropriate resolution for a failure in your Database Guard configuration.
1. Use the SHOW CONFIGURATION command to check the status of the configuration. The status is an aggregated status of all databases and instances in the broker configuration. If everything is working properly in the configuration, the output of this command with respect to status is "SUCCESS." If there is a problem in the configuration, you receive an error message. 2. If you receive an error message when you execute the SHOW CONFIGURATION command, execute the SHOW DATABASE command for each database to determine which database in the configuration has an error or warning. 3. You can then view the StatusReport monitorable database property for the database that is in error to view a list of the warnings and errors for the database. 4. After viewing the StatusReport output, you can view the other monitorable database properties (InconsistentProperties, LogXptStatus, InconsistentLogXptProps) as appropriate.

Oracle Database 11g: Data Guard Administration 8 - 164
Setting the LOG_ARCHIVE_TRACE Initialization Parameter Set this parameter to trace the transmission of redo data to the standby system. To enable, disable, or modify the LOG_ARCHIVE_TRACE parameter in a primary database, issue the ALTER SYSTEM SET LOG_ARCHIVE_TRACE=trace_level statement while the database is open or mounted. If you change the value of this parameter dynamically with an ALTER SYSTEM statement, the changes take effect at the start of the next archive operation. See Oracle Data Guard Concepts and Administration for additional information.
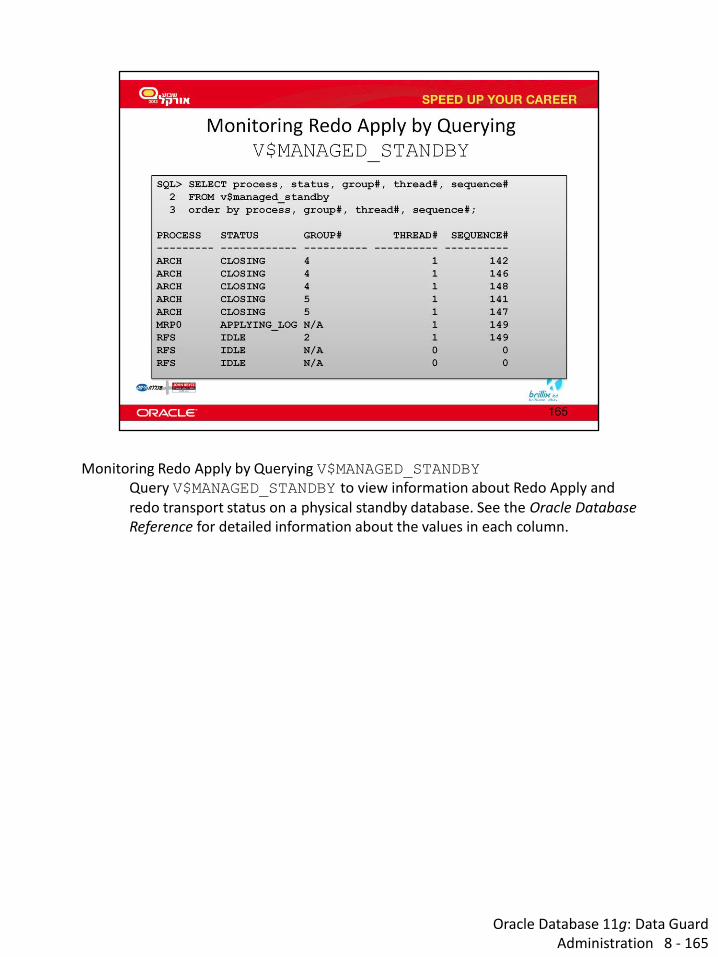
Oracle Database 11g: Data Guard Administration 8 - 165
Monitoring Redo Apply by Querying V$MANAGED_STANDBY Query V$MANAGED_STANDBY to view information about Redo Apply and redo transport status on a physical standby database. See the Oracle Database Reference for detailed information about the values in each column.

Oracle Database 11g: Data Guard Administration 8 - 166
Evaluating Redo Data by Querying V$DATAGUARD_STATS Query V$DATAGUARD_STATS to evaluate each standby database in terms of the currency of the data in the standby database and the time it takes to perform a role transition if all available redo data is applied to the standby database. V$DATAGUARD_STATS displays the amount of redo data generated by the primary database that is not yet available on the standby database. This information enables you to determine how much redo data would be lost if the primary database were to crash when you queried this view. See the Oracle Database Reference for detailed information about column values.

Oracle Database 11g: Data Guard Administration 8 - 167
Viewing Data Guard Status Information by Querying V$DATAGUARD_STATUS Query V$DATAGUARD_STATUS to view messages that were recently written to the alert log or server process trace files that concern physical standby databases or redo transport services for all standby database types. See the Oracle Database Reference for detailed information about column values.

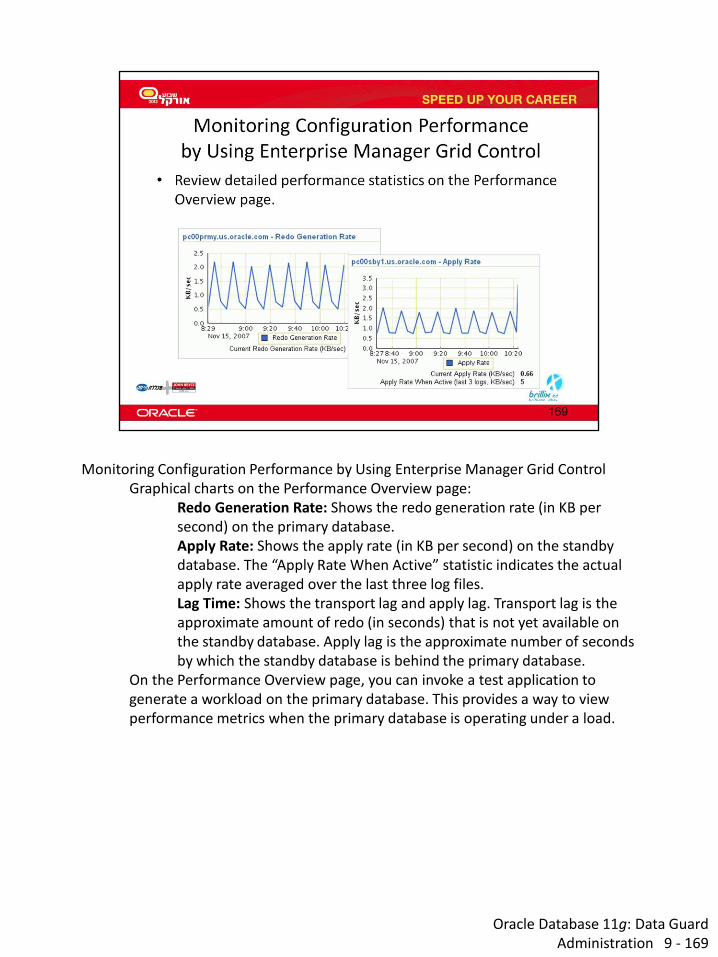
Oracle Database 11g: Data Guard Administration 9 - 169
Monitoring Configuration Performance by Using Enterprise Manager Grid Control Graphical charts on the Performance Overview page:
Redo Generation Rate: Shows the redo generation rate (in KB per second) on the primary database. Apply Rate: Shows the apply rate (in KB per second) on the standby database. The “Apply Rate When Active” statistic indicates the actual apply rate averaged over the last three log files. Lag Time: Shows the transport lag and apply lag. Transport lag is the approximate amount of redo (in seconds) that is not yet available on the standby database. Apply lag is the approximate number of seconds by which the standby database is behind the primary database.
On the Performance Overview page, you can invoke a test application to generate a workload on the primary database. This provides a way to view performance metrics when the primary database is operating under a load.

Oracle Database 11g: Data Guard Administration 9 - 170
Optimizing Redo Transport Services Information about these techniques is provided in the following slides.

Oracle Database 11g: Data Guard Administration 9 - 171
Setting the ReopenSecs Database Property When you specify a value for the ReopenSecs database property, it is propagated to the REOPEN attribute of the LOG_ARCHIVE_DEST_n initialization parameter for your primary database. The REOPEN attribute of the LOG_ARCHIVE_DEST_n parameter specifies the minimum number of seconds before the process that is shipping the redo should try again to access a previously failed destination. REOPEN applies to all errors and not only connection failures. These errors include (but are not limited to) network failures, disk errors, and quota exceptions.

Oracle Database 11g: Data Guard Administration 9 - 172
Setting the NetTimeout Database Property When you specify a value for the NetTimeout database property, it is propagated to the NET_TIMEOUT attribute of the LOG_ARCHIVE_DEST_n initialization parameter for your primary database. The NET_TIMEOUT attribute enables you to bypass the default network timeout interval that was established for the system on which the primary database resides. Without the NET_TIMEOUT attribute, the primary database can potentially stall for the default network timeout period. By specifying a smaller, nonzero value for NET_TIMEOUT, you can enable the primary database to mark a destination as “failed” after the user-specified timeout interval expires. Note: Remember to specify a reasonable value when running in maximum protection mode. False network failure detection may cause the primary instance to shut down if there are no other standby databases in the correct mode that can be contacted by the primary database instance.

Oracle Database 11g: Data Guard Administration 9 - 173
Optimizing Redo Transmission by Setting MaxConnections The redo transport mechanism uses all available bandwidth by allowing a single large redo log file to be transferred in parallel by multiple archiver processes. This behavior is controlled by the MaxConnections database property. This architecture increases the redo transfer rate and enables faster redo transmission to standby databases for bulk batch updates on the primary database. As a result of the improvement in transfer rates, there is an increased availability of data at the standby database site.

Oracle Database 11g: Data Guard Administration 9 - 174
Setting the MaxConnections Database Property When you specify a value for the MaxConnections database property, it is propagated to the MAX_CONNECTIONS attribute of the LOG_ARCHIVE_DEST_n initialization parameter for your primary database. The MAX_CONNECTIONS attribute of LOG_ARCHIVE_DEST_n is used to set the number of parallel connections that are used for transmitting archived redo log files to a remote destination. The MAX_CONNECTIONS attribute defaults to 1, indicating that a single connection is established for the communication and transfer of data. The maximum value for MAX_CONNECTIONS is 5. Note: You must set the LOG_ARCHIVE_MAX_PROCESSES initialization parameter to be greater than or equal to the value of MAX_CONNECTIONS to achieve the desired number of parallel connections. If the value of the MAX_CONNECTIONS attribute exceeds the value of LOG_ARCHIVE_MAX_PROCESSES, Data Guard uses the available archiver processes.

Oracle Database 11g: Data Guard Administration 9 - 175
Compressing Redo Data When the communication network to remote databases is a high-latency, low-bandwidth WAN link and the redo data that is transferred to standby databases is substantial, you want to make the most effective use of network bandwidth. Redo transport compression can be enabled on any remote destination to transfer gap redo data more efficiently and reduce network bandwidth usage. Redo compression can be enabled or disabled by setting the Oracle Data Guard broker’s RedoCompression property. The setting is propagated to the COMPRESSION attribute of the LOG_ARCHIVE_DEST_n initialization parameter. Redo compression is disabled by default. All databases in a Data Guard configuration must use Oracle Database 11g to enable redo transport compression. When you add a database to the Data Guard configuration, the Data Guard broker automatically detects whether network compression is enabled or disabled for the standby database being added. The property is set accordingly. Note: Use of this feature requires the Oracle Advanced Compression option.

Oracle Database 11g: Data Guard Administration 9 - 176
Compressing Redo Data When the communication network to remote databases is a high-latency, low-bandwidth WAN link and the redo data that is transferred to standby databases is substantial, you want to make the most effective use of network bandwidth. Redo transport compression can be enabled on any remote destination to transfer gap redo data more efficiently and reduce network bandwidth usage. Redo compression can be enabled or disabled by setting the Oracle Data Guard broker’s RedoCompression property. The setting is propagated to the COMPRESSION attribute of the LOG_ARCHIVE_DEST_n initialization parameter. Redo compression is disabled by default. All databases in a Data Guard configuration must use Oracle Database 11g to enable redo transport compression. When you add a database to the Data Guard configuration, the Data Guard broker automatically detects whether network compression is enabled or disabled for the standby database being added. The property is set accordingly. Note: Use of this feature requires the Oracle Advanced Compression option.

Oracle Database 11g: Data Guard Administration 9 - 177
Delaying the Application of Redo You can delay the application of changes to standby databases, thereby providing protection from user errors and corruptions. You can protect against the application of corrupted or erroneous data to the standby database. The apply process also revalidates the log records to prevent application of log corruptions. For example, if a critical table is accidentally dropped from the primary database, you can prevent this action from affecting the standby database by delaying the application of the change in the standby database. When operating in maximum protection or maximum availability mode, Data Guard ensures zero data loss even with the delayed apply in effect. If you define a delay for a destination that has real-time apply enabled, the delay is ignored. Note: You can use Flashback Database as an alternative to the Apply Delay configuration option. See the lesson titled “Using Flashback Database in a Data Guard Configuration” for additional information.

Oracle Database 11g: Data Guard Administration 9 - 178
Setting the DelayMins Database Property to Delay the Application of Redo Use the DelayMins configurable database property to specify the number of minutes that log apply services must wait before applying redo data to the standby database. This setting is propagated to the DELAY attribute of the LOG_ARCHIVE_DEST_n initialization parameter.

Oracle Database 11g: Data Guard Administration 9 - 179
Using Enterprise Manager to Delay the Application of Redo
1. On the Data Guard page, select your standby database and click Edit. 2. On the Edit Standby Database Properties page, click Standby Role Properties. 3. In the Apply Delay field, enter the delay value (in minutes). 4. Click Apply.

Oracle Database 11g: Data Guard Administration 9 - 180
Optimizing SQL Apply The MAX_SERVERS, APPLY_SERVERS, and PREPARE_SERVERS parameters can be modified to control the number of processes that are allocated to SQL Apply. Because SQL Apply allocates one process for the READER, BUILDER, and ANALYZER roles, the following relationship between the three parameters is required:
APPLY_SERVERS + PREPARE_SERVERS = MAX_SERVERS – 3
Use the DBMS_LOGSTDBY.APPLY_SET procedure to change the APPLY_SERVERS, MAX_SERVERS, and PREPARE_SERVERS parameters. Query DBA_LOGSTDBY_PARAMETERS to view the SQL Apply parameter settings. Note: See the Oracle Database PL/SQL Packages and Types Reference for detailed information about the DBMS_LOGSTDBY.APPLY_SET procedure.

Oracle Database 11g: Data Guard Administration 9 - 181
Adjusting the Number of APPLIER Processes Before changing the number of APPLIER processes, perform the following steps to determine whether adjusting the number of APPLIER processes will help you achieve greater throughput:
1. Determine if APPLIER processes are busy by issuing the following query:
SELECT COUNT(*) AS IDLE_APPLIER FROM V$LOGSTDBY_PROCESS WHERE TYPE = 'APPLIER' and status_code = 16166;
2. After ensuring that there are no idle APPLIER processes, determine if there is enough work available for additional APPLIER processes by issuing the following query:
SELECT NAME, VALUE FROM V$LOGSTDBY_STATS WHERE NAME LIKE 'transactions%';
The second query returns two statistics that provide a cumulative total: the number of transactions that are ready to be applied by the APPLIER processes and the number of transactions that have already been applied. If the difference between "transactions mined" and "transactions applied" is higher than twice the number of available APPLIER processes, an improvement in throughput is possible if you increase the number of APPLIER processes. Before you increase the number of APPLIER processes, consider the following requirement:

APPLY_SERVERS + PREPARE_SERVERS = MAX_SERVERS – 3
You may need to increase the value of MAX_SERVERS before increasing the value of APPLY_SERVERS.
181
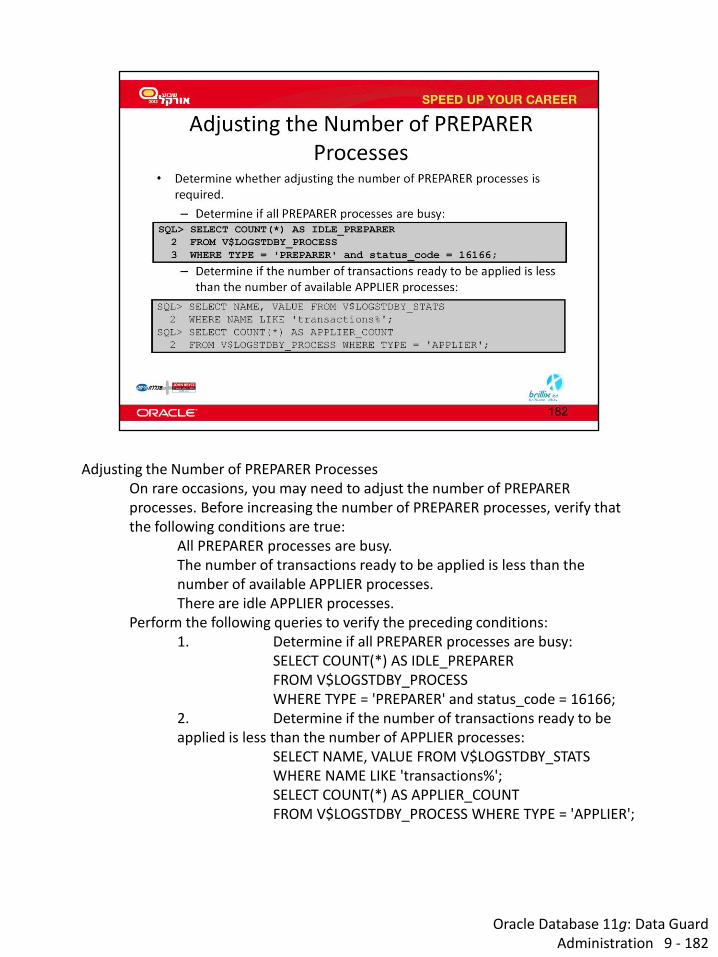
Oracle Database 11g: Data Guard Administration 9 - 182
Adjusting the Number of PREPARER Processes On rare occasions, you may need to adjust the number of PREPARER processes. Before increasing the number of PREPARER processes, verify that the following conditions are true:
All PREPARER processes are busy. The number of transactions ready to be applied is less than the number of available APPLIER processes. There are idle APPLIER processes.
Perform the following queries to verify the preceding conditions: 1. Determine if all PREPARER processes are busy:
SELECT COUNT(*) AS IDLE_PREPARER FROM V$LOGSTDBY_PROCESS WHERE TYPE = 'PREPARER' and status_code = 16166;
2. Determine if the number of transactions ready to be applied is less than the number of APPLIER processes:
SELECT NAME, VALUE FROM V$LOGSTDBY_STATS WHERE NAME LIKE 'transactions%'; SELECT COUNT(*) AS APPLIER_COUNT FROM V$LOGSTDBY_PROCESS WHERE TYPE = 'APPLIER';

Oracle Database 11g: Data Guard Administration 9 - 183
Adjusting the Number of PREPARER Processes (continued)
3. Determine if there are idle APPLIER processes: SELECT COUNT(*) AS IDLE_APPLIER FROM V$LOGSTDBY_PROCESS WHERE TYPE = 'APPLIER' and status_code = 16166;
Before you increase the number of PREPARER processes, consider the requirement:
APPLY_SERVERS + PREPARE_SERVERS = MAX_SERVERS – 3
You may need to increase the value of MAX_SERVERS before increasing the value of PREPARE_SERVERS. Use the DBMS_LOGSTDBY.APPLY_SET procedure to increase the values of MAX_SERVERS and PREPARE_SERVERS, as shown in the following example:
SQL> EXECUTE DBMS_LOGSTDBY.APPLY_SET('MAX_SERVERS', 26); SQL> EXECUTE DBMS_LOGSTDBY.APPLY_SET('PREPARE_SERVERS', 3);


185

Oracle Database 11g: Data Guard Administration 14 - 186
Oracle Active Data Guard Oracle Active Data Guard is a separately licensed database option for Oracle Database 11g Enterprise Edition. It includes the Real-time Query feature, which enables a physical standby database to be open read-only while Redo Apply is active. With this feature, users who are connected to a physical standby database can query and report against data that is up-to-date with the primary database. Oracle Active Data Guard also enables you to configure RMAN block change tracking for a physical standby database. With RMAN block change tracking, you can offload fast incremental backups from the production database to the physical standby database.

Oracle Database 11g: Data Guard Administration 14 - 187
Using Real-Time Query With Oracle Active Data Guard, you can use a physical standby database for queries while redo is applied to the physical standby database. This feature enables you to use a physical standby database for disaster recovery and to offload work from the primary database during normal operation. Note: If you need to create additional structures (such as indexes and materialized views), you can create a logical standby database as described in the lesson titled “Creating a Logical Standby Database.” In addition, this feature provides a loosely coupled read/write clustering mechanism for OLTP workloads when configured as follows:
Primary database: Recipient of all update traffic Several readable standby databases: Used to distribute the query workload
The physical standby database can be opened in read-only mode only if all files were recovered up to the same system change number (SCN). Otherwise, the open fails.

188
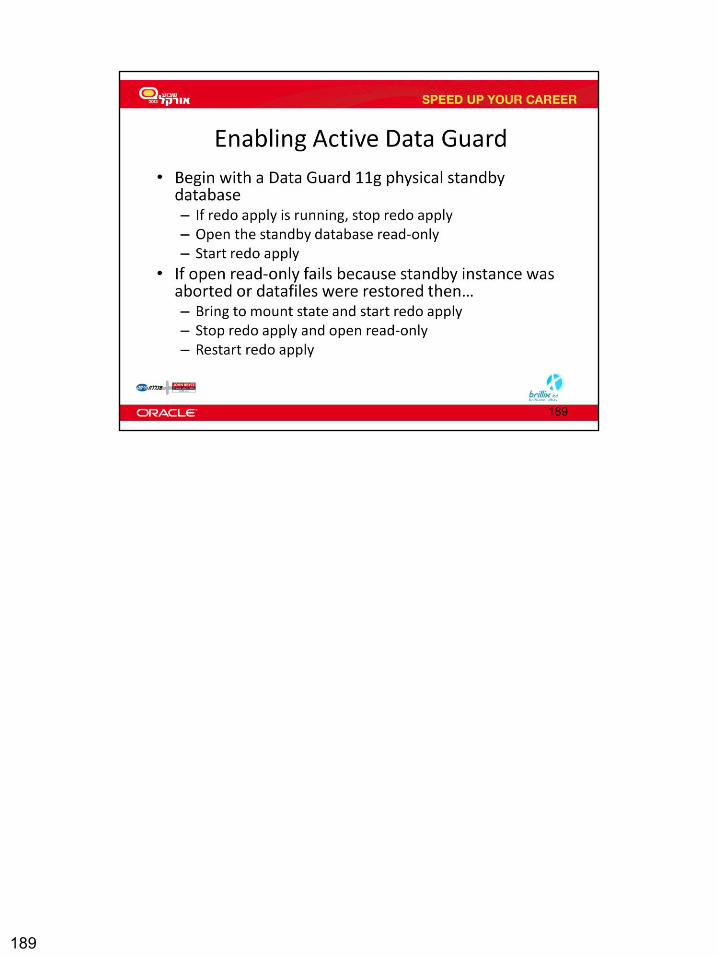
189

Oracle Database 11g: Data Guard Administration 14 - 190
Enabling Real-Time Query You must temporarily stop Redo Apply to open the physical standby database in read-only mode. After opening the database, restart Redo Apply. This enables the physical standby database to stay current with the primary database as users perform queries against data. Note: There is no DGMGRL command to enable Real-time Query.

Oracle Database 11g: Data Guard Administration 14 - 191
Disabling Real-Time Query To disable Real-time Query, you must shut down the standby database instance and restart it in MOUNT mode.

Oracle Database 11g: Data Guard Administration 14 - 192
Enabling Block Change Tracking on a Physical Standby Database With the Oracle Active Data Guard option, you can enable block change tracking on a physical standby database. When you back up the physical standby database, RMAN uses the block change tracking file to quickly identify the blocks that have changed since the last incremental backup. RMAN reads only the changed blocks rather than the entire data file.

Oracle Database 11g: Data Guard Administration 14 - 193
Creating Fast Incremental Backups The goal of an incremental backup is to back up only those data blocks that have changed since a previous backup. You can use RMAN to create incremental backups of data files, tablespaces, or the entire database. During media recovery, RMAN examines the restored files to determine whether it can recover them from an incremental backup. RMAN always chooses incremental backups over archived redo logs because applying changes at a block level is faster than reapplying individual changes. If you enable the block change tracking feature, Oracle Database tracks the physical location of all database changes in the change tracking file. RMAN uses this change-tracking data to determine which blocks to read during an incremental backup, creating much faster incremental backups by eliminating the need to read the entire data file. The maintenance of this file is fully automatic and does not require your intervention. The size of the change tracking file is proportional to the following:
Database size in bytes Number of enabled threads in a RAC environment Number of old backups maintained by the change tracking file
The minimum size for the change tracking file is 10 MB; new space is allocated in 10 MB increments. By default, the Oracle Database server does not record block-change information.

Oracle Database 11g: Data Guard Administration 14 - 194
Enabling Block Change Tracking You enable block change tracking from the database home page. Click the Policy tab on the Backup Settings page. You do not need to set the change tracking file destination if the DB_CREATE_FILE_DEST initialization parameter is set, because the file is created as an Oracle Managed File (OMF) file in the DB_CREATE_FILE_DEST location. You can, however, specify the name of the change tracking file and place it in any location you choose. You can also enable or disable block change tracking by using an ALTER DATABASE SQL command. If the change tracking file is stored in the database area with your database files, it is deleted when you disable change tracking. You can rename the change tracking file by using the ALTER DATABASE RENAME SQL command. Your database must be in the MOUNT state to rename the tracking file. The ALTER DATABASE RENAME FILE command updates the control file to refer to the new location. Use the following syntax to rename the change tracking file:
ALTER DATABASE RENAME FILE '...' TO '...';

Oracle Database 11g: Data Guard Administration 14 - 195
Monitoring Block Change Tracking The output of the V$BLOCK_CHANGE_TRACKING view shows where the change tracking file is located, the status of block change tracking (ENABLED/DISABLED), and the size (in bytes) of the file. Querying the V$BACKUP_DATAFILE view shows the effectiveness of block change tracking in minimizing the incremental backup I/O (the PCT_READ_FOR_BACKUP column). A high value indicates that RMAN reads most blocks in the data file during an incremental backup. You can reduce this ratio by decreasing the time between incremental backups.
Sample Formatted Output from the V$BACKUP_DATAFILE Query FILE# BLOCKS_IN_FILE BLOCKS_READ PCT_READ_FOR_BACKUP
BLOCKS_BACKED_UP
----- -------------- ----------- ------------------- --------
--------
1 56320 4480 7
462
2 3840 2688 70
2408
3 49920 16768 33
4457
4 640 64 10
1
5 19200 256 1

91
195


Oracle Database 11g: Data Guard Administration 13 - 197
Snapshot Standby Databases: Overview A snapshot standby database is a fully updatable standby database that is created by converting a physical standby database to a snapshot standby database. A snapshot standby database receives and archives—but does not apply—redo data from a primary database. Redo data received from the primary database is applied when a snapshot standby database is converted back to a physical standby database, after discarding all local updates to the snapshot standby database. You can create a snapshot standby database by using DGMGRL commands or SQL commands. When the standby database is converted to a snapshot standby database, an implicit guaranteed restore point is created and Flashback Database is enabled. After performing operations on the snapshot standby database, you can convert it back to a physical standby database. Data Guard implicitly flashes the database back to the guaranteed restore point and automatically applies the primary database redo that was archived by the snapshot standby database since it was created. The guaranteed restore point is dropped after this process is completed.

Oracle Database 11g: Data Guard Administration 13 - 198
Snapshot Standby Database: Architecture After a physical standby database is converted to a snapshot standby database, Redo Apply no longer applies the redo data. The redo data continues to be received using the defined transport method (SYNC or ASYNC), but it is not applied until the snapshot standby database is converted back to a physical standby database.

Oracle Database 11g: Data Guard Administration 13 - 199
Converting a Physical Standby Database to a Snapshot Standby Database Use the CONVERT DATABASE DGMGRL command to convert a physical standby database to a snapshot standby database, as in the following example:
DGMGRL> convert database pdb1 to snapshot standby; Converting database "pdb1" to a Snapshot Standby database, please wait... Database "pdb1" converted successfully

Oracle Database 11g: Data Guard Administration 13 - 200
Activating a Snapshot Standby Database: Issues and Cautions Keep the following in mind when activating a snapshot standby database:
Potential data loss when there is a corrupted log file: The snapshot standby database accepts redo log files but does not apply them. If there is a corrupted redo log file at the snapshot standby database, it is not discovered until the database is converted back to a physical standby database and the managed recovery process (MRP) is started. If the primary database is unavailable at that time, there is no way to retrieve that log. Lengthy conversion of the snapshot standby database to a primary database: In the event of a failure of the primary database, the snapshot standby database can be converted back to a physical standby database. The redo that has been received can then be applied, and the database can be converted to a primary database. If the snapshot standby database lags far behind the primary database, it may take a long time to apply the redo that has been received and convert it to the primary database.

Oracle Database 11g: Data Guard Administration 13 - 201
Snapshot Standby Database: Target Restrictions When you convert the physical standby database to a snapshot standby database, it cannot be the only standby database in the configuration if your configuration is in maximum protection mode. In addition, you cannot make changes to the configuration after converting to a snapshot standby database that would create this situation. You cannot perform a switchover to a snapshot standby database. A snapshot standby database cannot be configured as a fast-start failover target.
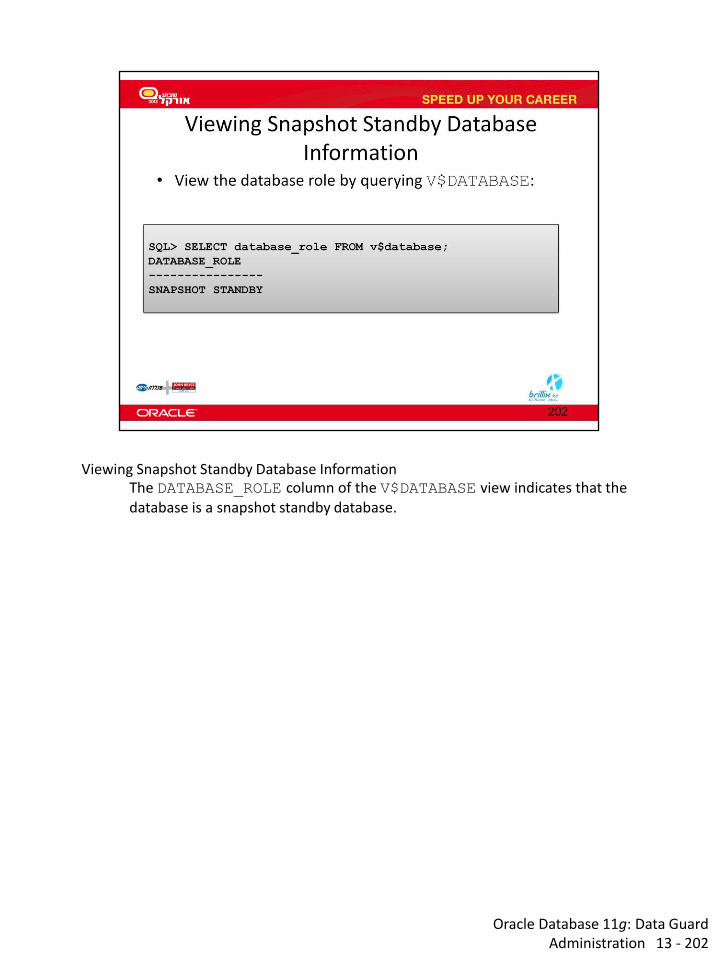
Oracle Database 11g: Data Guard Administration 13 - 202
Viewing Snapshot Standby Database Information The DATABASE_ROLE column of the V$DATABASE view indicates that the database is a snapshot standby database.

Oracle Database 11g: Data Guard Administration 13 - 203
Using DGMGRL to View Snapshot Standby Database Information Use the SHOW CONFIGURATION and SHOW CONFIGURATION VERBOSE DGMGRL commands to display information about the snapshot standby database.

Oracle Database 11g: Data Guard Administration 13 - 204
Using DGMGRL to View Snapshot Standby Database Information (continued) When you execute the SHOW DATABASE and SHOW DATABASE VERBOSE commands for a snapshot standby database, “SNAPSHOT STANDBY” is displayed in the role field.

Oracle Database 11g: Data Guard Administration 13 - 205
Converting a Snapshot Standby Database to a Physical Standby Database Use the CONVERT DATABASE command to convert the database back to a physical standby database.

206

207

208

209

210

211
Related Documents