Oracle® Communications Enterprise Trunk Manager Service Provider Configuration Guide Release 7.3 Formerly Net-Net Central SIP Trunk Xpress October 2013

Welcome message from author
This document is posted to help you gain knowledge. Please leave a comment to let me know what you think about it! Share it to your friends and learn new things together.
Transcript

Oracle® Communications Enterprise Trunk ManagerService Provider Configuration GuideRelease 7.3Formerly Net-Net Central SIP Trunk Xpress
October 2013

Copyright ©2013, 2012 Oracle and/or its affiliates. All rights reserved.
This software and related documentation are provided under a license agreement containing restrictions on use and disclosure and are protected by intellectual property laws. Except as expressly permitted in your license agreement or allowed by law, you may not use, copy, reproduce, translate, broadcast, modify, license, transmit, distribute, exhibit, perform, publish, or display any part, in any form, or by any means. Reverse engineering, disassembly, or decompilation of this software, unless required by law for interoperability, is prohibited.
The information contained herein is subject to change without notice and is not warranted to be error-free. If you find any errors, please report them to us in writing.
If this is software or related documentation that is delivered to the U.S. Government or anyone licensing it on behalf of the U.S. Government, the following notice is applicable:
U.S. GOVERNMENT END USERS: Oracle programs, including any operating system, integrated software, any programs installed on the hardware, and/or documentation, delivered to U.S. Government end users are "commercial computer software" pursuant to the applicable Federal Acquisition Regulation and agency-specific supplemental regulations. As such, use, duplication, disclosure, modification, and adaptation of the programs, including any operating system, integrated software, any programs installed on the hardware, and/or documentation, shall be subject to license terms and license restrictions applicable to the programs. No other rights are granted to the U.S. Government.
This software or hardware is developed for general use in a variety of information management applications. It is not developed or intended for use in any inherently dangerous applications, including applications that may create a risk of personal injury. If you use this software or hardware in dangerous applications, then you shall be responsible to take all appropriate fail-safe, backup, redundancy, and other measures to ensure its safe use. Oracle Corporation and its affiliates disclaim any liability for any damages caused by use of this software or hardware in dangerous applications.
Oracle and Java are registered trademarks of Oracle and/or its affiliates. Other names may be trademarks of their respective owners.
Intel and Intel Xeon are trademarks or registered trademarks of Intel Corporation. All SPARC trademarks are used under license and are trademarks or registered trademarks of SPARC International, Inc. AMD, Opteron, the AMD logo, and the AMD Opteron logo are trademarks or registered trademarks of Advanced Micro Devices. UNIX is a registered trademark of The Open Group.
This software or hardware and documentation may provide access to or information on content, products, and services from third parties. Oracle Corporation and its affiliates are not responsible for and expressly disclaim all warranties of any kind with respect to third-party content, products, and services. Oracle Corporation and its affiliates will not be responsible for any loss, costs, or damages incurred due to your access to or use of third-party content, products, or services.

Release 7.3 Oracle Communications Enterprise Trunk Manager Service Provider Configuration Guide iii
Contents
About this Guide . . . . . . . . . . . . . . . . . . . . . . . . . . . . . . . . . . . . . . . . . . . . . . . . . . 11
Introduction . . . . . . . . . . . . . . . . . . . . . . . . . . . . . . . . . . . . . . . . . . . . . . . . . . . . . . . . . . . . . . . . . . . . 11
Audience . . . . . . . . . . . . . . . . . . . . . . . . . . . . . . . . . . . . . . . . . . . . . . . . . . . . . . . . . . . . . . . . . . . . 11
About Net-Net C-Series Platforms . . . . . . . . . . . . . . . . . . . . . . . . . . . . . . . . . . . . . . . . . . . . . . . 11
Related Documentation. . . . . . . . . . . . . . . . . . . . . . . . . . . . . . . . . . . . . . . . . . . . . . . . . . . . . . . . . . 11
Revision History . . . . . . . . . . . . . . . . . . . . . . . . . . . . . . . . . . . . . . . . . . . . . . . . . . . . . . . . . . . . . . . . 12
1 Overview. . . . . . . . . . . . . . . . . . . . . . . . . . . . . . . . . . . . . . . . . . . . . . . . . . . . . . . . . 13
Introduction . . . . . . . . . . . . . . . . . . . . . . . . . . . . . . . . . . . . . . . . . . . . . . . . . . . . . . . . . . . . . . . . . . . . 13
What is a SIP Trunk? . . . . . . . . . . . . . . . . . . . . . . . . . . . . . . . . . . . . . . . . . . . . . . . . . . . . . . . . . . . . 13
What is SIP Trunk Xpress? . . . . . . . . . . . . . . . . . . . . . . . . . . . . . . . . . . . . . . . . . . . . . . . . . . . . . . . 13
What is the SIP Trunk Xpress Customer Portal? . . . . . . . . . . . . . . . . . . . . . . . . . . . . . . . . . . . . 14
How Does SIP Trunk Xpress Work? . . . . . . . . . . . . . . . . . . . . . . . . . . . . . . . . . . . . . . . . . . . . . . . 14
2 InstallingTrunk Manager. . . . . . . . . . . . . . . . . . . . . . . . . . . . . . . . . . . . . . . . . . . 17
Introduction . . . . . . . . . . . . . . . . . . . . . . . . . . . . . . . . . . . . . . . . . . . . . . . . . . . . . . . . . . . . . . . . . . . . 17
Hardware Support . . . . . . . . . . . . . . . . . . . . . . . . . . . . . . . . . . . . . . . . . . . . . . . . . . . . . . . . . . . . . . 17
Trunk Manager Hardware Support . . . . . . . . . . . . . . . . . . . . . . . . . . . . . . . . . . . . . . . . . . . . . . . 17
OS Support. . . . . . . . . . . . . . . . . . . . . . . . . . . . . . . . . . . . . . . . . . . . . . . . . . . . . . . . . . . . . . . . . . . . . 17
Trunk Manager OS Support. . . . . . . . . . . . . . . . . . . . . . . . . . . . . . . . . . . . . . . . . . . . . . . . . . . . . 17
Before You Start . . . . . . . . . . . . . . . . . . . . . . . . . . . . . . . . . . . . . . . . . . . . . . . . . . . . . . . . . . . . . . . . 18
Information You Need to Know . . . . . . . . . . . . . . . . . . . . . . . . . . . . . . . . . . . . . . . . . . . . . . . . . 18
Trunk Manager Components Required. . . . . . . . . . . . . . . . . . . . . . . . . . . . . . . . . . . . . . . . . . . . 18
Obtaining a Trunk Manager License . . . . . . . . . . . . . . . . . . . . . . . . . . . . . . . . . . . . . . . . . . . . . . 18
Installing Trunk Manager . . . . . . . . . . . . . . . . . . . . . . . . . . . . . . . . . . . . . . . . . . . . . . . . . . . . . . . . 19
Pre-requisites. . . . . . . . . . . . . . . . . . . . . . . . . . . . . . . . . . . . . . . . . . . . . . . . . . . . . . . . . . . . . . . . . 19
SIPSM or Non-SIPSM? . . . . . . . . . . . . . . . . . . . . . . . . . . . . . . . . . . . . . . . . . . . . . . . . . . . . . . . . 19
Custom Installation . . . . . . . . . . . . . . . . . . . . . . . . . . . . . . . . . . . . . . . . . . . . . . . . . . . . . . . . . . . . 20
Configuring a Cluster . . . . . . . . . . . . . . . . . . . . . . . . . . . . . . . . . . . . . . . . . . . . . . . . . . . . . . . 20
Configuring SFTP Information. . . . . . . . . . . . . . . . . . . . . . . . . . . . . . . . . . . . . . . . . . . . . . . . 23
Enabling/Disabling SIPSM in Trunk Manager . . . . . . . . . . . . . . . . . . . . . . . . . . . . . . . . . . . 24

iv Oracle Communications Enterprise Trunk Manager Service Provider Configuration Guide Release 7.3
Customizing the SIPTX Customer Portal . . . . . . . . . . . . . . . . . . . . . . . . . . . . . . . . . . . . . . . .27
Logging into Trunk Manager. . . . . . . . . . . . . . . . . . . . . . . . . . . . . . . . . . . . . . . . . . . . . . . . . . . . . .31
Trunk Manager at a Glance . . . . . . . . . . . . . . . . . . . . . . . . . . . . . . . . . . . . . . . . . . . . . . . . . . . . . . .33
Customizing the Page Display. . . . . . . . . . . . . . . . . . . . . . . . . . . . . . . . . . . . . . . . . . . . . . . . . . . .33
Changing Number of Items on the Page . . . . . . . . . . . . . . . . . . . . . . . . . . . . . . . . . . . . . . . .34
Navigating Pages . . . . . . . . . . . . . . . . . . . . . . . . . . . . . . . . . . . . . . . . . . . . . . . . . . . . . . . . . . .35
SIP Trunk Summary . . . . . . . . . . . . . . . . . . . . . . . . . . . . . . . . . . . . . . . . . . . . . . . . . . . . . . . . . . . .36
Trunk Overview . . . . . . . . . . . . . . . . . . . . . . . . . . . . . . . . . . . . . . . . . . . . . . . . . . . . . . . . . . .39Service Provider Device Overview . . . . . . . . . . . . . . . . . . . . . . . . . . . . . . . . . . . . . . . . . . .40Customer Device Overview . . . . . . . . . . . . . . . . . . . . . . . . . . . . . . . . . . . . . . . . . . . . . . . . .41Trunk Statistics Summary. . . . . . . . . . . . . . . . . . . . . . . . . . . . . . . . . . . . . . . . . . . . . . . . . . .43
3 Adding a Service Provider SBC (SP-SBC). . . . . . . . . . . . . . . . . . . . . . . . . . . . 45
Introduction. . . . . . . . . . . . . . . . . . . . . . . . . . . . . . . . . . . . . . . . . . . . . . . . . . . . . . . . . . . . . . . . . . . . .45
Setting up the SP-SBC. . . . . . . . . . . . . . . . . . . . . . . . . . . . . . . . . . . . . . . . . . . . . . . . . . . . . . . . . . . .45
Methods for Setting up Your SIP Trunk Network . . . . . . . . . . . . . . . . . . . . . . . . . . . . . . . . . . . .45
Pre-requisites . . . . . . . . . . . . . . . . . . . . . . . . . . . . . . . . . . . . . . . . . . . . . . . . . . . . . . . . . . . . . . . . .47
Adding an SP-SBC and Selecting a Bootstrap File . . . . . . . . . . . . . . . . . . . . . . . . . . . . . . . . . . .48
General Parameters . . . . . . . . . . . . . . . . . . . . . . . . . . . . . . . . . . . . . . . . . . . . . . . . . . . . . . . . . . . .52
Selecting an SP-SBC and Setting SNMP Community. . . . . . . . . . . . . . . . . . . . . . . . . . . . . .53
Adding a New SP-SBC. . . . . . . . . . . . . . . . . . . . . . . . . . . . . . . . . . . . . . . . . . . . . . . . . . . . . . .54
Selecting a Device Group . . . . . . . . . . . . . . . . . . . . . . . . . . . . . . . . . . . . . . . . . . . . . . . . . . . . .56
Adding a New Device Group. . . . . . . . . . . . . . . . . . . . . . . . . . . . . . . . . . . . . . . . . . . . . . . . . .57
Selecting a Load Balancing Pool . . . . . . . . . . . . . . . . . . . . . . . . . . . . . . . . . . . . . . . . . . . . . . .59
Setting Secure Auto-configure Subscription . . . . . . . . . . . . . . . . . . . . . . . . . . . . . . . . . . . . .60
Setting Multiple Network Interfaces . . . . . . . . . . . . . . . . . . . . . . . . . . . . . . . . . . . . . . . . . . . .61
Selecting a Bootstrap Template . . . . . . . . . . . . . . . . . . . . . . . . . . . . . . . . . . . . . . . . . . . . . . . .62
Applying a Trusted Certificate . . . . . . . . . . . . . . . . . . . . . . . . . . . . . . . . . . . . . . . . . . . . . . . . .65
Interface for Net-Net Central Traffic Parameters . . . . . . . . . . . . . . . . . . . . . . . . . . . . . . . . . . . .68
Destination Parameters . . . . . . . . . . . . . . . . . . . . . . . . . . . . . . . . . . . . . . . . . . . . . . . . . . . . . . . . .69
Interface for Trunk-side Traffic (no VLAN) . . . . . . . . . . . . . . . . . . . . . . . . . . . . . . . . . . . . . . . . .70
Generating the SP-SBC Bootstrap File . . . . . . . . . . . . . . . . . . . . . . . . . . . . . . . . . . . . . . . . . . . . .71
Downloading the SP-SBC Bootstrap File. . . . . . . . . . . . . . . . . . . . . . . . . . . . . . . . . . . . . . . . . . . .72
Downloading the SP-SBC Bootstrap File to Your PC . . . . . . . . . . . . . . . . . . . . . . . . . . . . . .72
Using “Push to Device” . . . . . . . . . . . . . . . . . . . . . . . . . . . . . . . . . . . . . . . . . . . . . . . . . . . . . .74
Applying the Bootstrap to the SBC (using the ACLI) . . . . . . . . . . . . . . . . . . . . . . . . . . . . . . . . .76
About the ACLI. . . . . . . . . . . . . . . . . . . . . . . . . . . . . . . . . . . . . . . . . . . . . . . . . . . . . . . . . . . . . . . .76
Applying the Bootstrap File Using the ACLI . . . . . . . . . . . . . . . . . . . . . . . . . . . . . . . . . . . . . . . .77
Using the “load-bootstrap” Command (from a Local Location) . . . . . . . . . . . . . . . . . . . . .77
Using the “load-bootstrap” Command (from a Remote Location) . . . . . . . . . . . . . . . . . . .80

Release 7.3 Oracle Communications Enterprise Trunk Manager Service Provider Configuration Guide v
4 Adding an Enterprise SBC (E-SBC). . . . . . . . . . . . . . . . . . . . . . . . . . . . . . . . . . 83
Introduction . . . . . . . . . . . . . . . . . . . . . . . . . . . . . . . . . . . . . . . . . . . . . . . . . . . . . . . . . . . . . . . . . . . . 83
Setting up the E-SBC . . . . . . . . . . . . . . . . . . . . . . . . . . . . . . . . . . . . . . . . . . . . . . . . . . . . . . . . . . . . 83
Pre-requisites. . . . . . . . . . . . . . . . . . . . . . . . . . . . . . . . . . . . . . . . . . . . . . . . . . . . . . . . . . . . . . . . . 84
Adding a Customer (E-SBC) . . . . . . . . . . . . . . . . . . . . . . . . . . . . . . . . . . . . . . . . . . . . . . . . . . . . 85
Adding a Site . . . . . . . . . . . . . . . . . . . . . . . . . . . . . . . . . . . . . . . . . . . . . . . . . . . . . . . . . . . . . . 88
Adding a New User . . . . . . . . . . . . . . . . . . . . . . . . . . . . . . . . . . . . . . . . . . . . . . . . . . . . . . . . . 91
Installation Setup . . . . . . . . . . . . . . . . . . . . . . . . . . . . . . . . . . . . . . . . . . . . . . . . . . . . . . . . . . . . . . . 95
Adding an Installation Setup . . . . . . . . . . . . . . . . . . . . . . . . . . . . . . . . . . . . . . . . . . . . . . . . . . . . 96
Device System Setup. . . . . . . . . . . . . . . . . . . . . . . . . . . . . . . . . . . . . . . . . . . . . . . . . . . . . . . . 97
Boot Parameters. . . . . . . . . . . . . . . . . . . . . . . . . . . . . . . . . . . . . . . . . . . . . . . . . . . . . . . . . . . . 98
Downloading and Applying the “Installation Setup” file . . . . . . . . . . . . . . . . . . . . . . . . . . 99
Downloading a Customer Bootstrap File . . . . . . . . . . . . . . . . . . . . . . . . . . . . . . . . . . . . . . . . . . 100
Pre-requisite . . . . . . . . . . . . . . . . . . . . . . . . . . . . . . . . . . . . . . . . . . . . . . . . . . . . . . . . . . . . . . . . 100
Downloading to your PC . . . . . . . . . . . . . . . . . . . . . . . . . . . . . . . . . . . . . . . . . . . . . . . . . . . . . . 100
Loading to the E-SBC . . . . . . . . . . . . . . . . . . . . . . . . . . . . . . . . . . . . . . . . . . . . . . . . . . . . . . . . . 102
Using “Push to Site” . . . . . . . . . . . . . . . . . . . . . . . . . . . . . . . . . . . . . . . . . . . . . . . . . . . . . . . . . . 102
Applying the Customer Bootstrap to the E-SBC . . . . . . . . . . . . . . . . . . . . . . . . . . . . . . . . . . . 103
5 Adding a SIP Trunk . . . . . . . . . . . . . . . . . . . . . . . . . . . . . . . . . . . . . . . . . . . . . . 105
Introduction . . . . . . . . . . . . . . . . . . . . . . . . . . . . . . . . . . . . . . . . . . . . . . . . . . . . . . . . . . . . . . . . . . . 105
Adding a SIP Trunk . . . . . . . . . . . . . . . . . . . . . . . . . . . . . . . . . . . . . . . . . . . . . . . . . . . . . . . . . . . . 105
From the Customers Window . . . . . . . . . . . . . . . . . . . . . . . . . . . . . . . . . . . . . . . . . . . . . . . . . . 106
Service Provider Configures the Customer Core Interface . . . . . . . . . . . . . . . . . . . . . . . . 108
Customer Configures the Customer Core Interface . . . . . . . . . . . . . . . . . . . . . . . . . . . . . . 116
From the SIP Trunks Window . . . . . . . . . . . . . . . . . . . . . . . . . . . . . . . . . . . . . . . . . . . . . . . . . . 118
6 Additional Functions . . . . . . . . . . . . . . . . . . . . . . . . . . . . . . . . . . . . . . . . . . . . . 125
Introduction . . . . . . . . . . . . . . . . . . . . . . . . . . . . . . . . . . . . . . . . . . . . . . . . . . . . . . . . . . . . . . . . . . . 125
Service Provider Devices (SP-SBCs) . . . . . . . . . . . . . . . . . . . . . . . . . . . . . . . . . . . . . . . . . . . . . . 126
Viewing SP-SBC Details . . . . . . . . . . . . . . . . . . . . . . . . . . . . . . . . . . . . . . . . . . . . . . . . . . . . . . . 126
Deleting a SP-SBC . . . . . . . . . . . . . . . . . . . . . . . . . . . . . . . . . . . . . . . . . . . . . . . . . . . . . . . . . . . 128
Searching for a SP-SBC . . . . . . . . . . . . . . . . . . . . . . . . . . . . . . . . . . . . . . . . . . . . . . . . . . . . . . . 131
Enterprise Devices (E-SBCs) . . . . . . . . . . . . . . . . . . . . . . . . . . . . . . . . . . . . . . . . . . . . . . . . . . . . 133
Viewing E-SBC Details . . . . . . . . . . . . . . . . . . . . . . . . . . . . . . . . . . . . . . . . . . . . . . . . . . . . . . . . 133
Editing E-SBC . . . . . . . . . . . . . . . . . . . . . . . . . . . . . . . . . . . . . . . . . . . . . . . . . . . . . . . . . . . . . . . 136
Deleting E-SBC . . . . . . . . . . . . . . . . . . . . . . . . . . . . . . . . . . . . . . . . . . . . . . . . . . . . . . . . . . . . . . 139
Searching for an E-SBC . . . . . . . . . . . . . . . . . . . . . . . . . . . . . . . . . . . . . . . . . . . . . . . . . . . . . . . 140

vi Oracle Communications Enterprise Trunk Manager Service Provider Configuration Guide Release 7.3
SIP Trunks . . . . . . . . . . . . . . . . . . . . . . . . . . . . . . . . . . . . . . . . . . . . . . . . . . . . . . . . . . . . . . . . . . . . .141
Editing SIP Trunk Maximum Sessions . . . . . . . . . . . . . . . . . . . . . . . . . . . . . . . . . . . . . . . . . . . .141
Viewing Service Provider Interface Parameters. . . . . . . . . . . . . . . . . . . . . . . . . . . . . . . . . .146
Viewing Service Provider Core Interface Parameters . . . . . . . . . . . . . . . . . . . . . . . . . .148Viewing Customer Interface Parameters. . . . . . . . . . . . . . . . . . . . . . . . . . . . . . . . . . . . . . . .149
Viewing Customer Core Interface Parameters . . . . . . . . . . . . . . . . . . . . . . . . . . . . . . . .150Deleting SIP Trunk . . . . . . . . . . . . . . . . . . . . . . . . . . . . . . . . . . . . . . . . . . . . . . . . . . . . . . . . . . . .152
Viewing SIP Trunk Statistics . . . . . . . . . . . . . . . . . . . . . . . . . . . . . . . . . . . . . . . . . . . . . . . . . . . .154
Setting Auto Refresh. . . . . . . . . . . . . . . . . . . . . . . . . . . . . . . . . . . . . . . . . . . . . . . . . . . . . . . .155
Current Details . . . . . . . . . . . . . . . . . . . . . . . . . . . . . . . . . . . . . . . . . . . . . . . . . . . . . . . . . . . .158
Average Period/State . . . . . . . . . . . . . . . . . . . . . . . . . . . . . . . . . . . . . . . . . . . . . . . . . . . . . . .160
Monthly Minutes. . . . . . . . . . . . . . . . . . . . . . . . . . . . . . . . . . . . . . . . . . . . . . . . . . . . . . . . . . .162
Quality of Service (QoS). . . . . . . . . . . . . . . . . . . . . . . . . . . . . . . . . . . . . . . . . . . . . . . . . . . . .163
Load Balancing Pools. . . . . . . . . . . . . . . . . . . . . . . . . . . . . . . . . . . . . . . . . . . . . . . . . . . . . . . . . . . .165
Adding Load Balancing Pool . . . . . . . . . . . . . . . . . . . . . . . . . . . . . . . . . . . . . . . . . . . . . . . . . . . .165
Searching for a Load Balancing Pool . . . . . . . . . . . . . . . . . . . . . . . . . . . . . . . . . . . . . . . . . . . . .168
Editing a Load Balancing Pool. . . . . . . . . . . . . . . . . . . . . . . . . . . . . . . . . . . . . . . . . . . . . . . . . . .169
Deleting a Load Balancing Pool . . . . . . . . . . . . . . . . . . . . . . . . . . . . . . . . . . . . . . . . . . . . . . . . .171
Bootstrap Templates for the SP-SBC and E-SBC. . . . . . . . . . . . . . . . . . . . . . . . . . . . . . . . . . . .172
Viewing Templates . . . . . . . . . . . . . . . . . . . . . . . . . . . . . . . . . . . . . . . . . . . . . . . . . . . . . . . . . . . .173
Downloading a Template. . . . . . . . . . . . . . . . . . . . . . . . . . . . . . . . . . . . . . . . . . . . . . . . . . . . . . .174
Certificates. . . . . . . . . . . . . . . . . . . . . . . . . . . . . . . . . . . . . . . . . . . . . . . . . . . . . . . . . . . . . . . . . . . . .178
How TLS Certificates Work . . . . . . . . . . . . . . . . . . . . . . . . . . . . . . . . . . . . . . . . . . . . . . . . . . . . .178
Adding a Certificate . . . . . . . . . . . . . . . . . . . . . . . . . . . . . . . . . . . . . . . . . . . . . . . . . . . . . . . . . . .179
Viewing a Certificate. . . . . . . . . . . . . . . . . . . . . . . . . . . . . . . . . . . . . . . . . . . . . . . . . . . . . . . . . . .182
Searching for a Certificate . . . . . . . . . . . . . . . . . . . . . . . . . . . . . . . . . . . . . . . . . . . . . . . . . . . . . .183
Deleting a Certificate . . . . . . . . . . . . . . . . . . . . . . . . . . . . . . . . . . . . . . . . . . . . . . . . . . . . . . . . . .184
Interop Files. . . . . . . . . . . . . . . . . . . . . . . . . . . . . . . . . . . . . . . . . . . . . . . . . . . . . . . . . . . . . . . . . . . .185
Adding an Interop File . . . . . . . . . . . . . . . . . . . . . . . . . . . . . . . . . . . . . . . . . . . . . . . . . . . . . . . . .185
Viewing an Interop File . . . . . . . . . . . . . . . . . . . . . . . . . . . . . . . . . . . . . . . . . . . . . . . . . . . . . . . .188
Downloading an Interop File. . . . . . . . . . . . . . . . . . . . . . . . . . . . . . . . . . . . . . . . . . . . . . . . . . . .189
Editing/Updating an Interop File. . . . . . . . . . . . . . . . . . . . . . . . . . . . . . . . . . . . . . . . . . . . . . . . .190
Deleting an Interop File . . . . . . . . . . . . . . . . . . . . . . . . . . . . . . . . . . . . . . . . . . . . . . . . . . . . . . . .192
Searching for an Interop File . . . . . . . . . . . . . . . . . . . . . . . . . . . . . . . . . . . . . . . . . . . . . . . . . . . .193
Installation Setup File . . . . . . . . . . . . . . . . . . . . . . . . . . . . . . . . . . . . . . . . . . . . . . . . . . . . . . . . . . .194
Editing the “Installation Setup” File . . . . . . . . . . . . . . . . . . . . . . . . . . . . . . . . . . . . . . . . . . . . . .195
Deleting the “Installation Setup” File . . . . . . . . . . . . . . . . . . . . . . . . . . . . . . . . . . . . . . . . . . . . .197
Configuring High Availability (HA) . . . . . . . . . . . . . . . . . . . . . . . . . . . . . . . . . . . . . . . . . . . . . . .198
Configuring HA on a SP-SBC . . . . . . . . . . . . . . . . . . . . . . . . . . . . . . . . . . . . . . . . . . . . . . . . . . .198
HA Interface for NNC Traffic (for both VLAN and non-VLAN) . . . . . . . . . . . . . . . . . . . .201

Release 7.3 Oracle Communications Enterprise Trunk Manager Service Provider Configuration Guide vii
HA Interface for Trunk-Side Traffic (with no VLAN) . . . . . . . . . . . . . . . . . . . . . . . . . . . . 201
HA Interface for Trunk-Side Traffic (with VLAN) . . . . . . . . . . . . . . . . . . . . . . . . . . . . . . . 202
Configuring HA on an E-SBC . . . . . . . . . . . . . . . . . . . . . . . . . . . . . . . . . . . . . . . . . . . . . . . . . . 203
Configuring HA in an Installation Setup File . . . . . . . . . . . . . . . . . . . . . . . . . . . . . . . . . . . 204
Boot Parameters for HA . . . . . . . . . . . . . . . . . . . . . . . . . . . . . . . . . . . . . . . . . . . . . . . . . . . . 205
Redundancy Configuration for HA . . . . . . . . . . . . . . . . . . . . . . . . . . . . . . . . . . . . . . . . . . . 206
Configuring HA on the Trunk . . . . . . . . . . . . . . . . . . . . . . . . . . . . . . . . . . . . . . . . . . . . . . . . . . 207
A Net-Net Central Installation Procedures . . . . . . . . . . . . . . . . . . . . . . . . . . . . . . . . . . . . . . . . . . . 209
Introduction . . . . . . . . . . . . . . . . . . . . . . . . . . . . . . . . . . . . . . . . . . . . . . . . . . . . . . . . . . . . . . . . . . . 209
Before You Start . . . . . . . . . . . . . . . . . . . . . . . . . . . . . . . . . . . . . . . . . . . . . . . . . . . . . . . . . . . . . . . 209
Net-Net Central Hardware/OS Support . . . . . . . . . . . . . . . . . . . . . . . . . . . . . . . . . . . . . . . . . . 209
System Requirements . . . . . . . . . . . . . . . . . . . . . . . . . . . . . . . . . . . . . . . . . . . . . . . . . . . . . . . . . 209
Linux . . . . . . . . . . . . . . . . . . . . . . . . . . . . . . . . . . . . . . . . . . . . . . . . . . . . . . . . . . . . . . . . . . . . 209
Network Manager with Fedora Core 13 . . . . . . . . . . . . . . . . . . . . . . . . . . . . . . . . . . . . . . . 210
OpenSSL . . . . . . . . . . . . . . . . . . . . . . . . . . . . . . . . . . . . . . . . . . . . . . . . . . . . . . . . . . . . . . . . 210
Client Requirements . . . . . . . . . . . . . . . . . . . . . . . . . . . . . . . . . . . . . . . . . . . . . . . . . . . . . . . 210
Using the DNS Database . . . . . . . . . . . . . . . . . . . . . . . . . . . . . . . . . . . . . . . . . . . . . . . . . . . 211
Information You Need . . . . . . . . . . . . . . . . . . . . . . . . . . . . . . . . . . . . . . . . . . . . . . . . . . . . . . . . 211
Net-Net Central Components Required . . . . . . . . . . . . . . . . . . . . . . . . . . . . . . . . . . . . . . . . . . 211
Opening Ports on the Firewall . . . . . . . . . . . . . . . . . . . . . . . . . . . . . . . . . . . . . . . . . . . . . . . . . . 212
Net-Net Central Virtual Environment on Linux. . . . . . . . . . . . . . . . . . . . . . . . . . . . . . . . . . . . 214
Before You Start. . . . . . . . . . . . . . . . . . . . . . . . . . . . . . . . . . . . . . . . . . . . . . . . . . . . . . . . . . . . . . 214
About the Net-Net NNC VM Image . . . . . . . . . . . . . . . . . . . . . . . . . . . . . . . . . . . . . . . . . . 214
Memory Usage. . . . . . . . . . . . . . . . . . . . . . . . . . . . . . . . . . . . . . . . . . . . . . . . . . . . . . . . . . . . 214
Installing VM NNC on VMware Player. . . . . . . . . . . . . . . . . . . . . . . . . . . . . . . . . . . . . . . . . . . 214
Installing VM NNC on ESXi. . . . . . . . . . . . . . . . . . . . . . . . . . . . . . . . . . . . . . . . . . . . . . . . . . . . 215
Configuring VM NNC with sysprep . . . . . . . . . . . . . . . . . . . . . . . . . . . . . . . . . . . . . . . . . . . . . 217
Changing the root Account Password . . . . . . . . . . . . . . . . . . . . . . . . . . . . . . . . . . . . . . . . . 218
Changing the nncentral Account Password . . . . . . . . . . . . . . . . . . . . . . . . . . . . . . . . . . . . 218
Configuring Networking. . . . . . . . . . . . . . . . . . . . . . . . . . . . . . . . . . . . . . . . . . . . . . . . . . . . 219
Configuring the Timezone . . . . . . . . . . . . . . . . . . . . . . . . . . . . . . . . . . . . . . . . . . . . . . . . . . 221
Configuring the Network Time Protocol. . . . . . . . . . . . . . . . . . . . . . . . . . . . . . . . . . . . . . . 222
Configuring Optional Services . . . . . . . . . . . . . . . . . . . . . . . . . . . . . . . . . . . . . . . . . . . . . . . 223
Exiting sysprep . . . . . . . . . . . . . . . . . . . . . . . . . . . . . . . . . . . . . . . . . . . . . . . . . . . . . . . . . . . . 223
Installing Net-Net Central . . . . . . . . . . . . . . . . . . . . . . . . . . . . . . . . . . . . . . . . . . . . . . . . . . 223
Typical Installation . . . . . . . . . . . . . . . . . . . . . . . . . . . . . . . . . . . . . . . . . . . . . . . . . . . . . . . . . . . 224
Procedures . . . . . . . . . . . . . . . . . . . . . . . . . . . . . . . . . . . . . . . . . . . . . . . . . . . . . . . . . . . . . . . 224
Checking and Applying the License . . . . . . . . . . . . . . . . . . . . . . . . . . . . . . . . . . . . . . . . 226Configuring HTTP/HTTPS Mode . . . . . . . . . . . . . . . . . . . . . . . . . . . . . . . . . . . . . . . . . . 229Creating a Self-Signed Certificate . . . . . . . . . . . . . . . . . . . . . . . . . . . . . . . . . . . . . . . . . . . . 233

viii Oracle Communications Enterprise Trunk Manager Service Provider Configuration Guide Release 7.3
Refraining from Creating a Self-Signed Certificate . . . . . . . . . . . . . . . . . . . . . . . . . . . . . . .234
Configuring Fault Management . . . . . . . . . . . . . . . . . . . . . . . . . . . . . . . . . . . . . . . . . . . . . .236
B Using the “auto-config” Command to Load a Bootstrap File . . . . . . . . . . . . . . . . . . . . . . . . . . . . . . . . . . . . . . . . . . . . . 239
Introduction. . . . . . . . . . . . . . . . . . . . . . . . . . . . . . . . . . . . . . . . . . . . . . . . . . . . . . . . . . . . . . . . . . . .239
Procedure. . . . . . . . . . . . . . . . . . . . . . . . . . . . . . . . . . . . . . . . . . . . . . . . . . . . . . . . . . . . . . . . . . . . . .239
C Creating Interop Files . . . . . . . . . . . . . . . . . . . . . . . . . . . . . . . . . . . . . . . . . . . . 243
Introduction. . . . . . . . . . . . . . . . . . . . . . . . . . . . . . . . . . . . . . . . . . . . . . . . . . . . . . . . . . . . . . . . . . . .243
Interop Files. . . . . . . . . . . . . . . . . . . . . . . . . . . . . . . . . . . . . . . . . . . . . . . . . . . . . . . . . . . . . . . . . . . .243
Trunk-side / Core-side . . . . . . . . . . . . . . . . . . . . . . . . . . . . . . . . . . . . . . . . . . . . . . . . . . . . . . . . .244
Interop File Example . . . . . . . . . . . . . . . . . . . . . . . . . . . . . . . . . . . . . . . . . . . . . . . . . . . . . . . . .245Interop File Format . . . . . . . . . . . . . . . . . . . . . . . . . . . . . . . . . . . . . . . . . . . . . . . . . . . . . . . . . . . .246
Using Special Character Entities . . . . . . . . . . . . . . . . . . . . . . . . . . . . . . . . . . . . . . . . . . . . . . . . .247
Character Entity Example. . . . . . . . . . . . . . . . . . . . . . . . . . . . . . . . . . . . . . . . . . . . . . . . . . . .247
Interop File Rules . . . . . . . . . . . . . . . . . . . . . . . . . . . . . . . . . . . . . . . . . . . . . . . . . . . . . . . . . . . . .248
Interop Elements, Attributes, and Service Variables . . . . . . . . . . . . . . . . . . . . . . . . . . . . . . . . .250
Elements of an Interop File . . . . . . . . . . . . . . . . . . . . . . . . . . . . . . . . . . . . . . . . . . . . . . . . . .250
Attributes of an Interop File . . . . . . . . . . . . . . . . . . . . . . . . . . . . . . . . . . . . . . . . . . . . . . . . . .252
Service Variables . . . . . . . . . . . . . . . . . . . . . . . . . . . . . . . . . . . . . . . . . . . . . . . . . . . . . . . . . . .252
Service Variable Examples . . . . . . . . . . . . . . . . . . . . . . . . . . . . . . . . . . . . . . . . . . . . . . . . . . .256
Procedure for Creating an Interop File . . . . . . . . . . . . . . . . . . . . . . . . . . . . . . . . . . . . . . . . . . . .257
Interop File Examples . . . . . . . . . . . . . . . . . . . . . . . . . . . . . . . . . . . . . . . . . . . . . . . . . . . . . . . . . .259
realmConfig . . . . . . . . . . . . . . . . . . . . . . . . . . . . . . . . . . . . . . . . . . . . . . . . . . . . . . . . . . . . . .259sessionAgent . . . . . . . . . . . . . . . . . . . . . . . . . . . . . . . . . . . . . . . . . . . . . . . . . . . . . . . . . . . . .259sipInterface . . . . . . . . . . . . . . . . . . . . . . . . . . . . . . . . . . . . . . . . . . . . . . . . . . . . . . . . . . . . . . .260
localPolicy . . . . . . . . . . . . . . . . . . . . . . . . . . . . . . . . . . . . . . . . . . . . . . . . . . . . . . . . . . . . . . . .260
mediaRouter . . . . . . . . . . . . . . . . . . . . . . . . . . . . . . . . . . . . . . . . . . . . . . . . . . . . . . . . . . . . . .260
sessionAgentGroup . . . . . . . . . . . . . . . . . . . . . . . . . . . . . . . . . . . . . . . . . . . . . . . . . . . . . . . .261
mediaPolicy . . . . . . . . . . . . . . . . . . . . . . . . . . . . . . . . . . . . . . . . . . . . . . . . . . . . . . . . . . . . . . .261
codecPolicy . . . . . . . . . . . . . . . . . . . . . . . . . . . . . . . . . . . . . . . . . . . . . . . . . . . . . . . . . . . . . . .262
mediaProfile. . . . . . . . . . . . . . . . . . . . . . . . . . . . . . . . . . . . . . . . . . . . . . . . . . . . . . . . . . . . . . .262
classProfile . . . . . . . . . . . . . . . . . . . . . . . . . . . . . . . . . . . . . . . . . . . . . . . . . . . . . . . . . . . . . . . .262
accessControl. . . . . . . . . . . . . . . . . . . . . . . . . . . . . . . . . . . . . . . . . . . . . . . . . . . . . . . . . . . . . .263
translationRules. . . . . . . . . . . . . . . . . . . . . . . . . . . . . . . . . . . . . . . . . . . . . . . . . . . . . . . . . . . .263
sessionTranslation. . . . . . . . . . . . . . . . . . . . . . . . . . . . . . . . . . . . . . . . . . . . . . . . . . . . . . . . . .263
sipManipulation . . . . . . . . . . . . . . . . . . . . . . . . . . . . . . . . . . . . . . . . . . . . . . . . . . . . . . . . . . .264
sipConfig . . . . . . . . . . . . . . . . . . . . . . . . . . . . . . . . . . . . . . . . . . . . . . . . . . . . . . . . . . . . . . . .264sipFeature. . . . . . . . . . . . . . . . . . . . . . . . . . . . . . . . . . . . . . . . . . . . . . . . . . . . . . . . . . . . . . . . .265
response Map . . . . . . . . . . . . . . . . . . . . . . . . . . . . . . . . . . . . . . . . . . . . . . . . . . . . . . . . . . . . .265

Release 7.3 Oracle Communications Enterprise Trunk Manager Service Provider Configuration Guide ix
Custom Variable and Template Files . . . . . . . . . . . . . . . . . . . . . . . . . . . . . . . . . . . . . . . . . . . . . 266
InteropVariables.xml . . . . . . . . . . . . . . . . . . . . . . . . . . . . . . . . . . . . . . . . . . . . . . . . . . . . . . . 266
Procedure for Customizing interopVariables.xml File . . . . . . . . . . . . . . . . . . . . . . . . . . . . 269
InteropTemplate.xml . . . . . . . . . . . . . . . . . . . . . . . . . . . . . . . . . . . . . . . . . . . . . . . . . . . . . . . 270
Procedure for Customizing interopTemplate.xml File . . . . . . . . . . . . . . . . . . . . . . . . . . . . 272
Performing a “verify-config” When Using Templates . . . . . . . . . . . . . . . . . . . . . . . . . . . . . . 273
D ACLI Configuration to to XML Element Mapping Reference. . . . . . . . . . . . . . . . . . . . . . . . . . . . . . . . . . . . . . . . . 275
Introduction . . . . . . . . . . . . . . . . . . . . . . . . . . . . . . . . . . . . . . . . . . . . . . . . . . . . . . . . . . . . . . . . . . . 275
ACLI to XML Element Mapping . . . . . . . . . . . . . . . . . . . . . . . . . . . . . . . . . . . . . . . . . . . . . . . . . 275
Glossary 325
Introduction . . . . . . . . . . . . . . . . . . . . . . . . . . . . . . . . . . . . . . . . . . . . . . . . . . . . . . . . . . . . . . . . . . . 325
Terms and Definitions . . . . . . . . . . . . . . . . . . . . . . . . . . . . . . . . . . . . . . . . . . . . . . . . . . . . . . . . . . 325

x Oracle Communications Enterprise Trunk Manager Service Provider Configuration Guide Release 7.3
Release 7.3 Oracle Communications Enterprise Trunk Manager Service Provider Configuration Guide 11
About this Guide
Introduction
The Oracle Communications Enterprise Trunk Manager Service Provider Configuration Guide includes information that applies to the Trunk Manager solution for setting up SIP Trunks between a Service Provider SBC (SP-SBC) and an Enterprise SBC (E-SBC). Using this guide, Service Provider administrators can quickly and easily establish SIP Trunks using the Trunk Manager application in the Session Delivery Management Suitesoftware.
Note: In this document, the term “Enterprise” pertains to the “Customer”.
Audience This guide is for Service Provider administrators setting up SIP Trunks between SP-SBCs and E-SBCs. Corresponding documentation includes the Oracle Communications Enterprise Trunk Manager Enterprise Configuration Guide.
About Net-Net C-Series Platforms
This guide supports the Acme Packet 3800 and the Acme Packet 4500 C-series platforms, as well as the Enterprise Session Director-Server Edition and the Enterprise Session Director-Virtual Machine Edition.
Related Documentation
The following table lists related documents.
Document Name Document Description
Oracle Communications Enterprise Trunk Manager Enterprise Configuration Guide
Contains Customer information for acessing the SIP Trunk Xpress Portal and configuring the E-SBC to connect to the SP-SBC, and for connecting to the SIP Trunk established by the Service Provider.
Oracle Communications Enterprise Trunk Manager Quick Start Guide (Full Mode)
Provides a five-step instruction for setting up a SIP Trunk between the SP-SBC and the E-SBC. This guide is for the SIP Session Manager (SIPSM) enabled version of Trunk Manager (displays a full menu of options).
Oracle Communications Enterprise Trunk Manager Quick Start Guide (E-SBC Bootstrap-only Mode)
Provides a five-step instruction for setting up a SIP Trunk between the SP-SBC and the E-SBC. This guide is for a non-SIP Session Manager (non-SIPSM) version of Trunk Manager (displays a limited menu of options).

ABOUT THIS GUIDE
12 Oracle Communications Enterprise Trunk Manager Service Provider Configuration Guide Release 7.3
Revision History
This section contains the revision history for this document.
Date Revision Number Description
September 28, 2012 Revision 1.00 • New Service Provider document to support the Net-Net SBC SIP Trunk Xpress Solution.
October 22, 2012 Revision 1.01 • Minor spelling and grammatical corrections
December 15, 2012 Revision 1.02 • Added SIPTX Custom Variable and Template File Enhancement
• Added Appendix D - ACLI Configuration Element to XML Element Mapping Reference
January 29, 2013 Revision 1.03 • Removed support for Solaris OSs• Updated installation instructions to support NNC
Release 7.3.• Added that EC6.4.0F1 and up and NNC 7.3 and
up support SIPTX.• Updated the section in Appendix A called
“Opening Ports on the Firewall.”• Added information to Appendix C about using
the verify-config command with templates.
Release 7.3 Oracle Communications Enterprise Trunk Manager Service Provider Configuration Guide 13
1 Overview
Introduction
This chapter describes a Session Initiation Protocol (SIP) trunk and how you can use it in your network. It also provides an overview of Acme Packet’s SIP Trunk Xpress solution for quickly and easily setting up SIP trunks between Service Provider and Customer Net-Net Session Border Controllers (SBCs).
For descriptions of terms used in this document, see the Glossary (325).
Topics include:
• What is a SIP Trunk? (13)
• What is SIP Trunk Xpress? (13)
• How Does SIP Trunk Xpress Work? (14)
What is a SIP Trunk?
A SIP trunk is a service offered to Enterprises by a Service Provider that permits the Enterprises with Private Branch Exchanges (PBXs) installed, to use IP communications (including Voice over IP (VoIP)) outside of their Enterprise network on an Internet connection. The SIP trunk is a combination of:
• the Customer’s SBC (E-SBC) or PBX IP address and port
• the IP address and port of the Service Provider's SBC (SP-SBC)
• the service level agreement constraints (e.g., concurrent number of sessions and/or bandwidth).
A SP-SBC can have multiple SIP trunks to one or more E-SBCs. However, SIP Trunk Xpress supports only one trunk per E-SBC.
What is SIP Trunk Xpress?
Acme Packet’s SIP Trunk Xpress is a Trunk Manager application enabled by Acme Packet’s Net-Net Central platform. Service Providers use SIP Trunk Xpress to automatically configure SIP trunks for their Customers. SIP Trunk Xpress is an easy-to-use, graphical application that you access using your Web browser in Net-Net Central. Its main purpose is to simplify the configuration of both the Service Provider and Enterprise SBCs on both ends of a SIP trunk.
SIP-based communications services are expanding to reach more subscribers in Service Provider networks. This growth has increased the number of SIP trunks needed to support the footprint of these services and their configuration is becoming much more time consuming. SIP Trunk Xpress provides centralized management of SIP trunks, allowing for automated configuration and on-going management of trunk configurations from a centralized location. SIP Trunk Xpress provides a simple mechanism to configure SIP trunk services between a SP-SBC and an E-SBC.
OVERVIEW
14 Oracle Communications Enterprise Trunk Manager Service Provider Configuration Guide Release 7.3
Key benefits include:
• Centralized configuration server for all SIP trunks
• Integrated with Net-Net Central using Graphical User Interface (GUI) features
• Faster SIP Trunk provisioning because of simple configuration procedures
• Eliminates error-prone manual configuration procedures
• Reduces OpEx to deploy Service Provider SIP trunking services
• Enables Service Providers to configure all remote E-SBCs
• Comprehensive management of Customer sites/services and SIP trunk associations
• Creates all configuration data for Net-Net SBCs on both ends of the SIP trunk
• Easy installation and configuration of the Net-Net E-SBC via a USB stick (for Net-Net Enterprise Session Director-Server Edition (ESD-SE) models only)
What is the SIP Trunk Xpress Customer Portal?
The SIP Trunk Xpress (SIPTX) Customer Portal is a Web-based application that a Customer can log into for viewing the summary information about the E-SBCs in their network, and the Trunk statistics for each E-SBC. Using the SIPTX Customer Portal, a Customer can apply a configuration file (bootstrap file) provided by you, to the E-SBC in the Customer network, thus allowing the device to connect over an established SIP Trunk to the configured SP-SBC in the Service Provider network.
If you give permission, the Customer can also use the SIPTX Customer Portal to configure, generate, and apply the E-SBC bootstrap file from the Customer site.
For more information about the SIPTX Customer Portal, see the Net-Net® SIP Trunk Xpress for Enterprises Guide.
How Does SIP Trunk Xpress Work?
The SIP Trunk Xpress allows a Service Provider administrator to set up a SIP Trunk between the SP-SBC in the Service Provider’s core network site, and the E-SBC(s) in the Customer network site. The Service Provider administrator applies the configuration to the SP-SBC and the E-SBC and establishes the SIP Trunk. Alternatively, a Service Provider can allow a Customer administrator to apply the configuration to the E-SBC if required.
At the Service Provider site, the administrator must assign a single or multiple SP-SBCs to a logical group known as a load balancing pool. Each load balancing pool is assigned one type of Service Provider configuration template. Once the template is assigned to that pool, any SP-SBCs added to the pool use the same configuration template.
The following shows the core Service Provider network with multiple SP-SBCs in the load balancing pool. All of the SP-SBCs in this pool use the same configuration template.

OVERVIEW
Release 7.3 Oracle Communications Enterprise Trunk Manager Service Provider Configuration Guide 15
The SIP Trunk Express service uses a Trunk Manager application in Net-Net Central to assist you in configuring the SP-SBC and E-SBC. Configuration of the Net-Net SBCs includes creating and applying a bootstrap file to each device. The bootstrap file contains all of the configuration parameter information required to boot the Net-Net SBC, connect the device to Net-Net Central, and setup the device for SIP Trunking. For Customers, the E-SBC bootstrap file provides the entire configuration for connecting to network PBXs and to the Service Provider over SIP trunks.
After specifying the configuration for both the SP-SBC and E-SBC using Trunk Manager, you can generate and apply bootstrap files for each device that automatically configure them to connect to Net-Net Central. When the Net-Net SBC subscription is successful through Net-Net Central, the Net-Net SBCs are bootstrapped and ready to connect over a SIP Trunk. Using Trunk Manager, you can then create the SIP Trunk to connect the two devices for communicating.
Alternatively, the Service Provider can provide the following to the Customer:
• Device configuration (bootstrap file) via email, for loading and applying to the E-SBC by the Customer.
• Bootstrap file on a USB stick for loading and applying by the Customer.
• Permission to configure the core network E-SBC parameters (including High Availability (HA)), and generate, load, and apply the E-SBC bootstrap file by the Customer.
The SP-SBC and E-SBC must have a status of “Bootstrapped” before connecting over a SIP Trunk. A “Bootstrapped” status indicates that the E-SBC is communicating with the SP-SBC.

OVERVIEW
16 Oracle Communications Enterprise Trunk Manager Service Provider Configuration Guide Release 7.3
Release 7.3 Oracle Communications Enterprise Trunk Manager Service Provider Configuration Guide 17
2 InstallingTrunk Manager
Introduction
This chapter provides information required to install Trunk Manager in your network. Trunk Manager is a licensed application that runs on Acme Packet’s Net-Net Central platform.
The Net-Net Central installation provides both a “Typical” installation and a “Custom” installation, depending on your network requirements. Only the “Custom” installation is described in this chapter. You must perform the “Typical” Net-Net Central installation first, and then perform the Trunk Manager installation. For information about the “Typical” installation, see Appendix A Net-Net Central Installation Procedures (209).
This chapter also includes Trunk Manager hardware and operating system support, and things you should know before installing Trunk Manager.
Hardware Support
This section provides the Net-Net SBC hardware that Trunk Manager supports.
Trunk Manager Hardware Support
The Trunk Manager application supports the following hardware platforms:
• NN3800
• NN4500
• Net-Net Enterprise Session Director-Server Edition (ESD-SE)
• Net-Net Enterprise Session Director-Virtual Machine Edition (ESD-VME)
For Net-Net Session Border Controllers (SBCs) that support Net-Net Central, see the Net-Net Central Installation Guide.
OS Support
This section provides the Net-Net SBC operating systems (OSs) that Trunk Manager supports.
Trunk Manager OS Support
The Trunk Manager application supports the following Net-Net SBC operating system:
• E-Cx6.4.0F1 and up for Acme Packet hardware platforms
• E-Cz6.4.0F1 and up for ESD-SE and ESD-VME
For Net-Net SBC OSs that support Net-Net Central, see the Net-Net Central Installation Guide.
INSTALLINGTRUNK MANAGER
18 Oracle Communications Enterprise Trunk Manager Service Provider Configuration Guide Release 7.3
Before You Start
Information You Need to Know
Ensure you have identified the following before you install Trunk Manager:
• Hostname and IP address/netmask of the Net-Net Central server, as well as the IP addresses of its gateway, subnet mask, and DNS server
• IP address for each Net-Net SBC
• SNMP community strings for each Net-Net SBC
Trunk Manager Components Required
To install the Trunk Manager application, you must obtain the appropriate license from Acme Packet. Call your Acme Packet representative to purchase the Trunk Manager application license. Your representative sends the Trunk Manager license file to you attached in an email after you purchase the license.
Obtaining a Trunk Manager License
To install Trunk Manager, you need a a license key and setup file. Contact your customer support or sales representative directly or at [email protected].
When requesting a license, please provide Acme Packet with the following Net-Net Central information. You must be logged into the Net-Net Central dashboard as Administrator to access this information:
• Net-Net Central Software Version Number (found at Help->About from Net-Net Central Main Menu)
• Net-Net Central Operating System (OS) (found at Help->About from Net-Net Central Main Menu)
• Net-Net Central License Number (found at Help->License Information from Net-Net Central Main Menu)
Note:
After obtaining the Trunk Manager license, your Acme Packet representative sends you an email with an attached license file for enabling the Trunk Manager in Net-Net Central. The filename is AcmePacketNetNetCentral_<company name>.xml.

INSTALLINGTRUNK MANAGER
Release 7.3 Oracle Communications Enterprise Trunk Manager Service Provider Configuration Guide 19
Installing Trunk Manager
This section provides a procedure for installing Trunk Manager in your network. Before installing the application, you must first FTP the Trunk Manager license file to the Net-Net Central server. You can then run the setup program to perform the following tasks:
• Check and apply the license
• Configure the Apache load balancer to run in either HTTP or HTTPS mode
• Configure Fault Management
Pre-requisites You must have Net-Net Central already installed in your network before installing Trunk Manager. To install Net-Net Central, see Appendix A Net-Net Central Installation Procedures (209).
SIPSM or Non-SIPSM?
When you installed Net-Net Central, you had the option of choosing a “Typical” or a “Custom” installation. A “Typical” installation installs the minimal configuration required to setup the Net-Net Central server.
A “Custom” installation allows you to manually customize the configuration for the Net-Net Central server and Trunk Manager, and is only recommended for more advanced users. It includes an option to select a SIP Session Manager (SIPSM) or non-SIPSM application, as well as specify branding features.
A SIPSM application provides a full menu of options (full mode) to select in Trunk Manager. You can configure the SP-SBC and E-SBC devices, create SIP Trunks, download configuration templates, add SSL certificates, and create, add, or edit Interoperational (Interop) files.
A non-SIPSM application provides a limited menu of options (E-SBC only mode). You can configure an E-SBC, create SIP Trunks, download configuration templates, and create, add, or edit Interop files.
Note: For more information about SIPSM and non-SIPSM menus, see Logging into Trunk Manager (31).
INSTALLINGTRUNK MANAGER
20 Oracle Communications Enterprise Trunk Manager Service Provider Configuration Guide Release 7.3
Custom Installation
This section provides the procedures required to install Trunk Manager. A custom installation allows you to specify whether Trunk Manager is SIPSM enabled or disabled, as well as specify branding elements for the software. Procedures in this section include:
• Configuring a Cluster (20)
• Configuring SFTP Information (23)
• Enabling/Disabling SIPSM in Trunk Manager (24)
• Customizing the SIPTX Customer Portal (27)
Configuring a Cluster These procedures allow you to configure Net-Net Central as part of a cluster network. A cluster network consists of two or more network devices (for example, in an HA or Web server environment) that integrate their resources to work together.
After configuring Fault Management in the Net-Net Central procedures (see Configuring Fault Management (236)), you can configure the Net-Net Central cluster management option.
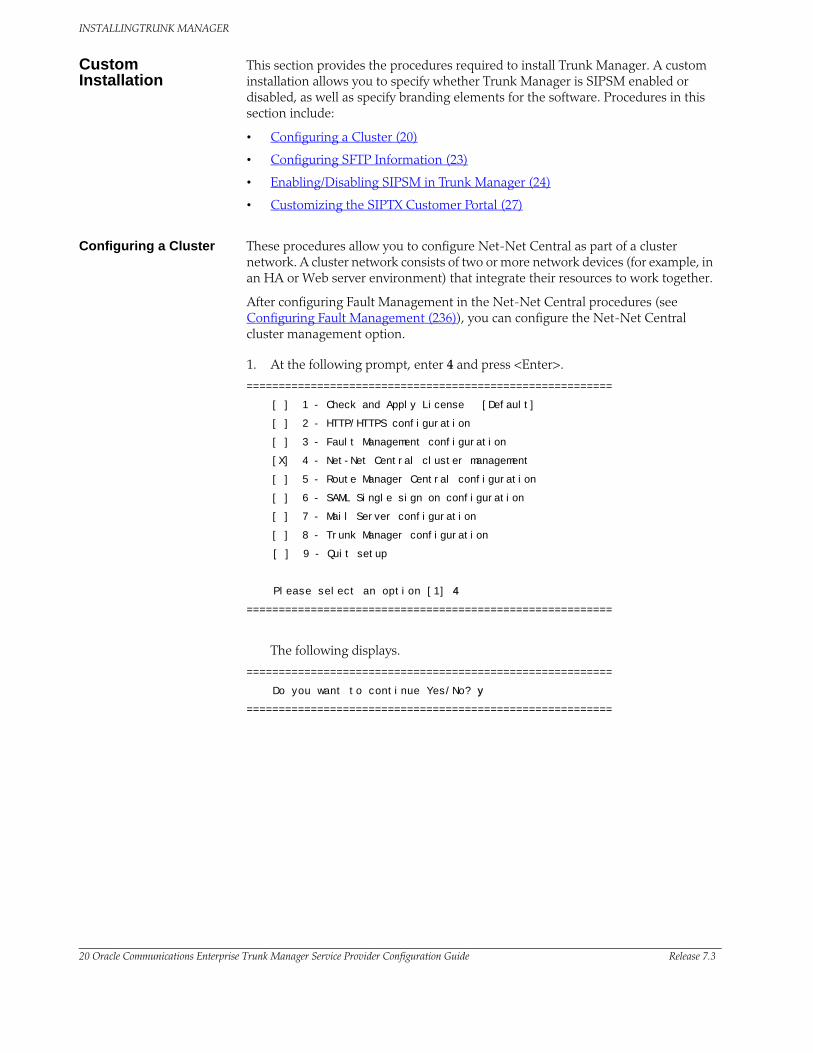
1. At the following prompt, enter 4 and press <Enter>.
=========================================================
[ ] 1 - Check and Apply License [Default]
[ ] 2 - HTTP/HTTPS configuration
[ ] 3 - Fault Management configuration
[X] 4 - Net-Net Central cluster management
[ ] 5 - Route Manager Central configuration
[ ] 6 - SAML Single sign on configuration
[ ] 7 - Mail Server configuration
[ ] 8 - Trunk Manager configuration
[ ] 9 - Quit setup
Please select an option [1] 4
=========================================================
The following displays.
=========================================================
Do you want to continue Yes/No? y
=========================================================

INSTALLINGTRUNK MANAGER
Release 7.3 Oracle Communications Enterprise Trunk Manager Service Provider Configuration Guide 21
2. Enter Y and press <Enter> to continue. The following displays.
=========================================================
Net-Net Central cluster management.
This option is used to configure NNC as part of a cluster
Management options
The host machine can run as a standalone or member of a Net-Net Central cluster.
Please choose to quit cluster management or apply new configuration
[X] 1 - Configure and manage members in cluster [Default]
[ ] 2 - Run current host as a standalone
[ ] 3 - Quit out of cluster configuration
Please select an option [1] 1
=========================================================
3. Enter 1 and press <Enter> to continue. The following displays.
=========================================================
Do you want to continue Yes/No? y
=========================================================
4. Enter Y and press <Enter> to continue. The following displays.
=========================================================
Host name | DB | MOM | Web Worker
| Port | Port | Port
localhost | 9000 | 61616 | 8009
Use the following options to add or remove members from cluster.
[X] 1 - Add a new member
[ ] 2 - Remove all remote members
[ ] 3 - Apply new cluster configuration
[ ] 4 - Cancel out and do not apply changes [Default]
Please select an option [4] 1
=========================================================
5. Enter 1 to add a new member and press <Enter> to continue. The following displays.
=========================================================
Do you want to continue Yes/No? y
=========================================================

INSTALLINGTRUNK MANAGER
22 Oracle Communications Enterprise Trunk Manager Service Provider Configuration Guide Release 7.3
6. Enter Y and press <Enter> to continue. The following displays.
=========================================================
Host name | DB | MOM | Web Worker
| Port | Port | Port
localhost | 9000 | 61616 | 8009
Provide the DNS name or IP address of the Host requiring membership to cluster.
Member host name [ ] 172.30.70.173
=========================================================
7. Enter the hostname, in dotted decimal format, to add the new member to your cluster, and press <Enter>. For example, 172.30.70.173. The following displays.
=========================================================
Valid remote member has been added
Host name | DB | MOM | Web Worker
| Port | Port | Port
localhost | 9000 | 61616 | 8009
============= Remote members ==============
172.30.70.173 | 9000 | 61616 | 8009
Use the following options to add or remove members from cluster.
[ ] 1 - Add a new member
[ ] 2 - Remove all remote members[X] 3 - Apply new cluster configuration
[ ] 4 - Cancel out and do not apply changes [Default]
Please select an option [4] 3
=========================================================
8. Enter 3 to apply the new cluster configuration, and press <Enter> to continue. The following displays.
=========================================================
Do you want to continue Yes/No? y
=========================================================
9. Enter Y and press <Enter> to continue. The following displays.
=========================================================
Host name | DB | MOM | Web Worker
| Port | Port | Port
127.0.0.1 | 9000 | 61616 | 8009
============= Remote members ==============
172.30.70.173 | 9000 | 61616 | 8009
Please choose to quit cluster management or apply new configuration
[ ] 1 - Configure and manage members in cluster [Default]
[ ] 2 - Run current host as a standalone[X] 3 - Quit out of cluster configuration
Please select an option [1] 3
=========================================================

INSTALLINGTRUNK MANAGER
Release 7.3 Oracle Communications Enterprise Trunk Manager Service Provider Configuration Guide 23
10. Enter 3 to quit cluster configuration, and press <Enter> to continue. The following displays.
=========================================================
Do you want to continue Yes/No? y
=========================================================
11. Enter Y and press <Enter> to continue.
12. Go to Configuring SFTP Information (23).
Configuring SFTP Information
After configuring the cluster management, you can configure the Secure Shell (SSH) File Transfer Protocol (SFTP) information for the member you added to the cluster.
1. At the following prompt, enter 1 and press <Enter>.
=========================================================
Configure sftp information
Make sure to configure sftp properties if there are members in the
cluster
Will this machine be a member of a Net-Net Central cluster?
[X] 1 - Yes
[ ] 2 - No [Default]
Please select an option [2] 1
=========================================================
The following displays.
=========================================================
Do you want to continue Yes/No? y
=========================================================
2. Enter Y and press <Enter> to continue. The following displays.
=========================================================
Please enter the username to use to sftp files off of this machine
Username [] nncentral
=========================================================
3. Enter the username that is used to SFTP files off of the member in the cluster, and press <Enter> to continue. For example, nncentral. The following displays.
=========================================================
Please enter the password for the username
Password []
=========================================================

INSTALLINGTRUNK MANAGER
24 Oracle Communications Enterprise Trunk Manager Service Provider Configuration Guide Release 7.3
4. Enter the password that is used to SFTP files off of the member in the cluster, and press <Enter> to continue.
5. Go to Enabling/Disabling SIPSM in Trunk Manager (24).
Enabling/Disabling SIPSM in Trunk Manager
After configuring the the SFTP information, you can select whether to enable or disable SIP Session Manager (SIPSM) in the Trunk Manager application. Enabling SIPSM displays a full menu of options in Trunk Manager. Disabling SIPSM displays a limited menu. For more information about the different menus, see Logging into Trunk Manager (31).
1. At the following prompt, enter 8 and press <Enter>.
=========================================================
[ ] 1 - Check and Apply License [Default]
[ ] 2 - HTTP/HTTPS configuration
[ ] 3 - Fault Management configuration
[ ] 4 - Net-Net Central cluster management
[ ] 5 - Route Manager Central configuration
[ ] 6 - SAML Single sign on configuration
[ ] 7 - Mail Server configuration
[X] 8 - Trunk Manager configuration
[ ] 9 - Quit setup
Please select an option [1] 8
=========================================================
2. The following displays.
=========================================================
Do you want to continue Yes/No? y
=========================================================
3. Enter Y and press <Enter> to continue. The following displays.
=========================================================
Trunk manager configuration
Configure trunk manager properties
Will you be using trunk manager to configure your service provider
device(s)?
[X] 1 - Yes [Default]
[ ] 2 - No
Please select an option [1] 1
=========================================================

INSTALLINGTRUNK MANAGER
Release 7.3 Oracle Communications Enterprise Trunk Manager Service Provider Configuration Guide 25
This option allows you to select whether to display a full menu of options (SIPSM enabled) in Trunk Manager for the Service Provider, or to display a limited menu of options (SIPSM disabled). If you enable SIPSM, Trunk Manager runs in full mode. If you disable SIPSM, Trunk Manager runs in E-SBC only mode. For more information about SIPSM, see SIPSM or Non-SIPSM? (19).
4. To display a full menu of options in Trunk Manager (SIPSM enabled), continue to the next step. or To display a limited menu of options in Trunk Manager (SIPSM disabled), enter 2, press <Enter>, and go to Step 7.
5. Enter 1 to enable the configuration of the SP-SBC, and press <Enter> to continue. This enables SIPSM. The following displays.
=========================================================
Please select the interface to use for the NNC/SBC notifications?
[ ] 1 - eth0 UP (172.30.70.177) [Default]
[X] 2 - eth1 UP (192.168.101.104)
Please select an option [1] 2
=========================================================
6. Enter 2 (eth1) as the Ethernet port to use for Trunk Manager. The following displays.
=========================================================
Do you want to continue Yes/No? y
=========================================================
7. Enter Y and press <Enter> to continue. The following displays.
=========================================================
Will you customize the customer portal?
[ ] 1 - Yes [Default]
[X] 2 - No
[ ] 3 - Restore default portal configuration
Please select an option [1] 2
=========================================================
If required, you can customize the SIPTX Customer Portal with a “Portal Name”, “Portal Logo”, and “Portal Shortcut Icon”. For more information about the SIPTX Customer Portal, see the Net-Net® SIP Trunk Xpress Guide for Enterprises.
8. To customize the SIPTX Customer Portal, go to Customizing the SIPTX Customer Portal (27).
or To continue without customizing the SIPTX Customer Portal, continue to the next step.

INSTALLINGTRUNK MANAGER
26 Oracle Communications Enterprise Trunk Manager Service Provider Configuration Guide Release 7.3
9. Enter 2 (No) and press <Enter> to continue. The following displays.
=========================================================
Do you want to continue Yes/No? y
=========================================================
10. Enter Y and press <Enter> to continue. The following displays.
=========================================================
[ ] 1 - Check and Apply License [Default]
[ ] 2 - HTTP/HTTPS configuration
[ ] 3 - Fault Management configuration
[ ] 4 - Net-Net Central cluster management
[ ] 5 - Route Manager Central configuration
[ ] 6 - SAML Single sign on configuration
[ ] 7 - Mail Server configuration
[ ] 8 - Trunk Manager configuration
[X] 9 - Quit setup
Please select an option [1] 9
=========================================================
Your custom installation procedure is complete.
11. Enter 9 to quit setup, and press <Enter>. The following displays.
=========================================================
Do you want to continue Yes/No? y
=========================================================
12. Enter Y and press <Enter> to continue. The following displays.
=========================================================
[root bin]#
=========================================================
13. Go to Logging into Trunk Manager (31).

INSTALLINGTRUNK MANAGER
Release 7.3 Oracle Communications Enterprise Trunk Manager Service Provider Configuration Guide 27
Customizing the SIPTX Customer Portal
The SIPTX Customer Portal allows Enterprise customers to configure their E-SBC in their core network if required, and download a bootstrap file (provided by the Service Provider) to the device. The following illustrates the login window for the SIPTX Customer Portal.
You can customize the SIPTX Customer Portal with a “Portal Name”, “Portal Logo”, and “Portal Shortcut Icon”, if required. For more information about the SIPTX Customer Portal, see the Net-Net® SIP Trunk Xpress Guide for Enterprises.
1. After performing Step 7 in the previous procedure (Enabling/Disabling SIPSM in Trunk Manager), the following displays.
=========================================================
Will you customize the customer portal?
[X] 1 - Yes [Default]
[ ] 2 - No
[ ] 3 - Restore default portal configuration
Please select an option [1] 2
=========================================================
2. Enter 1 (Yes), press <Enter>, and continue to the next step. The following displays.
=========================================================
Do you want to continue Yes/No? y
=========================================================
or Enter 3 to restore the SIPTX Customer Portal information to the Acme Packet defaults, press <Enter>, and go to Step 7.
3. Enter Y and press <Enter> to continue. The following displays.
=========================================================
Please enter the portal name: [SIP Trunk Xpress]
=========================================================
INSTALLINGTRUNK MANAGER
28 Oracle Communications Enterprise Trunk Manager Service Provider Configuration Guide Release 7.3
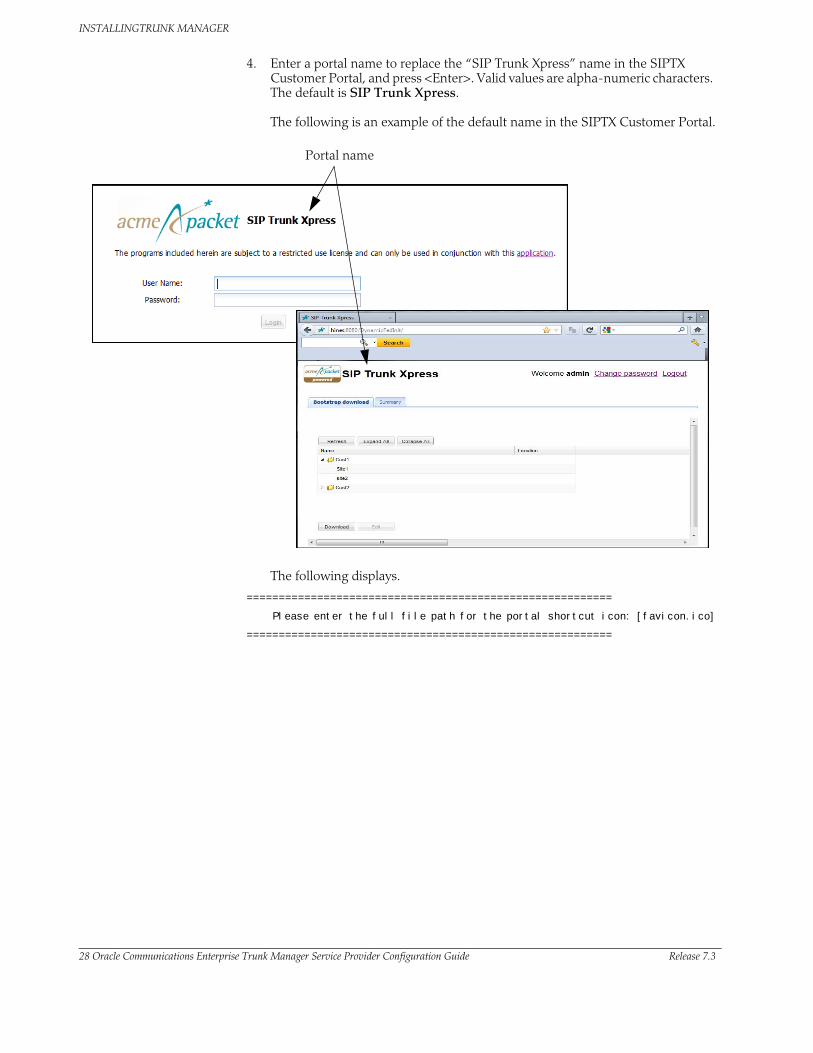
4. Enter a portal name to replace the “SIP Trunk Xpress” name in the SIPTX Customer Portal, and press <Enter>. Valid values are alpha-numeric characters. The default is SIP Trunk Xpress. The following is an example of the default name in the SIPTX Customer Portal.
Portal name
The following displays.
=========================================================
Please enter the full file path for the portal shortcut icon: [favicon.ico]
=========================================================
INSTALLINGTRUNK MANAGER
Release 7.3 Oracle Communications Enterprise Trunk Manager Service Provider Configuration Guide 29
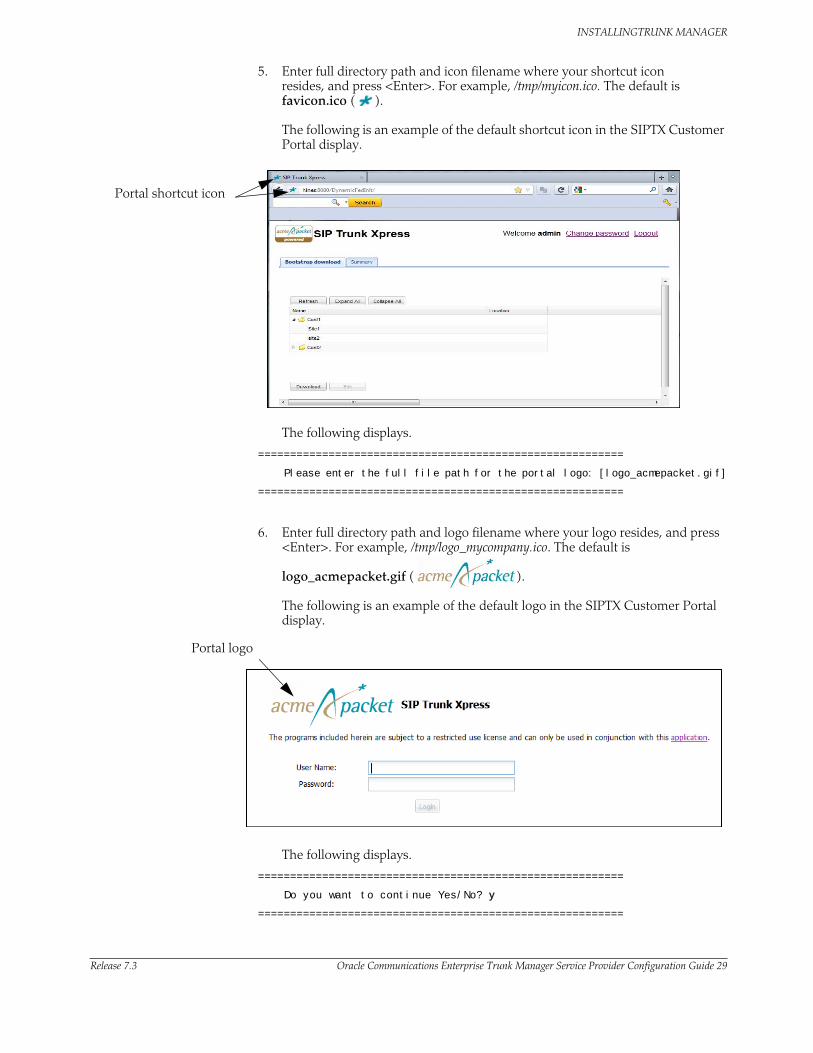
5. Enter full directory path and icon filename where your shortcut icon resides, and press <Enter>. For example, /tmp/myicon.ico. The default is favicon.ico ( ). The following is an example of the default shortcut icon in the SIPTX Customer Portal display.
Portal shortcut icon
The following displays.
=========================================================
Please enter the full file path for the portal logo: [logo_acmepacket.gif]
=========================================================
6. Enter full directory path and logo filename where your logo resides, and press <Enter>. For example, /tmp/logo_mycompany.ico. The default is logo_acmepacket.gif ( ). The following is an example of the default logo in the SIPTX Customer Portal display.
Portal logo
The following displays.
=========================================================
Do you want to continue Yes/No? y
=========================================================

INSTALLINGTRUNK MANAGER
30 Oracle Communications Enterprise Trunk Manager Service Provider Configuration Guide Release 7.3
7. Enter Y and press <Enter> to continue. The following displays.
=========================================================
[ ] 1 - Check and Apply License [Default]
[ ] 2 - HTTP/HTTPS configuration
[ ] 3 - Fault Management configuration
[ ] 4 - Net-Net Central cluster management
[ ] 5 - Route Manager Central configuration
[ ] 6 - SAML Single sign on configuration
[ ] 7 - Mail Server configuration
[ ] 8 - Trunk Manager configuration
[X] 9 - Quit setup
Please select an option [1] 9
=========================================================
You have completed customizing the SIPTX Customer Portal.
8. Enter 9 to quit setup, and press <Enter>. The following displays.
=========================================================
Do you want to continue Yes/No? y
=========================================================
9. Enter Y and press <Enter> to continue. The following displays.
=========================================================
[root bin]#
=========================================================
10. Go to Logging into Trunk Manager (31).
INSTALLINGTRUNK MANAGER
Release 7.3 Oracle Communications Enterprise Trunk Manager Service Provider Configuration Guide 31
Logging into Trunk Manager
After completing the Net-Net Central installation, you can open and log into the Trunk Manager application. Use the following procedure to login.
1. Open an Internet Browser on your PC.
2. Start Net-Net Central by using either the HTTP or HTTPS login:
http://<NNC server IP address>:8080
https://<NNC server IP address>:8443 (self-signed certificates)
https://<domain name>:8443 (third-party X.509 certificates)
If you are using third-party X.509 certificates, use the DNS name of the host (such as nncserver.acmepacket.com) instead of the IP address. This DNS name matches the common name in the certificate.
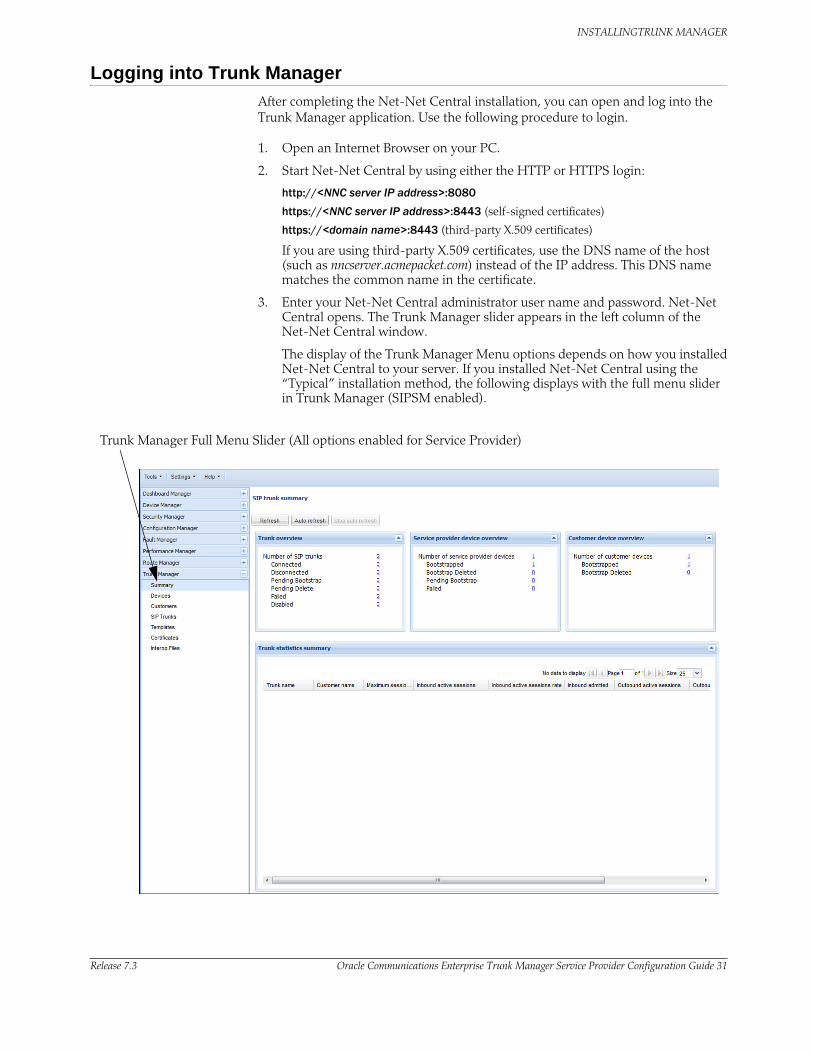
3. Enter your Net-Net Central administrator user name and password. Net-Net Central opens. The Trunk Manager slider appears in the left column of the Net-Net Central window.
The display of the Trunk Manager Menu options depends on how you installed Net-Net Central to your server. If you installed Net-Net Central using the “Typical” installation method, the following displays with the full menu slider in Trunk Manager (SIPSM enabled).
Trunk Manager Full Menu Slider (All options enabled for Service Provider)
INSTALLINGTRUNK MANAGER
32 Oracle Communications Enterprise Trunk Manager Service Provider Configuration Guide Release 7.3
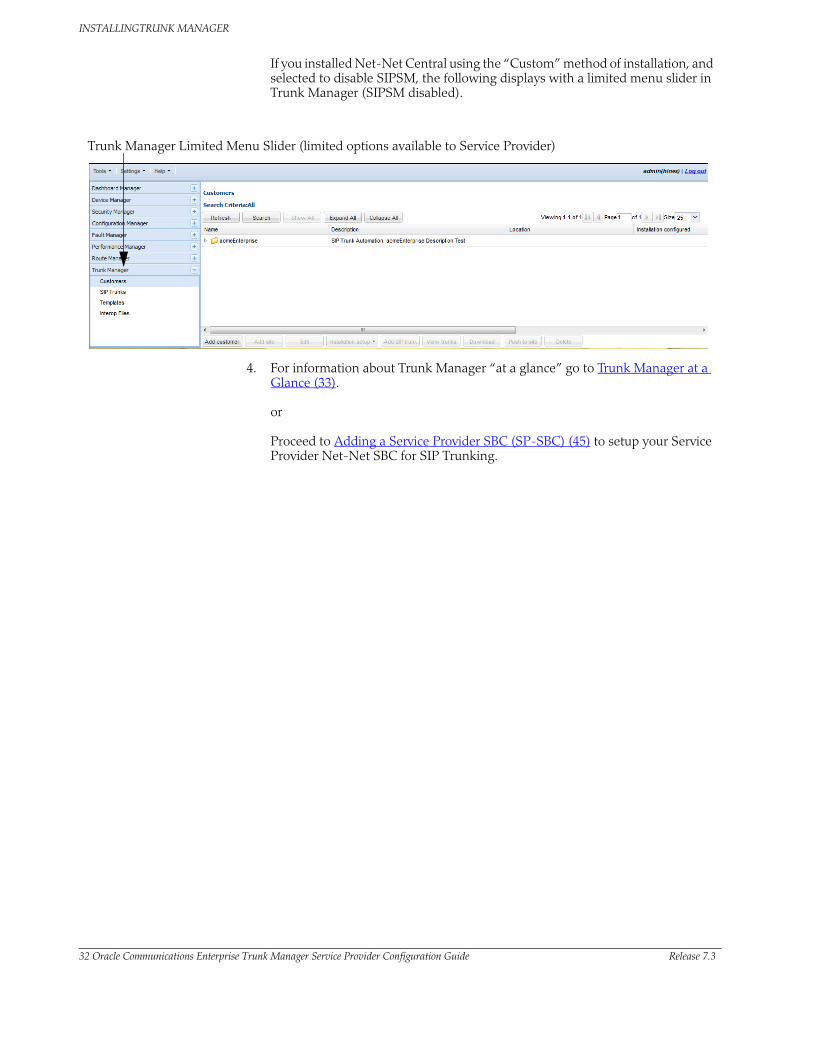
If you installed Net-Net Central using the “Custom” method of installation, and selected to disable SIPSM, the following displays with a limited menu slider in Trunk Manager (SIPSM disabled).
Trunk Manager Limited Menu Slider (limited options available to Service Provider)
4. For information about Trunk Manager “at a glance” go to Trunk Manager at a Glance (33). or Proceed to Adding a Service Provider SBC (SP-SBC) (45) to setup your Service Provider Net-Net SBC for SIP Trunking.
INSTALLINGTRUNK MANAGER
Release 7.3 Oracle Communications Enterprise Trunk Manager Service Provider Configuration Guide 33
Trunk Manager at a Glance
Trunk Manager allows you to customize how a page displays while using the application. You can display or hide specific columns and sort data within the column if required. In addition, a SIP Trunk Summary window allows you to quickly view the status of all SP-SBCs, E-SBCs, and SIP Trunks in your network.
This section provides information about the following:
• Customizing the Page Display (33)
• SIP Trunk Summary (36)
Customizing the Page Display
You can customize the data presented on windows in Trunk Manager by changing whether or not columns display and how they display. You can also sort the order of item entries to further customize the display to suit your needs.
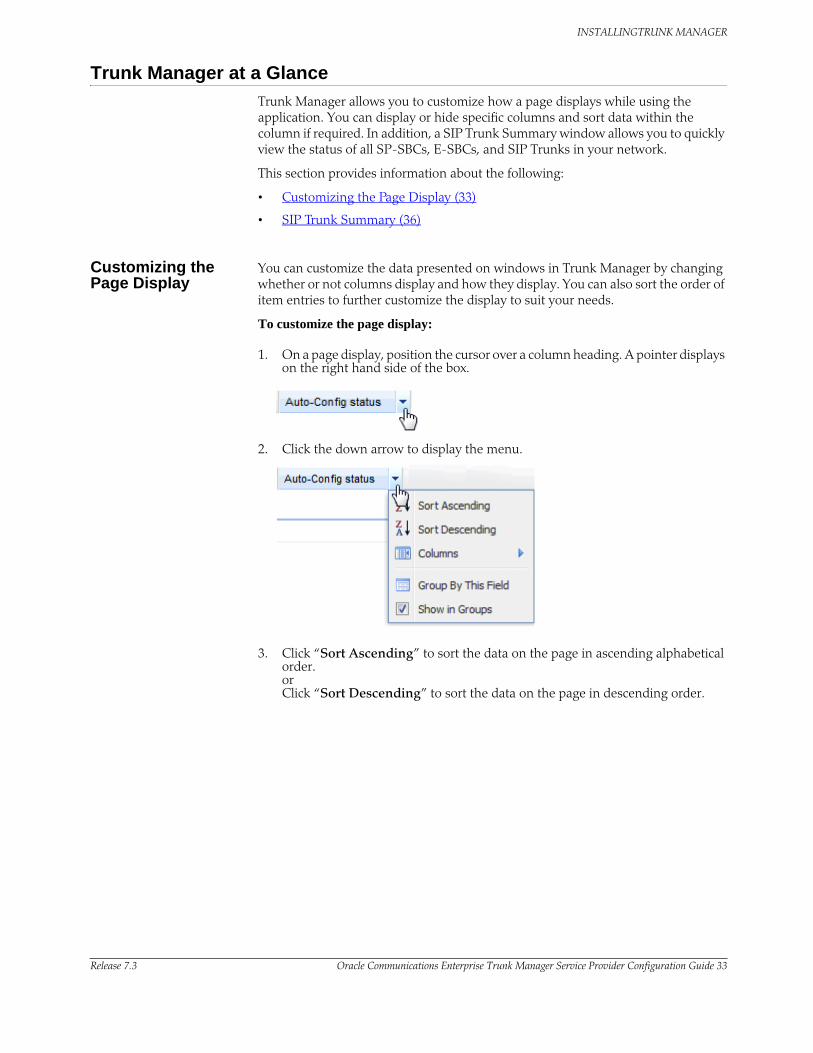
To customize the page display:
1. On a page display, position the cursor over a column heading. A pointer displays on the right hand side of the box.
2. Click the down arrow to display the menu.
3. Click “Sort Ascending” to sort the data on the page in ascending alphabetical order. or Click “Sort Descending” to sort the data on the page in descending order.
INSTALLINGTRUNK MANAGER
34 Oracle Communications Enterprise Trunk Manager Service Provider Configuration Guide Release 7.3
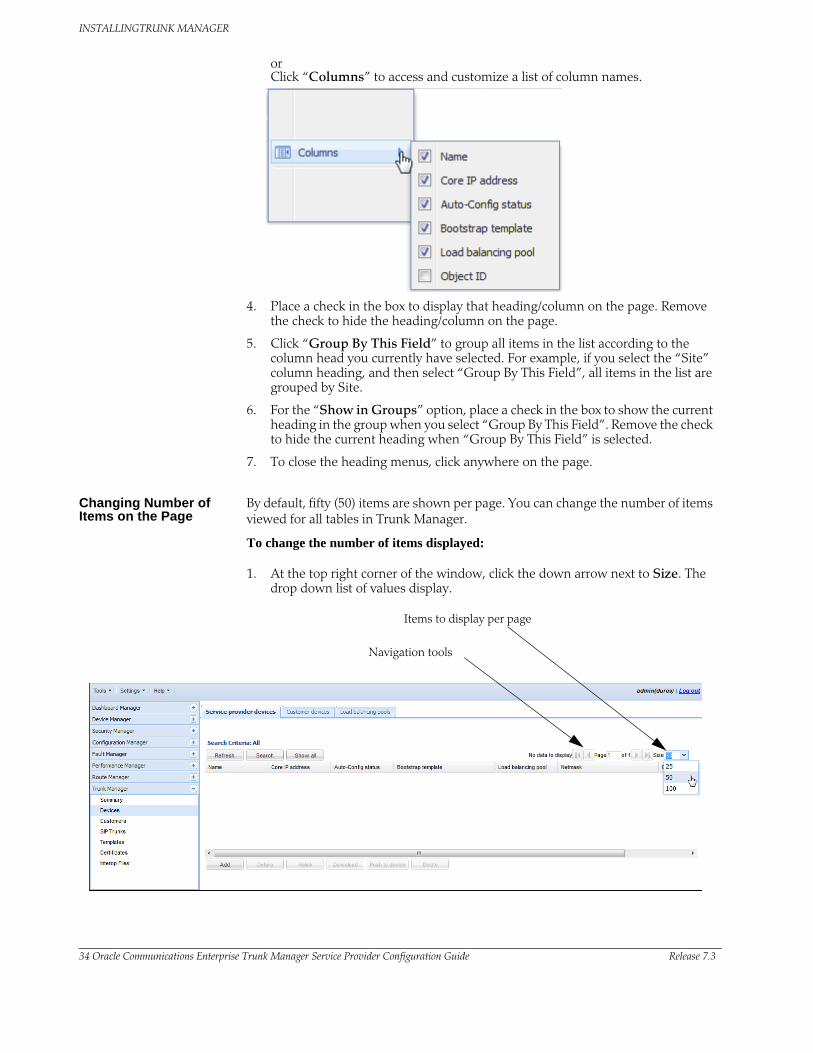
or Click “Columns” to access and customize a list of column names.
4. Place a check in the box to display that heading/column on the page. Remove the check to hide the heading/column on the page.
5. Click “Group By This Field” to group all items in the list according to the column head you currently have selected. For example, if you select the “Site” column heading, and then select “Group By This Field”, all items in the list are grouped by Site.
6. For the “Show in Groups” option, place a check in the box to show the current heading in the group when you select “Group By This Field”. Remove the check to hide the current heading when “Group By This Field” is selected.
7. To close the heading menus, click anywhere on the page.
Changing Number of Items on the Page
By default, fifty (50) items are shown per page. You can change the number of items viewed for all tables in Trunk Manager.
To change the number of items displayed:
1. At the top right corner of the window, click the down arrow next to Size. The drop down list of values display.
Items to display per page
Navigation tools

INSTALLINGTRUNK MANAGER
Release 7.3 Oracle Communications Enterprise Trunk Manager Service Provider Configuration Guide 35
2. Click the number you want to apply. The value displays in the “Size” field.
Navigating Pages To navigate through multiple pages:
1. Use the navigation arrows located at the top right corner of the window to navigate through multiple pages.
2. Click the navigation icons to display the desired page, such as the first page, previous page, next page, and the last page of Events list view.
First Page Last Page
Previous Page Next Page
INSTALLINGTRUNK MANAGER
36 Oracle Communications Enterprise Trunk Manager Service Provider Configuration Guide Release 7.3
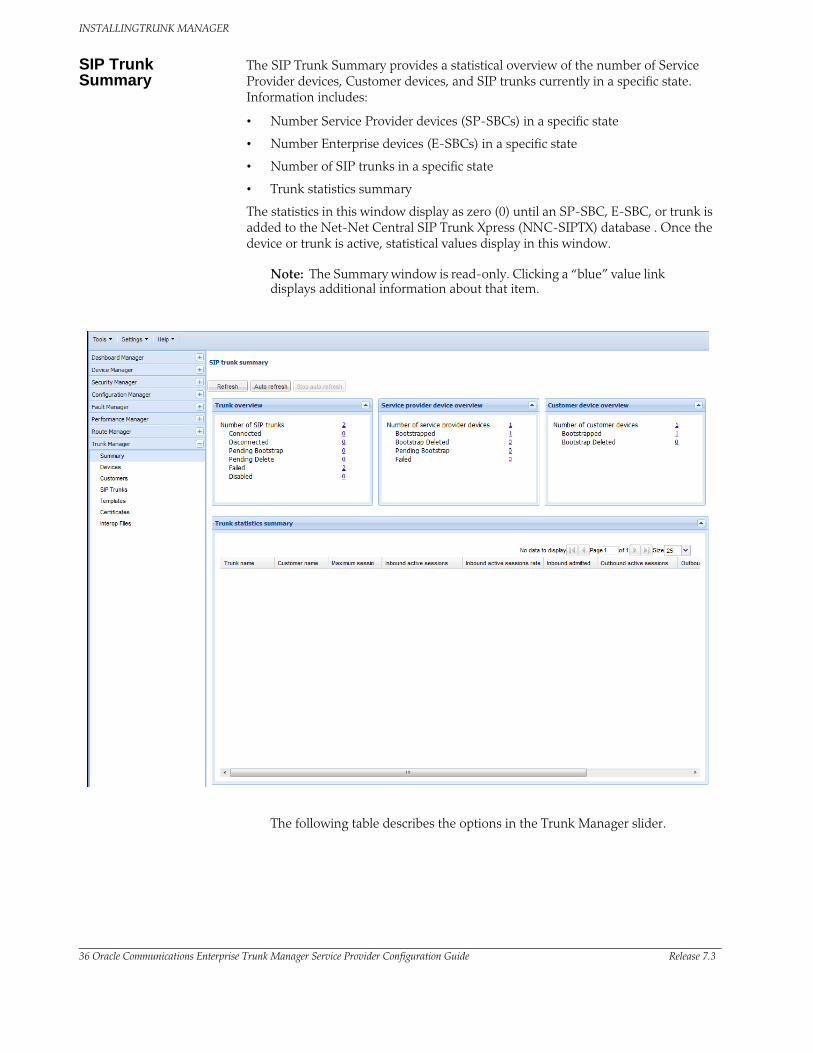
SIP Trunk Summary
The SIP Trunk Summary provides a statistical overview of the number of Service Provider devices, Customer devices, and SIP trunks currently in a specific state. Information includes:
• Number Service Provider devices (SP-SBCs) in a specific state
• Number Enterprise devices (E-SBCs) in a specific state
• Number of SIP trunks in a specific state
• Trunk statistics summary
The statistics in this window display as zero (0) until an SP-SBC, E-SBC, or trunk is added to the Net-Net Central SIP Trunk Xpress (NNC-SIPTX) database . Once the device or trunk is active, statistical values display in this window.
Note: The Summary window is read-only. Clicking a “blue” value link displays additional information about that item.
The following table describes the options in the Trunk Manager slider.
INSTALLINGTRUNK MANAGER
Release 7.3 Oracle Communications Enterprise Trunk Manager Service Provider Configuration Guide 37
OptionsApplies to SIPSM
EnabledApplies to SIPSM
DisabledDescription
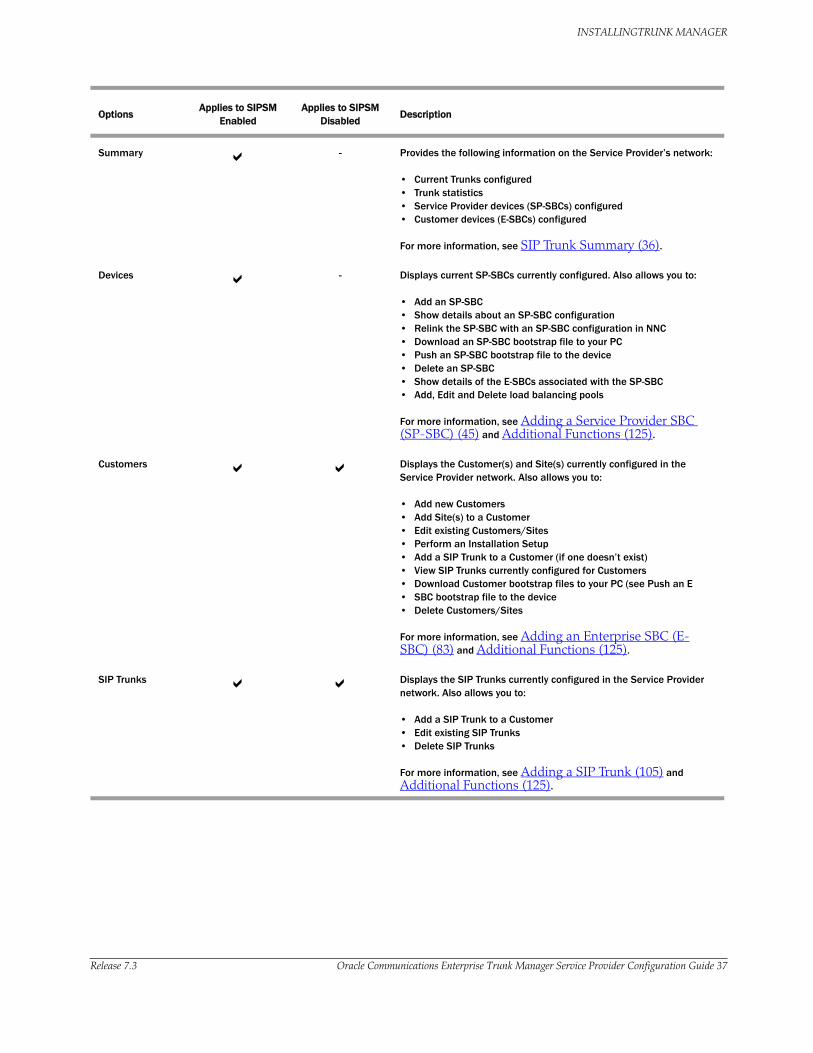
Summary - Provides the following information on the Service Provider’s network:
• Current Trunks configured• Trunk statistics• Service Provider devices (SP-SBCs) configured• Customer devices (E-SBCs) configured
For more information, see SIP Trunk Summary (36).
Devices - Displays current SP-SBCs currently configured. Also allows you to:
• Add an SP-SBC• Show details about an SP-SBC configuration• Relink the SP-SBC with an SP-SBC configuration in NNC• Download an SP-SBC bootstrap file to your PC• Push an SP-SBC bootstrap file to the device• Delete an SP-SBC• Show details of the E-SBCs associated with the SP-SBC• Add, Edit and Delete load balancing pools
For more information, see Adding a Service Provider SBC (SP-SBC) (45) and Additional Functions (125).
Customers Displays the Customer(s) and Site(s) currently configured in the Service Provider network. Also allows you to:
• Add new Customers • Add Site(s) to a Customer • Edit existing Customers/Sites • Perform an Installation Setup • Add a SIP Trunk to a Customer (if one doesn’t exist)• View SIP Trunks currently configured for Customers • Download Customer bootstrap files to your PC (see Push an E• SBC bootstrap file to the device• Delete Customers/Sites
For more information, see Adding an Enterprise SBC (E-SBC) (83) and Additional Functions (125).
SIP Trunks Displays the SIP Trunks currently configured in the Service Provider network. Also allows you to:
• Add a SIP Trunk to a Customer• Edit existing SIP Trunks• Delete SIP Trunks
For more information, see Adding a SIP Trunk (105) and Additional Functions (125).
INSTALLINGTRUNK MANAGER
38 Oracle Communications Enterprise Trunk Manager Service Provider Configuration Guide Release 7.3
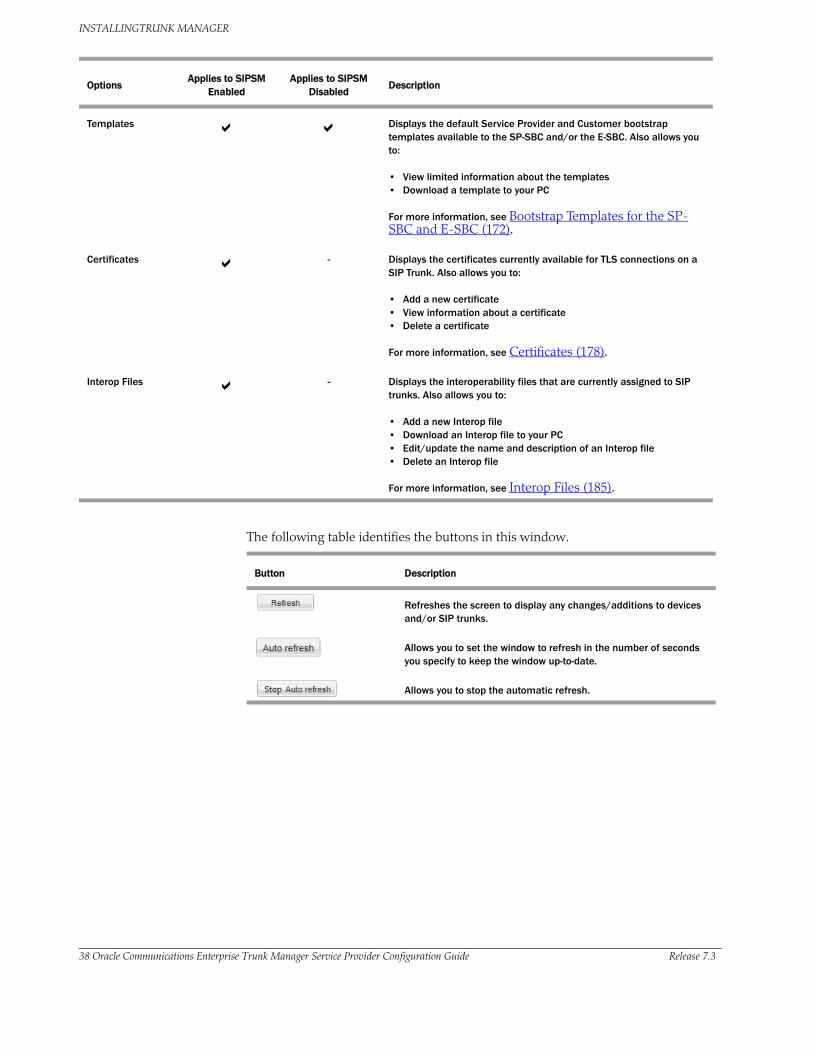
The following table identifies the buttons in this window.
Button Description
Refreshes the screen to display any changes/additions to devices and/or SIP trunks.
Allows you to set the window to refresh in the number of seconds you specify to keep the window up-to-date.
Allows you to stop the automatic refresh.
Templates Displays the default Service Provider and Customer bootstrap templates available to the SP-SBC and/or the E-SBC. Also allows you to:
• View limited information about the templates• Download a template to your PC
For more information, see Bootstrap Templates for the SP-SBC and E-SBC (172).
Certificates - Displays the certificates currently available for TLS connections on a SIP Trunk. Also allows you to:
• Add a new certificate• View information about a certificate• Delete a certificate
For more information, see Certificates (178).
Interop Files - Displays the interoperability files that are currently assigned to SIP trunks. Also allows you to:
• Add a new Interop file• Download an Interop file to your PC• Edit/update the name and description of an Interop file• Delete an Interop file
For more information, see Interop Files (185).
OptionsApplies to SIPSM
EnabledApplies to SIPSM
DisabledDescription
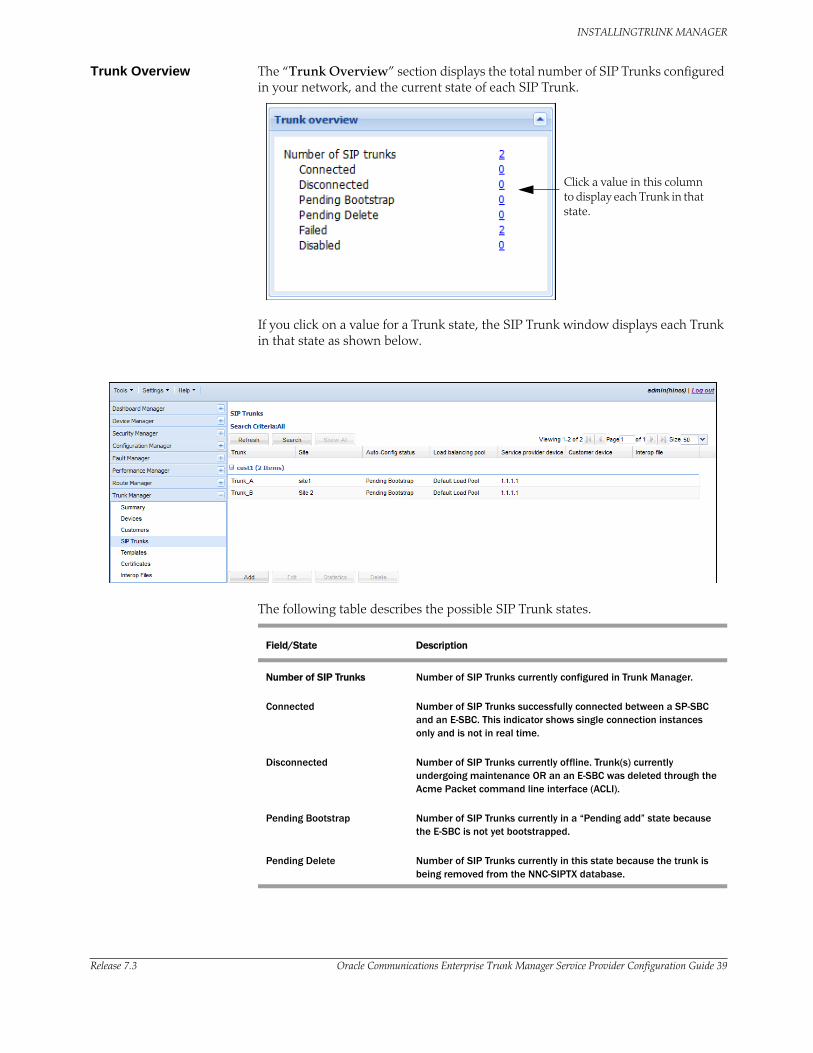
INSTALLINGTRUNK MANAGER
Release 7.3 Oracle Communications Enterprise Trunk Manager Service Provider Configuration Guide 39
Trunk Overview The “Trunk Overview” section displays the total number of SIP Trunks configured in your network, and the current state of each SIP Trunk.
Click a value in this column to display each Trunk in that state.
If you click on a value for a Trunk state, the SIP Trunk window displays each Trunk in that state as shown below.
The following table describes the possible SIP Trunk states.
Field/State Description
Number of SIP Trunks Number of SIP Trunks currently configured in Trunk Manager.
Connected Number of SIP Trunks successfully connected between a SP-SBC and an E-SBC. This indicator shows single connection instances only and is not in real time.
Disconnected Number of SIP Trunks currently offline. Trunk(s) currently undergoing maintenance OR an an E-SBC was deleted through the Acme Packet command line interface (ACLI).
Pending Bootstrap Number of SIP Trunks currently in a “Pending add” state because the E-SBC is not yet bootstrapped.
Pending Delete Number of SIP Trunks currently in this state because the trunk is being removed from the NNC-SIPTX database.
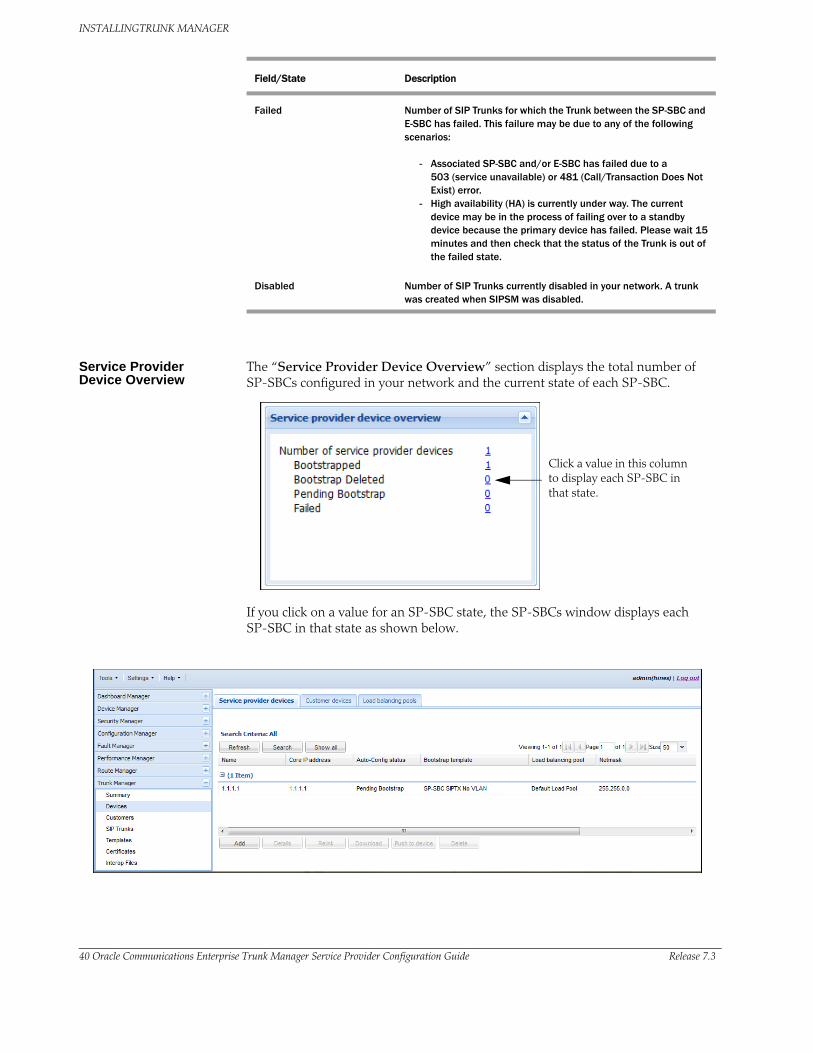
INSTALLINGTRUNK MANAGER
40 Oracle Communications Enterprise Trunk Manager Service Provider Configuration Guide Release 7.3
Service Provider Device Overview
The “Service Provider Device Overview” section displays the total number of SP-SBCs configured in your network and the current state of each SP-SBC.
Click a value in this column to display each SP-SBC in that state.
If you click on a value for an SP-SBC state, the SP-SBCs window displays each SP-SBC in that state as shown below.
Failed Number of SIP Trunks for which the Trunk between the SP-SBC and E-SBC has failed. This failure may be due to any of the following scenarios:
- Associated SP-SBC and/or E-SBC has failed due to a 503 (service unavailable) or 481 (Call/Transaction Does Not Exist) error.
- High availability (HA) is currently under way. The current device may be in the process of failing over to a standby device because the primary device has failed. Please wait 15 minutes and then check that the status of the Trunk is out of the failed state.
Disabled Number of SIP Trunks currently disabled in your network. A trunk was created when SIPSM was disabled.
Field/State Description
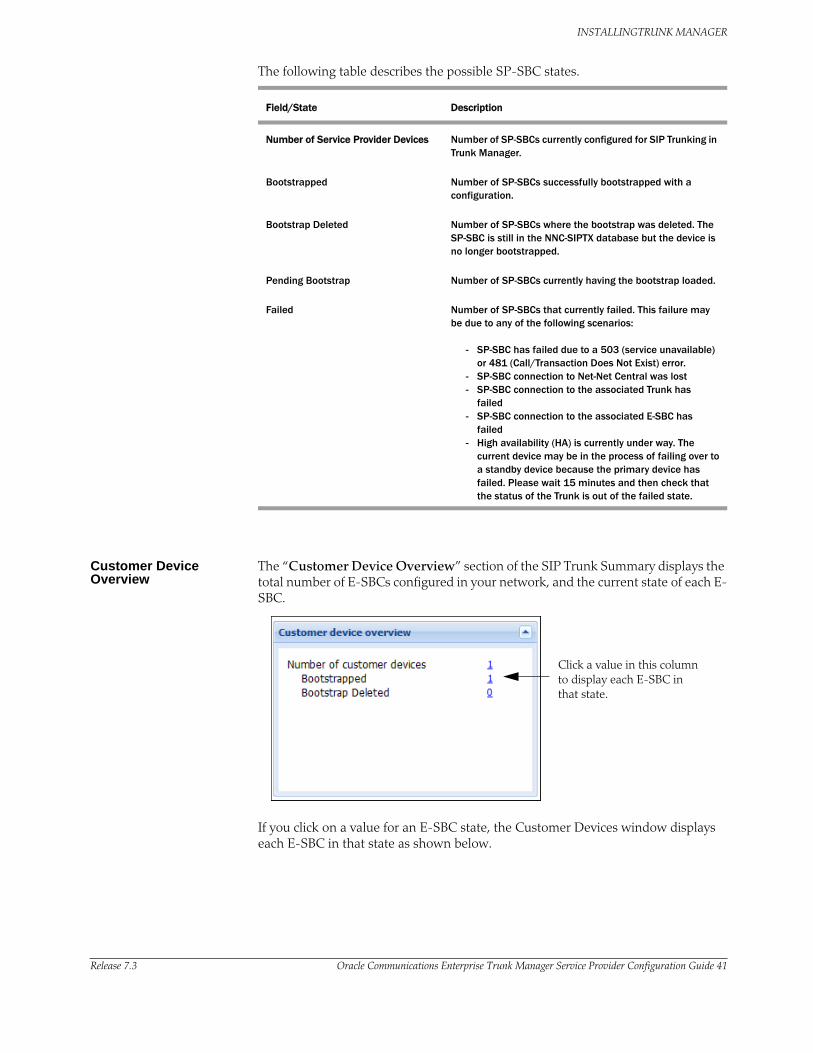
INSTALLINGTRUNK MANAGER
Release 7.3 Oracle Communications Enterprise Trunk Manager Service Provider Configuration Guide 41
The following table describes the possible SP-SBC states.
Field/State Description
Number of Service Provider Devices Number of SP-SBCs currently configured for SIP Trunking in Trunk Manager.
Bootstrapped Number of SP-SBCs successfully bootstrapped with a configuration.
Bootstrap Deleted Number of SP-SBCs where the bootstrap was deleted. The SP-SBC is still in the NNC-SIPTX database but the device is no longer bootstrapped.
Pending Bootstrap Number of SP-SBCs currently having the bootstrap loaded.
Failed Number of SP-SBCs that currently failed. This failure may be due to any of the following scenarios:
- SP-SBC has failed due to a 503 (service unavailable) or 481 (Call/Transaction Does Not Exist) error.
- SP-SBC connection to Net-Net Central was lost - SP-SBC connection to the associated Trunk has
failed - SP-SBC connection to the associated E-SBC has
failed - High availability (HA) is currently under way. The
current device may be in the process of failing over to a standby device because the primary device has failed. Please wait 15 minutes and then check that the status of the Trunk is out of the failed state.
Customer Device Overview
The “Customer Device Overview” section of the SIP Trunk Summary displays the total number of E-SBCs configured in your network, and the current state of each E-SBC.
Click a value in this column to display each E-SBC in that state.
If you click on a value for an E-SBC state, the Customer Devices window displays each E-SBC in that state as shown below.
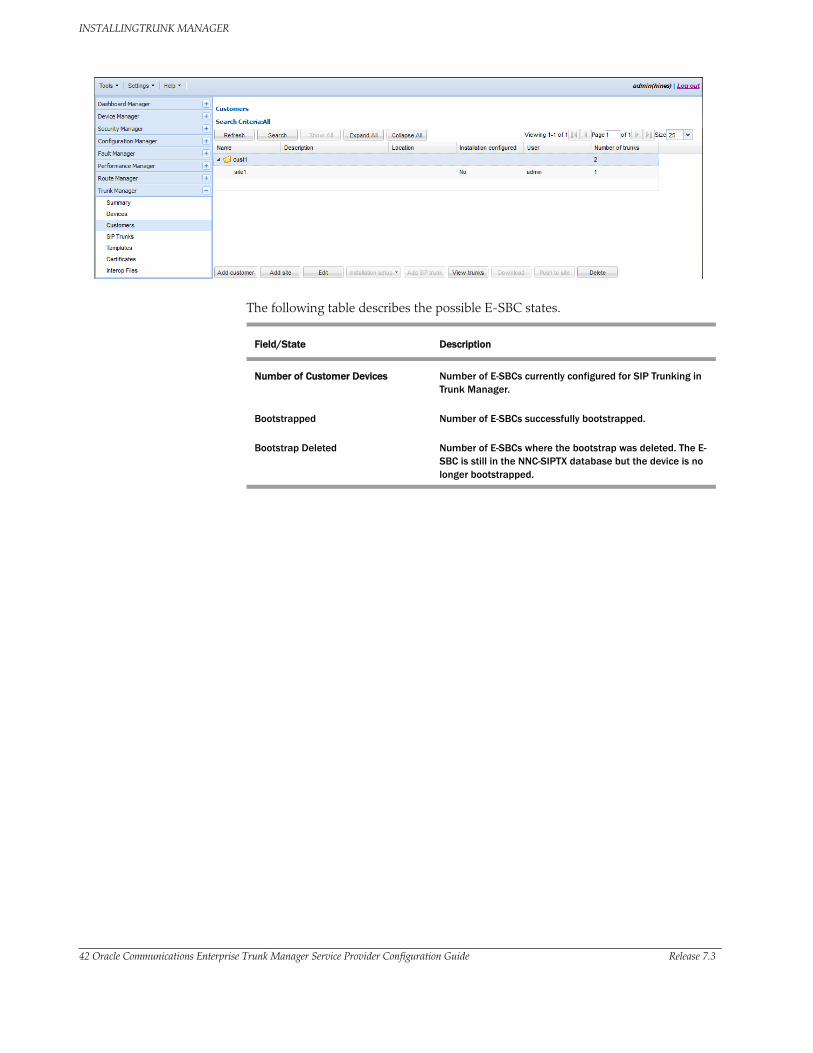
INSTALLINGTRUNK MANAGER
42 Oracle Communications Enterprise Trunk Manager Service Provider Configuration Guide Release 7.3
The following table describes the possible E-SBC states.
Field/State Description
Number of Customer Devices Number of E-SBCs currently configured for SIP Trunking in Trunk Manager.
Bootstrapped Number of E-SBCs successfully bootstrapped.
Bootstrap Deleted Number of E-SBCs where the bootstrap was deleted. The E-SBC is still in the NNC-SIPTX database but the device is no longer bootstrapped.
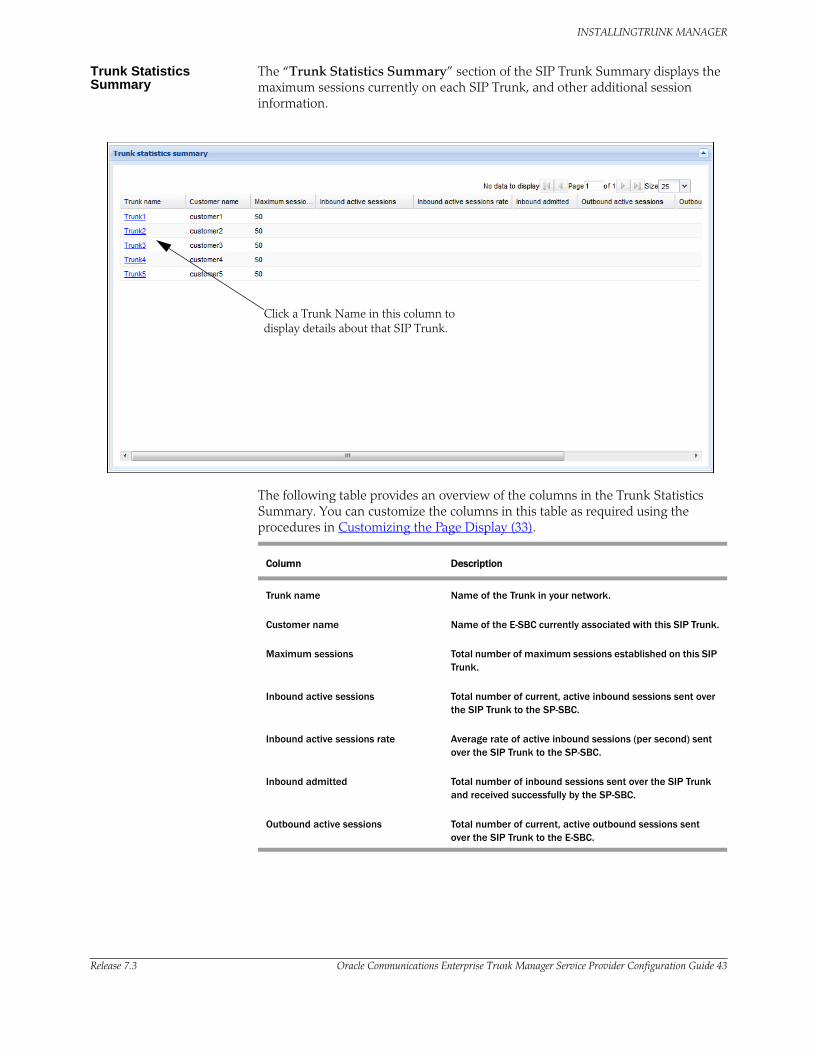
INSTALLINGTRUNK MANAGER
Release 7.3 Oracle Communications Enterprise Trunk Manager Service Provider Configuration Guide 43
Trunk Statistics Summary
The “Trunk Statistics Summary” section of the SIP Trunk Summary displays the maximum sessions currently on each SIP Trunk, and other additional session information.
Click a Trunk Name in this column to display details about that SIP Trunk.
The following table provides an overview of the columns in the Trunk Statistics Summary. You can customize the columns in this table as required using the procedures in Customizing the Page Display (33).
Column Description
Trunk name Name of the Trunk in your network.
Customer name Name of the E-SBC currently associated with this SIP Trunk.
Maximum sessions Total number of maximum sessions established on this SIP Trunk.
Inbound active sessions Total number of current, active inbound sessions sent over the SIP Trunk to the SP-SBC.
Inbound active sessions rate Average rate of active inbound sessions (per second) sent over the SIP Trunk to the SP-SBC.
Inbound admitted Total number of inbound sessions sent over the SIP Trunk and received successfully by the SP-SBC.
Outbound active sessions Total number of current, active outbound sessions sent over the SIP Trunk to the E-SBC.

INSTALLINGTRUNK MANAGER
44 Oracle Communications Enterprise Trunk Manager Service Provider Configuration Guide Release 7.3
Outbound active sessions rate Average rate of active outbound sessions (per second) sent over the SIP Trunk to the E-SBC.
Outbound admitted Total number of outbound sessions sent over the SIP Trunk and received successfully by the E-SBC.
Column Description

Release 7.3 Oracle Communications Enterprise Trunk Manager Service Provider Configuration Guide 45
3 Adding a Service Provider SBC (SP-SBC)
Introduction
This chapter provides information for setting up an SP-SBC in your network in preparation for establishing a SIP Trunk. It also provides information and procedures for selecting, downloading, and applying a bootstrap file for configuring the SP-SBC. The SP-SBC bootstrap file contains the configuration information that the device uses to subscribe to Net-Net Central and connect a SIP Trunk between the SP-SBC and the E-SBC.
Topics include:
• Setting up the SP-SBC (45)
• Adding an SP-SBC and Selecting a Bootstrap File (48)
• Downloading the SP-SBC Bootstrap File (72)
• Applying the Bootstrap to the SBC (using the ACLI) (76)
Setting up the SP-SBC
Using Net-Net Central, you can setup your SP-SBC in your network for SIP trunking. You add the SP-SBC using Trunk Manager, and then apply the Service Provider bootstrap file to that device. The bootstrap file contains all of the configuration parameter information required to boot the SP-SBC, connect the device to Net-Net Central, and setup the device for SIP Trunking to the E-SBC.
The SP-SBC must have a status of “Bootstrapped” before adding the E-SBC and the SIP Trunk. A “Bootstrapped” status indicates that the SP-SBC is communicating with Net-Net Central.
Methods for Setting up Your SIP Trunk Network
There are three methods for which you can choose to setup your SP-SBC and establish a SIP Trunk in your network:
• Service Provider configures the SP-SBC and E-SBC and creates the SIP Trunk
• Service Provider configures the SP-SBC and creates the SIP Trunk, but allows the Customer to configure the E-SBC.
• Service Provider configures the SP-SBC and creates the SIP Trunk, but allows the Customer to configure the E-SBC from a USB stick (applicable to NN-ESD-SE models only).
This Guide provides instructions for the Service Provider to configure the SP-SBC, E-SBC, and create a SIP Trunk. For information about having the Customer configure their E-SBC, see the Net-Net® SIP Trunk Xpress Guide for Enterprises.
The following illustration shows the process for establishing your SIP Trunk network.
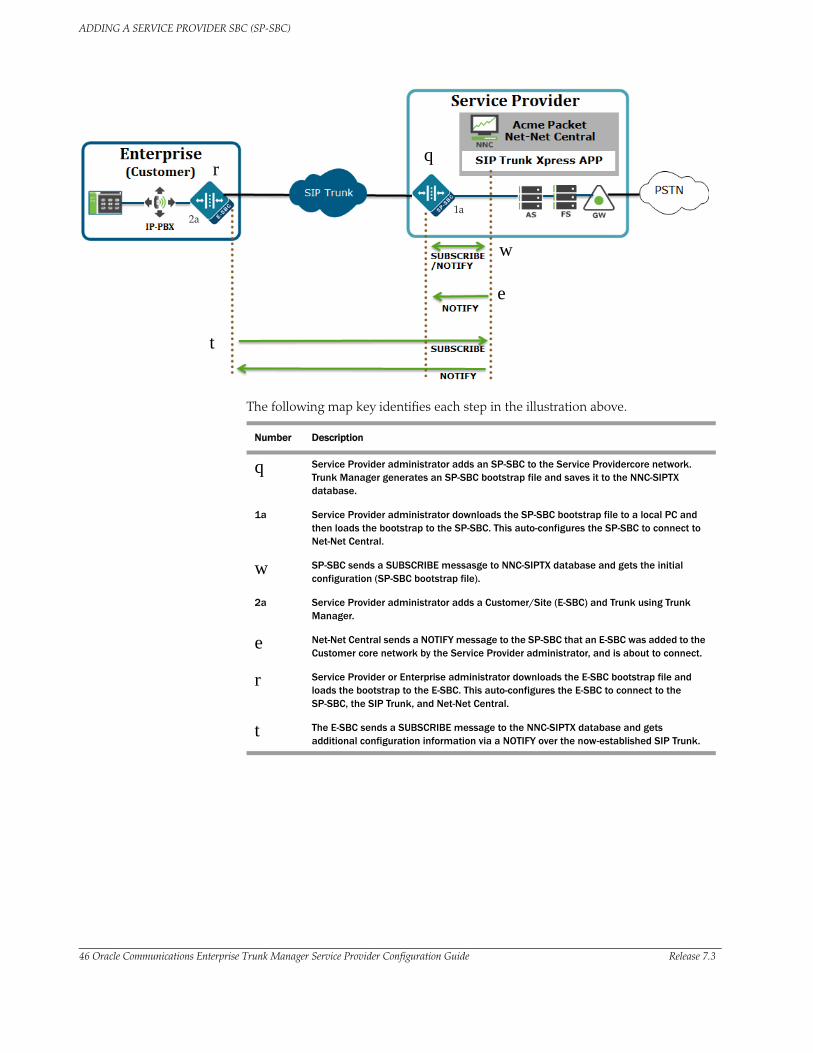
q
w
e
r
t
1a2a
ADDING A SERVICE PROVIDER SBC (SP-SBC)
46 Oracle Communications Enterprise Trunk Manager Service Provider Configuration Guide Release 7.3
The following map key identifies each step in the illustration above.
Number Description
q Service Provider administrator adds an SP-SBC to the Service Providercore network. Trunk Manager generates an SP-SBC bootstrap file and saves it to the NNC-SIPTX database.
1a Service Provider administrator downloads the SP-SBC bootstrap file to a local PC and then loads the bootstrap to the SP-SBC. This auto-configures the SP-SBC to connect to Net-Net Central.
w SP-SBC sends a SUBSCRIBE messasge to NNC-SIPTX database and gets the initial configuration (SP-SBC bootstrap file).
2a Service Provider administrator adds a Customer/Site (E-SBC) and Trunk using Trunk Manager.
e Net-Net Central sends a NOTIFY message to the SP-SBC that an E-SBC was added to the Customer core network by the Service Provider administrator, and is about to connect.
r Service Provider or Enterprise administrator downloads the E-SBC bootstrap file and loads the bootstrap to the E-SBC. This auto-configures the E-SBC to connect to the SP-SBC, the SIP Trunk, and Net-Net Central.
t The E-SBC sends a SUBSCRIBE message to the NNC-SIPTX database and gets additional configuration information via a NOTIFY over the now-established SIP Trunk.

ADDING A SERVICE PROVIDER SBC (SP-SBC)
Release 7.3 Oracle Communications Enterprise Trunk Manager Service Provider Configuration Guide 47
To prepare the SP-SBC for SIP Trunking, you must:
• Add an SP-SBC - Adds an SP-SBC to NNC-SIPTX database, and allows you to select a bootstrap template to use on the SP-SBC. After adding the device, Net-Net Central generates a bootstrap file. For more information, see Adding an SP-SBC and Selecting a Bootstrap File (48).
• Download the Service Provider Bootstrap file - Downloads the generated SP-SBC bootstrap file from NNC-SIPTX database to a local PC (or use “Push to Device” feature to automatically load the file to the SP-SBC). For more information, see Downloading the SP-SBC Bootstrap File (72).
• Apply the Service Provider Bootstrap file to the SP-SBC - Applies the Service Provider bootstrap file to the SP-SBC. The bootstrap contains an auto-config feature that loads the initial configuration necessary to connect the SP-SBC to the NNC-SIPTX database and prepare the device for SIP Trunking. After you apply the bootstrap, the SP-SBC shows a status of “Bootstrapped.” For more information, see Applying the Bootstrap to the SBC (using the ACLI) (76).
Use the remaining sections in this Chapter to prepare the SP-SBC for SIP Trunking.
Pre-requisites • You must have Net-Net Central running successfully in your network and the Trunk Manager application installed before setting up the SP-SBC.
• Important: Before setting up the SP-SBC in your core network, ensure that your SP-SBC has cables physically connected to Slot 1/Port 0 (internal network connection) AND Slot 0/Port 0 (sends data traffic over the SIP Trunk and to the E-SBC.
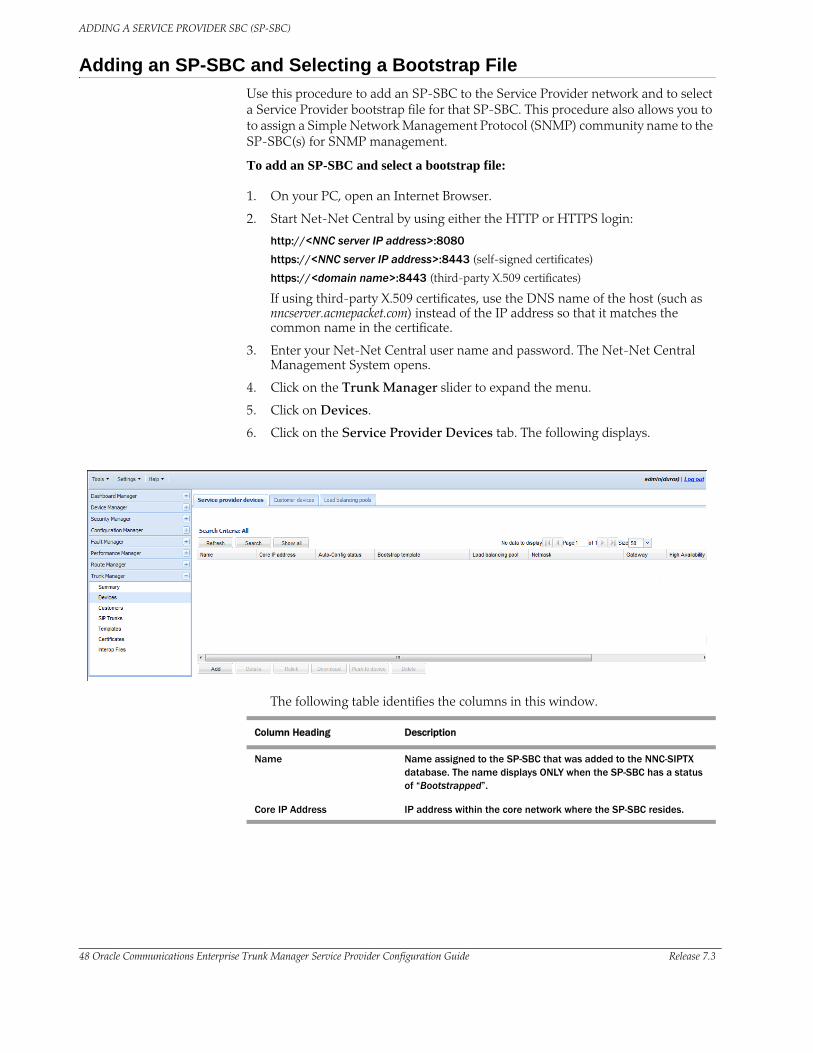
ADDING A SERVICE PROVIDER SBC (SP-SBC)
48 Oracle Communications Enterprise Trunk Manager Service Provider Configuration Guide Release 7.3
Adding an SP-SBC and Selecting a Bootstrap File
Use this procedure to add an SP-SBC to the Service Provider network and to select a Service Provider bootstrap file for that SP-SBC. This procedure also allows you to to assign a Simple Network Management Protocol (SNMP) community name to the SP-SBC(s) for SNMP management.
To add an SP-SBC and select a bootstrap file:
1. On your PC, open an Internet Browser.
2. Start Net-Net Central by using either the HTTP or HTTPS login:
http://<NNC server IP address>:8080
https://<NNC server IP address>:8443 (self-signed certificates)
https://<domain name>:8443 (third-party X.509 certificates)
If using third-party X.509 certificates, use the DNS name of the host (such as nncserver.acmepacket.com) instead of the IP address so that it matches the common name in the certificate.
3. Enter your Net-Net Central user name and password. The Net-Net Central Management System opens.
4. Click on the Trunk Manager slider to expand the menu.
5. Click on Devices.
6. Click on the Service Provider Devices tab. The following displays.
The following table identifies the columns in this window.
Column Heading Description
Name Name assigned to the SP-SBC that was added to the NNC-SIPTX database. The name displays ONLY when the SP-SBC has a status of “Bootstrapped”.
Core IP Address IP address within the core network where the SP-SBC resides.

ADDING A SERVICE PROVIDER SBC (SP-SBC)
Release 7.3 Oracle Communications Enterprise Trunk Manager Service Provider Configuration Guide 49
Auto-Config Status Current status of the SP-SBC. Valid values are:• Bootstrapped - SP-SBC was bootstrapped successfully. • Pending Bootstrap - SP-SBC is not yet bootstrapped but is
undergoing the bootstrap process.• Bootstrap deleted - Bootstrap has been deleted from the
SP-SBC.• Failed - Number of SP-SBCs that currently failed. This failure
may be due to any of the following scenarios:
- SP-SBC has failed due to a 503 (service unavailable) or 481 (Call/Transaction Does Not Exist) error.
- SP-SBC connection to Net-Net Central was lost. - SP-SBC connection to the associated Trunk has
failed. - SP-SBC connection to the associated E-SBC has
failed. - High availability (HA) is currently under way. The
current device may be in the process of failing over to a standby device because the primary device has failed. Please wait 15 minutes and then check that the status of the Trunk is out of the failed state.
Bootstrap Template Name of the current bootstrap file assigned to the SP-SBC. Default Service Provider templates include:• SP-SBC SIPTX No VLAN - SP-SBC No VLAN bootstrap template.
If you apply this template to the load balancing pool, all trunks share the same interface, and no VLANs are used. This template contains the SP-SBC configuration information required for the trunk where UDP or TCP is used dynamically* for SIP session traffic.
• SP-SBC SIPTX VLAN - SP-SBC VLAN bootstrap template. If you apply this template to the load balancing pool, each associated trunk has its own network interface with a unique VLAN ID. This template contains the SP-SBC configuration information required for the trunk, where User Datagram Protocol (UDP) or Transport Control Protocol (TCP) is used dynamically* for SIP session traffic.
• SP-SBC SIPTX-TLS No VLAN - SP-SBC TLS No VLAN bootstrap template. If you apply this template to the load balancing pool, all trunks share the same interface, and no VLANs are used. This template contains the SP-SBC configuration information required for the trunk, where Transport Layer Security (TLS) is used for SIP session traffic and SIPTX control traffic.
• SP-SBC SIPTX-TLS VLAN - SP-SBC TLS VLAN bootstrap template. If you apply this template to the load balancing pool, each associated trunk has its own network interface with a unique VLAN ID.This template contains the SP-SBC configuration information required for the trunk, where TLS is used for SIP session traffic and SIPTX control traffic.
*UDP or TCP is used dynamically for SIP session traffic between the SP-SBC and the Service Provider core network. TCP is used for the SIPTX control traffic between the SP-SBC and NNC-SIPTX.
Load Balancing Pool Name of the load balancing pool to which the SP-SBC belongs.
Netmask Netmask address associated with the SP-SBC.
Gateway Gateway IP address associated with the SP-SBC.
Column Heading Description
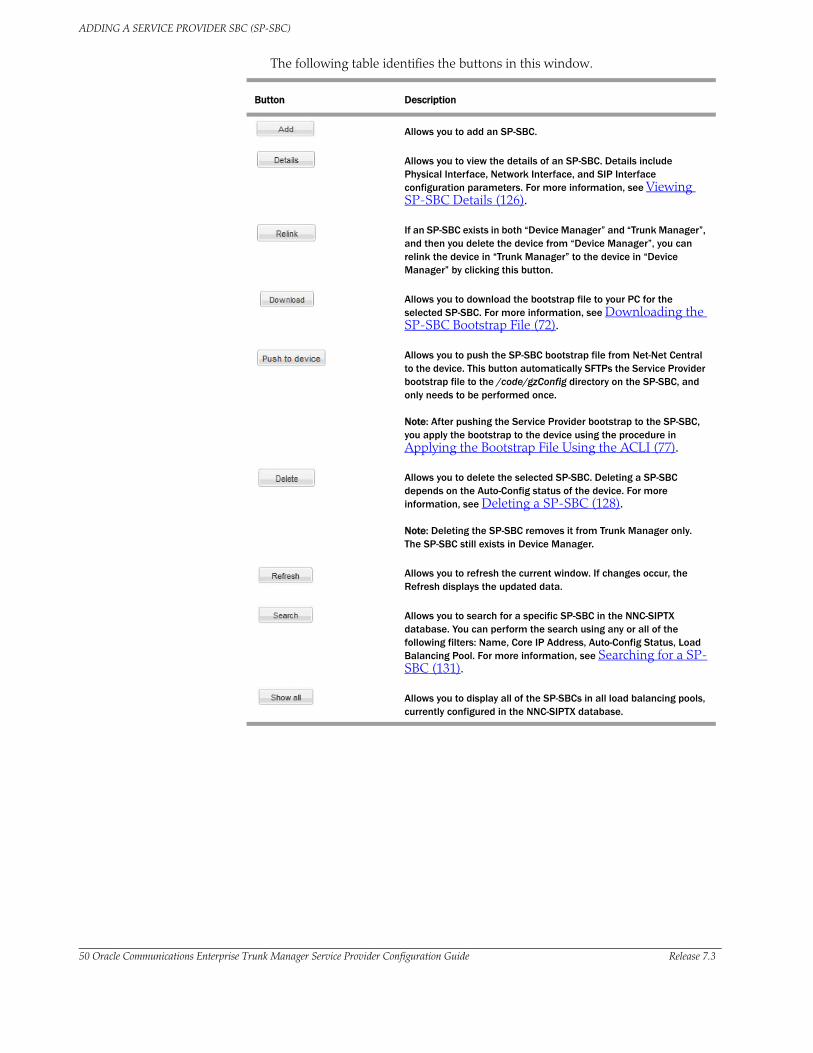
ADDING A SERVICE PROVIDER SBC (SP-SBC)
50 Oracle Communications Enterprise Trunk Manager Service Provider Configuration Guide Release 7.3
The following table identifies the buttons in this window.
Button Description
Allows you to add an SP-SBC.
Allows you to view the details of an SP-SBC. Details include Physical Interface, Network Interface, and SIP Interface configuration parameters. For more information, see Viewing SP-SBC Details (126).
If an SP-SBC exists in both “Device Manager” and “Trunk Manager”, and then you delete the device from “Device Manager”, you can relink the device in “Trunk Manager” to the device in “Device Manager” by clicking this button.
Allows you to download the bootstrap file to your PC for the selected SP-SBC. For more information, see Downloading the SP-SBC Bootstrap File (72).
Allows you to push the SP-SBC bootstrap file from Net-Net Central to the device. This button automatically SFTPs the Service Provider bootstrap file to the /code/gzConfig directory on the SP-SBC, and only needs to be performed once.
Note: After pushing the Service Provider bootstrap to the SP-SBC, you apply the bootstrap to the device using the procedure in Applying the Bootstrap File Using the ACLI (77).
Allows you to delete the selected SP-SBC. Deleting a SP-SBC depends on the Auto-Config status of the device. For more information, see Deleting a SP-SBC (128).
Note: Deleting the SP-SBC removes it from Trunk Manager only. The SP-SBC still exists in Device Manager.
Allows you to refresh the current window. If changes occur, the Refresh displays the updated data.
Allows you to search for a specific SP-SBC in the NNC-SIPTX database. You can perform the search using any or all of the following filters: Name, Core IP Address, Auto-Config Status, Load Balancing Pool. For more information, see Searching for a SP-SBC (131).
Allows you to display all of the SP-SBCs in all load balancing pools, currently configured in the NNC-SIPTX database.
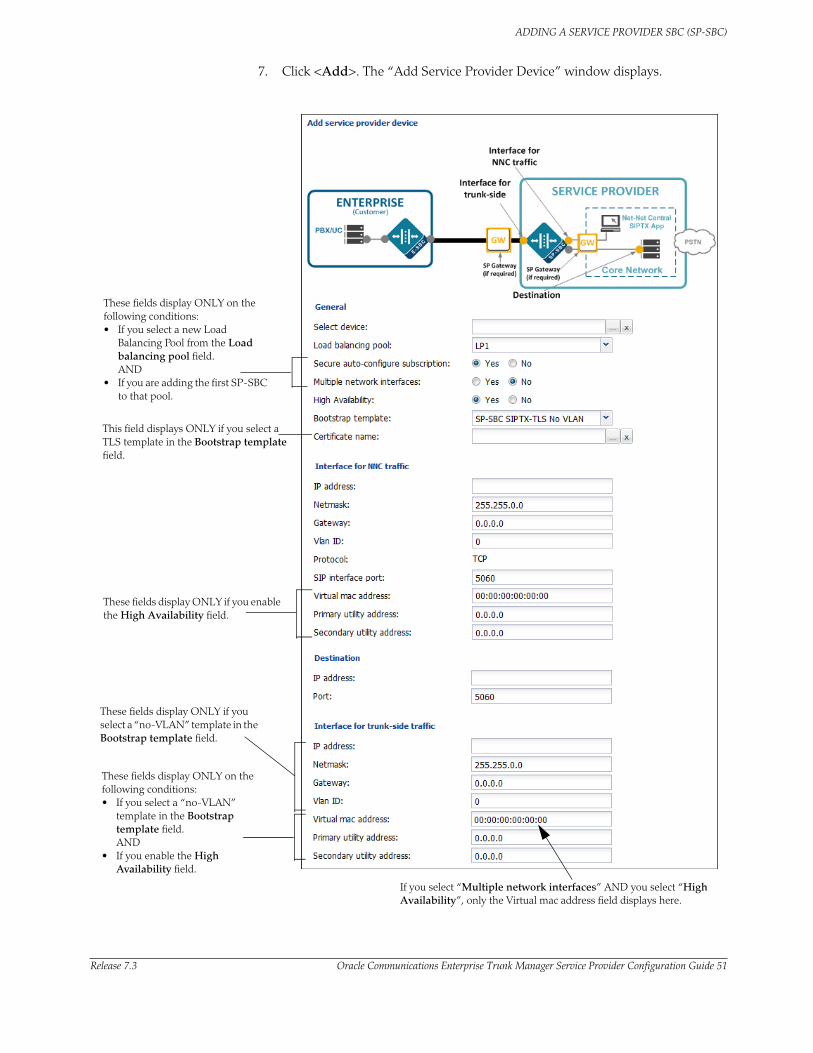
ADDING A SERVICE PROVIDER SBC (SP-SBC)
Release 7.3 Oracle Communications Enterprise Trunk Manager Service Provider Configuration Guide 51
7. Click <Add>. The “Add Service Provider Device” window displays.
These fields display ONLY if you select a “no-VLAN” template in the Bootstrap template field.
These fields display ONLY on the following conditions:• If you select a new Load
Balancing Pool from the Load balancing pool field. AND
• If you are adding the first SP-SBC to that pool.
This field displays ONLY if you select a TLS template in the Bootstrap template field.
These fields display ONLY if you enable the High Availability field.
These fields display ONLY on the following conditions:• If you select a “no-VLAN”
template in the Bootstrap template field. AND
• If you enable the High Availability field.
If you select “Multiple network interfaces” AND you select “High Availability”, only the Virtual mac address field displays here.
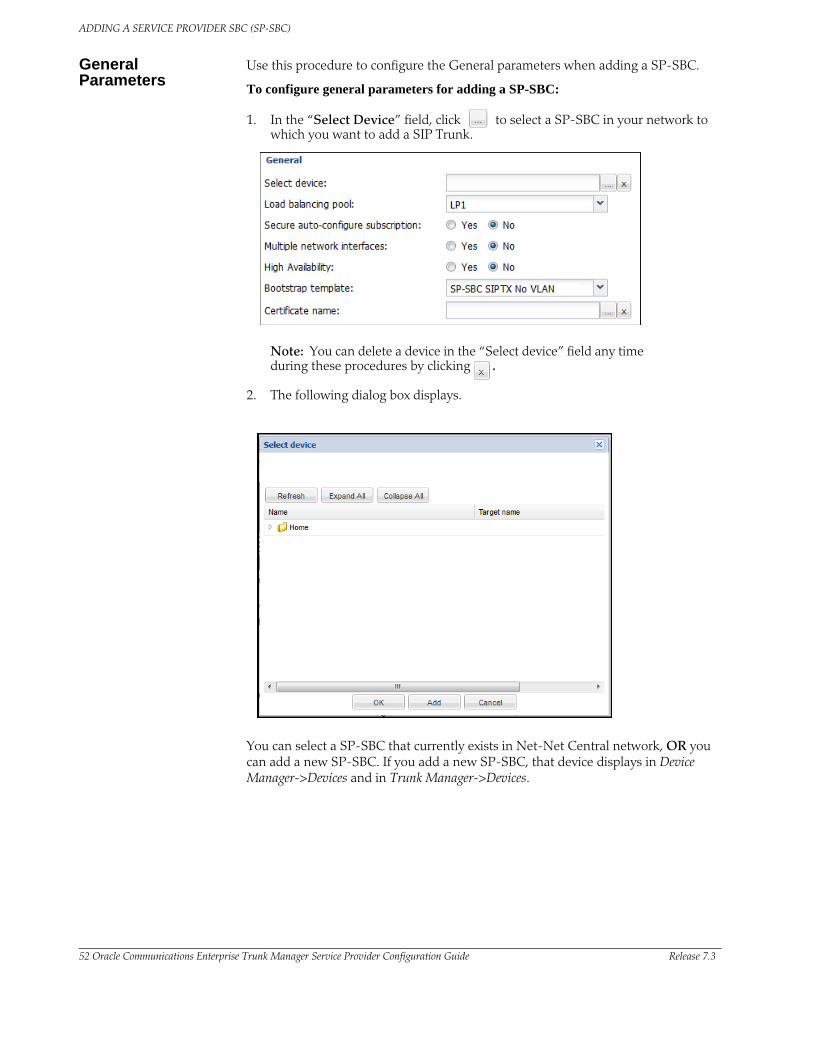
ADDING A SERVICE PROVIDER SBC (SP-SBC)
52 Oracle Communications Enterprise Trunk Manager Service Provider Configuration Guide Release 7.3
General Parameters
Use this procedure to configure the General parameters when adding a SP-SBC.
To configure general parameters for adding a SP-SBC:
1. In the “Select Device” field, click to select a SP-SBC in your network to which you want to add a SIP Trunk.
Note: You can delete a device in the “Select device” field any time during these procedures by clicking .
2. The following dialog box displays.
You can select a SP-SBC that currently exists in Net-Net Central network, OR you can add a new SP-SBC. If you add a new SP-SBC, that device displays in Device Manager->Devices and in Trunk Manager->Devices.
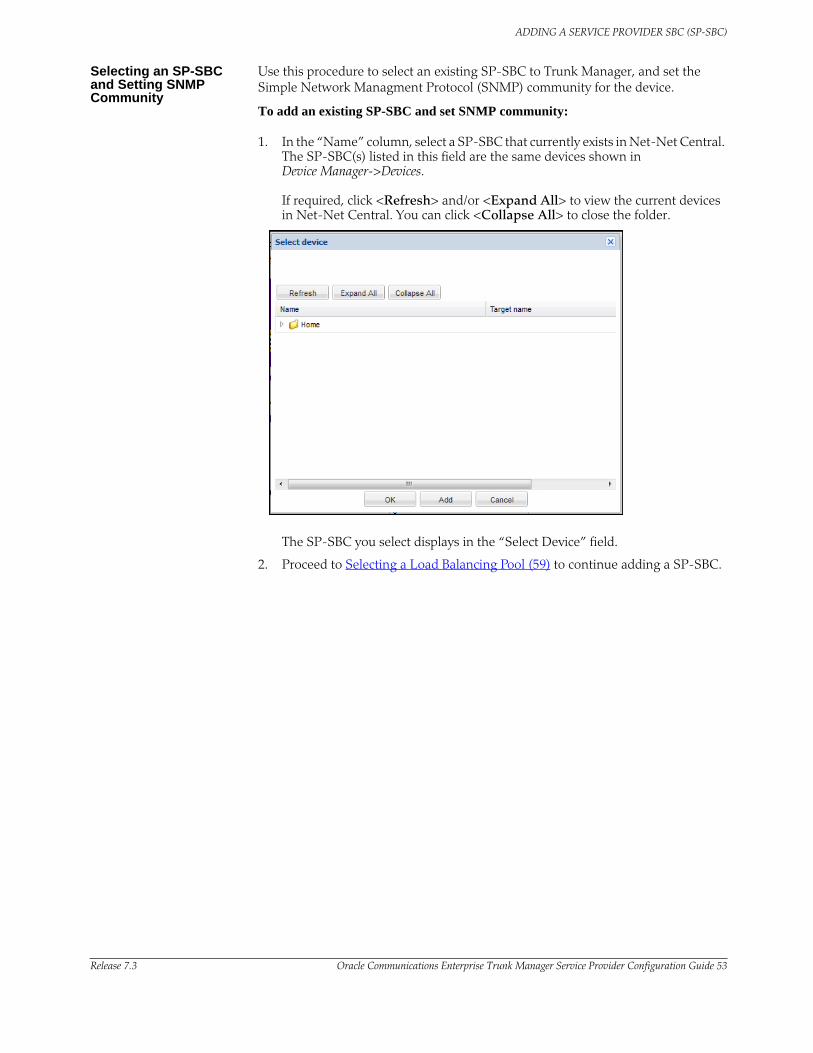
ADDING A SERVICE PROVIDER SBC (SP-SBC)
Release 7.3 Oracle Communications Enterprise Trunk Manager Service Provider Configuration Guide 53
Selecting an SP-SBC and Setting SNMP Community
Use this procedure to select an existing SP-SBC to Trunk Manager, and set the Simple Network Managment Protocol (SNMP) community for the device.
To add an existing SP-SBC and set SNMP community:
1. In the “Name” column, select a SP-SBC that currently exists in Net-Net Central. The SP-SBC(s) listed in this field are the same devices shown in Device Manager->Devices. If required, click <Refresh> and/or <Expand All> to view the current devices in Net-Net Central. You can click <Collapse All> to close the folder.
The SP-SBC you select displays in the “Select Device” field.
2. Proceed to Selecting a Load Balancing Pool (59) to continue adding a SP-SBC.

ADDING A SERVICE PROVIDER SBC (SP-SBC)
54 Oracle Communications Enterprise Trunk Manager Service Provider Configuration Guide Release 7.3
Adding a New SP-SBC Use this procedure to add a new SP-SBC to Net-Net Central and Trunk Manager.
To add a new SP-SBC:
1. In the “Select Device” dialog box, click <Add>.
The following dialog box displays.

ADDING A SERVICE PROVIDER SBC (SP-SBC)
Release 7.3 Oracle Communications Enterprise Trunk Manager Service Provider Configuration Guide 55
2. In the “Device type” field, select the type of device you want to add to Net-Net Central. Valid values are:
• 3800/4500 (default) - Acme Packet’s Net-Net SBC models supported by SIP Trunk Xpress Trunk Manager.
3. In the “IP Address 1” field, enter the IP address of the primary device’s network management interface to Net-Net Central. P Address must be entered in dotted decimal format (0.0.0.0). (For example, 192.168.34.220).
Note: The “IP Address 2” field is reserved for High Availability (HA) configuration. To configure HA, see Configuring High Availability (HA) (198).
4. In the “SNMP community name” field, enter the name of the Simple Network Management Protocol (SNMP) community name for this device. The SNMP community name is the name of an active community where the SP-SBC can send or receive SNMP performance and fault information. Valid values are alphanumeric characters. For example, “public”.
Note: The Net-Net Central server must be configured on the SP-SBC as a valid community name/IP address before adding the SP-SBC to Net-Net Central.
5. In the “SNMP port” field, enter the SNMP port number for this device. The default is 161. TCP and UDP use port 161 for SNMP messages.
6. In the “User name” field, enter an SNMP username for the SP-SBC, if required.
7. In the “Password” field, enter the SNMP password associated with the user name you entered in the previous step.
8. In the “Web protocol” field, select the type of Web protocol to use for this device. Valid values are :
• HTTP (default) - Hypertext Transfer Protocol (HTTP) used by the Web to define how messages are formatted and transferred.
• HTTPS - HTTP with Secure Sockets Layer (SSL) used to transfer encrypted data over the Web.
9. n the “Web port” field, enter the web port for this device. The default is 80.
10. In the “Web Services protocol” field, select the web protocol to use for this device. Valid values are:
• HTTP (default) - Hypertext Transfer Protocol (HTTP) used by the Web to define how messages are formatted and transferred.
• HTTPS - HTTP with Secure Sockets Layer (SSL) used to transfer encrypted data over the Web.
11. In the “Web Services port” field, enter the web services port for this device. The default is 80.
12. Proceed to Selecting a Device Group (56) to assign the SP-SBC to a device group.

ADDING A SERVICE PROVIDER SBC (SP-SBC)
56 Oracle Communications Enterprise Trunk Manager Service Provider Configuration Guide Release 7.3
Selecting a Device Group
A device group is a group of Acme Packet devices used to simplify management from small to very large networks. Device groups can be organized hierarchically according to the needs of the organization.
Use this procedure to assign the SP-SBC to an existing device group.
To select an existing device group:
1. In the “Device Group” field, click the to select a device group to associate with this device. “Home” is the default for this field.
The following dialog box displays.
2. Select a device group that currently exists in Net-Net Central. The device group(s) listed in this box are the same devices shown in Device Manager->Device Groups. If required, click <Refresh> and/or <Expand All> to view the current devices in Net-Net Central.
3. Click <OK>. The Device Group displays in the “Device Group” field of the “Add Device” dialog box.
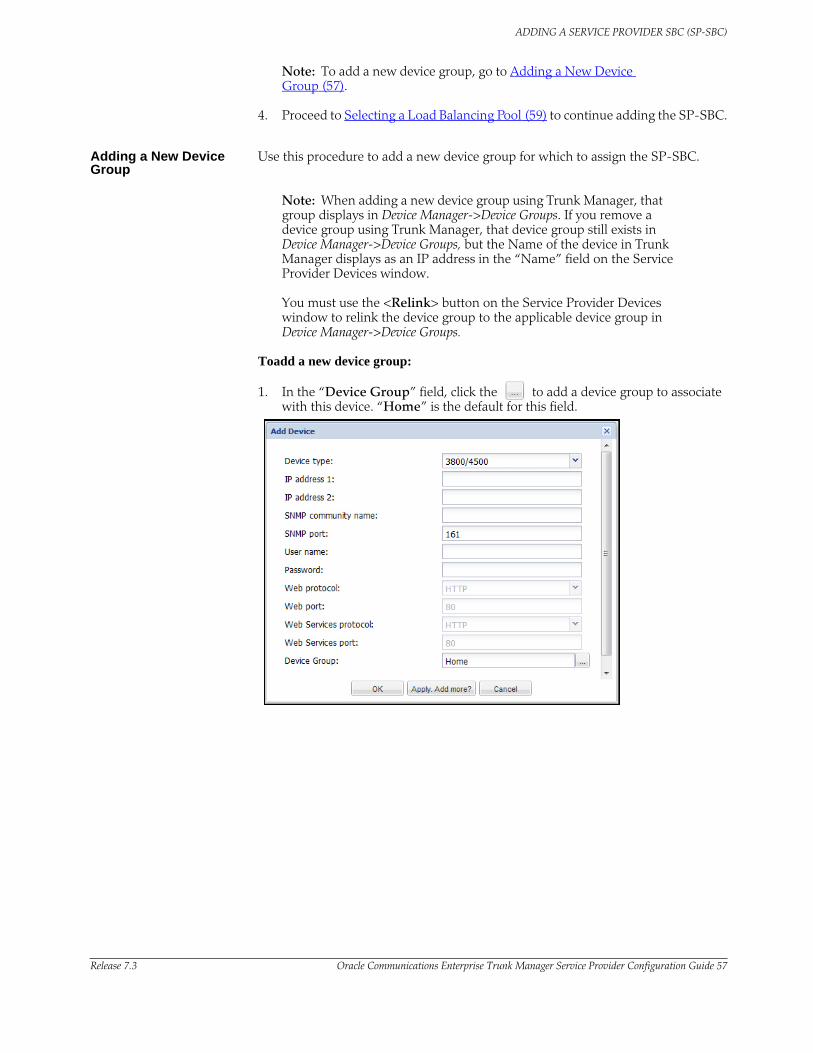
ADDING A SERVICE PROVIDER SBC (SP-SBC)
Release 7.3 Oracle Communications Enterprise Trunk Manager Service Provider Configuration Guide 57
Note: To add a new device group, go to Adding a New Device Group (57).
4. Proceed to Selecting a Load Balancing Pool (59) to continue adding the SP-SBC.
Adding a New Device Group
Use this procedure to add a new device group for which to assign the SP-SBC.
Note: When adding a new device group using Trunk Manager, that group displays in Device Manager->Device Groups. If you remove a device group using Trunk Manager, that device group still exists in Device Manager->Device Groups, but the Name of the device in Trunk Manager displays as an IP address in the “Name” field on the Service Provider Devices window. You must use the <Relink> button on the Service Provider Devices window to relink the device group to the applicable device group in Device Manager->Device Groups.
Toadd a new device group:
1. In the “Device Group” field, click the to add a device group to associate with this device. “Home” is the default for this field.
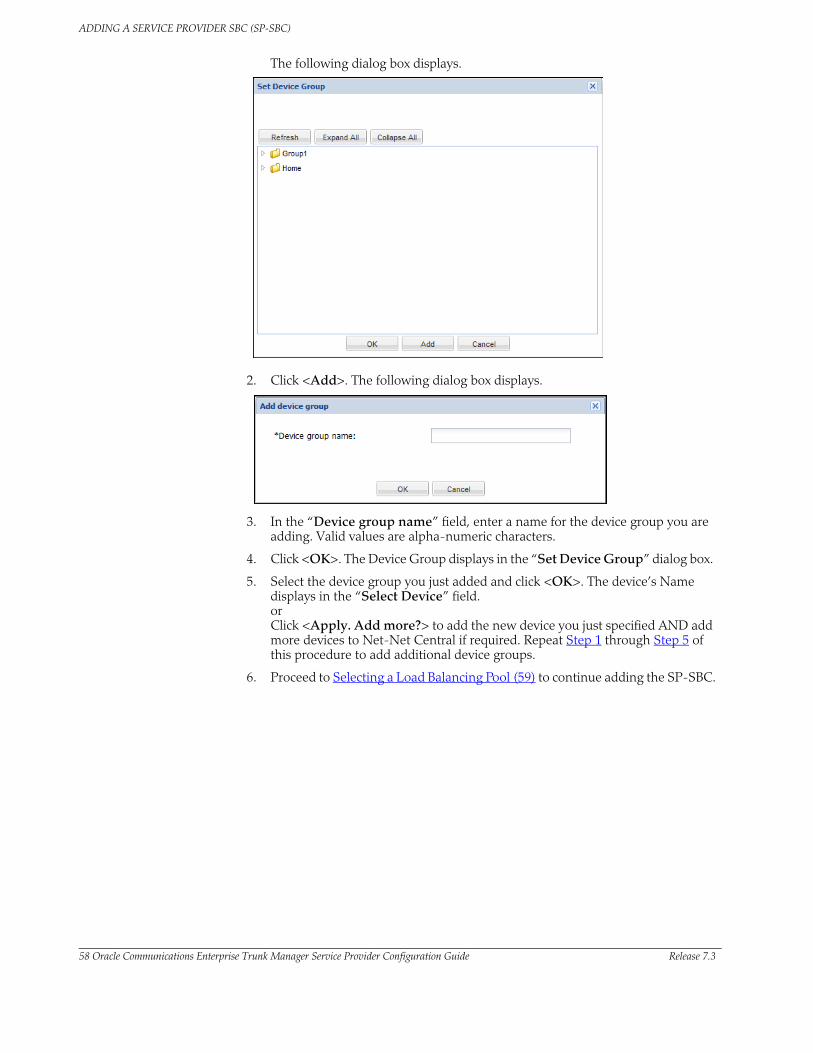
ADDING A SERVICE PROVIDER SBC (SP-SBC)
58 Oracle Communications Enterprise Trunk Manager Service Provider Configuration Guide Release 7.3
The following dialog box displays.
2. Click <Add>. The following dialog box displays.
3. In the “Device group name” field, enter a name for the device group you are adding. Valid values are alpha-numeric characters.
4. Click <OK>. The Device Group displays in the “Set Device Group” dialog box.
5. Select the device group you just added and click <OK>. The device’s Name displays in the “Select Device” field. or Click <Apply. Add more?> to add the new device you just specified AND add more devices to Net-Net Central if required. Repeat Step 1 through Step 5 of this procedure to add additional device groups.
6. Proceed to Selecting a Load Balancing Pool (59) to continue adding the SP-SBC.
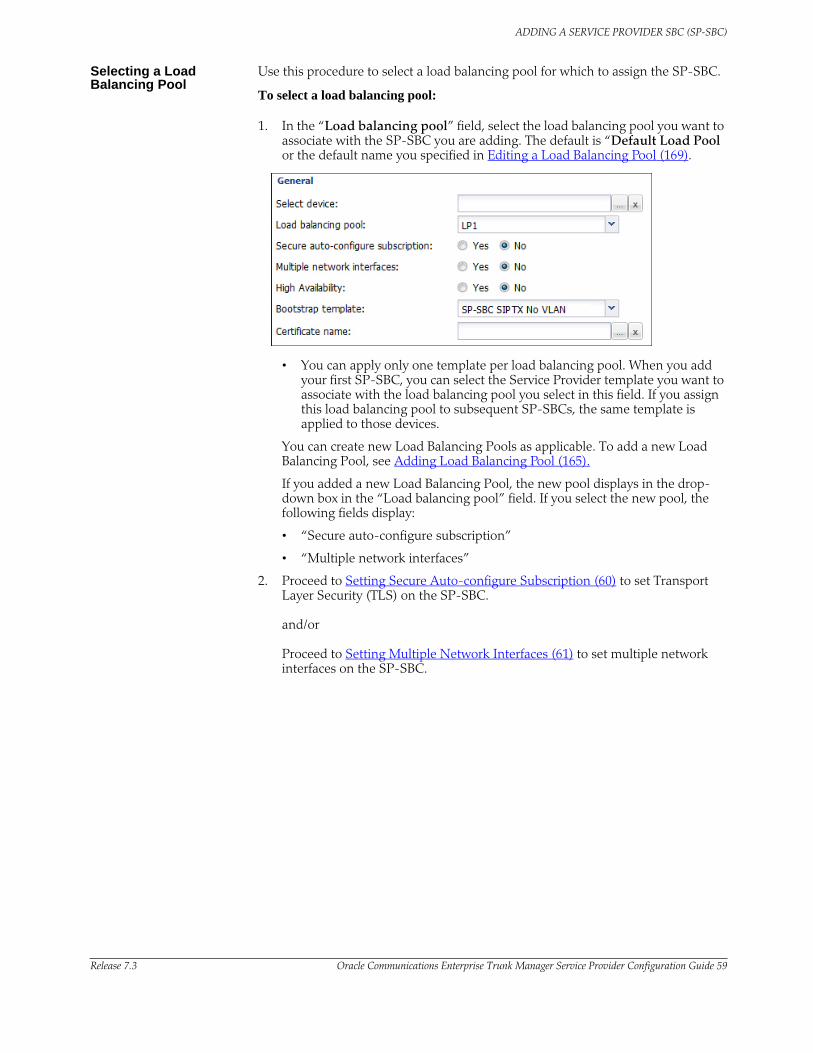
ADDING A SERVICE PROVIDER SBC (SP-SBC)
Release 7.3 Oracle Communications Enterprise Trunk Manager Service Provider Configuration Guide 59
Selecting a Load Balancing Pool
Use this procedure to select a load balancing pool for which to assign the SP-SBC.
To select a load balancing pool:
1. In the “Load balancing pool” field, select the load balancing pool you want to associate with the SP-SBC you are adding. The default is “Default Load Pool or the default name you specified in Editing a Load Balancing Pool (169).
• You can apply only one template per load balancing pool. When you add your first SP-SBC, you can select the Service Provider template you want to associate with the load balancing pool you select in this field. If you assign this load balancing pool to subsequent SP-SBCs, the same template is applied to those devices.
You can create new Load Balancing Pools as applicable. To add a new Load Balancing Pool, see Adding Load Balancing Pool (165).
If you added a new Load Balancing Pool, the new pool displays in the drop-down box in the “Load balancing pool” field. If you select the new pool, the following fields display:
• “Secure auto-configure subscription”
• “Multiple network interfaces”
2. Proceed to Setting Secure Auto-configure Subscription (60) to set Transport Layer Security (TLS) on the SP-SBC. and/or Proceed to Setting Multiple Network Interfaces (61) to set multiple network interfaces on the SP-SBC.
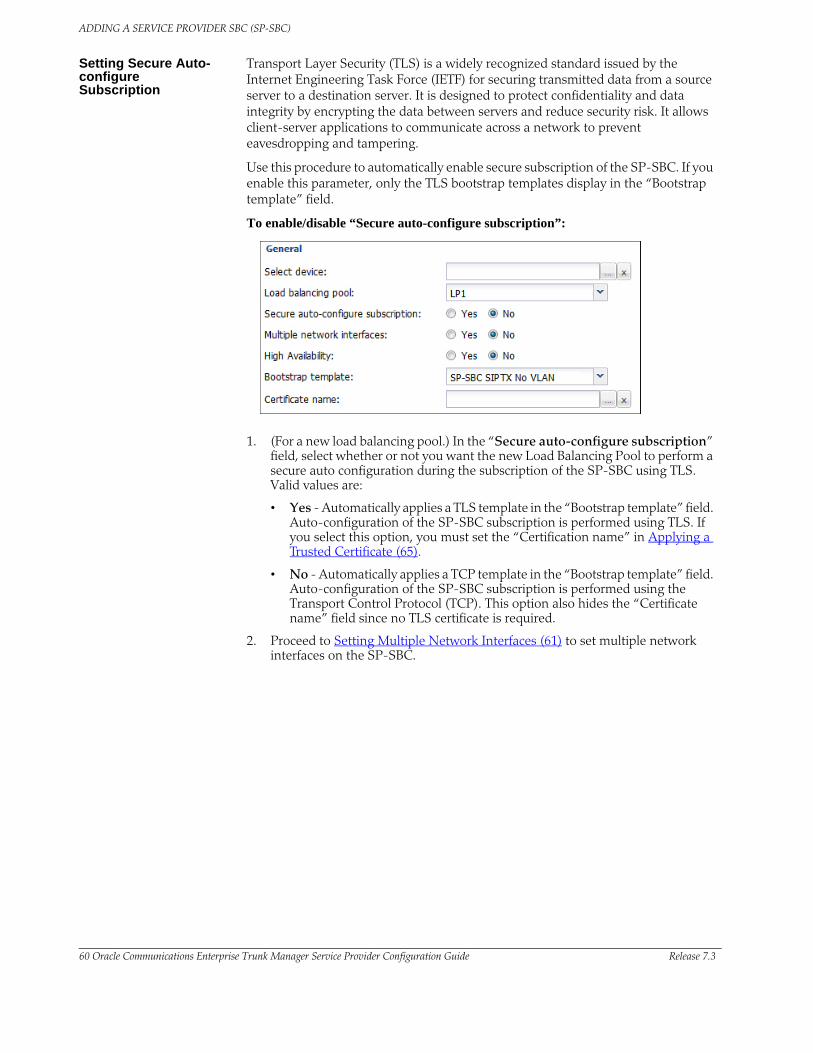
ADDING A SERVICE PROVIDER SBC (SP-SBC)
60 Oracle Communications Enterprise Trunk Manager Service Provider Configuration Guide Release 7.3
Setting Secure Auto-configure Subscription
Transport Layer Security (TLS) is a widely recognized standard issued by the Internet Engineering Task Force (IETF) for securing transmitted data from a source server to a destination server. It is designed to protect confidentiality and data integrity by encrypting the data between servers and reduce security risk. It allows client-server applications to communicate across a network to prevent eavesdropping and tampering.
Use this procedure to automatically enable secure subscription of the SP-SBC. If you enable this parameter, only the TLS bootstrap templates display in the “Bootstrap template” field.
To enable/disable “Secure auto-configure subscription”:
1. (For a new load balancing pool.) In the “Secure auto-configure subscription” field, select whether or not you want the new Load Balancing Pool to perform a secure auto configuration during the subscription of the SP-SBC using TLS. Valid values are:
• Yes - Automatically applies a TLS template in the “Bootstrap template” field. Auto-configuration of the SP-SBC subscription is performed using TLS. If you select this option, you must set the “Certification name” in Applying a Trusted Certificate (65).
• No - Automatically applies a TCP template in the “Bootstrap template” field. Auto-configuration of the SP-SBC subscription is performed using the Transport Control Protocol (TCP). This option also hides the “Certificate name” field since no TLS certificate is required.
2. Proceed to Setting Multiple Network Interfaces (61) to set multiple network interfaces on the SP-SBC.
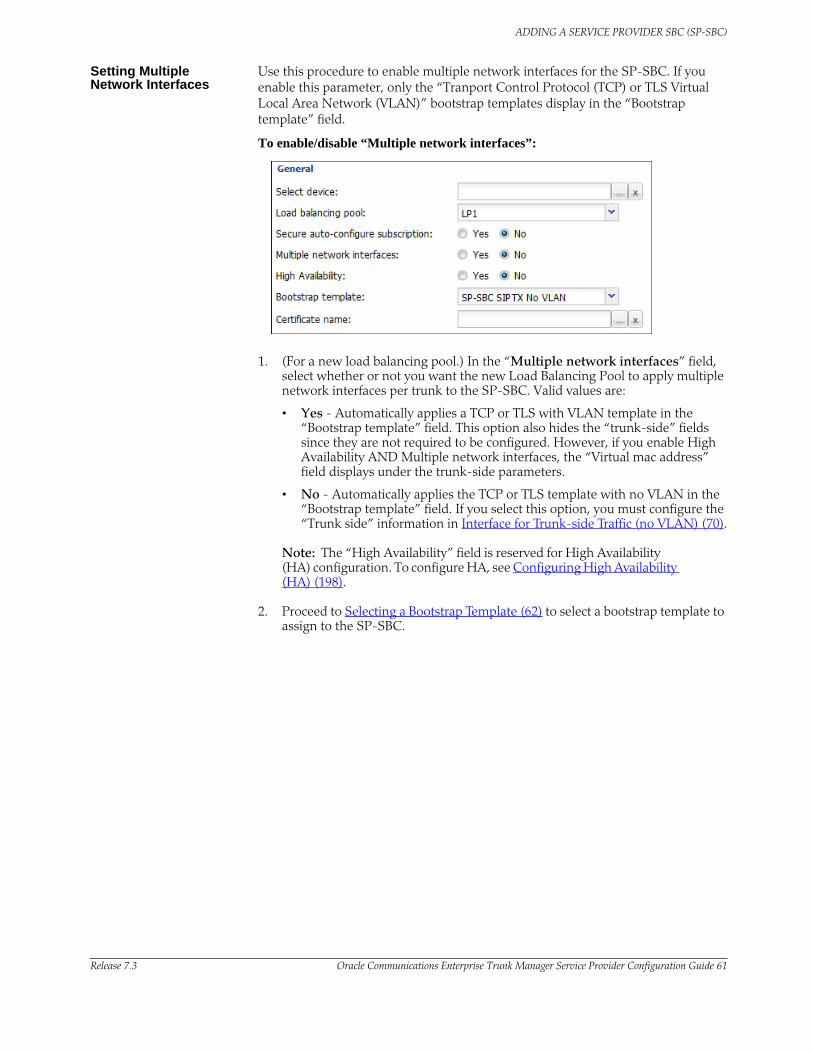
ADDING A SERVICE PROVIDER SBC (SP-SBC)
Release 7.3 Oracle Communications Enterprise Trunk Manager Service Provider Configuration Guide 61
Setting Multiple Network Interfaces
Use this procedure to enable multiple network interfaces for the SP-SBC. If you enable this parameter, only the “Tranport Control Protocol (TCP) or TLS Virtual Local Area Network (VLAN)” bootstrap templates display in the “Bootstrap template” field.
To enable/disable “Multiple network interfaces”:
1. (For a new load balancing pool.) In the “Multiple network interfaces” field, select whether or not you want the new Load Balancing Pool to apply multiple network interfaces per trunk to the SP-SBC. Valid values are:
• Yes - Automatically applies a TCP or TLS with VLAN template in the “Bootstrap template” field. This option also hides the “trunk-side” fields since they are not required to be configured. However, if you enable High Availability AND Multiple network interfaces, the “Virtual mac address” field displays under the trunk-side parameters.
• No - Automatically applies the TCP or TLS template with no VLAN in the “Bootstrap template” field. If you select this option, you must configure the “Trunk side” information in Interface for Trunk-side Traffic (no VLAN) (70).
Note: The “High Availability” field is reserved for High Availability (HA) configuration. To configure HA, see Configuring High Availability (HA) (198).
2. Proceed to Selecting a Bootstrap Template (62) to select a bootstrap template to assign to the SP-SBC.
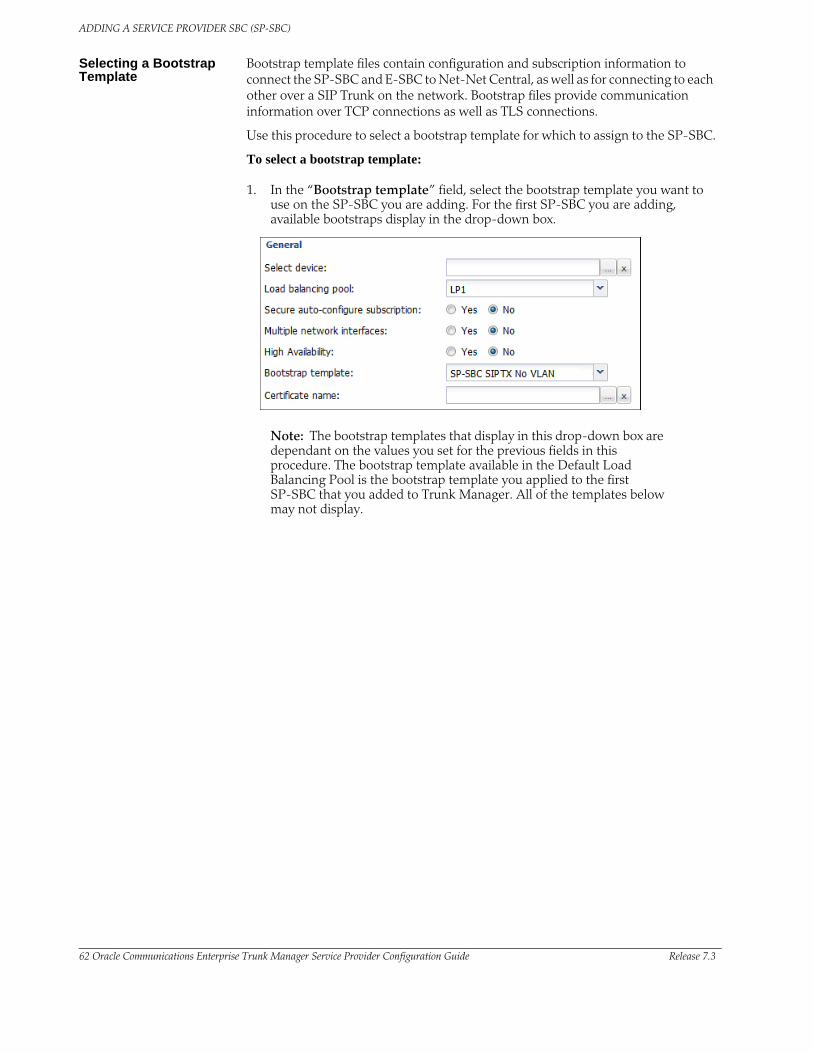
ADDING A SERVICE PROVIDER SBC (SP-SBC)
62 Oracle Communications Enterprise Trunk Manager Service Provider Configuration Guide Release 7.3
Selecting a Bootstrap Template
Bootstrap template files contain configuration and subscription information to connect the SP-SBC and E-SBC to Net-Net Central, as well as for connecting to each other over a SIP Trunk on the network. Bootstrap files provide communication information over TCP connections as well as TLS connections.
Use this procedure to select a bootstrap template for which to assign to the SP-SBC.
To select a bootstrap template:
1. In the “Bootstrap template” field, select the bootstrap template you want to use on the SP-SBC you are adding. For the first SP-SBC you are adding, available bootstraps display in the drop-down box.
Note: The bootstrap templates that display in this drop-down box are dependant on the values you set for the previous fields in this procedure. The bootstrap template available in the Default Load Balancing Pool is the bootstrap template you applied to the first SP-SBC that you added to Trunk Manager. All of the templates below may not display.

ADDING A SERVICE PROVIDER SBC (SP-SBC)
Release 7.3 Oracle Communications Enterprise Trunk Manager Service Provider Configuration Guide 63
Valid values are:
Bootstrap Description
• SP-SBC SIPTX No VLAN (default)
SP-SBC No VLAN bootstrap template.
Note: Displays only if “Secure auto-configure subscription” is disabled AND “Multiple network interfaces” is disabled.
If you apply this template to the load balancing pool, all trunks share the same interface, and no VLANs are used. This template contains the SP-SBC configuration information required for the trunk where UDP or TCP is used dynamically* for SIP session traffic.
If you select this template:• you must configure the trunk-side information in
Interface for Net-Net Central Traffic Parameters (68).
• and you enable an HA device, you must enter the HA
information in Configuring High Availability (HA) (198).
*UDP or TCP is used dynamically for SIP session traffic between the SP-SBC and the Service Provider core network. TCP is used for the SIPTX control traffic between the SP-SBC and NNC-SIPTX.
• SP-SBC SIPTX VLAN SP-SBC VLAN bootstrap template.
Note: Displays only if “Secure auto-configure subscription” is disabled AND “Multiple network interfaces” is enabled.
If you apply this template to the load balancing pool, each associated trunk has its own network interface with a unique VLAN ID. This template contains the SP-SBC configuration information required for the trunk, where User Datagram Protocol (UDP) or Transport Control Protocol (TCP) is used dynamically* for SIP session traffic.
If you select this template:• and you enable an HA device, you must enter the HA
information in Configuring High Availability (HA) (198).
*UDP or TCP is used dynamically for SIP session traffic between the SP-SBC and the Service Provider core network. TCP is used for the SIPTX control traffic between the SP-SBC and NNC-SIPTX.
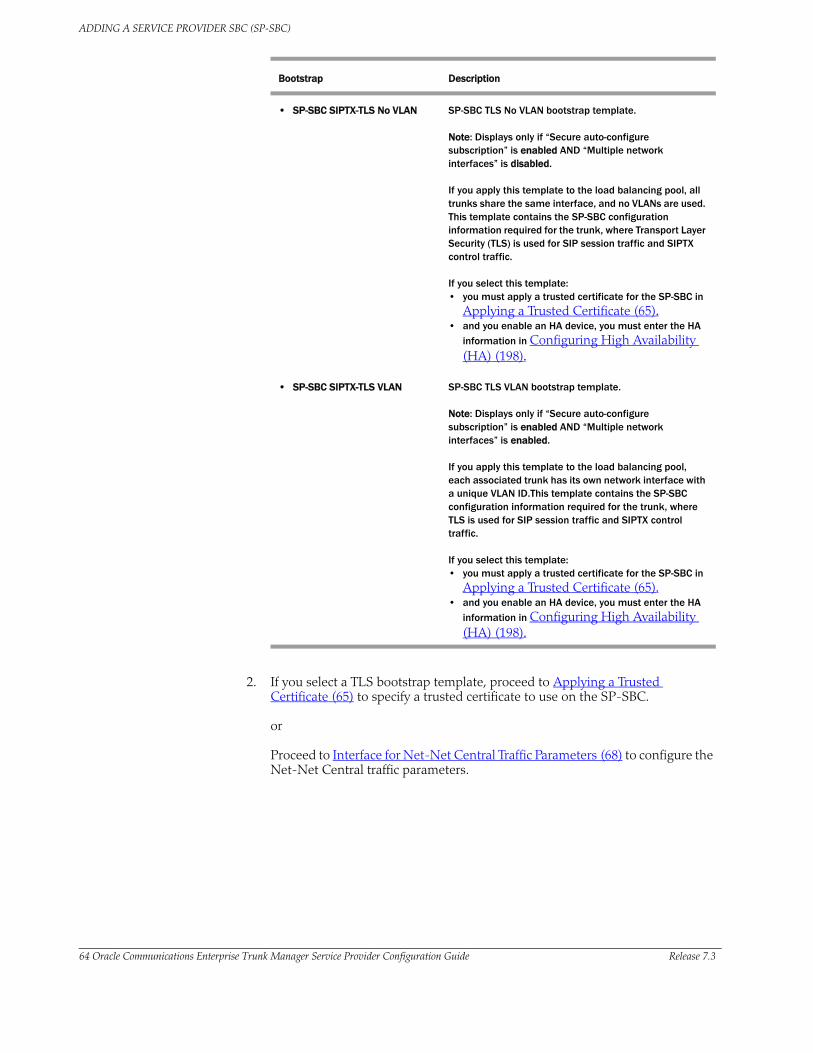
ADDING A SERVICE PROVIDER SBC (SP-SBC)
64 Oracle Communications Enterprise Trunk Manager Service Provider Configuration Guide Release 7.3
2. If you select a TLS bootstrap template, proceed to Applying a Trusted Certificate (65) to specify a trusted certificate to use on the SP-SBC. or Proceed to Interface for Net-Net Central Traffic Parameters (68) to configure the Net-Net Central traffic parameters.
• SP-SBC SIPTX-TLS No VLAN SP-SBC TLS No VLAN bootstrap template.
Note: Displays only if “Secure auto-configure subscription” is enabled AND “Multiple network interfaces” is disabled.
If you apply this template to the load balancing pool, all trunks share the same interface, and no VLANs are used. This template contains the SP-SBC configuration information required for the trunk, where Transport Layer Security (TLS) is used for SIP session traffic and SIPTX control traffic.
If you select this template:• you must apply a trusted certificate for the SP-SBC in
Applying a Trusted Certificate (65).• and you enable an HA device, you must enter the HA
information in Configuring High Availability (HA) (198).
• SP-SBC SIPTX-TLS VLAN SP-SBC TLS VLAN bootstrap template.
Note: Displays only if “Secure auto-configure subscription” is enabled AND “Multiple network interfaces” is enabled.
If you apply this template to the load balancing pool, each associated trunk has its own network interface with a unique VLAN ID.This template contains the SP-SBC configuration information required for the trunk, where TLS is used for SIP session traffic and SIPTX control traffic.
If you select this template:• you must apply a trusted certificate for the SP-SBC in
Applying a Trusted Certificate (65).• and you enable an HA device, you must enter the HA
information in Configuring High Availability (HA) (198).
Bootstrap Description
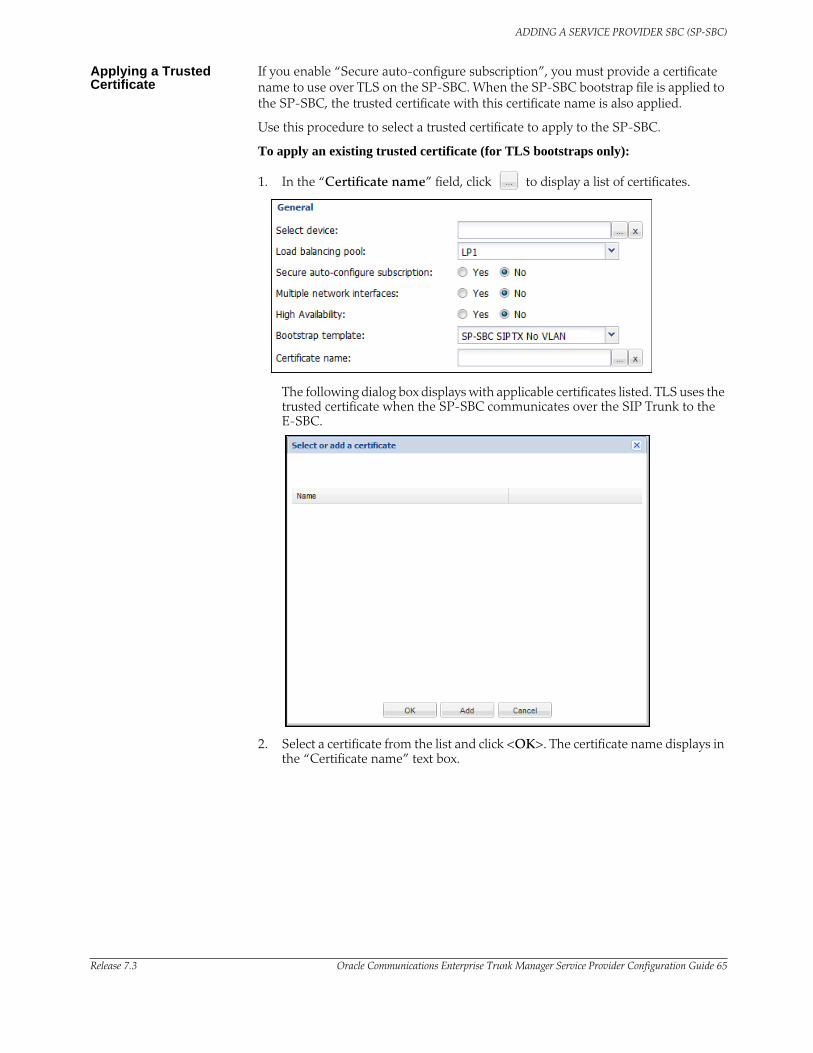
ADDING A SERVICE PROVIDER SBC (SP-SBC)
Release 7.3 Oracle Communications Enterprise Trunk Manager Service Provider Configuration Guide 65
Applying a Trusted Certificate
If you enable “Secure auto-configure subscription”, you must provide a certificate name to use over TLS on the SP-SBC. When the SP-SBC bootstrap file is applied to the SP-SBC, the trusted certificate with this certificate name is also applied.
Use this procedure to select a trusted certificate to apply to the SP-SBC.
To apply an existing trusted certificate (for TLS bootstraps only):
1. In the “Certificate name” field, click to display a list of certificates.
The following dialog box displays with applicable certificates listed. TLS uses the trusted certificate when the SP-SBC communicates over the SIP Trunk to the E-SBC.
2. Select a certificate from the list and click <OK>. The certificate name displays in the “Certificate name” text box.
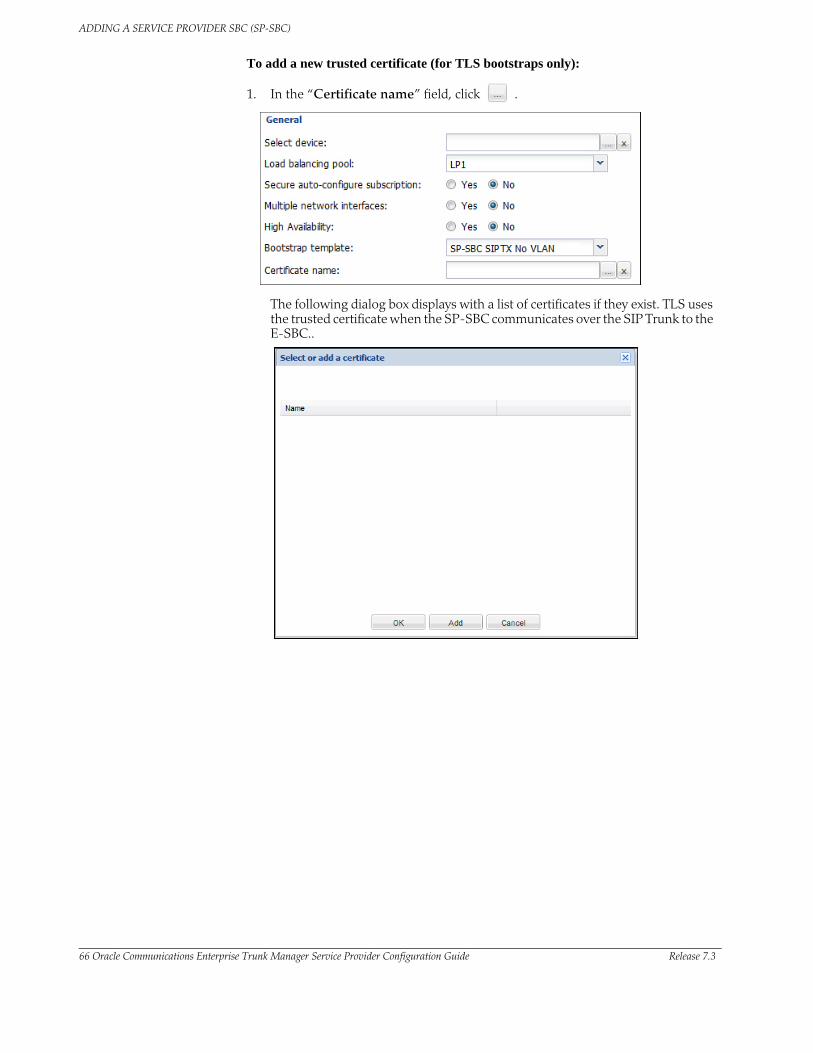
ADDING A SERVICE PROVIDER SBC (SP-SBC)
66 Oracle Communications Enterprise Trunk Manager Service Provider Configuration Guide Release 7.3
To add a new trusted certificate (for TLS bootstraps only):
1. In the “Certificate name” field, click .
The following dialog box displays with a list of certificates if they exist. TLS uses the trusted certificate when the SP-SBC communicates over the SIP Trunk to the E-SBC..
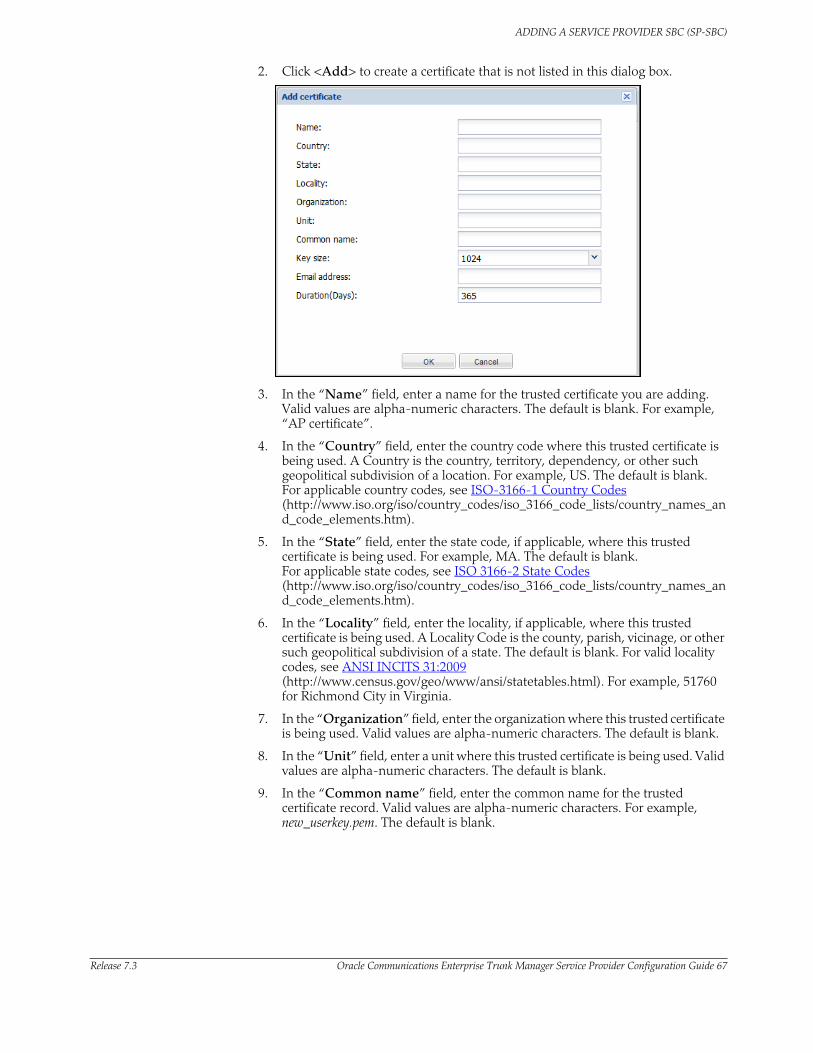
ADDING A SERVICE PROVIDER SBC (SP-SBC)
Release 7.3 Oracle Communications Enterprise Trunk Manager Service Provider Configuration Guide 67
2. Click <Add> to create a certificate that is not listed in this dialog box.
3. In the “Name” field, enter a name for the trusted certificate you are adding. Valid values are alpha-numeric characters. The default is blank. For example, “AP certificate”.
4. In the “Country” field, enter the country code where this trusted certificate is being used. A Country is the country, territory, dependency, or other such geopolitical subdivision of a location. For example, US. The default is blank. For applicable country codes, see ISO-3166-1 Country Codes (http://www.iso.org/iso/country_codes/iso_3166_code_lists/country_names_and_code_elements.htm).
5. In the “State” field, enter the state code, if applicable, where this trusted certificate is being used. For example, MA. The default is blank. For applicable state codes, see ISO 3166-2 State Codes (http://www.iso.org/iso/country_codes/iso_3166_code_lists/country_names_and_code_elements.htm).
6. In the “Locality” field, enter the locality, if applicable, where this trusted certificate is being used. A Locality Code is the county, parish, vicinage, or other such geopolitical subdivision of a state. The default is blank. For valid locality codes, see ANSI INCITS 31:2009 (http://www.census.gov/geo/www/ansi/statetables.html). For example, 51760 for Richmond City in Virginia.
7. In the “Organization” field, enter the organization where this trusted certificate is being used. Valid values are alpha-numeric characters. The default is blank.
8. In the “Unit” field, enter a unit where this trusted certificate is being used. Valid values are alpha-numeric characters. The default is blank.
9. In the “Common name” field, enter the common name for the trusted certificate record. Valid values are alpha-numeric characters. For example, new_userkey.pem. The default is blank.

ADDING A SERVICE PROVIDER SBC (SP-SBC)
68 Oracle Communications Enterprise Trunk Manager Service Provider Configuration Guide Release 7.3
10. In the “Key size” field, select the size, in bits, of the public encryption key. The trusted certificate usually contains the server name, the trusted certificate authority (CA) and the server's public encryption key. The default is 1024 bits. Valid values are:
• 512
• 1024 (default)
• 2048
11. (optional) In the “Email address” field, enter the email address of the administrator creating this certificate. Valid values are alpha-numeric characters. For example, [email protected]. The default is blank.
12. In the “Duration (Days)” field, enter the number of days for which the trusted certificate is valid. When the SP-SBC reaches the value in this field, an email is generated and sent to the email address specified in the “Email address” field notifying the administrator that the certificate is no longer valid. Valid values are 1 to 365 days. The default is 365.
13. Click <OK> to add the certificate. The certificate name displays in the “Certificate name” text box.
14. Proceed to Interface for Net-Net Central Traffic Parameters (68) to configure the Net-Net Central traffic parameters.
Interface for Net-Net Central Traffic Parameters
Use this procedure to configure the interface on the SP-SBC for Net-Net Central traffic.
Note: If you enable HA in your network, AND you selected a “no-VLAN” bootstrap template, the configurable HA parameters display in this “Interface for NNC traffic” section. If you enable “High Availability” AND you enable “Multiple network interfaces” (VLAN bootstrap template), then only the “Virtual mac address” field displays in the “Interface for NNC traffic” section. To configure the HA parameters, see Configuring High Availability (HA) (198).
To configure the SP-SBC interface for NNC traffic:
1. In the “IP address” field, enter the IP address that connects the SP-SBC to Net-Net Central. This IP Address must be entered in dotted decimal format (0.0.0.0). For example, 192.168.34.220.
2. In the “Netmask” field, enter the Netmask address for the SP-SBC that connects within the core Service Provider network. This IP Address must be entered in dotted decimal format (0.0.0.0). The default is 255.255.255.0.
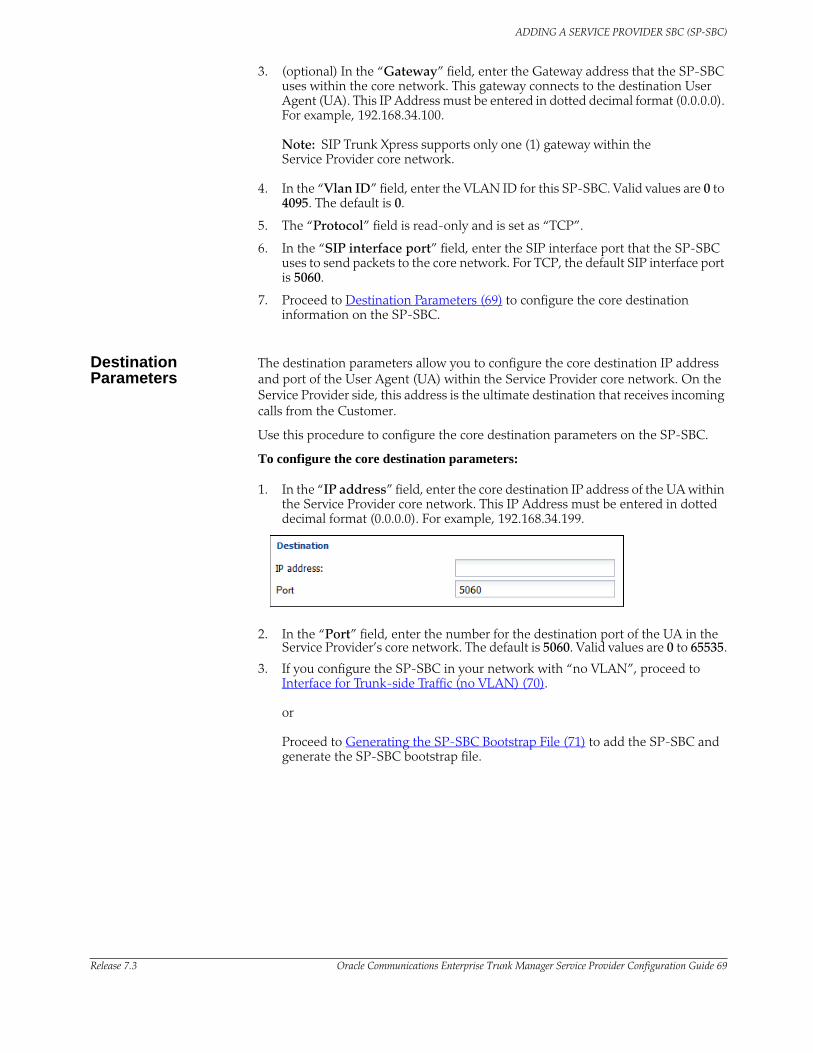
ADDING A SERVICE PROVIDER SBC (SP-SBC)
Release 7.3 Oracle Communications Enterprise Trunk Manager Service Provider Configuration Guide 69
3. (optional) In the “Gateway” field, enter the Gateway address that the SP-SBC uses within the core network. This gateway connects to the destination User Agent (UA). This IP Address must be entered in dotted decimal format (0.0.0.0). For example, 192.168.34.100.
Note: SIP Trunk Xpress supports only one (1) gateway within the Service Provider core network.
4. In the “Vlan ID” field, enter the VLAN ID for this SP-SBC. Valid values are 0 to 4095. The default is 0.
5. The “Protocol” field is read-only and is set as “TCP”.
6. In the “SIP interface port” field, enter the SIP interface port that the SP-SBC uses to send packets to the core network. For TCP, the default SIP interface port is 5060.
7. Proceed to Destination Parameters (69) to configure the core destination information on the SP-SBC.
Destination Parameters
The destination parameters allow you to configure the core destination IP address and port of the User Agent (UA) within the Service Provider core network. On the Service Provider side, this address is the ultimate destination that receives incoming calls from the Customer.
Use this procedure to configure the core destination parameters on the SP-SBC.
To configure the core destination parameters:
1. In the “IP address” field, enter the core destination IP address of the UA within the Service Provider core network. This IP Address must be entered in dotted decimal format (0.0.0.0). For example, 192.168.34.199.
2. In the “Port” field, enter the number for the destination port of the UA in the Service Provider’s core network. The default is 5060. Valid values are 0 to 65535.
3. If you configure the SP-SBC in your network with “no VLAN”, proceed to Interface for Trunk-side Traffic (no VLAN) (70). or Proceed to Generating the SP-SBC Bootstrap File (71) to add the SP-SBC and generate the SP-SBC bootstrap file.

ADDING A SERVICE PROVIDER SBC (SP-SBC)
70 Oracle Communications Enterprise Trunk Manager Service Provider Configuration Guide Release 7.3
Interface for Trunk-side Traffic (no VLAN)
Use this procedure to configure the interface on the SP-SBC for trunk-side traffic. The parameters for truck-side traffic display ONLY if you are configuring your SP-SBC with “no VLAN”.
Note: If you enable HA with “no VLAN” in your network, the HA parameters display in this “Interface for trunk-side traffic” section. To configure the HA trunk-side parameters, see Configuring High Availability (HA) (198).
To configure the interface for trunk-side traffic:
1. In the “IP address” field, enter the IP address of the SP-SBC that connects the Trunk to the E-SBC. This IP Address must be entered in dotted decimal format (0.0.0.0). For example, 172.16.34.220.
2. In the “Netmask” field, enter the network mask address of the SP-SBC that connects the Trunk to the E-SBC. This IP Address must be entered in dotted decimal format (0.0.0.0). The default is 255.255.0.0.
3. (optional) In the “Gateway” field, enter the Gateway IP address the Trunk uses to connect the SP-SBC to the E-SBC. This IP Address must be entered in dotted decimal format (0.0.0.0). For example, 172.16.34.223.
4. In the “Vlan ID” field, enter the VLAN ID on the SP-SBC that connects the Trunk to the E-SBC. Valid values are 0 to 4095. The default is 0.
5. Proceed to Generating the SP-SBC Bootstrap File (71) to add the SP-SBC and generate the SP-SBC bootstrap file.

ADDING A SERVICE PROVIDER SBC (SP-SBC)
Release 7.3 Oracle Communications Enterprise Trunk Manager Service Provider Configuration Guide 71
Generating the SP-SBC Bootstrap File
1. If you finished configuring the SP-SBC, click <OK>. Net-Net Central automatically generates the SP-SBC bootstrap file and saves it in NNC-SIPTX database. The following message displays when a device is added.
The bootstrap template you chose for the device contains the configuration information required to connect the SP-SBC to Net-Net Central. The Service Provider Devices window displays the device you added. The following example shows the SP-SBC (SP-SBC1) with an IP address of 192.168.34.220 added to the service provider network. The SP-SBC is using the bootstrap template indicated in the “Bootstrap Template” column. Current status of the SP-SBC is “Pending Bootstrap”.
Note: When adding a new device using Trunk Manager, that device also displays in Device Manager->Devices. If you remove the device using Trunk Manager, that device still exists in Device Manager->Devices, but the Name of the device in Trunk Manager displays as an IP address in the “Name” field on the Service Provider Devices window. You must use the <Relink> button on the Service Provider Devices window to relink the device to the applicable device in Device Manager->Devices. For more information about removing an SP-SBC, and using the <Relink> button, see Deleting a SP-SBC (128).
2. Download the SP-SBC bootstrap from NNC-SIPTX database to your PC, using the procedure in Downloading the SP-SBC Bootstrap File (72).
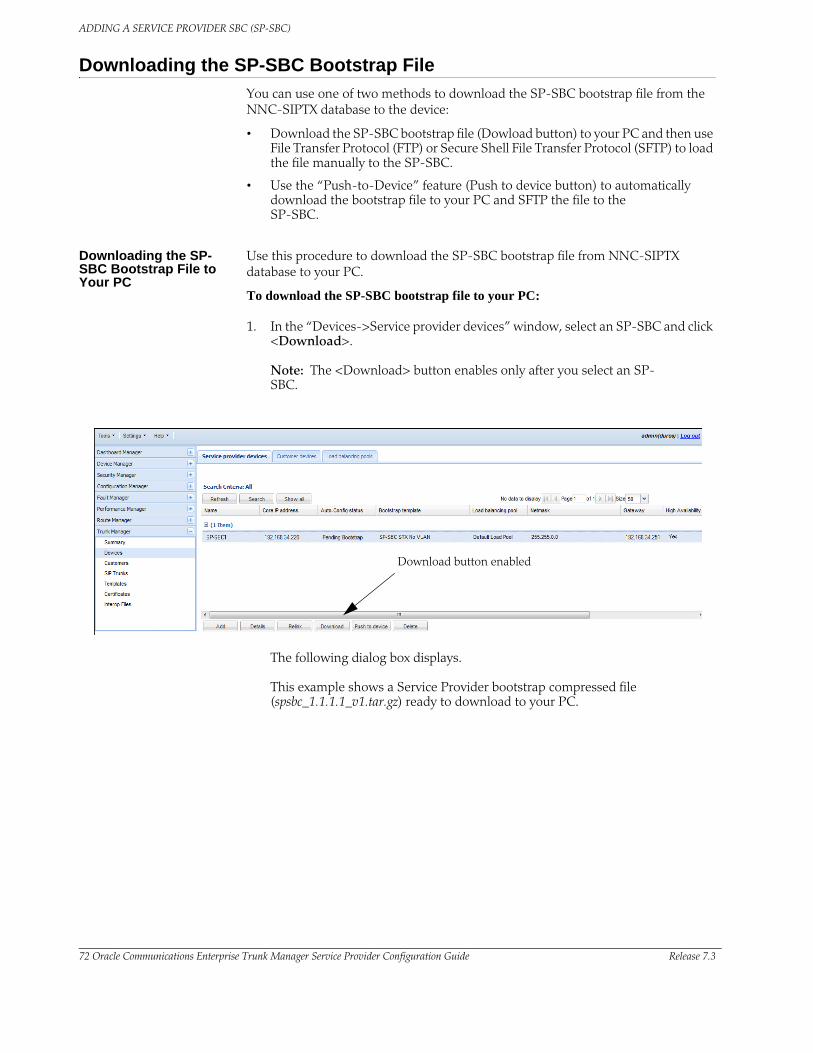
ADDING A SERVICE PROVIDER SBC (SP-SBC)
72 Oracle Communications Enterprise Trunk Manager Service Provider Configuration Guide Release 7.3
Downloading the SP-SBC Bootstrap File
You can use one of two methods to download the SP-SBC bootstrap file from the NNC-SIPTX database to the device:
• Download the SP-SBC bootstrap file (Dowload button) to your PC and then use File Transfer Protocol (FTP) or Secure Shell File Transfer Protocol (SFTP) to load the file manually to the SP-SBC.
• Use the “Push-to-Device” feature (Push to device button) to automatically download the bootstrap file to your PC and SFTP the file to the SP-SBC.
Downloading the SP-SBC Bootstrap File to Your PC
Use this procedure to download the SP-SBC bootstrap file from NNC-SIPTX database to your PC.
To download the SP-SBC bootstrap file to your PC:
1. In the “Devices->Service provider devices” window, select an SP-SBC and click <Download>.
Note: The <Download> button enables only after you select an SP-SBC.
Download button enabled
The following dialog box displays. This example shows a Service Provider bootstrap compressed file (spsbc_1.1.1.1_v1.tar.gz) ready to download to your PC.
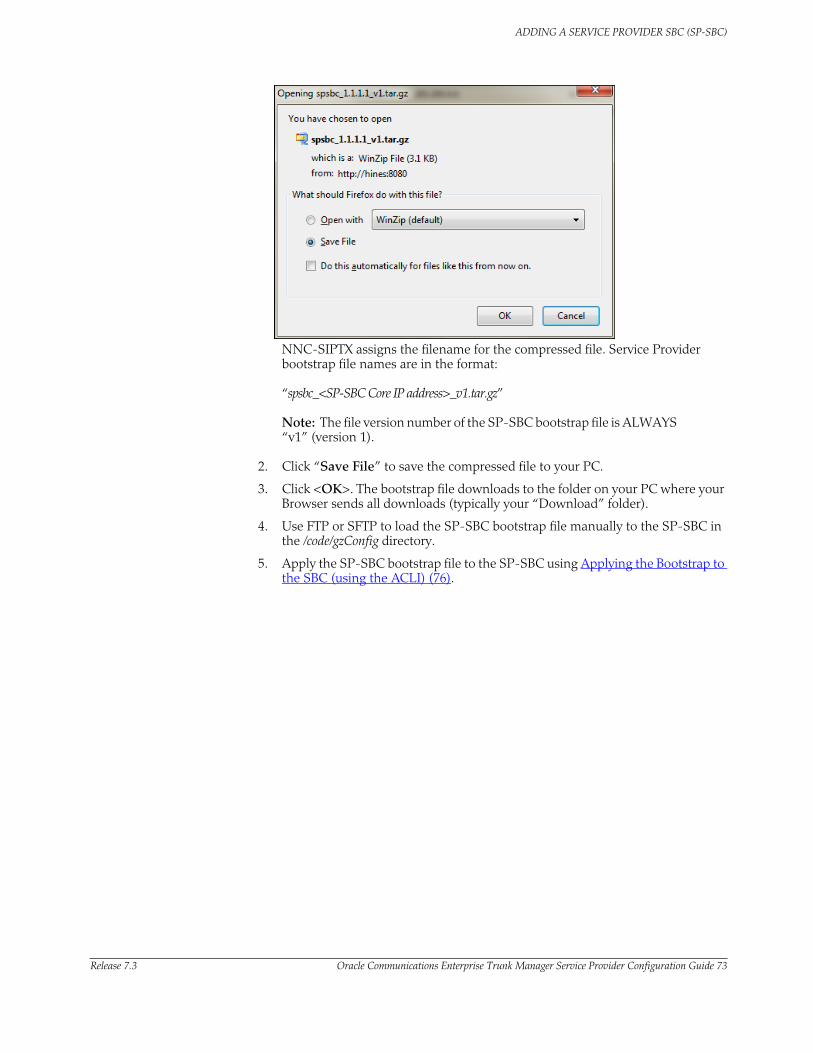
ADDING A SERVICE PROVIDER SBC (SP-SBC)
Release 7.3 Oracle Communications Enterprise Trunk Manager Service Provider Configuration Guide 73
NNC-SIPTX assigns the filename for the compressed file. Service Provider bootstrap file names are in the format: “spsbc_<SP-SBC Core IP address>_v1.tar.gz”
Note: The file version number of the SP-SBC bootstrap file is ALWAYS “v1” (version 1).
2. Click “Save File” to save the compressed file to your PC.
3. Click <OK>. The bootstrap file downloads to the folder on your PC where your Browser sends all downloads (typically your “Download” folder).
4. Use FTP or SFTP to load the SP-SBC bootstrap file manually to the SP-SBC in the /code/gzConfig directory.
5. Apply the SP-SBC bootstrap file to the SP-SBC using Applying the Bootstrap to the SBC (using the ACLI) (76).

ADDING A SERVICE PROVIDER SBC (SP-SBC)
74 Oracle Communications Enterprise Trunk Manager Service Provider Configuration Guide Release 7.3
Using “Push to Device”
You can optionally use the “Push to device” feature to download and load the SP-SBC bootstrap file automatically to the SP-SBC.
Use this procedure to push the SP-SBC bootstrap file to the SP-SBC.
To push the Service Provider bootstrap file to the SP-SBC:
1. In the “Devices->Service provider devices” window, select an SP-SBC and click <Push to device>.
Note: The <Push to device> button enables after you select an SP-SBC.
Push to device button enabled
The following displays.
2. Click “Yes” to push the Service Provider bootstrap file to the SP-SBC to be stored in the /code/gzConfig directory. or Click “No” to cancel this push function. If you click “Yes”, the following message displays.

ADDING A SERVICE PROVIDER SBC (SP-SBC)
Release 7.3 Oracle Communications Enterprise Trunk Manager Service Provider Configuration Guide 75
The following message displays when the push is complete.
3. Apply the Service Provider bootstrap to the SP-SBC using the procedure in Applying the Bootstrap to the SBC (using the ACLI) (76).

ADDING A SERVICE PROVIDER SBC (SP-SBC)
76 Oracle Communications Enterprise Trunk Manager Service Provider Configuration Guide Release 7.3
Applying the Bootstrap to the SBC (using the ACLI)
After loading a bootstrap file from your PC to the Net-Net SBC, you must apply the bootstrap file to the device. This changes the status of the device from “Pending bootstrap” to “Boostrapped.”
About the ACLI You can use the Acme Command Line Interface (ACLI) to apply the bootstrap file to the applicable device. The ACLI is a user interface tool for configuring, monitoring, and troubleshooting the Net-Net SBC. You can access the ACLI locally, via a serial console connection or remotely via a TELNET or SSH connection through the management interface, wancom0, on the rear of the system.
There are two password protected modes of operation when logging into the ACLI:
• User - User mode consists of a restricted set of basic monitoring commands and is identified by the greater-than sign (>) in the system prompt after the target name (example shows “AcmePacket as the target name). For example:
ACMEPACKET>
• Superuser - Superuser mode allows for access to all system commands for operation, maintenance, and administration. This mode is identified by the pound sign (#) in the prompt after the target name. For example:
ACMEPACKET#
To configure the elements of the Net-Net SBC, you must enter Configuration mode. For example:
ACMEPACKET# configure terminal
ACMEPACKET(configure)#
When you establish a connection to the Net-Net SBC, the prompt for User mode password displays (default password is “acme”). You must enable Superuser mode by entering “enable” and then entering the applicable password (default is “packet”). For example:
Password: acme
ACMEPACKET> enable
Password: packet
ACMEPACKET#
Note: The default passwords may have changed on your system. Contact your Network administrator if you need the new password(s).

ADDING A SERVICE PROVIDER SBC (SP-SBC)
Release 7.3 Oracle Communications Enterprise Trunk Manager Service Provider Configuration Guide 77
Applying the Bootstrap File Using the ACLI
After loading the bootstrap file from your PC to a Net-Net SBC device, the bootstrap file resides in the /code/gzConfig directory on the Net-Net SBC device. Use the procedures in this section to apply the bootstrap file to your Net-Net SBC.
Caution: If you initiate the backup-config command to save the current configuration on the Net-Net SBC, it also saves any previous bootstrap and subscription-based configuration applied prior to the issuance of the backup-config command. If you initiate the restore-backup-config command to restore a backed up configuration, it can cause newer bootstrap and subscription configuration to be overwritten by that associated with the restored configuration.
To apply the bootstrap file to the Net-Net SBC device, you use the ACLI “load-bootstrap” command.
Using the “load-bootstrap” Command (from a Local Location)
Use the procedure below to apply the bootstrap file to the Net-Net SBC device from a local location. Before you begin, make sure the applicable bootstrap file resides in the /code/gzConfig directory on the Net-Net SBC.
To apply the bootstrap file from a local location:
1. In the ACLI Superuser mode, enter load-bootstrap at the prompt and press <Enter>.
SBC1# load-bootstrap
The load-bootstrap utility allows you to select whether or not you want to continue loading the bootstrap file. The following displays:
Enter Exit/exit to discontinue loading bootstrap file. Bootstrap File Location [local/remote. Default:local]:
If you want to stop loading the bootstrap file, enter “exit” at the prompt. For example:Bootstrap File Location [local/remote]: exit
You can enter exit at any prompt in the load-bootstrap procedure to exit the utility and cancel loading the bootstrap file.
2. To continue loading the bootstrap file, press <Enter> to accept the Local option, or enter local.
Bootstrap File Location [local/remote]: <Press Enter> or Bootstrap File Location [local/remote]: local

ADDING A SERVICE PROVIDER SBC (SP-SBC)
78 Oracle Communications Enterprise Trunk Manager Service Provider Configuration Guide Release 7.3
If only one bootstrap file exists in the /code/gzConfig directory on the Net-Net SBC, the following message and prompt display:
Only one valid Bootstrap file: <bootstrap filename.tar.gz> exists
“Update Autoconfig settings with new bootstrap file [y/n]?”
3. Enter “y” and press <Enter>. Update Autoconfig settings with new bootstrap file [y/n]?: y
Continue to Step 4.
If more than one bootstrap file exists in the /code/gzConfig directory on the Net-Net SBC, the following displays:
Please select from the following options:
1. <bootstrap filename> 2. <bootstrap filename> Enter your option:
3a. Select the item number associated with the bootstrap file you want to load.
Please select from the following options: (1)spsbc_1.1.1.1_v1.tar.gz
(2)spsbc_2.2.2.2_v1.tar.gz
(3)spsbc_3.3.3.3_v1.tar.gz
Enter your option: 1
4. The load-bootstrap process proceeds to apply the bootstrap to the Net-Net SBC, automatically initiating the Save-Config and Activate-Config commands. The following are messages that display.
checking configuration
Save-Config received, processing.
(0)waiting for request to finish
Request to 'SAVE-CONFIG' has Finished,
Save complete
Currently active and saved configurations do not match!
To sync & activate, run 'activate-config' or 'reboot activate'.
Activate-Config received, processing.
waiting for request to finish
Request to 'ACTIVATE-CONFIG' has Finished,
Activate Complete
The bootstrap process verifies the configuration during activation. If any configuration errors exist, the errors display in a list for you to view.
Activating the SBC causes the device to send a SIP SUBSCRIBE message to Net-Net Central using the information provided in the bootstrap file.
The following message displays indicating the Net-Net SBC physical interface associated with a slot and port have been provisioned:
SBC1# Setting phy1 on Slot=1, Port=0, MAC=00:08:25:A2:08:25, VMAC=00:08:25:A2:08:25
The Net-Net SBC is now bootstrapped. The Auto-config status of “Bootstrapped” displays in the Trunk Manager->Devices->Service provider devices window (for SP-SBCs) or the Trunk Manager->Devices->Customer devices window (for E-SBCs), as shown in the illustrations below.
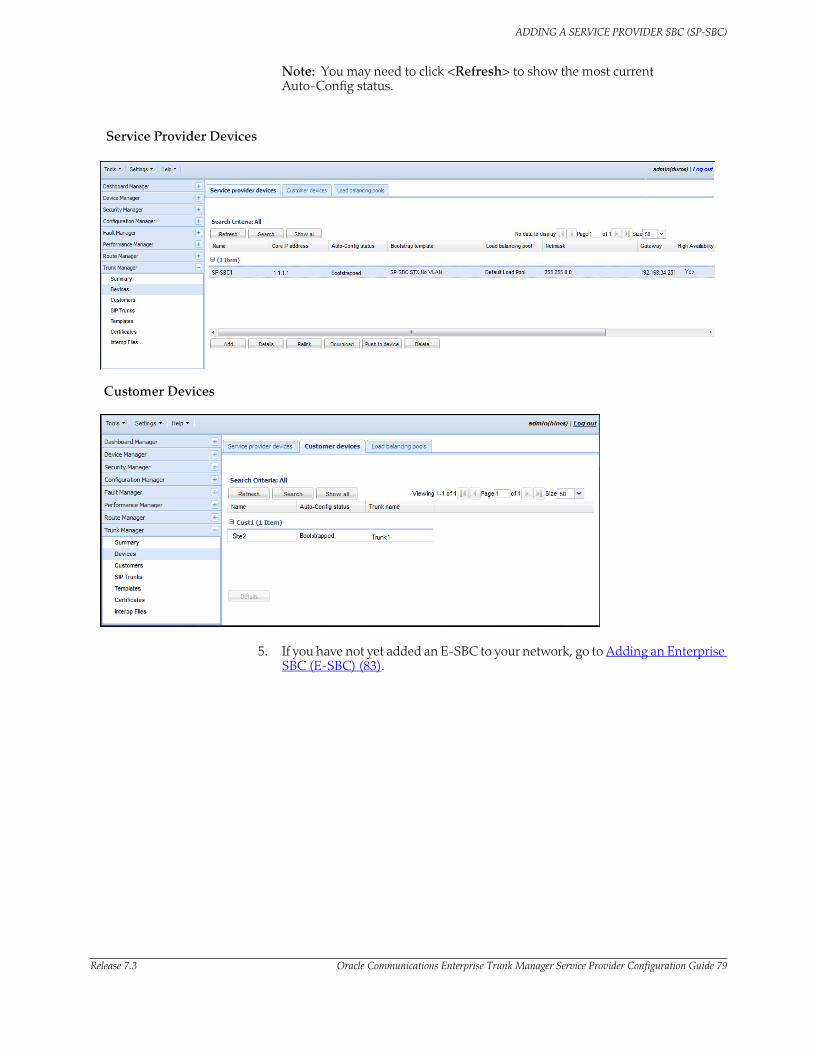
ADDING A SERVICE PROVIDER SBC (SP-SBC)
Release 7.3 Oracle Communications Enterprise Trunk Manager Service Provider Configuration Guide 79
Note: You may need to click <Refresh> to show the most current Auto-Config status.
Service Provider Devices
Customer Devices
5. If you have not yet added an E-SBC to your network, go to Adding an Enterprise SBC (E-SBC) (83).

ADDING A SERVICE PROVIDER SBC (SP-SBC)
80 Oracle Communications Enterprise Trunk Manager Service Provider Configuration Guide Release 7.3
Using the “load-bootstrap” Command (from a Remote Location)
Use the procedure in this section to apply the bootstrap file to the Net-Net SBC device from a remote location. Before you begin, make sure the applicable bootstrap file resides in the /code/gzConfig directory on the Net-Net SBC.
Note: Security policies of remote hosts may prohibit inbound FTP connections. You should contact your system administrator for more information about which file transfer application should be used. If you do not have access to an inbound FTP connection, you can manually FTP the bootstrap to the Net-Net SBC and use the procedures in Using the “load-bootstrap” Command (from a Local Location) (77) to apply the bootstrap to the Net-Net SBC.
To apply the bootstrap file from a remote location:
6. In the ACLI Superuser mode, enter load-bootstrap at the prompt and press <Enter>.
SBC1# load-bootstrap
The load-bootstrap utility allows you to select whether or not you want to continue loading the bootstrap file. The following displays:Enter Exit/exit to discontinue loading bootstrap file. Bootstrap File Location [local/remote. Default:local]:
If you want to stop loading the bootstrap file, enter exit at the prompt.Bootstrap File Location [local/remote]: exit
You can enter exit at any prompt in the load-bootstrap procedure to exit the utility and cancel loading the bootstrap file.
7. To continue loading the bootstrap file, enter remote.
Bootstrap File Location [local/remote]: remote
8. Enter the remote host address at the prompt and press <Enter>. This is the IP address of your FTP server where the bootstrap file currently resides.
Enter remote host address: 1.1.1.1
9. Enter the path on your FTP server where the bootstrap file currently resides, and press <Enter>. The default directory is $HOME.
Enter bootstrap file Directory on Remote Host: /home/ftpboot/ remotefile/
10. Enter the username you use to log onto your PC and press <Enter>. For example:
User name: JohnSmith
11. Enter the password you use to log onto your PC and press <Enter>. For example:
Password: JS12345
If only one bootstrap file exists in the /code/gzConfig directory on the Net-Net SBC, the following message and prompt display:
Only one valid Bootstrap file: <bootstrap filename.tar.gz> exists
Update Autoconfig settings with new bootstrap file [y/n]?
12. Enter “y” and press <Enter>. Update Autoconfig settings with new bootstrap file [y/n]?: y

ADDING A SERVICE PROVIDER SBC (SP-SBC)
Release 7.3 Oracle Communications Enterprise Trunk Manager Service Provider Configuration Guide 81
If more than one bootstrap file exists in the /code/gzConfig directory on the Net-Net SBC, the following displays:
Please select from the following options:
1. <bootstrap filename> 2. <bootstrap filename> Enter your option:
12a. Select the item number associated with the bootstrap file you want to load. For example:
Please select from the following options: (1)spsbc_1.1.1.1_v1.tar.gz
(2)spsbc_2.2.2.2_v1.tar.gz
(3)spsbc_3.3.3.3_v1.tar.gz
Enter your option: 1
The following displays:
File name selected by User is: <bootstrap filename.tar.gz>
Overwrite ‘/code/gzConfig/<bootstrap filename.tar.gz> [y/n]’?
12b. To overwrite the existing bootstrap file with this new bootstrap file, enter “y” and press <Enter>. If you do not want to overwrite your existing bootstrap file, enter “n” and perform a backup of your configuration and bootstrap file before proceeding.
Overwrite ‘/code/gzConfig/<bootstrap filename.tar.gz’> [y/n]?: y
The following is an example of the messages that display:
****************************************************************
Logged in to host 1.1.1.1 user johnsmith pCtrlSock 294 pDataSock 314
Receiving data
Successfully transferred image /code/gzConfig/<bootstrap filename>.tar.gz
****************************************************************
The following displays:Update AutoConfig settings with new bootstrap file [y/n]?:
13. Enter “y” and press <Enter>.
Update AutoConfig settings with new bootstrap file [y/n]?: y
14. The “load bootstrap” process proceeds to apply the bootstrap to the Net-Net SBC, automatically initiating the Save-Config and Activate-Config commands. The following are messages that display:
checking configuration
Save-Config received, processing.
waiting for request to finish
Request to 'SAVE-CONFIG' has Finished,
Save complete
Currently active and saved configurations do not match!
To sync & activate, run 'activate-config' or 'reboot activate'.
Activate-Config received, processing.
waiting for request to finish
Request to 'ACTIVATE-CONFIG' has Finished,
Activate Complete
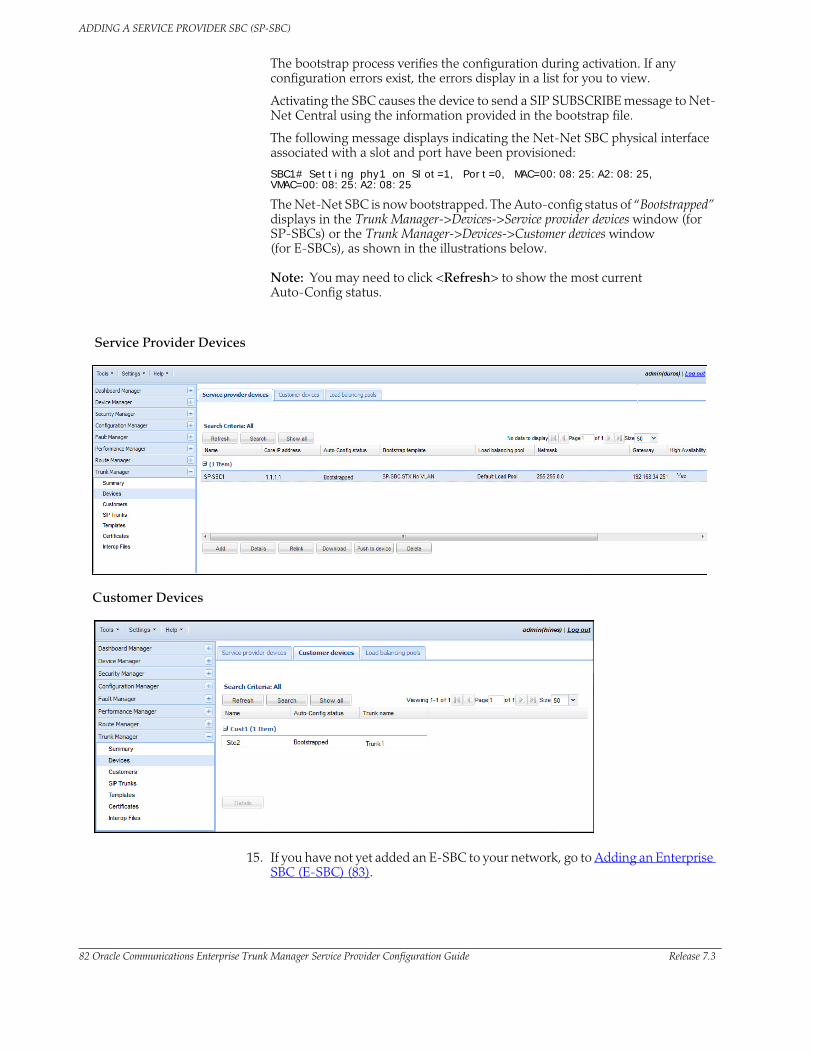
ADDING A SERVICE PROVIDER SBC (SP-SBC)
82 Oracle Communications Enterprise Trunk Manager Service Provider Configuration Guide Release 7.3
The bootstrap process verifies the configuration during activation. If any configuration errors exist, the errors display in a list for you to view.
Activating the SBC causes the device to send a SIP SUBSCRIBE message to Net-Net Central using the information provided in the bootstrap file.
The following message displays indicating the Net-Net SBC physical interface associated with a slot and port have been provisioned:
SBC1# Setting phy1 on Slot=1, Port=0, MAC=00:08:25:A2:08:25, VMAC=00:08:25:A2:08:25
The Net-Net SBC is now bootstrapped. The Auto-config status of “Bootstrapped” displays in the Trunk Manager->Devices->Service provider devices window (for SP-SBCs) or the Trunk Manager->Devices->Customer devices window (for E-SBCs), as shown in the illustrations below.
Note: You may need to click <Refresh> to show the most current Auto-Config status.
Service Provider Devices
Customer Devices
15. If you have not yet added an E-SBC to your network, go to Adding an Enterprise SBC (E-SBC) (83).
Release 7.3 Oracle Communications Enterprise Trunk Manager Service Provider Configuration Guide 83
4 Adding an Enterprise SBC (E-SBC)
Introduction
This chapter provides you with information about setting up your E-SBC for SIP trunking. You can also allow a Customer to configure their own E-SBC if required. For more information about having the Customer configure their E-SBC, see Chapter 5, Adding a SIP Trunk (105).
Topics include:
• Setting up the E-SBC (83)
• Installation Setup (95)
• Downloading a Customer Bootstrap File (100)
• Applying the Customer Bootstrap to the E-SBC (103)
Setting up the E-SBC
A Service Provider can administer and configure E-SBCs at a Customer site when setting up a SIP Trunk. After you bootstrap the SP-SBC and create a SIP Trunk in the Service Provider network, you can add an E-SBC and associate a group (with users) to that E-SBC. Once the E-SBC is added and bootstrapped, the SP-SBC and E-SBC can connect over the established SIP Trunk.
You must perform the following to prepare the E-SBC for SIP trunking using the Net-Net Central application:
• Add E-SBC - Allows you to add an E-SBC to a network. For more information, see Adding a Customer (E-SBC) (85).
• Add a Site - Allows you to add a location where the E-SBC resides. It also allows you to add a SIP Trunk User Group with associated Users to the site. You can have one or more E-SBCs within a site (but only one SIP Trunk per E-SBC). For more information, see Adding a Customer (E-SBC) (85).
• Add a SIP Trunk - Allows you to identify the parameters required for establishing a SIP trunk between the SP-SBC and the E-SBC and automatically generate an E-SBC bootstrap file. For more information, see Adding a SIP Trunk (105).
• Download the E-SBC Bootstrap file - Downloads the selected E-SBC bootstrap file from NNC-SIPTX database to your local PC. (Or you can use the “Push to Site” feature to download and load the file automatically to the E-SBC). For more information, see Downloading a Customer Bootstrap File (100).

ADDING AN ENTERPRISE SBC (E-SBC)
84 Oracle Communications Enterprise Trunk Manager Service Provider Configuration Guide Release 7.3
• Load the Customer Bootstrap File to the E-SBC- Loads and runs the Customer bootstrap file on the E-SBC. The bootstrap contains an auto-config feature that loads the initial configuration necessary to connect the Net-Net SBC to Net-Net Central. After the bootstrap is loaded, the E-SBC shows a status of “Bootstrapped”. For more information, see Applying the Customer Bootstrap to the E-SBC (103).
Note: Optionally, you can automatically create a file that contains configuration AND bootstrap information, and then apply that file to the E-SBC. For more information see, Installation Setup (95).
Use the remaining sections in this Chapter to prepare the E-SBC for SIP Trunking.
Pre-requisites • You must have Net-Net Central running successfully in your network and the Trunk Manager application installed before setting up the E-SBC.
• Important: Before setting up the Enterprise device in your core network, ensure that your SP-SBC has cables physically connected to Slot 1/Port 0 (internal network connection) AND Slot 0/Port 0 (sends data traffic over the SIP Trunk and to the E-SBC.
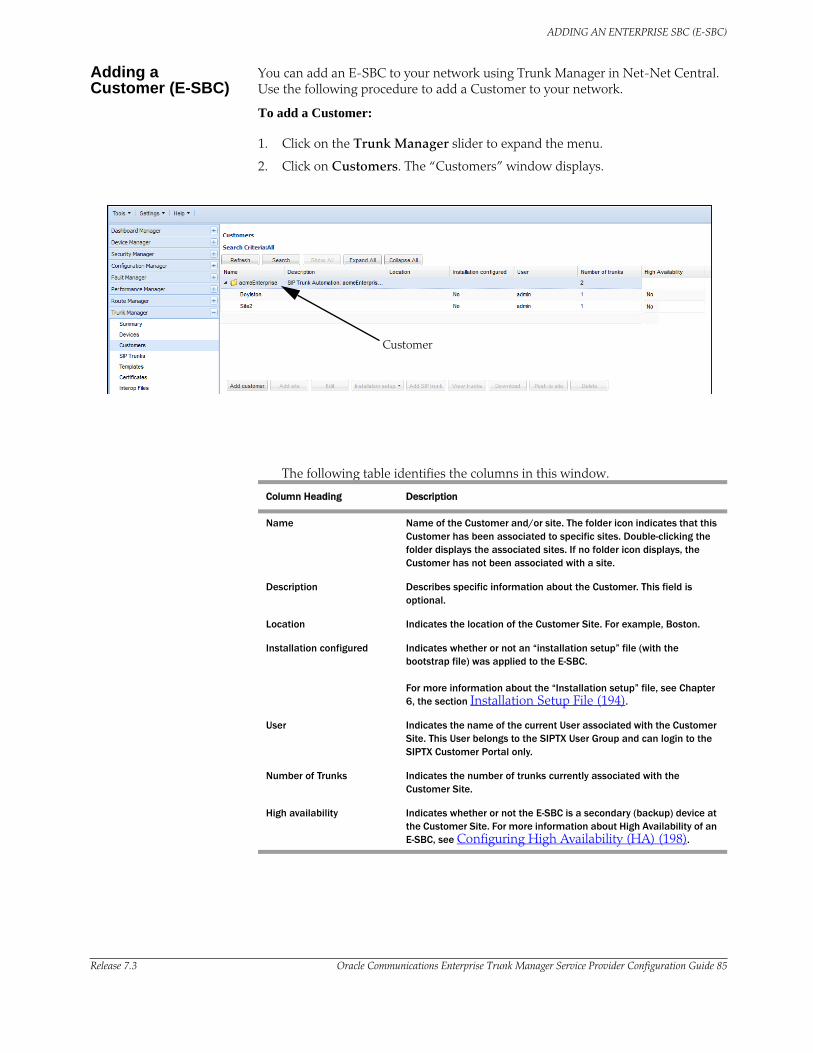
ADDING AN ENTERPRISE SBC (E-SBC)
Release 7.3 Oracle Communications Enterprise Trunk Manager Service Provider Configuration Guide 85
Adding a Customer (E-SBC)
You can add an E-SBC to your network using Trunk Manager in Net-Net Central. Use the following procedure to add a Customer to your network.
To add a Customer:
1. Click on the Trunk Manager slider to expand the menu.
2. Click on Customers. The “Customers” window displays.
Customer
The following table identifies the columns in this window.
Column Heading Description
Name Name of the Customer and/or site. The folder icon indicates that this Customer has been associated to specific sites. Double-clicking the folder displays the associated sites. If no folder icon displays, the Customer has not been associated with a site.
Description Describes specific information about the Customer. This field is optional.
Location Indicates the location of the Customer Site. For example, Boston.
Installation configured Indicates whether or not an “installation setup” file (with the bootstrap file) was applied to the E-SBC.
For more information about the “Installation setup” file, see Chapter 6, the section Installation Setup File (194).
User Indicates the name of the current User associated with the Customer Site. This User belongs to the SIPTX User Group and can login to the SIPTX Customer Portal only.
Number of Trunks Indicates the number of trunks currently associated with the Customer Site.
High availability Indicates whether or not the E-SBC is a secondary (backup) device at the Customer Site. For more information about High Availability of an E-SBC, see Configuring High Availability (HA) (198).

ADDING AN ENTERPRISE SBC (E-SBC)
86 Oracle Communications Enterprise Trunk Manager Service Provider Configuration Guide Release 7.3
The following table identifies the buttons in this window.
Button Description
Adds a Customer Name and Description to your network. For more information, see Adding a Customer (E-SBC) (85).
Adds a Site(s) associated with a Customer. This option adds an E-SBC to the Customer network. Also allows you to select a user or add a user, and select a bootstrap file to associate with the E-SBC. If you add a new user via Trunk Manager, a SIP Trunk Xpress (SIPTX) User Group is automatically added and associated with the User. For more information, see Adding a Site (88).
Note: “Add Site” button enables only when you select a Customer.
Edits the selected Customer and/or Site information. For more information see Editing E-SBC (136).
Note: “Edit” button enables only when you select an existing Customer or Site.
Allows you to create an installation file (“tar.gz” file) for a new E-SBC (when no SIP Trunks associated). Also allows you to edit and/or delete an installation setup file for an E-SBC (when SIP Trunks associated).
An installation setup file can contain the E-SBC configuration information for Simple Network Management Protocol (SNMP) parameters, boot parameters, and high availability (HA) (redundant device) parameters, as well as any other configuration information from the NNC-SIPTX database.
For new E-SBCs with no SIP Trunks associated, you can click <Installation setup/Add>, specify the applicable parameters and then click <OK>. This creates a setup file for the new E-SBC that contains the device configuration as well as the device bootstrap template. You can then download the file to the E-SBC and run a command to unzip the “tar.gz” file. The file automatically configures the new E-SBC with the information contained in the file, and loads the applicable bootstrap.
For E-SBCs with SIP trunks established, you can click <Installation setup/Edit> or <Installation setup/Delete> to edit or delete a setup file. For more information see Editing E-SBC (136).
Note: The “Installation setup” button enables only when you select an existing Site (E-SBC).
Adds a SIP Trunk between the SP-SBC and the E-SBC for the selected Site. This option starts the SIP Trunk Xpress wizard. For more information see Adding a SIP Trunk (105).
Note: “Add SIP Trunk” button enables only when you select a Site (E-SBC) that does not yet have a SIP Trunk configured (“Number of Trunks” column displays zero (0)).
Allows you to view the current Trunk associated with the Customer you selected. This option opens the “SIP Trunks” window (jumps to the SIP Trunks slider). For more information see “Adding a SIP Trunk” - From the SIP Trunks Window (118).
Note: “Add SIP Trunk” button enables only when you select a Customer and/orSite that has a SIP Trunk already configured (“Number of Trunks” column displays one or greater).

ADDING AN ENTERPRISE SBC (E-SBC)
Release 7.3 Oracle Communications Enterprise Trunk Manager Service Provider Configuration Guide 87
Allows you to download the bootstrap file to your PC for the selected Site (E-SBC). For more information, see Downloading a Customer Bootstrap File (100).
Note: “Download” button enables only when you select a Site (E-SBC) that has a SIP Trunk configured (“Number of Trunks” column displays one or greater).
Allows you to push the E-SBC bootstrap file from Net-Net Central to the device. Using this button allows you to automatically SFTP the Enterprise bootstrap file to the /code/gzConfig directory on the E-SBC, and only needs to be performed once.
After pushing the Service Provider bootstrap to the E-SBC, you must apply the bootstrap to the device using the procedure in Applying the Customer Bootstrap to the E-SBC (103).
Note: If the E-SBC sits behind a firewall, you cannot use the “Push to Site” feature. You may need to manually FTP the bootstrap file to the E-SBC as outlined in Appendix A, Net-Net Central Installation Procedures (209).
Allows you to delete the selected Site (E-SBC). Deleting a device is dependant on the Auto-Config status of that device. For more information, see Deleting E-SBC (139).
Note: “Delete” Button enables only when you select an existing Customer or Site (E-SBC). If you delete a Customer, all associated Sites (E-SBC devices) delete from Trunk Manager AND Device Manager.
Refreshes the current window. If changes occurred, the refresh displays the updated data.
Searches for a specific Customer configured in Trunk Manager. The result of the search displays only that Customer in the “Customers” window. For more information, see Searching for an E-SBC (140).
Note: Use the <Show All> button to redisplay all Customers.
Displays all Customers and E-SBCs currently configured in Trunk Manager.
Note: This button displays only after a Search for a specific Customer has been performed.
Expands all the folders that currently display in the Customers window.
Closes all the folders that currently display in the Customers window.
Button Description
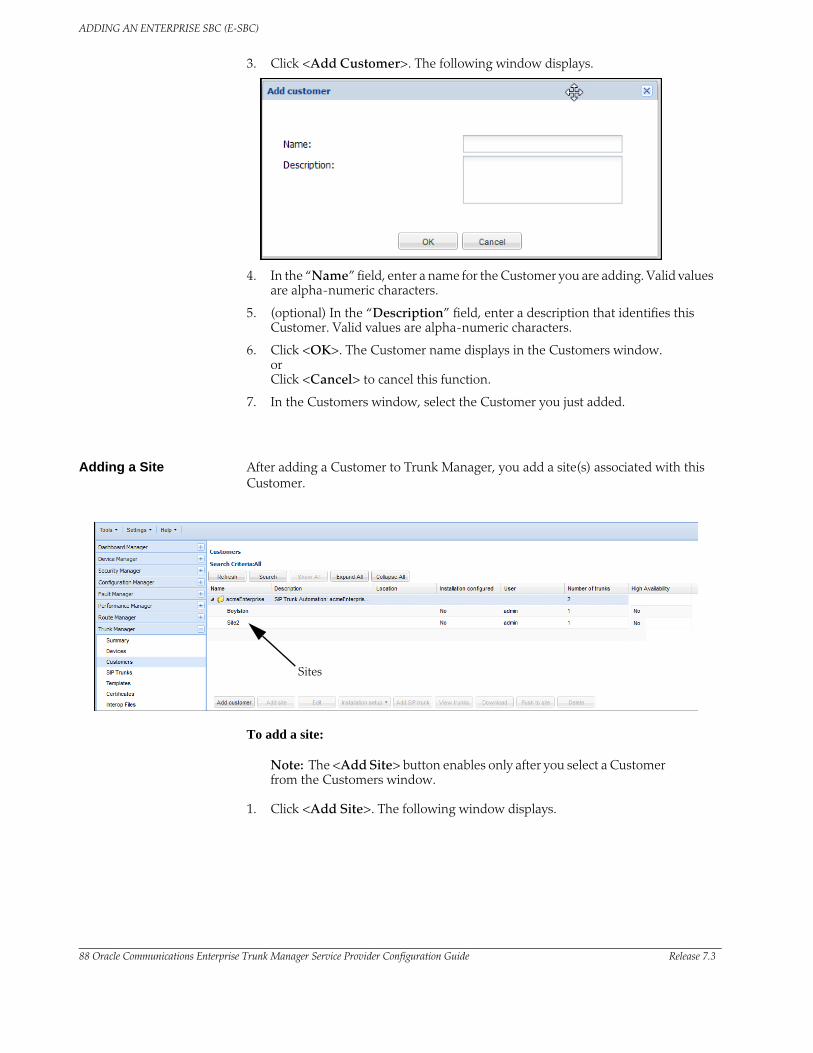
ADDING AN ENTERPRISE SBC (E-SBC)
88 Oracle Communications Enterprise Trunk Manager Service Provider Configuration Guide Release 7.3
3. Click <Add Customer>. The following window displays.
4. In the “Name” field, enter a name for the Customer you are adding. Valid values are alpha-numeric characters.
5. (optional) In the “Description” field, enter a description that identifies this Customer. Valid values are alpha-numeric characters.
6. Click <OK>. The Customer name displays in the Customers window. or Click <Cancel> to cancel this function.
7. In the Customers window, select the Customer you just added.
Adding a Site After adding a Customer to Trunk Manager, you add a site(s) associated with this Customer.
Sites
To add a site:
Note: The <Add Site> button enables only after you select a Customer from the Customers window.
1. Click <Add Site>. The following window displays.
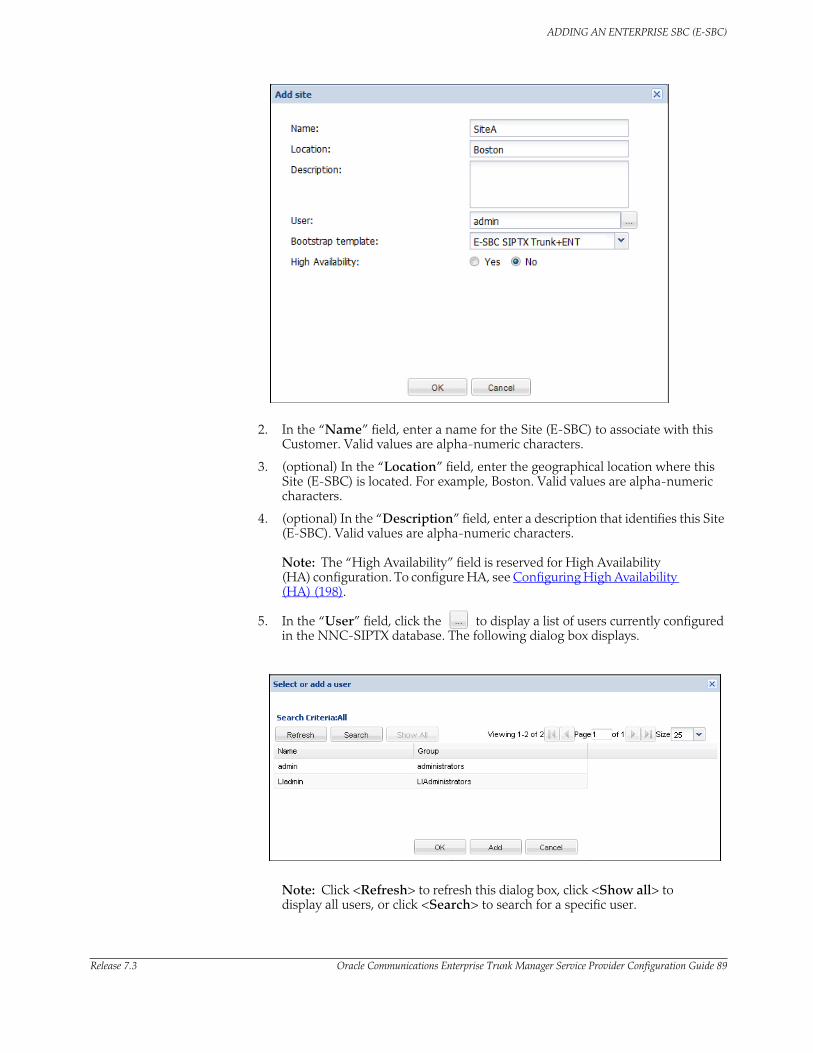
ADDING AN ENTERPRISE SBC (E-SBC)
Release 7.3 Oracle Communications Enterprise Trunk Manager Service Provider Configuration Guide 89
2. In the “Name” field, enter a name for the Site (E-SBC) to associate with this Customer. Valid values are alpha-numeric characters.
3. (optional) In the “Location” field, enter the geographical location where this Site (E-SBC) is located. For example, Boston. Valid values are alpha-numeric characters.
4. (optional) In the “Description” field, enter a description that identifies this Site (E-SBC). Valid values are alpha-numeric characters.
Note: The “High Availability” field is reserved for High Availability (HA) configuration. To configure HA, see Configuring High Availability (HA) (198).
5. In the “User” field, click the to display a list of users currently configured in the NNC-SIPTX database. The following dialog box displays.
Note: Click <Refresh> to refresh this dialog box, click <Show all> to display all users, or click <Search> to search for a specific user.

ADDING AN ENTERPRISE SBC (E-SBC)
90 Oracle Communications Enterprise Trunk Manager Service Provider Configuration Guide Release 7.3
By default, this window lists the “Admin” user belonging to the administrator group, and the “LIadmin” user belonging to the lawful intercept group. You can select either of these users to associate with the site you are adding, or you can add a new user. To add a new user, go to Adding a New User (91).
Note: For more information about the “Admin” and “LIadmin” users, see the Net-Net Central Configuration Guide.
6. Select from one of the default Users in this window and click <OK>. The user you select displays in the “User” field.
Note: When you initially assign a User to a site using Trunk Manager, a SIP Trunk Xpress Group (called SIPTX) is automatically created and the User is added to that group. All subsequent Users added via Trunk Manager are automatically added to the SIPTX group. Users added to SIPTX groups can log into the SIPTX Customer Portal only. For more information about the SIPTX Customer Portal, see the Net-Net® SIP Trunk Xpress for Enterprises Guide. You can view/edit the current groups and users in Net-Net Central by going to the path Security Manager->Groups and/or Security Manager->Users, respectively.
7. In the “Bootstrap template” field, select the bootstrap template you want to apply to the E-SBC you are adding. Available bootstraps display in the drop-down box.
Note: After an E-SBC has been bootstrapped, this “Bootstrap template” field cannot be edited.
Valid values are:
Value Description
• E-SBC SIPTX Trunk (default) E-SBC Trunk-side bootstrap template. This template contains the E-SBC configuration information required for the trunk where UDP or TCP is dynamically* used for SIP session traffic.
*UDP or TCP is used dynamically for SIP session traffic. TCP is always used for the SIPTX control traffic to NNC-SIPTX.
• E-SBC SIPTX-TLS Trunk E-SBC Trunk-side TLS bootstrap template. This template contains the E-SBC configuration information required for the trunk where TLS is used for SIP session traffic and SIPTX control traffic.
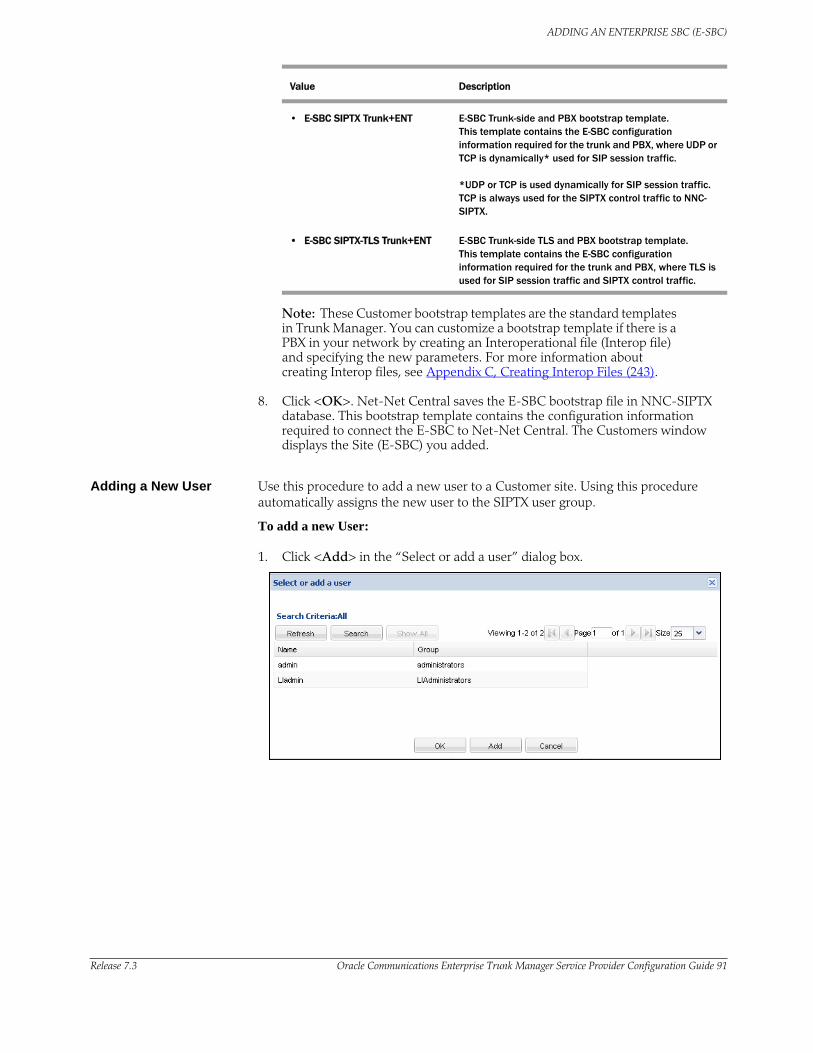
ADDING AN ENTERPRISE SBC (E-SBC)
Release 7.3 Oracle Communications Enterprise Trunk Manager Service Provider Configuration Guide 91
Note: These Customer bootstrap templates are the standard templates in Trunk Manager. You can customize a bootstrap template if there is a PBX in your network by creating an Interoperational file (Interop file) and specifying the new parameters. For more information about creating Interop files, see Appendix C, Creating Interop Files (243).
8. Click <OK>. Net-Net Central saves the E-SBC bootstrap file in NNC-SIPTX database. This bootstrap template contains the configuration information required to connect the E-SBC to Net-Net Central. The Customers window displays the Site (E-SBC) you added.
Adding a New User Use this procedure to add a new user to a Customer site. Using this procedure automatically assigns the new user to the SIPTX user group.
To add a new User:
1. Click <Add> in the “Select or add a user” dialog box.
• E-SBC SIPTX Trunk+ENT E-SBC Trunk-side and PBX bootstrap template. This template contains the E-SBC configuration information required for the trunk and PBX, where UDP or TCP is dynamically* used for SIP session traffic.
*UDP or TCP is used dynamically for SIP session traffic. TCP is always used for the SIPTX control traffic to NNC-SIPTX.
• E-SBC SIPTX-TLS Trunk+ENT E-SBC Trunk-side TLS and PBX bootstrap template. This template contains the E-SBC configuration information required for the trunk and PBX, where TLS is used for SIP session traffic and SIPTX control traffic.
Value Description

ADDING AN ENTERPRISE SBC (E-SBC)
92 Oracle Communications Enterprise Trunk Manager Service Provider Configuration Guide Release 7.3
The following dialog box displays.
2. In the “User name” field, enter a name for the user. The following guidelines apply to this field:
• minimum of 3 characters and maximum of 50
• name must start with an alphabetical character
• alphanumeric characters, hyphens, and underscores are allowed
• case insensitive
• cannot be the same as an existing user name
3. In the “Password” field, enter the password for the user. The following guidelines apply to this field:
• Numeric: Use of at least one numeric character from 0 to 9 in the password
• Alphabetic character: Use at least one character from the English language alphabet in the password.
• Special characters include {, |, }, ~, [, \, ], ^, _, ‘, :, ;, <, =, >, ?, !, “, #, $, %, &, `, (, ), *, +, ,, -, ., and /.
4. In the “Confirm password” field, re-enter the password you entered in the previous step to confirm.
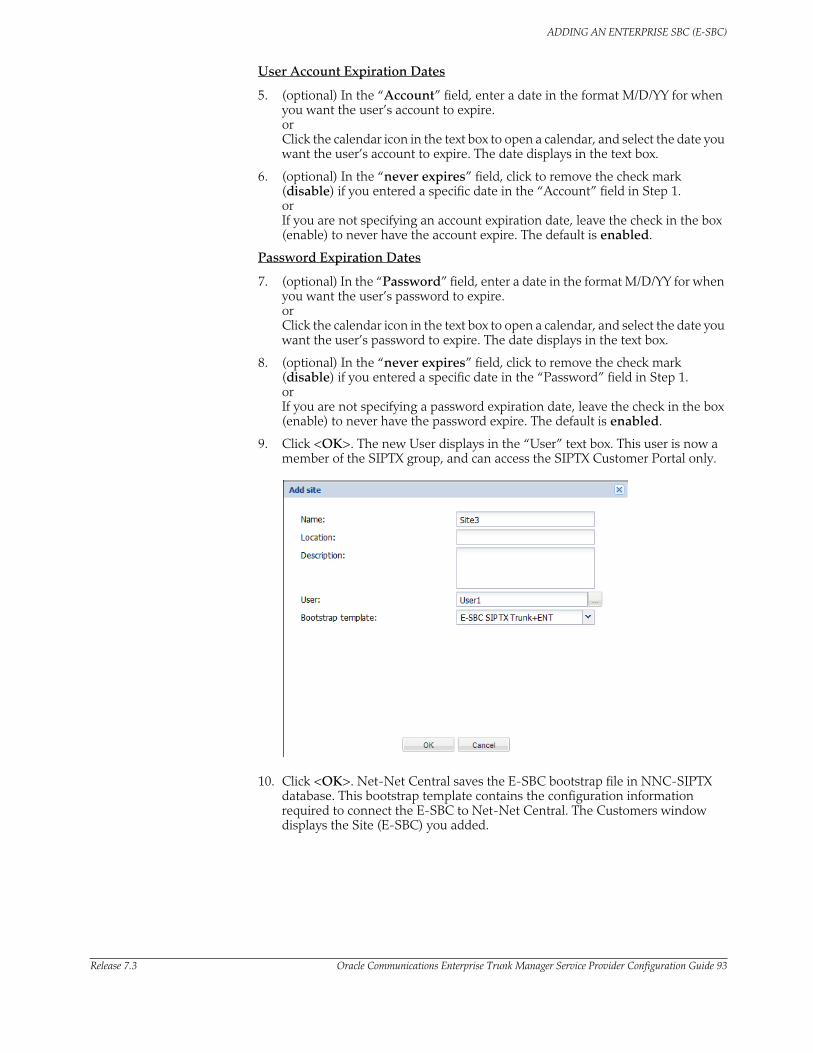
ADDING AN ENTERPRISE SBC (E-SBC)
Release 7.3 Oracle Communications Enterprise Trunk Manager Service Provider Configuration Guide 93
User Account Expiration Dates
5. (optional) In the “Account” field, enter a date in the format M/D/YY for when you want the user’s account to expire. or Click the calendar icon in the text box to open a calendar, and select the date you want the user’s account to expire. The date displays in the text box.
6. (optional) In the “never expires” field, click to remove the check mark (disable) if you entered a specific date in the “Account” field in Step 1. or If you are not specifying an account expiration date, leave the check in the box (enable) to never have the account expire. The default is enabled.
Password Expiration Dates
7. (optional) In the “Password” field, enter a date in the format M/D/YY for when you want the user’s password to expire. or Click the calendar icon in the text box to open a calendar, and select the date you want the user’s password to expire. The date displays in the text box.
8. (optional) In the “never expires” field, click to remove the check mark (disable) if you entered a specific date in the “Password” field in Step 1. or If you are not specifying a password expiration date, leave the check in the box (enable) to never have the password expire. The default is enabled.
9. Click <OK>. The new User displays in the “User” text box. This user is now a member of the SIPTX group, and can access the SIPTX Customer Portal only.
10. Click <OK>. Net-Net Central saves the E-SBC bootstrap file in NNC-SIPTX database. This bootstrap template contains the configuration information required to connect the E-SBC to Net-Net Central. The Customers window displays the Site (E-SBC) you added.
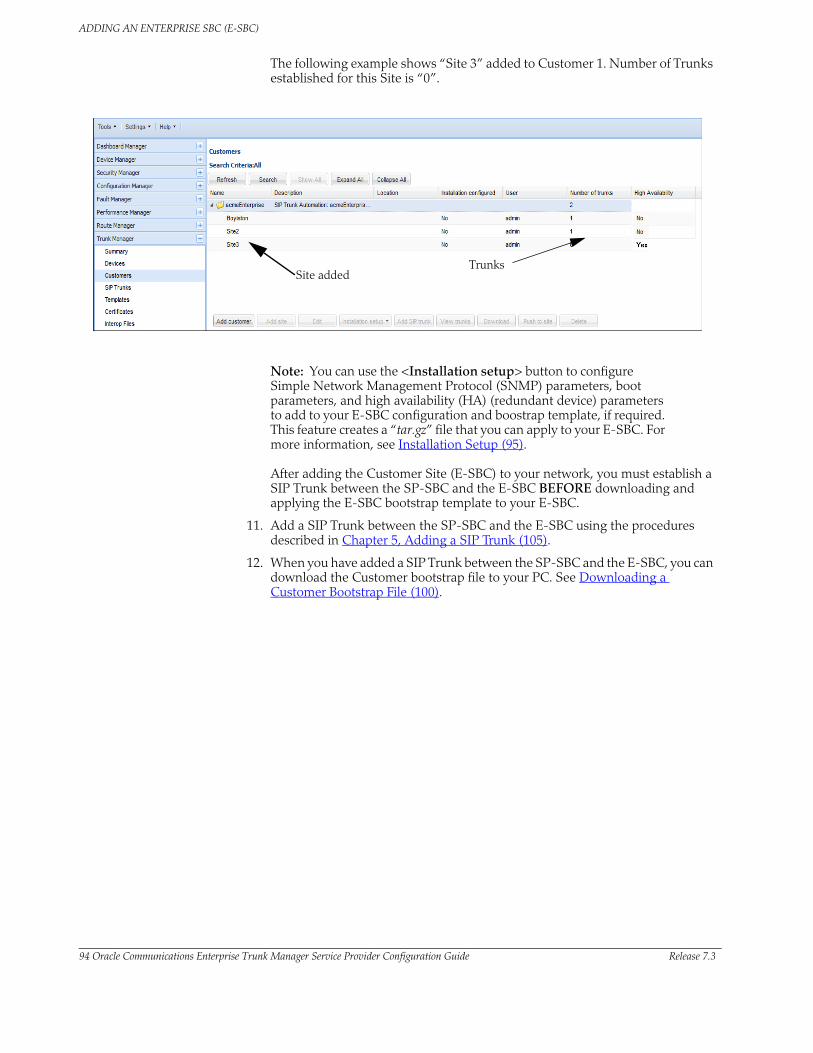
ADDING AN ENTERPRISE SBC (E-SBC)
94 Oracle Communications Enterprise Trunk Manager Service Provider Configuration Guide Release 7.3
The following example shows “Site 3” added to Customer 1. Number of Trunks established for this Site is “0”.
Site addedTrunks
Note: You can use the <Installation setup> button to configure Simple Network Management Protocol (SNMP) parameters, boot parameters, and high availability (HA) (redundant device) parameters to add to your E-SBC configuration and boostrap template, if required. This feature creates a “tar.gz” file that you can apply to your E-SBC. For more information, see Installation Setup (95).
After adding the Customer Site (E-SBC) to your network, you must establish a SIP Trunk between the SP-SBC and the E-SBC BEFORE downloading and applying the E-SBC bootstrap template to your E-SBC.
11. Add a SIP Trunk between the SP-SBC and the E-SBC using the procedures described in Chapter 5, Adding a SIP Trunk (105).
12. When you have added a SIP Trunk between the SP-SBC and the E-SBC, you can download the Customer bootstrap file to your PC. See Downloading a Customer Bootstrap File (100).
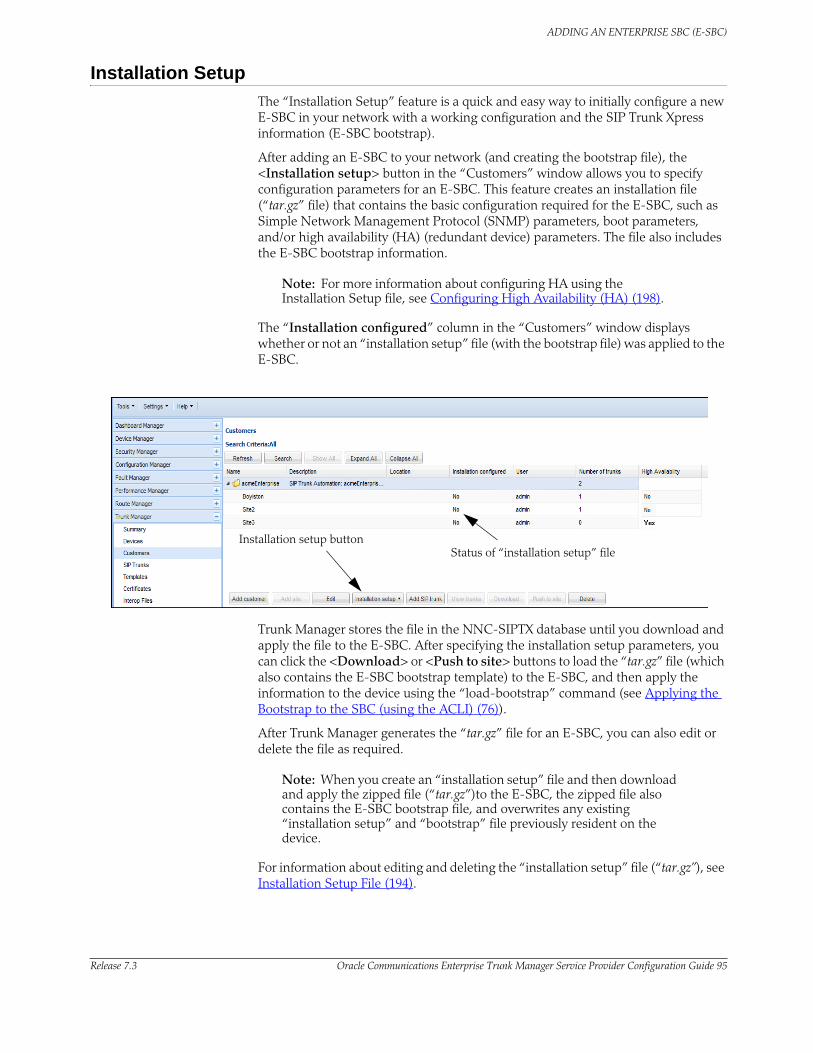
ADDING AN ENTERPRISE SBC (E-SBC)
Release 7.3 Oracle Communications Enterprise Trunk Manager Service Provider Configuration Guide 95
Installation Setup
The “Installation Setup” feature is a quick and easy way to initially configure a new E-SBC in your network with a working configuration and the SIP Trunk Xpress information (E-SBC bootstrap).
After adding an E-SBC to your network (and creating the bootstrap file), the <Installation setup> button in the “Customers” window allows you to specify configuration parameters for an E-SBC. This feature creates an installation file (“tar.gz” file) that contains the basic configuration required for the E-SBC, such as Simple Network Management Protocol (SNMP) parameters, boot parameters, and/or high availability (HA) (redundant device) parameters. The file also includes the E-SBC bootstrap information.
Note: For more information about configuring HA using the Installation Setup file, see Configuring High Availability (HA) (198).
The “Installation configured” column in the “Customers” window displays whether or not an “installation setup” file (with the bootstrap file) was applied to the E-SBC.
Status of “installation setup” fileInstallation setup button
Trunk Manager stores the file in the NNC-SIPTX database until you download and apply the file to the E-SBC. After specifying the installation setup parameters, you can click the <Download> or <Push to site> buttons to load the “tar.gz” file (which also contains the E-SBC bootstrap template) to the E-SBC, and then apply the information to the device using the “load-bootstrap” command (see Applying the Bootstrap to the SBC (using the ACLI) (76)).
After Trunk Manager generates the “tar.gz” file for an E-SBC, you can also edit or delete the file as required.
Note: When you create an “installation setup” file and then download and apply the zipped file (“tar.gz”)to the E-SBC, the zipped file also contains the E-SBC bootstrap file, and overwrites any existing “installation setup” and “bootstrap” file previously resident on the device.
For information about editing and deleting the “installation setup” file (“tar.gz”), see Installation Setup File (194).
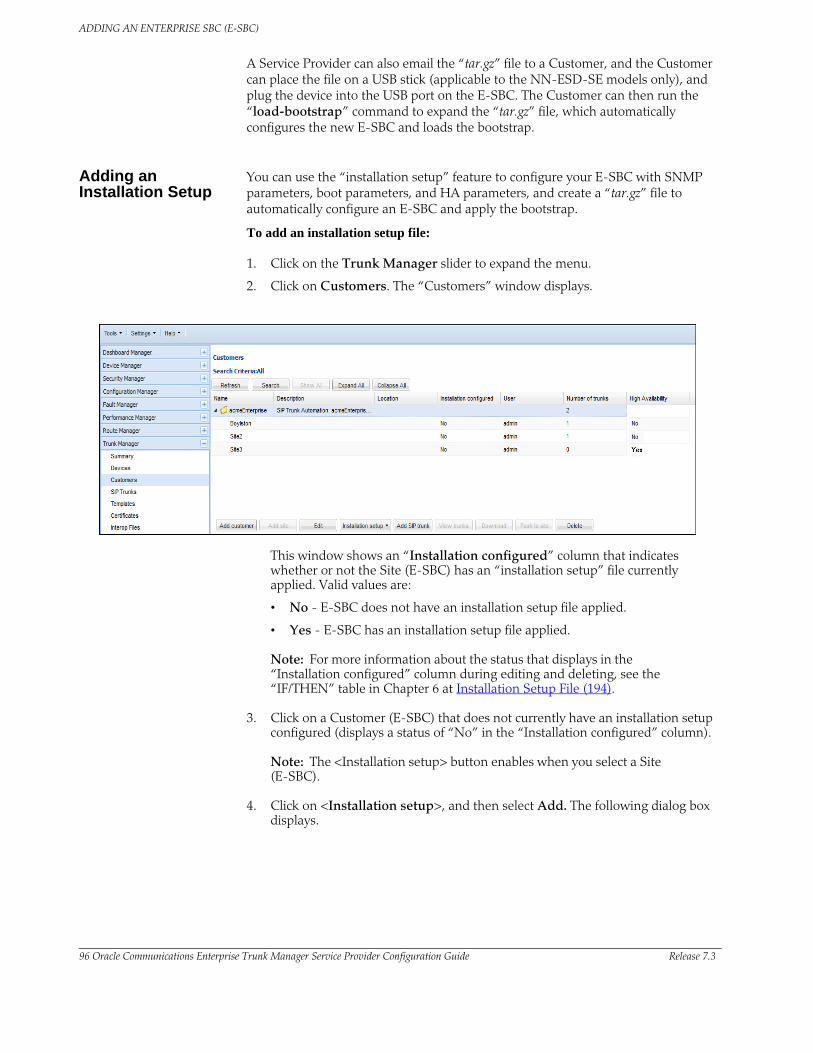
ADDING AN ENTERPRISE SBC (E-SBC)
96 Oracle Communications Enterprise Trunk Manager Service Provider Configuration Guide Release 7.3
A Service Provider can also email the “tar.gz” file to a Customer, and the Customer can place the file on a USB stick (applicable to the NN-ESD-SE models only), and plug the device into the USB port on the E-SBC. The Customer can then run the “load-bootstrap” command to expand the “tar.gz” file, which automatically configures the new E-SBC and loads the bootstrap.
Adding an Installation Setup
You can use the “installation setup” feature to configure your E-SBC with SNMP parameters, boot parameters, and HA parameters, and create a “tar.gz” file to automatically configure an E-SBC and apply the bootstrap.
To add an installation setup file:
1. Click on the Trunk Manager slider to expand the menu.
2. Click on Customers. The “Customers” window displays.
This window shows an “Installation configured” column that indicates whether or not the Site (E-SBC) has an “installation setup” file currently applied. Valid values are:
• No - E-SBC does not have an installation setup file applied.
• Yes - E-SBC has an installation setup file applied.
Note: For more information about the status that displays in the “Installation configured” column during editing and deleting, see the “IF/THEN” table in Chapter 6 at Installation Setup File (194).
3. Click on a Customer (E-SBC) that does not currently have an installation setup configured (displays a status of “No” in the “Installation configured” column).
Note: The <Installation setup> button enables when you select a Site (E-SBC).
4. Click on <Installation setup>, and then select Add. The following dialog box displays.
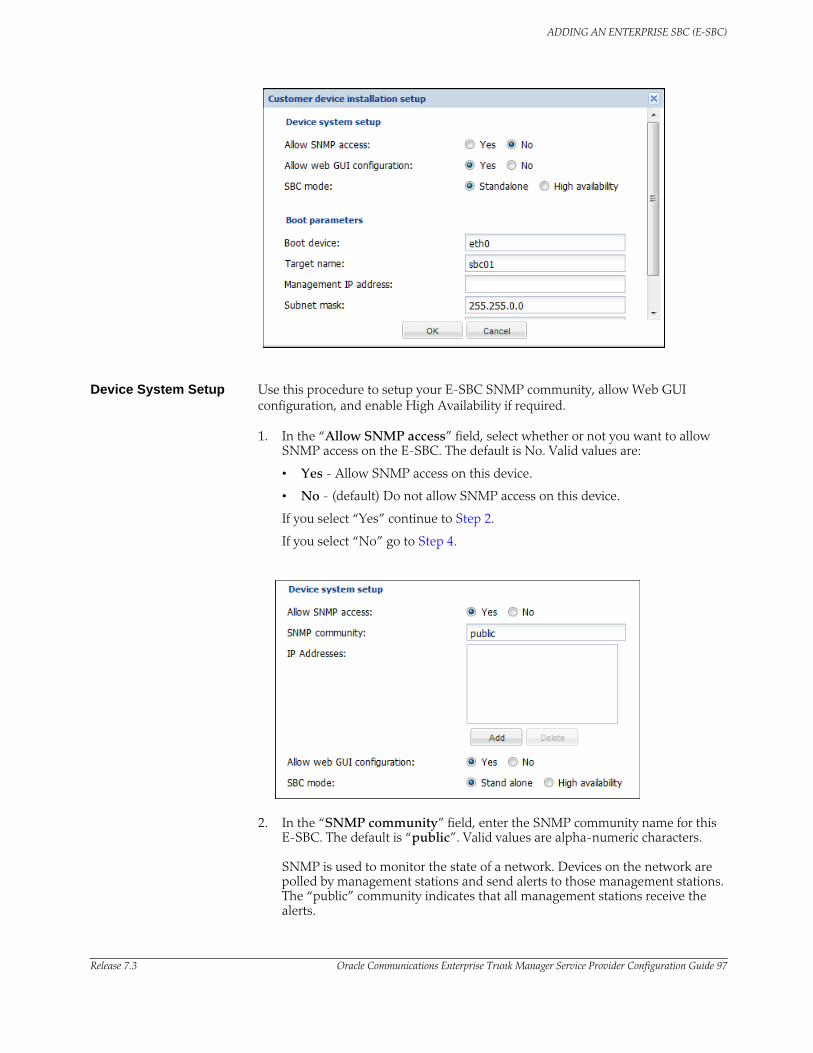
ADDING AN ENTERPRISE SBC (E-SBC)
Release 7.3 Oracle Communications Enterprise Trunk Manager Service Provider Configuration Guide 97
Device System Setup Use this procedure to setup your E-SBC SNMP community, allow Web GUI configuration, and enable High Availability if required.
1. In the “Allow SNMP access” field, select whether or not you want to allow SNMP access on the E-SBC. The default is No. Valid values are:
• Yes - Allow SNMP access on this device.
• No - (default) Do not allow SNMP access on this device.
If you select “Yes” continue to Step 2.
If you select “No” go to Step 4.
2. In the “SNMP community” field, enter the SNMP community name for this E-SBC. The default is “public”. Valid values are alpha-numeric characters. SNMP is used to monitor the state of a network. Devices on the network are polled by management stations and send alerts to those management stations. The “public” community indicates that all management stations receive the alerts.

ADDING AN ENTERPRISE SBC (E-SBC)
98 Oracle Communications Enterprise Trunk Manager Service Provider Configuration Guide Release 7.3
3. In the “IP Addresses” field, enter the management station IP address(s) that receives SNMP alerts, and click <Add>. These IP addresses must be entered in dotted decimal format (0.0.0.0). To remove any IP address from the list box, click on the IP address and then click <Delete>.
4. In the “Allow web GUI configuration” field, select whether or no you want to allow users to configure this E-SBC using the Net-Net Central GUI. The default is “Yes”. Valid values are:
• Yes - (default) Allow web GUI configuration for this device.
• No - Do not allow web GUI configuration for this device.
5. In the “SBC mode” field, select the mode of operation for this E-SBC. The default is “Stand alone”. Valid values are:
• Stand alone- (default) E-SBC is a standalone (primary) device with no redundant systems.
• High availability - E-SBC is a high availability (HA) device and is being used as a secondary failover device if the primary device fails.
Note: The “High Availability” value in the “SBC mode” field is reserved for High Availability (HA) configuration. To configure HA, see Configuring High Availability (HA) (198).
6. Proceed to Boot Parameters (98) to configure the E-SBC boot parameters.
Boot Parameters The boot parameters provide the configuration information required to boot the E-SBC in the Customer network. Use the following procedure to configure the E-SBC boot parameters.
1. In the “Boot device” field, enter the port on the E-SBC that accepts IP traffic. The default is “eth0” which is the management port.
2. In the “Target name” field, enter the name of the E-SBC. The default is “sbc01”. Valid values are alpha-numeric characters.
3. In the “Management IP address” field, enter the IP address on the E-SBC that accepts management IP traffic. This IP address must be entered in dotted decimal format (0.0.0.0). The default is blank. For example, 172.45.6.7.
4. In the “Subnet mask” field, enter the subnet mask P address on the E-SBC. This IP address must be entered in dotted decimal format (0.0.0.0). The default is 255.255.0.0.
5. In the “Gateway IP address” field, enter the gateway IP address that the E-SBC uses to connect to the outside network. This IP address must be entered in dotted decimal format (0.0.0.0). The default is 0.0.0.0. For example, 192.45.6.7.
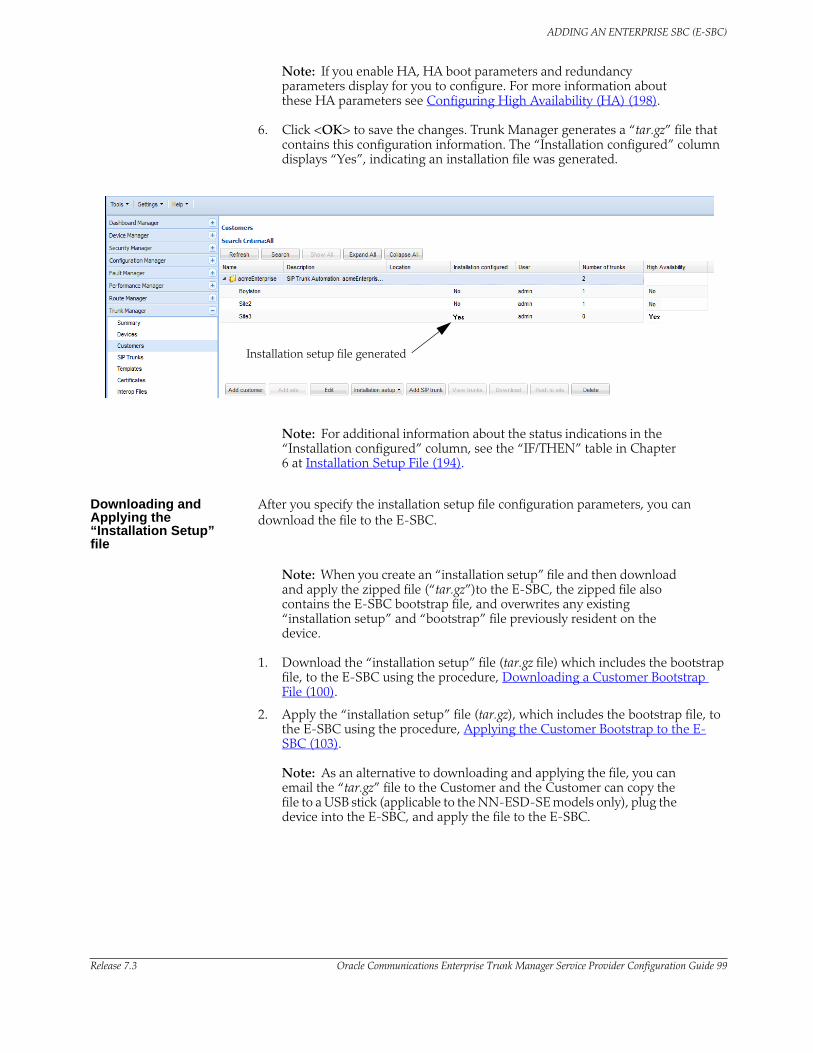
ADDING AN ENTERPRISE SBC (E-SBC)
Release 7.3 Oracle Communications Enterprise Trunk Manager Service Provider Configuration Guide 99
Note: If you enable HA, HA boot parameters and redundancy parameters display for you to configure. For more information about these HA parameters see Configuring High Availability (HA) (198).
6. Click <OK> to save the changes. Trunk Manager generates a “tar.gz” file that contains this configuration information. The “Installation configured” column displays “Yes”, indicating an installation file was generated.
Installation setup file generated
Note: For additional information about the status indications in the “Installation configured” column, see the “IF/THEN” table in Chapter 6 at Installation Setup File (194).
Downloading and Applying the “Installation Setup” file
After you specify the installation setup file configuration parameters, you can download the file to the E-SBC.
Note: When you create an “installation setup” file and then download and apply the zipped file (“tar.gz”)to the E-SBC, the zipped file also contains the E-SBC bootstrap file, and overwrites any existing “installation setup” and “bootstrap” file previously resident on the device.
1. Download the “installation setup” file (tar.gz file) which includes the bootstrap file, to the E-SBC using the procedure, Downloading a Customer Bootstrap File (100).
2. Apply the “installation setup” file (tar.gz), which includes the bootstrap file, to the E-SBC using the procedure, Applying the Customer Bootstrap to the E-SBC (103).
Note: As an alternative to downloading and applying the file, you can email the “tar.gz” file to the Customer and the Customer can copy the file to a USB stick (applicable to the NN-ESD-SE models only), plug the device into the E-SBC, and apply the file to the E-SBC.
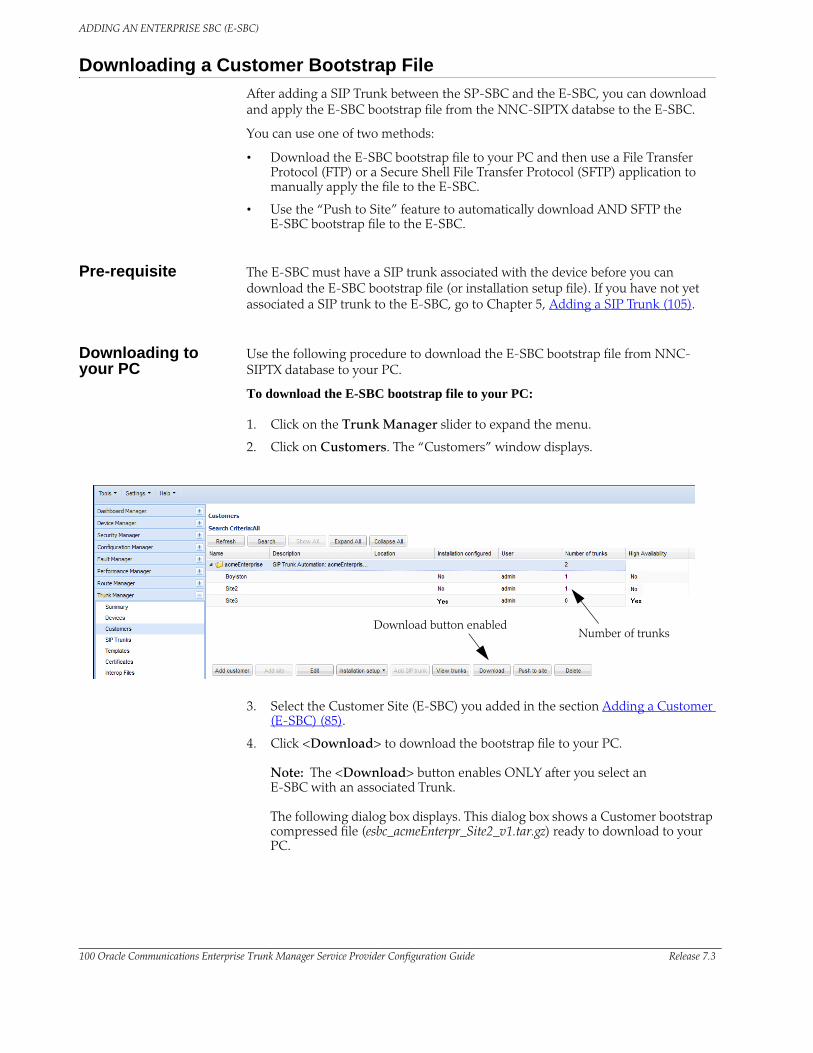
ADDING AN ENTERPRISE SBC (E-SBC)
100 Oracle Communications Enterprise Trunk Manager Service Provider Configuration Guide Release 7.3
Downloading a Customer Bootstrap File
After adding a SIP Trunk between the SP-SBC and the E-SBC, you can download and apply the E-SBC bootstrap file from the NNC-SIPTX databse to the E-SBC.
You can use one of two methods:
• Download the E-SBC bootstrap file to your PC and then use a File Transfer Protocol (FTP) or a Secure Shell File Transfer Protocol (SFTP) application to manually apply the file to the E-SBC.
• Use the “Push to Site” feature to automatically download AND SFTP the E-SBC bootstrap file to the E-SBC.
Pre-requisite The E-SBC must have a SIP trunk associated with the device before you can download the E-SBC bootstrap file (or installation setup file). If you have not yet associated a SIP trunk to the E-SBC, go to Chapter 5, Adding a SIP Trunk (105).
Downloading to your PC
Use the following procedure to download the E-SBC bootstrap file from NNC-SIPTX database to your PC.
To download the E-SBC bootstrap file to your PC:
1. Click on the Trunk Manager slider to expand the menu.
2. Click on Customers. The “Customers” window displays.
Number of trunksDownload button enabled
3. Select the Customer Site (E-SBC) you added in the section Adding a Customer (E-SBC) (85).
4. Click <Download> to download the bootstrap file to your PC.
Note: The <Download> button enables ONLY after you select an E-SBC with an associated Trunk.
The following dialog box displays. This dialog box shows a Customer bootstrap compressed file (esbc_acmeEnterpr_Site2_v1.tar.gz) ready to download to your PC.
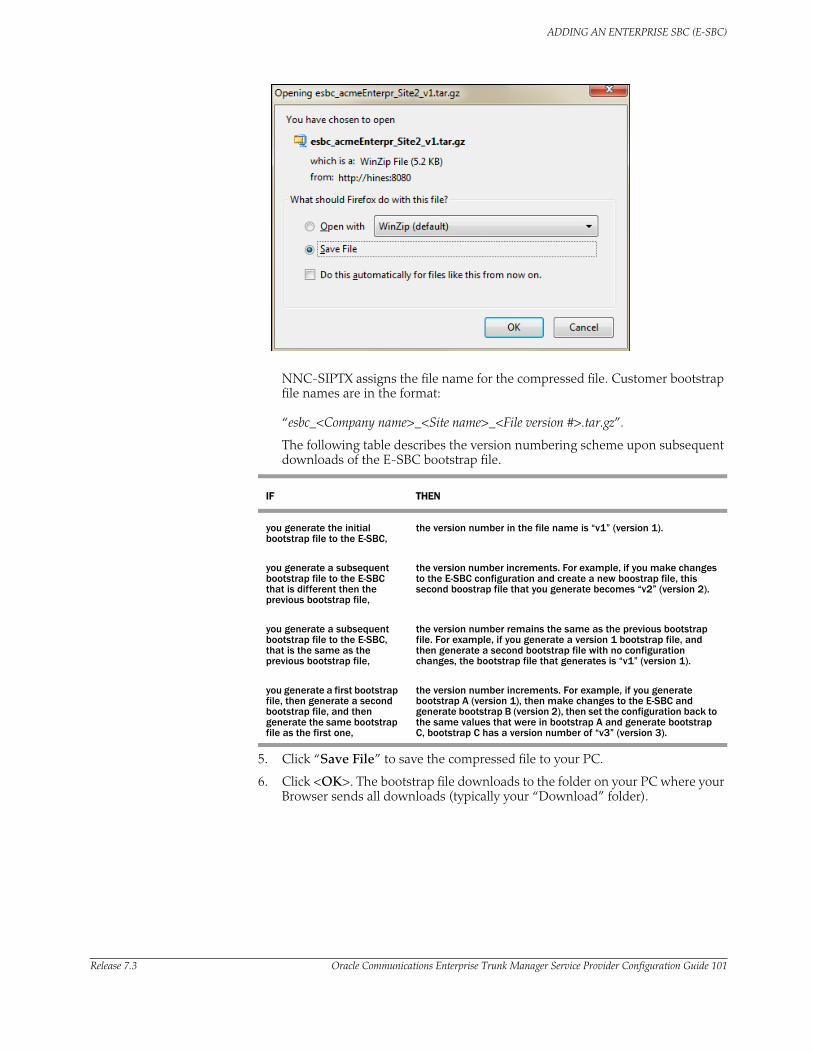
ADDING AN ENTERPRISE SBC (E-SBC)
Release 7.3 Oracle Communications Enterprise Trunk Manager Service Provider Configuration Guide 101
NNC-SIPTX assigns the file name for the compressed file. Customer bootstrap file names are in the format: “esbc_<Company name>_<Site name>_<File version #>.tar.gz”.
The following table describes the version numbering scheme upon subsequent downloads of the E-SBC bootstrap file.
IF THEN
you generate the initial bootstrap file to the E-SBC,
the version number in the file name is “v1” (version 1).
you generate a subsequent bootstrap file to the E-SBC that is different then the previous bootstrap file,
the version number increments. For example, if you make changes to the E-SBC configuration and create a new boostrap file, this second boostrap file that you generate becomes “v2” (version 2).
you generate a subsequent bootstrap file to the E-SBC, that is the same as the previous bootstrap file,
the version number remains the same as the previous bootstrap file. For example, if you generate a version 1 bootstrap file, and then generate a second bootstrap file with no configuration changes, the bootstrap file that generates is “v1” (version 1).
you generate a first bootstrap file, then generate a second bootstrap file, and then generate the same bootstrap file as the first one,
the version number increments. For example, if you generate bootstrap A (version 1), then make changes to the E-SBC and generate bootstrap B (version 2), then set the configuration back to the same values that were in bootstrap A and generate bootstrap C, bootstrap C has a version number of “v3” (version 3).
5. Click “Save File” to save the compressed file to your PC.
6. Click <OK>. The bootstrap file downloads to the folder on your PC where your Browser sends all downloads (typically your “Download” folder).
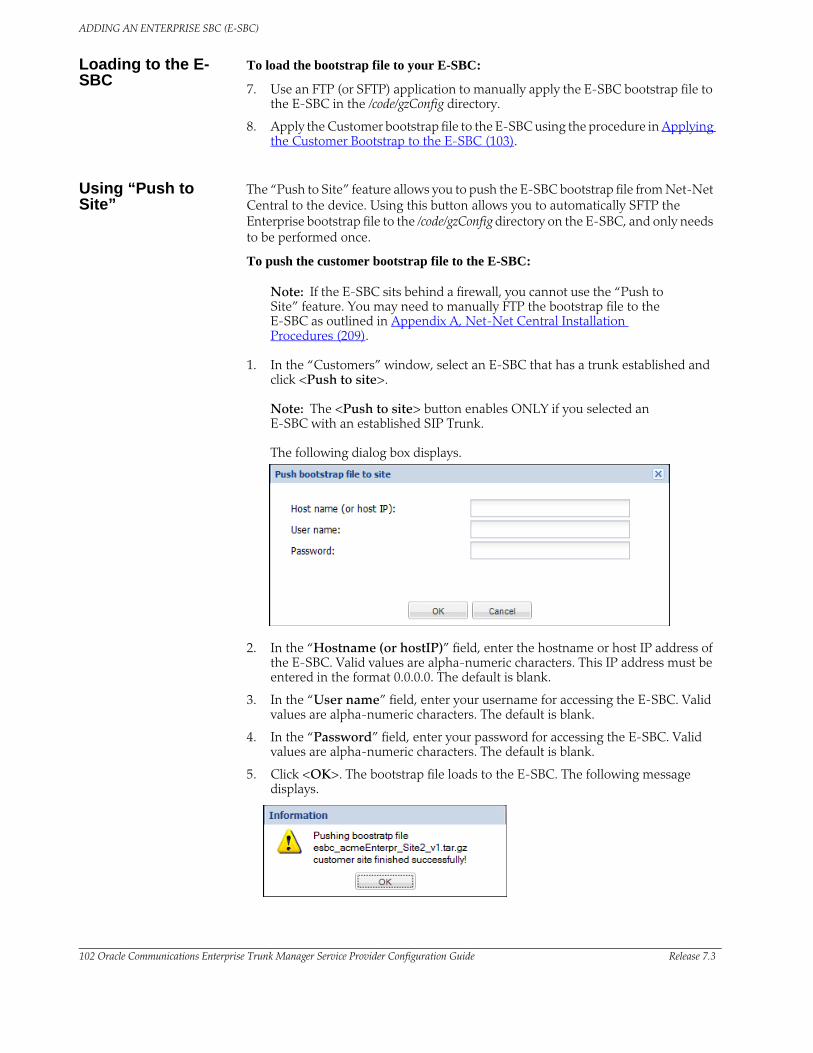
ADDING AN ENTERPRISE SBC (E-SBC)
102 Oracle Communications Enterprise Trunk Manager Service Provider Configuration Guide Release 7.3
Loading to the E-SBC
To load the bootstrap file to your E-SBC:
7. Use an FTP (or SFTP) application to manually apply the E-SBC bootstrap file to the E-SBC in the /code/gzConfig directory.
8. Apply the Customer bootstrap file to the E-SBC using the procedure in Applying the Customer Bootstrap to the E-SBC (103).
Using “Push to Site”
The “Push to Site” feature allows you to push the E-SBC bootstrap file from Net-Net Central to the device. Using this button allows you to automatically SFTP the Enterprise bootstrap file to the /code/gzConfig directory on the E-SBC, and only needs to be performed once.
To push the customer bootstrap file to the E-SBC:
Note: If the E-SBC sits behind a firewall, you cannot use the “Push to Site” feature. You may need to manually FTP the bootstrap file to the E-SBC as outlined in Appendix A, Net-Net Central Installation Procedures (209).
1. In the “Customers” window, select an E-SBC that has a trunk established and click <Push to site>.
Note: The <Push to site> button enables ONLY if you selected an E-SBC with an established SIP Trunk. The following dialog box displays.
2. In the “Hostname (or hostIP)” field, enter the hostname or host IP address of the E-SBC. Valid values are alpha-numeric characters. This IP address must be entered in the format 0.0.0.0. The default is blank.
3. In the “User name” field, enter your username for accessing the E-SBC. Valid values are alpha-numeric characters. The default is blank.
4. In the “Password” field, enter your password for accessing the E-SBC. Valid values are alpha-numeric characters. The default is blank.
5. Click <OK>. The bootstrap file loads to the E-SBC. The following message displays.

ADDING AN ENTERPRISE SBC (E-SBC)
Release 7.3 Oracle Communications Enterprise Trunk Manager Service Provider Configuration Guide 103
6. Apply the Customer bootstrap file to the E-SBC using the procedure in Applying the Customer Bootstrap to the E-SBC (103).
After applying the E-SBC bootstrap, the status of the device changes from “Pending bootstrap” to “Bootstrapped”.
Applying the Customer Bootstrap to the E-SBC
You can apply the Customer bootstrap to the E-SBC by using the ACLI procedures provided in the section, Applying the Bootstrap to the SBC (using the ACLI) (76).
After applying the E-SBC bootstrap, the status of the device changes from “Pending bootstrap” to “Bootstrapped”.

ADDING AN ENTERPRISE SBC (E-SBC)
104 Oracle Communications Enterprise Trunk Manager Service Provider Configuration Guide Release 7.3
Release 7.3 Oracle Communications Enterprise Trunk Manager Service Provider Configuration Guide 105
5 Adding a SIP Trunk
Introduction
This chapter provides the information required for setting up a SIP Trunk between the SP-SBC and the E-SBC. The procedures in this section assume you have added an SP-SBC (see Adding a Service Provider SBC (SP-SBC) (45)) and you have added an E-SBC (see Adding an Enterprise SBC (E-SBC) (83)). It is also assumes that you have bootstrapped the SP-SBC.
Note: You must add a SIP Trunk between the SP-SBC and the E-SBC BEFORE you bootstrap the E-SBC. An SP-SBC can have multiple trunks configured to multiple E-SBCs at a Customer site. However, you can have only 1 Trunk per E-SBC at that Customer site.
Topics include:
• Adding a SIP Trunk (105)
• From the Customers Window (106)
• From the SIP Trunks Window (118)
Adding a SIP Trunk
After adding an SP-SBC and an E-SBC to your network, you must add a SIP trunk between both devices using any of the following methods:
• From the Customers Window (106) - You can click Trunk Manager->Customers, then select a site, and click the <Add SIP trunk> button to start the SIP Trunk wizard.
Note: The <Add SIP Trunk> button enables only when you select a site that does not yet have a SIP Trunk configured. (# of Trunks column displays zero (0)).
• From the SIP Trunks Window (118) - You can click Trunk Manager->SIP Trunks, and click the <Add> button to start the SIP Trunk wizard.
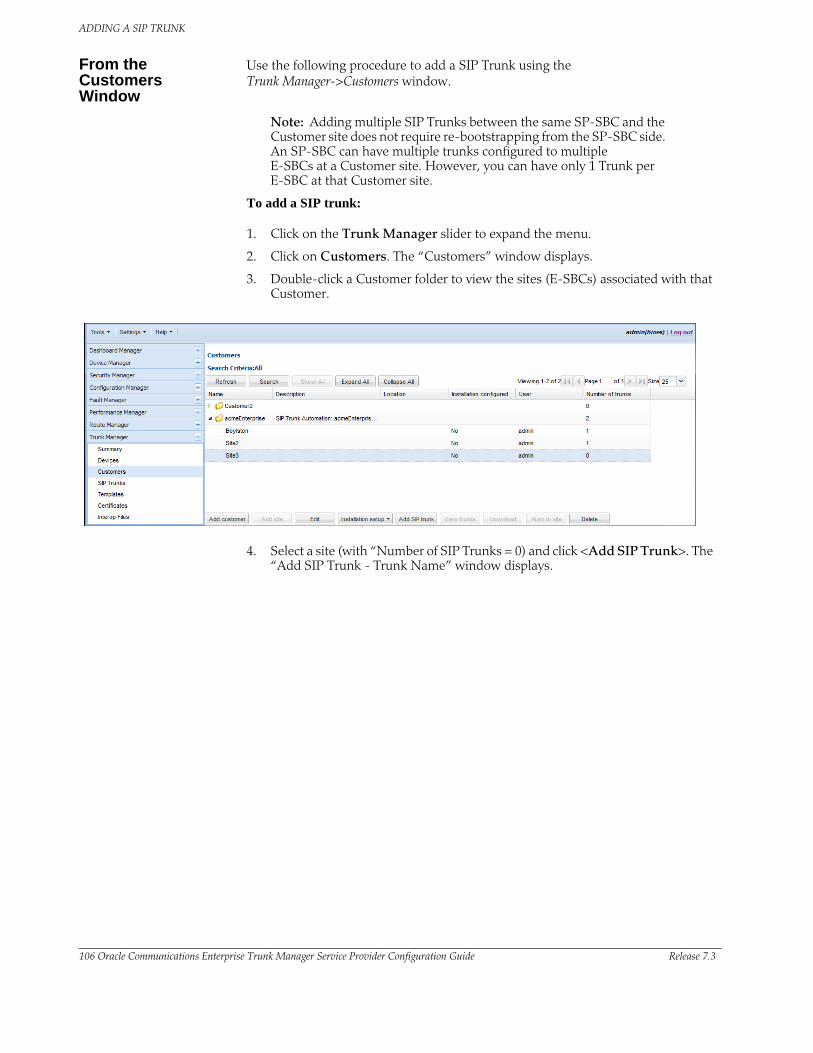
ADDING A SIP TRUNK
106 Oracle Communications Enterprise Trunk Manager Service Provider Configuration Guide Release 7.3
From the Customers Window
Use the following procedure to add a SIP Trunk using the Trunk Manager->Customers window.
Note: Adding multiple SIP Trunks between the same SP-SBC and the Customer site does not require re-bootstrapping from the SP-SBC side. An SP-SBC can have multiple trunks configured to multiple E-SBCs at a Customer site. However, you can have only 1 Trunk per E-SBC at that Customer site.
To add a SIP trunk:
1. Click on the Trunk Manager slider to expand the menu.
2. Click on Customers. The “Customers” window displays.
3. Double-click a Customer folder to view the sites (E-SBCs) associated with that Customer.
4. Select a site (with “Number of SIP Trunks = 0) and click <Add SIP Trunk>. The “Add SIP Trunk - Trunk Name” window displays.
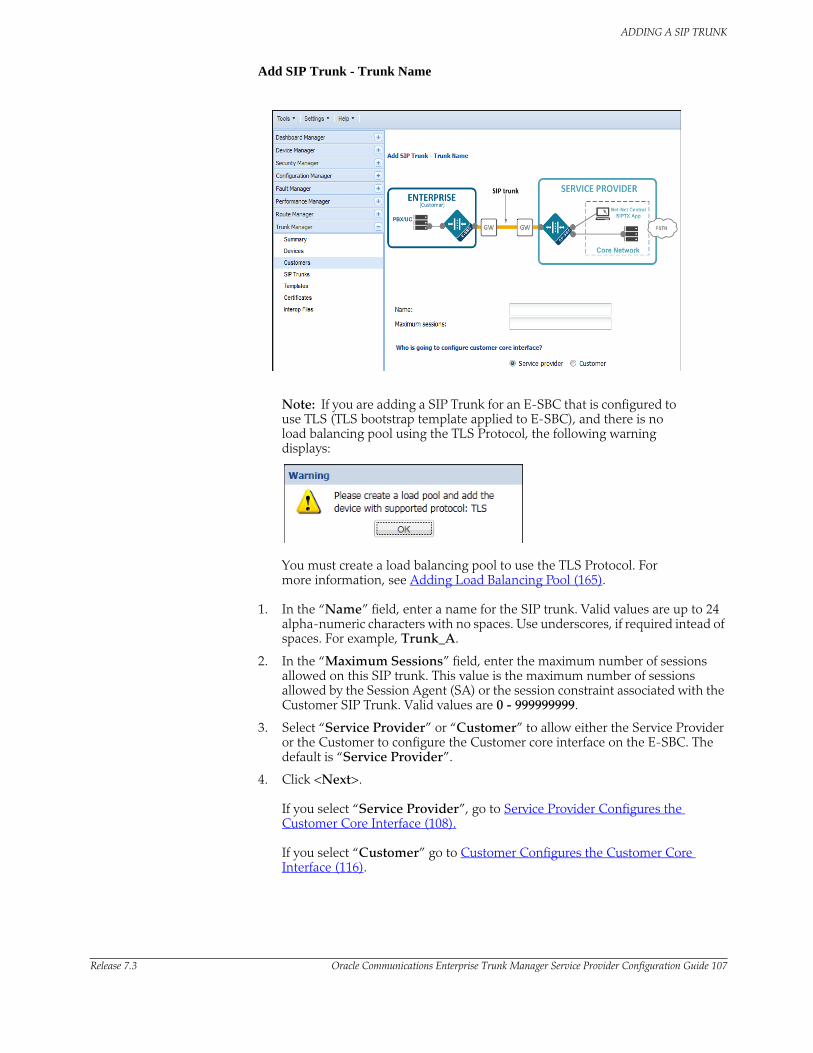
ADDING A SIP TRUNK
Release 7.3 Oracle Communications Enterprise Trunk Manager Service Provider Configuration Guide 107
Add SIP Trunk - Trunk Name
Note: If you are adding a SIP Trunk for an E-SBC that is configured to use TLS (TLS bootstrap template applied to E-SBC), and there is no load balancing pool using the TLS Protocol, the following warning displays:
You must create a load balancing pool to use the TLS Protocol. For more information, see Adding Load Balancing Pool (165).
1. In the “Name” field, enter a name for the SIP trunk. Valid values are up to 24 alpha-numeric characters with no spaces. Use underscores, if required intead of spaces. For example, Trunk_A.
2. In the “Maximum Sessions” field, enter the maximum number of sessions allowed on this SIP trunk. This value is the maximum number of sessions allowed by the Session Agent (SA) or the session constraint associated with the Customer SIP Trunk. Valid values are 0 - 999999999.
3. Select “Service Provider” or “Customer” to allow either the Service Provider or the Customer to configure the Customer core interface on the E-SBC. The default is “Service Provider”.
4. Click <Next>. If you select “Service Provider”, go to Service Provider Configures the Customer Core Interface (108). If you select “Customer” go to Customer Configures the Customer Core Interface (116).
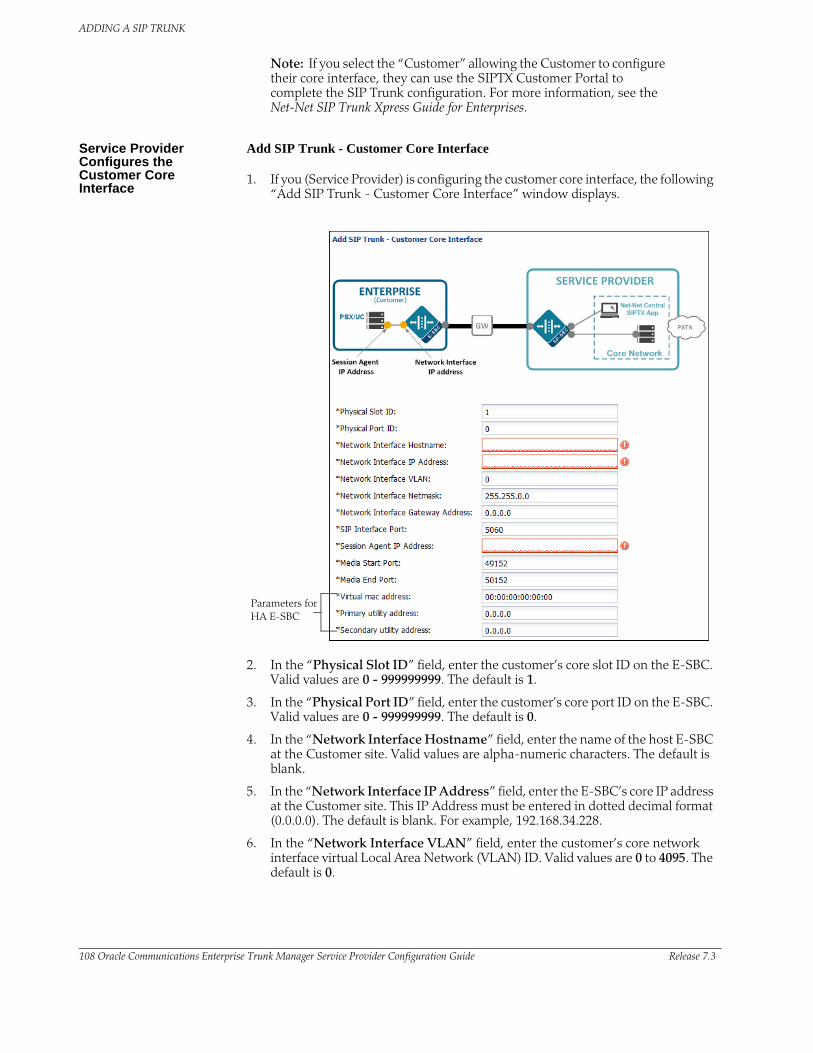
ADDING A SIP TRUNK
108 Oracle Communications Enterprise Trunk Manager Service Provider Configuration Guide Release 7.3
Note: If you select the “Customer” allowing the Customer to configure their core interface, they can use the SIPTX Customer Portal to complete the SIP Trunk configuration. For more information, see the Net-Net SIP Trunk Xpress Guide for Enterprises.
Service Provider Configures the Customer Core Interface
Add SIP Trunk - Customer Core Interface
1. If you (Service Provider) is configuring the customer core interface, the following “Add SIP Trunk - Customer Core Interface” window displays.
Parameters for HA E-SBC
2. In the “Physical Slot ID” field, enter the customer’s core slot ID on the E-SBC. Valid values are 0 - 999999999. The default is 1.
3. In the “Physical Port ID” field, enter the customer’s core port ID on the E-SBC. Valid values are 0 - 999999999. The default is 0.
4. In the “Network Interface Hostname” field, enter the name of the host E-SBC at the Customer site. Valid values are alpha-numeric characters. The default is blank.
5. In the “Network Interface IP Address” field, enter the E-SBC’s core IP address at the Customer site. This IP Address must be entered in dotted decimal format (0.0.0.0). The default is blank. For example, 192.168.34.228.
6. In the “Network Interface VLAN” field, enter the customer’s core network interface virtual Local Area Network (VLAN) ID. Valid values are 0 to 4095. The default is 0.

ADDING A SIP TRUNK
Release 7.3 Oracle Communications Enterprise Trunk Manager Service Provider Configuration Guide 109
7. In the “Network Interface Netmask” field, enter E-SBC’s core netmask address at the Customer site. This IP Address must be entered in dotted decimal format (0.0.0.0). The default is 255.255.0.0.
8. In the “Network Interface Gateway Address” field, enter the E-SBC’s core gateway address at the Customer site. This IP Address must be entered in dotted decimal format (0.0.0.0). The default is blank. For example, 192.168.34.197.
9. In the “SIP Interface Address” field, enter the E-SBC’s core SIP IP address at the Customer site. This IP Address must be entered in dotted decimal format (0.0.0.0). The default is blank. For example, 192.168.34.228.
10. In the “Customer Core SIP Interface Port” field, enter the E-SBC’s core SIP interface port. Valid values are 5060 to 65535. The default is 5060 for TCP.
11. In the “Session Agent Address” field, enter the destination IP address of the Session Agent (SA) in the Customer network. This IP Address must be entered in dotted decimal format (0.0.0.0). The default is blank. For example, 192.168.34.197.
12. In the “Media Start Port” field, enter the port number on the core destination side of your E-SBC that is dedicated to sending media traffic from your E-SBC to external destinations. Valid values are 0 - 65535. The default is 49152. The “Media Start Port” and “Media End Port” fields are used in the port forwarding process in your network. Port forwarding is the process of dedicating ports on your E-SBC to be used for sending/receiving specific traffic (media) for faster throughput. Port forwarding translates the address and/or port number of a packet to a destination, accepts packet(s) in a packet filter (firewall), AND forwards the packet according to the routing table.
13. In the “Media End Port” field, enter the port number on the core destination side of your E-SBC that is dedicated to receiving media traffic from external sources to your E-SBC. Valid values are 0 - 65535. The default is 50152.
14. If the trunk you are configuring connects to an HA E-SBC, proceed to For HA E-SBCs (109). or
Click <Next>. The “Add SIP Trunk - Customer SBC Trunk Interface” window displays.
For HA E-SBCs
1. In the “Virtual mac address” field, enter the virtual MAC address of the secondary E-SBC in your core network. This address must be in the format 00:00:00:00:00:00. For example, FE:15:90:33:45:aP.
2. In the “Primary utility address” field, enter the IP address of the primary E-SBC in your core network. This IP Address must be entered in dotted decimal format (0.0.0.0). For example, 192.168.36.222.
3. In the “Secondary utility address” field, enter the IP address of the secondary E-SBC (backup) in the Customer core network. This IP Address must be entered in dotted decimal format (0.0.0.0). For example, 192.168.36.223.
4. Click <Next>. The “Add SIP Trunk - Customer SBC Trunk Interface” window displays.
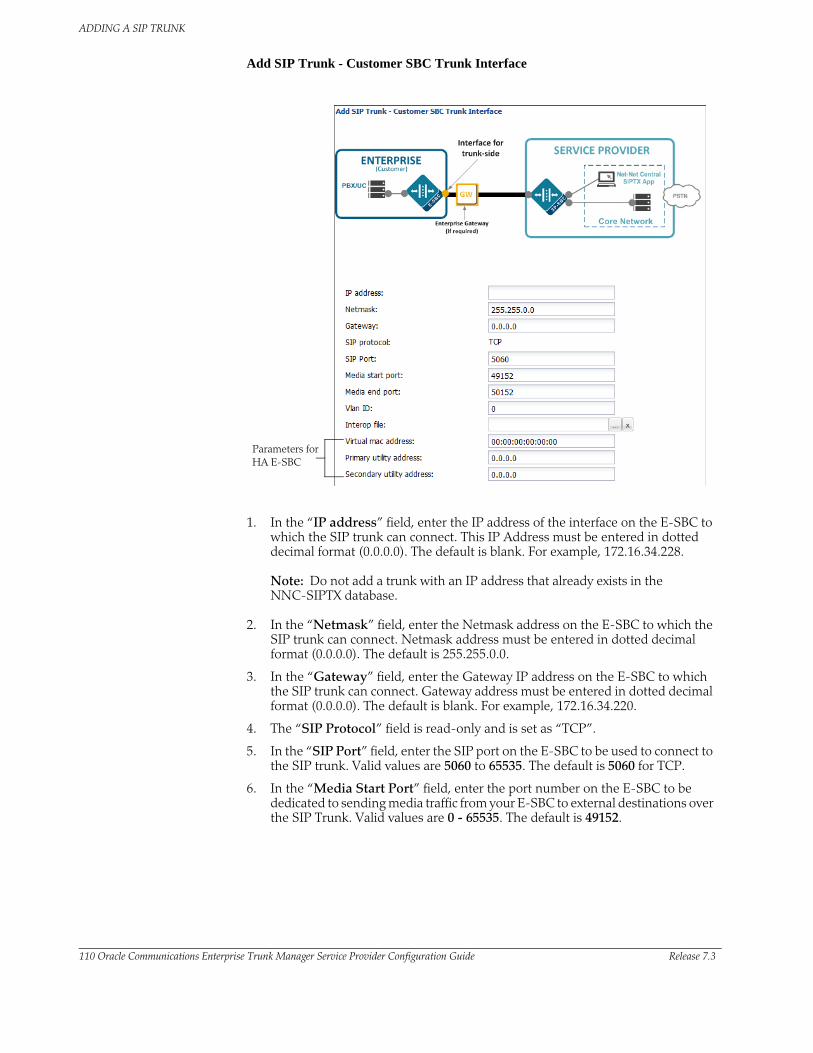
ADDING A SIP TRUNK
110 Oracle Communications Enterprise Trunk Manager Service Provider Configuration Guide Release 7.3
Add SIP Trunk - Customer SBC Trunk Interface
Parameters for HA E-SBC
1. In the “IP address” field, enter the IP address of the interface on the E-SBC to which the SIP trunk can connect. This IP Address must be entered in dotted decimal format (0.0.0.0). The default is blank. For example, 172.16.34.228.
Note: Do not add a trunk with an IP address that already exists in the NNC-SIPTX database.
2. In the “Netmask” field, enter the Netmask address on the E-SBC to which the SIP trunk can connect. Netmask address must be entered in dotted decimal format (0.0.0.0). The default is 255.255.0.0.
3. In the “Gateway” field, enter the Gateway IP address on the E-SBC to which the SIP trunk can connect. Gateway address must be entered in dotted decimal format (0.0.0.0). The default is blank. For example, 172.16.34.220.
4. The “SIP Protocol” field is read-only and is set as “TCP”.
5. In the “SIP Port” field, enter the SIP port on the E-SBC to be used to connect to the SIP trunk. Valid values are 5060 to 65535. The default is 5060 for TCP.
6. In the “Media Start Port” field, enter the port number on the E-SBC to be dedicated to sending media traffic from your E-SBC to external destinations over the SIP Trunk. Valid values are 0 - 65535. The default is 49152.
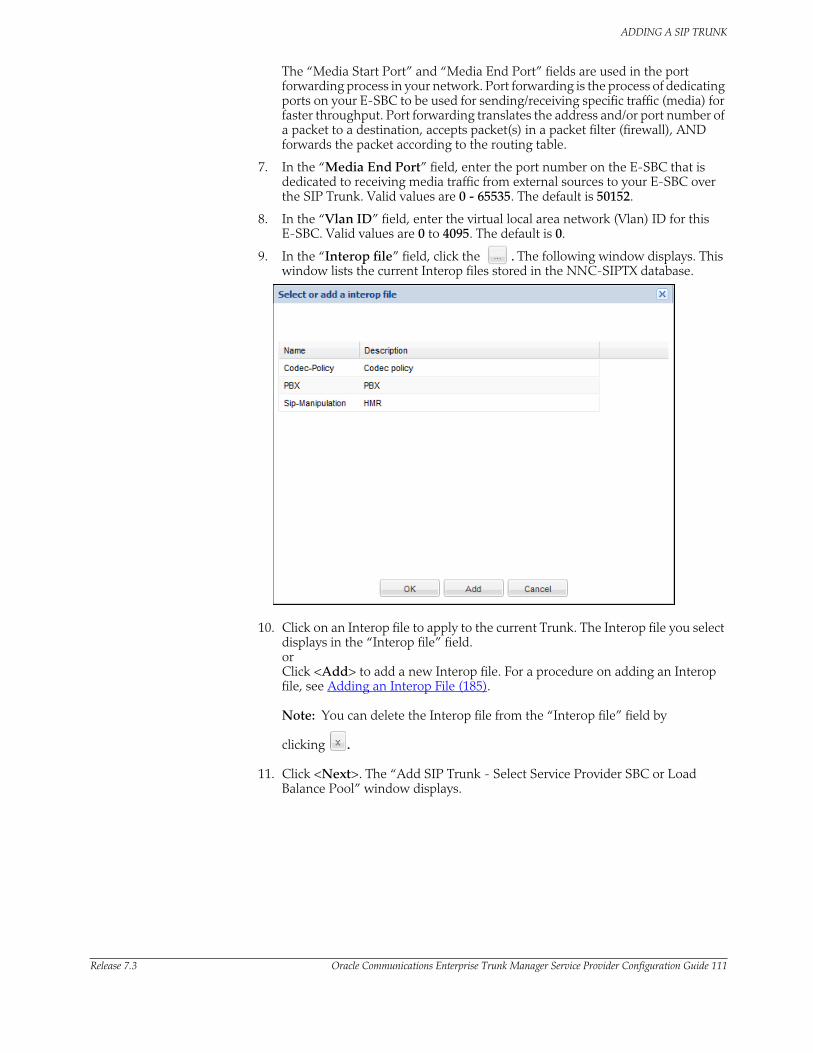
ADDING A SIP TRUNK
Release 7.3 Oracle Communications Enterprise Trunk Manager Service Provider Configuration Guide 111
The “Media Start Port” and “Media End Port” fields are used in the port forwarding process in your network. Port forwarding is the process of dedicating ports on your E-SBC to be used for sending/receiving specific traffic (media) for faster throughput. Port forwarding translates the address and/or port number of a packet to a destination, accepts packet(s) in a packet filter (firewall), AND forwards the packet according to the routing table.
7. In the “Media End Port” field, enter the port number on the E-SBC that is dedicated to receiving media traffic from external sources to your E-SBC over the SIP Trunk. Valid values are 0 - 65535. The default is 50152.
8. In the “Vlan ID” field, enter the virtual local area network (Vlan) ID for this E-SBC. Valid values are 0 to 4095. The default is 0.
9. In the “Interop file” field, click the . The following window displays. This window lists the current Interop files stored in the NNC-SIPTX database.
10. Click on an Interop file to apply to the current Trunk. The Interop file you select displays in the “Interop file” field. or Click <Add> to add a new Interop file. For a procedure on adding an Interop file, see Adding an Interop File (185).
Note: You can delete the Interop file from the “Interop file” field by clicking .
11. Click <Next>. The “Add SIP Trunk - Select Service Provider SBC or Load Balance Pool” window displays.

ADDING A SIP TRUNK
112 Oracle Communications Enterprise Trunk Manager Service Provider Configuration Guide Release 7.3
For HA E-SBCs
1. In the “Virtual mac address” field, enter the virtual MAC address of the secondary E-SBC in your core network. This address must be in the format 00:00:00:00:00:00. For example, FE:15:90:33:45:aP.
2. In the “Primary utility address” field, enter the IP address of the primary E-SBC in your core network. This IP Address must be entered in dotted decimal format (0.0.0.0). For example, 192.168.36.222.
3. In the “Secondary utility address” field, enter the IP address of the secondary E-SBC (backup) in the Customer core network. This IP Address must be entered in dotted decimal format (0.0.0.0). For example, 192.168.36.223.
4. Click <Next>. The “Add SIP Trunk - Select Service Provider SBC or Load Balance Pool” window displays.
Add SIP Trunk - Select Service Provider SBC or Load Balance Pool
Indicates the HA-enabled devices
1. Select a load balancing pool or a device within the load balancing pool to associate with this SIP Trunk.
Note: If a Load balancing pool contains SP-SBC devices with and without HA enabled, you must select the SP-SBC device you want to associate with this E-SBC. If you select the load pool instead of a device, the following message displays:
2. Click <Next>. The “Add SIP Trunk - Service Provider SBC Trunk Interface” window displays.
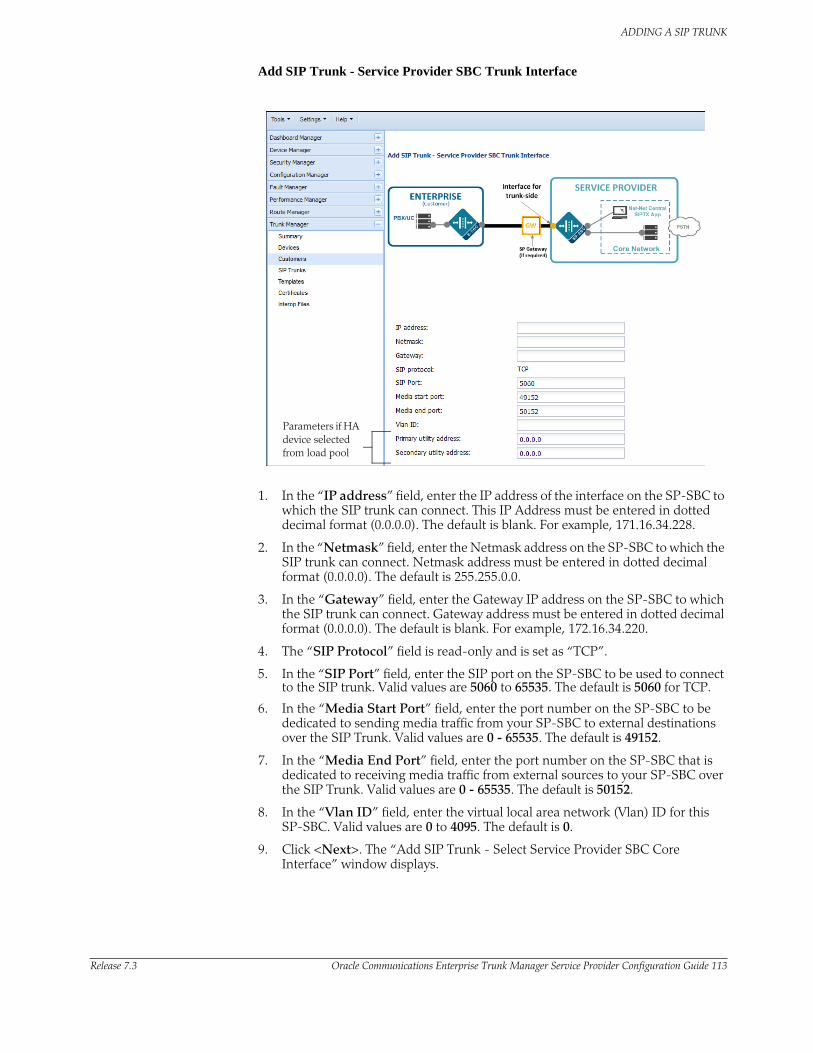
ADDING A SIP TRUNK
Release 7.3 Oracle Communications Enterprise Trunk Manager Service Provider Configuration Guide 113
Add SIP Trunk - Service Provider SBC Trunk Interface
Parameters if HA device selected from load pool
1. In the “IP address” field, enter the IP address of the interface on the SP-SBC to which the SIP trunk can connect. This IP Address must be entered in dotted decimal format (0.0.0.0). The default is blank. For example, 171.16.34.228.
2. In the “Netmask” field, enter the Netmask address on the SP-SBC to which the SIP trunk can connect. Netmask address must be entered in dotted decimal format (0.0.0.0). The default is 255.255.0.0.
3. In the “Gateway” field, enter the Gateway IP address on the SP-SBC to which the SIP trunk can connect. Gateway address must be entered in dotted decimal format (0.0.0.0). The default is blank. For example, 172.16.34.220.
4. The “SIP Protocol” field is read-only and is set as “TCP”.
5. In the “SIP Port” field, enter the SIP port on the SP-SBC to be used to connect to the SIP trunk. Valid values are 5060 to 65535. The default is 5060 for TCP.
6. In the “Media Start Port” field, enter the port number on the SP-SBC to be dedicated to sending media traffic from your SP-SBC to external destinations over the SIP Trunk. Valid values are 0 - 65535. The default is 49152.
7. In the “Media End Port” field, enter the port number on the SP-SBC that is dedicated to receiving media traffic from external sources to your SP-SBC over the SIP Trunk. Valid values are 0 - 65535. The default is 50152.
8. In the “Vlan ID” field, enter the virtual local area network (Vlan) ID for this SP-SBC. Valid values are 0 to 4095. The default is 0.
9. Click <Next>. The “Add SIP Trunk - Select Service Provider SBC Core Interface” window displays.
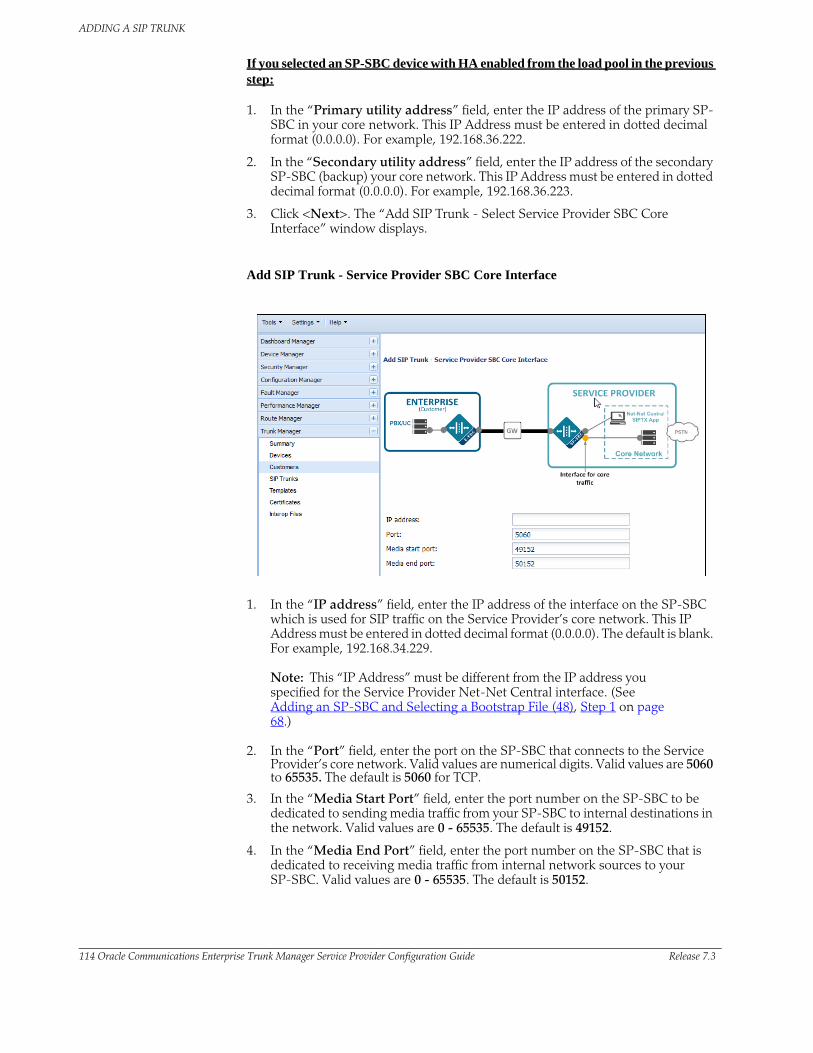
ADDING A SIP TRUNK
114 Oracle Communications Enterprise Trunk Manager Service Provider Configuration Guide Release 7.3
If you selected an SP-SBC device with HA enabled from the load pool in the previous step:
1. In the “Primary utility address” field, enter the IP address of the primary SP-SBC in your core network. This IP Address must be entered in dotted decimal format (0.0.0.0). For example, 192.168.36.222.
2. In the “Secondary utility address” field, enter the IP address of the secondary SP-SBC (backup) your core network. This IP Address must be entered in dotted decimal format (0.0.0.0). For example, 192.168.36.223.
3. Click <Next>. The “Add SIP Trunk - Select Service Provider SBC Core Interface” window displays.
Add SIP Trunk - Service Provider SBC Core Interface
1. In the “IP address” field, enter the IP address of the interface on the SP-SBC which is used for SIP traffic on the Service Provider’s core network. This IP Address must be entered in dotted decimal format (0.0.0.0). The default is blank. For example, 192.168.34.229.
Note: This “IP Address” must be different from the IP address you specified for the Service Provider Net-Net Central interface. (See Adding an SP-SBC and Selecting a Bootstrap File (48), Step 1 on page 68.)
2. In the “Port” field, enter the port on the SP-SBC that connects to the Service Provider’s core network. Valid values are numerical digits. Valid values are 5060 to 65535. The default is 5060 for TCP.
3. In the “Media Start Port” field, enter the port number on the SP-SBC to be dedicated to sending media traffic from your SP-SBC to internal destinations in the network. Valid values are 0 - 65535. The default is 49152.
4. In the “Media End Port” field, enter the port number on the SP-SBC that is dedicated to receiving media traffic from internal network sources to your SP-SBC. Valid values are 0 - 65535. The default is 50152.
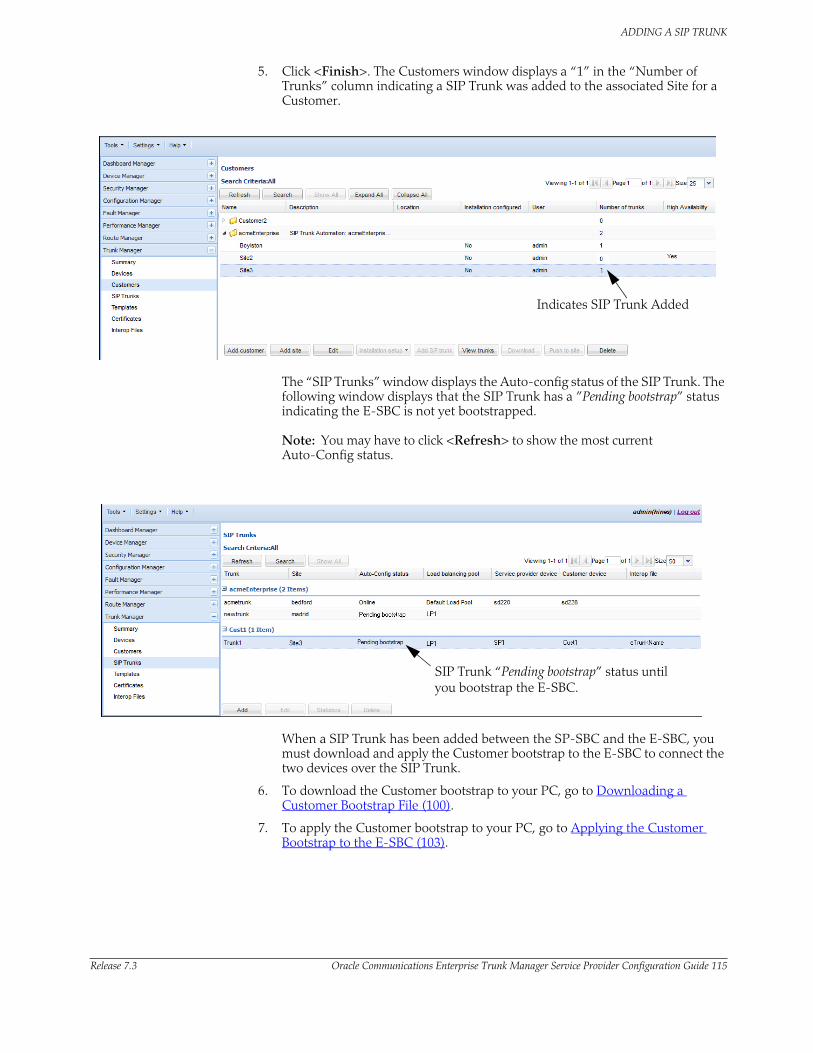
ADDING A SIP TRUNK
Release 7.3 Oracle Communications Enterprise Trunk Manager Service Provider Configuration Guide 115
5. Click <Finish>. The Customers window displays a “1” in the “Number of Trunks” column indicating a SIP Trunk was added to the associated Site for a Customer.
Indicates SIP Trunk Added
The “SIP Trunks” window displays the Auto-config status of the SIP Trunk. The following window displays that the SIP Trunk has a ”Pending bootstrap” status indicating the E-SBC is not yet bootstrapped.
Note: You may have to click <Refresh> to show the most current Auto-Config status.
SIP Trunk “Pending bootstrap” status until you bootstrap the E-SBC.
When a SIP Trunk has been added between the SP-SBC and the E-SBC, you must download and apply the Customer bootstrap to the E-SBC to connect the two devices over the SIP Trunk.
6. To download the Customer bootstrap to your PC, go to Downloading a Customer Bootstrap File (100).
7. To apply the Customer bootstrap to your PC, go to Applying the Customer Bootstrap to the E-SBC (103).
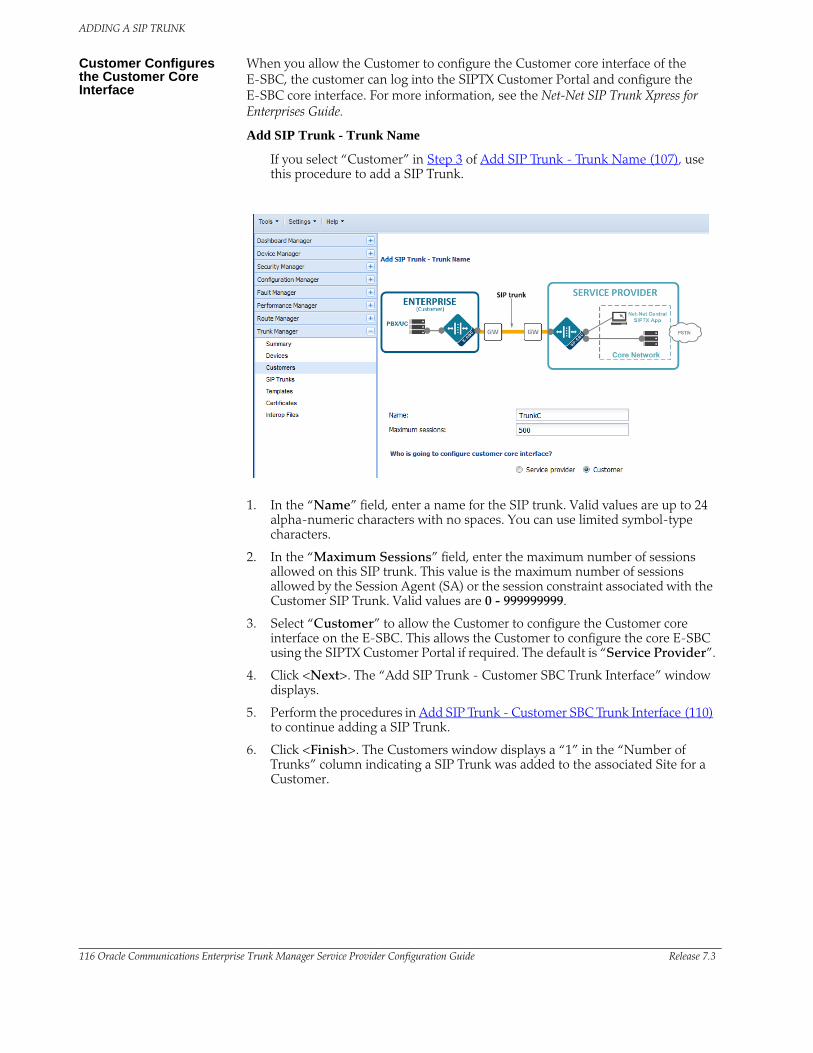
ADDING A SIP TRUNK
116 Oracle Communications Enterprise Trunk Manager Service Provider Configuration Guide Release 7.3
Customer Configures the Customer Core Interface
When you allow the Customer to configure the Customer core interface of the E-SBC, the customer can log into the SIPTX Customer Portal and configure the E-SBC core interface. For more information, see the Net-Net SIP Trunk Xpress for Enterprises Guide.
Add SIP Trunk - Trunk Name
If you select “Customer” in Step 3 of Add SIP Trunk - Trunk Name (107), use this procedure to add a SIP Trunk.
1. In the “Name” field, enter a name for the SIP trunk. Valid values are up to 24 alpha-numeric characters with no spaces. You can use limited symbol-type characters.
2. In the “Maximum Sessions” field, enter the maximum number of sessions allowed on this SIP trunk. This value is the maximum number of sessions allowed by the Session Agent (SA) or the session constraint associated with the Customer SIP Trunk. Valid values are 0 - 999999999.
3. Select “Customer” to allow the Customer to configure the Customer core interface on the E-SBC. This allows the Customer to configure the core E-SBC using the SIPTX Customer Portal if required. The default is “Service Provider”.
4. Click <Next>. The “Add SIP Trunk - Customer SBC Trunk Interface” window displays.
5. Perform the procedures in Add SIP Trunk - Customer SBC Trunk Interface (110) to continue adding a SIP Trunk.
6. Click <Finish>. The Customers window displays a “1” in the “Number of Trunks” column indicating a SIP Trunk was added to the associated Site for a Customer.
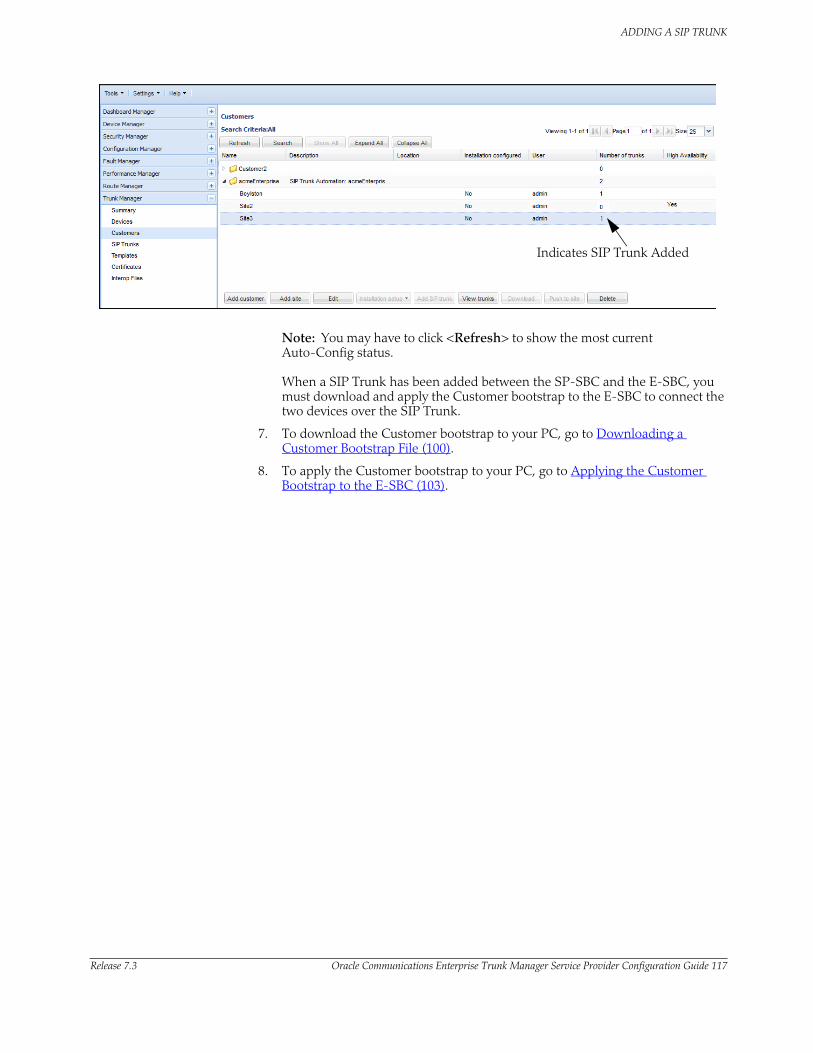
Indicates SIP Trunk Added
ADDING A SIP TRUNK
Release 7.3 Oracle Communications Enterprise Trunk Manager Service Provider Configuration Guide 117
Note: You may have to click <Refresh> to show the most current Auto-Config status.
When a SIP Trunk has been added between the SP-SBC and the E-SBC, you must download and apply the Customer bootstrap to the E-SBC to connect the two devices over the SIP Trunk.
7. To download the Customer bootstrap to your PC, go to Downloading a Customer Bootstrap File (100).
8. To apply the Customer bootstrap to your PC, go to Applying the Customer Bootstrap to the E-SBC (103).
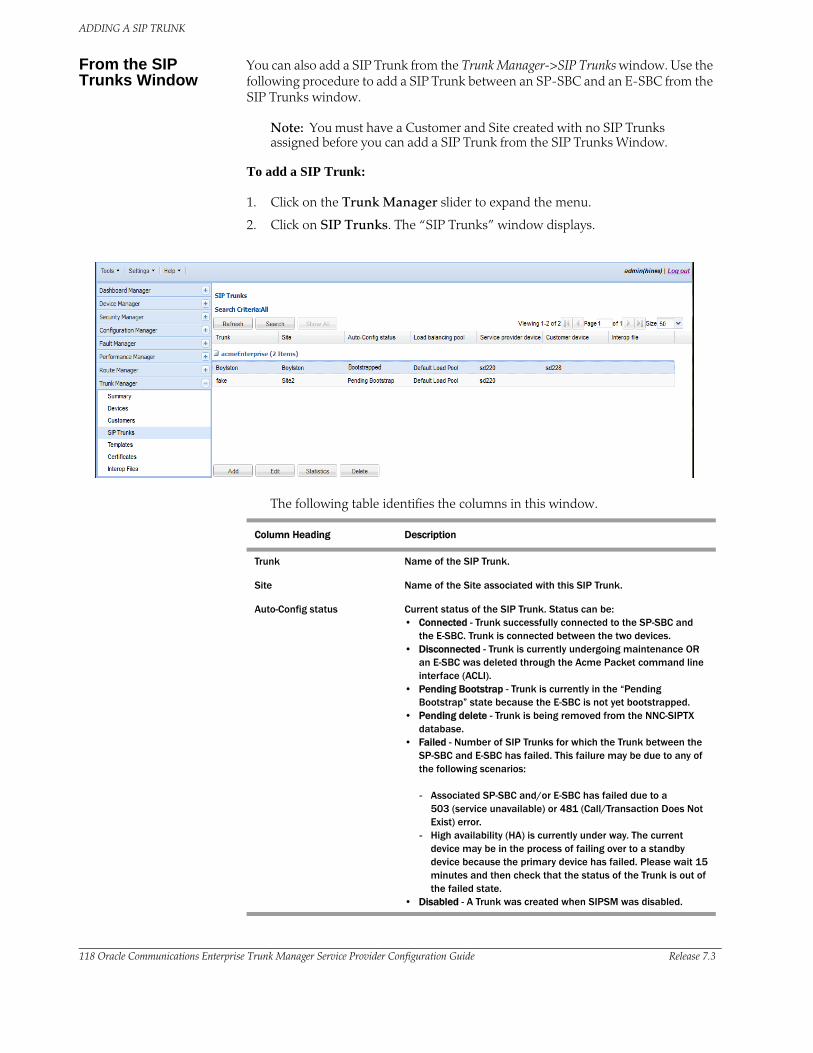
ADDING A SIP TRUNK
118 Oracle Communications Enterprise Trunk Manager Service Provider Configuration Guide Release 7.3
From the SIP Trunks Window
You can also add a SIP Trunk from the Trunk Manager->SIP Trunks window. Use the following procedure to add a SIP Trunk between an SP-SBC and an E-SBC from the SIP Trunks window.
Note: You must have a Customer and Site created with no SIP Trunks assigned before you can add a SIP Trunk from the SIP Trunks Window.
To add a SIP Trunk:
1. Click on the Trunk Manager slider to expand the menu.
2. Click on SIP Trunks. The “SIP Trunks” window displays.
The following table identifies the columns in this window.
Column Heading Description
Trunk Name of the SIP Trunk.
Site Name of the Site associated with this SIP Trunk.
Auto-Config status Current status of the SIP Trunk. Status can be:• Connected - Trunk successfully connected to the SP-SBC and
the E-SBC. Trunk is connected between the two devices.• Disconnected - Trunk is currently undergoing maintenance OR
an E-SBC was deleted through the Acme Packet command line interface (ACLI).
• Pending Bootstrap - Trunk is currently in the “Pending Bootstrap” state because the E-SBC is not yet bootstrapped.
• Pending delete - Trunk is being removed from the NNC-SIPTX database.
• Failed - Number of SIP Trunks for which the Trunk between the SP-SBC and E-SBC has failed. This failure may be due to any of the following scenarios:
- Associated SP-SBC and/or E-SBC has failed due to a
503 (service unavailable) or 481 (Call/Transaction Does Not Exist) error.
- High availability (HA) is currently under way. The current device may be in the process of failing over to a standby device because the primary device has failed. Please wait 15 minutes and then check that the status of the Trunk is out of the failed state.
• Disabled - A Trunk was created when SIPSM was disabled.
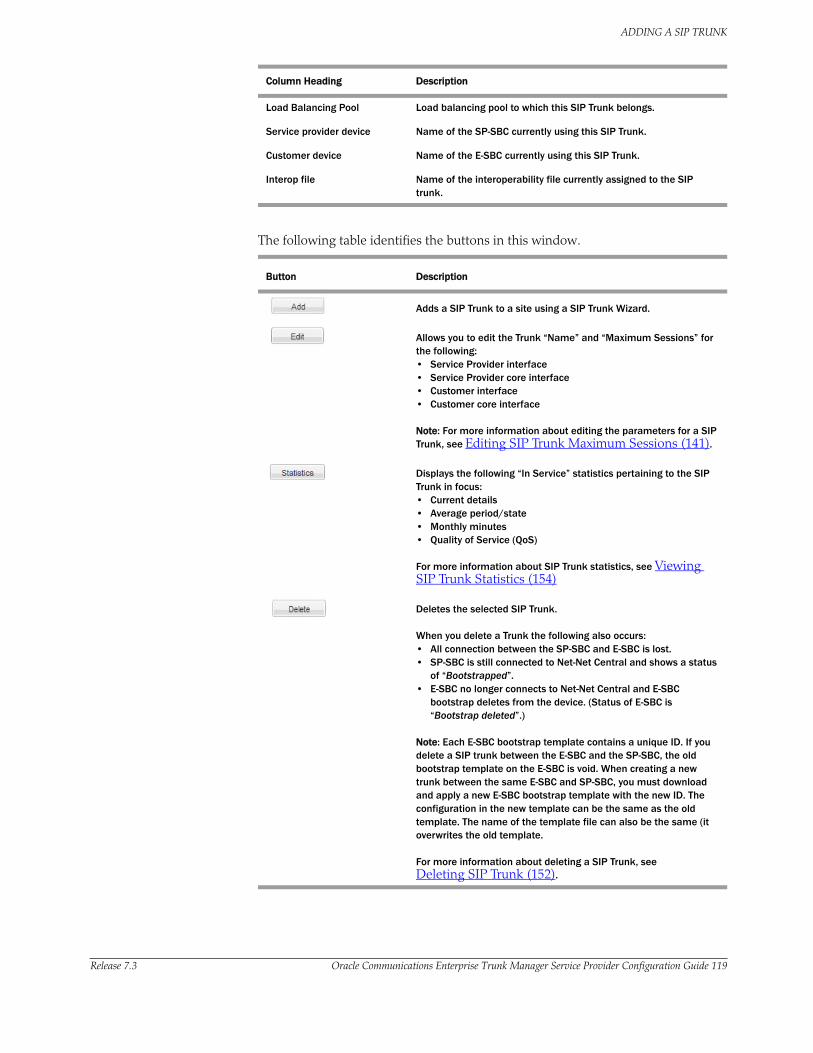
ADDING A SIP TRUNK
Release 7.3 Oracle Communications Enterprise Trunk Manager Service Provider Configuration Guide 119
The following table identifies the buttons in this window.
Button Description
Adds a SIP Trunk to a site using a SIP Trunk Wizard.
Allows you to edit the Trunk “Name” and “Maximum Sessions” for the following:• Service Provider interface• Service Provider core interface• Customer interface• Customer core interface
Note: For more information about editing the parameters for a SIP Trunk, see Editing SIP Trunk Maximum Sessions (141).
Displays the following “In Service” statistics pertaining to the SIP Trunk in focus:• Current details• Average period/state• Monthly minutes• Quality of Service (QoS)
For more information about SIP Trunk statistics, see Viewing SIP Trunk Statistics (154)
Deletes the selected SIP Trunk.
When you delete a Trunk the following also occurs:• All connection between the SP-SBC and E-SBC is lost.• SP-SBC is still connected to Net-Net Central and shows a status
of “Bootstrapped”.• E-SBC no longer connects to Net-Net Central and E-SBC
bootstrap deletes from the device. (Status of E-SBC is “Bootstrap deleted”.)
Note: Each E-SBC bootstrap template contains a unique ID. If you delete a SIP trunk between the E-SBC and the SP-SBC, the old bootstrap template on the E-SBC is void. When creating a new trunk between the same E-SBC and SP-SBC, you must download and apply a new E-SBC bootstrap template with the new ID. The configuration in the new template can be the same as the old template. The name of the template file can also be the same (it overwrites the old template.
For more information about deleting a SIP Trunk, see Deleting SIP Trunk (152).
Load Balancing Pool Load balancing pool to which this SIP Trunk belongs.
Service provider device Name of the SP-SBC currently using this SIP Trunk.
Customer device Name of the E-SBC currently using this SIP Trunk.
Interop file Name of the interoperability file currently assigned to the SIP trunk.
Column Heading Description

ADDING A SIP TRUNK
120 Oracle Communications Enterprise Trunk Manager Service Provider Configuration Guide Release 7.3
The following table identifies the possible status indications that display when the SP-SBC and/or E-SBC is in a specific state.
IF THEN
SP-SBC is bootstrapped, and E-SBC is bootstrapped, after adding the SIP Trunk
auto-config status of Trunk is “Connected”.
SP-SBC is bootstrapped, but E-SBC is not bootstrapped, after adding the SIP Trunk,
auto-config status of Trunk is “Pending Bootstrap”.
SP-SBC is not bootstrapped, and E-SBC is not bootstrapped, after adding the SIP Trunk,
auto-config status of Trunk is “Pending Bootstrap”.
SP-SBC is not bootstrapped, and E-SBC is not bootstrapped, after editing the SIP Trunk,
auto-config status of Trunk is “Pending Bootstrap”.
E-SBC is deleted via the ACLI, auto-config status of Trunk is “Disconnected”.
SP-SBC and E-SBC are bootstrapped, and Trunk is deleted,
auto-config status of Trunk is “Pending delete”.
SP-SBC has failed, after adding the SIP Trunk, auto-config status of Trunk is “Failed”.
SP-SBC and E-SBC were successfully bootstrapped, and either one or both of these devices fail,
auto-config status of Trunk is “Failed”.
3. Click <Add>. The “Add SIP Trunk - Select a Customer Site” window displays.
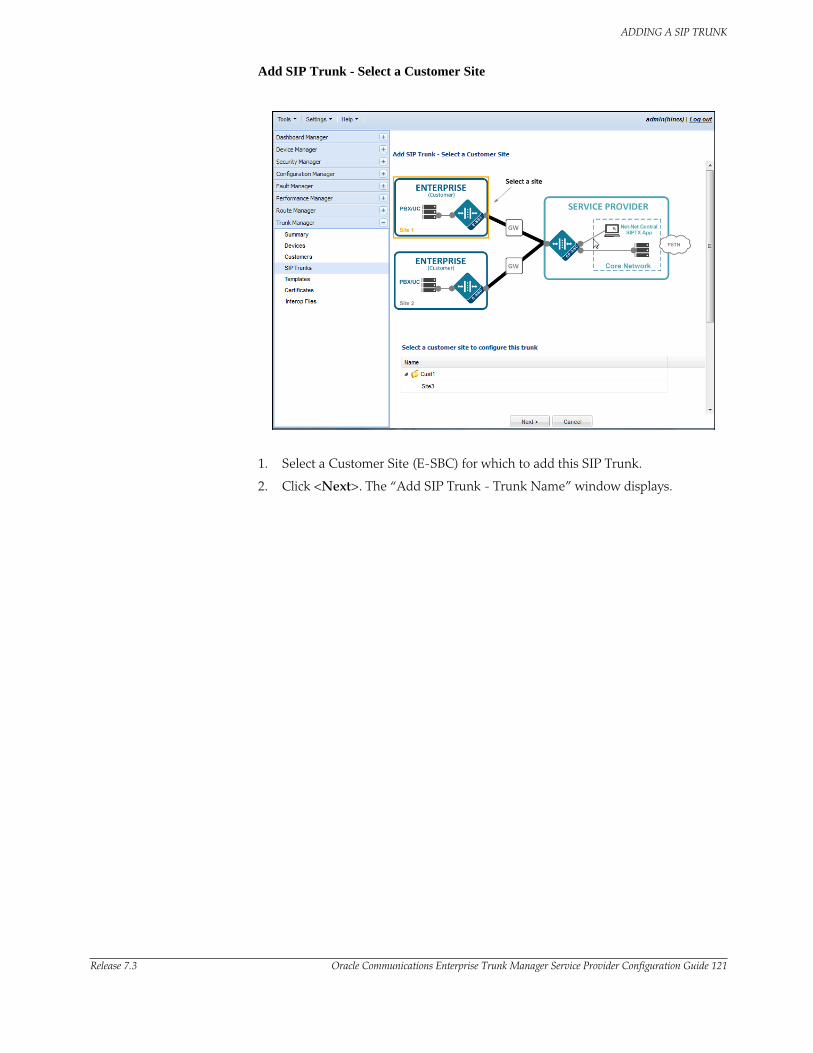
ADDING A SIP TRUNK
Release 7.3 Oracle Communications Enterprise Trunk Manager Service Provider Configuration Guide 121
Add SIP Trunk - Select a Customer Site
1. Select a Customer Site (E-SBC) for which to add this SIP Trunk.
2. Click <Next>. The “Add SIP Trunk - Trunk Name” window displays.
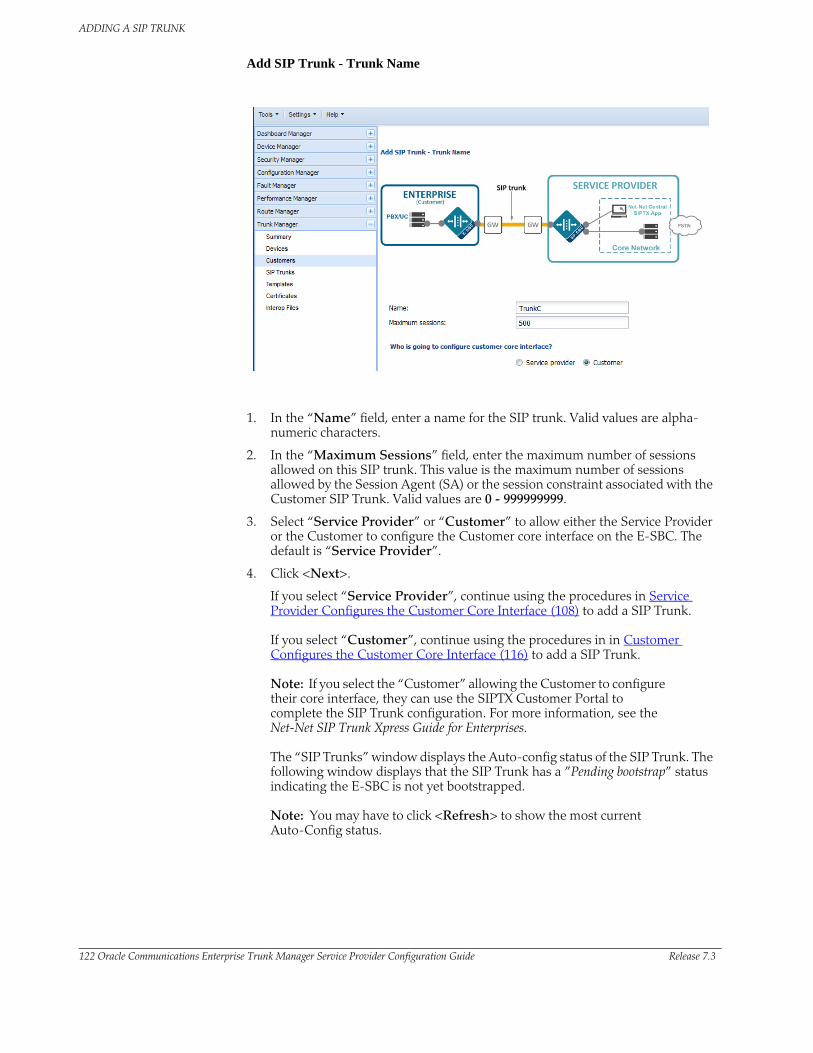
ADDING A SIP TRUNK
122 Oracle Communications Enterprise Trunk Manager Service Provider Configuration Guide Release 7.3
Add SIP Trunk - Trunk Name
1. In the “Name” field, enter a name for the SIP trunk. Valid values are alpha-numeric characters.
2. In the “Maximum Sessions” field, enter the maximum number of sessions allowed on this SIP trunk. This value is the maximum number of sessions allowed by the Session Agent (SA) or the session constraint associated with the Customer SIP Trunk. Valid values are 0 - 999999999.
3. Select “Service Provider” or “Customer” to allow either the Service Provider or the Customer to configure the Customer core interface on the E-SBC. The default is “Service Provider”.
4. Click <Next>.
If you select “Service Provider”, continue using the procedures in Service Provider Configures the Customer Core Interface (108) to add a SIP Trunk. If you select “Customer”, continue using the procedures in in Customer Configures the Customer Core Interface (116) to add a SIP Trunk.
Note: If you select the “Customer” allowing the Customer to configure their core interface, they can use the SIPTX Customer Portal to complete the SIP Trunk configuration. For more information, see the Net-Net SIP Trunk Xpress Guide for Enterprises.
The “SIP Trunks” window displays the Auto-config status of the SIP Trunk. The following window displays that the SIP Trunk has a ”Pending bootstrap” status indicating the E-SBC is not yet bootstrapped.
Note: You may have to click <Refresh> to show the most current Auto-Config status.
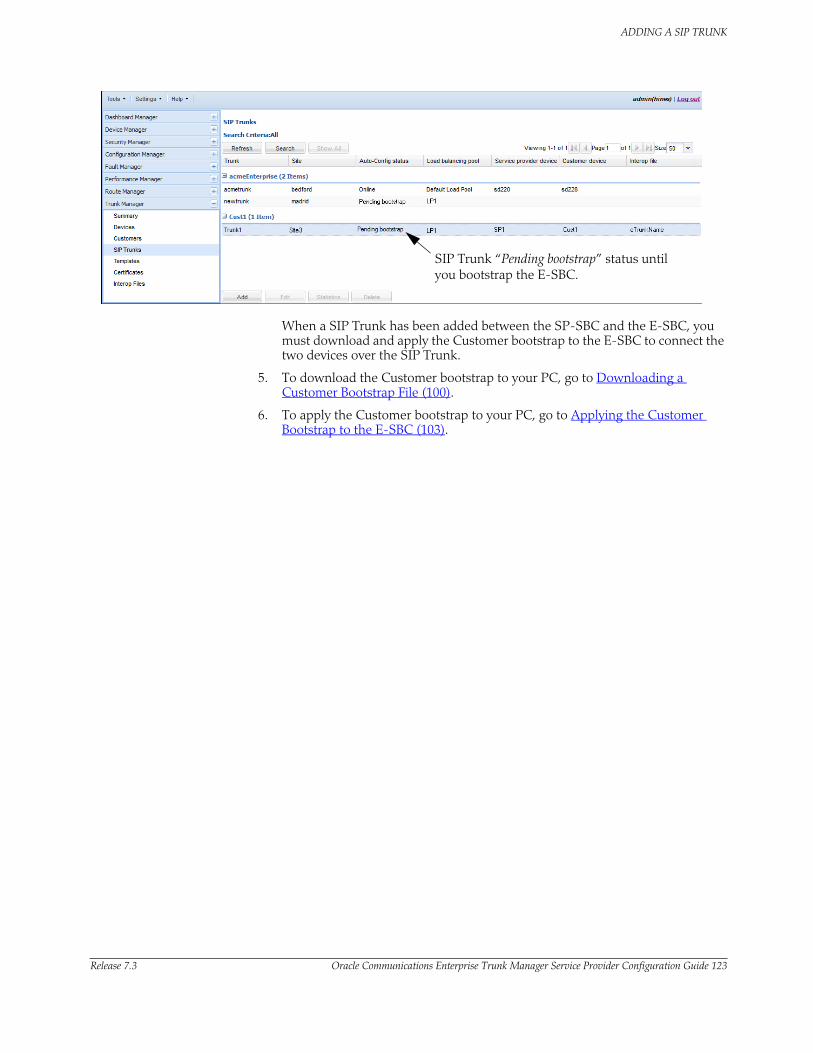
SIP Trunk “Pending bootstrap” status until you bootstrap the E-SBC.
ADDING A SIP TRUNK
Release 7.3 Oracle Communications Enterprise Trunk Manager Service Provider Configuration Guide 123
When a SIP Trunk has been added between the SP-SBC and the E-SBC, you must download and apply the Customer bootstrap to the E-SBC to connect the two devices over the SIP Trunk.
5. To download the Customer bootstrap to your PC, go to Downloading a Customer Bootstrap File (100).
6. To apply the Customer bootstrap to your PC, go to Applying the Customer Bootstrap to the E-SBC (103).

ADDING A SIP TRUNK
124 Oracle Communications Enterprise Trunk Manager Service Provider Configuration Guide Release 7.3

Release 7.3 Oracle Communications Enterprise Trunk Manager Service Provider Configuration Guide 125
6 Additional Functions
Introduction
This chapter provides information about additional functions available using the Trunk Manager application in Net-Net Central.
When the SP-SBC and E-SBC have been added to your network, and a SIP Trunk has been established between the two devices, you can perform the following functions using Net-Net Central’s Trunk Manager application:
Service Provider Devices (SP-SBCs) (126)
• View device details
• Delete device
• Search device
Load Balancing Pools (165)
• Add pool
• Search pool
• Edit pool
• Delete pool
Enterprise Devices (E-SBCs) (133)
• View device details
• Edit device
• Delete device
• Search device
Bootstrap Templates for the SP-SBC and E-SBC (172)
• View templates
• Download template
SIP Trunks (141)
• Edit trunks
• Delete trunks
• View trunk statistics
Certificates (178)
• View certificates
• Add certificates
• Search certificates
• Delete certificates
Interop Files (185)
• Add Interop file
• View Interop file
• Edit Interop file
• Delete Interop file
• Download Interop file
Installation Setup File (194)
• Edit installation setup file
• Delete installation setup file
Configuring High Availability (HA) (198)
• Configuring HA for an SP-SBC
• Configuring HA for an E-SBC
• Configuring HA when creating a Trunk
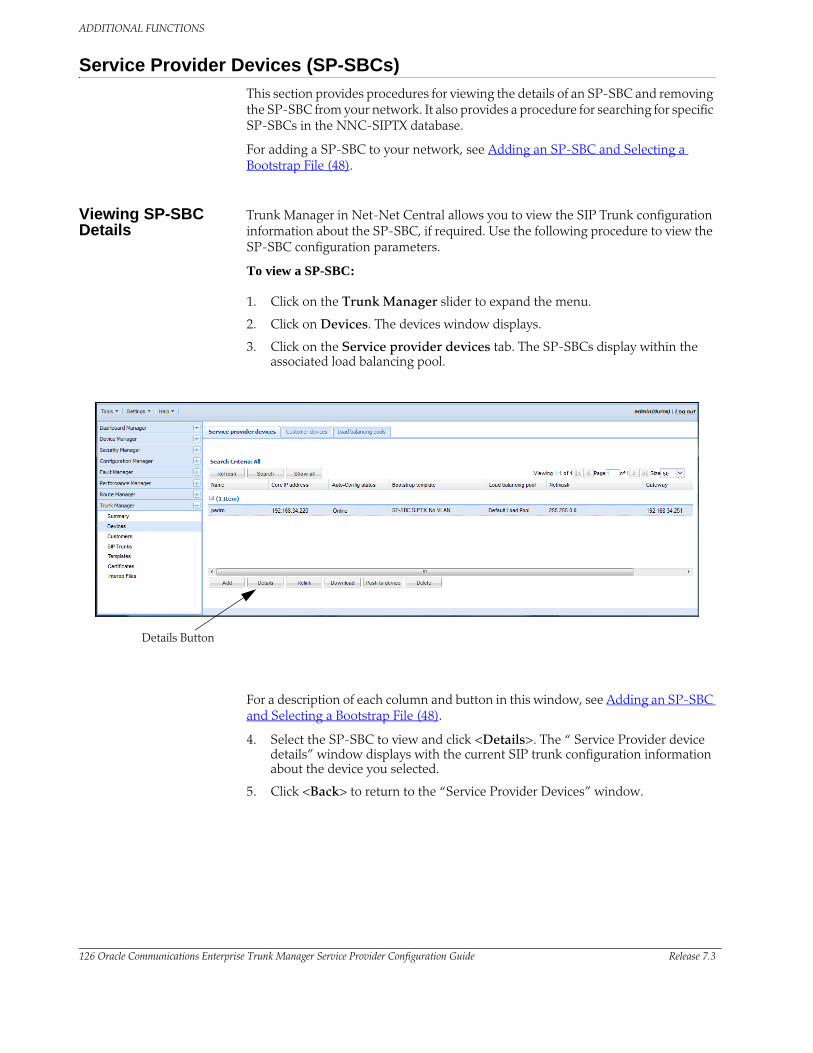
ADDITIONAL FUNCTIONS
126 Oracle Communications Enterprise Trunk Manager Service Provider Configuration Guide Release 7.3
Service Provider Devices (SP-SBCs)
This section provides procedures for viewing the details of an SP-SBC and removing the SP-SBC from your network. It also provides a procedure for searching for specific SP-SBCs in the NNC-SIPTX database.
For adding a SP-SBC to your network, see Adding an SP-SBC and Selecting a Bootstrap File (48).
Viewing SP-SBC Details
Trunk Manager in Net-Net Central allows you to view the SIP Trunk configuration information about the SP-SBC, if required. Use the following procedure to view the SP-SBC configuration parameters.
To view a SP-SBC:
1. Click on the Trunk Manager slider to expand the menu.
2. Click on Devices. The devices window displays.
3. Click on the Service provider devices tab. The SP-SBCs display within the associated load balancing pool.
Details Button
For a description of each column and button in this window, see Adding an SP-SBC and Selecting a Bootstrap File (48).
4. Select the SP-SBC to view and click <Details>. The “ Service Provider device details” window displays with the current SIP trunk configuration information about the device you selected.
5. Click <Back> to return to the “Service Provider Devices” window.
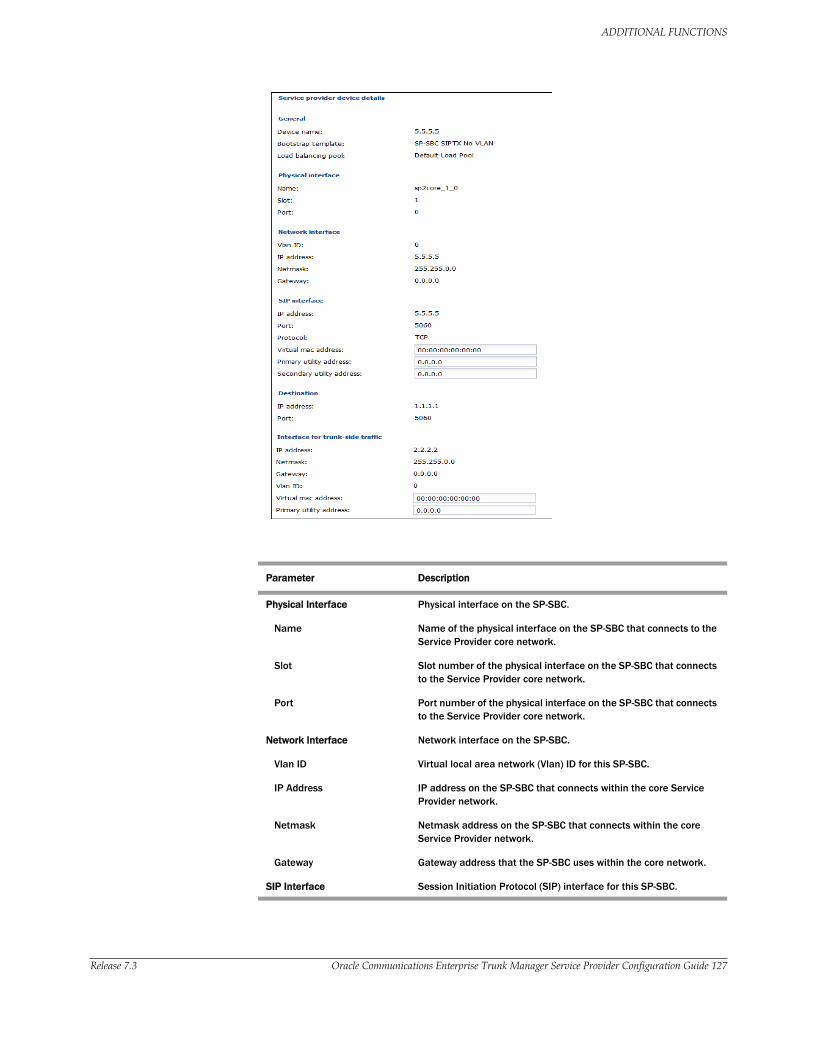
ADDITIONAL FUNCTIONS
Release 7.3 Oracle Communications Enterprise Trunk Manager Service Provider Configuration Guide 127
Parameter Description
Physical Interface Physical interface on the SP-SBC.
Name Name of the physical interface on the SP-SBC that connects to the Service Provider core network.
Slot Slot number of the physical interface on the SP-SBC that connects to the Service Provider core network.
Port Port number of the physical interface on the SP-SBC that connects to the Service Provider core network.
Network Interface Network interface on the SP-SBC.
Vlan ID Virtual local area network (Vlan) ID for this SP-SBC.
IP Address IP address on the SP-SBC that connects within the core Service Provider network.
Netmask Netmask address on the SP-SBC that connects within the core Service Provider network.
Gateway Gateway address that the SP-SBC uses within the core network.
SIP Interface Session Initiation Protocol (SIP) interface for this SP-SBC.

ADDITIONAL FUNCTIONS
128 Oracle Communications Enterprise Trunk Manager Service Provider Configuration Guide Release 7.3
Deleting a SP-SBC You can delete a SP-SBC from the Trunk Manager as required.
Note: Deleting the SP-SBC removes it from Trunk Manager only. The device still exists in Device Manager.
The deletion of an SP-SBC depends on the current Auto-Config status of that device. The following table identifies when an SP-SBC can be deleted from Trunk Manager.
IF Auto-Config status is THEN
Bootstrapped the SP-SBC can be deleted IF no SIP Trunk is associated with the device. Before deleting, Trunk Manager checks for an associated SIP Trunk. If one does exist, the device is not deleted.If one does not exist, the SP-SBC is deleted.
Pending Bootstrap the SP-SBC can be deleted IF no SIP Trunk is associated with the device. Before deleting, Trunk Manager checks for an associated SIP Trunk. If one does exist, the device is not deleted.If one does not exist, the SP-SBC is deleted.
Bootstrap deleted the SP-SBC can be deleted. No SIP Trunk is associated with the device.
Failed the SP-SBC can be deleted IF no SIP Trunk is associated with the device. Before deleting, Trunk Manager checks for an associated SIP Trunk. If one does exist, the device is not deleted.If one doesn’t exist, the SP-SBC is deleted.
Note: A failed device indicates a subscription to the device from Net-Net Central has failed.
IP Address IP address of the SIP interface on the SP-SBC that sends packets to the core network.
Port SIP interface port that the SP-SBC uses to send packets to the core network.
Protocol Protocol that the SP-SBC uses to send packets from the SIP interface on the SP-SBC to Net-Net Central.
Bootstrap template The Service Provider bootstrap template currently loaded on the device.
Trunk Information SIP Trunk parameters currently configured on the SP-SBC.
Trunk-side IP Address IP address of the SP-SBC that connects the Trunk to the E-SBC.
Trunk-side network mask Network mask address of the SP-SBC that connects the Trunk to the E-SBC.
Trunk-side network gateway Gateway IP address that connects the Trunk from the SP-SBC to the E-SBC.
Trunk-side Vlan ID VLAN ID on the SP-SBC that connects the Trunk to the E-SBC.
Parameter Description

ADDITIONAL FUNCTIONS
Release 7.3 Oracle Communications Enterprise Trunk Manager Service Provider Configuration Guide 129
Use the following procedure to delete an SP-SBC from your Trunk Manager configuration.
Note: If an SP-SBC is connected to an E-SBC via an established SIP Trunk, you cannot delete the SP-SBC. You must first delete the SIP Trunk in order to delete the associated SP-SBC. To delete a Trunk see Deleting SIP Trunk (152).
To delete an SP-SBC:
1. Click on the Trunk Manager slider to expand the menu.
2. Click on Devices. The devices window displays.
3. Click on the Service provider devices tab. The SP-SBCs display within the associated load balancing pool.
Delete Button
For a description of each column and button in this window, see Adding an SP-SBC and Selecting a Bootstrap File (48).
4. Select the SP-SBC you want to delete and click <Delete>. The following is an example of the prompt that displays: Are you sure you want to delete selected service provider SBC <Service Provider device name>?
5. Click <Yes> to delete the device from Trunk Manager or Click <No> to cancel the delete function. The SP-SBC is deleted from the “Trunk Manager” slider.
Note: Deleting the SP-SBC removes it from Trunk Manager only. The device still exists in Device Manager.
.
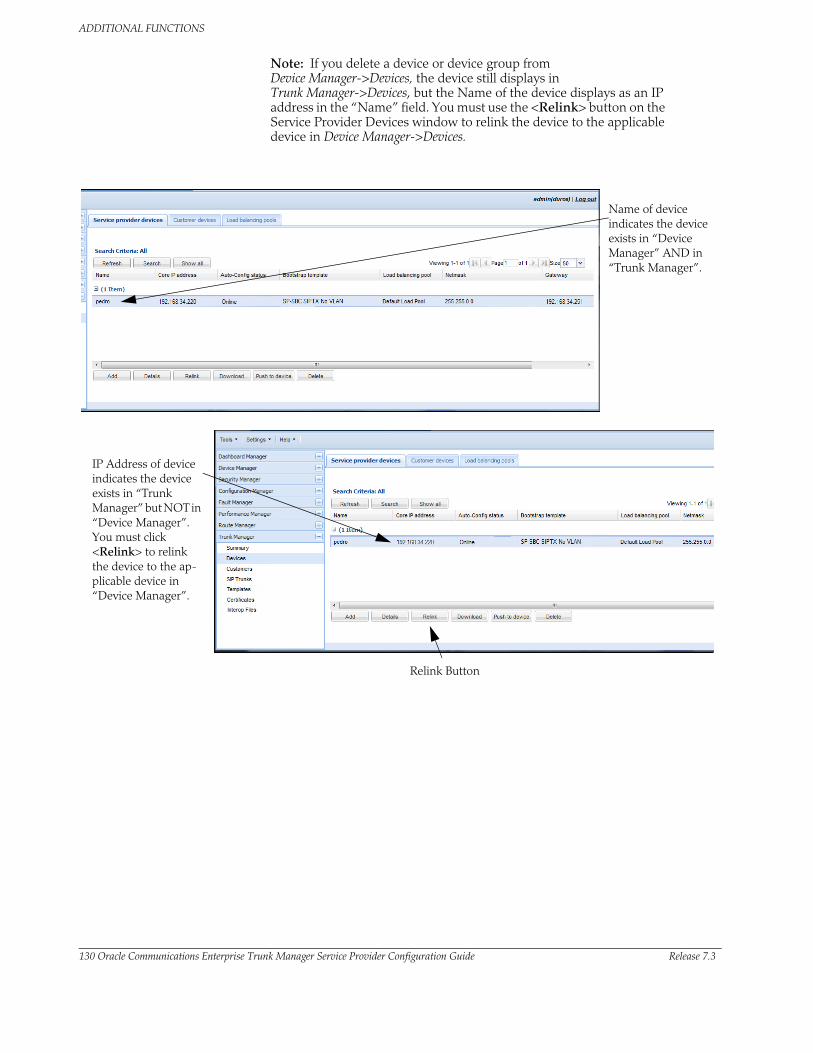
ADDITIONAL FUNCTIONS
130 Oracle Communications Enterprise Trunk Manager Service Provider Configuration Guide Release 7.3
Note: If you delete a device or device group from Device Manager->Devices, the device still displays in Trunk Manager->Devices, but the Name of the device displays as an IP address in the “Name” field. You must use the <Relink> button on the Service Provider Devices window to relink the device to the applicable device in Device Manager->Devices.
Trunk Manager/SP-SBCs Window
IP Address of device indicates the device exists in “Trunk Manager” but NOT in “Device Manager”. You must click <Relink> to relink the device to the ap-plicable device in “Device Manager”.
Relink Button
Name of device indicates the device exists in “Device Manager” AND in “Trunk Manager”.
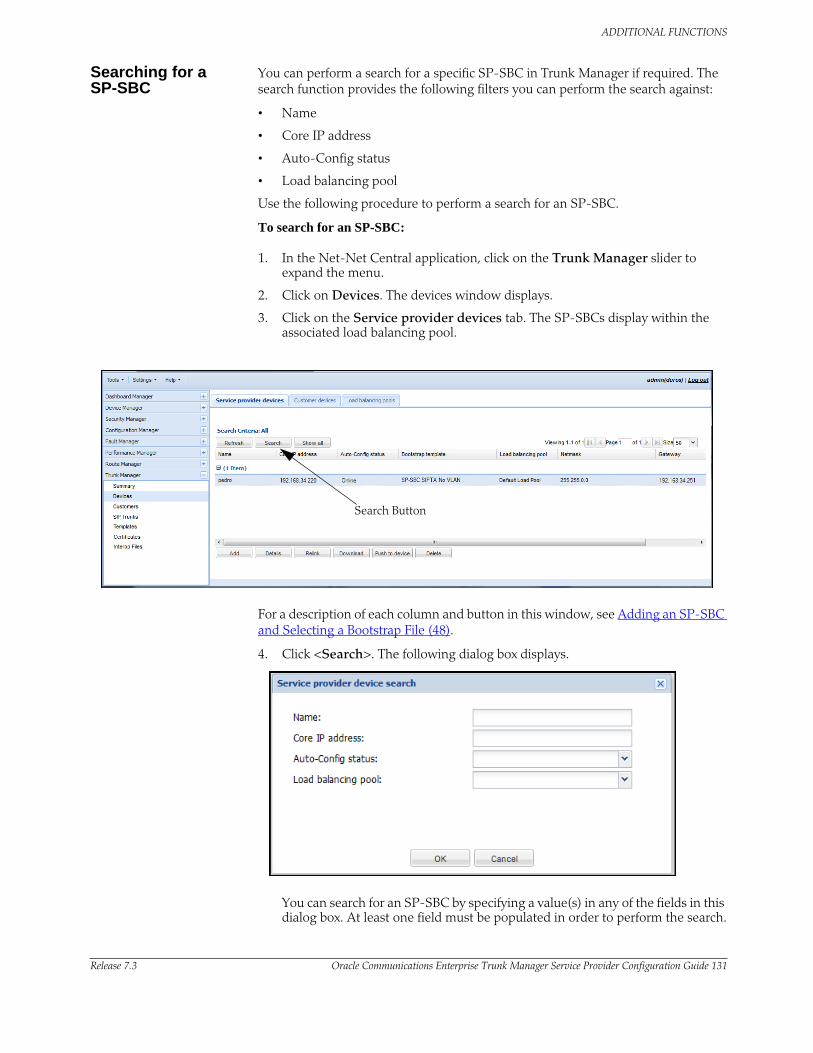
ADDITIONAL FUNCTIONS
Release 7.3 Oracle Communications Enterprise Trunk Manager Service Provider Configuration Guide 131
Searching for a SP-SBC
You can perform a search for a specific SP-SBC in Trunk Manager if required. The search function provides the following filters you can perform the search against:
• Name
• Core IP address
• Auto-Config status
• Load balancing pool
Use the following procedure to perform a search for an SP-SBC.
To search for an SP-SBC:
1. In the Net-Net Central application, click on the Trunk Manager slider to expand the menu.
2. Click on Devices. The devices window displays.
3. Click on the Service provider devices tab. The SP-SBCs display within the associated load balancing pool.
Search Button
For a description of each column and button in this window, see Adding an SP-SBC and Selecting a Bootstrap File (48).
4. Click <Search>. The following dialog box displays.
You can search for an SP-SBC by specifying a value(s) in any of the fields in this dialog box. At least one field must be populated in order to perform the search.

ADDITIONAL FUNCTIONS
132 Oracle Communications Enterprise Trunk Manager Service Provider Configuration Guide Release 7.3
5. In the “Name” field, enter the name of the SP-SBC for which you are searching. Valid values are alpha-numeric characters.
6. In the “Core IP address” field, enter the core IP address of the SP-SBC in your network. Values must be entered in the format 0.0.0.0. For example, 192.45.3.4.
7. In the “Auto-Config status” field, enter the current auto configuration status of the SP-SBC in your network. Valid values are:
• Bootstrapped
• Bootstrap Deleted
• Pending Bootstrap
• Failed
Note: For a description of each of these Auto-Config states, see Adding an SP-SBC and Selecting a Bootstrap File (48).
8. In the “Load balancing pool” field, select the load balancing pool to which the SP-SBC belongs. Valid values are dependant on the load balancing pool(s) currently in your network. The default is “Default Load Pool”.
9. Click <OK>. The SP-SBC for which you searched, displays on the Service Provider Devices window. or Click <Cancel> to cancel the search function.
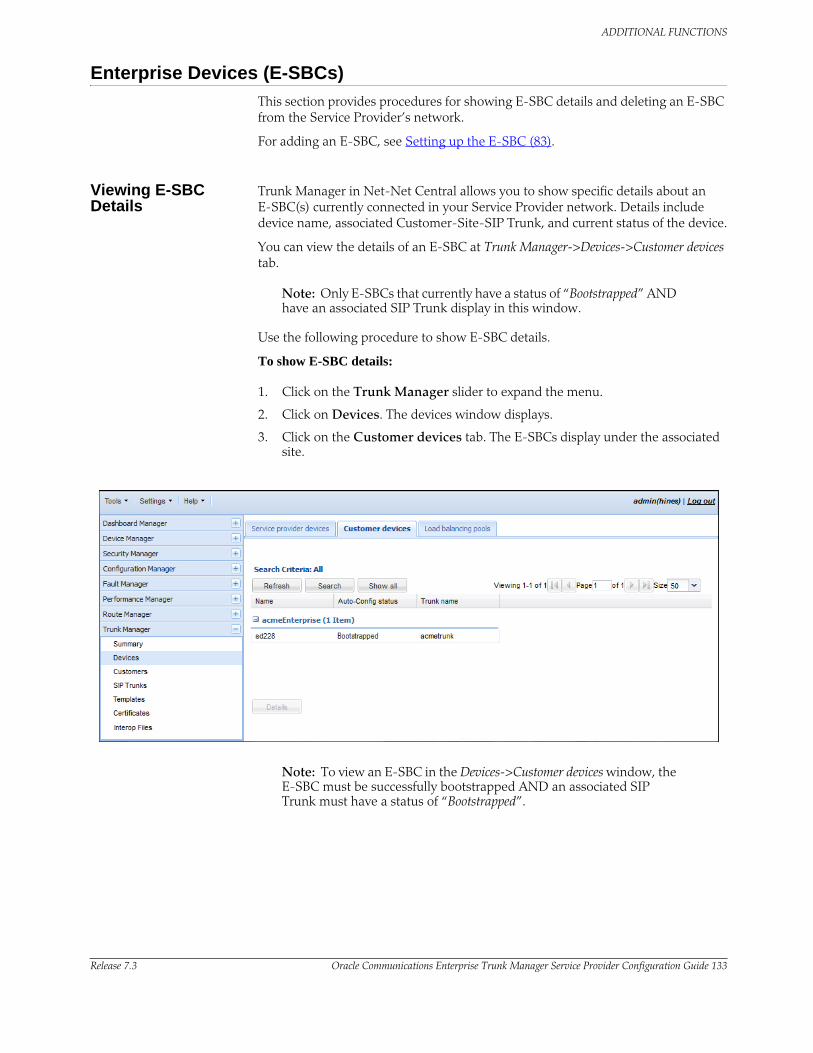
ADDITIONAL FUNCTIONS
Release 7.3 Oracle Communications Enterprise Trunk Manager Service Provider Configuration Guide 133
Enterprise Devices (E-SBCs)
This section provides procedures for showing E-SBC details and deleting an E-SBC from the Service Provider’s network.
For adding an E-SBC, see Setting up the E-SBC (83).
Viewing E-SBC Details
Trunk Manager in Net-Net Central allows you to show specific details about an E-SBC(s) currently connected in your Service Provider network. Details include device name, associated Customer-Site-SIP Trunk, and current status of the device.
You can view the details of an E-SBC at Trunk Manager->Devices->Customer devices tab.
Note: Only E-SBCs that currently have a status of “Bootstrapped” AND have an associated SIP Trunk display in this window.
Use the following procedure to show E-SBC details.
To show E-SBC details:
1. Click on the Trunk Manager slider to expand the menu.
2. Click on Devices. The devices window displays.
3. Click on the Customer devices tab. The E-SBCs display under the associated site.
Note: To view an E-SBC in the Devices->Customer devices window, the E-SBC must be successfully bootstrapped AND an associated SIP Trunk must have a status of “Bootstrapped”.
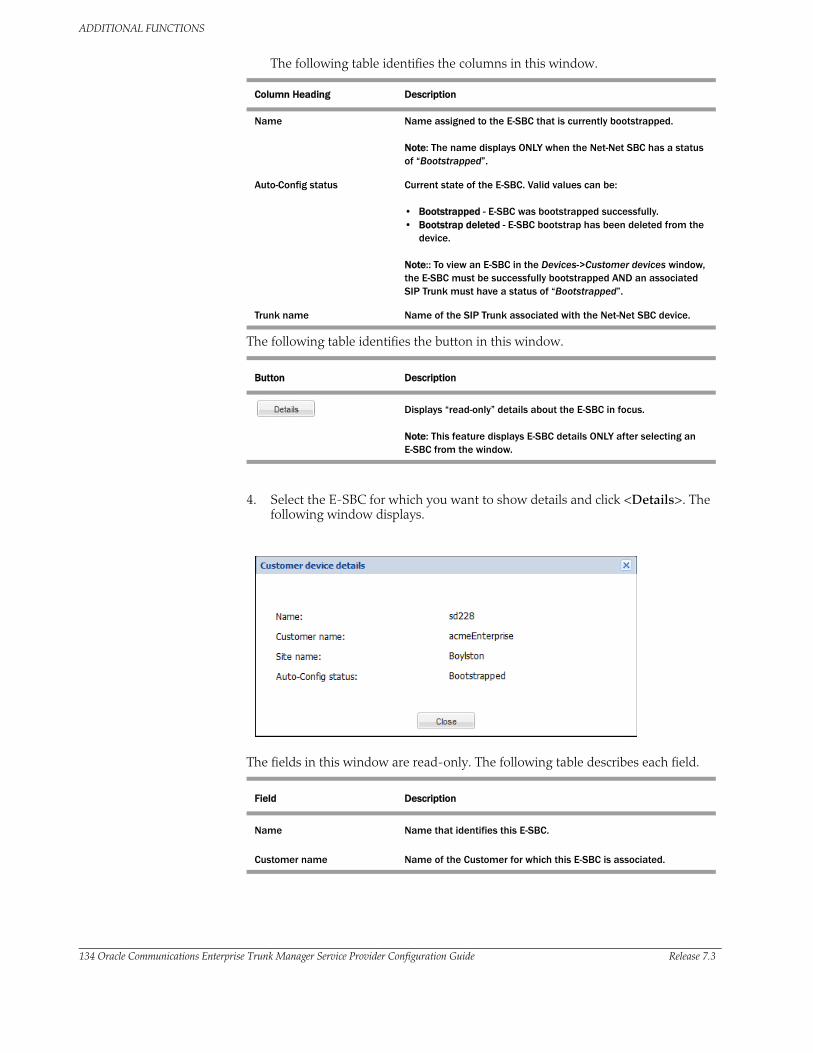
ADDITIONAL FUNCTIONS
134 Oracle Communications Enterprise Trunk Manager Service Provider Configuration Guide Release 7.3
The following table identifies the columns in this window.
Column Heading Description
Name Name assigned to the E-SBC that is currently bootstrapped.
Note: The name displays ONLY when the Net-Net SBC has a status of “Bootstrapped”.
Auto-Config status Current state of the E-SBC. Valid values can be:
• Bootstrapped - E-SBC was bootstrapped successfully. • Bootstrap deleted - E-SBC bootstrap has been deleted from the
device.
Note:: To view an E-SBC in the Devices->Customer devices window, the E-SBC must be successfully bootstrapped AND an associated SIP Trunk must have a status of “Bootstrapped”.
Trunk name Name of the SIP Trunk associated with the Net-Net SBC device.
The following table identifies the button in this window.
Button Description
Displays “read-only” details about the E-SBC in focus.
Note: This feature displays E-SBC details ONLY after selecting an E-SBC from the window.
4. Select the E-SBC for which you want to show details and click <Details>. The following window displays.
The fields in this window are read-only. The following table describes each field.
Field Description
Name Name that identifies this E-SBC.
Customer name Name of the Customer for which this E-SBC is associated.

ADDITIONAL FUNCTIONS
Release 7.3 Oracle Communications Enterprise Trunk Manager Service Provider Configuration Guide 135
5. Click <Close> to close the Customer Details window.
Site Name Name of the site for which this E-SBC is associated.
Auto-Config status Current state of the E-SBC. Valid values can be:
• Bootstrapped - E-SBC was bootstrapped successfully. • Bootstrap deleted - E-SBC bootstrap has been deleted from the
device.
Field Description
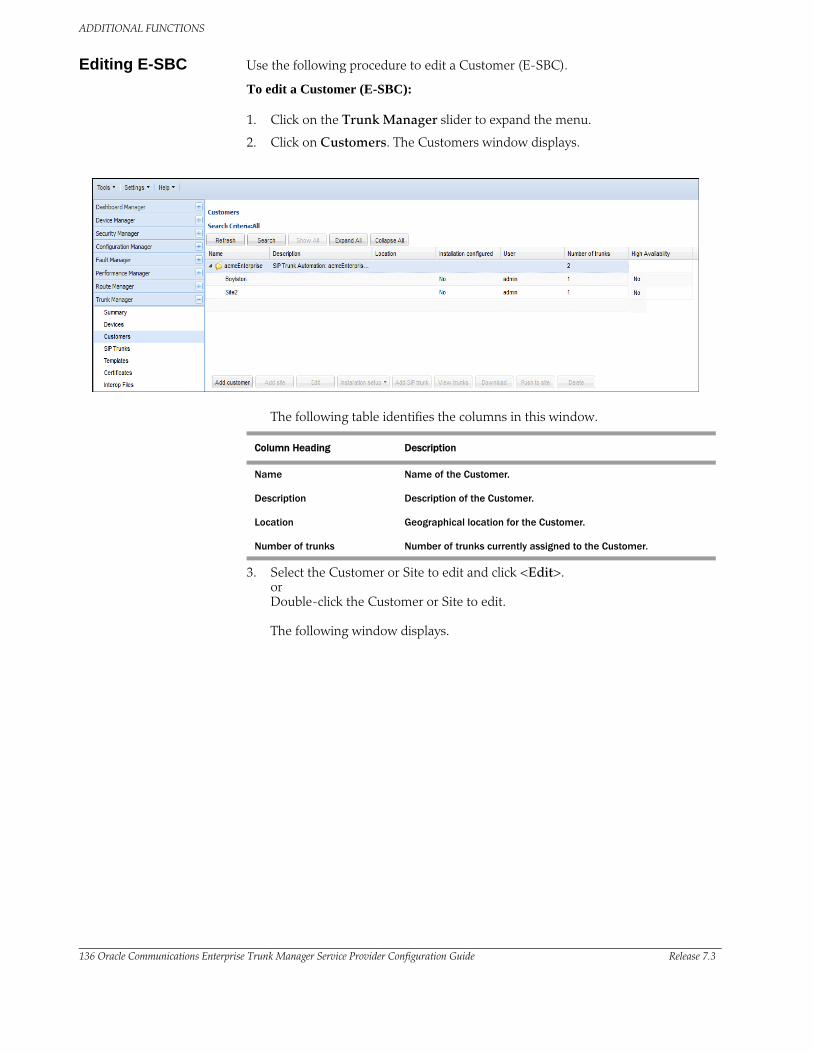
ADDITIONAL FUNCTIONS
136 Oracle Communications Enterprise Trunk Manager Service Provider Configuration Guide Release 7.3
Editing E-SBC Use the following procedure to edit a Customer (E-SBC).
To edit a Customer (E-SBC):
1. Click on the Trunk Manager slider to expand the menu.
2. Click on Customers. The Customers window displays.
The following table identifies the columns in this window.
Column Heading Description
Name Name of the Customer.
Description Description of the Customer.
Location Geographical location for the Customer.
Number of trunks Number of trunks currently assigned to the Customer.
3. Select the Customer or Site to edit and click <Edit>. or Double-click the Customer or Site to edit. The following window displays.
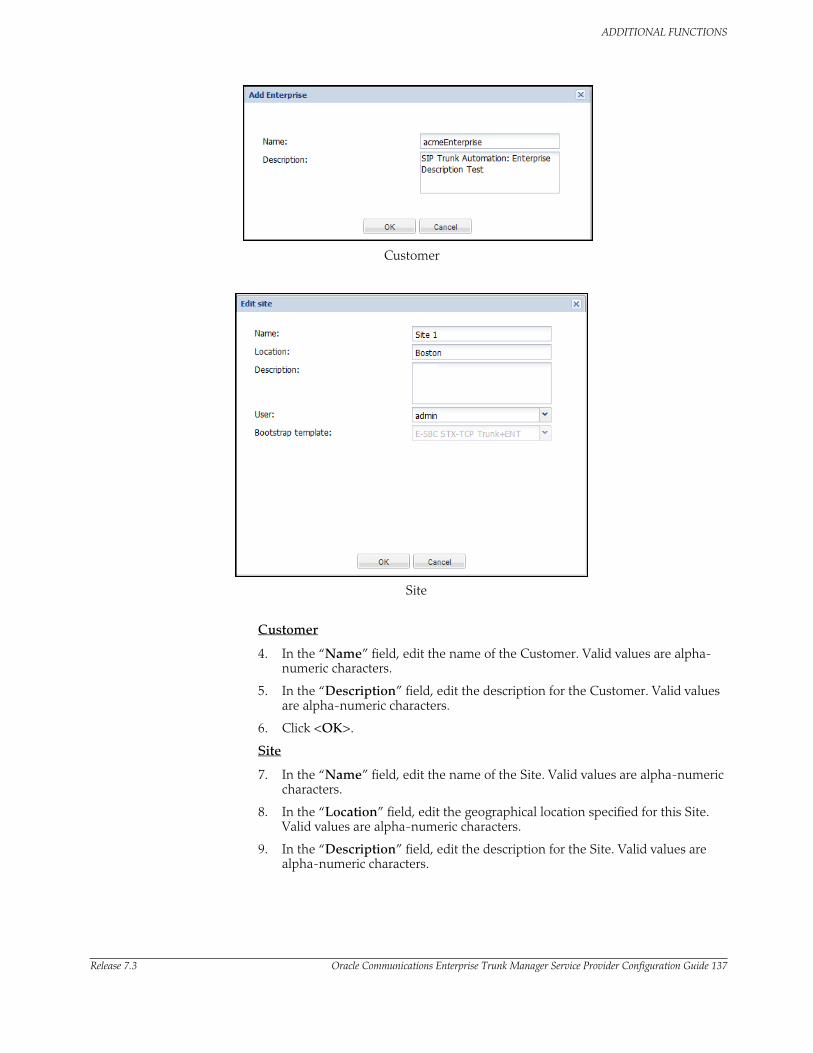
Customer
Site
ADDITIONAL FUNCTIONS
Release 7.3 Oracle Communications Enterprise Trunk Manager Service Provider Configuration Guide 137
Customer
4. In the “Name” field, edit the name of the Customer. Valid values are alpha-numeric characters.
5. In the “Description” field, edit the description for the Customer. Valid values are alpha-numeric characters.
6. Click <OK>.
Site
7. In the “Name” field, edit the name of the Site. Valid values are alpha-numeric characters.
8. In the “Location” field, edit the geographical location specified for this Site. Valid values are alpha-numeric characters.
9. In the “Description” field, edit the description for the Site. Valid values are alpha-numeric characters.

ADDITIONAL FUNCTIONS
138 Oracle Communications Enterprise Trunk Manager Service Provider Configuration Guide Release 7.3
10. In the “User” field, select the user permissions for this Site. The value you select applies to all of the Net-Net SBCs associated with this site. To add a new user, see To add a new User: (91).
11. The “Bootstrap template” field is read-only.
Note: If you want to change the bootstrap template on this E-SBC, you must delete the device and add a new E-SBC with the new bootstrap template. Deleting an E-SBC loses communication with the associated SP-SBC and the SIP Trunk. For more information about deleting an E-SBC, see Deleting E-SBC (139).
12. Click <OK>.
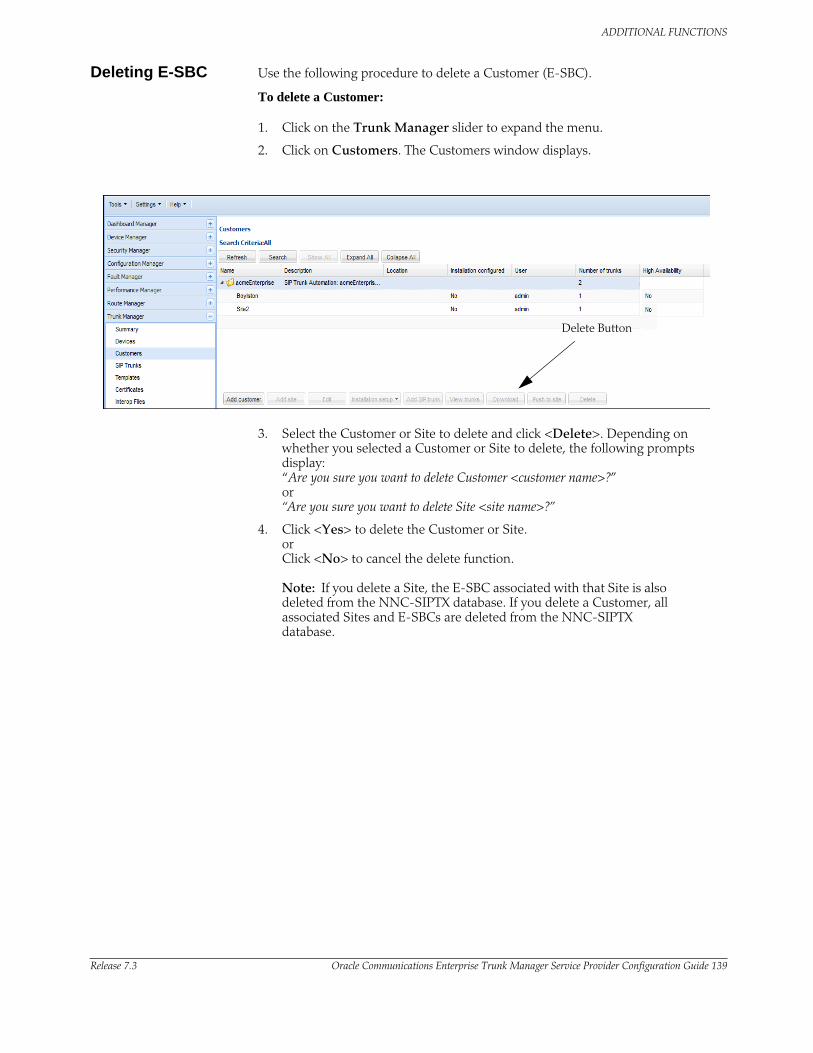
ADDITIONAL FUNCTIONS
Release 7.3 Oracle Communications Enterprise Trunk Manager Service Provider Configuration Guide 139
Deleting E-SBC Use the following procedure to delete a Customer (E-SBC).
To delete a Customer:
1. Click on the Trunk Manager slider to expand the menu.
2. Click on Customers. The Customers window displays.
Delete Button
3. Select the Customer or Site to delete and click <Delete>. Depending on whether you selected a Customer or Site to delete, the following prompts display: “Are you sure you want to delete Customer <customer name>?” or “Are you sure you want to delete Site <site name>?”
4. Click <Yes> to delete the Customer or Site. or Click <No> to cancel the delete function.
Note: If you delete a Site, the E-SBC associated with that Site is also deleted from the NNC-SIPTX database. If you delete a Customer, all associated Sites and E-SBCs are deleted from the NNC-SIPTX database.
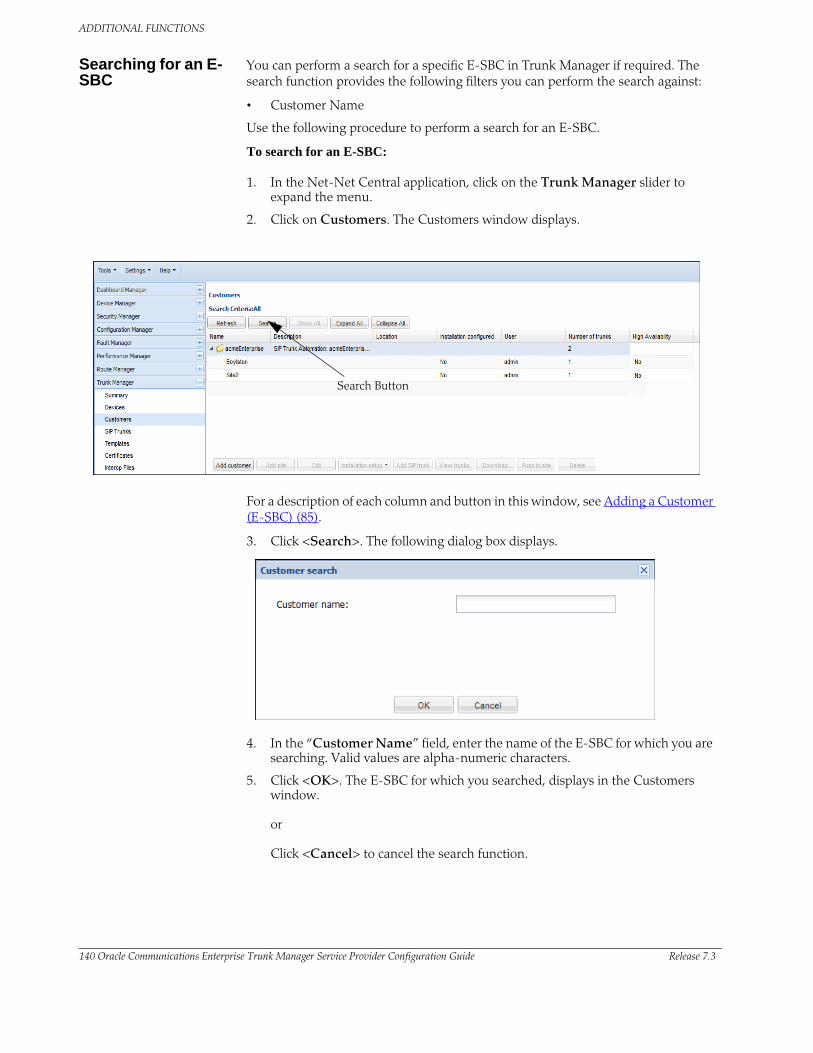
ADDITIONAL FUNCTIONS
140 Oracle Communications Enterprise Trunk Manager Service Provider Configuration Guide Release 7.3
Searching for an E-SBC
You can perform a search for a specific E-SBC in Trunk Manager if required. The search function provides the following filters you can perform the search against:
• Customer Name
Use the following procedure to perform a search for an E-SBC.
To search for an E-SBC:
1. In the Net-Net Central application, click on the Trunk Manager slider to expand the menu.
2. Click on Customers. The Customers window displays.
Search Button
For a description of each column and button in this window, see Adding a Customer (E-SBC) (85).
3. Click <Search>. The following dialog box displays.
4. In the “Customer Name” field, enter the name of the E-SBC for which you are searching. Valid values are alpha-numeric characters.
5. Click <OK>. The E-SBC for which you searched, displays in the Customers window. or Click <Cancel> to cancel the search function.
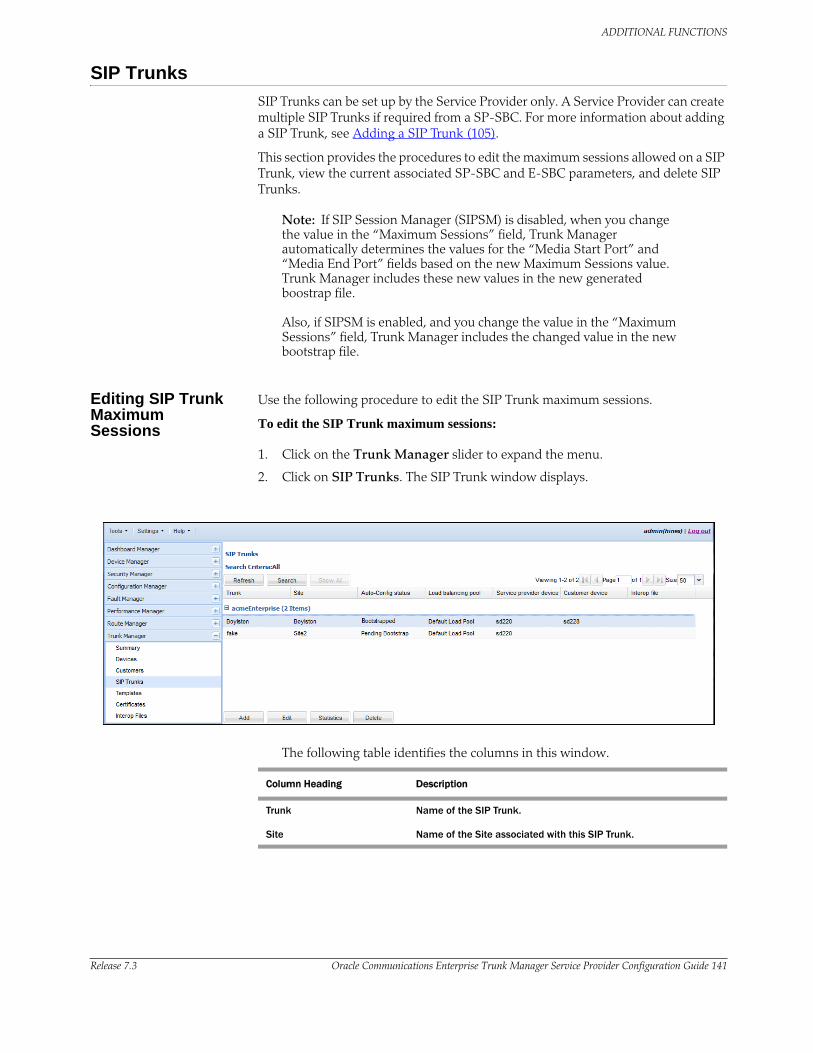
ADDITIONAL FUNCTIONS
Release 7.3 Oracle Communications Enterprise Trunk Manager Service Provider Configuration Guide 141
SIP Trunks
SIP Trunks can be set up by the Service Provider only. A Service Provider can create multiple SIP Trunks if required from a SP-SBC. For more information about adding a SIP Trunk, see Adding a SIP Trunk (105).
This section provides the procedures to edit the maximum sessions allowed on a SIP Trunk, view the current associated SP-SBC and E-SBC parameters, and delete SIP Trunks.
Note: If SIP Session Manager (SIPSM) is disabled, when you change the value in the “Maximum Sessions” field, Trunk Manager automatically determines the values for the “Media Start Port” and “Media End Port” fields based on the new Maximum Sessions value. Trunk Manager includes these new values in the new generated boostrap file. Also, if SIPSM is enabled, and you change the value in the “Maximum Sessions” field, Trunk Manager includes the changed value in the new bootstrap file.
Editing SIP Trunk Maximum Sessions
Use the following procedure to edit the SIP Trunk maximum sessions.
To edit the SIP Trunk maximum sessions:
1. Click on the Trunk Manager slider to expand the menu.
2. Click on SIP Trunks. The SIP Trunk window displays.
The following table identifies the columns in this window.
Column Heading Description
Trunk Name of the SIP Trunk.
Site Name of the Site associated with this SIP Trunk.

ADDITIONAL FUNCTIONS
142 Oracle Communications Enterprise Trunk Manager Service Provider Configuration Guide Release 7.3
The following table identifies the buttons in this window.
Auto-Config status Current status of the SIP Trunk. Status can be:• Connected - Trunk successfully connected to the SP-SBC and
the E-SBC. Trunk is connected between the two devices.• Disconnected - Trunk is currently undergoing maintenance OR
an E-SBC was deleted through the Acme Packet command line interface (ACLI).
• Pending Bootstrap - Trunk is currently in the “Pending Bootstrap” state because the E-SBC is not yet bootstrapped.
• Pending delete - Trunk is being removed from the NNC-SIPTX database.
• Failed - Trunk connection between the SP-SBC and E-SBC has failed. This may be due to any of the following scenarios: - Associated SP-SBC and/or E-SBC has failed due to a
503 (service unavailable) or 481 (Call/Transaction Does Not Exist) error.
- Trunk connection has failed - High availability (HA) is currently under way. The current
device may be in the process of failing over to a standby device because the primary device has failed. Please wait 15 minutes and then check that the status of the Trunk is out of the “Failed” state.
• Disabled - A Trunk was created when SIPSM was disabled.
Load Balancing Pool The load balancing pool for which this SIP Trunk belongs.
Service provider device Name of the SP-SBC currently using this SIP Trunk.
Customer device Name of the E-SBC currently using this SIP Trunk.
Interop File Name of the Interop file currently applied to this SIP Trunk.
Button Description
Adds a SIP Trunk to a site using a SIP Trunk Wizard.
Allows you to edit the Trunk “Name” and “Maximum Sessions” for the following:• Service Provider interface• Service Provider core interface• Customer interface• Customer core interface
Note: For more information about editing the parameters for a SIP Trunk, see Editing SIP Trunk Maximum Sessions (141).
Column Heading Description
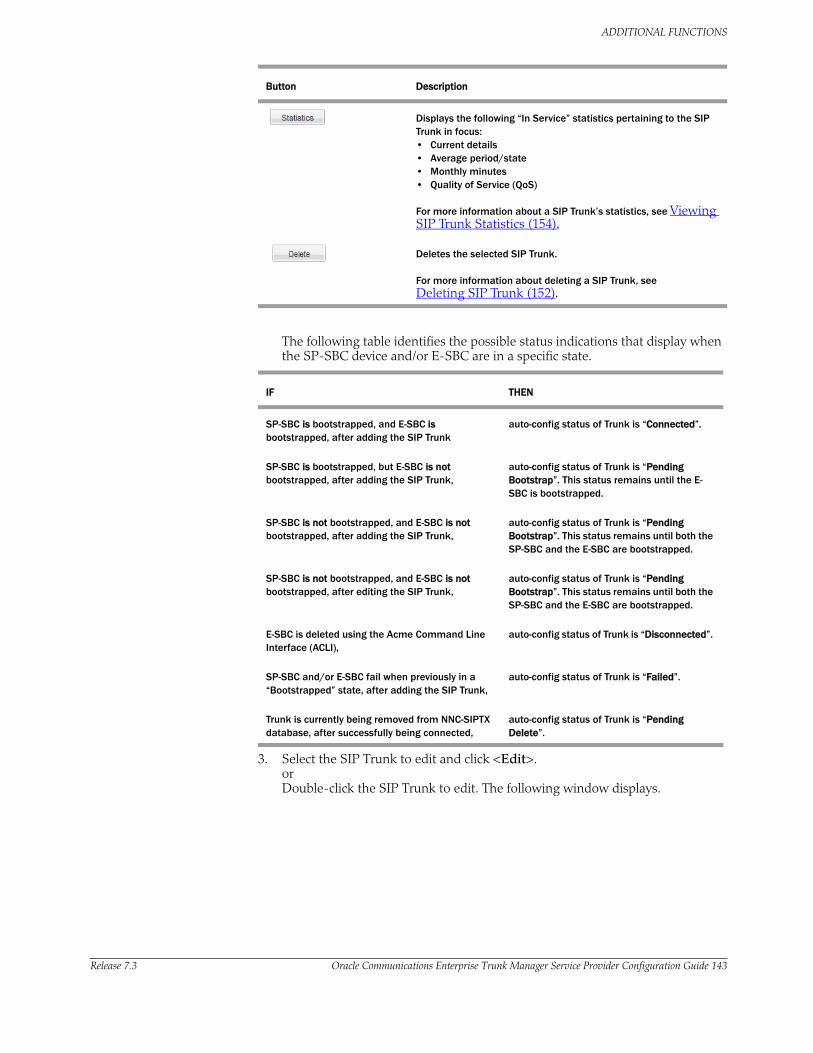
ADDITIONAL FUNCTIONS
Release 7.3 Oracle Communications Enterprise Trunk Manager Service Provider Configuration Guide 143
The following table identifies the possible status indications that display when the SP-SBC device and/or E-SBC are in a specific state.
IF THEN
SP-SBC is bootstrapped, and E-SBC is bootstrapped, after adding the SIP Trunk
auto-config status of Trunk is “Connected”.
SP-SBC is bootstrapped, but E-SBC is not bootstrapped, after adding the SIP Trunk,
auto-config status of Trunk is “Pending Bootstrap”. This status remains until the E-SBC is bootstrapped.
SP-SBC is not bootstrapped, and E-SBC is not bootstrapped, after adding the SIP Trunk,
auto-config status of Trunk is “Pending Bootstrap”. This status remains until both the SP-SBC and the E-SBC are bootstrapped.
SP-SBC is not bootstrapped, and E-SBC is not bootstrapped, after editing the SIP Trunk,
auto-config status of Trunk is “Pending Bootstrap”. This status remains until both the SP-SBC and the E-SBC are bootstrapped.
E-SBC is deleted using the Acme Command Line Interface (ACLI),
auto-config status of Trunk is “Disconnected”.
SP-SBC and/or E-SBC fail when previously in a “Bootstrapped” state, after adding the SIP Trunk,
auto-config status of Trunk is “Failed”.
Trunk is currently being removed from NNC-SIPTX database, after successfully being connected,
auto-config status of Trunk is “Pending Delete”.
3. Select the SIP Trunk to edit and click <Edit>. or Double-click the SIP Trunk to edit. The following window displays.
Displays the following “In Service” statistics pertaining to the SIP Trunk in focus:• Current details• Average period/state• Monthly minutes• Quality of Service (QoS)
For more information about a SIP Trunk’s statistics, see Viewing SIP Trunk Statistics (154).
Deletes the selected SIP Trunk.
For more information about deleting a SIP Trunk, see Deleting SIP Trunk (152).
Button Description
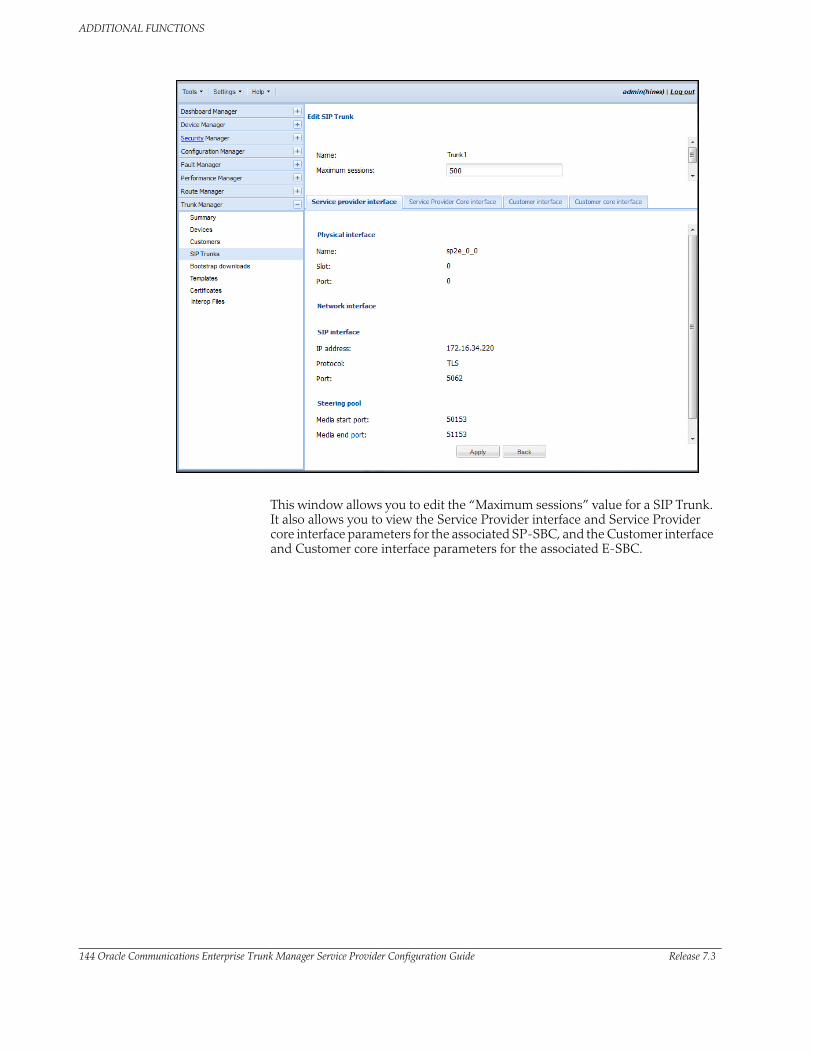
ADDITIONAL FUNCTIONS
144 Oracle Communications Enterprise Trunk Manager Service Provider Configuration Guide Release 7.3
This window allows you to edit the “Maximum sessions” value for a SIP Trunk. It also allows you to view the Service Provider interface and Service Provider core interface parameters for the associated SP-SBC, and the Customer interface and Customer core interface parameters for the associated E-SBC.

ADDITIONAL FUNCTIONS
Release 7.3 Oracle Communications Enterprise Trunk Manager Service Provider Configuration Guide 145
4. In the “Maximum Sessions” field, enter the maximum number of sessions allowed on this SIP trunk. This value is the maximum number of sessions allowed by the Session Agent (SA) or the session constraint associated with the Customer SIP Trunk. Valid values are 0 to 999999999.
Note: If SIP Session Manager (SIPSM) is disabled, when you change the value in the “Maximum Sessions” field, Trunk Manager automatically determines the values for the “Media Start Port” and “Media End Port” fields based on the new Maximum Sessions value. Trunk Manager includes these new values in the new generated boostrap file. Also, if SIPSM is enabled, and you change the value in the “Maximum Sessions” field, Trunk Manager includes the changed value in the new bootstrap file.
5. Click <Apply> to apply the change.
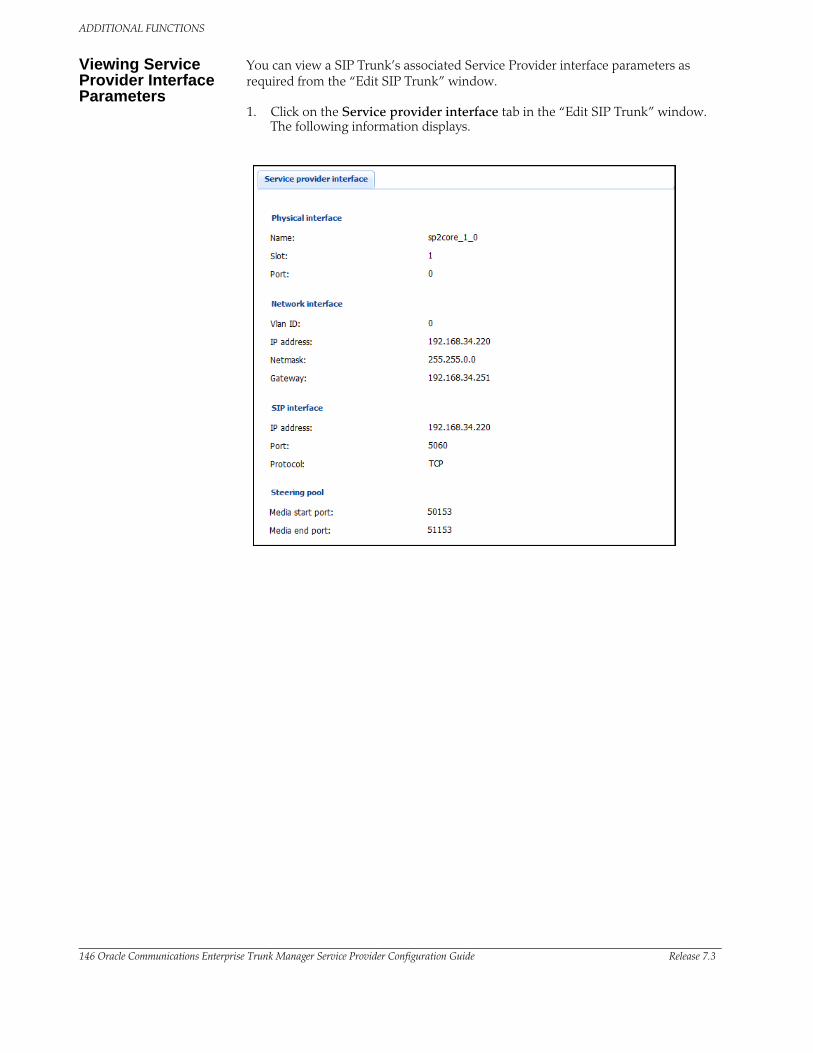
ADDITIONAL FUNCTIONS
146 Oracle Communications Enterprise Trunk Manager Service Provider Configuration Guide Release 7.3
Viewing Service Provider Interface Parameters
You can view a SIP Trunk’s associated Service Provider interface parameters as required from the “Edit SIP Trunk” window.
1. Click on the Service provider interface tab in the “Edit SIP Trunk” window. The following information displays.

ADDITIONAL FUNCTIONS
Release 7.3 Oracle Communications Enterprise Trunk Manager Service Provider Configuration Guide 147
The following table identifies the headings in this window.
Service Provider Interface Headings
Description
Physical Interface SP-SBC’s
Name Name of the physical interface on the SP-SBC that connects to Net-Net Central.
Slot Slot number of the physical interface on the SP-SBC that connects to Net-Net Central.
Port Port number of the physical interface on the SP-SBC that connects to Net-Net Central.
Network Interface Network interface on the SP-SBC that connects over the SIP Trunk to the E-SBC.
Vlan ID Virtual local area network (Vlan) ID that this SP-SBC uses as the network interface.
IP Address IP address on the SP-SBC that connects over the SIP Trunk to the E-SBC.
Netmask Netmask address on the SP-SBC that connects over the SIP Trunk to the E-SBC.
Gateway Gateway address that the SP-SBC uses to connect over the SIP Trunk to the E-SBC.
SIP Interface Session Initiation Protocol (SIP) interface for this SP-SBC.
IP Address IP address of the SIP interface on the SP-SBC that sends packets to the network.
Port SIP interface port that the SP-SBC uses to send packets to the network.
Protocol Protocol that the SP-SBC uses to send packets from the SIP interface on the SP-SBC to Net-Net Central.
Steering Pool Media ports assigned on the SP-SBC
Media start port Port number on the SP-SBC that is dedicated to sending media traffic from your SP-SBC to external destinations over the SIP Trunk.
Media end port Port number on the SP-SBC that is dedicated to receiving media traffic from external sources to your SP-SBC over the SIP Trunk.
Note: If you change the value in the “Maximum Sessions” field, Trunk Manager automatically updates the “Media end port” field.
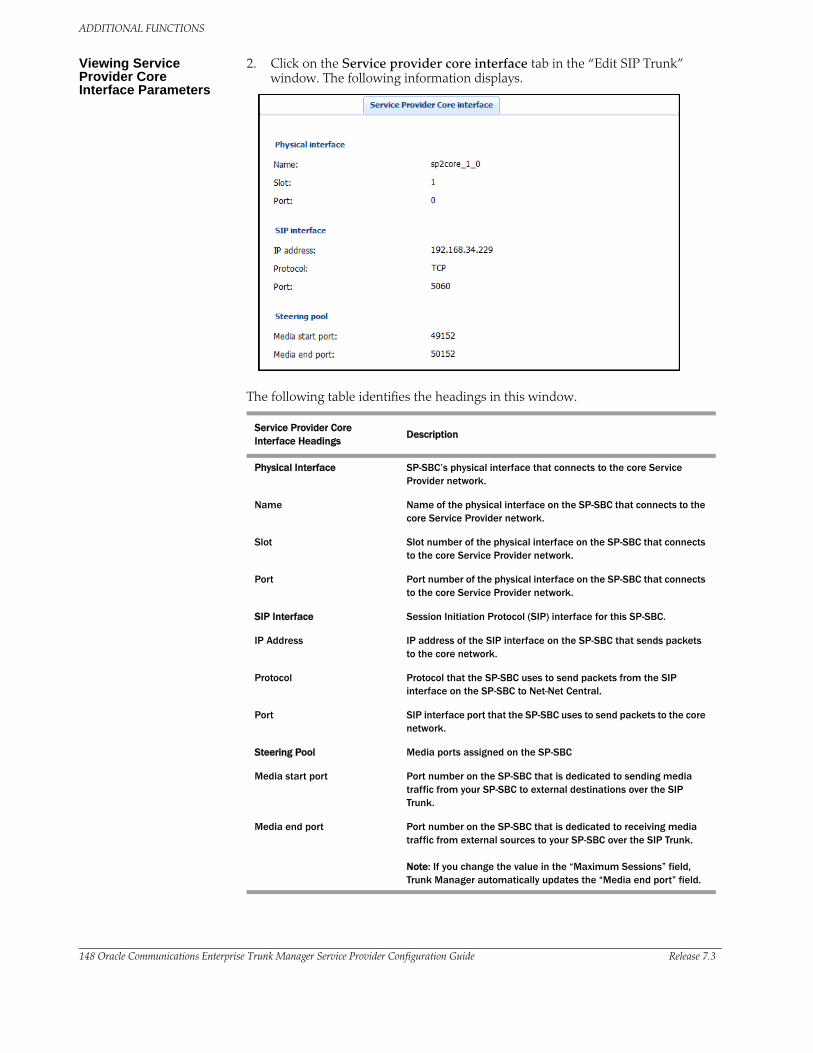
ADDITIONAL FUNCTIONS
148 Oracle Communications Enterprise Trunk Manager Service Provider Configuration Guide Release 7.3
Viewing Service Provider Core Interface Parameters
2. Click on the Service provider core interface tab in the “Edit SIP Trunk” window. The following information displays.
The following table identifies the headings in this window.
Service Provider Core Interface Headings
Description
Physical Interface SP-SBC’s physical interface that connects to the core Service Provider network.
Name Name of the physical interface on the SP-SBC that connects to the core Service Provider network.
Slot Slot number of the physical interface on the SP-SBC that connects to the core Service Provider network.
Port Port number of the physical interface on the SP-SBC that connects to the core Service Provider network.
SIP Interface Session Initiation Protocol (SIP) interface for this SP-SBC.
IP Address IP address of the SIP interface on the SP-SBC that sends packets to the core network.
Protocol Protocol that the SP-SBC uses to send packets from the SIP interface on the SP-SBC to Net-Net Central.
Port SIP interface port that the SP-SBC uses to send packets to the core network.
Steering Pool Media ports assigned on the SP-SBC
Media start port Port number on the SP-SBC that is dedicated to sending media traffic from your SP-SBC to external destinations over the SIP Trunk.
Media end port Port number on the SP-SBC that is dedicated to receiving media traffic from external sources to your SP-SBC over the SIP Trunk.
Note: If you change the value in the “Maximum Sessions” field, Trunk Manager automatically updates the “Media end port” field.
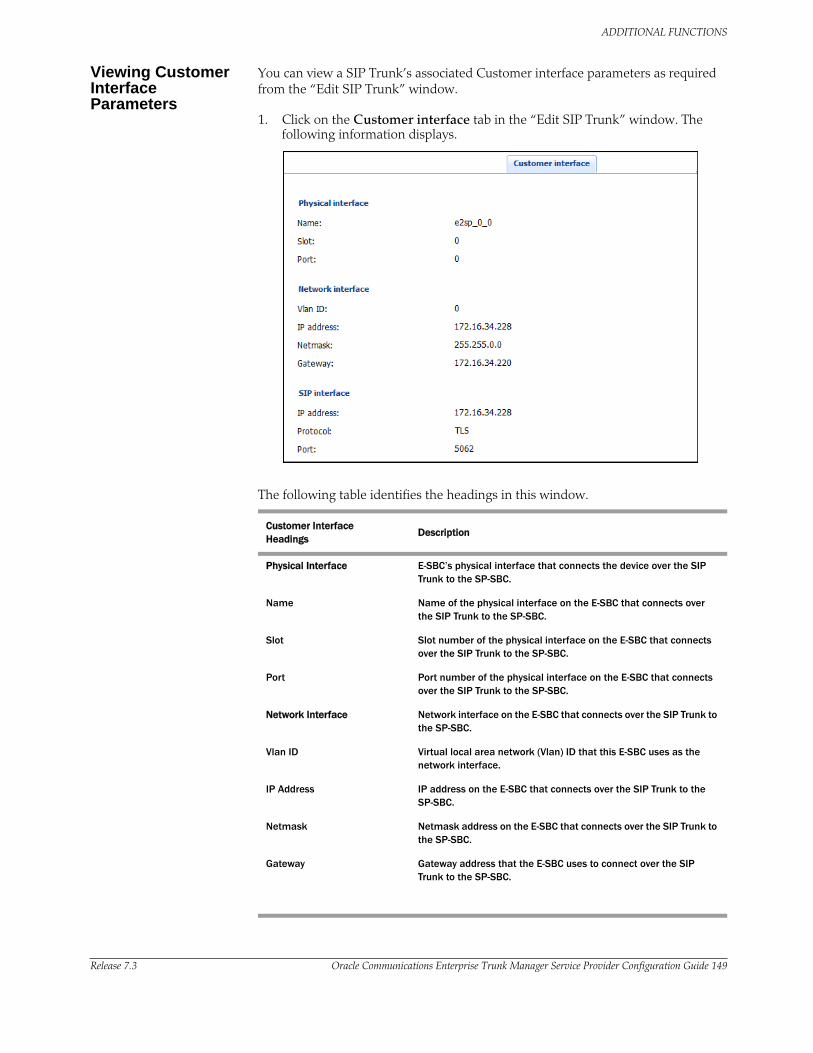
ADDITIONAL FUNCTIONS
Release 7.3 Oracle Communications Enterprise Trunk Manager Service Provider Configuration Guide 149
Viewing Customer Interface Parameters
You can view a SIP Trunk’s associated Customer interface parameters as required from the “Edit SIP Trunk” window.
1. Click on the Customer interface tab in the “Edit SIP Trunk” window. The following information displays.
The following table identifies the headings in this window.
Customer Interface Headings
Description
Physical Interface E-SBC’s physical interface that connects the device over the SIP Trunk to the SP-SBC.
Name Name of the physical interface on the E-SBC that connects over the SIP Trunk to the SP-SBC.
Slot Slot number of the physical interface on the E-SBC that connects over the SIP Trunk to the SP-SBC.
Port Port number of the physical interface on the E-SBC that connects over the SIP Trunk to the SP-SBC.
Network Interface Network interface on the E-SBC that connects over the SIP Trunk to the SP-SBC.
Vlan ID Virtual local area network (Vlan) ID that this E-SBC uses as the network interface.
IP Address IP address on the E-SBC that connects over the SIP Trunk to the SP-SBC.
Netmask Netmask address on the E-SBC that connects over the SIP Trunk to the SP-SBC.
Gateway Gateway address that the E-SBC uses to connect over the SIP Trunk to the SP-SBC.
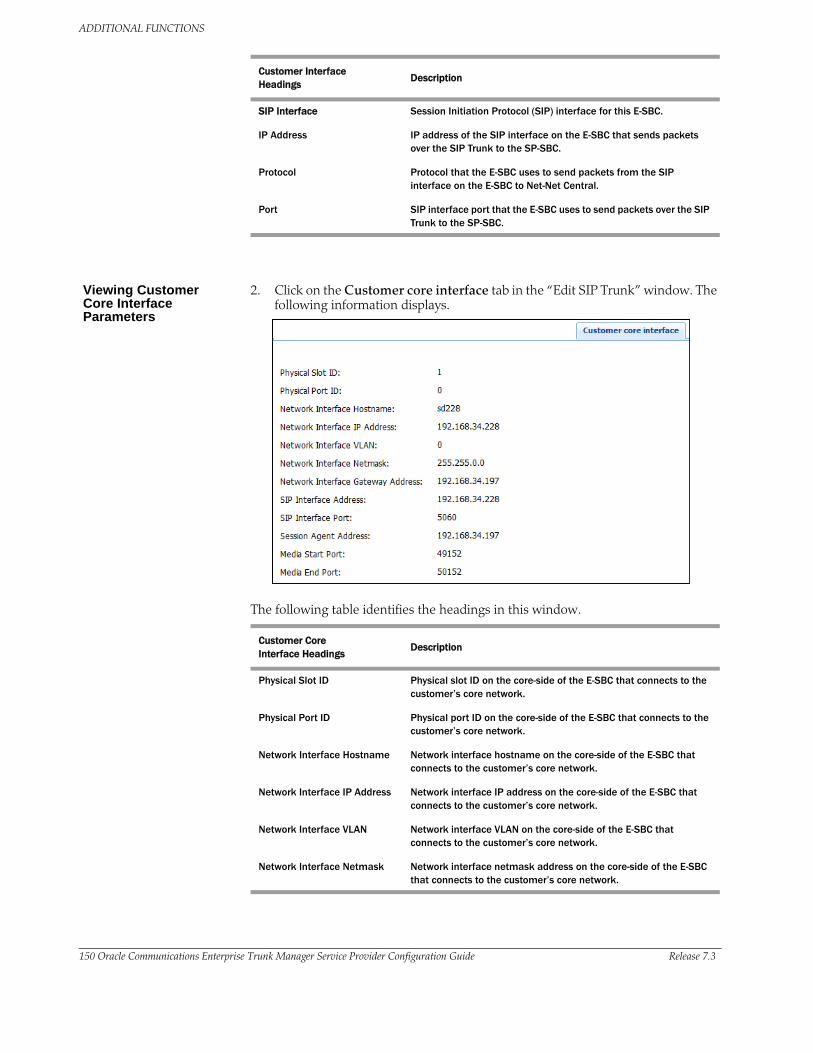
ADDITIONAL FUNCTIONS
150 Oracle Communications Enterprise Trunk Manager Service Provider Configuration Guide Release 7.3
Viewing Customer Core Interface Parameters
2. Click on the Customer core interface tab in the “Edit SIP Trunk” window. The following information displays.
The following table identifies the headings in this window.
SIP Interface Session Initiation Protocol (SIP) interface for this E-SBC.
IP Address IP address of the SIP interface on the E-SBC that sends packets over the SIP Trunk to the SP-SBC.
Protocol Protocol that the E-SBC uses to send packets from the SIP interface on the E-SBC to Net-Net Central.
Port SIP interface port that the E-SBC uses to send packets over the SIP Trunk to the SP-SBC.
Customer Interface Headings
Description
Customer Core Interface Headings
Description
Physical Slot ID Physical slot ID on the core-side of the E-SBC that connects to the customer’s core network.
Physical Port ID Physical port ID on the core-side of the E-SBC that connects to the customer’s core network.
Network Interface Hostname Network interface hostname on the core-side of the E-SBC that connects to the customer’s core network.
Network Interface IP Address Network interface IP address on the core-side of the E-SBC that connects to the customer’s core network.
Network Interface VLAN Network interface VLAN on the core-side of the E-SBC that connects to the customer’s core network.
Network Interface Netmask Network interface netmask address on the core-side of the E-SBC that connects to the customer’s core network.

ADDITIONAL FUNCTIONS
Release 7.3 Oracle Communications Enterprise Trunk Manager Service Provider Configuration Guide 151
Network Interface Gateway Address
Network interface gateway address on the core-side of the E-SBC that connects to the customer’s core network.
SIP Interface Address SIP interface address on the core-side of the E-SBC that connects to the customer’s core network.
SIP Interface Port SIP interface port on the core-side of the E-SBC that connects to the customer’s core network.
Session Agent Address Session Agent address in the customer’s core network to which the E-SBC connects.
Media Start Port Port number on the E-SBC that is dedicated to sending media traffic from your E-SBC to external destinations over the SIP Trunk.
Media End Port Port number on the E-SBC that is dedicated to receiving media traffic from external sources to your E-SBC over the SIP Trunk.
Note: If you change the value in the “Maximum Sessions” field, Trunk Manager automatically updates the “Media end port” field.
Customer Core Interface Headings
Description
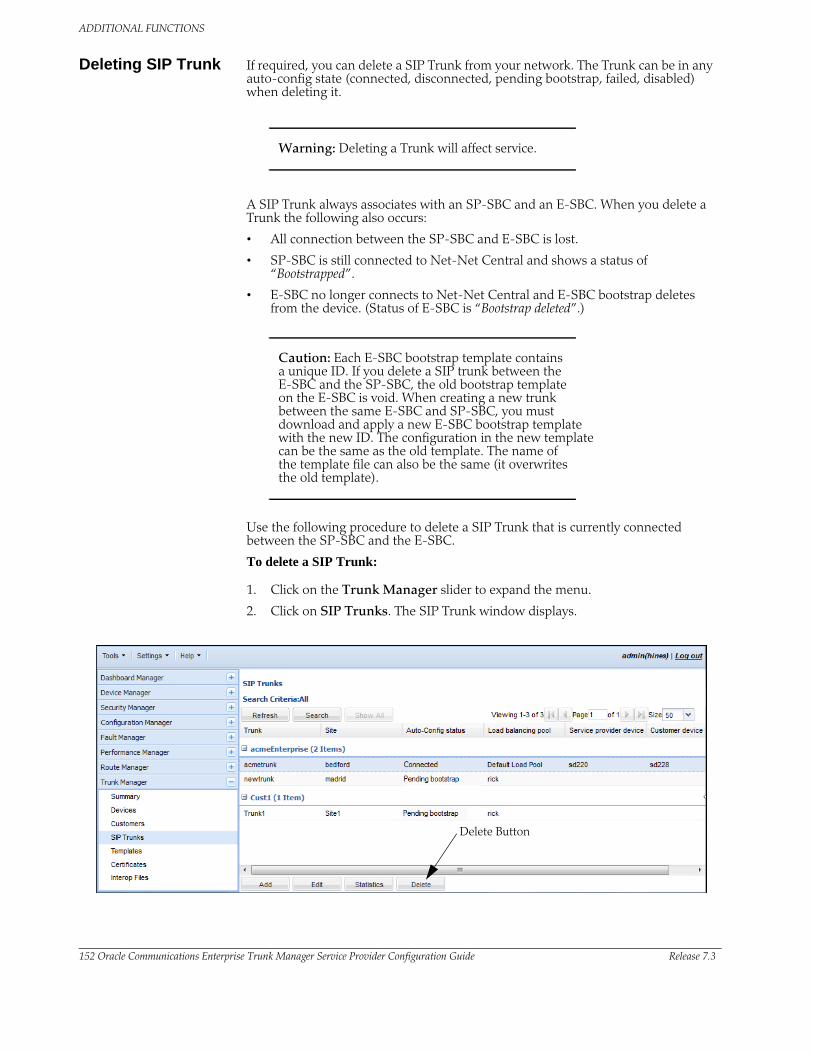
ADDITIONAL FUNCTIONS
152 Oracle Communications Enterprise Trunk Manager Service Provider Configuration Guide Release 7.3
Deleting SIP Trunk If required, you can delete a SIP Trunk from your network. The Trunk can be in any auto-config state (connected, disconnected, pending bootstrap, failed, disabled) when deleting it.
Warning: Deleting a Trunk will affect service.
A SIP Trunk always associates with an SP-SBC and an E-SBC. When you delete a Trunk the following also occurs:
• All connection between the SP-SBC and E-SBC is lost.
• SP-SBC is still connected to Net-Net Central and shows a status of “Bootstrapped”.
• E-SBC no longer connects to Net-Net Central and E-SBC bootstrap deletes from the device. (Status of E-SBC is “Bootstrap deleted”.)
Caution: Each E-SBC bootstrap template contains a unique ID. If you delete a SIP trunk between the E-SBC and the SP-SBC, the old bootstrap template on the E-SBC is void. When creating a new trunk between the same E-SBC and SP-SBC, you must download and apply a new E-SBC bootstrap template with the new ID. The configuration in the new template can be the same as the old template. The name of the template file can also be the same (it overwrites the old template).
Use the following procedure to delete a SIP Trunk that is currently connected between the SP-SBC and the E-SBC.
To delete a SIP Trunk:
1. Click on the Trunk Manager slider to expand the menu.
2. Click on SIP Trunks. The SIP Trunk window displays.
Delete Button
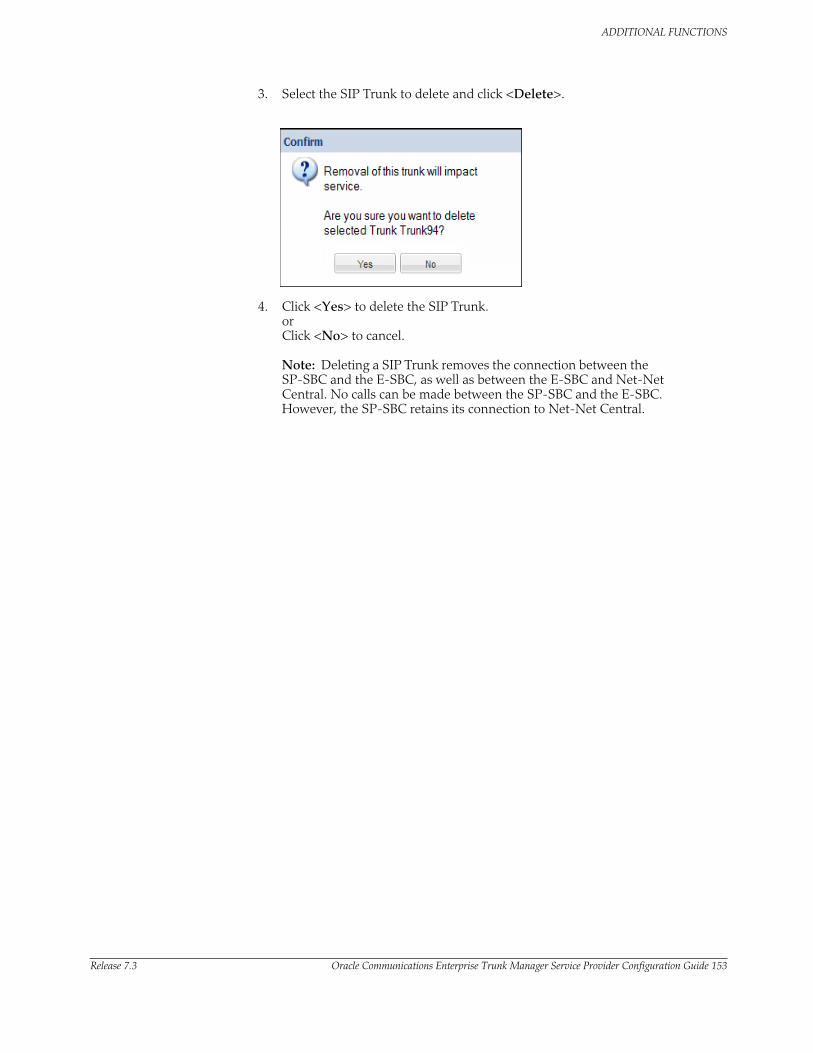
ADDITIONAL FUNCTIONS
Release 7.3 Oracle Communications Enterprise Trunk Manager Service Provider Configuration Guide 153
3. Select the SIP Trunk to delete and click <Delete>.
4. Click <Yes> to delete the SIP Trunk. or Click <No> to cancel.
Note: Deleting a SIP Trunk removes the connection between the SP-SBC and the E-SBC, as well as between the E-SBC and Net-Net Central. No calls can be made between the SP-SBC and the E-SBC. However, the SP-SBC retains its connection to Net-Net Central.
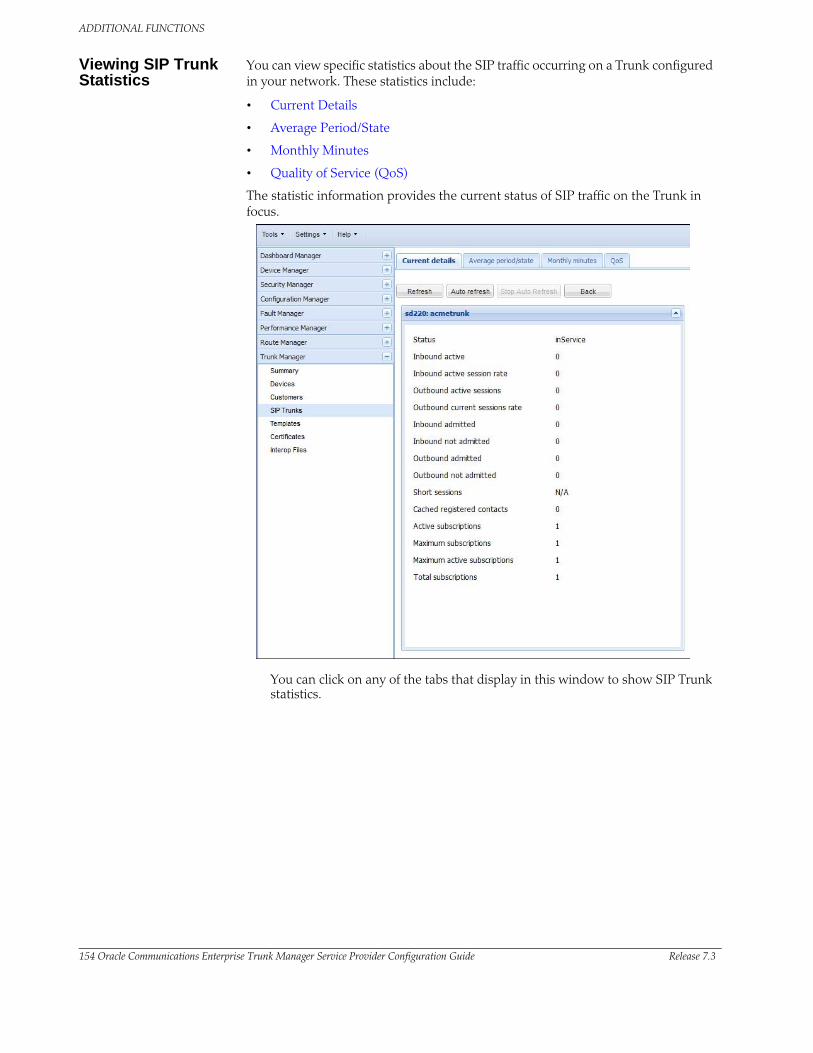
ADDITIONAL FUNCTIONS
154 Oracle Communications Enterprise Trunk Manager Service Provider Configuration Guide Release 7.3
Viewing SIP Trunk Statistics
You can view specific statistics about the SIP traffic occurring on a Trunk configured in your network. These statistics include:
• Current Details
• Average Period/State
• Monthly Minutes
• Quality of Service (QoS)
The statistic information provides the current status of SIP traffic on the Trunk in focus.
You can click on any of the tabs that display in this window to show SIP Trunk statistics.
ADDITIONAL FUNCTIONS
Release 7.3 Oracle Communications Enterprise Trunk Manager Service Provider Configuration Guide 155
The following table identifies the buttons in each statistic window.
Button Description
Allows you to refresh the current window. If changes occurred, the refresh displays the updated statistics.
Allows you to set the amount of time, in seconds, that the window automatically refreshes.
Note: This button disables when the <Stop Auto Refresh> button is enabled. The “Auto Refresh” feature is enabled in the current window ONLY. You must set <Auto Refresh> for each statistic window in focus. Displaying a different window cancels the “Auto Refresh” feature.
Allows you to stop and cancel the “auto refresh” setting.
Note: This button enables ONLY when the <Auto refresh> button is enabled.
Displays the “SIP Trunks” window.
Setting Auto Refresh You can set each statistic window to automatically refresh after a configured period of time. This feature automatically refreshes the window when it reaches the amount of time, in seconds, that you set for the “Auto Refresh Interval”.
Note: The “Auto Refresh” feature is enabled in the current window ONLY. You must set <Auto Refresh> for each statistic window in focus. Displaying a different window cancels the “Auto Refresh” feature.
To set auto refresh:
1. Click on the Trunk Manager slider to expand the menu.
2. Click on SIP Trunks. The SIP Trunk window displays.
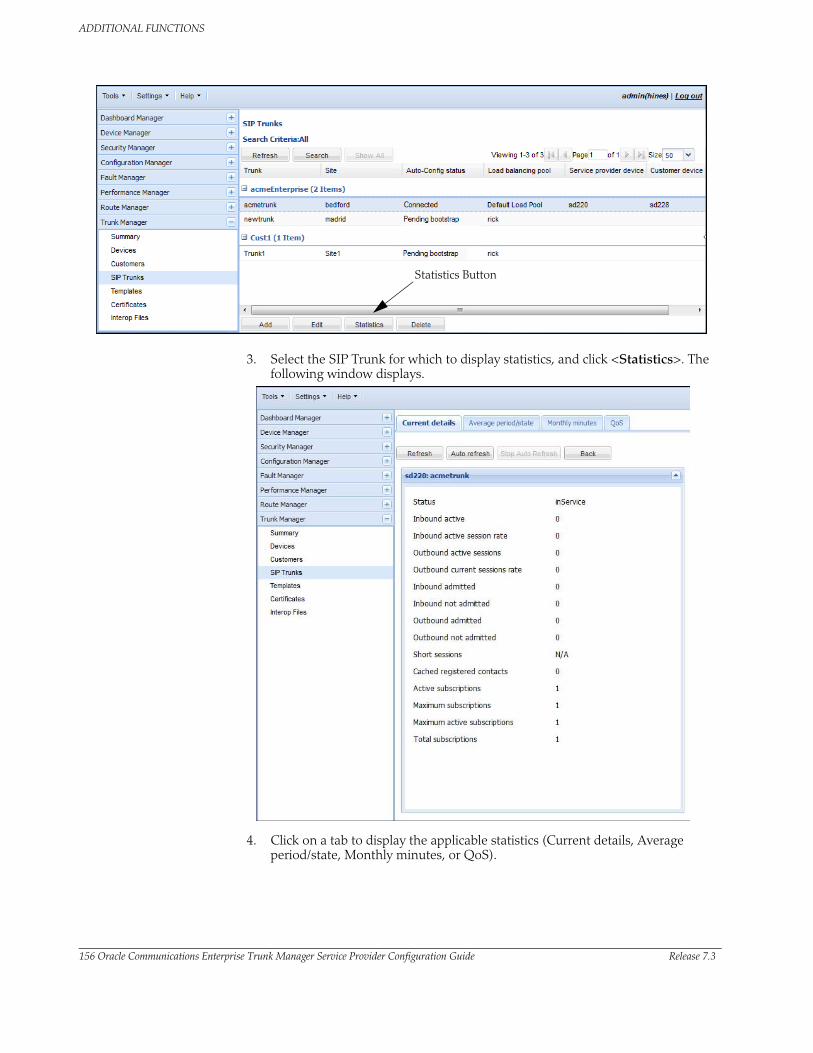
Statistics Button
ADDITIONAL FUNCTIONS
156 Oracle Communications Enterprise Trunk Manager Service Provider Configuration Guide Release 7.3
3. Select the SIP Trunk for which to display statistics, and click <Statistics>. The following window displays.
4. Click on a tab to display the applicable statistics (Current details, Average period/state, Monthly minutes, or QoS).

ADDITIONAL FUNCTIONS
Release 7.3 Oracle Communications Enterprise Trunk Manager Service Provider Configuration Guide 157
5. Click <Auto refresh>. The following dialog box displays.
6. In the “Auto refresh interval” field, enter an amount of time, in seconds, that you want the window to wait before refreshing the statistics on the screen. The default is blank. Valid values are 5 to 999999999.
7. Click <OK>. The statistics in the current window refresh after the Auto refresh interval value is reached.
8. Click <Stop Auto Refresh> to stop the automatic refresh feature.
Note: The “Auto Refresh” feature is enabled in the current window ONLY. You must set <Auto Refresh> for each statistic window in focus. Displaying a different window cancels the “Auto Refresh” feature.
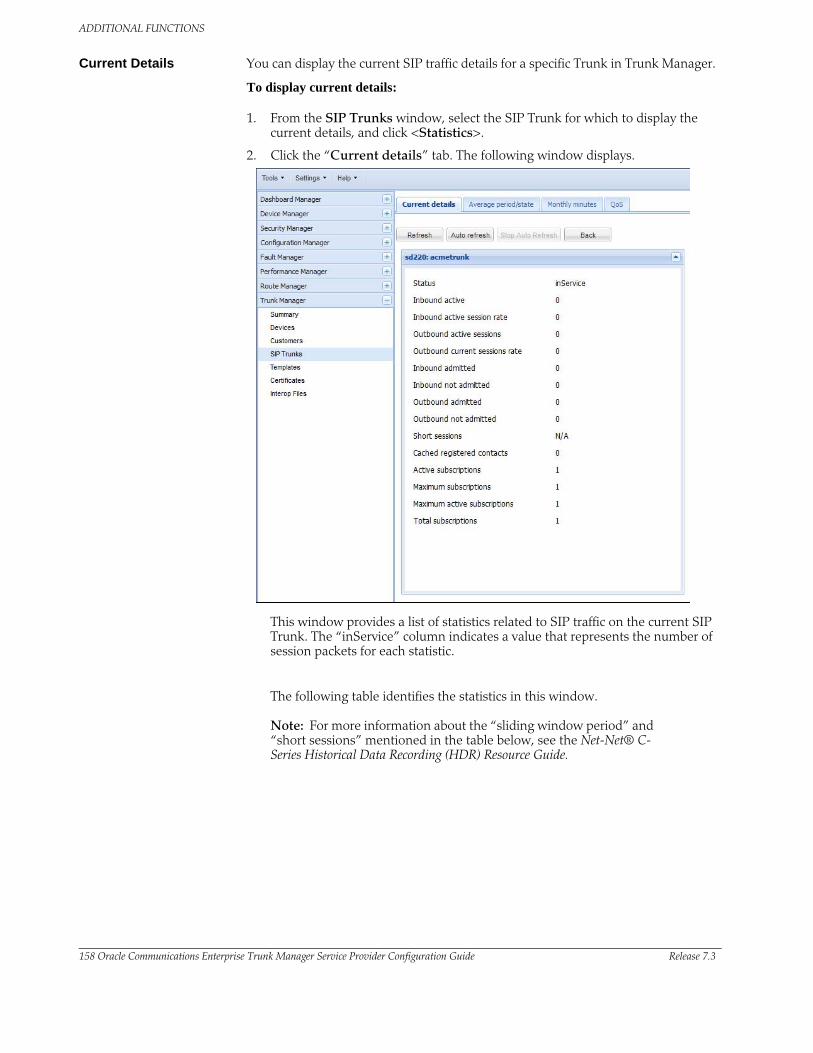
ADDITIONAL FUNCTIONS
158 Oracle Communications Enterprise Trunk Manager Service Provider Configuration Guide Release 7.3
Current Details You can display the current SIP traffic details for a specific Trunk in Trunk Manager.
To display current details:
1. From the SIP Trunks window, select the SIP Trunk for which to display the current details, and click <Statistics>.
2. Click the “Current details” tab. The following window displays.
This window provides a list of statistics related to SIP traffic on the current SIP Trunk. The “inService” column indicates a value that represents the number of session packets for each statistic.
The following table identifies the statistics in this window.
Note: For more information about the “sliding window period” and “short sessions” mentioned in the table below, see the Net-Net® C-Series Historical Data Recording (HDR) Resource Guide.

Statistic Description
Inbound active Total number of active inbound sessions on the SIP Trunk.
Inbound active sessions rate Average rate of active inbound session invitations (per second) on the SIP Trunk.
Outbound active sessions Total number of active outbound sessions on the SIP Trunk.
Outbound active sessions rate Average rate of active outbound sessions (per second) on the SIP Trunk.
Inbound admitted Total number of current inbound sessions successfully admitted over the SIP Trunk.
Inbound not admitted Total number of current inbound sessions that were NOT admitted over the SIP Trunk.
Outbound admitted Total number of current outbound sessions successfully admitted over the SIP Trunk.
Outbound not admitted Total number of current outbound sessions that were NOT admitted over the SIP Trunk.
Short sessions Total number of short sessions that exist on the SIP Trunk. A session is viewed as a "short session" if its duration (Disconnect Time - Connect Time) is within the values set on the SP-SBC. A short session can occur for any of the following reasons:• Sessions that don’t meet a minimum configurable duration
threshold• Session dialogue, captured media information and
termination signalling• Any event flagged as a short session
Cached registered contacts Total number of registered contacts that were cached for sessions on the SIP Trunk.
Active subscriptions Total number of active session subscriptions sent over the SIP Trunk.
Maximum subscriptions Maximum number of session subscriptions allowed on the SIP Trunk.
Maximum active subscriptions Maximum number of active subscriptions on the SIP Trunk.
Total subscriptions Total number of all subscriptions on the SIP Trunk.
ADDITIONAL FUNCTIONS
Release 7.3 Oracle Communications Enterprise Trunk Manager Service Provider Configuration Guide 159

ADDITIONAL FUNCTIONS
160 Oracle Communications Enterprise Trunk Manager Service Provider Configuration Guide Release 7.3
Average Period/State You can display the status details of a SIP Trunk, and the average number of times the SIP Trunk was in those states using Trunk Manager.
To display average period/state:
1. From the SIP Trunks window, select the SIP Trunk for which to display the current details, and click <Statistics>.
2. Click the “Average period/state” tab. The following window displays.
This window provides a list of statistics related to SIP traffic on the current SIP Trunk. The “inService” column indicates a value that represents the number of times the SIP Trunk was in each state.
The following table identifies the statistics in this window.
Note: For more information about the “sliding window period” mentioned in the table below, see the Net-Net® C-Series Historical Data Recording (HDR) Resource Guide.

Statistic Description
Inbound high current Highest number of concurrent inbound sessions on the SIP Trunk during the sliding window period.
Inbound average session rate Average rate of inbound sessions on the SIP Trunk during the sliding window period in calls per second (CPS).
Outbound high current Highest number of concurrent outbound sessions on the SIP Trunk during the sliding window period.
Outbound average session rate Average rate of outbound sessions on the SIP Trunk during the sliding window period in calls per second (CPS).
Max burst rate Burst rate of traffic (both inbound and outbound) on the SIP Trunk, measured during the current window period. The time period is equal to the value of the configuration parameter burst-rate-window in the session constraint or session-agent configuration record. It is equal to 1 if not configured. Its value is the number of active calls plus 1 divided by the time period. This is different from the Max Burst Rate value in the ACLI command "show sipd agent”. In the ACLI it is the high-water mark during the window period.
Total seizures Total number of seizures that occurred on this SIP Trunk during a sliding window period.
Total answered sessions Total number of sessions answered on this SIP Trunk during a sliding window period.
Answer/seizure ratio Answer-to-seizure ratio expressed as a percentage during the sliding window period. For example, a value of 90 would represent 90% or .90.
Average latency Average observed one-way signaling latency during the current window period. This is the average amount of time the signaling travels in one direction.
Max latency Maximum observed one-way signaling latency during the sliding window period. This is the maximum amount of time the signaling travels in one direction.
ADDITIONAL FUNCTIONS
Release 7.3 Oracle Communications Enterprise Trunk Manager Service Provider Configuration Guide 161
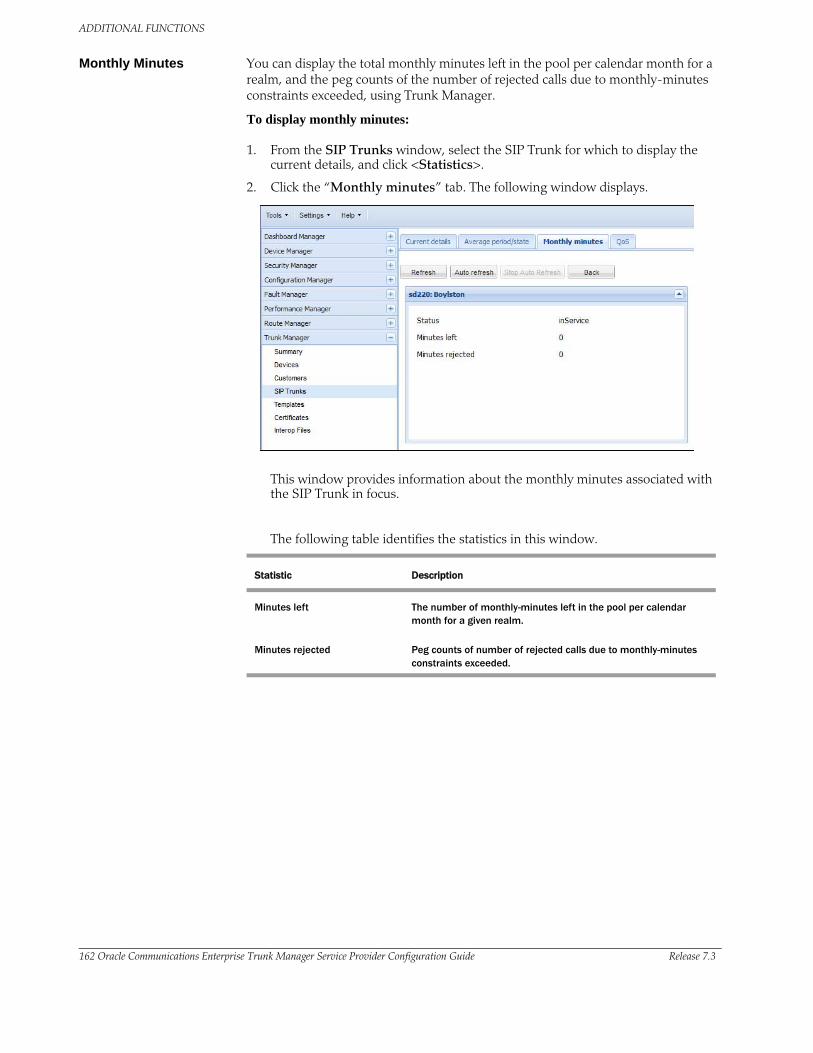
ADDITIONAL FUNCTIONS
162 Oracle Communications Enterprise Trunk Manager Service Provider Configuration Guide Release 7.3
Monthly Minutes You can display the total monthly minutes left in the pool per calendar month for a realm, and the peg counts of the number of rejected calls due to monthly-minutes constraints exceeded, using Trunk Manager.
To display monthly minutes:
1. From the SIP Trunks window, select the SIP Trunk for which to display the current details, and click <Statistics>.
2. Click the “Monthly minutes” tab. The following window displays.
This window provides information about the monthly minutes associated with the SIP Trunk in focus.
The following table identifies the statistics in this window.
Statistic Description
Minutes left The number of monthly-minutes left in the pool per calendar month for a given realm.
Minutes rejected Peg counts of number of rejected calls due to monthly-minutes constraints exceeded.
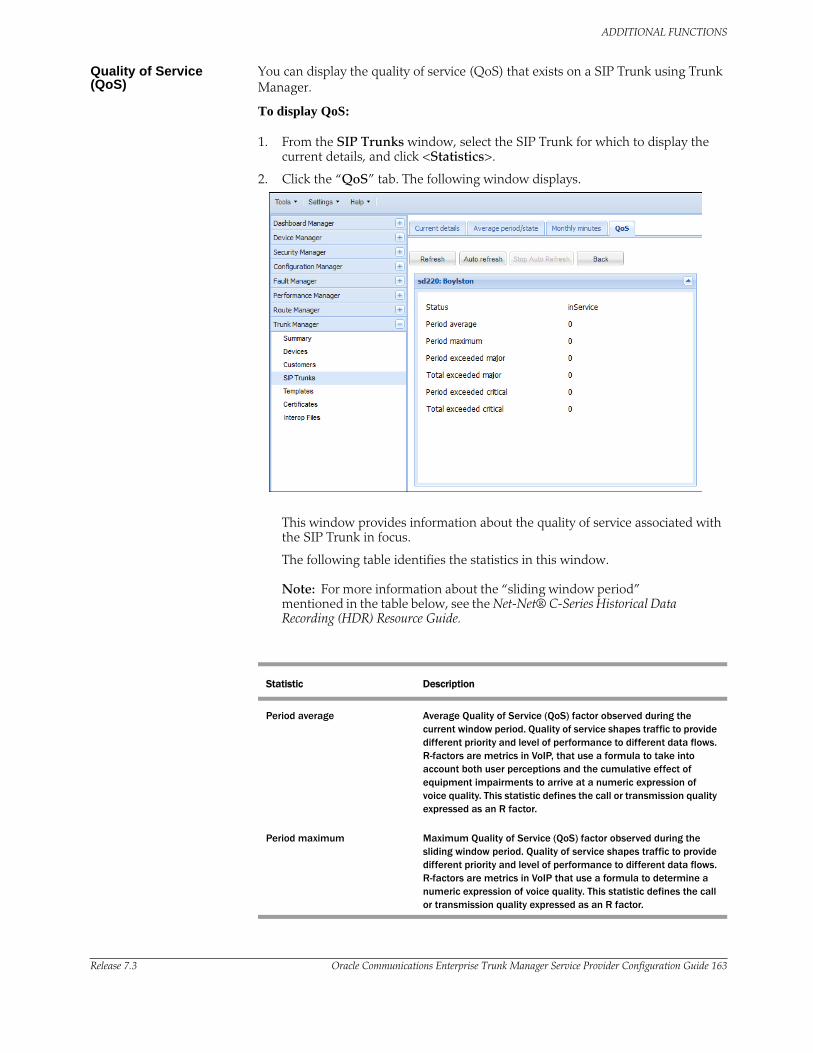
ADDITIONAL FUNCTIONS
Release 7.3 Oracle Communications Enterprise Trunk Manager Service Provider Configuration Guide 163
Quality of Service (QoS)
You can display the quality of service (QoS) that exists on a SIP Trunk using Trunk Manager.
To display QoS:
1. From the SIP Trunks window, select the SIP Trunk for which to display the current details, and click <Statistics>.
2. Click the “QoS” tab. The following window displays.
This window provides information about the quality of service associated with the SIP Trunk in focus.
The following table identifies the statistics in this window.
Note: For more information about the “sliding window period” mentioned in the table below, see the Net-Net® C-Series Historical Data Recording (HDR) Resource Guide.
Statistic Description
Period average Average Quality of Service (QoS) factor observed during the current window period. Quality of service shapes traffic to provide different priority and level of performance to different data flows. R-factors are metrics in VoIP, that use a formula to take into account both user perceptions and the cumulative effect of equipment impairments to arrive at a numeric expression of voice quality. This statistic defines the call or transmission quality expressed as an R factor.
Period maximum Maximum Quality of Service (QoS) factor observed during the sliding window period. Quality of service shapes traffic to provide different priority and level of performance to different data flows. R-factors are metrics in VoIP that use a formula to determine a numeric expression of voice quality. This statistic defines the call or transmission quality expressed as an R factor.

ADDITIONAL FUNCTIONS
164 Oracle Communications Enterprise Trunk Manager Service Provider Configuration Guide Release 7.3
Period exceeded major Peg counts of the number of times the major Rfactor threshold was exceeded during the sliding window period. The peg count provides counts of calls with different service classes that occur during intervals of frequency which reliability indicate the traffic load. R-factors are metrics in VoIP that use a formula to determine a numeric expression of voice quality.
Total exceeded major Count of the number of times the major Rfactor threshold was exceeded. Provides counts of calls with different service classes that occur during intervals of frequency which reliability indicate the traffic load. R-factors are metrics in VoIP that use a formula to determine a numeric expression of voice quality.
Period exceeded critical Count of the number of times the critical Rfactor threshold was exceeded during the sliding window period. Provides counts of calls with different service classes that occur during intervals of frequency which reliability indicate the traffic load. R-factors are metrics in VoIP that use a formula to determine a numeric expression of voice quality.
Total exceeded critical Count of the number of times the critical Rfactor threshold was exceeded. Provides counts of calls with different service classes that occur during intervals of frequency which reliability indicate the traffic load. R-factors are metrics in VoIP that use a formula to determine a numeric expression of voice quality.
Statistic Description
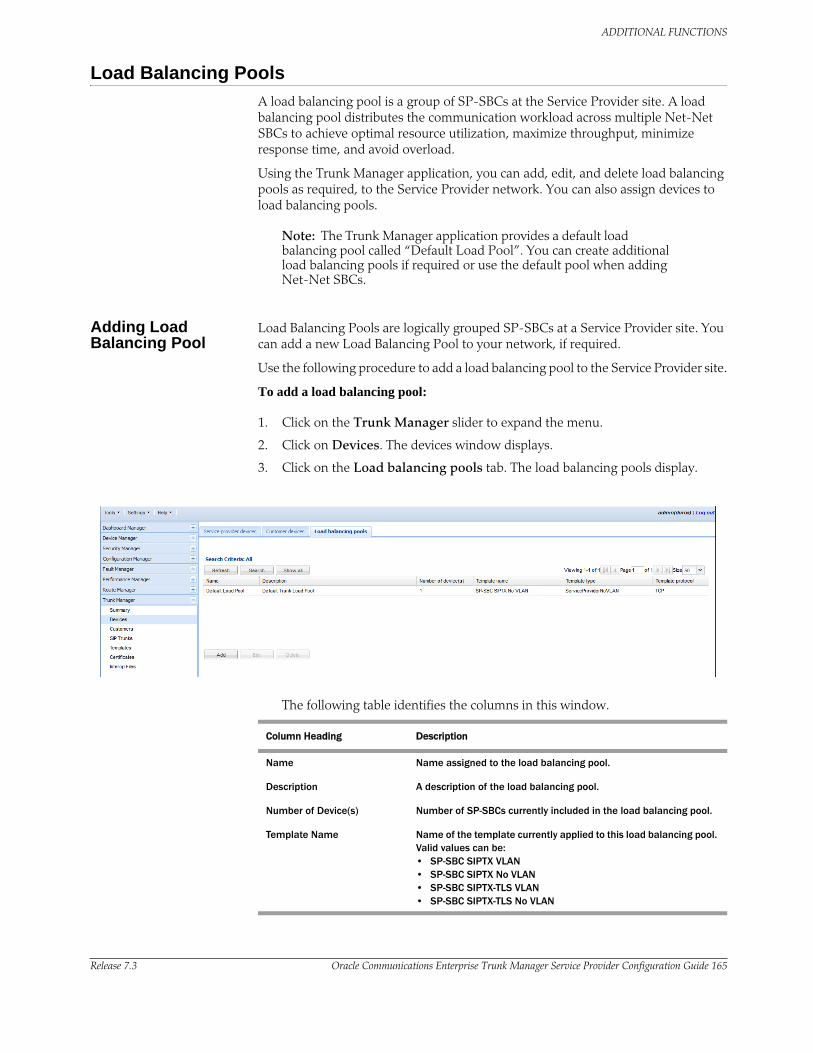
ADDITIONAL FUNCTIONS
Release 7.3 Oracle Communications Enterprise Trunk Manager Service Provider Configuration Guide 165
Load Balancing Pools
A load balancing pool is a group of SP-SBCs at the Service Provider site. A load balancing pool distributes the communication workload across multiple Net-Net SBCs to achieve optimal resource utilization, maximize throughput, minimize response time, and avoid overload.
Using the Trunk Manager application, you can add, edit, and delete load balancing pools as required, to the Service Provider network. You can also assign devices to load balancing pools.
Note: The Trunk Manager application provides a default load balancing pool called “Default Load Pool”. You can create additional load balancing pools if required or use the default pool when adding Net-Net SBCs.
Adding Load Balancing Pool
Load Balancing Pools are logically grouped SP-SBCs at a Service Provider site. You can add a new Load Balancing Pool to your network, if required.
Use the following procedure to add a load balancing pool to the Service Provider site.
To add a load balancing pool:
1. Click on the Trunk Manager slider to expand the menu.
2. Click on Devices. The devices window displays.
3. Click on the Load balancing pools tab. The load balancing pools display.
The following table identifies the columns in this window.
Column Heading Description
Name Name assigned to the load balancing pool.
Description A description of the load balancing pool.
Number of Device(s) Number of SP-SBCs currently included in the load balancing pool.
Template Name Name of the template currently applied to this load balancing pool. Valid values can be:• SP-SBC SIPTX VLAN• SP-SBC SIPTX No VLAN• SP-SBC SIPTX-TLS VLAN• SP-SBC SIPTX-TLS No VLAN

ADDITIONAL FUNCTIONS
166 Oracle Communications Enterprise Trunk Manager Service Provider Configuration Guide Release 7.3
The following table identifies the buttons in this window.
Button Description
Adds a load balancing pool. Allows you to specify a “Name” and “Description” for the load balancing pool.
Allows you to edit the “Name” and “Description” of the load balancing pool.
Deletes the load balancing pool.
Allows you to refresh the current window. If changes occurred, the refresh displays the updated window.
Allows you to search for a specific load balancing pool in the NNC-SIPTX database. You can perform the search using any or all of the following filters: Name, Number of devices. For more information, see Searching for a Load Balancing Pool (168).
Allows you to display all of the load balancing pools currently configured in the NNC-SIPTX database.
4. Click <Add>. The following dialog box displays.
Template Type Type of template currently applied to this load balancing pool. Valid values can be:• ServiceProviderVLAN• ServiceProviderNoVLAN
Template Protocol Protocol used in this load balancing pool and in the applied template. Valid values can be:• TCP (Transmission Control Protocol)• TLS (Transport Layer Security)
Column Heading Description
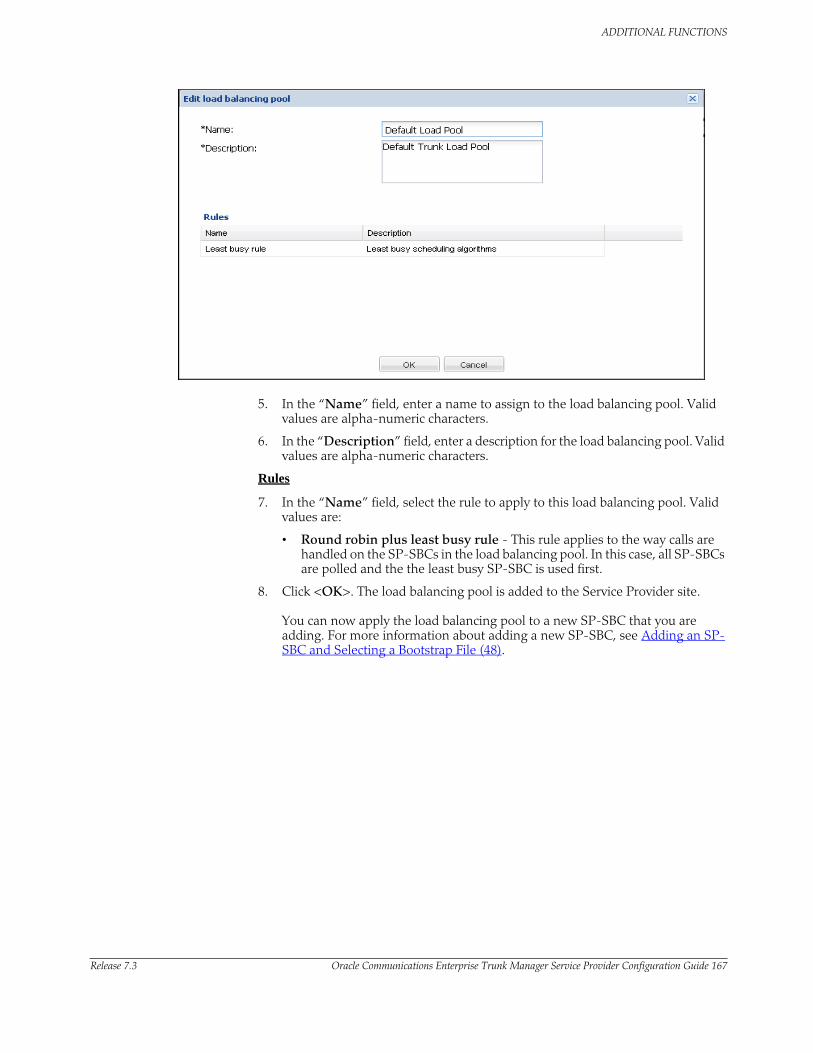
ADDITIONAL FUNCTIONS
Release 7.3 Oracle Communications Enterprise Trunk Manager Service Provider Configuration Guide 167
5. In the “Name” field, enter a name to assign to the load balancing pool. Valid values are alpha-numeric characters.
6. In the “Description” field, enter a description for the load balancing pool. Valid values are alpha-numeric characters.
Rules
7. In the “Name” field, select the rule to apply to this load balancing pool. Valid values are:
• Round robin plus least busy rule - This rule applies to the way calls are handled on the SP-SBCs in the load balancing pool. In this case, all SP-SBCs are polled and the the least busy SP-SBC is used first.
8. Click <OK>. The load balancing pool is added to the Service Provider site. You can now apply the load balancing pool to a new SP-SBC that you are adding. For more information about adding a new SP-SBC, see Adding an SP-SBC and Selecting a Bootstrap File (48).
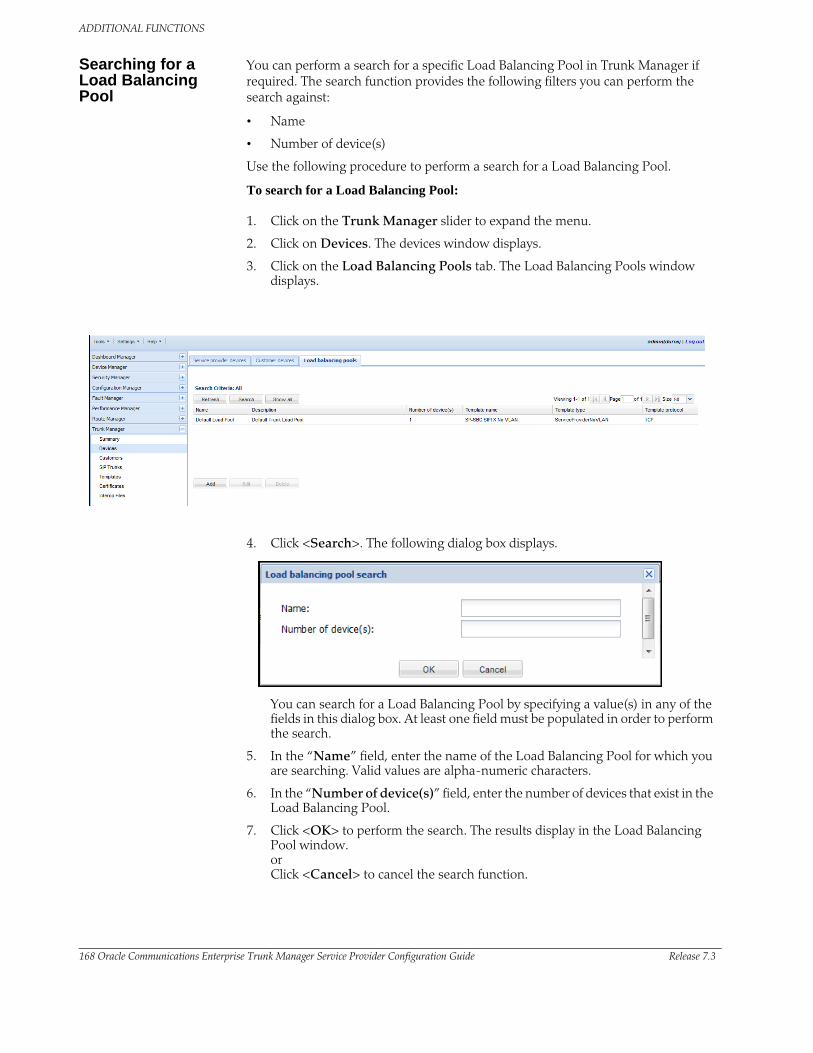
ADDITIONAL FUNCTIONS
168 Oracle Communications Enterprise Trunk Manager Service Provider Configuration Guide Release 7.3
Searching for a Load Balancing Pool
You can perform a search for a specific Load Balancing Pool in Trunk Manager if required. The search function provides the following filters you can perform the search against:
• Name
• Number of device(s)
Use the following procedure to perform a search for a Load Balancing Pool.
To search for a Load Balancing Pool:
1. Click on the Trunk Manager slider to expand the menu.
2. Click on Devices. The devices window displays.
3. Click on the Load Balancing Pools tab. The Load Balancing Pools window displays.
4. Click <Search>. The following dialog box displays.
You can search for a Load Balancing Pool by specifying a value(s) in any of the fields in this dialog box. At least one field must be populated in order to perform the search.
5. In the “Name” field, enter the name of the Load Balancing Pool for which you are searching. Valid values are alpha-numeric characters.
6. In the “Number of device(s)” field, enter the number of devices that exist in the Load Balancing Pool.
7. Click <OK> to perform the search. The results display in the Load Balancing Pool window. or Click <Cancel> to cancel the search function.
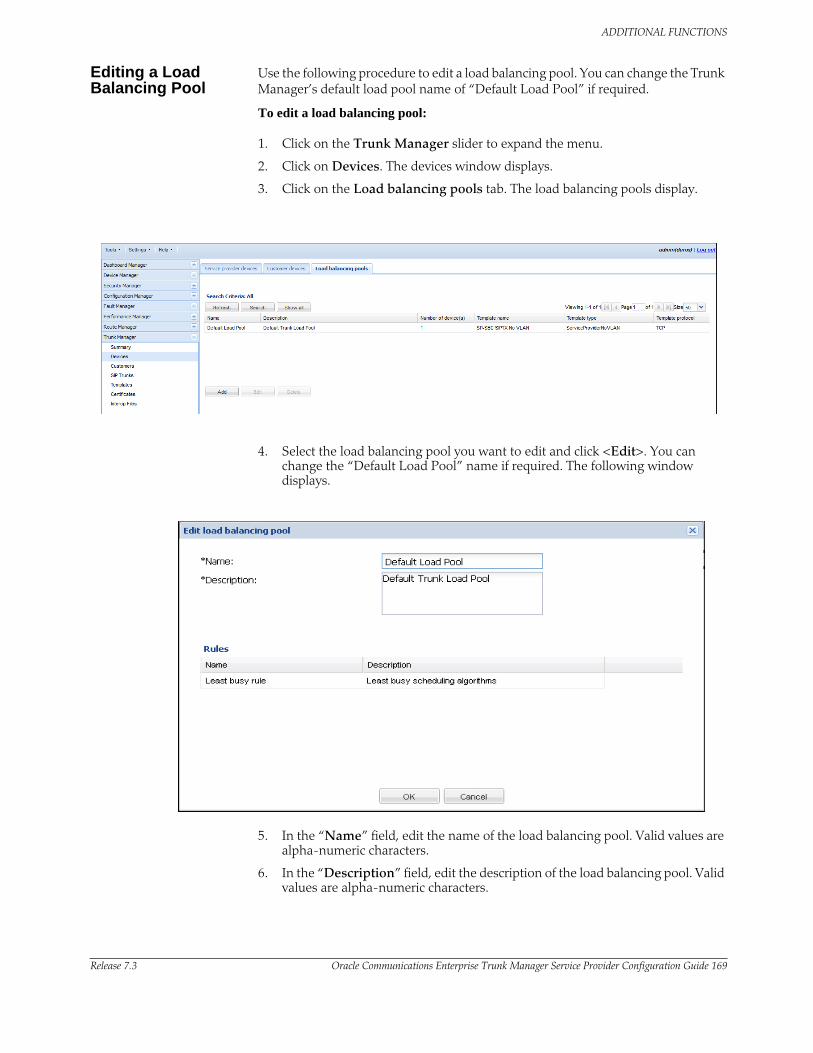
ADDITIONAL FUNCTIONS
Release 7.3 Oracle Communications Enterprise Trunk Manager Service Provider Configuration Guide 169
Editing a Load Balancing Pool
Use the following procedure to edit a load balancing pool. You can change the Trunk Manager’s default load pool name of “Default Load Pool” if required.
To edit a load balancing pool:
1. Click on the Trunk Manager slider to expand the menu.
2. Click on Devices. The devices window displays.
3. Click on the Load balancing pools tab. The load balancing pools display.
4. Select the load balancing pool you want to edit and click <Edit>. You can change the “Default Load Pool” name if required. The following window displays.
5. In the “Name” field, edit the name of the load balancing pool. Valid values are alpha-numeric characters.
6. In the “Description” field, edit the description of the load balancing pool. Valid values are alpha-numeric characters.

ADDITIONAL FUNCTIONS
170 Oracle Communications Enterprise Trunk Manager Service Provider Configuration Guide Release 7.3
Rules
7. In the “Name” field, select another rule to apply to this load balancing pool. Valid values are:
• Round robin plus least busy rule - This rule applies to the way calls are handled on the SP-SBCs in the load balancing pool. In this case, all SP-SBCs are polled and the the least busy SP-SBC is used first.
8. Click <OK>. The load balancing pool attributes are saved. The following message displays: “Updated successfully”.
9. Click <OK> to close the message box.
Note: If you have devices associated to a load balancing pool that you edited, the devices still belong to that same load balancing pool.
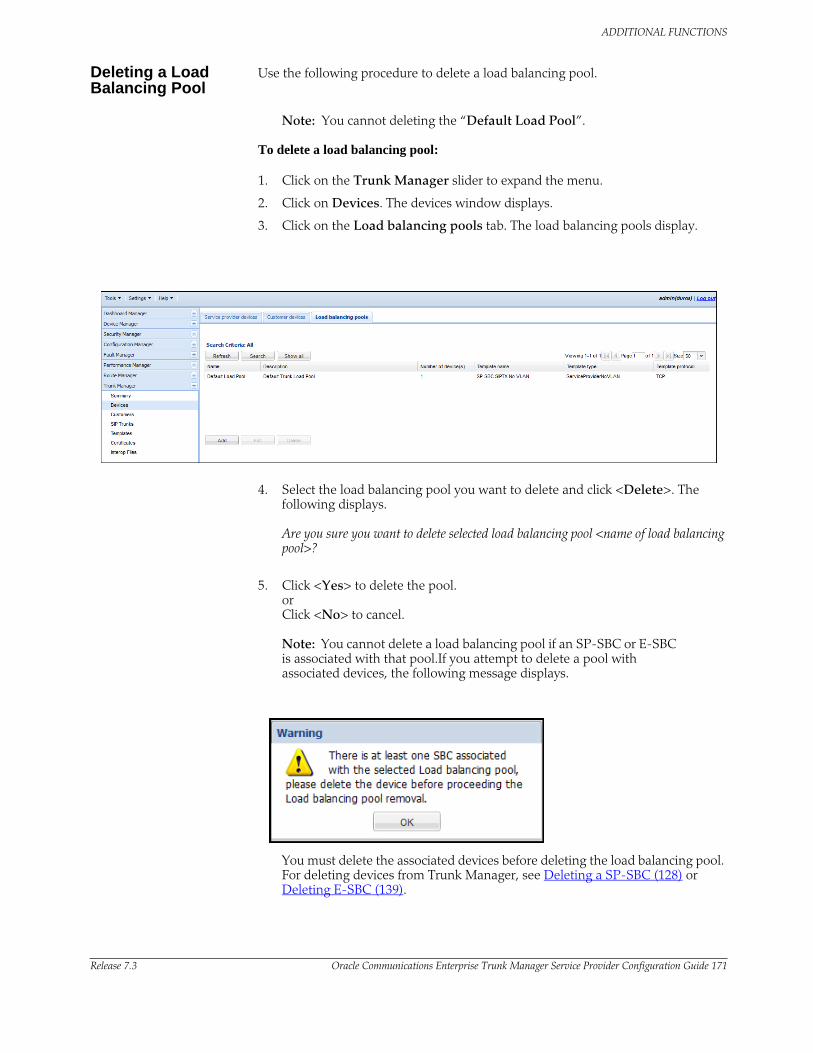
ADDITIONAL FUNCTIONS
Release 7.3 Oracle Communications Enterprise Trunk Manager Service Provider Configuration Guide 171
Deleting a Load Balancing Pool
Use the following procedure to delete a load balancing pool.
Note: You cannot deleting the “Default Load Pool”.
To delete a load balancing pool:
1. Click on the Trunk Manager slider to expand the menu.
2. Click on Devices. The devices window displays.
3. Click on the Load balancing pools tab. The load balancing pools display.
4. Select the load balancing pool you want to delete and click <Delete>. The following displays. Are you sure you want to delete selected load balancing pool <name of load balancing pool>?
5. Click <Yes> to delete the pool. or Click <No> to cancel.
Note: You cannot delete a load balancing pool if an SP-SBC or E-SBC is associated with that pool.If you attempt to delete a pool with associated devices, the following message displays.
You must delete the associated devices before deleting the load balancing pool. For deleting devices from Trunk Manager, see Deleting a SP-SBC (128) or Deleting E-SBC (139).
ADDITIONAL FUNCTIONS
172 Oracle Communications Enterprise Trunk Manager Service Provider Configuration Guide Release 7.3
Bootstrap Templates for the SP-SBC and E-SBC
The SP-SBC and the E-SBC must be in the state of “Bootstrapped” in order to communicate over a SIP Trunk. Bootstrap files contain configuration and subscription information to connect the SP-SBC and E-SBC to Net-Net Central, as well as for connecting to each other over a SIP Trunk on the network. Bootstrap files provide communication information over Transport Control Procotol (TCP) connections as well as Transport Layer Security (TLS) connections.
Note: The “Templates” option is available from the Trunk Manager menu slider regardless if SIP Session Manager (SIPSM) is enabled or disabled.
Trunk Manager provides the following standard Service Provider bootstrap and Customer bootstrap files that you can apply to the SP-SBC and E-SBC:
Bootstrap Templates Description
Service Provider
SP-SBC SIPTX No VLAN SP-SBC No VLAN bootstrap template. If you apply this template to the load balancing pool, all trunks share the same interface, and no VLANs are used. This template contains the SP-SBC configuration information required for the trunk where UDP or TCP is used dynamically* for SIP session traffic.
*UDP or TCP is used dynamically for SIP session traffic between the SP-SBC and the Service Provider core network. TCP is used for the SIPTX control traffic between the SP-SBC and NNC-SIPTX.
SP-SBC SIPTX VLAN SP-SBC VLAN bootstrap template. If you apply this template to the load balancing pool, each associated trunk has its own network interface with a unique VLAN ID. This template contains the SP-SBC configuration information required for the trunk, where User Datagram Protocol (UDP) or Transport Control Protocol (TCP) is used dynamically* for SIP session traffic.
*UDP or TCP is used dynamically for SIP session traffic between the SP-SBC and the Service Provider core network. TCP is used for the SIPTX control traffic between the SP-SBC and NNC-SIPTX.
SP-SBC SIPTX-TLS No VLAN SP-SBC TLS No VLAN bootstrap template. If you apply this template to the load balancing pool, all trunks share the same interface, and no VLANs are used. This template contains the SP-SBC configuration information required for the trunk, where Transport Layer Security (TLS) is used for SIP session traffic and SIPTX control traffic.
SP-SBC SIPTX-TLS VLAN SP-SBC TLS VLAN bootstrap template. If you apply this template to the load balancing pool, each associated trunk has its own network interface with a unique VLAN ID.This template contains the SP-SBC configuration information required for the trunk, where TLS is used for SIP session traffic and SIPTX control traffic.
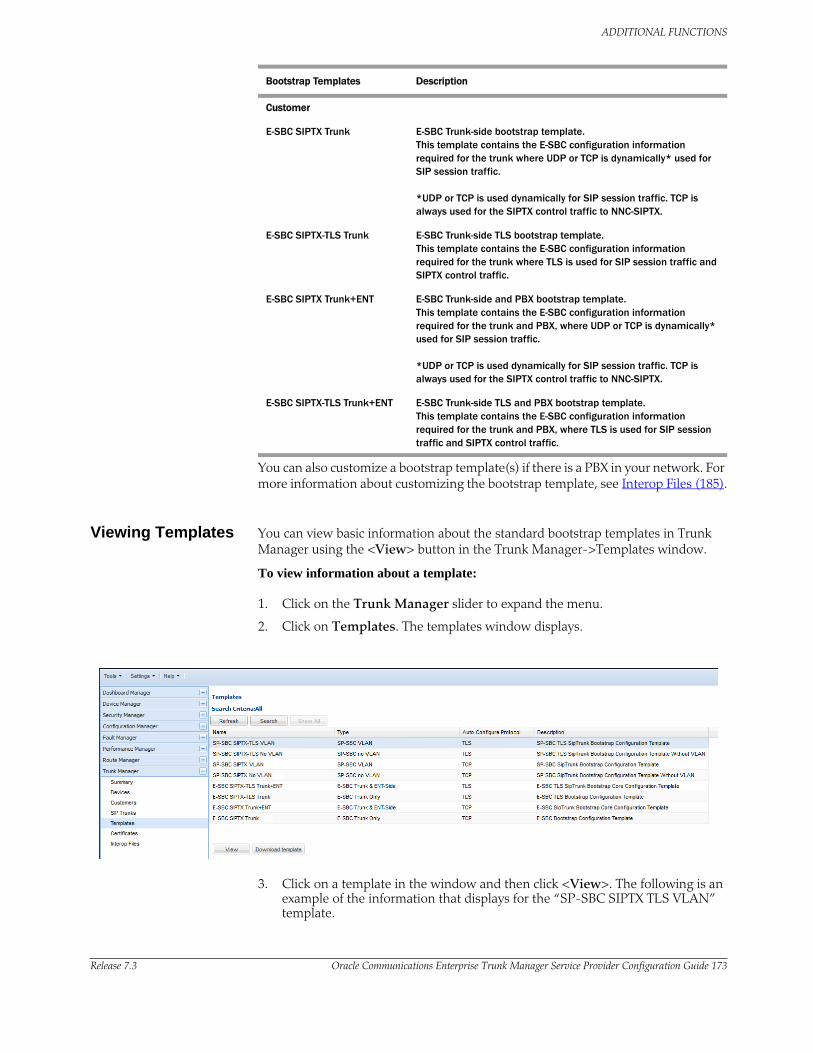
ADDITIONAL FUNCTIONS
Release 7.3 Oracle Communications Enterprise Trunk Manager Service Provider Configuration Guide 173
You can also customize a bootstrap template(s) if there is a PBX in your network. For more information about customizing the bootstrap template, see Interop Files (185).
Viewing Templates You can view basic information about the standard bootstrap templates in Trunk Manager using the <View> button in the Trunk Manager->Templates window.
To view information about a template:
1. Click on the Trunk Manager slider to expand the menu.
2. Click on Templates. The templates window displays.
3. Click on a template in the window and then click <View>. The following is an example of the information that displays for the “SP-SBC SIPTX TLS VLAN” template.
Customer
E-SBC SIPTX Trunk E-SBC Trunk-side bootstrap template. This template contains the E-SBC configuration information required for the trunk where UDP or TCP is dynamically* used for SIP session traffic.
*UDP or TCP is used dynamically for SIP session traffic. TCP is always used for the SIPTX control traffic to NNC-SIPTX.
E-SBC SIPTX-TLS Trunk E-SBC Trunk-side TLS bootstrap template. This template contains the E-SBC configuration information required for the trunk where TLS is used for SIP session traffic and SIPTX control traffic.
E-SBC SIPTX Trunk+ENT E-SBC Trunk-side and PBX bootstrap template. This template contains the E-SBC configuration information required for the trunk and PBX, where UDP or TCP is dynamically* used for SIP session traffic.
*UDP or TCP is used dynamically for SIP session traffic. TCP is always used for the SIPTX control traffic to NNC-SIPTX.
E-SBC SIPTX-TLS Trunk+ENT E-SBC Trunk-side TLS and PBX bootstrap template. This template contains the E-SBC configuration information required for the trunk and PBX, where TLS is used for SIP session traffic and SIPTX control traffic.
Bootstrap Templates Description
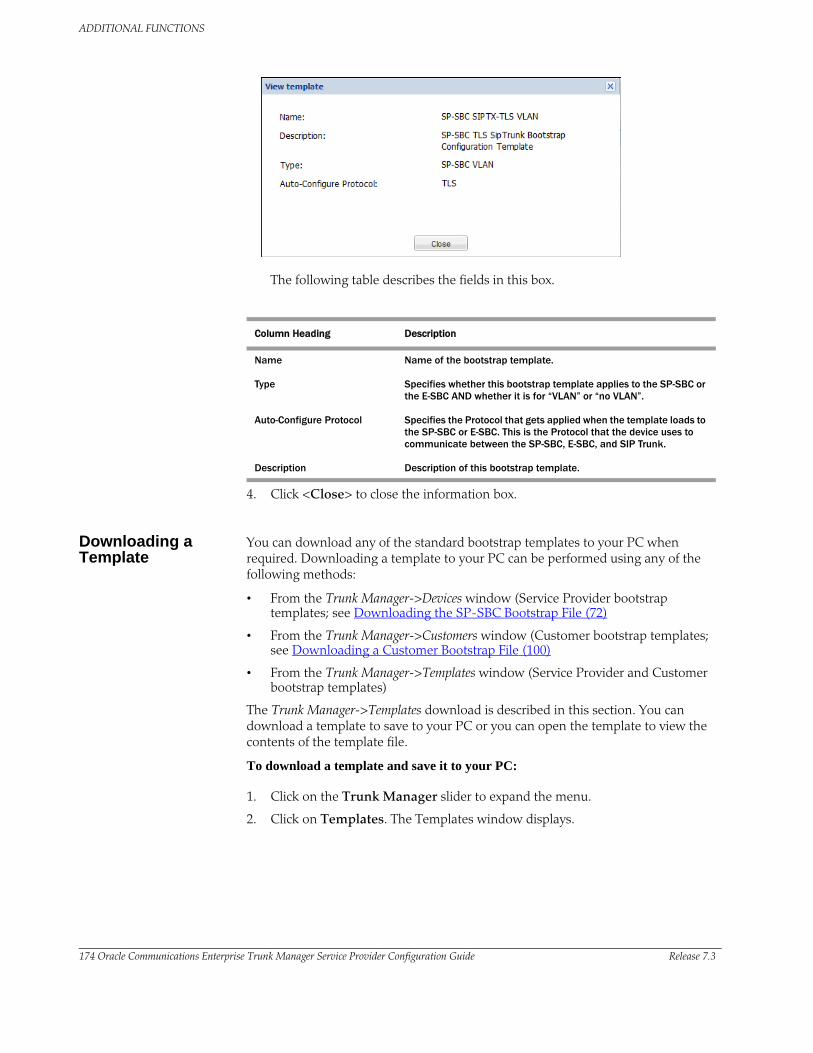
ADDITIONAL FUNCTIONS
174 Oracle Communications Enterprise Trunk Manager Service Provider Configuration Guide Release 7.3
The following table describes the fields in this box.
Column Heading Description
Name Name of the bootstrap template.
Type Specifies whether this bootstrap template applies to the SP-SBC or the E-SBC AND whether it is for “VLAN” or “no VLAN”.
Auto-Configure Protocol Specifies the Protocol that gets applied when the template loads to the SP-SBC or E-SBC. This is the Protocol that the device uses to communicate between the SP-SBC, E-SBC, and SIP Trunk.
Description Description of this bootstrap template.
4. Click <Close> to close the information box.
Downloading a Template
You can download any of the standard bootstrap templates to your PC when required. Downloading a template to your PC can be performed using any of the following methods:
• From the Trunk Manager->Devices window (Service Provider bootstrap templates; see Downloading the SP-SBC Bootstrap File (72)
• From the Trunk Manager->Customers window (Customer bootstrap templates; see Downloading a Customer Bootstrap File (100)
• From the Trunk Manager->Templates window (Service Provider and Customer bootstrap templates)
The Trunk Manager->Templates download is described in this section. You can download a template to save to your PC or you can open the template to view the contents of the template file.
To download a template and save it to your PC:
1. Click on the Trunk Manager slider to expand the menu.
2. Click on Templates. The Templates window displays.
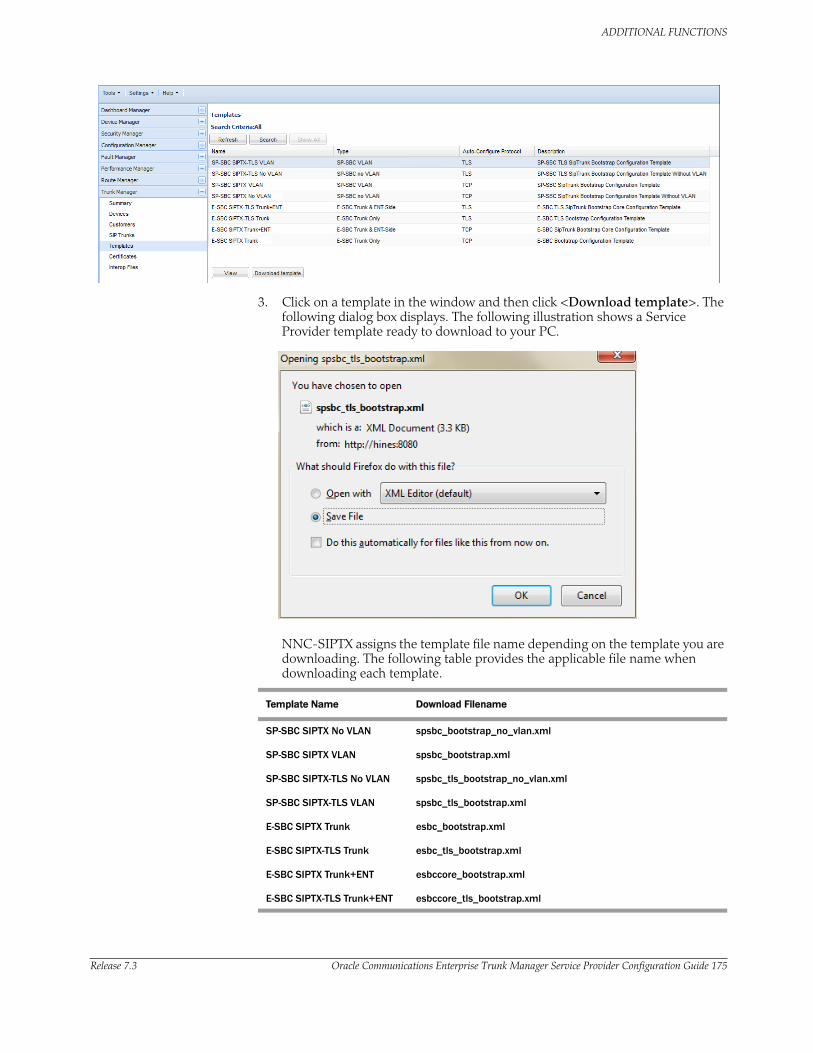
ADDITIONAL FUNCTIONS
Release 7.3 Oracle Communications Enterprise Trunk Manager Service Provider Configuration Guide 175
3. Click on a template in the window and then click <Download template>. The following dialog box displays. The following illustration shows a Service Provider template ready to download to your PC.
NNC-SIPTX assigns the template file name depending on the template you are downloading. The following table provides the applicable file name when downloading each template.
Template Name Download Filename
SP-SBC SIPTX No VLAN spsbc_bootstrap_no_vlan.xml
SP-SBC SIPTX VLAN spsbc_bootstrap.xml
SP-SBC SIPTX-TLS No VLAN spsbc_tls_bootstrap_no_vlan.xml
SP-SBC SIPTX-TLS VLAN spsbc_tls_bootstrap.xml
E-SBC SIPTX Trunk esbc_bootstrap.xml
E-SBC SIPTX-TLS Trunk esbc_tls_bootstrap.xml
E-SBC SIPTX Trunk+ENT esbccore_bootstrap.xml
E-SBC SIPTX-TLS Trunk+ENT esbccore_tls_bootstrap.xml
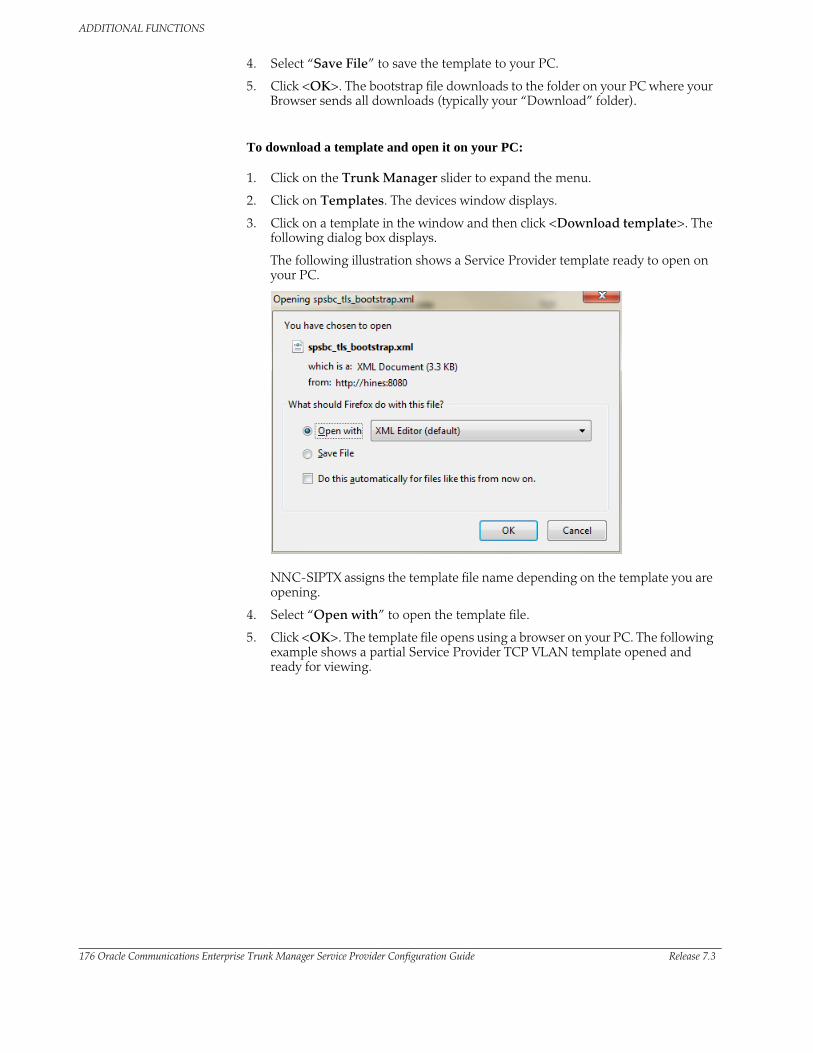
ADDITIONAL FUNCTIONS
176 Oracle Communications Enterprise Trunk Manager Service Provider Configuration Guide Release 7.3
4. Select “Save File” to save the template to your PC.
5. Click <OK>. The bootstrap file downloads to the folder on your PC where your Browser sends all downloads (typically your “Download” folder).
To download a template and open it on your PC:
1. Click on the Trunk Manager slider to expand the menu.
2. Click on Templates. The devices window displays.
3. Click on a template in the window and then click <Download template>. The following dialog box displays.
The following illustration shows a Service Provider template ready to open on your PC.
NNC-SIPTX assigns the template file name depending on the template you are opening.
4. Select “Open with” to open the template file.
5. Click <OK>. The template file opens using a browser on your PC. The following example shows a partial Service Provider TCP VLAN template opened and ready for viewing.
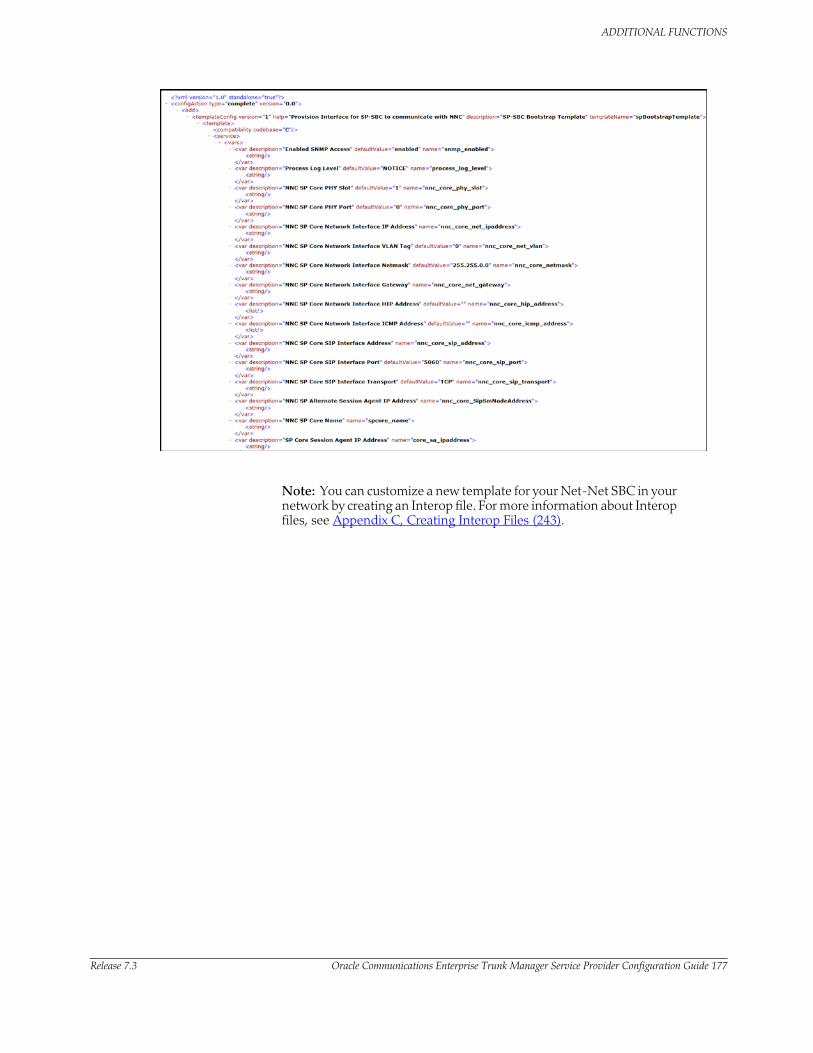
ADDITIONAL FUNCTIONS
Release 7.3 Oracle Communications Enterprise Trunk Manager Service Provider Configuration Guide 177
Note: You can customize a new template for your Net-Net SBC in your network by creating an Interop file. For more information about Interop files, see Appendix C, Creating Interop Files (243).

ADDITIONAL FUNCTIONS
178 Oracle Communications Enterprise Trunk Manager Service Provider Configuration Guide Release 7.3
Certificates
Certificates are files in “.pem” format that usually contain security information fields, such as, server name, the trusted certificate authority (CA), and the server's public encryption key. Acme Packet’s Trunk Manager supports the use of Transport Layer Security (TLS) certificates to use on the SP-SBC if you require additional secure transmission of data to the E-SBC over the SIP Trunk. The SBCs can use the same certificate and private key.
TLS is a widely recognized standard issued by the Internet Engineering Task Force (IETF) for securing transmitted data from a source server to a destination server. It is designed to protect confidentiality and data integrity by encrypting the data between servers and reduce security risk. It allows client-server applications to communicate across a network to prevent eavesdropping and tampering. When a TLS bootstrap template is loaded to both an SP-SBC and an E-SBC, the certificate from the SP-SBC encrypts the data exchanged between them in a format that encodes plain text into non-readable form. Using the Certificates window in Trunk Manager, you can manage the certificates between the E-SBC and the SP-SBC.
Note: A user can only manage certificates for the E-SBC and/or SP-SBC using the Certificates window in Trunk Manager. The certificates for SIP Trunking are not used to connect to Net-Net Central and/or the Trunk Manager application.
How TLS Certificates Work
The TLS Protocol consists of two layers:
• The TLS record protocol is designed to protect confidentiality by using symmetric data encryption.
• The TLS handshake protocol allows authentication between the SP-SBC and E-SBC and the negotiation of an encryption algorithm and cryptographic keys before the application protocol transmits or receives any data.
When you add an SP-SBC, and apply a TLS bootstrap template to that device, a “Certificate name” field displays allowing you to add a TLS certificate. For more information, see Adding an SP-SBC and Selecting a Bootstrap File (48). When you apply the bootstrap template to the SP-SBC, the certificate is also loaded to that device. When the SP-SBC and the E-SBC are “Bootstsrapped”, and the SIP Trunk is “Connected”, the SP-SBC negotiates a stateful connection with the E-SBC using a handshaking procedure. During this handshake, the SBCs agree on various parameters used to establish the connection's security:
• When the E-SBC connects to the TLS-enabled SP-SBC, it requests a secure connection and presents a list of supported cipher suites (ciphers and hash functions).
• From this list, the SP-SBC picks the strongest cipher and hash function that it also supports and notifies the E-SBC of the decision.
• The SP-SBC sends back its identification in the form of a digital certificate. The certificate usually contains the server name, the trusted certificate authority (CA) and the server's public encryption key. The E-SBC may contact the SP-SBC that issued the certificate (the trusted CA) and confirm the validity of the certificate before proceeding.
• In order to generate the session keys used for the secure connection, the E-SBC encrypts a random number with the SP-SBC’s public key and sends the result to the SP-SBC. Only the SP-SBC is able to decrypt it, with its private key.
• From the random number, both parties generate key material for encryption and decryption.
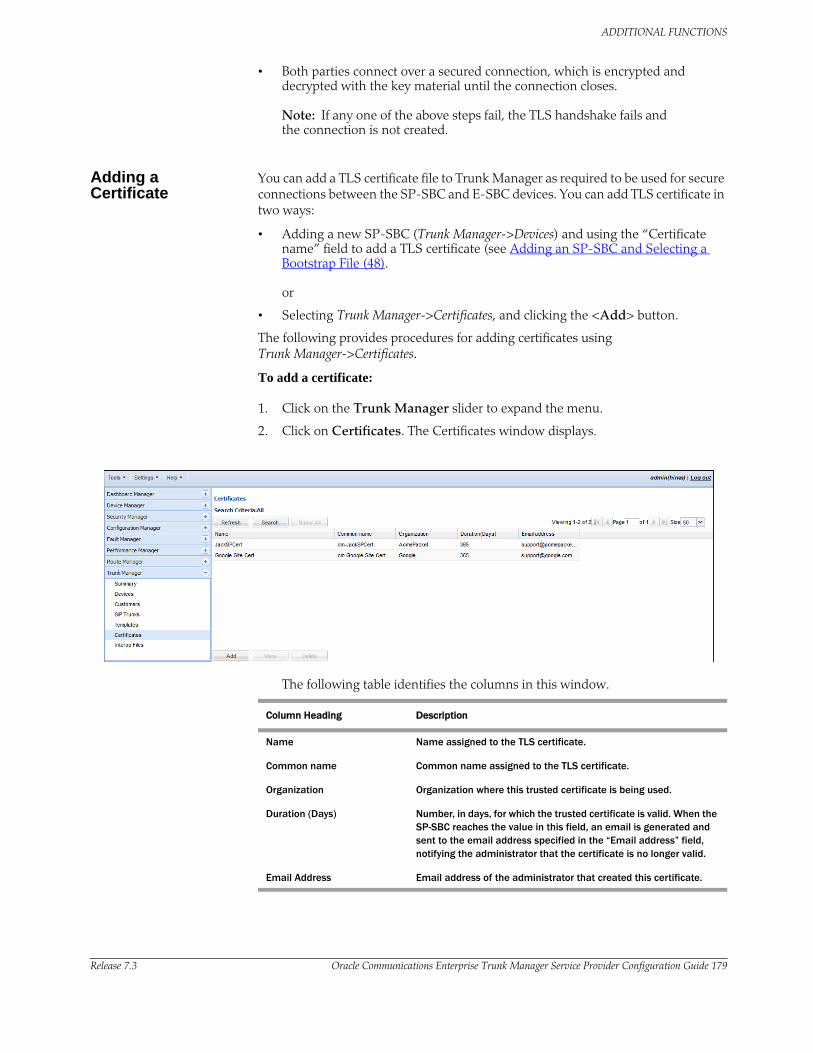
ADDITIONAL FUNCTIONS
Release 7.3 Oracle Communications Enterprise Trunk Manager Service Provider Configuration Guide 179
• Both parties connect over a secured connection, which is encrypted and decrypted with the key material until the connection closes.
Note: If any one of the above steps fail, the TLS handshake fails and the connection is not created.
Adding a Certificate
You can add a TLS certificate file to Trunk Manager as required to be used for secure connections between the SP-SBC and E-SBC devices. You can add TLS certificate in two ways:
• Adding a new SP-SBC (Trunk Manager->Devices) and using the “Certificate name” field to add a TLS certificate (see Adding an SP-SBC and Selecting a Bootstrap File (48). or
• Selecting Trunk Manager->Certificates, and clicking the <Add> button.
The following provides procedures for adding certificates using Trunk Manager->Certificates.
To add a certificate:
1. Click on the Trunk Manager slider to expand the menu.
2. Click on Certificates. The Certificates window displays.
The following table identifies the columns in this window.
Column Heading Description
Name Name assigned to the TLS certificate.
Common name Common name assigned to the TLS certificate.
Organization Organization where this trusted certificate is being used.
Duration (Days) Number, in days, for which the trusted certificate is valid. When the SP-SBC reaches the value in this field, an email is generated and sent to the email address specified in the “Email address” field, notifying the administrator that the certificate is no longer valid.
Email Address Email address of the administrator that created this certificate.
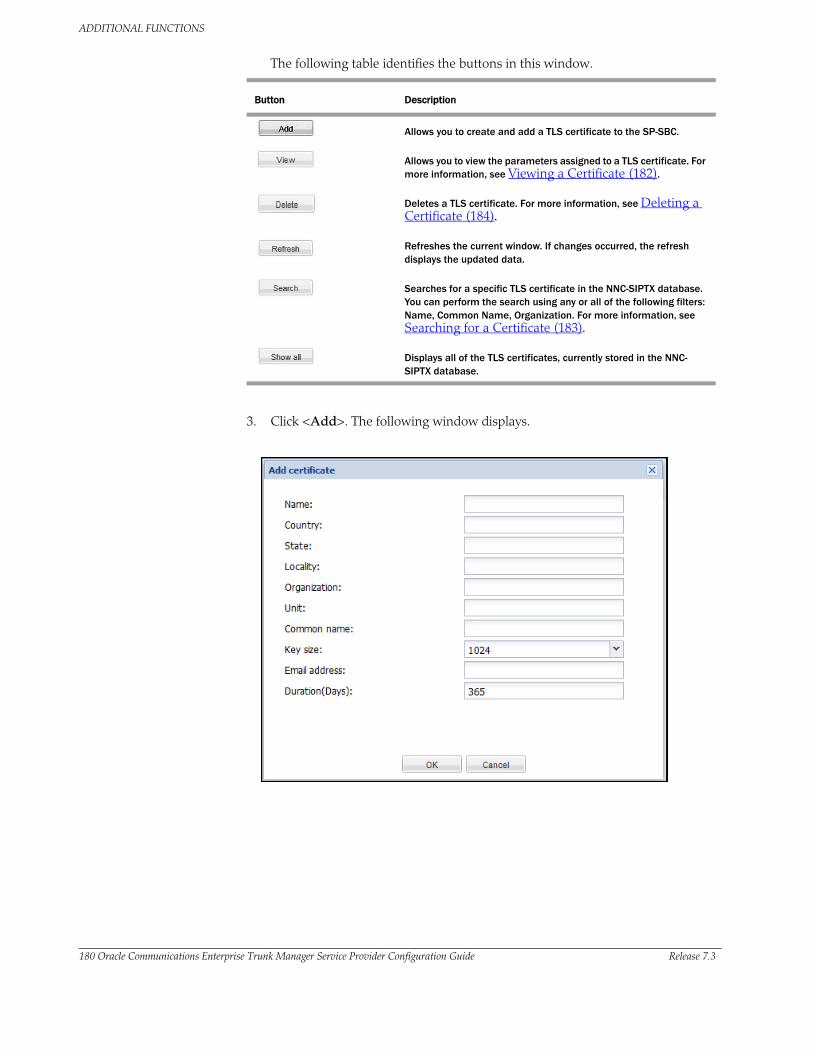
ADDITIONAL FUNCTIONS
180 Oracle Communications Enterprise Trunk Manager Service Provider Configuration Guide Release 7.3
The following table identifies the buttons in this window.
Button Description
Allows you to create and add a TLS certificate to the SP-SBC.
Allows you to view the parameters assigned to a TLS certificate. For more information, see Viewing a Certificate (182).
Deletes a TLS certificate. For more information, see Deleting a Certificate (184).
Refreshes the current window. If changes occurred, the refresh displays the updated data.
Searches for a specific TLS certificate in the NNC-SIPTX database. You can perform the search using any or all of the following filters: Name, Common Name, Organization. For more information, see Searching for a Certificate (183).
Displays all of the TLS certificates, currently stored in the NNC-SIPTX database.
3. Click <Add>. The following window displays.

ADDITIONAL FUNCTIONS
Release 7.3 Oracle Communications Enterprise Trunk Manager Service Provider Configuration Guide 181
4. In the “Name” field, enter a name for the trusted certificate you are adding. Valid values are alpha-numeric characters. The default is blank. For example, “AP certificate”.
5. In the “Country” field, enter the country code where this trusted certificate is being used. A Country is the country, territory, dependency, or other such geopolitical subdivision of a location. For example, US. For applicable country codes, see ISO-3166-1 Country Codes.
6. In the “State” field, enter the state code, if applicable, where this trusted certificate is being used. For example, MA. For applicable state codes, see ISO 3166-2 State Codes.
7. In the “Locality” field, enter the locality, if applicable, where this trusted certificate is being used. A Locality Code is the county, parish, vicinage, or other such geopolitical subdivision of a state. For valid locality codes, see ANSI INCITS 31:2009. For example, 51760 for Richmond City in Virginia.
8. In the “Organization” field, enter the organization where this trusted certificate is being used. Valid values are alpha-numeric characters. The default is blank. For example, Acme Packet.
9. In the “Unit” field, enter a unit where this trusted certificate is being used. Valid values are alpha-numeric characters. The default is blank. For example, Information Technology (IT).
10. In the “Common name” field, enter the common name for the trusted certificate record. Valid values are alpha-numeric characters. The default is blank. For example, new_userkey.pem.
11. In the “Key size” field, select the size, in bits, of the public encryption key. The trusted certificate usually contains the server name, the trusted certificate authority (CA) and the server's public encryption key. The default is 1024 bits. Valid values are:
• 512
• 1024 (default)
• 2048
12. (optional) In the “Email address” field, enter the email address of the administrator creating this certificate. Valid values are alpha-numeric characters. The default is blank. For example, [email protected].
13. In the “Duration (Days)” field, enter a number, in days, for which the trusted certificate is valid. When the SP-SBC reaches the value in this field, an email is generated and sent to the email address specified in the “Email address” field, notifying the administrator that the certificate is no longer valid. Valid values are 1 to 365 days. The default is 365.
14. Click <OK> to add the certificate.
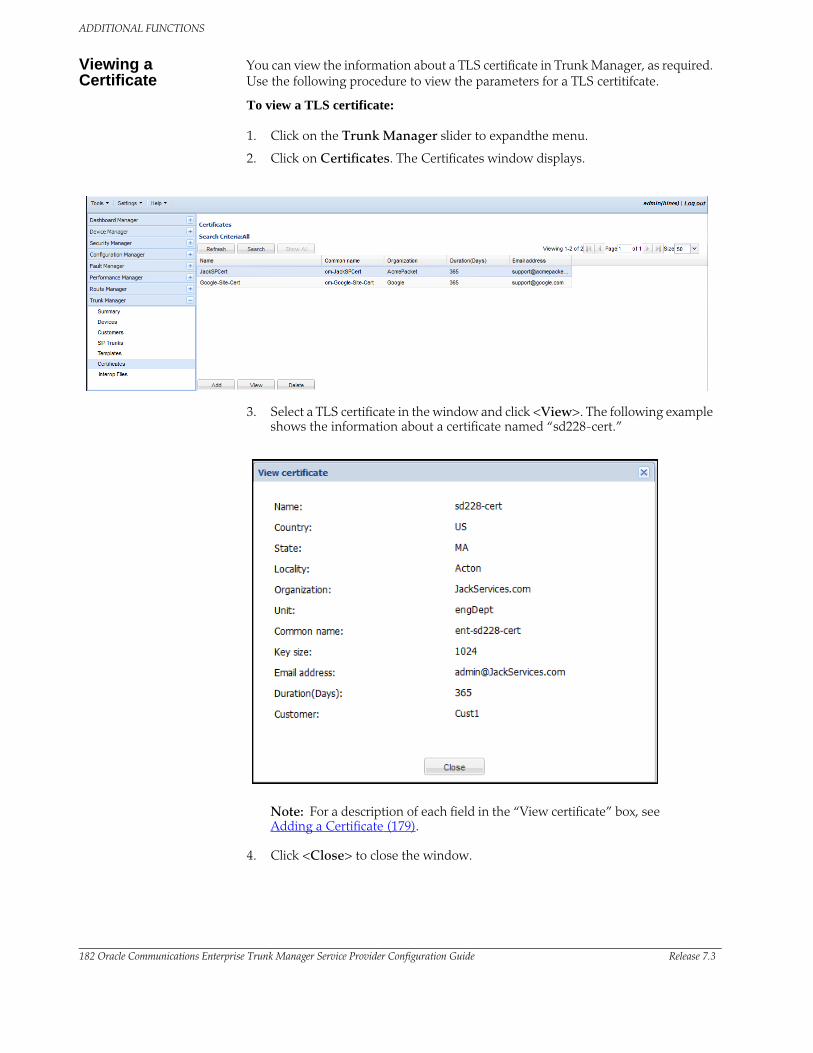
ADDITIONAL FUNCTIONS
182 Oracle Communications Enterprise Trunk Manager Service Provider Configuration Guide Release 7.3
Viewing a Certificate
You can view the information about a TLS certificate in Trunk Manager, as required. Use the following procedure to view the parameters for a TLS certitifcate.
To view a TLS certificate:
1. Click on the Trunk Manager slider to expandthe menu.
2. Click on Certificates. The Certificates window displays.
3. Select a TLS certificate in the window and click <View>. The following example shows the information about a certificate named “sd228-cert.”
Note: For a description of each field in the “View certificate” box, see Adding a Certificate (179).
4. Click <Close> to close the window.
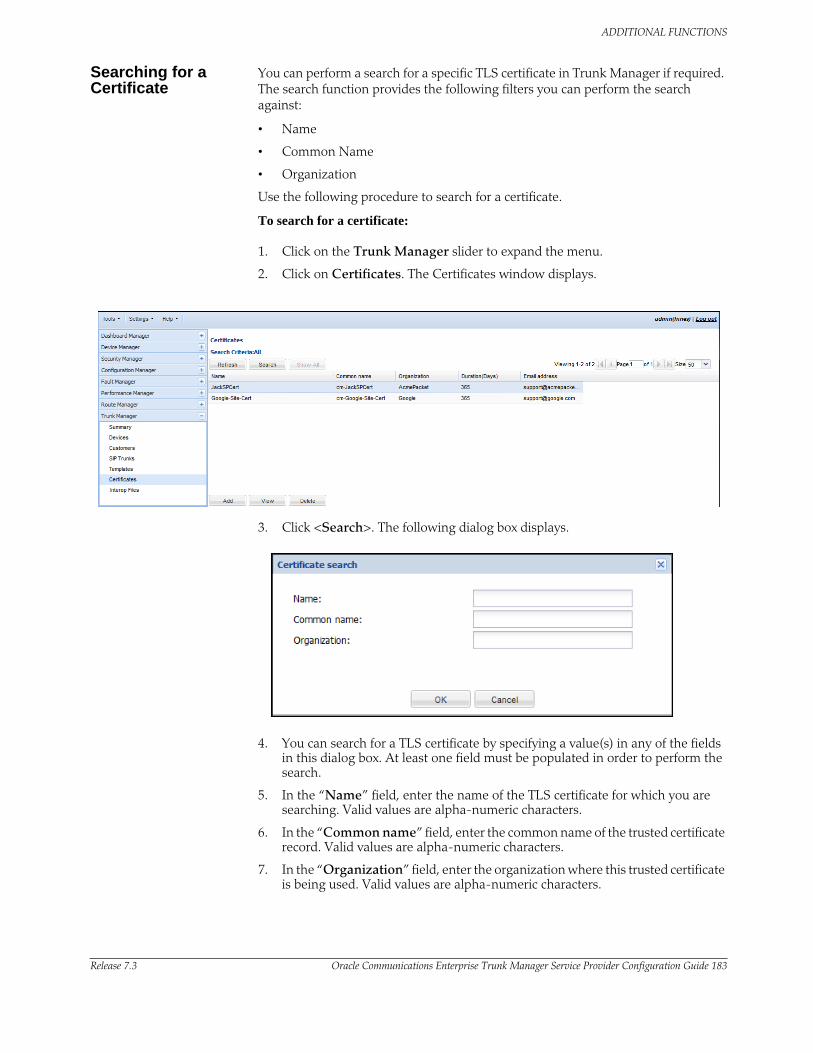
ADDITIONAL FUNCTIONS
Release 7.3 Oracle Communications Enterprise Trunk Manager Service Provider Configuration Guide 183
Searching for a Certificate
You can perform a search for a specific TLS certificate in Trunk Manager if required. The search function provides the following filters you can perform the search against:
• Name
• Common Name
• Organization
Use the following procedure to search for a certificate.
To search for a certificate:
1. Click on the Trunk Manager slider to expand the menu.
2. Click on Certificates. The Certificates window displays.
3. Click <Search>. The following dialog box displays.
4. You can search for a TLS certificate by specifying a value(s) in any of the fields in this dialog box. At least one field must be populated in order to perform the search.
5. In the “Name” field, enter the name of the TLS certificate for which you are searching. Valid values are alpha-numeric characters.
6. In the “Common name” field, enter the common name of the trusted certificate record. Valid values are alpha-numeric characters.
7. In the “Organization” field, enter the organization where this trusted certificate is being used. Valid values are alpha-numeric characters.
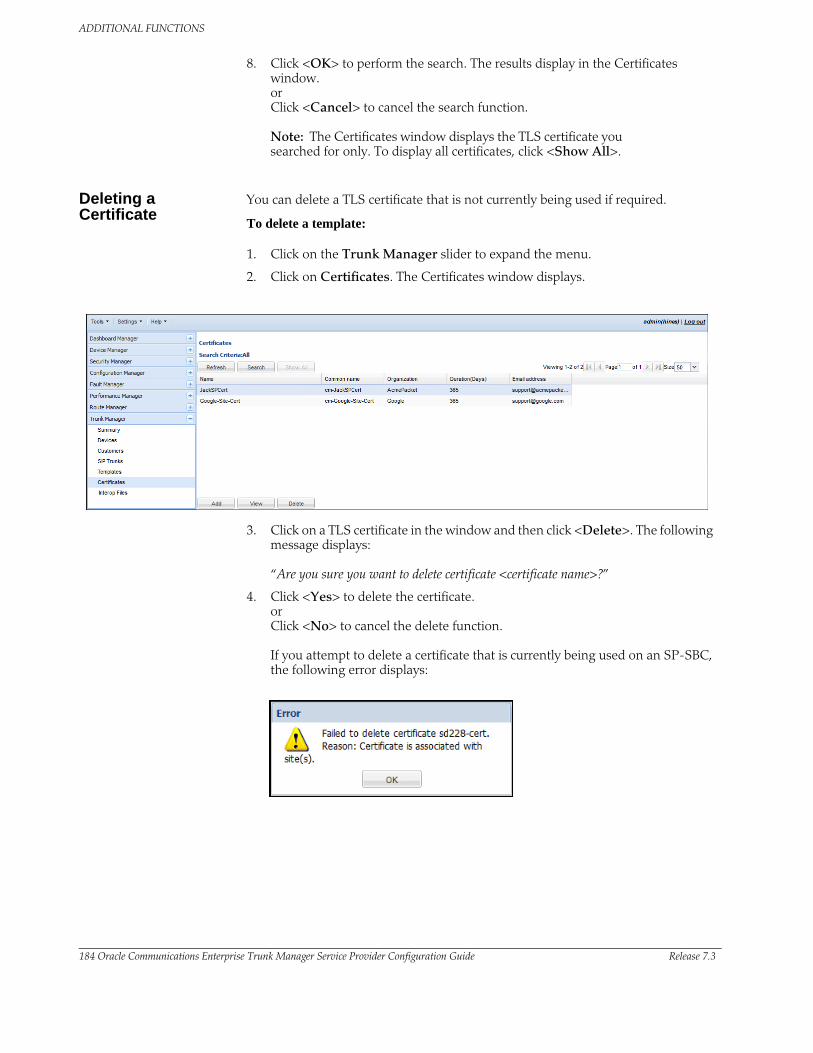
ADDITIONAL FUNCTIONS
184 Oracle Communications Enterprise Trunk Manager Service Provider Configuration Guide Release 7.3
8. Click <OK> to perform the search. The results display in the Certificates window. or Click <Cancel> to cancel the search function.
Note: The Certificates window displays the TLS certificate you searched for only. To display all certificates, click <Show All>.
Deleting a Certificate
You can delete a TLS certificate that is not currently being used if required.
To delete a template:
1. Click on the Trunk Manager slider to expand the menu.
2. Click on Certificates. The Certificates window displays.
3. Click on a TLS certificate in the window and then click <Delete>. The following message displays: “Are you sure you want to delete certificate <certificate name>?”
4. Click <Yes> to delete the certificate. or Click <No> to cancel the delete function. If you attempt to delete a certificate that is currently being used on an SP-SBC, the following error displays:
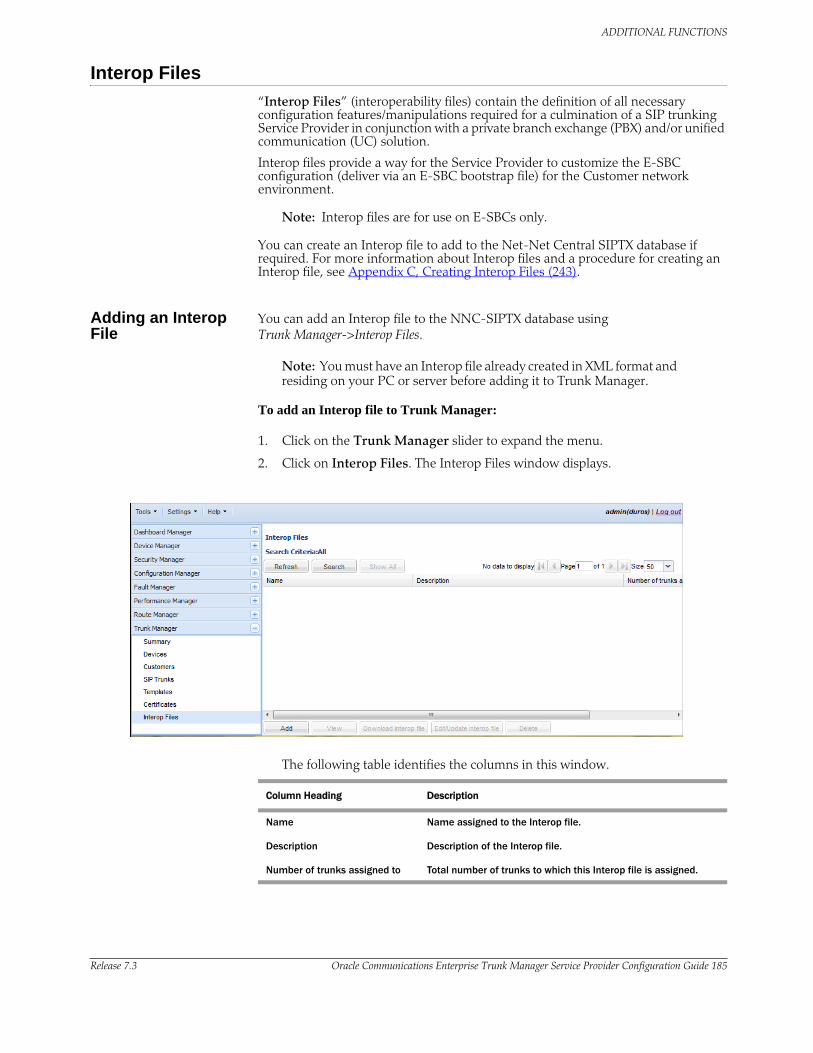
ADDITIONAL FUNCTIONS
Release 7.3 Oracle Communications Enterprise Trunk Manager Service Provider Configuration Guide 185
Interop Files
“Interop Files” (interoperability files) contain the definition of all necessary configuration features/manipulations required for a culmination of a SIP trunking Service Provider in conjunction with a private branch exchange (PBX) and/or unified communication (UC) solution.
Interop files provide a way for the Service Provider to customize the E-SBC configuration (deliver via an E-SBC bootstrap file) for the Customer network environment.
Note: Interop files are for use on E-SBCs only.
You can create an Interop file to add to the Net-Net Central SIPTX database if required. For more information about Interop files and a procedure for creating an Interop file, see Appendix C, Creating Interop Files (243).
Adding an Interop File
You can add an Interop file to the NNC-SIPTX database using Trunk Manager->Interop Files.
Note: You must have an Interop file already created in XML format and residing on your PC or server before adding it to Trunk Manager.
To add an Interop file to Trunk Manager:
1. Click on the Trunk Manager slider to expand the menu.
2. Click on Interop Files. The Interop Files window displays.
The following table identifies the columns in this window.
Column Heading Description
Name Name assigned to the Interop file.
Description Description of the Interop file.
Number of trunks assigned to Total number of trunks to which this Interop file is assigned.
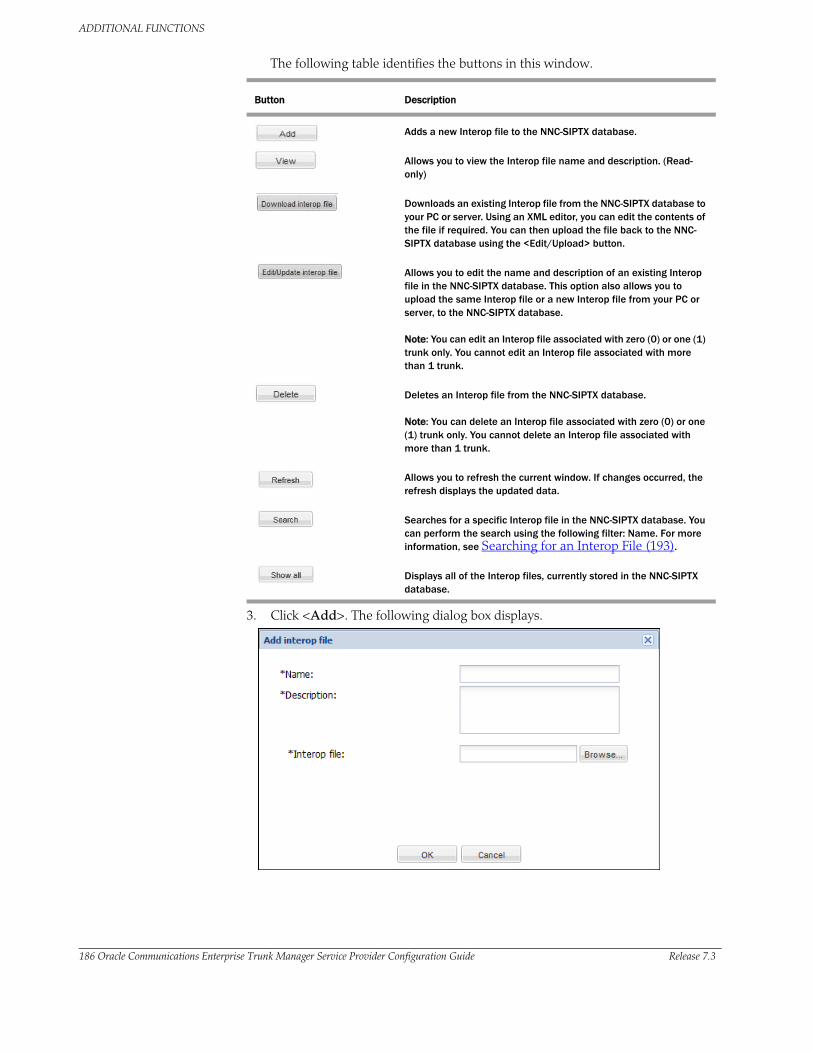
ADDITIONAL FUNCTIONS
186 Oracle Communications Enterprise Trunk Manager Service Provider Configuration Guide Release 7.3
The following table identifies the buttons in this window.
Button Description
Adds a new Interop file to the NNC-SIPTX database.
Allows you to view the Interop file name and description. (Read-only)
Downloads an existing Interop file from the NNC-SIPTX database to your PC or server. Using an XML editor, you can edit the contents of the file if required. You can then upload the file back to the NNC-SIPTX database using the <Edit/Upload> button.
Allows you to edit the name and description of an existing Interop file in the NNC-SIPTX database. This option also allows you to upload the same Interop file or a new Interop file from your PC or server, to the NNC-SIPTX database.
Note: You can edit an Interop file associated with zero (0) or one (1) trunk only. You cannot edit an Interop file associated with more than 1 trunk.
Deletes an Interop file from the NNC-SIPTX database.
Note: You can delete an Interop file associated with zero (0) or one (1) trunk only. You cannot delete an Interop file associated with more than 1 trunk.
Allows you to refresh the current window. If changes occurred, the refresh displays the updated data.
Searches for a specific Interop file in the NNC-SIPTX database. You can perform the search using the following filter: Name. For more information, see Searching for an Interop File (193).
Displays all of the Interop files, currently stored in the NNC-SIPTX database.
3. Click <Add>. The following dialog box displays.
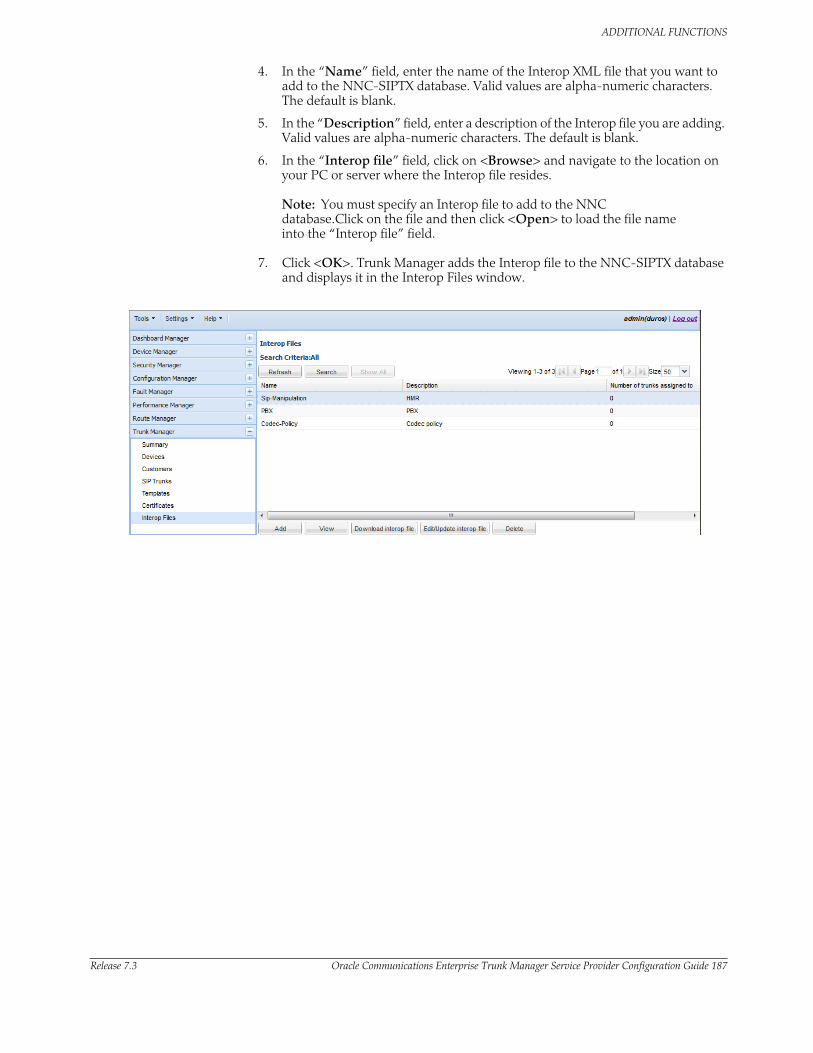
ADDITIONAL FUNCTIONS
Release 7.3 Oracle Communications Enterprise Trunk Manager Service Provider Configuration Guide 187
4. In the “Name” field, enter the name of the Interop XML file that you want to add to the NNC-SIPTX database. Valid values are alpha-numeric characters. The default is blank.
5. In the “Description” field, enter a description of the Interop file you are adding. Valid values are alpha-numeric characters. The default is blank.
6. In the “Interop file” field, click on <Browse> and navigate to the location on your PC or server where the Interop file resides.
Note: You must specify an Interop file to add to the NNC database.Click on the file and then click <Open> to load the file name into the “Interop file” field.
7. Click <OK>. Trunk Manager adds the Interop file to the NNC-SIPTX database and displays it in the Interop Files window.
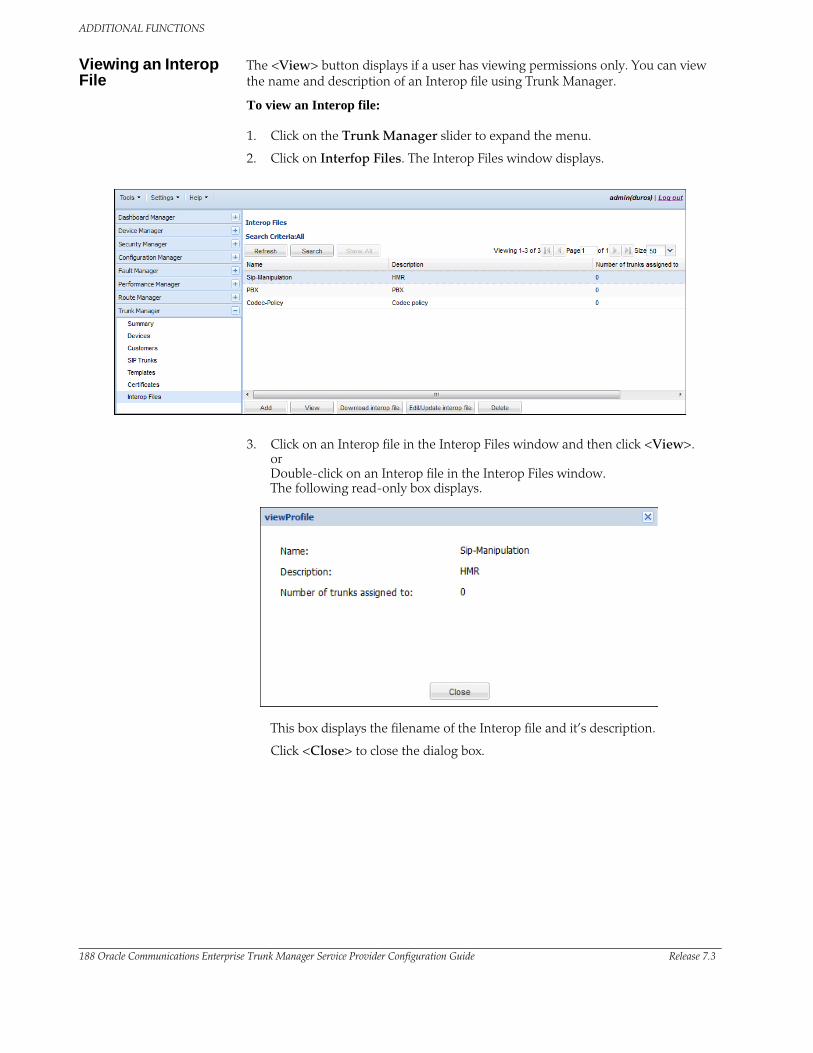
ADDITIONAL FUNCTIONS
188 Oracle Communications Enterprise Trunk Manager Service Provider Configuration Guide Release 7.3
Viewing an Interop File
The <View> button displays if a user has viewing permissions only. You can view the name and description of an Interop file using Trunk Manager.
To view an Interop file:
1. Click on the Trunk Manager slider to expand the menu.
2. Click on Interfop Files. The Interop Files window displays.
3. Click on an Interop file in the Interop Files window and then click <View>. or Double-click on an Interop file in the Interop Files window. The following read-only box displays.
This box displays the filename of the Interop file and it’s description.
Click <Close> to close the dialog box.
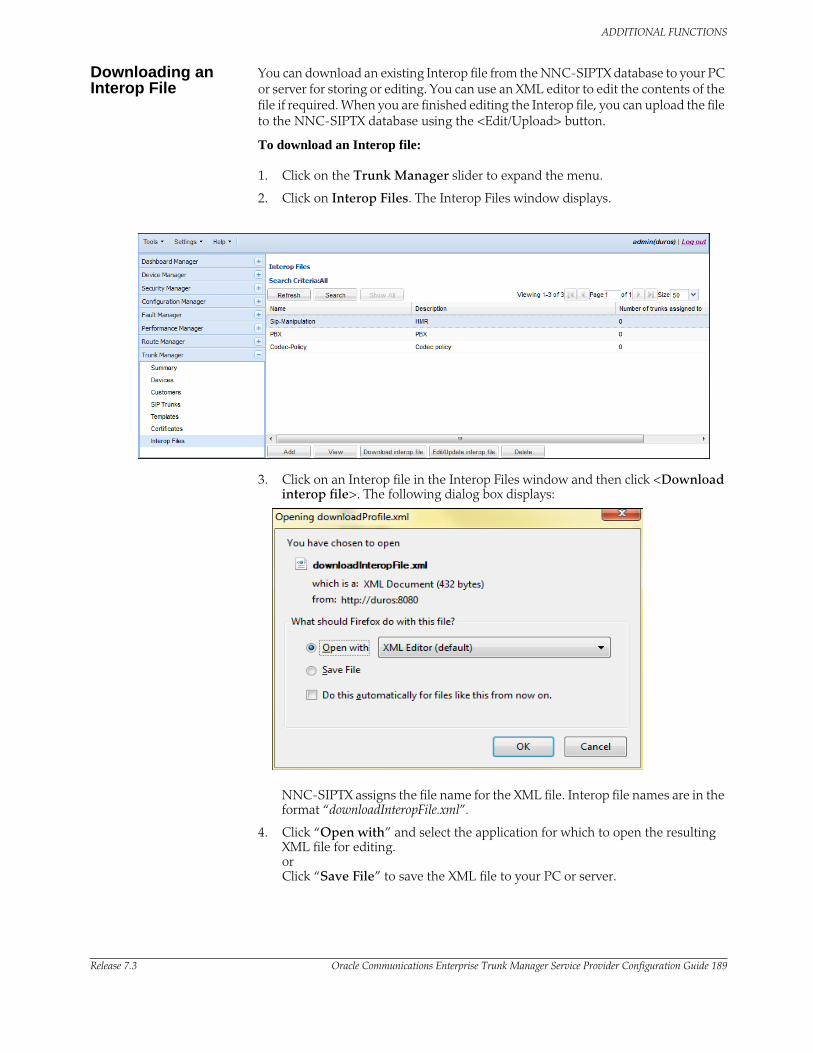
ADDITIONAL FUNCTIONS
Release 7.3 Oracle Communications Enterprise Trunk Manager Service Provider Configuration Guide 189
Downloading an Interop File
You can download an existing Interop file from the NNC-SIPTX database to your PC or server for storing or editing. You can use an XML editor to edit the contents of the file if required. When you are finished editing the Interop file, you can upload the file to the NNC-SIPTX database using the <Edit/Upload> button.
To download an Interop file:
1. Click on the Trunk Manager slider to expand the menu.
2. Click on Interop Files. The Interop Files window displays.
3. Click on an Interop file in the Interop Files window and then click <Download interop file>. The following dialog box displays:
NNC-SIPTX assigns the file name for the XML file. Interop file names are in the format “downloadInteropFile.xml”.
4. Click “Open with” and select the application for which to open the resulting XML file for editing. or Click “Save File” to save the XML file to your PC or server.
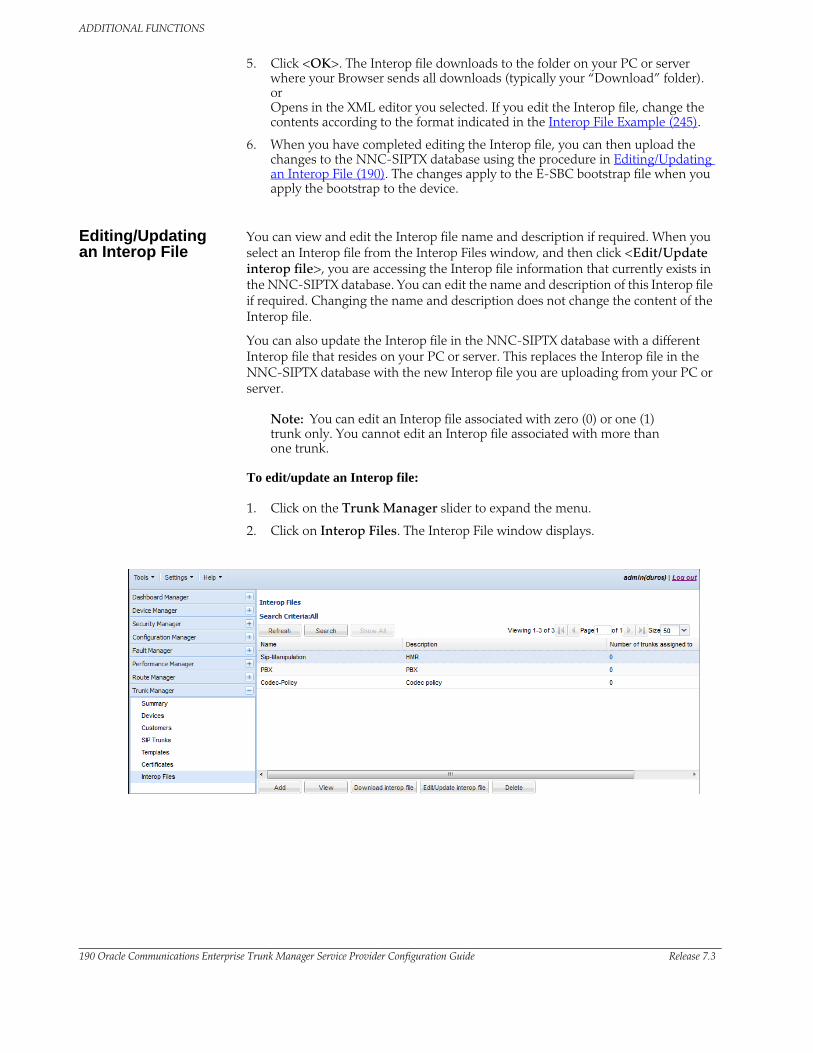
ADDITIONAL FUNCTIONS
190 Oracle Communications Enterprise Trunk Manager Service Provider Configuration Guide Release 7.3
5. Click <OK>. The Interop file downloads to the folder on your PC or server where your Browser sends all downloads (typically your “Download” folder). or Opens in the XML editor you selected. If you edit the Interop file, change the contents according to the format indicated in the Interop File Example (245).
6. When you have completed editing the Interop file, you can then upload the changes to the NNC-SIPTX database using the procedure in Editing/Updating an Interop File (190). The changes apply to the E-SBC bootstrap file when you apply the bootstrap to the device.
Editing/Updating an Interop File
You can view and edit the Interop file name and description if required. When you select an Interop file from the Interop Files window, and then click <Edit/Update interop file>, you are accessing the Interop file information that currently exists in the NNC-SIPTX database. You can edit the name and description of this Interop file if required. Changing the name and description does not change the content of the Interop file.
You can also update the Interop file in the NNC-SIPTX database with a different Interop file that resides on your PC or server. This replaces the Interop file in the NNC-SIPTX database with the new Interop file you are uploading from your PC or server.
Note: You can edit an Interop file associated with zero (0) or one (1) trunk only. You cannot edit an Interop file associated with more than one trunk.
To edit/update an Interop file:
1. Click on the Trunk Manager slider to expand the menu.
2. Click on Interop Files. The Interop File window displays.
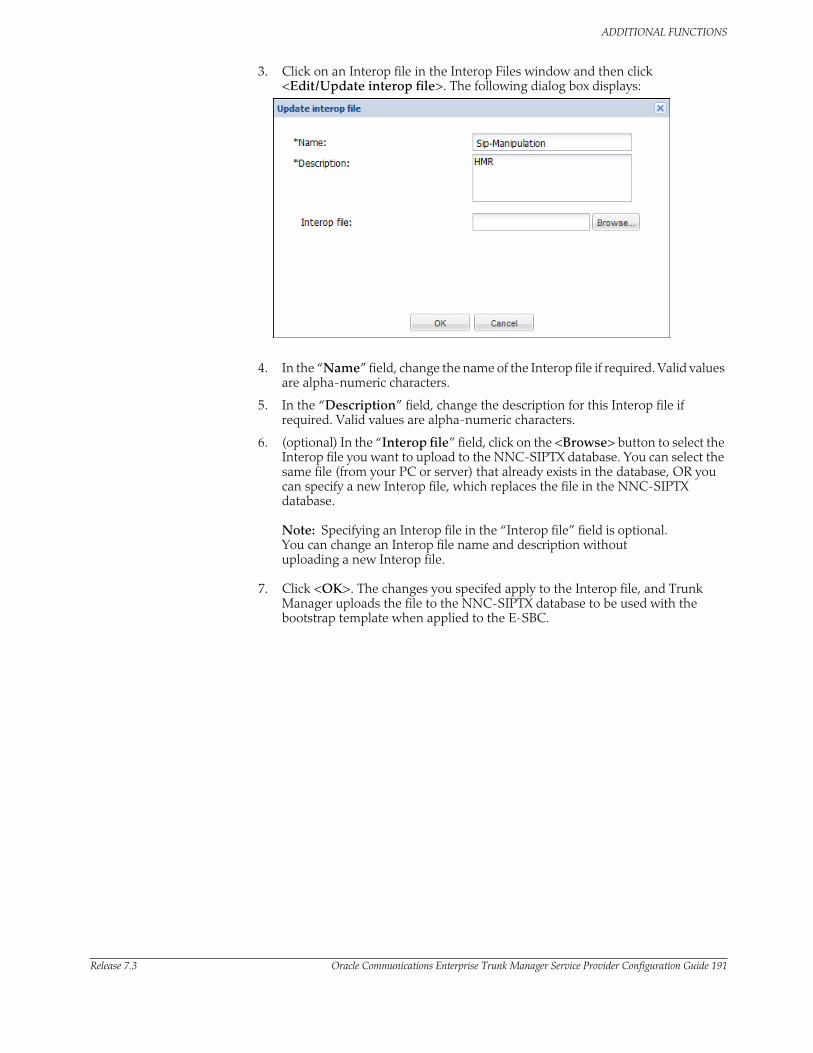
ADDITIONAL FUNCTIONS
Release 7.3 Oracle Communications Enterprise Trunk Manager Service Provider Configuration Guide 191
3. Click on an Interop file in the Interop Files window and then click <Edit/Update interop file>. The following dialog box displays:
4. In the “Name” field, change the name of the Interop file if required. Valid values are alpha-numeric characters.
5. In the “Description” field, change the description for this Interop file if required. Valid values are alpha-numeric characters.
6. (optional) In the “Interop file” field, click on the <Browse> button to select the Interop file you want to upload to the NNC-SIPTX database. You can select the same file (from your PC or server) that already exists in the database, OR you can specify a new Interop file, which replaces the file in the NNC-SIPTX database.
Note: Specifying an Interop file in the “Interop file” field is optional. You can change an Interop file name and description without uploading a new Interop file.
7. Click <OK>. The changes you specifed apply to the Interop file, and Trunk Manager uploads the file to the NNC-SIPTX database to be used with the bootstrap template when applied to the E-SBC.
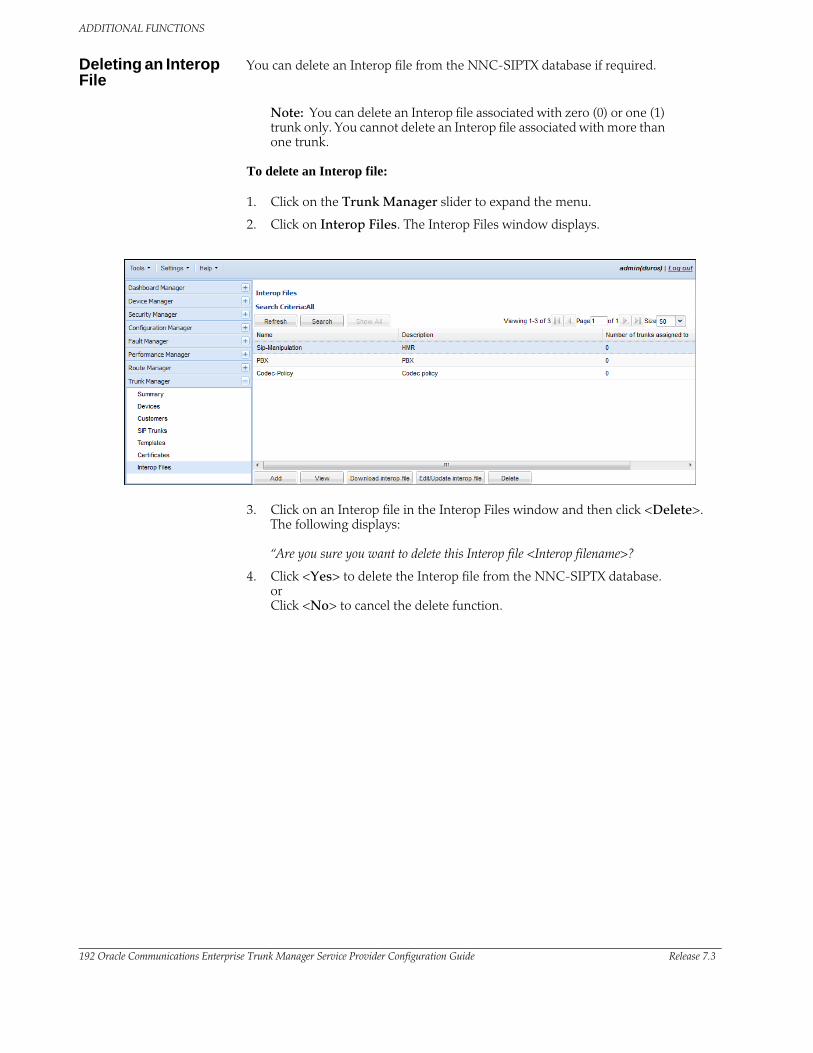
ADDITIONAL FUNCTIONS
192 Oracle Communications Enterprise Trunk Manager Service Provider Configuration Guide Release 7.3
Deleting an Interop File
You can delete an Interop file from the NNC-SIPTX database if required.
Note: You can delete an Interop file associated with zero (0) or one (1) trunk only. You cannot delete an Interop file associated with more than one trunk.
To delete an Interop file:
1. Click on the Trunk Manager slider to expand the menu.
2. Click on Interop Files. The Interop Files window displays.
3. Click on an Interop file in the Interop Files window and then click <Delete>. The following displays: “Are you sure you want to delete this Interop file <Interop filename>?
4. Click <Yes> to delete the Interop file from the NNC-SIPTX database. or Click <No> to cancel the delete function.
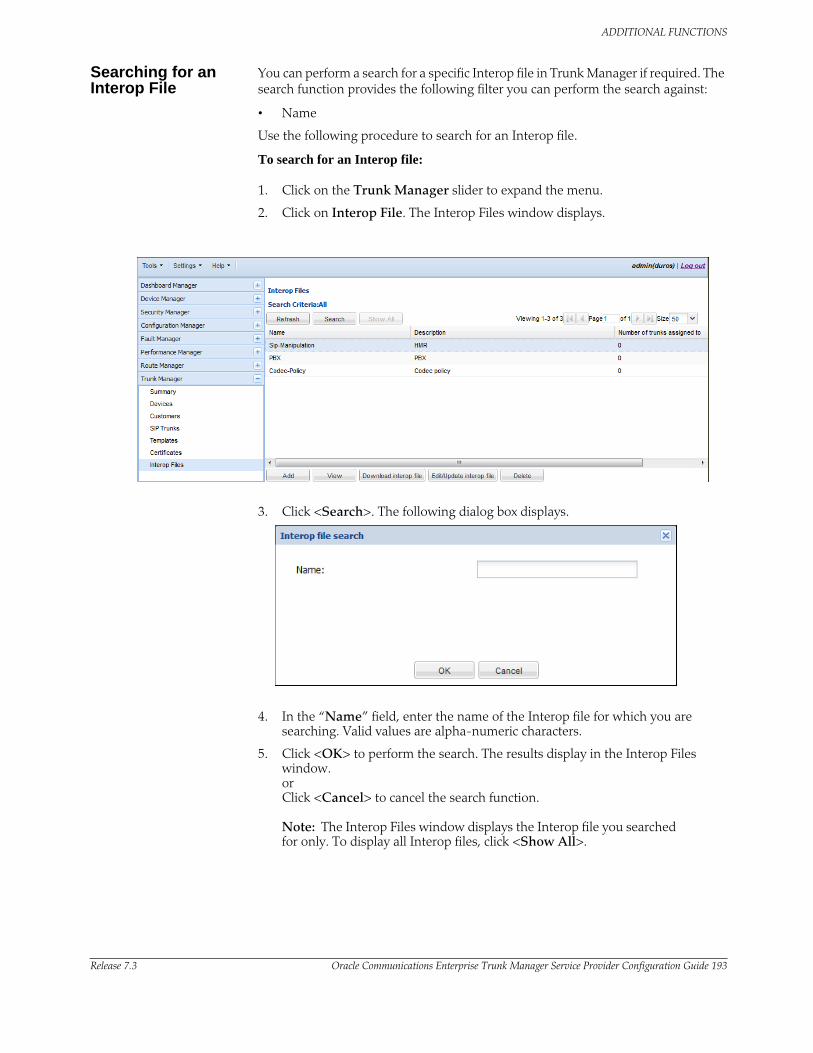
ADDITIONAL FUNCTIONS
Release 7.3 Oracle Communications Enterprise Trunk Manager Service Provider Configuration Guide 193
Searching for an Interop File
You can perform a search for a specific Interop file in Trunk Manager if required. The search function provides the following filter you can perform the search against:
• Name
Use the following procedure to search for an Interop file.
To search for an Interop file:
1. Click on the Trunk Manager slider to expand the menu.
2. Click on Interop File. The Interop Files window displays.
3. Click <Search>. The following dialog box displays.
4. In the “Name” field, enter the name of the Interop file for which you are searching. Valid values are alpha-numeric characters.
5. Click <OK> to perform the search. The results display in the Interop Files window. or Click <Cancel> to cancel the search function.
Note: The Interop Files window displays the Interop file you searched for only. To display all Interop files, click <Show All>.

ADDITIONAL FUNCTIONS
194 Oracle Communications Enterprise Trunk Manager Service Provider Configuration Guide Release 7.3
Installation Setup File
The “Installation Setup” feature is a quick and easy way to initially configure a new E-SBC in your network with a working configuration and the SIP Trunk Xpress information (E-SBC bootstrap).
After adding an E-SBC to your network (and creating the bootstrap file), the <Installation setup> button in the “Customers” window allows you to specify configuration parameters for an E-SBC. This feature creates an installation file (“tar.gz” file) that contains the basic configuration required for the E-SBC, such as . Simple Network Management Protocol (SNMP) parameters, boot parameters, and/or high availability (HA) (redundant device) parameters. The file also includes the E-SBC bootstrap information.
For more information about creating the “installation setup” file (tar.gz file) see Installation Setup (95).
This section provides information about editing and deleting this “installation setup” file if required. The following table describes the status of the “installation setup” file (tar.gz) during the process of editing and deleting.
IF THEN
you create an”installation setup” file and do not download or apply it to the E-SBC,
the changes are stored in the NNC-SIPTX database. The file and bootstrap do not apply to the E-SBC until you download and apply the file.
The status in the “Installation configured” column indicates “Yes”. The <Installation setup> button allows you to edit/delete the file stored in the NNC-SIPTX database.
you create, download, and apply an “installation setup” file to an E-SBC, and then edit the file again in Trunk Manager,
the changes are stored in the NNC-SIPTX database only. You must download and apply the information to the E-SBC for the changes to take affect. The edited file overwrites the original file on the E-SBC.
The status in the “Installation configured” column indicates “Yes”. The <Installation setup> button allows you to edit/delete the file stored in the NNC-SIPTX database.
you delete an “installation setup” file before downloading and applying the file to the E-SBC,
the file deletes from the NNC-SIPTX database only, but the E-SBC bootstrap file does not delete from the database.
The status in the “Installation configured” column indicates “No”. The <Installation setup> button allows you to add a new file to the NNC-SIPTX database.
you delete an “installation setup” file after downloading and applying a file to the E-SBC,
the file deletes from the NNC-SIPTX database, but the E-SBC bootstrap does not delete from the database. The previous file and bootstrap that you downloaded and applied is still resident on the E-SBC.
The status in the “Installation configured” column indicates “No” even if a previous file exists on the E-SBC. The <Installation setup> button allows you to add a new file to the NNC-SIPTX database. If you add and apply a new file, it overwrites the file and bootstrap currently resident on the E-SBC.
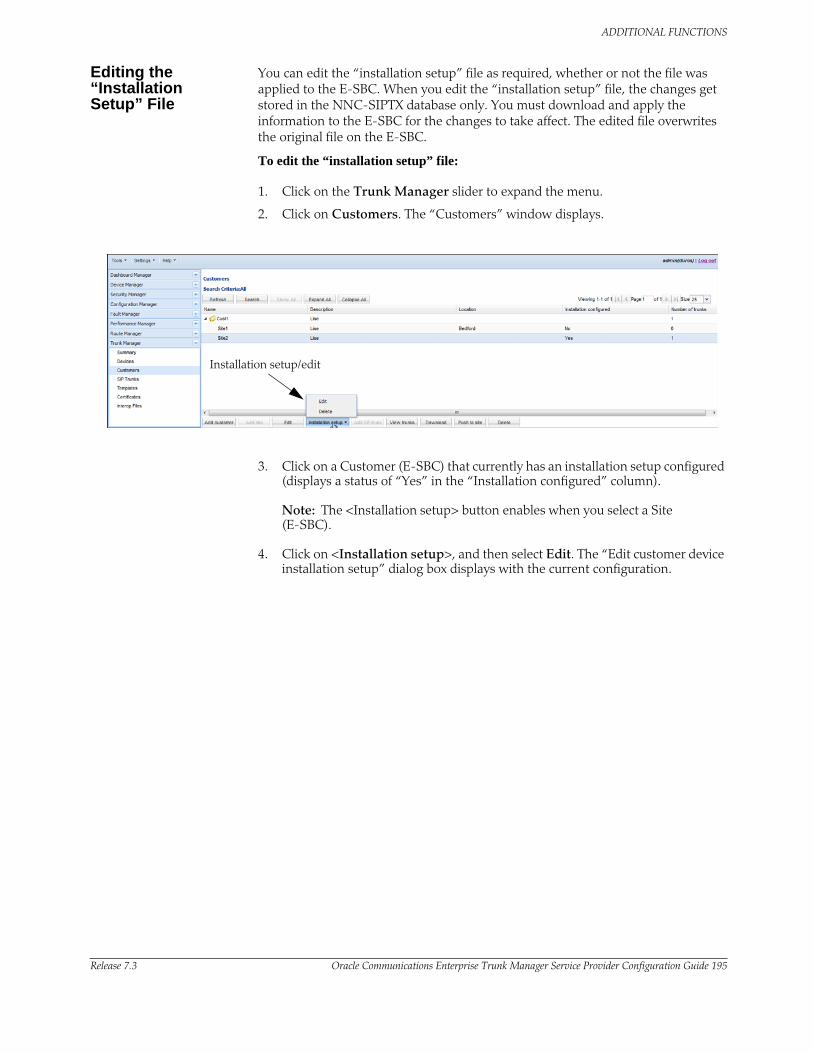
ADDITIONAL FUNCTIONS
Release 7.3 Oracle Communications Enterprise Trunk Manager Service Provider Configuration Guide 195
Editing the “Installation Setup” File
You can edit the “installation setup” file as required, whether or not the file was applied to the E-SBC. When you edit the “installation setup” file, the changes get stored in the NNC-SIPTX database only. You must download and apply the information to the E-SBC for the changes to take affect. The edited file overwrites the original file on the E-SBC.
To edit the “installation setup” file:
1. Click on the Trunk Manager slider to expand the menu.
2. Click on Customers. The “Customers” window displays.
Installation setup/edit
3. Click on a Customer (E-SBC) that currently has an installation setup configured (displays a status of “Yes” in the “Installation configured” column).
Note: The <Installation setup> button enables when you select a Site (E-SBC).
4. Click on <Installation setup>, and then select Edit. The “Edit customer device installation setup” dialog box displays with the current configuration.
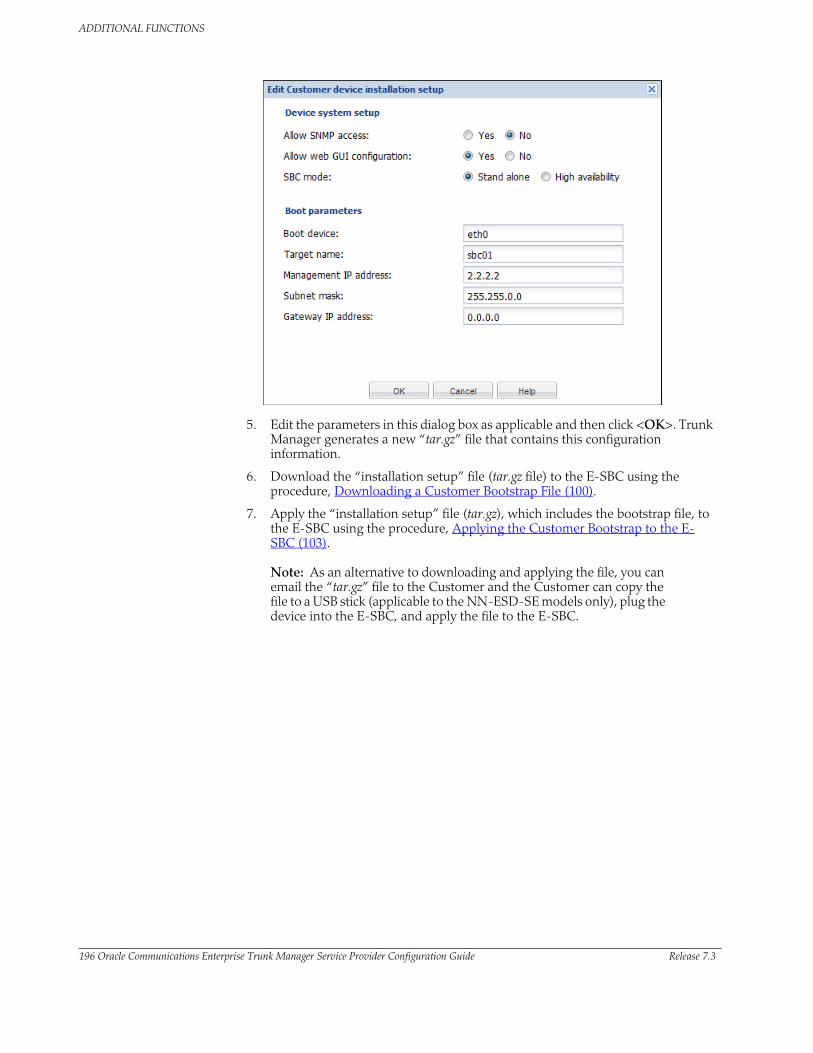
ADDITIONAL FUNCTIONS
196 Oracle Communications Enterprise Trunk Manager Service Provider Configuration Guide Release 7.3
5. Edit the parameters in this dialog box as applicable and then click <OK>. Trunk Manager generates a new “tar.gz” file that contains this configuration information.
6. Download the “installation setup” file (tar.gz file) to the E-SBC using the procedure, Downloading a Customer Bootstrap File (100).
7. Apply the “installation setup” file (tar.gz), which includes the bootstrap file, to the E-SBC using the procedure, Applying the Customer Bootstrap to the E-SBC (103).
Note: As an alternative to downloading and applying the file, you can email the “tar.gz” file to the Customer and the Customer can copy the file to a USB stick (applicable to the NN-ESD-SE models only), plug the device into the E-SBC, and apply the file to the E-SBC.
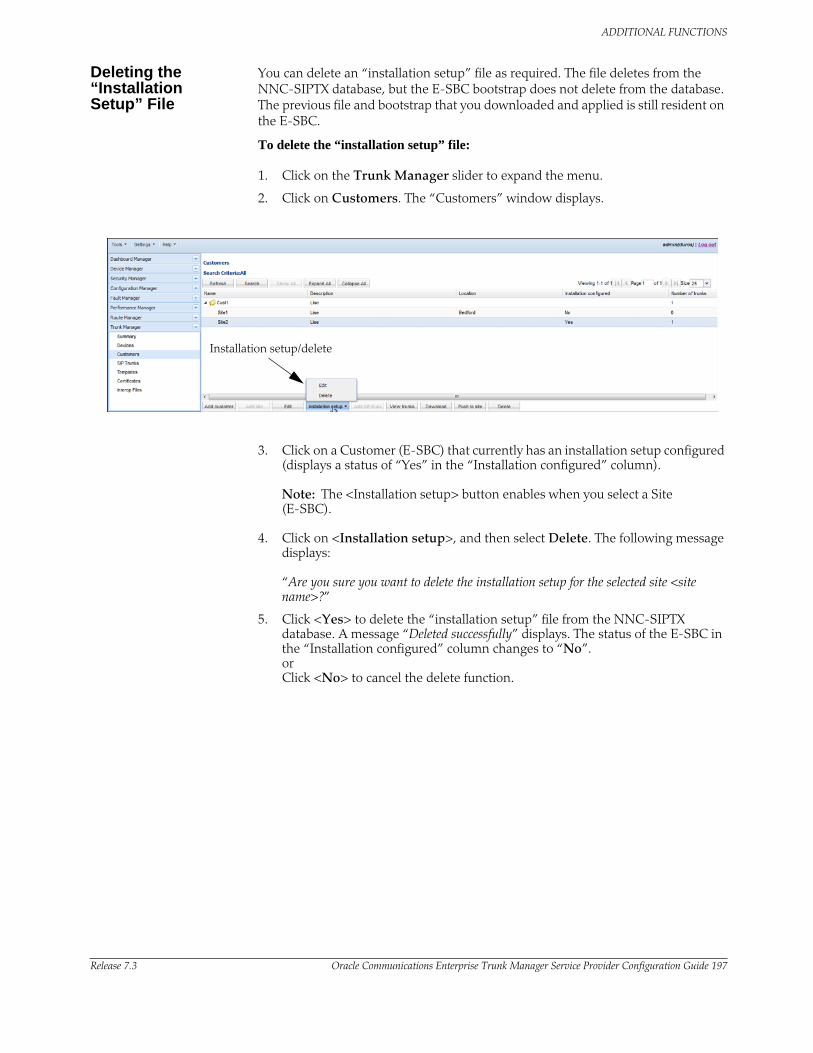
ADDITIONAL FUNCTIONS
Release 7.3 Oracle Communications Enterprise Trunk Manager Service Provider Configuration Guide 197
Deleting the “Installation Setup” File
You can delete an “installation setup” file as required. The file deletes from the NNC-SIPTX database, but the E-SBC bootstrap does not delete from the database. The previous file and bootstrap that you downloaded and applied is still resident on the E-SBC.
To delete the “installation setup” file:
1. Click on the Trunk Manager slider to expand the menu.
2. Click on Customers. The “Customers” window displays.
Installation setup/delete
3. Click on a Customer (E-SBC) that currently has an installation setup configured (displays a status of “Yes” in the “Installation configured” column).
Note: The <Installation setup> button enables when you select a Site (E-SBC).
4. Click on <Installation setup>, and then select Delete. The following message displays: “Are you sure you want to delete the installation setup for the selected site <site name>?”
5. Click <Yes> to delete the “installation setup” file from the NNC-SIPTX database. A message “Deleted successfully” displays. The status of the E-SBC in the “Installation configured” column changes to “No”. or Click <No> to cancel the delete function.
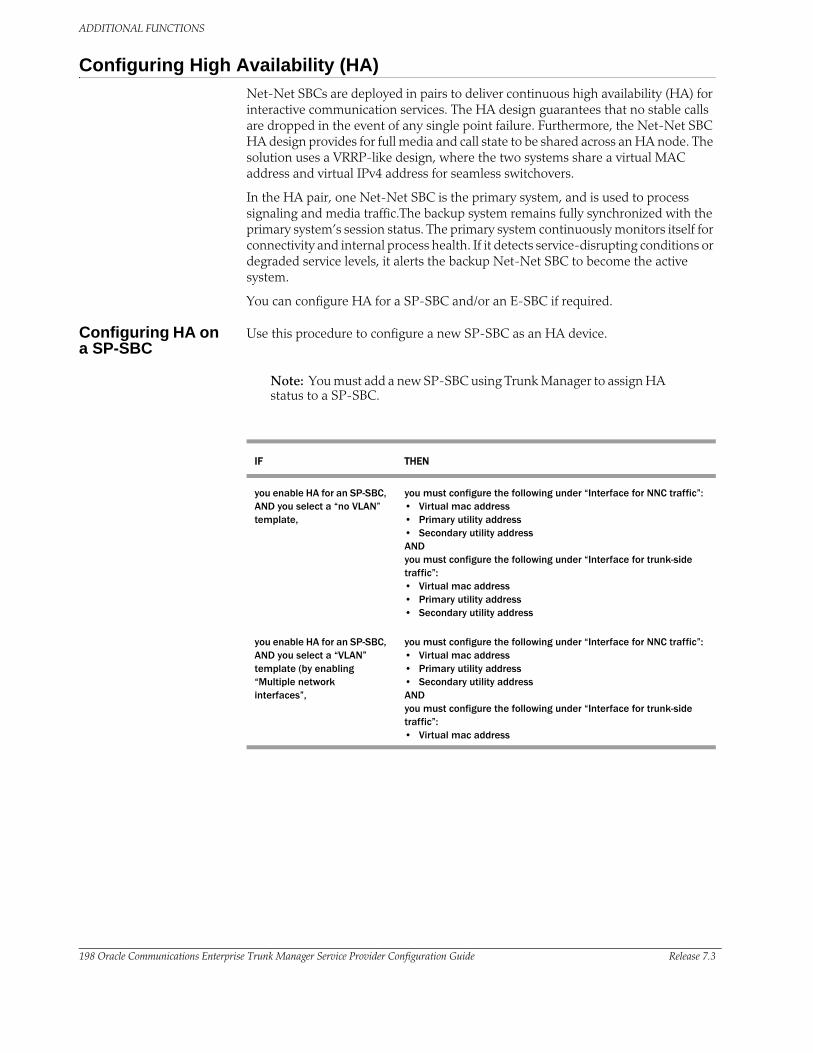
ADDITIONAL FUNCTIONS
198 Oracle Communications Enterprise Trunk Manager Service Provider Configuration Guide Release 7.3
Configuring High Availability (HA)
Net-Net SBCs are deployed in pairs to deliver continuous high availability (HA) for interactive communication services. The HA design guarantees that no stable calls are dropped in the event of any single point failure. Furthermore, the Net-Net SBC HA design provides for full media and call state to be shared across an HA node. The solution uses a VRRP-like design, where the two systems share a virtual MAC address and virtual IPv4 address for seamless switchovers.
In the HA pair, one Net-Net SBC is the primary system, and is used to process signaling and media traffic.The backup system remains fully synchronized with the primary system’s session status. The primary system continuously monitors itself for connectivity and internal process health. If it detects service-disrupting conditions or degraded service levels, it alerts the backup Net-Net SBC to become the active system.
You can configure HA for a SP-SBC and/or an E-SBC if required.
Configuring HA on a SP-SBC
Use this procedure to configure a new SP-SBC as an HA device.
Note: You must add a new SP-SBC using Trunk Manager to assign HA status to a SP-SBC.
IF THEN
you enable HA for an SP-SBC, AND you select a “no VLAN” template,
you must configure the following under “Interface for NNC traffic”:• Virtual mac address• Primary utility address• Secondary utility addressANDyou must configure the following under “Interface for trunk-side traffic”:• Virtual mac address• Primary utility address• Secondary utility address
you enable HA for an SP-SBC, AND you select a “VLAN” template (by enabling “Multiple network interfaces”,
you must configure the following under “Interface for NNC traffic”:• Virtual mac address• Primary utility address• Secondary utility addressANDyou must configure the following under “Interface for trunk-side traffic”:• Virtual mac address
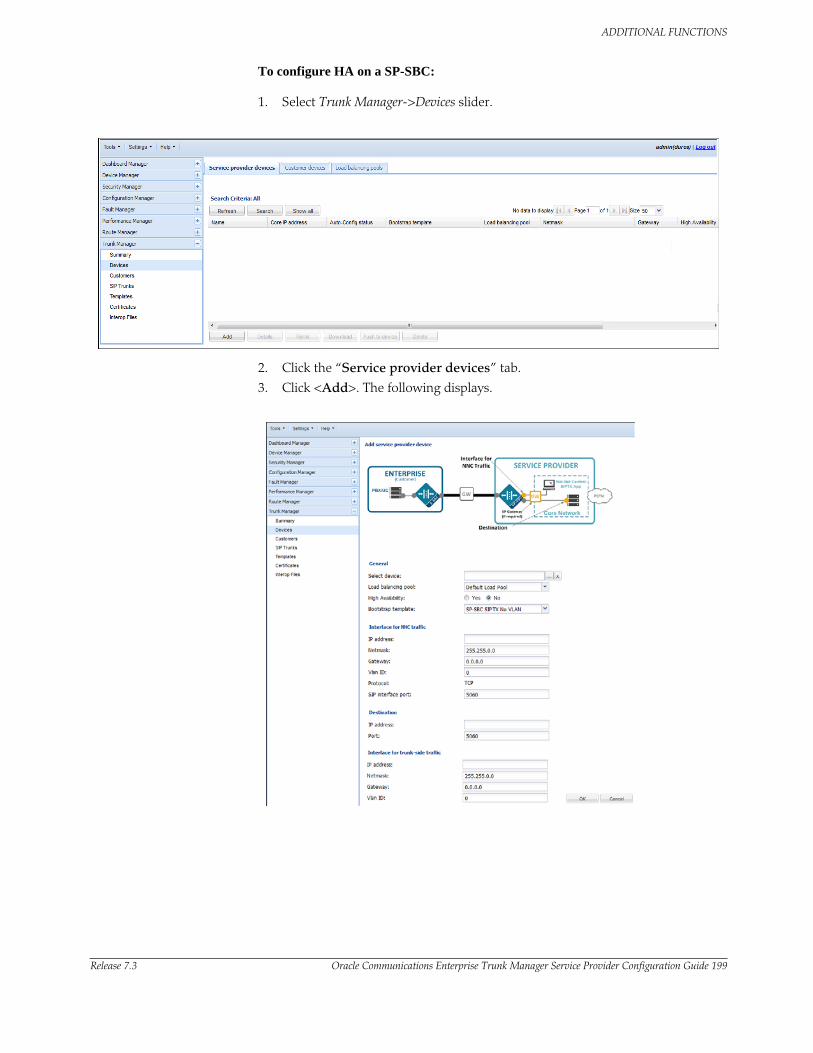
ADDITIONAL FUNCTIONS
Release 7.3 Oracle Communications Enterprise Trunk Manager Service Provider Configuration Guide 199
To configure HA on a SP-SBC:
1. Select Trunk Manager->Devices slider.
2. Click the “Service provider devices” tab.
3. Click <Add>. The following displays.
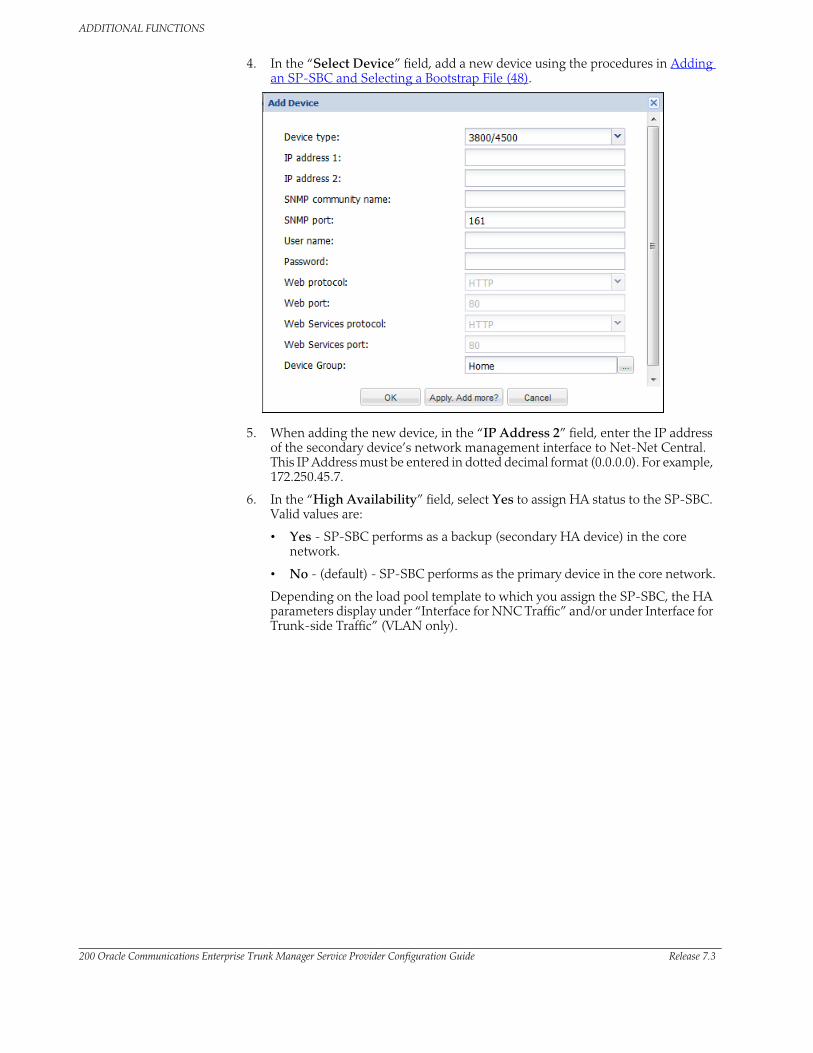
ADDITIONAL FUNCTIONS
200 Oracle Communications Enterprise Trunk Manager Service Provider Configuration Guide Release 7.3
4. In the “Select Device” field, add a new device using the procedures in Adding an SP-SBC and Selecting a Bootstrap File (48).
5. When adding the new device, in the “IP Address 2” field, enter the IP address of the secondary device’s network management interface to Net-Net Central. This IP Address must be entered in dotted decimal format (0.0.0.0). For example, 172.250.45.7.
6. In the “High Availability” field, select Yes to assign HA status to the SP-SBC. Valid values are:
• Yes - SP-SBC performs as a backup (secondary HA device) in the core network.
• No - (default) - SP-SBC performs as the primary device in the core network.
Depending on the load pool template to which you assign the SP-SBC, the HA parameters display under “Interface for NNC Traffic” and/or under Interface for Trunk-side Traffic” (VLAN only).

ADDITIONAL FUNCTIONS
Release 7.3 Oracle Communications Enterprise Trunk Manager Service Provider Configuration Guide 201
HA Interface for NNC Traffic (for both VLAN and non-VLAN)
If you enable High Availability, you must specify values for the virtual MAC address, primary utility address, and secondary utility address under the section, Interface for NNC traffic.
High Availability (HA)
1. In the “Virtual mac address” field, enter the virtual MAC address of the secondary SP-SBC in your core network. This address must be in the format 00:00:00:00:00:00. For example, FE:09:90:33:53:aP.
2. In the “Primary utility address” field, enter the IP address of the primary SP-SBC in your core network. This IP Address must be entered in dotted decimal format (0.0.0.0). For example, 192.168.34.220.
3. In the “Secondary utility address” field, enter the IP address of the secondary SP-SBC (backup) in your core network. This IP Address must be entered in dotted decimal format (0.0.0.0). For example, 192.168.34.221.
HA Interface for Trunk-Side Traffic (with no VLAN)
If you enable High Availability AND you select a “no-VLAN” template from the “Bootstrap template” field, you must specify values for the virtual MAC address, primary utility address, and secondary utility address under the section, Interface for trunk-side traffic.
High Availability (HA) with no VLAN
1. In the “Virtual mac address” field, enter the virtual MAC address of the secondary SP-SBC in your core network. This address must be in the format 00:00:00:00:00:00. For example, FE:09:90:33:53:aP.
2. In the “Primary utility address” field, enter the IP address of the primary SP-SBC in your core network. This IP Address must be entered in dotted decimal format (0.0.0.0). For example, 192.168.34.220.
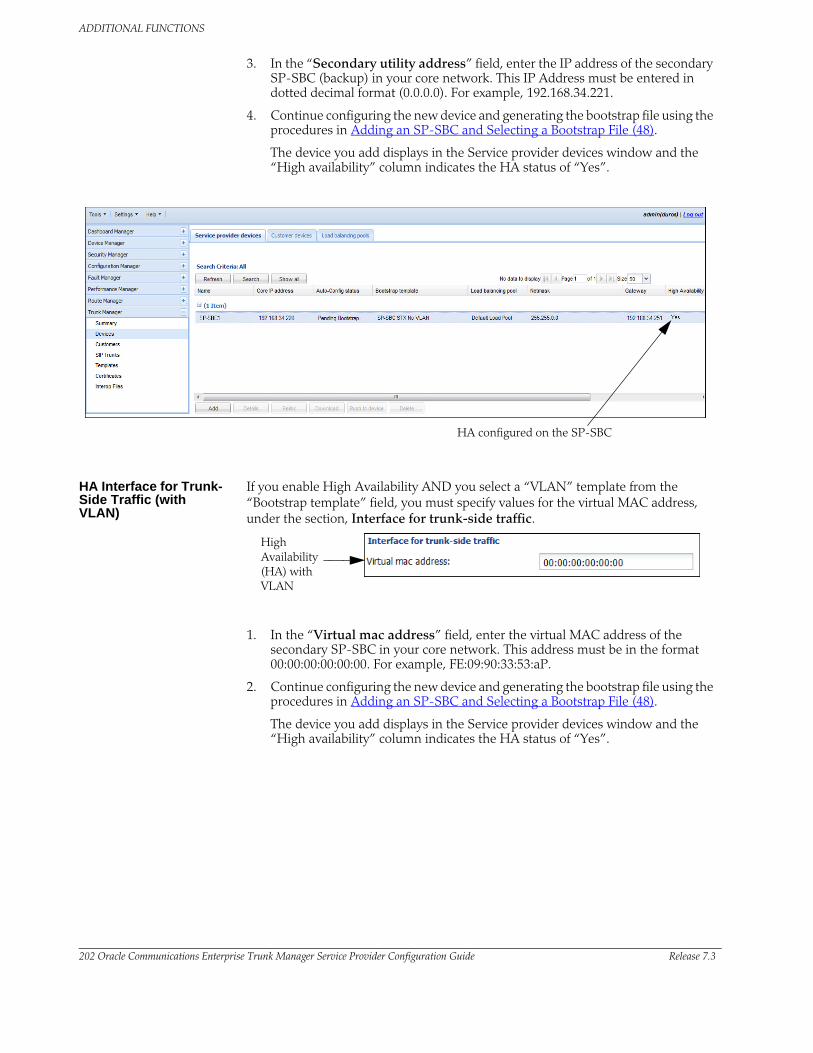
ADDITIONAL FUNCTIONS
202 Oracle Communications Enterprise Trunk Manager Service Provider Configuration Guide Release 7.3
3. In the “Secondary utility address” field, enter the IP address of the secondary SP-SBC (backup) in your core network. This IP Address must be entered in dotted decimal format (0.0.0.0). For example, 192.168.34.221.
4. Continue configuring the new device and generating the bootstrap file using the procedures in Adding an SP-SBC and Selecting a Bootstrap File (48).
The device you add displays in the Service provider devices window and the “High availability” column indicates the HA status of “Yes”.
HA configured on the SP-SBC
HA Interface for Trunk-Side Traffic (with VLAN)
If you enable High Availability AND you select a “VLAN” template from the “Bootstrap template” field, you must specify values for the virtual MAC address, under the section, Interface for trunk-side traffic.
High Availability (HA) with VLAN
1. In the “Virtual mac address” field, enter the virtual MAC address of the secondary SP-SBC in your core network. This address must be in the format 00:00:00:00:00:00. For example, FE:09:90:33:53:aP.
2. Continue configuring the new device and generating the bootstrap file using the procedures in Adding an SP-SBC and Selecting a Bootstrap File (48).
The device you add displays in the Service provider devices window and the “High availability” column indicates the HA status of “Yes”.
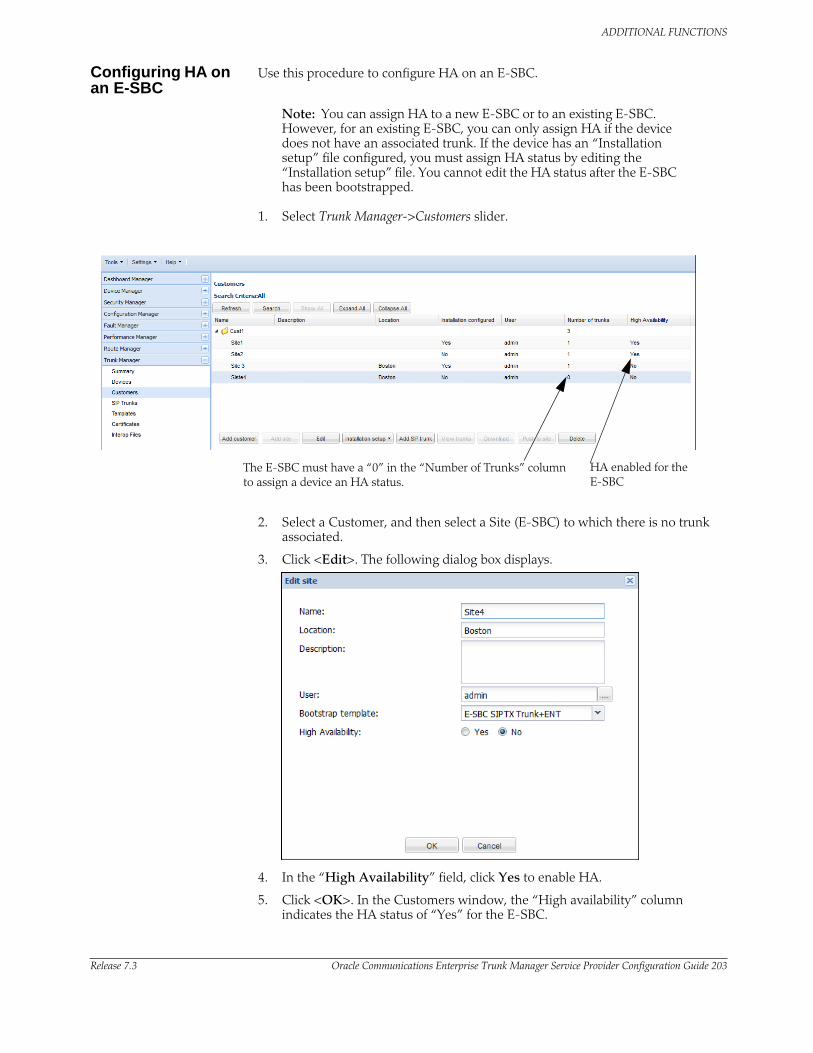
ADDITIONAL FUNCTIONS
Release 7.3 Oracle Communications Enterprise Trunk Manager Service Provider Configuration Guide 203
Configuring HA on an E-SBC
Use this procedure to configure HA on an E-SBC.
Note: You can assign HA to a new E-SBC or to an existing E-SBC. However, for an existing E-SBC, you can only assign HA if the device does not have an associated trunk. If the device has an “Installation setup” file configured, you must assign HA status by editing the “Installation setup” file. You cannot edit the HA status after the E-SBC has been bootstrapped.
1. Select Trunk Manager->Customers slider.
The E-SBC must have a “0” in the “Number of Trunks” column to assign a device an HA status.
HA enabled for the E-SBC
2. Select a Customer, and then select a Site (E-SBC) to which there is no trunk associated.
3. Click <Edit>. The following dialog box displays.
4. In the “High Availability” field, click Yes to enable HA.
5. Click <OK>. In the Customers window, the “High availability” column indicates the HA status of “Yes” for the E-SBC.
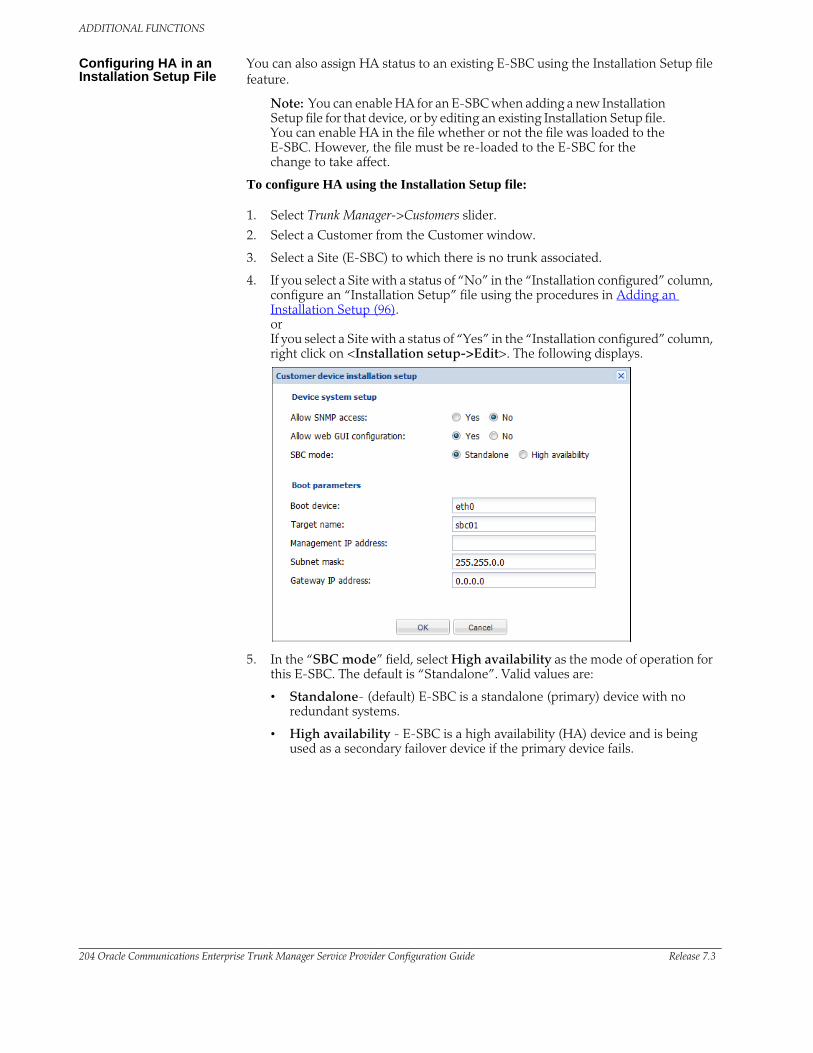
ADDITIONAL FUNCTIONS
204 Oracle Communications Enterprise Trunk Manager Service Provider Configuration Guide Release 7.3
Configuring HA in an Installation Setup File
You can also assign HA status to an existing E-SBC using the Installation Setup file feature.
Note: You can enable HA for an E-SBC when adding a new Installation Setup file for that device, or by editing an existing Installation Setup file. You can enable HA in the file whether or not the file was loaded to the E-SBC. However, the file must be re-loaded to the E-SBC for the change to take affect.
To configure HA using the Installation Setup file:
1. Select Trunk Manager->Customers slider.
2. Select a Customer from the Customer window.
3. Select a Site (E-SBC) to which there is no trunk associated.
4. If you select a Site with a status of “No” in the “Installation configured” column, configure an “Installation Setup” file using the procedures in Adding an Installation Setup (96). or If you select a Site with a status of “Yes” in the “Installation configured” column, right click on <Installation setup->Edit>. The following displays.
5. In the “SBC mode” field, select High availability as the mode of operation for this E-SBC. The default is “Standalone”. Valid values are:
• Standalone- (default) E-SBC is a standalone (primary) device with no redundant systems.
• High availability - E-SBC is a high availability (HA) device and is being used as a secondary failover device if the primary device fails.
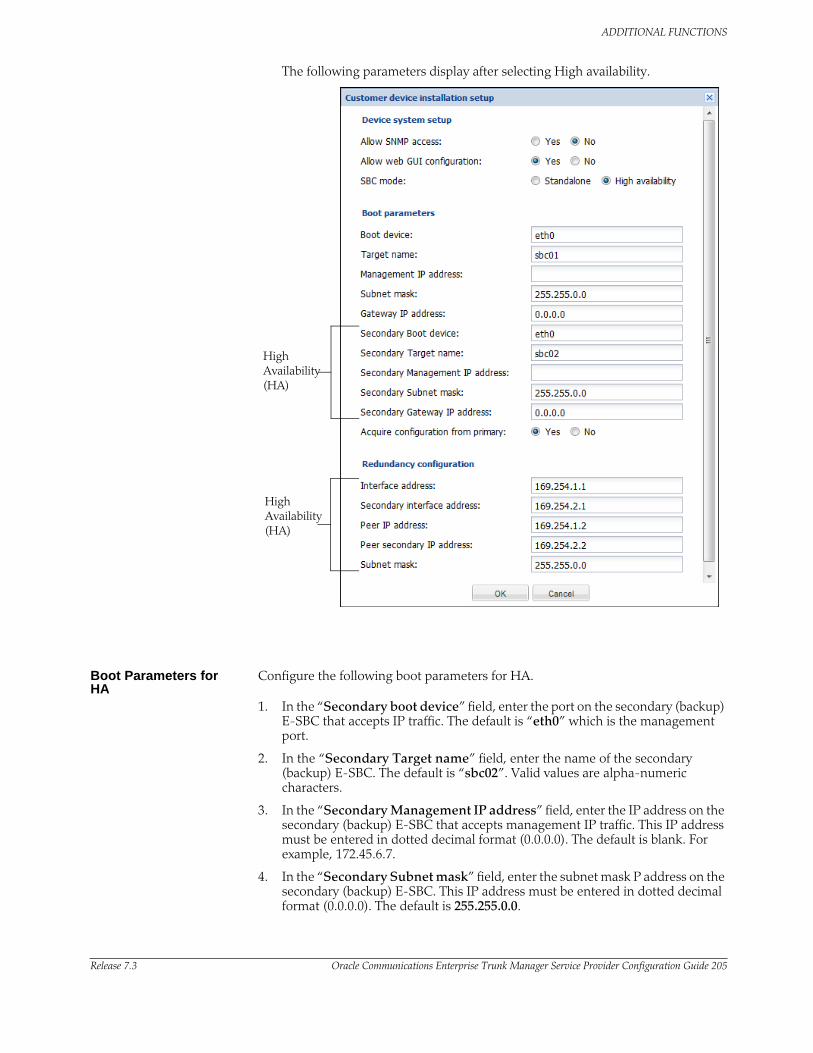
ADDITIONAL FUNCTIONS
Release 7.3 Oracle Communications Enterprise Trunk Manager Service Provider Configuration Guide 205
The following parameters display after selecting High availability.
High Availability (HA)
High Availability (HA)
Boot Parameters for HA
Configure the following boot parameters for HA.
1. In the “Secondary boot device” field, enter the port on the secondary (backup) E-SBC that accepts IP traffic. The default is “eth0” which is the management port.
2. In the “Secondary Target name” field, enter the name of the secondary (backup) E-SBC. The default is “sbc02”. Valid values are alpha-numeric characters.
3. In the “Secondary Management IP address” field, enter the IP address on the secondary (backup) E-SBC that accepts management IP traffic. This IP address must be entered in dotted decimal format (0.0.0.0). The default is blank. For example, 172.45.6.7.
4. In the “Secondary Subnet mask” field, enter the subnet mask P address on the secondary (backup) E-SBC. This IP address must be entered in dotted decimal format (0.0.0.0). The default is 255.255.0.0.
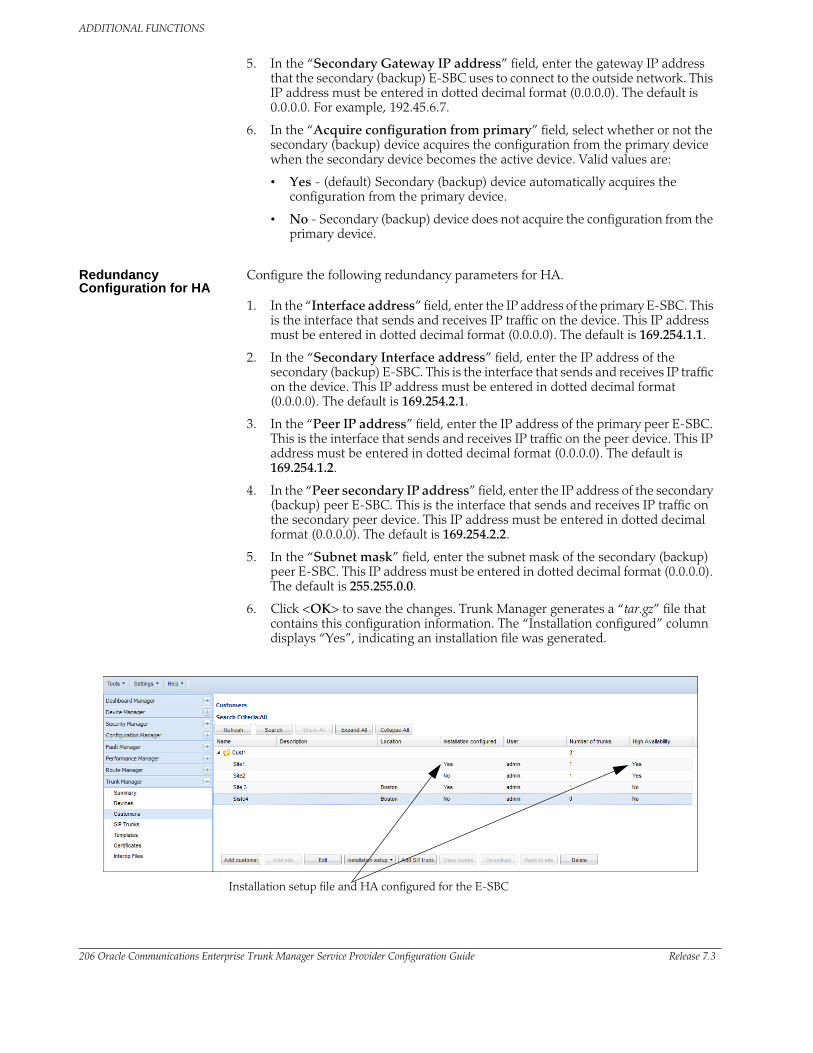
ADDITIONAL FUNCTIONS
206 Oracle Communications Enterprise Trunk Manager Service Provider Configuration Guide Release 7.3
5. In the “Secondary Gateway IP address” field, enter the gateway IP address that the secondary (backup) E-SBC uses to connect to the outside network. This IP address must be entered in dotted decimal format (0.0.0.0). The default is 0.0.0.0. For example, 192.45.6.7.
6. In the “Acquire configuration from primary” field, select whether or not the secondary (backup) device acquires the configuration from the primary device when the secondary device becomes the active device. Valid values are:
• Yes - (default) Secondary (backup) device automatically acquires the configuration from the primary device.
• No - Secondary (backup) device does not acquire the configuration from the primary device.
Redundancy Configuration for HA
Configure the following redundancy parameters for HA.
1. In the “Interface address” field, enter the IP address of the primary E-SBC. This is the interface that sends and receives IP traffic on the device. This IP address must be entered in dotted decimal format (0.0.0.0). The default is 169.254.1.1.
2. In the “Secondary Interface address” field, enter the IP address of the secondary (backup) E-SBC. This is the interface that sends and receives IP traffic on the device. This IP address must be entered in dotted decimal format (0.0.0.0). The default is 169.254.2.1.
3. In the “Peer IP address” field, enter the IP address of the primary peer E-SBC. This is the interface that sends and receives IP traffic on the peer device. This IP address must be entered in dotted decimal format (0.0.0.0). The default is 169.254.1.2.
4. In the “Peer secondary IP address” field, enter the IP address of the secondary (backup) peer E-SBC. This is the interface that sends and receives IP traffic on the secondary peer device. This IP address must be entered in dotted decimal format (0.0.0.0). The default is 169.254.2.2.
5. In the “Subnet mask” field, enter the subnet mask of the secondary (backup) peer E-SBC. This IP address must be entered in dotted decimal format (0.0.0.0). The default is 255.255.0.0.
6. Click <OK> to save the changes. Trunk Manager generates a “tar.gz” file that contains this configuration information. The “Installation configured” column displays “Yes”, indicating an installation file was generated.
Installation setup file and HA configured for the E-SBC

ADDITIONAL FUNCTIONS
Release 7.3 Oracle Communications Enterprise Trunk Manager Service Provider Configuration Guide 207
7. Download the “installation setup” file (tar.gz file) to the E-SBC using the procedure, Downloading a Customer Bootstrap File (100).
8. Apply the “installation setup” file (tar.gz), which includes the bootstrap file, to the E-SBC using the procedure, Applying the Customer Bootstrap to the E-SBC (103).
Note: As an alternative to downloading and applying the file, you can email the “tar.gz” file to the Customer and the Customer can copy the file to a USB stick (applicable to the NN-ESD-SE models only), plug the device into the E-SBC, and apply the file to the E-SBC.
Configuring HA on the Trunk
If you configure HA on an SP-SBC or an E-SBC, you must also configure the trunk to use the HA device. For information on configuring the trunk to use an HA device, see Adding a SIP Trunk (105).

ADDITIONAL FUNCTIONS
208 Oracle Communications Enterprise Trunk Manager Service Provider Configuration Guide Release 7.3
Release 7.3 Oracle Communications Enterprise Trunk Manager Service Provider Configuration Guide 209
A Net-Net Central Installation Procedures
Introduction
This chapter provides information required to install Net-Net Central in your network. Net-Net Central is a client/server application used to manage the Acme Packet Net-Net product family. Net-Net Central is accessed via a web-based browser client.
The Net-Net Central installation provides both a “Typical” installation and a “Custom” installation, depending on your network requirements. Only the “Typical” installation is described in this appendix. Installation of Trunk Manager is considered a “Custom” installation and requires a license to install. For information about installing Trunk Manager after installing Net-Net Central, see Chapter 2 InstallingTrunk Manager (17).
Before You Start
You should review this section before you start the Net-Net Central installation process.
Net-Net Central Hardware/OS Support
For information about the Net-Net Central Hardware and operating systems (OSs) that Net-Net Central supports, see the Net-Net Central Installation Guide.
Note: Trunk Manager supports specific hardware/OSs only. For more information, see Chapter 2 InstallingTrunk Manager (17).
System Requirements
Acme Packet has certified the following hardware and software server platforms and client requirements for use with Net-Net Central 7.3 and up, and the Trunk Manager application.
Note: Other hardware configurations might work with Net-Net Central, but Acme Packet has verified the configurations listed here.
Linux • CPU: 4-core 2.1 GHz processor or better
• 16 GB RAM minimum
• 195 GB hard drive, 300 GB hard drive recommended
• Linux Red Hat Fedora Core 13 64 bit or Red Hat Enterprise Linux 6.2 64 bit
NET-NET CENTRAL INSTALLATION PROCEDURES
210 Oracle Communications Enterprise Trunk Manager Service Provider Configuration Guide Release 7.3
Note: A 150 GB of hard drive space is required for each licensed application. NNC 7.3 supports RHEL 5.5, but it is not supported in future releases.
Network Manager with Fedora Core 13
Fedora Core 13 installs an application called Network Manager by default. Network Manager is used to configure network connections. It executes automatically when you start your session and it is visible as an applet icon. You need to check your system to see if Fedora Core 13 installed Network Manager on your system. If installed you need to remove it and then turn on the network services.
To check for and remove Network Manager:
1. Login as root.
2. Check for Network Manager.
service NetworkManager status
3. Shutdown the Network Manager.
service NetworkManager stop
4. Remove Network Manager using the following command:
yum remove NetworkManager
To turn on network services:
chkconfig network on
service network start
Note: You should also ensure that the option Controlled by NetworkManager in Network Configuration is unchecked on your system.
OpenSSL Most Linux distributions include OpenSSL as part of the OS installation. You can check the version on your system by using the following command:
openssl version
OpenSSL 0.9.7d Mar 27 2004
Client Requirements • Internet Explorer versions 9.0 and higher or Mozilla Firefox versions 3.0 and higher or Google Chrome versions 23.0 or higher
• Flash player compatible with your browser installed locally
• If the server is not part of your DNS domain, the hosts file on each client must be edited to include the hostname and IP address of the Net-Net Central server. The client host file is usually located in the following directory:
windows\system32\drivers\etc

NET-NET CENTRAL INSTALLATION PROCEDURES
Release 7.3 Oracle Communications Enterprise Trunk Manager Service Provider Configuration Guide 211
Using the DNS Database
All Net-Net Central servers and clients should be configured to use the DNS database for host name lookups. Net-Net Central servers should be defined in the DNS database.
If you are not using the DNS service, you must ensure the hosts file on all Net-Net Central servers and clients contain entries for the Net-Net Central server.
Note: If you want to connect to an NNC server over a Secure Sockets Layer (SSL) connection, you must have administrator privileges on the client system.
Information You Need
Ensure that you have identified the following information before you install:
• Hostname and IP address/netmask of the Net-Net Central server, as well as the IP addresses of its gateway, subnet mask, and DNS server
• IP address for each Net-Net SBC
• SNMP community strings for each Net-Net SBC
Net-Net Central Components Required
To install Net-Net Central, you need to obtain the appropriate tar.gz file for your environment from your Acme Packet representative.
• NNC72Linux64bit.tar.gz for Linux RHEL v5.5 64 bit installation
• NNC72FC1364bit.tar.gz for Linux Fedora Core 13 64 bit installation
• NNC72RHEL64bit.tar.gz for CentOS 6.2 and CentOS NNC-VM installation
You also need the AcmePacketNetNetCentral.xml license file.
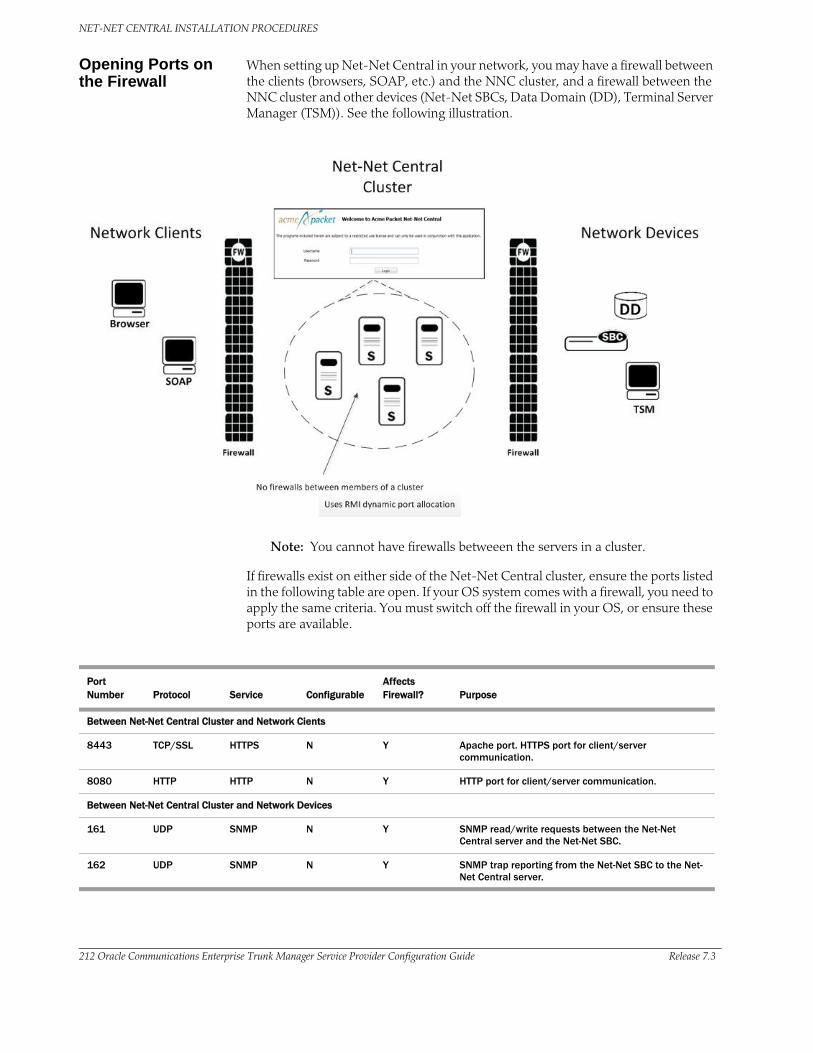
NET-NET CENTRAL INSTALLATION PROCEDURES
212 Oracle Communications Enterprise Trunk Manager Service Provider Configuration Guide Release 7.3
Opening Ports on the Firewall
When setting up Net-Net Central in your network, you may have a firewall between the clients (browsers, SOAP, etc.) and the NNC cluster, and a firewall between the NNC cluster and other devices (Net-Net SBCs, Data Domain (DD), Terminal Server Manager (TSM)). See the following illustration.
Note: You cannot have firewalls betweeen the servers in a cluster.
If firewalls exist on either side of the Net-Net Central cluster, ensure the ports listed in the following table are open. If your OS system comes with a firewall, you need to apply the same criteria. You must switch off the firewall in your OS, or ensure these ports are available.
Port Number Protocol Service Configurable
Affects Firewall? Purpose
Between Net-Net Central Cluster and Network Cients
8443 TCP/SSL HTTPS N Y Apache port. HTTPS port for client/server communication.
8080 HTTP HTTP N Y HTTP port for client/server communication.
Between Net-Net Central Cluster and Network Devices
161 UDP SNMP N Y SNMP read/write requests between the Net-Net Central server and the Net-Net SBC.
162 UDP SNMP N Y SNMP trap reporting from the Net-Net SBC to the Net-Net Central server.

NET-NET CENTRAL INSTALLATION PROCEDURES
Release 7.3 Oracle Communications Enterprise Trunk Manager Service Provider Configuration Guide 213
Either port 8080 (HTTP) or port 8443 (HTTPS) must be open on the firewall, depending on which port you choose between the network client and Net-Net Central server. If installing on a Linux system, the Linux firewall must also have either 8080 (HTTP) or port 8443 (HTTPS) open.
Note: For iptables/ipf, communication is open between Net-Net Central servers in a cluster if the ports listed above are open and there is no firewall deployed between the servers, as ports are assigned dynamically (Remote Method Invocation (RMI) dynamic port allocation).
22/21 SFTP/FTP Used for file transfer (such as Route Manager and LRT updates).
8080 HTTP AMI N Y Used by NNC to communicate with Net-Net 9200 devices via AMI.
5060 TCP N Y Used for Net-Net Central Trunk Manager (SIPTX) to communicate with SP-SBC.
3001/ 3000
ACP/ACLI Used by Net-Net Central to communicate with all versions of Net-Net SBC except for the Net-Net 9200.
Between Net-Net Central Servers in the Cluster
1098 TCP/SSL RMI N Y RMI Communication between host members in a cluster. Note: SSL is not supported when HTTPS is enabled.
1099 TCP/SSL RMI Lookup N Y RMI registry port. Used for the RMI communication between host members in a cluster.Note: SSL is not supported when HTTPS is enabled.
5701 TCP Hazelcast N Used by Hazelcast communication for distributed data structures, peer-to-peer collective data distribution.
5801 TCP Hazelcast N Y Used by the Hazelcast management console port for the NNC distributed scheduler service.
8005 TCP HTTP N Y Tomcat shutdown port used by the shutdown script. Can be blocked on a firewall because it is local to the Net-Net Central server.
8009 TCP Apache N Y Tomcat port.
9000 TCP Berkley N Y Berkley database.
61616 TCP Apache N Y Message broker.
22 SFTP ActiveMQ N Y Used to transfer files between Net-Net Central servers.
Port Number Protocol Service Configurable
Affects Firewall? Purpose
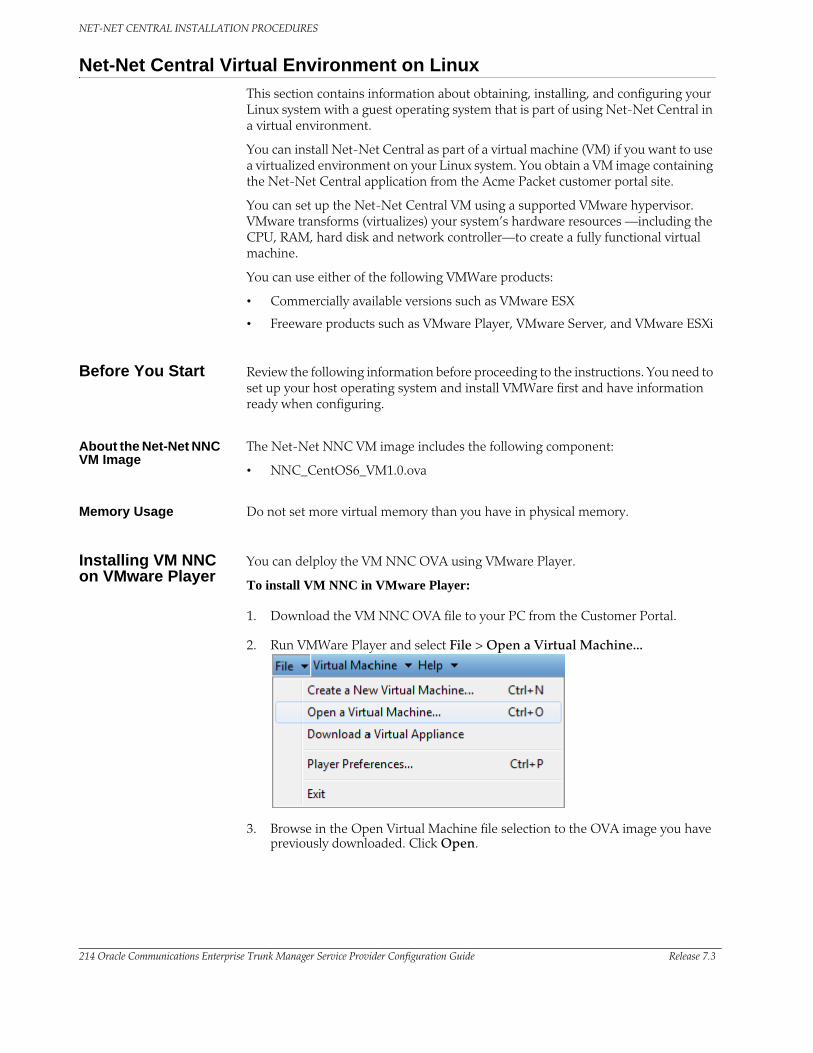
NET-NET CENTRAL INSTALLATION PROCEDURES
214 Oracle Communications Enterprise Trunk Manager Service Provider Configuration Guide Release 7.3
Net-Net Central Virtual Environment on Linux
This section contains information about obtaining, installing, and configuring your Linux system with a guest operating system that is part of using Net-Net Central in a virtual environment.
You can install Net-Net Central as part of a virtual machine (VM) if you want to use a virtualized environment on your Linux system. You obtain a VM image containing the Net-Net Central application from the Acme Packet customer portal site.
You can set up the Net-Net Central VM using a supported VMware hypervisor. VMware transforms (virtualizes) your system’s hardware resources —including the CPU, RAM, hard disk and network controller—to create a fully functional virtual machine.
You can use either of the following VMWare products:
• Commercially available versions such as VMware ESX
• Freeware products such as VMware Player, VMware Server, and VMware ESXi
Before You Start Review the following information before proceeding to the instructions. You need to set up your host operating system and install VMWare first and have information ready when configuring.
About the Net-Net NNC VM Image
The Net-Net NNC VM image includes the following component:
• NNC_CentOS6_VM1.0.ova
Memory Usage Do not set more virtual memory than you have in physical memory.
Installing VM NNC on VMware Player
You can delploy the VM NNC OVA using VMware Player.
To install VM NNC in VMware Player:
1. Download the VM NNC OVA file to your PC from the Customer Portal.
2. Run VMWare Player and select File > Open a Virtual Machine...
3. Browse in the Open Virtual Machine file selection to the OVA image you have previously downloaded. Click Open.
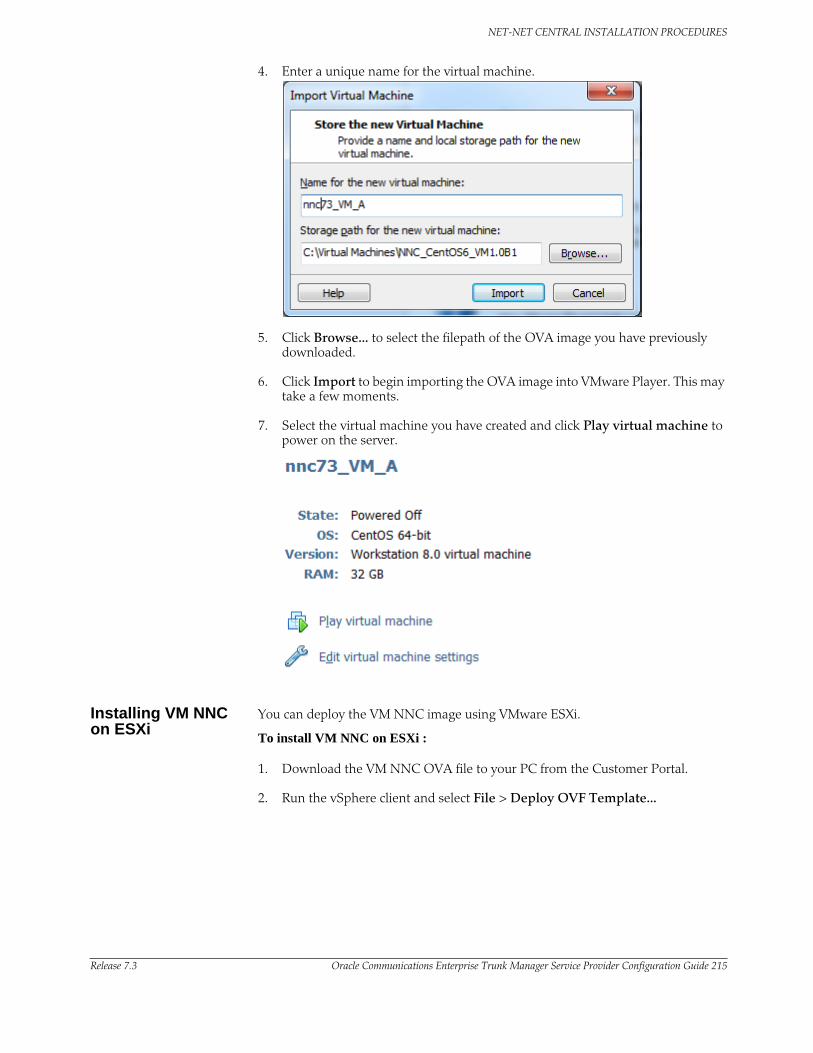
NET-NET CENTRAL INSTALLATION PROCEDURES
Release 7.3 Oracle Communications Enterprise Trunk Manager Service Provider Configuration Guide 215
4. Enter a unique name for the virtual machine.
5. Click Browse... to select the filepath of the OVA image you have previously downloaded.
6. Click Import to begin importing the OVA image into VMware Player. This may take a few moments.
7. Select the virtual machine you have created and click Play virtual machine to power on the server.
Installing VM NNC on ESXi
You can deploy the VM NNC image using VMware ESXi.
To install VM NNC on ESXi :
1. Download the VM NNC OVA file to your PC from the Customer Portal.
2. Run the vSphere client and select File > Deploy OVF Template...
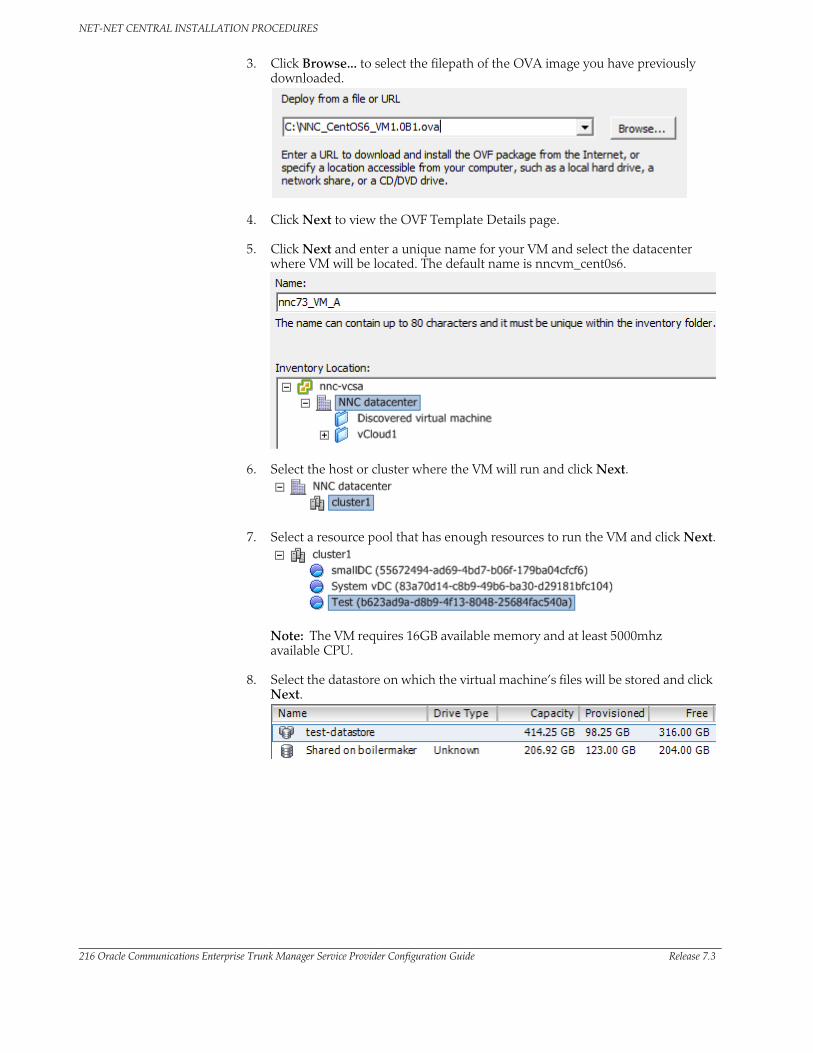
NET-NET CENTRAL INSTALLATION PROCEDURES
216 Oracle Communications Enterprise Trunk Manager Service Provider Configuration Guide Release 7.3
3. Click Browse... to select the filepath of the OVA image you have previously downloaded.
4. Click Next to view the OVF Template Details page.
5. Click Next and enter a unique name for your VM and select the datacenter where VM will be located. The default name is nncvm_cent0s6.
6. Select the host or cluster where the VM will run and click Next.
7. Select a resource pool that has enough resources to run the VM and click Next.
Note: The VM requires 16GB available memory and at least 5000mhz available CPU.
8. Select the datastore on which the virtual machine’s files will be stored and click Next.

NET-NET CENTRAL INSTALLATION PROCEDURES
Release 7.3 Oracle Communications Enterprise Trunk Manager Service Provider Configuration Guide 217
9. Select the disk format to use for the virtual disks and click Next.
Note: Acme Packet reccomends using thick provisioning to allocate any necessary resources.
10. Select the network the VM will connect to and click Next. The mapping you choose depends on the configuration of ESXi.
11. Click Finish after checking the configuration on the Ready to Complete. The OVA will take a few minutes to deploy.
12. Select the virtual machine you created from the left-hand pane and navigate to the Console tab.
13. Select Power on to launch the VM.
Configuring VM NNC with sysprep
The sysprep utility guides you through the configuration process for your VM NNC image. If this is your fist time installing Net-Net Central, you will want to exercise all options in the sysprep utility to fully configure the VM.
To configure the VM NNC using the sysprep utility:
1. Log in as root user with with the username root and the password root123.
login as: root
[email protected]'s password:
Last login: Tue Nov 20 10:01:01 2012
-----------------------------------------------------
This system is a virtual appliance which has been
prepared by Acme Packet to run Net-Net Central.
Operating system: Centos 6
Acme Packet version: 1.0B1
-----------------------------------------------------
=====================================================
First time 'root' login detected.
Running /usr/acme/sysprep.sh

NET-NET CENTRAL INSTALLATION PROCEDURES
218 Oracle Communications Enterprise Trunk Manager Service Provider Configuration Guide Release 7.3
Acme Packet Sysprep will walk you through several
steps needed to configure this system for use as
a Net-Net Central server.
=====================================================
2. Enter Y to continue and press Enter to launch the sysprep utility.
Run Acme Packet sysprep utility? (y/n) y
Changing the root Account Password
For security purposes, you need to change the root account password immediately.
To change the root account password:
1. Press Enter to accept the default value of 1 to change the root account password. You are prompted about continuing.
[X] 1. Change root password
[ ] 2. Change nncentral password
[ ] 3. Configure networking
[ ] 4. Configure Timezone
[ ] 5. Configure Network Time Protocol
[ ] 6. Configure optional services
[ ] 7. Exit
Please select an option [1] 1
2. Enter Y and press Enter to continue. The Change Password prompt appears.
Change password for account 'root'
Do you wish to continue? (y/n) y
3. Enter the new password for the account root and press Enter. You are prompted to confirm the password.
New password:
4. Enter the password again and press Enter. The confirmation message appears.
5. Press Enter to continue.
Changing the nncentral Account Password
For security purposes, you need to change the nncentral account password immediately.
To change the nncentral account password:
1. Press Enter to accept the default value of 2 to change the nncentral account password. You are prompted about continuing.
[ ] 1. Change root password
[X] 2. Change nncentral password
[ ] 3. Configure networking
[ ] 4. Configure Timezone
[ ] 5. Configure Network Time Protocol
[ ] 6. Configure optional services
[ ] 7. Exit
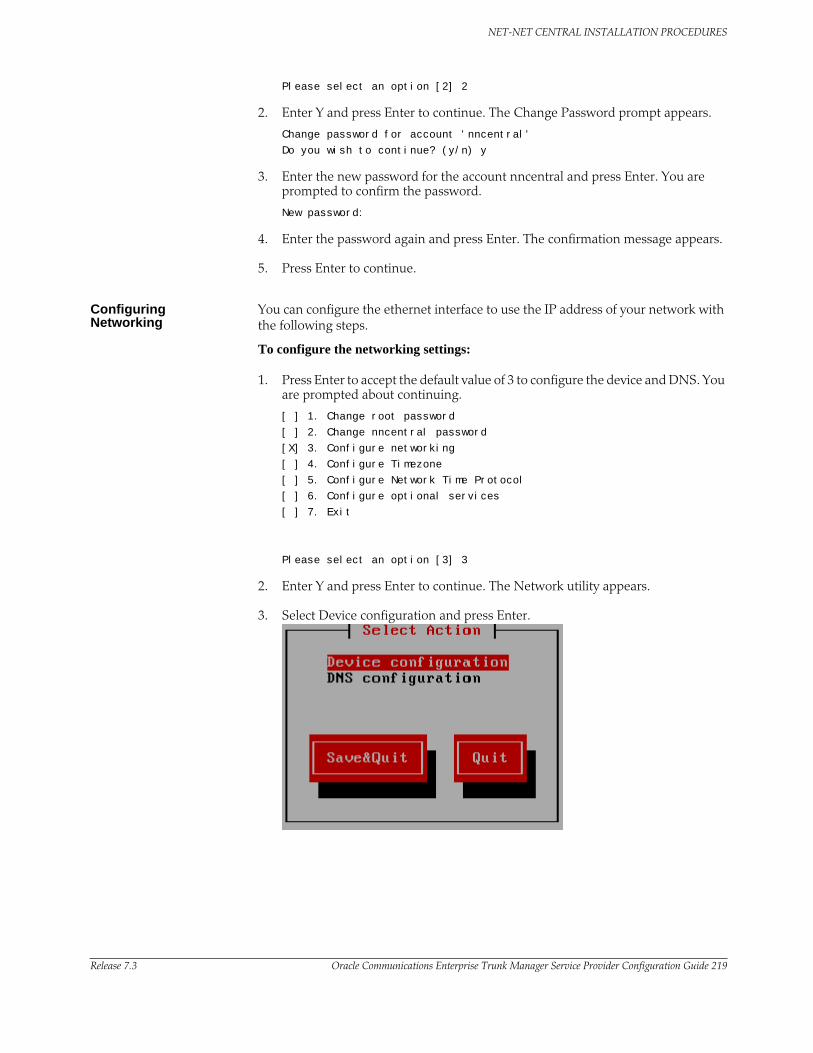
NET-NET CENTRAL INSTALLATION PROCEDURES
Release 7.3 Oracle Communications Enterprise Trunk Manager Service Provider Configuration Guide 219
Please select an option [2] 2
2. Enter Y and press Enter to continue. The Change Password prompt appears.
Change password for account 'nncentral'
Do you wish to continue? (y/n) y
3. Enter the new password for the account nncentral and press Enter. You are prompted to confirm the password.
New password:
4. Enter the password again and press Enter. The confirmation message appears.
5. Press Enter to continue.
Configuring Networking
You can configure the ethernet interface to use the IP address of your network with the following steps.
To configure the networking settings:
1. Press Enter to accept the default value of 3 to configure the device and DNS. You are prompted about continuing.
[ ] 1. Change root password
[ ] 2. Change nncentral password
[X] 3. Configure networking
[ ] 4. Configure Timezone
[ ] 5. Configure Network Time Protocol
[ ] 6. Configure optional services
[ ] 7. Exit
Please select an option [3] 3
2. Enter Y and press Enter to continue. The Network utility appears.
3. Select Device configuration and press Enter.
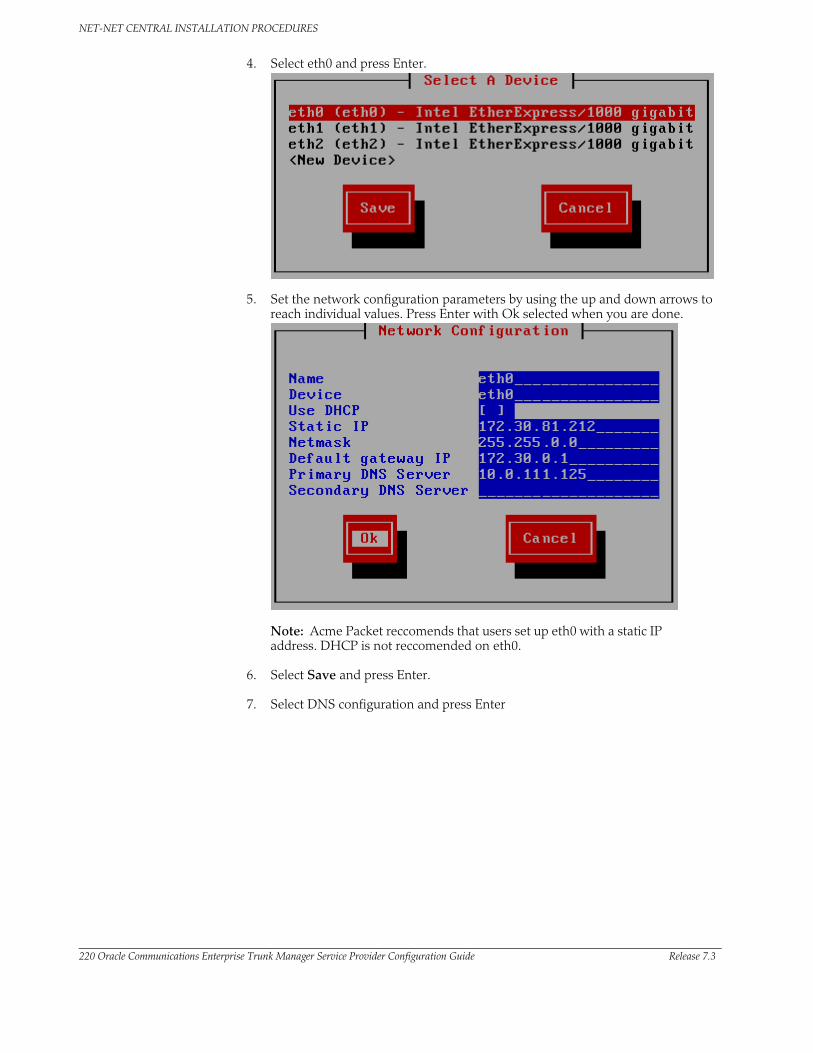
NET-NET CENTRAL INSTALLATION PROCEDURES
220 Oracle Communications Enterprise Trunk Manager Service Provider Configuration Guide Release 7.3
4. Select eth0 and press Enter.
5. Set the network configuration parameters by using the up and down arrows to reach individual values. Press Enter with Ok selected when you are done.
Note: Acme Packet reccomends that users set up eth0 with a static IP address. DHCP is not reccomended on eth0.
6. Select Save and press Enter.
7. Select DNS configuration and press Enter
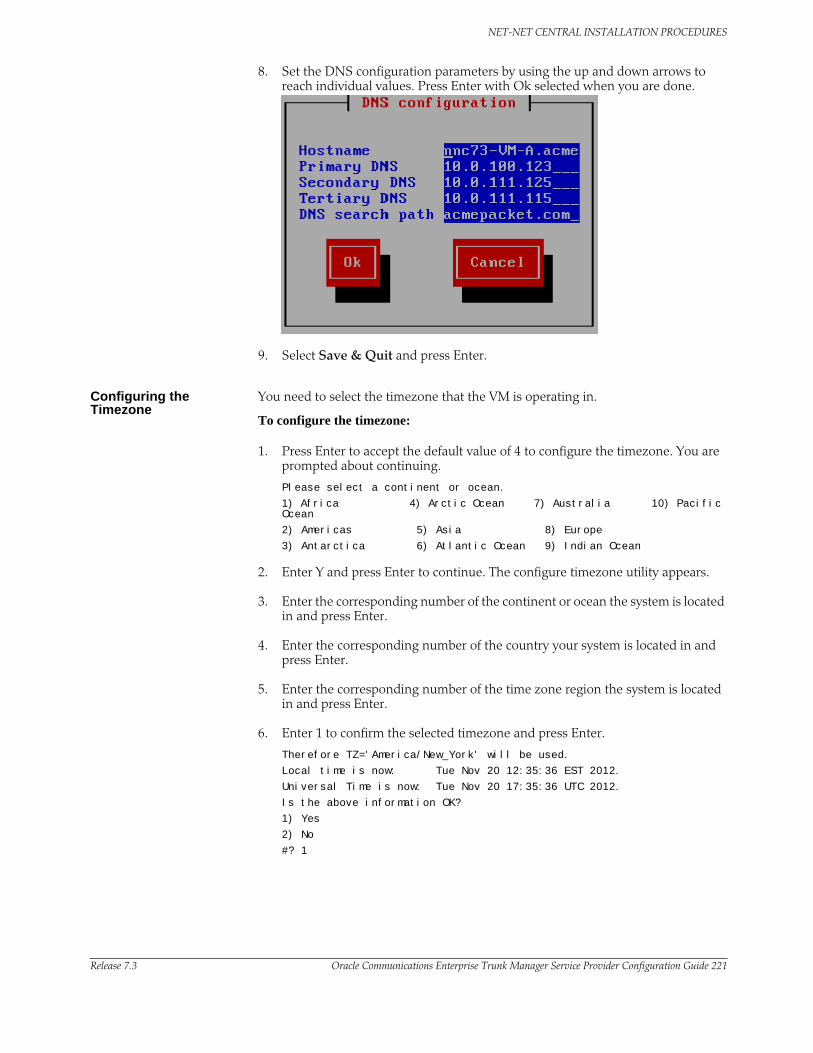
NET-NET CENTRAL INSTALLATION PROCEDURES
Release 7.3 Oracle Communications Enterprise Trunk Manager Service Provider Configuration Guide 221
8. Set the DNS configuration parameters by using the up and down arrows to reach individual values. Press Enter with Ok selected when you are done.
9. Select Save & Quit and press Enter.
Configuring the Timezone
You need to select the timezone that the VM is operating in.
To configure the timezone:
1. Press Enter to accept the default value of 4 to configure the timezone. You are prompted about continuing.
Please select a continent or ocean.
1) Africa 4) Arctic Ocean 7) Australia 10) Pacific Ocean
2) Americas 5) Asia 8) Europe
3) Antarctica 6) Atlantic Ocean 9) Indian Ocean
2. Enter Y and press Enter to continue. The configure timezone utility appears.
3. Enter the corresponding number of the continent or ocean the system is located in and press Enter.
4. Enter the corresponding number of the country your system is located in and press Enter.
5. Enter the corresponding number of the time zone region the system is located in and press Enter.
6. Enter 1 to confirm the selected timezone and press Enter.
Therefore TZ='America/New_York' will be used.
Local time is now: Tue Nov 20 12:35:36 EST 2012.
Universal Time is now: Tue Nov 20 17:35:36 UTC 2012.
Is the above information OK?
1) Yes
2) No
#? 1

NET-NET CENTRAL INSTALLATION PROCEDURES
222 Oracle Communications Enterprise Trunk Manager Service Provider Configuration Guide Release 7.3
Configuring the Network Time Protocol
You must configure the Network Time Protocol in order to synchronize cluster members.
To configure the Network Time Protocol:
1. Press Enter to accept the default value of 5 to configure the Network Time Protocol (NTP). You are prompted about continuing.
[ ] 1. Change root password
[ ] 2. Change nncentral password
[ ] 3. Configure networking
[ ] 4. Configure Timezone
[X] 5. Configure Network Time Protocol
[ ] 6. Configure optional services
[ ] 7. Exit
Please select an option [5] 5
2. Enter Y and press Enter to continue.
3. Enter Y and press Enter to enable the Network Time Protocol. A list of currently defined NTP servers appears.
Enabling Network Time Protocol is recommended
Enable Network Time Protocol (NTP)? (y/n) y
4. Enter Y and press Enter to include the selected NTP server or N to remove it from the NTP configuration.
3 NTP servers are currently defined in /etc/ntp.conf
Use NTP server ‘0.centos.pool.ntp.org’? (y/n) n
Use NTP server ‘1.centos.pool.ntp.org’? (y/n) n
Use NTP server ‘2.centos.pool.ntp.org’? (y/n) n
5. Enter Y and press Enter to add an additional NTP server. Otherwise, enter N and press Enter to continue without adding a new server.
Add additional NTP servers
Add NTP server (y/n)y
6. Enter the IP address or DNS name for the additional NTP server and press Enter. The Add Additional NTP Servers dialog appears again so you can conintue adding values.
Enter IP address or DNS name for NTP server: 192.168.1.101
Added NTP server ‘192.168.1.101’ to /etc/ntp.conf
7. Enter N and press Enter when you are finished adding NTP servers to your configuration.
Add NTP server? (y/n) n
Starting ntpd service...
8. Press Enter to continue.

NET-NET CENTRAL INSTALLATION PROCEDURES
Release 7.3 Oracle Communications Enterprise Trunk Manager Service Provider Configuration Guide 223
Configuring Optional Services
You must configure optional services if you wish to enable telnet and FTP.
To configure optional services:
1. Press Enter to accept the default value of 6 to configure optional services.
[ ] 1. Change root password
[ ] 2. Change nncentral password
[ ] 3. Configure networking
[ ] 4. Configure Timezone
[ ] 5. Configure Network Time Protocol
[X] 6. Configure optional services
[ ] 7. Exit
Please select an option [6] 6
2. Enter Y and press Enter to continue the configure optional services prompt appears.
3. Enter Y and press Enter to enable telnet. Otherwise, enter N and press Enter to continue with telnet disabled.
Would you like to enable telnet? (y/n) y
Enabling telnet...
4. Enter Y and press Enter to enable FTP. Otherwise, enter N and press Enter to continue with FTP disabled.
Would you like to enable ftp? (y/n) y
Enabling ftp...
Updating selinux ftp policy...
5. Press Enter to continue.
Exiting sysprep To exit the sysprep utility:
1. Press Enter to accept the default value of 7 to exit the sysprep utility. A reboot prompt appears.
[ ] 1. Change root password
[ ] 2. Change nncentral password
[ ] 3. Configure networking
[ ] 4. Configure Timezone
[ ] 5. Configure Network Time Protocol
[ ] 6. Configure optional services
[X] 7. Exit
Please select an option [7] 7
2. Enter Y and press Enter to reboot the system.
Note: Rebooting is required to apply all configuration changes.
Installing Net-Net Central
You are now able to install Net-Net Central using the typical install process. Refer to Typical Installation for more information.

NET-NET CENTRAL INSTALLATION PROCEDURES
224 Oracle Communications Enterprise Trunk Manager Service Provider Configuration Guide Release 7.3
Typical Installation When you install Net-Net Central, you have the option of choosing a “Typical” or a “Custom” installation. A “Typical” installation installs the minimal configuration required to setup the Net-Net Central server.
A “Custom” installation allows you to manually customize the configuration for the Net-Net Central server and Trunk Manager, and is only recommended for more advanced users.
For more information and procedures about performing a “Custom” installation, see Chapter 2 InstallingTrunk Manager (17).
For information about performing the “Typical” installation, see the next section, Procedures (224).
Procedures Use the following procedure to install Net-Net Central in your network. This procedure assumes you are installing Net-Net Central on a Linux system.
To install Net-Net Central:
1. Using an FTP application, FTP the file AcmePacketNetNetCentral_<company name>.xml to any directory location on your Net-Net Central server.
2. Open a Telnet session to your Net-Net Central server.
3. Login as root.
4. Navigate to the /<installation directory>/Acmepacket/NNC7x/bin directory.
NNC> cd /NNCInstall/AcmePacket/NNC72/bin
5. If the Net-Net Central server is running, you must stop the server before continuing. Enter the ./shutdownnnc.sh command at the root prompt to shut down.
NNCInstall/AcmePacket/NNC70/bin> ./shutdownnnc.sh
6. Type setup.sh at the prompt and press <Enter> to start the Net-Net Central setup process.
NNCInstall/AcmePacket/NNC70/bin> ./setup.sh
A Welcome message displays and initialization processes proceed. Setup checks that minimal system requirements are met, and checks system port availability for the Trunk Manager components.
=========================================================
Welcome to NNC Setup application
Version : NNC72N65
OS : Linux : amd64 : 2.6.18-194.el5
=========================================================
Please wait while application loads
Checking environment and setting permissions.
Please wait ....
100%[===================================================]
=========================================================
System Physical Memory Diagnostics
Total System Physical Memory = 2011 MB
Total System Free Physical Memory = 1605 MB
WARNING: Free physical memory is insufficient for running this application.
The recommended total required memory that should be available is = 12000 MB
=========================================================
System Disk Space Diagnostics
Total System Disk Space = 447 GB
Free System Disk Space = 440 GB

NET-NET CENTRAL INSTALLATION PROCEDURES
Release 7.3 Oracle Communications Enterprise Trunk Manager Service Provider Configuration Guide 225
=========================================================
System Port Availability Diagnostics : NNC Required Ports
The following port is available [ 5000 ]
The following port is available [ 8080 ]
The following port is available [ 61616 ]
The following port is available [ 9000 ]
The following port is available [ 8443 ]
The following port is available [ 1099 ]
The following port is available [ 8009 ]
The following port is available [ 1098 ]
The following port is available [ 8005 ]
=========================================================
Set up options
TYPICAL : This setup procedure walks the user through
the minimal setup configuration required to
configure Net-Net server.
CUSTOM : This setup procedure provides the user with
a set of options to manually pick and
choose from.
[X] 1 - Typical : Runs through most common set up options. (Recommended) [Default]
[ ] 2 - Custom : Allows manual customization. (Advanced users)
[ ] 3 - Quit : Finish and quit setup.
Please select an option [1]
=========================================================
A warning message regarding free physical memory may display. Increasing the physical memory on the Net-Net Central server is optional. The message displays for recommendation purposes only and can be ignored.
The remaining portion of this procedure provides the information required to perform a typical installation of the Net-Net Central software (including Trunk Manager). Procedures in this section include:
• Checking and Applying the License (226)
• Configuring HTTP/HTTPS Mode (229)
• Creating a Self-Signed Certificate (233)
• Refraining from Creating a Self-Signed Certificate (234)
• Configuring Fault Management (236)

NET-NET CENTRAL INSTALLATION PROCEDURES
226 Oracle Communications Enterprise Trunk Manager Service Provider Configuration Guide Release 7.3
Checking and Applying the License
After the setup process runs diagnostics successfully, the following displays.
=========================================================
Set up options
TYPICAL : This setup procedure walks the user through
the minimal setup configuration required to
configure Net-Net server.
CUSTOM : This setup procedure provides the user with
a set of options to manually pick and
choose from.
[X] 1 - Typical : Runs through most common set up options. (Recommended) [Default]
[ ] 2 - Custom : Allows manual customization. (Advanced users)
[ ] 3 - Quit : Finish and quit setup.
Please select an option [1] 1
=========================================================
1. Enter 1 (default) for a Typical setup and press <Enter>. The following displays.
=========================================================
Do you want to continue Yes/No? y
=========================================================
2. Enter Y and press <Enter> to continue. The following displays.
=========================================================
Typical Configuration
Will walk through basic configuration options.
[X] 1 - Check and Apply License [Default]
[ ] 2 - HTTP/HTTPS configuration
[ ] 3 - Fault Management configuration
[ ] 4 - Net-Net Central cluster management
[ ] 5 - Route Manager Central configuration
[ ] 6 - SAML Single sign on configuration
[ ] 7 - Mail Server configuration
[ ] 8 - Trunk Manager configuration
[ ] 9 - Quit setup
Please select an option [1] 1
=========================================================
3. Enter 1 (default) to select “Check and Apply License”. The following displays.
=========================================================
Do you want to continue Yes/No? y
=========================================================
4. Enter Y and press <Enter> to continue. The following displays.
=========================================================

NET-NET CENTRAL INSTALLATION PROCEDURES
Release 7.3 Oracle Communications Enterprise Trunk Manager Service Provider Configuration Guide 227
Check and Apply License
This option allows the end user to validate an existing license,
provide a license or re-apply a Acme Packet Net-Net Central license
Acme Packet Net-Net Central management
Acme Packet Net-Net Central license will be checked, applied and validated.
Please choose to quit license management or apply new license
[ ] 1 - Quit [Default]
[X] 2 - Apply new license
Please select an option [1] 2
=========================================================
5. Enter 2 to select “Apply new license” and press <Enter>. The following displays.
=========================================================
Do you want to continue Yes/No? y
=========================================================
6. Enter Y and press <Enter> to continue. The following displays.
=========================================================
Please specify the source directory and file name of Acme Packet Net-Net license
Source Directory [ ] /opt/AcmePacketNetNetCentral.xml
=========================================================
7. Enter the name of the directory where the license file is located followed by the name of the license file, and press <Enter>. /opt/AcmePacketNetNetCentral.xml
The setup process locates the file and displays details about the license.
=========================================================
Source Directory [/opt/AcmePacketNetNetCentral.xml]
License Details
License number : 12345-1-1068
ClientName : Acme Packet
LicenseType : permanent
IssuedDate : Wed Apr 04 08:47:28 EDT 2012
Key : 2.0.1
StartDate : 2012-04-04
ExpirationDate :
Cluster : Enabled
Applications
Application Number of licensed devices
TrunkManager : NA
RouteManager : 500

NET-NET CENTRAL INSTALLATION PROCEDURES
228 Oracle Communications Enterprise Trunk Manager Service Provider Configuration Guide Release 7.3
ElementManager : 500
Accepting this license will replace an existing license
[X] 1 - Accept license [Default]
[ ] 2 - Do not accept license
Please select an option [1] 1
=========================================================
8. Enter 1 (default) to select “Accept license” and press <Enter>. The following displays.
=========================================================
Do you want to continue Yes/No? y
=========================================================
9. Enter Y and press <Enter> to continue. Net-Net Central accepts the license.
10. Go to “Configuring HTTP/HTTPS Mode (229)” to continue.
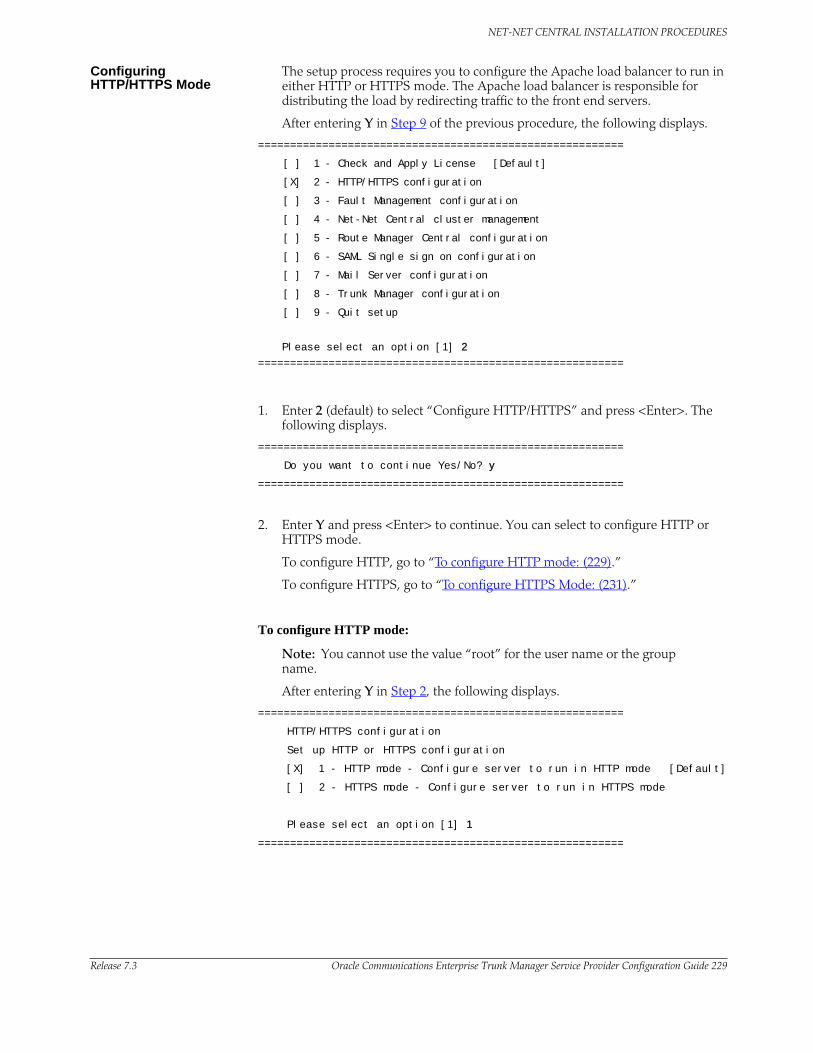
NET-NET CENTRAL INSTALLATION PROCEDURES
Release 7.3 Oracle Communications Enterprise Trunk Manager Service Provider Configuration Guide 229
Configuring HTTP/HTTPS Mode
The setup process requires you to configure the Apache load balancer to run in either HTTP or HTTPS mode. The Apache load balancer is responsible for distributing the load by redirecting traffic to the front end servers.
After entering Y in Step 9 of the previous procedure, the following displays.
=========================================================
[ ] 1 - Check and Apply License [Default]
[X] 2 - HTTP/HTTPS configuration
[ ] 3 - Fault Management configuration
[ ] 4 - Net-Net Central cluster management
[ ] 5 - Route Manager Central configuration
[ ] 6 - SAML Single sign on configuration
[ ] 7 - Mail Server configuration
[ ] 8 - Trunk Manager configuration
[ ] 9 - Quit setup
Please select an option [1] 2
=========================================================
1. Enter 2 (default) to select “Configure HTTP/HTTPS” and press <Enter>. The following displays.
=========================================================
Do you want to continue Yes/No? y
=========================================================
2. Enter Y and press <Enter> to continue. You can select to configure HTTP or HTTPS mode.
To configure HTTP, go to “To configure HTTP mode: (229).”
To configure HTTPS, go to “To configure HTTPS Mode: (231).”
To configure HTTP mode:
Note: You cannot use the value “root” for the user name or the group name.
After entering Y in Step 2, the following displays.
=========================================================
HTTP/HTTPS configuration
Set up HTTP or HTTPS configuration
[X] 1 - HTTP mode - Configure server to run in HTTP mode [Default]
[ ] 2 - HTTPS mode - Configure server to run in HTTPS mode
Please select an option [1] 1
=========================================================

NET-NET CENTRAL INSTALLATION PROCEDURES
230 Oracle Communications Enterprise Trunk Manager Service Provider Configuration Guide Release 7.3
3. Enter 1 (default) to select “HTTP mode” and press <Enter>. The following displays.
=========================================================
Do you want to continue Yes/No? y
=========================================================
4. Enter Y and press <Enter> to continue. The following displays.
=========================================================
HTTP mode
Configure server to run in HTTP mode
Enter the user name of the server process which determines what files
the server is allowed to access. Any files inaccessible to this user
are also inaccessible to clients connecting to the Apache HTTP Server.
Apache User [nncentral] nncentral
=========================================================
5. Press <Enter> to accept the default value nncentral. The following displays.
=========================================================
Enter the group name of the Apache HTTP Server processes
Apache Group [nncentral] nncentral
=========================================================
6. Press <Enter> to accept the default value nncentral. The following displays.
=========================================================
Enter the port number that the Apache HTTP Server should listen on
Apache Port Number (1024-65535) [8080] 8080
=========================================================
Note: You cannot use a port number reserved for Net-Net Central components.
7. Press <Enter> to accept the default value 8080. The following displays.
=========================================================
[ ] 1 - Check and Apply License [Default]
[ ] 2 - HTTP/HTTPS configuration
[X] 3 - Fault Management configuration
[ ] 4 - Net-Net Central cluster management
[ ] 5 - Route Manager Central configuration
[ ] 6 - SAML Single sign on configuration
[ ] 7 - Mail Server configuration
[ ] 8 - Trunk Manager configuration
[ ] 9 - Quit setup
Please select an option [1] 3
=========================================================

NET-NET CENTRAL INSTALLATION PROCEDURES
Release 7.3 Oracle Communications Enterprise Trunk Manager Service Provider Configuration Guide 231
8. Enter 3 (default) to select “Fault Management configuration”, and press <Enter>. The following displays.
=========================================================
Do you want to continue Yes/No? y
=========================================================
9. Enter Y and press <Enter> to continue.
10. Go to “Configuring Fault Management (236)” to continue.
To configure HTTPS Mode:
Note: You cannot use the value “root” for the user name or the group name.
After entering Y in Step 2 of the previous procedure, the following displays.
=========================================================
HTTP/HTTPS configuration
Set up HTTP or HTTPS configuration
[ ] 1 - HTTP mode - Configure server to run in HTTP mode [Default]
[X] 2 - HTTPS mode - Configure server to run in HTTPS mode
Please select an option [1] 2
=========================================================
1. Enter 2 to select “HTTPS mode” and press <Enter>. The following displays.
=========================================================
Do you want to continue Yes/No? y
=========================================================
2. Enter Y and press <Enter> to continue. The following displays.
=========================================================
HTTPS mode
Configure server to run in HTTPS mode
Enter the user name of the server process which determines what files
the server is allowed to access. Any files inaccessible to this user
are also inaccessible to clients connecting to the Apache HTTPS Server.
Apache User [nncentral] nncentral
=========================================================
3. Press <Enter> to accept the default value of nncentral. The following displays.
=========================================================
Enter the group name of the Apache HTTPS Server processes
Apache Group [nncentral] nncentral
=========================================================

NET-NET CENTRAL INSTALLATION PROCEDURES
232 Oracle Communications Enterprise Trunk Manager Service Provider Configuration Guide Release 7.3
4. Press <Enter> to accept the default value of nncentral. The following displays.
=========================================================
Enter the port number that the Apache HTTPS Server should listen on
Apache Port Number (1021-65535) [8443] 8443
=========================================================
Note: You cannot use a port number reserved for Net-Net Central components.
5. Press <Enter> to accept the default value 8443. The following displays.
=========================================================
The server name (DNS name of this server)
Server name [ ] DNS1
=========================================================
6. Enter the DNS name of the HTTPS server and press <Enter>. For example, DNS1. The following displays.
=========================================================
Would you like to create a self signed certificate?
[ ] 1 - Yes
[X] 2 - No [Default]
Please select an option [2]
=========================================================
This screen allows you to select whether or not to create a self-signed certificate for HTTPS.
To create a self-signed certificate, go to Creating a Self-Signed Certificate (233).
To refrain from creating a self-signed certificate, go to Refraining from Creating a Self-Signed Certificate (234).

NET-NET CENTRAL INSTALLATION PROCEDURES
Release 7.3 Oracle Communications Enterprise Trunk Manager Service Provider Configuration Guide 233
Creating a Self-Signed Certificate
After configuring the HTTP or HTTPS mode, you have the option of whether or not to create a self-signed certificate.
To create a self-signed certificate:
1. At the following prompt, enter 1 (Yes) and press <Enter>.
=========================================================
Would you like to create a self signed certificate?
[X] 1 - Yes
[ ] 2 - No [Default]
Please select an option [2] 1
=========================================================
The following displays.
=========================================================
Do you want to continue Yes/No? y
=========================================================
2. Enter Y and press <Enter> to continue. A prompt requesting the common name (DNS name) of the HTTPS server displays.
=========================================================
Common name (DNS name) of the HTTPS server [ ]
=========================================================
3. Enter the DNS name of the HTTPS server and press <Enter>. A prompt requesting the certificate alias name in the truststore displays.
=========================================================
Alias name for the certificate in the truststsore [ ]
=========================================================
4. Press <Enter> to accept the default value or enter a different alias name and press <Enter>. A prompt requesting the trustore password displays.
=========================================================
Trustore password [ ]
=========================================================

NET-NET CENTRAL INSTALLATION PROCEDURES
234 Oracle Communications Enterprise Trunk Manager Service Provider Configuration Guide Release 7.3
5. Enter the trustore password and press <Enter>. The following displays.
=========================================================
[ ] 1 - Check and Apply License [Default]
[ ] 2 - HTTP/HTTPS configuration
[X] 3 - Fault Management configuration
[ ] 4 - Net-Net Central cluster management
[ ] 5 - Route Manager Central configuration
[ ] 6 - SAML Single sign on configuration
[ ] 7 - Mail Server configuration
[ ] 8 - Trunk Manager configuration
[ ] 9 - Quit setup
Please select an option [1] 3
=========================================================
6. Enter 3 (default) to select “Fault Management configuration”, and press <Enter>. The following displays.
=========================================================
Do you want to continue Yes/No? y
=========================================================
7. Enter Y and press <Enter> to continue.
8. Go to “Configuring Fault Management (236)” to continue.
Refraining from Creating a Self-Signed Certificate
After configuring the HTTP or HTTPS mode, you have the option of whether or not to create a self-signed certificate.
To refrain from creating a self-signed certificate:
1. At the following prompt, enter 2 (No) and press <Enter>.
=========================================================
Would you like to create a self signed certificate?
[ ] 1 - Yes
[X] 2 - No [Default]
Please select an option [2] 2
=========================================================
The following displays.
=========================================================
Do you want to continue Yes/No? y
=========================================================
2. Enter Y and press <Enter> to continue. The following displays.
=========================================================
The private key file
Private key file [ ]
=========================================================

NET-NET CENTRAL INSTALLATION PROCEDURES
Release 7.3 Oracle Communications Enterprise Trunk Manager Service Provider Configuration Guide 235
3. Enter the private key file name, including the path, and press <Enter>. A prompt requesting the certificate file name displays.
=========================================================
Certificate file name [ ]
=========================================================
4. Enter the certificate file name, including the path, and click <Enter>. A prompt requesting the intermediate certificates displays.
=========================================================
Intermediate certificates [ ]
=========================================================
5. Press <Enter> to accept the default value. The following displays.
=========================================================
Do you want to continue Yes/No? y
=========================================================
6. Enter Y and press <Enter> to continue. A prompt requesting the alias name for the certificate in the truststore displays.
=========================================================
Alias name for the certificate in the truststsore [ ]
=========================================================
7. Press <Enter> to accept the default or enter a different alias name and press <Enter>. You are prompted for the trustore password.
=========================================================
Trustore password [ ]
=========================================================
8. Press <Enter> to accept the default value or enter a different password and press <Enter>. The following displays.
=========================================================
[ ] 1 - Check and Apply License [Default]
[ ] 2 - HTTP/HTTPS configuration
[X] 3 - Fault Management configuration
[ ] 4 - Net-Net Central cluster management
[ ] 5 - Route Manager Central configuration
[ ] 6 - SAML Single sign on configuration
[ ] 7 - Mail Server configuration
[ ] 8 - Trunk Manager configuration
[ ] 9 - Quit setup
Please select an option [1] 3
=========================================================

NET-NET CENTRAL INSTALLATION PROCEDURES
236 Oracle Communications Enterprise Trunk Manager Service Provider Configuration Guide Release 7.3
9. Enter 3 (default) to select “Fault Management configuration”, and press <Enter>. The following displays.
=========================================================
Do you want to continue Yes/No? y
=========================================================
10. Enter Y and press <Enter> to continue.
11. Go to “Configuring Fault Management (236)” to continue.
Configuring Fault Management
After configuring whether or not to create a signed certificate, you can configure the Fault Management SNMP trap settings.
1. At the following prompt, enter 3 and press <Enter>.
=========================================================
[ ] 1 - Check and Apply License [Default]
[ ] 2 - HTTP/HTTPS configuration
[X] 3 - Fault Management configuration
[ ] 4 - Net-Net Central cluster management
[ ] 5 - Route Manager Central configuration
[ ] 6 - SAML Single sign on configuration
[ ] 7 - Mail Server configuration
[ ] 8 - Trunk Manager configuration
[ ] 9 - Quit setup
Please select an option [1] 3
=========================================================
The following displays.
=========================================================
Do you want to continue Yes/No? y
=========================================================
2. Enter Y and press <Enter> to continue. The following displays.
=========================================================
Fault Management configuration
This option is used to configure the fault management settings.
[X] 1 - Configure SNMP trap settings [Default]
[ ] 2 - Quit out of fault management configuration
Please select an option [1] 1
=========================================================

NET-NET CENTRAL INSTALLATION PROCEDURES
Release 7.3 Oracle Communications Enterprise Trunk Manager Service Provider Configuration Guide 237
3. Enter 1 (default) to select “Configure SNMP trap settings”, and press <Enter> The following displays.
=========================================================
Do you want to continue Yes/No? y
=========================================================
4. Enter Y and press <Enter> to continue. The following displays.
=========================================================
Enter the port number that Trap Relay should listen on: (1-65535) [162] 162
=========================================================
5. Enter the port number on which Trap Relay listens, and press <Enter>. For example, 162. The following displays.
=========================================================
Net-Net Central requires entry of the sudo password in order to support internal components that require sudo user privileges. The password you supply will be securely encrypted.
Enter sudo password: []
=========================================================
Net-Net Central uses the sudo password to support internal components that require sudo user privileges. If necessary, verify with your system administrator that you have the correct sudo password before continuing.
6. Enter your sudo password and press <Enter>. The following displays.
=========================================================
Confirm sudo password: []
=========================================================
7. Confirm your sudo password by entering it again, and press <Enter>. The following message and prompt display.
=========================================================
Sudo password entered and encrypted successfully!
[ ] 1 - Check and Apply License [Default]
[ ] 2 - HTTP/HTTPS configuration
[ ] 3 - Fault Management configuration
[ ] 4 - Net-Net Central cluster management
[ ] 5 - Route Manager Central configuration
[ ] 6 - SAML Single sign on configuration
[ ] 7 - Mail Server configuration
[ ] 8 - Trunk Manager configuration
[X] 9 - Quit setup
Please select an option [1] 9
=========================================================
Net-Net Central is installed and ready for use.

NET-NET CENTRAL INSTALLATION PROCEDURES
238 Oracle Communications Enterprise Trunk Manager Service Provider Configuration Guide Release 7.3
8. To install Trunk Manager, see the procedure in Chapter 2 InstallingTrunk Manager (17). or If you are finished with the installation, continue to the next step.
9. Enter 9 to quit setup, and press <Enter>. The following displays.
=========================================================
Do you want to continue Yes/No? y
=========================================================
10. Enter Y and press <Enter> to continue. The following displays.
=========================================================
[root bin]#
=========================================================
11. Go to Logging into Trunk Manager (31).
Release 7.3 Oracle Communications Enterprise Trunk Manager Service Provider Configuration Guide 239
B Using the “auto-config” Command to Load a Bootstrap File
Introduction
This appendix provides a procedure for FTPing and loading the bootstrap file to the SBC device, using the “auto-config” command. Acme Packet recommends you use the “Push to device” option (see Adding an SP-SBC and Selecting a Bootstrap File (48) and Applying the Bootstrap to the SBC (using the ACLI) (76)) for automatically transferring the Service Provider bootstrap file and loading it to the SP-SBC. The “auto-config” command is an alternative method you can use.
The “auto-config” command allows you to FTP the bootstrap file to the Net-Net SBC and then manually configure the “auto-config” object using the ACLI, followed by saving and activating the configuration.
Procedure
Use the following procedure to apply and run the Net-Net SBC bootstrap file using the “auto-config” command. You can use any FTP client application to FTP the file to the directory /code/gzConfig on the Net-Net SBC.
To apply and run the bootstrap file using the “auto-config” command:
1. Open an FTP client application and FTP the Net-Net SBC bootstrap file (spsbc_<SP-SBC Core IP address>_v1.tar.gz) to the Net-Net SBC directory called /code/gzConfig.
2. Locally access the Net-Net SBC through the console connection or remotely via a TELNET or SSH connection.
3. At the prompt, enter the applicable password for entering the ACLI and press <Enter>. For example:
Password: acme
4. Enter “enable” to access the Superuser mode, followed by the password and press <Enter>. For example:
SBC1> enable Password: packet SBC1#
Note: The passwords used above are the default passwords for the ACLI. These passwords may have been changed by your System Administrator. Contact your System Administrator for more information.
5. Enter “configure terminal” at the prompt and press <Enter>. For example:
SBC1# configure terminal SBC1(configure)#

USING THE “AUTO-CONFIG” COMMAND TO LOAD A BOOTSTRAP FILE
240 Oracle Communications Enterprise Trunk Manager Service Provider Configuration Guide Release 7.3
6. Enter “system” at the prompt and press <Enter>. For example:
SBC1(configure)# system SBC1(system)#
7. Enter “auto-config” at the prompt and press <Enter>. For example:
SBC1(system)# auto-config SBC1(auto-config)#
8. Set the following attributes for the auto-config element. Press <Enter> after setting each attribute.
• auto-state• access-method• file-access
– config-filename
For example:
SBC1(auto-config)# auto-state enabled
SBC1(auto-config)# access-method file
SBC1(auto-config)# file-access
SBC1(file-access)# config-filename spsbc_1.1.1.1_v1.tar.gz
9. Enter “done” when you have entered all values, and then exit the configuration mode. For example:
SBC1(file-access)# done
SBC1(file-access)# exit
SBC1(auto-config)# exit
SBC1(system)# exit
SBC1(configure)# exit
SBC1#
10. Enter “save-config” and press <Enter>, followed by “activate-config” and press <Enter>. This saves the changes to a running configuration and activates the configuration information in the bootstrap file. For example:
SBC1# save-config
SBC1# activate-config
Note: The running configuration does not overwrite the previously saved configuration on the SP-SBC. However, upon reboot, the running configuration is activated. The saved configuration is still available, if required, in the /code/gzConfig.
Activating the Net-Net SBC bootstrap configuration causes the Net-Net SBC to initiate a SIP SUBSCRIBE message to be sent to the Net-Net Central using the information provided in the bootstrap file.
The following message displays indicating the physical interface associated with a slot and port have been provisioned. For example:
Setting phy0 on Slot=0, Port=0, MAC=00:08:25:04:78:F3, VMAC=00:08:25:04:78:F3
The Net-Net SBC is now bootstrapped and ready to connect to a Trunk. The status of “Bootstrapped” displays in the Trunk Manager->Devices-Service provider devices window. The “Name” of the Net-Net SBC also displays.
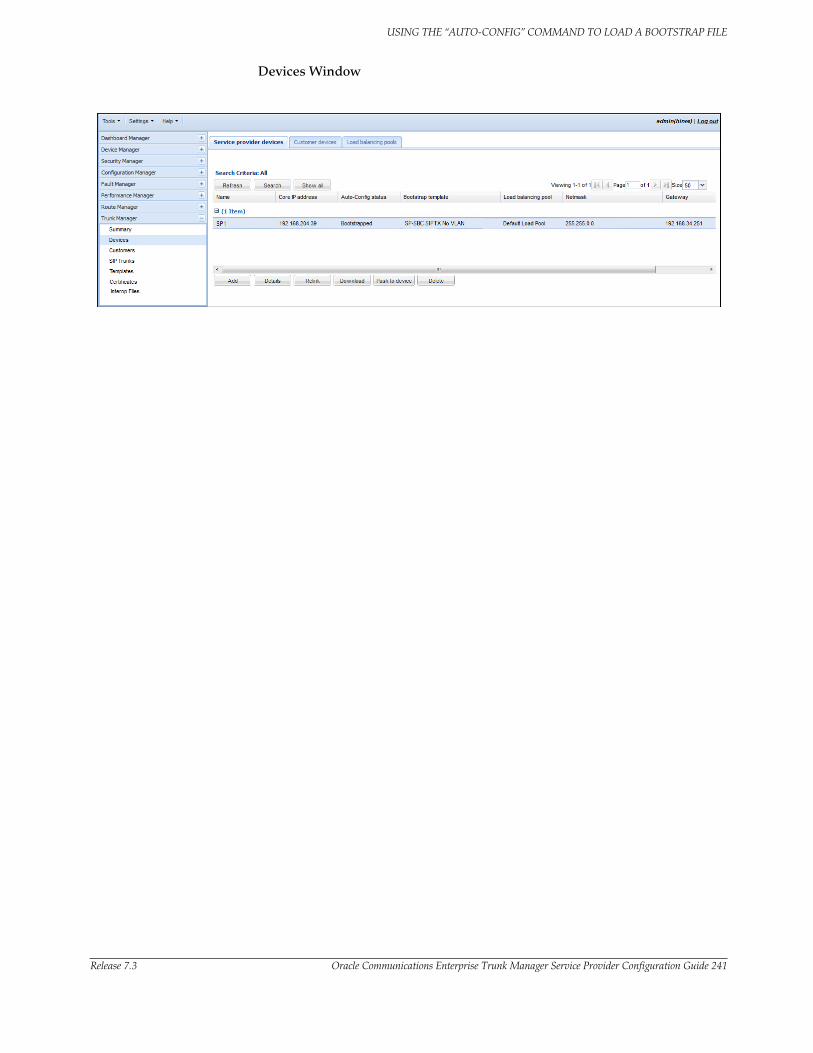
USING THE “AUTO-CONFIG” COMMAND TO LOAD A BOOTSTRAP FILE
Release 7.3 Oracle Communications Enterprise Trunk Manager Service Provider Configuration Guide 241
Devices Window

USING THE “AUTO-CONFIG” COMMAND TO LOAD A BOOTSTRAP FILE
242 Oracle Communications Enterprise Trunk Manager Service Provider Configuration Guide Release 7.3
Release 7.3 Oracle Communications Enterprise Trunk Manager Service Provider Configuration Guide 243
C Creating Interop Files
Introduction
This appendix provides the information and procedures for creating an Interop file for use with the SIP Trunk Xpress solution, to resolve vendor-specific PBX-to-trunk interoperability issues. The Interop file feature can be accessed in Net-Net Central’s Trunk Manager application. This appendix assumes you are familiar with the Extensible Markup Language (XML).
Topics include:
• Interop File Format (246)
• Using Special Character Entities (247)
• Interop File Rules (248)
• Interop Elements, Attributes, and Service Variables (250)
• Procedure for Creating an Interop File (257)
• Interop File Examples (259)
• Custom Variable and Template Files (266)
• Performing a “verify-config” When Using Templates (273)
Interop Files
Interop Files (interoperability files) contain the definition of all necessary configuration features/manipulations required for a culmination of a SIP trunking Service Provider in conjunction with a private branch exchange (PBX) and/or unified communication (UC) solution.
Interop files provide a way for the Service Provider to customize the E-SBC configuration (deliver via an E-SBC bootstrap file) for the Customer network environment.
Note: Interop files are for use on E-SBCs only.
The Service Provider can modify or add configuration elements, in XML format, to an Interop file to create a customized configuration for an E-SBC, and then upload that file to the Net-Net Central SIP Trunk Xpress (NNC-SIPTX) database via the Trunk Manager->Interop Files slider in Trunk Manager.
For more information about elements and associated NNC-SIPTX objects, see Interop Elements, Attributes, and Service Variables (250).
The file is then used with the E-SBC bootstrap file that you apply to the E-SBC. The user can also specify service variables in the Interop file that automatically set to the same values as those stored in the NNC-SIPTX database (which are based on the user inputs from the SIPTX Trunk Manager).
For more information about uploading an Interop file to the NNC-SIPTX database using Trunk Manager, see Chapter 6, Interop Files (185).
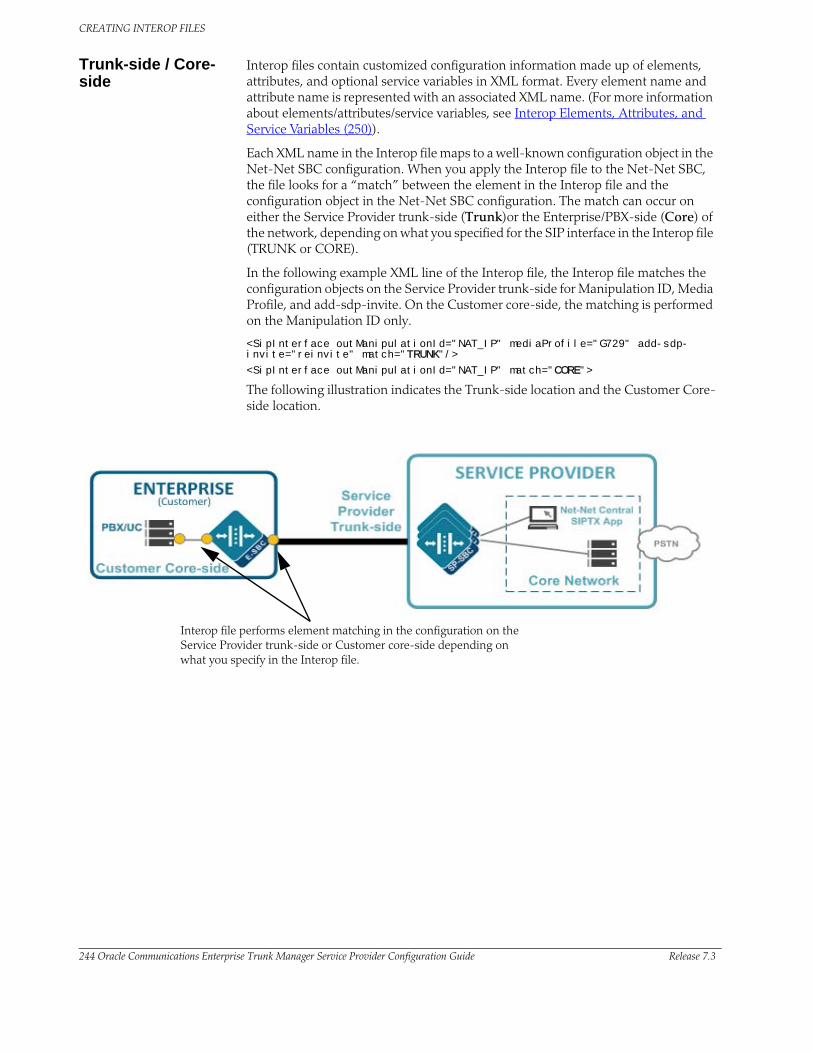
CREATING INTEROP FILES
244 Oracle Communications Enterprise Trunk Manager Service Provider Configuration Guide Release 7.3
Trunk-side / Core-side
Interop files contain customized configuration information made up of elements, attributes, and optional service variables in XML format. Every element name and attribute name is represented with an associated XML name. (For more information about elements/attributes/service variables, see Interop Elements, Attributes, and Service Variables (250)).
Each XML name in the Interop file maps to a well-known configuration object in the Net-Net SBC configuration. When you apply the Interop file to the Net-Net SBC, the file looks for a “match” between the element in the Interop file and the configuration object in the Net-Net SBC configuration. The match can occur on either the Service Provider trunk-side (Trunk)or the Enterprise/PBX-side (Core) of the network, depending on what you specified for the SIP interface in the Interop file (TRUNK or CORE).
In the following example XML line of the Interop file, the Interop file matches the configuration objects on the Service Provider trunk-side for Manipulation ID, Media Profile, and add-sdp-invite. On the Customer core-side, the matching is performed on the Manipulation ID only.
<SipInterface outManipulationId="NAT_IP" mediaProfile="G729" add-sdp-invite="reinvite" match="TRUNK"/>
<SipInterface outManipulationId="NAT_IP" match="CORE">
The following illustration indicates the Trunk-side location and the Customer Core-side location.
Interop file performs element matching in the configuration on the Service Provider trunk-side or Customer core-side depending on what you specify in the Interop file.
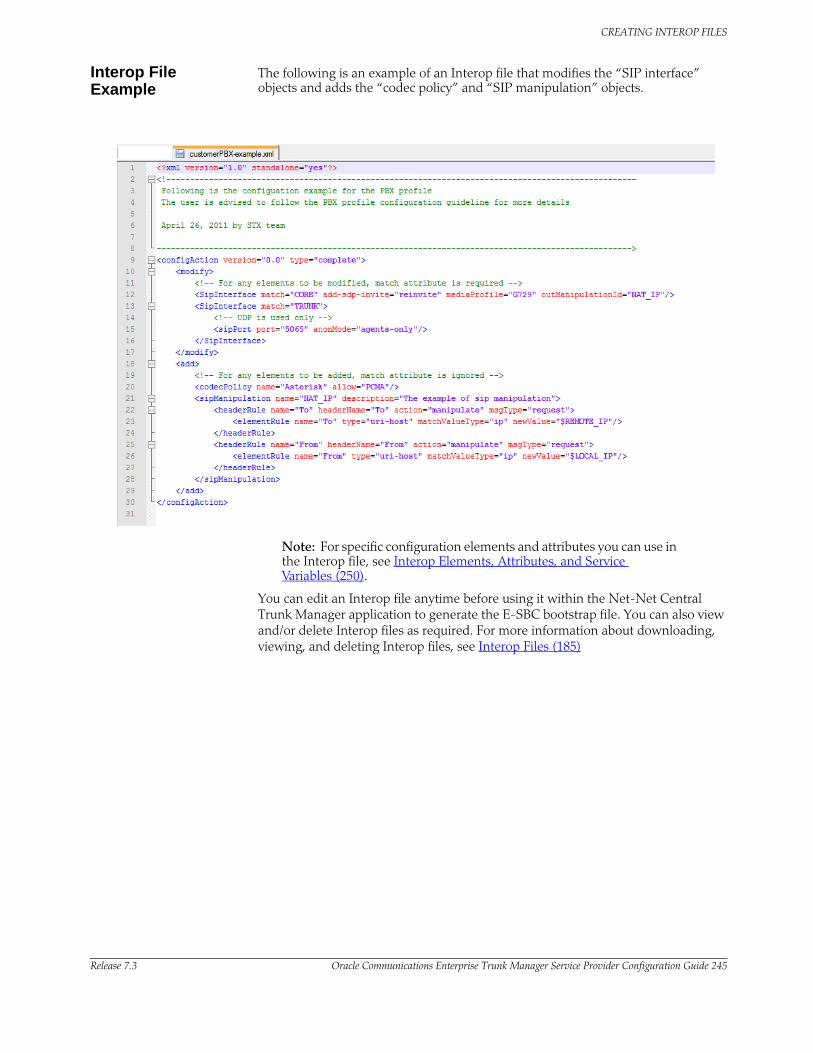
CREATING INTEROP FILES
Release 7.3 Oracle Communications Enterprise Trunk Manager Service Provider Configuration Guide 245
Interop File Example
The following is an example of an Interop file that modifies the “SIP interface” objects and adds the “codec policy” and “SIP manipulation” objects.
Note: For specific configuration elements and attributes you can use in the Interop file, see Interop Elements, Attributes, and Service Variables (250).
You can edit an Interop file anytime before using it within the Net-Net Central Trunk Manager application to generate the E-SBC bootstrap file. You can also view and/or delete Interop files as required. For more information about downloading, viewing, and deleting Interop files, see Interop Files (185)
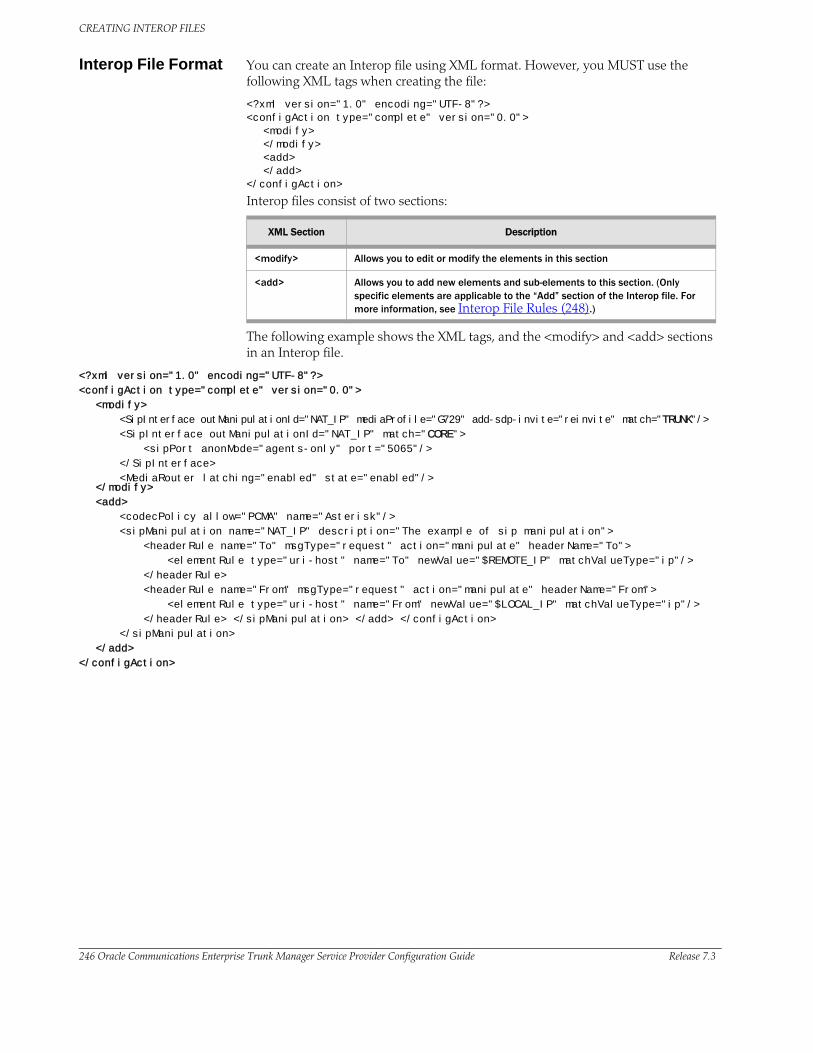
CREATING INTEROP FILES
246 Oracle Communications Enterprise Trunk Manager Service Provider Configuration Guide Release 7.3
Interop File Format You can create an Interop file using XML format. However, you MUST use the following XML tags when creating the file:
<?xml version="1.0" encoding="UTF-8"?>
<configAction type="complete" version="0.0">
<modify>
</modify> <add>
</add>
</configAction>
Interop files consist of two sections:
XML Section Description
<modify> Allows you to edit or modify the elements in this section
<add> Allows you to add new elements and sub-elements to this section. (Only specific elements are applicable to the “Add” section of the Interop file. For more information, see Interop File Rules (248).)
The following example shows the XML tags, and the <modify> and <add> sections in an Interop file.
<?xml version="1.0" encoding="UTF-8"?>
<configAction type="complete" version="0.0">
<modify>
<SipInterface outManipulationId="NAT_IP" mediaProfile="G729" add-sdp-invite="reinvite" match="TRUNK"/>
<SipInterface outManipulationId="NAT_IP" match="CORE">
<sipPort anonMode="agents-only" port="5065"/>
</SipInterface>
<MediaRouter latching="enabled" state="enabled"/> </modify>
<add>
<codecPolicy allow="PCMA" name="Asterisk"/>
<sipManipulation name="NAT_IP" description="The example of sip manipulation">
<headerRule name="To" msgType="request" action="manipulate" headerName="To">
<elementRule type="uri-host" name="To" newValue="$REMOTE_IP" matchValueType="ip"/>
</headerRule>
<headerRule name="From" msgType="request" action="manipulate" headerName="From">
<elementRule type="uri-host" name="From" newValue="$LOCAL_IP" matchValueType="ip"/>
</headerRule> </sipManipulation> </add> </configAction>
</sipManipulation>
</add>
</configAction>
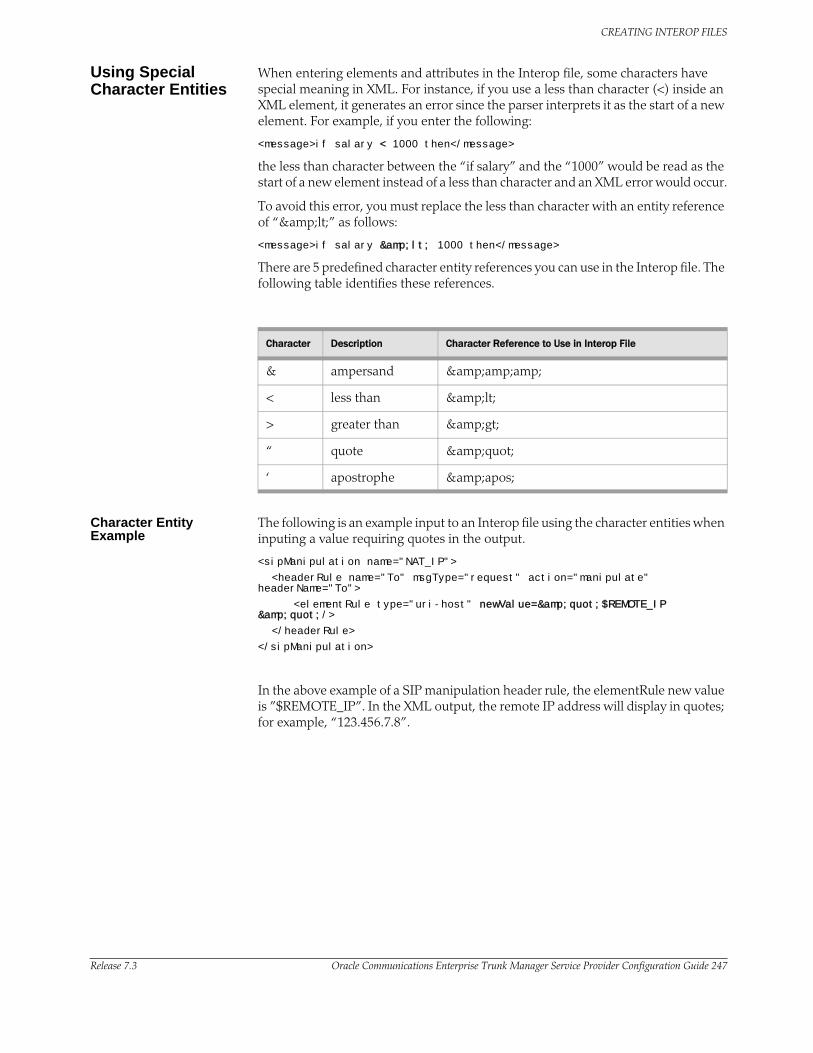
CREATING INTEROP FILES
Release 7.3 Oracle Communications Enterprise Trunk Manager Service Provider Configuration Guide 247
Using Special Character Entities
When entering elements and attributes in the Interop file, some characters have special meaning in XML. For instance, if you use a less than character (<) inside an XML element, it generates an error since the parser interprets it as the start of a new element. For example, if you enter the following:
<message>if salary < 1000 then</message>
the less than character between the “if salary” and the “1000” would be read as the start of a new element instead of a less than character and an XML error would occur.
To avoid this error, you must replace the less than character with an entity reference of “&lt;” as follows:
<message>if salary &lt; 1000 then</message>
There are 5 predefined character entity references you can use in the Interop file. The following table identifies these references.
Character Description Character Reference to Use in Interop File
& ampersand &amp;amp;
< less than &lt;
> greater than &gt;
“ quote &quot;
‘ apostrophe &apos;
Character Entity Example
The following is an example input to an Interop file using the character entities when inputing a value requiring quotes in the output.
<sipManipulation name="NAT_IP">
<headerRule name="To" msgType="request" action="manipulate" headerName="To">
<elementRule type="uri-host" newValue=&quot;$REMOTE_IP &quot;/>
</headerRule>
</sipManipulation>
In the above example of a SIP manipulation header rule, the elementRule new value is ”$REMOTE_IP”. In the XML output, the remote IP address will display in quotes; for example, “123.456.7.8”.
CREATING INTEROP FILES
248 Oracle Communications Enterprise Trunk Manager Service Provider Configuration Guide Release 7.3
Interop File Rules When creating Interop files, there are specific rules you must follow for the files to be compatible with the SP-SBC and E-SBC configurations. The Interop files must be able to map to the Net-Net SBCs configuration objects. For more information on the elements, attributes, and service variables you can use in the Interop file that map to specific configuration objects, see Interop Elements, Attributes, and Service Variables (250).
The following table identifies the rules you must follow when creating Interop files. After creating a file, Acme Packet also recommends that you validate the Interop file using the XML schema tool specified in the section sipConfig (264).
Rule Example
Enter all Interop file information in XML format only.
<?xml version="1.0" standalone="yes"?><configAction version="0.0" type="complete"> <modify> <element-name match="Core" attribute-name ="value" attribute-name ="value"> <sub-element name attribute name ="value"/> </element-name> </modify> <add> <element-name match="" attribute-name="value" attribute-name ="value"/> <element-name match="" attribute-name="value" attribute-name = "value"/> </add>
Edit existing elements in the <modify> section.
<modify> <mediaRouter match="" aclPctUntrustedMax ="60 "/></modify>
Add new elements in the <Add> section. Only specific elements can be added to an Interop file.
<add> <mediaProfile match="" subName ="60 "/></add>Values allowed: pattern
Enter the “match” as either “core” or “trunk” for the following elements:
• sipInterface• realmConfig• sessionAgent• localPolicy
Note: Only delta values are valid from the Interop file for match-based elements.
<modify>< sipInterface match = "Core" add-sdp-invite = "reinvite" mediaProfile = "G729" /> </modify>
<modify>< sipInterface match = "Trunk" rfc2833-mode = "preferred" /><modify>
Enter the “match” in X-Y-Z format, for the following element:
localPolicy
where “X” represents “from”, "Y" represent “to”, and "Z" represents “source realm” in the local-policy definition. If there is no "match" then that value is dropped.
X(from)-Y(to)-Z(source realm)format
<modify>< localPolicy match = "*-*-Core" /><policyAttribute methods = "INVITE, ACK"/></ localPolicy></modify>
CREATING INTEROP FILES
Release 7.3 Oracle Communications Enterprise Trunk Manager Service Provider Configuration Guide 249
Enter the "match" as an empty string (i.e. "" with no space between the quotes) or don’t enter “match” attribute at all for the following elements:
• mediaPolicy• codecPolicy • mediaProfile• mediaRouter• classPolicy • accessControl • translationRules• sessionTranslation• sipManipulation• sipConfig• mediaManager• sessionAgentGroup
With an empty string:
<modify> <mediaRouter match=””aclPctUntrustedMax ="60 "/></modify>
Without the “match” attribute (treats the match as an empty string):
<modify> <mediaRouter aclPctUntrustedMax ="60 "/></modify>
If you specify a “match” for the following direction-based elements, but there is no match found, then the “match” is ignored:
• sipConfig• mediaManager
Note: Only delta values are valid from the Interop file for direction-based elements.
<modify> <sipConfig match="core" domainRegistrar ="60 "/></modify>Values allowed: pattern
If you specify a “match” for the following element, but there is no match found, the element is still accepted:
• sessionAgentGroup
<add> <sessionAgentGroup match="core" strategy="60 "/></add>Values allowed: "", Hunt, RoundRobin, LeastBusy, PropDist, LowSusRate
You can specify multiple instances of the following elements:
mediaPolicycodecPolicymediaProfileclassProfileaccessControltranslationRulessessionTranslationsipManipulation
<add> <sipManipulation match="" name ="60 "/></add>Values allowed: String
<add> <sipManipulation match="" name ="60 "/> <headerRule match="" name ="60 "/> </sipManipulation></add>Values allowed: Pattern
You can add multiple sub-elements to an element in the <modify> section only.
<add> <mediaProfile match = "" name = "BT-SBC" />
< tosSetting mediaType = "audio" tosValue ="0xb8"/></tosSetting>< tosSetting mediaType = "audio" mediaSubType = "sip" tosValue ="0xb8"/></tosSetting >
</mediaProfile > </add>
Rule Example

CREATING INTEROP FILES
250 Oracle Communications Enterprise Trunk Manager Service Provider Configuration Guide Release 7.3
Interop Elements, Attributes, and Service Variables
Interop files contain customized configuration information made up of elements and attributes in XML format. Each XML element in the Interop file maps to a Net-Net SBC configuration object. All of the elements in the “Modify” section of the Interop file are standard elements that you can modify if required. You can add additional elements and sub-elements in the “Add” section of the Interop file.
Note: In the “Add” section of the Interop file, you can add any top configuration element. However, you must specify the XML element that maps to the configuration element. For a listing of XML elements that map to the configuration element, see Appendix D, ACLI Configuration to to XML Element Mapping Reference (275).
You can also add “Service Variables” to the “Modify” or “Add” sections as required. Service variables are elements that direct the Interop file to get values from those set in the NNC-SIPTX database. For more information on service variables, see Service Variables (252).
The following tables identify the elements you can use in an Interop file. For information about Net-Net SBC configuration attributes and values you can use with these elements, see the Net-Net Central Configuration Guide, or the Net-Net ACLI Reference Guide.
Elements of an Interop File
The following table identifies the XML elements in an Interop file that map to well known Net-Net SBC configuration objects.
XML Element “Mapped to” Configuration Object
Standard elements for <Modify> section:
realmConfig realm-config
sessionAgent session-agent
localPolicy local-policy
mediaRouter media-manager-config
sipInterface sip-interface
sipConfig sip-config
sessionAgentGroup session-group
Standard elements for <Add> section:
sipManipulation sip-manipulation
codecPolicy codec-policy
mediaPolicy media-policy
mediaProfile media-profile
classProfile class-profile
accessControl access-control
translationRules translation-rules
sessionTranslation session-translation

CREATING INTEROP FILES
Release 7.3 Oracle Communications Enterprise Trunk Manager Service Provider Configuration Guide 251
You can add additional XML elements to the <Modify> and <Add> sections of the Interop file. However, the additional elements you are allowed to enter are dependant on the elements specfied by your Adminstirator in the InteropTemplate file. For more information about adding custom elements, see Custom Variable and Template Files (266).
sipFeature sip-feature
responseMap response-map
XML Element “Mapped to” Configuration Object

CREATING INTEROP FILES
252 Oracle Communications Enterprise Trunk Manager Service Provider Configuration Guide Release 7.3
Attributes of an Interop File
You can use any of the current Net-Net SBC attributes with an associated element in either the <modify> or <add> sections of the Interop file. For example, in the <modify> section of the Interop file, you can modify the “realmConfig” element and specify the “outManipulationId” attribute on the core-side or trunk-side.
<modify> <realmConfig match="CORE" outManipulationId="NAT_IP"/>
</modify>
<modify> <realmConfig match="Trunk" outManipulationId="NAT_IP"/>
</modify>
This specifies the name of the SIP header manipulation rule set that you want to apply to outbound (egress direction) SIP messages.
For a list of attributes associated with each element, see the Net-Net Central Configuration Guide, or the Net-Net ACLI Reference Guide .
Service Variables Service variables are trunk-specific variables you can add to the Interop file in the <modify> or <add> sections, that direct the Interop file to get values from those set in the NNC-SIPTX database.
If you configure the SIP trunk via Trunk Manager, the trunk configuration values store in the NNC-SIPTX database. The service variables map to the associated configuration object values in the NNC-SIPTX database and use those values in the Interop file. This prevents the Interop file from overriding the values in the Net-Net SBC configuration.
You set the service variables in an Interop file for the E-SBC depending on the direction of the traffic flow between the SP-SBC and the E-SBC (E-SBC to/from Customer Core-side or E-SBC to/from SP-SBC trunk-side).
The following paragraphs identify the specific service variables you can use in the Interop file. The values for these variables are trunk-specific, and are determined by the values configured by the user via Trunk Manager and stored in the NNC-SIPTX database.
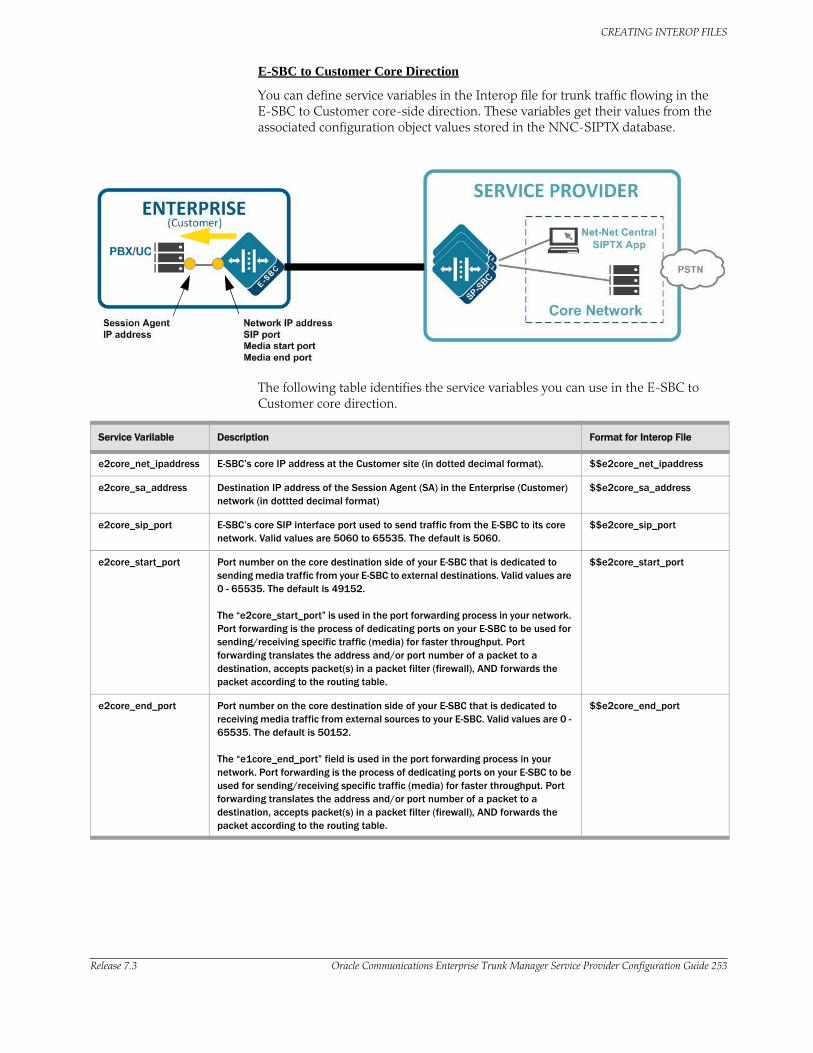
CREATING INTEROP FILES
Release 7.3 Oracle Communications Enterprise Trunk Manager Service Provider Configuration Guide 253
E-SBC to Customer Core Direction
You can define service variables in the Interop file for trunk traffic flowing in the E-SBC to Customer core-side direction. These variables get their values from the associated configuration object values stored in the NNC-SIPTX database.
The following table identifies the service variables you can use in the E-SBC to Customer core direction.
Service Varilable Description Format for Interop File
e2core_net_ipaddress E-SBC’s core IP address at the Customer site (in dotted decimal format). $$e2core_net_ipaddress
e2core_sa_address Destination IP address of the Session Agent (SA) in the Enterprise (Customer) network (in dottted decimal format)
$$e2core_sa_address
e2core_sip_port E-SBC’s core SIP interface port used to send traffic from the E-SBC to its core network. Valid values are 5060 to 65535. The default is 5060.
$$e2core_sip_port
e2core_start_port Port number on the core destination side of your E-SBC that is dedicated to sending media traffic from your E-SBC to external destinations. Valid values are 0 - 65535. The default is 49152.
The “e2core_start_port” is used in the port forwarding process in your network. Port forwarding is the process of dedicating ports on your E-SBC to be used for sending/receiving specific traffic (media) for faster throughput. Port forwarding translates the address and/or port number of a packet to a destination, accepts packet(s) in a packet filter (firewall), AND forwards the packet according to the routing table.
$$e2core_start_port
e2core_end_port Port number on the core destination side of your E-SBC that is dedicated to receiving media traffic from external sources to your E-SBC. Valid values are 0 - 65535. The default is 50152.
The “e1core_end_port” field is used in the port forwarding process in your network. Port forwarding is the process of dedicating ports on your E-SBC to be used for sending/receiving specific traffic (media) for faster throughput. Port forwarding translates the address and/or port number of a packet to a destination, accepts packet(s) in a packet filter (firewall), AND forwards the packet according to the routing table.
$$e2core_end_port
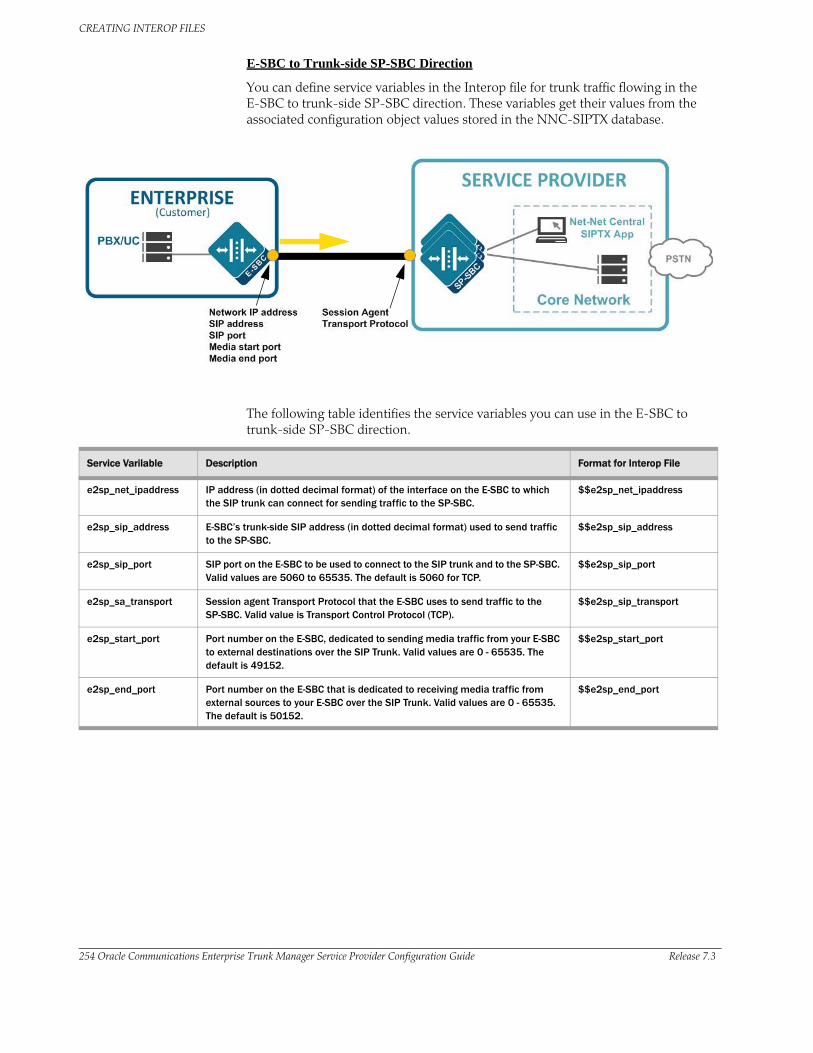
CREATING INTEROP FILES
254 Oracle Communications Enterprise Trunk Manager Service Provider Configuration Guide Release 7.3
E-SBC to Trunk-side SP-SBC Direction
You can define service variables in the Interop file for trunk traffic flowing in the E-SBC to trunk-side SP-SBC direction. These variables get their values from the associated configuration object values stored in the NNC-SIPTX database.
The following table identifies the service variables you can use in the E-SBC to trunk-side SP-SBC direction.
Service Varilable Description Format for Interop File
e2sp_net_ipaddress IP address (in dotted decimal format) of the interface on the E-SBC to which the SIP trunk can connect for sending traffic to the SP-SBC.
$$e2sp_net_ipaddress
e2sp_sip_address E-SBC’s trunk-side SIP address (in dotted decimal format) used to send traffic to the SP-SBC.
$$e2sp_sip_address
e2sp_sip_port SIP port on the E-SBC to be used to connect to the SIP trunk and to the SP-SBC. Valid values are 5060 to 65535. The default is 5060 for TCP.
$$e2sp_sip_port
e2sp_sa_transport Session agent Transport Protocol that the E-SBC uses to send traffic to the SP-SBC. Valid value is Transport Control Protocol (TCP).
$$e2sp_sip_transport
e2sp_start_port Port number on the E-SBC, dedicated to sending media traffic from your E-SBC to external destinations over the SIP Trunk. Valid values are 0 - 65535. The default is 49152.
$$e2sp_start_port
e2sp_end_port Port number on the E-SBC that is dedicated to receiving media traffic from external sources to your E-SBC over the SIP Trunk. Valid values are 0 - 65535. The default is 50152.
$$e2sp_end_port
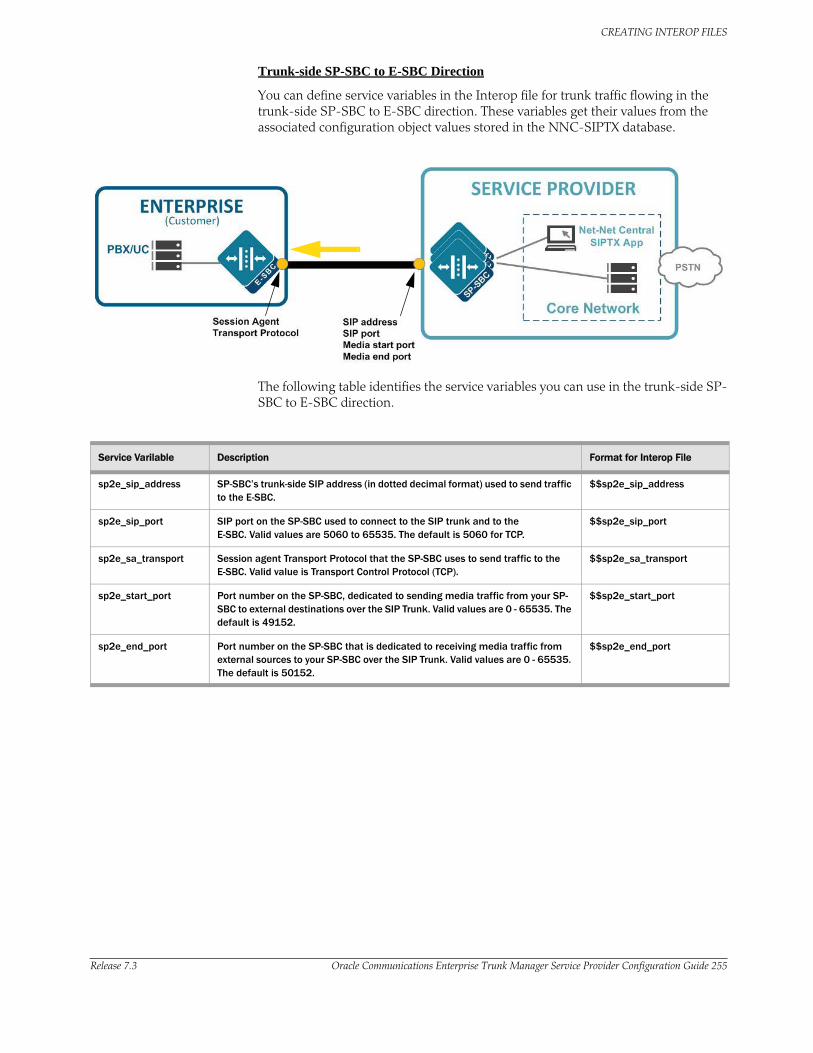
CREATING INTEROP FILES
Release 7.3 Oracle Communications Enterprise Trunk Manager Service Provider Configuration Guide 255
Trunk-side SP-SBC to E-SBC Direction
You can define service variables in the Interop file for trunk traffic flowing in the trunk-side SP-SBC to E-SBC direction. These variables get their values from the associated configuration object values stored in the NNC-SIPTX database.
The following table identifies the service variables you can use in the trunk-side SP-SBC to E-SBC direction.
Service Varilable Description Format for Interop File
sp2e_sip_address SP-SBC’s trunk-side SIP address (in dotted decimal format) used to send traffic to the E-SBC.
$$sp2e_sip_address
sp2e_sip_port SIP port on the SP-SBC used to connect to the SIP trunk and to the E-SBC. Valid values are 5060 to 65535. The default is 5060 for TCP.
$$sp2e_sip_port
sp2e_sa_transport Session agent Transport Protocol that the SP-SBC uses to send traffic to the E-SBC. Valid value is Transport Control Protocol (TCP).
$$sp2e_sa_transport
sp2e_start_port Port number on the SP-SBC, dedicated to sending media traffic from your SP-SBC to external destinations over the SIP Trunk. Valid values are 0 - 65535. The default is 49152.
$$sp2e_start_port
sp2e_end_port Port number on the SP-SBC that is dedicated to receiving media traffic from external sources to your SP-SBC over the SIP Trunk. Valid values are 0 - 65535. The default is 50152.
$$sp2e_end_port

CREATING INTEROP FILES
256 Oracle Communications Enterprise Trunk Manager Service Provider Configuration Guide Release 7.3
Using Prefixes and Suffixes with Service Variables
When entering service variables in an Interop file, you can include a “Prefix” or “Suffix” with the variable. This allows you to specify variables for the Enterprise (Customer)-side, or the Service Provider-side. Formats for prefix and suffix are:
<PREFIX>_<SERVICE_VARIABLE>
<SERVICE_VARIABLE>_<SUFFIX>
The following example specifies to the Interop file to get the “realm name” from the Customer-side in the NNC-SIPTX database:
ENT_$$e_trunk_name
The following example specifies to the Interop file to get the “realm name” from the Service Provider-side in the NNC-SIPTX database:
SP_$$sp_trunk_name
Service Variable Examples
When entering the service variable in the Interop file, you must enter it using “$$” before the variable name. For example,
$$e2sp_start_port
The following examples illustrate the use of the service variables in the Interop file.Example 1
The following example illustrates the use of a single service variable (E-SBC to SP-SBC SIP port) for a SIP interface. This service variable is used in the <modify> section of the Interop file.
<?xml version="1.0" standalone="yes"?>
<configAction version="0.0" type="complete">
<modify>
<SipInterface match="TRUNK" add-sdp-invite="reinvite" mediaProfile="G729" outManipulationId="NAT_IP"/>
<SipInterface match="CORE" outManipulationId="NAT_IP">
<sipPort port="$$e2sp_sip_port" anonMode="agents-only" imsAkaProfile="xyz"/>
</SipInterface>
<MediaRouter state="enabled" latching="enabled"/>
</modify>
</configAction>
When the bootstrap file and Interop file are downloaded to the E-SBC, the “$$e2sp_sip_port” uses the value set in the NNC-SIPTX database (for example, 5060).
Example 2
The following example illustrates the use of two service variables (E-SBC to SP-SBC SIP address and SIP port) for SIP manipulation. This service variable is used in the <add> section of the Interop file.
<?xml version="1.0" standalone="yes"?>
<configAction version="0.0" type="complete">
<add>
<codecPolicy name="Asterisk" allow="PCMA"/>
<sipManipulation name="NAT_IP" description="The example of sip manipulation">
<headerRule name="To" headerName="To" action="manipulate" msgType="request">

CREATING INTEROP FILES
Release 7.3 Oracle Communications Enterprise Trunk Manager Service Provider Configuration Guide 257
<elementRule name="To" type="uri-host" matchValueType="ip" newValue="$REMOTE_IP"/>
</headerRule>
<headerRule name="From" headerName="From" action="manipulate" msgType="request">
<elementRule name="From" type="uri-host" matchValueType="ip" newValue="$$e2sp_sip_address:$$e2sp_sip_port"/>
</headerRule>
</sipManipulation>
</add>
</configAction>
When you download the bootstrap file and Interop file to the E-SBC, the “$$e2sp_sip_address:$$e2sp_sip_port” uses the value set in the NNC-SIPTX database based on the values you set via Trunk Manager (for example, 172.30.80.100:5060).
Procedure for Creating an Interop File
You create an Interop file using XML format. Acme Packet recommends that you validate your Interop file with the configuration file schema provided by Acme Packet, to be sure the elements/attributes/service variables you used in the Interop file are valid for the E-SBC you are configuring.
You can use a text editor to create the XML file, or you can use the libxml2-2.7.6-4.el6.src.rpm XML schema tool that you can get from http://xmlsoft.org to enter the XML tags and validate against the configuration file schema from Acme Packet. The XML schema tool allows you to manipulate XML files, as well as read, modify and write XML and HTML files.
The following procedure is highly recommended when creating an Interop file for an E-SBC.
To create an Interop file:
1. Using a text editor, open a text file and enter the XML tags provided in the section Interop File Format (246). or Use the libxml2-2.7.6-4.el6.src.rpm XML schema tool that you can get from http://xmlsoft.org to enter the XML tags.
<?xml version="1.0" encoding="UTF-8"?>
<configAction type="complete" version="0.0">
<modify>
</modify> <add>
</add>
</configAction>
2. Modify or add the required elements/attributes/service variables. Refer to Interop File Rules (248) and Interop Elements, Attributes, and Service Variables (250) if needed. Appendix D provides a list of ACLI configuration elements and the corresponding XML elements for your reference.
3. Save the file.
4. Validate the XML Interop file against the configuration file schema provided by Acme Packet, using the libxml2-2.7.6-4.el6.src.rpm XML schema tool.
5. Open Trunk Manager in Net-Net Central and upload the Interop file to the NNC-SIPTX database.

CREATING INTEROP FILES
258 Oracle Communications Enterprise Trunk Manager Service Provider Configuration Guide Release 7.3
6. Download and apply the E-SBC bootstrap and Interop file to the E-SBC at the Customer site.

CREATING INTEROP FILES
Release 7.3 Oracle Communications Enterprise Trunk Manager Service Provider Configuration Guide 259
Interop File Examples
The following are examples for entering elements and attributes in the Interop file.
realmConfig The realmConfig element maps to the realm-config object in the Net-Net SBC configuration, used to configure realms. You can enter an “outManipulationId” attribute for the realmConfig element. For example,
<modify>
<realmConfig match="CORE" outManipulationId="NAT_IP"/>
</modify>
<modify>
<realmConfig match="Trunk" outManipulationId="NAT_IP"/>
</modify>
This example applies the SIP header manipulation rule set to the outbound (egress) SIP packets.
sessionAgent The sessionAgent element maps to the session-agent object in the Net-Net SBC configuration. The session-agent object defines a signaling endpoint configured to apply traffic shaping attributes and information regarding next hops or previous hops. You can enter a “pingMethod” attribute for the sessionAgent element. For example,
<modify>
<sessionAgent ="CORE" pingMethod ="60 "/>
</modify>
<modify>
<sessionAgent match="Trunk" pingMethod ="60"/>
</modify>
Values allowed: String
This example defines a SIP method to use for ping messages sent to the Conditional-Random-Sampling (CRS). This attribute only applies when the SIP Protocol is implemented.

CREATING INTEROP FILES
260 Oracle Communications Enterprise Trunk Manager Service Provider Configuration Guide Release 7.3
sipInterface The sipInterface element maps to the sip-interface object in the Net-Net SBC configuration. The sip-interface object configures the SIP interface on your Net-Net SBC. You can enter an “add-sdp-invite” attribute for the sipInterface element. For example,
<modify>
<sipInterface match="CORE" add-sdp-invite ="60 "/>
</modify>
<modify>
<sipInterface match="Trunk" add-sdp-invite ="60"/>
</modify>
Values allowed: disabled, invite, reInvite
This example enables the SIP interface to insert a Session Description Protocol (SDP) into an INVITE. Valid values are disabled, invite, or reInvite. For a description of each of these values, refer to the Net-Net Central Configuration Guide, or the Net-Net ACLI Reference Guide.
localPolicy The localPolicy element maps to the local-policy object in the Net-Net SBC configuration. The local-policy object determines where session signaling messsages are routed and/or forwarded. You can enter a “nextHop” attribute for the sessionAgent element. For example,
<modify>
<localPolicy match="x-y-z" to="60 "/>
<policyAttribute match="" nextHop ="60 "/>
</localPolicy>
</modify>
Values allowed: SAG:<SA-group-name> (for Session Agent group)
<hostname> or <ipv4|ipv6> (for single Session Agent)
This example defines the next hop to which to send signaling traffic. Valid values are session agent group, or a hostname or ipv4/ipv6 for a single session agent. For a description of each of these values, refer to the Net-Net Central Configuration Guide, or the Net-Net ACLI Reference Guide.
mediaRouter The mediaRouter element maps to the media-manager-config object in the Net-Net SBC configuration. The media-manager-config object defines the parameters used in the media steering functions performed by the Net-Net SBC, including the flow timers. You can enter an “aclPctUntrustedMax” attribute for the mediaRouter element. For example,
<modify>
<mediaRouter match="" aclPctUntrustedMax ="60 "/>
</modify>
This example sets the percentage of the maximum signaling bandwidth you want to make available for messages coming from untrusted sources. This bandwidth is only available when not being used by trusted sources. Valid values are min=”0”, max=”100”. The default is 100.

CREATING INTEROP FILES
Release 7.3 Oracle Communications Enterprise Trunk Manager Service Provider Configuration Guide 261
sessionAgentGroup The sessionAgentGroup element maps to the session-agent-group object in the Net-Net SBC configuration. The session-agent-group object creates a group of Session Agents and/or groups of other session agent groups (SAGs). The members of a session agent group are logically equivalent and can be used interchangeably. This allows for the creation of hunt groups for application servers or gateways. You can enter a “strategy” attribute for the sessionAgentGroup element. For example,
<add>
<sessionAgentGroup match="" strategy="60 "/>
</add>
Values allowed: "", Hunt, RoundRobin, LeastBusy, PropDist, LowSusRate
This example determines how the session agent(s) are chosen by this session-agent group. Valid values are Hunt, RoundRobin, LeastBusy, PropDist, LowSusRate. The default is Hunt. For a description of each of these values, refer to the Net-Net Central Configuration Guide, or the Net-Net ACLI Reference Guide.
mediaPolicy The mediaPolicy element maps to the media-policy object in the Net-Net SBC configuration. The media-policy object sets the type of service (TOS)/differentiated service (DiffServ) values that define the individual type or class of service It sets the Packet Marking for Media features and defines an individual type or class of service for the Net-Net SBC. You can choose media policies on a per-realm basis. You can enter a “media type” attribute for the mediaPolicy element. For example,
<add>
<mediaPolicy match="" name ="60 "/>
<tosSetting match="" mediaType ="60 "/>
</mediaPolicy>
</add>
Values allowed: String
This example sets the media to use for this set of TOS settings. The default is “None”.

CREATING INTEROP FILES
262 Oracle Communications Enterprise Trunk Manager Service Provider Configuration Guide Release 7.3
codecPolicy The codecPolicy element maps to the codec-policy object in the Net-Net SBC configuration. The codec-policy object configures codec policies, or sets of rules, that specify the manipulations to be performed on Session Description Protocol (SDP) offers and answers. You can enter a “name” attribute for the codecPolicy element. For example,
<add>
<codecPolicy match="" name ="60 "/>
</add>
Values allowed: String
This example assigns a unique name for the codec policy. This value is used to refer to this codec policy when you apply it to realms or session agents. This is a required parameter.
mediaProfile The mediaProfile element maps to the media-profile object in the Net-Net SBC configuration. The media-profile object configures the media profile for media traffic on the Net-Net SBC. You can enter a “mediaType” attribute for the mediaProfile element. For example,
<add>
<mediaProfile match="" mediaType ="60 "/>
</add>
Values allowed: String
This example sets the type of media used in Session Description Protocol lines. Valid values are audio, video, application, data, image, text. The default is audio. For a description of each of these values, refer to the Net-Net Central Configuration Guide, or the Net-Net ACLI Reference Guide.
classProfile The classProfile element maps to the class-profile object in the Net-Net SBC configuration. The classProfile object allows you to access the configuration elements for creating classification policies for TOS marking for SIP or H.323. You can enter a “classPolicy” sub-element and a “profile” attribute for the classProfile element. For example,
<add>
<classProfile match=""/>
<classPolicy match="" profile ="60 "/>
</classProfile>
</add>
Values allowed: Pattern
This example creates classification policies used to create a TOS marking on incoming traffic based on a matching media-policy and destination address.

CREATING INTEROP FILES
Release 7.3 Oracle Communications Enterprise Trunk Manager Service Provider Configuration Guide 263
accessControl The accessControl element maps to the access-control object in the Net-Net SBC configuration. The access-control object allows you to manually create access lists (ACLs) for the host path in the Net-Net SBC. You can enter a “inRealm” attribute for the accessControl element. For example,
<add>
<accessControl match="" inRelam ="60 "/>
</add>
Values allowed: Pattern
This example specifies the ingress realm of traffic destined to the host which applies this access list.
translationRules The translationRules element maps to the translation-rules object in the Net-Net SBC configuration. The translation-rules object creates unique sets of translation rules to apply to calling and called party numbers. The fields within this element specifies the type of translation to be performed, whether or not deletions can be performed, and where in the address that changes can be made. You can delete unspecified characters from an original address by using the at-sign (@). You can enter a “type” attribute for the translationRules element. For example,
<add>
<translationRules match="" type ="60 "/>
</add>
Values allowed: delete, replace, add, none
This example sets the address translation type to be performed. Valid values are add, delete, replace, none. The default is none. For a description of each of these values, refer to the Net-Net Central Configuration Guide, or the Net-Net ACLI Reference Guide.
sessionTranslation The sessionTranslation element maps to the session-translation object in the Net-Net SBC configuration. The sessionTranslation object defines how how translation rules are applied to incoming and outgoing phone numbers. Multiple translation rules can be referenced and applied; this configuration element groups rules together and allows them to be referenced by a single identifier.
The Net-Net SBC applies the translation rules established in this field cumulatively, in the order in which they are entered. If this field is configured with a value of "rule1 rule2 rule3", rule1 is applied to the original number first, rule2 is applied second, and rule3 is appliedlast.
This is a multiple instance configuration element.
You can enter a “ruleCalling” attribute for the sessionTranslation element. For example,
<add>
<sessionTranslation match="" ruleCalling ="60 "/>
</add>
Values allowed: Pattern
This example defines a rule in the translation rules element to the calling number.

CREATING INTEROP FILES
264 Oracle Communications Enterprise Trunk Manager Service Provider Configuration Guide Release 7.3
sipManipulation The sipManipulation element maps to the sip-manipulation object in the Net-Net SBC configuration. The sip-manipulation object allows you to configure the Net-Net SBC to add, modify, and delete SIP headers and SIP header elements. You can enter an “action” attribute for the sipManipulation element. For example,
<add>
<sipManipulation match="" name ="60 "/>
<headerRule match="" name ="60 "/>
</sipManipulation>
</add>
Values allowed: none, add, delete, manipulate, store, sip-manip, find-replace-all, reject, log
This example sets the action you want applied to the header specified in the name parameter. Valid values are add, delete, manipulate, store, none. The default is none. For a description of each of these values, refer to the Net-Net Central Configuration Guide, or the Net-Net ACLI Reference Guide.
sipConfig The sipConfig element maps to the sip-config object in the Net-Net SBC configuration. The sip-config object allows you to configure SIP Protocol parameters specific to the Net-Net SBC communicating with SIP. You can enter an “egressRealmID” attribute for the sipConfig element. For example,
<modify>
<sipConfig match="" egressRealmID ="60 "/>
</modify>
Values allowed: pattern
This example defines the egress realm ID default route to use for SIP requests addressed to destinations outside the home realm’s address prefix. If you enter a value for this optional field, it must correspond to the identifier value you entered when you configured the realm.
Note: Acme Packet recommends you leave the value blank for access/backbone applications. The realm specified in the home-realm-id parameter of the configuration is used by default.

CREATING INTEROP FILES
Release 7.3 Oracle Communications Enterprise Trunk Manager Service Provider Configuration Guide 265
sipFeature The sipFeature element maps to the sip-feature object in the Net-Net SBC configuration. The sip-feature object defines the option tag names and the action that the Net-Net SBC takes when the option tag is present in a Supported header, a Require header, and a Proxy-Require header in inbound/outbound SIP packets. If an option tag is encountered that is not configured as a SIP feature, the Net-Net SBC applies the default handling behavior. You only need to configure option tag handling in the SIP feature element when non-default treatment is required.
You can specify whether a SIP feature should be applied to a specific realm or globally across realms. You can also specify the treatment for an option based on whether it is present in an inbound or outbound packet. Inbound packets are those that are coming from a realm to the Net-Net SBC and outbound packets are those which are going from the Net-Net SBC to the realm.
You can enter a “name”, “realm”, “support mode”, “require mode”, and “proxy require mode ” attribute for inbound or outbound SIP packets using the sipFeature element. For example,
<add>
<sipFeature name="100rel" realm="ENT_$$e_trunk_name" modeSup="Pass" modeReq="Pass" modeProxyReq="Pass" modeSupOutbound="Strip" modeReqOutbound="Pass" modeProxyReqOutbound="Pass" />
</add>
This example defines how the Net-Net SBC called “100rel” in the Customer realm handles SIP features in inbound and outbound SIP packets within supported headers, required headers, and within proxy-required headers. Since the values are set as “Pass”, the 100rel Net-Net SBC passes all SIP features within the inbound and outbound packet headers, to and from the realm.
response Map The responseMap element maps to the response-map object in the Net-Net SBC configuration. The response-map object defines the name of the sip-response-map element set in the session router. This element establishes SIP response maps associated with the upstream session agent.
You can enter a “name” for the responseMap, and/or enter the subelements of “entries”. The “entries” subelement establishes the status code(s) for both received and transmitted messages, and the reason phrase(s) of a SIP response map. For the “entries” subelement, you can enter “recv code”, “xmit code”, and “reason”. The “recv code” is the original SIP response code received (valid values are 1 to 699). The “xmit code” is the translated SIP response code transmitted (valid values are 1 to 699). The “reason” is the translated response comment or reason phrase to send.
For example,
<add>
<responseMap name="SIPmap1” />
<entries recv code=”5” />
<entries xmit code=”5” />
<entries reason=”SIP connection error” />
</add>
This example defines the name of the sip-response-map element set in the session router. It also defines the codes that are sent back to the session agent when the reason specified (SIP connection error) occurs when sending a response to the SIP session agent.
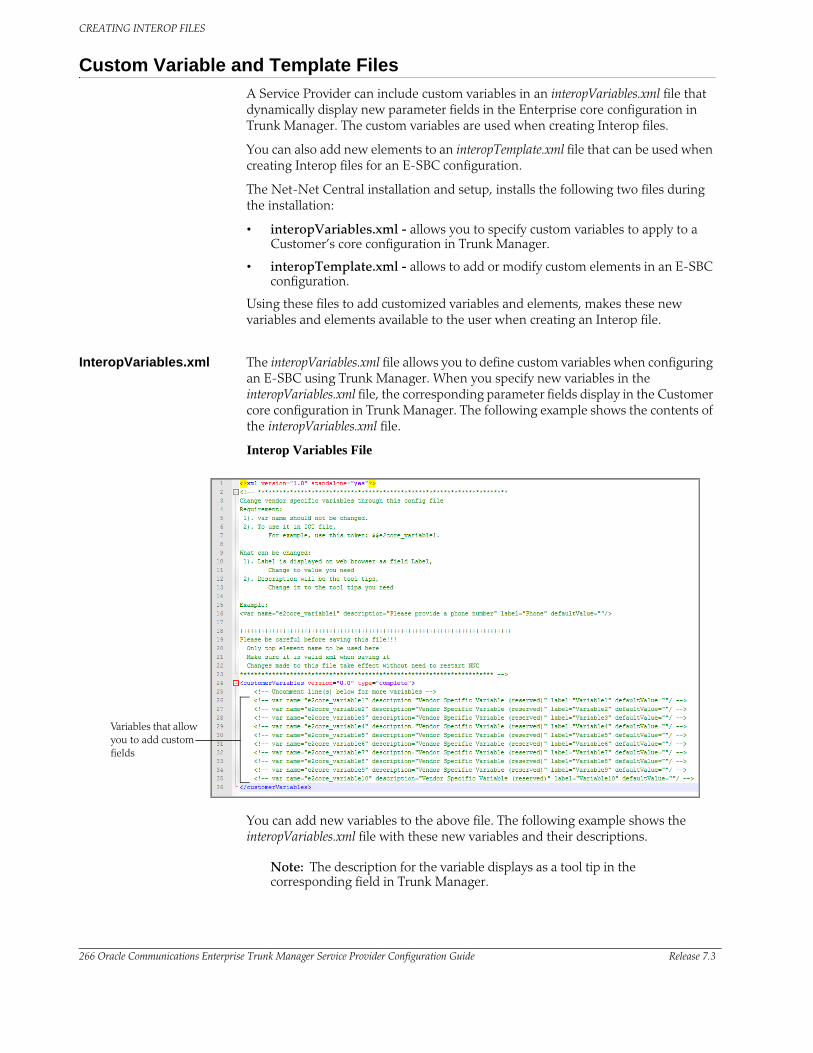
CREATING INTEROP FILES
266 Oracle Communications Enterprise Trunk Manager Service Provider Configuration Guide Release 7.3
Custom Variable and Template Files
A Service Provider can include custom variables in an interopVariables.xml file that dynamically display new parameter fields in the Enterprise core configuration in Trunk Manager. The custom variables are used when creating Interop files.
You can also add new elements to an interopTemplate.xml file that can be used when creating Interop files for an E-SBC configuration.
The Net-Net Central installation and setup, installs the following two files during the installation:
• interopVariables.xml - allows you to specify custom variables to apply to a Customer’s core configuration in Trunk Manager.
• interopTemplate.xml - allows to add or modify custom elements in an E-SBC configuration.
Using these files to add customized variables and elements, makes these new variables and elements available to the user when creating an Interop file.
InteropVariables.xml The interopVariables.xml file allows you to define custom variables when configuring an E-SBC using Trunk Manager. When you specify new variables in the interopVariables.xml file, the corresponding parameter fields display in the Customer core configuration in Trunk Manager. The following example shows the contents of the interopVariables.xml file.
Interop Variables File
Variables that allow you to add custom fields
You can add new variables to the above file. The following example shows the interopVariables.xml file with these new variables and their descriptions.
Note: The description for the variable displays as a tool tip in the corresponding field in Trunk Manager.

CREATING INTEROP FILES
Release 7.3 Oracle Communications Enterprise Trunk Manager Service Provider Configuration Guide 267
Customized Interop Variables File
New varilables added to the file
The following table identifies the custom variables that were added to the interopVariable.xml file in the above example.
Example Input
Variable LabelDescription (Displays as Tool Tip) Example
Email Address Email address of the Customer <var name="e2core_variable1" description="Email Address of Customer" label="Email Address" defaultValue=""/>
Phone Number Phone number of the Customer <var name="e2core_variable2" description=Phone Number of Customer" label="Phone Number" defaultValue=""/>
Zip Code Zip code of the Customer <var name="e2core_variable3" description="Zip code of Customer" label="Zip Code" defaultValue=""/>
Cell Number Cell number of the Customer <var name="e2core_variable4" description="Cell phone number of Customer" label="Cell Number" defaultValue=""/>
Table
After defining the new variables and saving the interopVariable.xml file, the corresponding parameters display in the Customer core configuration in Trunk Manager. The following example displays the new fields in Trunk Manager.

CREATING INTEROP FILES
268 Oracle Communications Enterprise Trunk Manager Service Provider Configuration Guide Release 7.3
Adding a SIP Trunk - E-SBC Customer Core Interface
New fields that display in the Customer core configuration when variables added to interopVariable.xml file
Tool tip description

CREATING INTEROP FILES
Release 7.3 Oracle Communications Enterprise Trunk Manager Service Provider Configuration Guide 269
Procedure for Customizing interopVariables.xml File
Use the following procedure to add custom variables to the E-SBC customer core interface configuration.
Before you Begin
The following rules must be met when adding new variables to the interopVariables.xml file:
• The var name=”e2core_variable<#>” should not be changed.
• When referencing the new variable in an Interop (IOT) file, always refer to the “$$e2core_variable<#>” associated with the new variable. For example, in the following line:
<var name="e2core_variable1" description="Email Address of Customer" label="Email Address" defaultValue=""/>
you would reference “$$e2core_variable1” in the IOT file to refer to the Email Address variable.
To customize the interopVariables.xml file:
1. Locate the file, interopVariables.xml in the directory <NNC root path>/conf/bootstrap/v1.0 folder.
2. Using a text editor application, open the interopVariables.xml file. The variable lines in this file are commented out.
3. To add a new variable, uncomment the variable line (remove the exclamation character and the dashes at the beginning of the line, and the dashes at the end of the line). <!--var name="e2core_variable1" description="Vendor Specific Variable
(reserved)" label="Variable #" defaultValue=""/-->
4. In the description="Vendor Specific Variable (reserved)” field, replace “Vendor Specific Variable (reserved)” with a description for the variable you are adding. For example:
description=”Please provide an mail address of the Customer”
Note: The description you specify displays as the field’s tool tip in NNC’s Trunk Manager for the variable you are adding.
5. In the label="Variable1" field, enter a label to apply to the Trunk Manager Customer core interface parameters in NNC. For example,
label=”Email Address”
This variable displays in Trunk Manager as a parameter on the Customer core interface page when configuring an E-SBC.
6. If the variable you entered in Step 5 requires a default value, in the defaultValue="" field, enter a default value for the variable you are entering. For example,
defaultValue=”[email protected]”
This value displays in the variable field box as the default value and can be edited if required.
7. Add additional variables as applicable following the same procedures in Steps 3 through 6.
8. Save and close the file. The variables display immediately in Trunk Manager on the Customer core interface page when configuring the E-SBC.
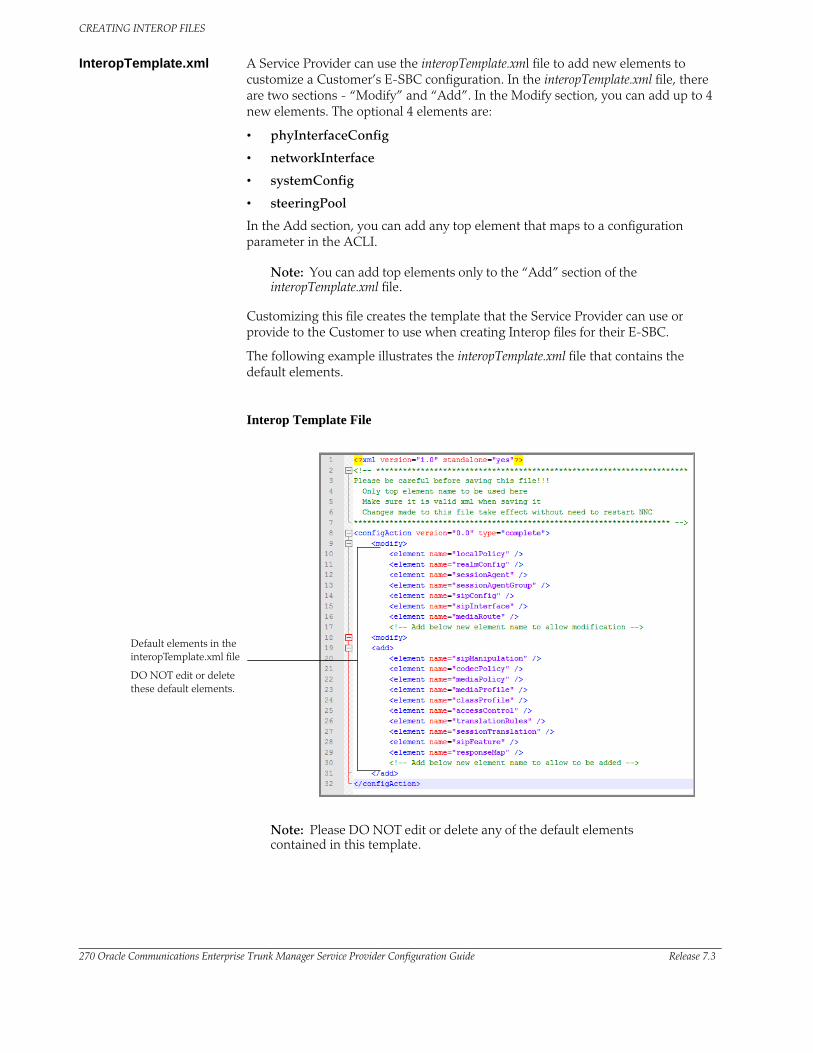
CREATING INTEROP FILES
270 Oracle Communications Enterprise Trunk Manager Service Provider Configuration Guide Release 7.3
InteropTemplate.xml A Service Provider can use the interopTemplate.xml file to add new elements to customize a Customer’s E-SBC configuration. In the interopTemplate.xml file, there are two sections - “Modify” and “Add”. In the Modify section, you can add up to 4 new elements. The optional 4 elements are:
• phyInterfaceConfig
• networkInterface
• systemConfig
• steeringPool
In the Add section, you can add any top element that maps to a configuration parameter in the ACLI.
Note: You can add top elements only to the “Add” section of the interopTemplate.xml file.
Customizing this file creates the template that the Service Provider can use or provide to the Customer to use when creating Interop files for their E-SBC.
The following example illustrates the interopTemplate.xml file that contains the default elements.
Interop Template File
Default elements in the interopTemplate.xml file
DO NOT edit or delete these default elements.
Note: Please DO NOT edit or delete any of the default elements contained in this template.
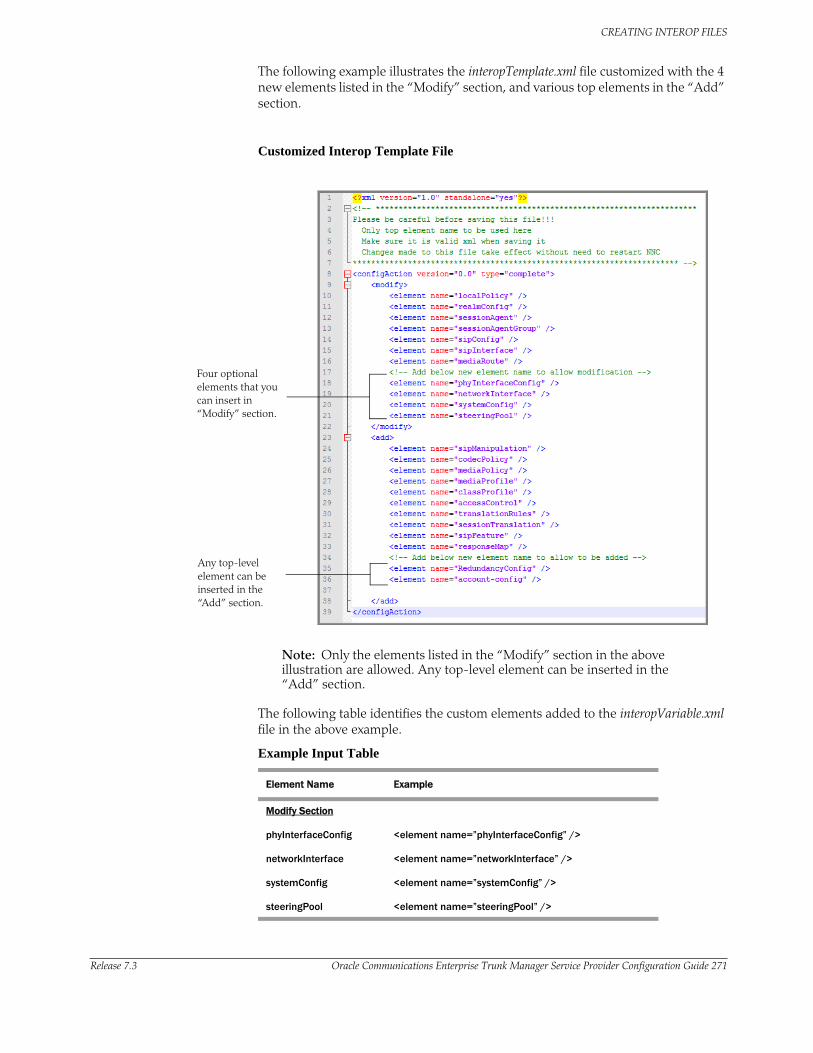
CREATING INTEROP FILES
Release 7.3 Oracle Communications Enterprise Trunk Manager Service Provider Configuration Guide 271
The following example illustrates the interopTemplate.xml file customized with the 4 new elements listed in the “Modify” section, and various top elements in the “Add” section.
Customized Interop Template File
Four optional elements that you can insert in “Modify” section.
Any top-level element can be inserted in the “Add” section.
Note: Only the elements listed in the “Modify” section in the above illustration are allowed. Any top-level element can be inserted in the “Add” section.
The following table identifies the custom elements added to the interopVariable.xml file in the above example.
Example Input Table
Element Name Example
Modify Section
phyInterfaceConfig <element name=”phyInterfaceConfig” />
networkInterface <element name=”networkInterface” />
systemConfig <element name=”systemConfig” />
steeringPool <element name=”steeringPool” />

CREATING INTEROP FILES
272 Oracle Communications Enterprise Trunk Manager Service Provider Configuration Guide Release 7.3
Procedure for Customizing interopTemplate.xml File
Use the “interopTemplate.xml” file to customize a template for the Service Provider or a Customer to use when creating Interop files.
Before you Begin
The following rules must be met when adding new elements to the interopTemplate.xml file:
• Only the following following elements are allowed in the “Modify” section of the template: LocalPolicy, realmConfig, sessionAgent, sessionAgentGroup, sipConfig, sipInterface, mediaRoute, phyInterfaceConfig, networkInterface, systemConfig, steeringPool.
• Only top element XML names can be inserted in the “Add” section of the template.
• You MUST not edit or delete the default elements of the interopTemplate.xml file.
• You must save the file as a valid XML file (interopTemplate.xml).
• Any changes made to the file take effect without need to restart NNC.
To customize the interopVariables.xml file:
1. Locate the file, interopTemplate.xml in the directory <NNC root path>/conf/bootstrap/v1.0 folder.
2. Using a text editor application, open the interopTemplate.xml file.
3. If required, add an allowed element (phyInterfaceConfig, networkInterface, systemConfig, steeringPool) in the <modify> section below the comment line: <!-- Add below new element name to allow modification -->
This allows the element to be modified in the E-SBC configuration. For example: <!-- Add below new element name to allow modification --> <element name="phyInterfaceConfig" />
4. If required, add a top configuration element in the <add> section below the comment line: <!-- Add below new element name to allow to be added-->
This allows the element to be added to the E-SBC configuration. For example: <!-- Add below new element name to allow to be added--> <element name="account-config" />
Note: You can insert top configuration elements in the “Add” section only.
5. Save and close the file. The changes to the file apply immediately and the file can be given to the Customer to configure their E-SBC.
Add Section
RedundanyConfig <element name=”RedundancyConfig” />
account-config <element name=”account-config” />
Element Name Example

CREATING INTEROP FILES
Release 7.3 Oracle Communications Enterprise Trunk Manager Service Provider Configuration Guide 273
Performing a “verify-config” When Using Templates
The verify-config is an administrative command that verifies the E-SBC’s current configuration. It checks the consistency of configuration elements that make up the current configuration and should be carried out prior to activating a configuration on the Net-Net SBC.
You can initiate the verify-config command at the root level of the configuration. For example:
ACMEPACKET#:verify-config
If errors or warnings exist after initiating the verify-config command, they display in the output. For example,
ERROR: sip-manipulation [id] sip-header-rule [xyz] has reference to new-value [zxy] which does not exist
This output identifies the element in the configuration where the error/warning has occurred, and the reason for the error/warning.
When configuring your E-SBC using templates, every element and variable in the configuration is additionally identified with the following
• T:templateName - Identifies the name of the template associated with the element
• P:profileName- Identifies the name of the profile associated with the element
• S:serviceName - Identifies the name of the service being used for creation of the element.
So if you initiate the verify-config command on an E-SBC using templates, and errors are found, the output would look similar to the following:
ERROR: sip-manipulation [id] sip-header-rule [xyz] (from template T:eBootstrapTemplate P:eBootstrapTemplate S:eBootstrap-service-ID24) has reference to new-value [xyz] which does not exist
where
“eBootstrapTemplate” is the template name that created the sip-manipulation element, “eBootstrapTemplate” is the template name associated with the sip-manipulation element, and “eBootstrap-service-ID24” is the service being used for creation of the sip-manipulation element.
This allows you to see exactly which variable is causing the verify-config issue. You must address the issue in the configuration template in order to fix the error.

CREATING INTEROP FILES
274 Oracle Communications Enterprise Trunk Manager Service Provider Configuration Guide Release 7.3

Release 7.3 Oracle Communications Enterprise Trunk Manager Service Provider Configuration Guide 275
D ACLI Configuration to to XML Element Mapping Reference
Introduction
This appendix provides the a listing of the Net-Net SBC ACLI configuration elements and the corresponding mapped XML elements. When creating IOT files, please refer to this appendix when specifying an XML element in an IOT file.
ACLI to XML Element Mapping
This section provides the ACLI configuration elements for the Net-Net SBC, and the applicable XML elements that map to each ACLI element. Refer to this listing when creating IOT files for your Net-Net SBC.
<?xml version="1.0" encoding="UTF-8"?>
<templateData>
<groups>
<group name="media-manager"/>
<group name="session-router">
<group name="h323"/>
<group name="h248-config"/>
<group name="class-profile"/>
</group>
<group name="system"/>
<group name="security">
<group name="ipsec">
<group name="security-association"/>
</group>
<group name="ike"/>
<group name="admin-security"/>
<group name="media-security"/>
</group>
</groups>
<classes>
<class cliname="access-control" xmlname="accessControl" group="session-router">
<attribute cliname="realm-id" xmlname="inRealm"/>
<attribute cliname="description" xmlname="description"/>
<attribute cliname="source-address" xmlname="inSrc"/>
<attribute cliname="destination-address" xmlname="inDst"/>
<attribute cliname="application-protocol" xmlname="appProtocol"/>
<attribute cliname="transport-protocol" xmlname="transProtocol" default="ALL"/>

ACLI CONFIGURATION TO TO XML ELEMENT MAPPING REFERENCE
276 Oracle Communications Enterprise Trunk Manager Service Provider Configuration Guide Release 7.3
<attribute cliname="access" xmlname="access" default="permit"/>
<attribute cliname="average-rate-limit" xmlname="rateLimit" default="0"/>
<attribute cliname="trust-level" xmlname="trustLevel" default="none"/>
<attribute cliname="minimum-reserved-bandwidth" xmlname="reservedBandwidth" default="0"/>
<attribute cliname="invalid-signal-threshold" xmlname="errMsgThreshold" default="0"/>
<attribute cliname="maximum-signal-threshold" xmlname="maxMsgThreshold" default="0"/>
<attribute cliname="untrusted-signal-threshold" xmlname="maxMsgThresholdUntrusted" default="0"/>
<attribute cliname="deny-period" xmlname="denyTimer" default="30"/>
<attribute cliname="nat-trust-threshold" xmlname="natTrustThreshold" default="0"/>
<attribute cliname="cac-failure-threshold" xmlname="cacFailThreshold" default="0"/>
<attribute cliname="untrust-cac-failure-threshold" xmlname="untrustedCacFailThreshold" default="0"/>
</class>
<class cliname="account-config" xmlname="acctConfig" group="session-router">
<attribute cliname="hostname" xmlname="hostname" default="localhost"/>
<attribute cliname="port" xmlname="port" default="1813"/>
<attribute cliname="strategy" xmlname="strategy" default="Hunt"/>
<attribute cliname="protocol" xmlname="protocol" default="RADIUS"/>
<attribute cliname="state" xmlname="state" default="enabled"/>
<attribute cliname="max-msg-delay" xmlname="maxDelay" default="60"/>
<attribute cliname="max-wait-failover" xmlname="maxWaitingFailover" default="100"/>
<attribute cliname="trans-at-close" xmlname="xmitAtClose" default="disabled"/>
<attribute cliname="generate-start" xmlname="genStart" default="OK"/>
<attribute cliname="generate-interim" xmlname="genInterim"/>
<attribute cliname="intermediate-period" xmlname="intermediatePeriod" default="0"/>
<attribute cliname="file-output" xmlname="doFileOutput" default="disabled"/>
<attribute cliname="file-path" xmlname="filePath" default="/ramdrv/logs/"/>
<attribute cliname="max-file-size" xmlname="maxFileSize" default="1000000"/>
<attribute cliname="max-files" xmlname="maxFiles" default="5"/>
<attribute cliname="file-compression" xmlname="fileCompression" default="disabled"/>
<attribute cliname="file-rotate-time" xmlname="rotInterval" default="0"/>
<attribute cliname="options" xmlname="options"/>
<attribute cliname="file-delete-alarm" xmlname="fileDeleteAlarm" default="disabled"/>
<attribute cliname="ftp-push" xmlname="doFtpPush" default="disabled"/>
<attribute cliname="ftp-address" xmlname="ftpAddress"/>
<attribute cliname="ftp-port" xmlname="ftpPort" default="21"/>
<attribute cliname="ftp-user" xmlname="ftpUser"/>
<attribute cliname="ftp-password" xmlname="ftpPassword"/>
<attribute cliname="ftp-remote-path" xmlname="ftpRemPath"/>
<attribute cliname="push-receiver" xmlname="cdrPushReceiver" subObject="CdrPushReceiver">
<attribute cliname="server" xmlname="server" default="0.0.0.0"/>
<attribute cliname="port" xmlname="port" default="21"/>

ACLI CONFIGURATION TO TO XML ELEMENT MAPPING REFERENCE
Release 7.3 Oracle Communications Enterprise Trunk Manager Service Provider Configuration Guide 277
<attribute cliname="admin-state" xmlname="state" default="enabled"/>
<attribute cliname="remote-path" xmlname="path"/>
<attribute cliname="filename-prefix" xmlname="prefix"/>
<attribute cliname="priority" xmlname="priority" default="4"/>
<attribute cliname="protocol" xmlname="protocol" default="ftp"/>
<attribute cliname="username" xmlname="username"/>
<attribute cliname="password" xmlname="ENCR-PBE-password"/>
<attribute cliname="public-key" xmlname="publickey"/>
</attribute>
<attribute cliname="cdr-output-redundancy" xmlname="doCdrRedundancy" default="enabled"/>
<attribute cliname="interim-stats-id-types" xmlname="interimId"/>
<attribute cliname="account-servers" xmlname="acctServer" subObject="AccountServer">
<attribute cliname="hostname" xmlname="hostname"/>
<attribute cliname="port" xmlname="port" default="1813"/>
<attribute cliname="state" xmlname="state" default="enabled"/>
<attribute cliname="min-round-trip" xmlname="minRtt" default="250"/>
<attribute cliname="max-inactivity" xmlname="maxInactivity" default="60"/>
<attribute cliname="restart-delay" xmlname="restartDelay" default="30"/>
<attribute cliname="bundle-vsa" xmlname="bundleVsa" default="enabled"/>
<attribute cliname="secret" xmlname="secret"/>
<attribute cliname="NAS-ID" xmlname="nasId"/>
<attribute cliname="priority" xmlname="priority" default="0"/>
<attribute cliname="origin-realm" xmlname="originRealm"/>
<attribute cliname="domain-name-suffix" xmlname="dnSuffix"/>
</attribute>
<attribute cliname="prevent-duplicate-attrs" xmlname="prevent_dup_attrs" default="disabled"/>
<attribute cliname="vsa-id-range" xmlname="vsa_id_range"/>
<attribute cliname="cdr-output-inclusive" xmlname="cdr_output_inclusive" default="disabled"/>
<attribute cliname="ftp-strategy" xmlname="cdrStrategy" default="Hunt"/>
<attribute cliname="ftp-max-wait-failover" xmlname="cdrmaxWaitFailover" default="120"/>
</class>
<class cliname="audit-logging" xmlname="auditLogging" group="admin-security">
<attribute cliname="state" xmlname="adminState" default="disabled"/>
<attribute cliname="detail-level" xmlname="detailLevel" default="brief"/>
<attribute cliname="file-transfer-time" xmlname="alarmUploadTime" default="720"/>
<attribute cliname="max-storage-space" xmlname="maxSpace" default="32"/>
<attribute cliname="percentage-full" xmlname="alarmPerFull" default="75"/>
<attribute cliname="max-file-size" xmlname="alarmFileSize" default="5"/>
<attribute cliname="storage-path" xmlname="storagePath" default="/code/audit/"/>
<attribute cliname="push-receiver" xmlname="auditPushReceiver" subObject="AuditPushReceiver">
<attribute cliname="server" xmlname="server" default="0.0.0.0"/>
<attribute cliname="port" xmlname="port" default="22"/>

ACLI CONFIGURATION TO TO XML ELEMENT MAPPING REFERENCE
278 Oracle Communications Enterprise Trunk Manager Service Provider Configuration Guide Release 7.3
<attribute cliname="remote-path" xmlname="path"/>
<attribute cliname="filename-prefix" xmlname="prefix"/>
<attribute cliname="username" xmlname="username"/>
<attribute cliname="auth-type" xmlname="authType" default="password"/>
<attribute cliname="password" xmlname="ENCR-PBE-password"/>
<attribute cliname="public-key" xmlname="publickey"/>
</attribute>
</class>
<class cliname="authentication" xmlname="authConfig" group="security">
<attribute cliname="source-port" xmlname="srcPort" default="1812"/>
<attribute cliname="type" xmlname="authType" default="local"/>
<attribute cliname="protocol" xmlname="authProt" default="pap"/>
<attribute cliname="tacacs-authorization" xmlname="tacacsPlusAuthorization" default="enabled"/>
<attribute cliname="tacacs-accounting" xmlname="tacacsPlusAccounting" default="enabled"/>
<attribute cliname="server-assigned-privilege" xmlname="serverAssignedPrivilege" default="disabled"/>
<attribute cliname="allow-local-authorization" xmlname="locallyAuthorize" default="disabled"/>
<attribute cliname="login-as-admin" xmlname="loginAsAdmin" default="disabled"/>
<attribute cliname="management-strategy" xmlname="authMgmtStrategy" default="hunt"/>
<attribute cliname="ike-radius-params-name" xmlname="authIkeRadiusParamsName"/>
<attribute cliname="management-servers" xmlname="authMgmtServers"/>
<attribute cliname="radius-servers" xmlname="radiusServer" subObject="AcmeRadiusServer">
<attribute cliname="address" xmlname="ipAddress"/>
<attribute cliname="port" xmlname="authPort" default="1812"/>
<attribute cliname="state" xmlname="adminState" default="enabled"/>
<attribute cliname="secret" xmlname="ENCR-PBE-secret"/>
<attribute cliname="nas-id" xmlname="nasID"/>
<attribute cliname="realm-id" xmlname="realmID"/>
<attribute cliname="retry-limit" xmlname="retries" default="3"/>
<attribute cliname="retry-time" xmlname="retryTime" default="5"/>
<attribute cliname="maximum-sessions" xmlname="maxSess" default="255"/>
<attribute cliname="class" xmlname="class" default="primary"/>
<attribute cliname="dead-time" xmlname="deadTime" default="10"/>
<attribute cliname="authentication-methods" xmlname="authMethod"/>
</attribute>
<attribute cliname="tacacs-servers" xmlname="tacacsPlusServer" subObject="AcmeTacacsPlusServer">
<attribute cliname="address" xmlname="ipAddress"/>
<attribute cliname="port" xmlname="authPort" default="49"/>
<attribute cliname="state" xmlname="adminState" default="enabled"/>
<attribute cliname="secret" xmlname="ENCR-PBE-secret"/>
<attribute cliname="realm-id" xmlname="realmID"/>
<attribute cliname="dead-time" xmlname="deadTime" default="10"/>

ACLI CONFIGURATION TO TO XML ELEMENT MAPPING REFERENCE
Release 7.3 Oracle Communications Enterprise Trunk Manager Service Provider Configuration Guide 279
<attribute cliname="authentication-methods" xmlname="authMethod"/>
<attribute cliname="retries_m" xmlname="retries" default="3"/>
<attribute cliname="retry-time_m" xmlname="retryTime" default="5"/>
</attribute>
</class>
<class cliname="auth-params" xmlname="authParamsConfig" group="security">
<attribute cliname="name" xmlname="name"/>
<attribute cliname="protocol" xmlname="authParamsProt" default="eap"/>
<attribute cliname="strategy" xmlname="authParamsStrategy" default="hunt"/>
<attribute cliname="servers" xmlname="authParamsServers"/>
</class>
<class cliname="bgf-config" xmlname="BgfConfig" group="media-manager">
<attribute cliname="state" xmlname="state" default="enabled"/>
<attribute cliname="log-level" xmlname="logLevel" default="INFO"/>
<attribute cliname="red-bgf-port" xmlname="redBgfPort" default="1997"/>
<attribute cliname="red-max-trans" xmlname="redNumTrans" default="10000"/>
<attribute cliname="red-sync-start-time" xmlname="redSyncStartTime" default="5000"/>
<attribute cliname="red-sync-comp-time" xmlname="redSyncCompTime" default="1000"/>
<attribute cliname="con-threshold" xmlname="conThreshold" default="100"/>
<attribute cliname="con-interval" xmlname="conMeasurementInterval" default="1"/>
<attribute cliname="con-action" xmlname="conAction" default="NONE"/>
<attribute cliname="crit-con-threshold" xmlname="critConThreshold" default="100"/>
<attribute cliname="crit-con-interval" xmlname="critConMeasurementInterval" default="1"/>
<attribute cliname="compact-encoding" xmlname="compactEncoding" default="disabled"/>
<attribute cliname="rfc2833-to-inband" xmlname="rfc2833toInband" default="disabled"/>
<attribute cliname="options" xmlname="options"/>
<attribute cliname="retry-init-timer" xmlname="initTransRetryTimer" default="2000"/>
<attribute cliname="retry-min-timer" xmlname="minTransRetryTimer" default="100"/>
<attribute cliname="retry-max-timer" xmlname="maxTransRetryTimer" default="4000"/>
<attribute cliname="retry-window" xmlname="transExpiryTimer" default="25000"/>
<attribute cliname="trans-history" xmlname="transHistoryTimer" default="30000"/>
</class>
<class cliname="call-recording-server" xmlname="callRecordingServer" group="session-router">
<attribute cliname="name" xmlname="name"/>
<attribute cliname="primary-realm" xmlname="primaryRealm"/>
<attribute cliname="primary-signaling-addr" xmlname="primarySignalingAddress"/>
<attribute cliname="primary-media-addr" xmlname="primaryMediaAddress"/>
<attribute cliname="secondary-realm" xmlname="secondaryRealm"/>
<attribute cliname="secondary-signaling-addr" xmlname="secondarySignalingAddress"/>
<attribute cliname="secondary-media-addr" xmlname="secondaryMediaAddress"/>
<attribute cliname="ping-method" xmlname="pingMethod"/>
<attribute cliname="ping-interval" xmlname="pingInterval" default="0"/>
<attribute cliname="crs-tls-decryption" xmlname="decryptTLS" default="disabled"/>

ACLI CONFIGURATION TO TO XML ELEMENT MAPPING REFERENCE
280 Oracle Communications Enterprise Trunk Manager Service Provider Configuration Guide Release 7.3
</class>
<class cliname="certificate-record" xmlname="certRecord" group="security">
<attribute cliname="name" xmlname="name"/>
<attribute cliname="country" xmlname="country" default="US"/>
<attribute cliname="state" xmlname="state" default="MA"/>
<attribute cliname="locality" xmlname="locality" default="Burlington"/>
<attribute cliname="organization" xmlname="organization" default="Engineering"/>
<attribute cliname="unit" xmlname="organizationUnit"/>
<attribute cliname="common-name" xmlname="commonName"/>
<attribute cliname="key-size" xmlname="keySize" default="1024"/>
<attribute cliname="alternate-name" xmlname="alternateName"/>
<attribute cliname="trusted" xmlname="trustedCert" default="enabled"/>
<attribute cliname="key-usage-list" xmlname="keyUsageExt"/>
<attribute cliname="extended-key-usage-list" xmlname="extKeyUsageExt"/>
<attribute cliname="options" xmlname="options"/>
<attribute cliname="cert-record-name" xmlname="certRecordName"/>
<attribute cliname="private-key" xmlname="privateKey"/>
<attribute cliname="pkcs10-request" xmlname="pkcs10Request"/>
<attribute cliname="pkcs7-certificate" xmlname="pkcs7Certificate"/>
<attribute cliname="email-address" xmlname="emailAddress"/>
<attribute cliname="key-usage" xmlname="keyUsage"/>
</class>
<class cliname="cert-status-profile" xmlname="certStatusProfile" group="security">
<attribute cliname="name" xmlname="name"/>
<attribute cliname="ip-address" xmlname="ipAddress"/>
<attribute cliname="hostname" xmlname="hostname"/>
<attribute cliname="port" xmlname="port" default="80"/>
<attribute cliname="type" xmlname="type" default="OCSP"/>
<attribute cliname="trans-proto" xmlname="transProto" default="HTTP"/>
<attribute cliname="requestor-cert" xmlname="requestorCert"/>
<attribute cliname="responder-cert" xmlname="responderCert"/>
<attribute cliname="trusted-cas" xmlname="trustedCAs"/>
<attribute cliname="realm-id" xmlname="reqRealmId"/>
<attribute cliname="retry-count" xmlname="retryCount" default="1"/>
<attribute cliname="dead-time" xmlname="deadTime" default="0"/>
</class>
<class cliname="policy" xmlname="classPolicy" group="class-profile">
<attribute cliname="profile-name" xmlname="profile"/>
<attribute cliname="from-address" xmlname="from"/>
<attribute cliname="to-address" xmlname="to"/>
<attribute cliname="media-policy" xmlname="mediaPolicy"/>
</class>
<class cliname="cluster-config" xmlname="clusterConfig" group="session-router">

ACLI CONFIGURATION TO TO XML ELEMENT MAPPING REFERENCE
Release 7.3 Oracle Communications Enterprise Trunk Manager Service Provider Configuration Guide 281
<attribute cliname="state" xmlname="state" default="enabled"/>
<attribute cliname="log-level" xmlname="logLevel" default="CRITICAL"/>
<attribute cliname="auto-rebalance" xmlname="autoReb" default="enabled"/>
<attribute cliname="source-rebalance-threshold" xmlname="pctSrcRebThresh" default="50"/>
<attribute cliname="dest-rebalance-threshold" xmlname="pctDstRebThresh" default="0"/>
<attribute cliname="dest-rebalance-max" xmlname="pctDstRebMax" default="80"/>
<attribute cliname="tunnel-check-interval" xmlname="tunCheckInterval" default="15000"/>
<attribute cliname="tunnel-fail-interval" xmlname="tunFailInterval" default="10000"/>
<attribute cliname="rebalance-request-delay" xmlname="rebReqDelay" default="500"/>
<attribute cliname="session-multiplier" xmlname="sessionMultiplier" default="10"/>
<attribute cliname="atom-limit-divisor" xmlname="atomLimitDivisor" default="1"/>
<attribute cliname="rebalance-skip-ahead" xmlname="skipAheadOnRebalance" default="0"/>
<attribute cliname="rebalance-max-refresh" xmlname="refreshLimitOnRebalance" default="0"/>
<attribute cliname="ignore-tgt-svcs-on-rebalance" xmlname="ignoreTgtSvcsOnRebalance" default="disabled"/>
<attribute cliname="rebalance-del-app-entries" xmlname="rebDelAppEntries" default="disabled"/>
<attribute cliname="inactive-sd-limit" xmlname="inactiveSdLimit" default="1800"/>
<attribute cliname="red-port" xmlname="redPort" default="2001"/>
<attribute cliname="red-max-trans" xmlname="redNumTrans" default="10000"/>
<attribute cliname="red-sync-start-time" xmlname="redSyncStartTime" default="5000"/>
<attribute cliname="red-sync-comp-time" xmlname="redSyncCompTime" default="1000"/>
<attribute cliname="service-ports" xmlname="servicePort" subObject="ServicePort">
<attribute cliname="address" xmlname="address"/>
<attribute cliname="port" xmlname="port" default="0"/>
<attribute cliname="trans-proto" xmlname="transProtocol"/>
<attribute cliname="intf" xmlname="netId"/>
</attribute>
</class>
<class cliname="codec-policy" xmlname="codecPolicy" group="media-manager">
<attribute cliname="name" xmlname="name"/>
<attribute cliname="allow-codecs" xmlname="allow"/>
<attribute cliname="add-codecs" xmlname="add"/>
<attribute cliname="order-codecs" xmlname="order"/>
</class>
<class cliname="data-flow" xmlname="dataFlow" group="ike">
<attribute cliname="name" xmlname="id"/>
<attribute cliname="realm-id" xmlname="realmId"/>
<attribute cliname="group-size" xmlname="groupSize" default="128"/>
<attribute cliname="upstream-rate" xmlname="upStreamRate" default="0"/>
<attribute cliname="downstream-rate" xmlname="downStreamRate" default="0"/>
</class>
<class cliname="dns-config" xmlname="dnsConfig" group="media-manager">
<attribute cliname="client-realm" xmlname="clientrealmID"/>

ACLI CONFIGURATION TO TO XML ELEMENT MAPPING REFERENCE
282 Oracle Communications Enterprise Trunk Manager Service Provider Configuration Guide Release 7.3
<attribute cliname="description" xmlname="description"/>
<attribute cliname="client-address-list" xmlname="client-ip-list"/>
<attribute cliname="server-dns-attributes" xmlname="ServerDnsattribute" subObject="ServerDns">
<attribute cliname="server-realm" xmlname="serverrealmID"/>
<attribute cliname="domain-suffix" xmlname="domainSuffix"/>
<attribute cliname="server-address-list" xmlname="server-ip-list"/>
<attribute cliname="source-address" xmlname="sourceAddress"/>
<attribute cliname="source-port" xmlname="sourcePort" default="53"/>
<attribute cliname="transaction-timeout" xmlname="transactionTimeout" default="10"/>
<attribute cliname="address-translation" xmlname="addressTranslation" subObject="AddressTranslation">
<attribute cliname="server-prefix" xmlname="serverprefix"/>
<attribute cliname="client-prefix" xmlname="clientprefix"/>
</attribute>
</attribute>
</class>
<class cliname="dpd-params" xmlname="dpdParams" group="ike">
<attribute cliname="name" xmlname="name"/>
<attribute cliname="max-loop" xmlname="maxLoop" default="100"/>
<attribute cliname="max-endpoints" xmlname="maxEndpoints" default="25"/>
<attribute cliname="max-cpu-limit" xmlname="maxCpuLimit" default="60"/>
<attribute cliname="load-max-loop" xmlname="loadMaxLoop" default="40"/>
<attribute cliname="load-max-endpoints" xmlname="loadMaxEndpoints" default="5"/>
</class>
<class cliname="enforcement-profile" xmlname="enforcementProfile" group="session-router">
<attribute cliname="name" xmlname="name"/>
<attribute cliname="allowed-methods" xmlname="allowedMethods"/>
<attribute cliname="sdp-address-check" xmlname="sdpAddressCheck" default="disabled"/>
<attribute cliname="allowed-elements-profile" xmlname="allowedElementsProfile"/>
<attribute cliname="subscribe-event" xmlname="subscribeEvent" subObject="SubscribeEvent">
<attribute cliname="event-type" xmlname="type"/>
<attribute cliname="max-subscriptions" xmlname="maxSubscriptions" default="0"/>
</attribute>
<attribute cliname="add-certificate-info" xmlname="certAttr"/>
<attribute cliname="certificate-ruri-check" xmlname="certificateRuriCheck" default="disabled"/>
</class>
<class cliname="enum-config" xmlname="EnumConfig" group="session-router">
<attribute cliname="name" xmlname="name"/>
<attribute cliname="top-level-domain" xmlname="topLevelDomain"/>
<attribute cliname="realm-id" xmlname="realmId"/>
<attribute cliname="enum-servers" xmlname="enumServers"/>
<attribute cliname="service-type" xmlname="serviceType" default="E2U+sip,sip+E2U"/>
<attribute cliname="query-method" xmlname="queryMethod" default="hunt"/>

ACLI CONFIGURATION TO TO XML ELEMENT MAPPING REFERENCE
Release 7.3 Oracle Communications Enterprise Trunk Manager Service Provider Configuration Guide 283
<attribute cliname="timeout" xmlname="timeout" default="11"/>
<attribute cliname="cacheInactivityTimer" xmlname="cacheInactivityTimer" default="3600"/>
<attribute cliname="lookup-length" xmlname="lookupLength" default="0"/>
<attribute cliname="max-response-size" xmlname="maxResponseSize" default="512"/>
<attribute cliname="health-query-number" xmlname="healthQueryNumber"/>
<attribute cliname="health-query-interval" xmlname="healthQueryInterval" default="0"/>
<attribute cliname="failover-to" xmlname="failoverTo"/>
<attribute cliname="cache-addl-records" xmlname="cacheAddlRecords" default="enabled"/>
<attribute cliname="include-source-info" xmlname="includeSourceInfo" default="disabled"/>
<attribute cliname="retarget-requests" xmlname="isRetarget" default="enabled"/>
<attribute cliname="recursive-query" xmlname="recursiveQuery" default="disabled"/>
<attribute cliname="options" xmlname="options"/>
</class>
<class cliname="ext-policy-server" xmlname="extBwManager" group="media-manager">
<attribute cliname="name" xmlname="name"/>
<attribute cliname="state" xmlname="state" default="enabled"/>
<attribute cliname="operation-type" xmlname="operationType" default="disabled"/>
<attribute cliname="protocol" xmlname="protocol" default="C-SOAP"/>
<attribute cliname="address" xmlname="address"/>
<attribute cliname="port" xmlname="port" default="80"/>
<attribute cliname="realm" xmlname="srcRealm"/>
<attribute cliname="permit-conn-down" xmlname="permitConnDown" default="disabled"/>
<attribute cliname="permit-on-reject" xmlname="permitOnReject" default="disabled"/>
<attribute cliname="disconnect-on-timeout" xmlname="disconnOnTimeOut" default="enabled"/>
<attribute cliname="product-name" xmlname="productName"/>
<attribute cliname="application-mode" xmlname="applicationMode" default="none"/>
<attribute cliname="application-id" xmlname="applicationId" default="0"/>
<attribute cliname="framed-ip-addr-encoding" xmlname="ipAddrEncodeMode" default="octet-string"/>
<attribute cliname="dest-realm-format" xmlname="destRealmFormat" default="user-with-realm"/>
<attribute cliname="ingress-realm-location" xmlname="realmLocation" default="realm-in"/>
<attribute cliname="user-name-mode" xmlname="userNameMode" default="none"/>
<attribute cliname="domain-name-suffix" xmlname="dnSuffix" default=".com"/>
<attribute cliname="gate-spec-mask" xmlname="gateSpecMask" default="255"/>
<attribute cliname="allow-srv-proxy" xmlname="allowSrvProxy" default="enabled"/>
<attribute cliname="wildcard-trans-protocol" xmlname="wildcardTransProto" default="disabled"/>
<attribute cliname="watchdog-ka-timer" xmlname="watchDogTimer" default="0"/>
<attribute cliname="options" xmlname="options"/>
<attribute cliname="service-class-options" xmlname="svcClassOptions"/>
<attribute cliname="num-connections" xmlname="numConn" default="1"/>
<attribute cliname="reserve-incomplete" xmlname="reserveIncomplete" default="enabled"/>
<attribute cliname="include-rtcp-in-request" xmlname="includeRTCPInReq" default="disabled"/>

ACLI CONFIGURATION TO TO XML ELEMENT MAPPING REFERENCE
284 Oracle Communications Enterprise Trunk Manager Service Provider Configuration Guide Release 7.3
<attribute cliname="max-timeouts" xmlname="maxMsgReTrans" default="0"/>
<attribute cliname="max-connections" xmlname="maxNumConn" default="1"/>
<attribute cliname="srv-selection-strategy" xmlname="serverStrategy" default="Failover"/>
<attribute cliname="enable-qos-local" xmlname="enableQoS" default="disabled"/>
<attribute cliname="service-name" xmlname="serviceName"/>
<attribute cliname="attr-namespace" xmlname="nameSpace"/>
</class>
<class cliname="h248-config" xmlname="h248Config" group="h248-config">
<attribute cliname="state" xmlname="state" default="enabled"/>
<attribute cliname="log-level" xmlname="logLevel" default="INFO"/>
<attribute cliname="operation-mode" xmlname="algMode" default="normal"/>
<attribute cliname="red-h248-port" xmlname="redH248Port" default="1989"/>
<attribute cliname="red-max-trans" xmlname="redNumTrans" default="10000"/>
<attribute cliname="red-sync-start-time" xmlname="redSyncStartTime" default="5000"/>
<attribute cliname="red-sync-comp-time" xmlname="redSyncCompTime" default="1000"/>
<attribute cliname="options" xmlname="options"/>
</class>
<class cliname="h248-mgc-config" xmlname="h248MgcConfig" group="h248-config">
<attribute cliname="name" xmlname="name"/>
<attribute cliname="state" xmlname="state" default="enabled"/>
<attribute cliname="realm-id" xmlname="realmId"/>
<attribute cliname="ip-address" xmlname="ipAddress"/>
<attribute cliname="port" xmlname="port" default="2944"/>
<attribute cliname="transport-method" xmlname="transMethod" default="UDP"/>
<attribute cliname="encoding" xmlname="encoding" default="text"/>
<attribute cliname="primary-mg" xmlname="primaryMG"/>
<attribute cliname="audit-interval" xmlname="auditInterval" default="0"/>
<attribute cliname="nat-traversal" xmlname="natTraversal" default="disabled"/>
<attribute cliname="options" xmlname="options"/>
</class>
<class cliname="h248-mg-config" xmlname="h248MgConfig" group="h248-config">
<attribute cliname="mgc-name" xmlname="mgcName"/>
<attribute cliname="mgc-ip-address" xmlname="mgcIpAddress"/>
<attribute cliname="mgc-port" xmlname="mgcPort" default="2944"/>
<attribute cliname="state" xmlname="state" default="enabled"/>
<attribute cliname="realm-id" xmlname="realmId"/>
<attribute cliname="ip-address" xmlname="ipAddress"/>
<attribute cliname="transport-protocol" xmlname="transProtocol" default="UDP"/>
<attribute cliname="encoding" xmlname="encoding" default="text"/>
<attribute cliname="options" xmlname="options"/>
</class>
<class cliname="h323-config" xmlname="H323Config" group="h323">
<attribute cliname="state" xmlname="state" default="enabled"/>

ACLI CONFIGURATION TO TO XML ELEMENT MAPPING REFERENCE
Release 7.3 Oracle Communications Enterprise Trunk Manager Service Provider Configuration Guide 285
<attribute cliname="log-level" xmlname="logLevel" default="NOTICE"/>
<attribute cliname="response-tmo" xmlname="responseTmo" default="4"/>
<attribute cliname="connect-tmo" xmlname="connectTmo" default="32"/>
<attribute cliname="rfc2833-payload" xmlname="rfc2833-payload" default="101"/>
<attribute cliname="alternate-routing" xmlname="alternate-routing" default="0"/>
<attribute cliname="codec-fallback" xmlname="codec-fallback" default="disabled"/>
<attribute cliname="enum-sag-match" xmlname="enumSagMatch" default="disabled"/>
<attribute cliname="remove-t38" xmlname="removeT38" default="disabled"/>
<attribute cliname="options" xmlname="options"/>
</class>
<class cliname="h323-stacks" xmlname="H323StackConfig" group="h323">
<attribute cliname="name" xmlname="name"/>
<attribute cliname="description" xmlname="description"/>
<attribute cliname="state" xmlname="state" default="enabled"/>
<attribute cliname="isgateway" xmlname="isgateway" default="enabled"/>
<attribute cliname="realm-id" xmlname="realm-id"/>
<attribute cliname="assoc-stack" xmlname="assoc-stack"/>
<attribute cliname="local-ip" xmlname="local-ip" default="0.0.0.0"/>
<attribute cliname="max-calls" xmlname="max-calls" default="200"/>
<attribute cliname="max-channels" xmlname="max-channels" default="6"/>
<attribute cliname="registration-ttl" xmlname="registration-ttl" default="120"/>
<attribute cliname="terminal-alias" xmlname="terminal-alias"/>
<attribute cliname="prefixes" xmlname="prefixes"/>
<attribute cliname="ras-port" xmlname="ras-port" default="1719"/>
<attribute cliname="auto-gk-discovery" xmlname="auto-gk-discovery" default="disabled"/>
<attribute cliname="multicast" xmlname="multicast" default="0.0.0.0:0"/>
<attribute cliname="gatekeeper" xmlname="gatekeeper" default="0.0.0.0:0"/>
<attribute cliname="gk-identifier" xmlname="gk-identifier"/>
<attribute cliname="q931-port" xmlname="q931-port" default="1720"/>
<attribute cliname="alternate-transport" xmlname="alternate-transport"/>
<attribute cliname="q931-max-calls" xmlname="q931-max-calls" default="200"/>
<attribute cliname="h245-tunneling" xmlname="h245-tunneling" default="disabled"/>
<attribute cliname="fs-in-first-msg" xmlname="fs-in-first-msg" default="disabled"/>
<attribute cliname="call-start-fast" xmlname="callStartFast" default="enabled"/>
<attribute cliname="call-start-slow" xmlname="callStartSlow" default="disabled"/>
<attribute cliname="media-profiles" xmlname="mediaProfiles"/>
<attribute cliname="process-registration" xmlname="processRegistration" default="disabled"/>
<attribute cliname="allow-anonymous" xmlname="AnonMode" default="all"/>
<attribute cliname="options" xmlname="stack-options"/>
<attribute cliname="proxy-mode" xmlname="proxy-mode"/>
<attribute cliname="h245-stage" xmlname="h245-stage" default="3"/>
<attribute cliname="q931-start-port" xmlname="q931-start-port" default="0"/>
<attribute cliname="q931-number-ports" xmlname="q931-number-ports" default="0"/>

ACLI CONFIGURATION TO TO XML ELEMENT MAPPING REFERENCE
286 Oracle Communications Enterprise Trunk Manager Service Provider Configuration Guide Release 7.3
<attribute cliname="dynamic-start-port" xmlname="dynamic-start-port" default="0"/>
<attribute cliname="dynamic-number-ports" xmlname="dynamic-number-ports" default="0"/>
<attribute cliname="rfc2833-mode" xmlname="rfc2833-mode" default="0"/>
<attribute cliname="filename" xmlname="filename"/>
<attribute cliname="tcp-keepalive" xmlname="tcp-keepalive" default="disabled"/>
<attribute cliname="alarm-threshold" xmlname="alarmThreshold" subObject="AlarmThresholdH323">
<attribute cliname="severity" xmlname="severity" default="minor"/>
<attribute cliname="value" xmlname="value" default="0"/>
</attribute>
</class>
<class cliname="ike-certificate-profile" xmlname="ikeCertificateProfile" group="ike">
<attribute cliname="identity" xmlname="identity"/>
<attribute cliname="end-entity-certificate" xmlname="endEntityCertificate"/>
<attribute cliname="trusted-ca-certificates" xmlname="trusted"/>
<attribute cliname="verify-depth" xmlname="verifyDepth" default="3"/>
</class>
<class cliname="ike-config" xmlname="ikeConfig" group="ike">
<attribute cliname="state" xmlname="state" default="enabled"/>
<attribute cliname="ike-version" xmlname="version" default="2"/>
<attribute cliname="log-level" xmlname="logLevel" default="INFO"/>
<attribute cliname="udp-port" xmlname="udpPort" default="500"/>
<attribute cliname="negotiation-timeout" xmlname="timeoutNegotiation" default="15"/>
<attribute cliname="event-timeout" xmlname="timeoutEvent" default="60"/>
<attribute cliname="phase1-mode" xmlname="phase1Mode" default="main"/>
<attribute cliname="phase1-dh-mode" xmlname="phase1DHMode" default="first-supported"/>
<attribute cliname="v2-ike-life-secs" xmlname="ikeV2IkeLifeSecs" default="86400"/>
<attribute cliname="v2-ipsec-life-secs" xmlname="ikeV2IPsecLifeSecs" default="28800"/>
<attribute cliname="phase1-life-seconds" xmlname="phase1LifeSecs" default="3600"/>
<attribute cliname="phase1-life-secs-max" xmlname="phase1LifeSecsMax" default="86400"/>
<attribute cliname="phase2-life-seconds" xmlname="phase2LifeSecs" default="28800"/>
<attribute cliname="phase2-life-secs-max" xmlname="phase2LifeSecsMax" default="86400"/>
<attribute cliname="phase2-exchange-mode" xmlname="exchangeMode" default="phase1-group"/>
<attribute cliname="shared-password" xmlname="ENCR-PBE-password"/>
<attribute cliname="options" xmlname="options"/>
<attribute cliname="eap-protocol" xmlname="eapProto" default="eap-radius-passthru"/>
<attribute cliname="addr-assignment" xmlname="addressMethod" default="local"/>
<attribute cliname="eap-bypass-identity" xmlname="bypassEapIdentity" default="disabled"/>
<attribute cliname="red-port" xmlname="redPort" default="0"/>
<attribute cliname="red-max-trans" xmlname="redMaxTrans" default="10000"/>
<attribute cliname="red-sync-start-time" xmlname="redSyncStartTime" default="5000"/>
<attribute cliname="red-sync-comp-time" xmlname="redSyncCompTime" default="1000"/>
<attribute cliname="dpd-time-interval" xmlname="dpdTimeInterval" default="0"/>

ACLI CONFIGURATION TO TO XML ELEMENT MAPPING REFERENCE
Release 7.3 Oracle Communications Enterprise Trunk Manager Service Provider Configuration Guide 287
<attribute cliname="overload-threshold" xmlname="overloadThreshold" default="100"/>
<attribute cliname="overload-interval" xmlname="overloadMeasurementInterval" default="1"/>
<attribute cliname="overload-action" xmlname="overloadAction" default="none"/>
<attribute cliname="overload-critical-threshold" xmlname="critOverloadThreshold" default="100"/>
<attribute cliname="overload-critical-interval" xmlname="critOverloadMeasurementInterval" default="1"/>
<attribute cliname="sd-authentication-method" xmlname="sdAuthenticationMethod" default="shared-password"/>
<attribute cliname="certificate-profile-id" xmlname="certificateProfileId"/>
</class>
<class cliname="ike-interface" xmlname="ikeInterface" group="ike">
<attribute cliname="address" xmlname="address"/>
<attribute cliname="realm-id" xmlname="realmID"/>
<attribute cliname="ike-mode" xmlname="ikeMode" default="responder"/>
<attribute cliname="local-address-pool-id-list" xmlname="localAddressPool"/>
<attribute cliname="dpd-params-name" xmlname="dpdParamsName"/>
<attribute cliname="v2-ike-life-secs" xmlname="ikeV2IkeLifeSecs"/>
<attribute cliname="v2-ipsec-life-secs" xmlname="ikeV2IPsecLifeSecs"/>
<attribute cliname="shared-password" xmlname="ENCR-PBE-password"/>
<attribute cliname="options" xmlname="options"/>
<attribute cliname="eap-protocol" xmlname="eapProto"/>
<attribute cliname="addr-assignment" xmlname="addressMethod"/>
<attribute cliname="radius-params-name" xmlname="radiusParamsName"/>
<attribute cliname="sd-authentication-method" xmlname="sdAuthenticationMethod" default="none"/>
<attribute cliname="certificate-profile-id-list" xmlname="certificateProfileId"/>
<attribute cliname="tunnel-orig-name-list" xmlname="tunnelOrigName"/>
</class>
<class cliname="ike-sainfo" xmlname="ikeSaInfo" group="ike">
<attribute cliname="name" xmlname="id"/>
<attribute cliname="security-protocol" xmlname="proto" default="ah"/>
<attribute cliname="auth-algo" xmlname="authAlgo" default="any"/>
<attribute cliname="encryption-algo" xmlname="encryAlgo" default="any"/>
<attribute cliname="ipsec-mode" xmlname="mode" default="transport"/>
<attribute cliname="tunnel-local-addr" xmlname="tunnelSrcIP"/>
<attribute cliname="tunnel-remote-addr" xmlname="tunnelDstIP" default="*"/>
</class>
<class cliname="ims-aka-profile" xmlname="imsAkaProfile" group="security">
<attribute cliname="name" xmlname="name" default="null"/>
<attribute cliname="protected-client-port" xmlname="protectedClientPort" default="0"/>
<attribute cliname="protected-server-port" xmlname="protectedServerPort" default="0"/>
<attribute cliname="auth-alg-list" xmlname="authAlg"/>
<attribute cliname="encr-alg-list" xmlname="encrAlg"/>

ACLI CONFIGURATION TO TO XML ELEMENT MAPPING REFERENCE
288 Oracle Communications Enterprise Trunk Manager Service Provider Configuration Guide Release 7.3
</class>
<class cliname="host-route" xmlname="ipRoute" group="system">
<attribute cliname="dest-network" xmlname="netAddress"/>
<attribute cliname="netmask" xmlname="netmask"/>
<attribute cliname="gateway" xmlname="gateway"/>
<attribute cliname="description" xmlname="description"/>
</class>
<class cliname="ipsec-global-config" xmlname="ipsecGlobalConfig" group="ipsec">
<attribute cliname="red-ipsec-port" xmlname="redIpsecPort" default="0"/>
<attribute cliname="red-max-trans" xmlname="redNumTrans" default="10000"/>
<attribute cliname="red-sync-start-time" xmlname="redSyncStartTime" default="5000"/>
<attribute cliname="red-sync-comp-time" xmlname="redSyncCompTime" default="1000"/>
<attribute cliname="options" xmlname="options"/>
</class>
<class cliname="ipt-config" xmlname="iptConfig" group="system">
<attribute cliname="options" xmlname="options"/>
<attribute cliname="min-tru-bw" xmlname="minTrustedBW" default="8000000"/>
<attribute cliname="min-tru-bw" xmlname="minTrustedBW" default="8000000"/>
<attribute cliname="max-tru-bw" xmlname="maxTrustedBW" default="24000000"/>
<attribute cliname="max-tru-bw" xmlname="maxTrustedBW" default="24000000"/>
<attribute cliname="min-untru-bw" xmlname="minUnTrustedBW" default="3000000"/>
<attribute cliname="min-untru-bw" xmlname="minUnTrustedBW" default="3000000"/>
<attribute cliname="max-untru-bw" xmlname="maxUnTrustedBW" default="9000000"/>
<attribute cliname="max-untru-bw" xmlname="maxUnTrustedBW" default="9000000"/>
<attribute cliname="log-level" xmlname="logLevel" default="CRITICAL"/>
</class>
<class cliname="iwf-config" xmlname="IwfStackConfig" group="session-router">
<attribute cliname="state" xmlname="state" default="disabled"/>
<attribute cliname="media-profiles" xmlname="media-profiles"/>
<attribute cliname="logging" xmlname="logging" default="disabled"/>
<attribute cliname="add-reason-hdr" xmlname="addReasonHdr" default="disabled"/>
<attribute cliname="slow-start-no-sdp-in-invite" xmlname="noSdpInInvite" default="disabled"/>
<attribute cliname="options" xmlname="options"/>
<attribute cliname="local-addr" xmlname="localAddr" default="127.0.0.1"/>
<attribute cliname="local-port" xmlname="localPort" default="5070"/>
<attribute cliname="proxy-addr" xmlname="proxyAddr" default="127.0.0.1"/>
<attribute cliname="proxy-port" xmlname="proxyPort" default="5060"/>
</class>
<class cliname="lbp-config" xmlname="lbpConfig" group="session-router">
<attribute cliname="state" xmlname="state" default="enabled"/>
<attribute cliname="log-level" xmlname="logLevel" default="CRITICAL"/>
<attribute cliname="red-port" xmlname="redPort" default="2000"/>
<attribute cliname="red-max-trans" xmlname="redNumTrans" default="500000"/>

ACLI CONFIGURATION TO TO XML ELEMENT MAPPING REFERENCE
Release 7.3 Oracle Communications Enterprise Trunk Manager Service Provider Configuration Guide 289
<attribute cliname="red-sync-start-time" xmlname="redSyncStartTime" default="5000"/>
<attribute cliname="red-sync-comp-time" xmlname="redSyncCompTime" default="1000"/>
<attribute cliname="untrusted-grace-period" xmlname="untrustedGracePeriod" default="30"/>
<attribute cliname="max-untrusted-percentage" xmlname="maxUntrustedPercentage" default="20"/>
<attribute cliname="max-untrusted-upper-threshold" xmlname="maxUntrustedUpThreshPercentage" default="80"/>
<attribute cliname="max-untrusted-lower-threshold" xmlname="maxUntrustedLowThreshPercentage" default="70"/>
<attribute cliname="endpoint-capacity-upper-threshold" xmlname="endpointCapacityUpThreshold" default="80"/>
<attribute cliname="endpoint-capacity-lower-threshold" xmlname="endpointCapacityLowThreshold" default="70"/>
<attribute cliname="options" xmlname="options"/>
</class>
<class cliname="lb-policy" xmlname="lbPolicy" group="session-router">
<attribute cliname="state" xmlname="state" default="enabled"/>
<attribute cliname="default-realm" xmlname="defaultRealm" default="enabled"/>
<attribute cliname="description" xmlname="description"/>
<attribute cliname="protocols" xmlname="protocol"/>
<attribute cliname="lb-realms" xmlname="lbRealm" subObject="lbPolicyRealm">
<attribute cliname="name" xmlname="name"/>
<attribute cliname="priority" xmlname="priority" default="0"/>
</attribute>
<attribute cliname="source-addr" xmlname="src"/>
<attribute cliname="destination-addr" xmlname="dst"/>
</class>
<class cliname="ldap-config" xmlname="ldapConfig" group="session-router">
<attribute cliname="name" xmlname="name"/>
<attribute cliname="state" xmlname="state" default="enabled"/>
<attribute cliname="address" xmlname="address"/>
<attribute cliname="port" xmlname="port" default="0"/>
<attribute cliname="realm" xmlname="realm"/>
<attribute cliname="base-domain-name" xmlname="baseDn"/>
<attribute cliname="user-domain-name" xmlname="userDn"/>
<attribute cliname="authentication-mode" xmlname="authType"/>
<attribute cliname="password" xmlname="password"/>
<attribute cliname="entry-size-limit" xmlname="sizeLimit" default="0"/>
<attribute cliname="timeout-limit" xmlname="timeLimit" default="0"/>
<attribute cliname="max-request-timeouts" xmlname="maxReqTimeouts" default="5"/>
<attribute cliname="tcp-keepalive" xmlname="tcpKeepalive" default="disabled"/>
<attribute cliname="ldap-transactions" xmlname="ldapTransaction" subObject="LdapTransaction">
<attribute cliname="app-trans-type" xmlname="type" default="LDAP_TRANS_UNK"/>
<attribute cliname="name-match" xmlname="nameMap"/>

ACLI CONFIGURATION TO TO XML ELEMENT MAPPING REFERENCE
290 Oracle Communications Enterprise Trunk Manager Service Provider Configuration Guide Release 7.3
<attribute cliname="base-prefix" xmlname="basePrefix"/>
<attribute cliname="filter-class" xmlname="filterClass"/>
<attribute cliname="filter-name" xmlname="filterName"/>
<attribute cliname="filter-match-name-value" xmlname="filterMatchValue"/>
<attribute cliname="ldap-cfg-attributes" xmlname="ldapCfgAttribute" subObject="LdapCfgAttrib">
<attribute cliname="attribute-name" xmlname="name"/>
<attribute cliname="name-match-value" xmlname="nameMatchValue"/>
<attribute cliname="permissions" xmlname="permissions" default="read-only"/>
</attribute>
</attribute>
</class>
<class cliname="lawful-intercept" xmlname="LiConfig" group="session-router">
<attribute cliname="state" xmlname="state" default="disabled"/>
<attribute cliname="type" xmlname="type"/>
<attribute cliname="spaf-network-interface" xmlname="spaf-network-interface"/>
<attribute cliname="spaf-network-address" xmlname="spaf-network-address"/>
<attribute cliname="df-cdc-network-interface" xmlname="df-cdc-network-interface"/>
<attribute cliname="df-cdc-src-port" xmlname="df-cdc-src-port" default="0"/>
<attribute cliname="df-ccc-network-interface" xmlname="df-ccc-network-interface"/>
<attribute cliname="df-ccc-src-port" xmlname="df-ccc-src-port" default="0"/>
<attribute cliname="realm" xmlname="realm"/>
<attribute cliname="sip-header-orig" xmlname="sip-header-orig"/>
<attribute cliname="sip-header-term" xmlname="sip-header-term"/>
<attribute cliname="ini1-realm" xmlname="ini1-realm"/>
<attribute cliname="ini1-src-address" xmlname="ini1-src-address"/>
<attribute cliname="ini1-password" xmlname="ini1-password"/>
<attribute cliname="ini1-neid" xmlname="ini1-neid"/>
<attribute cliname="ini1-keepalive-interval" xmlname="ini1-keepalive-interval" default="30"/>
<attribute cliname="ini2-dst-address" xmlname="ini2-dst-address"/>
<attribute cliname="ini2-realm" xmlname="ini2-realm"/>
<attribute cliname="ini2-src-address" xmlname="ini2-src-address"/>
<attribute cliname="ini2-keepalive-interval" xmlname="ini2-keepalive-interval" default="600"/>
<attribute cliname="ini2-ack-interval" xmlname="ini2-ack-interval" default="5"/>
<attribute cliname="ini2-num-of-retries" xmlname="ini2-num-of-retries" default="3"/>
<attribute cliname="ini2-element-id" xmlname="ini2-element-id" default="0"/>
<attribute cliname="ini2-mediareport-mode" xmlname="ini2-mediareport-mode" default="send-any"/>
<attribute cliname="ini3-dst-address" xmlname="ini3-dst-address"/>
<attribute cliname="ini3-src-interface" xmlname="ini3-src-interface"/>
<attribute cliname="ini3-src-port" xmlname="ini3-src-port" default="0"/>
<attribute cliname="directional-ccc-id" xmlname="directional-ccc-id" default="disabled"/>
<attribute cliname="alip-agent-address" xmlname="alip-agent-address"/>
<attribute cliname="alip-keepalive-timer" xmlname="alip-keepalive-timer" default="30"/>

ACLI CONFIGURATION TO TO XML ELEMENT MAPPING REFERENCE
Release 7.3 Oracle Communications Enterprise Trunk Manager Service Provider Configuration Guide 291
<attribute cliname="alip-intercept-timeout" xmlname="alip-intercept-timeout" default="30"/>
<attribute cliname="alip-transport-protocol" xmlname="alip-transport-protocol" default="TCP"/>
<attribute cliname="alip-tls-profile" xmlname="alip-tls-profile"/>
<attribute cliname="x1-realm" xmlname="x1-realm"/>
<attribute cliname="x1-agent-ipp" xmlname="x1-agent-ipp"/>
<attribute cliname="x1-keep-alive" xmlname="x1-keep-alive" default="30"/>
<attribute cliname="x1-digest" xmlname="x1-digest" default="disabled"/>
<attribute cliname="x1-transport" xmlname="x1-transport" default="TCP"/>
<attribute cliname="x1-tls-profile" xmlname="x1-tls-profile"/>
<attribute cliname="x1-target-retention" xmlname="x1-target-retention" default="delete-on-disconnect"/>
<attribute cliname="x2-realm" xmlname="x2-realm"/>
<attribute cliname="x2-dst-address" xmlname="x2-dst-address"/>
<attribute cliname="x2-src-address" xmlname="x2-src-address"/>
<attribute cliname="x2-element-id" xmlname="x2-element-id" default="0"/>
<attribute cliname="x2-operator-id" xmlname="x2-operator-id"/>
<attribute cliname="x2-keep-alive" xmlname="x2-keep-alive" default="30"/>
<attribute cliname="x2-sip-header-orig" xmlname="x2-sip-header-orig"/>
<attribute cliname="x2-sip-header-term" xmlname="x2-sip-header-term"/>
<attribute cliname="x2-sip-header-redir" xmlname="x2-sip-header-redir"/>
<attribute cliname="x2-sip-header-match" xmlname="x2-sip-header-match"/>
<attribute cliname="x2-sip-rsp-header-redir" xmlname="x2-sip-rsp-header-redir"/>
<attribute cliname="x2-sip-rsp-header-match" xmlname="x2-sip-rsp-header-match"/>
<attribute cliname="x2-match-realm" xmlname="x2-match-realm" default="disabled"/>
<attribute cliname="x2-diversion-rule" xmlname="x2-diversion-rule" default="first-and-last"/>
<attribute cliname="x2-transport" xmlname="x2-transport" default="TCP"/>
<attribute cliname="x2-tls-profile" xmlname="x2-tls-profile"/>
<attribute cliname="x2-intercept-methods" xmlname="x2-intercept-methods"/>
<attribute cliname="x2-register-intercept-mode" xmlname="x2-register-intercept-mode" default="none"/>
<attribute cliname="x3-directional-ccc" xmlname="x3-directional-ccc" default="disabled"/>
<attribute cliname="x3-dst-address" xmlname="x3-dst-address"/>
<attribute cliname="x3-src-address" xmlname="x3-src-address"/>
<attribute cliname="x3-realm" xmlname="x3-realm"/>
<attribute cliname="x3-stream-selector" xmlname="x3-stream-selector"/>
<attribute cliname="li-red-port" xmlname="li-red-port" default="1996"/>
<attribute cliname="li-num-trans" xmlname="li-num-trans" default="20000"/>
<attribute cliname="li-sync-start-time" xmlname="li-sync-start-time" default="5000"/>
<attribute cliname="li-sync-comp-time" xmlname="li-sync-comp-time" default="1000"/>
<attribute cliname="auth-serial-number" xmlname="ENCR-PBE-auth-serial-number"/>
<attribute cliname="match-realm" xmlname="match-realm" default="disabled"/>
<attribute cliname="mediation-functions" xmlname="mediation-function" subObject="LiConfigMf">
<attribute cliname="name" xmlname="name"/>

ACLI CONFIGURATION TO TO XML ELEMENT MAPPING REFERENCE
292 Oracle Communications Enterprise Trunk Manager Service Provider Configuration Guide Release 7.3
<attribute cliname="ini1-realm" xmlname="ini1-realm"/>
<attribute cliname="ini1-src-ip" xmlname="ini1-src-ip"/>
<attribute cliname="ini1-dst-address" xmlname="ini1-dst-address" default="0.0.0.0:0"/>
<attribute cliname="ini1-transport" xmlname="ini1-transport" default="TCP"/>
<attribute cliname="ini1-tls-profile" xmlname="ini1-tls-profile"/>
<attribute cliname="ini3-realm" xmlname="ini3-realm"/>
<attribute cliname="ini3-src-ip" xmlname="ini3-src-ip"/>
<attribute cliname="ini3-dst-address" xmlname="ini3-dst-address" default="0.0.0.0:0"/>
<attribute cliname="ini3-transport" xmlname="ini3-transport" default="TCP"/>
<attribute cliname="ini3-directional-ccc" xmlname="ini3-directional-ccc" default="disabled"/>
</attribute>
<attribute cliname="sip-header-redir" xmlname="sip-header-redir"/>
<attribute cliname="sip-header-match" xmlname="sip-header-match"/>
<attribute cliname="media-POR-mode" xmlname="media-POR-mode" default="transparent"/>
<attribute cliname="correlation-trigger-byte" xmlname="correlation-trigger-byte" default="0"/>
<attribute cliname="auth-user" xmlname="ENCR-PBE-auth-user"/>
<attribute cliname="auth-password" xmlname="ENCR-PBE-auth-password"/>
<attribute cliname="sip-sess-intercept-mode" xmlname="sip-sess-intercept-mode" default="report-as-single-session"/>
<attribute cliname="multiple-header-mode" xmlname="multiple-header-mode" default="override-with-most-recent"/>
<attribute cliname="target-interception-mode" xmlname="target-interception-mode" default="single-match"/>
<attribute cliname="deanonymize-caller" xmlname="deanonymize-caller" default="disabled"/>
</class>
<class cliname="local-address-pool" xmlname="localAddressPool" group="ike">
<attribute cliname="name" xmlname="id"/>
<attribute cliname="address-range" xmlname="localAddressPoolRange" subObject="LocalAddressPoolRange">
<attribute cliname="network-address" xmlname="networkAddress"/>
<attribute cliname="subnet-mask" xmlname="subnetMask"/>
</attribute>
<attribute cliname="dns-realm-id" xmlname="dnsRealmId"/>
<attribute cliname="data-flow" xmlname="dataFlow"/>
</class>
<class cliname="local-policy" xmlname="localPolicy" group="session-router">
<attribute cliname="from-address" xmlname="from"/>
<attribute cliname="to-address" xmlname="to"/>
<attribute cliname="source-realm" xmlname="sourceRealm"/>
<attribute cliname="description" xmlname="description"/>
<attribute cliname="activate-time" xmlname="activateTime"/>
<attribute cliname="deactivate-time" xmlname="deactivateTime"/>
<attribute cliname="state" xmlname="state" default="enabled"/>
<attribute cliname="policy-priority" xmlname="anonymousPriority" default="none"/>

ACLI CONFIGURATION TO TO XML ELEMENT MAPPING REFERENCE
Release 7.3 Oracle Communications Enterprise Trunk Manager Service Provider Configuration Guide 293
<attribute cliname="policy-attributes" xmlname="policyAttribute" subObject="LocalPolicyAttribute">
<attribute cliname="next-hop" xmlname="nextHop"/>
<attribute cliname="realm" xmlname="destRealm"/>
<attribute cliname="action" xmlname="action" default="none"/>
<attribute cliname="terminate-recursion" xmlname="isTermRoute" default="disabled"/>
<attribute cliname="carrier" xmlname="carrierName"/>
<attribute cliname="start-time" xmlname="startTime" default="0000"/>
<attribute cliname="end-time" xmlname="endTime" default="2400"/>
<attribute cliname="days-of-week" xmlname="dow" default="U-S"/>
<attribute cliname="cost" xmlname="cost" default="0"/>
<attribute cliname="state" xmlname="state" default="enabled"/>
<attribute cliname="app-protocol" xmlname="appProtocol"/>
<attribute cliname="methods" xmlname="methods"/>
<attribute cliname="media-profiles" xmlname="mediaProfiles"/>
<attribute cliname="lookup" xmlname="lookup" default="single"/>
<attribute cliname="next-key" xmlname="nextKey"/>
<attribute cliname="eloc-str-lkup" xmlname="eLocStrLkup" default="disabled"/>
<attribute cliname="eloc-str-match" xmlname="eLocStrMatch"/>
</attribute>
</class>
<class cliname="local-routing-config" xmlname="LocalRoutingConfig" group="session-router">
<attribute cliname="name" xmlname="name"/>
<attribute cliname="file-name" xmlname="fileName"/>
<attribute cliname="prefix-length" xmlname="prefixLength" default="0"/>
<attribute cliname="string-lookup" xmlname="isStringLkup" default="disabled"/>
<attribute cliname="retarget-requests" xmlname="isRetarget" default="enabled"/>
<attribute cliname="match-mode" xmlname="matchMode" default="exact"/>
</class>
<class cliname="login-config" xmlname="loginConfig" group="admin-security">
<attribute cliname="enable-login-banner" xmlname="enableLoginBanner" default="enabled"/>
<attribute cliname="concurrent-session-limit" xmlname="concurrentSessionLimit" default="2"/>
<attribute cliname="max-login-attempts" xmlname="maxLoginAttempts" default="3"/>
<attribute cliname="login-attempt-interval" xmlname="loginAttemptInterval" default="4"/>
<attribute cliname="lockout-interval" xmlname="lockoutInterval" default="60"/>
<attribute cliname="send-alarm" xmlname="sendAlarm" default="enabled"/>
<attribute cliname="login-auth-method" xmlname="loginAuthMode" default="single-factor"/>
</class>
<class cliname="media-policy" xmlname="mediaPolicy" group="media-manager">
<attribute cliname="name" xmlname="name"/>
<attribute cliname="tos-settings" xmlname="tosSetting" subObject="TosSetting">
<attribute cliname="media-type" xmlname="mediaType"/>
<attribute cliname="media-sub-type" xmlname="mediaSubType"/>

ACLI CONFIGURATION TO TO XML ELEMENT MAPPING REFERENCE
294 Oracle Communications Enterprise Trunk Manager Service Provider Configuration Guide Release 7.3
<attribute cliname="tos-value" xmlname="tosValue" default="0x00"/>
<attribute cliname="media-attributes" xmlname="mediaAttribute"/>
</attribute>
<attribute cliname="init-flowguard" xmlname="initFlowGuard" default="0"/>
<attribute cliname="subsq-flow-guard" xmlname="subsqFlowGuard" default="0"/>
<attribute cliname="max-session-len" xmlname="maxSessionLen" default="0"/>
<attribute cliname="max-latency" xmlname="maxLatency" default="0"/>
<attribute cliname="max-jitter" xmlname="maxJitter" default="0"/>
<attribute cliname="max-packet-loss" xmlname="maxPacketLoss" default="0"/>
<attribute cliname="window-size" xmlname="windowSize" default="0"/>
</class>
<class cliname="media-profile" xmlname="mediaProfile" group="session-router">
<attribute cliname="name" xmlname="name"/>
<attribute cliname="subname" xmlname="subName"/>
<attribute cliname="media-type" xmlname="mediaType" default="audio"/>
<attribute cliname="payload-type" xmlname="payloadType"/>
<attribute cliname="transport" xmlname="transport" default="RTP/AVP"/>
<attribute cliname="req-bandwidth" xmlname="reqBandwidth" default="0"/>
<attribute cliname="frames-per-packet" xmlname="framesPerPacket" default="0"/>
<attribute cliname="parameters" xmlname="parameters"/>
<attribute cliname="average-rate-limit" xmlname="avgRate" default="0"/>
<attribute cliname="peak-rate-limit" xmlname="peakRate" default="0"/>
<attribute cliname="max-burst-size" xmlname="maxBurstSize" default="0"/>
<attribute cliname="sdp-rate-limit-headroom" xmlname="sdpRateLimit" default="0"/>
<attribute cliname="sdp-bandwidth" xmlname="sdpBandwidth" default="disabled"/>
<attribute cliname="police-rate" xmlname="policeRate" default="0"/>
<attribute cliname="standard-pkt-rate" xmlname="standardPktRate" default="0"/>
</class>
<class cliname="media-manager" xmlname="mediaRouter" group="media-manager">
<attribute cliname="state" xmlname="state" default="enabled"/>
<attribute cliname="latching" xmlname="latching" default="enabled"/>
<attribute cliname="flow-time-limit" xmlname="timeLimit" default="86400"/>
<attribute cliname="initial-guard-timer" xmlname="startTimer" default="300"/>
<attribute cliname="subsq-guard-timer" xmlname="guardTimer" default="300"/>
<attribute cliname="tcp-flow-time-limit" xmlname="tcpTimeLimit" default="86400"/>
<attribute cliname="tcp-initial-guard-timer" xmlname="tcpStartTimer" default="300"/>
<attribute cliname="tcp-subsq-guard-timer" xmlname="tcpGuardTimer" default="300"/>
<attribute cliname="tcp-number-of-ports-per-flow" xmlname="numTCPPorts" default="2"/>
<attribute cliname="hnt-rtcp" xmlname="HntRtcp" default="disabled"/>
<attribute cliname="algd-log-level" xmlname="algdLogLevel" default="NOTICE"/>
<attribute cliname="mbcd-log-level" xmlname="mbcdLogLevel" default="NOTICE"/>
<attribute cliname="options" xmlname="options"/>
<attribute cliname="red-flow-port" xmlname="redPort" default="1985"/>

ACLI CONFIGURATION TO TO XML ELEMENT MAPPING REFERENCE
Release 7.3 Oracle Communications Enterprise Trunk Manager Service Provider Configuration Guide 295
<attribute cliname="red-mgcp-port" xmlname="redMgcpPort" default="1986"/>
<attribute cliname="red-max-trans" xmlname="redNumTrans" default="10000"/>
<attribute cliname="red-sync-start-time" xmlname="redSyncStartTime" default="5000"/>
<attribute cliname="red-sync-comp-time" xmlname="redSyncCompTime" default="1000"/>
<attribute cliname="media-policing" xmlname="mediaPolicing" default="enabled"/>
<attribute cliname="max-signaling-bandwidth" xmlname="aclMaxBandwidth" default="10000000"/>
<attribute cliname="max-untrusted-signaling" xmlname="aclPctUntrustedMax" default="100"/>
<attribute cliname="min-untrusted-signaling" xmlname="aclPctUntrustedMin" default="30"/>
<attribute cliname="app-signaling-bandwidth" xmlname="aclPctAppSignalBandwidth" default="0"/>
<attribute cliname="tolerance-window" xmlname="aclTolerance" default="30"/>
<attribute cliname="trap-on-demote-to-deny" xmlname="aclTrapOnDemoteToDeny" default="disabled"/>
<attribute cliname="syslog-on-demote-to-deny" xmlname="aclSyslogOnDemoteToDeny" default="disabled"/>
<attribute cliname="syslog-on-demote-to-untrusted" xmlname="aclSyslogOnDemoteToUntrusted" default="disabled"/>
<attribute cliname="rtcp-rate-limit" xmlname="rtcpRateLimit" default="0"/>
<attribute cliname="min-media-allocation" xmlname="minMediaAlloc" default="32000"/>
<attribute cliname="min-trusted-allocation" xmlname="minTrustAlloc" default="1000"/>
<attribute cliname="deny-allocation" xmlname="denyAlloc" default="1000"/>
<attribute cliname="anonymous-sdp" xmlname="anonymous-sdp" default="disabled"/>
<attribute cliname="arp-msg-bandwidth" xmlname="arpRateLimit" default="32000"/>
<attribute cliname="fragment-msg-bandwidth" xmlname="fragRateLimit" default="0"/>
<attribute cliname="rfc2833-timestamp" xmlname="rfc2833-timestamp" default="disabled"/>
<attribute cliname="default-2833-duration" xmlname="default-2833-duration" default="100"/>
<attribute cliname="rfc2833-end-pkts-only-for-non-sig" xmlname="rfc2833-end-pkts-only-for-non-sig" default="enabled"/>
<attribute cliname="translate-non-rfc2833-event" xmlname="translate-non-rfc2833-event" default="disabled"/>
<attribute cliname="vq-qos-stats" xmlname="doVqQos" default="disabled"/>
<attribute cliname="vq-qos-period" xmlname="vqQosTimeout" default="30s"/>
<attribute cliname="media-supervision-traps" xmlname="doMediaSupervisionTraps" default="disabled"/>
<attribute cliname="dnsalg-server-failover" xmlname="dnsAlgServerFailover" default="disabled"/>
<attribute cliname="home-realm-id" xmlname="homeRealmID"/>
<attribute cliname="percent-sub" xmlname="percentSub" default="0"/>
<attribute cliname="pss-wd-key" xmlname="psswdKey"/>
<attribute cliname="syslog-on-call-reject" xmlname="syslogOnCallReject" default="disabled"/>
<attribute cliname="usbc-untrusted-rate" xmlname="usbcUntrustedRate" default="50000"/>
<attribute cliname="usbc-trusted-rate" xmlname="usbcTrustedRate" default="50000"/>
<attribute cliname="usbc-arp-rate" xmlname="usbcArpRate" default="1000"/>
</class>
<class cliname="mgcp-config" xmlname="mgcpConfig" group="session-router">

ACLI CONFIGURATION TO TO XML ELEMENT MAPPING REFERENCE
296 Oracle Communications Enterprise Trunk Manager Service Provider Configuration Guide Release 7.3
<attribute cliname="private-realm" xmlname="realmPrivate"/>
<attribute cliname="private-address" xmlname="addrPrivate"/>
<attribute cliname="private-port" xmlname="portPrivate" default="2727"/>
<attribute cliname="public-realm" xmlname="realmPublic"/>
<attribute cliname="public-ca-host" xmlname="pubCAHost"/>
<attribute cliname="public-ca-address" xmlname="addrCAPublic"/>
<attribute cliname="public-ca-port" xmlname="portCAPublic" default="2727"/>
<attribute cliname="public-gw-host" xmlname="hostGWPublic"/>
<attribute cliname="public-gw-address" xmlname="addrGWPublic"/>
<attribute cliname="public-gw-port" xmlname="portGWPublic" default="2427"/>
<attribute cliname="second-public-gw-port" xmlname="portGWPublic2" default="0"/>
<attribute cliname="mode" xmlname="mode" default="LineUnit"/>
<attribute cliname="divisor" xmlname="divisor" default="256"/>
<attribute cliname="unit-prefix" xmlname="unitPrefix"/>
<attribute cliname="audit-interval" xmlname="auditInterval" default="0"/>
<attribute cliname="nat-traversal" xmlname="natTraversal" default="disabled"/>
<attribute cliname="dns-authentication" xmlname="dnsAuthentication" default="disabled"/>
<attribute cliname="dns-translation" xmlname="dnsTranslation"/>
<attribute cliname="ca-redundancy" xmlname="caRedundancy" default="disabled"/>
<attribute cliname="ca-ping-method" xmlname="caPingMethod"/>
<attribute cliname="ca-ping-interval" xmlname="caPingInterval" default="0"/>
<attribute cliname="ca-ping-retries" xmlname="caPingRetries" default="0"/>
<attribute cliname="rsip-failures" xmlname="rsipFailures" default="500-509,511-519,522-599"/>
<attribute cliname="options" xmlname="options"/>
<attribute cliname="ca-failover-ip-addresses" xmlname="ipAddresses"/>
<attribute cliname="port-map-start" xmlname="portMapStart" default="0"/>
<attribute cliname="port-map-end" xmlname="portMapEnd" default="0"/>
</class>
<class cliname="mikey-profile" xmlname="mikeyProfile" group="media-security">
<attribute cliname="name" xmlname="name"/>
<attribute cliname="key-exchange-method" xmlname="keyExchMethod" default="pre-shared"/>
<attribute cliname="encr-algorithm" xmlname="encrAlgorithm" default="any"/>
<attribute cliname="encr-algorithm" xmlname="encrAlgorithm" default="any"/>
<attribute cliname="auth-algorithm" xmlname="authAlgorithm" default="any"/>
<attribute cliname="shared-secret" xmlname="ENCR-PBE-sharedSecret"/>
<attribute cliname="certificate-profile" xmlname="certificateProfile"/>
<attribute cliname="mki" xmlname="mki" default="disabled"/>
<attribute cliname="egress-offer-format" xmlname="egressOfferFormat" default="same-as-ingress"/>
<attribute cliname="use-ingress-session-params" xmlname="useIngressSessionParams"/>
<attribute cliname="options" xmlname="options"/>
</class>
<class cliname="net-management-control" xmlname="netMgmtCtrl" group="session-router">

ACLI CONFIGURATION TO TO XML ELEMENT MAPPING REFERENCE
Release 7.3 Oracle Communications Enterprise Trunk Manager Service Provider Configuration Guide 297
<attribute cliname="name" xmlname="name"/>
<attribute cliname="state" xmlname="state" default="enabled"/>
<attribute cliname="type" xmlname="type"/>
<attribute cliname="value" xmlname="value" default="0"/>
<attribute cliname="treatment" xmlname="treatment"/>
<attribute cliname="next-hop" xmlname="nextHop"/>
<attribute cliname="realm-next-hop" xmlname="nextHopRealm"/>
<attribute cliname="protocol-next-hop" xmlname="nextHopProtocol"/>
<attribute cliname="status-code" xmlname="statusCode" default="503"/>
<attribute cliname="cause-code" xmlname="causeCode" default="63"/>
<attribute cliname="gap-rate-max-count" xmlname="gapRateMaxCount" default="0"/>
<attribute cliname="gap-rate-window-size" xmlname="gapRateWindowSize" default="0"/>
<attribute cliname="destination-identifier" xmlname="destinationId"/>
<attribute cliname="add-destination-identifier" xmlname="destinationId"/>
<attribute cliname="remove-destination-identifier" xmlname="destinationId"/>
<attribute cliname="rph-feature" xmlname="rphFeature" default="disabled"/>
<attribute cliname="rph-profile" xmlname="rphProfile"/>
<attribute cliname="rph-policy" xmlname="rphPolicy"/>
</class>
<class cliname="network-interface" xmlname="networkInterface" group="system">
<attribute cliname="name" xmlname="name"/>
<attribute cliname="sub-port-id" xmlname="subPortId" default="0"/>
<attribute cliname="description" xmlname="description"/>
<attribute cliname="host-name" xmlname="hostName"/>
<attribute cliname="ip-address" xmlname="ipAddress"/>
<attribute cliname="pri-utility-addr" xmlname="utilityAddress"/>
<attribute cliname="sec-utility-addr" xmlname="secondUtilityAddress"/>
<attribute cliname="netmask" xmlname="netmask"/>
<attribute cliname="gateway" xmlname="gateway"/>
<attribute cliname="sec-gateway" xmlname="secGateway"/>
<attribute cliname="gw-heartbeat" xmlname="GWHeartbeat" subObject="GWHeartbeat">
<attribute cliname="state" xmlname="state" default="disabled"/>
<attribute cliname="heartbeat" xmlname="timeout" default="0"/>
<attribute cliname="retry-count" xmlname="retryCount" default="0"/>
<attribute cliname="retry-timeout" xmlname="retryTimeout" default="1"/>
<attribute cliname="health-score" xmlname="healthDec" default="0"/>
</attribute>
<attribute cliname="bfd-config" xmlname="BFDConfig" subObject="BFDConfig">
<attribute cliname="state" xmlname="state" default="disabled"/>
<attribute cliname="icmp-pings" xmlname="icmpPings" default="disabled"/>
<attribute cliname="bfd-session" xmlname="BFDSessionConfig" subObject="BFDSessionConfig">
<attribute cliname="state" xmlname="state" default="disabled"/>

ACLI CONFIGURATION TO TO XML ELEMENT MAPPING REFERENCE
298 Oracle Communications Enterprise Trunk Manager Service Provider Configuration Guide Release 7.3
<attribute cliname="ip-address" xmlname="ipAddress"/>
<attribute cliname="min-tx-interval" xmlname="minTxInterval" default="300"/>
<attribute cliname="min-rx-interval" xmlname="minRxInterval" default="300"/>
<attribute cliname="detect-multiplier" xmlname="detectMultiplier" default="3"/>
<attribute cliname="priority" xmlname="gwSessionPriority" default="0"/>
</attribute>
</attribute>
<attribute cliname="icmp-heartbeat" xmlname="ICMPHeartbeat" subObject="ICMPHeartbeat">
<attribute cliname="state" xmlname="state" default="disabled"/>
<attribute cliname="ip-address" xmlname="ipAddress"/>
<attribute cliname="tx-interval" xmlname="minTxInterval" default="25"/>
<attribute cliname="detect-multiplier" xmlname="detectMultiplier" default="3"/>
</attribute>
<attribute cliname="icmp-response" xmlname="ICMPResponse" subObject="ICMPResponse">
<attribute cliname="state" xmlname="state" default="disabled"/>
<attribute cliname="source-subnet" xmlname="addressPrefix"/>
<attribute cliname="add-source-subnet" xmlname="addressPrefix"/>
<attribute cliname="remove-source-subnet" xmlname="addressPrefix"/>
</attribute>
<attribute cliname="dns-ip-primary" xmlname="domNameServer"/>
<attribute cliname="dns-ip-backup1" xmlname="b1DomNameServer"/>
<attribute cliname="dns-ip-backup2" xmlname="b2DomNameServer"/>
<attribute cliname="dns-domain" xmlname="defDomainName"/>
<attribute cliname="dns-timeout" xmlname="dnsTimeout" default="11"/>
<attribute cliname="hip-ip-list" xmlname="hip-ip-list"/>
<attribute cliname="add-hip-ip" xmlname="hip-ip-list"/>
<attribute cliname="remove-hip-ip" xmlname="hip-ip-list"/>
<attribute cliname="ftp-address" xmlname="ftpAddress"/>
<attribute cliname="add-ftp-ip" xmlname="ftpAddress"/>
<attribute cliname="remove-ftp-ip" xmlname="ftpAddress"/>
<attribute cliname="icmp-address" xmlname="icmp-ip-list"/>
<attribute cliname="add-icmp-ip" xmlname="icmp-ip-list"/>
<attribute cliname="remove-icmp-ip" xmlname="icmp-ip-list"/>
<attribute cliname="snmp-address" xmlname="snmpAddress"/>
<attribute cliname="add-snmp-ip" xmlname="snmpAddress"/>
<attribute cliname="remove-snmp-ip" xmlname="snmpAddress"/>
<attribute cliname="telnet-address" xmlname="telnetAddress"/>
<attribute cliname="add-telnet-ip" xmlname="telnetAddress"/>
<attribute cliname="remove-telnet-ip" xmlname="telnetAddress"/>
<attribute cliname="ssh-address" xmlname="sshAddress"/>
<attribute cliname="add-ssh-ip" xmlname="sshAddress"/>
<attribute cliname="remove-ssh-ip" xmlname="sshAddress"/>

ACLI CONFIGURATION TO TO XML ELEMENT MAPPING REFERENCE
Release 7.3 Oracle Communications Enterprise Trunk Manager Service Provider Configuration Guide 299
<attribute cliname="tunnel-config" xmlname="clusterControlPort" subObject="ClusterTunnelConfig">
<attribute cliname="name" xmlname="name"/>
<attribute cliname="name" xmlname="name"/>
<attribute cliname="local-address" xmlname="localIP"/>
<attribute cliname="remotei-p" xmlname="remoteIP"/>
<attribute cliname="remote-address" xmlname="remoteIP"/>
<attribute cliname="port" xmlname="port" default="4444"/>
<attribute cliname="trans-protocol" xmlname="transProtocol" default="UDP"/>
<attribute cliname="tls-profile" xmlname="tlsProfile"/>
<attribute cliname="app-proto" xmlname="appProto" default="NONE"/>
<attribute cliname="application" xmlname="appProto" default="NONE"/>
</attribute>
<attribute cliname="implicit-realm" xmlname="implicitRealm"/>
</class>
<class cliname="network-parameters" xmlname="NetworkParameters" group="system">
<attribute cliname="tcp-keepinit-timer" xmlname="tcpKeepinit" default="75"/>
<attribute cliname="tcp-keepalive-count" xmlname="tcpKeepcnt" default="4"/>
<attribute cliname="tcp-keepalive-idle-timer" xmlname="tcpKeepidle" default="400"/>
<attribute cliname="tcp-keepalive-interval-timer" xmlname="tcpKeepintvl" default="75"/>
<attribute cliname="tcp-keepalive-mode" xmlname="tcpKeepmode" default="0"/>
<attribute cliname="sctp-send-mode" xmlname="sctpSendmode" default="unordered"/>
<attribute cliname="options" xmlname="options"/>
</class>
<class cliname="ntp-sync" xmlname="ntpConfig" group="cfgRoot">
<attribute cliname="ntp-servers" xmlname="servers"/>
<attribute cliname="add-server" xmlname="servers"/>
<attribute cliname="del-server" xmlname="servers"/>
</class>
<class cliname="password-policy" xmlname="passwordPolicy" group="security">
<attribute cliname="min-secure-pwd-len" xmlname="minSecPwdLen" default="8"/>
<attribute cliname="expiry-interval" xmlname="expiryInterval" default="90"/>
<attribute cliname="expiry-notify-period" xmlname="notifyPeriod" default="30"/>
<attribute cliname="grace-period" xmlname="gracePeriod" default="30"/>
<attribute cliname="grace-logins" xmlname="graceLogins" default="3"/>
<attribute cliname="password-history-count" xmlname="passwordHistoryCount" default="3"/>
<attribute cliname="password-change-interval" xmlname="passwordChangeInterval" default="24"/>
</class>
<class cliname="phy-interface" xmlname="phyInterfaceConfig" group="system">
<attribute cliname="name" xmlname="name"/>
<attribute cliname="operation-type" xmlname="operationType" default="Control"/>
<attribute cliname="port" xmlname="port" default="0"/>
<attribute cliname="slot" xmlname="slot" default="0"/>

ACLI CONFIGURATION TO TO XML ELEMENT MAPPING REFERENCE
300 Oracle Communications Enterprise Trunk Manager Service Provider Configuration Guide Release 7.3
<attribute cliname="virtual-mac" xmlname="virtualMac"/>
<attribute cliname="admin-state" xmlname="admin" default="enabled"/>
<attribute cliname="auto-negotiation" xmlname="autoNegotiation" default="enabled"/>
<attribute cliname="duplex-mode" xmlname="duplex" default="FULL"/>
<attribute cliname="speed" xmlname="speed" default="100"/>
<attribute cliname="wancom-health-score" xmlname="wancomHealthyScore" default="50"/>
<attribute cliname="overload-protection" xmlname="overloadProtection" default="disabled"/>
<attribute cliname="network-alarm-threshold" xmlname="alarmThreshold" subObject="AlarmThresholdPhy">
<attribute cliname="severity" xmlname="severity" default="minor"/>
<attribute cliname="value" xmlname="value" default="0"/>
</attribute>
</class>
<class cliname="capture-receiver" xmlname="captureReceiver" group="system">
<attribute cliname="trace-name" xmlname="name" default="default"/>
<attribute cliname="state" xmlname="state" default="disabled"/>
<attribute cliname="address" xmlname="address"/>
<attribute cliname="network-interface" xmlname="networkInterfaceId"/>
</class>
<class cliname="q850-sip-map" xmlname="q850SipMap" group="session-router">
<attribute cliname="entries" xmlname="q850SipMapEntry" subObject="Q850SipMapEntry">
<attribute cliname="q850-cause" xmlname="cause" default="0"/>
<attribute cliname="sip-status" xmlname="sipstatus" default="0"/>
<attribute cliname="sip-reason" xmlname="reason"/>
</attribute>
</class>
<class cliname="qos-constraints" xmlname="qosConstraints" group="session-router">
<attribute cliname="name" xmlname="name"/>
<attribute cliname="state" xmlname="state" default="enabled"/>
<attribute cliname="major-rfactor" xmlname="majorRfactor" default="0"/>
<attribute cliname="critical-rfactor" xmlname="criticalRfactor" default="0"/>
<attribute cliname="call-load-reduction" xmlname="callLoadReduction" default="0"/>
</class>
<class cliname="realm-config" xmlname="realmConfig" group="media-manager">
<attribute cliname="identifier" xmlname="id"/>
<attribute cliname="description" xmlname="description"/>
<attribute cliname="addr-prefix" xmlname="addrPrefix"/>
<attribute cliname="network-interfaces" xmlname="networkInterfaceId"/>
<attribute cliname="mm-in-realm" xmlname="mrInRealm" default="disabled"/>
<attribute cliname="mm-in-network" xmlname="mrInNetwork" default="enabled"/>
<attribute cliname="mm-same-ip" xmlname="mmSameIp" default="enabled"/>
<attribute cliname="mm-in-system" xmlname="mmInSystem" default="enabled"/>
<attribute cliname="bw-cac-non-mm" xmlname="nonMmBwCAC" default="disabled"/>

ACLI CONFIGURATION TO TO XML ELEMENT MAPPING REFERENCE
Release 7.3 Oracle Communications Enterprise Trunk Manager Service Provider Configuration Guide 301
<attribute cliname="msm-release" xmlname="isMSMRelease" default="disabled"/>
<attribute cliname="qos-enable" xmlname="qosEnable" default="disabled"/>
<attribute cliname="generate-UDP-checksum" xmlname="generateUDPCksum" default="disabled"/>
<attribute cliname="max-bandwidth" xmlname="maxBandwidth" default="0"/>
<attribute cliname="fallback-bandwidth" xmlname="fallbackBandwidth" default="0"/>
<attribute cliname="max-priority-bandwidth" xmlname="maxPriorityBandwidth" default="0"/>
<attribute cliname="max-latency" xmlname="maxLatency" default="0"/>
<attribute cliname="max-jitter" xmlname="maxJitter" default="0"/>
<attribute cliname="max-packet-loss" xmlname="maxPacketLoss" default="0"/>
<attribute cliname="observ-window-size" xmlname="windowSize" default="0"/>
<attribute cliname="parent-realm" xmlname="parent"/>
<attribute cliname="dns-realm" xmlname="dnsRealm"/>
<attribute cliname="media-policy" xmlname="mediaPolicy"/>
<attribute cliname="media-sec-policy" xmlname="mediaSecPolicy"/>
<attribute cliname="srtp-msm-passthrough" xmlname="srtpMsmPassthrough" default="disabled"/>
<attribute cliname="class-profile" xmlname="classProfile"/>
<attribute cliname="in-translationid" xmlname="intranslationId"/>
<attribute cliname="out-translationid" xmlname="outtranslationId"/>
<attribute cliname="in-manipulationid" xmlname="inManipulationId"/>
<attribute cliname="out-manipulationid" xmlname="outManipulationId"/>
<attribute cliname="average-rate-limit" xmlname="rateLimit" default="0"/>
<attribute cliname="access-control-trust-level" xmlname="trustLevel" default="none"/>
<attribute cliname="invalid-signal-threshold" xmlname="errMsgThreshold" default="0"/>
<attribute cliname="maximum-signal-threshold" xmlname="maxMsgThreshold" default="0"/>
<attribute cliname="untrusted-signal-threshold" xmlname="maxMsgThresholdUntrusted" default="0"/>
<attribute cliname="nat-trust-threshold" xmlname="natTrustThreshold" default="0"/>
<attribute cliname="deny-period" xmlname="denyTimer" default="30"/>
<attribute cliname="cac-failure-threshold" xmlname="cacFailThreshold" default="0"/>
<attribute cliname="untrust-cac-failure-threshold" xmlname="untrustedCacFailThreshold" default="0"/>
<attribute cliname="ext-policy-svr" xmlname="bwManager"/>
<attribute cliname="diam-e2-address-realm" xmlname="diamE2AddrRealm"/>
<attribute cliname="symmetric-latching" xmlname="symmetricLatching" default="disabled"/>
<attribute cliname="pai-strip" xmlname="paiStrip" default="disabled"/>
<attribute cliname="trunk-context" xmlname="trunkContext"/>
<attribute cliname="early-media-allow" xmlname="earlyMediaAllow"/>
<attribute cliname="enforcement-profile" xmlname="enforcementProfile"/>
<attribute cliname="additional-prefixes" xmlname="additionalPrefixes"/>
<attribute cliname="add-additional-prefixes" xmlname="additionalPrefixes"/>
<attribute cliname="remove-additional-prefixes" xmlname="additionalPrefixes"/>
<attribute cliname="restricted-latching" xmlname="restrictedLatching" default="none"/>

ACLI CONFIGURATION TO TO XML ELEMENT MAPPING REFERENCE
302 Oracle Communications Enterprise Trunk Manager Service Provider Configuration Guide Release 7.3
<attribute cliname="restriction-mask" xmlname="restrictionMask" default="32"/>
<attribute cliname="user-cac-mode" xmlname="userCacMode" default="none"/>
<attribute cliname="user-cac-bandwidth" xmlname="userCacBandwidth" default="0"/>
<attribute cliname="user-cac-sessions" xmlname="userCacSessions" default="0"/>
<attribute cliname="icmp-detect-multiplier" xmlname="icmpDetectMultip" default="0"/>
<attribute cliname="icmp-advertisement-interval" xmlname="icmpAdvInterval" default="0"/>
<attribute cliname="icmp-target-ip" xmlname="icmpTargetIp"/>
<attribute cliname="monthly-minutes" xmlname="monthlyMinutes" default="0"/>
<attribute cliname="options" xmlname="options"/>
<attribute cliname="accounting-enable" xmlname="acctEnable" default="enabled"/>
<attribute cliname="net-management-control" xmlname="netMgmtCtrl" default="disabled"/>
<attribute cliname="delay-media-update" xmlname="delayedMediaUpdate" default="disabled"/>
<attribute cliname="refer-call-transfer" xmlname="referCallTransfer" default="disabled"/>
<attribute cliname="dyn-refer-term" xmlname="dynReferTerm" default="disabled"/>
<attribute cliname="codec-policy" xmlname="codecPolicy"/>
<attribute cliname="codec-manip-in-realm" xmlname="codecPolicyInRealm" default="disabled"/>
<attribute cliname="codec-manip-in-network" xmlname="codecPolicyInNetwork" default="disabled"/>
<attribute cliname="constraint-name" xmlname="constraintName"/>
<attribute cliname="call-recording-server-id" xmlname="callRecordingServerId"/>
<attribute cliname="xnq-state" xmlname="xnqState" default="xnq-unknown"/>
<attribute cliname="hairpin-id" xmlname="hairpinId" default="0"/>
<attribute cliname="manipulation-string" xmlname="hmrString"/>
<attribute cliname="manipulation-pattern" xmlname="manipPattern"/>
<attribute cliname="stun-enable" xmlname="stunEnable" default="disabled"/>
<attribute cliname="stun-server-ip" xmlname="stunServerIp" default="0.0.0.0"/>
<attribute cliname="stun-server-port" xmlname="stunServerPort" default="3478"/>
<attribute cliname="stun-changed-ip" xmlname="stunChangedIp" default="0.0.0.0"/>
<attribute cliname="stun-changed-port" xmlname="stunChangedPort" default="3479"/>
<attribute cliname="sip-profile" xmlname="sipProfile"/>
<attribute cliname="sip-isup-profile" xmlname="sipIsupProfile"/>
<attribute cliname="match-media-profiles" xmlname="matchMediaProfile"/>
<attribute cliname="qos-constraint" xmlname="qosConstraintName"/>
<attribute cliname="block-rtcp" xmlname="noRtcp" default="disabled"/>
<attribute cliname="hide-egress-media-update" xmlname="hideEgressMediaUpdate" default="disabled"/>
</class>
<class cliname="realm-group" xmlname="realmGroup" group="media-manager">
<attribute cliname="name" xmlname="name"/>
<attribute cliname="source-realms" xmlname="src_realm"/>
<attribute cliname="destination-realms" xmlname="dest_realm"/>
<attribute cliname="early-media-allow-direction" xmlname="blockDir" default="1"/>
<attribute cliname="state" xmlname="state" default="disabled"/>

ACLI CONFIGURATION TO TO XML ELEMENT MAPPING REFERENCE
Release 7.3 Oracle Communications Enterprise Trunk Manager Service Provider Configuration Guide 303
</class>
<class cliname="redundancy" xmlname="RedundancyConfig" group="system">
<attribute cliname="state" xmlname="state" default="enabled"/>
<attribute cliname="log-level" xmlname="logLevel" default="INFO"/>
<attribute cliname="health-threshold" xmlname="healthThreshhold" default="75"/>
<attribute cliname="emergency-threshold" xmlname="emergencyThreshhold" default="50"/>
<attribute cliname="port" xmlname="port" default="9090"/>
<attribute cliname="advertisement-time" xmlname="advertisementTime" default="500"/>
<attribute cliname="percent-drift" xmlname="percentDrift" default="210"/>
<attribute cliname="initial-time" xmlname="initialTime" default="1250"/>
<attribute cliname="becoming-standby-time" xmlname="becomingStandbyTime" default="180000"/>
<attribute cliname="becoming-active-time" xmlname="becomingActiveTime" default="100"/>
<attribute cliname="cfg-port" xmlname="cfgPort" default="1987"/>
<attribute cliname="cfg-max-trans" xmlname="cfgNumTrans" default="10000"/>
<attribute cliname="cfg-sync-start-time" xmlname="cfgSyncStartTime" default="5000"/>
<attribute cliname="cfg-sync-comp-time" xmlname="cfgSyncCompTime" default="1000"/>
<attribute cliname="gateway-heartbeat-interval" xmlname="timeout" default="0"/>
<attribute cliname="gateway-heartbeat-retry" xmlname="retryCount" default="0"/>
<attribute cliname="gateway-heartbeat-timeout" xmlname="retryTimeout" default="1"/>
<attribute cliname="gateway-heartbeat-health" xmlname="healthDec" default="0"/>
<attribute cliname="media-if-peercheck-time" xmlname="mediaIfPcTo" default="0"/>
<attribute cliname="peers" xmlname="RedundancyPeer" subObject="RedundancyPeer">
<attribute cliname="name" xmlname="name"/>
<attribute cliname="state" xmlname="state" default="enabled"/>
<attribute cliname="type" xmlname="type" default="Unknown"/>
<attribute cliname="destinations" xmlname="RedundancyDest" subObject="RedundancyDestination">
<attribute cliname="address" xmlname="address" default="0.0.0.0:0"/>
<attribute cliname="network-interface" xmlname="networkInterface" default=":0"/>
</attribute>
</attribute>
</class>
<class cliname="sip-response-map" xmlname="responseMap" group="session-router">
<attribute cliname="name" xmlname="name"/>
<attribute cliname="entries" xmlname="responseMapEntry" subObject="ResponseMapEntry">
<attribute cliname="recv-code" xmlname="statusRcvd" default="0"/>
<attribute cliname="xmit-code" xmlname="statusSend" default="0"/>
<attribute cliname="reason" xmlname="reason"/>
<attribute cliname="method" xmlname="method"/>
<attribute cliname="register-response-expires" xmlname="registerResponseExpires" default="0"/>
</attribute>
</class>

ACLI CONFIGURATION TO TO XML ELEMENT MAPPING REFERENCE
304 Oracle Communications Enterprise Trunk Manager Service Provider Configuration Guide Release 7.3
<class cliname="rph-policy" xmlname="rphPolicy" group="session-router">
<attribute cliname="name" xmlname="name"/>
<attribute cliname="override-r-value" xmlname="overrideRValues"/>
<attribute cliname="insert-r-value" xmlname="insertRValues"/>
</class>
<class cliname="rph-profile" xmlname="rphProfile" group="session-router">
<attribute cliname="name" xmlname="name"/>
<attribute cliname="r-values" xmlname="rValues"/>
<attribute cliname="media-policy" xmlname="mediaPolicy"/>
<attribute cliname="call-treatment" xmlname="callTreatment" default="accept"/>
</class>
<class cliname="manual" xmlname="saConfig" group="security-association">
<attribute cliname="name" xmlname="name"/>
<attribute cliname="spi" xmlname="spi" default="256"/>
<attribute cliname="network-interface" xmlname="networkInterfaceId"/>
<attribute cliname="local-ip-addr" xmlname="srcIPAddr"/>
<attribute cliname="remote-ip-addr" xmlname="dstIPAddr"/>
<attribute cliname="local-port" xmlname="srcPort" default="0"/>
<attribute cliname="remote-port" xmlname="dstPort" default="0"/>
<attribute cliname="trans-protocol" xmlname="transProtocol" default="ALL"/>
<attribute cliname="ipsec-protocol" xmlname="protocol" default="esp"/>
<attribute cliname="direction" xmlname="direction" default="both"/>
<attribute cliname="ipsec-mode" xmlname="mode" default="transport"/>
<attribute cliname="auth-algo" xmlname="authAlgo" default="null"/>
<attribute cliname="encr-algo" xmlname="encrAlgo" default="null"/>
<attribute cliname="auth-key" xmlname="ENCR-PBE-authKey"/>
<attribute cliname="encr-key" xmlname="ENCR-PBE-encrKey"/>
<attribute cliname="aes-ctr-nonce" xmlname="aesCtrNonce" default="0"/>
<attribute cliname="tunnel-mode" xmlname="tunnelMode" subObject="TunnelModeConfig">
<attribute cliname="local-ip-addr" xmlname="srcIP"/>
<attribute cliname="remote-ip-addr" xmlname="dstIP"/>
</attribute>
<attribute cliname="vlani-d" xmlname="vlanID" default="0"/>
</class>
<class cliname="session-controller" xmlname="scfConfig" group="session-router">
<attribute cliname="mid" xmlname="mid"/>
<attribute cliname="state" xmlname="state" default="enabled"/>
<attribute cliname="realm" xmlname="realm"/>
<attribute cliname="transport-protocol" xmlname="transProto" default="UDP"/>
<attribute cliname="ip-address" xmlname="address"/>
<attribute cliname="port" xmlname="port" default="2944"/>
<attribute cliname="log-level" xmlname="plogLevel" default="NOTICE"/>
<attribute cliname="compact-encoding" xmlname="compactEncoding" default="disabled"/>

ACLI CONFIGURATION TO TO XML ELEMENT MAPPING REFERENCE
Release 7.3 Oracle Communications Enterprise Trunk Manager Service Provider Configuration Guide 305
<attribute cliname="options" xmlname="options"/>
<attribute cliname="red-scf-port" xmlname="redScfPort" default="1999"/>
<attribute cliname="red-max-trans" xmlname="redNumTrans" default="10000"/>
<attribute cliname="red-sync-start-time" xmlname="redSyncStartTime" default="5000"/>
<attribute cliname="red-sync-comp-time" xmlname="redSyncCompTime" default="1000"/>
<attribute cliname="retry-init-timer" xmlname="initTransRetryTimer" default="2000"/>
<attribute cliname="retry-min-timer" xmlname="minTransRetryTimer" default="100"/>
<attribute cliname="retry-max-timer" xmlname="maxTransRetryTimer" default="4000"/>
<attribute cliname="retry-window" xmlname="transExpiryTimer" default="25000"/>
<attribute cliname="trans-history" xmlname="transHistoryTimer" default="30000"/>
</class>
<class cliname="controlled-gateways" xmlname="scfMgwConfig" group="session-router">
<attribute cliname="mid" xmlname="mid"/>
<attribute cliname="name" xmlname="name"/>
<attribute cliname="state" xmlname="state" default="enabled"/>
<attribute cliname="num-groups" xmlname="numGroups" default="256"/>
<attribute cliname="contexts-per-group" xmlname="contextsPerGroup" default="1024"/>
<attribute cliname="keepalive" xmlname="keepAliveTimer" default="15"/>
<attribute cliname="add-realm" xmlname="assignedRealm"/>
<attribute cliname="remove-realm" xmlname="assignedRealm"/>
<attribute cliname="options" xmlname="options"/>
</class>
<class cliname="sdes-profile" xmlname="sdesProfile" group="media-security">
<attribute cliname="name" xmlname="name" default="AES_CM_128_HMAC_SHA1_80"/>
<attribute cliname="crypto-list" xmlname="cipherSuites"/>
<attribute cliname="srtp-auth" xmlname="srtpAuth" default="enabled"/>
<attribute cliname="srtp-encrypt" xmlname="srtpEncrypt" default="enabled"/>
<attribute cliname="srtcp-encrypt" xmlname="srtcpEncrypt" default="enabled"/>
<attribute cliname="mki" xmlname="mki" default="disabled"/>
<attribute cliname="egress-offer-format" xmlname="egressOfferFormat" default="same-as-ingress"/>
<attribute cliname="use-ingress-session-params" xmlname="useIngressSessionParams"/>
<attribute cliname="options" xmlname="options"/>
<attribute cliname="key" xmlname="key"/>
<attribute cliname="salt" xmlname="salt"/>
</class>
<class cliname="security-config" xmlname="securityConfig" group="security">
<attribute cliname="ocsr-monitoring-traps" xmlname="ocsrMonitoringTraps" default="disabled"/>
<attribute cliname="host-frag-hw-offload" xmlname="hostFragHWOffload" default="disabled"/>
<attribute cliname="srtp-msm-password" xmlname="ENCR-PBE-srtpMsmPassword"/>
<attribute cliname="srtp-msm-attr-name" xmlname="srtpMsmAttrName" default="X-acme-srtp-msm"/>
<attribute cliname="options" xmlname="options"/>

ACLI CONFIGURATION TO TO XML ELEMENT MAPPING REFERENCE
306 Oracle Communications Enterprise Trunk Manager Service Provider Configuration Guide Release 7.3
<attribute cliname="image-integrity-value" xmlname="imageIntegrityValue"/>
</class>
<class cliname="session-group" xmlname="sessionAgentGroup" group="session-router">
<attribute cliname="group-name" xmlname="name"/>
<attribute cliname="description" xmlname="description"/>
<attribute cliname="state" xmlname="state" default="enabled"/>
<attribute cliname="app-protocol" xmlname="protocol" default="SIP"/>
<attribute cliname="strategy" xmlname="strategy" default="Hunt"/>
<attribute cliname="dest" xmlname="sipDest"/>
<attribute cliname="trunk-group" xmlname="trunkGroup"/>
<attribute cliname="sag-recursion" xmlname="sagRecurse" default="disabled"/>
<attribute cliname="stop-sag-recurse" xmlname="stopRecurse" default="401,407"/>
</class>
<class cliname="session-agent" xmlname="sessionAgent" group="session-router">
<attribute cliname="hostname" xmlname="hostname"/>
<attribute cliname="ip-address" xmlname="ipAddress"/>
<attribute cliname="port" xmlname="port" default="5060"/>
<attribute cliname="state" xmlname="state" default="enabled"/>
<attribute cliname="app-protocol" xmlname="appProtocol" default="SIP"/>
<attribute cliname="app-type" xmlname="appType" default="APP_UNKNOWN"/>
<attribute cliname="transport-method" xmlname="transMethod" default="UDP"/>
<attribute cliname="realm-id" xmlname="realmID"/>
<attribute cliname="egress-realm-id" xmlname="egressRealmID"/>
<attribute cliname="description" xmlname="description"/>
<attribute cliname="carriers" xmlname="carriers"/>
<attribute cliname="allow-next-hop-lp" xmlname="allowNextHop" default="enabled"/>
<attribute cliname="constraints" xmlname="useConstraints" default="disabled"/>
<attribute cliname="max-sessions" xmlname="maxNumSessions" default="0"/>
<attribute cliname="max-inbound-sessions" xmlname="maxInbSessions" default="0"/>
<attribute cliname="max-outbound-sessions" xmlname="maxOutbSessions" default="0"/>
<attribute cliname="max-burst-rate" xmlname="maxBurstRate" default="0"/>
<attribute cliname="max-inbound-burst-rate" xmlname="maxInbBurstRate" default="0"/>
<attribute cliname="max-outbound-burst-rate" xmlname="maxOutbBurstRate" default="0"/>
<attribute cliname="max-sustain-rate" xmlname="maxSustainedRate" default="0"/>
<attribute cliname="max-inbound-sustain-rate" xmlname="maxInbSustainedRate" default="0"/>
<attribute cliname="max-outbound-sustain-rate" xmlname="maxOutbSustainedRate" default="0"/>
<attribute cliname="min-seizures" xmlname="minSeizure" default="5"/>
<attribute cliname="min-asr" xmlname="minAnswerSeizureRatio" default="0"/>
<attribute cliname="time-to-resume" xmlname="timeToResume" default="0"/>
<attribute cliname="ttr-no-response" xmlname="noResponseTo" default="0"/>
<attribute cliname="in-service-period" xmlname="inServicePeriod" default="0"/>
<attribute cliname="burst-rate-window" xmlname="burstWindow" default="0"/>

ACLI CONFIGURATION TO TO XML ELEMENT MAPPING REFERENCE
Release 7.3 Oracle Communications Enterprise Trunk Manager Service Provider Configuration Guide 307
<attribute cliname="sustain-rate-window" xmlname="sustainedWindow" default="0"/>
<attribute cliname="req-uri-carrier-mode" xmlname="inclCarrierAs" default="None"/>
<attribute cliname="proxy-mode" xmlname="proxyMode"/>
<attribute cliname="redirect-action" xmlname="redirectAct"/>
<attribute cliname="loose-routing" xmlname="looseRouter" default="enabled"/>
<attribute cliname="send-media-session" xmlname="allocMedia" default="enabled"/>
<attribute cliname="response-map" xmlname="responseMap"/>
<attribute cliname="ping-method" xmlname="pingMethod"/>
<attribute cliname="ping-interval" xmlname="pingInterval" default="0"/>
<attribute cliname="ping-send-mode" xmlname="pingSendMode" default="keep-alive"/>
<attribute cliname="ping-all-addresses" xmlname="pingAllAddresses" default="disabled"/>
<attribute cliname="ping-in-service-response-codes" xmlname="inServiceCodes"/>
<attribute cliname="out-service-response-codes" xmlname="outServiceCodes"/>
<attribute cliname="load-balance-dns-query" xmlname="loadBalanceDnsQuery" default="hunt"/>
<attribute cliname="options" xmlname="options"/>
<attribute cliname="media-profiles" xmlname="mediaProfile"/>
<attribute cliname="in-translationid" xmlname="inTranslationId"/>
<attribute cliname="out-translationid" xmlname="outTranslationId"/>
<attribute cliname="trust-me" xmlname="trustMe" default="disabled"/>
<attribute cliname="request-uri-headers" xmlname="requesturiHeader"/>
<attribute cliname="stop-recurse" xmlname="stopRecurse"/>
<attribute cliname="local-response-map" xmlname="localresponseMap"/>
<attribute cliname="ping-to-user-part" xmlname="pingToUserPart"/>
<attribute cliname="ping-from-user-part" xmlname="pingFromUserPart"/>
<attribute cliname="li-trust-me" xmlname="trustMeForLI" default="disabled"/>
<attribute cliname="in-manipulationid" xmlname="inManipulationId"/>
<attribute cliname="out-manipulationid" xmlname="outManipulationId"/>
<attribute cliname="manipulation-string" xmlname="hmrString"/>
<attribute cliname="manipulation-pattern" xmlname="manipPattern"/>
<attribute cliname="p-asserted-id" xmlname="assertedID"/>
<attribute cliname="trunk-group" xmlname="trunkGroup"/>
<attribute cliname="max-register-sustain-rate" xmlname="maxRegisterSustainedRate" default="0"/>
<attribute cliname="early-media-allow" xmlname="earlyMediaAllow"/>
<attribute cliname="invalidate-registrations" xmlname="invalidateRegistrations" default="disabled"/>
<attribute cliname="rfc2833-mode" xmlname="rfc2833-mode" default="0"/>
<attribute cliname="rfc2833-payload" xmlname="rfc2833-payload" default="0"/>
<attribute cliname="codec-policy" xmlname="codecPolicy"/>
<attribute cliname="enforcement-profile" xmlname="enforcementProfile"/>
<attribute cliname="refer-call-transfer" xmlname="referCallTransfer" default="disabled"/>
<attribute cliname="reuse-connections" xmlname="reuse-connections" default="NONE"/>
<attribute cliname="tcp-keepalive" xmlname="tcp-keepalive" default="none"/>

ACLI CONFIGURATION TO TO XML ELEMENT MAPPING REFERENCE
308 Oracle Communications Enterprise Trunk Manager Service Provider Configuration Guide Release 7.3
<attribute cliname="tcp-reconn-interval" xmlname="tcp-reconn-interval" default="0"/>
<attribute cliname="max-register-burst-rate" xmlname="maxRegisterBurstRate" default="0"/>
<attribute cliname="register-burst-window" xmlname="registerBurstWindow" default="0"/>
<attribute cliname="rate-constraints" xmlname="rateConstraints" subObject="RateConstraints">
<attribute cliname="method" xmlname="method"/>
<attribute cliname="max-inbound-burst-rate" xmlname="maxInBurstRate" default="0"/>
<attribute cliname="max-outbound-burst-rate" xmlname="maxOutBurstRate" default="0"/>
<attribute cliname="max-inbound-sustain-rate" xmlname="maxInSustainedRate" default="0"/>
<attribute cliname="max-outbound-sustain-rate" xmlname="maxOutSustainedRate" default="0"/>
</attribute>
<attribute cliname="sip-profile" xmlname="sipProfile"/>
<attribute cliname="sip-isup-profile" xmlname="sipIsupProfile"/>
<attribute cliname="kpml-interworking" xmlname="kpmlInterworking" default="inherit"/>
</class>
<class cliname="session-constraints" xmlname="sessionConstraints" group="session-router">
<attribute cliname="name" xmlname="name"/>
<attribute cliname="state" xmlname="useConstraints" default="enabled"/>
<attribute cliname="max-sessions" xmlname="maxNumSessions" default="0"/>
<attribute cliname="max-inbound-sessions" xmlname="maxInbSessions" default="0"/>
<attribute cliname="max-outbound-sessions" xmlname="maxOutbSessions" default="0"/>
<attribute cliname="max-burst-rate" xmlname="maxBurstRate" default="0"/>
<attribute cliname="max-inbound-burst-rate" xmlname="maxInbBurstRate" default="0"/>
<attribute cliname="max-outbound-burst-rate" xmlname="maxOutbBurstRate" default="0"/>
<attribute cliname="max-sustain-rate" xmlname="maxSustainedRate" default="0"/>
<attribute cliname="max-inbound-sustain-rate" xmlname="maxInbSustainedRate" default="0"/>
<attribute cliname="max-outbound-sustain-rate" xmlname="maxOutbSustainedRate" default="0"/>
<attribute cliname="min-seizures" xmlname="minSeizure" default="5"/>
<attribute cliname="min-asr" xmlname="minAnswerSeizureRatio" default="0"/>
<attribute cliname="time-to-resume" xmlname="timeToResume" default="0"/>
<attribute cliname="ttr-no-response" xmlname="noResponseTo" default="0"/>
<attribute cliname="in-service-period" xmlname="inServicePeriod" default="0"/>
<attribute cliname="burst-rate-window" xmlname="burstWindow" default="0"/>
<attribute cliname="sustain-rate-window" xmlname="sustainedWindow" default="0"/>
<attribute cliname="rate-constraints" xmlname="rateConstraints" subObject="RateConstraints">
<attribute cliname="method" xmlname="method"/>
<attribute cliname="max-inbound-burst-rate" xmlname="maxInBurstRate" default="0"/>
<attribute cliname="max-outbound-burst-rate" xmlname="maxOutBurstRate" default="0"/>
<attribute cliname="max-inbound-sustain-rate" xmlname="maxInSustainedRate" default="0"/>
<attribute cliname="max-outbound-sustain-rate" xmlname="maxOutSustainedRate" default="0"/>
</attribute>
</class>

ACLI CONFIGURATION TO TO XML ELEMENT MAPPING REFERENCE
Release 7.3 Oracle Communications Enterprise Trunk Manager Service Provider Configuration Guide 309
<class cliname="session-router" xmlname="sessionRouter" group="session-router">
<attribute cliname="state" xmlname="state" default="enabled"/>
<attribute cliname="system-number-type" xmlname="systemNumberType" default="Pots"/>
<attribute cliname="sr-primary-name" xmlname="namePrimary"/>
<attribute cliname="sr-primary-address" xmlname="ipPrimary"/>
<attribute cliname="sr-secondary-name" xmlname="nameSecondary"/>
<attribute cliname="sr-secondary-address" xmlname="ipSecondary"/>
<attribute cliname="pac-name" xmlname="pacName"/>
<attribute cliname="pac-password" xmlname="pacPassword"/>
<attribute cliname="divide-resources" xmlname="divide" default="disabled"/>
<attribute cliname="match-lp-src-parent-realm" xmlname="matchLPSrcParentRealm" default="disabled"/>
<attribute cliname="nested-realm-stats" xmlname="nestedRealmStats" default="disabled"/>
<attribute cliname="reject-message-threshold" xmlname="rejectMessageThreshold" default="0"/>
<attribute cliname="reject-message-window" xmlname="rejectMessageWindow" default="10"/>
<attribute cliname="session-directors" xmlname="sessionDirector" subObject="SessionDirector">
<attribute cliname="primary-name" xmlname="namePrimary"/>
<attribute cliname="primary-address" xmlname="ipPrimary"/>
<attribute cliname="secondary-name" xmlname="nameSecondary"/>
<attribute cliname="secondary-address" xmlname="ipSecondary"/>
<attribute cliname="virtual-mac-base" xmlname="macBase"/>
</attribute>
<attribute cliname="holidays" xmlname="holiday" subObject="Holiday">
<attribute cliname="date" xmlname="date"/>
<attribute cliname="description" xmlname="descr"/>
</attribute>
<attribute cliname="force-report-trunk-info" xmlname="forceReportTrunkInfo" default="disabled"/>
<attribute cliname="additional-lp-lookups" xmlname="additionalLpLookups" default="0"/>
<attribute cliname="max-routes-per-lookup" xmlname="maxLpRoutesPerLookup" default="0"/>
<attribute cliname="total-lp-routes" xmlname="maxLpRoutesPerRequest" default="0"/>
<attribute cliname="multi-stage-src-realm-override" xmlname="multiStageSrcRealm" default="disabled"/>
</class>
<class cliname="session-translation" xmlname="sessionTranslation" group="session-router">
<attribute cliname="id" xmlname="id"/>
<attribute cliname="rules-calling" xmlname="rulecalling"/>
<attribute cliname="rules-called" xmlname="rulecalled"/>
</class>
<class cliname="sip-config" xmlname="sipConfig" group="session-router">
<attribute cliname="state" xmlname="state" default="enabled"/>
<attribute cliname="operation-mode" xmlname="opMode" default="dialog"/>
<attribute cliname="dialog-transparency" xmlname="transparency" default="enabled"/>

ACLI CONFIGURATION TO TO XML ELEMENT MAPPING REFERENCE
310 Oracle Communications Enterprise Trunk Manager Service Provider Configuration Guide Release 7.3
<attribute cliname="home-realm-id" xmlname="homeRealmID"/>
<attribute cliname="egress-realm-id" xmlname="egressRealmID"/>
<attribute cliname="nat-mode" xmlname="modeSipNat" default="None"/>
<attribute cliname="registrar-domain" xmlname="domainRegistrar"/>
<attribute cliname="registrar-host" xmlname="hostRegistrar"/>
<attribute cliname="registrar-port" xmlname="portRegistrar" default="0"/>
<attribute cliname="register-service-route" xmlname="registerServiceRoute" default="always"/>
<attribute cliname="init-timer" xmlname="sipReqTimer" default="500"/>
<attribute cliname="max-timer" xmlname="sipMaxTimer" default="4000"/>
<attribute cliname="trans-expire" xmlname="sipReqExpire" default="32"/>
<attribute cliname="invite-expire" xmlname="sipInvExpire" default="180"/>
<attribute cliname="inactive-dynamic-conn" xmlname="dynamicConnLimit" default="32"/>
<attribute cliname="enforcement-profile" xmlname="enforcementProfile"/>
<attribute cliname="pac-method" xmlname="methodPAC"/>
<attribute cliname="pac-interval" xmlname="intervalPAC" default="10"/>
<attribute cliname="pac-strategy" xmlname="strategyPAC" default="PropDist"/>
<attribute cliname="pac-load-weight" xmlname="wtLoad" default="1"/>
<attribute cliname="pac-session-weight" xmlname="wtSessions" default="1"/>
<attribute cliname="pac-route-weight" xmlname="wtRoutes" default="1"/>
<attribute cliname="pac-callid-lifetime" xmlname="expCallId" default="600"/>
<attribute cliname="pac-user-lifetime" xmlname="expUser" default="3600"/>
<attribute cliname="red-sip-port" xmlname="redSipPort" default="1988"/>
<attribute cliname="red-max-trans" xmlname="redNumTrans" default="10000"/>
<attribute cliname="red-sync-start-time" xmlname="redSyncStartTime" default="5000"/>
<attribute cliname="red-sync-comp-time" xmlname="redSyncCompTime" default="1000"/>
<attribute cliname="options" xmlname="options"/>
<attribute cliname="add-reason-header" xmlname="addReasonHdr" default="disabled"/>
<attribute cliname="sip-message-len" xmlname="sipMessageLen" default="4096"/>
<attribute cliname="enum-sag-match" xmlname="enumSagMatch" default="disabled"/>
<attribute cliname="extra-method-stats" xmlname="extraSipMethodStats" default="disabled"/>
<attribute cliname="rph-feature" xmlname="rphFeature" default="disabled"/>
<attribute cliname="nsep-user-sessions-rate" xmlname="nsepUserSessionsRate" default="0"/>
<attribute cliname="nsep-sa-sessions-rate" xmlname="nsepSASessionsRate" default="0"/>
<attribute cliname="registration-cache-limit" xmlname="regCacheLimit" default="0"/>
<attribute cliname="register-use-to-for-lp" xmlname="registerUseToForLp" default="disabled"/>
<attribute cliname="refer-src-routing" xmlname="referSrcRouting" default="disabled"/>
<attribute cliname="add-ucid-header" xmlname="addUcidHeader" default="disabled"/>
<attribute cliname="proxy-sub-events" xmlname="proxySubEvent"/>
<attribute cliname="pass-gruu-contact" xmlname="passGruuContact" default="disabled"/>
<attribute cliname="sag-lookup-on-redirect" xmlname="sagLookupOnRedirect" default="disabled"/>
<attribute cliname="set-disconnect-time-on-bye" xmlname="setDisconnectTimeOnBye" default="disabled"/>
</class>

ACLI CONFIGURATION TO TO XML ELEMENT MAPPING REFERENCE
Release 7.3 Oracle Communications Enterprise Trunk Manager Service Provider Configuration Guide 311
<class cliname="sip-feature" xmlname="sipFeature" group="session-router">
<attribute cliname="name" xmlname="name"/>
<attribute cliname="realm" xmlname="realm"/>
<attribute cliname="support-mode-inbound" xmlname="modeSup" default="Pass"/>
<attribute cliname="require-mode-inbound" xmlname="modeReq" default="Reject"/>
<attribute cliname="proxy-require-mode-inbound" xmlname="modeProxyReq" default="Pass"/>
<attribute cliname="support-mode-outbound" xmlname="modeSupOutbound" default="Pass"/>
<attribute cliname="require-mode-outbound" xmlname="modeReqOutbound" default="Reject"/>
<attribute cliname="proxy-require-mode-outbound" xmlname="modeProxyReqOutbound" default="Pass"/>
</class>
<class cliname="sip-interface" xmlname="sipInterface" group="session-router">
<attribute cliname="state" xmlname="state" default="enabled"/>
<attribute cliname="realm-id" xmlname="RealmID"/>
<attribute cliname="description" xmlname="description"/>
<attribute cliname="sip-ports" xmlname="sipPort" subObject="SipPort">
<attribute cliname="address" xmlname="address"/>
<attribute cliname="port" xmlname="port" default="5060"/>
<attribute cliname="transport-protocol" xmlname="transProtocol" default="UDP"/>
<attribute cliname="tls-profile" xmlname="tlsProfile"/>
<attribute cliname="allow-anonymous" xmlname="anonMode" default="all"/>
<attribute cliname="ims-aka-profile" xmlname="imsAkaProfile"/>
</attribute>
<attribute cliname="carriers" xmlname="carriers"/>
<attribute cliname="trans-expire" xmlname="trans-expire" default="0"/>
<attribute cliname="invite-expire" xmlname="invite-expire" default="0"/>
<attribute cliname="max-redirect-contacts" xmlname="max-redirect-contacts" default="0"/>
<attribute cliname="proxy-mode" xmlname="proxyMode"/>
<attribute cliname="redirect-action" xmlname="redirectAct"/>
<attribute cliname="contact-mode" xmlname="contactSip" default="none"/>
<attribute cliname="nat-traversal" xmlname="natTraversal" default="none"/>
<attribute cliname="nat-interval" xmlname="natInterval" default="30"/>
<attribute cliname="tcp-nat-interval" xmlname="tcpNatInterval" default="90"/>
<attribute cliname="registration-caching" xmlname="registrationCaching" default="disabled"/>
<attribute cliname="min-reg-expire" xmlname="regMinExpire" default="300"/>
<attribute cliname="registration-interval" xmlname="regInterval" default="3600"/>
<attribute cliname="route-to-registrar" xmlname="isRouteReg" default="disabled"/>
<attribute cliname="secured-network" xmlname="isSecure" default="disabled"/>
<attribute cliname="teluri-scheme" xmlname="telUri" default="disabled"/>
<attribute cliname="uri-fqdn-domain" xmlname="fqdnDomain"/>
<attribute cliname="options" xmlname="options"/>
<attribute cliname="trust-mode" xmlname="trustMode" default="all"/>
<attribute cliname="max-nat-interval" xmlname="natmaxInterval" default="3600"/>

ACLI CONFIGURATION TO TO XML ELEMENT MAPPING REFERENCE
312 Oracle Communications Enterprise Trunk Manager Service Provider Configuration Guide Release 7.3
<attribute cliname="nat-int-increment" xmlname="natIntervalIncrement" default="10"/>
<attribute cliname="nat-test-increment" xmlname="natTestIncrement" default="30"/>
<attribute cliname="sip-dynamic-hnt" xmlname="sipdynamicHnt" default="disabled"/>
<attribute cliname="stop-recurse" xmlname="stopRecurse" default="401,407"/>
<attribute cliname="port-map-start" xmlname="portMapStart" default="0"/>
<attribute cliname="port-map-end" xmlname="portMapEnd" default="0"/>
<attribute cliname="in-manipulationid" xmlname="inManipulationId"/>
<attribute cliname="out-manipulationid" xmlname="outManipulationId"/>
<attribute cliname="sip-ims-feature" xmlname="imsFeature" default="disabled"/>
<attribute cliname="subscribe-reg-event" xmlname="subscribeRegEvent" default="disabled"/>
<attribute cliname="operator-identifier" xmlname="operatorIdentifier"/>
<attribute cliname="anonymous-priority" xmlname="anonymousPriority" default="none"/>
<attribute cliname="max-incoming-conns" xmlname="maxConn" default="0"/>
<attribute cliname="per-src-ip-max-incoming-conns" xmlname="maxConnPerPeer" default="0"/>
<attribute cliname="inactive-conn-timeout" xmlname="idleConnTimeout" default="0"/>
<attribute cliname="untrusted-conn-timeout" xmlname="untrustedConnTimeout" default="0"/>
<attribute cliname="network-id" xmlname="NetworkID"/>
<attribute cliname="ext-policy-server" xmlname="extPolicyServer"/>
<attribute cliname="ldap-policy-server" xmlname="ldapPolicyServer"/>
<attribute cliname="default-location-string" xmlname="defaultLocationString"/>
<attribute cliname="term-tgrp-mode" xmlname="termTgrpMode" default="none"/>
<attribute cliname="charging-vector-mode" xmlname="chargingVectorMode" default="pass"/>
<attribute cliname="charging-function-address-mode" xmlname="chargingFuncAddrMode" default="pass"/>
<attribute cliname="ccf-address" xmlname="ccfAddress"/>
<attribute cliname="ecf-address" xmlname="ecfAddress"/>
<attribute cliname="implicit-service-route" xmlname="implicitServiceRoute" default="disabled"/>
<attribute cliname="rfc2833-payload" xmlname="rfc2833-payload" default="101"/>
<attribute cliname="rfc2833-mode" xmlname="rfc2833-mode" default="0"/>
<attribute cliname="constraint-name" xmlname="constraintName"/>
<attribute cliname="response-map" xmlname="responseMap"/>
<attribute cliname="local-response-map" xmlname="localresponseMap"/>
<attribute cliname="ims-aka-feature" xmlname="imsAkaFeature" default="disabled"/>
<attribute cliname="enforcement-profile" xmlname="enforcementProfile"/>
<attribute cliname="refer-call-transfer" xmlname="referCallTransfer" default="disabled"/>
<attribute cliname="route-unauthorized-calls" xmlname="routeUnauthorizedCalls"/>
<attribute cliname="tcp-keepalive" xmlname="tcp-keepalive" default="none"/>
<attribute cliname="add-sdp-invite" xmlname="add-sdp-invite" default="disabled"/>
<attribute cliname="add-sdp-profiles" xmlname="mediaProfile"/>
<attribute cliname="manipulation-string" xmlname="hmrString"/>
<attribute cliname="manipulation-pattern" xmlname="manipPattern"/>
<attribute cliname="sip-profile" xmlname="sipProfile"/>
<attribute cliname="sip-isup-profile" xmlname="sipIsupProfile"/>

ACLI CONFIGURATION TO TO XML ELEMENT MAPPING REFERENCE
Release 7.3 Oracle Communications Enterprise Trunk Manager Service Provider Configuration Guide 313
<attribute cliname="tunnel-name" xmlname="tunnelName"/>
<attribute cliname="register-keep-alive" xmlname="sipRegisterKeepAlive" default="none"/>
<attribute cliname="kpml-interworking" xmlname="kpmlInterworking" default="disabled"/>
</class>
<class cliname="sip-isup-profile" xmlname="sipIsupProfile" group="session-router">
<attribute cliname="name" xmlname="name"/>
<attribute cliname="isup-version" xmlname="isupVersion" default="ansi-2000"/>
<attribute cliname="convert-isup-format" xmlname="convertIsupFormat" default="disabled"/>
</class>
<class cliname="local-response-map" xmlname="sipLocalMap" group="session-router">
<attribute cliname="entries" xmlname="sipLocalMapEntry" subObject="SipLocalMapEntry">
<attribute cliname="local-error" xmlname="localerror" default="SIP_LOCAL_ERROR_UNKNOWN"/>
<attribute cliname="sip-status" xmlname="sipstatus" default="0"/>
<attribute cliname="q850-cause" xmlname="cause" default="0"/>
<attribute cliname="sip-reason" xmlname="sipreason"/>
<attribute cliname="q850-reason" xmlname="causereason"/>
<attribute cliname="method" xmlname="method"/>
<attribute cliname="register-response-expires" xmlname="registerResponseExpires" default="0"/>
</attribute>
</class>
<class cliname="sip-manipulation" xmlname="sipManipulation" group="session-router">
<attribute cliname="name" xmlname="name"/>
<attribute cliname="description" xmlname="description"/>
<attribute cliname="split-headers" xmlname="splitHdrList"/>
<attribute cliname="join-headers" xmlname="joinHdrList"/>
<attribute cliname="cfgRules" xmlname="cfgRules"/>
<attribute cliname="header-rules" xmlname="headerRule" subObject="SipHdrRule">
<attribute cliname="name" xmlname="name"/>
<attribute cliname="header-name" xmlname="headerName"/>
<attribute cliname="action" xmlname="action" default="none"/>
<attribute cliname="msg-type" xmlname="msgType" default="any"/>
<attribute cliname="methods" xmlname="methods"/>
<attribute cliname="comparison-type" xmlname="cmpType" default="case-sensitive"/>
<attribute cliname="match-value" xmlname="matchValue"/>
<attribute cliname="new-value" xmlname="newValue"/>
<attribute cliname="cfgRules" xmlname="cfgRules"/>
<attribute cliname="element-rules" xmlname="elementRule" subObject="SipElemRule">
<attribute cliname="name" xmlname="name"/>
<attribute cliname="parameter-name" xmlname="paramName"/>
<attribute cliname="type" xmlname="type" default="none"/>
<attribute cliname="action" xmlname="action" default="none"/>
<attribute cliname="match-val-type" xmlname="matchValueType" default="any"/>

ACLI CONFIGURATION TO TO XML ELEMENT MAPPING REFERENCE
314 Oracle Communications Enterprise Trunk Manager Service Provider Configuration Guide Release 7.3
<attribute cliname="comparison-type" xmlname="cmpType" default="case-sensitive"/>
<attribute cliname="match-value" xmlname="matchValue"/>
<attribute cliname="new-value" xmlname="newValue"/>
</attribute>
</attribute>
<attribute cliname="mime-rules" xmlname="mimeRule" subObject="MimeRule">
<attribute cliname="name" xmlname="name"/>
<attribute cliname="content-type" xmlname="contentType"/>
<attribute cliname="msg-type" xmlname="msgType" default="any"/>
<attribute cliname="methods" xmlname="methods"/>
<attribute cliname="format" xmlname="format" default="ascii-string"/>
<attribute cliname="action" xmlname="action" default="none"/>
<attribute cliname="comparison-type" xmlname="cmpType" default="case-sensitive"/>
<attribute cliname="match-value" xmlname="matchValue"/>
<attribute cliname="new-value" xmlname="newValue"/>
<attribute cliname="cfgRules" xmlname="cfgRules"/>
<attribute cliname="mime-header-rules" xmlname="mimeHeaderRule" subObject="MimeHeaderRule">
<attribute cliname="name" xmlname="name"/>
<attribute cliname="mime-header-name" xmlname="headerName"/>
<attribute cliname="action" xmlname="action" default="none"/>
<attribute cliname="comparison-type" xmlname="cmpType" default="case-sensitive"/>
<attribute cliname="match-value" xmlname="matchValue"/>
<attribute cliname="new-value" xmlname="newValue"/>
</attribute>
</attribute>
<attribute cliname="mime-isup-rules" xmlname="mimeIsupRule" subObject="MimeIsupRule">
<attribute cliname="name" xmlname="name"/>
<attribute cliname="content-type" xmlname="contentType"/>
<attribute cliname="isup-spec" xmlname="isupSpec" default="ansi-2000"/>
<attribute cliname="isup-msg-types" xmlname="isupMsgTypes"/>
<attribute cliname="msg-type" xmlname="msgType" default="any"/>
<attribute cliname="methods" xmlname="methods"/>
<attribute cliname="action" xmlname="action" default="none"/>
<attribute cliname="comparison-type" xmlname="cmpType" default="case-sensitive"/>
<attribute cliname="match-value" xmlname="matchValue"/>
<attribute cliname="new-value" xmlname="newValue"/>
<attribute cliname="cfgRules" xmlname="cfgRules"/>
<attribute cliname="mime-header-rules" xmlname="mimeHeaderRule" subObject="MimeHeaderRule">
<attribute cliname="name" xmlname="name"/>
<attribute cliname="mime-header-name" xmlname="headerName"/>
<attribute cliname="action" xmlname="action" default="none"/>
<attribute cliname="comparison-type" xmlname="cmpType" default="case-sensitive"/>

ACLI CONFIGURATION TO TO XML ELEMENT MAPPING REFERENCE
Release 7.3 Oracle Communications Enterprise Trunk Manager Service Provider Configuration Guide 315
<attribute cliname="match-value" xmlname="matchValue"/>
<attribute cliname="new-value" xmlname="newValue"/>
</attribute>
<attribute cliname="isup-param-rules" xmlname="isupParamRule" subObject="IsupParamRule">
<attribute cliname="name" xmlname="name"/>
<attribute cliname="type" xmlname="parameterType" default="0"/>
<attribute cliname="format" xmlname="parameterFormat" default="hex-ascii"/>
<attribute cliname="action" xmlname="action" default="none"/>
<attribute cliname="comparison-type" xmlname="cmpType" default="case-sensitive"/>
<attribute cliname="match-value" xmlname="matchValue"/>
<attribute cliname="new-value" xmlname="newValue"/>
</attribute>
</attribute>
<attribute cliname="mime-sdp-rules" xmlname="mimeSdpRule" subObject="MimeSdpRule">
<attribute cliname="name" xmlname="name"/>
<attribute cliname="msg-type" xmlname="msgType" default="any"/>
<attribute cliname="methods" xmlname="methods"/>
<attribute cliname="action" xmlname="action" default="none"/>
<attribute cliname="comparison-type" xmlname="cmpType" default="case-sensitive"/>
<attribute cliname="match-value" xmlname="matchValue"/>
<attribute cliname="new-value" xmlname="newValue"/>
<attribute cliname="cfgRules" xmlname="cfgRules"/>
<attribute cliname="mime-header-rules" xmlname="mimeHeaderRule" subObject="MimeHeaderRule">
<attribute cliname="name" xmlname="name"/>
<attribute cliname="mime-header-name" xmlname="headerName"/>
<attribute cliname="action" xmlname="action" default="none"/>
<attribute cliname="comparison-type" xmlname="cmpType" default="case-sensitive"/>
<attribute cliname="match-value" xmlname="matchValue"/>
<attribute cliname="new-value" xmlname="newValue"/>
</attribute>
<attribute cliname="sdp-session-rules" xmlname="sdpSessionRule" subObject="SdpSessionRule">
<attribute cliname="name" xmlname="name"/>
<attribute cliname="action" xmlname="action" default="none"/>
<attribute cliname="comparison-type" xmlname="cmpType" default="case-sensitive"/>
<attribute cliname="match-value" xmlname="matchValue"/>
<attribute cliname="new-value" xmlname="newValue"/>
<attribute cliname="cfgRules" xmlname="cfgRules"/>
<attribute cliname="sdp-line-rules" xmlname="lineRule" subObject="SdpLineRule">
<attribute cliname="name" xmlname="name"/>
<attribute cliname="type" xmlname="type"/>
<attribute cliname="action" xmlname="action" default="none"/>

ACLI CONFIGURATION TO TO XML ELEMENT MAPPING REFERENCE
316 Oracle Communications Enterprise Trunk Manager Service Provider Configuration Guide Release 7.3
<attribute cliname="comparison-type" xmlname="cmpType" default="case-sensitive"/>
<attribute cliname="match-value" xmlname="matchValue"/>
<attribute cliname="new-value" xmlname="newValue"/>
</attribute>
</attribute>
<attribute cliname="sdp-media-rules" xmlname="sdpMediaRule" subObject="SdpMediaRule">
<attribute cliname="name" xmlname="name"/>
<attribute cliname="media-type" xmlname="mediaType"/>
<attribute cliname="action" xmlname="action" default="none"/>
<attribute cliname="comparison-type" xmlname="cmpType" default="case-sensitive"/>
<attribute cliname="match-value" xmlname="matchValue"/>
<attribute cliname="new-value" xmlname="newValue"/>
<attribute cliname="cfgRules" xmlname="cfgRules"/>
<attribute cliname="sdp-line-rules" xmlname="sdpLineRule" subObject="SdpLineRule">
<attribute cliname="name" xmlname="name"/>
<attribute cliname="type" xmlname="type"/>
<attribute cliname="action" xmlname="action" default="none"/>
<attribute cliname="comparison-type" xmlname="cmpType" default="case-sensitive"/>
<attribute cliname="match-value" xmlname="matchValue"/>
<attribute cliname="new-value" xmlname="newValue"/>
</attribute>
</attribute>
</attribute>
</class>
<class cliname="sip-nat" xmlname="sipNatConfig" group="session-router">
<attribute cliname="realm-id" xmlname="RealmID"/>
<attribute cliname="domain-suffix" xmlname="DomainSuffix"/>
<attribute cliname="ext-proxy-address" xmlname="ProxyAddress"/>
<attribute cliname="ext-proxy-port" xmlname="ProxyPort" default="5060"/>
<attribute cliname="ext-address" xmlname="ExternalAddress"/>
<attribute cliname="home-address" xmlname="HomeAddress"/>
<attribute cliname="home-proxy-address" xmlname="HomeProxyAddress"/>
<attribute cliname="home-proxy-port" xmlname="HomeProxyPort" default="0"/>
<attribute cliname="route-home-proxy" xmlname="RouteHomeProxy" default="disabled"/>
<attribute cliname="address-prefix" xmlname="prefix" default="*"/>
<attribute cliname="tunnel-redirect" xmlname="TunnelRedirect" default="disabled"/>
<attribute cliname="use-url-parameter" xmlname="ParamMode" default="none"/>
<attribute cliname="parameter-name" xmlname="ParamName"/>
<attribute cliname="user-nat-tag" xmlname="UserNATTag" default="-acme-"/>
<attribute cliname="host-nat-tag" xmlname="HostNATTag" default="ACME-"/>
<attribute cliname="headers" xmlname="headers"/>
<attribute cliname="delete-headers" xmlname="headers"/>
</class>

ACLI CONFIGURATION TO TO XML ELEMENT MAPPING REFERENCE
Release 7.3 Oracle Communications Enterprise Trunk Manager Service Provider Configuration Guide 317
<class cliname="sip-profile" xmlname="sipProfile" group="session-router">
<attribute cliname="name" xmlname="name"/>
<attribute cliname="redirection" xmlname="redirection" default="inherit"/>
<attribute cliname="ingress-conditional-cac-admit" xmlname="ingressCondCacAdmit" default="inherit"/>
<attribute cliname="egress-conditional-cac-admit" xmlname="egressCondCacAdmit" default="inherit"/>
<attribute cliname="forked-cac-bw" xmlname="forkedCacBw" default="inherit"/>
<attribute cliname="cnam-lookup-server" xmlname="cnamLookupServer"/>
<attribute cliname="cnam-lookup-dir" xmlname="cnamLookupDir" default="egress"/>
<attribute cliname="cnam-unavailable-ptype" xmlname="cnamUnavPtype"/>
<attribute cliname="cnam-unavailable-utype" xmlname="cnamUnavUtype"/>
</class>
<class cliname="sip-q850-map" xmlname="sipQ850Map" group="session-router">
<attribute cliname="entries" xmlname="sipQ850MapEntry" subObject="SipQ850MapEntry">
<attribute cliname="sip-status" xmlname="sipstatus" default="0"/>
<attribute cliname="q850-cause" xmlname="cause" default="0"/>
<attribute cliname="q850-reason" xmlname="reason"/>
</attribute>
</class>
<class cliname="snmp-community" xmlname="snmpCommunity" group="system">
<attribute cliname="community-name" xmlname="communityName"/>
<attribute cliname="access-mode" xmlname="accessMode" default="READ-ONLY"/>
<attribute cliname="ip-addresses" xmlname="ipAddresses"/>
</class>
<class cliname="snmp-user-entry" xmlname="snmpUserEntry" group="system">
<attribute cliname="user-name" xmlname="userName"/>
<attribute cliname="auth-password" xmlname="ENCR-PBE-authPassword"/>
<attribute cliname="priv-password" xmlname="ENCR-PBE-privPassword"/>
</class>
<class cliname="security-policy" xmlname="spdConfig" group="ipsec">
<attribute cliname="name" xmlname="name"/>
<attribute cliname="network-interface" xmlname="networkInterfaceId"/>
<attribute cliname="priority" xmlname="priority" default="0"/>
<attribute cliname="local-ip-addr-match" xmlname="srcIPAddr"/>
<attribute cliname="remote-ip-addr-match" xmlname="dstIPAddr"/>
<attribute cliname="local-port-match" xmlname="srcPort" default="0"/>
<attribute cliname="remote-port-match" xmlname="dstPort" default="0"/>
<attribute cliname="trans-protocol-match" xmlname="protocol" default="ALL"/>
<attribute cliname="direction" xmlname="direction" default="both"/>
<attribute cliname="local-ip-mask" xmlname="srcIPMask" default="255.255.255.255"/>
<attribute cliname="remote-ip-mask" xmlname="dstIPMask" default="255.255.255.255"/>
<attribute cliname="action" xmlname="action" default="ipsec"/>

ACLI CONFIGURATION TO TO XML ELEMENT MAPPING REFERENCE
318 Oracle Communications Enterprise Trunk Manager Service Provider Configuration Guide Release 7.3
<attribute cliname="outbound-sa-fine-grained-mask" xmlname="spdFineGrained" subObject="SPDConfigFineGrained">
<attribute cliname="local-ip-mask" xmlname="srcIP"/>
<attribute cliname="remote-ip-mask" xmlname="dstIP"/>
<attribute cliname="local-port-mask" xmlname="srcPort" default="0"/>
<attribute cliname="remote-port-mask" xmlname="dstPort" default="0"/>
<attribute cliname="trans-protocol-mask" xmlname="protocol" default="0"/>
<attribute cliname="valid" xmlname="valid" default="enabled"/>
<attribute cliname="vlan-mask" xmlname="vlanID" default="0xFFF"/>
<attribute cliname="misc-select" xmlname="miscSelect" default="0"/>
<attribute cliname="network-interface" xmlname="networkInterfaceId"/>
</attribute>
<attribute cliname="ike-sainfo-name" xmlname="ikeSaInfoName"/>
<attribute cliname="vlan-id" xmlname="vlanID" default="0"/>
<attribute cliname="vlan-mask" xmlname="vlanIDMask" default="0"/>
<attribute cliname="local-port-mask" xmlname="srcPortMask" default="disabled"/>
<attribute cliname="remote-port-mask" xmlname="dstPortMask" default="disabled"/>
<attribute cliname="ip-prot-mask" xmlname="protocolMask" default="disabled"/>
</class>
<class cliname="spl-config" xmlname="splConfig" group="system">
<attribute cliname="plugins" xmlname="plugin" subObject="SplPluginConfig">
<attribute cliname="name" xmlname="name"/>
</attribute>
</class>
<class cliname="media-sec-policy" xmlname="mediaSecPolicy" group="media-security">
<attribute cliname="name" xmlname="name"/>
<attribute cliname="pass-through" xmlname="passThrough" default="disabled"/>
<attribute cliname="options" xmlname="options"/>
<attribute cliname="inbound" xmlname="inbound" subObject="MediaSecProfileInbound">
<attribute cliname="profile" xmlname="profile"/>
<attribute cliname="mode" xmlname="mode" default="rtp"/>
<attribute cliname="protocol" xmlname="protocol" default="none"/>
</attribute>
<attribute cliname="outbound" xmlname="outbound" subObject="MediaSecProfileOutbound">
<attribute cliname="profile" xmlname="profile"/>
<attribute cliname="mode" xmlname="mode" default="rtp"/>
<attribute cliname="protocol" xmlname="protocol" default="none"/>
</attribute>
</class>
<class cliname="ssh-config" xmlname="sshConfig" group="admin-security">
<attribute cliname="rekey-interval" xmlname="rekeyInterval" default="60"/>
<attribute cliname="rekey-byte-count" xmlname="rekeyByteCount" default="31"/>
</class>

ACLI CONFIGURATION TO TO XML ELEMENT MAPPING REFERENCE
Release 7.3 Oracle Communications Enterprise Trunk Manager Service Provider Configuration Guide 319
<class cliname="public-key" xmlname="sshPubKeyRecord" group="security">
<attribute cliname="name" xmlname="name"/>
<attribute cliname="type" xmlname="encrType" default="1"/>
<attribute cliname="size" xmlname="keySize" default="1024"/>
<attribute cliname="m_comment" xmlname="comment"/>
<attribute cliname="m_ktype" xmlname="keyType" default="2"/>
<attribute cliname="m_pub-key" xmlname="pubKey"/>
<attribute cliname="m_priv-key" xmlname="privKey"/>
<attribute cliname="m_finger-print" xmlname="fingerPrint"/>
<attribute cliname="m_finger-print-raw" xmlname="fingerPrintRaw"/>
<attribute cliname="m_user-class" xmlname="userClass" default="user"/>
</class>
<class cliname="static-flow" xmlname="staticFlow" group="media-manager">
<attribute cliname="in-realm-id" xmlname="inRealm"/>
<attribute cliname="description" xmlname="description"/>
<attribute cliname="in-source" xmlname="inSrc"/>
<attribute cliname="in-destination" xmlname="inDest"/>
<attribute cliname="out-realm-id" xmlname="outRealm"/>
<attribute cliname="out-source" xmlname="outSrc"/>
<attribute cliname="out-destination" xmlname="outDest"/>
<attribute cliname="protocol" xmlname="protocol" default="UDP"/>
<attribute cliname="alg-type" xmlname="algtype" default="none"/>
<attribute cliname="start-port" xmlname="startPort" default="0"/>
<attribute cliname="end-port" xmlname="endPort" default="0"/>
<attribute cliname="flow-time-limit" xmlname="timeLimit" default="0"/>
<attribute cliname="initial-guard-timer" xmlname="startTimer" default="60"/>
<attribute cliname="subsq-guard-timer" xmlname="guardTimer" default="60"/>
<attribute cliname="average-rate-limit" xmlname="rateLimit" default="0"/>
</class>
<class cliname="steering-pool" xmlname="steeringPool" group="media-manager">
<attribute cliname="ip-address" xmlname="ipAddress"/>
<attribute cliname="start-port" xmlname="startPort" default="0"/>
<attribute cliname="end-port" xmlname="endPort" default="0"/>
<attribute cliname="realm-id" xmlname="realmID"/>
<attribute cliname="network-interface" xmlname="networkInterfaceId"/>
</class>
<class cliname="surrogate-agent" xmlname="surrogateAgent" group="session-router">
<attribute cliname="register-host" xmlname="registerHost"/>
<attribute cliname="register-user" xmlname="registerUser"/>
<attribute cliname="description" xmlname="description"/>
<attribute cliname="realm-id" xmlname="realmID"/>
<attribute cliname="state" xmlname="state" default="enabled"/>
<attribute cliname="customer-host" xmlname="customerHost"/>

ACLI CONFIGURATION TO TO XML ELEMENT MAPPING REFERENCE
320 Oracle Communications Enterprise Trunk Manager Service Provider Configuration Guide Release 7.3
<attribute cliname="customer-next-hop" xmlname="customerRoute"/>
<attribute cliname="register-contact-host" xmlname="contactHost"/>
<attribute cliname="register-contact-user" xmlname="contactUser"/>
<attribute cliname="password" xmlname="password"/>
<attribute cliname="register-expires" xmlname="expires" default="600000"/>
<attribute cliname="replace-contact" xmlname="replaceContact" default="disabled"/>
<attribute cliname="options" xmlname="options"/>
<attribute cliname="route-to-registrar" xmlname="routeToRegistrar" default="enabled"/>
<attribute cliname="aor-count" xmlname="count" default="1"/>
<attribute cliname="auth-user" xmlname="authUser"/>
<attribute cliname="max-register-attempts" xmlname="maxRegisterAttempts" default="3"/>
<attribute cliname="register-retry-time" xmlname="registerRetryTime" default="300"/>
<attribute cliname="count-start" xmlname="countStart" default="1"/>
</class>
<class cliname="system-access-list" xmlname="sysACL" group="system">
<attribute cliname="source-address" xmlname="netAddress"/>
<attribute cliname="netmask" xmlname="netmask"/>
<attribute cliname="description" xmlname="description"/>
<attribute cliname="protocol" xmlname="protocolEntry"/>
</class>
<class cliname="system-config" xmlname="systemConfig" group="system">
<attribute cliname="hostname" xmlname="hostname"/>
<attribute cliname="description" xmlname="descr"/>
<attribute cliname="location" xmlname="location"/>
<attribute cliname="mib-system-contact" xmlname="sysContact"/>
<attribute cliname="mib-system-name" xmlname="sysName"/>
<attribute cliname="mib-system-location" xmlname="sysLocation"/>
<attribute cliname="snmp-enabled" xmlname="enableSnmp" default="enabled"/>
<attribute cliname="enable-snmp-auth-traps" xmlname="snmpAuth" default="disabled"/>
<attribute cliname="enable-snmp-syslog-notify" xmlname="slogNotification" default="disabled"/>
<attribute cliname="enable-snmp-monitor-traps" xmlname="enableSnmpMonitor" default="disabled"/>
<attribute cliname="enable-env-monitor-traps" xmlname="enableEnvMonitor" default="disabled"/>
<attribute cliname="snmp-syslog-his-table-length" xmlname="slogHistLen" default="1"/>
<attribute cliname="snmp-syslog-level" xmlname="slogLevel" default="WARNING"/>
<attribute cliname="syslog-servers" xmlname="syslogServer" subObject="SyslogServer">
<attribute cliname="address" xmlname="address" default="0.0.0.0"/>
<attribute cliname="port" xmlname="port" default="514"/>
<attribute cliname="facility" xmlname="facility" default="4"/>
</attribute>
<attribute cliname="system-log-level" xmlname="systemLogLevel" default="WARNING"/>
<attribute cliname="process-log-level" xmlname="processLogLevel" default="NOTICE"/>

ACLI CONFIGURATION TO TO XML ELEMENT MAPPING REFERENCE
Release 7.3 Oracle Communications Enterprise Trunk Manager Service Provider Configuration Guide 321
<attribute cliname="process-log-ip-address" xmlname="logIpAddr" default="0.0.0.0"/>
<attribute cliname="process-log-port" xmlname="logPort" default="0"/>
<attribute cliname="collect" xmlname="collectConfig" subObject="CollectConfig">
<attribute cliname="sample-interval" xmlname="sampleInt" default="5"/>
<attribute cliname="push-interval" xmlname="pushInt" default="15"/>
<attribute cliname="boot-state" xmlname="mode" default="disabled"/>
<attribute cliname="start-time" xmlname="startTime" default="now"/>
<attribute cliname="end-time" xmlname="endTime" default="never"/>
<attribute cliname="red-collect-state" xmlname="redCollectPort" default="disabled"/>
<attribute cliname="red-max-trans" xmlname="redNumTrans" default="1000"/>
<attribute cliname="red-sync-start-time" xmlname="redSyncStartTime" default="5000"/>
<attribute cliname="red-sync-comp-time" xmlname="redSyncCompTime" default="1000"/>
<attribute cliname="push-receiver" xmlname="pushReceiver" subObject="PushReceiver">
<attribute cliname="address" xmlname="address" default="0.0.0.0"/>
<attribute cliname="user-name" xmlname="userName"/>
<attribute cliname="password" xmlname="ENCR-PBE-password"/>
<attribute cliname="data-store" xmlname="dataStore"/>
<attribute cliname="protocol" xmlname="protocol" default="ftp"/>
</attribute>
<attribute cliname="group-settings" xmlname="collectGroup" subObject="CollectGroup">
<attribute cliname="group-name" xmlname="groupName" default="system"/>
<attribute cliname="sample-interval" xmlname="sampleInt" default="5"/>
<attribute cliname="start-time" xmlname="startTime" default="now"/>
<attribute cliname="end-time" xmlname="endTime" default="never"/>
<attribute cliname="boot-state" xmlname="mode" default="disabled"/>
</attribute>
<attribute cliname="push-success-trap-state" xmlname="pushSuccessTrapEnabledState" default="disabled"/>
</attribute>
<attribute cliname="call-trace" xmlname="callTrace" default="disabled"/>
<attribute cliname="internal-trace" xmlname="internalTrace" default="disabled"/>
<attribute cliname="log-filter" xmlname="logFilter" default="all"/>
<attribute cliname="default-gateway" xmlname="defaultGW" default="0.0.0.0"/>
<attribute cliname="restart" xmlname="reboot" default="enabled"/>
<attribute cliname="exceptions" xmlname="reboot-exceptions"/>
<attribute cliname="telnet-timeout" xmlname="telnet-timeout" default="0"/>
<attribute cliname="console-timeout" xmlname="console-timeout" default="0"/>
<attribute cliname="remote-control" xmlname="remote-control" default="enabled"/>
<attribute cliname="alarm-threshold" xmlname="alarmThreshold" subObject="AlarmThresholdSys">
<attribute cliname="type" xmlname="type" default="cpu"/>
<attribute cliname="volume" xmlname="volume"/>
<attribute cliname="severity" xmlname="severity" default="minor"/>
<attribute cliname="value" xmlname="value" default="0"/>

ACLI CONFIGURATION TO TO XML ELEMENT MAPPING REFERENCE
322 Oracle Communications Enterprise Trunk Manager Service Provider Configuration Guide Release 7.3
</attribute>
<attribute cliname="cli-audit-trail" xmlname="cliAudit" default="enabled"/>
<attribute cliname="link-redundancy-state" xmlname="linkRedState" default="disabled"/>
<attribute cliname="source-routing" xmlname="sourcerouting" default="disabled"/>
<attribute cliname="cli-more" xmlname="cliMore" default="disabled"/>
<attribute cliname="terminal-height" xmlname="cliMoreHeight" default="24"/>
<attribute cliname="debug-timeout" xmlname="debug-timeout" default="0"/>
<attribute cliname="trap-event-lifetime" xmlname="trapEventLifeTime" default="0"/>
<attribute cliname="ids-syslog-facility" xmlname="idsSyslogFacility" default="-1"/>
<attribute cliname="options" xmlname="options"/>
<attribute cliname="default-v6-gateway" xmlname="defaultGWv6" default="::"/>
<attribute cliname="cleanup-time-of-day" xmlname="cleanupTimeOfDay"/>
<attribute cliname="directory-cleanup" xmlname="directoryCleanup" subObject="DirectoryCleanup">
<attribute cliname="directory-path" xmlname="path"/>
<attribute cliname="admin-state" xmlname="adminState" default="enabled"/>
<attribute cliname="age" xmlname="age" default="30"/>
</attribute>
<attribute cliname="snmp-engine-id-suffix" xmlname="snmpEngineIDSuffix"/>
<attribute cliname="snmp-agent-mode" xmlname="snmpAgentMode" default="v1v2"/>
<attribute cliname="push-receiver" xmlname="pushReceiver" subObject="PushReceiver">
<attribute cliname="address" xmlname="address" default="0.0.0.0"/>
<attribute cliname="user-name" xmlname="userName"/>
<attribute cliname="password" xmlname="ENCR-PBE-password"/>
<attribute cliname="data-store" xmlname="dataStore"/>
<attribute cliname="protocol" xmlname="protocol" default="ftp"/>
</attribute>
<attribute cliname="group-settings" xmlname="collectGroup" subObject="CollectGroup">
<attribute cliname="group-name" xmlname="groupName" default="system"/>
<attribute cliname="sample-interval" xmlname="sampleInt" default="5"/>
<attribute cliname="start-time" xmlname="startTime" default="now"/>
<attribute cliname="end-time" xmlname="endTime" default="never"/>
<attribute cliname="boot-state" xmlname="mode" default="disabled"/>
</attribute>
</class>
<class cliname="tls-global" xmlname="tlsGlobal" group="security">
<attribute cliname="session-caching" xmlname="sessionCaching" default="disabled"/>
<attribute cliname="session-cache-timeout" xmlname="sessionCacheTimeout" default="12"/>
</class>
<class cliname="tls-profile" xmlname="tlsProfile" group="security">
<attribute cliname="name" xmlname="name"/>
<attribute cliname="end-entity-certificate" xmlname="endEntityCertStr"/>
<attribute cliname="trusted-ca-certificates" xmlname="trusted"/>

ACLI CONFIGURATION TO TO XML ELEMENT MAPPING REFERENCE
Release 7.3 Oracle Communications Enterprise Trunk Manager Service Provider Configuration Guide 323
<attribute cliname="cipher-list" xmlname="cipher"/>
<attribute cliname="verify-depth" xmlname="verifyDepth" default="10"/>
<attribute cliname="mutual-authenticate" xmlname="mutualAuthenticate" default="disabled"/>
<attribute cliname="tls-version" xmlname="tlsVersion" default="compatibility"/>
<attribute cliname="options" xmlname="options"/>
<attribute cliname="cert-status-check" xmlname="certStatusCheck" default="disabled"/>
<attribute cliname="cert-status-profile-list" xmlname="certStatusProfile"/>
<attribute cliname="ignore-dead-responder" xmlname="ignoreDeadResponder" default="disabled"/>
</class>
<class cliname="translation-rules" xmlname="translationRules" group="session-router">
<attribute cliname="id" xmlname="id"/>
<attribute cliname="type" xmlname="type" default="none"/>
<attribute cliname="add-string" xmlname="add_s"/>
<attribute cliname="add-index" xmlname="add_indx" default="0"/>
<attribute cliname="delete-string" xmlname="del_s"/>
<attribute cliname="delete-index" xmlname="del_indx" default="0"/>
</class>
<class cliname="trap-receiver" xmlname="trapReceiver" group="system">
<attribute cliname="ip-address" xmlname="ipAddrHostName" default="0.0.0.0:162"/>
<attribute cliname="filter-level" xmlname="filterLevel" default="Critical"/>
<attribute cliname="community-name" xmlname="communityName"/>
<attribute cliname="user-list" xmlname="userList"/>
</class>
<class cliname="tunnel-orig-params" xmlname="tunnelOrigParams" group="ike">
<attribute cliname="name" xmlname="name"/>
<attribute cliname="remote-addr" xmlname="remoteAddr"/>
<attribute cliname="retry-limit" xmlname="retryLimit" default="3"/>
<attribute cliname="retry-time" xmlname="retryTime" default="30"/>
</class>
<class cliname="vbg-config" xmlname="VbgConfig" group="media-manager">
<attribute cliname="mid" xmlname="mId"/>
<attribute cliname="state" xmlname="state" default="enabled"/>
<attribute cliname="realm-id" xmlname="realmId"/>
<attribute cliname="ip-address" xmlname="ipAddress"/>
<attribute cliname="port" xmlname="port" default="2944"/>
<attribute cliname="transport-protocol" xmlname="transProtocol" default="UDP"/>
<attribute cliname="encoding" xmlname="encoding" default="text"/>
<attribute cliname="associated-realms" xmlname="associatedRealm"/>
<attribute cliname="session-controllers" xmlname="VbgScConfig" subObject="VbgScConfig">
<attribute cliname="ip-address" xmlname="address"/>
<attribute cliname="port" xmlname="port" default="2944"/>
</attribute>

ACLI CONFIGURATION TO TO XML ELEMENT MAPPING REFERENCE
324 Oracle Communications Enterprise Trunk Manager Service Provider Configuration Guide Release 7.3
<attribute cliname="timerx" xmlname="timerx" default="0"/>
<attribute cliname="x3-src-address" xmlname="vbgX3SrcAddress"/>
<attribute cliname="options" xmlname="options"/>
<attribute cliname="srtp" xmlname="srtpState" default="disabled"/>
</class>
<class cliname="allowed-elements-profile" xmlname="allowedElementsProfile" group="session-router">
<attribute cliname="name" xmlname="name"/>
<attribute cliname="description" xmlname="description"/>
<attribute cliname="rule-sets" xmlname="ruleSet" subObject="WLRuleSetConfig">
<attribute cliname="name" xmlname="name"/>
<attribute cliname="unmatched-action" xmlname="unmatchedAction" default="reject"/>
<attribute cliname="msg-type" xmlname="msgType" default="any"/>
<attribute cliname="methods" xmlname="methods"/>
<attribute cliname="logging" xmlname="logging" default="disabled"/>
<attribute cliname="header-rules" xmlname="headerRule" subObject="WLHeaderRuleConfig">
<attribute cliname="header-name" xmlname="headerName"/>
<attribute cliname="unmatched-action" xmlname="unmatchedAction" default="reject"/>
<attribute cliname="allow-header-param" xmlname="allowedHeaderParams"/>
<attribute cliname="allow-uri-param" xmlname="allowedUriParams"/>
<attribute cliname="allow-uri-user-param" xmlname="allowedUriUserParams"/>
<attribute cliname="allow-uri-header-name" xmlname="allowedUriHeaderNames"/>
</attribute>
</attribute>
<attribute cliname="default-headers" xmlname="allowAny"/>
</class>
</classes>
</templateData>

Release 7.3 Oracle Communications Enterprise Trunk Manager Service Provider Configuration Guide 325
Glossary
Introduction
This glossary provides terms, acronyms, and definitions used in this document for reference purposes only.
Terms and Definitions
Term Description
Enterprise (Customer) A business organization.
E-SBC Enterprise Session Border Controller (SBC) used for SIP trunking to one or many Service Providers.
IP Internet protocol
IP-PBX IP based Public Branch Exchange (PBX). This is becoming increasingly popular as networks move towards IP.
Load Balancing Pool A collection of SP-SBCs.
Net-Net Central Acme Packet's application framework; it has an extensible, data-driven architecture that lends itself to drop-in service support (which are leveraged to form Applications); the layered architecture provides a clear separation of presentation & data models. Web based graphical thin clients are available northbound; southbound a series of interfaces are supported including SIP Net-Net Central hosts and the Trunk Manager application (also known as Net-Net Central SIP Trunk Xpress (NNC-SIPTX)).
PBX Private branch exchange - a telephone exchange that serves a particular business or office.
SBC Session Border Controller - A network element that provides critical control functions to deliver trusted, first-class interactive communications-voice, video and multimedia sessions-across IP network borders. A "session" is any real-time, interactive voice, video or multimedia communication using IP session-layer signaling protocols, such as SIP, H.323, MGCP, Megaco/H.248 or RTSP. The "border" is any IP-IP network border such as those between Service Provider and Enterprise, residential or mobile customer/subscriber; or between two Service Providers. The "control" functions satisfy requirements in the following five major areas - security, service reach maximization, SLA assurance, regulatory compliance, and cost and revenue management.
SIP Trunk A Session Initiation Protocol (SIP) service offered by a Service Provider that permits Enterprises with or without a PBX installed, to use IP communications outside of their Enterprise network via the same connection as the Internet connection. It is defined as the combination of the Enterprise's IP address and port (of their Net-Net SBC or PBX), the IP address and port of the Service Provider's SBC, and the service level agreement constraints (e.g., concurrent number of sessions and/or bandwidth). The traffic exchanged over SIP trunks is predominately VoIP, but in the future it may include IP video, multimedia/collaborative sessions and other services making use of IP signaling protocols.
Site A location that contains one or more Enterprises. A site may have one or more Net-Net SBCs.
SP An entity that provides services to other entities. Usually this refers to a business that provides IP communications service(s) and/or application service(s).
SP-SBC Service Provider Session Border Controller (SBC) used for SIP trunking to one or many Enterprises.

326 Oracle Communications Enterprise Trunk Manager Service Provider Configuration Guide Release 7.3
SSH Secure Shell or SSH is a network protocol that allows data to be exchanged using a secure channel between two networked devices.
TELNET A network protocol used on the Internet or local area networks to provide a bidirectional interactive text-oriented communications facility using a virtual terminal connection. User data is interspersed in-band with Telnet control information in an 8-bit byte oriented data connection over the Transmission Control Protocol (TCP).
VoIP Voice-over-IP - Voice over Internet Protocol is a family of technologies, methodologies, communication protocols, and transmission techniques for the delivery of voice communications and multimedia sessions over IP networks, such as the Internet.
Term Description
Related Documents