Oracle r Applications System Administrator’s Guide RELEASE 11i VOLUME 1 October 2002

Welcome message from author
This document is posted to help you gain knowledge. Please leave a comment to let me know what you think about it! Share it to your friends and learn new things together.
Transcript
Oracle � ApplicationsSystem Administrator’sGuideRELEASE 11iVOLUME 1
October 2002

Oracle Applications System Administrator’s Guide Release 11i
The part number for this volume is A96155–02. To reorder this book, please use the set part number,A96154–02.
Copyright � 1994, 2002 Oracle Corporation. All rights reserved.
Primary Authors: Steve Carter, Mildred Wang
Major Contributors: Dana Spradley, Leslie Studdard
Contributors: Ahmed Alomari, Troy Anthony, Ram Bhoopalam, George Buzsaki, Anne Carlson,Steven Chan, Siu Chang, John Cordes, Mark Fisher, Hubert Ferst, Clara Jaeckel, Michael Mast, TomMorrow, Emily Nordhagen, Muhannad Obeidat, Gursat Olgun, Richard Ou, Jan Smith, SethStafford, Susan Stratton, Raymond Tse, Mark Warren, Sara Woodhull
The Programs (which include both the software and documentation) contain proprietary information;they are provided under a license agreement containing restrictions on use and disclosure and are alsoprotected by copyright, patent and other intellectual and industrial property laws. Reverseengineering, disassembly, or decompilation of the Programs, except to the extent required to obtaininteroperability with other independently created software or as specified by law, is prohibited.
The information contained in this documentation is subject to change without notice. If you find anyproblems in the documentation, please report them to us in writing. This documentation is notwarranted to be error–free. Except as may be expressly permitted in your license agreement for thesePrograms, no part of these Programs may be reproduced or transmitted in any form or by any means,electronic or mechanical, for any purpose.
If the Programs are delivered to the United States Government or anyone licensing or using thePrograms on behalf of the United States Government, the following notice is applicable:
U.S. GOVERNMENT RIGHTS Programs, software, databases, and related documentation and technical data delivered to U.S.Government customers are ”commercial computer software” or ”commercial technical data” pursuantto the applicable Federal Acquisition Regulation, and agency–specific supplemental regulations. Assuch, use, duplication, disclosure, modification, and adaptation of the Programs, includingdocumentation and technical data, shall be subject to the licensing restrictions set forth in theapplicable Oracle license agreement, and, to the extent applicable, the additional rights set forth in FAR52.227–19, Commercial Computer Software – Restricted Rights (June, 1987). Oracle Corporation, 500Oracle Parkway, Redwood City, CA 94065. The Programs are not intended for use in any nuclear, aviation, mass transit, medical, or otherinherently dangerous applications. It shall be the licensee’s responsibility to take all appropriatefail–safe, backup, redundancy, and other measures to ensure the safe use of such applications if thePrograms are used for such purposes, and we disclaim liability for any damages caused by such use ofthe Programs.
Oracle is a registered trademark of Oracle Corporation and/or its affiliates. Other names may betrademarks of their respective owners.

iiiContents
Contents
VOLUME 1
Preface i. . . . . . . . . . . . . . . . . . . . . . . . . . . . . . . . . . . . . . . . . . . . . . . . .
Chapter 1 What Is System Administration? 1 – 1. . . . . . . . . . . . . . . . . . . . . . . . . . What Is System Administration? 1 – 2. . . . . . . . . . . . . . . . . . . . . . . . . . .
Chapter 2 Managing Oracle Applications Security 2 – 1. . . . . . . . . . . . . . . . . . . Overview of Oracle Applications Security 2 – 2. . . . . . . . . . . . . . . . . . . Defining a Responsibility 2 – 4. . . . . . . . . . . . . . . . . . . . . . . . . . . . . . . . . Defining a Request Security Group 2 – 6. . . . . . . . . . . . . . . . . . . . . . . . . User Session Limits 2 – 9. . . . . . . . . . . . . . . . . . . . . . . . . . . . . . . . . . . . . . Responsibilities Window 2 – 10. . . . . . . . . . . . . . . . . . . . . . . . . . . . . . . . . . Overview of Security Groups 2 – 15. . . . . . . . . . . . . . . . . . . . . . . . . . . . . . Security Groups Window 2 – 16. . . . . . . . . . . . . . . . . . . . . . . . . . . . . . . . . Users Window 2 – 17. . . . . . . . . . . . . . . . . . . . . . . . . . . . . . . . . . . . . . . . . . . Overview of Function Security 2 – 22. . . . . . . . . . . . . . . . . . . . . . . . . . . . . Implementing Function Security 2 – 28. . . . . . . . . . . . . . . . . . . . . . . . . . . Form Functions Window 2 – 34. . . . . . . . . . . . . . . . . . . . . . . . . . . . . . . . . . Menus Window 2 – 38. . . . . . . . . . . . . . . . . . . . . . . . . . . . . . . . . . . . . . . . . . Menu Viewer 2 – 42. . . . . . . . . . . . . . . . . . . . . . . . . . . . . . . . . . . . . . . . . . . . Compile Security Concurrent Program 2 – 44. . . . . . . . . . . . . . . . . . . . . . Function Security Reports 2 – 45. . . . . . . . . . . . . . . . . . . . . . . . . . . . . . . . . Users of a Responsibility Report 2 – 46. . . . . . . . . . . . . . . . . . . . . . . . . . .
iv Oracle Applications System Administrator’s Guide
Active Responsibilities Report 2 – 47. . . . . . . . . . . . . . . . . . . . . . . . . . . . . Active Users Report 2 – 48. . . . . . . . . . . . . . . . . . . . . . . . . . . . . . . . . . . . . . Reports and Sets by Responsibility Report 2 – 49. . . . . . . . . . . . . . . . . . .
Chapter 3 User and Data Auditing 3 – 1. . . . . . . . . . . . . . . . . . . . . . . . . . . . . . . . . . Overview of User and Data Auditing 3 – 2. . . . . . . . . . . . . . . . . . . . . . . Auditing User Activity 3 – 3. . . . . . . . . . . . . . . . . . . . . . . . . . . . . . . . . . . Monitor Users Window 3 – 8. . . . . . . . . . . . . . . . . . . . . . . . . . . . . . . . . . . Signon Audit Concurrent Requests Report 3 – 10. . . . . . . . . . . . . . . . . . Signon Audit Forms Report 3 – 12. . . . . . . . . . . . . . . . . . . . . . . . . . . . . . . Signon Audit Responsibilities Report 3 – 15. . . . . . . . . . . . . . . . . . . . . . . Signon Audit Unsuccessful Logins Report 3 – 17. . . . . . . . . . . . . . . . . . . Signon Audit Users Report 3 – 19. . . . . . . . . . . . . . . . . . . . . . . . . . . . . . . . Purge Signon Audit Data Program 3 – 21. . . . . . . . . . . . . . . . . . . . . . . . . Reporting On AuditTrail Data 3 – 22. . . . . . . . . . . . . . . . . . . . . . . . . . . . . Audit Installations Window 3 – 34. . . . . . . . . . . . . . . . . . . . . . . . . . . . . . . Audit Groups Window 3 – 36. . . . . . . . . . . . . . . . . . . . . . . . . . . . . . . . . . . Audit Tables Window 3 – 40. . . . . . . . . . . . . . . . . . . . . . . . . . . . . . . . . . . .
Chapter 4 Managing Concurrent Programs and Reports 4 – 1. . . . . . . . . . . . . . . Overview of Concurrent Programs and Requests 4 – 2. . . . . . . . . . . . . Multilingual Support for Concurrent Requests 4 – 4. . . . . . . . . . . . . . . Organizing Programs into Request Sets 4 – 6. . . . . . . . . . . . . . . . . . . . . Request Sets Report 4 – 18. . . . . . . . . . . . . . . . . . . . . . . . . . . . . . . . . . . . . . Organizing Programs into Request Groups 4 – 19. . . . . . . . . . . . . . . . . . Report Group Responsibilities Report 4 – 24. . . . . . . . . . . . . . . . . . . . . . Defining Program Incompatibility Rules 4 – 25. . . . . . . . . . . . . . . . . . . . Defining Data Groups 4 – 30. . . . . . . . . . . . . . . . . . . . . . . . . . . . . . . . . . . . Custom Concurrent Programs 4 – 35. . . . . . . . . . . . . . . . . . . . . . . . . . . . . Copying and Modifying Program Definitions 4 – 47. . . . . . . . . . . . . . . . Concurrent Program Details Report 4 – 57. . . . . . . . . . . . . . . . . . . . . . . . Concurrent Programs Report 4 – 58. . . . . . . . . . . . . . . . . . . . . . . . . . . . . . Request Groups Window 4 – 59. . . . . . . . . . . . . . . . . . . . . . . . . . . . . . . . . Concurrent Program Executable Window 4 – 61. . . . . . . . . . . . . . . . . . . Concurrent Programs Window 4 – 66. . . . . . . . . . . . . . . . . . . . . . . . . . . . Data Groups Window 4 – 81. . . . . . . . . . . . . . . . . . . . . . . . . . . . . . . . . . . .
Chapter 5 Managing Concurrent Processing 5 – 1. . . . . . . . . . . . . . . . . . . . . . . . . Overview of Concurrent Processing 5 – 2. . . . . . . . . . . . . . . . . . . . . . . . Service Management 5 – 5. . . . . . . . . . . . . . . . . . . . . . . . . . . . . . . . . . . . .

vContents
Managing Concurrent Processing with Oracle Applications Manager 5 – 8. . . . . . . . . . . . . . . . . . . . . . . . . . . . . . . . . . . . . . . . . . . . . . . . Reviewing Requests, Request Log Files, and Report Output Files 5 – 9. . . . . . . . . . . . . . . . . . . . . . . . . . . . . . . . . . . . . . . . . . . . . Changing the Status of Concurrent Requests 5 – 16. . . . . . . . . . . . . . . . . Managing Concurrent Processing Files and Tables 5 – 18. . . . . . . . . . . . Purge Concurrent Request and/or Manager Data Program 5 – 20. . . . Concurrent Processing User Profile Settings 5 – 24. . . . . . . . . . . . . . . . . Defining Managers and their Work Shifts 5 – 26. . . . . . . . . . . . . . . . . . . Completed Concurrent Requests Report 5 – 34. . . . . . . . . . . . . . . . . . . . Work Shift by Manager Report 5 – 35. . . . . . . . . . . . . . . . . . . . . . . . . . . . . Work Shifts Report 5 – 36. . . . . . . . . . . . . . . . . . . . . . . . . . . . . . . . . . . . . . . Specializing Managers to Run Only Certain Programs 5 – 37. . . . . . . . Grouping Programs by Request Type 5 – 53. . . . . . . . . . . . . . . . . . . . . . . Controlling Concurrent Managers 5 – 55. . . . . . . . . . . . . . . . . . . . . . . . . . Overview of Parallel Concurrent Processing 5 – 64. . . . . . . . . . . . . . . . . Managing Parallel Concurrent Processing 5 – 68. . . . . . . . . . . . . . . . . . . Concurrent Managers and Real Application Clusters (RAC) 5 – 76. . . Administer Concurrent Managers Window 5 – 80. . . . . . . . . . . . . . . . . . Concurrent Managers Window 5 – 89. . . . . . . . . . . . . . . . . . . . . . . . . . . . Work Shifts Window 5 – 98. . . . . . . . . . . . . . . . . . . . . . . . . . . . . . . . . . . . . Combined Specialization Rules Window 5 – 100. . . . . . . . . . . . . . . . . . . . Concurrent Request Types Window 5 – 103. . . . . . . . . . . . . . . . . . . . . . . . Viewer Options Window 5 – 105. . . . . . . . . . . . . . . . . . . . . . . . . . . . . . . . . . Nodes Window 5 – 107. . . . . . . . . . . . . . . . . . . . . . . . . . . . . . . . . . . . . . . . . .
Chapter 6 Oracle Applications Manager 6 – 1. . . . . . . . . . . . . . . . . . . . . . . . . . . . . Oracle Applications Management Tools 6 – 2. . . . . . . . . . . . . . . . . . . . . Oracle Management Pack for Oracle Applications 6 – 3. . . . . . . . . . . . Overview of Oracle Applications Manager 6 – 5. . . . . . . . . . . . . . . . . . Oracle Applications Manager 6 – 7. . . . . . . . . . . . . . . . . . . . . . . . . . . . . . Configuration for an Oracle Applications System 6 – 8. . . . . . . . . . . . Services 6 – 21. . . . . . . . . . . . . . . . . . . . . . . . . . . . . . . . . . . . . . . . . . . . . . . . . Work Shifts 6 – 35. . . . . . . . . . . . . . . . . . . . . . . . . . . . . . . . . . . . . . . . . . . . . Oracle Workflow Manager 6 – 37. . . . . . . . . . . . . . . . . . . . . . . . . . . . . . . . Background Engines 6 – 40. . . . . . . . . . . . . . . . . . . . . . . . . . . . . . . . . . . . . Notification Mailer 6 – 44. . . . . . . . . . . . . . . . . . . . . . . . . . . . . . . . . . . . . . . Agent Listeners 6 – 56. . . . . . . . . . . . . . . . . . . . . . . . . . . . . . . . . . . . . . . . . . Queue Propagation 6 – 58. . . . . . . . . . . . . . . . . . . . . . . . . . . . . . . . . . . . . .

vi Oracle Applications System Administrator’s Guide
Purging Workflow Data 6 – 61. . . . . . . . . . . . . . . . . . . . . . . . . . . . . . . . . . . Active Work Items 6 – 67. . . . . . . . . . . . . . . . . . . . . . . . . . . . . . . . . . . . . . . Deferred Work Items 6 – 70. . . . . . . . . . . . . . . . . . . . . . . . . . . . . . . . . . . . . Suspended Work Items 6 – 73. . . . . . . . . . . . . . . . . . . . . . . . . . . . . . . . . . . Errored Work Items 6 – 76. . . . . . . . . . . . . . . . . . . . . . . . . . . . . . . . . . . . . .
Index
VOLUME 2
Chapter 7 Printers 7 – 1. . . . . . . . . . . . . . . . . . . . . . . . . . . . . . . . . . . . . . . . . . . . . . . . . Printers and Printing 7 – 2. . . . . . . . . . . . . . . . . . . . . . . . . . . . . . . . . . . . . Setting Up Your Printers 7 – 11. . . . . . . . . . . . . . . . . . . . . . . . . . . . . . . . . . Printer Setup with Pasta 7 – 13. . . . . . . . . . . . . . . . . . . . . . . . . . . . . . . . . . Customizing Printing Support in Oracle Applications 7 – 24. . . . . . . . . Hierarchy of Printer and Print Style Assignments 7 – 31. . . . . . . . . . . . Postscript Printing in UNIX 7 – 37. . . . . . . . . . . . . . . . . . . . . . . . . . . . . . . Printer Types Window 7 – 39. . . . . . . . . . . . . . . . . . . . . . . . . . . . . . . . . . . . Printers Window 7 – 41. . . . . . . . . . . . . . . . . . . . . . . . . . . . . . . . . . . . . . . . . Print Styles Window 7 – 43. . . . . . . . . . . . . . . . . . . . . . . . . . . . . . . . . . . . . . Printer Drivers Window 7 – 46. . . . . . . . . . . . . . . . . . . . . . . . . . . . . . . . . .
Chapter 8 Oracle Applications Help 8 – 1. . . . . . . . . . . . . . . . . . . . . . . . . . . . . . . . Customizing Oracle Applications Help 8 – 2. . . . . . . . . . . . . . . . . . . . .
Chapter 9 Applications DBA Duties 9 – 1. . . . . . . . . . . . . . . . . . . . . . . . . . . . . . . . Overview of Applications DBA Duties 9 – 2. . . . . . . . . . . . . . . . . . . . . . Resource Consumer Groups in Oracle Applications 9 – 7. . . . . . . . . . Oracle Applications Schema Password Change Utility(FNDCPASS) 9 – 9. . . . . . . . . . . . . . . . . . . . . . . . . . . . . . . . . . . . . . . . . . . . ORACLE Users Window 9 – 13. . . . . . . . . . . . . . . . . . . . . . . . . . . . . . . . . . Concurrent Conflicts Domains Window 9 – 17. . . . . . . . . . . . . . . . . . . . . Applications Window 9 – 19. . . . . . . . . . . . . . . . . . . . . . . . . . . . . . . . . . . . Network Test Window 9 – 22. . . . . . . . . . . . . . . . . . . . . . . . . . . . . . . . . . . . Administering Folders 9 – 24. . . . . . . . . . . . . . . . . . . . . . . . . . . . . . . . . . . . Languages Window 9 – 28. . . . . . . . . . . . . . . . . . . . . . . . . . . . . . . . . . . . . . Territories Window 9 – 30. . . . . . . . . . . . . . . . . . . . . . . . . . . . . . . . . . . . . . .

viiContents
Chapter 10 Cost–Based Optimization in Oracle Applications 10 – 1. . . . . . . . . . . Oracle Applications and Cost–Based Optimization 10 – 2. . . . . . . . . . . Parameters for Cost–Based Optimization 10 – 3. . . . . . . . . . . . . . . . . . . . Concurrent Programs for CBO 10 – 9. . . . . . . . . . . . . . . . . . . . . . . . . . . . . Gather Table Statistics 10 – 10. . . . . . . . . . . . . . . . . . . . . . . . . . . . . . . . . . . . Backup Table Statistics 10 – 12. . . . . . . . . . . . . . . . . . . . . . . . . . . . . . . . . . . . Restore Table Statistics 10 – 13. . . . . . . . . . . . . . . . . . . . . . . . . . . . . . . . . . . . Gather Schema Statistics 10 – 14. . . . . . . . . . . . . . . . . . . . . . . . . . . . . . . . . . Gather Column Statistics 10 – 15. . . . . . . . . . . . . . . . . . . . . . . . . . . . . . . . . . Gather All Column Statistics 10 – 16. . . . . . . . . . . . . . . . . . . . . . . . . . . . . . FND_STATS Package 10 – 17. . . . . . . . . . . . . . . . . . . . . . . . . . . . . . . . . . . . . FND_CTL Package 10 – 32. . . . . . . . . . . . . . . . . . . . . . . . . . . . . . . . . . . . . . .
Chapter 11 User Profiles 11 – 1. . . . . . . . . . . . . . . . . . . . . . . . . . . . . . . . . . . . . . . . . . . . Overview of Setting User Profiles 11 – 2. . . . . . . . . . . . . . . . . . . . . . . . . . User Profile Option Values Report 11 – 5. . . . . . . . . . . . . . . . . . . . . . . . . . System Profile Values Window 11 – 6. . . . . . . . . . . . . . . . . . . . . . . . . . . . .
Chapter 12 Administering Process Navigation 12 – 1. . . . . . . . . . . . . . . . . . . . . . . . Overview of Process Navigation 12 – 2. . . . . . . . . . . . . . . . . . . . . . . . . . . Modifying Your Menu 12 – 3. . . . . . . . . . . . . . . . . . . . . . . . . . . . . . . . . . . . Creating Process Navigator Processes 12 – 4. . . . . . . . . . . . . . . . . . . . . . .
Chapter 13 Document Sequences 13 – 1. . . . . . . . . . . . . . . . . . . . . . . . . . . . . . . . . . . . Document Sequences Window 13 – 9. . . . . . . . . . . . . . . . . . . . . . . . . . . . . Document Categories Window 13 – 12. . . . . . . . . . . . . . . . . . . . . . . . . . . . Sequence Assignments Window 13 – 14. . . . . . . . . . . . . . . . . . . . . . . . . . .
Chapter 14 Developer Tools 14 – 1. . . . . . . . . . . . . . . . . . . . . . . . . . . . . . . . . . . . . . . . . Developer Tools 14 – 2. . . . . . . . . . . . . . . . . . . . . . . . . . . . . . . . . . . . . . . . . Work Directory 14 – 3. . . . . . . . . . . . . . . . . . . . . . . . . . . . . . . . . . . . . . . . . . Web Enabled PL/SQL Window 14 – 5. . . . . . . . . . . . . . . . . . . . . . . . . . . .
Appendix A Profile Options in Oracle Application Object Library A – 1. . . . . . .
Appendix B Using Predefined Alerts B – 1. . . . . . . . . . . . . . . . . . . . . . . . . . . . . . . . . . Overview of Oracle Alert B – 2. . . . . . . . . . . . . . . . . . . . . . . . . . . . . . . . . Predefined Alerts B – 5. . . . . . . . . . . . . . . . . . . . . . . . . . . . . . . . . . . . . . . . Oracle Alert Precoded Alerts B – 10. . . . . . . . . . . . . . . . . . . . . . . . . . . . . .
viii Oracle Applications System Administrator’s Guide
Appendix C Loaders C – 1. . . . . . . . . . . . . . . . . . . . . . . . . . . . . . . . . . . . . . . . . . . . . . . . . Generic Loader C – 2. . . . . . . . . . . . . . . . . . . . . . . . . . . . . . . . . . . . . . . . . . Application Object Library Configuration Files C – 12. . . . . . . . . . . . . . Concurrent Program Configuration File C – 13. . . . . . . . . . . . . . . . . . . . . Request Groups Configuration File C – 15. . . . . . . . . . . . . . . . . . . . . . . . . Lookups Configuration File C – 16. . . . . . . . . . . . . . . . . . . . . . . . . . . . . . . Profile Options and Profile Values Configuration File C – 18. . . . . . . . . Flexfields Setup Data Configuration File C – 20. . . . . . . . . . . . . . . . . . . . Attachments Setup Data Configuration File C – 24. . . . . . . . . . . . . . . . . Messages Configuration File C – 27. . . . . . . . . . . . . . . . . . . . . . . . . . . . . . . Security Information Configuration File C – 28. . . . . . . . . . . . . . . . . . . . . Message Dictionary Generator C – 30. . . . . . . . . . . . . . . . . . . . . . . . . . . . . Generic File Manager Access Utility (FNDGFU) C – 32. . . . . . . . . . . . . . Purge Obsolete Generic File Manager Data C – 36. . . . . . . . . . . . . . . . . .
Appendix D Multilingual External Documents D – 1. . . . . . . . . . . . . . . . . . . . . . . . . Multilingual External Documents D – 2. . . . . . . . . . . . . . . . . . . . . . . . . .
Appendix E Character Mode to GUI Appendix E – 1. . . . . . . . . . . . . . . . . . . . . . . . . Oracle Applications Character Mode Forms and Corresponding GUI Windows E – 2. . . . . . . . . . . . . . . . . . . . . . . . . . . . .
Appendix F Implementation Appendix F – 1. . . . . . . . . . . . . . . . . . . . . . . . . . . . . . . Setting Up Oracle Applications System Administrator F – 2. . . . . . . .
Appendix G Setting Up and Maintaining Oracle Applications G – 1. . . . . . . . . . . Setting Up and Maintaining Your Oracle Applications Configuration G – 2. . . . . . . . . . . . . . . . . . . . . . . . . . . . . . . . . . . . . . . . . . . Administering Oracle HTTP Server Powered by Apache G – 14. . . . . . Administering the TCF SocketServer G – 41. . . . . . . . . . . . . . . . . . . . . . . AdminAppServer Utility G – 44. . . . . . . . . . . . . . . . . . . . . . . . . . . . . . . . . . Support for Encrypted Thin JDBC Connections G – 50. . . . . . . . . . . . . . Administering Server Security G – 51. . . . . . . . . . . . . . . . . . . . . . . . . . . . . Restricting Access to Responsibilities Based on User’s Web Server G – 55. . . . . . . . . . . . . . . . . . . . . . . . . . . . . . . . . . . . . . . Application Object Library AOL/J Setup Test Suite G – 57. . . . . . . . . . . Configuring the Self–Service Framework G – 59. . . . . . . . . . . . . . . . . . . .
ixContents
Concurrent Managers G – 66. . . . . . . . . . . . . . . . . . . . . . . . . . . . . . . . . . . . Migrating an Oracle Applications Single Instance to Real Application Clusters (RAC) G – 85. . . . . . . . . . . . . . . . . . . . . . . . . . . Behavior of Date Formats in NLS Implementations G – 92. . . . . . . . . . .
Appendix H Technology Stack Enabled Features H – 1. . . . . . . . . . . . . . . . . . . . . . . Oracle9i Application Server (9iAS) and Oracle Applications H – 2. . . Oracle Applications with Oracle9iAS Portal H – 3. . . . . . . . . . . . . . . . . Implementing Single Sign–On for Oracle Applications 11i with Login Server Authentication Using Oracle Internet Directory H – 4. . . . . . . . . . . . . . . . . . . . . . . . . . . . . . . . . . Discoverer 4i with Oracle Applications 11i H – 21. . . . . . . . . . . . . . . . . . Oracle9i Applications Server (9iAS) with Oracle E–Business Suite Related Documentation H – 50. . . . . . . . . . . . . . . . . . . . . . . . . . . . . .
Glossary
Index

x Oracle Applications System Administrator’s Guide

xiPreface
Preface

xii Oracle Applications System Administrator’s Guide
Audience for This Guide
Welcome to Release 11i of the Oracle Applications System Administrator’s Guide.
This guide assumes you have a working knowledge of the principlesand customary practices of your business area. If you have never usedApplications we suggest you attend one or more of the OracleApplications System Administration training classes available throughOracle Education. (See Other Information Sources for moreinformation about Oracle training.)
This guide also assumes that you are familiar with the OracleApplications graphical user interface. To learn more about the OracleApplications graphical user interface, read the Oracle Applications User’sGuide.
See Other Information Sources for more information about OracleApplications product information.
How To Use This Guide
This guide contains the information you need to understand and useOracle Applications system administration.
• Chapter 1 describes the job of an Oracle Applications SystemAdministrator, and contrasts it with the job of an OracleDatabase Administrator.
• Chapter 2 explains how to secure access to the data andfunctionality within your Oracle Applications.
• Chapter 3 explains how to audit your application users and thechanges they effect on your application’s data.
• Chapters 4 and 5 explain concurrent processing in OracleApplications, including how you can manage programs runningconcurrently in the background while your users continue toperform online tasks and how to manage your concurrentprograms and organize those programs into groups and sets.
• Chapter 6 explains using printers with Oracle Applications.
• Chapter 7 describes the help architecture for HTML as well asexplaining how to customize Oracle Applications help.
• Chapter 8 explains Oracle Applications security tasks thatrequire a database administrator to either explicitly perform, orassist by performing prerequisite tasks.
xiiiPreface
• Chapter 9 describes how Cost–Based Optimization (CBO) isimplemented in Oracle Applications.
• Chapter 10 explains the role of user profiles in OracleApplications.
• Chapter 11 describes how to administer process navigation.
• Chapter 12 explains how you can use document sequences anddynamic currency with your Oracle Applications.
• Chapter 13 describes some of the tools an Oracle Applicationsdeveloper can use.
The Appendixes provide a reference source about the default menus,user profile options, runtime Alerts, and loaders included with OracleSystem Administration. Also, one appendix lists the supportedmultilingual external documents in Oracle Applications. Finally, thereare also appendixes for setting up Oracle Applications andimplementing Oracle System Administration.
Documentation Accessibility
Our goal is to make Oracle products, services, and supportingdocumentation accessible, with good usability, to the disabledcommunity. To that end, our documentation includes features thatmake information available to users of assistive technology. Thisdocumentation is available in HTML format, and contains markup tofacilitate access by the disabled community. Standards will continue toevolve over time, and Oracle Corporation is actively engaged withother market–leading technology vendors to address technicalobstacles so that our documentation can be accessible to all of ourcustomers. For additional information, visit the Oracle AccessibilityProgram Web site at http://www.oracle.com/accessibility/.
Accessibility of Code Examples in Documentation
JAWS, a Windows screen reader, may not always correctly read thecode examples in this document. The conventions for writing coderequire that closing braces should appear on an otherwise empty line;however, JAWS may not always read a line of text that consists solelyof a bracket or brace.
Accessibility of Links to External Web Sites in Documentation
This documentation may contain links to Web sites of other companiesor organizations that Oracle Corporation does not own or control.
xiv Oracle Applications System Administrator’s Guide
Oracle Corporation neither evaluates nor makes any representationsregarding the accessibility of these Web sites.
Other Information Sources
You can choose from many sources of information, including onlinedocumentation, training, and support services, to increase yourknowledge and understanding of Oracle Applications systemadministration.
If this guide refers you to other Oracle Applications documentation,use only the Release 11i versions of those guides.
Online Documentation
All Oracle Applications documentation is available online (HTML orPDF).
• Online Help – The new features section in the HTML helpdescribes new features in 11i. This information is updated foreach new release of Oracle Applications. The new featuressection also includes information about any features that werenot yet available when this guide was printed. For example, ifyour administrator has installed software from a mini–pack oran upgrade, this document describes the new features. Onlinehelp patches are available on OracleMetaLink.
• 11i Features Matrix – This document lists new features availableby patch and identifies any associated new documentation. Thenew features matrix document is available on OracleMetaLink.
• Readme File – Refer to the readme file for patches that you haveinstalled to learn about new documentation or documentationpatches that you can download.
Related User’s Guides
You can read the guides online by choosing Library from theexpandable menu on your HTML help window, by reading from theOracle Applications Document Library CD included in your mediapack, or by using a Web browser with a URL that your systemadministrator provides.
If you require printed guides, you can purchase them from the OracleStore at http://oraclestore.oracle.com.
xvPreface
Guides Related to All Products
Oracle Applications User’s Guide
This guide explains how to enter data, query, run reports, and navigateusing the graphical user interface (GUI) available with this release ofOracle Applications. This guide also includes information on settinguser profiles, as well as running and reviewing reports and concurrentprocesses.
You can access this user’s guide online by choosing ”Getting Startedwith Oracle Applications” from any Oracle Applications help file.
Installation and System Administration
Oracle Applications Concepts
This guide provides an introduction to the concepts, features,technology stack, architecture, and terminology for Oracle ApplicationsRelease 11i. It provides a useful first book to read before an installationof Oracle Applications. This guide also introduces the concepts behindApplications–wide features such as Business Intelligence (BIS),languages and character sets, and Self–Service Web Applications.
Installing Oracle Applications
This guide provides instructions for managing the installation of OracleApplications products. In Release 11i, much of the installation processis handled using Oracle Rapid Install, which minimizes the time toinstall Oracle Applications, the Oracle8 technology stack, and theOracle8i Server technology stack by automating many of the requiredsteps. This guide contains instructions for using Oracle Rapid Installand lists the tasks you need to perform to finish your installation. Youshould use this guide in conjunction with individual product user’sguides and implementation guides.
Upgrading Oracle Applications
Refer to this guide if you are upgrading your Oracle ApplicationsRelease 10.7 or Release 11.0 products to Release 11i. This guidedescribes the upgrade process and lists database and product–specificupgrade tasks. You must be either at Release 10.7
xvi Oracle Applications System Administrator’s Guide
(NCA, SmartClient, or character mode) or Release 11.0, to upgrade toRelease 11i. You cannot upgrade to Release 11i directly from releasesprior to 10.7.
Maintaining Oracle Applications
Use this guide to help you run the various AD utilities, such asAutoUpgrade, AutoPatch, AD Administration, AD Controller, ADRelink, License Manager, and others. It contains how–to steps,screenshots, and other information that you need to run the ADutilities. This guide also provides information on maintaining theOracle applications file system and database.
Oracle Alert User’s Guide
This guide explains how to define periodic and event alerts to monitorthe status of your Oracle Applications data.
Oracle Applications Developer’s Guide
This guide contains the coding standards followed by the OracleApplications development staff. It describes the Oracle ApplicationObject Library components needed to implement the OracleApplications user interface described in the Oracle Applications UserInterface Standards for Forms–Based Products. It also provides informationto help you build your custom Oracle Forms Developer 6i forms so thatthey integrate with Oracle Applications.
Other Implementation Documentation
Oracle Applications Product Update Notes
Use this guide as a reference for upgrading an installation of OracleApplications. It provides a history of the changes to individual OracleApplications products between Release 11.0 and Release 11i. It includesnew features, enhancements, and changes made to database objects,profile options, and seed data for this interval.
Multiple Reporting Currencies in Oracle Applications
If you use the Multiple Reporting Currencies feature to recordtransactions in more than one currency, use this manual, which detailsadditional steps and setup considerations for implementing multiplereporting currencies.
xviiPreface
Multiple Organizations in Oracle Applications
This guide describes how to set up and use various Oracle Applicationsproducts with Oracle Applications’ Multiple Organization supportfeature, so you can define and support different organization structureswhen running a single installation of a product.
Oracle Workflow Guide
This guide explains how to define new workflow business processes aswell as customize existing Oracle Applications–embedded workflowprocesses. You also use this guide to complete the setup steps necessaryfor any Oracle Applications product that includes workflow–enabledprocesses.
Oracle Applications Flexfields Guide
This guide provides flexfields planning, setup and referenceinformation for the Oracle Applications implementation team, as wellas for users responsible for the ongoing maintenance of OracleApplications product data. This manual also provides information oncreating custom reports on flexfields data.
Oracle eTechnical Reference Manuals
Each eTechnical Reference Manual (eTRM) contains database diagramsand a detailed description of database tables, forms, reports, andprograms for a specific Oracle Applications product. This informationhelps you convert data from your existing applications, integrateOracle Applications data with non–Oracle applications, and writecustom reports for Oracle Applications products. Oracle eTRM isavailable on OracleMetalink.
Oracle Applications User Interface Standards for Forms–Based Products
This guide contains the user interface (UI) standards followed by theOracle Applications development staff. It describes the UI for theOracle Applications products and how to apply this UI to the design ofan application built by using Oracle Forms.
xviii Oracle Applications System Administrator’s Guide
Oracle Applications Message Reference Manual
This manual describes all Oracle Applications messages. This manual isavailable in HTML format on the documentation CD–ROM for Release11i.
Training and Support
Training
Oracle offers a complete set of training courses to help you and yourstaff master Oracle Applications and reach full productivity quickly.These courses are organized into functional learning paths, so you takeonly those courses appropriate to your job or area of responsibility.
You have a choice of educational environments. You can attend coursesoffered by Oracle University at any one of our many EducationCenters, you can arrange for our trainers to teach at your facility, oryou can use Oracle Learning Network (OLN), Oracle University’sonline education utility. In addition, Oracle training professionals cantailor standard courses or develop custom courses to meet your needs.For example, you may want to use your organization structure,terminology, and data as examples in a customized training sessiondelivered at your own facility.
Support
From on–site support to central support, our team of experiencedprofessionals provides the help and information you need to keepOracle Applications working for you. This team includes yourTechnical Representative and Account Manager, and Oracle’s large staffof consultants and support specialists with expertise in your businessarea, managing an Oracle8i server, and your hardware and softwareenvironment.
Do Not Use Database Tools to Modify Oracle Applications Data
Oracle STRONGLY RECOMMENDS that you never use SQL*Plus,Oracle Data Browser, database triggers, or any other tool to modifyOracle Applications data unless otherwise instructed.
Oracle provides powerful tools you can use to create, store, change,retrieve, and maintain information in an Oracle database. But if you useOracle tools such as SQL*Plus to modify Oracle Applications data, you

xixPreface
risk destroying the integrity of your data and you lose the ability toaudit changes to your data.
Because Oracle Applications tables are interrelated, any change youmake using Oracle Applications can update many tables at once. Butwhen you modify Oracle Applications data using anything other thanOracle Applications, you may change a row in one table withoutmaking corresponding changes in related tables. If your tables get outof synchronization with each other, you risk retrieving erroneousinformation and you risk unpredictable results throughout OracleApplications.
When you use Oracle Applications to modify your data, OracleApplications automatically checks that your changes are valid. OracleApplications also keeps track of who changes information. If you enterinformation into database tables using database tools, you may storeinvalid information. You also lose the ability to track who has changedyour information because SQL*Plus and other database tools do notkeep a record of changes.
About Oracle
Oracle Corporation develops and markets an integrated line ofsoftware products for database management, applicationsdevelopment, decision support, and office automation, as well asOracle Applications, an integrated suite of more than 160 softwaremodules for financial management, supply chain management,manufacturing, project systems, human resources and customerrelationship management.
Oracle products are available for mainframes, minicomputers, personalcomputers, network computers and personal digital assistants,allowing organizations to integrate different computers, differentoperating systems, different networks, and even different databasemanagement systems, into a single, unified computing and informationresource.
Oracle is the world’s leading supplier of software for informationmanagement, and the world’s second largest software company. Oracleoffers its database, tools, and applications products, along with relatedconsulting, education, and support services, in over 145 countriesaround the world.
xx Oracle Applications System Administrator’s Guide
Your Feedback
Thank you for using Oracle Applications and this user’s guide.
Oracle values your comments and feedback. At the end of this guide isa Reader’s Comment Form you can use to explain what you like ordislike about Oracle Applications system administration or this user’sguide. Mail your comments to the following address or call us directlyat (650) 506–7000.
Oracle Applications Documentation ManagerOracle Corporation500 Oracle ParkwayRedwood Shores, CA 94065U.S.A.
Or, send electronic mail to [email protected].
C H A P T E R
1 T
1 – 1What Is System Administration?
What Is SystemAdministration?
his chapter briefly describes the job of an Oracle ApplicationsSystem Administrator, and contrasts it with the job of an OracleDatabase Administrator.
1 – 2 Oracle Applications System Administrator’s Guide
What Is System Administration?
A System Administrator is a person responsible for controlling access toOracle Applications and assuring smooth ongoing operation. Each sitewhere Oracle Applications is installed needs a system administrator toperform tasks such as:
• Managing and controlling security. Decide which users haveaccess to each application, and within an application, whichforms, functions, and reports a user can access.
• Setting up new users. Register new Oracle Applications users,and give them access to only those forms, functions, and reportsthey need to do their jobs.
• Auditing user activity. Monitor what users are doing and whenthey do it. Choose who to audit and what type of data to audit.
• Setting user profiles. A user profile is a set of changeable optionsthat affects the way Oracle Applications look and behave. ASystem Administrator can set user profile values at the site,application, responsibility, and user levels.
• Managing concurrent processing. Concurrent Processing is anOracle Applications facility that lets long–running, data–intensivetasks run simultaneously with online operations, taking fulladvantage of multitasking and parallel processing. A SystemAdministrator can monitor and control concurrent processingusing a few simple forms.
System vs. Database Administrator
You can think of Oracle Applications as having two sides: a front endthat users see and work with, and a back end where data manipulationis performed.
The natural division between user applications and the underlyingdatabase structures results in two separate job functions: systemadministrator, and database administrator.
An Oracle Applications System Administrator administers the userinterface or applications side of Oracle Applications.
An Oracle Database Administrator (DBA) administers the data thatusers enter, update, and delete while using Oracle Applications.
C H A P T E R
2 T
2 – 1Managing Oracle Applications Security
Managing OracleApplications Security
his chapter explains how to secure access to the data andfunctionality within your Oracle Applications. The key element inOracle Applications security is the definition of a responsibility. Aresponsibility defines:
• Application database privileges
• An application’s functionality that is accessible
• The concurrent programs and reports that are available
As System Administrator you define application users, and assign oneor more responsibilities to each user.
This chapter begins with an essay explaining security in OracleApplications. Afterwards, major topics are explained in greater detail,along with descriptions of the forms you use to implement security inOracle Applications. Some topics will refer you to other chapters whichcontain more detailed information, as well as relevant form descriptions.
2 – 2 Oracle Applications System Administrator’s Guide
Overview of Oracle Applications SecurityAs System Administrator, you define Oracle Applications users, andassign one or more responsibilities to each user.
Defining Application Users
You allow a new user to sign–on to Oracle Applications by defining anapplication user. An application user has a username and a password.You define an initial password, then the first time the application usersigns on, they must enter a new (secret) password.
When you define an application user, you assign to the user one or moreresponsibilities. If you assign only one responsibility, the user, aftersigning on, immediately enters an application.
If you assign two or more responsibilities, the user, after signing on, seesa window listing available responsibilities.
Responsibilities define Application Privileges
A responsibility is a level of authority in Oracle Applications that letsusers access only those Oracle Applications functions and dataappropriate to their roles in an organization. Each responsibility allowsaccess to:
• A specific application or applications, such as Oracle GeneralLedger or Oracle Planning.
• A set of books, such as U.S. Operations or German Sales or anorganization, such as New York Manufacturing or New YorkDistribution.
• A restricted list of windows that a user can navigate to; forexample, a responsibility may allow certain Oracle Planning usersto enter forecast items, but not enter master demand scheduleitems.
• A restricted list of functions a user can perform. For example,two responsibilities may have access to the same window, but oneresponsibility’s window may have additional function buttonsthat the other responsibility’s window does not have.
• Reports in a specific application; as system administrator, you canassign groups of reports to one or more responsibilities, so theresponsibility a user choose determines the reports that can besubmitted.
Each user has at least one or more responsibilities and several users canshare the same responsibility. A system administrator can assign users
2 – 3Managing Oracle Applications Security
any of the standard responsibilities provided with Oracle Applications,or create new custom responsibilities.
HRMS Security
The Human Resources Management Systems (HRMS) products have anadditional feature using Security Groups. For more information, seeSetting up Security for Applications Using Some HRMS Windows.
The Human Resources Management Systems (HRMS) products have anadditional feature using Security Groups. For more information, seeCustomizing, Reporting, and System Administration in Oracle HRMS.
Data Group (required)
Request Security Group (optional)
Menu (required)
Function and Menu Exclusions (optional)
2 – 4 Oracle Applications System Administrator’s Guide
Defining a ResponsibilityWhen you define a responsibility, you assign to it some or all of thecomponents described below:
A Data Group defines the mapping between Oracle Applicationsproducts and ORACLE IDs. A Data Group determines which Oracledatabase accounts a responsibility’s forms, concurrent programs, andreports connect to. See: Defining Data Groups: page 4 – 30.
A request security group defines the concurrent programs, includingrequests and request sets, that may be run by an application user undera particular responsibility. See: Defining a Request Security Group: page 2 – 6. See: Organizing Programs into Request Groups: page 4 – 19.
A menu is a hierarchical arrangement of application functions (forms)that displays in the Navigate window. Menus can also point tonon–form functions (subfunctions) that do not display in the Navigatewindow, but that define the range of application functionality availablefor a responsibility. Each responsibility is associated with a menu. See:Overview of Function Security: page 2 – 22.
A responsibility may optionally have function and menu exclusion rulesassociated with it to restrict the application functionality enabled forthat responsibility. See: Overview of Function Security: page 2 – 22.
Additional Notes About Responsibilities
Predefined Responsibilities
All Oracle Applications products are installed with predefinedresponsibilities. Consult the reference guide for your OracleApplications product for the names of those predefined responsibilities.
Additionally, instances of the major components that help define aresponsibility (data groups, request security groups, menus, andfunctions) are predefined for Oracle Applications.
Responsibilities and Request Security Groups
When a request group is assigned to a responsibility, it becomes a requestsecurity group.
From a standard submission form, such as the Submit Requests form,users can run only the reports, concurrent programs, and request setsthat are in their responsibility’s request security group.
2 – 5Managing Oracle Applications Security
• If you do not include the Submit Requests form on the menu for aresponsibility, then you do not need to assign a request securitygroup to the responsibility.
• If a request security group is not assigned to a responsibility, thenusers working under that responsibility cannot run any reports,request sets, or other concurrent programs from a standardsubmission form.
Responsibilities and Function Security
Oracle Applications GUI–based architecture aggregates several relatedbusiness functions into a single form. Parts of an application’sfunctionality may be identified as individual Oracle Applicationsfunctions, which can then be secured (i.e., included or excluded from aresponsibility).
See: Overview of Function Security: page 2 – 22
2 – 6 Oracle Applications System Administrator’s Guide
Defining a Request Security GroupBeyond this short introduction, request groups and request securitygroups are discussed in greater detail, as part of a broader range oftopics not necessarily limited to application security, in Chapter 7 –Managing Concurrent Programs and Reports.
See:
Organizing Programs into Request Groups: page 4 – 19
Request Groups: page 4 – 59
Using Request Security
You use request security to specify the reports, request sets, andconcurrent programs that your users can run from a standardsubmission form, such as the Submit Requests form.
To set up request security, you define a request group using the RequestGroups form. Using the Responsibilities form, you assign the requestgroup to a responsibility. The request group is then referred to as arequest security group. See: Request Security Groups: page 4 – 19.
You can define a request group to contain single requests, request sets,or all the requests and request sets in an application.
If you choose to include all the requests and requests sets in anapplication, the user has automatic access to any new requests andrequest sets (without owners) in the future.
A request security group can contain requests and request sets fromdifferent applications. If you want to define request security groups thatown requests from different applications, please refer to the discussionon Data Groups. See: Defining Data Groups: page 4 – 30.
Note: A request security group or request group is not the same asa security group.
Individual Requests and Request Sets
Reports or concurrent programs that are not included in a requestsecurity group on an individual basis, but that do belong to a request setincluded in a request security group, have the following privileges:
• Users cannot use the Submit Requests form to run single requestsand request sets that are not in their responsibility’s requestsecurity group.
• Users can, however, run request sets that contain requests that arenot in their request security group, if the request set is in theirrequest security group.
2 – 7Managing Oracle Applications Security
If you assign a request set, but not the requests in the set, to a requestsecurity group, the user:
• cannot edit request information in the request set definition
• cannot stop specific requests in the set from running
• can edit the request set by deleting requests from it or addingother requests to it, only if the user is the assigned owner of therequest set
The Request Security Groups figure illustrates the relationship betweena request security group, application user, and a responsibility.

2 – 8 Oracle Applications System Administrator’s Guide
RequestGroup Responsibility
User
Reports
Request sets
ConcurrentPrograms
Responsibility
RequestSecurityGroup
System Administrator groupsreports, request sets, and concurrent programs together tocreate a Request Group.
When the SystemAdministrator assigns theRequest Group to aresponsibility, it becomes aRequest Security Group.
System Administrator assigns the responsibility to a user.
User signs on and selects the responsibility.
The standard submission report form (e.g., Sub-mit Requests) lists reports, request sets, andconcurrent programs belonging to theresponsibility’s Request Security Group.
Reports
Request Sets
ConcurrentPrograms
Request SecurityGroups
2 – 9Managing Oracle Applications Security
User Session Limits
Using the following profile options you can specify limits on usersessions.
ICX:Session Timeout
Use this profile option to enforce an inactivity time–out. If a userperforms no Oracle Applications operation for a time period longer thanthe time–out value (specified in minutes), the user’s session is disabled.The user is provided an opportunity to re–authenticate and re–enable atimed–out session. If re–authentication is successful, the session isre–enabled and no work is lost. Otherwise, Oracle Applications exitswithout saving pending work.
If this profile option to 0 or NULL, then user sessions will never time outdue to inactivity.
ICX: Limit time
Use this profile option to specify the absolute maximum length of time(in hours) of any user session, active or inactive.
ICX: Limit connect
Use this profile option to specify the absolute maximum number ofconnection requests a user can make in a single session.
See Also
Profile Options in Oracle Application Object Library: page A – 2
2 – 10 Oracle Applications System Administrator’s Guide
Responsibilities Window
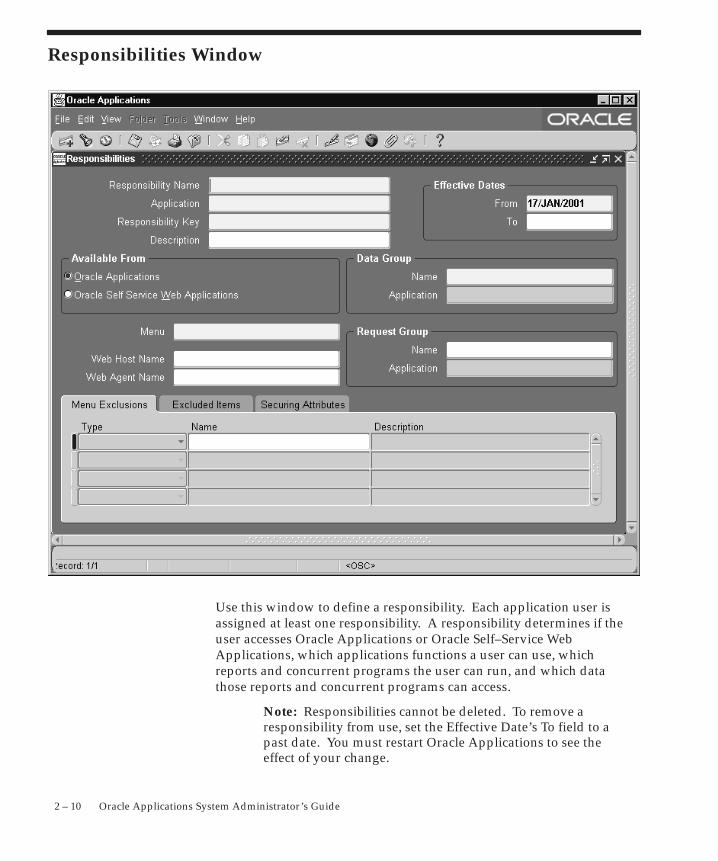
Use this window to define a responsibility. Each application user isassigned at least one responsibility. A responsibility determines if theuser accesses Oracle Applications or Oracle Self–Service WebApplications, which applications functions a user can use, whichreports and concurrent programs the user can run, and which datathose reports and concurrent programs can access.
Note: Responsibilities cannot be deleted. To remove aresponsibility from use, set the Effective Date’s To field to apast date. You must restart Oracle Applications to see theeffect of your change.
2 – 11Managing Oracle Applications Security
See: Overview of Function Security: page 2 – 22
Prerequisites
• Use the Data Groups window to list the ORACLE usernameyour responsibility’s concurrent programs reference on anapplication–by–application basis.
• Use the Request Groups window to define the Request Groupyou wish to make available with this responsibility.
• Use the Menus window to view the predefined Menu you couldchoose to assign to this responsibility.
Responsibilities Block
An application name and a responsibility name uniquely identify aresponsibility.
Responsibility Name
If you have multiple responsibilities, a pop–up window includes thisname after you sign on.
Application
This application name does not prevent the user of this responsibilityfrom accessing other applications’ forms and functions if you define themenu to access other applications.
Responsibility Key
This is a unique name for a responsibility that is used by loaderprograms. Loaders are concurrent programs used to ”load” suchinformation as messages, user profiles and user profile values into yourOracle Applications tables. To help ensure that your responsibility keyis unique throughout your system, begin each Responsibility Key namewith the application short name associated with this responsibility.
Effective Dates
From/To
Enter the start/end dates on which the responsibility becomesactive/inactive. The default value for the start date is the current date,
2 – 12 Oracle Applications System Administrator’s Guide
and if you do not enter an end date, the responsibility is validindefinitely.
You cannot delete a responsibility because its information helps toprovide an audit trail. You can deactivate a responsibility at any timeby setting the end date to the current date. If you wish to reactivate theresponsibility, change the end date to a date after the current date, orclear the end date.
Available From
A responsibility may be associated with only one applications system.Select between Oracle Self–Service Web Applications or OracleApplications.
Data Group
Name/Application
The data group defines the pairing of application and ORACLEusername.
Select the application whose ORACLE username forms connect towhen you choose this responsibility. The ORACLE usernamedetermines the database tables and table privileges accessible by yourresponsibility. Transaction managers can only process requests fromresponsibilities assigned the same data group as the transactionmanager.
Menu
The menu whose name you enter must already be defined with OracleApplications. See: Menus: page 2 – 38.
Web Host Name
If your Web Server resides on a different machine from your database,you must designate the host name (URL) here. Otherwise, the WebHost Name defaults to the current database host server.
Web Agent Name
Enter the PL/SQL Agent Name for the database used by thisresponsibility. If you do not specify an Agent Name, the responsibilitydefaults to the agent name current at log–on.
2 – 13Managing Oracle Applications Security
Request Group
Name/Application
If you do not assign a request security group to this responsibility, auser with this responsibility cannot run requests, request sets, orconcurrent programs from the Submit Requests window, except forrequest sets owned by the user. The user can access requests from aSubmit Requests window you customize with a request group codethrough menu parameters.
See:
Overview of Oracle Applications Security: page 2 – 2
Customizing the Submit Requests Window Using Codes: page 4 – 20
Request Groups: page 4 – 59
Menu Exclusions Block
Define function and menu exclusion rules to restrict the applicationfunctionality accessible to a responsibility.
Type
Select either Function or Menu as the type of exclusion rule to applyagainst this responsibility.
• When you exclude a function from a responsibility, alloccurrences of that function throughout the responsibility’smenu structure are excluded.
• When you exclude a menu, all of its menu entries, that is, all thefunctions and menus of functions that it selects, are excluded.
Name
Select the name of the function or menu you wish to exclude from thisresponsibility. The function or menu you specify must already bedefined in Oracle Applications.
2 – 14 Oracle Applications System Administrator’s Guide
Self–Service Applications Security
Oracle Self–Service Web Applications uses columns, rows and values indatabase tables to define what information users can access. Tablecolumns represent ”attributes” that can be assigned to a responsibilityas Securing Attributes or Excluded Attributes. These attributes aredefined in the Web Application Dictionary.
See Also
Data Security: (Oracle Self–Service Applications for the Web User’s Guide)
Defining Attributes: (Oracle Self–Service Applications for the Web User’sGuide)
Excluded Items
Use the List of Values to select valid attributes. You can assign anynumber of Excluded Attributes to a responsibility.
Securing Attributes
Use the List of Values to select valid attributes. You may assign anynumber of securing attributes to the responsibility.
2 – 15Managing Oracle Applications Security
Overview of Security Groups
Security Groups are used by Oracle HRMS only.
Security groups allows for data to be partitioned in a single installation.A single installation can use a particular set of configuration data, butstore data for multiple clients, where the data is partitioned by securitygroups. A user with an assignment of one security group can onlyaccess data within that security group.
A security group represents a distinct client or business entity. Data thatmust be distinct for each client in an installation is partitioned bysecurity group. All other data is shared across all security groups.
Security is maintained at the level of responsibility/security group pairs.That is, users are assigned specific responsibilities within each securitygroup. A user may be assigned a global responsibility that is valid in allsecurity groups. When signing on to Oracle Applications, a user, ifassigned more than one responsibility, will be asked to choose aresponsibility and security group pair. Partitioned data accessedthrough security group sensitive views will show only data assigned tothe current security group.
Defining Security Groups
Every installation will have a single ”Standard” security group seededin. If no other security groups are created, this single group will behidden from users when they sign on.
In the Users form, you assign a security group when you assign aresponsibility.
See Also
Customizing, Reporting, and System Administration in Oracle HRMS
2 – 16 Oracle Applications System Administrator’s Guide
Security Groups Window
This form is for HRMS security only.
For more information on setting up system administration for theHRMS products, see Customizing, Reporting, and System Administrationin Oracle HRMS.
2 – 17Managing Oracle Applications Security
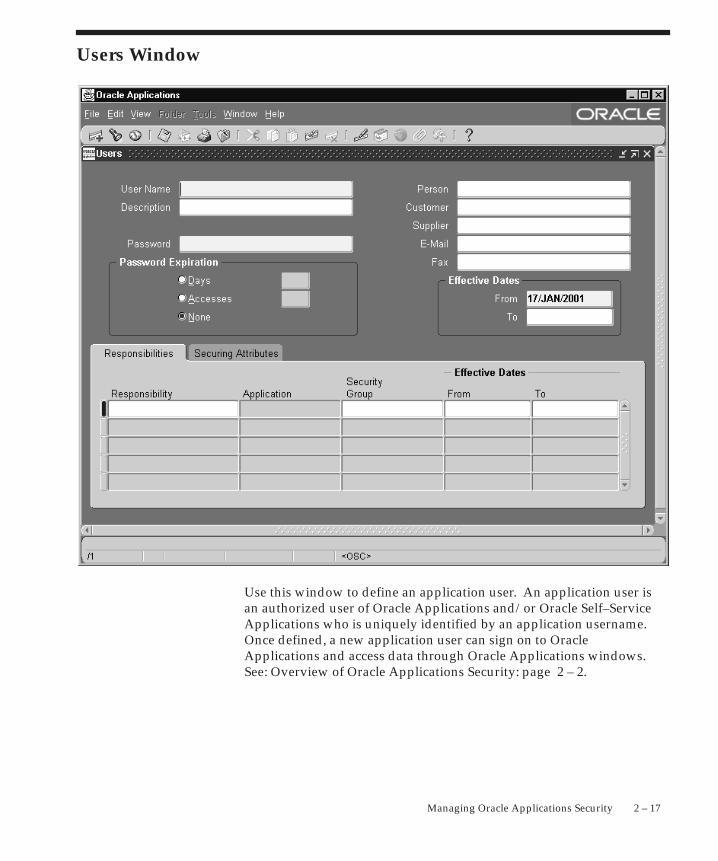
Users Window
Use this window to define an application user. An application user isan authorized user of Oracle Applications and/or Oracle Self–ServiceApplications who is uniquely identified by an application username.Once defined, a new application user can sign on to OracleApplications and access data through Oracle Applications windows.See: Overview of Oracle Applications Security: page 2 – 2.
2 – 18 Oracle Applications System Administrator’s Guide
Users Block
User Name
Enter the name of an application user. An application user enters thisusername to sign on to Oracle Applications.
• The username must not contain more than one word.
• You should use only alphanumeric characters (’A’ through ’Z’,and ’0’ through ’9’) in the username.
Please note that you must limit your username to the set of charactersthat your operating system supports for filenames.
Suggestion: We recommend that you define meaningfulusernames, such as the employee’s first initial followed by theirlast name. Or, for a group account, you can define theapplication username so as to indicate the purpose or nature ofthe group account.
Password
Enter the initial password of an application user. An application userenters this password along with her or his username to sign on toOracle Applications.
• A password must be at least five (5) characters and can be up tothirty (30) characters.
• All characters are allowed except control characters, which arenon–printable. Oracle encourages the use of non–alphanumericcharacters because they add complexity, making passwordsharder to guess.
This window does not display the password you enter. After you entera password, you must re–enter it to ensure you did not make a typingerror.
If the application user already exists and the two entries do not match,the original password is NOT changed, and you navigate automaticallyto the next field.
If you are defining a new application user and the two entries do notmatch, you are required to enter the password again. For a new user,you cannot navigate to the next field until the two entries match.
The first time an application user signs on, they must change his or herpassword. If a user forgets their password, you can reassign a newpassword in this field.
Password Expiration
2 – 19Managing Oracle Applications Security
As System Administrator, you can set an initial password or change anexisting password, but you cannot access the user’s chosen password.
You can set the minimum length of Oracle Applications user passwordsusing the profile option Signon Password Length. If this profile optionis left unset, the minimum length defaults to 5.
You can set the minimum number of days that a user must wait beforebeing allowed to reuse a password with the Signon Password No Reuseprofile option.
You can use the profile option Signon Password Hard to Guess to setrules for choosing passwords to ensure that they will be ”hard toguess.” A password is considered hard-to-guess if it follows theserules:
• The password contains at least one letter and at least onenumber.
• The password does not contain the username.
• The password does not contain repeating characters.
For more information on these profile options, see: Profile Options inOracle Application Object Library page: A – 2.
Person, Customer, and Supplier
Use these fields to enter the name of an employee (person), customer,or supplier contact. Enter the last name and first name, separated by acomma, of the employee, customer, or supplier who is using thisapplication username and password. Use the List of Values to select avalid name.
E–Mail/Fax
Enter the E–mail address and/or fax number for this user.
Days
Enter the maximum number of days between password changes. Apop–up window prompts an application user to change her or hispassword after the maximum number of days you specify has elapsed.
Accesses
Enter the maximum allowed number of sign–ons to OracleApplications allowed between password changes. A pop–up window
Effective Dates
2 – 20 Oracle Applications System Administrator’s Guide
prompts an application user to change her or his password after themaximum number of accesses you specify has elapsed.
Suggestion: We recommend that you require applicationusers to make frequent password changes. This reduces thelikelihood of unauthorized access to Oracle Applications.
From/To
The user cannot sign onto Oracle Applications before the start date andafter the end date. The default for the start date is the current date. Ifyou do not enter an end date, the username is valid indefinitely.
You cannot delete an application user from Oracle Applicationsbecause this information helps to provide an audit trail. You candeactivate an Oracle Applications user at any time by setting the EndDate to the current date.
If you wish to reactivate a user, change the End Date to a date after thecurrent date, or clear the End Date field.
Responsibilities Block
Responsibility
Select the name of a responsibility you wish to assign to this applicationuser. A responsibility is uniquely identified by application name andresponsibility name.
Security Group
This field is for HRMS security only. See: Customizing, Reporting, andSystem Administration in Oracle HRMS.
From/To
You cannot delete a responsibility because this information helps toprovide an audit trail. You can deactivate a user’s responsibility at anytime by setting the End Date to the current date.
If you wish to reactivate the responsibility for the user, change the EndDate to a date after the current date, or clear the End Date.

2 – 21Managing Oracle Applications Security
Securing Attributes
Securing attributes are used by Oracle Self–Service Web Applications toallow rows (records) of data to be visible to specified users orresponsibilities based on the specific data (attribute values) containedin the row.
You may assign one or more values for any of the securing attributesassigned to the user. If a securing attribute is assigned to both aresponsibility and to a user, but the user does not have a value for thatsecuring attribute, no information is returned for that attribute.
For example, to allow a user in the ADMIN responsibility to see rowscontaining a CUSTOMER_ID value of 1000, assign the securingattribute of CUSTOMER_ID to the ADMIN responsibility. Then givethe user a security attribute CUSTOMER_ID value of 1000.
When the user logs into the Admin responsibility, the only customerdata they have access to has a CUSTOMER_ID value of 1000.
Attribute
Select an attribute you want used to determine which records this usercan access. You can select from any of the attributes assigned to theuser’s responsibility.
Value
Enter the value for the attribute you want used to determine whichrecords this user can access.
2 – 22 Oracle Applications System Administrator’s Guide
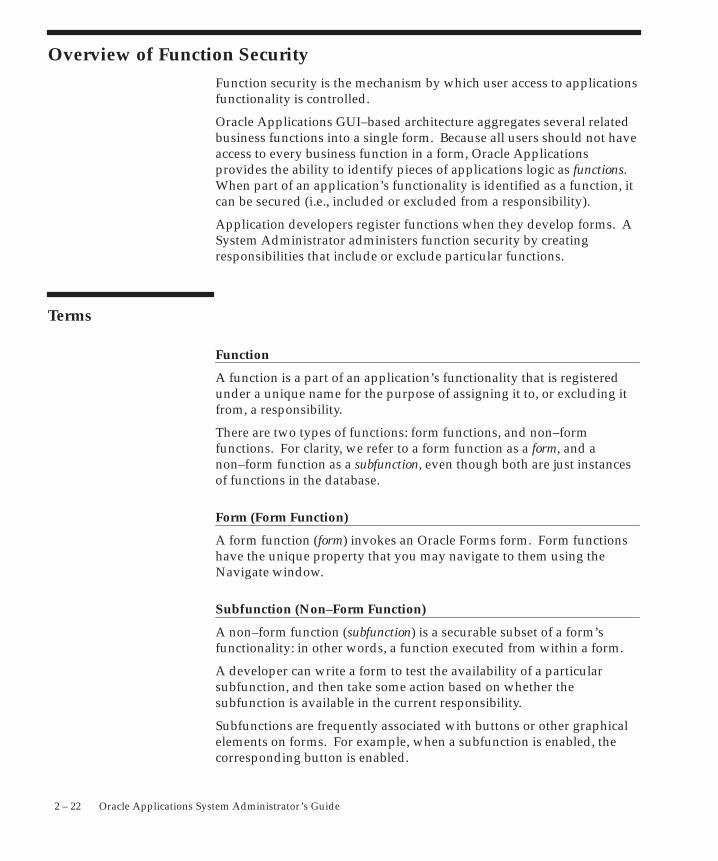
Overview of Function SecurityFunction security is the mechanism by which user access to applicationsfunctionality is controlled.
Oracle Applications GUI–based architecture aggregates several relatedbusiness functions into a single form. Because all users should not haveaccess to every business function in a form, Oracle Applicationsprovides the ability to identify pieces of applications logic as functions.When part of an application’s functionality is identified as a function, itcan be secured (i.e., included or excluded from a responsibility).
Application developers register functions when they develop forms. ASystem Administrator administers function security by creatingresponsibilities that include or exclude particular functions.
Terms
Function
A function is a part of an application’s functionality that is registeredunder a unique name for the purpose of assigning it to, or excluding itfrom, a responsibility.
There are two types of functions: form functions, and non–formfunctions. For clarity, we refer to a form function as a form, and anon–form function as a subfunction, even though both are just instancesof functions in the database.
Form (Form Function)
A form function (form) invokes an Oracle Forms form. Form functionshave the unique property that you may navigate to them using theNavigate window.
Subfunction (Non–Form Function)
A non–form function (subfunction) is a securable subset of a form’sfunctionality: in other words, a function executed from within a form.
A developer can write a form to test the availability of a particularsubfunction, and then take some action based on whether thesubfunction is available in the current responsibility.
Subfunctions are frequently associated with buttons or other graphicalelements on forms. For example, when a subfunction is enabled, thecorresponding button is enabled.

Figure 2 – 1
2 – 23Managing Oracle Applications Security
However, a subfunction may be tested and executed at any time duringa form’s operation, and it need not have an explicit user interfaceimpact. For example, if a subfunction corresponds to a form procedurenot associated with a graphical element, its availability is not obvious tothe form’s user.
Subfunctions are executed from within a Form.
Form Function
For example, logic executedby pressing a Button.
Copy
Window
Subfunction
Menu
A menu is a hierarchical arrangement of functions and menus offunctions. Each responsibility has a menu assigned to it.
Menu Entry
A menu entry is a menu component that identifies a function or a menuof functions. In some cases, both a function and a menu of functionscorrespond to the same menu entry. For example, both a form and itsmenu of subfunctions can occupy the same menu entry.
Responsibility
A responsibility defines an application user’s current privileges whileworking with Oracle Applications. When an application user signs on,they select a responsibility that grants certain privileges, specifically:
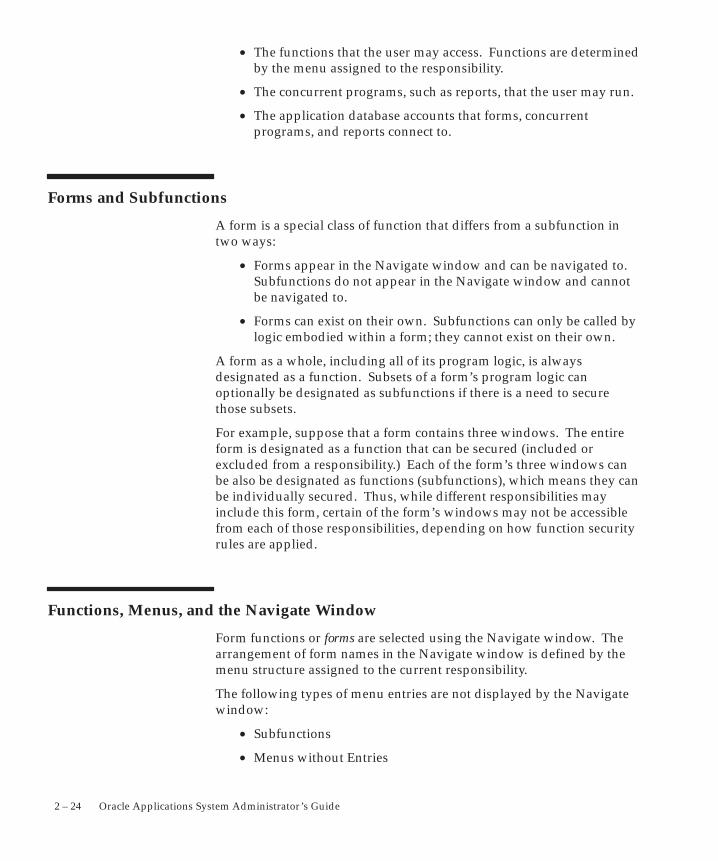
2 – 24 Oracle Applications System Administrator’s Guide
• The functions that the user may access. Functions are determinedby the menu assigned to the responsibility.
• The concurrent programs, such as reports, that the user may run.
• The application database accounts that forms, concurrentprograms, and reports connect to.
Forms and Subfunctions
A form is a special class of function that differs from a subfunction intwo ways:
• Forms appear in the Navigate window and can be navigated to.Subfunctions do not appear in the Navigate window and cannotbe navigated to.
• Forms can exist on their own. Subfunctions can only be called bylogic embodied within a form; they cannot exist on their own.
A form as a whole, including all of its program logic, is alwaysdesignated as a function. Subsets of a form’s program logic canoptionally be designated as subfunctions if there is a need to securethose subsets.
For example, suppose that a form contains three windows. The entireform is designated as a function that can be secured (included orexcluded from a responsibility.) Each of the form’s three windows canbe also be designated as functions (subfunctions), which means they canbe individually secured. Thus, while different responsibilities mayinclude this form, certain of the form’s windows may not be accessiblefrom each of those responsibilities, depending on how function securityrules are applied.
Functions, Menus, and the Navigate Window
Form functions or forms are selected using the Navigate window. Thearrangement of form names in the Navigate window is defined by themenu structure assigned to the current responsibility.
The following types of menu entries are not displayed by the Navigatewindow:
• Subfunctions
• Menus without Entries
2 – 25Managing Oracle Applications Security
• Menu Entries without a Prompt
If none of the entries on a menu are displayed by the Navigate window,the menu itself is not displayed.
Menu Entries with a Submenu and Functions
If a menu entry has both a submenu and a function defined on the sameline, then the behavior depends on whether or not the function isexecutable. If it is executable, then the submenu on the same line istreated as content to be rendered by the function. The submenu will notappear on a navigation tree, but will be available in function securitytests (FND_FUNCTION.TEST calls). If the function is not executable,then it is treated as a ”tag” for enforcing exclusion rules, and thesubmenu on the same line is displayed in the navigation tree.
A function is considered executable if it can be executed directly fromthe current running user interface. For example, an Oracle Applicationsform using Oracle Forms is an executable function from within OracleForms, but not within the Self Service applications.
How Function Security Works
Developers Register Functions
• Developers can require parts of their Oracle Forms code to lookup a unique function name, and then take some action based onwhether the function is available in the current responsibility.
• Developers register functions. They can also register parametersthat pass values to a function. For example, a form may supportdata entry only when a function parameter is passed to it.
Warning: In general, System Administrators should notmodify parameters passed to functions that are predefined aspart of the Oracle Applications products. The few cases wherefunction parameters may be modified by a SystemAdministrator are documented in the relevant technicalreference manual or product update notes.
• Typically, developers define a menu including all the functionsavailable in an application (i.e., all the forms and their securablesubfunctions). For some applications, developers may defineadditional menus that restrict the application’s functionality byomitting specific forms and subfunctions.

2 – 26 Oracle Applications System Administrator’s Guide
• When developers define menus of functions, they typically groupthe subfunctions of a form on a subfunction menu they associatewith the form.
System Administrators Exclude Functions
• Each Oracle Applications product is delivered with one or morepredefined menu hierarchies. System Administrators can assigna predefined menu hierarchy to a responsibility. To tailor aresponsibility, System Administrators exclude functions or menusof functions from that responsibility using exclusion rules.
• If System Administrators cannot create the desired menu byapplying exclusion rules to a predefined menu, they can define anew menu hierarchy. In this case, we recommend that theyconstruct their menu hierarchy using forms and their associatedmenus of subfunctions. In other words, System Administratorsshould leave the developer–defined associations between formsand their menus intact.
Available Functions Depend on the Current Responsibility
• When a user first selects or changes their responsibility, a list offunctions obtained from the responsibility’s menu structure iscached in memory.
• Functions a System Administrator has excluded from the currentresponsibility are marked as unavailable.
• Form functions in the function hierarchy (i.e., menu hierarchy) aredisplayed in the Navigate window. Available subfunctions areaccessed by working with the application’s forms.
Visibility of Excluded Functions
Some subfunctions are associated with a graphical element, for example,a button, and their exclusion may result in:
• the dimming of the button
• the absence of the button.
Other subfunctions may not correspond to a graphical element, andtheir exclusion may not be obvious to an end user.
2 – 27Managing Oracle Applications Security
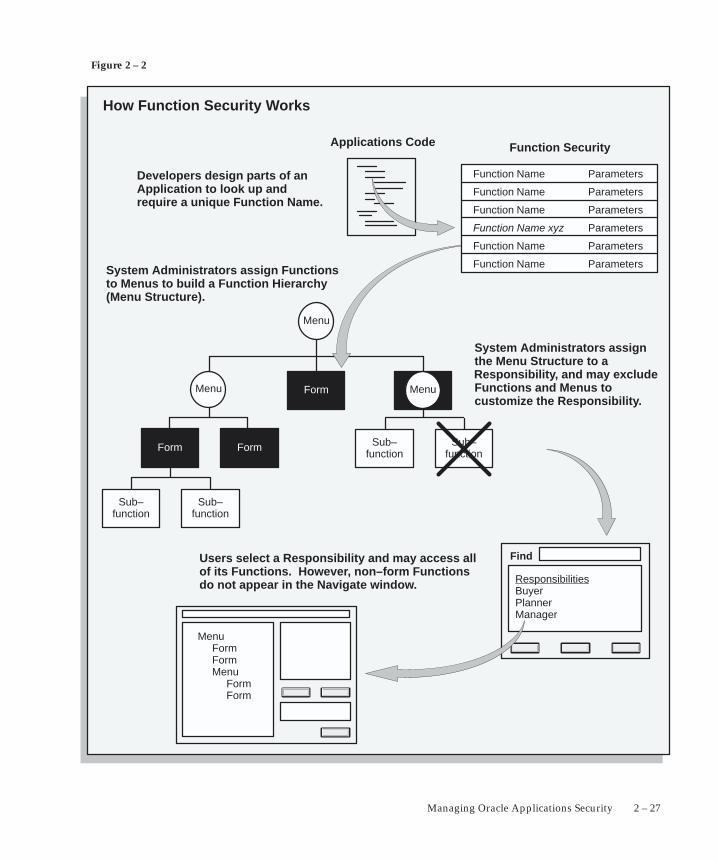
Figure 2 – 2
System Administrators assign Functionsto Menus to build a Function Hierarchy(Menu Structure).
Developers design parts of anApplication to look up and require a unique Function Name.
Applications Code
Users select a Responsibility and may access allof its Functions. However, non–form Functionsdo not appear in the Navigate window.
System Administrators assignthe Menu Structure to a Responsibility, and may excludeFunctions and Menus to customize the Responsibility.
ResponsibilitiesBuyerPlannerManager
Find
How Function Security Works
FormMenu
Form
Menu
Menu
Form
Sub–function
Sub–function
Sub–function
Sub–function
Function Name Parameters
Function Name Parameters
Function Name Parameters
Function Name xyz Parameters
Function Name Parameters
Function Name Parameters
Function Security
MenuForm
Form Menu
Form Form
2 – 28 Oracle Applications System Administrator’s Guide
Implementing Function Security
A ”full access” responsibility with a menu that includes all the functionsin an application is predefined for each Oracle Applications product.Some applications may provide additional predefined responsibilitiesthat include a smaller set of functions (i.e., fewer forms andsubfunctions).
As a System Administrator, you can restrict the functionality aresponsibility provides by defining rules to exclude specific functions ormenus of functions. In fact, we recommend that you use exclusion rulesto customize a responsibility in preference to constructing a new menuhierarchy for that responsibility.
For example, suppose you want to customize a responsibility to restrictthe functionality of a form included in that responsibility. First, youexamine the predefined menus that group the subfunctions associatedwith that form. Then, using exclusion rules, you can restrict the form’sfunctionality by excluding certain of the form’s subfunctions from theresponsibility.
If you cannot create the responsibility you need by applying exclusionrules, you may build a custom menu for that responsibility usingpredefined forms (i.e., form functions) and their associated menus ofsubfunctions. However, we recommend that you do not disassociate aform from its developer–defined menus of subfunctions.
Securing Functions Using Predefined Menus
Use the Responsibilities form to:
• Limit a predefined responsibility’s functionality by excludingmenus and functions from it.
• Define a new responsibility and assign a predefined menu to it.Customize the new responsibility’s functionality by excludingmenus and functions.
• By assigning the same menu hierarchy to different responsibilitiesand excluding different functions and menus, you can easilycustomize an application’s functionality.
Securing Functions Using New Menus
Use the Menus form to define menus pointing to functions that youwant to make available to a new responsibility.
• Use forms and their associated menus of subfunctions to definenew menus.
2 – 29Managing Oracle Applications Security
Assign the menu structure to a new responsibility using theResponsibilities form.
• For that responsibility, tailor a form’s functionality by excludingparticular subfunctions.
• By excluding a subfunction executed from within a form, thefunctionality of that form can be varied from one responsibility toanother.
• By applying exclusion rules to the predefined menus ofsubfunctions associated with a form, you can easily customize aform’s functionality.
Excluding Functions from a Responsibility
A system administrator may exclude functions or menus from the menustructure assigned to a responsibility.
• When a menu is excluded, all of its menu entries, that is, all thefunctions and menus of functions that it selects, are excluded.
• When you exclude a function from a responsibility, alloccurrences of that function throughout the responsibility’s menustructure are excluded.
Defining a New Menu Structure
When defining a new menu structure:
• Create a logical, hierarchical listing of functions. This allows foreasy exclusion of functions when customizing the menu structurefor different responsibilities.
• Create a logical, hierarchical menu that guides users to theirapplication forms.
Tasks for Defining a Custom Menu Structure
• Determine the application functionality required for different jobresponsibilities.
• Identify predefined menus, forms, and form subfunctions to useas entries when defining a new menu. Understand predefinedmenus by printing Menu Reports using the Submit Requestswindow.
Suggestion: To simplify your work, use predefined menus foryour menu entries. You can exclude individual functions after amenu structure is assigned to a responsibility.
2 – 30 Oracle Applications System Administrator’s Guide
• Plan your menu structure. Sketch out your menu designs.
• Define the lowest–level menus first. A menu must be definedbefore it can be selected as an entry on another menu.
• Assign menus and functions to higher–level menus.
• Assign menus and functions to a top–level menu (root menu).
• Document your menu structure by printing a Menu Report.
Warning: Start with a blank Menus form (blank screen).Menus cannot be copied. A menu saved under a different nameoverwrites the original menu (there is no “Save As” feature).
Notes About Defining Menus
Build Menus From Scratch
• Menus cannot be copied. Menu definitions cannot be savedunder a different name (i.e., there is no “Save As” capability).
• When a menu name displays in the Menus form, be sure you arein Query mode before overwriting the menu’s name.
Define Menus for Fast and Easy Keyboard Use
• Design menu prompts with unique first letters, so typing the firstletter automatically selects the form or menu
• Design the sequence of menu prompts with the most frequentlyused functions first (i.e., lower sequence numbers).
• Entries cannot be copied from one menu definition to another.
Note when Changing Menu Names or Modifying Entries
• When you change a menu’s name, the menu entries are notaffected. The menu’s definition exists under the new name.
• Other menus calling the menu by its old menu nameautomatically call the same menu by its new (revised) name.
• When defining menus or selecting a ”root” menu to assign to aresponsibility, the old menu name is not in a list of values.
• When modifying a predefined menu, all other menus that callthat menu display the menu’s modifications.
• For example, if you modify GL_TOP by adding another promptthat calls a form function, all menus that call GL_TOP will displaythe additional prompt when GL_TOP displays.
2 – 31Managing Oracle Applications Security
Menu Compilation
The Compile Security (FNDSCMPI) concurrent program is used tocompile menus so that the system can more quickly check if a particularfunction is available to a particular responsibility/menu.
You should compile your menus after you make changes to your menudata. A request for this concurrent program is automatically submittedafter you make changes using the Menus form.
After you apply a patch that includes menu changes, you should alsorun this concurrent program. You can do this through the ADAdministration utility. For more information, see: Maintaining OracleApplications.
See Also
Menus Window: page 2 – 38
Compile Security Concurrent Program: page 2 – 44
Preserving Custom Menus Across Upgrades
Preserve custom menus during upgrades of Oracle Applications byusing unique names for your custom menus. For example, you can startthe menu’s name with the application short name of a customapplication. Define a custom application named Custom General Ledger,whose application short name is XXCGL. Define your custom menunames to start with XXCGL, for example, XXCGL_MY_MENU.
Remember that the Oracle Applications standard menus may beoverwritten with upgrade versions. Therefore, if you attached yourcustom menu as a submenu to one of the preseeded Oracle Applicationsmenus, recreate the attachment to it following an upgrade. Analternative is to attach a standard Oracle Applications menu as asubmenu to your custom menu; the link from your custom menu to thestandard menu should survive the upgrade.
Special Function for Oracle HRMS, Oracle Sales and Marketing
In most Oracle Applications products, you can open multiple formsfrom the Navigator window without closing the form you already haveopen. However, when you define a new responsibility whose custommenu accesses Oracle Sales and Marketing forms, or Oracle HRMS task
☞
2 – 32 Oracle Applications System Administrator’s Guide
flows, you must include the function Disable Multiform, Multisession asan entry on the responsibility’s top–level menu.
You can identify an Oracle Sales and Marketing form by the OSM prefixcontained in the form’s function name.
In Oracle HRMS, a task flow is a method of linking windows so that youcarry information from one window to the next, in sequence, tocomplete a task. You can identify an Oracle HRMS form that may bepart of a task flow by the PER or PAY prefix in the form’s function name.For details on administering Oracle HRMS task flows, and ondetermining whether a form is part of a task flow, see: LinkingWindows in Task Flows, Oracle Human Resources User’s Guide.
Attention: You should not include the Disable Multiform,Multisession function on menus that do not include either OracleSales and Marketing or Oracle HRMS forms.
To include the Disable Multiform, Multisession function on a menu:
• Add a Function menu entry to the top–level menu (i.e., the menureferenced by your new responsibility).
• Select the function whose User Function Name and FunctionName are:
– Disable Multiform, Multisession
– FND_FNDSCSGN_DISABLE_MULTIFORM
• Save your changes.
Summary of Function Security
Functions:
• A function is a set of code in Oracle Applications that is executedonly if the name of the function is present in a list maintained on aresponsibility–by–responsibility basis.
• Functions can be excluded from a responsibility by a SystemAdministrator.
• There are two types of function: a form function or form, and anon–form function or subfunction. A subfunction represents asecurable subset of a form’s functionality.
Form Functions:
• A function that invokes a form.
• Form functions appear in the Navigate window and can benavigated to.
2 – 33Managing Oracle Applications Security
Subfunctions:
• A function that is executed from within a form. Subfunctions canonly be called by logic embodied within a Form Function.
• Subfunctions do not appear in the Navigate window and cannotbe navigated to.
Menus:
• Menus contain menu entries which point to a function, anothermenu, or a function and another menu.
• Menus appear in the Navigate window.
• Menus can be excluded from a responsibility by a SystemAdministrator.
See Also
Function Security Reports: page 2 – 45

2 – 34 Oracle Applications System Administrator’s Guide
Form Functions Window
Define new functions. A function is a part of an application’sfunctionality that is registered under a unique name for the purpose ofassigning it to, or excluding it from, a responsibility.
There are two types of functions: form functions, and non–formfunctions.
For clarity, we refer to a form function as a form, and a non–formfunction as a subfunction, even though both are just instances offunctions in the database.
Form Functions Block
Function
Users do not see this unique function name. However, you may usethis name when calling your function programmatically. You shouldfollow the naming conventions for functions.
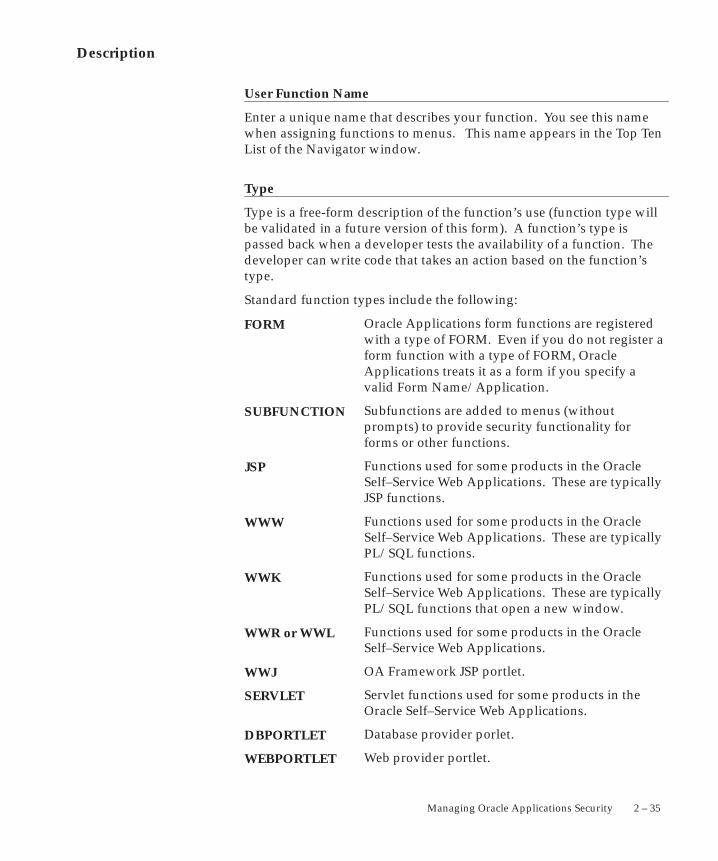
2 – 35Managing Oracle Applications Security
Description
User Function Name
Enter a unique name that describes your function. You see this namewhen assigning functions to menus. This name appears in the Top TenList of the Navigator window.
Type
Type is a free-form description of the function’s use (function type willbe validated in a future version of this form). A function’s type ispassed back when a developer tests the availability of a function. Thedeveloper can write code that takes an action based on the function’stype.
Standard function types include the following:
Oracle Applications form functions are registeredwith a type of FORM. Even if you do not register aform function with a type of FORM, OracleApplications treats it as a form if you specify avalid Form Name/Application.
Subfunctions are added to menus (withoutprompts) to provide security functionality forforms or other functions.
Functions used for some products in the OracleSelf–Service Web Applications. These are typicallyJSP functions.
Functions used for some products in the OracleSelf–Service Web Applications. These are typicallyPL/SQL functions.
Functions used for some products in the OracleSelf–Service Web Applications. These are typicallyPL/SQL functions that open a new window.
Functions used for some products in the OracleSelf–Service Web Applications.
OA Framework JSP portlet.
Servlet functions used for some products in theOracle Self–Service Web Applications.
Database provider porlet.
Web provider portlet.
FORM
SUBFUNCTION
JSP
WWW
WWK
WWR or WWL
WWJ
SERVLET
DBPORTLET
WEBPORTLET
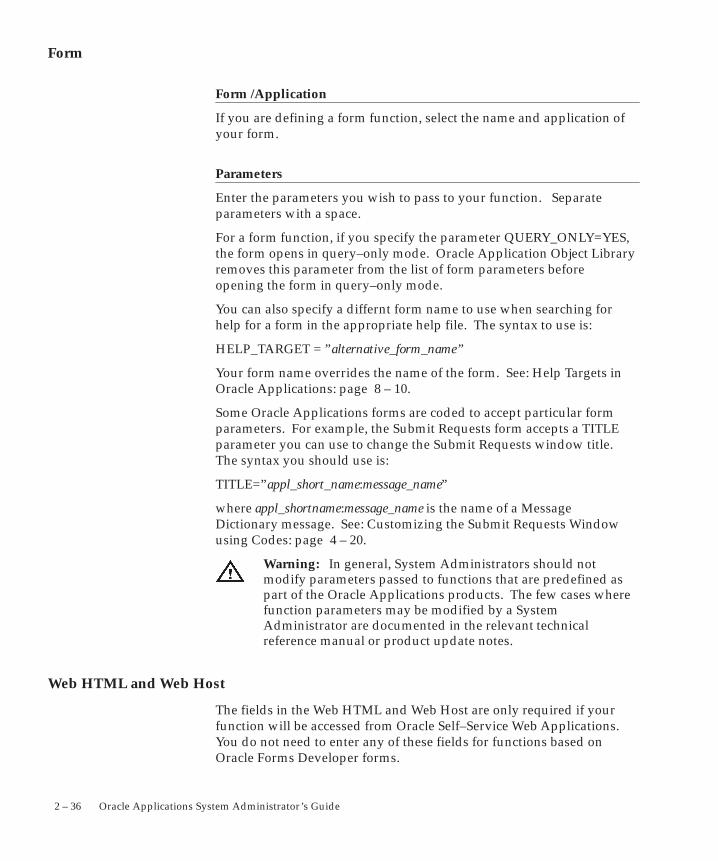
2 – 36 Oracle Applications System Administrator’s Guide
Form
Form /Application
If you are defining a form function, select the name and application ofyour form.
Parameters
Enter the parameters you wish to pass to your function. Separateparameters with a space.
For a form function, if you specify the parameter QUERY_ONLY=YES,the form opens in query–only mode. Oracle Application Object Libraryremoves this parameter from the list of form parameters beforeopening the form in query–only mode.
You can also specify a differnt form name to use when searching forhelp for a form in the appropriate help file. The syntax to use is:
HELP_TARGET = ”alternative_form_name”
Your form name overrides the name of the form. See: Help Targets inOracle Applications: page 8 – 10.
Some Oracle Applications forms are coded to accept particular formparameters. For example, the Submit Requests form accepts a TITLEparameter you can use to change the Submit Requests window title.The syntax you should use is:
TITLE=”appl_short_name:message_name”
where appl_shortname:message_name is the name of a MessageDictionary message. See: Customizing the Submit Requests Windowusing Codes: page 4 – 20.
Warning: In general, System Administrators should notmodify parameters passed to functions that are predefined aspart of the Oracle Applications products. The few cases wherefunction parameters may be modified by a SystemAdministrator are documented in the relevant technicalreference manual or product update notes.
Web HTML and Web Host
The fields in the Web HTML and Web Host are only required if yourfunction will be accessed from Oracle Self–Service Web Applications.You do not need to enter any of these fields for functions based onOracle Forms Developer forms.
2 – 37Managing Oracle Applications Security
HTML Call
The last section of your function URL is the HTML Call. The HTMLCall is used to activate your function. The function may be either astatic web page or a procedure.
For functions used with Mobile Application Server, enter the full nameof your your java class file, including <package name>.<class name>.The class name and package name are case sensitive. MobileApplication Server will try to load this class from the classpath as it is.For example, ’oracle.apps.mwa.demo.hello.HelloWorld’.
Secured
Secured is only required when your function is accessed by OracleWorkflow. Checking Secured enables recipients of a workflow E–Mailnotification to respond using E–Mail.
Encrypt Parameters
Checking Encrypt Parameters adds a layer of security to your functionto ensure that a user cannot access your function by altering the URL intheir browser window. You must define Encryption Parameters whenyou define your function to take advantage of this feature.
Host Name
The URL (universal resource locator) or address required for yourfunction consists of three sections: the Host Name, Agent Name, andthe HTML Call. The Host name is the IP address or alias of themachine where the Webserver is running.
Agent Name
The second section of your function URL is the Oracle Web Agent. TheOracle Web Agent determines which database is used when runningyour function. Defaults to the last agent used.
Icon
Enter the name of the icon used for this function.
Regions
The fields on this page are for future use.
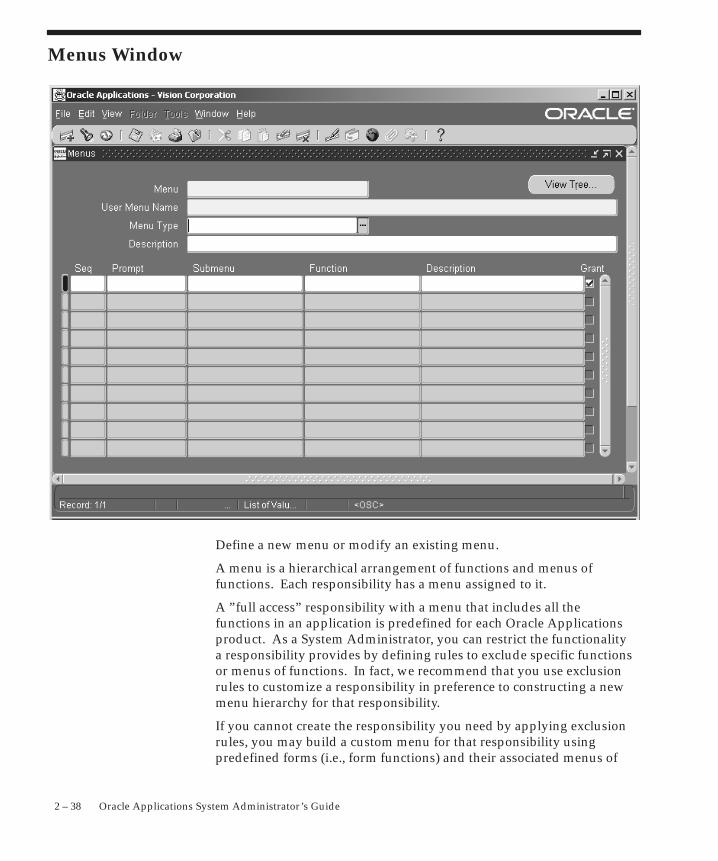
2 – 38 Oracle Applications System Administrator’s Guide
Menus Window
Define a new menu or modify an existing menu.
A menu is a hierarchical arrangement of functions and menus offunctions. Each responsibility has a menu assigned to it.
A ”full access” responsibility with a menu that includes all thefunctions in an application is predefined for each Oracle Applicationsproduct. As a System Administrator, you can restrict the functionalitya responsibility provides by defining rules to exclude specific functionsor menus of functions. In fact, we recommend that you use exclusionrules to customize a responsibility in preference to constructing a newmenu hierarchy for that responsibility.
If you cannot create the responsibility you need by applying exclusionrules, you may build a custom menu for that responsibility usingpredefined forms (i.e., form functions) and their associated menus of
2 – 39Managing Oracle Applications Security
subfunctions. However, we recommend that you do not disassociate aform from its developer–defined menus of subfunctions.
After you save your changes in this form, a request is submitted tocompile the menu data.
Prerequisites
• Register your application with Oracle Application Object Libraryusing the Applications window.
• Define any menus that you intend to call from your menu.Define the lowest–level submenus first. A submenu must bedefined before it can be called by another menu.
Suggestion: By calling submenus from your menu, you cangroup related windows together under a single heading onyour menu. You can reuse your menu on other menus.
Menus Block
Menu entries detail the options available from your menu.
Menu
Choose a name that describes the purpose of the menu. Users do notsee this menu name.
View Tree...
Once you have defined a menu, you can see its hierarchical structureusing the ”View Tree...” button. See: Menu Viewer: page 2 – 42.
User Menu Name
You use the user menu name when a responsibility calls a menu orwhen one menu calls another.
Menu Type
Optionally specify a menu type to describe the purpose of your menu.
• Standard – for menus that would be used in the Navigator form
• Tab – for menus used in self service applications tabs
• Security – for menus that are used to aggregate functions fordata security or specific function security purposes, but wouldnot be used in the Navigator form
☞☞
2 – 40 Oracle Applications System Administrator’s Guide
Menu Entries Block
Sequence
Enter a sequence number to specify where a menu entry appearsrelative to other menu entries in a menu. The default value for thisfield is the next whole sequence number.
A menu entry with a lower sequence number appears before a menuentry with a higher sequence number.
Attention: Use integers only as your sequence numbers.
Attention: If you change sequence numbers or frequentlyinsert and delete menu entries, carefully check the defaultvalue. This value may be a duplicate sequence number or anout of sequence number.
Suggestion: You cannot replace a menu entry sequencenumber with another sequence number that already exists. Ifyou want to add menu entries to a menu entry sequence,carefully renumber your menu entries to a sequence range welloutside the sequence range you want, ensuring that you do notuse existing sequence numbers.
Once you save this work, you can go back and renumber eachentry to have the final sequence number you want.
Navigator Prompt
Enter a user–friendly, intuitive prompt your menu displays for thismenu entry. You see this menu prompt in the hierarchy list of theNavigator window.
Suggestion: Enter menu prompts that have unique first lettersso that power users can type the first letter of the menu promptto choose a menu entry.
Submenu
Call another menu and allow your user to select menu entries from thatmenu.
Function
Call a function you wish to include in the menu. A form function(form) appears in the Navigate window and allows access to that form.Other non–form functions (subfunctions) allow access to a particularsubset of form functionality from this menu.
2 – 41Managing Oracle Applications Security
Description
Descriptions appear in a field at the top of the Navigate window whena menu entry is highlighted.
Grant
The Grant check box should usually be checked. Checking this boxindicates that this function is automatically enabled for the user. If thisis not checked then the function must be enabled using additional datasecurity rules.
2 – 42 Oracle Applications System Administrator’s Guide
Menu ViewerThe Menu Viewer is a read–only window that provides a hierarchicalview of the submenus and functions of a menu, and also listsproperties of the menus and functions.
You can launch the viewer from the Menus form by clicking on the”View Tree...” button. The viewer will appear for the menu specified inthe Menus form.
Note: When you are creating or editing a new menu, yourchanges must be committed to the database before you will beable to see them in the Menu Viewer.
Functionality
Menu Tree
To view the menu tree, click on the plus (+) sign next to the menu. Youwill see a hierarchical tree with a number of nodes. Each noderepresents a function or submenu of your main menu.
Note: The menu tree displays the user menu name for themain menu, and displays the prompts from the Menus form forsubmenus and functions. If no prompt has been specified, thenno label will appear for the node.
To print a menu tree, choose Print from the File menu.
Node Properties
To view properties of a particular menu or function, highlight the nodein the menu tree. The node properties will appear in the Propertiespane. You can create a separate Properties page for a node by clickingthe ”push pin” button at the top of the Properties pane.
The entry’s sequence number, prompt, and description are shown.
View Options
The View menu provides options on how the viewer displays yourmenu.
You can specify whether the Node Properties pane, the toolbar, or thestatus bar are displayed. You can also choose the display style in whichyou view your menu tree.

2 – 43Managing Oracle Applications Security
Display Styles
There are three styles for viewing your menu tree. You can select onefrom the View menu or from the buttons on the toolbar.
Menu entries are displayed vertically, similar tohow they appear in the Navigator window whenyou log on to Oracle Applications.
Menu entries are displayed horizontally andvertically.
Menu entries are displayed horizontally as in anorganizational chart.
Edit Menu
From the Edit menu you can bring up a Properties window for thenode you have highlighted in the menu tree.
Note: You can view the properties for your menu or functionhere, but you cannot edit them.
You can view and edit your Preferences for the Menu Viewer. You canchoose colors for your menu tree pane as well as the text font and size.
Vertical
Interleaved
Org–Chart
2 – 44 Oracle Applications System Administrator’s Guide
Compile Security Concurrent Program
Use this concurrent program to compile your menu data. Compilingyour menu data allows for the system to determine more quicklywhether a function is available to a particular responsibility/menu.
A request to run this program is automatically submitted when youmake changes using the Menus form.
Parameter
Everything
This parameter takes the value Yes or No. ”No” is used to recompileonly those entities that are marked as needing recompilation. ”Yes” isused to recompile all entities, and can take a long time. ”No” is thedefault value.
2 – 45Managing Oracle Applications Security
Function Security Reports
Use the function security reports to document the structure of your 11imenus. You can use these reports as hardcopy to document yourcustomized menu structures before upgrading your OracleApplications software.
The function security reports consist of the Function Security FunctionsReport, the Function Security Menu Report, and the Function SecurityNavigator Report.
These reports are available through the Function Security MenuReports request set. For each report, specify the responsibility whosefunction security you want to review.
Function Security Function Report
Specify a responsibility when submitting the report. The report outputlists the functions accessible by the specified responsibility.
The report does not include items excluded by function security rules.
Function Security Menu Report
Specify a responsibility when submitting the report. The report outputlists the complete menu of the responsibility, including all submenusand functions.
The report indicates any excluded menu items with the rule thatexcluded it.
Function Security Navigator Report
Specify a responsibility when submitting the report. The report outputlists the menu as it appears in the navigator for the responsibilityspecified.
This report does not include items excluded by function security rules,or non–form functions that do not appear in the navigator.
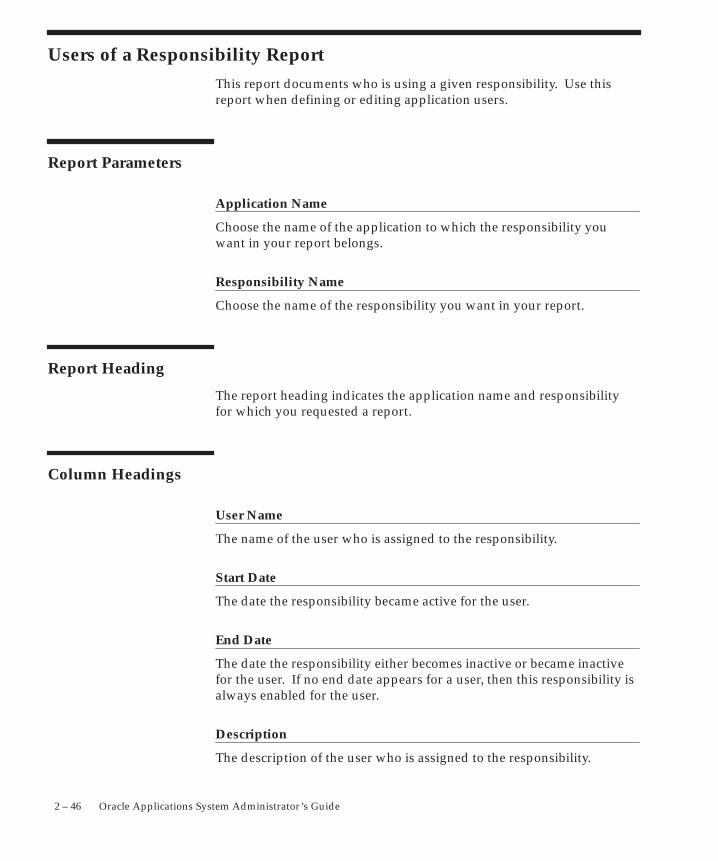
2 – 46 Oracle Applications System Administrator’s Guide
Users of a Responsibility ReportThis report documents who is using a given responsibility. Use thisreport when defining or editing application users.
Report Parameters
Application Name
Choose the name of the application to which the responsibility youwant in your report belongs.
Responsibility Name
Choose the name of the responsibility you want in your report.
Report Heading
The report heading indicates the application name and responsibilityfor which you requested a report.
Column Headings
User Name
The name of the user who is assigned to the responsibility.
Start Date
The date the responsibility became active for the user.
End Date
The date the responsibility either becomes inactive or became inactivefor the user. If no end date appears for a user, then this responsibility isalways enabled for the user.
Description
The description of the user who is assigned to the responsibility.
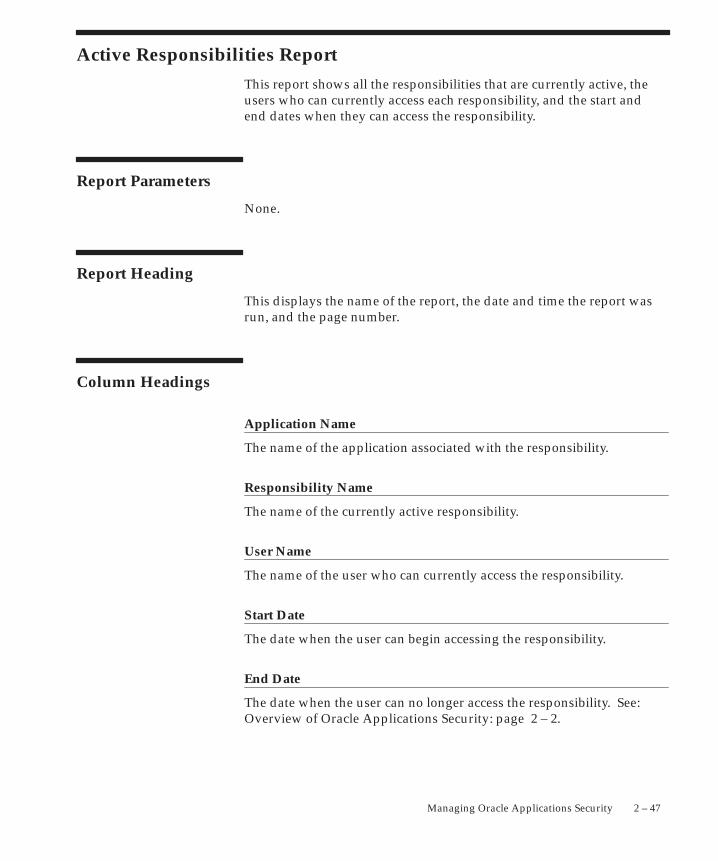
2 – 47Managing Oracle Applications Security
Active Responsibilities Report
This report shows all the responsibilities that are currently active, theusers who can currently access each responsibility, and the start andend dates when they can access the responsibility.
Report Parameters
None.
Report Heading
This displays the name of the report, the date and time the report wasrun, and the page number.
Column Headings
Application Name
The name of the application associated with the responsibility.
Responsibility Name
The name of the currently active responsibility.
User Name
The name of the user who can currently access the responsibility.
Start Date
The date when the user can begin accessing the responsibility.
End Date
The date when the user can no longer access the responsibility. See:Overview of Oracle Applications Security: page 2 – 2.
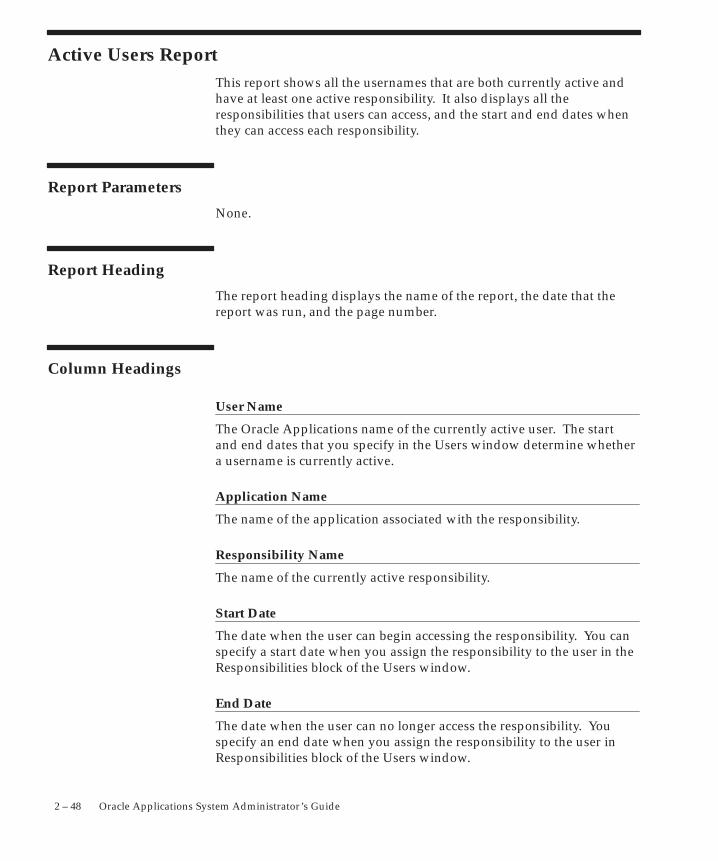
2 – 48 Oracle Applications System Administrator’s Guide
Active Users ReportThis report shows all the usernames that are both currently active andhave at least one active responsibility. It also displays all theresponsibilities that users can access, and the start and end dates whenthey can access each responsibility.
Report Parameters
None.
Report Heading
The report heading displays the name of the report, the date that thereport was run, and the page number.
Column Headings
User Name
The Oracle Applications name of the currently active user. The startand end dates that you specify in the Users window determine whethera username is currently active.
Application Name
The name of the application associated with the responsibility.
Responsibility Name
The name of the currently active responsibility.
Start Date
The date when the user can begin accessing the responsibility. You canspecify a start date when you assign the responsibility to the user in theResponsibilities block of the Users window.
End Date
The date when the user can no longer access the responsibility. Youspecify an end date when you assign the responsibility to the user inResponsibilities block of the Users window.
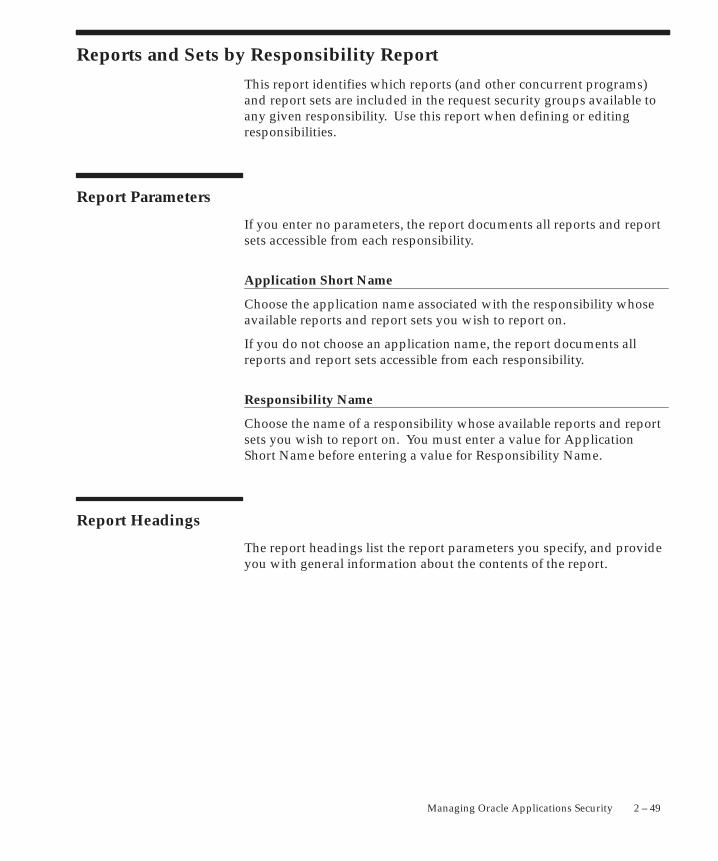
2 – 49Managing Oracle Applications Security
Reports and Sets by Responsibility Report
This report identifies which reports (and other concurrent programs)and report sets are included in the request security groups available toany given responsibility. Use this report when defining or editingresponsibilities.
Report Parameters
If you enter no parameters, the report documents all reports and reportsets accessible from each responsibility.
Application Short Name
Choose the application name associated with the responsibility whoseavailable reports and report sets you wish to report on.
If you do not choose an application name, the report documents allreports and report sets accessible from each responsibility.
Responsibility Name
Choose the name of a responsibility whose available reports and reportsets you wish to report on. You must enter a value for ApplicationShort Name before entering a value for Responsibility Name.
Report Headings
The report headings list the report parameters you specify, and provideyou with general information about the contents of the report.

2 – 50 Oracle Applications System Administrator’s Guide
C H A P T E R
3 T
3 – 1User and Data Auditing
User and Data Auditing
his chapter explains how to audit your application users and thechanges they effect on your application’s data.
3 – 2 Oracle Applications System Administrator’s Guide
Overview of User and Data Auditing
There are two types of auditing in Oracle Applications: auditing users,and auditing database row changes.
Auditing User Activity
Auditing users is supported by:
• Sign–On:Audit Level profile option setting
• Audit Reports
See:
Signon Audit Concurrent Requests: page 3 – 10
������ ���� ��� � ���� 3 – 12
Signon Audit Responsibilities: page 3 – 15
Signon Audit Unsuccessful Logins: page 3 – 17
������ ���� � �� � ���� 3 – 19
Sign–On Audit lets you track who signs on to your application andwhat they do.
Based on the audit level you choose, Sign–On Audit recordsusernames, dates and times of users accessing the system, as well aswhat responsibilities, forms, and terminals users are using.
Auditing Database Row Changes
Auditing database row changes is supported by:
• From the Help menu, About This Record ...
• AuditTrail:Activate profile option setting
• Audit forms – see below.
See:
Reporting on AuditTrail Data: page 3 – 22
Audit Installations: page 3 – 34
Audit Groups: page 3 – 36
Audit Tables: page 3 – 40
3 – 3User and Data Auditing
Auditing User Activity
Oracle Applications provides a Sign–On Audit feature that allows youto:
• Track what your users are doing and when they do it.
• Choose who to audit and what type of information to audit.
• View quickly online what your users are doing.
• Check the security of your application.
With Sign–On Audit, you can record usernames, terminals, and thedates and times your users access Oracle Applications. Sign–On Auditcan also track the responsibilities and forms your users use, as well asthe concurrent processes they run.
Major Features
Selective Auditing
Sign–On Audit lets you choose who to audit and what type of userinformation to track. You can selectively determine what auditinformation you need, to match your organization’s needs.
Monitor Application Users
The Monitor Users form gives you online, real–time information aboutwho is using Oracle Applications and what they are doing.
You can see what users are signed on (application username andoperating system login name), what responsibilities, forms, andterminals they are using, how long they have been working on forms,and what ORACLE processes they are using.
Sign–On Audit Reports
Sign–On Audit Reports give you historical, detailed information onwhat your users do in your application.
You can give search criteria to narrow your search for information.
You can also sort your Sign–On Audit information to createeasy–to–read reports.
3 – 4 Oracle Applications System Administrator’s Guide
Setting Up Sign–On Audit
You use the Sign–On:Audit Level user profile option to control whoSign–On Audit tracks and the level at which they are audited.
Use the Monitor Users form to view online what your users are doing.
Use the Submit Reports form to submit Sign–On Audit Reports thatgive you detailed audit information.
Enabling Sign–On Audit
Use the System Profile Values form to enable Sign–On Audit. Choosethe scope of your audit and who to audit by setting the user profilelevel at the user, responsibility, application, or site profile levels.
Users cannot see nor change this profile option.
After you set or change audit levels, the new audit levels for a user takeeffect the next time the user signs onto Oracle Applications from theoperating system.
Selecting Audit Levels
The Sign–On:Audit Level profile option allows you to select a level atwhich to audit users who sign on to Oracle Applications. Four auditlevels increase in functionality: None, User, Responsibility, and Form.
None is the default value, and means do not audit any users who signon to Oracle Applications.
Auditing at the User level tracks:
• who signs on to your system
• the times users log on and off
• the terminals in use
Auditing at the Responsibility level performs the User level auditfunctions and tracks:
• the responsibilities users choose
• how much time users spend using each responsibility
Auditing at the Form level performs the Responsibility level auditfunctions and tracks:
• the forms users choose
• how long users spend using each form
Factoring in System Overhead
In planning your organization’s Sign–On Audit implementation, youshould consider the additional system overhead required to precisely
☞
3 – 5User and Data Auditing
monitor and audit your users as they access Oracle Applications. Themore users you audit and the higher the level of auditing, the greaterthe likelihood of incurring additional system overhead.
Example – Audit Users, Responsibilities, & Forms
One example implementation of Sign–On Audit is to audit all of yourusers’ sign–ons, the responsibilities they select, and the forms theyaccess.
To set up this implementation, set ”Sign–On:Audit Level” to:
• Form audit
• At the Site profile level
Example – Audit a specific responsibility, excepting one user
Another example of using Sign–On Audit is for an organization toaudit all users of the Personnel Manager responsibility, except forMJONES.
In this example, you do not care to audit the forms the users access orthe responsibilities they select.
To set up this implementation, set ”Sign–On:Audit Level” to:
• User audit
• At the responsibility profile level for the Personnel Managerresponsibility
You also set ”Sign–On:Audit Level” to:
• None
• At the user profile level for the application user MJONES
Using the Application Monitor
Use the Monitor Users form to monitor who is using OracleApplications and what they are doing. You can monitor your users atany time.
The Application Monitor lets you see what users are signed on, whatresponsibilities, forms, and terminals they are using, how long theyhave been working on forms, and what ORACLE processes they areusing.
Attention: You can only monitor those users that are beingaudited by Sign–On Audit. The Application Monitor alsoreflects the level of auditing you define for your users.
3 – 6 Oracle Applications System Administrator’s Guide
About This Record Window
You can display Sign–On Audit data by choosing from the Help menu,About This Record...
Sign–On Audit can automatically tie in ”About This Record”information for records that are inserted or updated by audited users.This additional information appears in the ”About This Record”window when you set the Who:Display Type profile option toExtended.
Extended information shows the Oracle Applications session number,the operating system login name, and the terminal that a user you aretracking with Sign–On Audit used to insert or update a row.
As System Administrator, you can use the System Profile Values formto set “Who:Display Type” to let any user, responsibility, application, orsite view Extended ”About This Record” information.
Who: Display Type Profile Option
The Who: Display Type profile option allows you to choose betweentwo different displays in the About This Record window:
”Normal” displays the:
• name of the user who created the row
• date the user created the row
• name of the table containing the row
• name of the user who last updated the row
”Extended” displays Normal information, plus:
• the user’s operating system logon
• the user’s terminal identification
Users cannot see nor change this profile option.
This profile option is visible and updatable at all four levels.
Notifying of Unsuccessful Logins
Sign–On Audit can track user logins and provide users with a warningmessage if anyone has made an unsuccessful attempt to sign on withtheir application username since their last sign–on. This warningmessage appears after a user signs on.
3 – 7User and Data Auditing
You or your users can activate this feature using the Personal ProfileValues form by setting the ”Sign–On:Notification” user profile optionto Yes.
You do not have to audit the user with Sign–On Audit to use thisnotification feature.
Sign–On Audit Reports
Use the Submit Requests form to print standard audit reports.
You can generate reports detailing what users are signing on, whatresponsibilities they are accessing, what forms they are using, whatconcurrent requests they are submitting, and who is attempting to logon to other users’ accounts.
Oracle Applications provide the following Sign–On Audit reports:
Signon Audit Concurrent Requests: page 3 – 10 (shows who submittedwhat requests)
Signon Audit Forms: page 3 – 12 (shows who accessed what forms)
Signon Audit Responsibilities: page 3 – 15 (shows who accessed whatresponsibilities)
Signon Audit Unsuccessful Logins: page 3 – 17 (shows whounsuccessfully attempted to sign on as another user)
Signon Audit Users: page 3 – 19 (shows who signed on to OracleApplications)
For each report, you can also specify search criteria that makes yourreport as brief as you need.
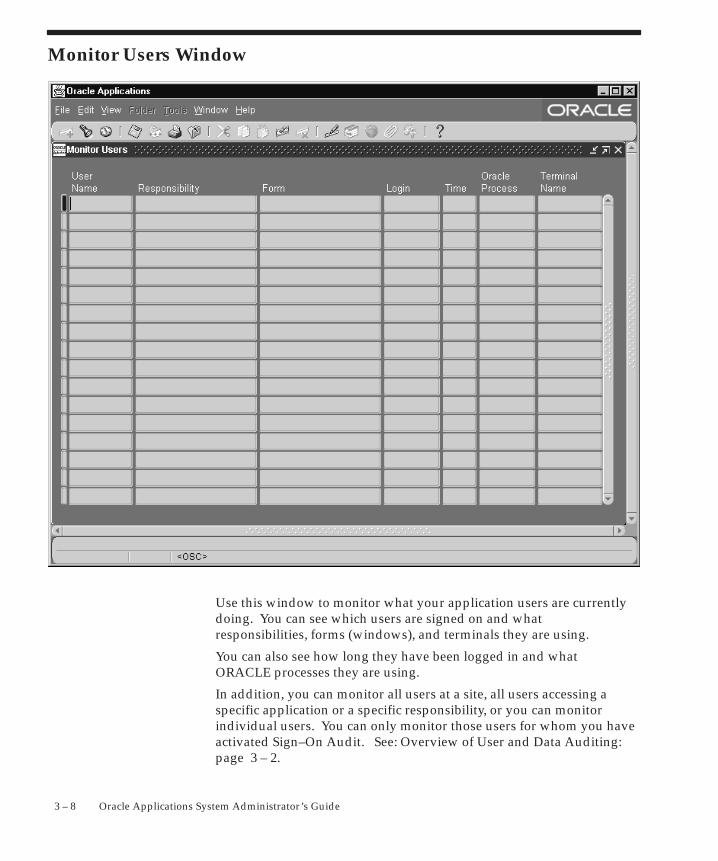
3 – 8 Oracle Applications System Administrator’s Guide
Monitor Users Window
Use this window to monitor what your application users are currentlydoing. You can see which users are signed on and whatresponsibilities, forms (windows), and terminals they are using.
You can also see how long they have been logged in and whatORACLE processes they are using.
In addition, you can monitor all users at a site, all users accessing aspecific application or a specific responsibility, or you can monitorindividual users. You can only monitor those users for whom you haveactivated Sign–On Audit. See: Overview of User and Data Auditing:page 3 – 2.
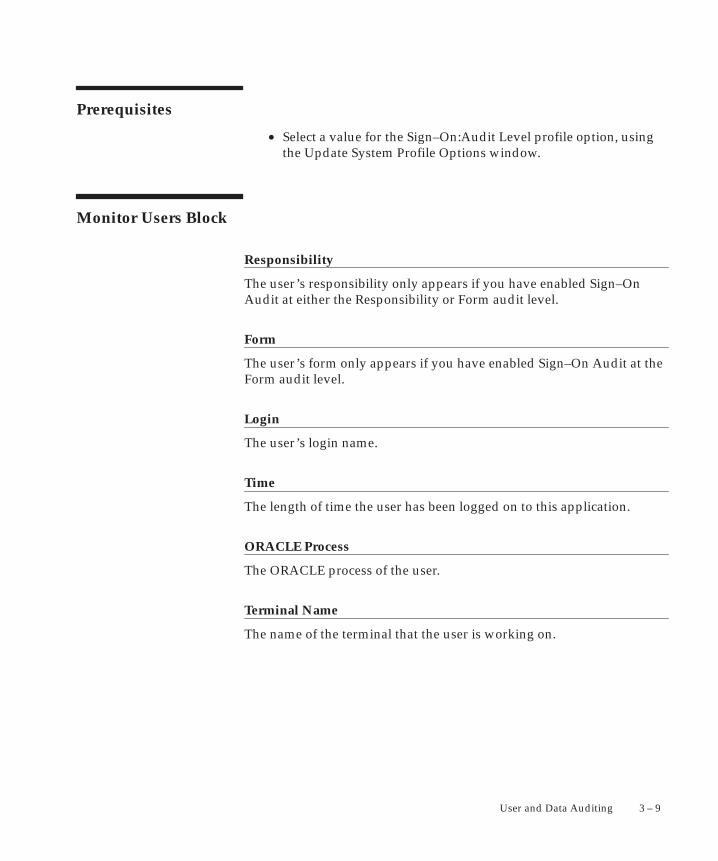
3 – 9User and Data Auditing
Prerequisites
• Select a value for the Sign–On:Audit Level profile option, usingthe Update System Profile Options window.
Monitor Users Block
Responsibility
The user’s responsibility only appears if you have enabled Sign–OnAudit at either the Responsibility or Form audit level.
Form
The user’s form only appears if you have enabled Sign–On Audit at theForm audit level.
Login
The user’s login name.
Time
The length of time the user has been logged on to this application.
ORACLE Process
The ORACLE process of the user.
Terminal Name
The name of the terminal that the user is working on.
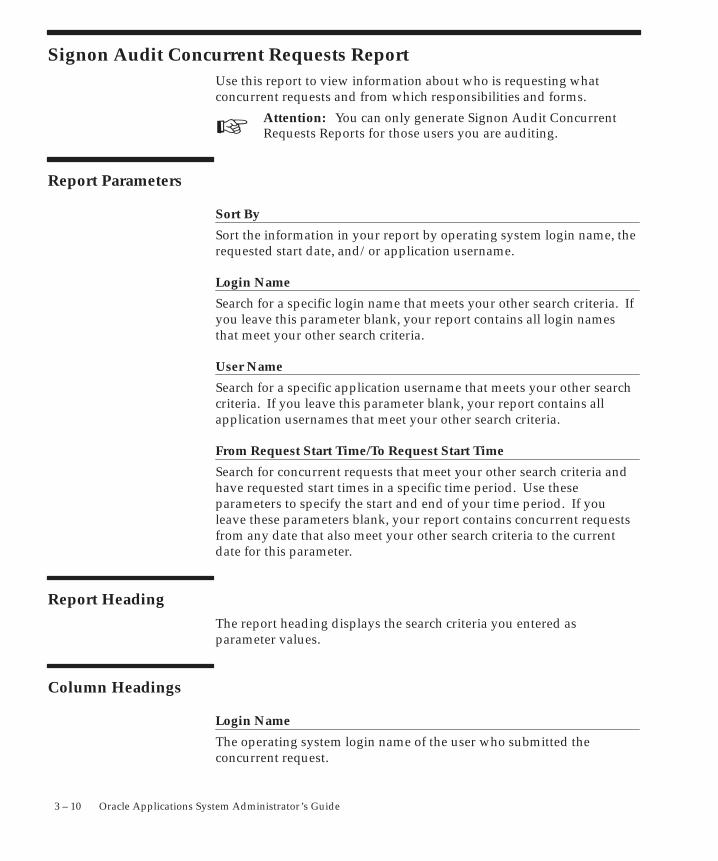
☞
3 – 10 Oracle Applications System Administrator’s Guide
Signon Audit Concurrent Requests ReportUse this report to view information about who is requesting whatconcurrent requests and from which responsibilities and forms.
Attention: You can only generate Signon Audit ConcurrentRequests Reports for those users you are auditing.
Report Parameters
Sort By
Sort the information in your report by operating system login name, therequested start date, and/or application username.
Login Name
Search for a specific login name that meets your other search criteria. Ifyou leave this parameter blank, your report contains all login namesthat meet your other search criteria.
User Name
Search for a specific application username that meets your other searchcriteria. If you leave this parameter blank, your report contains allapplication usernames that meet your other search criteria.
From Request Start Time/To Request Start Time
Search for concurrent requests that meet your other search criteria andhave requested start times in a specific time period. Use theseparameters to specify the start and end of your time period. If youleave these parameters blank, your report contains concurrent requestsfrom any date that also meet your other search criteria to the currentdate for this parameter.
Report HeadingThe report heading displays the search criteria you entered asparameter values.
Column Headings
Login Name
The operating system login name of the user who submitted theconcurrent request.
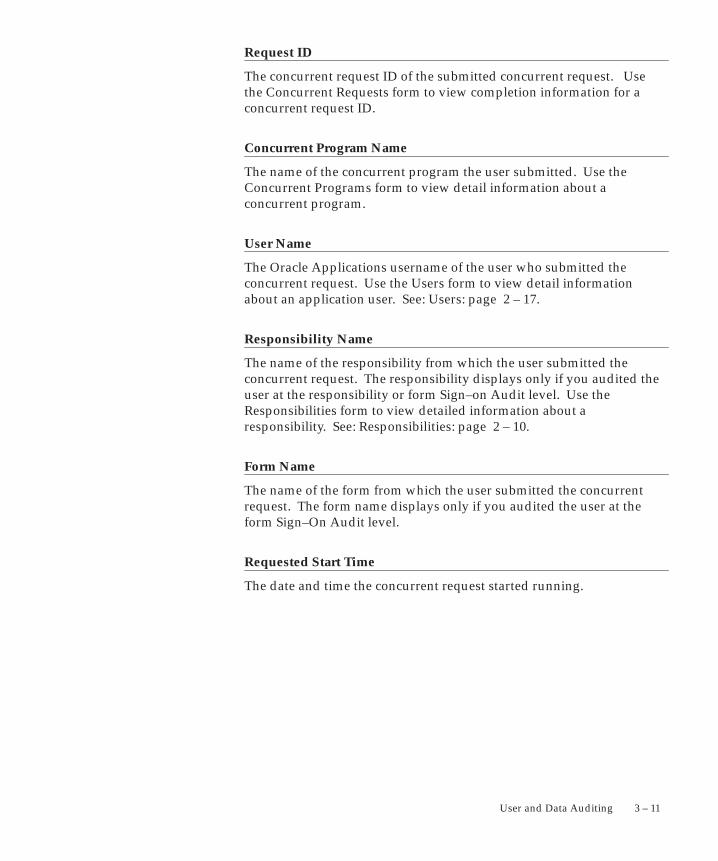
3 – 11User and Data Auditing
Request ID
The concurrent request ID of the submitted concurrent request. Usethe Concurrent Requests form to view completion information for aconcurrent request ID.
Concurrent Program Name
The name of the concurrent program the user submitted. Use theConcurrent Programs form to view detail information about aconcurrent program.
User Name
The Oracle Applications username of the user who submitted theconcurrent request. Use the Users form to view detail informationabout an application user. See: Users: page 2 – 17.
Responsibility Name
The name of the responsibility from which the user submitted theconcurrent request. The responsibility displays only if you audited theuser at the responsibility or form Sign–on Audit level. Use theResponsibilities form to view detailed information about aresponsibility. See: Responsibilities: page 2 – 10.
Form Name
The name of the form from which the user submitted the concurrentrequest. The form name displays only if you audited the user at theform Sign–On Audit level.
Requested Start Time
The date and time the concurrent request started running.
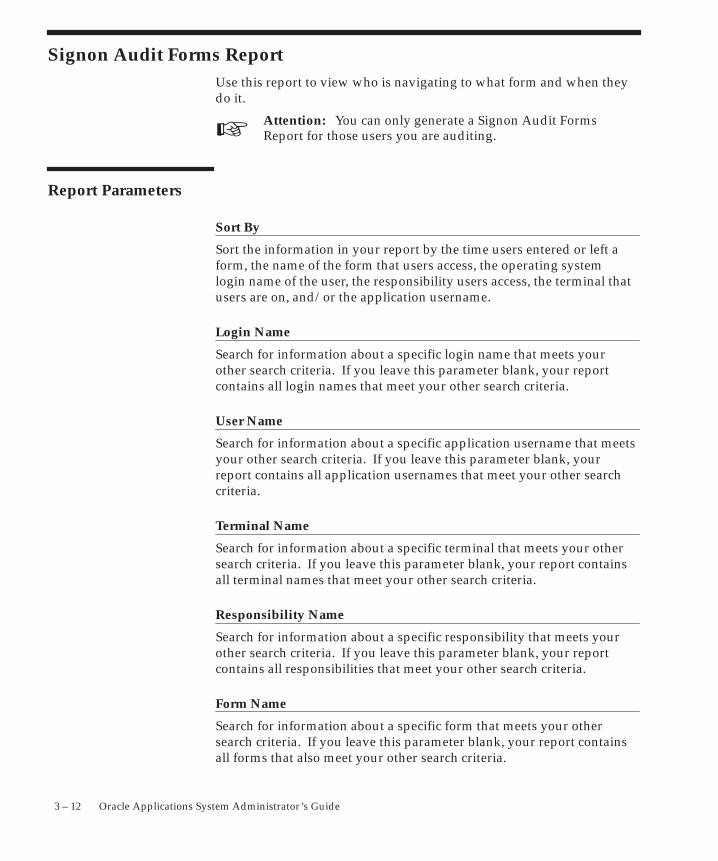
☞
3 – 12 Oracle Applications System Administrator’s Guide
Signon Audit Forms ReportUse this report to view who is navigating to what form and when theydo it.
Attention: You can only generate a Signon Audit FormsReport for those users you are auditing.
Report Parameters
Sort By
Sort the information in your report by the time users entered or left aform, the name of the form that users access, the operating systemlogin name of the user, the responsibility users access, the terminal thatusers are on, and/or the application username.
Login Name
Search for information about a specific login name that meets yourother search criteria. If you leave this parameter blank, your reportcontains all login names that meet your other search criteria.
User Name
Search for information about a specific application username that meetsyour other search criteria. If you leave this parameter blank, yourreport contains all application usernames that meet your other searchcriteria.
Terminal Name
Search for information about a specific terminal that meets your othersearch criteria. If you leave this parameter blank, your report containsall terminal names that meet your other search criteria.
Responsibility Name
Search for information about a specific responsibility that meets yourother search criteria. If you leave this parameter blank, your reportcontains all responsibilities that meet your other search criteria.
Form Name
Search for information about a specific form that meets your othersearch criteria. If you leave this parameter blank, your report containsall forms that also meet your other search criteria.
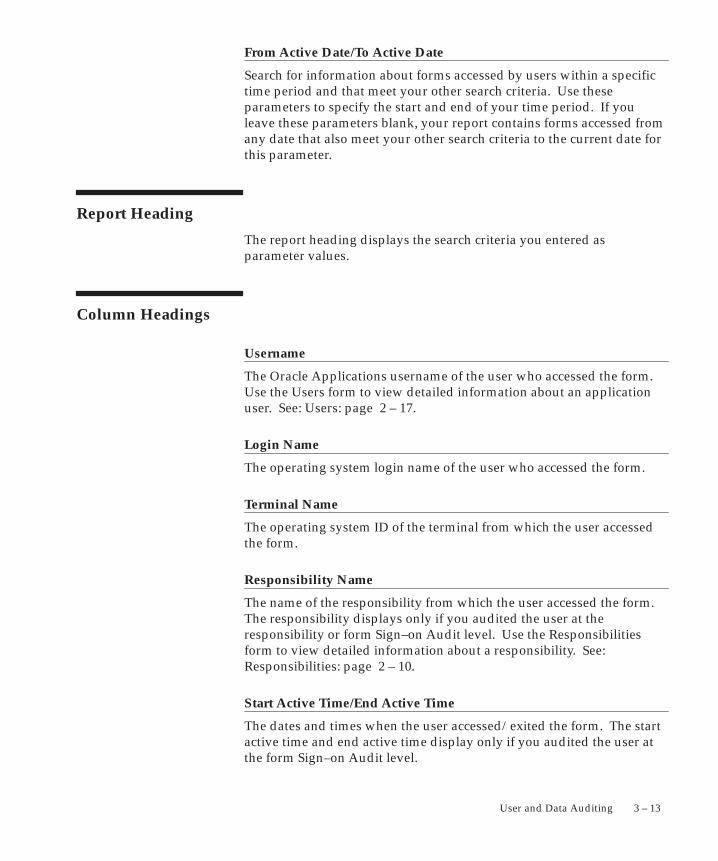
3 – 13User and Data Auditing
From Active Date/To Active Date
Search for information about forms accessed by users within a specifictime period and that meet your other search criteria. Use theseparameters to specify the start and end of your time period. If youleave these parameters blank, your report contains forms accessed fromany date that also meet your other search criteria to the current date forthis parameter.
Report Heading
The report heading displays the search criteria you entered asparameter values.
Column Headings
Username
The Oracle Applications username of the user who accessed the form.Use the Users form to view detailed information about an applicationuser. See: Users: page 2 – 17.
Login Name
The operating system login name of the user who accessed the form.
Terminal Name
The operating system ID of the terminal from which the user accessedthe form.
Responsibility Name
The name of the responsibility from which the user accessed the form.The responsibility displays only if you audited the user at theresponsibility or form Sign–on Audit level. Use the Responsibilitiesform to view detailed information about a responsibility. See:Responsibilities: page 2 – 10.
Start Active Time/End Active Time
The dates and times when the user accessed/exited the form. The startactive time and end active time display only if you audited the user atthe form Sign–on Audit level.

3 – 14 Oracle Applications System Administrator’s Guide
Form Name
The name of the form that the user accessed. The form name displaysonly if you audited the user at the form Sign–on Audit level.
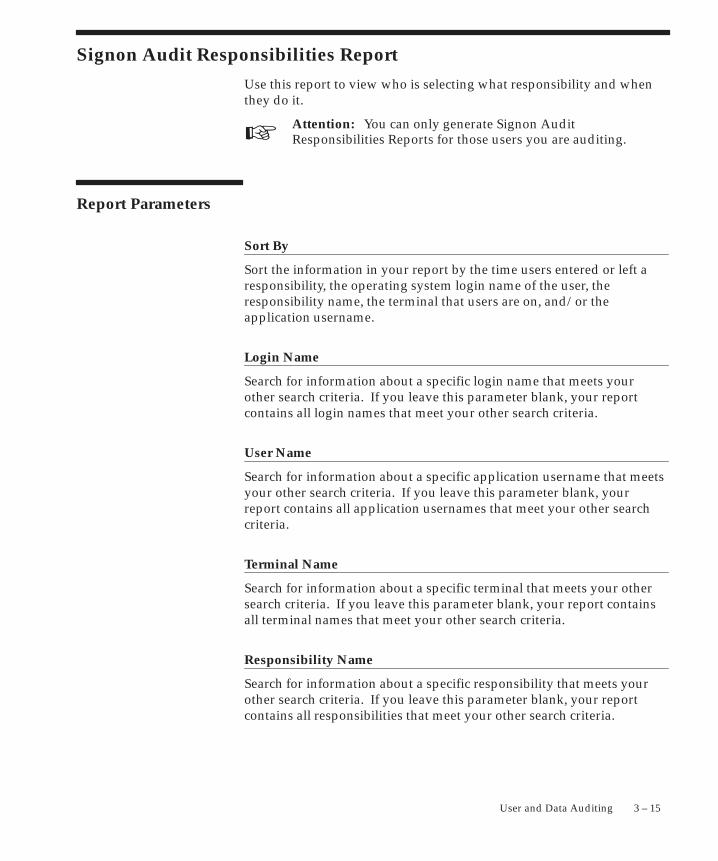
☞
3 – 15User and Data Auditing
Signon Audit Responsibilities Report
Use this report to view who is selecting what responsibility and whenthey do it.
Attention: You can only generate Signon AuditResponsibilities Reports for those users you are auditing.
Report Parameters
Sort By
Sort the information in your report by the time users entered or left aresponsibility, the operating system login name of the user, theresponsibility name, the terminal that users are on, and/or theapplication username.
Login Name
Search for information about a specific login name that meets yourother search criteria. If you leave this parameter blank, your reportcontains all login names that meet your other search criteria.
User Name
Search for information about a specific application username that meetsyour other search criteria. If you leave this parameter blank, yourreport contains all application usernames that meet your other searchcriteria.
Terminal Name
Search for information about a specific terminal that meets your othersearch criteria. If you leave this parameter blank, your report containsall terminal names that meet your other search criteria.
Responsibility Name
Search for information about a specific responsibility that meets yourother search criteria. If you leave this parameter blank, your reportcontains all responsibilities that meet your other search criteria.
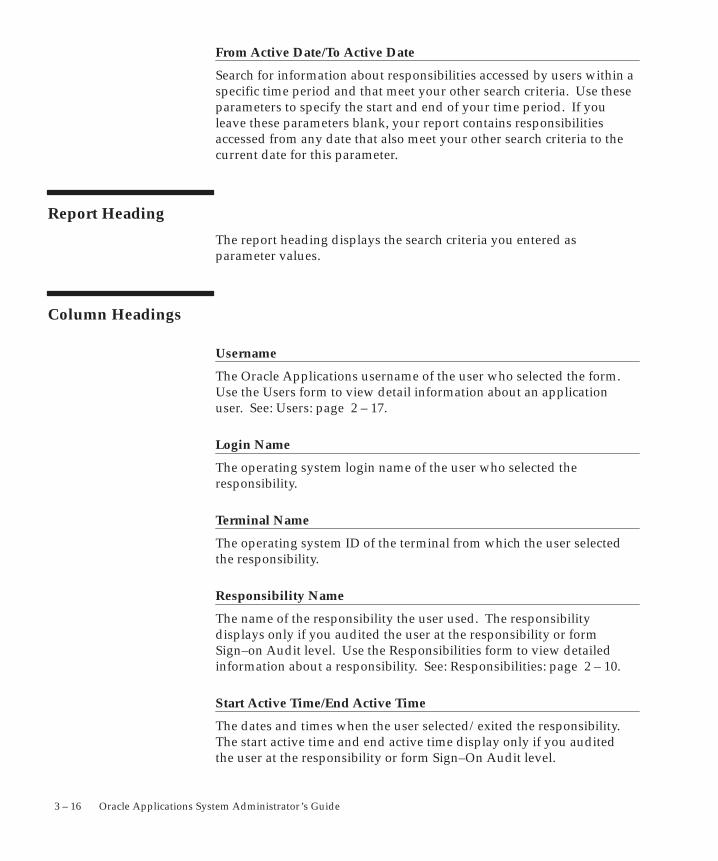
3 – 16 Oracle Applications System Administrator’s Guide
From Active Date/To Active Date
Search for information about responsibilities accessed by users within aspecific time period and that meet your other search criteria. Use theseparameters to specify the start and end of your time period. If youleave these parameters blank, your report contains responsibilitiesaccessed from any date that also meet your other search criteria to thecurrent date for this parameter.
Report Heading
The report heading displays the search criteria you entered asparameter values.
Column Headings
Username
The Oracle Applications username of the user who selected the form.Use the Users form to view detail information about an applicationuser. See: Users: page 2 – 17.
Login Name
The operating system login name of the user who selected theresponsibility.
Terminal Name
The operating system ID of the terminal from which the user selectedthe responsibility.
Responsibility Name
The name of the responsibility the user used. The responsibilitydisplays only if you audited the user at the responsibility or formSign–on Audit level. Use the Responsibilities form to view detailedinformation about a responsibility. See: Responsibilities: page 2 – 10.
Start Active Time/End Active Time
The dates and times when the user selected/exited the responsibility.The start active time and end active time display only if you auditedthe user at the responsibility or form Sign–On Audit level.
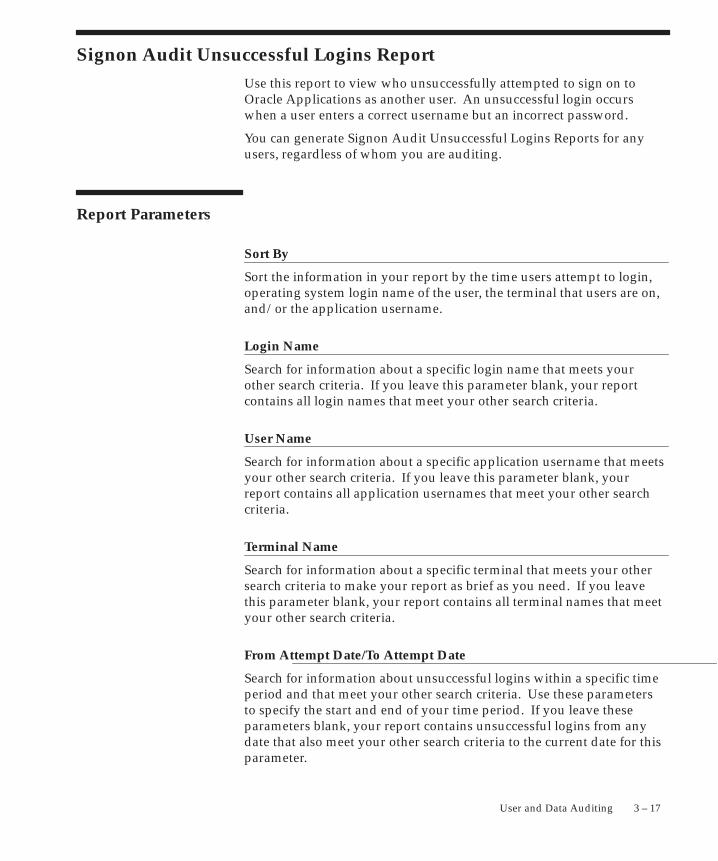
3 – 17User and Data Auditing
Signon Audit Unsuccessful Logins ReportUse this report to view who unsuccessfully attempted to sign on toOracle Applications as another user. An unsuccessful login occurswhen a user enters a correct username but an incorrect password.
You can generate Signon Audit Unsuccessful Logins Reports for anyusers, regardless of whom you are auditing.
Report Parameters
Sort By
Sort the information in your report by the time users attempt to login,operating system login name of the user, the terminal that users are on,and/or the application username.
Login Name
Search for information about a specific login name that meets yourother search criteria. If you leave this parameter blank, your reportcontains all login names that meet your other search criteria.
User Name
Search for information about a specific application username that meetsyour other search criteria. If you leave this parameter blank, yourreport contains all application usernames that meet your other searchcriteria.
Terminal Name
Search for information about a specific terminal that meets your othersearch criteria to make your report as brief as you need. If you leavethis parameter blank, your report contains all terminal names that meetyour other search criteria.
From Attempt Date/To Attempt Date
Search for information about unsuccessful logins within a specific timeperiod and that meet your other search criteria. Use these parametersto specify the start and end of your time period. If you leave theseparameters blank, your report contains unsuccessful logins from anydate that also meet your other search criteria to the current date for thisparameter.
3 – 18 Oracle Applications System Administrator’s Guide
Report Heading
The report heading displays the search criteria you entered asparameter values.
Column Headings
Username
The Oracle Applications username of the user who unsuccessfullysigned on. Use the Users form to view detail information about anapplication user. See: Users: page 2 – 17.
Login Name
The operating system login name of the user who unsuccessfully triedto sign on.
Terminal
The operating system ID of the terminal from which the userunsuccessfully tried to sign on.
Attempt Time
The date and time when the user unsuccessfully tried to sign on. See:Monitor Users: page 3 – 8.
☞
3 – 19User and Data Auditing
Signon Audit Users ReportUse this report to view who signs on and for how long.
Attention: You can only generate Signon Audit Users Reportsfor those users you are auditing.
Report Parameters
Sort By
Sort the information in your report by the time users start or finishusing an application username, the operating system login name of theuser, the terminal that users are on, and/or the application username.
Login Name
Search for information about a specific login name that meets yourother search criteria to make your report as brief as you need. If youleave this parameter blank, your report contains all login names thatmeet your other search criteria.
User Name
Search for information about a specific application username that meetsyour other search criteria to make your report as brief as you need. Ifyou leave this parameter blank, your report contains all applicationusernames that meet your other search criteria.
Terminal Name
Search for information about a specific terminal that meets your othersearch criteria to make your report as brief as you need. If you leavethis parameter blank, your report contains all terminal names that meetyour other search criteria.
From Active Date/To Active Date
You can search for information about users logged into OracleApplications within a specific time period and that meet your othersearch criteria. Use these parameters to specify the start and end ofyour time period. If you leave these parameters blank, your reportcontains user information from the first date that also meets your othersearch criteria to the current date.
3 – 20 Oracle Applications System Administrator’s Guide
Report Heading
The report heading displays the search criteria you entered asparameter values.
Column Headings
Session Number
The Oracle Applications session number which uniquely identifies eachapplication user sign–on.
User Name
The Oracle Applications username of the user who signed on. Use theUsers form to view detailed information about an application user.See: Users: page 2 – 17.
Login Name
The operating system login name of the user who signed on.
Terminal Name
The operating system ID of the terminal from which the user signed on.
Start Active Time/End Active Time
The dates and times when the user signed/exited onto OracleApplications. The start active time and end active time display only ifyou audited the user at the user Sign–On Audit level.
ORACLE Process
The ORACLE Process ID used during the user’s sign–on. Consult yourDatabase Administrator for more information concerning ORACLEProcesses.
System Process
The operating system process ID used during the user’s sign–on.Consult your operating system administrator for more informationconcerning your operating system process ID.
3 – 21User and Data Auditing
Purge Signon Audit Data Program
Use this program to purge Sign–On Audit information created before aspecified date.
The following data is deleted:
• Data for who signs on and for how long
• Data for who is selecting what responsibility and when they do it
• Data for who uses which forms in an application and when
Parameters
Audit Date
The Sign–On Audit information creation date. This program willdelete all Sign–On Audit information created before this date.
3 – 22 Oracle Applications System Administrator’s Guide
Reporting On AuditTrail DataAuditTrail lets you keep a history of changes to your important data:what changed, who changed it, and when. With AuditTrail, you caneasily determine how any data row or element obtained its currentvalue. You can track information on most types of fields, includingcharacter, number and date fields.
When you enter or update data in your forms, you change the databasetables underlying those forms. AuditTrail tracks which rows in thedatabase were updated at what time, and which user was logged inusing the associated form(s).
AuditTrail
Oracle Applications Releases 10.4 and above provide a mechanismbased on Oracle database triggers. AuditTrail stores changeinformation in a ”shadow table” of the audited table. This mechanismsaves audit data in an uncompressed but ”sparse” format, and youenable auditing for particular tables and groups of tables (”auditgroups”).
Setting Up Release 11i AuditTrail
You can choose to store and retrieve a history of all changes users makeon a given table. Auditing is accomplished using audit groups, whichfunctionally group tables to be audited. For a table to be audited, itmust be included in an enabled audit group.
The steps for setting up AuditTrail include:
Verify Select Privileges on SYS.DBA_TABLES
Have your database administrator grant SELECT privileges onSYS.DBA_TABLES to the APPLSYS account. Normally, this step wouldalready have been done as part of your installation or upgrade.
Define Audit Groups
These are groups of tables and columns, where you do not necessarilyneed to include all the columns in a given table. You enable auditingfor audit groups rather than for individual tables. You would typicallygroup together those tables that belong to the same business process(for example, purchase order tables).
☞
3 – 23User and Data Auditing
A given table can belong to more than one audit group. If so, the tableis audited according to the highest ”state” of enabling for any of itsgroups, where Enabled is the highest, followed by Disable Dump Data,Disable No Growth, and Disable Purge Table, in that order.
You can enable auditing for a maximum of 240 columns for a giventable, and you can enable auditing for all types of table columns exceptLONG, RAW, or LONG RAW. Your audit group must include allcolumns that make up the primary key for a table; these columns areadded to your audit group automatically. Once you have added acolumn to an audit group, you cannot remove it. See: Audit Groups:page 3 – 36.
Define Audit Installations
You choose the registered Oracle IDs at your site that you want toaudit. This allows you to audit across multiple applicationinstallations. When a table is added to an audit group, auditing willautomatically be enabled for all installations of the table for whichaudit is enabled. See: Audit Installations: page 3 – 34.
Run the Audit Trail Update Tables Report to Enable Auditing
Your AuditTrail definitions (and auditing) do not take effect until yourun the Audit Trail Update Tables Report. If you change any of yourdefinitions later, you must rerun this program. You run the Audit TrailUpdate Tables Report from the standard submission (Submit Reports)form.
Attention: AuditTrail requires two database connections. Ifyour operating platform does not automatically support twodatabase connections (e.g., VMS or MPE/XL), then add to yourenvironment file the environment variable FDATDB=<database connect string>.
Audit Trail Update Tables Report
This program creates database triggers on the tables in your auditgroups for your installations. It also creates shadow tables, one foreach audited table, to contain the audit information. If you havechanged your audit definitions or disabled auditing for an audit group,the program drops or modifies the auditing triggers and shadow tablesappropriately.
The program also builds special views you can use to retrieve youraudit data for reporting.
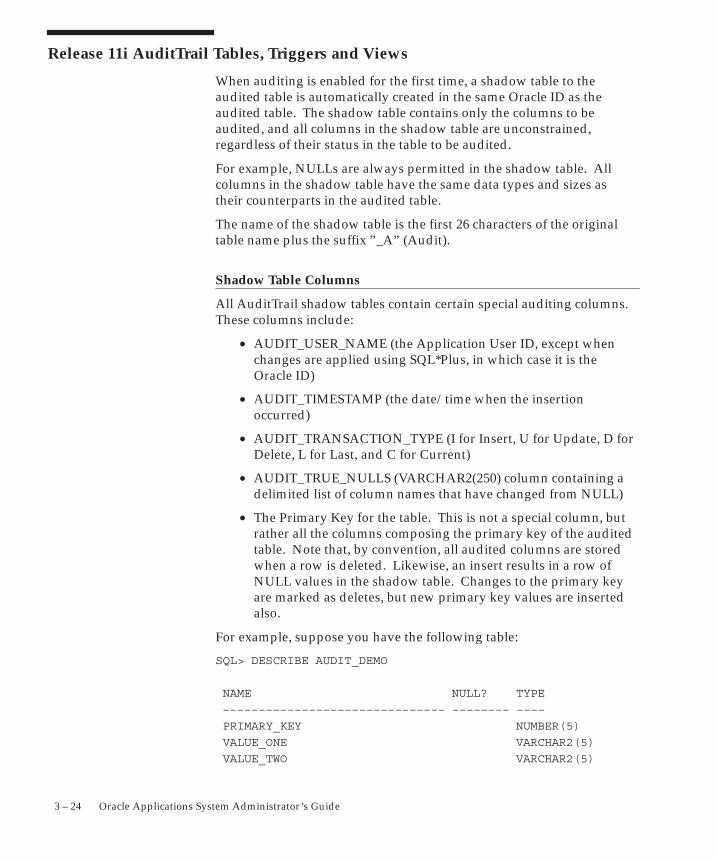
3 – 24 Oracle Applications System Administrator’s Guide
Release 11i AuditTrail Tables, Triggers and Views
When auditing is enabled for the first time, a shadow table to theaudited table is automatically created in the same Oracle ID as theaudited table. The shadow table contains only the columns to beaudited, and all columns in the shadow table are unconstrained,regardless of their status in the table to be audited.
For example, NULLs are always permitted in the shadow table. Allcolumns in the shadow table have the same data types and sizes astheir counterparts in the audited table.
The name of the shadow table is the first 26 characters of the originaltable name plus the suffix ”_A” (Audit).
Shadow Table Columns
All AuditTrail shadow tables contain certain special auditing columns.These columns include:
• AUDIT_USER_NAME (the Application User ID, except whenchanges are applied using SQL*Plus, in which case it is theOracle ID)
• AUDIT_TIMESTAMP (the date/time when the insertionoccurred)
• AUDIT_TRANSACTION_TYPE (I for Insert, U for Update, D forDelete, L for Last, and C for Current)
• AUDIT_TRUE_NULLS (VARCHAR2(250) column containing adelimited list of column names that have changed from NULL)
• The Primary Key for the table. This is not a special column, butrather all the columns composing the primary key of the auditedtable. Note that, by convention, all audited columns are storedwhen a row is deleted. Likewise, an insert results in a row ofNULL values in the shadow table. Changes to the primary keyare marked as deletes, but new primary key values are insertedalso.
For example, suppose you have the following table:
SQL> DESCRIBE AUDIT_DEMO
NAME NULL? TYPE
––––––––––––––––––––––––––––––– –––––––– ––––
PRIMARY_KEY NUMBER(5)
VALUE_ONE VARCHAR2(5)
VALUE_TWO VARCHAR2(5)
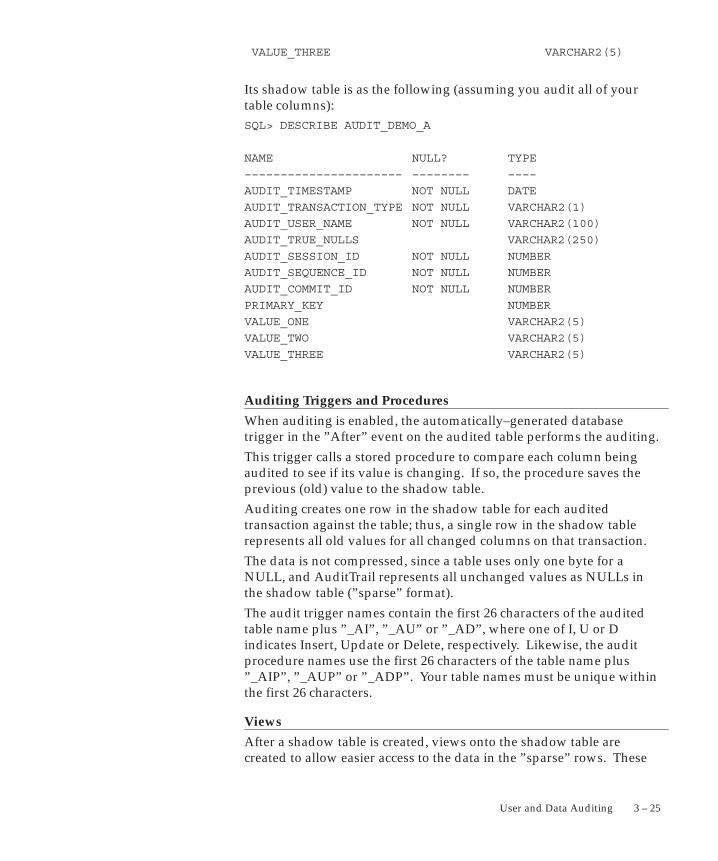
3 – 25User and Data Auditing
VALUE_THREE VARCHAR2(5)
Its shadow table is as the following (assuming you audit all of yourtable columns):SQL> DESCRIBE AUDIT_DEMO_A
NAME NULL? TYPE
–––––––––––––––––––––– –––––––– ––––
AUDIT_TIMESTAMP NOT NULL DATE
AUDIT_TRANSACTION_TYPE NOT NULL VARCHAR2(1)
AUDIT_USER_NAME NOT NULL VARCHAR2(100)
AUDIT_TRUE_NULLS VARCHAR2(250)
AUDIT_SESSION_ID NOT NULL NUMBER
AUDIT_SEQUENCE_ID NOT NULL NUMBER
AUDIT_COMMIT_ID NOT NULL NUMBER
PRIMARY_KEY NUMBER
VALUE_ONE VARCHAR2(5)
VALUE_TWO VARCHAR2(5)
VALUE_THREE VARCHAR2(5)
Auditing Triggers and Procedures
When auditing is enabled, the automatically–generated databasetrigger in the ”After” event on the audited table performs the auditing.
This trigger calls a stored procedure to compare each column beingaudited to see if its value is changing. If so, the procedure saves theprevious (old) value to the shadow table.
Auditing creates one row in the shadow table for each auditedtransaction against the table; thus, a single row in the shadow tablerepresents all old values for all changed columns on that transaction.
The data is not compressed, since a table uses only one byte for aNULL, and AuditTrail represents all unchanged values as NULLs inthe shadow table (”sparse” format).
The audit trigger names contain the first 26 characters of the auditedtable name plus ”_AI”, ”_AU” or ”_AD”, where one of I, U or Dindicates Insert, Update or Delete, respectively. Likewise, the auditprocedure names use the first 26 characters of the table name plus”_AIP”, ”_AUP” or ”_ADP”. Your table names must be unique withinthe first 26 characters.
Views
After a shadow table is created, views onto the shadow table arecreated to allow easier access to the data in the ”sparse” rows. These
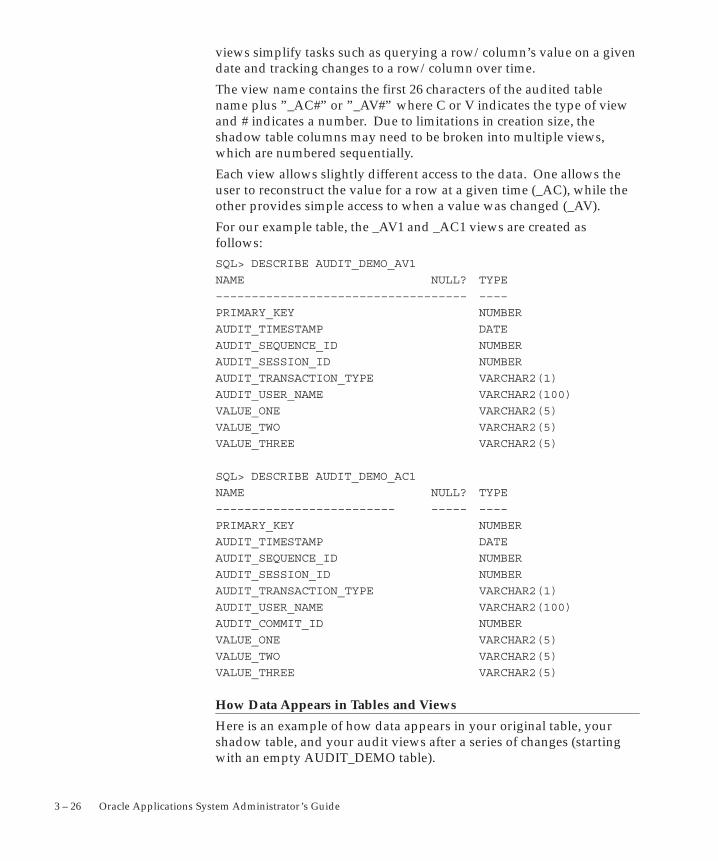
3 – 26 Oracle Applications System Administrator’s Guide
views simplify tasks such as querying a row/column’s value on a givendate and tracking changes to a row/column over time.
The view name contains the first 26 characters of the audited tablename plus ”_AC#” or ”_AV#” where C or V indicates the type of viewand # indicates a number. Due to limitations in creation size, theshadow table columns may need to be broken into multiple views,which are numbered sequentially.
Each view allows slightly different access to the data. One allows theuser to reconstruct the value for a row at a given time (_AC), while theother provides simple access to when a value was changed (_AV).
For our example table, the _AV1 and _AC1 views are created asfollows:SQL> DESCRIBE AUDIT_DEMO_AV1
NAME NULL? TYPE
––––––––––––––––––––––––––––––––––– ––––
PRIMARY_KEY NUMBER
AUDIT_TIMESTAMP DATE
AUDIT_SEQUENCE_ID NUMBER
AUDIT_SESSION_ID NUMBER
AUDIT_TRANSACTION_TYPE VARCHAR2(1)
AUDIT_USER_NAME VARCHAR2(100)
VALUE_ONE VARCHAR2(5)
VALUE_TWO VARCHAR2(5)
VALUE_THREE VARCHAR2(5)
SQL> DESCRIBE AUDIT_DEMO_AC1
NAME NULL? TYPE
––––––––––––––––––––––––– ––––– ––––
PRIMARY_KEY NUMBER
AUDIT_TIMESTAMP DATE
AUDIT_SEQUENCE_ID NUMBER
AUDIT_SESSION_ID NUMBER
AUDIT_TRANSACTION_TYPE VARCHAR2(1)
AUDIT_USER_NAME VARCHAR2(100)
AUDIT_COMMIT_ID NUMBER
VALUE_ONE VARCHAR2(5)
VALUE_TWO VARCHAR2(5)
VALUE_THREE VARCHAR2(5)
How Data Appears in Tables and Views
Here is an example of how data appears in your original table, yourshadow table, and your audit views after a series of changes (startingwith an empty AUDIT_DEMO table).
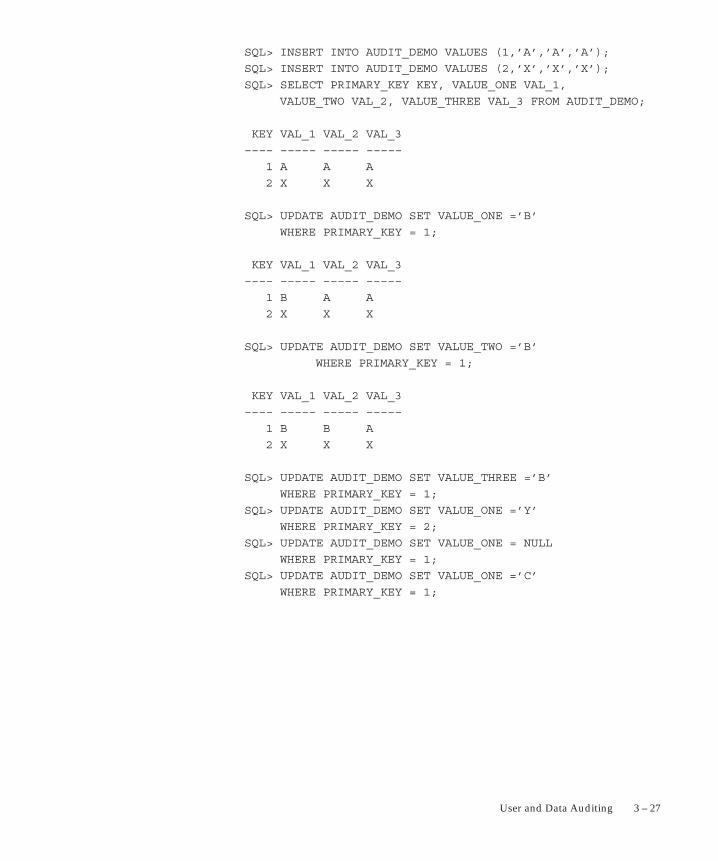
3 – 27User and Data Auditing
SQL> INSERT INTO AUDIT_DEMO VALUES (1,’A’,’A’,’A’);
SQL> INSERT INTO AUDIT_DEMO VALUES (2,’X’,’X’,’X’);
SQL> SELECT PRIMARY_KEY KEY, VALUE_ONE VAL_1,
VALUE_TWO VAL_2, VALUE_THREE VAL_3 FROM AUDIT_DEMO;
KEY VAL_1 VAL_2 VAL_3
–––– ––––– ––––– –––––
1 A A A
2 X X X
SQL> UPDATE AUDIT_DEMO SET VALUE_ONE =’B’
WHERE PRIMARY_KEY = 1;
KEY VAL_1 VAL_2 VAL_3
–––– ––––– ––––– –––––
1 B A A
2 X X X
SQL> UPDATE AUDIT_DEMO SET VALUE_TWO =’B’
WHERE PRIMARY_KEY = 1;
KEY VAL_1 VAL_2 VAL_3
–––– ––––– ––––– –––––
1 B B A
2 X X X
SQL> UPDATE AUDIT_DEMO SET VALUE_THREE =’B’
WHERE PRIMARY_KEY = 1;
SQL> UPDATE AUDIT_DEMO SET VALUE_ONE =’Y’
WHERE PRIMARY_KEY = 2;
SQL> UPDATE AUDIT_DEMO SET VALUE_ONE = NULL
WHERE PRIMARY_KEY = 1;
SQL> UPDATE AUDIT_DEMO SET VALUE_ONE =’C’
WHERE PRIMARY_KEY = 1;
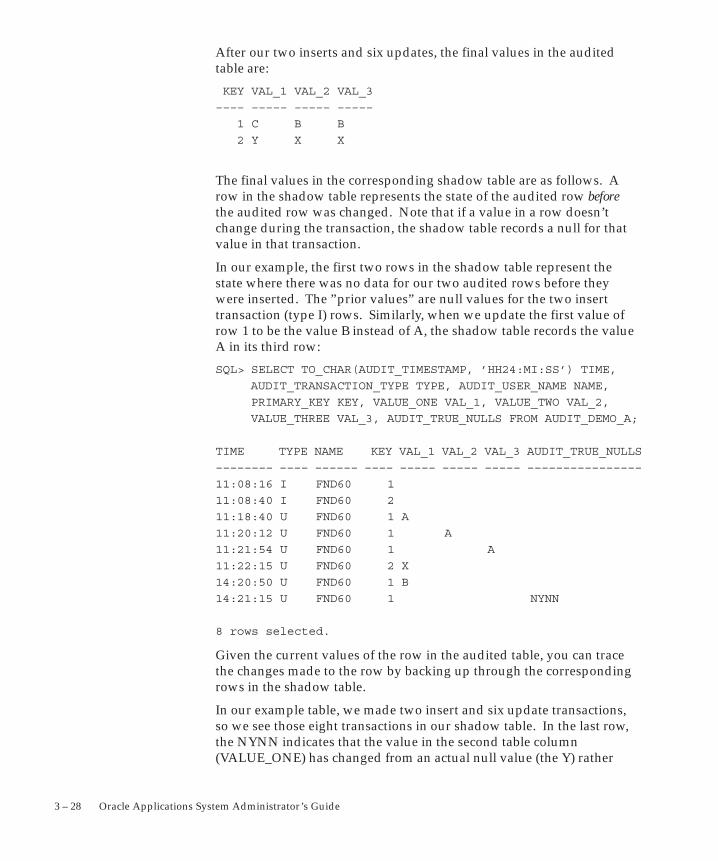
3 – 28 Oracle Applications System Administrator’s Guide
After our two inserts and six updates, the final values in the auditedtable are:
KEY VAL_1 VAL_2 VAL_3
–––– ––––– ––––– –––––
1 C B B
2 Y X X
The final values in the corresponding shadow table are as follows. Arow in the shadow table represents the state of the audited row beforethe audited row was changed. Note that if a value in a row doesn’tchange during the transaction, the shadow table records a null for thatvalue in that transaction.
In our example, the first two rows in the shadow table represent thestate where there was no data for our two audited rows before theywere inserted. The ”prior values” are null values for the two inserttransaction (type I) rows. Similarly, when we update the first value ofrow 1 to be the value B instead of A, the shadow table records the valueA in its third row:
SQL> SELECT TO_CHAR(AUDIT_TIMESTAMP, ’HH24:MI:SS’) TIME,
AUDIT_TRANSACTION_TYPE TYPE, AUDIT_USER_NAME NAME,
PRIMARY_KEY KEY, VALUE_ONE VAL_1, VALUE_TWO VAL_2,
VALUE_THREE VAL_3, AUDIT_TRUE_NULLS FROM AUDIT_DEMO_A;
TIME TYPE NAME KEY VAL_1 VAL_2 VAL_3 AUDIT_TRUE_NULLS
–––––––– –––– –––––– –––– ––––– ––––– ––––– ––––––––––––––––
11:08:16 I FND60 1
11:08:40 I FND60 2
11:18:40 U FND60 1 A
11:20:12 U FND60 1 A
11:21:54 U FND60 1 A
11:22:15 U FND60 2 X
14:20:50 U FND60 1 B
14:21:15 U FND60 1 NYNN
8 rows selected.
Given the current values of the row in the audited table, you can tracethe changes made to the row by backing up through the correspondingrows in the shadow table.
In our example table, we made two insert and six update transactions,so we see those eight transactions in our shadow table. In the last row,the NYNN indicates that the value in the second table column(VALUE_ONE) has changed from an actual null value (the Y) rather
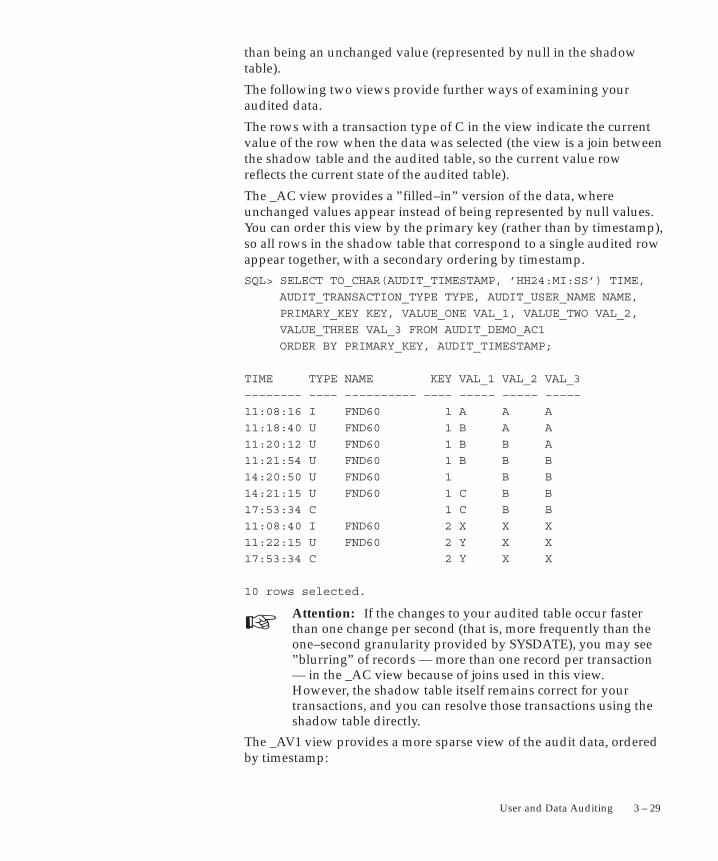
☞
3 – 29User and Data Auditing
than being an unchanged value (represented by null in the shadowtable).
The following two views provide further ways of examining youraudited data.
The rows with a transaction type of C in the view indicate the currentvalue of the row when the data was selected (the view is a join betweenthe shadow table and the audited table, so the current value rowreflects the current state of the audited table).
The _AC view provides a ”filled–in” version of the data, whereunchanged values appear instead of being represented by null values.You can order this view by the primary key (rather than by timestamp),so all rows in the shadow table that correspond to a single audited rowappear together, with a secondary ordering by timestamp.
SQL> SELECT TO_CHAR(AUDIT_TIMESTAMP, ’HH24:MI:SS’) TIME,
AUDIT_TRANSACTION_TYPE TYPE, AUDIT_USER_NAME NAME,
PRIMARY_KEY KEY, VALUE_ONE VAL_1, VALUE_TWO VAL_2,
VALUE_THREE VAL_3 FROM AUDIT_DEMO_AC1
ORDER BY PRIMARY_KEY, AUDIT_TIMESTAMP;
TIME TYPE NAME KEY VAL_1 VAL_2 VAL_3
–––––––– –––– –––––––––– –––– ––––– ––––– –––––
11:08:16 I FND60 1 A A A
11:18:40 U FND60 1 B A A
11:20:12 U FND60 1 B B A
11:21:54 U FND60 1 B B B
14:20:50 U FND60 1 B B
14:21:15 U FND60 1 C B B
17:53:34 C 1 C B B
11:08:40 I FND60 2 X X X
11:22:15 U FND60 2 Y X X
17:53:34 C 2 Y X X
10 rows selected.
Attention: If the changes to your audited table occur fasterthan one change per second (that is, more frequently than theone–second granularity provided by SYSDATE), you may see”blurring” of records –– more than one record per transaction–– in the _AC view because of joins used in this view.However, the shadow table itself remains correct for yourtransactions, and you can resolve those transactions using theshadow table directly.
The _AV1 view provides a more sparse view of the audit data, orderedby timestamp:
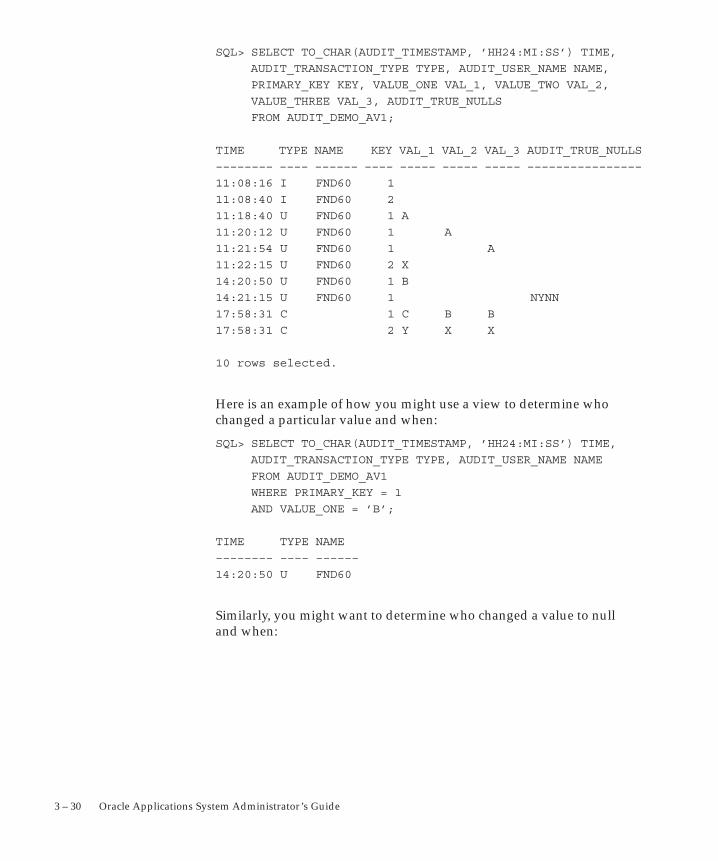
3 – 30 Oracle Applications System Administrator’s Guide
SQL> SELECT TO_CHAR(AUDIT_TIMESTAMP, ’HH24:MI:SS’) TIME,
AUDIT_TRANSACTION_TYPE TYPE, AUDIT_USER_NAME NAME,
PRIMARY_KEY KEY, VALUE_ONE VAL_1, VALUE_TWO VAL_2,
VALUE_THREE VAL_3, AUDIT_TRUE_NULLS
FROM AUDIT_DEMO_AV1;
TIME TYPE NAME KEY VAL_1 VAL_2 VAL_3 AUDIT_TRUE_NULLS
–––––––– –––– –––––– –––– ––––– ––––– ––––– ––––––––––––––––
11:08:16 I FND60 1
11:08:40 I FND60 2
11:18:40 U FND60 1 A
11:20:12 U FND60 1 A
11:21:54 U FND60 1 A
11:22:15 U FND60 2 X
14:20:50 U FND60 1 B
14:21:15 U FND60 1 NYNN
17:58:31 C 1 C B B
17:58:31 C 2 Y X X
10 rows selected.
Here is an example of how you might use a view to determine whochanged a particular value and when:
SQL> SELECT TO_CHAR(AUDIT_TIMESTAMP, ’HH24:MI:SS’) TIME,
AUDIT_TRANSACTION_TYPE TYPE, AUDIT_USER_NAME NAME
FROM AUDIT_DEMO_AV1
WHERE PRIMARY_KEY = 1
AND VALUE_ONE = ’B’;
TIME TYPE NAME
–––––––– –––– ––––––
14:20:50 U FND60
Similarly, you might want to determine who changed a value to nulland when:
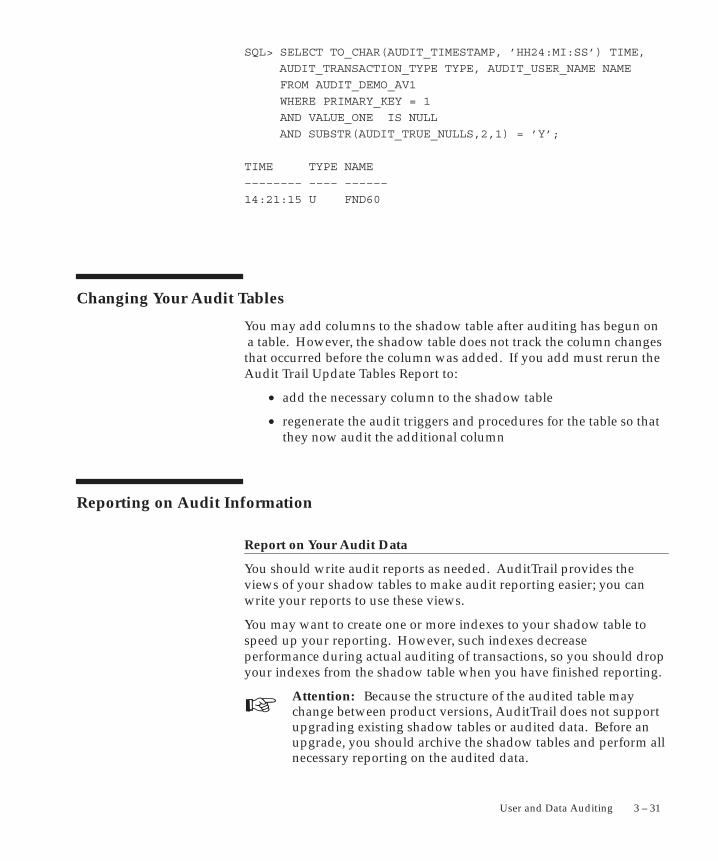
☞
3 – 31User and Data Auditing
SQL> SELECT TO_CHAR(AUDIT_TIMESTAMP, ’HH24:MI:SS’) TIME,
AUDIT_TRANSACTION_TYPE TYPE, AUDIT_USER_NAME NAME
FROM AUDIT_DEMO_AV1
WHERE PRIMARY_KEY = 1
AND VALUE_ONE IS NULL
AND SUBSTR(AUDIT_TRUE_NULLS,2,1) = ’Y’;
TIME TYPE NAME
–––––––– –––– ––––––
14:21:15 U FND60
Changing Your Audit Tables
You may add columns to the shadow table after auditing has begun on a table. However, the shadow table does not track the column changesthat occurred before the column was added. If you add must rerun theAudit Trail Update Tables Report to:
• add the necessary column to the shadow table
• regenerate the audit triggers and procedures for the table so thatthey now audit the additional column
Reporting on Audit Information
Report on Your Audit Data
You should write audit reports as needed. AuditTrail provides theviews of your shadow tables to make audit reporting easier; you canwrite your reports to use these views.
You may want to create one or more indexes to your shadow table tospeed up your reporting. However, such indexes decreaseperformance during actual auditing of transactions, so you should dropyour indexes from the shadow table when you have finished reporting.
Attention: Because the structure of the audited table maychange between product versions, AuditTrail does not supportupgrading existing shadow tables or audited data. Before anupgrade, you should archive the shadow tables and perform allnecessary reporting on the audited data.
3 – 32 Oracle Applications System Administrator’s Guide
Disabling AuditTrail and Archiving Audit Data
You may report on your audits or disable auditing at any time. Whenyou disable auditing, you should do the following procedure:
Stop Auditing New Transactions
Disable auditing using either ”Disable – Prepare for Archive” or”Disable – Interrupt Audit” and running the Audit Trail Update Tablesreport.
Copies the current values of all rows in the auditedtable into the shadow table, and then disables theauditing triggers. There is no longer any recordingof any changes. You should archive the shadowtable before you purge it.
Modifies the triggers to store one “final” row in theshadow table for each row that is modified in theaudit table (remember that a given row in theshadow table represents the data in the auditedrow before an update). If a row in the table beingaudited is changed again (a second time), thatchange is not recorded. The shadow table growsslowly, until it contains one row for each row in thetable being audited. Then there is no longer anyrecording of any changes.
Archive Your Audit Data
You should archive the information in the shadow tables according toyour business needs.
Clean Out the Shadow Table
Before you restart auditing, you should clean out the shadow table. Ifthere were transactions during the time auditing was disabled, and youdid not clean out the shadow table, the data in the shadow table wouldbe invalid because it would have a gap where transactions were notrecorded. You purge the shadow table(s) by setting the audit group toDisable – Purge Table and running the Audit Trail Update Tablesreport.
Drops the auditing triggers and views and deletesall data from the shadow table.
Restart Auditing (If Desired)
You restart auditing by setting the audit group to Enable Requestedand running the Audit Trail Update Tables report again.
Disable –Prepare forArchive
Disable –Interrupt Audit
Disable –Purge Table

☞
3 – 33User and Data Auditing
Attention: If you disable using Disable Purge Table and thenreenable auditing for a table, AuditTrail flushes the contents ofthe shadow table when auditing is reenabled. You shouldarchive any shadow table data that you want to keep beforeyou reenable auditing.
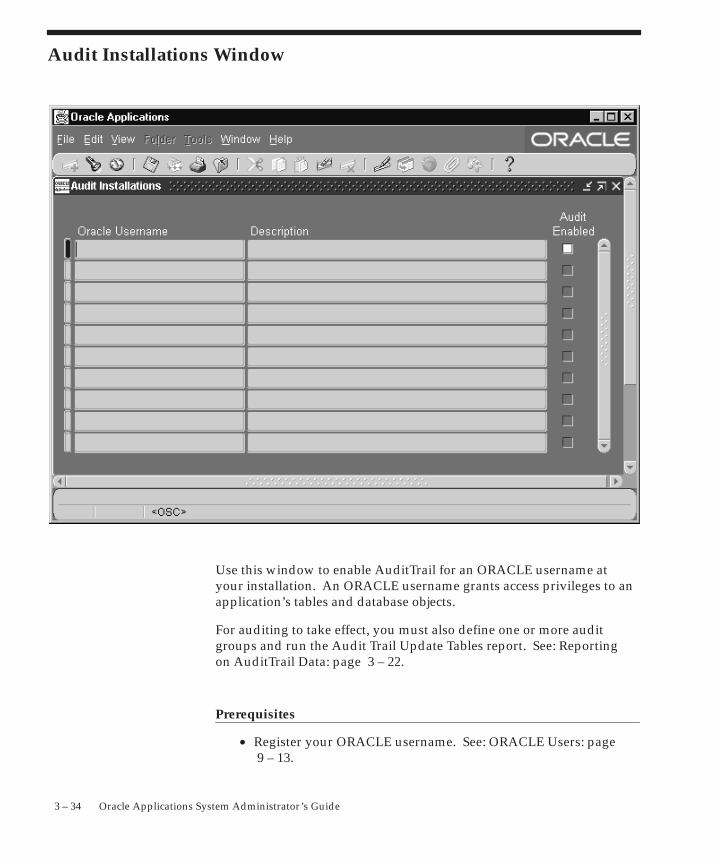
3 – 34 Oracle Applications System Administrator’s Guide
Audit Installations Window
Use this window to enable AuditTrail for an ORACLE username atyour installation. An ORACLE username grants access privileges to anapplication’s tables and database objects.
For auditing to take effect, you must also define one or more auditgroups and run the Audit Trail Update Tables report. See: Reportingon AuditTrail Data: page 3 – 22.
Prerequisites
• Register your ORACLE username. See: ORACLE Users: page 9 – 13.
3 – 35User and Data Auditing
Audit Installations Block
Oracle Username
Select the Oracle username that owns the tables you wish to audit.
Audit Enabled
Check the Audit Enabled check box to enable AuditTrail for an Oracleusername. Before auditing takes effect you must define one or moreaudit groups and run the Audit Trail Update Tables report.
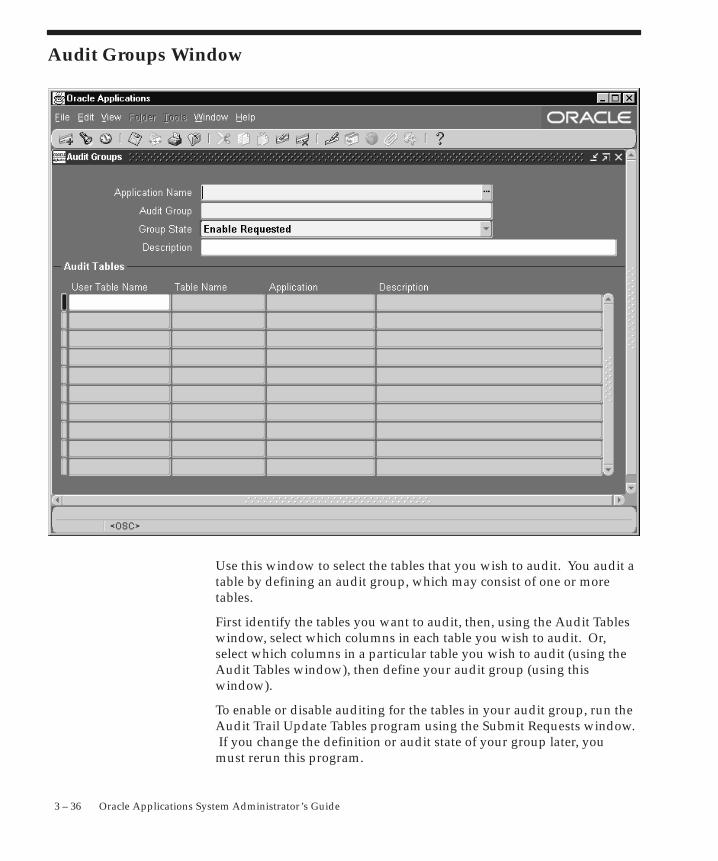
3 – 36 Oracle Applications System Administrator’s Guide
Audit Groups Window
Use this window to select the tables that you wish to audit. You audit atable by defining an audit group, which may consist of one or moretables.
First identify the tables you want to audit, then, using the Audit Tableswindow, select which columns in each table you wish to audit. Or,select which columns in a particular table you wish to audit (using theAudit Tables window), then define your audit group (using thiswindow).
To enable or disable auditing for the tables in your audit group, run theAudit Trail Update Tables program using the Submit Requests window. If you change the definition or audit state of your group later, youmust rerun this program.
☞
☞
3 – 37User and Data Auditing
Prerequisites
• Define an audit installation using the Audit Installationswindow.
Attention: Your tables and their primary key informationmust already be registered and defined for successful auditing.If the table you want to audit is a custom table (not shipped aspart of Oracle Applications), you should also perform thefollowing two steps:
• Register your table and its primary key columns using OracleApplication Object Library’s Tables window (ApplicationDeveloper Responsibility).
• Run the Register Tables concurrent program from the SubmitRequests window.
Audit Groups Block
Identify your audit group and enable or disable auditing for this group.
Application Name
Select the name of an application to associate with your audit group.The combination of application name and group name uniquelyidentifies your audit group. An audit group may be used to audittables in additional applications.
Audit Group
Enter the name of the audit group.
Group State
Choose Enable Requested if you are defining a new audit group. Whenyou run the Audit Trail Update Tables report, the concurrent programcreates database triggers for the tables in your audit group. Once youhave run the program, this field displays Enabled for audit groupswhere AuditTrail is active.
Attention: All primary key columns in each table in an auditgroup are automatically selected for auditing, whether or notyou use the Audit Tables window to select which columns youwish to audit.
3 – 38 Oracle Applications System Administrator’s Guide
To disable auditing for a group, choose one of the following optionsand then run the Audit Trail Update Tables report to have yourchanges take effect.
Copies the current values of all rows in the auditedtable into the shadow table, and then disables theauditing triggers. This option requires the mostspace, since there is at least one row in the shadowtable for every row in the audited table (andanother row in the shadow table for eachtransaction on the original row in the auditedtable). You should then archive the table beforeyou empty the shadow table.
Modifies the triggers to store one final row in theshadow table as the audited row is modified in theaudit table (remember that a given row in theshadow table represents the data in the auditedrow before an update). Inserts or further changesare no longer audited. The shadow table thengrows slowly, and the data may be accessed by theexisting audit views.
Drops the auditing triggers and views and deletesall data from the shadow table.
Audit Tables Block
Identify the application tables you want to audit in your audit group.
User Table
Select the end user table name (frequently the same name as the tablename) for your database table. Once you choose a table, you see itstable name and associated application.
Table Name
This field displays the actual name for the table you have selected toinclude in your audit group.
Application
This field displays the application name for the table you have selectedto include in your audit group.
Disable –Prepare forArchive
Disable –Interrupt Audit
Disable –Purge Table

3 – 39User and Data Auditing
Description
This field displays the description for the table you have selected toinclude in your audit group.
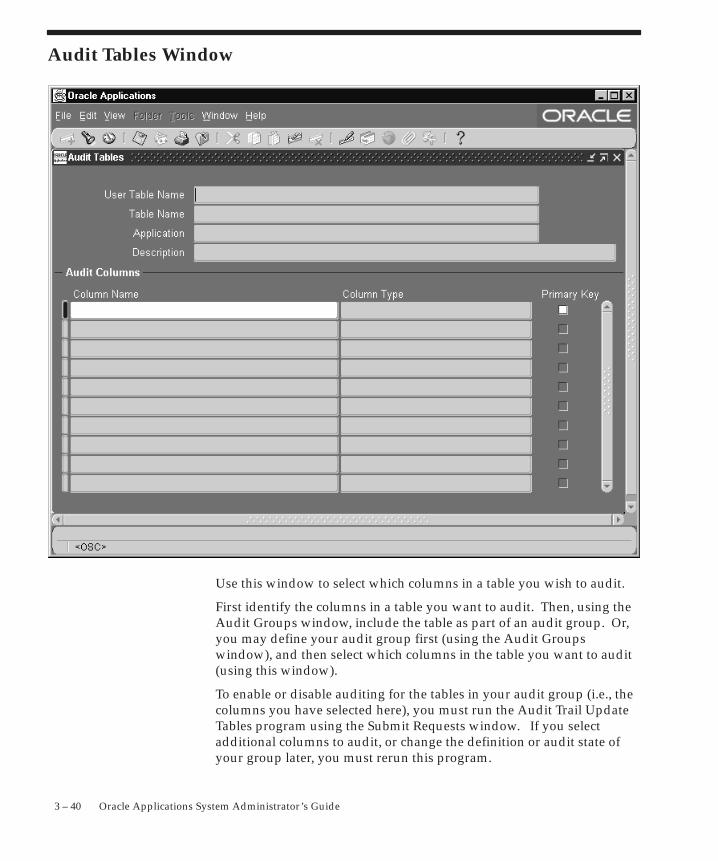
3 – 40 Oracle Applications System Administrator’s Guide
Audit Tables Window
Use this window to select which columns in a table you wish to audit.
First identify the columns in a table you want to audit. Then, using theAudit Groups window, include the table as part of an audit group. Or,you may define your audit group first (using the Audit Groupswindow), and then select which columns in the table you want to audit(using this window).
To enable or disable auditing for the tables in your audit group (i.e., thecolumns you have selected here), you must run the Audit Trail UpdateTables program using the Submit Requests window. If you selectadditional columns to audit, or change the definition or audit state ofyour group later, you must rerun this program.
☞
3 – 41User and Data Auditing
Prerequisites
• Define an audit installation using the Audit Installationswindow.
Attention: Your tables and their primary key informationmust already be registered and defined for successful auditing.If the table you want to audit is a custom table (not shipped aspart of Oracle Applications), you should also perform thefollowing two steps:
• Register your table and its primary key columns using OracleApplication Object Library’s Tables window (ApplicationDeveloper Responsibility).
• Run the Register Tables concurrent program from the SubmitRequests window.
Define Audit Tables Block
Identify the application table you want to audit. Successively selectingGo – Next Record from the menu or toolbar displays, in alphabeticalorder, the name of each application table registered at your installationsite.
User Table Name
Select the end user table name (frequently the same name as the tablename) for your database table. Once you choose a table, you see itstable name and associated application.
Table Name
This field displays the actual name for the table you have selected toinclude in your audit group.
Application
This field displays the application name for the table you have selectedto include in your audit group.
Audit Columns Block
Select the columns you want to audit. Successively selecting Go – NextRecord from the menu or toolbar displays, in alphabetical order, thename of each application table registered at your installation site.
3 – 42 Oracle Applications System Administrator’s Guide
• You cannot delete a column from auditing once it has beenselected.
• You may add additional columns to be audited.
• Each time you select a column to be audited, that change affectsevery audit group that includes the table which owns thecolumn.
Column Name
Enter the name of the database column you want to audit. You shouldnot explicitly enter the names of your table’s primary key columns,since they are entered automatically, and you will get an error messageif you try to save a duplicate column name. You can query to seewhich columns appear automatically.
Note that once you have chosen a column, you cannot delete it fromthe audit set, though you may add other columns to the set later.
Once you choose a column, you see its column type and whether it ispart of the primary key for this table.
Column Type
This field describes the type of data the column stores, for example,varchar2.
Primary Key
This field displays Yes or No indicating whether the column you areauditing is a primary key column.
Any primary key columns you do not select to audit are automaticallyincluded when you save your column selections. For example, if thetable you are auditing has two primary key columns, and you choose toaudit one of them, the second primary key column is automaticallyselected when you save your column selections.

C H A P T E R
4 T
4 – 1Managing Concurrent Programs and Reports
Managing ConcurrentPrograms and Reports
his chapter explains how to manage concurrent programs andorganize those programs into groups and sets. This chapter alsoexplains how to modify concurrent program definitions, modify thebehavior of parameters the programs refer to, and defineincompatibility rules among different programs.
The essays in this chapter are organized under the following topics:
• Overview of concurrent programs and requests
• Organizing programs into Request Sets
• Organizing programs into Request Groups
• Defining program incompatibility rules
• Defining application database connections or Data Groups
• Copying and modifying program definitions
Form descriptions follow at the end of the chapter.
4 – 2 Oracle Applications System Administrator’s Guide
Overview of Concurrent Programs and Requests
A concurrent program is an executable file that runs simultaneouslywith other concurrent programs and with online operations, fullyutilizing your hardware capacity. Typically, a concurrent program is along–running, data–intensive task, such as posting a journal orgenerating a report.
Request Groups and Request Sets
Reports and concurrent programs can be assembled into requestgroups and request sets.
• A request group is a collection of reports or concurrent programs.A System Administrator defines report groups in order tocontrol user access to reports and concurrent programs. Only aSystem Administrator can create a request group.
• Request sets define run and print options, and possibly, parametervalues, for a collection of reports or concurrent program. Endusers and System Administrators can define request sets. ASystem Administrator has request set privileges beyond those ofan end user.
Standard Request Submission and Request Groups
Standard Request Submission is an Oracle Applications feature thatallows you to select and run all your reports and other concurrentprograms from a single, standard form. The standard submission formis called Submit Request, although it can be customized to display adifferent title.
• The reports and concurrent programs that may be selected fromthe Submit Requests form belong to a request security group,which is a request group assigned to a responsibility.
• The reports and concurrent programs that may be selected froma customized Submit Request form belong to a request groupthat uses a code.
In summary, request groups can be used to control access to reportsand concurrent programs in two ways; according to a user’sresponsibility, or according to a customized standard submission(Submit Request) form. See: Customizing the Submit Request Windowusing Codes: page 4 – 20.
Additional Information: Running Oracle ApplicationsReports and Programs in the Oracle Applications User’s Guide
4 – 3Managing Concurrent Programs and Reports
Limiting Active Requests by User
As System Administrator you can limit the number of requests thatmay be active (status of Running) for an individual user. This ensuresthat a user cannot monopolize the request queue. For example, if auser with an Active Request Limit of 5 submits 20 requests, only 5requests will be run at the same time. The remaining requests will berun when the number of active requests for the user drops below 5.Use the Profile Options window to set the Concurrent: Active RequestLimit profile. To set a global limit for all users, set this option at the sitelevel. You can then modify limits for individual users by setting thisprofile option at the User level.
4 – 4 Oracle Applications System Administrator’s Guide
Multilingual Support for Concurrent RequestsBeginning with Release 11i, users are able to submit a single concurrentrequest that will cause a single concurrent program to run multipletimes, each time in a different language. Any output that is producedcan be routed to different printers based on language. Users can alsoroute completion notifications based on the language of the output.
For example, a user could submit a request for a Print Invoicesprogram that would cause that program to run several times, each timein a different language, with each set of invoices printed on a differentprinter.
Note: Multilingual requests cannot be run within request sets.
See Also
Oracle Applications User’s Guide
Oracle Applications Concepts Guide
Oracle Applications Developer’s Guide
Request Submission
A concurrent program can have a Multilingual Support (MLS) functionassociated with it. This function determines the set of languages overwhich the concurrent program will run. For example, the developermight associate a function with a Print Invoices program that wouldcause any request for that program to run in the preferred languages ofthe customers who have pending invoices. See Concurrent ProgramsWindow: page 4 – 66.
If the concurrent program does not have an MLS function associatedwith it, then a user can choose when submitting the request the list oflanguages in which the program should run. The language of thecurrent session is the default language.
If a concurrent program does have an MLS function associated with it,users will not be able to select languages for their requests. Theassociated MLS function determines the languages in which the requestwill run.
Runtime Behavior
Multilingual requests behave similarly to request sets. A user submitsa single request. When that request runs, it submits a child request for

4 – 5Managing Concurrent Programs and Reports
each language in its list of languages. The parent request remains inthe Running/Waiting state until its child requests are completed. If anychild request completes with error status, then the parent requestcompletes with error status. If no children complete with error status,but one or more completes with warning status, then the parentcompletes with warning status. Finally, if all children complete withnormal status, then the parent completes with normal status.
MLS Functions
Developers can create an MLS function for concurrent programs. TheMLS function determines in which of the installed languages a requestshould run. For example, an MLS function for a Print Invoicesprogram could require that any request for that program to run only inthe preferred languages of the customers who have pending invoices.This restriction saves system resources by assuring that the requestdoes not run in languages for which no output will be produced. Thisrestriction also prevents user error by automatically selecting theappropriate languages for a request.
MLS functions are PL/SQL stored procedures, written to a specificAPI. When the concurrent manager processes a multilingual requestfor a concurrent program with an associated MLS function, it calls theMLS function to retrieve a list of languages and submits theappropriate child requests for each language. The concurrent programapplication short name, the concurrent program short name, and theconcurrent request parameters are all available to the MLS function todetermine the list of languages that the requesst should be run in.
MLS functions are registered in the Concurrent Program Executableform. A registered MLS function can be assigned to one or moreconcurrent programs in the Concurrent Programs form.
See Also
Oracle Applications Developer’s Guide
4 – 6 Oracle Applications System Administrator’s Guide
Organizing Programs into Request SetsRequest sets are a quick and convenient way to run several reports andconcurrent programs with predefined print options and parametervalues. Request sets group requests into stages that are submitted bythe set. The order in which the stages are submitted is determined bythe status of previous stages.
Request sets can also be used by a System Administrator to customizeaccess to reports and concurrent programs. Using request sets, aSystem Administrator can:
• grant users of a responsibility the ability to run selected reportsand concurrent programs that are outside their request securitygroup.
• grant access to requests and other concurrent programs on auser–by–user basis.
• guarantee that reports in the set run with print options andparameter values that cannot be edited by end users.
Note: Multilingual requests cannot be run within request sets.
As System Administrator, you have privileges beyond those of yourapplication users, including a privileged version of the Request Setwindow. See: Request Set Windows, Oracle Applications User’s Guide.
Defining Request Sets
You can run the same set of concurrent requests regularly by defining arequest set, and then submitting the request set from the SubmitRequests form.
As System Administrator, you can include any Standard RequestSubmission report or concurrent program in the request sets youdefine. When end users define a request set, they can only select fromreports and programs that belong to their responsibility’s requestsecurity group.
Use the Request Set form to create and edit request sets. See: RequestSet Windows, Oracle Applications User’s Guide.
Request Set Stages
Organizing Request Sets into Stages
Request sets are divided into one or more ”stages” which are linked todetermine the sequence in which requests are run. Each stage consists
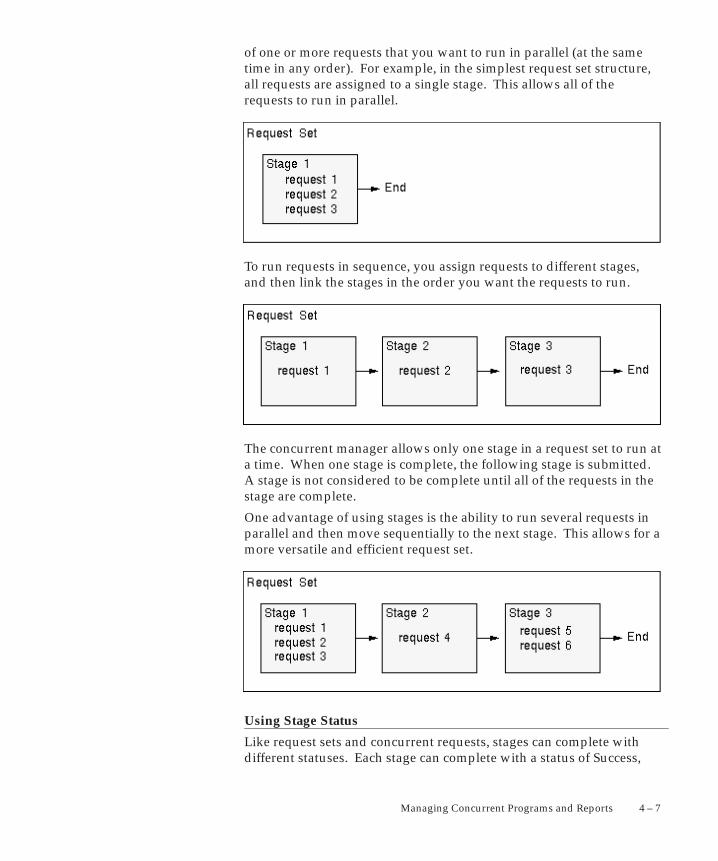
4 – 7Managing Concurrent Programs and Reports
of one or more requests that you want to run in parallel (at the sametime in any order). For example, in the simplest request set structure,all requests are assigned to a single stage. This allows all of therequests to run in parallel.
To run requests in sequence, you assign requests to different stages,and then link the stages in the order you want the requests to run.
The concurrent manager allows only one stage in a request set to run ata time. When one stage is complete, the following stage is submitted.A stage is not considered to be complete until all of the requests in thestage are complete.
One advantage of using stages is the ability to run several requests inparallel and then move sequentially to the next stage. This allows for amore versatile and efficient request set.
Using Stage Status
Like request sets and concurrent requests, stages can complete withdifferent statuses. Each stage can complete with a status of Success,
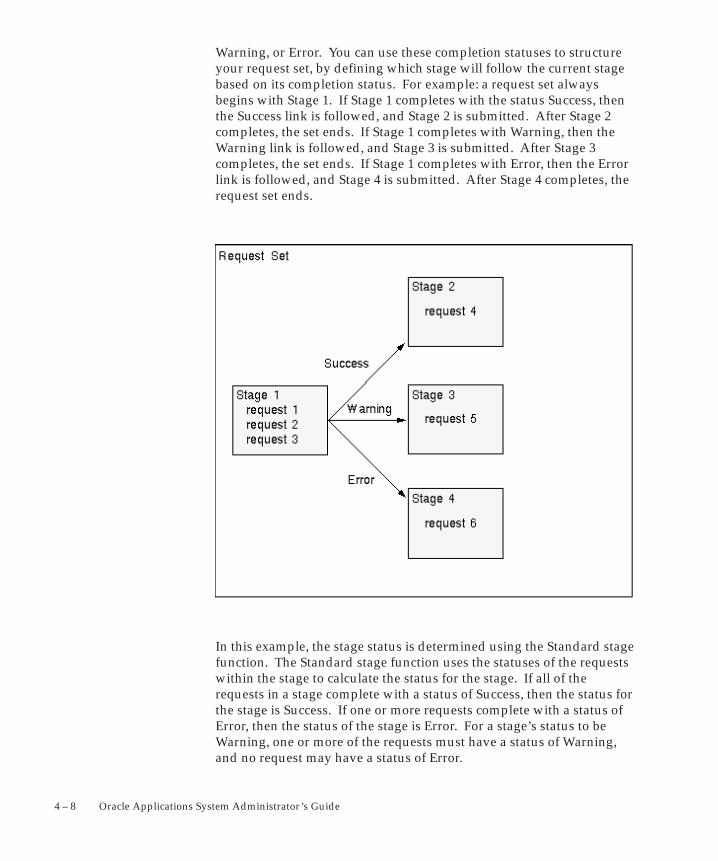
4 – 8 Oracle Applications System Administrator’s Guide
Warning, or Error. You can use these completion statuses to structureyour request set, by defining which stage will follow the current stagebased on its completion status. For example: a request set alwaysbegins with Stage 1. If Stage 1 completes with the status Success, thenthe Success link is followed, and Stage 2 is submitted. After Stage 2completes, the set ends. If Stage 1 completes with Warning, then theWarning link is followed, and Stage 3 is submitted. After Stage 3completes, the set ends. If Stage 1 completes with Error, then the Errorlink is followed, and Stage 4 is submitted. After Stage 4 completes, therequest set ends.
In this example, the stage status is determined using the Standard stagefunction. The Standard stage function uses the statuses of the requestswithin the stage to calculate the status for the stage. If all of therequests in a stage complete with a status of Success, then the status forthe stage is Success. If one or more requests complete with a status ofError, then the status of the stage is Error. For a stage’s status to beWarning, one or more of the requests must have a status of Warning,and no request may have a status of Error.
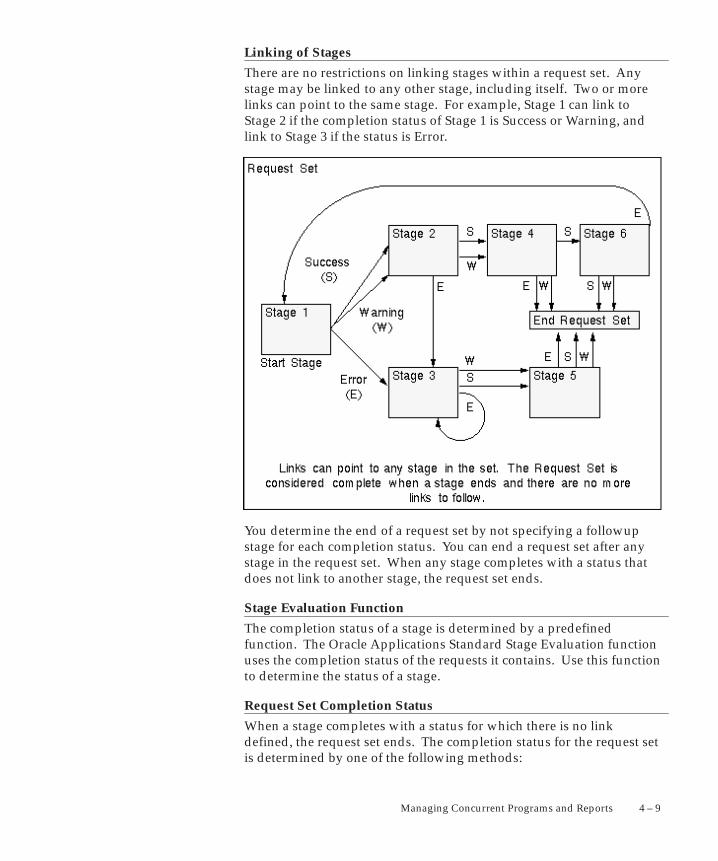
4 – 9Managing Concurrent Programs and Reports
Linking of Stages
There are no restrictions on linking stages within a request set. Anystage may be linked to any other stage, including itself. Two or morelinks can point to the same stage. For example, Stage 1 can link toStage 2 if the completion status of Stage 1 is Success or Warning, andlink to Stage 3 if the status is Error.
You determine the end of a request set by not specifying a followupstage for each completion status. You can end a request set after anystage in the request set. When any stage completes with a status thatdoes not link to another stage, the request set ends.
Stage Evaluation Function
The completion status of a stage is determined by a predefinedfunction. The Oracle Applications Standard Stage Evaluation functionuses the completion status of the requests it contains. Use this functionto determine the status of a stage.
Request Set Completion Status
When a stage completes with a status for which there is no linkdefined, the request set ends. The completion status for the request setis determined by one of the following methods:
☞
4 – 10 Oracle Applications System Administrator’s Guide
• Using the completion status of the last stage run in the requestset. This method is used by default.
• The user can override the default behavior by defining a specificstage within the set to be ”critical”. If the request set runs acritical stage, then the completion status of the set will be thesame as the completion status of the most recently run criticalstage. This can be useful if the final stage of the set is a ”cleanup” stage and is not considered important to the overall status ofthe set.
Printing Request Sets
On a report–by–report basis, you can select a different printer for eachreport in a request set. When you define a request set, print options,such as the printer a report is sent to, are saved so you do not have tospecify them again when you run the request set.
Attention: If a printer is defined for a concurrent programusing the Concurrent Programs form, then that value cannot beupdated, either by a user profile option setting, a request setdefinition, or when running the program or request set.
Note: Defining a printer for a request set concurrent program(e.g., Request Set Payables Aging Reports) in the ConcurrentPrograms form has no effect; the printer definition is notreferred to.
Request Sets as Concurrent Programs
When you define a request set or a stage within a request set thatallows incompatibilities, a concurrent program is created to run therequests in your request set according to the instructions you enter.
All concurrent programs that run request sets are titled Request Set<name of request set>, and programs that run request set stages are titledRequest Set Stage <name of request set stage>. In the Concurrent Programsform, to query request set or request set stage concurrent programs onthe basis of a program’s name, enter the following in the Name field:
• ”Request Set” or ”Request Set Stage” before the name of theconcurrent program
• ”Request Set %” or ”Request Set Stage %” to perform a query onall request set programs
Request set and request set stage concurrent programs create log filesdocumenting the execution of the request set or stage. Each report orconcurrent program within a request set or stage also creates its ownlog file.
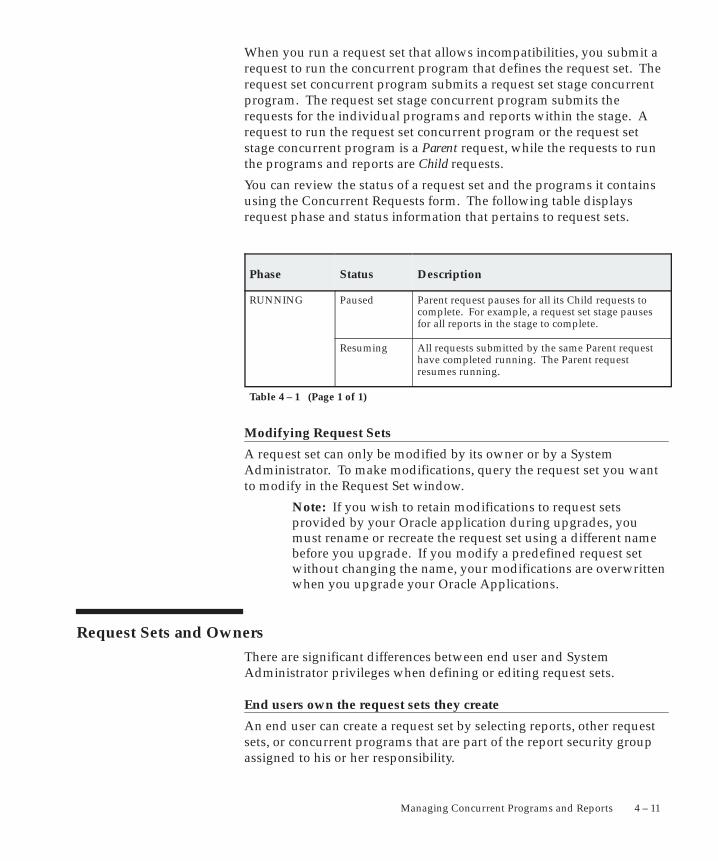
4 – 11Managing Concurrent Programs and Reports
When you run a request set that allows incompatibilities, you submit arequest to run the concurrent program that defines the request set. Therequest set concurrent program submits a request set stage concurrentprogram. The request set stage concurrent program submits therequests for the individual programs and reports within the stage. Arequest to run the request set concurrent program or the request setstage concurrent program is a Parent request, while the requests to runthe programs and reports are Child requests.
You can review the status of a request set and the programs it containsusing the Concurrent Requests form. The following table displaysrequest phase and status information that pertains to request sets.
Phase Status Description
RUNNING Paused Parent request pauses for all its Child requests tocomplete. For example, a request set stage pausesfor all reports in the stage to complete.
Resuming All requests submitted by the same Parent requesthave completed running. The Parent request resumes running.
Table 4 – 1 (Page 1 of 1)
Modifying Request Sets
A request set can only be modified by its owner or by a SystemAdministrator. To make modifications, query the request set you wantto modify in the Request Set window.
Note: If you wish to retain modifications to request setsprovided by your Oracle application during upgrades, youmust rename or recreate the request set using a different namebefore you upgrade. If you modify a predefined request setwithout changing the name, your modifications are overwrittenwhen you upgrade your Oracle Applications.
Request Sets and OwnersThere are significant differences between end user and SystemAdministrator privileges when defining or editing request sets.
End users own the request sets they create
An end user can create a request set by selecting reports, other requestsets, or concurrent programs that are part of the report security groupassigned to his or her responsibility.
4 – 12 Oracle Applications System Administrator’s Guide
When an end user creates a request set, the user automatically becomesthe “owner” of the request set. Ownership is identified by the person’sapplication username.
End users use the Request Set form to create a new request set, or toquery and update any request sets they own. End users can only editrequest sets they own.
We sometimes refer to a request set that an end user owns as a privaterequest set. Private request sets are not automatically added to arequest security group. That is, other users cannot access your privaterequest sets using the Submit Requests window unless the SystemAdministrator assigns that request set to a request security group.
Request sets owned by an end user are always available to that user,regardless of what responsibility the user is operating under. However,a standard submission form customized to display only reports in arequest group using a code does not display private request sets.
When a user signs on to Oracle Applications, the user can run requests,request sets, and concurrent programs included in:
• their responsibility’s request security group
• any request sets they own.
End User Benefits from Private Request Sets
Private request sets offer two main benefits to end users:
1. The request sets that users own are always available to them,regardless of which responsibility they are working under.
2. Users can create as many request sets as they want without addingrequest set choices to the list of standard submission concurrentprograms that other users must select from.
System Administrator Request Set Privileges
As System Administrator, you can:
• create request sets that include any reports or concurrentprogram.
• query and edit all request sets using the Request Set form.
• permit and define incompatibility rules for individual requestsets. See: Request Set Incompatibilities: page 4 – 14.
After you define a request set, you can assign a user to be its owner ifyou want the user to be able to run or edit this request set from any
User does not own request set
User owns request set
4 – 13Managing Concurrent Programs and Reports
responsibility. Request sets without an owner cannot be edited orupdated by any end users. In this way, you can guarantee print optionsand report parameters for a request set. You can also later edit therequest set to remove or change its ownership properties.
Other users can also run a request set if you, as System Administrator,assign the request set to their responsibility’s request security group. Ifyou do not assign a request set to a request security group, then onlythe owner can run the request set. In this way, you can grant access toreports and concurrent programs on a user–by–user basis.
Request Security Groups, Request Sets, and Reports
As System Administrator you can add any request set, includingprivate request sets, to a request security group. This allows you toprovide members of a responsibility access to reports and programsoutside their request security group.
Request set editing and report viewing privileges are different forreports that belong to a user’s request security group than they are forreports that are not in the user’s request security group.
All users can submit request sets that are added to a their requestsecurity group even if they contain requests that are not in the requestsecurity group. If the user does not own the request set, they:
• cannot edit the request set.
• cannot run an individual report by itself, but can only run theentire request set.
If the user owns the request set, they:
• can add any other requests in their request security group to therequest set.
• can delete any request from the request set, regardless ofwhether that report is in their request security group.
• can update print options or parameters for an individual reportin the request set, if the report is in their request security group.
• cannot run an individual report by itself, but can only run theentire request set.
System Administrator Benefits from Request Sets
Request sets offer three main benefits to System Administrators:
1. Request sets offer a means of controlling access to concurrentprograms on a user–by–user basis.
4 – 14 Oracle Applications System Administrator’s Guide
By defining a request set, assigning it an owner, and then notassigning the request set to any request security group, the reportsand programs in the request set are only available to the owner.
2. By leaving the Owner field blank, System Administrators cancreate request sets whose individual programs and parameterscannot be edited or updated by end users.
Only a System Administrator can edit a request set that has noowner.
3. System Administrators can provide members of a responsibilityaccess to reports and programs outside their request securitygroup.
By defining a request set that contains reports or programs not in arequest security group, and assigning that request set to the requestsecurity group, users can be granted run, but not edit privileges forselected reports or programs.
Request Set Incompatibilities
A request set is actually a concurrent program that submits requests torun each program in the request set. You can allow incompatibilityrules to govern your request set so that the request set does not run atthe same time as other reports or concurrent programs. You can alsoapply these rules to the stages that make up the request set.
Use the Concurrent Programs form to query the request set concurrentprogram and list those programs, and/or stages you want to define asincompatible with your request set. See: Concurrent Programs: page 4 – 66.
All concurrent programs that run request sets are titled Request Set<name of request set>. In the Concurrent Programs form, if you query arequest set concurrent program on the basis of the program’s name,you must enter in the Name field the words:
”Request Set” before the name of a concurrent program
”Request Set %” to perform a query on all request set programs
When you list a program as incompatible with your request set, theprogram will not run simultaneously within the same conflict domainas the request set or any of the reports within the set. See: DefiningProgram Incompatibility Rules: page 4 – 25 .
☞
4 – 15Managing Concurrent Programs and Reports
Sharing Parameters in a Request Set
Parameters, also referred to as arguments, are values that defineaspects of a program’s execution. You can share a parameter and itsentered value among some or all of the requests in your request set.
You identify a parameter as shared by giving it a label. Then, for eachconcurrent program in your request set, you can assign the same labelto a parameter for that program. Among the programs in your requestset, the parameters for each program share or accept a common value.
The first time you enter a value for any of the shared parameters, thatvalue becomes the shared parameter’s value. This is useful, becauseyou only have to enter a value once, rather than for each program inthe request set.
Behavior of Shared Parameters
Selecting a value for a shared parameter provides a default forsubsequent occurrences of the parameter. Changing a sharedparameter’s value provides a new default for subsequent occurrencesof the parameter, but does not affect prior requests in the set.
Once all the shared parameters contain values, changing the value for ashared parameter has no effect on the other shared parameters.
Attention: Do not hide shared parameters. Do not set sharedparameters to Display = No (which prevents modifying thevalue) or Modify = No. This prevents updates to sharedparameters, which are not propagated to other reports in theset, from generating unwanted inconsistencies.

Figure 4 – 1
4 – 16 Oracle Applications System Administrator’s Guide
No
No
No
No
No
Yes
Yes
Yes
No
Yes
No
No
No
Yes
No
No
Report1
Report 2
Report3
Report 4
Example Settings for a Shared Parameter
1
2
3
4
Selecting “No” for the first report defaults “No” in subsequent reports.
Selecting “Yes” for the second report, after selecting “No” for the firstreport, defaults “Yes” in subsequent reports, but does not change thefirst report (prior reports).
Selecting “No” for the third report, after selecting “Yes” for the secondreport, after selecting “No” for the first report, defaults “No” in subse-quent reports, but does not change the first or second reports (priorreports).
Once all the reports parameters contain values, updating a sharedparameter does not update the values in either subsequent or priorreports. For example, selecting “No” for the first report and navigat-ing through all the parameter pop–up windows provides the “No”value for all of the shared parameters. Selecting “Yes” afterwards forthe second report does not update the first, third, or fourth reports.
1
2
3
4
Example – Shared Parameter Value
We’ve created a request set containing two reports, a ConcurrentPrograms Report and the Concurrent Program Details Report. The tworeports and their parameters are listed in the table below:
REPORT PARAMETERS
Concurrent Programs Report Application Name
Concurrent Program Detail Report Application Name,Program
Table 4 – 2 (Page 1 of 1)
We identify the parameter Application Name as a parameter sharedbetween the two reports. We want to enter a value only once, that is,
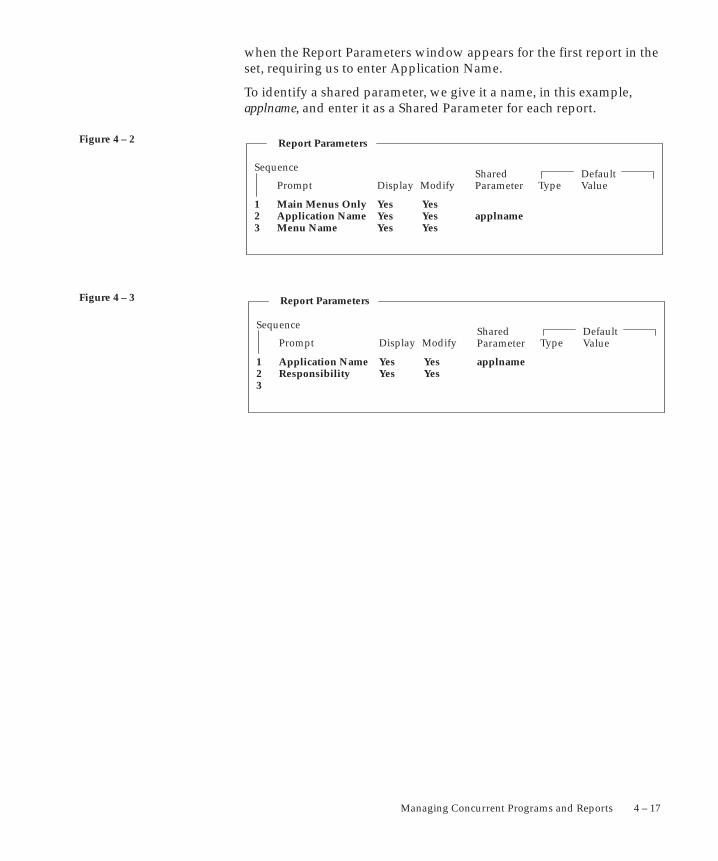
Figure 4 – 2
Figure 4 – 3
4 – 17Managing Concurrent Programs and Reports
when the Report Parameters window appears for the first report in theset, requiring us to enter Application Name.
To identify a shared parameter, we give it a name, in this example,applname, and enter it as a Shared Parameter for each report.
Report Parameters
Sequence
Prompt Display ModifySharedParameter Type
DefaultValue
YesYesYes
YesYesYes
applnameMain Menus OnlyApplication NameMenu Name
123
Report Parameters
Sequence
Prompt Display ModifySharedParameter Type
DefaultValue
YesYes
YesYes
applnameApplication NameResponsibility
123
4 – 18 Oracle Applications System Administrator’s Guide
Request Sets Report
This report documents request set definitions, including the set’sowner, program incompatibilities, as well as printer and print styleinformation. Use this report when defining or editing request setdefinitions.
Report Parameters
None.
Report Headings
The report headings provide you with general information about thecontents of the report.
4 – 19Managing Concurrent Programs and Reports
Organizing Programs into Request GroupsThis essay explains how you can organize your applications programsand reports into request groups. It presents the following topics:
• Request Security Groups
• Using Codes with Request Groups
• Customizing the Submit Requests Window using Codes
• Report Group Responsibilities report
Defining a Request Group
When defining a request group, you can include:
• all the reports and concurrent programs owned by an application
• individual reports and concurrent programs
• request sets, which are collections of reports and concurrentprograms that may be selected from an application user’srequest security groups
• request set stage functions, which are used to calculate the statusof stages within a request set.
Two types of Request Group
A request group is used by Oracle Applications at two different levels:
1. Responsibility level
When a request group is assigned to a responsibility, it is referredto as a request security group, and it defines the reports, requestsets, and concurrent programs that a user, operating under thatresponsibility, can select from the Submit Requests Window.
2. Form level
When a request group is assigned a code, that code can be passedas a parameter to the Submit Requests Window. The code helpsdefine the function that calls the Submit Requests Window.
The list of values for that unique Submit Requests Window lists thereports, request sets, and concurrent programs in the requestgroup.
Request Security Groups
When a request group is assigned to a responsibility, the request groupis referred to as a request security group. Any user signed on under a
4 – 20 Oracle Applications System Administrator’s Guide
responsibility can run the reports and concurrent programs containedin their responsibility’s request security group.
The Submit Requests standard submission form displays a list of all thereports and programs in the current responsibility’s request securitygroup.
Using Codes with Request Groups
Normally, when a menu calls the standard request submission form,that form can list the reports and concurrent programs contained in thereport security group for the current responsibility.
Alternatively, you can assign a code to a request group so that acustomized standard submission form only displays a list of concurrentprograms contained in that particular request group. A request groupcode is simply an argument that is passed from a menu to a customizedstandard submission form. To summarize:
• Request group codes provide a form–based method ofcontrolling user access to concurrent programs and reports.
• A code can be assigned to a request group.
• You can use the code as an argument passed from a menu to thestandard submission form.
• When a menu that calls the standard submission form uses thecode, that form lists only those programs in the request groupidentified by the code.
Customizing the Submit Requests Window using Codes
You can give the Submit Requests Window a different title, and definethe form so that it allows users to select only those reports orconcurrent programs belonging to a request group that you haveassigned a code to. To do this, you register a form function thatreferences the Submit Requests Window, and you pass certainarguments to the function. Then you construct your menu to includethis form function. See: Menus: page 2 – 38.
Using a Request Group Code as an argument
The following table describes the parameters passed to associate arequest group with the Submit Requests Window and to customize the
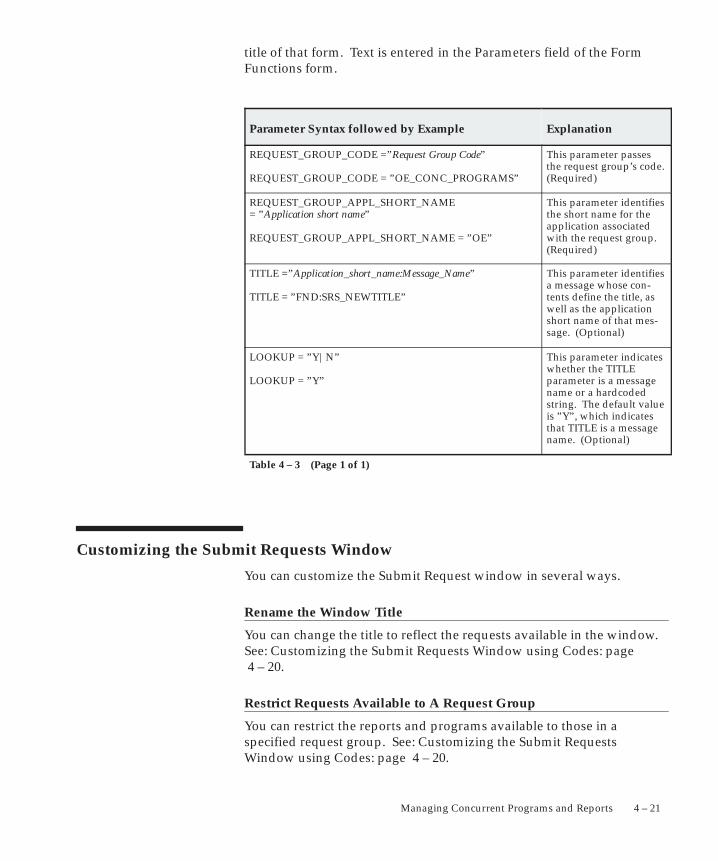
4 – 21Managing Concurrent Programs and Reports
title of that form. Text is entered in the Parameters field of the FormFunctions form.
Parameter Syntax followed by Example Explanation
REQUEST_GROUP_CODE =”Request Group Code”
REQUEST_GROUP_CODE = ”OE_CONC_PROGRAMS”
This parameter passes the request group’s code.(Required)
REQUEST_GROUP_APPL_SHORT_NAME= ”Application short name” REQUEST_GROUP_APPL_SHORT_NAME = ”OE”
This parameter identifiesthe short name for theapplication associatedwith the request group.(Required)
TITLE =”Application_short_name:Message_Name” TITLE = ”FND:SRS_NEWTITLE”
This parameter identifiesa message whose con-tents define the title, aswell as the applicationshort name of that mes-sage. (Optional)
LOOKUP = ”Y|N”
LOOKUP = ”Y”
This parameter indicateswhether the TITLE parameter is a messagename or a hardcodedstring. The default valueis ”Y”, which indicatesthat TITLE is a messagename. (Optional)
Table 4 – 3 (Page 1 of 1)
Customizing the Submit Requests Window
You can customize the Submit Request window in several ways.
Rename the Window Title
You can change the title to reflect the requests available in the window.See: Customizing the Submit Requests Window using Codes: page 4 – 20.
Restrict Requests Available to A Request Group
You can restrict the reports and programs available to those in aspecified request group. See: Customizing the Submit RequestsWindow using Codes: page 4 – 20.
4 – 22 Oracle Applications System Administrator’s Guide
Restrict Requests to a Single Request
You can call Submit Requests form for a single request submission bypassing the program/set name as parameters
The parameters window pops up on navigation to the form whencalled with a program/report_set name. The form exits after the useracknowledges the displayed request ID for the submitted request.
Restrict Requests To A List of Requests
You can call Submit Requests form to submit one or more requests for asingle program/set by passing the program/set name as parameters
The parameters window pops up on navigation to the form and theuser can submit one or more requests for the program that was passedas a parameter. Requests for other programs cannnot be submitted inthis case.
Pass Parameters Used in Value Set Parameters
You can pass additional parameters to the Submit Requests form thatcan be referenced in the value sets to validate the request parameters.
Pass Manufacturing ”ORG” Parameters
You can pass 5 ORG related parameters and refer to them in the valueset. Alternatively, you can bring up a ORG LOV on navigation to theSubmit Requests form that populates the ORG parameters which canbe referenced in the value sets.
Complete List of All Submit Request Paramters
Below is the comprehensive list of parameters supported by the ”RunRequests”/SRS form and additional information about their usage.
• REQUEST_GROUP_CODE
• REQUEST_GROUP_APPL_SHORT_NAME (used withREQUEST_GROUP_CODE)
• CONCURRENT_PROGRAM_NAME
• PROGRAM_APPL_SHORT_NAME (used withCONCURRENT_PROGRAM_NAME)
• REQUEST_SET_NAME
• SET_APPL_SHORT_NAME (used with REQUEST_SET_NAME)
• SUBMIT_ONCE (default ’N’).
4 – 23Managing Concurrent Programs and Reports
SUBMIT_ONCE can be set to either Y or N ( N is the default).
SUBMIT_ONCE is used in conjunction withCONCURRENT_PROGRAM_NAME orREQUEST_SET_NAME.
If SUBMIT_ONCE is set to Y, then the form will exit after theSubmit button is clicked.
• TITLE
• LOOKUP (default ’N’)
• USE_ORG, ORG_ID, ORG_NAME, ORG_CODE,CHART_OF_ACCOUNTS_ID (five parameters)
If USE_ORG is set to ’Y’ (default is ’N’) then the Submit Requestsform checks to see if the other ORG parameters are set. If theparameters are not set, then it attempts to populate theparameters from the globals (GLOBAL.FND_ORG_ID, GLOBAL.FND_ORG_NAME, etc.). If the globals have not yet been set,the an ORG LOV shows, and both the parameters and theglobals are populated from the LOV.
Values sets should always reference the parameters, not theglobals.
• CHAR1, CHAR2, CHAR3, CHAR4, CHAR5
• DATE1, DATE2, DATE3, DATE4, DATE5
• NUMBER1, NUMBER2, NUMBER3, NUMBER4, NUMBER5
In your value sets, refer to these parameters as:
:PARAMETER.CHAR1, :PARAMETER.DATE1,
:PARAMETER.NUMBER1 etc.
4 – 24 Oracle Applications System Administrator’s Guide
Report Group Responsibilities Report
This report lists those responsibilities which have access to a report or arequest set. Use this report when granting access privileges to reportsand request sets, either by assigning reports and request sets to requestsecurity groups, or when assigning owners to a request set.
Report Parameters
Application Name
Choose the application name associated with the report or request set.
Report Name/Request Set Name
Either choose the name of a report or request set.

4 – 25Managing Concurrent Programs and Reports
Defining Program Incompatibility RulesThis essay explains how you can define incompatibility rules for yourconcurrent programs and reports.
Incompatible and Run Alone Programs
When a concurrent program is incompatible with another program, thetwo programs cannot access or update the same data simultaneously.
When you define a concurrent program, you can list those programsyou want it to be incompatible with. You can also list the program asincompatible with itself, which means that two instances of theprogram cannot run simultaneously.
You can also make a program incompatible with all other concurrentprograms by defining the program to be run–alone.
There are two types of program incompatibilities, ”Global”incompatibilities, and ”Domain–specific” incompatibilities.
You can define a concurrent program to be globally incompatible withanother program –– that is, the two programs cannot be runsimultaneously at all; or you can define a concurrent program to beincompatible with another program in a Conflict Domain. Conflictdomains are abstract representations of groups of data. They cancorrespond to other group identifiers, such as sets of books, or they canbe arbitrary.
You define a concurrent program to be run–alone or to be incompatiblewith specific concurrent programs by editing the concurrent program’sdefinition using the Concurrent Programs window. See: ConcurrentPrograms: page 4 – 66.
Program incompatibility and run–alone program definitions areenforced by the Conflict Resolution Manager (CRM).
Note: The concept of ”Global” incompatibilities wasintroduced with Patch 2364876.
With this patch, all pre–existing incompatibilities are convertedto the type Global, unless both of the programs have a conflictdomain parameter registered. This may mean that if you havebeen using the Concurrent:Conflicts Domain profile option foryour custom programs, you may need to switch theincompatibility type to ”Domain–specific” to keep the expectedbehavior.
Also, the two user–level constraints, set by theConcurrent:Active Request Limit and Concurrent:Sequential
4 – 26 Oracle Applications System Administrator’s Guide
Requests profile options, are now enforced globally across allconflict domains.
Request Sets – Incompatibilities Allowed
When you define a request set or request set stage that allowsincompatabilities, you create a concurrent program that runs thereports in your request set or stage according to the instructions youentered. Using the Concurrent Programs window, when you listprograms as incompatible with a request set, those programs areprevented from starting until all the reports in the set or stage havecompleted running.
To define incompatibility rules for a request set and request set stage:
• For a request set check the Allow Incompatibility check box onthe Request Set window.
• For a request set stage check the Allow Incompatibility check boxon the Stages window.
• Navigate to the Incompatible Programs block in the ConcurrentPrograms form and list those programs that your request set orstage is incompatible with.
All concurrent programs that run request sets are titled Request Set<name of request set> while all concurrent programs that run request setstages are titled Request Set Stage <name of stage>–Request Set <name ofrequest set>. In the Concurrent Programs form, if you query a requestset or stage concurrent program on the basis of the program’s name,you must enter in the Name field the words:
• ”Request Set” or ”Request Set Stage” before the name of aconcurrent program
• ”Request Set %” to perform a query on all request set and stageprograms
Concurrent Conflict Domains
If two programs are defined as incompatible with one another, the datathese programs cannot access simultaneously must also be identified.
In other words, to prevent two programs from concurrently accessingor updating the same data, you have to know where, in terms of data,they are incompatible. A Conflict Domain identifies the data wheretwo incompatible programs cannot run simultaneously.
4 – 27Managing Concurrent Programs and Reports
Conflict Domains
In Oracle Applications, data is stored in database tables that belong to aparticular application. Each table may also contain information used todetermine what conditions need to be met to access the individualrecords. These conditions may consist of one or more of the followingdata groupings:
• SOB – based on the profile option GL_SET_OF_BOOKS
• Multiple installations (referred to as MSOB)
• Multiple Operating units (determined by profile optionMO_OPERATING_UNIT) (referred as MULTIORG).
• Multiple Orgs (determined by profile optionINV_ORGANIZATION_ID, Used by ManufacturingApplications)
• HR may use business group as a conflict resolution domain
• FA may use FA book
• etc...
A conflict domain is an abstract representation of the groupings used topartition your data. There is no limit to the number of domains thatcan be defined, but excessive domains may hurt performance.
All programs are assigned a conflict domain when they are submitted.If a domain is defined as part of a parameter the concurrent managerwill use it to resolve incompatibilities. If the domain is not defined by aparameter the concurrent manager uses the value defined for theprofile option Concurrent:Conflicts Domain. Lastly, if the domain isnot provided by a program parameter and the Concurrent:ConflictsDomain profile option has not been defined the ’Standard’ domain isused. The Standard domain is the default for all requests.
All programs use the Standard conflict domain unless a value isdefined for the profile option Concurrent:Conflicts Domain or a conflictdomain is defined through a program parameter.
Each request submitted uses parameters which identify the records thatit will access. For programs that are defined with incompatability rulesan additional parameter (conflict domain parameter) is used. Theconflict domain may be set automatically based on such variables as alogin ID, set of books, or the organization the user is working in. Theconflict domain parameter may in some cases be selected in theparameters field of the Submit Requests form. Once the parameter isdetermined the Conflict Resolution Manager (CRM) uses the domain toensure that incompatible programs do not run simultaneously in thesame domain.
4 – 28 Oracle Applications System Administrator’s Guide
Enforcing Incompatibility Rules
Concurrent managers read requests to start concurrent programsrunning. The Conflict Resolution Manager checks concurrent programdefinitions for incompatibility rules.
If a program is identified as Run Alone, then the Conflict ResolutionManager prevents the concurrent managers from starting otherprograms in the same conflict domain.
When a program lists other programs as being incompatible with it, theConflict Resolution Manager prevents the program from starting untilany incompatible programs in the same domain have completedrunning.
The figure below illustrates the role of the Conflict Resolution Managerwhen enforcing program incompatibility rules.
In a simple example without incompatibilities, a user submits a requestto run a program. This request is then added to the request table whichcontains a list of requests. Managers then read requests from this tableand start the associated concurrent programs.
A more complex example users may have submitted one request withincompatibility rules and another request to run a program that mustbe run alone. In this case these requests are added to the request table,but the Conflict Resolution Manager then checks the statuses of therequests in the table and marks which requests are ready to be run.The concurrent managers then read only the ”ready” requests and starttheir concurrent programs.
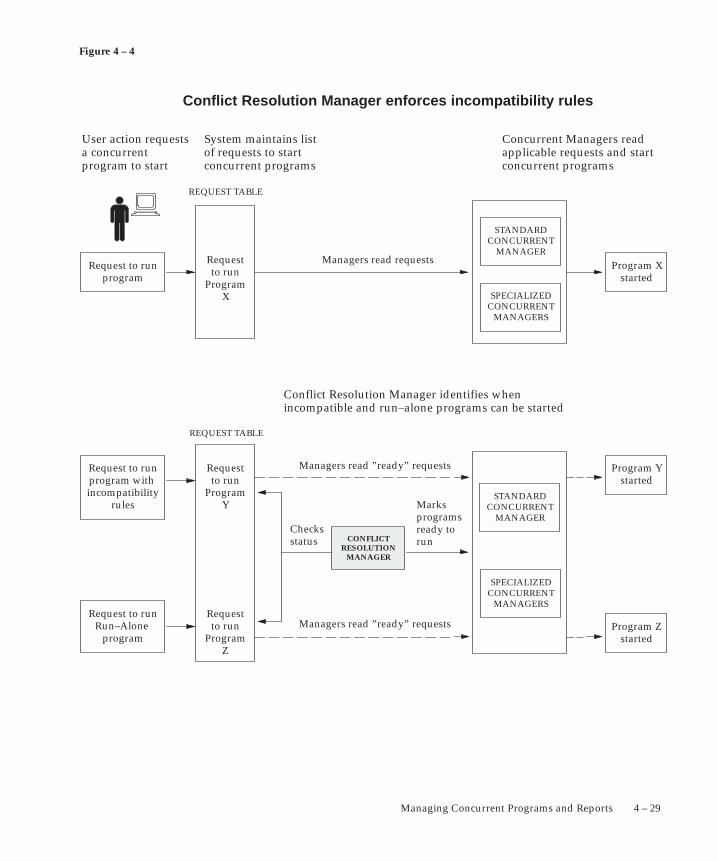
Figure 4 – 4
4 – 29Managing Concurrent Programs and Reports
Request to runprogram
Request to runRun–Alone
program
Request to runprogram with incompatibility
rules
Requestto run
ProgramX
REQUEST TABLE
User action requestsa concurrent program to start
System maintains listof requests to startconcurrent programs
Program Xstarted
Program Ystarted
Program Zstarted
CONFLICTRESOLUTION
MANAGER
Concurrent Managers readapplicable requests and startconcurrent programs
Marksprogramsready torun
Requestto run
ProgramY
Requestto run
ProgramZ
Conflict Resolution Manager identifies when incompatible and run–alone programs can be started
Checksstatus
Managers read requests
STANDARDCONCURRENT
MANAGER
SPECIALIZEDCONCURRENT
MANAGERS
Managers read ”ready” requests
Managers read ”ready” requests
Conflict Resolution Manager enforces incompatibility rules
STANDARDCONCURRENT
MANAGER
SPECIALIZEDCONCURRENT
MANAGERS
REQUEST TABLE
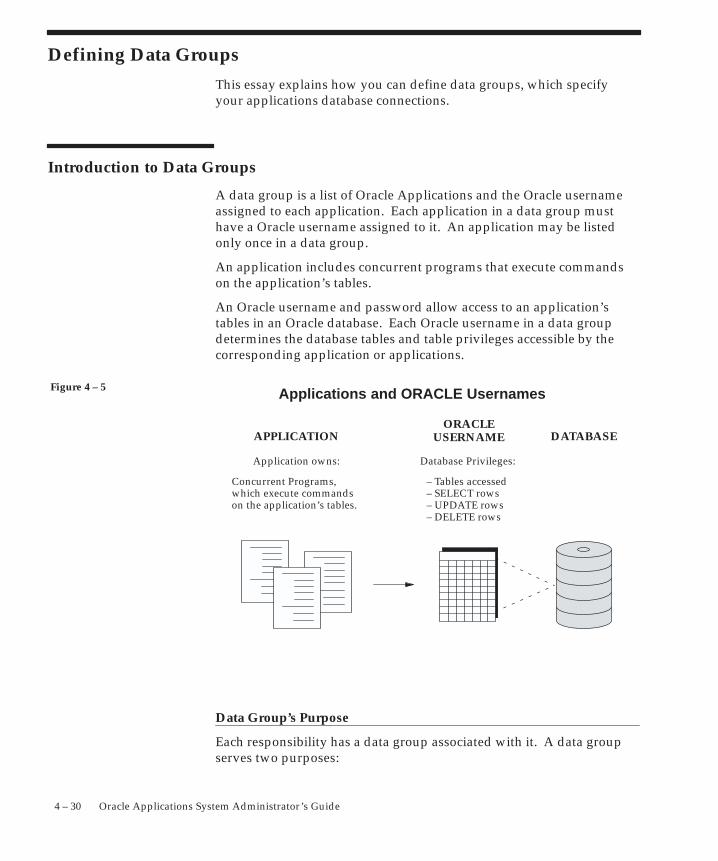
Figure 4 – 5
4 – 30 Oracle Applications System Administrator’s Guide
Defining Data Groups
This essay explains how you can define data groups, which specifyyour applications database connections.
Introduction to Data Groups
A data group is a list of Oracle Applications and the Oracle usernameassigned to each application. Each application in a data group musthave a Oracle username assigned to it. An application may be listedonly once in a data group.
An application includes concurrent programs that execute commandson the application’s tables.
An Oracle username and password allow access to an application’stables in an Oracle database. Each Oracle username in a data groupdetermines the database tables and table privileges accessible by thecorresponding application or applications.
Database Privileges:
– Tables accessed– SELECT rows– UPDATE rows– DELETE rows
Concurrent Programs,which execute commandson the application’s tables.
APPLICATIONORACLE
USERNAME DATABASE
Application owns:
Applications and ORACLE Usernames
Data Group’s Purpose
Each responsibility has a data group associated with it. A data groupserves two purposes:
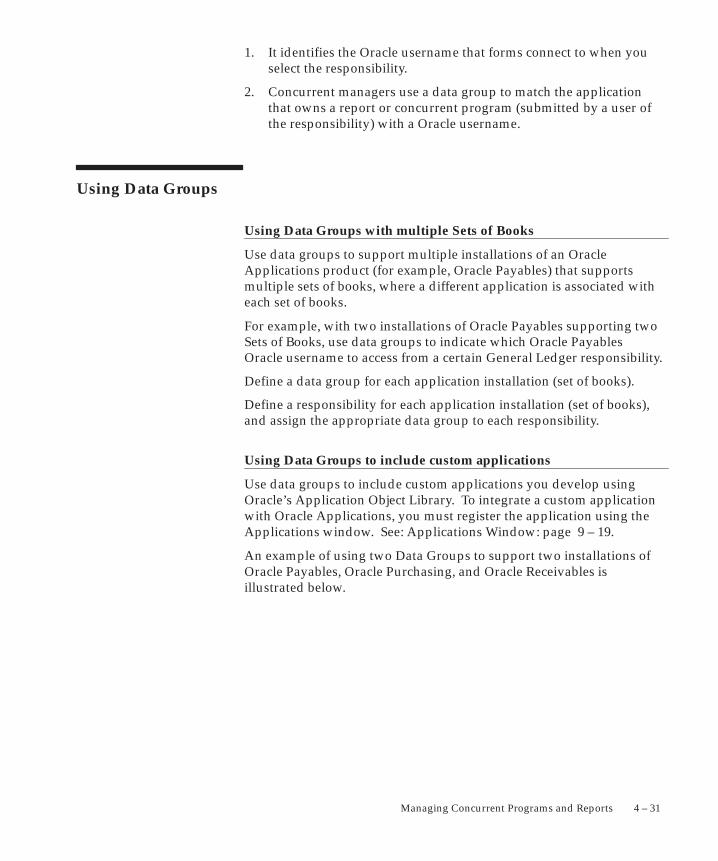
4 – 31Managing Concurrent Programs and Reports
1. It identifies the Oracle username that forms connect to when youselect the responsibility.
2. Concurrent managers use a data group to match the applicationthat owns a report or concurrent program (submitted by a user ofthe responsibility) with a Oracle username.
Using Data Groups
Using Data Groups with multiple Sets of Books
Use data groups to support multiple installations of an OracleApplications product (for example, Oracle Payables) that supportsmultiple sets of books, where a different application is associated witheach set of books.
For example, with two installations of Oracle Payables supporting twoSets of Books, use data groups to indicate which Oracle PayablesOracle username to access from a certain General Ledger responsibility.
Define a data group for each application installation (set of books).
Define a responsibility for each application installation (set of books),and assign the appropriate data group to each responsibility.
Using Data Groups to include custom applications
Use data groups to include custom applications you develop usingOracle’s Application Object Library. To integrate a custom applicationwith Oracle Applications, you must register the application using theApplications window. See: Applications Window: page 9 – 19.
An example of using two Data Groups to support two installations ofOracle Payables, Oracle Purchasing, and Oracle Receivables isillustrated below.
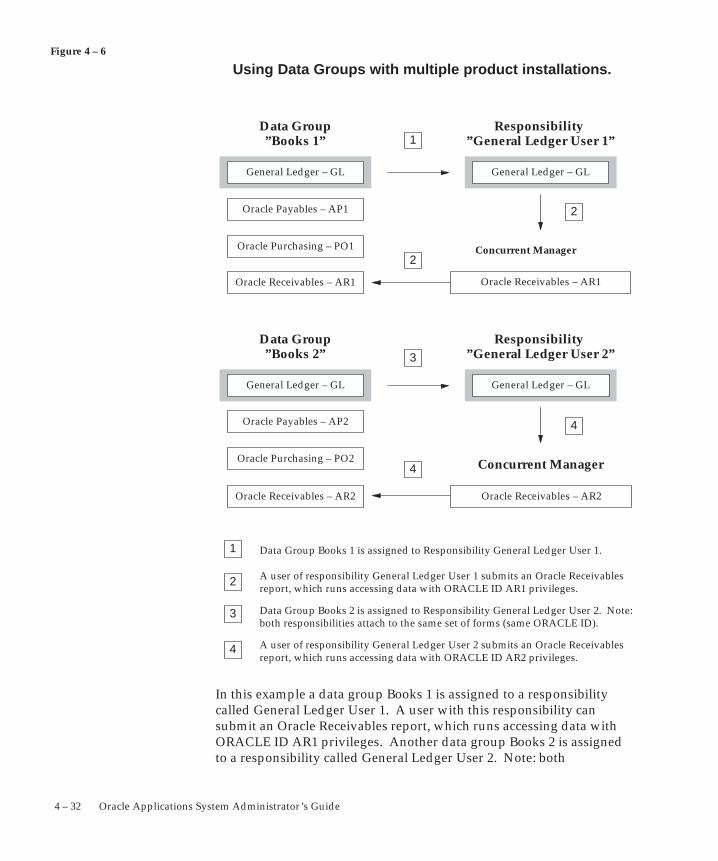
Figure 4 – 6
4 – 32 Oracle Applications System Administrator’s Guide
Data Group”Books 1”
Responsibility ”General Ledger User 1”
General Ledger – GL
Oracle Payables – AP1
Oracle Purchasing – PO1 Concurrent Manager
Oracle Receivables – AR1
Data Group Books 1 is assigned to Responsibility General Ledger User 1.
A user of responsibility General Ledger User 1 submits an Oracle Receivablesreport, which runs accessing data with ORACLE ID AR1 privileges.
Using Data Groups with multiple product installations.
Data Group”Books 2”
Responsibility ”General Ledger User 2”
Oracle Receivables – AR2
Concurrent Manager
1
2
2
3
4
4
Data Group Books 2 is assigned to Responsibility General Ledger User 2. Note:both responsibilities attach to the same set of forms (same ORACLE ID).
A user of responsibility General Ledger User 2 submits an Oracle Receivablesreport, which runs accessing data with ORACLE ID AR2 privileges.
1
2
3
4
General Ledger – GL
General Ledger – GLGeneral Ledger – GL
Oracle Payables – AP2
Oracle Purchasing – PO2
Oracle Receivables – AR1
Oracle Receivables – AR2
In this example a data group Books 1 is assigned to a responsibilitycalled General Ledger User 1. A user with this responsibility cansubmit an Oracle Receivables report, which runs accessing data withORACLE ID AR1 privileges. Another data group Books 2 is assignedto a responsibility called General Ledger User 2. Note: both
4 – 33Managing Concurrent Programs and Reports
responsibilities attach to the same set of forms, (same ORACLE ID). Auser of responsibility General Ledger User 2 can submit an OracleReceivables report which runs accessing data with ORACLE ID AR2privileges.
See:
Defining Data Groups: page 4 – 30
Modifying Data Groups: page 4 – 33
Data Groups: page 4 – 81
ORACLE Users field help: page 9 – 13
Modifying Data Groups
Predefined Standard Data Groups
During installation or upgrade of Oracle Applications, a standard datagroup is defined that pairs each installed application with an ORACLEusername (note: this occurs for each set of books).
You cannot change or delete the predefined values for Application orORACLE username in a Standard data group. However, you maymodify the Tool ORACLE username and description, or add newApplication–ORACLE username pairs to the group.
Defining new Data Groups
Since the installation process automatically defines Data Groups forOracle Applications, you only need to define any additional datagroups you wish to utilize.
You can copy a data group and give it a new name, creating a new datagroup. Each application, its assigned Oracle username, and, if present,its Tool Oracle username and description, are copied to the new datagroup.
Suggestion: Make a backup copy of your standard DataGroup, and do not assign it to a responsibility. That way, if youever inadvertently connect the wrong Oracle username to anapplication, or lose track of your applications’ configuration,you have an initial configuration you can revert to.
Adding a custom application to a Data Group
If a custom application is developed with Oracle Application ObjectLibrary, to include it in a Data Group, you:
4 – 34 Oracle Applications System Administrator’s Guide
• Register the application with Oracle Applications using theApplications form
• Assign an Oracle username to the application using the ORACLEUsernames form
Registering an Oracle Username
Registering an Oracle username with Oracle Applications sets up theprivileges to the Oracle Application Object Library database tables(such as flexfield tables, menu tables, and so on) that are necessary tosuccessfully use Oracle Applications. See: Overview of ApplicationsDBA Duties: page 9 – 2.
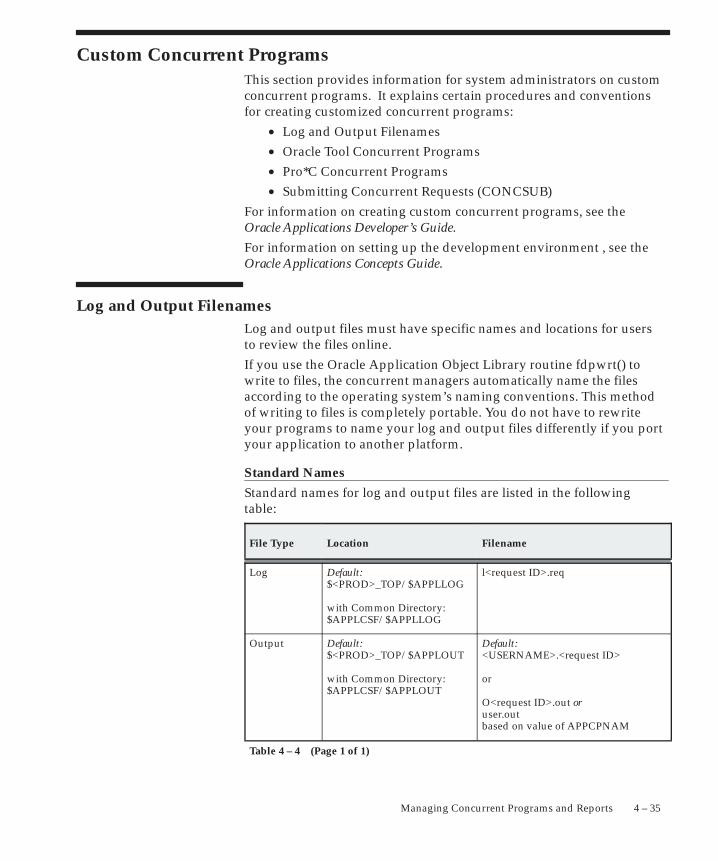
4 – 35Managing Concurrent Programs and Reports
Custom Concurrent ProgramsThis section provides information for system administrators on customconcurrent programs. It explains certain procedures and conventionsfor creating customized concurrent programs:
• Log and Output Filenames• Oracle Tool Concurrent Programs• Pro*C Concurrent Programs• Submitting Concurrent Requests (CONCSUB)
For information on creating custom concurrent programs, see theOracle Applications Developer’s Guide.For information on setting up the development environment , see theOracle Applications Concepts Guide.
Log and Output FilenamesLog and output files must have specific names and locations for usersto review the files online.If you use the Oracle Application Object Library routine fdpwrt() towrite to files, the concurrent managers automatically name the filesaccording to the operating system’s naming conventions. This methodof writing to files is completely portable. You do not have to rewriteyour programs to name your log and output files differently if you portyour application to another platform.
Standard Names
Standard names for log and output files are listed in the followingtable:
File Type Location Filename
Log Default:$<PROD>_TOP/$APPLLOG
with Common Directory:$APPLCSF/$APPLLOG
l<request ID>.req
Output Default:$<PROD>_TOP/$APPLOUT
with Common Directory:$APPLCSF/$APPLOUT
Default:<USERNAME>.<request ID>
or
O<request ID>.out oruser.outbased on value of APPCPNAM
Table 4 – 4 (Page 1 of 1)
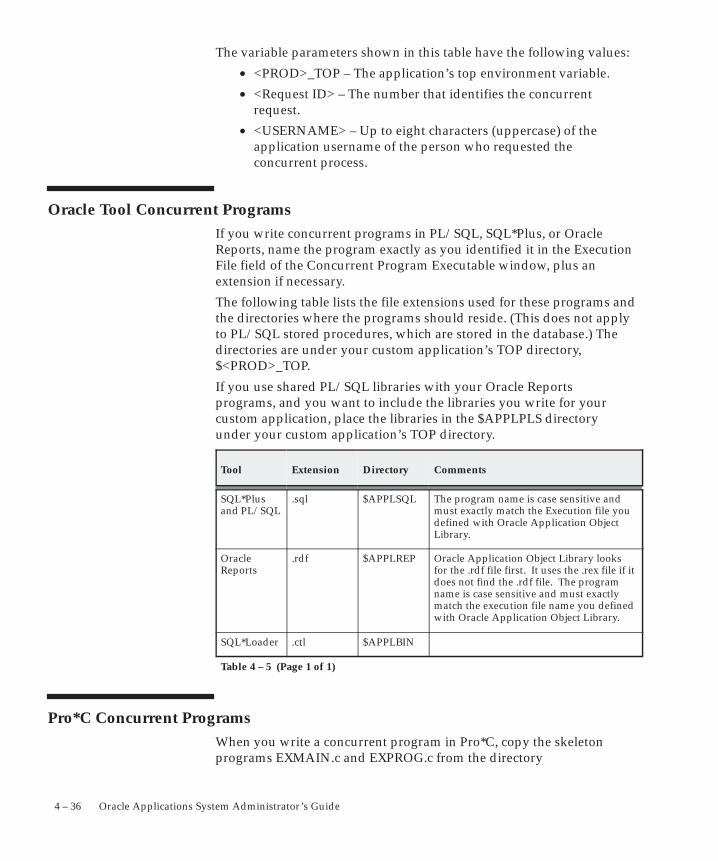
4 – 36 Oracle Applications System Administrator’s Guide
The variable parameters shown in this table have the following values:
• <PROD>_TOP – The application’s top environment variable.
• <Request ID> – The number that identifies the concurrentrequest.
• <USERNAME> – Up to eight characters (uppercase) of theapplication username of the person who requested theconcurrent process.
Oracle Tool Concurrent ProgramsIf you write concurrent programs in PL/SQL, SQL*Plus, or OracleReports, name the program exactly as you identified it in the ExecutionFile field of the Concurrent Program Executable window, plus anextension if necessary.
The following table lists the file extensions used for these programs andthe directories where the programs should reside. (This does not applyto PL/SQL stored procedures, which are stored in the database.) Thedirectories are under your custom application’s TOP directory,$<PROD>_TOP.
If you use shared PL/SQL libraries with your Oracle Reportsprograms, and you want to include the libraries you write for yourcustom application, place the libraries in the $APPLPLS directoryunder your custom application’s TOP directory.
Tool Extension Directory Comments
SQL*Plusand PL/SQL
.sql $APPLSQL The program name is case sensitive andmust exactly match the Execution file youdefined with Oracle Application ObjectLibrary.
OracleReports
.rdf $APPLREP Oracle Application Object Library looksfor the .rdf file first. It uses the .rex file if itdoes not find the .rdf file. The programname is case sensitive and must exactlymatch the execution file name you definedwith Oracle Application Object Library.
SQL*Loader .ctl $APPLBIN
Table 4 – 5 (Page 1 of 1)
Pro*C Concurrent ProgramsWhen you write a concurrent program in Pro*C, copy the skeletonprograms EXMAIN.c and EXPROG.c from the directory
☞
4 – 37Managing Concurrent Programs and Reports
$FND_TOP/$APPLUSR. Rename the files and globally replaceSUBROUTINE_NAME with the name of your subroutine.
EXMAIN.c is the skeleton used for your spawned programs.EXPROG.c is the skeleton used for your program’s logic. This modulecan be used to create a spawned or an immediate program. Forimmediate programs, you must include your copy of EXPROG.c in aprogram library. See below for information on building a programlibrary.
You can use programs written with these skeleton programs asspawned or immediate concurrent programs. Spawned programs runas a separate process while immediate programs run linked in with aconcurrent manager.
Attention: Oracle Corporation provides information onimmediate concurrent programs for backwards compatibilityonly. We strongly recommend that you do not create any newimmediate concurrent programs. You should define your newPro*C concurrent program executables as spawned.
Naming Your Executable File
Name your program’s executable file exactly as you identified it in theExecution File field of the Concurrent Program Executable window. Putyour executable file in the $APPLBIN directory under yourapplication’s TOP directory.
Building Your Program Library
Register a new program library with the Register Concurrent ProgramLibrary form and register all the programs you want to include in thislibrary. Then enter ”Yes” in the Rebuild field and commit. This creates arequest to build a new catalog file called <Library Name>.c under$<PROD>_TOP/$APPLLIB$ . You should compile the <LibraryName>.c file after the request completes.
Sample program libraries such as prgcat.c and prglib.c are locatedunder $FND_TOP/$APPLUSR.
Suggestion: For ease of maintenance, define your concurrentprogram executables as spawned.
Compiling C and Pro*C Programs
Your environment for compiling custom code depends on the file$FND_TOP/usrxit/devenv. If you change this file, you should reread itby logging in again so that the changes take effect.
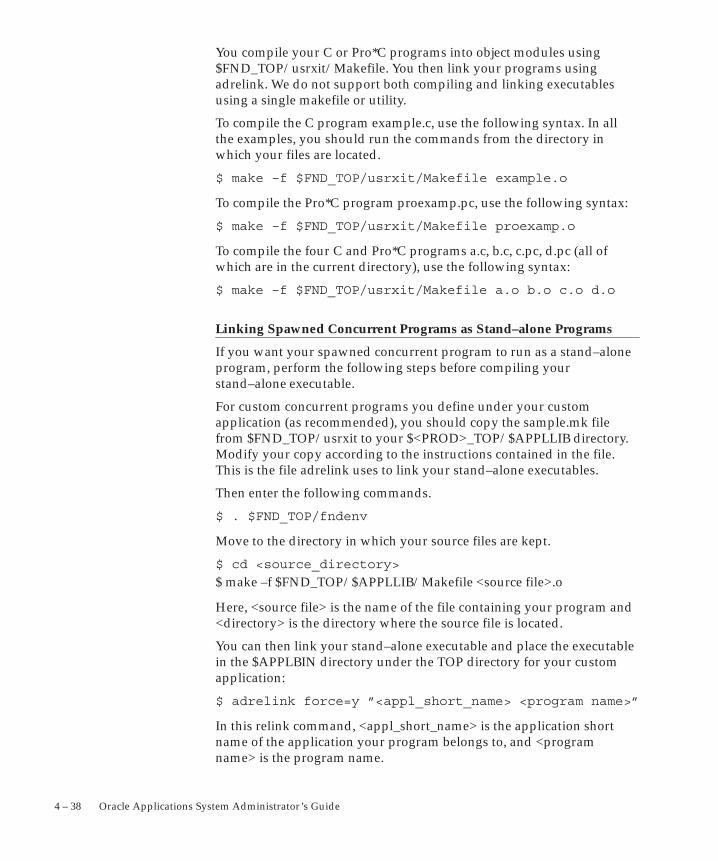
4 – 38 Oracle Applications System Administrator’s Guide
You compile your C or Pro*C programs into object modules using$FND_TOP/usrxit/Makefile. You then link your programs usingadrelink. We do not support both compiling and linking executablesusing a single makefile or utility.
To compile the C program example.c, use the following syntax. In allthe examples, you should run the commands from the directory inwhich your files are located.
$ make –f $FND_TOP/usrxit/Makefile example.o
To compile the Pro*C program proexamp.pc, use the following syntax:
$ make –f $FND_TOP/usrxit/Makefile proexamp.o
To compile the four C and Pro*C programs a.c, b.c, c.pc, d.pc (all ofwhich are in the current directory), use the following syntax:
$ make –f $FND_TOP/usrxit/Makefile a.o b.o c.o d.o
Linking Spawned Concurrent Programs as Stand–alone Programs
If you want your spawned concurrent program to run as a stand–aloneprogram, perform the following steps before compiling yourstand–alone executable.
For custom concurrent programs you define under your customapplication (as recommended), you should copy the sample.mk filefrom $FND_TOP/usrxit to your $<PROD>_TOP/$APPLLIB directory.Modify your copy according to the instructions contained in the file.This is the file adrelink uses to link your stand–alone executables.
Then enter the following commands.
$ . $FND_TOP/fndenv
Move to the directory in which your source files are kept.
$ cd <source_directory>
$ make –f $FND_TOP/$APPLLIB/Makefile <source file>.o
Here, <source file> is the name of the file containing your program and<directory> is the directory where the source file is located.
You can then link your stand–alone executable and place the executablein the $APPLBIN directory under the TOP directory for your customapplication:
$ adrelink force=y ”<appl_short_name> <program name>”
In this relink command, <appl_short_name> is the application shortname of the application your program belongs to, and <programname> is the program name.
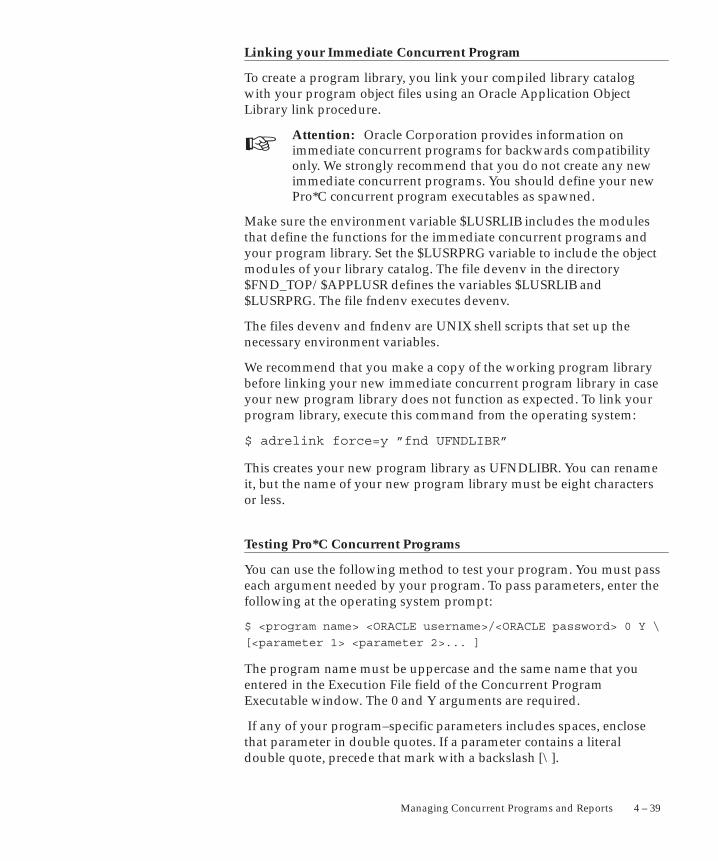
☞
4 – 39Managing Concurrent Programs and Reports
Linking your Immediate Concurrent Program
To create a program library, you link your compiled library catalogwith your program object files using an Oracle Application ObjectLibrary link procedure.
Attention: Oracle Corporation provides information onimmediate concurrent programs for backwards compatibilityonly. We strongly recommend that you do not create any newimmediate concurrent programs. You should define your newPro*C concurrent program executables as spawned.
Make sure the environment variable $LUSRLIB includes the modulesthat define the functions for the immediate concurrent programs andyour program library. Set the $LUSRPRG variable to include the objectmodules of your library catalog. The file devenv in the directory$FND_TOP/$APPLUSR defines the variables $LUSRLIB and$LUSRPRG. The file fndenv executes devenv.
The files devenv and fndenv are UNIX shell scripts that set up thenecessary environment variables.
We recommend that you make a copy of the working program librarybefore linking your new immediate concurrent program library in caseyour new program library does not function as expected. To link yourprogram library, execute this command from the operating system:
$ adrelink force=y ”fnd UFNDLIBR”
This creates your new program library as UFNDLIBR. You can renameit, but the name of your new program library must be eight charactersor less.
Testing Pro*C Concurrent Programs
You can use the following method to test your program. You must passeach argument needed by your program. To pass parameters, enter thefollowing at the operating system prompt:
$ <program name> <ORACLE username>/<ORACLE password> 0 Y \
[<parameter 1> <parameter 2>... ]
The program name must be uppercase and the same name that youentered in the Execution File field of the Concurrent ProgramExecutable window. The 0 and Y arguments are required.
If any of your program–specific parameters includes spaces, enclosethat parameter in double quotes. If a parameter contains a literaldouble quote, precede that mark with a backslash [\].
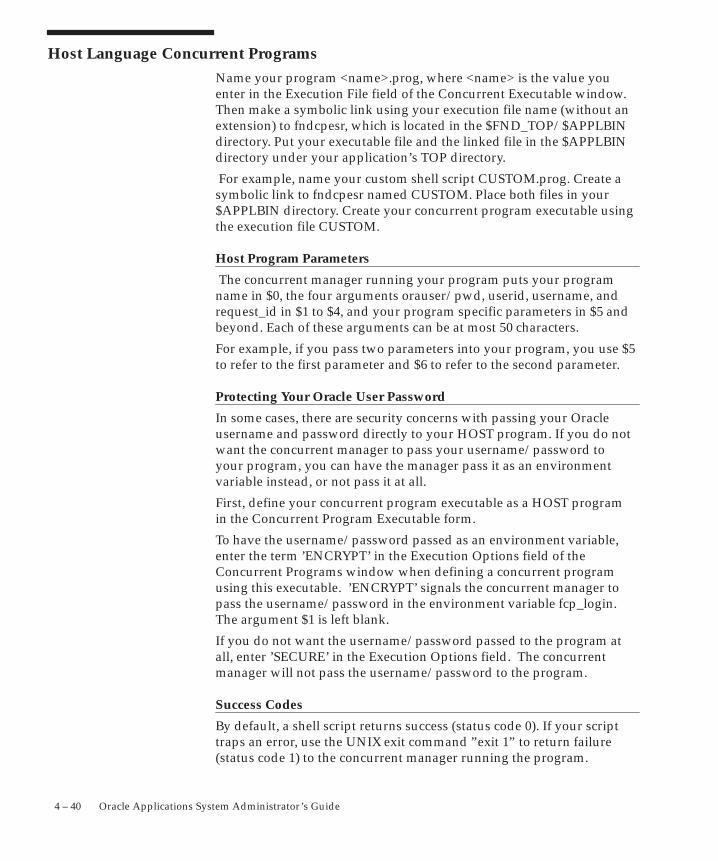
4 – 40 Oracle Applications System Administrator’s Guide
Host Language Concurrent ProgramsName your program <name>.prog, where <name> is the value youenter in the Execution File field of the Concurrent Executable window.Then make a symbolic link using your execution file name (without anextension) to fndcpesr, which is located in the $FND_TOP/$APPLBINdirectory. Put your executable file and the linked file in the $APPLBINdirectory under your application’s TOP directory.
For example, name your custom shell script CUSTOM.prog. Create asymbolic link to fndcpesr named CUSTOM. Place both files in your$APPLBIN directory. Create your concurrent program executable usingthe execution file CUSTOM.
Host Program Parameters
The concurrent manager running your program puts your programname in $0, the four arguments orauser/pwd, userid, username, andrequest_id in $1 to $4, and your program specific parameters in $5 andbeyond. Each of these arguments can be at most 50 characters.
For example, if you pass two parameters into your program, you use $5to refer to the first parameter and $6 to refer to the second parameter.
Protecting Your Oracle User Password
In some cases, there are security concerns with passing your Oracleusername and password directly to your HOST program. If you do notwant the concurrent manager to pass your username/password toyour program, you can have the manager pass it as an environmentvariable instead, or not pass it at all.
First, define your concurrent program executable as a HOST programin the Concurrent Program Executable form.
To have the username/password passed as an environment variable,enter the term ’ENCRYPT’ in the Execution Options field of theConcurrent Programs window when defining a concurrent programusing this executable. ’ENCRYPT’ signals the concurrent manager topass the username/password in the environment variable fcp_login.The argument $1 is left blank.
If you do not want the username/password passed to the program atall, enter ’SECURE’ in the Execution Options field. The concurrentmanager will not pass the username/password to the program.
Success Codes
By default, a shell script returns success (status code 0). If your scripttraps an error, use the UNIX exit command ”exit 1” to return failure(status code 1) to the concurrent manager running the program.
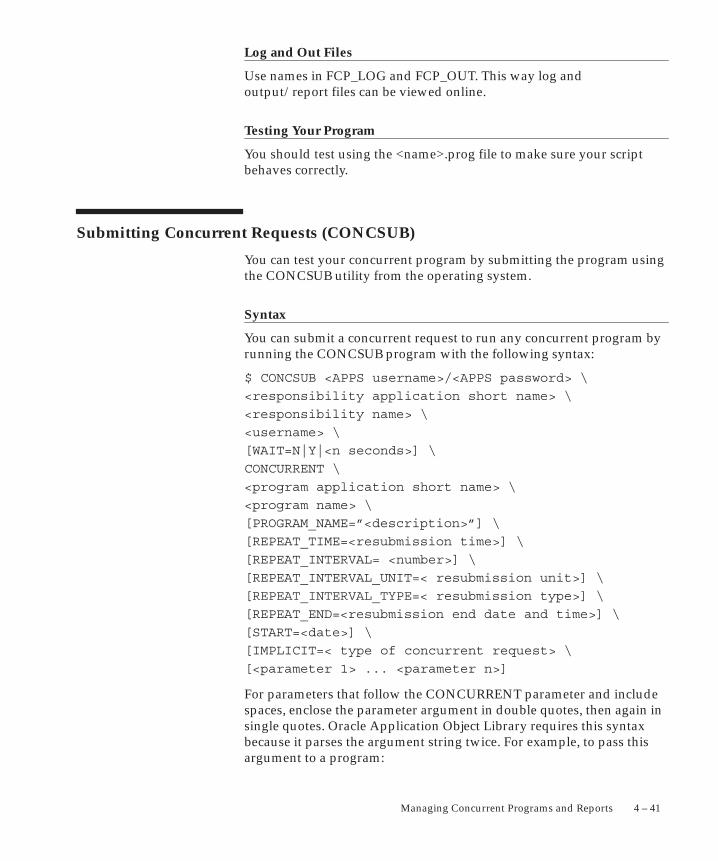
4 – 41Managing Concurrent Programs and Reports
Log and Out Files
Use names in FCP_LOG and FCP_OUT. This way log andoutput/report files can be viewed online.
Testing Your Program
You should test using the <name>.prog file to make sure your scriptbehaves correctly.
Submitting Concurrent Requests (CONCSUB)
You can test your concurrent program by submitting the program usingthe CONCSUB utility from the operating system.
Syntax
You can submit a concurrent request to run any concurrent program byrunning the CONCSUB program with the following syntax:
$ CONCSUB <APPS username>/<APPS password> \
<responsibility application short name> \
<responsibility name> \
<username> \
[WAIT=N|Y|<n seconds>] \
CONCURRENT \
<program application short name> \
<program name> \
[PROGRAM_NAME=”<description>”] \
[REPEAT_TIME=<resubmission time>] \
[REPEAT_INTERVAL= <number>] \
[REPEAT_INTERVAL_UNIT=< resubmission unit>] \
[REPEAT_INTERVAL_TYPE=< resubmission type>] \
[REPEAT_END=<resubmission end date and time>] \
[START=<date>] \
[IMPLICIT=< type of concurrent request> \
[<parameter 1> ... <parameter n>]
For parameters that follow the CONCURRENT parameter and includespaces, enclose the parameter argument in double quotes, then again insingle quotes. Oracle Application Object Library requires this syntaxbecause it parses the argument string twice. For example, to pass thisargument to a program:
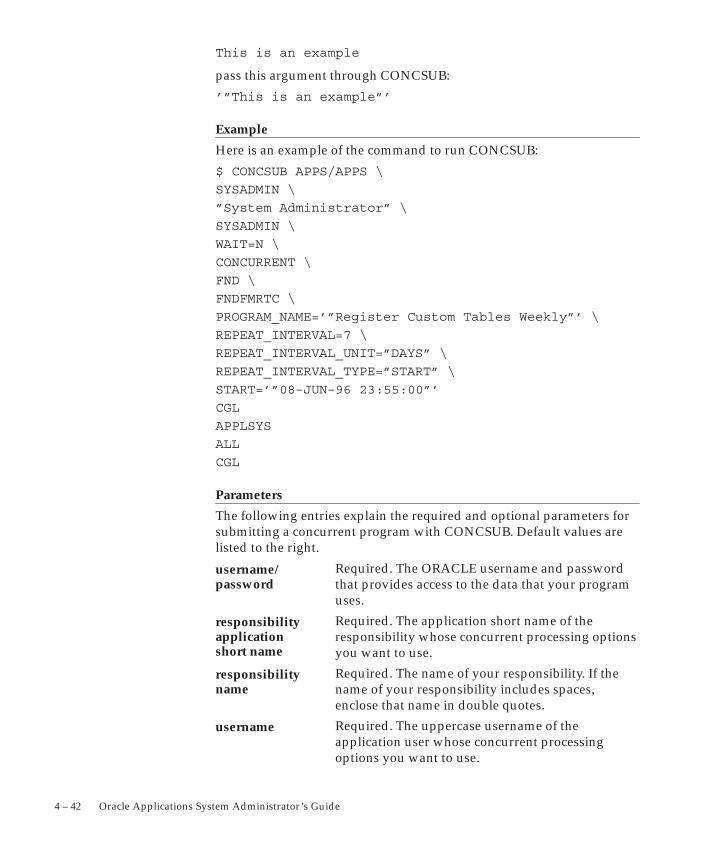
4 – 42 Oracle Applications System Administrator’s Guide
This is an example
pass this argument through CONCSUB:
’”This is an example”’
Example
Here is an example of the command to run CONCSUB:
$ CONCSUB APPS/APPS \
SYSADMIN \
”System Administrator” \
SYSADMIN \
WAIT=N \
CONCURRENT \
FND \
FNDFMRTC \
PROGRAM_NAME=’”Register Custom Tables Weekly”’ \
REPEAT_INTERVAL=7 \
REPEAT_INTERVAL_UNIT=”DAYS” \
REPEAT_INTERVAL_TYPE=”START” \
START=’”08–JUN–96 23:55:00”’
CGL
APPLSYS
ALL
CGL
Parameters
The following entries explain the required and optional parameters forsubmitting a concurrent program with CONCSUB. Default values arelisted to the right.
Required. The ORACLE username and passwordthat provides access to the data that your programuses.
Required. The application short name of theresponsibility whose concurrent processing optionsyou want to use.
Required. The name of your responsibility. If thename of your responsibility includes spaces,enclose that name in double quotes.
Required. The uppercase username of theapplication user whose concurrent processingoptions you want to use.
username/password
responsibilityapplicationshort name
responsibilityname
username
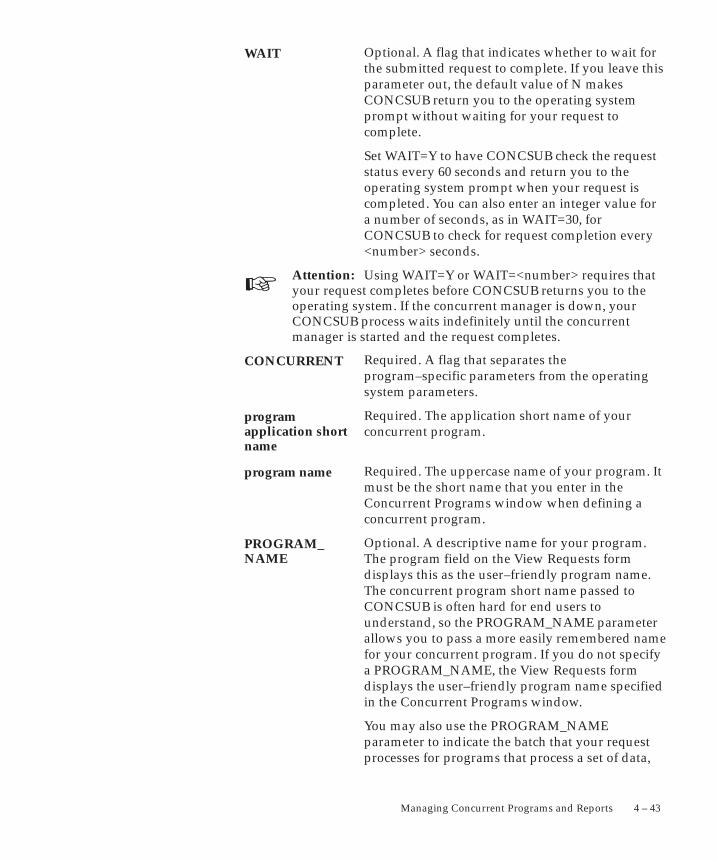
☞
4 – 43Managing Concurrent Programs and Reports
Optional. A flag that indicates whether to wait forthe submitted request to complete. If you leave thisparameter out, the default value of N makesCONCSUB return you to the operating systemprompt without waiting for your request tocomplete.
Set WAIT=Y to have CONCSUB check the requeststatus every 60 seconds and return you to theoperating system prompt when your request iscompleted. You can also enter an integer value fora number of seconds, as in WAIT=30, forCONCSUB to check for request completion every<number> seconds.
Attention: Using WAIT=Y or WAIT=<number> requires thatyour request completes before CONCSUB returns you to theoperating system. If the concurrent manager is down, yourCONCSUB process waits indefinitely until the concurrentmanager is started and the request completes.
Required. A flag that separates theprogram–specific parameters from the operatingsystem parameters.
Required. The application short name of yourconcurrent program.
Required. The uppercase name of your program. Itmust be the short name that you enter in theConcurrent Programs window when defining aconcurrent program.
Optional. A descriptive name for your program.The program field on the View Requests formdisplays this as the user–friendly program name.The concurrent program short name passed toCONCSUB is often hard for end users tounderstand, so the PROGRAM_NAME parameterallows you to pass a more easily remembered namefor your concurrent program. If you do not specifya PROGRAM_NAME, the View Requests formdisplays the user–friendly program name specifiedin the Concurrent Programs window.
You may also use the PROGRAM_NAMEparameter to indicate the batch that your requestprocesses for programs that process a set of data,
WAIT
CONCURRENT
programapplication shortname
program name
PROGRAM_NAME
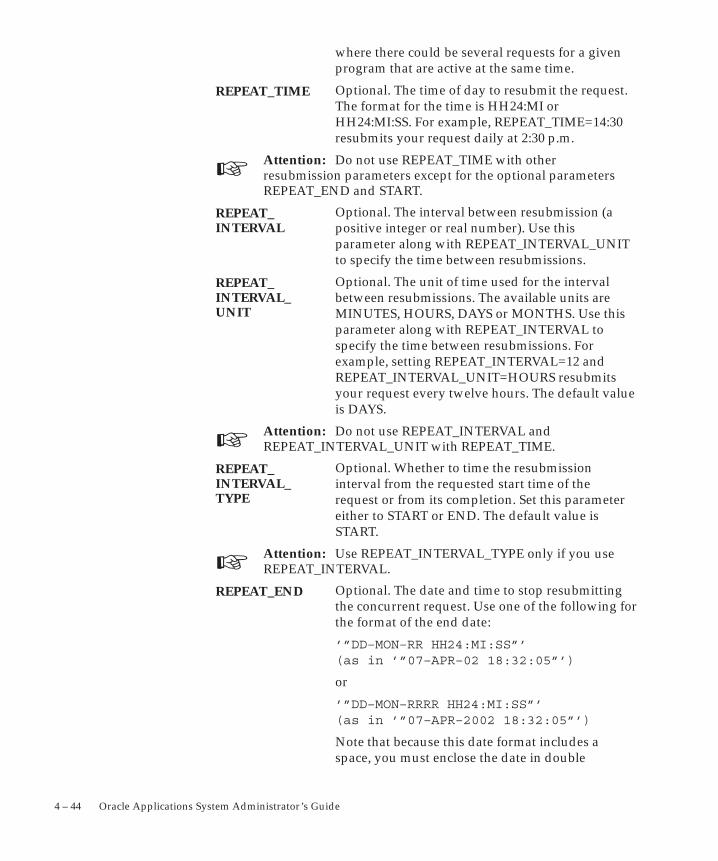
☞
☞
☞
4 – 44 Oracle Applications System Administrator’s Guide
where there could be several requests for a givenprogram that are active at the same time.
Optional. The time of day to resubmit the request.The format for the time is HH24:MI orHH24:MI:SS. For example, REPEAT_TIME=14:30resubmits your request daily at 2:30 p.m.
Attention: Do not use REPEAT_TIME with otherresubmission parameters except for the optional parametersREPEAT_END and START.
Optional. The interval between resubmission (apositive integer or real number). Use thisparameter along with REPEAT_INTERVAL_UNITto specify the time between resubmissions.
Optional. The unit of time used for the intervalbetween resubmissions. The available units areMINUTES, HOURS, DAYS or MONTHS. Use thisparameter along with REPEAT_INTERVAL tospecify the time between resubmissions. Forexample, setting REPEAT_INTERVAL=12 andREPEAT_INTERVAL_UNIT=HOURS resubmitsyour request every twelve hours. The default valueis DAYS.
Attention: Do not use REPEAT_INTERVAL andREPEAT_INTERVAL_UNIT with REPEAT_TIME.
Optional. Whether to time the resubmissioninterval from the requested start time of therequest or from its completion. Set this parametereither to START or END. The default value isSTART.
Attention: Use REPEAT_INTERVAL_TYPE only if you useREPEAT_INTERVAL.
Optional. The date and time to stop resubmittingthe concurrent request. Use one of the following forthe format of the end date:
’”DD–MON–RR HH24:MI:SS”’ (as in ’”07–APR–02 18:32:05”’)
or
’”DD–MON–RRRR HH24:MI:SS”’ (as in ’”07–APR–2002 18:32:05”’)
Note that because this date format includes aspace, you must enclose the date in double
REPEAT_TIME
REPEAT_INTERVAL
REPEAT_INTERVAL_UNIT
REPEAT_INTERVAL_TYPE
REPEAT_END
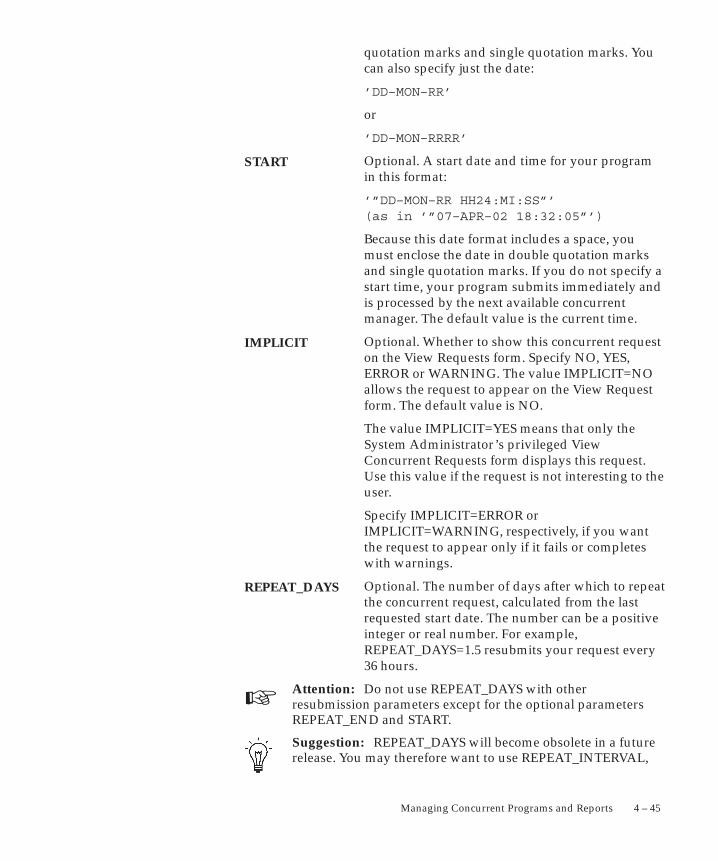
☞
4 – 45Managing Concurrent Programs and Reports
quotation marks and single quotation marks. Youcan also specify just the date:
’DD–MON–RR’
or
’DD–MON–RRRR’
Optional. A start date and time for your programin this format:
’”DD–MON–RR HH24:MI:SS”’ (as in ’”07–APR–02 18:32:05”’)
Because this date format includes a space, youmust enclose the date in double quotation marksand single quotation marks. If you do not specify astart time, your program submits immediately andis processed by the next available concurrentmanager. The default value is the current time.
Optional. Whether to show this concurrent requeston the View Requests form. Specify NO, YES,ERROR or WARNING. The value IMPLICIT=NOallows the request to appear on the View Requestform. The default value is NO.
The value IMPLICIT=YES means that only theSystem Administrator’s privileged ViewConcurrent Requests form displays this request.Use this value if the request is not interesting to theuser.
Specify IMPLICIT=ERROR orIMPLICIT=WARNING, respectively, if you wantthe request to appear only if it fails or completeswith warnings.
Optional. The number of days after which to repeatthe concurrent request, calculated from the lastrequested start date. The number can be a positiveinteger or real number. For example,REPEAT_DAYS=1.5 resubmits your request every36 hours.
Attention: Do not use REPEAT_DAYS with otherresubmission parameters except for the optional parametersREPEAT_END and START.
Suggestion: REPEAT_DAYS will become obsolete in a futurerelease. You may therefore want to use REPEAT_INTERVAL,
START
IMPLICIT
REPEAT_DAYS
4 – 46 Oracle Applications System Administrator’s Guide
REPEAT_INTERVAL_TYPE and REPEAT_INTERVAL_UNITinstead of REPEAT_DAYS.
Optional. Your program–specific parameters. If aparameter includes spaces, enclose that parameterin double quotes, then in single quotes. If aparameter contains a double quotation mark aspart of the argument, precede that mark with abackslash [\].
parameter 1 ...parameter n
4 – 47Managing Concurrent Programs and Reports
Copying and Modifying Program Definitions
These sections explain how you can copy and modify concurrentprogram definitions.
Warning: Do not overwrite program definitions for existingconcurrent programs. Copy the program, rename it, then makeany desired modifications to the new program.
Warnings for Modifying Program Definitions: page 4 – 53
Copying and Renaming a concurrent program
You can copy your concurrent programs and modify them to createnew programs with definitions that meet your needs. You can modifyhow a concurrent program operates by changing the program’sdefinition of:
• incompatible programs
• parameters (arguments)
– parameter value sets
• printer, print style, etc.
Rather than overwrite a concurrent program’s definition, you shouldcustomize a program by copying and renaming an existing program,then modifying the new program to suit your needs. The figure belowillustrates the basic steps in copying and modifying a new concurrentprogram.
As the figure illustrates, you can copy parameters, and then modify thebehavior of the parameters. Or you can copy the list of incompatibleprograms, and then modify the list. Finally , you can change theassociated printer and/or print style.
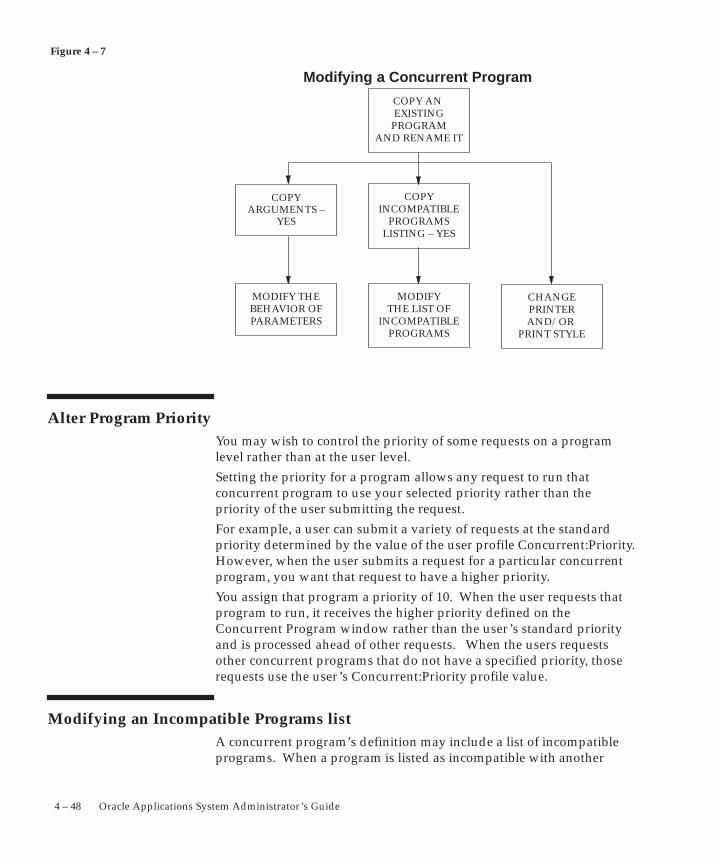
Figure 4 – 7
4 – 48 Oracle Applications System Administrator’s Guide
COPY AN EXISTING
PROGRAMAND RENAME IT
Modifying a Concurrent Program
COPYARGUMENTS –
YES
COPYINCOMPATIBLE
PROGRAMSLISTING – YES
CHANGEPRINTERAND/OR
PRINT STYLE
MODIFY THEBEHAVIOR OFPARAMETERS
MODIFYTHE LIST OF
INCOMPATIBLEPROGRAMS
Alter Program PriorityYou may wish to control the priority of some requests on a programlevel rather than at the user level.
Setting the priority for a program allows any request to run thatconcurrent program to use your selected priority rather than thepriority of the user submitting the request.
For example, a user can submit a variety of requests at the standardpriority determined by the value of the user profile Concurrent:Priority.However, when the user submits a request for a particular concurrentprogram, you want that request to have a higher priority.
You assign that program a priority of 10. When the user requests thatprogram to run, it receives the higher priority defined on theConcurrent Program window rather than the user’s standard priorityand is processed ahead of other requests. When the users requestsother concurrent programs that do not have a specified priority, thoserequests use the user’s Concurrent:Priority profile value.
Modifying an Incompatible Programs listA concurrent program’s definition may include a list of incompatibleprograms. When a program is listed as incompatible with another
☞
☞
4 – 49Managing Concurrent Programs and Reports
program, the two programs cannot run simultaneously in the sameconflict domain. See: Defining Program Incompatibility Rules: page 4 – 25.
You can view which programs are incompatible with a concurrentprogram from the Incompatible Programs block on the ConcurrentPrograms window. The programs listed cannot run simultaneouslywithin the same conflict domain as the concurrent program whosedefinition you are viewing.
To modify the list of incompatible programs you can either:
Add new programs to the list.
The Scope field refers to whether you want the program by itselfto be incompatible, or whether you want the program and allchild requests, that is, concurrent programs started by theprogram as part of a request set, to be incompatible.
• Delete programs from the list.
Attention: To immediately effect any changes you make in theIncompatible Programs zone, you must navigate to theAdminister Concurrent Managers window and choose Verifyfor the Internal Concurrent Manager.
Concurrent Program Parameters
Parameters, also referred to as arguments, are assigned to standardsubmission concurrent programs. To define a program as standardsubmission, set the value of the Standard Submission field in theConcurrent Programs form to Yes.
Attention: All the mechanisms for parameter defaulting(including references to values of other parameters, userprofiles, etc.) are evaluated only at submission time.
There are two aspects to a parameter associated with a concurrentprogram: its value set and its behavior.
The valid values the parameter can accept. The setof valid values is referred to as a value set.
How the parameter behaves within an application.For example, whether:
– an entry value for the parameter is required inorder for the program to work
– the parameter is displayed to the end user
Parameter value set
Parameterbehavior

4 – 50 Oracle Applications System Administrator’s Guide
– a default value is automatically provided for theparameter
If you wish to define or modify a value set, you must first carefullyplan your value set’s purpose and implementation.
See: Planning and Defining Values and Value Sets (Oracle Applications Flexfields Guide.)
Using the Concurrent Programs form, you can see a concurrentprogram’s parameters by choosing Parameters. Each parameter has avalue set that defines what values are permissible for the parameter. Tosee the name of a parameter’s value set, look at the Value Set field inthe Argument Details block.
Control the Behavior of Request Parameters
The behavior of parameters in programs running individually maydiffer from when those programs are run as part of a request set.
See:
Behavior of Program Parameters: page 4 – 52
Behavior of Parameters in Request Set: page 4 – 53
You define how a program’s parameters behave when you define theprogram using the Concurrent Programs form.
Using the Request Set form, you can also define how a program’sparameters behave when the program is run as part of a request. Inaddition, you can define parameters in different programs in a requestset to all share the same value by labeling them as Shared Parameters.See: Sharing Parameters in a Request Set: page 4 – 15.
Warning: Modifying a concurrent program’s definition byadding new or deleting existing parameters, or changing aparameter’s value set can prevent the program from running.See: Warnings for Modifying Program Definitions: page 4 – 53.
Not Displaying Parameters
Using the Concurrent Programs form or the Request Set form, you canset a parameter so it does not display to an end user. Becauseparameters that do not display cannot be modified, setting a parameterto not display:
• is a good security measure, guaranteeing a desired default valueis used

4 – 51Managing Concurrent Programs and Reports
• means you should enter a valid default type and value at eitherthe program’s definition, or if the program is part of a requestset, at the request set’s definition.
If you define a parameter to not display, then the parameter does notappear when the program is run using the Submit Requests form, nordoes it appear in the Request Set form.
If you define a parameter to not display, using the Request Set form,then the parameter does not appear on the Submit Requests form whenthe program is run as part of a request set.
Viewing displayed parameters after a request is submitted
After a request is submitted to run a concurrent program, theprogram’s parameters may be displayed in the Details block of theConcurrent Requests form.
When a parameter is set to not display, it does not appear in the Detailsblock of the Concurrent Requests form.
These displayed parameter values exactly match the values that theconcurrent manager passes to the concurrent program, and may ormay not correspond to the displayed value that the user chose.
For example, in the Submit Requests form, the user may choose”Oracle General Ledger” as a parameter, but the correspondingapplication ID displays in the Concurrent Requests form.
Suggestion: If your users encounter errors when running aprogram, you can look at the exact values that the concurrentprogram uses to help you diagnose the problem.
Setting Default Values for Parameters
Parameter default values can be changed by users when they submit aprogram or request set to run.
You can set a default value for a parameter using the:
• Default Type and Default Value fields in the ConcurrentPrograms form. These values cannot be changed on the RequestSet form.
• Default Type and Default Value fields in the Request Set form.
This default definition applies only when the program is run aspart of a request set.
• Shared Parameter and Default Value fields in the Request Setform
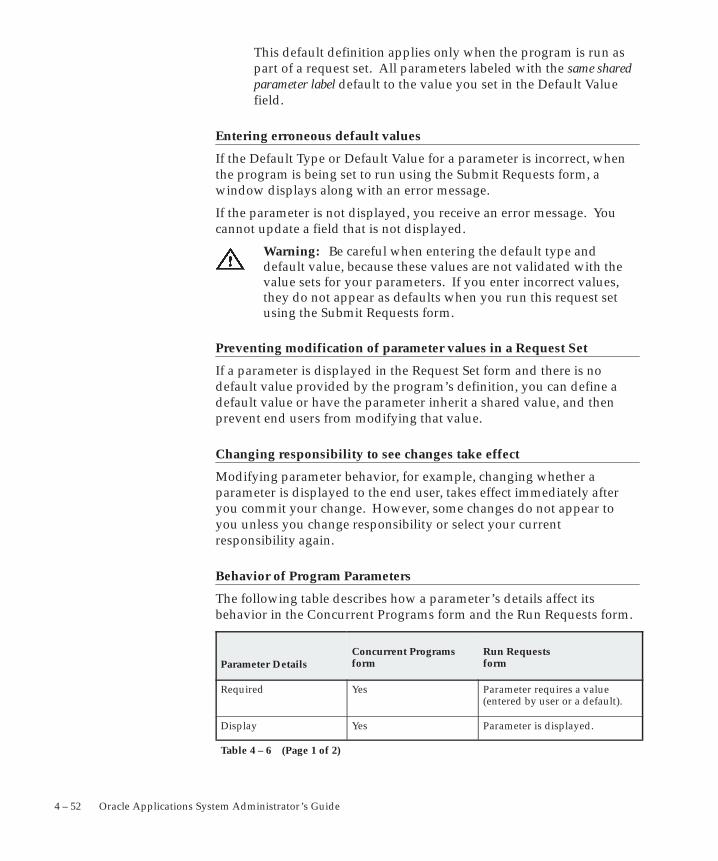
4 – 52 Oracle Applications System Administrator’s Guide
This default definition applies only when the program is run aspart of a request set. All parameters labeled with the same sharedparameter label default to the value you set in the Default Valuefield.
Entering erroneous default values
If the Default Type or Default Value for a parameter is incorrect, whenthe program is being set to run using the Submit Requests form, awindow displays along with an error message.
If the parameter is not displayed, you receive an error message. Youcannot update a field that is not displayed.
Warning: Be careful when entering the default type anddefault value, because these values are not validated with thevalue sets for your parameters. If you enter incorrect values,they do not appear as defaults when you run this request setusing the Submit Requests form.
Preventing modification of parameter values in a Request Set
If a parameter is displayed in the Request Set form and there is nodefault value provided by the program’s definition, you can define adefault value or have the parameter inherit a shared value, and thenprevent end users from modifying that value.
Changing responsibility to see changes take effect
Modifying parameter behavior, for example, changing whether aparameter is displayed to the end user, takes effect immediately afteryou commit your change. However, some changes do not appear toyou unless you change responsibility or select your currentresponsibility again.
Behavior of Program Parameters
The following table describes how a parameter’s details affect itsbehavior in the Concurrent Programs form and the Run Requests form.
Parameter DetailsConcurrent Programsform
Run Requests form
Required Yes Parameter requires a value (entered by user or a default).
Display Yes Parameter is displayed.
Table 4 – 6 (Page 1 of 2)
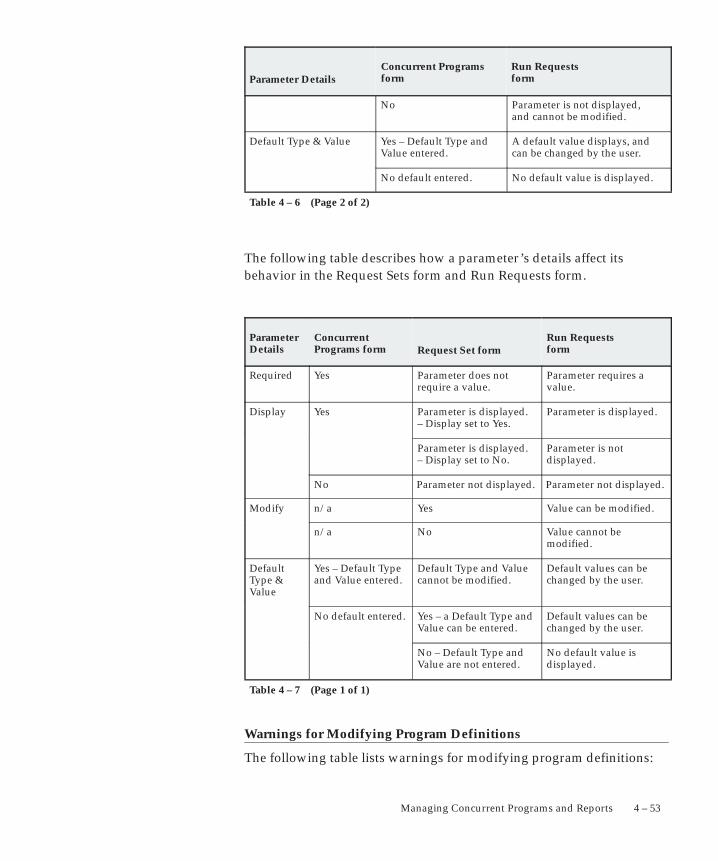
4 – 53Managing Concurrent Programs and Reports
Run Requests form
Concurrent ProgramsformParameter Details
No Parameter is not displayed, and cannot be modified.
Default Type & Value Yes – Default Type andValue entered.
A default value displays, andcan be changed by the user.
No default entered. No default value is displayed.
Table 4 – 6 (Page 2 of 2)
The following table describes how a parameter’s details affect itsbehavior in the Request Sets form and Run Requests form.
ParameterDetails
ConcurrentPrograms form Request Set form
Run Requests form
Required Yes Parameter does not require a value.
Parameter requires a value.
Display Yes Parameter is displayed.– Display set to Yes.
Parameter is displayed.
Parameter is displayed.– Display set to No.
Parameter is not displayed.
No Parameter not displayed. Parameter not displayed.
Modify n/a Yes Value can be modified.
n/a No Value cannot be modified.
DefaultType &Value
Yes – Default Typeand Value entered.
Default Type and Valuecannot be modified.
Default values can bechanged by the user.
No default entered. Yes – a Default Type andValue can be entered.
Default values can bechanged by the user.
No – Default Type andValue are not entered.
No default value is displayed.
Table 4 – 7 (Page 1 of 1)
Warnings for Modifying Program Definitions
The following table lists warnings for modifying program definitions:
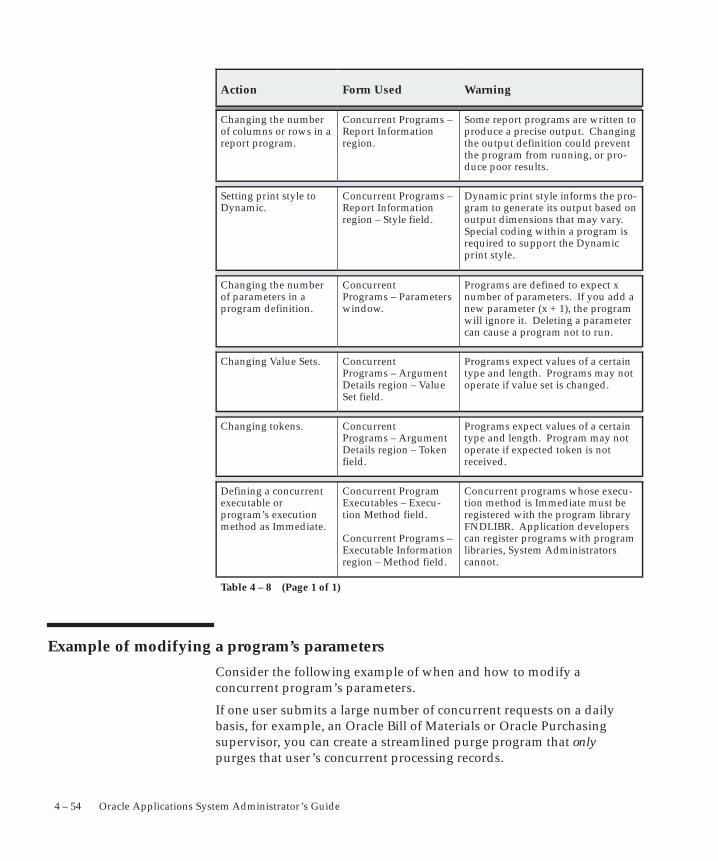
4 – 54 Oracle Applications System Administrator’s Guide
Action Form Used Warning
Changing the numberof columns or rows in areport program.
Concurrent Programs –Report Information region.
Some report programs are written toproduce a precise output. Changingthe output definition could preventthe program from running, or pro-duce poor results.
Setting print style toDynamic.
Concurrent Programs –Report Information region – Style field.
Dynamic print style informs the pro-gram to generate its output based onoutput dimensions that may vary.Special coding within a program isrequired to support the Dynamicprint style.
Changing the numberof parameters in aprogram definition.
Concurrent Programs – Parameterswindow.
Programs are defined to expect xnumber of parameters. If you add anew parameter (x + 1), the programwill ignore it. Deleting a parametercan cause a program not to run.
Changing Value Sets. Concurrent Programs – ArgumentDetails region – ValueSet field.
Programs expect values of a certaintype and length. Programs may notoperate if value set is changed.
Changing tokens. ConcurrentPrograms – ArgumentDetails region – Tokenfield.
Programs expect values of a certaintype and length. Program may notoperate if expected token is not received.
Defining a concurrentexecutable orprogram’s executionmethod as Immediate.
Concurrent ProgramExecutables – Execu-tion Method field.
Concurrent Programs –Executable Informationregion – Method field.
Concurrent programs whose execu-tion method is Immediate must beregistered with the program libraryFNDLIBR. Application developerscan register programs with programlibraries, System Administratorscannot.
Table 4 – 8 (Page 1 of 1)
Example of modifying a program’s parameters
Consider the following example of when and how to modify aconcurrent program’s parameters.
If one user submits a large number of concurrent requests on a dailybasis, for example, an Oracle Bill of Materials or Oracle Purchasingsupervisor, you can create a streamlined purge program that onlypurges that user’s concurrent processing records.
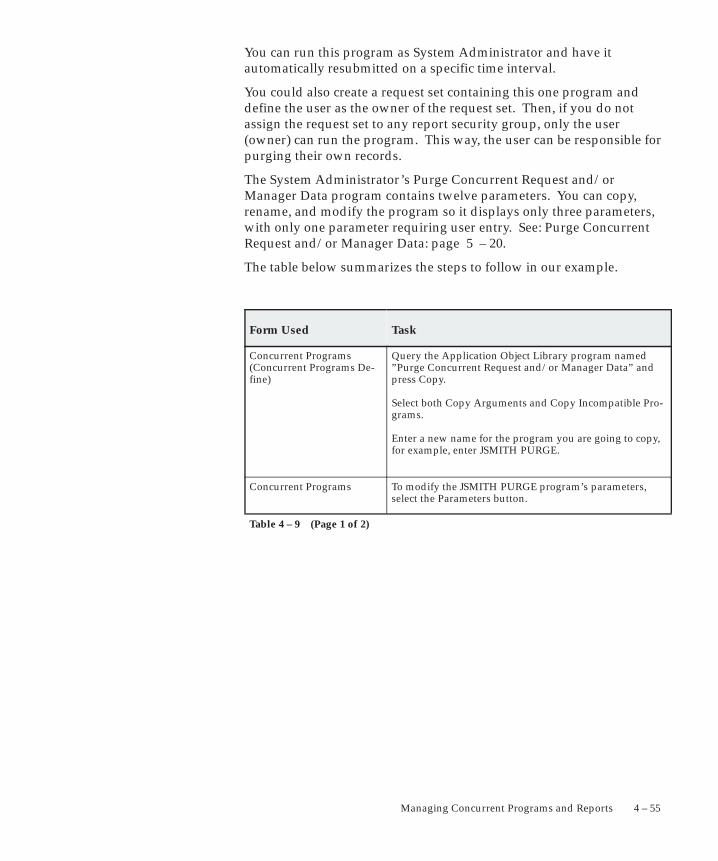
4 – 55Managing Concurrent Programs and Reports
You can run this program as System Administrator and have itautomatically resubmitted on a specific time interval.
You could also create a request set containing this one program anddefine the user as the owner of the request set. Then, if you do notassign the request set to any report security group, only the user(owner) can run the program. This way, the user can be responsible forpurging their own records.
The System Administrator’s Purge Concurrent Request and/orManager Data program contains twelve parameters. You can copy,rename, and modify the program so it displays only three parameters,with only one parameter requiring user entry. See: Purge ConcurrentRequest and/or Manager Data: page 5 – 20.
The table below summarizes the steps to follow in our example.
Form Used Task
Concurrent Programs(Concurrent Programs De-fine)
Query the Application Object Library program named”Purge Concurrent Request and/or Manager Data” andpress Copy.
Select both Copy Arguments and Copy Incompatible Pro-grams.
Enter a new name for the program you are going to copy,for example, enter JSMITH PURGE.
Concurrent Programs To modify the JSMITH PURGE program’s parameters,select the Parameters button.
Table 4 – 9 (Page 1 of 2)
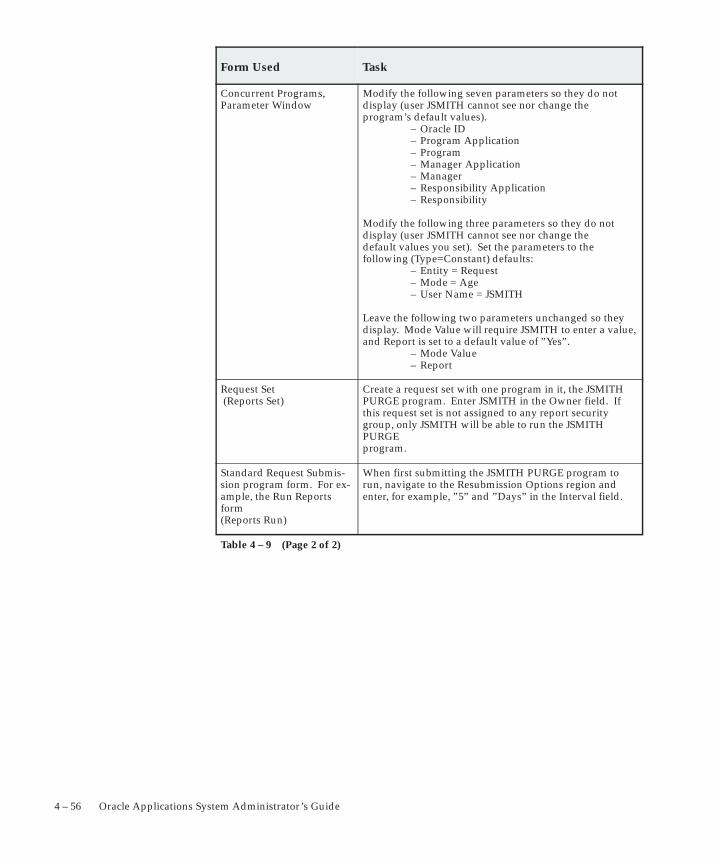
4 – 56 Oracle Applications System Administrator’s Guide
TaskForm Used
Concurrent Programs,Parameter Window
Modify the following seven parameters so they do notdisplay (user JSMITH cannot see nor change the program’s default values).
– Oracle ID– Program Application– Program– Manager Application– Manager– Responsibility Application– Responsibility
Modify the following three parameters so they do notdisplay (user JSMITH cannot see nor change the default values you set). Set the parameters to the following (Type=Constant) defaults:
– Entity = Request– Mode = Age– User Name = JSMITH
Leave the following two parameters unchanged so theydisplay. Mode Value will require JSMITH to enter a value,and Report is set to a default value of ”Yes”.
– Mode Value– Report
Request Set (Reports Set)
Create a request set with one program in it, the JSMITHPURGE program. Enter JSMITH in the Owner field. Ifthis request set is not assigned to any report securitygroup, only JSMITH will be able to run the JSMITHPURGE program.
Standard Request Submis-sion program form. For ex-ample, the Run Reportsform (Reports Run)
When first submitting the JSMITH PURGE program torun, navigate to the Resubmission Options region andenter, for example, ”5” and ”Days” in the Interval field.
Table 4 – 9 (Page 2 of 2)
4 – 57Managing Concurrent Programs and Reports
Concurrent Program Details Report
This report documents concurrent program definitions, includingexecutable file information, execution method, incompatible programlistings, and program parameters. If a concurrent program generates areport, column and row information, as well as print output and printstyle, are also documented.
Use this report when considering concurrent program modifications,such as modifying program incompatibility rules.
Report Parameters
Caution: If you do not enter any parameters, the reportreturns values for all concurrent programs, and may be verylengthy.
Application Name
Choose the application name associated with the concurrent programwhose program definition details you wish to report on.
Choose only an application name, without a program name, if youwish to run a program definition details report on all concurrentprograms associated with an application.
Program
Choose the name of a concurrent program whose program definitiondetails you wish to report on. You must enter a value for ApplicationName before entering a value for Program.
Report Headings
The report headings display the specified report parameters andprovide you with general information about the contents of the report.
4 – 58 Oracle Applications System Administrator’s Guide
Concurrent Programs Report
This report shows which concurrent programs are currently enablednand which programs are disabled.
Use this report to record the execution method, argument method, runalone status, standard submission status, request type, and print styleinformation associated with your concurrent programs.
Report Parameters
Application Name
Choose the application name associated with the concurrent programswhose program information you wish to report on.
If you do not enter an application name, the report will return valuesfor all concurrent programs.
Report Headings
The report headings display the specified report parameters andprovide you with general information about the contents of the report.
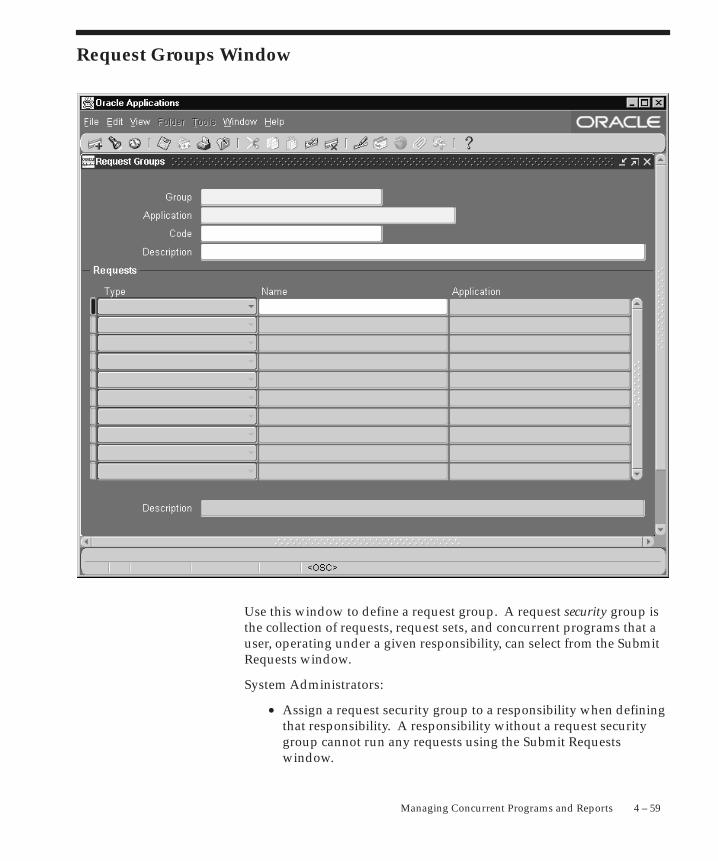
4 – 59Managing Concurrent Programs and Reports
Request Groups Window
Use this window to define a request group. A request security group isthe collection of requests, request sets, and concurrent programs that auser, operating under a given responsibility, can select from the SubmitRequests window.
System Administrators:
• Assign a request security group to a responsibility when definingthat responsibility. A responsibility without a request securitygroup cannot run any requests using the Submit Requestswindow.
4 – 60 Oracle Applications System Administrator’s Guide
• Can add any request set to a request security group. Adding aprivate request set to a request security group allows other usersto run that request set using the Submit Requests window.
Users:
• Can create their own private request sets using the Request Setswindow. In a private request set, users can include only therequests you assign to their request security group.
• Cannot update another user’s private request set using theRequest Sets window.
• Cannot delete a private request set if it is assigned to a requestsecurity group.
Request Groups Block
Group
Use the request group’s name to assign the request group to aresponsibility on the Responsibilities window. An application nameand request group name uniquely identify a request group.
Application
Select the name of the application you wish to associate with yourrequest group. An application name and a request security groupname uniquely identify a request security group. This applicationname does not prevent you from assigning requests and request setsfrom other applications to this request group.
Code
Assign a code to this request group. Some products use the requestgroup code as a parameter that identifies the requests a customizedstandard submission form can select. See: Customizing the SubmitRequests Window using Codes: page 4 – 20.
Requests Block
Specify the requests and request sets in the request group.
Type
Choose program or set to add one item, or choose application toinclude all requests in an application
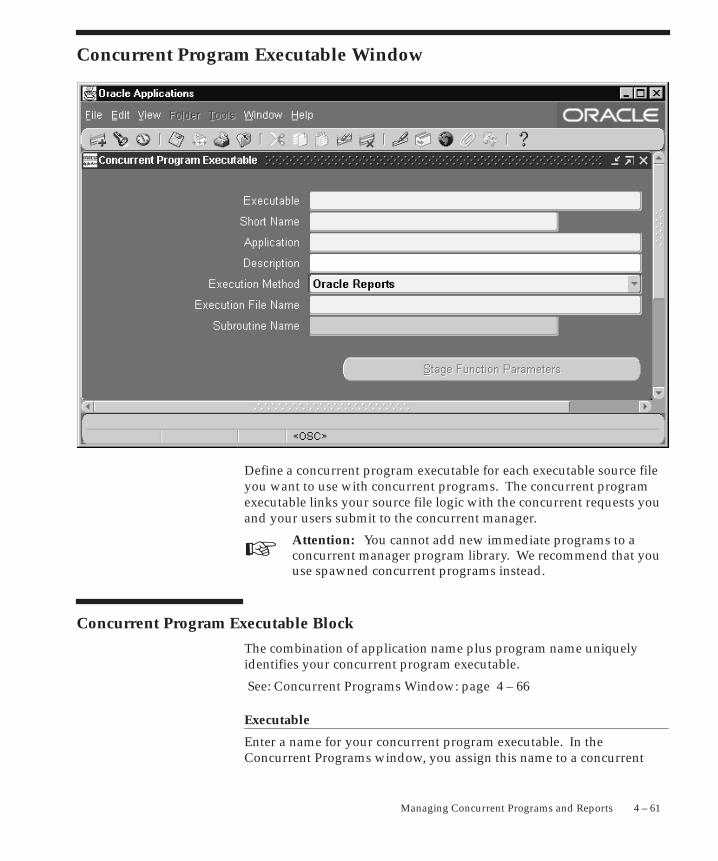
☞
4 – 61Managing Concurrent Programs and Reports
Concurrent Program Executable Window
Define a concurrent program executable for each executable source fileyou want to use with concurrent programs. The concurrent programexecutable links your source file logic with the concurrent requests youand your users submit to the concurrent manager.
Attention: You cannot add new immediate programs to aconcurrent manager program library. We recommend that youuse spawned concurrent programs instead.
Concurrent Program Executable Block
The combination of application name plus program name uniquelyidentifies your concurrent program executable.
See: Concurrent Programs Window: page 4 – 66
Executable
Enter a name for your concurrent program executable. In theConcurrent Programs window, you assign this name to a concurrent
4 – 62 Oracle Technical Documentation Handbook
program to associate your concurrent program with your executablelogic.
Short Name
Enter a short name for your concurrent program executable.
Application
The concurrent managers use the application to determine in whichdirectory structure to look for your execution file.
Execution Method
The execution method cannot be changed once the concurrent programexecutable has been assigned to one or more concurrent programs inthe Concurrent Programs window.
4 – 63Managing Concurrent Programs and Reports
The possible execution methods are:
The execution file is a host script.
The execution file is an Oracle Reports file.
The execution file is a PL/SQL stored procedure.
The execution file is a Java stored procedure.
The execution file is a program written in Java.
The execution file is a function (MLS function) thatsupports running concurrent programs in multiplelanguages.
The execution file is a SQL script.
The execution file is a SQL*Plus script.
The execution file is a C or Pro*C program.
The execution file is a program written to run as asubroutine of the concurrent manager. Werecommend against defining new immediateconcurrent programs, and suggest you use either aPL/SQL Stored Procedure or a Spawned CProgram instead.
PL/SQL Stored Function that can be uesd tocalculate the completion statuses of request setstages.
Execution File Name
Enter the operating system name of your execution file. Someoperating systems are case sensitive, so the name entered here shouldmatch the file name exactly.
Do not include spaces or periods (.) in the execution file name, unlessthe execution method is PL/SQL stored procedure or Request Set StageFunction.
The maximum size of an execution file name is 60 characters.
Subroutine Name
Enter the name of your C or Pro*C program subroutine here. Do notuse spaces or periods (.) in this field.
Host
Oracle Reports
PL/SQL StoredProcedure
Java StoredProcedure
Java ConcurrentProgram
Multi LanguageFunction
SQL*Loader
SQL*Plus
Spawned
Immediate
Request SetStage Function
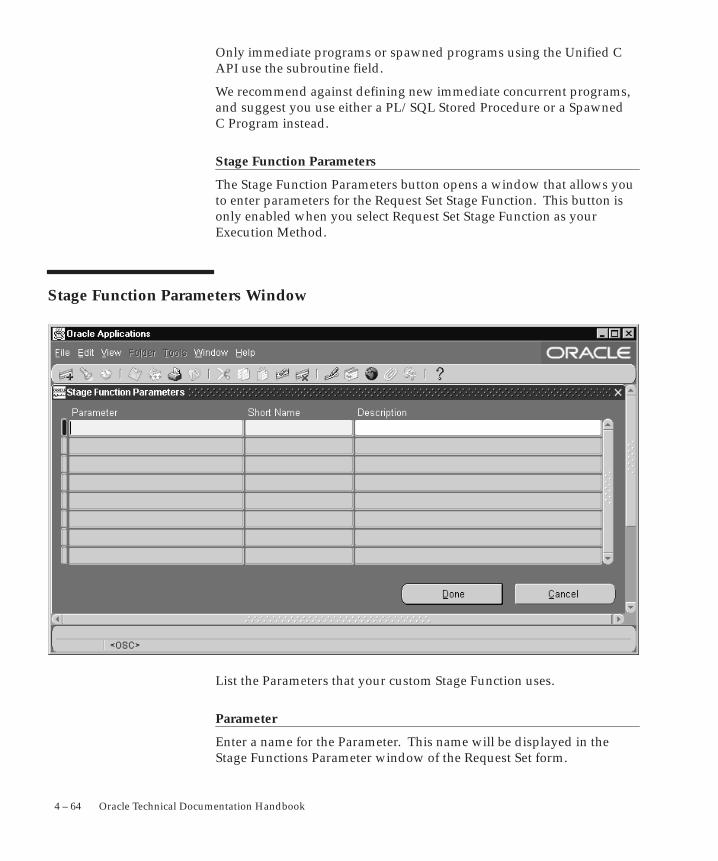
4 – 64 Oracle Technical Documentation Handbook
Only immediate programs or spawned programs using the Unified CAPI use the subroutine field.
We recommend against defining new immediate concurrent programs,and suggest you use either a PL/SQL Stored Procedure or a SpawnedC Program instead.
Stage Function Parameters
The Stage Function Parameters button opens a window that allows youto enter parameters for the Request Set Stage Function. This button isonly enabled when you select Request Set Stage Function as yourExecution Method.
Stage Function Parameters Window
List the Parameters that your custom Stage Function uses.
Parameter
Enter a name for the Parameter. This name will be displayed in theStage Functions Parameter window of the Request Set form.

4 – 65Managing Concurrent Programs and Reports
Short Name
Enter a short name that will be used by the function to reference theparameter.
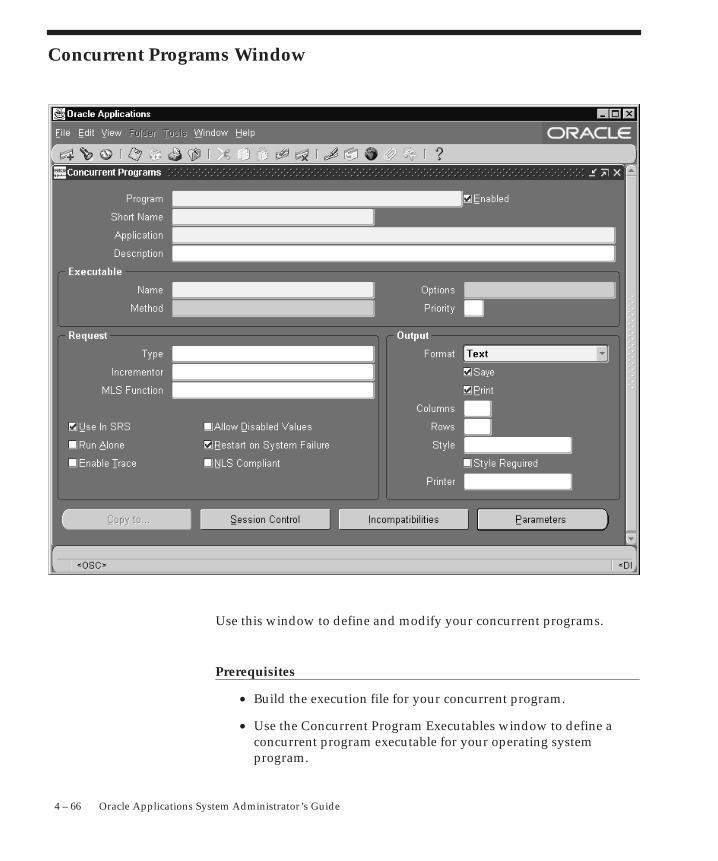
4 – 66 Oracle Applications System Administrator’s Guide
Concurrent Programs Window
Use this window to define and modify your concurrent programs.
Prerequisites
• Build the execution file for your concurrent program.
• Use the Concurrent Program Executables window to define aconcurrent program executable for your operating systemprogram.
Executable
4 – 67Managing Concurrent Programs and Reports
Concurrent Programs Block
The combination of application name plus program name uniquelyidentifies your concurrent program.
Program
You see this longer, more descriptive name when you view yourrequests in the Requests window. If this concurrent program runsthrough Standard Request Submission, you see this name in the SubmitRequests window when you run this program.
Short Name
Enter a brief name that Oracle Applications can use to associate yourconcurrent program with a concurrent program executable.
Application
The program’s application determines what ORACLE username yourprogram runs in and where to place the log and output files.
Enabled
Indicate whether users should be able to submit requests to run thisprogram and the concurrent managers should be able to run yourprogram.
Disabled programs do not show up in users’ lists, and do not appear inany concurrent manager queues. You cannot delete a concurrentprogram because its information helps to provide an audit trail.
Executable: Name
Select the concurrent program executable that can run your program.You define the executable using the Concurrent Program Executableswindow. You can define multiple concurrent programs using the sameconcurrent program executable. See: Concurrent Program Executables:page 4 – 61.
Executable: Options
Some execution methods, such as Oracle Reports, support additionalexecution options or parameters. You can enter such options in thisfield. The syntax varies depending on the execution method.
If you define a concurrent program with the bitmapped version ofOracle Reports, you can control the orientation of the bitmapped report
4 – 68 Oracle Applications System Administrator’s Guide
by passing the ORIENTATION parameter or token. For example, togenerate a report with landscape orientation, specify the followingoption in the Options field:
ORIENTATION=LANDSCAPE
Do not put spaces before or after the execution options values. Theparameters should be separated by only a single space. You can alsospecify an orientation of PORTRAIT.
You can control the dimensions of the generated output with thePAGESIZE parameter. A specified <width>x<height> in the Optionsfield overrides the values specified in the report definition. Forexample:
ORIENTATION=LANDSCAPE PAGESIZE=8x11.5
The units for your width and height are determined by your OracleReports definition. You set the units in your Oracle Reports menuunder Report => Global Properties => Unit of Measurement.
If the page size you specify with the PAGESIZE parameter is smallerthan what the report was designed for, your report fails with a”REP–1212” error.
Executable: Method
The execution method your concurrent program uses appears here.
Valid values are:
Your concurrent program is a stand–alone programin C or Pro*C.
Your concurrent program is written in a script foryour operating system.
Your concurrent program is a subroutine written inC or Pro*C. Immediate programs are linked inwith your concurrent manage and must beincluded in the manager’s program library.
Your concurrent program is an Oracle Reportsscript.
Spawned
Host
Immediate
Oracle Reports
Request
4 – 69Managing Concurrent Programs and Reports
Your concurrent program is a stored procedurewritten in PL/SQL.
Your concurrent program is a Java storedprocedure.
Your concurrent program is a program written inJava.
A multi–language support function (MLS function)is a function that supports running concurrentprograms in multiple languages. You should notchoose a multi–language function in theExecutable: Name field. If you have an MLSfunction for your program (in addition to anappropriate concurrent program executable), youspecify it in the MLS Function field.
Your concurrent program is a SQL*Loaderprogram.
Your concurrent program is a SQL*Plus or PL/SQLscript.
PL/SQL Stored Function that can be used tocalculate the completion statuses of request setstages.
You can switch between Spawned and Immediate, overriding theexecution method defined in the Concurrent Program Executablewindow, only if either method appears when the executable is selectedand both an execution file name and subroutine name have alreadybeen specified in the Concurrent Program Executable window. See:Concurrent Program Executables: page 4 – 61.
Priority
You can assign this program its own priority. The concurrent managersprocess requests for this program at the priority you assign here.
If you do not assign a priority, the user’s profile optionConcurrent:Priority sets the request’s priority at submission time.
Type
If you want to associate your program with a predefined request type,enter the name of the request type here. The request type can limitwhich concurrent managers can run your concurrent program.
PL/SQL StoredProcedure
Java StoredProcedure
Java ConcurrentProgram
Multi LanguageFunction
SQL*Loader
SQL*Plus
Request SetStage Function
4 – 70 Oracle Applications System Administrator’s Guide
Incrementor
For use by Oracle Applications internal developers only. Theincrementor function is shown here.
MLS Function
The MLS function, if any, used by the program.
The Multilingual Concurrent Request feature allows a user to submit arequest once to be run multiple times, each time in a different language.If this program utilizes this feature the MLS function determines whichinstalled languages are needed for the request.
See:
Oracle Applications Developer’s Guide
Use in SRS
Check this box to indicate that users can submit a request to run thisprogram from a Standard Request Submission window.
If you check this box, you must register your program parameters, ifany, in the Parameters window accessed from the button at the bottomof this window.
Allow Disabled Values
If you check the Use in SRS box, you can also check this box to allow auser to enter disabled or outdated values as parameter values.
Many value sets use special table columns that indicate whether aparticular value is enabled (using ENABLED_FLAG,START_DATE_ACTIVE, and END_DATE_ACTIVE columns). Thesevalue sets normally allow you to query disabled or outdated values butnot enter them in new data. For Standard Request Submission, thismeans that a user would not normally be allowed to enter disabledvalues as report parameter values when submitting a report, even if thereport is a query–only type report.
Run Alone
Indicate whether your program should run alone relative to all otherprograms in the same logical database. If the execution of yourprogram interferes with the execution of all other programs in the samelogical database (in other words, if your program is incompatible withall programs in its logical database, including itself), it should runalone.
Output
4 – 71Managing Concurrent Programs and Reports
You can enter any specific incompatible programs in the IncompatiblePrograms windows.
Enable Trace
Turns on SQL tracing when program runs.
Restart on System Failure
Use this option to indicate that this concurrent program shouldautomatically be restarted when the concurrent manager is restoredafter a system failure.
NLS Compliant
This box is checked if the program allows for a user to submit a requestof this program that will reflect a language and territory that aredifferent from the language and territory that the users are operatingin.
For example, users can enter orders in English in the United Kingdom,using the date and number formats appropriate in the UnitedKingdom, then generate invoices in German using the date and numberformats appropriate to their German customers.
If this box is left blank then a user can associate any installed languagewith the request, but the territory will default to the territory of theconcurrent manager environment.
Note that this option should be set only by the developer of theprogram. The program must be written as NLS Compliant to utilizethis feature. See: the Oracle Applications Developer’s Guide.
Note that this option should be set only by the developer of theprogram. The program must be written as NLS Compliant to utilizethis feature.
Format
Select the output format from the following:
• HTML
• PCL (HP’s Printer Control Language)
• PS (Post Script)
• Text
☞
4 – 72 Oracle Applications System Administrator’s Guide
Attention: If you choose HTML or PDF as the output typewith Oracle Report programs, you must use an appropriateprinter driver that handles HTML or PDF files.
Save
Indicate whether to automatically save the output from this program toan operating system file when it is run. This value becomes the defaultfor all requests submitted for this program. The output of programswith Save set to No is deleted after printing.
If this is a Standard Request Submission program, users can overridethis value from the Submit Requests window.
Enter Yes or No to indicate whether to allow the concurrent managersto print your program’s output to a printer. If you enter No, yourconcurrent program’s output is never sent to the printer.
Columns / Rows
Enter the minimum column and row length for this program’s reportoutput. Oracle Applications uses this information to determine whichprint styles can accommodate your report.
Style
The print style you select depends on your system and printer setup.Print styles include:
• 132 columns and 66 lines (Landscape)
• 180 columns and 66 lines (Landwide)
• 80 columns and 66 lines (Portrait)
• 132 columns and 62 lines (A4)
Your list is limited to those styles that meet your program’s columnsand row length requirements.
Style Required
If your program requires a specific print style (for example, acheckwriting report), use this check box to enforce that print style.
Printer
If you want to restrict your program’s output to a single printer, enterthe name of the printer to which you want to send your output. If your

Concurrent ProgramsButtons
4 – 73Managing Concurrent Programs and Reports
program has minimum or maximum columns or rows defined, yourlist of values is limited to those printers that can support yourprogram’s requirements.
Users cannot override your choice of printer from the Submit Requestsor Requests windows.
Use these buttons to open detail windows for programincompatibilities your program parameters.
Choose this button to create another concurrentprogram using the same executable, request andreport information. You can elect to copy theincompatibility and parameter details as well.
Choose this window to specify options for thedatabase session of the concurrent program whenit is executed.
Choose this button to open the IncompatiblePrograms window.
Choose this button to open the ConcurrentProgram Parameters window.
Copy to Window
Create another concurrent program using the same executable, requestand report information as the current program. You can optionallycopy the incompatibility and parameter details information as well.
See: Incompatible Programs Window: page 4 – 74
Session Control Window
Use this window to specify options for the database session of theconcurrent program when it is executed.
Consumer Group
Optionally specify the resource consumer group for the concurrentprogram.
See: Resource Consumer Groups in Oracle Applications: page 9 – 7
Rollback Segment
Optionally specify a rollback segment to be used with the concurrentprogram. This rollback segment will be used instead of the default andwill be used up until the first commit.
Copy to...
Session Control
Incompatibilities
Parameters
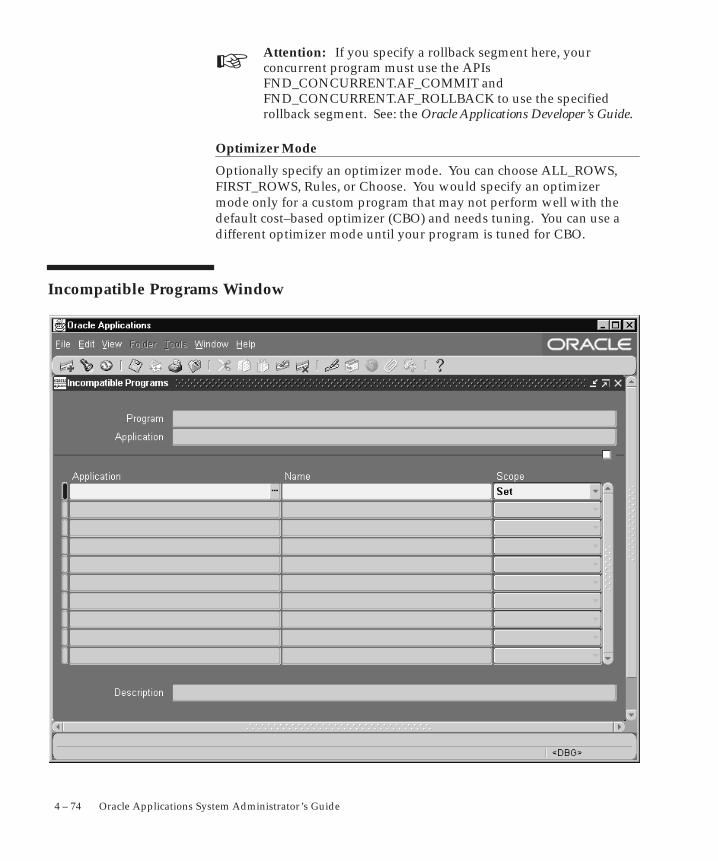
☞
4 – 74 Oracle Applications System Administrator’s Guide
Attention: If you specify a rollback segment here, yourconcurrent program must use the APIsFND_CONCURRENT.AF_COMMIT andFND_CONCURRENT.AF_ROLLBACK to use the specifiedrollback segment. See: the Oracle Applications Developer’s Guide.
Optimizer Mode
Optionally specify an optimizer mode. You can choose ALL_ROWS,FIRST_ROWS, Rules, or Choose. You would specify an optimizermode only for a custom program that may not perform well with thedefault cost–based optimizer (CBO) and needs tuning. You can use adifferent optimizer mode until your program is tuned for CBO.
Incompatible Programs Window
4 – 75Managing Concurrent Programs and Reports
Identify programs that should not run simultaneously with yourconcurrent program because they might interfere with its execution.You can specify your program as being incompatible with itself.
Application
Although the default for this field is the application of your concurrentprogram, you can enter any valid application name.
Name
The program name and application you specify must uniquely identifya concurrent program.
Your list displays the user–friendly name of the program, the shortname, and the description of the program.
Scope
Enter Set or Program Only to specify whether your concurrent programis incompatible with this program and all its child requests (Set) or onlywith this program (Program Only).
Type
Enter Domain or Global. If you choose Domain, the incompatibility isresolved at a domain–specific level. If you choose Global, then thisconcurrent program will be considered globally incompatible with yourconcurrent program, regardless of which domain it is running in.
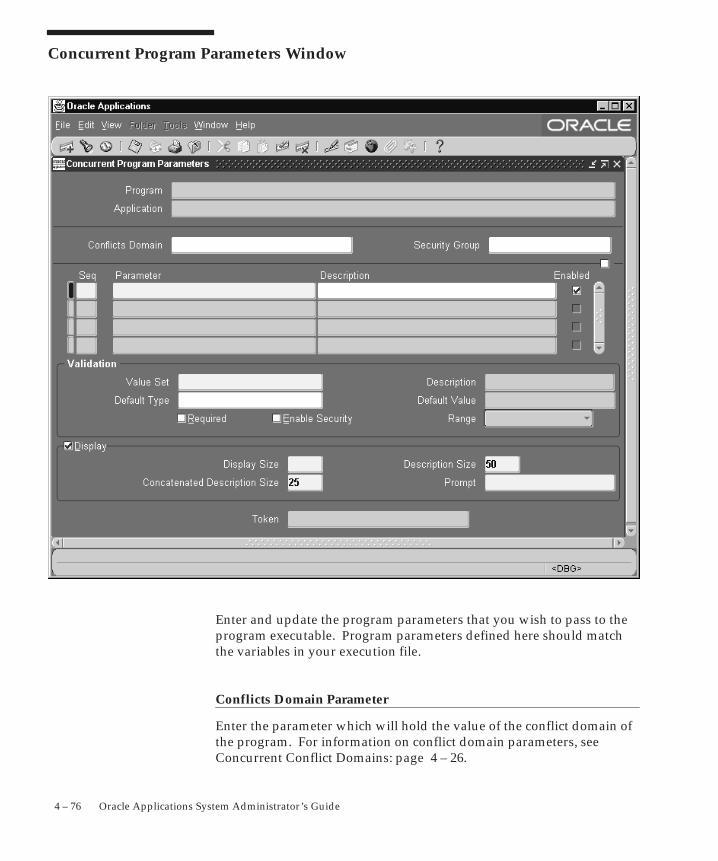
4 – 76 Oracle Applications System Administrator’s Guide
Concurrent Program Parameters Window
Enter and update the program parameters that you wish to pass to theprogram executable. Program parameters defined here should matchthe variables in your execution file.
Conflicts Domain Parameter
Enter the parameter which will hold the value of the conflict domain ofthe program. For information on conflict domain parameters, seeConcurrent Conflict Domains: page 4 – 26.
Argument Detail
Validation Information
☞
4 – 77Managing Concurrent Programs and Reports
Security Group
This field is for HRMS security only. See: Customizing, Reporting, andSystem Administration in Oracle HRMS.
Sequence
Choose the sequence numbers that specify the order in which yourprogram receives parameter values from the concurrent manager.
Parameter
Enter the parameter name. The value is case insensitive.
Enabled
Disabled parameters do not display at request submission time and arenot passed to your execution file.
You specify information about your parameter almost exactly as youdefine a flexfield segment.
Value Set
Enter the name of the value set you want your parameter to use forvalidation. You can only select from independent, table, andnon–validated value sets.
The maximum size of your value set is 240 characters.
Attention: If you are using a value set of dates, this value setshould have a format type of either Standard Date or StandardDateTime if you are using the Multilingual Request feature.
Default Type
If you want to set a default value for this parameter, identify the type ofvalue you need.
Valid types include:
The default value can be any literal value.
The default value is the current value in the userprofile option defined in the Default Value field.Use the profile option name, not the end–username. You do not need to include $PROFILE$.
The default value is determined by the SQLstatement you defined in the Default Value field.
Constant
Profile
SQL Statement
4 – 78 Oracle Applications System Administrator’s Guide
The default value is the value entered in a priorsegment of the same parameter window.
Default Value
You can enter a default value for the parameter. This default value foryour parameter automatically appears when you enter your parameterwindow. You determine whether the default value is a constant or acontext–dependent value by choosing the default type.
Your default value should be a valid value for your value set.Otherwise you see an error message when you enter your parameterwindow on the Run Request window and your default value does notappear.
Valid values for each default type include:
Enter any literal value for the default value.
The default value is the current value of the userprofile option you specify here. Enter the profileoption name, not the end–user name.
The default value is the value entered in a priorsegment of the same flexfield window. Enter thename of the segment whose value you want tocopy.
The default value is determined by the SQLstatement you enter here. Your SQL statementmust return exactly one row and one column in allcases.
Required
If the program executable file requires an argument, you should requireit for your concurrent program.
Enable Security
If the value set for this parameter does not allow security rules, thenthis field is display only. Otherwise you can elect to apply any securityrules defined for this value set to affect your parameter list.
Range
Choose either Low or High if you want to validate your parametervalue against the value of another parameter in this structure.Parameters with a range of Low must appear before parameters with a
Segment
Constant
Profile
Segment
SQL Statement
Window Information
4 – 79Managing Concurrent Programs and Reports
range of High (the low parameter must have a lower number than thehigh parameter). For example, if you plan two parameters named”Start Date” and ”End Date,” you may want to force users to enter anend date later than the start date. You could assign ”Start Date” arange of Low and ”End Date” a range of High. In this example, theparameter you name ”Start Date” must appear before the parameteryou name ”End Date.”
If you choose Low for one parameter, you must also choose High foranother parameter in that structure (and vice versa). Otherwise youcannot commit your changes.
If your value set is of the type Pair, this field is display only. The valuedefaults to Pair.
Display
Indicate whether to display this parameter in the Parameters windowwhen a user submits a request to run the program from the SubmitRequests window.
You should provide a default type and value for any non–displayedparameter.
Display Size
Enter the field length in characters for this parameter. The user seesand fills in the field in the Parameters window of the Submit Requestswindow.
You should ensure that the total of the value set maximum sizes (notthe display sizes) for all of your parameters, plus the number ofseparators you need (number of parameters minus one), does not addup to more than 240. If your program values’ concatenated lengthexceeds 240, you may experience truncation of your data in someforms.
Description Size
Enter the display length in characters for the parameter valuedescription. Your window may show fewer characters of yourdescription than you specify here if there is not enough room(determined by the sum of your longest prompt plus your display sizefor this parameter plus seven). However, your window does notdisplay more characters of the description than you specify here.
Prompt
A user sees the prompt instead of the parameter name in theParameters window of the Submit Requests window.
4 – 80 Oracle Applications System Administrator’s Guide
The default is the name of the parameter.
Concatenated Description Size
Enter the display length in characters for the parameter valuedescription. The user sees the parameter value in the ParameterDescription field of the Submit Requests and View Requests forms.The Parameter Description field concatenates all the parameter valuesfor the concurrent program.
Suggestion: We recommend that you set the ConcatenatedDescription Size for each of your parameters so that the totalConcatenated Description Size for your program is 80 or less,since most video screens are 80 characters wide.
Token
For a parameter in an Oracle Reports program, the keyword orparameter appears here. The value is case insensitive. For other typesof programs, you can skip this field.
See: Incompatible Programs Window: page 4 – 74

4 – 81Managing Concurrent Programs and Reports
Data Groups Window
Use this window to define data groups. A data group is a list of OracleApplications and the ORACLE usernames assigned to each application.
• If a custom application is developed with Oracle ApplicationObject Library, it may be assigned an ORACLE username,registered with Oracle Applications, and included in a datagroup.
4 – 82 Oracle Applications System Administrator’s Guide
An ORACLE username allows access to an application’s tables in anORACLE database. All data groups automatically include an entry forApplication Object Library.
• A concurrent manager running reports or programs under OracleApplications refers to a data group to identify the ORACLEusername it uses to access an application’s tables in the database.
• Transaction managers running synchrous programs can only runprograms submitted from responsibilities assigned the same datagroup as the transaction manager. If you create custom datagroups, you should create new transaction managers for theapplications that use transaction managers. Consult your productdocumenation to determine if your application uses transactionmanagers.
Each responsibility within Oracle Applications is assigned a data group.
During installation or upgrading of Oracle Applications, a standard datagroup is defined, pairing each installed application with an ORACLEusername (note: a standard data group is defined for each set of books).You cannot change or delete the predefined values for Application orORACLE username in a Standard data group. However, you may:
• Modify the Tool ORACLE username and description associatedwith an Application–ORACLE username pair.
• Add new Application–ORACLE username pairs to the group.
Data Groups Block
Create a new data group, or modify an existing data group.
You cannot change or delete the predefined values for Application orORACLE username in a Standard data group. However, you may modifythe Tool ORACLE username and description, or add newApplication–ORACLE username pairs to a Standard group.
Data Group
A data group is uniquely identified by its name. You cannot create adata group with a name already in use.
Once saved, data group names cannot be edited.
Application–ORACLE ID Pairs Block
Pair applications with ORACLE usernames.
Copy ApplicationsFrom...
4 – 83Managing Concurrent Programs and Reports
When you copy a data group, each application, its assigned ORACLEusername, and, if present, its Tool ORACLE username and description,appear in this zone automatically. All data groups automatically includean entry for Application Object Library.
Application
Within each data group, an application can be listed only one time.
Oracle ID
Select the ORACLE ID you want to assign to an application. Anapplication uses an ORACLE ID to access tables in the database. EachORACLE ID allows access to a predefined set of tables in the database.
Each responsibility within Oracle Applications is assigned to a datagroup. When you sign on to Oracle Applications under a givenresponsibility:
• Each application’s programs and reports access application tablesin the database using the ORACLE username assigned to it in theresponsibility’s data group.
Use this button to copy an existing data group, then add or deleteapplication–ORACLE username pairs to create a new data group.

4 – 84 Oracle Applications System Administrator’s Guide
C H A P T E R
5
T
5 – 1Managing Concurrent Processing
Managing ConcurrentProcessing
his chapter explains concurrent processing in Oracle Applicationsand how you can manage programs running concurrently in thebackground while your users continue to perform online tasks.
The essays in this chapter are organized under the following topics:
• Overview of Concurrent Processing
• Reviewing Requests and Log Files
• Changing the Status of Concurrent Requests
• Managing Concurrent Processing Files and Tables
• Concurrent Processing User Profile Settings
• Defining Managers and their Work Shifts
• Specializing Managers to run only certain programs
• Grouping Programs as a Request Type
• Controlling Concurrent Managers
• Overview of Parallel Concurrent Processing
• Managing Parallel Concurrent Processing
Form descriptions follow at the end of the chapter.
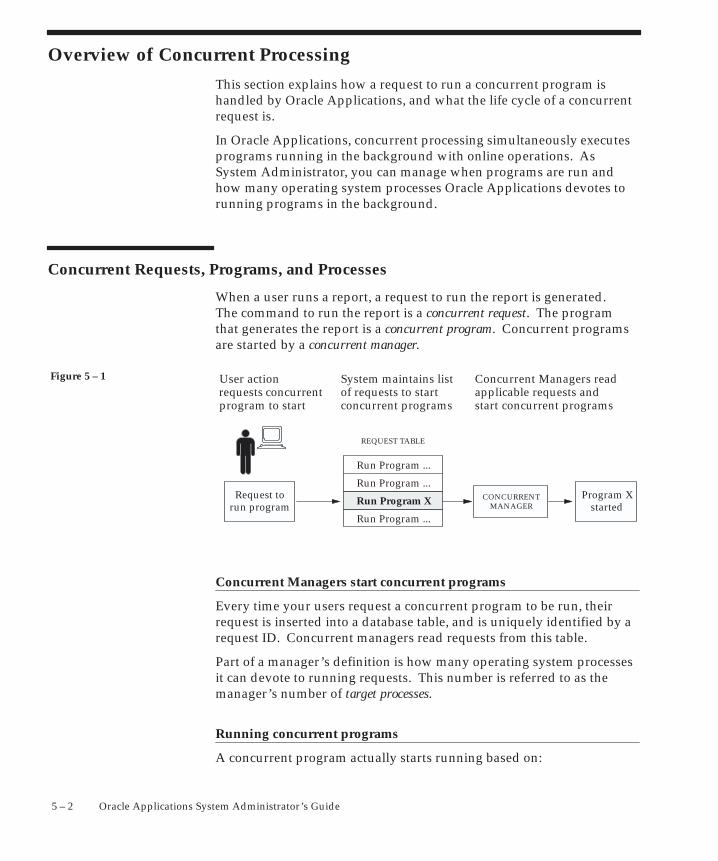
Figure 5 – 1
5 – 2 Oracle Applications System Administrator’s Guide
Overview of Concurrent Processing
This section explains how a request to run a concurrent program ishandled by Oracle Applications, and what the life cycle of a concurrentrequest is.
In Oracle Applications, concurrent processing simultaneously executesprograms running in the background with online operations. AsSystem Administrator, you can manage when programs are run andhow many operating system processes Oracle Applications devotes torunning programs in the background.
Concurrent Requests, Programs, and Processes
When a user runs a report, a request to run the report is generated.The command to run the report is a concurrent request. The programthat generates the report is a concurrent program. Concurrent programsare started by a concurrent manager.
Request torun program
User action requests concurrentprogram to start
Program Xstarted
Concurrent Managers readapplicable requests andstart concurrent programs
CONCURRENTMANAGERRun Program X
REQUEST TABLE
System maintains listof requests to startconcurrent programs
Run Program ...
Run Program ...
Run Program ...
Concurrent Managers start concurrent programs
Every time your users request a concurrent program to be run, theirrequest is inserted into a database table, and is uniquely identified by arequest ID. Concurrent managers read requests from this table.
Part of a manager’s definition is how many operating system processesit can devote to running requests. This number is referred to as themanager’s number of target processes.
Running concurrent programs
A concurrent program actually starts running based on:
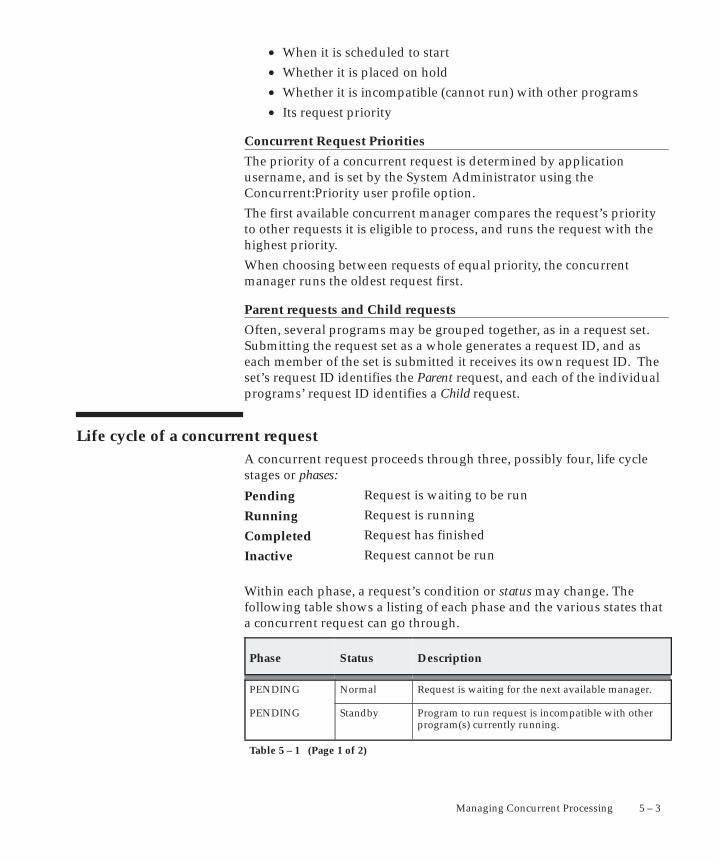
5 – 3Managing Concurrent Processing
• When it is scheduled to start• Whether it is placed on hold• Whether it is incompatible (cannot run) with other programs• Its request priority
Concurrent Request Priorities
The priority of a concurrent request is determined by applicationusername, and is set by the System Administrator using theConcurrent:Priority user profile option.
The first available concurrent manager compares the request’s priorityto other requests it is eligible to process, and runs the request with thehighest priority.
When choosing between requests of equal priority, the concurrentmanager runs the oldest request first.
Parent requests and Child requests
Often, several programs may be grouped together, as in a request set.Submitting the request set as a whole generates a request ID, and aseach member of the set is submitted it receives its own request ID. Theset’s request ID identifies the Parent request, and each of the individualprograms’ request ID identifies a Child request.
Life cycle of a concurrent requestA concurrent request proceeds through three, possibly four, life cyclestages or phases:
Request is waiting to be runRequest is runningRequest has finishedRequest cannot be run
Within each phase, a request’s condition or status may change. Thefollowing table shows a listing of each phase and the various states thata concurrent request can go through.
Phase Status Description
PENDING Normal Request is waiting for the next available manager.
PENDING Standby Program to run request is incompatible with otherprogram(s) currently running.
Table 5 – 1 (Page 1 of 2)
Pending
Running
Completed
Inactive
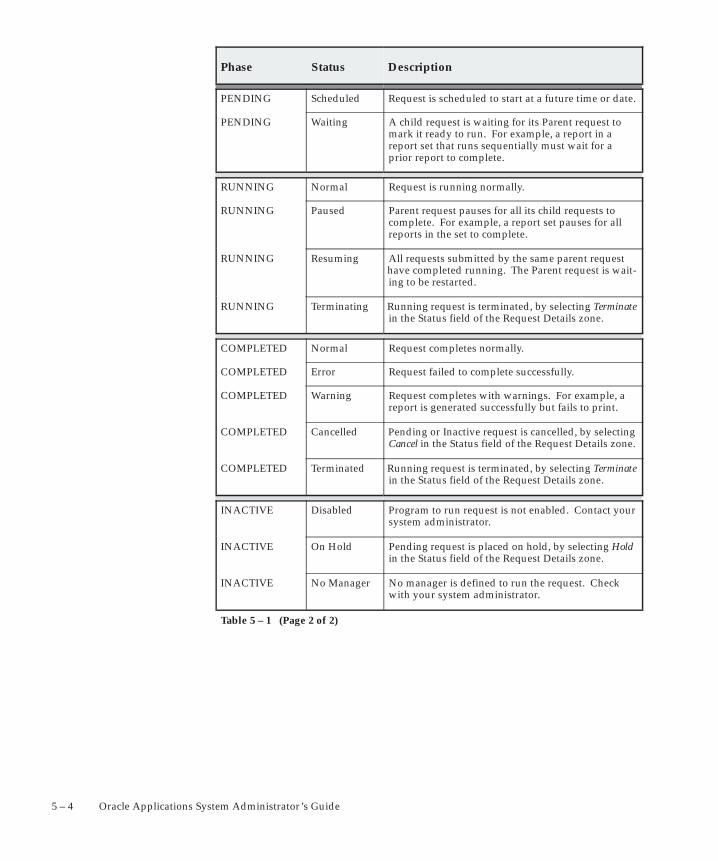
5 – 4 Oracle Applications System Administrator’s Guide
DescriptionStatusPhase
PENDING Scheduled Request is scheduled to start at a future time or date.
PENDING Waiting A child request is waiting for its Parent request tomark it ready to run. For example, a report in a report set that runs sequentially must wait for aprior report to complete.
RUNNING Normal Request is running normally.
RUNNING Paused Parent request pauses for all its child requests tocomplete. For example, a report set pauses for allreports in the set to complete.
RUNNING Resuming All requests submitted by the same parent requesthave completed running. The Parent request is wait-ing to be restarted.
RUNNING Terminating Running request is terminated, by selecting Terminatein the Status field of the Request Details zone.
COMPLETED Normal Request completes normally.
COMPLETED Error Request failed to complete successfully.
COMPLETED Warning Request completes with warnings. For example, areport is generated successfully but fails to print.
COMPLETED Cancelled Pending or Inactive request is cancelled, by selectingCancel in the Status field of the Request Details zone.
COMPLETED Terminated Running request is terminated, by selecting Terminatein the Status field of the Request Details zone.
INACTIVE Disabled Program to run request is not enabled. Contact yoursystem administrator.
INACTIVE On Hold Pending request is placed on hold, by selecting Holdin the Status field of the Request Details zone.
INACTIVE No Manager No manager is defined to run the request. Checkwith your system administrator.
Table 5 – 1 (Page 2 of 2)
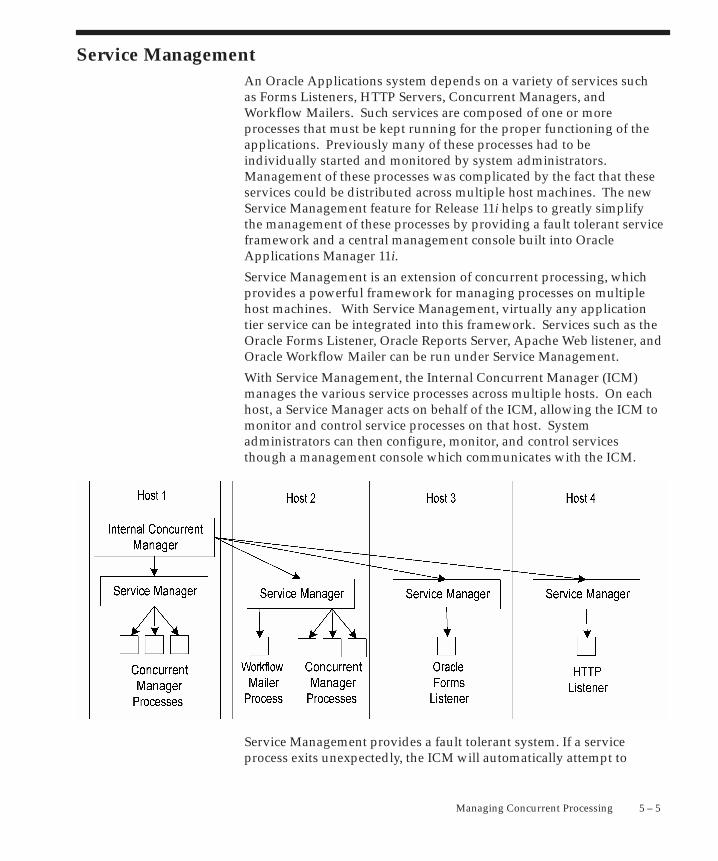
5 – 5Managing Concurrent Processing
Service ManagementAn Oracle Applications system depends on a variety of services suchas Forms Listeners, HTTP Servers, Concurrent Managers, andWorkflow Mailers. Such services are composed of one or moreprocesses that must be kept running for the proper functioning of theapplications. Previously many of these processes had to beindividually started and monitored by system administrators.Management of these processes was complicated by the fact that theseservices could be distributed across multiple host machines. The newService Management feature for Release 11i helps to greatly simplifythe management of these processes by providing a fault tolerant serviceframework and a central management console built into OracleApplications Manager 11i.
Service Management is an extension of concurrent processing, whichprovides a powerful framework for managing processes on multiplehost machines. With Service Management, virtually any applicationtier service can be integrated into this framework. Services such as theOracle Forms Listener, Oracle Reports Server, Apache Web listener, andOracle Workflow Mailer can be run under Service Management.
With Service Management, the Internal Concurrent Manager (ICM)manages the various service processes across multiple hosts. On eachhost, a Service Manager acts on behalf of the ICM, allowing the ICM tomonitor and control service processes on that host. Systemadministrators can then configure, monitor, and control servicesthough a management console which communicates with the ICM.
Service Management provides a fault tolerant system. If a serviceprocess exits unexpectedly, the ICM will automatically attempt to
5 – 6 Oracle Applications System Administrator’s Guide
restart the process. If a host fails, the ICM may start the affectedservice processes on a secondary host. The ICM itself is monitoredand kept alive by Internal Monitor processes located on various hosts.
Service Management provides significant improvements in themanageability of Oracle Applications. System administrators can nowuse the central console in Oracle Applications Manager 11i to manage avariety of services that formerly had to be managed independently onseparate hosts. The entire set of system services may be started orstopped with a single action. Service Management also provides a greatbenefit by automatically compensating for certain system failures.
Service processes are very much like concurrent manager andtransaction manager processes. They must be kept running on amiddle tier for the proper functioning of their respective products. Theconcurrent processing management feature has been built forconcurrent managers and transaction managers, to provide faulttolerance, process distribution, and simplified configuration andcontrol.
Benefits of Service Management
• The service processes will no longer need to be manually andindividually started and monitored by Oracle Applicationssystem administrators.
• Services can take advantage of the process distribution and faulttolerance capabilities that have been developed for concurrentprocessing.
• As with concurrent manager processes, system administratorscan use work shifts to determine the number of processes thatwill be active for a service on a given node for a given timeperiod.
To extend process management support to the various Applicationsservices, the Internal Concurrent Manager must be able to start,monitor, and control processes on all Applications tiers. Every node ofevery tier will have an Oracle RPC–based Service Controller installed.The ICM will use the Service Controller to manage processes.
Concepts
Service
A service is a process or collection of processes that perform actions atthe request of client processes. A concurrent manager is a type of
5 – 7Managing Concurrent Processing
service where the client submits a request for actions to be processedwhile the client continues to do other work.
While active, a service must have one or more listener processes thatwait to process requests from clients. An example of a listener is aconcurrent manager process which periodically polls a queue forrequests to process.
Service Instance
Each service controlled by service management may have multipleservice instances. Each instance may consist of one or more processes.
Concurrent:GSM Enabled Profile Option
The Concurrent:GSM Enabled profile option should be set to Y toenable Service Management.
Users cannot see nor change this profile option.
This profile option is visible and updatable at the site level for thesystem administrator.
The internal name for this profile option is CONC_GSM_ENABLED.
5 – 8 Oracle Applications System Administrator’s Guide
Managing Concurrent Processing with Oracle Applications Manager
The Oracle Applications Manager allows administrators to manageE–Business Suite systems from an HTML console. Oracle ApplicationsManager can be used for a wide variety of tasks such as administeringservices including concurrent managers, examining systemconfiguration, managing Oracle Workflow, examining applied patches,and measuring system usage.
Oracle Applications Manager provides diagnostic features forApplications systems. The console displays errors recently reported bysystem components such as transaction managers or concurrentrequests. For running processes such as forms or concurrent requests,system administrators can examine the database session details,including any currently executing SQL.
Oracle Applications Manager allows administrators to configure,monitor, and control concurrent processing. Combined with theService Management feature, Oracle Applications Manager can be usedto monitor and control concurrent managers, as well as otherapplication tier services.
Using the Oracle Applications Manager, you can:
• view a summary of concurrent managers
• view details of a concurrent manager
• create or edit a concurrent manager
• view a summary of concurrent requests
• view details of a concurrent request
• submit a concurrent request
Also, the Oracle Management Pack for Oracle Applications extendsOracle Enterprise Manager to enable the monitoring, diagnosing, andcapacity planning of the multi–tiered Oracle Applications environment.
For more information, see: Oracle Applications Management Tools:page 6 – 2
5 – 9Managing Concurrent Processing
Reviewing Requests, Request Log Files, and Report Output Files
This essay explains how you, as System Administrator, can view andchange the status of concurrent requests, and how to view request logand report output files.
How To View Request Status and Output
Use any of the following methods to view the status and output ofconcurrent requests.
Use the Requests Window
Use the Requests window to view the status of concurrent requests,and to view request log and report output files.
The System Administrator and Oracle Alert Manager have a privilegedversion of the Requests window that provides you with morecapabilities than your end users. For example, using the Requestswindow, you can view the status of and log files for all concurrentrequests (not just your own), including requests that completedunsuccessfully. On some platforms, you can even view the log files ofrunning requests.
Using the same window, you can view your own report output online.You cannot, however, view report output from other users’ requests.
From the Requests window, you can also:
• place and remove holds from any pending or inactive request
• cancel a pending request, or terminate a running request
• change the priority of any pending request
• view the manager log file
• determine where any pending request stands in the queue foreach manager defined to accept the request
• determine when the concurrent manager is inactive and needs tobe restarted.
Run the Completed Concurrent Requests Report
You can run a report that lists parameters and any error messagesassociated with concurrent requests that have completed running. See:Completed Concurrent Requests Report: page 5 – 34�
5 – 10 Oracle Applications System Administrator’s Guide
How to Modify Request Diagnostic Output
The Request Diagnostics window provides the user with request statusinformation. This information consists of messages that explain therequest’s current status.
Collect Runtime Data
Set the profile option Concurrent:Collect Request Statistics to ”Yes” tocollect runtime statistics.
A concurrent request may be comprised of one or two processes: aNet8i shadow which consumes database server resources, and afront–end process such as a C executable. The time used by the CPU iscollected for both of these types of processes.
Summarize and View Runtime Statistics
To review the statistics you must run the Purge Concurrent Requestand/or Manager Data program to process the raw data and have itwrite the computed statistics to the FND_CONC_STAT_SUMMARYtable. You can review the statistics on a request by request basis usingthe Diagnostics window from the Requests window.
Setting End User Report and Log File Access Privileges
The user profile option Concurrent:Report Access Level determines reportoutput file and log file access privileges for your end users. As SystemAdministrator, you can set this profile option to either ”User” or”Responsibility.”
All users can can review the log and report output files from requeststhat they submitted.
If you set the Concurrent:Report Access Level option to ”Responsibility”at the User level, that user can also review the log and report outputfiles from all requests submitted from the current responsibility.
If you set the Concurrent:Report Access Level option to ”Responsibility”at the Responsibility level, any user of that responsibility can also viewthe log and report output files from all requests submitted by any otheruser of that responsibility.
Enabling the Report Review Agent
Oracle Applications uses a tool called the Report Review Agent to viewconcurrent request log and output files online.
5 – 11Managing Concurrent Processing
Using the Report Review Agent, you can copy an entire report or logfile to your PC, subject to restrictions you, as the System Administrator,impose on file transfer size. You can view a report one page at a time.
1. To set up the Report Review Agent, a database or computeradministrator must modify the Net8i configuration. See theRelease 11i Installing Oracle Applications manual for details onmodifying your Net8i configuration.
2. Optionally, you can set each APPL_TOP to have its own ReportReview Agent service using the RRA: Server Prefix profile. Forexample, test and production instances of Oracle Applicationsinstalled on a single machine will not have to share a report reviewagent service.
In previous releases, Report Review Agent services were alwaysnamed using the ”FNDFS_nodename” convention. The RRA:Server Prefix profile allows system administrators to override thedefault server name prefix ”FNDFS_”.
To override the default service name prefix of ”FNDFS_”, set thesite level profile ”RRA: Service Prefix” to the desired prefix. Forexample, if the profile ”RRA: Service Prefix” is set to ”PROD_”,then the Report Review Agent services will be named”PROD_nodename” instead of ”FNDFS_nodename”.
The value of the profile ”RRA: Service Prefix” must be ninecharacters or fewer. We recommend that the last character be anunderscore. Use only alphanumeric characters and underscoresonly. If the profile is null, then the prefix ”FNDFS_” will be used.
3. When using a custom editor to view a concurrent output or log file,the Report Review Agent will make a ”temporary” copy of the fileon the client. Set the RRA:Delete Temporary Files profile to ”Yes”to automatically delete these files when the user exits OracleApplications. See: Defining the Reports Editor: page 5 – 12, ProfileOptions in Oracle Application Object Library: page A – 2.
4. Set the RRA:Maximum Transfer Size profile option to specify, inbytes, the maximum allowable size of files transferred by theReport Review Agent, including those downloaded by a user withthe ”Copy File...” menu option in the Oracle Applications ReportFile Viewer and those ”temporary” files which are automaticallydownloaded by custom editors.
If this profile is null, there is no size limit. See: System ProfileValues Window: page 11– 6.
5. Set up your directory tree so that the concurrent managers place alllog and out file directories in the same parent directory. See the
5 – 12 Oracle Applications System Administrator’s Guide
Release 11i Installing Oracle Applications manual for your serverplatform for details on setting the necessary environment variables.
Briefly, you direct the concurrent managers to place log and reportoutput files for all products in the same parent directory by settingthe environment variable APPLCSF on the server to the directorywhere all log and output files should reside.
Note: The APPLCSF environment variable is specific to yourserver. The APPLCSF variable is not used on the client.
6. Set the profile option Applications Web Agent to the base URL ofthe APPS schema’s Web Application Server Database AccessDescriptor (DAD).
See: Applications Web Agent: page A – 3.
Defining the Reports Viewer
The Oracle Applications Report File Viewer is used by default forviewing your text report files. You can also display text files in abrowser or use another application such as Microsoft Word. You defineyour default viewer by setting a profile option.
Set the Viewer:Text Profile Option
If the Viewer:Text profile option is set to ”Browser” then reports aresent to a web browser. If this profile option is left blank, the Report FileViewer is used instead.
If this profile option is left blank, a report or log file can still be viewedin a browser by first viewing it using the Report File Viewer, and thenchoosing ”Copy File...” from the Tools menu.
See:
Setting Your Personal User Profile(Oracle Applications User’s Guide)
System Profile Values Window: page 11– 6
See: Viewing Request Output and Log Files (Oracle Application’s User’s Guide)
Viewing HTML Report Output
You can view your reports with HTML output in a browser. Once anHTML report has been sent to a browser, it can be saved to the desktopby using the Save As functionality of the browser.
☞
5 – 13Managing Concurrent Processing
Note: HTML reports are displayed by the browser in thecharacter set of the server. This character set may or may notmatch the character set on the client. Therefore, it may benecessary to convert the output to the client character set whensaving the report. If the browser supports character setconversion with Save As, there will be a poplist in the Save Asdialog box. The user can then choose an encoding whichmatches the client character set.
Online Report Review using Other Applications
You can set up your Online Report Review implementation to enableviewing output files in other applications, such as Microsoft Word orExcel. To do this you associate MIME types with file output formats.
Users can then set their preferred MIME types for particular outputformats using profile options, or the users may be prompted to choosethe appropriate MIME type for a file at runtime.
You can register more than one MIME type file format with each outputformat. In the Viewer Options window, you enter in the file format, theMIME type, and a description. The description is displayed to the userin the Profile Values window and the Submit Request form. See:Viewer Options Window: page 5 – 105.
When the report is viewed, it must first be sent to a browser. Thebrowser then uses the associated MIME type to display the report.
Attention: For printing, if users choose either HTML or PDFas the output type with Oracle Report programs, they must useappropriate printer drivers to handle the PDF and HTML filefor printing their output. See: Overview of Printers andPrinting page: 7– 2.
Types of Log Files
Log files contain information about a concurrent program’s execution,or a concurrent manager’s activities. Log files are helpful whenreviewing a problem request.
Log files are generated for all Completed concurrent requests.
There are three types of log files:
1. Request log files that document the execution of a concurrentprogram running as the result of a concurrent request. Everyconcurrent request generates a log file.
Example – RequestLog File name
5 – 14 Oracle Applications System Administrator’s Guide
2. Manager Log files that document the performance of a concurrentmanager that is running a request. The Manager Log file listsrequests processed by a concurrent manager.
3. The Internal Concurrent Manager Log file that documents theperformance of the Internal Concurrent Manager. It displaysparameter values that are loaded when the Internal ConcurrentManager is started.
If a concurrent process ends in an error, you should review the log filesto help diagnose the problem. You may also want to review the logfiles if a program’s performance is questionable. For example, if areport runs very slowly or if it prints out data that you didn’t expect.
The Internal Concurrent Manager Log file also records the time thateach concurrent manager is started, and when each process monitorsession or pmon cycle is initiated. During each pmon cycle, the InternalConcurrent Manager verifies the correct operation of each definedconcurrent manager.
System Administrator Log File Privileges
Both you and your end users can review request log files and managerlog files online. Only the System Administrator can display theInternal Concurrent Manager log file.
As System Administrator, you can use the Concurrent Requests andAdminister Concurrent Program windows to view request andmanager log files.
Operating System Access to Log Files
Log files are stored as standard operating system files in directoriesdefined during the installation of Oracle Applications.
For example, Oracle General Ledger files are located using a pathvariable called $GL_TOP/$APPLLOG, or $APPLCSF/$APPLLOG, ifthe APPLCSF variable is set.
The complete path name to access an Oracle Applications log filedepends on the operating system you are using. However, there are anumber of file name conventions that are standard across all platforms.
For example, the log file naming convention in UNIX is the letter l,followed by the concurrent request ID, followed by the extension .req. Inthe example below, the concurrent request ID is 64225.
l64225.req
See: Concurrent Manager File Conventions(Installing Oracle Applications)
UNIX
Example – ReportOutput File name
5 – 15Managing Concurrent Processing
Operating System Access to Concurrent Manager Log Files
Concurrent manager log files are located in the log directory underFND_TOP, the variable that contains the path name to ApplicationObject Library Files, or under $APPLTOP/$APPLLOG.
For most platforms, n is the Concurrent Process ID number assigned tothe concurrent manager by the Internal Concurrent Manager, and isfound in the Internal Concurrent Manager log file.
The log file name for the Internal Concurrent Manager is specifiedwhen you use the STARTMGR command from the operating system tostart the concurrent managers.
See Also
Controlling the Internal Concurrent Manager from the OperatingSystem: page 5 – 58
Setting Up Concurrent Managers: page G – 66
Operating System Access to Report Output Files
Report output files generated by concurrent programs are stored asstandard operating system files in directories defined during theinstallation of Oracle Applications.
Path name to Output Files
The complete path name to access an Oracle Applications report outputfile depends on the operating system you are using. However, thereare a number of file name conventions that are standard across allplatforms.
• Each output file name includes the unique request ID assignedby the concurrent processing facility.
If APPCPNAM is set to USER then the naming convention used isApplication Username.Request ID.
If APPCPNAM is set to REQID then the naming convention used is0Request ID.out.
The default setting for APPCPNAM is REQID.
For example:
JSMITH.64225

5 – 16 Oracle Applications System Administrator’s Guide
Changing the Status of Concurrent RequestsThis essay explains how to change a request’s phase and status, andhow to change the priority of a Pending or Inactive request.
Changing a Request’s Phase and Status
A request is in one of four phases: Pending (waiting to be run),Running, Completed, or Inactive (unable to run). Within each phase, arequest’s condition is referred to as its status.
You can change the phase of a Pending, Running, or Inactive request bychanging its status.
Pending and Inactive Requests
You may cancel Pending and Inactive requests. The request’s phaseand status becomes Completed – Cancelled.
You may place on hold Pending and Inactive requests. The request’sphase and status becomes Inactive – On Hold. You can reverse thisaction by later selecting the request removing the hold.
Running Requests
You can terminate Running requests. The request’s phase and statusbecomes Completed – Terminated.
Changing a Request’s Status
You can change the status of a request, and its resulting phase, usingthe Requests window.
Changing the Priority of a Pending or Inactive request
Requests normally run according to start time, on “first–submitted,first–run” basis. However, a higher priority request starts before anearlier request.
As System Administrator, you can change the priority of any Pendingor Inactive request using the Requests window.
Request Priority is associated with an application User
The priority of a user’s requests defaults to the value you, as SystemAdministrator, set for their Concurrent:Priority user profile option.Users cannot change the priority of their requests.
5 – 17Managing Concurrent Processing
If a concurrent program has a defined priority, that priority overridesthe user’s profile option.
• Priorities range from 1 (highest) to 99 (lowest).
• The standard default is 50.
• Concurrent programs submitted by the Internal ConcurrentManager have a priority of zero (0), and override all otherrequests.
Suggestion: If you need to change the priority of a requestfrequently, you should consider assigning that concurrentprogram its own priority.
5 – 18 Oracle Applications System Administrator’s Guide
Managing Concurrent Processing Files and Tables
This section explains how to maintain the number of log and outputfiles the operating system retains, and how to manage ApplicationObject Library database tables that store information about concurrentrequests and concurrent manager processes.
The database tables that are affected by running the Purge ConcurrentRequest and/or Manager Data program are:
FND_CONCURRENT_REQUESTS
This table contains a complete history of all concurrent requests.
FND_RUN_REQUESTS
When a user submits a report set, this table stores information aboutthe reports in the report set and the parameter values for each report.
FND_CONC_REQUEST_ARGUMENTS
This table records arguments passed by the concurrent manager to eachprogram it starts running.
FND_DUAL
This table records when requests do not update database tables.
FND_CONCURRENT_PROCESSES
This table records information about Oracle Applications and operatingsystem processes.
FND_CONC_STAT_LIST
This table collects runtime performance statistics for concurrentrequests.
FND_CONC_STAT_SUMMARY
This table contains the concurrent program performance statisticsgenerated by the Purge Concurrent Request and/or Manager Dataprogram. The Purge Concurrent Request and/or Manager Dataprogram uses the data in FND_CONC_STAT_LIST to compute thesestatistics.
5 – 19Managing Concurrent Processing
Maintenance Suggestions
Your MIS department and application users should agree on anarchiving and file retention policy that is appropriate for yourorganization. To avoid running out of space on your disk drives, youshould periodically delete Oracle Applications log files and outputfiles.
Suggestion: You can run the program ”Purge ConcurrentRequest and/or Manager Data” once and automaticallyresubmit the program for you at specific time intervals.
There are some sample guidelines for when to run the PurgeConcurrent Requests and/or Manager Data program. Adopt theseguidelines according to your user community’s usage of OracleApplications.
• every 30 days for normal usage
• every two weeks (14 days) for heavy usage
• if using the AGE mode, set the Mode Value to 5 to retain the fivemost recent days of concurrent request data, log files, and reportoutput files.
Purging removes Audit data
When you purge concurrent request information, you lose audit details.The Signon Audit Concurrent Requests report uses this auditinformation.
5 – 20 Oracle Applications System Administrator’s Guide
Purge Concurrent Request and/or Manager Data Program
Use this program to delete:
• request log files, concurrent manager log files, and report outputfiles from your product directories maintained by the operatingsystem
• records (rows) from Application Object Library database tablesthat contain history information about concurrent requests andconcurrent manager processes.
Use this program to compute performance statistics for each of theconcurrent programs, if the Concurrent: Collect Request Statisticsprofile option is set to ”Yes”.
Report Options
Entity
Purges records from database tables that recordhistory information for concurrent requests, historyinformation for concurrent managers, and purgesrequest log files, manager log files, and reportoutput files from the operating system.
Purges records from database tables that recordhistory information for concurrent managers, andpurges manager log files from the operatingsystem.
Purges records from database tables that recordhistory information for concurrent requests, andpurges request log files and report output filesfrom the operating system.
Mode
Enter the number of days for which you want tosave concurrent request history, log files, andreport output files. The purge program deletes allrecords older (in days) than the number you enter.
For example, if you enter ”5”, then all concurrentrequest history, log files, and report output filesolder than five days is purged.
All
Manager
Request
Age
5 – 21Managing Concurrent Processing
Enter the number of (most recent) records forwhich you want to save concurrent request history,log file, and report output files. The purgeprogram starts from the most recent records,retains the number you enter, and purges allremaining records.
For example, if you enter ”5”, then the five mostrecent concurrent request history records, requestlog files, manager log files, report output files aresaved, and all remaining records are purged.
Mode Value
Enter a value to define the number of days for Mode=Age or thenumber of records for Mode=Count. The valid values are 1 – 9999999.
Oracle ID
Enter the Oracle ID that concurrent programs connect to for which youwant to purge concurrent request records, and associated log files andreport output files. Oracle ID has relevance when the Entity is either”Request” or ”All”.
For example, if you enter AP1, then the program purges all requestrecords, log files, and report output files associated with requests torun programs that connect to the AP1 Oracle ID.
User Name
Enter the application username whose concurrent request records andassociated log files and report output files you wish to purge.Username has relevance when the Entity is either ”Request” or ”All”.
For example, if you enter JSMITH, then the program purges all requestrecords, log files, and report output files associated with requestssubmitted by user JSMITH.
Select the application associated with the responsibility for which youwant to purge concurrent request records, and associated log files andreport output files. Responsibility Application is used with theResponsibility option, and has relevance when the Entity is either”Request” or ”All”.
Responsibility
Select the responsibility for which you want to purge concurrentrequest records, and associated log files and report output files.
Count
5 – 22 Oracle Applications System Administrator’s Guide
Responsibility has relevance when the Entity is either ”Request” or”All”.
For example, if you select the System Administrator responsibility, thenthe program purges all request records, log files, and report output filesassociated with requests submitted by users operating under theSystem Administrator responsibility.
Program Application
Select the application for which you want to purge concurrent requestrecords, and associated log files and report output files. ProgramApplication has relevance when the Entity is either ”Request” or ”All”.
For example, if you select Oracle Payables, then the program purges allrequest records, log files, and report output files associated withrequests to run Oracle Payables programs.
Program
Select the program for which you want to purge concurrent requestrecords, and associated log files and report output files. Program hasrelevance when the Entity is either ”Request” or ”All”.
For example, if you select Program X, then the purge program purgesall request records, log files, and report output files associated withrequests to run Program X.
Manager Application
Select the application associated with the concurrent manager forwhich you want to purge concurrent request records, and associatedlog files and report output files.
Manager Application is used with the Manager option, and hasdifferent effects when Entity is set to ”Request, and when Entity is setto ”Manager” or ”All”.
• When Entity is set to ”Request”, the program purges all requestrecords, log files, and report output files associated with requestsrun by the concurrent manager named in the Manager option.
• When Entity is set to either ”Manager” or ”All”, in addition tothe above, the program also purges all manager log filesassociated with the concurrent manager named in the Manageroption.
Manager
Select the concurrent manager for which you want to purge concurrentrequest records, and associated log files and report output files.
5 – 23Managing Concurrent Processing
Manager is used with the Manager Application option, and has differenteffects when Entity is set to ”Request,” and when Entity is set to”Manager” or ”All”.
• When Entity is set to ”Request”, the program purges all requestrecords, log files, and report output files associated with requestsrun by the concurrent manager named in the Manager option.
• When Entity is set to either ”Manager” or ”All”, in addition tothe above, the program also purges all manager log filesassociated with the concurrent manager named in the Manageroption.
Report
Select whether you want a report listing the number of records purgedby the Purge Concurrent Request and/or Manager Data program.
Run the program but do not generate a report.
Run the program and generate a report.
Purge Other
Select whether you want to delete records from the FND_DUAL table.
.Do not delete records from FND_DUAL.
Delete records from FND_DUAL.
No
Yes
No
Yes

5 – 24 Oracle Applications System Administrator’s Guide
Concurrent Processing User Profile SettingsThis essay explains the user profile option settings relevant tosubmitting concurrent requests.
Setting Concurrent Processing Options
End users can control certain runtime options for their concurrentrequests. For example, you can choose a specific date on which to starta request.
If a user does not explicitly enter these options at the time of therequest, concurrent processing options default to their user profilevalues.
As System Administrator, you set user profile values for your endusers with the System Profile Values window. Both you and your endusers can set some of your own profile values using the Personal ProfileValues form.
Changing Concurrent Processing Options for submitted requests
You or your users can use the Requests window to change theconcurrent processing options for a submitted request up until the timeit starts running.
• As System Administrator you can change all concurrent optionsfor any request.
• Your users can change most of their request’s concurrent options.
End users cannot change (nor set) the priority of their request, orthe report access level for viewing request log files and reportoutput files online.
See: Overview of Setting User Profiles: page 11– 2
The following table lists the concurrent processing user profile optionsand an explanation of each:
User Profile Option Explanation
Concurrent:Hold Requests
”Yes” places concurrent requests on hold. ”No” starts programs according to the request’s priorityand start time.
Concurrent:Multiple Time Zones
”Yes” ensures that requests are scheduled immediatelyregardless of the time zone your client is running in.
Table 5 – 2 (Page 1 of 2)
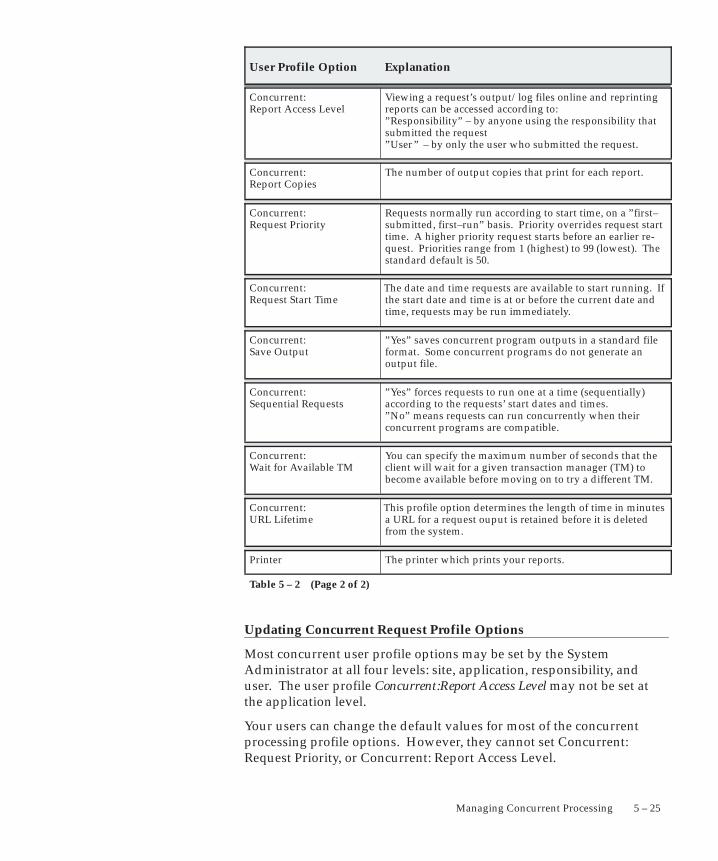
5 – 25Managing Concurrent Processing
ExplanationUser Profile Option
Concurrent:Report Access Level
Viewing a request’s output/log files online and reprintingreports can be accessed according to:”Responsibility” – by anyone using the responsibility thatsubmitted the request”User” – by only the user who submitted the request.
Concurrent:Report Copies
The number of output copies that print for each report.
Concurrent:Request Priority
Requests normally run according to start time, on a ”first–submitted, first–run” basis. Priority overrides request starttime. A higher priority request starts before an earlier re-quest. Priorities range from 1 (highest) to 99 (lowest). Thestandard default is 50.
Concurrent:Request Start Time
The date and time requests are available to start running. Ifthe start date and time is at or before the current date andtime, requests may be run immediately.
Concurrent:Save Output
”Yes” saves concurrent program outputs in a standard fileformat. Some concurrent programs do not generate anoutput file.
Concurrent:Sequential Requests
”Yes” forces requests to run one at a time (sequentially)according to the requests’ start dates and times. ”No” means requests can run concurrently when their concurrent programs are compatible.
Concurrent:Wait for Available TM
You can specify the maximum number of seconds that theclient will wait for a given transaction manager (TM) tobecome available before moving on to try a different TM.
Concurrent:URL Lifetime
This profile option determines the length of time in minutesa URL for a request ouput is retained before it is deletedfrom the system.
Printer The printer which prints your reports.
Table 5 – 2 (Page 2 of 2)
Updating Concurrent Request Profile Options
Most concurrent user profile options may be set by the SystemAdministrator at all four levels: site, application, responsibility, anduser. The user profile Concurrent:Report Access Level may not be set atthe application level.
Your users can change the default values for most of the concurrentprocessing profile options. However, they cannot set Concurrent:Request Priority, or Concurrent: Report Access Level.
5 – 26 Oracle Applications System Administrator’s Guide
Defining Managers and their Work Shifts
This essay explains how you can define concurrent managers andspecify when a manager is enabled.
A concurrent manager is itself a concurrent program that starts otherconcurrent programs running. When an application user submits arequest to run a program, the request is entered into a database tablethat lists all of the requests. Concurrent managers read requests fromthe table and start programs running. See: Concurrent Managers: page5 – 89.
In this essay, we explain how to specify when a manager is enabled,how to use managers to balance your applications processing workloadacross different time periods, and how to associate a library ofimmediate concurrent programs to be called by your manager.
Defining new managers
You can define as many concurrent managers as you want. When youdefine a manager, you:
• Assign a predefined library of immediate concurrent programs toyour manager.
Immediate concurrent programs are subroutines associated withconcurrent managers. All other concurrent programs arespawned as independent processes at run time.
• Assign work shifts to your manager, which determines whatdays and times the manager works.
• For each work shift, you define the maximum number ofoperating system processes the manager can run concurrently toread requests (start programs) during the work shift.
• Specialize your manager to read only certain kinds of requests.
Figure 5 – 2 illustrates the details of defining a concurrent manager.
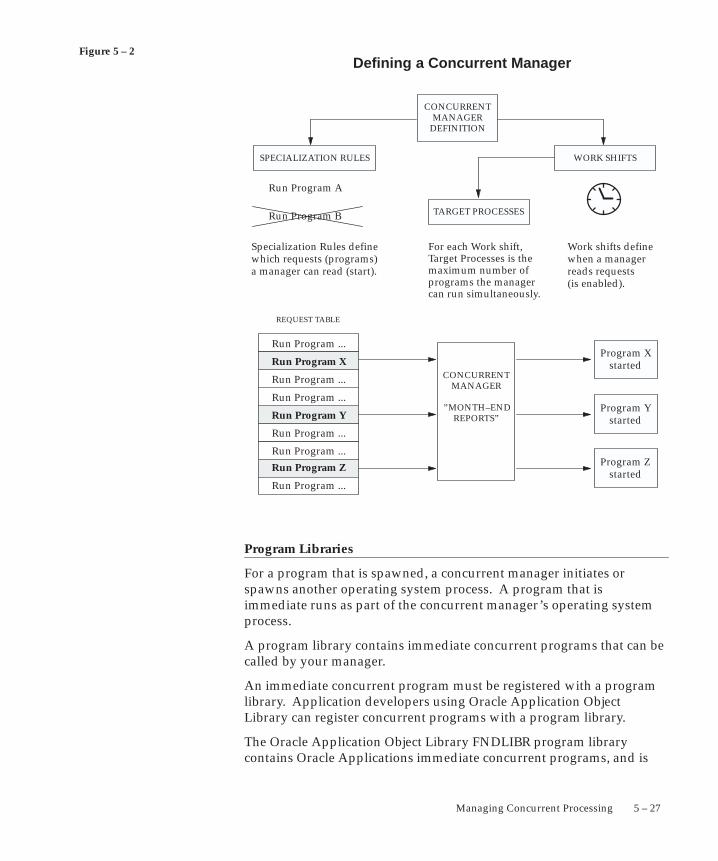
Figure 5 – 2
5 – 27Managing Concurrent Processing
Run Program ...
REQUEST TABLE
Run Program ...
Run Program ...
Run Program Y
Run Program ...
Run Program Z
Run Program ...
Specialization Rules definewhich requests (programs)a manager can read (start).
Work shifts definewhen a managerreads requests (is enabled).
CONCURRENTMANAGER
DEFINITION
SPECIALIZATION RULES WORK SHIFTS
Run Program A
Run Program B TARGET PROCESSES
For each Work shift, Target Processes is themaximum number ofprograms the managercan run simultaneously.
Program Xstarted
Program Ystarted
Program Zstarted
Run Program X
Run Program ...
CONCURRENTMANAGER
”MONTH–ENDREPORTS”
Defining a Concurrent Manager
Program Libraries
For a program that is spawned, a concurrent manager initiates orspawns another operating system process. A program that isimmediate runs as part of the concurrent manager’s operating systemprocess.
A program library contains immediate concurrent programs that can becalled by your manager.
An immediate concurrent program must be registered with a programlibrary. Application developers using Oracle Application ObjectLibrary can register concurrent programs with a program library.
The Oracle Application Object Library FNDLIBR program librarycontains Oracle Applications immediate concurrent programs, and is
5 – 28 Oracle Applications System Administrator’s Guide
assigned to the Standard concurrent manager. In most cases, you willinclude the FNDLIBR library with your manager’s definition.
The Internal and the Standard concurrent managers
Oracle System Administration predefines two managers for you:
• The Internal Concurrent Manager, which functions as the “boss”of all the other managers. The Internal Concurrent Managerstarts up, verifies the status of, resets, and shuts down theindividual managers.
You cannot alter the definition of the Internal ConcurrentManager.
See: Defining Program Incompatibility Rules: page 4– 25
• A manager named Standard. The Standard manager accepts anyand all requests; it has no specialization. The Standard manager isactive all the time; it works 365 days a year, 24 hours a day.
Warning: You should not alter the definition of the Standardconcurrent manager. If you do, and you have not definedadditional managers to accept your requests, some programsmay not run. Use the Standard manager as a safety net, amanager who is always available to run any request. Defineadditional managers to handle your installation site’s specificneeds.
Transaction Managers
While conventional concurrent managers let you execute long–running,data–intensive application programs asynchronously, transactionmanagers support synchronous processing of particular requests fromclient machines. A request from a client program to run a server–sideprogram synchronously causes a transaction manager to run itimmediately, and then to return a status to the client program.
Transaction managers are implemented as immediate concurrentprograms. At runtime, concurrent processing starts a number of thesemanagers. Rather than polling the concurrent requests table todetermine what to do, a transaction manager waits to be signalled by aclient program. The execution of the requested transaction programtakes place on the server, transparent to the client and with minimaltime delay. At the end of program execution, the client program isnotified of the outcome by a completion message and a set of returnvalues.
Communication with a transaction manager is automatic. Thetransaction manager mechanism does not establish an ongoing
5 – 29Managing Concurrent Processing
connection between the client and the transaction manager processes.The intent of the mechanism is for a small pool of server processes toservice a large number of clients with real–time response.
Each transaction manager can process only the programs contained inits program library. Oracle Applications developers using OracleApplication Object Library can register transaction programs with aprogram library.
A transaction manager is associated with a particular data group, anduses that data group to connect to the database. Transaction managerscan only process requests submitted from responsibilities associatedwith the same data group.
If you create custom data groups, you should define new transactionmanagers (using the predefined program libraries associated with theseeded transaction managers) for each application in your data groupthat uses transaction managers.
Work Shift Definitions
When you define a concurrent manager, you assign one or more workshifts to it. Work shifts determine when the manager operates. Youdefine work shifts using the Work Shifts form.
See:
Work Shifts: page 5 – 98
Work Shift by Manager Report: page 5 – 35
Work Shifts Report: page 5 – 36
For example, you can define work shifts such as:
• 8:00am–5:00pm, Monday–Friday.
• 11:00am–1:00pm, Wednesday(s).
• 6:00pm–11:59pm, April 15, 2000.
You can define a work shift to run during the night, when most or all ofyour employees are at home asleep, and are not using their terminals.For example, you can define a work shift as:
• 2:00am–6:00am, Monday–Friday.
You can define a work shift to run twenty–four hours a day on a certainday or days of the week, or on a specific date. For example, you candefine a work shift as:
• Monday–Friday.
5 – 30 Oracle Applications System Administrator’s Guide
• Wednesday(s).
• April 15, 2000.
You can define work shifts to use only on special occasions. Forexample, you can define a work shift named ”Inventory” to use whenyour company is conducting an inventory.
Disabling a work shift
If you define a period of time as a work shift, but do not necessarilywant to use the work shift, you can:
• Not assign the work shift to a concurrent manager
• Assign the number of target processes for the work shift as zero(0), on the Define Manager form.
• Delete a work shift assignment using the Define Manager form.
Work Shifts and Hours of the Day
Work shifts can run twenty–four hours a day, from midnight till thenext midnight. In military time this is defined as:
• 12:00am 00:00:00
• 11:59:59pm 23:59:59
Using work shifts to run through midnight
The military time clock for a twenty–four period starts and stops atmidnight.
If you do not want a work shift to run twenty–four hours a day, butyou do want to run programs continuously past 12:00 am, you mustdefine two work shifts:
• The first work shift stops at 23:59 (11:59pm).
• The second work shift starts at 00:00 (12:00 am).
For example, you want to run some data–intensive programs duringthe night, when most of your employees are away from the job site.You define two work shifts which you assign to this manager.
• The first work shift starts at 20:00 (8:00pm) and stops at 23:59(11:59pm).
• The second work shift starts at 00:00 (12:00am) and stops at 05:00(5:00am).
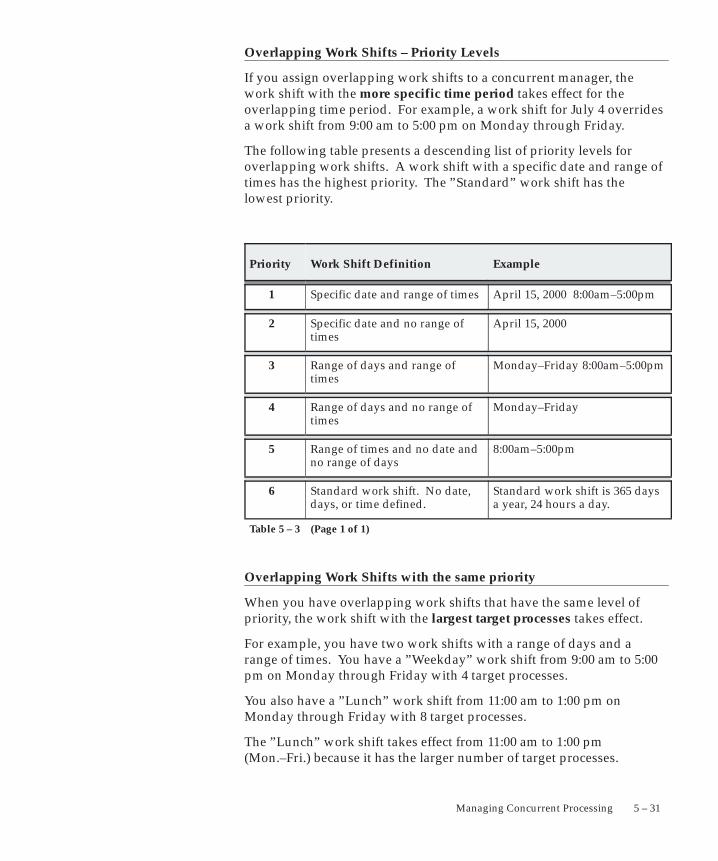
5 – 31Managing Concurrent Processing
Overlapping Work Shifts – Priority Levels
If you assign overlapping work shifts to a concurrent manager, thework shift with the more specific time period takes effect for theoverlapping time period. For example, a work shift for July 4 overridesa work shift from 9:00 am to 5:00 pm on Monday through Friday.
The following table presents a descending list of priority levels foroverlapping work shifts. A work shift with a specific date and range oftimes has the highest priority. The ”Standard” work shift has thelowest priority.
Priority Work Shift Definition Example
1 Specific date and range of times April 15, 2000 8:00am–5:00pm
2 Specific date and no range oftimes
April 15, 2000
3 Range of days and range oftimes
Monday–Friday 8:00am–5:00pm
4 Range of days and no range oftimes
Monday–Friday
5 Range of times and no date andno range of days
8:00am–5:00pm
6 Standard work shift. No date,days, or time defined.
Standard work shift is 365 daysa year, 24 hours a day.
Table 5 – 3 (Page 1 of 1)
Overlapping Work Shifts with the same priority
When you have overlapping work shifts that have the same level ofpriority, the work shift with the largest target processes takes effect.
For example, you have two work shifts with a range of days and arange of times. You have a ”Weekday” work shift from 9:00 am to 5:00pm on Monday through Friday with 4 target processes.
You also have a ”Lunch” work shift from 11:00 am to 1:00 pm onMonday through Friday with 8 target processes.
The ”Lunch” work shift takes effect from 11:00 am to 1:00 pm(Mon.–Fri.) because it has the larger number of target processes.
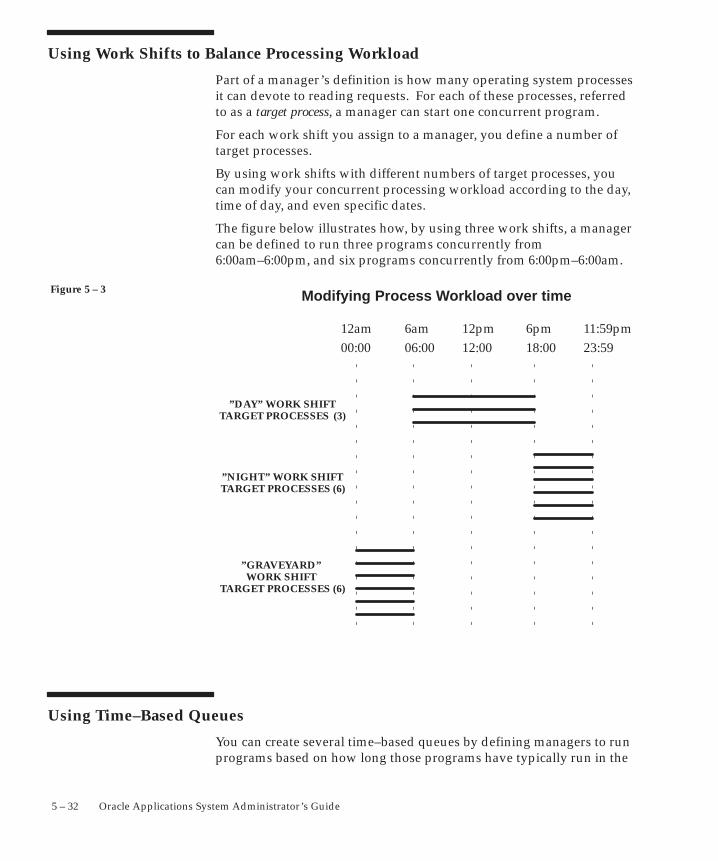
Figure 5 – 3
5 – 32 Oracle Applications System Administrator’s Guide
Using Work Shifts to Balance Processing Workload
Part of a manager’s definition is how many operating system processesit can devote to reading requests. For each of these processes, referredto as a target process, a manager can start one concurrent program.
For each work shift you assign to a manager, you define a number oftarget processes.
By using work shifts with different numbers of target processes, youcan modify your concurrent processing workload according to the day,time of day, and even specific dates.
The figure below illustrates how, by using three work shifts, a managercan be defined to run three programs concurrently from6:00am–6:00pm, and six programs concurrently from 6:00pm–6:00am.
6am 11:59pm6pm12pm12am
”DAY” WORK SHIFTTARGET PROCESSES (3)
”NIGHT” WORK SHIFTTARGET PROCESSES (6)
”GRAVEYARD” WORK SHIFT
TARGET PROCESSES (6)
Modifying Process Workload over time
06:00 23:5918:0012:0000:00
Using Time–Based Queues
You can create several time–based queues by defining managers to runprograms based on how long those programs have typically run in the
5 – 33Managing Concurrent Processing
past. That is, you can specialize managers to segregate requestsaccording to how long those requests take to run.
To do this, use the Completed Concurrent Requests Report in theSystem Administrator’s report security group. This report lists theactual start date and time and actual completion date and time forconcurrent programs that completed running. See: CompletedConcurrent Requests Report: page 5 – 34.
Suggestion: Run your concurrent programs at different times,perhaps, late at night and then again during the midafternoon,to determine processing time during different workloadperiods.
For example, based on actual time–to–completion, you can specializedifferent managers to run the following types of programs:
• inventory pick lists
• payable check runs
• postings
• invoice imports
Augment this approach by defining an ”overflow” manager, forexample, a manager who can accommodate programs directed to one(or more) of the managers above, but whose work shift is restricted tosay, 2:00am–4:00am (02:00–04:00). If some of your long–runningprograms have not started running before the ”overflow” work shiftbegins, then an additional manager is enabled to accommodate thoseprograms.
Further augment this approach with an ”exception” manager definedfor must have requests. For example, a manager that can run:
• certain programs that must complete by a certain time. The”must–have” manager can be specialized to only read requestsfor certain programs.
• programs submitted by a particular user, for example, theCompany Controller. You can specialize a manager to only readrequests from a single application user. You can even define asecond, higher–priority, username for a user to sign on with.
5 – 34 Oracle Applications System Administrator’s Guide
Completed Concurrent Requests ReportThis report displays how long concurrent programs actually run. Usethis report to segregate requests, based on their typicaltime–to–complete, by specializing concurrent managers to only readrequests for certain programs.
Use this report to record parameters and error messages associatedwith concurrent programs that have been run.
Report Parameters
If you do not enter any parameters, the report returns values for allcompleted concurrent requests.
Program Application Name
Choose the application name associated with the program whosecompleted concurrent requests you wish to report on.
Choose only an application name, without a program name, if youwish to run a report on all completed concurrent requests associatedwith an application.
Program Name
Choose the name of a program whose completed concurrent requestsyou wish to report on. You must enter a value for Program ApplicationName before entering a value for Program Name.
User Name
Choose the name of an application user whose completed concurrentrequests you wish to report on.
Start Date/End Date
Enter the start date and end date for your report.
Report Headings
The report headings list the specified parameters and provide you withgeneral information about the contents of the report.
5 – 35Managing Concurrent Processing
Work Shift by Manager Report
This report documents the work shifts assigned to each concurrentmanager. Use the report when defining or editing concurrentmanagers.
Report Parameters
None.
Report Headings
The report headings provide you with general information about thecontents of the report.
5 – 36 Oracle Applications System Administrator’s Guide
Work Shifts Report
This report documents all of your work shift definitions. Use thisreport when defining or editing concurrent manager work shifts.
Report Parameters
None.
Report Headings
The report headings provide you with general information about thecontents of the report.
5 – 37Managing Concurrent Processing
Specializing Managers to Run Only Certain Programs
This essay explains how you can specialize managers to run onlycertain programs.
Introduction to Specialization Rules
Every time your users request a concurrent program to be run, theirrequest is inserted into a database table. Concurrent managers readrequests from this table, and start running programs if the manager isdefined to read the particular request.
Without specialization rules, a manager reads requests to start anyconcurrent program.
Using specialization rules, you can specialize a manager to read onlycertain kinds of requests to start concurrent programs, for example,only requests to start Oracle General Ledger programs, or onlyrequests to start programs requested by the user ”Fred”. See:Concurrent Managers: page 5 – 89.
A special type of specialization rule is the combined specialization rule,that can combine more than one action to define a single rule. See:Combined Specialization Rules: page 5 – 100.
Defining Specialization Rules
A specialization rule associates an action with a type of request. Thereare two kinds of actions: Include and Exclude.
• Include defines a manager to only read requests of the typespecified.
• Exclude defines a manager to read all requests except the typespecified.
Requests to run concurrent programs may be allowed or disallowed onthe basis of:
• the ORACLE ID of the request’s Set of Books (for multipleinstalls) or Organization if you are using multiple organizations.
• the program itself or the program’s application
• the request type of the program
• the user who submitted the request
5 – 38 Oracle Applications System Administrator’s Guide
• a combined rule, which combines more than one action togenerate a single rule. The combined rule applies its actions toone or more types of request.
For example, a combined rule can exclude an action from anOracle ID and exclude another action from a specific program.
Using more than one rule
Each rule performs one action. When using more than one rule, therules are evaluated as follows:
• Include rules are evaluated together using ’OR’ statements as thebinding logic.
For example, If you use the rules:
– Include X
– Include Y
The result of the rules allows the manager to run either X ’OR’ Ybut does not require that both programs be run.
• Exclude rules are evaluated together using ’AND’ statements asthe binding logic.
For example, If you use the rules:
– Exclude 1
– Exclude 2.
The result of the rules prohibits the manager from runningprograms 1 ’AND’ 2 together or separately.
• Include rules are evaluated first, then Exclude rules areevaluated. Include rule(s) and Exclude rule(s) are evaluatedtogether as an AND statement. For example, (Include X OR Y)AND (Exclude 1 AND 2).
• An Exclude rule overrides an Include rule.
Specialization rule actions, their binding logic, and examples arepresented in the following two tables. See: Specialization Rule Logic –Examples: page 5 – 39.
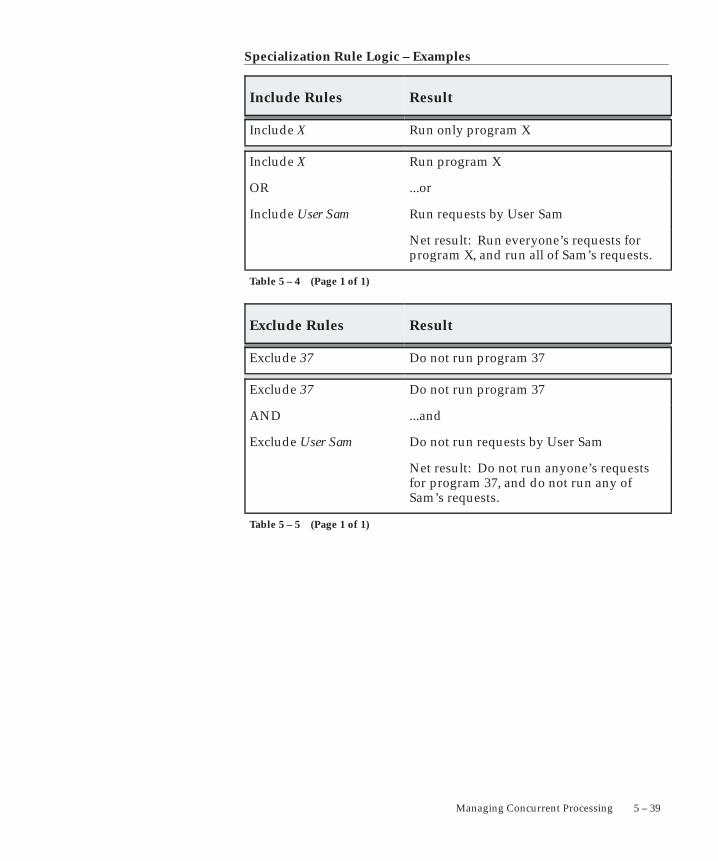
5 – 39Managing Concurrent Processing
Specialization Rule Logic – Examples
Include Rules Result
Include X Run only program X
Include X Run program X
OR ...or
Include User Sam Run requests by User Sam
Net result: Run everyone’s requests for program X, and run all of Sam’s requests.
Table 5 – 4 (Page 1 of 1)
Exclude Rules Result
Exclude 37 Do not run program 37
Exclude 37 Do not run program 37
AND ...and
Exclude User Sam Do not run requests by User Sam
Net result: Do not run anyone’s requestsfor program 37, and do not run any ofSam’s requests.
Table 5 – 5 (Page 1 of 1)
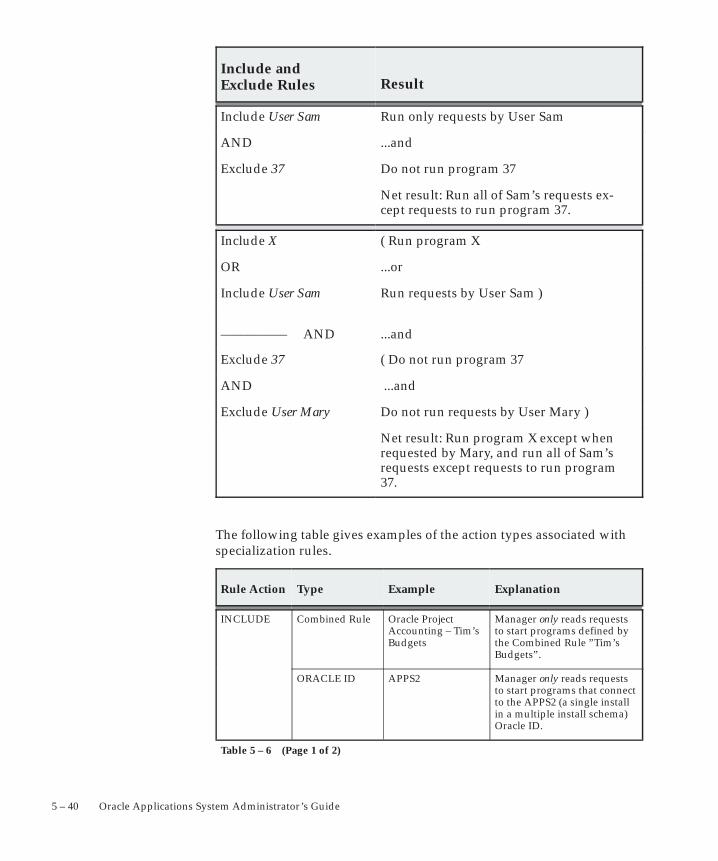
5 – 40 Oracle Applications System Administrator’s Guide
Include and Exclude Rules Result
Include User Sam Run only requests by User Sam
AND ...and
Exclude 37 Do not run program 37
Net result: Run all of Sam’s requests ex-cept requests to run program 37.
Include X ( Run program X
OR ...or
Include User Sam Run requests by User Sam )
–––––––––– AND ...and
Exclude 37 ( Do not run program 37
AND ...and
Exclude User Mary Do not run requests by User Mary )
Net result: Run program X except whenrequested by Mary, and run all of Sam’srequests except requests to run program37.
The following table gives examples of the action types associated withspecialization rules.
Rule Action Type Example Explanation
INCLUDE Combined Rule Oracle Project Accounting – Tim’sBudgets
Manager only reads requeststo start programs defined bythe Combined Rule ”Tim’sBudgets”.
ORACLE ID APPS2 Manager only reads requeststo start programs that connectto the APPS2 (a single installin a multiple install schema)Oracle ID.
Table 5 – 6 (Page 1 of 2)
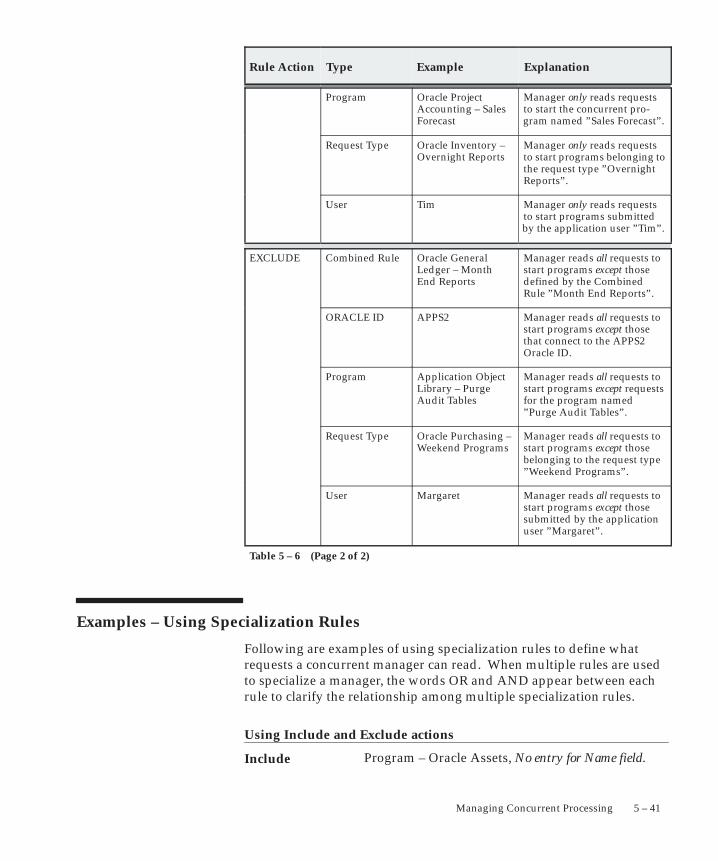
5 – 41Managing Concurrent Processing
ExplanationExampleTypeRule Action
Program Oracle Project Accounting – SalesForecast
Manager only reads requeststo start the concurrent pro-gram named ”Sales Forecast”.
Request Type Oracle Inventory –Overnight Reports
Manager only reads requeststo start programs belonging tothe request type ”OvernightReports”.
User Tim Manager only reads requeststo start programs submittedby the application user ”Tim”.
EXCLUDE Combined Rule Oracle General Ledger – MonthEnd Reports
Manager reads all requests tostart programs except thosedefined by the CombinedRule ”Month End Reports”.
ORACLE ID APPS2 Manager reads all requests tostart programs except thosethat connect to the APPS2Oracle ID.
Program Application ObjectLibrary – Purge Audit Tables
Manager reads all requests tostart programs except requestsfor the program named”Purge Audit Tables”.
Request Type Oracle Purchasing –Weekend Programs
Manager reads all requests tostart programs except thosebelonging to the request type”Weekend Programs”.
User Margaret Manager reads all requests tostart programs except thosesubmitted by the applicationuser ”Margaret”.
Table 5 – 6 (Page 2 of 2)
Examples – Using Specialization Rules
Following are examples of using specialization rules to define whatrequests a concurrent manager can read. When multiple rules are usedto specialize a manager, the words OR and AND appear between eachrule to clarify the relationship among multiple specialization rules.
Using Include and Exclude actions
Program – Oracle Assets, No entry for Name field.Include
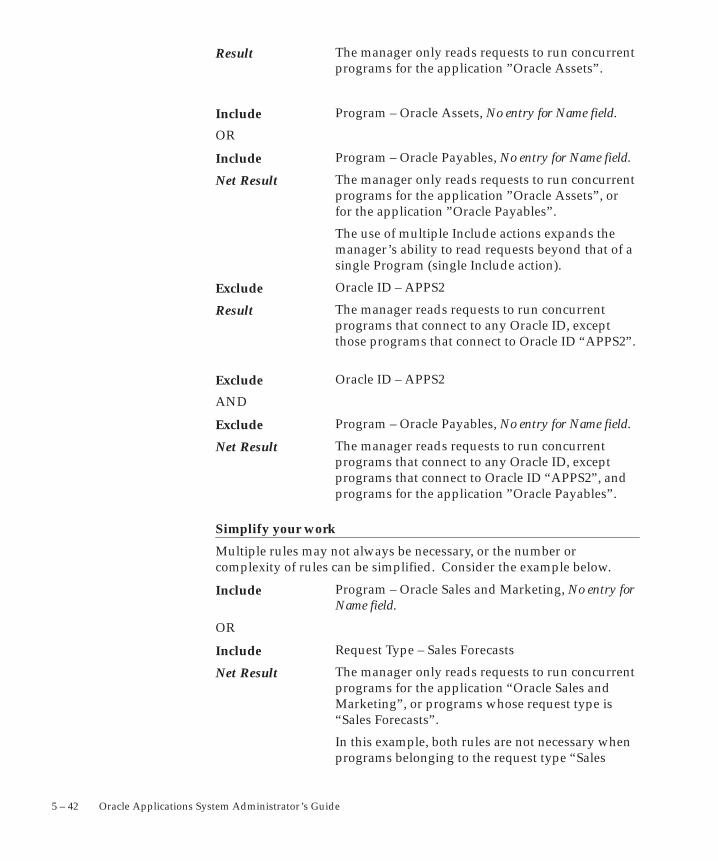
5 – 42 Oracle Applications System Administrator’s Guide
The manager only reads requests to run concurrentprograms for the application ”Oracle Assets”.
Program – Oracle Assets, No entry for Name field.
OR
Program – Oracle Payables, No entry for Name field.
The manager only reads requests to run concurrentprograms for the application ”Oracle Assets”, orfor the application ”Oracle Payables”.
The use of multiple Include actions expands themanager’s ability to read requests beyond that of asingle Program (single Include action).
Oracle ID – APPS2
The manager reads requests to run concurrentprograms that connect to any Oracle ID, exceptthose programs that connect to Oracle ID “APPS2”.
Oracle ID – APPS2
AND
Program – Oracle Payables, No entry for Name field.
The manager reads requests to run concurrentprograms that connect to any Oracle ID, exceptprograms that connect to Oracle ID “APPS2”, andprograms for the application ”Oracle Payables”.
Simplify your work
Multiple rules may not always be necessary, or the number orcomplexity of rules can be simplified. Consider the example below.
Program – Oracle Sales and Marketing, No entry forName field.
OR
Request Type – Sales Forecasts
The manager only reads requests to run concurrentprograms for the application “Oracle Sales andMarketing”, or programs whose request type is“Sales Forecasts”.
In this example, both rules are not necessary whenprograms belonging to the request type “Sales
Result
Include
Include
Net Result
Exclude
Result
Exclude
Exclude
Net Result
Include
Include
Net Result
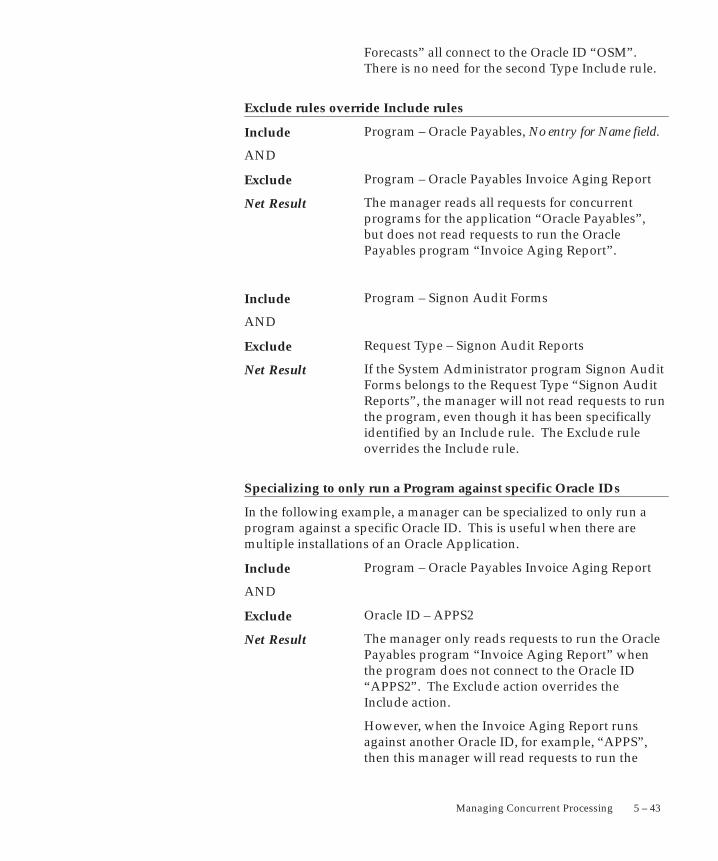
5 – 43Managing Concurrent Processing
Forecasts” all connect to the Oracle ID “OSM”.There is no need for the second Type Include rule.
Exclude rules override Include rules
Program – Oracle Payables, No entry for Name field.
AND
Program – Oracle Payables Invoice Aging Report
The manager reads all requests for concurrentprograms for the application “Oracle Payables”,but does not read requests to run the OraclePayables program “Invoice Aging Report”.
Program – Signon Audit Forms
AND
Request Type – Signon Audit Reports
If the System Administrator program Signon AuditForms belongs to the Request Type “Signon AuditReports”, the manager will not read requests to runthe program, even though it has been specificallyidentified by an Include rule. The Exclude ruleoverrides the Include rule.
Specializing to only run a Program against specific Oracle IDs
In the following example, a manager can be specialized to only run aprogram against a specific Oracle ID. This is useful when there aremultiple installations of an Oracle Application.
Program – Oracle Payables Invoice Aging Report
AND
Oracle ID – APPS2
The manager only reads requests to run the OraclePayables program “Invoice Aging Report” whenthe program does not connect to the Oracle ID“APPS2”. The Exclude action overrides theInclude action.
However, when the Invoice Aging Report runsagainst another Oracle ID, for example, “APPS”,then this manager will read requests to run the
Include
Exclude
Net Result
Include
Exclude
Net Result
Include
Exclude
Net Result

5 – 44 Oracle Applications System Administrator’s Guide
program. This is useful when working withmultiple installations of an application and datagroups.
Distinguishing a Program from a Request Type
You can specialize a manager to read requests to run all the programsbelonging to a Request Type, except for individual programs you wishto identify.
Request Type – Oracle General Ledger Reports
AND
Program – Oracle General Ledger AccountAnalysis
If the Account Analysis program belongs to therequest type Oracle General Ledger “Reports”,then this manager will run every program in therequest type Oracle General Ledger Reports,except the program Account Analysis.
Preventing specific programs from running
You can use an Exclude action more than once. For example, supposeyour manager reads all requests to run concurrent programs for aparticular application, but you want to prevent your manager fromrunning two specific programs. You can:
Program – Oracle General Ledger, No entry forName field.
AND
Program – Oracle General Ledger ConsolidationAudit
AND
Program – Oracle General Ledger ConsolidationRules
The manager reads requests for any concurrentprograms for the application “Oracle GeneralLedger”, except for the programs ”ConsolidationAudit” and “Consolidation Rules”.
Specializing to run only specific programs at certain times
Using multiple Include rules, you can specialize a manager to run onlyspecific programs. Then, when you define the manager’s work shift,
Include
Exclude
Net Result
Include
Exclude
Exclude
Net Result
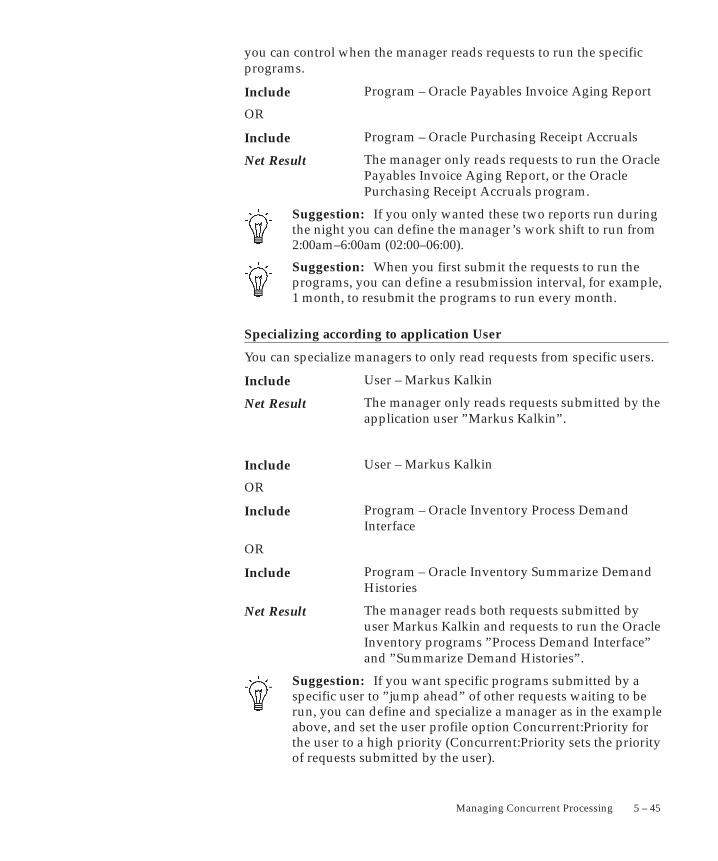
5 – 45Managing Concurrent Processing
you can control when the manager reads requests to run the specificprograms.
Program – Oracle Payables Invoice Aging Report
OR
Program – Oracle Purchasing Receipt Accruals
The manager only reads requests to run the OraclePayables Invoice Aging Report, or the OraclePurchasing Receipt Accruals program.
Suggestion: If you only wanted these two reports run duringthe night you can define the manager’s work shift to run from2:00am–6:00am (02:00–06:00).
Suggestion: When you first submit the requests to run theprograms, you can define a resubmission interval, for example,1 month, to resubmit the programs to run every month.
Specializing according to application User
You can specialize managers to only read requests from specific users.
User – Markus Kalkin
The manager only reads requests submitted by theapplication user ”Markus Kalkin”.
User – Markus Kalkin
OR
Program – Oracle Inventory Process DemandInterface
OR
Program – Oracle Inventory Summarize DemandHistories
The manager reads both requests submitted byuser Markus Kalkin and requests to run the OracleInventory programs ”Process Demand Interface”and ”Summarize Demand Histories”.
Suggestion: If you want specific programs submitted by aspecific user to ”jump ahead” of other requests waiting to berun, you can define and specialize a manager as in the exampleabove, and set the user profile option Concurrent:Priority forthe user to a high priority (Concurrent:Priority sets the priorityof requests submitted by the user).
Include
Include
Net Result
Include
Net Result
Include
Include
Include
Net Result
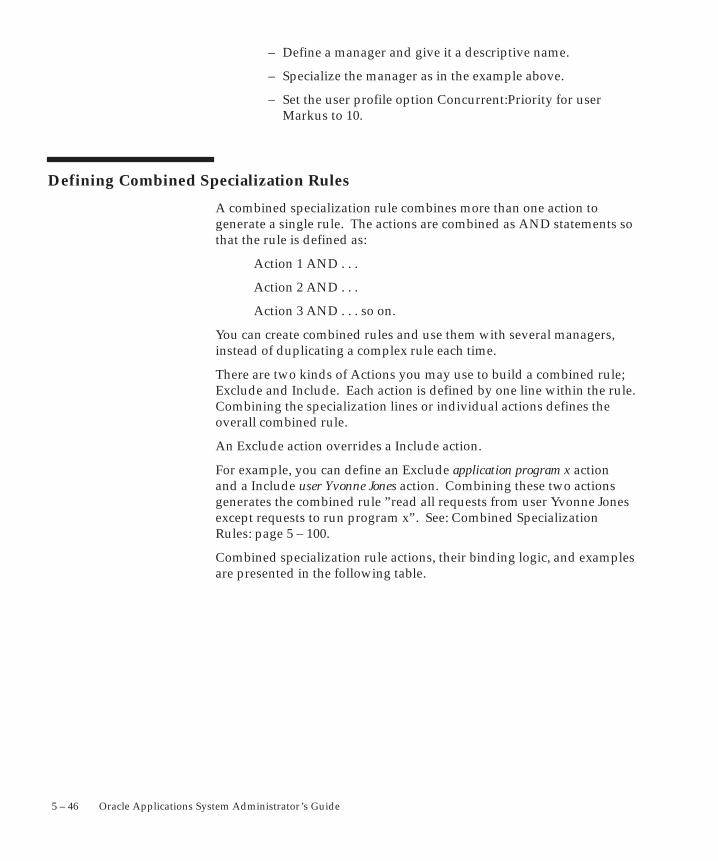
5 – 46 Oracle Applications System Administrator’s Guide
– Define a manager and give it a descriptive name.
– Specialize the manager as in the example above.
– Set the user profile option Concurrent:Priority for userMarkus to 10.
Defining Combined Specialization Rules
A combined specialization rule combines more than one action togenerate a single rule. The actions are combined as AND statements sothat the rule is defined as:
Action 1 AND . . .
Action 2 AND . . .
Action 3 AND . . . so on.
You can create combined rules and use them with several managers,instead of duplicating a complex rule each time.
There are two kinds of Actions you may use to build a combined rule;Exclude and Include. Each action is defined by one line within the rule.Combining the specialization lines or individual actions defines theoverall combined rule.
An Exclude action overrides a Include action.
For example, you can define an Exclude application program x actionand a Include user Yvonne Jones action. Combining these two actionsgenerates the combined rule ”read all requests from user Yvonne Jonesexcept requests to run program x”. See: Combined SpecializationRules: page 5 – 100.
Combined specialization rule actions, their binding logic, and examplesare presented in the following table.
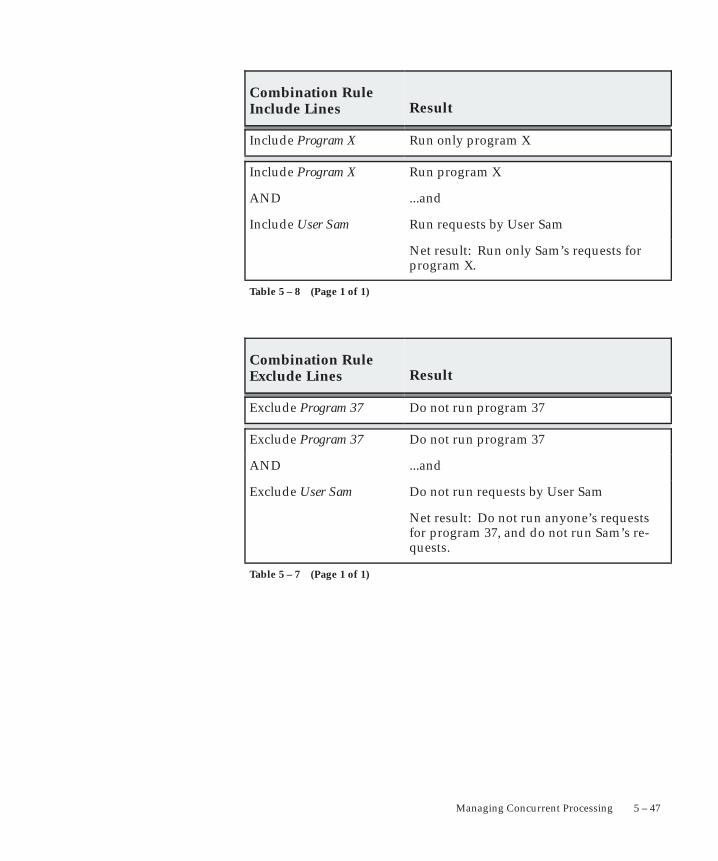
5 – 47Managing Concurrent Processing
Combination RuleInclude Lines Result
Include Program X Run only program X
Include Program X Run program X
AND ...and
Include User Sam Run requests by User Sam
Net result: Run only Sam’s requests for program X.
Table 5 – 8 (Page 1 of 1)
Combination RuleExclude Lines Result
Exclude Program 37 Do not run program 37
Exclude Program 37 Do not run program 37
AND ...and
Exclude User Sam Do not run requests by User Sam
Net result: Do not run anyone’s requestsfor program 37, and do not run Sam’s re-quests.
Table 5 – 7 (Page 1 of 1)
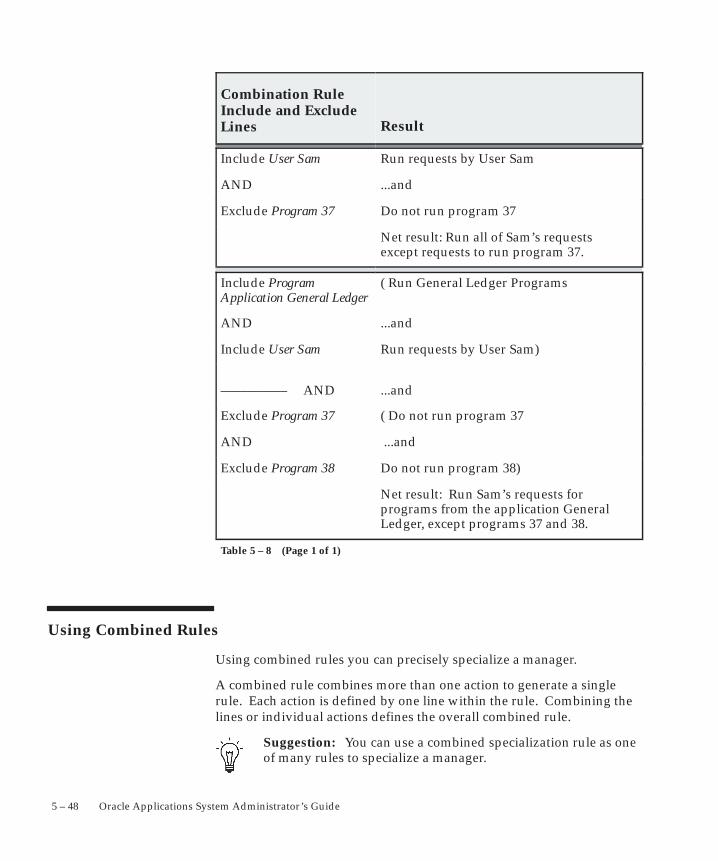
5 – 48 Oracle Applications System Administrator’s Guide
Combination RuleInclude and ExcludeLines Result
Include User Sam Run requests by User Sam
AND ...and
Exclude Program 37 Do not run program 37
Net result: Run all of Sam’s requestsexcept requests to run program 37.
Include ProgramApplication General Ledger
( Run General Ledger Programs
AND ...and
Include User Sam Run requests by User Sam)
–––––––––– AND ...and
Exclude Program 37 ( Do not run program 37
AND ...and
Exclude Program 38 Do not run program 38)
Net result: Run Sam’s requests forprograms from the application GeneralLedger, except programs 37 and 38.
Table 5 – 8 (Page 1 of 1)
Using Combined Rules
Using combined rules you can precisely specialize a manager.
A combined rule combines more than one action to generate a singlerule. Each action is defined by one line within the rule. Combining thelines or individual actions defines the overall combined rule.
Suggestion: You can use a combined specialization rule as oneof many rules to specialize a manager.
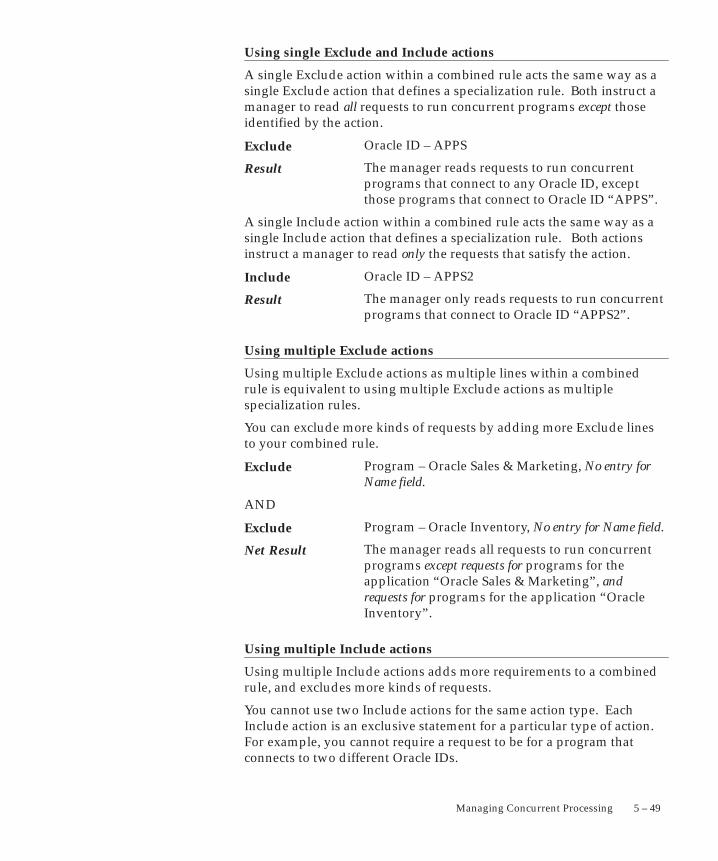
5 – 49Managing Concurrent Processing
Using single Exclude and Include actions
A single Exclude action within a combined rule acts the same way as asingle Exclude action that defines a specialization rule. Both instruct amanager to read all requests to run concurrent programs except thoseidentified by the action.
Oracle ID – APPS
The manager reads requests to run concurrentprograms that connect to any Oracle ID, exceptthose programs that connect to Oracle ID “APPS”.
A single Include action within a combined rule acts the same way as asingle Include action that defines a specialization rule. Both actionsinstruct a manager to read only the requests that satisfy the action.
Oracle ID – APPS2
The manager only reads requests to run concurrentprograms that connect to Oracle ID “APPS2”.
Using multiple Exclude actions
Using multiple Exclude actions as multiple lines within a combinedrule is equivalent to using multiple Exclude actions as multiplespecialization rules.
You can exclude more kinds of requests by adding more Exclude linesto your combined rule.
Program – Oracle Sales & Marketing, No entry forName field.
AND
Program – Oracle Inventory, No entry for Name field.
The manager reads all requests to run concurrentprograms except requests for programs for theapplication “Oracle Sales & Marketing”, andrequests for programs for the application “OracleInventory”.
Using multiple Include actions
Using multiple Include actions adds more requirements to a combinedrule, and excludes more kinds of requests.
You cannot use two Include actions for the same action type. EachInclude action is an exclusive statement for a particular type of action.For example, you cannot require a request to be for a program thatconnects to two different Oracle IDs.
Exclude
Result
Include
Result
Exclude
Exclude
Net Result
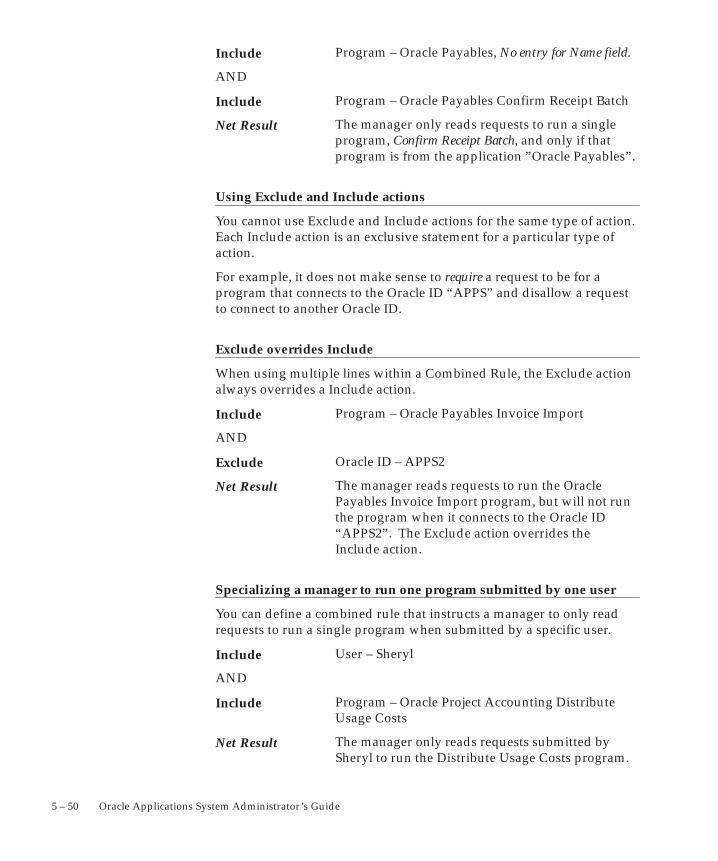
5 – 50 Oracle Applications System Administrator’s Guide
Program – Oracle Payables, No entry for Name field.
AND
Program – Oracle Payables Confirm Receipt Batch
The manager only reads requests to run a singleprogram, Confirm Receipt Batch, and only if thatprogram is from the application ”Oracle Payables”.
Using Exclude and Include actions
You cannot use Exclude and Include actions for the same type of action.Each Include action is an exclusive statement for a particular type ofaction.
For example, it does not make sense to require a request to be for aprogram that connects to the Oracle ID “APPS” and disallow a requestto connect to another Oracle ID.
Exclude overrides Include
When using multiple lines within a Combined Rule, the Exclude actionalways overrides a Include action.
Program – Oracle Payables Invoice Import
AND
Oracle ID – APPS2
The manager reads requests to run the OraclePayables Invoice Import program, but will not runthe program when it connects to the Oracle ID“APPS2”. The Exclude action overrides theInclude action.
Specializing a manager to run one program submitted by one user
You can define a combined rule that instructs a manager to only readrequests to run a single program when submitted by a specific user.
User – Sheryl
AND
Program – Oracle Project Accounting DistributeUsage Costs
The manager only reads requests submitted bySheryl to run the Distribute Usage Costs program.
Include
Include
Net Result
Include
Exclude
Net Result
Include
Include
Net Result
5 – 51Managing Concurrent Processing
Restricting the programs a manager will run for a specific user
You can define a combined rule that instructs a manager to ignorerequests to run a certain programs when submitted by a specific user.
User – Sheryl
AND
Program – Oracle Project Accounting ExpenditureStatus
The manager only reads requests submitted bySheryl, excluding requests to run the Oracle ProjectAccounting program Accounting Expenditure Status.
Specifying Oracle ID and excluding a program from a request type
Request Type – Oracle Project AccountingExpenditure Reports
AND
Oracle ID – APPS2
AND
Program – Oracle Project Accounting ExpenditureStatus
The manager only reads requests to run programsbelonging to the Oracle Project Accounting requesttype “Reports”, run against the Oracle ID“APPS2”, excluding the program ExpenditureReports.
Differences Between Specialization and Combined Rules
The primary difference between a specialization rule and a combinedspecialization rule is in how the use of multiple actions affects theoutcome of the rule, as described in the following table:
Include
Exclude
Net Result
Include
Include
Exclude
Net Result
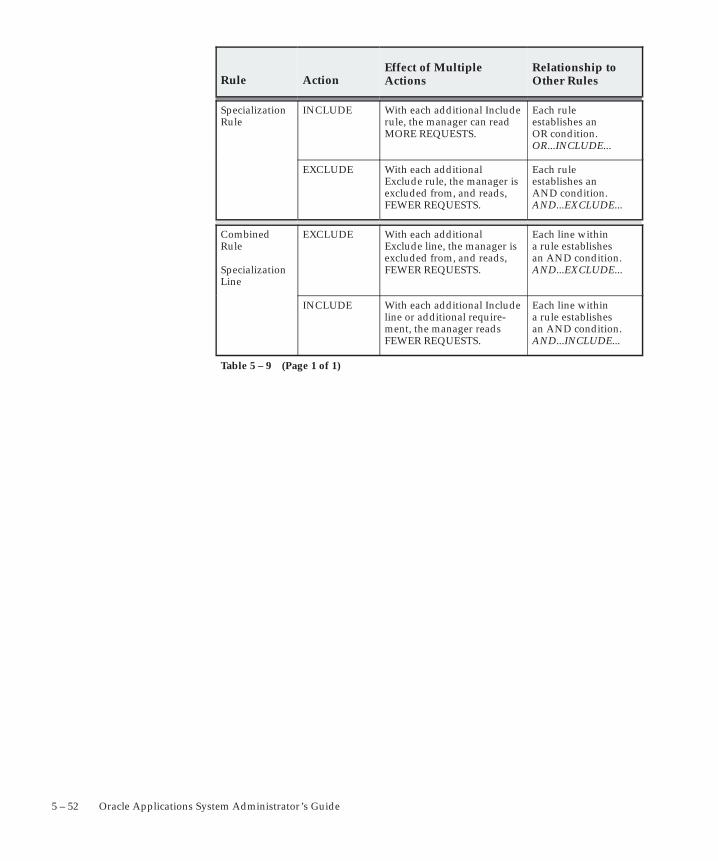
5 – 52 Oracle Applications System Administrator’s Guide
Rule ActionEffect of MultipleActions
Relationship toOther Rules
Specialization Rule
INCLUDE With each additional Includerule, the manager can readMORE REQUESTS.
Each rule establishes an OR condition.OR...INCLUDE...
EXCLUDE With each additional Exclude rule, the manager isexcluded from, and reads,FEWER REQUESTS.
Each rule establishes an AND condition.AND...EXCLUDE...
CombinedRule
Specialization Line
EXCLUDE With each additional Exclude line, the manager isexcluded from, and reads,FEWER REQUESTS.
Each line within a rule establishes an AND condition.AND...EXCLUDE...
INCLUDE With each additional Includeline or additional require-ment, the manager readsFEWER REQUESTS.
Each line within a rule establishes an AND condition.AND...INCLUDE...
Table 5 – 9 (Page 1 of 1)
5 – 53Managing Concurrent Processing
Grouping Programs by Request Type
As System Administrator, you may want to group similar programstogether. You do this by defining request types and assigning them tothe programs that users request in Oracle Applications. You can defineconcurrent managers that only run programs that belong to a particularrequest type.
Using request types to specialize concurrent managers can helpoptimize the processing of Oracle Applications, by letting certain typesof programs run without having to wait for other types of programs tofinish processing. Using request types saves you time when you createa concurrent manager’s specialization rules.
Using Request Types
Specializing a concurrent manage by request type involves three steps:
1. Define a Request Type using the Concurrent Request Types form.
2. Assign the Request Type to each concurrent program you want toidentify as a member of this request type using the ConcurrentPrograms form.
3. Select the Request Type when you specialize a concurrent managerusing the Concurrent Managers form.
Examples of using Request Types
Some example request types you may want to define are:
For concurrent programs that take a relativelyshort time to run.
For concurrent programs that take a long time torun, which you typically schedule to run duringthe late night or early morning hours.
For concurrent programs that generate reports yourun at the end of each month.
For example, if you run ten report programs at theend of each month, you could define a request typecalled “Month–End Reports” and assign it to yourten report programs.
Then you can use specialization rules to define aconcurrent manager that only runs requests of type“Month–End Reports”. This way, you do not haveto specify your ten different report programs when
Quick
Overnight
Month–EndReports

5 – 54 Oracle Applications System Administrator’s Guide
you define your concurrent manager. You can alsoeasily assign the ten programs to more than onemanager.
5 – 55Managing Concurrent Processing
Controlling Concurrent ManagersThis essay explains how to control your concurrent managers.
Manager States
Individual managers read requests to start concurrent programs andactually start programs running when certain conditions are satisfied,such as the manager’s work shift definition, number of targetprocesses, and specialization rules.
You can start, shut down, or reset the concurrent managers at any time.Oracle Applications provides an Internal Concurrent Manager thatprocesses these commands. You can issue commands either toindividual managers, or, by altering the state of the Internal ConcurrentManager, you can control every manager at once.
Starting Individual Managers
You can restart or activate managers on an individual basis. Restartinga concurrent manager forces the Internal Concurrent Manager to rereadthe definition for that concurrent manager. Activating a managercancels a previous command to deactivate it, and allows the InternalConcurrent Manager to start that manager when its work shift starts.
You should restart an individual manager when you:
• modify its work shift assignments
• modify a work shift’s target number of processes
• modify its specialization rules
• change a concurrent program’s incompatibility rules
Deactivating Individual Managers
When you shut down an individual manager, you can choose whetherto abort all requests and deactivate the manager immediately, or toallow it to finish processing its current requests before deactivating.
If you choose to Deactivate the manager, requests that are currentlyrunning are allowed to complete.
When you terminate requests and deactivate an individual manager,requests that are currently running are immediately stopped andmarked for resubmission (when the manager is activated).
Oracle Applications concurrent programs are designed so that no datais lost or duplicated when a terminated request is resumed after a shut
☞
5 – 56 Oracle Applications System Administrator’s Guide
down. This applies for shutdowns that are normal (e.g., using the”Deactivate concurrent manager” request) or abnormal (e.g., after ahardware failure).
Attention: When a manager is selected and explicitlydeactivated, it remains that way until you select and explicitlyactivate that manager. As a prerequisite, the Internal managermust be activated beforehand.
Controlling the Internal Concurrent Manager
When you activate the Internal Concurrent Manager, you activate allother managers as well, except those managers that were deactivatedon an individual basis.
When you deactivate the Internal Concurrent Manager, it issuescommands to deactivate all active managers. Managers that weredeactivated on an individual basis are not affected.
If you terminate requests and deactivate the Internal ConcurrentManager, it issues commands to all other managers to terminate theirrequests and deactivate. Requests that are currently running areimmediately stopped and marked for resubmission when the managersare activated.
Verify Concurrent Manager Status
The Internal Concurrent Manager continuously monitors eachconcurrent manager’s operating system process. This processmonitoring is referred to as the Internal Concurrent Manager’s PMONcycle. The length of the PMON cycle is one of the arguments passed bythe STARTMGR command, which starts up the Internal ConcurrentManager.
You can instruct the Internal Concurrent Manager to immediatelyverify the operating status of your individual concurrent managers, orto perform a PMON check.
Controlling Managers from the Administer Managers form
Use the Administer Concurrent Managers form to issue commands toyour concurrent managers.
You can also have the Internal Concurrent Manager ”manually” verifythe status of your individual managers, and restart individualmanagers. See: Administer Concurrent Managers: page 5 – 80.
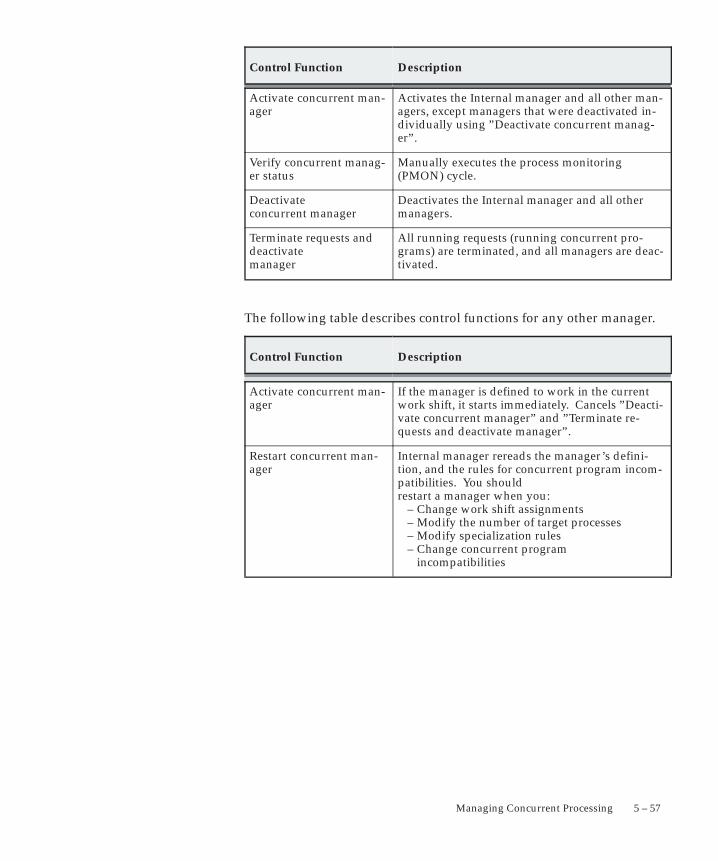
5 – 57Managing Concurrent Processing
Control Function Description
Activate concurrent man-ager
Activates the Internal manager and all other man-agers, except managers that were deactivated in-dividually using ”Deactivate concurrent manag-er”.
Verify concurrent manag-er status
Manually executes the process monitoring(PMON) cycle.
Deactivate concurrent manager
Deactivates the Internal manager and all othermanagers.
Terminate requests anddeactivate manager
All running requests (running concurrent pro-grams) are terminated, and all managers are deac-tivated.
The following table describes control functions for any other manager.
Control Function Description
Activate concurrent man-ager
If the manager is defined to work in the currentwork shift, it starts immediately. Cancels ”Deacti-vate concurrent manager” and ”Terminate re-quests and deactivate manager”.
Restart concurrent man-ager
Internal manager rereads the manager’s defini-tion, and the rules for concurrent program incom-patibilities. You should restart a manager when you:
– Change work shift assignments– Modify the number of target processes– Modify specialization rules– Change concurrent program
incompatibilities
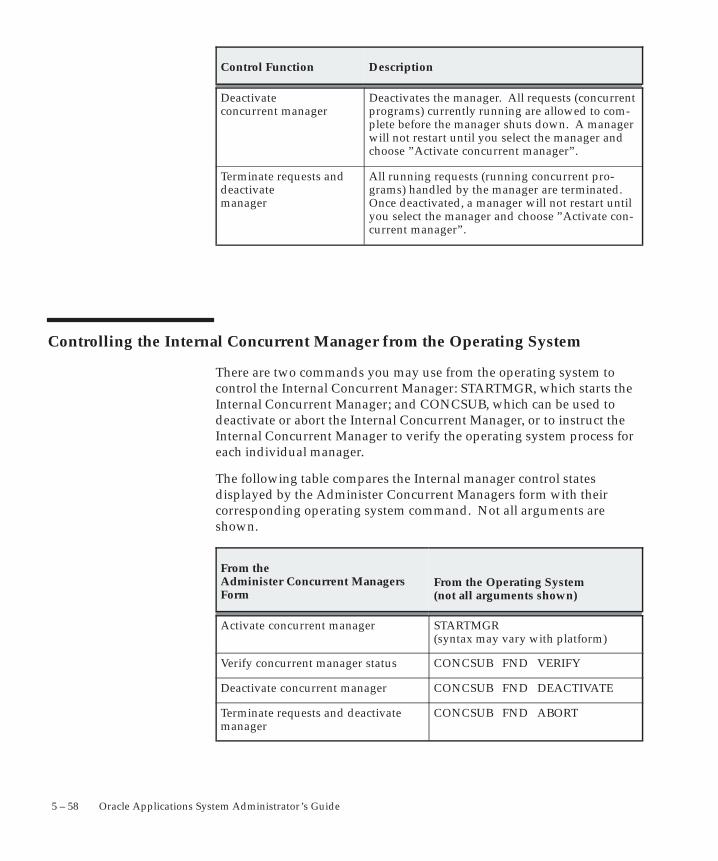
5 – 58 Oracle Applications System Administrator’s Guide
DescriptionControl Function
Deactivate concurrent manager
Deactivates the manager. All requests (concurrentprograms) currently running are allowed to com-plete before the manager shuts down. A managerwill not restart until you select the manager andchoose ”Activate concurrent manager”.
Terminate requests anddeactivate manager
All running requests (running concurrent pro-grams) handled by the manager are terminated.Once deactivated, a manager will not restart untilyou select the manager and choose ”Activate con-current manager”.
Controlling the Internal Concurrent Manager from the Operating System
There are two commands you may use from the operating system tocontrol the Internal Concurrent Manager: STARTMGR, which starts theInternal Concurrent Manager; and CONCSUB, which can be used todeactivate or abort the Internal Concurrent Manager, or to instruct theInternal Concurrent Manager to verify the operating system process foreach individual manager.
The following table compares the Internal manager control statesdisplayed by the Administer Concurrent Managers form with theircorresponding operating system command. Not all arguments areshown.
From the Administer Concurrent ManagersForm
From the Operating System (not all arguments shown)
Activate concurrent manager STARTMGR (syntax may vary with platform)
Verify concurrent manager status CONCSUB FND VERIFY
Deactivate concurrent manager CONCSUB FND DEACTIVATE
Terminate requests and deactivate manager
CONCSUB FND ABORT
5 – 59Managing Concurrent Processing
Starting the Internal Concurrent Manager from the Operating System
To start the concurrent managers, you can invoke the STARTMGRcommand from your operating system prompt. This command startsthe Internal Concurrent Manager, which in turn starts any concurrentmanagers you have defined.
You must have write privileges to the ”out” and ”log” directories ofevery application so that the concurrent managers can write to thesedirectories. You can start the concurrent managers with many differentoptions. An option on some operating systems is to send an electronicmail note to a given user when the concurrent managers shut down.See your installation guide for a discussion of this command.
See: Setting Up Concurrent Managers: page G – 66.
Use the STARTMGR command:
• during installation of Oracle Applications
• after you shut down the concurrent managers
• after MIS restarts the operating system
• after the database administrator restarts the database
The STARTMGR command takes up to ten optional parameters.
• Each parameter except PRINTER has a default.
• You can modify the STARTMGR command and yourenvironment to set your own defaults.
Enter the following command at your system prompt to start theInternal Concurrent Manager:
$ startmgr <optional parameters>
You can pass the parameters in any order. For example:
$ startmgr sysmgr=”applsys/fnd” mgrname=”std”
printer=”hqseq1” mailto=”jsmith” restart=”N”
logfile=”mgrlog” sleep=”90” pmon=”5” quesiz=”10”
Viewing the Internal Concurrent Manager startup parameters
The Internal Concurrent Manager’s log file displays startup parametervalues executed by the STARTMGR command. An example is shownbelow. You cannot change the parameter values.
logfile=/fnddev/fnd/6.0/log/FND60.mgr (path is
port–specific)
PRINTER=hqunx138
mailto=appldev
5 – 60 Oracle Applications System Administrator’s Guide
restart=N
diag=N
sleep=60 (default)
pmon=20 (default)
quesiz=1 (default)
Shutting down the Internal Concurrent Manager from the OperatingSystem
From the operating system prompt, you can use the CONCSUB utilityto submit a concurrent request, under the SYSADMIN username andthe System Administrator responsibility.
The CONCSUB utility submits a concurrent request and returns you tothe operating system prompt. You must wait until the concurrentrequest completes.
To check on the status of your concurrent request, use the ConcurrentRequests form.
CONCSUB applsys/pwd ’Responsibility application shortname’
’Responsibility name’ ’Username’ [WAIT={Y|N|n}] CONCURRENT
’Program application shortname’ PROGRAM
Parameters
The ORACLE username and password thatconnects to Oracle Application Object Library data.
The application shortname of the responsibility.For the System Administrator responsibility, theapplication shortname is SYSADMIN.
The name of the responsibility. For the SystemAdministrator responsibility, the responsibilityname is System Administrator.
The application username of the person whosubmits the request. For example, SYSADMIN isthe username of the System Administrator.
Set WAIT to Y if you want CONCSUB to wait untilthe request you submitted completes beforeCONCSUB returns you to the operating systemprompt.
Set WAIT to N (the default value) if you do notwant CONCSUB to wait.
You can also enter an integer value of n seconds forCONCSUB to wait before it exits.
applsys/pwd
Responsibilityapplicationshortname
Responsibility name
Username
WAIT={Y|N|n}
5 – 61Managing Concurrent Processing
When used, WAIT must be entered beforeCONCURRENT.
The application shortname of the program. For theDEACTIVATE, ABORT, and VERIFY programs, theapplication shortname is FND.
To submit the Shutdown All Managers concurrentrequest, use the program DEACTIVATE.
To submit the Shutdown Abort Managersconcurrent request, use the program ABORT.
To submit the Verify All Managers Statusconcurrent request, use the program VERIFY.
Example Syntax using CONCSUB
CONCSUB <Username/Password> SYSADMIN ’System Administrator’
SYSADMIN CONCURRENT FND DEACTIVATE
CONCSUB <Username/Password> SYSADMIN ’System Administrator’
SYSADMIN CONCURRENT FND ABORT
CONCSUB <Username/Password> SYSADMIN ’System Administrator’
SYSADMIN CONCURRENT FND VERIFY
Using CONCSUB to shut down your managers
Use CONCSUB to shut down the concurrent managers:
• before MIS shuts down the operating system
• before the database administrator shuts down the database
• when you want concurrent manager and concurrent programdefinitions to take effect
Then, use the STARTMGR command to restart the Internal ConcurrentManager, which starts the concurrent managers.
Example – nightly shutdown using CONCSUB
You can use the token WAIT with value Y ( WAIT=Y ) if you want touse CONCSUB to issue a concurrent request from within a shell scriptcontaining a sequence of steps. Using the token WAIT insures themanagers deactivate, abort, or verify status before the shell scriptproceeds to the next step.
Programapplicationshortname
PROGRAM
Example Sequence
5 – 62 Oracle Applications System Administrator’s Guide
For example, you can write a shell script for your particular operatingsystem that deactivates the Internal manager (and all the othermanagers) before shutting down, backing up, and restarting thedatabase. You can also incorporate the STARTMGR command into theshell script to start up the Internal manager.
See: Controlling the Internal Concurrent Manager from the OperatingSystem: page 5 – 58
1. Shell script customized for specific operating system starts.
2. CONCSUB applsys/pwd SYSADMIN ’System Administrator’
SYSADMIN WAIT=Y CONCURRENT FND DEACTIVATE
When the shell script passes control to CONCSUB, CONCSUBwaits until the program DEACTIVATE is complete before it returnscontrol to the shell script.
3. Script issues the command to shut down the database.
4. Script issues the command to backup the database.
5. Script issues the command to startup the database.
6. $ startmgr sysmgr=”applsys/fnd” mgrname=”std”
printer=”hqseq1” mailto=”jsmith” restart=”N”
logfile=”mgrlog” sleep=”90” pmon=”5” quesiz=”10”
The shell script passes control to STARTMGR, which starts up theInternal manager (and all the other managers).
7. Shell script completes.
Hiding the password using CONCSUB
If username/password are still supplied, the CONCSUB utility willwork as usual.
If username only is supplied (no ’/pwd’ in the first argument), it willprompt you for the password:
ORACLE Password:
The echo is turned off. For example, the command below does notinclude the ORACLE Password.
CONCSUB applsys SYSADMIN ’System Administrator’ SYSADMIN
CONCURRENT FND
FNDMNRMT Y 0 20221
ORACLE Password:
Submitted request 32157 for CONCURRENT FND FNDMNRMT Y 0
20221
5 – 63Managing Concurrent Processing
Now, the first argument has to be the application username as usual(for example, SYSADMIN).
The user can put the password in a file, and then redirect it to standardinput (stdin). In UNIX the command would be executed as follows:
CONCSUB applsys SYSADMIN ’System Administrator’ SYSADMIN
CONCURRENT FND
FNDMNRMT Y 0 20221 < password.file
where password.file is an ASCII file that contains the password. Thismethod is recommended for use in shell scripts or batch processes.
5 – 64 Oracle Applications System Administrator’s Guide
Overview of Parallel Concurrent ProcessingThis essay explains what parallel concurrent processing is, describesthe environments it runs in, and explains how it works.
What is Parallel Concurrent Processing?
Parallel concurrent processing allows you to distribute concurrentmanagers across multiple nodes in a cluster, massively parallel, ornetworked environment. Instead of operating concurrent processingon a single node while other nodes are idle, you can spread concurrentprocessing across all available nodes, fully utilizing hardwareresources.
Benefits of Parallel Concurrent Processing
Parallel concurrent processing provides Oracle Applications users withthe following benefits:
• High performancethe ability to run concurrent processes onmultiple nodes to improve concurrent processing throughput.
• Fault Tolerancethe ability to continue running concurrentprocesses on available nodes even when one or more nodes fails.
• Adaptabilitythe ability to integrate with platform–specificbatch queue and load–balancing systems to maximize concurrentprocessing performance on a particular platform.
• Single Point of Controlthe ability to administer concurrentmanagers running on multiple nodes from any node in a cluster,massively parallel, or networked environment.
Parallel Concurrent Processing Environments
Parallel concurrent processing runs in multi–node environments, suchas cluster, massively parallel, and networked environments. In theseenvironments, each node consists of one or more processors (CPUs)and their associated memory. Each node has its own memory that isnot shared with other nodes And each node operates independently ofother nodes, except when sharing a resource such as a disk.
With parallel concurrent processing, one or more concurrent managersrun on one or more nodes in a multi–node environment. You decidewhere concurrent managers run when configuring your system.
5 – 65Managing Concurrent Processing
You can define any set of concurrent manager specialization rules, andapply them across nodes in any way desired. For example, three“Oracle General Ledger” concurrent managers could be spread acrossthree nodes. Or an “Oracle Payables” concurrent manager and an“Oracle General Ledger” concurrent manager could runsimultaneously on the same node.
The following are examples of environments in which parallelconcurrent processing can run:
Cluster Environments
In a cluster environment, multiple computers, each representing asingle node, share a common pool of disks.
With parallel concurrent processing in a cluster environment, a singleORACLE database resides in the common disk pool, while multipleinstances of Real Application Clusters (RAC) run simultaneously onmultiple nodes in the cluster. Multiple concurrent managers are alsodistributed across the nodes in the cluster.
Massively Parallel Environments
In a massively parallel environment, multiple nodes are housed in asingle computer. All nodes share access to a common pool of disks.The IBM SP/2, for example, is a massively parallel computer.
With parallel concurrent processing in a massively parallelenvironment, separate RAC instances run simultaneously on multiplenodes, with multiple concurrent managers also distributed acrossnodes.
Networked Environments
In networked environments, multiple computers of the same type areconnected via a local area network (LAN) to a single database server,or alternatively, to a cluster of database servers.
For example, a simple networked environment could consist ofmultiple Sun SPARCstations connected via a LAN to a single Sequentserver. In a more complex networked environment, multiple SunSPARCstations could connect to a cluster of Sequent servers.
With parallel concurrent processing in a networked environment,concurrent managers run on multiple workstations. A single databaseserver runs a single instance of ORACLE; or, a cluster of databaseservers runs multiple ORACLE instances using RAC.
5 – 66 Oracle Applications System Administrator’s Guide
How Parallel Concurrent Processing Works
Concurrent Managers
With parallel concurrent processing, each node with concurrentmanagers may or may not be running an ORACLE instance. On a nodethat is not running ORACLE, the concurrent manager(s) connect viaNet8 to a node that is running ORACLE.
To each concurrent manager, you assign a primary and a secondarynode. Initially, a concurrent manager is started on its primary node. Incase of node or ORACLE instance failure, all concurrent managers onthat node migrate to their respective secondary nodes.
A concurrent manager on its secondary node migrates back to itsprimary node once that node becomes available. During migration, theprocesses of a single concurrent manager may be spread across itsprimary and secondary nodes.
Internal Concurrent Manager
The Internal Concurrent Manager can run on any node, and canactivate and deactivate concurrent managers on all nodes. Since theInternal Concurrent Manager must be active at all times, it needs highfault tolerance. To provide this fault tolerance, parallel concurrentprocessing uses Internal Monitor Processes.
Internal Monitor Processes
The sole job of an Internal Monitor Process is to monitor the InternalConcurrent Manager and to restart that manager should it fail. Thefirst Internal Monitor Process to detect that the Internal ConcurrentManager has failed restarts that manager on its own node.
Only one Internal Monitor Process can be active on a single node. Youdecide which nodes have an Internal Monitor Process when youconfigure your system. You can also assign each Internal MonitorProcess a primary and a secondary node to ensure fail over protection.
Internal Monitor Processes, like concurrent managers, can haveassigned work shifts, and are activated and deactivated by the InternalConcurrent Manager.
Log and Output File Access
The concurrent log and output files from requests that run on any nodeare accessible on–line from any other node. Users need not log onto a
5 – 67Managing Concurrent Processing
node to view the log and output files from requests run on that node.See: Database Instances, Manager Location, and File Distribution: page5 – 70.
This capability relies on setup steps taken at install time. For moreinformation, refer to the installation documentation for your platform.
Integration with Platform–Specific Queuing and Load–Balancing Systems
Some cluster or massively parallel systems have their own mechanismsfor queuing batch processes or distributing process loadsforexample, IBM LoadLeveler. Because users may wish to manage allprocessing, not just Oracle Applications processing, using thesemechanisms, parallel concurrent processing is designed to integratewith them. Thus, you can match your concurrent process managementto the specific capabilities of your operating platform.
For more information on integrating with platform–specific queuingand load–balancing systems, refer to the installation documentation foryour platform.
5 – 68 Oracle Applications System Administrator’s Guide
Managing Parallel Concurrent Processing
This essay describes how to manage parallel concurrent processingfrom System Administration forms. It presents the following topics,each in the context of parallel concurrent processing:
Defining Concurrent Managers
You define concurrent managers using the Concurrent Managerswindow. When you define a manager, you specify the manager type,which may be either Concurrent Manager, Internal Monitor, orTransaction Manager.
There are three other types of managers that Oracle Applicationspredefines for you: the Internal Concurrent Manager, which describesthe Internal Concurrent Manager process, the Conflict ResolutionManager, and the Scheduler. For the CRM and Scheduler you canassign the primary and secondary nodes. For the Internal ConcurrentManager you assign the primary node only.
To each concurrent manager and each Internal Monitor Process, youmay assign a primary and a secondary node. You may also assignprimary and secondary system queue names, if a platform–specificqueue management system is available on your platform. See:Concurrent Managers: page 5 – 89.
Administering Concurrent Managers
Target Nodes
Using the Administer Concurrent Managers form, you can view thetarget node for each concurrent manager in a parallel concurrentprocessing environment. The target node is the node on which theprocesses associated with a concurrent manager should run.
When a manager’s primary node and ORACLE instance are available,the target node is set to the primary node. Otherwise, the target nodeis set to the manager’s secondary node (if that node and its ORACLEinstance are available.) During process migration, processes migratefrom their current node to the target node.

5 – 69Managing Concurrent Processing
Control Across Nodes
Using the Administer Concurrent Managers form, you can start up,shut down, restart, and monitor concurrent managers and InternalMonitor Processes running on multiple nodes from any node in yourparallel concurrent processing environment. You do not need to logonto a node to control concurrent processing on it. You can alsoterminate the Internal Concurrent Manager or any other concurrentmanager from any node in your parallel concurrent processingenvironment.
Starting Up Managers
You start up parallel concurrent processing by invoking theSTARTMGR command from the operating system prompt. Regardlessof the node from which you activate the Internal Concurrent Manager,it starts up on its assigned node (assuming that you operate from anode whose platform supports remote process startup.)
After the Internal Concurrent Manager starts up, it starts all theInternal Monitor Processes and all the concurrent managers. Itattempts to start Internal Monitor Processes and concurrent managerson their primary nodes, and resorts to a secondary node only if aprimary node is unavailable.
Shutting Down Managers
You shut down parallel concurrent processing by issuing a”Deactivate” command against the Internal Concurrent Manager fromthe Administer Concurrent Managers form. All concurrent managersand Internal Monitor processes are shut down before the InternalConcurrent Manager shuts down.
Terminating a Concurrent Process
You can terminate a running concurrent process on the local node or onremote nodes by issuing a ”Terminate” command from the AdministerConcurrent Managers form.
Administer Concurrent Managers: page 5 – 80
Controlling the Internal Manager from the Operating System: page5 – 58
Concurrent Managers: page 5 – 89
Migrating Managers
Most process migration occurs automatically in response to the failureor subsequent availability of a primary node. However, you may
5 – 70 Oracle Applications System Administrator’s Guide
migrate processes manually by changing the node assignments for aconcurrent manager or Internal Monitor Process using the ConcurrentManagers form. To effect your changes, you issue a ”Verify” commandagainst the Internal Concurrent Manager from the AdministerConcurrent Managers form.
Database Instances, Manager Location, and File Distribution
The following pages illustrate some example configurations for parallelconcurrent processing.
With parallel concurrent processing, each node with concurrentmanagers may or may not be running an ORACLE instance. On a nodethat is not running ORACLE, the concurrent manager(s) connect viaNet8 to a node that is running ORACLE.
The APPLTOP can be stored on a node’s local disk. Alternatively, thesefiles can be stored in one central location, and read remotely from othernodes.
Examples of Parallel Concurrent Processing
Parallel Concurrent Processing – Single Database Instance withCentralized and Shared Log/Output/Executable File System: page5 – 71
Parallel Concurrent Processing – RAC with Centralized and SharedLog/Output/Executable File System: page 5 – 72
Parallel Concurrent Processing – Single Database Instance withDistributed Log/Output/Executable Files: page 5 – 73
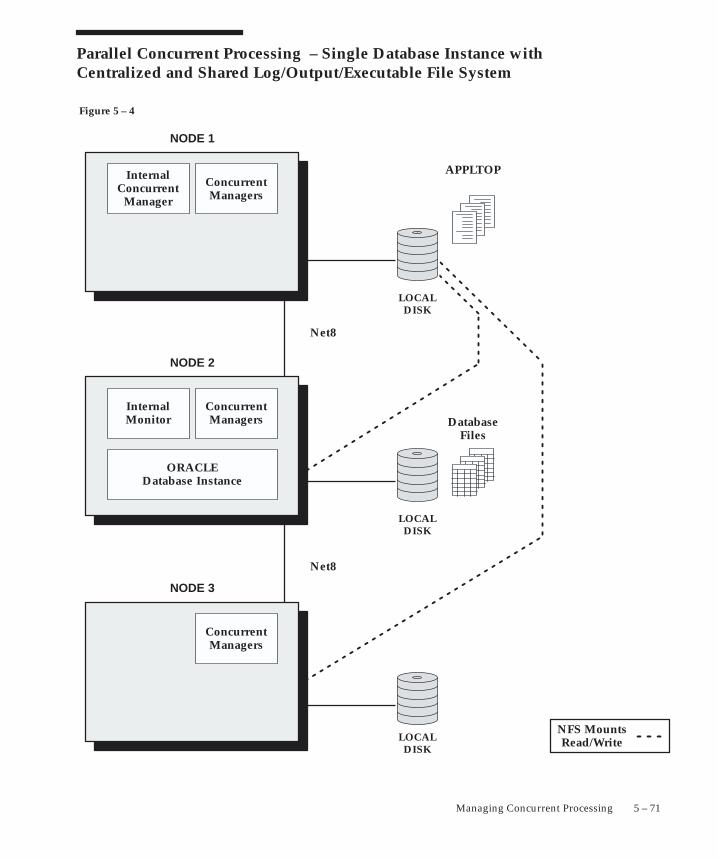
Figure 5 – 4
5 – 71Managing Concurrent Processing
Parallel Concurrent Processing – Single Database Instance with Centralized and Shared Log/Output/Executable File System
Net8
InternalMonitor
ConcurrentManagers
ORACLEDatabase Instance
NODE 2
DatabaseFiles
LOCALDISK
Net8
LOCALDISK
LOCALDISK
APPLTOP
NFS MountsRead/Write
InternalConcurrent
Manager
ConcurrentManagers
NODE 1
ConcurrentManagers
NODE 3
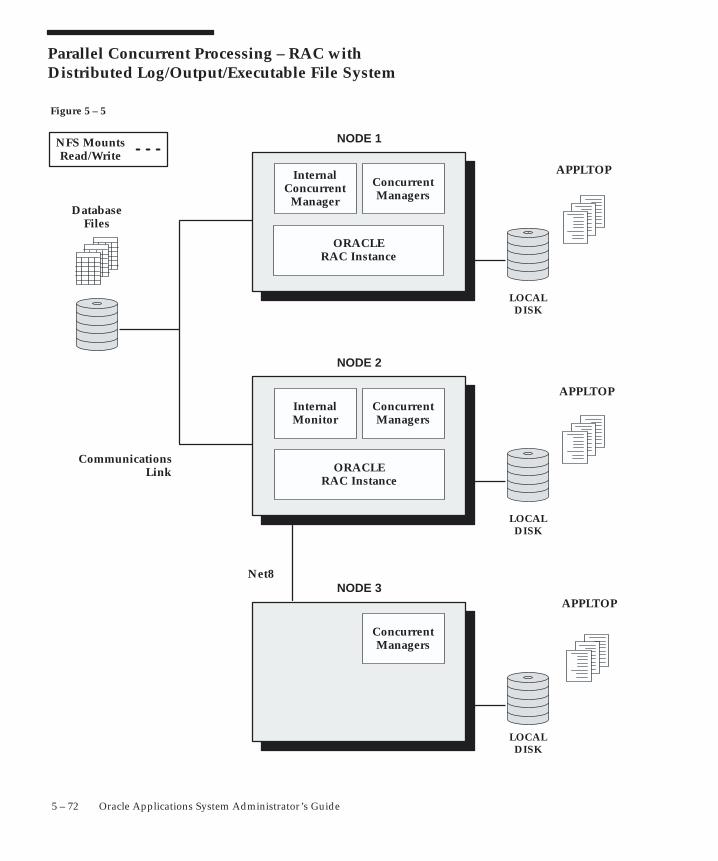
Figure 5 – 5
5 – 72 Oracle Applications System Administrator’s Guide
Parallel Concurrent Processing – RAC with Distributed Log/Output/Executable File System
InternalMonitor
ConcurrentManagers
ORACLERAC Instance
NODE 2
DatabaseFiles
LOCALDISK
LOCALDISK
LOCALDISK
APPLTOP
NFS MountsRead/Write
InternalConcurrent
Manager
ConcurrentManagers
NODE 1
ConcurrentManagers
NODE 3
ORACLERAC Instance
CommunicationsLink
Net8
APPLTOP
APPLTOP

Figure 5 – 6
5 – 73Managing Concurrent Processing
Parallel Concurrent Processing – Single Database Instance with Distributed Log/Output/Executable Files
Net8
DatabaseFiles
LOCALDISK
Net8
LOCALDISK
LOCALDISK
LOCALDISK
APPLTOP
APPLTOP
APPLTOP
InternalMonitor
ConcurrentManagers
ORACLEDatabase Instance
NODE 2
InternalConcurrent
Manager
ConcurrentManagers
NODE 1
ConcurrentManagers
NODE 3
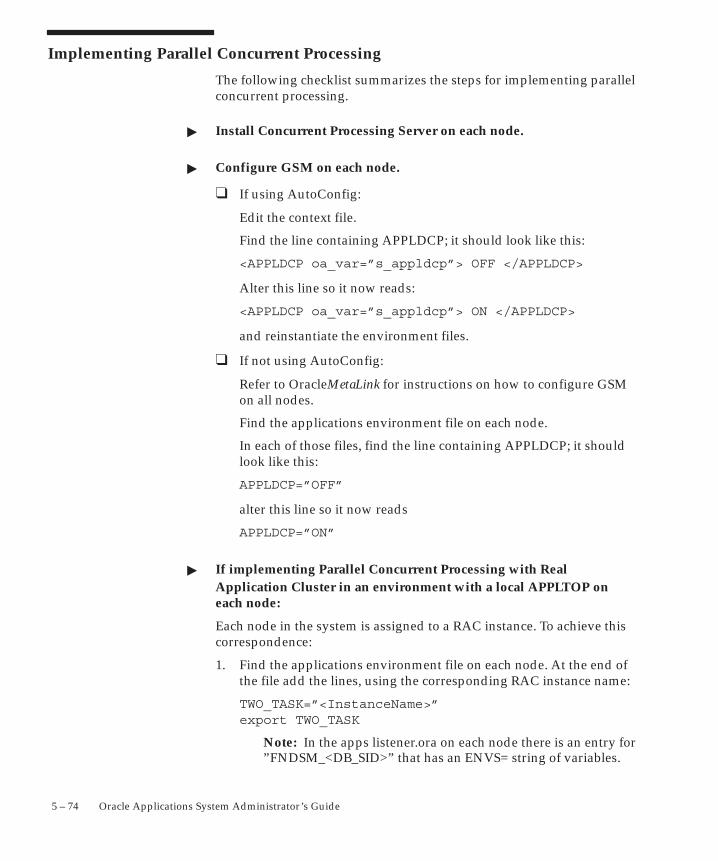
5 – 74 Oracle Applications System Administrator’s Guide
Implementing Parallel Concurrent Processing
The following checklist summarizes the steps for implementing parallelconcurrent processing.
� Install Concurrent Processing Server on each node.
� Configure GSM on each node.
❑ If using AutoConfig:
Edit the context file.
Find the line containing APPLDCP; it should look like this:
<APPLDCP oa_var=”s_appldcp”> OFF </APPLDCP>
Alter this line so it now reads:
<APPLDCP oa_var=”s_appldcp”> ON </APPLDCP>
and reinstantiate the environment files.
❑ If not using AutoConfig:
Refer to OracleMetaLink for instructions on how to configure GSMon all nodes.
Find the applications environment file on each node.
In each of those files, find the line containing APPLDCP; it shouldlook like this:
APPLDCP=”OFF”
alter this line so it now reads
APPLDCP=”ON”
� If implementing Parallel Concurrent Processing with RealApplication Cluster in an environment with a local APPLTOP oneach node:
Each node in the system is assigned to a RAC instance. To achieve thiscorrespondence:
1. Find the applications environment file on each node. At the end ofthe file add the lines, using the corresponding RAC instance name:
TWO_TASK=”<InstanceName>” export TWO_TASK
Note: In the apps listener.ora on each node there is an entry for”FNDSM_<DB_SID>” that has an ENVS= string of variables.
5 – 75Managing Concurrent Processing
The MYAPPSORA variable is set to the applicationsenvironment file that should be edited in this step.
2. Remember that every time you run AutoConfig you will have tomerge these changes back into the tnsnames.ora, listener.ora andapplications environment files.
See: Creating an Environment File (Maintaining Oracle Applications)
� Define the concurrent managers.
See: Managing Parallel Concurrent Processing: page 5 – 68
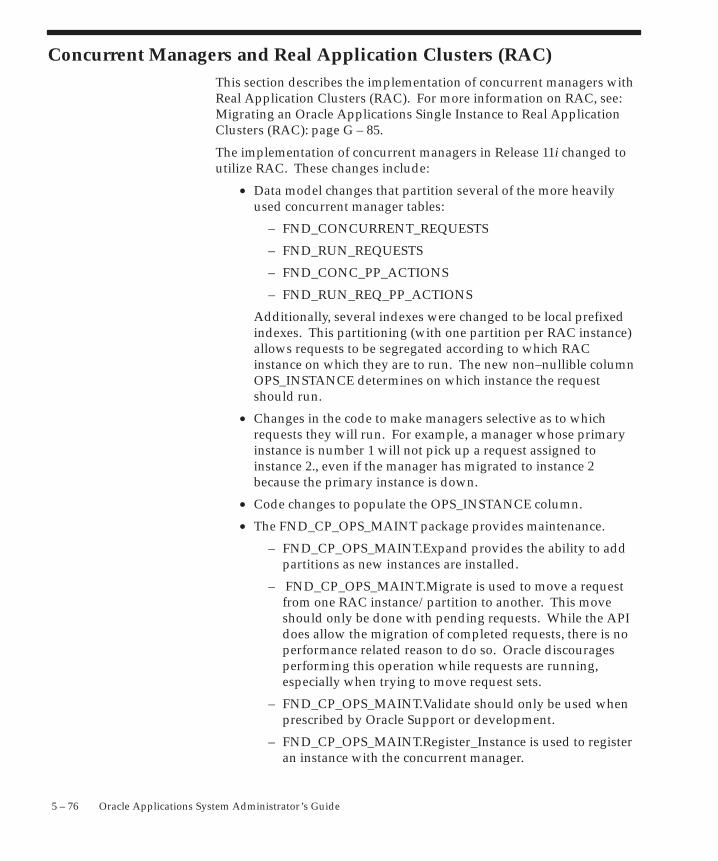
5 – 76 Oracle Applications System Administrator’s Guide
Concurrent Managers and Real Application Clusters (RAC)This section describes the implementation of concurrent managers withReal Application Clusters (RAC). For more information on RAC, see:Migrating an Oracle Applications Single Instance to Real ApplicationClusters (RAC): page G – 85.
The implementation of concurrent managers in Release 11i changed toutilize RAC. These changes include:
• Data model changes that partition several of the more heavilyused concurrent manager tables:
– FND_CONCURRENT_REQUESTS
– FND_RUN_REQUESTS
– FND_CONC_PP_ACTIONS
– FND_RUN_REQ_PP_ACTIONS
Additionally, several indexes were changed to be local prefixedindexes. This partitioning (with one partition per RAC instance)allows requests to be segregated according to which RACinstance on which they are to run. The new non–nullible columnOPS_INSTANCE determines on which instance the requestshould run.
• Changes in the code to make managers selective as to whichrequests they will run. For example, a manager whose primaryinstance is number 1 will not pick up a request assigned toinstance 2., even if the manager has migrated to instance 2because the primary instance is down.
• Code changes to populate the OPS_INSTANCE column.
• The FND_CP_OPS_MAINT package provides maintenance.
– FND_CP_OPS_MAINT.Expand provides the ability to addpartitions as new instances are installed.
– FND_CP_OPS_MAINT.Migrate is used to move a requestfrom one RAC instance/partition to another. This moveshould only be done with pending requests. While the APIdoes allow the migration of completed requests, there is noperformance related reason to do so. Oracle discouragesperforming this operation while requests are running,especially when trying to move request sets.
– FND_CP_OPS_MAINT.Validate should only be used whenprescribed by Oracle Support or development.
– FND_CP_OPS_MAINT.Register_Instance is used to registeran instance with the concurrent manager.

5 – 77Managing Concurrent Processing
– FND_CP_OPS_MAINT.Expand should normally be calledafter adding an instance, so that various partitioning can beperformed. If several instances are being registered at onetime, you may register all of them and then runFND_CP_OPS_MAINT.Expand once.
How to Install Concurrent Manager RAC Support
The following steps are involved in preparing your installation for theconcurrent manager RAC support.
1. First, specify the instance number for each of your instances in theirrespective configuration files (init.ora). If you fail to do this Oraclewill dynamically assign instance numbers as the various instancesare started up, which will lead to unpredictable results. It is alsoimportant that you begin the numbering at 1 and do not leave gapsas this would result in extra partition creation that will degradeperformance.
Here is an example from an init.ora file:
INSTANCE_NUMBER=1
2. Next, populate the table FND_OPS_INSTANCES using FND_CP_OPS_MAINT.Register_Instance:
PROCEDURE Register_Instance (INSTANCE_NUMBER IN NUMBER,
SERVICE_NAME IN VARCHAR2,
DESCRIPTION in VARCHAR2)
where:
– INSTANCE_NUMBER is the RAC instance ID hardcoded inthat instance’s configuration file.
– SERVICE_NAME is the SQL*Net service name.
– DESCRIPTION is a description of the instance for yourreference.
3. If the patch containing the RAC infrastructure has not beenapplied, apply it now.
Warning: It is extremely important that the concurrentmanagers be shutdown during this process.
The operations performed in this patch are the renaming of thetables to be partitioned, the recreation of the tables as partitioned,the copying of the data from the original tables to the rebuilt tables,and finally the dropping of the indexes from the old tables and
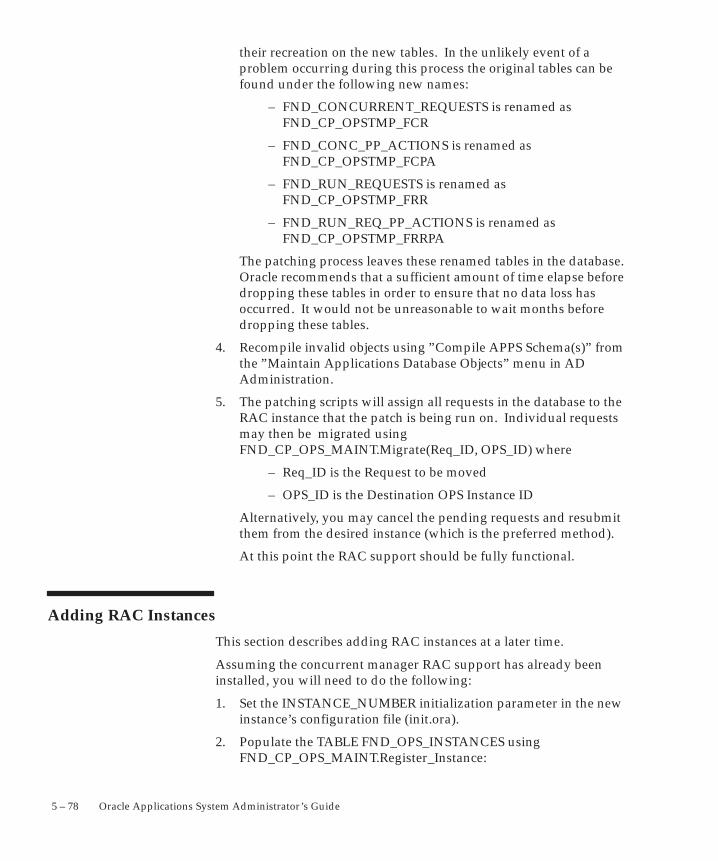
5 – 78 Oracle Applications System Administrator’s Guide
their recreation on the new tables. In the unlikely event of aproblem occurring during this process the original tables can befound under the following new names:
– FND_CONCURRENT_REQUESTS is renamed asFND_CP_OPSTMP_FCR
– FND_CONC_PP_ACTIONS is renamed asFND_CP_OPSTMP_FCPA
– FND_RUN_REQUESTS is renamed asFND_CP_OPSTMP_FRR
– FND_RUN_REQ_PP_ACTIONS is renamed asFND_CP_OPSTMP_FRRPA
The patching process leaves these renamed tables in the database.Oracle recommends that a sufficient amount of time elapse beforedropping these tables in order to ensure that no data loss hasoccurred. It would not be unreasonable to wait months beforedropping these tables.
4. Recompile invalid objects using ”Compile APPS Schema(s)” fromthe ”Maintain Applications Database Objects” menu in ADAdministration.
5. The patching scripts will assign all requests in the database to theRAC instance that the patch is being run on. Individual requestsmay then be migrated usingFND_CP_OPS_MAINT.Migrate(Req_ID, OPS_ID) where
– Req_ID is the Request to be moved
– OPS_ID is the Destination OPS Instance ID
Alternatively, you may cancel the pending requests and resubmitthem from the desired instance (which is the preferred method).
At this point the RAC support should be fully functional.
Adding RAC Instances
This section describes adding RAC instances at a later time.
Assuming the concurrent manager RAC support has already beeninstalled, you will need to do the following:
1. Set the INSTANCE_NUMBER initialization parameter in the newinstance’s configuration file (init.ora).
2. Populate the TABLE FND_OPS_INSTANCES usingFND_CP_OPS_MAINT.Register_Instance:
5 – 79Managing Concurrent Processing
PROCEDURE Register_Instance (INSTANCE_NUMBER IN NUMBER,
SERVICE_NAME IN VARCHAR2,
DESCRIPTION in VARCHAR2)
where:
– INSTANCE_NUMBER is the OPS instance ID specified in thatinstance’s configuration file.
– SERVICE_NAME is the SQL*Net service name.
– DESCRIPTION is a description of the instance for yourreference.
3. Execute the PLSQL function FND_CP_OPS_MAINT.EXPAND. Itshould return TRUE.
4. Use FND_CP_OPS_MAINT.Migrate(Req_ID, OPS_ID) to migratepending requests to the new instance as desired. Note: Runningrequests will not be moved, so you may wish to shut down themanagers for this operation, or alternatively cancel the pendingrequests and resubmit them from the desired instance.
Maintenance of Managers
Because managers only pick up requests for their own instance, youshould create new managers to support requests on additionalinstances. For example, if you have the standard manager running onInstance 1, but there will be requests submitted from Instance 2 thatwould normally run under the standard manager, you should createanother manager similar to the standard manager, but with a primarynode of Instance 2.
This requirement can be managed to a certain extent via the profileoption ”Database Instance”. This profile specifies which instance isused to log into the database at the time a user selects a responsibility.Since requests are assigned to the instance from which they aresubmitted, this can limit which instances will have certain programsrunning.
For example, suppose you have a manager to run requests forapplication XYZ and these requests are only submitted fromresponsibilities XYZ and XYZ–Super–User. If the profile DatabaseInstance is set to 1, the requests will only be submitted against instance1, and there will be no need to duplicate this manager on the otherinstances. Obviously, there are other performance implicationsinvolved in using this profile.
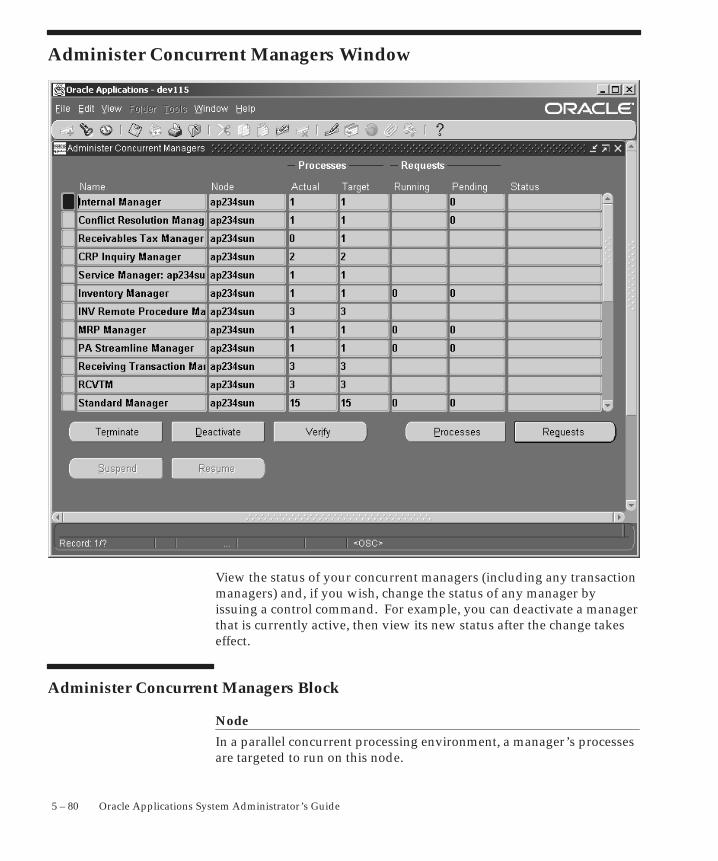
5 – 80 Oracle Applications System Administrator’s Guide
Administer Concurrent Managers Window
View the status of your concurrent managers (including any transactionmanagers) and, if you wish, change the status of any manager byissuing a control command. For example, you can deactivate a managerthat is currently active, then view its new status after the change takeseffect.
Administer Concurrent Managers Block
Node
In a parallel concurrent processing environment, a manager’s processesare targeted to run on this node.
5 – 81Managing Concurrent Processing
If a concurrent manager is defined to use a platform–specific systemqueue, this field displays the name of the queue which the managersubmits its processes to.
Processes Actual
Each manager process can run one concurrent request (start oneconcurrent program). Typically, the number of actual processes equalsthe number of target processes (the maximum number of requests amanager can run).
However, the number of actual processes may be less than the numberof target processes due to lack of requests, manager deactivation, ormanager migration.
Processes Target
This field displays the maximum number of manager processes that canbe active for this manager.
Requests Running/Requests Pending
Typically, when there are requests pending, this number should be thesame as the number of actual processes. However, if there are nopending requests, or requests were just submitted, the number ofrequests running may be less than the number of actual processes.
Moreover, if a concurrent program is incompatible with anotherprogram currently running, it does not start until the incompatibleprogram has completed. In this case, the number of requests runningmay be less than number of actual processes even when there arerequests pending.
Status
This field displays the status of a manager after you have chosen aspecific action for it using the top row of buttons near the bottom of thewindow.
You can control concurrent managers individually or collectively bycontrolling the Internal Concurrent Manager. This field is blank whenmanagers have been activated by the Internal Concurrent Manager.
In a parallel processing environment, this field displays Target node/queueunavailable when the primary and secondary nodes (or system queues)are not available.
Controlling a SpecificManager
5 – 82 Oracle Applications System Administrator’s Guide
The actions you can choose for controlling a manager are:
When you terminate requests and deactivate theInternal Concurrent Manager, all running requests(running concurrent programs) are terminated, andall managers are deactivated.
Managers previously deactivated on an individualbasis are not affected.
You can terminate requests and deactivateindividual managers. All running requests(running concurrent programs) handled by themanager are terminated.
Once deactivated, a manager does not restart untilyou select the manager and choose the Activatebutton.
When you deactivate the Internal ConcurrentManager, all other managers are deactivated aswell. Managers previously deactivated on anindividual basis are not affected.
You can deactivate individual managers. Oncedeactivated, a manager does not restart until youselect the manager and choose the Activate button.
When you deactivate a manager, including theInternal Concurrent Manager, all requests(concurrent programs) currently running areallowed to complete before the manager(s) shutdown.
This choice appears only when you select theInternal Concurrent Manager.
The Internal Concurrent Manager periodicallymonitors the processes of each concurrent manager.You can force this process monitoring or PMONactivity to occur by choosing the Verify button.
Another result of selecting this choice is that theInternal Concurrent Manager rereads concurrentprogram incompatibility rules.
This choice appears only when you select anindividual manager.
When you restart a concurrent manager, themanager rereads its definition.
Terminate
Deactivate
Verify
Restart
Reviewing a SpecificManager
5 – 83Managing Concurrent Processing
You should restart a manager when you have madethe following changes using the Define ConcurrentManager form, and you wish those changes to takeeffect:
– Change work shift assignments
– Modify the number of Target Processes
– In a parallel concurrent processing environment,change node or system queue information
When you activate the Internal ConcurrentManager, you activate all other managers as well,except those managers that were deactivated on anindividual basis.
You cannot activate the Internal ConcurrentManager from the PC client. The InternalConcurrent Manager is only activated from theserver.
You can also activate an individual concurrentmanager that is currently deactivated, so long as theInternal manager is active. If the manager isdefined to work in the current work shift, then theInternal manager starts it immediately.
View details of a concurrent manager’s operation.
You can view the details of the processes of a givenconcurrent manager. Processes that are currentlyactive, migrating, or terminating, as well asprocesses that have been terminated or deactivated,are displayed.
For a selected manager you can view all runningand pending requests handled by the manager.
The following actions are available only for certain services managedGeneric Service Management. These services must be defined to acceptcommands to suspend their operations.
Suspend the operations of the service.
Resume the operations of the service.
Activate
Processes
Requests
Suspend
Resume
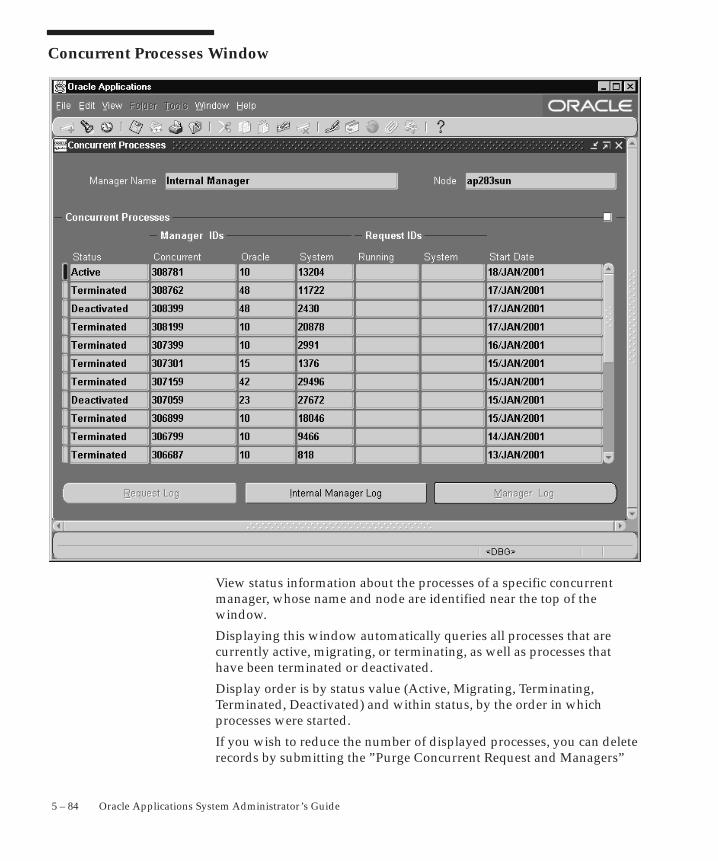
5 – 84 Oracle Applications System Administrator’s Guide
Concurrent Processes Window
View status information about the processes of a specific concurrentmanager, whose name and node are identified near the top of thewindow.
Displaying this window automatically queries all processes that arecurrently active, migrating, or terminating, as well as processes thathave been terminated or deactivated.
Display order is by status value (Active, Migrating, Terminating,Terminated, Deactivated) and within status, by the order in whichprocesses were started.
If you wish to reduce the number of displayed processes, you can deleterecords by submitting the ”Purge Concurrent Request and Managers”
5 – 85Managing Concurrent Processing
report from the Run Requests form. You can delete records according tothe number of days since the processes were started. However, youcannot delete the records of currently active managers.
Status
This field cannot be updated. The following are valid status values:
Currently running manager processes display as”Active”.
Manager processes that are no longer runningdisplay as ”Deactivated”.
These processes were deactivated by you choosingthe Deactivate button in the Administer ConcurrentManagers block, or by the Internal ConcurrentManager deactivating a concurrent manager at theend of that manager’s work shift.
Managers that are migrating between primary andsecondary nodes display as ”Migrating”.
In a parallel concurrent processing environment,concurrent managers run on either the primary orsecondary node assigned to them. Managersmigrate to the secondary node if the primary nodeor the database instance on the primary node isunavailable. Managers migrate back to the primarynode once it becomes available.
Manager processes that are being terminateddisplay as ”Terminating”.
These processes were terminated by you choosingthe Terminate button in the Administer ConcurrentManagers block, or by a user selecting ”Terminate”in the Concurrent Requests form.
Manager processes that have been terminateddisplay as ”Terminated”.
These processes were terminated by you choosingthe Terminate button in the Administer ConcurrentManagers block, or by a user selecting ”Terminate”in the Concurrent Requests form.
Manager IdentifiersConcurrent
This field displays a number generated by the individual concurrentmanager that identifies the process. This field cannot be updated.
Active
Deactivated
Migrating
Terminating
Terminated
Viewing Log Files
5 – 86 Oracle Applications System Administrator’s Guide
This number may be referenced if an operating system process ID is notavailable.
You can use this number to view the log file associated with the process.(This is the same log file you view when you select Manager Log fromthe View field of the Concurrent Requests form):
• At the operating system level, locate yourself in the log directory$FND_TOP/APPLLOG.
• For concurrent managers, use W<number>.mgr.
• For Internal Monitor processes, use I<number>.mgr.
Manager IdentifiersOracle
This field displays the ORACLE process ID associated with the managerprocess. This field cannot be updated.
Manager IdentifiersSystem
This field displays the operating system process ID associated with themanager process. This field cannot be updated.
Request Identifiers Running
Please note the following about this field:
• Normally this field is blank, as the run–time of a request istypically very short.
• For a terminated manager, the ID of the request being processedat the time of termination is displayed.
Request IdentifiersSystem
This field displays the operating system process ID for a spawnedconcurrent process.
Use the three buttons near the bottom of the window to view log files.Log files record information that may be helpful when diagnosingproblems.
Choose this button to view the log file of theprocess associated with the running request.
Request Log
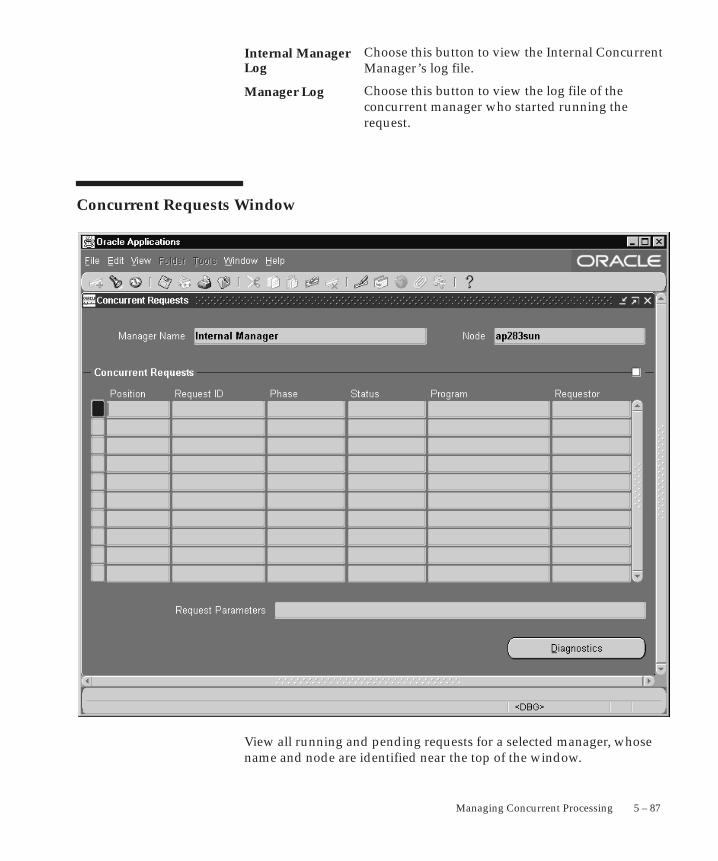
5 – 87Managing Concurrent Processing
Choose this button to view the Internal ConcurrentManager’s log file.
Choose this button to view the log file of theconcurrent manager who started running therequest.
Concurrent Requests Window
View all running and pending requests for a selected manager, whosename and node are identified near the top of the window.
Internal ManagerLog
Manager Log
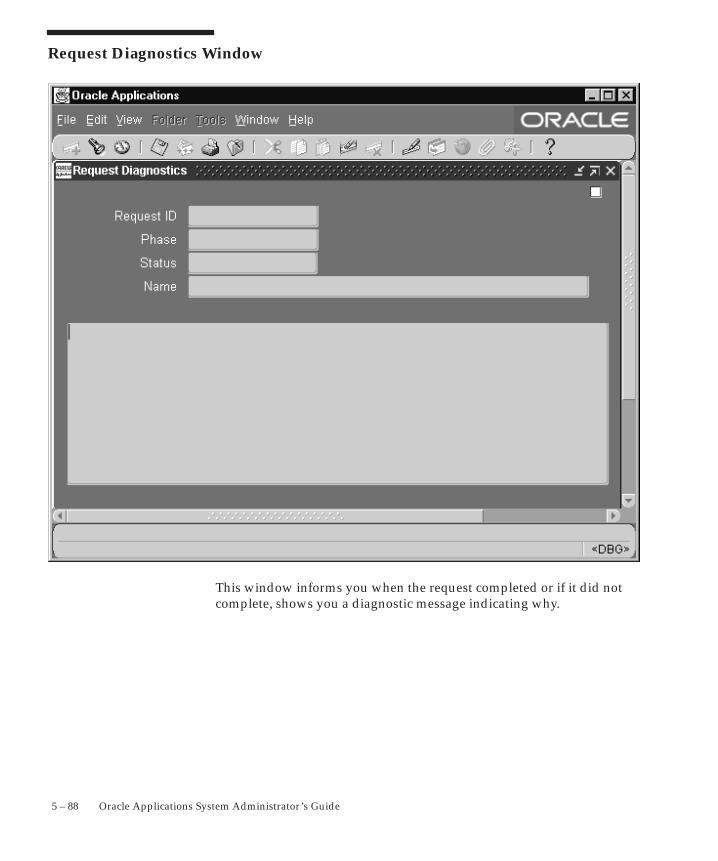
5 – 88 Oracle Applications System Administrator’s Guide
Request Diagnostics Window
This window informs you when the request completed or if it did notcomplete, shows you a diagnostic message indicating why.
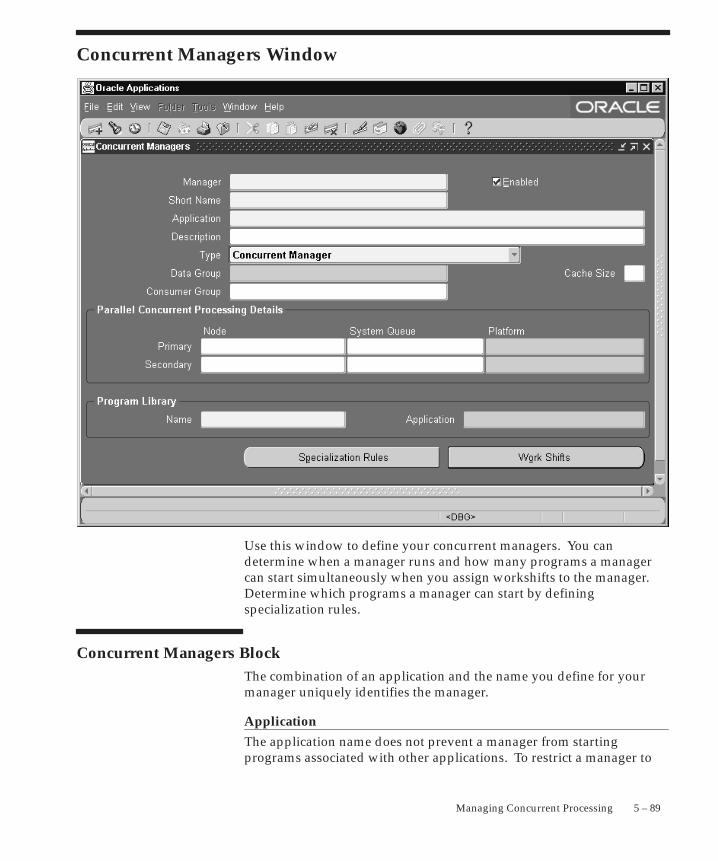
5 – 89Managing Concurrent Processing
Concurrent Managers Window
Use this window to define your concurrent managers. You candetermine when a manager runs and how many programs a managercan start simultaneously when you assign workshifts to the manager.Determine which programs a manager can start by definingspecialization rules.
Concurrent Managers BlockThe combination of an application and the name you define for yourmanager uniquely identifies the manager.
Application
The application name does not prevent a manager from startingprograms associated with other applications. To restrict a manager to
5 – 90 Oracle Applications System Administrator’s Guide
only running programs associated with certain applications, go to theSpecialization Rules window.
Type
Once you define a concurrent manager, you cannot update this field.There are several types of managers:
Concurrent Managers start concurrent programsrunning.
Internal Monitors monitor the Internal concurrentmanager in a parallel concurrent processingenvironment. If the Internal Concurrent Managerexits abnormally (for example, because its node orits database instance goes down), an InternalMonitor restarts it on another node.
Transaction managers handle synchronous requestsfrom client machines.
Cache Size (Concurrent Manager only)
Enter the number of requests your manager remembers each time itreads which requests to run. For example, if a manager’s workshift has1 target process and a cache value of 3, it will read three requests,, andwill wait until these three requests have been run before reading newrequests.
In reading requests, the manager will only put requests it is allowed torun into its cache. For example, if you have defined your manager torun only Order Entry reports then the manager will put only OrderEntry requests into its cache.
If you enter 1, the concurrent manager must look at its requests list eachtime it is ready to process another request.
By setting the cache size at a higher number, the concurrent managerdoes not have to read its requests list each time it runs a request.However, the manager does not recognizea nay priority changes youmake for a particular request if it has already read that request into itscache. Further, even if you give a higher priority to a new request, thatnew request must wait until the buffer isempty and the manager returnsto look at the requests list. That request may have to wait a long time ifyou set the buffer size to a high number.
You should use cache size to tune your concurrent managers to workmost efficiently for you site’s needs. If your organization tends toreprioritize jobs going to a certain manager, that manager should haveits buffer size set fairly low.
ConcurrentManager
Internal Monitor
TransactionManager
☞
5 – 91Managing Concurrent Processing
Suggestion: Enter a value of 1 when defining a manager thatruns long, time–consuming jobs, and a value of 3 or 4 formanagers that run small, quick jobs.
Data Group (Transaction Manager only)
The data group the transaction manager uses to connect to the database.Transaction managers only run programs submitted fromresponsibilities that use the same data group as the transaction manager.
Resource Consumer Group
The resource consumer group for the manager. For more information onresource consumer groups, see: Resource Consumer Groups in OracleApplications page: 9– 7.
Parallel Concurrent Processing Details
Node
If you are operating in a parallel concurrent processing environment andyou want your manager to operate on a specific node, select the name ofthe node.
The primary node, if available, is the node your concurrent manageroperates on. If the primary node or the database instance on it goesdown, your concurrent manager migrates to its secondary node. Yourconcurrent manager migrates back to its primary node when that nodebecomes available.
Nodes must be previously registered with Oracle Applications, usingthe Nodes form. See: Nodes: page 5 – 107.
System Queue
If you are operating in a parallel concurrent processing environment andyou want your manager to use a platform–specific queue managementsystem instead of generic concurrent processing queue management,specify the queue or class name of that system. For example, you maychoose a system queue name from a platform–specific queuemanagement system like NQS or IBM Load Leveler.
The primary system queue is the queue you associate with the primarynode. The secondary system queue is the queue you associate with thesecondary node.
Attention: To ensure that your manager uses yourplatform–specific queue management system, you should start
Program Library
Defining ManagerOperations
5 – 92 Oracle Applications System Administrator’s Guide
the concurrent managers in the proper mode (set APPLDCP =OSQ). Refer to platform–specific documentation to determine ifyour platform supports interfacing with system queues. ForUnix platforms, refer to the appropriate Oracle ApplicationsInstallation Update. For all other platforms, refer to theappropriate Oracle Applications Installation Guide.
Select a library of immediate concurrent programs to make available toyour manager. Your manager can only run immediate concurrentprograms that are registered in the selected program library.
Immediate concurrent programs must be registered in a program libraryby an applications developer using Oracle Application Object Library.
Program Library
Concurrent managers can run only those immediate concurrentprograms listed in their program library. They can also run concurrentprograms that use any other type of concurrent program executable aslong as the specialization rules include them.
Transaction Managers can only run programs listed in their programlibrary.
The two buttons near the bottom of the window display additionalwindows for defining when your manager operates, and, if you wish,specializing your manager to run only certain kinds of programs.
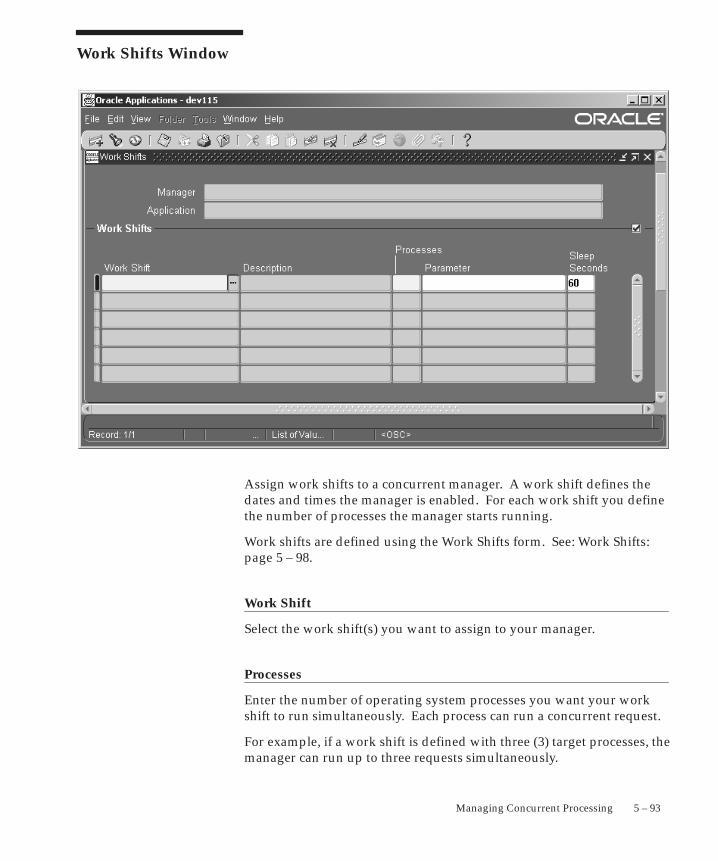
5 – 93Managing Concurrent Processing
Work Shifts Window
Assign work shifts to a concurrent manager. A work shift defines thedates and times the manager is enabled. For each work shift you definethe number of processes the manager starts running.
Work shifts are defined using the Work Shifts form. See: Work Shifts:page 5 – 98.
Work Shift
Select the work shift(s) you want to assign to your manager.
Processes
Enter the number of operating system processes you want your workshift to run simultaneously. Each process can run a concurrent request.
For example, if a work shift is defined with three (3) target processes, themanager can run up to three requests simultaneously.
5 – 94 Oracle Applications System Administrator’s Guide
Parameter
Enter the parameter string for a service under Generic ServiceManagement. The value of this field is dependent on the service typedefinition.
Sleep Seconds
Enter the sleep time for your manager during this work shift. Sleep timeis the number of seconds your manager waits between checking the listof pending concurrent requests (concurrent requests waiting to bestarted).
The default value is 60 (seconds).
Suggestion: Set the sleep time to be very brief during periodswhen the number of requests submitted is expected to be high.
Describe your application–ORACLE username pair, if you wish.
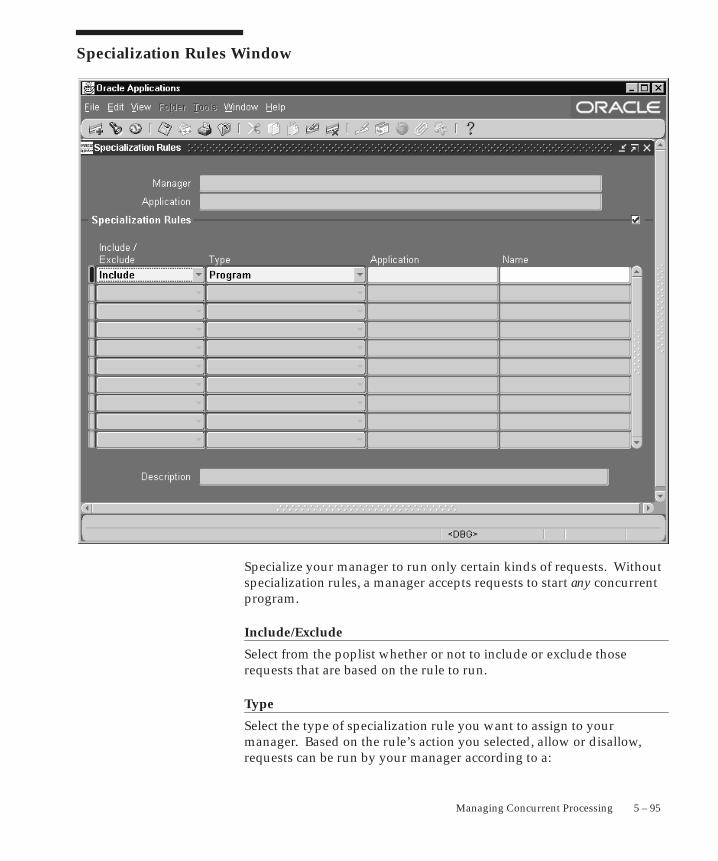
5 – 95Managing Concurrent Processing
Specialization Rules Window
Specialize your manager to run only certain kinds of requests. Withoutspecialization rules, a manager accepts requests to start any concurrentprogram.
Include/Exclude
Select from the poplist whether or not to include or exclude thoserequests that are based on the rule to run.
Type
Select the type of specialization rule you want to assign to yourmanager. Based on the rule’s action you selected, allow or disallow,requests can be run by your manager according to a:
5 – 96 Oracle Applications System Administrator’s Guide
• Combined Rule
For example, only requests that satisfy the combined rule youselect are allowed to be run by your manager. Or conversely,requests that satisfy a certain combined rule are excluded fromrunning.
Combined specialization rules, which combine more than onelogical statement, are defined using the Combined SpecializationRules form. See: Combined Specialization Rules: page 5 – 100.
• ORACLE ID
For example, programs with a certain ORACLE ID are excludedfrom running. Or conversely, a concurrent manager only includesprograms with a specific ORACLE ID.
• Program
For example, only the program you select is excluded fromrunning. Or conversely, a concurrent manager only includes theprograms you select. You can also include or exclude allprograms belonging to a specific application using the Programtype by entering the application in the Application field andleaving the Name field empty.
• Request Type (of the program)
For example, programs of a certain request type are excludedfrom running. Or conversely, a concurrent manager only includesprograms with the request type you select.
• User (application username at sign on)
For example, all programs submitted by a certain user areexcluded from running. Or conversely, a concurrent managerincludes only programs submitted by the user you select.
Application
Select the application associated with your:
• Combined Rule
• Program
• Request Type
Name
Select the name of your:
• Combined Rule

5 – 97Managing Concurrent Processing
• ORACLE ID
• Program
• Request Type
• User
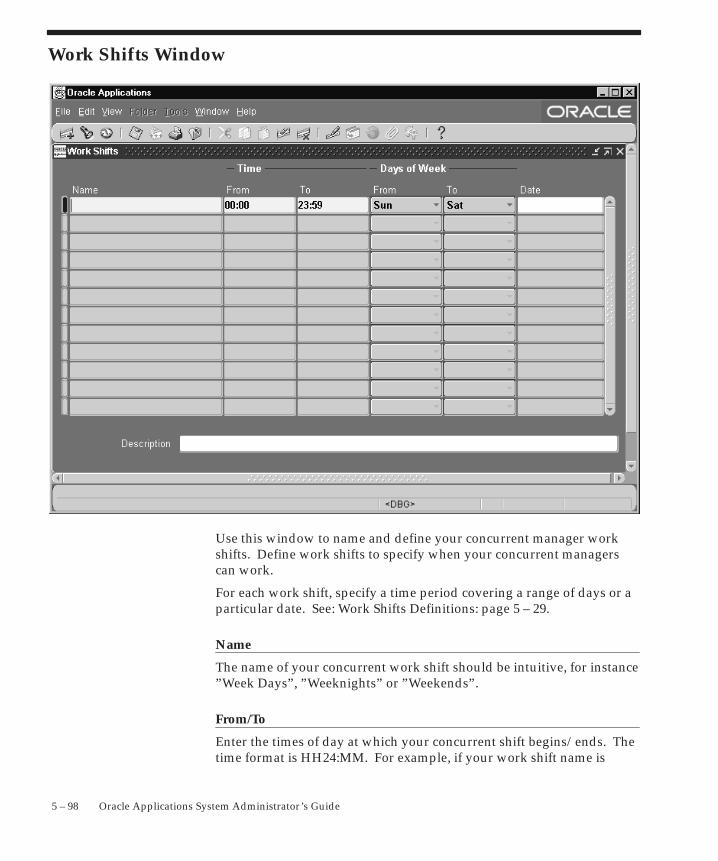
5 – 98 Oracle Applications System Administrator’s Guide
Work Shifts Window
Use this window to name and define your concurrent manager workshifts. Define work shifts to specify when your concurrent managerscan work.
For each work shift, specify a time period covering a range of days or aparticular date. See: Work Shifts Definitions: page 5 – 29.
Name
The name of your concurrent work shift should be intuitive, for instance”Week Days”, ”Weeknights” or ”Weekends”.
From/To
Enter the times of day at which your concurrent shift begins/ends. Thetime format is HH24:MM. For example, if your work shift name is
5 – 99Managing Concurrent Processing
”Week Days”, you could enter ”09:00” (9:00 am) as the start time and”17:00” (5:00 pm) as the end time. Note that Oracle Applications uses a24–hour clock.
Days of Week From/Days of Week To
Enter the first and last days of this shift. For instance, if your shift nameis ”Week Days”, you could enter ”Monday” in the ”Days of Week From”field and ”Friday” in the ”Days of Week To” field. If you enter a valuein the ”Days of Week From” field, you must enter a value in the ”Daysof Week To field”. You may not use the Date field for this row.
Date
Enter a date here to create a date–specific workshift. For instance, youcan name a workshift ”Memorial Day”, and enter the date in this field toenable this workshift only on the Memorial Day holiday.
Date–specific workshifts override workshifts that do not specify aspecific date. If you want to enter a value in this field (specify a date),you may not enter values for the Days of Week fields for this row. See:Overlapping Work Shifts – Priority Levels: page 5 – 31.
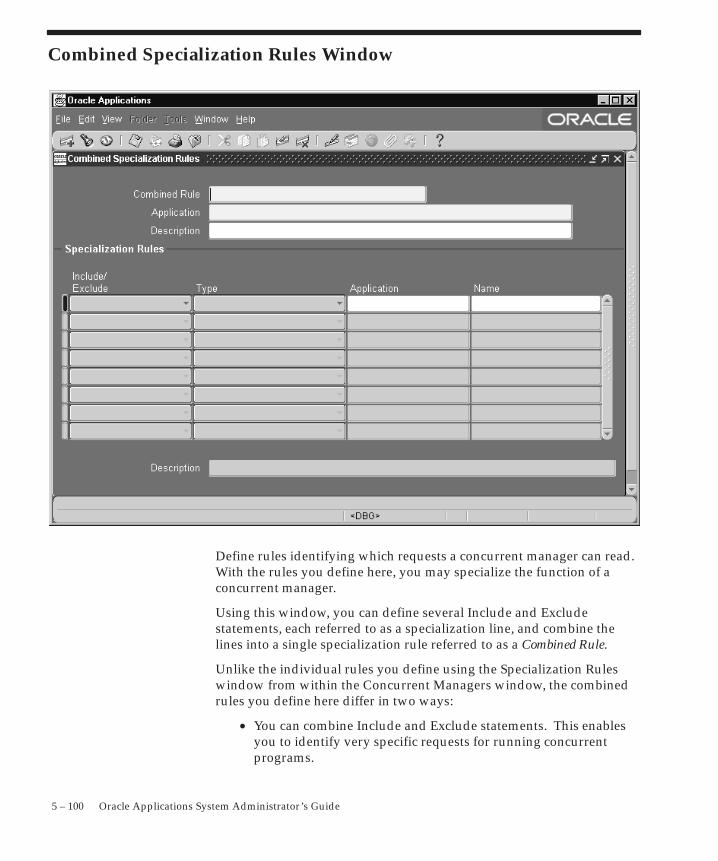
5 – 100 Oracle Applications System Administrator’s Guide
Combined Specialization Rules Window
Define rules identifying which requests a concurrent manager can read.With the rules you define here, you may specialize the function of aconcurrent manager.
Using this window, you can define several Include and Excludestatements, each referred to as a specialization line, and combine thelines into a single specialization rule referred to as a Combined Rule.
Unlike the individual rules you define using the Specialization Ruleswindow from within the Concurrent Managers window, the combinedrules you define here differ in two ways:
• You can combine Include and Exclude statements. This enablesyou to identify very specific requests for running concurrentprograms.
5 – 101Managing Concurrent Processing
• Within a combined rule, using multiple Include statementsrestricts a concurrent manager more.
With individual rules you define using the Specialization Ruleswindow (within the Concurrent Managers window), the more”Include” rules you define, the less restricted a manager becomes.
See: Concurrent Managers: page 5 – 89
Combined Specialization Rules Block
Together, the application name and the name you define for yourcombined specialization rule uniquely identifies the rule.
Application
The application name does not prevent a concurrent manager fromstarting programs associated with other applications.
Specialization Rules Block
Define the individual rules (statements) that make up your combinedspecialization rule.
• Each rule in this block defines one statement.
• The sum of all the specialization rules defines your combinedspecialization rule.
Include/Exclude
Select from the poplist whether to include or exclude those requests thatare based on the rule to run.
Type
Select the type of specialization rule you want to enforce on a concurrentmanager.
You cannot combine two Include rules of the same type.
• For example, you cannot include programs to be associated withan ORACLE ID, then, on another line, include programs to beassociated with a second, different ORACLE ID.
5 – 102 Oracle Applications System Administrator’s Guide
Based on a rule’s action, exclude or include, programs can be run byyour manager according to a:
• ORACLE ID
For example, programs with a certain ORACLE ID are excludedfrom running. Or conversely, a concurrent manager only includesprograms with a specific ORACLE ID.
• Program
For example, only the program you select is excluded fromrunning. Or conversely, a concurrent manager only includes theprograms you select. You can also include or exclude allprograms belonging to a specific application using the Programtype by entering the application in the Application field andleaving the Name field empty.
• Request Type (of the program)
For example, programs of a certain request type are excludedfrom running. Or conversely, a concurrent manager only includesprograms with the request type you select.
• User (application username at sign on)
For example, all programs submitted by a certain user areexcluded from running. Or conversely, a concurrent managerincludes only programs submitted by the user you select.
Application
Select the application associated with your:
• Program
• Request Type
Name
Select the name of your:
• ORACLE ID
• Program
• Request Type
• User
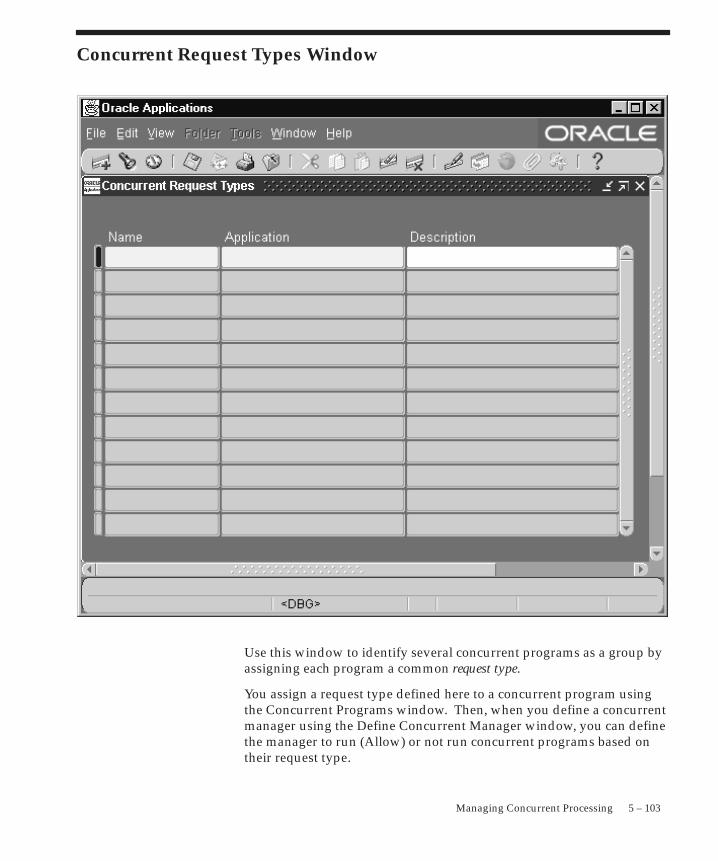
5 – 103Managing Concurrent Processing
Concurrent Request Types Window
Use this window to identify several concurrent programs as a group byassigning each program a common request type.
You assign a request type defined here to a concurrent program usingthe Concurrent Programs window. Then, when you define a concurrentmanager using the Define Concurrent Manager window, you can definethe manager to run (Allow) or not run concurrent programs based ontheir request type.
5 – 104 Oracle Applications System Administrator’s Guide
For example, you could define a request type as “end–of–monthreports”, assign that request type to several concurrent programs, thendefine a concurrent manager to only run ”end–of–month” requests.
Concurrent Request Types Block
Name and describe each type of concurrent request you want to define.The combination of application name plus request type uniquelyidentifies your concurrent request type.
This application name does not prevent you from assigning this requesttype to concurrent programs associated with other application names.
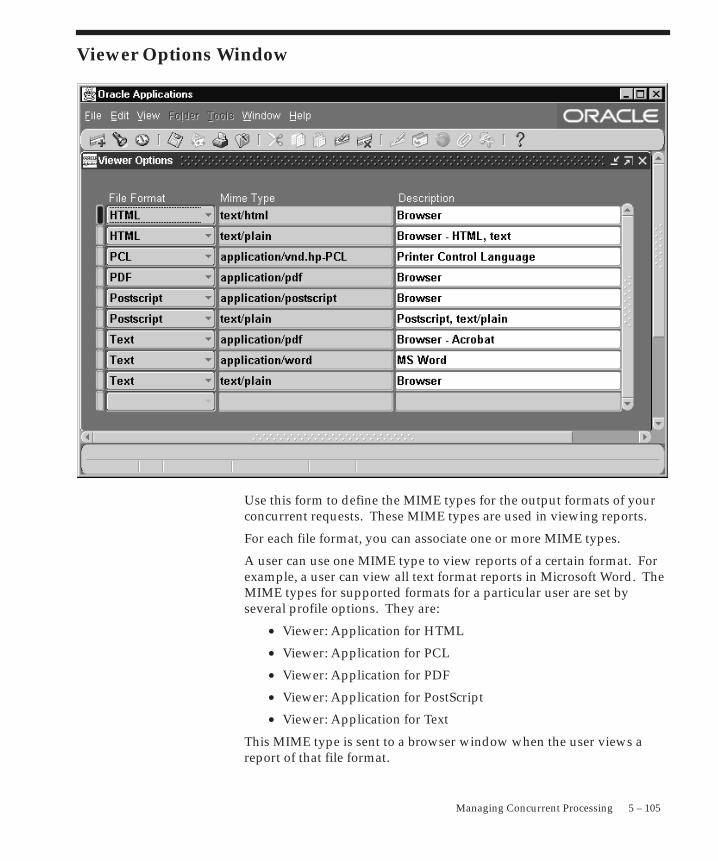
5 – 105Managing Concurrent Processing
Viewer Options Window
Use this form to define the MIME types for the output formats of yourconcurrent requests. These MIME types are used in viewing reports.
For each file format, you can associate one or more MIME types.
A user can use one MIME type to view reports of a certain format. Forexample, a user can view all text format reports in Microsoft Word. TheMIME types for supported formats for a particular user are set byseveral profile options. They are:
• Viewer: Application for HTML
• Viewer: Application for PCL
• Viewer: Application for PDF
• Viewer: Application for PostScript
• Viewer: Application for Text
This MIME type is sent to a browser window when the user views areport of that file format.
5 – 106 Oracle Applications System Administrator’s Guide
Viewer Options Block
Associate one or more MIME types with each supported file format. Bydefining viewer options, you can specify the application or applicationsthat are available for displaying files of each format.
File Format
The file format.
MIME Type
The MIME type to use for the file output.
See Also
Defining the Reports Viewer: page 5 – 12
Profile Options in Oracle Application Object Library page: A – 2
Oracle Applications User’s Guide
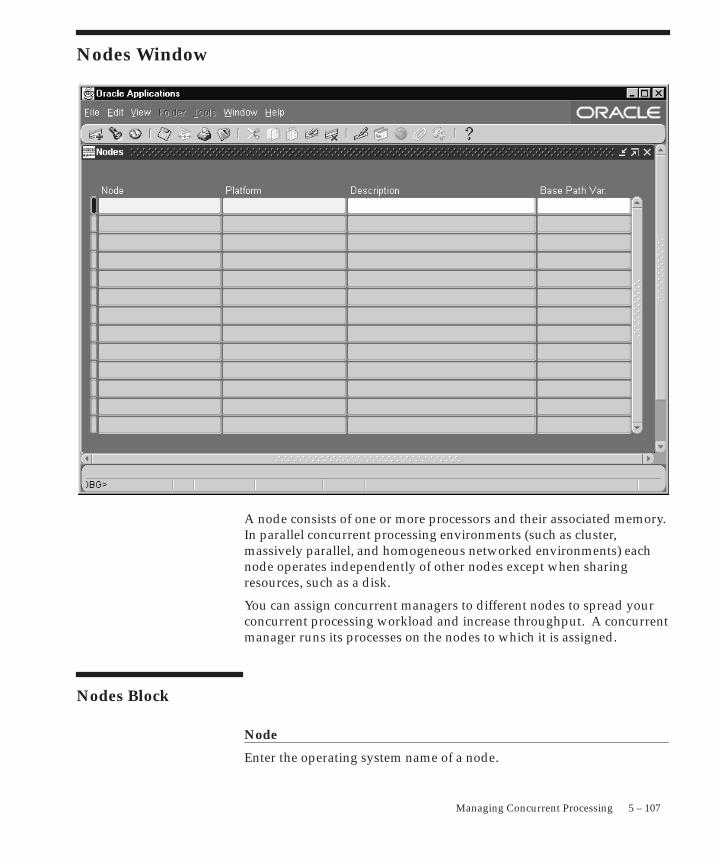
5 – 107Managing Concurrent Processing
Nodes Window
A node consists of one or more processors and their associated memory.In parallel concurrent processing environments (such as cluster,massively parallel, and homogeneous networked environments) eachnode operates independently of other nodes except when sharingresources, such as a disk.
You can assign concurrent managers to different nodes to spread yourconcurrent processing workload and increase throughput. A concurrentmanager runs its processes on the nodes to which it is assigned.
Nodes Block
Node
Enter the operating system name of a node.
5 – 108 Oracle Applications System Administrator’s Guide
Platform
Select the operating system platform that your node resides on.
Base Path Var.
Consult your installation manual to determine the correct base pathvariable for your platform to determine the location of the concurrentmanagers’ log and out files for this node.

C H A P T E R
6T
6 – 1Oracle Applications Manager
Oracle ApplicationsManager
his chapter describes these management tools for OracleApplications:
• Management Pack for Oracle Applications
• Oracle Applications Manager
6 – 2 Oracle Applications System Administrator’s Guide
Oracle Applications Management Tools
Oracle Applications provides a powerful set of management tools tohelp you manage your Oracle Applications installation.
Oracle Management Pack for Oracle Applications
The Oracle Management Pack for Oracle Applications (hereafterreferred to as the Management Pack for Oracle Applications) extendsOracle Enterprise Manager to enable the monitoring, diagnosing, andcapacity planning of the multi–tiered Oracle Applications environment.
Oracle Applications Manager
The new Oracle Applications Manager allows administrators tomanage E–Business Suite systems from an HTML console. OracleApplications Manager can be used for a wide variety of tasks such asadministering services, examining system configuration, managingOracle Workflow, examining applied patches, and measuring systemusage.
With Oracle Applications Manager, a system administrator can easilymonitor the status of a system including the database, application tierservices, concurrent requests, and Oracle Workflow processes.Administrators can also control application tier services and submitconcurrent requests directly from the console.
6 – 3Oracle Applications Manager
Oracle Management Pack for Oracle Applications
The Management Pack for Oracle Applications extends OracleEnterprise Manager to enable the monitoring, diagnosing, and capacityplanning of the multitiered Oracle Applications environment. TheManagement Pack for Oracle Applications takes advantage of thefollowing Oracle Enterprise Manager system management features:
• Discovery and graphical representation of services to bemonitored
• Starting tools from the console in the context of a specific service
• Automated data collection and management services
• Central monitoring and administration of remote systems usingintelligent agents
The Management Pack for Oracle Applications extends the followingtools to work with Oracle Applications:
• Oracle Enterprise Manager console
The console is extended to discover concurrent managers and tonotify you should any of the servers go down. You can alsodefine jobs for any of the Oracle Applications subsystems,allowing central administration of a distributed OracleApplications system.
• Oracle Applications Advanced Events
A library of events specific to Oracle Applications are providedfor lights–out event monitoring and problem detection of theOracle Applications system. Additional lights–out problemresolution is provided with fix–it jobs that are configured to runautomatically when an event triggers. These fix–it jobs are eithercustom–built or chosen from a small predefined set providedwith the Management Pack for Oracle Applications.
• Oracle Performance Manager
A new Oracle Applications data gatherer cartridge feeds data toOracle Performance Manager, providing you with an extensivearray of real–time monitoring charts on all concurrent managersand Forms sessions that are used by your Oracle Applicationsinstance.
• Oracle Capacity Planner
Concurrent manager performance data is gathered over time andfed to Oracle Capacity Planner for analysis of resourceconsumption and detection of performance anomalies.
6 – 4 Oracle Applications System Administrator’s Guide
• Concurrent Processing Tuning Assistant
This utility allows you to examine historical processinginformation about Oracle Concurrent Processing requests andconcurrent managers.
For more information on the Management Pack for OracleApplications, see Getting Started with the Oracle Management Pack forOracle Applications.

6– 5Oracle Applications Manager
Overview of Oracle Applications ManagerThe new Oracle Applications Manager allows administrators tomanage E–Business Suite systems from an HTML console. OracleApplications Manager can be used for a wide variety of tasks such asadministering services, examining system configuration, managingOracle Workflow, examining applied patches, and measuring systemusage.
With Oracle Applications Manager, a system administrator can easilymonitor the status of a system including the database, application tierservices, concurrent requests, and Oracle Workflow processes.Administrators can also control application tier services and submitconcurrent requests directly from the console. Charts and graphsprovide more intuitive summaries, and allow the user to drill down formore detailed information.
Oracle Applications Manager provides diagnostic features forApplications systems. The console displays errors recently reported bysystem components such as transaction managers or concurrentrequests. For running processes such as forms or concurrent requests,system administrators can examine the database session details,including any currently executing SQL.
Oracle Applications Manager provides access to configurationinformation for all of the tiers of an Oracle Applications system. Theconsole provides tools to detect potential configuration problems suchas recently altered site–level profile option settings or databaseinitialization parameters that do not meet the requirements orrecommendations of Oracle.
Oracle Applications Manager allows administrators to configure,monitor, and control concurrent processing. Combined with the newService Management feature of Release 11i, Oracle ApplicationsManager can be used to monitor and control Oracle Forms Listeners,Metrics Servers, Metrics Clients, Reports Servers, Apache Servers, andother application tier services.
Oracle Workflow Manager can be used to control Oracle Workflowsystem services, such as background engines, notification mailers,agent listeners, and queue propagation. Administrators can monitorand analyze Oracle Workflow system activity, suspend and resumeprocesses, retry activities that end in error, and purge obsoleteWorkflow data.
With the Patch History Database feature, administrators can examinethe patches applied to an Oracle Applications system. Systemadministrators can easily determine which patches have been appliedto a system, including the individual patches included in mini–packs,
6– 6 Oracle Applications System Administrator’s Guide
maintenance packs, and merged patches. Administrators can alsoexamine the patched files on a system, and find all of the patches thataltered a given file. For each patch applied, Oracle ApplicationsManager can show the individual actions taken by each patch driver.For more information on the Patch History Database feature, refer tothe Maintaining Oracle Applications: AD Utilities Reference Manual.
See Also
Oracle Workflow Guide
Maintaining Oracle Applications: AD Utilities Reference Manual
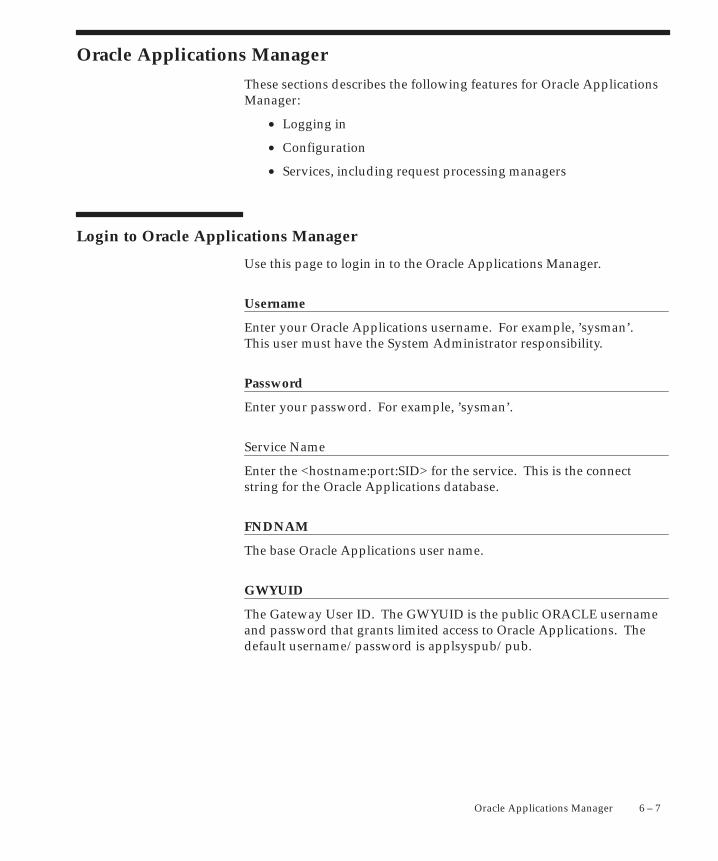
6 – 7Oracle Applications Manager
Oracle Applications Manager
These sections describes the following features for Oracle ApplicationsManager:
• Logging in
• Configuration
• Services, including request processing managers
Login to Oracle Applications Manager
Use this page to login in to the Oracle Applications Manager.
Username
Enter your Oracle Applications username. For example, ’sysman’.This user must have the System Administrator responsibility.
Password
Enter your password. For example, ’sysman’.
Service Name
Enter the <hostname:port:SID> for the service. This is the connectstring for the Oracle Applications database.
FNDNAM
The base Oracle Applications user name.
GWYUID
The Gateway User ID. The GWYUID is the public ORACLE usernameand password that grants limited access to Oracle Applications. Thedefault username/password is applsyspub/pub.
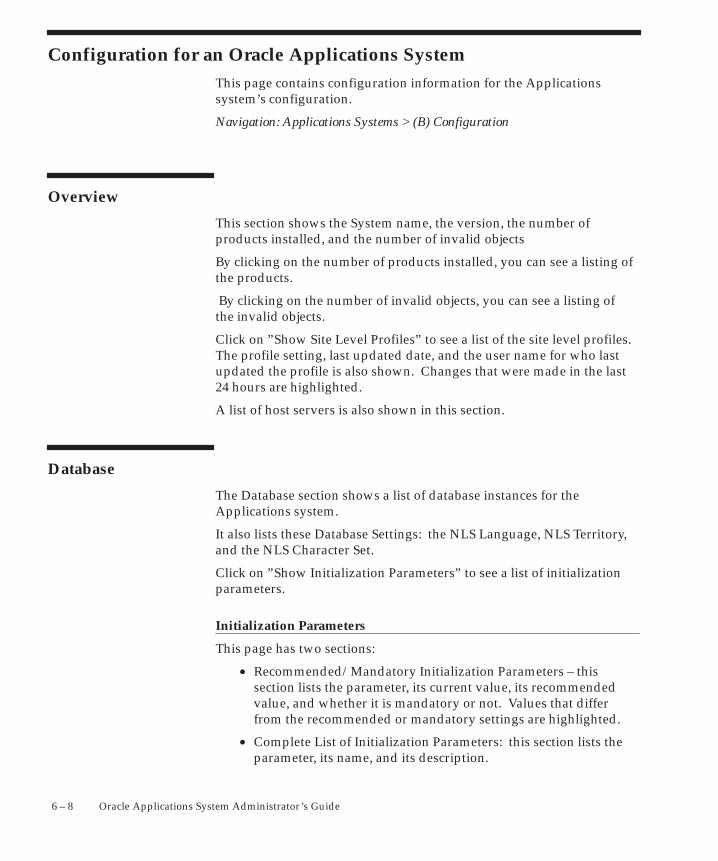
6 – 8 Oracle Applications System Administrator’s Guide
Configuration for an Oracle Applications SystemThis page contains configuration information for the Applicationssystem’s configuration.
Navigation: Applications Systems > (B) Configuration
Overview
This section shows the System name, the version, the number ofproducts installed, and the number of invalid objects
By clicking on the number of products installed, you can see a listing ofthe products.
By clicking on the number of invalid objects, you can see a listing ofthe invalid objects.
Click on ”Show Site Level Profiles” to see a list of the site level profiles.The profile setting, last updated date, and the user name for who lastupdated the profile is also shown. Changes that were made in the last24 hours are highlighted.
A list of host servers is also shown in this section.
Database
The Database section shows a list of database instances for theApplications system.
It also lists these Database Settings: the NLS Language, NLS Territory,and the NLS Character Set.
Click on ”Show Initialization Parameters” to see a list of initializationparameters.
Initialization Parameters
This page has two sections:
• Recommended/Mandatory Initialization Parameters – thissection lists the parameter, its current value, its recommendedvalue, and whether it is mandatory or not. Values that differfrom the recommended or mandatory settings are highlighted.
• Complete List of Initialization Parameters: this section lists theparameter, its name, and its description.
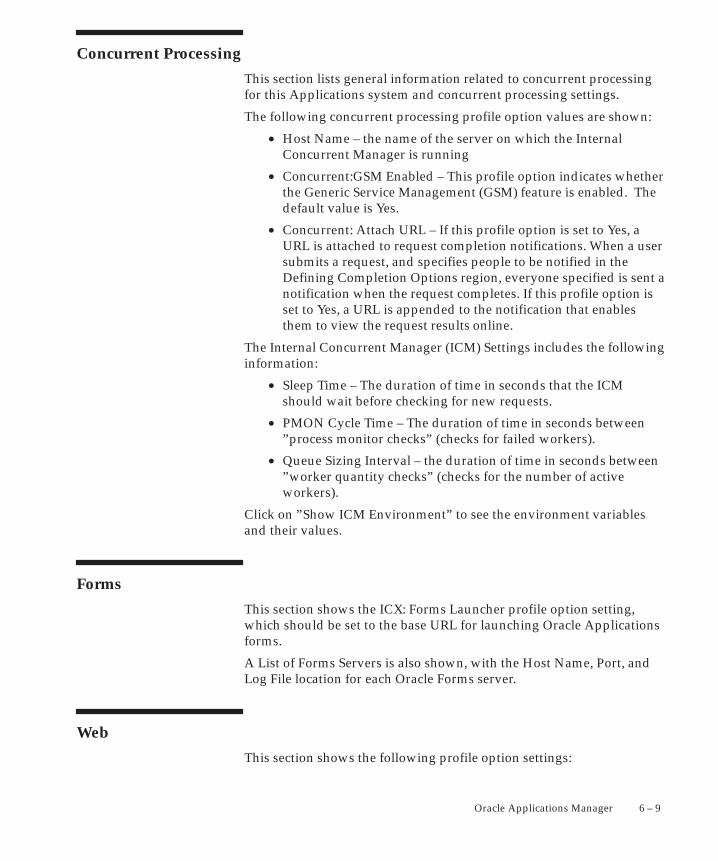
6 – 9Oracle Applications Manager
Concurrent Processing
This section lists general information related to concurrent processingfor this Applications system and concurrent processing settings.
The following concurrent processing profile option values are shown:
• Host Name – the name of the server on which the InternalConcurrent Manager is running
• Concurrent:GSM Enabled – This profile option indicates whetherthe Generic Service Management (GSM) feature is enabled. Thedefault value is Yes.
• Concurrent: Attach URL – If this profile option is set to Yes, aURL is attached to request completion notifications. When a usersubmits a request, and specifies people to be notified in theDefining Completion Options region, everyone specified is sent anotification when the request completes. If this profile option isset to Yes, a URL is appended to the notification that enablesthem to view the request results online.
The Internal Concurrent Manager (ICM) Settings includes the followinginformation:
• Sleep Time – The duration of time in seconds that the ICMshould wait before checking for new requests.
• PMON Cycle Time – The duration of time in seconds between”process monitor checks” (checks for failed workers).
• Queue Sizing Interval – the duration of time in seconds between”worker quantity checks” (checks for the number of activeworkers).
Click on ”Show ICM Environment” to see the environment variablesand their values.
Forms
This section shows the ICX: Forms Launcher profile option setting,which should be set to the base URL for launching Oracle Applicationsforms.
A List of Forms Servers is also shown, with the Host Name, Port, andLog File location for each Oracle Forms server.
Web
This section shows the following profile option settings:
6 – 10 Oracle Applications System Administrator’s Guide
• Applications Web Agent – Provides the base URL for the APPSSchema’s WebServer DAD. This profile option must be set to theURL which identifies the mod_plsql PL/SQL Gateway DatabaseAccess Descriptor base URL for your Applications instance.Oracle Applications use the value of this profile option toconstruct URLs for ’WWW’ type functions, Attachments, Export,and other features.
• Applications Servlet Agent – This profile option must be set tothe URL base for the servlet execution engine on Apache. OracleApplications uses the value of this profile option to constructURLs for JSP and SERVLET type functions. The syntax is:
http://<hostname>:<port>/<servlet_zone>
• Application Framework Agent – This profile option must pointto the Quik Apache Server.
A List of Web Servers is also shown, with the Host Name, Port, andLog File location for each web server.
Other
This section shows the following profile option settings:
• TCF:HOST and TCF Port – These profile options identify thenetwork location of the TCF Server. The TCF Server supportsvarious parts of the Oracle Applications user interface byexecuting some of their associated server logic and providingaccess to the database.
• ICX: Report Launcher, ICX: Report Server, ICX: Report Link –These profile options are used by the Oracle Business IntelligenceSystem (BIS) reports. For more information on these, see theOracle Business Intelligence System Implementation Guide.
System Activity
This region displays information on the system’s activity.
Navigation: Applications Systems > (B) Activity or click on [SystemName] or click on the ”check mark” icon under Concurrent ProcessingStatus for a system, or Applications Systems > Site Map > Service Status(under Concurrent Managers)
A Database Sessions graph displays the number of database sessionsrelated to the following:
6 – 11Oracle Applications Manager
• Login sessions
• Oracle Applications forms sessions
• Services
• Requests
When a user logs into Oracle Applications forms, a login session iscreated. Each form opened by the user has its own session (formsession) in the database.
A Concurrent Requests graph displays the number of requests with thefollowing statuses:
• Pending
• Running
• Waiting on a lock – these running requests are waiting for a lockon a database object that is currently held by another process
• Inactive
• Completed in the last hour
Click on the bar for any status to drill down to more information onrequests of each status.
Related Links
Click on Database Status to see information on the database.
Click on System Exceptions to see information on any exceptions forthe system. These are error conditions reported to the OracleApplications Manager by various system processes.
Click on Submit a New Request to submit a new concurrent request.
Note: To submit a new request, you use the Schedule Requestwindows in the Self Service Framework. A new browserwindow opens for you to submit your request.
Services
This region displays a list of the system’s application tier services andtheir statuses. It also lists the number of active processes and targetprocesses.
From this region you can select a service and use the View Detailsbutton to view more information on that service, as well as performcertain actions on them.
6 – 12 Oracle Applications System Administrator’s Guide
See also:
• Service Instances
• Internal Concurrent Manager
• Conflict Resolution Manager
• Scheduler/Prerelease Manager
• Request Processing Manager
• Internal Monitor
• Transaction Manager
System Exceptions
This page displays information on exceptions that have occurred inyour system. These exceptions are reported by various OracleApplications system processes.
Navigation: Application Systems > System Activity > System Exceptions or Application Systems > Sitemap > System Exceptions (under Activity)
You can search on exceptions using the following criteria:
• Application name
• User name
• Severity (Fatal, Error, Warning, Any)
• Processed (All, Yes, No)
The following information is displayed:
• Severity
• Message
• Module, if any
• Application
• User
• Session ID
• Time
• Processed (Y or N)
After the necessary corrective action has been taken, ( for example,extending the tablespaces for a ”could not extend tablespace”exception), you can select the exception and click ”Apply” to confirm
6 – 13Oracle Applications Manager
that the exception has been processed. This will move the exception toa ”processed” status and will not appear in the exceptions list thatrequires the database administrator’s attention.
Forms Sessions
This page shows information on the current forms sessions. Everyopen form has its own database session, or ”form session.”
Navigation: Application Systems > Site Map > Forms Sessions (underActivity)
The following columns are shown for each session::
• Form Name – The name of the form.
• User Name – The user associated with the form session.
• Responsibility – The responsibility associated with the formsession.
• Application – The application associated with the form session.
• LRs (Session Logical Reads) – Input/output (I/O) is one of themost expensive operations in a database system. SQL statementsthat are I/O intensive can monopolize memory and disk use andcause other database operations to compete for these resources.To prevent single sources of excessive I/O, Oracle lets you limitthe logical data block reads per call and per session. Logical datablock reads include data block reads from both memory anddisk. The limits are set and measured in number of block readsperformed by a call or during a session.
• PRs (Session Physical Reads) – The total number of data blocksread from disk for the session.
• CPU – The CPU used by this session.
• PGA (Session PGA memory) – The Program Global Area (PGA)is a memory buffer that contains data and control informationfor a server process. A PGA is created by Oracle when a serverprocess is started. The information in a PGA depends on theconfiguration of Oracle.
• UGA (Session UGA memory) – The User Global Area for thesession.
• Duration – the duration of the session.
6 – 14 Oracle Applications System Administrator’s Guide
Database Status
This window displays the details on the database session.
Navigation: Applications Systems > click on the icon in the Database Statuscolumn for a system, or from System Activity > Database Status (underRelated Links)
For more information on the entities listed here, refer to the followingdocumentation:
• Oracle8i Administrator’s Guide
• Oracle8i Concepts
• Oracle8i Reference
• Oracle8i Designing and Tuning for Performance
Instance Status
The following information is shown:
• Name
• Host
• Version
• Startup Time
• State
• Shutdown Pending
• Status
• Role
• Sessions (number)
Data is also shown for the following:
• Wait Events
• System Statistics
• Table Space and Free Space
• Rollback Segments and Extents
Processes
The Processes page shows information on the concurrent processes of aservice instance.
6 – 15Oracle Applications Manager
You navigate to this page from the Service Instances page for a service.
Navigation: Applications Systems > System Activity > (Services region)[Service] > (B) View Processes
The following information is given for each process:
• Status – The status of the process. The following are validstatuses:
– Active – Currently running service processes display as”Active”.
– Deactivated – Manager processes that were explicitlydeactivated by a system administrator, either bydeactivating the service or by shutting down the InternalConcurrent Manager.
– Migrating – Services that are migrating between primaryand secondary nodes display as ”Migrating”. In a parallelconcurrent processing environment, services run on eitherthe primary or secondary node assigned to them. Servicesmigrate to the secondary node if the primary node or thedatabase instance on the primary node is unavailable.Services migrate back to the primary node once it becomesavailable.
– Terminating – service processes that are being terminateddisplay as ”Terminating”. These processes were terminatedby you choosing the Terminate button in the AdministerConcurrent Managers form, by you choosing Abort in theService Instances page, or by a user selecting ”Terminate” inthe Concurrent Requests form.
– Terminated – service processes that have been terminateddisplay as ”Terminated”. These processes were terminatedby you choosing the Terminate button in the AdministerConcurrent Managers form, by you choosing Abort in theService Instances page, or by a user selecting ”Terminate” inthe Concurrent Requests form.
• SPID – The operating system process ID associated with theservice process.
• AUDSID – The database session ID for the service process.
• Oracle SPID – The ORACLE system process ID associated withthe service process.
• Start Date – The start date for the process.
You can use the buttons to view the following:
6 – 16 Oracle Applications System Administrator’s Guide
• Environment – The environment variable values for this serviceinstance.
• Manager Log – The manager log.
• ICM Log – The Internal Concurrent Manager log.
Sitemap
The site map lists the features and applications available in the OracleApplications Manager.
Navigation: Applications Systems > (B) Site Map
Features are grouped into the following categories:
Configuration
• Overview
• Site Level Profile Settings
• Database Initialization Parameters
• Internal Concurrent Manager (ICM) Environment
• Products Installed
Activity
• Activity Monitors
• Forms Sessions
• System Exceptions
Concurrent Requests
• Pending Requests
• Running Requests
• Inactive Requests
• Completed Requests
• Advanced Search for Requests
• Submit New Request
Concurrent Managers
• Request Processing Managers
6 – 17Oracle Applications Manager
• Transaction Managers
• Internal Monitors
• Service Status
• Workshift Library
Patches
• Simple Patches Search
• Advanced Patches Search
• Simple Files Search
• Advanced Files Search
Integrated Applications
• Workflow Manager
• Applications Usage
• Service Fulfillment Feature
Concurrent Requests
Use the Requests page to review details of concurrent requests for anOracle Applications system.
You can navigate to this page via several ways, including:
Applications Systems > (B) Activity or click on <System Name> >Concurrent Requests graph (click on <request type>) or
Applications Systems > (B) Activity or click on <System Name > (Search onRequests at top of page)
A list of requests is shown, with the following information, for all typesof requests.
• Request ID
• Short Name
• Program
• Requestor
Also, you can click on ”Show” under the Details column to see thedetails for a request, such as:

6 – 18 Oracle Applications System Administrator’s Guide
• Printing information
• Notification recipients
• Parameters
• Language
• Submission time
• Schedule
Inactive Requests
For inactive requests, the following additional columns are displayed:
• Priority – The priority of the concurrent program to be run. Aconcurrent program may be given a priority when it is initiallydefined. However, you can assign a new priority to a requesthere.
• Requested Start – The requested start time.
Pending Requests
For pending requests, the following additional columns are displayed:
• Priority – The priority of the concurrent program to be run. Aconcurrent program may be given a priority when it is initiallydefined. However, you can assign a new priority to a requesthere.
• Wait Time – How long the request has been in Pending status.
• Requested Start – The requested start time.
Running Requests
For running requests, you can also view a graph showing requestsgrouped by duration.
Completed Requests
For completed requests, the following additional columns aredisplayed:
• Completion Status– The status in which the request completed.Valid statuses are Normal, Error, Warning, Cancelled, andTerminated.
• Duration – How long the request took to run.
• Started At – The time at which the request was started.
6 – 19Oracle Applications Manager
For all requests, you can use the buttons to view the following:
• Diagnostics
• Request Log
• Manager Log
• Output
Advanced Search for Requests
This page allows you to search for requests according to variouscriteria including request attributes, request dates, and requestduration and wait time.
Attributes
You can search on the following attributes:
• Request ID
• Program Short Name
• Manager
• Application
• Requestor
• Responsibility
• Phase
• Status
• Description
Date
You can search for requests that are submitted within a specified daterange, or completed within a specified date range.
Duration/Wait Time
You can search for requests according to specified parameters:
• Waiting requests that have waited above a specified minimumwait time and below a specified maximum wait time
• Short running requests of a specified maximum duration thathave waited longer than a specified wait time

6 – 20 Oracle Applications System Administrator’s Guide
• Long running requests that have run longer than a specifiedduration
6 – 21Oracle Applications Manager
Services
Service InstancesThe Service Instances pages contain detailed information on the serviceinstances for a particular service type, and display functions you canperform on the services.
Service types include, but are not limited to, the following:
• Internal Concurrent Manager
• Conflict Resolution Manager
• Scheduler/Prerelease Manager
• Request Processing Manager
• Internal Monitor
• Transaction Manager
The information and functionality available depends on the servicetype. Information may include the following:
• Status
• State – The current state of a service. If you perform an action onthat service, the state column value is updated.
• Node – In a parallel concurrent processing environment, aservice’s processes are targeted to run on the node displayedhere. If a service is defined to use a platform–specific systemqueue, this column displays the name of the queue to which theservice submits its processes.
• Number of Running Requests
• Number of Pending Requests
• Actual Processes – The number of operating system processes.Typically, the number of actual processes equals the number oftarget processes (the maximum number of requests a service canrun). However, the number of actual processes may be less thanthe number of target processes due to lack of requests, servicedeactivation, or service migration.
• Target Processes –This column displays the maximum number ofservice processes that can be active for this service.
Service Instances for the Internal Concurrent ManagerThis page shows you information on the service instance for theInternal Concurrent Manager (ICM).
6 – 22 Oracle Applications System Administrator’s Guide
Navigation: Applications Systems > System Activity > (Services region)Internal Concurrent Manager
The following information is displayed:
• Status
• State
• Node
• Number of Pending Requests – for the ICM, these are eitherservice control requests (activate, deactivate, etc.) or requestsmarked for termination.
You can use the buttons at the top to perform the following on theservice instance:
• View Status
• View Processes
• View Requests
Controlling Service Instances
You can select the service instance and use the drop down menu abovethe table to perform the actions below.
Stop
You can stop (deactivate) an individual service.
When you stop the Internal Concurrent Manager, all other managersare deactivated as well. Managers previously deactivated on anindividual basis are not affected.
Any service that was active when the ICM was stopped will berestarted when the ICM is brought back up. Managers that weredeactivated on an individual basis will not be brought back up with theICM.
Abort
You can abort or terminate individual services.
When you abort (terminate) requests and terminate the InternalConcurrent Manager, all running requests (running concurrentprograms) are terminated, and all managers are terminated. Managerspreviously deactivated on an individual basis are not affected.
Any service that was active when the ICM was aborted will berestarted when the ICM is brought back up. Managers that were
6 – 23Oracle Applications Manager
deactivated on an individual basis will not be brought back up with theICM.
Verify
The Internal Concurrent Manager periodically monitors the processesof each concurrent manager. You can force this process monitoring, orPMON activity, to occur by choosing the Verify action.
Service Instances for the Conflict Resolution Manager
This page shows you information on service instances for the ConflictResolution Manager (CRM).
Navigation: Applications Systems > System Activity > (Services region)Conflict Resolution Manager
The following information is displayed:
• Status
• State
• Node
• Number of Pending Requests – the number of Pending/Standbyrequests. For each Pending/Standby request, the CRM willevaluate the constraints (such as incompatibilities, single thread,user limit, etc.) and change the request to Pending/Normalwhen appropriate.
You can use the buttons at the top to perform the following on aselected service instance:
• View Status
• View Processes
• View Concurrent Requests
Controlling Service Instances
You can select a service instance and use the drop down menu abovethe table to perform the actions below. Or you can use the drop downmenu at the top right to perform a single action on all service instances.
Verify
You can use the Verify option for the Conflict Resolution Manager toforce it to ”re–cache” its information on incompatibilities among

6 – 24 Oracle Applications System Administrator’s Guide
concurrent programs. Concurrent programs may be defined to beincompatible with other programs; that is, they should not runsimultaneously with each other because they might interfere with eachother’s execution.
Forcing the Conflict Resolution Manager to re–cache its information onusers. A user may be assigned a maximum number of requests thatmay be run simultaneously using the Concurrent:Active Requests Limitprofile option. The Conflict Resolution Manager rebuilds its list of userswhen you choose Verify.
Service Instances for a Scheduler/Prerelease Manager
This page shows you information on service instances for aScheduler/Prerelease Manager. The Scheduler checks for and managesrequests with advanced schedules.
Navigation: Applications Systems > System Activity > (Services region)Scheduler/Prerelease Manager
The following information is displayed:
• Status
• State
• Node
• Actual Processes
• Target Processes
You can use the buttons at the top to perform the following on aselected service instance:
• View Status
• View Processes
Service Instances of a Request Processing Manager
This page shows you information on service instances for a requestprocessing manager. This type of manager runs concurrent requests.
Navigation: Applications Systems > System Activity > (Services region)Request Processing Manager
The following information is displayed:

6 – 25Oracle Applications Manager
• Status
• State
• Node
• Number of Running Requests
• Number of Pending Requests
• Actual Processes
• Target Processes
You can use the buttons at the top to perform the following on aselected service instance:
• Delete
• Edit
• View Status
• View Processes
• View Concurrent Requests
To create a new service instance, use the Create New button.
Controlling Service Instances
You can select a service instance and use the drop down menu abovethe table to perform the actions listed below. Or you can use the dropdown menu at the top right to perform a single action on all serviceinstances.
Start
You can start (activate) a service instance.
Stop
You can deactivate individual services. Once deactivated, a servicedoes not restart until you select the service and choose the Start button.
When you deactivate a manager, all requests (concurrent programs)currently running are allowed to complete before the manager shutsdown.
Restart
When you restart a manager, the processes are shut down and thenbrought back up.
6 – 26 Oracle Applications System Administrator’s Guide
Abort
You can abort or terminate individual services.
Service Instances of a Transaction Manager
This page shows you information on service instances for a transactionmanager.
Navigation: Applications Systems > System Activity > (Services region)Transaction Manager
The following information is displayed:
• Status
• State
• Node
• Actual Processes
• Target Processes
You can use the buttons at the top to perform the following on aselected service instance:
• Delete
• Edit
• View Status
• View Processes
To create a new service instance, use the Create New button.
Controlling Service Instances
You can select a service instance and use the drop down menu abovethe table to perform the actions listed below. Or you can use the dropdown menu at the top right to perform a single action on all serviceinstances.
Start
You can start (activate) a service instance.
Stop
You can deactivate individual services. Once deactivated, a servicedoes not restart until you select the service and choose the Start button.
6 – 27Oracle Applications Manager
When you deactivate a manager, all transaction requests currentlyrunning are allowed to complete before the manager shuts down.
Restart
When you restart a transaction manager, its processes are shut downand then brought back up.
Abort
You can abort or terminate individual services.
Service Instances of an Internal Monitor
This page shows you information on service instances for an InternalMonitor. The purpose of an Internal Monitor is to monitor the InternalConcurrent Manager and restart it when it exits unexpectedly.
Navigation: Applications Systems > System Activity > (Services region)Internal Monitor
The following information is displayed:
• Status
• State
• Node
• Actual Processes
• Target Processes
You can use the buttons at the top to perform the following on aselected service instance:
• Delete
• Edit
• View Status
• View Processes
To create a new service instance, use the Create New button.
Controlling Service Instances
You can select a service instance and use the drop down menu abovethe table to perform the actions below. Or you can use the drop downmenu at the top right to perform a single action on all service instances.
6 – 28 Oracle Applications System Administrator’s Guide
Start
You can start (activate) a service instance.
Stop
You can deactivate individual services. Once deactivated, a servicedoes not restart until you select the service and choose the Start button.
Abort
You can abort or terminate individual services.
Service Instances for a Service Manager
This page shows you information on service instances for a servicemanager. Service managers perform actions on behalf of the InternalConcurrent Manager (ICM). They are controlled automatically by theICM as needed and cannot be manually controlled.
Navigation: Applications Systems > System Activity > (Services region)Service Manager
The following information is displayed:
• Status
• State
• Node
You can use the buttons at the top to perform the following on aselected service instance:
• View Status
• View Processes
Creating and Editing a Concurrent Manager
Use this page to create a new concurrent manager.
Navigation: Applications Systems > Sitemap > Request Processing Managers> (B) Create New or (B) Edit
You can define when a manager runs and how many programs themanager can start simultaneously when you assign work shifts to themanager. Specify which programs a manager can start by definingspecialization rules.
6 – 29Oracle Applications Manager
General
Enabled
Check this box if the manager is enabled.
Manager
The name of the manager.
Short Name
The short name of the manager.
Application
The application name does not prevent a manager from startingprograms associated with other applications. To restrict a manager toonly running programs associated with certain applications, go to theRules section.
The combination of an application and the name you define for yourmanager uniquely identifies the manager.
Cache Size
Enter the number of requests your manager remembers each time itreads which requests to run. For example, if a manager’s work shift has1 target process and a cache value of 3, it will read three requests, andtry to run those three requests before reading any new requests.
Suggestion: Enter a value of 1 when defining a manager thatruns long, time–consuming jobs, and a value of 3 or 4 formanagers that run small, quick jobs.
Program Library
Select a library of immediate concurrent programs to make available toyour manager. Your manager can only run immediate concurrentprograms that are registered in the selected program library.Concurrent managers can run only those immediate concurrentprograms listed in their program library. They can also run concurrentprograms that use any other type of concurrent program executable.
Resources Group
Optionally enter the resource consumer group for this manager.
6 – 30 Oracle Applications System Administrator’s Guide
Rules
Use the Rules section to specialize your manager to run only certainkinds of requests. Without specialization rules, a manager acceptsrequests to start any concurrent program.
A listing of available rules is displayed. Check the ”Include” checkboxfor a rule to include it.
The following information is also given for each rule:
• Type
• Application
• Name
• Description
To edit any of this information, use the Edit button. Use the Removebutton to remove a rule from the list. To create a new rule, use theCreate New dropdown list and click Go.
Work Shifts
Use the Work Shifts section to assign work shifts to your manager. Awork shift defines the dates and times the manager is enabled, as wellas the number of processes the manager can start running during thework shift.
To add a work shift, use the Add from Available Shifts button.
For each work shift listed, the following is displayed:
Sleep Seconds
The sleep time for your manager during this work shift. Sleep time isthe number of seconds your manager waits between checking the list ofpending concurrent requests (concurrent requests waiting to bestarted).
Suggestion: Set the sleep time to be very brief during periodswhen the number of requests submitted is expected to be high.
Processes
The number of operating system processes you want your work shift torun simultaneously. Each process can run a concurrent request.
For example, if a work shift is defined with three (3) target processes,the manager can run up to three requests simultaneously.
6 – 31Oracle Applications Manager
Nodes
If you are operating in a parallel concurrent processing environmentand you want your manager to operate on a specific node, select thename of the node.
The primary node, if available, is the node your concurrent manageroperates on. If the primary node or the database instance on it goesdown, your concurrent manager migrates to its secondary node. Yourconcurrent manager migrates back to its primary node when that nodebecomes available.
Nodes must be previously registered with Oracle Applications, usingthe Nodes form in Oracle Applications.
Creating and Editing an Internal Monitor
Use this page to create a new Internal Monitor.
Navigation: Applications Systems > Sitemap > Internal Monitors > (B)Create New or (B) Edit
Internal Monitors monitor the Internal Concurrent Manager in aparallel concurrent processing environment. If the Internal ConcurrentManager exits abnormally (for example, because its node or itsdatabase instance goes down), an Internal Monitor restarts it onanother node.
General
Enabled
Check this box if this internal monitor is enabled.
Manager
The name of the internal monitor.
Short Name
The short name for your internal monitor.
Application
The application associated with the internal monitor.
6 – 32 Oracle Applications System Administrator’s Guide
The combination of an application and the short name you define foryour internal monitor uniquely identifies the monitor.
Program Library
For an Internal Monitor, the program library is FNDIMON.
Work Shifts
Use the Work Shifts section to assign work shifts. A work shift definesthe dates and times the manager is enabled, as well as the number ofprocesses the manager can start running during the work shift.
To add a work shift, use the Add from Available Shifts button.
For each work shift listed, the following is displayed:
Sleep Seconds
The sleep time for your manager during this work shift. Sleep time isthe number of seconds your manager waits between checking the list ofpending concurrent requests (concurrent requests waiting to bestarted).
Suggestion: Set the sleep time to be very brief during periodswhen the number of requests submitted is expected to be high.
Processes
The number of operating system processes you want your work shift torun simultaneously. Each process can run a concurrent request.
For example, if a work shift is defined with three (3) target processes,the manager can run up to three requests simultaneously.
Nodes
If you are operating in a parallel concurrent processing environmentand you want your manager to operate on a specific node, select thename of the node.
The primary node, if available, is the node your concurrent manageroperates on. If the primary node or the database instance on it goesdown, your concurrent manager migrates to its secondary node. Yourconcurrent manager migrates back to its primary node when that nodebecomes available.
Nodes must be previously registered with Oracle Applications, usingthe Nodes form in Oracle Applications.
6 – 33Oracle Applications Manager
Creating and Editing a Transaction Manager
Use this page to create a new Transaction Manager. TransactionManagers handle synchronous requests from client machines.
Navigation: Applications Systems > Sitemap > Transaction Managers > (B)Create New or (B) Edit
General
Enabled
Check this box if this transaction manager is enabled.
Manager
The name of the transaction manager.
Short Name
The short name for your transaction manager.
Application
The application associated with the transaction manager.
The combination of an application and the short name you specify hereuniquely defines the transaction manager.
Program Library
Select a library of immediate transaction programs to make available toyour manager. Your manager can only run immediate transactionprograms that are registered in the selected program library.Transaction managers can run only those immediate transactionprograms listed in their program library. They can also run transactionprograms that use any other type of transaction program executable.
Work Shifts
Use the Work Shifts section to assign work shifts to your manager. Awork shift defines the dates and times the manager is enabled, as wellas the number of processes the manager can start running during thework shift.
To add a work shift, use the Add from Available Shifts button.

6 – 34 Oracle Applications System Administrator’s Guide
For each work shift listed, the following is displayed:
Sleep Seconds
The sleep time for a transaction manager determines how often amanager will check to see if it should shut down.
Suggestion: Set the sleep time to be very brief during periodswhen the number of requests submitted is expected to be high.
Processes
The number of operating system processes you want your work shift torun simultaneously. Each process can run a concurrent request.
For example, if a work shift is defined with three (3) target processes,the manager can run up to three requests simultaneously.
NOdes
If you are operating in a parallel concurrent processing environmentand you want your manager to operate on a specific node, select thename of the node.
The primary node, if available, is the node your concurrent manageroperates on. If the primary node or the database instance on it goesdown, your concurrent manager migrates to its secondary node. Yourconcurrent manager migrates back to its primary node when that nodebecomes available.
Nodes must be previously registered with Oracle Applications, usingthe Nodes form in Oracle Applications.
6 – 35Oracle Applications Manager
Work Shifts
Create a New Work Shift
Use this page to define work shifts for your services. Define work shiftsto specify when your services can work.
Navigation: Applications Systems > System Activity > Service Instances >Create [Service] > Workshifts region, (B) Add from Available Shifts > (B)Create New or Applications Systems > (B) Sitemap > Work Shift Library >Create New
Name
The name of your work shift should be intuitive, for instance ”WeekDays”, ”Weeknights” or ”Weekends”.
Description
Add a description for your work shift.
Schedule
For each work shift, specify a time period covering a range of days or aparticular date. Specify if you are scheduling by day or by date.
Day
Enter the first and last days of this shift. For instance, if your shift nameis ”Week Days”, you could enter ”Monday” in the ”Days of WeekFrom” field and ”Friday” in the ”Days of Week To” field. If you enter avalue in the ”Days of Week From” field, you must enter a value in the”Days of Week To field”.
Date
Enter a date here to create a date–specific work shift.
Date–specific work shifts override work shifts that do not specify aspecific date. If you want to enter a value in this field (specify a date),you may not enter values for the Days of Week fields for this row.
Time
Enter the times of day at which your concurrent shift begins/ends. Thetime format is HH24:MM. For example, if your work shift name is
6 – 36 Oracle Applications System Administrator’s Guide
”Week Days”, you could enter ”09:00” (9:00 am) as the start time and”17:00” (5:00 pm) as the end time. Note that Oracle Applications uses a24–hour clock.
List of Work Shifts
This page displays the available work shifts.
Navigation: Applications Systems > System Activity > Service Instances >Create [Service] > Workshifts region, (B) Add from Available Shifts orApplications Systems > (B) Sitemap > Work Shift Library
The following columns are shown:
• Name
• Start Day
• End Day
• Start Time
• End Time
• Date
• Description
You can use the buttons to edit or delete an existing work shift, orcreate a new one.
6 – 37Oracle Applications Manager
Oracle Workflow Manager
Oracle Workflow Manager is a component of Oracle ApplicationsManager that allows system administrators to manage OracleWorkflow for multiple Oracle Applications instances from a singleconsole.
Using Oracle Workflow Manager, administrators can control Workflowsystem services, such as background engines, the Notification Mailer,agent listeners, queue propagation, and purging obsolete Workflowdata. Administrators can also monitor work item processing byviewing the distribution of all work items by status and drilling downto additional information. Additionally, they can monitor eventmessage processing for local Business Event System agents by viewingthe distribution of event messages by status. With this ability tomonitor work items and event messages, a system administrator canidentify possible bottlenecks easily.
To access Oracle Workflow Manager, log into Oracle ApplicationsManager and select an applications system. Then, you can follow oneof the following navigation paths:
• Choose Workflow Manager from the pull–down menu in theApplications Systems page and click the Go button.
• Click the Sitemap button in the Applications Systems page, andthen click the Workflow Manager link in the IntegratedApplications region of the Sitemap page.
Navigation: Applications Systems > (pull–down menu) Workflow Manager >(B) Go
Workflow System Status
The Workflow System Status page provides a high–level view of thestatus of your Oracle Workflow instance.
Oracle Workflow Manager shows the status of the following Workflowprocesses:
• Background Engine
• Notification Mailer
• Agent Listener
• Queue Propagation
• Purge

6 – 38 Oracle Applications System Administrator’s Guide
For each kind of process, Oracle Workflow Manager displays theprocess name, the process type, an overall status, and the currentnumber of processes of that kind.
To view details for a process, either click the process link in the Processcolumn, or select the process and click the View Details button.
To submit a concurrent request through Oracle Self–Service WebApplications for a process that is a concurrent program, choose theprocess you want from the Submit Request For pull–down menu andclick the Go button. You can submit requests for the followingprocesses:
• Background Engine
• Agent Listener
• Purge
Workflow Metrics
Work Items
This graph displays the distribution of all work items with thefollowing statuses: Active, Deferred, Suspended, and Error.
• To view the distribution of item types within a status, either clickthe bar for that status in the graph, or click the status name link.
• To view the number of work items with a particular status,position the mouse pointer over the bar for that status in thegraph.
Note: A work item can be counted in more than one status.For example, all work items that do not have an end date arecounted as Active work items, including deferred, suspended,and errored work items as well as running work items. Also, ifan activity within an item is deferred, and the work item as awhole is suspended, the work item is included in the count forboth the Deferred and Suspended statuses. Consequently, thetotal of the counts for all the statuses is greater than the actualnumber of work items.
Agent Activity
This graph displays the distribution of all event messages on BusinessEvent System agents with the following statuses: Ready, Waiting,Expired, Undeliverable, and Error. To view the number of eventmessages with a particular status, position the mouse pointer over thebar for that status in the graph.

6 – 39Oracle Applications Manager
Related Metrics
Completed Work Items
Click the Completed Work Items link to view the distribution ofcompleted work items across different item types.
6 – 40 Oracle Applications System Administrator’s Guide
Background EnginesBackground engine processes serve three purposes in Oracle Workflow:to handle activities deferred by the Workflow Engine, to handle timedout notification activities, and to handle stuck processes.
When the Workflow Engine initiates and performs a process, itcompletes all necessary activities before continuing to the next eligibleactivity. In some cases, an activity can require a large amount ofprocessing resource or time to complete. Oracle Workflow lets youmanage the load on the Workflow Engine by setting up supplementalengines to run these costly activities as background tasks. In thesecases, the costly activity is deferred by the Workflow Engine and runlater by a background engine. The main Workflow Engine can thencontinue to the next available activity, which may occur on some otherparallel branch of the process.
A background engine must also be set up to handle timed outnotification activities. When the Workflow Engine comes across anotification activity that requires a response, it calls the NotificationSystem to send the notification to the appropriate performer, and thensets the notification activity to a status of ’NOTIFIED’ until theperformer completes the notification activity. Meanwhile, a backgroundengine set up to handle timed out activities periodically checks for’NOTIFIED’ activities and whether these activities have time out valuesspecified. If a ’NOTIFIED’ activity does have a time out value, and thecurrent date and time exceeds that time out value, the backgroundengine marks that activity as timed out and calls the Workflow Engine.The Workflow Engine then resumes by trying to execute a <timeout>transition activity.
Additionally, a background engine must be set up to handle stuckprocesses. A process is identified as stuck when it has a status ofACTIVE, but cannot progress any further. For example, a process couldbecome stuck in the following situations:
• A thread within a process leads to an activity that is not definedas an End activity but has no other activity modeled after it, andno other activity is active.
• A process with only one thread loops back, but the pivot activityof the loop has the On Revisit property set to Ignore.
• An activity returns a result for which no eligible transition exists.For instance, if the function for a function activity returns anunexpected result value, and no default transition is modeledafter that activity, the process cannot continue.
The background engine sets the status of a stuck process toERROR:#STUCK and executes the error process defined for it.
6 – 41Oracle Applications Manager
You can define and start up as many background engines as you like tocheck for deferred and timed out activities.
Background engines can be restricted to handle activities associatedwith specific item types, and within specific cost ranges. A backgroundengine runs until it completes all eligible activities at the time it wasinitiated. Generally, you should set the background engine up to runperiodically.
Ensure that you have at least one background engine that can check fortimed out activities, one that can process deferred activities, and onethat can handle stuck processes. At a minimum, you need to set up onebackground engine that can handle both timed out and deferredactivities as well as stuck processes. Generally, you should run aseparate background engine to check for stuck processes at lessfrequent intervals than the background engine that you run fordeferred activities, normally not more often than once a day. Run thebackground engine to check for stuck processes when the load on thesystem is low.
Running Background Engines
You run a background engine by submitting the Workflow BackgroundProcess concurrent program (FNDWFBG). When you start a newbackground engine, you can restrict the engine to handle activitiesassociated with specific item types, and within specific cost ranges.
• To submit a request for the Workflow Background Processconcurrent program through Oracle Self–Service WebApplications, choose Background Engine from the SubmitRequest For pull–down menu in the Workflow System Statuspage and click the Go button.
• To view Workflow Background Process concurrent requests,either click the Background Engine link in the Process column inthe Workflow System Status page, or select the BackgroundEngine process and click the View Details button.
Navigation: Applications Systems > (pull–down menu) Workflow Manager >(B) Go
Parameters
When you submit the Workflow Background Process concurrentprogram, specify the following parameters.
6 – 42 Oracle Applications System Administrator’s Guide
Item Type
Specify an item type to restrict this engine to activities associated withthat item type. If you do not specify an item type, the engine processesany activity regardless of its item type.
Minimum Threshold
Specify the minimum cost that an activity must have for thisbackground engine to execute it, in hundredths of a second.
Maximum Threshold
Specify the maximum cost that an activity can have for this backgroundengine to execute it, in hundredths of a second. By using MinimumThreshold and Maximum Threshold you can create multiplebackground engines to handle very specific types of activities. Thedefault values for these arguments are 0 and 100 so that thebackground engine runs activities regardless of cost.
Process Deferred
Specify whether this background engine checks for deferred activities.Setting this parameter to Yes allows the engine to check for deferredactivities.
Process Timeout
Specify whether this background engine checks for activities that havetimed out. Setting this parameter to Yes allows the engine to check fortimed out activities.
Process Stuck
Specify whether this background engine checks for stuck processes.Setting this parameter to Yes allows the engine to check for stuckprocesses.
Note: Make sure you have a least one background engine thatcan check for timed out activities, one that can process deferredactivities, and one that can handle stuck processes. At aminimum, you need to set up one background engine that canhandle both timed out and deferred activities as well as stuckprocesses.
Schedule
Specify the schedule options for your request. You can submit theWorkflow Background Process concurrent program several times toschedule different background engines to run at different times.
6 – 43Oracle Applications Manager
Viewing Concurrent Requests
When you view the Workflow Background Process concurrent requests,the Search Results page shows standard request detail information forthese requests. For each request, the list displays the request ID,program short name, application short name, phase, status, requester,duration, and wait time. Click any column heading to sort the list bythat column.
Navigation: Applications Systems > (pull–down menu) Workflow Manager >(B) Go > Background Engine
• To show the details for a request if they are hidden, click theShow link in the Details column. Oracle Applications Managerdisplays details about the request depending on the status of therequest. You can also perform actions, such as placing a hold ona request, canceling a request, viewing diagnostic information,viewing logs, or viewing request output, by clicking thecorresponding button. The actions that are available depend onthe status of the request.
• To hide the details for a request if they are shown, click the Hidelink in the Details column.
• To search for concurrent requests with different criteria, click theNew Search button.
• To modify the search criteria from this search, click the ModifySearch button.
6 – 44 Oracle Applications System Administrator’s Guide
Notification MailerThe Notification Mailer is a program that performs e–mail send andresponse processing for the Oracle Workflow Notification System. Youneed to implement the Notification Mailer only if you wish to haveyour workflow users receive their notifications via e–mail, as well asfrom the Notifications Worklist web page. The Notification Mailer pollsthe database for messages that have to be sent, dequeues thesemessages from the SMTP advanced queue, and performs the followingaction for each message:
• Resolves the recipient role to a single e–mail address, which itselfcan be a mail list
• Switches its database session to the role’s preferred language andterritory as defined by the directory service.
• Generates the message and any optional attachments using theappropriate message template.
• Sends the message via UNIX Sendmail or any MAPI–compliantmail application on Windows NT.
The Notification Mailer also processes responses by interpreting thetext of messages mailed to its response mail account and calling theappropriate notification response function to complete the notification.
The e–mail notifications are based on standard templates defined in theSystem: Mailer item type, which can be customized using the OracleWorkflow Builder. The templates describe the syntax the reply shouldfollow and list the information needed to confirm the notification. Thegenerated e–mail message also includes any custom site information,the due date, and any information necessary to process the response.
Once you set up the Notification Mailer to run, it continually polls thedatabase for messages to send and checks its response mail account forresponses to process. You do not have to do anything else unless youhave a need to reload the configuration parameters by eithersuspending and resuming, verifying, or stopping and restarting theNotification Mailer.
Two Notification Mailer service instances are defined in OracleWorkflow Manager by default, a detail Notification Mailer and asummary Notification Mailer.
• The detail Notification Mailer has a service name of WFMGSMDand has the Summary Only configuration parameter deselected.This Notification Mailer sends one e–mail message for eachindividual notification to users or roles with a notificationpreference of ’MAILTEXT’, ’MAILATTH’, or ’MAILHTML’.
☞
6 – 45Oracle Applications Manager
• The summary Notification Mailer has a service name ofWFMGSMS and has the Summary Only configuration parameterselected. This Notification Mailer sends one summary e–mailmessage listing all notifications since the last summary messageto users or roles with a notification preference of ’SUMMARY’.
After completing the remaining configuration parameters, you can startthese Notification Mailers to handle e–mail processing for yourWorkflow users.
Attention: The Notification Mailer will shut itself down if adatabase failure is encountered or if the PL/SQL package statefor the session is invalid due to dropping or replacing ofpackage definitions. In Oracle Workflow Manager, you canrestart the Notification Mailer program manually or schedule itto restart periodically using workshifts.
Service Instances for Workflow Mailer
This page shows the service instances for the Notification Mailer. Foreach service instance, the list displays the name, overall status,activated or deactivated state, node on which the Notification Mailer isrunning, number of actual processes, and number of target processes.Click any column heading to sort the list by that column.
Navigation: Applications Systems > (pull–down menu) Workflow Manager >(B) Go > Notification Mailer
• To view the status for a Notification Mailer service instance,select the service instance and click the View Status button.
• To view process details for a Notification Mailer service instance,either click the service instance link in the Name column, orselect the service instance and click the View Processes button.
• To define or review the configuration for a Notification Mailerservice instance, select the service instance and click theConfiguration button.
• To control the running of all the Notification Mailer serviceinstances, choose the command you want from the All commandpull–down menu and click the Go button. You can choose thefollowing commands:
– Start All
– Stop All
– Abort All
6 – 46 Oracle Applications System Administrator’s Guide
– Restart All
– Suspend All
– Resume All
– Verify All
• To control the running of a single Notification Mailer serviceinstance, select the service instance, choose the command youwant from the command pull–down menu, and click the Gobutton. You can choose the following commands:
– Start
– Stop
– Abort
– Restart
– Suspend
– Resume
– Verify
Notification Mailer Status
This page displays status details for the selected Notification Mailerservice instance.
Navigation: Applications Systems > (pull–down menu) Workflow Manager >(B) Go > Notification Mailer > (B) Status
General
• Up/Down – The overall up or down status of the serviceinstance.
• Node – The node where the service instance is running.
• Debug – A setting that indicates whether to print debugginginformation in the Notification Mailer log file.
– If debugging is turned off, click the Set Debug On button toturn it on.
– If debugging is turned on, click the Set Debug Off button toturn it off.
Processes
• Target – The number of target processes.
6 – 47Oracle Applications Manager
• Active – The number of active processes.
To control the running of the Notification Mailer service instance, clickthe button for the command you want to execute. Buttons are availablefor the following commands:
• Start
• Stop
• Abort
• Restart
• Suspend
• Resume
• Verify
Notification Mailer Processes
This page shows details about the processes for the selectedNotification Mailer service instance. For each process, the list displaysthe status, operating system process identifier (SPID), auditing sessionidentifier (AUDSID), Oracle server process identifier (Oracle SPID),and start date and time. Click any column heading to sort the list bythat column.
Navigation: Applications Systems > (pull–down menu) Workflow Manager >(B) Go > Notification Mailer > (B) Processes
• To view the log for the manager running a process, select theprocess and click the Manager Log button.
• To view the internal log for a process, select the process and clickthe Internal Log button.
• To view database session information for a process, click thesession ID link in the AUDSID column.
Note: The Environment button is reserved for future use.
Notification Mailer Configuration
This page lets you configure the selected Notification Mailer serviceinstance by entering general, e–mail, send, and receive parameters.
Navigation: Applications Systems > (pull–down menu) Workflow Manager >(B) Go > Notification Mailer > (B) Configuration
6 – 48 Oracle Applications System Administrator’s Guide
• To view the throughput for the Notification Mailer serviceinstance, click the View Throughput button at the top of thepage.
• To reset all configuration parameters to their default values, clickthe Reset button at the bottom of the page.
• To submit and save the configuration parameters that youentered, click the Submit button at the bottom of the page.
General
• Service Name – The name of the service instance. The servicename is included with the outgoing notification ID. The servicename for the detail Notification Mailer defaults to WFMGSMD,and the service name for the summary Notification Mailerdefaults to WFMGSMS.
• Log – The path and file name of a log file to record activity.
• Fail Command – The command to run if the Notification Mailerencounters a fatal error.
• Queue – The SMTP advanced queue used by the NotificationMailer.
• Idle – The number of seconds to wait before checking formessages to send. The value must be an integer greater than orequal to zero. The default is 30 seconds.
• Test Address – Enter a test e–mail address where you want todirect all outgoing e–mail notifications. The test addressoverrides each recipient’s e–mail address so that you can test aworkflow process without having to change each recipient’se–mail address to access the test notifications.
• Summary Only – (Required) Indicate whether this NotificationMailer processes only notifications assigned to users or roleswith a notification preference of ’SUMMARY’ or whether itprocesses only notifications for users or roles with a notificationpreference of ’MAILTEXT’, ’MAILATTH’, or ’MAILHTML’. TheSummary Only parameter is deselected by default for the detailNotification Mailer (WFMGSMD) and selected by default for theSummary Notification Mailer (WFMGSMS). If any of yourworkflow users or roles have a notification preference of’MAILTEXT’, ’MAILATTH’ or ’MAILHTML’, then you shouldensure that the detail Notification Mailer is correctly configuredfor your site. If any of your workflow users or roles have anotification preference of ’SUMMARY’, then you should ensurethat the summary Notification Mailer is correctly configured for
6 – 49Oracle Applications Manager
your site. Ensure that the mailer with service name WFMGSMShas Summary Only selected and the mailer with service nameWFMGSMD has Summary Only deselected. If you selectSummary Only, then the Notification Mailer will shut itself downafter it polls the database and delivers any appropriatenotification summaries. You must therefore schedule theNotification Mailer to run at the frequency you want notificationsummaries to be delivered. We recommend you run thesummary Notification Mailer once a day, since the summaryincludes all open notifications.
• Debug – Indicate whether to print debugging information in theNotification Mailer log file. This parameter is deselected bydefault.
• Reset Failed – Indicate whether this Notification Mailer shouldreset all notifications with a mail status of FAILED to a mailstatus of MAIL when the Notification Mailer is started. Thisparameter is deselected by default. If Reset Failed is selected,then the Notification Mailer will attempt to resend anynotification e–mail messages that failed previously.
• SQL Trace – Indicate whether to enable the SQL Trace facility tohelp assess the efficiency of the SQL statements the NotificationMailer runs.
E–mail
• Username – (Required) The information to connect to the mailaccount that the program uses to send notification messages. ForMAPI–compliant mail programs, the account information is themail account profile name and mail account password. ForSendmail, the account information is the full file path of the mailspool file where incoming messages are stored, such as/var/mail/applmgr3. Note that this should correspond to theaccount from which you start the Notification Mailer, in thisexample, applmgr3. To start the Sendmail version of theNotification Mailer, you must also specify the full path of theSendmail executable directory in your PATH environmentvariable.
Send
• From: – The value that appears in the From: field of the messageheader when a notification message is delivered to a user. Thedefault is Workflow Mailer – Detail for the detail NotificationMailer and Workflow Mailer – Summary for the summaryNotification Mailer.
☞
6 – 50 Oracle Applications System Administrator’s Guide
• Reply To: – (Required) A default e–mail address to reply to, if thee–mail account that processes responses is different from thee–mail account that sends outgoing notifications.
• HTML Agent: – The base URL that identifies the HTML webagent that handles HTML notification responses. This URL isrequired to support e–mail notifications with HTMLattachments. The default URL is derived from the Workflow WebAgent specified in the Global Preferences web page, but you canoverride this default by entering a different value for thisparameter.
• Response Template – Enter OPEN_MAIL_OUTLOOK to use theWorkflow Open Mail for Outlook Express message as thetemplate for e–mail notifications that require a response, forusers with a notification preference of ’MAILHTML’ or’MAILATTH’. You can select this message template if you use ane–mail application such as Microsoft Outlook Express as youre–mail client, in order to include a link to the Notification Detailsweb page which lets users respond to the notification there. Thistemplate is provided to accommodate e–mail applications thatcannot process the response links included in the WorkflowOpen Mail (Templated) and Workflow Open Mail (Direct)templates. If you want to use the normal Workflow Open Mail(Templated) and Workflow Open Mail (Direct) templates, leavethe Response Template parameter blank to let the NotificationMailer use these templates by default.
Attention: Attention: If you enter OPEN_MAIL_OUTLOOKin the Response Template parameter, the Notification Mailerwill ignore the Direct Response parameter when sendingmessages to users with a notification preference of’MAILATTH’. Instead, all users with this notificationpreference will receive the plain text message body defined forthe Workflow Open Mail for Outlook Express template, whichuses the templated response method. Consequently, if you donot need to use the Workflow Open Mail for Outlook Expresstemplate, you should leave the Response Template parameterblank to let the Direct Response parameter take effect.
Note: The Response Template parameter does not apply tousers with a notification preference of ’MAILTEXT’.
• Sendmail Arguments – The arguments with which Sendmailshould be executed, if you are using the Sendmail version of theNotification Mailer. The default value for the Sendmailarguments is
%s –t –F”%s” < %s

☞
6 – 51Oracle Applications Manager
• Autoclose FYI – Indicate whether this Notification Mailerautomatically closes notifications that do not require a response,such as FYI (For Your Information) notifications, after sendingthe notifications by electronic mail. This parameter is deselectedby default. If Autoclose FYI is deselected, all FYI notificationswill remain open in the Notifications Worklist until usersmanually close these notifications.
• Direct Response – Clear this parameter to send plain textnotifications requiring a templated response to users with anotification preference of ’MAILTEXT’ or ’MAILATTH’. Selectthis parameter to send plain text notifications requiring a directresponse to users with these preferences. This parameter isdeselected by default. For the templated response method, usersmust reply using a template of response prompts and enter theirresponse values between the quotes following each prompt. Forthe direct response method, users must enter their responsevalues directly as the first lines of a reply
Attention: If you specify a value for the Response Templateparameter, the Notification Mailer will ignore the DirectResponse parameter when sending messages to users with anotification preference of ’MAILATTH’. Instead, all users withthis notification preference will receive the plain text messagebody defined for the Workflow Open Mail for Outlook Expresstemplate, which uses the templated response method.Consequently, if you do not need to use the Workflow OpenMail for Outlook Express template, you should leave theResponse Template parameter blank to let the Direct Responseparameter take effect.
• Send Access Key – Select this parameter to include an access keyin the Notification Detail Link attachment that is sent withHTML e–mail notifications and with plain text e–mailnotifications with HTML attachments. The access key allowsusers to access the Notification Details web page directly byclicking the Notification Detail Link. Clear this parameter toexclude the access key from the Notification Detail Link. Whenusers click the link without the access key, they are prompted tolog in, if they have not already done so, before they can accessthe Notification Details web page. The Send Access Keyparameter is selected by default.
• Reset NLS – Indicate whether the Notification Mailer shouldconvert the NLS codeset for a notification message according tothe notification recipient’s preferences before composing themessage. This parameter is deselected by default. If Reset NLS isselected, the Notification Mailer will convert the message to the
6 – 52 Oracle Applications System Administrator’s Guide
codeset listed in the WF_LANGUAGES table for the languageand territory specified in the recipient’s Workflow userpreferences. If no preferred territory is specified, the NotificationMailer will use the codeset associated with the first entry itencounters for the user’s preferred language. If neither alanguage nor a territory is specified in the user preferences, theNotification Mailer will use the codeset seeded inWF_LANGUAGES for the language AMERICAN and territoryAMERICA. This parameter is relevant when there are severallanguages installed in the database and the character set of theuser’s e–mail client is not the same as the one specified for thedatabase. For example, when a UTF8 database is used, thecharacter set of e–mail clients used in Western Europe isgenerally ’Western (ISO–8859–1)’. In this case, selecting the ResetNLS means that the user will receive any e–mail notificationmessages in the correct character set for the e–mail client.
Receive
• Process – The name of the mail folder or full path name of themail file where you want the Notification Mailer to putprocessed notification messages. Select the Truncate check box ifyou want the Notification Mailer to truncate the folder or file onstartup. A hyphen (–) preceding the name also causes theNotification Mailer to truncate the folder or file on startup. Thedefault is processed. For the UNIX Sendmail version of theNotification Mailer, the Process value must always be the fullpath name of a mail file.
• Unprocess – The name of the mail folder or the full path name ofthe mail file where you want the Notification Mailer to putunprocessed notification messages. Select the Truncate check boxif you want the Notification Mailer to truncate the folder or fileon startup. A hyphen (–) preceding the name also causes theNotification Mailer to truncate the folder or file on startup. Thedefault is unprocessed. For the UNIX Sendmail version of theNotification Mailer, the Unprocess value must always be the fullpath name of a mail file.
• Discard – The name of the mail folder or full path name of themail file where you want the Notification Mailer to putdiscarded messages. Select the Truncate check box if you wantthe Notification Mailer to truncate the folder or file on startup. Ahyphen (–) preceding the name also causes the NotificationMailer to truncate the folder or file on startup. The default is–discard. For the UNIX Sendmail version of the Notification
☞
6 – 53Oracle Applications Manager
Mailer, the Discard value must always be the full path name of amail file.
• Tagfile – The full path and name of a tag file. The tag file listsstrings of text found in unusual messages and the status youwant to assign to a message response if it contains any of thosestrings. Unusual messages include bounced or returnedmessages and auto–reply messages such as those sent byvacation daemons, mass mailing lists, and so on. Since differentmail systems vary in how they identify bounced, undeliverable,or otherwise invalid messages, you can use a tag file to specifyhow your mail system identifies those stray messages and howyou want the Notification Mailer to handle those messagesshould it come across them.
Attention: Only a message response that contains anotification ID is checked by the tag file. If the NotificationMailer receives a message response that does not contain anotification ID, it moves the message response to the discardfolder and sends a ’Warning’ message to the sender that itreceived unsolicited mail.
– The format used in the tag file is Status ”Matching string”where Status can be the value: ERROR, IGNORE, orUNAVAIL and ”Matching string” is the text to look for inthe From: line, Subject: line, or body of the message. TheNotification Mailer handles a message assigned one of thesestatus values as follows:
IGNORE – moves the message to the discard folder andcontinues waiting for a valid reply to the open notification.The notification’s status is still OPEN and its mail status isstill SENT.
ERROR – moves the message to the discard folder andinitiates an error process, if one is defined. The notification’sstatus is still OPEN, but its mail status and activity statusare updated to ERROR. Ideally, the workflow administratorcorrects the problem and resends the notification byupdating its mail status to MAIL.
UNAVAIL (or any other user defined tag) – moves themessage to the discard folder and continues waiting for areply to the notification since the notification’s status is stillOPEN, but its mail status is updated to UNAVAIL. Thisstatus is purely informative, as no further processing occurswith this notification.
– The Notification Mailer can also assign an INVALID statusto a message response, if the returned response value is not
☞
☞
6 – 54 Oracle Applications System Administrator’s Guide
a valid value in the assigned lookup (result) type. In thiscase, it moves the message to the discard folder, and sendsan ’Invalid’ message but does not alter the notification’sstatus or mail status, so that it continues to wait for a validreply.
Attention: It is important that you uniquely identify bouncedmessages and auto–replies from normal responses in the tagfile. If you do not identify bounced and auto–reply messages,the Notification Mailer can mistake these as invalid responses,send an ’Invalid’ message and continue to wait for a reply. Inboth cases a perpetual loop would occur where the NotificationMailer keeps sending out an ’Invalid’ message and the ’Invalid’message bounces back or is auto–replied. As an example, if youwant to mark all message responses that contain the string”–Unsent message follows–” in the subject or body of themessage as an error, you can include the following line in yourtag file: ERROR ”–Unsent message follows–”
Attention: If a message response matches more than onestring in the tag file, it gets tagged with the status of the firststring it matches in the file. That is, the Notification Mailerperforms a top to bottom comparison against the tag file. Dueto this behavior, you should prioritize your strings listing theERROR tags first, followed by the UNAVAIL and thenIGNORE tags.
– Oracle Workflow provides an example tag file calledwfmail.tag. For the version of Oracle Workflow embeddedin Oracle Applications, the file resides on your server in theresource subdirectory under $FND_TOP.
• Allow Forwarded Messages – Indicate whether to allow a user torespond to an e–mail notification that has been forwarded fromanother role. This parameter is selected by default.
– If Allow Forwarded Messages is deselected, the NotificationMailer will check if the ”From:” e–mail address of thenotification response exactly matches the e–mail address ofthe recorded recipient role (or the e–mail address of a userin that role). If the two e–mail addresses match exactly,meaning the notification was not forwarded or wasforwarded according to a valid routing rule, the NotificationMailer treats the response as a valid response. If the twoe–mail addresses do not match exactly, meaning thenotification was simply forwarded using the e–mailForward command, the Notification Mailer does notprocess the response and treats it as unsolicited mail.
☞
6 – 55Oracle Applications Manager
– If Allow Forwarded Messages is selected, the NotificationMailer never checks the ”From:” e–mail address of thenotification response and always allows the response to beprocessed.
Attention: Note that there are limitations when you clearAllow Forwarded Messages. For example, suppose anotification is sent to a distribution list mail alias that does nothave a USER/ROLE relationship in the Oracle Workflowdirectory service. If any user from the distribution list respondsto the notification, the Notification Mailer will always treat thatnotification response as unsolicited mail, because the ”From:”e–mail address, which is an individual user’s e–mail address,will never match the distribution list mail alias.
Notification Mailer Throughput
This graph shows the throughput of the Notification Mailer bydisplaying the distribution of notification messages with the followingstatuses:
• Processed – Outbound notification messages for which an e–mailmessage has been sent.
• Waiting – Outbound notification messages for which an e–mailmessage has not yet been sent.
To view the number of notification messages with a particular status,position the mouse pointer over the bar for that status in the graph.
Navigation: Applications Systems > (pull–down menu) Workflow Manager >(B) Go > Notification Mailer > (B) Configuration > (B) View Throughput
6 – 56 Oracle Applications System Administrator’s Guide
Agent Listeners
The Oracle Workflow Business Event System requires agent listeners tobe scheduled to receive inbound event messages. An agent listenermonitors a Business Event System agent for incoming messages anddequeues messages using the agent’s queue handler. You should runagent listeners for your local inbound agents.
When an event message is dequeued, the Event Manager beginssubscription processing for the event. The Event Manager searches forand executes any active subscriptions by the local system to that eventwith a source type of External, and also any active subscriptions by thelocal system to the Any event with a source type of External.
The agent listener exits after all event messages on the agent’s queuehave been dequeued.
You must schedule listeners for the standard WF_DEFERRED andWF_ERROR agents to enable deferred subscription processing anderror handling for the Business Event System, respectively. Also, if youwant to use the standard WF_IN agent for event message propagation,schedule a listener for that agent as well.
Running Agent Listeners
You run an agent listener for an agent by submitting the WorkflowAgent Listener concurrent program (FNDWFLST). You must specifythe agent that you want to monitor.
• To submit a request for the Workflow Agent Listener concurrentprogram through Oracle Self–Service Web Applications, chooseAgent Listener from the Submit Request For pull–down menu inthe Workflow System Status page and click the Go button.
• To view Workflow Agent Listener concurrent requests, eitherclick the Agent Listener link in the Process column in theWorkflow System Status page, or select the Agent Listenerprocess and click the View Details button.
Navigation: Applications Systems > (pull–down menu) Workflow Manager >(B) Go
Parameters
When you submit the Workflow Agent Listener concurrent program,specify the following parameter.
6 – 57Oracle Applications Manager
Agent Name
Specify the name of the agent that you want to monitor for inboundevent messages.
Schedule
Specify the schedule options for your request. You can submit theWorkflow Agent Listener concurrent program several times to scheduleagent listeners for different agents.
Viewing Concurrent Requests
When you view the Workflow Agent Listener concurrent requests, theSearch Results page shows standard request detail information forthese requests. For each request, the list displays the request ID,program short name, application short name, phase, status, requestor,duration, and wait time. Click any column heading to sort the list bythat column.
Navigation: Applications Systems > (pull–down menu) Workflow Manager >(B) Go > Agent Listener
• To show the details for a request if they are hidden, click theShow link in the Details column. Oracle Applications Managerdisplays details about the request depending on the status of therequest. You can also perform actions, such as placing a hold ona request, canceling a request, viewing diagnostic information,viewing logs, or viewing request output, by clicking thecorresponding button. The actions that are available depend onthe status of the request.
• To hide the details for a request if they are shown, click the Hidelink in the Details column.
• To search for concurrent requests with different criteria, click theNew Search button.
• To modify the search criteria from this search, click the ModifySearch button.
6 – 58 Oracle Applications System Administrator’s Guide
Queue PropagationThe Queue Propagation page shows a list of propagation schedules forBusiness Event System agents in your instance of Oracle Workflow. Youshould schedule propagation for your local outbound agents to sendevent messages to their destinations.
Navigation: Applications Systems > (pull–down menu) Workflow Manager >(B) Go > Queue Propagation
For each propagation schedule, the list displays the outbound queue,destination database link, job queue process executing the schedule,whether the schedule is enabled or disabled, and the error date anderror message of the last unsuccessful execution. Click any columnheading to sort the list by that column.
If no process is allocated to execute the schedule, you may need toincrease the JOB_QUEUE_PROCESSES database initializationparameter to ensure that processes are available for propagation.
To view details for a propagation schedule, either click the queue linkin the Queue column, or select the schedule and click the View Detailsbutton.
Queue Propagation Details
The Queue Details page displays the following details for apropagation schedule:
Navigation: Applications Systems > (pull–down menu) Workflow Manager >(B) Go > Queue Propagation > (B) View Details
• Destination – The destination database link.
• Process Name – The name of the job queue process executingthis schedule.
• Enabled – Y if this schedule is enabled or N if the schedule isdisabled. The schedule will not be executed if it is disabled.
• Last Error Date – The date of the last unsuccessful execution.
• Last Error Time – The time of the last unsuccessful execution.
• Last Error Message – The error message of the last unsuccessfulexecution.
• Schema – The schema that owns the queue.
• Session ID – The session ID (SID, SERIAL#) of the job executingthis schedule; NULL if not currently executing.
6 – 59Oracle Applications Manager
• Propagation Window – The duration in seconds of thepropagation window.
• Maximum Bytes – The maximum number of bytes propagatedduring a propagation window.
• Failures – The number of times that execution of the schedulefailed. If the number of failures reaches 16, the schedule will bedisabled.
• Latency – The latency time in seconds that specifies how long towait, after all messages have been propagated, before recheckingthe queue for new messages to the destination. The latencyrepresents the maximum wait time during the propagationwindow for a message to be propagated after it is enqueued.
• Next Run Date – The date at which the next propagationwindow of this schedule will be started.
• Next Run Time – The time at which the next propagationwindow of this schedule will be started, in HH:MI:SS format.
• Current Start Date – The date at which the current propagationwindow of this schedule was started.
• Current Start Time – The time at which the current propagationwindow of this schedule was started, in HH:MI:SS format.
• Instance – The cluster database instance number executing theschedule.
• Start Date – The date when propagation should be started, in thedefault date format.
• Start Time – The time when propagation should be started, inHH:MI:SS format.
• Last Run Date – The date of the last successful execution.
• Last Run Time – The time of the last successful execution, inHH:MI:SS format.
• Total Time – The total time, in seconds, spent by the system inexecuting this schedule.
• Total Number – The total number of messages propagated in thisschedule.
• Total Bytes – The total number of bytes propagated in thisschedule.
• Maximum Number – The maximum number of messagespropagated during a propagation window.
• Average Number – The average number of messages propagatedduring a propagation window.
6 – 60 Oracle Applications System Administrator’s Guide
• Average Size – The average size of a propagated message, inbytes.
• Average Time – The average time, in seconds, to propagate amessage.
6 – 61Oracle Applications Manager
Purging Workflow DataThe Oracle Applications Manager console helps you easily maintain theWorkflow database tables. Oracle Workflow accesses several tables thatcan grow quite large with obsolete workflow information that is storedfor all completed workflow processes. The size of these tables andindexes can adversely affect performance. These tables should bepurged on a regular basis, using the Purge Obsolete Workflow RuntimeData concurrent program.
Workflow PurgeThe Workflow Purge page shows summary information about the nextscheduled and last completed purge requests and about completedwork items.
Navigation: Applications Systems > (pull–down menu) Workflow Manager >(B) Go > Purge
Navigation: Applications Systems > (pull–down menu) Workflow Manager >(B) Go > Related Metrics > Completed Work Items
To view work items with a different status, choose the status you wantfrom the View pull–down menu and click the Go button. You can viewitems with the following statuses:
• Completed Work Items
• Active Work Items
• Deferred Work Items
• Suspended Work Items
• Errored Work Items
Summary
This region displays summary information about the next scheduledand last completed Purge Obsolete Workflow Runtime Data concurrentrequests.
• To show information in this region if it is hidden, click the Showlink.
• To hide information in this region if it is shown, click the Hidelink.
Next Scheduled
For the next scheduled Purge Obsolete Workflow Runtime Dataconcurrent request, Oracle Workflow Manager displays the request ID,requestor, status, requested start time, wait time, and parameters.
6 – 62 Oracle Applications System Administrator’s Guide
To view detail information for Purge Obsolete Workflow Runtime Dataconcurrent requests, click the View Purge Requests link.
Last Completed
For the last completed Purge Obsolete Workflow Runtime Dataconcurrent request, Oracle Workflow Manager displays the request ID,requestor, status, completed time, duration, and parameters.
To view the log file for the request, click the View Request Log button.
Completed Work Items
This region displays the distribution of completed work items acrossdifferent item types.
• To show information in this region if it is hidden, click the Showlink.
• To hide information in this region if it is shown, click the Hidelink.
For each item type in the Completed Work Items list, Oracle WorkflowManager displays the item type name, the persistence type, theretention period in days, the number of completed work items of thattype, and the number of items of that type that are available forpurging. Click any column heading to sort the list by that column.
To view details for work items of a particular item type that endedwithin the last 30 days, either click the item type link in the Work ItemType column, or select the item type and click the View Details button.
Submitting the Purge Program
You perform purging by submitting the Purge Obsolete WorkflowRuntime Data concurrent program (FNDWFPR). You can enterrestrictions to specify the data that you want to purge.
• To submit a request for the Purge Obsolete Workflow RuntimeData concurrent program through Oracle Self–Service WebApplications, either click the Purge button in the CompletedWork Items region of the Workflow Purge page, or choose Purgefrom the Submit Request For pull–down menu in the WorkflowSystem Status page and click the Go button.
• To view Purge Obsolete Workflow Runtime Data concurrentrequests, either click the View Purge Requests link in the
6 – 63Oracle Applications Manager
Summary region of the Workflow Purge page, or click the ViewPurge Requests button in the Completed Work Items region ofthe Workflow Purge page.
Parameters
When you submit the Purge Obsolete Workflow Runtime Dataconcurrent program, specify the following parameters.
Item Type
Specify the item type to purge. Leave this field blank to purge theruntime data for all item types.
Item Key
Specify the item key to purge. The item key is a unique identifier for anitem within an item type. Leave this field blank to purge the runtimedata for all items of the specified item type.
Age
Specify the minimum age of data to purge, in days, if you are purgingitems with a Temporary persistence type. The default is 0 days.
Persistence Type
Specify the persistence type of the data you want to purge, eitherPermanent or Temporary. The default is Temporary.
Schedule
Specify the schedule options for your request.
Viewing Concurrent Requests
When you view the Purge Obsolete Workflow Runtime Dataconcurrent requests, the Search Results page shows standard requestdetail information for these requests. For each request, the list displaysthe request ID, program short name, application short name, phase,status, requestor, duration, and wait time. Click any column heading tosort the list by that column.
Navigation: Applications Systems > (pull–down menu) Workflow Manager >(B) Go > Purge > (B) View Purge Requests
6 – 64 Oracle Applications System Administrator’s Guide
Navigation: Applications Systems > (pull–down menu) Workflow Manager >(B) Go > Related Metrics > Completed Work Items > (B) View Purge Requests
• To show the details for a request if they are hidden, click theShow link in the Details column. Oracle Applications Managerdisplays details about the request depending on the status of therequest. You can also perform actions, such as placing a hold ona request, canceling a request, viewing diagnostic information,viewing logs, or viewing request output, by clicking thecorresponding button. The actions that are available depend onthe status of the request.
• To hide the details for a request if they are shown, click the Hidelink in the Details column.
• To search for concurrent requests with different criteria, click theNew Search button.
• To modify the search criteria from this search, click the ModifySearch button.
Completed Work Item Details
This page shows details about completed work items of a particularitem type that ended within the last 30 days.
Navigation: Applications Systems > (pull–down menu) Workflow Manager >(B) Go > Purge > (B) View Details
Navigation: Applications Systems > (pull–down menu) Workflow Manager >(B) Go > Related Metrics > Completed Work Items > (B) View Details
To view work items with a different status, choose the status you wantfrom the View pull–down menu and click the Go button. You can viewitems with the following statuses:
• Completed Work Items
• Active Work Items
• Deferred Work Items
• Suspended Work Items
• Errored Work Items
Completed Work Items Stage Summary
This region displays the distribution of completed work items thatended at various activity stages within the workflow process, within

6 – 65Oracle Applications Manager
the last 30 days. For each activity stage, the list displays the activityinternal name and result, and the number of completed work items thatended at that stage. Click any column heading to sort the list by thatcolumn.
To view details about the work items that ended at a particular activitystage, either click the activity stage link in the Work Item Activity Stagecolumn, or select the activity stage and click the View Details button.
Completed Work Items in All Stages
This region displays a list of completed work items of the selected itemtype at all end activity stages, that ended within the last 30 days. Foreach work item, the list displays the internal name of the activity atwhich the work item ended, the start date, end date, user assigned toperform the activity, and item key. Click any column heading to sort thelist by that column.
To launch the Workflow Monitor for a work item, select the work itemand click the Launch Workflow Monitor button.
Note: If you perform an action in the Workflow Monitor thatchanges the status of the work item, then you must refreshyour Oracle Workflow Manager web page in order to see theupdated information.
Completed Work Item Activity Details
This page shows details about completed work items that ended at aparticular activity stage within a particular item type and that endedwithin the last 30 days.
Navigation: Applications Systems > (pull–down menu) Workflow Manager >(B) Go > Purge > (B) View Details > (B) View Details
Navigation: Applications Systems > (pull–down menu) Workflow Manager >(B) Go > Related Metrics > Completed Work Items > (B) View Details > (B)View Details
To view work items with a different status, choose the status you wantfrom the View pull–down menu and click the Go button. You can viewitems with the following statuses:
• Completed Work Items
• Active Work Items
• Deferred Work Items
6 – 66 Oracle Applications System Administrator’s Guide
• Suspended Work Items
• Errored Work Items
Oracle Workflow Manager displays a list of all completed work itemsof the selected item type that ended at the selected activity stage withinthe last 30 days. For each work item, the list displays the internal nameof the activity at which the work item ended, the start date, end date,user assigned to perform the activity, and item key. Click any columnheading to sort the list by that column.
To launch the Workflow Monitor for a work item, select the work itemand click the Launch Workflow Monitor button.
Note: If you perform an action in the Workflow Monitor thatchanges the status of the work item, then you must refreshyour Oracle Workflow Manager web page in order to see theupdated information.

6 – 67Oracle Applications Manager
Active Work ItemsThe Active Work Items page shows the distribution of active workitems across different item types. All work items that do not have anend date are counted as Active work items, including deferred,suspended, and errored work items as well as running work items.
Navigation: Applications Systems > (pull–down menu) Workflow Manager >(B) Go > Workflow Metrics > Work Items > Active
To view work items with a different status, choose the status you wantfrom the View pull–down menu and click the Go button. You can viewitems with the following statuses:
• Completed Work Items
• Active Work Items
• Deferred Work Items
• Suspended Work Items
• Errored Work Items
For each item type, the Active Work Items page displays the item typename and the number of active work items of that type. Click anycolumn heading to sort the list by that column.
To view details about active work item activities within a particularitem type, for work items that started within the last 30 days, eitherclick the item type link in the Work Item Type column, or select theitem type and click the View Details button.
Active Work Item Activities
This page shows details about active work item activities within aparticular item type, for work items that started within the last 30 days.Active work item activities include only activities with a status ofActive, Waiting, or Notified.
Note: Only activities with a status of Active, Waiting, orNotified are included in this page. Activities with a status ofDeferred, Suspended, or Error are not included in this page,although the work items to which they belong are counted asActive work items. You can use the View pull–down menu toview details for activities with a status of Deferred, Suspended,or Error.
Navigation: Applications Systems > (pull–down menu) Workflow Manager >(B) Go > Workflow Metrics > Work Items > Active > (B) View Details
6 – 68 Oracle Applications System Administrator’s Guide
To view work items with a different status, choose the status you wantfrom the View pull–down menu and click the Go button. You can viewitems with the following statuses:
• Completed Work Items
• Active Work Items
• Deferred Work Items
• Suspended Work Items
• Errored Work Items
Active Work Items Stage Summary
This region displays the distribution of active work items that arecurrently at various activity stages within the workflow process, if theactivity has a status of Active, Waiting, or Notified and the work itemstarted within the last 30 days. For each activity stage, the list displaysthe activity internal name and the number of active work items at thatstage. Click any column heading to sort the list by that column.
To view details about the work items at a particular activity stage,either click the activity stage link in the Work Item Activity Stagecolumn, or select the activity stage and click the View Details button.
Active Work Items in All Stages
This region displays a list of all active activities for work items of theselected item type that started within the last 30 days. Active workitem activities include only activities with a status of Active, Waiting,or Notified. For each activity, the list displays the activity internalname, start date, end date, user assigned to perform the activity, anditem key of the work item. Click any column heading to sort the list bythat column.
• To abort all work items in the list, click the Abort All button.
• To suspend all activities in the list, click the Suspend All button.
• To abort a single work item, select the activity you want andclick the Abort button.
• To suspend a single activity, select the activity you want andclick the Suspend button.
• To launch the Workflow Monitor for a work item, select theactivity you want and click the Launch Workflow Monitorbutton.
Note: If you perform an action in the Workflow Monitor thatchanges the status of the work item, such as aborting the work
6 – 69Oracle Applications Manager
item, then you must refresh your Oracle Workflow Managerweb page in order to see the updated information.
Active Work Item Activity Details
This page shows details about active work item activities of a particularactivity stage within a particular item type, for work items that startedwithin the last 30 days. Active work item activities include onlyactivities with a status of Active, Waiting, or Notified.
Navigation: Applications Systems > (pull–down menu) Workflow Manager >(B) Go > Workflow Metrics > Work Items > Active > (B) View Details > (B)View Details
To view work items with a different status, choose the status you wantfrom the View pull–down menu and click the Go button. You can viewitems with the following statuses:
• Completed Work Items
• Active Work Items
• Deferred Work Items
• Suspended Work Items
• Errored Work Items
Oracle Workflow Manager displays a list of all active activities of theselected stage for work items of the selected item type that startedwithin the last 30 days. Active work item activities include onlyactivities with a status of Active, Waiting, or Notified. For eachactivity, the list displays the activity internal name, start date, due date,user assigned to perform the activity, and item key of the work item.Click any column heading to sort the list by that column.
• To abort a work item, select the activity you want and click theAbort button.
• To suspend an activity, select the activity you want and click theSuspend button.
• To launch the Workflow Monitor for a work item, select theactivity you want and click the Launch Workflow Monitorbutton.
Note: If you perform an action in the Workflow Monitor thatchanges the status of the work item, such as aborting the workitem, then you must refresh your Oracle Workflow Managerweb page in order to see the updated information.
6 – 70 Oracle Applications System Administrator’s Guide
Deferred Work ItemsThe Deferred Work Items page shows the distribution of deferred workitems across different item types. An abnormal number of activitieswith a deferred status may indicate that there are not enoughbackground engines available.
Navigation: Applications Systems > (pull–down menu) Workflow Manager >(B) Go > Workflow Metrics > Work Items > Deferred
To view work items with a different status, choose the status you wantfrom the View pull–down menu and click the Go button. You can viewitems with the following statuses:
• Completed Work Items
• Active Work Items
• Deferred Work Items
• Suspended Work Items
• Errored Work Items
For each item type, the Deferred Work Items page displays the itemtype name and the number of deferred work items of that type. Clickany column heading to sort the list by that column. To view details for work items of a particular item type that startedwithin the last 30 days, either click the item type link in the Work ItemType column, or select the item type and click the View Details button.
Deferred Work Item Details
This page shows details about deferred work items of a particular itemtype that started within the last 30 days.
Navigation: Applications Systems > (pull–down menu) Workflow Manager >(B) Go > Workflow Metrics > Work Items > Deferred > (B) View Details
To view work items with a different status, choose the status you wantfrom the View pull–down menu and click the Go button. You can viewitems with the following statuses:
• Completed Work Items
• Active Work Items
• Deferred Work Items
• Suspended Work Items
• Errored Work Items
6 – 71Oracle Applications Manager
Deferred Work Items Stage Summary
This region displays the distribution of deferred work items that arecurrently at various activity stages within the workflow process andthat started within the last 30 days. For each activity stage, the listdisplays the activity internal name and the number of deferred workitems at that stage. Click any column heading to sort the list by thatcolumn.
To view details about the work items at a particular activity stage,either click the activity stage link in the Work Item Activity Stagecolumn, or select the activity stage and click the View Details button.
Deferred Work Items in All Stages
This region displays a list of all deferred activities for work items of theselected item type that started within the last 30 days. For eachactivity, the list displays the activity internal name, start date, end date,user assigned to perform the activity, and item key of the work item.Click any column heading to sort the list by that column.
• To abort all work items in the list, click the Abort All button.
• To suspend all activities in the list, click the Suspend All button.
• To abort a single work item, select the activity you want andclick the Abort button.
• To suspend a single activity, select the activity you want andclick the Suspend button.
• To launch the Workflow Monitor for a work item, select theactivity you want and click the Launch Workflow Monitorbutton.
Note: If you perform an action in the Workflow Monitor thatchanges the status of the work item, such as aborting the workitem, then you must refresh your Oracle Workflow Managerweb page in order to see the updated information.
Deferred Work Item Activity Details
This page shows details about deferred work items that are currently ata particular activity stage within a particular item type and that startedwithin the last 30 days.
Navigation: Applications Systems > (pull–down menu) Workflow Manager >(B) Go > Workflow Metrics > Work Items > Deferred > (B) View Details >(B) View Details
6 – 72 Oracle Applications System Administrator’s Guide
To view work items with a different status, choose the status you wantfrom the View pull–down menu and click the Go button. You can viewitems with the following statuses:
• Completed Work Items
• Active Work Items
• Deferred Work Items
• Suspended Work Items
• Errored Work Items
Oracle Workflow Manager displays a list of all deferred activities of theselected stage for work items of the selected item type that startedwithin the last 30 days. For each activity, the list displays the activityinternal name, start date, due date, user assigned to perform theactivity, and item key of the work item. Click any column heading tosort the list by that column.
• To abort a work item, select the activity you want and click theAbort button.
• To suspend an activity, select the activity you want and click theSuspend button.
• To launch the Workflow Monitor for a work item, select theactivity you want and click the Launch Workflow Monitorbutton.
Note: If you perform an action in the Workflow Monitor thatchanges the status of the work item, such as aborting the workitem, then you must refresh your Oracle Workflow Managerweb page in order to see the updated information.
6 – 73Oracle Applications Manager
Suspended Work Items
The Suspended Work Items page shows the distribution of suspendedwork items across different item types.
Navigation: Applications Systems > (pull–down menu) Workflow Manager >(B) Go > Workflow Metrics > Work Items > Suspended
To view work items with a different status, choose the status you wantfrom the View pull–down menu and click the Go button. You can viewitems with the following statuses:
• Completed Work Items
• Active Work Items
• Deferred Work Items
• Suspended Work Items
• Errored Work Items
For each item type, the Suspended Work Items page displays the itemtype name and the number of suspended work items of that type. Clickany column heading to sort the list by that column.
To view details for an item type, either click the item type link in theWork Item Type column, or select the item type and click the ViewDetails button.
Suspended Work Item Details
This page shows details about all suspended work items of a particularitem type.
Navigation: Applications Systems > (pull–down menu) Workflow Manager >(B) Go > Workflow Metrics > Work Items > Suspended > (B) View Details
To view work items with a different status, choose the status you wantfrom the View pull–down menu and click the Go button. You can viewitems with the following statuses:
• Completed Work Items
• Active Work Items
• Deferred Work Items
• Suspended Work Items
• Errored Work Items
6 – 74 Oracle Applications System Administrator’s Guide
Suspended Work Items Stage Summary
This region displays the distribution of suspended work items that arecurrently at various activity stages within the workflow process. Foreach activity stage, the list displays the activity internal name and thenumber of suspended work items at that stage. Click any columnheading to sort the list by that column.
To view details about the work items at a particular activity stage,either click the activity stage link in the Work Item Activity Stagecolumn, or select the activity stage and click the View Details button.
Suspended Work Items in All Stages
This region displays a list of all suspended activities for work items ofthe selected item type. For each activity, the list displays the activityinternal name, start date, end date, user assigned to perform theactivity, and item key of the work item. Click any column heading tosort the list by that column.
• To abort all work items in the list, click the Abort All button.
• To resume all activities in the list, click the Resume All button.
• To abort a single work item, select the activity you want andclick the Abort button.
• To resume a single activity, select the activity you want and clickthe Resume button.
• To launch the Workflow Monitor for a work item, select theactivity you want and click the Launch Workflow Monitorbutton.
Note: If you perform an action in the Workflow Monitor thatchanges the status of the work item, such as aborting the workitem, then you must refresh your Oracle Workflow Managerweb page in order to see the updated information.
Suspended Work Item Activity Details
This page shows details about all suspended work items at a particularactivity stage within a particular item type.
Navigation: Applications Systems > (pull–down menu) Workflow Manager >(B) Go > Workflow Metrics > Work Items > Suspended > (B) View Details >(B) View Details
To view work items with a different status, choose the status you wantfrom the View pull–down menu and click the Go button. You can viewitems with the following statuses:
6 – 75Oracle Applications Manager
• Completed Work Items
• Active Work Items
• Deferred Work Items
• Suspended Work Items
• Errored Work Items
Oracle Workflow Manager displays a list of all suspended activities ofthe selected stage for work items of the selected item type. For eachactivity, the list displays the activity internal name, start date, due date,user assigned to perform the activity, and item key of the work item.Click any column heading to sort the list by that column.
• To abort a work item, select the activity you want and click theAbort button.
• To resume an activity, select the activity you want and click theResume button.
• To launch the Workflow Monitor for a work item, select theactivity you want and click the Launch Workflow Monitorbutton.
Note: If you perform an action in the Workflow Monitor thatchanges the status of the work item, such as aborting the workitem, then you must refresh your Oracle Workflow Managerweb page in order to see the updated information.
6 – 76 Oracle Applications System Administrator’s Guide
Errored Work Items
The Errored Work Items page shows the distribution of errored workitems across different item types.
Navigation: Applications Systems > (pull–down menu) Workflow Manager >(B) Go > Workflow Metrics > Work Items > Error
To view work items with a different status, choose the status you wantfrom the View pull–down menu and click the Go button. You can viewitems with the following statuses:
• Completed Work Items
• Active Work Items
• Deferred Work Items
• Suspended Work Items
• Errored Work Items
For each item type, the Errored Work Items page displays the item typename and the number of errored work items of that type. Click anycolumn heading to sort the list by that column.
To view details for an item type, either click the item type link in theWork Item Type column, or select the item type and click the ViewDetails button.
Errored Work Item Details
This page shows details about all errored work items of a particularitem type.
Navigation: Applications Systems > (pull–down menu) Workflow Manager >(B) Go > Workflow Metrics > Work Items > Error > (B) View Details
To view work items with a different status, choose the status you wantfrom the View pull–down menu and click the Go button. You can viewitems with the following statuses:
• Completed Work Items
• Active Work Items
• Deferred Work Items
• Suspended Work Items
• Errored Work Items
6 – 77Oracle Applications Manager
Errored Work Items Stage Summary
This region displays the distribution of errored work items that arecurrently at various activity stages within the workflow process. Foreach activity stage, the list displays the activity internal name and thenumber of errored work items at that stage. Click any column headingto sort the list by that column.
To view details about the work items at a particular activity stage,either click the activity stage link in the Work Item Activity Stagecolumn, or select the activity stage and click the View Details button.
Errored Work Items in All Stages
This region displays a list of all errored activities for work items of theselected item type. For each activity, the list displays the activityinternal name, start date, end date, user assigned to perform theactivity, and item key of the work item. Click any column heading tosort the list by that column.
• To abort all work items in the list, click the Abort All button.
• To retry all activities in the list, click the Retry All button.
• To abort a single work item, select the activity you want andclick the Abort button.
• To retry a single activity, select the activity you want and clickthe Retry button.
• To launch the Workflow Monitor for a work item, select theactivity you want and click the Launch Workflow Monitorbutton.
Note: If you perform an action in the Workflow Monitor thatchanges the status of the work item, such as aborting the workitem, then you must refresh your Oracle Workflow Managerweb page in order to see the updated information.
Errored Work Item Activity Details
This page shows details about all errored work items at a particularactivity stage within a particular item type.
Navigation: Applications Systems > (pull–down menu) Workflow Manager >(B) Go > Workflow Metrics > Work Items > Error > (B) View Details > (B)View Details
To view work items with a different status, choose the status you wantfrom the View pull–down menu and click the Go button. You can viewitems with the following statuses:
6 – 78 Oracle Applications System Administrator’s Guide
• Completed Work Items
• Active Work Items
• Deferred Work Items
• Suspended Work Items
• Errored Work Items
Oracle Workflow Manager displays a list of all errored activities of theselected stage for work items of the selected item type. For eachactivity, the list displays the activity internal name, start date, due date,user assigned to perform the activity, and item key of the work item.Click any column heading to sort the list by that column.
• To abort a work item, select the activity you want and click theAbort button.
• To retry an activity, select the activity you want and click theRetry button.
• To launch the Workflow Monitor for a work item, select theactivity you want and click the Launch Workflow Monitorbutton.
Note: If you perform an action in the Workflow Monitor thatchanges the status of the work item, such as aborting the workitem, then you must refresh your Oracle Workflow Managerweb page in order to see the updated information.
Index – 1
Index
AActive work items, 6 – 67AdminAppServer utility, G – 44Administer Folders, 9 – 24Administering Oracle Applications security,
G – 51Agent listeners, 6 – 56Apache Server, G – 14Application, registering, 9 – 19Application basepath, 9 – 20, 9 – 21Application environment variable, 9 – 21Application Server Security, G – 51Application Server Trust Level, G – 56Application users
assigning one or more responsibilities, 2 – 2changing passwords, 2 – 19defining, 2 – 2, 2 – 17disabling application password, 2 – 19password characteristics, 2 – 18password profile options, 2 – 19reporting on active users, 2 – 48start dates, 2 – 20username characteristics, 2 – 18username/password, 2 – 2
Applications security, defining a responsibility,2 – 10
applsys. See ORACLE IDApplsys password, matching APPS accounts,
9 – 14
APPS accounts, password, 9 – 14Assign default folders, 9 – 24Audit reports
brief explanation, 3 – 7listing, 3 – 2
Auditing database row changes. See AuditTrailAuditing user activity. See Sign–On AuditAuditTrail
archiving data, 3 – 32audit groups, 3 – 22audit set, 3 – 22changing audit tables, 3 – 31description, 3 – 22introduction, 3 – 2reporting, 3 – 31setting up, 3 – 22tables, 3 – 24 to 3 – 27views, 3 – 25
BBackground engines, 6 – 40
Ccharacter mode mapping to GUI windows,
E – 2Completed work items, 6 – 39, 6 – 62CONCSUB, 4 – 41

Index – 2 Oracle Applications System Administrator’s Guide
Concurrent managersSee also Internal concurrent manager;
Specializing managersactivating a manager, 5 – 55activating and other control states, 5 – 81assigning work shifts, 5 – 93controlling, 5 – 55 to 5 – 65, 5 – 80, G – 72defining, 5 – 26 to 5 – 35, 5 – 89 to 5 – 98defining combined specialization rules,
5 – 100defining work shifts, 5 – 98disabling a work shift, 5 – 30Immediate program libraries, 5 – 92migrating, 5 – 69operating system process ID number, 5 – 86Oracle process ID number, 5 – 86PMON cycle, 5 – 56program libraries, 5 – 27reporting on work shifts, 5 – 35, 5 – 36restarting a manager, 5 – 55role of application name in combined rules,
5 – 101role of application name when defining,
5 – 89sleep time, 5 – 94specializing – Define Managers form, 5 – 95specializing managers, 5 – 37 to 5 – 62Standard manager, 5 – 28target processes, 5 – 2time–based queues, 5 – 32viewing actual number of processes, 5 – 81viewing manager control processes, 5 – 84viewing manager request queue, 5 – 87viewing number of running requests, 5 – 81viewing status of, 5 – 80viewing target number of processes, 5 – 81work shifts, 5 – 29 to 5 – 34work shifts and target processes, 5 – 32,
5 – 93work shifts hours, 5 – 30work shifts overlap, 5 – 31work shifts overlap – same priority, 5 – 31work shifts past midnight, 5 – 30
Concurrent processingfile purging guidelines, 5 – 19lifecycle of a request, 5 – 3 to 5 – 6managing files and tables, 5 – 18 to 5 – 26overview, 5 – 2 to 5 – 7
profile options, 5 – 24 to 5 – 27programs, 4 – 66purge files program, 5 – 20purging and audit data, 5 – 19purging request data, 5 – 18 to 5 – 26System Administrator privileges, 5 – 9viewing incompatible tasks, 4 – 66when programs start, 5 – 2
Concurrent programsand requests, 5 – 2behavior of program parameters, 4 – 52behavior of report set parameters, 4 – 53changing responsibility to see changed
effects, 4 – 52CONCSUB, 4 – 41copying and modifying, 4 – 47 to 4 – 57custom, 4 – 35database session control, 4 – 73defining incompatibility rules, 4 – 25 to
4 – 31disabling, 4 – 66displaying parameters – programs vs. report
sets, 4 – 51enforcement of incompatibility rules, 4 – 28
to 4 – 30example – modifying program parameters,
4 – 54 to 4 – 56execution method, 4 – 63, 4 – 66grouping as a request type, 5 – 103grouping as request types, 5 – 53 to 5 – 55Immediate program libraries, 5 – 92incompatible, 4 – 66, 4 – 75modifying incompatible programs list,
4 – 48 to 4 – 50modifying parameters, 4 – 49 to 4 – 57multiple language support, 4 – 63, 4 – 69not displaying parameters, 4 – 50parameter sequence, 4 – 77program libraries, 5 – 27report set incompatibilities, 4 – 14reporting on enabled programs, 4 – 58reporting on incompatible programs, 4 – 57reporting on program definitions, 4 – 57role of application name in request types,
5 – 104run alone programs, 4 – 25 to 4 – 27running alone, 4 – 66, 4 – 70setting default values, 4 – 51 to 4 – 53

Index – 3
spawned vs. immediate, 5 – 27subroutines, 4 – 63viewing, 4 – 66warnings about modifying, 4 – 47, 4 – 53
Concurrent request type, 5 – 53 to 5 – 55Concurrent requests
changing phase and status, 5 – 16changing priority of, 5 – 16child requests, 5 – 3explained, 5 – 2file access privileges, 5 – 10lifecycle of, 5 – 3 to 5 – 6log file privileges, 5 – 14multilingual support, 4 – 4output file – path to, 5 – 15output file access privileges, 5 – 10parent requests, 5 – 3phase and status, 5 – 3 to 5 – 6phase/status listing, 5 – 3priority of, 5 – 3Report Review Agent, 5 – 10request types, 5 – 103role of application name in request types,
5 – 104submitting using CONCSUB, 4 – 41System Administrator privileges, 5 – 9time taken to run, 5 – 34viewing output, 5 – 105viewing request parameters, 4 – 51viewing status of, 5 – 9 to 5 – 12
Conflict Domain, defining, 9 – 18Conflict domains
defining, 9 – 17explained, 4 – 27
Consumer groups. See Resource consumergroups
Context–sensitive help, link syntax, 8 – 10Controlling access to reports or programs. See
Report GroupsCost–based optimization, 10 – 2
initialization parameters, 10 – 3Custom concurrent programs, 4 – 35Custom help, context–sensitive links, 8 – 10CUSTOM library, 14 – 2Custom reports, context–sensitive help, 8 – 10
DData Groups
Application Object Library requirement, 4 – 83
copying, 4 – 33defining, 4 – 81explained, 4 – 30purposes of, 4 – 30using, 4 – 30 to 4 – 36using with custom applications, 4 – 31using with multiple Set of Books, 4 – 31
Database Resource Manager, 9 – 7DBC file, G – 7DBC files, G – 46Default folders, 9 – 24Deferred activities, 6 – 40Deferred work items, 6 – 70Defining a Conflict Domain, 9 – 18Detail Notification Mailer, 6 – 44Discoverer 4i, H – 21Document sequences
active sequence definitions, 13 – 8application, 13 – 7, 13 – 15assigning sequences to document definitions,
13 – 6, 13 – 8auditability, 13 – 2automatic document numbering – initial
value, 13 – 4automatic numbering, 13 – 10automatic vs manual, 13 – 8category, 13 – 7, 13 – 15category application, 13 – 13category code, 13 – 13category identifies database table, 13 – 12,
13 – 13defining a sequence, 13 – 3defining document categories, 13 – 12defining documents to be numbered, 13 – 7differences – document numbering vs. entry,
13 – 8disabling a sequence assignment, 13 – 16document categories explained, 13 – 6document definition, 13 – 15Document Flexfield, 13 – 7
Index – 4 Oracle Applications System Administrator’s Guide
enabling segments in the document flexfield,13 – 16
end date – document definition, 13 – 16end date – document flexfield, 13 – 16entering documents, 13 – 1entering transactions, 13 – 1examples – document categories, 13 – 6examples – sequence definitions, 13 – 4initial value of sequence, 13 – 11manual numbering, 13 – 10message displayed by document, 13 – 10method in document flexfield, 13 – 7,
13 – 16segments and the document flexfield,
13 – 16sequence names, 13 – 9sequence start date, 13 – 10sequence type, 13 – 10sequences and audit records, 13 – 10sequences explained, 13 – 2set of books in document flexfield, 13 – 7,
13 – 16start date – document definition, 13 – 15start date – document flexfield, 13 – 15type of document numbering, 13 – 10type of sequence numbering, 13 – 4
EEmployee, application user, 2 – 19Environment variable, 9 – 20Errored work items, 6 – 76Event messages, 6 – 38External documents, D – 2
FFlexfields
Shared Table Lock profile, A – 21Shorthand Entry profile option, A – 21
FND_CTL, 10 – 32FND_SESS_CTL, 10 – 32FND_STATS, 10 – 9
FNDCPASS utility, 9 – 9FNDLOAD, C – 2FNDWFBG, 6 – 41FNDWFLST, 6 – 56FNDWFPR, 6 – 62Folder Administration, 9 – 24Folder Set, 9 – 24Folders
Changing ownership, 9 – 26Private vs. Public, 9 – 26
Form, passing arguments to, 4 – 20 to 4 – 24Forms
Administer Concurrent Managers, 5 – 80Applications, 9 – 19Concurrent Conflicts Domains, 9 – 17Concurrent Request Types, 5 – 103Define Application User, 2 – 17Define Combined Specialization Rules,
5 – 100Define Concurrent Manager, 5 – 89Define Data Group, 4 – 81Define Menu, 2 – 34, 2 – 38Define Print Style, 7 – 43Define Printer Driver, 7 – 46Define Printer Types, 7 – 39Define Report Group, 4 – 59Define Work Shifts, 5 – 98Languages, 9 – 28Monitor Application Users, 3 – 8Register Nodes, 5 – 107Register ORACLE IDs, 9 – 13Register Printers, 7 – 41Responsibility, 2 – 10Security Group, 2 – 16Territories, 9 – 30Update System Profile Options, 11 – 6
Function SecurityOracle HRMS, Special Function, 2 – 31Oracle Sales and Marketing, Special
Function, 2 – 31Function Security Function Report, 2 – 45Function Security Menu Report, 2 – 45

Index – 5
Function Security Menu Viewer. See MenuViewer
Function Security Navigator Report, 2 – 45
GGeneric Loader, C – 2GSM. See Generic Service Management
HHelp system
customizing Oracle Applications help, 8 – 2Help System Utility, 8 – 2����������� �� ��� ��� ������� � � ���� ��� �� ��� ����� ������ � � ���� ����� �� ��� ��� ������ � � ������� ������ � � � �� � � ����������� �� ��� � � � �
HTTP Server, G – 14HTTP Server Configuration Checklist, G – 64
IIncompatible programs. See Concurrent
programsInternal concurrent manager
CONCSUB – hiding password, 5 – 62CONCSUB – using to shut down, 5 – 61 to
5 – 63CONCSUB command, 5 – 58, 5 – 60 to
5 – 64control states, 5 – 56 to 5 – 58enforces incompatibility rules, 4 – 28 to
4 – 30explained, 5 – 28internal monitors, 5 – 66log file – name and path, 5 – 15operating system control, 5 – 58 to 5 – 64parallel concurrent processing, 5 – 66PMON cycle, 5 – 14, 5 – 56shut down from operating system, 5 – 61 to
5 – 63
starting from operating system, 5 – 59 to 5 – 61
STARTMGR command, 5 – 58 to 5 – 60when inactive, 5 – 9
JJOB_QUEUE_PROCESSES, 6 – 58
LLDAP integration, H – 4Loaders, C – 2Log files
access level profile option, 5 – 10Internal manager log file, 5 – 15manager log files, 5 – 14manager log files – path and name, 5 – 15parallel processing on multiple nodes,
5 – 66purge program, 5 – 20request log – path to, 5 – 14System Administrator privileges, 5 – 14types of, 5 – 13
Logical databasesdefine for custom applications, 9 – 5example of program incompatibilities, 9 – 4explained, 9 – 4program incompatibility rules, 9 – 4Standard logical database method, 9 – 5
MManagement Pack for Oracle Applications. See
Oracle Management Pack for OracleApplications
Menu Paths, mapping Char mode to GUI, E – 2
Menu Viewer, 2 – 42Menus
compiling, 2 – 31, 2 – 44defining, 2 – 34 to 2 – 37, 2 – 38 to 2 – 43defining a menu entry, 2 – 39
Index – 6 Oracle Applications System Administrator’s Guide
entering arguments, 2 – 36menu prompts, 2 – 40Menu Viewer, 2 – 42role in function security, 2 – 2sequence numbers, 2 – 40
MIME types, for viewing reports, 5 – 105MLS. See Multilingual supportMLS function, 4 – 63, 4 – 69Monitoring users. See Sign–On AuditMulti–language function (MLS function),
4 – 63, 4 – 69Multilingual external documents, D – 2Multilingual support, concurrent requests,
4 – 4
NNavigation Paths, mapping Char mode to GUI,
E – 2Network bandwidth, testing, 9 – 23Network latency, testing, 9 – 23Network Test window, 9 – 22Node, explained, 5 – 107Nodes
explained, 5 – 64manager’s target node, 5 – 68primary and secondary, 5 – 66
Notification Mailerconfiguration, 6 – 47overview, 6 – 44processes, 6 – 47service instances, 6 – 45status, 6 – 46throughput, 6 – 55
OOptions. See User profilesOracle Applications Manager, 5 – 8, 6 – 2Oracle Enterprise Manager, 6 – 3Oracle HTTP Server, G – 14ORACLE ID
applsys – password warning, 9 – 14
applsys privileges, 9 – 16assigning privileges, 9 – 15assigning to responsibility, 2 – 12create session privilege, 9 – 14disabled privileges, 9 – 13, 9 – 15enabled privileges, 9 – 13, 9 – 15explained, 9 – 2Oracle password, 9 – 15Oracle username, 9 – 13public privileges, 9 – 16registering, 9 – 2, 9 – 13requirement for database access, 9 – 3reregistering, 9 – 3restricted privileges, 9 – 3, 9 – 13, 9 – 15
Oracle Internet Directory, H – 4Oracle Management Pack for Oracle
Applications, 6 – 2, 6 – 3Oracle Portal, H – 3Oracle Reports, bitmapped, 4 – 67Oracle Workflow
agent activity, 6 – 38purging, 6 – 61submitting concurrent requests, 6 – 38system status, 6 – 37
Oracle Workflow Manager, 6 – 37Oracle*Mail, integration with Oracle Alert,
B – 6Oracle9i Application Server, H – 2, H – 3
PParallel concurrent processing
examples implementing, 5 – 70 to 5 – 77explained, 5 – 64 to 5 – 76implementation checklist, 5 – 74Internal manager, 5 – 66introduced, 5 – 64log files and multiple nodes, 5 – 66managing, 5 – 68 to 5 – 76migrating managers, 5 – 69operating environments, 5 – 64proprietary queuing systems, 5 – 67
PasswordSee also Application userFNDCPASS utility, 9 – 9

Index – 7
PMON cycle, concurrent managers, 5 – 56Predefined alerts
action sets – definition of, B – 4alert – definition of, B – 3alert action – definition of, B – 3customizing, B – 6DBA alerts, B – 10event alert – definition of, B – 3explained, B – 2, B – 5overview of Oracle Alert, B – 2periodic alert – definition of, B – 3precoded custom alerts, B – 10purge mail alert, B – 15purging alerts, B – 14using, B – 5vs. Oracle Alert, B – 1
Printer supportarguments, 7 – 49arguments for print command, 7 – 26caching of definitions, 7 – 12Command driver method, 7 – 25concurrent managers – restarting, 7 – 12concurrent program print definitions, 7 – 31custom print programs – location, 7 – 26drivers, styles, printer types and platforms,
7 – 5end user settings, 7 – 36header pages, 7 – 45initialization, 7 – 49initialization string, 7 – 28initialization string – editing, 7 – 25introduction to printing, 7 – 2page break problems, 7 – 24platform, 7 – 47postscript printing, 7 – 37predefined types, styles, drivers, 7 – 24print command & arguments – example,
7 – 27print style assignments, 7 – 33print styles – columns, 7 – 44print styles – defining, 7 – 43print styles – explained, 7 – 4print styles – introduction, 7 – 3print styles – predefined, 7 – 43print styles – rows, 7 – 44printer / style assignments, 7 – 31 to 7 – 34printer assignments, 7 – 32
printer driver method, 7 – 25, 7 – 48printer drivers – assigning, 7 – 39printer drivers – defining, 7 – 46printer drivers – explained, 7 – 5printer drivers – introduction, 7 – 3printer drivers – predefined for printers,
7 – 46printer drivers – predefined for styles, 7 – 46printer drivers – when to define new drivers,
7 – 46printer types – defining, 7 – 39printer types – introduction, 7 – 3printers – operating system name, 7 – 42printers – registering, 7 – 41Program driver method, 7 – 25Program driver method – example, 7 – 26program name, 7 – 48reset, 7 – 49reset string, 7 – 28reset string – editing, 7 – 25sequence of printing events, 7 – 5setting up – forms used, 7 – 11setting up printers, 7 – 11shell scripts, 7 – 26spool file, 7 – 28, 7 – 48SRW driver, 7 – 47SRW driver – customizing, 7 – 29 to 7 – 32SRW drivers – how used, 7 – 30SRW drivers – location, 7 – 29standard input, 7 – 27, 7 – 48Subroutine driver method, 7 – 25System Administrator privileges, 7 – 34verifying printer drivers, 7 – 24
Printers. See Printer supportPrinting, G – 76Process Navigator, overview, 12 – 2Profiles. See User profilesPropagation schedules, 6 – 58Purge Obsolete Workflow Runtime Data
concurrent program, 6 – 61, 6 – 62Purging Workflow data, 6 – 61
QQueue propagation, 6 – 58
Index – 8 Oracle Applications System Administrator’s Guide
RReal Application Clusters (RAC), 5 – 76,
G – 85 to G – 91Register
application, 9 – 19concurrent program, 4 – 66
Report Groupsdefining, 4 – 59example – using a code, 4 – 20may consist of, 4 – 19Report Security Groups, 4 – 19report security groups, report sets, reports,
4 – 13responsibility–level vs. form–level, 4 – 19using, 4 – 19 to 4 – 25using a code to customize, 4 – 60using a code with, 4 – 20 to 4 – 24vs. report sets, 4 – 2 to 4 – 4
Report parameters, sharing in a report set, 4 – 15 to 4 – 18
Report Review Agent, 5 – 10Report Security Groups
See also Report Groupsindividual reports and report sets, 2 – 6relationship with application user and
responsibility, 2 – 7using, 2 – 6
Report Setsas concurrent programs, 4 – 10behavior of program parameters, 4 – 53defining, 4 – 6displaying parameters – programs vs. report
sets, 4 – 51example – shared parameters, 4 – 16incompatibility rules, 4 – 14, 4 – 26owners of, 4 – 11 to 4 – 17preventing parameters from being changed,
4 – 52printing, 4 – 10querying in Define Concurrent programs
form, 4 – 14report security groups, report sets, reports,
4 – 13reporting on, 4 – 24reporting on definitions, 4 – 18
request phase and status, 4 – 11sharing parameters in a set, 4 – 15 to 4 – 18System Administrator privileges, 4 – 12vs. report groups, 4 – 2 to 4 – 4
ReportsActive Responsibilities, 2 – 47Active Users, 2 – 48Completed Concurrent Requests, 5 – 34Concurrent Program Details, 4 – 57Concurrent Programs, 4 – 58Purge Concurrent Request and/or Manager
Data, 5 – 20Report Group Responsibilities, 4 – 24Report Sets, 4 – 18Reports and Sets by Responsibility, 2 – 49Signon Audit Concurrent Requests, 3 – 10Signon Audit Forms, 3 – 12Signon Audit Responsibilities, 3 – 15Signon Audit Unsuccessful Logins, 3 – 17Signon Audit Users, 3 – 19User Profile Option Values, 11 – 5Users of a Responsibility, 2 – 46Work Shift by Manager, 5 – 35Work Shifts, 5 – 36
Request type, 5 – 53 to 5 – 55Resource consumer groups, 9 – 7Responsibilities
Application name, 2 – 11changing, 2 – 2deactivating, 2 – 12defines application privileges, 2 – 2defining, 2 – 10description, 2 – 2major components, 2 – 4predefined, 2 – 4Report Security Groups, 2 – 4reporting on active responsibilities, 2 – 47reporting on reports and report sets, 2 – 49,
4 – 24reporting on users of, 2 – 46standard, 2 – 2Start date, 2 – 11
Responsibility, default folders, 9 – 25Run Reports form, customizing using codes,
4 – 20

Index – 9
Run Requests form, example – customizing, 4 – 20
SSecurity
server trust level, G – 55server, administering, G – 51
Security Groups, defining (for HRMS only), 2 – 16
Self–Service Framework, configuration, G – 59HTTP server configuration checklist, G – 64
Server security, G – 51, G – 55Server trust level, G – 55Service Management, 5 – 5Session parameters, for optimization, 10 – 32Session time–out, 2 – 9Shared parameters, behavior of. See Report
SetsSign–On Audit
audit levels, 3 – 4examples using, 3 – 5introduction, 3 – 2monitoring users, 3 – 5, 3 – 8purging obsolete data, 3 – 21reporting on users, 3 – 19reporting on users and forms, 3 – 12reporting on users and requests, 3 – 10reporting on users and responsibilities,
3 – 15reporting on users and unsuccessful logins,
3 – 17reports, 3 – 7setting up, 3 – 4using, 3 – 3 to 3 – 8
Single Sign–On, H – 4Specializing managers
action types, 5 – 37 to 5 – 39actions, 5 – 37 to 5 – 39defining combined rules, 5 – 46 to 5 – 49defining specialization rules, 5 – 37 to
5 – 40examples of action types, 5 – 40 to 5 – 42
examples of combined rules, 5 – 48 to 5 – 53
examples of rules, 5 – 41 to 5 – 48explained, 5 – 37 to 5 – 62introduction, 5 – 37specialization vs. combined rules, 5 – 51using more than one rule, 5 – 38 to 5 – 41
Standard Report Submission, explained, 4 – 2Standard Submission form
customizing, 4 – 2, 4 – 20 to 4 – 24example – customizing, 4 – 20explained, 4 – 2list, 4 – 20
Stuck processes, 6 – 40Summary Notification Mailer, 6 – 44Suspended work items, 6 – 73System Administrator
report set privileges, 4 – 12versus Database Administrator, 1 – 2
TTarget processes. See Concurrent managersTimed out activities, 6 – 40Transaction Managers, 5 – 28
UUpgrading, preserving custom menus, 2 – 31User, default folders, 9 – 25User profiles
assigning Set of Books, 11 – 2examples of, 11 – 4reporting on, 11 – 5setting options, 11 – 2updating system profiles, 11 – 6using site level as defaults, 11 – 3when changes take effect, 11 – 2
User session limits, 2 – 9Username. See Application userUTF8, G – 92

Index – 10 Oracle Applications System Administrator’s Guide
VViewer Options window, 5 – 105
WWFMGSMD, 6 – 44WFMGSMS, 6 – 45
Windows, character mode mapping to GUI, E – 2
Work Directory, 14 – 2, 14 – 3Work items, 6 – 38Work shifts. See Concurrent ManagersWorkflow Agent Listener concurrent program,
6 – 56Workflow Background Process concurrent
program, 6 – 41

Reader’s Comment Form
Oracle Applications System Administrator’s Guide Volume 1, Release 11iA96155–02
Oracle Corporation welcomes your comments and suggestions on the quality and usefulnessof this publication. Your input is an important part of the information we use for revision.
• Did you find any errors?
• Is the information clearly presented?
• Do you need more information? If so, where?
• Are the examples correct? Do you need more examples?
• What features did you like most about this manual? What did you like least about it?
If you find any errors or have any other suggestions for improvement, please indicate the topic, chapter,and page number below:
Please send your comments to:
Oracle Applications Documentation ManagerOracle Corporation500 Oracle ParkwayRedwood Shores, CA 94065 USAPhone: (650) 506–7000 Fax: (650) 506–7200
If you would like a reply, please give your name, address, and telephone number below:
Thank you for helping us improve our documentation.


Oracle � ApplicationsSystem Administrator’sGuideRELEASE 11iVOLUME 2
October 2002
Oracle Applications System Administrator’s Guide Release 11i
The part number for this volume is A96156–02. To reorder this book, please use the set part number,A96154–02.
Copyright � 1994, 2002 Oracle Corporation. All rights reserved.
Primary Authors: Steve Carter, Mildred Wang
Major Contributors: Dana Spradley, Leslie Studdard
Contributors: Ahmed Alomari, Troy Anthony, Ram Bhoopalam, George Buzsaki, Anne Carlson,Steven Chan, Siu Chang, John Cordes, Mark Fisher, Hubert Ferst, Clara Jaeckel, Michael Mast, TomMorrow, Emily Nordhagen, Muhannad Obeidat, Gursat Olgun, Richard Ou, Jan Smith, SethStafford, Susan Stratton, Raymond Tse, Mark Warren, Sara Woodhull
The Programs (which include both the software and documentation) contain proprietary information;they are provided under a license agreement containing restrictions on use and disclosure and are alsoprotected by copyright, patent and other intellectual and industrial property laws. Reverseengineering, disassembly, or decompilation of the Programs, except to the extent required to obtaininteroperability with other independently created software or as specified by law, is prohibited.
The information contained in this documentation is subject to change without notice. If you find anyproblems in the documentation, please report them to us in writing. This documentation is notwarranted to be error–free. Except as may be expressly permitted in your license agreement for thesePrograms, no part of these Programs may be reproduced or transmitted in any form or by any means,electronic or mechanical, for any purpose.
If the Programs are delivered to the United States Government or anyone licensing or using thePrograms on behalf of the United States Government, the following notice is applicable:
U.S. GOVERNMENT RIGHTS Programs, software, databases, and related documentation and technical data delivered to U.S.Government customers are ”commercial computer software” or ”commercial technical data” pursuantto the applicable Federal Acquisition Regulation, and agency–specific supplemental regulations. Assuch, use, duplication, disclosure, modification, and adaptation of the Programs, includingdocumentation and technical data, shall be subject to the licensing restrictions set forth in theapplicable Oracle license agreement, and, to the extent applicable, the additional rights set forth in FAR52.227–19, Commercial Computer Software – Restricted Rights (June, 1987). Oracle Corporation, 500Oracle Parkway, Redwood City, CA 94065. The Programs are not intended for use in any nuclear, aviation, mass transit, medical, or otherinherently dangerous applications. It shall be the licensee’s responsibility to take all appropriatefail–safe, backup, redundancy, and other measures to ensure the safe use of such applications if thePrograms are used for such purposes, and we disclaim liability for any damages caused by such use ofthe Programs.
Oracle is a registered trademark of Oracle Corporation and/or its affiliates. Other names may betrademarks of their respective owners.
iiiContents
Contents
VOLUME 1
Preface i. . . . . . . . . . . . . . . . . . . . . . . . . . . . . . . . . . . . . . . . . . . . . . . . .
Chapter 1 What Is System Administration? 1 – 1. . . . . . . . . . . . . . . . . . . . . . . . . . What Is System Administration? 1 – 2. . . . . . . . . . . . . . . . . . . . . . . . . . .
Chapter 2 Managing Oracle Applications Security 2 – 1. . . . . . . . . . . . . . . . . . . Overview of Oracle Applications Security 2 – 2. . . . . . . . . . . . . . . . . . . Defining a Responsibility 2 – 4. . . . . . . . . . . . . . . . . . . . . . . . . . . . . . . . . Defining a Request Security Group 2 – 6. . . . . . . . . . . . . . . . . . . . . . . . . User Session Limits 2 – 9. . . . . . . . . . . . . . . . . . . . . . . . . . . . . . . . . . . . . . Responsibilities Window 2 – 10. . . . . . . . . . . . . . . . . . . . . . . . . . . . . . . . . . Overview of Security Groups 2 – 15. . . . . . . . . . . . . . . . . . . . . . . . . . . . . . Security Groups Window 2 – 16. . . . . . . . . . . . . . . . . . . . . . . . . . . . . . . . . Users Window 2 – 17. . . . . . . . . . . . . . . . . . . . . . . . . . . . . . . . . . . . . . . . . . . Overview of Function Security 2 – 22. . . . . . . . . . . . . . . . . . . . . . . . . . . . . Implementing Function Security 2 – 28. . . . . . . . . . . . . . . . . . . . . . . . . . . Form Functions Window 2 – 34. . . . . . . . . . . . . . . . . . . . . . . . . . . . . . . . . . Menus Window 2 – 38. . . . . . . . . . . . . . . . . . . . . . . . . . . . . . . . . . . . . . . . . . Menu Viewer 2 – 42. . . . . . . . . . . . . . . . . . . . . . . . . . . . . . . . . . . . . . . . . . . . Compile Security Concurrent Program 2 – 44. . . . . . . . . . . . . . . . . . . . . . Function Security Reports 2 – 45. . . . . . . . . . . . . . . . . . . . . . . . . . . . . . . . . Users of a Responsibility Report 2 – 46. . . . . . . . . . . . . . . . . . . . . . . . . . .

iv Oracle Applications System Administrator’s Guide
Active Responsibilities Report 2 – 47. . . . . . . . . . . . . . . . . . . . . . . . . . . . . Active Users Report 2 – 48. . . . . . . . . . . . . . . . . . . . . . . . . . . . . . . . . . . . . . Reports and Sets by Responsibility Report 2 – 49. . . . . . . . . . . . . . . . . . .
Chapter 3 User and Data Auditing 3 – 1. . . . . . . . . . . . . . . . . . . . . . . . . . . . . . . . . . Overview of User and Data Auditing 3 – 2. . . . . . . . . . . . . . . . . . . . . . . Auditing User Activity 3 – 3. . . . . . . . . . . . . . . . . . . . . . . . . . . . . . . . . . . Monitor Users Window 3 – 8. . . . . . . . . . . . . . . . . . . . . . . . . . . . . . . . . . . Signon Audit Concurrent Requests Report 3 – 10. . . . . . . . . . . . . . . . . . Signon Audit Forms Report 3 – 12. . . . . . . . . . . . . . . . . . . . . . . . . . . . . . . Signon Audit Responsibilities Report 3 – 15. . . . . . . . . . . . . . . . . . . . . . . Signon Audit Unsuccessful Logins Report 3 – 17. . . . . . . . . . . . . . . . . . . Signon Audit Users Report 3 – 19. . . . . . . . . . . . . . . . . . . . . . . . . . . . . . . . Purge Signon Audit Data Program 3 – 21. . . . . . . . . . . . . . . . . . . . . . . . . Reporting On AuditTrail Data 3 – 22. . . . . . . . . . . . . . . . . . . . . . . . . . . . . Audit Installations Window 3 – 34. . . . . . . . . . . . . . . . . . . . . . . . . . . . . . . Audit Groups Window 3 – 36. . . . . . . . . . . . . . . . . . . . . . . . . . . . . . . . . . . Audit Tables Window 3 – 40. . . . . . . . . . . . . . . . . . . . . . . . . . . . . . . . . . . .
Chapter 4 Managing Concurrent Programs and Reports 4 – 1. . . . . . . . . . . . . . . Overview of Concurrent Programs and Requests 4 – 2. . . . . . . . . . . . . Multilingual Support for Concurrent Requests 4 – 4. . . . . . . . . . . . . . . Organizing Programs into Request Sets 4 – 6. . . . . . . . . . . . . . . . . . . . . Request Sets Report 4 – 18. . . . . . . . . . . . . . . . . . . . . . . . . . . . . . . . . . . . . . Organizing Programs into Request Groups 4 – 19. . . . . . . . . . . . . . . . . . Report Group Responsibilities Report 4 – 24. . . . . . . . . . . . . . . . . . . . . . Defining Program Incompatibility Rules 4 – 25. . . . . . . . . . . . . . . . . . . . Defining Data Groups 4 – 30. . . . . . . . . . . . . . . . . . . . . . . . . . . . . . . . . . . . Custom Concurrent Programs 4 – 35. . . . . . . . . . . . . . . . . . . . . . . . . . . . . Copying and Modifying Program Definitions 4 – 47. . . . . . . . . . . . . . . . Concurrent Program Details Report 4 – 57. . . . . . . . . . . . . . . . . . . . . . . . Concurrent Programs Report 4 – 58. . . . . . . . . . . . . . . . . . . . . . . . . . . . . . Request Groups Window 4 – 59. . . . . . . . . . . . . . . . . . . . . . . . . . . . . . . . . Concurrent Program Executable Window 4 – 61. . . . . . . . . . . . . . . . . . . Concurrent Programs Window 4 – 66. . . . . . . . . . . . . . . . . . . . . . . . . . . . Data Groups Window 4 – 81. . . . . . . . . . . . . . . . . . . . . . . . . . . . . . . . . . . .
Chapter 5 Managing Concurrent Processing 5 – 1. . . . . . . . . . . . . . . . . . . . . . . . . Overview of Concurrent Processing 5 – 2. . . . . . . . . . . . . . . . . . . . . . . . Service Management 5 – 5. . . . . . . . . . . . . . . . . . . . . . . . . . . . . . . . . . . . .
vContents
Managing Concurrent Processing with Oracle Applications Manager 5 – 8. . . . . . . . . . . . . . . . . . . . . . . . . . . . . . . . . . . . . . . . . . . . . . . . Reviewing Requests, Request Log Files, and Report Output Files 5 – 9. . . . . . . . . . . . . . . . . . . . . . . . . . . . . . . . . . . . . . . . . . . . . Changing the Status of Concurrent Requests 5 – 16. . . . . . . . . . . . . . . . . Managing Concurrent Processing Files and Tables 5 – 18. . . . . . . . . . . . Purge Concurrent Request and/or Manager Data Program 5 – 20. . . . Concurrent Processing User Profile Settings 5 – 24. . . . . . . . . . . . . . . . . Defining Managers and their Work Shifts 5 – 26. . . . . . . . . . . . . . . . . . . Completed Concurrent Requests Report 5 – 34. . . . . . . . . . . . . . . . . . . . Work Shift by Manager Report 5 – 35. . . . . . . . . . . . . . . . . . . . . . . . . . . . . Work Shifts Report 5 – 36. . . . . . . . . . . . . . . . . . . . . . . . . . . . . . . . . . . . . . . Specializing Managers to Run Only Certain Programs 5 – 37. . . . . . . . Grouping Programs by Request Type 5 – 53. . . . . . . . . . . . . . . . . . . . . . . Controlling Concurrent Managers 5 – 55. . . . . . . . . . . . . . . . . . . . . . . . . . Overview of Parallel Concurrent Processing 5 – 64. . . . . . . . . . . . . . . . . Managing Parallel Concurrent Processing 5 – 68. . . . . . . . . . . . . . . . . . . Concurrent Managers and Real Application Clusters (RAC) 5 – 76. . . Administer Concurrent Managers Window 5 – 80. . . . . . . . . . . . . . . . . . Concurrent Managers Window 5 – 89. . . . . . . . . . . . . . . . . . . . . . . . . . . . Work Shifts Window 5 – 98. . . . . . . . . . . . . . . . . . . . . . . . . . . . . . . . . . . . . Combined Specialization Rules Window 5 – 100. . . . . . . . . . . . . . . . . . . . Concurrent Request Types Window 5 – 103. . . . . . . . . . . . . . . . . . . . . . . . Viewer Options Window 5 – 105. . . . . . . . . . . . . . . . . . . . . . . . . . . . . . . . . . Nodes Window 5 – 107. . . . . . . . . . . . . . . . . . . . . . . . . . . . . . . . . . . . . . . . . .
Chapter 6 Oracle Applications Manager 6 – 1. . . . . . . . . . . . . . . . . . . . . . . . . . . . . Oracle Applications Management Tools 6 – 2. . . . . . . . . . . . . . . . . . . . . Oracle Management Pack for Oracle Applications 6 – 3. . . . . . . . . . . . Overview of Oracle Applications Manager 6 – 5. . . . . . . . . . . . . . . . . . Oracle Applications Manager 6 – 7. . . . . . . . . . . . . . . . . . . . . . . . . . . . . . Configuration for an Oracle Applications System 6 – 8. . . . . . . . . . . . Services 6 – 21. . . . . . . . . . . . . . . . . . . . . . . . . . . . . . . . . . . . . . . . . . . . . . . . . Work Shifts 6 – 35. . . . . . . . . . . . . . . . . . . . . . . . . . . . . . . . . . . . . . . . . . . . . Oracle Workflow Manager 6 – 37. . . . . . . . . . . . . . . . . . . . . . . . . . . . . . . . Background Engines 6 – 40. . . . . . . . . . . . . . . . . . . . . . . . . . . . . . . . . . . . . Notification Mailer 6 – 44. . . . . . . . . . . . . . . . . . . . . . . . . . . . . . . . . . . . . . . Agent Listeners 6 – 56. . . . . . . . . . . . . . . . . . . . . . . . . . . . . . . . . . . . . . . . . . Queue Propagation 6 – 58. . . . . . . . . . . . . . . . . . . . . . . . . . . . . . . . . . . . . .

vi Oracle Applications System Administrator’s Guide
Purging Workflow Data 6 – 61. . . . . . . . . . . . . . . . . . . . . . . . . . . . . . . . . . . Active Work Items 6 – 67. . . . . . . . . . . . . . . . . . . . . . . . . . . . . . . . . . . . . . . Deferred Work Items 6 – 70. . . . . . . . . . . . . . . . . . . . . . . . . . . . . . . . . . . . . Suspended Work Items 6 – 73. . . . . . . . . . . . . . . . . . . . . . . . . . . . . . . . . . . Errored Work Items 6 – 76. . . . . . . . . . . . . . . . . . . . . . . . . . . . . . . . . . . . . .
Index
VOLUME 2
Chapter 7 Printers 7 – 1. . . . . . . . . . . . . . . . . . . . . . . . . . . . . . . . . . . . . . . . . . . . . . . . . Printers and Printing 7 – 2. . . . . . . . . . . . . . . . . . . . . . . . . . . . . . . . . . . . . Setting Up Your Printers 7 – 11. . . . . . . . . . . . . . . . . . . . . . . . . . . . . . . . . . Printer Setup with Pasta 7 – 13. . . . . . . . . . . . . . . . . . . . . . . . . . . . . . . . . . Customizing Printing Support in Oracle Applications 7 – 24. . . . . . . . . Hierarchy of Printer and Print Style Assignments 7 – 31. . . . . . . . . . . . Postscript Printing in UNIX 7 – 37. . . . . . . . . . . . . . . . . . . . . . . . . . . . . . . Printer Types Window 7 – 39. . . . . . . . . . . . . . . . . . . . . . . . . . . . . . . . . . . . Printers Window 7 – 41. . . . . . . . . . . . . . . . . . . . . . . . . . . . . . . . . . . . . . . . . Print Styles Window 7 – 43. . . . . . . . . . . . . . . . . . . . . . . . . . . . . . . . . . . . . . Printer Drivers Window 7 – 46. . . . . . . . . . . . . . . . . . . . . . . . . . . . . . . . . .
Chapter 8 Oracle Applications Help 8 – 1. . . . . . . . . . . . . . . . . . . . . . . . . . . . . . . . Customizing Oracle Applications Help 8 – 2. . . . . . . . . . . . . . . . . . . . .
Chapter 9 Applications DBA Duties 9 – 1. . . . . . . . . . . . . . . . . . . . . . . . . . . . . . . . Overview of Applications DBA Duties 9 – 2. . . . . . . . . . . . . . . . . . . . . . Resource Consumer Groups in Oracle Applications 9 – 7. . . . . . . . . . Oracle Applications Schema Password Change Utility(FNDCPASS) 9 – 9. . . . . . . . . . . . . . . . . . . . . . . . . . . . . . . . . . . . . . . . . . . . ORACLE Users Window 9 – 13. . . . . . . . . . . . . . . . . . . . . . . . . . . . . . . . . . Concurrent Conflicts Domains Window 9 – 17. . . . . . . . . . . . . . . . . . . . . Applications Window 9 – 19. . . . . . . . . . . . . . . . . . . . . . . . . . . . . . . . . . . . Network Test Window 9 – 22. . . . . . . . . . . . . . . . . . . . . . . . . . . . . . . . . . . . Administering Folders 9 – 24. . . . . . . . . . . . . . . . . . . . . . . . . . . . . . . . . . . . Languages Window 9 – 28. . . . . . . . . . . . . . . . . . . . . . . . . . . . . . . . . . . . . . Territories Window 9 – 30. . . . . . . . . . . . . . . . . . . . . . . . . . . . . . . . . . . . . . .
viiContents
Chapter 10 Cost–Based Optimization in Oracle Applications 10 – 1. . . . . . . . . . . Oracle Applications and Cost–Based Optimization 10 – 2. . . . . . . . . . . Parameters for Cost–Based Optimization 10 – 3. . . . . . . . . . . . . . . . . . . . Concurrent Programs for CBO 10 – 9. . . . . . . . . . . . . . . . . . . . . . . . . . . . . Gather Table Statistics 10 – 10. . . . . . . . . . . . . . . . . . . . . . . . . . . . . . . . . . . . Backup Table Statistics 10 – 12. . . . . . . . . . . . . . . . . . . . . . . . . . . . . . . . . . . . Restore Table Statistics 10 – 13. . . . . . . . . . . . . . . . . . . . . . . . . . . . . . . . . . . . Gather Schema Statistics 10 – 14. . . . . . . . . . . . . . . . . . . . . . . . . . . . . . . . . . Gather Column Statistics 10 – 15. . . . . . . . . . . . . . . . . . . . . . . . . . . . . . . . . . Gather All Column Statistics 10 – 16. . . . . . . . . . . . . . . . . . . . . . . . . . . . . . FND_STATS Package 10 – 17. . . . . . . . . . . . . . . . . . . . . . . . . . . . . . . . . . . . . FND_CTL Package 10 – 32. . . . . . . . . . . . . . . . . . . . . . . . . . . . . . . . . . . . . . .
Chapter 11 User Profiles 11 – 1. . . . . . . . . . . . . . . . . . . . . . . . . . . . . . . . . . . . . . . . . . . . Overview of Setting User Profiles 11 – 2. . . . . . . . . . . . . . . . . . . . . . . . . . User Profile Option Values Report 11 – 5. . . . . . . . . . . . . . . . . . . . . . . . . . System Profile Values Window 11 – 6. . . . . . . . . . . . . . . . . . . . . . . . . . . . .
Chapter 12 Administering Process Navigation 12 – 1. . . . . . . . . . . . . . . . . . . . . . . . Overview of Process Navigation 12 – 2. . . . . . . . . . . . . . . . . . . . . . . . . . . Modifying Your Menu 12 – 3. . . . . . . . . . . . . . . . . . . . . . . . . . . . . . . . . . . . Creating Process Navigator Processes 12 – 4. . . . . . . . . . . . . . . . . . . . . . .
Chapter 13 Document Sequences 13 – 1. . . . . . . . . . . . . . . . . . . . . . . . . . . . . . . . . . . . Document Sequences Window 13 – 9. . . . . . . . . . . . . . . . . . . . . . . . . . . . . Document Categories Window 13 – 12. . . . . . . . . . . . . . . . . . . . . . . . . . . . Sequence Assignments Window 13 – 14. . . . . . . . . . . . . . . . . . . . . . . . . . .
Chapter 14 Developer Tools 14 – 1. . . . . . . . . . . . . . . . . . . . . . . . . . . . . . . . . . . . . . . . . Developer Tools 14 – 2. . . . . . . . . . . . . . . . . . . . . . . . . . . . . . . . . . . . . . . . . Work Directory 14 – 3. . . . . . . . . . . . . . . . . . . . . . . . . . . . . . . . . . . . . . . . . . Web Enabled PL/SQL Window 14 – 5. . . . . . . . . . . . . . . . . . . . . . . . . . . .
Appendix A Profile Options in Oracle Application Object Library A – 1. . . . . . .
Appendix B Using Predefined Alerts B – 1. . . . . . . . . . . . . . . . . . . . . . . . . . . . . . . . . . Overview of Oracle Alert B – 2. . . . . . . . . . . . . . . . . . . . . . . . . . . . . . . . . Predefined Alerts B – 5. . . . . . . . . . . . . . . . . . . . . . . . . . . . . . . . . . . . . . . . Oracle Alert Precoded Alerts B – 10. . . . . . . . . . . . . . . . . . . . . . . . . . . . . .

viii Oracle Applications System Administrator’s Guide
Appendix C Loaders C – 1. . . . . . . . . . . . . . . . . . . . . . . . . . . . . . . . . . . . . . . . . . . . . . . . . Generic Loader C – 2. . . . . . . . . . . . . . . . . . . . . . . . . . . . . . . . . . . . . . . . . . Application Object Library Configuration Files C – 12. . . . . . . . . . . . . . Concurrent Program Configuration File C – 13. . . . . . . . . . . . . . . . . . . . . Request Groups Configuration File C – 15. . . . . . . . . . . . . . . . . . . . . . . . . Lookups Configuration File C – 16. . . . . . . . . . . . . . . . . . . . . . . . . . . . . . . Profile Options and Profile Values Configuration File C – 18. . . . . . . . . Flexfields Setup Data Configuration File C – 20. . . . . . . . . . . . . . . . . . . . Attachments Setup Data Configuration File C – 24. . . . . . . . . . . . . . . . . Messages Configuration File C – 27. . . . . . . . . . . . . . . . . . . . . . . . . . . . . . . Security Information Configuration File C – 28. . . . . . . . . . . . . . . . . . . . . Message Dictionary Generator C – 30. . . . . . . . . . . . . . . . . . . . . . . . . . . . . Generic File Manager Access Utility (FNDGFU) C – 32. . . . . . . . . . . . . . Purge Obsolete Generic File Manager Data C – 36. . . . . . . . . . . . . . . . . .
Appendix D Multilingual External Documents D – 1. . . . . . . . . . . . . . . . . . . . . . . . . Multilingual External Documents D – 2. . . . . . . . . . . . . . . . . . . . . . . . . .
Appendix E Character Mode to GUI Appendix E – 1. . . . . . . . . . . . . . . . . . . . . . . . . Oracle Applications Character Mode Forms and Corresponding GUI Windows E – 2. . . . . . . . . . . . . . . . . . . . . . . . . . . . .
Appendix F Implementation Appendix F – 1. . . . . . . . . . . . . . . . . . . . . . . . . . . . . . . Setting Up Oracle Applications System Administrator F – 2. . . . . . . .
Appendix G Setting Up and Maintaining Oracle Applications G – 1. . . . . . . . . . . Setting Up and Maintaining Your Oracle Applications Configuration G – 2. . . . . . . . . . . . . . . . . . . . . . . . . . . . . . . . . . . . . . . . . . . Administering Oracle HTTP Server Powered by Apache G – 14. . . . . . Administering the TCF SocketServer G – 41. . . . . . . . . . . . . . . . . . . . . . . AdminAppServer Utility G – 44. . . . . . . . . . . . . . . . . . . . . . . . . . . . . . . . . . Support for Encrypted Thin JDBC Connections G – 50. . . . . . . . . . . . . . Administering Server Security G – 51. . . . . . . . . . . . . . . . . . . . . . . . . . . . . Restricting Access to Responsibilities Based on User’s Web Server G – 55. . . . . . . . . . . . . . . . . . . . . . . . . . . . . . . . . . . . . . . Application Object Library AOL/J Setup Test Suite G – 57. . . . . . . . . . . Configuring the Self–Service Framework G – 59. . . . . . . . . . . . . . . . . . . .

ixContents
Concurrent Managers G – 66. . . . . . . . . . . . . . . . . . . . . . . . . . . . . . . . . . . . Migrating an Oracle Applications Single Instance to Real Application Clusters (RAC) G – 85. . . . . . . . . . . . . . . . . . . . . . . . . . . Behavior of Date Formats in NLS Implementations G – 92. . . . . . . . . . .
Appendix H Technology Stack Enabled Features H – 1. . . . . . . . . . . . . . . . . . . . . . . Oracle9i Application Server (9iAS) and Oracle Applications H – 2. . . Oracle Applications with Oracle9iAS Portal H – 3. . . . . . . . . . . . . . . . . Implementing Single Sign–On for Oracle Applications 11i with Login Server Authentication Using Oracle Internet Directory H – 4. . . . . . . . . . . . . . . . . . . . . . . . . . . . . . . . . . Discoverer 4i with Oracle Applications 11i H – 21. . . . . . . . . . . . . . . . . . Oracle9i Applications Server (9iAS) with Oracle E–Business Suite Related Documentation H – 50. . . . . . . . . . . . . . . . . . . . . . . . . . . . . .
Glossary
Index

x Oracle Applications System Administrator’s Guide
C H A P T E R
7 T
7 – 1Printers
Printers
his chapter tells you everything you need to know about usingprinters with Oracle Applications. The essays in this chapter areorganized under the following topics:
• Overview of Printers and Printing
• Setting Up Your Printers
• Customizing Printing Support in Oracle Applications
• Postscript Printing in UNIX
• Hierarchy of Printer and Print Style Assignments
• Upgrading Printer Files
Form descriptions follow at the end of the chapter.
7 – 2 Oracle Applications System Administrator’s Guide
Printers and PrintingOracle Applications offers two printing solutions to handle all yourprinting requirements. For most printing needs, the Pasta Utility offersquick setup and easy maintenance. For additional flexibility, OracleApplications allows you to define your own printer drivers and printstyles.
• To set up your printers using Pasta, see Printer Setup with Pasta:page 7 – 13.
Note: Pasta is required to print using UTF8.
• To set up your printers using a custom solution, see CustomizingPrinting Support in Oracle Applications: page 7 – 24.
Note: For updates on printing in Oracle Applications, pleaserefer to OracleMetaLink.
Overview
When you run an Oracle Applications report, Oracle Reports generatesand formats the output. A completed report is sent to the operatingsystem by the concurrent manager, which issues an operating systemprint command, or calls a custom print program or subroutine thatissues an operating system print command.
Oracle Reports and Report Generation
Oracle Reports includes page break, carriage return, line feed, text boldon/off, and text underline on/off instructions within the output file.The values are retrieved from a SQL*ReportWriter (SRW) driver file.
When the report is generated for online viewing, Oracle Reports usesthe SRW driver named by the print style in the Print Styles form.
When the report is to be printed, Oracle Reports uses the SRW drivernamed by the Oracle Applications printer driver in the Printer Driversform.
The dimensions of a report are determined by the columns and rowsvalues in the print style, defined using the Print Styles form. Thesevalues override the width and height values in an SRW driver file.
Concurrent Manager Issues or Calls a Print Command
When a report program finishes running, the concurrent managerprepends an initialization string, and appends a printer reset string to
7 – 3Printers
the output file. Both strings are defined using the Printer Drivers form.
An Oracle Applications printer driver is invoked by issuing a printcommand or by calling a print program or subroutine.
When the printer driver method is Command, the concurrent managercan issue an operating system print command and arguments, enteredin the Arguments field of the Printer Drivers form.
When the printer driver method is Program, the concurrent managercan call a custom print program, named (along with its path) in theName field of the Printer Drivers form. Arguments to the programmay be entered in the form’s Arguments field.
When the printer driver method is Subroutine, the concurrent managercalls a predefined Oracle Applications subroutine that passes a printcommand and arguments to the printer via the operating system. Thesubroutine name is entered in the Program Name field of the PrinterDrivers form.
The concurrent manager may provide values for four arguments to anoperating system print command or custom print program:
• the name of the file to be printed
• the operating system name of the target printer
• the title of the file, which appears on a header page if it is printed
• the number of copies to be printed
Printer Types, Print Styles, and Printer Drivers
The commands that a printer can understand vary from one type ofprinter to another. A printer type identifies a printer by manufacturerand model.
A print style tells the printer how a printed output should look. Aprinter driver delivers commands that tell the printer how to output thespecified print style.
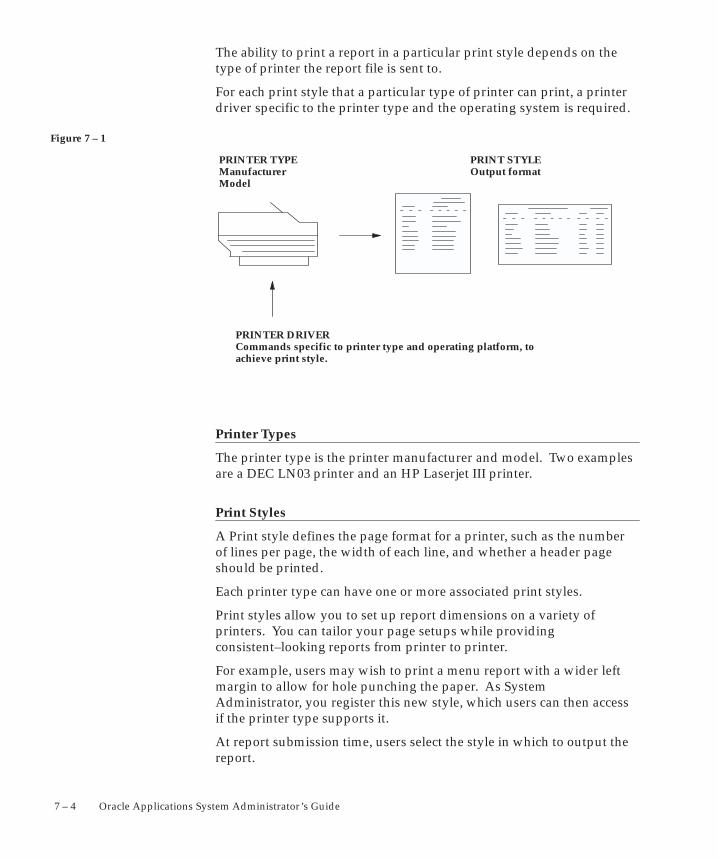
Figure 7 – 1
7 – 4 Oracle Applications System Administrator’s Guide
The ability to print a report in a particular print style depends on thetype of printer the report file is sent to.
For each print style that a particular type of printer can print, a printerdriver specific to the printer type and the operating system is required.
PRINTER TYPEManufacturerModel
PRINT STYLEOutput format
PRINTER DRIVERCommands specific to printer type and operating platform, toachieve print style.
Printer Types
The printer type is the printer manufacturer and model. Two examplesare a DEC LN03 printer and an HP Laserjet III printer.
Print Styles
A Print style defines the page format for a printer, such as the numberof lines per page, the width of each line, and whether a header pageshould be printed.
Each printer type can have one or more associated print styles.
Print styles allow you to set up report dimensions on a variety ofprinters. You can tailor your page setups while providingconsistent–looking reports from printer to printer.
For example, users may wish to print a menu report with a wider leftmargin to allow for hole punching the paper. As SystemAdministrator, you register this new style, which users can then accessif the printer type supports it.
At report submission time, users select the style in which to output thereport.
7 – 5Printers
• Only styles available on the destination printer are displayed.
• Some concurrent programs predefine either the printer or theprint style, and these values cannot be changed.
Printer Drivers
To print in a particular style from a particular printer type, you define aprinter driver. A printer driver is the mechanism that delivers areport’s output along with its commands to the target printer.
Concurrent managers determine what drivers to use depending onwhat the print style is and what printer type the report is to be sent to.
You need to define a printer driver for each print style that you want touse with a specific printer type on a specific platform.
Sequence of Printing Events
The concurrent manager associates a print style and a printer driverwith the destination printer’s printer type. This combination of printstyle and printer driver is defined in the Printer Types form.
A printer driver tells the destination printer how to interpret theformat. An SRW Driver formats text and sets page breaks within anOracle Reports file.
Sequence of Printing Events – Example
The following is an example of the sequence of printing events.
1. A user submits a request to run a report from the Run Reportsform.
2. A request to run the report is added to the requests table.
3. A concurrent manager reads the request.
4. The concurrent manager calls Oracle Reports to run the report, andpasses the SRW Driver name. If Report Copies = 0 and the Printerfield is blank, the Print Style’s SRW Driver is used. If ReportCopies > 0 and Printer is required, then the Printer Driver’s SRWDriver is used.
The concurrent manager passes Print Style information (Columnsand Rows) to Oracle Reports (overrides SRW Driver width andheight if the report is to be printed).
5. A report is created using Oracle Reports. The concurrent managerattaches Printer Driver information to the file. It prepends theinitialization string and appends the reset string.
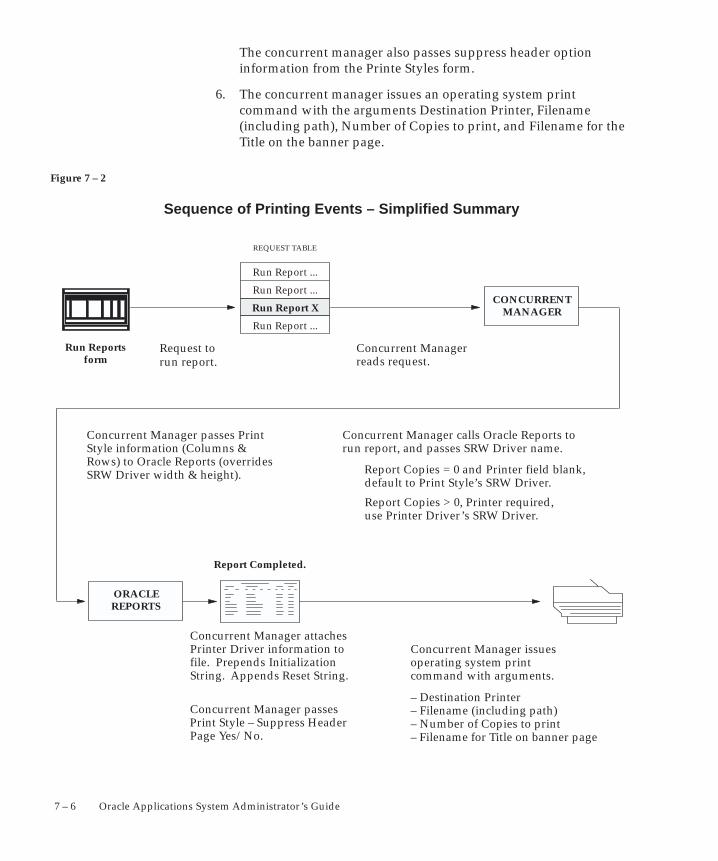
Figure 7 – 2
7 – 6 Oracle Applications System Administrator’s Guide
The concurrent manager also passes suppress header optioninformation from the Printe Styles form.
6. The concurrent manager issues an operating system printcommand with the arguments Destination Printer, Filename(including path), Number of Copies to print, and Filename for theTitle on the banner page.
Sequence of Printing Events – Simplified Summary
Run Report X
REQUEST TABLE
Run Report ...
Run Report ...
Run Report ...
Run Reportsform
Request torun report.
Concurrent Managerreads request.
Concurrent Manager calls Oracle Reports torun report, and passes SRW Driver name.
Report Copies = 0 and Printer field blank,default to Print Style’s SRW Driver.
Report Copies > 0, Printer required,use Printer Driver’s SRW Driver.
Concurrent Manager passes PrintStyle information (Columns &Rows) to Oracle Reports (overridesSRW Driver width & height).
Concurrent Manager passesPrint Style – Suppress HeaderPage Yes/No.
Report Completed.
Concurrent Manager attachesPrinter Driver information tofile. Prepends InitializationString. Appends Reset String.
Concurrent Manager issuesoperating system printcommand with arguments.
– Destination Printer– Filename (including path)– Number of Copies to print– Filename for Title on banner page
ORACLEREPORTS
CONCURRENTMANAGER
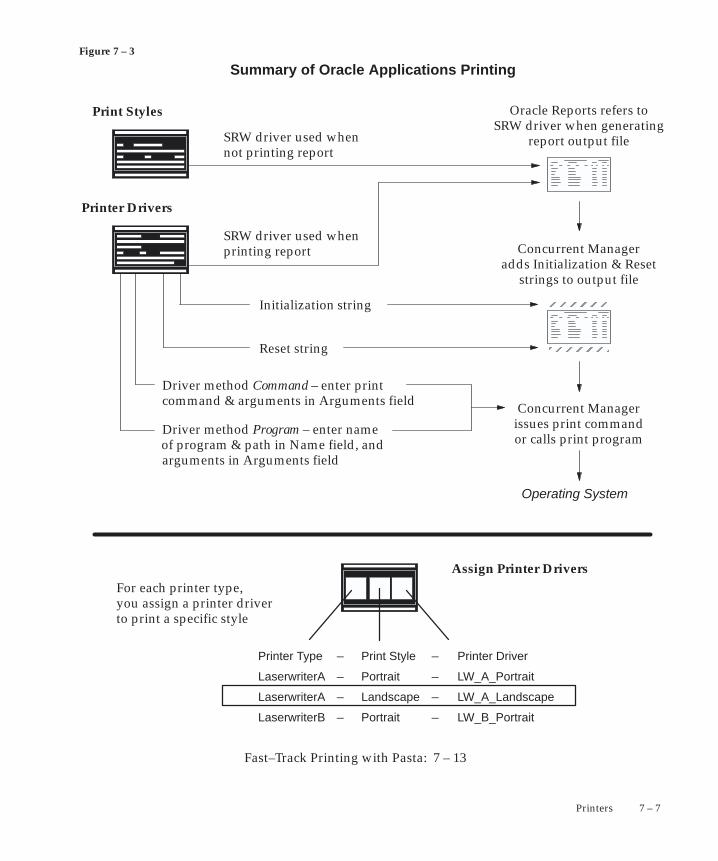
Figure 7 – 3
7 – 7Printers
Assign Printer Drivers
Print Styles
Printer Drivers
Printer Type Print Style Printer Driver_ _
LaserwriterA Portrait LW_A_Portrait_ _
LaserwriterA Landscape LW_A_Landscape_ _
LaserwriterB Portrait LW_B_Portrait_ _
For each printer type, you assign a printer driver to print a specific style
Oracle Reports refers toSRW driver when generating
report output fileSRW driver used whennot printing report
SRW driver used whenprinting report
Initialization string
Reset string
Driver method Command – enter printcommand & arguments in Arguments field
Driver method Program – enter nameof program & path in Name field, and arguments in Arguments field
Concurrent Manageradds Initialization & Reset
strings to output file
Concurrent Managerissues print commandor calls print program
Operating System
Summary of Oracle Applications Printing
ÉÉÉÉÉÉÉÉ
ÉÉÉÉ
Fast–Track Printing with Pasta: 7 – 13
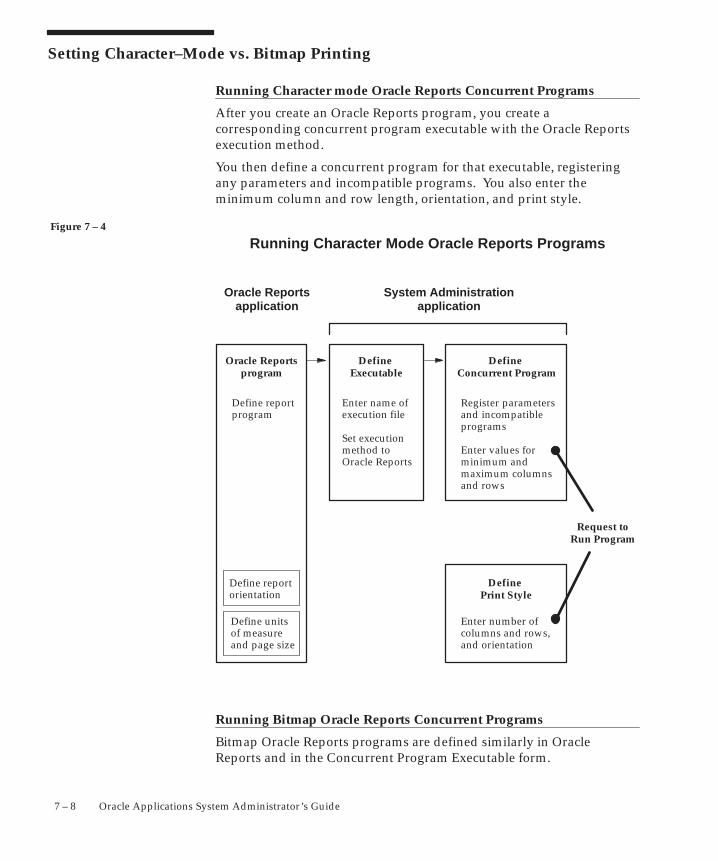
Figure 7 – 4
7 – 8 Oracle Applications System Administrator’s Guide
Setting Character–Mode vs. Bitmap Printing
Running Character mode Oracle Reports Concurrent Programs
After you create an Oracle Reports program, you create acorresponding concurrent program executable with the Oracle Reportsexecution method.
You then define a concurrent program for that executable, registeringany parameters and incompatible programs. You also enter theminimum column and row length, orientation, and print style.
Oracle Reportsprogram
Define Executable
Define Concurrent Program
Oracle Reportsapplication
System Administrationapplication
Define unitsof measureand page size
Define reportorientation
Enter name ofexecution file
Set executionmethod toOracle Reports
Register parametersand incompatibleprograms
Enter values forminimum and maximum columnsand rows
Define reportprogram
Running Character Mode Oracle Reports Programs
Define Print Style
Enter number ofcolumns and rows,and orientation
Request toRun Program
Running Bitmap Oracle Reports Concurrent Programs
Bitmap Oracle Reports programs are defined similarly in OracleReports and in the Concurrent Program Executable form.
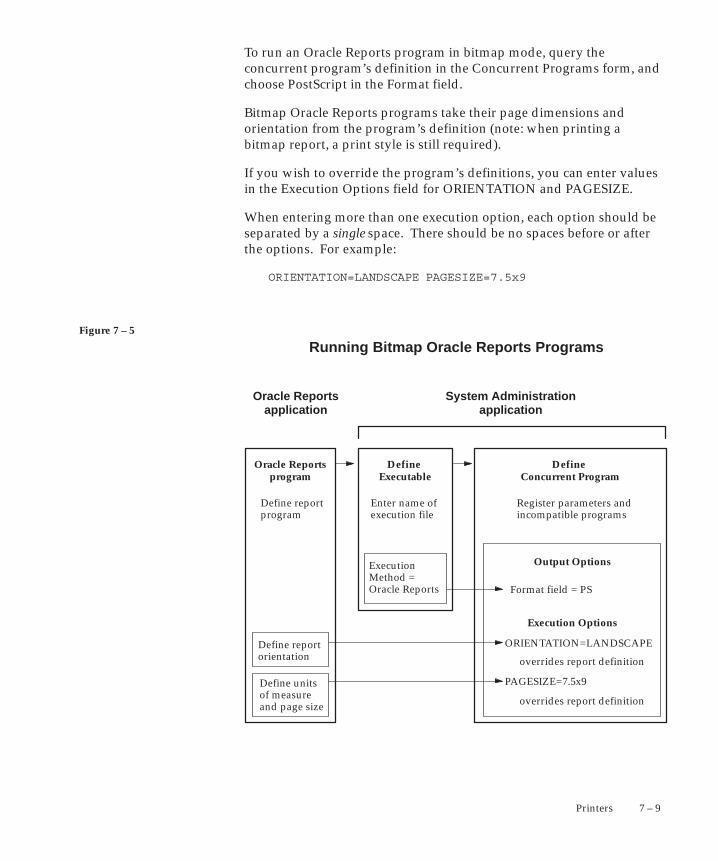
Figure 7 – 5
7 – 9Printers
To run an Oracle Reports program in bitmap mode, query theconcurrent program’s definition in the Concurrent Programs form, andchoose PostScript in the Format field.
Bitmap Oracle Reports programs take their page dimensions andorientation from the program’s definition (note: when printing abitmap report, a print style is still required).
If you wish to override the program’s definitions, you can enter valuesin the Execution Options field for ORIENTATION and PAGESIZE.
When entering more than one execution option, each option should beseparated by a single space. There should be no spaces before or afterthe options. For example:
ORIENTATION=LANDSCAPE PAGESIZE=7.5x9
Oracle Reportsprogram
Define Executable
Define Concurrent Program
Oracle Reportsapplication
System Administrationapplication
Output Options
Format field = PS
ORIENTATION=LANDSCAPE
PAGESIZE=7.5x9Define unitsof measureand page size
Define reportorientation
overrides report definition
overrides report definition
Enter name ofexecution file
Register parameters andincompatible programs
ExecutionMethod =Oracle Reports
Define reportprogram
Running Bitmap Oracle Reports Programs
Execution Options
7 – 10 Oracle Applications System Administrator’s Guide
Notes about PAGESIZE in the Execution Options field
In Oracle Reports, when defining a report the units and size of thereport are specified in the menu under Report–>GlobalProperties–>Unit of Measurement.
For bitmapped reports, <width>x<height> for PAGESIZE is usually ininches; however, this depends on the particular report definition.
You can enter the PAGESIZE parameter in the Execution Options fieldof the Concurrent Programs form (for bitmapped reports only) whenyou want to override the values specified in the report definition. Forexample:
PAGESIZE=7.5x9
If the dimensions specified with the PAGESIZE parameter are smallerthan what the report was designed for, you will generate a “REP–1212”error.
☞
Printer Types
Printers
Print Styles
Printer Drivers
7 – 11Printers
Setting Up Your Printers
Oracle Applications provides you with predefined printer types, printstyles, and printer drivers. Use the Printer Types form to query thecombinations of print style and printer driver that support each type ofprinter you have. Customize the predefined components as necessary.See: Customizing Printing Support in Oracle Applications: page 7 – 24.
Attention: Predefined printing components may have to bemodified for different printer types and/or operatingplatforms.
Forms for Defining Printer Support
You use four forms to define printer support.
You must define any printer types used at your site that are notshipped with Oracle Applications. It is on this form that you associatethe print style with a printer driver for the particular printer type.
You register a printer so that Oracle Applications recognizes the printerand can forward to it the output from a report program.
To register a printer you specify the printer’s operating system name,which uniquely identifies the printer, and select the printer type. Theprinter type must already be defined.
For example, if you want users of Oracle Applications to be able toprint to a newly purchased printer, you:
• Register the operating system name of the new printer (forexample, printer39), and select the printer type (for example,LN03).
• If the correct printer type is not defined, you must define thenew printer type before you can register the printer.
To generate a report, the print style values for columns and rows arepassed by the concurrent manager to Oracle Reports. A print styledetermines the dimensions of your report, or the number of rows andcolumns per page.
A printer driver includes the initialization and reset strings that formatand restart a printer. You need a defined printer driver for each printstyle that you plan to use with a specific printer type on a specificplatform.
☞
7 – 12 Oracle Applications System Administrator’s Guide
Printing Setup Interrelationships
• Many printers can be registered as the same printer type.
• A printer type can support multiple print styles.
• A printer driver must be assigned to a printer type for each printstyle.
• Many printer drivers can support the same print style.
• Many printer drivers can support the same printer type.
See: Overview of Printers and Printing: page 7 – 2
Printer Setup Information Is Cached On Demand
Printer setup information such as Printer Type definitions, Print Styledefinitions, and Printer Driver definitions, are read into memory(cached) the first time the information is required to print a program’soutput.
The cache area that holds printer setup information is private to theconcurrent managers. Printer setup information remains cached inmemory until the concurrent managers are restarted, when the valuesare erased and new values are cached.
Attention: You should issue a Restart concurrent managercommand for all currently active managers whenever you editan existing Printer Type, Print Style, or Printer Driver (unlessthe type, style or driver has not been referred to or cached yet).
See: Controlling Concurrent Managers: page 5 – 55
7 – 13Printers
Printer Setup with Pasta
Overview
Pasta is an Oracle Applications utility that converts text report files toPostscript and also enables the printing of custom Postscript reportsfrom Oracle Applications. The reports can then be directed to anyPostscript printer.
Setting up your system to use Pasta is much simpler than the standardOracle Applications printer setup procedure. The Printer Type, PrinterDriver, and SRW driver files are provided. The only setup required tobegin printing is the registration of the printer with Oracle E–BusinessSuite.
Many printing options can be defined using the Pasta configuration file(pasta.cfg). You no longer need to maintain multiple drivers andstyles for each printer.
Pasta is provided as an executable named FNDPSTAX.
For updates and more details, see OracleMetaLink.
Setup for Basic Printing with Pasta
The following setup can be used to enable any Postscript printer toprint text or Postscript reports in the following styles: Landscape,Landwide, Portrait, or Dynamic.
Use the Printers window to register your printer:
1. Enter your printer’s name as defined in the operating system andapplications.
2. Select ”––Pasta Universal Printer” from the list of values for theprinter Type.
You are now ready to print text and Postscript reports from yourPostscript printer using the default Pasta configuration.
For more information on the Printers window, see Printers Window:page 7 – 41.
For more information on setting options in the Pasta configuration file,see: Configuration File Options: page 7 – 19.
7 – 14 Oracle Applications System Administrator’s Guide
Defining Configuration Files for Specific Printers
The pasta.cfg file controls many printing options. You can use thedefault file for many printers for multiple languages. However, if youhave printers that require special setup, you can customize theseoptions by creating a configuration file for each printer.
Copy the pasta.cfg file to pasta_<printer name>.cfg. Makethe necessary changes to the file. Pasta automatically looks for aprinter–specific file name. If it does not find one, Pasta then uses thedefault file, pasta.cfg.
For example, suppose you have a printer named ”hqprinter” for whichyou want to set the page height and width to letter size:
1. Copy $FND_TOP/resource/pasta.cfg to$FND_TOP/resource/pasta_hqprinter.cfg wherehqprinter is the name of the printer as defined on the operatingsystem.
2. In the pasta_hqprinter.cfg file, edit the paper size options:
Set pagewidth=8.5
Set pageheight=11
Pasta will now use the options as defined in thepasta_hqprinter.cfg file when printing to the hqprinter.
For more information on setting options in the Pasta configuration file,see: Configuration File Options: page 7 – 19.
Using a Different Configuration File as the Default
You can change the file that is defined as the default configuration filefor Pasta by using the –F command line parameter.
For example, suppose you create a PCL print–specific configuration filenamed pcl.cfg. Set the FNDPSTAX command line option as follows:
–Fpcl.cfg
Pasta will look for pcl_<printer>.cfg first, and if it is not found,Pasta will use pcl.cfg as the default.
These files must be placed under the $FND_TOP/resource directory.
The –F command line parameter can be set in the Arguments field ofthe Printer Drivers window. See Printer Drivers Window: page 7 – 46.
Setup for Basic Printing with Pasta: page 7 – 13
7 – 15Printers
Modify an Existing Printer Type to Use Pasta
If your printer is already assigned to a printer type that contains stylesand drivers that you want to maintain, you can add Pasta to theexisting printer type.
To add Pasta to an existing printer type, you must associate one of thePasta printer drivers with a print style on the Printer Types window.
The seeded Pasta printer drivers are:
• PASTA_LANDSCAPE
• PASTA_PORTRAIT
• PASTA_LANDWIDE
• PASTA_DYNAMIC
You can associate a Pasta driver with an existing print style, or you cancreate a new print style. To create a new print style, use the Print Styleswindow. For more information on defining a print style, see PrintStyles Window: page 7 – 43.
1. Query your existing printer type in the Printer Types window.
2. In the Style field, select the style to which you want to assign aPasta driver.
Or, if you are assigning Pasta to a style already defined for theprinter type, delete the driver in the Driver Name field currentlyassociated with the style.
3. In the Driver Name field, select the appropriate Pasta driver.
For more information on the Printer Types window, see PrinterTypes Window: page 7 – 39.
Add a New Printer Type to Use Pasta
If you want to add a new Printer Type, you can also add Pasta to yournew printer type.
1. Navigate to the Printer Types window.
2. Enter the Type of printer.
3. In the Style field use the list of values to select the style to whichyou want to assign a Pasta driver.
4. In the Driver Name field, select the appropriate Pasta driver fromthe list of values:
7 – 16 Oracle Applications System Administrator’s Guide
• PASTA_LANDSCAPE
• PASTA_PORTRAIT
• PASTA_LANDWIDE
• PASTA_DYNAMIC
For more information on the Printer Types window, see PrinterTypes Window: page 7 – 39.
Setup for Basic Printing with Pasta: page 7 – 13
Setting Margins
The margins on your printed output are determined by the marginsettings in the pasta.cfg file and the printable area defined by yourprinter. In order to set your margins properly you must know theprintable area for your specific printer and adjust the margin parametersettings in the pasta.cfg file accordingly. The margin parameters areleftMargin, rightMargin, topMargin, and bottomMargin.
For example, suppose you want to set the left margin to one inch. If theprintable area for your printer begins at .25 inches from the left, thenyou must set the leftMargin option to .75 in the pasta.cfg file.
For more information on setting options in the Pasta configuration file,see: Configuration File Options: page 7 – 19.
Refer to your printer’s documentation for information on its printablearea.
Setup for Basic Printing with Pasta: page 7 – 13
Printing a Report Generated Using the noprint Option
When you use the ”noprint” printer option to generate a report, youcan still have the option of printing it later using Pasta.
Before running the report, associate the noprint printer with the”––Pasta Universal Printer Type” in the Printers form.
Note: You must restart the concurrent manager for this to takeeffect. See Printer Setup Information is Cached on Demand:page 7 – 12.
Setup for Basic Printing with Pasta: page 7 – 13

☞
7 – 17Printers
Generating Other Formats Using the Preprocessing Option
Pasta can use a preprocessing option to invoke any executable thatsupports an input file and an output file (filter program). Pasta willinvoke the filter program to preprocess the Pasta output before passingit to the printing command. By using the preprocessing option, youcan generate output formats other than the formats that Pasta currentlysupports. For example, by invoking products such as Adobe AcrobatDistiller Server or Ghostscript, you can generate PDF output or PCLoutput.
Attention: Ensure that the executable for the preprocessprogram is placed in your path.
The preprocessing command is a configuration file (pasta.cfg)option. This option uses {infile} and {outfile}.
• {infile} is the file generated by Pasta to be used as input to thepreprocessing command. It is a temporary file and will bedeleted after it is passed to the preprocessing command.
• {outfile} is the output file generated by the preprocessingcommand. Pasta names it temporarily and it will be deletedafter it is passed to the printing command.
If you want to keep the {outfile}, you can name it by using the”outFile” pasta configuration file option (see Configuration FileOptions: page 7 – 19), or the ”–o” command line option (seeCommand Line Parameters: page 7 – 22). Pasta will copy{outfile} to the file you specify.
Example for Generating PCL Output
In this example, ”gs” is Ghostscript and ”pxlmono” is a device usedwith HP black and white PCL XL printers (Laserjet 5 and 6 family).
In the pasta.cfg file, enter the following for the preprocess option:
preprocess=gs –q –dNOPAUSE –dBATCH –sDEVICE=pxlmono
–sOutputFile={outfile} {infile}
To get a list of output devices available in Ghostscript go tohttp://www.gnu.org/software/ghostscript/devices.html
Example for Generating PDF Output
In this example, ”ps2pdf” is a shell script bundled with Ghostscript.The ps2pdf script can convert a Postscript file to a PDF file.
In most cases you cannot send a PDF file to the printer commandbecause the printer command cannot understand PDF. Set the noPrint
7 – 18 Oracle Applications System Administrator’s Guide
option to ”y” or use the ”–np” (no print) command line option if youdo not want Pasta to send the PDF file to the printer.
Use the outFile option to define the destination on the middle tier forthe output file. You can use {inputfile} in the outFile option. Pasta willreplace it with the actual input file name (without the path) specified bythe ”–f” (input file) command line option.
1. Using the basic Pasta setup procedure, define a printer in thePrinters window called ”PDFfile”. Assign the ”––Pasta UniversalPrinter” type to the printer.
For more information about defining a printer, see: Setup for BasicPrinting with Pasta: page 7 – 13.
2. Create a configuration file for the PDFfile printer called”pasta_PDFfile.cfg”.
For more information about defining a configuration file, see:Defining Configuration Files for Specific Printers: page 7 – 14.
3. In the pasta_PDFfile.cfg file, enter the following for thepreprocess option:
preprocess=ps2pdf {infile} {outfile}
noPrint=y
outFile=<APPLTMP>/{inputfile}.pdf
Font Source
If your printer does not have the necessary fonts installed, Pastaembeds the required glyphs as a small font in your report from the fontfiles.
If you do not want to use the fonts provided by Oracle you can specifythe font you want by using the font name option in the pasta.cfg file.You can use any TrueType fonts on your middle tier; or, if your printerhas a font installed suitable for the language of your report, you canutilize the printer font.
The form of the pasta.cfg option is:
Font.Default.<Style>=<TrueType font file name>
or
Font.Default.<Style>=printer:<Printer font file name>
Example using TrueType font file:
7 – 19Printers
Font.Default.Plain=<FND_TOP>/<APPLRSC>/ADUO.ttf
Font.Default.Bold=<FND_TOP>/<APPLRSC>/ADUOB.ttf
Example using Printer Font:
Font.Default.Plain=printer:Courier
Font.Default.Bold=printer:Courier–Bold
Setup for Basic Printing with Pasta: page 7 – 13
Language–Specific Font Support
The default pasta.cfg file contains font settings for languages. Youoverride the default setting in the language–specific section of thepasta.cfg file.
For example, if you want to override the default setting of Courier fontfor French language reports to use Helvetica instead, add the followingto the end of the pasta.cfg file:
[FRENCH]
Font.Default.Plain = printer:Helvetica
Font.Default.Bold = printer:Helvetica–Bold
Setup for Basic Printing with Pasta: page 7 – 13
Configuration File Options
The configuration file pasta.cfg governs many printing options. Thefile is a normal ASCII text file that has a simple format described below.
The options are listed in the following two tables. They are dividedinto Generic Options and Arabic, Hebrew, and Thai options. For eachoption are listed the Key Name, the Default Value (if applicable), theDescription, and the Equivalent Command Line Option (if applicable).
Note: For options that also have command line equivalents,Oracle recommends that you set the value in the configurationfile.
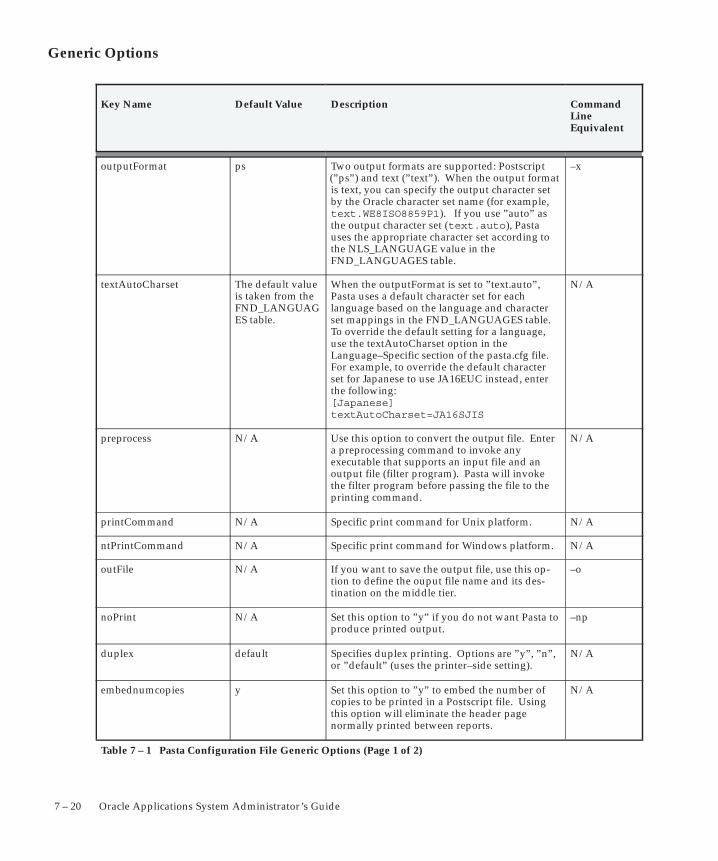
7 – 20 Oracle Applications System Administrator’s Guide
Generic Options
Key Name Default Value Description CommandLineEquivalent
outputFormat ps Two output formats are supported: Postscript(”ps”) and text (”text”). When the output formatis text, you can specify the output character setby the Oracle character set name (for example,text.WE8ISO8859P1). If you use ”auto” asthe output character set (text.auto), Pastauses the appropriate character set according tothe NLS_LANGUAGE value in theFND_LANGUAGES table.
–x
textAutoCharset The default valueis taken from theFND_LANGUAGES table.
When the outputFormat is set to ”text.auto”,Pasta uses a default character set for eachlanguage based on the language and characterset mappings in the FND_LANGUAGES table.To override the default setting for a language,use the textAutoCharset option in theLanguage–Specific section of the pasta.cfg file.For example, to override the default characterset for Japanese to use JA16EUC instead, enterthe following: [Japanese]textAutoCharset=JA16SJIS
N/A
preprocess N/A Use this option to convert the output file. Entera preprocessing command to invoke anyexecutable that supports an input file and anoutput file (filter program). Pasta will invokethe filter program before passing the file to theprinting command.
N/A
printCommand N/A Specific print command for Unix platform. N/A
ntPrintCommand N/A Specific print command for Windows platform. N/A
outFile N/A If you want to save the output file, use this op-tion to define the ouput file name and its des-tination on the middle tier.
–o
noPrint N/A Set this option to ”y” if you do not want Pasta toproduce printed output.
–np
duplex default Specifies duplex printing. Options are ”y”, ”n”,or ”default” (uses the printer–side setting).
N/A
embednumcopies y Set this option to ”y” to embed the number ofcopies to be printed in a Postscript file. Usingthis option will eliminate the header pagenormally printed between reports.
N/A
Table 7 – 1 Pasta Configuration File Generic Options (Page 1 of 2)
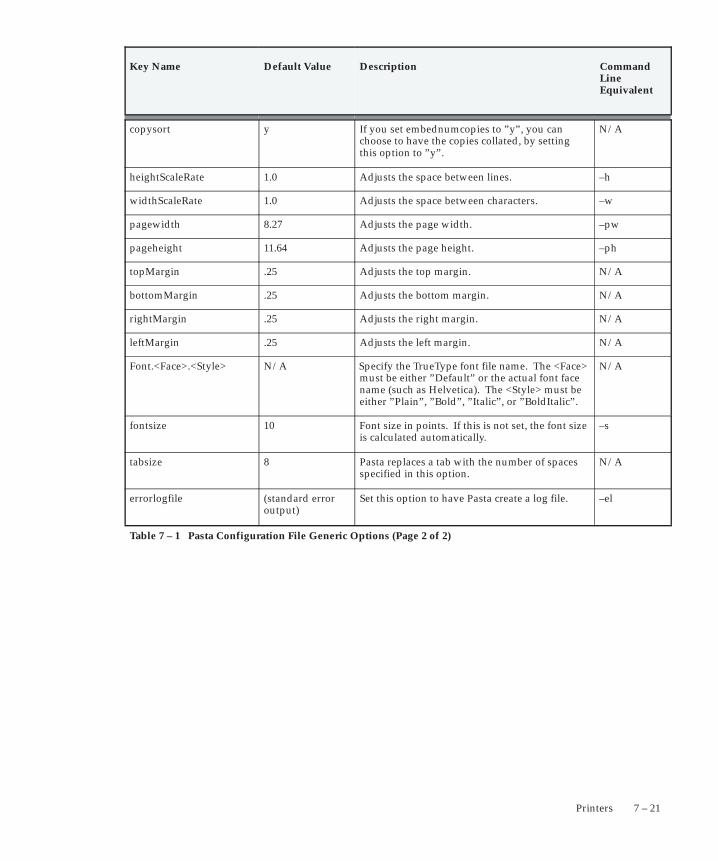
7 – 21Printers
CommandLineEquivalent
DescriptionDefault ValueKey Name
copysort y If you set embednumcopies to ”y”, you canchoose to have the copies collated, by settingthis option to ”y”.
N/A
heightScaleRate 1.0 Adjusts the space between lines. –h
widthScaleRate 1.0 Adjusts the space between characters. –w
pagewidth 8.27 Adjusts the page width. –pw
pageheight 11.64 Adjusts the page height. –ph
topMargin .25 Adjusts the top margin. N/A
bottomMargin .25 Adjusts the bottom margin. N/A
rightMargin .25 Adjusts the right margin. N/A
leftMargin .25 Adjusts the left margin. N/A
Font.<Face>.<Style> N/A Specify the TrueType font file name. The <Face>must be either ”Default” or the actual font facename (such as Helvetica). The <Style> must beeither ”Plain”, ”Bold”, ”Italic”, or ”BoldItalic”.
N/A
fontsize 10 Font size in points. If this is not set, the font sizeis calculated automatically.
–s
tabsize 8 Pasta replaces a tab with the number of spacesspecified in this option.
N/A
errorlogfile (standard erroroutput)
Set this option to have Pasta create a log file. –el
Table 7 – 1 Pasta Configuration File Generic Options (Page 2 of 2)
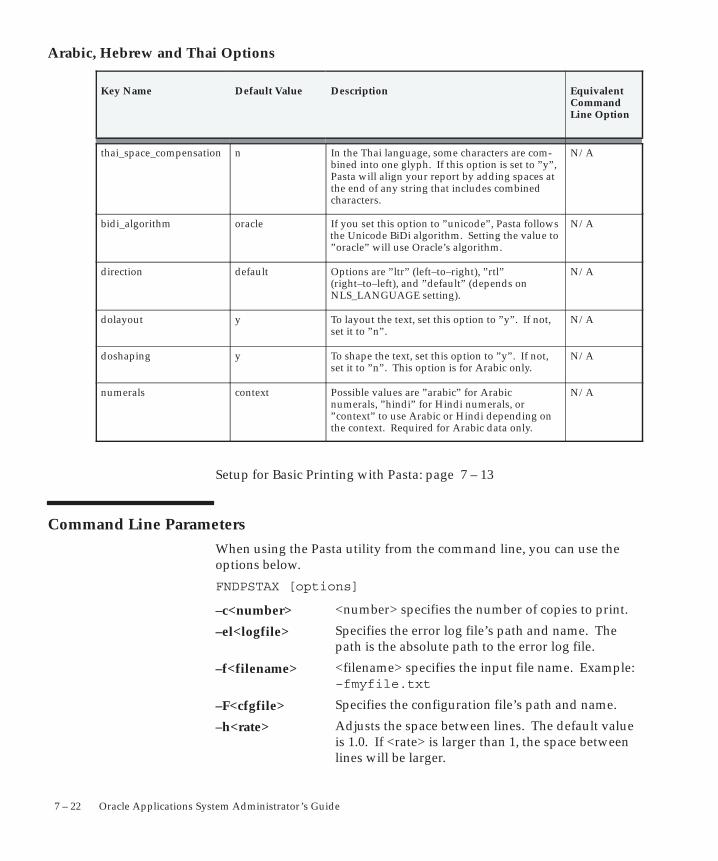
7 – 22 Oracle Applications System Administrator’s Guide
Arabic, Hebrew and Thai Options
Key Name Default Value Description EquivalentCommandLine Option
thai_space_compensation n In the Thai language, some characters are com-bined into one glyph. If this option is set to ”y”,Pasta will align your report by adding spaces atthe end of any string that includes combinedcharacters.
N/A
bidi_algorithm oracle If you set this option to ”unicode”, Pasta followsthe Unicode BiDi algorithm. Setting the value to”oracle” will use Oracle’s algorithm.
N/A
direction default Options are ”ltr” (left–to–right), ”rtl”(right–to–left), and ”default” (depends onNLS_LANGUAGE setting).
N/A
dolayout y To layout the text, set this option to ”y”. If not,set it to ”n”.
N/A
doshaping y To shape the text, set this option to ”y”. If not,set it to ”n”. This option is for Arabic only.
N/A
numerals context Possible values are ”arabic” for Arabicnumerals, ”hindi” for Hindi numerals, or”context” to use Arabic or Hindi depending onthe context. Required for Arabic data only.
N/A
Setup for Basic Printing with Pasta: page 7 – 13
Command Line ParametersWhen using the Pasta utility from the command line, you can use theoptions below.
FNDPSTAX [options]
<number> specifies the number of copies to print.
Specifies the error log file’s path and name. Thepath is the absolute path to the error log file.
<filename> specifies the input file name. Example:–fmyfile.txt
Specifies the configuration file’s path and name.
Adjusts the space between lines. The default valueis 1.0. If <rate> is larger than 1, the space betweenlines will be larger.
–c<number>
–el<logfile>
–f<filename>
–F<cfgfile>
–h<rate>
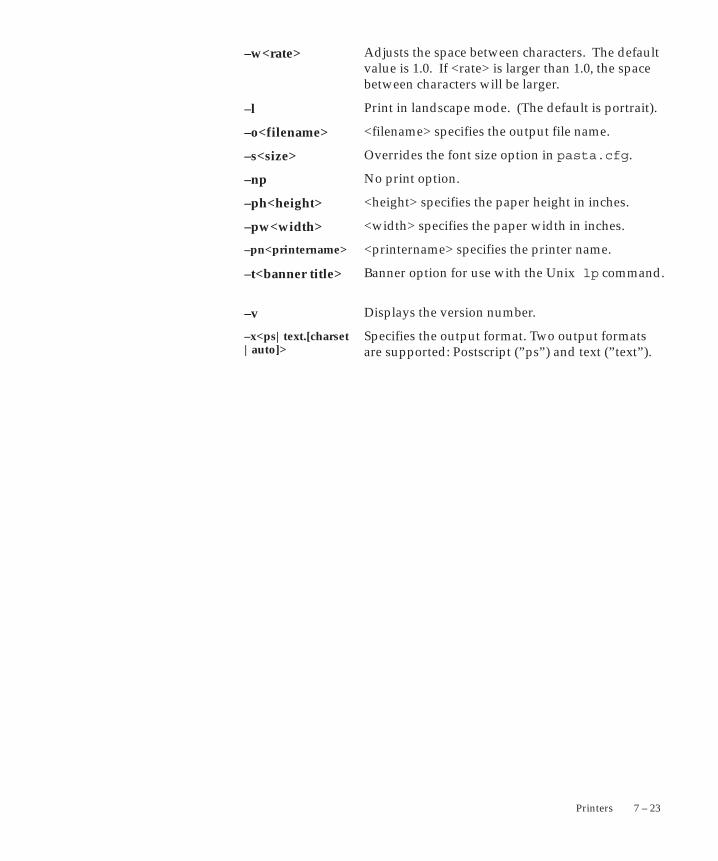
7 – 23Printers
Adjusts the space between characters. The defaultvalue is 1.0. If <rate> is larger than 1.0, the spacebetween characters will be larger.
Print in landscape mode. (The default is portrait).
<filename> specifies the output file name.
Overrides the font size option in pasta.cfg.
No print option.
<height> specifies the paper height in inches.
<width> specifies the paper width in inches.
<printername> specifies the printer name.
Banner option for use with the Unix lp command.
Displays the version number.
Specifies the output format. Two output formatsare supported: Postscript (”ps”) and text (”text”).
–w<rate>
–l
–o<filename>
–s<size>
–np
–ph<height>
–pw<width>
–pn<printername>
–t<banner title>
–v
–x<ps|text.[charset|auto]>

☞
7 – 24 Oracle Applications System Administrator’s Guide
Customizing Printing Support in Oracle ApplicationsOracle Applications provides numerous predefined printer types withwhich you can identify your printers, as well as print styles that definethe dimensions of Oracle Reports output files, and printer drivers thatinstruct the various printer types how to output the selected print style.
Use the Printer Types form to query the combinations of print style andprinter driver that support each type of printer you have.
Attention: Predefined printing components may have to bemodified for different printer types and/or operatingplatforms.
For example, if a blank page is being printed after each printedpage, the number of rows defined for the print style may needto be reduced, or an escape sequence that is being interpreteddifferently, creating a page eject command, may have to berewritten.
Verify and, if necessary, Customize Printer Driver Definitions
Upon installation for any printer type you are using, verify your printerdriver definitions, particularly the following:
• Initialization string
Print a short report to verify the page’s printing orientation. Ifyou want to change the printer’s default font for the report, youwould include that information in the Initialization string.
• Reset string
Print two short reports with different printing orientations, forexample, one that is landscape and another that is portrait, toverify the printer is resetting itself properly.
• Arguments
Print a short report to verify the arguments to the operatingsystem’s print command or a custom print program are beinginterpreted correctly.
If you need to define a new print style, verify the printer driver youassign to the new print style, for any printer type you use.
Verify and, if necessary, Customize Oracle Reports SRW Drivers
If you have a printer type that does not properly interpret the controlcharacters in the SRW driver files that set page breaks, bold on/off andunderline on/off attributes in your Oracle Reports files, you can copythe SRW driver file and modify it.
7 – 25Printers
Creating Custom Printer Drivers
If necessary, edit the Initialization string and the Reset string for theprinter type you are using. Refer to your printer’s user guide forinstructions. The Initialization and Reset fields appear on the PrinterDrivers form.
Edit your Initialization string or Reset string if:
• Your printer type requires different control characters.
• The control characters have a different meaning due to youroperating system and platform.
• Language translation changes the meaning of the controlcharacters. The printer needs special control characters to selectdifferent character sets.
• You want to change the printer’s default font for the report(Initialization string only).
Printer Driver Methods
There are three methods to invoke a printer driver:
The concurrent manager can issue an operatingsystem print command and its arguments.
An operating system print command, along withall its arguments, is entered in the Arguments fieldof the Printer Drivers form.
The concurrent manager can call a custom printprogram and pass arguments to the program.
The name of a custom print program is entered inthe Program Name field and any arguments to bepassed to the program are entered in theArguments field of the Printer Drivers form.
The concurrent manager can call a predefinedOracle Applications subroutine that passes a printcommand and arguments to the printer via theoperating system.
A subroutine is predefined by Oracle Applications,and the name is entered in the Program Name fieldof the Printer Drivers form.
The arguments field is disregarded when the drivermethod is Subroutine. However, the concurrentmanager reads the Initialization and Reset escapesequences.
Command
Program
Subroutine
7 – 26 Oracle Applications System Administrator’s Guide
On UNIX systems, the subroutine method, unlikethe command method, does not start an operatingsystem shell along with the print command.
Example – Using the Program Driver Method
The Program driver method allows customers to define their owncustom print programs. For example, your company might want towrite a custom program that opens a file, allows the file to be editedand saved under a second filename, then sends the second (edited) fileon to the printer by issuing the print command. This method of issuingprint commands is called a filter.
Location for Custom Print Programs
To call a custom print program using the Printer Drivers form, theprogram name, including the full path to the program, should beentered in the Program Name field.
The path to the program name is not necessary if the program’slocation can be identified by the operating system’s PATH environmentvariable (i.e., is in the $PATH variable name).
For platforms where the equivalent of a $PATH variable doesn’t exist,then use the full path name. A path can be up to 255 characters.
Custom print programs are not registered as concurrent programs withOracle Application Object Library, but are called after the concurrentprocess has completed.
Using Operating System Shell Scripts
For operating system shell scripts, the printer driver method can beeither command or program, as long as you populate the argumentfield correctly.
The script for a command shell procedure should reside in:
$FND_TOP/$APPLBIN.
Arguments That a Concurrent Manager Can Supply Values For
The concurrent manager can supply four different values as argumentsto the operating system print command it issues, or to a custom printprogram that it calls. An example of using these values as argumentsfollows.
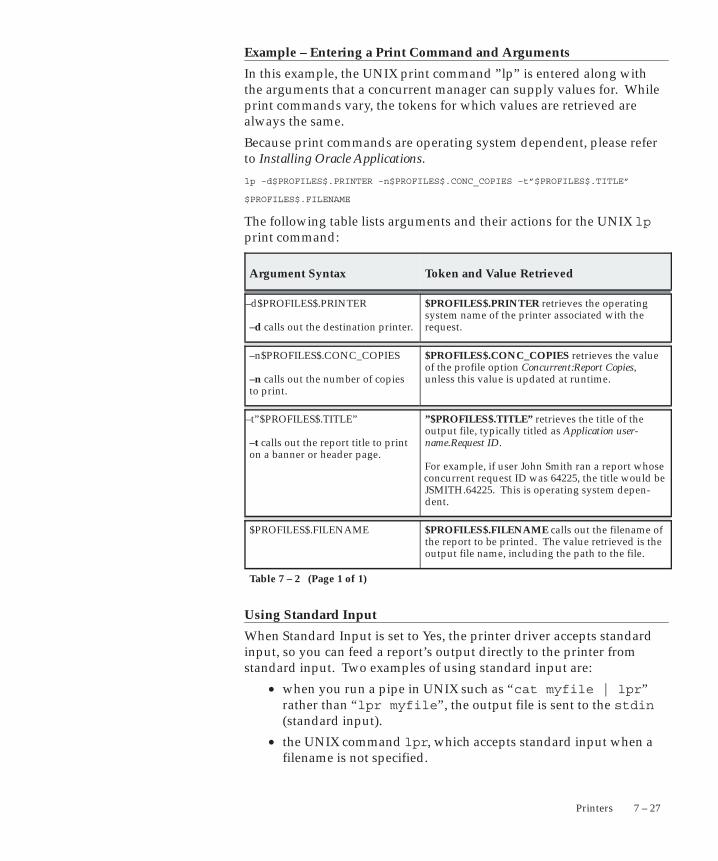
7 – 27Printers
Example – Entering a Print Command and Arguments
In this example, the UNIX print command ”lp” is entered along withthe arguments that a concurrent manager can supply values for. Whileprint commands vary, the tokens for which values are retrieved arealways the same.
Because print commands are operating system dependent, please referto Installing Oracle Applications.
lp –d$PROFILES$.PRINTER –n$PROFILES$.CONC_COPIES –t”$PROFILES$.TITLE”
$PROFILES$.FILENAME
The following table lists arguments and their actions for the UNIX lpprint command:
Argument Syntax Token and Value Retrieved
–d$PROFILES$.PRINTER
–d calls out the destination printer.
$PROFILES$.PRINTER retrieves the operatingsystem name of the printer associated with the request.
–n$PROFILES$.CONC_COPIES
–n calls out the number of copiesto print.
$PROFILES$.CONC_COPIES retrieves the valueof the profile option Concurrent:Report Copies, unless this value is updated at runtime.
–t”$PROFILES$.TITLE”
–t calls out the report title to printon a banner or header page.
”$PROFILES$.TITLE” retrieves the title of the output file, typically titled as Application user-name.Request ID.
For example, if user John Smith ran a report whoseconcurrent request ID was 64225, the title would beJSMITH.64225. This is operating system depen-dent.
$PROFILES$.FILENAME $PROFILES$.FILENAME calls out the filename ofthe report to be printed. The value retrieved is theoutput file name, including the path to the file.
Table 7 – 2 (Page 1 of 1)
Using Standard Input
When Standard Input is set to Yes, the printer driver accepts standardinput, so you can feed a report’s output directly to the printer fromstandard input. Two examples of using standard input are:
• when you run a pipe in UNIX such as “cat myfile | lpr”rather than “lpr myfile”, the output file is sent to the stdin(standard input).
• the UNIX command lpr, which accepts standard input when afilename is not specified.
☞
☞
7 – 28 Oracle Applications System Administrator’s Guide
The Standard Input field should be set to No when the Driver Methodis set to Program or Subroutine. Unless the program accepts standardinput, the Standard Input field should always be set to No.
Attention: When Standard Input is set to No, the printcommand issued by the concurrent manager runsasynchronously. That is, the concurrent manager issues thecommand, and does not wait for an operating system response.
Using Initialization and Reset Strings
Use the initialization and reset strings to set and reset the orientation,character set and line density for your printer.
Initialization and reset strings consist of control characters and escapesequences.
• A control character can be represented by “ ^ ” followed byanother character.
• An escape sequence can be identified by either “ /e ” or “ \e ”.
Attention: You see “/e” for escape sequences defined usingthe Printer Drivers form (because you cannot enter thebackslash ( \ ) character into a form when your terminaldefinition uses backslash as the [Menu] key). You see “\e” forescape sequences originally defined in .pdf files that wereupgraded to release 11 printer drivers.
For nonprintable characters, you may represent their value in octalmode. For example, 0x26 is represented as “ /046 ”. As an example, ifyou need to represent the escape sequence:
^ [ ^ L ^ [ l 6 D ( 0 x 26 )
you can represent it as:
/ e ^ L / e l 6 D / 0 4 6
Using a Spool File
When Spool File is set to No, then a temporary file is created where theinitialization and reset strings are inserted, and the file is sent to theprint command or program.
Set the Spool File to Yes only if the print program creates its owntemporary file. This option is recommended when using the Programdriver method and the print program creates its own temporary file.
7 – 29Printers
This option helps to reduce the creation of temoraryp files, since theconcurrent manager will not create a temporary file when Spool File isset to Yes.
When Spool File is set to Yes, it is recommended that the:
• Standard Input be set to No
• Initialization and reset fields are null.
This option does not apply to the Subroutine driver method.
Creating Custom SRW Drivers
SRW drivers are read by Oracle Reports when a report is generated,and insert control characters that tell the destination printer where toset page breaks, and which characters to format as bold or underlined.
SRW drivers only pertain to Oracle Reports output files. An SRWdriver is used during the generation of a report. A printer driver isused when the completed output file is sent to the printer.
SRW drivers are designed for the DEC LN03 printer, and all printersthat understand the same control characters as the LN03.
Location and Content of SRW Driver Files
SRW driver files reside in $FND_TOP/$APPLREP, and have the fileextension “.prt”. The predefined SRW file names are:
• A.prt
• P.prt
• L.prt
• PD.prt
• W.prt
Creating a Custom SRW Driver
You can customize any of the SRW driver files to support a printer typethat is not correctly interpreting the control characters used to set pagebreaks and format text as bold or underlined in Oracle Reports files.
For example, you may need to change the control characters thatinstruct the printer to set a page break.
on an LN03 on an XYZ LaserInk
☞
7 – 30 Oracle Applications System Administrator’s Guide
new page ... ^L ^[E
If you need to change formatting control characters for page breaks,underlined text, or bold text in Oracle Reports:
• Copy the .prt file (SRW driver) and rename the copy.
• Modify the new file with new control characters.
• Place the modified copy of the SRW driver file in$FND_TOP/$APPLREP.
• Associate the new driver with a print style and/or printer driverdefinition.
Attention: Copy the SRW driver (.prt file) and rename itbefore starting any text editing.
SRW Drivers – Print Styles and Printer Drivers
When the concurrent manager calls Oracle Reports to run a report, theSRW driver name is passed as a parameter to Oracle Reports.
The SRW driver is not required because some customers might beusing styles or printer drivers for non–Oracle Reports programs.
The SRW driver name you enter in the Print Styles and Printer Driversforms is used in slightly different ways depending on whether you areprinting or simply viewing the report.
If you run an Oracle Reports program without printing the output file,the SRW driver associated with the report’s print style is used.
If you run an Oracle Reports program and print the output file, theSRW driver that is correct for the destination printer type is chosen byselecting the SRW driver associated with the printer driver.
☞
7 – 31Printers
Hierarchy of Printer and Print Style Assignments
A printer and a print style can be chosen and their identities can beincluded in a concurrent program’s definition. When a concurrentprogram is defined to send its output to a specific printer, or is requiredto generate its output in a specific print style, those values cannot beoverridden by users, or by report set default settings, or by user profiledefault settings.
Often, a default value can be set in more than one way. This leads to ahierarchical relationship among the various default settings, where onedefault takes precedence over another. The diagram below illustratesthe order of how printer or print style values are read by the concurrentmanager when submitting a report program to run.
Attention: Defining a concurrent program with a default printstyle, or requiring a concurrent program to output a specificprint style, does not make that style available at a printer. Youmust assign the print style, and its corresponding printerdriver, to each printer type you wish to print from.
The concurrent manager reads the printer value using the followinghierarchy: concurrent program definition, report set definition, printeruser profile option value, and value specified by user during reportsubmission.
The concurrent manager reads the print style value using the followinghierarchy: concurrent program definition, report set definition, andvalue specified by user during report submission.
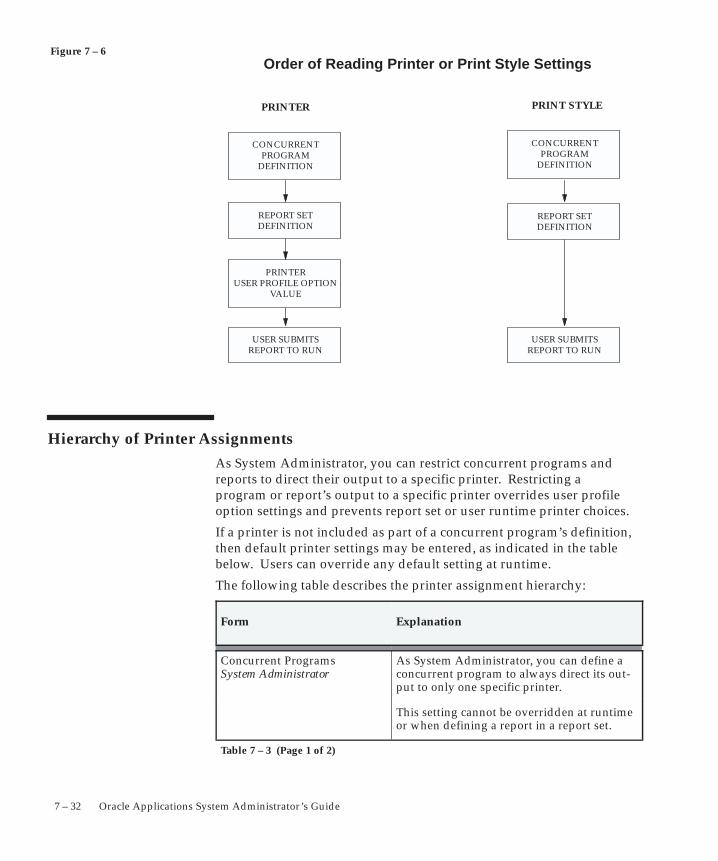
Figure 7 – 6
7 – 32 Oracle Applications System Administrator’s Guide
CONCURRENTPROGRAM
DEFINITION
USER SUBMITSREPORT TO RUN
CONCURRENTPROGRAM
DEFINITION
REPORT SETDEFINITION
USER SUBMITSREPORT TO RUN
PRINTER PRINT STYLE
Order of Reading Printer or Print Style Settings
PRINTERUSER PROFILE OPTION
VALUE
REPORT SETDEFINITION
Hierarchy of Printer AssignmentsAs System Administrator, you can restrict concurrent programs andreports to direct their output to a specific printer. Restricting aprogram or report’s output to a specific printer overrides user profileoption settings and prevents report set or user runtime printer choices.
If a printer is not included as part of a concurrent program’s definition,then default printer settings may be entered, as indicated in the tablebelow. Users can override any default setting at runtime.
The following table describes the printer assignment hierarchy:
Form Explanation
Concurrent ProgramsSystem Administrator
As System Administrator, you can define aconcurrent program to always direct its out-put to only one specific printer.
This setting cannot be overridden at runtimeor when defining a report in a report set.
Table 7 – 3 (Page 1 of 2)
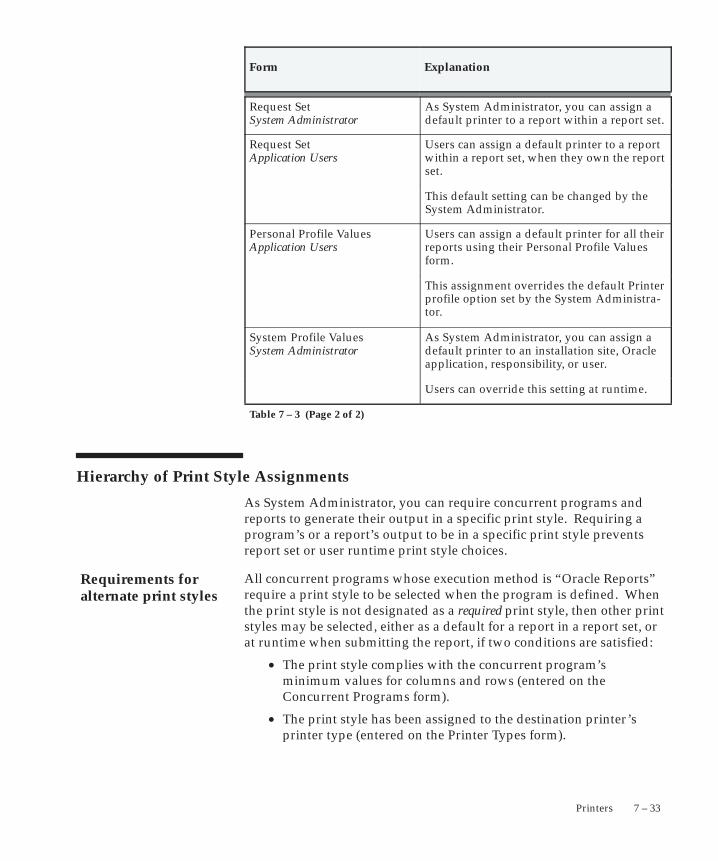
Requirements foralternate print styles
7 – 33Printers
ExplanationForm
Request SetSystem Administrator
As System Administrator, you can assign adefault printer to a report within a report set.
Request SetApplication Users
Users can assign a default printer to a reportwithin a report set, when they own the reportset.
This default setting can be changed by theSystem Administrator.
Personal Profile ValuesApplication Users
Users can assign a default printer for all theirreports using their Personal Profile Valuesform.
This assignment overrides the default Printerprofile option set by the System Administra-tor.
System Profile ValuesSystem Administrator
As System Administrator, you can assign adefault printer to an installation site, Oracleapplication, responsibility, or user.
Users can override this setting at runtime.
Table 7 – 3 (Page 2 of 2)
Hierarchy of Print Style Assignments
As System Administrator, you can require concurrent programs andreports to generate their output in a specific print style. Requiring aprogram’s or a report’s output to be in a specific print style preventsreport set or user runtime print style choices.
All concurrent programs whose execution method is “Oracle Reports”require a print style to be selected when the program is defined. Whenthe print style is not designated as a required print style, then other printstyles may be selected, either as a default for a report in a report set, orat runtime when submitting the report, if two conditions are satisfied:
• The print style complies with the concurrent program’sminimum values for columns and rows (entered on theConcurrent Programs form).
• The print style has been assigned to the destination printer’sprinter type (entered on the Printer Types form).

7 – 34 Oracle Applications System Administrator’s Guide
The following table describes the print style assignment hierarchy:
Form Explanation
Concurrent ProgramsSystem Administrator
As System Administrator, you can require aconcurrent program to generate its output ina specific print style.
This setting cannot be overridden at runtimeor when defining a report in a report set.
If a Print Style is entered in a program definition, but is not required, it serves as thefirst default setting to be read.
Request SetSystem Administrator
As System Administrator, you can assign adefault print style to a report within a reportset.
Request SetApplication Users
Users can assign a default print style to a report within a report set, when they own thereport set.
This default setting can be changed by theSystem Administrator.
Table 7 – 4 (Page 1 of 1)
System Administrator Printer and Print Style Settings
Program Definitions, Printers and Print Styles
As System Administrator you can restrict programs to send theiroutput files only to a specified printer, for example, a printer in a secureoffice, using the Concurrent Programs form. You can also require areport to generate its output in a specific print style.
Assigning Default Printers and Print Styles to Reports in a Set
As System Administrator you can identify a default printer for eachreport within a report set, and assign a default print style for eachreport, using the Request Set form.
Assigning Default Printers Using Profile Options
As System Administrator you can identify a printer as a default printerfor your installation site, a specific Oracle Application, a specific
7 – 35Printers
responsibility, or any of your end users, by setting the “Printer” userprofile option in the System Profile Values window.
Users can override a default profile option value by:
• Setting their own personal “Printer” profile option using theirPersonal Profile Values form.
• Selecting another (available) printer at runtime when submittinga report.
7 – 36 Oracle Applications System Administrator’s Guide
End User Printer and Print Style Settings
End users may:
• Set default print styles for reports in their report sets, using theirRequest Set form.
• Identify a default printer of their own by using the PersonalProfile Values form.
Users may override the default profile option setting theirSystem Administrator defines.
• Choose any available printer and print style when runningreports, when using the Run Reports form.
If a default printer or print style displays, users may override thedefault if other printers or print styles are available.
Printer Setup with Pasta: 7 – 13

☞
7 – 37Printers
Postscript Printing in UNIX
You can convert your report output files into postscript format whenprinting in some UNIX environments by using the enscript UNIX utility.
Attention: Refer to your UNIX documentation before usingenscript. Usage and the arguments employed by enscript maybe specific to your platform.
Concurrent Manager Arguments
The concurrent manager can supply four different values as argumentsto an operating system print command or custom print program. Seethe example of using all four values provided by the concurrentmanager. See: Example – Entering a Print Command and Arguments:page 7 – 27
See the example of using the enscript UNIX utility and two of thevalues the concurrent manager supplies as arguments. See: Example –Using the UNIX Enscript Command: page 7 – 38.
Enscript Arguments and Print Styles
The following table lists some sample enscript arguments, using theCourier font, for converting a report’s output into postscript for theportrait, landscape, landwide, and A4 print styles.
Print Style
EnscriptArguments Explanation Result
Portrait –fCourier10 Font is Courier 10 point. 80 characters portrait
Landscape –r –fCourier8 –r rotates the printer’soutput 90 degrees to printin landscape mode. Fontis Courier 8 point.
132 characters landscape
Landwide –r –fCourier6 –r rotates the printer’soutput 90 degrees to printin landscape mode. Fontis Courier 6 point.
180 characters landscape
A4 –fCourier10 Font is Courier 10 point. 132 characters landscape(A4 paper)
Table 7 – 5 (Page 1 of 1)
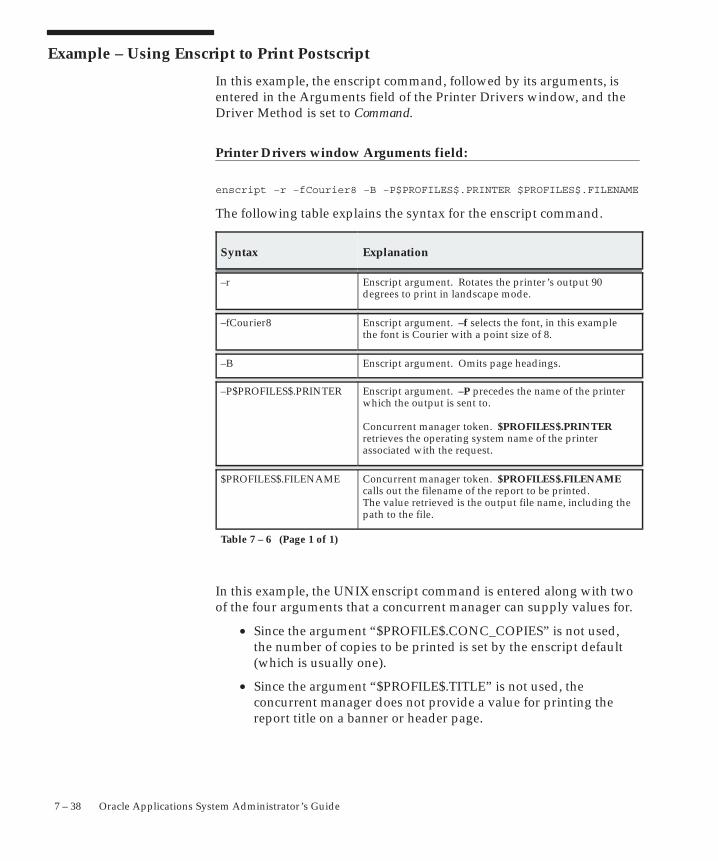
7 – 38 Oracle Applications System Administrator’s Guide
Example – Using Enscript to Print Postscript
In this example, the enscript command, followed by its arguments, isentered in the Arguments field of the Printer Drivers window, and theDriver Method is set to Command.
Printer Drivers window Arguments field:
enscript –r –fCourier8 –B –P$PROFILES$.PRINTER $PROFILES$.FILENAME
The following table explains the syntax for the enscript command.
Syntax Explanation
–r Enscript argument. Rotates the printer’s output 90 degrees to print in landscape mode.
–fCourier8 Enscript argument. –f selects the font, in this example the font is Courier with a point size of 8.
–B Enscript argument. Omits page headings.
–P$PROFILES$.PRINTER Enscript argument. –P precedes the name of the printerwhich the output is sent to.
Concurrent manager token. $PROFILES$.PRINTER retrieves the operating system name of the printerassociated with the request.
$PROFILES$.FILENAME Concurrent manager token. $PROFILES$.FILENAMEcalls out the filename of the report to be printed. The value retrieved is the output file name, including thepath to the file.
Table 7 – 6 (Page 1 of 1)
In this example, the UNIX enscript command is entered along with twoof the four arguments that a concurrent manager can supply values for.
• Since the argument “$PROFILE$.CONC_COPIES” is not used,the number of copies to be printed is set by the enscript default(which is usually one).
• Since the argument “$PROFILE$.TITLE” is not used, theconcurrent manager does not provide a value for printing thereport title on a banner or header page.
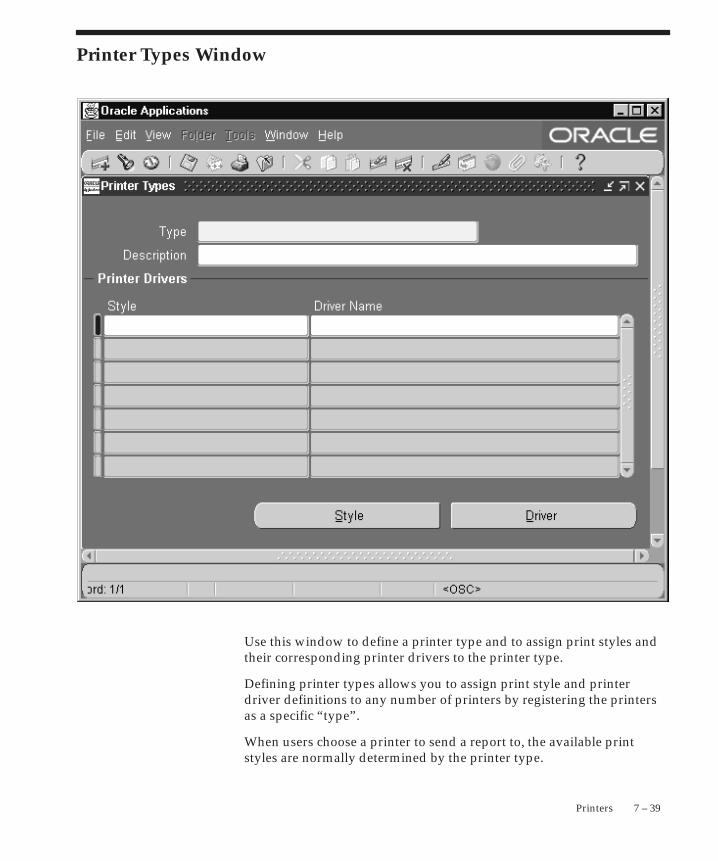
7 – 39Printers
Printer Types Window
Use this window to define a printer type and to assign print styles andtheir corresponding printer drivers to the printer type.
Defining printer types allows you to assign print style and printerdriver definitions to any number of printers by registering the printersas a specific “type”.
When users choose a printer to send a report to, the available printstyles are normally determined by the printer type.
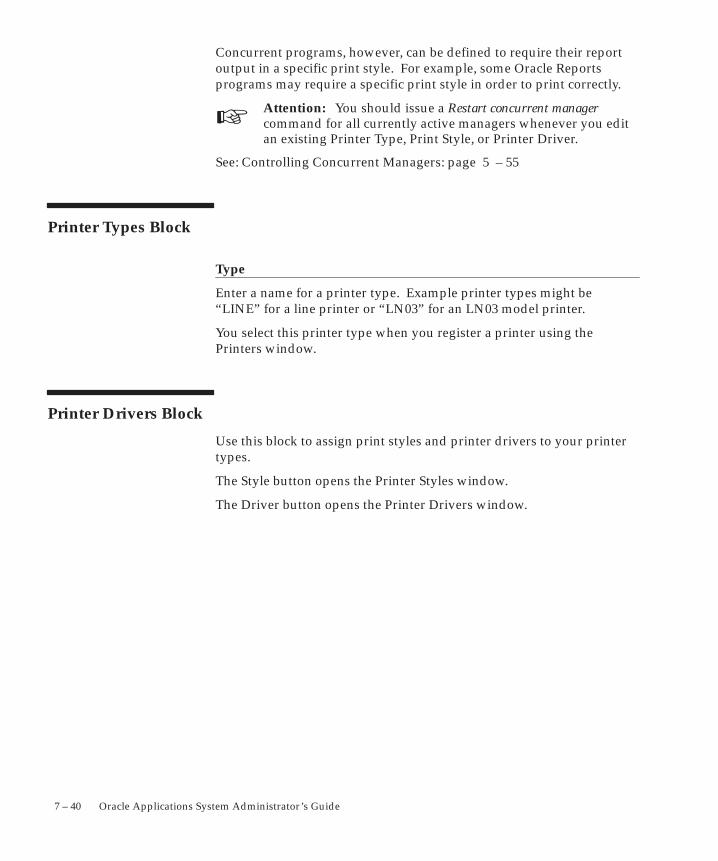
☞
7 – 40 Oracle Applications System Administrator’s Guide
Concurrent programs, however, can be defined to require their reportoutput in a specific print style. For example, some Oracle Reportsprograms may require a specific print style in order to print correctly.
Attention: You should issue a Restart concurrent managercommand for all currently active managers whenever you editan existing Printer Type, Print Style, or Printer Driver.
See: Controlling Concurrent Managers: page 5 – 55
Printer Types Block
Type
Enter a name for a printer type. Example printer types might be“LINE” for a line printer or “LN03” for an LN03 model printer.
You select this printer type when you register a printer using thePrinters window.
Printer Drivers Block
Use this block to assign print styles and printer drivers to your printertypes.
The Style button opens the Printer Styles window.
The Driver button opens the Printer Drivers window.
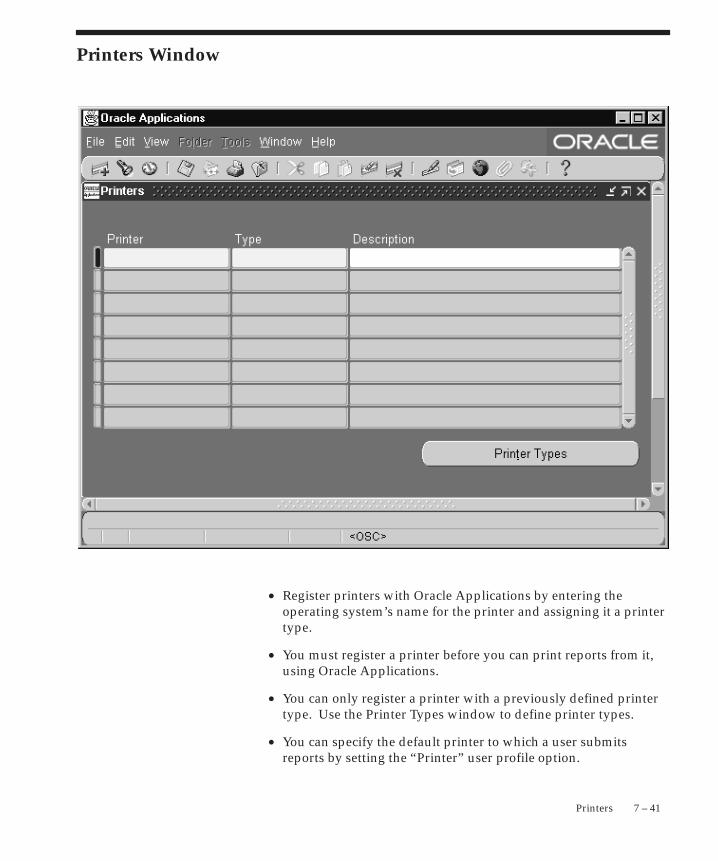
7 – 41Printers
Printers Window
• Register printers with Oracle Applications by entering theoperating system’s name for the printer and assigning it a printertype.
• You must register a printer before you can print reports from it,using Oracle Applications.
• You can only register a printer with a previously defined printertype. Use the Printer Types window to define printer types.
• You can specify the default printer to which a user submitsreports by setting the “Printer” user profile option.
7 – 42 Oracle Applications System Administrator’s Guide
Printers Block
Printer
Enter the name your operating system specifies for the printer.
Type
Select your printer type (i.e., manufacturer and model). Some reportsrequire a printer of a specific type in order to print correctly.
You can only select a previously defined printer type. Use the PrinterTypes button to open a window to define a printer type.
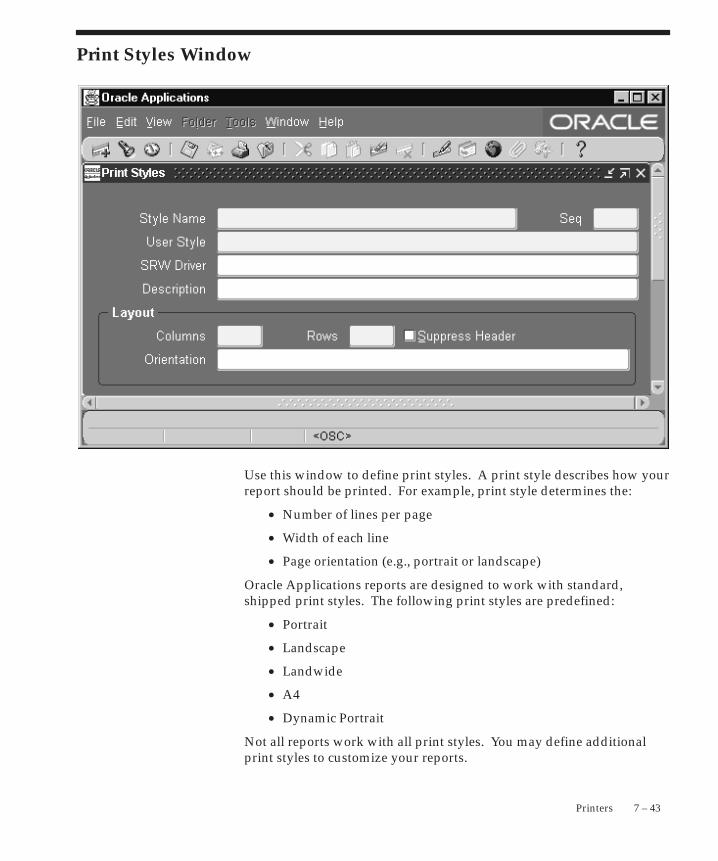
7 – 43Printers
Print Styles Window
Use this window to define print styles. A print style describes how yourreport should be printed. For example, print style determines the:
• Number of lines per page
• Width of each line
• Page orientation (e.g., portrait or landscape)
Oracle Applications reports are designed to work with standard,shipped print styles. The following print styles are predefined:
• Portrait
• Landscape
• Landwide
• A4
• Dynamic Portrait
Not all reports work with all print styles. You may define additionalprint styles to customize your reports.
☞
7 – 44 Oracle Applications System Administrator’s Guide
Once defined, a print style cannot be deleted.
Print Styles Block
Define a print style. The combination of Name and User Nameuniquely identifies a print style.
Attention: You should issue a Restart concurrent managercommand for all currently active managers whenever you editan existing Printer Type, Print Style, or Printer Driver.
See: Controlling Concurrent Managers: page 5 – 55.
Style Name
Multiple print styles display alphabetically in a list window.
You cannot update a print style’s name.
Sequence
Enter a number that determines the display sequence for your printstyle when performing a query in this window. A negative sequencenumber appears before zero, and zero appears before a positivesequence number.
User Style
This user name does not appear anywhere except this window.
SRW Driver
Enter the name of the Oracle Reports (SRW) driver to be called whenprinting an applications report generated by Oracle Reports. This fieldis used only by applications reports generated by Oracle Reports.
Layout Block
Columns
Enter the number of columns your print style defines.
Rows
Enter the number of rows your print style defines.

7 – 45Printers
Suppress Header
Reports may print with a header page that indicates who requested thereport and when. Check the Supress Header check box to define a printstyle that suppresses printing of this header page.
For example, suppressing the header page when printing checksprevents a check from being overwritten and maintains the orderlysequence of check numbers.
Orientation
Enter the orientation of your printed page, for example, portrait orlandscape.
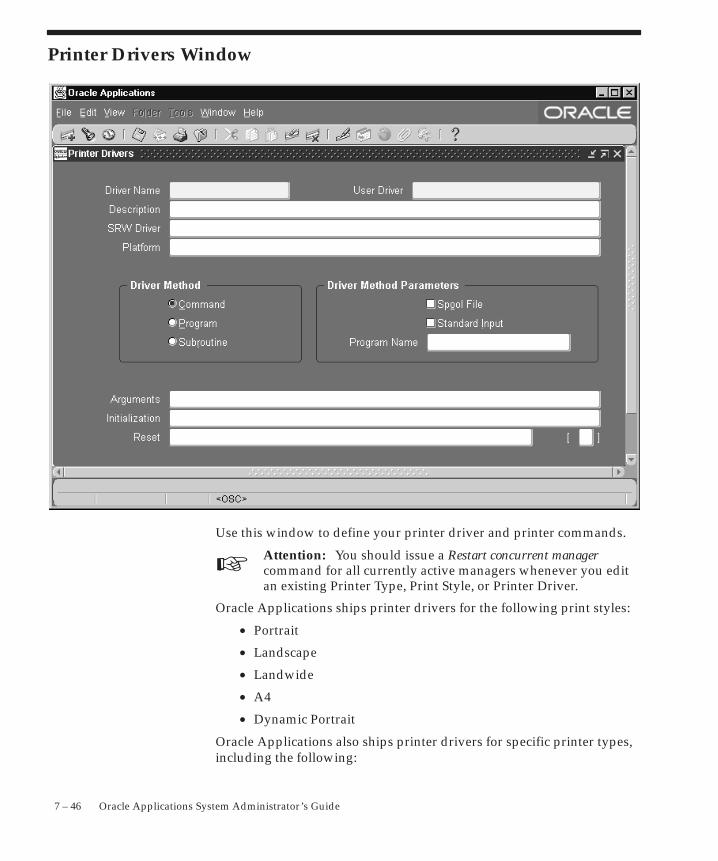
☞
7 – 46 Oracle Applications System Administrator’s Guide
Printer Drivers Window
Use this window to define your printer driver and printer commands.
Attention: You should issue a Restart concurrent managercommand for all currently active managers whenever you editan existing Printer Type, Print Style, or Printer Driver.
Oracle Applications ships printer drivers for the following print styles:
• Portrait
• Landscape
• Landwide
• A4
• Dynamic Portrait
Oracle Applications also ships printer drivers for specific printer types,including the following:
7 – 47Printers
• Apple
• DEC LN03
• HP Laserjet II, HP Laserjet III, HP Laserjet 4
• HP line printer, HP 256X line printer
• EPOCH
• EPSON FX1050 and DMTX1
• QMS PS 825/925
Define additional printer drivers if you have different types of printers,or define additional print styles.
Printer Drivers Block
See: Controlling Concurrent Managers: page 5 – 55.
Driver Name
The printer driver name must be unique for a given platform.
User Driver
This user name is referenced by Oracle Applications and must be uniquefor a given platform.
SRW Driver
Enter the name of the Oracle Reports (SRW) printer driver, if any, thatwill be invoked by your printer driver. Only Oracle Reports programsrequire this information.
Enter the entire path to the file, or just the file name. If you enter onlythe file name, Oracle Applications assumes the file is located in the$FND_TOP/$APPLREP directory.
Platform
Select the platform for which the printer driver is defined. Do notassign platform codes to printer drivers unless you have multipledrivers of the same name. If it cannot find a specific platform codeassociated with a driver, the concurrent manager will default to thedriver with a null platform code.
Driver Method Region
Driver MethodParameters Region
7 – 48 Oracle Applications System Administrator’s Guide
Select one of three methods by which your printer driver is invoked.
The printer driver executes within an operatingsystem shell. An example is the lpr command inUNIX.
The printer driver executes directly as a program,not through an operating system shell.
• An example is a C standalone program forprinting.
• This method executes faster than the Commandmethod, but cannot access shell commands likePRINT on MS–DOS.
The printer driver executes a predefined OracleApplications routine.
Subroutines are specific to operating platforms andare invoked directly by a system call from theconcurrent manager.
Spool File
Select whether the printer driver creates its own copy of a file forprinting. If this check box is checked when the Driver Method is set toProgram, the print program creates its own spool file.
• An example of spool files is the UNIX lpr command, whichcreates its own copy of a file if you do not specify the –s option.
Standard Input
Select whether the printer driver accepts standard input. Uncheck thischeck box when the Driver Method is set to Program. Unless theprogram accepts standard input, this check box should always beunchecked.
• An example is the UNIX command lpr, which accepts standardinput when a filename is not specified.
Program Name
If the driver method is Program:
• Enter the full path to the program that the driver invokes. Thepath is not necessary if the program’s location can be identified
Command
Program
Subroutine
7 – 49Printers
by the operating system’s PATH environment variable. SeeLocation for Custom Print Programs: page 7 – 26.
If the driver method is Subroutine:
• Enter the subroutine name that the driver invokes.
Arguments
When the Driver Method is set to Program, enter any generic argumentsthat must be supplied to the print program.
When the Driver Method is set to Command, enter the full commandand its arguments.
Initialization
Enter the initialization string that must be sent to the printer before theprinter driver can begin printing.
Reset
Enter the reset string that returns the printer to its ready state whenprinting is complete
[ ]
The double brackets ([ ]) identify a descriptive flexfield that you can useto add data fields to this form without programming.
This descriptive flexfield allows you to define special commandsspecific to your printer driver and/or the platform it runs on.

7 – 50 Oracle Applications System Administrator’s Guide
C H A P T E R
8 T
8 – 1Oracle Applications Help
Oracle ApplicationsHelp
his chapter explains how to customize Oracle Applications help.
8 – 2 Oracle Applications System Administrator’s Guide
Customizing Oracle Applications HelpOracle Applications help files are formatted as HTML allowing easymodification using commercial HTML text editors. You can also addcustomized files of your own to the help system.
If you have licensed Oracle Tutor 11i, you can use it to edit your OracleApplications help files. Oracle Tutor 11i additionally provides modelbusiness procedures, process documents, and courseware that you cancustomize to fit your company’s specific needs and link to the OracleApplications help system. For more information, see Tutor Author UserManual and Tutor Publisher User Manual.
Caution: With each new release of Oracle Applications andeach patch you accept, you will need to reapply your changesto any updated help files you have modified, if you wantaccess to the latest information. In addition, Oracle does notprovide any mechanism for identifying changes betweenreleases of Oracle Applications help files.
Customizing Oracle Applications Help includes the following topics:
• Downloading and Uploading Help Files (Help System Utility):page 8 – 2
• Linking Help Files: page 8 – 7
• Updating the Search Index: page 8 – 11
• Customizing Help Navigation Trees: page 8 – 12
• Customizing Help in a Global Environment: page 8 – 21
See Also
Profile Options in Oracle Application Object Library: page A – 2
Downloading and Uploading Help Files
Oracle Applications help files are stored in the database. The OracleApplications Help System Utility is provided for retrieving andreplacing them in the course of customization.
Setting Help System Utility Profile Options
Before using the Help System Utility you must define the upload anddownload directory paths. Oracle Applications provides profileoptions for you to set these paths.

8 – 3Oracle Applications Help
Use the profile option Help Utility Download Path to define thedirectory location to which the Help System Utility will download files.Use Help Utility Upload Path to define the directory location fromwhich your customized files will be transferred back into the OracleApplications Help System.
Identifying Help Files for Customization
Help files are downloaded by file name. To identify the specific filethat you want to customize, open the document in the OracleApplications Help System. Use the view source function of yourbrowser to view the HTML source code. The source information willinclude the file name.
For example, if you view the source for this help document you will seethe file name identified as SYS00032663.htm.
To identify the language and product of the help file, use the sourcedocument URL. The final three nodes of the source document URL arethe language, the product name, and the anchor or target name.
Using this document again as an example, you will see the final threenodes of the URL are /US/FND/@ht_updown#ht_updown. Thisidentifies the language as US, the product group as FND (ApplicationsObject Library), and the target name as ht_updown.
Note: The syntax in the URL, @ht_updown#ht_updown, is anexample of the Oracle Applications special syntax used to linkdocuments by anchorname. For more information about thissyntax see Linking Help Files: page 8 – 7.
The Oracle Applications Help System Utility also provides reports tocross–reference target names and help file names. See CreatingReports: page 8 – 6.
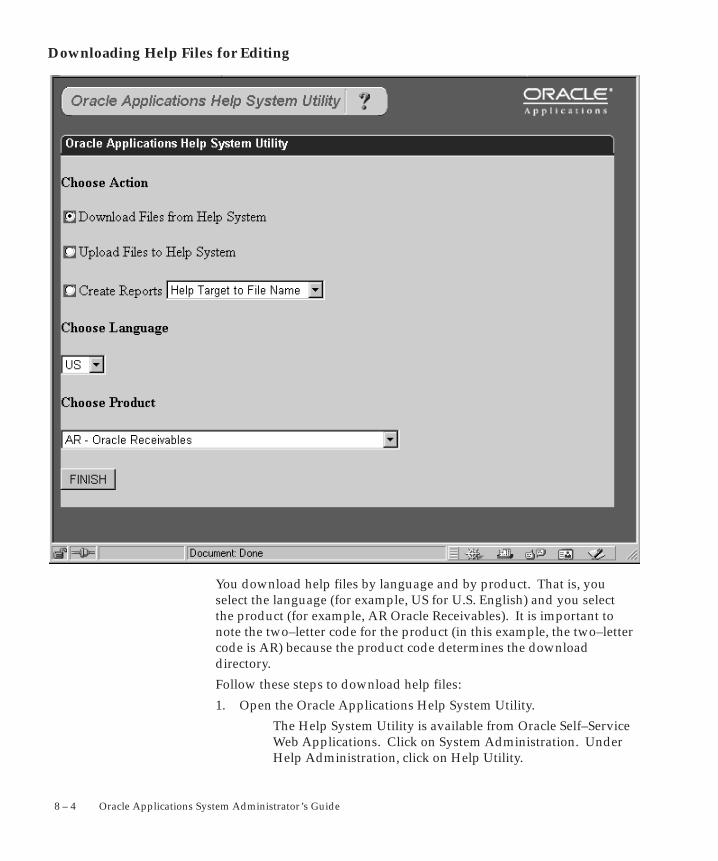
8 – 4 Oracle Applications System Administrator’s Guide
Downloading Help Files for Editing
You download help files by language and by product. That is, youselect the language (for example, US for U.S. English) and you selectthe product (for example, AR Oracle Receivables). It is important tonote the two–letter code for the product (in this example, the two–lettercode is AR) because the product code determines the downloaddirectory.
Follow these steps to download help files:
1. Open the Oracle Applications Help System Utility.
The Help System Utility is available from Oracle Self–ServiceWeb Applications. Click on System Administration. UnderHelp Administration, click on Help Utility.
8 – 5Oracle Applications Help
2. Select ”Download Files from Help System” from the Choose Actionoption group.
3. Select the language from the Choose Language pop list.
4. Select the product from the Choose Product pop list. You can onlyselect one product at a time.
5. Click Finish.
The Help System Utility downloads the help files for the product youselected. All files will be downloaded, including graphics. The filesare downloaded, following the path defined in the profile option HelpUtility Download Path, to a directory for the chosen language andproduct.
For example, if you selected the language to be US and the product tobe AR Accounts Receivable, the files will be downloaded to <serverlocation>\<Help Utility Download Path>\US\AR.
Uploading Help Files
Once you have customized the help files, use the Help System Utility toupload the documents into the help system. Your files are uploadedfrom the upload directory specified in the profile option Help UtilityUpload Path.
Note: If you have created a new application with new helpfiles that you are uploading for the first time, you must use theGeneric File Manager Access Utility (FNDGFU) to upload thesefiles. See Generic File Manager Access Utility: page C – 32.
There are four types of files that can be uploaded to the help system.These are:
• HTML files (all HTML files must have a .htm extension)
• GIF graphics files (must have a .gif extension)
• Adobe� Acrobat files (must have a .pdf extension)
• Cascading Style Sheets (must have a .css extension)
Follow these steps to upload your customized help files:
1. Copy the customized files to the appropriate product folder in theupload directory.
For example, if you customized six help files for AccountsReceivable, copy the six files to the <serverlocation>\<Help Utility Upload Path>\US\ARdirectory. It is critical that you copy the files to the correctproduct folder in order for the Oracle Applications Help
8 – 6 Oracle Applications System Administrator’s Guide
System Utility to place the files in the correct location withinthe Oracle Applications Help System.
2. Open the Oracle Applications Help System Utility.
The Help System Utility is available from Oracle Self–ServiceWeb Applications. Click on System Administration. UnderHelp Administration, click on Help Utility.
3. Select ”Upload Files from Help System” from the Choose Actionoption group.
4. Select the language from the Choose Language pop list.
5. Select the product from the Choose Product pop list. You can onlyselect one product at a time.
6. Click Finish.
The Help Utility uploads the help files for the product you selected.All files located in the directory for the selected language and productwill be uploaded.
Creating Reports
The Help System Utility provides two reports for you tocross–reference help targets and file names.
Help Target to File Name Report This report lists by target, each filethat contains the target, the document title of the file, and the product.
File Name to Help Target Report This report lists every file name anddocument title by language and product and all the targets foundwithin each file.
Follow these steps to run these reports:
1. Open the Oracle Applications Help System Utility.
The Help System Utility is available from Oracle Self–ServiceWeb Applications. Click on System Administration. UnderHelp Administration, click on Help Utility.
2. Select ”Create Reports” from the Choose Action option group.
3. Select the appropriate report from the Create Reports pop list.
4. Select the language from the Choose Language pop list.
5. Select the product from the Choose Product pop list. You can buildreports for all products by selecting ”All Products” from the list.
6. Click Finish.
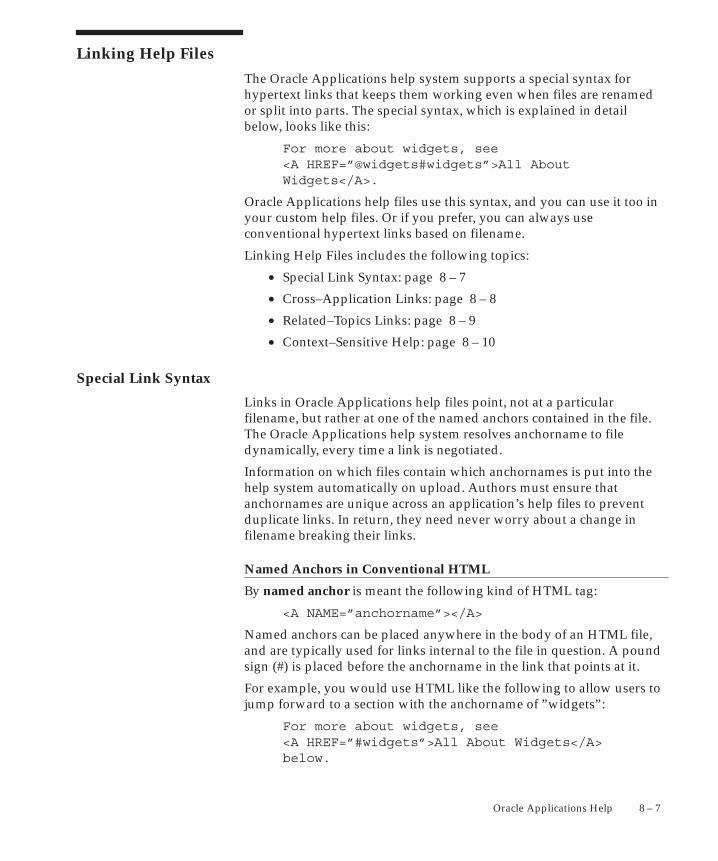
8 – 7Oracle Applications Help
Linking Help Files
The Oracle Applications help system supports a special syntax forhypertext links that keeps them working even when files are renamedor split into parts. The special syntax, which is explained in detailbelow, looks like this:
For more about widgets, see <A HREF=”@widgets#widgets”>All AboutWidgets</A>.
Oracle Applications help files use this syntax, and you can use it too inyour custom help files. Or if you prefer, you can always useconventional hypertext links based on filename.
Linking Help Files includes the following topics:
• Special Link Syntax: page 8 – 7
• Cross–Application Links: page 8 – 8
• Related–Topics Links: page 8 – 9
• Context–Sensitive Help: page 8 – 10
Special Link Syntax
Links in Oracle Applications help files point, not at a particularfilename, but rather at one of the named anchors contained in the file.The Oracle Applications help system resolves anchorname to filedynamically, every time a link is negotiated.
Information on which files contain which anchornames is put into thehelp system automatically on upload. Authors must ensure thatanchornames are unique across an application’s help files to preventduplicate links. In return, they need never worry about a change infilename breaking their links.
Named Anchors in Conventional HTML
By named anchor is meant the following kind of HTML tag:
<A NAME=”anchorname”></A>
Named anchors can be placed anywhere in the body of an HTML file,and are typically used for links internal to the file in question. A poundsign (#) is placed before the anchorname in the link that points at it.
For example, you would use HTML like the following to allow users tojump forward to a section with the anchorname of ”widgets”:
For more about widgets, see <A HREF=”#widgets”>All About Widgets</A> below.
8 – 8 Oracle Applications System Administrator’s Guide
<A NAME=”widgets”></A><H2>All About Widgets</H2>
Extended to Support Interdocument Links
Oracle Applications help files extend this conventional HTML syntaxto create links not only within, but also between help files. To link to afile that contains a particular named anchor, you simply place an atsign (@) before the anchorname. To link to the precise spot within thefile where this anchor appears, you append a pound sign followed bythe anchorname, just as you would in conventional HTML. This resultsin the following special syntax:
<A HREF=”@anchorname#anchorname”>link text</A>.
For example, to link to the file that contains the ”widgets” anchorillustrated above, at the point in the file that this anchor occurs, youwould use HTML like the following:
For more about widgets, see <A HREF=”@widgets#widgets”>All AboutWidgets</A>.
If you simply want to link to the top of the file that contains this anchor,you can omit the pound–sign segment ”#widgets.”
Links in Oracle Applications help files rarely omit the pound–signsegment. This means that however topics are rearranged within oramong files, links to these topics from other files always go to theproper file, and to the precise spot within the file where the topicoccurs.
Caution: Do not use case to make distinctions betweenanchornames. Unlike most web browsers, the OracleApplications help system treats anchornames in acase–insensitive fashion.
Cross–Application Links
In the Oracle Applications help system, all help files associated with aparticular application exist in the same directory, as far as their URL isconcerned. Help files associated with other applications exist indirectories named after the application’s short name. All theseapplication directories are at the same level in the help system.
To create a link that goes to a help file associated with a differentapplication, you create a relative link that goes up a level to the parentof all help application directories, and then back down through theother application’s directory, before concluding with Oracle
8 – 9Oracle Applications Help
Applications’ special link syntax. This results in the followingcross–application link syntax:
<A HREF=”../shortname/@anchorname#anchorname”>link text</A>
For example, if the ”All About Widgets” topic illustrated above werean Oracle Payables help topic, and you wanted to link to it from anOracle General Ledger help file, you would use a link like thefollowing, where AP is Oracle Payables’ short name:
For more about widgets in Oracle Payables, see <A HREF=”../AP/@widgets#widgets”>All AboutWidgets</A>.
When used in this fashion, application short names are case insensitive.
Note: These application help directories are merely ”virtual”directories recognized by the Oracle Applications help systemwhen used in URLs. All files are actually stored in thedatabase, with application short name being one attributeamong many associated with them.
Note: Oracle Payables’ official short name is SQLAP. This hasbeen shortened to AP for the virtual directory used in theOracle Applications help system. Similarly, Oracle GeneralLedger’s official short name of SQLGL has been shortened toGL, and Oracle Assets short name of OFA has been shortenedto FA. These are the only exceptions.
Related Topics Links
Links are not limited to a single target in the Oracle Applications helpsystem. You can point your links at multiple topics and files by usingthe following syntax:
<A HREF =”@anchorname1,anchorname2,anchorname3”>Related Topics</A>
When a user negotiates the link, a page headed ”Related Topics”appears, containing a list of the page titles corresponding to theseanchornames, with each title linked to the file in question.
To include cross–application links, simply prefix the application shortname and a colon to the anchorname:
<A HREF =
”@anchorname1,shortname:anchorname2,anchorname3”>
Related Topics</A>

8 – 10 Oracle Applications System Administrator’s Guide
Context–Sensitive Help
When you ask for help in Oracle Applications, the topic for yourcurrent window opens. If you ask for help from a report parameterswindow, your help file opens to a discussion of that report.
Oracle Applications help files contain special anchornames to enablethese context–sensitive links. When calling help from a window, OracleApplications looks for an anchorname based on the form name and thewindow name combined as follows:
<A NAME=”form_name_window_name”></A>
You can override the form_name portion of the anchorname byspecifying a HELP_TARGET parameter in the parameter field of theForm Functions window. Use the syntax HELP_TARGET =”alternative_form_name”. See: Form Functions: page 2 – 34.
When calling help from a report parameter window, OracleApplications looks for an anchorname constructed as follows:
<A NAME=”SRS_concurrent_program_shortname”></A>
Example
8 – 11Oracle Applications Help
Updating the Search Index
Oracle interMedia Text enables the search feature provided by theOracle Applications help system. You run a script called aflobbld.sql torebuild the search index after uploading customized documents. Thisensures that they will be included in any searches your users perform.
To rebuild the interMedia index, use the following command line:
sqlplus <apps/pwd> @$FND_TOP/sql/aflobbld.sql
where
is the APPS schema username/password. Tospecify a particular database, append an @ signand the database SID (@database).
sqlplus apps/apps@devdb @$FND_TOP/sql/aflobbld.sql
• connects to apps/apps@devdb using Oracle SQL*PLUS
• rebuilds the search index for Oracle Applications help
<apps/pwd>
8 – 12 Oracle Applications System Administrator’s Guide
Customizing Help Navigation Trees
You use the Help Builder applet to customize the help navigation treesthat appear in your browser window’s navigation frame when help isinvoked.
Trees are composed of root, branch, and leaf nodes. The root of a helpnavigation tree is the top–most level. When expanded, it reveals acollection of first–level branches and leaves under it. A branch expandsfurther, to reveal branches and leaves the next level down. In theOracle Applications help system, some branches also link todocuments. A leaf expands no further, but simply links to a document,terminating the hierarchy at this point.
Caution: With each new release of Oracle Applications andeach patch you accept, you will need to reapply your changesto any updated help navigation trees you have modified, if youwant access to the latest information. In addition, Oracle doesnot provide any mechanism for identifying changes betweenreleases of Oracle Applications help navigation trees.
You can use the Help Builder to perform the following tasks:
• open a tree for editing: page 8 – 15
• add new help files to a tree: page 8 – 16
• add new nodes to a tree: page 8 – 17
• add nodes to one tree from another: page 8 – 18
• change the organization of a tree: page 8 – 18
• create a new navigation tree: page 8 – 19
For help understanding the information associated with each of theHelp Builder’s fields, see Help Builder Window Reference: page 8 – 19.
Accessing the Help Builder
To access the Help Builder, navigate from Oracle Self–Service WebApplications as follows: System Administration – Help Builder.
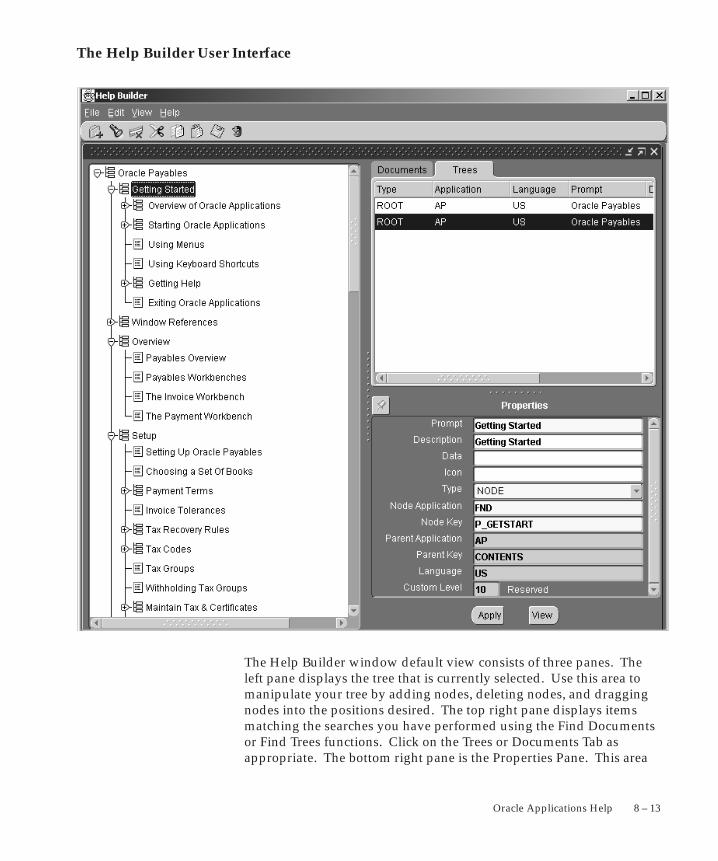
8 – 13Oracle Applications Help
The Help Builder User Interface
The Help Builder window default view consists of three panes. Theleft pane displays the tree that is currently selected. Use this area tomanipulate your tree by adding nodes, deleting nodes, and draggingnodes into the positions desired. The top right pane displays itemsmatching the searches you have performed using the Find Documentsor Find Trees functions. Click on the Trees or Documents Tab asappropriate. The bottom right pane is the Properties Pane. This area
8 – 14 Oracle Applications System Administrator’s Guide
displays the properties of the item (root, node, or document) currentlyselected. Those properties with enabled fields can be updated.
Help Builder Menus
File Menu
The File Menu provides the following functions:
Creates a new root node. Selecting this option willopen the Root Node Properties window for you toenter the appropriate values for your new rootnode.
Opens a tree. Selecting this option will open theFind Trees window for you to enter selectioncriteria to find the appropriate tree.
Saves the current changes.
Reloads the current tree to apply all changesthroughout the tree hierarchy.
Prints the current tree pane.
Exits the Help Builder.
Edit Menu
The Edit Menu provides the following functions:
Creates a new node beneath the selected node onthe tree. If the selected node is a document, adocument node is created. If the selected node is abranch node, a branch node is created.
Cuts the selected item (document or branch node).
Copies the selected item (document or branchnode).
Pastes an item beneath the currently selected nodeon the tree. If the node selected is a document, theitem will be pasted beneath it on the tree. If thenode selected is a branch that has been expanded,the item will be pasted as a child of the selectednode. If the node selected is a branch that has notbeen expanded, the item will be pasted as a siblingbeneath the selected node.
Deletes the selected item.
New
Open
Save
Reload
Exit
New Node
Cut
Copy
Paste
Delete
8 – 15Oracle Applications Help
Allows you to update the properties of the selecteditem via the Properties window. The Propertieswindow is identical to the Properties Pane.
See Help Builder Window Reference: page 8 – 19for descriptions of the Properties fields.
Allows you to set interface preferences via thePreferences window. The preferences you can setare:
Background Color
Line and Box Color
Default Node Color
Default Node Text Color
Font Name
Font Size
View Menu
The View Menu provides the following functions
Enable the check box to display the NodeProperties pane (enabled is the default).
Enable the check box to display the Toolbar(enabled is the default).
Enable the check box to display the Status Bar(enabled is the default).
Opens the Find Documents window.
Opens the Find Trees window.
Help Menu
The View Menu provides the following functions:
Displays information about the Help Builder.
Opens the Oracle Applications Help Library.
Help Builder Tasks
� To open a tree for editing:
1. Open the Find Trees window using one of the following menuoptions:
Properties...
Preferences...
Node Properties
Toolbar
Statusbar
Find Documents
Find Trees
About...
Library
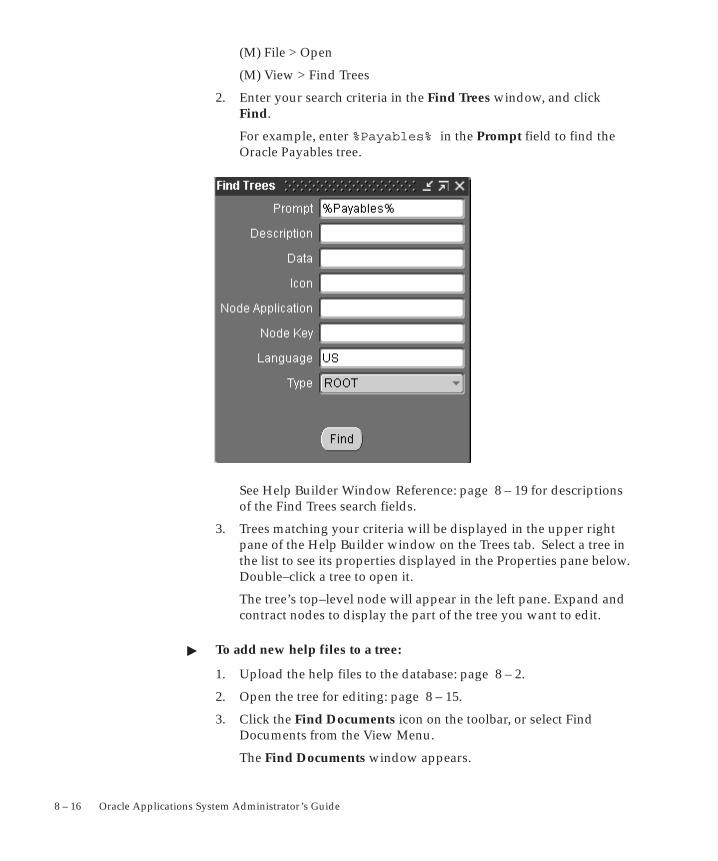
8 – 16 Oracle Applications System Administrator’s Guide
(M) File > Open
(M) View > Find Trees
2. Enter your search criteria in the Find Trees window, and clickFind.
For example, enter %Payables% in the Prompt field to find theOracle Payables tree.
See Help Builder Window Reference: page 8 – 19 for descriptionsof the Find Trees search fields.
3. Trees matching your criteria will be displayed in the upper rightpane of the Help Builder window on the Trees tab. Select a tree inthe list to see its properties displayed in the Properties pane below.Double–click a tree to open it.
The tree’s top–level node will appear in the left pane. Expand andcontract nodes to display the part of the tree you want to edit.
� To add new help files to a tree:
1. Upload the help files to the database: page 8 – 2.
2. Open the tree for editing: page 8 – 15.
3. Click the Find Documents icon on the toolbar, or select FindDocuments from the View Menu.
The Find Documents window appears.
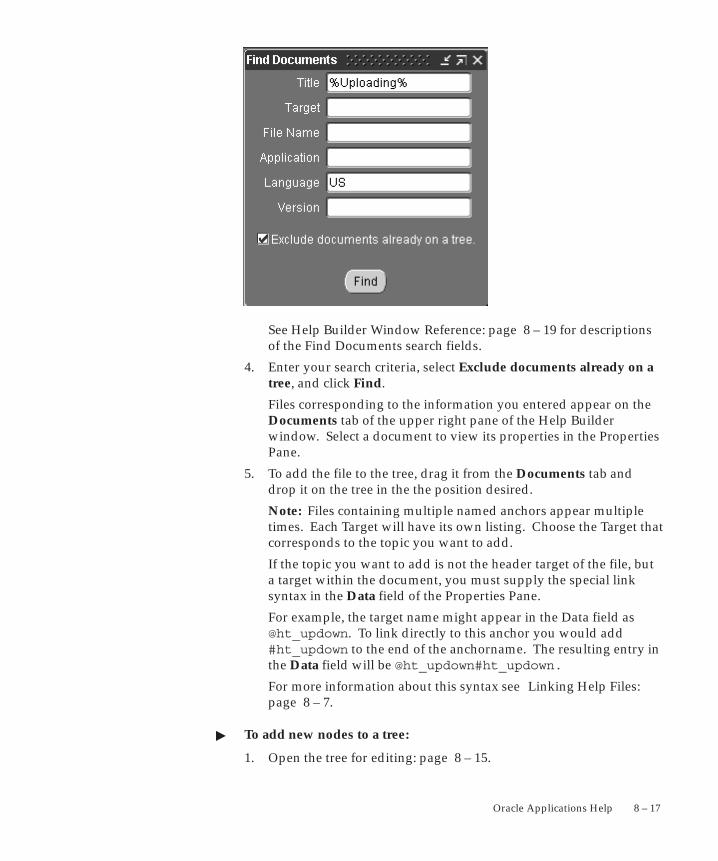
8 – 17Oracle Applications Help
See Help Builder Window Reference: page 8 – 19 for descriptionsof the Find Documents search fields.
4. Enter your search criteria, select Exclude documents already on atree, and click Find.
Files corresponding to the information you entered appear on theDocuments tab of the upper right pane of the Help Builderwindow. Select a document to view its properties in the PropertiesPane.
5. To add the file to the tree, drag it from the Documents tab anddrop it on the tree in the the position desired.
Note: Files containing multiple named anchors appear multipletimes. Each Target will have its own listing. Choose the Target thatcorresponds to the topic you want to add.
If the topic you want to add is not the header target of the file, buta target within the document, you must supply the special linksyntax in the Data field of the Properties Pane.
For example, the target name might appear in the Data field as@ht_updown. To link directly to this anchor you would add#ht_updown to the end of the anchorname. The resulting entry inthe Data field will be @ht_updown#ht_updown.
For more information about this syntax see Linking Help Files:page 8 – 7.
� To add new nodes to a tree:
1. Open the tree for editing: page 8 – 15.
8 – 18 Oracle Applications System Administrator’s Guide
2. Select the node beneath which you want to add a new node, andclick New Node on the toolbar or select New Node from the EditMenu.
Note: The New Node feature will add a node that is like the nodeselected. For example, if a branch node is selected a branch nodewill be added beneath it. It a leaf node is selected, a leaf node willbe added beneath it.
When adding a branch node as a sibling to an existing branch node,be sure that the selected branch node is not expanded. If theexisting branch node is expanded, the new node will be added as achild to the selected branch.
3. Enter information for the new node in the Properties Pane, andclick Apply.
4. Click Save to save your changes.
� To add nodes from one tree to another:
1. Open the tree for editing: page 8 – 15.
2. From the View menu select Find Trees.
3. In the Find Trees window select Node from the Type poplist andenter search criteria for the nodes you want to add. Click Find.
Nodes corresponding to the information you enter appear on theTrees tab of the main Help Builder window.
4. Drag nodes from the Trees tab and drop them on the tree.
5. Click Save to save your changes.
� To change the organization of a tree:
Caution: Changes made to nodes added from another tree arereflected in the original tree and all other trees that includethem.
1. Open the tree for editing: page 8 – 15.
2. To move a node, drag the node from its current location and drop itat its new location in the tree.
3. To delete a node, select it and click Delete on the toolbar or selectDelete from the Edit Menu.
4. To change a prompt, select the node, enter the new prompt in thePrompt field of the Properties pane, and click Apply.
Other node properties can be changed in a similar fashion.
8 – 19Oracle Applications Help
Note: If the same node appears elsewhere in the tree, your changeswill not appear there until you click the Reload button on thetoolbar. For one node to be the same as another, the Node Key andNode Application of their parent nodes must be the same, as wellas all their own properties. Their grandparent nodes and above canbe different.
� To create a new navigation tree:
1. Choose File > New.
The Root Node Properties window appears.
2. Enter information for the tree’s root node, and click Apply.
3. Add new nodes to the tree: page 8 – 17.
4. Add new help files to the tree: page 8 – 16.
5. Add nodes from other trees to the tree: page 8 – 18.
6. To view the new tree with context–sensitive help, enter its root asthe Help Tree Root for some application, responsibility, or user:page A – 29.
To view it stand alone, substitute its root in the root= parameterat the end of your site’s Oracle Applications Help URL. Includethe application short name. For example, for a root namedROOT_INV belonging to the Oracle Inventory product, you woulduse root=INV:ROOT_INV in the URL.
Help Builder Window Reference
Field names and descriptions for the Help Builder window are givenbelow.
Application shortname of application that owns thehelp file.
Customization level of the node. 100 is the defaultfor customer use. Levels under 100 are reserved forsystem use.
If the node links to a help file, the file name or atarget name preceded by an ”@” symbol, or anabsolute URL.
Longer description of the node, if the Prompt isterse. Otherwise may simply repeat the Prompt.
Pre–upload filename of the help file.
Application
Custom Level
Data
Description
Filename
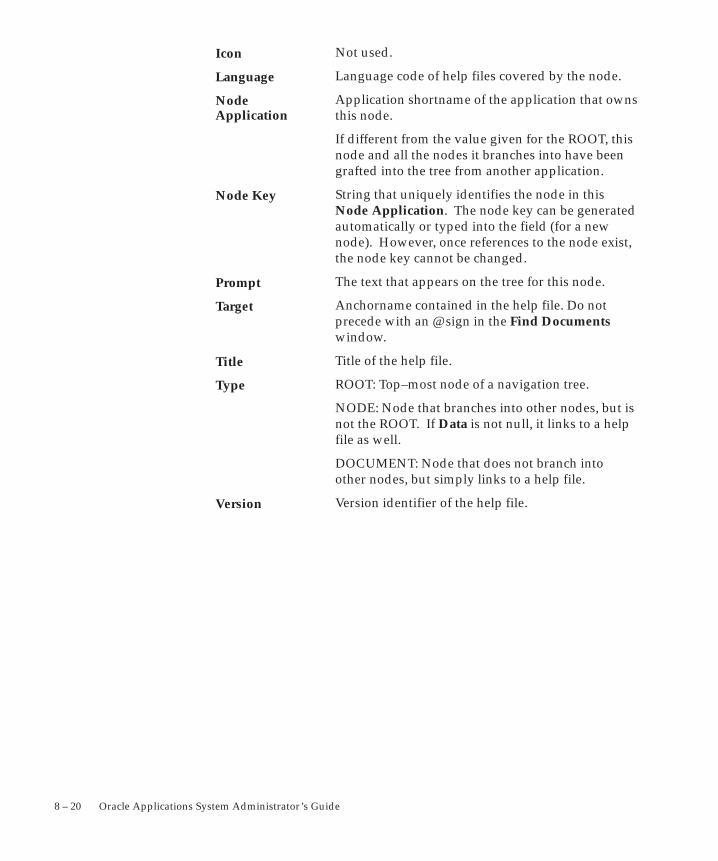
8 – 20 Oracle Applications System Administrator’s Guide
Not used.
Language code of help files covered by the node.
Application shortname of the application that ownsthis node.
If different from the value given for the ROOT, thisnode and all the nodes it branches into have beengrafted into the tree from another application.
String that uniquely identifies the node in thisNode Application. The node key can be generatedautomatically or typed into the field (for a newnode). However, once references to the node exist,the node key cannot be changed.
The text that appears on the tree for this node.
Anchorname contained in the help file. Do notprecede with an @ sign in the Find Documentswindow.
Title of the help file.
ROOT: Top–most node of a navigation tree.
NODE: Node that branches into other nodes, but isnot the ROOT. If Data is not null, it links to a helpfile as well.
DOCUMENT: Node that does not branch intoother nodes, but simply links to a help file.
Version identifier of the help file.
Icon
Language
NodeApplication
Node Key
Prompt
Target
Title
Type
Version
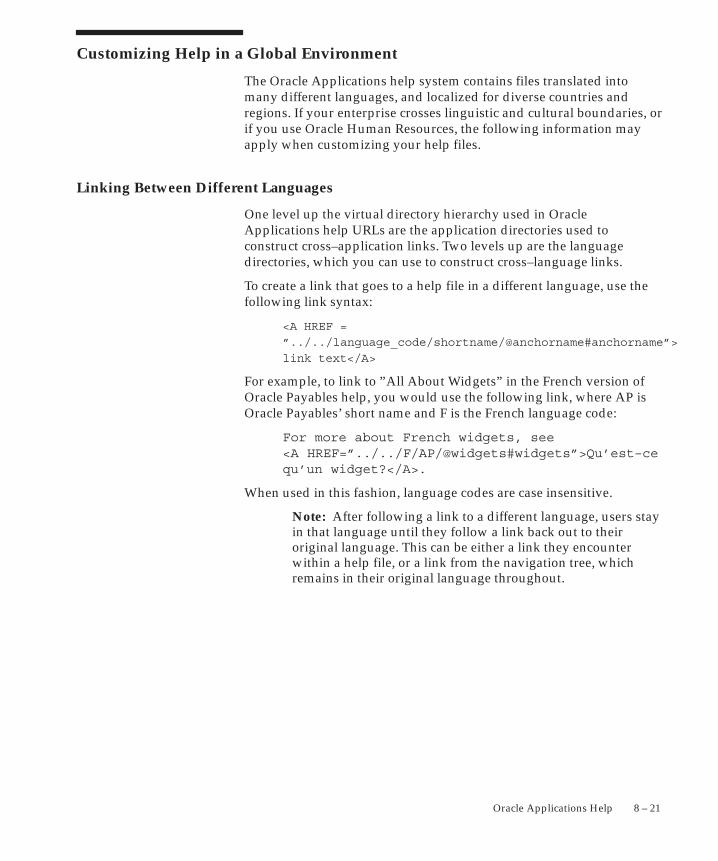
8 – 21Oracle Applications Help
Customizing Help in a Global Environment
The Oracle Applications help system contains files translated intomany different languages, and localized for diverse countries andregions. If your enterprise crosses linguistic and cultural boundaries, orif you use Oracle Human Resources, the following information mayapply when customizing your help files.
Linking Between Different Languages
One level up the virtual directory hierarchy used in OracleApplications help URLs are the application directories used toconstruct cross–application links. Two levels up are the languagedirectories, which you can use to construct cross–language links.
To create a link that goes to a help file in a different language, use thefollowing link syntax:
<A HREF =
”../../language_code/shortname/@anchorname#anchorname”>
link text</A>
For example, to link to ”All About Widgets” in the French version ofOracle Payables help, you would use the following link, where AP isOracle Payables’ short name and F is the French language code:
For more about French widgets, see <A HREF=”../../F/AP/@widgets#widgets”>Qu’est–cequ’un widget?</A>.
When used in this fashion, language codes are case insensitive.
Note: After following a link to a different language, users stayin that language until they follow a link back out to theiroriginal language. This can be either a link they encounterwithin a help file, or a link from the navigation tree, whichremains in their original language throughout.

8 – 22 Oracle Applications System Administrator’s Guide

C H A P T E R
9 T
9 – 1Applications DBA Duties
Applications DBADuties
his chapter explains Oracle Applications security tasks thatrequire a database administrator to either explicitly perform, or assistby performing prerequisite tasks.
Depending on the nature of the company and the installation site, theseduties may sometimes belong to the System Administrator. As such,this “borderline” area of tasks, which encompasses forms from variouslocations on the System Administrator menu tree, is referred to asApplications DBA duties.
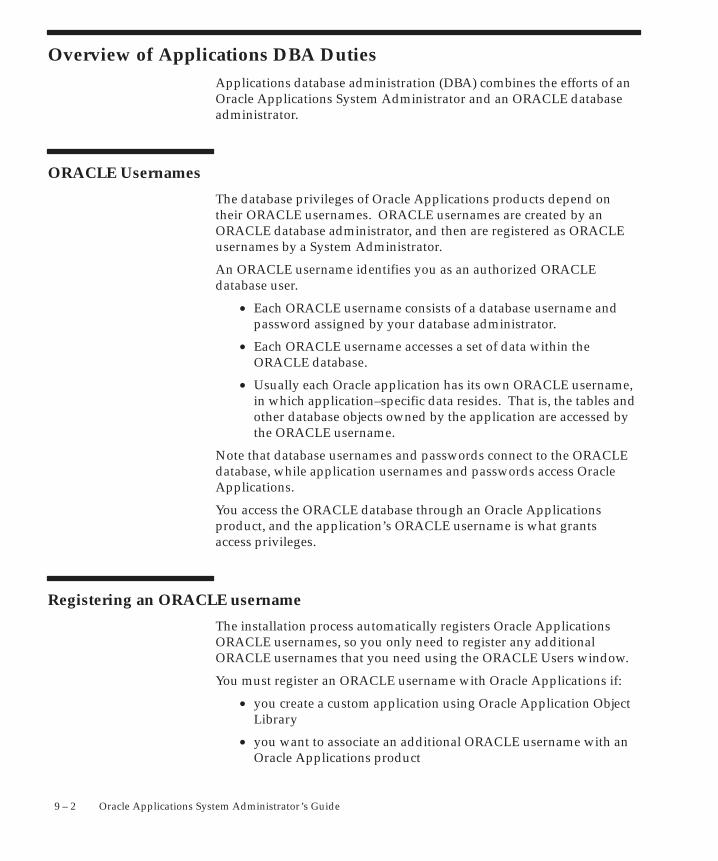
9 – 2 Oracle Applications System Administrator’s Guide
Overview of Applications DBA DutiesApplications database administration (DBA) combines the efforts of anOracle Applications System Administrator and an ORACLE databaseadministrator.
ORACLE Usernames
The database privileges of Oracle Applications products depend ontheir ORACLE usernames. ORACLE usernames are created by anORACLE database administrator, and then are registered as ORACLEusernames by a System Administrator.
An ORACLE username identifies you as an authorized ORACLEdatabase user.
• Each ORACLE username consists of a database username andpassword assigned by your database administrator.
• Each ORACLE username accesses a set of data within theORACLE database.
• Usually each Oracle application has its own ORACLE username,in which application–specific data resides. That is, the tables andother database objects owned by the application are accessed bythe ORACLE username.
Note that database usernames and passwords connect to the ORACLEdatabase, while application usernames and passwords access OracleApplications.
You access the ORACLE database through an Oracle Applicationsproduct, and the application’s ORACLE username is what grantsaccess privileges.
Registering an ORACLE username
The installation process automatically registers Oracle ApplicationsORACLE usernames, so you only need to register any additionalORACLE usernames that you need using the ORACLE Users window.
You must register an ORACLE username with Oracle Applications if:
• you create a custom application using Oracle Application ObjectLibrary
• you want to associate an additional ORACLE username with anOracle Applications product
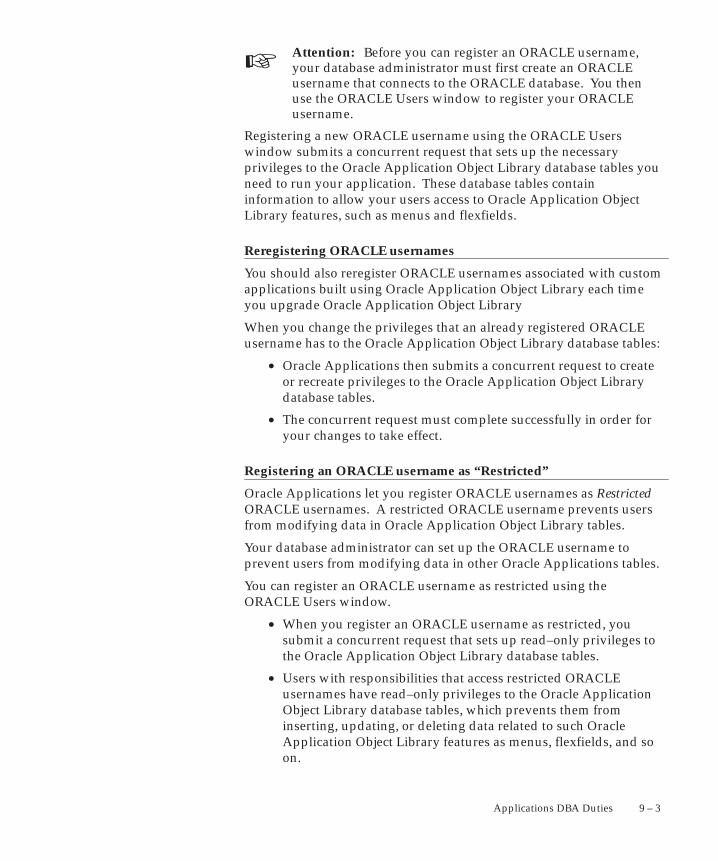
☞
9 – 3Applications DBA Duties
Attention: Before you can register an ORACLE username,your database administrator must first create an ORACLEusername that connects to the ORACLE database. You thenuse the ORACLE Users window to register your ORACLEusername.
Registering a new ORACLE username using the ORACLE Userswindow submits a concurrent request that sets up the necessaryprivileges to the Oracle Application Object Library database tables youneed to run your application. These database tables containinformation to allow your users access to Oracle Application ObjectLibrary features, such as menus and flexfields.
Reregistering ORACLE usernames
You should also reregister ORACLE usernames associated with customapplications built using Oracle Application Object Library each timeyou upgrade Oracle Application Object Library
When you change the privileges that an already registered ORACLEusername has to the Oracle Application Object Library database tables:
• Oracle Applications then submits a concurrent request to createor recreate privileges to the Oracle Application Object Librarydatabase tables.
• The concurrent request must complete successfully in order foryour changes to take effect.
Registering an ORACLE username as “Restricted”
Oracle Applications let you register ORACLE usernames as RestrictedORACLE usernames. A restricted ORACLE username prevents usersfrom modifying data in Oracle Application Object Library tables.
Your database administrator can set up the ORACLE username toprevent users from modifying data in other Oracle Applications tables.
You can register an ORACLE username as restricted using theORACLE Users window.
• When you register an ORACLE username as restricted, yousubmit a concurrent request that sets up read–only privileges tothe Oracle Application Object Library database tables.
• Users with responsibilities that access restricted ORACLEusernames have read–only privileges to the Oracle ApplicationObject Library database tables, which prevents them frominserting, updating, or deleting data related to such OracleApplication Object Library features as menus, flexfields, and soon.
9 – 4 Oracle Applications System Administrator’s Guide
Defining Data Groups
A data group assigns an ORACLE username to an Oracle Applicationsproduct, and includes a list of the valid Application–ORACLEusername pairs.
The installation process automatically defines Data Groups for OracleApplications, so you only need to define any additional data groupsthat you wish to utilize. See: Defining Data Groups: page 4 – 30. See:Data Groups: page 4 – 81.
Conflict Domains
A conflict domain is a set of related data stored in one or moreORACLE usernames and linked by grants and synonyms. Do notconfuse logical databases with your ORACLE database. The ORACLEdatabase contains all your Oracle Applications data, with eachapplication’s data usually residing in one ORACLE username. You canthink of a logical database as a line drawn around a set of related datafor which you wish to define concurrent program incompatibilities. Inother words, logical databases determine which concurrent programscannot run at the same time.
Logical Databases and Program Incompatibilities
When an ORACLE username is identified as belonging to a logicaldatabase, concurrent program incompatibility rules are enforced whenconcurrent programs connect to the ORACLE username.
By checking for incompatibilities between programs runningconcurrently, accessing the same data, Oracle Applications ensures thatdata retrieved by one program is not incorrect or adversely affectedwhen retrieved by another program.
Example – Program Incompatibilities
An example of a concurrent program that is incompatible with otherconcurrent programs is Oracle General Ledger’s Posting program, usedto post journal entries.
If the Posting program’s incompatibility with other Oracle Applicationsconcurrent programs were not enforced, other financial reports runningsimultaneously with the Posting program could contain incorrectaccount balance information. Logical databases ensure that this doesnot happen.
9 – 5Applications DBA Duties
Defining Logical Databases
The installation process automatically defines logical databases andassigns ORACLE usernames to them.
A Standard logical database can be assigned to every OracleApplications product so that every concurrent program, if incompatiblewith any other program, does not run concurrently with that program,regardless of which ORACLE username those two programs connectto. Assigning every ORACLE username to the same (e.g., Standard)logical database is a fail–safe method of enforcing programincompatibility rules.
You must define new logical databases only if you build a customapplication whose data do not interact with data found in existinglogical databases.
As a general rule, you should define a logical database for each customapplication, and assign that application’s ORACLE username(s) to thecorresponding logical database.
However, if a custom application’s data interacts with anotherapplication’s data, you should assign the two applications’ ORACLEusernames to the same logical database.
Initialization Code
You can now add in custom initialization SQL code to be executed atdatabase session startup. You specify this code using a profile option.
Oracle Applications products may also have application–specificinitialization code specified.
The code is executed by FND_GLOBAL.INITIALIZE andAPPS_INITIALIZE immediately after initializing global variables,profiles, and the contents of client_info on session startup.
The order of execution is:
• FND_GLOBAL values initialized
• Profiles initialized
• CLIENT_INFO contents initialized
• FND_APPS_INIT_SQL initialization code called (if a value isdefined)
• FND_INIT_SQL initialization code called (if a value is defined)
9 – 6 Oracle Applications System Administrator’s Guide
Profile Option Initialization SQL Statement – Custom
Using the profile option Initialization SQL Statement – Custom, youcan add site–specific initialization code, such as optimizer settings.This profile value must be a valid SQL statement, or a PL/SQL blockfor more than one statement, that is to be executed once at the startupof every database session.
This profile option can be set at any level by the System Administrator,and is reserved for use by customers.
Profile Option Initialization SQL Statement – Oracle
This profile option is used by Oracle Applications to addapplication–specific initialization code. This profile option is set at theapplication level only, and will only be executed for responsibilitiesowned by that application. This profile option and its value settingsare delivered as seed data, and must not be modified.
9 – 7Applications DBA Duties
Resource Consumer Groups in Oracle ApplicationsThe Database Resource Manager in Oracle8i is used to allocate andmanage resources among database users and applications.
Resource consumer groups and resource plans provide a method forspecifying how to partition processing resources among different users.A resource consumer group defines a set of users who have similarresource usage requirements. An overall resource plan specifies howresources are distributed among the different resource consumergroups.
Oracle Applications allows the system administrator to assignindividual Oracle Applications users to resource consumer groups. Inaddition, concurrent programs and concurrent managers can beassigned to resource consumer groups.
Note: These resource consumer groups apply to CPUresources only.
For additional information, see Oracle8i Concepts and Oracle8iAdministrator’s Guide.
Assigning Resource Consumer Groups
The system administrator can assign a user to a resource consumergroup by setting the value of the user profile option FND:ResourceConsumer Group for that particular user. The user can see this profileoption but cannot update it. See: User Profiles: page A – 26 .
The system administrator can assign a concurrent program to aresource consumer group in the Parameters window of the DefineConcurrent Program form. See: Concurrent Programs ParametersWindow: page 4 – 76 .
The system administrator can assign a concurrent manager to aresource consumer group in the Define Concurrent Manager form. See:Concurrent Managers Window: page 5 – 89.
Hierarchy of Resource Consumer Group Assignments
Conflicts can arise between the resource consumer groups associatedwith a single session. For example, a concurrent manager assigned toone resource consumer group may run a concurrent program assignedto another. A similar situation arises when a user performs a
9 – 8 Oracle Applications System Administrator’s Guide
transaction managed by a transaction manager that has a differentresource consumer group than the user. To resolve such conflicts,Oracle Applications uses a hierarchy.
In the case of a concurrent program, the system first checks to see if theprogram has an assigned resource consumer group and if so, uses that.If not, the system checks the concurrent manager running the programand uses its resource consumer group. If the concurrent manager is notassigned to a resource consumer group the system uses the defaultgroup ”Default_Consumer_Group”.
In the case of a transaction manager running a transaction program, thesystem once again checks the resource consumer group assigned to theprogram, if any, and if there is none, checks the transaction manager. Ifthe transaction manager has no assigned resource consumer group thesystem then checks the profile option value for the user whose sessionbegan the transaction. If there is no resource consumer group definedthe system uses the default resource consumer group.
For a user running a form, the system first checks the profile optionvalue for that user and uses that if it is defined. Otherwise the systemuses the default resource consumer group.
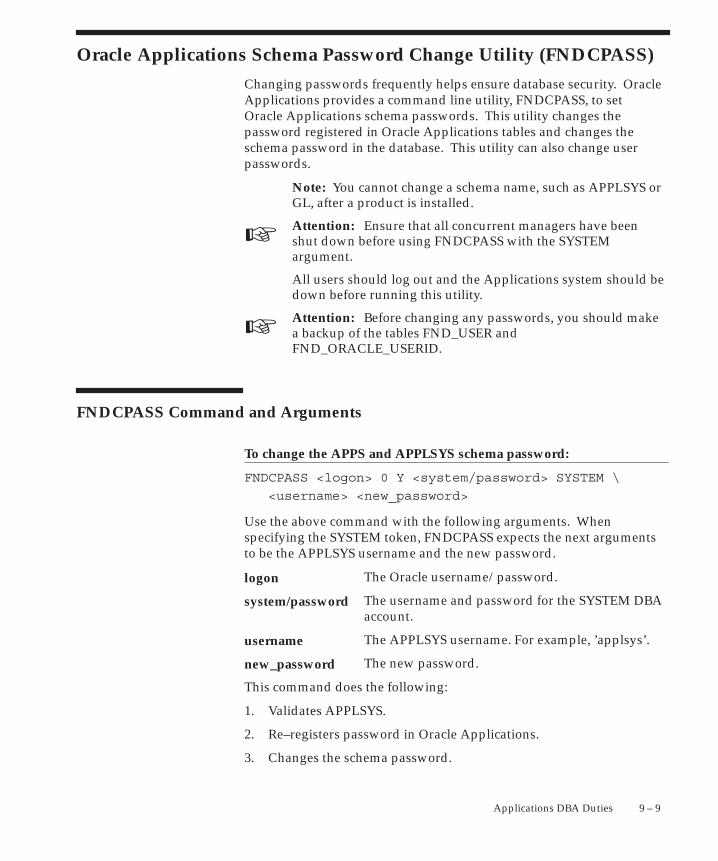
☞
☞
9 – 9Applications DBA Duties
Oracle Applications Schema Password Change Utility (FNDCPASS)
Changing passwords frequently helps ensure database security. OracleApplications provides a command line utility, FNDCPASS, to setOracle Applications schema passwords. This utility changes thepassword registered in Oracle Applications tables and changes theschema password in the database. This utility can also change userpasswords.
Note: You cannot change a schema name, such as APPLSYS orGL, after a product is installed.
Attention: Ensure that all concurrent managers have beenshut down before using FNDCPASS with the SYSTEMargument.
All users should log out and the Applications system should bedown before running this utility.
Attention: Before changing any passwords, you should makea backup of the tables FND_USER andFND_ORACLE_USERID.
FNDCPASS Command and Arguments
To change the APPS and APPLSYS schema password:
FNDCPASS <logon> 0 Y <system/password> SYSTEM \
<username> <new_password>
Use the above command with the following arguments. Whenspecifying the SYSTEM token, FNDCPASS expects the next argumentsto be the APPLSYS username and the new password.
The Oracle username/password.
The username and password for the SYSTEM DBAaccount.
The APPLSYS username. For example, ’applsys’.
The new password.
This command does the following:
1. Validates APPLSYS.
2. Re–registers password in Oracle Applications.
3. Changes the schema password.
logon
system/password
username
new_password

9 – 10 Oracle Applications System Administrator’s Guide
4. Changes the APPLSYS and all APPS passwords (for multi–APPSschema installations) to the same password.
Because everything with a read_only_flag in theFND_ORACLE_USERID table must always have the samepassword, FNDCPASS updates these passwords as well asAPPLSYS’s password. For example, the APPS password will beupdated when the APPLSYS password is changed.
5. ALTER USER is executed to change the oracle password for theabove Oracle users.
For example, the following command changes the APPLSYS passwordto ’WELCOME’.
FNDCPASS apps/apps 0 Y system/manager SYSTEM APPLSYS
WELCOME
To change an Oracle Applications schema password (other thanAPPS/APPLSYS):
FNDCPASS <logon> 0 Y <system/password> ORACLE \
<username> <new_password>
Use the above command with the following arguments. Whenspecifying the ORACLE token, FNDCPASS expects the next argumentsto be an ORACLE username and the new password.
The Oracle username/password.
The username and password for the SYSTEM DBAaccount.
The Oracle username. For example, ’GL’.
The new password.
For example, the following command changes the GL user password to’GL1’.
FNDCPASS apps/apps 0 Y system/manager ORACLE GL GL1
To change an Oracle Applications user’s password:
FNDCPASS <logon> 0 Y <system/password> USER \
<username> <new_password>
Use the above command with the following arguments. Whenspecifying the USER token, FNDCPASS expects the next arguments tobe an Oracle Applications username and the new password.
The Oracle username/password.
logon
system/password
username
new_password
logon
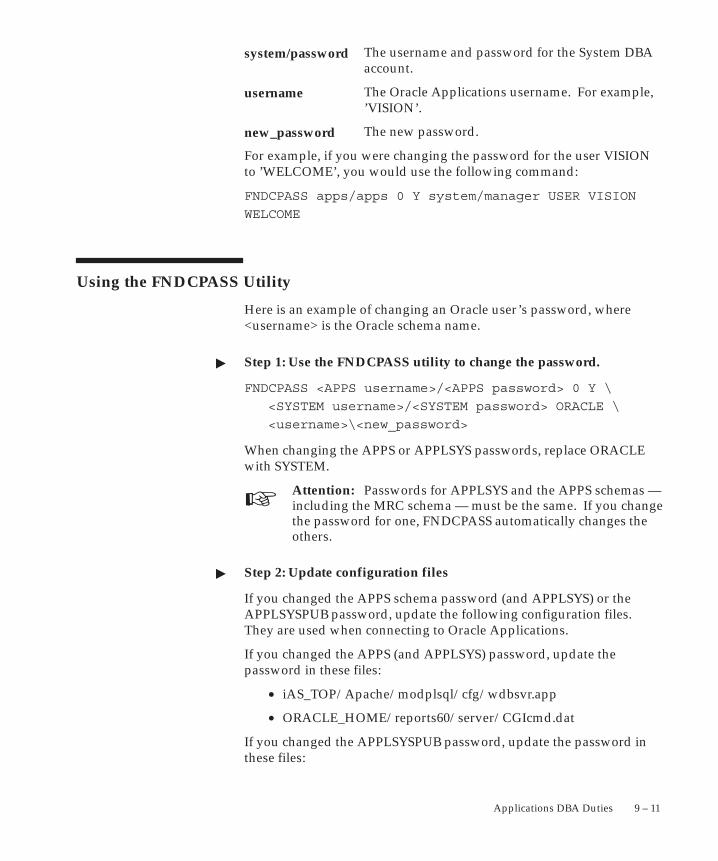
☞
9 – 11Applications DBA Duties
The username and password for the System DBAaccount.
The Oracle Applications username. For example,’VISION’.
The new password.
For example, if you were changing the password for the user VISIONto ’WELCOME’, you would use the following command:
FNDCPASS apps/apps 0 Y system/manager USER VISION
WELCOME
Using the FNDCPASS Utility
Here is an example of changing an Oracle user’s password, where<username> is the Oracle schema name.
� Step 1: Use the FNDCPASS utility to change the password.
FNDCPASS <APPS username>/<APPS password> 0 Y \
<SYSTEM username>/<SYSTEM password> ORACLE \
<username>\<new_password>
When changing the APPS or APPLSYS passwords, replace ORACLEwith SYSTEM.
Attention: Passwords for APPLSYS and the APPS schemas ––including the MRC schema –– must be the same. If you changethe password for one, FNDCPASS automatically changes theothers.
� Step 2: Update configuration files
If you changed the APPS schema password (and APPLSYS) or theAPPLSYSPUB password, update the following configuration files.They are used when connecting to Oracle Applications.
If you changed the APPS (and APPLSYS) password, update thepassword in these files:
• iAS_TOP/Apache/modplsql/cfg/wdbsvr.app
• ORACLE_HOME/reports60/server/CGIcmd.dat
If you changed the APPLSYSPUB password, update the password inthese files:
system/password
username
new_password

9 – 12 Oracle Applications System Administrator’s Guide
• FND_TOP/resource/appsweb.cfg
• OA_HTML/bin/appsweb.cfg
• FND_TOP/secure/<host_name>_<dbname>.dbc
Note: When changing APPS (or APPLSYS) and APPLSYSPUBpasswords, new connection requests cannot be fulfilledsuccessfully by the web server after Step 1 has been completedand until Step 2 is completed.
� Step 3: Verify the new password
If you changed the password for APPS (and APPLSYS), restart allconcurrent managers, then log on to Oracle Applications to test thenew password.

9 – 13Applications DBA Duties
ORACLE Users Window
Register an ORACLE username with Oracle Applications. AnORACLE username grants access privileges to the ORACLE database.
The installation process always registers your ORACLE username, soyou need not register it unless you create a custom application usingOracle Application Object Library, or if you wish to associate anadditional ORACLE username with Oracle Applications.
If you register an ORACLE username as a “restricted” ORACLEusername, you submit a concurrent request to set up read–onlyprivileges to the Oracle Application Object Library tables. An“enabled” ORACLE username has all privileges to those tables. A“disabled” ORACLE username has no privileges to those tables.
If you do not register and enable your ORACLE username or if youdisable a registered ORACLE username, your user cannot use OracleApplication Object Library features such as menus and flexfields.
You should not change the registration of any ORACLE usernames thatthe installation process registers, other than changing the passwords.
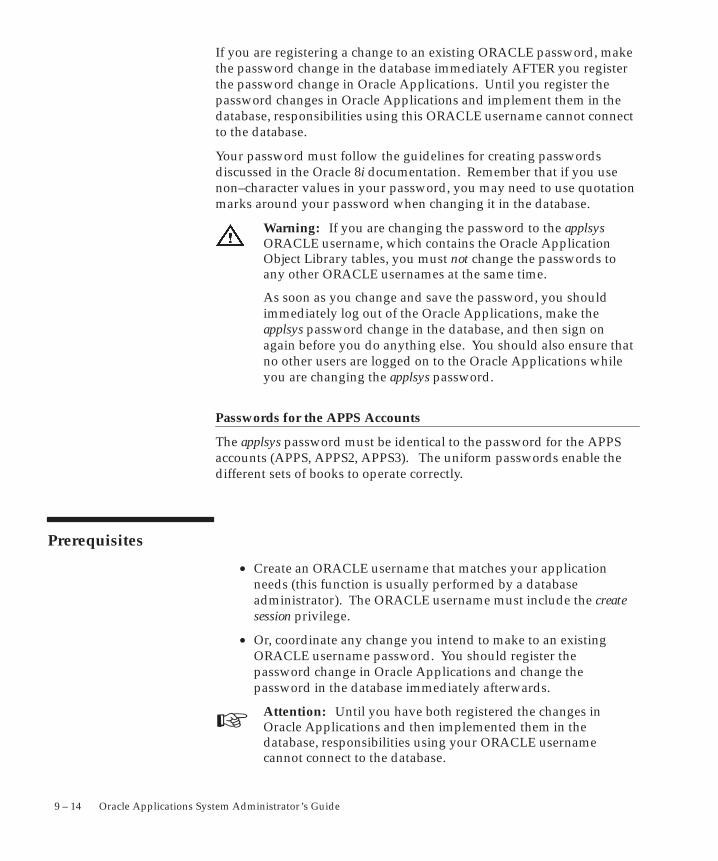
☞
9 – 14 Oracle Applications System Administrator’s Guide
If you are registering a change to an existing ORACLE password, makethe password change in the database immediately AFTER you registerthe password change in Oracle Applications. Until you register thepassword changes in Oracle Applications and implement them in thedatabase, responsibilities using this ORACLE username cannot connectto the database.
Your password must follow the guidelines for creating passwordsdiscussed in the Oracle 8i documentation. Remember that if you usenon–character values in your password, you may need to use quotationmarks around your password when changing it in the database.
Warning: If you are changing the password to the applsysORACLE username, which contains the Oracle ApplicationObject Library tables, you must not change the passwords toany other ORACLE usernames at the same time.
As soon as you change and save the password, you shouldimmediately log out of the Oracle Applications, make theapplsys password change in the database, and then sign onagain before you do anything else. You should also ensure thatno other users are logged on to the Oracle Applications whileyou are changing the applsys password.
Passwords for the APPS Accounts
The applsys password must be identical to the password for the APPSaccounts (APPS, APPS2, APPS3). The uniform passwords enable thedifferent sets of books to operate correctly.
Prerequisites
• Create an ORACLE username that matches your applicationneeds (this function is usually performed by a databaseadministrator). The ORACLE username must include the createsession privilege.
• Or, coordinate any change you intend to make to an existingORACLE username password. You should register thepassword change in Oracle Applications and change thepassword in the database immediately afterwards.
Attention: Until you have both registered the changes inOracle Applications and then implemented them in thedatabase, responsibilities using your ORACLE usernamecannot connect to the database.
9 – 15Applications DBA Duties
ORACLE Users Block
Password
Enter the password of your ORACLE username. Your password is notdisplayed. If you are registering a change to an existing ORACLEpassword, make the password change in the database immediatelyAFTER you register the password change in Oracle Applications.
Until you register the password changes in Oracle Applications andimplement them in the database, responsibilities using this ORACLEusername cannot connect to the database.
Warning: If you are changing the password to the applsysORACLE username, which contains the Oracle ApplicationObject Library tables), you must not change the passwords toany other ORACLE usernames at the same time.
As soon as you change and save the password, you shouldimmediately log out of the Oracle Applications, make theapplsys password change in the database, and then sign onagain before you do anything else. You should also ensure thatno other users are logged on to the Oracle Applications whileyou are changing the applsys password.
Privilege
Enter the type of privilege to the Oracle Application Object Librarydatabase tables that you want this ORACLE username to have. TheOracle Application Object Library tables contain information for OracleApplication Object Library features such as menus, help text, andflexfields. If you do not have access to these tables, you cannot usethese features.
The default value for this field is Enabled.
An enabled ORACLE username has full privileges(insert, query, update, and delete) to the OracleApplication Object Library database tables.
A restricted ORACLE username has only queryprivileges to the Oracle Application Object Librarydatabase tables. This ORACLE username can viewOracle Application Object Library data, but cannotinsert, update, or delete information.
A disabled ORACLE username has no privileges tothe Oracle Application Object Library databasetables. This ORACLE username cannot insert,
Enabled
Restricted
Disabled
☞
9 – 16 Oracle Applications System Administrator’s Guide
query, update, or delete Oracle Application ObjectLibrary information and cannot use OracleApplication Object Library features.
Two additional privilege types appear, associated with ORACLEusernames configured at installation. However, these privilege typescannot be selected from your list of values.
The installation process registered an ORACLEusername with the Public privilege, allowing allusers to access the Application Sign–On Securityform where they must enter a valid OracleApplications username and password.
The installation process registered the OracleApplication Object Library ORACLE usernamewith the Applsys privilege.
See:
Overview of Oracle Applications Security: page 2 – 2
Installing Oracle Applications
Install Group
Enter the value of the installation group associated with your ORACLEusername. Install group numbers should be consecutive wholenumbers, where 1 represents the first set of books (or first set ofproduct installations), 2 is the second set of books, 3 is the third set ofbooks, and so on. Install group number 0 represents products thatneed only single installations.
Attention: Since the installation process does not affectORACLE usernames (also known as ”schemas”) for customapplications, this value is for your reference only and iscurrently not used.
See: Installing Oracle Applications
Public
Applsys
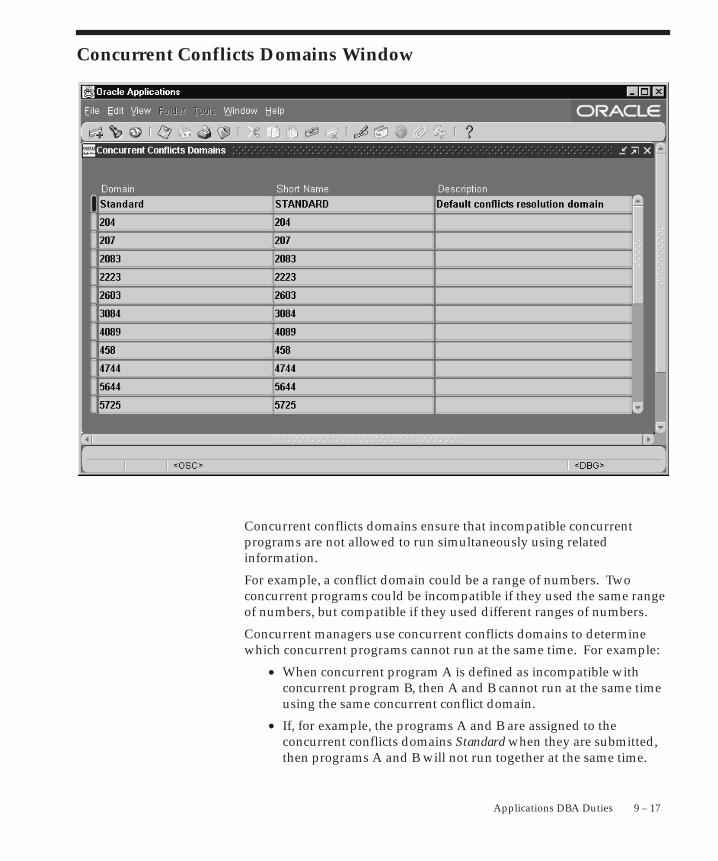
9 – 17Applications DBA Duties
Concurrent Conflicts Domains Window
Concurrent conflicts domains ensure that incompatible concurrentprograms are not allowed to run simultaneously using relatedinformation.
For example, a conflict domain could be a range of numbers. Twoconcurrent programs could be incompatible if they used the same rangeof numbers, but compatible if they used different ranges of numbers.
Concurrent managers use concurrent conflicts domains to determinewhich concurrent programs cannot run at the same time. For example:
• When concurrent program A is defined as incompatible withconcurrent program B, then A and B cannot run at the same timeusing the same concurrent conflict domain.
• If, for example, the programs A and B are assigned to theconcurrent conflicts domains Standard when they are submitted,then programs A and B will not run together at the same time.
9 – 18 Oracle Applications System Administrator’s Guide
� Defining a Conflict Domain
1. Enter a unique Domain name. The name you enter here may beused as a value for a parameter in the Submit Requests window.
2. Enter a unique Short Name for your domain. Limit the Short Nameto 8 characters.
3. Optionally, you can provide a description for your domain.
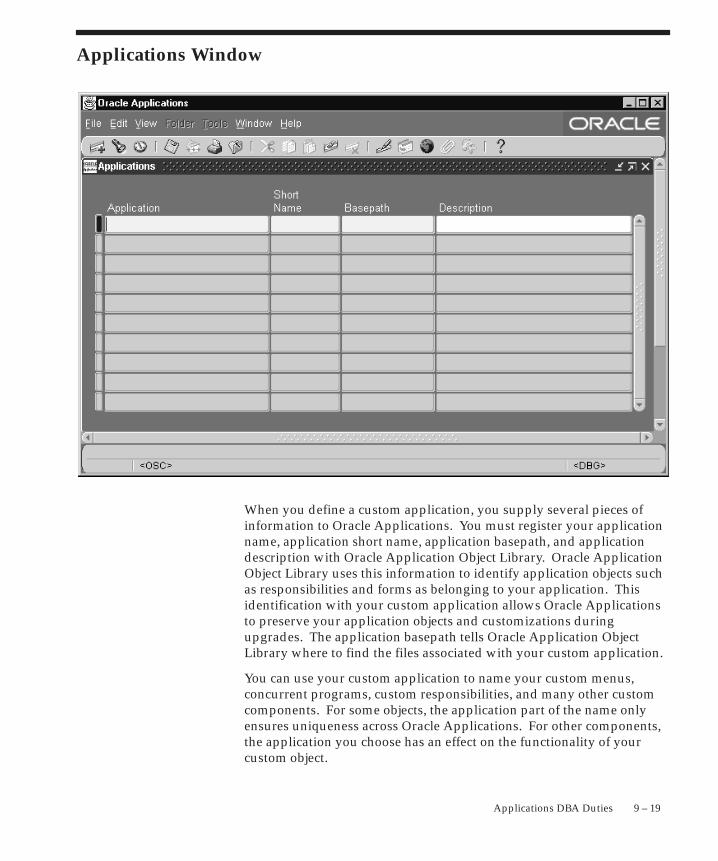
9 – 19Applications DBA Duties
Applications Window
When you define a custom application, you supply several pieces ofinformation to Oracle Applications. You must register your applicationname, application short name, application basepath, and applicationdescription with Oracle Application Object Library. Oracle ApplicationObject Library uses this information to identify application objects suchas responsibilities and forms as belonging to your application. Thisidentification with your custom application allows Oracle Applicationsto preserve your application objects and customizations duringupgrades. The application basepath tells Oracle Application ObjectLibrary where to find the files associated with your custom application.
You can use your custom application to name your custom menus,concurrent programs, custom responsibilities, and many other customcomponents. For some objects, the application part of the name onlyensures uniqueness across Oracle Applications. For other components,the application you choose has an effect on the functionality of yourcustom object.
☞
9 – 20 Oracle Applications System Administrator’s Guide
Prerequisites
❑ If you are creating a custom application: Define an environmentvariable that translates to your application’s basepath (see OracleApplications Concepts for your operating system).
❑ If you are creating a custom application: Set up a directorystructure for your application (see Oracle Applications Concepts foryour operating system)
❑ If you are using this window with Oracle Alert: If your applicationresides in a database other than the database where Oracle Alertresides, you must create a database link.
Applications Block
When you register a custom application, you provide the informationOracle uses to identify it whenever you reference it. Although you canchange the name of an application, doing so may cause a change in theapplication code where you hardcode your application name. Forexample, if you pass program arguments through the menu that haveapplication name hardcoded, you will also have to update them.
Attention: You should not change the name of any applicationthat you did not develop, as you cannot be sure of theconsequences. You should never change the name of anyOracle Applications application, because these applicationsmay contain hardcoded references to the application name.
Application
This user–friendly name appears in lists seen by application users.
Short Name
Oracle Applications use the application short name when identifyingforms, menus, concurrent programs and other application components.The short name is stored in hidden fields while the name displays forusers.
Your short name should not include spaces. You use an applicationshort name when you request a concurrent process from a form, andwhen you invoke a subroutine from a menu.
Suggestion: Although your short name can be up to 50characters, we recommend that you use only four or five
9 – 21Applications DBA Duties
characters for ease in maintaining your application and incalling routines that use your short name. To reduce the riskthat your custom application short name could conflict with afuture Oracle Applications short name, we recommend thatyour custom application short name begins with ”XX”.
Basepath
Enter the name of an environment variable that represents the topdirectory of your application’s directory tree. Oracle Applicationssearch specific directories beneath the basepath for your application’sexecutable files and scripts when defining actions that reside inexternal files.
In general, your application’s basepath should be unique so thatseparate applications do not write to the same directories.
However, you may define custom applications that will be used onlyfor naming your custom responsibilities, menus and other datacomponents. In this case, you can use the basepath of the Oracleapplication that uses the same forms as your application. For example,if you are defining a Custom_GL application, you could use theGL_TOP basepath for your custom application. In this case, however,you should not create custom components in the directory structure,such as custom forms and reports, because they will be difficult toisolate for maintenance and upgrading.
See: Oracle Applications Concepts
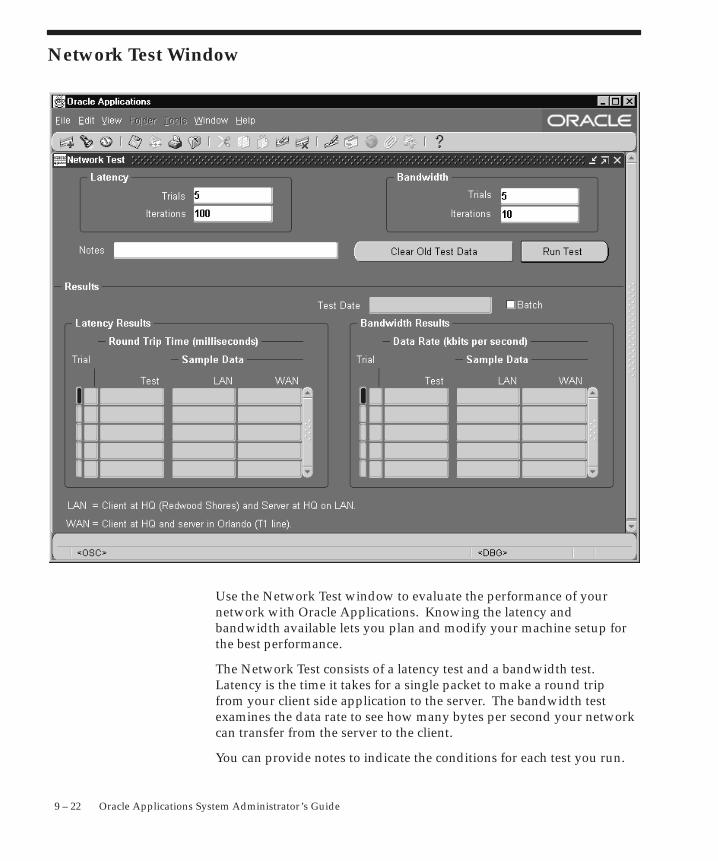
9 – 22 Oracle Applications System Administrator’s Guide
Network Test Window
Use the Network Test window to evaluate the performance of yournetwork with Oracle Applications. Knowing the latency andbandwidth available lets you plan and modify your machine setup forthe best performance.
The Network Test consists of a latency test and a bandwidth test.Latency is the time it takes for a single packet to make a round tripfrom your client side application to the server. The bandwidth testexamines the data rate to see how many bytes per second your networkcan transfer from the server to the client.
You can provide notes to indicate the conditions for each test you run.
9 – 23Applications DBA Duties
� To Test Latency On a Network
Specify the number of Trials and the Iterations for each trial.
For each iteration, a single packet is sent from the client application tothe server and back. A trial consists of the specified number ofiterations. The total time for all round trips in a trial is divided by thenumber of iterations to obtain the average latency that is that trial’sresult.
The default settings are 5 trials of 100 iterations each.
Select the Run Test button to perform the test.
� To Test Bandwidth On a Network
Specify the number of Trials and the Iterations for each trial. For eachiteration, several kilobytes of data are sent from the client to the serverand back. The form measures the average rate at which the datatravels.
The default settings are 5 trials of 10 iterations each.
Select the Run Test button to perform the test.
Evaluating the Test Results
The results of both the latency and bandwidth tests display in theResults block.
Latency Results display the minimum, average, and maximum roundtrip time for a single round trip from a PC client to the server.
Bandwidth Results display the minimum, average, and maximum datarate in kilobytes per second over the trials.
For comparison, the sample data fields show the results of testscompleted at the development headquarters in Redwood Shores.These tests were conducted under ideal conditions; it is unlikely thatyour results can match them.
If one test result varies significantly from the other trials, discard thatinformation.
Purging Your Data
Use the Clear Old Test Data button to purge previous test results fromyour database.
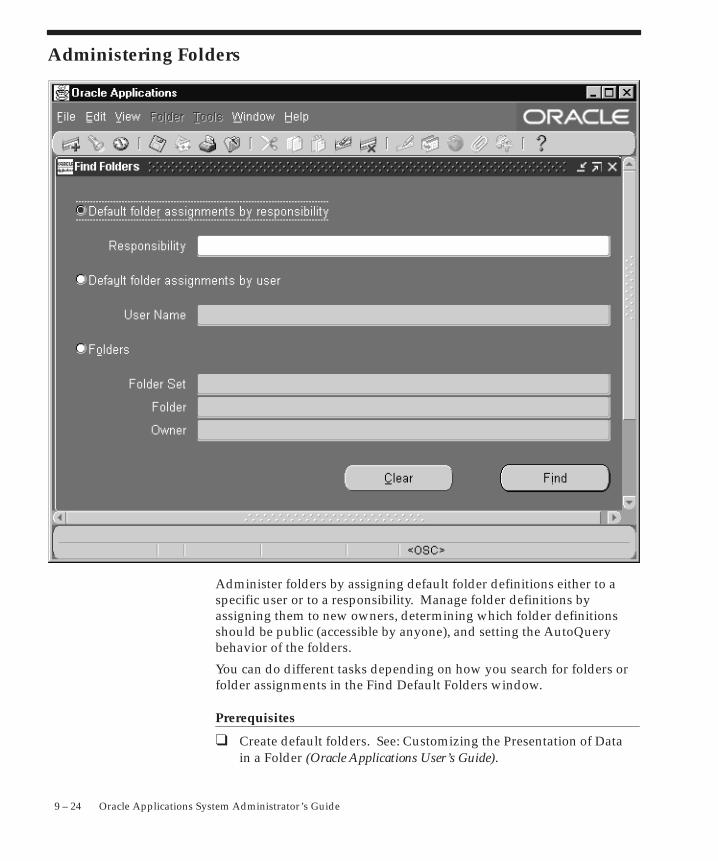
9 – 24 Oracle Applications System Administrator’s Guide
Administering Folders
Administer folders by assigning default folder definitions either to aspecific user or to a responsibility. Manage folder definitions byassigning them to new owners, determining which folder definitionsshould be public (accessible by anyone), and setting the AutoQuerybehavior of the folders.
You can do different tasks depending on how you search for folders orfolder assignments in the Find Default Folders window.
Prerequisites
❑ Create default folders. See: Customizing the Presentation of Datain a Folder (Oracle Applications User’s Guide).
9 – 25Applications DBA Duties
� To Assign a Folder to a Responsibility:
1. Navigate to the Find Default Folders window. Use ”Default folderassignments by responsibility” to view the responsibilities forwhich to assign default folders.
2. You can assign default folders for each responsibility. When usersof this responsibility navigate to this folder block, they see thedefault folder you specify, unless it is overridden by a user–leveldefault.
From the Folder field, enter the name of the default folder. Thename of the folder set to which the folder belongs is filled inautomatically.
If you do not know the name of the folder, enter the folder set first,then view the folders that belong to that set.
After you save a default folder definition for a folder set, thatfolder set no longer appears in the list of values.
Folder Set: Every folder set is associated with a particular folder block,and a user or responsibility can have one default folder within eachfolder set. The folder set name generally describes the records shown inthe block; some blocks may have multiple sets of folders associatedwith them.
� To Assign a Folder to a User:
1. Navigate to the Find Default Folders window. Use ”Default folderassignments by user” to view a list of eligible users.
2. You can assign default folders for each responsibility. When usersnavigate to this folder block, they see the default folder you specify.
From the Folder field, enter the name of the default folder. Thename of the folder set to which the folder belongs is filled inautomatically.
If you do not know the name of the folder, enter the folder set first,then view the folders that belong to that set.
After you save a default folder definition for a folder set, thatfolder set no longer appears in the list of values.
Folder Set: Every folder set is associated with a particular folder block,and a user or responsibility can have one default folder within eachfolder set. The folder set name generally describes the records shown inthe block; some blocks may have multiple sets of folders associatedwith them.
Source Type: Either User or Responsibility. Records entered in thiswindow use the source type of User. If one of the current user’s
9 – 26 Oracle Applications System Administrator’s Guide
responsibilities has default folders defined, the default folders are listedwith a source type of Responsibility.
User defaults override Responsibility defaults. You cannot deleteResponsibility default folders in this window.
Responsibility: The responsibility which uses this default folderdefinition.
� To Assign Ownership of a Folder:
1. Navigate to the Find Default Folders window. Use ”Folders” toview general information about folders.
2. Select the folder(s) that requires a change of ownership.
3. Choose ”Change Owner” and enter the new owner for the selectedfolders, or change the value in the Owner field to change the ownerof a single folder.
Folder Set: Every folder set is associated with a particular folder block,and a user or responsibility can have one default folder within eachfolder set. The folder set name generally describes the records shown inthe block; some blocks may have multiple sets of folders associatedwith them.
Public: Whether this folder definition is public; whether users besidesthe owner can use it. Use this field to determine whether to makefolder definitions generally available.
Anyone’s Default: Whether this folder definition is used as a defaultby a user or a responsibility. If it is a default definition, use DefaultAssignments to view the users and responsibilities for which it is thedefault folder definition.
Default Assignments: The users and responsibilities that use thisfolder definition as a default.
� To Delete a Folder Definition
1. Navigate to the Find Default Folders window. Use ”Folders” toview general information about folders.
2. If you queried up multiple folders, select the folder(s) to delete.
3. Delete the folder. Deleting folders deletes the folder definitionalong with any user and responsibility default assignments for thefolder.
See Also
Customizing the Presentation of Data in a Folder (Oracle ApplicationsUser’s Guide)

9 – 27Applications DBA Duties
Querying Records in a Folder (Oracle Applications User’s Guide)
Managing Folder Definitions (Oracle Applications User’s Guide)
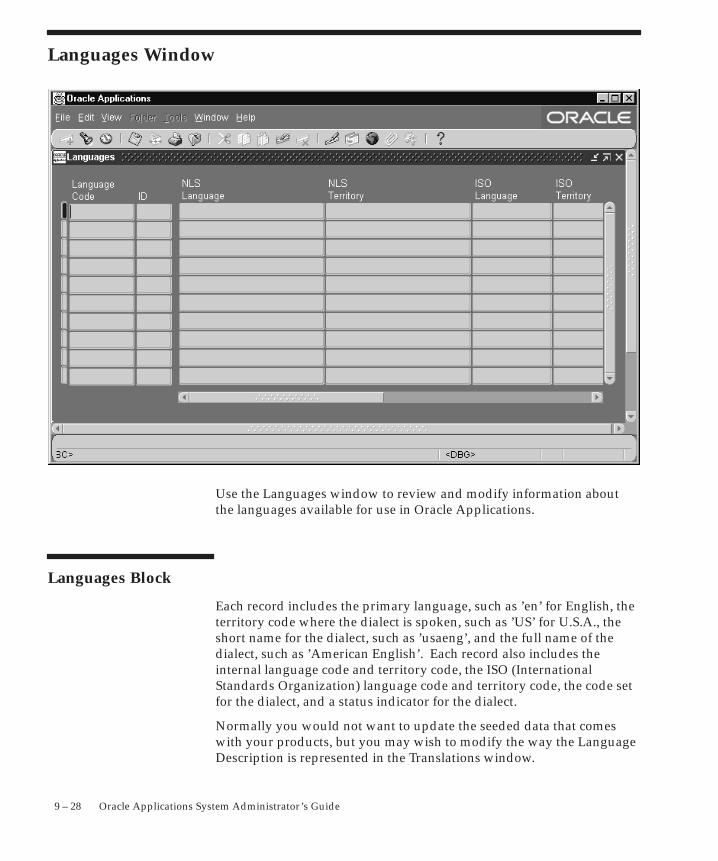
9 – 28 Oracle Applications System Administrator’s Guide
Languages Window
Use the Languages window to review and modify information aboutthe languages available for use in Oracle Applications.
Languages Block
Each record includes the primary language, such as ’en’ for English, theterritory code where the dialect is spoken, such as ’US’ for U.S.A., theshort name for the dialect, such as ’usaeng’, and the full name of thedialect, such as ’American English’. Each record also includes theinternal language code and territory code, the ISO (InternationalStandards Organization) language code and territory code, the code setfor the dialect, and a status indicator for the dialect.
Normally you would not want to update the seeded data that comeswith your products, but you may wish to modify the way the LanguageDescription is represented in the Translations window.

9 – 29Applications DBA Duties
Description
You can update the description of the Language to change the fieldname displayed in the Translations window.
9 – 30 Oracle Applications System Administrator’s Guide
Territories Window
Use the Territories window to review and modify information for thecountry values used in Oracle Applications.
Territories Block
Each record includes the two–letter upper case territory Code such as”US”, the Short Name for the territory such as ”United States”, theNLS Code, the ISO numeric entity code, an Alternate territory code, theEU Country Code, and a longer description (Description), such as”United States of America”.
Normally you would not want to update the seeded data that comeswith your products, but you may wish to modify the way the countryis represented in List of Values through out your applications.
Description
You can update the description of the Territory to change the territoryvalue displayed in List of Values used in Oracle Application products.
C H A P T E R
10
T
10 – 1Cost–Based Optimization in Oracle Applications
Cost–BasedOptimization in OracleApplications
his chapter explains how you implement cost–based optimizationin Oracle Applications.

10 – 2 Oracle Applications System Administrator’s Guide
Oracle Applications and Cost–Based Optimization
Oracle Applications Release 11i uses the cost–based optimization(CBO) approach in choosing the most efficient way to execute SQLstatements. Using this approach, the optimizer determines whichexecution plan is most efficient by considering available access pathsand factoring information based on statistics for the schema objectsaccessed by the SQL statement.
To use cost–based optimization effectively, you must keep yourdatabase statistics current. Oracle Applications provides a set ofprocedures in the FND_STATS package to help you collect thesestatistics. FND_STATS uses the DBMS_STATS package to gatherstatistics.
Also, you can manipulate some of your session level parameters fortesting optimization. These parameters can be controlled by the systemprofile option ”Initialization SQL Statement – Custom.” Use theFND_CTL procedures in this profile option’s value for an applicationsuser’s session.
For information on cost–based optimization, refer to Oracle 8i Conceptsand Oracle 8i Tuning.
10 – 3Cost–Based Optimization in Oracle Applications
Parameters for Cost–Based OptimizationThis section describes the mandatory parameters in the init.ora filerelated to cost–based optimization.
Most of these parameters are dynamic and can be set at the sessionlevel. For online users, there are profile options to change theparameter values. For concurrent programs, the Define ConcurrentPrograms form allows the system administrator or applicationdeveloper to specify an optimizer mode. Other parameters are set byprofile options.
optimizer_features_enable
This parameter allows you to change the init.ora parameters whichcontrol the optimizer’s behavior. Set this parameter to the currentrelease.
For more information on this parameter, see Oracle 8i Reference.
Example:
optimizer_features_enable = 8.1.6
optimizer_mode
This parameter specifies the behavior of the optimizer. Prior to Release11i, optimizer_mode was always set to rule. For Release 11i, youmust set optimizer_mode to choose. Although Oracle Applicationsmodules will set the optimizer mode to either first_rows orall_rows, depending on whether the session is online or batch, anOracle Applications database must be started with the optimizer modeset to choose. Many of the system dictionary views, in particularExport, still require rule–based optimization. In general, the profileoptions will ensure that online users use first_rows, and that batchjobs use all_rows.
For more information on this parameter, see Oracle 8i Reference.
Example:
optimizer_mode = choose
_optimizer_undo_changes
This parameter is not dynamic and for rule–based optimization (RBO)compatibility must remain as TRUE. For Release 11i, it is recommendedthat this parameter be set to FALSE; but if custom code continues to
10 – 4 Oracle Applications System Administrator’s Guide
use RBO, and experiences performance problems, then setting thisparameter to TRUE should not affect CBO queries. This parameter willbe removed in a future release.
Example:
_optimizer_undo_changes = FALSE
_optimizer_mode_force
This parameter forces recursive SQL ( packaged SQL ) to use theoptimizer_mode from the current environment. This paramatermust be set to TRUE.
Example:
_optimizer_mode_force = TRUE
db_file_multiblock_read_count
This parameter is used for multi–block I/O and specifies the minimumnumber of blocks read in one I/O operation during a sequential scan.In previous releases, many Oracle Applications customers hadmultiblock read count set at 16 or 32 depending on block size. ForRelease 11i, the recommended value is now 8 because this provides thebest value for CBO.
This parameter can be set at the session level, so specific batch jobs,index rebuilds, and the analyze command can take full advantage ofthe maximum available multiblock I/O.
For more information on this parameter, see Oracle 8i Reference.
Example:
db_file_multiblock_read_count = 8
optimizer_max_permutations
This parameter lets the user limit the amount of work the optimizerexpends on optimizing queries with large joins. The default (80000)can cause excessive parse times in some circumstances. If necessary,and if recommended to do so by Oracle Support, this value can bereduced to just under 80000 (79000). The parameter must be set to79,000 or less in order to allow the optimizer to consider more than thestarting table. The default of 80,000 limits the number of starting tablesthat the optimizer considers.
For more information on this parameter, see Oracle 8i Reference.
10 – 5Cost–Based Optimization in Oracle Applications
Example:
optimizer_max_permutations = 79000
_complex_view_merging
This parameter enables the complex view merging feature whichallows certain types of complex views to be merged such as the AppsKFV views. This parameter is disabled by default, so it must beexplicitly set.
Example:
_complex_view_merging = TRUE
_push_join_predicate
This parameter enables the push join predicate feature that allows theoptimizer to push join predicates inside nonmergeable views. Thishelps eliminate full table scans against the adjoining table of anonmergeable view. Pushing the join predicate allows the optimizer topromote an index on the table inside the view and utilize a nested loopjoin to the outer referencing table. Push join predicate is disabled bydefault, so it must be explicitly enabled.
Example:
_push_join_predicate = TRUE
_sort_elimination_cost_ratio
Setting this parameter to 5 forces the optimizer to only eliminate thesort when it is 1/5th the cost of the index probe (or conversely theindex probe is 5 times as costly as the sort).
Example:
_sort_elimination_cost_ratio = 5
_use_column_stats_for_function
This parameter allows the optimizer to utilize dictionary statistics forcolumns that are involved in no–op expressions such as [col + 0] and[col || ’’]. If this parameter is disabled (FALSE), the optimizer willemploy internal default statistics for these complex expressions thatcan result in higher parse times and more expensive execution plans.
Example:
10 – 6 Oracle Applications System Administrator’s Guide
_use_column_stats_for_function = TRUE
_like_with_bind_as_equality
This parameter forces the optimizer to treat expressions of the form[indexed–column like :b1] similarly to [index–column =:b1]. Oracle Applications have many queries which use the LIKEoperator on indexed columns with binds. Since binds are involved,CBO assigns internal default selectivity estimates for the LIKE operator(5%), and hence does not consider the index selective.
Example:
_like_with_bind_as_equality = TRUE
_or_expand_nvl_predicate
This parameter allows the optimizer to probe an index for a columninvolved in an nvl() function as an r–value.
If enabled, the optimizer transforms expressions of the form
[p.project_id = nvl(:b1,p.project_id)]
into an OR expanded UNION where one side of the UNION contains thepredicate
((:b1 is not null) and (p.project_id =:b1))
and the second branch of the UNION contains the predicate
(:b1 is null)
Therefore, if a value for the project_id bind is supplied, theoptimizer executes the first branch of the UNION and probes theproject_id index.
This improves performance for the Oracle Applications legacy codewhich employs the nvl() construct on indexed columns.
Example:
_or_expand_nvl_predicate = TRUE
_push_join_union_view
This parameter allows the optimizer to push join predicates insidenonmergeable views which contain UNION ALL set operators. Thisimproves query execution performance for queries joining to viewswhich contain UNION ALL operators.
10 – 7Cost–Based Optimization in Oracle Applications
Example:
_push_join_union_view = TRUE
_table_scan_cost_plus_one
This parameter increases the cost of a full table scan by one in order toeliminate ties between a full table scan on a small lookup table and thecost of a unique or range index scan on the lookup table.
Example:
_table_scan_cost_plus_one = TRUE
_fast_full_scan_enabled
This parameter is used to disable fast full scans.
Example:
_fast_full_scan_enabled = FALSE
_ordered_nested_loop
When set to TRUE, this parameter reduces the cost of a nested loopjoin/index probe when the left side of the join input is being satisfiedvia an index or sort row source.
Example:
_ordered_nested_loop = TRUE
optimizer_percent_parallel
This parameter specifies the amount of parallelism to include in theCBO cost function. The default is zero, and normally should not bechanged. It is necessary to ensure that parallel query is not included incosting.
For more information on this parameter, see Oracle 8i Reference.
Example:
optimizer_percent_parallel=0
query_rewrite_enabled
This parameter allows you to enable or disable query rewriting. Thisparameter must be set to TRUE for materialized views and function

10 – 8 Oracle Applications System Administrator’s Guide
based indexes, which are used in some applications in Release 11i. Therecommended value is TRUE.
For more information on this parameter, see Oracle 8i Reference.
Example:
query_rewrite_enabled = TRUE
compatible
The Oracle 8i release for your Oracle Applications instance.
Example:
compatible = 8.1.6
10 – 9Cost–Based Optimization in Oracle Applications
Concurrent Programs for CBO
Oracle Applications provides concurrent programs that use thepackage FND_STATS to gather statistics for your applications databaseobjects. See: FND_STATS Package: page 10 – 17
For information on DBMS_STATS see Oracle 8i Tuning.
The following concurrent programs are available for collecting andmaintaining statistics:
• Gather Table Statistics
• Backup Table Statistics
• Restore Table Statistics
• Gather Schema Statistics
• Gather Column Statistics

10 – 10 Oracle Applications System Administrator’s Guide
Gather Table Statistics The Gather Table Statistics program gathers the table statistics for thespecified table. This program keeps a backup of existing statistics inthe FND_STATTAB table before gathering new statistics. This programalso gathers the related index statistics by default.
This concurrent program attempts to parallelize as much of the work aspossible. This operation does not parallelize if the user does not haveselect privilege on the table being analyzed. If the value ofbackup_flag is BACKUP then it exports the old statistics usingexport_table_stats before gathering the new statistics. Theexported data is stored in FND_STATTAB. If the value ofbackup_flag is anything other than BACKUP then the table statisticsare not exported.
For a detailed description of the procedure used by this concurrentprogram, see: GATHER_TABLE_STATS Procedure: page 10 – 24.
Parameters
Owner Name
The owner of the table.
Table Name
The name of the table.
Percent
The percentage of the rows to use for the statistics using the estimationtechnique. NULL means to use exact computation. The valid range isfrom 0 to 99.
Degree
The degree of parallelism. NULL means to use the table default value.
Partition Name
The name of the partition.
Backup Flag
The backup flag indicates whether to backup statistics. Set this flag toBACKUP to back up your statistics.
10 – 11Cost–Based Optimization in Oracle Applications
Granularity
The granularity of statistics to collect (only relevant for tables that arepartitioned). Valid values are:
DEFAULT – Gather global and partition–level statistics.
SUBPARTITION – Gather subpartition–level statistics.
PARTITION – Gather partition–level statistics.
GLOBAL – Gather global statistics.
ALL – Gather all (subpartition, partition, and global) statistics.
10 – 12 Oracle Applications System Administrator’s Guide
Backup Table Statistics
This concurrent program stores the statistics of the given table into theFND_STATTAB table. This program also backs up the related indexand column statistics by default.
You can assign the statistics an identifier that can be used with theRestore Table Statistics program. Statistics can be backed up withdifferent statistics identifiers. The default identifier is BACKUP. You cankeep different versions of the backup with different identifiers.
For a detailed description of the procedure used by this concurrentprogram, see: BACKUP_TABLE_STATS Procedure: page 10 – 17.
Parameters
Schema Name
The name of the schema. The value ALL means all Oracle Applicationsschemas.
Table Name
The name of the table.
Statistics ID
An optional identifier to associate with these statistics withinFND_STATTAB.
Partition Name
Name of the table partition. If the table is partitioned and if thepartition name is NULL, then global and partition table statistics areexported.
10 – 13Cost–Based Optimization in Oracle Applications
Restore Table Statistics
This concurrent program restores the previously backed up tablestatistics from a given statistics identifier. The default statisticsidentifier is BACKUP.
All index and column statistics associated with the specified table areimported as well.
For a detailed description of the procedure used by this concurrentprogram, see: RESTORE_TABLE_STATS Procedure: page 10 – 19.
Parameters
Owner Name
The name of the schema. The value ALL means all Oracle Applicationsschemas.
Table Name
The name of the table.
Statistics ID
An optional identifier to associate with these statistics withinFND_STATTAB.
Partition Name
Name of the table partition. If the table is partitioned and if thepartition name is NULL, then global and partition table statistics areimported.
10 – 14 Oracle Applications System Administrator’s Guide
Gather Schema Statistics
This concurrent program gathers the specified schema level statistics.
Before gathering the statistics, this program also creates a backup of theexisting statistics so that if the database slows down after gatheringnew statistics, you can restore the system to its previous status. Thestatistics ID used for this backup is NULL.
After gathering the schema level statistics this program creates thehistogram for the specified columns in the FND_HISTOGRAM_COLStables.
Also, this program populates default statistics for all the INTERFACEtables as specified in the FND_EXCLUDE_TABLE_STATS table.
You should run this concurrent program periodically.
For a detailed description of the procedure used by this concurrentprogram, see: GATHER_SCHEMA_STATS Procedure: page 10 – 21.
Parameters
Schema Name
The name of the schema to analyze. Specify ALL for all OracleApplications schemas (all schemas that have an entry in theFND_PRODUCT_INSTALLATIONS table).
Percent
The percentage of the rows to estimate. NULL means to use exactcomputation. The valid range is from 0 to 99.
Degree
The degree of parallelism. NULL means to use the table default value.
Backup Flag
If the value is NOBACKUP then the GATHER_SCHEMA_STATSprocedure will not take a backup of the current statistics. This way theGATHER_SCHEMA_STATS procedure will run faster. If the InternalFlag is set to INTERNAL, the ANALYZE command will be used insteadof DBMS_STATS.
10 – 15Cost–Based Optimization in Oracle Applications
Gather Column Statistics This concurrent program is actually two procedures which gathercolumn statistics. One procedure gathers the column statistics for allthe columns specified in the SEED data tableFND_HISTOGRAM_COLS. The second procedure gathers the columnstatistics for a specified column_name in a given table.
The procedure takes a backup into the FND_STATTAB table beforegathering the statistics.
For a detailed description of the procedure used by this concurrentprogram, see: GATHER_COLUMN_STATS Procedure: page 10 – 26.
Parameters
Table Owner
The owner of the table.
Table Name
The name of the table.
Column Name
The name of the column.
Estimate Percent
The percentage of the rows to use for the statistics using the estimationtechnique. NULL means to use exact computation. The valid range isfrom 0 to 99.
Parallel Degree
The degree of parallelism. NULL means to use the table default value.
Bucket Size
The number of buckets in the histogram.
Backup Flag
The backup flag indicates whether to backup statistics. Set this flag toBACKUP to back up your statistics. NULL means no backup will betaken.

10 – 16 Oracle Applications System Administrator’s Guide
Gather All Column Statistics
This concurrent program is obsolete in Release 11i and should not beused.
10 – 17Cost–Based Optimization in Oracle Applications
FND_STATS PackageThe FND_STATS package provides procedures for gathering statisticsfor Oracle Applications database objects. It also provides proceduresfor storing the current statistics in a table (FND_STATTAB) andrestoring them back. This package also facilitates the gathering of somestatistics in parallel. This package calls the DBMS_STATS package.
The FND_STATS package also has procedures to populate theFND_STATS_HIST table to record the time taken for gathering thestatistics for the different types of objects.
For more information on DBMS_STATS, see Oracle 8i Tuning and Oracle8i Supplied Packages Reference.
CREATE_STAT_TABLE ProcedureThis procedure creates a table with the name FND_STATTAB in theAPPLSYS schema to hold statistics. This table should be accessed onlythrough the procedures in this package.
The first procedure below creates the default table FND_STATTAB inthe FND specific schema. The other procedure uses parameters forschema name, table name and tablespace name.
Syntax
FND_STATS.CREATE_STAT_TABLE ;
FND_STATS.CREATE_STAT_TABLE (
schemaname IN VARCHAR2,
tabname IN VARCHAR2,
tblspcname IN VARCHAR2);
Parameters
Name of the schema.
Name of the table.
Tablespace in which to create the statistics tables.If none is specified, then the tables are created inthe user’s default tablespace.
BACKUP_TABLE_STATSThis procedure stores the statistics for a particular table in theFND_STATTAB table. Setting cascade to TRUE results in all index and
schemaname
tabname
tblspcname
10 – 18 Oracle Applications System Administrator’s Guide
column statistics associated with the specified table being stored aswell. A different version can be stored by specifying a differentstatistics identifier (statid).
Syntax
FND_STATS.BACKUP_TABLE_STATS (
errbuf OUT VARCHAR2,
retcode OUT VARCHAR2,
schemaname VARCHAR2,
tabname VARCHAR2,
statid VARCHAR2 DEFAULT ’BACKUP’,
partname VARCHAR2 DEFAULT NULL,
cascade BOOLEAN DEFAULT TRUE);
FND_STATS.BACKUP_TABLE_STATS (
schemaname VARCHAR2,
tabname VARCHAR2,
statid VARCHAR2 DEFAULT ’BACKUP’,
partname VARCHAR2 DEFAULT NULL,
cascade BOOLEAN DEFAULT TRUE);
Parameters
Required for running as a concurrent process.
Required for running as a concurrent process.
Name of the schema.
Name of the table.
Optional identifier to associate with these statisticswithin FND_STATTAB.
Name of the table partition. If the table ispartitioned and if partname is NULL, then globaland partition table statistics are exported.
If TRUE, then column and index statistics for thistable are also exported.
BACKUP_SCHEMA_STATS Procedure
This procedure stores the statistics for a schema in the FND_STATTABtable. A different version can be stored by specifying a differentstatid.
errbuf
retcode
schemaname
tabname
statid
partname
cascade
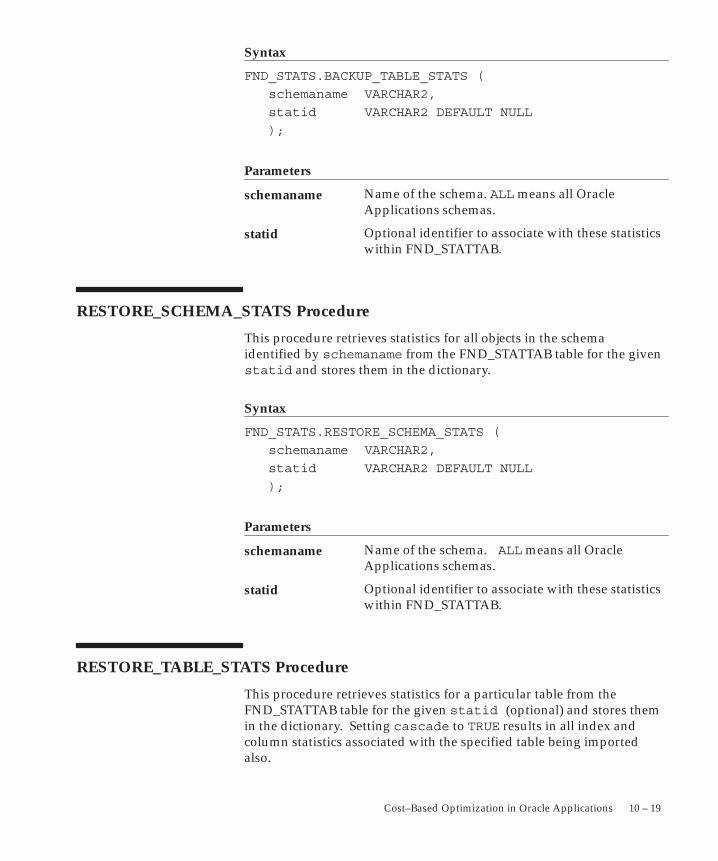
10 – 19Cost–Based Optimization in Oracle Applications
Syntax
FND_STATS.BACKUP_TABLE_STATS (
schemaname VARCHAR2,
statid VARCHAR2 DEFAULT NULL
);
Parameters
Name of the schema. ALL means all OracleApplications schemas.
Optional identifier to associate with these statisticswithin FND_STATTAB.
RESTORE_SCHEMA_STATS Procedure
This procedure retrieves statistics for all objects in the schemaidentified by schemaname from the FND_STATTAB table for the givenstatid and stores them in the dictionary.
Syntax
FND_STATS.RESTORE_SCHEMA_STATS (
schemaname VARCHAR2,
statid VARCHAR2 DEFAULT NULL
);
Parameters
Name of the schema. ALL means all OracleApplications schemas.
Optional identifier to associate with these statisticswithin FND_STATTAB.
RESTORE_TABLE_STATS Procedure
This procedure retrieves statistics for a particular table from theFND_STATTAB table for the given statid (optional) and stores themin the dictionary. Setting cascade to TRUE results in all index andcolumn statistics associated with the specified table being importedalso.
schemaname
statid
schemaname
statid
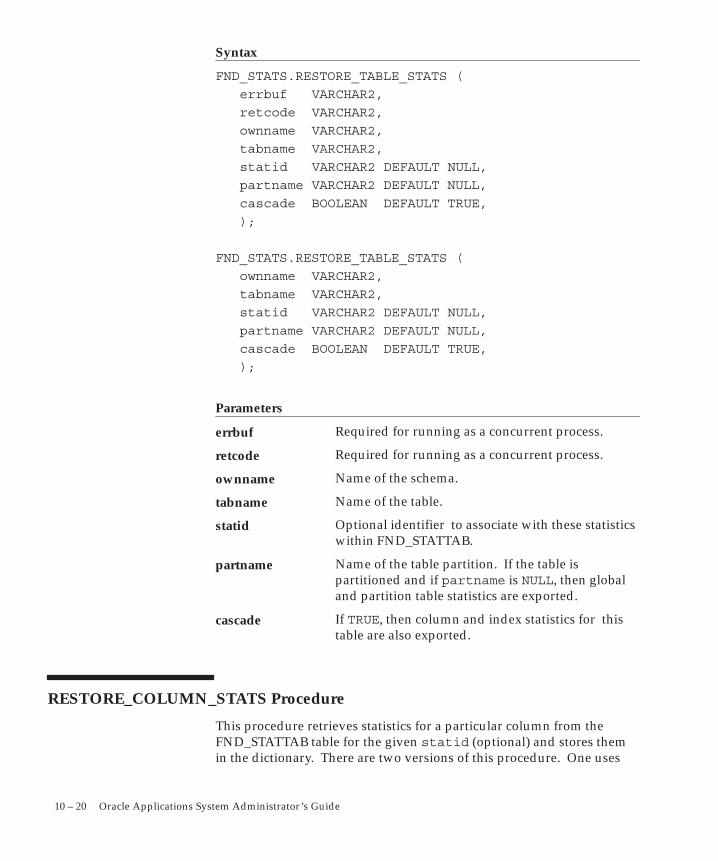
10 – 20 Oracle Applications System Administrator’s Guide
Syntax
FND_STATS.RESTORE_TABLE_STATS (
errbuf VARCHAR2,
retcode VARCHAR2,
ownname VARCHAR2,
tabname VARCHAR2,
statid VARCHAR2 DEFAULT NULL,
partname VARCHAR2 DEFAULT NULL,
cascade BOOLEAN DEFAULT TRUE,
);
FND_STATS.RESTORE_TABLE_STATS (
ownname VARCHAR2,
tabname VARCHAR2,
statid VARCHAR2 DEFAULT NULL,
partname VARCHAR2 DEFAULT NULL,
cascade BOOLEAN DEFAULT TRUE,
);
Parameters
Required for running as a concurrent process.
Required for running as a concurrent process.
Name of the schema.
Name of the table.
Optional identifier to associate with these statisticswithin FND_STATTAB.
Name of the table partition. If the table ispartitioned and if partname is NULL, then globaland partition table statistics are exported.
If TRUE, then column and index statistics for thistable are also exported.
RESTORE_COLUMN_STATS Procedure
This procedure retrieves statistics for a particular column from theFND_STATTAB table for the given statid (optional) and stores themin the dictionary. There are two versions of this procedure. One uses
errbuf
retcode
ownname
tabname
statid
partname
cascade
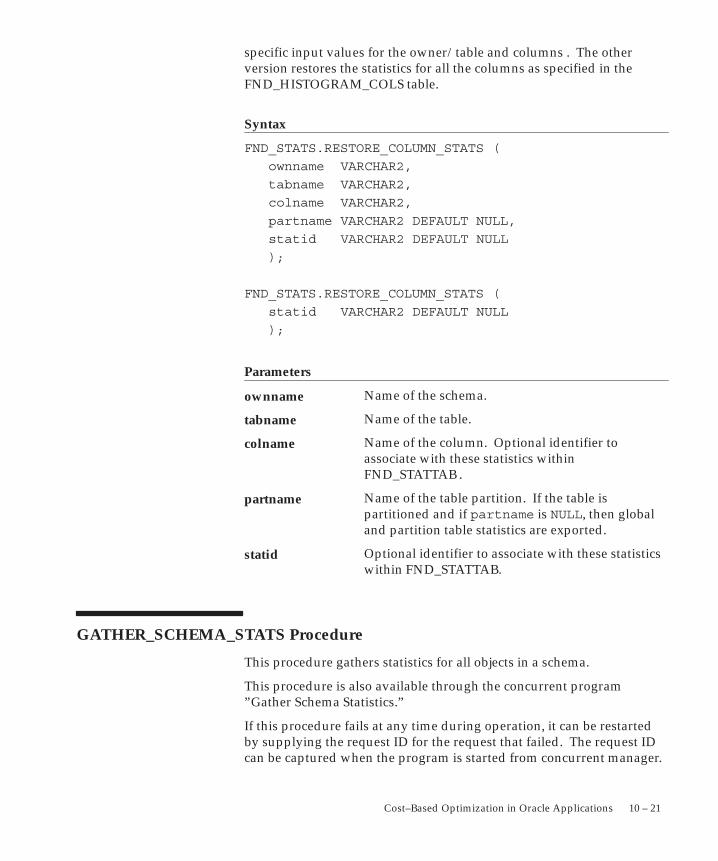
10 – 21Cost–Based Optimization in Oracle Applications
specific input values for the owner/table and columns . The otherversion restores the statistics for all the columns as specified in theFND_HISTOGRAM_COLS table.
Syntax
FND_STATS.RESTORE_COLUMN_STATS (
ownname VARCHAR2,
tabname VARCHAR2,
colname VARCHAR2,
partname VARCHAR2 DEFAULT NULL,
statid VARCHAR2 DEFAULT NULL
);
FND_STATS.RESTORE_COLUMN_STATS (
statid VARCHAR2 DEFAULT NULL
);
Parameters
Name of the schema.
Name of the table.
Name of the column. Optional identifier toassociate with these statistics withinFND_STATTAB.
Name of the table partition. If the table ispartitioned and if partname is NULL, then globaland partition table statistics are exported.
Optional identifier to associate with these statisticswithin FND_STATTAB.
GATHER_SCHEMA_STATS Procedure
This procedure gathers statistics for all objects in a schema.
This procedure is also available through the concurrent program”Gather Schema Statistics.”
If this procedure fails at any time during operation, it can be restartedby supplying the request ID for the request that failed. The request IDcan be captured when the program is started from concurrent manager.
ownname
tabname
colname
partname
statid
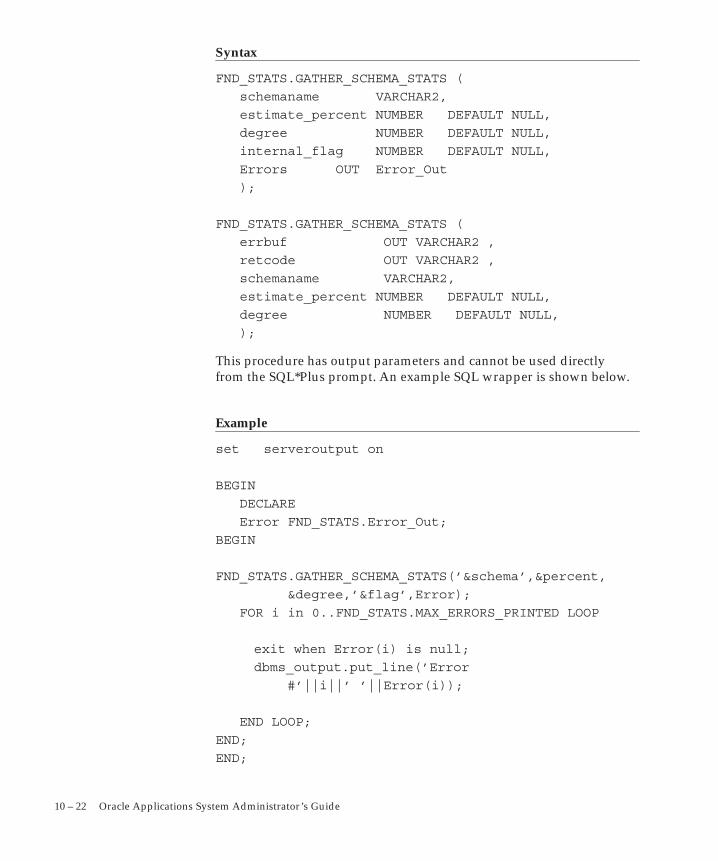
10 – 22 Oracle Applications System Administrator’s Guide
Syntax
FND_STATS.GATHER_SCHEMA_STATS (
schemaname VARCHAR2,
estimate_percent NUMBER DEFAULT NULL,
degree NUMBER DEFAULT NULL,
internal_flag NUMBER DEFAULT NULL,
Errors OUT Error_Out
);
FND_STATS.GATHER_SCHEMA_STATS (
errbuf OUT VARCHAR2 ,
retcode OUT VARCHAR2 ,
schemaname VARCHAR2,
estimate_percent NUMBER DEFAULT NULL,
degree NUMBER DEFAULT NULL,
);
This procedure has output parameters and cannot be used directlyfrom the SQL*Plus prompt. An example SQL wrapper is shown below.
Example
set serveroutput on
BEGIN
DECLARE
Error FND_STATS.Error_Out;
BEGIN
FND_STATS.GATHER_SCHEMA_STATS(’&schema’,&percent,
°ree,’&flag’,Error);
FOR i in 0..FND_STATS.MAX_ERRORS_PRINTED LOOP
exit when Error(i) is null;
dbms_output.put_line(’Error
#’||i||’ ’||Error(i));
END LOOP;
END;
END;
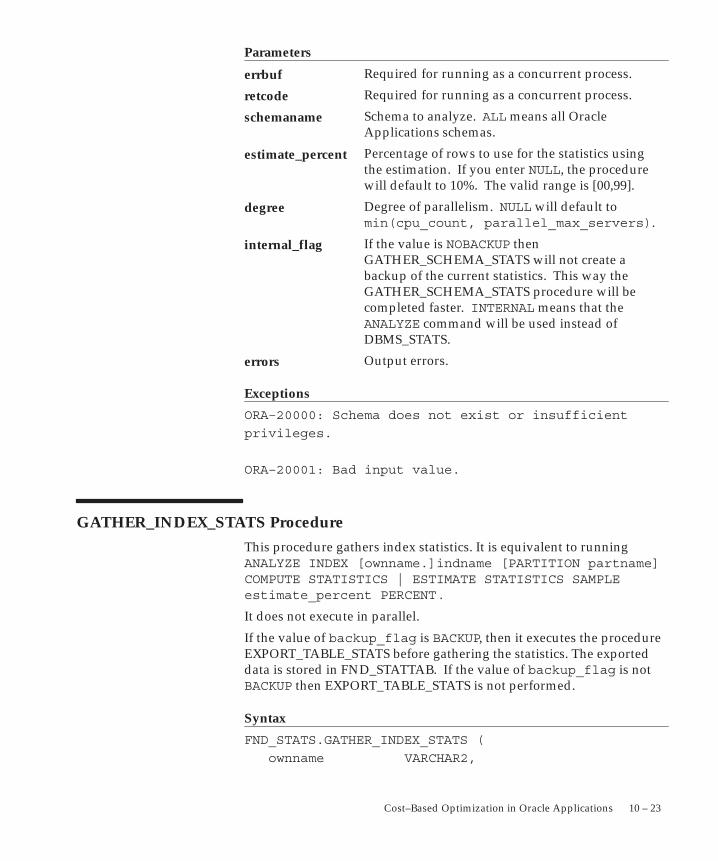
10 – 23Cost–Based Optimization in Oracle Applications
Parameters
Required for running as a concurrent process.
Required for running as a concurrent process.
Schema to analyze. ALL means all OracleApplications schemas.
Percentage of rows to use for the statistics usingthe estimation. If you enter NULL, the procedurewill default to 10%. The valid range is [00,99].
Degree of parallelism. NULL will default tomin(cpu_count, parallel_max_servers).
If the value is NOBACKUP thenGATHER_SCHEMA_STATS will not create abackup of the current statistics. This way theGATHER_SCHEMA_STATS procedure will becompleted faster. INTERNAL means that theANALYZE command will be used instead ofDBMS_STATS.
Output errors.
Exceptions
ORA–20000: Schema does not exist or insufficient
privileges.
ORA–20001: Bad input value.
GATHER_INDEX_STATS Procedure
This procedure gathers index statistics. It is equivalent to runningANALYZE INDEX [ownname.]indname [PARTITION partname]COMPUTE STATISTICS | ESTIMATE STATISTICS SAMPLEestimate_percent PERCENT .
It does not execute in parallel.
If the value of backup_flag is BACKUP, then it executes the procedureEXPORT_TABLE_STATS before gathering the statistics. The exporteddata is stored in FND_STATTAB. If the value of backup_flag is notBACKUP then EXPORT_TABLE_STATS is not performed.
Syntax
FND_STATS.GATHER_INDEX_STATS (
ownname VARCHAR2,
errbuf
retcode
schemaname
estimate_percent
degree
internal_flag
errors
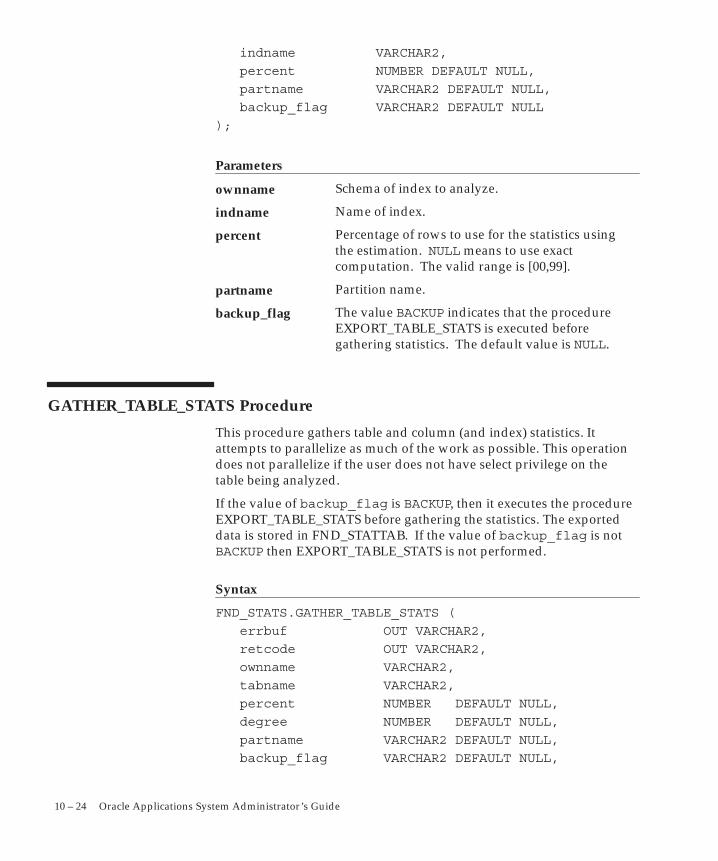
10 – 24 Oracle Applications System Administrator’s Guide
indname VARCHAR2,
percent NUMBER DEFAULT NULL,
partname VARCHAR2 DEFAULT NULL,
backup_flag VARCHAR2 DEFAULT NULL
);
Parameters
Schema of index to analyze.
Name of index.
Percentage of rows to use for the statistics usingthe estimation. NULL means to use exactcomputation. The valid range is [00,99].
Partition name.
The value BACKUP indicates that the procedureEXPORT_TABLE_STATS is executed beforegathering statistics. The default value is NULL.
GATHER_TABLE_STATS Procedure
This procedure gathers table and column (and index) statistics. Itattempts to parallelize as much of the work as possible. This operationdoes not parallelize if the user does not have select privilege on thetable being analyzed.
If the value of backup_flag is BACKUP, then it executes the procedureEXPORT_TABLE_STATS before gathering the statistics. The exporteddata is stored in FND_STATTAB. If the value of backup_flag is notBACKUP then EXPORT_TABLE_STATS is not performed.
Syntax
FND_STATS.GATHER_TABLE_STATS (
errbuf OUT VARCHAR2,
retcode OUT VARCHAR2,
ownname VARCHAR2,
tabname VARCHAR2,
percent NUMBER DEFAULT NULL,
degree NUMBER DEFAULT NULL,
partname VARCHAR2 DEFAULT NULL,
backup_flag VARCHAR2 DEFAULT NULL,
ownname
indname
percent
partname
backup_flag
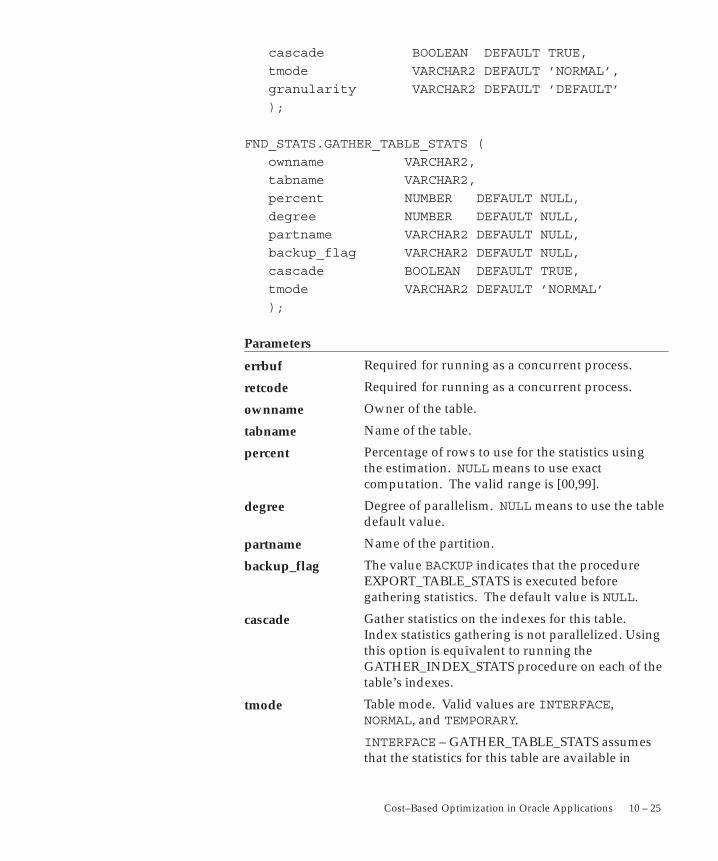
10 – 25Cost–Based Optimization in Oracle Applications
cascade BOOLEAN DEFAULT TRUE,
tmode VARCHAR2 DEFAULT ’NORMAL’,
granularity VARCHAR2 DEFAULT ’DEFAULT’
);
FND_STATS.GATHER_TABLE_STATS (
ownname VARCHAR2,
tabname VARCHAR2,
percent NUMBER DEFAULT NULL,
degree NUMBER DEFAULT NULL,
partname VARCHAR2 DEFAULT NULL,
backup_flag VARCHAR2 DEFAULT NULL,
cascade BOOLEAN DEFAULT TRUE,
tmode VARCHAR2 DEFAULT ’NORMAL’
);
Parameters
Required for running as a concurrent process.
Required for running as a concurrent process.
Owner of the table.
Name of the table.
Percentage of rows to use for the statistics usingthe estimation. NULL means to use exactcomputation. The valid range is [00,99].
Degree of parallelism. NULL means to use the tabledefault value.
Name of the partition.
The value BACKUP indicates that the procedureEXPORT_TABLE_STATS is executed beforegathering statistics. The default value is NULL.
Gather statistics on the indexes for this table.Index statistics gathering is not parallelized. Usingthis option is equivalent to running theGATHER_INDEX_STATS procedure on each of thetable’s indexes.
Table mode. Valid values are INTERFACE,NORMAL, and TEMPORARY.
INTERFACE – GATHER_TABLE_STATS assumesthat the statistics for this table are available in
errbuf
retcode
ownname
tabname
percent
degree
partname
backup_flag
cascade
tmode
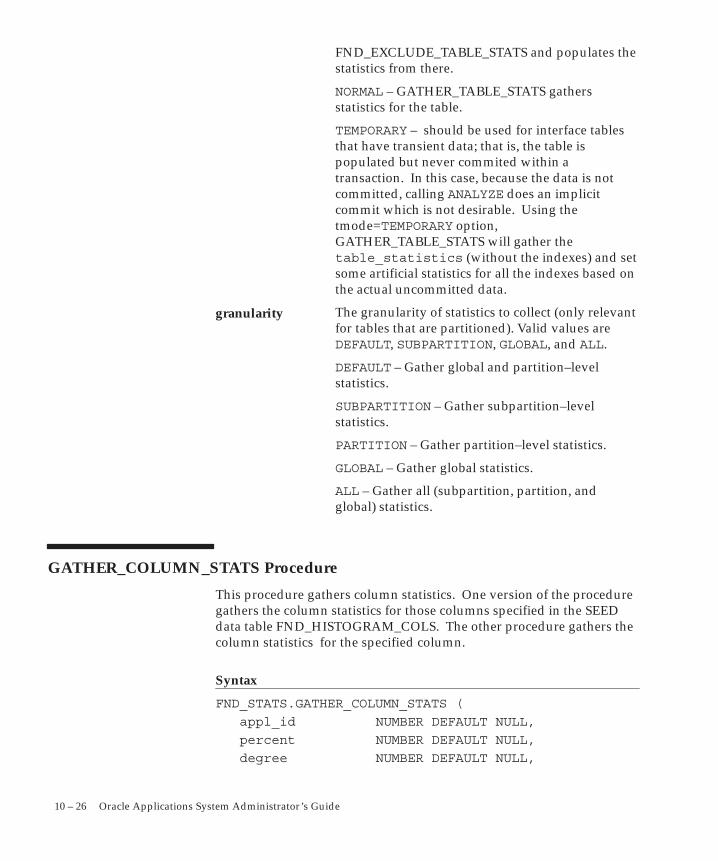
10 – 26 Oracle Applications System Administrator’s Guide
FND_EXCLUDE_TABLE_STATS and populates thestatistics from there.
NORMAL – GATHER_TABLE_STATS gathersstatistics for the table.
TEMPORARY – should be used for interface tablesthat have transient data; that is, the table ispopulated but never commited within atransaction. In this case, because the data is notcommitted, calling ANALYZE does an implicitcommit which is not desirable. Using thetmode=TEMPORARY option,GATHER_TABLE_STATS will gather thetable_statistics (without the indexes) and setsome artificial statistics for all the indexes based onthe actual uncommitted data.
The granularity of statistics to collect (only relevantfor tables that are partitioned). Valid values areDEFAULT, SUBPARTITION, GLOBAL, and ALL.
DEFAULT – Gather global and partition–levelstatistics.
SUBPARTITION – Gather subpartition–levelstatistics.
PARTITION – Gather partition–level statistics.
GLOBAL – Gather global statistics.
ALL – Gather all (subpartition, partition, andglobal) statistics.
GATHER_COLUMN_STATS Procedure
This procedure gathers column statistics. One version of the proceduregathers the column statistics for those columns specified in the SEEDdata table FND_HISTOGRAM_COLS. The other procedure gathers thecolumn statistics for the specified column.
Syntax
FND_STATS.GATHER_COLUMN_STATS (
appl_id NUMBER DEFAULT NULL,
percent NUMBER DEFAULT NULL,
degree NUMBER DEFAULT NULL,
granularity
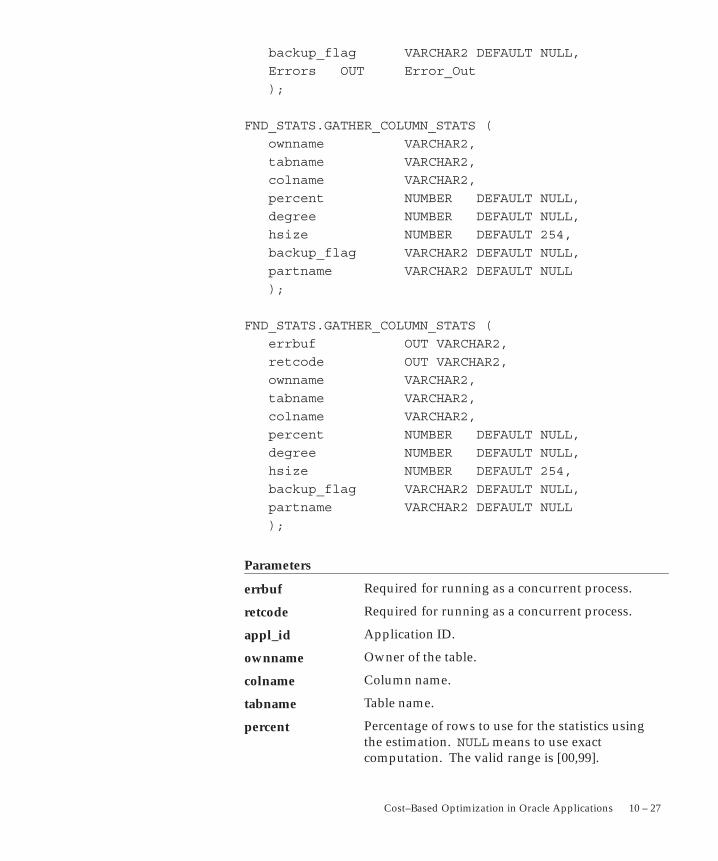
10 – 27Cost–Based Optimization in Oracle Applications
backup_flag VARCHAR2 DEFAULT NULL,
Errors OUT Error_Out
);
FND_STATS.GATHER_COLUMN_STATS (
ownname VARCHAR2,
tabname VARCHAR2,
colname VARCHAR2,
percent NUMBER DEFAULT NULL,
degree NUMBER DEFAULT NULL,
hsize NUMBER DEFAULT 254,
backup_flag VARCHAR2 DEFAULT NULL,
partname VARCHAR2 DEFAULT NULL
);
FND_STATS.GATHER_COLUMN_STATS (
errbuf OUT VARCHAR2,
retcode OUT VARCHAR2,
ownname VARCHAR2,
tabname VARCHAR2,
colname VARCHAR2,
percent NUMBER DEFAULT NULL,
degree NUMBER DEFAULT NULL,
hsize NUMBER DEFAULT 254,
backup_flag VARCHAR2 DEFAULT NULL,
partname VARCHAR2 DEFAULT NULL
);
Parameters
Required for running as a concurrent process.
Required for running as a concurrent process.
Application ID.
Owner of the table.
Column name.
Table name.
Percentage of rows to use for the statistics usingthe estimation. NULL means to use exactcomputation. The valid range is [00,99].
errbuf
retcode
appl_id
ownname
colname
tabname
percent

10 – 28 Oracle Applications System Administrator’s Guide
Degree of parallelism. NULL means to use the tabledefault value.
Number of buckets in the histogram.
The value BACKUP indicates that the procedureEXPORT_TABLE_STATS is executed beforegathering statistics. The default value is NULL.
Name of the partition.
Error output.
GATHER_ALL_COLUMN_STATS Procedure
This procedure gathers column statistics for the given schema as listedin the FND_HISTOGRAM_COLS table.
Syntax
FND_STATS.GATHER_ALL_COLUMN_STATS (
ownname VARCHAR2 ,
percent NUMBER DEFAULT NULL,
degree NUMBER DEFAULT NULL
);
FND_STATS.GATHER_ALL_COLUMN_STATS (
errbuf OUT VARCHAR2,
retcode OUT VARCHAR2,
ownname VARCHAR2,
percent NUMBER DEFAULT NULL,
degree NUMBER DEFAULT NULL
);
Parameters
Required for running as a concurrent process.
Required for running as a concurrent process.
Owner of the table. ALL means all Applicationsschemas.
Percentage of rows to use for the statistics usingthe estimation. NULL means to use exactcomputation. The valid range is [00,99].
degree
hsize
backup_flag
partname
errors
errbuf
retcode
ownname
percent
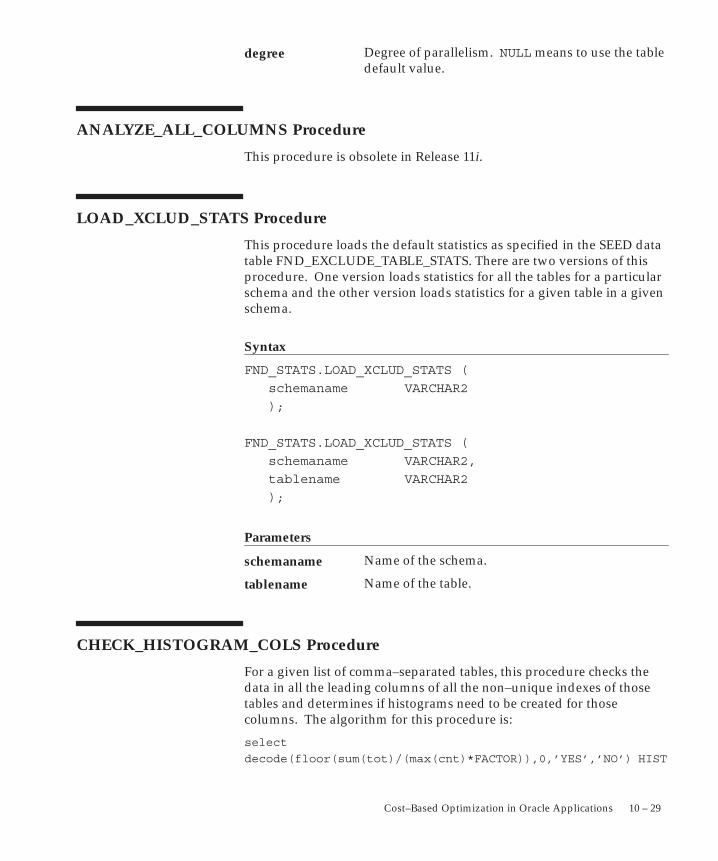
10 – 29Cost–Based Optimization in Oracle Applications
Degree of parallelism. NULL means to use the tabledefault value.
ANALYZE_ALL_COLUMNS Procedure
This procedure is obsolete in Release 11i.
LOAD_XCLUD_STATS Procedure
This procedure loads the default statistics as specified in the SEED datatable FND_EXCLUDE_TABLE_STATS. There are two versions of thisprocedure. One version loads statistics for all the tables for a particularschema and the other version loads statistics for a given table in a givenschema.
Syntax
FND_STATS.LOAD_XCLUD_STATS (
schemaname VARCHAR2
);
FND_STATS.LOAD_XCLUD_STATS (
schemaname VARCHAR2,
tablename VARCHAR2
);
Parameters
Name of the schema.
Name of the table.
CHECK_HISTOGRAM_COLS Procedure
For a given list of comma–separated tables, this procedure checks thedata in all the leading columns of all the non–unique indexes of thosetables and determines if histograms need to be created for thosecolumns. The algorithm for this procedure is:
select
decode(floor(sum(tot)/(max(cnt)*FACTOR)),0,’YES’,’NO’) HIST
degree
schemaname
tablename

10 – 30 Oracle Applications System Administrator’s Guide
from (select count(col) cnt , count(*) tot
from tab sample (PERCENT)
where col is not null
group by col);
The decode statement determines whether a single value occupies1/FACTOR or more of the sample PERCENT.
If sum(cnt) is very small (a small non–null sample), the results maybe inaccurate. A count(*) of at least 3000 is recommended. Theprocedure is run from a SQL prompt after setting the server output on.
Syntax
FND_STATS.CHECK_HISTOGRAM_COLS (
tablelist VARCHAR2,
factor NUMBER DEFAULT 75,
percent NUMBER DEFAULT 10,
degree NUMBER DEFAULT NULL
);
Parameters
A comma separated list of tables. It should be ofthe form schema.tablename. A wildcard in thetablename is also allowed. For example,tablelist=>’oe.so%head% , pa.pa_exp% ,ar.ra_customers’. The owner part ismandatory.
The factor for calculating the histograms.
Sample percent.
Degree of parallelization.
VERIFY_STATS Procedure
For a given list of comma–separated tables, or for a given schemaname, this procedure reports the statistics in the data dictionary tablesfor the tables, indexes, and histograms.
Syntax
FND_STATS.VERIFY_STATS (
schemaname VARCHAR2 DEFAULT NULL,
tablelist
factor
percent
degree
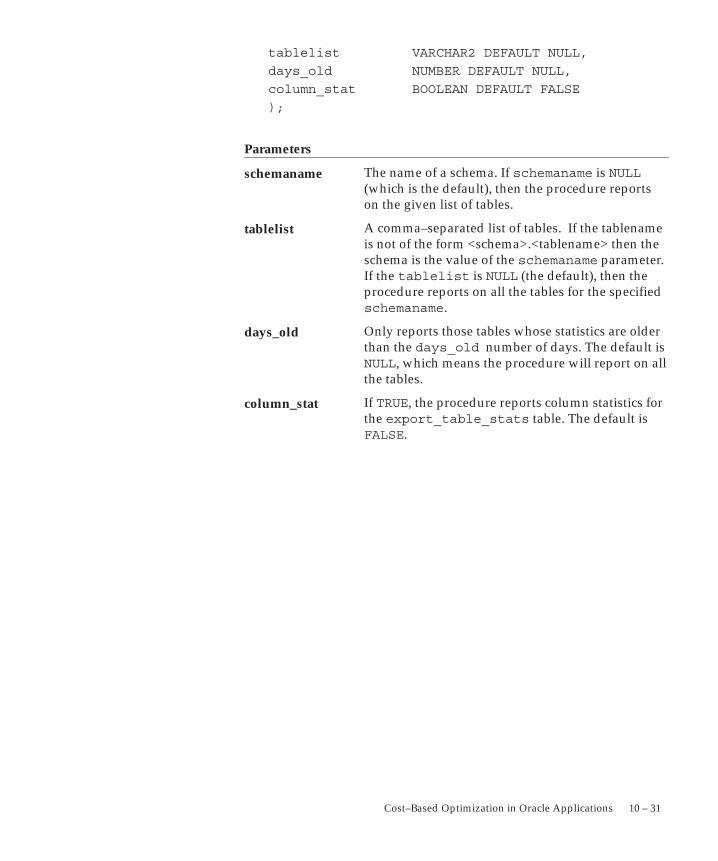
10 – 31Cost–Based Optimization in Oracle Applications
tablelist VARCHAR2 DEFAULT NULL,
days_old NUMBER DEFAULT NULL,
column_stat BOOLEAN DEFAULT FALSE
);
Parameters
The name of a schema. If schemaname is NULL(which is the default), then the procedure reportson the given list of tables.
A comma–separated list of tables. If the tablenameis not of the form <schema>.<tablename> then theschema is the value of the schemaname parameter.If the tablelist is NULL (the default), then theprocedure reports on all the tables for the specifiedschemaname.
Only reports those tables whose statistics are olderthan the days_old number of days. The default isNULL, which means the procedure will report on allthe tables.
If TRUE, the procedure reports column statistics forthe export_table_stats table. The default isFALSE.
schemaname
tablelist
days_old
column_stat
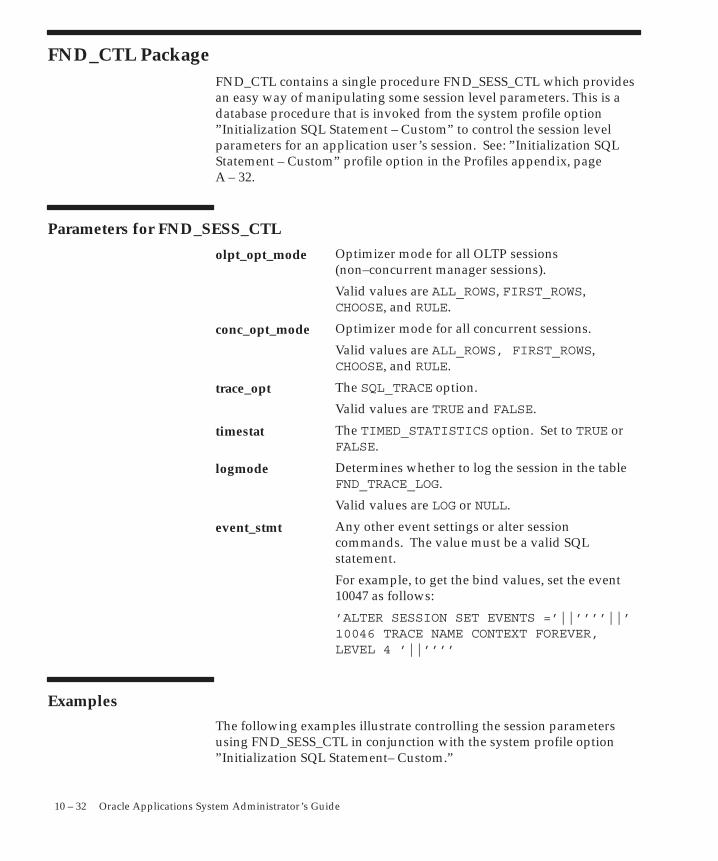
10 – 32 Oracle Applications System Administrator’s Guide
FND_CTL PackageFND_CTL contains a single procedure FND_SESS_CTL which providesan easy way of manipulating some session level parameters. This is adatabase procedure that is invoked from the system profile option”Initialization SQL Statement – Custom” to control the session levelparameters for an application user’s session. See: ”Initialization SQLStatement – Custom” profile option in the Profiles appendix, pageA – 32.
Parameters for FND_SESS_CTL
Optimizer mode for all OLTP sessions(non–concurrent manager sessions).
Valid values are ALL_ROWS, FIRST_ROWS,CHOOSE, and RULE.
Optimizer mode for all concurrent sessions.
Valid values are ALL_ROWS, FIRST_ROWS,CHOOSE, and RULE.
The SQL_TRACE option.
Valid values are TRUE and FALSE.
The TIMED_STATISTICS option. Set to TRUE orFALSE.
Determines whether to log the session in the tableFND_TRACE_LOG.
Valid values are LOG or NULL.
Any other event settings or alter sessioncommands. The value must be a valid SQLstatement.
For example, to get the bind values, set the event10047 as follows:
’ALTER SESSION SET EVENTS =’||’’’’||’10046 TRACE NAME CONTEXT FOREVER,LEVEL 4 ’||’’’’
Examples
The following examples illustrate controlling the session parametersusing FND_SESS_CTL in conjunction with the system profile option”Initialization SQL Statement– Custom.”
olpt_opt_mode
conc_opt_mode
trace_opt
timestat
logmode
event_stmt
10 – 33Cost–Based Optimization in Oracle Applications
The following statement uses FIRST_ROWS for OLTP sessions,ALL_ROWS for concurrent sessions, and turns the trace option on:
BEGIN FND_CTL.FND_SESS_CTL(’FIRST_ROWS’,
’ALL_ROWS’,’TRUE’,’TRUE’,’’,’’); END;
The following statement does the same as the above statement andincludes an event statement:
BEGIN FND_CTL.FND_SESS_CTL(’FIRST_ROWS’,’ALL_ROWS’,
’TRUE’,’TRUE’,’’,’ALTER SESSION SET EVENTS
=’||’’’’||’ 10046 TRACE NAME CONTEXT FOREVER,
LEVEL 4 ’||’’’’); END;
The following statement sets the parameter complex_view_merging:
BEGIN FND_CTL.FND_SESS_CTL(’’,’’,’’,’’,’’,
’ALTER SESSION SET ”_complex_view_merging” =
true’); END;
The following statement turns logging on: For this option the log tableis FND_TRACE_LOG .
BEGIN FND_CTL.FND_SESS_CTL(’’,’’,’’,’’,’LOG’,’’);
END;
FND_TRACE_LOG is a transaction table that contains the LOGinformation when the LOG mode is turned on. This table should bepurged periodically.

10 – 34 Oracle Applications System Administrator’s Guide
C H A P T E R
11 T
11 – 1User Profiles
User Profiles
his chapter tells you about the role of user profiles in OracleApplications, including an overview of user profiles and a detaileddescription of the form you use to set user profile values for your usercommunity.
The Overview of User Profiles includes definitions of key concepts, andan explanation of how to set site, application, responsibility, and userprofile options in Oracle Applications.
11 – 2 Oracle Applications System Administrator’s Guide
Overview of Setting User ProfilesA user profile is a set of changeable options that affect the way yourapplication looks and behaves. As System Administrator, you controlhow Oracle Applications operate by setting user profile options to thevalues you want. You can set user profile options at four differentlevels: site, application, responsibility, and user.
Major Features
Set of Books
You can further control security by assigning a set of books to aresponsibility, application or site. A set of books is a company or groupof companies within Oracle Applications that share a common accountcode, calendar, and functional currency.
Setting User Profile Options
As System Administrator, you use the System Profile Values window toset profile options for your user community. If you change a userprofile option value, your change takes effect as soon as your users logon again or change responsibilities. See: System Profile ValuesWindow: page 11 – 6.
When you set a user profile, you provide Oracle Applications withstandard information (such as printer) that describes a user,responsibility, application, or site. You can set values for user profileoptions at each profile level.
Option settings pertain to all users at aninstallation site.
Option settings pertain to all users of anyresponsibility associated with the application.
Option settings pertain to all users currently signedon under the responsibility.
Option settings pertain to an individual user,identified by their application username.
The values you set at each level provide run–time values for eachuser’s profile options. An option’s run–time value becomes thehighest–level setting for that option.
Site
Application
Responsibility
User
11 – 3User Profiles
When a profile option may be set at more than one level, site has thelowest priority, superseded by application, then responsibility, withuser having the highest priority. For example, a value entered at thesite level may be overridden by values entered at any other level. Avalue entered at the user level has the highest priority, and overridesvalues entered at any other level.
For example, for a given user, assume the printer option is set only atthe site and responsibility levels. When the user logs on, the printeroption assumes the value set at the responsibility level, since it is thehighest–level setting for the option.
Suggestion: As System Administrator, you should setsite–level option values before specifying profile options at theother three levels after the installation of Oracle Applications.The options specified at the site–level work as defaults until thesame options are specified at the other levels.
Application users may use the Personal Profile Values window to settheir own personal profile options at the user level. Not all profileoptions are visible to users, and some profile options, while visible,may not be updated by end users.
See Also
Setting Your Personal User Profile, Oracle Applications User’s Guide
Using Profile Options as a Parameter or Segment Default Value
Profile option settings may be used as a default value for a concurrentprogram’s parameter or flexfield’s segment. The following table liststhe forms you may use to enter a profile option whose setting serves asa default value.
To use a profile option’s setting as a default value, navigate to theform’s Default Type field and select Profile. Then, enter the profileoption’s internal name in the Default Value field.
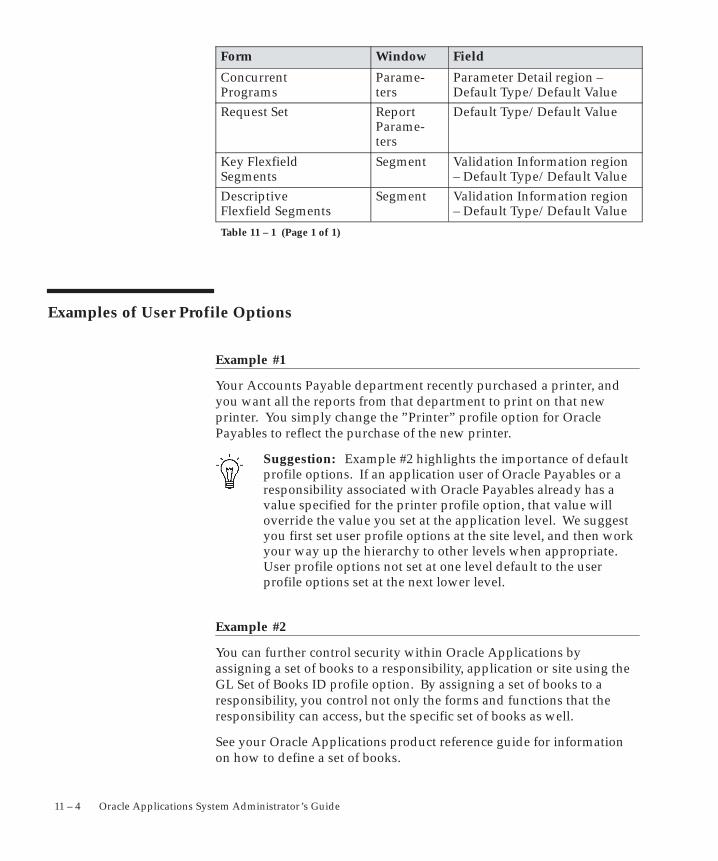
11 – 4 Oracle Applications System Administrator’s Guide
Form Window Field
Concurrent Programs
Parame-ters
Parameter Detail region – Default Type/Default Value
Request Set Report Parame-ters
Default Type/Default Value
Key Flexfield Segments
Segment Validation Information region– Default Type/Default Value
Descriptive Flexfield Segments
Segment Validation Information region– Default Type/Default Value
Table 11 – 1 (Page 1 of 1)
Examples of User Profile Options
Example #1
Your Accounts Payable department recently purchased a printer, andyou want all the reports from that department to print on that newprinter. You simply change the ”Printer” profile option for OraclePayables to reflect the purchase of the new printer.
Suggestion: Example #2 highlights the importance of defaultprofile options. If an application user of Oracle Payables or aresponsibility associated with Oracle Payables already has avalue specified for the printer profile option, that value willoverride the value you set at the application level. We suggestyou first set user profile options at the site level, and then workyour way up the hierarchy to other levels when appropriate.User profile options not set at one level default to the userprofile options set at the next lower level.
Example #2
You can further control security within Oracle Applications byassigning a set of books to a responsibility, application or site using theGL Set of Books ID profile option. By assigning a set of books to aresponsibility, you control not only the forms and functions that theresponsibility can access, but the specific set of books as well.
See your Oracle Applications product reference guide for informationon how to define a set of books.
11 – 5User Profiles
User Profile Option Values Report
This report documents user profile option settings. Use this reportwhen defining different profile option values for severalresponsibilities, or users, or for different applications.
Report Parameters
Profile Option Name
Choose the profile option name whose values you wish to report on. Ifyou do not select a profile option name, then this report will documentall profile options.
User Name
Choose the name of a user whose profile option values you wish toreport on.
Application Short Name
Choose the name of an application whose profile option values youwish to report on.
Responsibility Name
Choose the name of a responsibility whose profile option values youwish to report on.
Report Headings
The report headings display the specified report parameters andprovide you with general information about the contents of the report.
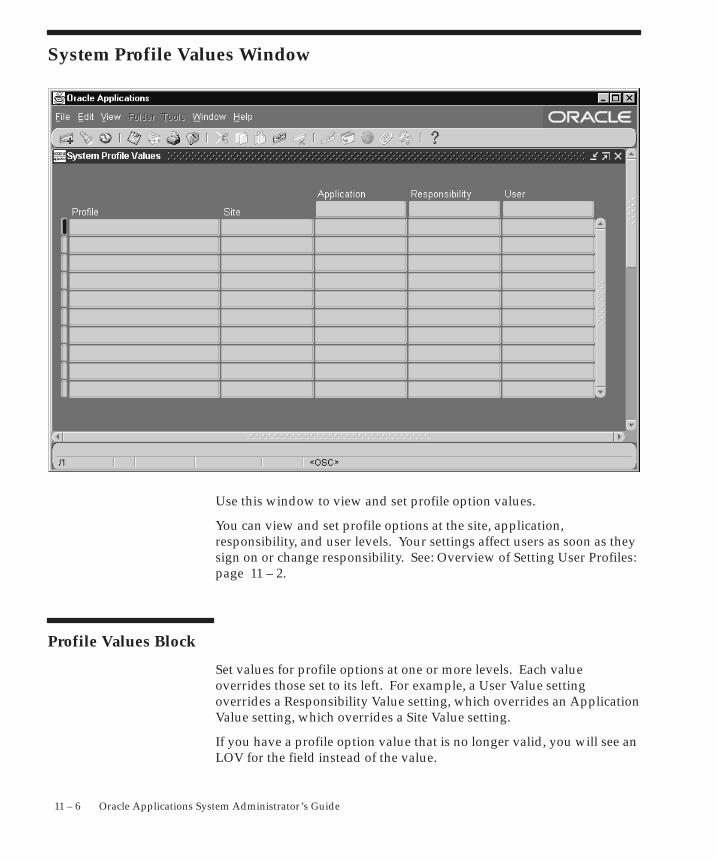
11 – 6 Oracle Applications System Administrator’s Guide
System Profile Values Window
Use this window to view and set profile option values.
You can view and set profile options at the site, application,responsibility, and user levels. Your settings affect users as soon as theysign on or change responsibility. See: Overview of Setting User Profiles:page 11 – 2.
Profile Values Block
Set values for profile options at one or more levels. Each valueoverrides those set to its left. For example, a User Value settingoverrides a Responsibility Value setting, which overrides an ApplicationValue setting, which overrides a Site Value setting.
If you have a profile option value that is no longer valid, you will see anLOV for the field instead of the value.
11 – 7User Profiles
Profile
This field displays the name of a profile option.
Site
This field displays the current value, if set, for all users at the installationsite.
Application
This field displays the current value, if set, for all users working underresponsibilities owned by the application identified in the Find ProfileValues block.
Responsibility
This field displays the current value, if set, for all users working underthe responsibility identified in the Find Profile Values block.
User
This field displays the current value, if set, for the application useridentified in the Find Profile Values block.
Suggestion: You should set site–level default values for anyrequired options after installation of an application. If you donot assign a particular profile option at any of the four levels,that option does not have a default value and may cause errorswhen you use forms, run reports, or run concurrent requests.
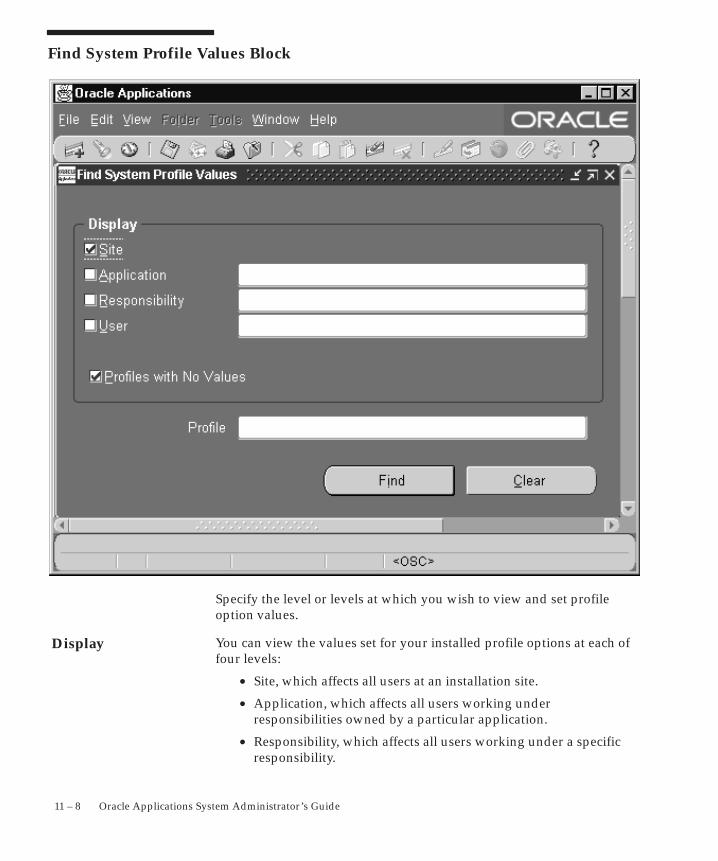
Display
11 – 8 Oracle Applications System Administrator’s Guide
Find System Profile Values Block
Specify the level or levels at which you wish to view and set profileoption values.
You can view the values set for your installed profile options at each offour levels:
• Site, which affects all users at an installation site.
• Application, which affects all users working underresponsibilities owned by a particular application.
• Responsibility, which affects all users working under a specificresponsibility.
11 – 9User Profiles
• User, which affects a unique application user.
You can find the values for all profile options that include a specificcharacter string, such as “OE:” for Oracle Order Entry. You can alsodisplay only profile options whose values are currently set.
Site
Check the Site check box if you wish to display the values for profileoptions at an installation site.
Application
Select an application if you wish to display profile option values forresponsibilities owned by that application.
Responsibility
Select a responsibility if you wish to display profile option values for aspecific responsibility.
User
Select an application user if you wish to display profile option values fora specific user.
Profile
Enter the name of the profile option whose values you wish to display.You may search for profile options using character strings and thewildcard symbol (%). For example, to find all the profile optionsprefixed by “Concurrent:”, you could enter “Conc%” and press the Findbutton.
Profiles with No Values
Select whether to display all profiles, including those without currentlyset values. If this check box is unselected, only profiles with currentvalues are retrieved.
Find
Choose the Find button to display all profile options, or the profileoptions you are searching for, at the level or levels you specified.

11 – 10 Oracle Applications System Administrator’s Guide

C H A P T E R
12 T
12 – 1Administering Process Navigation
Administering ProcessNavigation
his chapter describes the Process Navigator, a feature whichprovides you with diagrams of each of your business processes as awhole and of the individual steps in each process. The ProcessNavigator also provides direct access to the form asssociated with eachstep in a process.
The major topics include:
• Modifying your Menu
• Creating Process Navigator Processes
12 – 2 Oracle Applications System Administrator’s Guide
Overview of Process Navigation
A ”process” is a series of actions taken to achieve a specific result. TheProcess Navigator utilizes Oracle Workflow to depict each of yourbusiness processes with a workflow diagram. A process diagramcontains an icon for each step in the process; each icon acts as a visualcue and as an access point for the actual form associated with eachstep. You can navigate to any form involved in the process simply byclicking on the appropriate icon.
What is Oracle Workflow?
Oracle Workflow allows you to define business processes using adrag–and–drop designer. You can route relevant information todecision makers, automate processes, deliver electronic notifications tousers in a given workflow, and monitor your processes as they areimplemented. You can display any workflow diagram as a process inthe Process Navigator. See: Oracle Workflow Guide.
What are Seeded Processes?
A seeded process is one that is delivered to you ready to use. OracleApplications Release 11i includes several seeded business processeswhich you can use as they are.
12 – 3Administering Process Navigation
Modifying Your Menu
Before you begin, you should be aware that simply referencing a formfrom a process does not provide the required permissions for theresponsibility to access the forms in the process. Form Functions foreach form referenced from a process must be added to the FunctionSecurity Menu for the responsibility. If the Form Function is notaccessible, the user will receive an error when attempting to access theform from the process in the Process Navigator.
See: Form Functions Window
See: Menus Window
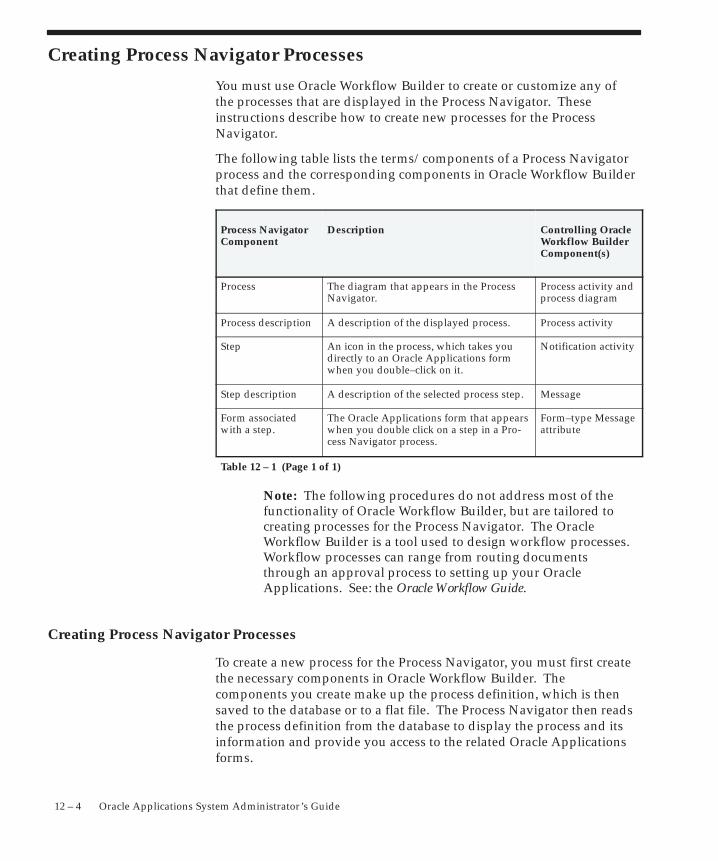
12 – 4 Oracle Applications System Administrator’s Guide
Creating Process Navigator Processes
You must use Oracle Workflow Builder to create or customize any ofthe processes that are displayed in the Process Navigator. Theseinstructions describe how to create new processes for the ProcessNavigator.
The following table lists the terms/components of a Process Navigatorprocess and the corresponding components in Oracle Workflow Builderthat define them.
Process NavigatorComponent
Description Controlling OracleWorkflow BuilderComponent(s)
Process The diagram that appears in the ProcessNavigator.
Process activity andprocess diagram
Process description A description of the displayed process. Process activity
Step An icon in the process, which takes youdirectly to an Oracle Applications formwhen you double–click on it.
Notification activity
Step description A description of the selected process step. Message
Form associatedwith a step.
The Oracle Applications form that appearswhen you double click on a step in a Pro-cess Navigator process.
Form–type Messageattribute
Table 12 – 1 (Page 1 of 1)
Note: The following procedures do not address most of thefunctionality of Oracle Workflow Builder, but are tailored tocreating processes for the Process Navigator. The OracleWorkflow Builder is a tool used to design workflow processes.Workflow processes can range from routing documentsthrough an approval process to setting up your OracleApplications. See: the Oracle Workflow Guide.
Creating Process Navigator Processes
To create a new process for the Process Navigator, you must first createthe necessary components in Oracle Workflow Builder. Thecomponents you create make up the process definition, which is thensaved to the database or to a flat file. The Process Navigator then readsthe process definition from the database to display the process and itsinformation and provide you access to the related Oracle Applicationsforms.

12 – 5Administering Process Navigation
� Creating a New Process Navigator Process
1. Open Oracle Workflow Builder.
2. Create an item type.—an item type is a repository that will containall the components associated with the process you wish to build.See: To Create an Item Type: Oracle Workflow Guide.
3. Create an Item Attribute of type role, whose internal name isUSER_NAME. See: To Define and Item Type or Activity Attribute:Oracle Workflow Guide.
Note: Enter a new display name for the message using theformat <Verb><Form Title>. If the form title already contains averb, then simply use the form title as the display name. If theform title does not contain a verb, then consider using one ofthe following verbs:
Define / Assign / Run / Load / Convert / Open / Set /
Generate / Review
4. Create a message to describe the task that is to be accomplished bya Process Navigator process step. See: To Create a Message: OracleWorkflow Guide.
5. Create a form–type for the message. The seeded processesgenerally assign these message attributes an internal name of OpenForm, but this is not required. See also: To Define a MessageAttribute: Oracle Workflow Guide.
6. Create a notification activity to represent a Process Navigatorprocess step. See: To Create a Notification Activity: Oracle WorkflowGuide.
7. Create a process activity to represent a Process Navigator Process.See: To Create a Process Activity: Oracle Workflow Guide.
Note: Enter a display name for your process. This nameappears in the Process Navigator’s process list. The namingconvention for the process should be a functional namefollowed by the word ”Process.”
Enter a description for your process. The description appearswhen a user selects a process in the Process Navigator, ForOracle Workflow Builder Release 2.5 and higher, thedescription is limited to 240 characters.
8. Draw the Process Diagram. Once you create a process activity, youcan draw the process diagram that is associated with it. Theprocess diagram is what appears when you display a process in theProcess Navigator. See: Diagramming a Process: Oracle WorkflowGuide
12 – 6 Oracle Applications System Administrator’s Guide
Note: The Performer type of the Notification Activity youinclude in a process diagram for the Process Navigator must beset to the item attribute USER_NAME..
9. Save your changes. When you save your work to a database, youactually save everything in the current data store that has beenmodified. When you save your work to a flat file, you actually saveeverything in the current data store to the file.
Note: It is highly recommended that for new processes createdfor the Process Navigator that you always save a copy of yourworkflow process definition as a flat file and check that file intoa source control system to maintain a working version of yourprocess definition. Then when you want to update yourdefinition in the database, you can pull up the flat file and saveit directly to the database. Avoid using the process definitionstored in your database as your source controlled version, asothers with access to the database can update the definition.
10. Enable access to your process
Enable access to your process
Before a process may be accessed in the Navigator you must completethe following two steps. Create a new function for your process in theForm Functions window, and add your process to a responsibility byadding the function you just created, to the responsibilities top menu inthe Menus window.
� Create a function for your Process
1. As the System Administrator navigate to the Form Functionswindow (Application–>Function).
2. Enter a Function Name for your process using the format:
<app>_<processname>
Where <app> can be any application short name and<processname> is the internal name you entered when you createdyour process activity.
3. Enter a User Function Name. The name you enter here appears inthe Navigator.
4. Enter ”PROCESS” as your function type.
5. In the tabbed region ’Form’ use the following format to enter avalue in the Parameters field:
<itemtype>:<processname>
12 – 7Administering Process Navigation
6. Save your work. No other fields are required to create yourprocess function.
See: Form Functions Window
� Add your function to a menu
In order for a user to access a process in the Navigator, the processmust be added to a menu referenced by the user’s responsibility. Todetermine the menu referenced by a particular responsibility use theResponsibilities window (Security–>Responsibility–>Define).
1. As the System Administrator navigate to the Menus window(Application–>Menu).
2. Use the Find window to access the desired menu.
3. In a new row use the LOV to select the function you created foryour process in the Functions field. You may optionally enter adescription for the function. DO NOT enter any other fields. TheSequence field is automatically populated and the NavigatorPrompt and Submenu fields must remain empty.
4. Save your work.
See: Menus Window
Access the Seeded Processes from the Database
To access the seed processes from the database, you need to first installOracle Applications production Release 11i and you need to installOracle Workflow Builder Release 2.5 or greater on your client PC.
� To access the seed processes
1. Run the Oracle Workflow Builder from you client.
2. Select Open from the File menu.
3. Choose Database.
• For User, enter the FNDNAM of your database
• For Password, enter the FNDNAM password of your database
• For Connect, enter the alias for your database which should beentered in your tnsnames.ora file under the following directoryon your client:
Local drive (i.e. “C”):orant\network\admin
Note: If you are using Windows 95, then the “orant” should bereplaced with “orawin” in the directory structure above.
12 – 8 Oracle Applications System Administrator’s Guide
4. In the Show Item Types window, select the item type(s) associatedwith the seeded processes you wish to view. To select more thanone item type, hold down your control key as you select the itemtypes. Choose Show, and then choose OK.
� Finding the Form Function Name
1. Log into Oracle Applications and navigate to the form of interest.
2. Choose About Oracle Applications... from the Help menu. Scrolldown to Form Information and make note of the form name.
3. Now log into Oracle Applications using the ImplementationSystem Administration responsibility and navigate to/Application/Form. Within the Form window, query for the formname you just made a note of in the Form field.
4. Make note of the value in the User Form Name field once yourquery completes.
5. Close the Form window and navigate to /Application/Function.Within the Function window, query for the User Form Name valuethat you just made a note of in the Form field.
6. The value that is returned in the Function field is the form functionname that you need to associate a Process Navigator process stepto a form.
C H A P T E R
13 T
13 – 1Document Sequences
Document Sequences
his chapter explains how to assign unique numbers to documentsyou create using Oracle Applications. Each time you enter atransaction, you create a document.
• For example, when you enter a payment, you create a paymentdocument. Or when you enter an invoice, you create an invoicedocument.
By assigning unique numbers to documents, you can account for eachtransaction you enter and the document that accompanies it.
This chapter begins with an essay explaining what document sequencesare and how they work in Oracle Applications.
Following the essay are descriptions of the forms you use to:
• Define sequences to number your documents.
• Define document categories to group documents together.
• Assign sequences to documents, defining which documents youwill number using a particular sequence.
13 – 2 Oracle Applications System Administrator’s Guide
What is a Document Sequence?
A document sequence uniquely numbers documents generated by anOracle Applications product. Using Oracle Applications, you initiate atransaction by entering data through a form and generating adocument, for example, an invoice. A document sequence generates anaudit trail that identifies the application that created the transaction, forexample, Oracle Receivables, and the original document that wasgenerated, for example, invoice number 1234.
Document sequences can provide proof of completeness. For example,document sequences can be used to account for every transaction, eventransactions that fail.
Document sequences can also provide an audit trail. For example, adocument sequence can provide an audit trail from the general ledgerinto the subsidiary ledger, and to the document that originally affectedthe account balance.
Document sequences generate audit data, so even if documents aredeleted, their audit records remain.
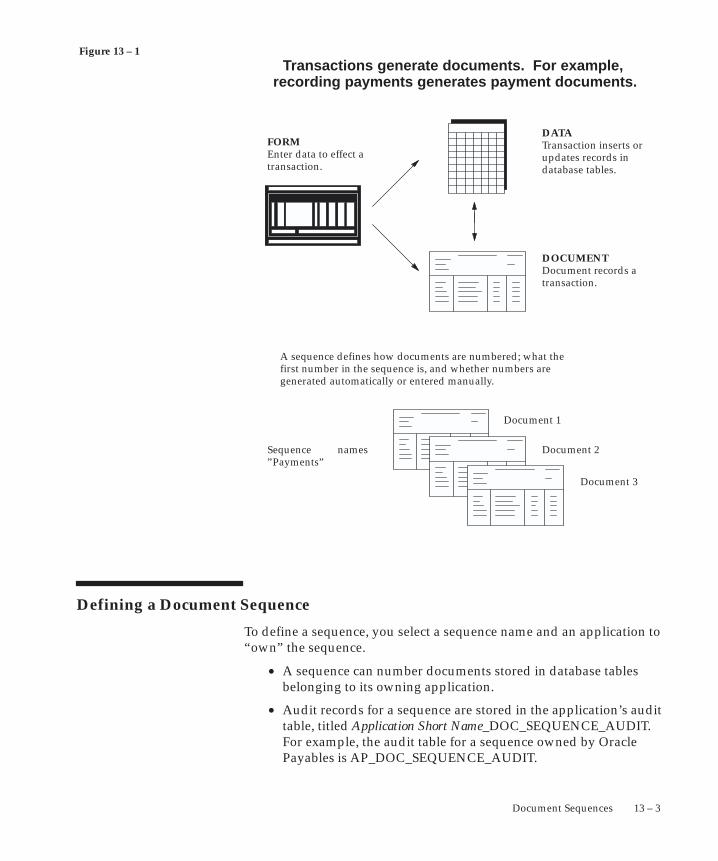
Figure 13 – 1
13 – 3Document Sequences
FORMEnter data to effect atransaction.
DOCUMENTDocument records atransaction.
DATATransaction inserts orupdates records indatabase tables.
Transactions generate documents. For example, recording payments generates payment documents.
A sequence defines how documents are numbered; what thefirst number in the sequence is, and whether numbers aregenerated automatically or entered manually.
Sequence names”Payments”
Document 1
Document 2
Document 3
Defining a Document Sequence
To define a sequence, you select a sequence name and an application to“own” the sequence.
• A sequence can number documents stored in database tablesbelonging to its owning application.
• Audit records for a sequence are stored in the application’s audittable, titled Application Short Name_DOC_SEQUENCE_AUDIT.For example, the audit table for a sequence owned by OraclePayables is AP_DOC_SEQUENCE_AUDIT.
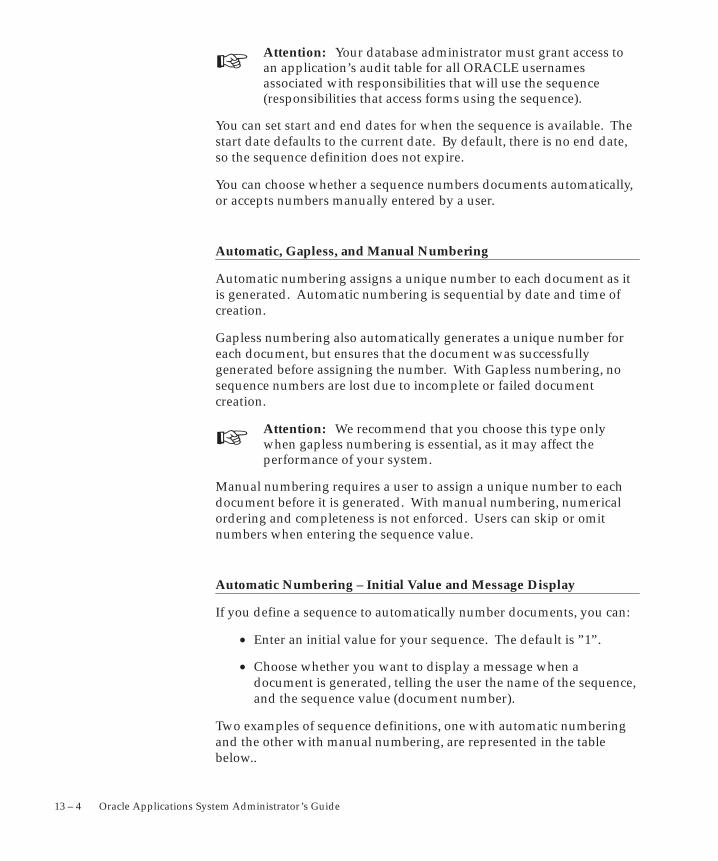
☞
☞
13 – 4 Oracle Applications System Administrator’s Guide
Attention: Your database administrator must grant access toan application’s audit table for all ORACLE usernamesassociated with responsibilities that will use the sequence(responsibilities that access forms using the sequence).
You can set start and end dates for when the sequence is available. Thestart date defaults to the current date. By default, there is no end date,so the sequence definition does not expire.
You can choose whether a sequence numbers documents automatically,or accepts numbers manually entered by a user.
Automatic, Gapless, and Manual Numbering
Automatic numbering assigns a unique number to each document as itis generated. Automatic numbering is sequential by date and time ofcreation.
Gapless numbering also automatically generates a unique number foreach document, but ensures that the document was successfullygenerated before assigning the number. With Gapless numbering, nosequence numbers are lost due to incomplete or failed documentcreation.
Attention: We recommend that you choose this type onlywhen gapless numbering is essential, as it may affect theperformance of your system.
Manual numbering requires a user to assign a unique number to eachdocument before it is generated. With manual numbering, numericalordering and completeness is not enforced. Users can skip or omitnumbers when entering the sequence value.
Automatic Numbering – Initial Value and Message Display
If you define a sequence to automatically number documents, you can:
• Enter an initial value for your sequence. The default is ”1”.
• Choose whether you want to display a message when adocument is generated, telling the user the name of the sequence,and the sequence value (document number).
Two examples of sequence definitions, one with automatic numberingand the other with manual numbering, are represented in the tablebelow..
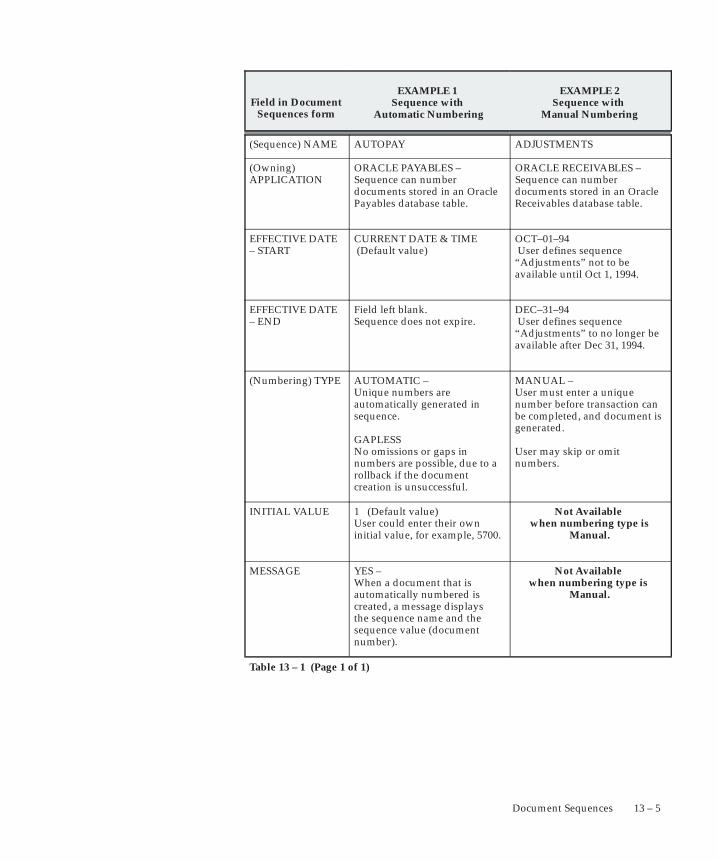
13 – 5Document Sequences
Field in DocumentSequences form
EXAMPLE 1 Sequence with
Automatic Numbering
EXAMPLE 2Sequence with
Manual Numbering
(Sequence) NAME AUTOPAY ADJUSTMENTS
(Owning) APPLICATION
ORACLE PAYABLES – Sequence can number documents stored in an OraclePayables database table.
ORACLE RECEIVABLES – Sequence can number documents stored in an Oracle Receivables database table.
EFFECTIVE DATE – START
CURRENT DATE & TIME (Default value)
OCT–01–94 User defines sequence “Adjustments” not to be available until Oct 1, 1994.
EFFECTIVE DATE – END
Field left blank. Sequence does not expire.
DEC–31–94 User defines sequence “Adjustments” to no longer be available after Dec 31, 1994.
(Numbering) TYPE AUTOMATIC – Unique numbers are automatically generated in sequence.
GAPLESSNo omissions or gaps in numbers are possible, due to arollback if the document creation is unsuccessful.
MANUAL – User must enter a unique number before transaction can be completed, and document is generated.
User may skip or omit numbers.
INITIAL VALUE 1 (Default value) User could enter their own initial value, for example, 5700.
Not Available when numbering type is
Manual.
MESSAGE YES – When a document that is automatically numbered iscreated, a message displays the sequence name and the sequence value (documentnumber).
Not Available when numbering type is
Manual.
Table 13 – 1 (Page 1 of 1)
13 – 6 Oracle Applications System Administrator’s Guide
Defining Document Categories
Document categories organize documents into logical groups.
• A document category (also called a document type) is one of therules you use to define which documents a sequence assignsnumbers to.
• You can separately number each document category by assigninga different sequence to each category.
A document category identifies the database table that storesdocuments resulting from transactions your users enter.
• When you assign a sequence to a category, the sequence numbersthe documents that are stored in a particular table.
Use categories to more precisely classify your documents. Forexample, you can categorize accounts receivable invoices into severaldifferent categories, such as:
• Chargebacks
• Deposits
• Guarantees
• Debit Memos
• Credit Memos
• Sales Invoices
• Customer Service Invoices
Similarly, you can categorize accounts payable or purchase invoicesinto several different categories, such as:
• Standard
• Expense Report
• Prepayment
• Interest
• Credit Memo
• Debit Memo
Assigning a Document Sequence
Before you can assign a sequence to number documents, you mustdefine which documents are to be numbered.
13 – 7Document Sequences
Sequences versus Assignments
Defining a sequence is different from assigning a sequence to a series ofdocuments.
• A sequence’s definition determines whether a document’snumber is automatically generated or manually entered by theuser.
• A sequence’s assignment, that is, the documents a sequence isassigned to, is defined in the Sequence Assignments form.
Defining Documents for numbering by Assigned Sequences
You specify a combination of four rules that define any given documentfor assignment to a specific sequence name.
You can then assign a different (numbering) sequence to eachdocument definition.
The four rules, that when combined, define what documents a selectedsequence assigns numbers to are:
You select the application that generates thedocuments you wish to number.
For example, to number sales invoices, you selectOracle Receivables.
You select a document category to identify a logicalsubset of documents.
For example, if you do not want to number allinvoices in Oracle Receivables, you can choose tonumber only the category of sales invoices.
A category identifies a table that stores transactionsentered (documents generated) using an OracleApplication.
The Category values you can choose from to definea document are dependent upon the applicationyou select.
You select the chart of accounts for your businessthat is affected by the documents you wish tonumber. You may optionally enable this rulethrough the Document Flexfield.
You select the method that your documents areentered, automatic or manual. You may optionallyenable this rule through the Document Flexfield.
Application
Category
Set of Books
Method
☞
13 – 8 Oracle Applications System Administrator’s Guide
Automatic is when a concurrent process, such asan external program, is set up to enter transactiondata into an Oracle Application.
Manual is when a document is manually enteredusing a form in an application.
Assignment of Sequences to Document Definitions
For each unique document definition there can only be one activesequence assignment. A document definition consists of theApplication, Category, and the optional Document Flexfield segmentsSet of Books and Method
Attention: When assigning sequences to a documentdefinition, each active sequence can be assigned to only oneunique combination of application and category (i.e.,application table).
Active Assignments and Active Sequences
An active sequence assignment does not have a post dated end date.That is, the assignment’s end date is not before the current date.
• An active sequence assignment either has no end date, or an enddate that is not before the current date.
• A sequence assignment and its dates of effectivity are defined onthe Sequence Assignments form.
A sequence definition must be active as well. That is, the sequencedefinition’s end date (as opposed to its assignment’s end date) mustnot be before the current date.
• A sequence definition and its dates of effectivity are defined onthe Document Sequences form.
When you define a document sequence, you give the sequence a name,and define how the sequence numbers each document by:
• Choosing whether numbers are automatically generated insequence, or entered manually by the user.
• Entering the initial value or first number in the sequence.
Document Numbering vs. Document Entry
Do not confuse the type of document numbering a sequence employs,which can be automatic or manual, with the method of enteringdocuments, which is also defined as either automatic or manual.
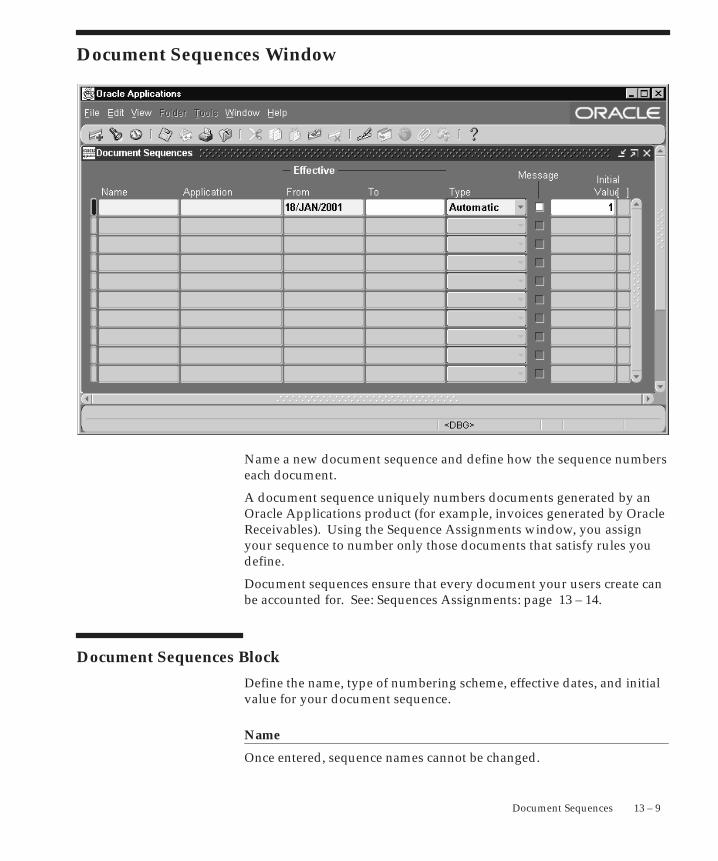
13 – 9Document Sequences
Document Sequences Window
Name a new document sequence and define how the sequence numberseach document.
A document sequence uniquely numbers documents generated by anOracle Applications product (for example, invoices generated by OracleReceivables). Using the Sequence Assignments window, you assignyour sequence to number only those documents that satisfy rules youdefine.
Document sequences ensure that every document your users create canbe accounted for. See: Sequences Assignments: page 13 – 14.
Document Sequences Block
Define the name, type of numbering scheme, effective dates, and initialvalue for your document sequence.
Name
Once entered, sequence names cannot be changed.
☞
13 – 10 Oracle Applications System Administrator’s Guide
Application
Once selected, the application associated with your sequence cannot bechanged.
Audit records for your sequence are stored in the application’s audittable, titled Application Short Name_DOC_SEQUENCE_AUDIT. Forexample, the audit table for a sequence owned by Oracle Payables isAP_DOC_SEQUENCE_AUDIT.
Effective From/To
Enter the dates on which your document sequence takes effect/is nolonger enabled. The Start on field automatically defaults to the currentdate, and once a sequence is defined, the start date cannot be changed.If you leave the End on field blank, your document sequence does notexpire; and if you enter an end date and define your sequence, the enddate cannot be modified later. If there is no end date defined and thereare no active assignments for a sequence, you can disable the sequenceby entering the current date as the end date. Once disabled, a sequencecannot be reactivated.
Type
Once defined, you cannot change the type of document numberingsequence.
Sequentially assigns, by date and time of creation, aunique number to each document as it is generated.
Manual numbering requires a user to assign anumber to each document before it is generated.
You must enter unique values. However, pleasenote that numerical ordering and completeness isnot enforced.
Attention: The Automatic–By–User type is currently notsupported, and is reserved for a future version of OracleApplications.
Warning: The Gapless Numbering type is valid only in thecontext of certain localizations. We recommend that you choosethis type only after consulting with Worldwide Support, as itmay affect the performance of your system.
Message
Check the Message check box if you want each document to display amessage (in the message line near the bottom of the screen) informingthe user of the sequence name and value (number).
Automatic
Manual
13 – 11Document Sequences
This check box only applies to sequences with the automatic type ofnumbering. Messages appear only on form displays, and are notwritten to a request’s log file.
Once a sequence is defined, the message choice cannot be changed.
Initial Value
Enter a value for the first document in your sequence. This field onlyapplies to sequences with automatic or gapless numbering type. Themaximun sequence value is 1.0e+27.
If you leave this field blank, the first document is automatically assigneda value of ”1”.
Once a sequence is defined, this initial value cannot be changed.
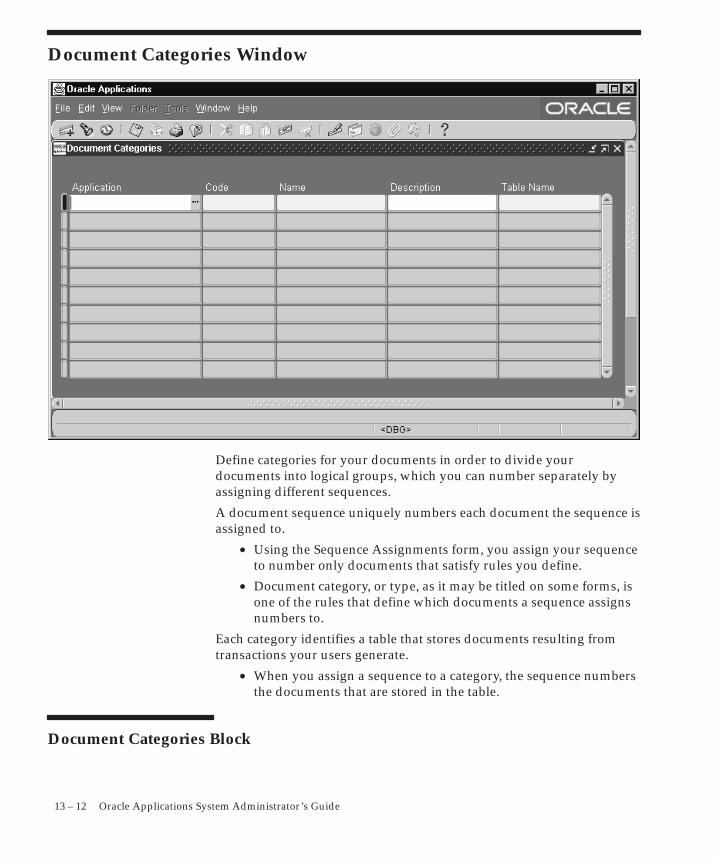
13 – 12 Oracle Applications System Administrator’s Guide
Document Categories Window
Define categories for your documents in order to divide yourdocuments into logical groups, which you can number separately byassigning different sequences.
A document sequence uniquely numbers each document the sequence isassigned to.
• Using the Sequence Assignments form, you assign your sequenceto number only documents that satisfy rules you define.
• Document category, or type, as it may be titled on some forms, isone of the rules that define which documents a sequence assignsnumbers to.
Each category identifies a table that stores documents resulting fromtransactions your users generate.
• When you assign a sequence to a category, the sequence numbersthe documents that are stored in the table.
Document Categories Block
13 – 13Document Sequences
Name a document category and associate a table with the category.
When you enter this block, Oracle automatically queries for any existingdocument categories.
Application
Once a category is defined, you cannot change the choice of application.Only tables belonging to the selected application can be assigned to acategory.
Code
Category code must be unique within an application. Once a category isdefined, you cannot update its code.
Name
You can update the name, if you wish. For example, if the categoryname is predefined, you can change the name to a more familiar value.
Description
You can update the description, if you wish. For example, if thecategory description is predefined, you can change the description to amore familiar value.
Table Name
Select the name of the table that stores the documents you want toidentify by your category.
• When the sequential numbering feature checks for completenessor generates a report, it locates the category’s documents in thetable.
• Only tables belonging to the application associated with thecategory can be chosen.
• Once a category is defined, you cannot change the choice of table.

13 – 14 Oracle Applications System Administrator’s Guide
Sequence Assignments Window
Define which documents a document sequence can number, and thenassign the document sequence to your definition.
A document sequence numbers documents generated by an OracleApplications product (for example, invoices generated by OracleReceivables).
Documents can be defined by the application that generates them andtheir category (the table in which they are stored). Additional fieldsappear when the optional rules for defining documents (Set of Booksand Method of document entry) are enabled.
Besides entering a document definition and assigning a sequence to it,you can, if you wish, enter effective dates for the assignment.
13 – 15Document Sequences
Prerequisites
• Define the document sequence using the Document Sequenceswindow. See: Document Sequences: page 13 – 9.
Sequence Assignments Block
Specify documents by the application that generates them and thecategory of the document (table where the documents are stored). Youcan also include in your document definition the set of books they affect,and the method by which the document is entered.
Once a document definition is entered, you select a sequence to assign itto, and if you wish, enter effective dates for the assignment.
There can only be one active sequence assigned to each uniquecombination of Application, Category, Set of Books, and Method. Thelast two criterion are optional, and are set in the Document Flexfield.
However, the same sequence, the same numbering scheme, and initialvalue can be assigned to more than one combination of Application,Category, Set of Books, and Method as long as the Application andCategory remain the same.
Select the application that generates the documentsyou wish to number.
For example, to number sales invoices, you selectOracle Receivables.
Select a document category to identify a logicalsubset of documents.
For example, if you do not want to number allinvoices in Oracle Receivables, you can choose tonumber only the category of sales invoices.
Assignment Region
Since the effective dates for an assignment must fall within thesequence’s start and end dates, the list of available sequences dependson the start and end dates specified for the assignment.
Start Date/End Date
Enter the dates on which the sequence assignment to your documentdefinition takes effect/is no longer enabled. The Start Date fieldautomatically defaults to the current date, and once a sequenceassignment is defined, the start date cannot be changed.
Application
Category

☞
13 – 16 Oracle Applications System Administrator’s Guide
If you leave the End Date field blank, your sequence assignment doesnot expire; and if you enter an end date and define your sequenceassignment, the end date cannot be modified later.
If there is no end date defined and there are no active assignments for asequence, you can disable the sequence assignment by entering thecurrent date as the end date. Once disabled, a sequence assignmentcannot be reactivated.
Sequence
Select a sequence to assign to your document definition. The sequence’sapplication and the document’s application must be the same.
Once you define a sequence assignment, the sequence name cannot beupdated later.
If you want to disable the sequence assignment and assign a newsequence to the document definition (Document Flexfield combination),you must first, enter an End Date to disable the current sequenceassignment, then, second, create a new record (row) for the newassignment.
Document Flexfield
The Document Flexfield may consist of none, one or two segments.
Select the chart of accounts for your business that isaffected by the documents you wish to number.
Select the method that your documents are entered,automatic or manual.
Automatic is when a concurrent process (e.g., anexternal program) enters transaction data into anOracle Application, which generates documents.
Manual is when a document is manually enteredusing a form in an application.
Once defined, a Document Flexfield definition cannot be updated. Youmay not define additional segments for the Document Flexfield.
Attention: To enable this descriptive flexfield, use theDescriptive Flexfield Segments window. Select the applicationApplication Object Library, and the title ”Document Flexfield”. Besure to unfreeze the flexfield; then, navigate to the Segmentswindow and enable the segments. Freeze your flexfield afteryou set it up, and save and compile the new definition.
See: Defining Descriptive Flexfields Structures(Oracle Applications Flexfields Guide)
Set of Books
Method
C H A P T E R
14 T
14 – 1Developer Tools
Developer Tools
his chapter provides information for a system administrator abouttools applications developers can use in Oracle Applications.
14 – 2 Oracle Applications System Administrator’s Guide
Developer Tools
There are several tools to help developers create and debug customforms and programs. These include the Custom Library, WorkDirectory and the Log/Trace Service. This section provides anoverview of these tools for the system administrator.
The CUSTOM library allows extension of Oracle Applications withoutmodification of Oracle Applications code. For information on theCUSTOM library, see the Oracle Applications Developer’s Guide.
The Work Directory allows a developer to use a custom form fromwithin Oracle Applications, while other users use the standard form.
☞
14 – 3Developer Tools
Work Directory
The Work Directory feature enables a developer, support consultant, orother technical specialist to test modifications to forms and concurrentprograms in Oracle Applications without affecting users of the samecode tree.
Using the Work Directory, a user can be logged into an OracleApplications system but access a version of a form or concurrentprogram that is not within the standard $PROD_TOP directory. Forexample, an on–site developer can test out a new version of a customform without affecting other testing on the system.
You can use the Work Directory feature for alternate files of forms andconcurrent programs only.
Implementation
To implement this feature, set up a directory to hold the alternate filesfor your forms or concurrent programs.
To use an alternate file, set the profile option FND:Override Directorywith the path for the directory containing the alternate file.
Attention: This profile option should usually be set at theUser level only. If you set FND:Override Directory at the Sitelevel, for example, you will affect all users at that site using theparticular forms.
Using the Work Directory
After you have created the alternate directory and set the profile optionFND: Override Directory with the appropriate value, you can use filesin that alternate directory.
In searching for the appropriate file path for a form or concurrentprogram, Oracle Applications will first check to see if the profile optionFND: Override Directory is set and if a given file exists in the specifieddirectory. If the above two conditions are true then the alternate file isused. If the profile option is not set or if the necessary file does notexist in that directory, then the default (usual) file path is used.
Note: The Oracle Applications Navigator caches the paths tofiles that have been successfully opened. If the standard formhas been opened, then that form will be used for the remainder
14 – 4 Oracle Applications System Administrator’s Guide
of the session. To switch to a different file path, you must exitand restart Oracle Applications.
To provide a visual indication that an alternate form is in use, thedeveloper of the form should specify a different version number for theform in the PRE–FORM trigger. This version number appears duringruntime using Help > About Oracle Applications. For moreinformation, see: Oracle Applications Developer’s Guide.
14 – 5Developer Tools
Web Enabled PL/SQL Window
Use this form to maintain the FND_ENABLED_PLSQL runtimeregistry.
PL/SQL Object Block
Name
The name of the PL/SQL object.
Type
The type of the PL/SQL object. The object may be a package, packageprocedure, or procedure.
Enabled
Check this box to enable the PL/SQL object.

14 – 6 Oracle Applications System Administrator’s Guide
A P P E N D I X
A
T
A – 1Profile Options in Oracle Application Object Library
Profile Options inOracle ApplicationObject Library
his appendix lists the profile options that the system administratorcan set for the site, application, responsibility, or user. The profiledescriptions include the internal name of the profile option used whendefaulting values from a profile option.
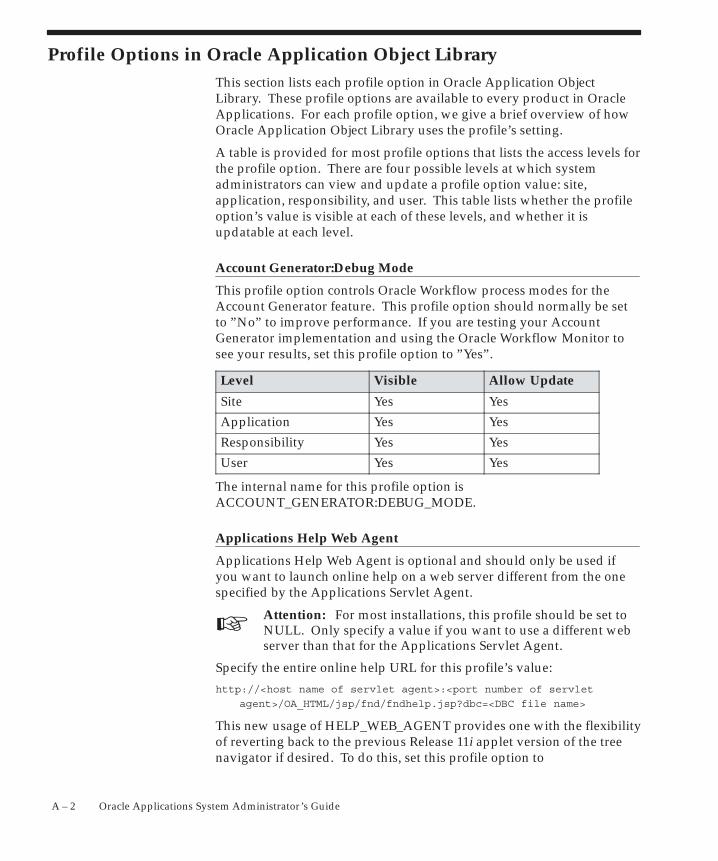
☞
A – 2 Oracle Applications System Administrator’s Guide
Profile Options in Oracle Application Object LibraryThis section lists each profile option in Oracle Application ObjectLibrary. These profile options are available to every product in OracleApplications. For each profile option, we give a brief overview of howOracle Application Object Library uses the profile’s setting.
A table is provided for most profile options that lists the access levels forthe profile option. There are four possible levels at which systemadministrators can view and update a profile option value: site,application, responsibility, and user. This table lists whether the profileoption’s value is visible at each of these levels, and whether it isupdatable at each level.
Account Generator:Debug Mode
This profile option controls Oracle Workflow process modes for theAccount Generator feature. This profile option should normally be setto ”No” to improve performance. If you are testing your AccountGenerator implementation and using the Oracle Workflow Monitor tosee your results, set this profile option to ”Yes”.
Level Visible Allow Update
Site Yes Yes
Application Yes Yes
Responsibility Yes Yes
User Yes Yes
The internal name for this profile option isACCOUNT_GENERATOR:DEBUG_MODE.
Applications Help Web Agent
Applications Help Web Agent is optional and should only be used ifyou want to launch online help on a web server different from the onespecified by the Applications Servlet Agent.
Attention: For most installations, this profile should be set toNULL. Only specify a value if you want to use a different webserver than that for the Applications Servlet Agent.
Specify the entire online help URL for this profile’s value:
http://<host name of servlet agent>:<port number of servlet
agent>/OA_HTML/jsp/fnd/fndhelp.jsp?dbc=<DBC file name>
This new usage of HELP_WEB_AGENT provides one with the flexibilityof reverting back to the previous Release 11i applet version of the treenavigator if desired. To do this, set this profile option to
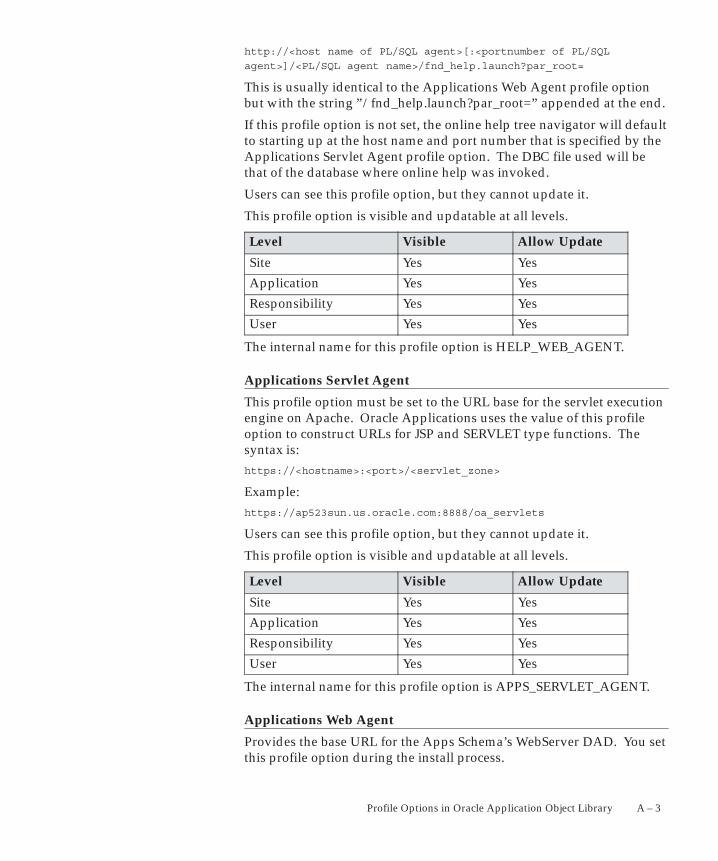
A – 3Profile Options in Oracle Application Object Library
http://<host name of PL/SQL agent>[:<portnumber of PL/SQL
agent>]/<PL/SQL agent name>/fnd_help.launch?par_root=
This is usually identical to the Applications Web Agent profile optionbut with the string ”/fnd_help.launch?par_root=” appended at the end.
If this profile option is not set, the online help tree navigator will defaultto starting up at the host name and port number that is specified by theApplications Servlet Agent profile option. The DBC file used will bethat of the database where online help was invoked.
Users can see this profile option, but they cannot update it.
This profile option is visible and updatable at all levels.
Level Visible Allow Update
Site Yes Yes
Application Yes Yes
Responsibility Yes Yes
User Yes Yes
The internal name for this profile option is HELP_WEB_AGENT.
Applications Servlet Agent
This profile option must be set to the URL base for the servlet executionengine on Apache. Oracle Applications uses the value of this profileoption to construct URLs for JSP and SERVLET type functions. Thesyntax is:https://<hostname>:<port>/<servlet_zone>
Example:https://ap523sun.us.oracle.com:8888/oa_servlets
Users can see this profile option, but they cannot update it.
This profile option is visible and updatable at all levels.
Level Visible Allow Update
Site Yes Yes
Application Yes Yes
Responsibility Yes Yes
User Yes Yes
The internal name for this profile option is APPS_SERVLET_AGENT.
Applications Web Agent
Provides the base URL for the Apps Schema’s WebServer DAD. You setthis profile option during the install process.
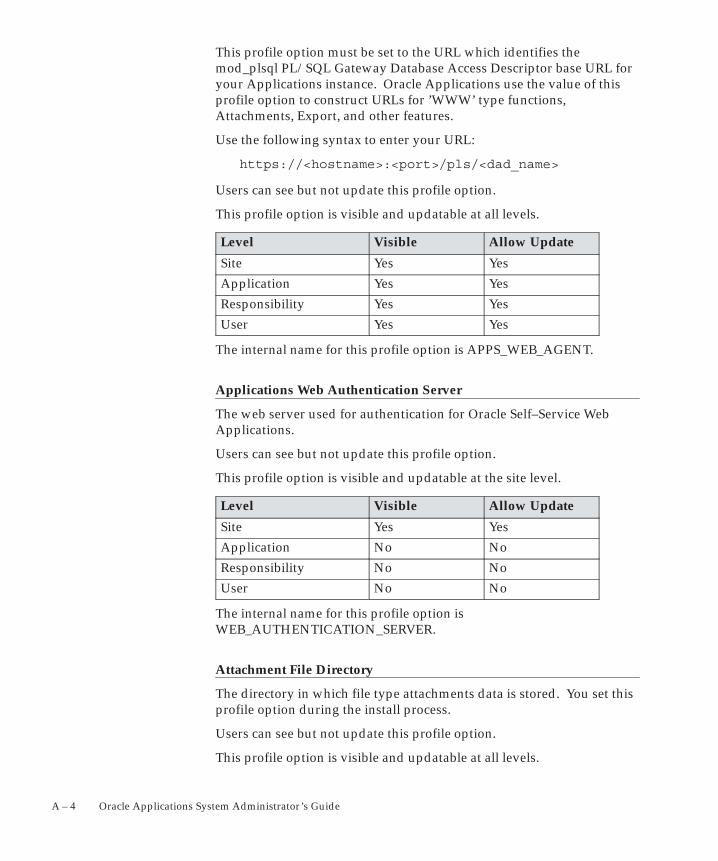
A – 4 Oracle Applications System Administrator’s Guide
This profile option must be set to the URL which identifies themod_plsql PL/SQL Gateway Database Access Descriptor base URL foryour Applications instance. Oracle Applications use the value of thisprofile option to construct URLs for ’WWW’ type functions,Attachments, Export, and other features.
Use the following syntax to enter your URL:
https://<hostname>:<port>/pls/<dad_name>
Users can see but not update this profile option.
This profile option is visible and updatable at all levels.
Level Visible Allow Update
Site Yes Yes
Application Yes Yes
Responsibility Yes Yes
User Yes Yes
The internal name for this profile option is APPS_WEB_AGENT.
Applications Web Authentication Server
The web server used for authentication for Oracle Self–Service WebApplications.
Users can see but not update this profile option.
This profile option is visible and updatable at the site level.
Level Visible Allow Update
Site Yes Yes
Application No No
Responsibility No No
User No No
The internal name for this profile option isWEB_AUTHENTICATION_SERVER.
Attachment File Directory
The directory in which file type attachments data is stored. You set thisprofile option during the install process.
Users can see but not update this profile option.
This profile option is visible and updatable at all levels.
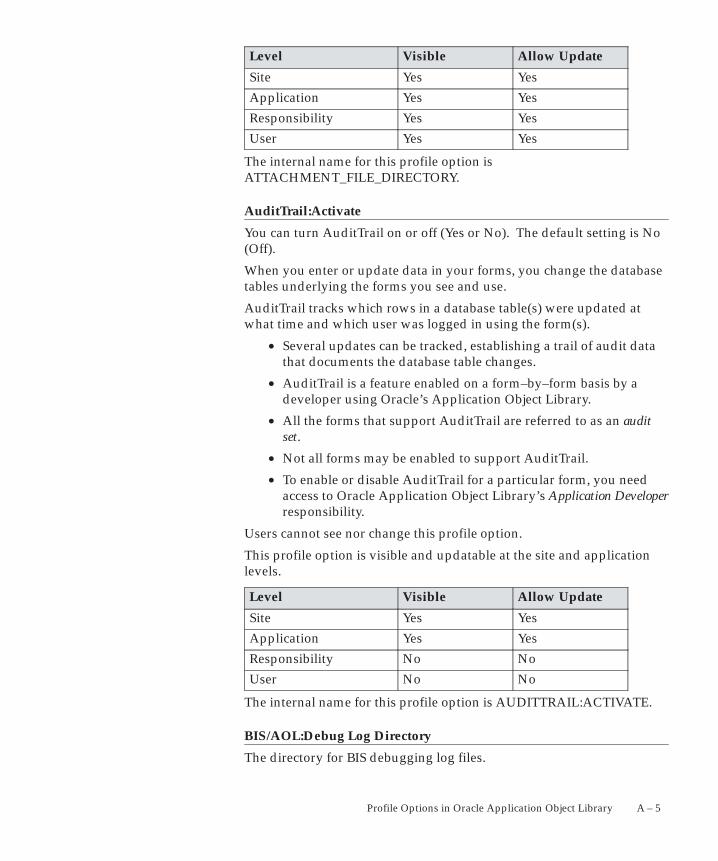
A – 5Profile Options in Oracle Application Object Library
Level Visible Allow Update
Site Yes Yes
Application Yes Yes
Responsibility Yes Yes
User Yes Yes
The internal name for this profile option isATTACHMENT_FILE_DIRECTORY.
AuditTrail:Activate
You can turn AuditTrail on or off (Yes or No). The default setting is No(Off).
When you enter or update data in your forms, you change the databasetables underlying the forms you see and use.
AuditTrail tracks which rows in a database table(s) were updated atwhat time and which user was logged in using the form(s).
• Several updates can be tracked, establishing a trail of audit datathat documents the database table changes.
• AuditTrail is a feature enabled on a form–by–form basis by adeveloper using Oracle’s Application Object Library.
• All the forms that support AuditTrail are referred to as an auditset.
• Not all forms may be enabled to support AuditTrail.
• To enable or disable AuditTrail for a particular form, you needaccess to Oracle Application Object Library’s Application Developerresponsibility.
Users cannot see nor change this profile option.
This profile option is visible and updatable at the site and applicationlevels.
Level Visible Allow Update
Site Yes Yes
Application Yes Yes
Responsibility No No
User No No
The internal name for this profile option is AUDITTRAIL:ACTIVATE.
BIS/AOL:Debug Log Directory
The directory for BIS debugging log files.
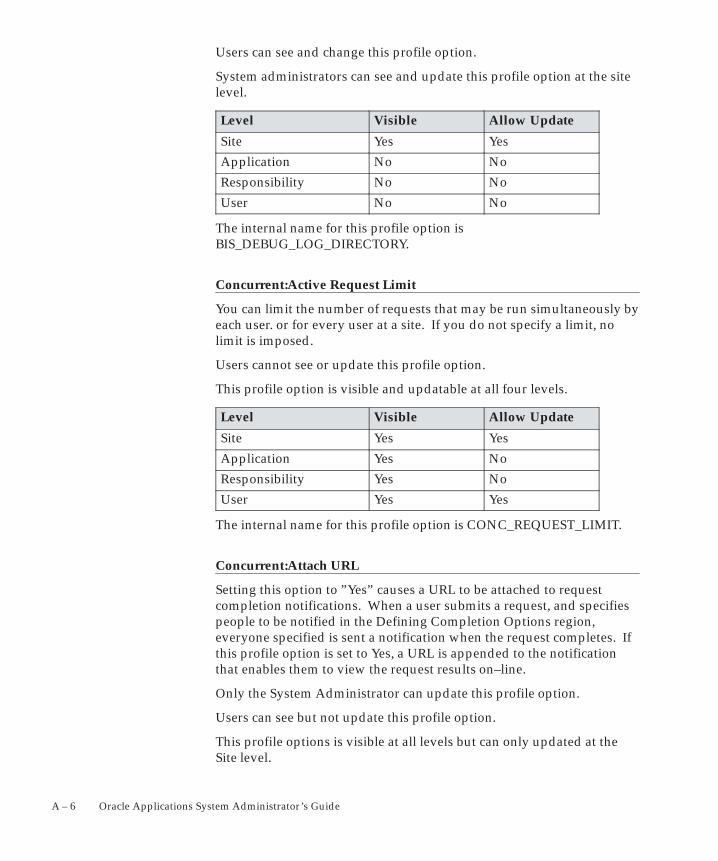
A – 6 Oracle Applications System Administrator’s Guide
Users can see and change this profile option.
System administrators can see and update this profile option at the sitelevel.
Level Visible Allow Update
Site Yes Yes
Application No No
Responsibility No No
User No No
The internal name for this profile option isBIS_DEBUG_LOG_DIRECTORY.
Concurrent:Active Request Limit
You can limit the number of requests that may be run simultaneously byeach user. or for every user at a site. If you do not specify a limit, nolimit is imposed.
Users cannot see or update this profile option.
This profile option is visible and updatable at all four levels.
Level Visible Allow Update
Site Yes Yes
Application Yes No
Responsibility Yes No
User Yes Yes
The internal name for this profile option is CONC_REQUEST_LIMIT.
Concurrent:Attach URL
Setting this option to ”Yes” causes a URL to be attached to requestcompletion notifications. When a user submits a request, and specifiespeople to be notified in the Defining Completion Options region,everyone specified is sent a notification when the request completes. Ifthis profile option is set to Yes, a URL is appended to the notificationthat enables them to view the request results on–line.
Only the System Administrator can update this profile option.
Users can see but not update this profile option.
This profile options is visible at all levels but can only updated at theSite level.
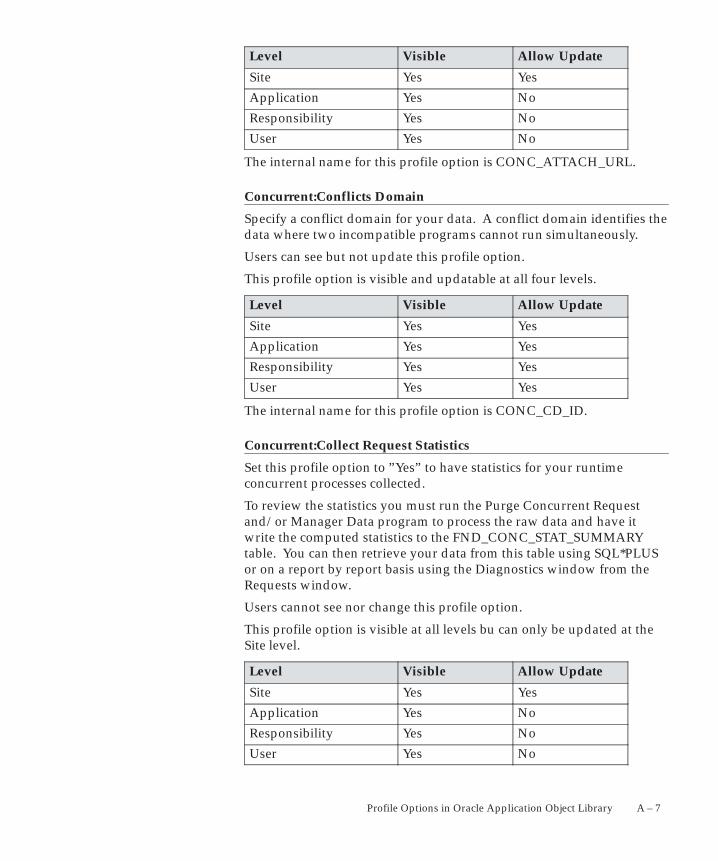
A – 7Profile Options in Oracle Application Object Library
Level Visible Allow Update
Site Yes Yes
Application Yes No
Responsibility Yes No
User Yes No
The internal name for this profile option is CONC_ATTACH_URL.
Concurrent:Conflicts Domain
Specify a conflict domain for your data. A conflict domain identifies thedata where two incompatible programs cannot run simultaneously.
Users can see but not update this profile option.
This profile option is visible and updatable at all four levels.
Level Visible Allow Update
Site Yes Yes
Application Yes Yes
Responsibility Yes Yes
User Yes Yes
The internal name for this profile option is CONC_CD_ID.
Concurrent:Collect Request Statistics
Set this profile option to ”Yes” to have statistics for your runtimeconcurrent processes collected.
To review the statistics you must run the Purge Concurrent Requestand/or Manager Data program to process the raw data and have itwrite the computed statistics to the FND_CONC_STAT_SUMMARYtable. You can then retrieve your data from this table using SQL*PLUSor on a report by report basis using the Diagnostics window from theRequests window.
Users cannot see nor change this profile option.
This profile option is visible at all levels bu can only be updated at theSite level.
Level Visible Allow Update
Site Yes Yes
Application Yes No
Responsibility Yes No
User Yes No
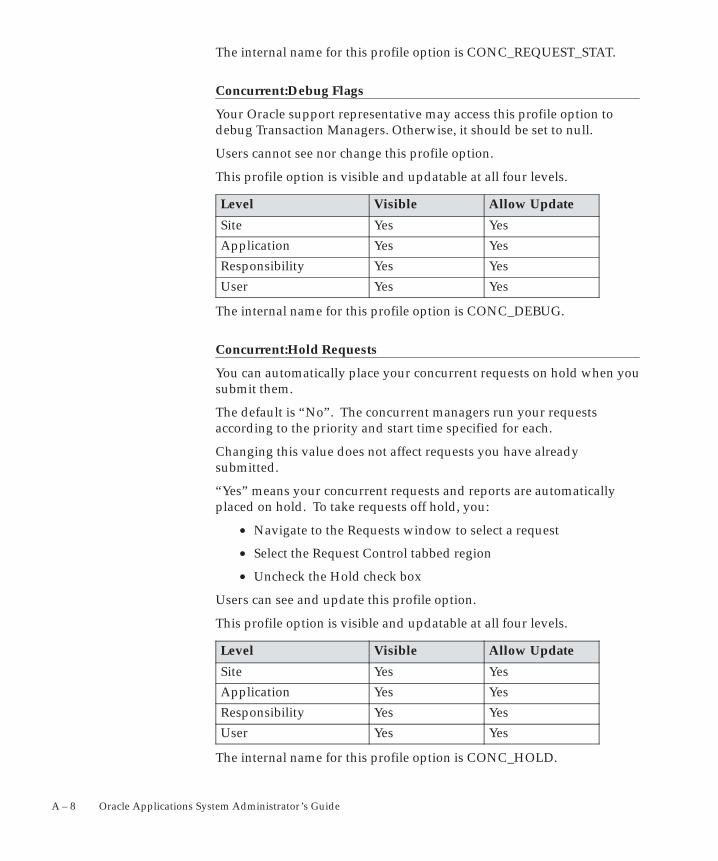
A – 8 Oracle Applications System Administrator’s Guide
The internal name for this profile option is CONC_REQUEST_STAT.
Concurrent:Debug Flags
Your Oracle support representative may access this profile option todebug Transaction Managers. Otherwise, it should be set to null.
Users cannot see nor change this profile option.
This profile option is visible and updatable at all four levels.
Level Visible Allow Update
Site Yes Yes
Application Yes Yes
Responsibility Yes Yes
User Yes Yes
The internal name for this profile option is CONC_DEBUG.
Concurrent:Hold Requests
You can automatically place your concurrent requests on hold when yousubmit them.
The default is “No”. The concurrent managers run your requestsaccording to the priority and start time specified for each.
Changing this value does not affect requests you have alreadysubmitted.
“Yes” means your concurrent requests and reports are automaticallyplaced on hold. To take requests off hold, you:
• Navigate to the Requests window to select a request
• Select the Request Control tabbed region
• Uncheck the Hold check box
Users can see and update this profile option.
This profile option is visible and updatable at all four levels.
Level Visible Allow Update
Site Yes Yes
Application Yes Yes
Responsibility Yes Yes
User Yes Yes
The internal name for this profile option is CONC_HOLD.

A – 9Profile Options in Oracle Application Object Library
Concurrent:Multiple Time Zones
”Yes” sets the default value to ’Sysdate–1’ for the ’Schedules Start Date’used by request submissions. Sysdate–1 ensures that you request isscheduled immediately regardless of which time zone your clientsession is running in. You should use this profile option when theclient’s session is running in a different time zone than the concurrentmanager’s session.
Users cannot see nor change this profile option.
This profile option is visible at all four levels and updatable at the Sitelevel.
Level Visible Allow Update
Site Yes Yes
Application Yes No
Responsibility Yes No
User Yes No
The internal name for this profile option is CONC_MULTI_TZ.
Concurrent:PMON method
PMON refers to process monitor. The Internal Concurrent Managermonitors the individual concurrent managers’ processes to verify themanagers are running.
This profile option should always be set to LOCK. Using the LOCKmethod, the Internal Concurrent Manager tries to get a lock on theindividual concurrent manager’s process. The name of the lock isdetermined by a sequence (which is the ID of the individual manager)and the program in question. If the Internal Concurrent Manager is ableto get the lock, then it knows the process is no longer running.
Users cannot see nor change this profile option.
This profile option is neither visible nor updatable from the SystemProfile Options form.
Level Visible Allow Update
Site No No
Application No No
Responsibility No No
User No No
The internal name for this profile option is CONC_PMON_METHOD.
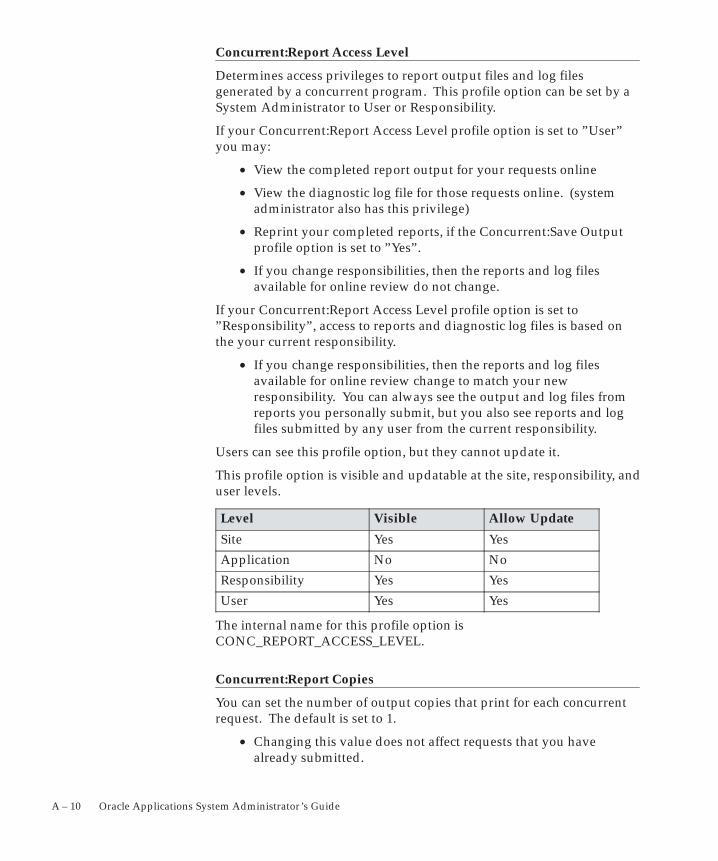
A – 10 Oracle Applications System Administrator’s Guide
Concurrent:Report Access Level
Determines access privileges to report output files and log filesgenerated by a concurrent program. This profile option can be set by aSystem Administrator to User or Responsibility.
If your Concurrent:Report Access Level profile option is set to ”User”you may:
• View the completed report output for your requests online
• View the diagnostic log file for those requests online. (systemadministrator also has this privilege)
• Reprint your completed reports, if the Concurrent:Save Outputprofile option is set to ”Yes”.
• If you change responsibilities, then the reports and log filesavailable for online review do not change.
If your Concurrent:Report Access Level profile option is set to”Responsibility”, access to reports and diagnostic log files is based onthe your current responsibility.
• If you change responsibilities, then the reports and log filesavailable for online review change to match your newresponsibility. You can always see the output and log files fromreports you personally submit, but you also see reports and logfiles submitted by any user from the current responsibility.
Users can see this profile option, but they cannot update it.
This profile option is visible and updatable at the site, responsibility, anduser levels.
Level Visible Allow Update
Site Yes Yes
Application No No
Responsibility Yes Yes
User Yes Yes
The internal name for this profile option isCONC_REPORT_ACCESS_LEVEL.
Concurrent:Report Copies
You can set the number of output copies that print for each concurrentrequest. The default is set to 1.
• Changing this value does not affect requests that you havealready submitted.
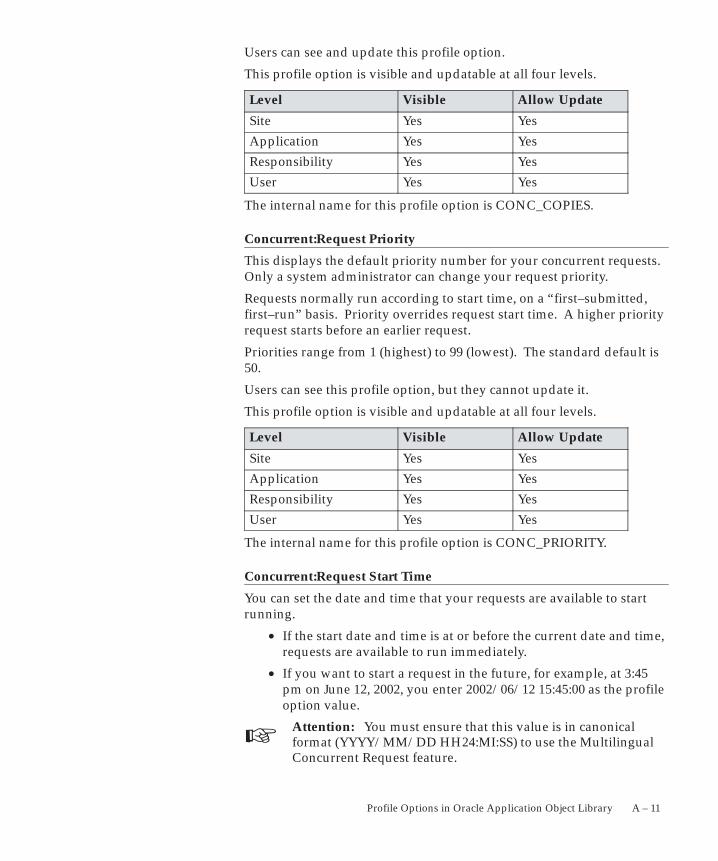
☞
A – 11Profile Options in Oracle Application Object Library
Users can see and update this profile option.
This profile option is visible and updatable at all four levels.
Level Visible Allow Update
Site Yes Yes
Application Yes Yes
Responsibility Yes Yes
User Yes Yes
The internal name for this profile option is CONC_COPIES.
Concurrent:Request Priority
This displays the default priority number for your concurrent requests.Only a system administrator can change your request priority.
Requests normally run according to start time, on a “first–submitted,first–run” basis. Priority overrides request start time. A higher priorityrequest starts before an earlier request.
Priorities range from 1 (highest) to 99 (lowest). The standard default is50.
Users can see this profile option, but they cannot update it.
This profile option is visible and updatable at all four levels.
Level Visible Allow Update
Site Yes Yes
Application Yes Yes
Responsibility Yes Yes
User Yes Yes
The internal name for this profile option is CONC_PRIORITY.
Concurrent:Request Start Time
You can set the date and time that your requests are available to startrunning.
• If the start date and time is at or before the current date and time,requests are available to run immediately.
• If you want to start a request in the future, for example, at 3:45pm on June 12, 2002, you enter 2002/06/12 15:45:00 as the profileoption value.
Attention: You must ensure that this value is in canonicalformat (YYYY/MM/DD HH24:MI:SS) to use the MultilingualConcurrent Request feature.
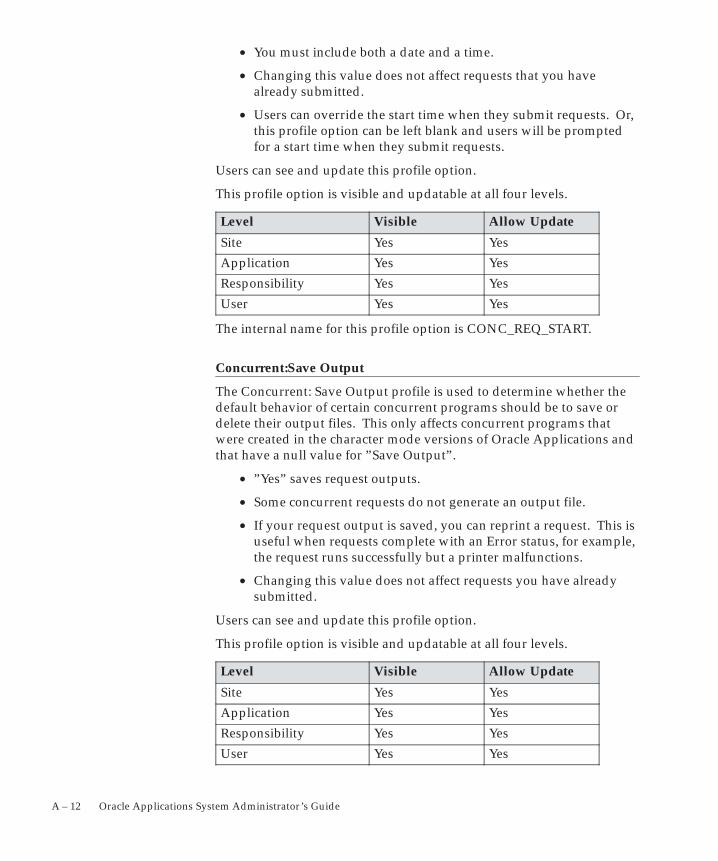
A – 12 Oracle Applications System Administrator’s Guide
• You must include both a date and a time.
• Changing this value does not affect requests that you havealready submitted.
• Users can override the start time when they submit requests. Or,this profile option can be left blank and users will be promptedfor a start time when they submit requests.
Users can see and update this profile option.
This profile option is visible and updatable at all four levels.
Level Visible Allow Update
Site Yes Yes
Application Yes Yes
Responsibility Yes Yes
User Yes Yes
The internal name for this profile option is CONC_REQ_START.
Concurrent:Save Output
The Concurrent: Save Output profile is used to determine whether thedefault behavior of certain concurrent programs should be to save ordelete their output files. This only affects concurrent programs thatwere created in the character mode versions of Oracle Applications andthat have a null value for ”Save Output”.
• ”Yes” saves request outputs.
• Some concurrent requests do not generate an output file.
• If your request output is saved, you can reprint a request. This isuseful when requests complete with an Error status, for example,the request runs successfully but a printer malfunctions.
• Changing this value does not affect requests you have alreadysubmitted.
Users can see and update this profile option.
This profile option is visible and updatable at all four levels.
Level Visible Allow Update
Site Yes Yes
Application Yes Yes
Responsibility Yes Yes
User Yes Yes
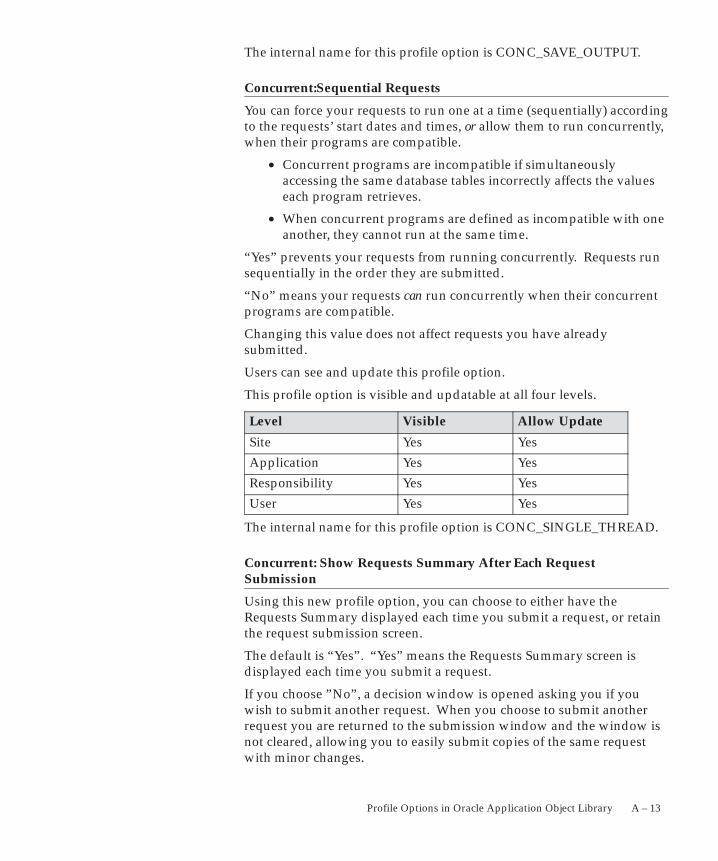
A – 13Profile Options in Oracle Application Object Library
The internal name for this profile option is CONC_SAVE_OUTPUT.
Concurrent:Sequential Requests
You can force your requests to run one at a time (sequentially) accordingto the requests’ start dates and times, or allow them to run concurrently,when their programs are compatible.
• Concurrent programs are incompatible if simultaneouslyaccessing the same database tables incorrectly affects the valueseach program retrieves.
• When concurrent programs are defined as incompatible with oneanother, they cannot run at the same time.
“Yes” prevents your requests from running concurrently. Requests runsequentially in the order they are submitted.
“No” means your requests can run concurrently when their concurrentprograms are compatible.
Changing this value does not affect requests you have alreadysubmitted.
Users can see and update this profile option.
This profile option is visible and updatable at all four levels.
Level Visible Allow Update
Site Yes Yes
Application Yes Yes
Responsibility Yes Yes
User Yes Yes
The internal name for this profile option is CONC_SINGLE_THREAD.
Concurrent: Show Requests Summary After Each RequestSubmission
Using this new profile option, you can choose to either have theRequests Summary displayed each time you submit a request, or retainthe request submission screen.
The default is “Yes”. “Yes” means the Requests Summary screen isdisplayed each time you submit a request.
If you choose ”No”, a decision window is opened asking you if youwish to submit another request. When you choose to submit anotherrequest you are returned to the submission window and the window isnot cleared, allowing you to easily submit copies of the same requestwith minor changes.
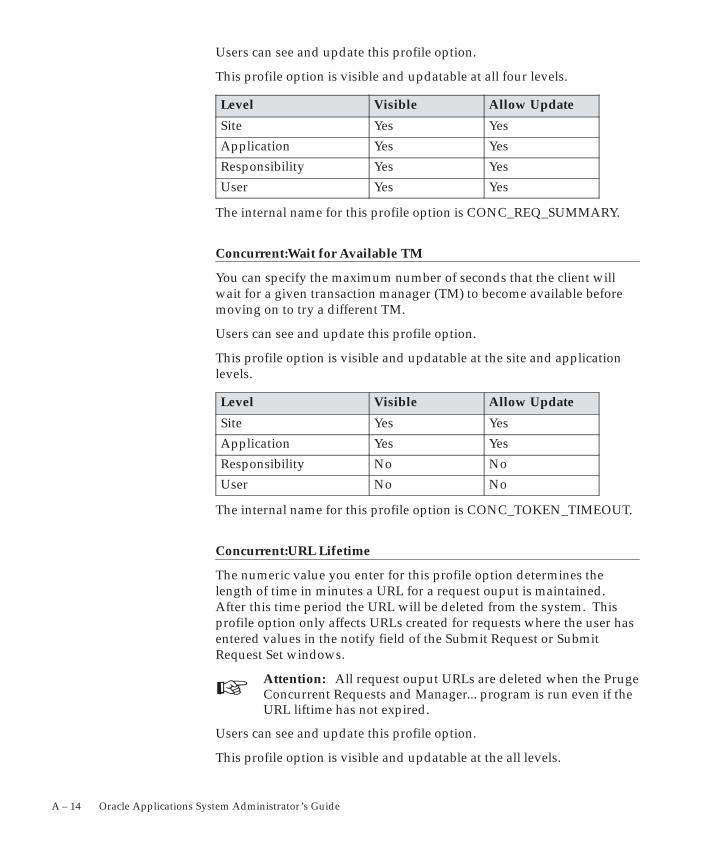
☞
A – 14 Oracle Applications System Administrator’s Guide
Users can see and update this profile option.
This profile option is visible and updatable at all four levels.
Level Visible Allow Update
Site Yes Yes
Application Yes Yes
Responsibility Yes Yes
User Yes Yes
The internal name for this profile option is CONC_REQ_SUMMARY.
Concurrent:Wait for Available TM
You can specify the maximum number of seconds that the client willwait for a given transaction manager (TM) to become available beforemoving on to try a different TM.
Users can see and update this profile option.
This profile option is visible and updatable at the site and applicationlevels.
Level Visible Allow Update
Site Yes Yes
Application Yes Yes
Responsibility No No
User No No
The internal name for this profile option is CONC_TOKEN_TIMEOUT.
Concurrent:URL Lifetime
The numeric value you enter for this profile option determines thelength of time in minutes a URL for a request ouput is maintained.After this time period the URL will be deleted from the system. Thisprofile option only affects URLs created for requests where the user hasentered values in the notify field of the Submit Request or SubmitRequest Set windows.
Attention: All request ouput URLs are deleted when the PrugeConcurrent Requests and Manager... program is run even if theURL liftime has not expired.
Users can see and update this profile option.
This profile option is visible and updatable at the all levels.
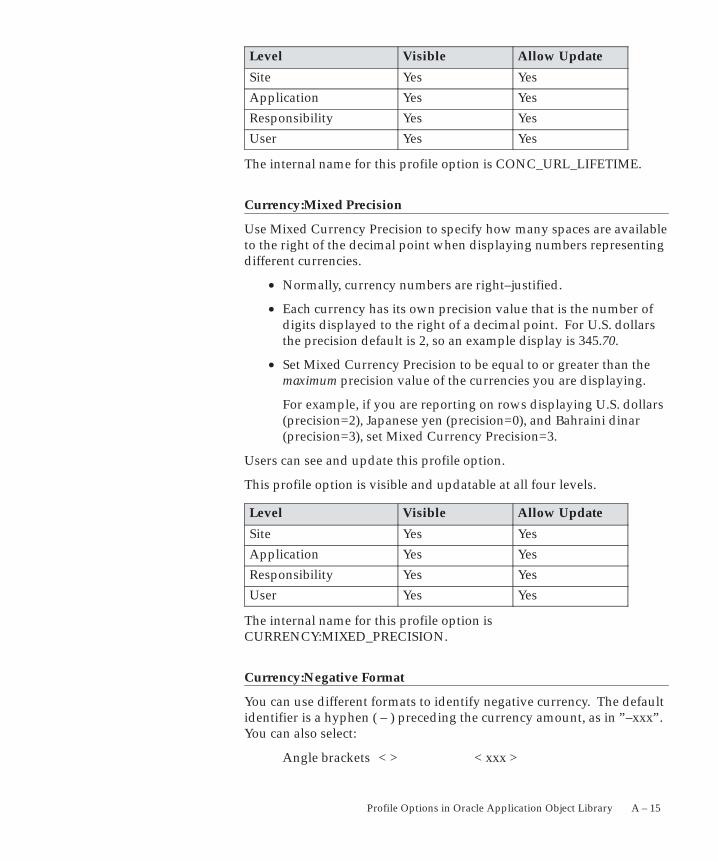
A – 15Profile Options in Oracle Application Object Library
Level Visible Allow Update
Site Yes Yes
Application Yes Yes
Responsibility Yes Yes
User Yes Yes
The internal name for this profile option is CONC_URL_LIFETIME.
Currency:Mixed Precision
Use Mixed Currency Precision to specify how many spaces are availableto the right of the decimal point when displaying numbers representingdifferent currencies.
• Normally, currency numbers are right–justified.
• Each currency has its own precision value that is the number ofdigits displayed to the right of a decimal point. For U.S. dollarsthe precision default is 2, so an example display is 345.70.
• Set Mixed Currency Precision to be equal to or greater than themaximum precision value of the currencies you are displaying.
For example, if you are reporting on rows displaying U.S. dollars(precision=2), Japanese yen (precision=0), and Bahraini dinar(precision=3), set Mixed Currency Precision=3.
Users can see and update this profile option.
This profile option is visible and updatable at all four levels.
Level Visible Allow Update
Site Yes Yes
Application Yes Yes
Responsibility Yes Yes
User Yes Yes
The internal name for this profile option isCURRENCY:MIXED_PRECISION.
Currency:Negative Format
You can use different formats to identify negative currency. The defaultidentifier is a hyphen ( – ) preceding the currency amount, as in ”–xxx”.You can also select:
Angle brackets < > < xxx >
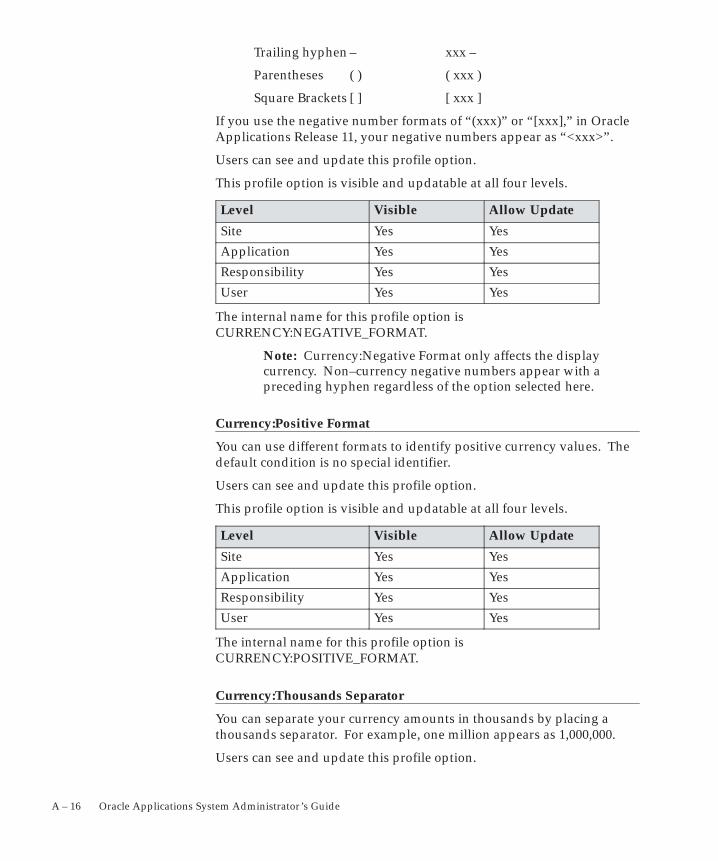
A – 16 Oracle Applications System Administrator’s Guide
Trailing hyphen – xxx –
Parentheses ( ) ( xxx )
Square Brackets [ ] [ xxx ]
If you use the negative number formats of “(xxx)” or “[xxx],” in OracleApplications Release 11, your negative numbers appear as “<xxx>”.
Users can see and update this profile option.
This profile option is visible and updatable at all four levels.
Level Visible Allow Update
Site Yes Yes
Application Yes Yes
Responsibility Yes Yes
User Yes Yes
The internal name for this profile option isCURRENCY:NEGATIVE_FORMAT.
Note: Currency:Negative Format only affects the displaycurrency. Non–currency negative numbers appear with apreceding hyphen regardless of the option selected here.
Currency:Positive Format
You can use different formats to identify positive currency values. Thedefault condition is no special identifier.
Users can see and update this profile option.
This profile option is visible and updatable at all four levels.
Level Visible Allow Update
Site Yes Yes
Application Yes Yes
Responsibility Yes Yes
User Yes Yes
The internal name for this profile option isCURRENCY:POSITIVE_FORMAT.
Currency:Thousands Separator
You can separate your currency amounts in thousands by placing athousands separator. For example, one million appears as 1,000,000.
Users can see and update this profile option.
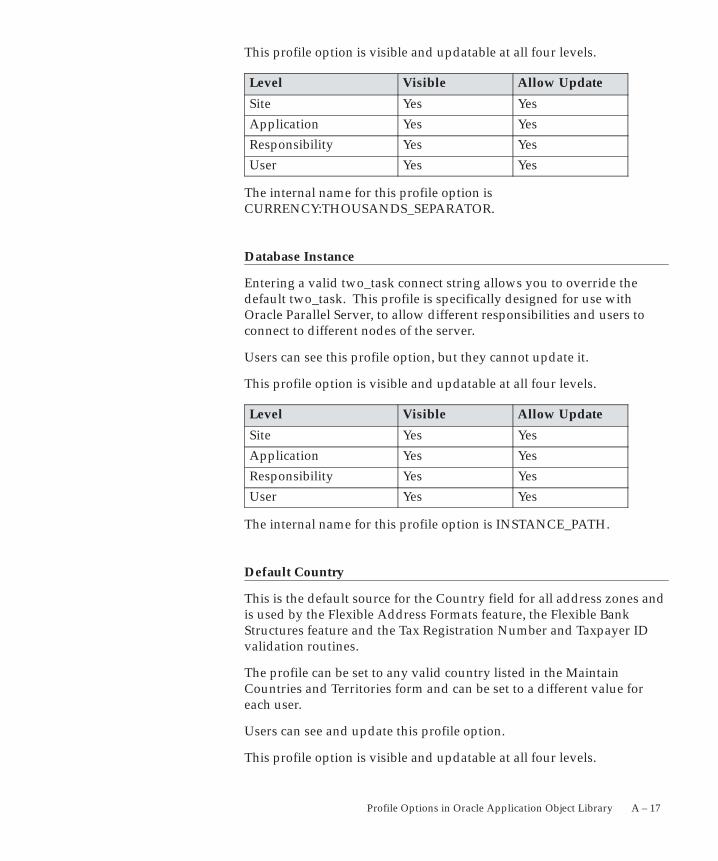
A – 17Profile Options in Oracle Application Object Library
This profile option is visible and updatable at all four levels.
Level Visible Allow Update
Site Yes Yes
Application Yes Yes
Responsibility Yes Yes
User Yes Yes
The internal name for this profile option isCURRENCY:THOUSANDS_SEPARATOR.
Database Instance
Entering a valid two_task connect string allows you to override thedefault two_task. This profile is specifically designed for use withOracle Parallel Server, to allow different responsibilities and users toconnect to different nodes of the server.
Users can see this profile option, but they cannot update it.
This profile option is visible and updatable at all four levels.
Level Visible Allow Update
Site Yes Yes
Application Yes Yes
Responsibility Yes Yes
User Yes Yes
The internal name for this profile option is INSTANCE_PATH.
Default Country
This is the default source for the Country field for all address zones andis used by the Flexible Address Formats feature, the Flexible BankStructures feature and the Tax Registration Number and Taxpayer IDvalidation routines.
The profile can be set to any valid country listed in the MaintainCountries and Territories form and can be set to a different value foreach user.
Users can see and update this profile option.
This profile option is visible and updatable at all four levels.
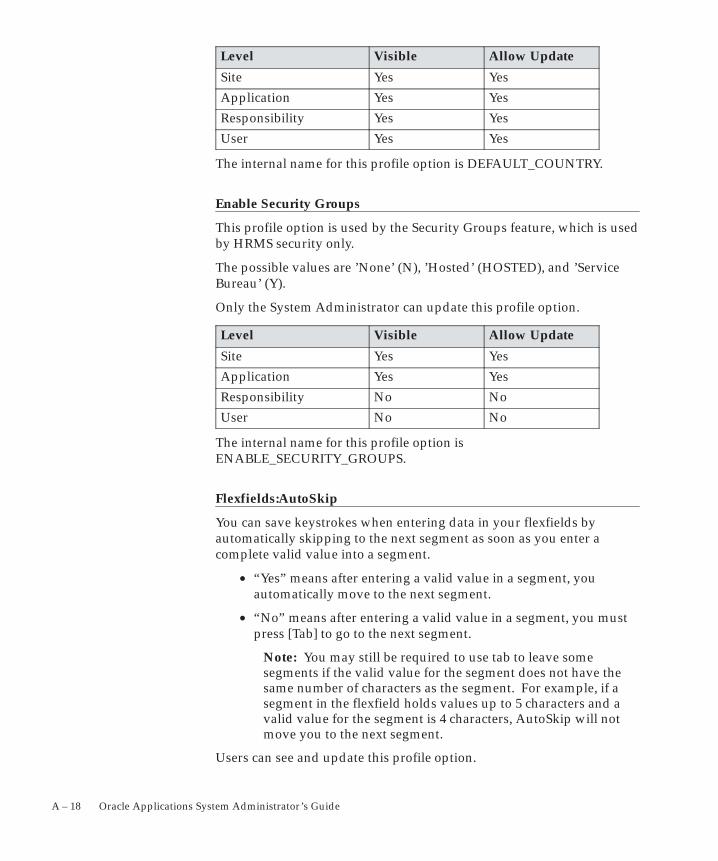
A – 18 Oracle Applications System Administrator’s Guide
Level Visible Allow Update
Site Yes Yes
Application Yes Yes
Responsibility Yes Yes
User Yes Yes
The internal name for this profile option is DEFAULT_COUNTRY.
Enable Security Groups
This profile option is used by the Security Groups feature, which is usedby HRMS security only.
The possible values are ’None’ (N), ’Hosted’ (HOSTED), and ’ServiceBureau’ (Y).
Only the System Administrator can update this profile option.
Level Visible Allow Update
Site Yes Yes
Application Yes Yes
Responsibility No No
User No No
The internal name for this profile option isENABLE_SECURITY_GROUPS.
Flexfields:AutoSkip
You can save keystrokes when entering data in your flexfields byautomatically skipping to the next segment as soon as you enter acomplete valid value into a segment.
• “Yes” means after entering a valid value in a segment, youautomatically move to the next segment.
• “No” means after entering a valid value in a segment, you mustpress [Tab] to go to the next segment.
Note: You may still be required to use tab to leave somesegments if the valid value for the segment does not have thesame number of characters as the segment. For example, if asegment in the flexfield holds values up to 5 characters and avalid value for the segment is 4 characters, AutoSkip will notmove you to the next segment.
Users can see and update this profile option.
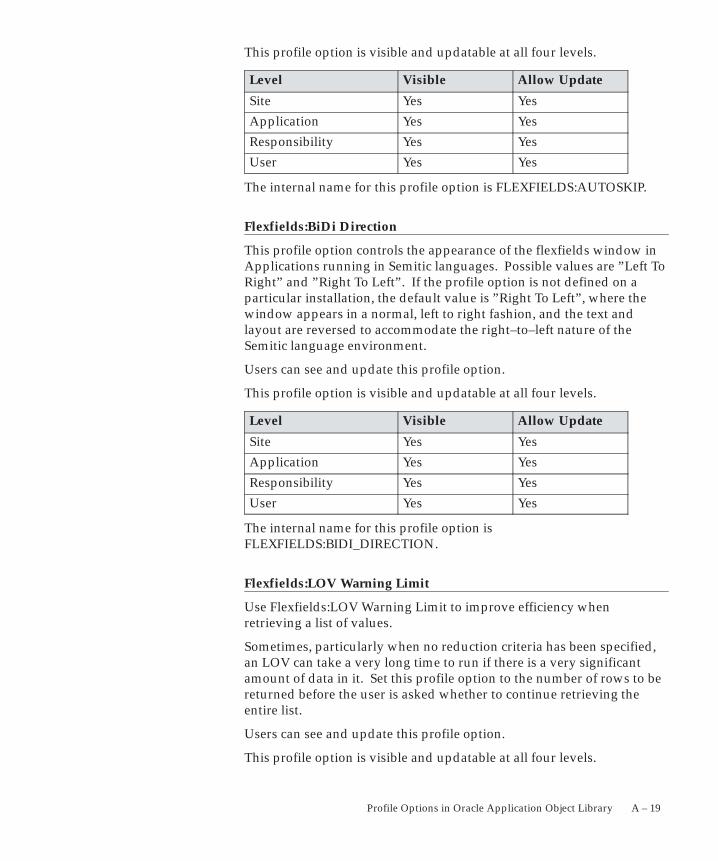
A – 19Profile Options in Oracle Application Object Library
This profile option is visible and updatable at all four levels.
Level Visible Allow Update
Site Yes Yes
Application Yes Yes
Responsibility Yes Yes
User Yes Yes
The internal name for this profile option is FLEXFIELDS:AUTOSKIP.
Flexfields:BiDi Direction
This profile option controls the appearance of the flexfields window inApplications running in Semitic languages. Possible values are ”Left ToRight” and ”Right To Left”. If the profile option is not defined on aparticular installation, the default value is ”Right To Left”, where thewindow appears in a normal, left to right fashion, and the text andlayout are reversed to accommodate the right–to–left nature of theSemitic language environment.
Users can see and update this profile option.
This profile option is visible and updatable at all four levels.
Level Visible Allow Update
Site Yes Yes
Application Yes Yes
Responsibility Yes Yes
User Yes Yes
The internal name for this profile option isFLEXFIELDS:BIDI_DIRECTION.
Flexfields:LOV Warning Limit
Use Flexfields:LOV Warning Limit to improve efficiency whenretrieving a list of values.
Sometimes, particularly when no reduction criteria has been specified,an LOV can take a very long time to run if there is a very significantamount of data in it. Set this profile option to the number of rows to bereturned before the user is asked whether to continue retrieving theentire list.
Users can see and update this profile option.
This profile option is visible and updatable at all four levels.
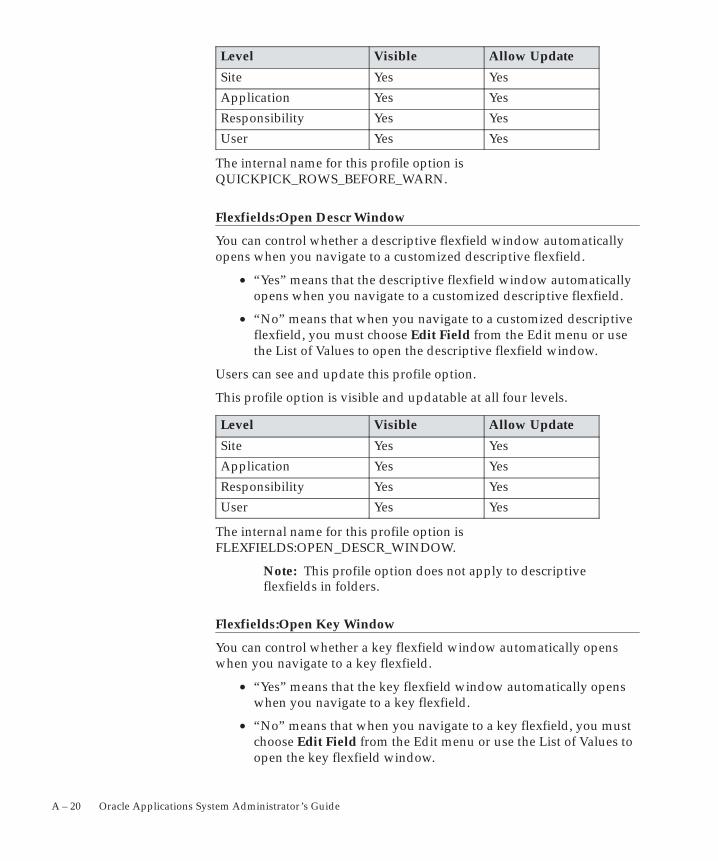
A – 20 Oracle Applications System Administrator’s Guide
Level Visible Allow Update
Site Yes Yes
Application Yes Yes
Responsibility Yes Yes
User Yes Yes
The internal name for this profile option isQUICKPICK_ROWS_BEFORE_WARN.
Flexfields:Open Descr Window
You can control whether a descriptive flexfield window automaticallyopens when you navigate to a customized descriptive flexfield.
• “Yes” means that the descriptive flexfield window automaticallyopens when you navigate to a customized descriptive flexfield.
• “No” means that when you navigate to a customized descriptiveflexfield, you must choose Edit Field from the Edit menu or usethe List of Values to open the descriptive flexfield window.
Users can see and update this profile option.
This profile option is visible and updatable at all four levels.
Level Visible Allow Update
Site Yes Yes
Application Yes Yes
Responsibility Yes Yes
User Yes Yes
The internal name for this profile option isFLEXFIELDS:OPEN_DESCR_WINDOW.
Note: This profile option does not apply to descriptiveflexfields in folders.
Flexfields:Open Key Window
You can control whether a key flexfield window automatically openswhen you navigate to a key flexfield.
• “Yes” means that the key flexfield window automatically openswhen you navigate to a key flexfield.
• “No” means that when you navigate to a key flexfield, you mustchoose Edit Field from the Edit menu or use the List of Values toopen the key flexfield window.
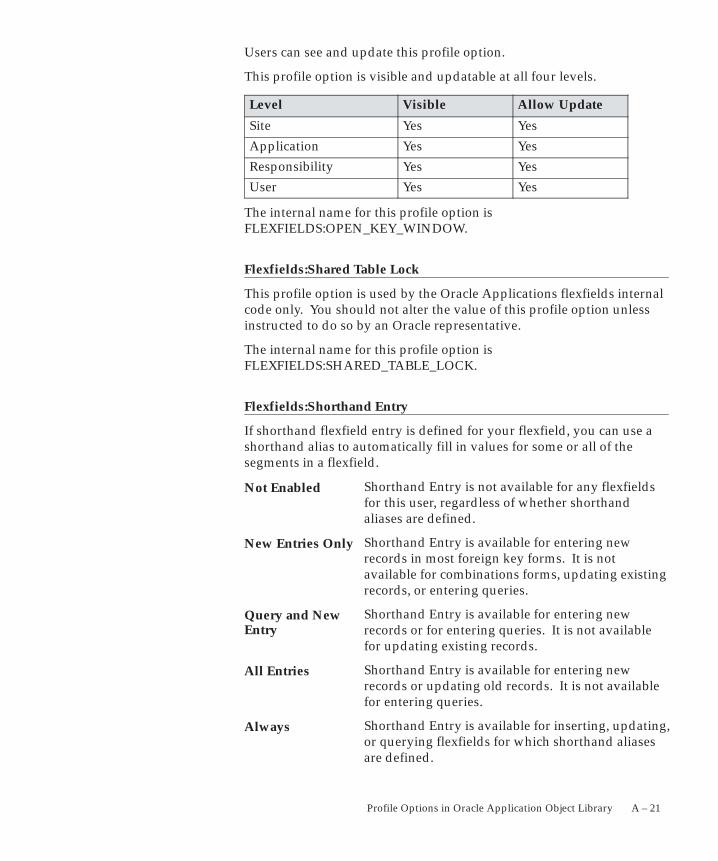
A – 21Profile Options in Oracle Application Object Library
Users can see and update this profile option.
This profile option is visible and updatable at all four levels.
Level Visible Allow Update
Site Yes Yes
Application Yes Yes
Responsibility Yes Yes
User Yes Yes
The internal name for this profile option isFLEXFIELDS:OPEN_KEY_WINDOW.
Flexfields:Shared Table Lock
This profile option is used by the Oracle Applications flexfields internalcode only. You should not alter the value of this profile option unlessinstructed to do so by an Oracle representative.
The internal name for this profile option isFLEXFIELDS:SHARED_TABLE_LOCK.
Flexfields:Shorthand Entry
If shorthand flexfield entry is defined for your flexfield, you can use ashorthand alias to automatically fill in values for some or all of thesegments in a flexfield.
Shorthand Entry is not available for any flexfieldsfor this user, regardless of whether shorthandaliases are defined.
Shorthand Entry is available for entering newrecords in most foreign key forms. It is notavailable for combinations forms, updating existingrecords, or entering queries.
Shorthand Entry is available for entering newrecords or for entering queries. It is not availablefor updating existing records.
Shorthand Entry is available for entering newrecords or updating old records. It is not availablefor entering queries.
Shorthand Entry is available for inserting, updating,or querying flexfields for which shorthand aliasesare defined.
Not Enabled
New Entries Only
Query and NewEntry
All Entries
Always
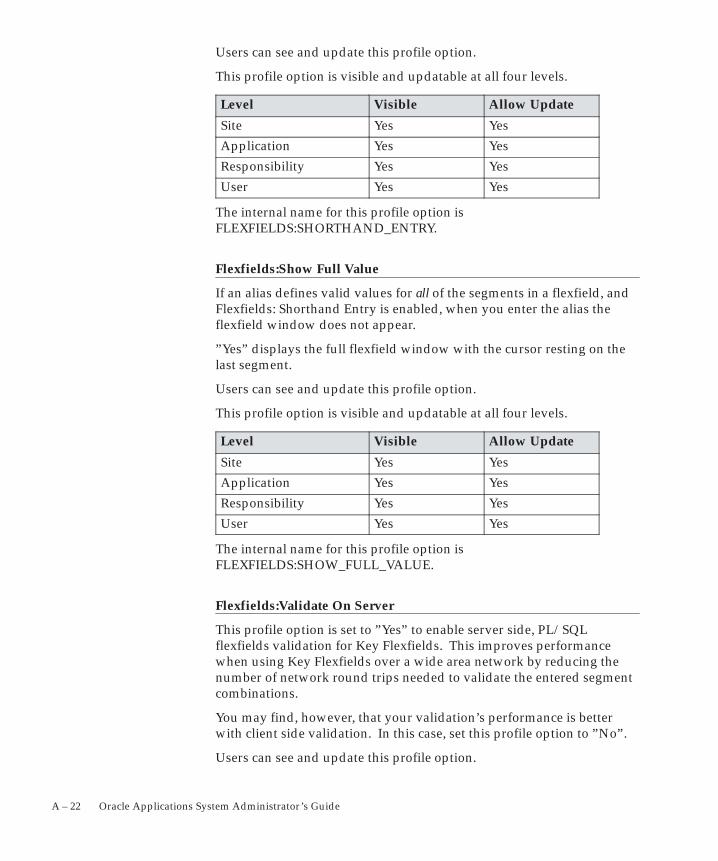
A – 22 Oracle Applications System Administrator’s Guide
Users can see and update this profile option.
This profile option is visible and updatable at all four levels.
Level Visible Allow Update
Site Yes Yes
Application Yes Yes
Responsibility Yes Yes
User Yes Yes
The internal name for this profile option isFLEXFIELDS:SHORTHAND_ENTRY.
Flexfields:Show Full Value
If an alias defines valid values for all of the segments in a flexfield, andFlexfields: Shorthand Entry is enabled, when you enter the alias theflexfield window does not appear.
”Yes” displays the full flexfield window with the cursor resting on thelast segment.
Users can see and update this profile option.
This profile option is visible and updatable at all four levels.
Level Visible Allow Update
Site Yes Yes
Application Yes Yes
Responsibility Yes Yes
User Yes Yes
The internal name for this profile option isFLEXFIELDS:SHOW_FULL_VALUE.
Flexfields:Validate On Server
This profile option is set to ”Yes” to enable server side, PL/SQLflexfields validation for Key Flexfields. This improves performancewhen using Key Flexfields over a wide area network by reducing thenumber of network round trips needed to validate the entered segmentcombinations.
You may find, however, that your validation’s performance is betterwith client side validation. In this case, set this profile option to ”No”.
Users can see and update this profile option.
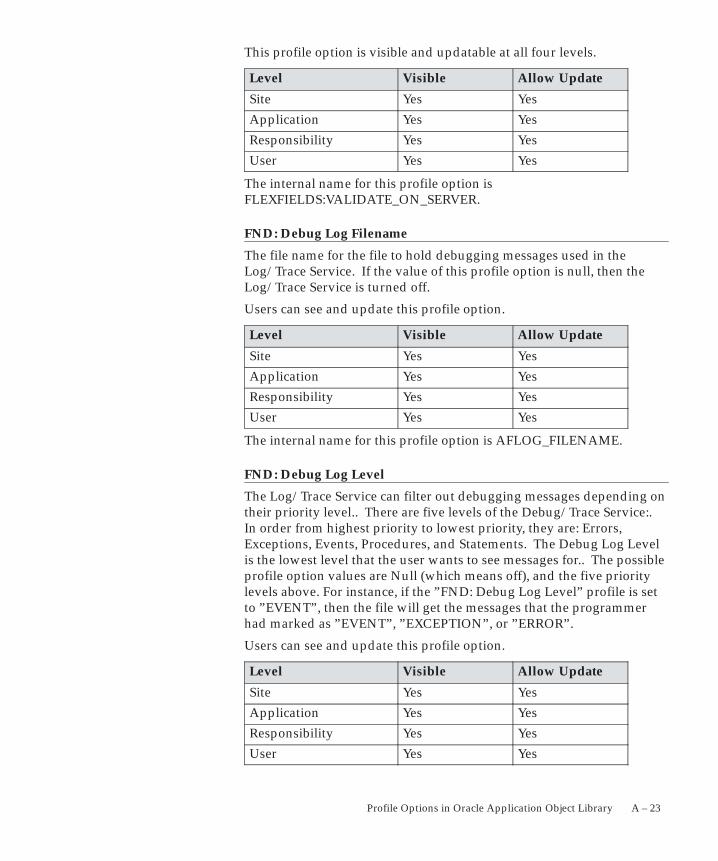
A – 23Profile Options in Oracle Application Object Library
This profile option is visible and updatable at all four levels.
Level Visible Allow Update
Site Yes Yes
Application Yes Yes
Responsibility Yes Yes
User Yes Yes
The internal name for this profile option isFLEXFIELDS:VALIDATE_ON_SERVER.
FND: Debug Log Filename
The file name for the file to hold debugging messages used in theLog/Trace Service. If the value of this profile option is null, then theLog/Trace Service is turned off.
Users can see and update this profile option.
Level Visible Allow Update
Site Yes Yes
Application Yes Yes
Responsibility Yes Yes
User Yes Yes
The internal name for this profile option is AFLOG_FILENAME.
FND: Debug Log Level
The Log/Trace Service can filter out debugging messages depending ontheir priority level.. There are five levels of the Debug/Trace Service:.In order from highest priority to lowest priority, they are: Errors,Exceptions, Events, Procedures, and Statements. The Debug Log Levelis the lowest level that the user wants to see messages for.. The possibleprofile option values are Null (which means off), and the five prioritylevels above. For instance, if the ”FND: Debug Log Level” profile is setto ”EVENT”, then the file will get the messages that the programmerhad marked as ”EVENT”, ”EXCEPTION”, or ”ERROR”.
Users can see and update this profile option.
Level Visible Allow Update
Site Yes Yes
Application Yes Yes
Responsibility Yes Yes
User Yes Yes

A – 24 Oracle Applications System Administrator’s Guide
The internal name for this profile option is AFLOG_LEVEL.
FND: Debug Log Module
The Log/Trace Service can filter out debugging messages depending ontheir module. Module names are unique across applications and codinglanguages. If a module is specified for this profile option, then onlymessages for that module will be written to the log file. If this profileoption is left blank then messages for all modules will be written to thelog file.
Users can see and update this profile option.
Level Visible Allow Update
Site Yes Yes
Application Yes Yes
Responsibility Yes Yes
User Yes Yes
The internal name for this profile option is AFLOG_MODULE.
FND: Enable Cancel Query
Oracle Applications allows end users to cancel certain long–runningqueries, such as retrieving data in a block. When these operationsexceed a threshold of time, approximately ten seconds, a dialog willdisplay that allows the user to cancel the query.
Set the FND: Enable Cancel Query profile option to Yes if you wish toenable the ability to cancel a form query. This profile option may be setat the site, application, responsibility or the user level.
Users can see but not update this profile option.
Level Visible Allow Update
Site Yes Yes
Application Yes Yes
Responsibility Yes Yes
User Yes Yes
The internal name for this profile option isFND_ENABLE_CANCEL_QUERY.
FND: Indicator Colors
The default for this profile option is null, which means ”Yes.” When thisprofile option is set to Yes:
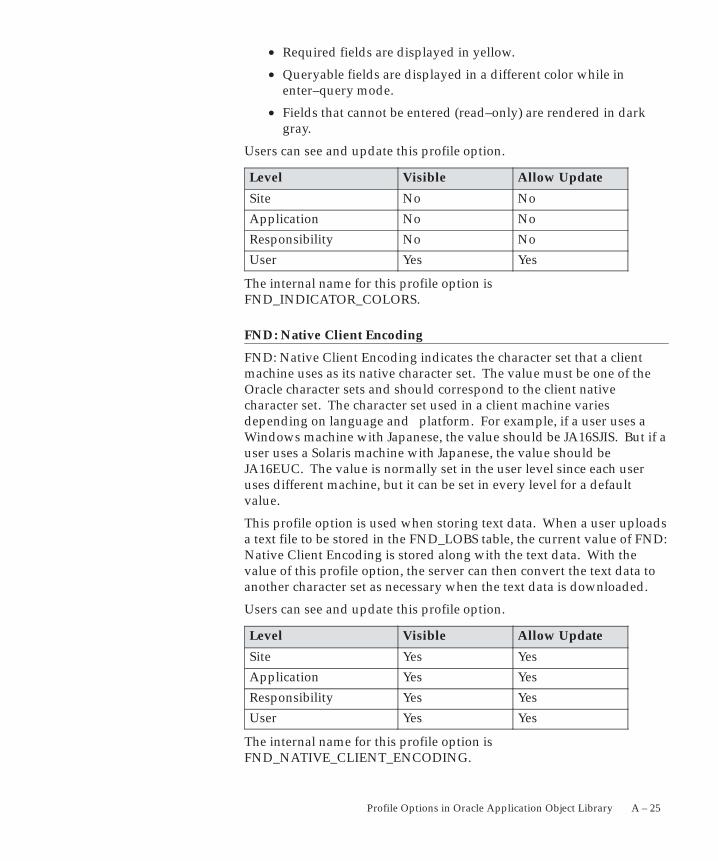
A – 25Profile Options in Oracle Application Object Library
• Required fields are displayed in yellow.
• Queryable fields are displayed in a different color while inenter–query mode.
• Fields that cannot be entered (read–only) are rendered in darkgray.
Users can see and update this profile option.
Level Visible Allow Update
Site No No
Application No No
Responsibility No No
User Yes Yes
The internal name for this profile option isFND_INDICATOR_COLORS.
FND: Native Client Encoding
FND: Native Client Encoding indicates the character set that a clientmachine uses as its native character set. The value must be one of theOracle character sets and should correspond to the client nativecharacter set. The character set used in a client machine variesdepending on language and platform. For example, if a user uses aWindows machine with Japanese, the value should be JA16SJIS. But if auser uses a Solaris machine with Japanese, the value should beJA16EUC. The value is normally set in the user level since each useruses different machine, but it can be set in every level for a defaultvalue.
This profile option is used when storing text data. When a user uploadsa text file to be stored in the FND_LOBS table, the current value of FND:Native Client Encoding is stored along with the text data. With thevalue of this profile option, the server can then convert the text data toanother character set as necessary when the text data is downloaded.
Users can see and update this profile option.
Level Visible Allow Update
Site Yes Yes
Application Yes Yes
Responsibility Yes Yes
User Yes Yes
The internal name for this profile option isFND_NATIVE_CLIENT_ENCODING.
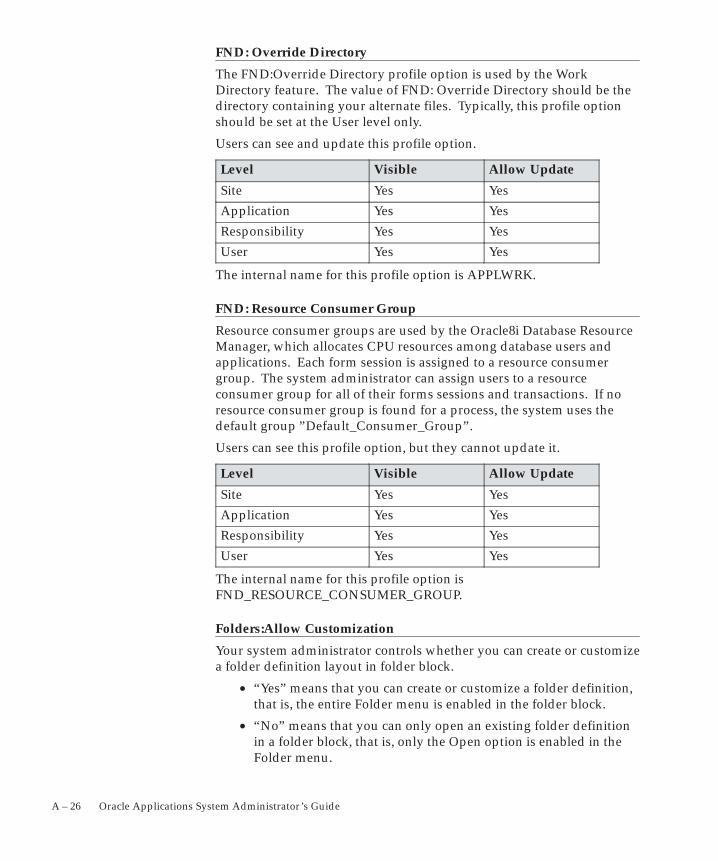
A – 26 Oracle Applications System Administrator’s Guide
FND: Override Directory
The FND:Override Directory profile option is used by the WorkDirectory feature. The value of FND: Override Directory should be thedirectory containing your alternate files. Typically, this profile optionshould be set at the User level only.
Users can see and update this profile option.
Level Visible Allow Update
Site Yes Yes
Application Yes Yes
Responsibility Yes Yes
User Yes Yes
The internal name for this profile option is APPLWRK.
FND: Resource Consumer Group
Resource consumer groups are used by the Oracle8i Database ResourceManager, which allocates CPU resources among database users andapplications. Each form session is assigned to a resource consumergroup. The system administrator can assign users to a resourceconsumer group for all of their forms sessions and transactions. If noresource consumer group is found for a process, the system uses thedefault group ”Default_Consumer_Group”.
Users can see this profile option, but they cannot update it.
Level Visible Allow Update
Site Yes Yes
Application Yes Yes
Responsibility Yes Yes
User Yes Yes
The internal name for this profile option isFND_RESOURCE_CONSUMER_GROUP.
Folders:Allow Customization
Your system administrator controls whether you can create or customizea folder definition layout in folder block.
• “Yes” means that you can create or customize a folder definition,that is, the entire Folder menu is enabled in the folder block.
• “No” means that you can only open an existing folder definitionin a folder block, that is, only the Open option is enabled in theFolder menu.
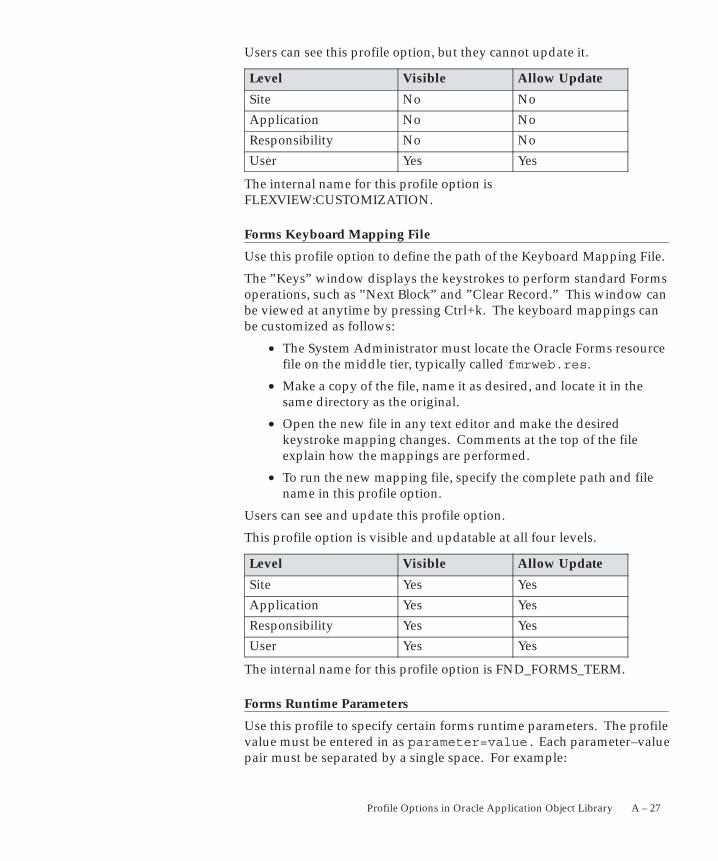
A – 27Profile Options in Oracle Application Object Library
Users can see this profile option, but they cannot update it.
Level Visible Allow Update
Site No No
Application No No
Responsibility No No
User Yes Yes
The internal name for this profile option isFLEXVIEW:CUSTOMIZATION.
Forms Keyboard Mapping File
Use this profile option to define the path of the Keyboard Mapping File.
The ”Keys” window displays the keystrokes to perform standard Formsoperations, such as ”Next Block” and ”Clear Record.” This window canbe viewed at anytime by pressing Ctrl+k. The keyboard mappings canbe customized as follows:
• The System Administrator must locate the Oracle Forms resourcefile on the middle tier, typically called fmrweb.res.
• Make a copy of the file, name it as desired, and locate it in thesame directory as the original.
• Open the new file in any text editor and make the desiredkeystroke mapping changes. Comments at the top of the fileexplain how the mappings are performed.
• To run the new mapping file, specify the complete path and filename in this profile option.
Users can see and update this profile option.
This profile option is visible and updatable at all four levels.
Level Visible Allow Update
Site Yes Yes
Application Yes Yes
Responsibility Yes Yes
User Yes Yes
The internal name for this profile option is FND_FORMS_TERM.
Forms Runtime Parameters
Use this profile to specify certain forms runtime parameters. The profilevalue must be entered in as parameter=value. Each parameter–valuepair must be separated by a single space. For example:
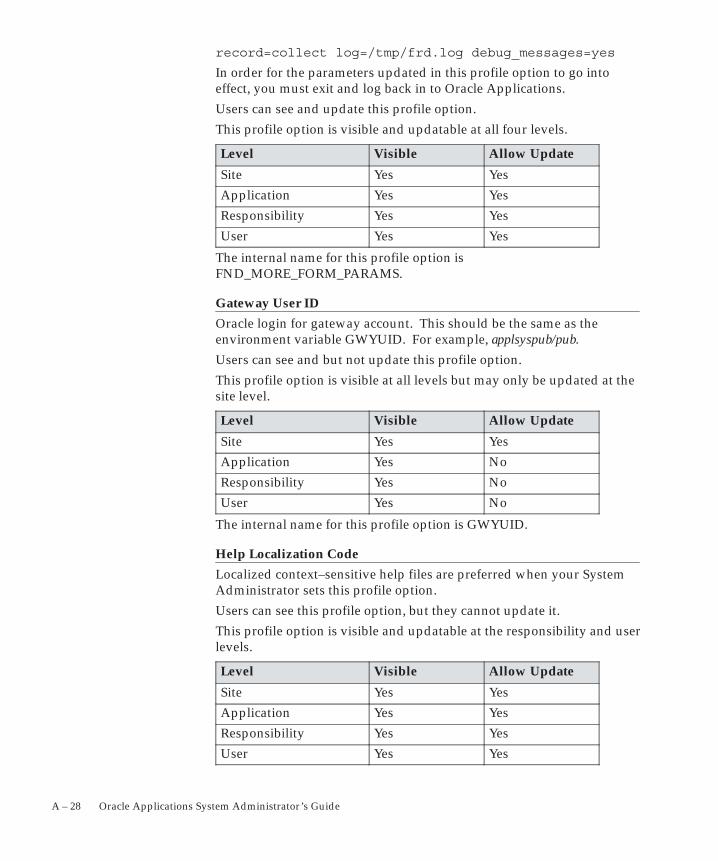
A – 28 Oracle Applications System Administrator’s Guide
record=collect log=/tmp/frd.log debug_messages=yes
In order for the parameters updated in this profile option to go intoeffect, you must exit and log back in to Oracle Applications.
Users can see and update this profile option.
This profile option is visible and updatable at all four levels.
Level Visible Allow Update
Site Yes Yes
Application Yes Yes
Responsibility Yes Yes
User Yes Yes
The internal name for this profile option isFND_MORE_FORM_PARAMS.
Gateway User ID
Oracle login for gateway account. This should be the same as theenvironment variable GWYUID. For example, applsyspub/pub.
Users can see and but not update this profile option.
This profile option is visible at all levels but may only be updated at thesite level.
Level Visible Allow Update
Site Yes Yes
Application Yes No
Responsibility Yes No
User Yes No
The internal name for this profile option is GWYUID.
Help Localization Code
Localized context–sensitive help files are preferred when your SystemAdministrator sets this profile option.
Users can see this profile option, but they cannot update it.
This profile option is visible and updatable at the responsibility and userlevels.
Level Visible Allow Update
Site Yes Yes
Application Yes Yes
Responsibility Yes Yes
User Yes Yes
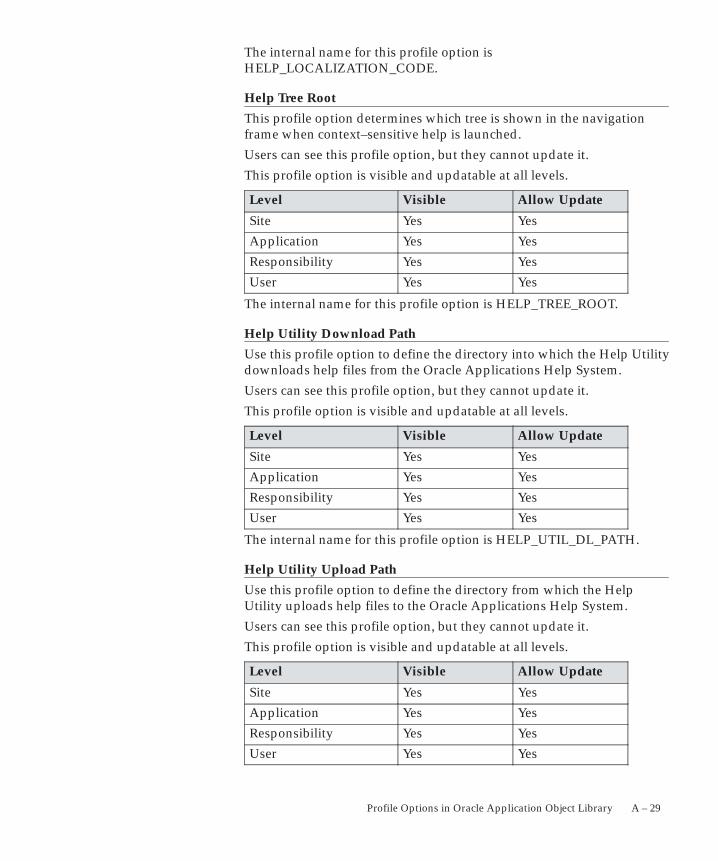
A – 29Profile Options in Oracle Application Object Library
The internal name for this profile option isHELP_LOCALIZATION_CODE.
Help Tree Root
This profile option determines which tree is shown in the navigationframe when context–sensitive help is launched.
Users can see this profile option, but they cannot update it.
This profile option is visible and updatable at all levels.
Level Visible Allow Update
Site Yes Yes
Application Yes Yes
Responsibility Yes Yes
User Yes Yes
The internal name for this profile option is HELP_TREE_ROOT.
Help Utility Download Path
Use this profile option to define the directory into which the Help Utilitydownloads help files from the Oracle Applications Help System.
Users can see this profile option, but they cannot update it.
This profile option is visible and updatable at all levels.
Level Visible Allow Update
Site Yes Yes
Application Yes Yes
Responsibility Yes Yes
User Yes Yes
The internal name for this profile option is HELP_UTIL_DL_PATH.
Help Utility Upload Path
Use this profile option to define the directory from which the HelpUtility uploads help files to the Oracle Applications Help System.
Users can see this profile option, but they cannot update it.
This profile option is visible and updatable at all levels.
Level Visible Allow Update
Site Yes Yes
Application Yes Yes
Responsibility Yes Yes
User Yes Yes

A – 30 Oracle Applications System Administrator’s Guide
The internal name for this profile option is HELP_UTIL_UL_PATH.
Hide Diagnostics Menu Entry
This profile option determines whether users can access the Diagnosticsmenu entry from the Help menu. If it is set to Yes, the Diagnostics menuentry is hidden. If it is set to No, the Diagnostics menu entry is visible.
Users cannot see nor change this profile option.
This profile option is visible and updatable at the all levels.
Level Visible Allow Update
Site Yes Yes
Application Yes Yes
Responsibility Yes Yes
User Yes Yes
The internal name for this profile option is FND_HIDE_DIAGNOSTICS.
ICX: Client IANA Encoding
This profile option is used to determine the character set of the textdisplayed by Java Server pages.
This profile option must be set to the correct character set (that is, thecharacter set of the Apache server on the Web tier) for the online helpsystem to support character sets other than American English.
The default setting is the US character set (ISO–8859–1).
Users can see this profile option, but they cannot update it.
This profile option is visible and updatable at the all levels.
Level Visible Allow Update
Site Yes Yes
Application Yes Yes
Responsibility Yes Yes
User Yes Yes
The internal name for this profile option isICX_CLIENT_IANA_ENCODING.
ICX: Discoverer Launcher, Forms Launcher, and Report Launcher
These profile options are used by the Oracle Applications PersonalHomepage.

A – 31Profile Options in Oracle Application Object Library
Set the site level value of each of these profile options to the base URLfor launching each application. The profile option value should besufficient to launch the application, but should not include anyadditional parameters which may be supplied by the PersonalHomepage.
Users can see these profile options, but they cannot update them.
These profile options are visible and updatable at all levels.
Level Visible Allow Update
Site Yes Yes
Application Yes Yes
Responsibility Yes Yes
User Yes Yes
The internal name for these profile options areICX_DISCOVERER_LAUNCHER, ICX_FORMS_LAUNCHER, andICX_REPORT_LAUNCHER.
ICX: Limit connect
This profile option determines the maximum number of connectionrequests a user can make in a single session.
Users cannot see or update this profile option.
Level Visible Allow Update
Site Yes Yes
Application No No
Responsibility No No
User Yes Yes
The internal name for this profile option is ICX_LIMIT_CONNECT.
ICX: Limit time
This profile option determines the absolute maximum duration (inhours) of a user’s session, regardless of activity.
Users cannot see or update this profile option.
Level Visible Allow Update
Site Yes Yes
Application No No
Responsibility No No
User Yes Yes
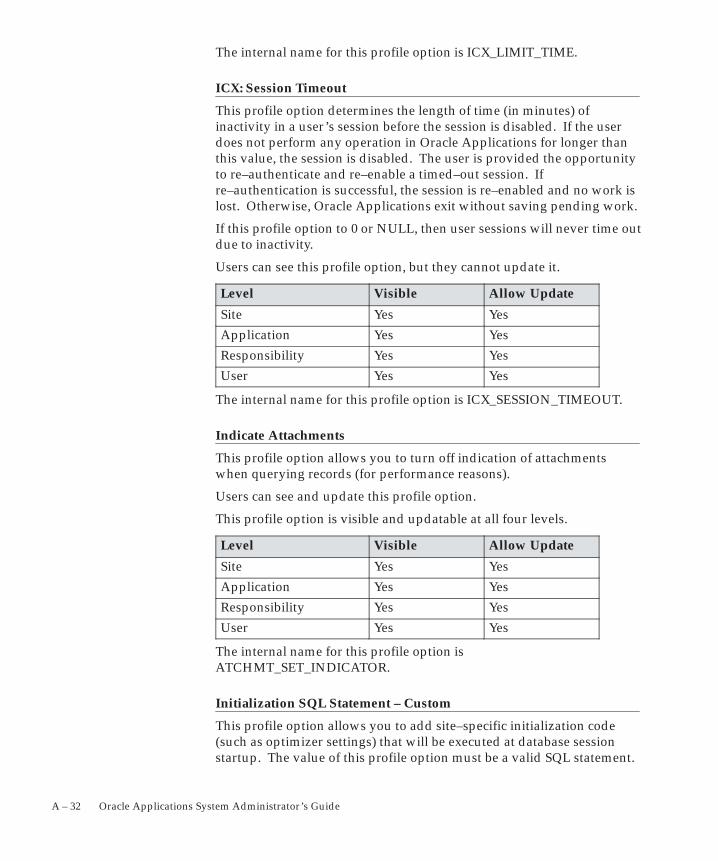
A – 32 Oracle Applications System Administrator’s Guide
The internal name for this profile option is ICX_LIMIT_TIME.
ICX: Session Timeout
This profile option determines the length of time (in minutes) ofinactivity in a user’s session before the session is disabled. If the userdoes not perform any operation in Oracle Applications for longer thanthis value, the session is disabled. The user is provided the opportunityto re–authenticate and re–enable a timed–out session. Ifre–authentication is successful, the session is re–enabled and no work islost. Otherwise, Oracle Applications exit without saving pending work.
If this profile option to 0 or NULL, then user sessions will never time outdue to inactivity.
Users can see this profile option, but they cannot update it.
Level Visible Allow Update
Site Yes Yes
Application Yes Yes
Responsibility Yes Yes
User Yes Yes
The internal name for this profile option is ICX_SESSION_TIMEOUT.
Indicate Attachments
This profile option allows you to turn off indication of attachmentswhen querying records (for performance reasons).
Users can see and update this profile option.
This profile option is visible and updatable at all four levels.
Level Visible Allow Update
Site Yes Yes
Application Yes Yes
Responsibility Yes Yes
User Yes Yes
The internal name for this profile option isATCHMT_SET_INDICATOR.
Initialization SQL Statement – Custom
This profile option allows you to add site–specific initialization code(such as optimizer settings) that will be executed at database sessionstartup. The value of this profile option must be a valid SQL statement.
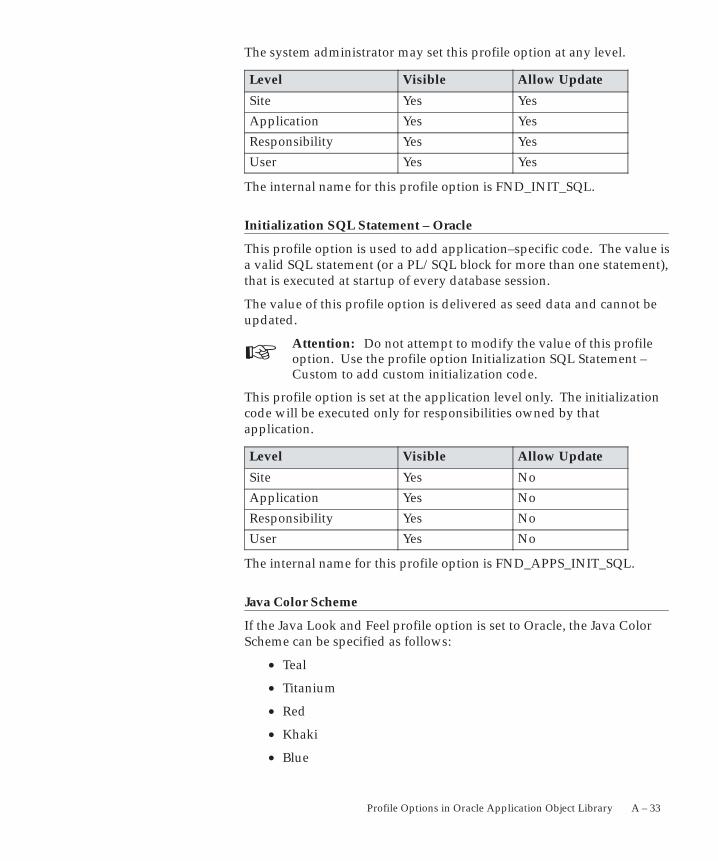
☞
A – 33Profile Options in Oracle Application Object Library
The system administrator may set this profile option at any level.
Level Visible Allow Update
Site Yes Yes
Application Yes Yes
Responsibility Yes Yes
User Yes Yes
The internal name for this profile option is FND_INIT_SQL.
Initialization SQL Statement – Oracle
This profile option is used to add application–specific code. The value isa valid SQL statement (or a PL/SQL block for more than one statement),that is executed at startup of every database session.
The value of this profile option is delivered as seed data and cannot beupdated.
Attention: Do not attempt to modify the value of this profileoption. Use the profile option Initialization SQL Statement –Custom to add custom initialization code.
This profile option is set at the application level only. The initializationcode will be executed only for responsibilities owned by thatapplication.
Level Visible Allow Update
Site Yes No
Application Yes No
Responsibility Yes No
User Yes No
The internal name for this profile option is FND_APPS_INIT_SQL.
Java Color Scheme
If the Java Look and Feel profile option is set to Oracle, the Java ColorScheme can be specified as follows:
• Teal
• Titanium
• Red
• Khaki
• Blue
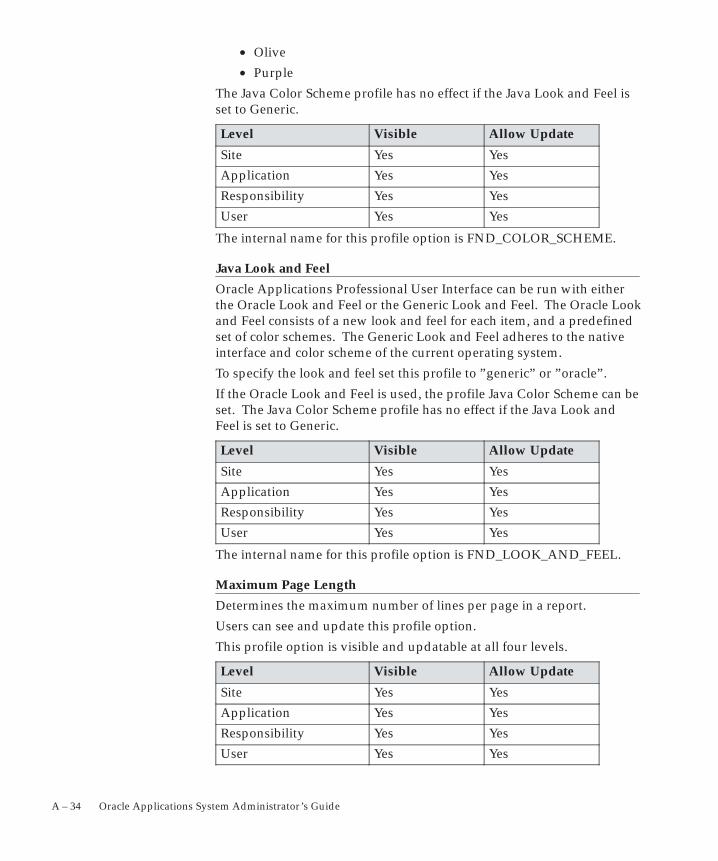
A – 34 Oracle Applications System Administrator’s Guide
• Olive
• Purple
The Java Color Scheme profile has no effect if the Java Look and Feel isset to Generic.
Level Visible Allow Update
Site Yes Yes
Application Yes Yes
Responsibility Yes Yes
User Yes Yes
The internal name for this profile option is FND_COLOR_SCHEME.
Java Look and Feel
Oracle Applications Professional User Interface can be run with eitherthe Oracle Look and Feel or the Generic Look and Feel. The Oracle Lookand Feel consists of a new look and feel for each item, and a predefinedset of color schemes. The Generic Look and Feel adheres to the nativeinterface and color scheme of the current operating system.
To specify the look and feel set this profile to ”generic” or ”oracle”.
If the Oracle Look and Feel is used, the profile Java Color Scheme can beset. The Java Color Scheme profile has no effect if the Java Look andFeel is set to Generic.
Level Visible Allow Update
Site Yes Yes
Application Yes Yes
Responsibility Yes Yes
User Yes Yes
The internal name for this profile option is FND_LOOK_AND_FEEL.
Maximum Page Length
Determines the maximum number of lines per page in a report.
Users can see and update this profile option.
This profile option is visible and updatable at all four levels.
Level Visible Allow Update
Site Yes Yes
Application Yes Yes
Responsibility Yes Yes
User Yes Yes
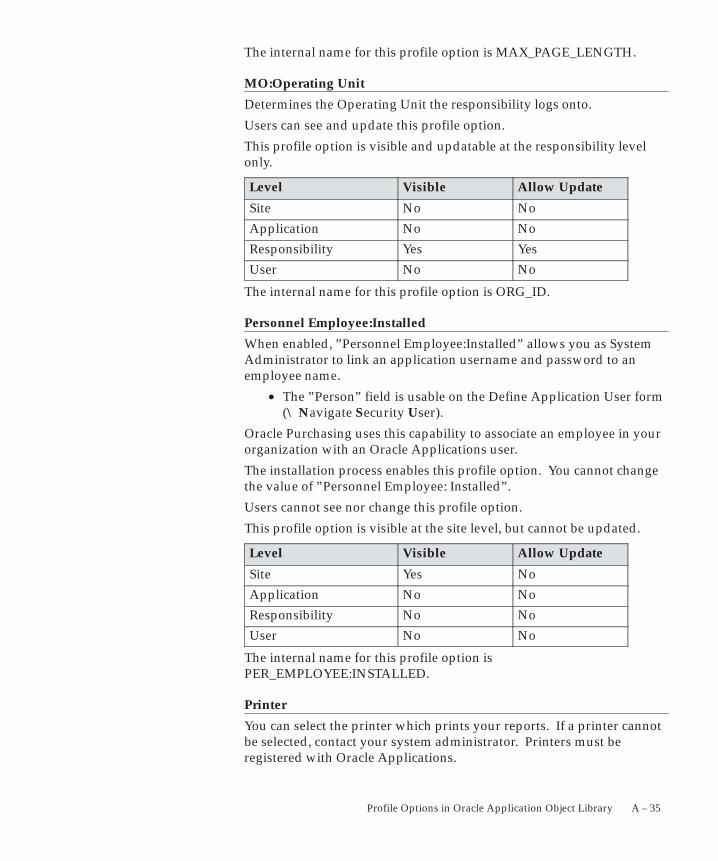
A – 35Profile Options in Oracle Application Object Library
The internal name for this profile option is MAX_PAGE_LENGTH.
MO:Operating Unit
Determines the Operating Unit the responsibility logs onto.
Users can see and update this profile option.
This profile option is visible and updatable at the responsibility levelonly.
Level Visible Allow Update
Site No No
Application No No
Responsibility Yes Yes
User No No
The internal name for this profile option is ORG_ID.
Personnel Employee:Installed
When enabled, ”Personnel Employee:Installed” allows you as SystemAdministrator to link an application username and password to anemployee name.
• The ”Person” field is usable on the Define Application User form(\ Navigate Security User).
Oracle Purchasing uses this capability to associate an employee in yourorganization with an Oracle Applications user.
The installation process enables this profile option. You cannot changethe value of ”Personnel Employee: Installed”.
Users cannot see nor change this profile option.
This profile option is visible at the site level, but cannot be updated.
Level Visible Allow Update
Site Yes No
Application No No
Responsibility No No
User No No
The internal name for this profile option isPER_EMPLOYEE:INSTALLED.
Printer
You can select the printer which prints your reports. If a printer cannotbe selected, contact your system administrator. Printers must beregistered with Oracle Applications.
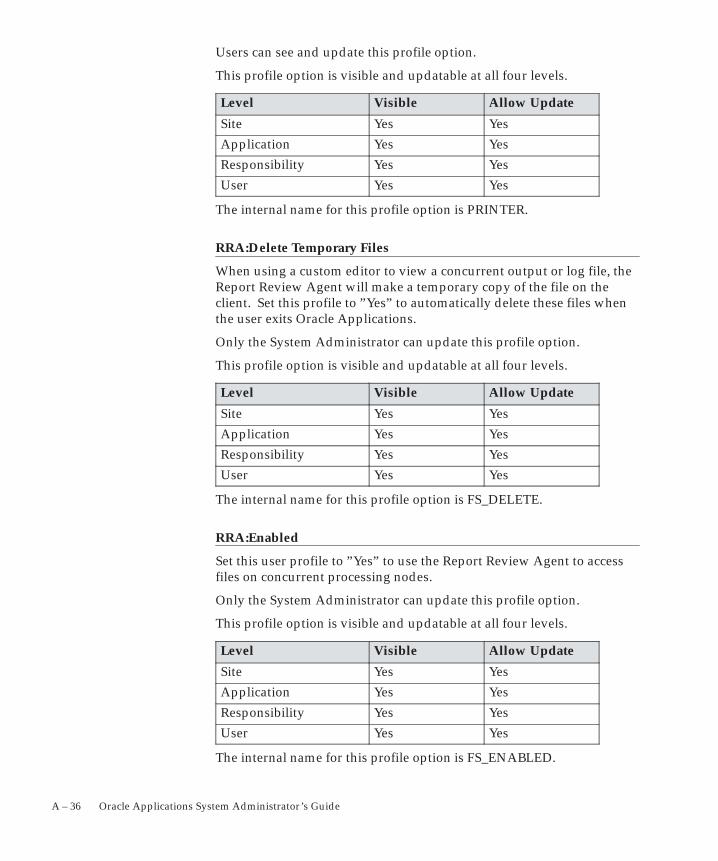
A – 36 Oracle Applications System Administrator’s Guide
Users can see and update this profile option.
This profile option is visible and updatable at all four levels.
Level Visible Allow Update
Site Yes Yes
Application Yes Yes
Responsibility Yes Yes
User Yes Yes
The internal name for this profile option is PRINTER.
RRA:Delete Temporary Files
When using a custom editor to view a concurrent output or log file, theReport Review Agent will make a temporary copy of the file on theclient. Set this profile to ”Yes” to automatically delete these files whenthe user exits Oracle Applications.
Only the System Administrator can update this profile option.
This profile option is visible and updatable at all four levels.
Level Visible Allow Update
Site Yes Yes
Application Yes Yes
Responsibility Yes Yes
User Yes Yes
The internal name for this profile option is FS_DELETE.
RRA:Enabled
Set this user profile to ”Yes” to use the Report Review Agent to accessfiles on concurrent processing nodes.
Only the System Administrator can update this profile option.
This profile option is visible and updatable at all four levels.
Level Visible Allow Update
Site Yes Yes
Application Yes Yes
Responsibility Yes Yes
User Yes Yes
The internal name for this profile option is FS_ENABLED.
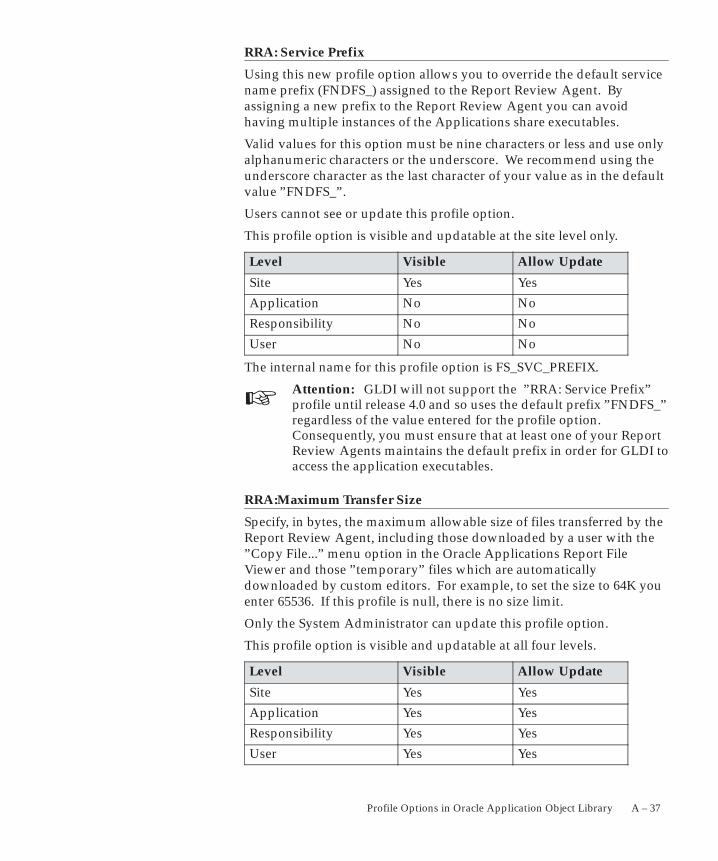
☞
A – 37Profile Options in Oracle Application Object Library
RRA: Service Prefix
Using this new profile option allows you to override the default servicename prefix (FNDFS_) assigned to the Report Review Agent. Byassigning a new prefix to the Report Review Agent you can avoidhaving multiple instances of the Applications share executables.
Valid values for this option must be nine characters or less and use onlyalphanumeric characters or the underscore. We recommend using theunderscore character as the last character of your value as in the defaultvalue ”FNDFS_”.
Users cannot see or update this profile option.
This profile option is visible and updatable at the site level only.
Level Visible Allow Update
Site Yes Yes
Application No No
Responsibility No No
User No No
The internal name for this profile option is FS_SVC_PREFIX.
Attention: GLDI will not support the ”RRA: Service Prefix”profile until release 4.0 and so uses the default prefix ”FNDFS_”regardless of the value entered for the profile option.Consequently, you must ensure that at least one of your ReportReview Agents maintains the default prefix in order for GLDI toaccess the application executables.
RRA:Maximum Transfer Size
Specify, in bytes, the maximum allowable size of files transferred by theReport Review Agent, including those downloaded by a user with the”Copy File...” menu option in the Oracle Applications Report FileViewer and those ”temporary” files which are automaticallydownloaded by custom editors. For example, to set the size to 64K youenter 65536. If this profile is null, there is no size limit.
Only the System Administrator can update this profile option.
This profile option is visible and updatable at all four levels.
Level Visible Allow Update
Site Yes Yes
Application Yes Yes
Responsibility Yes Yes
User Yes Yes
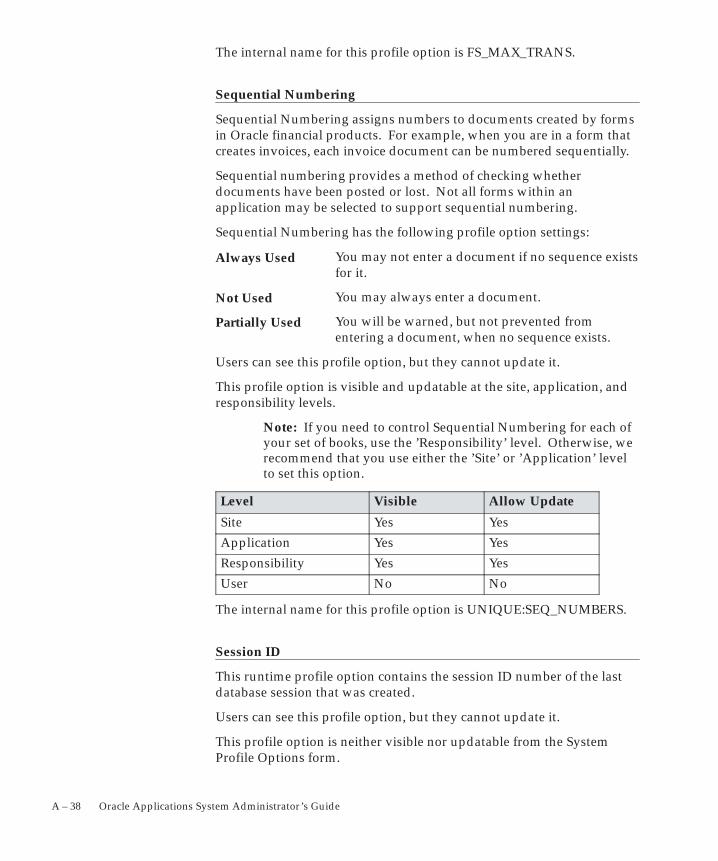
A – 38 Oracle Applications System Administrator’s Guide
The internal name for this profile option is FS_MAX_TRANS.
Sequential Numbering
Sequential Numbering assigns numbers to documents created by formsin Oracle financial products. For example, when you are in a form thatcreates invoices, each invoice document can be numbered sequentially.
Sequential numbering provides a method of checking whetherdocuments have been posted or lost. Not all forms within anapplication may be selected to support sequential numbering.
Sequential Numbering has the following profile option settings:
You may not enter a document if no sequence existsfor it.
You may always enter a document.
You will be warned, but not prevented fromentering a document, when no sequence exists.
Users can see this profile option, but they cannot update it.
This profile option is visible and updatable at the site, application, andresponsibility levels.
Note: If you need to control Sequential Numbering for each ofyour set of books, use the ’Responsibility’ level. Otherwise, werecommend that you use either the ’Site’ or ’Application’ levelto set this option.
Level Visible Allow Update
Site Yes Yes
Application Yes Yes
Responsibility Yes Yes
User No No
The internal name for this profile option is UNIQUE:SEQ_NUMBERS.
Session ID
This runtime profile option contains the session ID number of the lastdatabase session that was created.
Users can see this profile option, but they cannot update it.
This profile option is neither visible nor updatable from the SystemProfile Options form.
Always Used
Not Used
Partially Used
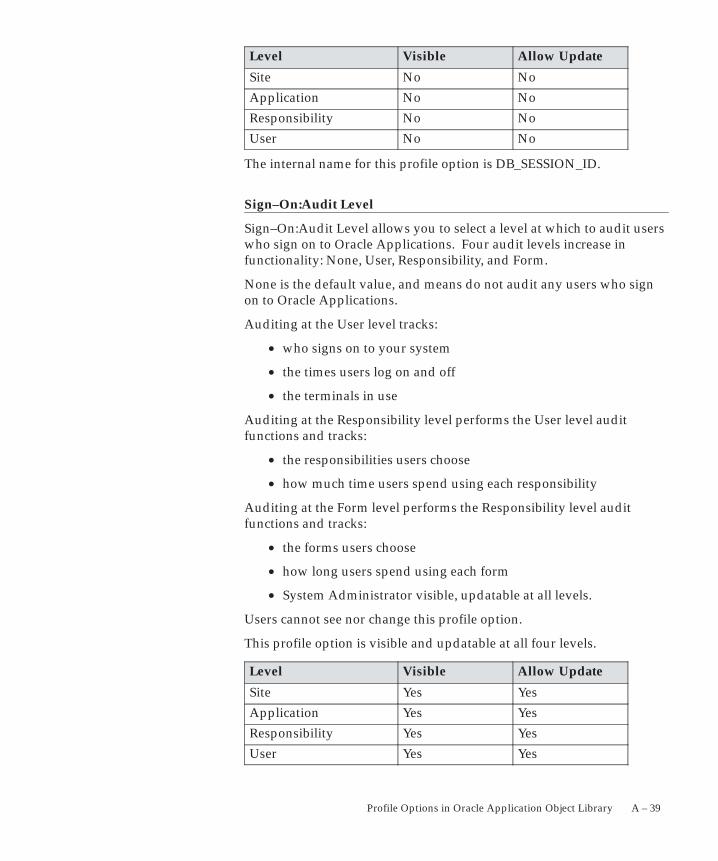
A – 39Profile Options in Oracle Application Object Library
Level Visible Allow Update
Site No No
Application No No
Responsibility No No
User No No
The internal name for this profile option is DB_SESSION_ID.
Sign–On:Audit Level
Sign–On:Audit Level allows you to select a level at which to audit userswho sign on to Oracle Applications. Four audit levels increase infunctionality: None, User, Responsibility, and Form.
None is the default value, and means do not audit any users who signon to Oracle Applications.
Auditing at the User level tracks:
• who signs on to your system
• the times users log on and off
• the terminals in use
Auditing at the Responsibility level performs the User level auditfunctions and tracks:
• the responsibilities users choose
• how much time users spend using each responsibility
Auditing at the Form level performs the Responsibility level auditfunctions and tracks:
• the forms users choose
• how long users spend using each form
• System Administrator visible, updatable at all levels.
Users cannot see nor change this profile option.
This profile option is visible and updatable at all four levels.
Level Visible Allow Update
Site Yes Yes
Application Yes Yes
Responsibility Yes Yes
User Yes Yes
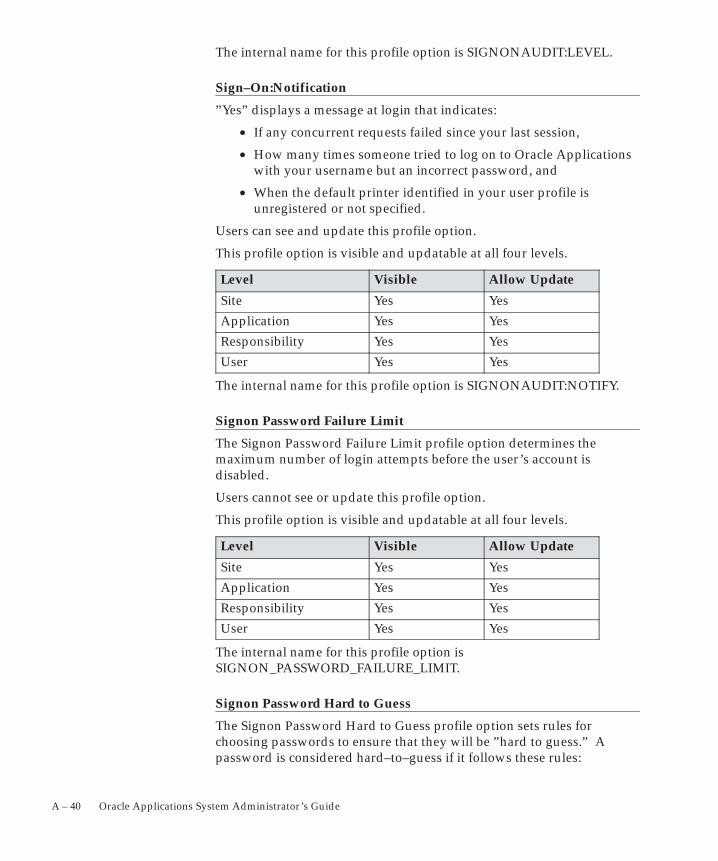
A – 40 Oracle Applications System Administrator’s Guide
The internal name for this profile option is SIGNONAUDIT:LEVEL.
Sign–On:Notification
”Yes” displays a message at login that indicates:
• If any concurrent requests failed since your last session,
• How many times someone tried to log on to Oracle Applicationswith your username but an incorrect password, and
• When the default printer identified in your user profile isunregistered or not specified.
Users can see and update this profile option.
This profile option is visible and updatable at all four levels.
Level Visible Allow Update
Site Yes Yes
Application Yes Yes
Responsibility Yes Yes
User Yes Yes
The internal name for this profile option is SIGNONAUDIT:NOTIFY.
Signon Password Failure Limit
The Signon Password Failure Limit profile option determines themaximum number of login attempts before the user’s account isdisabled.
Users cannot see or update this profile option.
This profile option is visible and updatable at all four levels.
Level Visible Allow Update
Site Yes Yes
Application Yes Yes
Responsibility Yes Yes
User Yes Yes
The internal name for this profile option isSIGNON_PASSWORD_FAILURE_LIMIT.
Signon Password Hard to Guess
The Signon Password Hard to Guess profile option sets rules forchoosing passwords to ensure that they will be ”hard to guess.” Apassword is considered hard–to–guess if it follows these rules:
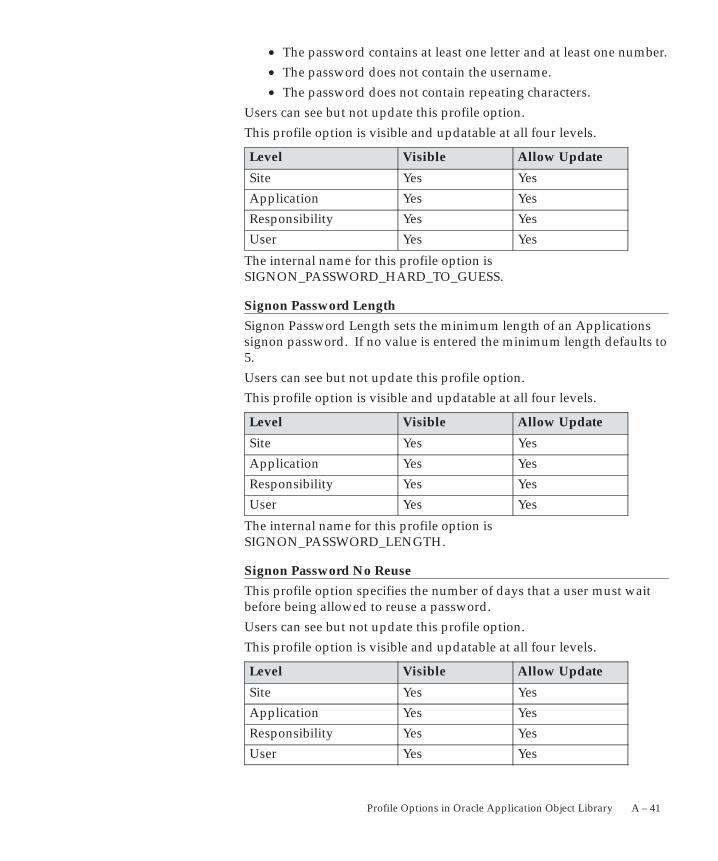
A – 41Profile Options in Oracle Application Object Library
• The password contains at least one letter and at least one number.• The password does not contain the username.• The password does not contain repeating characters.
Users can see but not update this profile option.
This profile option is visible and updatable at all four levels.
Level Visible Allow Update
Site Yes Yes
Application Yes Yes
Responsibility Yes Yes
User Yes Yes
The internal name for this profile option isSIGNON_PASSWORD_HARD_TO_GUESS.
Signon Password Length
Signon Password Length sets the minimum length of an Applicationssignon password. If no value is entered the minimum length defaults to5.
Users can see but not update this profile option.
This profile option is visible and updatable at all four levels.
Level Visible Allow Update
Site Yes Yes
Application Yes Yes
Responsibility Yes Yes
User Yes Yes
The internal name for this profile option isSIGNON_PASSWORD_LENGTH.
Signon Password No Reuse
This profile option specifies the number of days that a user must waitbefore being allowed to reuse a password.
Users can see but not update this profile option.
This profile option is visible and updatable at all four levels.
Level Visible Allow Update
Site Yes Yes
Application Yes Yes
Responsibility Yes Yes
User Yes Yes
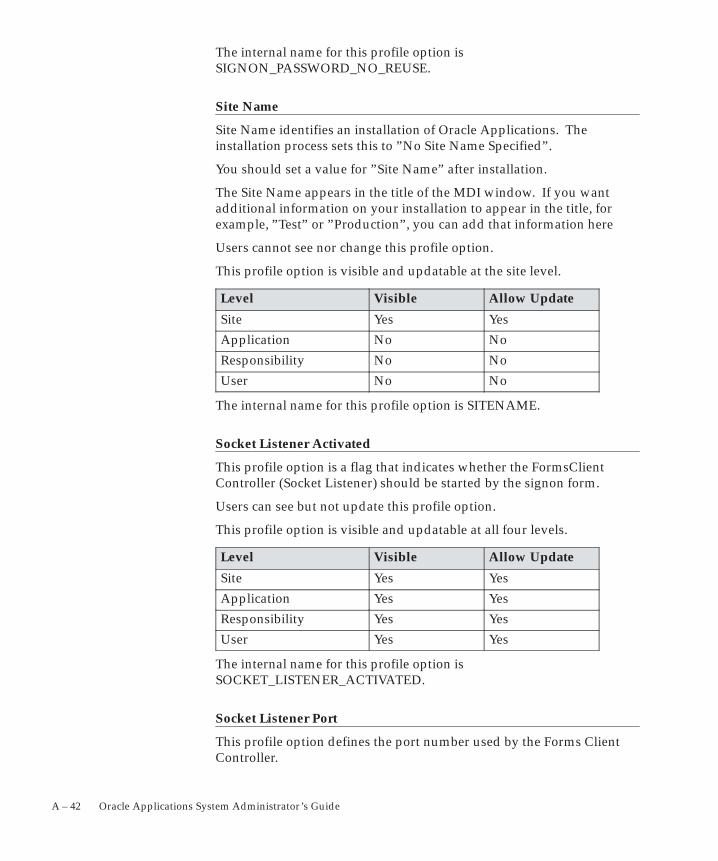
A – 42 Oracle Applications System Administrator’s Guide
The internal name for this profile option isSIGNON_PASSWORD_NO_REUSE.
Site Name
Site Name identifies an installation of Oracle Applications. Theinstallation process sets this to ”No Site Name Specified”.
You should set a value for ”Site Name” after installation.
The Site Name appears in the title of the MDI window. If you wantadditional information on your installation to appear in the title, forexample, ”Test” or ”Production”, you can add that information here
Users cannot see nor change this profile option.
This profile option is visible and updatable at the site level.
Level Visible Allow Update
Site Yes Yes
Application No No
Responsibility No No
User No No
The internal name for this profile option is SITENAME.
Socket Listener Activated
This profile option is a flag that indicates whether the FormsClientController (Socket Listener) should be started by the signon form.
Users can see but not update this profile option.
This profile option is visible and updatable at all four levels.
Level Visible Allow Update
Site Yes Yes
Application Yes Yes
Responsibility Yes Yes
User Yes Yes
The internal name for this profile option isSOCKET_LISTENER_ACTIVATED.
Socket Listener Port
This profile option defines the port number used by the Forms ClientController.
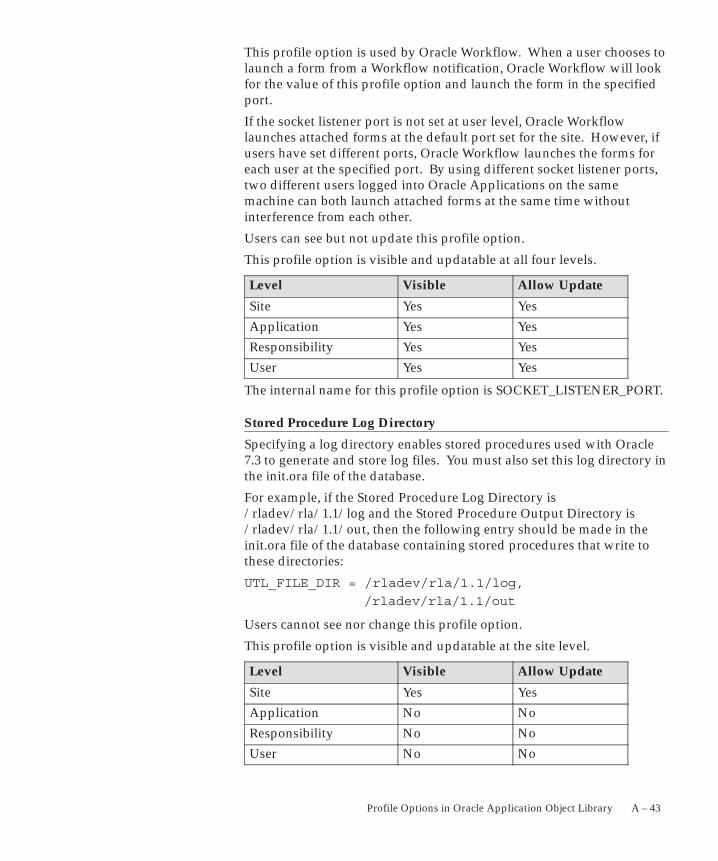
A – 43Profile Options in Oracle Application Object Library
This profile option is used by Oracle Workflow. When a user chooses tolaunch a form from a Workflow notification, Oracle Workflow will lookfor the value of this profile option and launch the form in the specifiedport.
If the socket listener port is not set at user level, Oracle Workflowlaunches attached forms at the default port set for the site. However, ifusers have set different ports, Oracle Workflow launches the forms foreach user at the specified port. By using different socket listener ports,two different users logged into Oracle Applications on the samemachine can both launch attached forms at the same time withoutinterference from each other.
Users can see but not update this profile option.
This profile option is visible and updatable at all four levels.
Level Visible Allow Update
Site Yes Yes
Application Yes Yes
Responsibility Yes Yes
User Yes Yes
The internal name for this profile option is SOCKET_LISTENER_PORT.
Stored Procedure Log Directory
Specifying a log directory enables stored procedures used with Oracle7.3 to generate and store log files. You must also set this log directory inthe init.ora file of the database.
For example, if the Stored Procedure Log Directory is/rladev/rla/1.1/log and the Stored Procedure Output Directory is/rladev/rla/1.1/out, then the following entry should be made in theinit.ora file of the database containing stored procedures that write tothese directories:
UTL_FILE_DIR = /rladev/rla/1.1/log,
/rladev/rla/1.1/out
Users cannot see nor change this profile option.
This profile option is visible and updatable at the site level.
Level Visible Allow Update
Site Yes Yes
Application No No
Responsibility No No
User No No
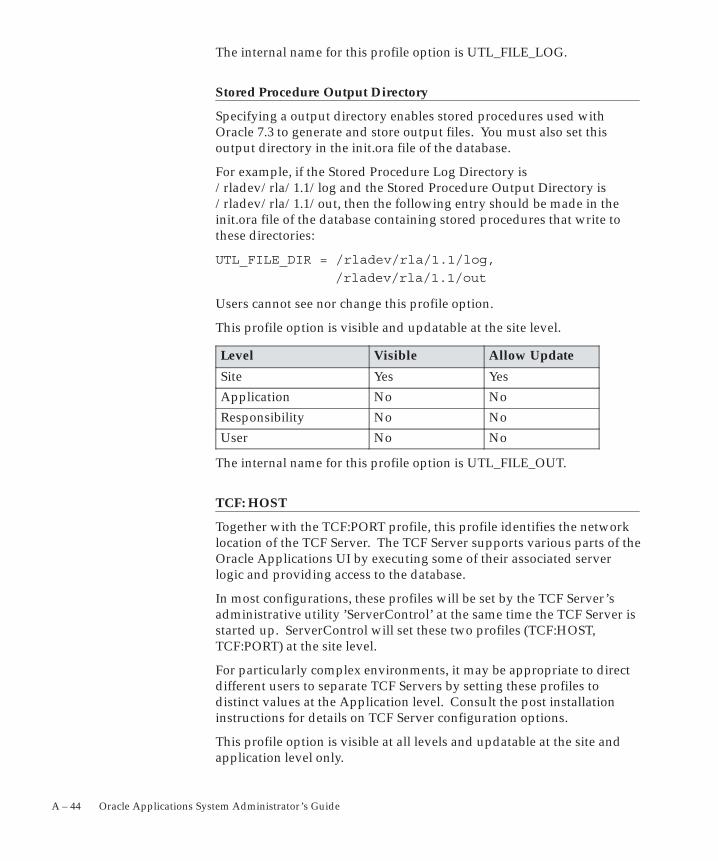
A – 44 Oracle Applications System Administrator’s Guide
The internal name for this profile option is UTL_FILE_LOG.
Stored Procedure Output Directory
Specifying a output directory enables stored procedures used withOracle 7.3 to generate and store output files. You must also set thisoutput directory in the init.ora file of the database.
For example, if the Stored Procedure Log Directory is/rladev/rla/1.1/log and the Stored Procedure Output Directory is/rladev/rla/1.1/out, then the following entry should be made in theinit.ora file of the database containing stored procedures that write tothese directories:
UTL_FILE_DIR = /rladev/rla/1.1/log,
/rladev/rla/1.1/out
Users cannot see nor change this profile option.
This profile option is visible and updatable at the site level.
Level Visible Allow Update
Site Yes Yes
Application No No
Responsibility No No
User No No
The internal name for this profile option is UTL_FILE_OUT.
TCF: HOST
Together with the TCF:PORT profile, this profile identifies the networklocation of the TCF Server. The TCF Server supports various parts of theOracle Applications UI by executing some of their associated serverlogic and providing access to the database.
In most configurations, these profiles will be set by the TCF Server’sadministrative utility ’ServerControl’ at the same time the TCF Server isstarted up. ServerControl will set these two profiles (TCF:HOST,TCF:PORT) at the site level.
For particularly complex environments, it may be appropriate to directdifferent users to separate TCF Servers by setting these profiles todistinct values at the Application level. Consult the post installationinstructions for details on TCF Server configuration options.
This profile option is visible at all levels and updatable at the site andapplication level only.
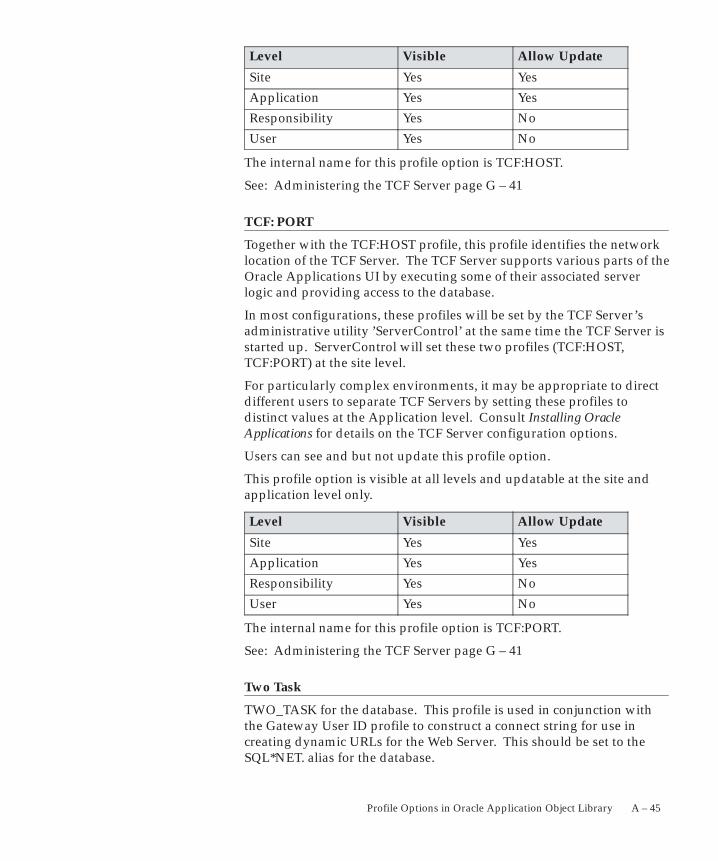
A – 45Profile Options in Oracle Application Object Library
Level Visible Allow Update
Site Yes Yes
Application Yes Yes
Responsibility Yes No
User Yes No
The internal name for this profile option is TCF:HOST.
See: Administering the TCF Server page G – 41
TCF: PORT
Together with the TCF:HOST profile, this profile identifies the networklocation of the TCF Server. The TCF Server supports various parts of theOracle Applications UI by executing some of their associated serverlogic and providing access to the database.
In most configurations, these profiles will be set by the TCF Server’sadministrative utility ’ServerControl’ at the same time the TCF Server isstarted up. ServerControl will set these two profiles (TCF:HOST,TCF:PORT) at the site level.
For particularly complex environments, it may be appropriate to directdifferent users to separate TCF Servers by setting these profiles todistinct values at the Application level. Consult Installing OracleApplications for details on the TCF Server configuration options.
Users can see and but not update this profile option.
This profile option is visible at all levels and updatable at the site andapplication level only.
Level Visible Allow Update
Site Yes Yes
Application Yes Yes
Responsibility Yes No
User Yes No
The internal name for this profile option is TCF:PORT.
See: Administering the TCF Server page G – 41
Two Task
TWO_TASK for the database. This profile is used in conjunction withthe Gateway User ID profile to construct a connect string for use increating dynamic URLs for the Web Server. This should be set to theSQL*NET. alias for the database.
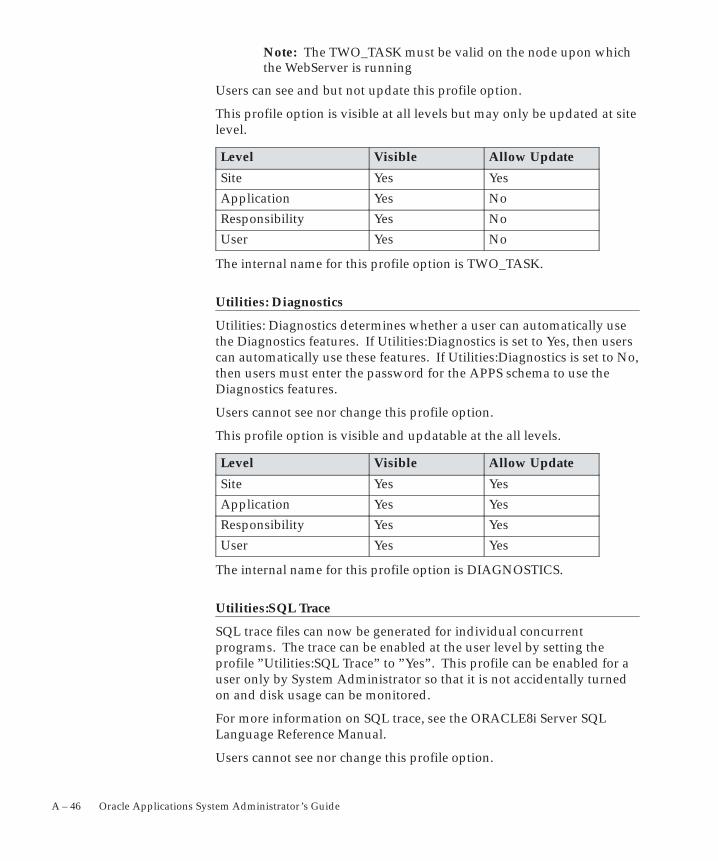
A – 46 Oracle Applications System Administrator’s Guide
Note: The TWO_TASK must be valid on the node upon whichthe WebServer is running
Users can see and but not update this profile option.
This profile option is visible at all levels but may only be updated at sitelevel.
Level Visible Allow Update
Site Yes Yes
Application Yes No
Responsibility Yes No
User Yes No
The internal name for this profile option is TWO_TASK.
Utilities: Diagnostics
Utilities: Diagnostics determines whether a user can automatically usethe Diagnostics features. If Utilities:Diagnostics is set to Yes, then userscan automatically use these features. If Utilities:Diagnostics is set to No,then users must enter the password for the APPS schema to use theDiagnostics features.
Users cannot see nor change this profile option.
This profile option is visible and updatable at the all levels.
Level Visible Allow Update
Site Yes Yes
Application Yes Yes
Responsibility Yes Yes
User Yes Yes
The internal name for this profile option is DIAGNOSTICS.
Utilities:SQL Trace
SQL trace files can now be generated for individual concurrentprograms. The trace can be enabled at the user level by setting theprofile ”Utilities:SQL Trace” to ”Yes”. This profile can be enabled for auser only by System Administrator so that it is not accidentally turnedon and disk usage can be monitored.
For more information on SQL trace, see the ORACLE8i Server SQLLanguage Reference Manual.
Users cannot see nor change this profile option.
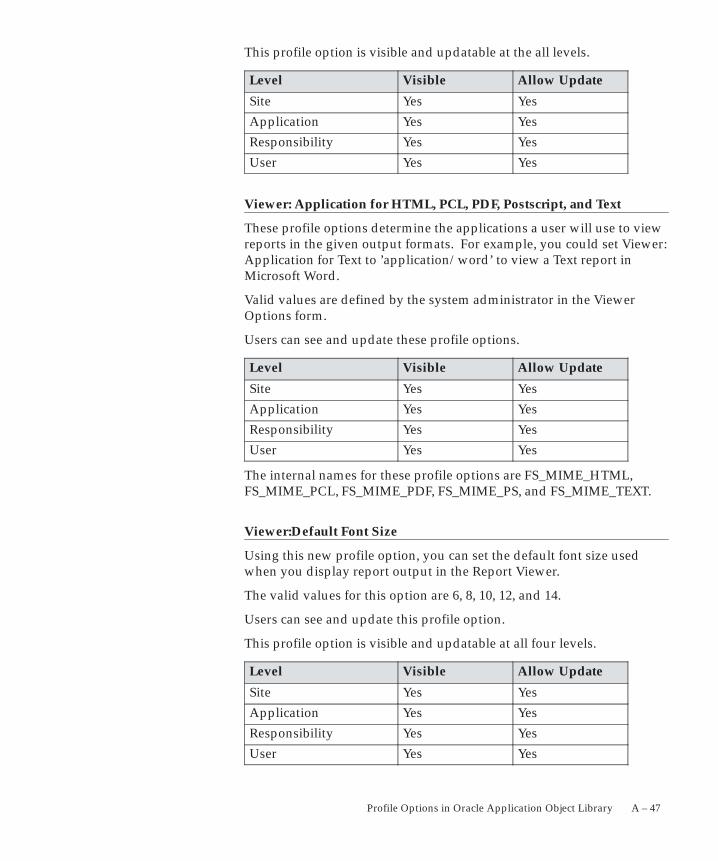
A – 47Profile Options in Oracle Application Object Library
This profile option is visible and updatable at the all levels.
Level Visible Allow Update
Site Yes Yes
Application Yes Yes
Responsibility Yes Yes
User Yes Yes
Viewer: Application for HTML, PCL, PDF, Postscript, and Text
These profile options determine the applications a user will use to viewreports in the given output formats. For example, you could set Viewer:Application for Text to ’application/word’ to view a Text report inMicrosoft Word.
Valid values are defined by the system administrator in the ViewerOptions form.
Users can see and update these profile options.
Level Visible Allow Update
Site Yes Yes
Application Yes Yes
Responsibility Yes Yes
User Yes Yes
The internal names for these profile options are FS_MIME_HTML,FS_MIME_PCL, FS_MIME_PDF, FS_MIME_PS, and FS_MIME_TEXT.
Viewer:Default Font Size
Using this new profile option, you can set the default font size usedwhen you display report output in the Report Viewer.
The valid values for this option are 6, 8, 10, 12, and 14.
Users can see and update this profile option.
This profile option is visible and updatable at all four levels.
Level Visible Allow Update
Site Yes Yes
Application Yes Yes
Responsibility Yes Yes
User Yes Yes
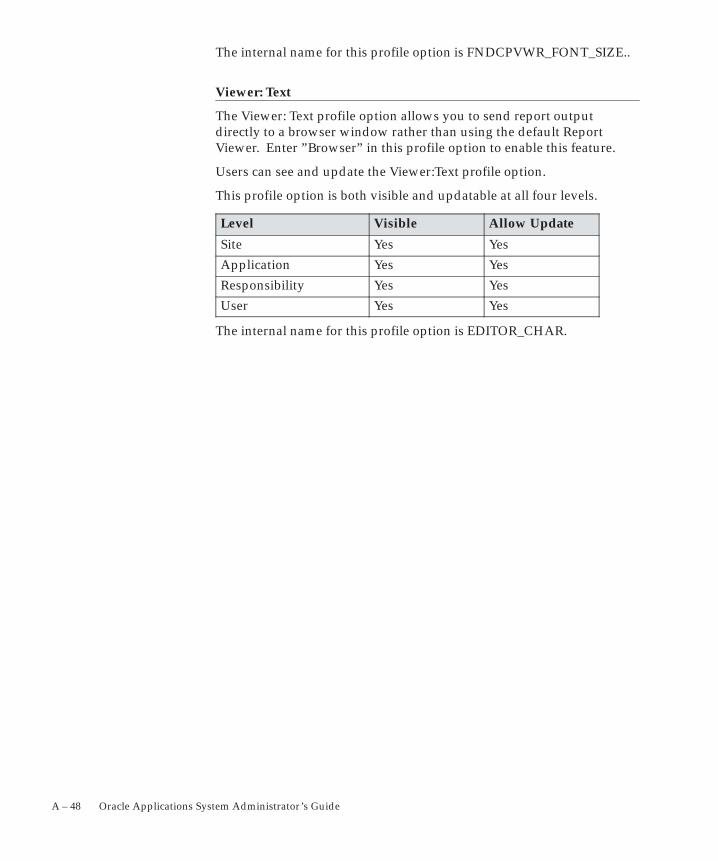
A – 48 Oracle Applications System Administrator’s Guide
The internal name for this profile option is FNDCPVWR_FONT_SIZE..
Viewer: Text
The Viewer: Text profile option allows you to send report outputdirectly to a browser window rather than using the default ReportViewer. Enter ”Browser” in this profile option to enable this feature.
Users can see and update the Viewer:Text profile option.
This profile option is both visible and updatable at all four levels.
Level Visible Allow Update
Site Yes Yes
Application Yes Yes
Responsibility Yes Yes
User Yes Yes
The internal name for this profile option is EDITOR_CHAR.
A P P E N D I X
BT
☞
B – 1Using Predefined Alerts
Using Predefined Alerts
his chapter gives you an overview of Oracle Alert and how to usethe predefined alerts that are packaged with your Oracle Applicationsproduct. Specifically, this chapter describes:
• The business needs for Oracle Alert
• How to run predefined alerts
• How to modify the predefined alerts to fit your needs
Attention: This chapter focuses on using and customizing thepredefined alerts that are packaged with Oracle Applicationsproducts. If you have a license of the full Oracle Alert product,you should refer to the Oracle Alert Reference Manual forinformation on how to create and customize your own alerts.
B – 2 Oracle Applications System Administrator’s Guide
Overview of Oracle AlertOracle Alert is your complete exception control solution.
Oracle Alert gives you an immediate view of the critical activity inyour database. It helps you keep on top of important or unusualbusiness events you need to know about, as they happen. Oracle Alertgives you real–time measurements of staff and organizationperformance, so you can zero in on potential trouble spots immediately.You can automate routine transactions with Oracle Alert, saving yourvaluable time for more essential tasks. And, Oracle Alert does all thisonline, so you do not have to contend with a pile of paperwork.
Oracle Alert gives you the flexibility you need to monitor your businessinformation the way you want.
Basic Business Needs
Oracle Alert meets the following basic business needs:
• Informs you of exception conditions as they occur
• Lets you specify the exception conditions you want to knowabout, as often as you want to know about them
• Informs you of exception conditions by sending alert messagesthrough a single applicationyour electronic mail
• Takes actions you specify, based upon your response to an alertmessage
• Automatically performs routine database tasks, according to aschedule you define
• Integrates fully with your electronic mail system
Oracle Alert Runtime Features
If you do not have a licensed copy of the full Oracle Alert product, youmay still derive benefit from major Oracle Alert features by using thepredefined alerts that are packaged with your Oracle Applicationsproduct.
All Oracle Applications products are packaged with a runtime versionof Oracle Alert. Although all the Oracle Alert windows are available inthis runtime version, not all the features in those windows are enabled.With the runtime version of Oracle Alert, you can run only the
B – 3Using Predefined Alerts
predefined alerts that are packaged with your product; you cannotcreate new alerts.
Alert Definitions
Alert
A mechanism that checks your database for a specific exceptioncondition. An alert is characterized by the SQL SELECT statement itcontains. A SQL SELECT statement tells your application whatdatabase exception to identify, as well as what output to produce forthat exception.
For example, you can define an alert to flag purchase orders exceeding$10,000, and have that alert output the name of the individual whorequested the purchase order, as well as the name of the individual’smanager. All predefined alerts are listed in the Alerts window ofOracle Alert.
Event Alert
An event alert monitors the occurrence of a specific exception orchange in your database. An exception in your database results if youadd or update information using your Oracle Applications windows.The event alert monitors the database for exceptions based on its SQLSELECT statement.
Periodic Alert
A periodic alert periodically reports key information according to aschedule that you define. Rather than notify you of immediateexceptions in the database like an event alert, a periodic alert scans forspecific database information specified by its SQL SELECT statement atscheduled intervals.
Alert Action
An alert action is an action you want your alert to perform. An alertaction can be dependent on the output from the alert. An alert actioncan fall under one of three categories:
• Detail action—an action that represents one exception found inthe database
• Summary action—an action that represents multiple exceptionsfound in the database

B – 4 Oracle Applications System Administrator’s Guide
• No exception action—an action that represents no exceptionsfound in the database
An action can include sending an electronic mail message to a mail ID,running an Oracle Applications program, running a program or scriptfrom your operating system, or running a SQL script to modifyinformation in your database.
You can have more than one action for an alert and an action canincorporate the output of the alert. For example, you may want aparticular alert to send a message to a manager, as well as run anOracle Applications program when an exception occurs.
Action Sets
An action set is a sequence of alert actions that are enabled for aparticular alert. Each action that you include in an action set can beassigned a sequence number so that you can specify the order in whichthe actions are performed. Some predefined alerts may also have morethan one action set. You can also assign a sequence number to eachaction set to specify the order in which each action set is performed.
B – 5Using Predefined Alerts
Predefined AlertsThere are two types of predefined alerts:
• Event alerts—for example, the Receiving Notification alert forOracle Purchasing notifies the requestor with a mail messagewhen an item is received and entered in the Receipts window.
• Periodic alerts—for example, the Forecast Over–Consumptionalert for Oracle Material Planning checks every day forover–consumption of the forecast and sends you a mail messageif the current forecast quantity listed in the Forecast Entrieswindow goes below zero.
Suggestion: See your product’s reference guide for a list ofthe predefined alerts that are packaged with your OracleApplications product.
Using Predefined Alerts
All predefined alerts are initially disabled. You must enable the alertsyou want to use. Select the Oracle Alert Manager responsibility whenyou start Oracle Applications to view or use a predefined alert. TheAlert Manager responsibility gives you access to the Oracle Alertmenu.
Navigate to the Alerts window to enable or edit predefined alerts. Todisplay the predefined alert(s) for your Oracle Applications product,execute a query with your Oracle Applications product name in theApplication field.
The Name field displays the name of the predefined alert. The Typefield indicates if the alert is an event or a periodic alert.
You can enable an alert to run by checking the Enabled check box. Youcan also enter an End Date to specify the date until you want this alertrun.
Choose the Alert Details button to open the Alert Details window.Choose the Alert Installations tabbed region to display the availableInstallations.
Enter the Oracle ID of the application installation you want your alertto run against. You can select only the Oracle IDs that are associatedwith the application that owns your alert. You can disable an Oracle IDfor the alert temporarily by unchecking the Enabled check box.
Choose the Actions button to open the Actions window. Oracle Alertautomatically displays the actions that are defined for the alert.
B – 6 Oracle Applications System Administrator’s Guide
In the Actions window, if the Action Type is Detail, choose the ActionDetails button to display details for that action.
The alert action sends an alert action message to the mail ID listed inthe To field of the Message Detail zone. If the mail ID is in the format&NAME, where Name is an output defined by your alert, you need notmodify this field. If, however, the mail ID in the To field is not in theabove format or if there is no value entered in the field, you must enterthe mail ID(s) of the person(s) you wish to receive the alert actionmessage. After modifying the contents of this window, save yourwork.
Navigate to the Oracle Alert Options window. Use this window tospecify the electronic mail application you wish to integrate with thepredefined alerts.
In the Alerts window, choose the Actions Sets button to navigate to theAction Sets window. Oracle Alert automatically displays the actionsets defined for the alert.
Check the Enabled check box for each action set you wish to use. Youmay also enter an End Date field to specify the date until you want thisalert action set to be enabled.
In addition, in the Action Set Members block, check the Enabled checkbox for each action set member you want to use in that action set.
You may also enter an End Date to specify the date until you want thisalert action set member to be enabled. When you finish, save yourwork.
Your predefined alert is now ready to use.
Customizing Predefined Alerts
You can customize predefined alerts in the following ways to suit yourbusiness needs:
Electronic Mail Integration
Oracle Alert is fully integrated with Oracle Office and can use OracleOffice to send electronic mail messages to your users. Since OracleOffice has gateways to other electronic mail systems, Oracle Alert cansend messages to users on those systems as well. Oracle Alert can alsouse UNIX mail, VMS mail, or a custom mail system to send electronicmail messages to your users.
You open the Oracle Alert Options window and use the Mail Systemstabbed region to specify the electronic mail application you wish to use
B – 7Using Predefined Alerts
with your predefined alerts. You enter the Name of your electronicmail application, the operating system Command you use to start themail application, and any Parameters you wish to pass to the mailprogram.
If you are using Oracle Office, you need not specify an operatingsystem Command. Once you enter the information for your mailapplication, check the In Use check box, then save your work. You canhave only one mail application enabled at any given time.
Standard Alert Message Text
You can customize the message header and footer text that appears inall your alert message actions. Navigate to the Message Elementstabbed region of the Oracle Alert Options window, and four messageelements appear automatically. Each element represents a specific typeof message text that appears in all your alert mail messages.
In the runtime version of Oracle Alert, you need to edit only theMessage Action Header and Message Action Footer elements. Simplycustomize the text that appears to alter the text at the beginning andend of every alert message. You may also leave the text blank if you donot want to display any standard text in your alert messages. Saveyour work when you are done making changes in this window.
Alert Frequency
You can schedule the frequency you wish to run each predefinedperiodic alert. You may want to check some alerts every day, someonly once a month, still others only when you explicitly request them.You have the flexibility to monitor critical exceptions every day, or evenmultiple times during a 24–hour period. And, you can set lesssignificant exceptions to a more infrequent schedule; for example, amonthly schedule.
To change the frequency of a predefined alert, navigate to the Alertswindow. Perform a query to display the predefined periodic alert youwish to modify, then alter the Frequency of the periodic alert.
Alert History
Oracle Alert can keep a history of exceptions and actions for aparticular alert. Use the Alerts window to alter the number of days ofhistory you wish to keep for an alert. Simply change the Keep N Daysfield to the number of days of history you wish to keep.
Suppressing Duplicates
If you do not want Oracle Alert to send repeated messages for the samealert exception, you can choose to suppress duplicate messages. If
B – 8 Oracle Applications System Administrator’s Guide
Oracle Alert finds a duplicate exception condition for the alert, itsimply does not execute the action set members for that alert again.
Use the Suppress Duplicates check box in the Action Sets block of theAlerts window to specify this option. The default for the SuppressDuplicates check box is unchecked. If you check the SuppressDuplicates check box, you must also make sure you keep history forthe alert at least one day longer than the number of days between alertchecks. Oracle Alert uses the history information to determine if anexception is a duplicate.
Message Actions
If a predefined alert involves a message action, you can customizecertain aspects of that message action. Navigate to the Actions block inthe Alerts window by choosing the Actions button. In this block, moveyour cursor to the row representing the message action you want tocustomize, then choose the Action Details button to open the ActionDetail window for that message action. You can modify the followingfeatures of the message action:
• Recipient list—you can add or delete mail IDs in the List, To, Cc,Bcc, or Print For User fields. You should not modify any mailIDs listed with the format &Name, as they represent mail ID’sdefined by the alert output.
• Printer—you can modify the name of the printer to which youwant Oracle Alert to direct the message.
• Text—you can modify the boilerplate text that you want youralert message to send. Do not edit any of the alert outputs (inthe format &Name) used in the body of the text. For summarymessages, edit only the opening and closing text within thesummary message. Save your work when you finish makingmodifications.
Summary Threshold
Predefined alerts use one of three action types: detail action, summaryaction, and no exception action. A no exception action isstraightforward in that Oracle Alert performs the defined action whenno exceptions are found for the alert.
But how does Oracle Alert know when to perform a detail or asummary action? Oracle Alert can perform a detail action for everyexception it finds, regardless of the number of exceptions, or OracleAlert can perform a summary action for a unique set of exceptions. Forexample, you can receive individual mail messages for each exception

B – 9Using Predefined Alerts
found by an alert, or you can receive a single mail messagesummarizing all the exceptions found by the alert.
In the Members tabbed region of the Action Sets block of the Alertswindow, you can set a Summary Threshold to specify how manyexceptions Oracle Alert can find before it should change the actionfrom a detail action to a summary action.
B – 10 Oracle Applications System Administrator’s Guide
Oracle Alert Precoded Alerts
Your Oracle Alert installation contains custom alerts that are designedto help you manage your database and the data you generate when youuse Oracle Alert. Oracle Alert provides eight alerts that systematicallymonitor your system for potential tablespace, disk space, and allocationproblems, making your Database Administrators more efficient, andincreasing database performance.
Occasionally, you will want to purge your database of obsoleteconcurrent requests, alert checks, and action set checks. Oracle Alertprovides two alerts that let you periodically remove old files, freeingup valuable tablespace and increasing database performance. OracleAlert also provides an alert that clears your Oracle Alert electronic mailfolders of older messages, keeping your send mail and response mailaccounts to a manageable size.
This section gives you an overview of these eleven alerts, andsuggestions on how to use them to enhance your system performance.
Terms
Before reading this discussion of precoded alerts, you may want tofamiliarize yourself with the following Glossary terms:
• Periodic Alert
• Exception
• Action
• Detail Action
• Summary Action
• No Exception Action
• Input
Oracle Alert DBA Alerts
Oracle Alert DBA alerts help you manage your database by notifyingyou regularly of:
• Tables and indexes unable to allocate another extent
• Users who are nearing their tablespace quota
B – 11Using Predefined Alerts
• Tablespaces without adequate free space
• Tables and indexes that are too large or are fragmented
• Tables and indexes that are near their maximum extents
Customizable Alert Frequencies
Oracle Alert DBA alerts are periodic alerts, so you determine howoften they check your database. Set them to run daily, weekly, ormonthly, according to your database needs.
Summary and No Exception Messages
If Oracle Alert finds the database exceptions specified in a DBA alert, itsends you a message summarizing all exceptions found. If Oracle Alertfinds no exceptions, it sends you a message reporting that noexceptions were found. Oracle Alert keeps you notified of the status ofyour database, even if it is unchanging.
Customizable Alert Inputs
Inputs let you customize your DBA alerts. You can specify theORACLE username, table, or index you want your alerts to target, andyou can specify the threshold number of extents, maximum extents, orblocks Oracle Alert should look for. You can also define your inputvalues at the action set level, so you can create multiple action sets thattarget different usernames, tables, and indexes. You can create as manyaction sets as you need.
Support for Multiple Database Instances
The Applications DBA application owns the Oracle Alert DBA alerts.This lets Oracle Alert perform the DBA alerts for every databaseinstance you create, even those that reside outside Oracle Alert’sdatabase.
Applications DBA Alerts Descriptions
The following descriptions list the customizable frequency and inputsof each DBA alert.
Tables Unable to Allocate Another Extent
This alert looks for tables where the next extent is larger than thelargest free extent.
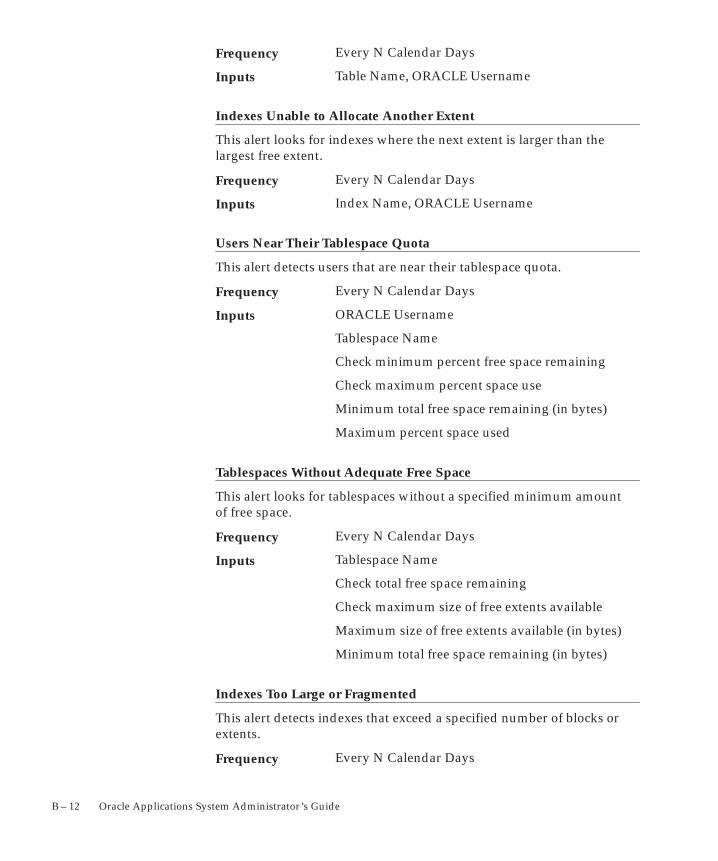
B – 12 Oracle Applications System Administrator’s Guide
Every N Calendar Days
Table Name, ORACLE Username
Indexes Unable to Allocate Another Extent
This alert looks for indexes where the next extent is larger than thelargest free extent.
Every N Calendar Days
Index Name, ORACLE Username
Users Near Their Tablespace Quota
This alert detects users that are near their tablespace quota.
Every N Calendar Days
ORACLE Username
Tablespace Name
Check minimum percent free space remaining
Check maximum percent space use
Minimum total free space remaining (in bytes)
Maximum percent space used
Tablespaces Without Adequate Free Space
This alert looks for tablespaces without a specified minimum amountof free space.
Every N Calendar Days
Tablespace Name
Check total free space remaining
Check maximum size of free extents available
Maximum size of free extents available (in bytes)
Minimum total free space remaining (in bytes)
Indexes Too Large or Fragmented
This alert detects indexes that exceed a specified number of blocks orextents.
Every N Calendar Days
Frequency
Inputs
Frequency
Inputs
Frequency
Inputs
Frequency
Inputs
Frequency

B – 13Using Predefined Alerts
Index Name
ORACLE Username
Check maximum number of blocks
Check maximum number of extents
Maximum number of blocks
Maximum number of extents
Tables Too Large or Fragmented
This alert detects tables that exceed a specified number of blocks orextents.
Every N Calendar Days
Table Name
ORACLE Username
Check maximum number of blocks
Check maximum number of extents
Maximum number of blocks
Maximum number of extents
Tables Near Maximum Extents
This alert searches for tables and indexes that are within a specifiednumber of extents of their maximum extents.
Every N Calendar Days
Table Name
ORACLE Username
Minimum number of extents remaining
Indexes Near Maximum Extents
This alert searches for tables and indexes that are within a specifiednumber of extents of their maximum extents.
Every N Calendar Days
Index Name
ORACLE Username
Minimum number of extents remaining
Inputs
Frequency
Inputs
Frequency
Inputs
Frequency
Inputs
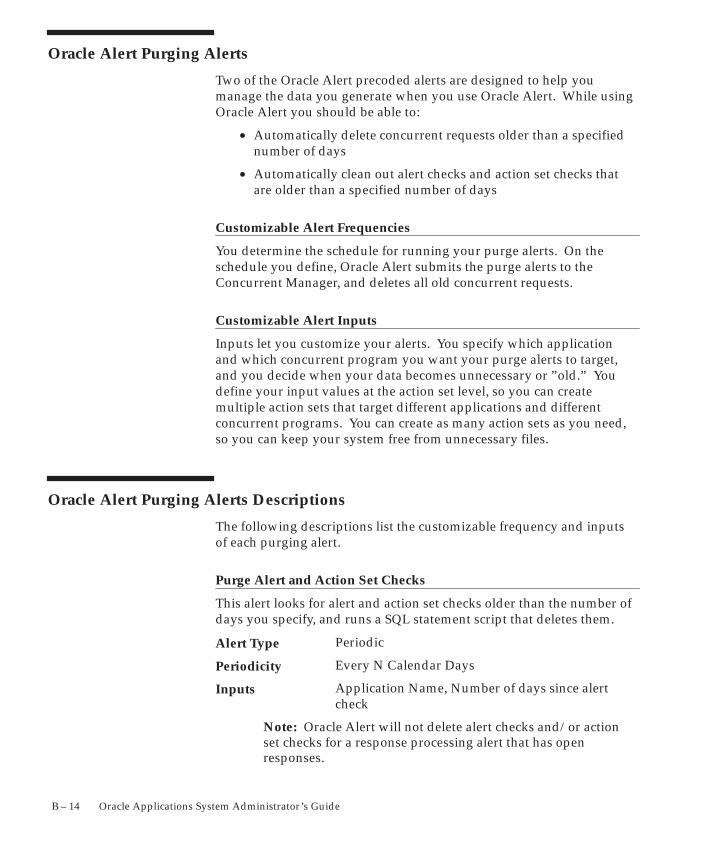
B – 14 Oracle Applications System Administrator’s Guide
Oracle Alert Purging Alerts
Two of the Oracle Alert precoded alerts are designed to help youmanage the data you generate when you use Oracle Alert. While usingOracle Alert you should be able to:
• Automatically delete concurrent requests older than a specifiednumber of days
• Automatically clean out alert checks and action set checks thatare older than a specified number of days
Customizable Alert Frequencies
You determine the schedule for running your purge alerts. On theschedule you define, Oracle Alert submits the purge alerts to theConcurrent Manager, and deletes all old concurrent requests.
Customizable Alert Inputs
Inputs let you customize your alerts. You specify which applicationand which concurrent program you want your purge alerts to target,and you decide when your data becomes unnecessary or ”old.” Youdefine your input values at the action set level, so you can createmultiple action sets that target different applications and differentconcurrent programs. You can create as many action sets as you need,so you can keep your system free from unnecessary files.
Oracle Alert Purging Alerts Descriptions
The following descriptions list the customizable frequency and inputsof each purging alert.
Purge Alert and Action Set Checks
This alert looks for alert and action set checks older than the number ofdays you specify, and runs a SQL statement script that deletes them.
Periodic
Every N Calendar Days
Application Name, Number of days since alertcheck
Note: Oracle Alert will not delete alert checks and/or actionset checks for a response processing alert that has openresponses.
Alert Type
Periodicity
Inputs
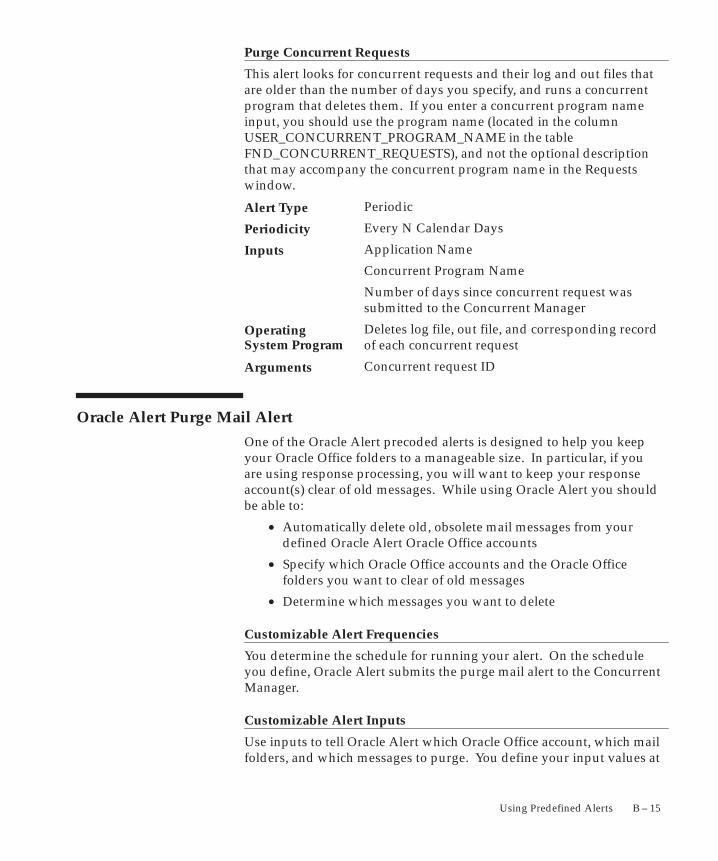
B – 15Using Predefined Alerts
Purge Concurrent Requests
This alert looks for concurrent requests and their log and out files thatare older than the number of days you specify, and runs a concurrentprogram that deletes them. If you enter a concurrent program nameinput, you should use the program name (located in the columnUSER_CONCURRENT_PROGRAM_NAME in the tableFND_CONCURRENT_REQUESTS), and not the optional descriptionthat may accompany the concurrent program name in the Requestswindow.
Periodic
Every N Calendar Days
Application Name
Concurrent Program Name
Number of days since concurrent request wassubmitted to the Concurrent Manager
Deletes log file, out file, and corresponding recordof each concurrent request
Concurrent request ID
Oracle Alert Purge Mail Alert
One of the Oracle Alert precoded alerts is designed to help you keepyour Oracle Office folders to a manageable size. In particular, if youare using response processing, you will want to keep your responseaccount(s) clear of old messages. While using Oracle Alert you shouldbe able to:
• Automatically delete old, obsolete mail messages from yourdefined Oracle Alert Oracle Office accounts
• Specify which Oracle Office accounts and the Oracle Officefolders you want to clear of old messages
• Determine which messages you want to delete
Customizable Alert Frequencies
You determine the schedule for running your alert. On the scheduleyou define, Oracle Alert submits the purge mail alert to the ConcurrentManager.
Customizable Alert Inputs
Use inputs to tell Oracle Alert which Oracle Office account, which mailfolders, and which messages to purge. You define your input values at
Alert Type
Periodicity
Inputs
OperatingSystem Program
Arguments
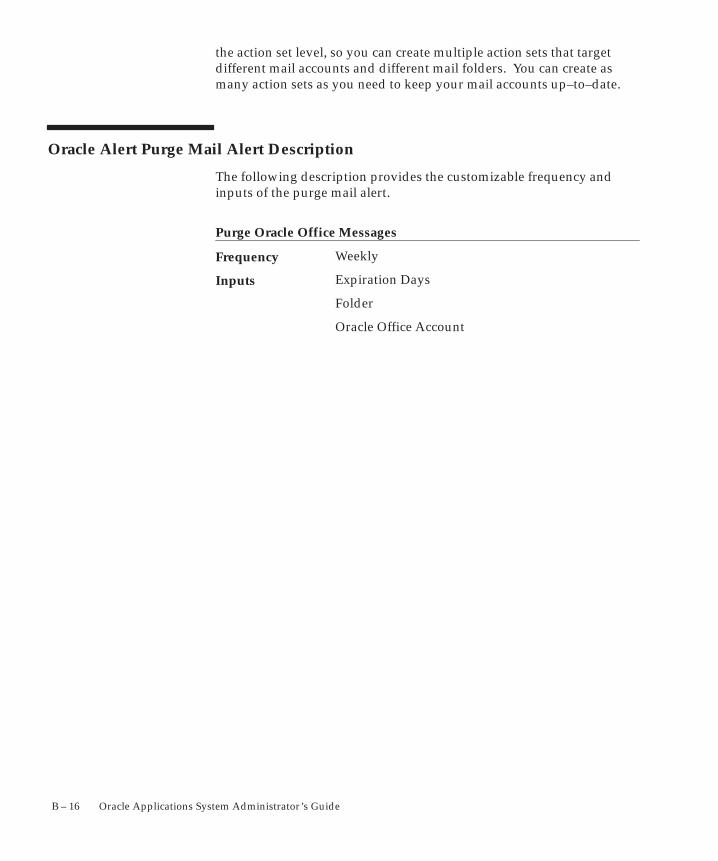
B – 16 Oracle Applications System Administrator’s Guide
the action set level, so you can create multiple action sets that targetdifferent mail accounts and different mail folders. You can create asmany action sets as you need to keep your mail accounts up–to–date.
Oracle Alert Purge Mail Alert Description
The following description provides the customizable frequency andinputs of the purge mail alert.
Purge Oracle Office Messages
Weekly
Expiration Days
Folder
Oracle Office Account
Frequency
Inputs
A P P E N D I X
CT
C – 1Loaders
Loaders
his appendix lists the loader programs that the systemadministrator can use.
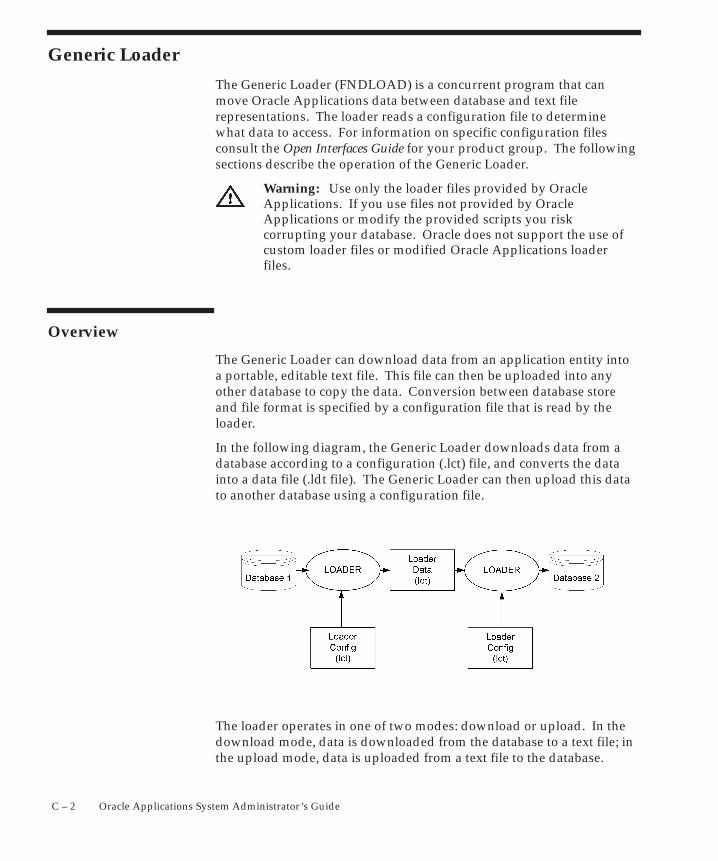
C – 2 Oracle Applications System Administrator’s Guide
Generic Loader
The Generic Loader (FNDLOAD) is a concurrent program that canmove Oracle Applications data between database and text filerepresentations. The loader reads a configuration file to determinewhat data to access. For information on specific configuration filesconsult the Open Interfaces Guide for your product group. The followingsections describe the operation of the Generic Loader.
Warning: Use only the loader files provided by OracleApplications. If you use files not provided by OracleApplications or modify the provided scripts you riskcorrupting your database. Oracle does not support the use ofcustom loader files or modified Oracle Applications loaderfiles.
Overview
The Generic Loader can download data from an application entity intoa portable, editable text file. This file can then be uploaded into anyother database to copy the data. Conversion between database storeand file format is specified by a configuration file that is read by theloader.
In the following diagram, the Generic Loader downloads data from adatabase according to a configuration (.lct) file, and converts the datainto a data file (.ldt file). The Generic Loader can then upload this datato another database using a configuration file.
The loader operates in one of two modes: download or upload. In thedownload mode, data is downloaded from the database to a text file; inthe upload mode, data is uploaded from a text file to the database.

C – 3Loaders
Data structures supported by the loader include master–detailrelationships and foreign key reference relationships.
In both downloading and uploading, the structure of the data involvedis described by a configuration file. The configuration file describes thestructure of the data and also the access methods to use to copy thedata into or out of the database. The same configuration file may beused for both uploading and downloading.
When downloading, the Generic Loader creates a second file, called thedata file, that contains the structured data selected for downloading.The data file has a standard syntax for representing the data that hasbeen downloaded. When uploading, the Generic Loader reads a datafile to get the data that it is to upload. In most cases, the data file wasproduced by a previous download, but may have come from anothersource. The data file cannot be interpreted without the correspondingconfiguration file available.
Download database information to a text file
The text file is human–readable and portable, and can be examined andmodified with any editor. Generally, a ”developer key” is used toidentify records written out to text files. For example, thePROFILE_OPTION_NAME, not the PROFILE_OPTION_ID, is used toidentify records in the Profiles configuration file.
Upload (merge) the information in a text file to the database
In uploading, if a row exists, but has different attributes, the row isupdated. If a row does not exist, a new row is inserted.
Depending on the configuration file, a row that exists in the databasebut not in the text file may or may not be deleted when the text file isuploaded. Refer to the configuration file to determine how such rowsare handled.
These download and upload capabilities allow profile valueinformation that is defined in one database to be easily propagated toother databases. This is useful for delivering Oracle Applications seeddata to customers, as well as for copying customer profile definitionsfrom a primary site to other sites.
The text file version of profile value data is also useful for bulk editingoperations, which can be accomplished more efficiently with a texteditor than with a form.
Preservation of data
FNDLOAD uses the OWNER and LAST_UPDATE_DATE attributes todetermine whether to overwrite pre–existing data. The rules appliedare:
C – 4 Oracle Applications System Administrator’s Guide
1. If the entity being uploaded is not present in the database, a newentity is always inserted.
2. Entities uploaded from a file with OWNER=SEED never overwriteentities with OWNER=CUSTOM in the database.
3. Entities with OWNER=CUSTOM uploaded from a file alwaysupdate entities with OWNER=SEED in the database.
4. If the owner of the entity is the same in the file and database, theentity is updated only if the LAST_UPDATE_DATE in the file islater than the LAST_UPDATE_DATE in the database.
FNDLOAD Executable
The Generic Loader is a concurrent program named FNDLOAD. Theconcurrent executable takes the following parameters:
FNDLOAD apps/pwd 0 Y mode configfile datafile entity
[ param ... ]
where
The APPS schema and password in the formusername/password[@connect_string]. Ifconnect_string is omitted, it is taken in aplatform–specific manner from the environmentusing the name TWO_TASK.
Concurrent program flags
UPLOAD or DOWNLOAD. UPLOAD causes thedatafile to be uploaded to the database.DOWNLOAD causes the loader to fetch rows andwrite them to the datafile.
The configuration file to use (usually with a suffixof .lct, but not enforced or supplied by the loader).
The data file to write (usually with a suffix of .ldt,but not enforced or supplied by the loader). If thedata file already exists, it will be overwritten.
The entity(ies) to upload or download. Whenuploading, you should always upload all entities,so specify a ”–” to upload all entities.
Zero or more additional parameters are used toprovide bind values in the access SQL (bothUPLOAD and DOWNLOAD). Each parameter is
<apps/pwd>
< 0 Y >
mode
<configfile>
<datafile>
<entity>
< [param] >
C – 5Loaders
in the form NAME=VALUE. NAME should notconflict with an attribute name for the entitiesbeing loaded.
File Specifications
The configuration file and data file parameters are specified in one oftwo ways:
@<application_short_name>:[<dir>/.../]file.ext
For example,
@fnd/11i/loader/fndapp.lct
@po:install/data/poreq.ldt
Alternatively, the parameters can be specified as such:
<native path>
For example,
mydata.ldt
c:\loader\config\cfg102.lct
Examples
An example of downloading is:
FNDLOAD apps/apps@devdb 0 Y
DOWNLOAD testcfg.lct out.ldt FND_APPLICATION_TL
APPSNAME=FND
This command does the following:
• connects to apps/apps@devd
• downloads data using the configuration file testcfg.lct
• writes data to data file out.ldt
• downloads the FND_APPLICATION_TL entity withAPPSNAME parameter defined as value ’FND’
An example of uploading is:
FNDLOAD apps/apps@custdb 0 Y
UPLOAD fndapp.lct fnd1234.ldt –
This command does the following:
• connects to apps/apps@custdb
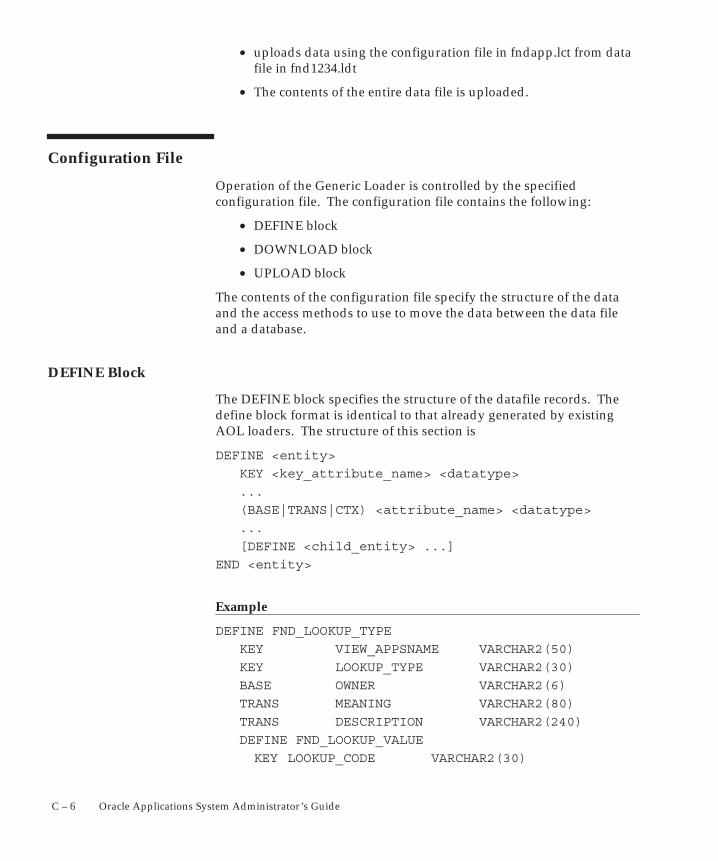
C – 6 Oracle Applications System Administrator’s Guide
• uploads data using the configuration file in fndapp.lct from datafile in fnd1234.ldt
• The contents of the entire data file is uploaded.
Configuration File
Operation of the Generic Loader is controlled by the specifiedconfiguration file. The configuration file contains the following:
• DEFINE block
• DOWNLOAD block
• UPLOAD block
The contents of the configuration file specify the structure of the dataand the access methods to use to move the data between the data fileand a database.
DEFINE Block
The DEFINE block specifies the structure of the datafile records. Thedefine block format is identical to that already generated by existingAOL loaders. The structure of this section is
DEFINE <entity>
KEY <key_attribute_name> <datatype>
...
(BASE|TRANS|CTX) <attribute_name> <datatype>
...
[DEFINE <child_entity> ...]
END <entity>
Example
DEFINE FND_LOOKUP_TYPE
KEY VIEW_APPSNAME VARCHAR2(50)
KEY LOOKUP_TYPE VARCHAR2(30)
BASE OWNER VARCHAR2(6)
TRANS MEANING VARCHAR2(80)
TRANS DESCRIPTION VARCHAR2(240)
DEFINE FND_LOOKUP_VALUE
KEY LOOKUP_CODE VARCHAR2(30)
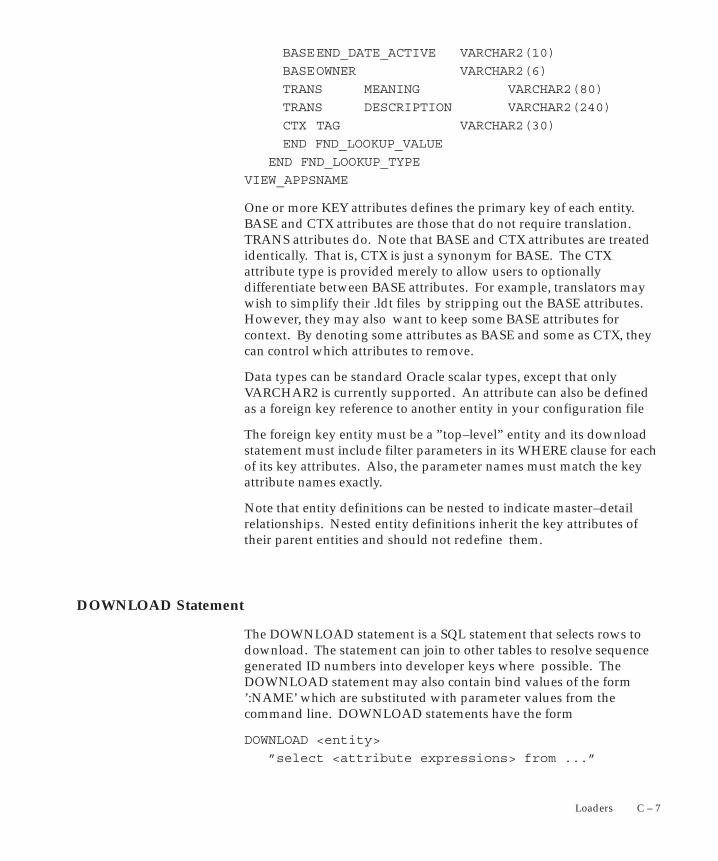
C – 7Loaders
BASEEND_DATE_ACTIVE VARCHAR2(10)
BASEOWNER VARCHAR2(6)
TRANS MEANING VARCHAR2(80)
TRANS DESCRIPTION VARCHAR2(240)
CTX TAG VARCHAR2(30)
END FND_LOOKUP_VALUE
END FND_LOOKUP_TYPE
VIEW_APPSNAME
One or more KEY attributes defines the primary key of each entity.BASE and CTX attributes are those that do not require translation.TRANS attributes do. Note that BASE and CTX attributes are treatedidentically. That is, CTX is just a synonym for BASE. The CTXattribute type is provided merely to allow users to optionallydifferentiate between BASE attributes. For example, translators maywish to simplify their .ldt files by stripping out the BASE attributes.However, they may also want to keep some BASE attributes forcontext. By denoting some attributes as BASE and some as CTX, theycan control which attributes to remove.
Data types can be standard Oracle scalar types, except that onlyVARCHAR2 is currently supported. An attribute can also be definedas a foreign key reference to another entity in your configuration file
The foreign key entity must be a ”top–level” entity and its downloadstatement must include filter parameters in its WHERE clause for eachof its key attributes. Also, the parameter names must match the keyattribute names exactly.
Note that entity definitions can be nested to indicate master–detailrelationships. Nested entity definitions inherit the key attributes oftheir parent entities and should not redefine them.
DOWNLOAD Statement
The DOWNLOAD statement is a SQL statement that selects rows todownload. The statement can join to other tables to resolve sequencegenerated ID numbers into developer keys where possible. TheDOWNLOAD statement may also contain bind values of the form’:NAME’ which are substituted with parameter values from thecommand line. DOWNLOAD statements have the form
DOWNLOAD <entity>
”select <attribute expressions> from ...”
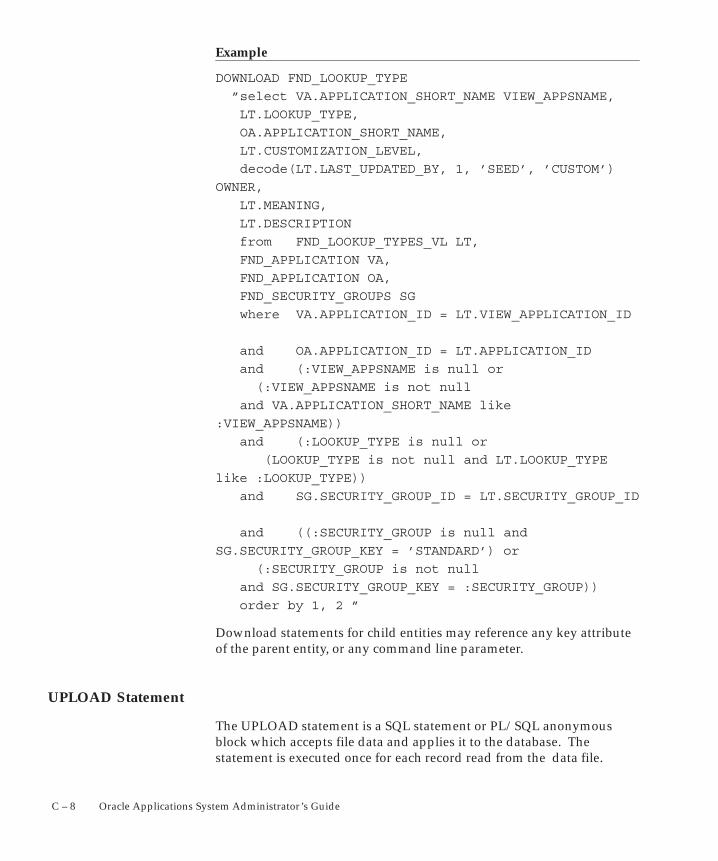
C – 8 Oracle Applications System Administrator’s Guide
Example
DOWNLOAD FND_LOOKUP_TYPE
”select VA.APPLICATION_SHORT_NAME VIEW_APPSNAME,
LT.LOOKUP_TYPE,
OA.APPLICATION_SHORT_NAME,
LT.CUSTOMIZATION_LEVEL,
decode(LT.LAST_UPDATED_BY, 1, ’SEED’, ’CUSTOM’)
OWNER,
LT.MEANING,
LT.DESCRIPTION
from FND_LOOKUP_TYPES_VL LT,
FND_APPLICATION VA,
FND_APPLICATION OA,
FND_SECURITY_GROUPS SG
where VA.APPLICATION_ID = LT.VIEW_APPLICATION_ID
and OA.APPLICATION_ID = LT.APPLICATION_ID
and (:VIEW_APPSNAME is null or
(:VIEW_APPSNAME is not null
and VA.APPLICATION_SHORT_NAME like
:VIEW_APPSNAME))
and (:LOOKUP_TYPE is null or
(LOOKUP_TYPE is not null and LT.LOOKUP_TYPE
like :LOOKUP_TYPE))
and SG.SECURITY_GROUP_ID = LT.SECURITY_GROUP_ID
and ((:SECURITY_GROUP is null and
SG.SECURITY_GROUP_KEY = ’STANDARD’) or
(:SECURITY_GROUP is not null
and SG.SECURITY_GROUP_KEY = :SECURITY_GROUP))
order by 1, 2 ”
Download statements for child entities may reference any key attributeof the parent entity, or any command line parameter.
UPLOAD Statement
The UPLOAD statement is a SQL statement or PL/SQL anonymousblock which accepts file data and applies it to the database. Thestatement is executed once for each record read from the data file.
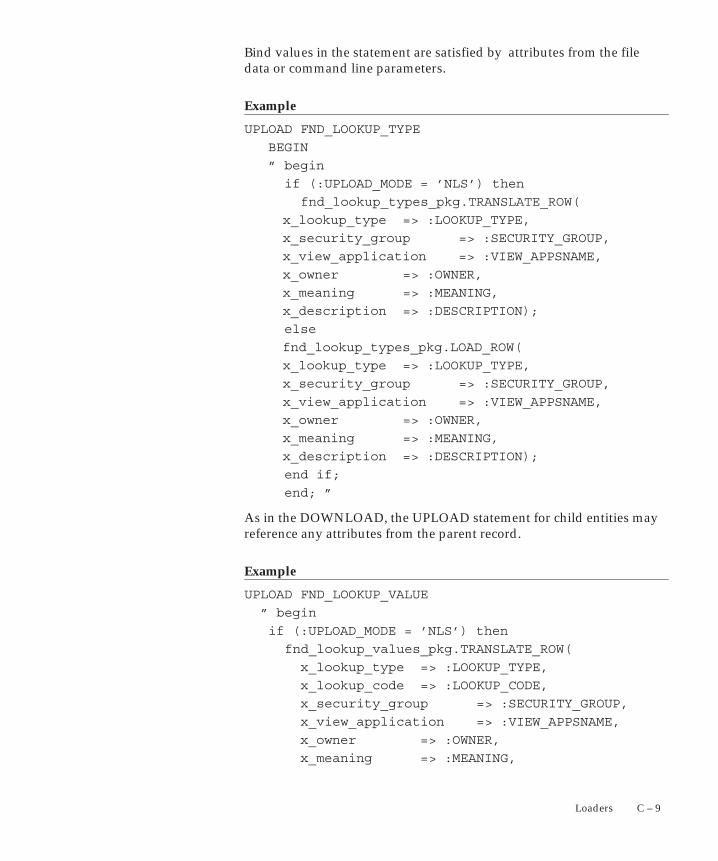
C – 9Loaders
Bind values in the statement are satisfied by attributes from the filedata or command line parameters.
Example
UPLOAD FND_LOOKUP_TYPE
BEGIN
” begin
if (:UPLOAD_MODE = ’NLS’) then
fnd_lookup_types_pkg.TRANSLATE_ROW(
x_lookup_type => :LOOKUP_TYPE,
x_security_group => :SECURITY_GROUP,
x_view_application => :VIEW_APPSNAME,
x_owner => :OWNER,
x_meaning => :MEANING,
x_description => :DESCRIPTION);
else
fnd_lookup_types_pkg.LOAD_ROW(
x_lookup_type => :LOOKUP_TYPE,
x_security_group => :SECURITY_GROUP,
x_view_application => :VIEW_APPSNAME,
x_owner => :OWNER,
x_meaning => :MEANING,
x_description => :DESCRIPTION);
end if;
end; ”
As in the DOWNLOAD, the UPLOAD statement for child entities mayreference any attributes from the parent record.
Example
UPLOAD FND_LOOKUP_VALUE
” begin
if (:UPLOAD_MODE = ’NLS’) then
fnd_lookup_values_pkg.TRANSLATE_ROW(
x_lookup_type => :LOOKUP_TYPE,
x_lookup_code => :LOOKUP_CODE,
x_security_group => :SECURITY_GROUP,
x_view_application => :VIEW_APPSNAME,
x_owner => :OWNER,
x_meaning => :MEANING,
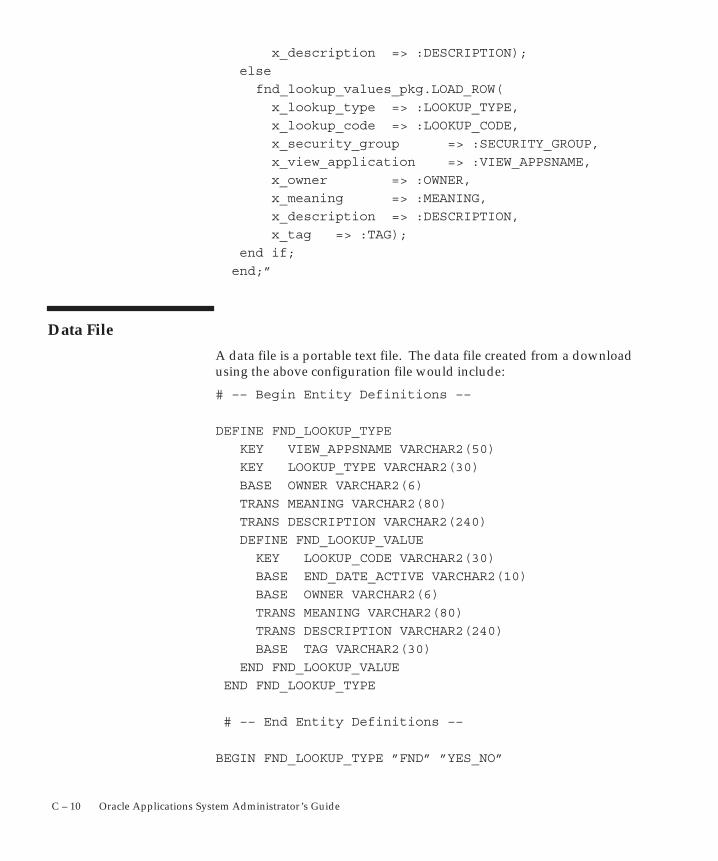
C – 10 Oracle Applications System Administrator’s Guide
x_description => :DESCRIPTION);
else
fnd_lookup_values_pkg.LOAD_ROW(
x_lookup_type => :LOOKUP_TYPE,
x_lookup_code => :LOOKUP_CODE,
x_security_group => :SECURITY_GROUP,
x_view_application => :VIEW_APPSNAME,
x_owner => :OWNER,
x_meaning => :MEANING,
x_description => :DESCRIPTION,
x_tag => :TAG);
end if;
end;”
Data File
A data file is a portable text file. The data file created from a downloadusing the above configuration file would include:
# –– Begin Entity Definitions ––
DEFINE FND_LOOKUP_TYPE
KEY VIEW_APPSNAME VARCHAR2(50)
KEY LOOKUP_TYPE VARCHAR2(30)
BASE OWNER VARCHAR2(6)
TRANS MEANING VARCHAR2(80)
TRANS DESCRIPTION VARCHAR2(240)
DEFINE FND_LOOKUP_VALUE
KEY LOOKUP_CODE VARCHAR2(30)
BASE END_DATE_ACTIVE VARCHAR2(10)
BASE OWNER VARCHAR2(6)
TRANS MEANING VARCHAR2(80)
TRANS DESCRIPTION VARCHAR2(240)
BASE TAG VARCHAR2(30)
END FND_LOOKUP_VALUE
END FND_LOOKUP_TYPE
# –– End Entity Definitions ––
BEGIN FND_LOOKUP_TYPE ”FND” ”YES_NO”

C – 11Loaders
OWNER = ”SEED”
MEANING = ”Yes or No”
BEGIN FND_LOOKUP_VALUE Y
OWNER = ”SEED”
MEANING = ”Yes”
END FND_LOOKUP_VALUE
BEGIN FND_LOOKUP_VALUE N
OWNER = ”SEED”
MEANING = ”No”
END FND_LOOKUP_VALUE
END FND_LOOKUP_TYPE
C – 12 Oracle Applications System Administrator’s Guide
Application Object Library Configuration Files
Oracle Application Object Library provides several configuration filesfor the Generic Loader that you can use with your setup data.
These configuration files operate on the following data:
• Concurrent program definitions
• Request groups
• Lookup types and lookup values
• Profile options and profile option values
• Flexfields setup data
• Attachments definitions
• Messages
• Security information
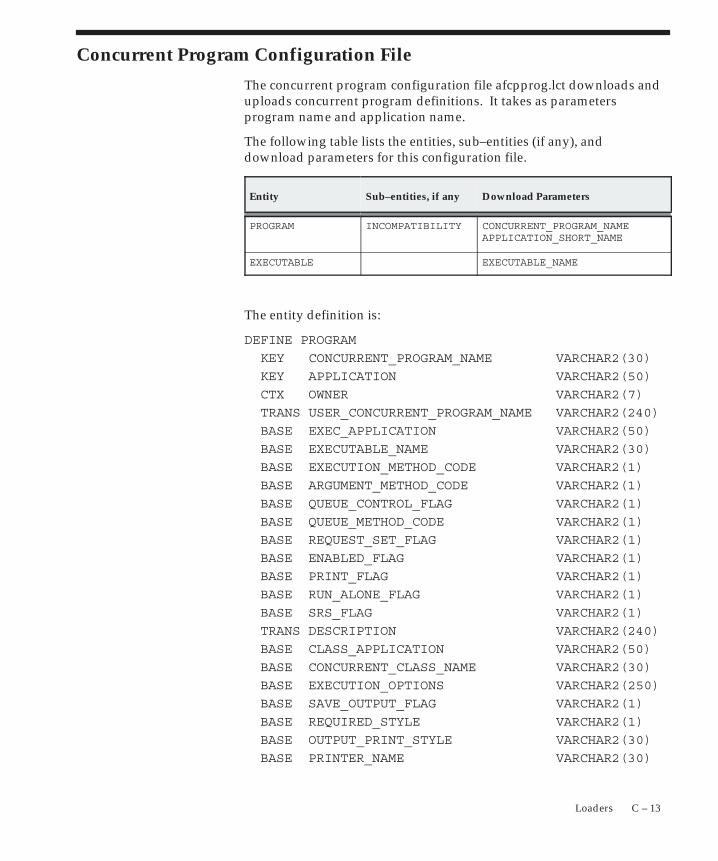
C – 13Loaders
Concurrent Program Configuration File
The concurrent program configuration file afcpprog.lct downloads anduploads concurrent program definitions. It takes as parametersprogram name and application name.
The following table lists the entities, sub–entities (if any), anddownload parameters for this configuration file.
Entity Sub–entities, if any Download Parameters
PROGRAM INCOMPATIBILITY CONCURRENT_PROGRAM_NAMEAPPLICATION_SHORT_NAME
EXECUTABLE EXECUTABLE_NAME
The entity definition is:
DEFINE PROGRAM
KEY CONCURRENT_PROGRAM_NAME VARCHAR2(30)
KEY APPLICATION VARCHAR2(50)
CTX OWNER VARCHAR2(7)
TRANS USER_CONCURRENT_PROGRAM_NAME VARCHAR2(240)
BASE EXEC_APPLICATION VARCHAR2(50)
BASE EXECUTABLE_NAME VARCHAR2(30)
BASE EXECUTION_METHOD_CODE VARCHAR2(1)
BASE ARGUMENT_METHOD_CODE VARCHAR2(1)
BASE QUEUE_CONTROL_FLAG VARCHAR2(1)
BASE QUEUE_METHOD_CODE VARCHAR2(1)
BASE REQUEST_SET_FLAG VARCHAR2(1)
BASE ENABLED_FLAG VARCHAR2(1)
BASE PRINT_FLAG VARCHAR2(1)
BASE RUN_ALONE_FLAG VARCHAR2(1)
BASE SRS_FLAG VARCHAR2(1)
TRANS DESCRIPTION VARCHAR2(240)
BASE CLASS_APPLICATION VARCHAR2(50)
BASE CONCURRENT_CLASS_NAME VARCHAR2(30)
BASE EXECUTION_OPTIONS VARCHAR2(250)
BASE SAVE_OUTPUT_FLAG VARCHAR2(1)
BASE REQUIRED_STYLE VARCHAR2(1)
BASE OUTPUT_PRINT_STYLE VARCHAR2(30)
BASE PRINTER_NAME VARCHAR2(30)
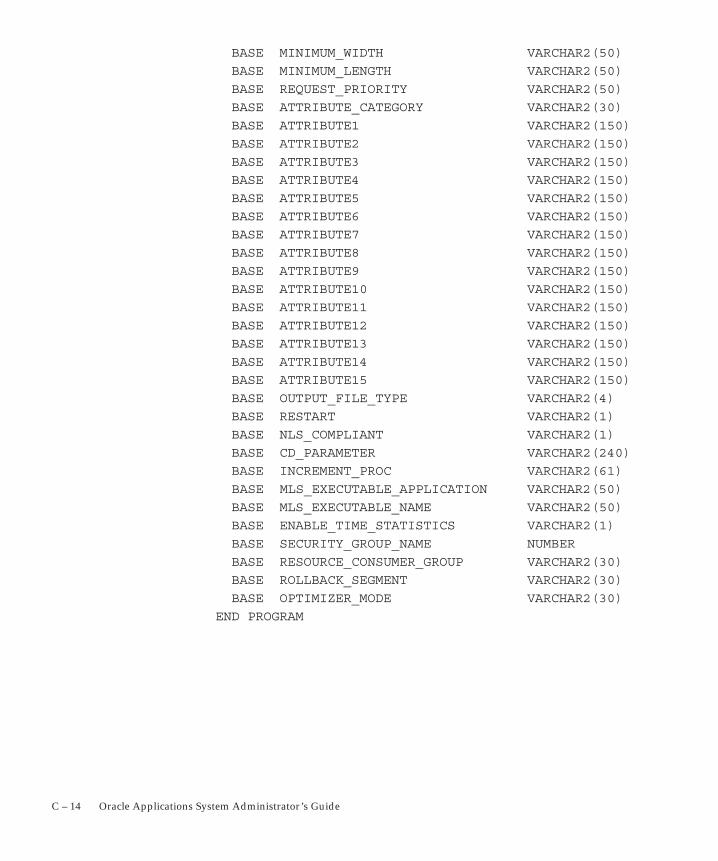
C – 14 Oracle Applications System Administrator’s Guide
BASE MINIMUM_WIDTH VARCHAR2(50)
BASE MINIMUM_LENGTH VARCHAR2(50)
BASE REQUEST_PRIORITY VARCHAR2(50)
BASE ATTRIBUTE_CATEGORY VARCHAR2(30)
BASE ATTRIBUTE1 VARCHAR2(150)
BASE ATTRIBUTE2 VARCHAR2(150)
BASE ATTRIBUTE3 VARCHAR2(150)
BASE ATTRIBUTE4 VARCHAR2(150)
BASE ATTRIBUTE5 VARCHAR2(150)
BASE ATTRIBUTE6 VARCHAR2(150)
BASE ATTRIBUTE7 VARCHAR2(150)
BASE ATTRIBUTE8 VARCHAR2(150)
BASE ATTRIBUTE9 VARCHAR2(150)
BASE ATTRIBUTE10 VARCHAR2(150)
BASE ATTRIBUTE11 VARCHAR2(150)
BASE ATTRIBUTE12 VARCHAR2(150)
BASE ATTRIBUTE13 VARCHAR2(150)
BASE ATTRIBUTE14 VARCHAR2(150)
BASE ATTRIBUTE15 VARCHAR2(150)
BASE OUTPUT_FILE_TYPE VARCHAR2(4)
BASE RESTART VARCHAR2(1)
BASE NLS_COMPLIANT VARCHAR2(1)
BASE CD_PARAMETER VARCHAR2(240)
BASE INCREMENT_PROC VARCHAR2(61)
BASE MLS_EXECUTABLE_APPLICATION VARCHAR2(50)
BASE MLS_EXECUTABLE_NAME VARCHAR2(50)
BASE ENABLE_TIME_STATISTICS VARCHAR2(1)
BASE SECURITY_GROUP_NAME NUMBER
BASE RESOURCE_CONSUMER_GROUP VARCHAR2(30)
BASE ROLLBACK_SEGMENT VARCHAR2(30)
BASE OPTIMIZER_MODE VARCHAR2(30)
END PROGRAM
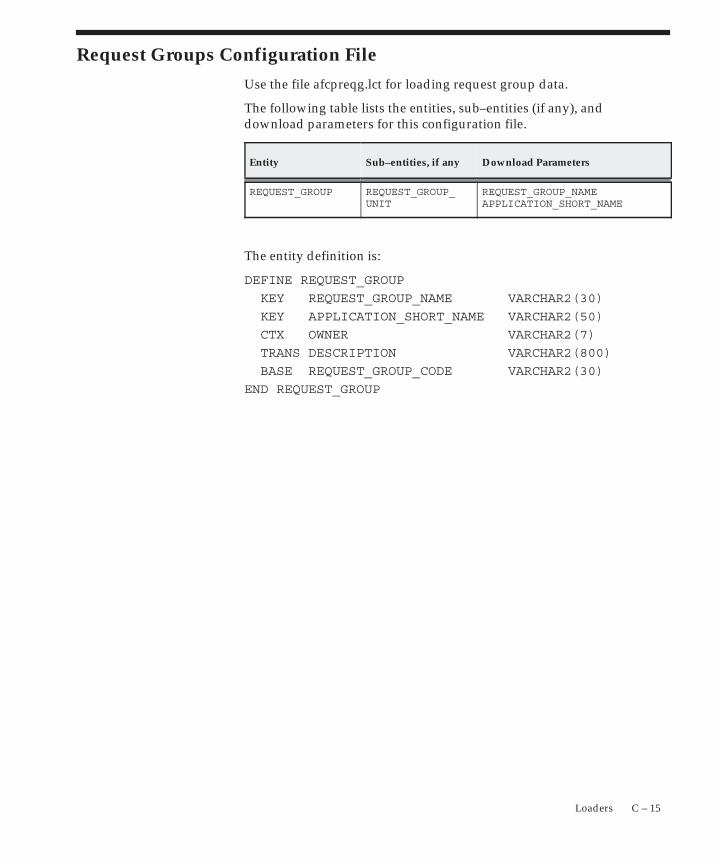
C – 15Loaders
Request Groups Configuration File
Use the file afcpreqg.lct for loading request group data.
The following table lists the entities, sub–entities (if any), anddownload parameters for this configuration file.
Entity Sub–entities, if any Download Parameters
REQUEST_GROUP REQUEST_GROUP_UNIT
REQUEST_GROUP_NAMEAPPLICATION_SHORT_NAME
The entity definition is:
DEFINE REQUEST_GROUP
KEY REQUEST_GROUP_NAME VARCHAR2(30)
KEY APPLICATION_SHORT_NAME VARCHAR2(50)
CTX OWNER VARCHAR2(7)
TRANS DESCRIPTION VARCHAR2(800)
BASE REQUEST_GROUP_CODE VARCHAR2(30)
END REQUEST_GROUP

C – 16 Oracle Applications System Administrator’s Guide
Lookups Configuration FileUse the file aflvmlu.lct for loading Lookup types and Lookups values.
The following table lists the entities, sub–entities (if any), anddownload parameters for this configuration file.
Entity Sub–entities, if any Download Parameters
FND_LOOKUP_TYPE FND_LOOKUP_VALUE VIEW_APPSNAMELOOKUP_TYPESECURITY_GROUP
The entity definition is:
DEFINE FND_LOOKUP_TYPE
KEY VIEW_APPSNAME VARCHAR2(50)
KEY LOOKUP_TYPE VARCHAR2(30)
CTX APPLICATION_SHORT_NAME VARCHAR2(50)
BASE CUSTOMIZATION_LEVEL VARCHAR2(1)
CTX OWNER VARCHAR2(6)
TRANS MEANING VARCHAR2(80)
TRANS DESCRIPTION VARCHAR2(240)
DEFINE FND_LOOKUP_VALUE
KEY LOOKUP_CODE VARCHAR2(30)
BASE ENABLED_FLAG VARCHAR2(1)
BASE START_DATE_ACTIVE VARCHAR2(10)
BASE END_DATE_ACTIVE VARCHAR2(10)
BASE TERRITORY_CODE VARCHAR2(2)
BASE TAG
VARCHAR2(30)
BASE ATTRIBUTE_CATEGORY VARCHAR2(30)
BASE ATTRIBUTE1 VARCHAR2(150)
BASE ATTRIBUTE2 VARCHAR2(150)
BASE ATTRIBUTE3 VARCHAR2(150)
BASE ATTRIBUTE4 VARCHAR2(150)
BASE ATTRIBUTE5 VARCHAR2(150)
BASE ATTRIBUTE6 VARCHAR2(150)
BASE ATTRIBUTE7 VARCHAR2(150)
BASE ATTRIBUTE8 VARCHAR2(150)
BASE ATTRIBUTE9 VARCHAR2(150)

C – 17Loaders
BASE ATTRIBUTE10 VARCHAR2(150)
BASE ATTRIBUTE11 VARCHAR2(150)
BASE ATTRIBUTE12 VARCHAR2(150)
BASE ATTRIBUTE13 VARCHAR2(150)
BASE ATTRIBUTE14 VARCHAR2(150)
BASE ATTRIBUTE15 VARCHAR2(150)
CTX OWNER VARCHAR2(6)
TRANS MEANING VARCHAR2(80)
TRANS DESCRIPTION VARCHAR2(240)
END FND_LOOKUP_VALUE
END FND_LOOKUP_TYPE
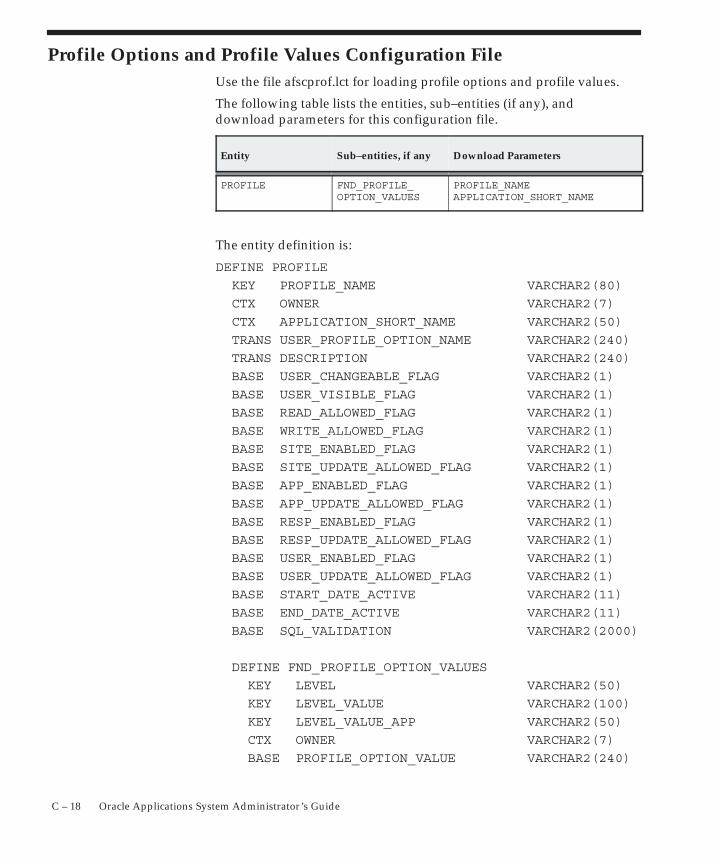
C – 18 Oracle Applications System Administrator’s Guide
Profile Options and Profile Values Configuration FileUse the file afscprof.lct for loading profile options and profile values.
The following table lists the entities, sub–entities (if any), anddownload parameters for this configuration file.
Entity Sub–entities, if any Download Parameters
PROFILE FND_PROFILE_OPTION_VALUES
PROFILE_NAMEAPPLICATION_SHORT_NAME
The entity definition is:
DEFINE PROFILE
KEY PROFILE_NAME VARCHAR2(80)
CTX OWNER VARCHAR2(7)
CTX APPLICATION_SHORT_NAME VARCHAR2(50)
TRANS USER_PROFILE_OPTION_NAME VARCHAR2(240)
TRANS DESCRIPTION VARCHAR2(240)
BASE USER_CHANGEABLE_FLAG VARCHAR2(1)
BASE USER_VISIBLE_FLAG VARCHAR2(1)
BASE READ_ALLOWED_FLAG VARCHAR2(1)
BASE WRITE_ALLOWED_FLAG VARCHAR2(1)
BASE SITE_ENABLED_FLAG VARCHAR2(1)
BASE SITE_UPDATE_ALLOWED_FLAG VARCHAR2(1)
BASE APP_ENABLED_FLAG VARCHAR2(1)
BASE APP_UPDATE_ALLOWED_FLAG VARCHAR2(1)
BASE RESP_ENABLED_FLAG VARCHAR2(1)
BASE RESP_UPDATE_ALLOWED_FLAG VARCHAR2(1)
BASE USER_ENABLED_FLAG VARCHAR2(1)
BASE USER_UPDATE_ALLOWED_FLAG VARCHAR2(1)
BASE START_DATE_ACTIVE VARCHAR2(11)
BASE END_DATE_ACTIVE VARCHAR2(11)
BASE SQL_VALIDATION VARCHAR2(2000)
DEFINE FND_PROFILE_OPTION_VALUES
KEY LEVEL VARCHAR2(50)
KEY LEVEL_VALUE VARCHAR2(100)
KEY LEVEL_VALUE_APP VARCHAR2(50)
CTX OWNER VARCHAR2(7)
BASE PROFILE_OPTION_VALUE VARCHAR2(240)

C – 19Loaders
END FND_PROFILE_OPTION_VALUES
END PROFILE
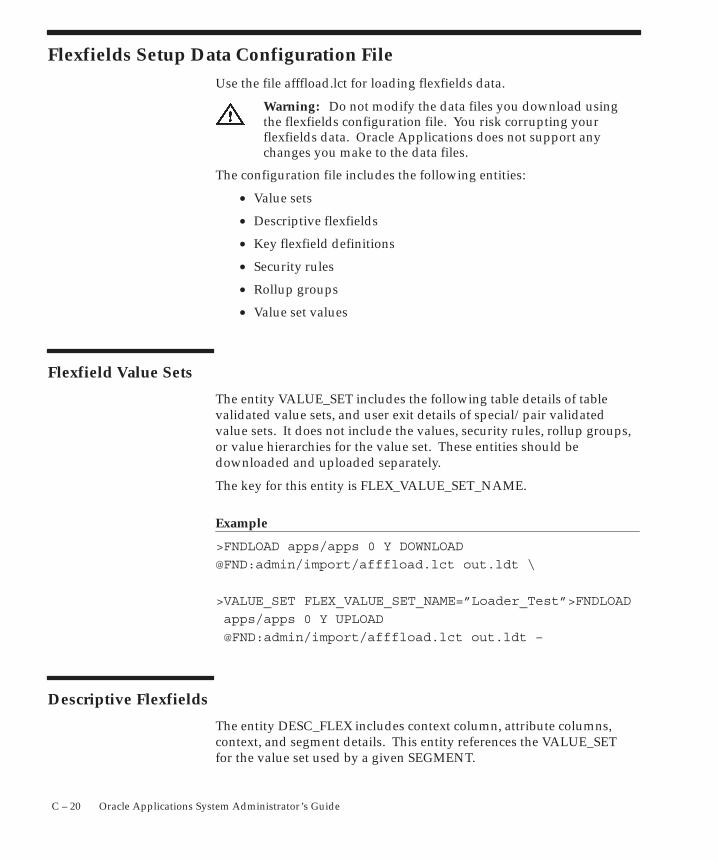
C – 20 Oracle Applications System Administrator’s Guide
Flexfields Setup Data Configuration FileUse the file afffload.lct for loading flexfields data.
Warning: Do not modify the data files you download usingthe flexfields configuration file. You risk corrupting yourflexfields data. Oracle Applications does not support anychanges you make to the data files.
The configuration file includes the following entities:
• Value sets
• Descriptive flexfields
• Key flexfield definitions
• Security rules
• Rollup groups
• Value set values
Flexfield Value Sets
The entity VALUE_SET includes the following table details of tablevalidated value sets, and user exit details of special/pair validatedvalue sets. It does not include the values, security rules, rollup groups,or value hierarchies for the value set. These entities should bedownloaded and uploaded separately.
The key for this entity is FLEX_VALUE_SET_NAME.
Example
>FNDLOAD apps/apps 0 Y DOWNLOAD
@FND:admin/import/afffload.lct out.ldt \
>VALUE_SET FLEX_VALUE_SET_NAME=”Loader_Test”>FNDLOAD
apps/apps 0 Y UPLOAD
@FND:admin/import/afffload.lct out.ldt –
Descriptive Flexfields
The entity DESC_FLEX includes context column, attribute columns,context, and segment details. This entity references the VALUE_SETfor the value set used by a given SEGMENT.
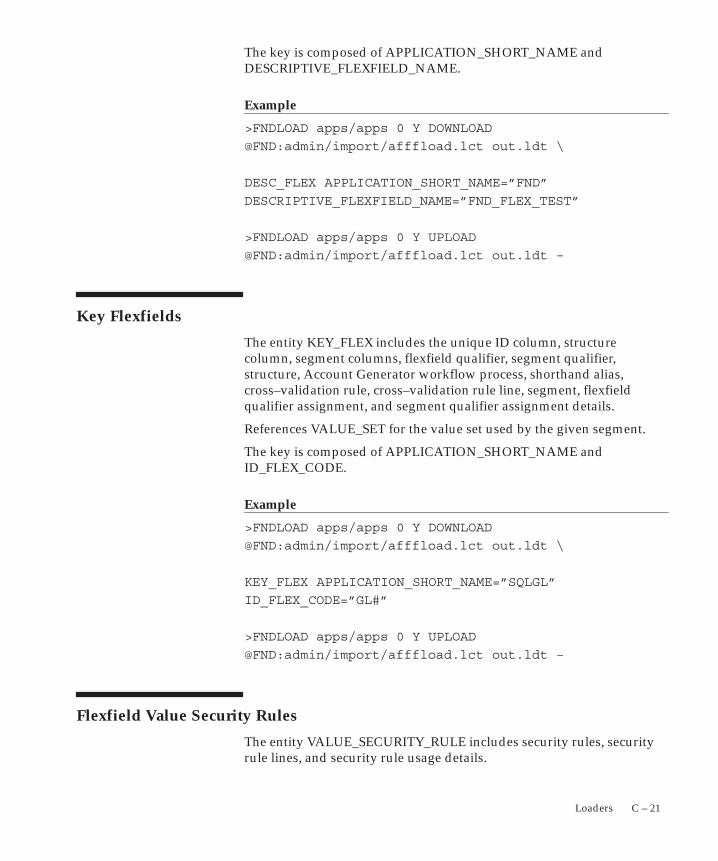
C – 21Loaders
The key is composed of APPLICATION_SHORT_NAME andDESCRIPTIVE_FLEXFIELD_NAME.
Example
>FNDLOAD apps/apps 0 Y DOWNLOAD
@FND:admin/import/afffload.lct out.ldt \
DESC_FLEX APPLICATION_SHORT_NAME=”FND”
DESCRIPTIVE_FLEXFIELD_NAME=”FND_FLEX_TEST”
>FNDLOAD apps/apps 0 Y UPLOAD
@FND:admin/import/afffload.lct out.ldt –
Key Flexfields
The entity KEY_FLEX includes the unique ID column, structurecolumn, segment columns, flexfield qualifier, segment qualifier,structure, Account Generator workflow process, shorthand alias,cross–validation rule, cross–validation rule line, segment, flexfieldqualifier assignment, and segment qualifier assignment details.
References VALUE_SET for the value set used by the given segment.
The key is composed of APPLICATION_SHORT_NAME andID_FLEX_CODE.
Example
>FNDLOAD apps/apps 0 Y DOWNLOAD
@FND:admin/import/afffload.lct out.ldt \
KEY_FLEX APPLICATION_SHORT_NAME=”SQLGL”
ID_FLEX_CODE=”GL#”
>FNDLOAD apps/apps 0 Y UPLOAD
@FND:admin/import/afffload.lct out.ldt –
Flexfield Value Security Rules
The entity VALUE_SECURITY_RULE includes security rules, securityrule lines, and security rule usage details.

C – 22 Oracle Applications System Administrator’s Guide
It references VALUE_SET for the value set.
The key is composed of FLEX_VALUE_SET_NAME,FLEX_VALUE_RULE_NAME, and PARENT_FLEX_VALUE_LOW.
Example
>FNDLOAD apps/apps 0 Y DOWNLOAD
@FND:admin/import/afffload.lct out.ldt \
VALUE_SECURITY_RULE FLEX_VALUE_SET_NAME=”Loader_Test”
FLEX_VALUE_RULE_NAME=”%” \
PARENT_FLEX_VALUE_LOW=”%”
>FNDLOAD apps/apps 0 Y UPLOAD
@FND:admin/import/afffload.lct out.ldt –
Flexfields Value Hierarchies (Rollup Groups)
The entity VALUE_ROLLUP_GROUP contains rollup groups.
It references VALUE_SET for the value set.
The key is composed of FLEX_VALUE_SET_NAME andHIERARCHY_CODE.
Example
>FNDLOAD apps/apps 0 Y DOWNLOAD
@FND:admin/import/afffload.lct out.ldt \
VALUE_ROLLUP_GROUP FLEX_VALUE_SET_NAME=”Loader_Test”
HIERARCHY_CODE=”%”
>FNDLOAD apps/apps 0 Y UPLOAD
@FND:admin/import/afffload.lct out.ldt –
Flexfields Values
The entity VALUE_SET_VALUE includes the normalized valuehierarchy and value qualifier value details.
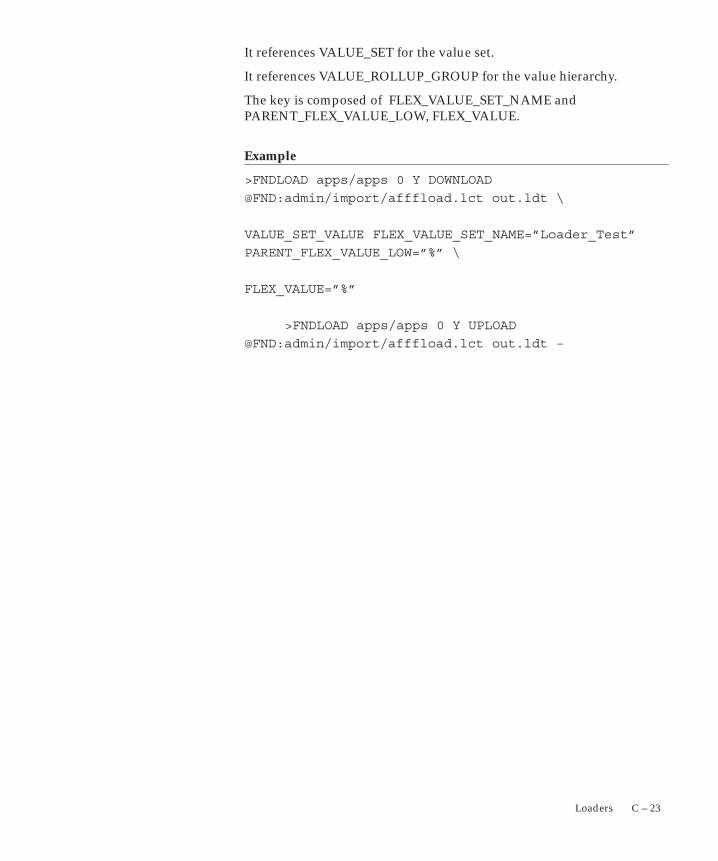
C – 23Loaders
It references VALUE_SET for the value set.
It references VALUE_ROLLUP_GROUP for the value hierarchy.
The key is composed of FLEX_VALUE_SET_NAME andPARENT_FLEX_VALUE_LOW, FLEX_VALUE.
Example
>FNDLOAD apps/apps 0 Y DOWNLOAD
@FND:admin/import/afffload.lct out.ldt \
VALUE_SET_VALUE FLEX_VALUE_SET_NAME=”Loader_Test”
PARENT_FLEX_VALUE_LOW=”%” \
FLEX_VALUE=”%”
>FNDLOAD apps/apps 0 Y UPLOAD
@FND:admin/import/afffload.lct out.ldt –
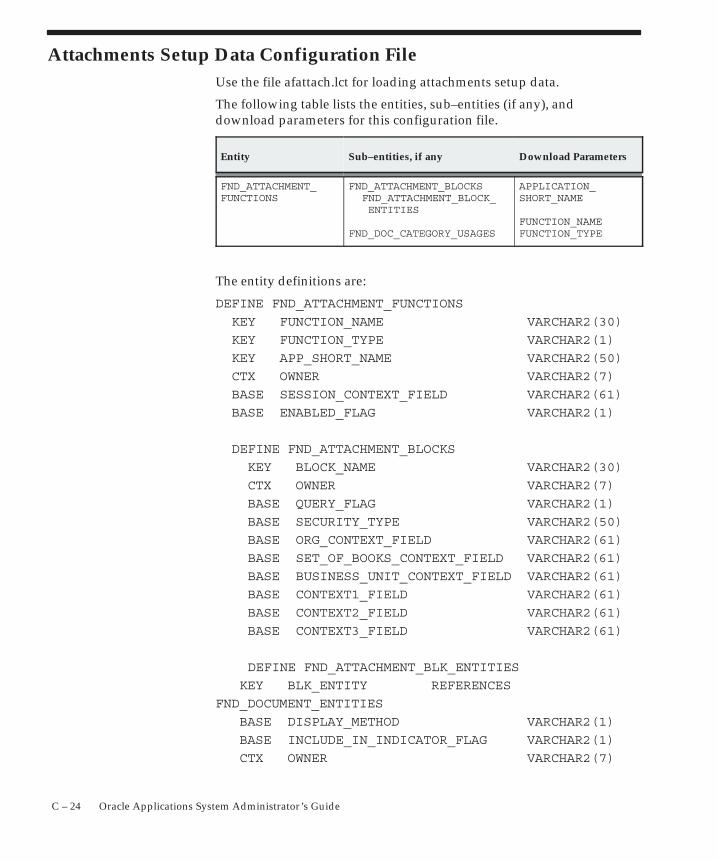
C – 24 Oracle Applications System Administrator’s Guide
Attachments Setup Data Configuration FileUse the file afattach.lct for loading attachments setup data.
The following table lists the entities, sub–entities (if any), anddownload parameters for this configuration file.
Entity Sub–entities, if any Download Parameters
FND_ATTACHMENT_FUNCTIONS
FND_ATTACHMENT_BLOCKS FND_ATTACHMENT_BLOCK_ ENTITIES
FND_DOC_CATEGORY_USAGES
APPLICATION_SHORT_NAME
FUNCTION_NAMEFUNCTION_TYPE
The entity definitions are:
DEFINE FND_ATTACHMENT_FUNCTIONS
KEY FUNCTION_NAME VARCHAR2(30)
KEY FUNCTION_TYPE VARCHAR2(1)
KEY APP_SHORT_NAME VARCHAR2(50)
CTX OWNER VARCHAR2(7)
BASE SESSION_CONTEXT_FIELD VARCHAR2(61)
BASE ENABLED_FLAG VARCHAR2(1)
DEFINE FND_ATTACHMENT_BLOCKS
KEY BLOCK_NAME VARCHAR2(30)
CTX OWNER VARCHAR2(7)
BASE QUERY_FLAG VARCHAR2(1)
BASE SECURITY_TYPE VARCHAR2(50)
BASE ORG_CONTEXT_FIELD VARCHAR2(61)
BASE SET_OF_BOOKS_CONTEXT_FIELD VARCHAR2(61)
BASE BUSINESS_UNIT_CONTEXT_FIELD VARCHAR2(61)
BASE CONTEXT1_FIELD VARCHAR2(61)
BASE CONTEXT2_FIELD VARCHAR2(61)
BASE CONTEXT3_FIELD VARCHAR2(61)
DEFINE FND_ATTACHMENT_BLK_ENTITIES
KEY BLK_ENTITY REFERENCES
FND_DOCUMENT_ENTITIES
BASE DISPLAY_METHOD VARCHAR2(1)
BASE INCLUDE_IN_INDICATOR_FLAG VARCHAR2(1)
CTX OWNER VARCHAR2(7)
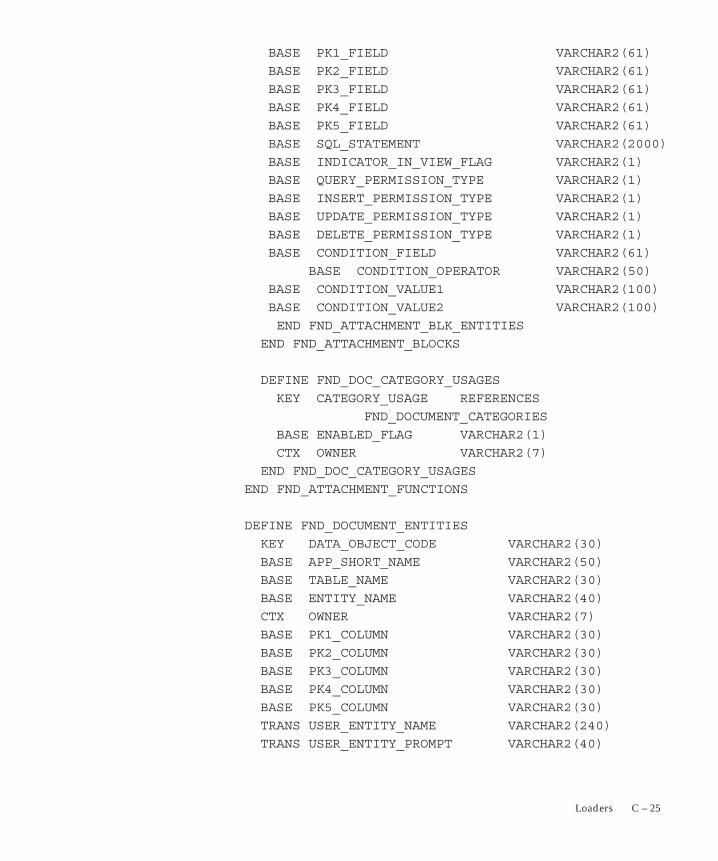
C – 25Loaders
BASE PK1_FIELD VARCHAR2(61)
BASE PK2_FIELD VARCHAR2(61)
BASE PK3_FIELD VARCHAR2(61)
BASE PK4_FIELD VARCHAR2(61)
BASE PK5_FIELD VARCHAR2(61)
BASE SQL_STATEMENT VARCHAR2(2000)
BASE INDICATOR_IN_VIEW_FLAG VARCHAR2(1)
BASE QUERY_PERMISSION_TYPE VARCHAR2(1)
BASE INSERT_PERMISSION_TYPE VARCHAR2(1)
BASE UPDATE_PERMISSION_TYPE VARCHAR2(1)
BASE DELETE_PERMISSION_TYPE VARCHAR2(1)
BASE CONDITION_FIELD VARCHAR2(61)
BASE CONDITION_OPERATOR VARCHAR2(50)
BASE CONDITION_VALUE1 VARCHAR2(100)
BASE CONDITION_VALUE2 VARCHAR2(100)
END FND_ATTACHMENT_BLK_ENTITIES
END FND_ATTACHMENT_BLOCKS
DEFINE FND_DOC_CATEGORY_USAGES
KEY CATEGORY_USAGE REFERENCES
FND_DOCUMENT_CATEGORIES
BASE ENABLED_FLAG VARCHAR2(1)
CTX OWNER VARCHAR2(7)
END FND_DOC_CATEGORY_USAGES
END FND_ATTACHMENT_FUNCTIONS
DEFINE FND_DOCUMENT_ENTITIES
KEY DATA_OBJECT_CODE VARCHAR2(30)
BASE APP_SHORT_NAME VARCHAR2(50)
BASE TABLE_NAME VARCHAR2(30)
BASE ENTITY_NAME VARCHAR2(40)
CTX OWNER VARCHAR2(7)
BASE PK1_COLUMN VARCHAR2(30)
BASE PK2_COLUMN VARCHAR2(30)
BASE PK3_COLUMN VARCHAR2(30)
BASE PK4_COLUMN VARCHAR2(30)
BASE PK5_COLUMN VARCHAR2(30)
TRANS USER_ENTITY_NAME VARCHAR2(240)
TRANS USER_ENTITY_PROMPT VARCHAR2(40)
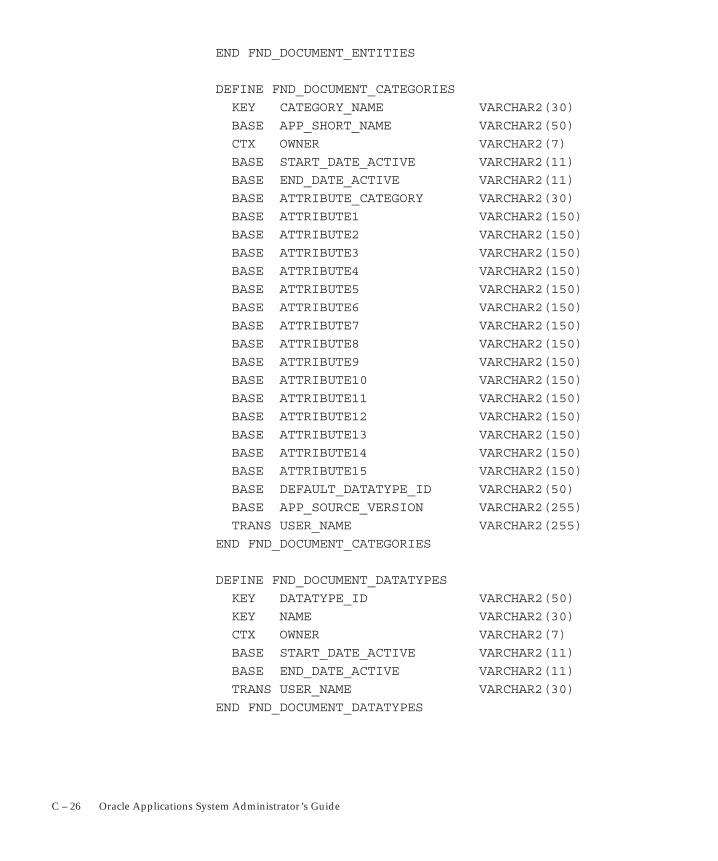
C – 26 Oracle Applications System Administrator’s Guide
END FND_DOCUMENT_ENTITIES
DEFINE FND_DOCUMENT_CATEGORIES
KEY CATEGORY_NAME VARCHAR2(30)
BASE APP_SHORT_NAME VARCHAR2(50)
CTX OWNER VARCHAR2(7)
BASE START_DATE_ACTIVE VARCHAR2(11)
BASE END_DATE_ACTIVE VARCHAR2(11)
BASE ATTRIBUTE_CATEGORY VARCHAR2(30)
BASE ATTRIBUTE1 VARCHAR2(150)
BASE ATTRIBUTE2 VARCHAR2(150)
BASE ATTRIBUTE3 VARCHAR2(150)
BASE ATTRIBUTE4 VARCHAR2(150)
BASE ATTRIBUTE5 VARCHAR2(150)
BASE ATTRIBUTE6 VARCHAR2(150)
BASE ATTRIBUTE7 VARCHAR2(150)
BASE ATTRIBUTE8 VARCHAR2(150)
BASE ATTRIBUTE9 VARCHAR2(150)
BASE ATTRIBUTE10 VARCHAR2(150)
BASE ATTRIBUTE11 VARCHAR2(150)
BASE ATTRIBUTE12 VARCHAR2(150)
BASE ATTRIBUTE13 VARCHAR2(150)
BASE ATTRIBUTE14 VARCHAR2(150)
BASE ATTRIBUTE15 VARCHAR2(150)
BASE DEFAULT_DATATYPE_ID VARCHAR2(50)
BASE APP_SOURCE_VERSION VARCHAR2(255)
TRANS USER_NAME VARCHAR2(255)
END FND_DOCUMENT_CATEGORIES
DEFINE FND_DOCUMENT_DATATYPES
KEY DATATYPE_ID VARCHAR2(50)
KEY NAME VARCHAR2(30)
CTX OWNER VARCHAR2(7)
BASE START_DATE_ACTIVE VARCHAR2(11)
BASE END_DATE_ACTIVE VARCHAR2(11)
TRANS USER_NAME VARCHAR2(30)
END FND_DOCUMENT_DATATYPES
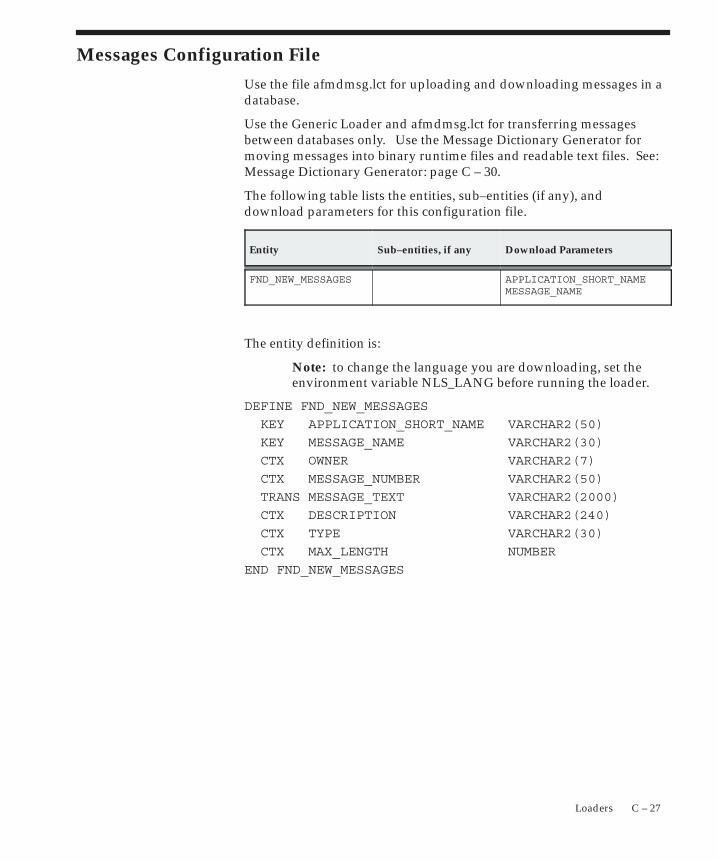
C – 27Loaders
Messages Configuration File
Use the file afmdmsg.lct for uploading and downloading messages in adatabase.
Use the Generic Loader and afmdmsg.lct for transferring messagesbetween databases only. Use the Message Dictionary Generator formoving messages into binary runtime files and readable text files. See:Message Dictionary Generator: page C – 30.
The following table lists the entities, sub–entities (if any), anddownload parameters for this configuration file.
Entity Sub–entities, if any Download Parameters
FND_NEW_MESSAGES APPLICATION_SHORT_NAMEMESSAGE_NAME
The entity definition is:
Note: to change the language you are downloading, set theenvironment variable NLS_LANG before running the loader.
DEFINE FND_NEW_MESSAGES
KEY APPLICATION_SHORT_NAME VARCHAR2(50)
KEY MESSAGE_NAME VARCHAR2(30)
CTX OWNER VARCHAR2(7)
CTX MESSAGE_NUMBER VARCHAR2(50)
TRANS MESSAGE_TEXT VARCHAR2(2000)
CTX DESCRIPTION VARCHAR2(240)
CTX TYPE VARCHAR2(30)
CTX MAX_LENGTH NUMBER
END FND_NEW_MESSAGES
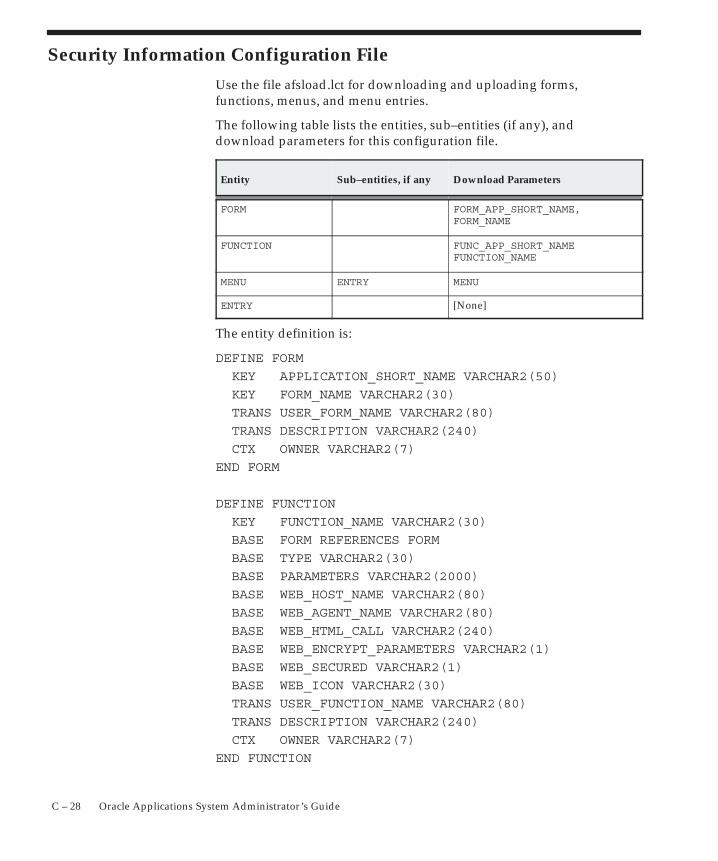
C – 28 Oracle Applications System Administrator’s Guide
Security Information Configuration File
Use the file afsload.lct for downloading and uploading forms,functions, menus, and menu entries.
The following table lists the entities, sub–entities (if any), anddownload parameters for this configuration file.
Entity Sub–entities, if any Download Parameters
FORM FORM_APP_SHORT_NAME, FORM_NAME
FUNCTION FUNC_APP_SHORT_NAMEFUNCTION_NAME
MENU ENTRY MENU
ENTRY [None]
The entity definition is:
DEFINE FORM
KEY APPLICATION_SHORT_NAME VARCHAR2(50)
KEY FORM_NAME VARCHAR2(30)
TRANS USER_FORM_NAME VARCHAR2(80)
TRANS DESCRIPTION VARCHAR2(240)
CTX OWNER VARCHAR2(7)
END FORM
DEFINE FUNCTION
KEY FUNCTION_NAME VARCHAR2(30)
BASE FORM REFERENCES FORM
BASE TYPE VARCHAR2(30)
BASE PARAMETERS VARCHAR2(2000)
BASE WEB_HOST_NAME VARCHAR2(80)
BASE WEB_AGENT_NAME VARCHAR2(80)
BASE WEB_HTML_CALL VARCHAR2(240)
BASE WEB_ENCRYPT_PARAMETERS VARCHAR2(1)
BASE WEB_SECURED VARCHAR2(1)
BASE WEB_ICON VARCHAR2(30)
TRANS USER_FUNCTION_NAME VARCHAR2(80)
TRANS DESCRIPTION VARCHAR2(240)
CTX OWNER VARCHAR2(7)
END FUNCTION

C – 29Loaders
DEFINE MENU
KEY MENU_NAME VARCHAR2(30)
TRANS USER_MENU_NAME VARCHAR2(80)
TRANS DESCRIPTION VARCHAR2(240)
CTX OWNER VARCHAR2(7)
DEFINE ENTRY
TRANS PROMPT VARCHAR2(60)
TRANS DESCRIPTION VARCHAR2(240)
CTX SUBMENU REFERENCES MENU
CTX FUNCTION REFERENCES FUNCTION
CTX OWNER VARCHAR2(7)
END ENTRY
END MENU

C – 30 Oracle Applications System Administrator’s Guide
Message Dictionary Generator
The Message Dictionary Generator (FNDMDGEN) is a concurrentprogram that generates binary runtime files from the database forOracle Applications Message Dictionary messages. The followingsections describe the operation of the Message Dictionary Generator.
For more information on using the Message Dictionary and creatingmessages, see the Oracle Applications Developer’s Guide.
Note: Use the Generic Loader and correspondingconfiguration file for uploading and downloading message textfiles into a database.
Message Repositories
Message information is stored in two different repositories, each ofwhich has its own format and serves a specific need. Following is adescription for each of the message repositories, including the messageattributes they store.
Database
The FND_NEW_MESSAGES table in the database stores all OracleApplications messages for all languages. Database messages aredirectly used only by the stored procedure Message Dictionary API.Database message data can be edited using the Messages form.
Database Attributes: APPLICATION, LANGUAGE, NAME, NUMBER,TEXT, DESCRIPTION
Runtime
A runtime binary file stores the messages for a single application and asingle language. The file is optimized for rapid lookup of individualmessages by message NAME.
A runtime file is located in:
<APPL_TOP>/$APPLMSG/<LANGUAGE>.msb
where <APPL_TOP> is the application basepath, APPLMSG is anenvironment variable whose usual value is ”mesg”, and<LANGUAGE> is the NLS language code (for example: ’US’, or ’F’.).A typical message file would be $FND_TOP/mesg/US.msb.
Runtime Attributes: NAME, NUMBER, TEXT
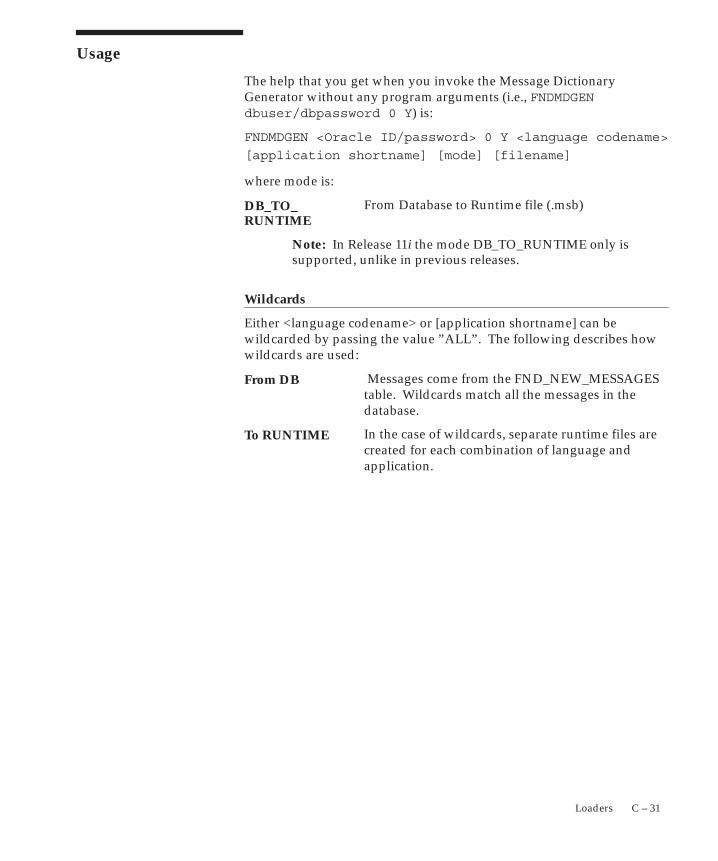
C – 31Loaders
Usage
The help that you get when you invoke the Message DictionaryGenerator without any program arguments (i.e., FNDMDGENdbuser/dbpassword 0 Y) is:
FNDMDGEN <Oracle ID/password> 0 Y <language codename>
[application shortname] [mode] [filename]
where mode is:
From Database to Runtime file (.msb)
Note: In Release 11i the mode DB_TO_RUNTIME only issupported, unlike in previous releases.
Wildcards
Either <language codename> or [application shortname] can bewildcarded by passing the value ”ALL”. The following describes howwildcards are used:
Messages come from the FND_NEW_MESSAGEStable. Wildcards match all the messages in thedatabase.
In the case of wildcards, separate runtime files arecreated for each combination of language andapplication.
DB_TO_RUNTIME
From DB
To RUNTIME
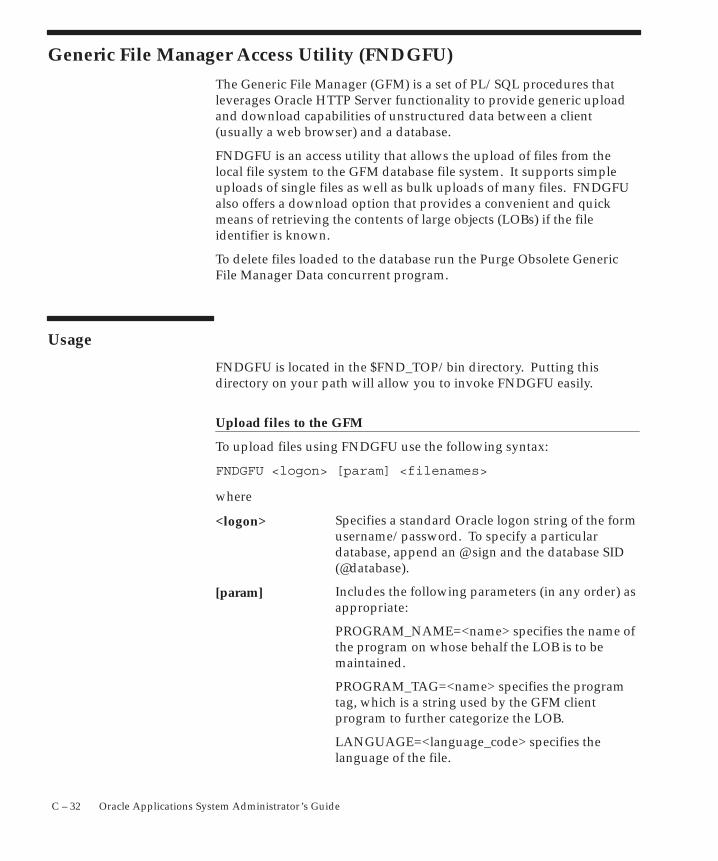
C – 32 Oracle Applications System Administrator’s Guide
Generic File Manager Access Utility (FNDGFU)
The Generic File Manager (GFM) is a set of PL/SQL procedures thatleverages Oracle HTTP Server functionality to provide generic uploadand download capabilities of unstructured data between a client(usually a web browser) and a database.
FNDGFU is an access utility that allows the upload of files from thelocal file system to the GFM database file system. It supports simpleuploads of single files as well as bulk uploads of many files. FNDGFUalso offers a download option that provides a convenient and quickmeans of retrieving the contents of large objects (LOBs) if the fileidentifier is known.
To delete files loaded to the database run the Purge Obsolete GenericFile Manager Data concurrent program.
Usage
FNDGFU is located in the $FND_TOP/bin directory. Putting thisdirectory on your path will allow you to invoke FNDGFU easily.
Upload files to the GFM
To upload files using FNDGFU use the following syntax:
FNDGFU <logon> [param] <filenames>
where
Specifies a standard Oracle logon string of the formusername/password. To specify a particulardatabase, append an @ sign and the database SID(@database).
Includes the following parameters (in any order) asappropriate:
PROGRAM_NAME=<name> specifies the name ofthe program on whose behalf the LOB is to bemaintained.
PROGRAM_TAG=<name> specifies the programtag, which is a string used by the GFM clientprogram to further categorize the LOB.
LANGUAGE=<language_code> specifies thelanguage of the file.
<logon>
[param]
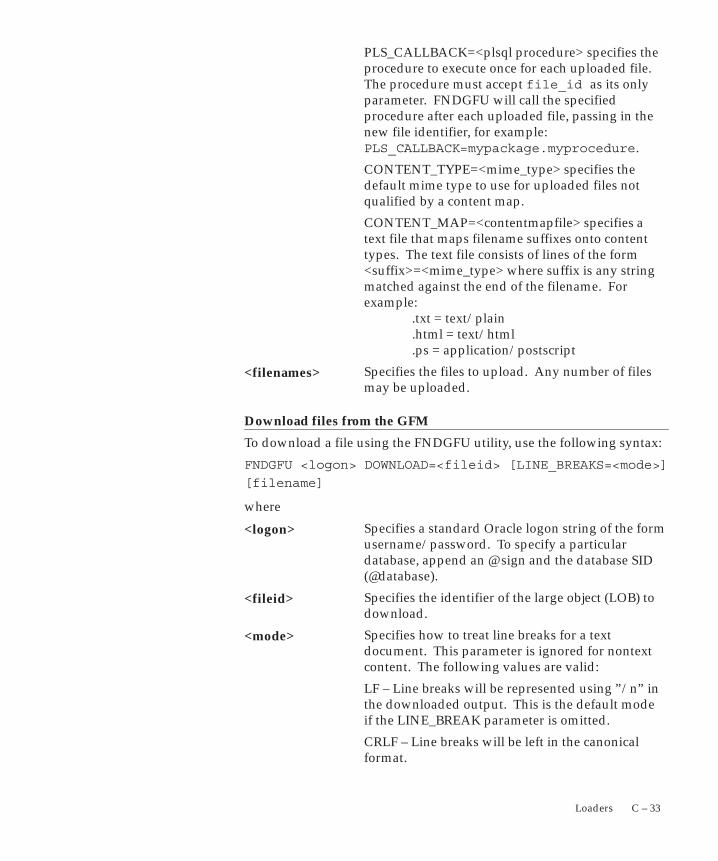
C – 33Loaders
PLS_CALLBACK=<plsql procedure> specifies theprocedure to execute once for each uploaded file.The procedure must accept file_id as its onlyparameter. FNDGFU will call the specifiedprocedure after each uploaded file, passing in thenew file identifier, for example:PLS_CALLBACK=mypackage.myprocedure.
CONTENT_TYPE=<mime_type> specifies thedefault mime type to use for uploaded files notqualified by a content map.
CONTENT_MAP=<contentmapfile> specifies atext file that maps filename suffixes onto contenttypes. The text file consists of lines of the form<suffix>=<mime_type> where suffix is any stringmatched against the end of the filename. Forexample:
.txt = text/plain
.html = text/html
.ps = application/postscript
Specifies the files to upload. Any number of filesmay be uploaded.
Download files from the GFM
To download a file using the FNDGFU utility, use the following syntax:
FNDGFU <logon> DOWNLOAD=<fileid> [LINE_BREAKS=<mode>]
[filename]
where
Specifies a standard Oracle logon string of the formusername/password. To specify a particulardatabase, append an @ sign and the database SID(@database).
Specifies the identifier of the large object (LOB) todownload.
Specifies how to treat line breaks for a textdocument. This parameter is ignored for nontextcontent. The following values are valid:
LF – Line breaks will be represented using ”/n” inthe downloaded output. This is the default modeif the LINE_BREAK parameter is omitted.
CRLF – Line breaks will be left in the canonicalformat.
<filenames>
<logon>
<fileid>
<mode>
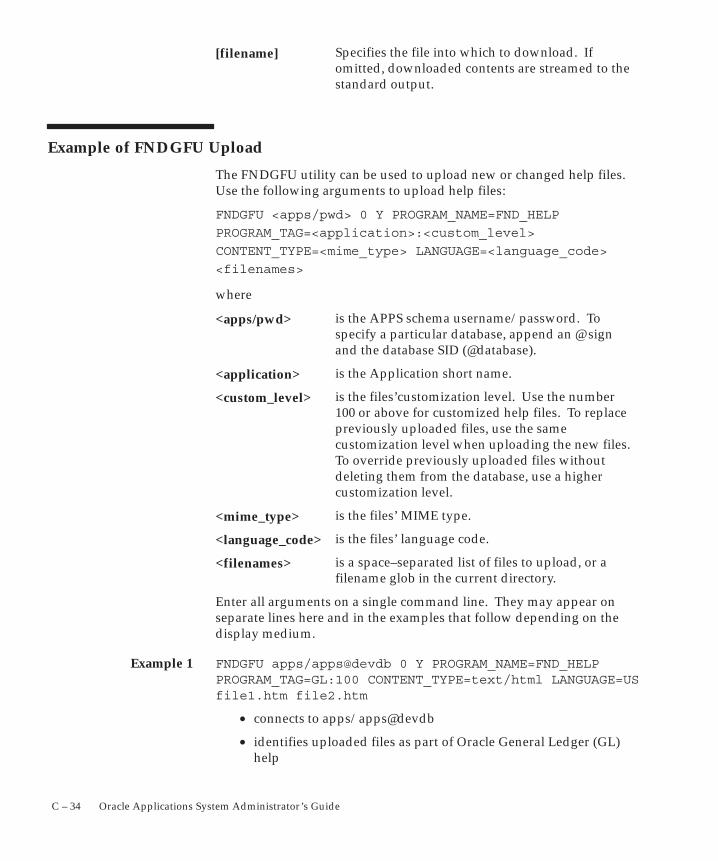
Example 1
C – 34 Oracle Applications System Administrator’s Guide
Specifies the file into which to download. Ifomitted, downloaded contents are streamed to thestandard output.
Example of FNDGFU Upload
The FNDGFU utility can be used to upload new or changed help files.Use the following arguments to upload help files:
FNDGFU <apps/pwd> 0 Y PROGRAM_NAME=FND_HELP
PROGRAM_TAG=<application>:<custom_level>
CONTENT_TYPE=<mime_type> LANGUAGE=<language_code>
<filenames>
where
is the APPS schema username/password. Tospecify a particular database, append an @ signand the database SID (@database).
is the Application short name.
is the files’customization level. Use the number100 or above for customized help files. To replacepreviously uploaded files, use the samecustomization level when uploading the new files.To override previously uploaded files withoutdeleting them from the database, use a highercustomization level.
is the files’ MIME type.
is the files’ language code.
is a space–separated list of files to upload, or afilename glob in the current directory.
Enter all arguments on a single command line. They may appear onseparate lines here and in the examples that follow depending on thedisplay medium.
FNDGFU apps/apps@devdb 0 Y PROGRAM_NAME=FND_HELPPROGRAM_TAG=GL:100 CONTENT_TYPE=text/html LANGUAGE=USfile1.htm file2.htm
• connects to apps/apps@devdb
• identifies uploaded files as part of Oracle General Ledger (GL)help
[filename]
<apps/pwd>
<application>
<custom_level>
<mime_type>
<language_code>
<filenames>

Example 2
C – 35Loaders
• identifies the uploaded files’ customization level as 100
• identifies their MIME type as text/html
• identifies their language as US English (US)
• uploads the two specified .htm files in the current directory (inUNIX)
FNDGFU apps/apps@custdb 0 Y PROGRAM_NAME=FND_HELPPROGRAM_TAG=FND:100 CONTENT_TYPE=image/gif *.gif
• connects to apps/apps@custdb
• identifies uploaded files as part of Application Object Library(FND) help
• identifies the uploaded files’ customization level as 100
• identifies their MIME type as image/gif
• does not identify their language, which defaults touserenv(’LANG’)
• uploads all .gif files in the current directory (in UNIX)
Purging Generic File Manager Data
To purge uploaded files from the Generic File Manager, run theconcurrent program, Purge Obsolete Generic File Manager Data.
This concurrent program should also be used to periodically expungeexpired data. It is recommended that you schedule this program to runevery day or so, using the default parameter values.
See Also
Purge Obsolete Generic File Manager Data: page C – 36
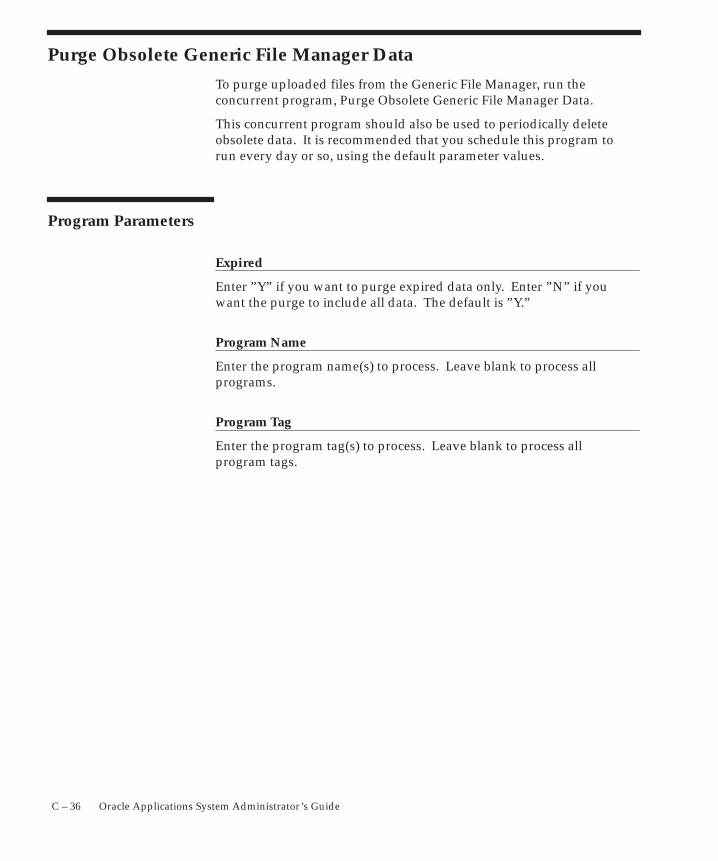
C – 36 Oracle Applications System Administrator’s Guide
Purge Obsolete Generic File Manager Data
To purge uploaded files from the Generic File Manager, run theconcurrent program, Purge Obsolete Generic File Manager Data.
This concurrent program should also be used to periodically deleteobsolete data. It is recommended that you schedule this program torun every day or so, using the default parameter values.
Program Parameters
Expired
Enter ”Y” if you want to purge expired data only. Enter ”N” if youwant the purge to include all data. The default is ”Y.”
Program Name
Enter the program name(s) to process. Leave blank to process allprograms.
Program Tag
Enter the program tag(s) to process. Leave blank to process allprogram tags.

A P P E N D I X
D
D – 1Multilingual External Documents
Multilingual ExternalDocuments

D – 2 Oracle Applications System Administrator’s Guide
Multilingual External Documents
Oracle Applications ship with a set of external documents, or thosedocuments directed toward your customers and trading partners, forwhich we model the data multilingually. Any document for which thedata model is multilingual can be submitted, through a single request,to run in one language or in any subset of the installed languages. YourItalian customer, for example, can receive invoices printed in Italian,while your Korean customer receives packing slips printed in Korean.
Oracle Shipping
• Bill of Lading
• Commercial Invoice
• Pack Slip
Oracle Order Management
• Price List
• Sales Order Acknowledgment
Oracle Receivables
• Dunning Letter Print
• Print Statements
• Transaction Print
Oracle Purchasing
• Printed Change Order Report (Landscape)
• Printed Change Order Report (Portrait)
• Printed Purchase Order Report (Landscape)
• Printed Purchase Order Report (Portrait)
• Printed RFQ Report (Landscape)
• Printed RFQ Report (Portrait)
Oracle Payables
• Invalid PO Supplier Notice
• Prepayment Remittance Notice
D – 3Multilingual External Documents
• Print Invoice Notice
• Supplier Open Balance Letter
Oracle Human Resources
• Full Person Details
• Full Applicant Details
• Full Assignment Details
• Full Work Details
Oracle Payroll
• Check Writer
• Deposit Advice
• Third Party Checks

D – 4 Oracle Applications System Administrator’s Guide

A P P E N D I X
E
E – 1Character Mode to GUI Appendix
Character Mode to GUIAppendix
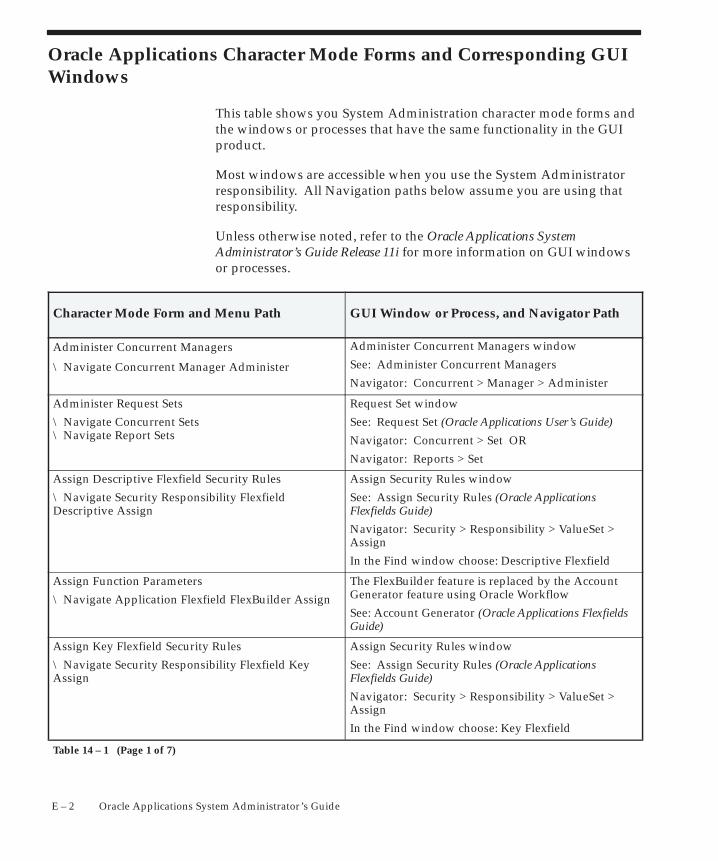
E – 2 Oracle Applications System Administrator’s Guide
Oracle Applications Character Mode Forms and Corresponding GUIWindows
This table shows you System Administration character mode forms andthe windows or processes that have the same functionality in the GUIproduct.
Most windows are accessible when you use the System Administratorresponsibility. All Navigation paths below assume you are using thatresponsibility.
Unless otherwise noted, refer to the Oracle Applications SystemAdministrator’s Guide Release 11i for more information on GUI windowsor processes.
Character Mode Form and Menu Path GUI Window or Process, and Navigator Path
Administer Concurrent Managers
\ Navigate Concurrent Manager Administer
Administer Concurrent Managers window
See: Administer Concurrent Managers
Navigator: Concurrent > Manager > Administer
Administer Request Sets
\ Navigate Concurrent Sets \ Navigate Report Sets
Request Set window
See: Request Set (Oracle Applications User’s Guide)
Navigator: Concurrent > Set OR
Navigator: Reports > Set
Assign Descriptive Flexfield Security Rules
\ Navigate Security Responsibility FlexfieldDescriptive Assign
Assign Security Rules window
See: Assign Security Rules (Oracle ApplicationsFlexfields Guide)
Navigator: Security > Responsibility > ValueSet >Assign
In the Find window choose: Descriptive Flexfield
Assign Function Parameters
\ Navigate Application Flexfield FlexBuilder Assign
The FlexBuilder feature is replaced by the AccountGenerator feature using Oracle Workflow
See: Account Generator (Oracle Applications FlexfieldsGuide)
Assign Key Flexfield Security Rules
\ Navigate Security Responsibility Flexfield KeyAssign
Assign Security Rules window
See: Assign Security Rules (Oracle ApplicationsFlexfields Guide)
Navigator: Security > Responsibility > ValueSet >Assign
In the Find window choose: Key Flexfield
Table 14 – 1 (Page 1 of 7)
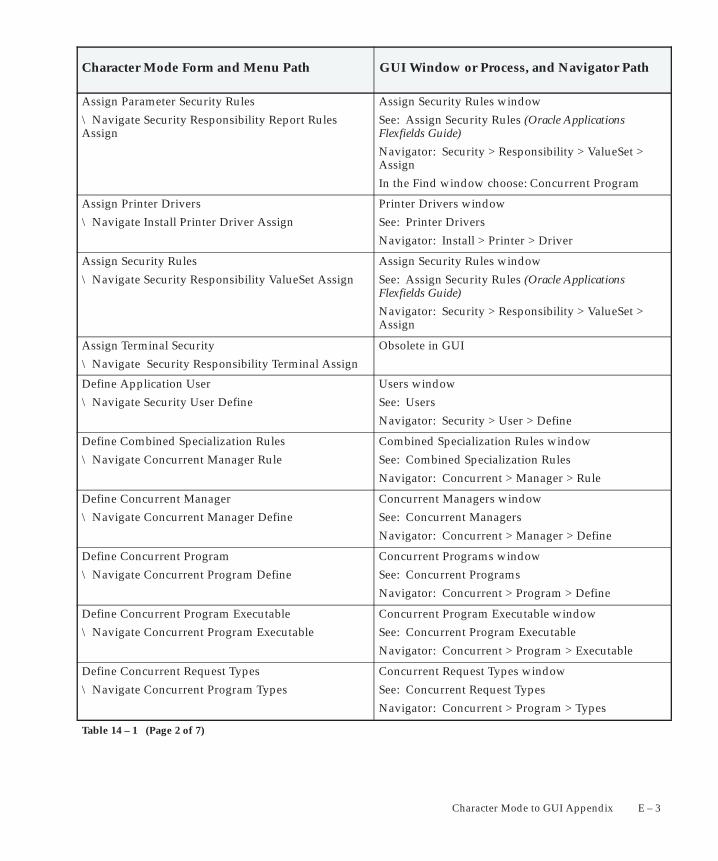
E – 3Character Mode to GUI Appendix
GUI Window or Process, and Navigator PathCharacter Mode Form and Menu Path
Assign Parameter Security Rules
\ Navigate Security Responsibility Report RulesAssign
Assign Security Rules window
See: Assign Security Rules (Oracle ApplicationsFlexfields Guide)
Navigator: Security > Responsibility > ValueSet >Assign
In the Find window choose: Concurrent Program
Assign Printer Drivers
\ Navigate Install Printer Driver Assign
Printer Drivers window
See: Printer Drivers
Navigator: Install > Printer > Driver
Assign Security Rules
\ Navigate Security Responsibility ValueSet Assign
Assign Security Rules window
See: Assign Security Rules (Oracle ApplicationsFlexfields Guide)
Navigator: Security > Responsibility > ValueSet >Assign
Assign Terminal Security
\ Navigate Security Responsibility Terminal Assign
Obsolete in GUI
Define Application User
\ Navigate Security User Define
Users window
See: Users
Navigator: Security > User > Define
Define Combined Specialization Rules
\ Navigate Concurrent Manager Rule
Combined Specialization Rules window
See: Combined Specialization Rules
Navigator: Concurrent > Manager > Rule
Define Concurrent Manager
\ Navigate Concurrent Manager Define
Concurrent Managers window
See: Concurrent Managers
Navigator: Concurrent > Manager > Define
Define Concurrent Program
\ Navigate Concurrent Program Define
Concurrent Programs window
See: Concurrent Programs
Navigator: Concurrent > Program > Define
Define Concurrent Program Executable
\ Navigate Concurrent Program Executable
Concurrent Program Executable window
See: Concurrent Program Executable
Navigator: Concurrent > Program > Executable
Define Concurrent Request Types
\ Navigate Concurrent Program Types
Concurrent Request Types window
See: Concurrent Request Types
Navigator: Concurrent > Program > Types
Table 14 – 1 (Page 2 of 7)
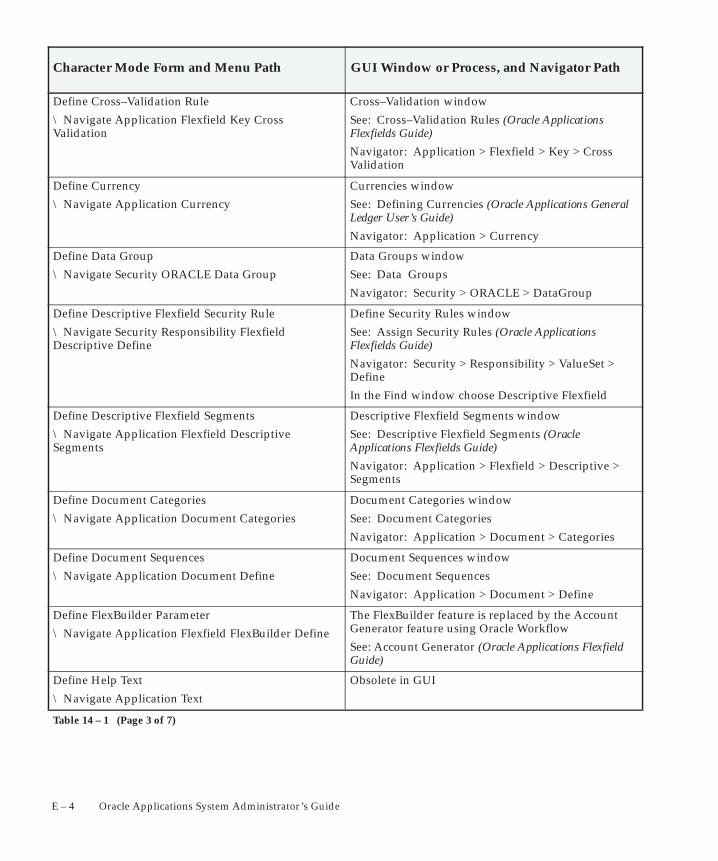
E – 4 Oracle Applications System Administrator’s Guide
GUI Window or Process, and Navigator PathCharacter Mode Form and Menu Path
Define Cross–Validation Rule
\ Navigate Application Flexfield Key CrossValidation
Cross–Validation window
See: Cross–Validation Rules (Oracle ApplicationsFlexfields Guide)
Navigator: Application > Flexfield > Key > CrossValidation
Define Currency
\ Navigate Application Currency
Currencies window
See: Defining Currencies (Oracle Applications GeneralLedger User’s Guide)
Navigator: Application > Currency
Define Data Group
\ Navigate Security ORACLE Data Group
Data Groups window
See: Data Groups
Navigator: Security > ORACLE > DataGroup
Define Descriptive Flexfield Security Rule
\ Navigate Security Responsibility FlexfieldDescriptive Define
Define Security Rules window
See: Assign Security Rules (Oracle ApplicationsFlexfields Guide)
Navigator: Security > Responsibility > ValueSet >Define
In the Find window choose Descriptive Flexfield
Define Descriptive Flexfield Segments
\ Navigate Application Flexfield DescriptiveSegments
Descriptive Flexfield Segments window
See: Descriptive Flexfield Segments (OracleApplications Flexfields Guide)
Navigator: Application > Flexfield > Descriptive >Segments
Define Document Categories
\ Navigate Application Document Categories
Document Categories window
See: Document Categories
Navigator: Application > Document > Categories
Define Document Sequences
\ Navigate Application Document Define
Document Sequences window
See: Document Sequences
Navigator: Application > Document > Define
Define FlexBuilder Parameter
\ Navigate Application Flexfield FlexBuilder Define
The FlexBuilder feature is replaced by the AccountGenerator feature using Oracle Workflow
See: Account Generator (Oracle Applications FlexfieldGuide)
Define Help Text
\ Navigate Application Text
Obsolete in GUI
Table 14 – 1 (Page 3 of 7)
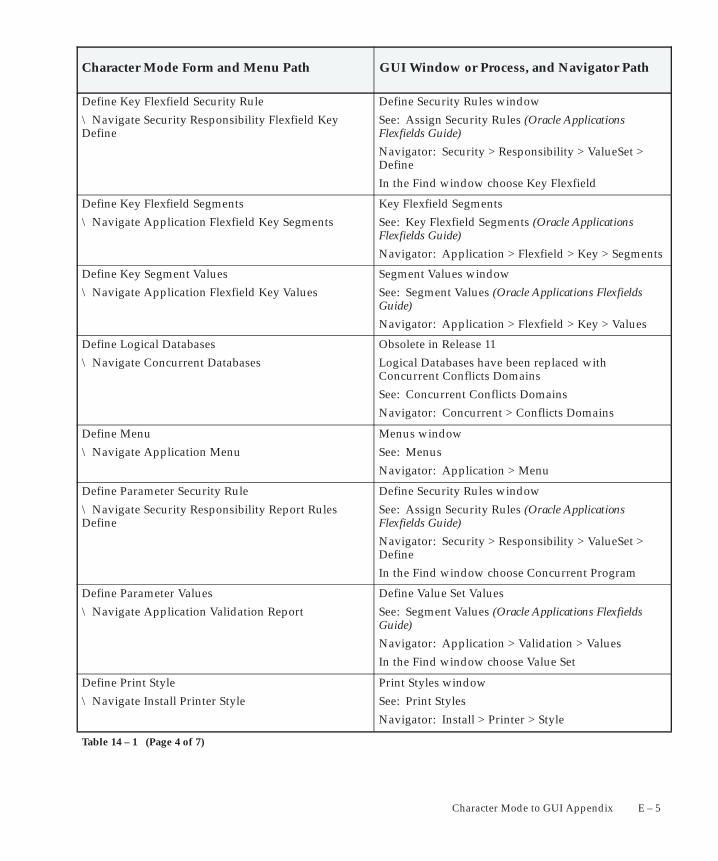
E – 5Character Mode to GUI Appendix
GUI Window or Process, and Navigator PathCharacter Mode Form and Menu Path
Define Key Flexfield Security Rule
\ Navigate Security Responsibility Flexfield KeyDefine
Define Security Rules window
See: Assign Security Rules (Oracle ApplicationsFlexfields Guide)
Navigator: Security > Responsibility > ValueSet >Define
In the Find window choose Key Flexfield
Define Key Flexfield Segments
\ Navigate Application Flexfield Key Segments
Key Flexfield Segments
See: Key Flexfield Segments (Oracle ApplicationsFlexfields Guide)
Navigator: Application > Flexfield > Key > Segments
Define Key Segment Values
\ Navigate Application Flexfield Key Values
Segment Values window
See: Segment Values (Oracle Applications FlexfieldsGuide)
Navigator: Application > Flexfield > Key > Values
Define Logical Databases
\ Navigate Concurrent Databases
Obsolete in Release 11
Logical Databases have been replaced withConcurrent Conflicts Domains
See: Concurrent Conflicts Domains
Navigator: Concurrent > Conflicts Domains
Define Menu
\ Navigate Application Menu
Menus window
See: Menus
Navigator: Application > Menu
Define Parameter Security Rule
\ Navigate Security Responsibility Report RulesDefine
Define Security Rules window
See: Assign Security Rules (Oracle ApplicationsFlexfields Guide)
Navigator: Security > Responsibility > ValueSet >Define
In the Find window choose Concurrent Program
Define Parameter Values
\ Navigate Application Validation Report
Define Value Set Values
See: Segment Values (Oracle Applications FlexfieldsGuide)
Navigator: Application > Validation > Values
In the Find window choose Value Set
Define Print Style
\ Navigate Install Printer Style
Print Styles window
See: Print Styles
Navigator: Install > Printer > Style
Table 14 – 1 (Page 4 of 7)

E – 6 Oracle Applications System Administrator’s Guide
GUI Window or Process, and Navigator PathCharacter Mode Form and Menu Path
Define Printer Driver
\ Navigate Install Printer Driver
Printer Drivers window
See: Printer Drivers
Navigator: Install > Printer > Driver
Define Printer Types
\ Navigate Install Printer Type
Printer Types window
See: Printer Types
Navigator: Install > Printer > Types
Define Report Group
\ Navigate Security Responsibility Report Group
Request Groups window
See: Request Groups
Navigator: Security > Responsibility > Request
Define Responsibility
\ Navigate Security Responsibility Define
Responsibilities window
See: Responsibilities
Navigator: Security > Responsibility > Define
Define Rollup Groups
\ Navigate Application Flexfield Key Groups
Rollup Groups window
See: Rollup Groups (Oracle Applications FlexfieldsGuide)
Navigator: Application > Flexfield > Key > Groups
Define Segment Values
\ Navigate Application Validation Values
Segment Values window
See: Segment Values (Oracle Applications FlexfieldsGuide)
Navigator: Application > Validation > Values
or
Navigator: Application > Flexfield > Key > Values
Define Shorthand Aliases
\ Navigate Application Flexfield Key Aliases
Shorthand Aliases window
See: Shorthand Aliases (Oracle Applications FlexfieldsGuide)
Navigator: Application > Flexfield > Key > Aliases
Define Terminal Group
\ Navigate Security Responsibility Terminal Group
Obsolete in GUI
Define Value Set
\ Navigate Application Validation Set
Value Sets window
See: Value Sets (Oracle Applications Flexfields Guide)
Navigator: Application > Validation > Set
Define Work Shifts
\ Navigate Concurrent Manager Work Shifts
Work Shifts window
See: Work Shifts
Navigator: Concurrent > Manager > WorkShifts
Table 14 – 1 (Page 5 of 7)
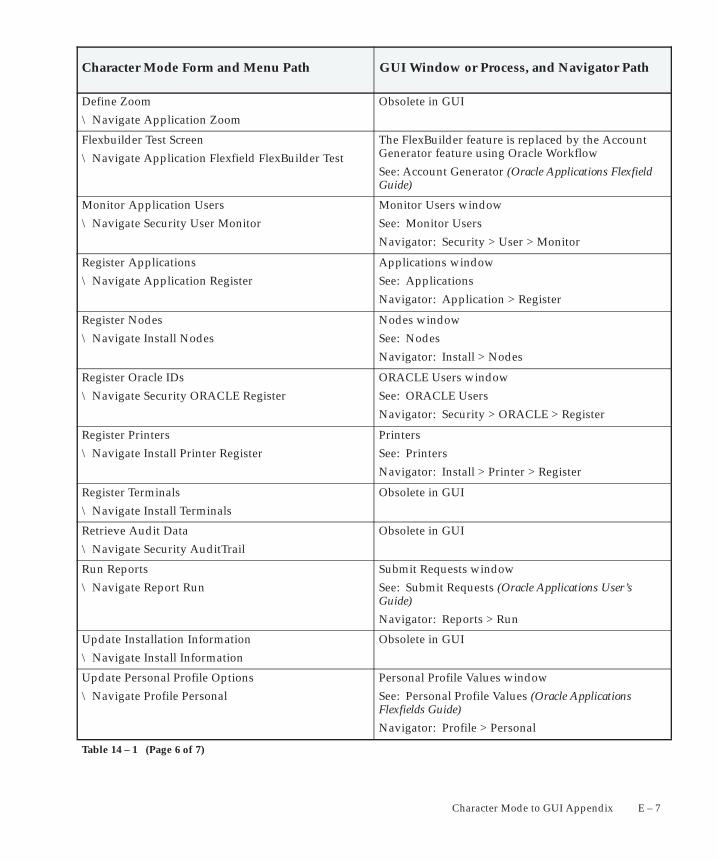
E – 7Character Mode to GUI Appendix
GUI Window or Process, and Navigator PathCharacter Mode Form and Menu Path
Define Zoom
\ Navigate Application Zoom
Obsolete in GUI
Flexbuilder Test Screen
\ Navigate Application Flexfield FlexBuilder Test
The FlexBuilder feature is replaced by the AccountGenerator feature using Oracle Workflow
See: Account Generator (Oracle Applications FlexfieldGuide)
Monitor Application Users
\ Navigate Security User Monitor
Monitor Users window
See: Monitor Users
Navigator: Security > User > Monitor
Register Applications
\ Navigate Application Register
Applications window
See: Applications
Navigator: Application > Register
Register Nodes
\ Navigate Install Nodes
Nodes window
See: Nodes
Navigator: Install > Nodes
Register Oracle IDs
\ Navigate Security ORACLE Register
ORACLE Users window
See: ORACLE Users
Navigator: Security > ORACLE > Register
Register Printers
\ Navigate Install Printer Register
Printers
See: Printers
Navigator: Install > Printer > Register
Register Terminals
\ Navigate Install Terminals
Obsolete in GUI
Retrieve Audit Data
\ Navigate Security AuditTrail
Obsolete in GUI
Run Reports
\ Navigate Report Run
Submit Requests window
See: Submit Requests (Oracle Applications User’sGuide)
Navigator: Reports > Run
Update Installation Information
\ Navigate Install Information
Obsolete in GUI
Update Personal Profile Options
\ Navigate Profile Personal
Personal Profile Values window
See: Personal Profile Values (Oracle ApplicationsFlexfields Guide)
Navigator: Profile > Personal
Table 14 – 1 (Page 6 of 7)
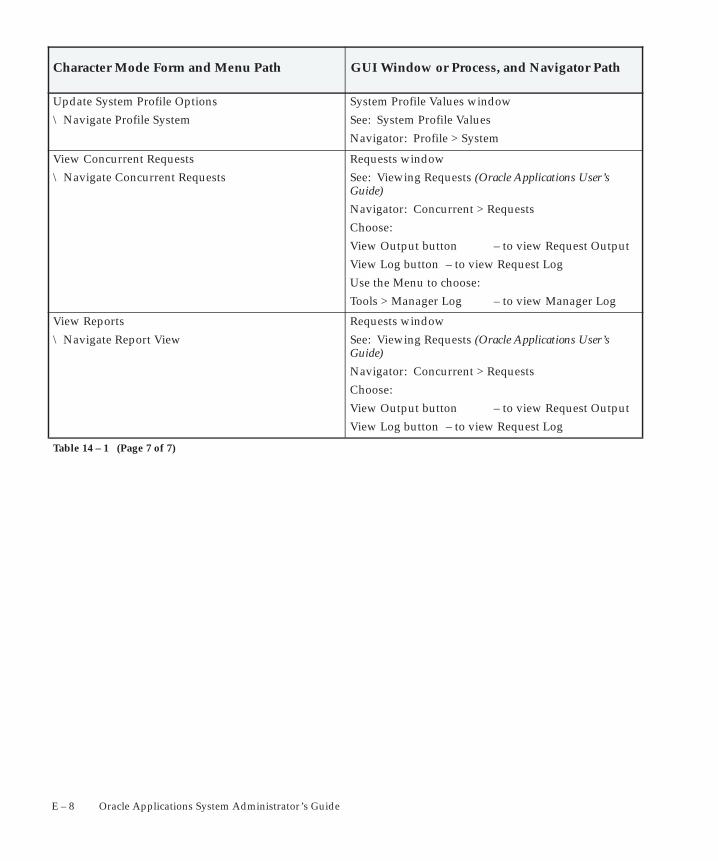
E – 8 Oracle Applications System Administrator’s Guide
GUI Window or Process, and Navigator PathCharacter Mode Form and Menu Path
Update System Profile Options
\ Navigate Profile System
System Profile Values window
See: System Profile Values
Navigator: Profile > System
View Concurrent Requests
\ Navigate Concurrent Requests
Requests window
See: Viewing Requests (Oracle Applications User’sGuide)
Navigator: Concurrent > Requests
Choose:
View Output button – to view Request Output
View Log button – to view Request Log
Use the Menu to choose:
Tools > Manager Log – to view Manager Log
View Reports
\ Navigate Report View
Requests window
See: Viewing Requests (Oracle Applications User’sGuide)
Navigator: Concurrent > Requests
Choose:
View Output button – to view Request Output
View Log button – to view Request Log
Table 14 – 1 (Page 7 of 7)

A P P E N D I X
F
F – 1Implementation Appendix
ImplementationAppendix
F – 2 Oracle Applications System Administrator’s Guide
Setting Up Oracle Applications System AdministratorThis section contains an overview of each task you need to completebefore you can use any Oracle Applications products.
Oracle Applications Implementation Wizard
If you are implementing more than one Oracle Applications product,you may want to use the Oracle Applications Implementation Wizardto coordinate your setup activities. The Implementation Wizard guidesyou through the setup steps for the applications you have installed,suggesting a logical sequence that satisfies cross–productimplementation dependencies and reduces redundant setup steps. TheWizard also identifies steps that can be completed independently––byseveral teams working in parallel––to help you manage yourimplementation process most efficiently.
You can use the Implementation Wizard as a resource center to see agraphical overview of setup steps, read online help for a setup activity,and open the appropriate setup window. You can also document yourimplementation, for further reference and review, by using the Wizardto record comments for each step.
Oracle Enterprise Manager Tools
Oracle Applications Manager and Oracle Management Pack for OracleApplications are tools within the Oracle Enterprise Managerframework. These tools are set up separately.
Setup Checklist
After you log aon to Oracle System Administrator, complete thefollowing steps to set up your Oracle Applications:
❑ Step 1: Create an Oracle Applications User to Complete Setting Up(Required)
❑ Step 2: Create New Responsibilities (Optional)
❑ Step 3: Implement Function Security (Optional)
❑ Step 4: Create Additional Users (Required)
❑ Step 5: Set Up Your Printers (Required)
❑ Step 6: Specify Your Site–level and Application–level ProfileOptions (Required with Defaults)
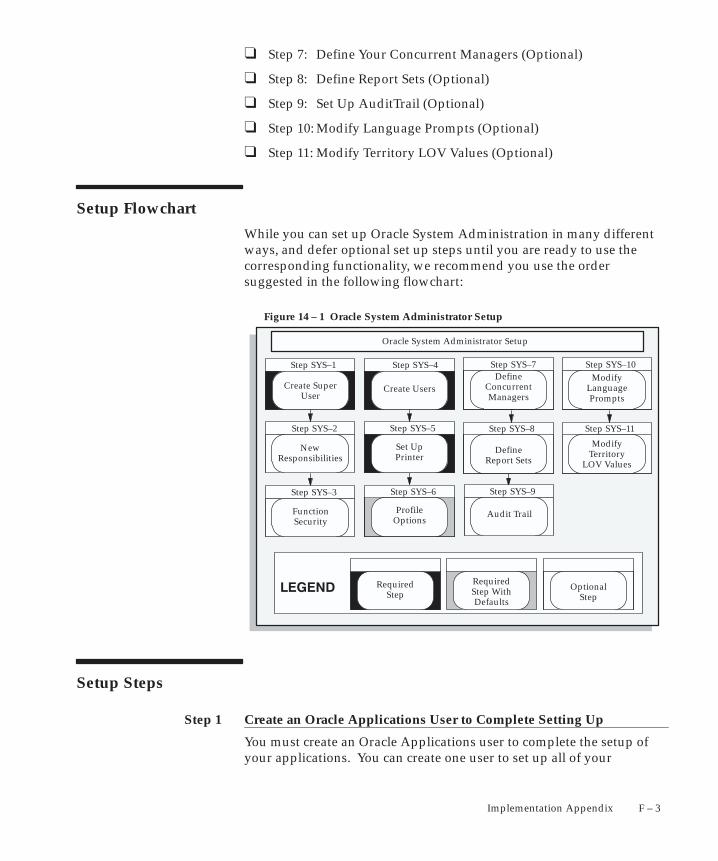
Step 1
F – 3Implementation Appendix
❑ Step 7: Define Your Concurrent Managers (Optional)
❑ Step 8: Define Report Sets (Optional)
❑ Step 9: Set Up AuditTrail (Optional)
❑ Step 10: Modify Language Prompts (Optional)
❑ Step 11: Modify Territory LOV Values (Optional)
Setup Flowchart
While you can set up Oracle System Administration in many differentways, and defer optional set up steps until you are ready to use thecorresponding functionality, we recommend you use the ordersuggested in the following flowchart:
Oracle System Administrator Setup
Figure 14 – 1 Oracle System Administrator Setup
NewResponsibilities
Create SuperUser
Create Users
DefineReport Sets
������
ProfileOptions
DefineConcurrentManagers
Step SYS–2
Step SYS–1
Step SYS–3
FunctionSecurity
Step SYS–4
Step SYS–6
Audit Trail
Step SYS–7
Step SYS–8
Step SYS–9
RequiredStep
RequiredStep WithDefaults
OptionalStep
Set UpPrinter
Step SYS–5
ModifyTerritory
LOV Values
ModifyLanguagePrompts
Step SYS–10
Step SYS–11
Setup Steps
Create an Oracle Applications User to Complete Setting Up
You must create an Oracle Applications user to complete the setup ofyour applications. You can create one user to set up all of your
☞
Step 2
F – 4 Oracle Applications System Administrator’s Guide
applications, or you can define one for each product or group ofproducts.
To log on to Oracle Applications, double–click on the OracleApplications icon.
The sign–on window appears. Enter user name SYSADMIN andpassword SYSADMIN to access the system administrator responsibilityand choose Connect.
Attention: In some cases, a consultant installing yourapplication may have changed the command, usernameand/or password to something appropriate to yourorganization. If so, please refer to your consultant for thecorrect logon instructions.
To define your user, navigate to the Users window by choosingSecurity > User > Define from the navigation list. Enter a username(for example, INSTALL) in the User Name field and choose your ownpassword. Oracle Applications asks you to change the password thefirst time you sign on as this new user. You should enter a descriptionto remind yourself that this user is for the setting up of OracleApplications.
Set the end date to the current date for each of the users you create inthis step. This ensures that no one can access your applications withthese usernames later.
Assign responsibilities to your new user. You should assign to yournew user the full–function responsibility for each of the applicationsyou install.
See Also
Users Window: page 2 – 17
Create New Responsibilities (Optional)
A responsibility in Oracle Applications is a level of authority thatdetermines how much of an application’s functionality a user can use,what requests and concurrent programs the user can run, and whichapplications’ data those requests and concurrent programs can access.Oracle Applications provides a set of predefined responsibilities thatyou can use. You can also define your own responsibilities if the onesprovided do not meet your needs.
You associate each responsibility with a data group, request group, anda menu. The data group defines the pairing of application andORACLE username. The ORACLE username determines the database
Step 3
Step 4
F – 5Implementation Appendix
tables and table privileges accessible by your responsibility. Therequest group permits the user with this responsibility to run requests,request sets, or concurrent programs from the Submit Requests form.Select a predefined menu. A menu provides access to applicationfunctions through a hierarchical arrangement of functions and menusof functions
Use the Responsibilities window to define a new responsibility. Youcan then assign your new responsibility to a user using the Userswindow.
See Also
Responsibilities Window: page 2 – 10
Users Window: page 2 – 17
Implement Function Security (Optional)
Function security is the mechanism by which user access toapplications functionality is controlled.
Use the Responsibilities form to limit a responsibility’s functionality byexcluding menus and functions.
Or
Use the Menus form to create new menus that point to functions youwant to make available to a responsibility.
See Also
Responsibilities Window: page 2 – 10
Menus Window: page 2 – 38
Create Additional Users
You should use the procedure outlined in Step 1 to create additionalapplication users. When you define a new user, you assign one or moreresponsibilities and a password that the user changes after the initiallogon. You can use the LOV in the Responsibility field to get a list ofthe standard responsibilities for each application you specify. You canassign multiple responsibilities to a user.
See Also
Users Window: page 2 – 17
Step 5
Step 6
F – 6 Oracle Applications System Administrator’s Guide
Set Up Your Printers
Read the Setting Up Your Printers page to learn how to set up yourprinters. You must define any printer types used at your site that arenot shipped with Oracle Applications, then register each printer withits name as determined by your operating system.
For every custom printer type or specialized print style you define, usethe Printer Drivers form to assign a printer driver to use with eachprint style used by a printer type.
See Also
Overview of Printers and Printing: page 7 – 2
Printer Types, Print Styles, and Printer Drivers: page 7 – 3
Setting Up Your Printers: page 7 – 11
If you need more information on how to find your printer operatingsystem names, refer to the Printing section of Installing OracleApplications.
Specify Your Site–level and Application–level Profile Options
Navigate to the System Profile Values form (Profile > System). In theFind window check Site and Application as your Display levels. EnterSystem Administration for the Application field and enter Site Name inthe Profile field. Oracle Applications displays ’Not Specified’ as thesite name. Change Not Specified to your site name.
To specify the remaining options, return to the find window, clear theProfile field and choose Find.
You should also examine the values set by AutoInstall for the otherprofile options and determine which ones you want to change. Thesite–level profile options serve as the defaults for your system until youoverride them at other levels.
A description for each of the System Administration profile options isavailable in the Common User Profile Options: page A – 2
Important profile options include:
• Application Web Agent
• Gateway User ID
• TWO_TASK
• Site Name
☞
Step 7
F – 7Implementation Appendix
• Attachment File Directory
• Help System Base URL
• Help System Root
• TCF:Host
• TCF:Port
Attention: This list is not a complete list of SystemAdministration profile options. Use the Find window to findall System Administration profile options.
See Also
Overview of User Profiles: page 11 – 2
Setting User Profile Options: page 11 – 2
System Profile Values: page 11 – 6
Define Your Concurrent Managers (Optional)
Concurrent Processing is a feature of Oracle Applications that lets youperform multiple tasks simultaneously. Oracle ApplicationsConcurrent Processing lets you run long, data–dependent functions atthe same time as your users perform online operations. Concurrentmanagers are components of concurrent processing that monitor andrun your time–consuming tasks without tying up your computers.
Oracle Applications automatically installs one standard concurrentmanager that can run every request. You may want to take advantageof the flexibility of concurrent managers to control throughput on yoursystem.
You can define as many concurrent managers as you need. Keep inmind, however, that each concurrent manager consumes additionalmemory.
You can specialize each of your concurrent managers so that they runall requests, requests submitted by a particular user, requestssubmitted by a particular application, or other constraints, or anycombination of these constraints.
If you are using Parallel Concurrent Processing in a cluster, massivelyparallel, or homogeneous networked environment, you should registeryour Nodes and then assign your concurrent managers to primary andsecondary nodes. You can spread your concurrent managers, andtherefore your concurrent processing, across all available nodes to fullyutilize hardware resources.
Step 8
Step 9
Step 10
F – 8 Oracle Applications System Administrator’s Guide
Use the Define Concurrent Manager form to define new concurrentmanagers.
See Also
Memory Requirements (Installing Oracle Applications)
Preparing to Install or Upgrade (Installing Oracle Applications)
Defining Managers and their Work Shifts: page 5 – 26
Overview of Concurrent Processing: page 5 – 2
Define Request Sets (Optional)
A request set is a group of reports or programs which you submit withone request.. To define and maintain request sets, use the Request Setsform.
Your users can also define their own report sets.
See Also
Define Request Sets (Oracle Applications User’s Guide)
Set Up AuditTrail (Optional)
If you want to keep track of the changes made to your data byapplication users, you should set up AuditTrail for the relevant tables.
Defining AuditTrail for your site involves defining Audit Groups,which are groups of tables and columns for which you intend to trackchanges. You then define Audit Installations to instruct AuditTrailwhich ORACLE IDs you want to audit. Finally, you run the Audit TrailUpdate Tables Report, which allows your AuditTrail definitions to takeeffect.
See Also
Define Audit Groups: page 3 – 36
Define Audit Installations: page 3 – 34
Overview of User and Data Auditing: page 3 – 2
Modify Language Prompts (Optional)
If you want to modify the field name displayed in the Translationswindow, you should change the Description value for the language youwant to modify in the Languages window.
Step 11
F – 9Implementation Appendix
See Also
Languages window: page 9 – 28
Modify Territory LOV Values (Optional)
If you want to modify the territory value displayed in LOVs, youshould change the Description value for the territory you want tomodify in the Territories window.
See Also
Territories window: page 9 – 30

F – 10 Oracle Applications System Administrator’s Guide
A P P E N D I X
G
G – 1Setting Up and Maintaining Oracle Applications
Setting Up andMaintaining OracleApplications
This appendix describes how to maintain your Oracle Applicationsinstallation. It includes information on Oracle HTTP Server, the TCFServer, concurrent managers, and RunDiscoverer.
G – 2 Oracle Applications System Administrator’s Guide
Setting Up and Maintaining Your Oracle Applications ConfigurationThis appendix describes some of the recommended manual setup stepsfor Application Object Library in Release 11i. You can use thisappendix as a reference for maintaining your Oracle Applicationsinstallation. For complete instructions on setting up a new installation,see Installing Oracle Applications.
Proper setup is required before a number of Application Object Libraryfeatures will operate correctly. Please follow the steps in this guide intheir entirety when troubleshooting a Release 11i installation.
The following steps are recommended in configuring OracleApplication Object Library in Release 11i:
1. Run Rapid Install
2. Test Web Listener Virtual Directories
3. Test the Oracle HTTP Server Configuration
4. Create DBC files
5. Test Java Servlet Setup
6. Set the Web Server Profile Options
7. Configure the TCF SocketServer
The steps should be performed in the listed order, since later steps usefunctionality enabled by previous steps.
Note: If you are using Oracle8i Parallel Server refer toOracleMetaLink for additional configuration steps.
Run Rapid Install
Rapid Install is the Release 11i installation process. Refer to InstallingOracle Applications for information on Rapid Install.
The remainder of this section describes specific configuration andtesting that should be done to ensure that all Applications ObjectLibrary features are operational.
Oracle Applications Rapid Install delivers the standard Apache SingleListener configuration. Follow the instructions that come with theRapid Install for basic Apache configuration.
Rapid Install configures the HTTP Server automatically. For moreinformation on configuring the HTTP Server, see Administering OracleHTTP Server Powered by Apache: page G – 14.
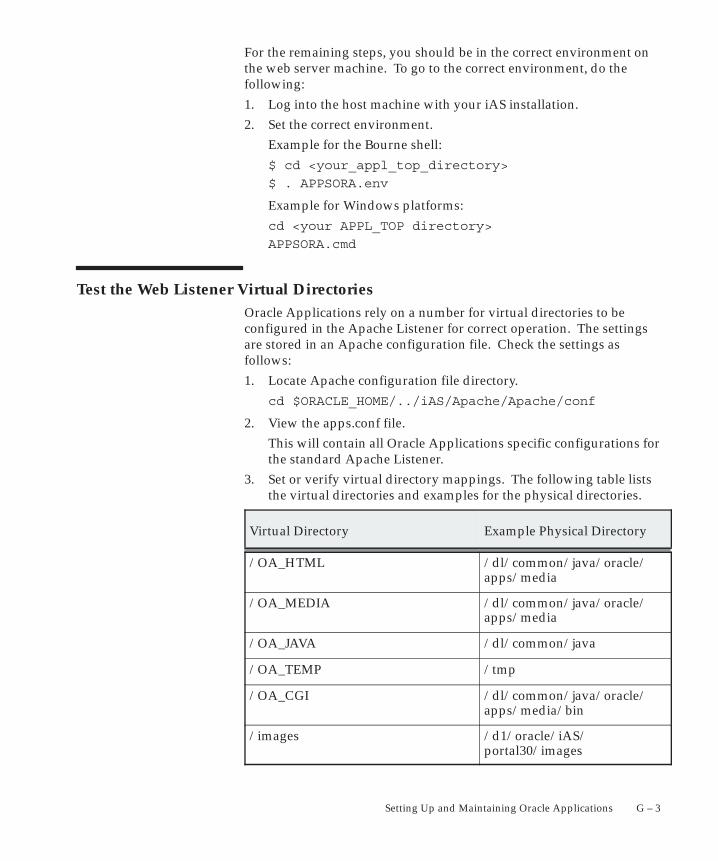
G – 3Setting Up and Maintaining Oracle Applications
For the remaining steps, you should be in the correct environment onthe web server machine. To go to the correct environment, do thefollowing:
1. Log into the host machine with your iAS installation.
2. Set the correct environment.
Example for the Bourne shell:
$ cd <your_appl_top_directory>
$ . APPSORA.env
Example for Windows platforms:
cd <your APPL_TOP directory>
APPSORA.cmd
Test the Web Listener Virtual DirectoriesOracle Applications rely on a number for virtual directories to beconfigured in the Apache Listener for correct operation. The settingsare stored in an Apache configuration file. Check the settings asfollows:
1. Locate Apache configuration file directory.
cd $ORACLE_HOME/../iAS/Apache/Apache/conf
2. View the apps.conf file.
This will contain all Oracle Applications specific configurations forthe standard Apache Listener.
3. Set or verify virtual directory mappings. The following table liststhe virtual directories and examples for the physical directories.
Virtual Directory Example Physical Directory
/OA_HTML /dl/common/java/oracle/apps/media
/OA_MEDIA /dl/common/java/oracle/apps/media
/OA_JAVA /dl/common/java
/OA_TEMP /tmp
/OA_CGI /dl/common/java/oracle/apps/media/bin
/images /d1/oracle/iAS/portal30/images
G – 4 Oracle Applications System Administrator’s Guide
You can use the Application Object Library AOL/J Setup Test Suite toverify that virtual directories are set properly. See: Application ObjectLibrary AOL/J Setup Test Suite: page G – 57
You can also use your browser to fetch the following URLs to test thesetup of the virtual directories:
http://<hostname>:<port>/OA_MEDIA/FNDLOGOL.gif
should return the large Oracle Applications logo
http://<hostname>:<port>/OA_JAVA/oracle/forms/registry/
Registry.dat
should return a text file with forms registry settings
http://<hostname>:<port>/OA_CGI/FNDWRR.exe
should return ”Query String Parse Error.”
For more information on the Apache configuration file, seeAdministering Oracle HTTP Server Powered by Apache: page G – 14.
Test the HTTP Server Configuration
� Use your web browser to load the Oracle WebDB PL/SQL GatewaySettings page.
By default, this page is disabled for security reasons. You will beprompted for the system username/password.
The default URL for this page is the following:
http://<hostname>:<port>/pls/admin_/
Example:
http://ap557sun.us.oracle.com:2002/pls/admin_/
Navigate to ”Gateway Database Access Descriptor Settings” andcreate or edit a Database Access Descriptor
The settings for the Database Access Descriptor for your OracleApplications database are:
Database Access Descriptor Name <two_task>
Oracle User Name <apps_schema_name>
Oracle Password <apps_schema_password>

G – 5Setting Up and Maintaining Oracle Applications
Oracle Connect String <two_task>
Maximum Number of Worker Thread <tune this>
Keep Database Connection Open... Yes
Default (Home) Page fnd_web.ping
Document Table apps.fnd_lobs_document
Document Access Path docs
Document Access Procedure <null>
Extensions to be Uploaded as BLOB *
Extensions to be Uploaded as LONG RAW <null>
Path Alias fndgfm
Path Alias Procedure fnd_gfm.dispatch
Enable Single Signon Authentication No
Custom Authentication CUSTOM
Example:
Database Access Descriptor Name R115
Oracle User Name apps
Oracle Password apps
Oracle Connect String R115
Maximum Number of Worker Thread 10
Keep Database Connection Open... Yes
Default (Home) Page fnd_web.ping
Document Table apps.fnd_lobs_document
Document Access Path docs
Document Access Procedure
Extensions to be Uploaded as BLOB *
Extensions to be Uploaded as LONG RAW
Path Alias fndgfm
Path Alias Procedure fnd_gfm.dispatch
Enable Single Signon Authentication No
Custom Authentication CUSTOM
� Bounce the web server.
� Test the Database Access Descriptor.
You should now be able to use the PL/SQL Gateway to run authorizedPL/SQL procedures on your Release 11i database server. To test this,use a web browser to fetch the following URL:
http://<hostname>:<port>/pls/<dad_name>/FND_WEB.PING
Example:
http://ap523sun.us.oracle.com/pls/R115/FND_WEB.PING
G – 6 Oracle Applications System Administrator’s Guide
The FND_WEB.PING procedure is delivered with Release 11i andgenerates a response table with the following information:
FND_WEB.PING
SYSDATE: <server system date>
DATABASE_VERSION: <database version banner>
DATABASE_ID: <database identifier>
SCHEMA_NAME: <oracle schema name>
AOL_VERSION: <AOL version number>
APPS_WEB_AGENT: <profile option site level value>
This information should allow you to confirm that your PL/SQLGateway is indeed pointing at the correct APPS schema.
� Test that CUSTOM authentication is working.
Warning: Failure to verify CUSTOM authentication will leaveserious security holes open in your installation. This step isMANDATORY.
The CUSTOM authentication flag directs WebDB to check accessprivileges using the OWA_CUSTOM.AUTHORIZE function. OracleApplication Object Library supplies an implementation of this function(AFOAUTHB.pls) which verifies requests are enabled for webexecution via the FND_ENABLED_PLSQL table. You should verifythat this access control is in place by running a function which is notauthorized for web execution. For example:
http://<hostname>:<port>/pls/<dad_name>/HTP.HR
Example:
http://ap523sun.us.oracle.com/pls/R115/HTP.HR
You should see an access control error. If you get a page with ahorizonal rule across it, then the web request actually executed theHTP.HR procedure even though this package is not listed inFND_ENABLED_PLSQL. To correct this problem, set the ”CustomAuthentication” field to ”CUSTOM” as described in the beginning ofthis section.
� Test the Generic File Manager service.
Oracle WebDB is used by the Application Object Library Generic FileManager for file upload and download services. The Generic FileManager service is used to implement online help, attachments, andother file–based features. To test the Generic File Manager, try fetchingan online help document with your browser:
G – 7Setting Up and Maintaining Oracle Applications
http://<hostname>:<port>/pls/<dad_name>/
fndgfm/fnd_help.get/US/fnd/@search
Example:
http://ap523sun.us.oracle.com/pls/R115/
fndgfm/fnd_help.get/US/fnd/@search
This should return an HTML page describe help search features of theonline help system.
Create DBC files
A DBC (.dbc) file holds information used by application servers toidentify and authenticate with an application database. DBC files mustbe created on all tiers if you run a multi–tier system. The files arelocated in $FND_TOP/secure of your Oracle Applications installationand are named as follows:
$FND_TOP/secure/<db_host>_<db_sid>.dbc
Example:
/d1/appltop/fnd/11.5.8/secure/ap100sun_dev115.dbc
� Locate the DBC file for your database (Rapid Install should havecreated one for you). Verify the settings are correct.
� Test the DBC file by running the AdminAppServer STATUS check:
Prior to running AdminAppServer you must ensure that theCLASSPATH environment variable contains
• $JAVA_TOP (Oracle Applications java code)
• $ORACLE_HOME/jdbc/lib/classes111.zip (jdbc drivers forUNIX) or %JAVA_TOP%\jdbc111.zip (jdbc drivers for Windows)
Example for running the status check in UNIX:
Run the utility using the following syntax:
jre oracle.apps.fnd.security.AdminAppServer STATUS \
DBC=<full_path_to_dbc_file>
Example:
jre oracle.apps.fnd.security.AdminAppServer STATUS \
DBC=/d1/appltop/fnd/11.5/secure/ap100sun_dev115.dbc
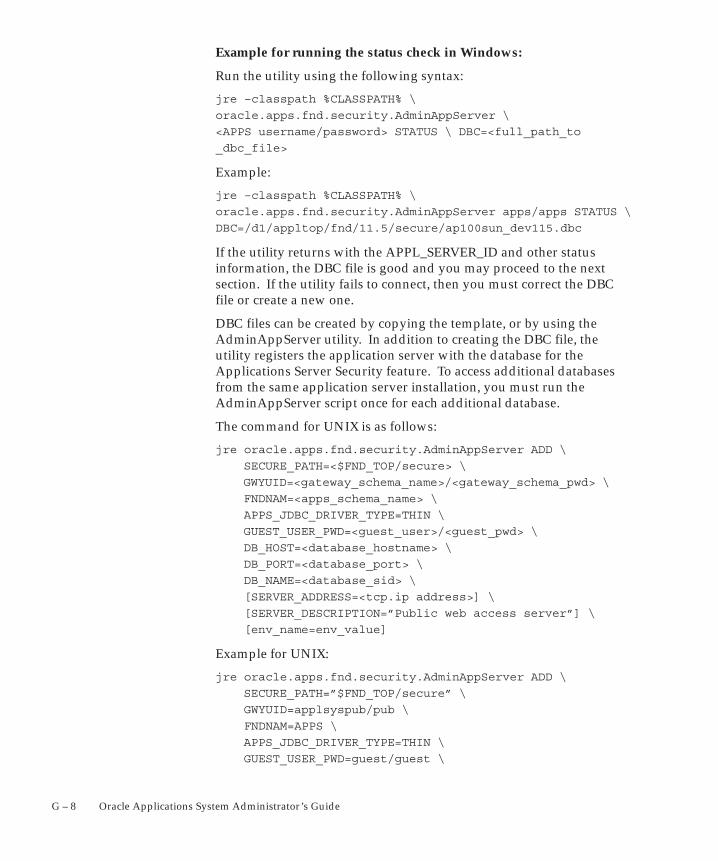
G – 8 Oracle Applications System Administrator’s Guide
Example for running the status check in Windows:
Run the utility using the following syntax:
jre –classpath %CLASSPATH% \
oracle.apps.fnd.security.AdminAppServer \
<APPS username/password> STATUS \ DBC=<full_path_to
_dbc_file>
Example:
jre –classpath %CLASSPATH% \
oracle.apps.fnd.security.AdminAppServer apps/apps STATUS \
DBC=/d1/appltop/fnd/11.5/secure/ap100sun_dev115.dbc
If the utility returns with the APPL_SERVER_ID and other statusinformation, the DBC file is good and you may proceed to the nextsection. If the utility fails to connect, then you must correct the DBCfile or create a new one.
DBC files can be created by copying the template, or by using theAdminAppServer utility. In addition to creating the DBC file, theutility registers the application server with the database for theApplications Server Security feature. To access additional databasesfrom the same application server installation, you must run theAdminAppServer script once for each additional database.
The command for UNIX is as follows:
jre oracle.apps.fnd.security.AdminAppServer ADD \
SECURE_PATH=<$FND_TOP/secure> \
GWYUID=<gateway_schema_name>/<gateway_schema_pwd> \
FNDNAM=<apps_schema_name> \
APPS_JDBC_DRIVER_TYPE=THIN \
GUEST_USER_PWD=<guest_user>/<guest_pwd> \
DB_HOST=<database_hostname> \
DB_PORT=<database_port> \
DB_NAME=<database_sid> \
[SERVER_ADDRESS=<tcp.ip address>] \
[SERVER_DESCRIPTION=”Public web access server”] \
[env_name=env_value]
Example for UNIX:
jre oracle.apps.fnd.security.AdminAppServer ADD \
SECURE_PATH=”$FND_TOP/secure” \
GWYUID=applsyspub/pub \
FNDNAM=APPS \
APPS_JDBC_DRIVER_TYPE=THIN \
GUEST_USER_PWD=guest/guest \
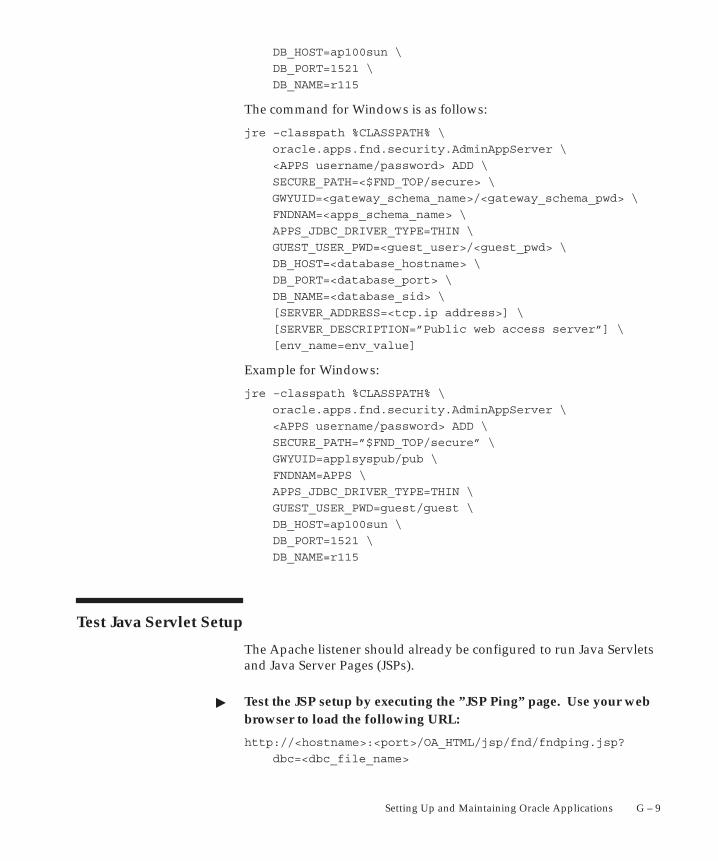
G – 9Setting Up and Maintaining Oracle Applications
DB_HOST=ap100sun \
DB_PORT=1521 \
DB_NAME=r115
The command for Windows is as follows:
jre –classpath %CLASSPATH% \
oracle.apps.fnd.security.AdminAppServer \
<APPS username/password> ADD \
SECURE_PATH=<$FND_TOP/secure> \
GWYUID=<gateway_schema_name>/<gateway_schema_pwd> \
FNDNAM=<apps_schema_name> \
APPS_JDBC_DRIVER_TYPE=THIN \
GUEST_USER_PWD=<guest_user>/<guest_pwd> \
DB_HOST=<database_hostname> \
DB_PORT=<database_port> \
DB_NAME=<database_sid> \
[SERVER_ADDRESS=<tcp.ip address>] \
[SERVER_DESCRIPTION=”Public web access server”] \
[env_name=env_value]
Example for Windows:
jre –classpath %CLASSPATH% \
oracle.apps.fnd.security.AdminAppServer \
<APPS username/password> ADD \
SECURE_PATH=”$FND_TOP/secure” \
GWYUID=applsyspub/pub \
FNDNAM=APPS \
APPS_JDBC_DRIVER_TYPE=THIN \
GUEST_USER_PWD=guest/guest \
DB_HOST=ap100sun \
DB_PORT=1521 \
DB_NAME=r115
Test Java Servlet Setup
The Apache listener should already be configured to run Java Servletsand Java Server Pages (JSPs).
� Test the JSP setup by executing the ”JSP Ping” page. Use your webbrowser to load the following URL:
http://<hostname>:<port>/OA_HTML/jsp/fnd/fndping.jsp?
dbc=<dbc_file_name>
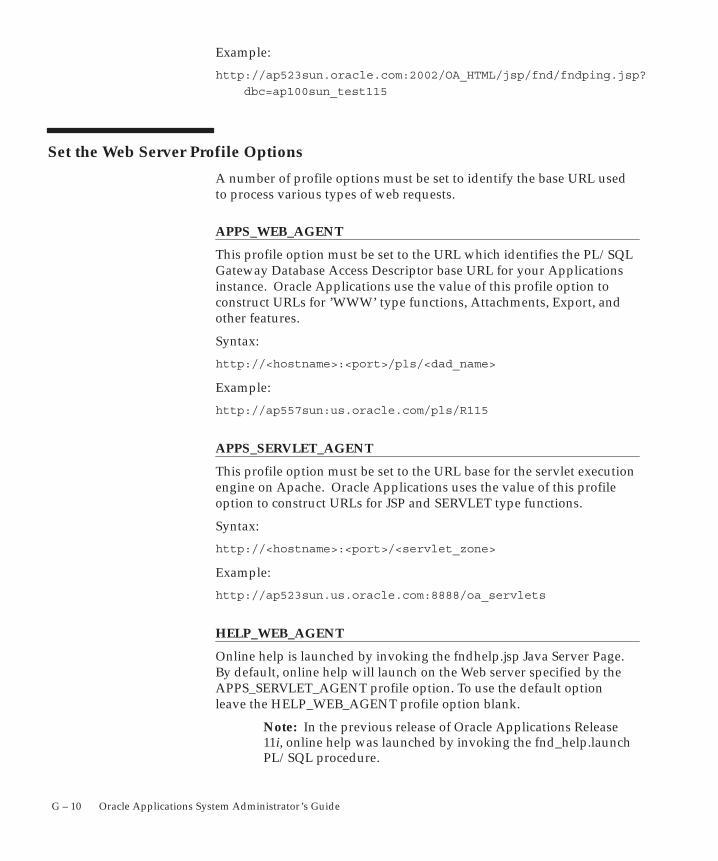
G – 10 Oracle Applications System Administrator’s Guide
Example:
http://ap523sun.oracle.com:2002/OA_HTML/jsp/fnd/fndping.jsp?
dbc=ap100sun_test115
Set the Web Server Profile Options
A number of profile options must be set to identify the base URL usedto process various types of web requests.
APPS_WEB_AGENT
This profile option must be set to the URL which identifies the PL/SQLGateway Database Access Descriptor base URL for your Applicationsinstance. Oracle Applications use the value of this profile option toconstruct URLs for ’WWW’ type functions, Attachments, Export, andother features.
Syntax:
http://<hostname>:<port>/pls/<dad_name>
Example:
http://ap557sun:us.oracle.com/pls/R115
APPS_SERVLET_AGENT
This profile option must be set to the URL base for the servlet executionengine on Apache. Oracle Applications uses the value of this profileoption to construct URLs for JSP and SERVLET type functions.
Syntax:
http://<hostname>:<port>/<servlet_zone>
Example:
http://ap523sun.us.oracle.com:8888/oa_servlets
HELP_WEB_AGENT
Online help is launched by invoking the fndhelp.jsp Java Server Page.By default, online help will launch on the Web server specified by theAPPS_SERVLET_AGENT profile option. To use the default optionleave the HELP_WEB_AGENT profile option blank.
Note: In the previous release of Oracle Applications Release11i, online help was launched by invoking the fnd_help.launchPL/SQL procedure.
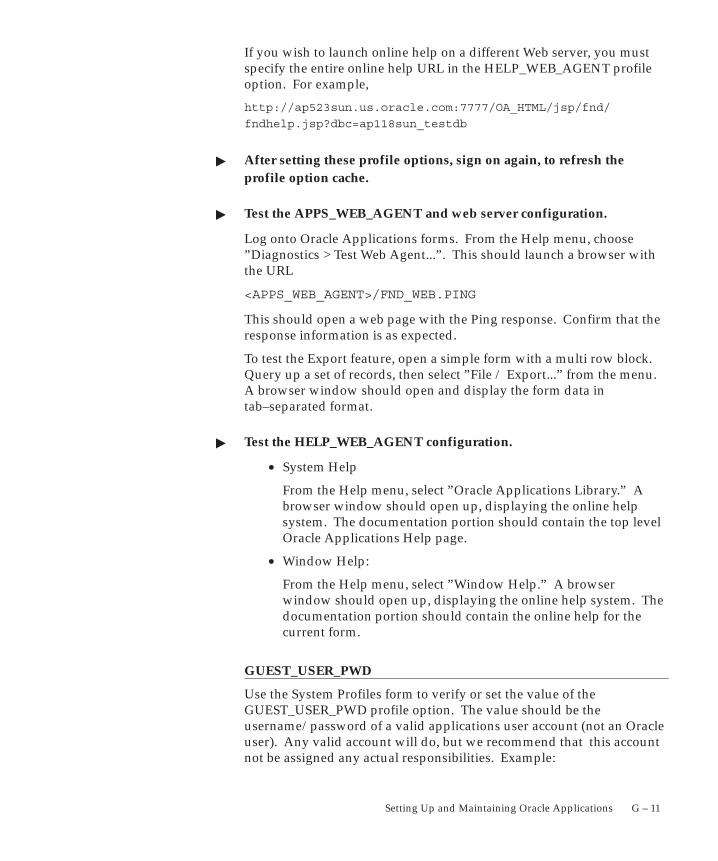
G – 11Setting Up and Maintaining Oracle Applications
If you wish to launch online help on a different Web server, you mustspecify the entire online help URL in the HELP_WEB_AGENT profileoption. For example,
http://ap523sun.us.oracle.com:7777/OA_HTML/jsp/fnd/
fndhelp.jsp?dbc=ap118sun_testdb
� After setting these profile options, sign on again, to refresh theprofile option cache.
� Test the APPS_WEB_AGENT and web server configuration.
Log onto Oracle Applications forms. From the Help menu, choose”Diagnostics > Test Web Agent...”. This should launch a browser withthe URL
<APPS_WEB_AGENT>/FND_WEB.PING
This should open a web page with the Ping response. Confirm that theresponse information is as expected.
To test the Export feature, open a simple form with a multi row block.Query up a set of records, then select ”File / Export...” from the menu.A browser window should open and display the form data intab–separated format.
� Test the HELP_WEB_AGENT configuration.
• System Help
From the Help menu, select ”Oracle Applications Library.” Abrowser window should open up, displaying the online helpsystem. The documentation portion should contain the top levelOracle Applications Help page.
• Window Help:
From the Help menu, select ”Window Help.” A browserwindow should open up, displaying the online help system. Thedocumentation portion should contain the online help for thecurrent form.
GUEST_USER_PWD
Use the System Profiles form to verify or set the value of theGUEST_USER_PWD profile option. The value should be theusername/password of a valid applications user account (not an Oracleuser). Any valid account will do, but we recommend that this accountnot be assigned any actual responsibilities. Example:
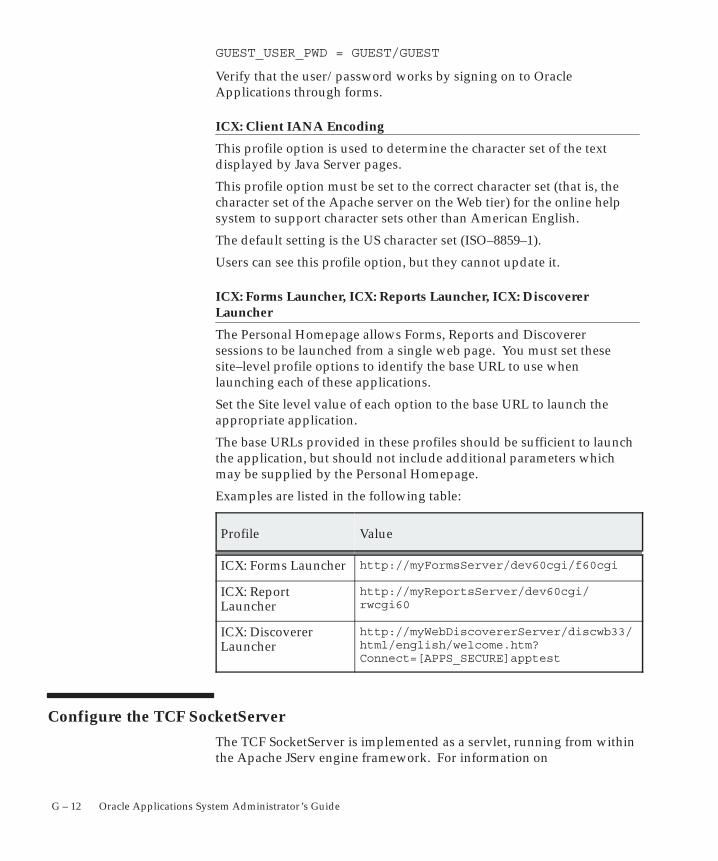
G – 12 Oracle Applications System Administrator’s Guide
GUEST_USER_PWD = GUEST/GUEST
Verify that the user/password works by signing on to OracleApplications through forms.
ICX: Client IANA Encoding
This profile option is used to determine the character set of the textdisplayed by Java Server pages.
This profile option must be set to the correct character set (that is, thecharacter set of the Apache server on the Web tier) for the online helpsystem to support character sets other than American English.
The default setting is the US character set (ISO–8859–1).
Users can see this profile option, but they cannot update it.
ICX: Forms Launcher, ICX: Reports Launcher, ICX: DiscovererLauncher
The Personal Homepage allows Forms, Reports and Discoverersessions to be launched from a single web page. You must set thesesite–level profile options to identify the base URL to use whenlaunching each of these applications.
Set the Site level value of each option to the base URL to launch theappropriate application.
The base URLs provided in these profiles should be sufficient to launchthe application, but should not include additional parameters whichmay be supplied by the Personal Homepage.
Examples are listed in the following table:
Profile Value
ICX: Forms Launcher http://myFormsServer/dev60cgi/f60cgi
ICX: ReportLauncher
http://myReportsServer/dev60cgi/rwcgi60
ICX: DiscovererLauncher
http://myWebDiscovererServer/discwb33/html/english/welcome.htm?Connect=[APPS_SECURE]apptest
Configure the TCF SocketServer
The TCF SocketServer is implemented as a servlet, running from withinthe Apache JServ engine framework. For information on
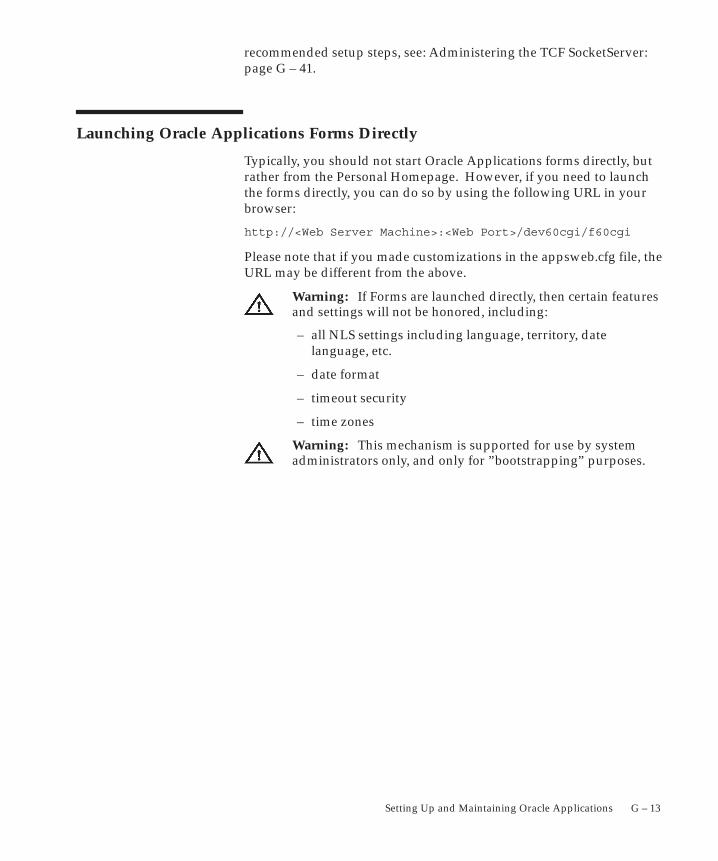
G – 13Setting Up and Maintaining Oracle Applications
recommended setup steps, see: Administering the TCF SocketServer:page G – 41.
Launching Oracle Applications Forms Directly
Typically, you should not start Oracle Applications forms directly, butrather from the Personal Homepage. However, if you need to launchthe forms directly, you can do so by using the following URL in yourbrowser:
http://<Web Server Machine>:<Web Port>/dev60cgi/f60cgi
Please note that if you made customizations in the appsweb.cfg file, theURL may be different from the above.
Warning: If Forms are launched directly, then certain featuresand settings will not be honored, including:
– all NLS settings including language, territory, datelanguage, etc.
– date format
– timeout security
– time zones
Warning: This mechanism is supported for use by systemadministrators only, and only for ”bootstrapping” purposes.
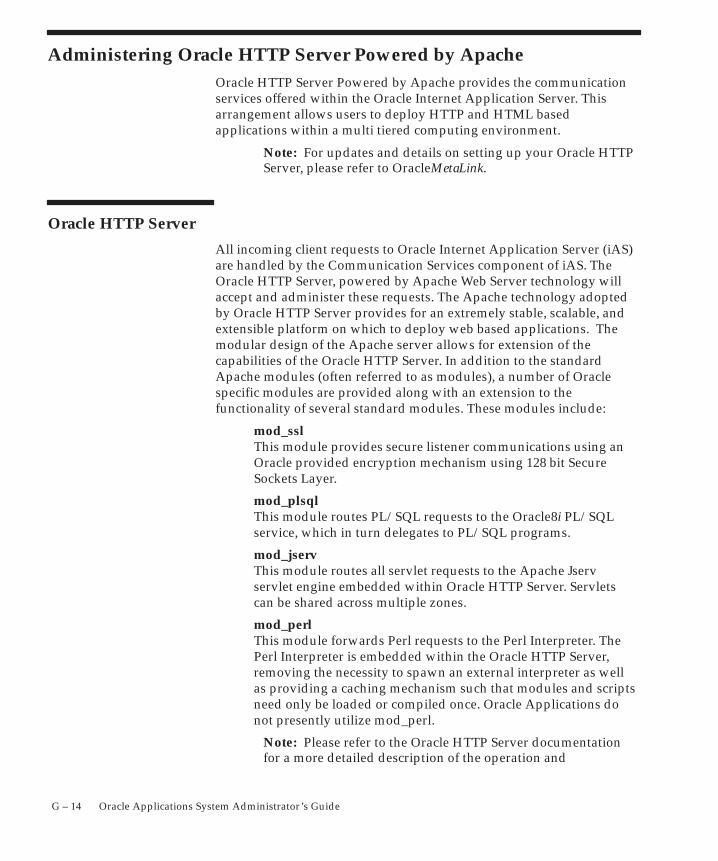
G – 14 Oracle Applications System Administrator’s Guide
Administering Oracle HTTP Server Powered by ApacheOracle HTTP Server Powered by Apache provides the communicationservices offered within the Oracle Internet Application Server. Thisarrangement allows users to deploy HTTP and HTML basedapplications within a multi tiered computing environment.
Note: For updates and details on setting up your Oracle HTTPServer, please refer to OracleMetaLink.
Oracle HTTP Server
All incoming client requests to Oracle Internet Application Server (iAS)are handled by the Communication Services component of iAS. TheOracle HTTP Server, powered by Apache Web Server technology willaccept and administer these requests. The Apache technology adoptedby Oracle HTTP Server provides for an extremely stable, scalable, andextensible platform on which to deploy web based applications. Themodular design of the Apache server allows for extension of thecapabilities of the Oracle HTTP Server. In addition to the standardApache modules (often referred to as modules), a number of Oraclespecific modules are provided along with an extension to thefunctionality of several standard modules. These modules include:
mod_sslThis module provides secure listener communications using anOracle provided encryption mechanism using 128 bit SecureSockets Layer.
mod_plsqlThis module routes PL/SQL requests to the Oracle8i PL/SQLservice, which in turn delegates to PL/SQL programs.
mod_jservThis module routes all servlet requests to the Apache Jservservlet engine embedded within Oracle HTTP Server. Servletscan be shared across multiple zones.
mod_perlThis module forwards Perl requests to the Perl Interpreter. ThePerl Interpreter is embedded within the Oracle HTTP Server,removing the necessity to spawn an external interpreter as wellas providing a caching mechanism such that modules and scriptsneed only be loaded or compiled once. Oracle Applications donot presently utilize mod_perl.
Note: Please refer to the Oracle HTTP Server documentationfor a more detailed description of the operation and
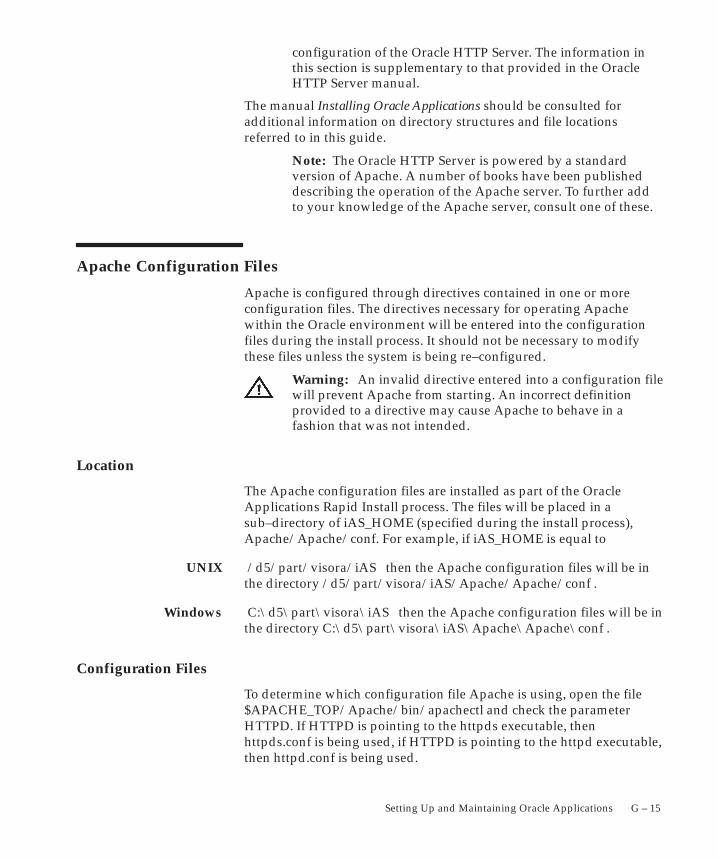
UNIX
Windows
G – 15Setting Up and Maintaining Oracle Applications
configuration of the Oracle HTTP Server. The information inthis section is supplementary to that provided in the OracleHTTP Server manual.
The manual Installing Oracle Applications should be consulted foradditional information on directory structures and file locationsreferred to in this guide.
Note: The Oracle HTTP Server is powered by a standardversion of Apache. A number of books have been publisheddescribing the operation of the Apache server. To further addto your knowledge of the Apache server, consult one of these.
Apache Configuration Files
Apache is configured through directives contained in one or moreconfiguration files. The directives necessary for operating Apachewithin the Oracle environment will be entered into the configurationfiles during the install process. It should not be necessary to modifythese files unless the system is being re–configured.
Warning: An invalid directive entered into a configuration filewill prevent Apache from starting. An incorrect definitionprovided to a directive may cause Apache to behave in afashion that was not intended.
Location
The Apache configuration files are installed as part of the OracleApplications Rapid Install process. The files will be placed in asub–directory of iAS_HOME (specified during the install process),Apache/Apache/conf. For example, if iAS_HOME is equal to
/d5/part/visora/iAS then the Apache configuration files will be inthe directory /d5/part/visora/iAS/Apache/Apache/conf .
C:\d5\part\visora\iAS then the Apache configuration files will be inthe directory C:\d5\part\visora\iAS\Apache\Apache\conf .
Configuration Files
To determine which configuration file Apache is using, open the file$APACHE_TOP/Apache/bin/apachectl and check the parameterHTTPD. If HTTPD is pointing to the httpds executable, thenhttpds.conf is being used, if HTTPD is pointing to the httpd executable,then httpd.conf is being used.
UNIX
Windows
G – 16 Oracle Applications System Administrator’s Guide
This file contains those directives necessary to allow Apache to run.The syntax of the configuration file allows for one directive per line.Lines may be continued on to the next line by placing a backslash, ”\”as the last character in the line. Directives specified in any of theconfiguration files are case–insensitive, however arguments todirectives may be case–sensitive. Lines beginning with a hash, ”#”, areconsidered comments and are ignored.
Other files may be linked to the httpds.conf file through the addition ofinclude directives. Rapid Install will have created two otherconfiguration files in the conf directory, oracle_apache.conf, and apps.conf.The file oracle_apache.conf should also contain an include statementpointing to the file <iAS_HOME>/Apache/modplsql/cfg/plsql.conf.
The configuration file to be used at startup can be specified using the –foption on the command line. To view all of the options that the httpdsexecutable accepts, at the command line enter:
$<iAS_HOME>/Apache/Apache/bin/httpds –h
Open a console window (DOS prompt), change directory to where theApache executable is stored, and execute the command ”Apache.exe–h”. For example, at the DOS prompt enter:
C:\> cd C:\<iAS_HOME>\Apache\Apache
C:\> Apache.exe –h
Note: Refer to the Apache documentation athttp://www.apache.org/docs/windows.html for moreinformation on the operation of Apache in the Windowsenvironment.
The default Apache configuration file
Important directives specified in the file httpd.conf or httpds.conf:
A fully qualified domain name. For example,myserver.acme.com. This is the name with whichApache responds to HTTP requests.
The port number on which Apache listens forHTTP requests. Set during Rapid Install. Thedefault port number is 80.
A fully qualified path, under which the ApacheServer’s configuration, error and log files reside.Directives defined with relative paths will appendto this path. Set to <iAS_HOME>/Apache/Apacheby Rapid Install.
ServerName
Port
ServerRoot
UNIX
G – 17Setting Up and Maintaining Oracle Applications
The directory out of which document requests areserved. Defaults to <COMMON_TOP>/portal.
A fully qualified path to the error log file. Thedefault entry is equal to<iAS_HOME>/Apache/Apache/logs/error_logon UNIX and<iAS_HOME>Apache/Apache/logs/error.log onWindows.
The location and format of the access log. Thedefault entry is equal to logs/access_log common.This sets the file to be in the Common LogfileFormat.
The file in which the parent process is recorded onstartup. Defaults to logs/httpds.pid
Two include files should be specified in the defaultApache configuration file.<iAS_HOME>/Apache/Jserv/etc/jserv.conf, and<iAS_HOME>/Apache/Apache/conf/oracle_apache.conf.
Warning: The order in which the include files are specified isimportant. jserv.conf should be placed before oracle_apache.conf.
oracle_apache.conf
The file oracle_apache.conf is ”included” in httpds.conf. This file iscreated by Rapid Install, and has include entries pointing to apps.conf,and plsql.conf at a minimum. There may also be entries pointing toother files including xml.conf, and ojsp.conf. As an exampleoracle_apache.conf should contain the lines:
include /d5/ora/iAS/Apache/modplsql/cfg/plsql.conf
include /d5/ora/iAS/Apache/Apache/conf/apps.conf
plsql.conf
The file plsql.conf has entries related to the handling of PL/SQLprocedures. The directive LoadModule plsql_module has an argumentthat is a pointer to the shared library modplsql.so. An examplespecifying the default location would be:
#Directives for mod_plsqlLoadModule plsql_module \/d5/ora/iAS/Apache/modplsql/bin/modplsql.so
DocumentRoot
ErrorLog
CustomLog
PidFile
Include

Windows
UNIX
Windows
G – 18 Oracle Applications System Administrator’s Guide
#Directives for mod_plsqlLoadModule plsql_module \D:\<iAS_HOME>\bin\modplsql.dll
apps.conf
This file contains Oracle Applications specific information for theApache HTTP listener. A number of Alias directives for physicaldirectories will be present in this file. Entries will exist for OA_HTML,OA_MEDIA, OA_JAVA, OA_TEMP, OA_SECURE, and OA_CGIamongst others. An example of the entries that may be present include:
Alias /OA_JAVA/ ”/d5/part/common/java/”
<Location /OA_JAVA/>
Order allow,deny
Allow from all
</Location>
Alias /OA_HTML/ ”/d5/part/common/html/”
<Location /OA_HTML/>
Order allow, deny
Allow from all
</Location>
Alias /OA_MEDIA/ \
”/d5/part/common/java/oracle apps/media/”
<Location /OA_MEDIA/>
Order allow, deny
Allow from all
</Location>
Note: Ensure that trailing slashes, ”/”, are present in thephysical directory definition. Omission of the trailing slash canresult in errors such as broken images or files not being found.
Controlling Apache
Rapid Install will create a sub–directory under the common area withthe path admin/scripts/<context_name>. Within this directory anumber of control scripts are created. The control script adapcctl can beused to stop and start the Apache Web Listener.
Apache control file: admin/scripts/adapcctl.sh
Apache control file: admin\scripts\adapcctl
The Apache control file is a shell script that can accept the argumentseither ”stop” or ”start”. At the command line enter the following:
UNIX
Windows
UNIX
G – 19Setting Up and Maintaining Oracle Applications
To start Apache:
$ adapcctl.sh start
To stop Apache:
$ adapcctl.sh stop
To start Apache on Windows platforms, the command is:
adapcctl.cmd start
To stop Apache on Windows platforms, the command is:
adapcctl.cmd stop
Alternatively, you can use the Services tool from the Control Panel tostart and stop the Apache service.
Testing Apache Server Status
In order to test the correct operation of the Oracle HTTP as a part of theoverall application, it is necessary to ensure that the Oracle database,the Oracle database listener, and the concurrent manager are running, ifrequired. Refer to earlier sections in this guide to determine applicablesteps necessary to ensure these processes are available.To test the status of Apache, enter the following at the operating systemprompt (from the <iAS_HOME>/Apache/Apache/bin directory):
To test the status of the Apache Server–
$apachectl status
The return from this command is dependent on what the directive”STATUSURL” is set to in the apachectl file as well as on theavailability of the lynx command. For example, if the following line isentered in apachectl:
STATUSURL=”http://myserver.acme.com:8002/pls/VIS/FND_
WEB.PING”
then the status command will return:
$ apachectl status
FND_WEB.PING
SYSDATE 08–DEC–2001 06:37:24
DATABASE VERSION Oracle8i Enterprise Edition –
Production
DATABASE ID:vision
SCHEMA NAME APPS
Windows
G – 20 Oracle Applications System Administrator’s Guide
AOL VERSION 11.5
APPS WEB AGENT
http://myserver.acme.com:8002/pls/VIS
To fully test the configuration of the Oracle HTTP Server, you can bringup the Rapid Installation Index Page , by requesting the following URL:
http://<server>.<domain>:<port>
for example, http://myserver.acme.com:8002, and then selecting”Apps Logon Links” from this page. This launches the OracleApplication Login page from which you can login as an OracleApplications User, such as SYSADMIN.
Note: More information on the operation of apachectl can befound in the manual Oracle HTTP Server. Refer to the sectiontitled ”Secure Sockets Layer Configuration” in this guide formore information on the operation of the ”startssl” argument.
To test the status of the Apache Server on Windows, point yourbrowser at the server URL, for example:
http://myserver.acme.com:8002/pls/VIS/FND_WEB.PING
should result in the output
FND_WEB.PING
SYSDATE 08–DEC–2001 06:37:24
DATABASE VERSION Oracle8i Enterprise Edition –
Production
DATABASE ID:vision
SCHEMA NAME APPS
AOL VERSION 11.5
APPS WEB AGENT
http://myserver.acme.com:8002/pls/VIS
Secure Sockets Layer Configuration
Secure Sockets Layer (SSL) allows the Apache listener to encryptHTML pages and transmit them on the network using the HTTPSprotocol for secure transmissions.
SSL uses an encrypting method called public key cryptography, wherethe server provides the client with a public key for encryptinginformation. The server’s private key is required to decrypt thisinformation. The client uses the public key to encrypt and send
G – 21Setting Up and Maintaining Oracle Applications
information to the server, including its own key which identifies it tothe server.
In order for the Oracle HTTP Server, powered by Apache, to functionin secure mode it is also necessary to utilize certificates which validatethe server’s identity. These certificates are used to ensure that theowner of a public key is who they say they are. Typically you will wantto use a private key with an officially signed certificate, validated by aCertificate Authority (CA). The CA validates the company details, setsexpiration dates on the certificates and may place policies on whatinformation is contained within the certificate. A number of CAs exist,and include such authorities as Verisign, RSA, and GTE CyberTrust. Toobtain a CA approved certificate it is necessary to generate a certificaterequest, which includes details of the organization applying as well asthe public key to be distributed, this is then sent to the CA, validatedand returned. Authorities may also require proof of ownership of thecompany applying for the certificate, as well as proof of ownership ofthe domain name specified in the certificate request.
Note: The task of obtaining a signed certificate is beyond thescope of this guide. Refer to the Oracle Advanced SecurityAdministrator’s Guide for more information on the use ofcertificates in an Oracle environment. Refer tohttp://www.modssl.org for more information on the SSLmodule for Apache.
It is possible to generate a self–signed certificate that can be used to testSSL operation. Most browsers are configured to accept certificates froma number of recognized authorities. Receiving a certificate from anorganization other than one of these will generate a warning, and theuser will be prompted to accept or reject this certificate. A self–signedcertificate will generate this warning.
Creating a self–signed certificate
The SSL module provides a utility called openssl which can be used tocreate a self–signed certificate. In order to generate a self–signedcertificate perform the following steps:
Temporary SSL Environment Setup
Step 1: Create Random number file.
Create a file containing a string of random numbers. The default pathfor this file is:
UNIX
Windows
G – 22 Oracle Applications System Administrator’s Guide
$HOME/.rnd
RANDFILE can be set with the Control Panel System Properties utility.
The environment variable, RANDFILE, set in openssl.cnf can be used tospecify the path to the file containing the random numbers.
Step 2: Create a working directory to hold Apache’s private key, certificate request andtest certificate.
For example:
$COMMON_TOP/admin/certs/apache
Step 3: Create the private key (apache_1024.key).
Set up a temporary environment variable OPENSSL_TOP, and set it to<iAS_Home>/Apache/open_ssl in UNIX and<iAS_Home>\Apache\open_ssl in Windows.
From the working directory, type the following command to generateyour RSA private key (apache_1024.key):
$OPENSSL_TOP/bin/openssl genrsa –des3 –out apache_1024.key 1024
You will be prompted to enter the PEM pass phrase, which must be atleast 4 characters in length. Remember this pass phrase; unless youdecide to unencrypt your server key using step 4 below, you will beprompted to enter in the next step and each time you start up Apachein SSL mode.
Step 4: Optionally, unencrypt the value of the server key.
If this is done, you will not be prompted for the PEM pass phrase everytime you start up the Apache web server (Note that if anyone gets thiskey they will be able to impersonate you on the net, so consider leavingit encrypted and entering the PEM pass phrase each time you startApache).
Copy the private key (apache_1024.key) that you created in step 3above to a backup file (apache_1024.key.bak) then type the followingcommand to invoke the RSA key processing tool:
$ $OPENSSL_TOP/bin/openssl rsa –in apache_1024.key.bak –out \
apache_1024.key
Note: On Windows, you must perform this step. Thislimitation will be fixed in Apache 2.0.
i.
ii.
UNIX
Windows
G – 23Setting Up and Maintaining Oracle Applications
Step 5: Edit the default openssl configuration file ($OPENSSL_CONF) so that it can beused to generate the certificate signing request.
Locate the line that reads dir = ./demoCA and modify this line topoint to the full directory path where the directory of your key andrequest file are located (the directory created in step 2 above).
On Windows, comment out the lines that set the RANDFILE, oid_fileand oid_section variables:
#RANDFILE =$ENV::HOME/.rnd
#oid_file=$ENV::HOME/.oid
#oid_section=new_oids
Step 6: Set environment variable to point to openssl.cnf.
In order for openssl to find the correct configuration file, anenvironment variable needs to be set. This variable is calledOPENSSL_CONF and it should equal the path to the file openssl.cnf.For example:
In a csh environment, the command could be
% setenv OPENSSL_CONF
/d5/part/ora/iAS/Apache/open_ssl/bin/openssl.cnf
OPENSSL_CONF can be set with the Control Panel Properties utility.
If this variable is not set openssl will look for the file/usr/local/Apache/libexec/ssl/ssl/openssl.cnf on UNIX systems, or\usr\local\ssl\openssl.cnf on Windows systems. You will see an errorstating that configuration information cannot be found if this file doesnot exist.
Step 7: Generate the certificate signing request (CSR).
From the working directory, type the following command to generateyour CSR (apache_1024.csr) derived from the private key(apache_1024.key).
$ $OPENSSL_TOP/bin/openssl req –config $OPENSSL_CONF \
–new –key apache_1024.key –out apache_1024.csr
You will be prompted for the following:
• Enter PEM pass phrase: Enter the pass phrase chosen in step 4.
• Country Name (2 letter code) [AU]

G – 24 Oracle Applications System Administrator’s Guide
State or Province Name (full name) [Some–State]: Locality Name (e.g., city) []: Organization Name (e.g., company) [Internet Widgets Pty Ltd]:Organizational Unit Name (e.g., section) []:
• Common Name (e.g., YOUR name) []: Enter the fully qualifiedname of your server. For example: orl–sun.oracle.com
• E–mail Address []: Enter your e–mail address. This is where thecertificate will be sent.
• Please enter the following ’extra’ attributes: These questions areoptional.
Now the working directory contains a private key (apache_1024.key)and a certificate request (apache_1024.csr). Both are text filescontaining encrypted information and can be viewed. The contents ofcertificate request be used in the next step.
Step 8: Submit your certificate request (CSR) to your certificate authority(CA).
The request process is generally explained in detail by your CA ofchoice. Go to the web site of your CA to follow their specific processfor requesting a certificate. In the example here, a trial certificate isrequested from Verisign.
Go to www.verisign.com, to request a trial certificate. From Verisign’shome page, there should be a link for getting a trial certificate (if this isnot obvious, search on ”trial certificate”)
The Verisign web site will lead you through the steps of requestingyour certificate. When asked to submit your CSR, paste the contents ofyour certificate request (apache_1024.csr) beginning with and including
–––––BEGIN CERTIFICATE REQUEST–––––
and ending with and including
–––––END CERTIFICATE REQUEST–––––
Click Submit, then enter the additional requested information,including your e–mail address again for the certificate. You shouldreceive the certificate via e–mail within a couple of hours.
Step 9: Create the certificate file.
Once you have received your certificate, use your e–mail application tosave the entire e–mail message to a text file. Name the fileapache_1024. crt. It is very important to do this so that you do notcorrupt your certificate by cutting and pasting from your e–mail
G – 25Setting Up and Maintaining Oracle Applications
application. In addition, you must use a text editor, rather than a wordprocessing application for your editions to the resulting text file.
If you have saved your e–mail message to a machine that is not yourserver, transfer the file over to the server and into the workingdirectory ($COMMON_TOP/admin/certs/apache), for example, usingftp.
In the working directory, open the file in a text editor and delete all thelines except for the certificate. The certificate consists of all linesbeginning with and including
–––––BEGIN CERTIFICATE–––––
and ending with and including
–––––END CERTIFICATE–––––
Once your changes are made, save the file with the nameapache_1024.crt.
At this stage, if you are using a global server certificate, you will alsohave to retrieve the intermediate certificate which should be accessiblevia a URL in the e–mail that you receive containing your certificate.Transfer the file over to the server and into the working directory($COMMON_TOP/admin/certs/apache), for example, using ftp. Savethis intermediate certificate in a file named intermediate.crt.
Configure Apache for SSL connections
Configuring Apache for SSL connections using AutoConfig
If you are AutoConfig enabled, run AutoConfig as described inOracleMetaLink Note 165195.1 after ensuring that the followingparameters are correctly set in your context xml file:
• set the %s_url_protocol variable to https
• set the %s_local_url_protocol variable to https
• set the %s_webssl_port variable to the Apache SSL port required
• set the %s_web_ssl_directory variable to point to the fulldirectory path of the directory that is to contain the .crt and .keyfiles that you ar using for Apache, for example,<$COMMON_TOP>/admin/certs/apache
Then perform the following steps:
• create two directories in the s_web_ssl_directory, named ssl.crtand ssl.key
G – 26 Oracle Applications System Administrator’s Guide
• copy your Apache .crt file in to the ssl.crt directory with a filename of server.crt
• copy your Apache key file in to the ssl.key file with a file name ofserver.key
Manual Steps for Apache configuration (for reference only)
This section is for customers on Release 11.5.7 and earlier, who are notusing AutoConfig. AutoConfig is required in Release 11.5.8.
This section contains information on modifying configuration files andprofiles that are maintained by the AutoConfig infrastructure.
� Step 1: Determine which configuration file Apache is currentlyusing.
On UNIX, if you are not sure which configuration file Apache iscurrently using, open the file $APACHE_TOP/Apache/bin/apachectland check the parameter HTTPD. If HTTPD is pointing to the httpdsexecutable, then httpds.conf is being used, if HTTPD is pointing to thehttpd executable, then httpd.conf is being used.
Windows does not use the apachectl file. On these platforms, Apacheis implemented through use of services. By default the apache servicepoints to the httpd.conf file during startup. This is defined in an OracleApplications environment through use of the adsvapc.cmd file in theadmin\install directory in the Oracle Applications common topdirectory tree. If you are not sure which configuration file Apache iscurrently using, open the adsvapc.cmd file and check the value of the–f variable in the call to invoke Apache.exe.
� Step 2: Back up the file httpds.conf before making any changes.
Use the following commands:
$ cd $APACHE_TOP/Apache/conf
$ cp httpds.conf httpds.conf.BAK
� Step 3: If Apache has up to now been using httpd.conf as theconfiguration file, copy httpd.conf as httpds.conf.
Use the following command:
$ cp httpd.conf httpds.conf
� Step 4: Edit the SSL directives for Apache in httpds.conf.
Decide on the port that you want Apache to use for SSLcommunication. Apache will listen both on the original non–SSL port
G – 27Setting Up and Maintaining Oracle Applications
that has already been configured as well as the new port you choose forSSL.
The standard port for SSL communication is 443, but it need only be afree port on your server. Keep in mind that on UNIX, if you havechosen port 443 (or any port under 1024) for your SSL port, you willhave to start Apache as root, otherwise you should connect as theoracle user.
Open httpds.conf in an editor.
a. Find the main section:
### Section 2: ’Main’ server configuration
Find the subsection:
## SSL Support
Ensure the <IfDefine SSL> block reflects your original non–SSL port forthe first Listen directive and the chosen SSL port for the second Listendirective.
For example:
<IfDefine SSL>
Listen 8800
Listen 443
</IfDefine>
b. Find the main section:
### Section 3: Virtual Hosts
Ignore the first (commented out) reference to ”VirtualHost_default_:”,but change the second reference to ensure your true choice for the SSLport is reflected in the line beneath the SSL Virtual Host ContextSection:
<VirtualHost_default_:443>
Find the subsection:
## SSL Virtual Host Context
Find and edit the DocumentRoot directive to point to your portal. Forexample (note the trailing slash):
DocumentRoot ”/u08/app/oracle/viscomn/portal/”
Find and edit the SSLCertificateFile directive to point to your servercertificate (apache_1024.crt). For example:
SSLCertificateFile
/u08/app/oracle/viscomn/admin/certs/apache_1024.crt
G – 28 Oracle Applications System Administrator’s Guide
Find and edit the SSLCertificateKeyFile directive to point to yourprivate key (apache_1024.key). For example:
SSLCertificateKeyFile
/u08/app/oracle/viscomn/admin/certs/apache_1024.key
If you are using global server certificates, find and edit theSSLCertificateChainFile directive to point to your intermediatecertificate (intermediate.crt). For example:
SSLCertificateChainFile
/u08/app/oracle/viscomn/admin/certs/intermediate.key
c. Save and close the file httpds.conf.
� Step 5: Modify the Apache service to start up in SSL mode.
On UNIX, to start Apache in SSL mode, the Apache control script(adapcctl.sh) in $COMMON_TOP/admin/scripts should be altered toinvoke the httpdsctl script instead of the default apachectl script.Before this change can be made, it is necessary to customise and testthe httpdsctl script as follows:
Note: If AutoConfig has been used, then the Apache controlscript will be in the directory called$COMMON_TOP/admin/scripts/<context_name>.
a. Backup the httpdsctl file before making any changes.
$ cd $APACHE_TOP/Apache/bin
$ cp httpdsctl httpdsctl.BAK
b. Transfer the Oracle–specific environment that is set–up in theapachectl script to the httpdsctl script.
The configuration section begins with the line:
# |||||||||||||||||||| START CONFIGURATION SECTION||||||||||||||||||||
and ends with the line:
# |||||||||||||||||||| END CONFIGURATION SECTION||||||||||||||||||||
Many of the lines in the configuration section can be copied fromapachectl to httpdsctl, but there are also variables in this section thatmust be defined differently between starting in SSL vs. NonSSL mode,such as the variables PIDFILE (which should point to httpds.pid in the$APACHE_TOP/Apache/logs directory) and HTTPD (which shouldpoint to httpds in the $APACHE_TOP/Apache/bin directory, thusinvoking the settings in the httpds.conf file).
c. Save the changes that you have made to the httpdsctl script.
G – 29Setting Up and Maintaining Oracle Applications
Once you have transferred the necessary environment settings fromapachectl to httpdsctl and checked your work carefully, save and closethe file httpdsctl.
d. Test the changes that you have made to the httpdsctl script file.
Use the httpdsctl script to start Apache in SSL mode as follows:
$APACHE_TOP/bin/httpdsctl startssl
If your server key is encrypted, you will be prompted for the PEM passphrase that you chose when creating your server’s private key. Also, ifyou have chosen the default port 443 (or any other port number lessthan 1024) for your SSL port, you will have to start Apache as root.
Make sure that Apache can startup successfully before continuing.Ensure that there are spawned processes for Apache through use of thecommand ps –ef | grep util and that you successfully get an SSLconnection to the default Apache banner screen usinghttps:/<host.domain>:<SSL_port> where <host.domain> isthe fully qualified name of the machine running Apache and<SSL_port> is the SSL port number defined in httpds.conf.
e. Replace the call to apachectl with a call to httpdsctl in the controlscript that starts the Apache server.
First, make a backup of $SCRIPT_TOP/adapcctl.sh
$ cd $SCRIPT_TOP
$ cp adapcctl.sh adapcctl.sh.BAK
Then, edit the file adapcctl.sh in $COMMON_TOP/admin/scripts asfollows:
Find the line:
$APACHE_TOP/Apache/bin/apachectl $control_code
Change ”apachectl $control_code” to ”httpdsctl $control_code”, forexample,
$APACHE_TOP/Apache/bin/httpdsctl $control_code
Save and close the file adapcctl.sh.
On Windows, the Apache service should be configured to use SSLthrough use of the adsvapc.cmd file that is shipped with OracleApplications in the admin\install directory in the Oracle Applicationscommon top directory tree. Follow the instructions below to changethe Apache service to run in SSL mode:
a. Make a backup of the adsvapc.cmd file in your<CommonTopMountPoint>\admin\install directory.
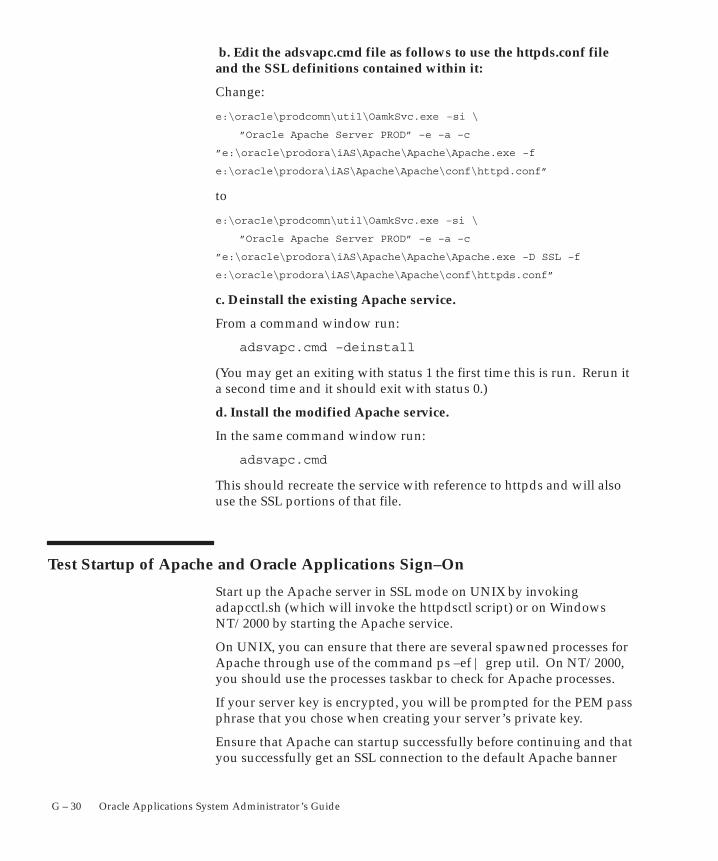
G – 30 Oracle Applications System Administrator’s Guide
b. Edit the adsvapc.cmd file as follows to use the httpds.conf fileand the SSL definitions contained within it:
Change:
e:\oracle\prodcomn\util\OamkSvc.exe –si \
”Oracle Apache Server PROD” –e –a –c
”e:\oracle\prodora\iAS\Apache\Apache\Apache.exe –f
e:\oracle\prodora\iAS\Apache\Apache\conf\httpd.conf”
to
e:\oracle\prodcomn\util\OamkSvc.exe –si \
”Oracle Apache Server PROD” –e –a –c
”e:\oracle\prodora\iAS\Apache\Apache\Apache.exe –D SSL –f
e:\oracle\prodora\iAS\Apache\Apache\conf\httpds.conf”
c. Deinstall the existing Apache service.
From a command window run:
adsvapc.cmd –deinstall
(You may get an exiting with status 1 the first time this is run. Rerun ita second time and it should exit with status 0.)
d. Install the modified Apache service.
In the same command window run:
adsvapc.cmd
This should recreate the service with reference to httpds and will alsouse the SSL portions of that file.
Test Startup of Apache and Oracle Applications Sign–On
Start up the Apache server in SSL mode on UNIX by invokingadapcctl.sh (which will invoke the httpdsctl script) or on WindowsNT/2000 by starting the Apache service.
On UNIX, you can ensure that there are several spawned processes forApache through use of the command ps –ef | grep util. On NT/2000,you should use the processes taskbar to check for Apache processes.
If your server key is encrypted, you will be prompted for the PEM passphrase that you chose when creating your server’s private key.
Ensure that Apache can startup successfully before continuing and thatyou successfully get an SSL connection to the default Apache banner
G – 31Setting Up and Maintaining Oracle Applications
screen using https:/<host.domain>:<SSL_port> where <host.domain>is the fully qualified name of the machine running Apache and<SSL_port> is the SSL port number defined in httpds.conf.
SSL Setup for Oracle Forms 6i Server (UNIX)
Use Wallet Manager to create certificate
In order for the forms server to run in https mode, you must use theOracle Wallet Manager utility delivered with Developer 6i. Developer6i is installed in the Oracle 8.0.6 Oracle Home on your server. Allreferences to ORACLE_HOME in this section refer to the home forOracle 8.0.6.
� Create a working directory.
Create a working directory to hold the Oracle Forms 6i Wallet, forexample:
$COMMON_TOP/admin/certs/forms
� Start Wallet Manager.
On UNIX, as the ORACLE user,
1. Change to the directory of your Oracle 8.0.6 $ORACLE_HOME.
2. Source the environment file [sid].env.
3. Set the DISPLAY variable to display to the IP address from whereyou are working. For example:
$ export DISPLAY=192.168.0.x:0.0
where 192.168.0.x is the IP address of your workstation.
4. Run owm, which is located in the 8.0.6 $ORACLE_HOME/bindirectory.
� Create a new wallet and certificate request (CSR)
Note: When you create a new wallet in Wallet Manager, thisstep of creating a CSR is the only way to enable the function ofimporting a User Certificate. (Operations > Import UserCertificate). If a CSR has not been generated within a specificwallet, the option to import a User Certificate will remaindisabled. (See comments in the OracleMetaLink note 123718.1for additional details.)
G – 32 Oracle Applications System Administrator’s Guide
1. Select Wallet > New.
2. Select No when prompted with the message:
”Your default directory doesn’t exist. Do you wish to create itnow?”
3. In the New Wallet dialogue box, create a Wallet Password and clickOK.
Make sure you remember this password. You will be prompted forthe password each time you open this wallet with Oracle WalletManager.
4. Select Yes when prompted with the message:
”A new empty wallet has been created. Do you wish to create acertificate request at this time?”
5. Fill out the fields in the Create Certificate Request dialogue box, forexample:
Common Name: <Fully qualified host name of your server>
Organizational Unit:
Organization:
Locality/City:
State/Province:
Country:
Key Size: 512
Note: If you are not on Oracle Forms version 6.0.8.10.3 orhigher, the list of values for Key Size will only contain 512 bits.
6. Select OK when prompted with the message:
”A certificate was created. Please submit this to a CertificateAuthority or you can use ’Export Certificate Request’ to export itinto a file.”
� Select Wallet and ensure that the Auto Login checkbox is checked.
This ensures that the wallet is open to connect via SSL.
� Select Wallet > Save As to save the new wallet.
Save the wallet files to the working directory chosen for the wallet, forexample:
$COMMON_TOP/admin/certs/forms
G – 33Setting Up and Maintaining Oracle Applications
(Use the value of $COMMON_TOP, rather than the variable.)
Two new files will be created in your wallet directory:
• cwallet.sso –– Auto Login is checked; wallet is open
• ewallet.der –– stores your certificate once imported
� Submit your certificate request (CSR) to your certificate authority(CA)
Within the Wallet Manager navigator window, highlight the Certificate:[Requested] branch of the Wallet. On the right hand side you will seeyour CSR in the Certificate Request window. This is the window youwill cut and paste from when prompted by your CA.
The request process is generally explained in detail by your CA ofchoice. Go to the web site of your CA to follow their specific processfor requesting a certificate. The example described here uses a trialcertificate from Verisign.
Go to www.verisign.com, to request a trial certificate. From Verisign’shome page, there should be a link for getting a trial certificate (if this isnot obvious, search on ”trial certificate”).
The Verisign web site will lead you through the steps for requestingyour certificate. When asked to submit your CSR, paste the contents ofyour CSR from Wallet Manager beginning with and including
–––––BEGIN CERTIFICATE REQUEST–––––
and ending with and including
–––––END CERTIFICATE REQUEST–––––
Click Submit.
If you have created the certificate request with a 512 bit key size,Verisign will warn you that it has detected a 512 bit key size. As statedearlier, the 512 key size is the only option in Release 11i for Forms 6iversions below 6.0.8.10.3.
Click Continue, then enter the additional requested information,including your e–mail address again for the certificate. You shouldreceive the certificate via e–mail within several hours.
� Create the certificate file.
Once you have received your certificate, use your e–mail application tosave the entire e–mail message to a text file. Based on the conventionin this document, name the file forms_[key_size].crt, where [key_size]is the number of bits chosen in Wallet Manager when creating the
G – 34 Oracle Applications System Administrator’s Guide
certificate request. For example, use forms_1024.crt if 1024–bit key sizewas chosen. It is very important to save the message as a text file sothat you do not corrupt your certificate by cutting and pasting fromyour e–mail application. In addition, you must use a text editor, ratherthan a word processing application for your editions to the resultingtext file.
If you have saved your e–mail message to a machine that is not yourserver, transfer the file over to the server and into the workingdirectory ($COMMON_TOP/admin/certs/forms), for example usingbinary ftp.
In the working directory, open the file in a text editor (for example, vi)and delete all the lines except for the certificate. The certificate consistsof all lines beginning with and including
–––––BEGIN CERTIFICATE–––––
and ending with and including
–––––END CERTIFICATE–––––
Once your editions are made, save the file, again with the nameforms_[key_size].crt, for example, forms_1024.crt.
� Import your User Certificate into Wallet Manager
Back in Wallet Manager,
Perform the following steps:
1. Navigate to Operations > Import User Certificate.
2. Select a file that contains the certificate and click OK.
3. Enter the full path of your working directory where you havestored your certificate file (forms_[key_size].crt), for example:
$ COMMON_TOP/admin/certs/forms
(Use the value of $COMMON_TOP, rather than the variable).
4. Highlight the certificate file (forms_[key_size].crt) and click OK.
5. The bottom status bar of Wallet Manager should display themessage:
”Your certificate has been successfully imported.”
6. In the navigator window under Wallet, you can highlight theCertificate:
[Ready]
to see the unencrypted values of your certificate.
G – 35Setting Up and Maintaining Oracle Applications
Note: The following error message when attempting to importthe User Certificate indicates that you are working with anunrecognized CA root certificate:
”User certificate import has failed because the CA certificatedoesn’t exist. Do you want to import a CA certificate now?”
This error occurs when Wallet Manager attempts to importyour User Certificate, but does not recognize the digitalsignature of the CA who issued this certificate to you. WalletManager then offers you the option to import the CA certificateunder the ”Trusted Certificates” branch of this Wallet, so that itcan finish the proper import of your User Certificate.
At this point, it is best to leave the error message above openon the terminal and continue with the installation of the CAroot certificate that is a pre–requisite of importing the usercertificate in Oracle Wallet Manager by following the certificateauthority’s instructions to obtain an X.509 format *.cer file. thenusing it to import the digital certificate of your CA as trusted tosuccessfully finish the import of your User Certificate.
The bottom status bar of Wallet Manager should display the message:
”Your certificate has been successfully imported.”
You should now be able to highlight Certificate: [Ready] in thenavigator window under Wallet to see the unencrypted values of yourcertificate.
Set up Forms Server environment
Setting up the Forms Server environment using AutoConfig
This section contains instructions to modify configuration files andprofiles that are maintained by the AutoConfig infrastructure.
Run AutoConfig as described in MetaLink Note 165195.1 or in the ADUtilities Reference Guide after ensuring that the variables that enableforms to connect in https mode are correctly set in your context XMLfile.
No more steps are required in the current section. You can proceedwith testing the startup of Oracle Forms 6i and Oracle Applications.
Set the following SSL environment variables for Developer 6i Formsserver by defining them somewhere below the setting of theORACLE_HOME variable in the environment file for your 8.0.6 OracleHome: $ORACLE_HOME/[sid].env:
• FORMS60_WALLET: specifies the directory created for yourwallet that holds the certificate used on the server, for example,$COMMON_TOP/admin/certs/forms
G – 36 Oracle Applications System Administrator’s Guide
• FORMS60_HTTPS_NEGOTIATE_DOWN: specifies whether toallow the Forms Server to negotiate encryption down to thehighest level supported by the client (TRUE) or to ensure that allencryption occurs at the level at which it is running (FALSE).This should be set to TRUE.
On Windows NT/2000 platforms, these variables should also be set inthe registry under \HK_LOCAL_MACHINE\SOFTWARE\ORACLEusing the regedit or regedt32 command.
Manual steps for setting the Forms Server environment
The following steps are included for reference for customers on Release11.5.7 and earlier.
� Edit the FORMS60_WEB_CONFIG_FILE (appsweb.cfg)
The FORMS60_WEB_CONFIG_FILE variable is defined in your$APACHE_TOP/Apache/conf/apps.conf file for Apache to use duringthe initial connection in order to spawn a forms session. It is definedfor Release 11i to be $OA_HTML/bin/appsweb.cfg. This file must beedited to allow forms sessions in https mode.
1. Make a backup of the appsweb.cfg file in the Oracle ApplicationsHTML bin ($OA_HTML/bin) directory tree.
2. Edit appsweb.cfg.
3. Find the connectMode parameter in the section:
; Forms Client–Server Communication Mode: socket, http, or
https
4. Set the connectMode parameter to be https. For example:
connectMode=https
5. Save and close the file appsweb.cfg.
Note that this file should always be kept in synchronization with theversion at $FND_TOP/resource/appsweb.cfg. Be sure any changesyou make are reflected in both locations.
� Amend the forms server process to startup in https mode
For UNIX:
In order for the forms server process to startup in https mode on UNIX,you must edit your forms server control script adfrmctl.sh under$SCRIPT_TOP directory.
1. Make a backup of the forms startup script file in use($SCRIPT_TOP/adfrmctl.sh).
G – 37Setting Up and Maintaining Oracle Applications
For example, where <script_name> is the name of the formsstartup script in use:
$ cp $SCRIPT_TOP/<script_name>$SCRIPT_TOP/<script_name.BAK>
2. Edit the and change the command that invokes f60ctl to use modehttps, for example:
$ vi $SCRIPT_TOP/<script_name>
Alter the line that starts with f60ctl start port=$FORMS_PORTmode=http exe=f60webmx to read
f60ctl start port=$FORMS_PORT mode=https exe=f60webmx >> \
$FRMLOG 2>/dev/null
3. Save and close the forms startup script file.
SSLLog/d5/part/ora/iAS/Apache/Apache/logs
/ssl_engine_log
For Windows NT/2000:
On Windows NT/2000 platforms the forms server process isimplemented through use of services. The forms service should beconfigured to use https through use of the adsvfrm.cmd file that isshipped with Oracle Applications in the admin\install directory in theOracle Applications common top directory tree. Follow the instructionsbelow to change the forms service to run in https mode:
1. Make a backup of the adsvfrm.cmd file in your<CommonTopMountPoint>\admin\install directory
2. Edit the adsvfrm.cmd file as follows to change the connect modefrom socket to https:
Change:
<Applications COMMON_TOP>\util\OamkSvc.exe –si
OracleFormsServer–Forms60<sid> –e –a –t –c ”<8.0.6
ORACLE_HOME>\bin\ifsrv60.exe –listen port=9000 mode=SOCKET
log=<Applications COMMON_TOP>\admin\log\forms_server.log”
to
Applications COMMON_TOP>\util\OamkSvc.exe –si
OracleFormsServer–Forms60<sid> –e –a –t –c ”<8.0.6
ORACLE_HOME>\bin\ifsrv60.exe –listen port=9000 mode=HTTPS
log=<Applications COMMON_TOP>\admin\log\forms_server.log”
3. Deinstall the existing forms service.
From a command window run:
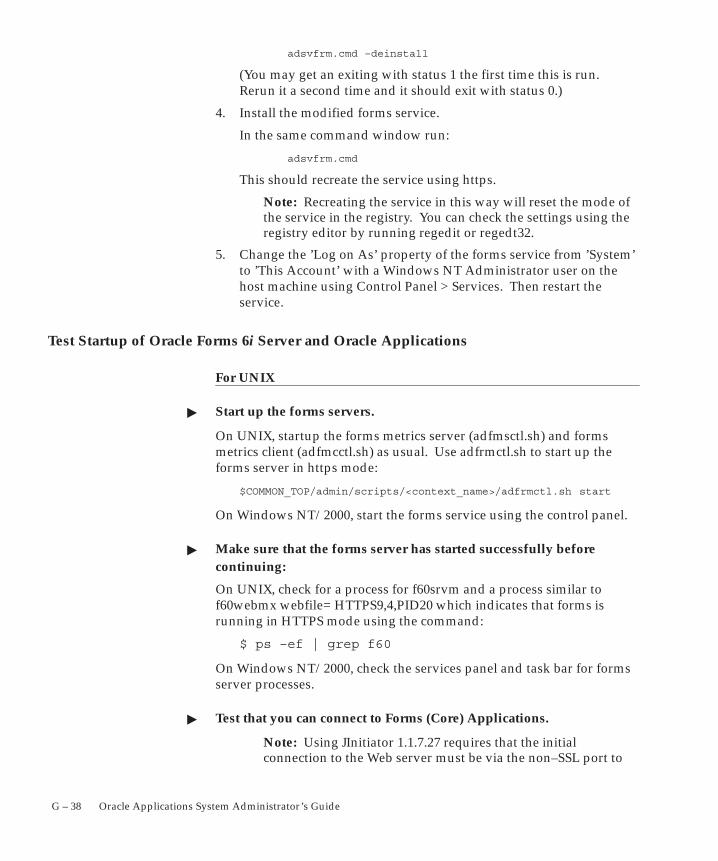
G – 38 Oracle Applications System Administrator’s Guide
adsvfrm.cmd –deinstall
(You may get an exiting with status 1 the first time this is run.Rerun it a second time and it should exit with status 0.)
4. Install the modified forms service.
In the same command window run:
adsvfrm.cmd
This should recreate the service using https.
Note: Recreating the service in this way will reset the mode ofthe service in the registry. You can check the settings using theregistry editor by running regedit or regedt32.
5. Change the ’Log on As’ property of the forms service from ’System’to ’This Account’ with a Windows NT Administrator user on thehost machine using Control Panel > Services. Then restart theservice.
Test Startup of Oracle Forms 6i Server and Oracle Applications
For UNIX
� Start up the forms servers.
On UNIX, startup the forms metrics server (adfmsctl.sh) and formsmetrics client (adfmcctl.sh) as usual. Use adfrmctl.sh to start up theforms server in https mode:
$COMMON_TOP/admin/scripts/<context_name>/adfrmctl.sh start
On Windows NT/2000, start the forms service using the control panel.
� Make sure that the forms server has started successfully beforecontinuing:
On UNIX, check for a process for f60srvm and a process similar tof60webmx webfile= HTTPS9,4,PID20 which indicates that forms isrunning in HTTPS mode using the command:
$ ps –ef | grep f60
On Windows NT/2000, check the services panel and task bar for formsserver processes.
� Test that you can connect to Forms (Core) Applications.
Note: Using JInitiator 1.1.7.27 requires that the initialconnection to the Web server must be via the non–SSL port to
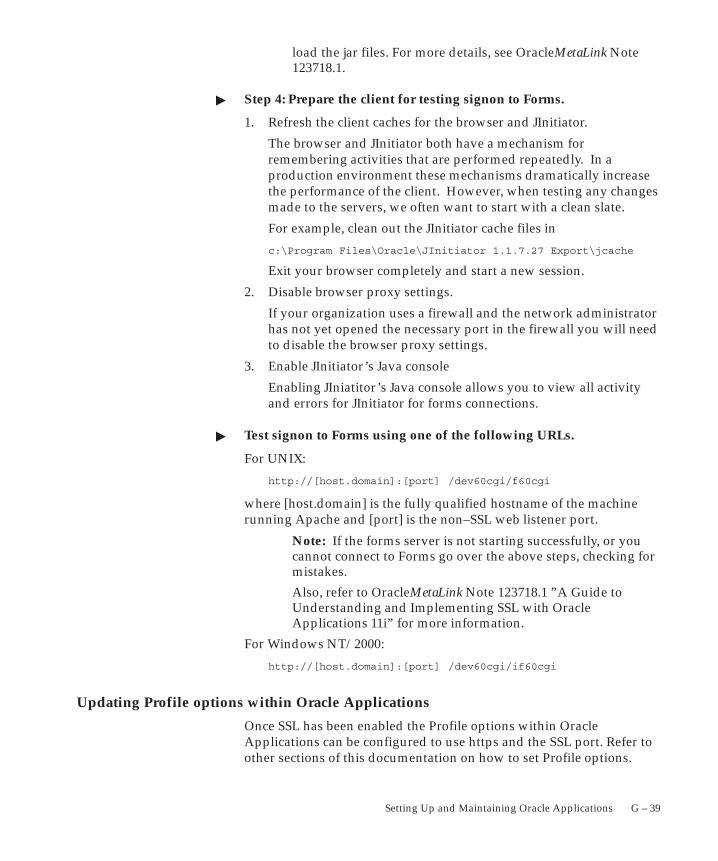
G – 39Setting Up and Maintaining Oracle Applications
load the jar files. For more details, see OracleMetaLink Note123718.1.
� Step 4: Prepare the client for testing signon to Forms.
1. Refresh the client caches for the browser and JInitiator.
The browser and JInitiator both have a mechanism forremembering activities that are performed repeatedly. In aproduction environment these mechanisms dramatically increasethe performance of the client. However, when testing any changesmade to the servers, we often want to start with a clean slate.
For example, clean out the JInitiator cache files in
c:\Program Files\Oracle\JInitiator 1.1.7.27 Export\jcache
Exit your browser completely and start a new session.
2. Disable browser proxy settings.
If your organization uses a firewall and the network administratorhas not yet opened the necessary port in the firewall you will needto disable the browser proxy settings.
3. Enable JInitiator’s Java console
Enabling JIniatitor’s Java console allows you to view all activityand errors for JInitiator for forms connections.
� Test signon to Forms using one of the following URLs.
For UNIX:
http://[host.domain]:[port] /dev60cgi/f60cgi
where [host.domain] is the fully qualified hostname of the machinerunning Apache and [port] is the non–SSL web listener port.
Note: If the forms server is not starting successfully, or youcannot connect to Forms go over the above steps, checking formistakes.
Also, refer to OracleMetaLink Note 123718.1 ”A Guide toUnderstanding and Implementing SSL with OracleApplications 11i” for more information.
For Windows NT/2000:
http://[host.domain]:[port] /dev60cgi/if60cgi
Updating Profile options within Oracle Applications
Once SSL has been enabled the Profile options within OracleApplications can be configured to use https and the SSL port. Refer toother sections of this documentation on how to set Profile options.

G – 40 Oracle Applications System Administrator’s Guide
Note: Any HTML files being served from this server can bemodified to use the https protocol instead of http once Apacheis operating in SSL mode.
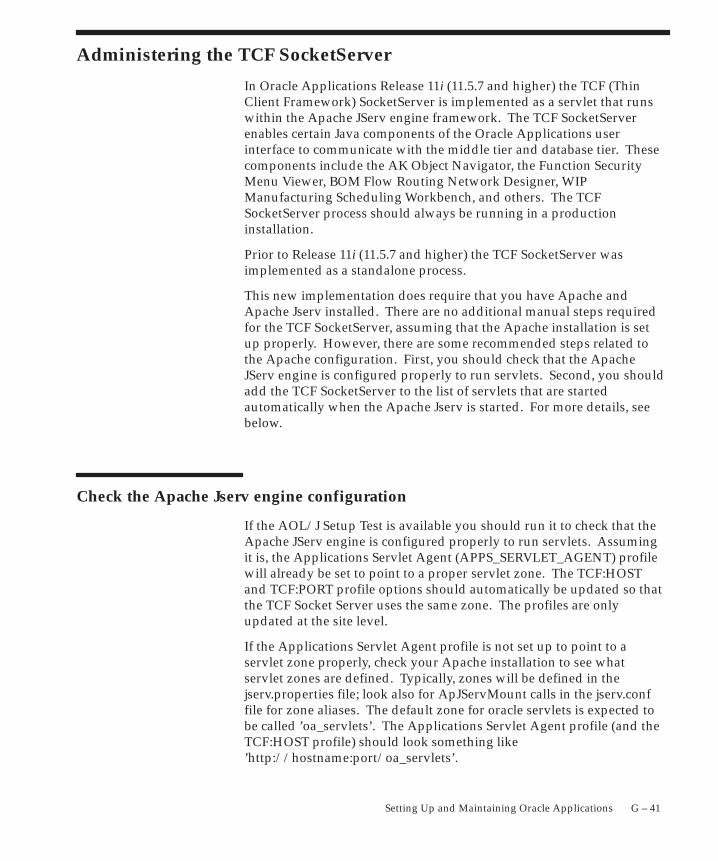
G – 41Setting Up and Maintaining Oracle Applications
Administering the TCF SocketServer
In Oracle Applications Release 11i (11.5.7 and higher) the TCF (ThinClient Framework) SocketServer is implemented as a servlet that runswithin the Apache JServ engine framework. The TCF SocketServerenables certain Java components of the Oracle Applications userinterface to communicate with the middle tier and database tier. Thesecomponents include the AK Object Navigator, the Function SecurityMenu Viewer, BOM Flow Routing Network Designer, WIPManufacturing Scheduling Workbench, and others. The TCFSocketServer process should always be running in a productioninstallation.
Prior to Release 11i (11.5.7 and higher) the TCF SocketServer wasimplemented as a standalone process.
This new implementation does require that you have Apache andApache Jserv installed. There are no additional manual steps requiredfor the TCF SocketServer, assuming that the Apache installation is setup properly. However, there are some recommended steps related tothe Apache configuration. First, you should check that the ApacheJServ engine is configured properly to run servlets. Second, you shouldadd the TCF SocketServer to the list of servlets that are startedautomatically when the Apache Jserv is started. For more details, seebelow.
Check the Apache Jserv engine configuration
If the AOL/J Setup Test is available you should run it to check that theApache JServ engine is configured properly to run servlets. Assumingit is, the Applications Servlet Agent (APPS_SERVLET_AGENT) profilewill already be set to point to a proper servlet zone. The TCF:HOSTand TCF:PORT profile options should automatically be updated so thatthe TCF Socket Server uses the same zone. The profiles are onlyupdated at the site level.
If the Applications Servlet Agent profile is not set up to point to aservlet zone properly, check your Apache installation to see whatservlet zones are defined. Typically, zones will be defined in thejserv.properties file; look also for ApJServMount calls in the jserv.conffile for zone aliases. The default zone for oracle servlets is expected tobe called ’oa_servlets’. The Applications Servlet Agent profile (and theTCF:HOST profile) should look something like’http://hostname:port/oa_servlets’.

G – 42 Oracle Applications System Administrator’s Guide
See Also
AOL/J Setup Test Suite: page G – 57
Profile Options in Oracle Application Object Library: page A – 2
Start the TCF SocketServer automatically
One other recommended step is to add the TCF SocketServer to the listof servlets that are started up automatically when Apache Jserv isstarted. This prevents the first user of the Socket Server from having toincur the overhead of starting it up.
To do this, find the <zone>.properties file corresponding to theservlet zone being used, and add the line:
servlets.startup=oracle.apps.fnd.tcf.SocketServer
to it. You will have to bounce your Apache server for any changes toApache configuration files to take effect. If your setup is alreadycorrect, you may still need to bounce the server anyway depending onwhether your Apache server is set up to load classes from the’apps.zip’ file dynamically.
Checking the status of the TCF SocketServer
You can check the status of the TCF SocketServer using the TCF Statusfunction on the AOL/J Diagnostics menu.
To navigate to this menu, log in to Oracle Applications with the SystemAdministration (Oracle Self–Service Web Applications) responsibility.The navigation path is Navigate region, Self–Service > SystemAdministration > Diagnostics, AOL/J Diagnostics.
Troubleshooting
If you encounter the following issues when upgrading to the TCFservlet, you can make the appropriate changes in the Apacheconfiguration files.
• If you are getting an error message like ’Unable to establish aJDBC connection’, the issue most probably is that FND_TOPneeds to be defined as an initial argument to the TCF servlet.Change the appropriate zone.properties file to include the line:
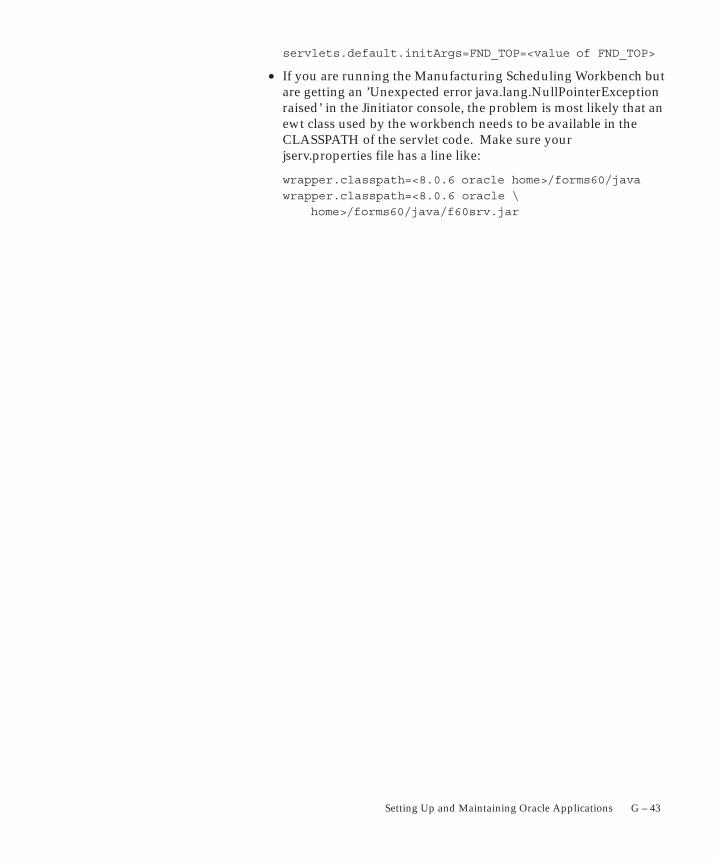
G – 43Setting Up and Maintaining Oracle Applications
servlets.default.initArgs=FND_TOP=<value of FND_TOP>
• If you are running the Manufacturing Scheduling Workbench butare getting an ’Unexpected error java.lang.NullPointerExceptionraised’ in the Jinitiator console, the problem is most likely that anewt class used by the workbench needs to be available in theCLASSPATH of the servlet code. Make sure yourjserv.properties file has a line like:
wrapper.classpath=<8.0.6 oracle home>/forms60/java
wrapper.classpath=<8.0.6 oracle \
home>/forms60/java/f60srv.jar
G – 44 Oracle Applications System Administrator’s Guide
AdminAppServer UtilityBecause Release 11i is deployed in a multi–tier configuration, thesecurity model includes authentication of application servers to thedatabase servers they access. When this layer of security is activated, ituses ”server IDs” or passwords that the application server passes to thedatabase server. If the database server recognizes the server ID, itgrants access to the database. The server IDs are created using a Javascript called AdminAppServer.
The application server security system is initially not activated; youhave to activate it after installation. The application servers are notassigned server IDs and the database servers do not check for serverIDs.
See Also
Administering Server Security: page G – 51
Using the AdminAppServer utility
The Java script AdminAppServer is used to create .dbc files and toenable or disable application server security.
Prior to running AdminAppServer you must ensure that:
• JDBC classes are in the CLASSPATH and LD_LIBRARY_PATH
• $JAVA_TOP is in the classpath
For UNIX platforms, the script is run as:
java oracle.apps.fnd.security.AdminAppServer [parameters]
For Windows platforms, the script is run as:
jre –classpath %CLASSPATH% \
oracle.apps.fnd.security.AdminAppServer [parameters]
The first parameter must be the connection string followed by thecommand string, for example:
apps/apps@dbname ADD
The following commands are supported:
• ADD – create a new .dbc file
• UPDATE – update an existing .dbc file
• DELETE – delete an existing .dbc file
G – 45Setting Up and Maintaining Oracle Applications
• STATUS – check the serverID status for a database
• AUTHENTICATION – toggle authentication mode
Additional parameters depend on the operation. These include:
• DBC – The .dbc file to modified, or used to connect to thedatabase. Used with UPDATE, DELETE, STATUS, ANDAUTHENTICATION.
• SECURE_PATH – Used with ADD. This parameter specifies inwhich directory the .dbc file should be created, and defaults tothe current directory if not provided. This parameter shouldalways point to $FND_TOP/secure.
• DB_HOST – Required in Release 11i. The host machine ofdatabase.
• DB_PORT – Required in Release 11i. The port of database. Thedefault is 1521.
• DB_NAME – For thin drivers. The database SID.
• APPS_JDBC_DRIVER_TYPE – THICK or THIN. Thisparameter must be set to THIN in Release 11i.
• GUEST_USER_PWD – Any valid applications user. Thisparameter defaults to the value of GUEST_USER_PWD profile ifnot provided. If passed with no arguments to an UPDATE call,it will refresh with the value from database.
• GWYUID – For thick drivers.
• FNDNAM – For thick drivers.
• TWO_TASK – For thick drivers. Name of database.
• WALLET_PWD – Used with the TCF Socket Server in SSL mode.
• SERVER_ADDRESS – Used with authentication.
• SERVER_DESCRIPTION – Used with authentication.
• FND_MAX_JDBC_CONNECTIONS – The maximum numberof open connections in the JDBC connection cache. This numberis dependent on the amount of memory available, number ofprocesses specified in the init.ora file of the database and theper–processor file descriptor limit.
• FND_IN_USE_CONNECTION_TIMEOUT – The maximumnumber of seconds a connection can be in use. In order to avoidconnections being locked up for too long, the connection cacheuses this parameter to forcibly close connections that have beenlocked for longer than this specified limit. If this parameter is
☞
G – 46 Oracle Applications System Administrator’s Guide
unspecified, connections in use will not be cleaned up. Thisshould be set to a number larger than the time taken to completethe largest transaction.
• FND_UNUSED_CONNECTION_TIMEOUT – The maximumnumber of seconds an unused connection can remain in thecache. The connection cache will close and remove from thecache any connection that has been idle for longer than thisspecified limit.
Attention: In Release 11i, the following parameters arerequired: APPS_JDBC_DRIVER_TYPE (must be set to THIN),DB_HOST, and DB_PORT.
Administering .dbc Files
The .dbc file is contained on the web/applications server and holdsinformation used by the database for authentication. Theweb/application server passes the information from the .dbc file, aswell as login information, to the database server to authenticate theuser. The authentication process is handled by the standardapplications security feature.
The .dbc files required by the application server security system are notpart of the delivered product and must be created after installation.
The Java utility AdminAppServer is used to create the .dbc files.
Prior to running AdminAppServer you must ensure that:
• JDBC classes are in the CLASSPATH and LD_LIBRARY_PATH
• $JAVA_TOP is in the classpath
Creating a .dbc file
Use the AdminAppServer utility to create a .dbc file for the applicationserver to access the database server. In addition to creating the .dbc filethis utility registers the application server with the database for theApplications Server Security feature.
To access additional database servers from the same application server,you must rerun the AdminAppServer utility for each additionaldatabase. You must run the AdminAppServer utility each time youcreate a .dbc file, and each .dbc file only allows access to one database.
To create a .dbc file for an application server:
1. You must set the username/password value for theGUEST_USER_PWD parameter. Create a valid username (”guest”

UNIX
Windows
G – 47Setting Up and Maintaining Oracle Applications
for example) in Oracle Applications. Then use theusername/password combination as the value forGUEST_USER_PWD. The syntax is illustrated in the followingexample:
GUEST_USER_PWD=guest/guest
Oracle recommends that you do not assign any responsibilities forthis user.
2. From the command line, enter the appropriate command for yourplatform:
For UNIX platforms:
java oracle.apps.fnd.security.AdminAppServer apps/apps@dbname \
ADD DB_HOST=database_host_name DB_PORT=database_port \
DB_NAME=database_sid \
[env_name=env_value] SECURE_PATH=$FND_TOP/secure
For Windows platforms:
jre –classpath %CLASSPATH% \
oracle.apps.fnd.security.AdminAppServer apps/apps@dbname \
ADD DB_HOST=database_host_name DB_PORT=database_port \
DB_NAME=database_sid \
[env_name=env_value] SECURE_PATH=$FND_TOP/secure
GWYUID, FNDNAM, and GUEST_USER_PWD will be defaulted if notprovided explicitly. dbc files should be located in $FND_TOP/secure,so SECURE_PATH should always be set to that, or this should be rundirectly out of of the $FND_TOP/secure area.
Updating a .dbc file (or Server ID)
When updating the .dbc file you can change as many parameters asyou want, including the server ID, but you must enter at least one.Settings that you do not update retain their value.
To update a .dbc file or server ID:
Enter from the command line:
java oracle.apps.fnd.security.AdminAppServer apps/apps@dbname \
UPDATE DBC=$FND_TOP/secure/file.dbc APPL_SERVER_ID \
[env_name=env_value]
jre –classpath %CLASSPATH% \
oracle.apps.fnd.security.AdminAppServer apps/apps@dbname \
UPDATE DBC=$FND_TOP/secure/file.dbc APPL_SERVER_ID \
[env_name=env_value]
UNIX
Windows
G – 48 Oracle Applications System Administrator’s Guide
If APPL_SERVER_ID is not passed, AdminAppServer will attempt tosynchronize the current server ID value in the .dbc file and thedatabase, generating a new one if neither contains a value at all.Passing in APPL_SERVER_ID by itself will force a brand newapplication server ID to be created always, overwriting any existingone.
Note: You may need to run the AdminAppServer command if youare using a TCF SocketServer in SSL mode in an earlier release(11.5.5 or earlier). This command needs to be run specifying awallet password, The command might look like (for UNIX):
java oracle.apps.fnd.security.AdminAppServer apps/apps \
UPDATE DBC=$FND_TOP/secure/file.dbc WALLET_PWD=welcome
Generating the wallet password is not required in 11.5.7 orlater, as TCF runs in servlet mode and no longer requires it.
Deleting a .dbc file
To delete a .dbc file, enter on the command line:
java oracle.apps.fnd.security.AdminAppServer apps/apps@dbname \
DELETE DBC=$FND_TOP/secure/file.dbc
jre –classpath %CLASSPATH% \
oracle.apps.fnd.security.AdminAppServer apps/apps@dbname \
DELETE DBC=$FND_TOP/secure/file.dbc
This deletes the .dbc file and disallows access to the indicated databaseif Server Security is active.
Troubleshooting
The following are possible problems you may encounter and suggestedsolutions.
� Database connection failed.
Check to see if your JDBC environment is correct. See:AdminAppServer Utility: page G – 44.
� File I/O error while adding the server.
Check to see if the path you supplied as SECURE_PATH exists and thatyou have write permissions on it.
G – 49Setting Up and Maintaining Oracle Applications
� Unable to read environment file.
A value for SECURE_PATH may not have been specified. If a value isnot specified, the AdminAppServer utility assumes you are runningfrom JAVA_TOP and looks for the file$JAVA_TOP/oracle/apps/env.html to find the value of FND_TOP.Retry the command specifying the value of SECURE_PATH.
� Database error: Unique constraint violated.
There can be only one entry for each application server per database. Ifyou do not specify the value for SERVER_ADDRESS, theAdminAppServer utility will default the IP address of the machinefrom which you are running the command. To resolve this issue, runthe STATUS command of AdminAppServer to ensure you are nottrying to create a duplicate entry. Delete the old entry if you want toreplace it. Retry, supplying the correct value for SERVER_ADDRESS.
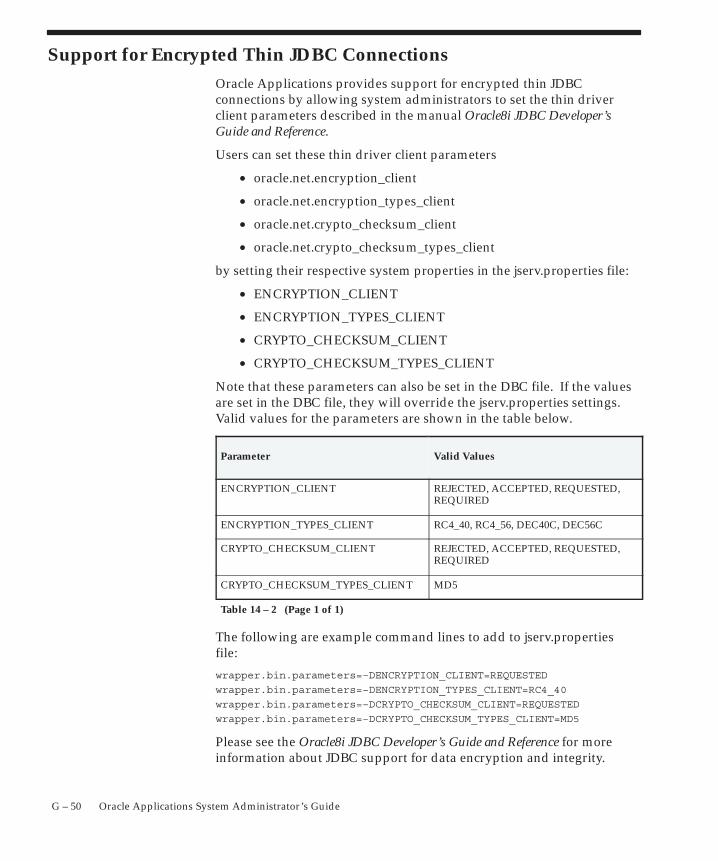
G – 50 Oracle Applications System Administrator’s Guide
Support for Encrypted Thin JDBC ConnectionsOracle Applications provides support for encrypted thin JDBCconnections by allowing system administrators to set the thin driverclient parameters described in the manual Oracle8i JDBC Developer’sGuide and Reference.
Users can set these thin driver client parameters
• oracle.net.encryption_client
• oracle.net.encryption_types_client
• oracle.net.crypto_checksum_client
• oracle.net.crypto_checksum_types_client
by setting their respective system properties in the jserv.properties file:
• ENCRYPTION_CLIENT
• ENCRYPTION_TYPES_CLIENT
• CRYPTO_CHECKSUM_CLIENT
• CRYPTO_CHECKSUM_TYPES_CLIENT
Note that these parameters can also be set in the DBC file. If the valuesare set in the DBC file, they will override the jserv.properties settings.Valid values for the parameters are shown in the table below.
Parameter Valid Values
ENCRYPTION_CLIENT REJECTED, ACCEPTED, REQUESTED,REQUIRED
ENCRYPTION_TYPES_CLIENT RC4_40, RC4_56, DEC40C, DEC56C
CRYPTO_CHECKSUM_CLIENT REJECTED, ACCEPTED, REQUESTED,REQUIRED
CRYPTO_CHECKSUM_TYPES_CLIENT MD5
Table 14 – 2 (Page 1 of 1)
The following are example command lines to add to jserv.propertiesfile:
wrapper.bin.parameters=–DENCRYPTION_CLIENT=REQUESTED
wrapper.bin.parameters=–DENCRYPTION_TYPES_CLIENT=RC4_40
wrapper.bin.parameters=–DCRYPTO_CHECKSUM_CLIENT=REQUESTED
wrapper.bin.parameters=–DCRYPTO_CHECKSUM_TYPES_CLIENT=MD5
Please see the Oracle8i JDBC Developer’s Guide and Reference for moreinformation about JDBC support for data encryption and integrity.
G – 51Setting Up and Maintaining Oracle Applications
Administering Server Security
Oracle Applications Release 11i is deployed in a multi–tierconfiguration with one database server and many possible middle–tierapplication servers. The application servers include ApacheJSP/Servlet, Forms, Discoverer and also some client programs such asApplication Desktop Integrator. Any program which makes a SQL*Netconnection to the Oracle Applications database needs to be trusted atsome level. Oracle Applications uses the Server Security feature toensure that such SQL*Net connections are coming from trustedmachines and/or trusted programs.
The Server Security feature of Application Object Library supportsauthentication of application server machines and code modules inorder to access the database. When Server Security is activated,application servers are required to supply server IDs (like passwords)and/or code IDs to access a database server. Server IDs identify themachine from which the connection is originating. Code IDs identifythe module and patch level from which the connection is originating.Code IDs are included in applications code by development. Thedatabase server can be set to allow access only from specific machinesand/or by code at a desired patch level.
The application server security feature is not initially activated. Youshould activate it by using the commands described in this section.
Application Server Security can be OFF or in one of two active states:
• OFF – Server security is not checked. Any application servermachine can access the database. Code IDs are also not checked.Use this option on test systems or if you have full control overthe software on all machines which can physically access yourdatabase.
• ON – Some level of trust is required to access the database.Either the application server must be registered with thedatabase or the code must pass a module and version ID knownto be trusted. Use this option only if you wish to maintaincompatibility with application servers that you cannot yet patchto the code level required for best security.
• SECURE – Full trust is required for access to the database. Onlyregistered application server machines may connect to thedatabase, and only trusted code modules may connect to thedatabase.
UNIX
Windows
☞
UNIX
G – 52 Oracle Applications System Administrator’s Guide
Server Security Status
You can check the Server Security status for a particular database usingthe STATUS command in the AdminAppServer utility, and providingthe dbc file corresponding to that database. The STATUS commandwill display whether server security is turned on and whether theserver ID in the dbc file is currently valid.
To check the Server Security status for a database:
java oracle.apps.fnd.security.AdminAppServer apps/apps \
STATUS DBC=<dbc file path>
jre –classpath %CLASSPATH% \
oracle.apps.fnd.security.AdminAppServer apps/apps \
STATUS DBC=<dbc file path>
Attention: Check the Server Security status of your databasesbefore you activate server security and ensure that all desiredapplication servers have been registered.
Adding, Updating, or Deleting Server IDs
Application servers can be registered as trusted machines with adatabase server. This works by generating a large random ID numberand storing that in both the application server and the database. Whenthe application server attempts to connect to the database it will supplyits server ID and the database will verify that it matches a trustedmachine. The server ID is stored as a parameter in the DBC file foreach application server. It can also be defined as an environmentvariable. The AdminAppServer utility is used to generate server IDsand then register them with a database server.
To add a server ID
Server ID values are generated by the AdminAppServer utility, andtherefore cannot be supplied on the command line. They will be addedto the database automatically when the AdminAppServer is used tocreate a dbc file.
java oracle.apps.fnd.security.AdminAppServer apps/apps \
ADD [SECURE_PATH=$FND_TOP/secure] \
DB_HOST=<database host> \
DB_PORT=<database port> \
DB_NAME=<database sid>
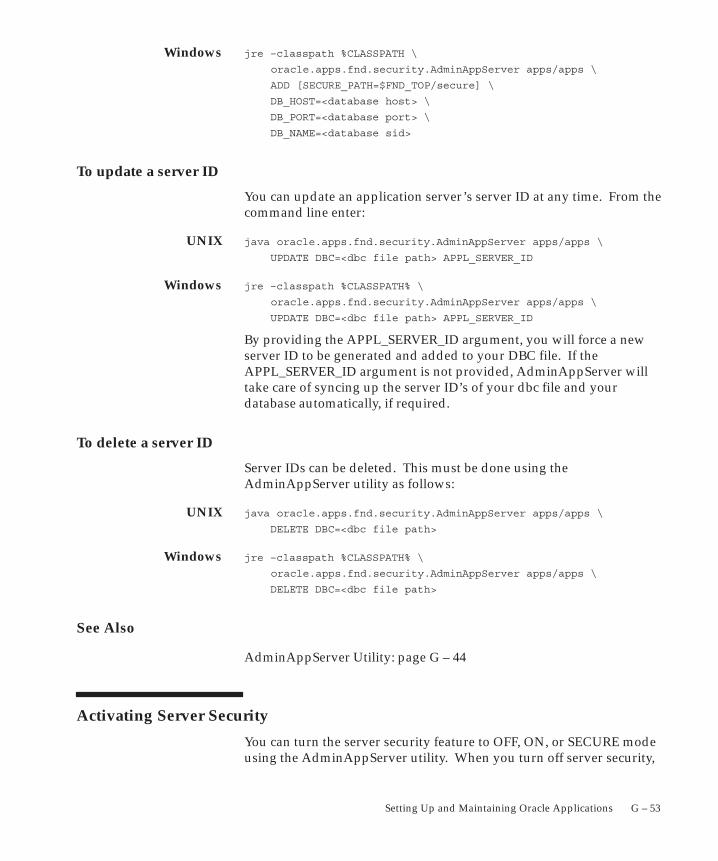
Windows
UNIX
Windows
UNIX
Windows
G – 53Setting Up and Maintaining Oracle Applications
jre –classpath %CLASSPATH \
oracle.apps.fnd.security.AdminAppServer apps/apps \
ADD [SECURE_PATH=$FND_TOP/secure] \
DB_HOST=<database host> \
DB_PORT=<database port> \
DB_NAME=<database sid>
To update a server ID
You can update an application server’s server ID at any time. From thecommand line enter:
java oracle.apps.fnd.security.AdminAppServer apps/apps \
UPDATE DBC=<dbc file path> APPL_SERVER_ID
jre –classpath %CLASSPATH% \
oracle.apps.fnd.security.AdminAppServer apps/apps \
UPDATE DBC=<dbc file path> APPL_SERVER_ID
By providing the APPL_SERVER_ID argument, you will force a newserver ID to be generated and added to your DBC file. If theAPPL_SERVER_ID argument is not provided, AdminAppServer willtake care of syncing up the server ID’s of your dbc file and yourdatabase automatically, if required.
To delete a server ID
Server IDs can be deleted. This must be done using theAdminAppServer utility as follows:
java oracle.apps.fnd.security.AdminAppServer apps/apps \
DELETE DBC=<dbc file path>
jre –classpath %CLASSPATH% \
oracle.apps.fnd.security.AdminAppServer apps/apps \
DELETE DBC=<dbc file path>
See Also
AdminAppServer Utility: page G – 44
Activating Server Security
You can turn the server security feature to OFF, ON, or SECURE modeusing the AdminAppServer utility. When you turn off server security,
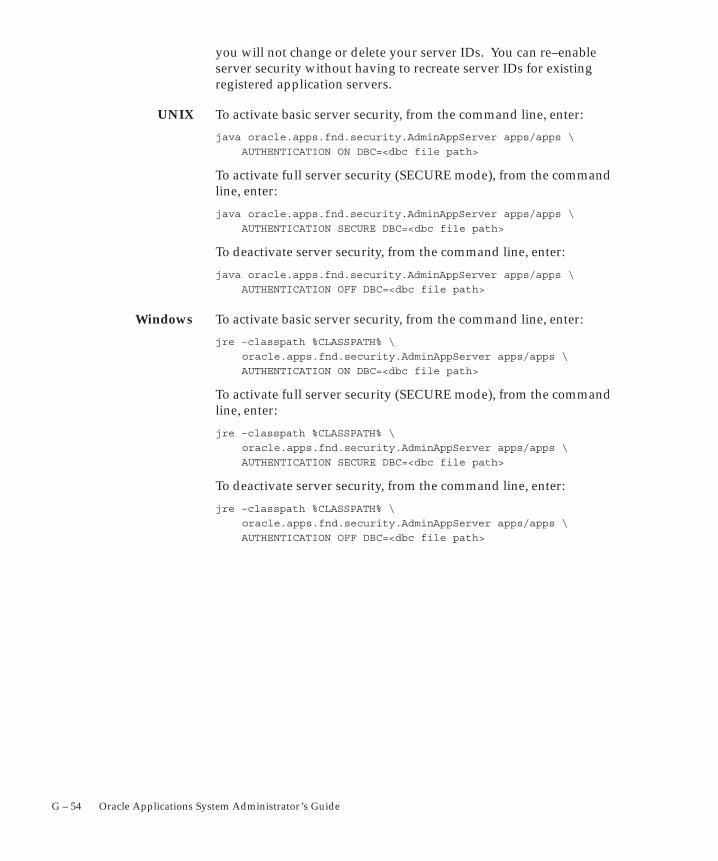
UNIX
Windows
G – 54 Oracle Applications System Administrator’s Guide
you will not change or delete your server IDs. You can re–enableserver security without having to recreate server IDs for existingregistered application servers.
To activate basic server security, from the command line, enter:
java oracle.apps.fnd.security.AdminAppServer apps/apps \
AUTHENTICATION ON DBC=<dbc file path>
To activate full server security (SECURE mode), from the commandline, enter:
java oracle.apps.fnd.security.AdminAppServer apps/apps \
AUTHENTICATION SECURE DBC=<dbc file path>
To deactivate server security, from the command line, enter:
java oracle.apps.fnd.security.AdminAppServer apps/apps \
AUTHENTICATION OFF DBC=<dbc file path>
To activate basic server security, from the command line, enter:
jre –classpath %CLASSPATH% \
oracle.apps.fnd.security.AdminAppServer apps/apps \
AUTHENTICATION ON DBC=<dbc file path>
To activate full server security (SECURE mode), from the commandline, enter:
jre –classpath %CLASSPATH% \
oracle.apps.fnd.security.AdminAppServer apps/apps \
AUTHENTICATION SECURE DBC=<dbc file path>
To deactivate server security, from the command line, enter:
jre –classpath %CLASSPATH% \
oracle.apps.fnd.security.AdminAppServer apps/apps \
AUTHENTICATION OFF DBC=<dbc file path>
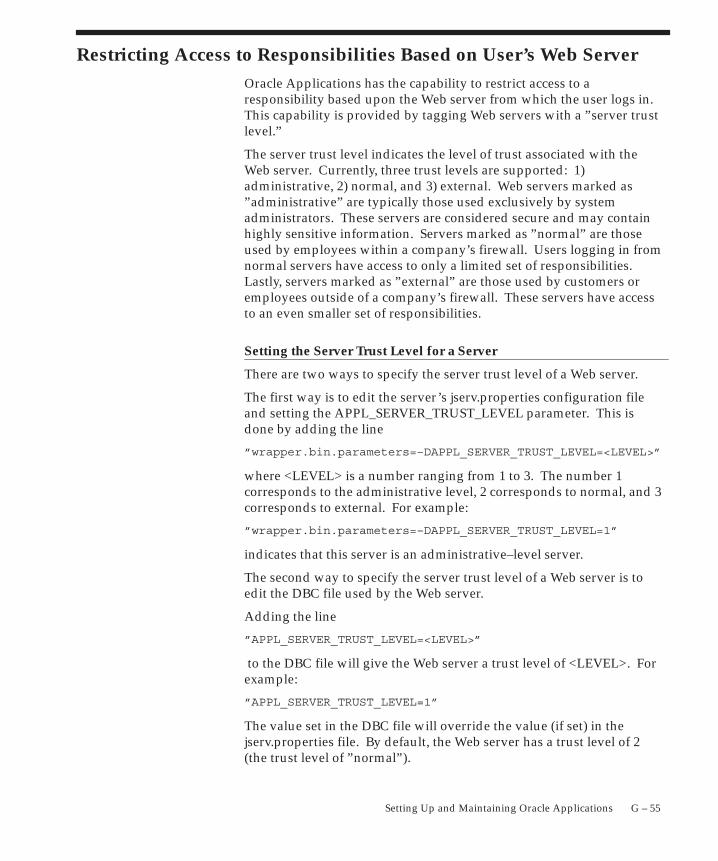
G – 55Setting Up and Maintaining Oracle Applications
Restricting Access to Responsibilities Based on User’s Web ServerOracle Applications has the capability to restrict access to aresponsibility based upon the Web server from which the user logs in.This capability is provided by tagging Web servers with a ”server trustlevel.”
The server trust level indicates the level of trust associated with theWeb server. Currently, three trust levels are supported: 1)administrative, 2) normal, and 3) external. Web servers marked as”administrative” are typically those used exclusively by systemadministrators. These servers are considered secure and may containhighly sensitive information. Servers marked as ”normal” are thoseused by employees within a company’s firewall. Users logging in fromnormal servers have access to only a limited set of responsibilities.Lastly, servers marked as ”external” are those used by customers oremployees outside of a company’s firewall. These servers have accessto an even smaller set of responsibilities.
Setting the Server Trust Level for a Server
There are two ways to specify the server trust level of a Web server.
The first way is to edit the server’s jserv.properties configuration fileand setting the APPL_SERVER_TRUST_LEVEL parameter. This isdone by adding the line
”wrapper.bin.parameters=–DAPPL_SERVER_TRUST_LEVEL=<LEVEL>”
where <LEVEL> is a number ranging from 1 to 3. The number 1corresponds to the administrative level, 2 corresponds to normal, and 3corresponds to external. For example:
”wrapper.bin.parameters=–DAPPL_SERVER_TRUST_LEVEL=1”
indicates that this server is an administrative–level server.
The second way to specify the server trust level of a Web server is toedit the DBC file used by the Web server.
Adding the line
”APPL_SERVER_TRUST_LEVEL=<LEVEL>”
to the DBC file will give the Web server a trust level of <LEVEL>. Forexample:
”APPL_SERVER_TRUST_LEVEL=1”
The value set in the DBC file will override the value (if set) in thejserv.properties file. By default, the Web server has a trust level of 2(the trust level of ”normal”).
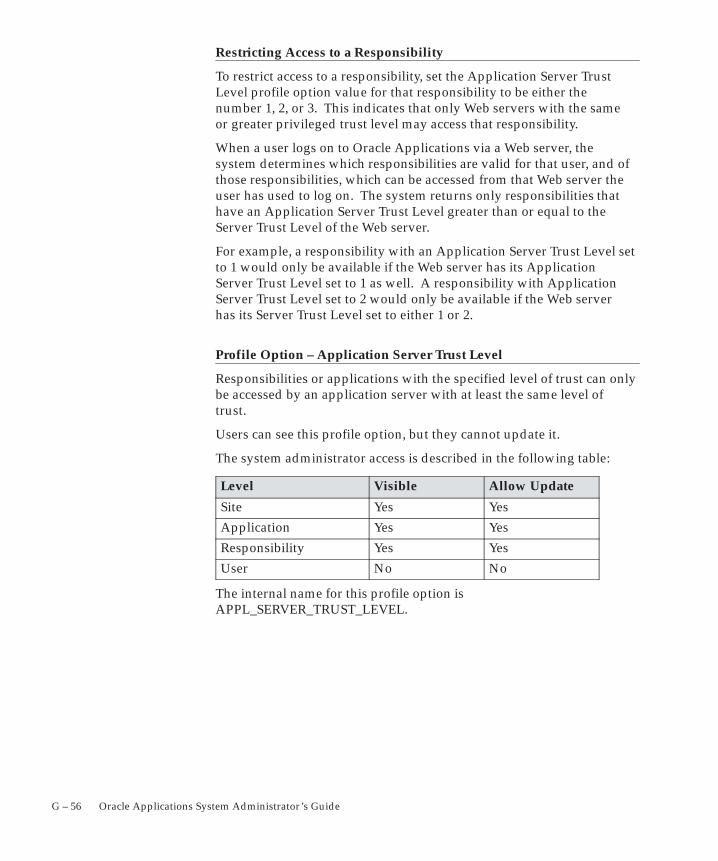
G – 56 Oracle Applications System Administrator’s Guide
Restricting Access to a Responsibility
To restrict access to a responsibility, set the Application Server TrustLevel profile option value for that responsibility to be either thenumber 1, 2, or 3. This indicates that only Web servers with the sameor greater privileged trust level may access that responsibility.
When a user logs on to Oracle Applications via a Web server, thesystem determines which responsibilities are valid for that user, and ofthose responsibilities, which can be accessed from that Web server theuser has used to log on. The system returns only responsibilities thathave an Application Server Trust Level greater than or equal to theServer Trust Level of the Web server.
For example, a responsibility with an Application Server Trust Level setto 1 would only be available if the Web server has its ApplicationServer Trust Level set to 1 as well. A responsibility with ApplicationServer Trust Level set to 2 would only be available if the Web serverhas its Server Trust Level set to either 1 or 2.
Profile Option – Application Server Trust Level
Responsibilities or applications with the specified level of trust can onlybe accessed by an application server with at least the same level oftrust.
Users can see this profile option, but they cannot update it.
The system administrator access is described in the following table:
Level Visible Allow Update
Site Yes Yes
Application Yes Yes
Responsibility Yes Yes
User No No
The internal name for this profile option isAPPL_SERVER_TRUST_LEVEL.

G – 57Setting Up and Maintaining Oracle Applications
Application Object Library AOL/J Setup Test Suite
The AOL/J Setup Test suite consists of Java Server Pages (JSPs) and canbe used to diagnose AOL/J setup issues. These JSPs exercise variousfeatures of AOL/J and provide feedback on the results. The test suiteis accessed from the URL:
http://<host_name>:<port_number>/OA_HTML/jsp/fnd/aoljtest.jsp
where host_name and port_number correspond to the host nameand port number of your instance’s Apache listener. The host nameand port number values are normally found in theAPPS_SERVLET_AGENT profile option.
When you access the test suite, you will be asked to provide logininformation for your instance:
• Applications Schema Name
• Applications Schema Password
• TWO_TASK
• Host Name
• Port Number
The following is a list of functions and tests you can run with yourinstance.
• Connection Test
– Locate DBC File
– Verify DBC Settings
– AOL/J Connection Test
• Virtual Directory settings
• APPS_WEB_AGENT
– Virtual Directory Settings
– FND_WEB.PING
– Custom Authentication
– GFM (Generic File Manager)
• APPS_SERVLET_AGENT
– Virtual Directory Settings
– Servlet Ping
– Jsp Ping
G – 58 Oracle Applications System Administrator’s Guide
• APPS_FRAMEWORK_AGENT
– Virtual Directory Settings
– Servlet Ping
– Jsp Ping
– Cabo Setup Tests
– X Server Accessibility
– OA Framework System Info
– Versions for Loaded Classes
• HELP_WEB_AGENT
• TCF
– Test Connection
• Tool Launcher Profile Settings
– ICX_FORMS_LAUNCHER
– ICX_REPORT_LAUNCHER
– ICX_DISCOVERER_LAUNCHER
• Application Login
– Login Page
– Show Responsibilities
– Show Session Properties
☞
G – 59Setting Up and Maintaining Oracle Applications
Configuring the Self–Service FrameworkThe Oracle Applications Self–Service Framework is the standardHTML development and deployment platform for Oracle Self–ServiceApplications.
The aims of the Self–Service Framework are to make Oracle’sSelf–Service Applications easy to use, build, deploy, maintain, andcustomize. The Framework also ensures high performance andscalability at runtime.
Attention: The following instructions are current as ofpublication. For the most up–to–date information refer toOracle MetaLink, specifically Note 205571.1, entitled”Configure and Troubleshoot the Self Service Framework 5.6with Applications 11.5.8”. Please note that Self–ServiceFramework Release 5.6 corresponds to Release 11.5.8 of OracleApplications.
This document uses the following conventions:
• <ORAHTTP_TOP> refers to the top–level directory where yourOracle HTTP server is installed.
• <JAVA_TOP> refers to the top–level Oracle Applications Javadirectory, or $JAVA_TOP. This is where apps.zip resides.
• <APPL_TOP> refers to the top–level Applications directory, or$APPL_TOP.
Replace any usage of these symbols with the physical paths for thecorresponding components. See Installing Oracle Applications for moreinformation regarding the physical location of the Apache Server.
In the instructions that follow, the settings for JDK–related parametersin your jserv.properties file (such as wrapper.classpath),require a physical path to the correct files. The instructions below areappropriate for Sun Solaris installations.
� Upgrade your Apache Web Server environment to JDK 1.3.
Follow the JDK 1.3 upgrade instructions found in Oracle MetaLinkNote 130091.1, ”Upgrading to JDK1.3 with Oracle Applications11i.”
� Set the display server for dynamic gif generation.
An important feature included with the new Self–ServiceFramework is the ability to dynamically generate and cache imageswith embedded text at runtime. These dynamic images are used to
G – 60 Oracle Applications System Administrator’s Guide
create buttons and tab menu bars that are displayed throughout theSelf–Service transaction pages. This feature uses Java AWT, whichis a standard component within Java.
To perform dynamic image generation, Java AWT on Unix requiresthat an X Server be available to reference. This display server doesnot need to be a high–powered machine because we generate andcache the images on the file system once under theOA_HTML/cabo/images/cache directory. Once cached, theseimages need not be generated again.
To enable this functionality on Unix, you must specify the X Serverwill be used to generate dynamic images. This server does nothave to be a dedicated server for Applications; however, it must beaccessible by the Apache server that will call it. This can be donethrough ”xhost +”, or through a more secure ”xauth” Unixcommand. Use the Unix man command to view more informationabout the ”xhost” and ”xauth” commands.
Note: This step is not required if you are installing theSelf–Service Framework on a Windows–based operatingsystem.
To implement the Display Server identifier, update the<ORAHTTP_TOP>/Jserv/etc/jserv.properties file with thefollowing changes:
• Add the following DISPLAY parameter immediately below thewrapper.bin variable:
wrapper.env=DISPLAY=<xserver–hostname>:<xserver–displayport>
• Replace <xserver–hostname> and <xserver–displayport> withthe machine name and port number where the X Server isrunning. For example:
wrapper.env=DISPLAY=myxserver.mycorp.com:0
� Set the FND_TOP environment variable for the web server.
FND_TOP is used to derive the location of the dbc file which isthen used to make connections to the appropriate database. Youmust define this environment variable for your web server if youare using HTTPS. In order to set this variable add the followingline to <ORAHTTP_TOP>/Jserv/etc/jserv.properties:
wrapper.bin.parameters=–DFND_TOP=<path_to_FND_TOP>
� Update the web server java classpath
• Update <ORAHTTP_TOP>Jserv/etc/jserv.properties byadding the following new components to your classpath:
☞
G – 61Setting Up and Maintaining Oracle Applications
wrapper.classpath=<JDK13_TOP>/lib/dt.jar
wrapper.classpath=<JDK13_TOP>/lib/tools.jar
wrapper.classpath=<JDK13_TOP>/jre/lib/rt.jar
wrapper.classpath=<JAVA_TOP>/jbojdbcpatch.zip
wrapper.classpath=<JAVA_TOP>/sax2.zip
Attention: You must provide the physical path for the<JAVA_TOP> because environment variables are not supportedin jserv.properties.
• You must use the XML Parser library that is delivered with theSelf–Service Framework patch, rather than the one included withearly versions of the Rapid Install. Look for awrapper.classpath setting that includes the filexmlparserv2.jar or xmlparserv2.zip. If it refers to a fileunder <ORAHTTP_TOP>, for example:
# wrapper.classpath=<ORAHTTP_TOP>/Ojsp/lib/xmlparserv2.jar
Comment out this line using the # symbol and add the followingline immediately below it:
wrapper.classpath=<JAVA_TOP>/xmlparserv2.zip
If the setting already points to your <JAVA_TOP>, then noadditional action is needed.
� Start the Apache web server.
Start your Apache Web Server by executing the following at thecommand line:
<ORAHTTP_TOP>/Apache/bin/apachect1 restart
Log in to Applications using the System Administratorresponsibility. Set the ”Application Framework Agent” profileoption to the Apache server name and port that you have justconfigured in the previous steps.
For example:
http://oaweb.mycorp.com:8080
� Set the Application Framework Agent profile option.
Set this profile option to point to the HTTP server you are currentlyconfiguring for Framework applications. You can define the”Application Framework Agent” profile at any profile level but it iscommon to set this value at the Site level. You can set up andadminister multiple Apache server listener instances and control
G – 62 Oracle Applications System Administrator’s Guide
access to these Apache Listeners through this profile by setting thisprofile at a lower level, such as responsibility.
� Set session timeout limit.
In order to appropriately set the session timeout limit forSelf–Service Framework Applications you need to synchronize thevalue used by the web server with the value specified in the profileoption ICX:Session Timeout.
The ICX:Session Timeout option sets the maximum number ofminutes to wait before invalidating an idle ICX Session. Thedefault value is null. The web server session timeout value, ormore appropriately the Apache Jserv Session value, is used tospecify the number of milliseconds to wait before invalidating anunused session. The default value is 1800000 or 30 minutes.
We recommend that you set the ICX:Session Timeout and theApache Jserv Session to be the same. It is better to be consistentand let the ICX session and the Apache Jserv (middle tier) sessionexpire at the same time.
If the ICX session expires before the Jserv session, the user will bepresented with a login page even though the Jserv session is stillactive. If the user logs back in before the Jserv session expires, theprevious state of the middle–tier transaction will be seen. This canbe confusing, since from the point of view of the user there is nodistinction between the ICX session and the Jserv session.
We also recommend that you do not set the Apache Jserv Sessiontimeout to be any higher than 30 minutes. Longer idle sessions willdrain the JVM resources and can also cause out of memory errors.
The session timeout for the web server is specified via thefollowing directive in the file<ORAHTTP_TOP>/Jserv/etc/zone.properties:
session.timeout=1800000
� Test your web server setup for Self–Service Framework Applications
This option is currently available to those who have applied OracleApplication Object Library Java Roll Up Patch G 2047263 and Patch2209062. Future versions of the Self–Service Framework will usethese patches as a prerequisite so this option will be automaticallyavailable.
The option consists of a collection of tests that you can use todetermine if your web server is configured properly. You canaccess these tests via:
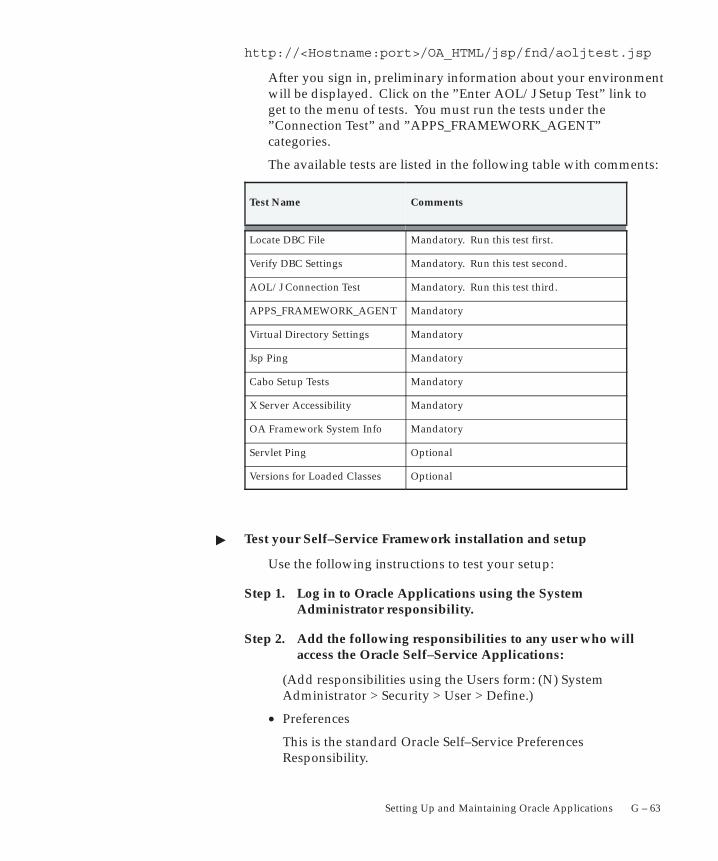
G – 63Setting Up and Maintaining Oracle Applications
http://<Hostname:port>/OA_HTML/jsp/fnd/aoljtest.jsp
After you sign in, preliminary information about your environmentwill be displayed. Click on the ”Enter AOL/J Setup Test” link toget to the menu of tests. You must run the tests under the”Connection Test” and ”APPS_FRAMEWORK_AGENT”categories.
The available tests are listed in the following table with comments:
Test Name Comments
Locate DBC File Mandatory. Run this test first.
Verify DBC Settings Mandatory. Run this test second.
AOL/J Connection Test Mandatory. Run this test third.
APPS_FRAMEWORK_AGENT Mandatory
Virtual Directory Settings Mandatory
Jsp Ping Mandatory
Cabo Setup Tests Mandatory
X Server Accessibility Mandatory
OA Framework System Info Mandatory
Servlet Ping Optional
Versions for Loaded Classes Optional
� Test your Self–Service Framework installation and setup
Use the following instructions to test your setup:
Step 1. Log in to Oracle Applications using the SystemAdministrator responsibility.
Step 2. Add the following responsibilities to any user who willaccess the Oracle Self–Service Applications:
(Add responsibilities using the Users form: (N) SystemAdministrator > Security > User > Define.)
• Preferences
This is the standard Oracle Self–Service PreferencesResponsibility.
G – 64 Oracle Applications System Administrator’s Guide
• Workflow User Web Applications
This is the standard Workflow user responsibility. This willallow your users to access the new Workflow WorklistNotification User Interface.
Step 3. To add Lookup Type/Lookup Codes HTML interface for aSystem Administrator who will add new lookup types ofcodes, add the following responsibility:
• System Administration
This is the standard Oracle Self–Service Administrationresponsibility.
Step 4. Test the setup of your Self–Service Framework ApacheEnvironment.
1. Add the ”Workflow User Web Applications” responsibility to a testuser, using the Users form.
2. Launch a browser and log in to Self–Service Applications using thetest user you just created.
3. From the Navigate Region on the Self–Service Personal Home Page,click on the Workflow User Web Applications responsibility.
4. From the list of Workflow functions under Workflow User WebApplications, click on the Advanced Worklist option.
After a few seconds of initialization on the HTTP Server, the newWorkflow Worklist will appear.
Additional Information: For further information andtroubleshooting tips, see Oracle MetaLink.
HTTP Server Configuration Checklist
❑ Jserv is using JDK 1.3. You can find JDK 1.3 upgrade instructionsin MetaLink Note 130091.1, titled ”Upgrading to JDK 1.3 withOracle Applications 11i.”
❑ Classpath contains tools.jar and rt.jar (located under theJDK1.3 distribution).
❑ Classpath contains <JAVA_TOP>sax2.jar and<JAVA_TOP>xmlparserv2.jar.
❑ Classpath contains jdbc12.zip (located under OA_JAVA).
❑ Classpath contains jbojdbcpatch.zip (located underOA_JAVA).
G – 65Setting Up and Maintaining Oracle Applications
❑ jdbc12.zip is placed before apps.zip in the classpath.
❑ jbojdbcpatch.zip is placed before jdbc12.zip and apps.zipin the classpath.
❑ Defined the Application Framework Agent profile option. (Ensurethat it points to the correct server.)
❑ Application Framework Agent is set to HTTPS (instead of HTTP),if ussing SSL.
❑ Checked permissions on OA_HTML/cabo directory. Ensure thatthis physical directory structure is writeable by the user who willlaunch the apachectl command.
❑ Defined FND_TOP in jserv.properties.
❑ Defined value for DISPLAY to point to an X Server.
❑ Specified appropriate heap size for the JVM.
For example, for 50 active users the typical heap size range is from255 Mb – 400 Mb. However, this may change based on the type ofapplications you are using. You can set the heap size by adding thefollowing line to your jserv.properties file:
wrapper.bin.parameters=–Xms255m –Xms400m
G – 66 Oracle Applications System Administrator’s Guide
Concurrent Managers
Oracle Applications concurrent managers run processes in thebackground on a server machine. You must set up and start theconcurrent managers for each product group before you can use yourOracle Applications products. Refer to the AD Procedures Guide fordetails on the adcmctl script for starting and and stopping concurrentmanagers. The instructions in this section apply whether you areinstalling or upgrading.
Setting Up Concurrent Managers
For UNIX
Keep the following in mind when you start the concurrent managers:
• Concurrent managers inherit directory privileges from the userwho starts them. If you plan to start the managers from a loginother than the main applications login, applmgr, ensure that thelogin has the appropriate directory privileges.
For more information on directory privileges, see OracleApplications Concepts.
Parameter values set in startmgr override any other values. Commandline values override environment and default values, and so on.Another section in this manual contains more information on editingthe startmgr script.
You can change directory privileges while the managers are running,and the changes will be effective immediately. You can changeenvironment variables and startup parameters while the managers arerunning, but your changes will not take effect until the concurrentmanagers are restarted. To put changes into effect, shut down themanagers, make the necessary modifications, and restart the managers.
For Windows
On Windows platforms, the OracleConcMgr<SID> service (where<SID> is the database <SID> and the value of the LOCAL variable)spawns the concurrent manager programs. The OracleConcMgr<SID>service is initially created by the Rapid Install program. If you need torecreate the service, use one of the following two methods:
Method 1
G – 67Setting Up and Maintaining Oracle Applications
From the command prompt:
C:\> cd %COMMON_TOP%\admin\install
C:\> adsvcm.cmd <NT User> <NT Password>
where NT User is the user that runs the concurrent manager service,and NT Password is the password of the user that runs the service.
Method 2
Invoke the GUI program ccmsetup.exe (located in %FND_TOP%\bin),and choose the option to create the service.
Parameters
The following entries describe the concurrent manager startupparameters, which are read by the concurrent manager service andpassed to the concurrent manager programs. The GUI programccmsetup.exe (located in %FND_TOP%\bin) should be used to createand set these parameters in the Windows registry. Note that theregistry settings override defaults. These parameters can also be usedby the adcmctl.cmd script (see the AD Procedures Guide for moreinformation).
Database Connection
The APPS schema name should be set to the APPSuser ID.
This is the password to the Oracle Applicationsaccount in the database.
This is the database <SID>.
Server Startup
Check the ”Use this Account box” to specify the OSaccount ( <NT User> and <NT Password>) thatruns the CCM service. If you do not check thisbox, the system account launching the service willnot have permission to access network resources.
Startup Options
Number of seconds (integer) the internalconcurrent manager waits between times it looksfor new concurrent requests. The default value is60.
Number of minutes (integer) the internalconcurrent manager waits before attempting to
Schema Name
Password
TNS Aliasname
Use this Account
Sleep
Restart
G – 68 Oracle Applications System Administrator’s Guide
restart after abnormal termination. The defaultvalue prevents the manager from restarting afterabnormal termination. The default value is N.
Number of pmon cycles (integer) the internalconcurrent manager waits between times it checksfor normal changes in concurrent manageroperation. Normal changes include the start or endof a work shift and changes to concurrent managerdefinitions entered in the Concurrent Managersform. The default value is 1.
Number of sleep cycles (integer) the internalconcurrent manager waits between times it checksfor concurrent managers that have failed whilerunning a concurrent request. The default value is20.
Name of the printer to which the concurrentmanagers send request output, where the requestsare submitted from within a concurrent program ifthe submitting program (parent request) does nothave a printer associated with it.
Check this box to enable distributed concurrentprocessing.
Shutdown
Shuts down the concurrent managers using normalshutdown methods.
When shutting down the concurrent managers,aborts the concurrent managers.
Note: This option is currently disabled. Checkingthis box will have no effect.
File Logging
The name of the log file generated upon startup ofthe Internal Concurrent Manager. Defaults toCM_<SID>.log.
The name of the log file generated upon shutdownof the Internal Concurrent Manager. Defaults toCS_<SID>.log.
Queue Size
PMON cycle
Printer Name
EnableDistributedConcurrentProcessing
Deactivate/Normal
Terminate/AbortProcesses
Activation Log
Deactivation Log
G – 69Setting Up and Maintaining Oracle Applications
Checking this box will cause concurrent managersto produce diagnostic output regularly. Note thatleaving this box unchecked prevents large log files.
Checking this box prevents log files from beingoverwritten when the concurrent manager isstarted.
Additional setup is required to enable printing and reporting throughthe concurrent manager service. Please refer to the instructions in theEnable Printing section of the ”Oracle Applications Installation UpdateNotes Release 11i for Windows NT/2000” available on OracleMetaLinkfor details.
Starting the Concurrent ManagersNote: Before starting the concurrent managers, you must startthe Oracle Applications TNS listener on all nodes. The TNSlistener must be started by the applmgr user.
For UNIX
You can start the concurrent managers from by running the scriptstartmgr from the operating system command line. To start theconcurrent manager from the operating system prompt, use thefollowing syntax:
$ startmgr \
sysmgr=”<APPS username>/<APPS password>” \
mgrname=”<name>” \
PRINTER=”<printer>” \
mailto=”<userid1 userid2...>” \
restart=”N|<minutes>” \
logfile=”<filename>” \
sleep=”<seconds>” \
pmon=”<cycles>” \
quesiz=”<cycles>” \
diag=”Y|N”
All parameters are optional. You can pass parameters to the script inany order. These parameters can also be used by the adcmctl.sh script(see the AD Procedures Guide for more information).
Parameters
The following entries describe the concurrent manager startupparameters. The default values apply if you do not specify different
RecordDiagnosticMessages
Save Log History

G – 70 Oracle Applications System Administrator’s Guide
values in the startmgr script, on the command line when you runstartmgr, or in your environment.
APPS schema name should be set to the APPSschema user ID and password. You will beprompted for the password if you omit theparameter and use the default value. The defaultvalue is $FNDNAM.
Name of the internal concurrent manager(alphanumeric characters only). The default valueis std.
Name of the printer to which the concurrentmanagers send request output, where the requestsare submitted from within a concurrent program ifthe submitting program (parent request) does nothave a printer associated with it.
List of users who receive mail when the internalconcurrent manager stops running. The defaultvalue is the user who starts managers.
Number of minutes (integer) the internalconcurrent manager waits before attempting torestart after abnormal termination. The defaultvalue is N. The default value prevents the managerfrom restarting after abnormal termination.
The name of the internal concurrent manager’s logfile. The default value is <mgrname.mgr>.
Number of seconds (integer) the internalconcurrent manager waits between times it looksfor new concurrent requests. The default value is60.
Number of sleep cycles (integer) the internalconcurrent manager waits between times it checksfor concurrent managers that have failed whilerunning a concurrent request. The default value is20.
Number of pmon cycles (integer) the internalconcurrent manager waits between times it checksfor normal changes in concurrent manageroperation. Normal changes include the start or endof a work shift and changes to concurrent managerdefinitions entered in the Concurrent Managersform. The default value is 1.
sysmgr
mgrname
PRINTER
mailto
restart
logfile
sleep
pmon
quesiz

G – 71Setting Up and Maintaining Oracle Applications
diag=Y tells all concurrent managers to producediagnostic output regularly. The default valuediag=N prevents large log files.
Example
$ startmgr sysmgr=”apps/apps” \
mgrname=”std” \
PRINTER=”hqseq1” \
mailto=”jsmith” \
restart=”N” \
logfile=”mgrlog” \
sleep=”30” \
pmon=”5” \
quesiz=”2”
For Windows
The OracleConcMgr<SID> service is launched from the Control PanelServices applet. It can also be launched from the command line usingthe following command:
C:\> net start OracleConcMgr<SID>
• Concurrent managers inherit directory privileges from the userwho installs and starts them. If you plan to install and start themanagers from a login other than the main applications login(applmgr) ensure that the login has the appropriate directoryprivileges. The Windows account that starts the concurrentmanager service must be the same one that installed it.
• Startup parameter values apply in this order:
– Values set in the registry (through the use of ccmsetup)
– Default values
This means that values set in the registry override the defaultvalues.
You cannot change startup parameters while the managers are running.To put changes into effect, shut down the managers, make thenecessary modifications, and restart the managers.
See: Setting Up Concurrent Managers: page G – 66
See: Restarting the Concurrent Managers: page G – 72
diag
G – 72 Oracle Applications System Administrator’s Guide
Restarting the Concurrent Managers
You must restart the concurrent managers whenever you start theOracle8i Server database or change the concurrent manager startupparameters.
On UNIX platforms, concurrent managers append to their own log fileif the log files exist when they restart. Therefore, the user who restartsthe concurrent managers must either own the existing files, have writeprivilege for them, or delete them before restarting.
On Windows, the concurrent manager logs are overwritten when theconcurrent managers are restarted. Checking the ”Save Log History”option in the ccmsetup GUI tool saves the previous log files.
The concurrent managers delete temporary files when each concurrentprocess finishes. If the concurrent managers stop abnormally, however,they may not delete these files.
Suggestion: Delete temporary files only if they have not beenaccessed more recently than a few days ago. This helps toprevent the loss of files required by the operating system or theconcurrent managers.
Ideally, delete temporary files during maintenance windowswhen the database is down and no applications programs areactive.
See Also
Controlling Concurrent Managers: page 5 – 55
Shutting Down the Concurrent Manager Service (Windows)
The OracleConcMgr<SID> service may be shut down from the ControlPanel Services applet. It can also be stopped from the command lineusing the following command:
C:\> net stop OracleConcMgr<SID>
Although you can shut down concurrent managers from OracleApplications System Administrator’s responsibility, this does not stopthe concurrent manager service. You must still stop the concurrentmanager service from the Windows Control Panel Services appletbefore you can restart the concurrent managers.
Note: The OracleConcMgr<SID> service may take severalminutes to shut down because it needs to finish processingcurrently running requests.
G – 73Setting Up and Maintaining Oracle Applications
Warning: Do not use the Task Manager to stop the concurrentmanager service or other Applications processes unless you areadvised to do so by Oracle Worldwide Support.
Removing the Concurrent Manager Service (Windows)
If you need to remove the concurrent manager service, ensure that it isnot running.
To remove or delete the OracleConcMgr<SID> service, use one of thefollowing 2 methods:
Method 1
At the command prompt, type:
C:\> cd %COMMON_TOP%\admin\install
C:\> adsvcm.cmd –deinstall
Method 2
Invoke the GUI program ccmsetup.exe, and choose the option toremove the service.
Once you have done this, you will need to reinstall the concurrentmanager service in order to process concurrent requests.
File Conventions
The following tables list the locations and file naming conventions forlog, output, and temporary files. The location of product log andoutput files depends on whether you have set up a common directory.
For UNIX
File Type Location Filename
InternalConcurrentManager Log
$FND_TOP/$APPLLOGwith Common Directory:$APPLCSF/$APPLLOG
<mgrname>.mgr
Concurrent ManagerLog
$FND_TOP/$APPLLOGwith Common Directory:$APPLCSF/$APPLLOG
W<nnn>.mgr
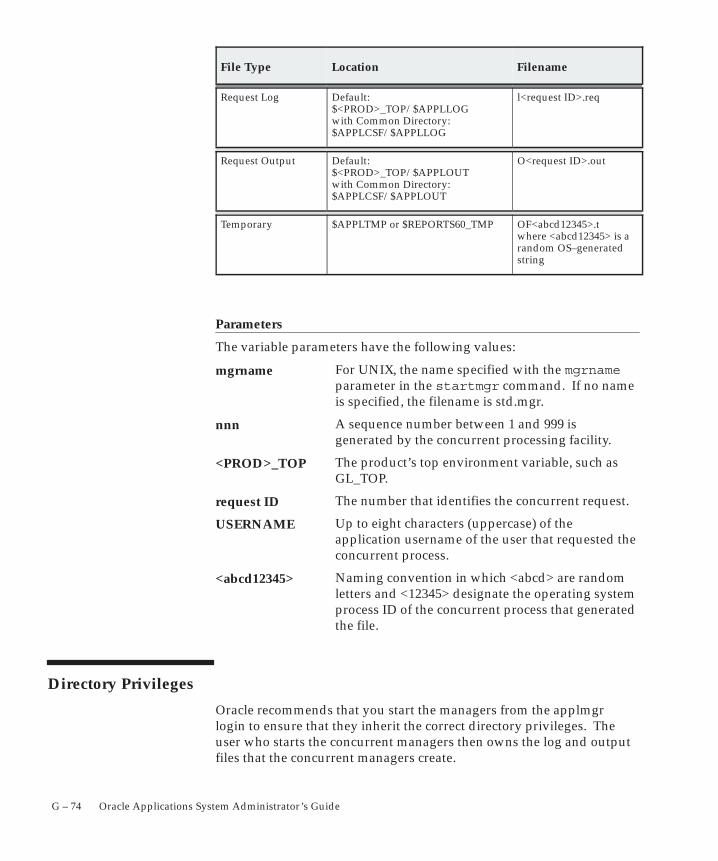
G – 74 Oracle Applications System Administrator’s Guide
FilenameLocationFile Type
Request Log Default:$<PROD>_TOP/$APPLLOGwith Common Directory:$APPLCSF/$APPLLOG
l<request ID>.req
Request Output Default:$<PROD>_TOP/$APPLOUTwith Common Directory:$APPLCSF/$APPLOUT
O<request ID>.out
Temporary $APPLTMP or $REPORTS60_TMP OF<abcd12345>.twhere <abcd12345> is arandom OS–generatedstring
Parameters
The variable parameters have the following values:
For UNIX, the name specified with the mgrnameparameter in the startmgr command. If no nameis specified, the filename is std.mgr.
A sequence number between 1 and 999 isgenerated by the concurrent processing facility.
The product’s top environment variable, such asGL_TOP.
The number that identifies the concurrent request.
Up to eight characters (uppercase) of theapplication username of the user that requested theconcurrent process.
Naming convention in which <abcd> are randomletters and <12345> designate the operating systemprocess ID of the concurrent process that generatedthe file.
Directory Privileges
Oracle recommends that you start the managers from the applmgrlogin to ensure that they inherit the correct directory privileges. Theuser who starts the concurrent managers then owns the log and outputfiles that the concurrent managers create.
mgrname
nnn
<PROD>_TOP
request ID
USERNAME
<abcd12345>
G – 75Setting Up and Maintaining Oracle Applications
Oracle recommends that you start the managers from the applmgrlogin to ensure that they inherit the correct directory privileges.
For UNIX, any user who runs an environment file and has access to thestartmgr script can start the concurrent managers.
Warning: Always start the concurrent managers from theapplmgr login if you are using parallel concurrent processingon multiple nodes.
For UNIX
Setting the startmgr User ID with setuid in UNIX
To ensure that startmgr inherits the applmgr directory privileges, youcan use the UNIX setuid facility to set startmgr to the applmgr login’sUNIX user ID. The concurrent managers then inherit the applmgrprivileges no matter which login runs startmgr. This allows you tostart or restart concurrent managers using the Administer ConcurrentManagers form, regardless of the originating UNIX login. Note thatyou must reset the user ID with setuid if you modify or copy startmgr.Refer to your online UNIX documentation for information on setuid.
Note: The use of the setuid command may cause unexpectedbehavior on certain platforms that employ dynamic linking oflibraries. Please refer to the Oracle Applications InstallationUpdate for your platform for any information regarding thisproblem.
Directory Privileges for Logins other than applmgr
If you do not set the startmgr script to the applmgr user ID and youstart the managers from a login other than applmgr, that login needs tohave these privileges:
• Read and execute privileges on all Oracle Applicationsdirectories
• Write privilege for all directories defined by the followingvariables:
– APPLLOG (typically log directory or directories)
– APPLOUT (typically out directory or directories)
– APPLCSF (common directory for log and output files)
– APPLTMP (temporary directory)
– REPORTS60_TMP (temporary directory for Oracle Reportsfiles)
G – 76 Oracle Applications System Administrator’s Guide
• Write privilege for these directories: /tmp and /usr/tmp
You can verify that a login has the necessary privileges on a certaindirectory with this command:
$ ls –ld < directory>
Here is an example:
$ ls –ld /usr/tmp
drwxrwxrwx 3 root 22880 Mar 10 11:05 /usr/tmp
^^^
The three letters marked in the sample response indicate that all usershave read, write, and execute privilege for the directory.
Printing (UNIX)
This section contains printer reference material specific to the UNIXoperating system, including information on how to create and registerexecutable printing programs.
To register printers in the Printers form of Oracle Applications, yourOracle Applications System Administrator needs to know eachprinter’s operating system name. Your installation update tells youwhere to find the printer names for your platform.
For additional information, see: Operating System Names for Printers,Oracle Applications Installation Update for your platform.
Standard Print Subroutine
The standard printing subroutine that you can select in the PrinterDrivers form uses Oracle Application Object Library routines to printreports. This requires fewer machine resources than printing through acustomized executable program or a shell command such as lp or lpr.
When you use the subroutine, there may be options available throughthe descriptive flexfield at the bottom of the form. These options varyby platform and may include the following: mail Notify user byelectronic mail when report finishes printing.
• Mail: Notify user by electronic mail when report finishesprinting.
• Priority: Set the priority for reports in the print queue.
Check your installation update for any additional options available onyour platform.
G – 77Setting Up and Maintaining Oracle Applications
Executable Printing Programs
Oracle Applications supports the use of executable programs forprinting. However, we recommend that you use executable programsonly to provide features unavailable through Oracle Applicationsprinter drivers, such as:
• Interpreting special characters in the text passed to the printer.For example, you need a program to interpret 8–bit characterssent to a 7–bit compatible printer
• Interpreting arguments passed by Oracle Applications. Forexample, you need a program to perform different actions basedon different output filenames.
If you do not need to support special features such as these, printthrough the standard printing subroutine and printer drivers defined inthe Oracle Applications database. This makes the most efficient use ofmachine resources.
See Also
Overview of Printers and Printing: page 7 – 2
Upgrading to Existing Executable Programs
Because printing through the standard printer subroutine uses machineresources more effectively than printing through executable programs,we recommend the following if you used executable printing programsin the previous release of Oracle Applications:
• If predefined printer drivers can replace the executable program,simply register the drivers along with the printer types in thePrinter Types form.
For example, Oracle Applications provides a print styleLandscape and the printer driver LANDSCAPESUB. Theyperform the same function as the program land, which enablesDEC LN03 printers to print 132 characters per line.
• If no predefined drivers will work, you may be able to create acustomized driver that can replace the executable. You createdrivers with the Printer Drivers form.
• If you cannot replace the executable with a simple printer driverdefinition, you can continue to use the executable by registeringit or the shell script that calls it with Oracle Applications.
See Also
Printer Drivers Window: page 7 – 46
G – 78 Oracle Applications System Administrator’s Guide
Writing an Executable Program
Executable printing programs can format report output through escapesequences or a printer programming language. Creating them requiresa thorough knowledge of both printer operation and a computerprogramming language. Follow the guidelines in this section if youneed to create an executable printing program.
Printer Styles
An executable program should be able to format report output forvarious print styles, including these:
• Portrait: 80 columns wide, 66 lines per page
• Landscape 132 characters wide, 66 lines per page (62 lines perpage on A4 style paper)
• Landwide 180 characters wide, 66 lines per page (62 lines perpage on A4 style paper)
Formatting Arguments
If the program handles formatting for various print styles internally,you can pass arguments from the printer drivers to the program todetermine which print style to use.
If the program does not contain print style formatting commands, youcan define the commands in a shell script that calls the program. Youthen define the shell script as the printing program in a printer driverand pass arguments that determine the print style from the driver tothe script.
The printer driver that calls the executable program or shell script mustbe able to pass the following arguments:
• Name of the destination printer
• Number of copies to print
• Banner on title page
• Filename
Initialization and Reset
You do not have to add printer initialization and reset strings to yourprogram if you can define these strings in the Printer Drivers form.
Character Mode Oracle Reports Commands
G – 79Setting Up and Maintaining Oracle Applications
We recommend that you design your executable programs to workwith the standard Oracle Reports print drivers. The following standarddrivers are located in the $FND_TOP/$APPLREP directory:
• P.prt – Portrait style
• L.prt – Landscape style
• W.prt – Landwide style
• A.prt – A4 style
The program should not misinterpret the commands for bold on, boldoff, and page size that the standard drivers imbed in OracleApplications reports. If necessary, you can create customized OracleReports drivers as described below.
Location of Program
When you have compiled and linked the source code or written a shellscript, move the program to the $APPLBIN subdirectory under the topdirectory of your custom development area. Keep copies of the sourcefile in your custom development area as a backup.
Creating Customized Character Mode Oracle Reports Print Drivers
The Oracle Reports print drivers set the font styles for italics,underlining, and bolding. If your executable printing program cannotuse the standard Oracle Reports drivers, create a customized driver foreach print style you will use with the program.
To create a customized driver, copy L.prt, P.prt, A.prt, or W.prt from$FND_TOP/$APPLREP to your custom development area. Modify astandard driver as needed for your executable printing program. Givethe customized driver a new filename but keep the .prt extension. Thencopy the customized driver to $FND_TOP/$APPLREP.
Suggestion: Use the executable program name and print styleletter as the driver name. For example, use HPLJ3P.prt forportrait style printing with the executable program HPLJ3.When you print in portrait style with this program, theconcurrent managers pass the HPLJ3P.prt driver to OracleReports as DESFORMAT=HPLJ3P.
Registering Executable Programs
When you have created your executable programs and, optionally, yourshell scripts and Oracle Reports drivers, register them in the PrinterDrivers form.
Define a printer driver and corresponding print style for each printstyle that your executable program supports. Complete the followingsteps to register an executable program for a printer driver:

G – 80 Oracle Applications System Administrator’s Guide
1. Navigate to the Printer Drivers window and create a new printerdriver name. Also add the user name, description, and platform.
2. In the SRW Driver field, enter the name (without the .prt extension)of a standard or customized Oracle Reports driver. All driversmust be in the directory $FND_TOP/$APPLREP.
3. Enter Program as the driver method.
4. Enter No in the Spool File field.
5. Enter No in the Standard Input field.
6. In the program name field, enter the name of the executableprogram or the shell script that calls it. Include the full path nameif this file is not in the $FND_TOP/bin directory.
7. Add the arguments that Oracle Applications passes to the programor shell script. The driver must pass the following to theexecutable program:
– Name of the destination printer
– Number of copies to print
– Banner on title page
– Filename
– Add the initialization and reset strings to the appropriatefields if the program does not send these strings to theprinter.
See Also
Printer Drivers Window: page 7 – 46
For Windows
This section contains printer reference material specific to the Windowsoperating system. It also explains how to create and register executableprinting programs.
Additional setup is required to enable printing and reporting throughthe concurrent manager service. Please refer to the instructions in theEnable Printing section of the ”Oracle Applications Installation UpdateNotes Release 11i for Windows NT/2000” available on OracleMetaLinkfor details.
Operating System Names for Printers
To register printers in the Printers window of Oracle Applications, yourOracle Applications system administrator needs to know each printer’s
G – 81Setting Up and Maintaining Oracle Applications
operating system name. For Windows, you can obtain the printer’sname from the Printers folder in My Computer. If you register aninvalid printer, the operating system’s default printer will be usedinstead.
Standard Print Subroutine
The standard printing subroutine that you can select in the PrinterDrivers form uses Oracle Application Object Library routines to printreports. This requires fewer machine resources than printing through acustomized executable program DOS command such as PRINT.
Executable Printing Programs
Oracle Applications supports the use of executable programs forprinting. However, we recommend that you use executable programsonly to provide features unavailable through Oracle Applicationsprinter drivers, such as:
• Interpreting special characters in the text passed to the printer.For example, you need a program to interpret 8–bit characterssent to a 7–bit compatible printer.
• Interpreting arguments passed by Oracle Applications. Forexample, you need a program to perform different actions basedon different output filenames.
If you do not need to support special features such as these, printthrough the standard printing subroutine and printer drivers defined inthe Oracle Applications database. This makes the most efficient use ofmachine resources.
See Also
Overview of Printers and Printing: page 7 – 2
Upgrading Existing Executable Programs
Because printing through the standard printer subroutine uses machineresources more effectively than printing through executable programs,we recommend the following if you used executable printing programsin the previous release of Oracle Applications:
• If predefined printer drivers can replace the executable program,simply register the drivers along with the printer types in thePrinter Types form.
For example, Oracle Applications provides a print styleLandscape and the printer driver LANDSCAPESUB. They
G – 82 Oracle Applications System Administrator’s Guide
perform the same function as the program land, which enablesDEC LN03 printers to print 132 characters per line.
• If no predefined drivers will work, you may be able to create acustomized driver that can replace the executable. You createdrivers with the Printer Drivers form.
• If you cannot replace the executable with a simple printer driverdefinition, you can continue to use the executable by registeringit or the shell script that calls it with Oracle Applications.
See Also
Printer Types, Print Styles, and Printer Drivers: page 7 – 3
Printer Drivers Window: page 7 – 46
Writing an Executable Program
Executable printing programs can format report output through escapesequences or a printer programming language. Creating them requiresa thorough knowledge of both printer operation and a computerprogramming language. Follow the guidelines in this section if youneed to create an executable printing program.
Printer Styles
An executable program should be able to format report output forvarious print styles, including these:
• Portrait: 80 columns wide, 66 lines per page
• Landscape 132 characters wide, 66 lines per page (62 lines perpage on A4 style paper)
• Landwide 180 characters wide, 66 lines per page (62 lines perpage on A4 style paper)
Formatting Arguments
If the program handles formatting for various print styles internally,you can pass arguments from the printer drivers to the program todetermine which print style to use.
If the program does not contain print style formatting commands, youcan define the commands in a command file that calls the program.You then define the .cmd file as the printing program in a printer driverand pass arguments that determine the print style from the driver tothe script.
The printer driver that calls the executable program or .cmd file mustbe able to pass the following arguments:
G – 83Setting Up and Maintaining Oracle Applications
• Name of the destination printer
• Number of copies to print
• Banner on title page
• Filename
Initialization and Reset
You do not have to add printer initialization and reset strings to yourprogram if you can define these strings in the Printer Drivers form.
Character Mode Oracle Reports Commands
We recommend that you design your executable programs to workwith the standard Oracle Reports print drivers. The followingstandard drivers are located in the %FND_TOP%\%APPLREP%directory:
• P.prt – Portrait style
• L.prt – Landscape style
• W.prt – Landwide style
• A.prt – A4 style
The program should not misinterpret the commands for bold on, boldoff, and page size that the standard drivers imbed in OracleApplications reports. If necessary, you can create customized OracleReports drivers as described in the next section.
Location of Program
When you have compiled and linked the source code or written acommand file, move the program to the %APPLBIN% subdirectoryunder the top directory of your custom development area. Keep copiesof the source file in your custom development area as a backup.
Creating Customized Character Mode Oracle Reports Print Drivers
The Oracle Reports print drivers set the font styles for italics,underlining, and bolding. If your executable printing program cannotuse the standard Oracle Reports drivers, create a customized driver foreach print style you will use with the program.
To create a customized driver, copy L.prt, P.prt, A.prt, or W.prt from%FND_ TOP%\%APPLREP% to your custom development area.Modify a standard driver as needed for your executable printingprogram. Give the customized driver a new filename but keep the .prtextension. Then copy the customized driver to %FND_TOP%\%APPLREP%.
G – 84 Oracle Applications System Administrator’s Guide
Suggestion: Use the executable program name and print styleletter as the driver name. For example, use HPLJ3P.prt forportrait style printing with the executable program HPLJ3.When you print in portrait style with this program, theconcurrent managers pass the HPLJ3P.prt driver to OracleReports as DESFORMAT=HPLJ3P.
For more information, see the Oracle Reports Developerdocumentation.
Registering Executable Programs
When you have created your executable programs and, optionally, yourOracle Reports drivers, register them in the Printer Drivers form.
Define a printer driver and corresponding print style for each printstyle that your executable program supports. Complete the followingsteps to register an executable program for a printer driver:
1. Navigate to the Printer Drivers form and create a new printerdriver name. Also add the user name, description, and platform.
2. In the SRW Driver field, enter the name (without the .prt extension)of a standard or customized Oracle Reports driver. All driversmust be in the directory %FND_TOP%\%APPLREP%.
3. Enter Program as the driver method.
4. Enter No in the Spool File field.
5. Enter No in the Standard Input field.
6. In the Program Name field, enter the name of the executableprogram or the command file that calls it. Include the full pathname if this file is not in the %FND_TOP%\bin directory.
7. Add the arguments that Oracle Applications passes to the programor command file. The driver must pass the following to theexecutable program:
– Name of the destination printer
– Number of copies to print
– Banner on title page
– Filename
8. Add the initialization and reset strings to the appropriate fields ifthe program does not send these strings to the printer.
G – 85Setting Up and Maintaining Oracle Applications
Migrating an Oracle Applications Single Instance to Real ApplicationClusters (RAC)
Introduction
This section describes the steps required to install Oracle Applicationsin an environment which uses Real Application Clusters (RAC). Thereare essentially two cases when using RAC with Oracle Applications:the fresh install case, or the case whereby Oracle Applications isalready deployed using a single database instance. The steps tomigrate to RAC are essentially the same for both cases. There are twosets of steps: prerequisite steps which are required before the migrationcommences, and the migration steps.
Prerequisites
The following steps should be performed prior to the migration of thedatabase to RAC. The prerequisite steps can be performed at any timeprior to the migration to RAC. Both the prerequisite steps and theRAC migration steps require downtime, hence you should planaccordingly.
� Step 1: Complete the Rapid Install of Oracle Applications
If you already have an existing Oracle Applications runtimeenvironment, you can skip this step. You should complete the RapidInstall and use the standard single database instance installation mode.You should also ensure that the Application modules including Formsand Self–Service are functional. In addition, you should ensure that theConcurrent Managers are active and functional.
� Step 2: Configure the Shared Disk Volumes
RAC requires shared disk volumes in order to facilitate theimplementation of a shared disk architecture. Using the disk volumemanager for your platform such as Veritas, configure the shared diskvolumes. In order to minimize the migration time, you shouldconfigure a separate shared volume for each database file includingdatabase files, redo log files, and control files. All database files mustbe placed on shared volumes so as to allow access to all the files fromall the instances. Although redo log files are private per instance, other
G – 86 Oracle Applications System Administrator’s Guide
instances may need to access the redo log files in the case of recovery.If your database consists of 80 data files, 4 redo log files, and 2 controlfiles, then you should configure at least 86 shared disk volumes. Thevolume should be sized such that it can contain the original data file.For example, if the existing data file is 1 GB, then the shared volume forthat data file should be at least 1 GB in size. In general, you should sizethe shared volume such that it is larger than the existing data file byseveral megabytes in order to account for volume manager and rawdevice overhead.
Once you have completed configuring the shared volumes, bring theshared volumes online, and change the permissions of the sharedvolumes such that the shared volumes can be read and written by thesystem account which owns the oracle binary.
� Step 3: Install the Real Application Clusters Option
Using the Oracle9i Universal Installer from the $ORACLE_HOME onthe database server, install the Real Application Clusters option (if notalready installed).
If you are using Oracle8i, then you should install the Parallel Serveroption using the Oracle8i installer.
� Step 4: Ensure that the MAXINSTANCES Parameter is set properly
Converting to RAC requires that the database support multipleinstances mounting and accessing the same database. Hence, theMAXINSTANCES parameter of the control file should be set to thenumber of active RAC instances. For example, if configuring atwo–node cluster, then MAXINSTANCES should be set to at least two(2). In order to determine the existing value of MAXINSTANCES, runthe following query:
select type,records_total
from v$controlfile_record_section
where type=’REDO THREAD’;
OUTPUT:
TYPE RECORDS_TOTAL
–––––––––––––––– ––––––––––––––
REDO THREAD 4
If the value for RECORDS_TOTAL for the REDO THREAD type isgreater than or equal to the desired number of RAC instances, then youcan skip Step 5. Otherwise, follow the instructions in Step 5 in order toincrease the value of MAXINSTANCES. In the example output
G – 87Setting Up and Maintaining Oracle Applications
provided above, MAXINSTANCES is set to 4, hence there is no need torecreate the control file.
� Step 5: Increase the MAXINSTANCES Parameter
In order to change the control file parameter MAXINSTANCES, youneed to recreate the database control file. This can be done via thefollowing steps:
1. Backup the existing control file.
myhost> sqlplus ”/ as sysdba”
SQL> alter database backup controlfile to trace;
2. Locate and edit the trace file.
The backup control file command will generate a trace file in thedirectory specified by the init.ora parameter user_dump_dest.Locate the trace file, and edit the trace file in order to create a SQLscript which can be used to recreate the control file. You shouldremove the trace file comments. Change the value for theMAXINSTANCES parameter from 1 to 4, for example.
STARTUP NOMOUNT
CREATE CONTROLFILE REUSE DATABASE ”OPSPROD” NORESETLOGS \
NOARCHIVELOG
MAXLOGFILES 255
MAXLOGMEMBERS 2
MAXDATAFILES 1022
MAXINSTANCES 4
MAXLOGHISTORY 907
...............
3. Save the changes into a SQL script.
Save the changes made to the trace file in a SQL script namedcontrol.sql.
4. Recreate the control file.
Shut down all the application services and then the database (innormal mode). Then recreate the control file as follows:
myhost> sqlplus ”/ as sysdba”
SQL>@control.sql
Ensure that the control file has been successfully created, and that thedatabase has opened successfully. Repeat Step 4 ”Ensure that the
G – 88 Oracle Applications System Administrator’s Guide
MAXINSTANCES Parameter is set properly” in order to confirm thatthe MAXINSTANCES parameter has been set correctly.
RAC Migration Steps
The following steps should be performed following the completion ofthe prerequisite steps.
� Step 1: Shut Down the Application Services
Prior to migrating to the RAC environment, you should shutdown allthe application services such as the Concurrent Manager, Forms Server,Report Server, Discoverer, Self Service (Apache JServ and Apache ModPL/SQL), and others. Once the middle–tier services have beensuccessfully shut down, you should shut down the database instance innormal or immediate mode.
� Step 2: Copy the Database Files to the Shared Volumes
The database should be shutdown prior to copying the files. Copy allthe database files to the shared volumes using the OS copy utility. OnSolaris, you can use the dd command to copy the data files. Forexample:
prompt> dd if=ont_idx1.dbf of=/dev/vx/rdsk/apps1opsdg/vol25 bs=64k
prompt> dd if=mrp_data1.dbf of=/dev/vx/rdsk/apps1opsdg/vol26 \
bs=64k
� Step 3: Link to the Shared Volumes
After completing the copy of the database files to the shared volumes,you need to ensure that the database now points to the sharedvolumes. You can either create symbolic links which point to the newshared volumes or rename the file names stored in the database via thecommand ”ALTER DATABASE RENAME FILE”. To rename the datafiles via the ALTER DATABASE RENAME FILE command, thedatabase needs to be started in the exclusive mount mode. Afterrenaming the data files, the database can be opened.
If the ALTER DATABASE RENAME FILE command was used torename the files, open the database via the command ”ALTERDATABASE open” following the completion of the rename. Queryv$datafile, v$logfile, and v$tempfile to ensure that the database filenames reflect the shared volume names. Then, shutdown the databaseinstance in normal mode.
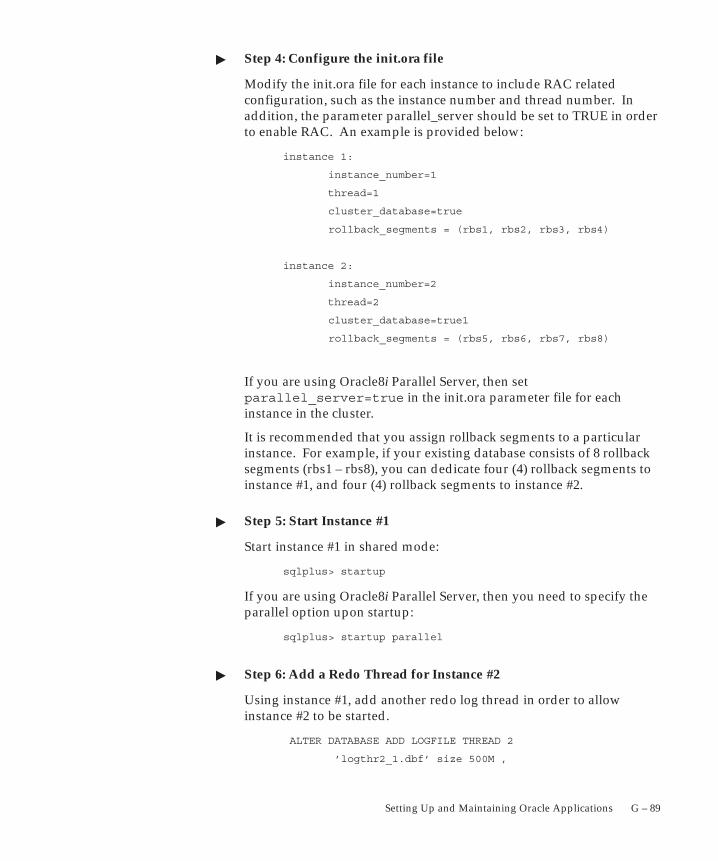
G – 89Setting Up and Maintaining Oracle Applications
� Step 4: Configure the init.ora file
Modify the init.ora file for each instance to include RAC relatedconfiguration, such as the instance number and thread number. Inaddition, the parameter parallel_server should be set to TRUE in orderto enable RAC. An example is provided below:
instance 1:
instance_number=1
thread=1
cluster_database=true
rollback_segments = (rbs1, rbs2, rbs3, rbs4)
instance 2:
instance_number=2
thread=2
cluster_database=true1
rollback_segments = (rbs5, rbs6, rbs7, rbs8)
If you are using Oracle8i Parallel Server, then setparallel_server=true in the init.ora parameter file for eachinstance in the cluster.
It is recommended that you assign rollback segments to a particularinstance. For example, if your existing database consists of 8 rollbacksegments (rbs1 – rbs8), you can dedicate four (4) rollback segments toinstance #1, and four (4) rollback segments to instance #2.
� Step 5: Start Instance #1
Start instance #1 in shared mode:
sqlplus> startup
If you are using Oracle8i Parallel Server, then you need to specify theparallel option upon startup:
sqlplus> startup parallel
� Step 6: Add a Redo Thread for Instance #2
Using instance #1, add another redo log thread in order to allowinstance #2 to be started.
ALTER DATABASE ADD LOGFILE THREAD 2
’logthr2_1.dbf’ size 500M ,
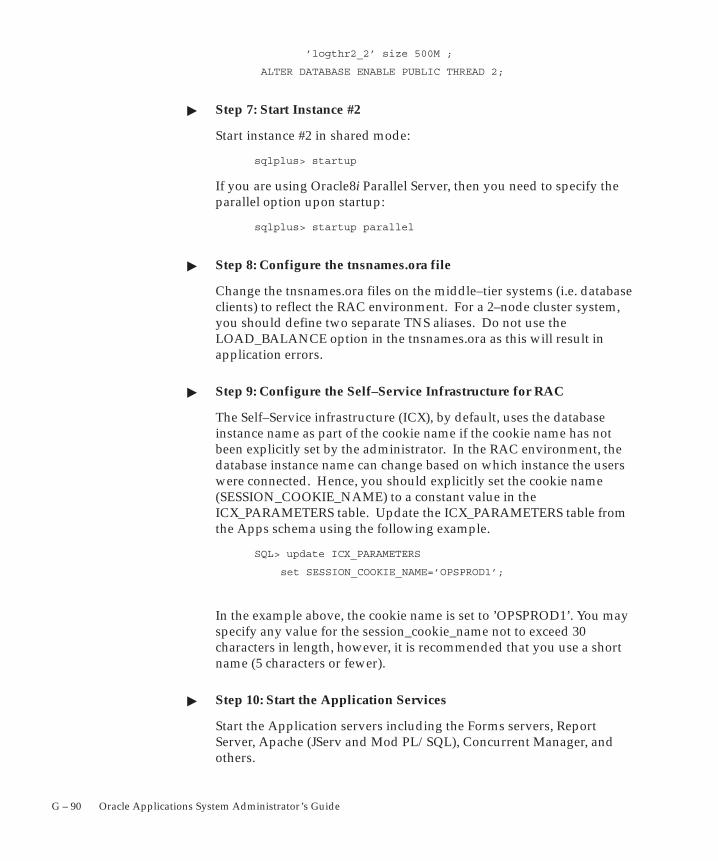
G – 90 Oracle Applications System Administrator’s Guide
’logthr2_2’ size 500M ;
ALTER DATABASE ENABLE PUBLIC THREAD 2;
� Step 7: Start Instance #2
Start instance #2 in shared mode:
sqlplus> startup
If you are using Oracle8i Parallel Server, then you need to specify theparallel option upon startup:
sqlplus> startup parallel
� Step 8: Configure the tnsnames.ora file
Change the tnsnames.ora files on the middle–tier systems (i.e. databaseclients) to reflect the RAC environment. For a 2–node cluster system,you should define two separate TNS aliases. Do not use theLOAD_BALANCE option in the tnsnames.ora as this will result inapplication errors.
� Step 9: Configure the Self–Service Infrastructure for RAC
The Self–Service infrastructure (ICX), by default, uses the databaseinstance name as part of the cookie name if the cookie name has notbeen explicitly set by the administrator. In the RAC environment, thedatabase instance name can change based on which instance the userswere connected. Hence, you should explicitly set the cookie name(SESSION_COOKIE_NAME) to a constant value in theICX_PARAMETERS table. Update the ICX_PARAMETERS table fromthe Apps schema using the following example.
SQL> update ICX_PARAMETERS
set SESSION_COOKIE_NAME=’OPSPROD1’;
In the example above, the cookie name is set to ’OPSPROD1’. You mayspecify any value for the session_cookie_name not to exceed 30characters in length, however, it is recommended that you use a shortname (5 characters or fewer).
� Step 10: Start the Application Services
Start the Application servers including the Forms servers, ReportServer, Apache (JServ and Mod PL/SQL), Concurrent Manager, andothers.
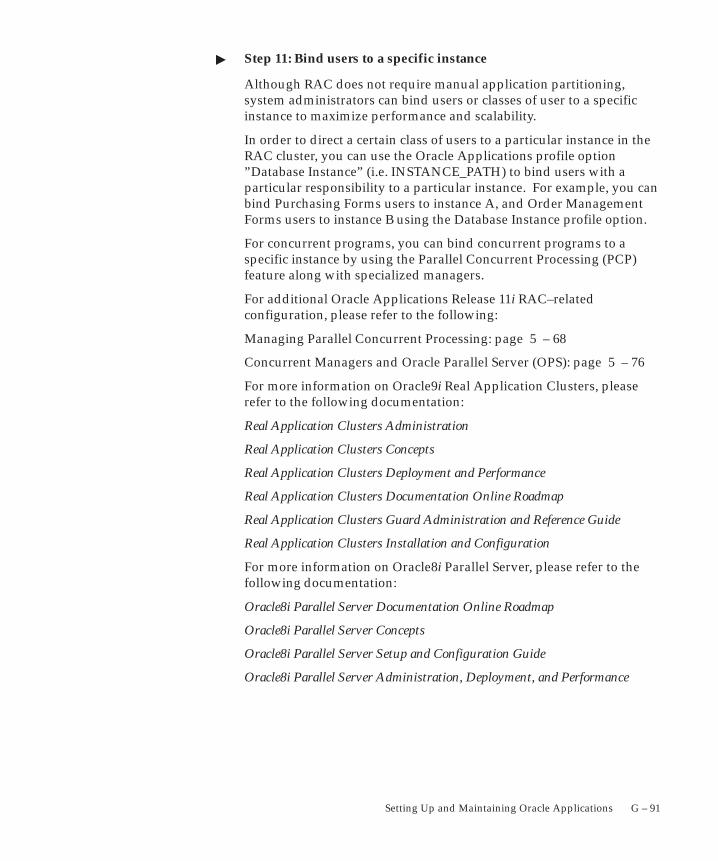
G – 91Setting Up and Maintaining Oracle Applications
� Step 11: Bind users to a specific instance
Although RAC does not require manual application partitioning,system administrators can bind users or classes of user to a specificinstance to maximize performance and scalability.
In order to direct a certain class of users to a particular instance in theRAC cluster, you can use the Oracle Applications profile option”Database Instance” (i.e. INSTANCE_PATH) to bind users with aparticular responsibility to a particular instance. For example, you canbind Purchasing Forms users to instance A, and Order ManagementForms users to instance B using the Database Instance profile option.
For concurrent programs, you can bind concurrent programs to aspecific instance by using the Parallel Concurrent Processing (PCP)feature along with specialized managers.
For additional Oracle Applications Release 11i RAC–relatedconfiguration, please refer to the following:
Managing Parallel Concurrent Processing: page 5 – 68
Concurrent Managers and Oracle Parallel Server (OPS): page 5 – 76
For more information on Oracle9i Real Application Clusters, pleaserefer to the following documentation:
Real Application Clusters Administration
Real Application Clusters Concepts
Real Application Clusters Deployment and Performance
Real Application Clusters Documentation Online Roadmap
Real Application Clusters Guard Administration and Reference Guide
Real Application Clusters Installation and Configuration
For more information on Oracle8i Parallel Server, please refer to thefollowing documentation:
Oracle8i Parallel Server Documentation Online Roadmap
Oracle8i Parallel Server Concepts
Oracle8i Parallel Server Setup and Configuration Guide
Oracle8i Parallel Server Administration, Deployment, and Performance
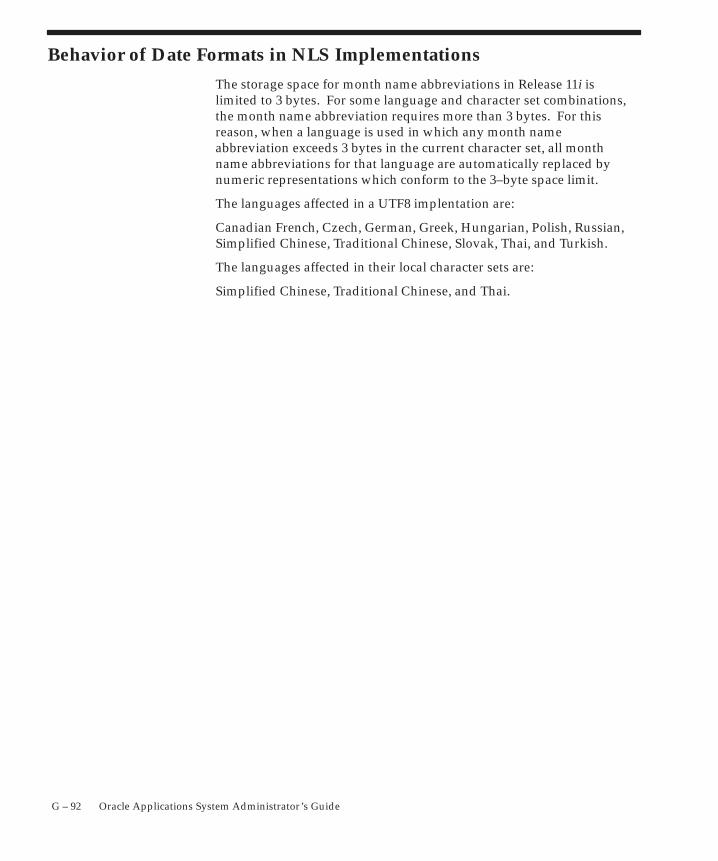
G – 92 Oracle Applications System Administrator’s Guide
Behavior of Date Formats in NLS Implementations
The storage space for month name abbreviations in Release 11i islimited to 3 bytes. For some language and character set combinations,the month name abbreviation requires more than 3 bytes. For thisreason, when a language is used in which any month nameabbreviation exceeds 3 bytes in the current character set, all monthname abbreviations for that language are automatically replaced bynumeric representations which conform to the 3–byte space limit.
The languages affected in a UTF8 implentation are:
Canadian French, Czech, German, Greek, Hungarian, Polish, Russian,Simplified Chinese, Traditional Chinese, Slovak, Thai, and Turkish.
The languages affected in their local character sets are:
Simplified Chinese, Traditional Chinese, and Thai.

A P P E N D I X
H
H – 1Technology Stack Enabled Features
Technology StackEnabled Features
H – 2 Oracle Applications System Administrator’s Guide
Oracle9i Application Server (9iAS) and Oracle Applications
Oracle9i Application Server (Oracle9iAS) offers the industry’s fastest,most complete and integrated J2EE–certified application server.Oracle9iAS has revolutionized the application server market by beingthe first to integrate all the technology required to develop and deploye–business portals, transactional applications, and Web services into asingle product. Oracle9iAS provides the most productive developmentenvironment for developers to create Internet Applications includingJ2EE Applications, Web Services, Enterprise Portals, Wireless andBusiness Intelligence Applications. Its open and integration–readyarchitecture and standards compliance ensures that your Webapplications can integrate with your IT environment, including legacysystems, the applications of your suppliers and partners, and Oracleand non–Oracle databases.
Oracle9iAS provides the most reliable platform to deploy InternetApplications including the fastest J2EE and Web Services environment,High Availability and Clustering Support, and complete, centralizedManagement and Security of all Oracle9iAS components.
For information on installing Oracle9iAS with Oracle Applications, seeOracleMetaLink Note 146468.1. For related documentation, see thesection Oracle9i Applications Server (9iAS) with Oracle E–BusinessSuite Related Documentation: page H – 49.

H – 3Technology Stack Enabled Features
Oracle Applications with Oracle9iAS Portal
Oracle9i Application Server enables you to rapidly build and deploypersonalized portals using Oracle9iAS Portal. With its intuitive Webinterface, workflow, and self–service publishing features, Oracle9iASPortal allows you to integrate Web–based resources such asapplications, Web pages, business intelligence reports, and syndicatedcontent feeds within standardized information components calledportlets. You can build a personalized portal to deliver all of yourbusiness information and applications to any device with Oracle9iASPortal.
For information on configuring Oracle Portal for integration withOracle Applications, see OracleMetaLink Note 146469.1.
H – 4 Oracle Applications System Administrator’s Guide
Implementing Single Sign–On for Oracle Applications 11i with LoginServer Authentication Using Oracle Internet Directory
Oracle Applications 11i now supports the use of Single Sign–Onfunctionality via Oracle Portal, Oracle Login Server, and OracleInternet Directory. Single Sign–On functionality allows users to accessOracle Applications 11i and other applications and services fromOracle Portal through a single user ID, without having to log into eachapplication separately.
User information in external, third–party user directories can besynchronized with Oracle Internet Directory using LightweightDirectory Access Protocols (LDAP). With Oracle Internet Directory,customers can manage and publish user information in a centrallocation which their various application systems, including OracleApplications 11i, can reference.
This document describes the process for implementing Single Sign–Onfunctionality for Oracle Applications 11i. Components that need to beinstalled and configured to support Single Sign–On and integrationwith external LDAP user directories are:
• Oracle Applications Release 11.5.7 and higher
• Oracle9i Application Server (9iAS) 1.0.2.2.2
• Oracle Portal 3.0.9.8.2 (optional)
• Oracle9i Application Server (9iAS) Login Server 3.0.9.8.2(installed with Oracle Portal)
• Oracle Internet Directory (OID) 3.0.1
Basic familiarity with the following areas is assumed in this document:Oracle Applications 11i, single sign–on concepts, Lightweight DirectoryAccess Protocol services, and general security management principles.System administrators are strongly advised to make backups of theirenvironments before executing any of the procedures noted, and to testtheir environments before executing these procedures in productionenvironments. Users must be asked to log off the system whileapplying these changes. The procedures in this document havesignificant effects on Oracle E–Business Suite Release 11i environmentsand should be executed only by skilled Oracle Applications 11idatabase or systems administrators.
Obtain the Latest Documentation
The most current version of this section is published in Note 150832.1on OracleMetaLink. It is important that you read this document and the
H – 5Technology Stack Enabled Features
appropriate documents in the Related Documentation section beforeimplementing any procedures listed in this note.
Functional Overview
Integration with Oracle9i Application Server, Portal, and Login Server
Oracle9i Application Server 1.0.2.2.2 components are integrated withOracle Applications 11i to provide a seamless user experience viaSingle Sign–on. Users sign on to Oracle Portal, see their Portal homepage, and may access a variety of applications and services, includingOracle Applications 11i Self–Service Web Applications, Forms,Discoverer workbooks (if Business Intelligence System modules areconfigured), and other external applications.
To upgrade an existing Oracle Applications 11i environment to supportsingle sign–on functionality, the following documents must becompleted before implementing the procedures described in thissection:
1. Installing Oracle9i Application Server with Oracle Applications 11i(OracleMetaLink Note 146468.1)
2. Configuring Oracle Applications with Oracle Portal (Metalink146469.1) – installation of Oracle Portal is optional
During the configuration of Oracle Portal, system administratorsmay choose between authenticating users via:
• Login Server authentication using Oracle Applications 11iFND_USER user directory
– See Step 3.1 in Configuring Oracle Applications with OraclePortal (OracleMetaLink Note 146469.1)
• Login Server authentication using Oracle Internet Directory
– To configure Login Server to authenticate using OracleInternet Directory, see Oracle9iAS Single Sign–OnAdministrator’s Guide Release 3.0.9 (Part #A88732–01)
– Once Login Server has been configured to use OracleInternet Directory, Oracle Internet Directory must beconfigured to synchronize with Oracle Applications 11iFND_USER user directory by following the procedures inthis section, or OracleMetaLink Note 150832.1.
How Single Sign–On User works with Oracle Applications 11i
The following is a high–level overview of the responsibilities ofdifferent components in a Single Sign–On transaction:
H – 6 Oracle Applications System Administrator’s Guide
Authentication Phase: Validating a user’s identity
1. User attempts to access Oracle Applications 11i from Oracle Portal.
2. User is redirected by Portal to Login Server.
3. Login Server attempts to verify whether the user has a validpartner application cookie from Oracle Applications 11i.
4. If there is no valid partner application cookie set in the user’sbrowser, Login Server displays a login page to the user requesting auser ID and password.
5. Login Server verifies the user ID and password via Oracle InternetDirectory or FND_USER.
6. Once verified, Login Server sends the user an encrypted validpartner application cookie.
7. Login Server redirects the user back to Oracle Applications 11i andincludes an encrypted token in the URL. This token contains theuser’s identity and possibly other application specific configurationinformation, such as language preference. The token is encrypted ina key which is shared only by the Login Server and OracleApplications 11i, and allows Oracle Applications 11i to verify thatthe token is authentic and was created by the Login Server.
Authorization Phase: Determining what services and data that theuser may access
1. Oracle Applications 11i receives and decrypts the URL token andchecks the user’s granted responsibilities to determine grant accessto the authenticated user.
2. If Oracle Applications 11i grants the user access, it sets a partnerapplication cookie in the user’s browser.
3. On the user’s home page, Portal displays portlets that the user hasbeen granted access to via the responsibilities in OracleApplications 11i.
4. The client sends the Oracle Applications 11i partner applicationcookie along with subsequent HTTP requests to OracleApplications 11i. Using this cookie, Oracle Applications 11iidentifies and grants access to the user without having to redirectthe user to the Login Server for authentication. Oracle Applications11i cookies expire after a period of time specified by OracleApplications system administrators, or when the user shuts downhis browser.

H – 7Technology Stack Enabled Features
Synchronizing User Information Between Oracle Internet Directory and OracleApplications 11i
By implementing the procedures in this document, user informationwill be stored in Oracle Internet Directory. Oracle Internet Directory isthe authoritative, master source for user definitions.
For performance reasons, the user information in Oracle InternetDirectory must be copied locally to the Oracle Applications 11iFND_USER user directory, even though the master user definition islocated in Oracle Internet Directory. The synchronization process isunidirectional: changes made to the user definition in Oracle InternetDirectory are propagated periodically to FND_USER via an OracleWorkflow business event. Using Oracle Workflow, systemadministrators may set the frequency for this synchronization fromOID to FND_USER.
The patches described in this section support updating the FND_USERtable with data from the LDAP directory. Future enhancements willenable bidirectional synchronization in both directions, i.e. FND_USERto LDAP, as well as LDAP to FND_USER. Bidirectional support willallow user information to be managed in either Oracle InternetDirectory or Oracle Applications 11i; changes made to user definitionsin one user directory will be synchronized with the other.
Creating User Entries in Oracle Internet Directory
User information can be entered into Oracle Internet Directory in threeways:
1. Entered manually by an Oracle Internet Directory administrator
2. Imported from third–party LDAP user directories via LightweightDirectory Interchange Format (LDIF) ASCII flat files
3. Imported from Oracle Applications 11i Human ResourcesPER_PEOPLE_F using the Oracle Human Resources agent
The Human Resources module in Oracle Applications 11i must beimplemented to support the third method above. Oracle InternetDirectory can be initially provisioned with user information fromOracle Human Resources 11i PER_PEOPLE_F table using the OracleHuman Resources agent. The Oracle Human Resources Agent is aone–way provisioning integration from PER_PEOPLE_F to OracleInternet Directory and requires the OID Directory Integration Server.For more information, see Chapter 27, ”Synchronizing with OracleHuman Resources” in the Oracle Internet Directory Administrator’s GuideRelease 3.0.1 (Part Number A90151–01).
H – 8 Oracle Applications System Administrator’s Guide
Integration with third–party LDAP user directories
Oracle Internet Directory can synchronize with external, third–partyuser directories if they comply with LDAP 3 / X.500 industrystandards. Examples of third–party LDAP user directories includeSun/Netscape’s iPlanet, Microsoft’s Active Directory, and Novell’sNovell Directory Services.
Integration with third–party LDAP user directories is achieved viaLightweight Directory Interchange Format (LDIF) ASCII flat files.LDIF files are formatted to industry standards and are used toexchange data between Lightweight Directory Access Protocol (LDAP)servers. The process of integrating Oracle Internet Directory with anexternal third–party LDAP user directory is:
1. Third–party user LDAP user directory exports user informationinto an LDIF file
2. LDIF file is manually imported into Oracle Internet Directory
3. User entries in Oracle Internet Directory are copied to OracleApplications 11i FND_USER user directory via the ”Synchronizewith LDAP information” concurrent program
Additional steps are required to ensure integrity and compatibility ofthe LDIF file, particularly for user attribute mapping and the use ofpassword hash algorithms. For details, see Appendix F of the OracleInternet Directory Administrator’s Guide Release 3.0.1 (Part NumberA90151–01).
Managing Passwords and Responsibilities
When Oracle Internet Directory is designated as the master source foruser information, all user attributes including passwords aremaintained and administered using Oracle Internet Directory. Changesmade to user information in Oracle Internet Directory are propagatedto the Oracle Applications 11i FND_USER tables through theWorkflow–based synchronization process described above. There aretwo exceptions to this:
1. Passwords are managed exclusively in Oracle Internet Directoryand are not propagated from Oracle Internet Directory to OracleApplications 11i FND_USER.
2. Oracle Internet Directory does not have access to the list ofavailable responsibilities for Oracle Applications 11i users.Responsibilities continue to be administered in Oracle Applications11i via the standard Applications System Administratorresponsibilities and Oracle Applications Forms.
H – 9Technology Stack Enabled Features
Functional Limitations for Customer Relationship Management Module Users
Single Sign–On for Professional Interface (Forms–based) CRM 11imodules is supported. Single Sign–On for Self–Service (HTML–based)Customer Relationship Management (CRM) 11i modules via Portal isnot yet supported with this release. Customers who are usingCustomer Relationship Management modules cannot switch to OracleInternet Directory as the source of authentication for just theApplications modules (e.g. General Ledger, Human Resources).FND_USER must remain the source of authentication for theApplications modules due to CRM dependencies on the passwordinformation in FND_USER. This limitation is expected to be removedwith later releases of Customer Relationship Management modules.
Oracle Login Server versus Oracle Single Sign–On Server
Various related documentation may alternately refer to Oracle LoginServer, Single Sign–On Server, and Single Sign–On. These terms allrefer to the same product at different times in its lifecycle:
• Oracle9i Application Server 1.0.2.2.2 uses the term Login Server
• Oracle9i Application Server 9.0.2 and higher use the term SingleSign–On Server, or simply Single Sign–On
Conventions
The following table lists the typographical conventions that are used inthis appendix, along with their meanings:
Convention Meaning
\ In examples of commands you type online, abackward slash at the end of a line signifies that youmust type the entire command on one line. Do nottype the backslash.
Monospace text
Represents command line text. Type this textexactly as shown.
H – 10 Oracle Applications System Administrator’s Guide
MeaningConvention
<> or [] Text enclosed in angled or square bracketsrepresents a variable. Substitute an appropriatevalue for the variable text. Do not type the brackets.
Directory Paths Directory paths in this appendix are relative to thetop level installation directory for the OracleE–Business Suite. For example, if you installed theOracle E–Business Suite under a directory named/my/appsinstall and are pointing to an OracleE–Business Suite Release 11i database namedmytestdb, then <dbname>ora/iAS/Apache in thisdocument will mean the fully qualified path:/my/appsinstall/mytestdbora/iAS/Apache
Concepts and Definitions
User
”Users” are individuals who have access to one or more softwareapplications at a particular enterprise. Users are ”global” entities,which means their existence and attributes are true outside the contextof any particular software application.
User Directory
”User Directories” are software services that store the list of users andtheir attributes. Oracle Applications currently has its own proprietaryuser directory (FND_USER table). There are also general purpose userdirectories that manage user information and expose it to integratedapplications through a standard interface. LDAP is one Internetstandard protocol and schema for user directories which has gainedwidespread acceptance.
Currently Oracle Applications 11i is certified to synchronize directlywith Oracle Internet Directory only. Oracle Internet Directory cansynchronize with one or more external, third–party user directories.
LDAP
The Lightweight Directory Access Protocol is a standard, extensibledirectory access protocol used for communication between LDAPclients and servers.
H – 11Technology Stack Enabled Features
LDAP was conceived as an Internet–ready, lightweight implementationof the International Standardization Organization (ISO) X.500 standardfor directory services. It requires a minimal amount of networkingsoftware on the client side, which makes it particularly attractive forInternet–based, thin client applications.
Oracle Internet Directory
Oracle Internet Directory is a general purpose directory service thatenables retrieval of information about dispersed users and networkresources. It combines LDAP Version 3 with the high performance,scalability, robustness, and availability of Oracle8i.
Oracle Internet Directory runs as an application on Oracle9i. Itcommunicates with the database, which may be on the same or on adifferent operating system, by using Oracle Net, Oracle’s operatingsystem–independent database connectivity solution.
As stated above, Oracle Applications is certified to synchronize directlywith Oracle Internet Directory only. Oracle Internet Directory cansynchronize with one or more external, third–party user directories.
For more information, see: Oracle Internet Directory Administrator’s GuideRelease 3.0.1 (Part #A90151–01).
DBMS_LDAP Package
The PL/SQL package DBMS_LDAP contains the functions andprocedures which can be used to access data from LDAP servers. Thispackage is shipped with Oracle8i Release 8.1.7. For more information,see: Oracle 8.1.7 Documentation Addendum.
Business Event System (Oracle Workflow 2.6)
The Oracle Workflow Business Event System is an application servicethat uses the Oracle Advanced Queuing (AQ) infrastructure tocommunicate business events between systems. The Business EventSystem consists of the Event Manager and workflow process eventactivities.
The Event Manager contains a registry of business events, systems,named communication agents within those systems, and subscriptionsindicating that an event is significant to a particular system. Events canbe raised locally or received from an external system or the localsystem through Oracle Advanced Queuing. When a local event occurs,the subscribing code is executed in the same transaction as the codethat raised the event.
H – 12 Oracle Applications System Administrator’s Guide
For more information, see: Oracle Workflow Guide Release 2.6.
Software Requirements and Supported Architectures
The requirements for Single Sign–On functionality and Oracle InternetDirectory integration are:
• Oracle Applications Release 11.5.1 or higher
Database Tier:
Oracle8i Database Release 8.1.7 Release 3 or higher with theOracle Internet Directory option installed (required forDBMS_LDAP support on this tier)
Application Tier Server:
Oracle9i Application Server Release 1.0.2.2.2
Oracle Portal 3.0.9.8.2 (optional)
Oracle Login Server 3.0.9.8.2
Oracle Workflow Release 11i Version 2.6 (Patch 1765626)
• Oracle Internet Directory Release 3.0.1 from Oracle9i Release 1
Directory Server Tier:
Oracle Internet Directory Release 3.0.1 from Oracle9i Release 1
The Oracle Internet Directory server may be installed:
a. On a separate, standalone directory server
b. On the Oracle Applications 11i application tier server in aseparate ORACLE_HOME
Directory Database Server:
Oracle Internet Directory Release 3.0.1 from Oracle9i Release 1
The Oracle Internet Directory database may be installed:
a. On a separate, standalone database server
b. On the Oracle Applications 11i database server in astandalone database
c. On the Oracle Applications 11i database server in theOracle Applications 11i database.
Overview of Synchronization Functionality
The current release enables the Oracle Applications 11i FND_USERuser directory to be updated from Oracle Internet Directory.
H – 13Technology Stack Enabled Features
Specifically, FND_USER is synchronized with the LDAP directoryinformation when Oracle Applications is notified of changes andadditions to LDAP data in Oracle Internet Directory
The concurrent program ”Synchronize with LDAP information” looksfor user information directly and identifies LDAP user changes(creation, modification, deletion) by querying the Oracle InternetDirectory LDAP change log records.
If there is a change in Oracle Internet Directory, theoracle.apps.global.user.change (”User Entry has changed”) businessevent is raised. The oracle.apps.global.user.change event is listedunder the Applications 11i navigation path for Workflowadministrative responsibilities :
Personal Home Page > Navigate Portlet > Workflow User WebApplications > Find Event
When the oracle.apps.global.user.change business event is raised, oneof the following business event subscriptions runs to synchronize userinformation from Oracle Internet Directory into FND_USER:
1. ”FND listening for public user changes to create USERS”
2. ”FND listening for public user changes to update USERS”
These two subscriptions are listed under the Applications 11inavigation path for Workflow administrative responsibilities:
Personal Home Page > Navigate Portlet > Workflow User WebApplications > Find Event Subscription
Upgrading Applications 11i to Support Synchronization with Oracle InternetDirectory
The following steps are required to upgrade Oracle Applications 11i tosupport synchronization between Oracle Internet Directory and theOracle Applications 11i FND_USER user directory.
Step 1. Apply the Oracle Internet Directory Synchronization Patches
� Step 1.1: Apply the Oracle Applications 11i Workflow Patch
This patch is required to enable the Workflow Business Event Managerfunctionality.
• Download patch 2499306 from OracleMetaLink.
H – 14 Oracle Applications System Administrator’s Guide
• Follow the instructions in the patch to apply it to your system.
• In addition to other Workflow and infrastructure–related files,this patch contains the following subscriptions:
– fnd_user_pkg.user_change
– fnd_user_pkg.user_create_rf
– wf_sso.user_change
� Step 1.2: Apply the Oracle Internet Directory Synchronization Patch
This patch is required to enable the subscriptions and associatedconcurrent programs that synchronize user information from OracleInternet Directory to Oracle Applications 11i FND_USER.
• Download patch 1784626 from OracleMetalink.
• Follow the instructions in the patch to apply it to your system.
• Note that the README for this patch refers to the prerequisitepatch 2146295. That patch has been replaced by the patch listedabove as the Oracle Applications 11i Workflow Patch.
� Step 1.3 Apply the latest ICX Core Rollup Patch
When Oracle Internet Directory is designated as the master source foruser information, all user attributes, including passwords, must beadministered in Oracle Internet Directory. The sole exception areApplications responsibilities, which are managed via the standardApplications System Administrator responsibilities and ApplicationForms.
These Applications Forms must be updated to the ”ICX Core Roll–UpFor August 2002” level or later to prevent passwords from beingchanged via Applications Forms when Oracle Internet Directory isimplemented.
• Download the ”ICX Core Roll–Up For August 2002” patch1784626 or the most recent ICX Core Roll–Up patch fromOracleMetalink.
• Follow the instructions in the patch to apply it to your system.
Step 2. Set the Oracle Workflow System LDAP Preferences Using the Workflow GlobalPreferences Window
Oracle Workflow needs to be configured with information about thelocation of Oracle Internet Directory and access information for thechangelog. These preferences specify which LDAP directory to connectto and how to find the user and changelog information.
H – 15Technology Stack Enabled Features
� Step 2.1: Login to Oracle Applications and Navigate to WorkflowGlobal Preferences
1. Log in to Oracle Applications 11i as a Workflow Administratorwith the System Administrator responsibility
2. Navigate to Workflow > Global Preferences
� Step 2.2: Verify Generic Workflow Settings
Verify that the following generic Workflow values are set correctly:
• Workflow Administrator: Name of the WorkflowAdministrator. For example: SYSADMIN
• Workflow Web Agent: URL to the Workflow Web Agent:
– Format:http://<hostname>.<domain>:<port>/pls/<DAD_NAME>
– For example: http://prod.company.com:8090/pls/prod1
• Local System: Current system’s hostname.domain. Forexample: prod.company.com
• System Status: Enabled
� Step 2.3: Identify the Oracle Internet Directory LDAP Server
Set the following two options to identify the Oracle Internet DirectoryLDAP server:
• LDAP Host: Host on which the Oracle Internet Directory LDAPdirectory resides.
– Format: <ldap_host>.<domain>
– For example: ldap.company.com
• LDAP Port: Port on the Oracle Internet Directory LDAP host.For example: 5309
� Step 2.4: Identify the Oracle Internet Directory LDAP User Account
Set the following two options to identify the Oracle Internet DirectoryLDAP user account that Oracle Workflow will use to bind to the OracleInternet Directory LDAP server. This Oracle Internet Directory LDAPuser account must have write privileges to the Oracle InternetDirectory in order to create a changelog subscription object.
• LDAP User Name: Oracle Internet Directory LDAP user accountwith write privileges
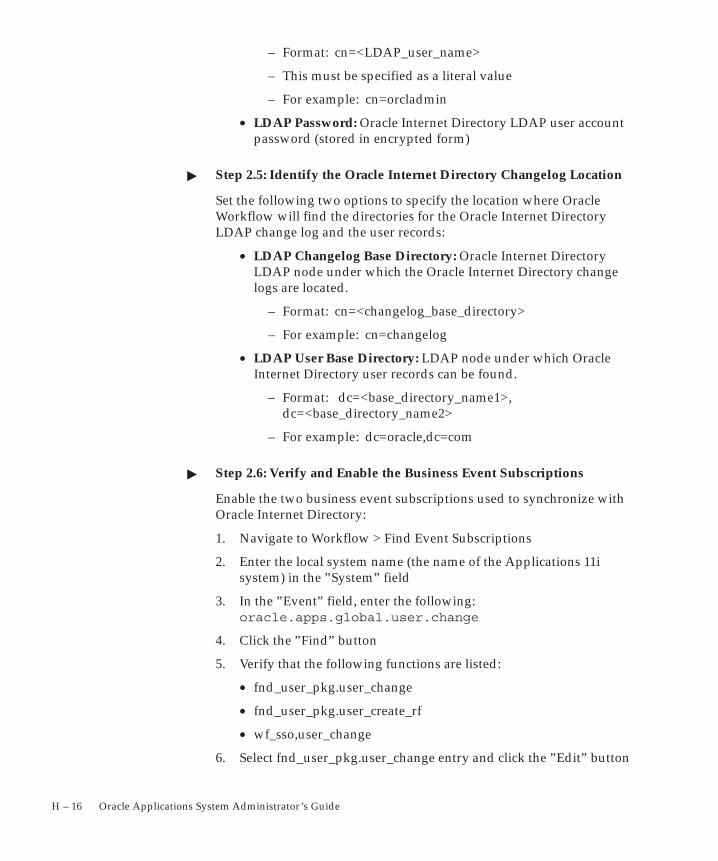
H – 16 Oracle Applications System Administrator’s Guide
– Format: cn=<LDAP_user_name>
– This must be specified as a literal value
– For example: cn=orcladmin
• LDAP Password: Oracle Internet Directory LDAP user accountpassword (stored in encrypted form)
� Step 2.5: Identify the Oracle Internet Directory Changelog Location
Set the following two options to specify the location where OracleWorkflow will find the directories for the Oracle Internet DirectoryLDAP change log and the user records:
• LDAP Changelog Base Directory: Oracle Internet DirectoryLDAP node under which the Oracle Internet Directory changelogs are located.
– Format: cn=<changelog_base_directory>
– For example: cn=changelog
• LDAP User Base Directory: LDAP node under which OracleInternet Directory user records can be found.
– Format: dc=<base_directory_name1>,dc=<base_directory_name2>
– For example: dc=oracle,dc=com
� Step 2.6: Verify and Enable the Business Event Subscriptions
Enable the two business event subscriptions used to synchronize withOracle Internet Directory:
1. Navigate to Workflow > Find Event Subscriptions
2. Enter the local system name (the name of the Applications 11isystem) in the ”System” field
3. In the ”Event” field, enter the following:oracle.apps.global.user.change
4. Click the ”Find” button
5. Verify that the following functions are listed:
• fnd_user_pkg.user_change
• fnd_user_pkg.user_create_rf
• wf_sso,user_change
6. Select fnd_user_pkg.user_change entry and click the ”Edit” button
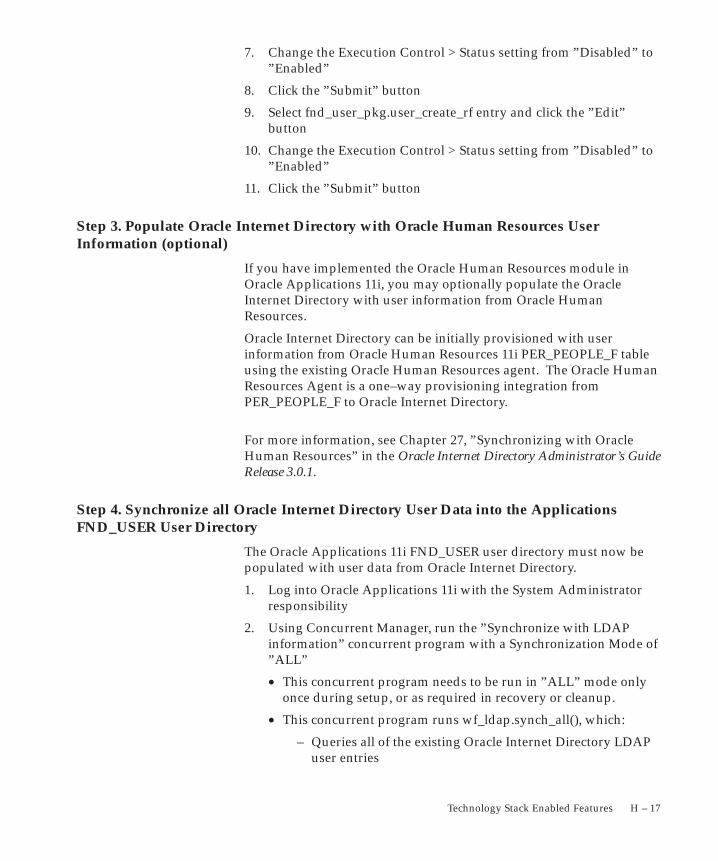
H – 17Technology Stack Enabled Features
7. Change the Execution Control > Status setting from ”Disabled” to”Enabled”
8. Click the ”Submit” button
9. Select fnd_user_pkg.user_create_rf entry and click the ”Edit”button
10. Change the Execution Control > Status setting from ”Disabled” to”Enabled”
11. Click the ”Submit” button
Step 3. Populate Oracle Internet Directory with Oracle Human Resources UserInformation (optional)
If you have implemented the Oracle Human Resources module inOracle Applications 11i, you may optionally populate the OracleInternet Directory with user information from Oracle HumanResources.
Oracle Internet Directory can be initially provisioned with userinformation from Oracle Human Resources 11i PER_PEOPLE_F tableusing the existing Oracle Human Resources agent. The Oracle HumanResources Agent is a one–way provisioning integration fromPER_PEOPLE_F to Oracle Internet Directory.
For more information, see Chapter 27, ”Synchronizing with OracleHuman Resources” in the Oracle Internet Directory Administrator’s GuideRelease 3.0.1.
Step 4. Synchronize all Oracle Internet Directory User Data into the ApplicationsFND_USER User Directory
The Oracle Applications 11i FND_USER user directory must now bepopulated with user data from Oracle Internet Directory.
1. Log into Oracle Applications 11i with the System Administratorresponsibility
2. Using Concurrent Manager, run the ”Synchronize with LDAPinformation” concurrent program with a Synchronization Mode of”ALL”
• This concurrent program needs to be run in ”ALL” mode onlyonce during setup, or as required in recovery or cleanup.
• This concurrent program runs wf_ldap.synch_all(), which:
– Queries all of the existing Oracle Internet Directory LDAPuser entries
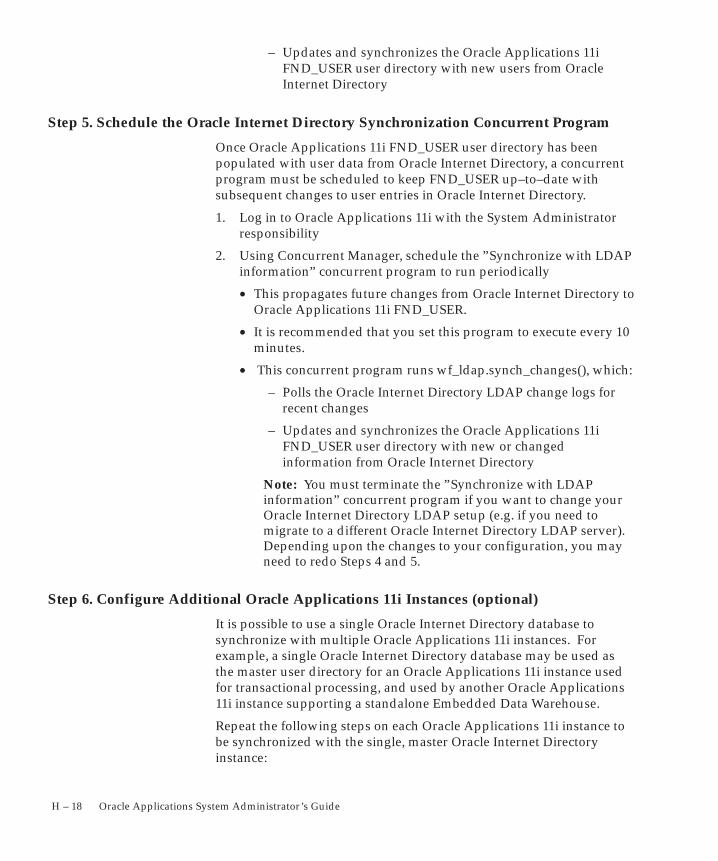
H – 18 Oracle Applications System Administrator’s Guide
– Updates and synchronizes the Oracle Applications 11iFND_USER user directory with new users from OracleInternet Directory
Step 5. Schedule the Oracle Internet Directory Synchronization Concurrent Program
Once Oracle Applications 11i FND_USER user directory has beenpopulated with user data from Oracle Internet Directory, a concurrentprogram must be scheduled to keep FND_USER up–to–date withsubsequent changes to user entries in Oracle Internet Directory.
1. Log in to Oracle Applications 11i with the System Administratorresponsibility
2. Using Concurrent Manager, schedule the ”Synchronize with LDAPinformation” concurrent program to run periodically
• This propagates future changes from Oracle Internet Directory toOracle Applications 11i FND_USER.
• It is recommended that you set this program to execute every 10minutes.
• This concurrent program runs wf_ldap.synch_changes(), which:
– Polls the Oracle Internet Directory LDAP change logs forrecent changes
– Updates and synchronizes the Oracle Applications 11iFND_USER user directory with new or changedinformation from Oracle Internet Directory
Note: You must terminate the ”Synchronize with LDAPinformation” concurrent program if you want to change yourOracle Internet Directory LDAP setup (e.g. if you need tomigrate to a different Oracle Internet Directory LDAP server).Depending upon the changes to your configuration, you mayneed to redo Steps 4 and 5.
Step 6. Configure Additional Oracle Applications 11i Instances (optional)
It is possible to use a single Oracle Internet Directory database tosynchronize with multiple Oracle Applications 11i instances. Forexample, a single Oracle Internet Directory database may be used asthe master user directory for an Oracle Applications 11i instance usedfor transactional processing, and used by another Oracle Applications11i instance supporting a standalone Embedded Data Warehouse.
Repeat the following steps on each Oracle Applications 11i instance tobe synchronized with the single, master Oracle Internet Directoryinstance:
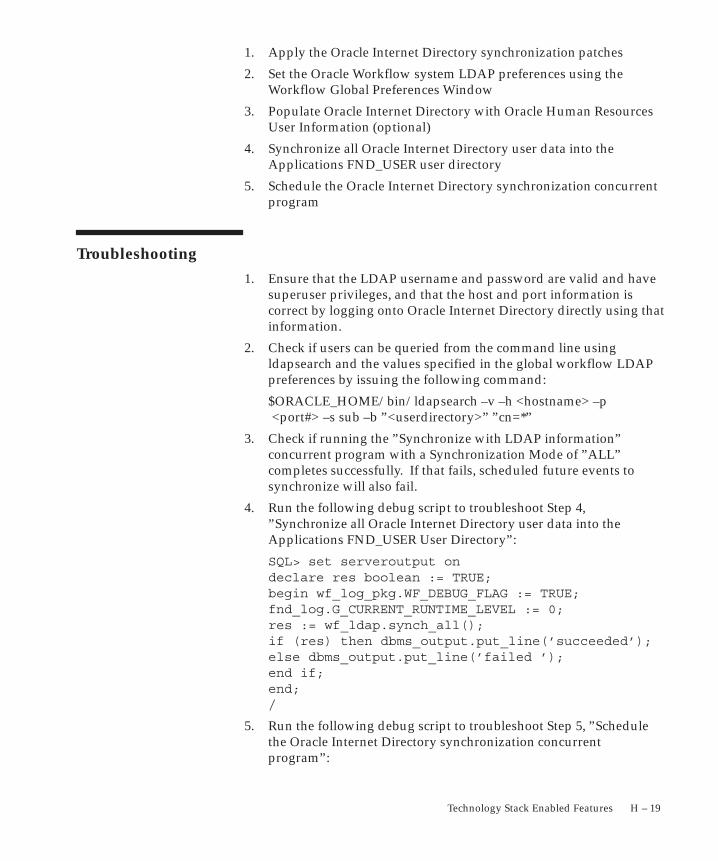
H – 19Technology Stack Enabled Features
1. Apply the Oracle Internet Directory synchronization patches
2. Set the Oracle Workflow system LDAP preferences using theWorkflow Global Preferences Window
3. Populate Oracle Internet Directory with Oracle Human ResourcesUser Information (optional)
4. Synchronize all Oracle Internet Directory user data into theApplications FND_USER user directory
5. Schedule the Oracle Internet Directory synchronization concurrentprogram
Troubleshooting
1. Ensure that the LDAP username and password are valid and havesuperuser privileges, and that the host and port information iscorrect by logging onto Oracle Internet Directory directly using thatinformation.
2. Check if users can be queried from the command line usingldapsearch and the values specified in the global workflow LDAPpreferences by issuing the following command:
$ORACLE_HOME/bin/ldapsearch –v –h <hostname> –p <port#> –s sub –b ”<userdirectory>” ”cn=*”
3. Check if running the ”Synchronize with LDAP information”concurrent program with a Synchronization Mode of ”ALL”completes successfully. If that fails, scheduled future events tosynchronize will also fail.
4. Run the following debug script to troubleshoot Step 4,”Synchronize all Oracle Internet Directory user data into theApplications FND_USER User Directory”:
SQL> set serveroutput ondeclare res boolean := TRUE;begin wf_log_pkg.WF_DEBUG_FLAG := TRUE;fnd_log.G_CURRENT_RUNTIME_LEVEL := 0;res := wf_ldap.synch_all();if (res) then dbms_output.put_line(’succeeded’);else dbms_output.put_line(’failed ’);end if;end;/
5. Run the following debug script to troubleshoot Step 5, ”Schedulethe Oracle Internet Directory synchronization concurrentprogram”:

H – 20 Oracle Applications System Administrator’s Guide
SQL> set serveroutput ondeclare res boolean := TRUE;begin wf_log_pkg.WF_DEBUG_FLAG := TRUE;fnd_log.G_CURRENT_RUNTIME_LEVEL := 0;res := wf_ldap.synch_changes();if (res) then dbms_output.put_line(’succeeded’);else dbms_output.put_line(’failed ’);end if;end;/
6. Verify that the Oracle Internet Directory user rows are reaching theintermediate table wf_attribute_cache. If the rows are making it thisfar but not into FND_USER, then the Business Event System maynot be configured correctly.
7. Verify that all of the users in the Oracle Internet Directorydirectory specified in global preferences exist in FND_USER. If theusers are not moved over to FND_USER, check if the globalpreferences are set correctly.
See Also
Oracle9i Application Server (9iAS) with Oracle E–Business SuiteRelease 11i: page H – 49
H – 21Technology Stack Enabled Features
Discoverer 4i with Oracle Applications 11iThis section describes how to set up Discoverer 4i for use with OracleApplications Release 11i.
The following instructions are current as of publication. For the mostup–to–date information refer to OracleMetaLink, specifically Note139516.1, entitled ”Discoverer 4i with Oracle Applications 11i.”
Note: Discoverer 4i is certified and supported with OracleApplications 11i
– as part of Oracle E–Business Suite Release 11.5.7 and higherRapid Install environments
– on a standalone server accessing an Oracle E–Business SuiteRelease 11i database.
Customers who are on Oracle Applications Release 11.5.1 to11.5.5 and who wish to migrate their existing application tierserver node to 9iAS 1.0.2.2.2 must wait for the certification ofthe migration path to 9iAS 1.0.2.2.2. Once that certification isavailable, existing 11i customers will be able to follow themigration instructions in OracleMetaLink Note 146468.1 toapply 9iAS 1.0.2.2.2 and to configure Oracle E–Business Suitefeatures that depend on it. Customers interested in thisconfiguration are advised to check product certifications onOracleMetaLink.
Scope, Assumptions and Important Notes
Successful migration to Discoverer 4i requires two essential activities
• Installation of the Discoverer 4i software with iAS 1.0.2.2.2 on amiddle tier server
• Installation of the Discoverer 4i compatible End User Layer(EUL) in your database
This section document describes in how to successfully install theDiscoverer 4i EUL or upgrade your Discoverer EUL from Discoverer 3ito Discoverer 4i. It is intended for System or Database Administratorsof Oracle Applications 11i.
Note: The MKS Toolkit is a prerequisite for all AD utilitiesrunning on Windows NT. For maintainance of Discoverer eexfiles you must acquire and install MKS Toolkit version 6.1a orhigher (see http://www.mks.com) in order to importDiscoverer eex files using the AD tool adupdeul.sh. You canuse any of the Developer series of MKS Toolkit.
There are several reasons you may need to or wish to upgrade toDiscoverer 4i. You can take advantage of new features with Discoverer

H – 22 Oracle Applications System Administrator’s Guide
4i such as charting in Discoverer Plus and Discoverer Viewer. WithDiscoverer 4i it is possible to patch the EUL at a granular level withouthaving to drop and recreate the EUL again.
The section Installation of additional Discoverer 4i patches: page H – 43describes how to successfully install additional Discoverer 4i patchesafter successful migration to Discoverer 4i EUL.
As with all technology upgrades, we recommend that you apply theseinstructions to a test instance first, and verify that your implementationand customizations work properly before upgrading your productioninstances.
Step 1: Preserve 3i Customizations
If you are installing Discoverer for the first time, you can go directly toStep 2.
If you are upgrading to Discoverer 4i from Discoverer 3i, you may wishto preserve your existing customized workbooks and business areas.Installing Discoverer 4i requires that your existing Discoverer 3i EndUser Layer be uninstalled first. Follow the instructions in this section ifyou have customized content that you’d like to preserve and migrate toyour new Discoverer 4i installation.
Preserving customizations to your 3i End User Layer for Discoverer isgenerally not supported when upgrading to the Discoverer 4i End UserLayer. The Discoverer 3i compatible EUL will be dropped and a new 4iEUL will be installed.
Nevertheless, if you have created your own custom business areas andworkbooks which
• do not reference any Oracle delivered content
• use Display Names which don’t conflict with the Oracledelivered content, for example by using a custom prefix
then it is possible to export the custom business areas using Discoverer3.1 and import them to the new 4i EUL using Discoverer 4.1.
Step 1.1 Export custom Business Areas
1. Log in to the Discoverer Administration Edition 3.1 on theDiscoverer Administration NT machine as the EUL schema owner:
D:\orant\DISCVR31\DIS31ADM.EXE /CONNECT \
<3iSchema>/<password>@<db>
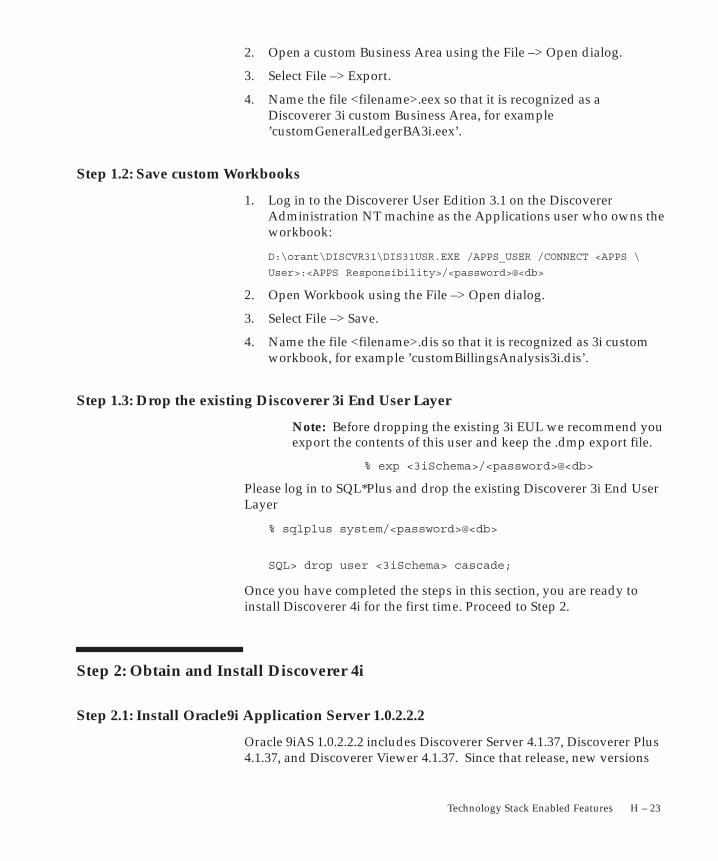
H – 23Technology Stack Enabled Features
2. Open a custom Business Area using the File –> Open dialog.
3. Select File –> Export.
4. Name the file <filename>.eex so that it is recognized as aDiscoverer 3i custom Business Area, for example’customGeneralLedgerBA3i.eex’.
Step 1.2: Save custom Workbooks
1. Log in to the Discoverer User Edition 3.1 on the DiscovererAdministration NT machine as the Applications user who owns theworkbook:
D:\orant\DISCVR31\DIS31USR.EXE /APPS_USER /CONNECT <APPS \
User>:<APPS Responsibility>/<password>@<db>
2. Open Workbook using the File –> Open dialog.
3. Select File –> Save.
4. Name the file <filename>.dis so that it is recognized as 3i customworkbook, for example ’customBillingsAnalysis3i.dis’.
Step 1.3: Drop the existing Discoverer 3i End User Layer
Note: Before dropping the existing 3i EUL we recommend youexport the contents of this user and keep the .dmp export file.
% exp <3iSchema>/<password>@<db>
Please log in to SQL*Plus and drop the existing Discoverer 3i End UserLayer
% sqlplus system/<password>@<db>
SQL> drop user <3iSchema> cascade;
Once you have completed the steps in this section, you are ready toinstall Discoverer 4i for the first time. Proceed to Step 2.
Step 2: Obtain and Install Discoverer 4i
Step 2.1: Install Oracle9i Application Server 1.0.2.2.2
Oracle 9iAS 1.0.2.2.2 includes Discoverer Server 4.1.37, Discoverer Plus4.1.37, and Discoverer Viewer 4.1.37. Since that release, new versions
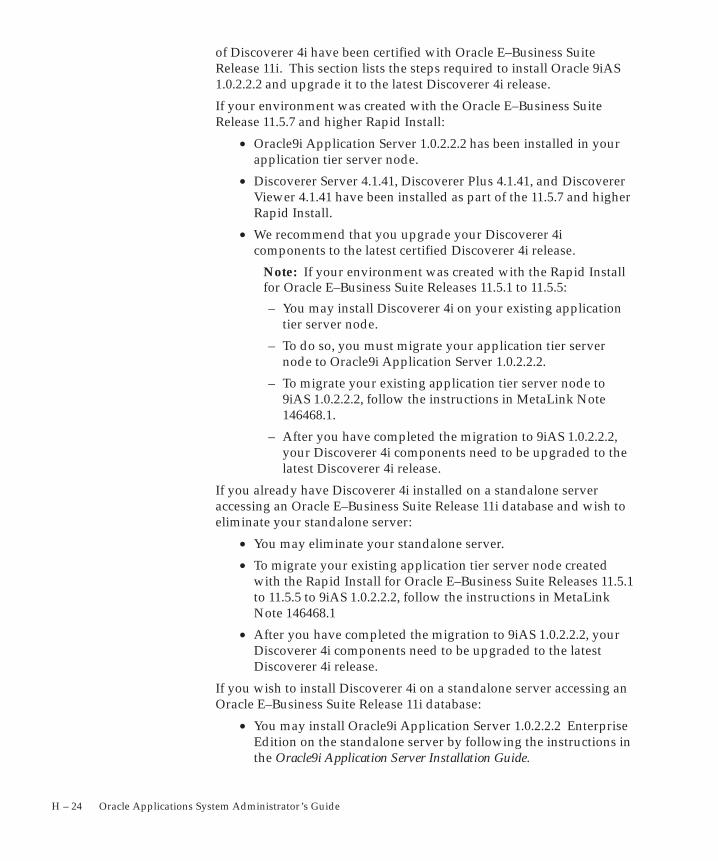
H – 24 Oracle Applications System Administrator’s Guide
of Discoverer 4i have been certified with Oracle E–Business SuiteRelease 11i. This section lists the steps required to install Oracle 9iAS1.0.2.2.2 and upgrade it to the latest Discoverer 4i release.
If your environment was created with the Oracle E–Business SuiteRelease 11.5.7 and higher Rapid Install:
• Oracle9i Application Server 1.0.2.2.2 has been installed in yourapplication tier server node.
• Discoverer Server 4.1.41, Discoverer Plus 4.1.41, and DiscovererViewer 4.1.41 have been installed as part of the 11.5.7 and higherRapid Install.
• We recommend that you upgrade your Discoverer 4icomponents to the latest certified Discoverer 4i release.
Note: If your environment was created with the Rapid Installfor Oracle E–Business Suite Releases 11.5.1 to 11.5.5:
– You may install Discoverer 4i on your existing applicationtier server node.
– To do so, you must migrate your application tier servernode to Oracle9i Application Server 1.0.2.2.2.
– To migrate your existing application tier server node to9iAS 1.0.2.2.2, follow the instructions in MetaLink Note146468.1.
– After you have completed the migration to 9iAS 1.0.2.2.2,your Discoverer 4i components need to be upgraded to thelatest Discoverer 4i release.
If you already have Discoverer 4i installed on a standalone serveraccessing an Oracle E–Business Suite Release 11i database and wish toeliminate your standalone server:
• You may eliminate your standalone server.
• To migrate your existing application tier server node createdwith the Rapid Install for Oracle E–Business Suite Releases 11.5.1to 11.5.5 to 9iAS 1.0.2.2.2, follow the instructions in MetaLinkNote 146468.1
• After you have completed the migration to 9iAS 1.0.2.2.2, yourDiscoverer 4i components need to be upgraded to the latestDiscoverer 4i release.
If you wish to install Discoverer 4i on a standalone server accessing anOracle E–Business Suite Release 11i database:
• You may install Oracle9i Application Server 1.0.2.2.2 EnterpriseEdition on the standalone server by following the instructions inthe Oracle9i Application Server Installation Guide.
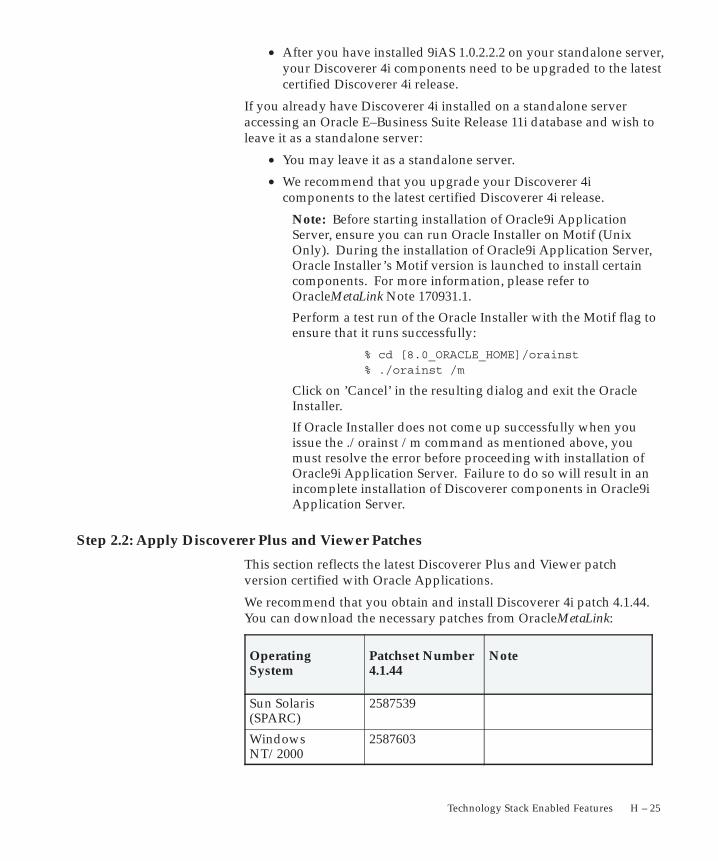
H – 25Technology Stack Enabled Features
• After you have installed 9iAS 1.0.2.2.2 on your standalone server,your Discoverer 4i components need to be upgraded to the latestcertified Discoverer 4i release.
If you already have Discoverer 4i installed on a standalone serveraccessing an Oracle E–Business Suite Release 11i database and wish toleave it as a standalone server:
• You may leave it as a standalone server.
• We recommend that you upgrade your Discoverer 4icomponents to the latest certified Discoverer 4i release.
Note: Before starting installation of Oracle9i ApplicationServer, ensure you can run Oracle Installer on Motif (UnixOnly). During the installation of Oracle9i Application Server,Oracle Installer’s Motif version is launched to install certaincomponents. For more information, please refer toOracleMetaLink Note 170931.1.
Perform a test run of the Oracle Installer with the Motif flag toensure that it runs successfully:
% cd [8.0_ORACLE_HOME]/orainst % ./orainst /m
Click on ’Cancel’ in the resulting dialog and exit the OracleInstaller.
If Oracle Installer does not come up successfully when youissue the ./orainst /m command as mentioned above, youmust resolve the error before proceeding with installation ofOracle9i Application Server. Failure to do so will result in anincomplete installation of Discoverer components in Oracle9iApplication Server.
Step 2.2: Apply Discoverer Plus and Viewer Patches
This section reflects the latest Discoverer Plus and Viewer patchversion certified with Oracle Applications.
We recommend that you obtain and install Discoverer 4i patch 4.1.44.You can download the necessary patches from OracleMetaLink:
OperatingSystem
Patchset Number4.1.44
Note
Sun Solaris(SPARC)
2587539
WindowsNT/2000
2587603
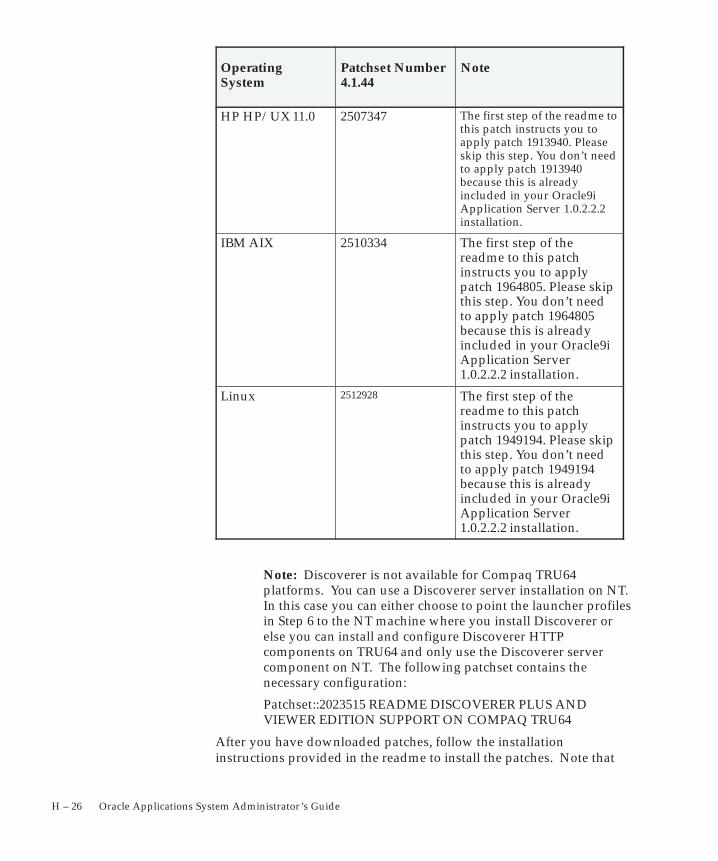
H – 26 Oracle Applications System Administrator’s Guide
NotePatchset Number4.1.44
OperatingSystem
HP HP/UX 11.0 2507347 The first step of the readme tothis patch instructs you toapply patch 1913940. Pleaseskip this step. You don’t needto apply patch 1913940because this is alreadyincluded in your Oracle9iApplication Server 1.0.2.2.2installation.
IBM AIX 2510334 The first step of thereadme to this patchinstructs you to applypatch 1964805. Please skipthis step. You don’t needto apply patch 1964805because this is alreadyincluded in your Oracle9iApplication Server1.0.2.2.2 installation.
Linux 2512928 The first step of thereadme to this patchinstructs you to applypatch 1949194. Please skipthis step. You don’t needto apply patch 1949194because this is alreadyincluded in your Oracle9iApplication Server1.0.2.2.2 installation.
Note: Discoverer is not available for Compaq TRU64platforms. You can use a Discoverer server installation on NT.In this case you can either choose to point the launcher profilesin Step 6 to the NT machine where you install Discoverer orelse you can install and configure Discoverer HTTPcomponents on TRU64 and only use the Discoverer servercomponent on NT. The following patchset contains thenecessary configuration:
Patchset::2023515 README DISCOVERER PLUS ANDVIEWER EDITION SUPPORT ON COMPAQ TRU64
After you have downloaded patches, follow the installationinstructions provided in the readme to install the patches. Note that
H – 27Technology Stack Enabled Features
the corresponding patch version of Discoverer Administration Editionwill perform an End User Layer upgrade. As a result, the versions ofDiscoverer Plus and Discoverer Viewer shipped with this patch willonly be able to connect to End User Layers that have been eitherupgraded or created with Discoverer Administrator 4.1.44 (Step 2.5).
Step 2.3: Reapply configuration settings
The Discoverer patch may overwrite configuration settings in files
• <iAS_HOME>/Apache/Apache/htdocs/discwb4/scripts/htmlvars.js
• <iAS_HOME>/Apache/Apache/htdocs/disco4iv/html/disco4iv.xml
• <ORACLE_806_HOME>/discwb4/discwb.sh
Choose one of the following two procedures to reapply yourconfiguration settings based on whether you are using the AutoConfiginfrastructure:
• If you are running Discoverer 4i on your application tier servernode and you want to use AutoConfig, follow the procedure inthe section ”Reapply configuration settings using AutoConfig”.
• If you are not using AutoConfig, please proceed with theprocedure described in the section ”Reapply configurationsettings manually”.
� Reapply configuration settings using AutoConfig
This section describes the procedure to configure your concurrentprocessing node in an AutoConfig–enabled environment.
AutoConfig is installed as part of Release 11.5.8.
Note: For customers who are on a release prior to 11.5.8: If youare not sure whether your environment is AutoConfig enabled,or you wish to migrate to AutoConfig, please seeOracleMetaLink Note 165195.1 titled ”Using AutoConfig toManage System Configurations with Oracle Applications 11i”.
Your environment has been enabled for AutoConfig if youmigrated your environment to 9iAS 1.0.2.2.2 followingOracleMetaLink Note 146468.1, ”Installing Oracle 9i ApplicationServer with Oracle Applications 11i.”
Once you have enabled AutoConfig in your environment, proceed withthe following steps to configure your application tier server node:
1. Update the Oracle Applications file system with the FND templatefiles by applying patch 2347573.
H – 28 Oracle Applications System Administrator’s Guide
2. Run AutoConfig to generate all configuration files for theAPPL_TOP and the ORACLE_HOMEs in its supporting technologystack:
<COMMON_TOP>/admin/scripts/<CONTEXT_NAME>/adautocfg.sh
For more details on AutoConfig, see OracleMetaLink Note 165195.1.
Now go to Step 2.4, Install Oracle9i Developer Suite 1.0.2.4.
Step 2.4: Install Oracle9i Developer Suite 1.0.2.4
You need to obtain and install Discoverer Administration Edition onWindows NT for the installation and import of the Discoverer 4i EndUser Layer.
Discoverer Administration Edition 4.1.37 is delivered as part ofOracle9i Developer Suite 1.0.2.4 for NT. The CD is also included inOracle Applications 11.5.7 and above CD packs.
Step 2.5: Apply Discoverer Administration Edition Patches
This section reflects the latest Discoverer Administration Edition patchversion certified with Oracle Applications.
We recommend that you obtain and install Discoverer 4.1 patch 4.1.44.You can download the necessary patches from MetaLink:
• For Windows NT/2000: Patchset Number 2587578
After you have downloaded patch 4.1.44, follow the installationinstructions provided in the readme to install the patch.
If you already have an existing Discoverer 4i EUL installed, please notethat this patch version of Discoverer Administration Edition willperform an End User Layer upgrade. Use Discoverer AdministrationEdition 4.1.44 and connect to an existing EUL as the EUL schemaowner:
D:\orant\DISCVR4\DIS4ADM.EXE /CONNECT \
<4iSchema>/<password>@<db>
Discoverer will automatically detect whether an EUL upgrade isrequired. If an upgrade is required, you will be prompted to make abackup of the EUL tables. The EUL upgrade is performed uponconfirmation that the backup has been made,
As a result, the version of Discoverer Desktop Edition shipped withthis patch will only be able to connect to End User Layers that havebeen either upgraded or created with Discoverer Administrator 4.1.44.
H – 29Technology Stack Enabled Features
The corresponding 4.1.44 patch versions of Oracle9iAS Discoverer Plusand Oracle9iAS Discoverer Viewer will only be able to connect to anEnd User Layer that has been either upgraded or created with version4.1.44 of Discoverer Administration Edition.
Step 2.6: NT Registry Settings
On the NT machine running Discoverer Administration Editon set thefollowing entries in the NT Registry:
HKEY_CURRENT_USER\Software\Oracle\Discoverer 4\Database\EnableTriggers
REG_DWORD
1
HKEY_CURRENT_USER\Software\Oracle\Discoverer 4\Database\DefaultPreserveDisplayPropertyForRefresh
REG_DWORD
1
Step 3: Run and Maintain Discoverer
Refer to the Oracle Discoverer 4i Configuration Guide for Oracle 9iApplication Server for details how to run, maintain and supportOracle9iAS Discoverer.
Step 3.1: Specify Connect Dialog for Oracle Applications Users
If you use the Discoverer login page for direct login using OracleApplications User/Password authentication please set up the Connectdialog to display the Applications User checkbox.
1. Open the file <ORACLE_806_HOME>/discwb4/util/pref.txt in atext editor
2. Set the DefaultUserTypeIsApps preference to ”1”
3. Set the ShowUserTypeChoice preference to ”1”
4. Save the pref.txt file.
5. On UNIX< run the script Runscript<ORACLE_806_HOME>/discwb4/util/applypreferences.sh
Name
DataType
Value
Name
DataType
Value

H – 30 Oracle Applications System Administrator’s Guide
6. Stop and restart the OracleDiscoverer4i service.
Note: If you append a colon : immediately after the user in theDiscoverer Connect dialog without specifying a responsibilityafter the colon, Discoverer will always try to establish aconnection as Oracle Applications user and pop up a list ofvalid Applications responsibilities for this Applications user.
Step 4: Create a new Discoverer 4i End User Layer
On the NT box where Discoverer Administration Edition is installeduse the following command line to create the new Discoverer 4i EndUser Layer.
Note: The language of the EUL must be set explicitly using the/SET_EUL_LANGUAGE option. Make sure your NLS_LANGsetting is correct on your NT box and connect to SQL*Plus. Thevalue for the /SET_EUL_LANGUAGE option should be the sameas given by the statement
SQL> SELECT USERENV(’LANG’) FROM DUAL;
Note: Using the command line option/DEFAULT_TABLESPACE you can specify the tablespace whereyou want to install the EUL, for example you can install theEUL in a tablespace discoverer. The max_extents defaultstorage parameter for this tablespace should be minimum 505.Please check this value before you create the EUL.
% sqlplus system/<password>@<db>SQL> select tablespace_name, max_extents fromdba_tablespaces;
If necessary you can increase the value using the follwing alterstatement:
SQL> alter tablespace <tablespace_name> defaultstorage( maxextents 505 );
The command line syntax to create the End User Layer is:
D:\orant\DISCVR4\DIS4ADM.EXE
/CREATE_EUL
/APPS_MODE
/CONNECT system/<password>@<db>
/USER <EUL4_User_Prefix>_<Language>
/PASSWORD <password>
/DEFAULT_TABLESPACE <default tablespace>
/TEMPORARY_TABLESPACE <temp tablespace>
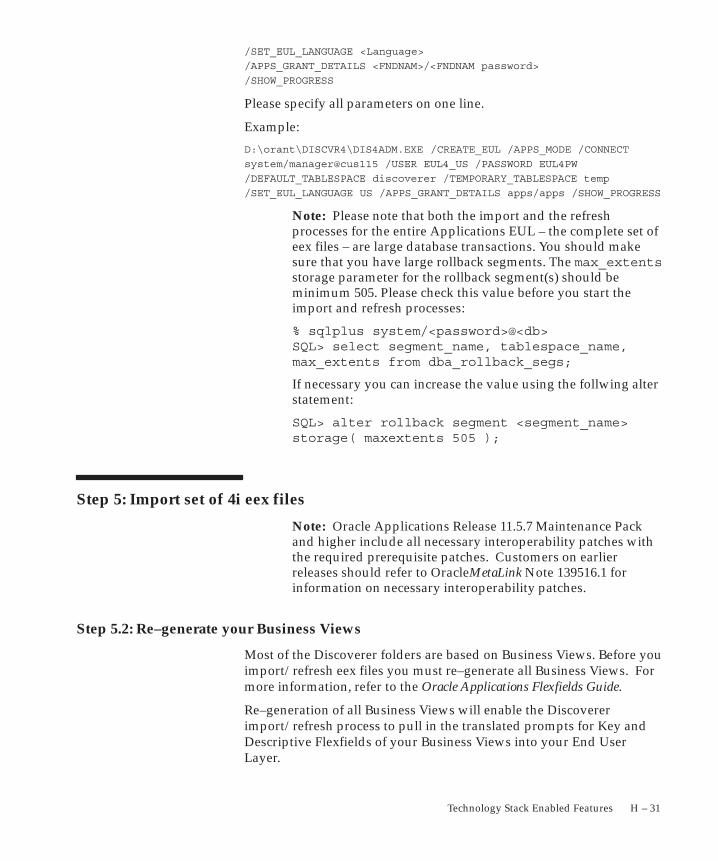
H – 31Technology Stack Enabled Features
/SET_EUL_LANGUAGE <Language>
/APPS_GRANT_DETAILS <FNDNAM>/<FNDNAM password>
/SHOW_PROGRESS
Please specify all parameters on one line.
Example:
D:\orant\DISCVR4\DIS4ADM.EXE /CREATE_EUL /APPS_MODE /CONNECT
system/manager@cus115 /USER EUL4_US /PASSWORD EUL4PW
/DEFAULT_TABLESPACE discoverer /TEMPORARY_TABLESPACE temp
/SET_EUL_LANGUAGE US /APPS_GRANT_DETAILS apps/apps /SHOW_PROGRESS
Note: Please note that both the import and the refreshprocesses for the entire Applications EUL – the complete set ofeex files – are large database transactions. You should makesure that you have large rollback segments. The max_extentsstorage parameter for the rollback segment(s) should beminimum 505. Please check this value before you start theimport and refresh processes:
% sqlplus system/<password>@<db>SQL> select segment_name, tablespace_name,max_extents from dba_rollback_segs;
If necessary you can increase the value using the follwing alterstatement:
SQL> alter rollback segment <segment_name>storage( maxextents 505 );
Step 5: Import set of 4i eex files
Note: Oracle Applications Release 11.5.7 Maintenance Packand higher include all necessary interoperability patches withthe required prerequisite patches. Customers on earlierreleases should refer to OracleMetaLink Note 139516.1 forinformation on necessary interoperability patches.
Step 5.2: Re–generate your Business Views
Most of the Discoverer folders are based on Business Views. Before youimport/refresh eex files you must re–generate all Business Views. Formore information, refer to the Oracle Applications Flexfields Guide.
Re–generation of all Business Views will enable the Discovererimport/refresh process to pull in the translated prompts for Key andDescriptive Flexfields of your Business Views into your End UserLayer.
H – 32 Oracle Applications System Administrator’s Guide
After generation of the Business Views has been completed pleasecheck the Business View Generator output file. It should not containany errors.
Recompile all objects in the APPS schema by running adadmin.
Note: At this point you must make make sure the BIS viewsexist and all BIS views are valid.
% sqlplus apps/<password>@<db> SQL> select object_name from user_objects where object_type = ’VIEW’ and status = ’INVALID’ and ( object_name like ’%FV_%’ or object_name like ’%FG_%’ or object_name like ’%BV_%’ or object_name like ’%BG_%’ );
If necessary please recompile those objects so that all views arevalid. If a SELECT statement from a invalid BIS View results inthe error message ”ORA–04063: view ”APPS.<ViewName>” has errors”, then the Discoverer refresh processwill stop and therefore this issue must be resolved before youcan successfully proceed with import and refresh.
Step 5.3: Set up Applications User/Responsibility for EUL Administration:SYSADMIN/System Administrator
1. Log in to the Discoverer Administration Edition 4.1 as EUL schemaowner:
D:\orant\DISCVR4\DIS4ADM.EXE /CONNECT<4iSchema>/<password>@<db>
2. Grant the EUL Administration privileges to SYSADMIN/SystemAdministrator.
Start the Privileges dialog using Tools –> Privileges. From thePrivileges tab, select the Applications user ’SYSADMIN’. In thePrivilege window, click the checkbox for Administration, FormatBusiness Area, Create/Edit Business Area, Create Summaries, SetPriivilege, and Manage Schedule Workbook.
Click the Apply button.
Repeat the same grant for the Oracle Applications responsibility,’System Administrator’.
For all further EUL Administration activities you must use theOracle Applications User/Responsibility SYSADMIN/SystemAdministrator. This Applications user must import and own the
H – 33Technology Stack Enabled Features
Workbooks and Business Areas of all future Discoverer 4i patchesand share them to other Applications users/responsibilities.
3. Make sure the user SYSADMIN does have full security access to allBusiness Areas.
This step is not necessary for the first import into a new EULbecause the EUL does not contain any Business Areas at this point.But for all subsequent future imports, please make sure the userSYSADMIN does have full security to all Business Areas.
Start the Security dialog using Tools –> Security. From theUsers–>Business Area tab, select the Applications user’SYSADMIN’ from the dropdown menu. Move all availableBusiness Areas to the list of Selected Business Areas. Check the”Allow Administration” checkbox for all Business Areas. Click theApply button.
Step 5.4: Map NT box to $AU_TOP/discover
From the NT box where Discoverer Administration Edition is installedeither map a drive to the $AU_TOP/discover/ directory or copy theentire directory $AU_TOP/discover/ to the NT box. This will includethe import shell script $AU_TOP/discover/adupdeul.sh and alllanguage specific subdirectories containing the set of eex files.
If you don’t have the software to map UNIX drives to your NT box youcan also zip and ftp the entire $AU_TOP/discover directory. In thiscase, please make sure you include the directory structure and preserveit when you unzip on the NT box.
Example for UNIX:
% cd $AU_TOP
zip –r ~/discover.zip discover
The –r option ensures that the subdirectory structure is included.
Example for Windows NT:
ftp <your unix machine>
bin
get ~/discover.zip
Use winzip to extract into a directory, for example D:\au_top\ andmake sure you have the option ”Use folder names” checked. Then youcan start the import adupdeul.sh in D:\au_top\discover\ directory.
Step 5.5: Import unsing adupdeul.sh mode=complete
Note: These are the minimum memory requirements for theimport process on the NT machine running DiscovererAdministration Edition 4.1.
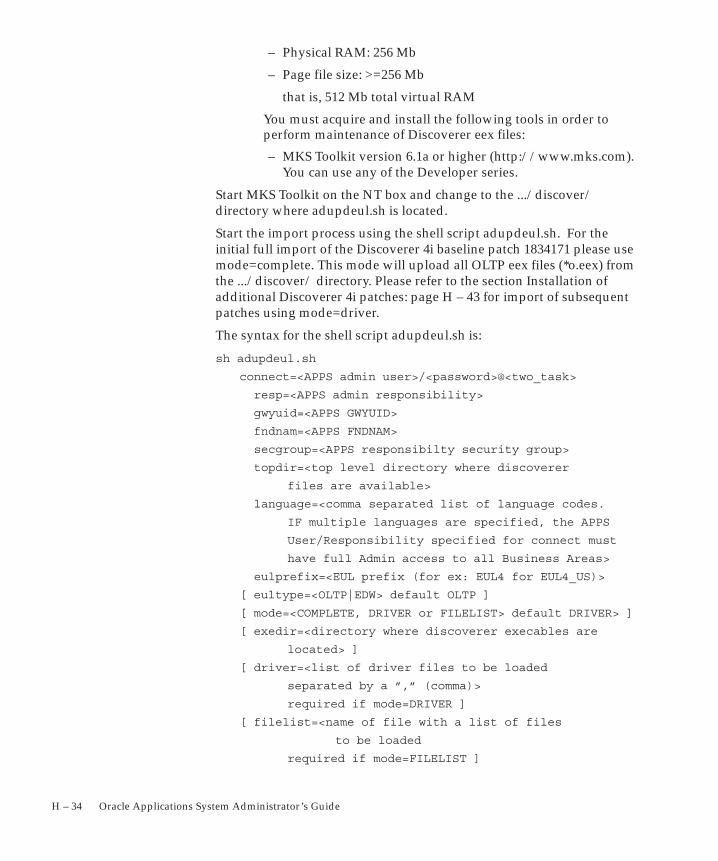
H – 34 Oracle Applications System Administrator’s Guide
– Physical RAM: 256 Mb
– Page file size: >=256 Mb
that is, 512 Mb total virtual RAM
You must acquire and install the following tools in order toperform maintenance of Discoverer eex files:
– MKS Toolkit version 6.1a or higher (http://www.mks.com).You can use any of the Developer series.
Start MKS Toolkit on the NT box and change to the .../discover/directory where adupdeul.sh is located.
Start the import process using the shell script adupdeul.sh. For theinitial full import of the Discoverer 4i baseline patch 1834171 please usemode=complete. This mode will upload all OLTP eex files (*o.eex) fromthe .../discover/ directory. Please refer to the section Installation ofadditional Discoverer 4i patches: page H – 43 for import of subsequentpatches using mode=driver.
The syntax for the shell script adupdeul.sh is:
sh adupdeul.sh
connect=<APPS admin user>/<password>@<two_task>
resp=<APPS admin responsibility>
gwyuid=<APPS GWYUID>
fndnam=<APPS FNDNAM>
secgroup=<APPS responsibilty security group>
topdir=<top level directory where discoverer
files are available>
language=<comma separated list of language codes.
IF multiple languages are specified, the APPS
User/Responsibility specified for connect must
have full Admin access to all Business Areas>
eulprefix=<EUL prefix (for ex: EUL4 for EUL4_US)>
[ eultype=<OLTP|EDW> default OLTP ]
[ mode=<COMPLETE, DRIVER or FILELIST> default DRIVER> ]
[ exedir=<directory where discoverer execables are
located> ]
[ driver=<list of driver files to be loaded
separated by a ”,” (comma)>
required if mode=DRIVER ]
[ filelist=<name of file with a list of files
to be loaded
required if mode=FILELIST ]
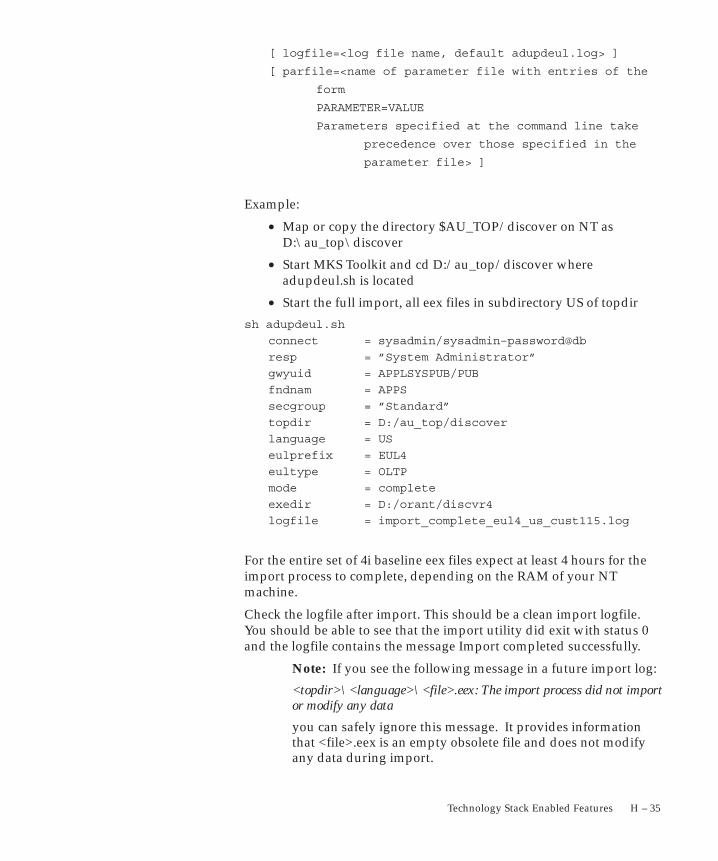
H – 35Technology Stack Enabled Features
[ logfile=<log file name, default adupdeul.log> ]
[ parfile=<name of parameter file with entries of the
form
PARAMETER=VALUE
Parameters specified at the command line take
precedence over those specified in the
parameter file> ]
Example:
• Map or copy the directory $AU_TOP/discover on NT asD:\au_top\discover
• Start MKS Toolkit and cd D:/au_top/discover whereadupdeul.sh is located
• Start the full import, all eex files in subdirectory US of topdir
sh adupdeul.sh
connect = sysadmin/sysadmin–password@db
resp = ”System Administrator”
gwyuid = APPLSYSPUB/PUB
fndnam = APPS
secgroup = ”Standard”
topdir = D:/au_top/discover
language = US
eulprefix = EUL4
eultype = OLTP
mode = complete
exedir = D:/orant/discvr4
logfile = import_complete_eul4_us_cust115.log
For the entire set of 4i baseline eex files expect at least 4 hours for theimport process to complete, depending on the RAM of your NTmachine.
Check the logfile after import. This should be a clean import logfile.You should be able to see that the import utility did exit with status 0and the logfile contains the message Import completed successfully.
Note: If you see the following message in a future import log:
<topdir>\<language>\<file>.eex: The import process did not importor modify any data
you can safely ignore this message. It provides informationthat <file>.eex is an empty obsolete file and does not modifyany data during import.
H – 36 Oracle Applications System Administrator’s Guide
Step 5.6: Refresh the 4i EUL
After import you must refresh your EUL against the database. You cando this by following these steps:
1. Log in to the Discoverer Administration Edition 4.1 as an OracleApplications user with full administration and security privileges:
D:\orant\DISCVR4\DIS4ADM.EXE /CONNECT”SYSADMIN:System Administrator/<password>@<db>”/EUL <EULprefix>_<Lang>
Note: For the refresh process you must use the ApplicationsUser/Responsibility to log on rather than the EUL databaseschema owner. The EUL database schema owner doesn’t havethe necessary grants for the APPS schema and the refreshprocess would drop folders.
2. Use the Help –> About Discoverer... dialog to make sure you areconnected to the correct End User Layer (<EULprefix>_<Lang>;compare the import options used in Step 5.5). You can change theEUL in the dialog Tools –> Options –> Default EUL.
3. Open all Business Areas.
4. Multiple select all Business Areas. Use Shift or Ctrl keys incombination with the mouse for multiple select.
5. Use File –> Refresh to start the Refresh Wizard. Make sure theoption ’On–line dictionary’ is checked and click the Finish button.
6. The refresh process will start with Analyzing differences... andshow a large list of refresh actions. Most of these are new flexfielditems that will be added to the existing folders in the End UserLayer. Start the refresh process by accepting this dialog using theOK button. During refresh the Discoverer Administration willshow a progress window ”Refreshing EUL objects...”
For all Business Areas, you should expect several hours for the refreshprocess to complete, depending on your flexfield structure. When therefresh process completes, Discoverer Administration will close theprogress window. Your End User Layer is now refreshed. Flexfieldcolumns have been pulled in to the folders using the flex prompts inthe language of the EUL as Item Display Names.
Step 5.7: Grant EUL User Privileges for Oracle Applications responsibilities
1. Log in to the Discoverer Administration Edition 4.1 as EUL schemaowner:
D:\orant\DISCVR4\DIS4ADM.EXE /CONNECT \<4iSchema>/<password>@<db>
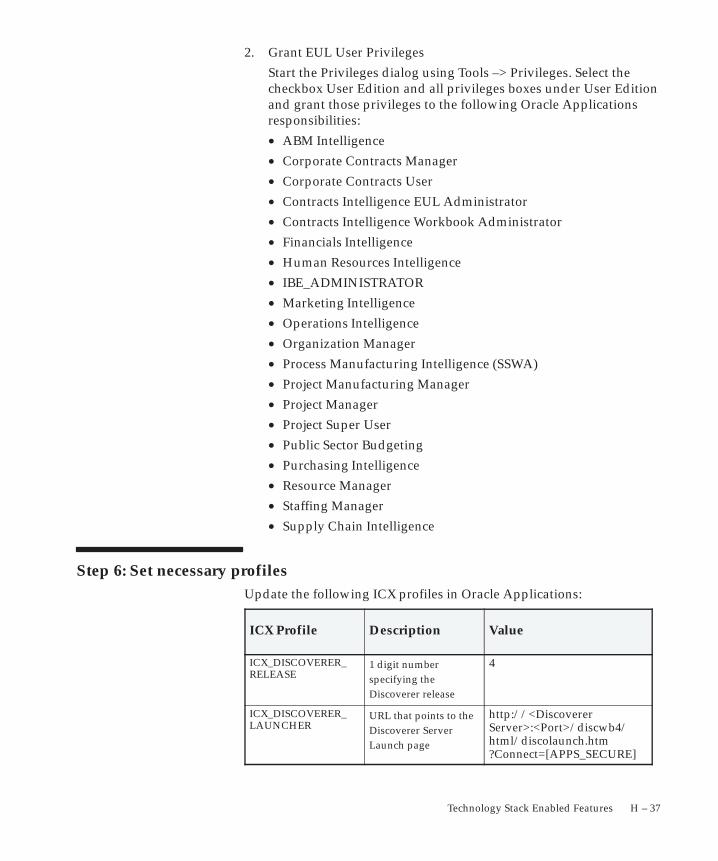
H – 37Technology Stack Enabled Features
2. Grant EUL User Privileges
Start the Privileges dialog using Tools –> Privileges. Select thecheckbox User Edition and all privileges boxes under User Editionand grant those privileges to the following Oracle Applicationsresponsibilities:
• ABM Intelligence
• Corporate Contracts Manager
• Corporate Contracts User
• Contracts Intelligence EUL Administrator
• Contracts Intelligence Workbook Administrator
• Financials Intelligence
• Human Resources Intelligence
• IBE_ADMINISTRATOR
• Marketing Intelligence
• Operations Intelligence
• Organization Manager
• Process Manufacturing Intelligence (SSWA)
• Project Manufacturing Manager
• Project Manager
• Project Super User
• Public Sector Budgeting
• Purchasing Intelligence
• Resource Manager
• Staffing Manager
• Supply Chain Intelligence
Step 6: Set necessary profilesUpdate the following ICX profiles in Oracle Applications:
ICX Profile Description Value
ICX_DISCOVERER_RELEASE
1 digit numberspecifying theDiscoverer release
4
ICX_DISCOVERER_LAUNCHER
URL that points to theDiscoverer ServerLaunch page
http://<DiscovererServer>:<Port>/discwb4/html/discolaunch.htm?Connect=[APPS_SECURE]
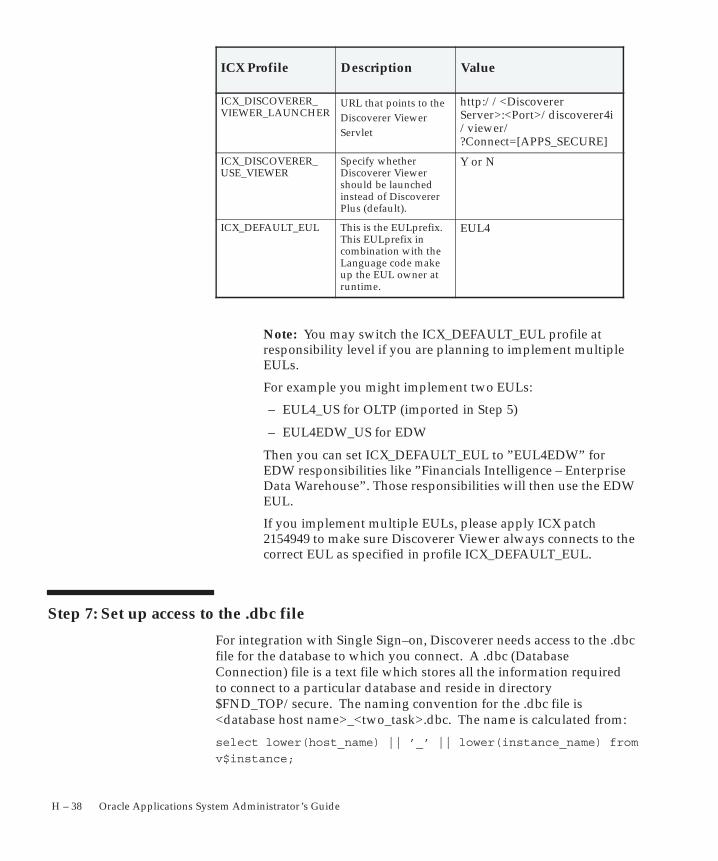
H – 38 Oracle Applications System Administrator’s Guide
ValueDescriptionICX Profile
ICX_DISCOVERER_VIEWER_LAUNCHER
URL that points to theDiscoverer ViewerServlet
http://<DiscovererServer>:<Port>/discoverer4i/viewer/ ?Connect=[APPS_SECURE]
ICX_DISCOVERER_USE_VIEWER
Specify whetherDiscoverer Viewershould be launchedinstead of DiscovererPlus (default).
Y or N
ICX_DEFAULT_EUL This is the EULprefix.This EULprefix incombination with theLanguage code makeup the EUL owner atruntime.
EUL4
Note: You may switch the ICX_DEFAULT_EUL profile atresponsibility level if you are planning to implement multipleEULs.
For example you might implement two EULs:
– EUL4_US for OLTP (imported in Step 5)
– EUL4EDW_US for EDW
Then you can set ICX_DEFAULT_EUL to ”EUL4EDW” forEDW responsibilities like ”Financials Intelligence – EnterpriseData Warehouse”. Those responsibilities will then use the EDWEUL.
If you implement multiple EULs, please apply ICX patch2154949 to make sure Discoverer Viewer always connects to thecorrect EUL as specified in profile ICX_DEFAULT_EUL.
Step 7: Set up access to the .dbc file
For integration with Single Sign–on, Discoverer needs access to the .dbcfile for the database to which you connect. A .dbc (DatabaseConnection) file is a text file which stores all the information requiredto connect to a particular database and reside in directory$FND_TOP/secure. The naming convention for the .dbc file is<database host name>_<two_task>.dbc. The name is calculated from:
select lower(host_name) || ’_’ || lower(instance_name) from
v$instance;
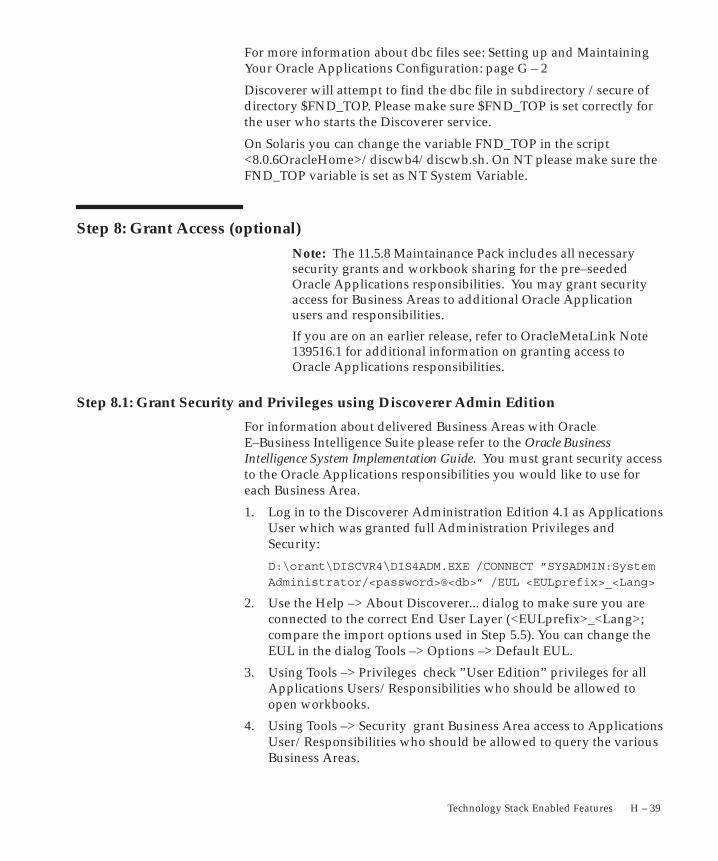
H – 39Technology Stack Enabled Features
For more information about dbc files see: Setting up and MaintainingYour Oracle Applications Configuration: page G – 2
Discoverer will attempt to find the dbc file in subdirectory /secure ofdirectory $FND_TOP. Please make sure $FND_TOP is set correctly forthe user who starts the Discoverer service.
On Solaris you can change the variable FND_TOP in the script<8.0.6OracleHome>/discwb4/discwb.sh. On NT please make sure theFND_TOP variable is set as NT System Variable.
Step 8: Grant Access (optional)
Note: The 11.5.8 Maintainance Pack includes all necessarysecurity grants and workbook sharing for the pre–seededOracle Applications responsibilities. You may grant securityaccess for Business Areas to additional Oracle Applicationusers and responsibilities.
If you are on an earlier release, refer to OracleMetaLink Note139516.1 for additional information on granting access toOracle Applications responsibilities.
Step 8.1: Grant Security and Privileges using Discoverer Admin Edition
For information about delivered Business Areas with OracleE–Business Intelligence Suite please refer to the Oracle BusinessIntelligence System Implementation Guide. You must grant security accessto the Oracle Applications responsibilities you would like to use foreach Business Area.
1. Log in to the Discoverer Administration Edition 4.1 as ApplicationsUser which was granted full Administration Privileges andSecurity:
D:\orant\DISCVR4\DIS4ADM.EXE /CONNECT ”SYSADMIN:System
Administrator/<password>@<db>” /EUL <EULprefix>_<Lang>
2. Use the Help –> About Discoverer... dialog to make sure you areconnected to the correct End User Layer (<EULprefix>_<Lang>;compare the import options used in Step 5.5). You can change theEUL in the dialog Tools –> Options –> Default EUL.
3. Using Tools –> Privileges check ”User Edition” privileges for allApplications Users/Responsibilities who should be allowed toopen workbooks.
4. Using Tools –> Security grant Business Area access to ApplicationsUser/Responsibilities who should be allowed to query the variousBusiness Areas.
H – 40 Oracle Applications System Administrator’s Guide
8.2 Share Workbooks using Discoverer Plus Edition
For information about delivered workbooks with Oracle E–BusinessIntelligence Suite and detailed descriptions of worksheets please referto the Oracle Business Intelligence System User’s Guide. You must grantshared workbook access to the Oracle Applications responsibilities youwould like to use for workbook analysis.
1. Log in to the Discoverer User Edition 4.1 as the ApplicationsAdmin user who imported the eex files in step 5.5.
D:\orant\DISCVR4\DIS4USR.EXE /APPS_USER /CONNECT \
”SYSADMIN:System Administrator/<password>@<db>” /EUL
<EULprefix>_<Lang>
2. Use the Help –> About Discoverer... dialog to make sure you areconnected to the correct End User Layer (<EUL prefix>_<Lang>;compare the import options used in Step 5.5). You can change theEUL in the dialog Tools –> Options –> EUL.
3. Using the ”File –> Manage Workbooks... –> Sharing...” dialog,share the workbooks to the Applications User/Responsibilitieswho should be allowed to open the various workbooks.
For example, share the following workbooks with the followingOracle Applications responsibilities:
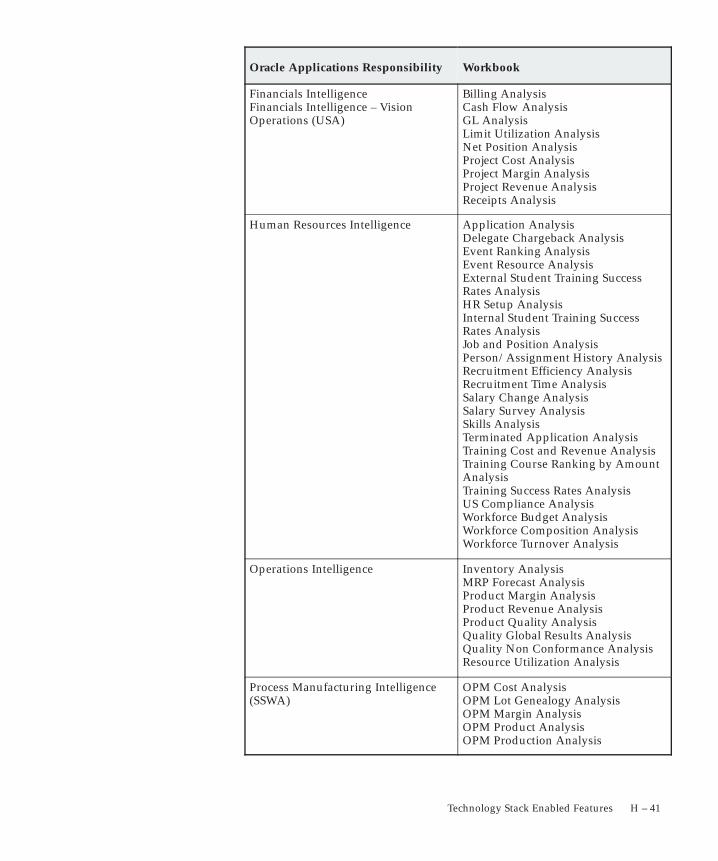
H – 41Technology Stack Enabled Features
Oracle Applications Responsibility Workbook
Financials IntelligenceFinancials Intelligence – VisionOperations (USA)
Billing Analysis Cash Flow Analysis GL Analysis Limit Utilization Analysis Net Position Analysis Project Cost Analysis Project Margin Analysis Project Revenue Analysis Receipts Analysis
Human Resources Intelligence Application Analysis Delegate Chargeback Analysis Event Ranking Analysis Event Resource Analysis External Student Training SuccessRates Analysis HR Setup Analysis Internal Student Training SuccessRates Analysis Job and Position Analysis Person/Assignment History AnalysisRecruitment Efficiency Analysis Recruitment Time Analysis Salary Change Analysis Salary Survey Analysis Skills Analysis Terminated Application Analysis Training Cost and Revenue Analysis Training Course Ranking by AmountAnalysis Training Success Rates Analysis US Compliance AnalysisWorkforce Budget Analysis Workforce Composition Analysis Workforce Turnover Analysis
Operations Intelligence Inventory Analysis MRP Forecast Analysis Product Margin Analysis Product Revenue Analysis Product Quality Analysis Quality Global Results Analysis Quality Non Conformance Analysis Resource Utilization Analysis
Process Manufacturing Intelligence(SSWA)
OPM Cost Analysis OPM Lot Genealogy Analysis OPM Margin Analysis OPM Product Analysis OPM Production Analysis
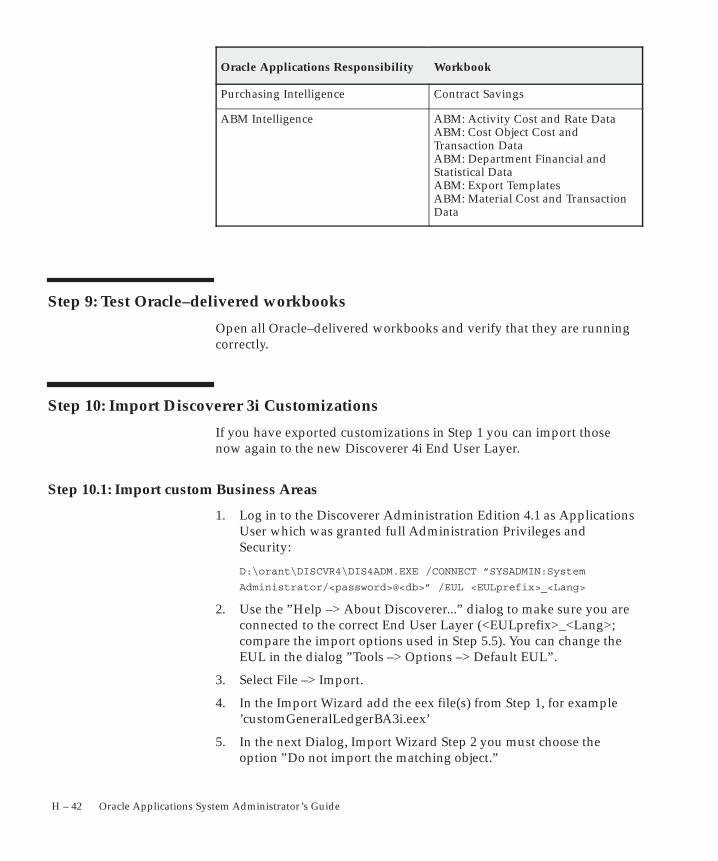
H – 42 Oracle Applications System Administrator’s Guide
WorkbookOracle Applications Responsibility
Purchasing Intelligence Contract Savings
ABM Intelligence ABM: Activity Cost and Rate Data ABM: Cost Object Cost andTransaction Data ABM: Department Financial andStatistical Data ABM: Export Templates ABM: Material Cost and TransactionData
Step 9: Test Oracle–delivered workbooks
Open all Oracle–delivered workbooks and verify that they are runningcorrectly.
Step 10: Import Discoverer 3i Customizations
If you have exported customizations in Step 1 you can import thosenow again to the new Discoverer 4i End User Layer.
Step 10.1: Import custom Business Areas
1. Log in to the Discoverer Administration Edition 4.1 as ApplicationsUser which was granted full Administration Privileges andSecurity:
D:\orant\DISCVR4\DIS4ADM.EXE /CONNECT ”SYSADMIN:System
Administrator/<password>@<db>” /EUL <EULprefix>_<Lang>
2. Use the ”Help –> About Discoverer...” dialog to make sure you areconnected to the correct End User Layer (<EULprefix>_<Lang>;compare the import options used in Step 5.5). You can change theEUL in the dialog ”Tools –> Options –> Default EUL”.
3. Select File –> Import.
4. In the Import Wizard add the eex file(s) from Step 1, for example’customGeneralLedgerBA3i.eex’
5. In the next Dialog, Import Wizard Step 2 you must choose theoption ”Do not import the matching object.”
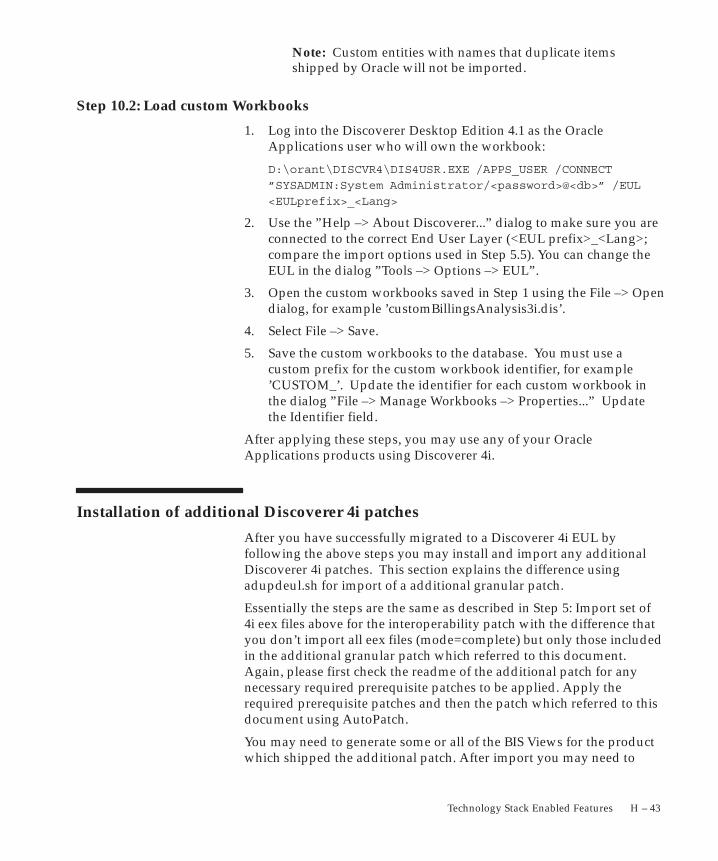
H – 43Technology Stack Enabled Features
Note: Custom entities with names that duplicate itemsshipped by Oracle will not be imported.
Step 10.2: Load custom Workbooks
1. Log into the Discoverer Desktop Edition 4.1 as the OracleApplications user who will own the workbook:
D:\orant\DISCVR4\DIS4USR.EXE /APPS_USER /CONNECT
”SYSADMIN:System Administrator/<password>@<db>” /EUL
<EULprefix>_<Lang>
2. Use the ”Help –> About Discoverer...” dialog to make sure you areconnected to the correct End User Layer (<EUL prefix>_<Lang>;compare the import options used in Step 5.5). You can change theEUL in the dialog ”Tools –> Options –> EUL”.
3. Open the custom workbooks saved in Step 1 using the File –> Opendialog, for example ’customBillingsAnalysis3i.dis’.
4. Select File –> Save.
5. Save the custom workbooks to the database. You must use acustom prefix for the custom workbook identifier, for example’CUSTOM_’. Update the identifier for each custom workbook inthe dialog ”File –> Manage Workbooks –> Properties...” Updatethe Identifier field.
After applying these steps, you may use any of your OracleApplications products using Discoverer 4i.
Installation of additional Discoverer 4i patches
After you have successfully migrated to a Discoverer 4i EUL byfollowing the above steps you may install and import any additionalDiscoverer 4i patches. This section explains the difference usingadupdeul.sh for import of a additional granular patch.
Essentially the steps are the same as described in Step 5: Import set of4i eex files above for the interoperability patch with the difference thatyou don’t import all eex files (mode=complete) but only those includedin the additional granular patch which referred to this document.Again, please first check the readme of the additional patch for anynecessary required prerequisite patches to be applied. Apply therequired prerequisite patches and then the patch which referred to thisdocument using AutoPatch.
You may need to generate some or all of the BIS Views for the productwhich shipped the additional patch. After import you may need to
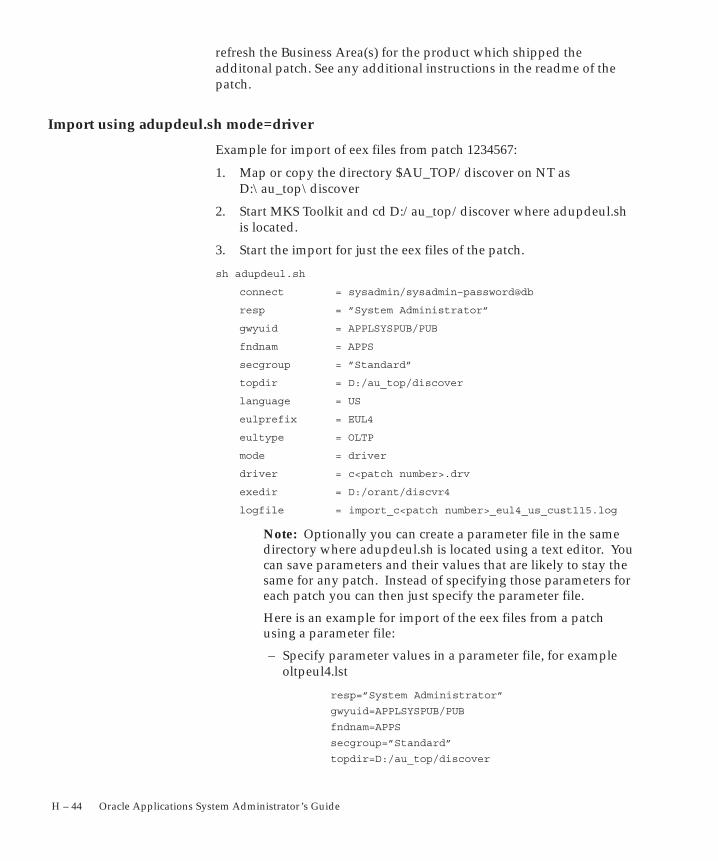
H – 44 Oracle Applications System Administrator’s Guide
refresh the Business Area(s) for the product which shipped theadditonal patch. See any additional instructions in the readme of thepatch.
Import using adupdeul.sh mode=driver
Example for import of eex files from patch 1234567:
1. Map or copy the directory $AU_TOP/discover on NT asD:\au_top\discover
2. Start MKS Toolkit and cd D:/au_top/discover where adupdeul.shis located.
3. Start the import for just the eex files of the patch.
sh adupdeul.sh
connect = sysadmin/sysadmin–password@db
resp = ”System Administrator”
gwyuid = APPLSYSPUB/PUB
fndnam = APPS
secgroup = ”Standard”
topdir = D:/au_top/discover
language = US
eulprefix = EUL4
eultype = OLTP
mode = driver
driver = c<patch number>.drv
exedir = D:/orant/discvr4
logfile = import_c<patch number>_eul4_us_cust115.log
Note: Optionally you can create a parameter file in the samedirectory where adupdeul.sh is located using a text editor. Youcan save parameters and their values that are likely to stay thesame for any patch. Instead of specifying those parameters foreach patch you can then just specify the parameter file.
Here is an example for import of the eex files from a patchusing a parameter file:
– Specify parameter values in a parameter file, for exampleoltpeul4.lst
resp=”System Administrator”
gwyuid=APPLSYSPUB/PUB
fndnam=APPS
secgroup=”Standard”
topdir=D:/au_top/discover
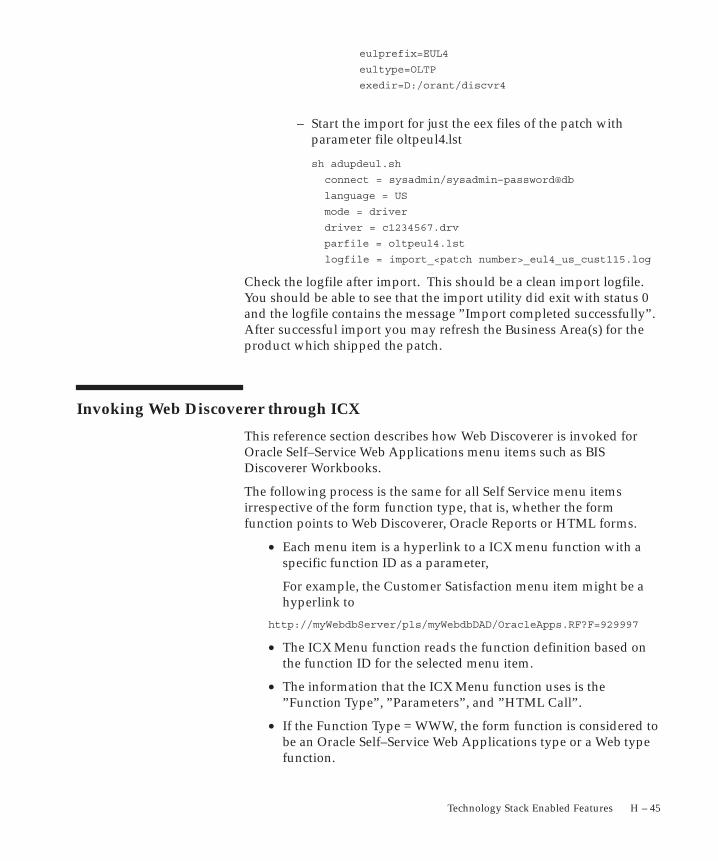
H – 45Technology Stack Enabled Features
eulprefix=EUL4
eultype=OLTP
exedir=D:/orant/discvr4
– Start the import for just the eex files of the patch withparameter file oltpeul4.lst
sh adupdeul.sh
connect = sysadmin/sysadmin–password@db
language = US
mode = driver
driver = c1234567.drv
parfile = oltpeul4.lst
logfile = import_<patch number>_eul4_us_cust115.log
Check the logfile after import. This should be a clean import logfile.You should be able to see that the import utility did exit with status 0and the logfile contains the message ”Import completed successfully”.After successful import you may refresh the Business Area(s) for theproduct which shipped the patch.
Invoking Web Discoverer through ICX
This reference section describes how Web Discoverer is invoked forOracle Self–Service Web Applications menu items such as BISDiscoverer Workbooks.
The following process is the same for all Self Service menu itemsirrespective of the form function type, that is, whether the formfunction points to Web Discoverer, Oracle Reports or HTML forms.
• Each menu item is a hyperlink to a ICX menu function with aspecific function ID as a parameter,
For example, the Customer Satisfaction menu item might be ahyperlink to
http://myWebdbServer/pls/myWebdbDAD/OracleApps.RF?F=929997
• The ICX Menu function reads the function definition based onthe function ID for the selected menu item.
• The information that the ICX Menu function uses is the”Function Type”, ”Parameters”, and ”HTML Call”.
• If the Function Type = WWW, the form function is considered tobe an Oracle Self–Service Web Applications type or a Web typefunction.
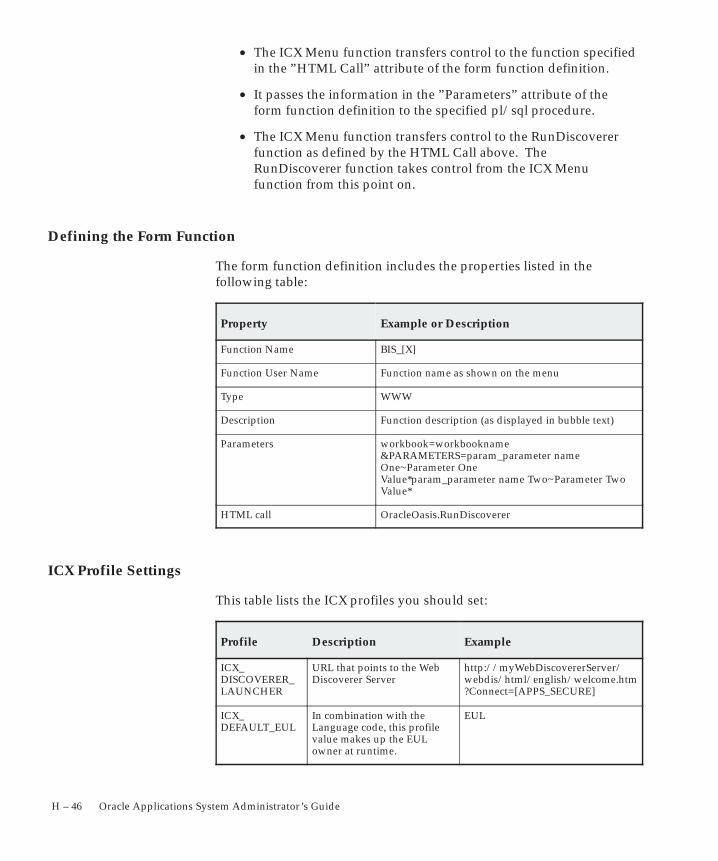
H – 46 Oracle Applications System Administrator’s Guide
• The ICX Menu function transfers control to the function specifiedin the ”HTML Call” attribute of the form function definition.
• It passes the information in the ”Parameters” attribute of theform function definition to the specified pl/sql procedure.
• The ICX Menu function transfers control to the RunDiscovererfunction as defined by the HTML Call above. TheRunDiscoverer function takes control from the ICX Menufunction from this point on.
Defining the Form Function
The form function definition includes the properties listed in thefollowing table:
Property Example or Description
Function Name BIS_[X]
Function User Name Function name as shown on the menu
Type WWW
Description Function description (as displayed in bubble text)
Parameters workbook=workbookname&PARAMETERS=param_parameter nameOne~Parameter One Value*param_parameter name Two~Parameter TwoValue*
HTML call OracleOasis.RunDiscoverer
ICX Profile Settings
This table lists the ICX profiles you should set:
Profile Description Example
ICX_DISCOVERER_LAUNCHER
URL that points to the Web Discoverer Server
http://myWebDiscovererServer/webdis/html/english/welcome.htm?Connect=[APPS_SECURE]
ICX_DEFAULT_EUL
In combination with the Language code, this profile value makes up the EUL owner at runtime.
EUL
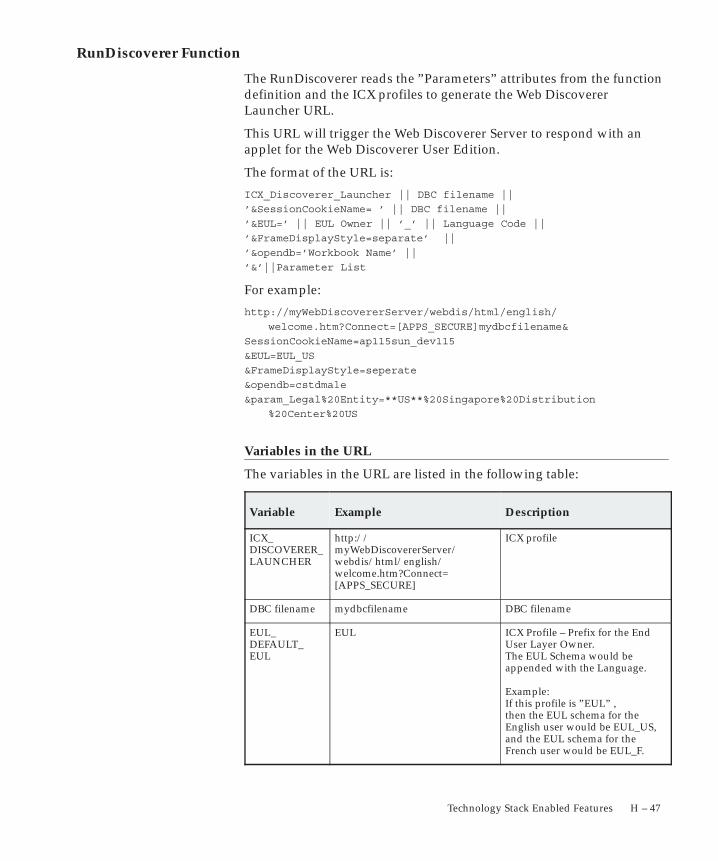
H – 47Technology Stack Enabled Features
RunDiscoverer Function
The RunDiscoverer reads the ”Parameters” attributes from the functiondefinition and the ICX profiles to generate the Web DiscovererLauncher URL.
This URL will trigger the Web Discoverer Server to respond with anapplet for the Web Discoverer User Edition.
The format of the URL is:
ICX_Discoverer_Launcher || DBC filename ||
’&SessionCookieName= ’ || DBC filename ||
’&EUL=’ || EUL Owner || ’_’ || Language Code ||
’&FrameDisplayStyle=separate’ ||
’&opendb=’Workbook Name’ ||
’&’||Parameter List
For example:
http://myWebDiscovererServer/webdis/html/english/
welcome.htm?Connect=[APPS_SECURE]mydbcfilename&
SessionCookieName=ap115sun_dev115
&EUL=EUL_US
&FrameDisplayStyle=seperate
&opendb=cstdmale
¶m_Legal%20Entity=**US**%20Singapore%20Distribution
%20Center%20US
Variables in the URL
The variables in the URL are listed in the following table:
Variable Example Description
ICX_DISCOVERER_LAUNCHER
http://myWebDiscovererServer/webdis/html/english/welcome.htm?Connect=[APPS_SECURE]
ICX profile
DBC filename mydbcfilename DBC filename
EUL_DEFAULT_EUL
EUL ICX Profile – Prefix for the End User Layer Owner. The EUL Schema would beappended with the Language.
Example:If this profile is ”EUL” ,then the EUL schema for the English user would be EUL_US, and the EUL schema for the French user would be EUL_F.
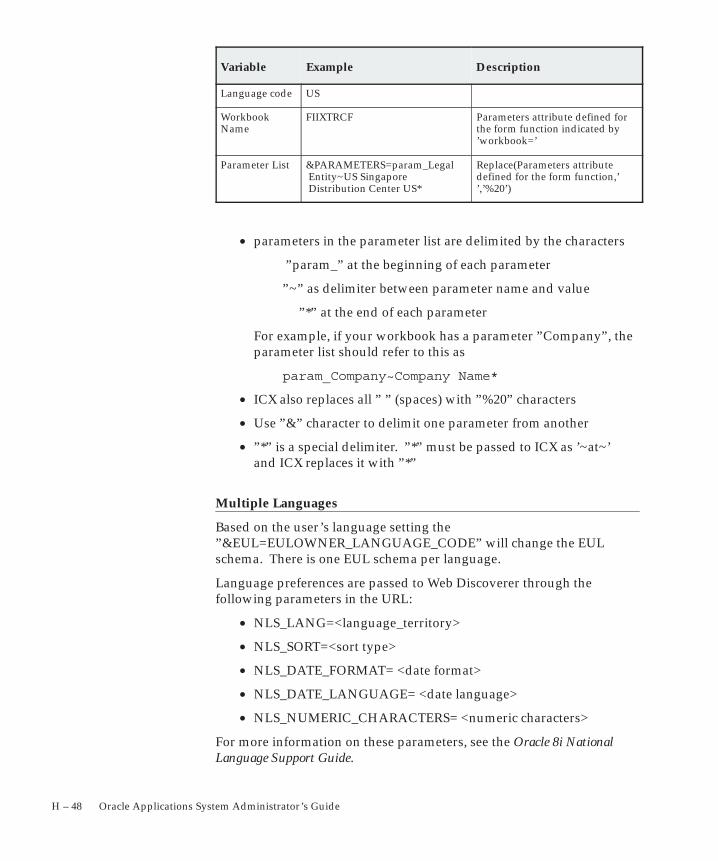
H – 48 Oracle Applications System Administrator’s Guide
DescriptionExampleVariable
Language code US
WorkbookName
FIIXTRCF Parameters attribute defined forthe form function indicated by’workbook=’
Parameter List &PARAMETERS=param_Legal Entity~US Singapore Distribution Center US*
Replace(Parameters attributedefined for the form function,’’,’%20’)
• parameters in the parameter list are delimited by the characters
”param_” at the beginning of each parameter
”~” as delimiter between parameter name and value
”*” at the end of each parameter
For example, if your workbook has a parameter ”Company”, theparameter list should refer to this as
param_Company~Company Name*
• ICX also replaces all ” ” (spaces) with ”%20” characters
• Use ”&” character to delimit one parameter from another
• ”*” is a special delimiter. ”*” must be passed to ICX as ’~at~’and ICX replaces it with ”*”
Multiple Languages
Based on the user’s language setting the”&EUL=EULOWNER_LANGUAGE_CODE” will change the EULschema. There is one EUL schema per language.
Language preferences are passed to Web Discoverer through thefollowing parameters in the URL:
• NLS_LANG=<language_territory>
• NLS_SORT=<sort type>
• NLS_DATE_FORMAT= <date format>
• NLS_DATE_LANGUAGE= <date language>
• NLS_NUMERIC_CHARACTERS= <numeric characters>
For more information on these parameters, see the Oracle 8i NationalLanguage Support Guide.

H – 49Technology Stack Enabled Features
Oracle9i Applications Server (9iAS) with Oracle E–Business SuiteRelated Documentation
This section lists documentation that may be useful when installing orupgrading Oracle9i Application Server (9iAS) 1.0.2.2.2 with OracleE–Business Suite Release 11i environments.
Users are strongly advised to make backups of their environmentsbefore executing any of the procedures noted in the documentationbelow, and to test their environments before executing these proceduresin production environments. Some of the procedures in thesedocuments may have significant effects on Oracle E–Business SuiteRelease 11i environments and should be executed only by skilledOracle E–Business Suite database or systems administrators.
The most current version of this section is published in Note 207159.1on OracleMetaLink. This OracleMetaLink note will be updatedregularly, and it is recommended that you obtain the latest versionbefore proceeding with your installation.
The following documentation for Oracle9i Application Server withOracle E–Business Suite Release 11i environments is available fromOracleMetaLink:
Installing and Upgrading 9iAS 1.0.2.2.2 with Oracle E–Business Suite Release 11i
Installing Oracle9i Application Server with Oracle Applications 11i(Note 146468.1)
• Main document for installing and upgrading existing OracleE–Business Suite Release 11i environments to 9iAS 1.0.2.2.2
• Covers upgrade scenarios for 11.5.1 through 11.5.7 environments
• This document is a prerequisite to enable Portal and SingleSign–on functionality for Oracle E–Business Suite Release 11i
Oracle9i Application Server (9iAS) with Oracle E–Business SuiteRelease 11i Frequently Asked Questions (Note 186981.1)
• Answers to Frequently Asked Questions (FAQ) about Oracle9iApplication Server and how it works with Oracle E–BusinessSuite Release 11i
• Includes sections on 9iAS Installation, 9iAS Configuration,Discoverer, Portal, Oracle Internet Directory and Single Sign–On,and other issues
H – 50 Oracle Applications System Administrator’s Guide
• Reviews common issues, troubleshooting tips, andplatform–specific issues for Sun Solaris, HP HP–UX, IBM AIX,and Linux
Upgrading to JDK 1.3 with Oracle Applications 11i (Note 130091.1)
• Describes process for upgrading upgrading existing OracleE–Business Suite Release 11i environments to the latest JavaDevelopment Kit 1.3 release
• Required as part of the prerequisites for Installing Oracle9iApplication Server with Oracle Applications 11i (Note 146468.1)
Upgrading to JDK 1.3 with Oracle Applications 11i ConcurrentProcessing Node (Note 202128.1)
• Describes process for upgrading existing Oracle E–Business SuiteRelease 11i Concurrent Processing server nodes to the latest JavaDevelopment Kit 1.3 release
• Optional – may be applied after Upgrading to JDK 1.3 withOracle Applications 11i (Note 130091.1)
Upgrading Oracle HTTP Server in Applications 11i (Note 161779.1)
• Oracle HTTP Server is upgraded to OHS 1.0.2.2 when upgradingexisting Oracle E–Business Suite Release 11i environments to9iAS 1.0.2.2.2
• Customers who wish to upgrade to the latest version of OracheHTTP Server without upgrading to 9iAS 1.0.2.2.2 may optionallyuse this document
• Describes upgrade to Oracle HTTP Server 1.0.2.1s, whichincludes Apache 1.3.12 with additional Oracle mods
• Customers who have already upgraded to 9iAS 1.0.2.2.2following Installing Oracle9i Application Server with OracleApplications 11i (Note 146468.1) must not use this note
Debugging 9iAS Installations and Upgrades
Using AutoConfig to Manage System Configurations with OracleApplications 11i (Note 165195.1)
• AutoConfig is installed during the migration of an existingOracle E–Business Suite Release 11i environment to 9iAS 1.0.2.2.2
H – 51Technology Stack Enabled Features
• Describes AutoConfig concepts and systems administrationguidelines for configuration management
• AutoConfig is mandatory for managing environments after theyhave been migrated to 9iAS 1.0.2.2.2
Running orainst in Motif Mode Causes Error: User Interface Failure(Note 170931.1)
Installation of 9iAS 1.x Fails to Install Discoverer on Unix (Note165516.1)
How To Manually Install Discoverer 3i or 4i With 9iAS on a UNIXPlatform (Note 131662.1)
• Discussions of DISPLAY–related issues for Unix platforms whenrunning the Oracle Universal Installer
• Descriptions of issue background, debugging, and recovery tips
Enabling Portal and Single Sign–On functionality
Configuring Oracle Applications with Oracle Portal (Note 146469.1)
• Main document for installing and upgrading existing OracleE–Business Suite Release 11i environments to Portal 3i
• May optionally only be used after Installing Oracle9i ApplicationServer with Oracle Applications 11i (Note 146468.1)
• This document is a prerequisite to enable Portal and SingleSign–on functionality for Oracle E–Business Suite Release 11i
Oracle Portal Diagnostics Agent (Note 169490.1)
• Describes installation of a utility for debugging Portalinstallations
• Optional but recommended after Configuring OracleApplications with Oracle Portal (Note 146469.1)
• Oracle Support may request reports from this tool beforeresponding to Portal–related Technical Assistance Requests(TARs)
Configuring and Troubleshooting Oracle HTTP Server with OracleApplications (Note 139863.1)
• Instructions and debugging tips for implementing the OracleApplications Self–Service Framework within an existing OracleE–Business Suite Release 11i environment
H – 52 Oracle Applications System Administrator’s Guide
• Required as part of the prerequisites for Configuring OracleApplications with Oracle Portal (Note 146469.1)
Implementing Oracle Applications Synchronization with LDAP(Note 150832.1)
• Main document for implementing integration between OracleInternet Directory (OID) and Oracle E–Business Suite Release 11i
• Supports unidirectional synchronization of user informationfrom OID 3.0.1 or higher to FND_USER
• May optionally be used after Configuring Oracle Applicationswith Oracle Portal (Note 146469.1)
Oracle9iAS Single Sign–On Integration with Third–Party SingleSign–On Products (Note 176526.1)
• White paper describing fundamental concepts for integration of9iAS Single Sign–On with third–party SSO providers
• Contains descriptions of technical APIs and a case study withsample code for integrating with Netegrity SiteMinder
Enabling Discoverer functionality
Discoverer 4i with Oracle Applications 11i (Note 139516.1)
• Main document for installing and upgrading existing OracleE–Business Suite Release 11i environments to Discoverer 4i
• Covers upgrade scenarios from Discoverer 3i and 4i for BusinessIntelligence System 11i and 1.2 installations
• May be used after Installing Oracle9i Application Server withOracle Applications 11i (Note 146468.1)
• This document is a prerequisite to enable Discovererfunctionality for Oracle E–Business Suite Release 11i
Oracle 9iAS 1.0.2.2 Discoverer: Best Practices for Scalability andPerformance (Note 175287.1)
• Tips for optimizing Discoverer scalability and performance inhigh–volume environments
• Contains discussions about Discoverer system architectures, tipsfor structuring End–User Layers, optimizing workbooks, andmuch more
H – 53Technology Stack Enabled Features
• May be used after Discoverer 4i with Oracle Applications 11i(Note 139516.1)
Discoverer Plus 4i Firewall Configuration (Note 183658.1)
Oracle Discoverer 4i Plus Firewall and SSL Tips (Note 159200.1)
• Tips for implementing Discoverer 4i with firewalls using SecureSocket Layer protocols
• May be used after Discoverer 4i with Oracle Applications 11i(Note 139516.1)
Related Areas
Oracle9i Application Server Release Documentation (OracleTechnology Network)
• Master Oracle9i Application Server documentation library,including generic and platform–specific documentation
• Core documentation for Oracle HTTP Server, Portal, Discoverer,Single Sign–On, Oracle Internet Directory, Workflow, and other9iAS components
• IMPORTANT: Generic installation and tuning–relateddocuments in this library are not applicable to Oracle E–BusinessSuite Release 11i environments.
– 9iAS must be installed in Release 11i environments usingthe Metalink Notes 146468.1, 146469.1, and 139516.1 (seeabove)
– 9iAS tuning in Oracle E–Business Suite Release 11ienvironments must be performed via AutoConfig’s ContextEditor (Note 165195.1)
Using Forms Listener Servlet with Oracle Applications 11i (Note201340.1)
• Describes optional installation and implementation of FormsListener Servlet support for Oracle E–Business Suite Release 11ienvironments
• Does not require migration to 9iAS 1.0.2.2.2
H – 54 Oracle Applications System Administrator’s Guide
Using UTF8 Character Set with Applications Release 11i (Note134375.1)
• Describes process for supporting UTF–8 multilingual Unicodecharacter sets in Oracle E–Business Suite Release 11ienvironments
• Does not require migration to 9iAS 1.0.2.2.2

Glossary – 1
GlossaryAccounting Flexfield The code you use to
identify a general ledger account in anOracle Financials application. EachAccounting Flexfield value corresponds toa summary or rollup account within yourchart of accounts.
Action Set A sequence of alert actions thatare enabled for a particular alert. You canassign a sequence number to each actionyou include in an action set to specify theorder in which the actions are performed.
Alert A mechanism that checks your databasefor a specific exception condition. An alertis characterized by the SQL SELECTstatement it contains. A SQL SELECTstatement tells your application whatdatabase exception to identify as well aswhat output to produce for that exception.
Alert Action An action you want your alertto perform. An alert action can depend onthe output from the alert. An action caninclude sending an electronic mail messageto a mail ID, running an OracleApplications program, running a programor script from your operating system, orrunning a SQL script to modify informationin your database. You can have more thanone action for an alert, and an action canincorporate the output of the alert.
AuditTrail AuditTrail tracks which rows in adatabase table(s) were updated at whattime and which user was logged in usingthe form(s). Several updates can betracked, establishing a trail of audit datathat documents the database table changes.
Concurrent Manager A mechanism that runsconcurrent programs. A manager operatesduring the time and days defined by awork shift. A manager can run anyconcurrent program, or be specialized torun only certain kinds of programs.
Concurrent Program A program that runsconcurrently (at the same time) as otherprograms. Concurrent programs run asbackground processes, while you continueto work at your terminal.
Concurrent Request A command to start aconcurrent program. An example of aconcurrent request is a command togenerate and print a report.
Data Group A data group is a group list ofOracle Applications and the Oracle ID eachapplication is assigned to. An Oracle IDgrants access privileges to tables in anORACLE database.
Detail Action An alert action that representsone exception found in the database.
Glossary – 2 Oracle Applications System Administrator’s Guide
Document Sequence A definition of how toassign a unique number to each documentgenerated when a selected database table isupdated.
Event Alert An alert that monitors theoccurrence of a specific exception or changein your database. An exception in yourdatabase results if you add or updateinformation using Oracle Applicationsforms. The event alert monitors thedatabase for exceptions based on its SQLSELECT statement.
No Exception Action An alert action thatrepresents no exceptions found in thedatabase.
Periodic Alert An alert that periodicallyreports key information according to aschedule you define. Rather than notifyyou of immediate exceptions in thedatabase like an event alert, a periodic alertscans for specific database informationspecified by its SQL SELECT statement atscheduled intervals.
Summary Action An alert action thatrepresents multiple exceptions found in thedatabase.
Summary Threshold The number ofexceptions Oracle Alert can find before itchanges an alert action from a detail actionto a summary action.

Index – 1
Index
AActive work items, 6 – 67AdminAppServer utility, G – 44Administer Folders, 9 – 24Administering Oracle Applications security,
G – 51Agent listeners, 6 – 56Apache Server, G – 14Application, registering, 9 – 19Application basepath, 9 – 20, 9 – 21Application environment variable, 9 – 21Application Server Security, G – 51Application Server Trust Level, G – 56Application users
assigning one or more responsibilities, 2 – 2changing passwords, 2 – 19defining, 2 – 2, 2 – 17disabling application password, 2 – 19password characteristics, 2 – 18password profile options, 2 – 19reporting on active users, 2 – 48start dates, 2 – 20username characteristics, 2 – 18username/password, 2 – 2
Applications security, defining a responsibility,2 – 10
applsys. See ORACLE IDApplsys password, matching APPS accounts,
9 – 14
APPS accounts, password, 9 – 14Assign default folders, 9 – 24Audit reports
brief explanation, 3 – 7listing, 3 – 2
Auditing database row changes. See AuditTrailAuditing user activity. See Sign–On AuditAuditTrail
archiving data, 3 – 32audit groups, 3 – 22audit set, 3 – 22changing audit tables, 3 – 31description, 3 – 22introduction, 3 – 2reporting, 3 – 31setting up, 3 – 22tables, 3 – 24 to 3 – 27views, 3 – 25
BBackground engines, 6 – 40
Ccharacter mode mapping to GUI windows,
E – 2Completed work items, 6 – 39, 6 – 62CONCSUB, 4 – 41

Index – 2 Oracle Applications System Administrator’s Guide
Concurrent managersSee also Internal concurrent manager;
Specializing managersactivating a manager, 5 – 55activating and other control states, 5 – 81assigning work shifts, 5 – 93controlling, 5 – 55 to 5 – 65, 5 – 80, G – 72defining, 5 – 26 to 5 – 35, 5 – 89 to 5 – 98defining combined specialization rules,
5 – 100defining work shifts, 5 – 98disabling a work shift, 5 – 30Immediate program libraries, 5 – 92migrating, 5 – 69operating system process ID number, 5 – 86Oracle process ID number, 5 – 86PMON cycle, 5 – 56program libraries, 5 – 27reporting on work shifts, 5 – 35, 5 – 36restarting a manager, 5 – 55role of application name in combined rules,
5 – 101role of application name when defining,
5 – 89sleep time, 5 – 94specializing – Define Managers form, 5 – 95specializing managers, 5 – 37 to 5 – 62Standard manager, 5 – 28target processes, 5 – 2time–based queues, 5 – 32viewing actual number of processes, 5 – 81viewing manager control processes, 5 – 84viewing manager request queue, 5 – 87viewing number of running requests, 5 – 81viewing status of, 5 – 80viewing target number of processes, 5 – 81work shifts, 5 – 29 to 5 – 34work shifts and target processes, 5 – 32,
5 – 93work shifts hours, 5 – 30work shifts overlap, 5 – 31work shifts overlap – same priority, 5 – 31work shifts past midnight, 5 – 30
Concurrent processingfile purging guidelines, 5 – 19lifecycle of a request, 5 – 3 to 5 – 6managing files and tables, 5 – 18 to 5 – 26overview, 5 – 2 to 5 – 7
profile options, 5 – 24 to 5 – 27programs, 4 – 66purge files program, 5 – 20purging and audit data, 5 – 19purging request data, 5 – 18 to 5 – 26System Administrator privileges, 5 – 9viewing incompatible tasks, 4 – 66when programs start, 5 – 2
Concurrent programsand requests, 5 – 2behavior of program parameters, 4 – 52behavior of report set parameters, 4 – 53changing responsibility to see changed
effects, 4 – 52CONCSUB, 4 – 41copying and modifying, 4 – 47 to 4 – 57custom, 4 – 35database session control, 4 – 73defining incompatibility rules, 4 – 25 to
4 – 31disabling, 4 – 66displaying parameters – programs vs. report
sets, 4 – 51enforcement of incompatibility rules, 4 – 28
to 4 – 30example – modifying program parameters,
4 – 54 to 4 – 56execution method, 4 – 63, 4 – 66grouping as a request type, 5 – 103grouping as request types, 5 – 53 to 5 – 55Immediate program libraries, 5 – 92incompatible, 4 – 66, 4 – 75modifying incompatible programs list,
4 – 48 to 4 – 50modifying parameters, 4 – 49 to 4 – 57multiple language support, 4 – 63, 4 – 69not displaying parameters, 4 – 50parameter sequence, 4 – 77program libraries, 5 – 27report set incompatibilities, 4 – 14reporting on enabled programs, 4 – 58reporting on incompatible programs, 4 – 57reporting on program definitions, 4 – 57role of application name in request types,
5 – 104run alone programs, 4 – 25 to 4 – 27running alone, 4 – 66, 4 – 70setting default values, 4 – 51 to 4 – 53
Index – 3
spawned vs. immediate, 5 – 27subroutines, 4 – 63viewing, 4 – 66warnings about modifying, 4 – 47, 4 – 53
Concurrent request type, 5 – 53 to 5 – 55Concurrent requests
changing phase and status, 5 – 16changing priority of, 5 – 16child requests, 5 – 3explained, 5 – 2file access privileges, 5 – 10lifecycle of, 5 – 3 to 5 – 6log file privileges, 5 – 14multilingual support, 4 – 4output file – path to, 5 – 15output file access privileges, 5 – 10parent requests, 5 – 3phase and status, 5 – 3 to 5 – 6phase/status listing, 5 – 3priority of, 5 – 3Report Review Agent, 5 – 10request types, 5 – 103role of application name in request types,
5 – 104submitting using CONCSUB, 4 – 41System Administrator privileges, 5 – 9time taken to run, 5 – 34viewing output, 5 – 105viewing request parameters, 4 – 51viewing status of, 5 – 9 to 5 – 12
Conflict Domain, defining, 9 – 18Conflict domains
defining, 9 – 17explained, 4 – 27
Consumer groups. See Resource consumergroups
Context–sensitive help, link syntax, 8 – 10Controlling access to reports or programs. See
Report GroupsCost–based optimization, 10 – 2
initialization parameters, 10 – 3Custom concurrent programs, 4 – 35Custom help, context–sensitive links, 8 – 10CUSTOM library, 14 – 2Custom reports, context–sensitive help, 8 – 10
DData Groups
Application Object Library requirement, 4 – 83
copying, 4 – 33defining, 4 – 81explained, 4 – 30purposes of, 4 – 30using, 4 – 30 to 4 – 36using with custom applications, 4 – 31using with multiple Set of Books, 4 – 31
Database Resource Manager, 9 – 7DBC file, G – 7DBC files, G – 46Default folders, 9 – 24Deferred activities, 6 – 40Deferred work items, 6 – 70Defining a Conflict Domain, 9 – 18Detail Notification Mailer, 6 – 44Discoverer 4i, H – 21Document sequences
active sequence definitions, 13 – 8application, 13 – 7, 13 – 15assigning sequences to document definitions,
13 – 6, 13 – 8auditability, 13 – 2automatic document numbering – initial
value, 13 – 4automatic numbering, 13 – 10automatic vs manual, 13 – 8category, 13 – 7, 13 – 15category application, 13 – 13category code, 13 – 13category identifies database table, 13 – 12,
13 – 13defining a sequence, 13 – 3defining document categories, 13 – 12defining documents to be numbered, 13 – 7differences – document numbering vs. entry,
13 – 8disabling a sequence assignment, 13 – 16document categories explained, 13 – 6document definition, 13 – 15Document Flexfield, 13 – 7

Index – 4 Oracle Applications System Administrator’s Guide
enabling segments in the document flexfield,13 – 16
end date – document definition, 13 – 16end date – document flexfield, 13 – 16entering documents, 13 – 1entering transactions, 13 – 1examples – document categories, 13 – 6examples – sequence definitions, 13 – 4initial value of sequence, 13 – 11manual numbering, 13 – 10message displayed by document, 13 – 10method in document flexfield, 13 – 7,
13 – 16segments and the document flexfield,
13 – 16sequence names, 13 – 9sequence start date, 13 – 10sequence type, 13 – 10sequences and audit records, 13 – 10sequences explained, 13 – 2set of books in document flexfield, 13 – 7,
13 – 16start date – document definition, 13 – 15start date – document flexfield, 13 – 15type of document numbering, 13 – 10type of sequence numbering, 13 – 4
EEmployee, application user, 2 – 19Environment variable, 9 – 20Errored work items, 6 – 76Event messages, 6 – 38External documents, D – 2
FFlexfields
Shared Table Lock profile, A – 21Shorthand Entry profile option, A – 21
FND_CTL, 10 – 32FND_SESS_CTL, 10 – 32FND_STATS, 10 – 9
FNDCPASS utility, 9 – 9FNDLOAD, C – 2FNDWFBG, 6 – 41FNDWFLST, 6 – 56FNDWFPR, 6 – 62Folder Administration, 9 – 24Folder Set, 9 – 24Folders
Changing ownership, 9 – 26Private vs. Public, 9 – 26
Form, passing arguments to, 4 – 20 to 4 – 24Forms
Administer Concurrent Managers, 5 – 80Applications, 9 – 19Concurrent Conflicts Domains, 9 – 17Concurrent Request Types, 5 – 103Define Application User, 2 – 17Define Combined Specialization Rules,
5 – 100Define Concurrent Manager, 5 – 89Define Data Group, 4 – 81Define Menu, 2 – 34, 2 – 38Define Print Style, 7 – 43Define Printer Driver, 7 – 46Define Printer Types, 7 – 39Define Report Group, 4 – 59Define Work Shifts, 5 – 98Languages, 9 – 28Monitor Application Users, 3 – 8Register Nodes, 5 – 107Register ORACLE IDs, 9 – 13Register Printers, 7 – 41Responsibility, 2 – 10Security Group, 2 – 16Territories, 9 – 30Update System Profile Options, 11 – 6
Function SecurityOracle HRMS, Special Function, 2 – 31Oracle Sales and Marketing, Special
Function, 2 – 31Function Security Function Report, 2 – 45Function Security Menu Report, 2 – 45

Index – 5
Function Security Menu Viewer. See MenuViewer
Function Security Navigator Report, 2 – 45
GGeneric Loader, C – 2GSM. See Generic Service Management
HHelp system
customizing Oracle Applications help, 8 – 2Help System Utility, 8 – 2����������� �� ��� ��� ������� � � ���� ��� �� ��� ����� ������ � � ���� ����� �� ��� ��� ������ � � ������� ������ � � � �� � � ����������� �� ��� � � � �
HTTP Server, G – 14HTTP Server Configuration Checklist, G – 64
IIncompatible programs. See Concurrent
programsInternal concurrent manager
CONCSUB – hiding password, 5 – 62CONCSUB – using to shut down, 5 – 61 to
5 – 63CONCSUB command, 5 – 58, 5 – 60 to
5 – 64control states, 5 – 56 to 5 – 58enforces incompatibility rules, 4 – 28 to
4 – 30explained, 5 – 28internal monitors, 5 – 66log file – name and path, 5 – 15operating system control, 5 – 58 to 5 – 64parallel concurrent processing, 5 – 66PMON cycle, 5 – 14, 5 – 56shut down from operating system, 5 – 61 to
5 – 63
starting from operating system, 5 – 59 to 5 – 61
STARTMGR command, 5 – 58 to 5 – 60when inactive, 5 – 9
JJOB_QUEUE_PROCESSES, 6 – 58
LLDAP integration, H – 4Loaders, C – 2Log files
access level profile option, 5 – 10Internal manager log file, 5 – 15manager log files, 5 – 14manager log files – path and name, 5 – 15parallel processing on multiple nodes,
5 – 66purge program, 5 – 20request log – path to, 5 – 14System Administrator privileges, 5 – 14types of, 5 – 13
Logical databasesdefine for custom applications, 9 – 5example of program incompatibilities, 9 – 4explained, 9 – 4program incompatibility rules, 9 – 4Standard logical database method, 9 – 5
MManagement Pack for Oracle Applications. See
Oracle Management Pack for OracleApplications
Menu Paths, mapping Char mode to GUI, E – 2
Menu Viewer, 2 – 42Menus
compiling, 2 – 31, 2 – 44defining, 2 – 34 to 2 – 37, 2 – 38 to 2 – 43defining a menu entry, 2 – 39

Index – 6 Oracle Applications System Administrator’s Guide
entering arguments, 2 – 36menu prompts, 2 – 40Menu Viewer, 2 – 42role in function security, 2 – 2sequence numbers, 2 – 40
MIME types, for viewing reports, 5 – 105MLS. See Multilingual supportMLS function, 4 – 63, 4 – 69Monitoring users. See Sign–On AuditMulti–language function (MLS function),
4 – 63, 4 – 69Multilingual external documents, D – 2Multilingual support, concurrent requests,
4 – 4
NNavigation Paths, mapping Char mode to GUI,
E – 2Network bandwidth, testing, 9 – 23Network latency, testing, 9 – 23Network Test window, 9 – 22Node, explained, 5 – 107Nodes
explained, 5 – 64manager’s target node, 5 – 68primary and secondary, 5 – 66
Notification Mailerconfiguration, 6 – 47overview, 6 – 44processes, 6 – 47service instances, 6 – 45status, 6 – 46throughput, 6 – 55
OOptions. See User profilesOracle Applications Manager, 5 – 8, 6 – 2Oracle Enterprise Manager, 6 – 3Oracle HTTP Server, G – 14ORACLE ID
applsys – password warning, 9 – 14
applsys privileges, 9 – 16assigning privileges, 9 – 15assigning to responsibility, 2 – 12create session privilege, 9 – 14disabled privileges, 9 – 13, 9 – 15enabled privileges, 9 – 13, 9 – 15explained, 9 – 2Oracle password, 9 – 15Oracle username, 9 – 13public privileges, 9 – 16registering, 9 – 2, 9 – 13requirement for database access, 9 – 3reregistering, 9 – 3restricted privileges, 9 – 3, 9 – 13, 9 – 15
Oracle Internet Directory, H – 4Oracle Management Pack for Oracle
Applications, 6 – 2, 6 – 3Oracle Portal, H – 3Oracle Reports, bitmapped, 4 – 67Oracle Workflow
agent activity, 6 – 38purging, 6 – 61submitting concurrent requests, 6 – 38system status, 6 – 37
Oracle Workflow Manager, 6 – 37Oracle*Mail, integration with Oracle Alert,
B – 6Oracle9i Application Server, H – 2, H – 3
PParallel concurrent processing
examples implementing, 5 – 70 to 5 – 77explained, 5 – 64 to 5 – 76implementation checklist, 5 – 74Internal manager, 5 – 66introduced, 5 – 64log files and multiple nodes, 5 – 66managing, 5 – 68 to 5 – 76migrating managers, 5 – 69operating environments, 5 – 64proprietary queuing systems, 5 – 67
PasswordSee also Application userFNDCPASS utility, 9 – 9
Index – 7
PMON cycle, concurrent managers, 5 – 56Predefined alerts
action sets – definition of, B – 4alert – definition of, B – 3alert action – definition of, B – 3customizing, B – 6DBA alerts, B – 10event alert – definition of, B – 3explained, B – 2, B – 5overview of Oracle Alert, B – 2periodic alert – definition of, B – 3precoded custom alerts, B – 10purge mail alert, B – 15purging alerts, B – 14using, B – 5vs. Oracle Alert, B – 1
Printer supportarguments, 7 – 49arguments for print command, 7 – 26caching of definitions, 7 – 12Command driver method, 7 – 25concurrent managers – restarting, 7 – 12concurrent program print definitions, 7 – 31custom print programs – location, 7 – 26drivers, styles, printer types and platforms,
7 – 5end user settings, 7 – 36header pages, 7 – 45initialization, 7 – 49initialization string, 7 – 28initialization string – editing, 7 – 25introduction to printing, 7 – 2page break problems, 7 – 24platform, 7 – 47postscript printing, 7 – 37predefined types, styles, drivers, 7 – 24print command & arguments – example,
7 – 27print style assignments, 7 – 33print styles – columns, 7 – 44print styles – defining, 7 – 43print styles – explained, 7 – 4print styles – introduction, 7 – 3print styles – predefined, 7 – 43print styles – rows, 7 – 44printer / style assignments, 7 – 31 to 7 – 34printer assignments, 7 – 32
printer driver method, 7 – 25, 7 – 48printer drivers – assigning, 7 – 39printer drivers – defining, 7 – 46printer drivers – explained, 7 – 5printer drivers – introduction, 7 – 3printer drivers – predefined for printers,
7 – 46printer drivers – predefined for styles, 7 – 46printer drivers – when to define new drivers,
7 – 46printer types – defining, 7 – 39printer types – introduction, 7 – 3printers – operating system name, 7 – 42printers – registering, 7 – 41Program driver method, 7 – 25Program driver method – example, 7 – 26program name, 7 – 48reset, 7 – 49reset string, 7 – 28reset string – editing, 7 – 25sequence of printing events, 7 – 5setting up – forms used, 7 – 11setting up printers, 7 – 11shell scripts, 7 – 26spool file, 7 – 28, 7 – 48SRW driver, 7 – 47SRW driver – customizing, 7 – 29 to 7 – 32SRW drivers – how used, 7 – 30SRW drivers – location, 7 – 29standard input, 7 – 27, 7 – 48Subroutine driver method, 7 – 25System Administrator privileges, 7 – 34verifying printer drivers, 7 – 24
Printers. See Printer supportPrinting, G – 76Process Navigator, overview, 12 – 2Profiles. See User profilesPropagation schedules, 6 – 58Purge Obsolete Workflow Runtime Data
concurrent program, 6 – 61, 6 – 62Purging Workflow data, 6 – 61
QQueue propagation, 6 – 58

Index – 8 Oracle Applications System Administrator’s Guide
RReal Application Clusters (RAC), 5 – 76,
G – 85 to G – 91Register
application, 9 – 19concurrent program, 4 – 66
Report Groupsdefining, 4 – 59example – using a code, 4 – 20may consist of, 4 – 19Report Security Groups, 4 – 19report security groups, report sets, reports,
4 – 13responsibility–level vs. form–level, 4 – 19using, 4 – 19 to 4 – 25using a code to customize, 4 – 60using a code with, 4 – 20 to 4 – 24vs. report sets, 4 – 2 to 4 – 4
Report parameters, sharing in a report set, 4 – 15 to 4 – 18
Report Review Agent, 5 – 10Report Security Groups
See also Report Groupsindividual reports and report sets, 2 – 6relationship with application user and
responsibility, 2 – 7using, 2 – 6
Report Setsas concurrent programs, 4 – 10behavior of program parameters, 4 – 53defining, 4 – 6displaying parameters – programs vs. report
sets, 4 – 51example – shared parameters, 4 – 16incompatibility rules, 4 – 14, 4 – 26owners of, 4 – 11 to 4 – 17preventing parameters from being changed,
4 – 52printing, 4 – 10querying in Define Concurrent programs
form, 4 – 14report security groups, report sets, reports,
4 – 13reporting on, 4 – 24reporting on definitions, 4 – 18
request phase and status, 4 – 11sharing parameters in a set, 4 – 15 to 4 – 18System Administrator privileges, 4 – 12vs. report groups, 4 – 2 to 4 – 4
ReportsActive Responsibilities, 2 – 47Active Users, 2 – 48Completed Concurrent Requests, 5 – 34Concurrent Program Details, 4 – 57Concurrent Programs, 4 – 58Purge Concurrent Request and/or Manager
Data, 5 – 20Report Group Responsibilities, 4 – 24Report Sets, 4 – 18Reports and Sets by Responsibility, 2 – 49Signon Audit Concurrent Requests, 3 – 10Signon Audit Forms, 3 – 12Signon Audit Responsibilities, 3 – 15Signon Audit Unsuccessful Logins, 3 – 17Signon Audit Users, 3 – 19User Profile Option Values, 11 – 5Users of a Responsibility, 2 – 46Work Shift by Manager, 5 – 35Work Shifts, 5 – 36
Request type, 5 – 53 to 5 – 55Resource consumer groups, 9 – 7Responsibilities
Application name, 2 – 11changing, 2 – 2deactivating, 2 – 12defines application privileges, 2 – 2defining, 2 – 10description, 2 – 2major components, 2 – 4predefined, 2 – 4Report Security Groups, 2 – 4reporting on active responsibilities, 2 – 47reporting on reports and report sets, 2 – 49,
4 – 24reporting on users of, 2 – 46standard, 2 – 2Start date, 2 – 11
Responsibility, default folders, 9 – 25Run Reports form, customizing using codes,
4 – 20
Index – 9
Run Requests form, example – customizing, 4 – 20
SSecurity
server trust level, G – 55server, administering, G – 51
Security Groups, defining (for HRMS only), 2 – 16
Self–Service Framework, configuration, G – 59HTTP server configuration checklist, G – 64
Server security, G – 51, G – 55Server trust level, G – 55Service Management, 5 – 5Session parameters, for optimization, 10 – 32Session time–out, 2 – 9Shared parameters, behavior of. See Report
SetsSign–On Audit
audit levels, 3 – 4examples using, 3 – 5introduction, 3 – 2monitoring users, 3 – 5, 3 – 8purging obsolete data, 3 – 21reporting on users, 3 – 19reporting on users and forms, 3 – 12reporting on users and requests, 3 – 10reporting on users and responsibilities,
3 – 15reporting on users and unsuccessful logins,
3 – 17reports, 3 – 7setting up, 3 – 4using, 3 – 3 to 3 – 8
Single Sign–On, H – 4Specializing managers
action types, 5 – 37 to 5 – 39actions, 5 – 37 to 5 – 39defining combined rules, 5 – 46 to 5 – 49defining specialization rules, 5 – 37 to
5 – 40examples of action types, 5 – 40 to 5 – 42
examples of combined rules, 5 – 48 to 5 – 53
examples of rules, 5 – 41 to 5 – 48explained, 5 – 37 to 5 – 62introduction, 5 – 37specialization vs. combined rules, 5 – 51using more than one rule, 5 – 38 to 5 – 41
Standard Report Submission, explained, 4 – 2Standard Submission form
customizing, 4 – 2, 4 – 20 to 4 – 24example – customizing, 4 – 20explained, 4 – 2list, 4 – 20
Stuck processes, 6 – 40Summary Notification Mailer, 6 – 44Suspended work items, 6 – 73System Administrator
report set privileges, 4 – 12versus Database Administrator, 1 – 2
TTarget processes. See Concurrent managersTimed out activities, 6 – 40Transaction Managers, 5 – 28
UUpgrading, preserving custom menus, 2 – 31User, default folders, 9 – 25User profiles
assigning Set of Books, 11 – 2examples of, 11 – 4reporting on, 11 – 5setting options, 11 – 2updating system profiles, 11 – 6using site level as defaults, 11 – 3when changes take effect, 11 – 2
User session limits, 2 – 9Username. See Application userUTF8, G – 92
Index – 10 Oracle Applications System Administrator’s Guide
VViewer Options window, 5 – 105
WWFMGSMD, 6 – 44WFMGSMS, 6 – 45
Windows, character mode mapping to GUI, E – 2
Work Directory, 14 – 2, 14 – 3Work items, 6 – 38Work shifts. See Concurrent ManagersWorkflow Agent Listener concurrent program,
6 – 56Workflow Background Process concurrent
program, 6 – 41

Reader’s Comment Form
Oracle Applications System Administrator’s Guide Volume 2, Release 11iA96156–02
Oracle Corporation welcomes your comments and suggestions on the quality and usefulnessof this publication. Your input is an important part of the information we use for revision.
• Did you find any errors?
• Is the information clearly presented?
• Do you need more information? If so, where?
• Are the examples correct? Do you need more examples?
• What features did you like most about this manual? What did you like least about it?
If you find any errors or have any other suggestions for improvement, please indicate the topic, chapter,and page number below:
Please send your comments to:
Oracle Applications Documentation ManagerOracle Corporation500 Oracle ParkwayRedwood Shores, CA 94065 USAPhone: (650) 506–7000 Fax: (650) 506–7200
If you would like a reply, please give your name, address, and telephone number below:
Thank you for helping us improve our documentation.

Related Documents


![Oracle Applications [System Administrator's Guide - Configuration] Thank you for choosing _ __ _ ___ __ _| |_ / _| ___ ___ __| | / __/ _` | __| |_ / _ \ / _ \ / _` | | (_| (_| | |_|](https://static.cupdf.com/doc/110x72/5523fdfe4a7959d82f8b4571/oracle-applications-system-administrators-guide-configuration-thank-you-for-choosing-4.jpg)
