OPTIS External User Guide 9. Reimbursement Requests 93 9. Reimbursement Requests Chapter Updated February 2021 The OPTIS system provides an electronic format for requesting reimbursement for authorized expenses. Reimbursement Requests and Periodic Reporting When an OPTIS reimbursement request (RR) is submitted, OPTIS confirms that an Agency Periodic Report (APR) for the time period of the expense is on file. If the APR is not on file, in most cases, the following error message will display when you try to submit. It will show which APR(s) need to be completed: Agencies have 45 days after the end of the quarter to submit an APR, but payment(s) cannot be made for expenses incurred during a particular period without an APR on file for that period. If you attempt to submit a reimbursement request before the APR is complete, you will get an error message. An exception is made for vehicle purchase(s), since often those requests are large and PTD understands the need to be reimbursed soon after taking delivery. Supporting Documentation Additional required documents, such as invoices or capital purchase documents, need to be attached to the request. Documentation for each project type varies. Contact PTD directly for further clarification. Attaching documents to your reimbursement request in OPTIS is the preferred method for providing supplemental documentation. This ensures that everything required for the regional transit coordinator (RTC) to approve your payment is in one central place and associated with the exact document it pertains to. To attach documents to your RR you must be able to scan documents and save them to your local computer. These documents are then located and

Welcome message from author
This document is posted to help you gain knowledge. Please leave a comment to let me know what you think about it! Share it to your friends and learn new things together.
Transcript

OPTIS External User Guide 9. Reimbursement Requests
93
9. Reimbursement Requests Chapter Updated February 2021 The OPTIS system provides an electronic format for requesting reimbursement for authorized expenses.
Reimbursement Requests and Periodic Reporting When an OPTIS reimbursement request (RR) is submitted, OPTIS confirms that an Agency Periodic Report (APR) for the time period of the expense is on file. If the APR is not on file, in most cases, the following error message will display when you try to submit. It will show which APR(s) need to be completed:
Agencies have 45 days after the end of the quarter to submit an APR, but payment(s) cannot be made for expenses incurred during a particular period without an APR on file for that period. If you attempt to submit a reimbursement request before the APR is complete, you will get an error message. An exception is made for vehicle purchase(s), since often those requests are large and PTD understands the need to be reimbursed soon after taking delivery. Supporting Documentation
Additional required documents, such as invoices or capital purchase documents, need to be attached to the request. Documentation for each project type varies. Contact PTD directly for further clarification. Attaching documents to your reimbursement request in OPTIS is the preferred method for providing supplemental documentation. This ensures that everything required for the regional transit coordinator (RTC) to approve your payment is in one central place and associated with the exact document it pertains to. To attach documents to your RR you must be able to scan documents and save them to your local computer. These documents are then located and

OPTIS External User Guide 9. Reimbursement Requests
93
attached during the creation of your RR. If you do not have access to a scanner, supporting documents should be sent to PTD in another format, such as by mail or fax. You must put a note in the “Comments” section of the RR to explain how supporting documents are being sent. Details are included in the following instructions. Creating a Reimbursement Request
As with other processes in OPTIS, there are several ways to progress through the various screens while creating your request. You may prefer to use the navigation menu, the wizard, or a combination of both, since some fields are auto-generated and do not need any action on your part. Follow the steps below the first few times you create a RR and as your comfort level and understanding of the system increase, change them to suit yourself.
1. Log in to OPTIS. 2. Select Create Documents and then Create Reimbursement Request from the Navigation
Menu or Create Documents screen.
OR
3. Select the correct biennium for this request. Click Next.

OPTIS External User Guide 9. Reimbursement Requests
93
4. Select correct agreement for this request. Click Next.
5. The Additional Information page appears with a summary of the new RR. Click Create to create the document and assign a form number (this will later become the document number). Click Continue to open the wizard and begin entering details. Or, you may click View to review the document just created.
6. Number 1 of Wizard - Number This is an information only screen showing the OPTIS assigned document number. Click Next.
OPTIS External User Guide 9. Reimbursement Requests
93
7. Number 2 of Wizard – Information
“Document Date” – Auto-filled with today’s date, leave as is; “Title” – Auto-filled from title of sub-grant agreement, leave as is; “Reimbursement Quarter” – Select the correct quarter and the year from the drop down menus. Click Next.
Note: If this is the last RR for this agreement, check the “Is this the last request for this sub-grant agreement?” box to notify PTD staff.
8. Number 3 of Wizard – Comments (optional) Enter any comments you have regarding this request (e.g., clarifying information which PTD may need to process this payment). May be left blank. Click Next.
OPTIS External User Guide 9. Reimbursement Requests
93
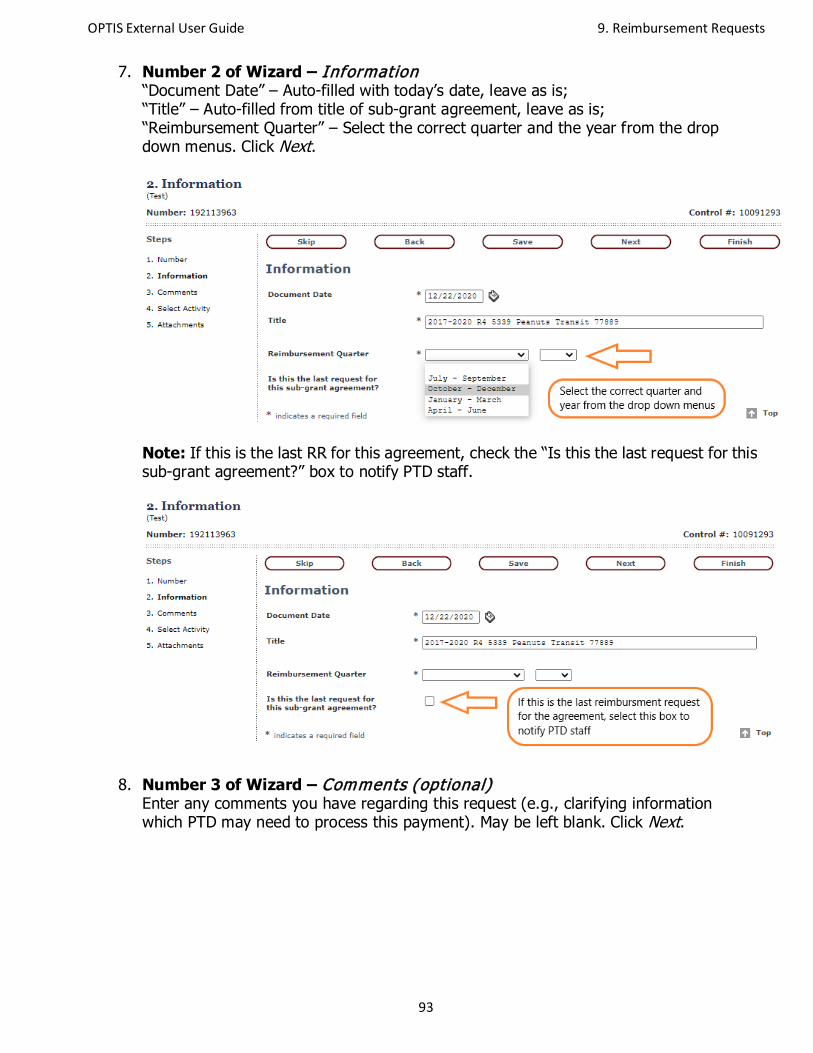
9. Number 4 of Wizard – Select Activity
Select the correct activity (e.g., vehicle purchase, operations, administration) for this request. Depending on the agreement there may be more than one choice. Click Next.
Note: The original funded amount and the remaining amount available for each activity is listed next to each item.
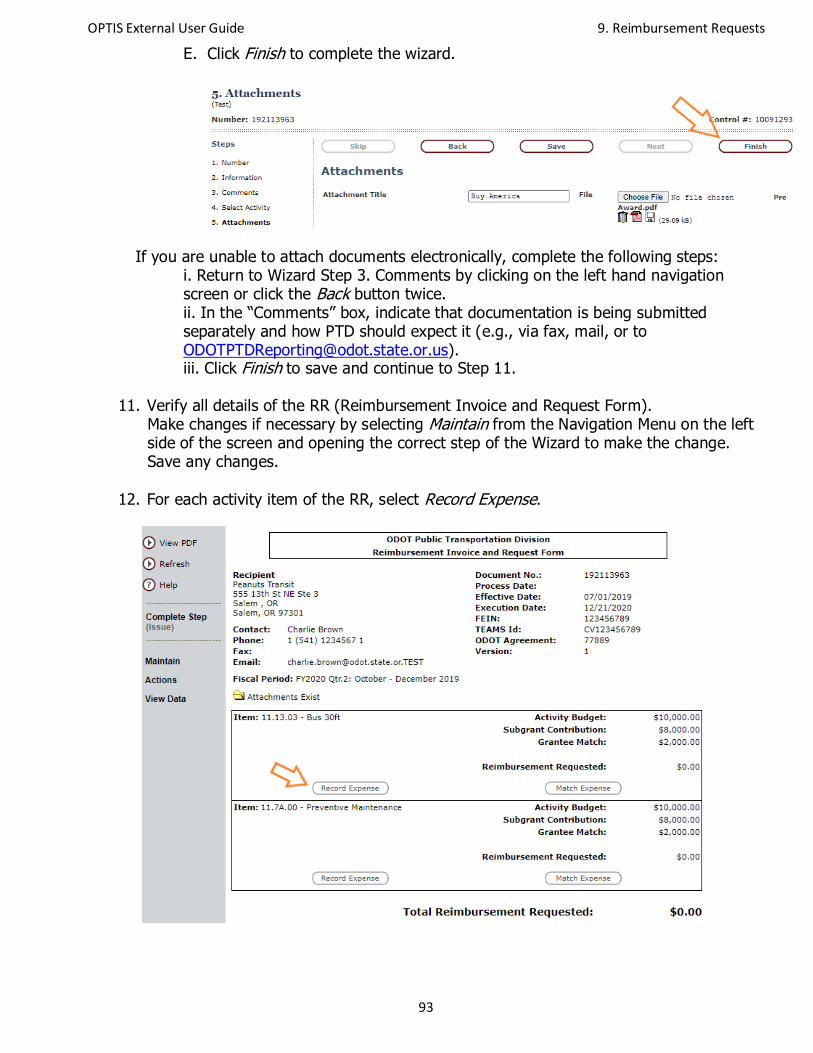
10. Number 5 of Wizard - Attachments
Supplemental documentation is required under the terms of most agreements. If the agreement for which you are creating a reimbursement requires back-up documentation, here is where you will add it. If you have not already, scan back-up documentation and save it to your computer in a place you will easily find it. Should you need to navigate away from OPTIS, make sure to take note of the OPTIS document number (located at the top left of the screen) so you can easily find the RR when you return. Attach documentation as follows at the Step 5. Attachments screen:
A. Type in the name of the document in the “Attachment Title” field (e.g., Vehicle Purchase Invoice).
OPTIS External User Guide 9. Reimbursement Requests
93
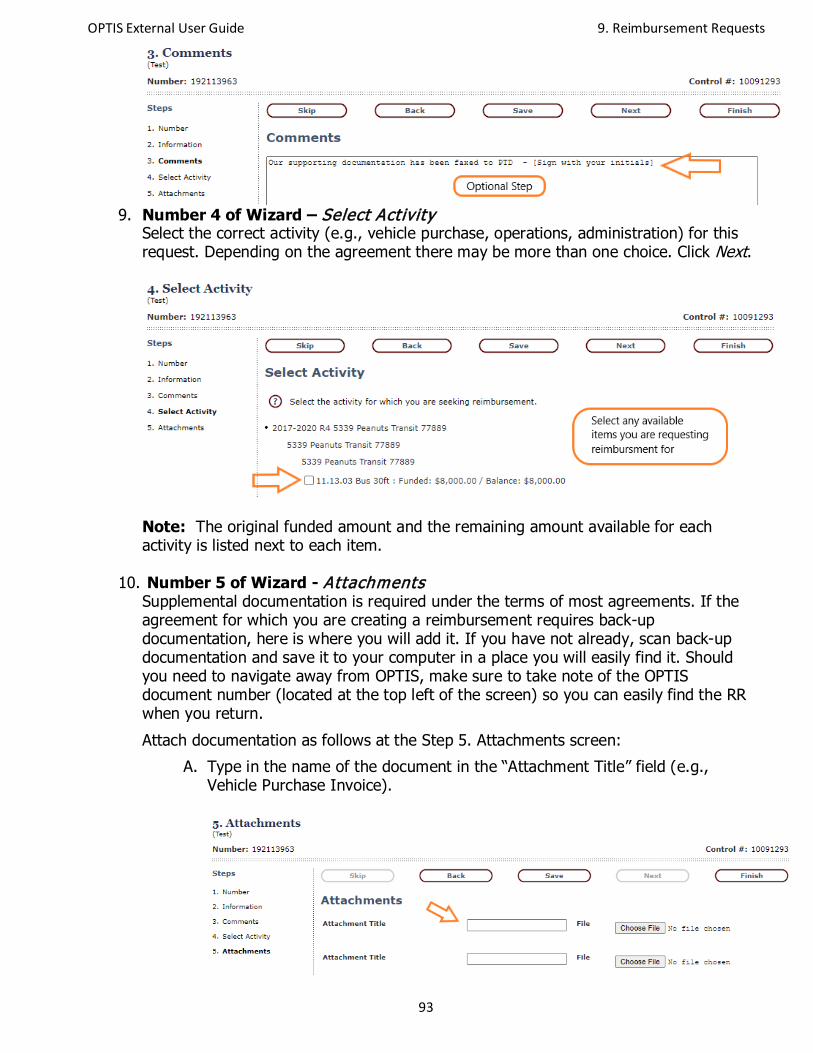
B. Tab to or click Choose File to search your local computer for the required attachment.
C. Select Open or double click the document to attach it to the RR.
D. Repeat steps A-C for multiple attachments.
Note: If you have more than six attachments, after attaching the sixth one, click Save and more attachment fields will open.
OPTIS External User Guide 9. Reimbursement Requests
93
E. Click Finish to complete the wizard.
If you are unable to attach documents electronically, complete the following steps: i. Return to Wizard Step 3. Comments by clicking on the left hand navigation screen or click the Back button twice. ii. In the “Comments” box, indicate that documentation is being submitted separately and how PTD should expect it (e.g., via fax, mail, or to [email protected]). iii. Click Finish to save and continue to Step 11.
11. Verify all details of the RR (Reimbursement Invoice and Request Form). Make changes if necessary by selecting Maintain from the Navigation Menu on the left side of the screen and opening the correct step of the Wizard to make the change. Save any changes.
12. For each activity item of the RR, select Record Expense.

OPTIS External User Guide 9. Reimbursement Requests
93
13. At the Record Expense screen complete each of the following: A. “Type” – Choose from drop-down menu.
B. “Description” – Type in expense description (e.g., Q1 Operations). C. “Receipt” – If attaching backup documentation click this box; if not, disregard. D. “Date” –Type in the last day of the quarter in which this payment falls in (e.g.,
09/30/2021). For capital items only—type in that date the asset was received or completed. (This must match a date within the reimbursement period chosen in Wizard Step 2 or you will get an error message.)
E. “Total Expenses” – Type the total project expense amount (not the payment amount) using whole numbers.
F. Click Submit/Return. If you have a long list of expenses, you may prefer to click Submit/Remain between each of them. Your work will be saved and you will remain in this window.

OPTIS External User Guide 9. Reimbursement Requests
93
14. Click on Match Expense. (If you have chosen multiple expense types, you will have to
match the expense for each one. This example shows only one.)
15. At the Expense Match screen, enter match amount in the correct source box (e.g., Local, State Funds, or Other). Key in “Other” source if necessary. Click Submit/Return.
OPTIS External User Guide 9. Reimbursement Requests
93
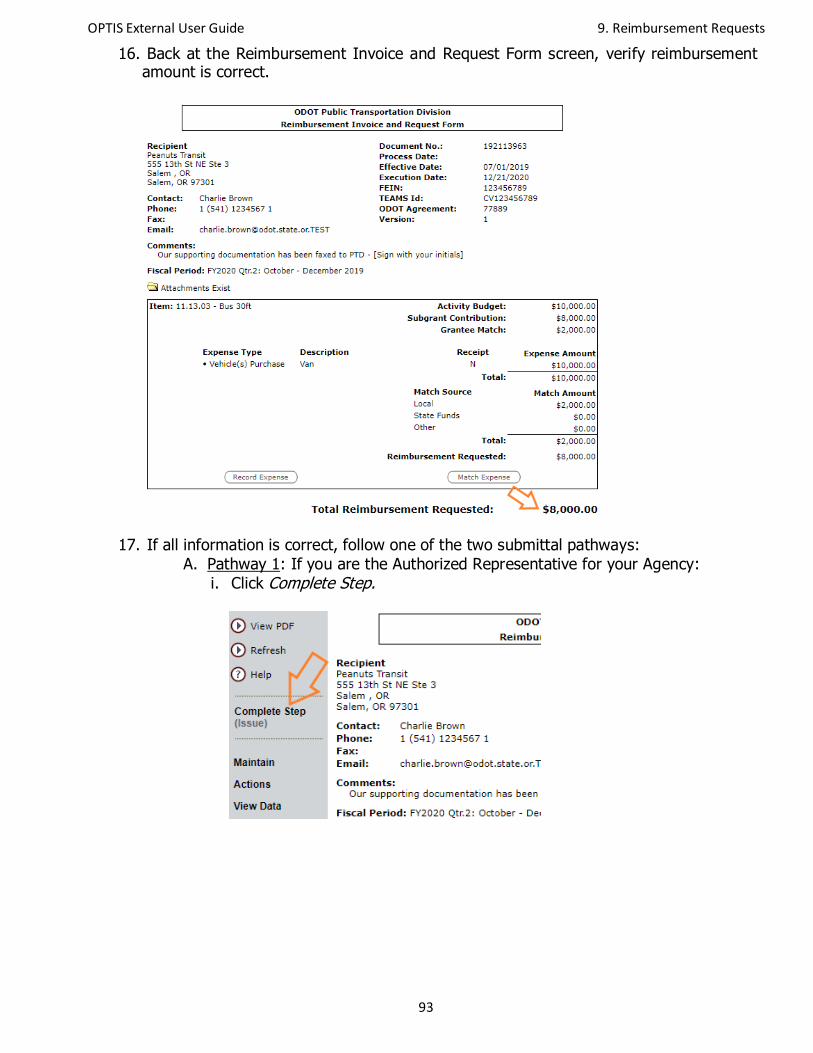
16. Back at the Reimbursement Invoice and Request Form screen, verify reimbursement amount is correct.
17. If all information is correct, follow one of the two submittal pathways: A. Pathway 1: If you are the Authorized Representative for your Agency:
i. Click Complete Step.

OPTIS External User Guide 9. Reimbursement Requests
93
ii. At the Review/Approve screen enter your eResponse Keyword in the provided box.
iii. Check the box verifying that you agree with the statement ‘By checking this box I am certifying that this document is correct to the best of my knowledge and that I am the authorized representative.’
iv. Click Submit.
B. Pathway 2: If you are not the Authorized Representative for your Agency: a. Select Actions from the Navigation Menu, then select Forward.
b. At the Forward Screen, you will find the document number. The current step will be identified as ‘Issue.’ (This indicates that the document needs to be ‘issued to’ the Authorized Representative, not that there is a problem with the RR. Further clarification on this is provided later in the chapter.)
OPTIS External User Guide 9. Reimbursement Requests
93
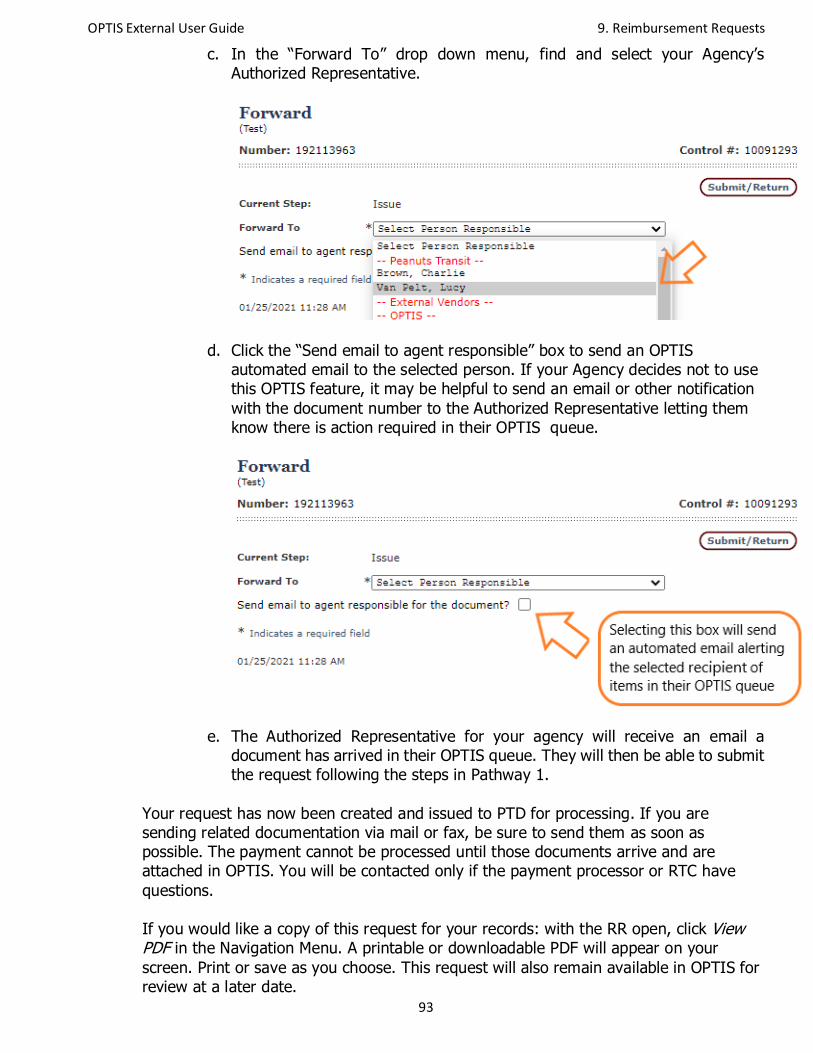
c. In the “Forward To” drop down menu, find and select your Agency’s Authorized Representative.
d. Click the “Send email to agent responsible” box to send an OPTIS automated email to the selected person. If your Agency decides not to use this OPTIS feature, it may be helpful to send an email or other notification with the document number to the Authorized Representative letting them know there is action required in their OPTIS queue.
e. The Authorized Representative for your agency will receive an email a document has arrived in their OPTIS queue. They will then be able to submit the request following the steps in Pathway 1.
Your request has now been created and issued to PTD for processing. If you are sending related documentation via mail or fax, be sure to send them as soon as possible. The payment cannot be processed until those documents arrive and are attached in OPTIS. You will be contacted only if the payment processor or RTC have questions. If you would like a copy of this request for your records: with the RR open, click View PDF in the Navigation Menu. A printable or downloadable PDF will appear on your screen. Print or save as you choose. This request will also remain available in OPTIS for review at a later date.
OPTIS External User Guide 9. Reimbursement Requests
93
Verifying Submittal of Reimbursement Request
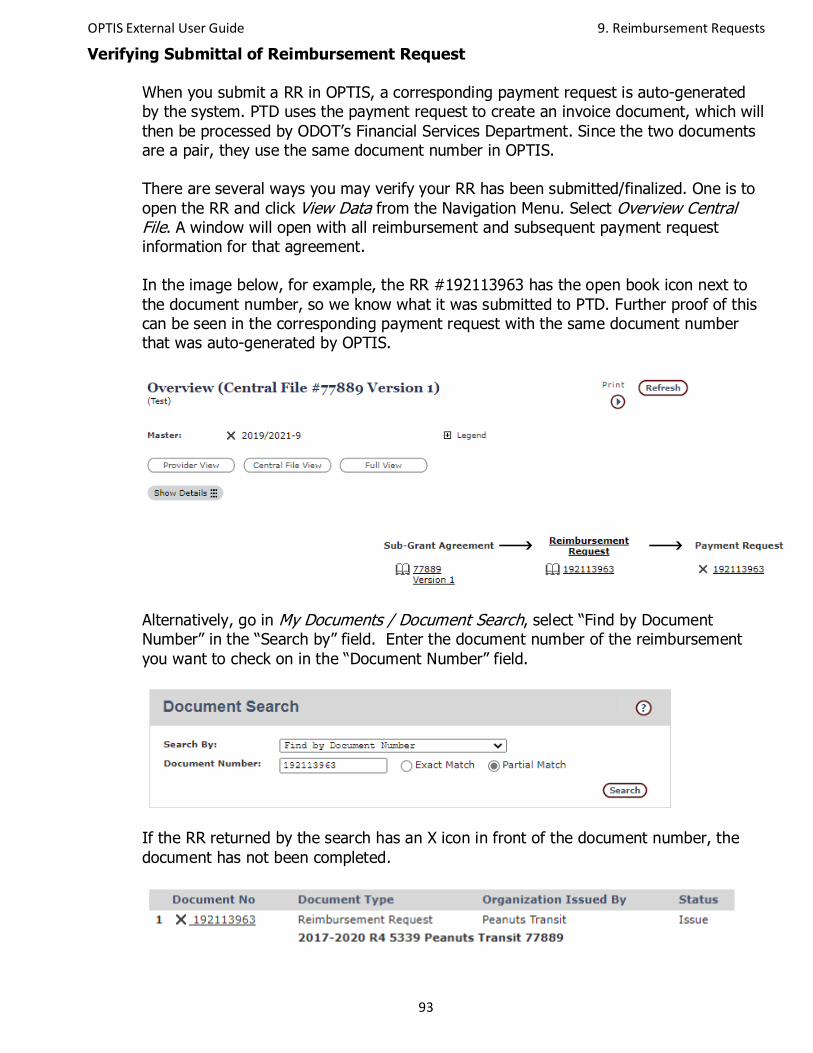
When you submit a RR in OPTIS, a corresponding payment request is auto-generated by the system. PTD uses the payment request to create an invoice document, which will then be processed by ODOT’s Financial Services Department. Since the two documents are a pair, they use the same document number in OPTIS. There are several ways you may verify your RR has been submitted/finalized. One is to open the RR and click View Data from the Navigation Menu. Select Overview Central File. A window will open with all reimbursement and subsequent payment request information for that agreement. In the image below, for example, the RR #192113963 has the open book icon next to the document number, so we know what it was submitted to PTD. Further proof of this can be seen in the corresponding payment request with the same document number that was auto-generated by OPTIS.
Alternatively, go in My Documents / Document Search, select “Find by Document Number” in the “Search by” field. Enter the document number of the reimbursement you want to check on in the “Document Number” field.
If the RR returned by the search has an X icon in front of the document number, the document has not been completed.
OPTIS External User Guide 9. Reimbursement Requests
93
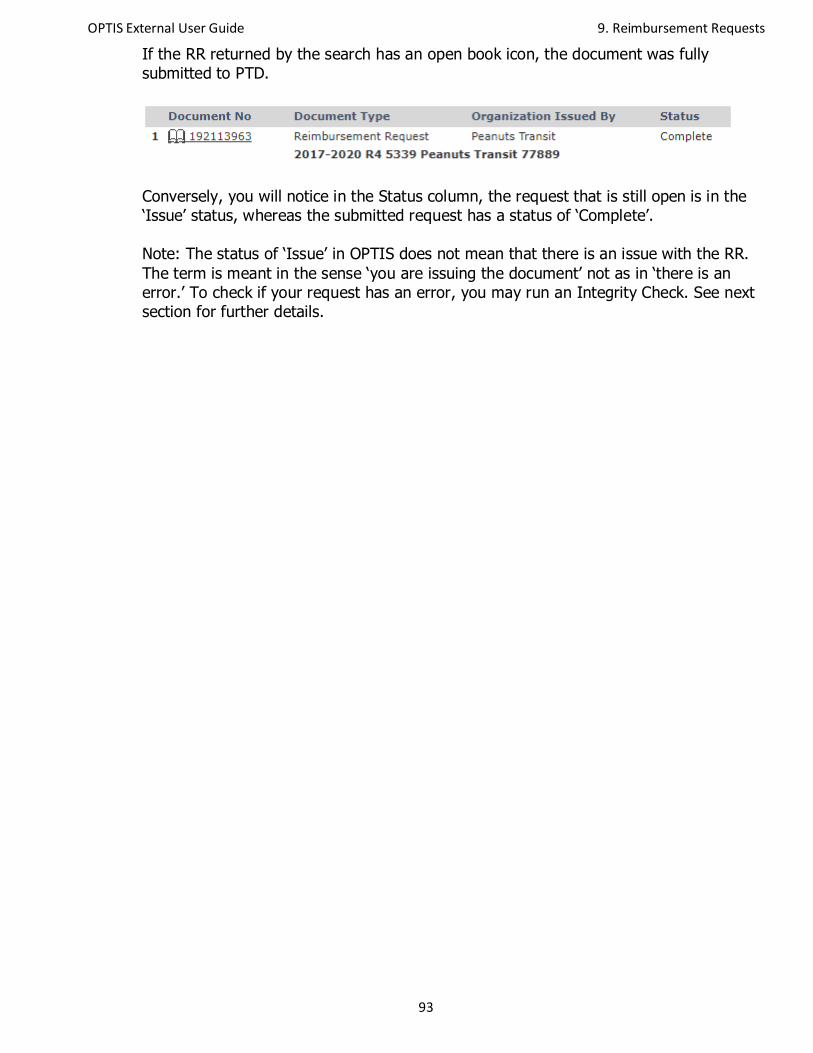
If the RR returned by the search has an open book icon, the document was fully submitted to PTD.
Conversely, you will notice in the Status column, the request that is still open is in the ‘Issue’ status, whereas the submitted request has a status of ‘Complete’. Note: The status of ‘Issue’ in OPTIS does not mean that there is an issue with the RR. The term is meant in the sense ‘you are issuing the document’ not as in ‘there is an error.’ To check if your request has an error, you may run an Integrity Check. See next section for further details.
OPTIS External User Guide 9. Reimbursement Requests
93
Integrity Check
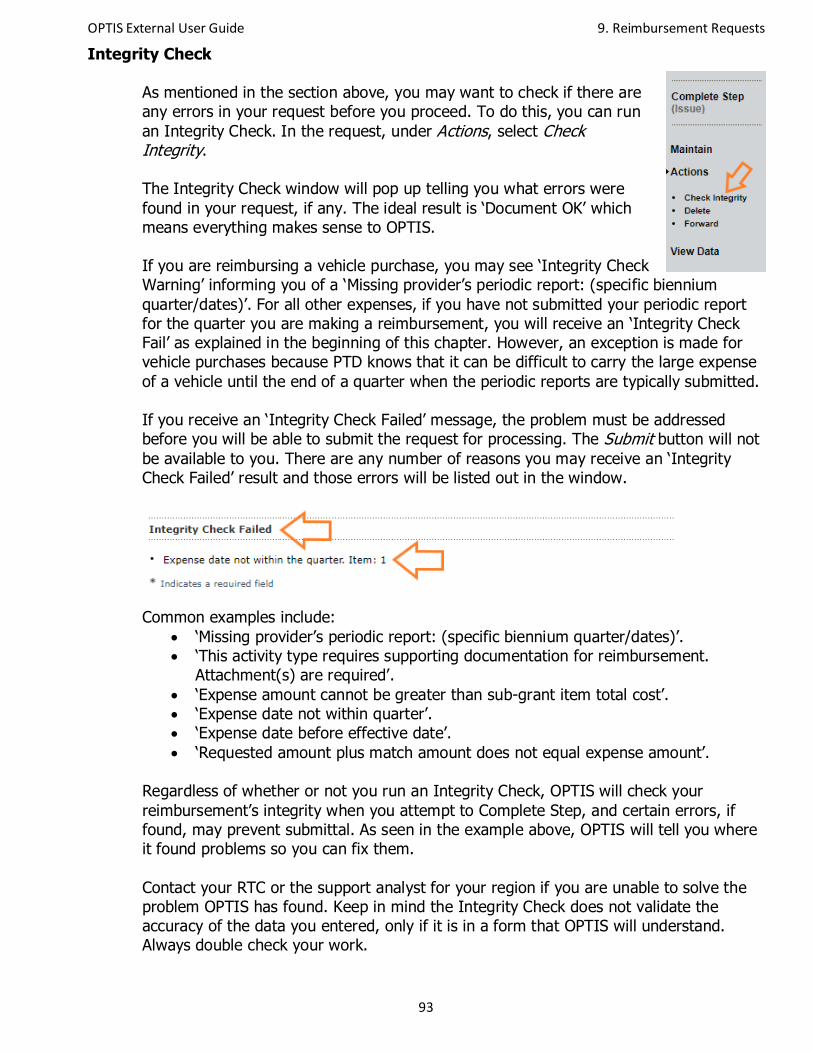
As mentioned in the section above, you may want to check if there are any errors in your request before you proceed. To do this, you can run an Integrity Check. In the request, under Actions, select Check Integrity.
The Integrity Check window will pop up telling you what errors were found in your request, if any. The ideal result is ‘Document OK’ which means everything makes sense to OPTIS. If you are reimbursing a vehicle purchase, you may see ‘Integrity Check Warning’ informing you of a ‘Missing provider’s periodic report: (specific biennium quarter/dates)’. For all other expenses, if you have not submitted your periodic report for the quarter you are making a reimbursement, you will receive an ‘Integrity Check Fail’ as explained in the beginning of this chapter. However, an exception is made for vehicle purchases because PTD knows that it can be difficult to carry the large expense of a vehicle until the end of a quarter when the periodic reports are typically submitted.
If you receive an ‘Integrity Check Failed’ message, the problem must be addressed before you will be able to submit the request for processing. The Submit button will not be available to you. There are any number of reasons you may receive an ‘Integrity Check Failed’ result and those errors will be listed out in the window.
Common examples include:
• ‘Missing provider’s periodic report: (specific biennium quarter/dates)’. • ‘This activity type requires supporting documentation for reimbursement.
Attachment(s) are required’. • ‘Expense amount cannot be greater than sub-grant item total cost’. • ‘Expense date not within quarter’. • ‘Expense date before effective date’. • ‘Requested amount plus match amount does not equal expense amount’.
Regardless of whether or not you run an Integrity Check, OPTIS will check your reimbursement’s integrity when you attempt to Complete Step, and certain errors, if found, may prevent submittal. As seen in the example above, OPTIS will tell you where it found problems so you can fix them. Contact your RTC or the support analyst for your region if you are unable to solve the problem OPTIS has found. Keep in mind the Integrity Check does not validate the accuracy of the data you entered, only if it is in a form that OPTIS will understand. Always double check your work.

OPTIS External User Guide 9. Reimbursement Requests
93
Correcting a Reimbursement Request
As stated earlier in this chapter, when you submit your RR in OPTIS, a corresponding payment request is auto-generated. This is important to note when talking about correcting RRs that have already been submitted. Before they can be re-opened and returned for you to make your edits, PTD will first have to delete the corresponding payment request. This is easily done on our end. We will then re-open the RR and forward it back to your OPTIS queue for edits.
a) If you discover an error and want to start over:
i. Contact your region’s support analyst or RTC and explain that you wish to re-open or delete an RR. Have the document number available.
ii. The support analyst or RTC will delete the corresponding payment request in OPTIS, reopen the RR, and forward it to your queue. You will receive email notification once this is complete.
iii. The RR is now ready for you to delete or make changes to.
b) To delete an RR: i. Open the RR. ii. Select Maintain from the Navigation Menu. iii. Select Delete. iv. Click Submit/Return. Once you do so, the document will no longer exist.
c) To modify/fix an error in a RR after PTD reopens it: i. Make sure it is in your queue. (See next section). ii. Select Maintain from the Navigation Menu. iii. Select any of the areas to reopen. iv. Make necessary changes. v. Complete as normal.
OPTIS External User Guide 9. Reimbursement Requests
93
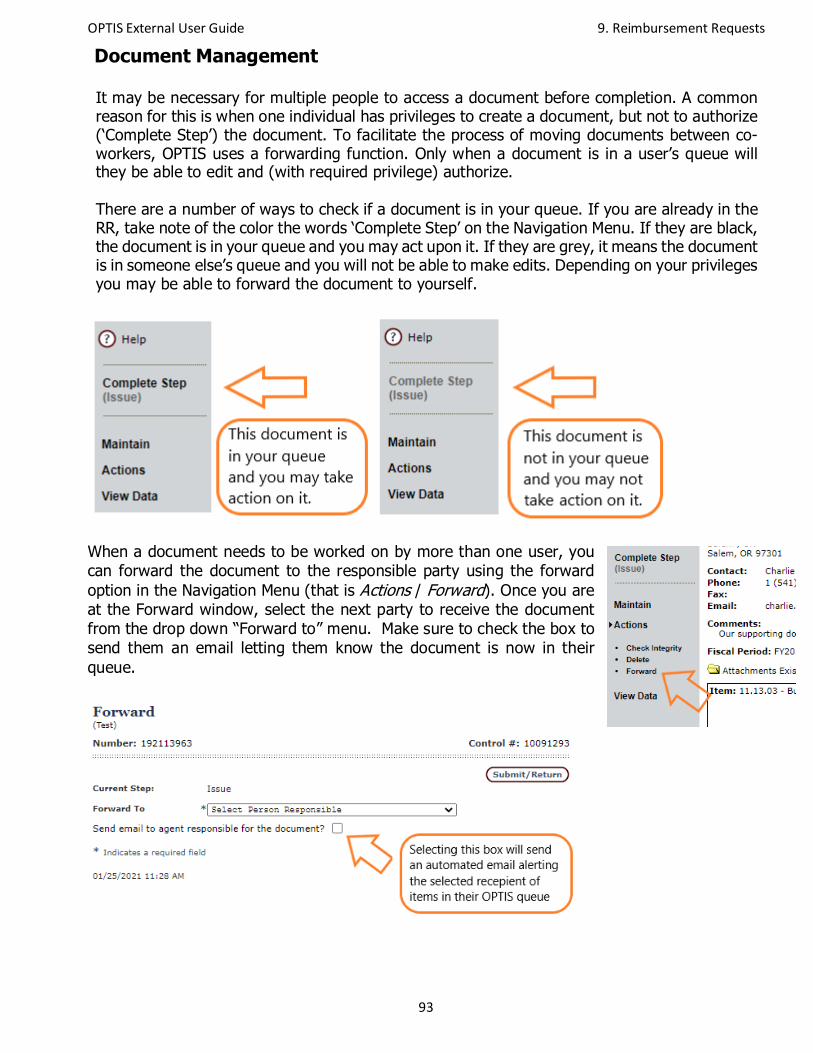
Document Management It may be necessary for multiple people to access a document before completion. A common reason for this is when one individual has privileges to create a document, but not to authorize (‘Complete Step’) the document. To facilitate the process of moving documents between co-workers, OPTIS uses a forwarding function. Only when a document is in a user’s queue will they be able to edit and (with required privilege) authorize. There are a number of ways to check if a document is in your queue. If you are already in the RR, take note of the color the words ‘Complete Step’ on the Navigation Menu. If they are black, the document is in your queue and you may act upon it. If they are grey, it means the document is in someone else’s queue and you will not be able to make edits. Depending on your privileges you may be able to forward the document to yourself.
When a document needs to be worked on by more than one user, you can forward the document to the responsible party using the forward option in the Navigation Menu (that is Actions / Forward). Once you are at the Forward window, select the next party to receive the document from the drop down “Forward to” menu. Make sure to check the box to send them an email letting them know the document is now in their queue.
Related Documents