Welcome message from author
This document is posted to help you gain knowledge. Please leave a comment to let me know what you think about it! Share it to your friends and learn new things together.
Transcript
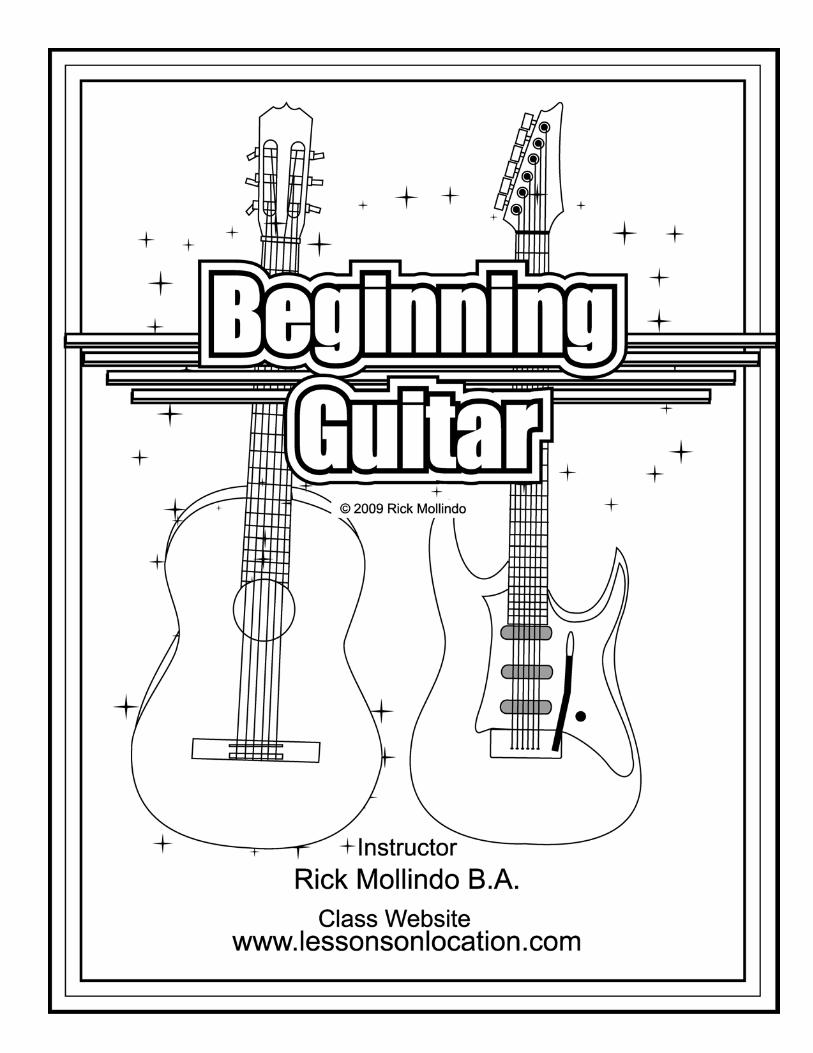
1
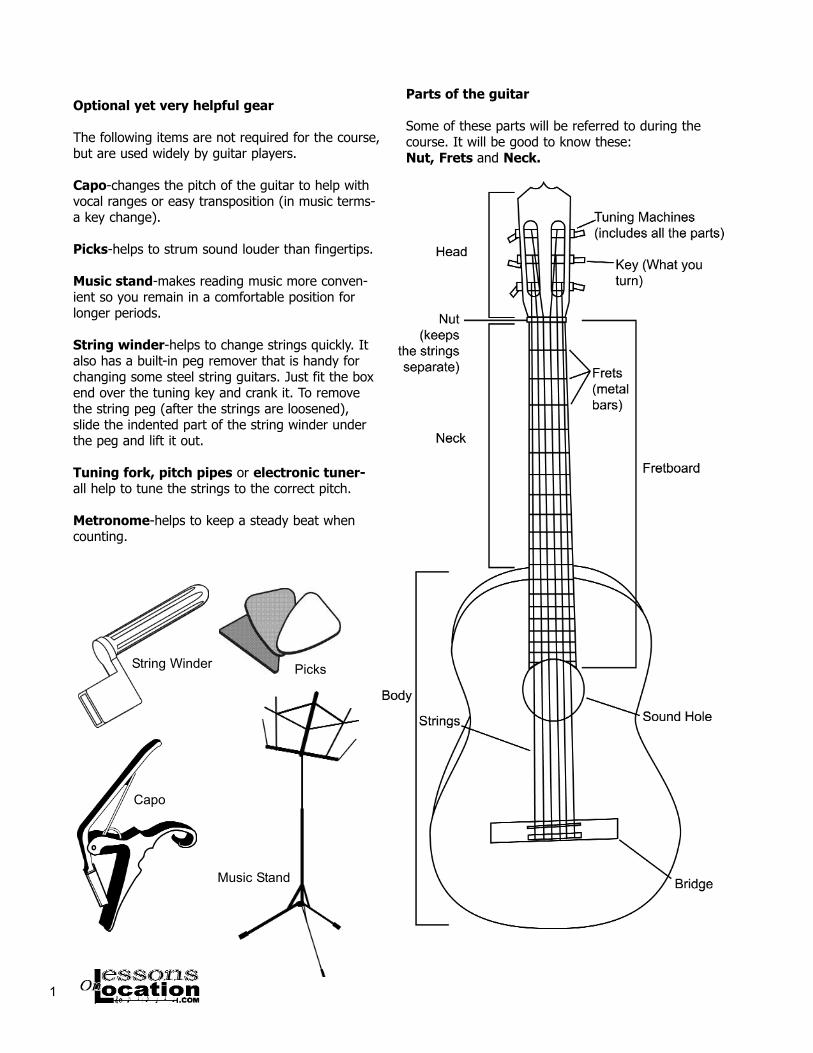
Optional yet very helpful gear
The following items are not required for the course,but are used widely by guitar players.
Capo-changes the pitch of the guitar to help withvocal ranges or easy transposition (in music terms-a key change).
Picks-helps to strum sound louder than fingertips.
Music stand-makes reading music more conven-ient so you remain in a comfortable position forlonger periods.
String winder-helps to change strings quickly. Italso has a built-in peg remover that is handy forchanging some steel string guitars. Just fit the boxend over the tuning key and crank it. To removethe string peg (after the strings are loosened),slide the indented part of the string winder underthe peg and lift it out.
Tuning fork, pitch pipes or electronic tuner-all help to tune the strings to the correct pitch.
Metronome-helps to keep a steady beat whencounting.
String Winder Picks
Parts of the guitar
Some of these parts will be referred to during thecourse. It will be good to know these: Nut, Frets and Neck.
Music Stand
Capo

2
Tuning your guitar
The Guitar goes out of tune frequently, even whileyou’re playing a song. It’s best to eventually learn howto tune by ear. Here are some alternate methods.
Middle “C”Low “E” “A” “D” “G” “B” “E”
Pitch pipes-Blow the labeled pipe to the correspon-ding string.
Electronic tuner-Turn it on, select the string’s letteron the tuner, and tune as needed for each string.
For Internet help on tuning your guitar, go to:www.lessonsonlocation.com/tuning
Tuning with a Tuning Fork
Memorize String Names and Numbers!
Tuning fork-Hold it by its stem, strike the fork endagainst your knee, then touch the ball end to theface of the bridge. You will hear a hum that shouldmatch the sound of your string. Tighten or loosen thestring as needed.
Tuning to a piano-If you’re familiar with apiano’s keys, the low “E” string is the sameas the “E” just below middle “C”.

3
Relative Tuning- Tuning strings to each others pitches.
First, use Pitch Pipes, Electronic Tuner, Tuning Fork orPiano or other instrument to tune the E or 6th String.
To tune:
A or 5th String
D or 4th String
G or 3rd String
B or 2nd String
E or 1st String
Press this String:
E or 6th String
A or 5th String
D or 4th String
G or 3rd String
B or 2nd String
At this Fret
5th Fret
5th Fret
5th Fret
4th Fret
5th Fret
Play strings together. Tighten or loosen A as needed. Fig 1
Play strings together. Tighten or loosen D as needed. Fig 2
Play strings together. Tighten or loosen G as needed. Fig 3
Play strings together. Tighten or loosen B as needed. Fig 4
Play strings together. Tighten or loosen E as needed. Fig 5
Fig 1 Fig 2 Fig 3 Fig 4 Fig 5
4
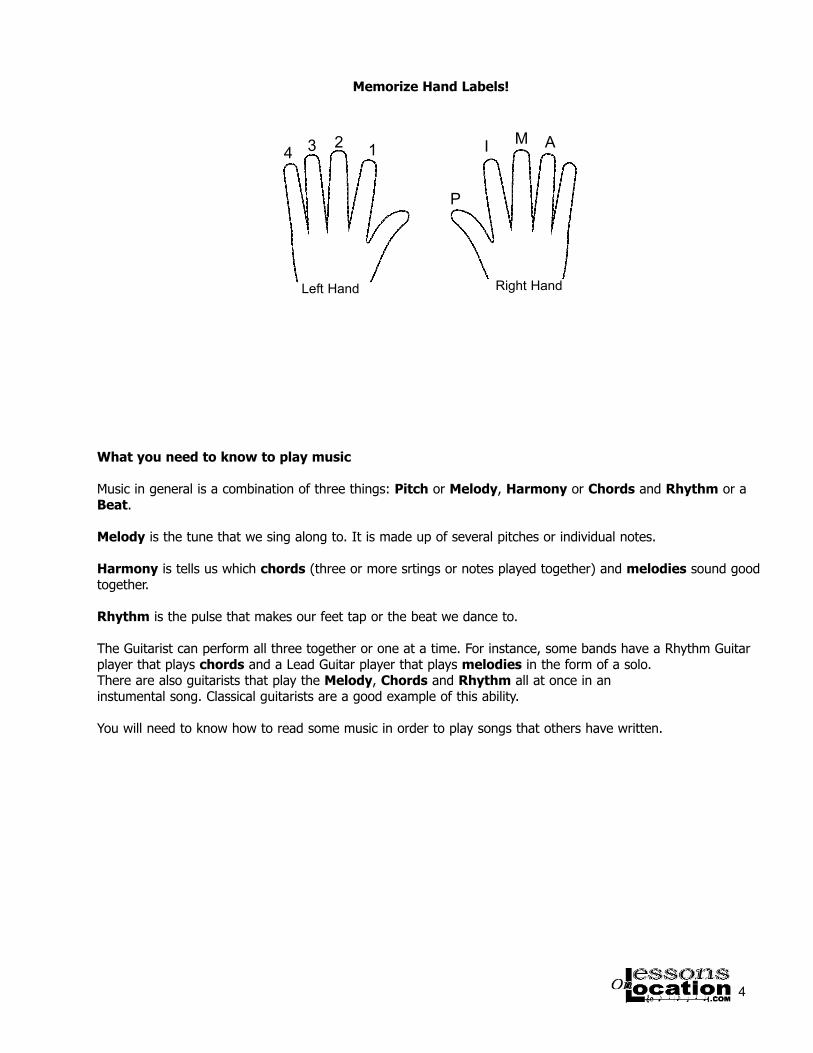
Right HandLeft Hand
4 3 2 1
P
I M A
Memorize Hand Labels!
What you need to know to play music
Music in general is a combination of three things: Pitch or Melody, Harmony or Chords and Rhythm or aBeat.
Melody is the tune that we sing along to. It is made up of several pitches or individual notes.
Harmony is tells us which chords (three or more srtings or notes played together) and melodies sound goodtogether.
Rhythm is the pulse that makes our feet tap or the beat we dance to.
The Guitarist can perform all three together or one at a time. For instance, some bands have a Rhythm Guitarplayer that plays chords and a Lead Guitar player that plays melodies in the form of a solo. There are also guitarists that play the Melody, Chords and Rhythm all at once in an instumental song. Classical guitarists are a good example of this ability.
You will need to know how to read some music in order to play songs that others have written.

5
Introduction to Types of Guitar Music
There are three common ways to write music for guitar: Chord Charts, Tablature and StandardNotation.
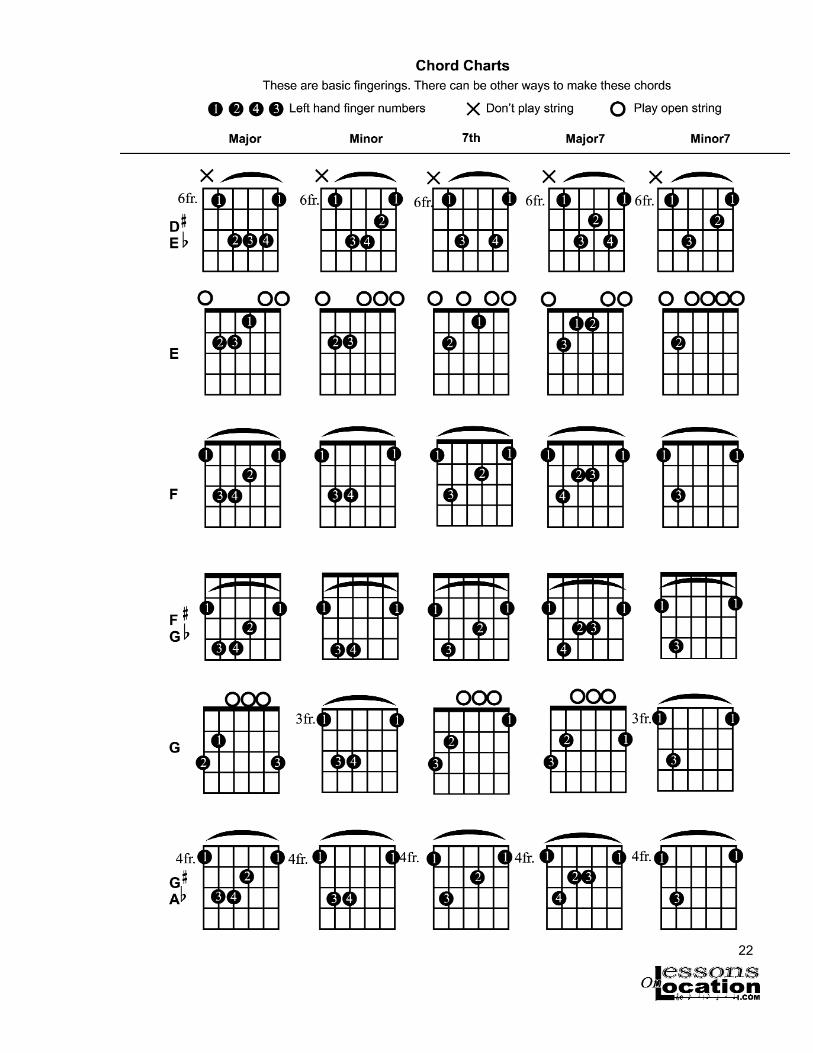
Chord Charts
The Chord chart is picture of the fret board.
The Nut of the guitar is on top and the thick “E” or 6th string is pictured on the left.
The horizontal lines are the Frets.
The Dots represent finger placement.
The “X’s” mean don’t play this string. The “O’s” mean play open string (no fret).
This is by far the easiest way to notate guitar music. After you play these chords a few times theyare easy to recognize by the chord name alone. Once you know some of them, it’s easy to look at amusic book and begin playing a song right away. By recognizing chord names, you can accompanyvocals or other instruments using their music.

6
When the fret numbers are writtenside-by-side, it means play stringsone at a time.
Tablature
Or TAB is good way to write music to show more than just the chords like a chord chart. TAB canshow which individual strings to play and at which fret. You can write out songs, melodies, lead gui-tar solos or show finger picking patterns. There is an incredible amount of TAB on the Internet,magazines and books to help you learn new songs.
TAB is a picture of the six strings on a guitar. In music, the lowest sound is written on the bottom.So, the lowest string pictured is the Low E or 6th string. The one on top is the High soundingE or 1st string.
The numbers mean which fret to play on the string. The “O” (zero) means play the string open, withno fret or finger.
When the fret numbers arestacked on top of each other, itmeans play the noted stringstogether in one strum.
7
D Chord E ChordA Chord C Chord G Chord
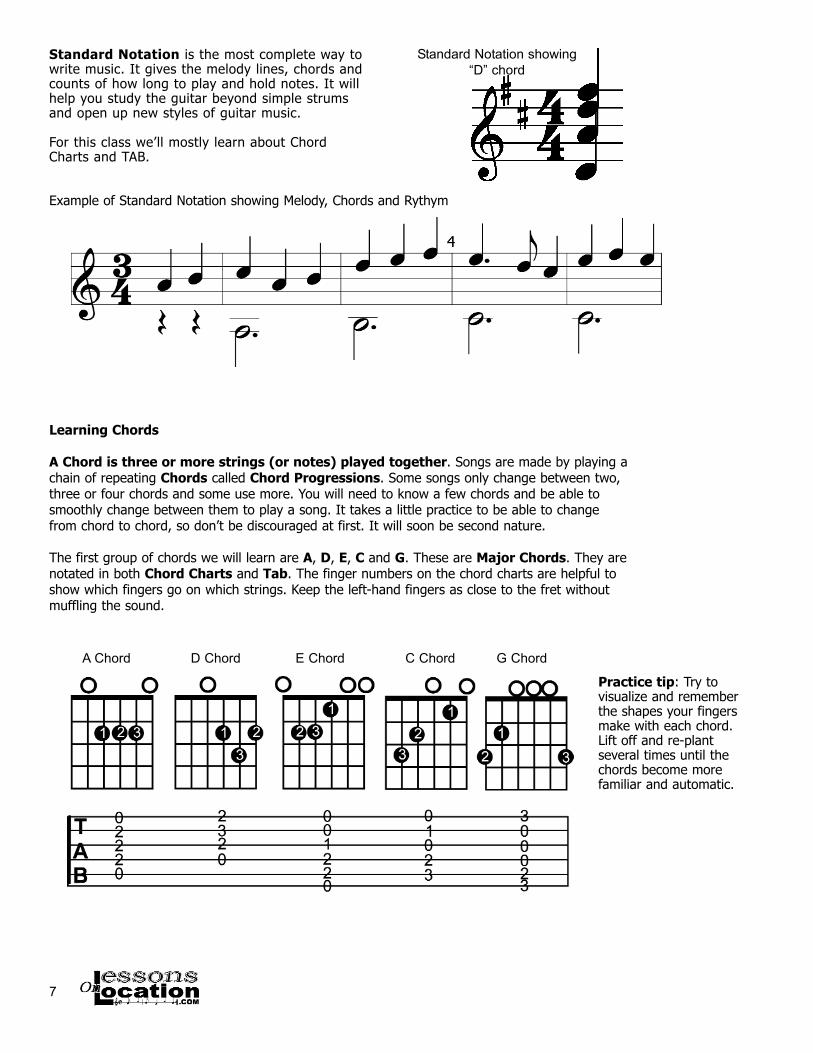
Learning Chords
A Chord is three or more strings (or notes) played together. Songs are made by playing achain of repeating Chords called Chord Progressions. Some songs only change between two,three or four chords and some use more. You will need to know a few chords and be able tosmoothly change between them to play a song. It takes a little practice to be able to changefrom chord to chord, so don’t be discouraged at first. It will soon be second nature.
The first group of chords we will learn are A, D, E, C and G. These are Major Chords. They are notated in both Chord Charts and Tab. The finger numbers on the chord charts are helpful toshow which fingers go on which strings. Keep the left-hand fingers as close to the fret withoutmuffling the sound.
Standard Notation showing“D” chord
Standard Notation is the most complete way towrite music. It gives the melody lines, chords andcounts of how long to play and hold notes. It willhelp you study the guitar beyond simple strumsand open up new styles of guitar music.
For this class we’ll mostly learn about ChordCharts and TAB.
Example of Standard Notation showing Melody, Chords and Rythym
Practice tip: Try tovisualize and rememberthe shapes your fingersmake with each chord.Lift off and re-plantseveral times until thechords become morefamiliar and automatic.
8
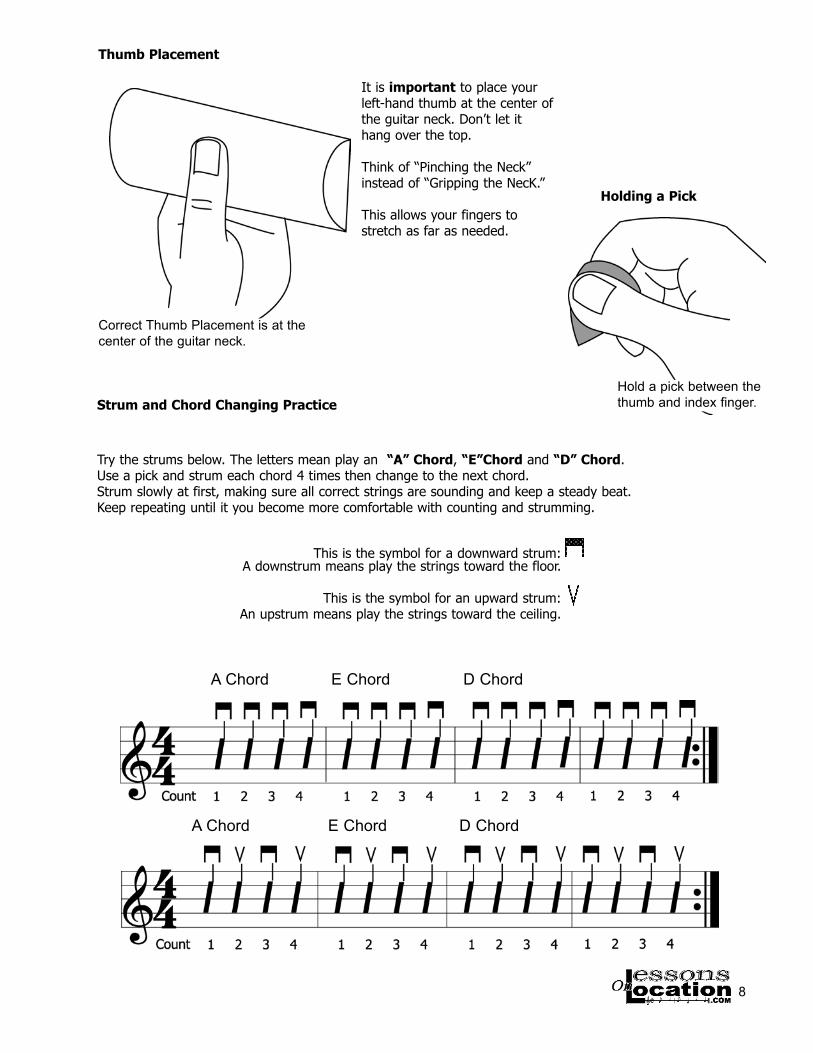
This is the symbol for a downward strum:A downstrum means play the strings toward the floor.
This is the symbol for an upward strum:An upstrum means play the strings toward the ceiling.
A Chord E Chord
A Chord D Chord
Thumb Placement
It is important to place yourleft-hand thumb at the center ofthe guitar neck. Don’t let ithang over the top.
Think of “Pinching the Neck”instead of “Gripping the NecK.”
This allows your fingers tostretch as far as needed.
Correct Thumb Placement is at thecenter of the guitar neck.
Hold a pick between thethumb and index finger.
Try the strums below. The letters mean play an “A” Chord, “E”Chord and “D” Chord.Use a pick and strum each chord 4 times then change to the next chord. Strum slowly at first, making sure all correct strings are sounding and keep a steady beat.Keep repeating until it you become more comfortable with counting and strumming.
D Chord
E Chord
Strum and Chord Changing Practice
Holding a Pick

9
Finger Picking
Tablature can also show how topick the strings individuallyinstead of a strumming all thestrings at once.
In TAB, when the fret numbersare shown side-by-side insteadof stacked, it means play themone at a time.
Try these variations with nochord (all open strings).
The right hand letters showwhich fingers to use.
Start slowly and make sure allstrings are sounded. Notice theRepeat Sign, meaning goback to the beginning.
When you feel comfortable andhave a good rhythm, try fingerpicking with the D, A and Echords. When a chord is playedone note at a time it’s called anArppegio.
Hear it on www.lessonsonlocation.com
Repeat Sign

10
“D Minor” written in Standard Notation
“D Minor” with aChord Chart “Dm” just written
Ways of Writing Guitar Strums
Strums are repeating rhythm patterns. Two ways to write and read strums are Standard Notation orStrum Notes. You’ll need to know how to count and read these to play songs and to write music. Afterlearning a few different strum patterns, you’ll be able to play lots of music.
All three examples below mean strum a D Minor Chord 4 times. By recognizing chord names and charts, it is far simpler than reading charts or standard notation.
More info at www.lessonsonlocation.com
This is the intro to Smoke on the Water by Deep Purple, I picked it up myself so I don't know or am not sure if it is accurate or not. I'm sure you can produce various sound changes by moving it up and down the bars. It's a fairly, actually reallysimple intro. I'm not really sure about the spacing either. Here it is...
e|-------------|---------------|-------------|-------------B|-------------|---------------|-------------|-------------G|---0---3---5-|---0---3---6-5-|---0---3---5-|---3--0-0----D|---0---3---5-|---0---3---6-5-|---0---3---5-|---3--0-0----A|-------------|---------------|-------------|-------------E|-------------|---------------|-------------|-------------
let ring
That's it, like I said before I'm not sure if it's accurate, and again like I said before.
Tab Music from the Internet
In the box is an example of Tablature you can get form the Internet. It’s not always correct and there’s usuallysome explanation about the song. It can give you an idea of how to play some of your favorite songs quickly.Look on the last page of this book for a good website to get Tablature, Chords and Lyrics.

Notes tell us when to play something for an exact amount of beats. Here is how Notes get their names:
11
Reading Notes describes the rhythm andstrum for a song. Both Round Head andSquare head notes mean the same value.The square type notes are a handy short-cut to writing all the notes of a chord.
The Music Staff
Staff - The 5 lines and 4 spaces that the notes and symbols hang on.Treble Clef - Means this music can be played on Guitar (other instruments too).Time Signature - This gives the beat and Rhythm of a songMeasure - Sections of timeBars - Separate the measuresStrumming Notes - Show which beat to strum on
The Staff is the musical way of organizing rhythms and melodies. The Guitar only uses the Treble Staff for reading and writing music. The Bars separate the Measures. Measures make it easy to count in small chunks of time.The Time Signature is a way to tell the musician how the beat and rhythm should sound. It doesn’t say howfast or slow to play, just how the rhythm should sound.
Notes and Note Values
12
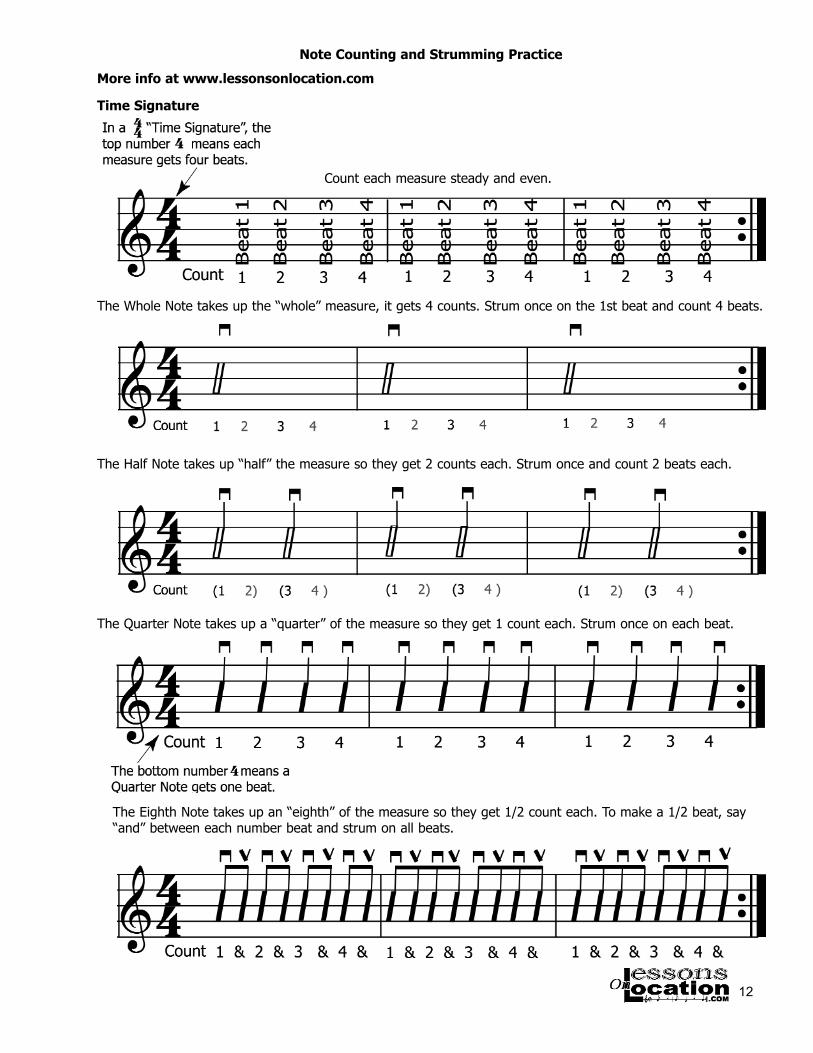
Note Counting and Strumming Practice
Count each measure steady and even.
More info at www.lessonsonlocation.com
Time Signature
The Whole Note takes up the “whole” measure, it gets 4 counts. Strum once on the 1st beat and count 4 beats.
The Half Note takes up “half” the measure so they get 2 counts each. Strum once and count 2 beats each.
The Quarter Note takes up a “quarter” of the measure so they get 1 count each. Strum once on each beat.
The Eighth Note takes up an “eighth” of the measure so they get 1/2 count each. To make a 1/2 beat, say“and” between each number beat and strum on all beats.

13
Hear it atwww.lessonsonlocation.com

14

15
Continue the same way to the 9th fret, then reverse and work your way back to the first fret.This excersize will help strengthen your fingers, increase your stretch and familiarize you with thefretboard.
SCALES
Scales are a part of learning music for any instrument. They are the notes that make up the melody of anysong. Although there are many scales, we’re going to learn one that will help your fingers become nimble andfamiliar with the fretboard. It’s easy! Look at the TAB below.
Start by playing the #1 finger on the low “E” string’s first fret, then #2 finger second fret, #3 finger third fret,#4 finger fourth fret; then repeat on the A string then on the D string then on the G string then on the B andfinally on the high E string.
Then reverse all the way back to the low E string. Next repeat the scale only shift everything up one fret to thesecond fret, then to the third and all the way up to the 9th fret.
Count while your practicing and start slow to make sure all strings are played correctly and evenly. If you’reusing a pick, alternate down and up strokes. If your using right hand fingers, alternate your “I” and “M” fingers.

16
Bar Chords are extremely useful. They make it possible to play the Chords you already know, all theway up the fretboard. All styles of music use them, especially “Rock” music. They take a bit of work atfirst, but after a few days of practice they become very easy to play. What’s different about Bar Chordsis that the #1 finger of the left hand stops (bars) all or most of the strings and the #2, #3 and # 4 fin-gers can recreate the shapes of the chords you know.
Practice Tips: Try planting your #1 and#2 fingers first, play them; then place #3and #4, play them; then plant the laststrings with the #1 finger to complete theBar Chord. Also try playing the chords at the 5th fret.(The strings have less tension further fromthe nut.) Then when you’re comfortablewith the Bar Chord try it at the 1st fret.
Barre (Bar) Chord
#1 finger stops all or most strings
#2, #3, and #4 fingersform the rest of the chord.
B
F
Bm
Fm
B7
F7
The curve linesmean Bar acrossthe fret.
The 2,3 and 4 fingersmake the shape ofthe A Major Chord
The 2, 3 and 4 fingersmake the shape of theE Major Chord
The 3 and 4 fingersmake the shape ofthe A7 Chord
The 2 and 3 fingersmake the shape ofthe E7 Chord
Barre (Bar) Chords

17
>=Accent-Strum Harder

18

19

20

21
22

Music Resources
Now that you have some skills, you’ll want to start playing your favorite songs. All you need is music.You can find music at your local music store in books or in single sheets. The library sometimes has musicbooks that can be checked out.
There are some magazines dedicated to musicicans that provide music and short courses, such asGuitar Player.
The Internet is also a great resource for finding music. Some Web Sites have music sheets and booksfor sale, while others provide lyrics, Tab and chords for free. (At this time they are legal sites.)Here are some good Web Sites to check out. They’re also kid friendly.
Tab, Chords, Sheet Music and Lyricshttp://www.lessonsonlocation.com - the website for this classhttp://www.chordie.com/ - Free tabs, chords and lyrics http://www.lacuerda.net - Free tabs, chords and lyrics for Spanish and Latin musichttp://www.8notes.com/ - Free sheet music in different styles
23
Related Documents