Crestron ® Room Scheduling Panels Operations Guide Crestron Electronics, Inc.

Welcome message from author
This document is posted to help you gain knowledge. Please leave a comment to let me know what you think about it! Share it to your friends and learn new things together.
Transcript
Crestron® Room Scheduling Panels
Operations Guide Crestron Electronics, Inc.

Crestron product development software is licensed to Crestron dealers and Crestron Service Providers (CSPs) under a limited non-exclusive, non-transferable Software Development Tools License Agreement. Crestron product operating system software is licensed to Crestron dealers, CSPs, and end-users under a separate End-User License Agreement. Both of these Agreements can be found on the Crestron website at www.crestron.com/legal/software_license_agreement. The product warranty can be found at www.crestron.com/warranty. The specific patents that cover Crestron products are listed at www.crestron.com/legal/patents. Certain Crestron products contain open source software. For specific information, please visit www.crestron.com/opensource. Crestron, the Crestron logo, Crestron Fusion, Crestron Toolbox, and RoomView are either trademarks or registered trademarks of Crestron Electronics, Inc. in the United States and/or other countries. Google and Google Calendar are either trademarks or registered trademarks of Google, Inc. in the United States and/or other countries. Active Directory and Microsoft are either trademarks or registered trademarks of Microsoft Corporation in the United States and/or other countries. Other trademarks, registered trademarks, and trade names may be used in this document to refer to either the entities claiming the marks and names or their products. Crestron disclaims any proprietary interest in the marks and names of others. Crestron is not responsible for errors in typography or photography. This document was written by the Technical Publications department at Crestron. ©2018 Crestron Electronics, Inc.
Operations Guide – DOC. 8205B Contents • i
Contents
Introduction 1
Setup 2
Configuration via Web Interface 3
Action Menu .................................................................................................................. 4 Reboot .................................................................................................................... 4 Restore ................................................................................................................... 4 Firmware Upgrade .................................................................................................. 5 Download Logs ....................................................................................................... 5 Save Changes ......................................................................................................... 5 Revert ..................................................................................................................... 5 Upload Scheduling Project ...................................................................................... 6
Status ............................................................................................................................ 6 Device ..................................................................................................................... 7 System Setup ......................................................................................................... 7 Schedule ................................................................................................................. 9
Settings ....................................................................................................................... 11 System Setup ....................................................................................................... 12 Audio .................................................................................................................... 16 Schedule ............................................................................................................... 17 Reservation ........................................................................................................... 20 UI Settings ............................................................................................................ 22 Display .................................................................................................................. 23 Room .................................................................................................................... 25 Automation ........................................................................................................... 27 Work Hours ........................................................................................................... 28 Broadcast Messages ............................................................................................ 29 Scheduling Advanced ........................................................................................... 29 Cloud Settings ...................................................................................................... 29 Configure Date/Time ............................................................................................. 30 Authentication Management ................................................................................. 31 802.1x Configuration ............................................................................................. 38
Configuration via Crestron Fusion 41
Adding Custom Properties to a Room ......................................................................... 41 Setting Custom Properties for the Scheduling Application ........................................... 42 Scheduling Application Custom Properties .................................................................. 43
Work Hours Settings ............................................................................................. 43 Display Settings .................................................................................................... 43 Broadcast Messages Settings ............................................................................... 44
ii • Contents Operations Guide – DOC. 8205B
UI Settings ............................................................................................................ 44 Automation Settings .............................................................................................. 45 Room Settings ...................................................................................................... 45 Reservation Settings ............................................................................................. 47 Schedule Settings ................................................................................................. 48
Master List of Scheduling Application Custom Properties ............................................ 49
Operations Guide – DOC. 8205B Crestron Room Scheduling Panels • 1
Crestron® Room Scheduling Panels
Introduction The Crestron® room scheduling application provides a complete room scheduling solution for the Crestron TSW-760 and TSW-1060 touch screens. When the scheduling application is enabled on a touch screen installed outside of a meeting space, users can view the room's availability, check the status of nearby rooms, and book an ad hoc meeting directly through the touch screen.
The scheduling application integrates with Crestron Fusion® software, Microsoft® Exchange software, or the Google Calendar™ calendaring application (via a Google® software account) to provide real-time notifications and to intelligently monitor the meeting space.
NOTE: The scheduling application comes preinstalled on the TSW-760 and TSW-1060 touch screens. Ensure that the touch screen is running the latest firmware version that includes the scheduling application. For more information, refer to the firmware release notes.
For more information regarding scheduling application functionality and the user interface, refer to the Crestron Room Scheduling Panels User Guide (Doc. 8206) at www.crestron.com/manuals.
For more information regarding customizing the scheduling application, refer to the Crestron Room Scheduling Panels Programming Guide (Doc. 8213) at www.crestron.com/manuals.
2 • Crestron Room Scheduling Panels Operations Guide – DOC. 8205B
Setup The touch screen runs in user project mode by default. Use the following procedure to enable the room scheduling application on the touch screen.
NOTE: Ensure that the latest touch screen firmware containing the scheduling application is installed on the touch screen. If older firmware is installed on the touch screen, download and install the most recent firmware from the "Resources" tab on the product webpages at www.crestron.com or from the Crestron firmware library at www.crestron.com/firmware.
1. Enter the IP address of the touch screen in a web browser. The configuration web interface loads.
NOTE: If the touch screen is assigned an IP address using DHCP (Dynamic Host Configuration Protocol), locate the touch screen IP address on the device's main setup page. For more information on locating and configuring the touch screen IP address, refer to the TSW-560, TSW-760, and TSW-1060 Supplemental Guide (Doc. 7927) at www.crestron.com/manuals.
2. If selecting Microsoft Exchange or Crestron Fusion as the scheduling calendar provider, first set the time zone on the touch screen:
NOTE: If selecting Google Calendar as the scheduling panel provider, the scheduling application uses the time zone set in the Google Calendar settings.
a. Navigate to Settings > Configure Date/Time in the web configuration utility.
b. Toggle the Enable Time Synchronization On/Off switch to On.
c. Enter the necessary information in the Time Server, Time Zone, Time(24hr Format), and Date fields, and then click Synchronize Now. For more information, refer to "Configure Date/Time" on page 30.
3. Navigate to Settings > System Setup > Miscellaneous in the web configuration utility.
4. Select Scheduling from the Project Type drop-down menu.
5. Click Save Changes from the Action menu. A pop-up window displays with a "The device will be rebooted. Do you want to continue?" dialogue. Click Yes to reboot the touch screen in scheduling mode or click Cancel to remain in user project mode.
Operations Guide – DOC. 8205B Crestron Room Scheduling Panels • 3
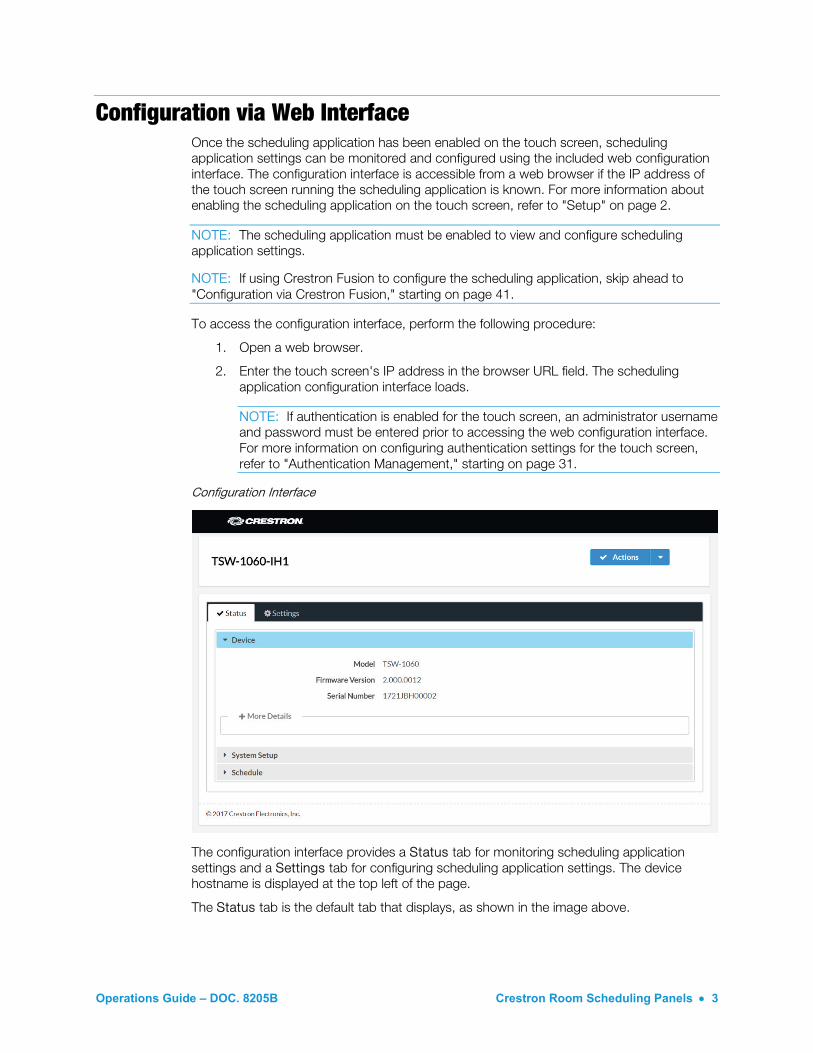
Configuration via Web Interface Once the scheduling application has been enabled on the touch screen, scheduling application settings can be monitored and configured using the included web configuration interface. The configuration interface is accessible from a web browser if the IP address of the touch screen running the scheduling application is known. For more information about enabling the scheduling application on the touch screen, refer to "Setup" on page 2.
NOTE: The scheduling application must be enabled to view and configure scheduling application settings.
NOTE: If using Crestron Fusion to configure the scheduling application, skip ahead to "Configuration via Crestron Fusion," starting on page 41.
To access the configuration interface, perform the following procedure:
1. Open a web browser.
2. Enter the touch screen's IP address in the browser URL field. The scheduling application configuration interface loads.
NOTE: If authentication is enabled for the touch screen, an administrator username and password must be entered prior to accessing the web configuration interface. For more information on configuring authentication settings for the touch screen, refer to "Authentication Management," starting on page 31.
Configuration Interface
The configuration interface provides a Status tab for monitoring scheduling application settings and a Settings tab for configuring scheduling application settings. The device hostname is displayed at the top left of the page.
The Status tab is the default tab that displays, as shown in the image above.
4 • Crestron Room Scheduling Panels Operations Guide – DOC. 8205B
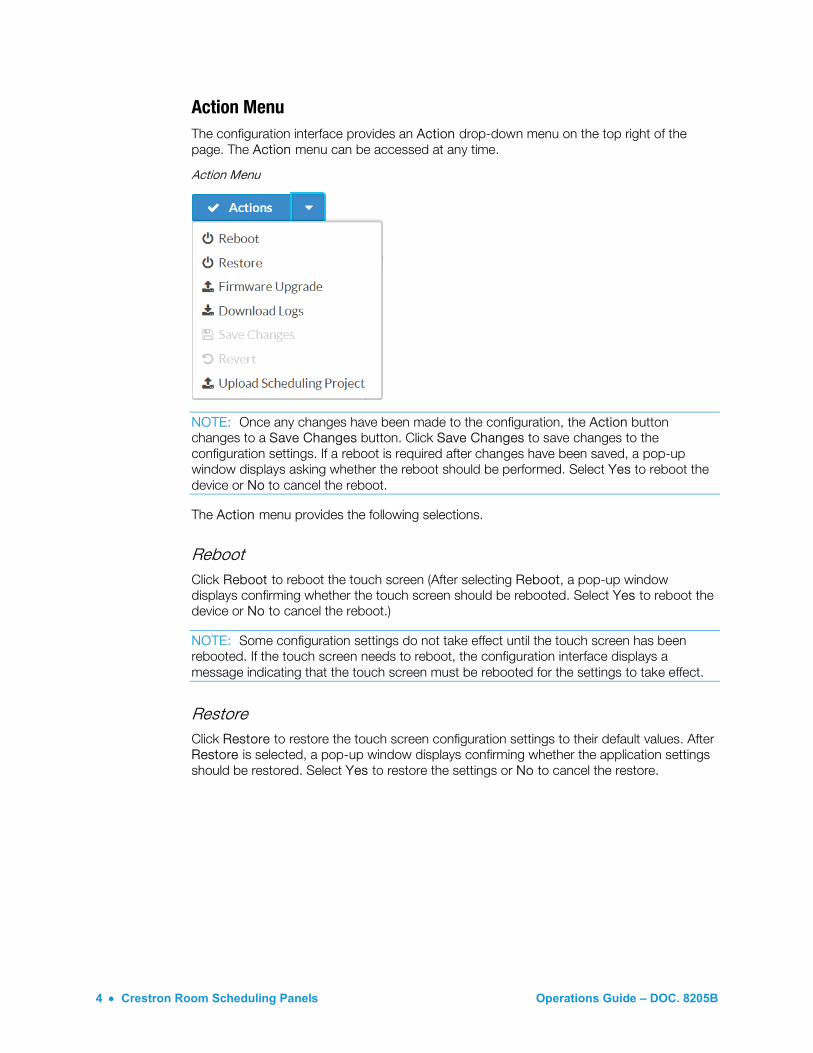
Action Menu The configuration interface provides an Action drop-down menu on the top right of the page. The Action menu can be accessed at any time.
Action Menu
NOTE: Once any changes have been made to the configuration, the Action button changes to a Save Changes button. Click Save Changes to save changes to the configuration settings. If a reboot is required after changes have been saved, a pop-up window displays asking whether the reboot should be performed. Select Yes to reboot the device or No to cancel the reboot.
The Action menu provides the following selections.
Reboot Click Reboot to reboot the touch screen (After selecting Reboot, a pop-up window displays confirming whether the touch screen should be rebooted. Select Yes to reboot the device or No to cancel the reboot.)
NOTE: Some configuration settings do not take effect until the touch screen has been rebooted. If the touch screen needs to reboot, the configuration interface displays a message indicating that the touch screen must be rebooted for the settings to take effect.
Restore Click Restore to restore the touch screen configuration settings to their default values. After Restore is selected, a pop-up window displays confirming whether the application settings should be restored. Select Yes to restore the settings or No to cancel the restore.
Operations Guide – DOC. 8205B Crestron Room Scheduling Panels • 5
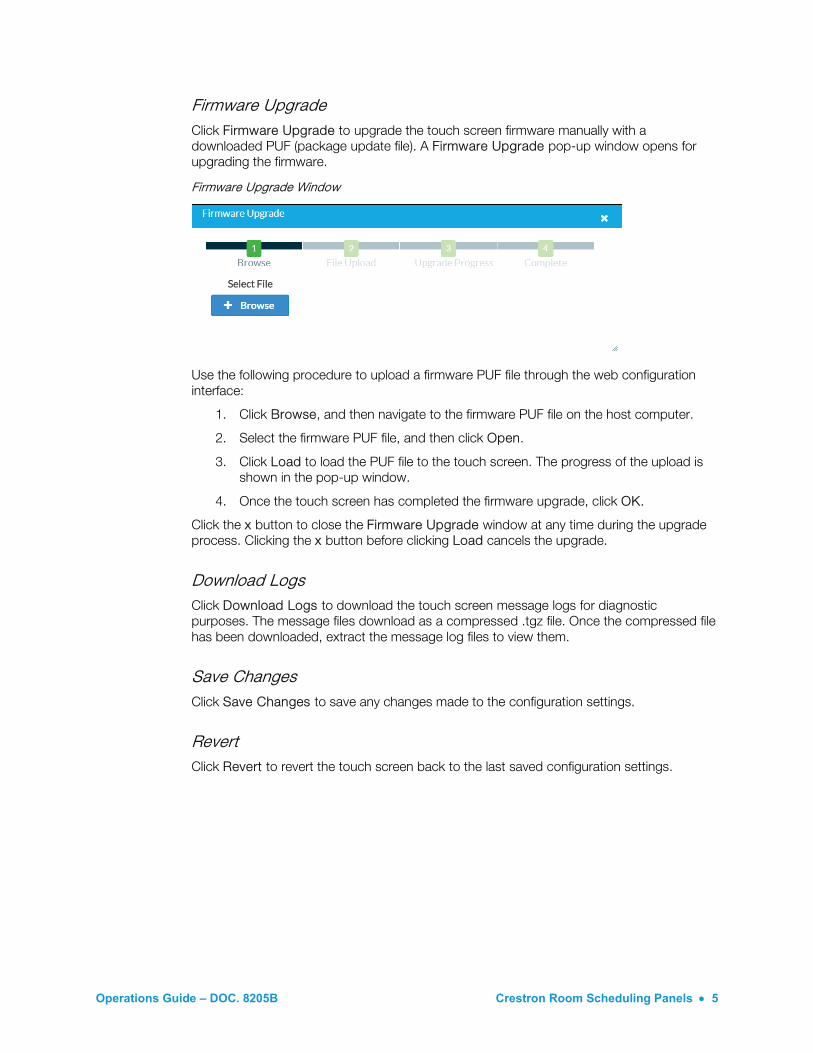
Firmware Upgrade Click Firmware Upgrade to upgrade the touch screen firmware manually with a downloaded PUF (package update file). A Firmware Upgrade pop-up window opens for upgrading the firmware.
Firmware Upgrade Window
Use the following procedure to upload a firmware PUF file through the web configuration interface:
1. Click Browse, and then navigate to the firmware PUF file on the host computer.
2. Select the firmware PUF file, and then click Open.
3. Click Load to load the PUF file to the touch screen. The progress of the upload is shown in the pop-up window.
4. Once the touch screen has completed the firmware upgrade, click OK.
Click the x button to close the Firmware Upgrade window at any time during the upgrade process. Clicking the x button before clicking Load cancels the upgrade.
Download Logs Click Download Logs to download the touch screen message logs for diagnostic purposes. The message files download as a compressed .tgz file. Once the compressed file has been downloaded, extract the message log files to view them.
Save Changes Click Save Changes to save any changes made to the configuration settings.
Revert Click Revert to revert the touch screen back to the last saved configuration settings.
6 • Crestron Room Scheduling Panels Operations Guide – DOC. 8205B
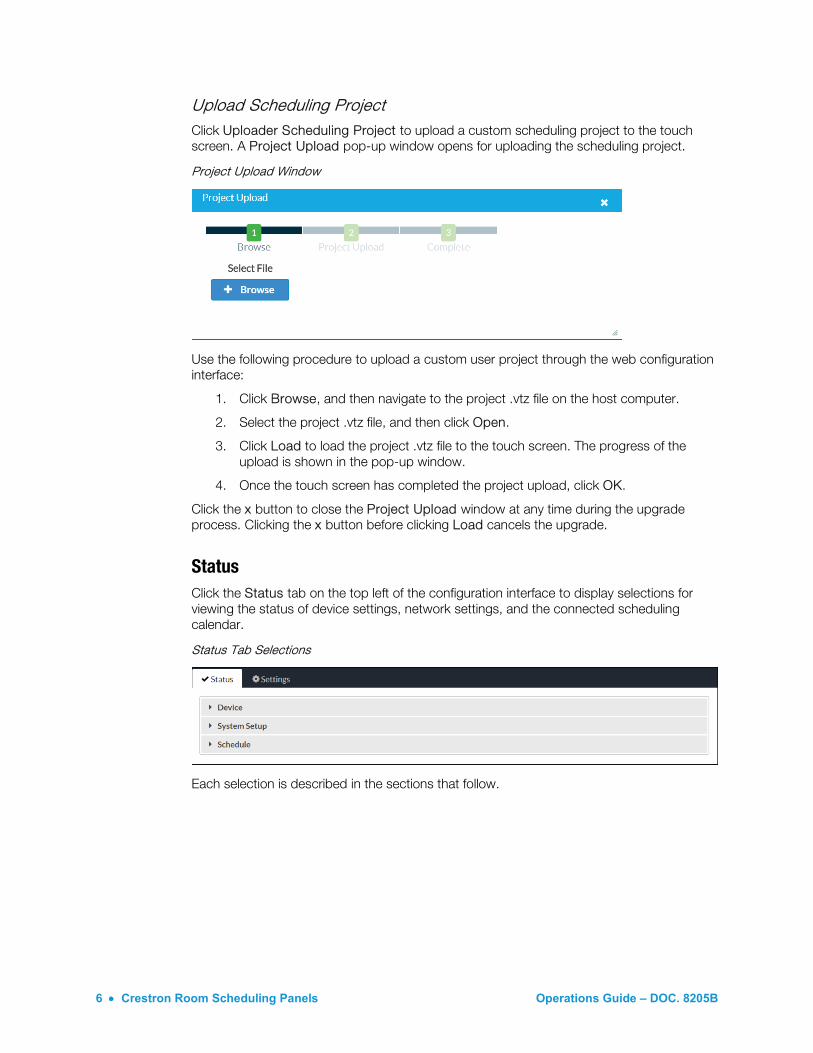
Upload Scheduling Project Click Uploader Scheduling Project to upload a custom scheduling project to the touch screen. A Project Upload pop-up window opens for uploading the scheduling project.
Project Upload Window
Use the following procedure to upload a custom user project through the web configuration interface:
1. Click Browse, and then navigate to the project .vtz file on the host computer.
2. Select the project .vtz file, and then click Open.
3. Click Load to load the project .vtz file to the touch screen. The progress of the upload is shown in the pop-up window.
4. Once the touch screen has completed the project upload, click OK.
Click the x button to close the Project Upload window at any time during the upgrade process. Clicking the x button before clicking Load cancels the upgrade.
Status Click the Status tab on the top left of the configuration interface to display selections for viewing the status of device settings, network settings, and the connected scheduling calendar.
Status Tab Selections
Each selection is described in the sections that follow.
Operations Guide – DOC. 8205B Crestron Room Scheduling Panels • 7
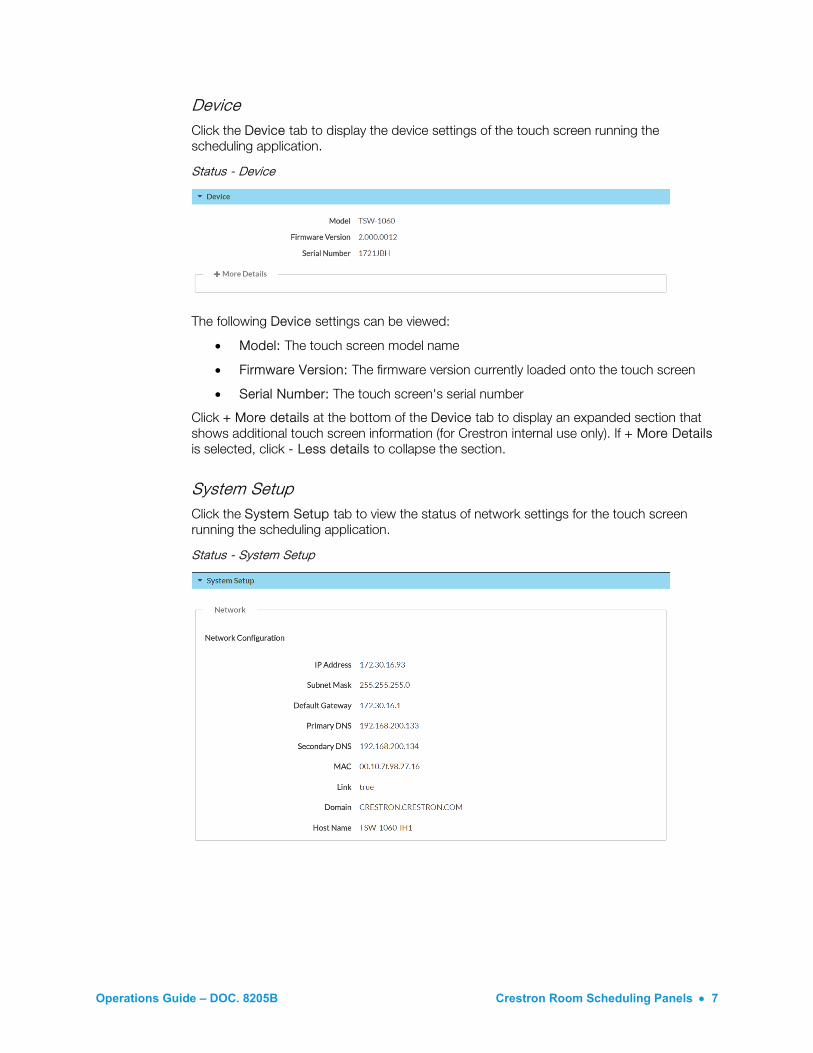
Device Click the Device tab to display the device settings of the touch screen running the scheduling application.
Status - Device
The following Device settings can be viewed:
• Model: The touch screen model name
• Firmware Version: The firmware version currently loaded onto the touch screen
• Serial Number: The touch screen's serial number
Click + More details at the bottom of the Device tab to display an expanded section that shows additional touch screen information (for Crestron internal use only). If + More Details is selected, click - Less details to collapse the section.
System Setup Click the System Setup tab to view the status of network settings for the touch screen running the scheduling application.
Status - System Setup

8 • Crestron Room Scheduling Panels Operations Guide – DOC. 8205B
The following System Setup > Network settings can be viewed:
• IP Address: The IP address of the touch screen
• Subnet Mask: The subnet mask address of the touch screen
• Default Gateway: The address of the gateway router
• Primary DNS: The primary DNS (domain name server) address used to resolve the touch screen domain name to an IP address
• Secondary DNS: The secondary DNS address used to resolve the touch screen domain name to an IP address if the primary DNS fails
• MAC: The unique MAC (media access control) address of the touch screen
• Link: Indicates the status of the Ethernet connection (A true message indicates that the Ethernet connection is active, while a false message indicates that the Ethernet connection is inactive.)
• Domain: The domain name of the touch screen
• Host Name: The host name of the touch screen
For more information about configuring network settings, refer to page 12.
Operations Guide – DOC. 8205B Crestron Room Scheduling Panels • 9
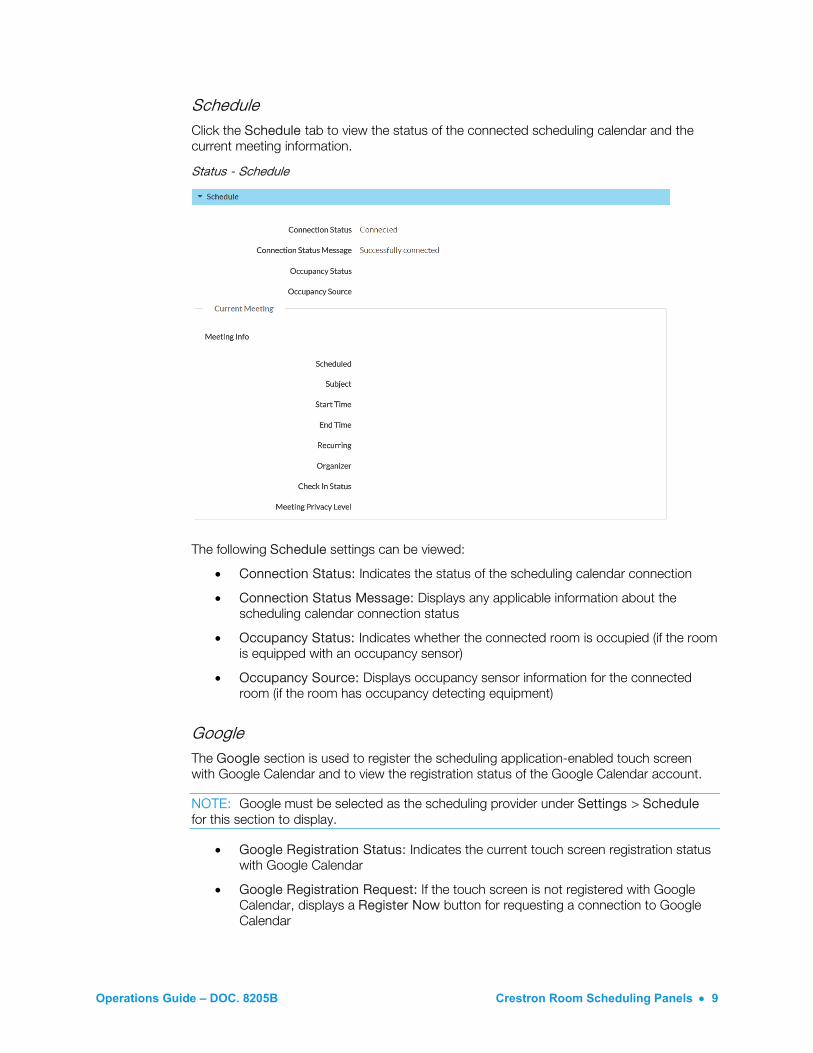
Schedule Click the Schedule tab to view the status of the connected scheduling calendar and the current meeting information.
Status - Schedule
The following Schedule settings can be viewed:
• Connection Status: Indicates the status of the scheduling calendar connection
• Connection Status Message: Displays any applicable information about the scheduling calendar connection status
• Occupancy Status: Indicates whether the connected room is occupied (if the room is equipped with an occupancy sensor)
• Occupancy Source: Displays occupancy sensor information for the connected room (if the room has occupancy detecting equipment)
Google The Google section is used to register the scheduling application-enabled touch screen with Google Calendar and to view the registration status of the Google Calendar account.
NOTE: Google must be selected as the scheduling provider under Settings > Schedule for this section to display.
• Google Registration Status: Indicates the current touch screen registration status with Google Calendar
• Google Registration Request: If the touch screen is not registered with Google Calendar, displays a Register Now button for requesting a connection to Google Calendar
10 • Crestron Room Scheduling Panels Operations Guide – DOC. 8205B
NOTE: If the touch screen is registered with Google Calendar, an Unregister button is displayed. Select this button to unregister the touch screen with Google Calendar.
• Google Registration URL: If a Google Calendar registration has been requested, displays a URL that is used to register the touch screen with Google Calendar
• Google Registration Code: If a Google Calendar registration has been requested, displays a unique code that is used to register the touch screen with Google Calendar
Use the following procedure to register the scheduling application-enabled touch screen with Google Calendar.
1. Navigate to Settings > Schedule, and then select Google from the Schedule source drop-down menu.
2. If more than one calendar is available for the registered Google account, enter the full calendar name or ID to be used in the Google Calendar text box. If this field is left empty or not provided, the scheduling application uses the primary calendar for the account.
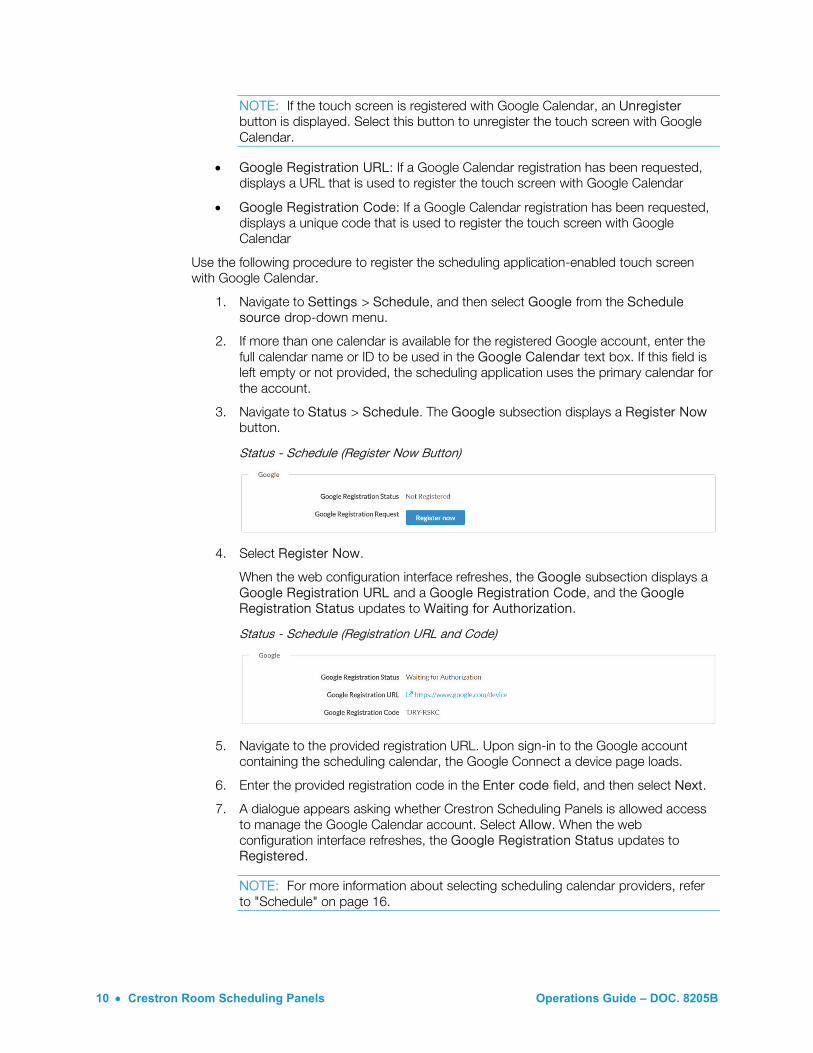
3. Navigate to Status > Schedule. The Google subsection displays a Register Now button.
Status - Schedule (Register Now Button)
4. Select Register Now.
When the web configuration interface refreshes, the Google subsection displays a Google Registration URL and a Google Registration Code, and the Google Registration Status updates to Waiting for Authorization.
Status - Schedule (Registration URL and Code)
5. Navigate to the provided registration URL. Upon sign-in to the Google account containing the scheduling calendar, the Google Connect a device page loads.
6. Enter the provided registration code in the Enter code field, and then select Next.
7. A dialogue appears asking whether Crestron Scheduling Panels is allowed access to manage the Google Calendar account. Select Allow. When the web configuration interface refreshes, the Google Registration Status updates to Registered.
NOTE: For more information about selecting scheduling calendar providers, refer to "Schedule" on page 16.

Operations Guide – DOC. 8205B Crestron Room Scheduling Panels • 11
Current Meeting The following Schedule > Current Meetings settings can be viewed:
• Scheduled: Indicates whether the connected room is currently reserved (A true message indicates that the room is reserved, while a false message indicates that the room is available.)
• Subject: The subject of the current reservation if the room is reserved
• Start Time: The start time of the current reservation if the room is reserved
• End Time: The scheduled end time of the current reservation if the room is reserved
• Recurring: Indicates whether the current meeting is set to recur on the scheduling calendar if the room is reserved (A true message indicates that the meeting is set to recur, while a false message indicates that the meeting is not set to recur.)
• Organizer: The name of the current reservation organizer if the room is reserved and this information is not set to private
• Check In Status: Indicates whether the current reservation has been checked in if required and if the room is reserved
• Meeting Privacy Level: The privacy level of the current reservation if the room is reserved
Settings Click the Settings tab on the top left of the configuration interface to display selections for configuring various scheduling application settings.
Settings Selections
Each selection is described in the sections that follow.
12 • Crestron Room Scheduling Panels Operations Guide – DOC. 8205B
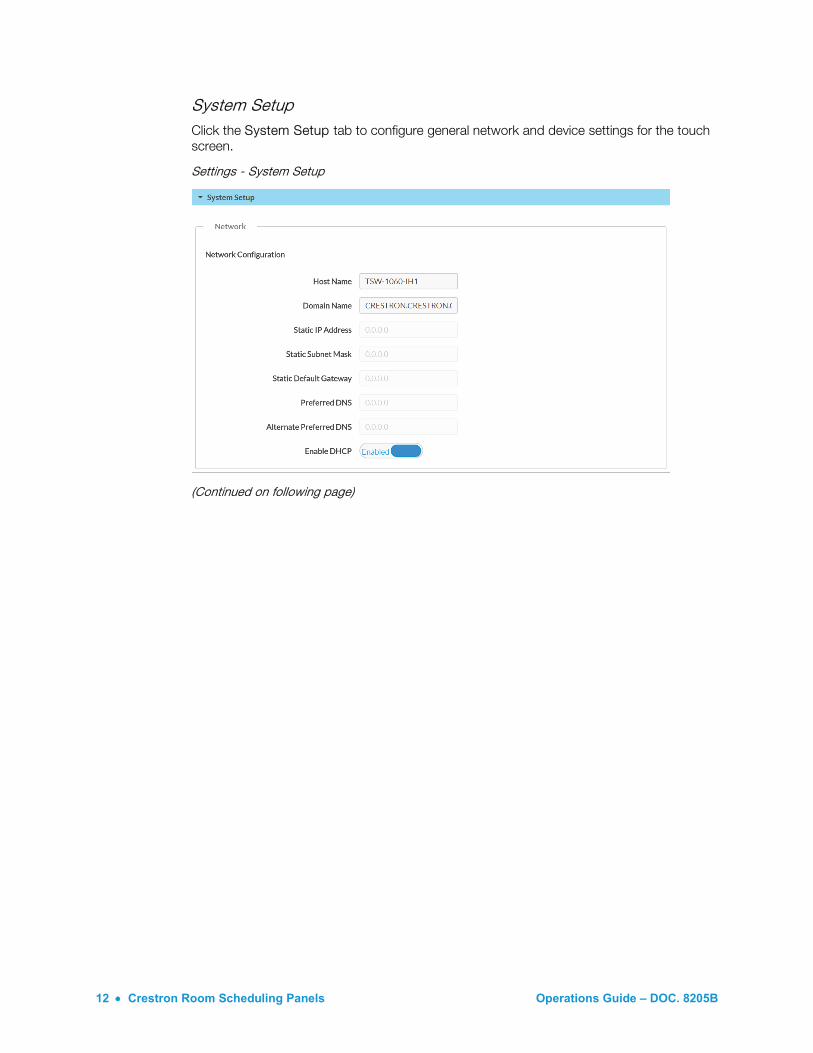
System Setup Click the System Setup tab to configure general network and device settings for the touch screen.
Settings - System Setup
(Continued on following page)
Operations Guide – DOC. 8205B Crestron Room Scheduling Panels • 13
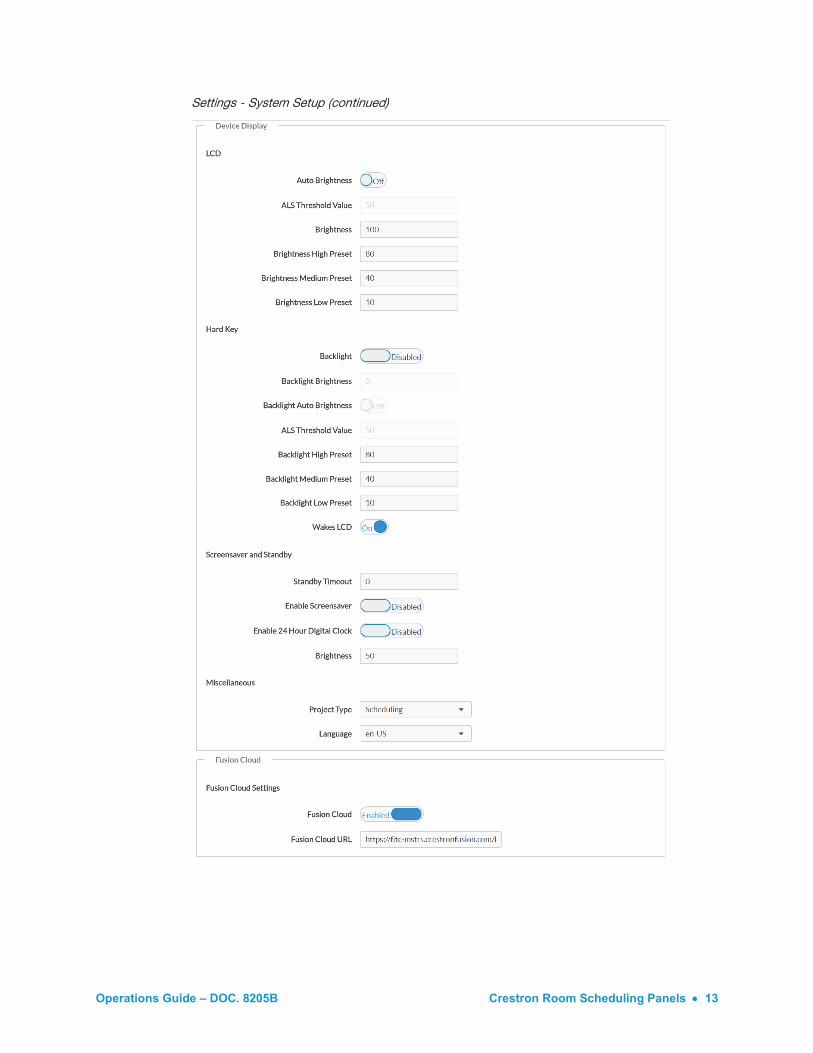
Settings - System Setup (continued)
14 • Crestron Room Scheduling Panels Operations Guide – DOC. 8205B
The following System Setup settings can be configured:
Network
NOTE: The Static IP Address, Static Subnet Mask, Static Default Gateway, Preferred DNS, and Alternate Preferred DNS fields are only used if Enable DHCP is set to Disabled.
The following System Setup > Network > Network Configurations settings can be configured:
• Host Name: Sets the touch screen hostname
• Domain Name: Sets the fully-qualified domain name on the network, consisting of the hostname and the DNS suffix
• Static IP Address: Sets the IP address of the touch screen on the network. (Valid IP addresses consist of four octets, 0 to 255, separated by periods.)
• Static Subnet Mask: Sets the subnet mask address of the touch screen on the network
• Static Default Gateway: Sets the gateway router address on the network
• Preferred DNS: Sets the primary DNS address used to resolve the domain name to an IP address
• Alternate Preferred DNS: Sets the alternate DNS address used to resolve the domain name to an IP address if the primary DNS fails
• Enable DHCP: Enables or disables using DHCP (Click the Enable DHCP button to toggle between enabling and disabling DHCP. If DHCP is enabled, IP does not function until a reply has been received from the server. The touch screen broadcasts requests for an IP address periodically.)
Device Display • LCD
o Auto Brightness: Enables or disables automatic brightness control for the touch screen LCD
o ALS Threshold Value: If Auto Brightness is enabled, sets the ALS (ambient light sensor) threshold value for switching between high and low auto-brightness presets
o Brightness: If Auto Brightness is disabled, sets the touch screen LCD brightness value
o Brightness High Preset: Selects the touch screen LCD high brightness preset value
o Brightness Medium Preset: Selects the touch screen LCD medium brightness preset value
o Brightness Low Preset: Selects the touch screen LCD low brightness preset value
Operations Guide – DOC. 8205B Crestron Room Scheduling Panels • 15
• Hard Key
o Backlight: Enables or disables the hard key backlight on the touch screen
o Backlight Brightness: If Backlight is enabled, sets the touch screen hard key backlight brightness value
o Backlight Auto Brightness: If Backlight is enabled, enables or disables automatic brightness control for the hard key backlight
o ALS Threshold Value: If Backlight and Backlight Auto Brightness are enabled, sets the touch screen hard key ALS threshold value for switching between high and low auto-brightness presets
o Backlight High Preset: Selects the hard key backlight high brightness preset value
o Backlight Medium Preset: Selects the hard key backlight medium brightness preset value
o Backlight Low Preset: Selects the hard key backlight low brightness preset value
o Wakes LCD: Enables or disables the ability to tap the hard keys to wake the LCD display
• Screensaver and Standby
o Standby Timeout: Sets the touch screen's standby timeout duration, in minutes
o Enable Screensaver: Enables or disables displaying a screensaver on the touch screen
o Enable 24 Hour Digital Clock: If Enable Digital Clock is enabled, enables or disables displaying the digital clock screensaver in 24-hour time format
o Brightness: Sets the screensaver brightness value
• Miscellaneous
o Project Type: Sets whether the touch screen displays a custom user project or the scheduling application
o Language: Selects the primary language of the touch screen
Fusion Cloud
NOTE: If connecting to a Crestron Fusion® software on-premises server, connections are made using either traditional (outbound) or inbound communications. For more information, refer to the Crestron Fusion 10 On-Premises Software Getting Started Guide (Doc. 7685) at www.crestron.com/manuals.
• Fusion Cloud Settings
o Fusion Cloud: Enables or disables a connection between the touch screen and a Crestron Fusion server
o Fusion Cloud Url: Sets the URL used to connect the touch screen with a Crestron Fusion server
16 • Crestron Room Scheduling Panels Operations Guide – DOC. 8205B
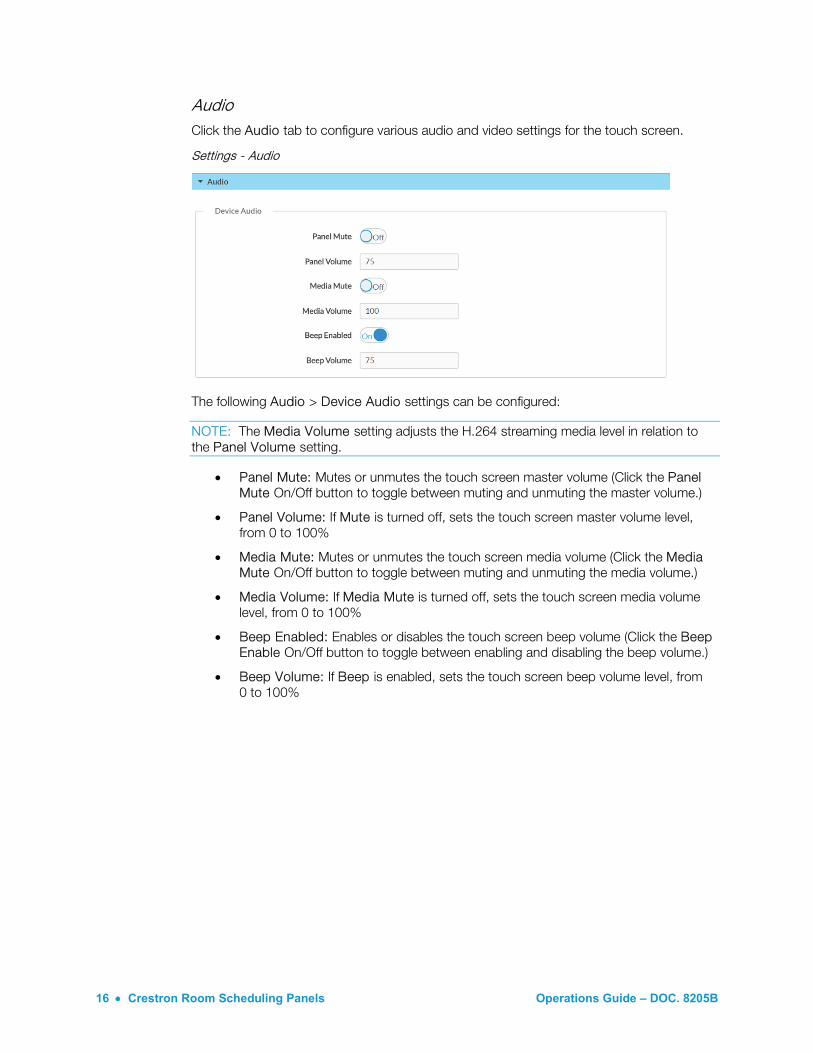
Audio Click the Audio tab to configure various audio and video settings for the touch screen.
Settings - Audio
The following Audio > Device Audio settings can be configured:
NOTE: The Media Volume setting adjusts the H.264 streaming media level in relation to the Panel Volume setting.
• Panel Mute: Mutes or unmutes the touch screen master volume (Click the Panel Mute On/Off button to toggle between muting and unmuting the master volume.)
• Panel Volume: If Mute is turned off, sets the touch screen master volume level, from 0 to 100%
• Media Mute: Mutes or unmutes the touch screen media volume (Click the Media Mute On/Off button to toggle between muting and unmuting the media volume.)
• Media Volume: If Media Mute is turned off, sets the touch screen media volume level, from 0 to 100%
• Beep Enabled: Enables or disables the touch screen beep volume (Click the Beep Enable On/Off button to toggle between enabling and disabling the beep volume.)
• Beep Volume: If Beep is enabled, sets the touch screen beep volume level, from 0 to 100%
Operations Guide – DOC. 8205B Crestron Room Scheduling Panels • 17
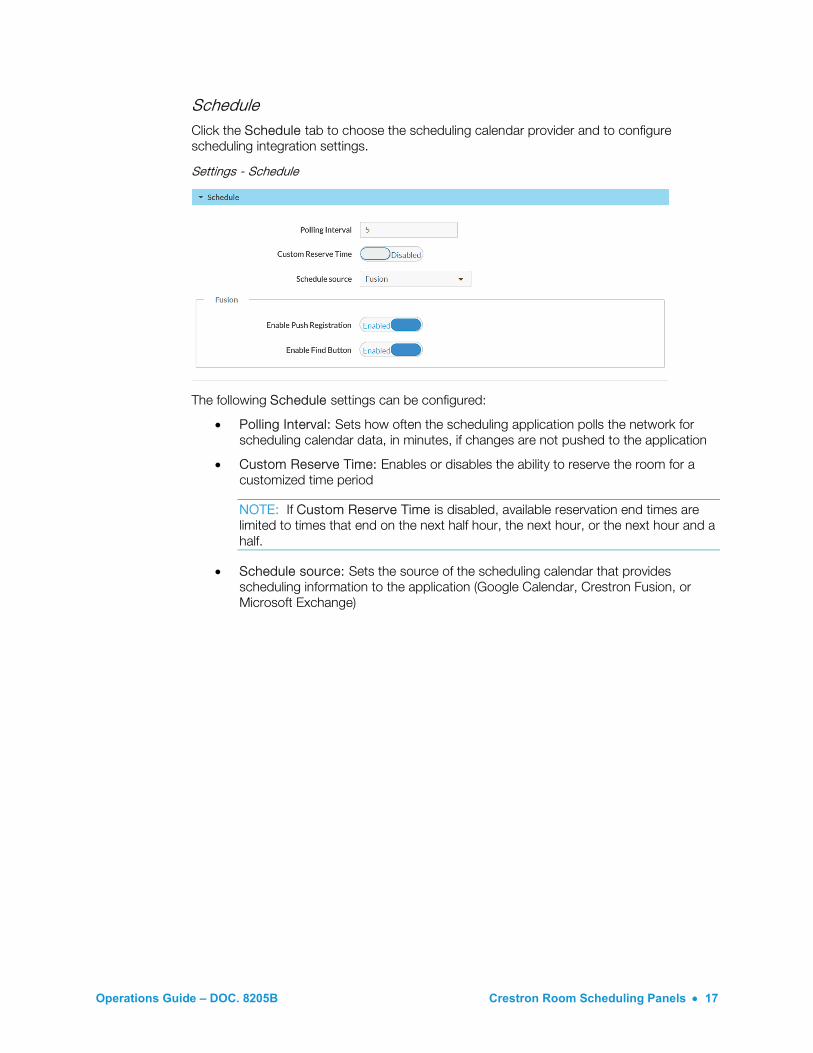
Schedule Click the Schedule tab to choose the scheduling calendar provider and to configure scheduling integration settings.
Settings - Schedule
The following Schedule settings can be configured:
• Polling Interval: Sets how often the scheduling application polls the network for scheduling calendar data, in minutes, if changes are not pushed to the application
• Custom Reserve Time: Enables or disables the ability to reserve the room for a customized time period
NOTE: If Custom Reserve Time is disabled, available reservation end times are limited to times that end on the next half hour, the next hour, or the next hour and a half.
• Schedule source: Sets the source of the scheduling calendar that provides scheduling information to the application (Google Calendar, Crestron Fusion, or Microsoft Exchange)
18 • Crestron Room Scheduling Panels Operations Guide – DOC. 8205B
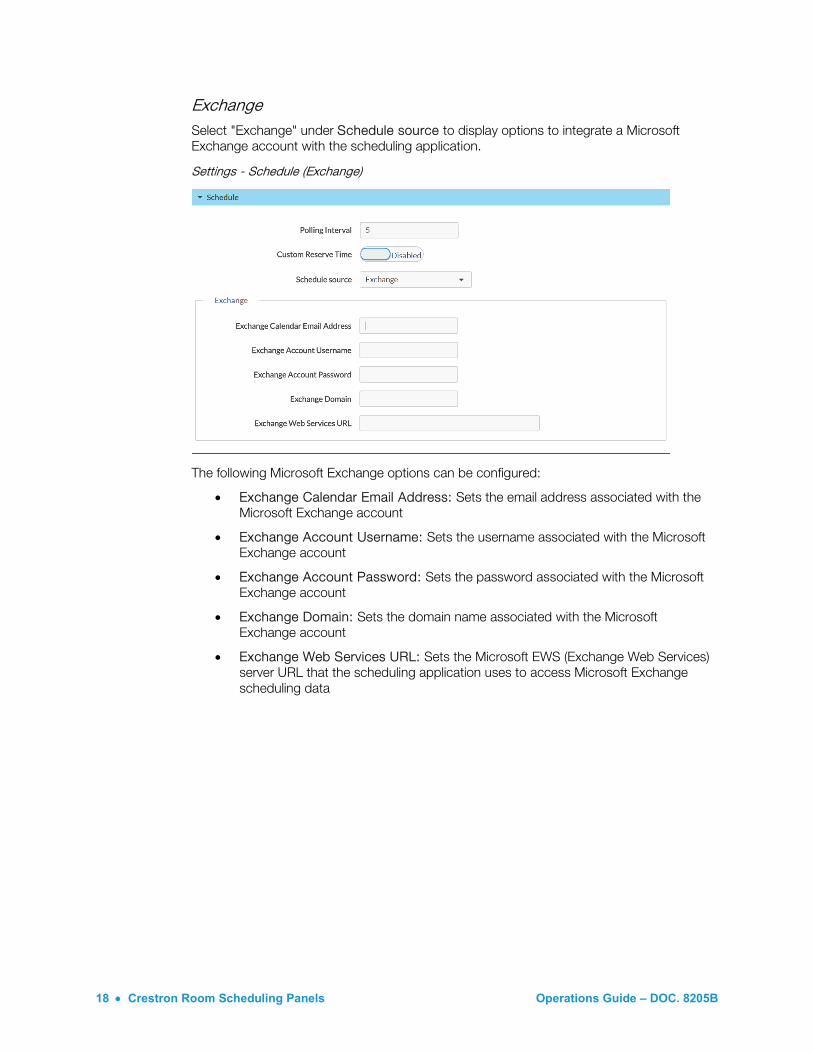
Exchange Select "Exchange" under Schedule source to display options to integrate a Microsoft Exchange account with the scheduling application.
Settings - Schedule (Exchange)
The following Microsoft Exchange options can be configured:
• Exchange Calendar Email Address: Sets the email address associated with the Microsoft Exchange account
• Exchange Account Username: Sets the username associated with the Microsoft Exchange account
• Exchange Account Password: Sets the password associated with the Microsoft Exchange account
• Exchange Domain: Sets the domain name associated with the Microsoft Exchange account
• Exchange Web Services URL: Sets the Microsoft EWS (Exchange Web Services) server URL that the scheduling application uses to access Microsoft Exchange scheduling data
Operations Guide – DOC. 8205B Crestron Room Scheduling Panels • 19
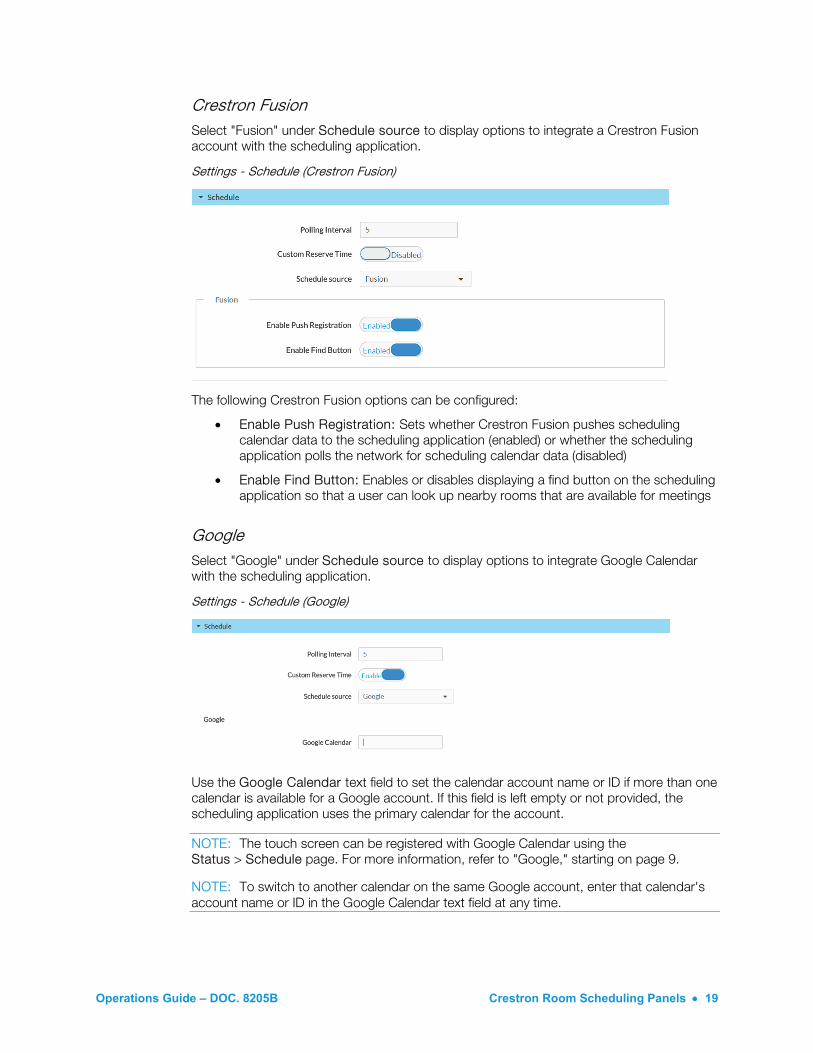
Crestron Fusion Select "Fusion" under Schedule source to display options to integrate a Crestron Fusion account with the scheduling application.
Settings - Schedule (Crestron Fusion)
The following Crestron Fusion options can be configured:
• Enable Push Registration: Sets whether Crestron Fusion pushes scheduling calendar data to the scheduling application (enabled) or whether the scheduling application polls the network for scheduling calendar data (disabled)
• Enable Find Button: Enables or disables displaying a find button on the scheduling application so that a user can look up nearby rooms that are available for meetings
Google Select "Google" under Schedule source to display options to integrate Google Calendar with the scheduling application.
Settings - Schedule (Google)
Use the Google Calendar text field to set the calendar account name or ID if more than one calendar is available for a Google account. If this field is left empty or not provided, the scheduling application uses the primary calendar for the account.
NOTE: The touch screen can be registered with Google Calendar using the Status > Schedule page. For more information, refer to "Google," starting on page 9.
NOTE: To switch to another calendar on the same Google account, enter that calendar's account name or ID in the Google Calendar text field at any time.
20 • Crestron Room Scheduling Panels Operations Guide – DOC. 8205B
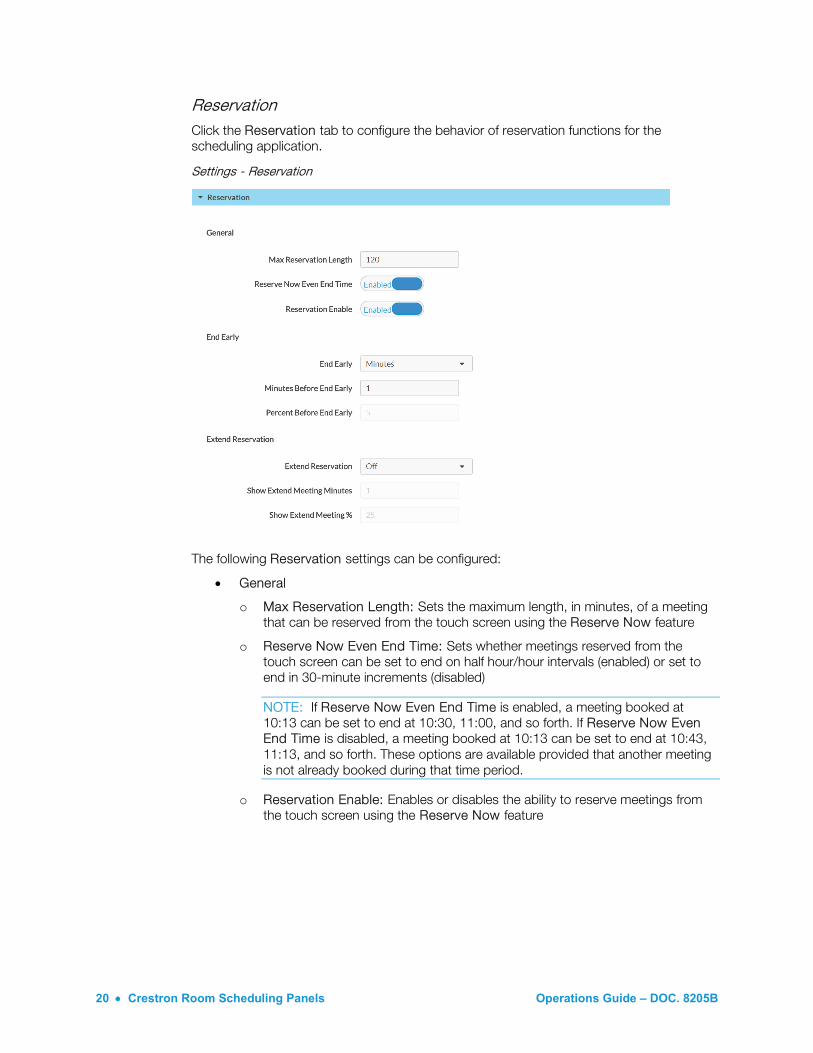
Reservation Click the Reservation tab to configure the behavior of reservation functions for the scheduling application.
Settings - Reservation
The following Reservation settings can be configured:
• General
o Max Reservation Length: Sets the maximum length, in minutes, of a meeting that can be reserved from the touch screen using the Reserve Now feature
o Reserve Now Even End Time: Sets whether meetings reserved from the touch screen can be set to end on half hour/hour intervals (enabled) or set to end in 30-minute increments (disabled)
NOTE: If Reserve Now Even End Time is enabled, a meeting booked at 10:13 can be set to end at 10:30, 11:00, and so forth. If Reserve Now Even End Time is disabled, a meeting booked at 10:13 can be set to end at 10:43, 11:13, and so forth. These options are available provided that another meeting is not already booked during that time period.
o Reservation Enable: Enables or disables the ability to reserve meetings from the touch screen using the Reserve Now feature
Operations Guide – DOC. 8205B Crestron Room Scheduling Panels • 21
• End Early
o End Early: Sets whether a button appears on the scheduling application during a meeting that allows the meeting to be ended early from the touch screen
NOTE: Select Minutes to have the End button appear on the scheduling application after a specified number of minutes have elapsed, or select Percentage to have the End button appear after a specified percentage of the meeting has passed.
o Minutes Before End Early: If Minutes is selected for End Early, sets the number of minutes that must elapse in a meeting before the End button appears on the scheduling application
o Percent Before End Early: If Percentage is selected for End Early, sets the percent of a meeting that must elapse before the End button appears on the scheduling application
• Extend Reservation
o Extend Reservation: Sets whether a button appears on the scheduling application during a meeting that allows the meeting to be extended from the touch screen
NOTE: Select Minutes to have the Extend button appear on the scheduling application after a specified number of minutes have elapsed, or select Percentage to have the Extend button appear after a specified percentage of the meeting has passed.
NOTE: The extend reservation function is only available if a meeting has not been booked directly after the current meeting.
o Show Extend Meeting Minutes: If Minutes is selected for Extend Reservation, sets the number of minutes that must elapse in a meeting before the Extend button appears on the scheduling application
o Show Extend Meeting %: If Percentage is selected for Extend Reservation, sets the percent of a meeting that must elapse before the Extend button appears on the scheduling application
22 • Crestron Room Scheduling Panels Operations Guide – DOC. 8205B
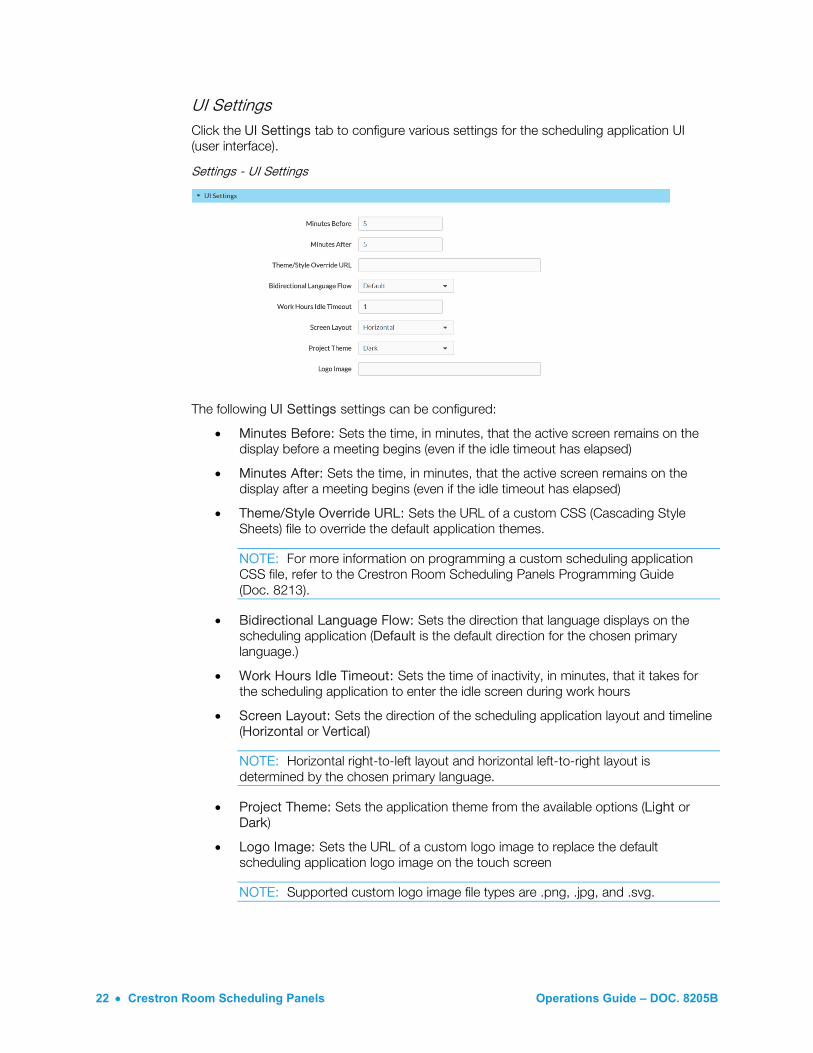
UI Settings Click the UI Settings tab to configure various settings for the scheduling application UI (user interface).
Settings - UI Settings
The following UI Settings settings can be configured:
• Minutes Before: Sets the time, in minutes, that the active screen remains on the display before a meeting begins (even if the idle timeout has elapsed)
• Minutes After: Sets the time, in minutes, that the active screen remains on the display after a meeting begins (even if the idle timeout has elapsed)
• Theme/Style Override URL: Sets the URL of a custom CSS (Cascading Style Sheets) file to override the default application themes.
NOTE: For more information on programming a custom scheduling application CSS file, refer to the Crestron Room Scheduling Panels Programming Guide (Doc. 8213).
• Bidirectional Language Flow: Sets the direction that language displays on the scheduling application (Default is the default direction for the chosen primary language.)
• Work Hours Idle Timeout: Sets the time of inactivity, in minutes, that it takes for the scheduling application to enter the idle screen during work hours
• Screen Layout: Sets the direction of the scheduling application layout and timeline (Horizontal or Vertical)
NOTE: Horizontal right-to-left layout and horizontal left-to-right layout is determined by the chosen primary language.
• Project Theme: Sets the application theme from the available options (Light or Dark)
• Logo Image: Sets the URL of a custom logo image to replace the default scheduling application logo image on the touch screen
NOTE: Supported custom logo image file types are .png, .jpg, and .svg.
Operations Guide – DOC. 8205B Crestron Room Scheduling Panels • 23
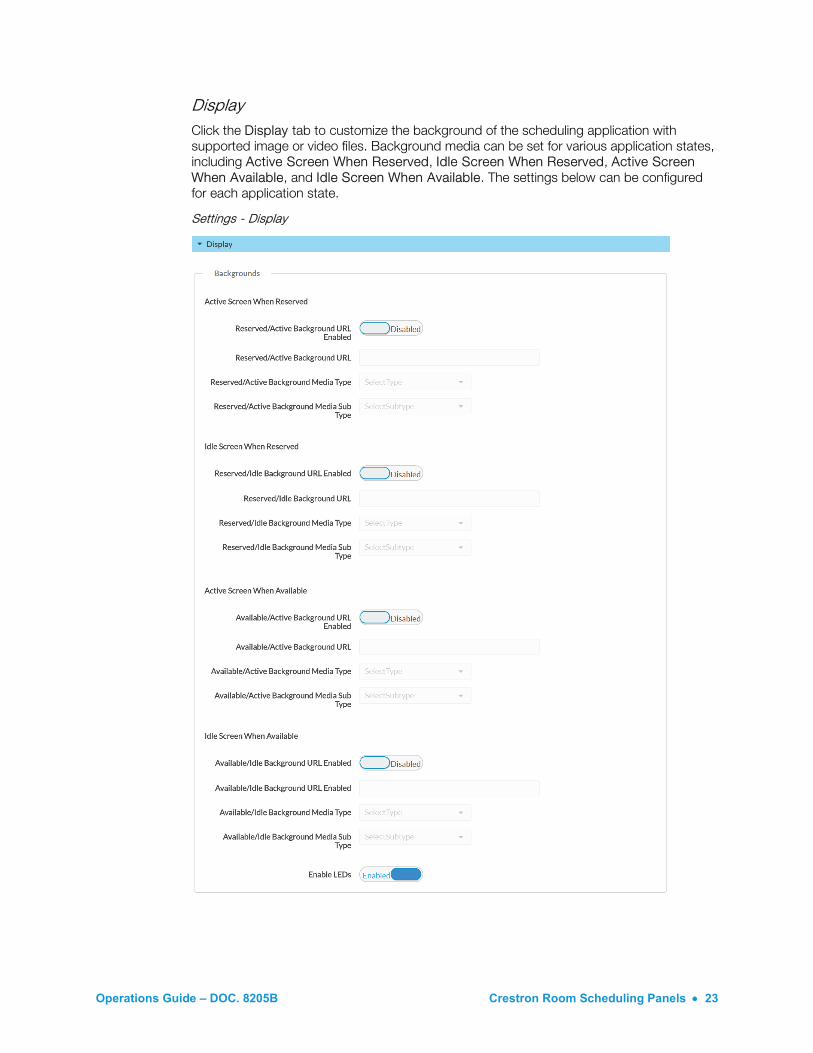
Display Click the Display tab to customize the background of the scheduling application with supported image or video files. Background media can be set for various application states, including Active Screen When Reserved, Idle Screen When Reserved, Active Screen When Available, and Idle Screen When Available. The settings below can be configured for each application state.
Settings - Display
24 • Crestron Room Scheduling Panels Operations Guide – DOC. 8205B
The following Display settings can be configured:
NOTE: Supported image file types are .jpeg, .gif, and .png. For optimal image quality, images should be sized to 1024 x 600 pixels for a TSW-760 and 1280 x 800 pixels for a TSW-1060.
NOTE: The supported video file type is .webm (compressed with a VP8 codec). The first and last seconds of the video should display the same still image to avoid flickering on the loop playback.
Backgrounds • Active Screen When Reserved
o Reserved/Active Background URL Enabled: Enables or disables background media for the reserved/active state
o Reserved/Active Background URL: If Background URL Enabled is enabled, sets the URL of the background media file for the reserved/active state
o Reserved/Active Background Media Type: If Background URL Enabled is enabled, sets the media type of the background media file (image or video) for the reserved/active state
o Reserved/Active Background Media Sub Type: If Background URL Enabled is enabled, sets the media subtype of the background media file for the reserved/active state
• Idle Screen When Reserved
o Reserved/Idle Background URL Enabled: Enables or disables background media for the reserved/idle state
o Reserved/Idle Background URL: If Background URL Enabled is enabled, sets the URL of the background media file for the reserved/idle state
o Reserved/Idle Background Media Type: If Background URL Enabled is enabled, sets the media type of the background media file (image or video) for the reserved/idle state
o Reserved/Idle Background Media Sub Type: If Background URL Enabled is enabled, sets the media subtype of the background media file for the reserved/idle state
• Active Screen When Available
o Available/Active Background URL Enabled: Enables or disables background media for the available/active state
o Available/Active Background URL: If Background URL Enabled is enabled, sets the URL of the background media file for the available/active state
o Available/Active Background Media Type: If Background URL Enabled is enabled, sets the media type of the background media file (image or video) for the available/active state
o Available/Active Background Media Sub Type: If Background URL Enabled is enabled, sets the media subtype of the background media file for the available/active state
Operations Guide – DOC. 8205B Crestron Room Scheduling Panels • 25
• Idle Screen When Available
o Available/Idle Background URL Enabled: Enables or disables background media for the available/idle state
o Available/Idle Background URL: If Background URL Enabled is enabled, sets the URL of the background media file for the available/idle state
o Available/Idle Background Media Type: If Background URL Enabled is enabled, sets the media type of the background media file (image or video) for the available/idle state
o Available/Idle Background Media Sub Type: If Background URL Enabled is enabled, sets the media subtype of the background media file for the available/idle state
• Enable LEDs: Enables or disables touch screen LEDs while in scheduling mode
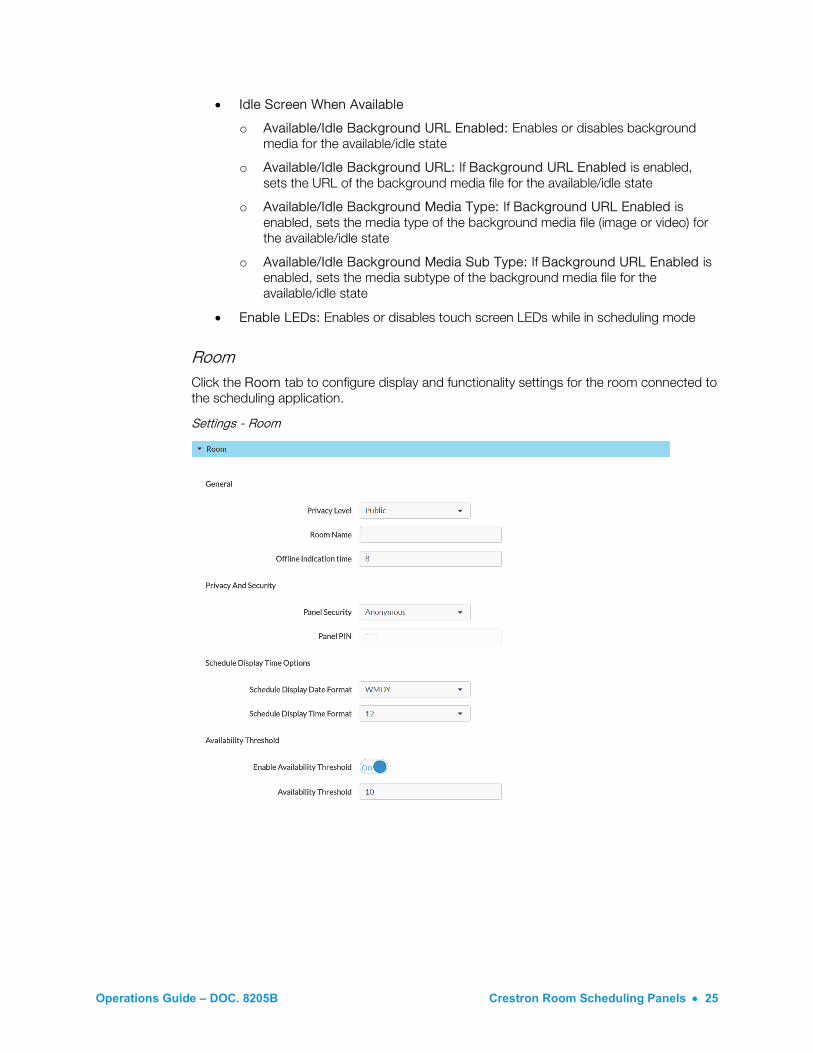
Room Click the Room tab to configure display and functionality settings for the room connected to the scheduling application.
Settings - Room
26 • Crestron Room Scheduling Panels Operations Guide – DOC. 8205B
The following Room settings can be configured:
• General
o Privacy Level: Sets the privacy level of the scheduling application for the room
NOTE: The selections for Privacy Level control how much information is displayed about each meeting on the scheduling application. Select Public to show the meeting subject, organizer, and attendees; select Semi-Private to show the meeting organizer but not the subject or attendees; or select Private to not show any meeting information except for whether the room is free or reserved.
o Room Name: Sets a custom room name that overwrites the calendar name.
o Offline indication time: Sets the time, in hours, that the connected scheduling calendar must be offline before the scheduling application displays an offline notification
• Privacy And Security
o Panel Security: Sets the security level of the scheduling application for the room
NOTE: If Anonymous is selected, a user can access scheduling application functions from the touch screen without entering a PIN. If Touch Screen PIN is selected, a user must first enter a PIN before accessing scheduling application functions.
o Panel PIN: If Touch Screen PIN is selected for Panel Security, sets the four-digit PIN that must be entered to gain access to scheduling application functions
• Schedule Display Time Options
o Schedule Display Date Format: Sets the date display format for the room from the available options
o Schedule Display Time Format: Sets the time display format for the room from the available options
• Availability Threshold
o Enable Availability Threshold: Enables the availability threshold behavior for the room
o Availability Threshold: Sets the time, in minutes, that the room cannot be booked for a meeting before a scheduled meeting begins

Operations Guide – DOC. 8205B Crestron Room Scheduling Panels • 27
Automation Click the Automation tab to configure the behavior of automated settings for the scheduling application.
Settings - Automation
The following Automation settings can be configured:
Check-In and Decline for No Show • Decline for No Show
o Decline for No Show: Enables or disables automatically declining meetings in the event of a no-show
NOTE: When Decline for No Show is enabled, a user must tap a check-in button on the touch screen during the specified check-in period or the meeting is removed from the scheduling calendar.
o Decline reservations up to (min): If Decline for No Show is enabled, limits this feature to reservations up to and including the set number of minutes.
• Check-in
o Require Check-In: Enables or disables requiring an attendee to check in to the meeting from the touch screen during a specified check-in period
o Check-In Time: Sets the number of minutes that a Check In button is available on the touch screen before a meeting begins
NOTE: If the Check In button from the prior meeting is still active and has not been pressed, the Check In button from the next meeting does not appear until the previous button expires.
o Check-In End: Sets the number of minutes that a Check In button is available on the touch screen after a meeting begins
NOTE: If the length of a meeting is shorter than the set Check-In End value, the Check-In End time will be limited to the length of the meeting.
28 • Crestron Room Scheduling Panels Operations Guide – DOC. 8205B
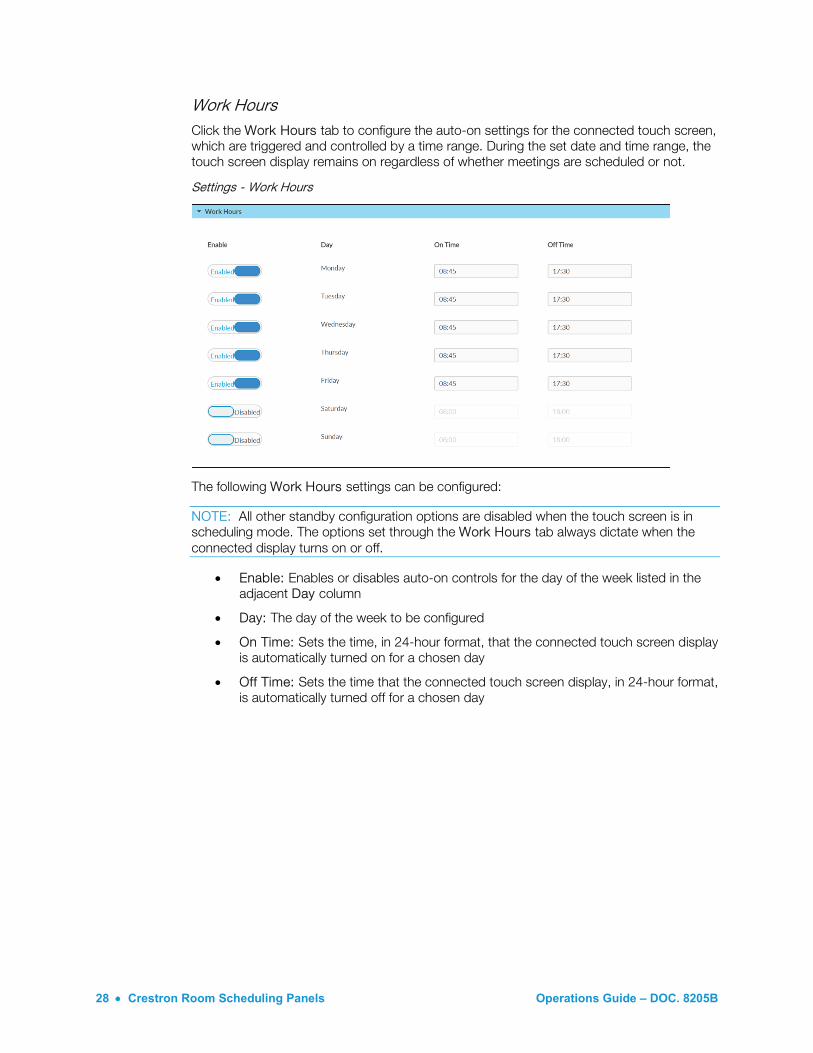
Work Hours Click the Work Hours tab to configure the auto-on settings for the connected touch screen, which are triggered and controlled by a time range. During the set date and time range, the touch screen display remains on regardless of whether meetings are scheduled or not.
Settings - Work Hours
The following Work Hours settings can be configured:
NOTE: All other standby configuration options are disabled when the touch screen is in scheduling mode. The options set through the Work Hours tab always dictate when the connected display turns on or off.
• Enable: Enables or disables auto-on controls for the day of the week listed in the adjacent Day column
• Day: The day of the week to be configured
• On Time: Sets the time, in 24-hour format, that the connected touch screen display is automatically turned on for a chosen day
• Off Time: Sets the time that the connected touch screen display, in 24-hour format, is automatically turned off for a chosen day
Operations Guide – DOC. 8205B Crestron Room Scheduling Panels • 29
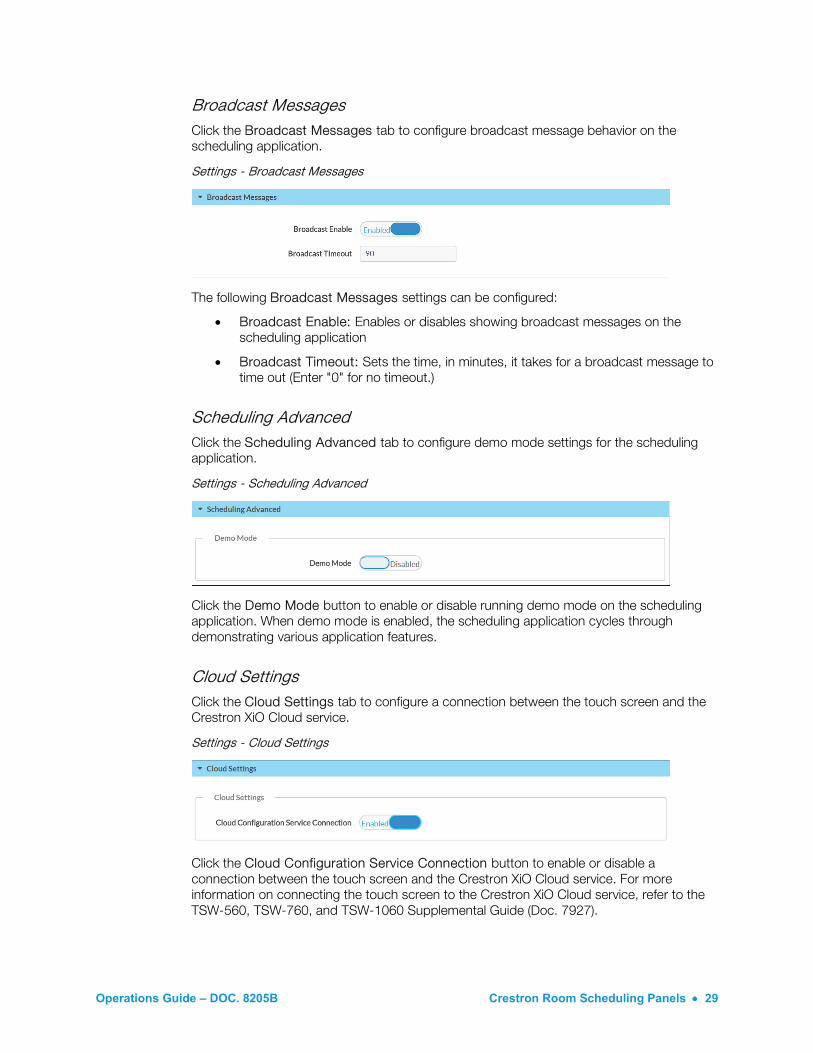
Broadcast Messages Click the Broadcast Messages tab to configure broadcast message behavior on the scheduling application.
Settings - Broadcast Messages
The following Broadcast Messages settings can be configured:
• Broadcast Enable: Enables or disables showing broadcast messages on the scheduling application
• Broadcast Timeout: Sets the time, in minutes, it takes for a broadcast message to time out (Enter "0" for no timeout.)
Scheduling Advanced Click the Scheduling Advanced tab to configure demo mode settings for the scheduling application.
Settings - Scheduling Advanced
Click the Demo Mode button to enable or disable running demo mode on the scheduling application. When demo mode is enabled, the scheduling application cycles through demonstrating various application features.
Cloud Settings Click the Cloud Settings tab to configure a connection between the touch screen and the Crestron XiO Cloud service.
Settings - Cloud Settings
Click the Cloud Configuration Service Connection button to enable or disable a connection between the touch screen and the Crestron XiO Cloud service. For more information on connecting the touch screen to the Crestron XiO Cloud service, refer to the TSW-560, TSW-760, and TSW-1060 Supplemental Guide (Doc. 7927).
30 • Crestron Room Scheduling Panels Operations Guide – DOC. 8205B
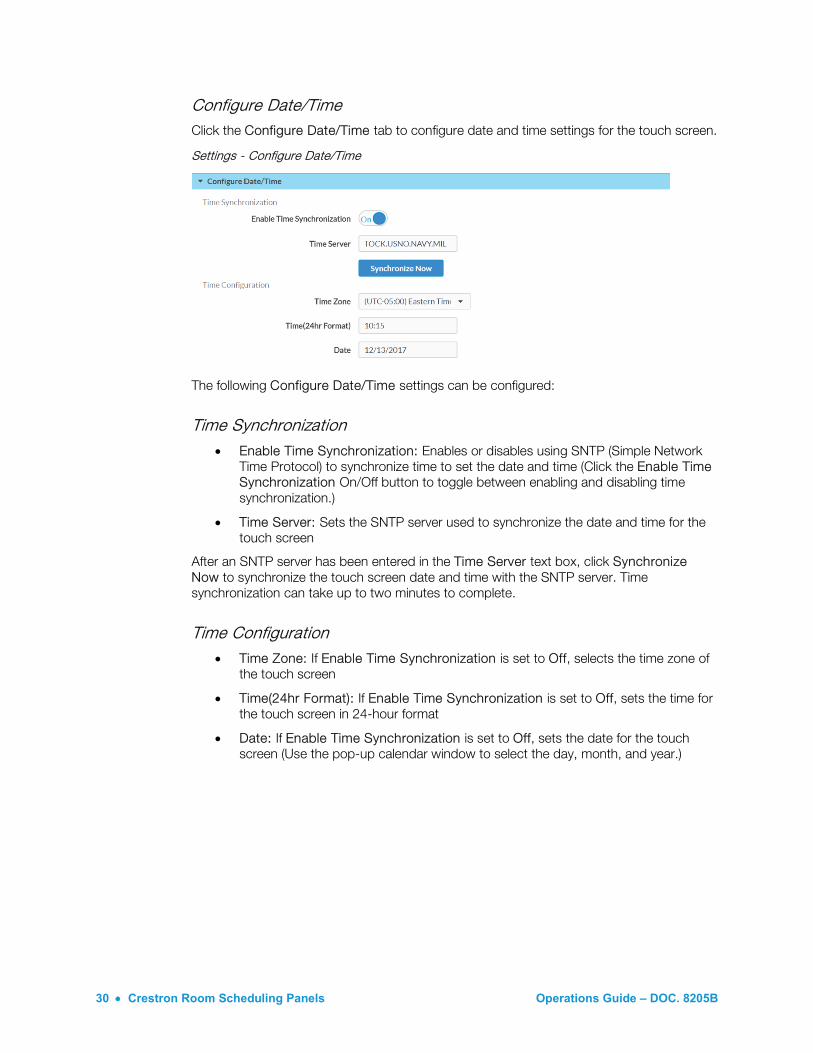
Configure Date/Time Click the Configure Date/Time tab to configure date and time settings for the touch screen.
Settings - Configure Date/Time
The following Configure Date/Time settings can be configured:
Time Synchronization • Enable Time Synchronization: Enables or disables using SNTP (Simple Network
Time Protocol) to synchronize time to set the date and time (Click the Enable Time Synchronization On/Off button to toggle between enabling and disabling time synchronization.)
• Time Server: Sets the SNTP server used to synchronize the date and time for the touch screen
After an SNTP server has been entered in the Time Server text box, click Synchronize Now to synchronize the touch screen date and time with the SNTP server. Time synchronization can take up to two minutes to complete.
Time Configuration • Time Zone: If Enable Time Synchronization is set to Off, selects the time zone of
the touch screen
• Time(24hr Format): If Enable Time Synchronization is set to Off, sets the time for the touch screen in 24-hour format
• Date: If Enable Time Synchronization is set to Off, sets the date for the touch screen (Use the pop-up calendar window to select the day, month, and year.)
Operations Guide – DOC. 8205B Crestron Room Scheduling Panels • 31
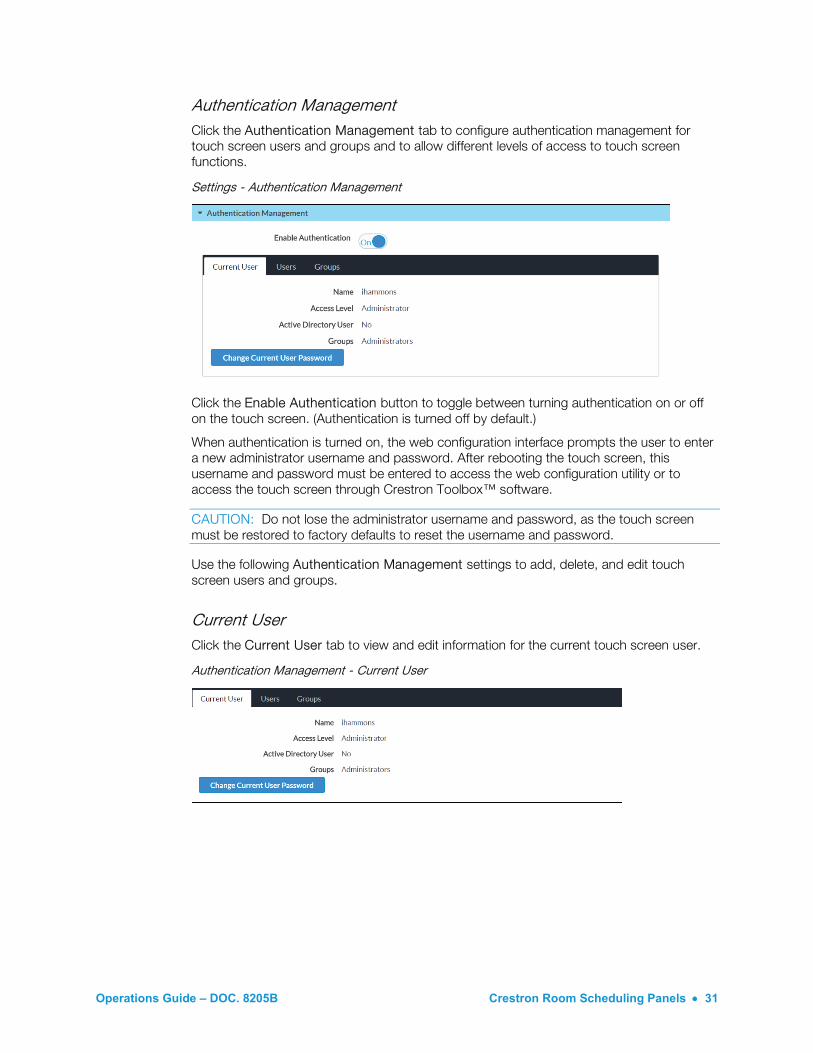
Authentication Management Click the Authentication Management tab to configure authentication management for touch screen users and groups and to allow different levels of access to touch screen functions.
Settings - Authentication Management
Click the Enable Authentication button to toggle between turning authentication on or off on the touch screen. (Authentication is turned off by default.)
When authentication is turned on, the web configuration interface prompts the user to enter a new administrator username and password. After rebooting the touch screen, this username and password must be entered to access the web configuration utility or to access the touch screen through Crestron Toolbox™ software.
CAUTION: Do not lose the administrator username and password, as the touch screen must be restored to factory defaults to reset the username and password.
Use the following Authentication Management settings to add, delete, and edit touch screen users and groups.
Current User Click the Current User tab to view and edit information for the current touch screen user.
Authentication Management - Current User
32 • Crestron Room Scheduling Panels Operations Guide – DOC. 8205B
The following settings for the current user can be viewed:
• Name: Displays the chosen username
• Access Level: Displays the access level granted to the current user (Administrator, Programmer, Operator, User, or Connect)
• Active Directory User: Displays whether the current user is authenticated using Active Directory® software.
NOTE: A user must be added to an Active Directory group to be selected as an Active Directory user. For more information, refer to "Groups" on page 36.
• Groups: Displays any groups that contain the active user
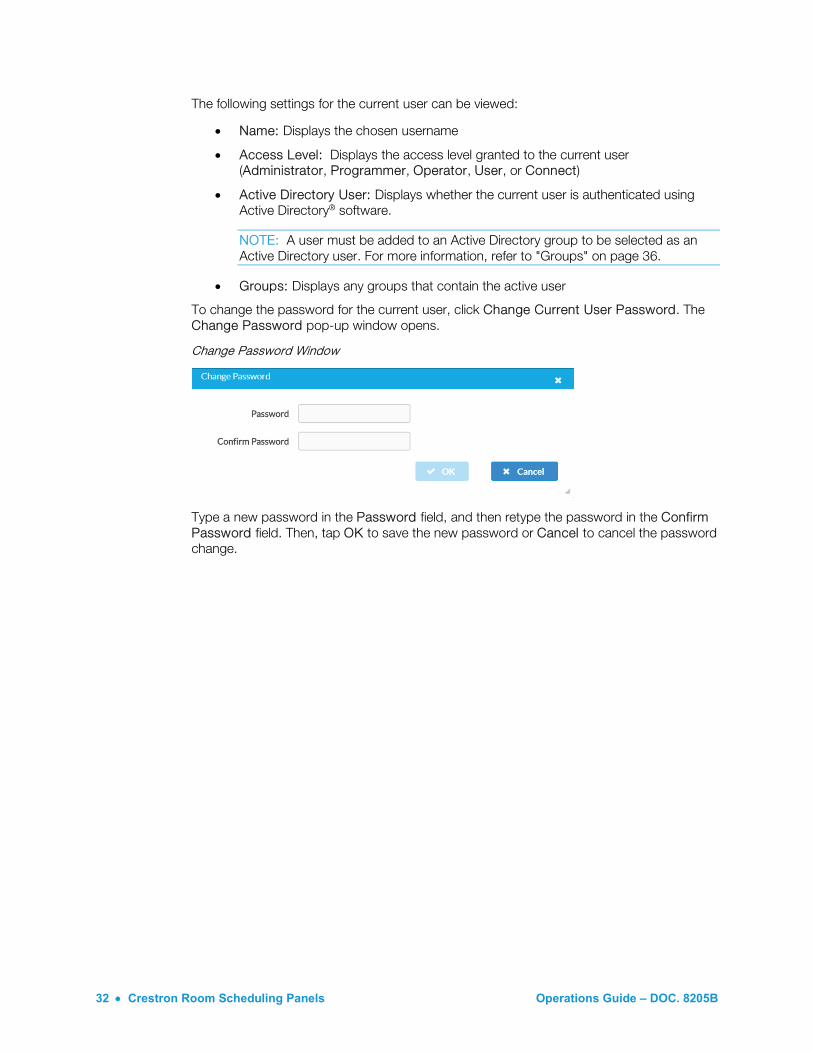
To change the password for the current user, click Change Current User Password. The Change Password pop-up window opens.
Change Password Window
Type a new password in the Password field, and then retype the password in the Confirm Password field. Then, tap OK to save the new password or Cancel to cancel the password change.
Operations Guide – DOC. 8205B Crestron Room Scheduling Panels • 33
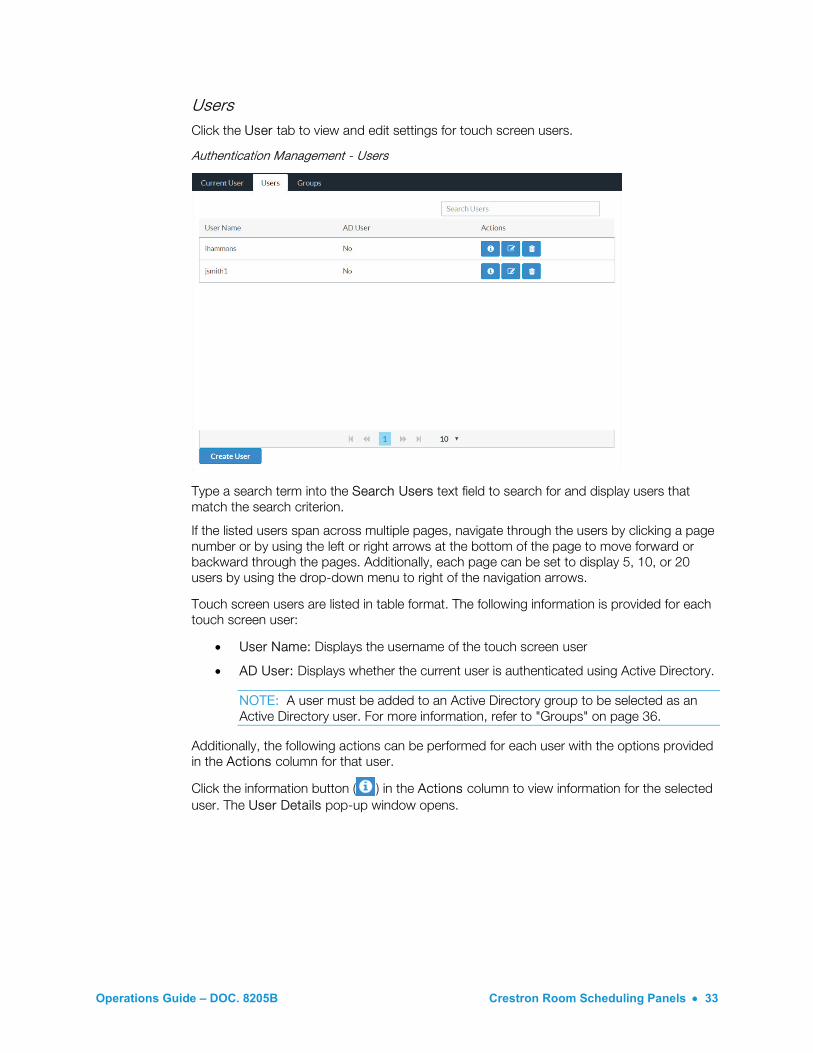
Users Click the User tab to view and edit settings for touch screen users.
Authentication Management - Users
Type a search term into the Search Users text field to search for and display users that match the search criterion.
If the listed users span across multiple pages, navigate through the users by clicking a page number or by using the left or right arrows at the bottom of the page to move forward or backward through the pages. Additionally, each page can be set to display 5, 10, or 20 users by using the drop-down menu to right of the navigation arrows.
Touch screen users are listed in table format. The following information is provided for each touch screen user:
• User Name: Displays the username of the touch screen user
• AD User: Displays whether the current user is authenticated using Active Directory.
NOTE: A user must be added to an Active Directory group to be selected as an Active Directory user. For more information, refer to "Groups" on page 36.
Additionally, the following actions can be performed for each user with the options provided in the Actions column for that user.
Click the information button ( ) in the Actions column to view information for the selected user. The User Details pop-up window opens.
34 • Crestron Room Scheduling Panels Operations Guide – DOC. 8205B
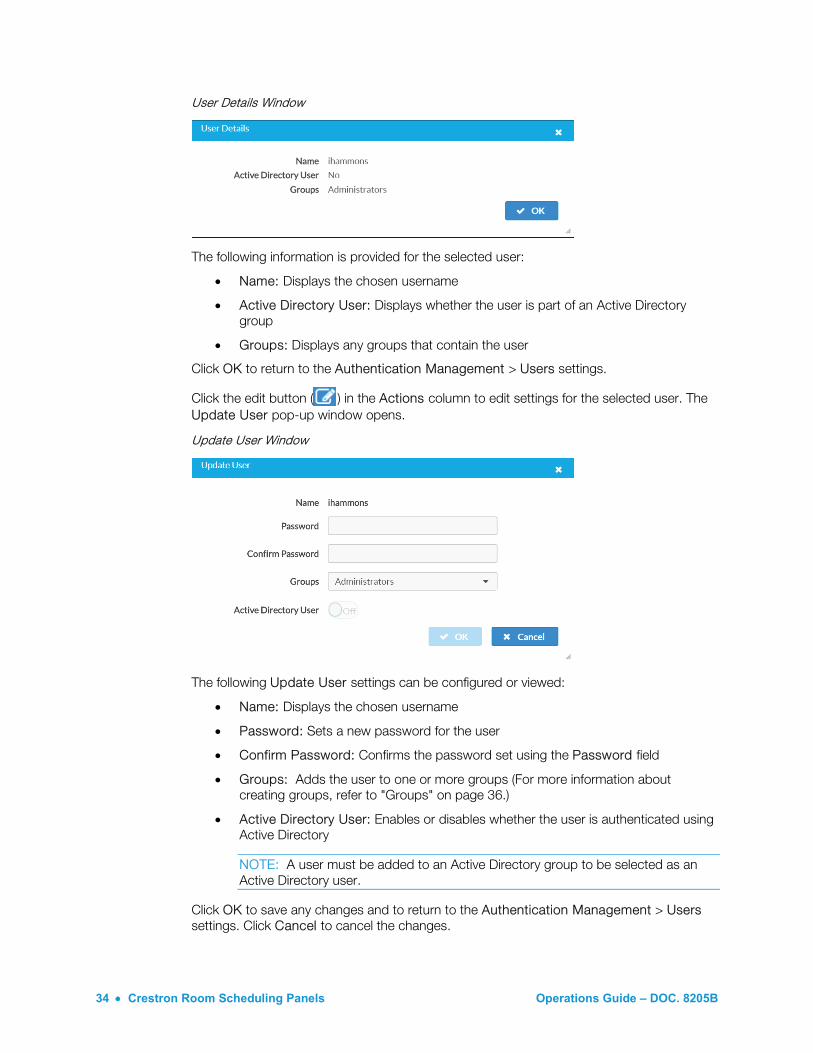
User Details Window
The following information is provided for the selected user:
• Name: Displays the chosen username
• Active Directory User: Displays whether the user is part of an Active Directory group
• Groups: Displays any groups that contain the user
Click OK to return to the Authentication Management > Users settings.
Click the edit button ( ) in the Actions column to edit settings for the selected user. The Update User pop-up window opens.
Update User Window
The following Update User settings can be configured or viewed:
• Name: Displays the chosen username
• Password: Sets a new password for the user
• Confirm Password: Confirms the password set using the Password field
• Groups: Adds the user to one or more groups (For more information about creating groups, refer to "Groups" on page 36.)
• Active Directory User: Enables or disables whether the user is authenticated using Active Directory
NOTE: A user must be added to an Active Directory group to be selected as an Active Directory user.
Click OK to save any changes and to return to the Authentication Management > Users settings. Click Cancel to cancel the changes.
Operations Guide – DOC. 8205B Crestron Room Scheduling Panels • 35
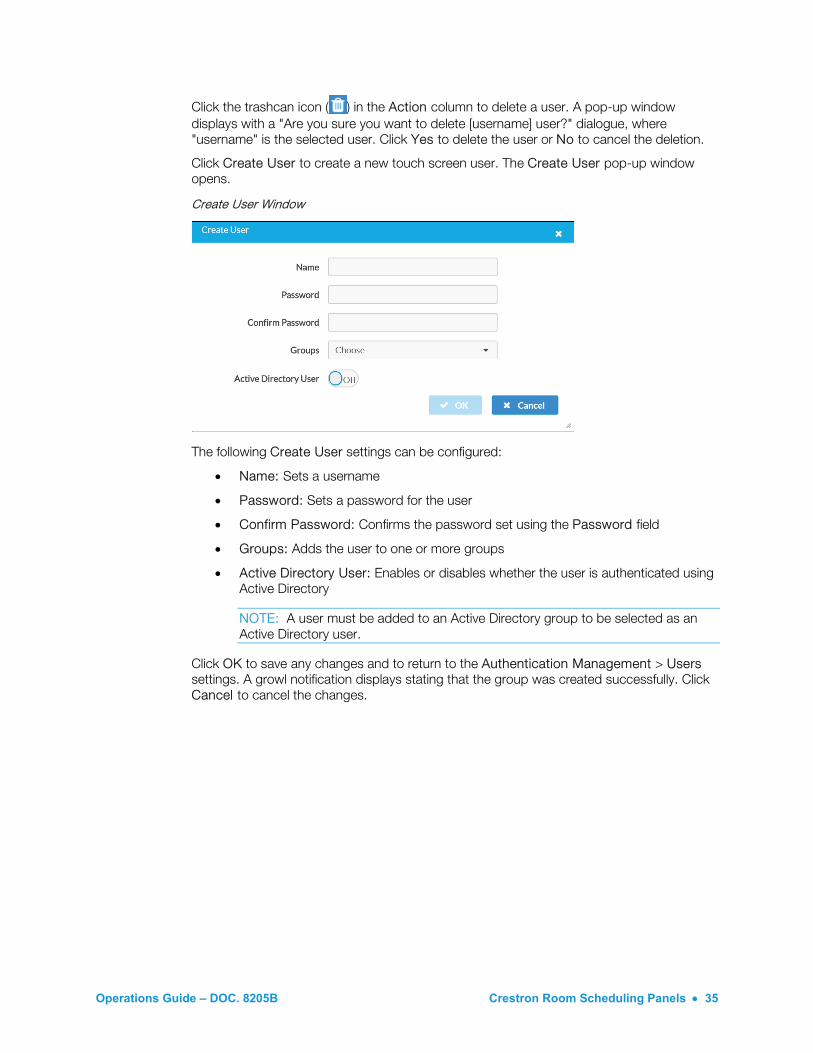
Click the trashcan icon ( ) in the Action column to delete a user. A pop-up window displays with a "Are you sure you want to delete [username] user?" dialogue, where "username" is the selected user. Click Yes to delete the user or No to cancel the deletion.
Click Create User to create a new touch screen user. The Create User pop-up window opens.
Create User Window
The following Create User settings can be configured:
• Name: Sets a username
• Password: Sets a password for the user
• Confirm Password: Confirms the password set using the Password field
• Groups: Adds the user to one or more groups
• Active Directory User: Enables or disables whether the user is authenticated using Active Directory
NOTE: A user must be added to an Active Directory group to be selected as an Active Directory user.
Click OK to save any changes and to return to the Authentication Management > Users settings. A growl notification displays stating that the group was created successfully. Click Cancel to cancel the changes.
36 • Crestron Room Scheduling Panels Operations Guide – DOC. 8205B
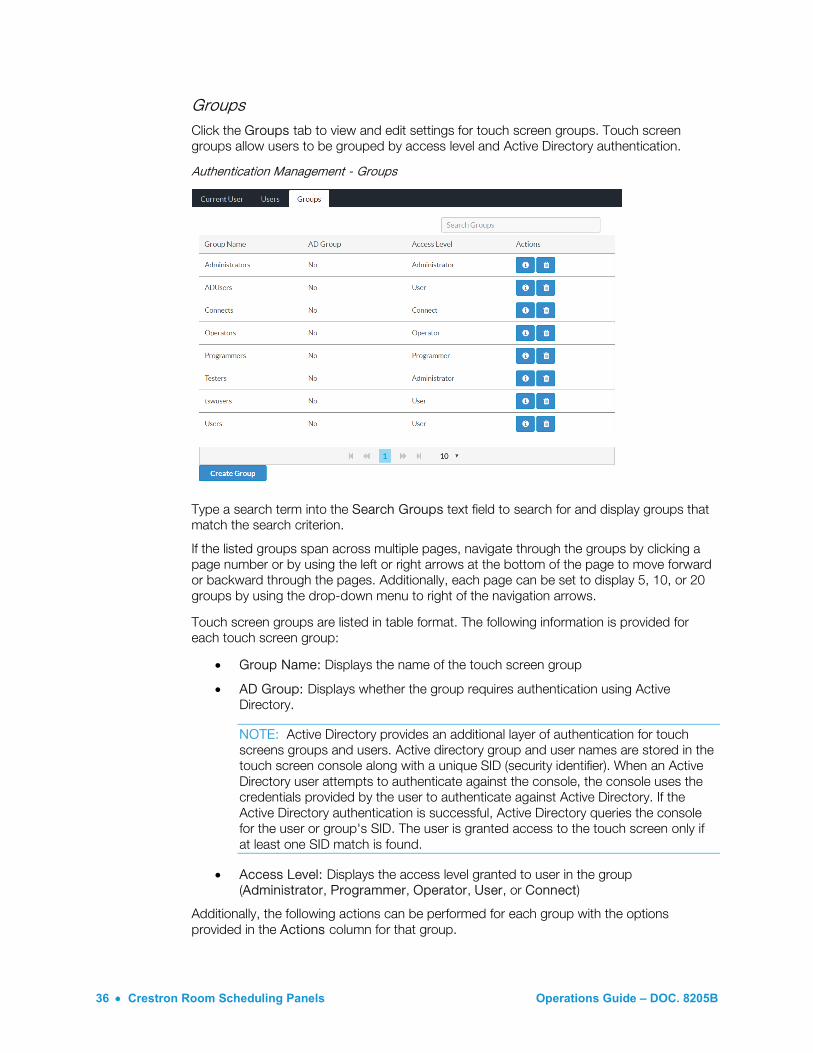
Groups Click the Groups tab to view and edit settings for touch screen groups. Touch screen groups allow users to be grouped by access level and Active Directory authentication.
Authentication Management - Groups
Type a search term into the Search Groups text field to search for and display groups that match the search criterion.
If the listed groups span across multiple pages, navigate through the groups by clicking a page number or by using the left or right arrows at the bottom of the page to move forward or backward through the pages. Additionally, each page can be set to display 5, 10, or 20 groups by using the drop-down menu to right of the navigation arrows.
Touch screen groups are listed in table format. The following information is provided for each touch screen group:
• Group Name: Displays the name of the touch screen group
• AD Group: Displays whether the group requires authentication using Active Directory.
NOTE: Active Directory provides an additional layer of authentication for touch screens groups and users. Active directory group and user names are stored in the touch screen console along with a unique SID (security identifier). When an Active Directory user attempts to authenticate against the console, the console uses the credentials provided by the user to authenticate against Active Directory. If the Active Directory authentication is successful, Active Directory queries the console for the user or group's SID. The user is granted access to the touch screen only if at least one SID match is found.
• Access Level: Displays the access level granted to user in the group (Administrator, Programmer, Operator, User, or Connect)
Additionally, the following actions can be performed for each group with the options provided in the Actions column for that group.
Operations Guide – DOC. 8205B Crestron Room Scheduling Panels • 37
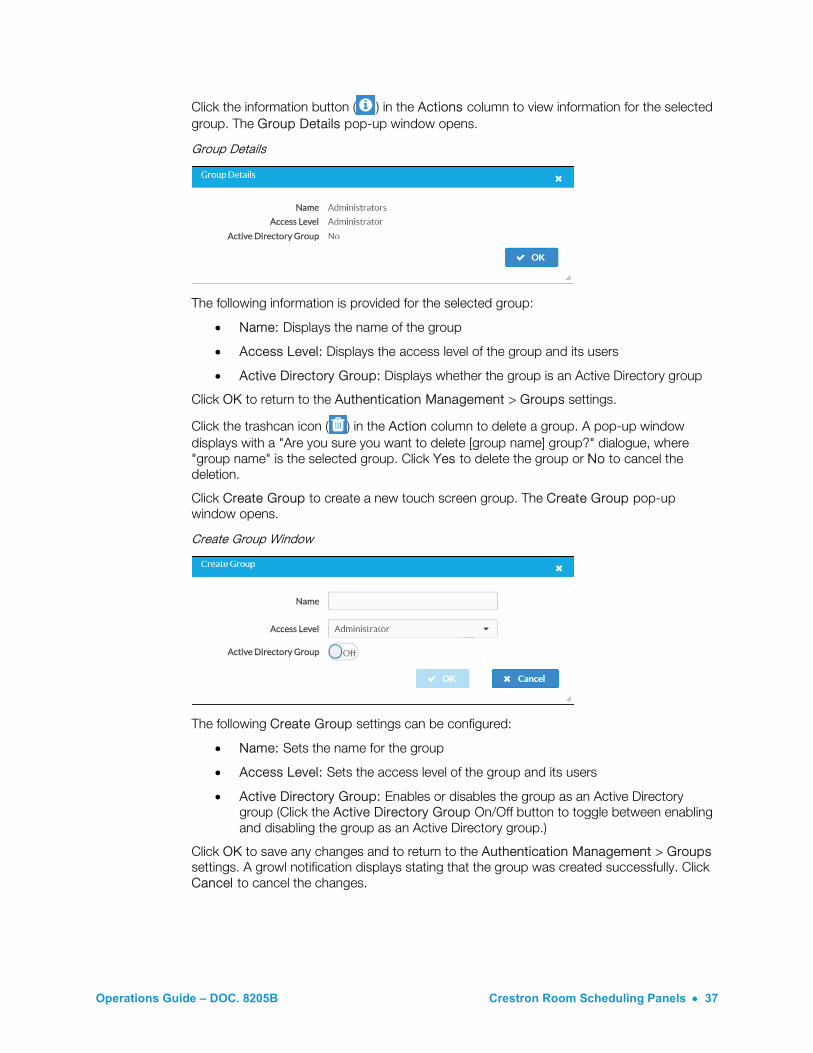
Click the information button ( ) in the Actions column to view information for the selected group. The Group Details pop-up window opens.
Group Details
The following information is provided for the selected group:
• Name: Displays the name of the group
• Access Level: Displays the access level of the group and its users
• Active Directory Group: Displays whether the group is an Active Directory group
Click OK to return to the Authentication Management > Groups settings.
Click the trashcan icon ( ) in the Action column to delete a group. A pop-up window displays with a "Are you sure you want to delete [group name] group?" dialogue, where "group name" is the selected group. Click Yes to delete the group or No to cancel the deletion.
Click Create Group to create a new touch screen group. The Create Group pop-up window opens.
Create Group Window
The following Create Group settings can be configured:
• Name: Sets the name for the group
• Access Level: Sets the access level of the group and its users
• Active Directory Group: Enables or disables the group as an Active Directory group (Click the Active Directory Group On/Off button to toggle between enabling and disabling the group as an Active Directory group.)
Click OK to save any changes and to return to the Authentication Management > Groups settings. A growl notification displays stating that the group was created successfully. Click Cancel to cancel the changes.
38 • Crestron Room Scheduling Panels Operations Guide – DOC. 8205B
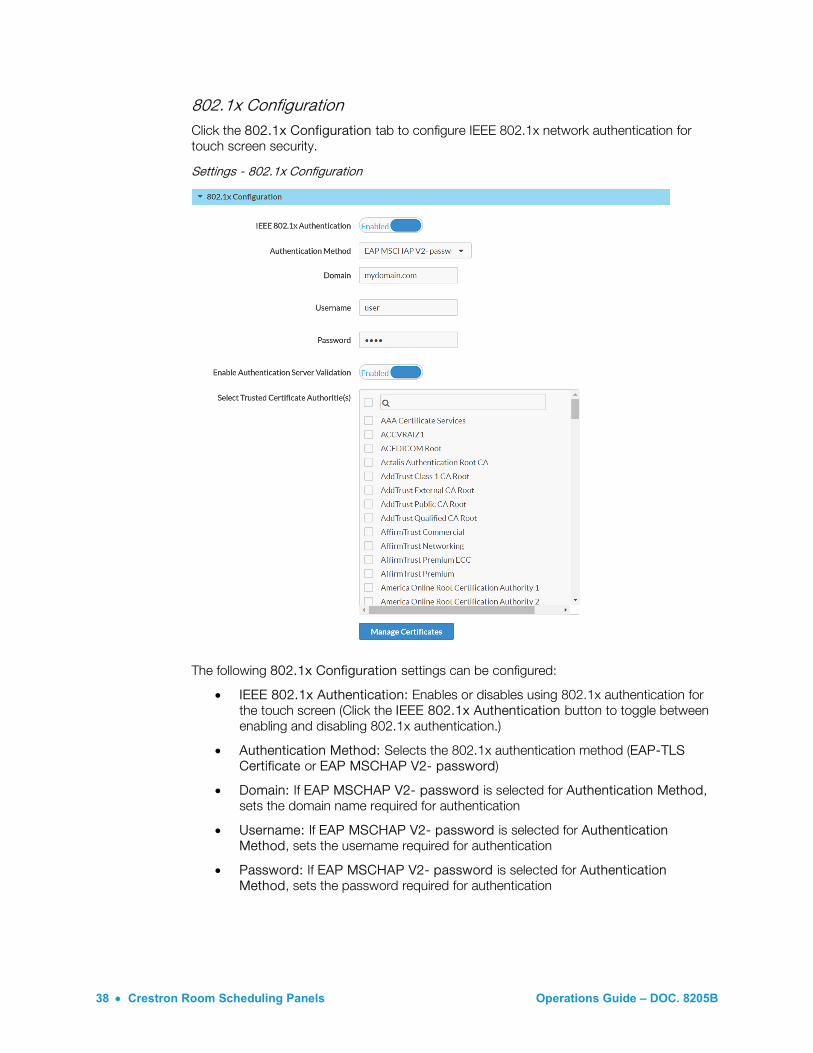
802.1x Configuration Click the 802.1x Configuration tab to configure IEEE 802.1x network authentication for touch screen security.
Settings - 802.1x Configuration
The following 802.1x Configuration settings can be configured:
• IEEE 802.1x Authentication: Enables or disables using 802.1x authentication for the touch screen (Click the IEEE 802.1x Authentication button to toggle between enabling and disabling 802.1x authentication.)
• Authentication Method: Selects the 802.1x authentication method (EAP-TLS Certificate or EAP MSCHAP V2- password)
• Domain: If EAP MSCHAP V2- password is selected for Authentication Method, sets the domain name required for authentication
• Username: If EAP MSCHAP V2- password is selected for Authentication Method, sets the username required for authentication
• Password: If EAP MSCHAP V2- password is selected for Authentication Method, sets the password required for authentication
Operations Guide – DOC. 8205B Crestron Room Scheduling Panels • 39
• Enable Authentication Server Validation: Enables or disables server validation when using 802.1x authentication for increased security (Click the Enable Authentication Server Validation button to toggle between enabling and disabling server validation.)
• Select Trusted Certificate Authoritie(s): Selects trusted CAs (Certificate Authorities) to use for server validation:
o Click the check box to the left of a CA to select it as a trusted CA.
o Type a search term into the text field at the top of the CA menu to search for and display CAs that match the search criterion.
o Click the check box to the left of the text field at the top of the CA menu to select all listed CAs as trusted CAs.
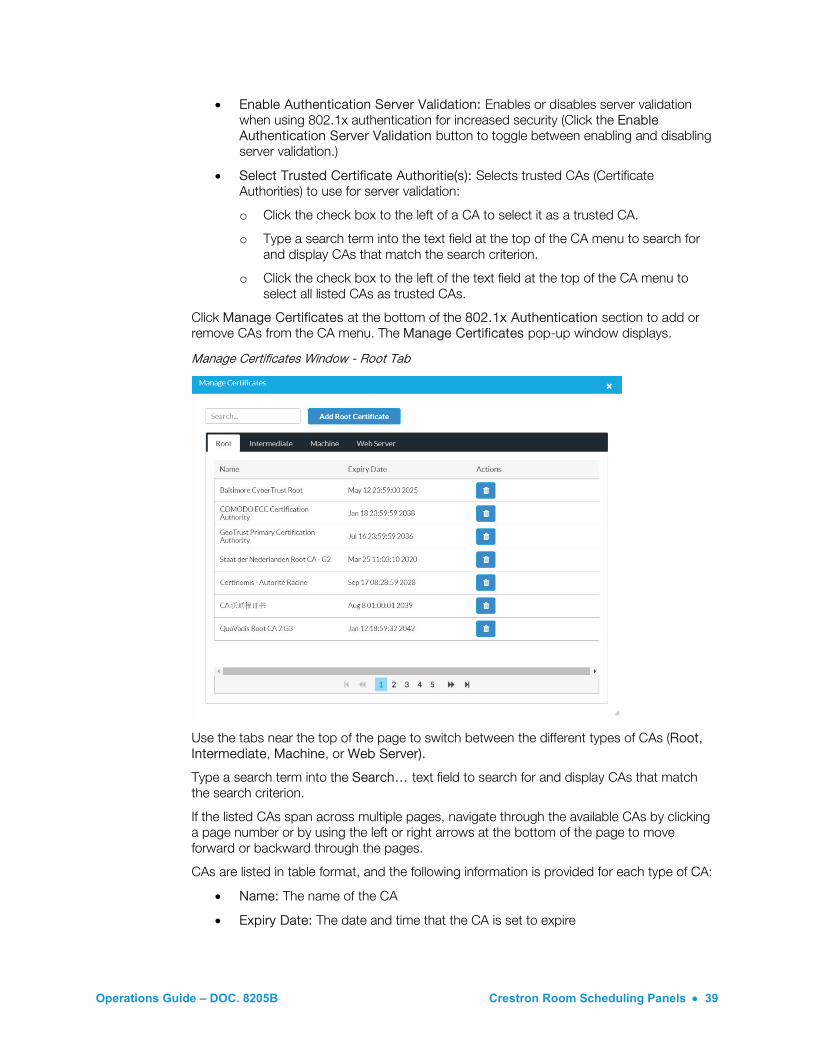
Click Manage Certificates at the bottom of the 802.1x Authentication section to add or remove CAs from the CA menu. The Manage Certificates pop-up window displays.
Manage Certificates Window - Root Tab
Use the tabs near the top of the page to switch between the different types of CAs (Root, Intermediate, Machine, or Web Server).
Type a search term into the Search… text field to search for and display CAs that match the search criterion.
If the listed CAs span across multiple pages, navigate through the available CAs by clicking a page number or by using the left or right arrows at the bottom of the page to move forward or backward through the pages.
CAs are listed in table format, and the following information is provided for each type of CA:
• Name: The name of the CA
• Expiry Date: The date and time that the CA is set to expire
40 • Crestron Room Scheduling Panels Operations Guide – DOC. 8205B
CAs can be deleted by clicking the trashcan button ( ) in the Action column of the CA menu. A pop-up window displays with a "Are you sure you want to delete this certificate? [Certificate Name]?" dialogue, where "Certificate Name" is the selected CA. Click Yes to delete the certificate or No to cancel the deletion.
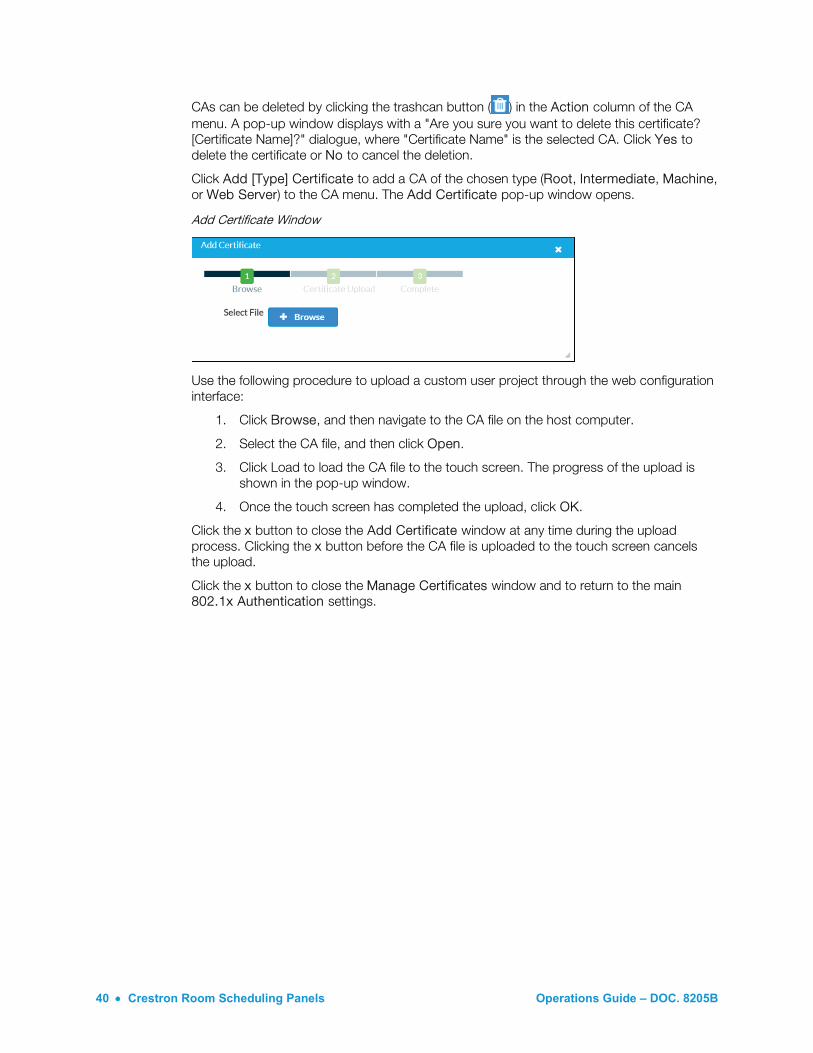
Click Add [Type] Certificate to add a CA of the chosen type (Root, Intermediate, Machine, or Web Server) to the CA menu. The Add Certificate pop-up window opens.
Add Certificate Window
Use the following procedure to upload a custom user project through the web configuration interface:
1. Click Browse, and then navigate to the CA file on the host computer.
2. Select the CA file, and then click Open.
3. Click Load to load the CA file to the touch screen. The progress of the upload is shown in the pop-up window.
4. Once the touch screen has completed the upload, click OK.
Click the x button to close the Add Certificate window at any time during the upload process. Clicking the x button before the CA file is uploaded to the touch screen cancels the upload.
Click the x button to close the Manage Certificates window and to return to the main 802.1x Authentication settings.
Operations Guide – DOC. 8205B Crestron Room Scheduling Panels • 41
Configuration via Crestron Fusion Once the scheduling application is connected to Crestron Fusion, scheduling application settings can be configured through Crestron Fusion by using custom properties.
Custom properties expand the functionality of the scheduling application, such as passing properties to the touch screen to display and announcing an emergency alert generated by Crestron Fusion. Custom properties provide information that is important to the user and that can be included in the description of the room. Custom properties that communicate settings to the device are defined for each room and are set through the Crestron Fusion Setup web client.
NOTE: Custom properties set in Crestron Fusion have precedence over settings configured using the web browser interface.
NOTE: For more information on setting up rooms and adding devices to rooms in Crestron Fusion Cloud, consult the Getting Started Guide for Adding Devices to Crestron Fusion Software (Doc. 7888) at www.crestron.com/manuals.
Adding Custom Properties to a Room The following steps assume that the scheduling application has been enabled on the touch screens and that a connection to Crestron Fusion has been established. These steps also assume that the scheduling application-enabled touch screen has already been added to the appropriate room in the Crestron Fusion server.
1. Log in to the Crestron Fusion server.
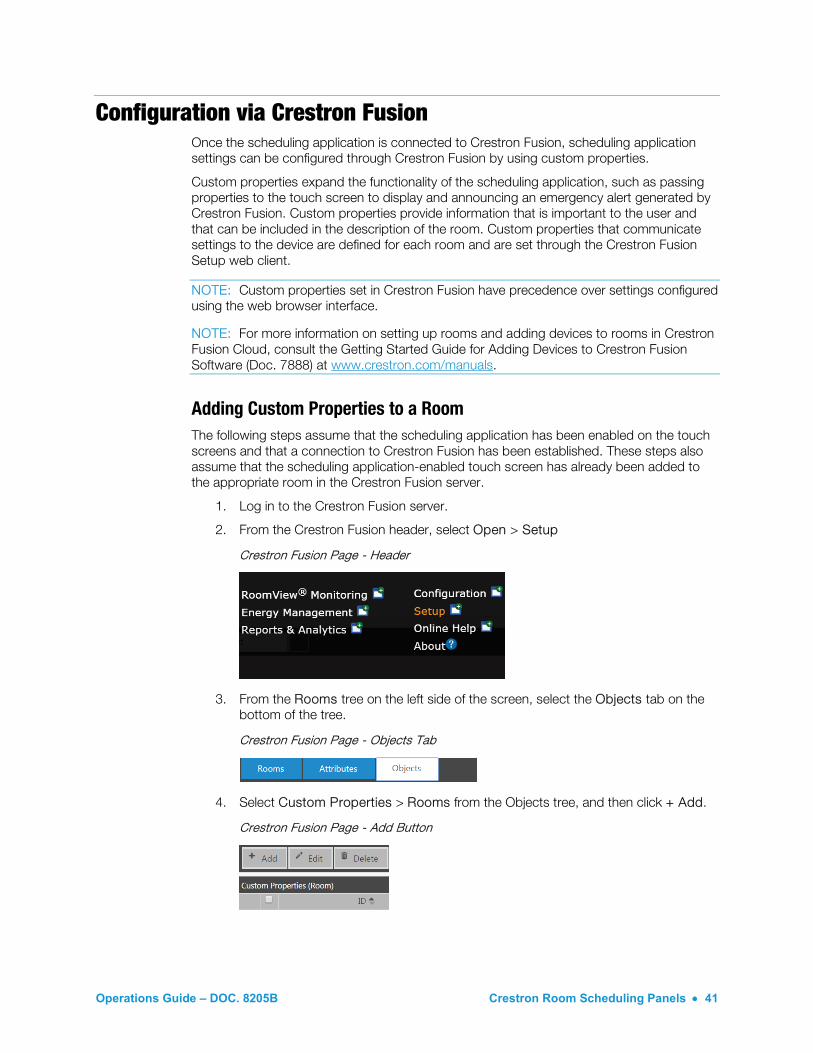
2. From the Crestron Fusion header, select Open > Setup
Crestron Fusion Page - Header
3. From the Rooms tree on the left side of the screen, select the Objects tab on the bottom of the tree.
Crestron Fusion Page - Objects Tab
4. Select Custom Properties > Rooms from the Objects tree, and then click + Add.
Crestron Fusion Page - Add Button

42 • Crestron Room Scheduling Panels Operations Guide – DOC. 8205B
5. Enter the following information for each custom property that is being added:
o ID: Enter the ID of the custom property exactly as it appears in this document.
o Name: Enter any descriptive name for the property.
o Type: Enter the custom property type (integer, string, Boolean, etc.).
o Searchable: Check this box to make the custom property searchable (optional).
Add ‐ Custom Property (Room) Window
6. Click Save & Close to save any changes. Click Close to cancel the addition.
Setting Custom Properties for the Scheduling Application After adding custom properties to the room as described in the above steps, use the Custom Property tab to configure the custom properties for the scheduling application.
1. Navigate to the Rooms tree as described in the first three steps of the "Adding Custom Properties to a Room" section above.
2. Click the Rooms tab if it is not already selected, and then click the + sign next to the root directory to expand the directory tree.
3. Double-click on the desired room to open the Edit - Room window.
4. Click the Custom Properties tab to view the available custom properties for that room.
5. To enable a custom property, either add a valid value to the appropriate text box or check the appropriate check box.
6. Click Save & Close to apply the selected properties. Click Close to cancel any changes.
Operations Guide – DOC. 8205B Crestron Room Scheduling Panels • 43
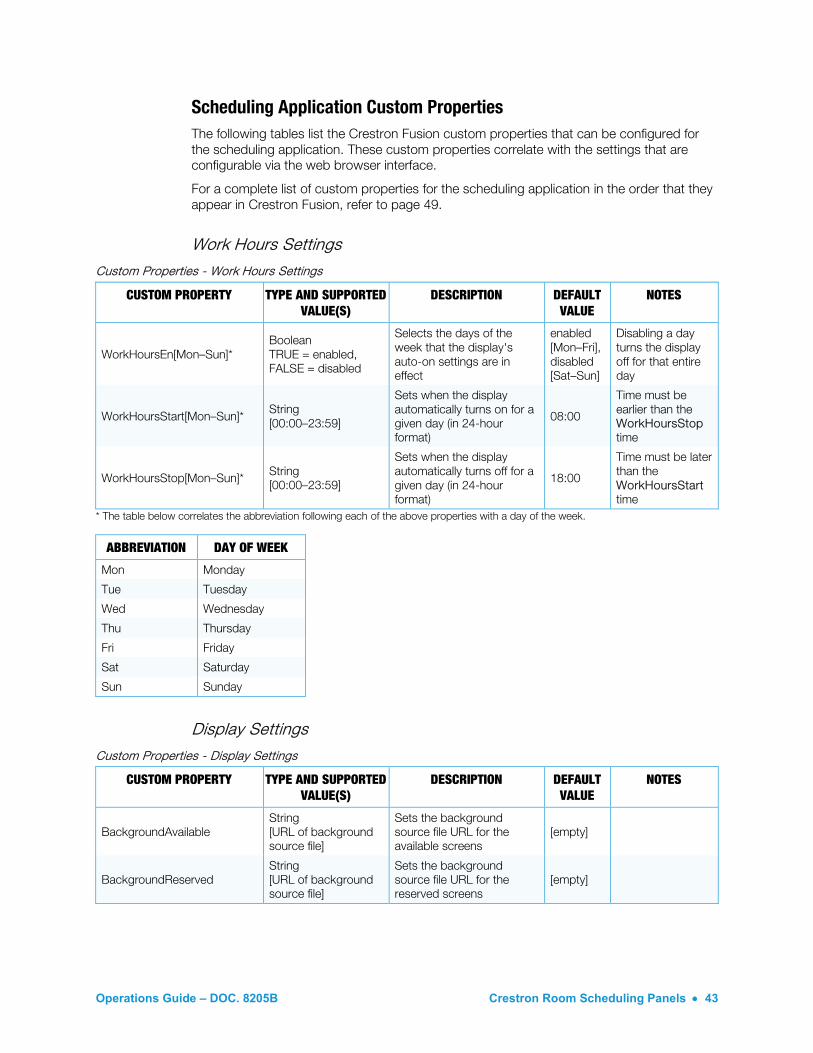
Scheduling Application Custom Properties The following tables list the Crestron Fusion custom properties that can be configured for the scheduling application. These custom properties correlate with the settings that are configurable via the web browser interface.
For a complete list of custom properties for the scheduling application in the order that they appear in Crestron Fusion, refer to page 49.
Work Hours Settings
Custom Properties - Work Hours Settings
CUSTOM PROPERTY TYPE AND SUPPORTED VALUE(S)
DESCRIPTION DEFAULT VALUE
NOTES
WorkHoursEn[Mon–Sun]* Boolean TRUE = enabled, FALSE = disabled
Selects the days of the week that the display's auto-on settings are in effect
enabled [Mon–Fri], disabled [Sat–Sun]
Disabling a day turns the display off for that entire day
WorkHoursStart[Mon–Sun]* String [00:00–23:59]
Sets when the display automatically turns on for a given day (in 24-hour format)
08:00
Time must be earlier than the WorkHoursStop time
WorkHoursStop[Mon–Sun]* String [00:00–23:59]
Sets when the display automatically turns off for a given day (in 24-hour format)
18:00
Time must be later than the WorkHoursStart time
* The table below correlates the abbreviation following each of the above properties with a day of the week.
ABBREVIATION DAY OF WEEK
Mon Monday
Tue Tuesday
Wed Wednesday
Thu Thursday
Fri Friday
Sat Saturday
Sun Sunday
Display Settings
Custom Properties - Display Settings
CUSTOM PROPERTY TYPE AND SUPPORTED VALUE(S)
DESCRIPTION DEFAULT VALUE
NOTES
BackgroundAvailable String [URL of background source file]
Sets the background source file URL for the available screens
[empty]
BackgroundReserved String [URL of background source file]
Sets the background source file URL for the reserved screens
[empty]
44 • Crestron Room Scheduling Panels Operations Guide – DOC. 8205B
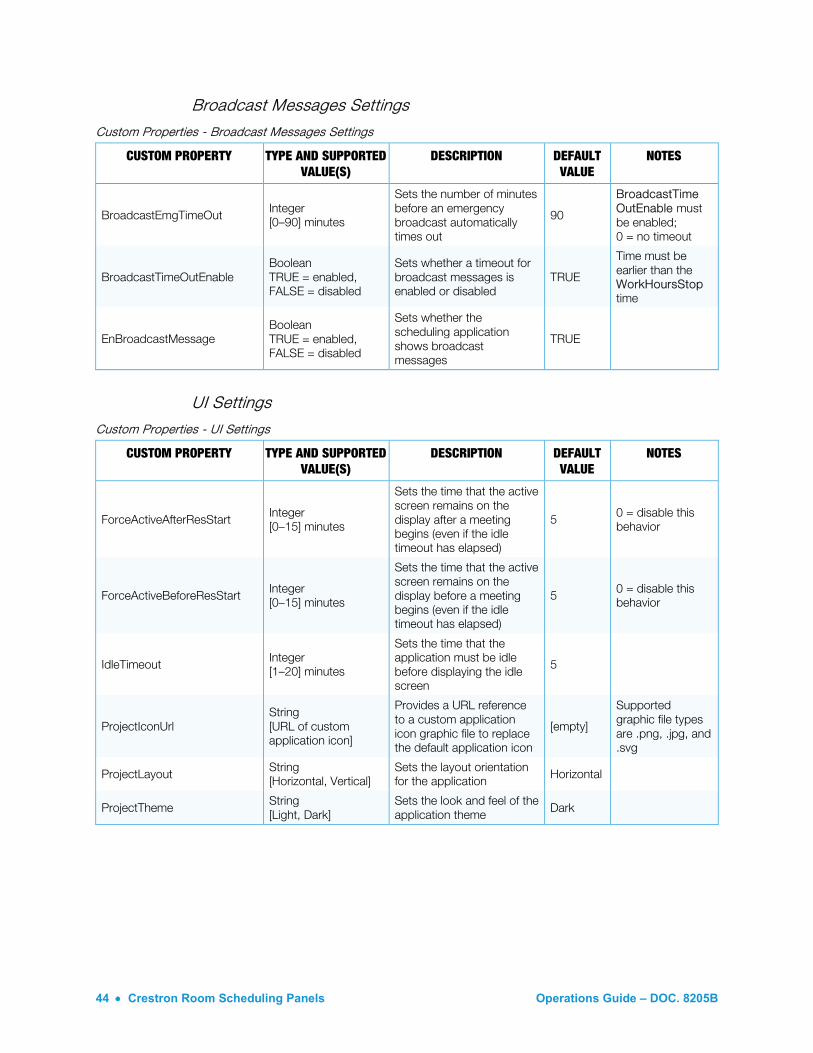
Broadcast Messages Settings
Custom Properties - Broadcast Messages Settings
CUSTOM PROPERTY TYPE AND SUPPORTED VALUE(S)
DESCRIPTION DEFAULT VALUE
NOTES
BroadcastEmgTimeOut Integer [0–90] minutes
Sets the number of minutes before an emergency broadcast automatically times out
90
BroadcastTime OutEnable must be enabled; 0 = no timeout
BroadcastTimeOutEnable Boolean TRUE = enabled, FALSE = disabled
Sets whether a timeout for broadcast messages is enabled or disabled
TRUE
Time must be earlier than the WorkHoursStop time
EnBroadcastMessage Boolean TRUE = enabled, FALSE = disabled
Sets whether the scheduling application shows broadcast messages
TRUE
UI Settings
Custom Properties - UI Settings
CUSTOM PROPERTY TYPE AND SUPPORTED VALUE(S)
DESCRIPTION DEFAULT VALUE
NOTES
ForceActiveAfterResStart Integer [0–15] minutes
Sets the time that the active screen remains on the display after a meeting begins (even if the idle timeout has elapsed)
5 0 = disable this behavior
ForceActiveBeforeResStart Integer [0–15] minutes
Sets the time that the active screen remains on the display before a meeting begins (even if the idle timeout has elapsed)
5 0 = disable this behavior
IdleTimeout Integer [1–20] minutes
Sets the time that the application must be idle before displaying the idle screen
5
ProjectIconUrl String [URL of custom application icon]
Provides a URL reference to a custom application icon graphic file to replace the default application icon
[empty]
Supported graphic file types are .png, .jpg, and .svg
ProjectLayout String [Horizontal, Vertical]
Sets the layout orientation for the application Horizontal
ProjectTheme String [Light, Dark]
Sets the look and feel of the application theme Dark
Operations Guide – DOC. 8205B Crestron Room Scheduling Panels • 45
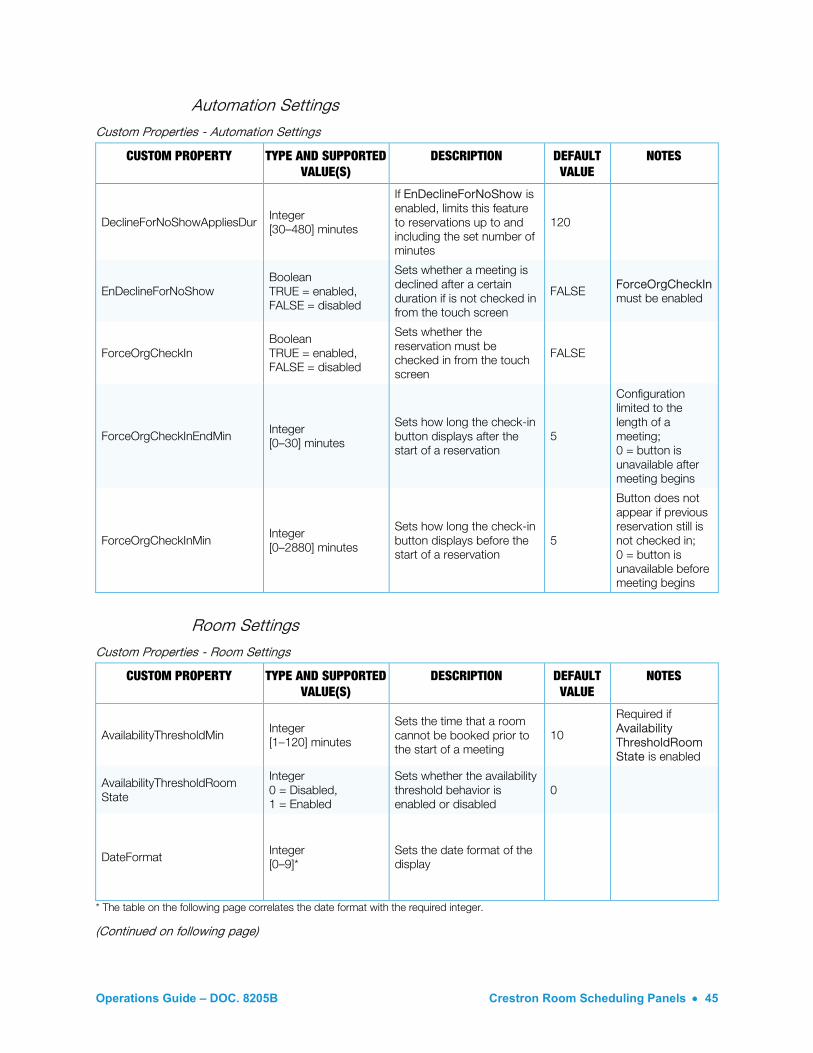
Automation Settings
Custom Properties - Automation Settings
CUSTOM PROPERTY TYPE AND SUPPORTED VALUE(S)
DESCRIPTION DEFAULT VALUE
NOTES
DeclineForNoShowAppliesDur Integer [30–480] minutes
If EnDeclineForNoShow is enabled, limits this feature to reservations up to and including the set number of minutes
120
EnDeclineForNoShow Boolean TRUE = enabled, FALSE = disabled
Sets whether a meeting is declined after a certain duration if is not checked in from the touch screen
FALSE ForceOrgCheckIn must be enabled
ForceOrgCheckIn Boolean TRUE = enabled, FALSE = disabled
Sets whether the reservation must be checked in from the touch screen
FALSE
ForceOrgCheckInEndMin Integer [0–30] minutes
Sets how long the check-in button displays after the start of a reservation
5
Configuration limited to the length of a meeting; 0 = button is unavailable after meeting begins
ForceOrgCheckInMin Integer [0–2880] minutes
Sets how long the check-in button displays before the start of a reservation
5
Button does not appear if previous reservation still is not checked in; 0 = button is unavailable before meeting begins
Room Settings
Custom Properties - Room Settings
CUSTOM PROPERTY TYPE AND SUPPORTED VALUE(S)
DESCRIPTION DEFAULT VALUE
NOTES
AvailabilityThresholdMin Integer [1–120] minutes
Sets the time that a room cannot be booked prior to the start of a meeting
10
Required if Availability ThresholdRoom State is enabled
AvailabilityThresholdRoom State
Integer 0 = Disabled, 1 = Enabled
Sets whether the availability threshold behavior is enabled or disabled
0
DateFormat Integer [0–9]*
Sets the date format of the display
* The table on the following page correlates the date format with the required integer.
(Continued on following page)
46 • Crestron Room Scheduling Panels Operations Guide – DOC. 8205B
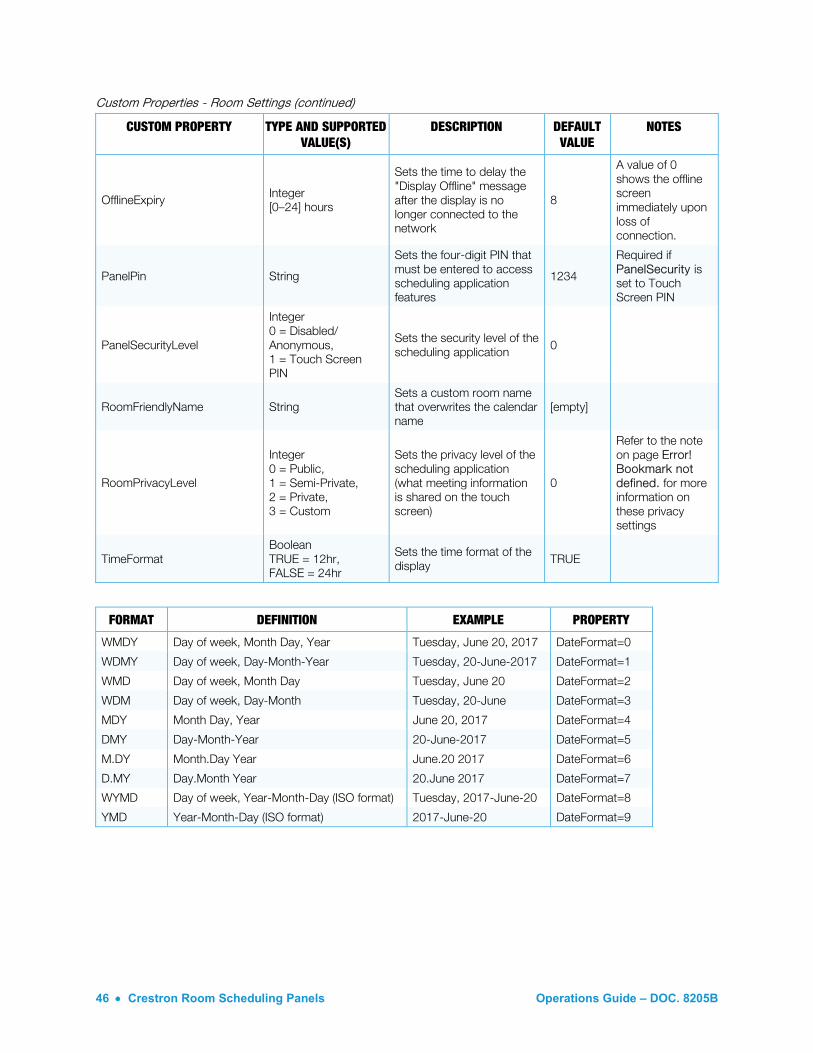
Custom Properties - Room Settings (continued)
CUSTOM PROPERTY TYPE AND SUPPORTED VALUE(S)
DESCRIPTION DEFAULT VALUE
NOTES
OfflineExpiry Integer [0–24] hours
Sets the time to delay the "Display Offline" message after the display is no longer connected to the network
8
A value of 0 shows the offline screen immediately upon loss of connection.
PanelPin String
Sets the four-digit PIN that must be entered to access scheduling application features
1234
Required if PanelSecurity is set to Touch Screen PIN
PanelSecurityLevel
Integer 0 = Disabled/ Anonymous, 1 = Touch Screen PIN
Sets the security level of the scheduling application 0
RoomFriendlyName String Sets a custom room name that overwrites the calendar name
[empty]
RoomPrivacyLevel
Integer 0 = Public, 1 = Semi-Private, 2 = Private, 3 = Custom
Sets the privacy level of the scheduling application (what meeting information is shared on the touch screen)
0
Refer to the note on page Error! Bookmark not defined. for more information on these privacy settings
TimeFormat Boolean TRUE = 12hr, FALSE = 24hr
Sets the time format of the display TRUE
FORMAT DEFINITION EXAMPLE PROPERTY
WMDY Day of week, Month Day, Year Tuesday, June 20, 2017 DateFormat=0
WDMY Day of week, Day-Month-Year Tuesday, 20-June-2017 DateFormat=1
WMD Day of week, Month Day Tuesday, June 20 DateFormat=2
WDM Day of week, Day-Month Tuesday, 20-June DateFormat=3
MDY Month Day, Year June 20, 2017 DateFormat=4
DMY Day-Month-Year 20-June-2017 DateFormat=5
M.DY Month.Day Year June.20 2017 DateFormat=6
D.MY Day.Month Year 20.June 2017 DateFormat=7
WYMD Day of week, Year-Month-Day (ISO format) Tuesday, 2017-June-20 DateFormat=8
YMD Year-Month-Day (ISO format) 2017-June-20 DateFormat=9
Operations Guide – DOC. 8205B Crestron Room Scheduling Panels • 47
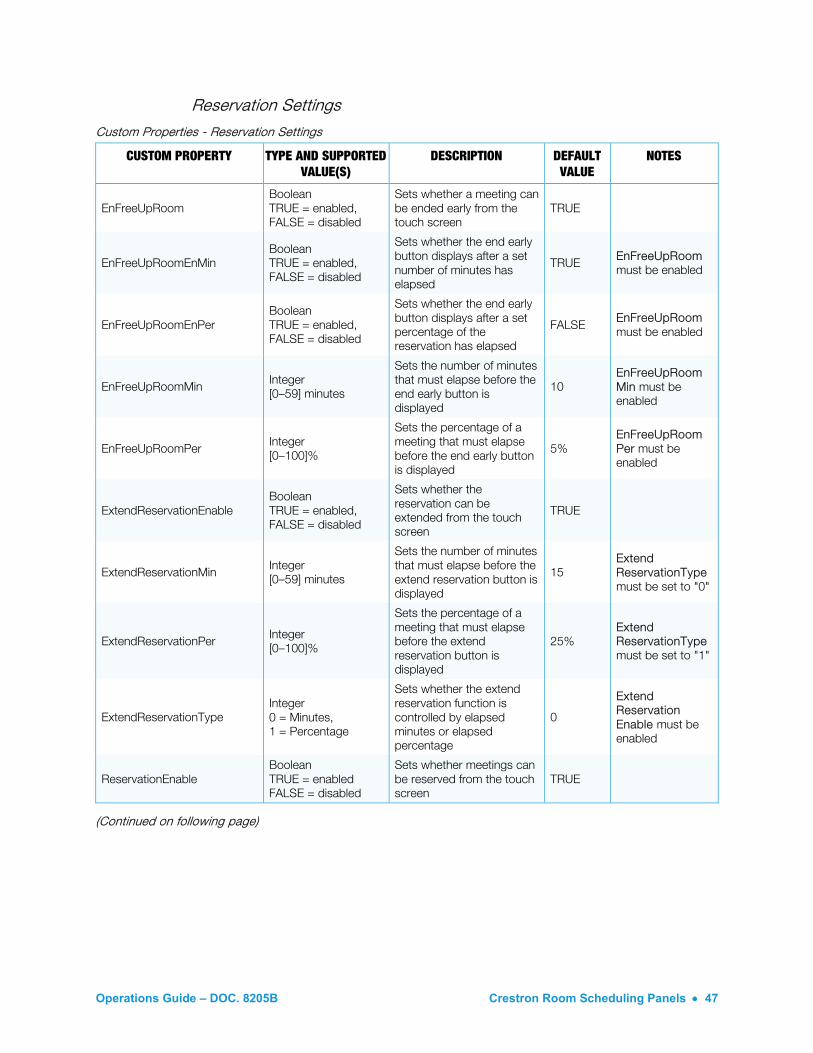
Reservation Settings
Custom Properties - Reservation Settings
CUSTOM PROPERTY TYPE AND SUPPORTED VALUE(S)
DESCRIPTION DEFAULT VALUE
NOTES
EnFreeUpRoom Boolean TRUE = enabled, FALSE = disabled
Sets whether a meeting can be ended early from the touch screen
TRUE
EnFreeUpRoomEnMin Boolean TRUE = enabled, FALSE = disabled
Sets whether the end early button displays after a set number of minutes has elapsed
TRUE EnFreeUpRoom must be enabled
EnFreeUpRoomEnPer Boolean TRUE = enabled, FALSE = disabled
Sets whether the end early button displays after a set percentage of the reservation has elapsed
FALSE EnFreeUpRoom must be enabled
EnFreeUpRoomMin Integer [0–59] minutes
Sets the number of minutes that must elapse before the end early button is displayed
10 EnFreeUpRoom Min must be enabled
EnFreeUpRoomPer Integer [0–100]%
Sets the percentage of a meeting that must elapse before the end early button is displayed
5% EnFreeUpRoom Per must be enabled
ExtendReservationEnable Boolean TRUE = enabled, FALSE = disabled
Sets whether the reservation can be extended from the touch screen
TRUE
ExtendReservationMin Integer [0–59] minutes
Sets the number of minutes that must elapse before the extend reservation button is displayed
15 Extend ReservationType must be set to "0"
ExtendReservationPer Integer [0–100]%
Sets the percentage of a meeting that must elapse before the extend reservation button is displayed
25% Extend ReservationType must be set to "1"
ExtendReservationType Integer 0 = Minutes, 1 = Percentage
Sets whether the extend reservation function is controlled by elapsed minutes or elapsed percentage
0
Extend Reservation Enable must be enabled
ReservationEnable Boolean TRUE = enabled FALSE = disabled
Sets whether meetings can be reserved from the touch screen
TRUE
(Continued on following page)
48 • Crestron Room Scheduling Panels Operations Guide – DOC. 8205B
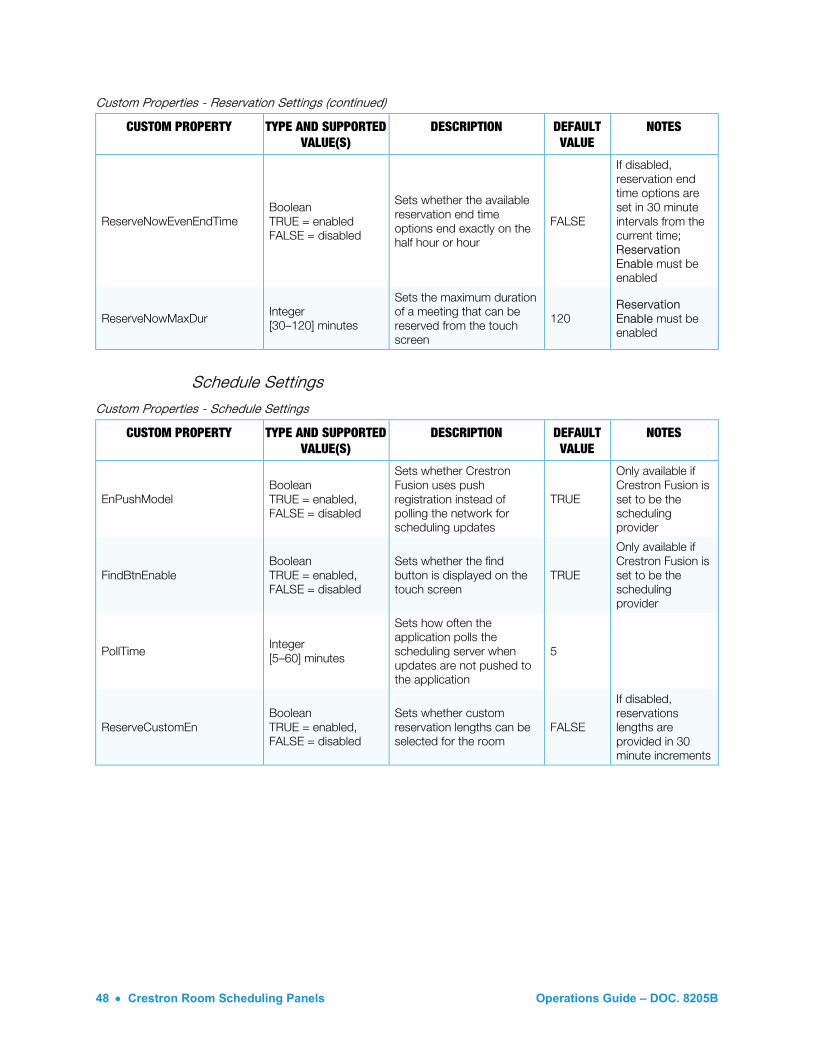
Custom Properties - Reservation Settings (continued)
CUSTOM PROPERTY TYPE AND SUPPORTED VALUE(S)
DESCRIPTION DEFAULT VALUE
NOTES
ReserveNowEvenEndTime Boolean TRUE = enabled FALSE = disabled
Sets whether the available reservation end time options end exactly on the half hour or hour
FALSE
If disabled, reservation end time options are set in 30 minute intervals from the current time; Reservation Enable must be enabled
ReserveNowMaxDur Integer [30–120] minutes
Sets the maximum duration of a meeting that can be reserved from the touch screen
120 Reservation Enable must be enabled
Schedule Settings
Custom Properties - Schedule Settings
CUSTOM PROPERTY TYPE AND SUPPORTED VALUE(S)
DESCRIPTION DEFAULT VALUE
NOTES
EnPushModel Boolean TRUE = enabled, FALSE = disabled
Sets whether Crestron Fusion uses push registration instead of polling the network for scheduling updates
TRUE
Only available if Crestron Fusion is set to be the scheduling provider
FindBtnEnable Boolean TRUE = enabled, FALSE = disabled
Sets whether the find button is displayed on the touch screen
TRUE
Only available if Crestron Fusion is set to be the scheduling provider
PollTime Integer [5–60] minutes
Sets how often the application polls the scheduling server when updates are not pushed to the application
5
ReserveCustomEn Boolean TRUE = enabled, FALSE = disabled
Sets whether custom reservation lengths can be selected for the room
FALSE
If disabled, reservations lengths are provided in 30 minute increments
Operations Guide – DOC. 8205B Crestron Room Scheduling Panels • 49
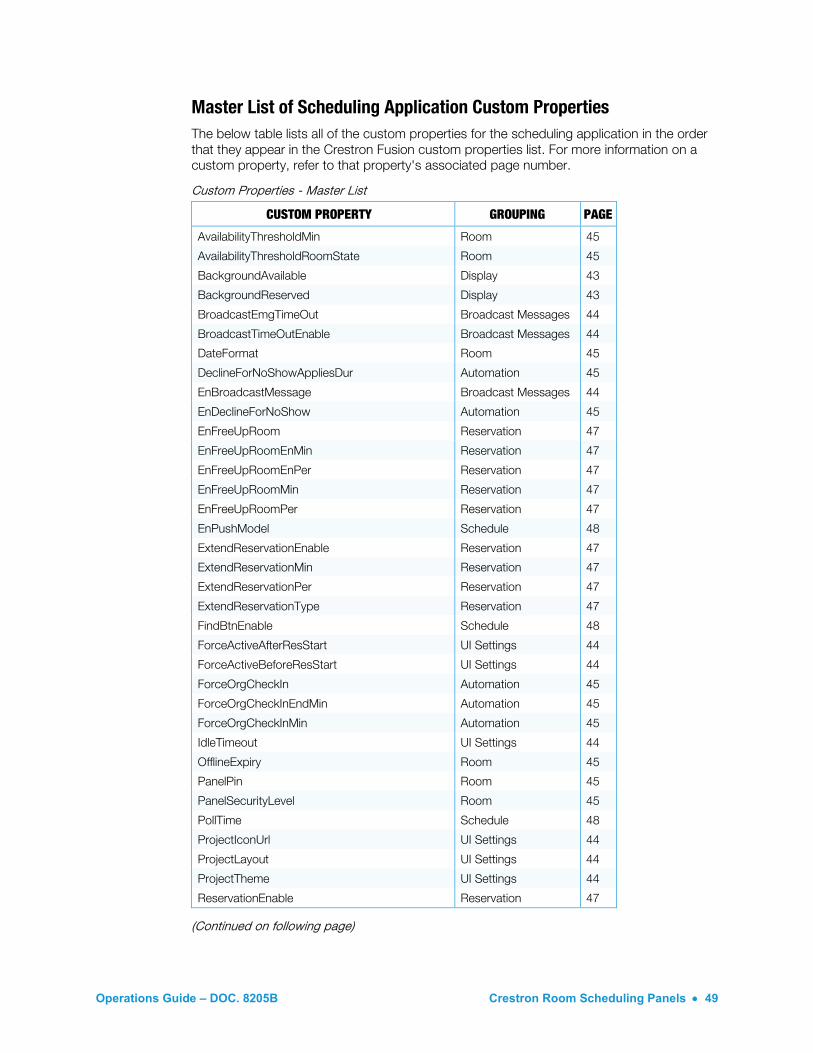
Master List of Scheduling Application Custom Properties The below table lists all of the custom properties for the scheduling application in the order that they appear in the Crestron Fusion custom properties list. For more information on a custom property, refer to that property's associated page number.
Custom Properties - Master List
CUSTOM PROPERTY GROUPING PAGE
AvailabilityThresholdMin Room 45
AvailabilityThresholdRoomState Room 45
BackgroundAvailable Display 43
BackgroundReserved Display 43
BroadcastEmgTimeOut Broadcast Messages 44
BroadcastTimeOutEnable Broadcast Messages 44
DateFormat Room 45
DeclineForNoShowAppliesDur Automation 45
EnBroadcastMessage Broadcast Messages 44
EnDeclineForNoShow Automation 45
EnFreeUpRoom Reservation 47
EnFreeUpRoomEnMin Reservation 47
EnFreeUpRoomEnPer Reservation 47
EnFreeUpRoomMin Reservation 47
EnFreeUpRoomPer Reservation 47
EnPushModel Schedule 48
ExtendReservationEnable Reservation 47
ExtendReservationMin Reservation 47
ExtendReservationPer Reservation 47
ExtendReservationType Reservation 47
FindBtnEnable Schedule 48
ForceActiveAfterResStart UI Settings 44
ForceActiveBeforeResStart UI Settings 44
ForceOrgCheckIn Automation 45
ForceOrgCheckInEndMin Automation 45
ForceOrgCheckInMin Automation 45
IdleTimeout UI Settings 44
OfflineExpiry Room 45
PanelPin Room 45
PanelSecurityLevel Room 45
PollTime Schedule 48
ProjectIconUrl UI Settings 44
ProjectLayout UI Settings 44
ProjectTheme UI Settings 44
ReservationEnable Reservation 47
(Continued on following page)
50 • Crestron Room Scheduling Panels Operations Guide – DOC. 8205B
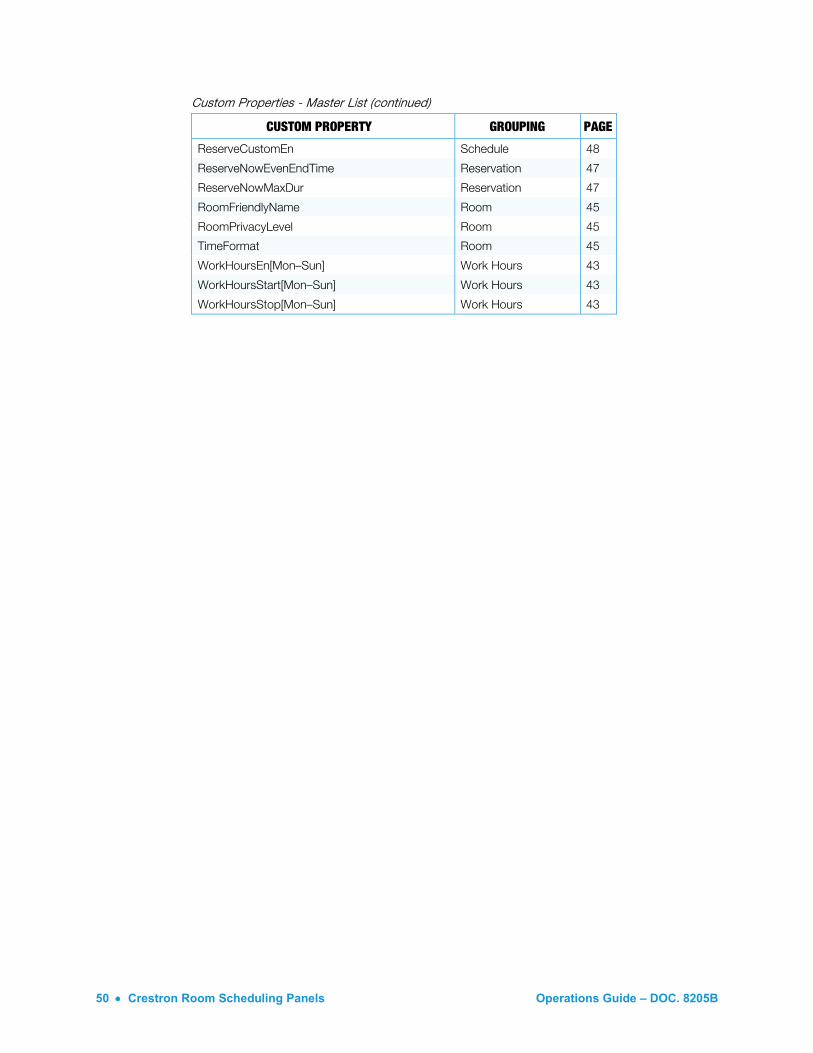
Custom Properties - Master List (continued)
CUSTOM PROPERTY GROUPING PAGE
ReserveCustomEn Schedule 48
ReserveNowEvenEndTime Reservation 47
ReserveNowMaxDur Reservation 47
RoomFriendlyName Room 45
RoomPrivacyLevel Room 45
TimeFormat Room 45
WorkHoursEn[Mon–Sun] Work Hours 43
WorkHoursStart[Mon–Sun] Work Hours 43
WorkHoursStop[Mon–Sun] Work Hours 43

Operations Guide – DOC. 8205B Crestron Room Scheduling Panels • 51
This page is intentionally left blank.

Crestron Electronics, Inc. Operations Guide – DOC. 8205B 15 Volvo Drive, Rockleigh, NJ 07647 (2049156) Tel: 888.CRESTRON 02.18 Fax: 201.767.7576 Specifications subject to www.crestron.com change without notice.
Related Documents