Version 1, 2019 Semi-automatic Rotary Microtome ZFP012 Operation Manual Semi-Automatic Microtome ZFP012

Welcome message from author
This document is posted to help you gain knowledge. Please leave a comment to let me know what you think about it! Share it to your friends and learn new things together.
Transcript

Version 1, 2019 Semi-automatic Rotary Microtome ZFP012
Operation Manual
S emi -Automa tic Microtome
ZFP012

Version 1, 2019 Semi-automatic Rotary Microtome ZFP012
Index
Please ready this manual book carefully before operator the Computer Microtome
ZFP012, and especially pay more attention to Safe Indication in Three chapter and
Warnings in other chapters.
Only eligible use can operate the machine according to the indication in this
manual. This microtome is just for tissue section of histology and pathology.
Only eligible maintenance man and professional worker can maintain the
microtome. Maintenance and service of after-service will be supply by our service
department.
Because of the improvement of technical and knowledge, we have the right to
make improvement of technology upon of this one.
There is specification, publication Date and Registration Number in the
nameplate in the back of machine.
Word explanation:
“ Warning” ---- if violate it, there will be an sever accident and it will hurt the
machine or user badly.
“Attention” --- if violate, the operation will be error and not work continually,
even will be hurt the machine.
“Indication” ---- remain to the best proposal of operation, more detailed
explanation of the function, or more accessories.
Registration Number :
Publication Date :
All information data, indication and
explanation in this manual consist of
normal scientific knowledge and
craftwork technology .

Version 1, 2019 Semi-automatic Rotary Microtome ZFP012
Contents Index………………………………………………………………………………….1
Contents ………………………………………………………………………………2
1. General description……………………………………………………………… 3
2. Main technical parameters………………………………………………………..4
3. Unpacking and installment………………………………………………………..4
Installment the microtome ……………………………………………………...4
Requirement for Site…………………………………………………………..4
Installment of waste tray………………………………………………………5
Installment of handwheel……………………………………………………...5
4. Safe indication of operating the microtome……………………………………….5
5. Illustration the microtome ………………………………………………………...7
6. The Specimen Orienting System…………………………………………………..8
7. Knife carrier’s Fixing System……………………………………………………..8
Installment of knife carrier ……………………………………………………..8
Adjust section angle…………………………………………………………….9
Knife carrier’s Safe System…………………………………………………….9
8. Function induction of LCD and control panel…..……………………………….10
9. Operation…………………………………………………………………………11
Switch on..………………………………………………………………………11
Fixing the specimen…………………………………………………………...11
Fixing the knife carrier………………………………………………………...11
Fast forward and backward …………………………………………………...11
Trimming ……………………………………………………………………...11
Section…………………………………………………………………………12
Position of specimen clamp……………………………………………………12
Auto “sleep” protection function ………………………………………….......12
10. Cleaning and daily maintenance………………………………………………….13
Shut down the microtome…………………………………………………...13
Cleaning ……………………………………………………………………13
11. Problems and Solution…………………………………………………………...14
12. Store and Transportation ………………………………………………………...15
13. Packing list …………………………………………………………………… 15
14. Maintenance and After-service…………………………………………………..15

Version 1, 2019 Semi-automatic Rotary Microtome ZFP012
1. General description:
Thank you for your choice of Semi-Automatic Rotary Microtome (Touch Screen
Model).
The ZFP012 Semi-Automatic Microtome is used widely for routine and
laboratory section in hospitals, medical colleges, Animal and Plant Quarantine,
medical jurisprudence inspection departments and Scientific research units. It is used
for slicing different thickness specimen section for pathological diagnosis.
The microtome integrates the distillate of technology of our company, adopts
advanced design idea in the world. Its main components are imported from
reputed manufacturers in the world. No matter setting program is easy or the
rotation of the handwheel is light, which greatly reduces the labor’s intensity in the
section job.
Our unique design of the specimen clamp that can be adjust the angle
arbitrarily. Precision Roller Cross Guide and Step Motor Driver System are available
with sustained lubricating and automatic adjustment. There is not need of adding oil
and maintenance, etc.
The microtome lives up to that standard in a unique manner: stable
performance, easy operation and exemplary comfort and safety standards
characterize as much as the comfortable level of the working surface and the
ergonomic design.
Its main functions: “fast forward “fast backward”, section and trimming
thickness adjustable freely between 1~100um, auto sleep protection, etc.
Touch screen:Section and trimming thickness
Section counter
Stroke position/distance

Version 1, 2019 Semi-automatic Rotary Microtome ZFP012
2. Main technical parameters:
Section thickness range: 1-100μm
Trimming thickness range: 1-100μm
Specimen retraction 12 μm
Max. Horizontal dislocation of specimen stroke: 20mm
Max. Vertical displacement of specimen stroke: 60mm
Min. section thickness gradual value: 1μm
Min. trimming thickness gradual value: 1μm
Section precision: ±10℅
Max. size of specimen section 50×45mm
Overall dimension: (L)500×(W)420×(H)310mm
Wet weight: 32kg
Gross weight: 38kg
Environmental temperature: 10℃~~40℃
3.Unpacking and Installation:
Please check the weather Tip-n-Tell indicators on the outside of the carton box is
upon or not. Make sure it is upon.
Cut off the plastic bands on the outside of carton.
Take out the accessory box and the instruction manual.
Remove the around foam packing.
3.1 Installing the instrument:
Place the instrument on a stable laboratory table,
with back away from the wall about 150mm.
3.2 Requirement for site:
The installation site must meet the following requirements:
-Stable, vibration-free laboratory table
-Vibration-free floor
-room temperature always between+10℃~+40℃.
Do not carry the instrument with the
handle of the handwheel, or Blade
Carrier device.

Version 1, 2019 Semi-automatic Rotary Microtome ZFP012
3.3 Section waste tray:
3.4 Installment of handwheel
3.4 Installment of the hand wheel
Make sure the axis of hand wheel is in the axis hole of the hand wheel. then fix the
screw with the inner hexagon spanner.
4.Safety instruction for operating the instrument:
Safety devices (Spanner)
Insert the section waste tray
as the figure indicates.
The spindle in the handwheel
should be insert to the hole in the
machine. Especially the small bolt
must be inset the small hole. Then
tight the screw with inner hexagon
spanner in the toolbox.
The safety devices on the instrument
and accessory equipment must not be
removed or revised!
Safety device of the handwheel: the
locking system: the spanner controls the
handwheel, lock the handwheel at any
position of rotation.

Version 1, 2019 Semi-automatic Rotary Microtome ZFP012
The handwheel can be locked in any direction with the locking spanner. The locking
spanner can be set on the locked or released position on the right side of the base.
Inspection:Push the locking spanner backside until the handwheel be locked and
can’t rotate.
Release action:Push the locking spanner to the front side, and the handwheel can
rotate again.
Prior to manipulating or changing
the specimen or knife (Blade), and
during breaks, it must always cover
the cutting edge with the knife
(Blade) guard!
Every Knife (Blade) carrier has different
shape Knife (Blade) guard(1) that allows
to cover the cutting edge completely. Turn
over the knife (Blade) guard handle(2)to
cover the knife (Blade) edge.
Do lock the handwheel prior to manipulating or
changing the specimen or knife.

Version 1, 2019 Semi-automatic Rotary Microtome ZFP012
5.Illustration of Microtome
1.Knife (Blade) carrier 2. Specimen clamp 3. Handwheel 4.Waste tray 5.Touch
Screen Panel 6.Cover 7.The lock spanner of handwheel 8.Fuse 9.Power
connection 10.Power switch 11.Fan

Version 1, 2019 Semi-automatic Rotary Microtome ZFP012
6. The specimen Orienting system:
The specimen orienting system consists of specimen clamp and angle adjusting
device. The specimen clamp can be adjusted right and left or up and down to obtain
the best slicing angle.
1 Springs screw 2 lock spanner for clamp 3 screw for controlling size of clamp
4. specimen clamp 5 screw for left and right 6 screw for up and down
Attention :The specimen clamping system has been installed and adjusted
appropriately. Users don’t need to dismount and adjust by himself.
7. Knife carrier’s Fixing System
7.1 Installment of the knife carrier:
1) Rotate and release the fixing spanner ( 1 ) of the knife carrier base, push the
carrier base forward along with Rail ( 3 ) in the machine .Then lock the fixing spanner
and fix knife carrier base.
2) Rotate and release the fixing spanner (2 ) of knife carrier .
3) The locking block (4 ) of the knife carrier base enter the T shape tray of the
knife carrier.
4) Rotary and lock the fixing spanner (2 ) of knife carrier to lock the knife carrier .
Version 1, 2019 Semi-automatic Rotary Microtome ZFP012
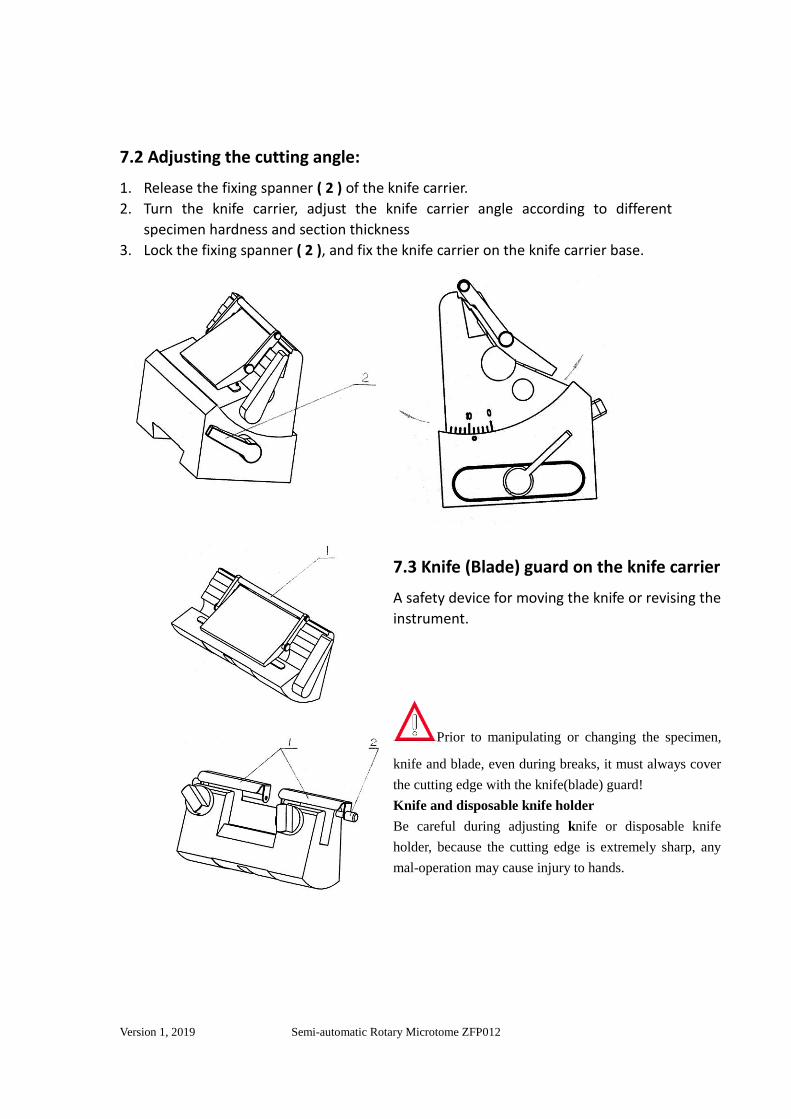
7.2 Adjusting the cutting angle:
1. Release the fixing spanner ( 2 ) of the knife carrier.
2. Turn the knife carrier, adjust the knife carrier angle according to different
specimen hardness and section thickness
3. Lock the fixing spanner ( 2 ), and fix the knife carrier on the knife carrier base.
7.3 Knife (Blade) guard on the knife carrier
A safety device for moving the knife or revising the
instrument.
Prior to manipulating or changing the specimen,
knife and blade, even during breaks, it must always cover
the cutting edge with the knife(blade) guard!
Knife and disposable knife holder
Be careful during adjusting knife or disposable knife
holder, because the cutting edge is extremely sharp, any
mal-operation may cause injury to hands.

Version 1, 2019 Semi-automatic Rotary Microtome ZFP012
8. Functions induction of the Touch Screen Control Panel
Touch Screen Panel: Show the Stroke Distance, Counter, Show or Set Trimming
Thickness, Section Thickness
“TRIM” button: Press this button to select trimming model, cursor flicker in the
thickness value, adjust thickness by pressing the “FF“ button or “FB “button
“SECT” button: Press this button to select section model, cursor flicker in the
thickness value, adjust thickness by pressing the “FF“ button or “FB “button
“ FF” button:Press this key to let specimen clamp to move fast forward .if under
Section or Trimming model ,Press this button to increase the thickness when
cursor flickering in the thickness value .
“ FB” button:Press this key to let specimen clamp to move fast draw-back. if under
Section or Trimming model, Press this button to decrease the thickness when
cursor flickering in the thickness value .

Version 1, 2019 Semi-automatic Rotary Microtome ZFP012
9.Operation
9.1 Switch on
Ensure that the instrument is laid steadily on a firm and solid testing table.
Insert the power cord plug in the input socket on the rear cover board, and then
connect through the 220V main power supply.
Turn on the general power switch, the power switch and screen light up, and the
specimen clamp resets fast.
9.2 Fixing the specimen
Rotate the handwheel till the specimen clamp is hoisted to the highest position,
and lock the handwheel. Loose the specimen clamp and mounting the specimen
tissue and fix it.
9.3 Fixing the knife or disposal blade
Insert the blade into the knife(blade) carrier and fix.
Adjust the appropriate knife angle.
Release the fixing spanner of the knife(blade) carrier base.
Approach the knife(blade) holder to the specimen as close as possible.
Lock the fixing spanner, and the knife(blade) carrier.
Rotate the handwheel to make the specimen and knife edge on the same height.
!Be careful when changing the knife or disposable blades, the cutting edge
is extremely sharp, or will cause injury to hands! Be extremely careful when
manipulating the knife, because the cutting edge is extremely sharp, any
mal-operation may cause severe injury. In any case, do not touch the falling knife
with your naked hand!
Do not lay the knife with the edge upside. If not in use, keep the knife in the knife
box!
Always lock the handwheel prior to manipulating or changing the specimen or knife,
even during breaks.
Indication: We provide various permanent knife carriers and disposable blade
holder for your option.
9.4 Fast forward or backward:
Press the”FF” button or “FB” button; the specimen clamp can fast forward or
backward. After it reached the appropriate distance, release the specimen clamp
spanner. Rotating the Angle adjusting handle, accordingly, can adjust the parallel
between the specimen and knife right and left or up and down. At the same time,
rotate the handwheel slowly to reach a better angle. Lock the specimen clamp spanner
to fix the specimen clamp.
Indication: It will alarm as bees hum when it forward or backward to the limit.

Version 1, 2019 Semi-automatic Rotary Microtome ZFP012
9.5 Trimming:
Press “Mode” button show trimming thickness “TRIM:00μm”. Cursor flickering in
the thickness value, Press “FF” or “FB” to adjust the thickness until a satisfactory
thickness. wait seconds until cursor stop flickering, rotate the handwheel to do
trimming section.
After section trimming, the surface of the specimen should be clean and smooth,
Rotate the handwheel clockwise till dispose the specimen clamp in the highest
position, and at this time, the specimen is in a status for section.
9.6 Section:
Press “Mode” button to display the section thickness “section thickness 00μm”,
Cursor flickering in the thickness value, Press “FF” or “FB” to adjust the thickness
until a satisfactory thickness. for example, screen displays “SECT 03μm, COUNT00”,
wait seconds until cursor stop flickering, rotate the handwheel to do trimming
section and auto-counting at the same time.
if need to trim the specimen when section, just to press “MODE” to change
Rotate the handwheel for a complete circle for each section. The best section
way is to rotate the handwheel clockwise from the starting point to the starting point
evenly. If the handwheel is rotated too fast, it will compress the specimen, and cause
tissue sticking.
After section, rotate the handwheel to the starting position, and lock the
handwheel.
Indication: it will auto-store the section thickness and account number , so you
do not need to set the program again.
9.7 Position of specimen clamp
” FEED mm” and schematic show the screen remind the operator to notice the
distance limit of the specimen clamp movement. If the specimen clamp moves to the
distance limit,it can’t feed the knife. Press the “ FB” button to reset.
Attention :handwheel rotation should be even, and the rotation speed should be
compatible with the specimen hardness. When slicing hard specimen, the speed
should be more slowly
Attention :During the section, if manipulated fast forward, fast backward,
trimming, or section thickness alteration, etc, should press the “MODE” button,
otherwise, the handwheel can’t feed the knife automatically.
9.8 “Auto-sleep” protection function
After booting, if don’t work for a long time, the instrument will enter
“auto-sleep” protection status. The display screen darkness touch the screen when
needed, and resume to work.
Indication:
After termination, the power supply should be closed, otherwise, the instrument will
in protection status for a lone time, which will speed the aging of the instrument, and

Version 1, 2019 Semi-automatic Rotary Microtome ZFP012
shorten its life-span.
10 Cleaning and Maintenance
Warning!Remove the knife(blade), knife(blade) carrier and knife(blade) carrier
base before any cleaning and maintenance. 10.1 shut down the microtome
Shut off the general power supply switch, remove the power supply plug
Turn the handwheel to make the specimen clamp to the highest position, turn
the spanner, and lock the handwheel.
Loose the knife-protection board and knife,lock the spanner, put the knife in
knife box.
Loose the specimen-clamping bolt, and remove the specimen.
10.2 Cleaning
Remove all debris in the machine;
Remove the section waste tray for emptying
Lock the hand wheel before cleaning the instrument!
Clean the instrument like family daily life; pay especial attention to remove the
waste wax around the knife(blade)carrier.
Only use mild commercial detergents or soap solution for cleaning! Do not use
solvent that contains acetone and benzene!
Use dry cloth and bedew a little detergent to clean the surface of the
instrument.
Do ensure that during the cleaning, no detergent liquid enter the instrument.
After cleaning, wipe off the surface of the instrument with a soft cloth.
Keep on cleaning all positions of the instrument after use. Use the knife carrier
to move on the sliding rail, infuse the detergent lubricant. Good maintenance to the
instrument will prolong the life span of the instrument.
Warning:Be extremely careful when using the knife, because its edge is very
sharp, any mal-operation will cause serious injury. In any case, do not touch the
falling knife with your hand!
Do not leave about the knife in other places.
Do not lay the knife with the edge upside. If not in use, keep the knife(blade)
in the knife(blade) box!
Lock the handwheel for each operating of the knife and specimen, or during the
working intermission.

Version 1, 2019 Semi-automatic Rotary Microtome ZFP012
11. Problem and solution
Problems, possible causes and corrective action
Problems Possible causes Corrective action
Non-even of sections: The
section thickness varies from one
section to another. In extreme
cases, sections are skipped
meaning that a section is not
obtained.
-Insufficient knife/blade
inclination; consequently the
Clearance angle is too small.
-Insufficient clamping of specimen
and/or knife.
-Blunt knife/blade.
-Systematically try several Clearance
angle adjustments until the
optimum angle is found.
-Check if all clamps are locked and
screws are tightened on the
specimen and knife carrier systems.
Retighten the clamps and screws if
necessary.]
-Use a different part of the cutting
edge or use a new knife/blade.
Compressed sections
The sections are extremely
compressed, wrinkled or
jammed together.
-Blunt knife/blade.
-Specimen too warm.
-Clearance angle too big.
-Sectioning speed too high.
-Use a different part of the cutting
edge or use a new knife/blade.
-Cool the specimen on a cold plate.
- Clearance angle adjustment;
systematically decrease the
Clearance angle until the optimum
adjustment is obtained.
-Rotate the handwheel at a lower
speed.
The knife ”rings” on the cutting
specimen when slicing hard
specimens. Sections exhibit
scratches and chatter marks.
-Sectioning speed too high.
-Clearance angle too big.
-Insufficient clamping of paraffin
forceps or knife carrier.
-Rotate the handwheel at a lower
speed.
-Clearance angle adjustment;
systematically decrease the
clearance angle until the optimum
adjustment is obtained.
-Check if all levers are locked and
screws are tightened on the
specimen and knife carrier systems.
Retighten the clamps and screws if
necessary.
No more specimen advance and
consequently no section
produced.
1. Specimen reached the front
feed limit.
2. The coarse feed wheel cannot
rotate freely.
1. Turn the coarse feed wheel in
the appropriate direction to
move the specimen towards the
clearance limit.
2. Remove and obstruction.
Not lighting-up and no display Fuse is burned Replace the fuse
Version 1, 2019 Semi-automatic Rotary Microtome ZFP012
when turn-on the power supply
switch.
Warning:It should use well-earthed plug and turn on the power supply.
This machine should be used only to section specimen it should not be used
for other purpose.
The machine should be 15cm away from the wall to keep good
heat-scattering effect; otherwise it will shorten the span-life of the machin
12. Storage and transportation
This machine should be stored in a room with temperature 5°~ 40°C,relative
humidity <= 80%.
Before transportation of this machine, please check if it’s locked and if marks are
complete.
The microtome must be erectly transported!
13.Packing list 1, Microtome 1
2, Operation Manual 1
3, Power line 1
4, 3A fuse 1
5, Brush 1
6, Inner hexagon spanner 1
7, Waste tray 1
8, Knife shell 1 pieces
(base for disposable blade optional)
14. Maintenance and after-sales service
If any damage, please do not carry out any repairs on your own, as this will
invalidate the warranty.
Qualified service engineers authorized by our company may only carry out
repairs.
If the user operate strictly in accord with this manual, and obey the instruction,
we will provide one-year warranty from the date of delivery. Within one year, all
damages caused by quality defects, we will be responsible for repairs or replacement
free of charge. Besides, we will provide long time maintenance service.
In order to develop and improve our products continuously, we may alter the
technical parameters of the products without further notice.
Related Documents