Operation Guide Introduction ..................................................... 2 1. Operating Requirements ................................................................................. 2 2. Features and Functions ................................................................................... 2 Preparations..................................................... 3 1. Downloading and Installing the Korg ASIO Audio Driver ................................. 3 2. Downloading and Installing Serato DJ Intro .................................................... 3 3. Preparing the KAOSS DJ to control the Serato DJ Intro software ...................... 4 Controlling Serato DJ Intro ................................ 5 1. Loading and mixing songs .............................................................................. 5 2. Changing the Tempo of the Song .................................................................... 5 3. Cue Points and Loops....................................................................................... 6 4. Effects ............................................................................................................. 7 5. Controlling the KAOSS Effects .......................................................................... 7 6. KAOSS Effect Settings ...................................................................................... 8 7. Equalizer ......................................................................................................... 8 8. Using the Sampler Function ............................................................................ 9 9. About the Startup Modes ................................................................................ 9 Appendix ........................................................ 10 1. MIDI Message List ......................................................................................... 10 2. Effect Program List ........................................................................................ 11 3. Scale List ....................................................................................................... 12

Welcome message from author
This document is posted to help you gain knowledge. Please leave a comment to let me know what you think about it! Share it to your friends and learn new things together.
Transcript

Operation Guide
Introduction .....................................................21. Operating Requirements .................................................................................22. Features and Functions ...................................................................................2
Preparations.....................................................31. Downloading and Installing the Korg ASIO Audio Driver .................................32. Downloading and Installing Serato DJ Intro ....................................................33. Preparing the KAOSS DJ to control the Serato DJ Intro software ......................4
Controlling Serato DJ Intro ................................51. Loading and mixing songs ..............................................................................52. Changing the Tempo of the Song ....................................................................53. Cue Points and Loops .......................................................................................64. Effects .............................................................................................................75. Controlling the KAOSS Effects ..........................................................................76. KAOSS Effect Settings ......................................................................................87. Equalizer .........................................................................................................88. Using the Sampler Function ............................................................................99. About the Startup Modes ................................................................................9
Appendix ........................................................ 101. MIDI Message List .........................................................................................102. Effect Program List ........................................................................................113. Scale List .......................................................................................................12

2
KAOSS DJ Operation Guide
IntroductionThank you for purchasing the Korg KAOSS DJ DJ Controller. This Operation Guide was created to allow you to make the most of your KORG KAOSS DJ when it is being used to control the Serato DJ Intro DJ Software. To fully enjoy your KAOSS DJ controller and to ensure trouble-free performance, please read this Operation Guide—as well as the Owner’s Manual—carefully, and use the product only as directed. Be sure to save both of these documents, and keep them available for future reference.
1. Operating RequirementsWindowsSupported computers:A computer that meets the operating requirements of Microsoft Windows 7 or later, and is equipped with a USB port (a USB chipset made by Intel is recommended)Supported operating systems:Windows 7 SP1 (32-bit, 64-bit) or later, or Windows 8.1 (32-bit, 64-bit) or later
MacintoshSupported computers:An Apple Macintosh with an Intel processor that meets the operating requirements of Mac OS X and is equipped with a USB portSupported operating systems:Mac OS X 10.6.8 or later
2. Features and Functions
22 23 24 25
17
12
18
20
21
19
1
26 11
14132 3 15 4
16
6 7 9
85
10
16
Controller Mode FunctionsController Function
Shift Function(Hold the Shift Button [22] to access)
1 Headphone knob Adjusts the headphone volume level ---
2 Balance knob Adjusts the balance between the master mix and the headphone monitor mix ---
3 Master knob Adjusts the master volume level ---4 Browse knob Selects a song from the library Moves between levels5 Display Indicates the effect number or parameter Indicates the key or scale
6 Touchpad mode button Switches the touchpad between the Controller, KAOSS Effect, and Sampler modes ---
7 Program/value knob Selects an effect Selects a key, selects a scale
8 Tap buttonSets the tempo Long-press this button to access the auto BPM function
Key setting mode
9 Hold button Enables/disables the touchpad’s hold function Scale setting mode
10Touchpad (Controller mode) Controls the effects of the DJ software Adjusts the Beats MultiplierTouchpad (Kaoss Effect mode) Controls the KAOSS effect Adjusts the depth of the KAOSS EffectTouchpad (Sampler mode) Controls the sampler function of the DJ software ---
11 Crossfader Adjusts the balance between Decks A and B ---12 Touch slider mode button Switches between the three touch slider mode ---
13 Touch slider
Normal mode
Left Side Nudges (pitch -)Moves to the specified position in the song (slider)Center Enables the touch wheel's Scratch
modeRight Side Nudges (pitch +)
Hot Cue mode
Left Side Sets Hot Cue 1, and moves to Hot Cue 1 Deletes Hot Cue 1
Center Sets Hot Cue 2, and moves to Hot Cue 2 Deletes Hot Cue 2
Right Side Sets Hot Cue 3, and moves to Hot Cue 3 Deletes Hot Cue 3
Loop modeLeft Side Auto Loop × 1/2 Sets the Loop In pointCenter Auto Loop × 1, Loop on/off Activates Roll modeRight Side Auto Loop × 2 Sets the Loop Out point
14 EQBoosts or Cuts the Hi EQ ---Boosts or Cuts the Mid EQ ---Boosts or Cuts the Lo EQ ---
15 Gain knob Adjusts the gain ---16 Load button Loads the song into the selected deck ---17 Fx button Applies the effect to the selected deck ---
18 Headphone cue button Turns the headphone monitor on/offSwitches the function of the level meter between Deck A/B and the Master level
19 Touch wheel Scratches or adjusts the pitch Search function20 Pitch fader Adjusts the pitch
21 Level meter Indicates the input level to deck A/B or the master level ---
22 Shift button Holding this button provides access to the controllers SHIFT functions ---
23 button Starts/pauses the song Key Lock On/Off24 Sync button Synchronizes the tempo of Deck A and Deck B Cancels tempo synchronization25 Cue button Sets the cue point or moves to the cue point Returns to the beginning of the song.26 Level fader Adjusts the level of deck A/B ---
* Items 12–26 are repeated for Deck A and for Deck B.

3
KAOSS DJ Operation Guide
PreparationsThe KAOSS DJ Controller can quickly connect to your computer using a single USB cable. Once connected, the KAOSS DJ can be used as both a custom control surface for effec-tively using the Serato DJ Intro software, and as an integrated USB digital audio interface. The sliders, buttons, touch wheels, and the dual-axis X-Y touchpad offer effortless perfor-mance software control, as well as the ability to apply KAOSS effects directly to the software audio. To get started, you will need to download and install the Serato DJ Intro software.
1. Downloading and Installing the Korg ASIO Audio DriverIf you use the audio driver that is built into Windows, you might notice some latency, or delay, in the audio output. To improve the audio response time, you can use "Korg 4ch Audio driver," a low-latency ASIO driver.
Downloading and installing the driverDownload the Korg 4-Channel Audio Driver installer from the Korg website.The downloaded file will include the installation instructions.
2. Downloading and Installing Serato DJ IntroIn order to use Serato DJ Intro, download the software from the Serato Corporation website and install it. Serato DJ Intro is DJ software made by the Serato Audio Research.
Installing Serato DJ Intro (Windows)1. Access the download page (https://serato.com/dj-intro/downloads) and click "Download
Serato DJ Intro."
2. If you already have a Serato.com ID, enter your email address and password to log on, and then proceed to step 5.
3. If you do not yet have a Serato.com ID, enter your email address and click Continue to proceed to the registration screen. Once you have entered the necessary information as directed, please and click Continue, an email will be sent to the address you have en-tered.
4. In the email you receive, click "Verify" to complete your Serato.com registration.
5. Select "KORG KAOSS DJ" as the controller that you're using, and then click Continue to automatically download a Zip file containing the installer. (If the download does not start automatically, click "start the download manually.")
6. Decompress the downloaded Zip file, and start the installer. Proceed as directed to install Serato DJ Intro.
Installing Serato DJ Intro (Mac)1. Access the download page (https://serato.com/dj-intro/downloads) and click "Download
Serato DJ Intro."
2. If you already have a Serato.com ID, enter your email address and password to log on, and then proceed to step 5.
3. If you do not yet have a Serato.com ID, enter your email address and click Continue to proceed to the registration screen. Once you have entered the necessary information as directed, please and click Continue, an email will be sent to the address you have en-tered.
4. In the email you receive, click "Verify" to complete your Serato.com registration.
5. Select "KORG KAOSS DJ" as the controller that you're using, and then click Continue to automatically download a DMG file containing the installer. (If the download does not start automatically, click "start the download manually.")
6. Open the downloaded DMG file, and then drag and drop the Serato DJ Intro icon onto the Applications folder icon.

4
KAOSS DJ Operation Guide
3. Preparing the KAOSS DJ to control the Serato DJ Intro softwareStarting the KAOSS DJSet the start mode select switch to the controller position, and then connect the KAOSS DJ to your computer.
Starting Serato DJ IntroWindowsFrom the Start menu, click All Programs > Serato > Serato DJ Intro > Serato DJ Intro
MacintoshApplication folder > Serato DJ IntroStart the application that's in the above folder.
Checking that the KAOSS DJ is recognizedStart Serato DJ Intro which you installed, and check whether the KAOSS DJ is recognized by your computer.
If it is recognizedTwo decks are shown.
If it is not recognizedNo decks are shown.

5
KAOSS DJ Operation Guide
Controlling Serato DJ IntroThis section will cover how to use the KAOSS DJ to control the Serato DJ Intro software installed on your computer. For details on the functions of Serato DJ Intro software itself, please refer to the Serato DJ Intro owner’s manual.
1. Loading and mixing songsLoading and Playing a Song Using the KAOSS DJSong data from the computer where you installed Serato DJ Intro can be loaded into either of the two decks and controlled by the KAOSS DJ.
1. Turn the Browse knob to select a file.By holding down the Shift button while you turn the Browse knob, you can change to a different folder level.
2. Press the Load A button or Load B button to load a track into the chosen deck.
3. Press the Play button to play back the track.
Controlling the Playback MixThe playback level and the mix between the two decks are controlled by the Gain knobs, the Level faders, and the Crossfader.
1. Use the Gain knobs and Level faders to adjust the audio output level of each deck.
2. Use the Crossfader to control and set the mix level between the two decks.
Deck A output Deck B output
Use the crossfader to control the mixbetween the two decks
3. Turn the Master knob to adjust the audio output level.TIP Be sure to properly adjust the levels of the power amp that’s connected to the KAOSS DJ Out L/R
jacks to achieve the best audio response.
Adjusting the monitor output1. Use the headphone Cue button to turn the monitor on/off for each deck A and B.
2. Use the monitor Balance knob to adjust the output balance between the master out level and the monitor out level.
3. Use the Headphone knob to adjust the volume of the headphones.TIP By holding down the Shift button and pressing the headphone cue button, you can switch the
function of the level meter to display the Monitor level.
2. Changing the Tempo of the SongThe playback speed of each deck can be controlled manually, or the two decks can be sync’d automatically. Normally, speeding up the tempo will also increase the pitch. However, the Key Lock function can be used to keep the pitch constant, regardless of tempo.
Key Lock functionThis function keeps the pitch unchanged when you changing the tempo. Hold down the Shift button and press the Play button to turn Key Lock on/off.
Changing the Tempo AutomaticallySync functionPressing the Sync button will instantly match the tempo of the two songs playing in Deck A and Deck B, so that the beats will match.
Changing the Tempo ManuallyLarge changesUse the pitch faders to adjust the playback speed / pitch of the selected Deck.
Increases the tempo
Decreases the tempo
Fine Tempo adjustmentsYou can use the touch wheel or the touch slider to make fine adjustments to the playback tempo /pitch, to correct any beat mismatch between the two decks, for example.
1. Press the touch slider mode button to set the touch slider to normal mode; then press the center of the touch slider to turn off touch wheel scratch mode.
6
KAOSS DJ Operation Guide2. Use the touch wheel to adjust the playback speed.
Increases the tempoDecreases the tempo
3. You can make fine adjustments in the playback speed by pressing the right or left end of the touch slider.
Slower
LED goes dark
Faster
Turns off the Touch wheel scratch mode
Scratching and searching
1. Press the touch slider mode button to set the touch slider to normal mode; then press the center of the touch slider to turn on touch wheel scratch mode.
2. Use the touch wheel to adjust the playback position. This lets you create an effect similar to scratching the record forward or backward.
3. You can make large adjustments in the playback position by holding down the Shift button and using the touch wheel.
Increases the tempoDecreases the tempo
3. Cue Points and LoopsKAOSS DJ allows you to set up a series of cue points and hot cues that allow the playback to instantly begin from a pre-specified point in the song. In addition, any section of a song can be used to create a loop that will continually repeat the playback of that part of the song.
Cue PointsSetting a Cue point allows you to specify a location in the song from where playback will begin, and to instantly access that location.
1. Pause at the desired cue location, and press the Cue button.The cue point is set at the location where you paused.
2. During playback, press and hold the Cue button; playback returns to the cue point and continues from there.
3. When you stop pressing the Cue button, you return to the cue point and playback stops.TIP If you hold down the Shift button and press the Cue button, the song plays from the beginning.
Hot CuesIn addition, the KAOSS DJ lets you specify three Hot Cue locations for each track. You can instantly begin playback from a Hot Cue location. These Hot Cues are accessed using the left, center, and right positions on the touch slider.
1. Press the touch slider mode button to make the Hot Cue LED light; the touch slider is in Hot Cue mode.
2. During playback or while paused, press the right, left, or center of the touch slider to assign a Hot Cue point.
Hot Cue 1
Make the Hot Cue LED light
Hot Cue 3
Hot Cue 2
3. Playback starts from the assigned Hot Cue point that corresponds to the right, left or center of the touch slider.
4. You can erase an assigned Hot Cue point by holding down the Shift button and pressing the right, left or center of the touch slider.

7
KAOSS DJ Operation Guide
Auto LoopingThe KAOSS DJ can automatically create a loop in the current song, based on the number of beats selected.
1. Press the touch slider mode button to make the Loop LED light; the touch slider is in Loop mode.
2. Specify the length (in beats) of the loop playback by pressing the right or left end of the touch slider.
Shorten the playback length
Make the Loop LED light
Lengthen the playback length
Start/stop loop playback
3. To start loop playback, press the center of the touch slider.
Manual LoopingIf you prefer, you can also set up a loop manually using the touch slider
1. Press the touch slider mode button to make the Loop LED light; the touch slider is in Loop mode.
2. During playback, hold down the Shift button and press the left of the touch slider to specify the Loop In point.
3. Hold down the Shift button and press the right of the touch slider to specify the Loop Out point.When you have specified the Loop In and Loop Out points, playback starts repeating between the two points.
4. During loop playback, press the center of the touch slider to stop loop playback.TIP During loop playback, hold down the Shift button and press the left or right of the touch slider to
move the screen to the Loop In point or Out point. At this time, you can use the touch wheel to make fine adjustments to the location of each point.
About the touch sliderWhen the touch slider mode is Normal, you can hold down the Shift button and touch the touch slider to move to a specific position in the song. The length of the touch slider corresponds to the overall length of the loaded song.
TIP This function is not supported by Serato DJ Intro.
4. EffectsBoth the Serato DJ Intro effects and the Korg KAOSS DJ effects can be controlled in real time by running your finger across the dual-axis X-Y touchpad to independently change the value of two parameters at the same time. Simply switch the touchpad mode to choose which effects will be controlled.
Controlling the Serato DJ Intro EffectsYou can use the touchpad to control the effects that are built into Serato DJ Intro.
1. Press the touchpad mode button to make the Controller LED light; the touchpad is in Controller mode.
2. Use the Fx button to select which deck the effect will be applied to.
3. While holding down the Shift button of deck A or deck B, turn the program/value knob to select the effect type for each deck.
4. You can use the touchpad to control the effects.TIP For details on how to use the effects, refer to the Serato DJ Intro owner's manual.
Do not use a hard or pointed object. Do not operate the touchpad with anything other than an ungloved fingertip.
TIP If you hold down the Hold button and touch the touchpad, the effect remains on even when you release your finger. Hold is defeated when you press the Hold button once again.
5. Controlling the KAOSS EffectsThe KAOSS DJ features its own internal effects that can be applied to the mix output as a Master Effect.
Turning the Kaoss effect on/offPress the touchpad mode button to make the Kaoss Fx LED light; the touchpad is in Kaoss Fx mode.In Kaoss Fx mode, the effect on/off setting is applied only to the master out.TIP You can't apply separate effects to decks A and B.
Applying the effect to the selected deck(s)Press the Fx buttons (the button will light) to apply the KAOSS DJ Effect to Deck A, Deck B, or both. If both decks are selected, the effect is applied to the master outputs after Deck A and Deck B have been mixed using the crossfader. If you turn off the effect for both decks, the sound unprocessed by the effect is output. If no deck is selected, the effect will not be applied.
Selecting an effect programTurn the program/value knob to select one of the KAOSS DJ internal effects.TIP For details on the effect programs, refer to the program list.

8
KAOSS DJ Operation Guide
Using the touchpad to apply the effectThe touchpad allows you to control and manipulate the effect in real time using just your finger.
Do not use a hard or pointed object. Do not operate the touchpad with anything other than an ungloved fingertip.
1. The effect is applied when you touch the touchpad.
2. The effect disappears when you release your finger from the touchpad.TIP If you press the Hold button to turn it on, the effect immediately prior to when you released your
finger is held.
Adjusting the effect depthHold down the Shift button and then move your finger to left or right on the touchpad to adjust the effect depth (FX DEPTH).
6. KAOSS Effect SettingsIn order to tailor the effect to work with the music, the KAOSS DJ offers control of certain parameters such as BPM Tempo, the musical scale, and the root note. In addition, there is an independent 3-band equalizer available to control the tone of each deck.TIP The availability of each parameter depends on the program. Refer to the effect program list.
Setting the BPM (tempo)There are three ways to set the temp of the effect when using the KOASS DJ Effects.
Manual
1. Press the Tap button; the display will indicate the current BPM.
2. Use the program/value knob to edit the value.
Tap tempo
1. Press the Tap button; the display will indicate the current BPM.
2. Press the Tap button several times at the desired tempo to set the BPM.
Auto BPMThe KAOSS DJ can automatically detect the tempo of the song being played by either deck.
1. Select a deck by pressing that deck’s FX button.
2. While the song is playing, long-press the Tap button.The beat of the song is detected, and the BPM is changed.
3. To exit Auto BPM, long-press the Tap button once again. The last Auto BPM tempo detected will become the current tempo.
TIP If the BPM cannot be detected, press the Tap button several times in synchronization with the beat of the song; the BPM is automatically detected with that beat as a guideline. Due to the nature of the Auto BPM function, the detected value might be 1/2 or 2/3 of the correct BPM, or there might be slight inaccuracies; in such cases, use the Tap button to assist the Auto BPM function.
TIP The BPM cannot be detected if the music does not have a clear sense of beat. The detectable tempo range is 80–160 BPM
TIP If the BPM cannot be detected, such as when there is no audio input, you'll return to the program select screen even if you have not exited the Auto BPM function. If you want to see the BPM indication again, press the Tap button.
Selecting the Key and Scale Certain KAOSS DJ Effect programs fall into the synth category. These programs allow you to change the pitch of the program using the X-axis, and to affect a second synth parameter (tone, filter, vibrato, etc.) using the Y-axis. The ability to choose the correct scale and musi-cal key allows these programs to be used in a musically useful way.
Choosing the Scale:
1. Hold down the Shift button and press the Hold button; the abbreviated name of the currently specified scale appears in the display.
2. Turn the program/value knob to change the scale.
3. When a certain length of time has elapsed after making the change, the program indica-tion reappears.
TIP By pressing the Shift button you can immediately return to the program indication.
Choosing the key (tonic)Here's how to specify the basic pitch of the scale used for a synth program.
1. Hold down the Shift button and press the Tap button; the currently specified key appears in the display.
2. Turn the program/value knob to change the key.
3. When a certain length of time has elapsed after making the change, the program indica-tion reappears.
TIP By pressing the Shift button you can immediately return to the program indication. Depending on the settings, there might be no sound, or noise might be produced.
7. EqualizerThe onboard equalizers—one for each deck—allow you to control the playback tone of each deck.EQ Hi knob: Cuts or boosts the hi-frequenciesEQ Mid knob: Cuts or boosts the mid-frequenciesEQ Lo knob: Cuts or boosts the low-frequencies
9
KAOSS DJ Operation Guide
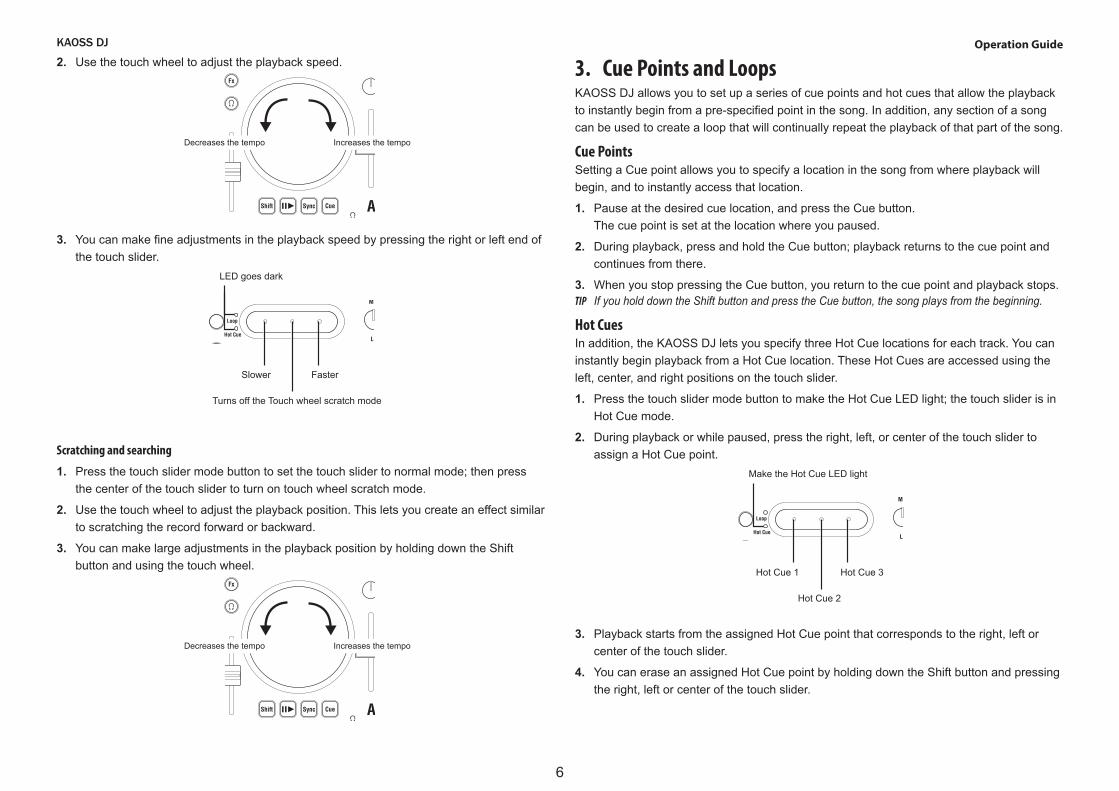
8. Using the Sampler FunctionYou can use the KAOSS DJ touchpad to control the sampler built into the Serato DJ Intro software.
1. Long-press the touchpad mode button to switch the touchpad into the Sampler mode.
2. When you tap the touchpad, the sampler plays. Samples 1 – 4 are assigned to the following areas of the touchpad.
Make the Sampler LED ligit
1 2
43
TIP Assigning audio data to the sampler and recording sample data requires using the corresponding operations found within Serato DJ Intro.
9. About the Startup ModesThe KAOSS DJ provides two additional Startup modes that expand the operation of the unit to match specific applications.
Audioless modeThe KAOSS DJ can be used as an expansive USB MIDI control surface when using an external audio interface. To operate the KAOSS DJ in this audioless mode, simultaneously hold down the touch slider mode button (Deck B) + headphone cue button (Deck B), and plug in the USB cable to start the unit.TIP The audio interface of the KAOSS DJ will be unavailable. Audio is not output from the KAOSS
DJ's out L/R.TIP MIDI messages are output from all controllers.TIP Serato DJ Intro does not support audioless mode.
Audio Return modeIn the Audio Return mode, the audio output (Out L/R) signal is sent to the computer as a digital audio signal via USB so that you can record the output of the KAOSS DJ. Normally, it is the Mic/Line in A audio signal that is being sent to the computer via USB. To operate the KAOSS DJ in the Audio Return mode, simultaneously hold down the touch slider mode button (Deck B) + FX button (Deck B), and plug in the USB cable to start the unit. TIP Normally, the audio of Mic/Line In A is returned.

10
KAOSS DJ Operation Guide
Appendix
1. MIDI Message List
22 23 24 25
17
12
18
20
21
19
1
26 11
14132 3 15 4
16
6 7 9
85
10
16
No. Controller Number MIDI Channel LEDCommon Deck-A Deck-B1 Headphone knob Audioless Mode Only CC:20 7 - - ○2 Balance knob Audioless Mode Only CC:21 7 - - ○3 Master knob Audioless Mode Only CC:22 7 - - ○4 Browse knob CC:30 7 - - -
6 Touchpad mode button - - - - -Hold Note:34(A#1) 7 - - -
7 Program/value knob CC:31 7 - - -
8 Tap button Note:11(B-1) 7 - - ○Hold Note:33(A1) 7 - - ○
9 Hold button - - - - ○
10 TouchpadNote:32(G1) 7 - - -
X CC:12 7 - - -Y CC:13 7 - - -
11 Crossfader CC:23 7 - - -12 Touch slider mode button - - - - -
13 Touch slider
Normal mode
Left button (Pitch-) Note:21(A0) - 8 9 ○Center button (Search) Note:22(Bb0) - 8 9 ○Right button (Pitch+) Note:23(B0) - 8 9 ○
CC:33 - 8 9 -
Loop modeLeft button (Loop In) Note:15(D#0) - 8 9 ○Center button (Loop On/Off) Note:16(E0) - 8 9 ○Right button (Loop Out) Note:17(F0) - 8 9 ○
Hot Cue modeLeft button (Hot Cue1) Note:18(F#0) - 8 9 ○Center button (Hot Cue2) Note:19(G0) - 8 9 ○Right button (Hot Cue3) Note:20(G#0) - 8 9 ○
14 EQHi CC:27 - 8 9 ○Mid CC:28 - 8 9 ○Lo CC:29 - 8 9 ○
15 Gain knob CC:26 - 8 9 ○
16 Load button Note:14(D0) - 8 9 -Hold Note:35(B1) - 8 9 -
17 Fx button Note:24(C1) - 8 9 ○18 Headphone cue button Note:25(C#1) - 8 9 ○
19 Touch wheel On/Off Note:31(F#1) - 8 9 - XY CC:14 - 8 9 -
20 Pitch fader CC:25 - 8 9 -21 Level meter Receive NOTE:60(C4)- 67(G4) - 8 9 ○22 Shift button Note:26(D1) - 8 9 ○23 button Note:27(D#1) - 8 9 ○24 Sync button Note:29(E1) - 8 9 ○25 Cue button Note:30(F1) - 8 9 ○26 Level fader CC:24 - 8 9 -
* LED lights when MIDI messages the same as the Controller will be transmitted. (On:value =127 / Off:value = 0 )

11
KAOSS DJ Operation Guide
2. Effect Program ListKAOSS Effects ListNo. Program Name Category X Axis Y Axis Fx Release BPM Sync Scale1 Low Pass Filter Filter Cutoff Resonance o x x2 High Pass Filter Filter Cutoff Resonance o x x3 Band Pass Filter Filter Cutoff Resonance o x x4 72dB/oct LPF Filter Cutoff Resonance o x x5 Morphing Filter Filter Cutoff Resonance o x x6 Vowel Filter Filter 1st & 2nd Formant 1st & 2nd Formant o x x7 Mid Cut Filter Filter Cutoff Resonance o x x8 Isolator Filter Low – MidLo – MidHi – Hi Level o x x9 Dist Isolator Filter Low – MidLo – MidHi – Hi Distortion o x x10 Center Cancel Filter Cutoff Resonance o x x11 Radio Filter Tone Level o x x12 Telephone Filter Tone Stereo – Mono o x x13 Reverb Filter Filter Cutoff Resonance o x x14 Vinyl Break Modulation Stop Speed Scratch x x x15 Break Reverb Modulation Stop Speed Scratch x x x16 Jet Modulation Tone (Delay Time) Feedback o x x17 Manual Phaser Modulation Cutoff Resonance o x x18 Talk Filter Modulation 1st Formant 2nd Formant, Feedback x o x19 Digi Talk Modulation 1st Formant 2nd Formant o x x20 Decimator Modulation Cutoff Sampling Rate & Bit Depth o x x21 Fuzz Distortion Modulation Tone Distortion o x x22 Bass Distortion Modulation Distortion Low Boost o x x23 Ring Mod HPF Modulation Ring Mod Frequency Cutoff o x x24 Pitch Shift HPF Modulation Pitch Cutoff o x x25 Mid Pitch Shift Modulation Pitch Pitch Shift Depth o x x26 Ducking Comp Dynamics Ratio Threshold o x x27 LowBoost Comp Dynamics Comp Sensitivity Attack Nuance o x x28 Hard Limiter Dynamics Attack Nuance Threshold o x x29 LFO LPF LFO LFO Speed Resonance o o x30 LFO HPF LFO LFO Speed Resonance o o x31 Infinite Filter LFO LFO Speed LFO Depth o o x32 Jag Filter LFO LFO Speed LFO Shape o o x33 Yoi Yoi LFO LFO Speed Yoi Level o o x34 Flanger LFO LFO Speed Feedback o o x35 Flanger Filter LFO LFO Speed Cutoff o o x36 Infinite Flanger LFO LFO Speed Feedback o o x37 Phaser LFO LFO Speed Resonance o o x38 Mid Phaser LFO LFO Speed Resonance o o x39 Step Phaser LFO Cutoff Resonance o o x40 Auto Pan LFO LFO Speed Auto Pan Depth o o x41 Mid Auto Pan LFO LFO Speed Auto Pan Depth o o x42 Slicer LFO LFO Speed Slicer Depth o o x43 Mid Slicer LFO LFO Speed Slicer Depth o o x44 LPF Slicer LFO LFO Speed Cutoff o o x45 HPF Slicer LFO LFO Speed Cutoff o o x46 Delay Delay Delay Time Feedback Level x o x47 One Delay Delay Delay Time Delay Tone x o x48 Ping Pong Delay Delay Delay Time Feedback Level x o x49 Multi Tap Delay Delay Delay Tone Feedback Level x x x50 Modulation Delay Delay Delay Time Feedback Level x x x51 Tape Echo Delay Delay Time Feedback Level x o x52 Dub Echo Delay Delay Time Feedback Level x o x53 Feedback Echo Delay Delay Time Feedback Level x o x
No. Program Name Category X Axis Y Axis Fx Release BPM Sync Scale54 LPF Delay Delay Delay Time Cutoff x o x55 HPF Delay Delay Delay Time Cutoff x o x
56 Phaser Delay Delay Delay Time Resonance & Feedback Level x o x
57 Flanger Delay Delay Delay Time Resonance & Feedback Level x o x
58 Hall Reverb Reverb Reverb Time Reverb Depth x x x59 Room Reverb Reverb Reverb Time Reverb Depth x x x60 Spring Reverb Reverb Reverb Time Reverb Depth x o x61 Pump Reverb Reverb Reverb Tone Pump Depth x o x62 Freeze Reverb Reverb Reverb Tone Mix Balance o x x63 Grain Shifter Grain Buffer Update Interval Duration o x x64 Mid Grain Grain Buffer Update Interval Duration o o x65 Mix Grain Grain Duration Mix Balance o o x66 KP2 Looper Looper Loop Length Cutoff o o x67 LPF Looper Looper Loop Length Cutoff o o x68 HPF Looper Looper Loop Length Cutoff o o x69 High Looper Looper Loop Length Lo Range Balance o o x70 Iso Looper Looper Loop Length Low – MidLo – MidHi – Hi o o x71 Freeze Looper Looper Loop Length Cutoff o o x72 Phaser Looper Looper Loop Length Cutoff o o x73 Flanger Looper Looper Loop Length Flanger Tone (Delay Time) o o x74 Deci Looper Looper Loop Length Sampling Rate & Cutoff o o x75 Slice Looper Looper Loop Length Slice Position o o x76 F/R Looper Looper Loop Length Reverse – Forward o o x77 KP3 Looper Looper Loop Length Reverse – Forward o o x78 Backing Looper Looper Loop Length Reverse – Forward o o x79 Shuttle Looper Looper Loop Length Cutoff o o x80 RwDelay Looper Looper Loop Length Cutoff o o x81 OverDub Looper Looper Loop Length Loop – Overdub o o x82 Break Looper Looper Loop Length Stop Speed o o x83 KP3 RwLooper Looper Loop Length Pitch o o x84 Pitch Looper Looper Loop Length Pitch o o x85 Weird Looper Looper Loop Length Pitch o o x86 Looper & Noise Looper Loop Length Noise Level o o x87 Unison Saw Lead Note Reverb Depth o x o88 KP3 Unison Saw Lead Note Cutoff, Resonance x o o89 Unison Lead Lead Note Cutoff o o o90 Pulse Verb Lead Note Cutoff o o o91 Paz Square Lead Note Pitch EG Time o x o92 8bit Square Lead Note Octave o x o93 Ring Flutter Lead Note Mod Detune Width o o o94 Say Yay Synth Lead Note Formant & Vibrato Depth o o o95 Air Spectrum Lead Note Decay & Release Time o o o96 Ray EP Acoustic Note Velocity o o o97 Didgeridoo Acoustic Note LFO Speed o o o98 Slap Bass Bass Note Decay Time (Mute) o x o99 Unison Squ Bass Bass Note Cutoff, Resonance x x oa0 Hoover Bass Bass Note Octave o x oa1 Bad Bass Bass Note LFO Depth o o oa2 Wobble Bass Bass Note, LFO Speed Cutoff o o oa3 Fall Bass Bass Note Cutoff, Drive o x oa4 Pulse Code Chord Note Cutoff, Resonance o o o

12
KAOSS DJ Operation GuideNo. Program Name Category X Axis Y Axis Fx Release BPM Sync Scalea5 Pump Chord Chord Note Chord (Min – Maj) o o oa6 Scale Chord Chord Note Reverb Depth o x oa7 Sine Chord Chord Note Octave o o oa8 Pad Chord Chord Note Filter Attack Time & EG Int. o x oa9 Noise Filter Sound Effect Cutoff Resonance o o xb0 Pump Noise Sound Effect Cutoff Pump Depth o o xb1 Bubble SFX Sound Effect LFO Speed LFO Depth x o xb2 Resonator Sound Effect Cutoff LFO Depth & Speed o o xb3 Itch Noiz Sound Effect Note LFO Speed & Pitch Mod Int. o o ob4 Ring Mod SFX Sound Effect Pitch Mod LFO Intensity o o xb5 Beam Saber Sound Effect Mod Pitch Mod Depth o x xb6 Kaoss Drone Sound Effect Cutoff Feedback o x xb7 Sync Random Sound Effect Note Random Pitch Width o o ob8 Disco Siren Sound Effect LFO Speed Sound Character o o xb9 Rise/Fall Sound Effect Pitch Rise – Fall o o xc0 Sweep Sound Effect Pitch, Pan LFO Speed o x x
3. Scale ListScale Name Scale [Key C]
1 Chromatic C, D♭, D, E♭, E, F, G♭, G, A♭, A, B♭, B2 Ionian C, D, E, F, G, A, B3 Dorian C, D, E♭, F, G, A, B♭4 Phrygian C, D♭, E♭, F, G, A♭, B♭5 Lydian C, D, E, F♯, G, A, B6 Mixolydian C, D, E, F, G, A, B♭7 Aeolian C, D, E♭, F, G, A♭, B♭8 Locrian C, D♭, E♭, F, G♭, A♭, B♭9 Harmonic minor C, D, E♭, F, G, A♭, B10 Melodic minor C, D, E♭, F, G, A, B11 Major Blues C, D, E♭, E, G, A12 minor Blues C, E♭, F, G♭, G, B♭13 Diminished C, D, E♭, F, F♯, G♯, A, B14 Combination Diminished C, D♭, E♭, E, F♯, G, A, B♭15 Major Pentatonic C, D, E, G, A16 minor Pentatonic C, E♭, F, G, B♭17 Raga Bhairav C, D♭, E, F, G, A♭, B18 Raga Gamanasrama C, D♭, E, F♯, G, A, B19 Raga Todi C, D♭, E♭, F♯, G, A♭, B20 Arabian C, D, E, F, G♭, A♭, B♭21 Spanish C, D♭, E♭, E, F, G, A♭, B♭22 Gypsy C, D, E♭, F♯, G, A♭, B23 Egyptian C, D, F, G, B♭24 Hawaiian C, D, E♭, G, A25 Bali Island Pelog C, D♭, E♭, G, A♭26 Japanese Miyakobushi C, D♭, F, G, A♭27 Ryukyu C, E, F, G, B28 Chinese C, E, F♯, G, B29 Bass Line C, G, B♭30 Whole Tone C, D, E, G♭, A♭, B♭31 minor 3rd Interval C, E♭, G♭, A32 Major 3rd Interval C, E, A♭33 4th Interval C, F, B♭34 5th Interval C, G35 Octave C
* All product names and company names are the trademarks or registered trademarks of their respective owners.
Related Documents