78,0°F | 6,16% | 456kg/m 3 | -27,3td | 0,64aw | 51,9%r.H. | 14,8%abs | 100,4g/m 2 | 09m/s | 4,90Ugl | 1 Operating Manual Always read this operating manual before using the humimeter FS3! humimeter FS3 Moisture meter for measuring the moisture content of food and luxury food Moisture meter Version 3.0 ®

Welcome message from author
This document is posted to help you gain knowledge. Please leave a comment to let me know what you think about it! Share it to your friends and learn new things together.
Transcript

78,0 °F | 6,16 % | 456 kg/m3 | -27,3 td | 0,64 aw | 51,9 %r.H. | 14,8 % abs | 100,4 g/m2 | 09 m/s | 4,90 Ugl | 1
Operating Manual
Always read this operating manual before using the humimeter FS3!
humimeter FS3 Moisture meter for measuring the moisture
content of food and luxury food
Moisture meter
Version 3.0
®
humimeter FS3 Operating Manual
Page 2
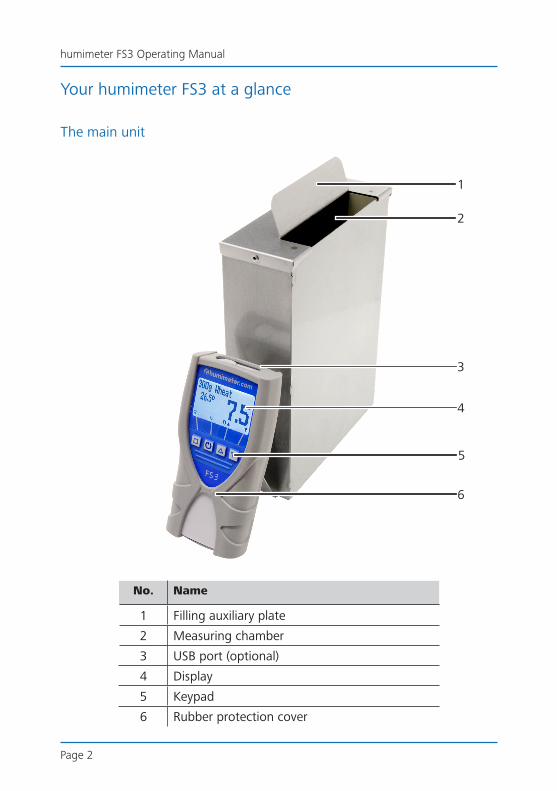
Your humimeter FS3 at a glance
The main unit
No. Name
1 Filling auxiliary plate
2 Measuring chamber
3 USB port (optional)
4 Display
5 Keypad
6 Rubber protection cover
1
2
3
4
5
6
Page 3
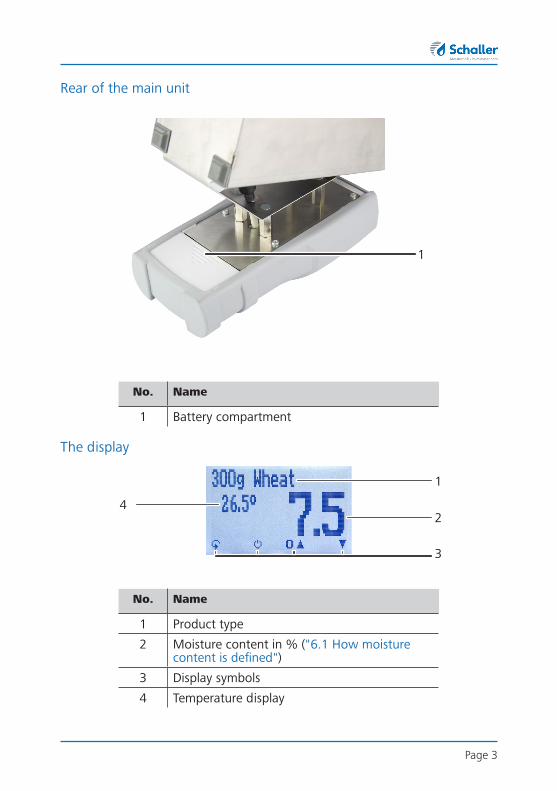
Rear of the main unit
No. Name
1 Battery compartment
The display
No. Name
1 Product type
2 Moisture content in % ("6.1 How moisture content is defined")
3 Display symbols
4 Temperature display
1
24
3
1
humimeter FS3 Operating Manual
Page 4
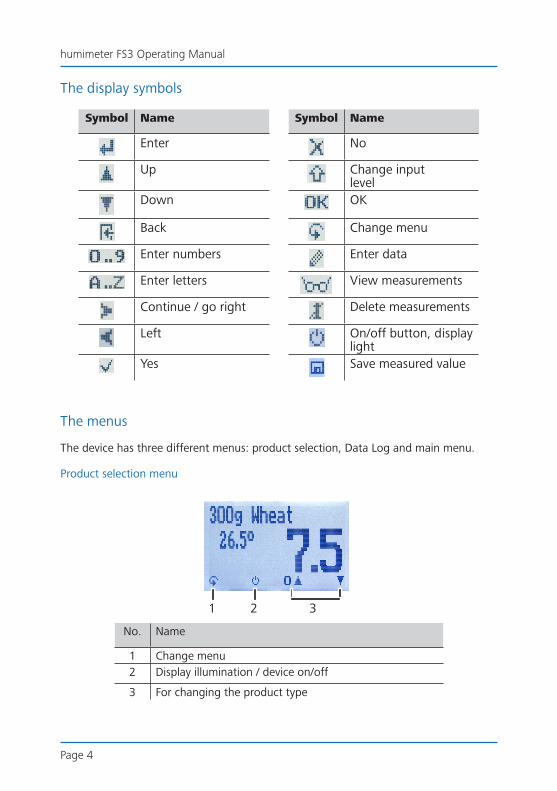
The display symbols
Symbol Name Symbol Name
Enter No
Up Change input level
Down OK
Back Change menu
Enter numbers Enter data
Enter letters View measurements
Continue / go right Delete measurements
Left On/off button, display light
Yes Save measured value
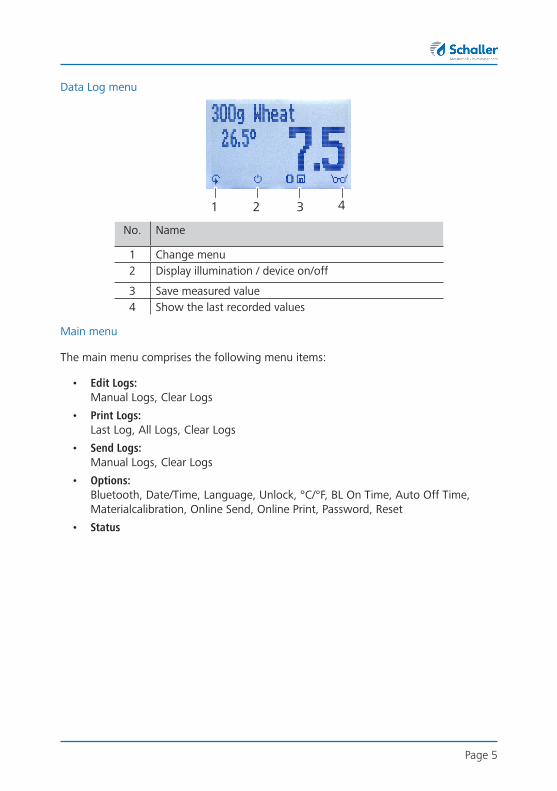
The menus
The device has three different menus: product selection, Data Log and main menu.
Product selection menu
No. Name
1 Change menu2 Display illumination / device on/off
3 For changing the product type
21 3
Page 5
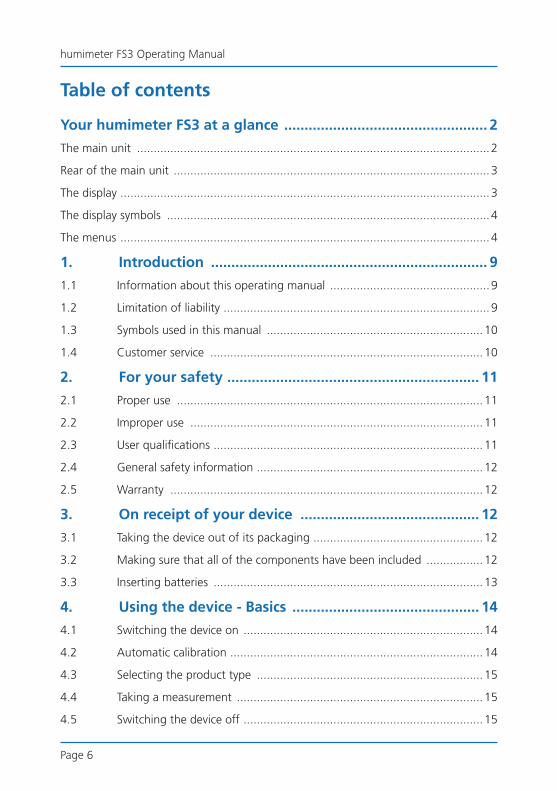
Data Log menu
No. Name
1 Change menu2 Display illumination / device on/off
3 Save measured value4 Show the last recorded values
Main menu
The main menu comprises the following menu items:
• Edit Logs: Manual Logs, Clear Logs
• Print Logs: Last Log, All Logs, Clear Logs
• Send Logs: Manual Logs, Clear Logs
• Options: Bluetooth, Date/Time, Language, Unlock, °C/°F, BL On Time, Auto Off Time, Materialcalibration, Online Send, Online Print, Password, Reset
• Status
21 3 4
humimeter FS3 Operating Manual
Page 6
Table of contents
Your humimeter FS3 at a glance �������������������������������������������������� 2
The main unit ..........................................................................................................2
Rear of the main unit ...............................................................................................3
The display ...............................................................................................................3
The display symbols .................................................................................................4
The menus ...............................................................................................................4
1� Introduction �������������������������������������������������������������������� 9
1.1 Information about this operating manual ................................................9
1.2 Limitation of liability ................................................................................9
1.3 Symbols used in this manual .................................................................10
1.4 Customer service ..................................................................................10
2� For your safety �������������������������������������������������������������� 11
2.1 Proper use ............................................................................................11
2.2 Improper use ........................................................................................11
2.3 User qualifications .................................................................................11
2.4 General safety information ....................................................................12
2.5 Warranty ..............................................................................................12
3� On receipt of your device �������������������������������������������� 12
3.1 Taking the device out of its packaging ...................................................12
3.2 Making sure that all of the components have been included .................12
3.3 Inserting batteries .................................................................................13
4� Using the device - Basics ���������������������������������������������� 14
4.1 Switching the device on ........................................................................14
4.2 Automatic calibration ............................................................................14
4.3 Selecting the product type ....................................................................15
4.4 Taking a measurement ..........................................................................15
4.5 Switching the device off ........................................................................15
Page 7
5� The measuring process ������������������������������������������������� 16
5.1 Preparing a measurement .....................................................................16
5.2 Taking a measurement ..........................................................................17
5.3 Saving individual readings .....................................................................18
5.4 Saving several readings (a measurement series) at the same time ..........19
5.5 Viewing individual readings ...................................................................21
5.6 Viewing individual readings from a series of measurements ...................21
5.7 Deleting all measured values (data log) .................................................22
5.8 Deleting individual measurement series .................................................22
5.9 Deleting individual values from a single series of measurements ............23
6� Product types ���������������������������������������������������������������� 24
6.1 How moisture content is defined ..........................................................25
7� Using the LogMemorizer program ������������������������������ 26
7.1 Installing / opening the program ...........................................................26
7.2 Exporting measured values to a computer .............................................26
8� Checking the device's status ���������������������������������������� 29
9. Configuringthedevice ������������������������������������������������� 30
9.1 Turning on Bluetooth ............................................................................30
9.2 Adjust the date/time ............................................................................30
9.3 Selecting a language .............................................................................31
9.4 Activating options .................................................................................31
9.5 Deactivating options .............................................................................32
9.6 Selecting °C/°F ......................................................................................32
9.7 Reducing the device's power consumtion ..............................................32
9.7.1 Configuring the display illumination time ..............................................32
9.7.2 Configuring automatic switch-off .........................................................33
9.8 Configuring the material calibration function ........................................34
9.9 Online functions ...................................................................................34
humimeter FS3 Operating Manual
Page 8
9.9.1 Online Send ..........................................................................................34
9.9.2 Online Print ...........................................................................................34
9.10 Changing the password ........................................................................35
9.11 Resetting the device to its factory settings .............................................36
10� Cleaning and maintenance ������������������������������������������ 36
10.1 Changing batteries ...............................................................................36
10.2 Checking the calibration .......................................................................37
10.2.1 Checking the scale ................................................................................37
10.2.2 Checking the device ..............................................................................37
10.3 Care instructions ...................................................................................38
10.4 Cleaning the device ..............................................................................39
11� Faults ����������������������������������������������������������������������������� 40
12� Storage and disposal ���������������������������������������������������� 41
12.1 Storing the device .................................................................................41
12.2 Disposing of the device .........................................................................41
13� Device information ������������������������������������������������������� 42
13.1 CE declaration of conformity .................................................................42
13.2 Technical data .......................................................................................43
Page 9
1. Introduction
1.1 Information about this operating manual
This operating manual is designed to enable you to use the humimeter FS3 safely and effectively. It is part of the device, has to be stored nearby and must be easily accessi-ble to users at all times.
All users are required to carefully read and make sure that they have understood this operating manual before using the humimeter FS3. All of the safety and operating instructions detailed in this manual have to be observed to ensure the safety of the device.
1.2 Limitation of liability
All of the information and instructions provided in this operating manual have been compiled on the basis of the current standards and regulations, the state of the art, and the extensive expertise and experience of Schaller GmbH.
Schaller GmbH does not accept any liability for damage associated with the following, which also voids the warranty:
• Non-observance of this operating manual
• Improper use
• Inadequately qualified users
• Unauthorised modifications
• Technical changes
• Use of unapproved spare parts
This fast measuring procedure can be affected by a range of different factors. For this reason, we recommend periodically checking the device’s measurements with a stan-dardised oven-drying method.
We, as the manufacturer, do not accept any liability for any incorrect measurements and associated consequential damage.
humimeter FS3 Operating Manual
Page 10
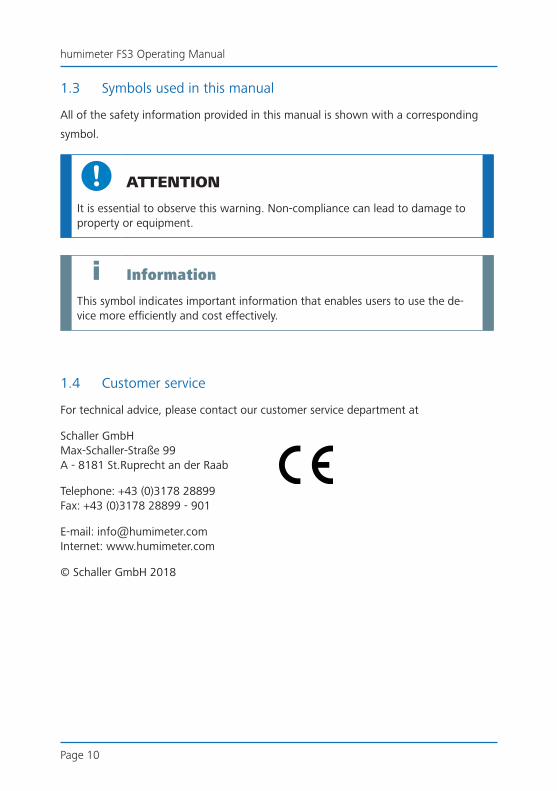
1.3 Symbols used in this manual
All of the safety information provided in this manual is shown with a corresponding
symbol.
ATTENTION
It is essential to observe this warning. Non-compliance can lead to damage to property or equipment.
i Information
This symbol indicates important information that enables users to use the de-vice more efficiently and cost effectively.
1.4 Customer service
For technical advice, please contact our customer service department at
Schaller GmbH Max-Schaller-Straße 99 A - 8181 St.Ruprecht an der Raab
Telephone: +43 (0)3178 28899 Fax: +43 (0)3178 28899 - 901
E-mail: [email protected] Internet: www.humimeter.com
© Schaller GmbH 2018
Page 11
2. For your safetyThe device complies with the following European directives:
• Restriction of Hazardous Substances in Electrical and Electronic Equipment (RoHS)
• Electromagnetic compatibility (EMC)
The device corresponds to state-of-the-art technology. However, it is still associated with a number of residual hazards.
These hazards can be avoided through strict observance of our safety information.
2.1 Proper use
• Easy to use device for quickly measuring the moisture content of food and luxury food
• The device must only be used for taking measurements on the products defined in the following sections of this manual (see "6. Product types").
2.2 Improper use
• The device is not suitable for measuring mouldy material.
• The device is not waterproof and must be protected from water and fine dust.
2.3 User qualifications
The device must only be operated by people who can be expected to reliably take the measurements. The device must not be operated by people whose reaction times may be slowed due to, e.g. the use of drugs, alcohol or medication.
All persons using this device must have read, understood and follow the instructions provided in the operating manual.
humimeter FS3 Operating Manual
Page 12
2.4 General safety information
The following safety information has to be observed at all times to avoid damage to objects and injury to people:
• Remove the batteries if the device isn´t used for a prolonged period of time (4 weeks).
• In case of damages or loose parts on the device, remove the batteries and con-tact Schaller GmbH or your dealer.
All of the device’s technical features have been inspected and tested before delivery. Every device has a serial number. Do not remove the tag with the serial number.
2.5 Warranty
The warranty does not apply to:
• Damage resulting from non-observance of the operating manual
• Damage resulting from third-party interventions
• Products that have been used improperly or modified without authorisation
• Products with missing or damaged warranty seals
• Damage resulting from force majeure, natural disasters, etc.
• Damage from improper cleaning
• Batteries older than six months
3. On receipt of your device
3.1 Taking the device out of its packaging
• Take the device out of its packaging.
• Next, make sure that it is not damaged and that no parts are missing.
3.2 Making sure that all of the components have been included
Make sure that all of the components have been included by checking the package contents against the following list:
• humimeter FS3
• 4 pieces of AA Alkaline batteries
• Digital scale 500 grams
Page 13
• Measuring cup 0.5 liter
• Plastic case
• Rubber protection cover
• Operating manual
Optional accessories:
• humimeter USB data interface module - USB stick with software and USB cable
• Battery operated portable thermal printer (only possible together with humimeter USB data interface module) - Described in a separate operating manual
• Bluetooth module (only possible together with humimeter USB data interface module) - Described in a separate operating manual
3.3 Inserting batteries
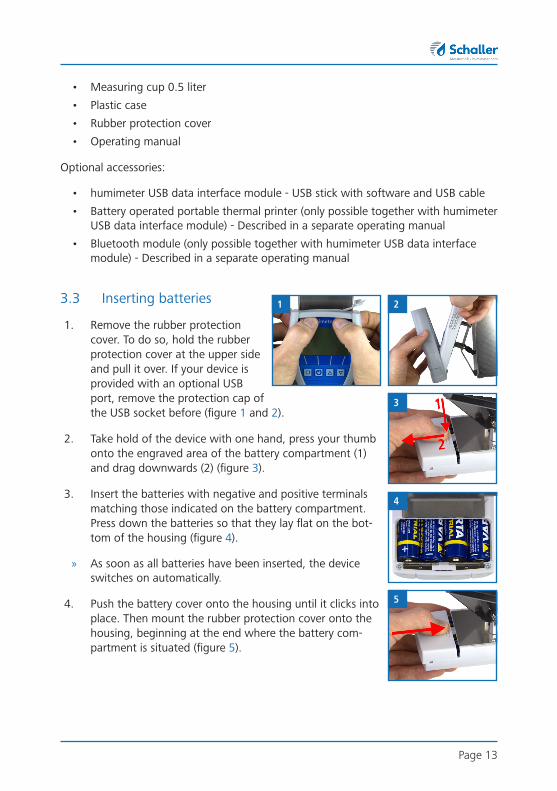
1. Remove the rubber protection cover. To do so, hold the rubber protection cover at the upper side and pull it over. If your device is provided with an optional USB port, remove the protection cap of the USB socket before (figure 1 and 2).
2. Take hold of the device with one hand, press your thumb onto the engraved area of the battery compartment (1) and drag downwards (2) (figure 3).
3. Insert the batteries with negative and positive terminals matching those indicated on the battery compartment. Press down the batteries so that they lay flat on the bot-tom of the housing (figure 4).
» As soon as all batteries have been inserted, the device switches on automatically.
4. Push the battery cover onto the housing until it clicks into place. Then mount the rubber protection cover onto the housing, beginning at the end where the battery com-partment is situated (figure 5).
1 2
3
4
5
humimeter FS3 Operating Manual
Page 14
4. Using the device - Basics
4.1 Switching the device on
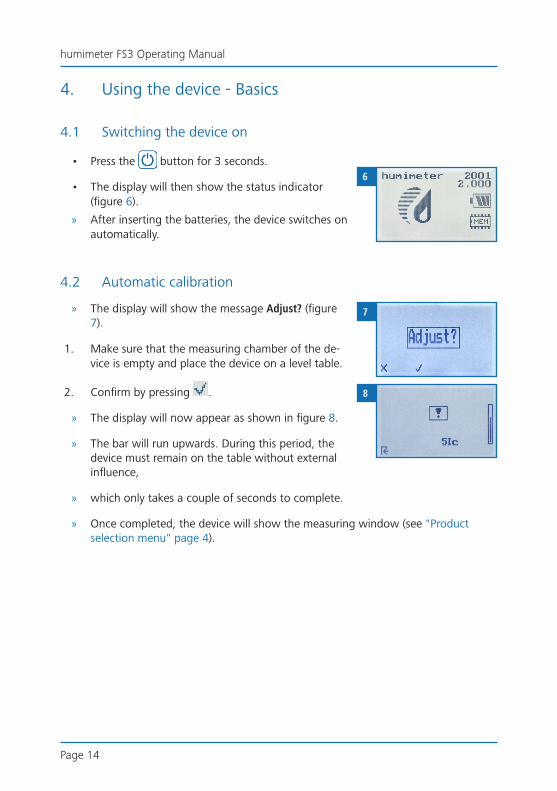
• Press the button for 3 seconds.
• The display will then show the status indicator (figure 6).
» After inserting the batteries, the device switches on automatically.
4.2 Automatic calibration
» The display will show the message Adjust? (figure 7).
1. Make sure that the measuring chamber of the de-vice is empty and place the device on a level table.
2. Confirm by pressing .
» The display will now appear as shown in figure 8.
» The bar will run upwards. During this period, the device must remain on the table without external influence,
» which only takes a couple of seconds to complete.
» Once completed, the device will show the measuring window (see "Product selection menu" page 4).
6
7
8
Page 15
4.3 Selecting the product type
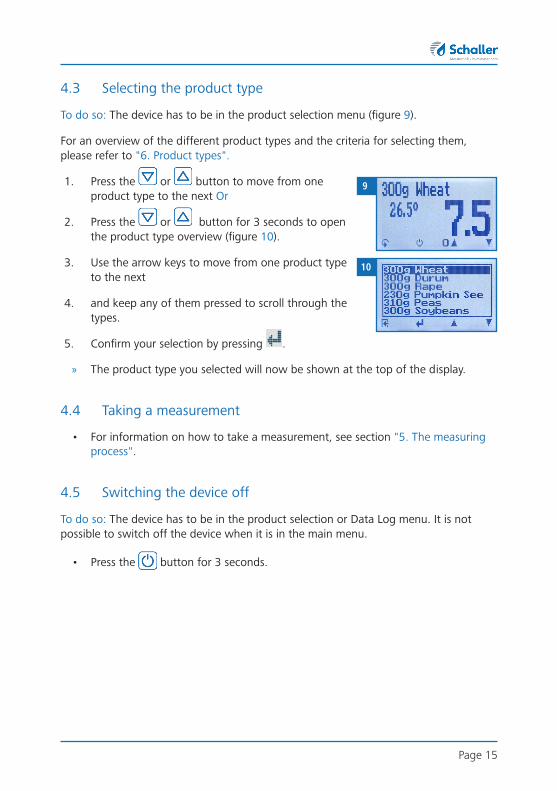
To do so: The device has to be in the product selection menu (figure 9).
For an overview of the different product types and the criteria for selecting them, please refer to "6. Product types".
1. Press the or button to move from one product type to the next Or
2. Press the or button for 3 seconds to open the product type overview (figure 10).
3. Use the arrow keys to move from one product type to the next
4. and keep any of them pressed to scroll through the types.
5. Confirm your selection by pressing .
» The product type you selected will now be shown at the top of the display.
4.4 Taking a measurement
• For information on how to take a measurement, see section "5. The measuring process".
4.5 Switching the device off
To do so: The device has to be in the product selection or Data Log menu. It is not possible to switch off the device when it is in the main menu.
• Press the button for 3 seconds.
9
10
humimeter FS3 Operating Manual
Page 16
5. The measuring process
5.1 Preparing a measurement
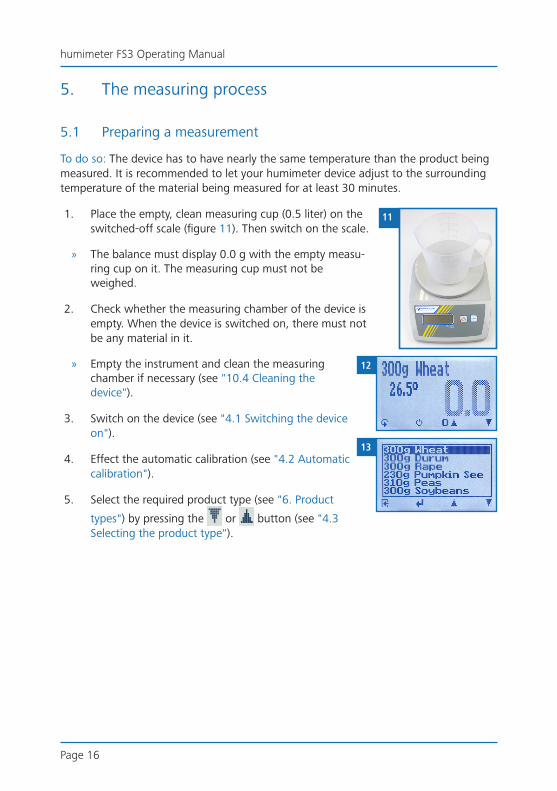
To do so: The device has to have nearly the same temperature than the product being measured. It is recommended to let your humimeter device adjust to the surrounding temperature of the material being measured for at least 30 minutes.
1. Place the empty, clean measuring cup (0.5 liter) on the switched-off scale (figure 11). Then switch on the scale.
» The balance must display 0.0 g with the empty measu-ring cup on it. The measuring cup must not be weighed.
2. Check whether the measuring chamber of the device is empty. When the device is switched on, there must not be any material in it.
» Empty the instrument and clean the measuring chamber if necessary (see "10.4 Cleaning the device").
3. Switch on the device (see "4.1 Switching the device on").
4. Effect the automatic calibration (see "4.2 Automatic calibration").
5. Select the required product type (see "6. Product
types") by pressing the or button (see "4.3 Selecting the product type").
11
12
13

Page 17
5.2 Taking a measurement
To do so: The device has to have nearly the same temperature than the product being measured.
1. Fill the measuring cup with the filling quantity displayed in the product type name (+/- 1.0 g) (figure 15) (see "6. Product types").
2. Now slowly and evenly fill the measuring chamber of the device with the material being measured (figure 15).
» For the filling, no funnel or similar device may be used.
3. The device will now display the moisture content (figure 16).
» The displayed value flashes when the moisture content exceeds the measuring range of the se-lected product type (figure 17). A flashing value signals a decreasing accuracy of the measure-ment. The measuring range is dependent on the product type (see "6. Product types").
» Once the reading has been taken, it can be saved on the device (see "5.3 Saving individual readings" or "5.4 Saving several readings (a measurement series) at the same time").
4. Empty the device and make sure that there are no residues in the measuring chamber.
» Clean the measuring chamber if necessary (see "10.4 Cleaning the device").
i Information - Measuring accuracy
This rapid and non-destructive measuring procedure allows you to quickly take several moisture readings of the same sample material. When saving the individual readings, the device will automatically calculate the readings’ average (see "5.4 Saving several readings (a measurement series) at the same time").
i Information - Incorrect readingsAlways make sure to select the correct product type and the correct filling quantity for the material you are measuring. This prevents taking incorrect read-ings (see "11. Faults").
14
15
16
17
humimeter FS3 Operating Manual
Page 18
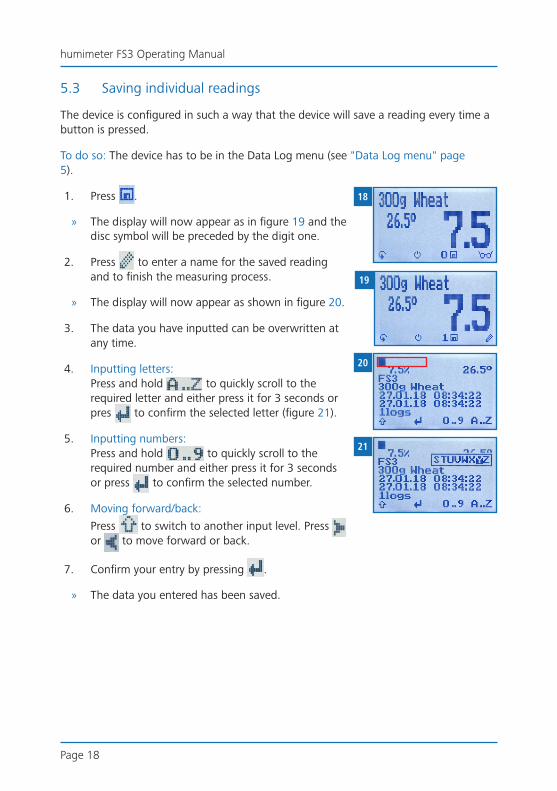
5.3 Saving individual readings
The device is configured in such a way that the device will save a reading every time a button is pressed.
To do so: The device has to be in the Data Log menu (see "Data Log menu" page 5).
1. Press .
» The display will now appear as in figure 19 and the disc symbol will be preceded by the digit one.
2. Press to enter a name for the saved reading and to finish the measuring process.
» The display will now appear as shown in figure 20.
3. The data you have inputted can be overwritten at any time.
4. Inputting letters: Press and hold to quickly scroll to the required letter and either press it for 3 seconds or pres to confirm the selected letter (figure 21).
5. Inputting numbers: Press and hold to quickly scroll to the required number and either press it for 3 seconds or press to confirm the selected number.
6. Moving forward/back:
Press to switch to another input level. Press or to move forward or back.
7. Confirm your entry by pressing .
» The data you entered has been saved.
18
19
20
21
Page 19
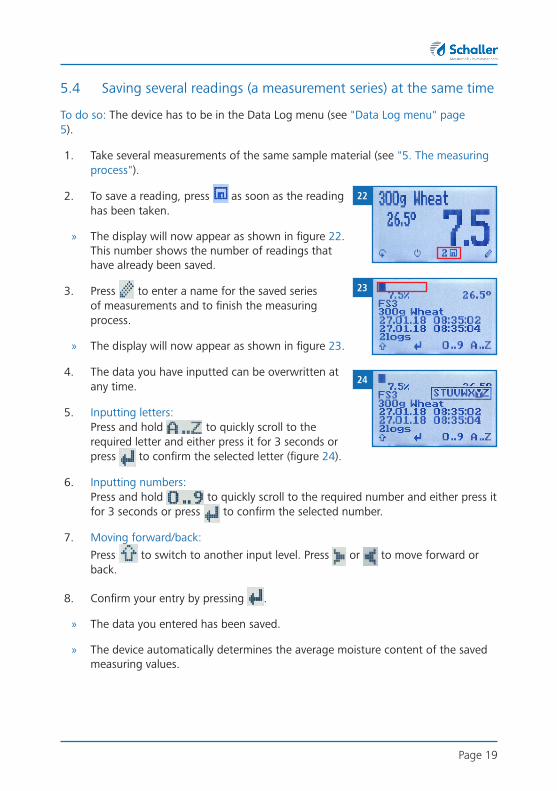
5.4 Saving several readings (a measurement series) at the same time
To do so: The device has to be in the Data Log menu (see "Data Log menu" page 5).
1. Take several measurements of the same sample material (see "5. The measuring process").
2. To save a reading, press as soon as the reading has been taken.
» The display will now appear as shown in figure 22. This number shows the number of readings that have already been saved.
3. Press to enter a name for the saved series of measurements and to finish the measuring process.
» The display will now appear as shown in figure 23.
4. The data you have inputted can be overwritten at any time.
5. Inputting letters: Press and hold to quickly scroll to the required letter and either press it for 3 seconds or press to confirm the selected letter (figure 24).
6. Inputting numbers: Press and hold to quickly scroll to the required number and either press it for 3 seconds or press to confirm the selected number.
7. Moving forward/back:
Press to switch to another input level. Press or to move forward or back.
8. Confirm your entry by pressing .
» The data you entered has been saved.
» The device automatically determines the average moisture content of the saved measuring values.
22
23
24
humimeter FS3 Operating Manual
Page 20
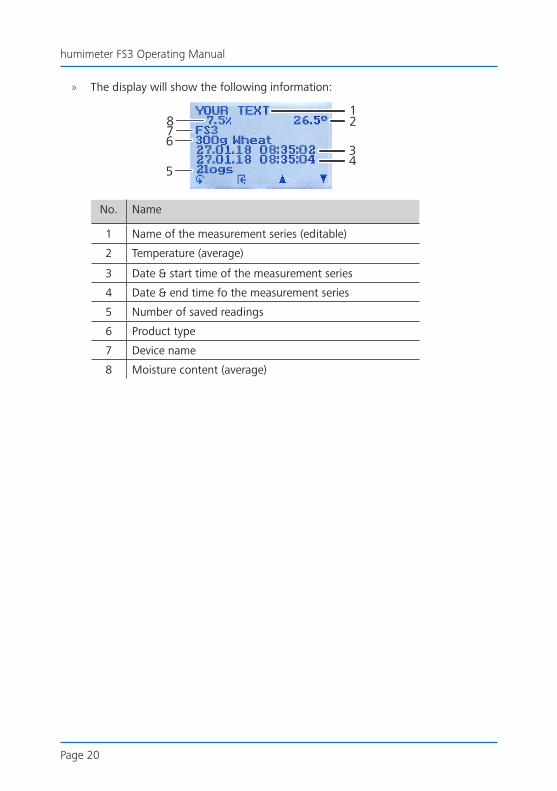
» The display will show the following information:
No. Name
1 Name of the measurement series (editable)
2 Temperature (average)
3 Date & start time of the measurement series
4 Date & end time fo the measurement series
5 Number of saved readings
6 Product type
7 Device name
8 Moisture content (average)
1
543
2
678
Page 21
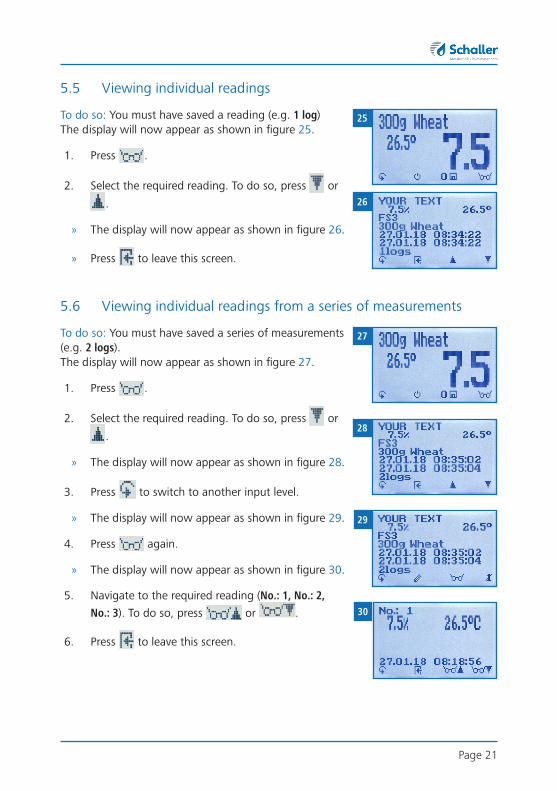
5.5 Viewing individual readings
To do so: You must have saved a reading (e.g. 1 log) The display will now appear as shown in figure 25.
1. Press .
2. Select the required reading. To do so, press or
.
» The display will now appear as shown in figure 26.
» Press to leave this screen.
5.6 Viewing individual readings from a series of measurements
To do so: You must have saved a series of measurements (e.g. 2 logs). The display will now appear as shown in figure 27.
1. Press .
2. Select the required reading. To do so, press or
.
» The display will now appear as shown in figure 28.
3. Press to switch to another input level.
» The display will now appear as shown in figure 29.
4. Press again.
» The display will now appear as shown in figure 30.
5. Navigate to the required reading (No.: 1, No.: 2,
No.: 3). To do so, press or .
6. Press to leave this screen.
25
26
27
28
29
30
humimeter FS3 Operating Manual
Page 22
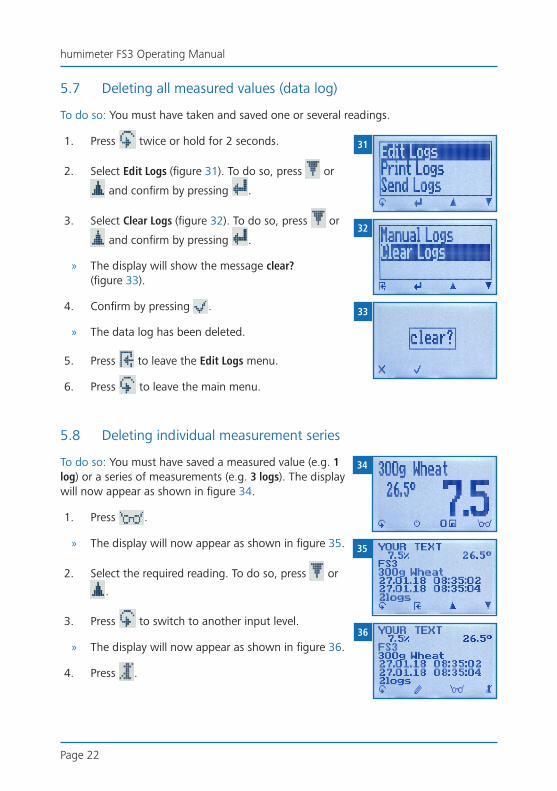
5.7 Deleting all measured values (data log)
To do so: You must have taken and saved one or several readings.
1. Press twice or hold for 2 seconds.
2. Select Edit Logs (figure 31). To do so, press or
and confirm by pressing .
3. Select Clear Logs (figure 32). To do so, press or
and confirm by pressing .
» The display will show the message clear? (figure 33).
4. Confirm by pressing .
» The data log has been deleted.
5. Press to leave the Edit Logs menu.
6. Press to leave the main menu.
5.8 Deleting individual measurement series
To do so: You must have saved a measured value (e.g. 1 log) or a series of measurements (e.g. 3 logs). The display will now appear as shown in figure 34.
1. Press .
» The display will now appear as shown in figure 35.
2. Select the required reading. To do so, press or
.
3. Press to switch to another input level.
» The display will now appear as shown in figure 36.
4. Press .
31
32
33
34
35
36
Page 23
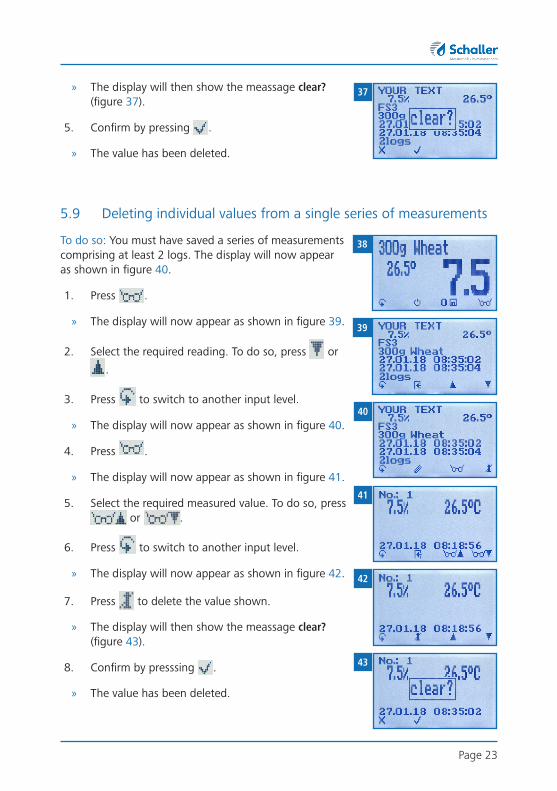
» The display will then show the meassage clear? (figure 37).
5. Confirm by pressing .
» The value has been deleted.
5.9 Deleting individual values from a single series of measurements
To do so: You must have saved a series of measurements comprising at least 2 logs. The display will now appear as shown in figure 40.
1. Press .
» The display will now appear as shown in figure 39.
2. Select the required reading. To do so, press or
.
3. Press to switch to another input level.
» The display will now appear as shown in figure 40.
4. Press .
» The display will now appear as shown in figure 41.
5. Select the required measured value. To do so, press or .
6. Press to switch to another input level.
» The display will now appear as shown in figure 42.
7. Press to delete the value shown.
» The display will then show the meassage clear? (figure 43).
8. Confirm by presssing .
» The value has been deleted.
37
38
39
40
41
42
43
humimeter FS3 Operating Manual
Page 24
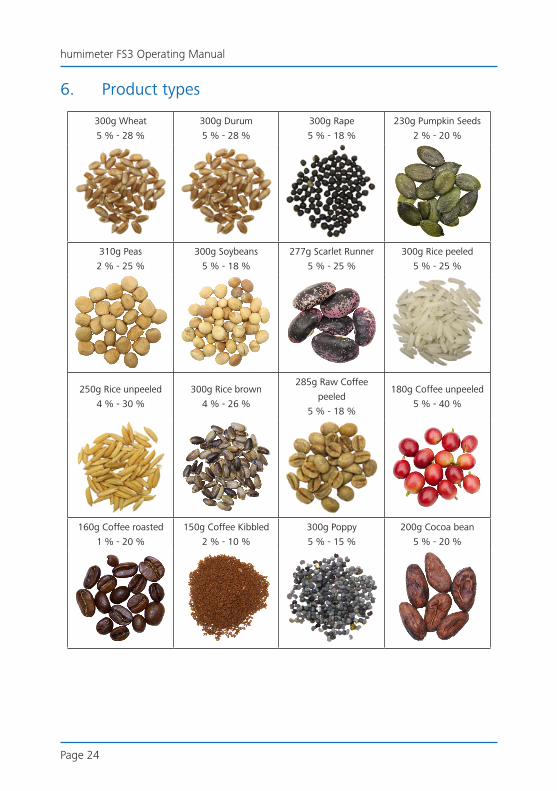
6. Product types
300g Wheat
5 % - 28 %
300g Durum
5 % - 28 %
300g Rape
5 % - 18 %
230g Pumpkin Seeds
2 % - 20 %
310g Peas
2 % - 25 %
300g Soybeans
5 % - 18 %
277g Scarlet Runner
5 % - 25 %
300g Rice peeled
5 % - 25 %
250g Rice unpeeled
4 % - 30 %
300g Rice brown
4 % - 26 %
285g Raw Coffee
peeled
5 % - 18 %
180g Coffee unpeeled
5 % - 40 %
160g Coffee roasted
1 % - 20 %
150g Coffee Kibbled
2 % - 10 %
300g Poppy
5 % - 15 %
200g Cocoa bean
5 % - 20 %
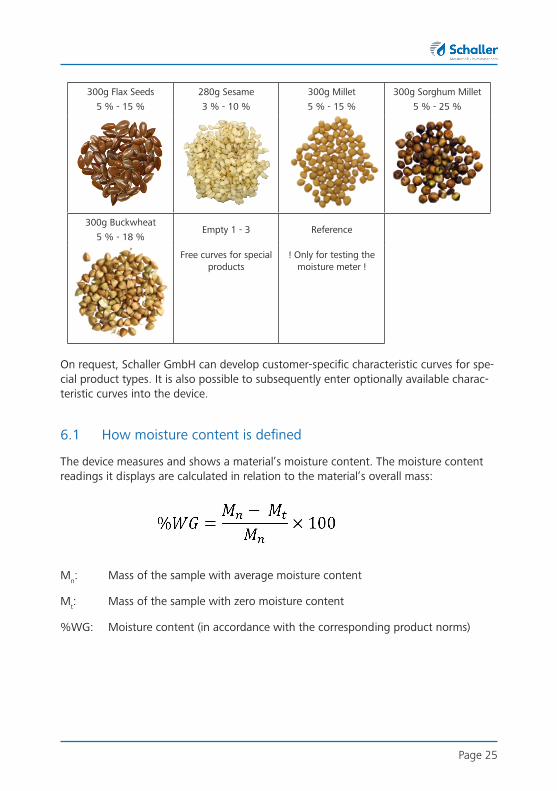
Page 25
300g Flax Seeds
5 % - 15 %
280g Sesame
3 % - 10 %
300g Millet
5 % - 15 %
300g Sorghum Millet
5 % - 25 %
300g Buckwheat
5 % - 18 %Empty 1 - 3 Reference
Free curves for special products
! Only for testing the moisture meter !
On request, Schaller GmbH can develop customer-specific characteristic curves for spe-cial product types. It is also possible to subsequently enter optionally available charac-teristic curves into the device.
6.1 How moisture content is defined
The device measures and shows a material’s moisture content. The moisture content readings it displays are calculated in relation to the material’s overall mass:
Mn: Mass of the sample with average moisture content
Mt: Mass of the sample with zero moisture content
%WG: Moisture content (in accordance with the corresponding product norms)
humimeter FS3 Operating Manual
Page 26
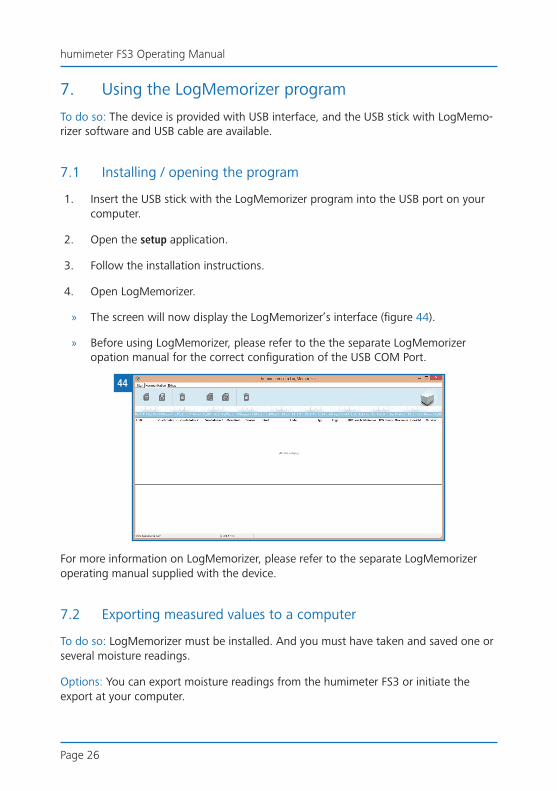
7. Using the LogMemorizer program
To do so: The device is provided with USB interface, and the USB stick with LogMemo-rizer software and USB cable are available.
7.1 Installing / opening the program
1. Insert the USB stick with the LogMemorizer program into the USB port on your computer.
2. Open the setup application.
3. Follow the installation instructions.
4. Open LogMemorizer.
» The screen will now display the LogMemorizer’s interface (figure 44).
» Before using LogMemorizer, please refer to the the separate LogMemorizer opation manual for the correct configuration of the USB COM Port.
For more information on LogMemorizer, please refer to the separate LogMemorizer operating manual supplied with the device.
7.2 Exporting measured values to a computer
To do so: LogMemorizer must be installed. And you must have taken and saved one or several moisture readings.
Options: You can export moisture readings from the humimeter FS3 or initiate the export at your computer.
44

Page 27
Exporting moisture readings from the humimeter FS3
Connect the humimeter FS3 to your computer using the supplied USB cable:
1. Insert the USB Mini B connector into the humime-ter FS3 (figure 45).
2. Insert the USB connector into the computer.
3. Open LogMemorizer on your computer.
4. Switch on the humimeter FS3.
5. Press twice or hold for 2 seconds.
6. Select Send Logs (figure 46). To do so, press or
and confirm by pressing .
7. Select Manual Logs (figure 47). To do so, press
or and confirm by pressing .
» The display will then show the message Send (figure 48).
» All of the measuring values saved on the humime-ter FS3 will now be sent to your computer.
Initiating the data export at your computer
Connect the humimeter FS3 to your computer using the supplied USB cable:
1. Insert the USB Mini B connector into the humime-ter FS3 (figure 49).
2. Insert the USB connector into the computer.
3. Open LogMemorizer on your computer.
4. Switch on the humimeter FS3.
5. Open the Communication tab in LogMemorizer (figure 50).
45
46
47
48
49
50
humimeter FS3 Operating Manual
Page 28
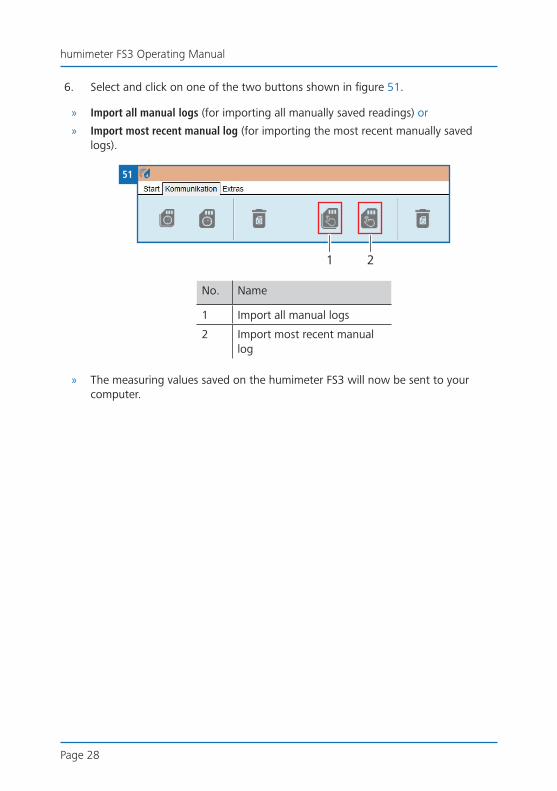
6. Select and click on one of the two buttons shown in figure 51.
» Import all manual logs (for importing all manually saved readings) or
» Import most recent manual log (for importing the most recent manually saved logs).
No. Name
1 Import all manual logs
2 Import most recent manual log
» The measuring values saved on the humimeter FS3 will now be sent to your computer.
51
1 2
Page 29
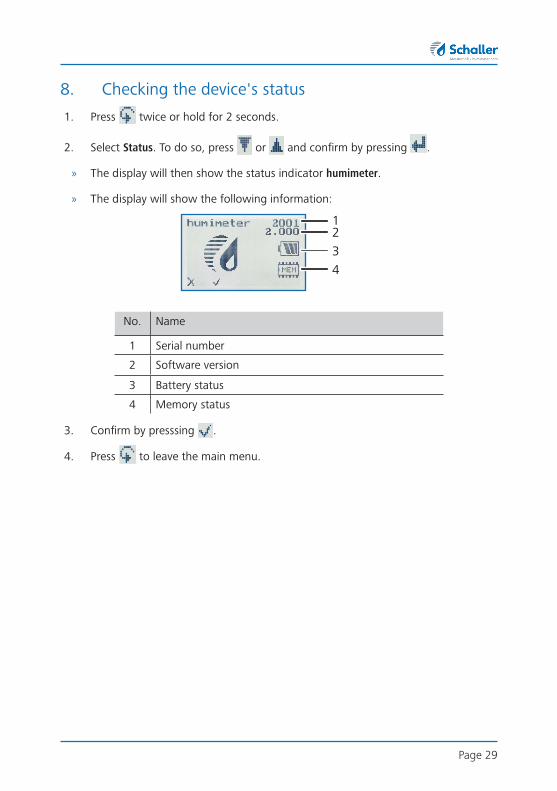
8. Checking the device's status
1. Press twice or hold for 2 seconds.
2. Select Status. To do so, press or and confirm by pressing .
» The display will then show the status indicator humimeter.
» The display will show the following information:
No. Name
1 Serial number
2 Software version
3 Battery status
4 Memory status
3. Confirm by presssing .
4. Press to leave the main menu.
1234

humimeter FS3 Operating Manual
Page 30
9. Configuring the device
9.1 Turning on Bluetooth
The information on Bluetooth is provided in a separate operating manual.
9.2 Adjust the date/time
1. Press twice or hold for 2 seconds.
2. Select Options. To do so, press or and confirm by pressing .
3. Select Date/Time. To do so, press or and confirm by pressing .
» The display will now appear as shown in figure 52.
» The format for the date is DD-MM-YY (Day-Month-Year).
» The format for the time is hh:mm:ss (Hour:Minutes:Seconds).
4. Inputting numbers: Press and hold to quickly scroll to the required number and either press it for 3 seconds or press to confirm the selected number (figure 53).
5. Moving forward: To move forward between DD-MM-YY and hh:mm:ss, press .
6. Moving back:
Press to switch to another input level. To move backward between
DD-MM-YY and hh:mm:ss, press .
7. Confirm the date/time by pressing .
» The settings have been saved.
8. Press to leave the Options menu.
9. Press to leave the main menu.
52
53
Page 31
9.3 Selecting a language
1. Press twice or hold for 2 seconds.
2. Select Options. To do so, press or and confirm by pressing .
3. Select Language. To do so, press or and confirm by pressing .
4. Navigate to the required language. To do so, press or and confirm by
pressing .
» The settings have been saved.
5. Press to leave the Options menu.
6. Press to leave the main menu.
9.4 Activating options
To do so: Some of the options must be deactivated.
1. Press twice or hold for 2 seconds.
2. Select Options. To do so, press or and confirm by pressing .
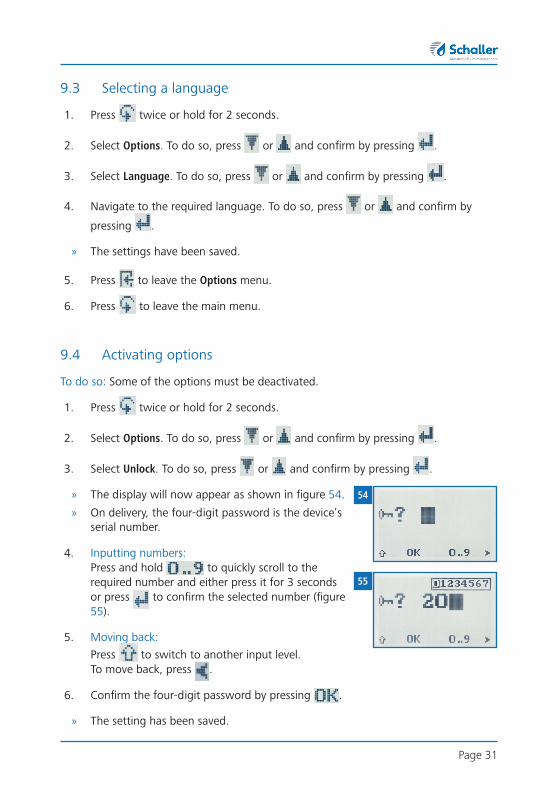
3. Select Unlock. To do so, press or and confirm by pressing .
» The display will now appear as shown in figure 54.
» On delivery, the four-digit password is the device’s serial number.
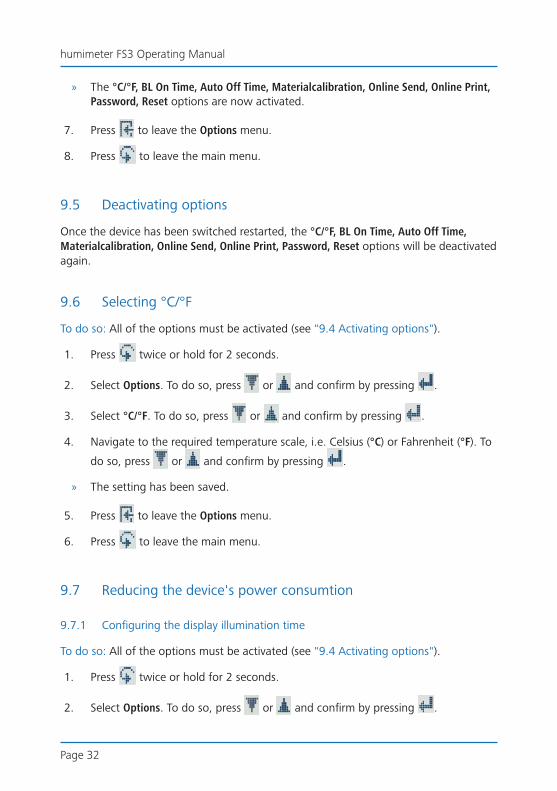
4. Inputting numbers: Press and hold to quickly scroll to the required number and either press it for 3 seconds or press to confirm the selected number (figure 55).
5. Moving back:
Press to switch to another input level. To move back, press .
6. Confirm the four-digit password by pressing .
» The setting has been saved.
54
55
humimeter FS3 Operating Manual
Page 32
» The °C/°F, BL On Time, Auto Off Time, Materialcalibration, Online Send, Online Print, Password, Reset options are now activated.
7. Press to leave the Options menu.
8. Press to leave the main menu.
9.5 Deactivating options
Once the device has been switched restarted, the °C/°F, BL On Time, Auto Off Time, Materialcalibration, Online Send, Online Print, Password, Reset options will be deactivated again.
9.6 Selecting °C/°F
To do so: All of the options must be activated (see "9.4 Activating options").
1. Press twice or hold for 2 seconds.
2. Select Options. To do so, press or and confirm by pressing .
3. Select °C/°F. To do so, press or and confirm by pressing .
4. Navigate to the required temperature scale, i.e. Celsius (°C) or Fahrenheit (°F). To
do so, press or and confirm by pressing .
» The setting has been saved.
5. Press to leave the Options menu.
6. Press to leave the main menu.
9.7 Reducing the device's power consumtion
9.7.1 Configuring the display illumination time
To do so: All of the options must be activated (see "9.4 Activating options").
1. Press twice or hold for 2 seconds.
2. Select Options. To do so, press or and confirm by pressing .
Page 33
3. Select BL On Time. To do so, press or and confirm by pressing .
4. Select the required display illumination period (30 seconds, 2 minutes, 5 minutes,
10 minutes). To do so, press or and confirm by pressing .
» The setting has been saved.
5. Press to leave the Options menu.
6. Press to leave the main menu.
9.7.2 Configuring automatic switch-off
To do so: All of the options must be activated (see "9.4 Activating options").
1. Press twice or hold for 2 seconds.
2. Select Options. To do so, press or and confirm by pressing .
3. Select Auto Off Time. To do so, press or and confirm by pressing .
4. Select the period of time you want the device to stay switched on (3 minutes,
5minutes, 10 minutes). To do so, press or and confirm by pressing .
» The setting has been saved.
5. Press to leave the Options menu.
6. Press to leave the main menu.
humimeter FS3 Operating Manual
Page 34
9.8 Configuring the material calibration function
The type calibration function is described in a separate operating manual.
9.9 Online functions
9.9.1 Online Send
To do so: All of the options must be activated (see "9.4 Activating options").
1. Press twice or hold for 2 seconds.
2. Select Options. To do so, press or and confirm by pressing .
3. Select Online Send. To do so, press or and confirm by pressing .
» The setting has been saved.
» The device now automatically sends the stored measured value to the PC each time the memory button is pressed.
4. Press to leave the Options menu.
5. Press to leave the main menu.
9.9.2 Online Print
To do so: All of the options must be activated (see "9.4 Activating options").
1. Press twice or hold for 2 seconds.
2. Select Options. To do so, press or and confirm by pressing .
3. Select Online Print. To do so, press or and confirm by pressing .
» The setting has been saved.
» The device now automatically prints out the stored measured value each time the memory button is pressed.
4. Press to leave the Options menu.
5. Press to leave the main menu.
Page 35
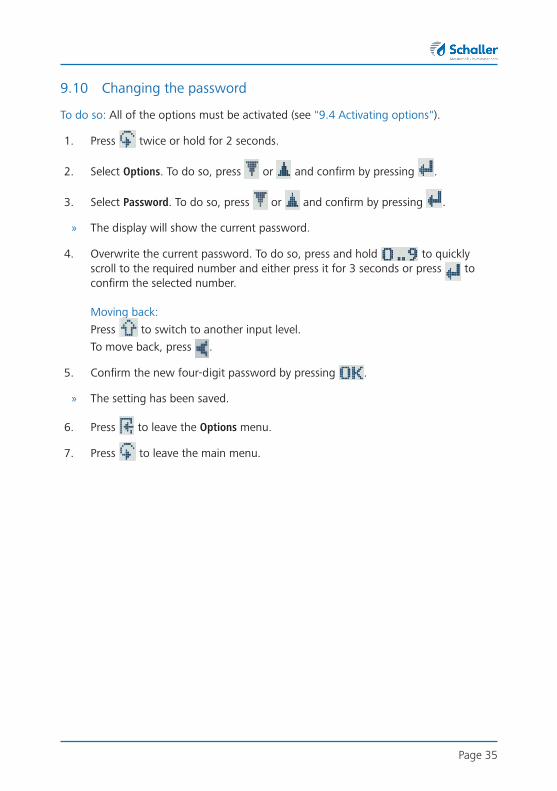
9.10 Changing the password
To do so: All of the options must be activated (see "9.4 Activating options").
1. Press twice or hold for 2 seconds.
2. Select Options. To do so, press or and confirm by pressing .
3. Select Password. To do so, press or and confirm by pressing .
» The display will show the current password.
4. Overwrite the current password. To do so, press and hold to quickly scroll to the required number and either press it for 3 seconds or press to confirm the selected number. Moving back:
Press to switch to another input level.
To move back, press .
5. Confirm the new four-digit password by pressing .
» The setting has been saved.
6. Press to leave the Options menu.
7. Press to leave the main menu.
humimeter FS3 Operating Manual
Page 36
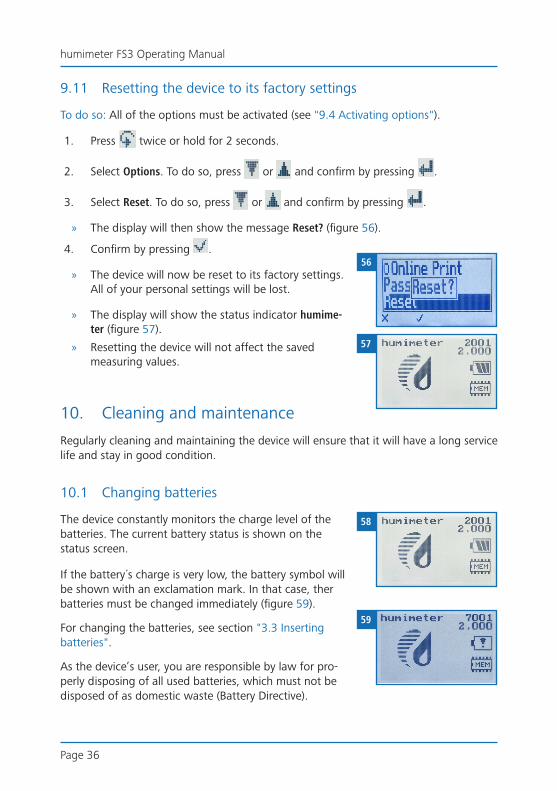
9.11 Resetting the device to its factory settings
To do so: All of the options must be activated (see "9.4 Activating options").
1. Press twice or hold for 2 seconds.
2. Select Options. To do so, press or and confirm by pressing .
3. Select Reset. To do so, press or and confirm by pressing .
» The display will then show the message Reset? (figure 56).
4. Confirm by pressing .
» The device will now be reset to its factory settings. All of your personal settings will be lost.
» The display will show the status indicator humime-ter (figure 57).
» Resetting the device will not affect the saved measuring values.
10. Cleaning and maintenance
Regularly cleaning and maintaining the device will ensure that it will have a long service life and stay in good condition.
10.1 Changing batteries
The device constantly monitors the charge level of the batteries. The current battery status is shown on the status screen.
If the battery´s charge is very low, the battery symbol will be shown with an exclamation mark. In that case, ther batteries must be changed immediately (figure 59).
For changing the batteries, see section "3.3 Inserting batteries".
As the device’s user, you are responsible by law for pro-perly disposing of all used batteries, which must not be disposed of as domestic waste (Battery Directive).
56
57
58
59

Page 37
10.2 Checking the calibration
The device’s calibration should be checked every four weeks. For the check, the optio-nally available test equipment (article no. 11758) is required.
10.2.1 Checking the scale
1. Switch on the scale
2. Place the test weight on the scale (figure 60).
3. The scale should show a value of 500.0 g now (figure 61).
» If the balance displays a value with a deviation of more than 0.5 g, the balance can be readjusted (see manual of the scale).
10.2.2 Checking the device
To do so: The device as well as the test equipment must have a temperature between 17.0 °C and 23.0 °C.
1. Make sure that the measuring chamber of the device is empty.
» Empty the instrument and clean the measuring chamber if necessary (see "10.4 Cleaning the device").
2. Switch on the device (see "4.1 Switching the device on").
3. Effect the automatic calibration (see "4.2 Automatic calibration")
4. Select the product type „Reference“ by pressing the arrow keys (see "4.3 Selecting the product type") (figure 62).
5. Place the empty, clean measuring cup (0.5 liter) on the switched-off scale. Then switch on the scale.
» The balance must display 0.0 g with the empty measuring cup on it. The measuring cup must not be weighed.
6. Fill the measuring cup with 400 gram glass beads (figure 63).
60
61
62
63
humimeter FS3 Operating Manual
Page 38
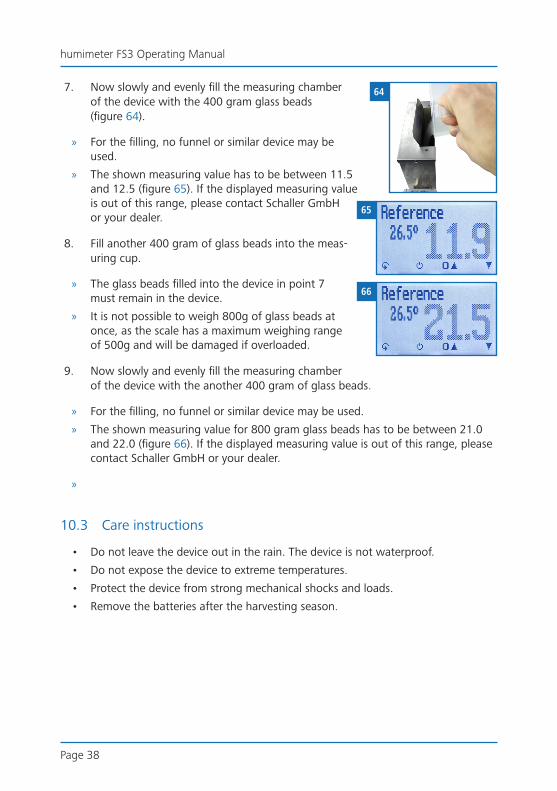
7. Now slowly and evenly fill the measuring chamber of the device with the 400 gram glass beads (figure 64).
» For the filling, no funnel or similar device may be used.
» The shown measuring value has to be between 11.5 and 12.5 (figure 65). If the displayed measuring value is out of this range, please contact Schaller GmbH or your dealer.
8. Fill another 400 gram of glass beads into the meas-uring cup.
» The glass beads filled into the device in point 7 must remain in the device.
» It is not possible to weigh 800g of glass beads at once, as the scale has a maximum weighing range of 500g and will be damaged if overloaded.
9. Now slowly and evenly fill the measuring chamber of the device with the another 400 gram of glass beads.
» For the filling, no funnel or similar device may be used.
» The shown measuring value for 800 gram glass beads has to be between 21.0 and 22.0 (figure 66). If the displayed measuring value is out of this range, please contact Schaller GmbH or your dealer.
»
10.3 Care instructions
• Do not leave the device out in the rain. The device is not waterproof.
• Do not expose the device to extreme temperatures.
• Protect the device from strong mechanical shocks and loads.
• Remove the batteries after the harvesting season.
64
65
66
Page 39
10.4 Cleaning the device
ATTENTION
Do not clean with fluidsWater or cleaning fluid getting inside the device can destroy the device.
► Only clean with dry materials.
Plastic housing
• Clean the plastic housing with a dry cloth.
Measuring chamber
• Clean the measuring chamber with a soft brush.
humimeter FS3 Operating Manual
Page 40
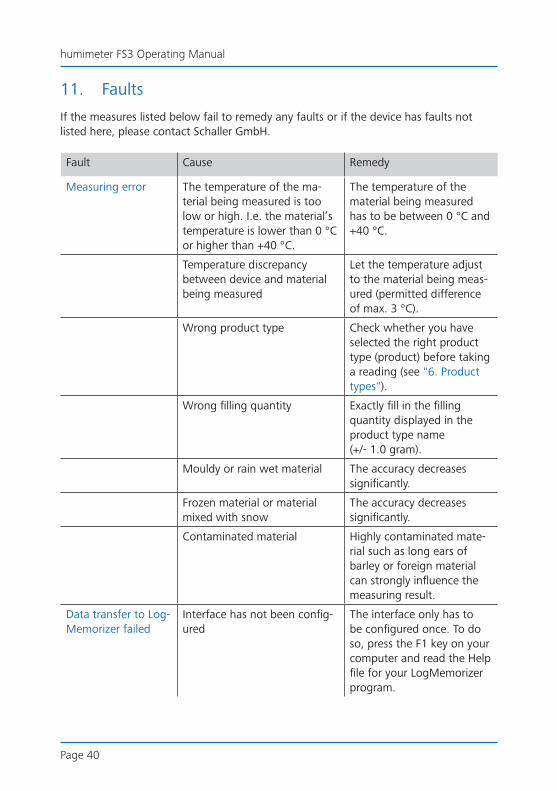
11. Faults
If the measures listed below fail to remedy any faults or if the device has faults not listed here, please contact Schaller GmbH.
Fault Cause Remedy
Measuring error The temperature of the ma-terial being measured is too low or high. I.e. the material’s temperature is lower than 0 °C or higher than +40 °C.
The temperature of the material being measured has to be between 0 °C and +40 °C.
Temperature discrepancy between device and material being measured
Let the temperature adjust to the material being meas-ured (permitted difference of max. 3 °C).
Wrong product type Check whether you have selected the right product type (product) before taking a reading (see "6. Product types").
Wrong filling quantity Exactly fill in the filling quantity displayed in the product type name (+/- 1.0 gram).
Mouldy or rain wet material The accuracy decreases significantly.
Frozen material or material mixed with snow
The accuracy decreases significantly.
Contaminated material Highly contaminated mate-rial such as long ears of barley or foreign material can strongly influence the measuring result.
Data transfer to Log-Memorizer failed
Interface has not been config-ured
The interface only has to be configured once. To do so, press the F1 key on your computer and read the Help file for your LogMemorizer program.
Page 41
12. Storage and disposal
12.1 Storing the device
The device must be stored as follows:
• Do not store outdoors.
• Store in a dry and dust-free place.
• Protect the device from sunlight.
• Avoid mechanical shocks/loads.
• Remove the batteries if the device isn´t used for a period of 4 weeks or longer
• Storage temperature: -20 °C to +60 °C
12.2 Disposing of the device
Devices marked with this symbol are subject to Directive 2012/19/EU of the European Parliament and of the Council of 4 July 2012 on waste electrical and electronic equipment (WEEE). If the device is being operated outside the European Union, the national regulations on the disposal of such devices that apply in the country of use must be observed.
Electronic devices must not be disposed of as domestic waste.
The device must be disposed of appropriately using appropriate collection systems.
humimeter FS3 Operating Manual
Page 42
13. Device information
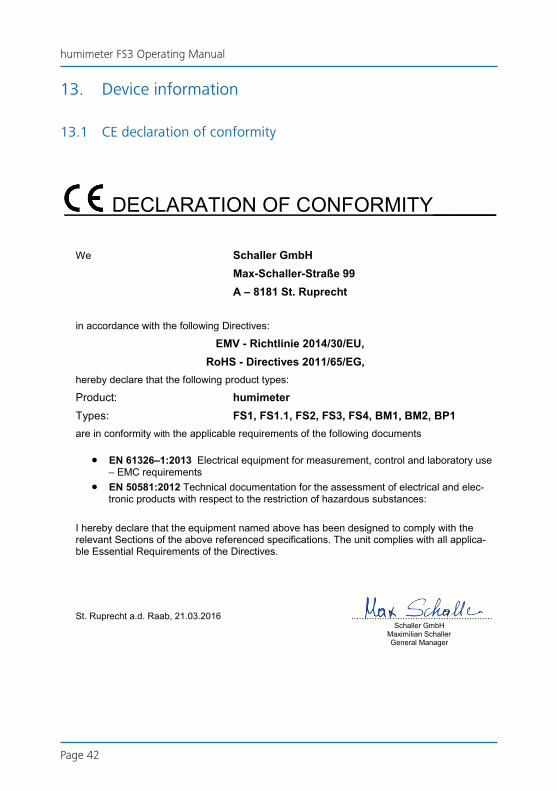
13.1 CE declaration of conformity
DECLARATION OF CONFORMITY______
We Schaller GmbH Max-Schaller-Straße 99 A – 8181 St. Ruprecht
in accordance with the following Directives:
EMV - Richtlinie 2014/30/EU, RoHS - Directives 2011/65/EG,
hereby declare that the following product types:
Product: humimeter Types: FS1, FS1.1, FS2, FS3, FS4, BM1, BM2, BP1 are in conformity with the applicable requirements of the following documents
• EN 61326–1:2013 Electrical equipment for measurement, control and laboratory use – EMC requirements
• EN 50581:2012 Technical documentation for the assessment of electrical and elec-tronic products with respect to the restriction of hazardous substances:
I hereby declare that the equipment named above has been designed to comply with the relevant Sections of the above referenced specifications. The unit complies with all applica-ble Essential Requirements of the Directives.
St. Ruprecht a.d. Raab, 21.03.2016 ....................................................... Schaller GmbH Maximilian Schaller General Manager
Page 43
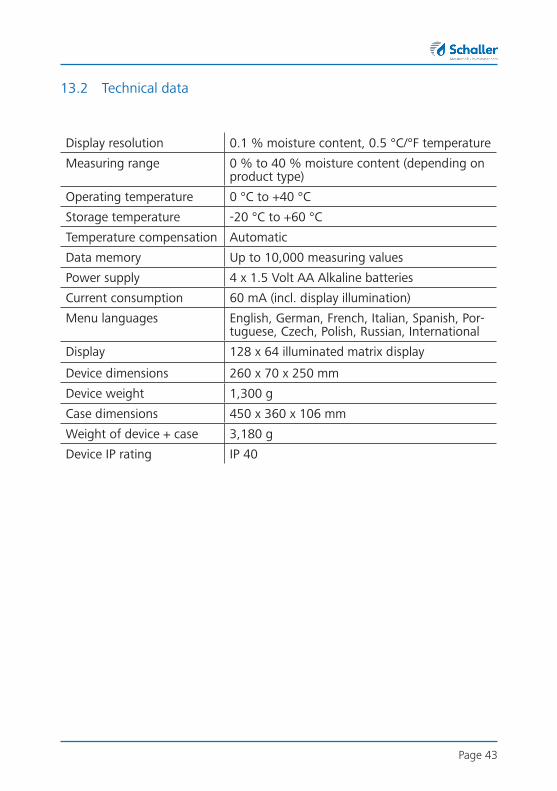
13.2 Technical data
Display resolution 0.1 % moisture content, 0.5 °C/°F temperature
Measuring range 0 % to 40 % moisture content (depending on product type)
Operating temperature 0 °C to +40 °C
Storage temperature -20 °C to +60 °C
Temperature compensation Automatic
Data memory Up to 10,000 measuring values
Power supply 4 x 1.5 Volt AA Alkaline batteries
Current consumption 60 mA (incl. display illumination)
Menu languages English, German, French, Italian, Spanish, Por-tuguese, Czech, Polish, Russian, International
Display 128 x 64 illuminated matrix display
Device dimensions 260 x 70 x 250 mm
Device weight 1,300 g
Case dimensions 450 x 360 x 106 mm
Weight of device + case 3,180 g
Device IP rating IP 40

Climate Environment
Food
Bioenergy
Materials
Buildings
Paper / Board
Related Documents