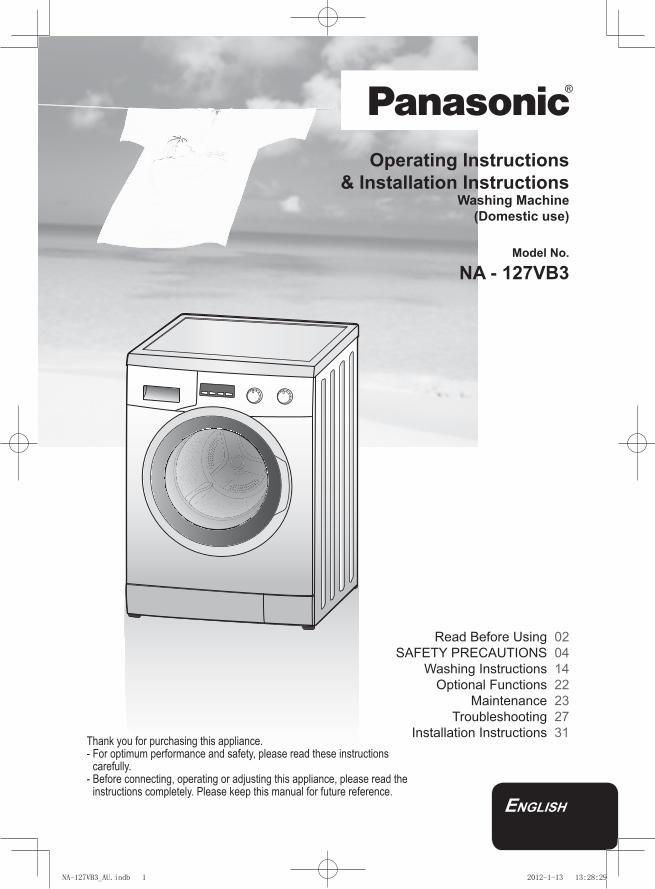
Read Before Using 02 SAFETY PRECAUTIONS 04 Washing Instructions 14 Optional Functions 22 Maintenance 23 Troubleshooting 27 Installation Instructions 31 Operating Instructions & Installation Instructions Washing Machine (Domestic use) Model No. NA - 127VB3 ® Thank you for purchasing this appliance. - For optimum performance and safety, please read these instructions carefully. - Before connecting, operating or adjusting this appliance, please read the instructions completely. Please keep this manual for future reference. ENGLISH NA-127VB3_AU.indb 1 2012-1-13 13:28:29

Welcome message from author
This document is posted to help you gain knowledge. Please leave a comment to let me know what you think about it! Share it to your friends and learn new things together.
Transcript
Read Before Using 02SAFETY PRECAUTIONS 04
Washing Instructions 14Optional Functions 22
Maintenance 23Troubleshooting 27
Installation Instructions 31
Operating Instructions& Installation Instructions
Washing Machine(Domestic use)
Model No.
NA - 127VB3
®
Thank you for purchasing this appliance.- For optimum performance and safety, please read these instructions
carefully.- Before connecting, operating or adjusting this appliance, please read the
instructions completely. Please keep this manual for future reference.ENGLISH
NA-127VB3_AU.indb 1 2012-1-13 13:28:29
2 - Read Before Using
Consider the Environment
Disposing of packagingThe packaging used to protect the washing machine from damage during transportation is all recyclable. For information on recycling, contact your local authority.
Disposing of Waste Electrical & Electronic EquipmentInformation on disposal for users of waste electrical & electronic equipment (private households)
This symbol on the products and/or accompanying documents means that used electrical and electronic products should not be mixed with general household waste.
For proper treatment, recovery and recycling, please take these products to designated collection points, where they will be accepted on a free of charge basis. Alternatively, in some countries you may be able to return your products to your local retailer upon the purchase of an equivalent new product.
Disposing of this product correctly will help to save valuable resources and prevent any potential negative effects on human health and the environment which could otherwise arise from inappropriate waste handling. Please contact your local authority for further details of your nearest designated disposable point.
Penalties may be applicable for incorrect disposal of this waste, in accordance with national legislation.
Information on disposal in other countries outside the European UnionThis symbol is only valid in the European Union.
If you wish to discard this product, please contact your local authorities or dealer and ask for the correct method of disposal.
Eco-friendly LaundryKeep to the load limit of each -programme.
The washing machine automatically -adjusts the operating time of each programme depending on the load.
You only need to use a preliminary wash -if your laundry is heavily soiled.
Using the 60°C Cotton programme -instead of the 90°C Cotton one will save energy, and will remove ordinary stains.
For lightly soiled laundry, using the Cold -Wash programme instead of the 40°C Quick programme will save more energy.
Detergent amountUse the correct amount of detergent -based on the detergent pack instructions and local water hardness.
Adjust the amount of detergent -depending on how soiled your laundry is.
When using a tumble dryerTo save energy, please select the correct spin-dry revolution speed according to the instruction of your tumble dryer.
This product complies with the directives 2006/95/EC and 2004/108/EC.
NA-127VB3_AU.indb 2 2012-1-13 13:28:30
Read Before Using - 3
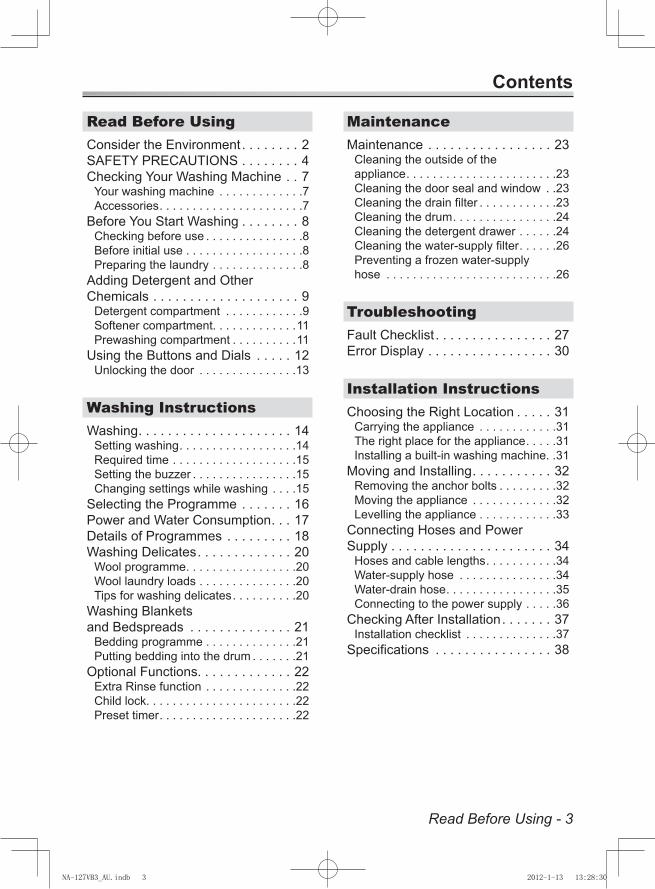
Contents
Read Before UsingConsider the Environment. . . . . . . . 2SAFETY PRECAUTIONS . . . . . . . . 4Checking Your Washing Machine . . 7
Your washing machine . . . . . . . . . . . . .7Accessories. . . . . . . . . . . . . . . . . . . . . .7
Before You Start Washing . . . . . . . . 8Checking before use . . . . . . . . . . . . . . .8Before initial use . . . . . . . . . . . . . . . . . .8Preparing the laundry . . . . . . . . . . . . . .8
Adding Detergent and Other Chemicals . . . . . . . . . . . . . . . . . . . . 9
Detergent compartment . . . . . . . . . . . .9Softener compartment. . . . . . . . . . . . .11Prewashing compartment . . . . . . . . . .11
Using the Buttons and Dials . . . . . 12Unlocking the door . . . . . . . . . . . . . . .13
Washing InstructionsWashing. . . . . . . . . . . . . . . . . . . . . 14
Setting washing. . . . . . . . . . . . . . . . . .14Required time . . . . . . . . . . . . . . . . . . .15Setting the buzzer . . . . . . . . . . . . . . . .15Changing settings while washing . . . .15
Selecting the Programme . . . . . . . 16Power and Water Consumption. . . 17Details of Programmes . . . . . . . . . 18Washing Delicates. . . . . . . . . . . . . 20
Wool programme. . . . . . . . . . . . . . . . .20Wool laundry loads . . . . . . . . . . . . . . .20Tips for washing delicates. . . . . . . . . .20
Washing Blankets and Bedspreads . . . . . . . . . . . . . . 21
Bedding programme . . . . . . . . . . . . . .21Putting bedding into the drum . . . . . . .21
Optional Functions. . . . . . . . . . . . . 22Extra Rinse function . . . . . . . . . . . . . .22Child lock. . . . . . . . . . . . . . . . . . . . . . .22Preset timer. . . . . . . . . . . . . . . . . . . . .22
MaintenanceMaintenance . . . . . . . . . . . . . . . . . 23
Cleaning the outside of the appliance. . . . . . . . . . . . . . . . . . . . . . .23Cleaning the door seal and window . .23Cleaning the drain filter . . . . . . . . . . . .23Cleaning the drum. . . . . . . . . . . . . . . .24Cleaning the detergent drawer . . . . . .24Cleaning the water-supply filter. . . . . .26Preventing a frozen water-supply hose . . . . . . . . . . . . . . . . . . . . . . . . . .26
TroubleshootingFault Checklist . . . . . . . . . . . . . . . . 27Error Display . . . . . . . . . . . . . . . . . 30
Installation InstructionsChoosing the Right Location . . . . . 31
Carrying the appliance . . . . . . . . . . . .31The right place for the appliance. . . . .31Installing a built-in washing machine. .31
Moving and Installing. . . . . . . . . . . 32Removing the anchor bolts . . . . . . . . .32Moving the appliance . . . . . . . . . . . . .32Levelling the appliance . . . . . . . . . . . .33
Connecting Hoses and Power Supply . . . . . . . . . . . . . . . . . . . . . . 34
Hoses and cable lengths. . . . . . . . . . .34Water-supply hose . . . . . . . . . . . . . . .34Water-drain hose. . . . . . . . . . . . . . . . .35Connecting to the power supply . . . . .36
Checking After Installation. . . . . . . 37Installation checklist . . . . . . . . . . . . . .37
Specifications . . . . . . . . . . . . . . . . 38
NA-127VB3_AU.indb 3 2012-1-13 13:28:30
4 - Read Before Using
SAFETY PRECAUTIONSPlease read and follow these safety precautions.
WARNINGThis describes issues which could cause death or serious injury.
General UseThis appliance is not intended for use -by persons (including children) with reduced physical, sensory or mental capabilities, or lack of experience and knowledge, unless they have been given supervision or instruction concerning use of the appliance by a person responsible for their safety.
Children should be supervised to ensure -that they do not play with the appliance.
Do NOT place a stand or a chair close to -the appliance. Children may be able to reach the control panel or climb onto or into the appliance.
Turn off the water supply to the -appliance if it is not going to be used for a prolonged period, such as during a holiday. This is especially important if there is no drainage around the appliance. If the water supply is left on, the water pressure may unnecessarily increase and result in a leak.
Do NOT install the appliance in a damp -location or in a location exposed to the weather. This may result in malfunction, deterioration, electric shock, or fire.
Do NOT pour or spill water directly onto -any part of the appliance. This may result in malfunction, electric shock, or fire.
Keep sources of ignition, such as -candles or cigarettes, away from the appliance. They may cause a fire or damage to the appliance.
Keep flammable materials away from -the appliance, for example, gasoline, thinner, alcohol, or clothing soaked with these materials. They may cause an explosion or a fire.
NA-127VB3_AU.indb 4 2012-1-13 13:28:30
Read Before Using - 5
SAFETY PRECAUTIONSPower source and cable
Unplug the mains lead when cleaning -the appliance.
Check the mains lead and mains plug for -any damage. If the mains lead is damaged, it must be replaced by the manufacturer, its service agent or similarly qualified person to aviod a hazard.
Do NOT use a mains plug adaptor or -extension cable. There is a possibility of overheating which may cause a fire. Use an unused household mains socket, fully rated at AC 220 V to 240 V. If you are not sure, contact a qualified electrician.
ENSURE the mains plug is fully inserted -into the household mains socket. If the mains plug is not fully pushed in, a loose connection may overheat and cause an electric shock or fire.
Do NOT touch the mains lead or mains -plug with wet hands. Possibility of an electric shock.
Do NOT pull the mains lead but hold the -mains plug to unplug the appliance. Otherwise, there is possibility of damage to the mains lead, which may lead to an electric shock or fire.
To Prevent InjuryThe installation of the appliance should -be done by the manufacturer’s dealer or service agent. If the installation, test run and inspection of the appliance are not carried out following the installation method outlined in these instructions, the manufacturer will not be liable for any accident or damage caused.
Do NOT dismantle, repair or modify the -appliance. There is a possibility the appliance may malfunction which may result in a fire or an injury. If repairs are needed, contact your local Customer Service Centre.
Do NOT touch the laundry inside the -drum until it has completely stopped, as there is a possibility of injury. Keep children away from the rotating laundry.
NA-127VB3_AU.indb 5 2012-1-13 13:28:30
6 - Read Before Using
SAFETY PRECAUTIONS
CAUTIONThis describes issues which could cause injury or damage your belongings.
General UsePrior to use, turn on the tap and check -the hose and connections for any leaks. Improper connection could cause leaks.
The new hose-sets supplied with the -appliance are to be used and that old hose-sets should not be reused.
This appliance is only suitable for textiles -labelled washing machine washable.
Do not connect to the hot water supply. -This appliance works ONLY with cold water.
Do NOT apply pesticide, hair spray or -deodorant to the appliance.
Do NOT put any electrical equipment, -for example, TVs, radios or battery chargers, on or near the appliance.
Do NOT put too much laundry or -detergent into the appliance. This may cause damage to the appliance.
REMOVE the anchor bolts before -installing the appliance using a spanner or similar tool. The anchor bolts are used to transport the appliance. If the anchor bolts are not removed, the appliance will strongly vibrate during use.
To Prevent InjuryDo NOT climb onto the appliance. -This may cause injury or damage to the appliance.
Keep fingers away from the door hinge -when opening and closing the door.
Do NOT slide your hand (or unprotected -foot) underneath the appliance when in use.
Check all washing and remove all -objects such as nails, pins, coins, clips, metal wires, etc. They may cause damage to other laundry or the appliance.
Do NOT use the appliance to wash -waterproof sheets or clothing. There is a possibility of excessive vibration or failure during the spin-drying cycle that may result in an injury, damage to the appliance or a water leak.
BE CAREFUL when draining hot water -or any detergent out of the drum.
BE CAREFUL not to get laundry caught -in the door seal when it is closed. This may result in a water leak or damage to the laundry during the wash cycle.
NA-127VB3_AU.indb 6 2012-1-13 13:28:30
Read Before Using - 7
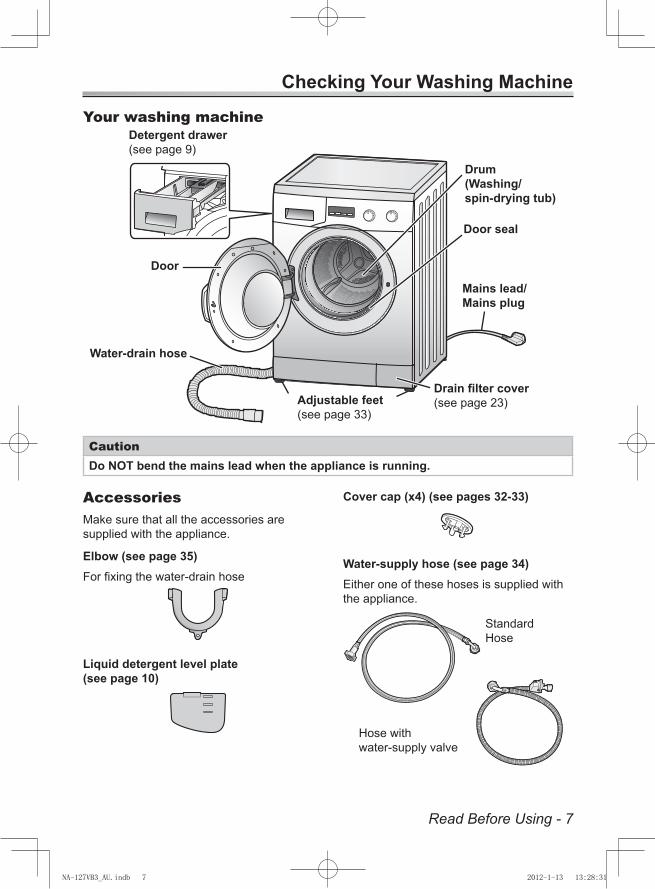
Checking Your Washing Machine
Your washing machine
CautionDo NOT bend the mains lead when the appliance is running.
AccessoriesMake sure that all the accessories are supplied with the appliance.
Elbow (see page 35)For fixing the water-drain hose
Liquid detergent level plate(see page 10)
Cover cap (x4) (see pages 32-33)
Water-supply hose (see page 34)Either one of these hoses is supplied with the appliance.
Detergent drawer(see page 9)
Door
Water-drain hose
Adjustable feet(see page 33)
Drain filter cover(see page 23)
Mains lead/Mains plug
Door seal
Drum(Washing/spin-drying tub)
StandardHose
Hose withwater-supply valve
NA-127VB3_AU.indb 7 2012-1-13 13:28:31
8 - Read Before Using
Before You Start Washing
Checking before useFor the appliance’s initial operation or after a prolonged period of non-operation, perform the following procedures:
Secure the water-supply hose.1. Open the tap.2. Connect the power.3. Make sure that the water-drain hose 4. is positioned towards a drain.For more details, see page 35.
Before initial useFor the appliance’s initial operation, operate the Cotton programme with the default temperature setting, which is 40ºC, WITHOUT any detergent or clothing to rinse out residue or moisture.
NoteThere may be drops of water or condensation in the appliance due to the factory inspection prior to shipment. This is not a malfunction.
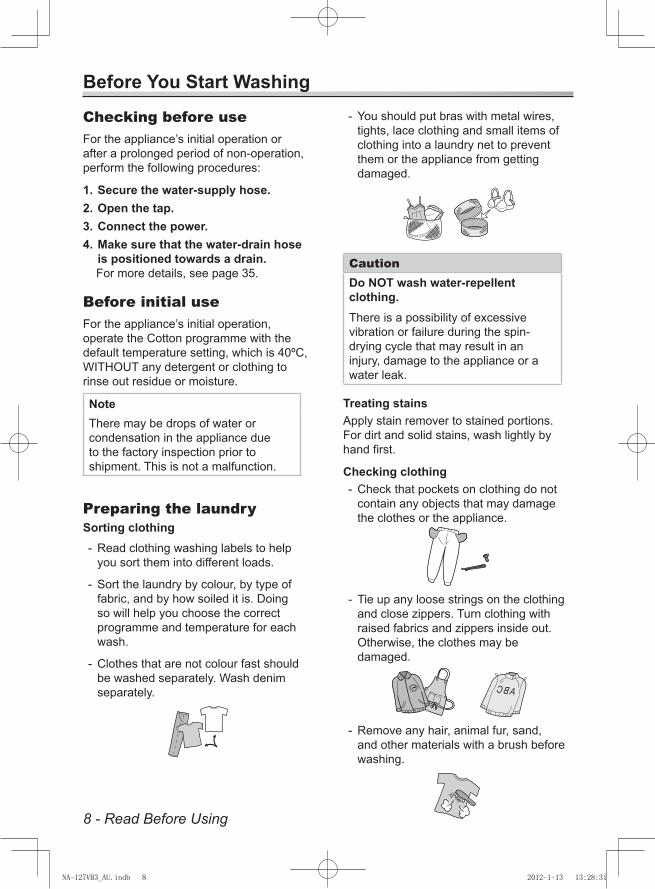
Preparing the laundrySorting clothing
Read clothing washing labels to help -you sort them into different loads.
Sort the laundry by colour, by type of -fabric, and by how soiled it is. Doing so will help you choose the correct programme and temperature for each wash.
Clothes that are not colour fast should -be washed separately. Wash denim separately.
You should put bras with metal wires, -tights, lace clothing and small items of clothing into a laundry net to prevent them or the appliance from getting damaged.
CautionDo NOT wash water-repellent clothing.There is a possibility of excessive vibration or failure during the spin-drying cycle that may result in an injury, damage to the appliance or a water leak.
Treating stainsApply stain remover to stained portions. For dirt and solid stains, wash lightly by hand first.
Checking clothingCheck that pockets on clothing do not -contain any objects that may damage the clothes or the appliance.
Tie up any loose strings on the clothing -and close zippers. Turn clothing with raised fabrics and zippers inside out. Otherwise, the clothes may be damaged.
Remove any hair, animal fur, sand, -and other materials with a brush before washing.
NA-127VB3_AU.indb 8 2012-1-13 13:28:31
Read Before Using - 9
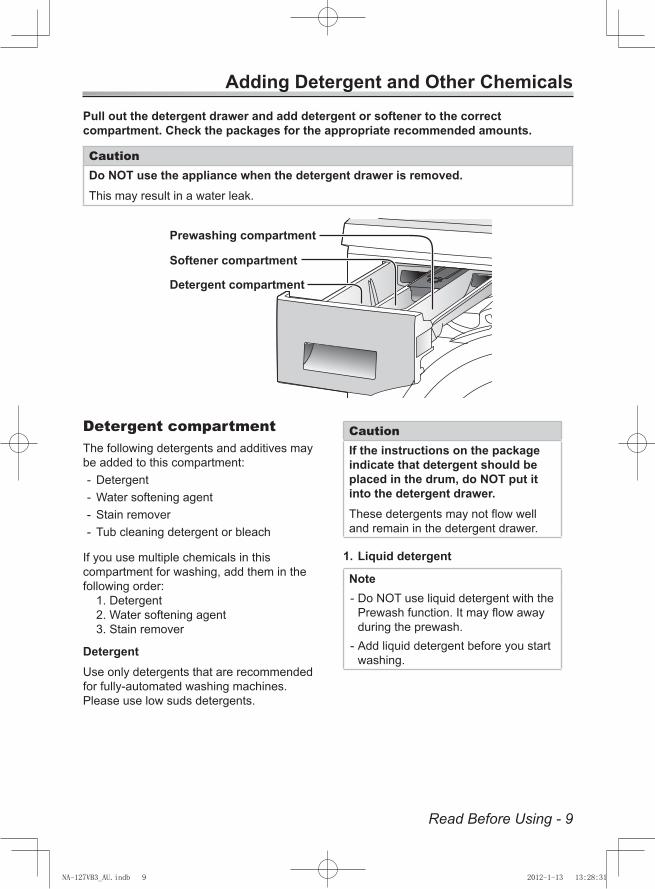
Adding Detergent and Other ChemicalsPull out the detergent drawer and add detergent or softener to the correct compartment. Check the packages for the appropriate recommended amounts.
CautionDo NOT use the appliance when the detergent drawer is removed. This may result in a water leak.
Detergent compartmentThe following detergents and additives may be added to this compartment:
Detergent -Water softening agent -Stain remover -Tub cleaning detergent or bleach -
If you use multiple chemicals in this compartment for washing, add them in the following order:
1. Detergent2. Water softening agent3. Stain remover
DetergentUse only detergents that are recommended for fully-automated washing machines. Please use low suds detergents.
CautionIf the instructions on the package indicate that detergent should be placed in the drum, do NOT put it into the detergent drawer.These detergents may not flow well and remain in the detergent drawer.
Liquid detergent1.
NoteDo NOT use liquid detergent with the -Prewash function. It may flow away during the prewash.Add liquid detergent before you start -washing.
Prewashing compartment
Softener compartment
Detergent compartment
NA-127VB3_AU.indb 9 2012-1-13 13:28:31
10 - Read Before Using
Adding Detergent and Other Chemicals
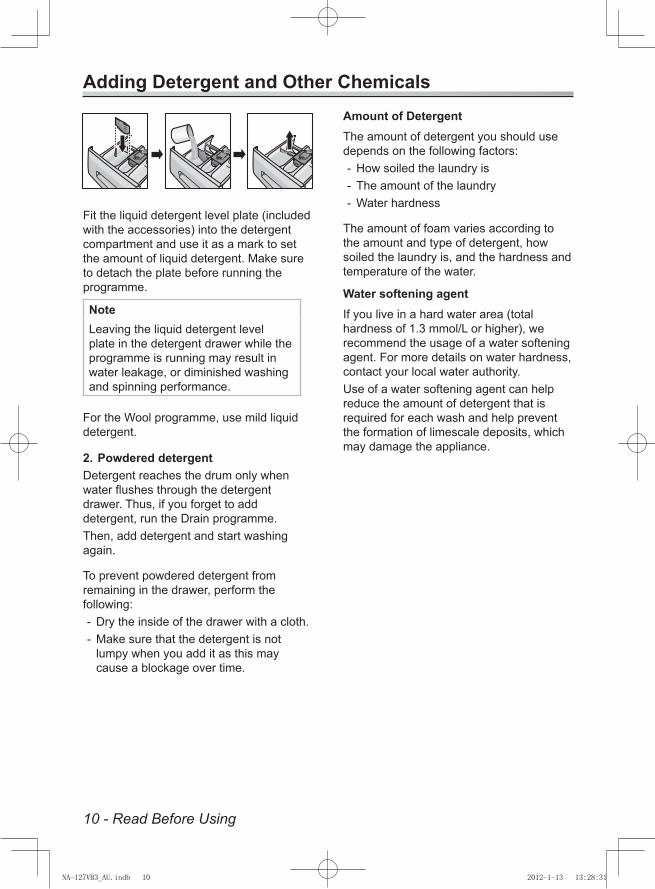
Fit the liquid detergent level plate (included with the accessories) into the detergent compartment and use it as a mark to set the amount of liquid detergent. Make sure to detach the plate before running the programme.
NoteLeaving the liquid detergent level plate in the detergent drawer while the programme is running may result in water leakage, or diminished washing and spinning performance.
For the Wool programme, use mild liquid detergent.
Powdered detergent2. Detergent reaches the drum only when water flushes through the detergent drawer. Thus, if you forget to add detergent, run the Drain programme.Then, add detergent and start washing again.
To prevent powdered detergent from remaining in the drawer, perform the following:
Dry the inside of the drawer with a cloth. -Make sure that the detergent is not -lumpy when you add it as this may cause a blockage over time.
Amount of DetergentThe amount of detergent you should use depends on the following factors:
How soiled the laundry is -The amount of the laundry -Water hardness -
The amount of foam varies according to the amount and type of detergent, how soiled the laundry is, and the hardness and temperature of the water.
Water softening agentIf you live in a hard water area (total hardness of 1.3 mmol/L or higher), we recommend the usage of a water softening agent. For more details on water hardness, contact your local water authority.Use of a water softening agent can help reduce the amount of detergent that is required for each wash and help prevent the formation of limescale deposits, which may damage the appliance.
NA-127VB3_AU.indb 10 2012-1-13 13:28:31
Read Before Using - 11
Adding Detergent and Other Chemicals
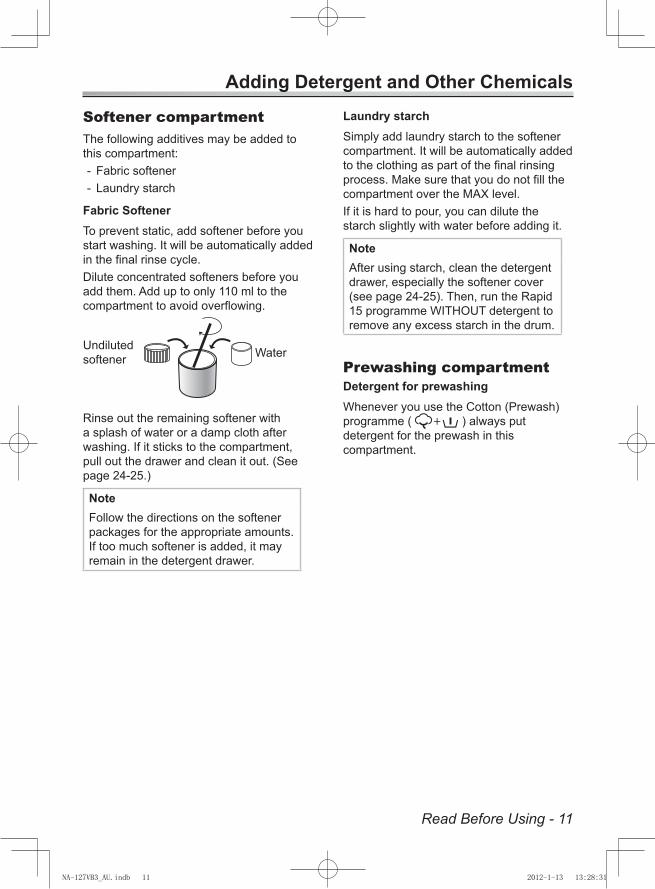
Undilutedsoftener Water
Softener compartmentThe following additives may be added to this compartment:
Fabric softener -Laundry starch -
Fabric SoftenerTo prevent static, add softener before you start washing. It will be automatically added in the final rinse cycle.Dilute concentrated softeners before you add them. Add up to only 110 ml to the compartment to avoid overflowing.
Rinse out the remaining softener with a splash of water or a damp cloth after washing. If it sticks to the compartment, pull out the drawer and clean it out. (See page 24-25.)
NoteFollow the directions on the softener packages for the appropriate amounts. If too much softener is added, it may remain in the detergent drawer.
Laundry starchSimply add laundry starch to the softener compartment. It will be automatically added to the clothing as part of the final rinsing process. Make sure that you do not fill the compartment over the MAX level.If it is hard to pour, you can dilute the starch slightly with water before adding it.
NoteAfter using starch, clean the detergent drawer, especially the softener cover (see page 24-25). Then, run the Rapid 15 programme WITHOUT detergent to remove any excess starch in the drum.
Prewashing compartmentDetergent for prewashingWhenever you use the Cotton (Prewash) programme ( + ) always put detergent for the prewash in this compartment.
NA-127VB3_AU.indb 11 2012-1-13 13:28:31
12 - Read Before Using
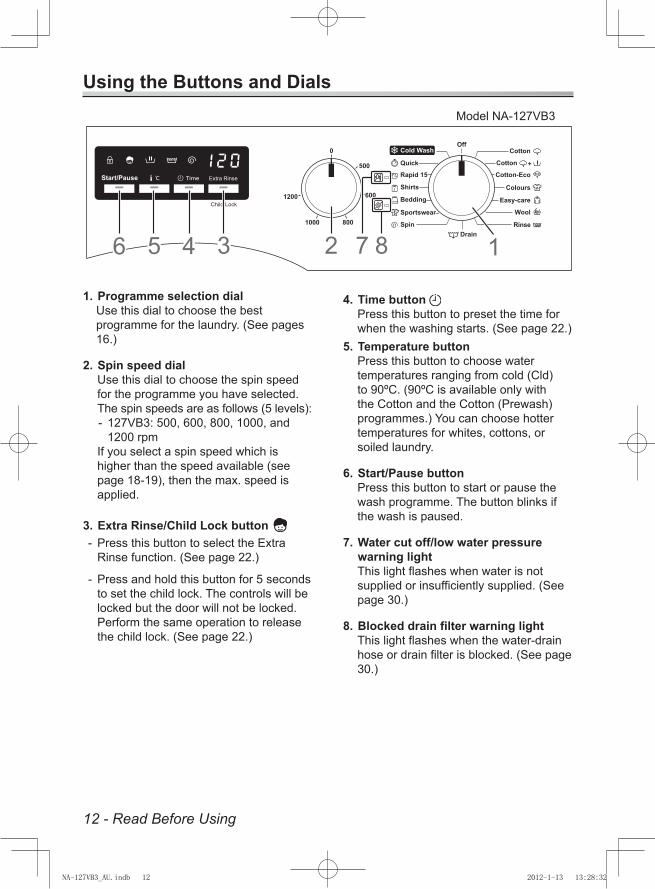
Using the Buttons and Dials
Colours
Rapid 15
Shirts
Bedding
Wool
Rinse
Easy-care
Quick
0
500
600
8001000
1200
Start/Pause
Sportswear
SpinDrain
OffCotton
Cotton
Cotton-Eco
456 3 2 17 8
Cold Wash
Model NA-127VB3
Programme selection dial1. Use this dial to choose the best programme for the laundry. (See pages 16.)
Spin speed dial2. Use this dial to choose the spin speed for the programme you have selected.The spin speeds are as follows (5 levels):
127VB3: 500, 600, 800, 1000, and -1200 rpm
If you select a spin speed which is higher than the speed available (see page 18-19), then the max. speed is applied.
Extra Rinse/Child Lock button 3. Press this button to select the Extra -Rinse function. (See page 22.)
Press and hold this button for 5 seconds -to set the child lock. The controls will be locked but the door will not be locked. Perform the same operation to release the child lock. (See page 22.)
Time button 4. Press this button to preset the time for when the washing starts. (See page 22.)Temperature button5. Press this button to choose water temperatures ranging from cold (Cld) to 90ºC. (90ºC is available only with the Cotton and the Cotton (Prewash) programmes.) You can choose hotter temperatures for whites, cottons, or soiled laundry.
Start/Pause button6. Press this button to start or pause the wash programme. The button blinks if the wash is paused.
Water cut off/low water pressure 7. warning lightThis light flashes when water is not supplied or insufficiently supplied. (See page 30.)
Blocked drain filter warning light8. This light flashes when the water-drain hose or drain filter is blocked. (See page 30.)
NA-127VB3_AU.indb 12 2012-1-13 13:28:32
Read Before Using - 13
Using the Buttons and Dials
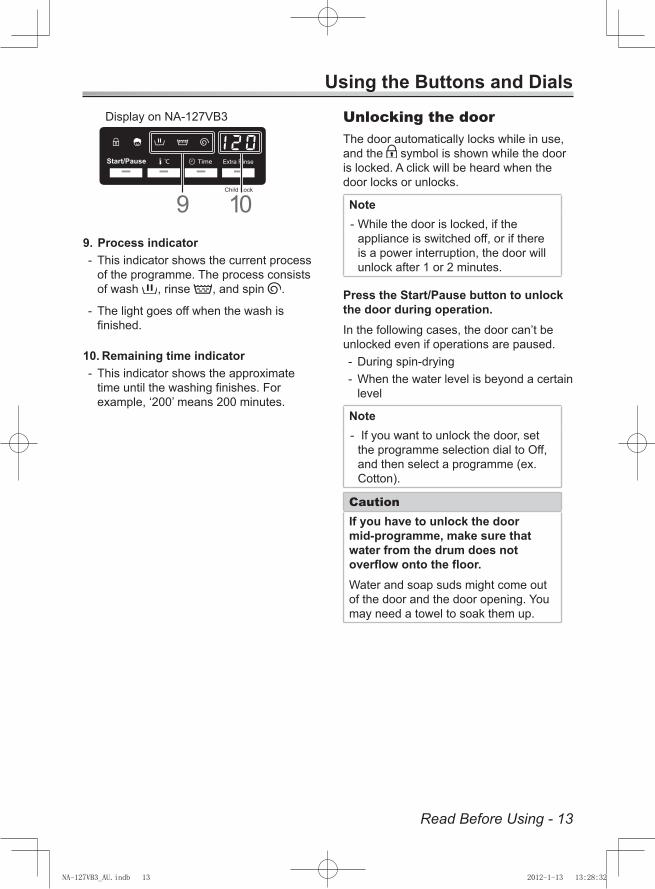
Start/Pause
9 10Process indicator9. This indicator shows the current process -of the programme. The process consists of wash , rinse , and spin .
The light goes off when the wash is -finished.
Remaining time indicator10. This indicator shows the approximate -time until the washing finishes. For example, ‘200’ means 200 minutes.
Display on NA-127VB3 Unlocking the doorThe door automatically locks while in use, and the symbol is shown while the door is locked. A click will be heard when the door locks or unlocks.
NoteWhile the door is locked, if the -appliance is switched off, or if there is a power interruption, the door will unlock after 1 or 2 minutes.
Press the Start/Pause button to unlock the door during operation.In the following cases, the door can’t be unlocked even if operations are paused.
During spin-drying -When the water level is beyond a certain -level
Note If you want to unlock the door, set -the programme selection dial to Off, and then select a programme (ex. Cotton).
CautionIf you have to unlock the door mid-programme, make sure that water from the drum does not overflow onto the floor.Water and soap suds might come out of the door and the door opening. You may need a towel to soak them up.
NA-127VB3_AU.indb 13 2012-1-13 13:28:32
14 - Washing Instructions
Washing
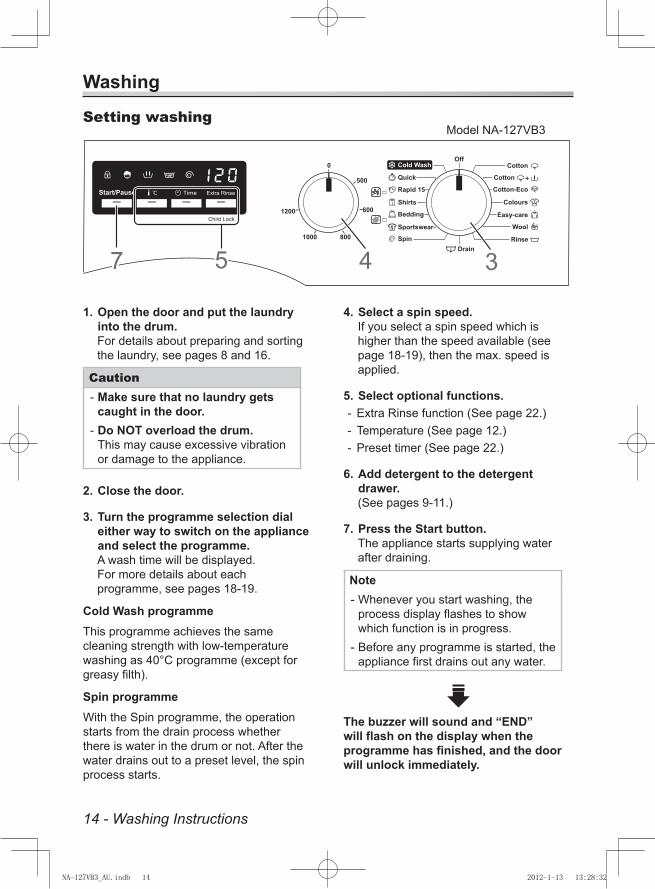
Open the door and put the laundry 1. into the drum.For details about preparing and sorting the laundry, see pages 8 and 16.
CautionMake sure that no laundry gets -caught in the door.Do NOT overload the drum. -This may cause excessive vibration or damage to the appliance.
Close the door.2.
Turn the programme selection dial 3. either way to switch on the appliance and select the programme.A wash time will be displayed.For more details about each programme, see pages 18-19.
Cold Wash programmeThis programme achieves the same cleaning strength with low-temperature washing as 40°C programme (except for greasy filth).
Spin programmeWith the Spin programme, the operation starts from the drain process whether there is water in the drum or not. After the water drains out to a preset level, the spin process starts.
Select a spin speed.4. If you select a spin speed which is higher than the speed available (see page 18-19), then the max. speed is applied.
Select optional functions.5. Extra Rinse function (See page 22.) -Temperature (See page 12.) -Preset timer (See page 22.) -
Add detergent to the detergent 6. drawer.(See pages 9-11.)
Press the Start button.7. The appliance starts supplying water after draining.
NoteWhenever you start washing, the -process display flashes to show which function is in progress.Before any programme is started, the -appliance first drains out any water.
The buzzer will sound and “END” will flash on the display when the programme has finished, and the door will unlock immediately.
Setting washing
Colours
Rapid 15
Shirts
Bedding
Wool
Rinse
Easy-care
Quick
0
500
600
8001000
1200
Start/Pause
Sportswear
SpinDrain
OffCotton
Cotton
Cotton-Eco
7 5 4 3
Cold Wash
Model NA-127VB3
NA-127VB3_AU.indb 14 2012-1-13 13:28:32
Washing Instructions - 15
Washing
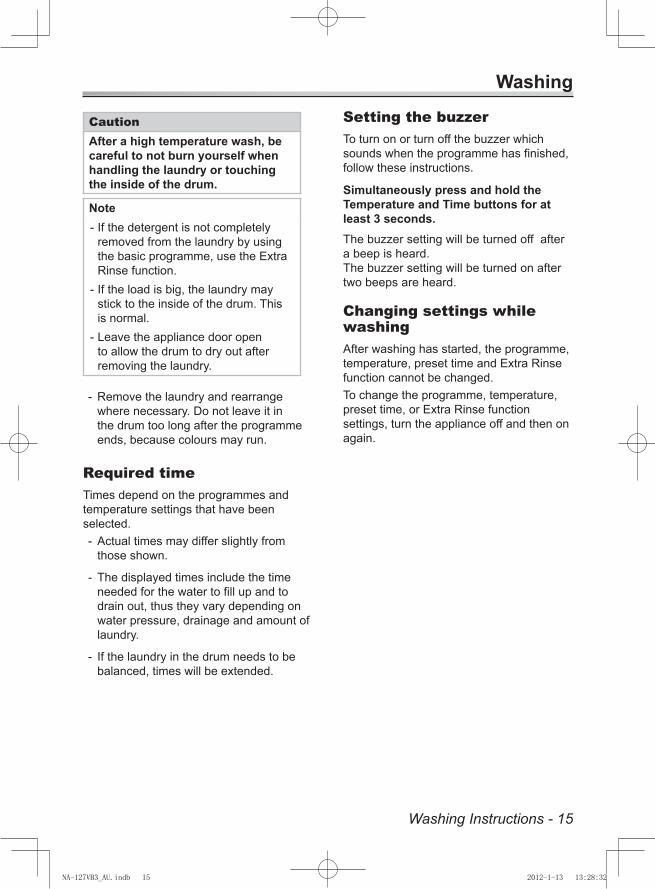
CautionAfter a high temperature wash, be careful to not burn yourself when handling the laundry or touching the inside of the drum.
NoteIf the detergent is not completely -removed from the laundry by using the basic programme, use the Extra Rinse function.If the load is big, the laundry may -stick to the inside of the drum. This is normal.Leave the appliance door open -to allow the drum to dry out after removing the laundry.
Remove the laundry and rearrange -where necessary. Do not leave it in the drum too long after the programme ends, because colours may run.
Required timeTimes depend on the programmes and temperature settings that have been selected.
Actual times may differ slightly from -those shown.
The displayed times include the time -needed for the water to fill up and to drain out, thus they vary depending on water pressure, drainage and amount of laundry.
If the laundry in the drum needs to be -balanced, times will be extended.
Setting the buzzerTo turn on or turn off the buzzer which sounds when the programme has finished, follow these instructions.
Simultaneously press and hold the Temperature and Time buttons for at least 3 seconds.The buzzer setting will be turned off after a beep is heard. The buzzer setting will be turned on after two beeps are heard.
Changing settings while washingAfter washing has started, the programme, temperature, preset time and Extra Rinse function cannot be changed.To change the programme, temperature, preset time, or Extra Rinse function settings, turn the appliance off and then on again.
NA-127VB3_AU.indb 15 2012-1-13 13:28:32
16 - Washing Instructions
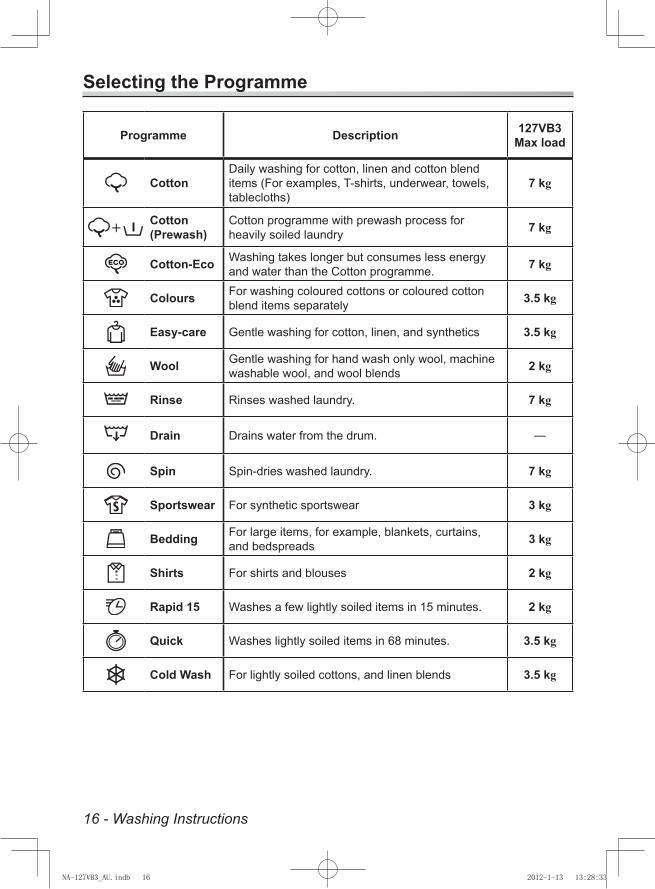
Selecting the Programme
Programme Description 127VB3 Max load
CottonDaily washing for cotton, linen and cotton blend items (For examples, T-shirts, underwear, towels, tablecloths)
7 kg
+ Cotton (Prewash)
Cotton programme with prewash process for heavily soiled laundry 7 kg
Cotton-Eco Washing takes longer but consumes less energy and water than the Cotton programme. 7 kg
Colours For washing coloured cottons or coloured cotton blend items separately 3.5 kg
Easy-care Gentle washing for cotton, linen, and synthetics 3.5 kg
Wool Gentle washing for hand wash only wool, machine washable wool, and wool blends 2 kg
Rinse Rinses washed laundry. 7 kg
Drain Drains water from the drum. ―
Spin Spin-dries washed laundry. 7 kg
Sportswear For synthetic sportswear 3 kg
Bedding For large items, for example, blankets, curtains, and bedspreads 3 kg
Shirts For shirts and blouses 2 kg
Rapid 15 Washes a few lightly soiled items in 15 minutes. 2 kg
Quick Washes lightly soiled items in 68 minutes. 3.5 kg
Cold Wash For lightly soiled cottons, and linen blends 3.5 kg
NA-127VB3_AU.indb 16 2012-1-13 13:28:33
Washing Instructions - 17
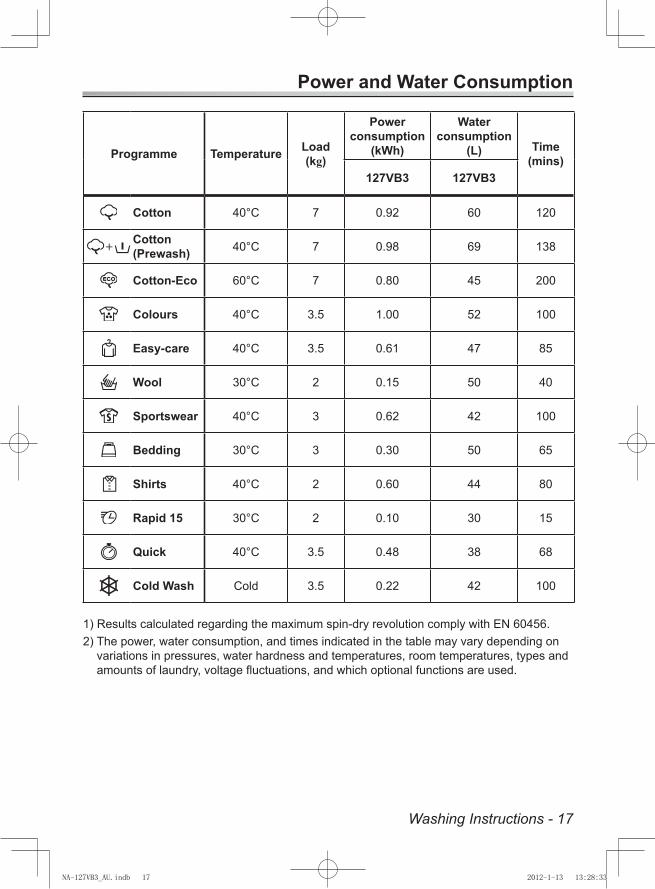
Power and Water Consumption
Programme Temperature Load (kg)
Power consumption
(kWh)
Water consumption
(L) Time (mins)
127VB3 127VB3
Cotton 40°C 7 0.92 60 120
+ Cotton (Prewash) 40°C 7 0.98 69 138
Cotton-Eco 60°C 7 0.80 45 200
Colours 40°C 3.5 1.00 52 100
Easy-care 40°C 3.5 0.61 47 85
Wool 30°C 2 0.15 50 40
Sportswear 40°C 3 0.62 42 100
Bedding 30°C 3 0.30 50 65
Shirts 40°C 2 0.60 44 80
Rapid 15 30°C 2 0.10 30 15
Quick 40°C 3.5 0.48 38 68
Cold Wash Cold 3.5 0.22 42 100
1) Results calculated regarding the maximum spin-dry revolution comply with EN 60456.2) The power, water consumption, and times indicated in the table may vary depending on
variations in pressures, water hardness and temperatures, room temperatures, types and amounts of laundry, voltage fluctuations, and which optional functions are used.
NA-127VB3_AU.indb 17 2012-1-13 13:28:33
18 - Washing Instructions
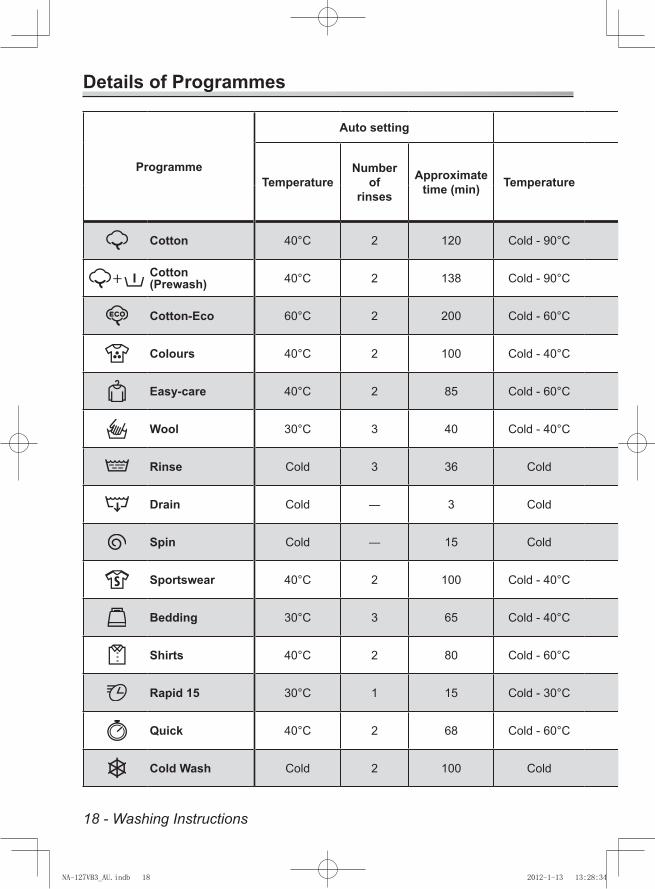
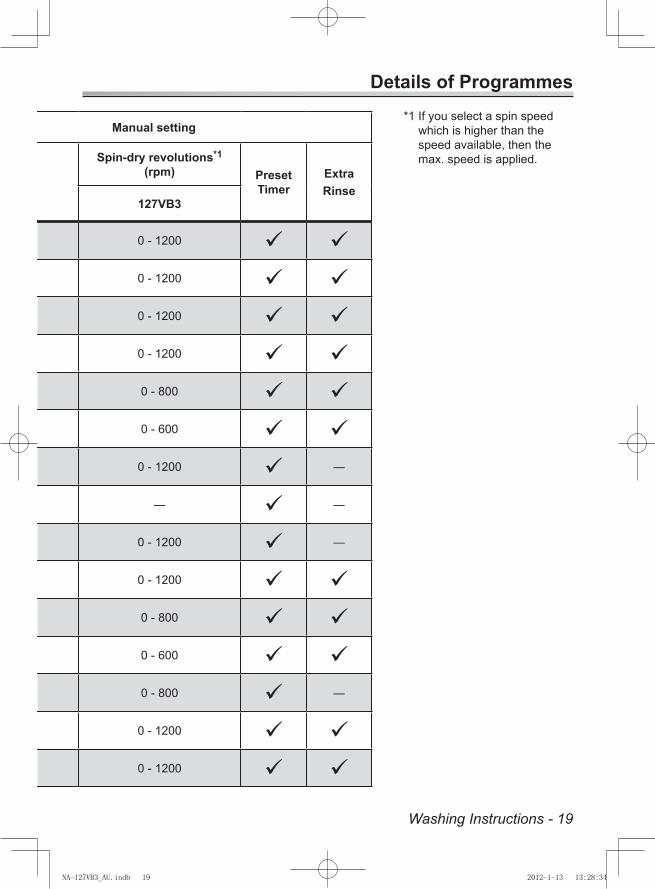
Details of Programmes
Programme
Auto setting Manual setting
TemperatureNumber
of rinses
Approximate time (min) Temperature
Spin-dry revolutions*1
(rpm) Preset Timer
ExtraRinse
127VB3
Cotton 40°C 2 120 Cold - 90°C 0 - 1200
+ Cotton (Prewash) 40°C 2 138 Cold - 90°C 0 - 1200 Cotton-Eco 60°C 2 200 Cold - 60°C 0 - 1200 Colours 40°C 2 100 Cold - 40°C 0 - 1200 Easy-care 40°C 2 85 Cold - 60°C 0 - 800 Wool 30°C 3 40 Cold - 40°C 0 - 600 Rinse Cold 3 36 Cold 0 - 1200 ―
Drain Cold ― 3 Cold ― ―
Spin Cold ― 15 Cold 0 - 1200 ―
Sportswear 40°C 2 100 Cold - 40°C 0 - 1200 Bedding 30°C 3 65 Cold - 40°C 0 - 800 Shirts 40°C 2 80 Cold - 60°C 0 - 600 Rapid 15 30°C 1 15 Cold - 30°C 0 - 800 ―
Quick 40°C 2 68 Cold - 60°C 0 - 1200 Cold Wash Cold 2 100 Cold 0 - 1200
NA-127VB3_AU.indb 18 2012-1-13 13:28:34
Washing Instructions - 19
Details of Programmes1 If you select a spin speed *
which is higher than the speed available, then the max. speed is applied.Programme
Auto setting Manual setting
TemperatureNumber
of rinses
Approximate time (min) Temperature
Spin-dry revolutions*1
(rpm) Preset Timer
ExtraRinse
127VB3
Cotton 40°C 2 120 Cold - 90°C 0 - 1200
+ Cotton (Prewash) 40°C 2 138 Cold - 90°C 0 - 1200 Cotton-Eco 60°C 2 200 Cold - 60°C 0 - 1200 Colours 40°C 2 100 Cold - 40°C 0 - 1200 Easy-care 40°C 2 85 Cold - 60°C 0 - 800 Wool 30°C 3 40 Cold - 40°C 0 - 600 Rinse Cold 3 36 Cold 0 - 1200 ―
Drain Cold ― 3 Cold ― ―
Spin Cold ― 15 Cold 0 - 1200 ―
Sportswear 40°C 2 100 Cold - 40°C 0 - 1200 Bedding 30°C 3 65 Cold - 40°C 0 - 800 Shirts 40°C 2 80 Cold - 60°C 0 - 600 Rapid 15 30°C 1 15 Cold - 30°C 0 - 800 ―
Quick 40°C 2 68 Cold - 60°C 0 - 1200 Cold Wash Cold 2 100 Cold 0 - 1200
NA-127VB3_AU.indb 19 2012-1-13 13:28:34
20 - Washing Instructions
Washing Delicates
Wool programmeThe drum spins gently in the Wool programme.For details about washing instructions, see pages 14-15.
Wool laundry loadsWool programme: 2 kg or less
Approximate weightsWool sweater: 400 g
Tips for washing delicatesPutting laundry in the drumPile them one on top of each other.
DetergentsFor wool items, use a mild liquid -detergent. Other detergents may damage the clothes.
With Wool programme, you may need to -use the Extra Rinse function to remove excess detergent from the laundry. (See page 22.)
Hanging the laundryHang out white or light-coloured wool -and nylon items away from direct heat or sunlight.
After washing, lay out wool and nylon -clothes, and return them to their normal shape before hanging in the shade. This saves on ironing too.
Hang wool items without folds or -creases, or spread them out to dry.
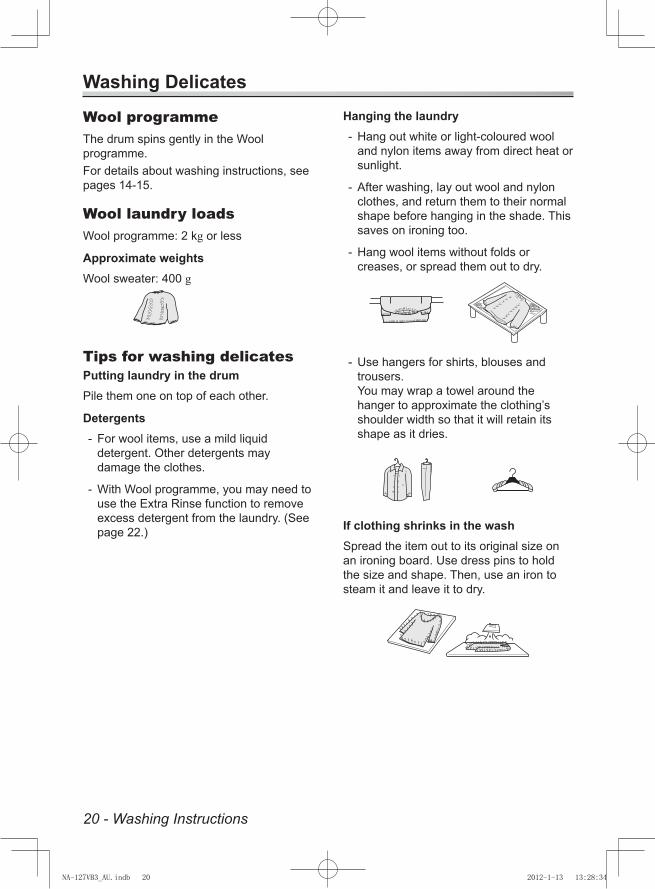
Use hangers for shirts, blouses and -trousers. You may wrap a towel around the hanger to approximate the clothing’s shoulder width so that it will retain its shape as it dries.
If clothing shrinks in the washSpread the item out to its original size on an ironing board. Use dress pins to hold the size and shape. Then, use an iron to steam it and leave it to dry.
NA-127VB3_AU.indb 20 2012-1-13 13:28:34

Washing Instructions - 21
Washing Blankets and Bedspreads
Bedding programmeFor details about washing instructions, see pages 14-15.
Make sure that the label of each item -to be washed shows either the wash or handwash symbol ( , ).
Wash only one blanket at a time. -
Washable100% synthetic fibre blankets – up to -3 kg100% synthetic fibre futons and 100% -cotton blankets – up to 1.5 kg (single bed size)Sheets -Bedspreads -100% synthetic fibre undersheets -
Non-washable100% wool blankets -Long-piled blankets -Electric blankets (including cover) -
Putting bedding into the drum
Fold down blankets or bedspreads 1. into a quarter of their original size.
Put the blanket or bedspread to the 2. drum.Fold it while putting it into the drum.
Both ends of blanket should be directed inward the drum
CautionDo NOT roll blankets or bedspreads into balls, nor haphazardly fold them.This may cause excessive vibration and damage the laundry or the appliance.
NoteAvoid using blanket nets. They prevent the laundry from spinning properly.
NA-127VB3_AU.indb 21 2012-1-13 13:28:34
22 - Washing Instructions
Optional Functions
Extra Rinse function
NoteExtra Rinse functions cannot be used with certain programmes. (See pages 18-19.)If you select it when it is unavailable, an error alarm will sound.
Press the Extra Rinse button to select the function.The button will flash.
Function DescriptionExtra Rinse
Rinse your laundry more thoroughly with an extra rinsing process.
Child lockWhen the child lock is activated, the controls are locked (the door will not be locked). This prevents children from changing the wash settings or playing with the appliance.
Activating/deactivating child lockSwitch on the appliance.1. Press and hold the Extra Rinse 2. button for at least 5 seconds.The symbol light up to show that the child lock is activated.To deactivate, hold down the Extra 3. Rinse button again for 5 seconds (please ignore three beeps heard, keep Extra Rinse button pressed until it deactivates).
Preset timerYou can use the timer to preset the wash to start anywhere from 1 to 24 hours later.
NoteDo NOT use detergent which does not dissolve thoroughly with the preset function, because the detergent might cake up before the wash starts and not flow out.
Setting a preset timeSet a preset time after you have selected the programmed and optional functions (see page 14).
Continuously press the Time button 1. until the desired preset time is displayed.Press the Temperature button or the 2. Extra Rinse button to set the preset time.The countdown has not started.
To cancel the preset time -Press the Time button.To change the preset time -Press the Time button, then redo the setting from step 1.
Press the Start/Pause button to 3. activate the countdown.
To cancel the preset time -Turn the programme selection dial to ‘Off’. (All settings will be cancelled.)To change the preset time -Turn the programme selection dial to ‘Off’. After reselecting the programme and optional functions, redo the setting from step 1.
NA-127VB3_AU.indb 22 2012-1-13 13:28:35
Maintenance - 23
Maintenance
Cleaning the outside of the applianceClean the outside of the appliance with a soft cloth and mild detergent, for example, kitchen detergent, and soapy water.
WarningDo NOT splash water over the -appliance.Do NOT use cream cleansers, -thinners, nor products containing alcohol or paraffin oil.
Cleaning the door seal and windowAfter each wash, perform the following:
Remove any objects from the door seal. -
Wipe the window and seal to remove lint -and stains.
If lint builds up, it can cause leaks.
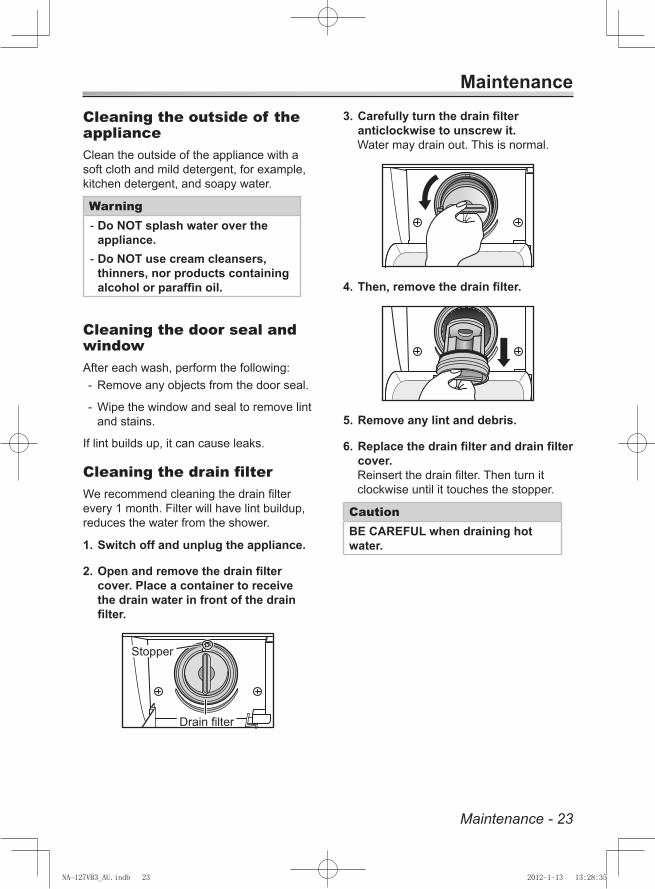
Cleaning the drain filterWe recommend cleaning the drain filter every 1 month. Filter will have lint buildup, reduces the water from the shower.
Switch off and unplug the appliance.1.
Open and remove the drain filter 2. cover. Place a container to receive the drain water in front of the drain filter.
Carefully turn the drain filter 3. anticlockwise to unscrew it. Water may drain out. This is normal.
Then, remove the drain filter.4.
Remove any lint and debris.5.
Replace the drain filter and drain filter 6. cover.Reinsert the drain filter. Then turn it clockwise until it touches the stopper.
CautionBE CAREFUL when draining hot water.
Drain filter
Stopper
NA-127VB3_AU.indb 23 2012-1-13 13:28:35
24 - Maintenance
Maintenance
Cleaning the drumIf you keep using cold water in the appliance, bacteria may build up inside the drum and give off an odour. You can avoid this by running the 90°C Cotton programme once a month. (If you use a scale remover, follow the manufacturer’s instructions.)
CautionViruses and bacteria are not killed in water temperature of 40°C. Pathogens can spread via the commingling of clothes and thus transmit diseases. Pathogens die at 60°C or higher. However, using water temperatures up to 90°C is unnecessary.
NoteDo NOT put laundry nor laundry detergent into the appliance while it is being cleaned.
If you use tub cleaning detergent or bleach, put it into the detergent drawer before starting the wash. The appropriate amount to be used is about 30 ml. (See page 9.)
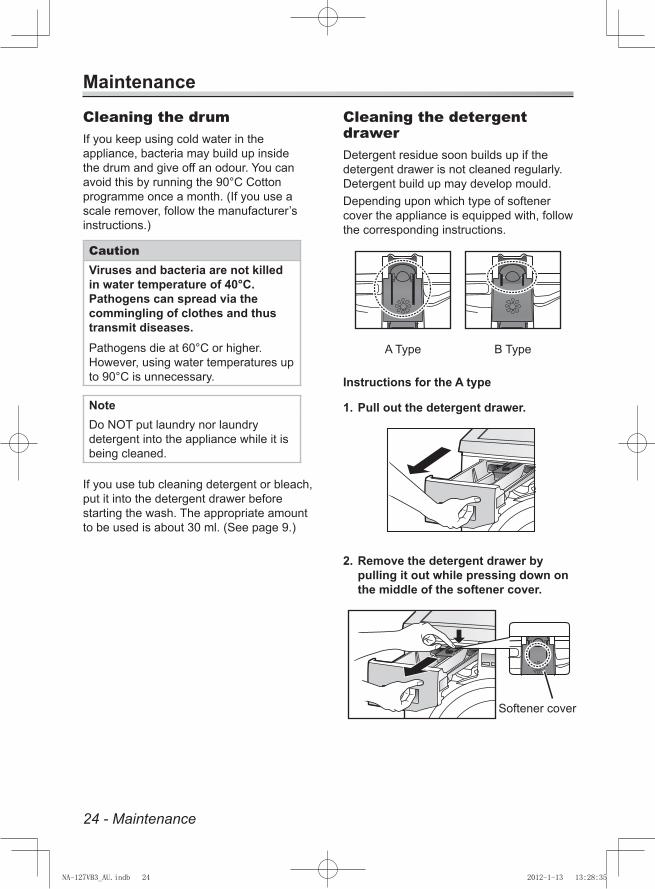
Cleaning the detergent drawerDetergent residue soon builds up if the detergent drawer is not cleaned regularly. Detergent build up may develop mould.Depending upon which type of softener cover the appliance is equipped with, follow the corresponding instructions.
A Type B Type
Instructions for the A type
Pull out the detergent drawer.1.
Remove the detergent drawer by 2. pulling it out while pressing down on the middle of the softener cover.
Softener cover
NA-127VB3_AU.indb 24 2012-1-13 13:28:35
Maintenance - 25
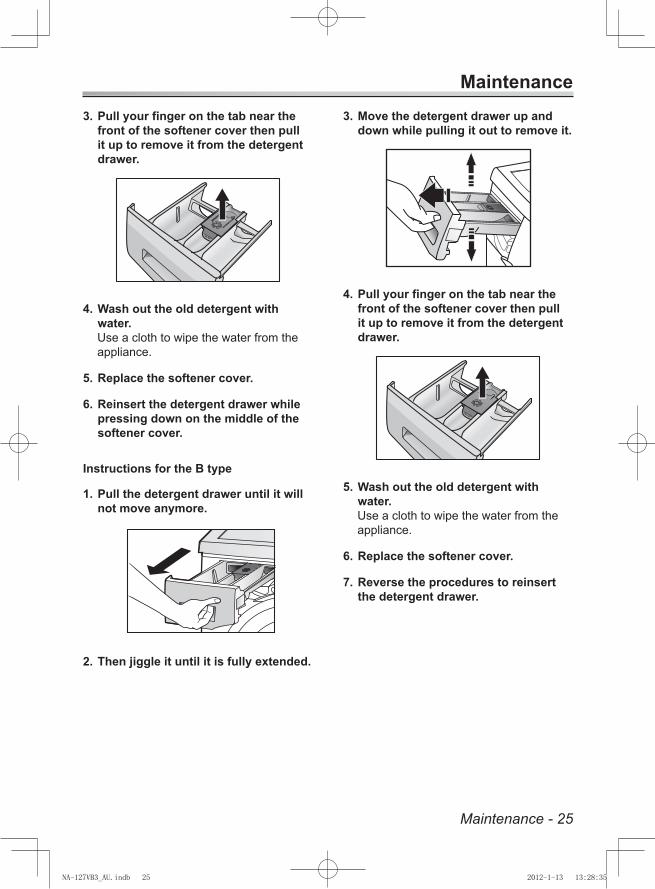
MaintenancePull your finger on the tab near the 3. front of the softener cover then pull it up to remove it from the detergent drawer.
Wash out the old detergent with 4. water.Use a cloth to wipe the water from the appliance.
Replace the softener cover.5.
Reinsert the detergent drawer while 6. pressing down on the middle of the softener cover.
Instructions for the B type
Pull the detergent drawer until it will 1. not move anymore.
Then jiggle it until it is fully extended.2.
Move the detergent drawer up and 3. down while pulling it out to remove it.
Pull your finger on the tab near the 4. front of the softener cover then pull it up to remove it from the detergent drawer.
Wash out the old detergent with 5. water.Use a cloth to wipe the water from the appliance.
Replace the softener cover.6.
Reverse the procedures to reinsert 7. the detergent drawer.
Softener cover
NA-127VB3_AU.indb 25 2012-1-13 13:28:35
26 - Maintenance
MaintenanceReconnect the water-supply hose.8. Tighten the plastic joint firmly.
Turn on the tap, then check for leaks.9.
Preventing a frozen water-supply hoseIf the appliance is delivered in freezing weather conditions, after setting up, leave it at room temperature for 24 hours before using. This will ensure that the water-supply hose does not get clogged up with ice.
If your water-supply hose freezes, perform the following procedures:
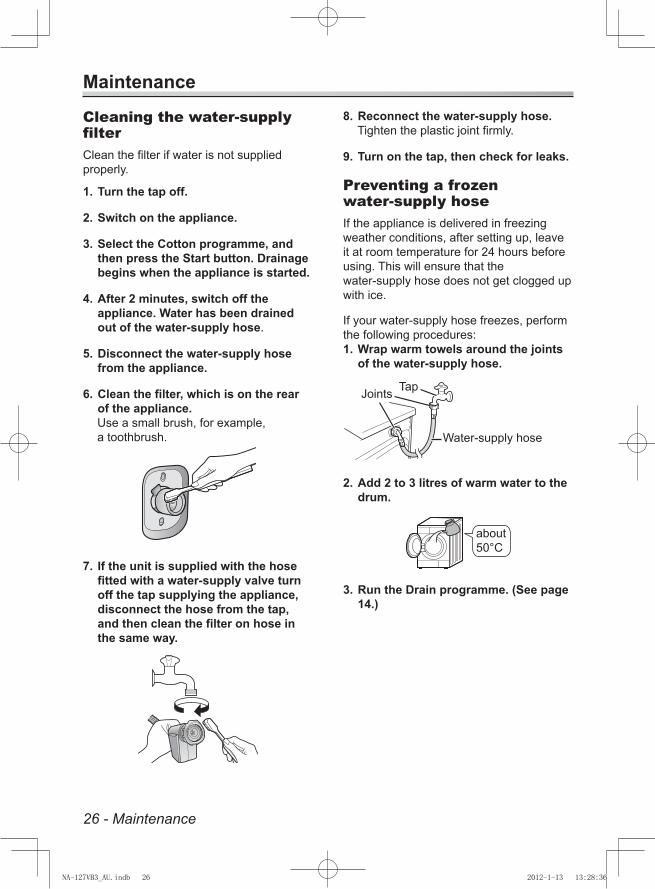
Wrap warm towels around the joints 1. of the water-supply hose.
Add 2 to 3 litres of warm water to the 2. drum.
Run the Drain programme. (See page 3. 14.)
Joints Tap
Cleaning the water-supply filterClean the filter if water is not supplied properly.
Turn the tap off.1.
Switch on the appliance.2.
Select the Cotton programme, and 3. then press the Start button. Drainage begins when the appliance is started.
After 2 minutes, switch off the 4. appliance. Water has been drained out of the water-supply hose.
Disconnect the water-supply hose 5. from the appliance.
Clean the filter, which is on the rear 6. of the appliance.Use a small brush, for example, a toothbrush.
If the unit is supplied with the hose 7. fitted with a water-supply valve turn off the tap supplying the appliance, disconnect the hose from the tap, and then clean the filter on hose in the same way.
about50°C
Water-supply hose
NA-127VB3_AU.indb 26 2012-1-13 13:28:36
Troubleshooting - 27
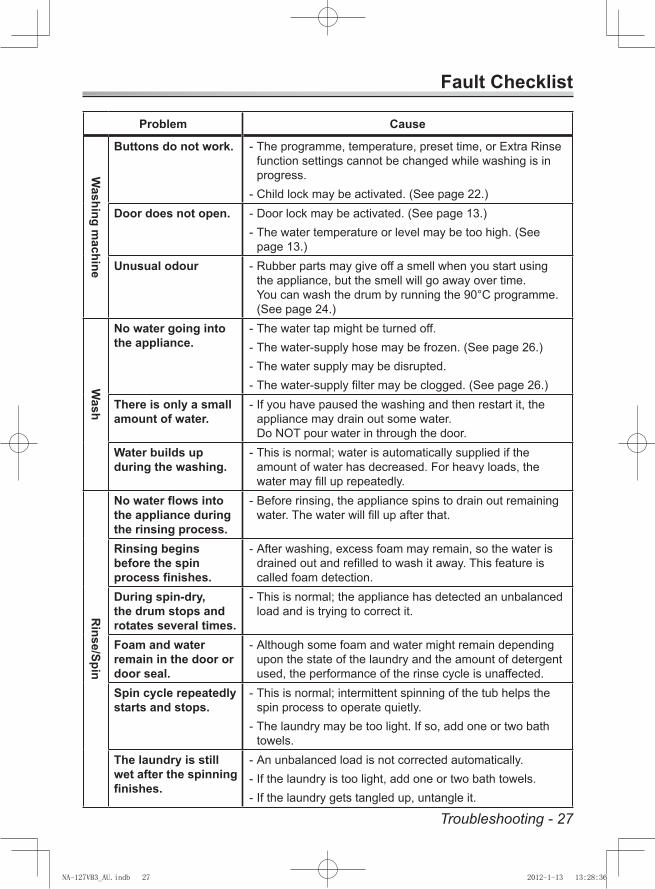
Fault Checklist
Problem Cause
Washing m
achine
Buttons do not work. The programme, temperature, preset time, or Extra Rinse -function settings cannot be changed while washing is in progress.Child lock may be activated. (See page 22.) -
Door does not open. Door lock may be activated. (See page 13.) -The water temperature or level may be too high. (See -page 13.)
Unusual odour Rubber parts may give off a smell when you start using -the appliance, but the smell will go away over time.You can wash the drum by running the 90°C programme. (See page 24.)
Wash
No water going into the appliance.
The water tap might be turned off. -The water-supply hose may be frozen. (See page 26.) -The water supply may be disrupted. -The water-supply filter may be clogged. (See page 26.) -
There is only a small amount of water.
If you have paused the washing and then restart it, the -appliance may drain out some water. Do NOT pour water in through the door.
Water builds up during the washing.
This is normal; water is automatically supplied if the -amount of water has decreased. For heavy loads, the water may fill up repeatedly.
Rinse/Spin
No water flows into the appliance during the rinsing process.
Before rinsing, the appliance spins to drain out remaining -water. The water will fill up after that.
Rinsing begins before the spin process finishes.
After washing, excess foam may remain, so the water is -drained out and refilled to wash it away. This feature is called foam detection.
During spin-dry, the drum stops and rotates several times.
This is normal; the appliance has detected an unbalanced -load and is trying to correct it.
Foam and water remain in the door or door seal.
Although some foam and water might remain depending -upon the state of the laundry and the amount of detergent used, the performance of the rinse cycle is unaffected.
Spin cycle repeatedly starts and stops.
This is normal; intermittent spinning of the tub helps the -spin process to operate quietly.The laundry may be too light. If so, add one or two bath -towels.
The laundry is still wet after the spinning finishes.
An unbalanced load is not corrected automatically. -If the laundry is too light, add one or two bath towels. -If the laundry gets tangled up, untangle it. -
NA-127VB3_AU.indb 27 2012-1-13 13:28:36
28 - Troubleshooting
Fault Checklist
Problem Cause
Detergent and foam
There is no foam or hardly any foam.
The amount of foam varies, depending on the -temperature, level and softness of the water. You may have put powdered detergent directly into the -drum; you must put it in the detergent drawer.You may not be using enough detergent. -You may be using a reduced-foam type of detergent. -Heavily soiled laundry and larger loads of laundry may -reduce the amount of foam.
There is a lot of foam. The amount of foam varies, depending on the -temperature, level and softness of the water.You may have used too much detergent. -The type of detergent you are using may cause excess -foam.
Fabric softener overflows.
The softener may have exceeded the MAX level for the -detergent drawer. (See page 11.)You may have spilt the liquid by closing the detergent -drawer too strongly.
After the wash has finished, powdered detergent residue remains.
You may have put powdered detergent directly into the -drum; you must put it in the detergent drawer.
NA-127VB3_AU.indb 28 2012-1-13 13:28:36
Troubleshooting - 29
Fault Checklist
Problem Cause
Time
The displayed remaining time changes.
The remaining time is estimated and corrected continually. -Thus, the time displayed may change.
Noise
There is an unusual noise or vibration.
There may be metal items in the drum. -The anchor bolts may not have been removed. (See page -32.)The appliance may be on a sloping or unstable surface. -
If none of the above is the cause, contact your local Customer Service Centre.
There is noise when the water drains out.
This is normal; it is noise created by the operation of the -drain pump.
There are noises during washing or rinsing.
This is normal; They are noises from the pump that -circulates washing or rinsing water.
Others
The electricity supply cuts out while the appliance is on.
The appliance stops operating. When power is restored, it -resumes operation from the point that it had stopped.
A circuit breaker trips, interrupting the power supply.
The appliance stops operating. When the breaker is reset, -it resumes operation from the point that it had stopped. However, we recommend finding and resolving the cause of the trip before resetting the breaker.
The water supply is disrupted.
When the water is supplied again, it may be impure at first. -You have to disconnect the water-supply hose and drain away the impure water through the tap. Make sure that the water-supply hose has been reconnected before using the appliance.
The display is not clear.
The appliance may be in a brightly lit or sunlit area. -
NA-127VB3_AU.indb 29 2012-1-13 13:28:36
30 - Troubleshooting
Error Display
Error What to do
Door is open
Make sure that the door is shut properly.
Unable to supply water
Check for any of following problems.The tap is closed. -The water pipe or hose is frozen. -The water supply has been disrupted. -The water-supply filter is clogged. (See page 26.) -
If the red mark appears in the hose with water-supply valve, it have been stop the water supply. You should replace with a new hose. Hose with water-supply valve
Unable to drain
Check the drain hose for any of following problems.It clogs up. -Its tip is immersed in water. -It extends with joints. -The water is frozen. -
Clean the drain filter if it clogs up. (See page 23.)
Overflow
Check for any of following problems.The water-supply valve has failed. -The water-supply valve triac has failed. -
Switch off and unplug the appliance. Shut off the tap and contact your local Customer Service Centre.
Supply water is cut-off or water pressure is low.
If the light flashes, check for any of following problems.The tap is closed. -The supply water is cut-off. -The supply water pressure is low. -The water-supply hose is clogged or twisted. -The water-supply filter is clogged. (See page 26.) -
Drain filter is clogged.
If the light flashes, check for any of following problems.The drain filter is clogged. (See page 23.) -The water-drain hose is clogged or twisted. -
To restart the operation after an error message appears, set the programme selection dial to Off, and then select a programme and start the operation.
NA-127VB3_AU.indb 30 2012-1-13 13:28:36
Installation Instructions - 31
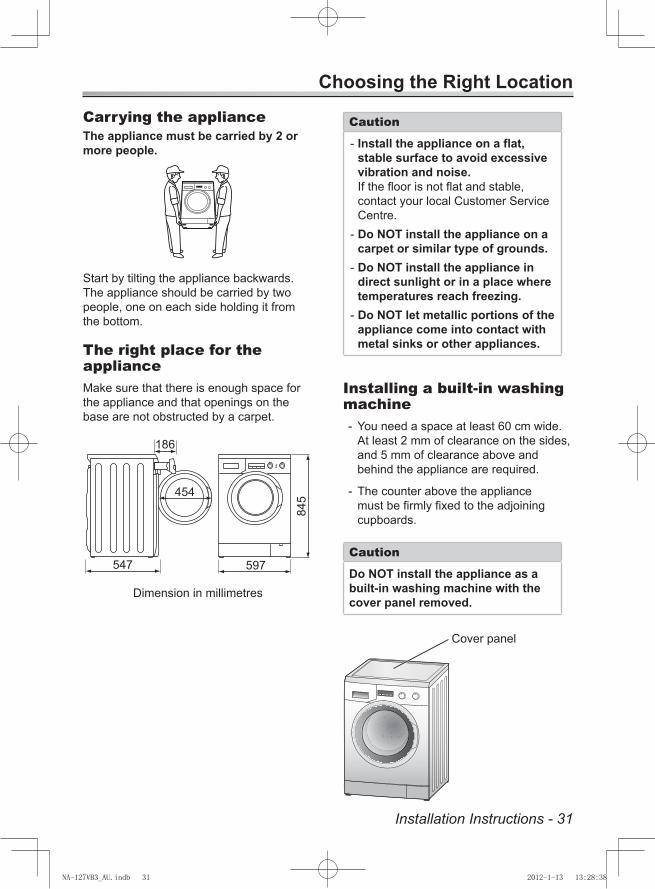
Choosing the Right Location
Carrying the applianceThe appliance must be carried by 2 or more people.
Start by tilting the appliance backwards. The appliance should be carried by two people, one on each side holding it from the bottom.
The right place for the applianceMake sure that there is enough space for the appliance and that openings on the base are not obstructed by a carpet.
186
597547
845454
Dimension in millimetres
Caution
Install the appliance on a flat, -stable surface to avoid excessive vibration and noise.If the floor is not flat and stable, contact your local Customer Service Centre.Do NOT install the appliance on a -carpet or similar type of grounds.Do NOT install the appliance in -direct sunlight or in a place where temperatures reach freezing.Do NOT let metallic portions of the -appliance come into contact with metal sinks or other appliances.
Installing a built-in washing machine
You need a space at least 60 cm wide. -At least 2 mm of clearance on the sides, and 5 mm of clearance above and behind the appliance are required.
The counter above the appliance -must be firmly fixed to the adjoining cupboards.
Caution
Do NOT install the appliance as a built-in washing machine with the cover panel removed.
Cover panel
NA-127VB3_AU.indb 31 2012-1-13 13:28:38
32 - Installation Instructions
Moving and Installing
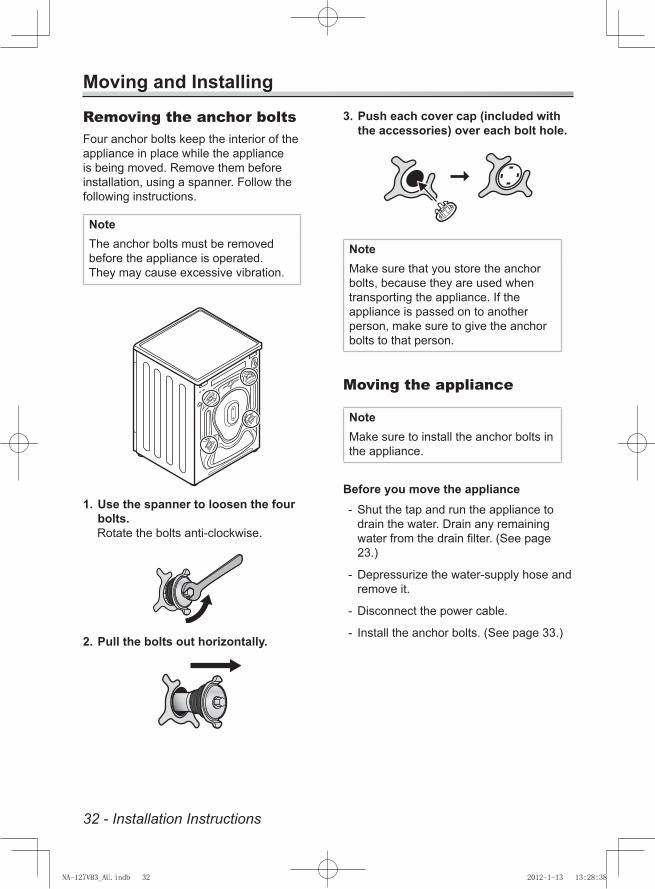
Removing the anchor boltsFour anchor bolts keep the interior of the appliance in place while the appliance is being moved. Remove them before installation, using a spanner. Follow the following instructions.
NoteThe anchor bolts must be removed before the appliance is operated. They may cause excessive vibration.
Use the spanner to loosen the four 1. bolts.Rotate the bolts anti-clockwise.
Pull the bolts out horizontally.2.
Push each cover cap (included with 3. the accessories) over each bolt hole.
NoteMake sure that you store the anchor bolts, because they are used when transporting the appliance. If the appliance is passed on to another person, make sure to give the anchor bolts to that person.
Moving the appliance
NoteMake sure to install the anchor bolts in the appliance.
Before you move the applianceShut the tap and run the appliance to -drain the water. Drain any remaining water from the drain filter. (See page 23.)
Depressurize the water-supply hose and -remove it.
Disconnect the power cable. -
Install the anchor bolts. (See page 33.) -
NA-127VB3_AU.indb 32 2012-1-13 13:28:38
Installation Instructions - 33
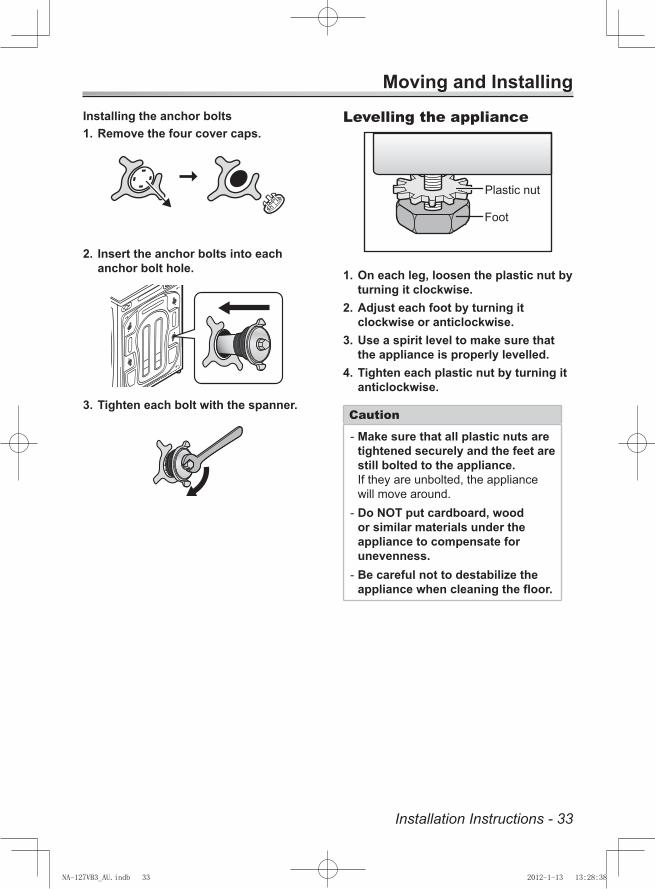
Moving and InstallingInstalling the anchor bolts
Remove the four cover caps.1.
Insert the anchor bolts into each 2. anchor bolt hole.
Tighten each bolt with the spanner.3.
Levelling the appliance
On each leg, loosen the plastic nut by 1. turning it clockwise.Adjust each foot by turning it 2. clockwise or anticlockwise.Use a spirit level to make sure that 3. the appliance is properly levelled.Tighten each plastic nut by turning it 4. anticlockwise.
Caution
Make sure that all plastic nuts are -tightened securely and the feet are still bolted to the appliance.If they are unbolted, the appliance will move around.Do NOT put cardboard, wood -or similar materials under the appliance to compensate for unevenness.Be careful not to destabilize the -appliance when cleaning the floor.
Plastic nut
Foot
NA-127VB3_AU.indb 33 2012-1-13 13:28:38
34 - Installation Instructions
Connecting Hoses and Power Supply
Water-supply hoseCaution
Do NOT connect the water-supply -hose to a combination tap.Do NOT twist, squash, modify, or -cut the hose.
Optimum mains water pressure is 0.1 - -1.0 MPa. If the water pressure exceeds this value, install a pressure reducing valve.
Water-flow from the tap should be more -than 5 L/min.
Connecting the water-supply hoseAttach one end of the hose to 1. the water inlet on the back of the appliance and tighten the joint by hand.
Attach the other end of the hose to 2. the tap and tighten it the same way.
Standard hose -
Hose with water-supply valve -
Open the tap slowly and make sure 3. that there are no leaks around the joints.The joints are subject to water pressure.
Follow the instructions in this section to prevent water leaks. If you are unsure, ask a service agent to connect the hoses.
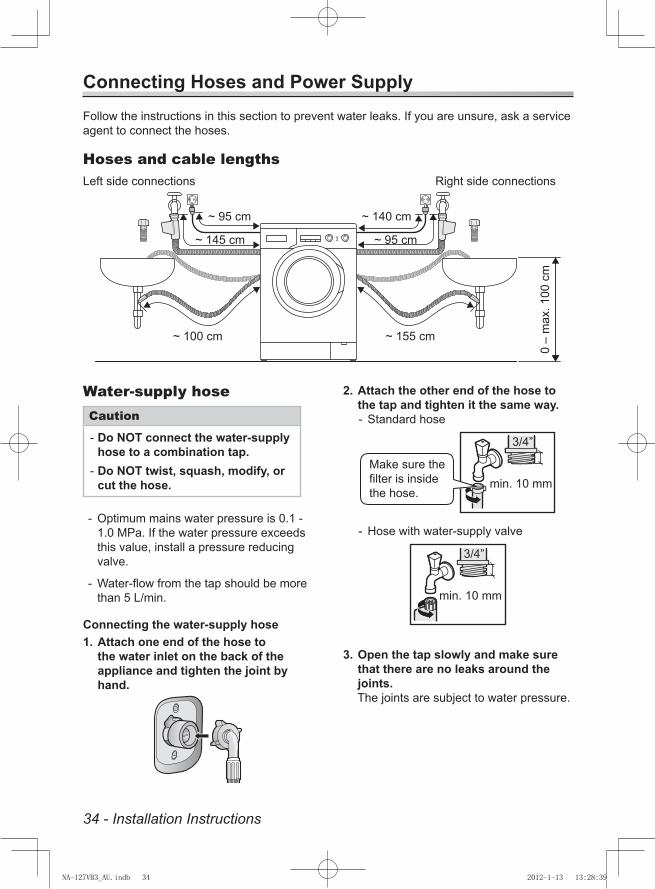
Hoses and cable lengthsLeft side connections Right side connections
~ 95 cm ~ 140 cm
~ 145 cm ~ 95 cm
0 –
max
. 100
cm
min. 10 mm
min. 10 mm
3/4”
3/4”
~ 100 cm ~ 155 cm
Make sure the filter is inside the hose.
NA-127VB3_AU.indb 34 2012-1-13 13:28:39
Installation Instructions - 35
Connecting Hoses and Power Supply Leak-proof SystemThe appliance is installed with the system that is designed to prevent water leaks. The system includes the following components.
1) Aquastop systemIf a water leak is detected in the water inlet hose, the system stops supplying water automatically. This system is only functions with hoses with water supply valves.
2) Overflow detectionIf water in the appliance increases to a certain level, this function stops the water supply and activates the drain pump.
Water-drain hose
Caution
Do NOT twist, pull out, or bend the -drain hose.Do NOT use joints to extend the -water-drain hose.
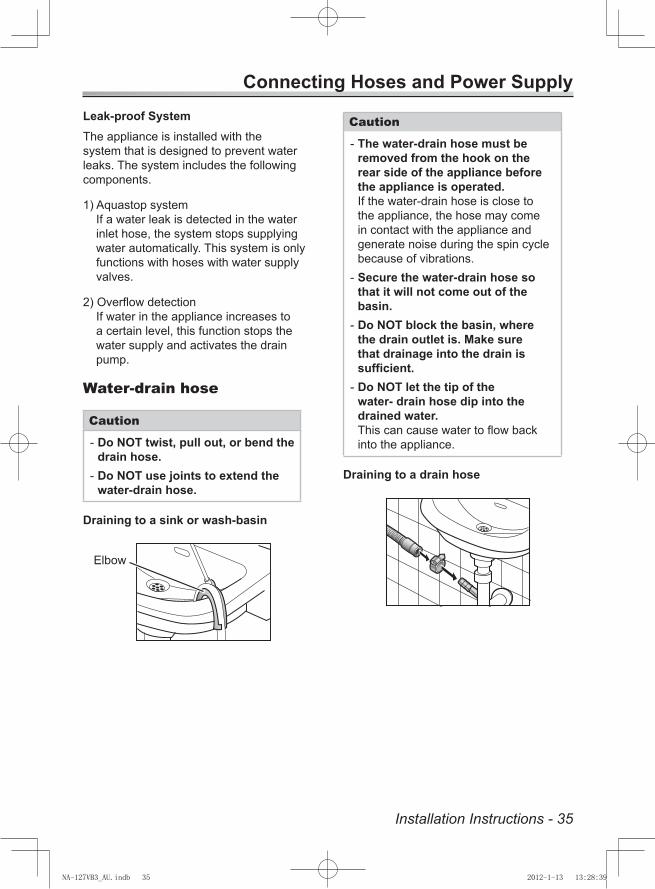
Draining to a sink or wash-basin
Caution
The water-drain hose must be -removed from the hook on the rear side of the appliance before the appliance is operated. If the water-drain hose is close to the appliance, the hose may come in contact with the appliance and generate noise during the spin cycle because of vibrations.Secure the water-drain hose so -that it will not come out of the basin.Do NOT block the basin, where -the drain outlet is. Make sure that drainage into the drain is sufficient.Do NOT let the tip of the -water- drain hose dip into the drained water.This can cause water to flow back into the appliance.
Draining to a drain hose
Elbow
NA-127VB3_AU.indb 35 2012-1-13 13:28:39
36 - Installation Instructions
Connecting Hoses and Power Supply
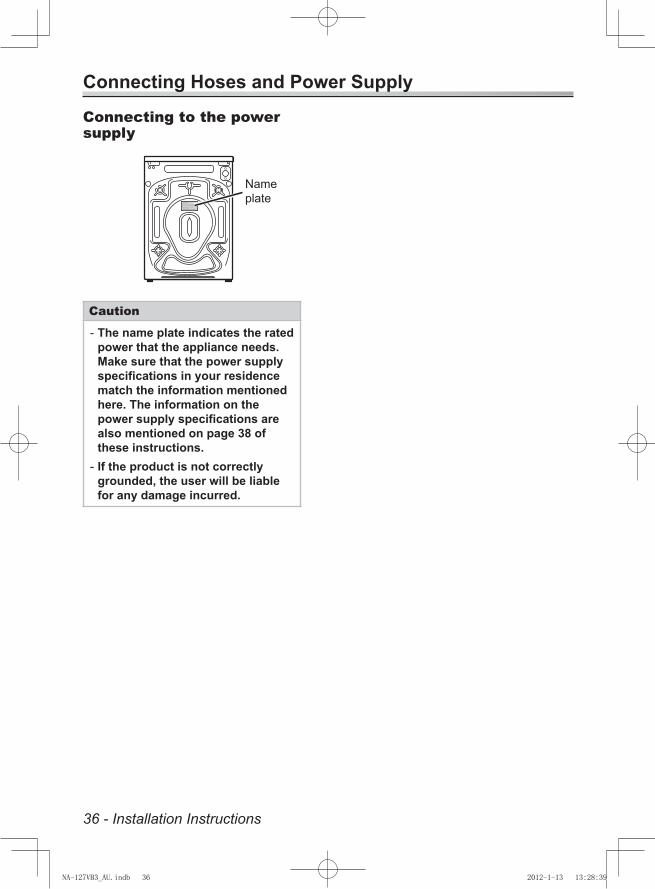
Connecting to the power supply
Caution
The name plate indicates the rated -power that the appliance needs. Make sure that the power supply specifications in your residence match the information mentioned here. The information on the power supply specifications are also mentioned on page 38 of these instructions.If the product is not correctly -grounded, the user will be liable for any damage incurred.
Name plate
NA-127VB3_AU.indb 36 2012-1-13 13:28:39
Installation Instructions - 37
Checking After Installation
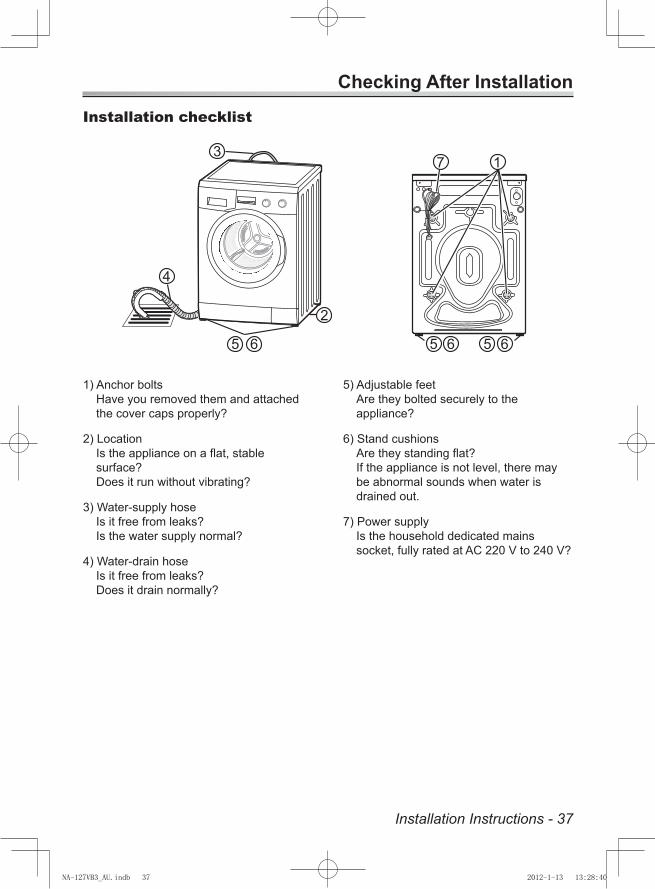
Installation checklist
3
2
4
65
7 1
5 6 5 6
5) Adjustable feetAre they bolted securely to the appliance?
6) Stand cushionsAre they standing flat? If the appliance is not level, there may be abnormal sounds when water is drained out.
7) Power supplyIs the household dedicated mains socket, fully rated at AC 220 V to 240 V?
1) Anchor boltsHave you removed them and attached the cover caps properly?
2) LocationIs the appliance on a flat, stable surface?Does it run without vibrating?
3) Water-supply hoseIs it free from leaks?Is the water supply normal?
4) Water-drain hoseIs it free from leaks?Does it drain normally?
NA-127VB3_AU.indb 37 2012-1-13 13:28:40
38 - Installation Instructions
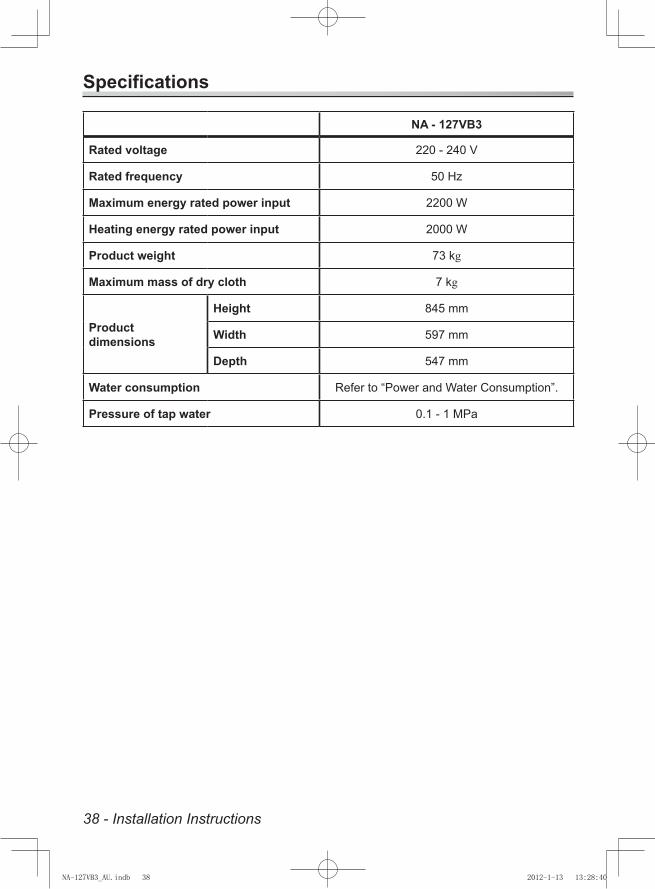
Specifications
NA - 127VB3
Rated voltage 220 - 240 V
Rated frequency 50 Hz
Maximum energy rated power input 2200 W
Heating energy rated power input 2000 W
Product weight 73 kg
Maximum mass of dry cloth 7 kg
Product dimensions
Height 845 mm
Width 597 mm
Depth 547 mm
Water consumption Refer to “Power and Water Consumption”.
Pressure of tap water 0.1 - 1 MPa
NA-127VB3_AU.indb 38 2012-1-13 13:28:40
NA-127VB3_AU.indb 39 2012-1-13 13:28:40

Web Site: http://panasonic.net
© Panasonic Corporation 2012
Printed in TurkeyMarch 2012
W9901-W8BZ00
NA-127VB3_AU.indb 40 2012-1-13 13:28:40
Related Documents