OpenText Employee File Management User Guide The OpenText Employee File Management user guide describes the handling of HR-related SAP records and documents within OpenText Employee File Management 4.0 SP1. EIM040001-UGD-EN-1

OpenText Employee File Management 4 0 1 - User Guide English (EIM040001-UGD-En-1)
Dec 25, 2015
This user guide addresses the following target groups:
• HR employees who use EFM.
• HR employees who create guest user tickets.
• Managers and employees who use EFM as guest users.
• Managers and employees who use EFM in self service scenarios
Basic knowledge of working with an SAP system is necessary.
• HR employees who use EFM.
• HR employees who create guest user tickets.
• Managers and employees who use EFM as guest users.
• Managers and employees who use EFM in self service scenarios
Basic knowledge of working with an SAP system is necessary.
Welcome message from author
This document is posted to help you gain knowledge. Please leave a comment to let me know what you think about it! Share it to your friends and learn new things together.
Transcript

OpenText Employee File Management
User Guide
The OpenText Employee File Management user guide describesthe handling of HR-related SAP records and documents withinOpenText Employee File Management 4.0 SP1.
EIM040001-UGD-EN-1
OpenText Employee File ManagementUser GuideEIM040001-UGD-EN-1Rev.: 26. Mar. 2014
This documentation has been created for software version 4.0.1.It is also valid for subsequent software versions as long as no new document version is shipped with the product or ispublished at https://knowledge.opentext.com.
Open Text SA
40 Avenue Monterey , Luxembourg, Luxembourg L-2163
Tel: 35 2 264566 1
Open Text Corporation
275 Frank Tompa Drive, Waterloo, Ontario, Canada, N2L 0A1
Tel: +1-519-888-7111Toll Free Canada/USA: 1-800-499-6544 International: +800-4996-5440Fax: +1-519-888-0677Email: [email protected]: ftp://ftp.opentext.comFor more information, visit http://www.opentext.com
Copyright © 2014 by Open Text Corporation
OpenText is a trademark or registered trademark of Open Text SA and/or Open Text ULC. The list of trademarks is notexhaustive of other trademarks, registered trademarks, product names, company names, brands and service namesmentioned herein are property of Open Text SA or other respective owners.
Disclaimer
No Warranties and Limitation of Liability
Every effort has been made to ensure the accuracy of the features and techniques presented in this publication. However,Open Text Corporation and its affiliates accept no responsibility and offer no warranty whether expressed or implied, for theaccuracy of this publication.
Table of Contents1 About OpenText Employee File Management ........................ 71.1 What is OpenText Employee File Management? ................................. 71.2 About this document .......................................................................... 71.2.1 Target audience ................................................................................ 7
Part 1 Using EFM in SAP GUI 9
2 Getting started with EFM ........................................................ 112.1 Launching EFM ............................................................................... 112.2 Searching a personnel file ............................................................... 142.3 Searching specific documents .......................................................... 162.4 Sorting documents .......................................................................... 182.5 Browsing a personnel file ................................................................. 192.6 Buttons in EFM ............................................................................... 222.7 Getting help .................................................................................... 22
3 Working with EFM ................................................................... 233.1 Displaying archived documents ........................................................ 233.2 Using thumbnail view ...................................................................... 243.3 Archiving documents ....................................................................... 243.4 Archiving emails and attachments .................................................... 263.5 Archiving documents with DesktopLink ............................................. 313.6 Moving and copying documents ....................................................... 313.7 Displaying and changing attributes or a document's date of origin ...... 343.8 Printing documents ......................................................................... 353.9 Jumping into SAP HR standard transactions ..................................... 363.10 Creating and processing follow-ups .................................................. 373.10.1 Creating a follow-up ........................................................................ 373.10.2 Processing a follow-up .................................................................... 403.11 Deleting documents with approval .................................................... 413.11.1 Creating a Delete with approval workflow .......................................... 423.11.2 Processing a Delete with approval workflow ...................................... 443.12 Requesting workflow status ............................................................. 463.13 Using reporting ............................................................................... 47
4 Creating and using guest user tickets .................................. 514.1 Creating guest user ticket with Guest User Ticketing System (GTS) ... 514.1.1 Creating guest user ticket ................................................................ 514.1.2 Using guest user ticket .................................................................... 544.1.3 Changing an open guest user ticket .................................................. 564.2 Creating guest user ticket with guest user account ............................ 58
EIM040001-UGD-EN-1 OpenText Employee File Management iii
4.2.1 Creating a guest user ticket ............................................................. 584.2.2 Using a guest user account .............................................................. 63
5 Using activity logging ............................................................. 655.1 Selecting log reports ........................................................................ 655.2 Evaluating logs ............................................................................... 70
6 Using the EFM Cockpit ........................................................... 73
7 Using the Document Inbox ..................................................... 77
Part 2 Using EFM Web UI 81
8 Getting started with EFM Web UI ........................................... 838.1 Launching EFM Web UI ................................................................... 838.2 Searching personnel files ................................................................. 838.3 Searching specific documents .......................................................... 848.4 Sorting documents .......................................................................... 858.5 Browsing a personnel file ................................................................. 858.6 Browsing thumbnails for fast document retrieval ................................ 868.7 Buttons in EFM Web UI ................................................................... 898.8 Using guest user access .................................................................. 90
9 Working with EFM Web UI ...................................................... 919.1 Displaying archived documents in EFM Web UI ................................ 919.2 Archiving documents in EFM Web UI ............................................... 919.3 Moving and copying documents in EFM Web UI ................................ 939.4 Changing a document's date of origin in EFM Web UI ....................... 979.5 Creating and processing workflows in EFM Web UI ........................... 989.6 Uploading multiple documents using Drag&Drop ............................. 1019.7 Using reporting ............................................................................. 1049.8 Using full-text search ..................................................................... 1059.9 Document Upload and Inbox application ......................................... 1089.9.1 Employee Self-Service Document Upload ....................................... 1099.9.2 Manager Self-Service Document Upload ........................................ 1099.9.3 Document Inbox ............................................................................ 111
Part 3 Using EFM in other integrations 113
10 ESS/MSS/HRA integrations .................................................. 11510.1 SAP ESS integration ..................................................................... 11510.2 SAP MSS integration ..................................................................... 11610.2.1 SAP MSS integration with Web Dynpro Java (WDJ) ........................ 11710.2.2 SAP MSS integration with Web Dynpro ABAP (WDA) ...................... 11810.3 HR Administrator integration .......................................................... 119
Table of Contents
iv OpenText Employee File Management EIM040001-UGD-EN-1

11 Employee Interaction Center (EIC) integration ................... 121
12 SAP SuccessFactors integration ......................................... 123
Part 4 Using EFM on a mobile 127
13 Getting started with EFM mobile app .................................. 12913.1 Launching EFM mobile app ........................................................... 12913.2 Searching a personnel file ............................................................. 13013.3 Browsing a personnel file ............................................................... 132
Table of Contents
EIM040001-UGD-EN-1 User Guide v

Chapter 1
About OpenText Employee File Management
1.1 What is OpenText Employee File Management?OpenText Employee File Management (EFM) provides employees in the HumanResources (HR) department access to all HR-related documents in an electronicpersonnel file. Thus, working with paper documents can be reduced to a minimum.
EFM offers data protection that guarantees only authorized employees can accessthe documents. Combined with OpenText Archive and Storage Services, EFMprovides secure long-term storage.
EFM provides a clear folder structure of content such as original documents, masterdata, employee-related emails and Microsoft Office documents in SAP. Double-clickon a document opens it in the appropriate viewer. The search function makesretrieving information on employees easier.
EFM provides a direct link to the SAP ERP Human Capital Management (HCM)objects. So, you can access the corresponding SAP transaction to view, change, orcreate data records. Creation of documents is supported by integration of an uploadfunction in Employee-Self-Service (ESS) and Manager-Self-Service (MSS); a centralDocument Inbox manages typical document workflows.
For quick and easy access to documents in a web-based environment, EFM offers theEFM Web UI, including a feature that allows you to browse through thumbnails ofthe documents. The EFM Web UI is based on the SAP Web Dynpro technology.
For mobile access to documents, EFM provides a document viewer with extensivefiltering capabilities. Currently, Android-based devices and the iPad are supported.
1.2 About this document
1.2.1 Target audienceThis user guide addresses the following target groups:
• HR employees who use EFM.
• HR employees who create guest user tickets.
• Managers and employees who use EFM as guest users.
• Managers and employees who use EFM in self service scenarios
Basic knowledge of working with an SAP system is necessary.
EIM040001-UGD-EN-1 OpenText Employee File Management 7


Part 1Using EFM in SAP GUI
EFM is fully integrated in the SAP HR solution and provides a clear folder structureof original documents, master data, employee-related emails and Microsoft Officedocuments. The search function eases information retrieval on employees.
Part 1 Using EFM in SAP GUI
10 OpenText Employee File Management EIM040001-UGD-EN-1
Chapter 2
Getting started with EFM
2.1 Launching EFMYou can launch Employee File Management (EFM) as follows:
• Directly with customized transactions.• As a DocuLink transaction.• From an HR master record either in the Display HR Master Data (PA20) or the
Maintain HR Master Data (PA30) transaction.
Note: You can access only the views that you are authorized to see.
To launch EFM directly:
1. Log on to the SAP system.
2. Execute one of the following transactions:
/OTEI/VIEW_100Displays personnel files in infotype structure view.
/OTEI/VIEW_110Displays personnel files in folder structure 1 view.
/OTEI/VIEW_120Displays personnel files in folder structure 2 view.
/OTEI/VIEW_130Displays personnel files in folder structure 3 view.
3. In the Selection HR Master Data dialog, enter the selection criteria to be usedfor selecting the personnel file that you want to access.Click the button.
Tip: Click the icon for a selection mask.
The corresponding personnel file is displayed.
To launch EFM as a DocuLink transaction:
1. Log on to the SAP system.
2. Execute the J6NY transaction to start DocuLink.
EIM040001-UGD-EN-1 OpenText Employee File Management 11

3. Select Employee File Management 4.0 from the Projects for DocuLinkapplications list.
The EFM start screen is displayed, showing one or more EFM projects. Forexample, there might be separate projects for regular employees, apprenticesand retired employees.
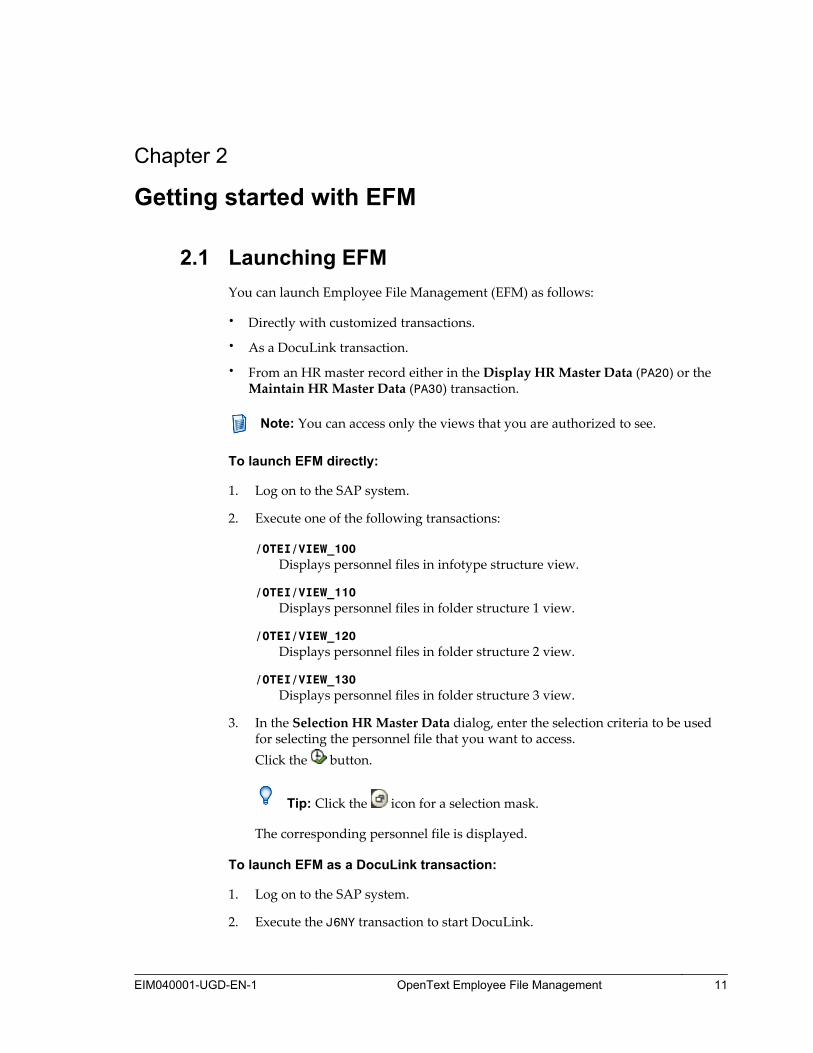
To launch EFM from an HR master record:
1. Navigate to the Human Resources > Personnel Management > Administration> HR Master Data menu, double-click PA20 - Display or PA30 - Maintain.
2. Open an HR master record:
a. Enter the personnel number of the record in the Personnel No. field or use
the icon to search for the record.b. Press ENTER to display the record.
Chapter 2 Getting started with EFM
12 OpenText Employee File Management EIM040001-UGD-EN-1

3. Click the Services for object icon next to the heading.
4. Select DocuLink.
5. EFM starts directly if only one HR project is configured. If multiple HR projectsare configured, you can select from a list of the projects.
2.1. Launching EFM
EIM040001-UGD-EN-1 User Guide 13
Depending on the customizing, EFM is either called in a pop-up screen withlimited functionality or in full screen mode.In both cases the personnel file of the associated HR master record is displayed.
2.2 Searching a personnel fileYou can search for personnel files specifying a range of HR master data, includingpersonal data and organizational information.
To search personnel files with HR data:
1. Launch the EFM start screen; see “Launching EFM” on page 11.
2. Click the Personnel file node you want to search in.
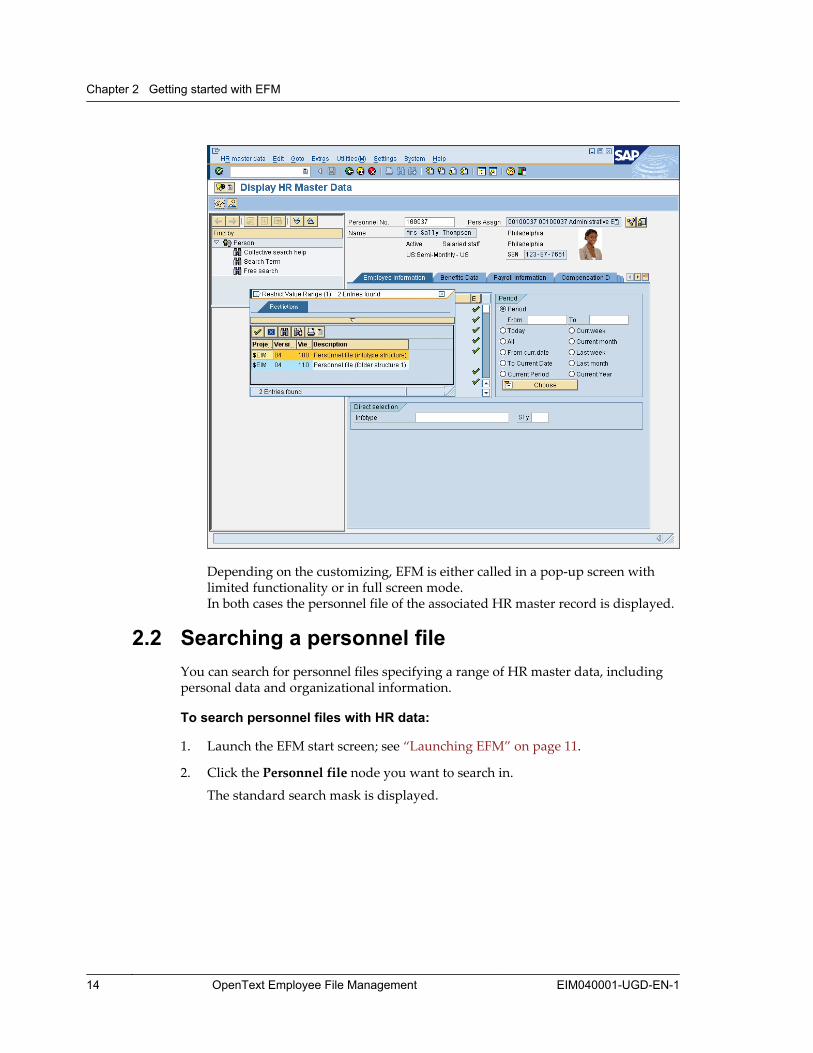
The standard search mask is displayed.
Chapter 2 Getting started with EFM
14 OpenText Employee File Management EIM040001-UGD-EN-1
Note: The search mask may look different, for example it may have fewersearch fields, depending on the user group you are assigned to.
3. Enter the search criteria. You can search for single values and for ranges. Tosearch for ranges, enter threshold values in both fields in a row.
Note: The External person ID field allows you to search for the SAP globalemployee ID; for more details on its usage, see the respective SAPdocumentation.
4. To display a list of possible entries, select the field and click the icon, ifavailable. In the list of possible entries, double-click an entry to fill it in thesearch field.
5. To search for multiple values, click the Multiple selection icon . This actionuses the SAP standard dialog for multiple selection. See the online help fordetails.
Tip: You can clear criteria lines from values entered by marking the lineand clicking the icon. If more than one value was entered in themultiple selection dialog and you click the icon in the main selectionmask (not in the multiple selection dialog), only one selection criteria isdeleted.
2.2. Searching a personnel file
EIM040001-UGD-EN-1 User Guide 15
You can save the search mask as a variant, using the icon in thestandard search mask. A saved variant is especially useful with repetitiveselections.
6. To start the search, click the icon.The search result, one or more master records, is displayed as a hit list in thePersonnel file node selected.
2.3 Searching specific documentsUsing the document search, you can search for specific documents within apersonnel file specifying one of the following:
• Both HR and document metadata such as document type, document class orinfotype.
• A specific text string using the full-text search.
Note: The metadata search is available for the infotype and flexible folderviews.
The full-text search must be customized by your administrator.
To search specific documents with metadata:
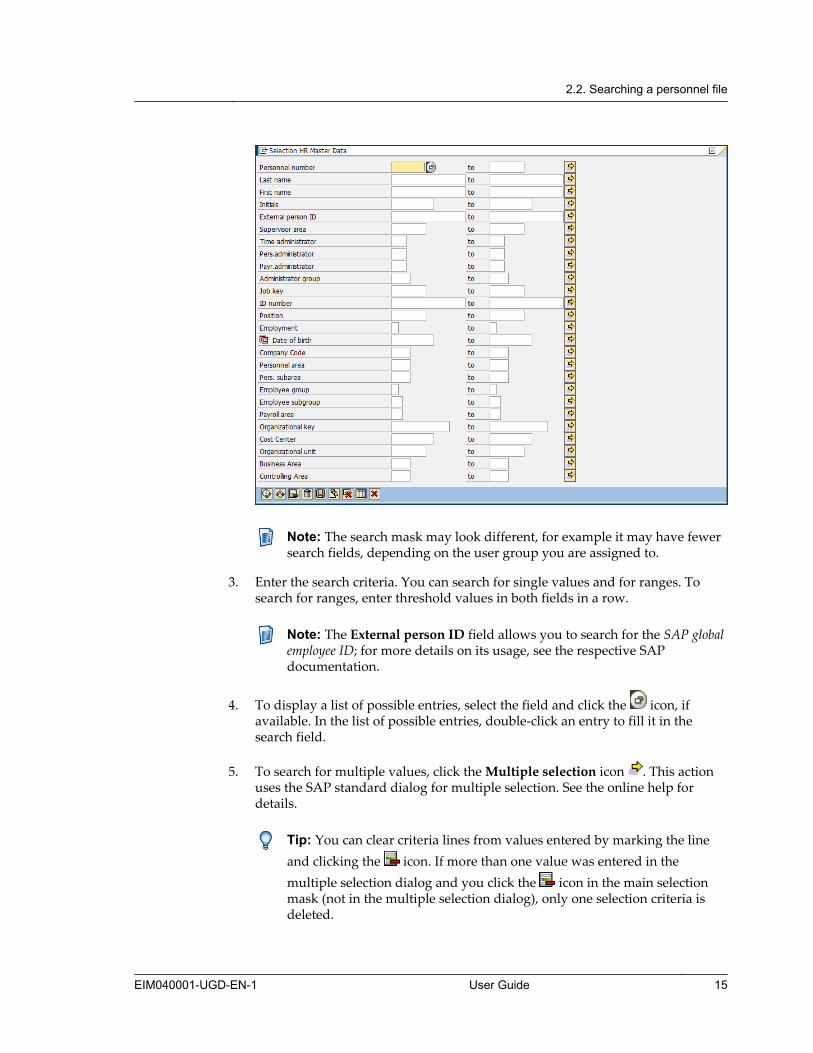
1. Click the Search folder in a personnel file you want to search in.The Search dialog is displayed.
Note: The search mask may look different, for example it may have fewersearch fields, depending on the user group you are assigned to.
2. Enter one or more of the following search criteria:
Document typeClassification for documents that were stored. This can be either adocument type or a business document type.
Note: Business document types are customized by your administrator.They unite several technical document types such as PDF or TIFF into
Chapter 2 Getting started with EFM
16 OpenText Employee File Management EIM040001-UGD-EN-1
a logical type such as contract or appraisal. This business documenttype can be searched for like the standard document type.
Date of originDate of origin of the stored document.
Storage dateDate on which the entry was made in link table.
InfotypeHR infotype; for example Education, Skills or Family member.
SubtypeHR subtype.
Object IDHR object ID.
Document classArchive format for documents in the Content Server.
Tip: All fields provide an F4 help. The F4 helps relate to each other; forexample the document class determines the possible document types.
3. You can search for single values and for ranges. To search for ranges, enterthreshold values in both fields in a row.
To display a list of possible entries, select the field and click the icon, ifavailable. In the list of possible entries, double-click an entry to fill it in thesearch field.
When you complete inputs for the search mask by pressing the ENTER key, thevalues entered are stored during the user session. When the search mask isopened again, it is then already filled with the previously entered searchcriteria.
4. To search for multiple values, click the Multiple selection icon . This actionuses the SAP standard dialog for multiple selection. See the online help fordetails.
5. To start the search, click the icon.
After executing the search, a corresponding subfolder named Search result isdisplayed which contains all documents found.
To search specific documents with text:
1. Click the Search folder in a personnel file you want to search in.
The Search dialog is displayed.
2. Enter the search text string in the Search Pattern field.
2.3. Searching specific documents
EIM040001-UGD-EN-1 User Guide 17

Tip: You can combine the full-text search with specific metadata. Fordetails, see “To search specific documents with metadata:“ on page 16.
3. To start the search, click the icon.
After executing the search, a corresponding subfolder named Search result isdisplayed which contains all documents found.
2.4 Sorting documentsThe search results in the Search and All Documents folder are displayed as hit listwith sortable columns. The sorting criteria are the columns Description, Date oforigin, and Storage date. The list entries can be sorted by selecting one (or more)column header(s) and then clicking on the sort buttons in the toolbar.
To sort search results:
1. Perform a document search (see “Searching specific documents” on page 16).
2. In the Search result folder, click the title of the columns Description, Date oforigin, or Storage date to sort according to the respective criteria.
and
If more than one column is selected, a popup is asking for sort order and sorttype for each column.
3. To customize the display, click the icon and modify the parameters.
Chapter 2 Getting started with EFM
18 OpenText Employee File Management EIM040001-UGD-EN-1
Note: Sorting is only available for the Search and All Documents folder. Forall other folders, the sorting order can be customized by your administrator.
2.5 Browsing a personnel fileOnce you have executed the search, a hit list with all employees matching the searchcriteria is displayed. For each employee in the hit list a personnel file is available.
Notes
• The hit list displays a maximum number of 1000 entries.• The layout of the hit list differs, depending on the DocuLink user group you
are assigned to.
Tip: You can configure your personal hit list, using the Administration Hit listdialog. For example, you can remove columns from the hit list. To open thedialog, double-click the icon next to the heading of the hit list.
The personnel file is built using one of the following structures:
Infotype structureThis structure is based on the SAP infotypes. Each infotype is assigned to afolder, each subtype to a subfolder and each object ID to another subfolderbelow the subtype subfolder.
By double-clicking the folder symbol or clicking the hotspot (underline thatappears when positioning the pointer over the folder description), you can openthe PA20 transaction to view the corresponding record.
By double-clicking the pen icon beside a folder, you can open the PA30transaction to edit the corresponding record. Note that this icon is only availableif you are authorized to edit the corresponding record.
A Documents folder is displayed below every subfolder containing documents.The Documents folder contains all documents assigned to the subfolder.
Structures
2.5. Browsing a personnel file
EIM040001-UGD-EN-1 User Guide 19
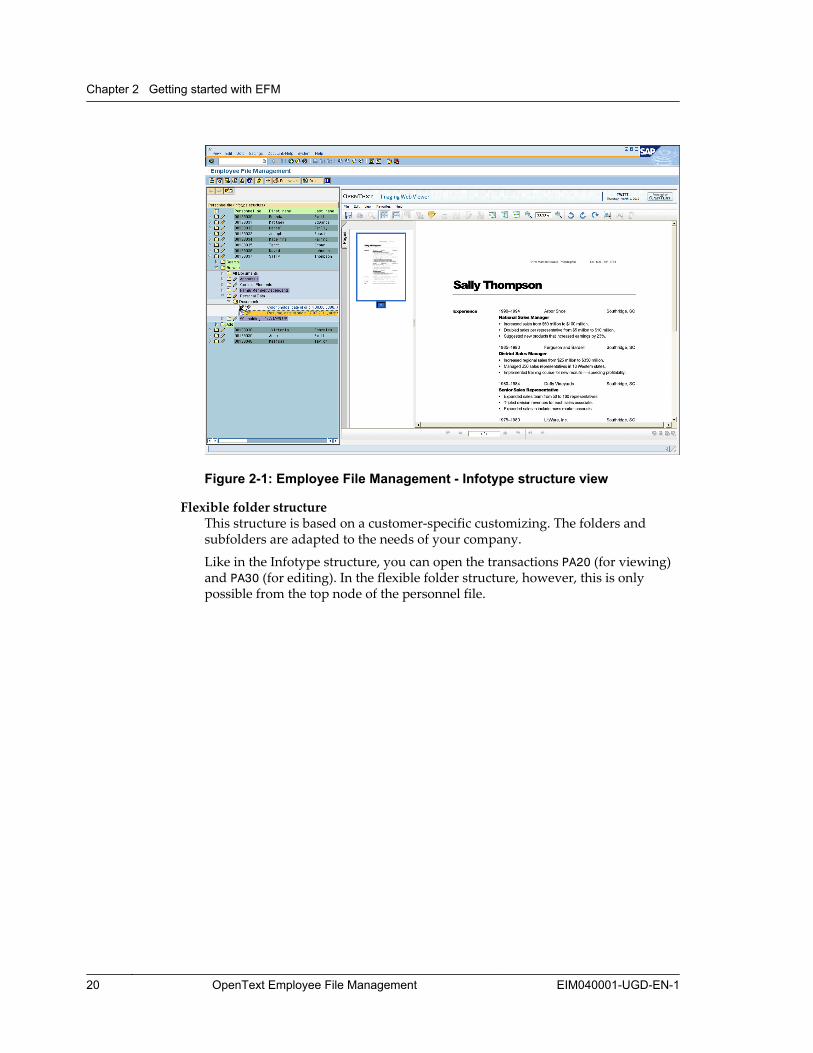
Figure 2-1: Employee File Management - Infotype structure view
Flexible folder structureThis structure is based on a customer-specific customizing. The folders andsubfolders are adapted to the needs of your company.
Like in the Infotype structure, you can open the transactions PA20 (for viewing)and PA30 (for editing). In the flexible folder structure, however, this is onlypossible from the top node of the personnel file.
Chapter 2 Getting started with EFM
20 OpenText Employee File Management EIM040001-UGD-EN-1

Figure 2-2: Employee File Management - Flexible folder structure view
Note: If both structures are configured on your system or there is more thanone personnel file, you can switch between structures, using the iconabove the personnel file.
The first level within the personnel file comprises the subtrees Search, Browse andAdd (regardless of whether infotype structure or flexible folder structure is used). Inthe next level, all folders include an All Documents subfolder.
SearchUsing the document search, you can search for specific documents within anemployee file using both HR and document metadata such as document type,document class or infotype.
BrowseUsed for searching and displaying documents. Only folders that containdocuments are displayed.The customizing of the document types (and additional customizing in case ofthe flexible folder structure) determines what folders appear.
AddUsed for storing documents. All folders that you can assign documents to aredisplayed.The customizing of the document types (and additional customizing in case ofthe flexible folder structure) is relevant for what folders appear.
All DocumentsContains all documents that are available for the selected employee.
Folders
2.5. Browsing a personnel file
EIM040001-UGD-EN-1 User Guide 21
Documents (Infotype structure only)Contains all documents assigned to this specific subfolder; available only in theInfotype structure view.
2.6 Buttons in EFMNote: Since the functions of EFM can be customized for different users, youmay not be able to access all functions described in the following.
Apart from the standard DocuLink buttons such as Sort, Display original andRefresh, the tool bar provides the following EFM-specific function buttons:
Follow-UpSee “Creating and processing follow-ups” on page 37.
DeleteSee “Deleting documents with approval” on page 41.
2.7 Getting helpThere are various ways to get help in EFM:
•To access input help in a selection or create screen, click the F4 icon next tothe input field.
• To fill in date fields, use the calendar that is provided as input help. You canbrowse through the months and select a date.
Chapter 2 Getting started with EFM
22 OpenText Employee File Management EIM040001-UGD-EN-1
Chapter 3
Working with EFM
Employee File Management (EFM) provides the following functions:
• “Displaying archived documents” on page 23• “Using thumbnail view” on page 24• “Archiving documents” on page 24• “Archiving emails and attachments” on page 26• “Archiving documents with DesktopLink” on page 31• “Moving and copying documents” on page 31• “Displaying and changing attributes or a document's date of origin” on page 34• “Printing documents” on page 35• “Jumping into SAP HR standard transactions” on page 36• “Creating and processing follow-ups” on page 37• “Deleting documents with approval” on page 41• “Requesting workflow status” on page 46• “Using reporting” on page 47
ImportantSince the functions of EFM can be customized for different roles, you maynot be able to access all functions described in the following.
3.1 Displaying archived documentsYou can display all archived documents of a personnel file.
To display archived documents:
1. Open the personnel file you want to display documents from.
2. Open the node Browse | All Documents.
All available documents are listed.
3. Double-click a document to display it in the viewer that is configured in yoursystem.
Note: MS Office documents, emails, or PDF documents can be displayedin their related applications, if installed on your computer.
EIM040001-UGD-EN-1 OpenText Employee File Management 23

Notes
• Finding a document in the All Documents folder might be time-consuming.You can use the subfolders to find the required document.
• In the Infotype structure view, you will find a Documents folder belowevery subfolder containing all documents assigned to this subfolder.
3.2 Using thumbnail viewYou can display the personnel file in a thumbnail view.
To use the thumbnail view:
1. Open the personnel file you want to display documents from.
2. Select the context menu item Show Thumbnails to display a folder in thethumbnail view.
3. Select the folder icons in the thumbnail view to browse in the personnel file.For more details, see “Browsing thumbnails for fast document retrieval”on page 86.
Note: Using thumbnail view requires configuration settings and prerequisitesthat are described in section 3.1.2 “Enabling thumbnail view” in OpenTextEmployee File Management - Administration Guide (EIM-AGD).
3.3 Archiving documentsThere are various ways to archive documents from an EFM view. The followingarchiving scenarios are possible:
Late archiving with barcodeThis scenario allows you to deposit a barcode for a document. The barcode isstored in the barcode table instead of the document to be archived. If adocument is scanned and the barcode is identified correctly, then this documentis assigned to the open barcode and the barcode will be closed. Instead of theopen barcode the document is linked with the employee, infotype, subtype, orobject the barcode was attached to.
File Upload with DesktopLinkThis scenario is specific to OpenText. The client communicates directly with thearchive. Documents are stored directly. They do not need to go through the SAPsystem. See “Archiving documents with DesktopLink” on page 31.
Note: To use this scenario, OpenText DesktopLink needs to be installed onyour computer.
Chapter 3 Working with EFM
24 OpenText Employee File Management EIM040001-UGD-EN-1

File UploadThis scenario is the standard scenario that SAP uses to archive documents. Thedocuments from the local computer are sent to the SAP system, and are thenarchived from there. The SAP system is used for communication.
ScanningFor this scenario, the scan client (OpenText Imaging Enterprise Scan) needs to beinstalled on the local computer. Documents are scanned and delivered directlyfrom the scan queue to the archive. If you archive the entire scan queue, alldocuments are assigned to the same employee, infotype, subtype or object.
In the following example, a work contract is archived using the File Uploadscenario.
To archive a document:
1. Open the personnel file and navigate to the Add node.
2. Navigate to the folder to archive the document to.
3. Either double-click the Archive new document icon or – as an alternative –mark the entire folder and select the context menu item Create | Document.When using the folder structure, the context menu item is either Create | Folderdocuments (for top level folders) or Create | Subfolder documents (forsubfolders).
4. Select the archiving scenario and click the button.
The Add document dialog opens.
3.3. Archiving documents
EIM040001-UGD-EN-1 User Guide 25

5. Select the document you want to upload either using the Browse field or drag itto the drop area of the dialog.
6. Select a document type from the Document Type drop-down.
Note: The document types to select from depend on the customizing forthe folder you started the archiving from.
7. Maintain the HR data as required (for example date of origin, infotype andsubtype) and any additional document attributes.
Note: Additional document attributes are only available if they have beencustomized by your administrator.
8. Click the button to archive the document.
When the archiving process is complete, the new document(s) will be visualizedwithin the personnel file. Visualization differs depending on how you started thearchiving process:
• If you used the icon, the subtree below the folder from where you startedarchiving will be refreshed automatically. If the subtree is expanded before youstart attaching documents, you will see the new documents immediately.
• If you started archiving from the context menu, no automatic refresh of thesubtree is performed. In this case, the document is visualized in red as a directchild of the folder where you have chosen the context menu entry. However, thismight not be the location expected for the document (based on your entry in theAttach <document type> dialog). After expanding the subtree and triggering anexplicit refresh (F9 key) in the EFM view, the entry in red disappears and thedocument is displayed in the proper location.
3.4 Archiving emails and attachmentsYou will probably receive personnel-file-related documents as an email or an emailattachment. EFM enables you to archive these documents directly from the emailand integrate them into personnel files.
Prerequisites
To archive directly from an email, the following OpenText products need to beinstalled:
• OpenText DesktopLink (DesktopLink)• OpenText Imaging ExchangeLink (ExchangeLink) for Microsoft Exchange/
Outlook or• OpenText Imaging NotesLink (NotesLink) for Lotus Notes
Note: These products are licensed separately. Contact your OpenText salesrepresentative.
Chapter 3 Working with EFM
26 OpenText Employee File Management EIM040001-UGD-EN-1

The following example shows the archiving of a work contract attachment, usingExchangeLink and DesktopLink:
To archive an email attachment:
1. Open Microsoft Outlook and select the email containing the attachment.
2. To start ExchangeLink, select the Save to SAP Solutions button in the tool bar.The ExchangeLink dialog opens.
3. Select if you want to archive the whole message or only selected attachments.
In our example, select Selected attachments.
4. Click OK.
The OpenText Desktop Monitor dialog opens.
Note: Depending on the customizing, the OpenText Desktop Monitordialog might be skipped, and the SAP logon is displayed immediately.Continue with Step 6 on page 27.
5. In the OpenText Desktop Monitor dialog, select SAP as the target system.
Click Save.
The SAP logon is displayed.
6. If you have access to more than one SAP system, select the appropriate SAPsystem from the list and click OK.
3.4. Archiving emails and attachments
EIM040001-UGD-EN-1 User Guide 27

Note: The SAP logon is displayed only once per DesktopLink session. Ifyou archive further documents, DesktopLink remembers the login.
7. Log on to the selected SAP system.
Note: If you have access to more than one SAP system and want to switchthe system, click the System button to select the appropriate SAP system.This executes Step 6 on page 27 that might be skipped becauseDesktopLink remembers the last system you have selected.
The Select Scenario screen is displayed.
Note: The Select Scenario screen is displayed only once per DesktopLinksession. If you archive further documents, DesktopLink remembers yourselection.
You can choose from the following scenarios:
DocuLink scenarioDocuLink is a general scenario available after installing DesktopLink. Itallows you to manually select a DocuLink view for identifying the object thedocument will be attached to. In case of EFM, you have to select one of theEFM views (infotype structure or some folder structure). DesktopLinkremembers your selection and starts this view immediately if you archivefurther documents.
Note: To select another EFM view, you have to cancel the selectionmask and leave the current view, using the button.
Continue with Step 8 on page 30.
EFM scenarios, Example: Store in HR Personnel folderEFM scenarios are available only if configured by the SAP administrator.The administrator can choose any scenario name and link the scenario witha specific EFM view. Using EFM scenarios, the linked EFM view is selectedautomatically. For example, the administrator can provide multiple
Chapter 3 Working with EFM
28 OpenText Employee File Management EIM040001-UGD-EN-1

scenarios for “Employee folder structure”, “Retiree folder structure” and“Apprentice folder structure”.
a. Select the Store in HR Personnel folder scenario and click the button.The Selection HR Master Data dialog opens.
Note: Depending on the user group you are assigned to, thedialog might look different.
b. Enter the selection criteria to be used for selecting the personnel file thatyou want to archive documents to. Click the button.
Tip: Click the icon for a selection mask.
3.4. Archiving emails and attachments
EIM040001-UGD-EN-1 User Guide 29
The corresponding personnel file is displayed in an SAP window.c. Continue with Step 10 on page 30.
8. Select the DocuLink scenario and click the button.
A project selection screen is displayed.
Note: The project selection screen is displayed only once per DesktopLinksession. If you archive further documents, DesktopLink remembers yourselection.
9. Select the Employee File Management project.
The standard search mask is displayed in a SAP window. Search for thepersonnel file you want to archive the email attachment to. See “Searching apersonnel file” on page 14.
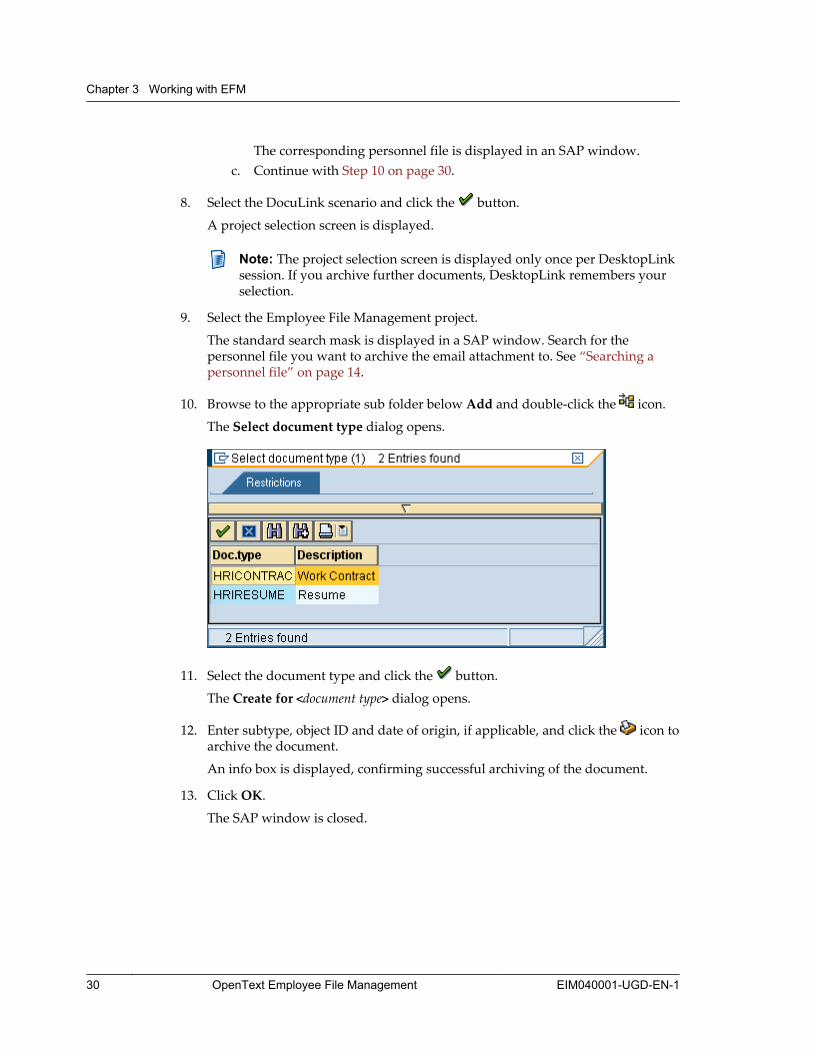
10. Browse to the appropriate sub folder below Add and double-click the icon.
The Select document type dialog opens.
11. Select the document type and click the button.
The Create for <document type> dialog opens.
12. Enter subtype, object ID and date of origin, if applicable, and click the icon toarchive the document.
An info box is displayed, confirming successful archiving of the document.
13. Click OK.
The SAP window is closed.
Chapter 3 Working with EFM
30 OpenText Employee File Management EIM040001-UGD-EN-1
3.5 Archiving documents with DesktopLinkDesktopLink allows you to archive documents directly from the file system or aMicrosoft Office application like Microsoft Word, and integrate them into personnelfiles in EFM. Archiving is triggered from outside the SAP system.
Note: As a prerequisite, OpenText DesktopLink (DesktopLink) needs to beinstalled on your computer.
The procedure of archiving with DesktopLink is almost identical to the emailarchiving procedure. You can archive documents in the following ways:
• Drag documents from the file system to the Save to SAP Solutions shortcut.Follow the procedure from Step 6 on page 27.
• Use the Save to SAP Solutions menu item in a MS Office application. Follow theprocedure from Step 5 on page 27.
3.6 Moving and copying documentsWhen processing documents, a wrong allocation of documents may occur. Wrongallocation means that the wrong document type or infotype/subtype/object ID wasselected when archiving the document. However, it is not necessary to deletedocuments and archive them again. Using the functions move and copy, you cantransfer documents from one file or folder to another:
• Moving a documentmoves it from its source destination (employee/infotype/subtype/object ID) to atarget destination (employee/infotype/subtype/object ID). The documentdisappears from the source destination.
• Copying a documentleaves the document also in the source destination. To copy a document, keep theCTRL key pressed during Drag & Drop.
Notes
• Any additional document attributes that have been maintained for thedocument will be moved or copied too.
• You can move and copy documents between infotypes/folders and betweenpersonnel files.
ImportantThe target destination must be a folder below the Add folder.
In the following example, a Primary School Certificate has been assigned to thewrong employee (John Kent) and must be moved into the correct personnel file(Stefan Kraft).
3.5. Archiving documents with DesktopLink
EIM040001-UGD-EN-1 User Guide 31
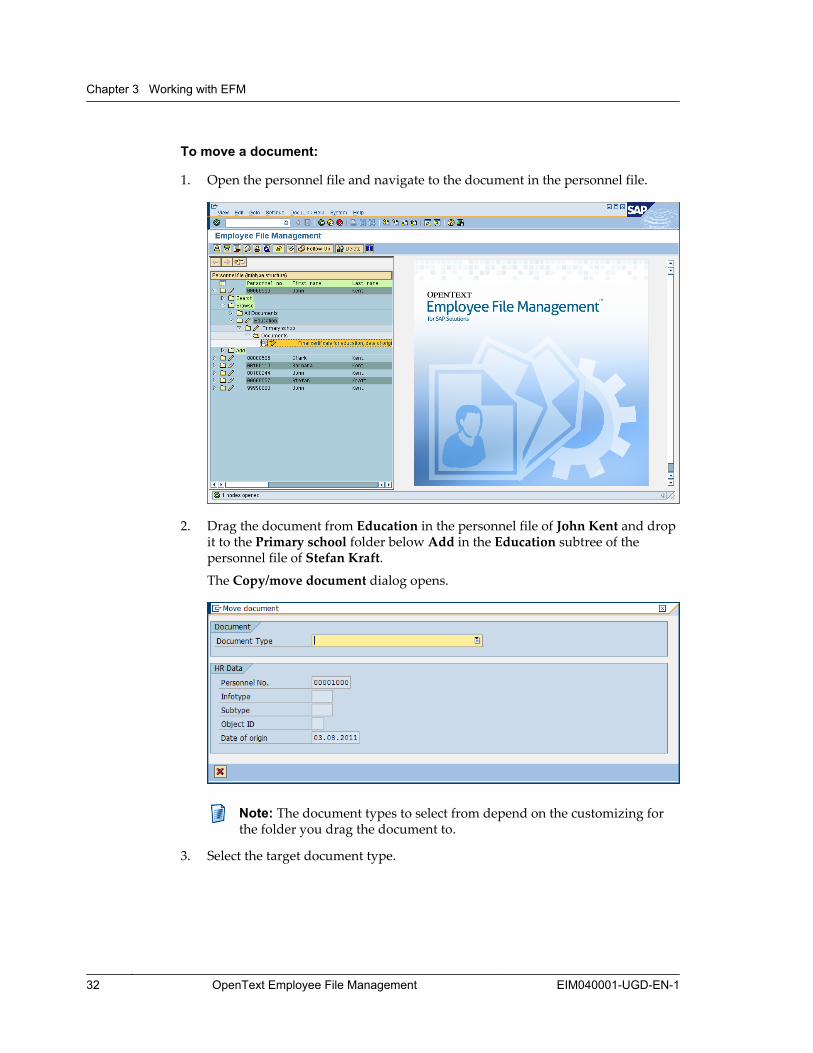
To move a document:
1. Open the personnel file and navigate to the document in the personnel file.
2. Drag the document from Education in the personnel file of John Kent and dropit to the Primary school folder below Add in the Education subtree of thepersonnel file of Stefan Kraft.
The Copy/move document dialog opens.
Note: The document types to select from depend on the customizing forthe folder you drag the document to.
3. Select the target document type.
Chapter 3 Working with EFM
32 OpenText Employee File Management EIM040001-UGD-EN-1

Depending on the customizing of the document type, you may have to enter aninfotype, a subtype and an object ID.There may also be additional attributes you have to maintain in the DocumentAttributes field.
4. After maintaining all the required HR data and attributes, click the button.
The document is now moved to the Primary school folder in the personnel fileof Stefan Kraft.
3.6. Moving and copying documents
EIM040001-UGD-EN-1 User Guide 33

3.7 Displaying and changing attributes or adocument's date of originThe ArchiveLink standard attributes such as DocumentTypeDescription,DateOfOrigin and ArchivingDate are already visible in the employee file.
Note: Additional document attributes such as infotype, subtype, object, and –if available – the ArchiveLink PLUS attributes are only visible in the Display/Change attributes dialog.
During the input of the document data, errors might occur. Therefore, it might benecessary to change the attributes or even the date of origin assigned to a document.
To change the document attributes:
1. Open the personnel file.
2. In the personnel file, double-click the icon next to the document you want tochange the date of origin for.
The Change attributes dialog opens.
3. Change the available attributes as required. You can only modify the date oforigin and – if available – the ArchiveLink PLUS attributes.
Tip: You can invoke input helps by clicking the icon.
4. Click the button to save your changes.
Chapter 3 Working with EFM
34 OpenText Employee File Management EIM040001-UGD-EN-1

In case you changed the document's date of origin, the new date is displayed.
3.8 Printing documentsDepending on your system configuration, you can print documents using thefollowing functions:
ViewerUse the print function of the viewer that is installed on your system; see theonline help of the respective viewer.
ApplicationsIf documents are displayed in their related applications, for example MicrosoftWord, you can use the application's print function.
DocuLink (OpenText Rendition Server)If OpenText Rendition Server is installed on your system, you can use theDocuLink print function. When you print a document with OpenText RenditionServer, DocuLink converts the document to the PDF format prior to sending it tothe printer.
Note: OpenText Rendition Server needs to be licensed separately.
To print one or more documents with the DocuLink print function:
1. Navigate in EFM to the required document(s).
2. Select the required document(s) either as single documents or a complete foldercontaining documents.
3. Click the (Document Processing) button and select the Print document entryin the Document Processing dialog.
The Print document dialog opens.
4. Select the Task Profile field and click the icon to open the Task Profiledialog. Select the required task profile from the selection dialog.
5. Click the (Copy) button to confirm your selection and press the ENTER key.
The task profile together with its defined printer path is displayed in the Printdocument dialog.
6. If required, enter any additional information in the Comment field.
This comment will be visible in the Overview of my Document Processing jobsdialog.
7. Click the Print button to trigger the printing of the selected document(s).
3.8. Printing documents
EIM040001-UGD-EN-1 User Guide 35

3.9 Jumping into SAP HR standard transactionsEFM displays only selected information from an employee data record. However,EFM allows you to jump into the HR standard transactions PA20 and PA30 andaccess the complete data by double-click. The PA20 transaction only displays thecomplete employee data record whereas you can edit data in the PA30 transaction.
Note: Jumping into the HR standard transactions from (sub)folders is onlypossible in the infotype structure. However, jumping to the HR Master Datarecord is also possible in the flexible folder structure, see “To jump into the HRMaster Data record:“ on page 36.
To jump into the PA20 transaction for viewing:
1. Open the personnel file and navigate to the wanted (sub)folder.
Note: The Browse sub tree only displays (sub)folders that containdocuments. If you want to jump to an infotype/subtype/object-ID with noassigned documents, use the Add sub tree.
2. Click the underlined node heading.
The PA20 transaction is displayed showing the corresponding data record.
3. To return to the EFM view, press the F3 key.
To jump into the PA30 transaction for editing:
1. Open the personnel file and navigate to the wanted (sub)folder.
Note: In the flexible folder structure, jumping to the PA30 transaction isonly possible from the top node of the personnel file.
2. Double-click the icon next to the wanted (sub)folder.
The PA30 transaction is displayed showing the corresponding data record.
Note: Your permissions for the PA30 transaction and the HR Master Datarecord determine your ability to perform changes.
3. Edit data and click to save your changes.
4. To return to the EFM view, press the F3 key.
To jump into the HR Master Data record:
1. Open the personnel file (infotype structure or flexible folder structure).
2. Jump to the HR Master Data record:
• To jump into the PA20 transaction for viewing, click the underlinedpersonnel number or last name in the root node of the personnel file.
Chapter 3 Working with EFM
36 OpenText Employee File Management EIM040001-UGD-EN-1
• To jump in the PA30 transaction for editing, click the icon next to the rootnode of the personnel file.
Note: You must have appropriate permissions to perform this action.Otherwise, the icon is not displayed.
3. To return to the EFM view, press the F3 key.
3.10 Creating and processing follow-upsIt might be necessary to ask another HR employee to have a look at certaindocuments in personnel files or at a complete personnel file. You also might want toset up a reminder for yourself, regarding a document. For this purpose, EFMprovides the Follow-Up function. You create a Follow-up workflow for thedocuments or the personnel file and assign it to the required HR employee, the so-called recipient. In the personnel file, the follow-up icon is displayed to the left ofthe documents or the personnel file, visible for all participants of the Follow-upworkflow, that is both the creator and recipient (in standard customizing).
In addition, the recipient gets a corresponding work item in the Workflow folder ofthe SAP Business Workplace inbox. The recipient accesses the Follow-up workflowby double-clicking the work item. The recipient can enter comments, display thedocument, jump to the EFM view of the personnel file, and finish the follow-up.
The creator and the recipient can display the follow-up by double-clicking the icon in the personnel file.
3.10.1 Creating a follow-upTo create a follow-up:
1. Open the personnel file and navigate to the document(s) you want to create afollow-up for.
2. Click the icon on the very left of the document line to select the document.
Notes
• To select multiple documents, keep the CTRL key pressed and select thedocuments.
• For a follow-up on a complete personnel file, click the icon on the veryleft of the personnel file to select the personnel file.
• It is not possible to create a follow-up for a folder.
3. Click the Follow-Up button in the application tool bar.
The Create Follow-Up screen is displayed.
The example shows two documents from different employee's files.
3.10. Creating and processing follow-ups
EIM040001-UGD-EN-1 User Guide 37
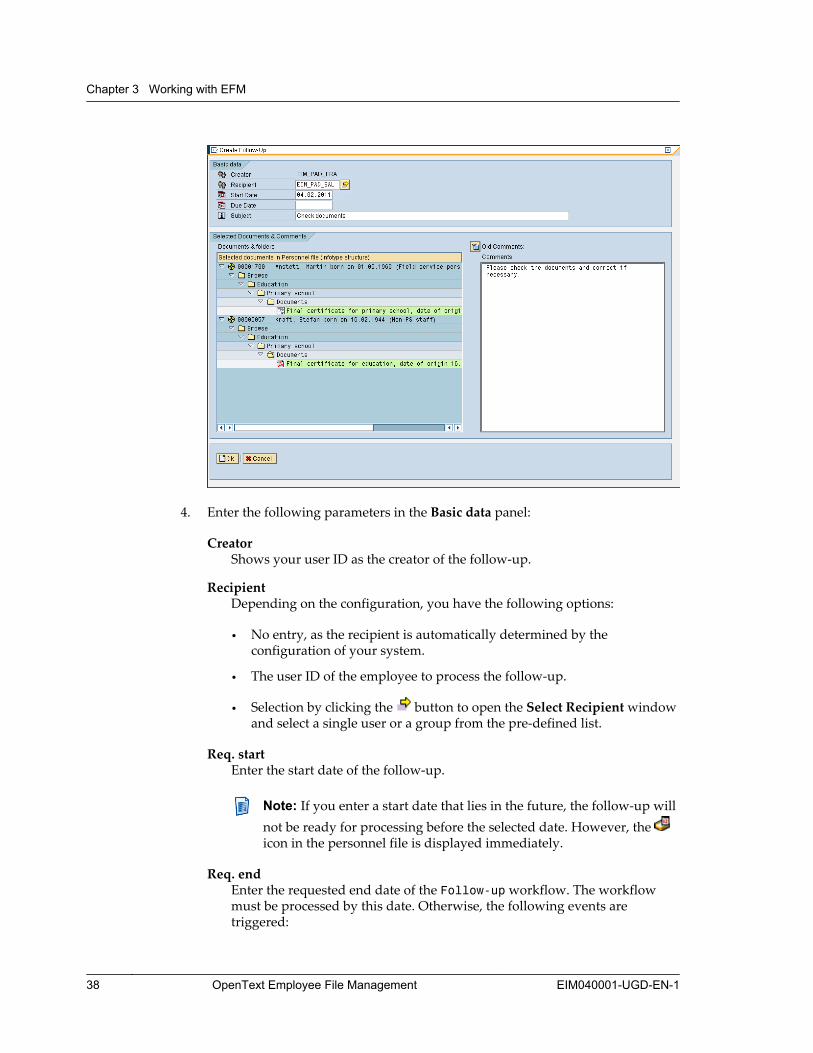
4. Enter the following parameters in the Basic data panel:
CreatorShows your user ID as the creator of the follow-up.
RecipientDepending on the configuration, you have the following options:
• No entry, as the recipient is automatically determined by theconfiguration of your system.
• The user ID of the employee to process the follow-up.
• Selection by clicking the button to open the Select Recipient windowand select a single user or a group from the pre-defined list.
Req. startEnter the start date of the follow-up.
Note: If you enter a start date that lies in the future, the follow-up willnot be ready for processing before the selected date. However, the icon in the personnel file is displayed immediately.
Req. endEnter the requested end date of the Follow-up workflow. The workflowmust be processed by this date. Otherwise, the following events aretriggered:
Chapter 3 Working with EFM
38 OpenText Employee File Management EIM040001-UGD-EN-1

• The workflow appears in the SAP Business Workplace inbox underWorkflow marked in yellow and a clock icon is displayed in the columnWork item overdue.
• The workflow appears in the SAP Business Workplace inbox underWorkflow | Overdue entries and a clock icon is displayed in thecolumn Work item overdue.
• A message appears under Workflow | Deadline messages with a link tothe respective work item; this message goes both to the creator and theprocessor user.
SubjectEnter a short description of the follow-up. The subject is used as the workitem text for the Follow-up workflow.
The Selected documents & comments panel comprises the following fields:
Documents & foldersLists a snapshot of the corresponding personnel files: the documents and allhigher-level folders.Double-click the icon on the very left of the line to display the document inthe viewer that is installed on your system.Double-click the icon on the very left of the employee record to jump tothe Display HR Master Data view.
Old CommentsYou can insert a comment on the follow-up, describing the work to be done.
5. Click OK.
The follow-up process is initiated. The processing employee receives a workitem in his workflow inbox at the selected start date. In the personnel file, the icon is visible for the process participants.
To display a follow-up:
1. Double-click the icon in the personnel file. If more than one follow-upprocess with your participation apply to the document, a selection screen isdisplayed.
The Display follow-up screen allows you to view the details of the follow-up.
2. You can perform certain actions like displaying the original document oraccessing the corresponding personnel file.
Note: You cannot enter comments or finish the follow-up in the Displayfollow-up screen.
3.10. Creating and processing follow-ups
EIM040001-UGD-EN-1 User Guide 39

3.10.2 Processing a follow-upYou start processing follow-ups from your inbox in the SAP Business Workplace.
To process a follow-up:
1. To navigate to the Workflow folder in your SAP Business Workplace inbox,click the icon in the application tool bar and open Inbox > Workflow.
2. Double-click the work item you want to process.
The Process Follow-Up screen is displayed.
The Basic data panel comprises general information about the Follow-upworkflow. See Step 4 on page 38.
The Selected documents & Comments panel comprises the following fields:
Documents & foldersLists a snapshot of the corresponding personnel files: the documents and allhigher-level folders.Double-click the icon on the very left of the line to display the document inthe viewer that is installed on your system.Double-click the icon on the very left of the employee record to jump tothe Display HR Master Data view.
Chapter 3 Working with EFM
40 OpenText Employee File Management EIM040001-UGD-EN-1
Old CommentsDisplays all comments that have been made to the follow-up. You cantoggle the history of comments on and off by clicking the (CollapseHistory) button.
CommentsYou can insert a comment on the follow-up, for example the actions youhave performed on it.
Note: If you cancel processing the follow-up, a dialog opens asking ifyou want to save your comments. If you click Yes, a short noticecontaining your user ID, date and time is added to the comments,even if you do not have added text to the Comments field.
At the bottom of the Process Follow-up screen, the following action buttons areavailable:
Personnel file buttonClick this button to access the EFM view of the personnel file the follow-upbelongs to.
Note: The label of this button uses the name of the personnel filestructure of EFM. This name can be customized, so the label probablydiffers from Personnel file.
Personnel Actions buttonClick this button to access the PA40 transaction in a separate window.
Finish buttonClick this button to finish the follow-up process.
The icon disappears from the document or folder in the personnel file.The work item in the SAP Business Workplace inbox disappears.
3.11 Deleting documents with approvalIn certain situations, you might want to delete documents from a personnel file, forexample, if they have become obsolete. For this purpose, EFM provides the Delete-with-Approval feature that ensures that a second user must approve all deletionprocesses. The Delete with approval workflow is very similar to the Follow-upworkflow.
You create a Delete with approval workflow for the documents and assign theworkflow to the required HR employee, the recipient. Creator and recipient must bedifferent persons. In the personnel file, the icon is displayed to the right of thedocuments, visible for all users of the personnel file.
Additionally, the recipient gets a corresponding work item in the Workflow folderof the SAP Business Workplace inbox. The recipient accesses the Delete withapproval workflow by double-clicking the work item. The recipient can enter
3.11. Deleting documents with approval
EIM040001-UGD-EN-1 User Guide 41
comments, display the document, jump to the EFM view of the personnel file, andfinish the Delete with approval workflow.
All participants of the process (creator and recipient) can display the deletionrequest by double-clicking the icon in the personnel file. All other users will getan error message when clicking the icon (in standard customizing).
Note: It is not possible to create a Delete with approval workflow for afolder or a complete personnel file.
3.11.1 Creating a Delete with approval workflowTo create a Delete with approval workflow:
1. Open the personnel file and navigate to the document(s) you want to delete.
2. Click the icon on the very left of the document line to mark the document.
Note: To select multiple documents, keep the CTRL key pressed and markthe documents.
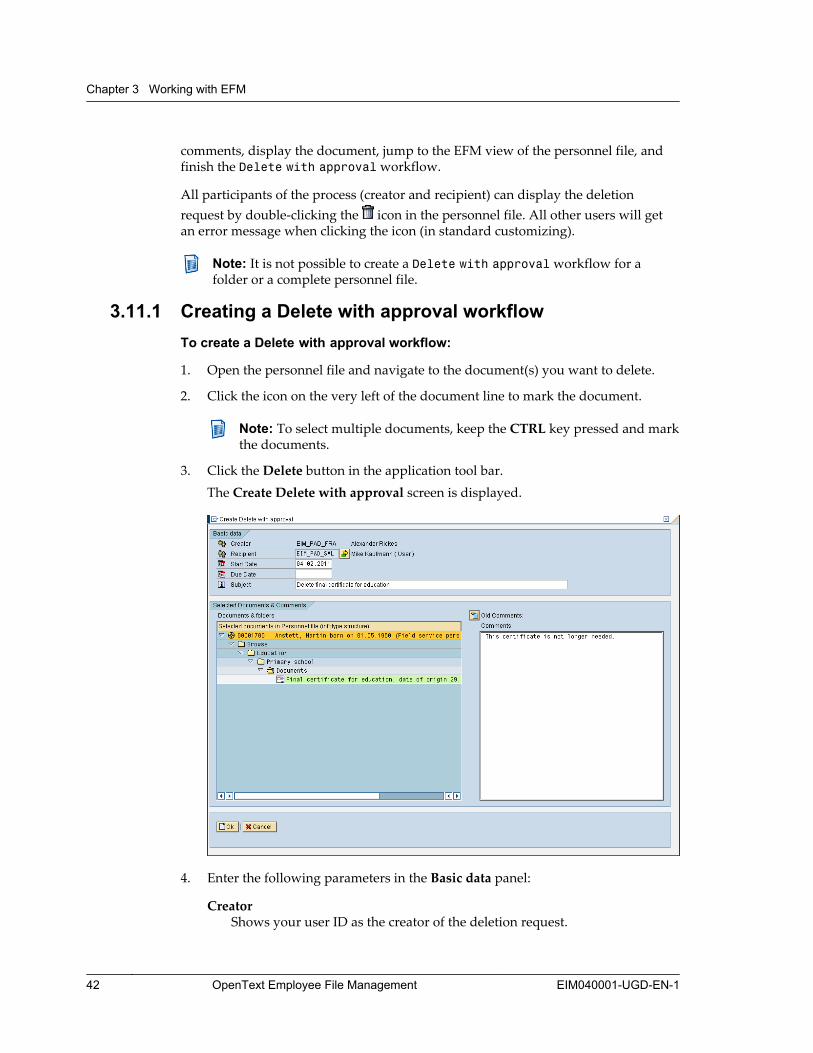
3. Click the Delete button in the application tool bar.The Create Delete with approval screen is displayed.
4. Enter the following parameters in the Basic data panel:
CreatorShows your user ID as the creator of the deletion request.
Chapter 3 Working with EFM
42 OpenText Employee File Management EIM040001-UGD-EN-1

RecipientDepending on the configuration, you have the following options:
• No entry, as the recipient is automatically determined by theconfiguration of your system.
• The user ID of the employee to process the follow-up.
• Selection by clicking the button to open the Select Recipient windowand select a single user or a group from the pre-defined list.
Note: To make sure the deletion is approved by a second person, therecipient must not be the same user as the creator.
Req. startEnter the start date of the Delete with approval workflow.
Note: If you enter a start date that lies in the future, the Delete withapproval workflow will not be ready for processing before theselected date. However, the icon in the personnel file is displayedimmediately.
Req. endEnter the requested end date of the Delete with approval workflow. Theworkflow must be processed by this date. Otherwise, the following eventsare triggered:
• The workflow appears in the SAP Business Workplace inbox underWorkflow marked in yellow and a clock icon is displayed in the columnWork item overdue.
• The workflow appears in the SAP Business Workplace inbox underWorkflow | Overdue entries and a clock icon is displayed in thecolumn Work item overdue.
• A message appears under Workflow | Deadline messages with a link tothe respective work item; this message goes both to the creator and therecipient user.
SubjectEnter a short description of the deletion request. The subject is used as thework item text for the Delete with approval workflow.
The Documents & Comments panel comprises the following fields:
Documents & foldersLists a snapshot of the corresponding personnel files: the documents and allhigher-level folders.Double-click the icon on the very left of the line to display the document inthe viewer that is installed on your system.Double-click the icon on the very left of the employee record to jump tothe Display HR Master Data view.
3.11. Deleting documents with approval
EIM040001-UGD-EN-1 User Guide 43
Old CommentsYou can insert a comment on the deletion request, describing the reason fordeleting documents.
5. Click OK.
The Delete with approval workflow is initiated. The recipient receives a workitem in their workflow inbox at the selected start date. In the personnel file, the
icon is visible for the documents to be deleted.
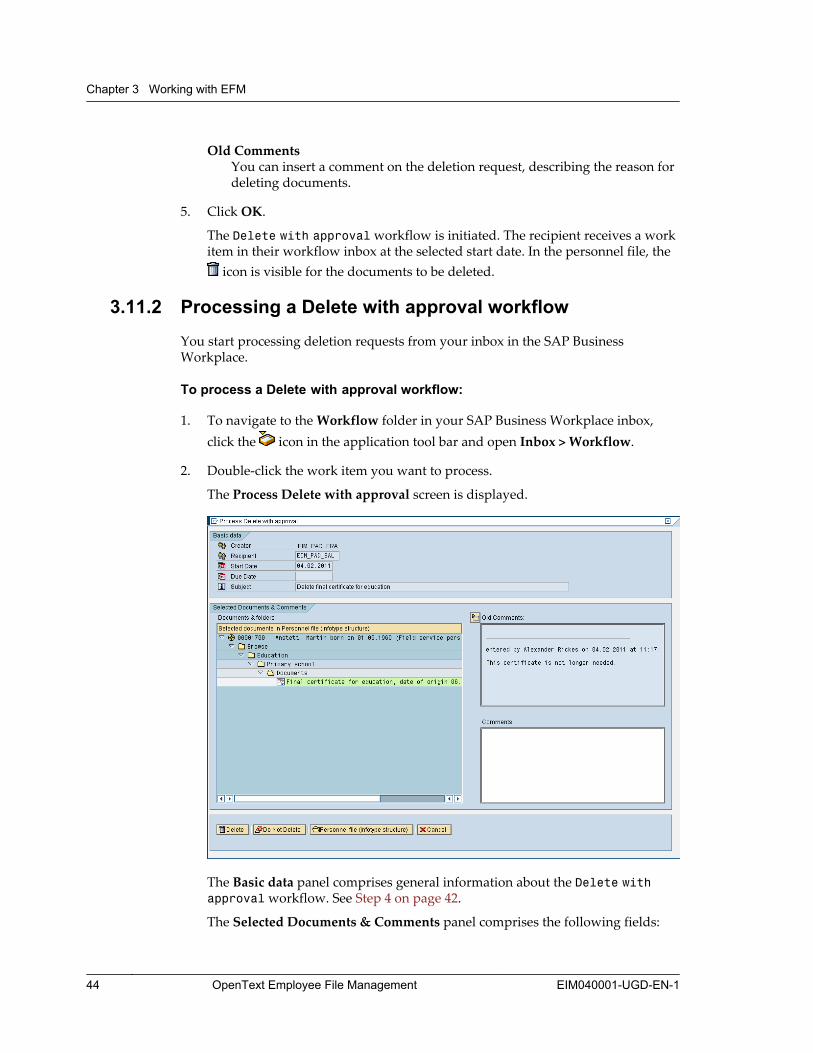
3.11.2 Processing a Delete with approval workflow
You start processing deletion requests from your inbox in the SAP BusinessWorkplace.
To process a Delete with approval workflow:
1. To navigate to the Workflow folder in your SAP Business Workplace inbox,click the icon in the application tool bar and open Inbox > Workflow.
2. Double-click the work item you want to process.
The Process Delete with approval screen is displayed.
The Basic data panel comprises general information about the Delete withapproval workflow. See Step 4 on page 42.
The Selected Documents & Comments panel comprises the following fields:
Chapter 3 Working with EFM
44 OpenText Employee File Management EIM040001-UGD-EN-1
Documents & foldersLists a snapshot of the corresponding personnel files: the documents and allhigher-level folders.Double-click the icon on the very left of the line to display the document inthe viewer that is installed on your system.Double-click the icon on the very left of the employee record to jump tothe Display HR Master Data view.
Old CommentsDisplays all comments that have been made to the deletion request. You cantoggle the history of comments on and off by clicking the Collapse Historybutton ( ).
CommentsYou can insert a comment on the deletion request, for example what actionsyou have performed about it.
Note: If you cancel processing the deletion request, a dialog opensasking if you want to save your comments. If you click Yes, a shortnotice containing your user ID, date and time is added to thecomments, even if you don't have added text to the Comments field.
At the bottom of the Process Delete with approval screen, the following actionbuttons are available:
Personnel file buttonClick this button to access the EFM view of the personnel file the deletionrequest belongs to.
Note: The label of this button uses the name of the personnel filestructure of EFM. This name can be customized, so it is very likely thatthe label differs from Personnel file.
Do not delete buttonClick this button to reject the deletion request.
The requested documents are not deleted.The icon disappears from the documents in the personnel file. The workitem in the SAP Business Workplace inbox disappears.
Delete buttonClick this button to accept the deletion request.
The requested documents are deleted.The icon disappears from the documents in the personnel file. The workitem in the SAP Business Workplace inbox disappears.
3.11. Deleting documents with approval
EIM040001-UGD-EN-1 User Guide 45
3.12 Requesting workflow statusEFM informs you about the workflow status; the information you get dependswhether you are in the creator or recipient role. Depending on the customizing, thefollowing options are available:
Standard email notificationsAs a recipient, you receive an email notification in your mail program inbox (forexample Microsoft Outlook) when a new workflow item appears in your SAPBusiness Workplace Inbox. If you are part of a group defined as workflowprocessor, all the other members of the group will also receive an emailnotification.As soon as one of the group has processed the workflow item from the SAPBusiness Workplace Inbox, the item is no longer visible for the other processors.In this case, no additional notification is sent.As a creator, you are notified by an email once the workflow is completed(Follow-up finished or Delete with approval accepted or rejected).If the workflow item is forwarded using the standard SAP forward function, noadditional notification is sent.
Note: For security reasons, emails do not contain any workflow-specificdocuments as attachments. The respective documents can only be accessedvia the SAP Business Workplace or the SAP NetWeaver Portal UnifiedWorklist (UWL).
SAP Business Workplace inboxAs a creator, you will get a Processing info document in your SAP BusinessWorkplace inbox once the recipient has finished your work item. In the case of aFollow-up workflow, this is the finish state; in the case of a Delete withapproval workflow, it is either an acceptance or a reject.
Note: This function is only available when creator and recipient aredifferent users.
EFM Activity LogIn addition, as an HR employee, you can use the EFM Activity Log to requestthe workflow status. You can perform the following:
• Search for the FOLLOW_UP or 4-EYE-DELETE workflow activity profiles.• Check workflow status for creation or processing in the Activity column.• Check the EFM-specific Workflow Status field for detailed information.
Note: For more details, see “Evaluating logs” on page 70.
Employee File Management Workflow MonitoringIn addition, as an HR employee, you can use the Employee File ManagementWorkflow Monitoring (/OTEI/SWF_ADMIN transaction) to monitor the EFM-specific workflows.
Chapter 3 Working with EFM
46 OpenText Employee File Management EIM040001-UGD-EN-1
Note: Make sure you have the necessary permission to perform thetransaction. For more details, see section 3.3 “Workflow monitoring” inOpenText Employee File Management - Administration Guide (EIM-AGD).
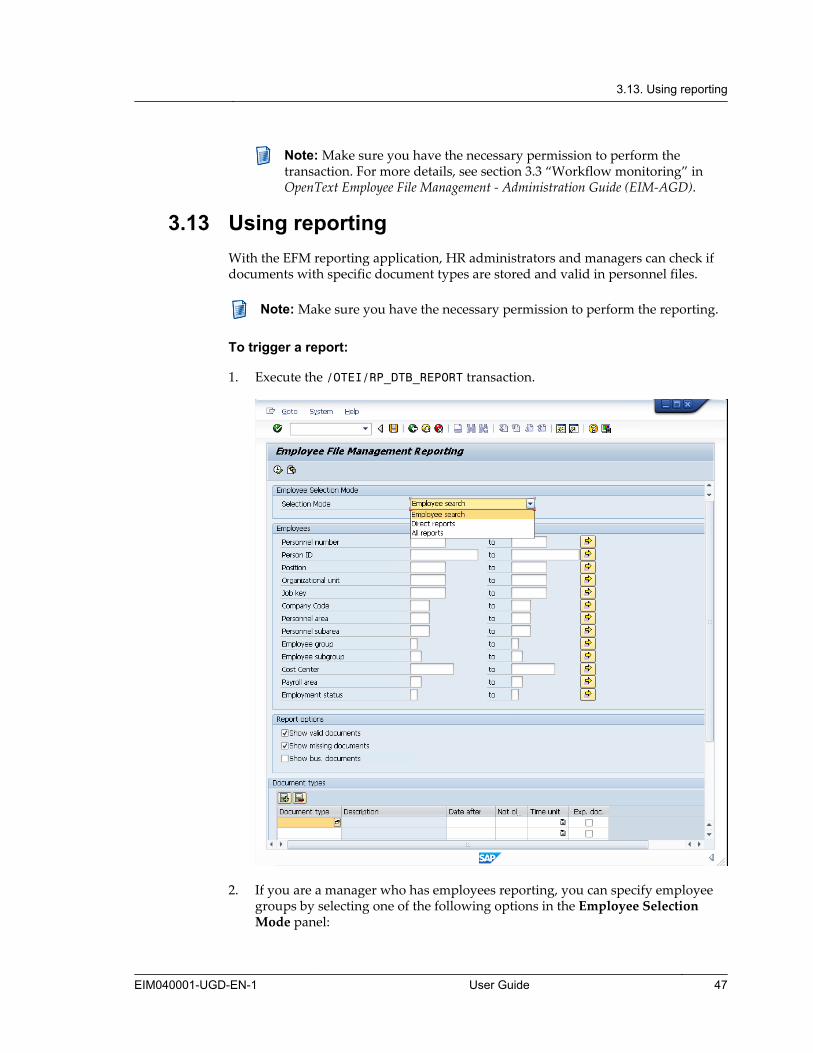
3.13 Using reportingWith the EFM reporting application, HR administrators and managers can check ifdocuments with specific document types are stored and valid in personnel files.
Note: Make sure you have the necessary permission to perform the reporting.
To trigger a report:
1. Execute the /OTEI/RP_DTB_REPORT transaction.
2. If you are a manager who has employees reporting, you can specify employeegroups by selecting one of the following options in the Employee SelectionMode panel:
3.13. Using reporting
EIM040001-UGD-EN-1 User Guide 47

Direct ReportFilters all employees whose organizational unit level is directly under yourorganizational unit.
All ReportsFilters all employees which are under your organizational unit.
Employee SearchChecks all employees; use the parameters in the Employees group such asthe personnel number or person ID to refine your search.
Note: For HR administrators, the Employee Selection Mode is notavailable. For them, reporting is always done in the Employee Searchmode.
3. Specify one or more of the following parameters:
EmployeesLimit the search to a specific group using HR data such as the personnelnumber, person ID, position, organizational unit or job key; you may alsocombine these parameters.
Tip: You can search for the HR data by selecting the line and clicking
.
Report optionsSelect whether valid or missing documents are displayed and/or whetherbusiness document types are enabled. If business document types areenabled, the F4 help for document types and the result list display businessdocument types instead of document types.
Note: Business document types are customized by your administrator.They unite several technical document types such as PDF or TIFF intoa logical type such as contract or appraisal. This business documenttype can be searched for like the standard document type.
Document typesSpecify one or more document types or business document types (ifcustomized) that you want to include in your report. If you select the Exp.doc. option, expired documents of the respective type are also displayed.
Tip: If you want to display expired documents specify the fields DateAfter or Not Older. The option Date After will mark a document asexpired, if its date of origin is prior to the Date After.With the Not Older and the Unit of time setting, a time interval can bespecified. Documents whose date of origin is not in this time intervalare marked as expired.
Chapter 3 Working with EFM
48 OpenText Employee File Management EIM040001-UGD-EN-1

Tip: You can use the standard SAP procedure for variants to save theentries for a search that is used on a regular basis in a user-specific(personal) variant.Stored variants can also be used in the reporting in the EFM Web UI.
4. Click the button.
The report table is displayed, the single rows indicating the respectivedocuments. Their status is color-coded; see the table’s header for details.
5. Depending on the customizing, you can perform the following operations onthe report table:
• Select the required row and click the button; the respective document isopened and displayed in the OpenText Imaging Web Viewer.
• Select the required row and click the button to start EFM with thepersonnel no. of the respective row.
• Click the button to show the report table as a business graphic.
• Click the button to export the report table to Microsoft Excel.
• Click the PersNo hotspot to invoke the Display HR master data functiondialog.
• Click the Doc.type or the Description hotspot to display the respectivedocument.
3.13. Using reporting
EIM040001-UGD-EN-1 User Guide 49

Chapter 4
Creating and using guest user tickets
In certain situations, it might be necessary to allow temporary access to EFM forusers who are not employees of the HR department. For example, an employeemight want to view his/her own personnel file or a manager might want to look atthe file of an employee who has applied for a vacant position in another departmentof the company. In these situations, it is required to create a guest user ticket.
There are two options to create guest user access:
• Using Guest User Ticketing System - The HR manager creates the ticket anddefines which documents and employees are accessible for the guest user. Theguest user can access all documents and employees that the ticket creator haslisted in the ticket. The guest user receives an E-mail notification from the ticketcreator containing ticket and PIN numbers to access the guest user ticket.
• Using guest user account - Access to EFM for the guest user is made possible bya guest user account and a password (PIN), granting a restricted access to apersonnel file. The guest user ticket denotes the combination of the guest useraccount and the corresponding PIN. For more information, see “Creating guestuser ticket with guest user account” on page 58.
4.1 Creating guest user ticket with Guest UserTicketing System (GTS)
4.1.1 Creating guest user ticketTo create a guest user ticket, for example as HR manager, you must perform thefollowing steps.
To create a guest user ticket:
1. Execute transaction /OTEI/GTS.
2. In the Guest User Ticketing System window, click to create a new ticket.
3. Customize the following settings:
• Interface – select WebLink.
• Access Type – you have the following options:
• Single Access – the guest user can access the ticket only once.
• Multiple Access – the guest user can access the ticket more than onetime.
EIM040001-UGD-EN-1 OpenText Employee File Management 51
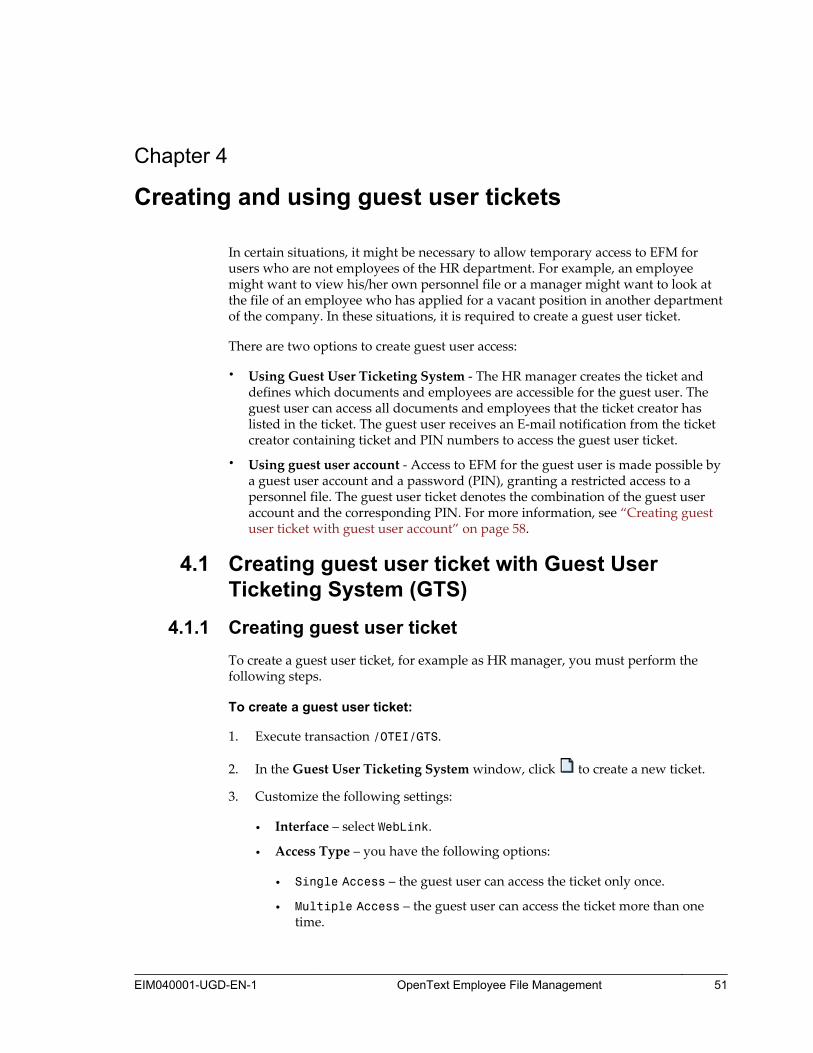
• From/To – enter the time period during which the ticket can be accessed.After the expiry of this period, the ticket becomes invalid.
• Content – enter the content type that you want to provide for the guest user.The available content types have been determined in the guest user ticketcustomizing.
• Requester – enter the personnel number of the ticket requester or click toselect one.
• View Type – select either Infotype Structure or Folder Structure todisplay the requested employee information in the ticket. If you selectFolder Structure, you must select the folder structure configuration to beused in the field Configuration shown next to View Type. This field is onlyavailable when using Folder Structure.
4. In the Ticket Overview table, enter the personnel number of the employee/syou want to give access to in the Employee box.
The Name and Date of Birth fields for these employees are populated.
The corresponding employee files appear in the area next to the TicketOverview panel. Navigate to and expand the folders that you want to giveaccess to.
5. Depending on the selected content type specified in field Content, additionalscreen areas are displayed next to the Ticket Overview area.
• Content: Files only uses the employee number(s) specified in TicketOverview to grant access to all documents contained in those employee files.
• Content: Documents shows a tree of available folders per employee next toTicket Overview. Only folders containing documents are shown. The usermust select one or more folders by marking the corresponding check boxesand click Please click this button to check the documents. A list ofdocuments contained in the selected folders appears. The user must selectthe documents to be contained in the ticket by selecting the correspondingcheck boxes. The ticket will only grant access to the selected documents.
• Content: Folders works like Content: Documents but all documents areselected automatically. You can deselect check boxes for documents that youdo not want to include in the ticket.
• Content: Template shows a tree of available folders configured in theinfotype or folder structure. This tree does not consider specificemployees but shows all configured folders including folders containing nodocuments. In this scenario, you just need to select one or more folders byselecting the corresponding check boxes. You cannot select specificdocuments. This scenario is used to grant access to all documents containedin the selected folders for all of the specified employees.
6. You can write comments to the requester in the Comment box.
7. Click Save.
Chapter 4 Creating and using guest user tickets
52 OpenText Employee File Management EIM040001-UGD-EN-1
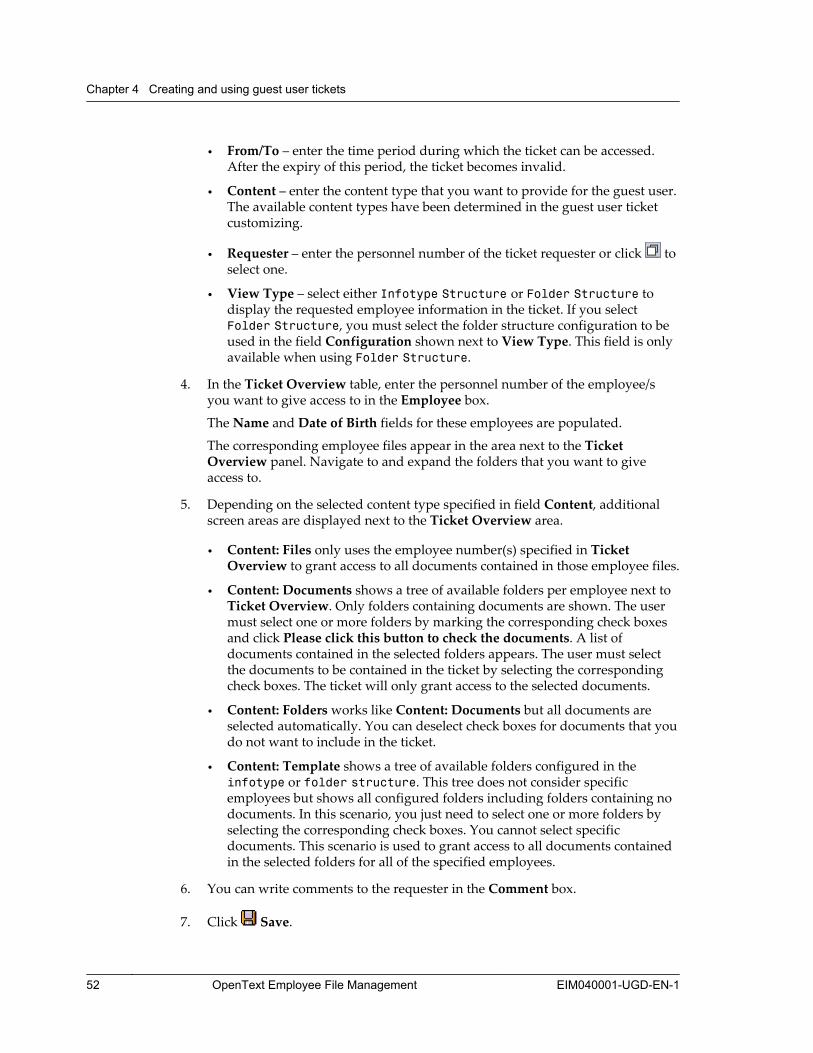
8. The Ticket Information window opens. Verify your ticket information. If it wasenabled in the customizing, you can edit the E-mail addresses.
ImportantYou must have selected at least one document for each employee. Whenthe ticket contains employees with no document selected, you will getan error message.
9. You have the following options:
• click to create the ticket and send the notification mails
• click to create the ticket without sending notifications or printing theticket.
4.1. Creating guest user ticket with Guest User Ticketing System (GTS)
EIM040001-UGD-EN-1 User Guide 53

• click to create the ticket and print the ticket information.
10. Click to confirm the ticket creation.
4.1.2 Using guest user ticketAfter the HR manager has created the guest user ticket, the requester receives the E-mail notification with the access information. The first notification E-mail containsticket and PIN numbers and the second E-mail contains the access link. When youhave received your access information, proceed as follows:
1. Copy ticket and PIN numbers from your notification E-mail to the clipboard.
2. Click the access link in your notification E-mail. In the guest user ticket logonscreen, enter ticket and PIN number.
Click the Log On button.
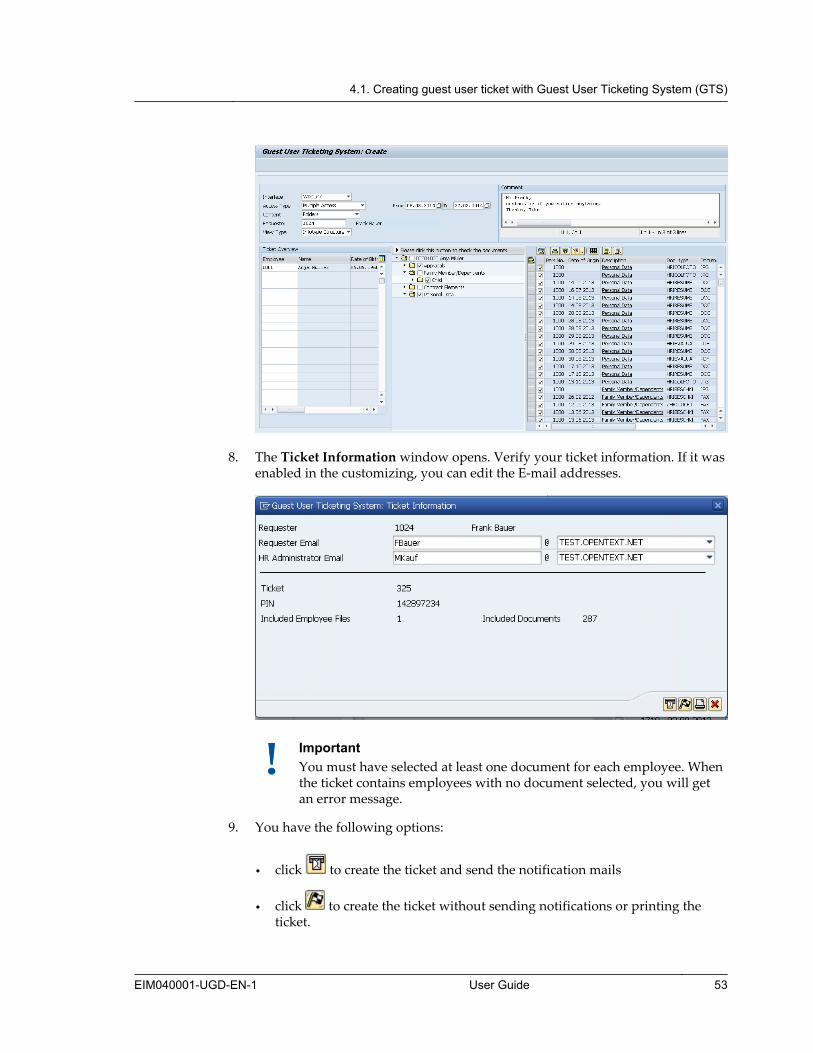
3. The employee/s included in the ticket are listed. Double-click the employeeentry to open the Employee Details, Comment and Content Informationpanels.
4. You can use the structure shown in the Content Information panel asnavigation help for selecting specific documents assigned to this employee.
5. Click a folder to display the corresponding documents in the Documents panel.Click the top folder to display all documents for the selected employee.
Chapter 4 Creating and using guest user tickets
54 OpenText Employee File Management EIM040001-UGD-EN-1
6. To display the document content, click the Description link in the documententry.
The document opens in the application customized for the document type.
7. You can write a comment for the ticket creator. In the Comments panel, clickAdd. Expand the new comment line to enter a comment in the Comments box.Click Save.
8. To exit the ticket, you have the following options:
• Click Leave. You can still re-enter the ticket until the validity period hasexpired. This option is only available if you have a ticket created with themultiple access setting.
• Click Close and confirm with Yes. The ticket is closed and you can no longerre-enter it. If you have added a comment, the ticket creator receives anotification E-mail including your comment.
4.1. Creating guest user ticket with Guest User Ticketing System (GTS)
EIM040001-UGD-EN-1 User Guide 55

4.1.3 Changing an open guest user ticketAs ticket creator, you have the option to change/edit an open guest user ticket.
Example: A manager already has accessed documents of an employee via a guest user ticketand needs to check documents of a second employee, for example, to compare contractelements of both employees. The HR manager can change the existing guest user ticket toinclude access to the second employee. The manager can access the changed guest user ticketagain using the same ticket and PIN number.
Notes
• You can only change a ticket created with Multiple Access setting.• You cannot change a ticket with the Status Closed and Expired.
To edit/change an existing guest user ticket:
1. Execute transaction /OTEI/GTS to open the Guest User Ticketing System.
2. From the ticket list, select the ticket you want to change and click Edit Ticket.
3. You can edit the following:
• changingAccess Type
• adding new employees in the Ticket Overview.
• selecting the employee documents you want to provide access for.
Chapter 4 Creating and using guest user tickets
56 OpenText Employee File Management EIM040001-UGD-EN-1

You cannot change Content type, Requester and View Type.
4. Click Save. In the Ticket Information dialog, the updated information aboutincluded files and documents is displayed. Ticket and PIN numbers do notchange and are not displayed.
5. Click Finish and confirm the change with .
In the Guest User Ticketing Systemoverview, the ticket is now listed with theStatus = Changed.
Notes
• After the ticket update, the requester does not get an E-mail notification.• You can check log changes on guest user ticket in EFM activity log.
To enter the updated guest user ticket:
1. Use the still valid access URL, ticket and PIN numbers of your previous accessto re-enter your guest user ticket.
2. You guest user ticket now contains the updated information.
4.1. Creating guest user ticket with Guest User Ticketing System (GTS)
EIM040001-UGD-EN-1 User Guide 57

4.2 Creating guest user ticket with guest useraccountAccess to EFM for the guest user is made possible by a guest user account and apassword (PIN), granting a restricted access to a personnel file. The guest user ticketdenotes the combination of the guest user account and the corresponding PIN.
Notes
• OpenText recommends creating an SAP user with appropriate roles for eachguest user account.
• The number of available guest user accounts can be customized.
The following different access types of guest user accounts are possible:
Employee on siteThis type of access allows an employee to look at his own personnel file on acomputer in the HR department.
Manager on siteThis type of access allows a manager to look at a personnel file on a computer inthe HR department.
Manager remoteThis type of access allows a manager to look at a personnel file using a remoteconnection.
Note: An Employee guest user may log on to the system only once. TheManager and Manager remote guest users can log on several times.
4.2.1 Creating a guest user ticketUsually HR employees create the guest user tickets. For creating guest user tickets,you need the permission for the corresponding transaction. Contact youradministrator for details.
Note: Make sure you have the necessary permission to create guest usertickets.
To create a guest user ticket:
1. Log on to SAP.
2. In the User menu, double-click Create guest user account.
Note: Depending on the system settings, the Create guest user accountlink might be located in a different menu.
Alternatively execute the /OTEI/GU01 transaction.
Chapter 4 Creating and using guest user tickets
58 OpenText Employee File Management EIM040001-UGD-EN-1
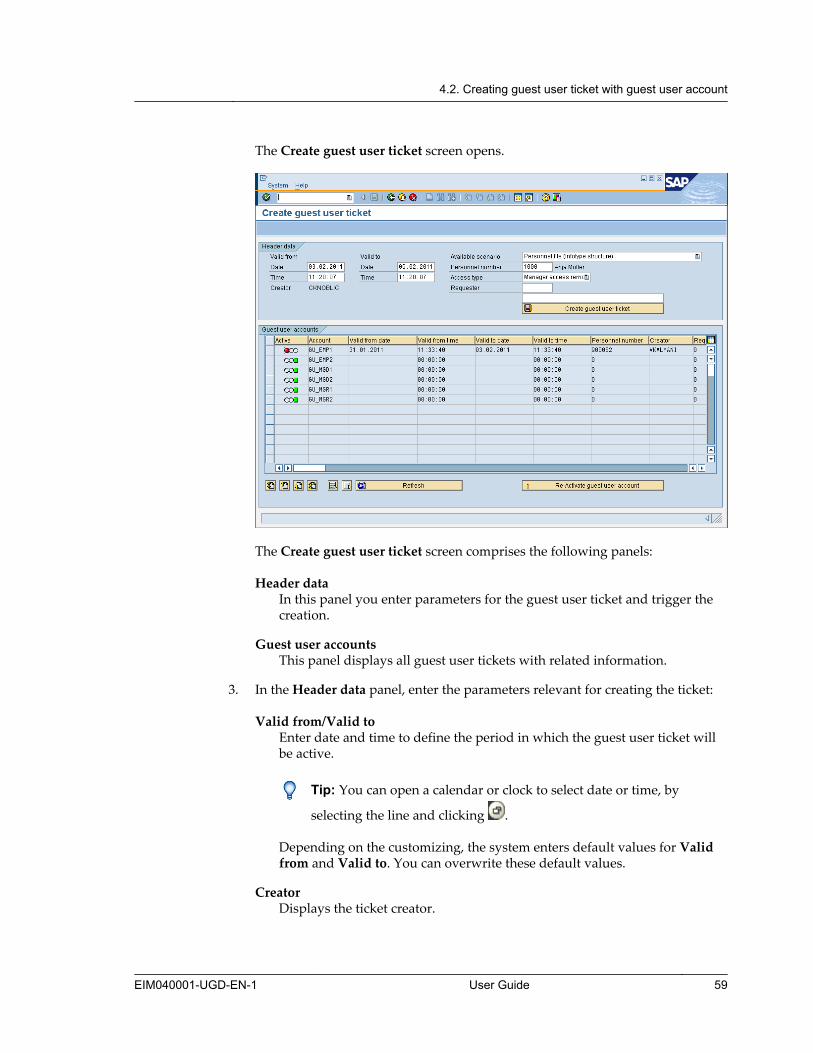
The Create guest user ticket screen opens.
The Create guest user ticket screen comprises the following panels:
Header dataIn this panel you enter parameters for the guest user ticket and trigger thecreation.
Guest user accountsThis panel displays all guest user tickets with related information.
3. In the Header data panel, enter the parameters relevant for creating the ticket:
Valid from/Valid toEnter date and time to define the period in which the guest user ticket willbe active.
Tip: You can open a calendar or clock to select date or time, by
selecting the line and clicking .
Depending on the customizing, the system enters default values for Validfrom and Valid to. You can overwrite these default values.
CreatorDisplays the ticket creator.
4.2. Creating guest user ticket with guest user account
EIM040001-UGD-EN-1 User Guide 59

Available scenarioSelect the personnel file structure to be initially displayed to the guest user.For details, see “Browsing a personnel file” on page 19.
Personnel numberEnter the personnel number of the employee whose file will be accessiblefor the guest user. You can search for the personnel number, by selecting
the line and clicking .
Note: You cannot create a guest user account for your own personnelnumber.
Access typeSelect the guest user access type:
• Employee
• Manager
• Manager remote
For details, see “The following different access types of guest user accountsare possible:”.
Requester (only for access types Manager and Manager remote)Identifies who has requested the guest user ticket; usually, this will be themanager themselves. The following ways to identify the requester arepossible:
Personnel number (first line)Enter the personnel number of the person who requested the guest useraccount. You can search for the personnel number by selecting the line
and clicking .
Free text (second line)Enter the name as free text if the requester is not available in the SAPHR system.
4. Click the Create guest user ticket button.
A Message dialog is displayed.For the Employee type, continue with Step 5.For Manager type, continue with Step 6
5. For Employee type:
Chapter 4 Creating and using guest user tickets
60 OpenText Employee File Management EIM040001-UGD-EN-1
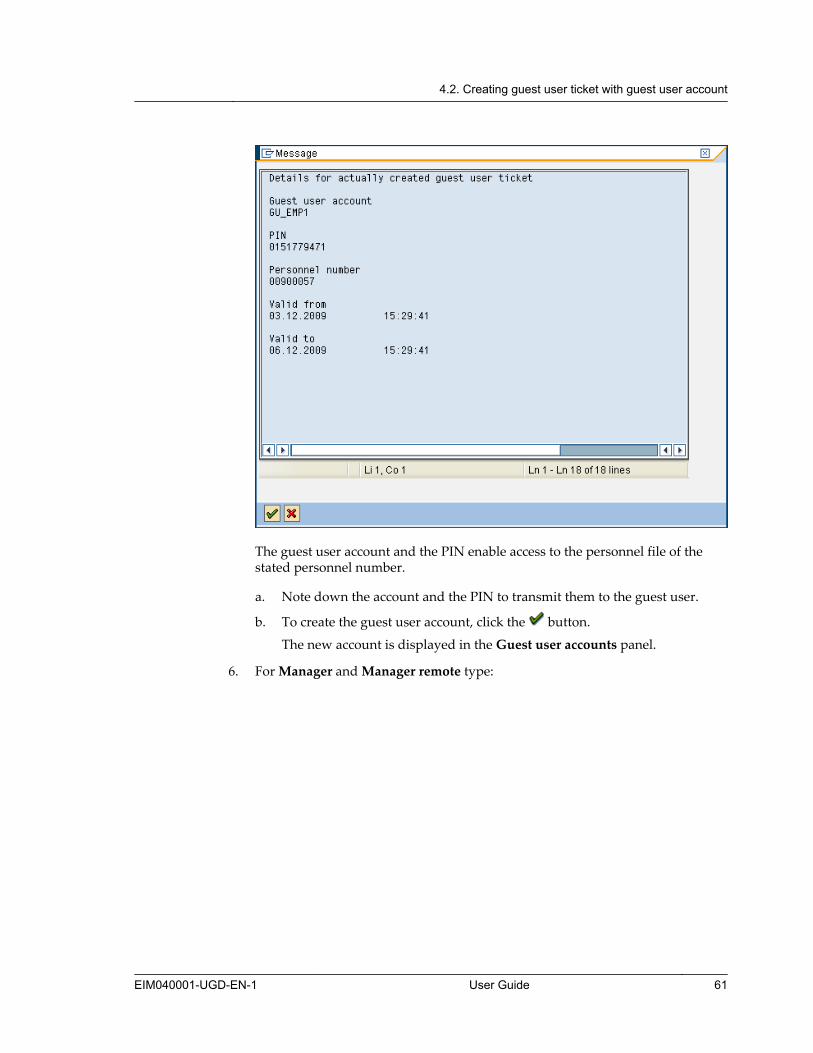
The guest user account and the PIN enable access to the personnel file of thestated personnel number.
a. Note down the account and the PIN to transmit them to the guest user.
b. To create the guest user account, click the button.
The new account is displayed in the Guest user accounts panel.
6. For Manager and Manager remote type:
4.2. Creating guest user ticket with guest user account
EIM040001-UGD-EN-1 User Guide 61

The guest user account and the PIN enable access to the personnel file of thestated personnel number.
At the bottom of the message, the email address of the receiver is displayed.This email address is taken from the Requester entry if you have inserted thepersonnel number and if the email address is maintained.
a. If the system is configured accordingly, you can edit the part of the emailaddress left of the @.
Note: Sending the email containing the account and the PIN might bedisabled on your system. Contact your administrator for details. Incase the email is not sent, note down the account and the PIN totransmit them to the guest user.
b. To create the guest user account, click the button.
The guest user account is created, and the email is sent.The new account is displayed in the Guest user accounts panel.
The Guest user accounts panel provides the following function buttons:
Chapter 4 Creating and using guest user tickets
62 OpenText Employee File Management EIM040001-UGD-EN-1
RefreshUpdates the screen and the list of accounts. The default date and time are set tothe present.
Re-Activate guest user accountIf an active guest user account is not used any longer you can reactivate it. Thatmeans the guest user cannot use the corresponding account/PIN combinationany longer. Accounts are reactivated automatically after an employee used theiraccount/PIN to access their personnel folder once or if the validity period isexceeded.
To re-activate a guest user account
1. Select an active account (red lamp) in the list.
2. Click the Re-Activate guest user account button to make the guest user accountavailable again.
4.2.2 Using a guest user accountThe guest user account grants you a restricted access to your personnel file(employee account) or to the file of another employee (manager account). You cansee all documents contained in the personnel file but you cannot perform anyactions.
Notes
• With the Employee access type, you can log into EFM only once. The accesstypes Manager and Manager remote allow several logins.
• With a manager access, some infotypes are excluded from access due to legalrestrictions. You cannot access corresponding documents. Which infotypesare excluded can be configured in the HR specific roles for guest usermanagers.
To access EFM with a guest user account:
1. Log on to SAP with the special SAP user and password you received from theHR department.
2. In the User menu, double-click Access guest user account.
Note: Depending on the system settings, the Access guest user accountlink might be located in a different menu.
Alternatively execute the /OTEI/GU02 transaction.
The Access guest user account screen is displayed.
3. Enter the guest user account and the PIN you received from the HR departmentand click the Execute button.
The restricted view of the personnel file is displayed.
4.2. Creating guest user ticket with guest user account
EIM040001-UGD-EN-1 User Guide 63
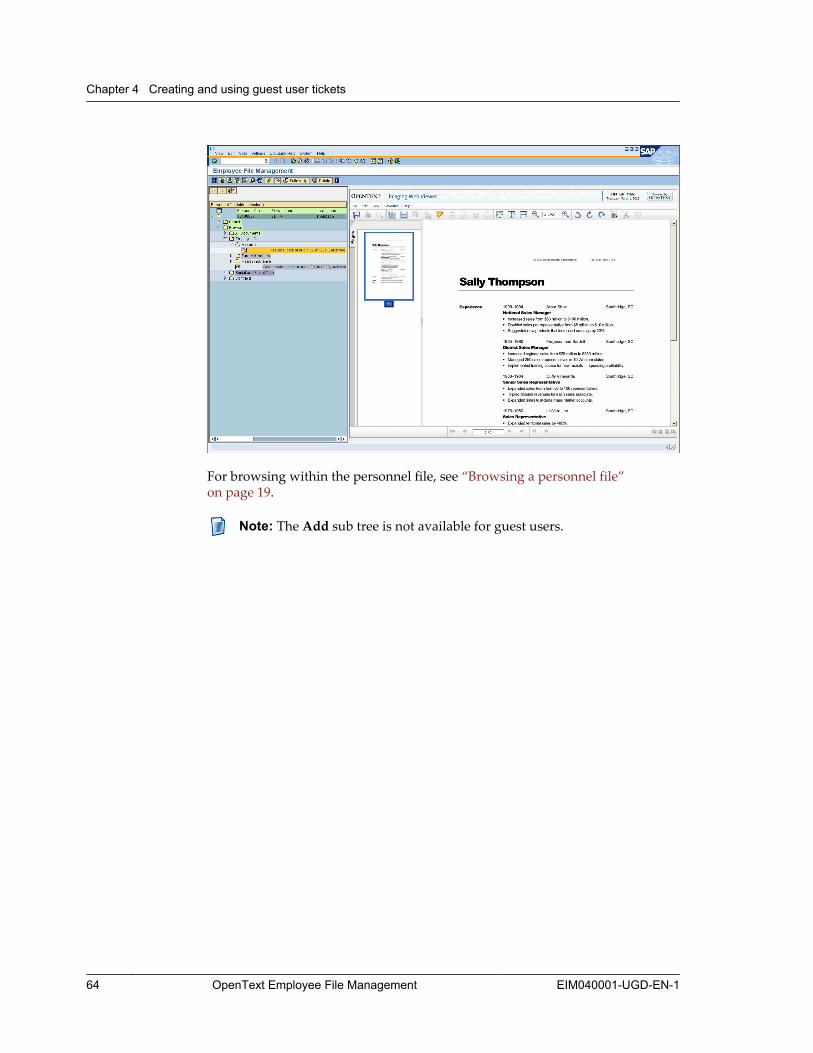
For browsing within the personnel file, see “Browsing a personnel file”on page 19.
Note: The Add sub tree is not available for guest users.
Chapter 4 Creating and using guest user tickets
64 OpenText Employee File Management EIM040001-UGD-EN-1

Chapter 5
Using activity logging
Employee File Management provides logging of all guest user, document- andworkflow-related activities. This logging can be used by HR managers on a regularbasis to get an overview of the processed personnel files. An SAP (technical)administrator can use this logging as well in order to get a chronological list ofactivities that may have caused an error case.
The log comprises the following details:
• Shows all document-related actions by a user or a guest user account.• Provides a direct access to processed HR documents via hyperlinks.• Displays HR-related information like infotype and subtype.• Provides an overview of initiated and processed workflows and workflow states.• Shows guest user actions like ticket creation and guest user log-in.
5.1 Selecting log reportsTo select a log report:
1. Execute the /OTEI/ACT_LOG transaction.
EIM040001-UGD-EN-1 OpenText Employee File Management 65
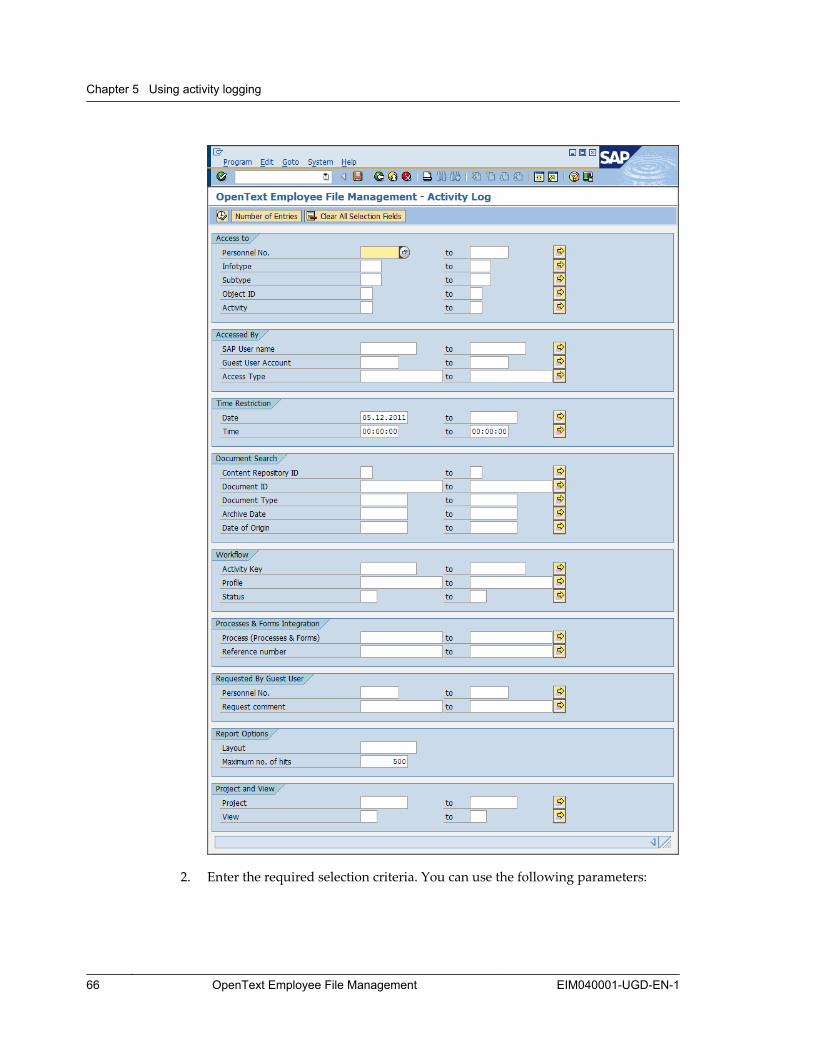
2. Enter the required selection criteria. You can use the following parameters:
Chapter 5 Using activity logging
66 OpenText Employee File Management EIM040001-UGD-EN-1
Access to
Personnel No.The number of the personnel file on which the action was performed.
InfotypeThe infotype of the accessed personnel file.
SubtypeThe subtype of the accessed personnel file.
Object IDID for subtype.
ActivityThe action performed; the following activities are considered:
• Document createdLogged after adding a new HR document to a personnel file.
• Date of origin changedIndicates a change in the date of origin.
• Ticket createdLogged after a ticket creation for a guest user access.
• Guest user account reactivatedRecorded for a reactivated guest user account.
• Guest user logged inIndicates a log-in as a guest user.
• Guest user login failedLogged after a failed guest user access due to a wrong PIN or guestuser account.
• Workflow initiatedIndicates a started workflow.
• Workflow processedRecorded for a processed workflow.
• Document copiedLogged after copying an HR document.
• Document moved - SourceLog entry for the document which has been deleted with adocument move.
• Document displayedRecorded for a displayed document.
• Document moved - DestinationLog entry for the document which has been created with adocument move.
• Document deleted
5.1. Selecting log reports
EIM040001-UGD-EN-1 User Guide 67

Log entry for the document which has been deleted.
Accessed By
SAP User NameName of the technical SAP user who accomplished the action.
Guest User AccountThe account which was used during a guest user access.
Access TypeThe access type considers Guest User Employee, Guest User ManagerOn-Site, Guest User Manager Remote, Standard, and Workflow.
The standard access type can be used to filter out activities that wereexecuted using EFM directly without a guest user ticket. All initiatedand processed workflows can be searched with the workflow accesstype.
Time Restriction
DateThe date when the action was completed.
TimeThe time when the action was processed.
Document Search
Content Repository IDID of the content repository in which the document-related activity wasperformed.
Document IDArchiveLink ID of the processed HR document.
Document TypeDocument type of the managed HR document.
Archive DateDate when the HR document has been archived.
Date of OriginOrigin date of HR document.
Workflow
Activity KeyID in workflow activities.
ProfileThe workflow type.
StatusThe workflow status.
Chapter 5 Using activity logging
68 OpenText Employee File Management EIM040001-UGD-EN-1

Processes & Forms Integration
Process (Processes & Forms)Personnel administration process.
Reference numberProcess reference number.
Requested By Guest User
Personnel No.The personnel number of the person who requested access to personnelfile as manager using the guest user access.
User nameName of the person who requested access as manager using the guestuser access.
Report Options
LayoutEnter the layout for the report if you have saved a personal layout usingthe ALV grid control beforehand.
Maximum no. of hitsThe number of hits can be limited by this value.
Project and View
ProjectID of the project.
ViewView number of the project.
3. Click the button to execute the logging report.
A report is created and displayed in the Display of Log Entries Found screenusing the current settings.
Tip: Click the Number of Entries button to get the number of found log entriesconsidering the current selection criteria.Click the Clear All Selection Fields to reset all selection fields.
5.1. Selecting log reports
EIM040001-UGD-EN-1 User Guide 69

5.2 Evaluating logs
The Display of Log Entries Found screen comprises:
• Header sectionThe header section of the report screen shows the log dates of the first and thelast entry of the report period; it also displays the number of log entries found.The maximum number of displayed entries can be changed and the report resultwill be updated automatically.
• SAP list viewerThe SAP list viewer (ALV) provides various standard SAP action buttons for thelist viewer that displays the actual report results. You can change the layout ofthe report, that is move, remove or add columns and save this new layout. Youcan then select your saved layout in the selection screen when you start thereport the next time.
The SAP list viewer displays the report results; in addition to the selectioncriteria, the following columns are displayed:
Document selectionThe icon in the first column marks document-related activities like copy ormove. If the icon is selected, the respective document is opened in a webbrowser. The Content Repository ID and Document ID columns alsocontain hyperlinks which can be selected and open the document in a webbrowser.
Document Type DescriptionDescription of the document type.
Additional InformationAdditional description of the activity.
To view details for a specific log entry, double-click a cell in the respective row inthe SAP list viewer. A detailed list is displayed showing all information on therespective activity.
Note: With EFM, deletion for log entries can be configured. Depending on thecustomizing, a document deletion may also delete all document-related log
Chapter 5 Using activity logging
70 OpenText Employee File Management EIM040001-UGD-EN-1
entries. Such a customizing would ensure that any information on thisdocument is removed from the system. Contact your administrator for details.
5.2. Evaluating logs
EIM040001-UGD-EN-1 User Guide 71


Chapter 6
Using the EFM Cockpit
EFM features the EFM Cockpit as a tool for central access to your standard HRfunctions. The EFM Cockpit provides a customized set of subscreens and thefollowing default buttons for commonly-used functions:
Personnel FileOpens a customized EFM view.
Display HR Master DataInvokes the PA20 transaction.
Maintain HR Master DataInvokes the PA30 transaction.
Personnel ActionInvokes the PA40 transaction.
ReportingInvokes the /OTEI/RP_DTB_REPORT transaction for reporting. For details, see“Using reporting” on page 47.
Document InboxOpens a customized Document Inbox. For details, see “Using the DocumentInbox“ on page 77.
Full Text SearchInvokes the SAP full-text search.
Note: Depending on the customizing, the buttons might be different on yoursystem. Contact your administrator for details.
To launch EFM Cockpit:
1. Log on to the SAP system.
2. Execute the /OTEI/COCKPIT transaction.
The corresponding EFM Cockpit is displayed.
EIM040001-UGD-EN-1 OpenText Employee File Management 73
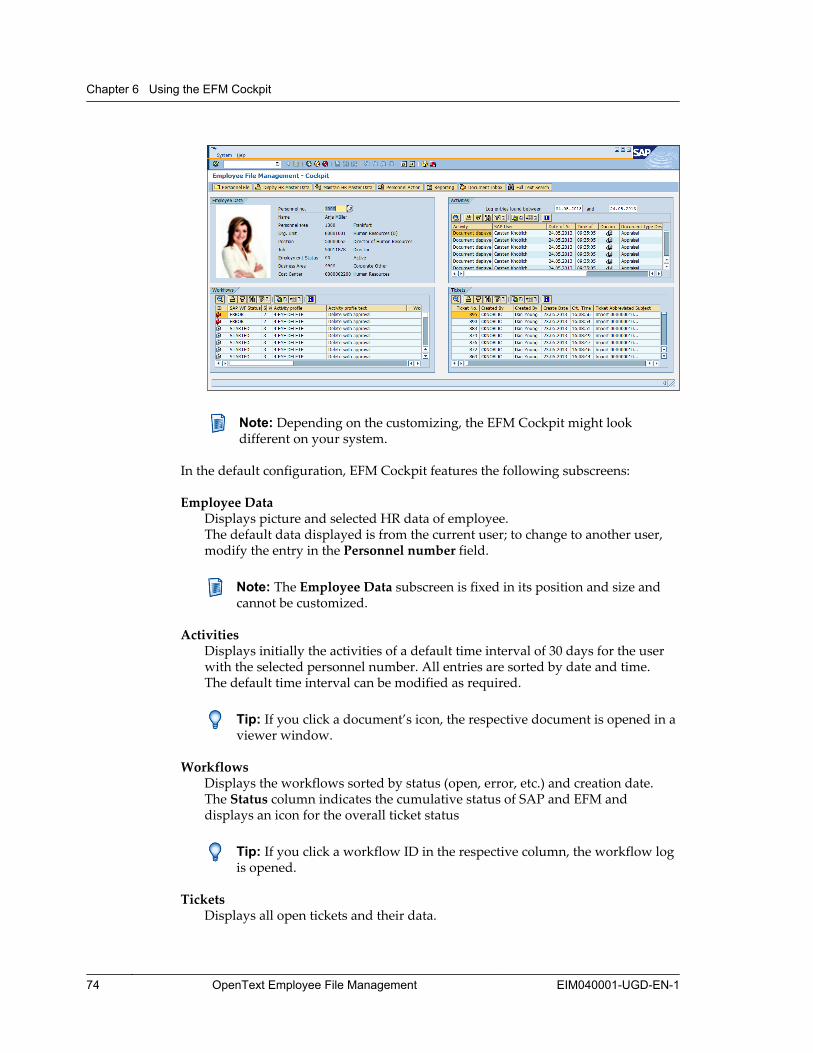
Note: Depending on the customizing, the EFM Cockpit might lookdifferent on your system.
In the default configuration, EFM Cockpit features the following subscreens:
Employee DataDisplays picture and selected HR data of employee.The default data displayed is from the current user; to change to another user,modify the entry in the Personnel number field.
Note: The Employee Data subscreen is fixed in its position and size andcannot be customized.
ActivitiesDisplays initially the activities of a default time interval of 30 days for the userwith the selected personnel number. All entries are sorted by date and time.The default time interval can be modified as required.
Tip: If you click a document’s icon, the respective document is opened in aviewer window.
WorkflowsDisplays the workflows sorted by status (open, error, etc.) and creation date.The Status column indicates the cumulative status of SAP and EFM anddisplays an icon for the overall ticket status
Tip: If you click a workflow ID in the respective column, the workflow logis opened.
TicketsDisplays all open tickets and their data.
Chapter 6 Using the EFM Cockpit
74 OpenText Employee File Management EIM040001-UGD-EN-1

Note: To customize the layout of the subscreens, click the button of therespective subscreen to open the Change layout dialog. You can modify thesettings for column selection, sorting, filters and display purposes.Refer to your SAP documentation for a description of these functions.
EIM040001-UGD-EN-1 User Guide 75


Chapter 7
Using the Document Inbox
EFM features the Document Inbox as a tool for central access to ticket processing,document processing, and the document conversion filter. The Document Inboxitems are fed into the system via the ESS/MSS upload (“Document Upload andInbox application” on page 108) and the file batch import. These input channelscreate tickets and forward them to the Document Inbox.
The Document Inbox main screen features the following subscreens:
Ticket Search subscreenThis subscreen allows searching for a specific ticket, using the ticket’s metadata.
Preview subscreenThe ticket preview displays the first 4 pages of a document. If you click on adisplayed page, the configured display application (Windows Viewer or WebViewer) is started.
Tickets subscreenThis subscreen displays all tickets that fulfill the filter criteria and for which youhave also authorizations. For example, only the tickets are displayed where theemployee/personnel no. relates to the specified organizational unit, personnelarea or company code.
Ticket Overview subscreenThis subscreen displays details of the selected ticket.
Ticket History subscreenThis subscreen displays the history (including the comments) of the selectedticket. To restart a faulty document conversion manually, click the Convertbutton.
EIM040001-UGD-EN-1 OpenText Employee File Management 77
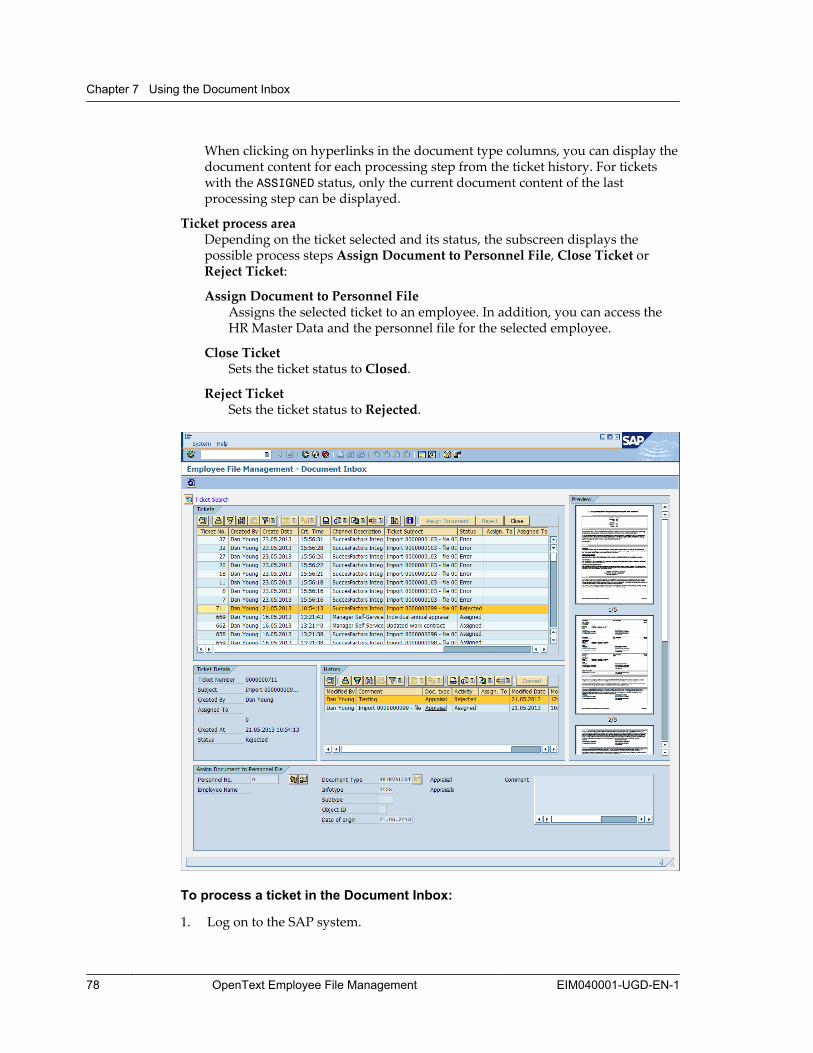
When clicking on hyperlinks in the document type columns, you can display thedocument content for each processing step from the ticket history. For ticketswith the ASSIGNED status, only the current document content of the lastprocessing step can be displayed.
Ticket process areaDepending on the ticket selected and its status, the subscreen displays thepossible process steps Assign Document to Personnel File, Close Ticket orReject Ticket:
Assign Document to Personnel FileAssigns the selected ticket to an employee. In addition, you can access theHR Master Data and the personnel file for the selected employee.
Close TicketSets the ticket status to Closed.
Reject TicketSets the ticket status to Rejected.
To process a ticket in the Document Inbox:
1. Log on to the SAP system.
Chapter 7 Using the Document Inbox
78 OpenText Employee File Management EIM040001-UGD-EN-1

2. Execute the /OTEI/INBOX_100 transaction (for document type selection viainfotype) or /OTEI/INBOX_110 transaction (for document type selection viaflexible folder).The document type selection you use also determines the view used when youopen a personnel file.
The Document Inbox with all tickets for which you have authorizations isdisplayed.
3. Select the ticket that you want to process. If required, enter filter criteria in theSearch subscreen and click the button to locate the required ticket.
The subscreens are updated and display the ticket status. The selected ticket isnow locked and cannot be accessed by other users.
Tip: If you do not use the Search subscreen, click the button to collapseit. This will free screen space for the other elements.
4. Depending on the required processing, click the Assign Document, Reject orClose button in the Tickets subscreen:
a. To assign a document, specify the following document data; onlyPersonnel No. and Document Type are mandatory:
Personnel No.Specifies the employee’s personnel no.
Document TypeThe MIME type of the uploaded document determines the possibledocument types. The document type chosen via the Document UploadSelf-Service applications is already preset.Click the button to open the Select Document Type dialog andselect the required document type.
InfotypeOptional; entering an infotype limits the possible entries for theDocument type field.
Subtype, Object ID, Date of originOptional; parameters will be available depending on the selecteddocument type.
Enter a comment and click the Assign Document button.
b. To reject or close a document, enter a comment and click the Reject orClose button.
In both cases notification emails are sent back to the employee whouploaded the document. Rejected document uploads can be processedagain by uploading a new document.
5. In the toolbar, click the button and confirm the processing of the ticket.
EIM040001-UGD-EN-1 User Guide 79
The process area, the ticket list, and the ticket history are updated and displaythe new ticket status.
6. Check uploaded document in personnel file by clicking the (Open PersonnelFile) button from the ticket process area.
Chapter 7 Using the Document Inbox
80 OpenText Employee File Management EIM040001-UGD-EN-1

Part 2Using EFM Web UI
EFM Web UI allows you to perform Employee File Management tasks in a web-based environment, including a dedicated tree view and browsing of documentthumbnails. The EFM Web UI is based on the SAP Web Dynpro technology.
Part 2 Using EFM Web UI
82 OpenText Employee File Management EIM040001-UGD-EN-1

Chapter 8
Getting started with EFM Web UI
8.1 Launching EFM Web UITo launch EFM Web UI:
1. Open the appropriate URL for EFM Web UI in your browser.
Note: The appropriate URL might be available in the Favorites menu ofyour browser or on an Intranet page. In case of problems, contact youradministrator.
2. If required, enter your credentials and click OK.
The EFM web start screen is displayed, showing hyperlinks to the availableviews of the EFM project.Depending on the kind of URL you are using, you might get redirected directlyto the EFM web search mask.
8.2 Searching personnel filesYou can search for personnel files specifying a range of HR master data, includingpersonal data and organizational information.
To search personnel files in EFM Web UI:
1. Launch EFM within EFM Web UI, see “Launching EFM Web UI” on page 83.
2. Click the hyperlink of the EFM view you want to search in.
The EFM Web UI search mask is displayed.
3. Enter the search criteria. You can search for single values and for value ranges.To search for ranges, enter threshold values in both fields in a row.
Tip: To display a list of possible entries, click the icon to the right of thesearch field, if available. In the list of possible entries, double-click anentry to fill it in the search field.
4. To start the search, click the Search button.
The search result, one or more master records, is displayed as a hit list in theSearch Results panel.
EIM040001-UGD-EN-1 OpenText Employee File Management 83
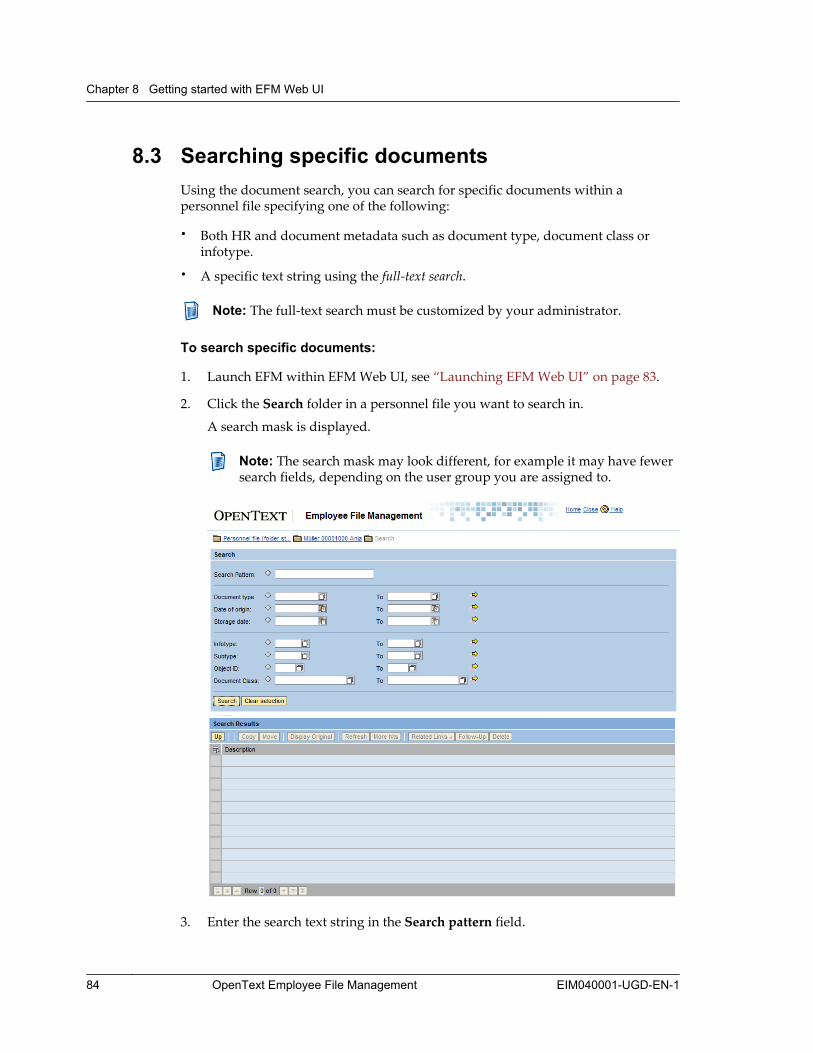
8.3 Searching specific documentsUsing the document search, you can search for specific documents within apersonnel file specifying one of the following:
• Both HR and document metadata such as document type, document class orinfotype.
• A specific text string using the full-text search.
Note: The full-text search must be customized by your administrator.
To search specific documents:
1. Launch EFM within EFM Web UI, see “Launching EFM Web UI” on page 83.
2. Click the Search folder in a personnel file you want to search in.
A search mask is displayed.
Note: The search mask may look different, for example it may have fewersearch fields, depending on the user group you are assigned to.
3. Enter the search text string in the Search pattern field.
Chapter 8 Getting started with EFM Web UI
84 OpenText Employee File Management EIM040001-UGD-EN-1
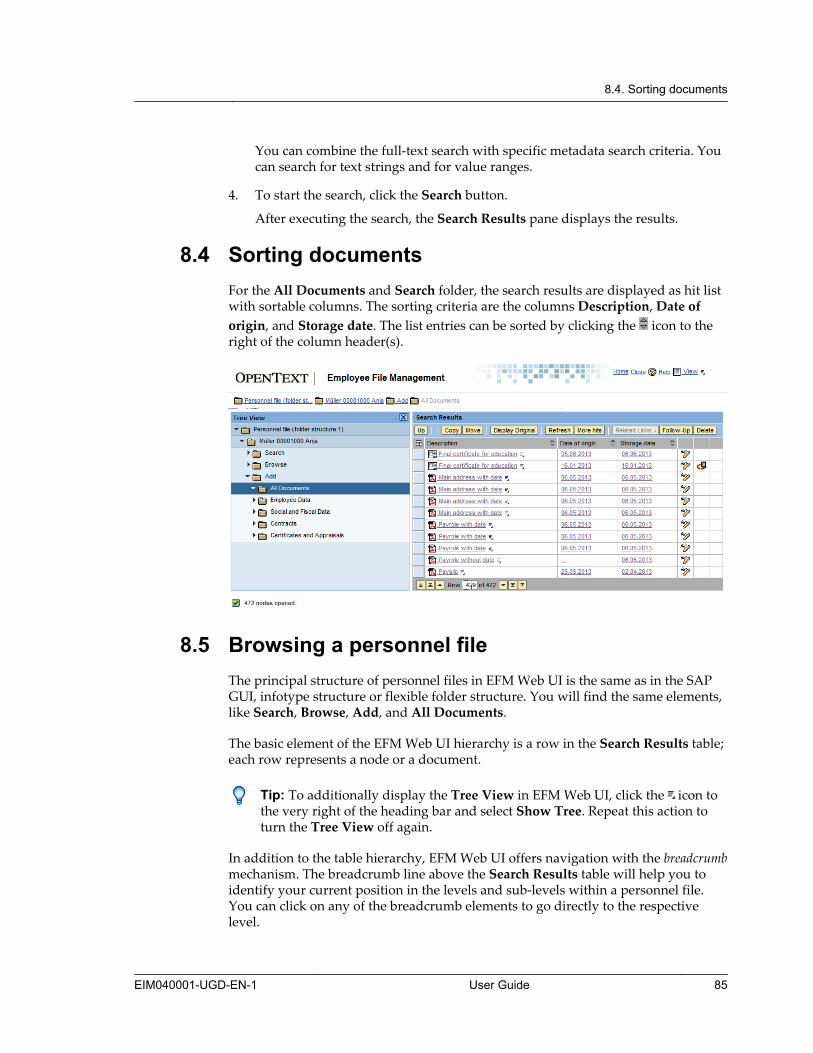
You can combine the full-text search with specific metadata search criteria. Youcan search for text strings and for value ranges.
4. To start the search, click the Search button.
After executing the search, the Search Results pane displays the results.
8.4 Sorting documentsFor the All Documents and Search folder, the search results are displayed as hit listwith sortable columns. The sorting criteria are the columns Description, Date oforigin, and Storage date. The list entries can be sorted by clicking the icon to theright of the column header(s).
8.5 Browsing a personnel fileThe principal structure of personnel files in EFM Web UI is the same as in the SAPGUI, infotype structure or flexible folder structure. You will find the same elements,like Search, Browse, Add, and All Documents.
The basic element of the EFM Web UI hierarchy is a row in the Search Results table;each row represents a node or a document.
Tip: To additionally display the Tree View in EFM Web UI, click the icon tothe very right of the heading bar and select Show Tree. Repeat this action toturn the Tree View off again.
In addition to the table hierarchy, EFM Web UI offers navigation with the breadcrumbmechanism. The breadcrumb line above the Search Results table will help you toidentify your current position in the levels and sub-levels within a personnel file.You can click on any of the breadcrumb elements to go directly to the respectivelevel.
8.4. Sorting documents
EIM040001-UGD-EN-1 User Guide 85

Notes
• Using the standard BACK button or shortcut of your browser will result in adisplay error in EFM Web UI.
• Depending on the customizing, the EFM Web UI might look different onyour system.
8.6 Browsing thumbnails for fast document retrievalTo speed up the search for a particular document, EFM Web UI displays each pageof each document in a personnel file as a thumbnail. From the thumbnail view, youcan open the document in the viewer configured on your system.
Note: Depending on the customizing, the thumbnail view might not beavailable on your system.
To display thumbnails of documents:
1. Launch EFM Web UI.
2. Navigate to the required personnel folder and open a node containingdocuments.
3. Click the icon to the very right of the heading bar and select Thumbnails.
The pages of the documents in the node are displayed as thumbnails.
Chapter 8 Getting started with EFM Web UI
86 OpenText Employee File Management EIM040001-UGD-EN-1

Notes
• You can navigate through the personnel file like in the list view. Foldersare displayed in the thumbnails with a folder symbol. To open thefolder, click the symbol.
• To switch off the thumbnails view and return to the list view, click theView link on the right of the heading bar.
EFM Web UI displays thumbnails for the following document formats:
TXTText document format
PDFAdobe Reader document format
OTFSAP output text format
ALFSAP print list format
TIFTagged Image File format (graphics)
FAXGraphic format
PNGPortable Network Graphics format
8.6. Browsing thumbnails for fast document retrieval
EIM040001-UGD-EN-1 User Guide 87
JPGGraphic format
GIFGraphic format
For MS Office documents, EFM Web UI displays an icon instead of a thumbnail.Click the icon to display the document in its corresponding MS Officeapplication, for example MS Word, embedded in EFM Web UI.
4. Browse through the thumbnails to locate the required document.
5. Click a thumbnail to display an enlarged view of the document. Click on theenlarged view to open the document in the viewer configured in your system.
In the thumbnails view, the following settings are available:
Page tabDisplays the current page.
Notes tabDisplays notes on the current document, if there are any.
Zoom In/Zoom OutYou can increase or reduce the size of the page in the Page tab.
LayoutYou can switch between Vertical and Horizontal layout of the thumbnails.Default value: Horizontal
Thumbnail sizeYou can switch between Small, Medium and Large thumbnail size. Defaultvalue: Small
Previous/NextThe thumbnails hit list shows only a certain number of documents at a time. Theactual number depends on the settings of the system. You can navigate betweenthe displayed documents, using the Previous and Next buttons.
More hitsDisplays the next portion of a hit list exceeding the current page display.
RefreshRefreshes the current view and returns to the first hit list of pages.
Chapter 8 Getting started with EFM Web UI
88 OpenText Employee File Management EIM040001-UGD-EN-1
8.7 Buttons in EFM Web UI
Note: Since the functions of EFM can be customized for different users, youmay not be able to access all functions described in the following.
The tool bar in EFM Web UI provides the following function buttons:
UpGoes to the next higher level.
CopyCopies the selected element to a new location within the SAP system. See“Moving and copying documents in EFM Web UI” on page 93.
MoveMoves the selected element to a new location within the SAP system. See“Moving and copying documents in EFM Web UI” on page 93.
Display OriginalDisplays the original document or a selection list of documents assigned to theselected record. See “Displaying archived documents in EFM Web UI”on page 91.
Follow-UpStarts a follow-up workflow for the selected documents.
DeleteStarts a delete workflow for the selected documents.
RefreshRebuilds the page display.
More hitsDisplays the next portion of a hit list exceeding the current page display.
Related LinksInvokes the links customized by your administrator.
In addition to the buttons in the tool bar, you can use menu items from the contextmenu (indicated by the icon next to the folder/document) to trigger an operation.
Note: Some of the context menu items are also available in the tool bar. Theyare described in “Tool bar” on page 89.
The following additional context menu item is available below the Add folder:
CreateAdds a new document to the personnel file, see “Archiving documents in EFMWeb UI” on page 91. The Create menu item is only available for folders belowAdd, containing documents, for example All Documents or Documents folders.
Tool bar
Context menu
8.7. Buttons in EFM Web UI
EIM040001-UGD-EN-1 User Guide 89

Note: In the flexible folder structure, the Create menu item does not workfor the All Documents folder.
8.8 Using guest user accessThe EFM Web UI also provides guest user access. The guest user access grantsaccess to EFM by prompting for a guest user account and a corresponding PIN.
To use the guest user access:
1. Launch EFM Web UI (see “Launching EFM Web UI” on page 83).
2. If there is no SAP service alias configured for the EFM Web UI, you have to login first with the technical SAP user into the SAP system. The technical SAP usermust have an appropriate guest user role.
The web-based guest user access dialog is displayed.
Note: Usage of guest user roles is described in section 5.2 “Customizingguest user access based on guest user accounts” in OpenText Employee FileManagement - Administration Guide (EIM-AGD).
3. Enter guest user account and PIN.
Note: For using the web-based guest user access, it is recommended toconfigure so-called SAP service aliases for EFM Web UI. The serviceconfiguration is described in section 11.4 “Customizing guest user access” inOpenText Employee File Management - Administration Guide (EIM-AGD).
Chapter 8 Getting started with EFM Web UI
90 OpenText Employee File Management EIM040001-UGD-EN-1

Chapter 9
Working with EFM Web UI
EFM Web UI provides the following functions:
• “Displaying archived documents in EFM Web UI” on page 91
• “Archiving documents in EFM Web UI” on page 91
• “Moving and copying documents in EFM Web UI” on page 93
• “Changing a document's date of origin in EFM Web UI” on page 97
• “Creating and processing workflows in EFM Web UI” on page 98
• “Uploading multiple documents using Drag&Drop” on page 101
• “Using reporting” on page 104
• “Using full-text search” on page 105
• “Document Upload and Inbox application” on page 108
ImportantSince the functions of EFM can be customized for different roles, you maynot be able to access all functions described in the following.
9.1 Displaying archived documents in EFM Web UIEFM Web UI provides the following ways to display documents:
• Click on the document in the list view.
• Click on the thumbnail of a document.
• Select a document and click the Display Original button in the tool bar.
9.2 Archiving documents in EFM Web UIEFM Web UI supports the File upload archiving scenario only. For an introduction tothe archiving scenarios, see “Archiving documents” on page 24.
To archive a document:
1. Open the personnel file in EFM Web UI and navigate to the Add node.
2. Select the folder to archive the document to.
EIM040001-UGD-EN-1 OpenText Employee File Management 91

3. Either click the store icon on the very right of the line or select the contextmenu and choose Create Document.
The File Upload - Create documents dialog is displayed.
4. Click the Browse button to navigate to the document that you want to archive.
5. Click the Attach button to transfer the document to the Current fileattachment(s) field.
Chapter 9 Working with EFM Web UI
92 OpenText Employee File Management EIM040001-UGD-EN-1

Note: Attaching multiple documents is not possible; documents need to beattached one after another.
6. Select the document type from the drop-down-list.If you have chosen a wrong document, use the Remove button to remove it.
7. Click the Upload button.
The Create View dialog is displayed.
Note: For other document types, you may have to select an infotype, asubtype or an object ID. The procedure is identical: Click the respective icon, and click the correct infotype/subtype/object ID in the list. Theinfotype/subtype/object ID is transferred to the Create View dialog.
8. Enter the date of origin and click the Create button to archive the document.
9.3 Moving and copying documents in EFM Web UIFor a general explanation of moving and copying documents, see “Moving andcopying documents” on page 31.
ImportantThe target destination must be a folder below the Add folder.
Note: You can move and copy documents between infotypes/folders andpersonnel files.
9.3. Moving and copying documents in EFM Web UI
EIM040001-UGD-EN-1 User Guide 93
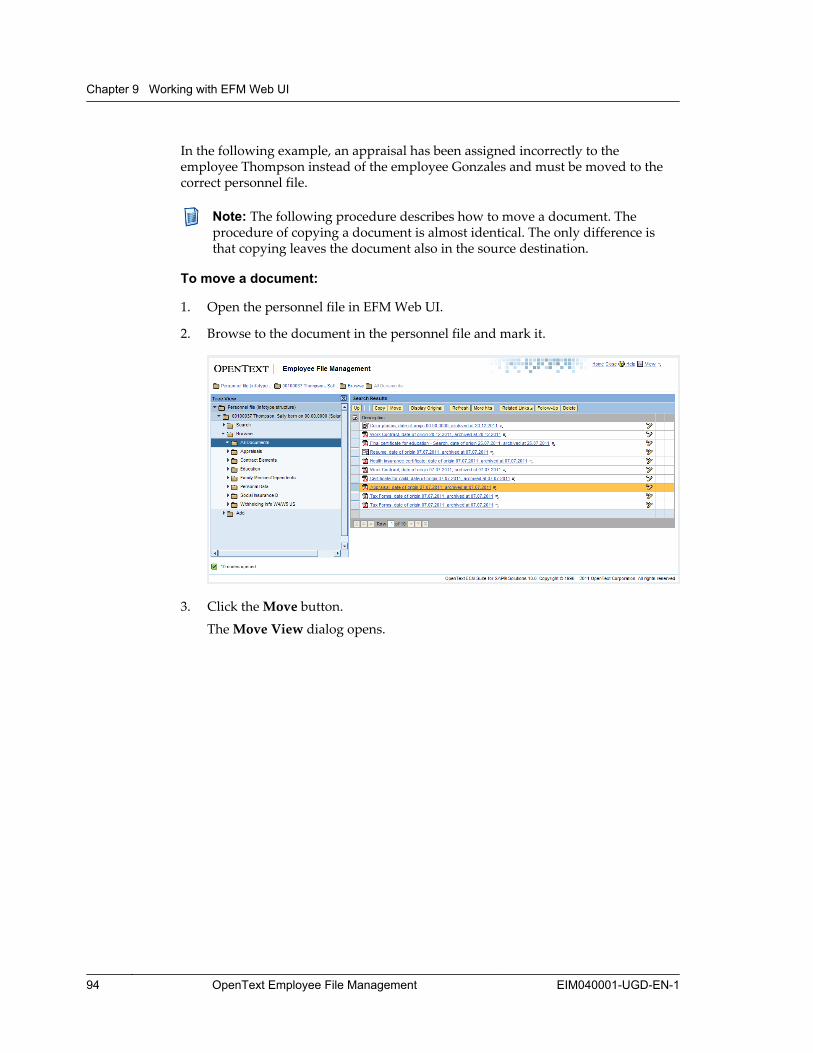
In the following example, an appraisal has been assigned incorrectly to theemployee Thompson instead of the employee Gonzales and must be moved to thecorrect personnel file.
Note: The following procedure describes how to move a document. Theprocedure of copying a document is almost identical. The only difference isthat copying leaves the document also in the source destination.
To move a document:
1. Open the personnel file in EFM Web UI.
2. Browse to the document in the personnel file and mark it.
3. Click the Move button.
The Move View dialog opens.
Chapter 9 Working with EFM Web UI
94 OpenText Employee File Management EIM040001-UGD-EN-1
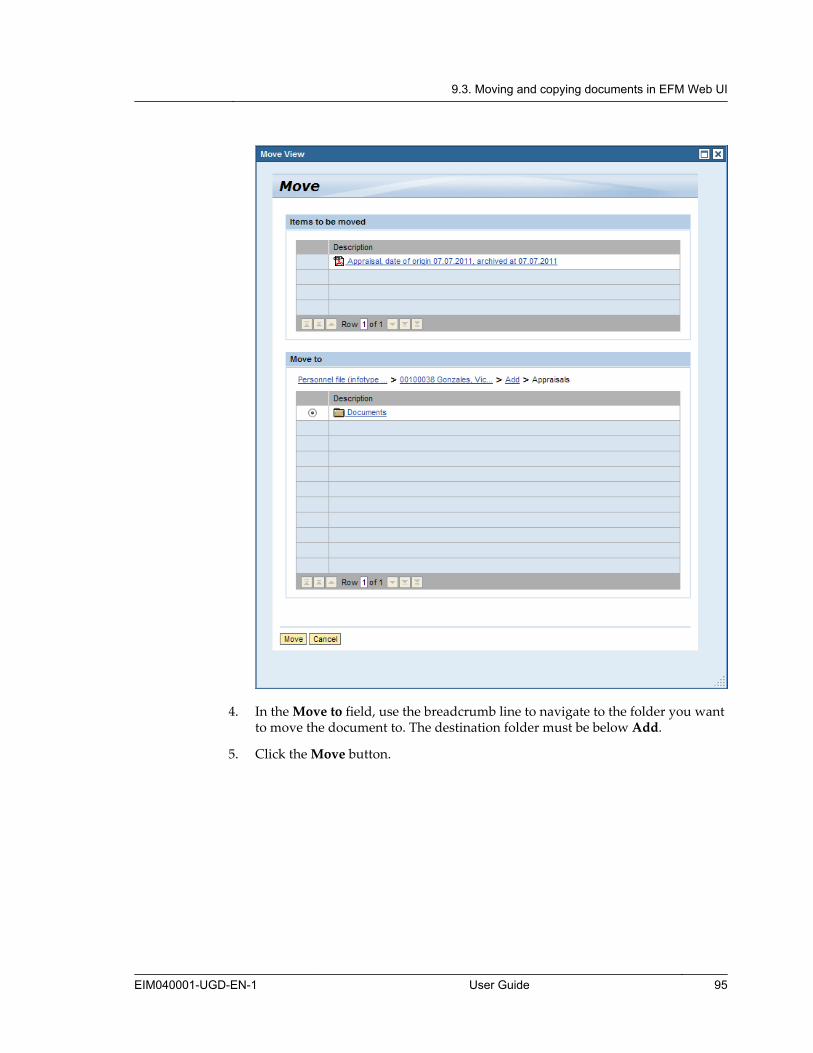
4. In the Move to field, use the breadcrumb line to navigate to the folder you wantto move the document to. The destination folder must be below Add.
5. Click the Move button.
9.3. Moving and copying documents in EFM Web UI
EIM040001-UGD-EN-1 User Guide 95
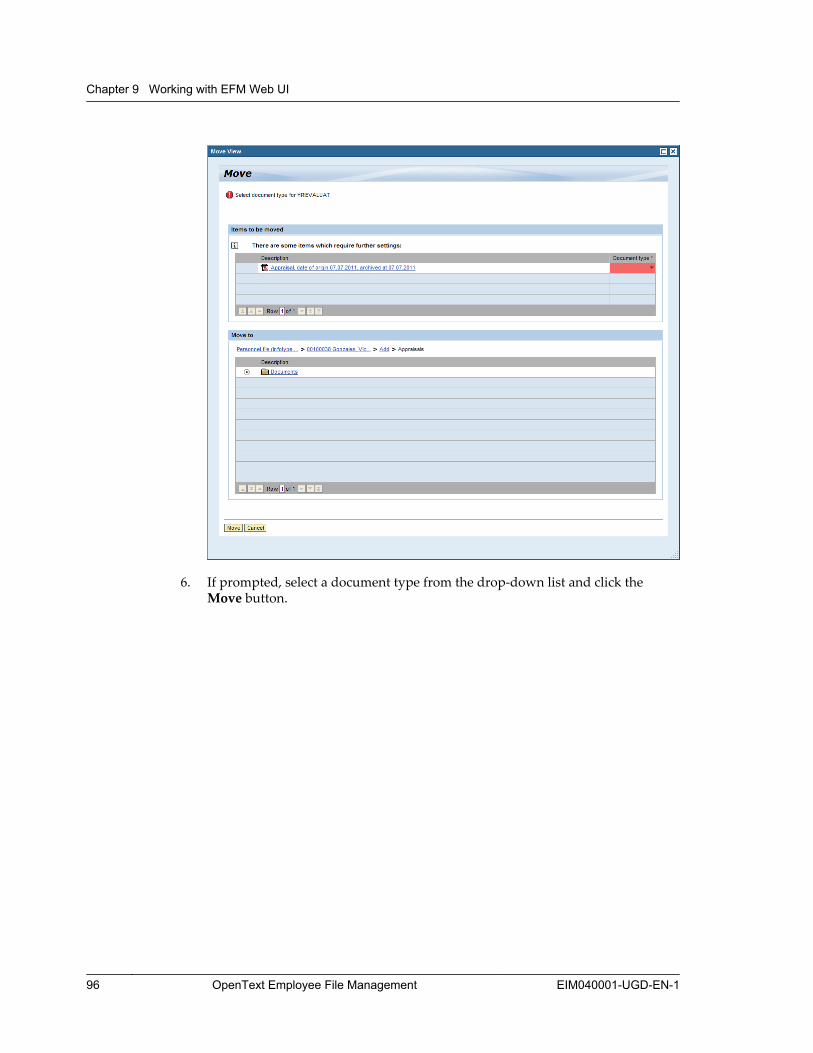
6. If prompted, select a document type from the drop-down list and click theMove button.
Chapter 9 Working with EFM Web UI
96 OpenText Employee File Management EIM040001-UGD-EN-1
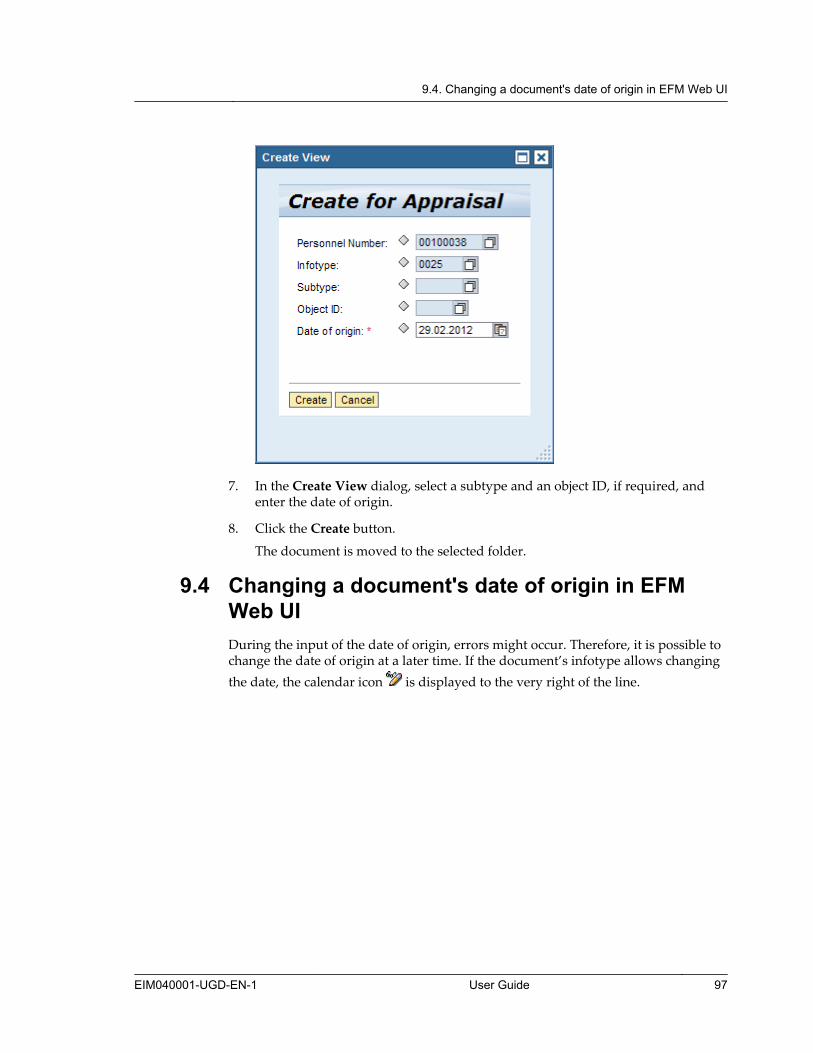
7. In the Create View dialog, select a subtype and an object ID, if required, andenter the date of origin.
8. Click the Create button.
The document is moved to the selected folder.
9.4 Changing a document's date of origin in EFMWeb UIDuring the input of the date of origin, errors might occur. Therefore, it is possible tochange the date of origin at a later time. If the document’s infotype allows changingthe date, the calendar icon is displayed to the very right of the line.
9.4. Changing a document's date of origin in EFM Web UI
EIM040001-UGD-EN-1 User Guide 97

To change the date of origin:
1. Open the personnel file and browse to the document you want to change thedate of origin for.
2. Click the icon at the very right of the document's line.
3. In the Change View dialog, change the date of origin.
Tip: You can invoke a calendar to select the date by clicking the icon.
4. Click the Change button to save your changes.
The changed date of origin is displayed.
9.5 Creating and processing workflows in EFM WebUIYou can handle the EFM workflows Follow-up and Delete with approval in theEFM Web UI and the SAP NetWeaver Portal application. The general handling inEFM Web UI and SAP GUI is very similar and the same workflows are used. It istherefore possible to start a workflow in the EFM Web UI and process it in the SAPGUI and vice versa.
To create a workflow:
1. Open the personnel file and select the document(s) you want to create aworkflow for.
Note: Due to technical restrictions of the EFM Web UI, it is not possible toselect simultaneously documents of several employees at once. ForFollow-up workflows, you can also select the folder of an employee.
Chapter 9 Working with EFM Web UI
98 OpenText Employee File Management EIM040001-UGD-EN-1
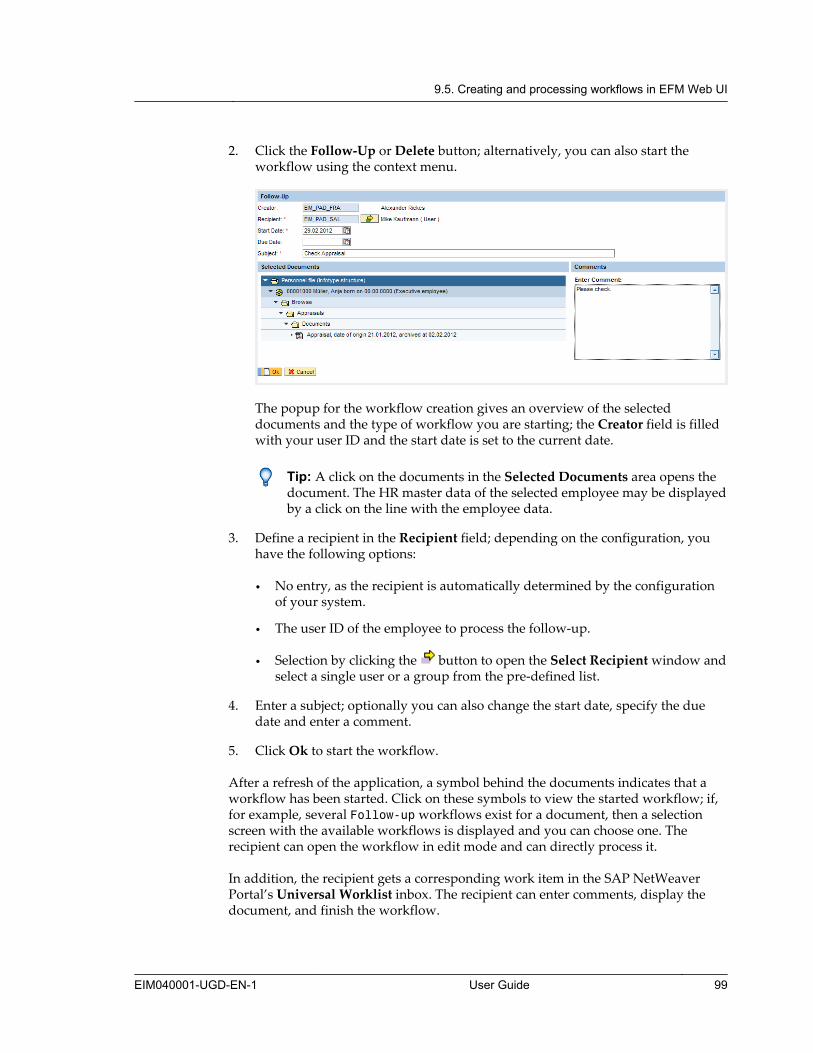
2. Click the Follow-Up or Delete button; alternatively, you can also start theworkflow using the context menu.
The popup for the workflow creation gives an overview of the selecteddocuments and the type of workflow you are starting; the Creator field is filledwith your user ID and the start date is set to the current date.
Tip: A click on the documents in the Selected Documents area opens thedocument. The HR master data of the selected employee may be displayedby a click on the line with the employee data.
3. Define a recipient in the Recipient field; depending on the configuration, youhave the following options:
• No entry, as the recipient is automatically determined by the configurationof your system.
• The user ID of the employee to process the follow-up.
• Selection by clicking the button to open the Select Recipient window andselect a single user or a group from the pre-defined list.
4. Enter a subject; optionally you can also change the start date, specify the duedate and enter a comment.
5. Click Ok to start the workflow.
After a refresh of the application, a symbol behind the documents indicates that aworkflow has been started. Click on these symbols to view the started workflow; if,for example, several Follow-up workflows exist for a document, then a selectionscreen with the available workflows is displayed and you can choose one. Therecipient can open the workflow in edit mode and can directly process it.
In addition, the recipient gets a corresponding work item in the SAP NetWeaverPortal’s Universal Worklist inbox. The recipient can enter comments, display thedocument, and finish the workflow.
9.5. Creating and processing workflows in EFM Web UI
EIM040001-UGD-EN-1 User Guide 99

To process a follow-up:
1. Navigate the SAP NetWeaver Portal’s Universal Worklist inbox and click theProcess Follow Up button in the preview of the workflow.
The popup for the workflow processing gives an overview of the selecteddocuments and the type of workflow; the functionality to view the documentsand employee data is the same as for the workflow creation.However, there is an additional Personnel file button that allows to view thepersonnel file of the employee in the EFM application.
2. Complete the workflow.
a. For Follow-up workflow:The Finish button completes the workflow; the Cancel button closes theview, but the workflow remains in the inbox.You can add new comments by typing in the Enter Comment field andclicking the Save Comment button.
b. For Delete with approval workflow:The Delete button deletes all selected documents and completes theworkflow. The Do not delete button also completes the workflow, but doesnot delete the documents.In a Delete with approval workflow you should always comment yourdecision in the Enter Comment field.
Chapter 9 Working with EFM Web UI
100 OpenText Employee File Management EIM040001-UGD-EN-1
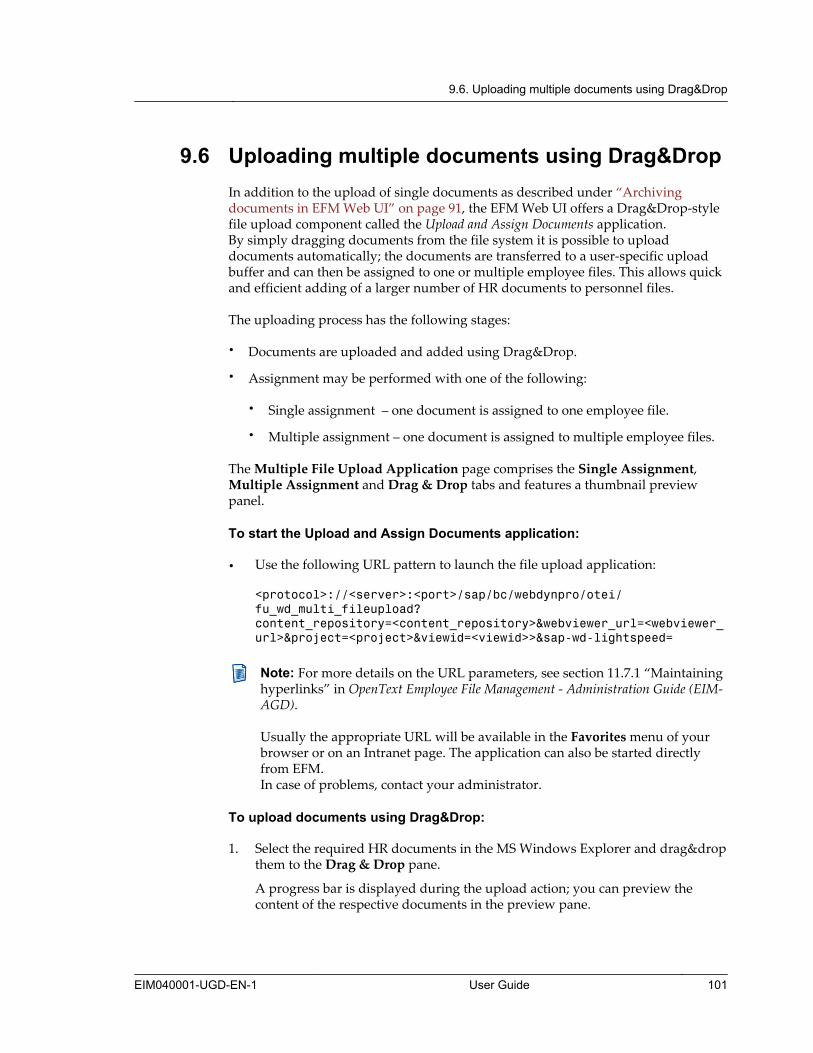
9.6 Uploading multiple documents using Drag&DropIn addition to the upload of single documents as described under “Archivingdocuments in EFM Web UI” on page 91, the EFM Web UI offers a Drag&Drop-stylefile upload component called the Upload and Assign Documents application.By simply dragging documents from the file system it is possible to uploaddocuments automatically; the documents are transferred to a user-specific uploadbuffer and can then be assigned to one or multiple employee files. This allows quickand efficient adding of a larger number of HR documents to personnel files.
The uploading process has the following stages:
• Documents are uploaded and added using Drag&Drop.
• Assignment may be performed with one of the following:
• Single assignment – one document is assigned to one employee file.
• Multiple assignment – one document is assigned to multiple employee files.
The Multiple File Upload Application page comprises the Single Assignment,Multiple Assignment and Drag & Drop tabs and features a thumbnail previewpanel.
To start the Upload and Assign Documents application:
• Use the following URL pattern to launch the file upload application:
<protocol>://<server>:<port>/sap/bc/webdynpro/otei/fu_wd_multi_fileupload?content_repository=<content_repository>&webviewer_url=<webviewer_url>&project=<project>&viewid=<viewid>>&sap-wd-lightspeed=
Note: For more details on the URL parameters, see section 11.7.1 “Maintaininghyperlinks” in OpenText Employee File Management - Administration Guide (EIM-AGD).
Usually the appropriate URL will be available in the Favorites menu of yourbrowser or on an Intranet page. The application can also be started directlyfrom EFM.In case of problems, contact your administrator.
To upload documents using Drag&Drop:
1. Select the required HR documents in the MS Windows Explorer and drag&dropthem to the Drag & Drop pane.
A progress bar is displayed during the upload action; you can preview thecontent of the respective documents in the preview pane.
9.6. Uploading multiple documents using Drag&Drop
EIM040001-UGD-EN-1 User Guide 101
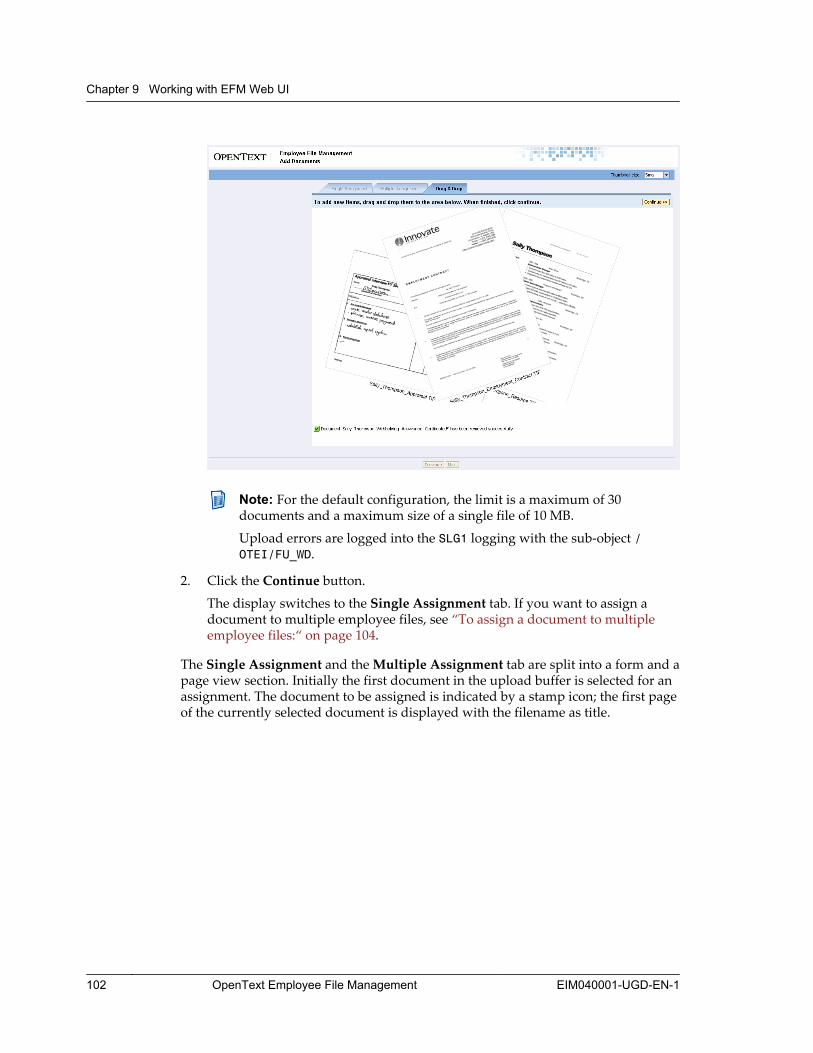
Note: For the default configuration, the limit is a maximum of 30documents and a maximum size of a single file of 10 MB.
Upload errors are logged into the SLG1 logging with the sub-object /OTEI/FU_WD.
2. Click the Continue button.
The display switches to the Single Assignment tab. If you want to assign adocument to multiple employee files, see “To assign a document to multipleemployee files:“ on page 104.
The Single Assignment and the Multiple Assignment tab are split into a form and apage view section. Initially the first document in the upload buffer is selected for anassignment. The document to be assigned is indicated by a stamp icon; the first pageof the currently selected document is displayed with the filename as title.
Chapter 9 Working with EFM Web UI
102 OpenText Employee File Management EIM040001-UGD-EN-1
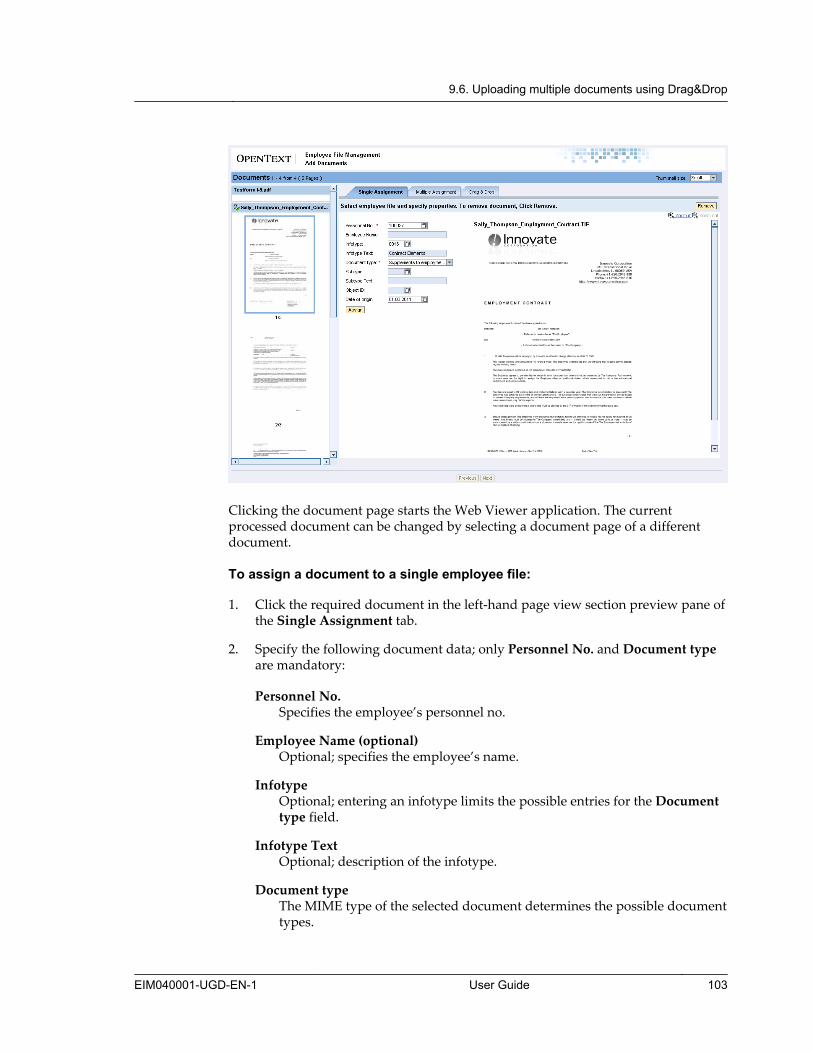
Clicking the document page starts the Web Viewer application. The currentprocessed document can be changed by selecting a document page of a differentdocument.
To assign a document to a single employee file:
1. Click the required document in the left-hand page view section preview pane ofthe Single Assignment tab.
2. Specify the following document data; only Personnel No. and Document typeare mandatory:
Personnel No.Specifies the employee’s personnel no.
Employee Name (optional)Optional; specifies the employee’s name.
InfotypeOptional; entering an infotype limits the possible entries for the Documenttype field.
Infotype TextOptional; description of the infotype.
Document typeThe MIME type of the selected document determines the possible documenttypes.
9.6. Uploading multiple documents using Drag&Drop
EIM040001-UGD-EN-1 User Guide 103

Subtype / Subtype text / Object ID / Date of origin (optional)Optional; will be enabled depending on the selected document type.
3. Click the Assign button; with an assignment, all EFM HR authorization checksare fulfilled.
Note: Assignment errors are logged into the SLG1 logging with the sub-object /OTEI/FU_WD.
Documents uploaded by mistake can be deleted from the upload buffer by clickingthe Remove button.
To assign a document to multiple employee files:
1. Click the Multiple Assignment tab.
2. The procedure is basically the same as for the single assignment (see “To assigna document to a single employee file:“ on page 103).However, you can enter multiple personnel numbers in a list control. Afterentering a personnel number, press the ENTER key to fill automatically the lastand first name of an employee. The last and first name are hyperlinks whichstart the PA20 transaction (if ITS is maintained).
3. Click the Assign to All button to archive the document and assign it to theselected employee files.
9.7 Using reportingWith the EFM reporting application, HR administrators and managers can check ifdocuments with specific document types are stored and valid in personnel files.
Note: Make sure you have the necessary permission to perform the reporting.
To trigger a report:
1. Use the following URL pattern to launch the reporting application:
<protocol>://<server>:<port>/sap/bc/webdynpro/otei/rp_wd_reporting?sap-wd-configId=/OTEI/RP_WD_DEFAULT
2. As a manager, use the Employee Search option to restrict the personnel files tobe checked.
3. Specify one or more of the parameters in the Employees, Report options andDocument types fields.
4. Use the Variants drop-down to choose an existing variant.
Tip: To create or maintain variants click the icon or the icon and selectthe Add New Variant or Manage Variant commands.
5. Click the Search button.
Chapter 9 Working with EFM Web UI
104 OpenText Employee File Management EIM040001-UGD-EN-1

The report list is displayed.
6. You can perform the following operations on the report list:
• Click the Graphics tab to display the report list as a business graphic.
• Click the Download to MS Excel button to export the report list to MicrosoftExcel.
7. You can perform the following operations on the report list entries:
Display HR Master DataStarts the PA20 transaction.In SAP NetWeaver Portal, the OpenText Employee Information page isdisplayed with the personnel no. of the respective search result item.
Open Employee DataStarts the EFM application with the personnel file of the search result item.In SAP NetWeaver Portal, the Process Personnel File page within theOpenText Employee Information section is displayed.
Display DocumentOpens the respective document in the OpenText Imaging Web Viewer.
9.8 Using full-text searchEmployee File Management offers a separate full-text search application that can bestarted directly in a browser window.With this search application, HR managers can perform a full-text search inpersonnel files containing HR documents. The search application also offers an HRmetadata search, with which you can search for HR documents with a specific HRmetadata, for example the personnel number.
To perform a full-text search:
1. Use the following URL pattern to launch the full-text search application:
<protocol>://<server>:<port>/sap/bc/webdynpro/otx/rm_seawd_search?sap-wd-configId=/OTEI/RM_SEARCH_DEFAULT
Note: Usually the appropriate URL will be available in the Favoritesmenu of your browser or on an Intranet page.In case of problems, contact your administrator.
2. Enter the search text string that helps to identify the required document in theFulltext search field.In addition, you can specify additional metadata search criteria for restrictingthe search to specific personnel files.
Click the icon to access these criteria on the HR metadata panel.
9.8. Using full-text search
EIM040001-UGD-EN-1 User Guide 105
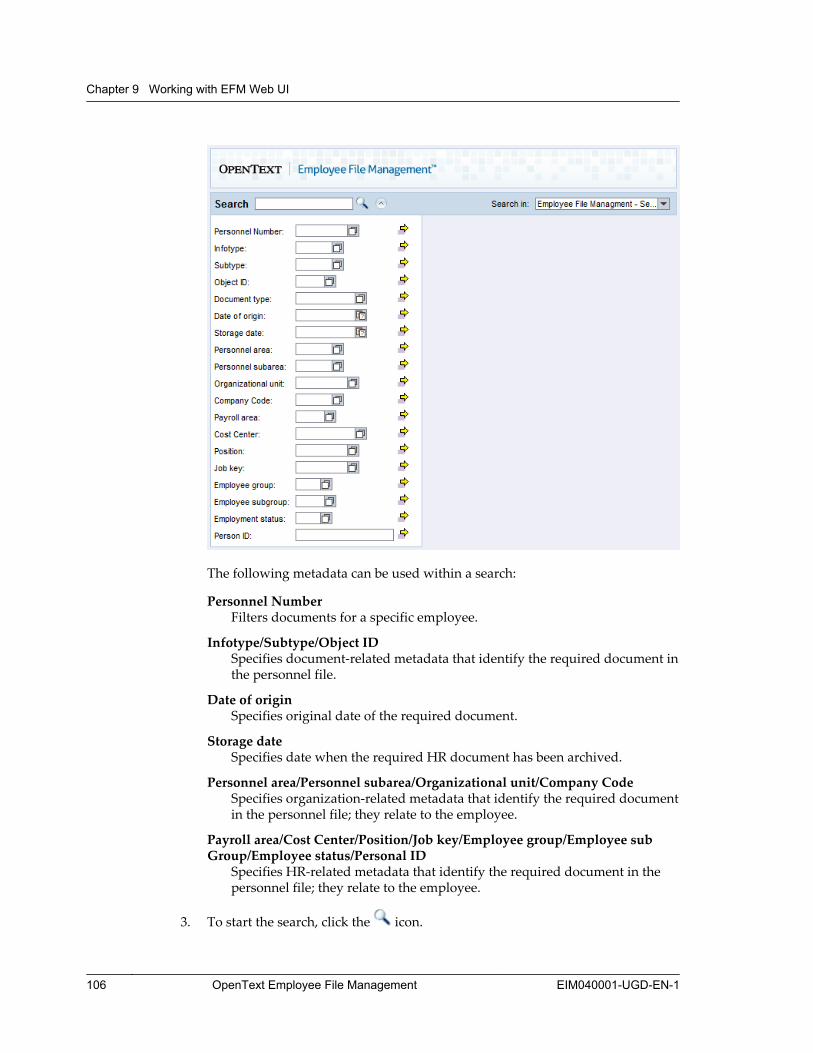
The following metadata can be used within a search:
Personnel NumberFilters documents for a specific employee.
Infotype/Subtype/Object IDSpecifies document-related metadata that identify the required document inthe personnel file.
Date of originSpecifies original date of the required document.
Storage dateSpecifies date when the required HR document has been archived.
Personnel area/Personnel subarea/Organizational unit/Company CodeSpecifies organization-related metadata that identify the required documentin the personnel file; they relate to the employee.
Payroll area/Cost Center/Position/Job key/Employee group/Employee subGroup/Employee status/Personal ID
Specifies HR-related metadata that identify the required document in thepersonnel file; they relate to the employee.
3. To start the search, click the icon.
Chapter 9 Working with EFM Web UI
106 OpenText Employee File Management EIM040001-UGD-EN-1

The search results are shown in a hit list. Each list entry shows:
• Thumbnail preview for the document; with a click on a thumbnail thedocument is opened with the OpenText Imaging Web Viewer.
• Document title.
• Short abstract of the document’s content; the search term is displayed inbold type.
• Footer with information on relevance, storage date and size.
• Area with HR metadata such as personnel no., infotype and date of origin.
Each list entry also contains a hyperlink that you can use to open the documentwith the OpenText Imaging Web Viewer.
4. Click the icon on the document title to invoke the function menu. Thefollowing functions are available:
Display Employee DataStarts the PA20 transaction.In SAP NetWeaver Portal, the OpenText Employee Information page isdisplayed with the personnel no. of the respective search result item.
Open Employee DataStarts the EFM application with the personnel file of the search result item.In SAP NetWeaver Portal, the Process Personnel File page within theOpenText Employee Information section is displayed.
9.8. Using full-text search
EIM040001-UGD-EN-1 User Guide 107

9.9 Document Upload and Inbox applicationWith the Document Upload and Inbox application, employees and managers canupload documents that should be added to personal files. This in turn creates aticket which goes to the HR administrator’s Document Inbox (see “Using theDocument Inbox“ on page 77). The HR administrator then checks the uploadeddocuments and assigns them to personnel files in EFM.
Example: Bonita Reyes wants to add a new tax card and an insurance certificate to herpersonnel file. She uploads a scan of the tax card and the PDF version of her insurancecertificate using the Employee Self-Service Document Upload. The upload triggers aDocument Inbox workflow for her HR administrator, who then checks the uploadeddocuments and assigns them to Bonita Reyes’ personnel file.
The Document Upload and Inbox comprises the following single applications:
• Employee Self-Service Document Upload• Manager Self-Service Document Upload• Document Inbox
Note: The Document Inbox in the EFM Web UI has a reduced functionalitycompared to the Document Inbox in the SAP GUI. You cannot start adocument conversion and ticket handling is limited. OpenText thereforerecommends using the Document Inbox in the SAP GUI. For details see “Usingthe Document Inbox“ on page 77.
Chapter 9 Working with EFM Web UI
108 OpenText Employee File Management EIM040001-UGD-EN-1
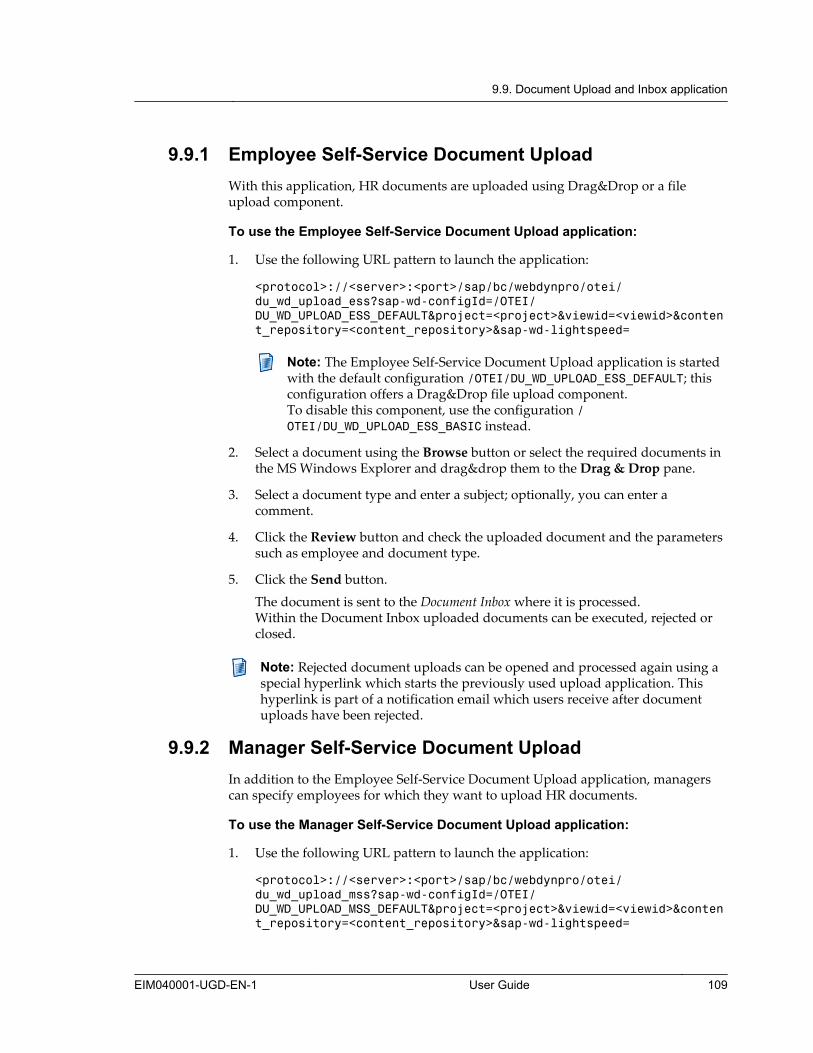
9.9.1 Employee Self-Service Document UploadWith this application, HR documents are uploaded using Drag&Drop or a fileupload component.
To use the Employee Self-Service Document Upload application:
1. Use the following URL pattern to launch the application:
<protocol>://<server>:<port>/sap/bc/webdynpro/otei/du_wd_upload_ess?sap-wd-configId=/OTEI/DU_WD_UPLOAD_ESS_DEFAULT&project=<project>&viewid=<viewid>&content_repository=<content_repository>&sap-wd-lightspeed=
Note: The Employee Self-Service Document Upload application is startedwith the default configuration /OTEI/DU_WD_UPLOAD_ESS_DEFAULT; thisconfiguration offers a Drag&Drop file upload component.To disable this component, use the configuration /OTEI/DU_WD_UPLOAD_ESS_BASIC instead.
2. Select a document using the Browse button or select the required documents inthe MS Windows Explorer and drag&drop them to the Drag & Drop pane.
3. Select a document type and enter a subject; optionally, you can enter acomment.
4. Click the Review button and check the uploaded document and the parameterssuch as employee and document type.
5. Click the Send button.
The document is sent to the Document Inbox where it is processed.Within the Document Inbox uploaded documents can be executed, rejected orclosed.
Note: Rejected document uploads can be opened and processed again using aspecial hyperlink which starts the previously used upload application. Thishyperlink is part of a notification email which users receive after documentuploads have been rejected.
9.9.2 Manager Self-Service Document UploadIn addition to the Employee Self-Service Document Upload application, managerscan specify employees for which they want to upload HR documents.
To use the Manager Self-Service Document Upload application:
1. Use the following URL pattern to launch the application:
<protocol>://<server>:<port>/sap/bc/webdynpro/otei/du_wd_upload_mss?sap-wd-configId=/OTEI/DU_WD_UPLOAD_MSS_DEFAULT&project=<project>&viewid=<viewid>&content_repository=<content_repository>&sap-wd-lightspeed=
9.9. Document Upload and Inbox application
EIM040001-UGD-EN-1 User Guide 109
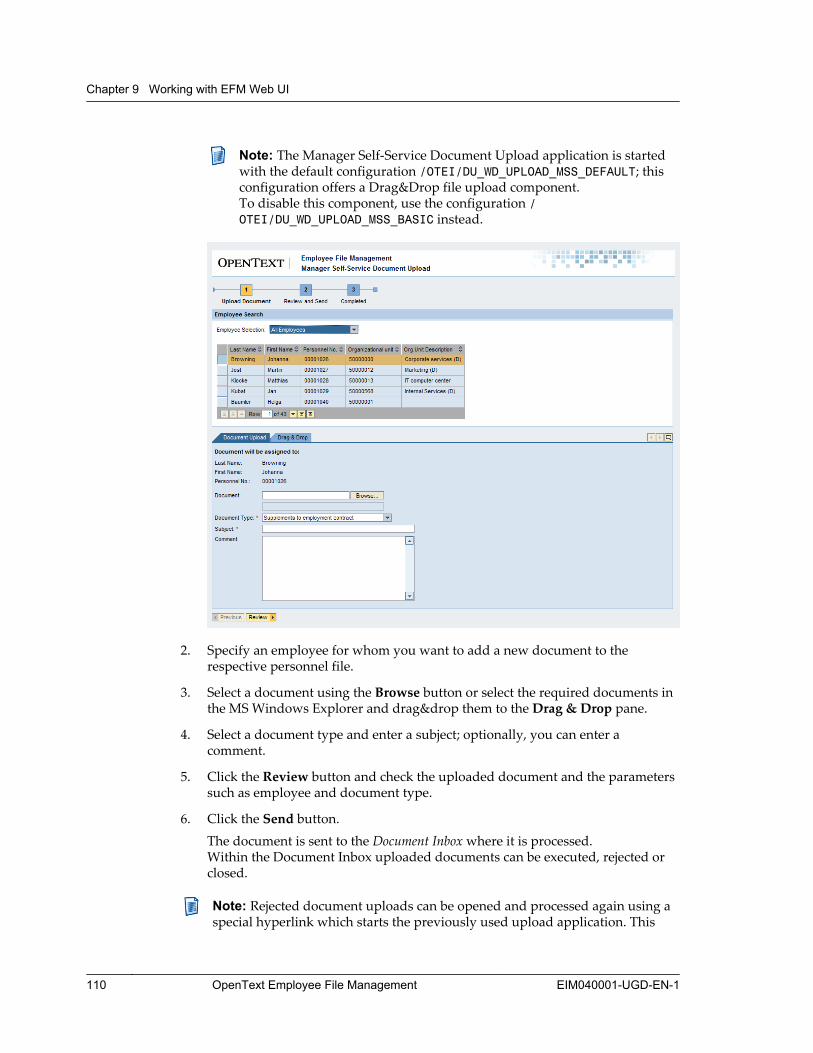
Note: The Manager Self-Service Document Upload application is startedwith the default configuration /OTEI/DU_WD_UPLOAD_MSS_DEFAULT; thisconfiguration offers a Drag&Drop file upload component.To disable this component, use the configuration /OTEI/DU_WD_UPLOAD_MSS_BASIC instead.
2. Specify an employee for whom you want to add a new document to therespective personnel file.
3. Select a document using the Browse button or select the required documents inthe MS Windows Explorer and drag&drop them to the Drag & Drop pane.
4. Select a document type and enter a subject; optionally, you can enter acomment.
5. Click the Review button and check the uploaded document and the parameterssuch as employee and document type.
6. Click the Send button.The document is sent to the Document Inbox where it is processed.Within the Document Inbox uploaded documents can be executed, rejected orclosed.
Note: Rejected document uploads can be opened and processed again using aspecial hyperlink which starts the previously used upload application. This
Chapter 9 Working with EFM Web UI
110 OpenText Employee File Management EIM040001-UGD-EN-1

hyperlink is part of a notification email which users receive after documentuploads have been rejected.
9.9.3 Document Inbox
Note: The Document Inbox in the EFM Web UI has a reduced functionalitycompared to the Document Inbox in the SAP GUI. You cannot start adocument conversion and ticket handling is limited. OpenText thereforerecommends using the Document Inbox in the SAP GUI. For details see “Usingthe Document Inbox“ on page 77.
To work in the Document Inbox:
1. Use the following URL pattern to launch the Document Inbox application:
<protocol>://<server>:<port>/sap/bc/webdynpro/otei/du_wd_inbox?project=<project>&viewid=<viewid>&sap-wd-lightspeed=
2. To process uploaded documents, select a ticket to process.Click the icon to display the uploaded document.
3. Click Edit and check the uploaded document in form and content.
Tip: You can increase or reduce the size of the page using the Zoom In/Zoom Out buttons.
4. Choose Assign Document, Reject or Close.
a. To assign a document, specify the following document data; onlyPersonnel No. and Document type are mandatory:
Personnel No.Specifies the employee’s personnel no.
InfotypeOptional; entering an infotype limits the possible entries for theDocument type field.
Infotype TextOptional; description of the infotype.
Document typeThe MIME type of the uploaded document determines the possibledocument types. The document type chosen via the Document UploadSelf-Service applications is already preset.
Subtype, Subtype text, Object ID, Date of origin (optional)Optional; parameters will be available depending on the selecteddocument type.
b. To reject or close a document, enter a comment and click the Reviewbutton.
9.9. Document Upload and Inbox application
EIM040001-UGD-EN-1 User Guide 111
5. Check all entries and click the Finish button to complete the action.
Chapter 9 Working with EFM Web UI
112 OpenText Employee File Management EIM040001-UGD-EN-1

Part 3Using EFM in other integrations

EFM integrates its functionality in the following SAP applications:
• Employee-Self-Service (ESS)• Manager-Self-Service (MSS)• HR Administrator (HRA)• Employee Interaction Center (EIC)• SuccessFactors
Part 3 Using EFM in other integrations
114 OpenText Employee File Management EIM040001-UGD-EN-1
Chapter 10
ESS/MSS/HRA integrations
EFM can be integrated in Employee-Self-Service (ESS), Manager-Self-Service (MSS),and HR Administrator (HRA). This can be done either by using a correspondingbusiness package on the SAP NetWeaver Portal or directly using the SAPNetWeaver Business Client.
On the SAP NetWeaver Portal, you require corresponding business packages thatimplement ESS/MSS/HRA. These business packages come in the following variants:
• Business package using Web Dynpro Java (WDJ) connected to SAP ECC system.• Business package using Web Dynpro ABAP (WDA) running on SAP ECC
system.
In addition, there are the Web Dynpro ABAP (WDA) applications for ESS/MSS/HRAthat run directly on the SAP ECC system and can be accessed using the SAPNetWeaver Business Client (NWBC). This integration requires SAP ECC EhP5 forthe ESS/MSS integration or SAP ECC EhP6 + HR Renewal for the HRA integration.
Note: Depending on your system and the business packages that are used, theuser interface will look different. In the following, the Web Dynpro Javaversion is shown as default.Depending on the variant used to access ESS/MSS/HRA, the user interfacemight look different on your system.
10.1 SAP ESS integrationThe SAP NetWeaver Portal HR application Employee-Self-Service (ESS) offers anemployee access to personal data such as address and bank account information.With the EFM integration, the employee now also has access to the personnel file.
Note: The employee's access to the infotypes of his personnel file has to beauthorized by using appropriate roles. For details see section 19 “Security” inOpenText Employee File Management - Administration Guide (EIM-AGD).
Depending on the customizing, the ESS integration might look different onyour system. In particular, the link names may be different; the followingprocedure uses the default names.
To access the personnel file:
1. Log on to the ESS and access the personnel file by using one of the followingoptions:
a. Click the Personnel File quick link on the Overview page.
EIM040001-UGD-EN-1 OpenText Employee File Management 115

b. Click Personal Information. On the Personal Information page, click thePersonnel File entry in the OpenText Employee File Management section.
The Personnel File screen is displayed.
2. Navigate through the files; for details see “Browsing thumbnails for fastdocument retrieval” on page 86.
10.2 SAP MSS integrationThe SAP NetWeaver Portal HR application Manager-Self-Service (MSS) givesmanagers access to general personnel information such as position, working timeand travel-related data. With the EFM integration, managers can now also searchand access the personnel files of their respective employees.
Note: Managers' access to personnel files of respective employees has to beauthorized by using appropriate roles. For details see section 19 “Security” inOpenText Employee File Management - Administration Guide (EIM-AGD).
The MSS integration comes in the following variants:
• Business package using Web Dynpro Java (WDJ) connected to SAP ECC system.• Business package using Web Dynpro ABAP (WDA) running on SAP ECC
system.
Chapter 10 ESS/MSS/HRA integrations
116 OpenText Employee File Management EIM040001-UGD-EN-1

10.2.1 SAP MSS integration with Web Dynpro Java (WDJ)
To access a personnel file:
1. Log in to the MSS and navigate to the Team section.
2. Select the General Information link in the Employee Information group.
3. Select the respective employee from the list and click the Personnel File entry inthe OpenText Employee File Management section.
The Personnel File screen is displayed.
4. Navigate through the files; for details see “Browsing thumbnails for fastdocument retrieval” on page 86.
To search for a personnel file:
1. Log in to the MSS and navigate to the Team section.
2. Select the General Information link in the Employee Information group.
3. Click the Personnel File Search entry in the OpenText Employee FileManagement section.
10.2. SAP MSS integration
EIM040001-UGD-EN-1 User Guide 117
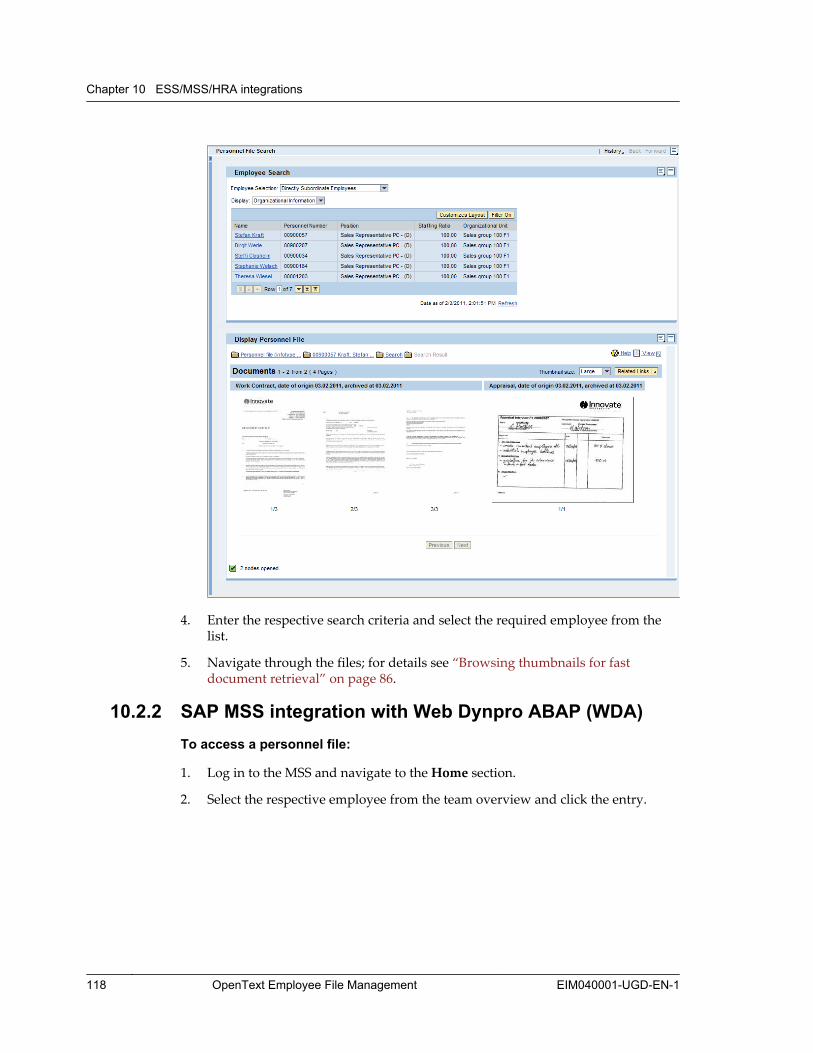
4. Enter the respective search criteria and select the required employee from thelist.
5. Navigate through the files; for details see “Browsing thumbnails for fastdocument retrieval” on page 86.
10.2.2 SAP MSS integration with Web Dynpro ABAP (WDA)To access a personnel file:
1. Log in to the MSS and navigate to the Home section.
2. Select the respective employee from the team overview and click the entry.
Chapter 10 ESS/MSS/HRA integrations
118 OpenText Employee File Management EIM040001-UGD-EN-1
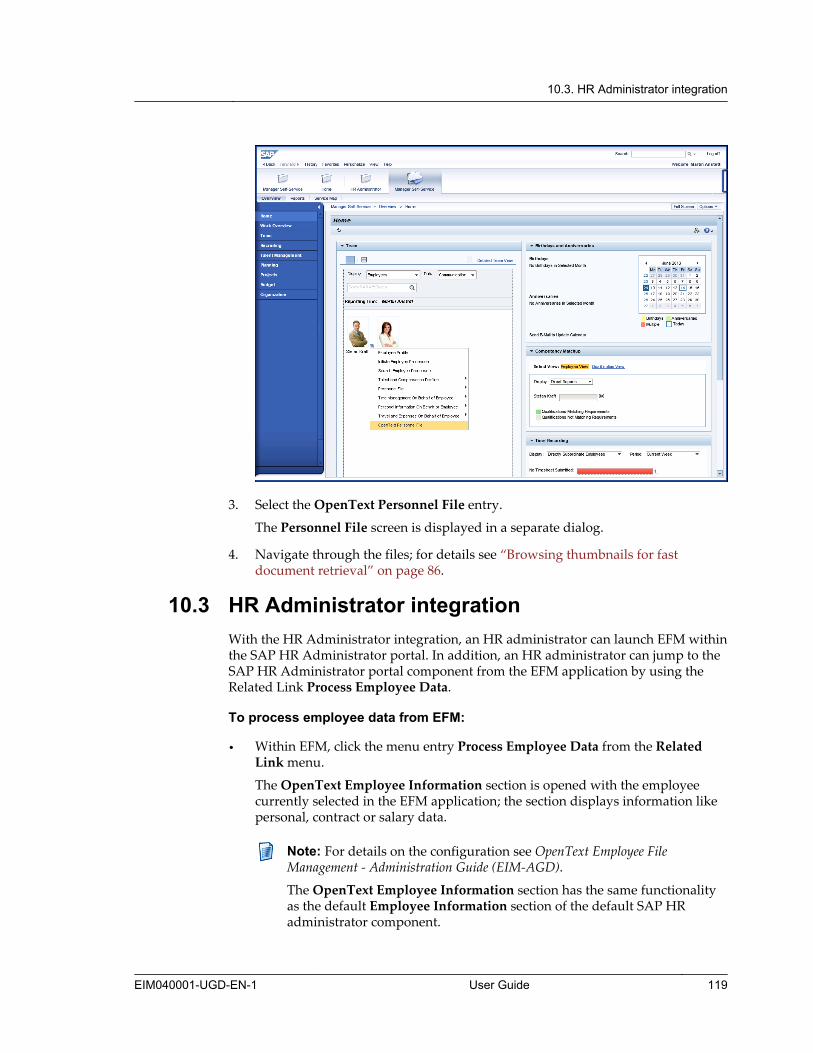
3. Select the OpenText Personnel File entry.
The Personnel File screen is displayed in a separate dialog.
4. Navigate through the files; for details see “Browsing thumbnails for fastdocument retrieval” on page 86.
10.3 HR Administrator integrationWith the HR Administrator integration, an HR administrator can launch EFM withinthe SAP HR Administrator portal. In addition, an HR administrator can jump to theSAP HR Administrator portal component from the EFM application by using theRelated Link Process Employee Data.
To process employee data from EFM:
• Within EFM, click the menu entry Process Employee Data from the RelatedLink menu.
The OpenText Employee Information section is opened with the employeecurrently selected in the EFM application; the section displays information likepersonal, contract or salary data.
Note: For details on the configuration see OpenText Employee FileManagement - Administration Guide (EIM-AGD).
The OpenText Employee Information section has the same functionalityas the default Employee Information section of the default SAP HRadministrator component.
10.3. HR Administrator integration
EIM040001-UGD-EN-1 User Guide 119
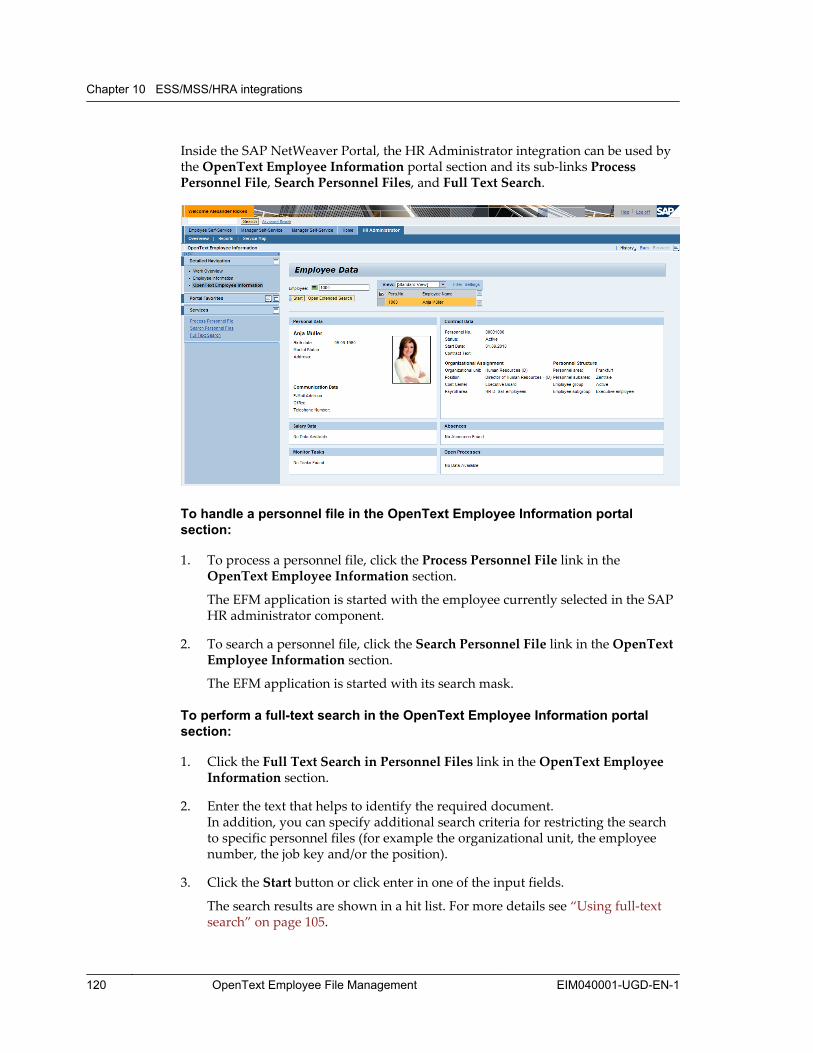
Inside the SAP NetWeaver Portal, the HR Administrator integration can be used bythe OpenText Employee Information portal section and its sub-links ProcessPersonnel File, Search Personnel Files, and Full Text Search.
To handle a personnel file in the OpenText Employee Information portalsection:
1. To process a personnel file, click the Process Personnel File link in theOpenText Employee Information section.
The EFM application is started with the employee currently selected in the SAPHR administrator component.
2. To search a personnel file, click the Search Personnel File link in the OpenTextEmployee Information section.
The EFM application is started with its search mask.
To perform a full-text search in the OpenText Employee Information portalsection:
1. Click the Full Text Search in Personnel Files link in the OpenText EmployeeInformation section.
2. Enter the text that helps to identify the required document.In addition, you can specify additional search criteria for restricting the searchto specific personnel files (for example the organizational unit, the employeenumber, the job key and/or the position).
3. Click the Start button or click enter in one of the input fields.
The search results are shown in a hit list. For more details see “Using full-textsearch” on page 105.
Chapter 10 ESS/MSS/HRA integrations
120 OpenText Employee File Management EIM040001-UGD-EN-1
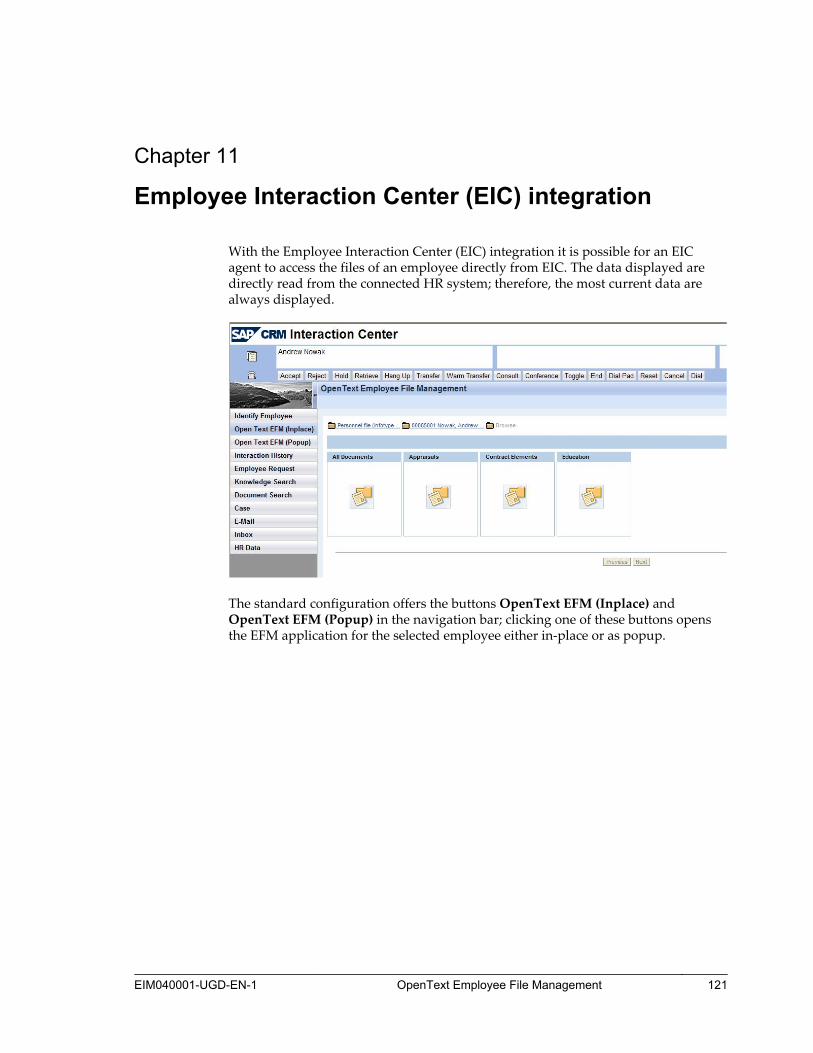
Chapter 11
Employee Interaction Center (EIC) integration
With the Employee Interaction Center (EIC) integration it is possible for an EICagent to access the files of an employee directly from EIC. The data displayed aredirectly read from the connected HR system; therefore, the most current data arealways displayed.
The standard configuration offers the buttons OpenText EFM (Inplace) andOpenText EFM (Popup) in the navigation bar; clicking one of these buttons opensthe EFM application for the selected employee either in-place or as popup.
EIM040001-UGD-EN-1 OpenText Employee File Management 121


Chapter 12
SAP SuccessFactors integration
The SAP SuccessFactors integration allows the batch import of PDF files generatedwith SAP SuccessFactors and the subsequent assignment to personnel files.Typically, the import and assignment of SuccessFactors files is performed by an HRadministrator.
Note: For the export of documents from SuccessFactors, refer to your SAPSuccessFactors documentation. The following procedure only gives a generaloverview.
To export PDF files from SuccessFactors:
1. From the menu in SuccessFactors, select the Archive & Print command.
2. From the Create New menu, select the Document Archive entry
EIM040001-UGD-EN-1 OpenText Employee File Management 123

3. Select what you want to archive and specify the required parameters. In theArchive Formats group, select the Multiple PDF Archive option and checkPrepend each file name with username. Enter a name for the zip file name andclick OK.
This creates a request. When the batch is done, you can access the created zipfile, either using the link in the generated email or from the SuccessFactors userinterface.
To import PDF files into EFM:
1. Execute the /OTEI/INB transaction. If required, enter selection parameters andclick the button.
The File Import Administration dialog is displayed. The Import overview panelists the import jobs and their status.
2. You can now start a new import from the toolbar or process an already existingimport from the import overview :
a. Start a new import by clicking either the button to import files in onlinemode via selected profile ID or the button to schedule an import for aspecific time via profile ID and job.
Click the button to run a test which calculates which files would beimported and which attributes would be set for the files without actuallyimporting them.
b. Process an already existing import by selecting it in the Import overviewpane.
Chapter 12 SAP SuccessFactors integration
124 OpenText Employee File Management EIM040001-UGD-EN-1

The Erroneous and unfinished files of selected import pane displays allfiles that caused problems during the import process.
The toolbar features the following buttons:
Cancels selected import; faulty and unfinished imports can be set tocanceled. A canceled import cannot be restarted.
Restarts import directly.
Restarts import as batch job.
Executes a test run for the selected import job.
To assign PDF files from SuccessFactors:
1. Execute the /OTEI/INBOX_100 transaction (for document type selection viainfotype) or /OTEI/INBOX_110 transaction (for document type selection viaflexible folder).
For every document, a ticket has been created in the Document Inbox.Depending on the customizing, some of these tickets may be processedautomatically.
2. If applicable, assign the files imported from SuccessFactors as described in“Using the Document Inbox“ on page 77.
EIM040001-UGD-EN-1 User Guide 125


Part 4Using EFM on a mobile
Part of the Employee File Management functionality is also available on mobiledevices. For mobile access to HR documents, EFM provides a document viewer appwith filtering capabilities.
The EFM mobile application provides the following options:
• You can search for personnel files to obtain a hit list for all employees matchingyour search criteria.
• In a detailed view, you can view metadata of the selected employee.• You can view all documents belonging to the selected employee.
Note: The search criteria to be available and the metadata displayed for theemployee hit list and detailed employee information can be customized. Formore information, see OpenText Employee File Management - AdministrationGuide (EIM-AGD).
Currently, Employee File Management supports the following environments:
• Safari browser on Apple® iPad®2 or higher with iOS 6.0• Chrome browser on tablets (minimum display size 10") with Android® 4.x
Note: While the tasks to perform are identical, there can be some minordifferences in the user interface between iOS and Android. Further, thescreenshots only show the iPad user interface.
Supported En-vironments
Part 4 Using EFM on a mobile
128 OpenText Employee File Management EIM040001-UGD-EN-1
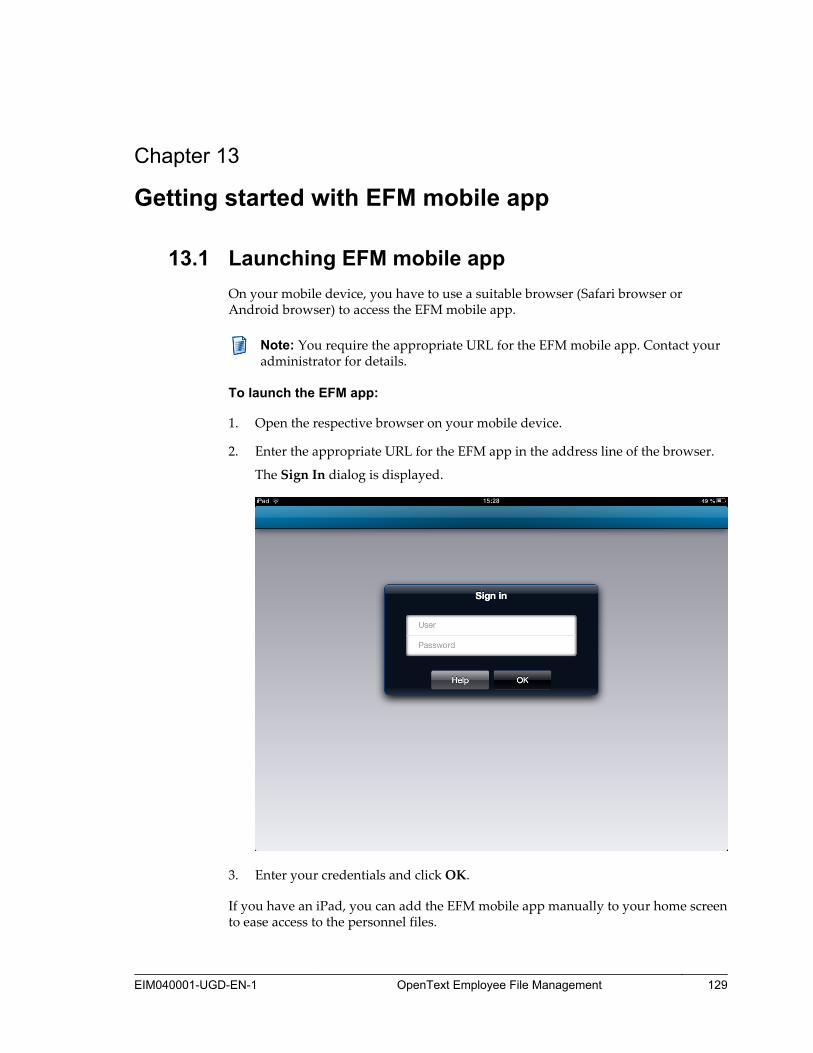
Chapter 13
Getting started with EFM mobile app
13.1 Launching EFM mobile appOn your mobile device, you have to use a suitable browser (Safari browser orAndroid browser) to access the EFM mobile app.
Note: You require the appropriate URL for the EFM mobile app. Contact youradministrator for details.
To launch the EFM app:
1. Open the respective browser on your mobile device.
2. Enter the appropriate URL for the EFM app in the address line of the browser.
The Sign In dialog is displayed.
3. Enter your credentials and click OK.
If you have an iPad, you can add the EFM mobile app manually to your home screento ease access to the personnel files.
EIM040001-UGD-EN-1 OpenText Employee File Management 129
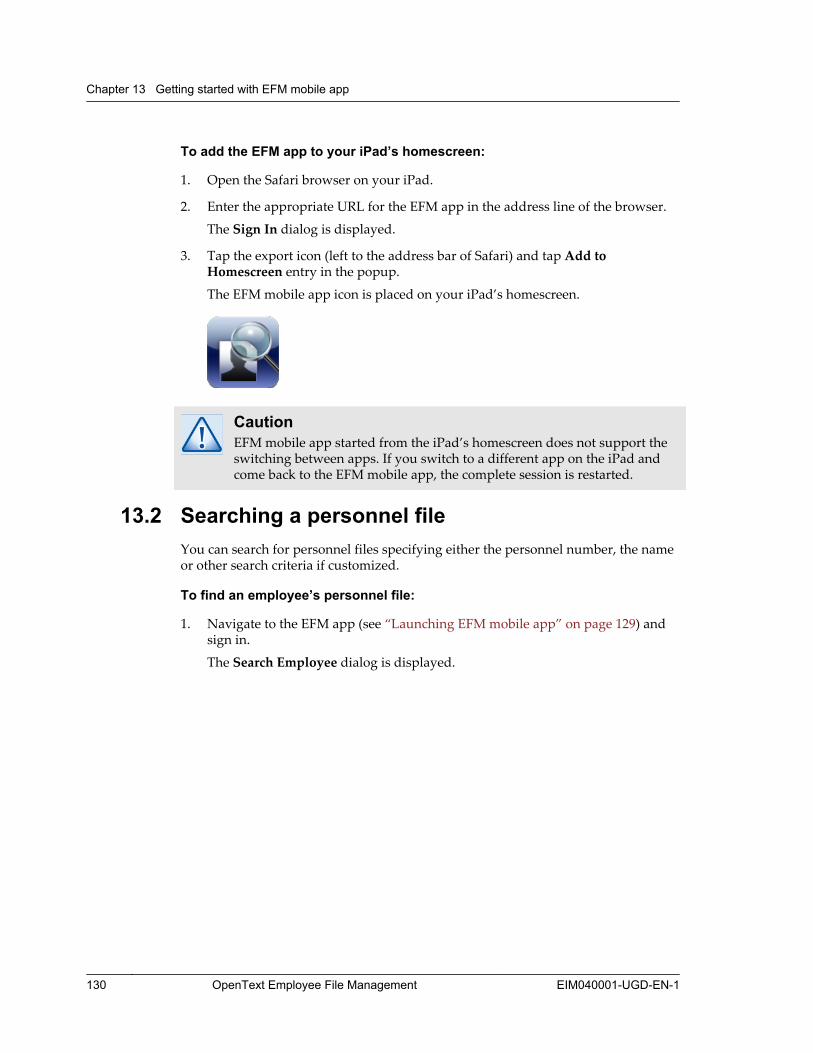
To add the EFM app to your iPad’s homescreen:
1. Open the Safari browser on your iPad.
2. Enter the appropriate URL for the EFM app in the address line of the browser.
The Sign In dialog is displayed.
3. Tap the export icon (left to the address bar of Safari) and tap Add toHomescreen entry in the popup.
The EFM mobile app icon is placed on your iPad’s homescreen.
CautionEFM mobile app started from the iPad’s homescreen does not support theswitching between apps. If you switch to a different app on the iPad andcome back to the EFM mobile app, the complete session is restarted.
13.2 Searching a personnel fileYou can search for personnel files specifying either the personnel number, the nameor other search criteria if customized.
To find an employee’s personnel file:
1. Navigate to the EFM app (see “Launching EFM mobile app” on page 129) andsign in.
The Search Employee dialog is displayed.
Chapter 13 Getting started with EFM mobile app
130 OpenText Employee File Management EIM040001-UGD-EN-1
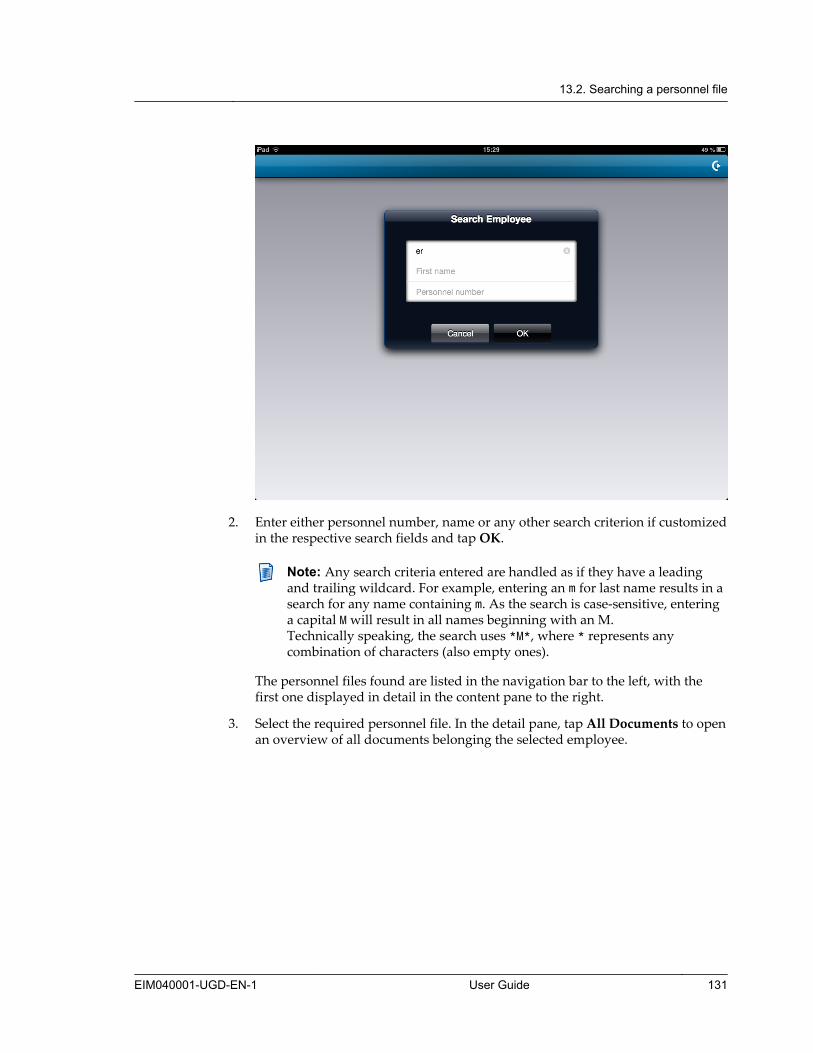
2. Enter either personnel number, name or any other search criterion if customizedin the respective search fields and tap OK.
Note: Any search criteria entered are handled as if they have a leadingand trailing wildcard. For example, entering an m for last name results in asearch for any name containing m. As the search is case-sensitive, enteringa capital M will result in all names beginning with an M.Technically speaking, the search uses *M*, where * represents anycombination of characters (also empty ones).
The personnel files found are listed in the navigation bar to the left, with thefirst one displayed in detail in the content pane to the right.
3. Select the required personnel file. In the detail pane, tap All Documents to openan overview of all documents belonging the selected employee.
13.2. Searching a personnel file
EIM040001-UGD-EN-1 User Guide 131
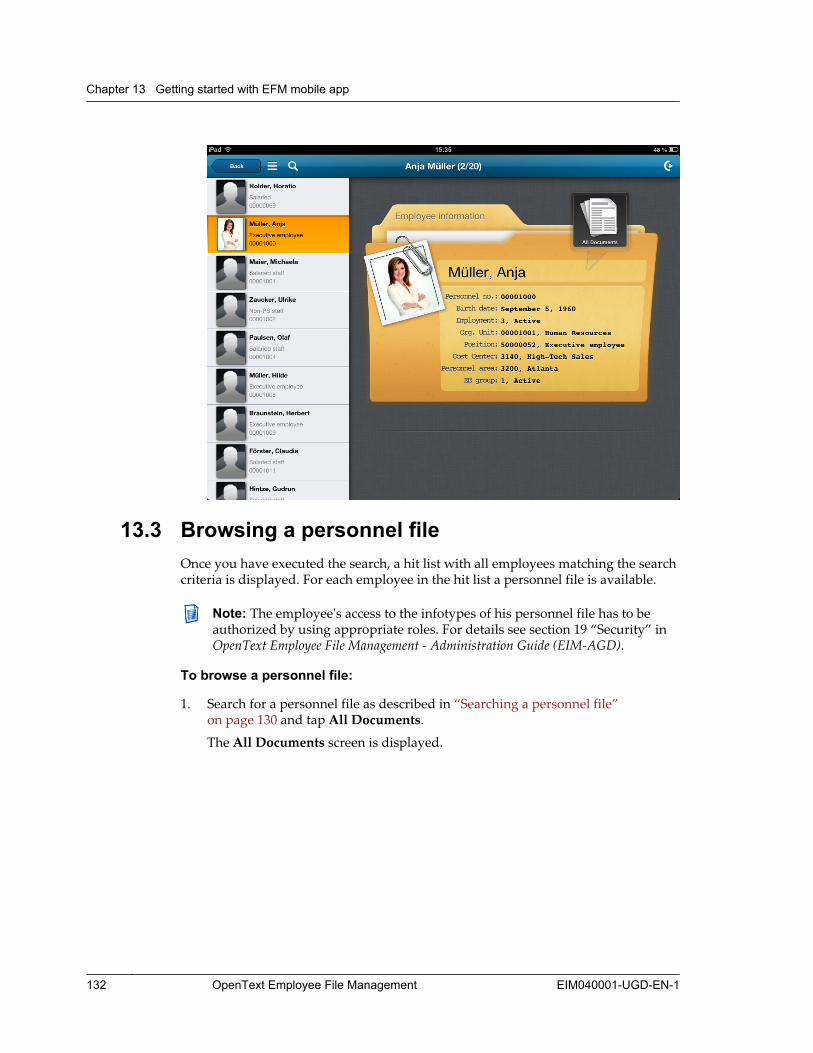
13.3 Browsing a personnel fileOnce you have executed the search, a hit list with all employees matching the searchcriteria is displayed. For each employee in the hit list a personnel file is available.
Note: The employee's access to the infotypes of his personnel file has to beauthorized by using appropriate roles. For details see section 19 “Security” inOpenText Employee File Management - Administration Guide (EIM-AGD).
To browse a personnel file:
1. Search for a personnel file as described in “Searching a personnel file”on page 130 and tap All Documents.
The All Documents screen is displayed.
Chapter 13 Getting started with EFM mobile app
132 OpenText Employee File Management EIM040001-UGD-EN-1

2. Navigate through the document types in the navigation bar to the left, with therespective previews displayed in the content pane to the right.
Tip: The number boxes in the navigation bar indicate the number ofdocuments of the respective document type; the number boxes in thecontent pane indicate the number of pages available for the respectivedocument.
3. To change the sort order of the results, tap the icon and change the sortorder. You can sort for date of origin and archive date.
4. To view documents, tap the respective preview.
13.3. Browsing a personnel file
EIM040001-UGD-EN-1 User Guide 133

5. To zoom in the document view, double-tap the document.
Tip: The display zoom cycles in steps (2x > 4x > 1x).
6. To navigate with the thumbnails, select a page thumbnail in the navigation barto the left, the main area then scrolls to the according page in full size.
Chapter 13 Getting started with EFM mobile app
134 OpenText Employee File Management EIM040001-UGD-EN-1
Related Documents