QUICK REFERENCE OpenArray ® Sample Tracker Software For QuantStudio™ 12K Flex OpenArray ® Sample Block and the OpenArray ® Real-Time PCR System Publication Part Number 4460657 Rev. C Revision Date May 2012 Contents ■ Product information . . . . . . . . . . . . . . . . . . . . . . . . . . . . . . . . . . . . . . . . . . . . . . . . . . . . . . . . . . . . . . . . . . . . . . . . . . . . . . . . . . . . . . . . . . . . . . . . . . 1 ■ Supported instruments and plates . . . . . . . . . . . . . . . . . . . . . . . . . . . . . . . . . . . . . . . . . . . . . . . . . . . . . . . . . . . . . . . . . . . . . . . . . . . . . . . . . . . . . 3 ■ Workflow . . . . . . . . . . . . . . . . . . . . . . . . . . . . . . . . . . . . . . . . . . . . . . . . . . . . . . . . . . . . . . . . . . . . . . . . . . . . . . . . . . . . . . . . . . . . . . . . . . . . . . . . . . . . 4 ■ Start the software . . . . . . . . . . . . . . . . . . . . . . . . . . . . . . . . . . . . . . . . . . . . . . . . . . . . . . . . . . . . . . . . . . . . . . . . . . . . . . . . . . . . . . . . . . . . . . . . . . . . 5 ■ (Optional) Set preferences. . . . . . . . . . . . . . . . . . . . . . . . . . . . . . . . . . . . . . . . . . . . . . . . . . . . . . . . . . . . . . . . . . . . . . . . . . . . . . . . . . . . . . . . . . . . . 6 ■ Enter experiment properties . . . . . . . . . . . . . . . . . . . . . . . . . . . . . . . . . . . . . . . . . . . . . . . . . . . . . . . . . . . . . . . . . . . . . . . . . . . . . . . . . . . . . . . . . . 7 ■ Enter sample information for the 96-well reaction plates . . . . . . . . . . . . . . . . . . . . . . . . . . . . . . . . . . . . . . . . . . . . . . . . . . . . . . . . . . . . . . . . . 9 ■ View the sample mapping. . . . . . . . . . . . . . . . . . . . . . . . . . . . . . . . . . . . . . . . . . . . . . . . . . . . . . . . . . . . . . . . . . . . . . . . . . . . . . . . . . . . . . . . . . . . 11 ■ Print or export data . . . . . . . . . . . . . . . . . . . . . . . . . . . . . . . . . . . . . . . . . . . . . . . . . . . . . . . . . . . . . . . . . . . . . . . . . . . . . . . . . . . . . . . . . . . . . . . . . 15 ■ Close the software . . . . . . . . . . . . . . . . . . . . . . . . . . . . . . . . . . . . . . . . . . . . . . . . . . . . . . . . . . . . . . . . . . . . . . . . . . . . . . . . . . . . . . . . . . . . . . . . . . 20 ■ Create *.csv files . . . . . . . . . . . . . . . . . . . . . . . . . . . . . . . . . . . . . . . . . . . . . . . . . . . . . . . . . . . . . . . . . . . . . . . . . . . . . . . . . . . . . . . . . . . . . . . . . . . . 21 Product information Overview To load samples into a TaqMan ® OpenArray ® plate, you must: 1. Pipet the samples into a 96-well reaction plate. 2. Transfer the samples from the 96-well reaction plate to an OpenArray ® 384-Well Sample Plate using an adjustable or fixed pipette. 3. Transfer the samples from the OpenArray ® 384-Well Sample Plate to the TaqMan ® OpenArray ® plate using the OpenArray ® AccuFill ™ System. IMPORTANT! To ensure accurate results, you need to correctly track sample information from plate to plate. The OpenArray ® Sample Tracker Software helps you easily track your samples. Enter sample information for the 96-well reaction plate into the Sample Tracker Software. The Sample Tracker Software automatically maps the sample information to the appropriate locations in the OpenArray ® 384-Well Sample Plate, providing a pipetting guide and the TaqMan ® OpenArray ® plates, for your records. Software terms The following terms are used in the Sample Tracker Software: • 384-well sample plate – The OpenArray ® 384-Well Sample Plate used in the OpenArray ® AccuFill ™ System. • Sample mapping – The process of moving sample information from the 96-well reaction plate(s) to the OpenArray ® 384-Well Sample Plate and subsequently to the TaqMan ® OpenArray ® plates. • Sample integration – A function in the OpenArray ® AccuFill ™ Software which adds sample information from a 384-well plate file (*.csv) to the assay information in an OpenArray ® plate file (*.spf or *.tpf) to create an integrated OpenArray ® plate file (*.spf or *.tpf). • Fixed 12-channel pipette – A 12-channel pipette where the distance between the tips is set for a 96-well plate. A pipette of this type skips every other well in a 384-well plate. • Adjustable 12-channel pipette – A 12-channel pipette where the distance between the tips is adjustable. A pipette of this type can be set to pipet into adjacent wells for either a 96- or 384-well plate.

Welcome message from author
This document is posted to help you gain knowledge. Please leave a comment to let me know what you think about it! Share it to your friends and learn new things together.
Transcript
QUICK REFERENCE
OpenArray® Sample Tracker Software For QuantStudio™ 12K Flex OpenArray® Sample Block and the OpenArray® Real-Time PCR SystemPublication Part Number 4460657 Rev. C Revision Date May 2012
Contents■ Product information . . . . . . . . . . . . . . . . . . . . . . . . . . . . . . . . . . . . . . . . . . . . . . . . . . . . . . . . . . . . . . . . . . . . . . . . . . . . . . . . . . . . . . . . . . . . . . . . . . 1
■ Supported instruments and plates . . . . . . . . . . . . . . . . . . . . . . . . . . . . . . . . . . . . . . . . . . . . . . . . . . . . . . . . . . . . . . . . . . . . . . . . . . . . . . . . . . . . . 3
■ Workflow. . . . . . . . . . . . . . . . . . . . . . . . . . . . . . . . . . . . . . . . . . . . . . . . . . . . . . . . . . . . . . . . . . . . . . . . . . . . . . . . . . . . . . . . . . . . . . . . . . . . . . . . . . . . 4
■ Start the software. . . . . . . . . . . . . . . . . . . . . . . . . . . . . . . . . . . . . . . . . . . . . . . . . . . . . . . . . . . . . . . . . . . . . . . . . . . . . . . . . . . . . . . . . . . . . . . . . . . . 5
■ (Optional) Set preferences. . . . . . . . . . . . . . . . . . . . . . . . . . . . . . . . . . . . . . . . . . . . . . . . . . . . . . . . . . . . . . . . . . . . . . . . . . . . . . . . . . . . . . . . . . . . . 6
■ Enter experiment properties . . . . . . . . . . . . . . . . . . . . . . . . . . . . . . . . . . . . . . . . . . . . . . . . . . . . . . . . . . . . . . . . . . . . . . . . . . . . . . . . . . . . . . . . . . 7
■ Enter sample information for the 96-well reaction plates. . . . . . . . . . . . . . . . . . . . . . . . . . . . . . . . . . . . . . . . . . . . . . . . . . . . . . . . . . . . . . . . . 9
■ View the sample mapping. . . . . . . . . . . . . . . . . . . . . . . . . . . . . . . . . . . . . . . . . . . . . . . . . . . . . . . . . . . . . . . . . . . . . . . . . . . . . . . . . . . . . . . . . . . . 11
■ Print or export data . . . . . . . . . . . . . . . . . . . . . . . . . . . . . . . . . . . . . . . . . . . . . . . . . . . . . . . . . . . . . . . . . . . . . . . . . . . . . . . . . . . . . . . . . . . . . . . . . 15
■ Close the software . . . . . . . . . . . . . . . . . . . . . . . . . . . . . . . . . . . . . . . . . . . . . . . . . . . . . . . . . . . . . . . . . . . . . . . . . . . . . . . . . . . . . . . . . . . . . . . . . . 20
■ Create *.csv files. . . . . . . . . . . . . . . . . . . . . . . . . . . . . . . . . . . . . . . . . . . . . . . . . . . . . . . . . . . . . . . . . . . . . . . . . . . . . . . . . . . . . . . . . . . . . . . . . . . . 21
Product informationOverviewTo load samples into a TaqMan® OpenArray® plate, you must:
1. Pipet the samples into a 96-well reaction plate.
2. Transfer the samples from the 96-well reaction plate to an OpenArray® 384-Well Sample Plate using an adjustable or fixed pipette.
3. Transfer the samples from the OpenArray® 384-Well Sample Plate to the TaqMan® OpenArray® plate using the OpenArray® AccuFill™ System.
IMPORTANT! To ensure accurate results, you need to correctly track sample information from plate to plate.
The OpenArray® Sample Tracker Software helps you easily track your samples. Enter sample information for the 96-well reaction plate into the Sample Tracker Software. The Sample Tracker Software automatically maps the sample information to the appropriate locations in the OpenArray® 384-Well Sample Plate, providing a pipetting guide and the TaqMan® OpenArray® plates, for your records.
Software termsThe following terms are used in the Sample Tracker Software: • 384-well sample plate – The OpenArray® 384-Well Sample Plate used in the OpenArray® AccuFill™ System. • Sample mapping – The process of moving sample information from the 96-well reaction plate(s) to the OpenArray® 384-Well Sample
Plate and subsequently to the TaqMan® OpenArray® plates. • Sample integration – A function in the OpenArray® AccuFill™ Software which adds sample information from a 384-well plate file
(*.csv) to the assay information in an OpenArray® plate file (*.spf or *.tpf) to create an integrated OpenArray® plate file (*.spf or *.tpf). • Fixed 12-channel pipette – A 12-channel pipette where the distance between the tips is set for a 96-well plate. A pipette of this
type skips every other well in a 384-well plate. • Adjustable 12-channel pipette – A 12-channel pipette where the distance between the tips is adjustable. A pipette of this type can
be set to pipet into adjacent wells for either a 96- or 384-well plate.

2
OpenArray® Sample Tracker Software Quick Reference
Screen capturesUnless otherwise indicated, the screen captures in this document illustrate the workflow for a TaqMan® OpenArray® Genotyping Plate – Format 64.

3
OpenArray® Sample Tracker Software Quick Reference
Supported instruments and platesSupported instruments • Applied Biosystems OpenArray® Real-Time PCR System • Applied Biosystems QuantStudio™ 12K Flex Real-Time PCR System
Supported OpenArray® plates
OpenArray® plate Plate names Format No. of
preloaded assays
Maximum no. of
samples
OpenArray® plate Part no.
OpenArray® system
QuantStudio™ 12K Flex system
TaqMan® OpenArray® Genotyping Plates
N/A†
† N/A = Not applicable
Format 16 16 144 4413546 4471113
Format 32 32 96 4413548 4471114
Format 64 64 48 4413550 4471115
Format 128 128 24 4413551 4471116
Format 192 192 16 4413553 4471117
Format 256 256 12 4413554 4471118
TaqMan® OpenArray® Real-Time PCR Plates
N/A Format 18 18 (in triplicate)
48 4456272 4471124
Format 56 56 48 4456276 4471125
Format 112 112 24 4456268 4471126
Format 168 168 16 4456270 4471127
Format 224 224 12 4456274 4471128
TaqMan® OpenArray® 3 Sample Fixed Panels Plates
TaqMan® OpenArray® Human MicroRNA Panel Plate
Format 818 N/A 3 4470187
TaqMan® OpenArray® Rodent MicroRNA Panel Plate
Format 818 3 4470188
TaqMan® OpenArray® Human Kinome Panel
Format 896 3 4467775
TaqMan® OpenArray® 4 Sample Fixed Panels Plate
TaqMan® OpenArray® Human Cancer Panel
Format 672 4 4467778
TaqMan® OpenArray® Human Inflammation Panel
Format 672 4 4467776
TaqMan® OpenArray® Human Stem Cell Panel
Format 672 4 4467777
TaqMan® OpenArray® Human Signal Transduction Panel
Format 672 4 4467779
TaqMan® OpenArray® Mouse Inflammation Panel
Format 672 4 4467780

4
OpenArray® Sample Tracker Software Quick Reference
Workflow
Start the software (page 5)
Enter experiment properties (page 7)
Enter sample information for the 96-well reaction plates (page 9)
View the sample mapping (page 11)
Print or export data (page 15)

5
OpenArray® Sample Tracker Software Quick Reference
Start the softwareStandalone version
1 Download the software a. Go to www.lifetechnologies.com and click the Technical Resources tab.
b. Click Software, Patches, and Updates.
c. Click OpenArray® Sample Tracker Software and then click Download.
2 Install the software Double-click SampleTrackingUtility_setup.exe and follow the instructions to install the software.
By default the software is installed to C:\Program Files\Applied Biosytems\Sample Tracking Utility.
3 Start the software Double-click the OpenArray® Sample Tracker Software icon on the desktop.
QuantStudio™ 12K Flex Software version
1. Open the QuantStudio™ 12K Flex Software.
2. From the Home screen, go to the Tools pane, then click OpenArray® Sample Tracker Software.
The OpenArray® Sample Tracker Software opens in a new window.

6
OpenArray® Sample Tracker Software Quick Reference
(Optional) Set preferencesSet preferences for your default experiment type, OpenArray® plate format, and import and export directories.
1 Open the Preferences dialog box
From the menu bar, select View Preferences to open the Preferences dialog box.
2 Select your Preferences a. From the Experiment Type drop-down list, select from Genotyping, Gene Expression, 3 Sample Fixed Panels, 4 Sample Fixed Panels.
b. From the OpenArray® Plate drop-down list, select an OpenArray® plate format.
c. From the Pipettor drop-down list, select Fixed or Adjustable as the Pipettor type.
d. From the Import Data Directory, browse and save a directory. The Sample Tracker import data directory; the OpenArray® Sample Tracker Software will automatically open this directory when you import *.csv files.
e. From the Export Data Directory, browse and save a directory. The Sample Tracker export data directory; when you export *.csv or *.xls files the OpenArray® Sample Tracker Software will automatically save the files in this directory.
f. Click Save.
7
OpenArray® Sample Tracker Software Quick Reference
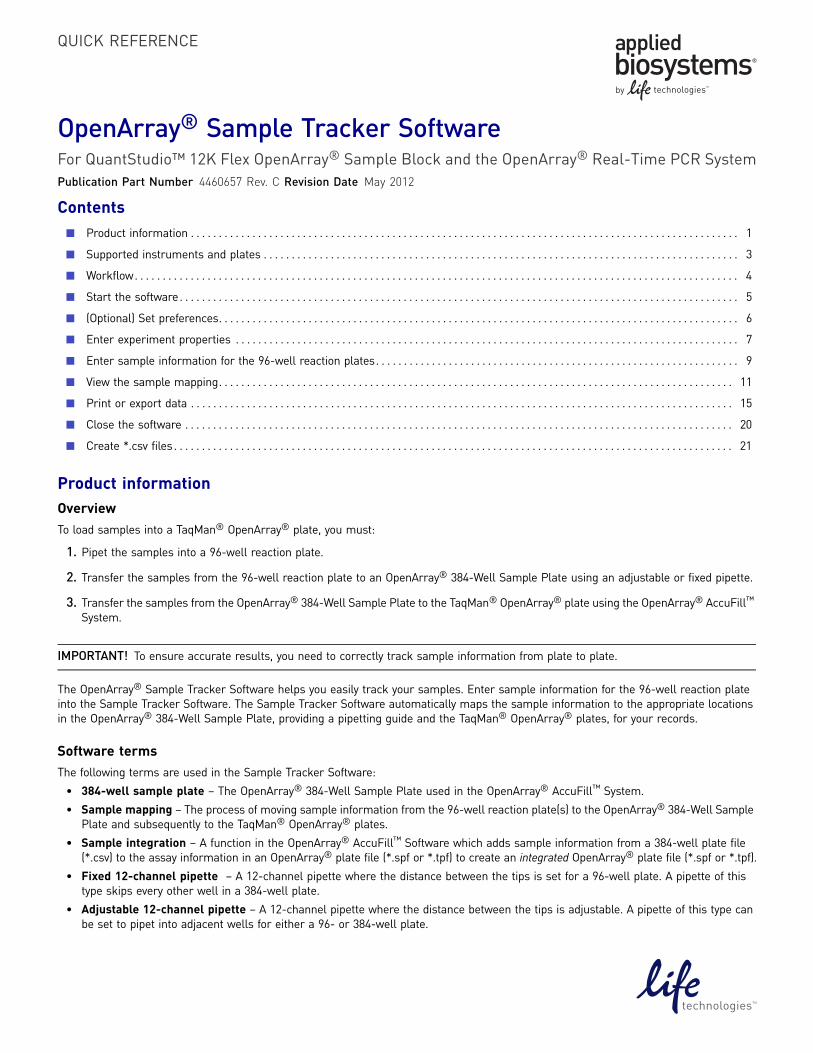
Enter experiment propertiesIn the Sample Tracker Software Properties window, enter general information about your experiment.
Figure 1 Properties window (the numbers in the screen capture refer to the step numbers in this procedure)
1 Open the Properties window
In the Sample Tracker navigation pane, click Properties (default view).
2 Select the experiment type
From the Experiment Type drop-down list, select the appropriate experiment type: • Genotyping • Gene Expression (also referred to as real-time PCR experiments) • 3 Sample Fixed Panels • 4 Sample Fixed Panels
3 Select the OpenArray® plate format
From the OpenArray® Plate drop-down list, select the OpenArray® plate format:
step 2step 3
step 5step 4
If the experiment type is... Then select one of the following formats...
Genotyping Genotyping – 16
Genotyping – 32
Genotyping – 64
Genotyping – 128
Genotyping – 192
Genotyping – 256
Gene Expression (real-time PCR)
Gene Expression – 18
Gene Expression – 56
Gene Expression – 112
Gene Expression – 168
Gene Expression – 224
3 Sample Fixed Panels N/A†
† N/A = Not applicable
4 Sample Fixed Panels N/A

8
OpenArray® Sample Tracker Software Quick Reference
4 Select the type of pipettor
From the Pipettor drop-down list, select Fixed or Adjustable.
5 (Optional) Enter the 384-well sample plate serial number
If you have added a serial number or barcode to the OpenArray® 384-Well Sample Plate, enter the serial number.

9
OpenArray® Sample Tracker Software Quick Reference
Enter sample information for the 96-well reaction platesIn the Sample Tracker Software Samples window, enter the sample information for the 96-well reaction plates.
1 Open the Samples window
In the Sample Tracker navigation pane, click Samples.
2 Enter the sample information
You can enter sample information either manually or by importing *.csv files.
Import sample information
1. In a simple text program or spreadsheet program, create one or more *.csv files, one for each 96-well reaction plate. For detailed instructions, see “Create *.csv files” on page 21.
2. In the Sample Tracker Software Samples window, select the appropriate tab for the 96-well reaction plate (96-Well Plate n).
Note: The number of plate tabs displayed in the Samples window depends on the OpenArray® plate format that you selected in the Properties window. See “Select the OpenArray® plate format” on page 7.
3. Click Import, then browse to and open the appropriate *.csv file for the selected plate tab. The sample information is displayed in the Sample Tracker Software. Note: All sample information is displayed in the table view; only the sample ID is displayed in the plate layout view.
Manually enter sample information
1. In the Sample Tracker Software Samples window, select the appropriate tab for the 96-well reaction plate (96-Well Plate n).
Note: The number of plate tabs displayed in the Samples window depends on the OpenArray® plate format that you selected in the Properties window. See “Select the OpenArray® plate format” on page 7.
2. Click View Table.
3. Enter sample IDs: • Double-click inside the SampleInfo.SampleID table cell to activate it, then enter identifying
information for the sample. • From a spreadsheet containing sample names, copy one or more cells, click-drag in the
table to select rows, and then enter Ctrl-V to paste the names.
10
OpenArray® Sample Tracker Software Quick Reference
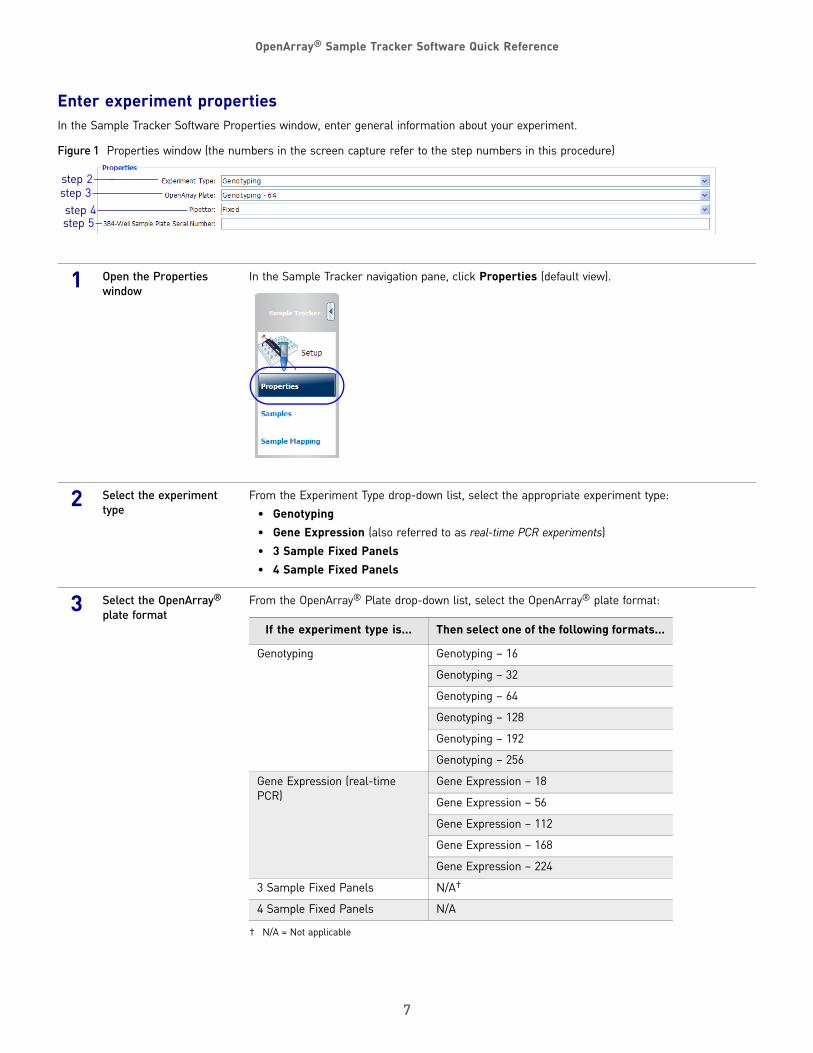
3 Review the sample information
Review the sample information for accuracy, and edit the information if needed. The following table describes the actions you can perform in the Samples window.
View Step Action
Plate Layout
a To toggle between the plate layout and table views, click View Table or click View Plate Layout.
b To zoom in on the wells, click Zoom In.
c To zoom out from the wells, click Zoom Out.
d To fit all wells into the default plate layout size, click Fit to Size.
e To import sample information from a *.csv file, click Import.
f To delete selected sample information, select one or more cells, then click Clear.
To delete all sample information, do not select any cells and click Clear.
IMPORTANT! The Clear function permanently deletes the sample information. There is no Undo function.
g To edit the sample ID, double-click a well in the plate layout to activate the well, then type over the existing text.
Table h To toggle between the plate layout and table views, click View Table or click View Plate Layout.
i To import sample information from a *.csv file, click Import.
j To delete selected sample information, select one or more cells, then click Clear.
To delete all sample information, do not select any cells and click Clear.
IMPORTANT! The Clear function permanently deletes the sample information. There is no Undo function.
k To edit the sample ID:• Double-click the SampleInfo.SampleID cell to activate it, then type over the existing text. • From a spreadsheet containing sample names, copy one or more cells, click-drag in the table to select rows,
and then enter Ctrl-V to paste the names.
Note: To paste all the selected samples, you must select the same amount of copied cells and then paste.
a
b c d
g
fe
h
kji

11
OpenArray® Sample Tracker Software Quick Reference
View the sample mappingIn the Sample Tracker Software Sample Mapping window, you can view the sample mapping from plate to plate: • 384-Well Plate tab – Displays the sample mapping from 96-well reaction plates to the 384-well sample plates (this page) • OpenArray tab – Displays the sample mapping from 384-well sample plates to the OpenArray® plates (page 13)
384-Well Plate tabThe 384-Well Plate tab displays the sample mapping from 96-well reaction plates to 384-well sample plates.
1 Open the Sample Mapping window
a. In the Sample Tracker navigation pane, click Sample Mapping.
b. Click the 384-Well Plate tab (default view).
2 Select the plates to view a. From the Show drop-down list, select the plates to view: 96-well reaction plates (96-Well Plate n) and/or 384-well sample plate (384-Well Plate).
Note: The number of plates displayed in the Show drop-down list depends on the OpenArray® plate format that you selected in the Properties window. See “Select the OpenArray® plate format” on page 7.
b. (Optional) Move the samples from one of the 96-well reaction plates to another:
1. Click Swap.
2. Select a plate, click (Up) or (Down) to change the plate position, then click OK.

12
OpenArray® Sample Tracker Software Quick Reference
The samples are reassigned to each plate based on the order of the plates.
c. (Optional) For some OpenArray® Plate Formats, only half of the samples from the 96-well plate are loaded per instrument run. To view the plates for the second run, click .Note: For some OpenArray® Plate Formats, use the 12-channel pipette to vertically load samples into columns.
3 Review the sample information
Review the sample information for accuracy. The following table describes the actions you can perform in the 384-Well Plate tab of the Sample Mapping window.
Note: You cannot edit the sample information in the Sample Mapping window.
View Step Action
Plate Layout
a To toggle between the plate layout and table views, click View Table or click View Plate Layout.
b To zoom in on the wells, click Zoom In.
c To zoom out from the wells, click Zoom Out.
d To fit all wells into the default plate layout size, click Fit to Size.
e To enable using the lower half or the right side of the 384-Well Plate, click .
f To enable using the upper half or the left side of the 384-Well Plate, click .
a db c

13
OpenArray® Sample Tracker Software Quick Reference
OpenArray tabThe OpenArray tab displays the sample mapping from the 384-well sample plate to the OpenArray® plates.
1 Open the Sample Mapping window
a. In the Sample Tracker navigation pane, click Sample Mapping.
b. Click the OpenArray tab.
2 Select the plates to view From the Show drop-down list, select the OpenArray® plates to view (Plate n).
Table e To toggle between the plate layout and table views, click View Table or click View Plate Layout.
View Step Action
e

14
OpenArray® Sample Tracker Software Quick Reference
3 Review the sample information
Review the sample information for accuracy. The following table describes the actions you can perform in the OpenArray tab of the Sample Mapping window.
Note: You cannot edit the sample information in the Sample Mapping window.
View Step Action
Plate Layout
a To zoom in on the wells, click Zoom In.
b To zoom out from the wells, click Zoom Out.
c To fit all wells into the default plate layout size, click Fit to Size.
ca b
15
OpenArray® Sample Tracker Software Quick Reference
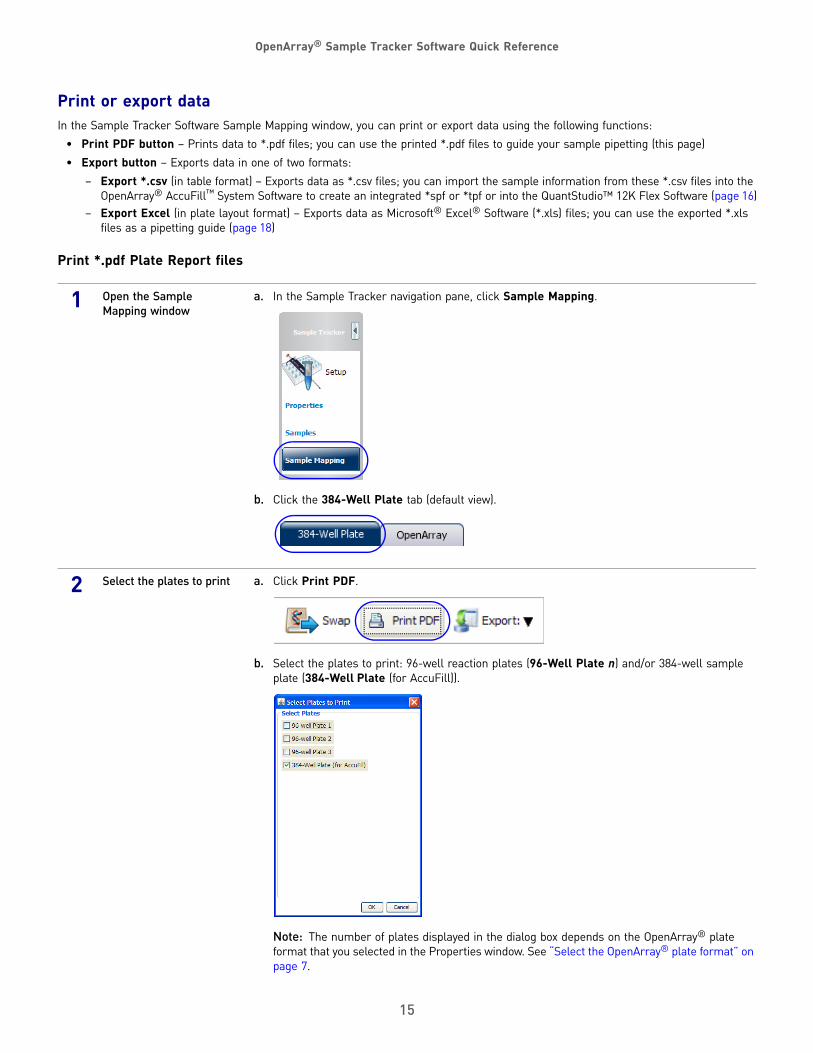
Print or export dataIn the Sample Tracker Software Sample Mapping window, you can print or export data using the following functions: • Print PDF button – Prints data to *.pdf files; you can use the printed *.pdf files to guide your sample pipetting (this page) • Export button – Exports data in one of two formats:
– Export *.csv (in table format) – Exports data as *.csv files; you can import the sample information from these *.csv files into the OpenArray® AccuFill™ System Software to create an integrated *spf or *tpf or into the QuantStudio™ 12K Flex Software (page 16)
– Export Excel (in plate layout format) – Exports data as Microsoft® Excel® Software (*.xls) files; you can use the exported *.xls files as a pipetting guide (page 18)
Print *.pdf Plate Report files
1 Open the Sample Mapping window
a. In the Sample Tracker navigation pane, click Sample Mapping.
b. Click the 384-Well Plate tab (default view).
2 Select the plates to print a. Click Print PDF.
b. Select the plates to print: 96-well reaction plates (96-Well Plate n) and/or 384-well sample plate (384-Well Plate (for AccuFill)).
Note: The number of plates displayed in the dialog box depends on the OpenArray® plate format that you selected in the Properties window. See “Select the OpenArray® plate format” on page 7.

16
OpenArray® Sample Tracker Software Quick Reference
2 Select the plates to print (continued)
c. Click OK. The Sample Tracker Software displays the Plate Report window.
3 View, print, and/or save the Plate Report
Use the tools in the Plate Report window to view, print, and/or save the report, then close the Plate Report window.
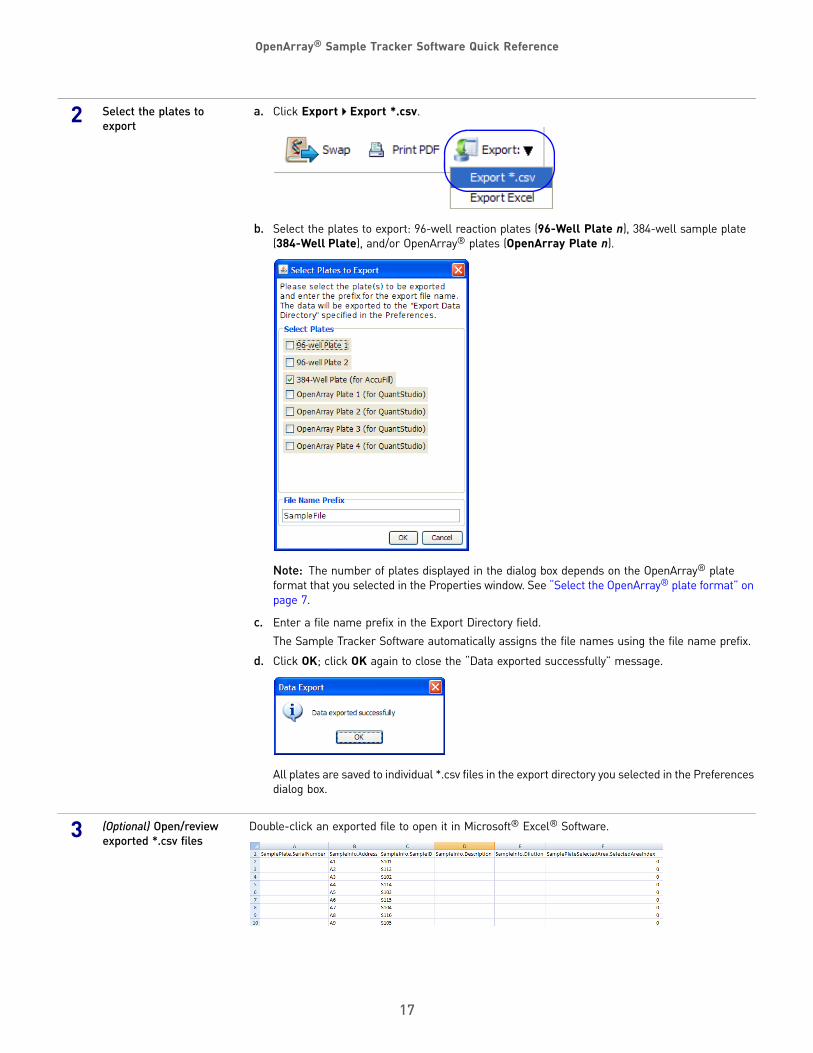
Export *.csv files in table format
1 Open the Sample Mapping window
a. In the Sample Tracker navigation pane, click Sample Mapping.
b. Click the 384-Well Plate tab (default view).
SavePrint
Browse pages Size
17
OpenArray® Sample Tracker Software Quick Reference
2 Select the plates to export
a. Click Export Export *.csv.
b. Select the plates to export: 96-well reaction plates (96-Well Plate n), 384-well sample plate (384-Well Plate), and/or OpenArray® plates (OpenArray Plate n).
Note: The number of plates displayed in the dialog box depends on the OpenArray® plate format that you selected in the Properties window. See “Select the OpenArray® plate format” on page 7.
c. Enter a file name prefix in the Export Directory field.The Sample Tracker Software automatically assigns the file names using the file name prefix.
d. Click OK; click OK again to close the “Data exported successfully” message.
All plates are saved to individual *.csv files in the export directory you selected in the Preferences dialog box.
3 (Optional) Open/review exported *.csv files
Double-click an exported file to open it in Microsoft® Excel® Software.
18
OpenArray® Sample Tracker Software Quick Reference
4 (Optional) Import *.csv files into other applications
Import the exported files into other applications: • 96-Well Plate files – Use these files as needed for your own record keeping. • 384-Well Plate file – Use this file with the OpenArray® AccuFill™ System Software to create
an integrated *.spf or *.tpf file. containing sample names. • OpenArray Plate file – Use this file to import setup information directly into the QuantStudio™
12K Flex Software or to add sample information after the data has been acquired.
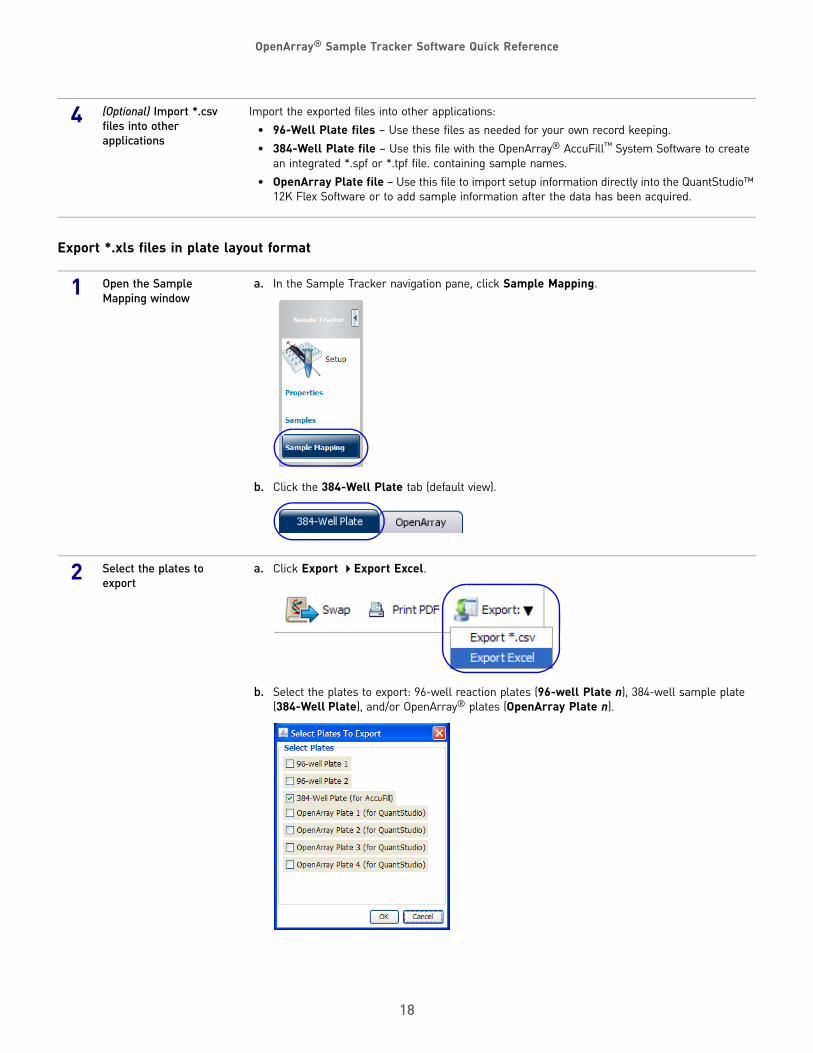
Export *.xls files in plate layout format
1 Open the Sample Mapping window
a. In the Sample Tracker navigation pane, click Sample Mapping.
b. Click the 384-Well Plate tab (default view).
2 Select the plates to export
a. Click Export Export Excel.
b. Select the plates to export: 96-well reaction plates (96-well Plate n), 384-well sample plate (384-Well Plate), and/or OpenArray® plates (OpenArray Plate n).

19
OpenArray® Sample Tracker Software Quick Reference
Note: The number of plates displayed in the dialog box depends on the OpenArray® plate format that you selected in the Properties window. See “Select the OpenArray® plate format” on page 7.
c. Browse to an export directory, enter a file name, then click Save.Note: All plates are saved to one *.xls file in the export directory.
d. Click OK to close the “Data exported successfully” message.
3 (Optional) Open/review the exported *.xls file
Double-click the exported file to open it in Microsoft® Excel® Software.

OpenArray® Sample Tracker Software Quick Reference
20
Close the software
IMPORTANT! Sample Tracker Software does not save the sample information in any of the windows. When you close the software, all sample information is lost. To save the sample information, export or print the data before closing; see “Print or export data” on page 15.
From the menu bar, select File Exit, then click OK to close the Sample Tracker Software:.
21
OpenArray® Sample Tracker Software Quick Reference
Create *.csv filesIf you are entering sample information into the Samples window by importing *.csv files, use a template file (installed with the software) to create the *.csv files as described in this section.
Note: Create a separate *.csv file for each 96-well reaction plate.
1 Open the template file Open the file 96-Well Sample Plate x.csv template file, where x corresponds one of your 96-well plates, in a simple text program or in a spreadsheet program (such as Microsoft® Excel® Software).
By default, the template files are installed to C:\Program Files\Applied Biosytems\Sample Tracking Utility\examples.
2 Enter the sample name Follow these guidelines: • Include all samples and all No Template Controls (NTCs). • Enter information for only one sample or NTC per row.
a. In the SampleInfo.SampleID column, enter the sample name for each sample in the 96-well reaction plate.
b. (Optional) In the SampleInfo.SampleDescription column, enter the sample description. Valid characters include spaces, numbers, letters, and punctuation.Leave all the other columns empty.
Note: For each *.csv file, you can have a maximum of 97 rows: one row for the column headings, and up to 96 rows with sample information. All extra rows are ignored.
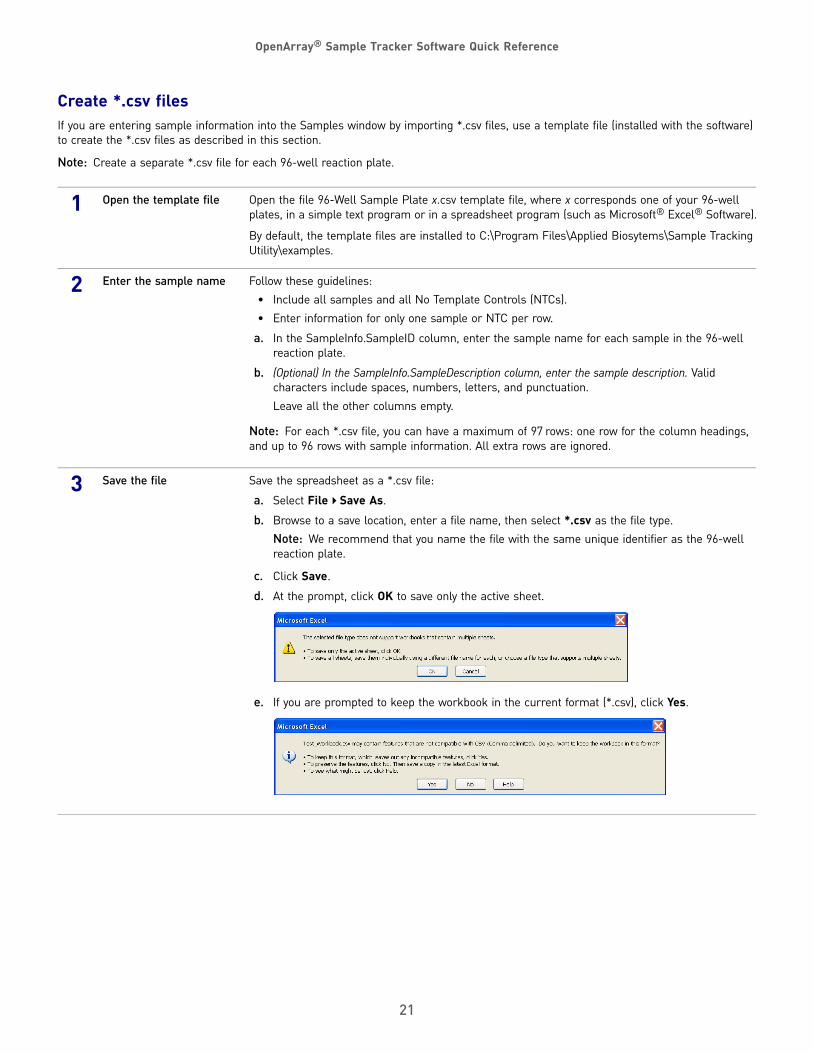
3 Save the file Save the spreadsheet as a *.csv file:
a. Select File Save As.
b. Browse to a save location, enter a file name, then select *.csv as the file type. Note: We recommend that you name the file with the same unique identifier as the 96-well reaction plate.
c. Click Save.
d. At the prompt, click OK to save only the active sheet.
e. If you are prompted to keep the workbook in the current format (*.csv), click Yes.

OpenArray® Sample Tracker Software Quick Reference
Headquarters5791 Van Allen Way | Carlsbad, CA 92008 USA | Phone +1 760 603 7200 | Toll Free in USA 800 955 6288For support visit www.lifetechnologies.com/support
www.lifetechnologies.com
For Research Use Only. Not intended for human or animal therapeutic or diagnostic use.LIFE TECHNOLOGIES CORPORATION AND/OR ITS AFFILIATE(S) DISCLAIM ALL WARRANTIES WITH RESPECT TO THIS DOCUMENT, EXPRESSED OR IMPLIED, INCLUDING BUT NOT LIMITED TO THOSE OF MERCHANTABILITY, FITNESS FOR A PARTICULAR PURPOSE, OR NON-INFRINGEMENT. TO THE EXTENT ALLOWED BY LAW, IN NO EVENT SHALL LIFE TECHNOLOGIES AND/OR ITS AFFILIATE(S) BE LIABLE, WHETHER IN CONTRACT, TORT, WARRANTY, OR UNDER ANY STATUTE OR ON ANY OTHER BASIS FOR SPECIAL, INCIDENTAL, INDIRECT, PUNITIVE, MULTIPLE OR CONSEQUENTIAL DAMAGES IN CONNECTION WITH OR ARISING FROM THIS DOCUMENT, INCLUDING BUT NOT LIMITED TO THE USE THEREOF.
© 2012 Life Technologies Corporation. All rights reserved. The trademarks mentioned herein are the property of Life Technologies Corporation or their respective owners. Excel and Microsoft are registered trademarks of Microsoft Corporation. TaqMan is a registered trademark of Roche Molecular Systems, Inc., used under permission and license.
Related Documents