Open Music System (OMS 2.3 for Mac) This is an Acrobat version of the printed OMS 2.3 for Macintosh manual.

Welcome message from author
This document is posted to help you gain knowledge. Please leave a comment to let me know what you think about it! Share it to your friends and learn new things together.
Transcript
OPCODE
Open Music System
TECH PUB
(OMS 2.3 for Mac)
This is an Acrobat version of the printed OMS 2.3 for Macintosh manual.
- i - OMS 2.3 for Macintosh
TABLE OF CONTENTS
Ch 1: Overview and Installation 1
Introduction to the Open Music System™ (OMS) .................................................. 1
About this Manual................................................................................................... 2
Installing OMS ........................................................................................................ 4
What’s Installed ...................................................................................................... 4
Ch 2: Creating a New Studio Setup Document 10
What is a Studio Setup Document?...................................................................... 10
Creating Your First Studio Setup Document..........................................................11Deciding About AppleTalk............................................................................. 11Searching for MIDI Devices .......................................................................... 13
Anatomy of the Studio Setup Document .............................................................. 16
Configuring OMS Drivers...................................................................................... 19Standard Interface ........................................................................................ 19IAC Driver ..................................................................................................... 20SampleCell ................................................................................................... 21MacProteus................................................................................................... 21QuickTime Music .......................................................................................... 22
Ch 3: Defining MIDI Devices 23
Defining an Undefined MIDI Device ..................................................................... 23
Deleting MIDI Devices .......................................................................................... 27
Adding MIDI Devices to a Studio Setup Document .............................................. 28
Ch 4: Connecting Devices in the Studio Setup Document 29
Connecting MIDI Devices Together ...................................................................... 29Connecting Devices to a MIDI Interface ....................................................... 30
Connecting and Disconnecting MIDI Cables ........................................................ 31
Disconnecting MIDI Devices................................................................................. 32
Ch 5: Special Studio Setup Techniques 33
Using MIDI Thru Ports .......................................................................................... 33
Using MIDI Mergers.............................................................................................. 35
Using MIDI PatchBays.......................................................................................... 37
Using Multiport MIDI Interfaces ............................................................................ 39
Using QuickTime™ with OMS .............................................................................. 40
Testing Your Studio Setup Document ................................................................... 43

CH 1: OVERVIEW AND INSTALLATION
INTRODUCTION TO THE OPEN MUSIC SYSTEM™ (OMS)
Opcode’s Open Music System (OMS) is a set of extensions and pro-grams that bridge the gap between MIDI applications and MIDI hardware. It has many functions and features:
• OMS acts as a central MIDI driver
OMS-compatible applications use OMS to communicate with all of your MIDI hardware (such as synthesizers, drum machines, effects devices, or MIDI controllers).
• OMS provides a central location for defining and storing a detailed description of your MIDI studio
Use the OMS Setup application to create a Studio Setup document, in which you store a detailed description of the MIDI devices in your studio—including their names, their MIDI channels, and how they’re all physically connected.All OMS-compatible applications reference this Studio Setup docu-ment. So, if you change your studio in any way, simply modify your Studio Setup document and all compatible applications are immedi-ately aware of the change.
• OMS provides a patch name management tool
Use this tool, appropriately called the Name Manager, to store the names of all the patches in your MIDI devices and provide those names to your OMS-compatible applications.
• OMS handles all your computer’s internal MIDI timing
This allows you to run multiple OMS-compatible applications simul-taneously and in perfect synchronization.
Ch 1: Overview and Installation - 1 - OMS 2.3 for Macintosh

• OMS gives you access to hundreds of MIDI channels
The actual number of MIDI channels that OMS can access depends on which MIDI interface(s) you use.Standard MIDI interfaces (such as Opcode’s MIDI Translator) access 16 total MIDI channels. Multiport MIDI Interfaces (such as Opcode’s Studio 4 or Studio 5) access 16 MIDI channels on each pair of MIDI In/Out jacks. So, for example, since a Studio 5 has 15 pairs of MIDI In/Out jacks, it can access 240 total MIDI channels.For more information, see your MIDI interface manuals.
ABOUT THIS MANUAL
This manual assumes that you’re familiar with basic Macintosh operations. If you’re not, please read your Macintosh manual before installing or using OMS.
Also, you should have a basic understanding of MIDI. If you don’t, you may wish to purchase one of the many basic MIDI reference books available from your local book store or music retailer.
This manual accurately describes OMS operations at the time of its printing. However, updates and changes may occur. Always look for the latest information in the Read Me files on your master program disk.
WHAT THISMANUAL DOESN’T
COVER
This manual does not discuss the Name Manager. Although the Name Manager is part of OMS, its services are available only from within OMS-compatible applications and not from within the OMS Setup application. Therefore, Name Manager information is con-tained within your OMS-compatible application manuals.
Also, OMS supports a wide variety of MIDI hardware configura-tions. Because many of these configurations are of interest to a small percentage of users, Opcode documents them in special on-line doc-uments called Technical Publications. These publications address specific topics not covered in the written manual.
You can download the latest Technical Publications for OMS (or any other Opcode products) from Opcode’s World Wide Web site at:
• http://www.opcode.com
If you don’t have Web access, you can contact Opcode to receive Technical Publications through the mail. For more information about contacting Opcode, see Creating a New Studio Setup Document (pg. 10).
Ch 1: Overview and Installation - 2 - OMS 2.3 for Macintosh
MANUALCONVENTIONS
This manual uses a number of conventions that make it easier to dis-cuss and understand certain on-screen actions.
MOUSE ACTIONS
This manual uses the following terms to describe various mouse actions:
• Click: When the manual instructs you to click, position the mouse where you’re told and press once on the mouse button, then immedi-ately release it.
• Double-click: When the manual instructs you to double-click, posi-tion the mouse where you’re told and rapidly press and release the mouse button twice.
• Press and hold: When the manual instructs you to press and hold, position the mouse where you’re told, press the mouse button and hold it down until instructed to release it.
• Release: When the manual instructs you to release, let up on the mouse button (which you were probably holding down because of an earlier press and hold instruction).
• Drag: When the manual instructs you to drag, position the mouse where you’re told, then press and hold the mouse button as you move the mouse.
• Move: When the manual instructs you to move the mouse, simply move it to another location on the screen without pressing its button.
CHOOSE VS. SELECT
The words “choose” and “select” are often interchangeable in con-versational English. In this manual, however, there is a distinct difference between the two terms.
• Select: When the manual tells you to “select” something, it stays selected. This is the case with check boxes and menu options.
• Choose: When the manual tells you to “choose” something, a one-time action is performed. This is the case with most commands; they perform their chosen action only once.
Ch 1: Overview and Installation - 3 - OMS 2.3 for Macintosh
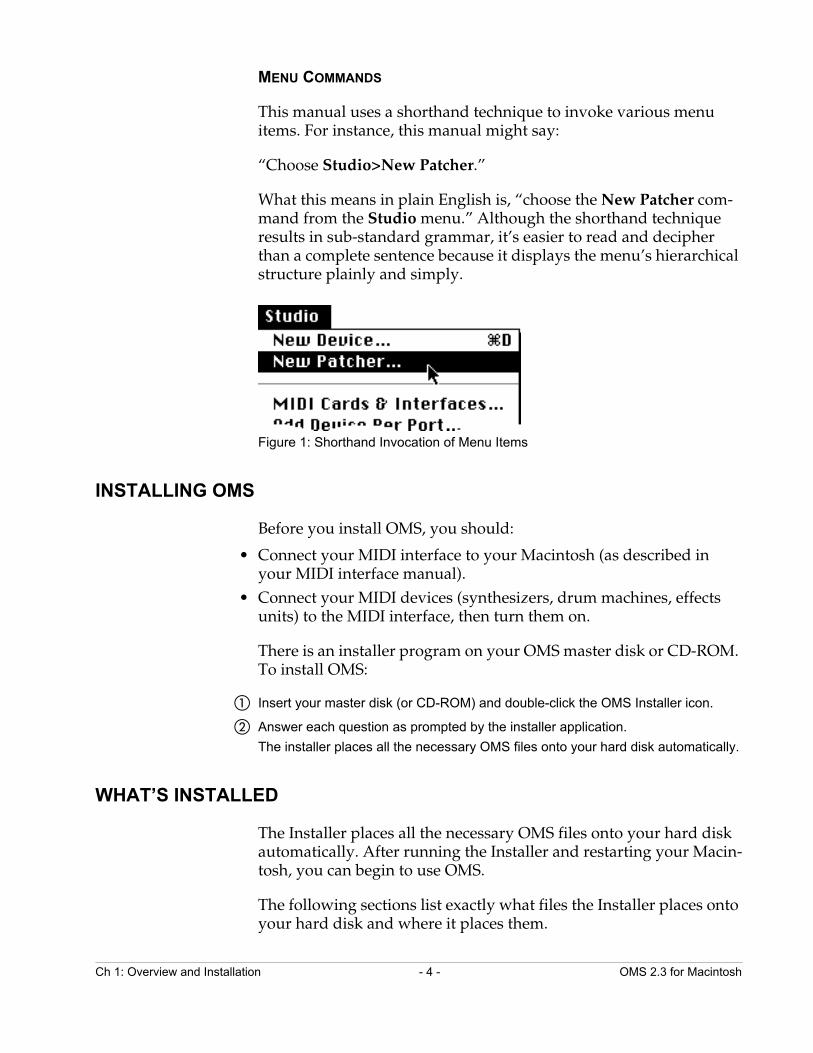
MENU COMMANDS
This manual uses a shorthand technique to invoke various menu items. For instance, this manual might say:
“Choose Studio>New Patcher.”
What this means in plain English is, “choose the New Patcher com-mand from the Studio menu.” Although the shorthand technique results in sub-standard grammar, it’s easier to read and decipher than a complete sentence because it displays the menu’s hierarchical structure plainly and simply.
Figure 1: Shorthand Invocation of Menu Items
INSTALLING OMS
Before you install OMS, you should:
• Connect your MIDI interface to your Macintosh (as described in your MIDI interface manual).
• Connect your MIDI devices (synthesizers, drum machines, effects units) to the MIDI interface, then turn them on.
There is an installer program on your OMS master disk or CD-ROM. To install OMS:
a Insert your master disk (or CD-ROM) and double-click the OMS Installer icon.
b Answer each question as prompted by the installer application.
The installer places all the necessary OMS files onto your hard disk automatically.
WHAT’S INSTALLED
The Installer places all the necessary OMS files onto your hard disk automatically. After running the Installer and restarting your Macin-tosh, you can begin to use OMS.
The following sections list exactly what files the Installer places onto your hard disk and where it places them.
Ch 1: Overview and Installation - 4 - OMS 2.3 for Macintosh

If you are updating from an older version of OMS, your previous Studio Setup documents will be read by the new OMS Setup application.
? CAUTION: Do not relocate or rename any files or folders that the Installer places in the System Folder. You may delete unnecessary files, but some files are essential for OMS operation. See Software Definitions (pg. 5) for more information.
Here is an overview of the OMS file layout:
• The Open Music System extension is placed into the Extensions folder.
• A folder named “OMS Folder” is created within the System Folder and OMS drivers are placed inside it.
• OMS applications are placed inside the “OMS Applications” folder that, depending on the installer, resides either at the top-level of your hard drive or in a folder named “Opcode.”
You can move the applications folder, but the extension and OMS Folder must remain in their initial locations.
SOFTWAREDEFINITIONS
This section describes each file that the installer could possibly place on your hard disk. If, after reading the definition, you are sure you won’t need the file, you can throw it away. For instance, if you don’t have a Studio 3 interface, there is no reason to have the Studio 3 OMS Driver on your hard drive.
Future releases of OMS may add new files or features, so consult any Read Me documents contained on your master disk.
DRIVERS
OMS drivers enable OMS to work with a variety of products that either connect to the Macintosh, or reside within it. You may remove any drivers that you don’t need from your hard disk. Drivers are located in the OMS Folder inside your System Folder. The following drivers are currently available:
Ch 1: Overview and Installation - 5 - OMS 2.3 for Macintosh
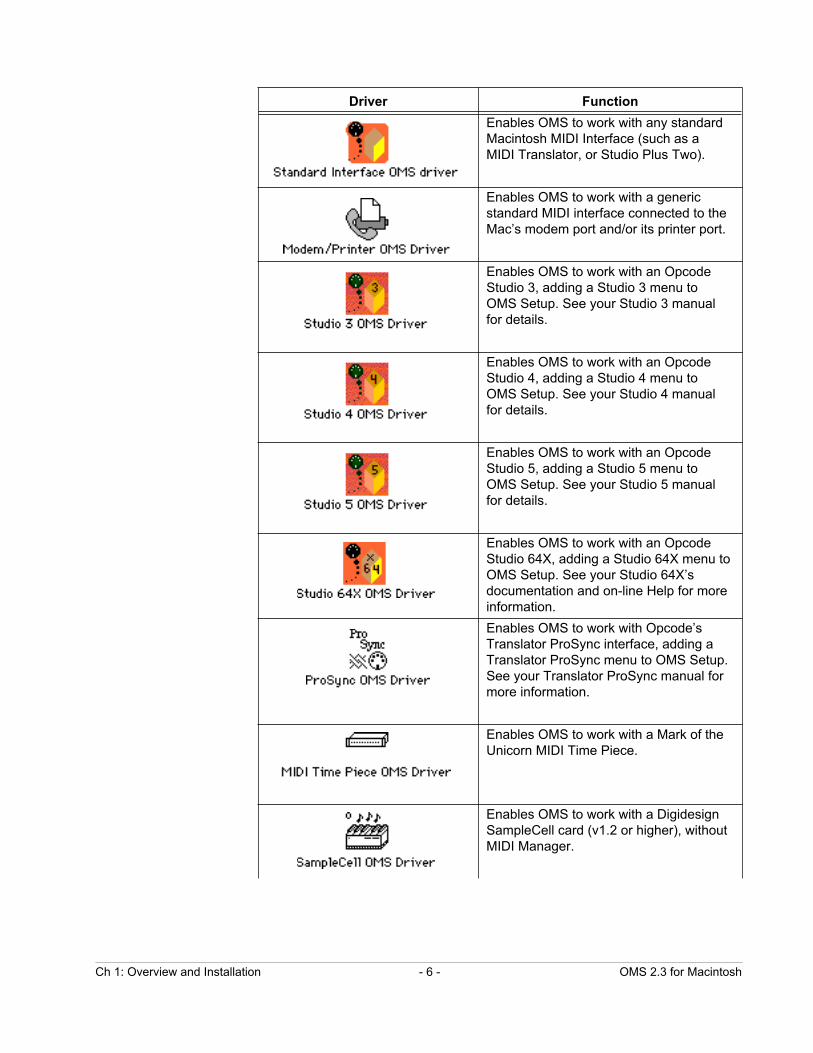
Driver Function
Enables OMS to work with any standard Macintosh MIDI Interface (such as a MIDI Translator, or Studio Plus Two).
Enables OMS to work with a generic standard MIDI interface connected to the Mac’s modem port and/or its printer port.
Enables OMS to work with an Opcode Studio 3, adding a Studio 3 menu to OMS Setup. See your Studio 3 manual for details.
Enables OMS to work with an Opcode Studio 4, adding a Studio 4 menu to OMS Setup. See your Studio 4 manual for details.
Enables OMS to work with an Opcode Studio 5, adding a Studio 5 menu to OMS Setup. See your Studio 5 manual for details.
Enables OMS to work with an Opcode Studio 64X, adding a Studio 64X menu to OMS Setup. See your Studio 64X’s documentation and on-line Help for more information.
Enables OMS to work with Opcode’s Translator ProSync interface, adding a Translator ProSync menu to OMS Setup. See your Translator ProSync manual for more information.
Enables OMS to work with a Mark of the Unicorn MIDI Time Piece.
Enables OMS to work with a Digidesign SampleCell card (v1.2 or higher), without MIDI Manager.
Ch 1: Overview and Installation - 6 - OMS 2.3 for Macintosh
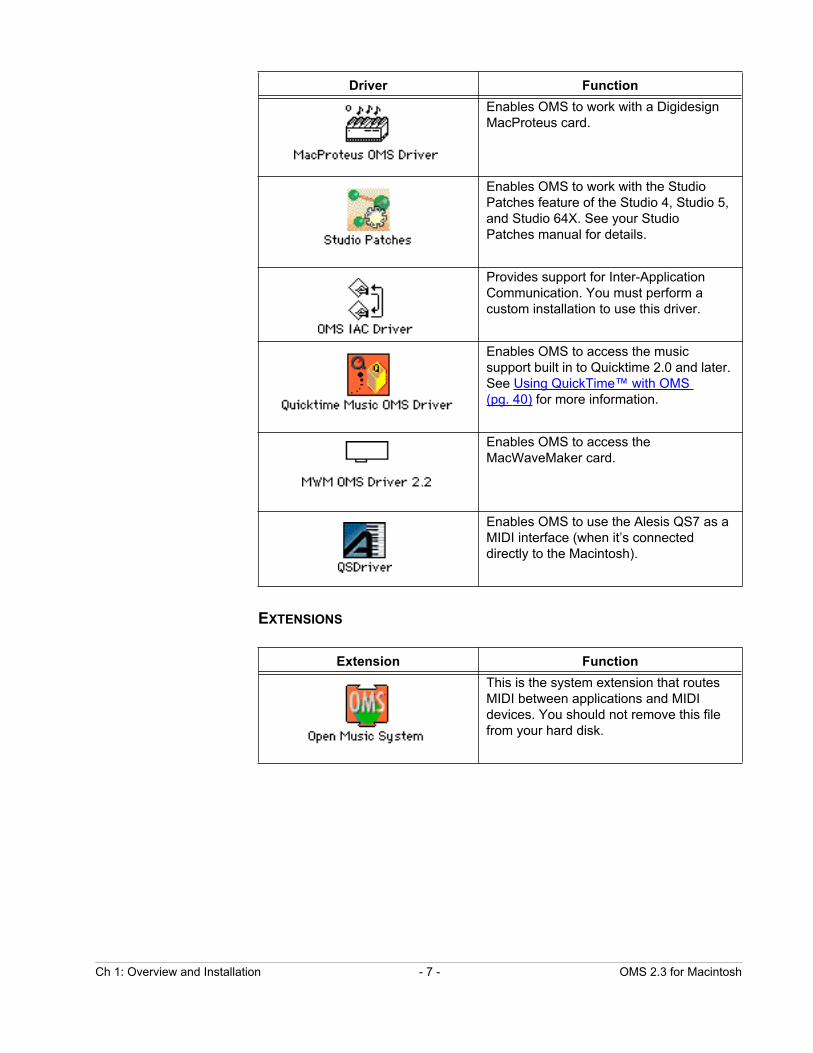
EXTENSIONS
Enables OMS to work with a Digidesign MacProteus card.
Enables OMS to work with the Studio Patches feature of the Studio 4, Studio 5, and Studio 64X. See your Studio Patches manual for details.
Provides support for Inter-Application Communication. You must perform a custom installation to use this driver.
Enables OMS to access the music support built in to Quicktime 2.0 and later. See Using QuickTime™ with OMS (pg. 40) for more information.
Enables OMS to access the MacWaveMaker card.
Enables OMS to use the Alesis QS7 as a MIDI interface (when it’s connected directly to the Macintosh).
Extension Function
This is the system extension that routes MIDI between applications and MIDI devices. You should not remove this file from your hard disk.
Driver Function
Ch 1: Overview and Installation - 7 - OMS 2.3 for Macintosh
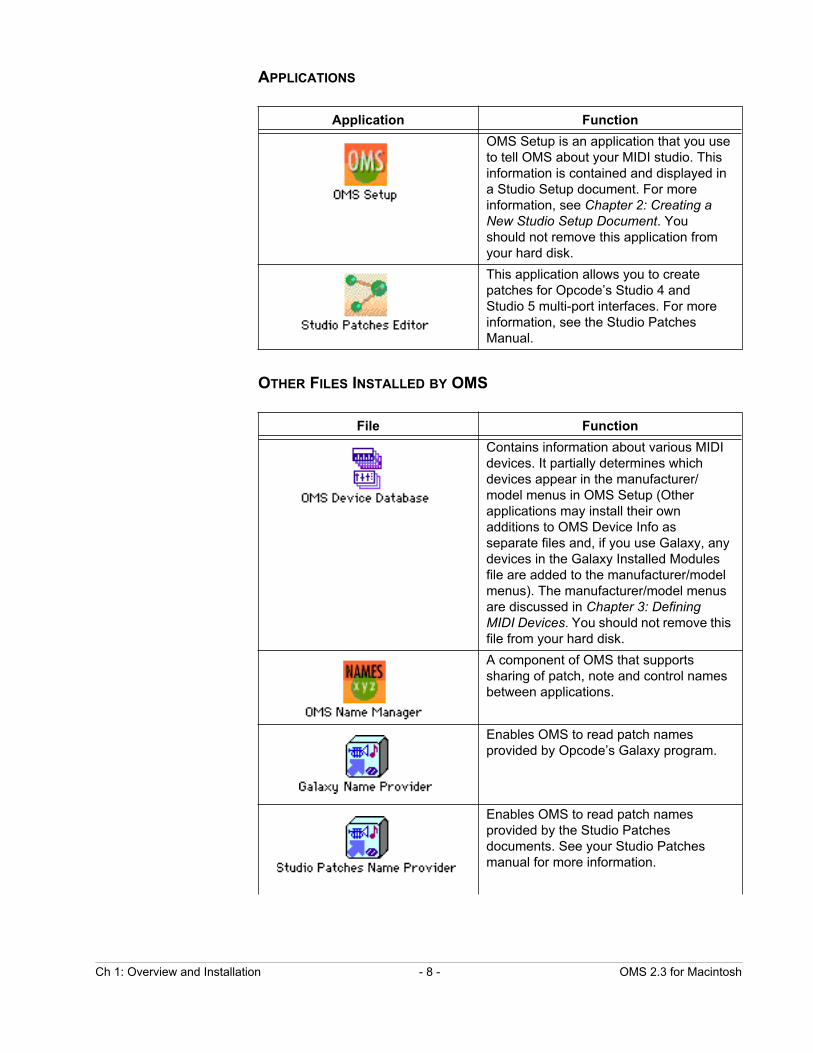
APPLICATIONS
OTHER FILES INSTALLED BY OMS
Application Function
OMS Setup is an application that you use to tell OMS about your MIDI studio. This information is contained and displayed in a Studio Setup document. For more information, see Chapter 2: Creating a New Studio Setup Document. You should not remove this application from your hard disk.
This application allows you to create patches for Opcode’s Studio 4 and Studio 5 multi-port interfaces. For more information, see the Studio Patches Manual.
File Function
Contains information about various MIDI devices. It partially determines which devices appear in the manufacturer/model menus in OMS Setup (Other applications may install their own additions to OMS Device Info as separate files and, if you use Galaxy, any devices in the Galaxy Installed Modules file are added to the manufacturer/model menus). The manufacturer/model menus are discussed in Chapter 3: Defining MIDI Devices. You should not remove this file from your hard disk.
A component of OMS that supports sharing of patch, note and control names between applications.
Enables OMS to read patch names provided by Opcode’s Galaxy program.
Enables OMS to read patch names provided by the Studio Patches documents. See your Studio Patches manual for more information.
Ch 1: Overview and Installation - 8 - OMS 2.3 for Macintosh

EASY SETUP VS.CUSTOM SETUP
There are two methods for defining a Studio Setup document:
• Easy Setup
This automated procedure is invoked when there is no current Studio Setup document and an OMS-compatible application is opened. In general, it’s a menu-driven setup procedure and, as such, is not discussed in this manual. Remember, Easy Setup was designed to be a “quick and dirty” way to get going. If you have a complicated studio configuration (for example, devices connected via MIDI Thru jacks, or devices whose input and output port numbers aren’t the same), you will need to use the OMS Setup application to create a custom Studio Setup document.
• Custom Setup
If you need a higher degree of control, you can use the OMS Setup application to create customized Studio Setup documents. This is the procedure that’s described in this manual.
A component of OMS that provides timing service. With this module, diverse applications can be synchronized to one clock source—OMS.
The Serial Switch control panel is required to use MIDI applications with the Mac IIfx, Quadra 900, or Quadra 950. Choose “Compatible” rather than “Faster” in the control panel.
The Serial Switch is automatically installed only if you have one of the requisite computers. If you don’t, and you manually installed the Serial Switch, you may remove it from your hard disk.
This folder contains factory default name lists for many popular MIDI devices. OMS Name Manager-compatible applications subscribe to these names by default, though you can override the subscription and create your own name lists.
Customized choices and a reference to your current Studio Setup are stored in files within this folder.
File Function
Ch 1: Overview and Installation - 9 - OMS 2.3 for Macintosh
CH 2: CREATING A NEW STUDIO SETUP DOCUMENT
This chapter teaches you to use the OMS Setup application to create a new Studio Setup document.
WHAT IS A STUDIO SETUP DOCUMENT?
A Studio Setup document is an exact model of your MIDI Studio. A fully configured Studio Setup document contains information about:
• MIDI interfaces connected to your Macintosh (such as an Opcode Studio 64X or Studio 5).
• MIDI cards installed inside your computer (such as a MacProteus™ or SampleCell™).
• Software-based synthesizers and other “Virtual Synthesizers” (such as Apple’s QuickTime Musical Instruments).
• MIDI devices connected to MIDI interfaces (such as synthesizers, drum machines, effects devices, and MIDI controllers).
Additionally, a Studio Setup document contains information about how all this hardware is physically connected.
You can create and store any number of Studio Setup documents to describe any number of studios or studio configurations, but OMS can reference only one Studio Setup document at a time. This is called the current Studio Setup document.
Once you’ve defined a current Studio Setup document, OMS knows each instrument’s name, port, MIDI reception channel(s), Device ID and many other details. This information is provided to all OMS-compatible applications. Within these applications, you simply select and work with devices by name—OMS handles the rest. Any time you change your current Studio Setup document, OMS auto-matically provides the updated information to all your OMS-compatible applications.
Ch 2: Creating a New Studio Setup Document - 10 - OMS 2.3 for Macintosh
CREATING YOUR FIRST STUDIO SETUP DOCUMENT
To create a new Studio Setup document:
a If you have not already done so, install any MIDI cards and interfaces, connect your MIDI devices to your MIDI interface, and turn them on.
See your card, interface, and/or MIDI device manuals if you need help.
You create and modify Studio Setup documents using an application called OMS Setup, so...
b Find the OMS Setup application.
By default, the OMS Setup application is in the “OMS Applications” folder that, depending on the installer, is either at the top-level of your hard drive or in a folder named “Opcode.”
c Double-click OMS Setup to start the program.
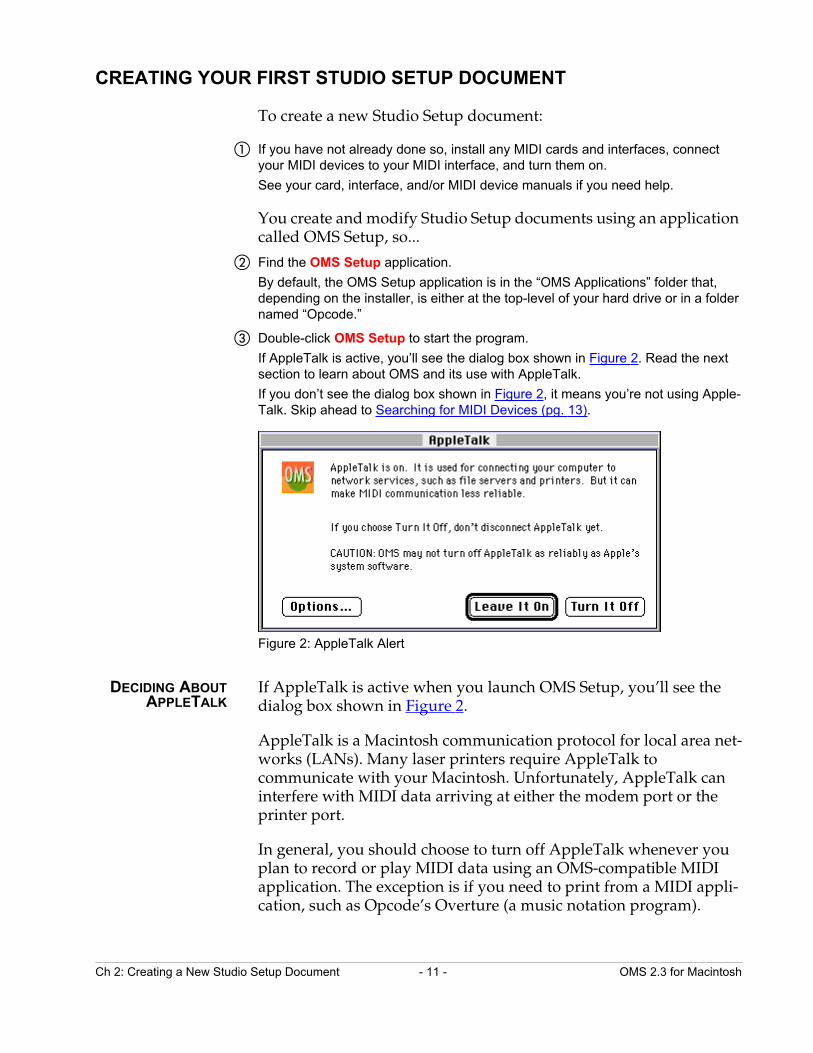
If AppleTalk is active, you’ll see the dialog box shown in Figure 2. Read the next section to learn about OMS and its use with AppleTalk.
If you don’t see the dialog box shown in Figure 2, it means you’re not using Apple-Talk. Skip ahead to Searching for MIDI Devices (pg. 13).
Figure 2: AppleTalk Alert
DECIDING ABOUTAPPLETALK
If AppleTalk is active when you launch OMS Setup, you’ll see the dialog box shown in Figure 2.
AppleTalk is a Macintosh communication protocol for local area net-works (LANs). Many laser printers require AppleTalk to communicate with your Macintosh. Unfortunately, AppleTalk can interfere with MIDI data arriving at either the modem port or the printer port.
In general, you should choose to turn off AppleTalk whenever you plan to record or play MIDI data using an OMS-compatible MIDI application. The exception is if you need to print from a MIDI appli-cation, such as Opcode’s Overture (a music notation program).
Ch 2: Creating a New Studio Setup Document - 11 - OMS 2.3 for Macintosh
To continue:
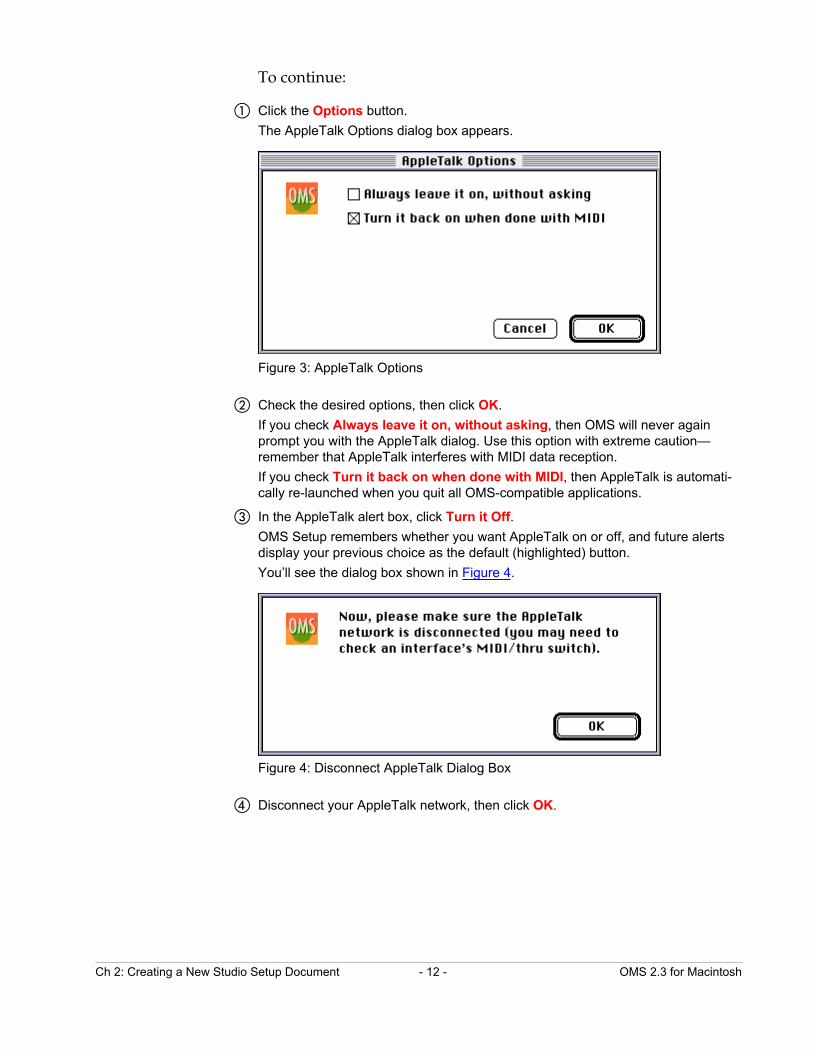
a Click the Options button.
The AppleTalk Options dialog box appears.
Figure 3: AppleTalk Options
b Check the desired options, then click OK.
If you check Always leave it on, without asking, then OMS will never again prompt you with the AppleTalk dialog. Use this option with extreme caution—remember that AppleTalk interferes with MIDI data reception.
If you check Turn it back on when done with MIDI, then AppleTalk is automati-cally re-launched when you quit all OMS-compatible applications.
c In the AppleTalk alert box, click Turn it Off.
OMS Setup remembers whether you want AppleTalk on or off, and future alerts display your previous choice as the default (highlighted) button.
You’ll see the dialog box shown in Figure 4.
Figure 4: Disconnect AppleTalk Dialog Box
d Disconnect your AppleTalk network, then click OK.
Ch 2: Creating a New Studio Setup Document - 12 - OMS 2.3 for Macintosh

SEARCHING FORMIDI DEVICES
If you’ve never created a Studio Setup document (using either Custom or Easy setup), then you’ll see the dialog box shown in Figure 5.
If you’ve already created a Studio Setup document, but wish to create a new one, choose File>New Studio Setup to open the dialog box shown in Figure 5.
Figure 5: Configure OMS Dialog
e Click OK to proceed.
The following dialog box appears.
Figure 6: OMS Driver Search Dialog Box
f Check the box next to each serial port that’s connected to a MIDI interface.
You should check only those serial ports that you’ll use for MIDI.
g Click Search.
OMS scans the selected ports, looking for any MIDI devices connected to them. It also scans your Macintosh looking for MIDI cards (such as a SampleCell or MacProteus) and other “Virtual Synthesizers” (such as QuickTime Musical Instruments).
Ch 2: Creating a New Studio Setup Document - 13 - OMS 2.3 for Macintosh
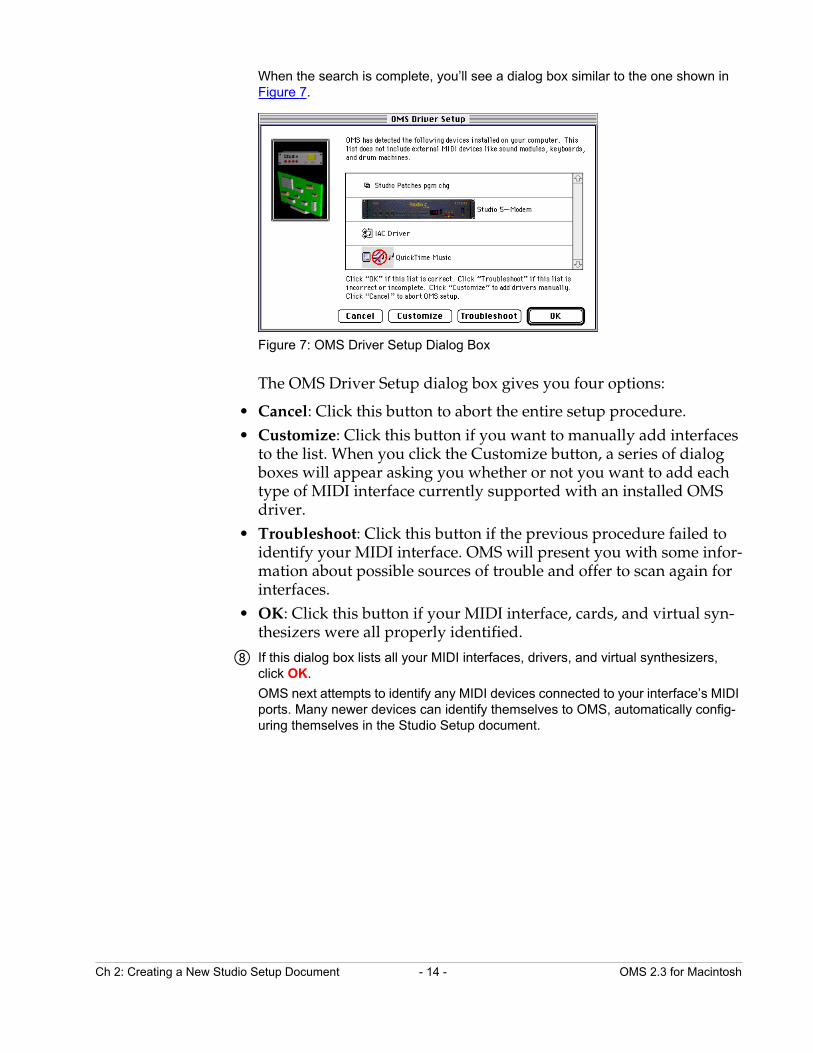
When the search is complete, you’ll see a dialog box similar to the one shown in Figure 7.
Figure 7: OMS Driver Setup Dialog Box
The OMS Driver Setup dialog box gives you four options:
• Cancel: Click this button to abort the entire setup procedure.• Customize: Click this button if you want to manually add interfaces
to the list. When you click the Customize button, a series of dialog boxes will appear asking you whether or not you want to add each type of MIDI interface currently supported with an installed OMS driver.
• Troubleshoot: Click this button if the previous procedure failed to identify your MIDI interface. OMS will present you with some infor-mation about possible sources of trouble and offer to scan again for interfaces.
• OK: Click this button if your MIDI interface, cards, and virtual syn-thesizers were all properly identified.
h If this dialog box lists all your MIDI interfaces, drivers, and virtual synthesizers, click OK.
OMS next attempts to identify any MIDI devices connected to your interface’s MIDI ports. Many newer devices can identify themselves to OMS, automatically config-uring themselves in the Studio Setup document.
Ch 2: Creating a New Studio Setup Document - 14 - OMS 2.3 for Macintosh
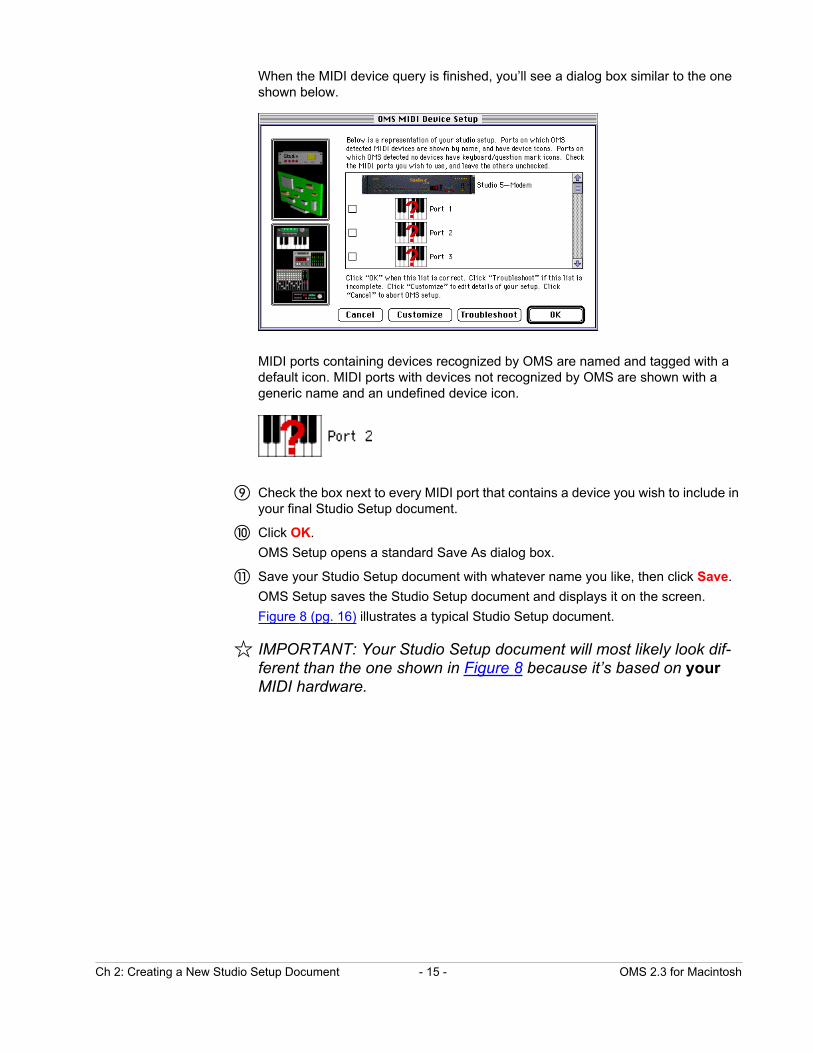
When the MIDI device query is finished, you’ll see a dialog box similar to the one shown below.
MIDI ports containing devices recognized by OMS are named and tagged with a default icon. MIDI ports with devices not recognized by OMS are shown with a generic name and an undefined device icon.
i Check the box next to every MIDI port that contains a device you wish to include in your final Studio Setup document.
j Click OK.
OMS Setup opens a standard Save As dialog box.
k Save your Studio Setup document with whatever name you like, then click Save.
OMS Setup saves the Studio Setup document and displays it on the screen.
Figure 8 (pg. 16) illustrates a typical Studio Setup document.
? IMPORTANT: Your Studio Setup document will most likely look dif-ferent than the one shown in Figure 8 because it’s based on your MIDI hardware.
Ch 2: Creating a New Studio Setup Document - 15 - OMS 2.3 for Macintosh

ANATOMY OF THE STUDIO SETUP DOCUMENT
Figure 8: Anatomy of a Studio Setup Document
Figure 8 shows many of the various elements that can appear in a Studio Setup document. These are:
A Multiport MIDI Interface
This example shows a Studio 5 multiport interface connected to the modem port.
B MIDI ports on a multiport MIDI interface
Multiport MIDI interfaces display each of their MIDI ports in the Studio Setup document.By default, if OMS Setup can’t auto-detect a specific MIDI device, it creates an undefined MIDI device on each port.If you have only a standard MIDI interface (such as a MIDI Transla-tor II or Studio 3), then the Studio Setup document won’t contain any port numbers for that interface.
A
B
C
D
E
F
G
H
I
J
Ch 2: Creating a New Studio Setup Document - 16 - OMS 2.3 for Macintosh
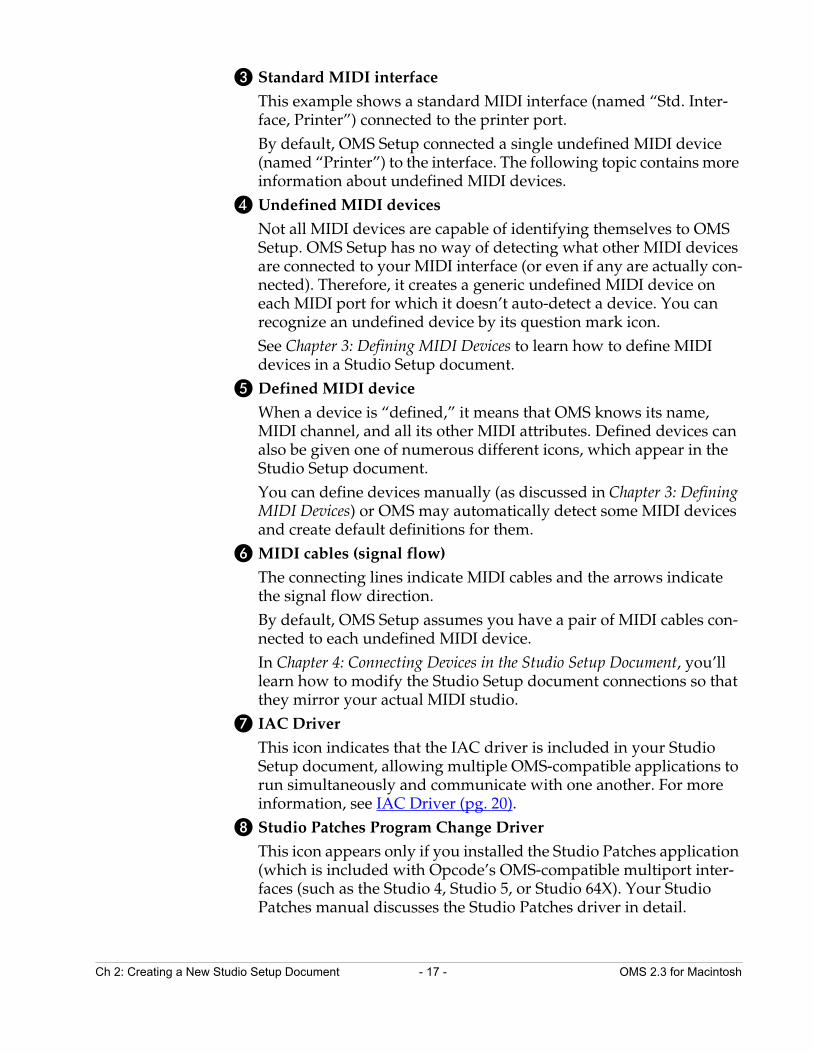
C Standard MIDI interface
This example shows a standard MIDI interface (named “Std. Inter-face, Printer”) connected to the printer port.By default, OMS Setup connected a single undefined MIDI device (named “Printer”) to the interface. The following topic contains more information about undefined MIDI devices.
D Undefined MIDI devices
Not all MIDI devices are capable of identifying themselves to OMS Setup. OMS Setup has no way of detecting what other MIDI devices are connected to your MIDI interface (or even if any are actually con-nected). Therefore, it creates a generic undefined MIDI device on each MIDI port for which it doesn’t auto-detect a device. You can recognize an undefined device by its question mark icon.See Chapter 3: Defining MIDI Devices to learn how to define MIDI devices in a Studio Setup document.
E Defined MIDI device
When a device is “defined,” it means that OMS knows its name, MIDI channel, and all its other MIDI attributes. Defined devices can also be given one of numerous different icons, which appear in the Studio Setup document.You can define devices manually (as discussed in Chapter 3: Defining MIDI Devices) or OMS may automatically detect some MIDI devices and create default definitions for them.
F MIDI cables (signal flow)
The connecting lines indicate MIDI cables and the arrows indicate the signal flow direction.By default, OMS Setup assumes you have a pair of MIDI cables con-nected to each undefined MIDI device.In Chapter 4: Connecting Devices in the Studio Setup Document, you’ll learn how to modify the Studio Setup document connections so that they mirror your actual MIDI studio.
G IAC Driver
This icon indicates that the IAC driver is included in your Studio Setup document, allowing multiple OMS-compatible applications to run simultaneously and communicate with one another. For more information, see IAC Driver (pg. 20).
H Studio Patches Program Change Driver
This icon appears only if you installed the Studio Patches application (which is included with Opcode’s OMS-compatible multiport inter-faces (such as the Studio 4, Studio 5, or Studio 64X). Your Studio Patches manual discusses the Studio Patches driver in detail.
Ch 2: Creating a New Studio Setup Document - 17 - OMS 2.3 for Macintosh
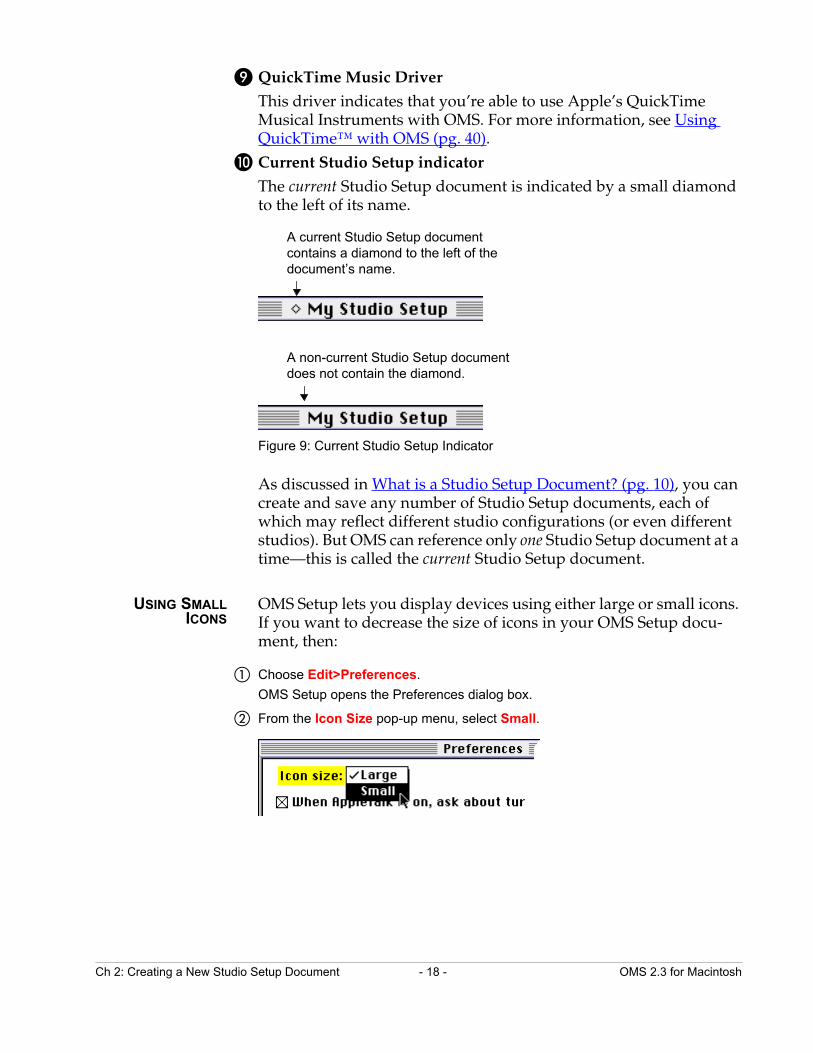
I QuickTime Music Driver
This driver indicates that you’re able to use Apple’s QuickTime Musical Instruments with OMS. For more information, see Using QuickTime™ with OMS (pg. 40).
J Current Studio Setup indicator
The current Studio Setup document is indicated by a small diamond to the left of its name.
Figure 9: Current Studio Setup Indicator
As discussed in What is a Studio Setup Document? (pg. 10), you can create and save any number of Studio Setup documents, each of which may reflect different studio configurations (or even different studios). But OMS can reference only one Studio Setup document at a time—this is called the current Studio Setup document.
USING SMALLICONS
OMS Setup lets you display devices using either large or small icons. If you want to decrease the size of icons in your OMS Setup docu-ment, then:
a Choose Edit>Preferences.
OMS Setup opens the Preferences dialog box.
b From the Icon Size pop-up menu, select Small.
A current Studio Setup document contains a diamond to the left of the document’s name.
A non-current Studio Setup document does not contain the diamond.
Ch 2: Creating a New Studio Setup Document - 18 - OMS 2.3 for Macintosh
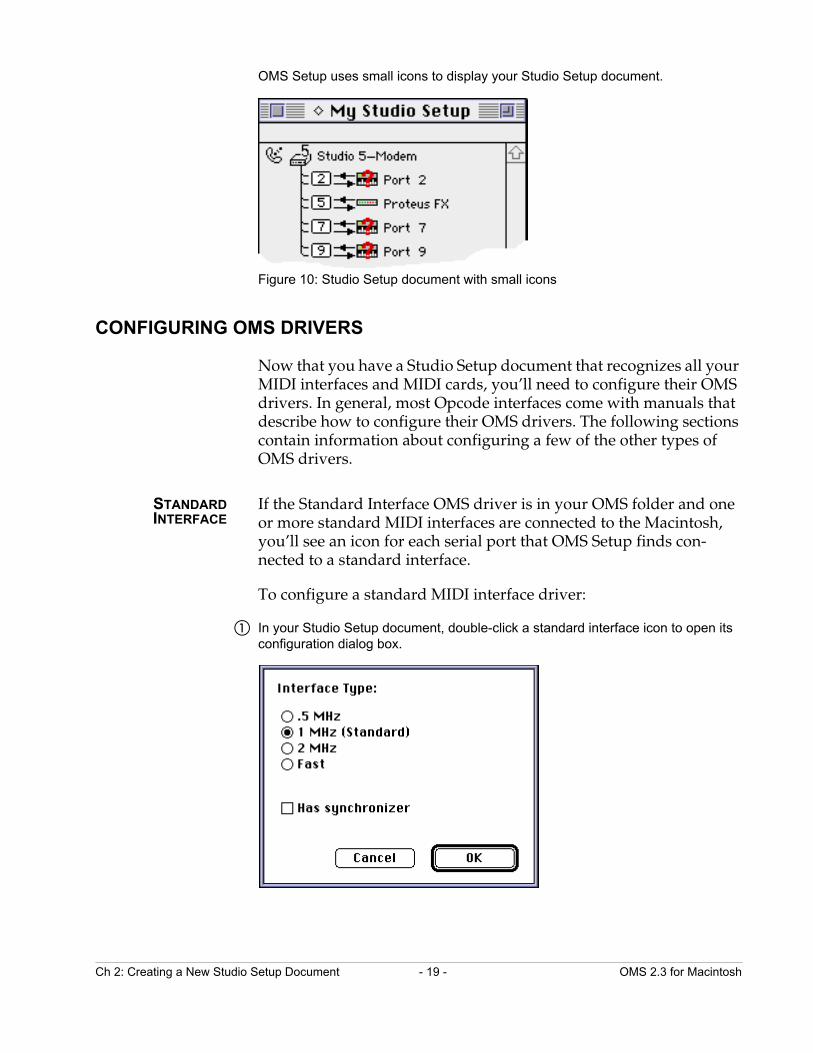
OMS Setup uses small icons to display your Studio Setup document.
Figure 10: Studio Setup document with small icons
CONFIGURING OMS DRIVERS
Now that you have a Studio Setup document that recognizes all your MIDI interfaces and MIDI cards, you’ll need to configure their OMS drivers. In general, most Opcode interfaces come with manuals that describe how to configure their OMS drivers. The following sections contain information about configuring a few of the other types of OMS drivers.
STANDARDINTERFACE
If the Standard Interface OMS driver is in your OMS folder and one or more standard MIDI interfaces are connected to the Macintosh, you’ll see an icon for each serial port that OMS Setup finds con-nected to a standard interface.
To configure a standard MIDI interface driver:
a In your Studio Setup document, double-click a standard interface icon to open its configuration dialog box.
Ch 2: Creating a New Studio Setup Document - 19 - OMS 2.3 for Macintosh

b Select the appropriate clock frequency and synchronizer settings for your interface, then click OK.
The clock frequency is usually determined automatically. Select the Has synchro-nizer option only if the interface has built-in synchronization functions. See your standard interface manual if you have questions.
IAC DRIVER The IAC (Inter Application Communication) driver provides a means for various OMS-compatible MIDI applications to communi-cate with one another.
The IAC driver provides up to 4 busses, which any application may send to and/or receive from. For example, using one bus, you can run Digidesign’s Pro Tools and Opcode’s Vision programs simulta-neously -- using one to control the playback of the other. Using another bus, you could send MIDI information from Vision to Opcode’s Max, using its programmable modules to perform sophis-ticated MIDI processing.
? IMPORTANT: This driver is not installed as part of OMS’ Easy instal-lation process so, if you wish to use it, you must perform a Custom installation.
To define and name busses:
a In your OMS Studio Setup document, double-click the IAC Driver icon to open its Configuration dialog box.
b Type a name for each bus you wish to activate, then click OK.
There will be one bus for each name you enter.
Initially, there is only one bus with the name “IAC Bus #1.” You can rename this bus or add new busses, as desired.
Ch 2: Creating a New Studio Setup Document - 20 - OMS 2.3 for Macintosh
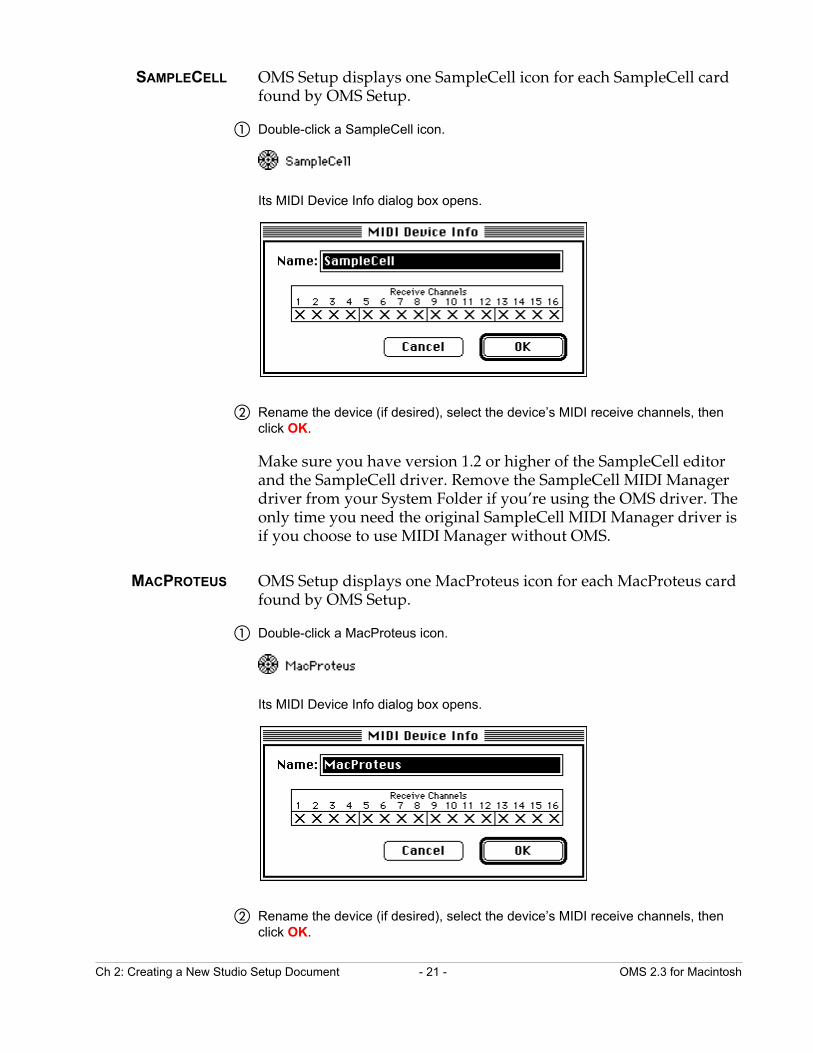
SAMPLECELL OMS Setup displays one SampleCell icon for each SampleCell card found by OMS Setup.
a Double-click a SampleCell icon.
Its MIDI Device Info dialog box opens.
b Rename the device (if desired), select the device’s MIDI receive channels, then click OK.
Make sure you have version 1.2 or higher of the SampleCell editor and the SampleCell driver. Remove the SampleCell MIDI Manager driver from your System Folder if you’re using the OMS driver. The only time you need the original SampleCell MIDI Manager driver is if you choose to use MIDI Manager without OMS.
MACPROTEUS OMS Setup displays one MacProteus icon for each MacProteus card found by OMS Setup.
a Double-click a MacProteus icon.
Its MIDI Device Info dialog box opens.
b Rename the device (if desired), select the device’s MIDI receive channels, then click OK.
Ch 2: Creating a New Studio Setup Document - 21 - OMS 2.3 for Macintosh

Keep the MacProteus MIDI Manager driver in your System Folder if you wish to use the MacProteus Front Panel application—otherwise you can remove it. Also, the MacProteus Batteries extension is com-patible with the OMS MacProteus driver.
QUICKTIME MUSIC Configuration and use of this driver is discussed in Using Quick-Time™ with OMS (pg. 40).
Ch 2: Creating a New Studio Setup Document - 22 - OMS 2.3 for Macintosh
CH 3: DEFINING MIDI DEVICES
In this chapter, you’ll learn how to define the MIDI devices in your Studio Setup document so that they accurately represent the hard-ware in your MIDI studio.
DEFINING AN UNDEFINED MIDI DEVICE
If the current Studio Setup document isn’t already open, choose File>Open Current Studio Setup, then follow through these steps to learn how to define a MIDI device in your Studio Setup document.
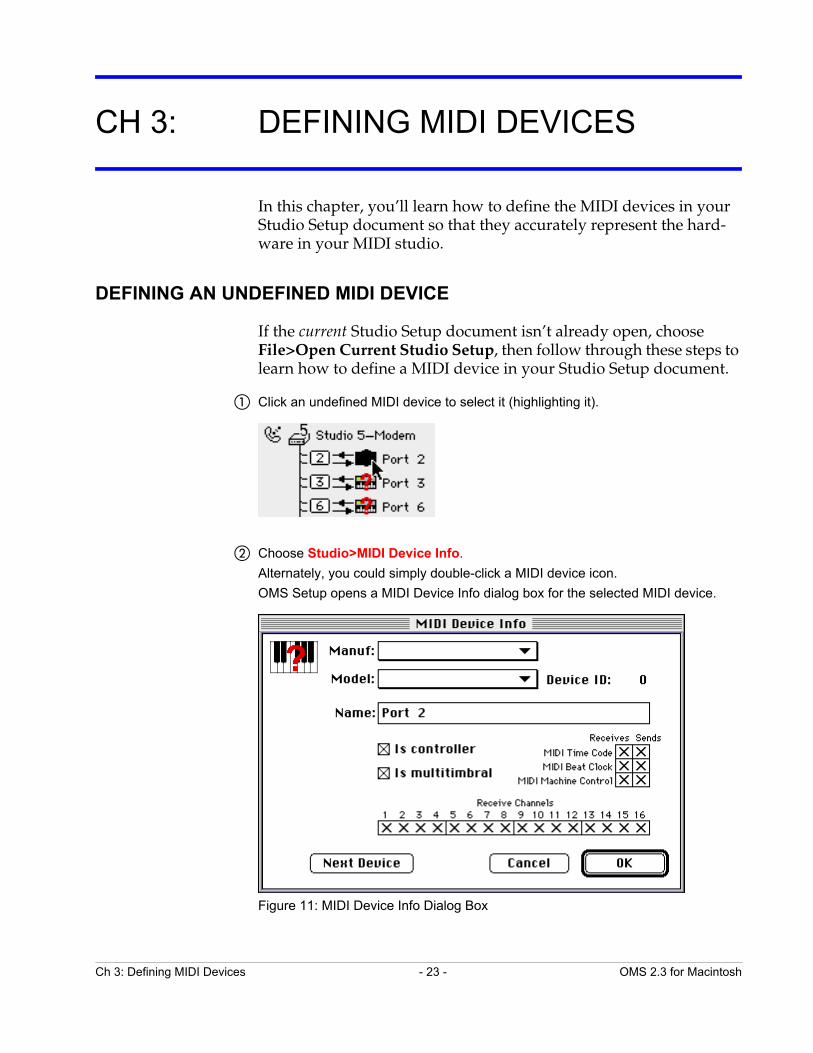
a Click an undefined MIDI device to select it (highlighting it).
b Choose Studio>MIDI Device Info.
Alternately, you could simply double-click a MIDI device icon.
OMS Setup opens a MIDI Device Info dialog box for the selected MIDI device.
Figure 11: MIDI Device Info Dialog Box
Ch 3: Defining MIDI Devices - 23 - OMS 2.3 for Macintosh

DEFININGMANUFACTURER
AND MODEL
You’ll first want to define the MIDI device’s manufacturer and model number. To do so:
a Select a manufacturer from the Manuf pop-up menu.
Figure 12: Select a Manufacturer
b Select a model from the Model pop-up menu.
Figure 13: Select a Model
OMS Setup automatically fills in the Name field with the model’s name. You can type in a different name if you desire.
DEFINING THE MIDICHARACTERISTICS
You’ll next want to define the MIDI characteristics of the selected device.
Figure 14: MIDI Characteristics
Manufacturer Selected
Model Selected
A
B
D
C
E
Ch 3: Defining MIDI Devices - 24 - OMS 2.3 for Macintosh

Figure 14 shows the various MIDI characteristics contained in the MIDI Device Info dialog box. These are:
A Is controller check boxCheck this check box if your MIDI device is a MIDI controller (such as a keyboard, MIDI guitar, MIDI drum pads, and so on).This check box is automatically set when you define a manufacturer and model, but you can override the default setting.
B Is multitimbral check boxCheck this check box if your MIDI device is multitimbral.Multitimbral means that the device is capable of receiving MIDI data on more than one channel. Most modern synthesizers are multitim-bral—many early MIDI synthesizers are not.This check box is automatically set when you define a Manufacturer and Model, but you can override the default setting.
C MIDI Receive ChannelsCheck all the MIDI channels on which your MIDI device receives MIDI data.For example, if your synthesizer is set up to receive only on MIDI channels 1 through 6, check only the boxes numbered 1 through 6.If the Is multitimbral check box is not checked, your device can receive on only one MIDI channel, so you can check only one box at a time.
D Device IDSet the Device ID numerical to match the Device ID setting on your MIDI device.If the Is multitimbral check box is not checked, the Device ID is automatically set to match the MIDI Receive Channel. You can enter a different Device ID number if you wish.See your MIDI device manual to learn how to view (or change) its Device ID.
Ch 3: Defining MIDI Devices - 25 - OMS 2.3 for Macintosh
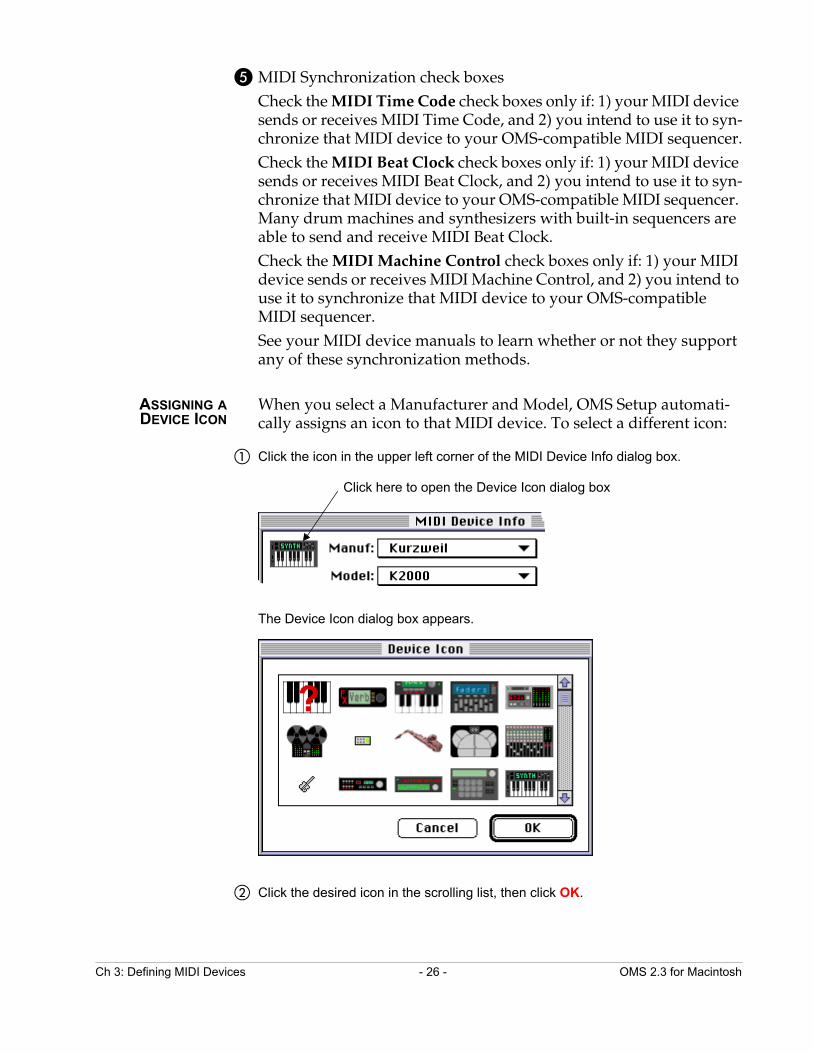
E MIDI Synchronization check boxesCheck the MIDI Time Code check boxes only if: 1) your MIDI device sends or receives MIDI Time Code, and 2) you intend to use it to syn-chronize that MIDI device to your OMS-compatible MIDI sequencer.Check the MIDI Beat Clock check boxes only if: 1) your MIDI device sends or receives MIDI Beat Clock, and 2) you intend to use it to syn-chronize that MIDI device to your OMS-compatible MIDI sequencer. Many drum machines and synthesizers with built-in sequencers are able to send and receive MIDI Beat Clock.Check the MIDI Machine Control check boxes only if: 1) your MIDI device sends or receives MIDI Machine Control, and 2) you intend to use it to synchronize that MIDI device to your OMS-compatible MIDI sequencer.See your MIDI device manuals to learn whether or not they support any of these synchronization methods.
ASSIGNING ADEVICE ICON
When you select a Manufacturer and Model, OMS Setup automati-cally assigns an icon to that MIDI device. To select a different icon:
a Click the icon in the upper left corner of the MIDI Device Info dialog box.
The Device Icon dialog box appears.
b Click the desired icon in the scrolling list, then click OK.
Click here to open the Device Icon dialog box
Ch 3: Defining MIDI Devices - 26 - OMS 2.3 for Macintosh
? NOTE: You can open the Device Icon dialog box directly from the Studio Setup Window. To do so, either 1)click the device’s icon to select it, then choose Studio>Device Icon, or 2) option-double-click the device’s icon.
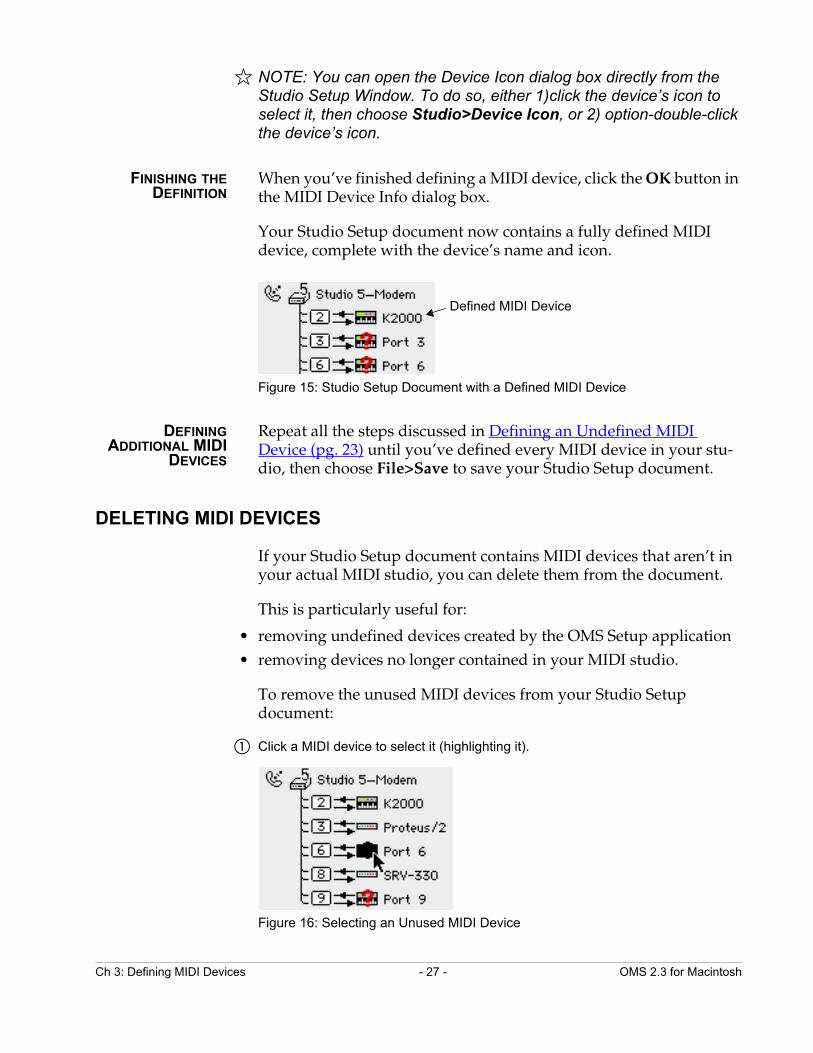
FINISHING THEDEFINITION
When you’ve finished defining a MIDI device, click the OK button in the MIDI Device Info dialog box.
Your Studio Setup document now contains a fully defined MIDI device, complete with the device’s name and icon.
Figure 15: Studio Setup Document with a Defined MIDI Device
DEFININGADDITIONAL MIDI
DEVICES
Repeat all the steps discussed in Defining an Undefined MIDI Device (pg. 23) until you’ve defined every MIDI device in your stu-dio, then choose File>Save to save your Studio Setup document.
DELETING MIDI DEVICES
If your Studio Setup document contains MIDI devices that aren’t in your actual MIDI studio, you can delete them from the document.
This is particularly useful for:
• removing undefined devices created by the OMS Setup application• removing devices no longer contained in your MIDI studio.
To remove the unused MIDI devices from your Studio Setup document:
a Click a MIDI device to select it (highlighting it).
Figure 16: Selecting an Unused MIDI Device
Defined MIDI Device
Ch 3: Defining MIDI Devices - 27 - OMS 2.3 for Macintosh

b Choose Edit>Delete.
OMS Setup removes the MIDI Device from your Studio Setup document.
c Continue this process for all remaining, unused MIDI devices.
Figure 17: Studio Setup Document with No Undefined MIDI Devices
ADDING MIDI DEVICES TO A STUDIO SETUP DOCUMENT
Sometimes you’ll need to add a MIDI device to your Studio Setup document. To do so:
a Choose Studio>New Device.
OMS Setup opens the MIDI Device Info dialog box.
b Configure the dialog box as discussed in Defining an Undefined MIDI Device (pg. 23).
OMS Setup creates a new device and automatically connects it to the selected device (if there is one) or to the top-most interface in your Studio Setup document.
Figure 18: New, Unconnected MIDI Device
Chapter 4: Connecting Devices in the Studio Setup Document will tell you how to connect or reconnect MIDI devices in a Studio Setup document.
Newly defined MIDI device
Ch 3: Defining MIDI Devices - 28 - OMS 2.3 for Macintosh

CH 4: CONNECTING DEVICES IN THE STUDIO SETUP DOCUMENT
In this chapter, you’ll connect all the MIDI devices in your Studio Setup document to mirror the way the actual hardware is connected in your studio.
When you finish connecting device icons, your Studio Setup docu-ment will function as a graphic representation of the MIDI components in your studio.
? IMPORTANT: The Studio Setup document should reflect, as accu-rately as possible, the actual connection of MIDI devices in your studio. OMS-compatible applications derive their knowledge of the devices in your studio from the Studio Setup document.
CONNECTING MIDI DEVICES TOGETHER
To “connect” MIDI devices together in a Studio Setup document, simply drag one device icon onto another.
Using this technique, you can connect...
• MIDI devices to MIDI interfaces, as discussed in Connecting Devices to a MIDI Interface (pg. 30).
• MIDI devices to other MIDI devices. This technique is used when “daisychaining devices using MIDI Thru jacks, as discussed in Using MIDI Thru Ports (pg. 33).
• MIDI patchbays to MIDI interfaces, as discussed in Using MIDI PatchBays (pg. 37).
• MIDI devices to MIDI patchbays, as discussed in Using MIDI Patch-Bays (pg. 37).
Ch 4: Connecting Devices in the Studio Setup Document - 29 - OMS 2.3 for Macintosh
CONNECTINGDEVICES TO A
MIDI INTERFACE
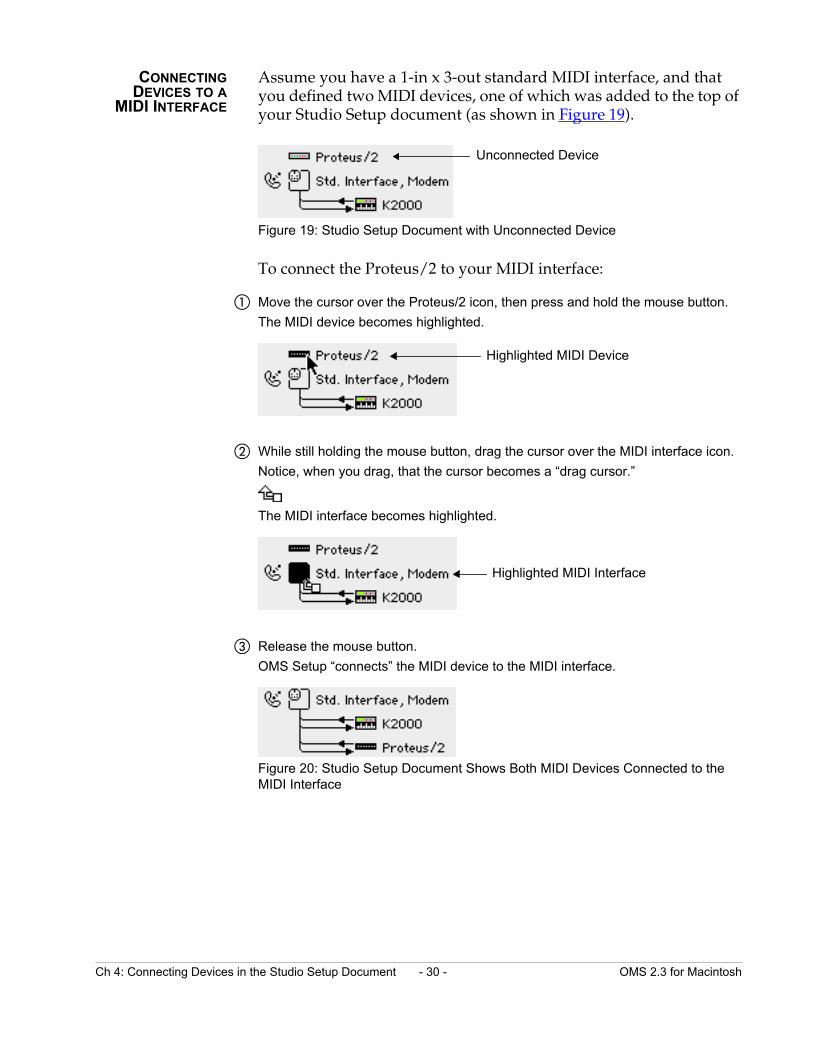
Assume you have a 1-in x 3-out standard MIDI interface, and that you defined two MIDI devices, one of which was added to the top of your Studio Setup document (as shown in Figure 19).
Figure 19: Studio Setup Document with Unconnected Device
To connect the Proteus/2 to your MIDI interface:
a Move the cursor over the Proteus/2 icon, then press and hold the mouse button.
The MIDI device becomes highlighted.
b While still holding the mouse button, drag the cursor over the MIDI interface icon.
Notice, when you drag, that the cursor becomes a “drag cursor.”
The MIDI interface becomes highlighted.
c Release the mouse button.
OMS Setup “connects” the MIDI device to the MIDI interface.
Figure 20: Studio Setup Document Shows Both MIDI Devices Connected to the MIDI Interface
Unconnected Device
Highlighted MIDI Device
Highlighted MIDI Interface
Ch 4: Connecting Devices in the Studio Setup Document - 30 - OMS 2.3 for Macintosh
CONNECTING AND DISCONNECTING MIDI CABLES
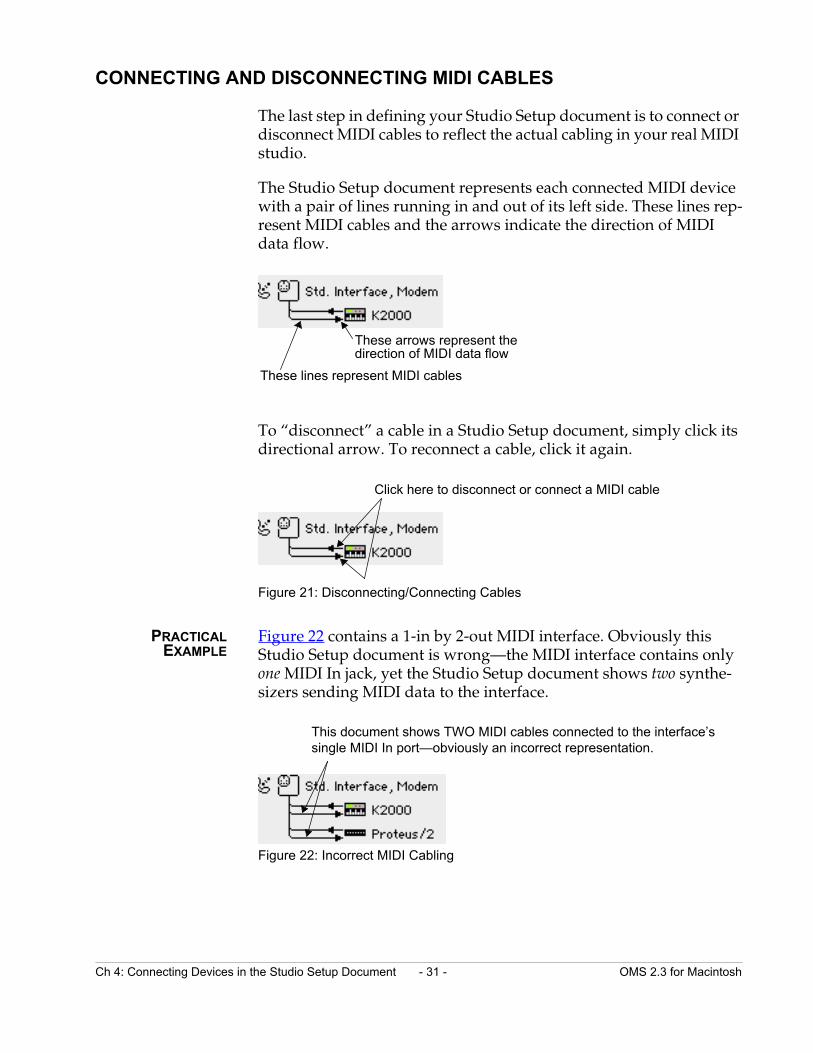
The last step in defining your Studio Setup document is to connect or disconnect MIDI cables to reflect the actual cabling in your real MIDI studio.
The Studio Setup document represents each connected MIDI device with a pair of lines running in and out of its left side. These lines rep-resent MIDI cables and the arrows indicate the direction of MIDI data flow.
To “disconnect” a cable in a Studio Setup document, simply click its directional arrow. To reconnect a cable, click it again.
Figure 21: Disconnecting/Connecting Cables
PRACTICALEXAMPLE
Figure 22 contains a 1-in by 2-out MIDI interface. Obviously this Studio Setup document is wrong—the MIDI interface contains only one MIDI In jack, yet the Studio Setup document shows two synthe-sizers sending MIDI data to the interface.
Figure 22: Incorrect MIDI Cabling
These lines represent MIDI cables
These arrows represent thedirection of MIDI data flow
Click here to disconnect or connect a MIDI cable
This document shows TWO MIDI cables connected to the interface’s single MIDI In port—obviously an incorrect representation.
Ch 4: Connecting Devices in the Studio Setup Document - 31 - OMS 2.3 for Macintosh
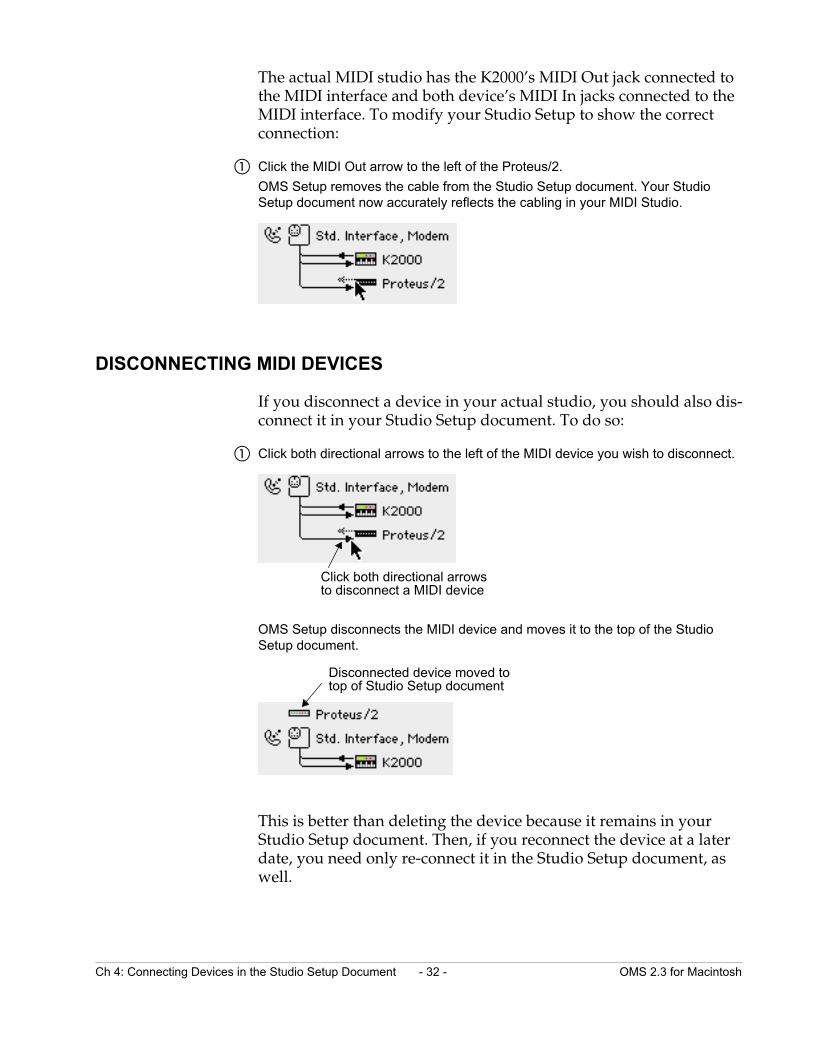
The actual MIDI studio has the K2000’s MIDI Out jack connected to the MIDI interface and both device’s MIDI In jacks connected to the MIDI interface. To modify your Studio Setup to show the correct connection:
a Click the MIDI Out arrow to the left of the Proteus/2.
OMS Setup removes the cable from the Studio Setup document. Your Studio Setup document now accurately reflects the cabling in your MIDI Studio.
DISCONNECTING MIDI DEVICES
If you disconnect a device in your actual studio, you should also dis-connect it in your Studio Setup document. To do so:
a Click both directional arrows to the left of the MIDI device you wish to disconnect.
OMS Setup disconnects the MIDI device and moves it to the top of the Studio Setup document.
This is better than deleting the device because it remains in your Studio Setup document. Then, if you reconnect the device at a later date, you need only re-connect it in the Studio Setup document, as well.
Click both directional arrowsto disconnect a MIDI device
Disconnected device moved totop of Studio Setup document
Ch 4: Connecting Devices in the Studio Setup Document - 32 - OMS 2.3 for Macintosh
CH 5: SPECIAL STUDIO SETUP TECHNIQUES
USING MIDI THRU PORTS
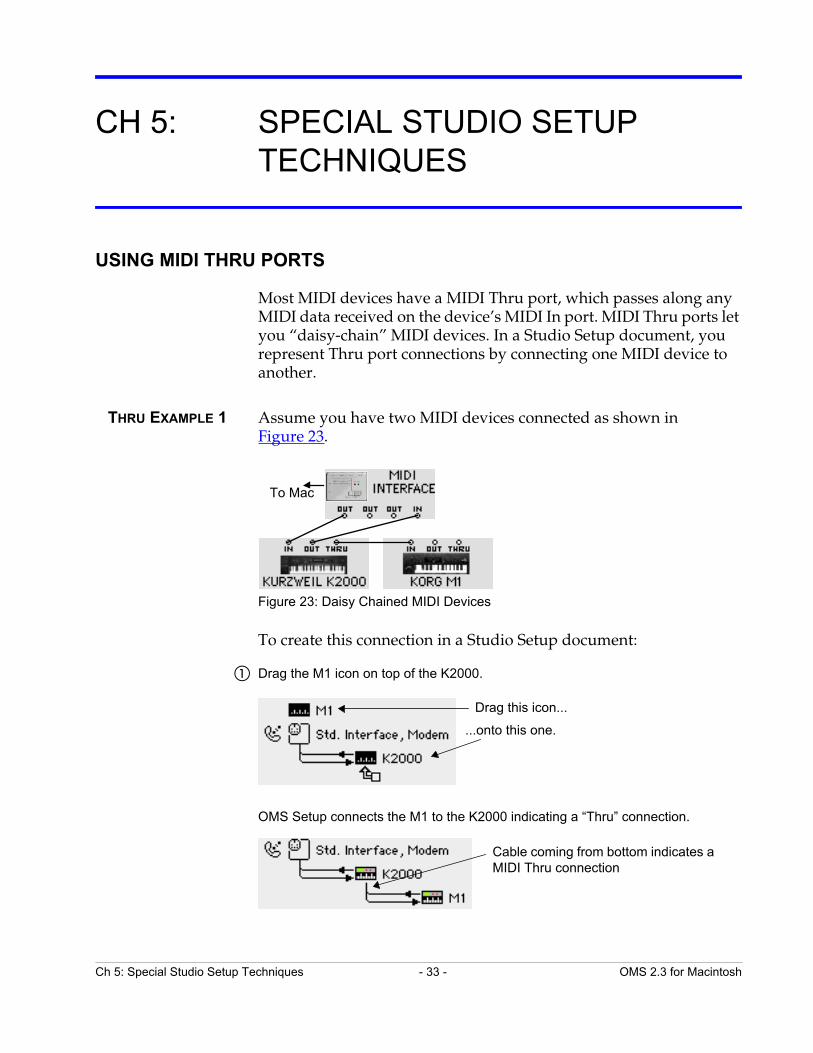
Most MIDI devices have a MIDI Thru port, which passes along any MIDI data received on the device’s MIDI In port. MIDI Thru ports let you “daisy-chain” MIDI devices. In a Studio Setup document, you represent Thru port connections by connecting one MIDI device to another.
THRU EXAMPLE 1 Assume you have two MIDI devices connected as shown in Figure 23.
Figure 23: Daisy Chained MIDI Devices
To create this connection in a Studio Setup document:
a Drag the M1 icon on top of the K2000.
OMS Setup connects the M1 to the K2000 indicating a “Thru” connection.
To Mac
Drag this icon...
...onto this one.
Cable coming from bottom indicates a MIDI Thru connection
Ch 5: Special Studio Setup Techniques - 33 - OMS 2.3 for Macintosh

b Click the M1 MIDI Out arrow to disconnect it.
Your Studio Setup document now accurately reflects the cabling in your actual MIDI studio.
THRU EXAMPLE 2 Assume you have two MIDI devices connected as shown in Figure 24.
Figure 24: Alternative MIDI Daisy Chain
To create this connection in a Studio Setup document:
a Drag the M1 icon on top of the K2000 icon, then disconnect the K2000’s MIDI output.
b Click the M1 icon to select it (highlighting it).
c Choose Studio>Different In/Out Ports.
OMS Setup creates a MIDI loop with a MIDI plug.
MIDI Out is disconnected
To Mac
MIDI Plug
MIDI Loop
Ch 5: Special Studio Setup Techniques - 34 - OMS 2.3 for Macintosh
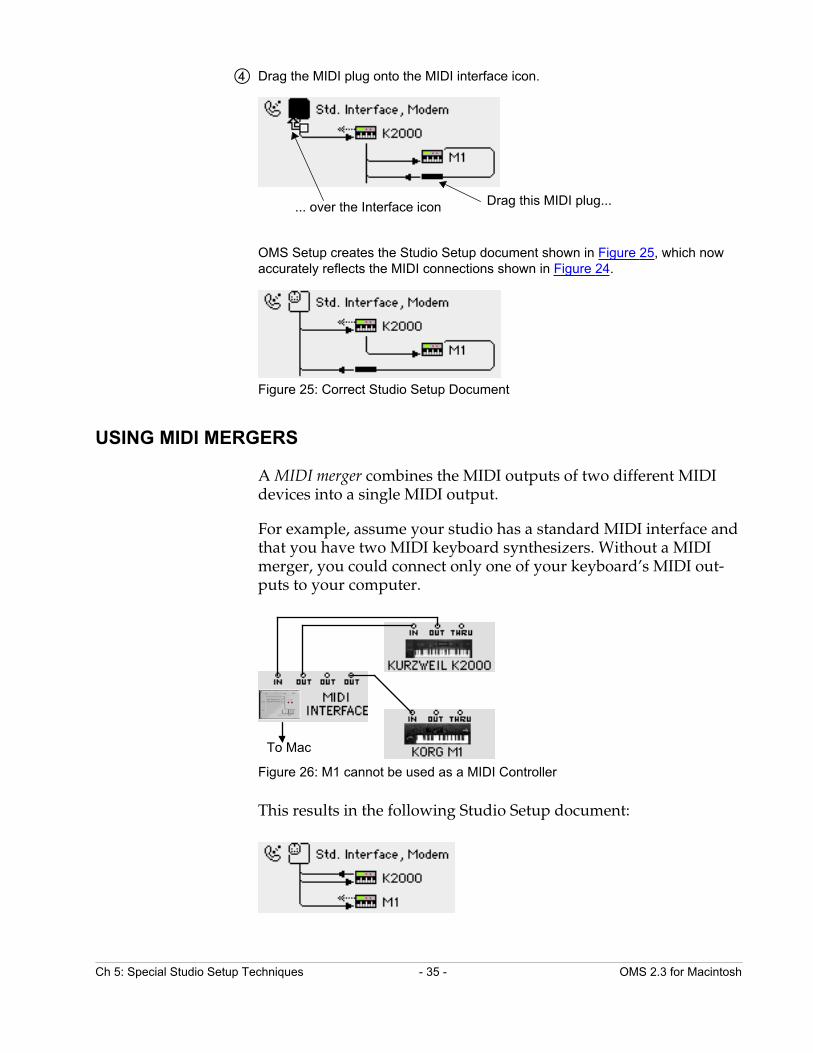
d Drag the MIDI plug onto the MIDI interface icon.
OMS Setup creates the Studio Setup document shown in Figure 25, which now accurately reflects the MIDI connections shown in Figure 24.
Figure 25: Correct Studio Setup Document
USING MIDI MERGERS
A MIDI merger combines the MIDI outputs of two different MIDI devices into a single MIDI output.
For example, assume your studio has a standard MIDI interface and that you have two MIDI keyboard synthesizers. Without a MIDI merger, you could connect only one of your keyboard’s MIDI out-puts to your computer.
Figure 26: M1 cannot be used as a MIDI Controller
This results in the following Studio Setup document:
Drag this MIDI plug...... over the Interface icon
To Mac
Ch 5: Special Studio Setup Techniques - 35 - OMS 2.3 for Macintosh
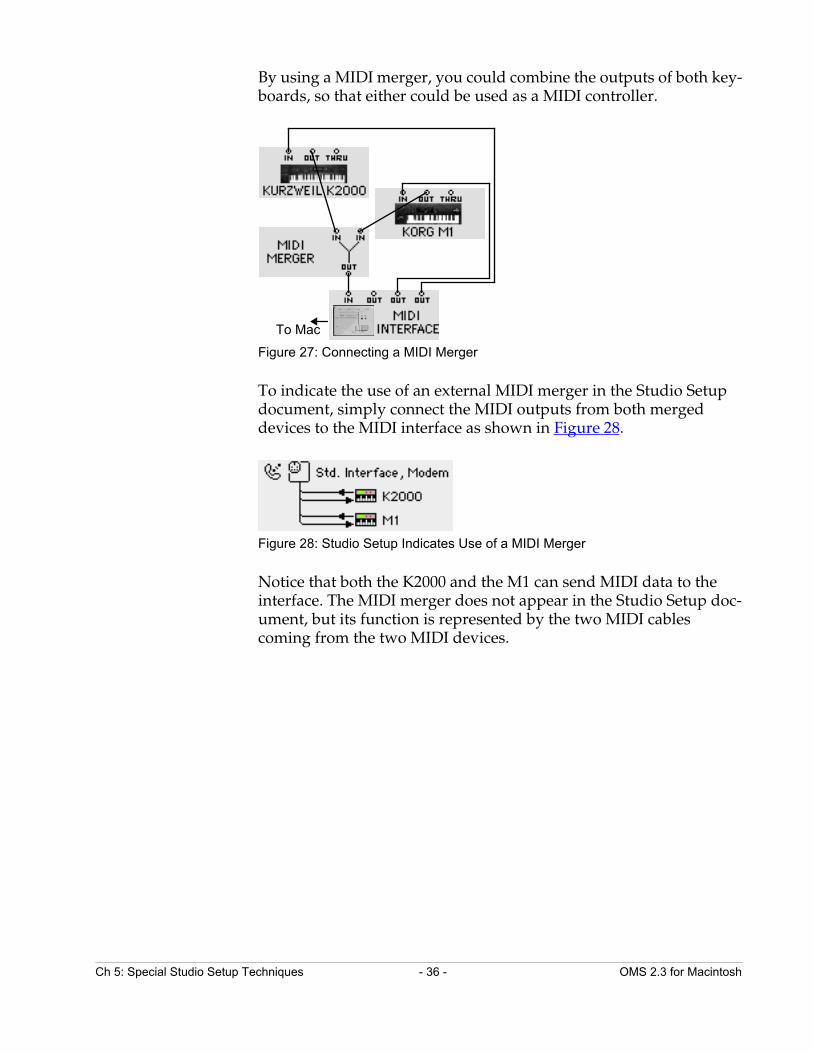
By using a MIDI merger, you could combine the outputs of both key-boards, so that either could be used as a MIDI controller.
Figure 27: Connecting a MIDI Merger
To indicate the use of an external MIDI merger in the Studio Setup document, simply connect the MIDI outputs from both merged devices to the MIDI interface as shown in Figure 28.
Figure 28: Studio Setup Indicates Use of a MIDI Merger
Notice that both the K2000 and the M1 can send MIDI data to the interface. The MIDI merger does not appear in the Studio Setup doc-ument, but its function is represented by the two MIDI cables coming from the two MIDI devices.
To Mac
Ch 5: Special Studio Setup Techniques - 36 - OMS 2.3 for Macintosh
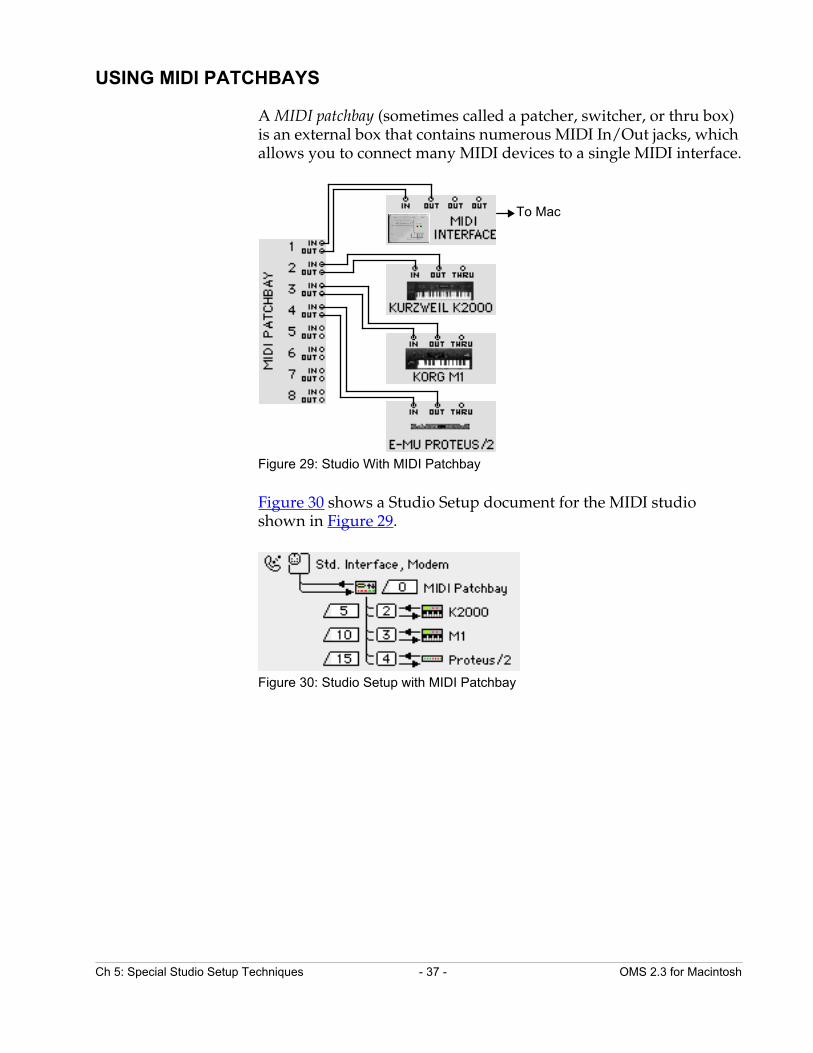
USING MIDI PATCHBAYS
A MIDI patchbay (sometimes called a patcher, switcher, or thru box) is an external box that contains numerous MIDI In/Out jacks, which allows you to connect many MIDI devices to a single MIDI interface.
Figure 29: Studio With MIDI Patchbay
Figure 30 shows a Studio Setup document for the MIDI studio shown in Figure 29.
Figure 30: Studio Setup with MIDI Patchbay
To Mac
Ch 5: Special Studio Setup Techniques - 37 - OMS 2.3 for Macintosh
ADDING A MIDIPATCHBAY TO
THE STUDIO SETUPDOCUMENT
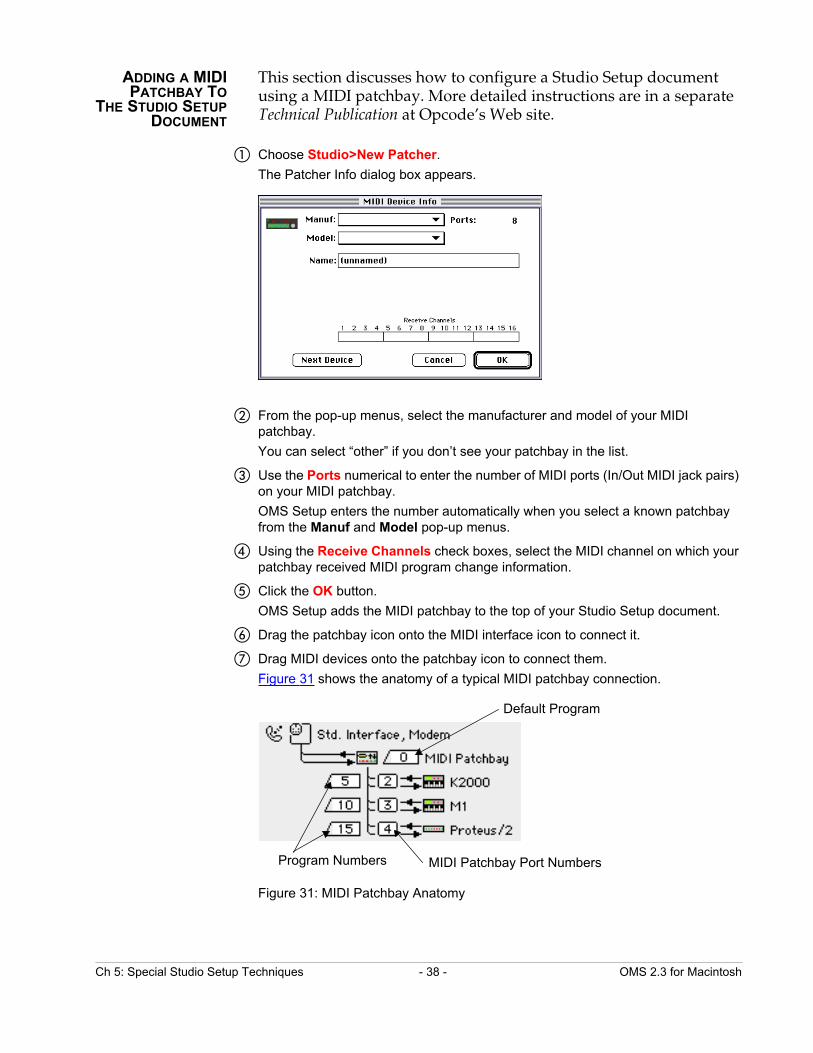
This section discusses how to configure a Studio Setup document using a MIDI patchbay. More detailed instructions are in a separate Technical Publication at Opcode’s Web site.
a Choose Studio>New Patcher.
The Patcher Info dialog box appears.
b From the pop-up menus, select the manufacturer and model of your MIDI patchbay.
You can select “other” if you don’t see your patchbay in the list.
c Use the Ports numerical to enter the number of MIDI ports (In/Out MIDI jack pairs) on your MIDI patchbay.
OMS Setup enters the number automatically when you select a known patchbay from the Manuf and Model pop-up menus.
d Using the Receive Channels check boxes, select the MIDI channel on which your patchbay received MIDI program change information.
e Click the OK button.
OMS Setup adds the MIDI patchbay to the top of your Studio Setup document.
f Drag the patchbay icon onto the MIDI interface icon to connect it.
g Drag MIDI devices onto the patchbay icon to connect them.
Figure 31 shows the anatomy of a typical MIDI patchbay connection.
Figure 31: MIDI Patchbay Anatomy
MIDI Patchbay Port NumbersProgram Numbers
Default Program
Ch 5: Special Studio Setup Techniques - 38 - OMS 2.3 for Macintosh
h Set the ports and program numbers to mirror your MIDI patchbay’s actual operation (as discussed below).
Briefly:
• MIDI Patchbay Port Numbers: These numericals correspond to the numbered ports on your MIDI patchbay. For example, if your Korg M1 is connected to port 3 of your MIDI patchbay, set the numerical next to the M1 to “3”.
• Default Program: Every MIDI patchbay needs one internal program that’s designed to 1) transfer MIDI data from any MIDI controller to your Mac, and 2) transfer MIDI data from the Mac to every MIDI device. This is called the “default” program. Set the Default Program numerical to match the MIDI program number of the patchbay’s internal “default” program.
• Program Numbers: You should program your MIDI patchbay such that each MIDI device has its own patchbay program that sends MIDI data only to that device and receives MIDI data only from that device. Set each Program Number numerical to match the MIDI pro-gram number that does this in the patchbay’s internal memory.
? IMPORTANT: See the Technical Publication named “Using OMS with a MIDI Patchbay” for detailed information about patchbay pro-gramming and Studio Setup configuration.
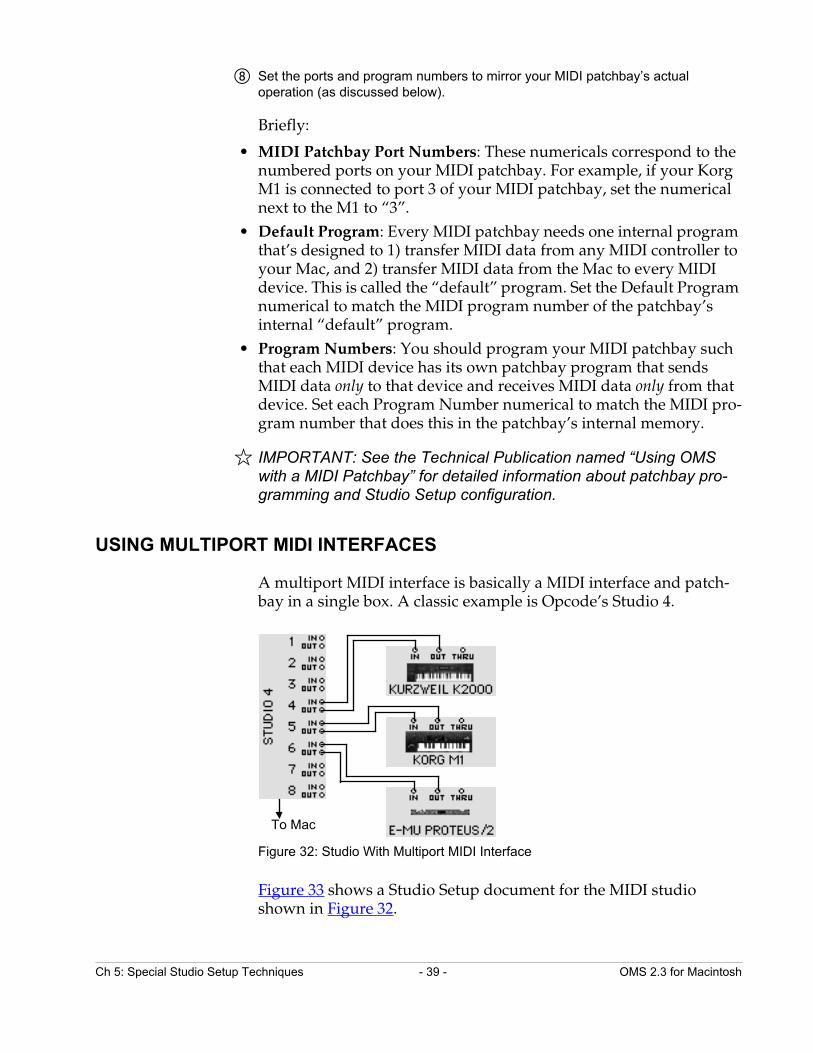
USING MULTIPORT MIDI INTERFACES
A multiport MIDI interface is basically a MIDI interface and patch-bay in a single box. A classic example is Opcode’s Studio 4.
Figure 32: Studio With Multiport MIDI Interface
Figure 33 shows a Studio Setup document for the MIDI studio shown in Figure 32.
To Mac
Ch 5: Special Studio Setup Techniques - 39 - OMS 2.3 for Macintosh
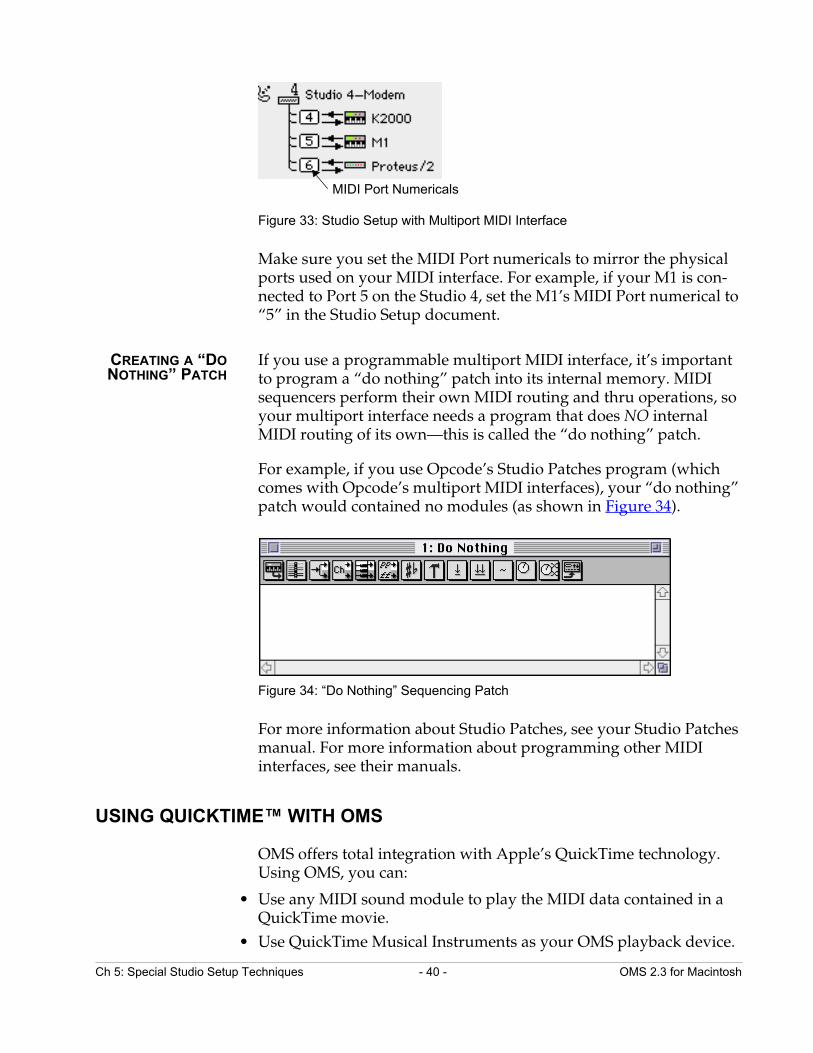
Figure 33: Studio Setup with Multiport MIDI Interface
Make sure you set the MIDI Port numericals to mirror the physical ports used on your MIDI interface. For example, if your M1 is con-nected to Port 5 on the Studio 4, set the M1’s MIDI Port numerical to “5” in the Studio Setup document.
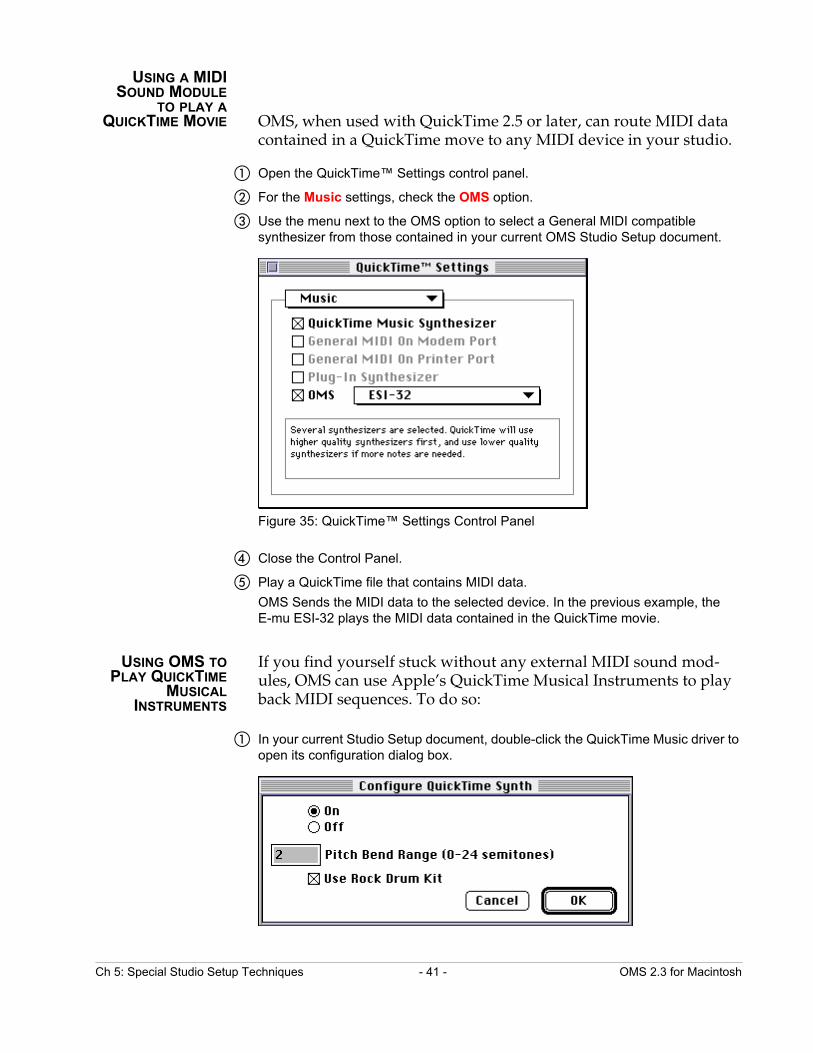
CREATING A “DONOTHING” PATCH
If you use a programmable multiport MIDI interface, it’s important to program a “do nothing” patch into its internal memory. MIDI sequencers perform their own MIDI routing and thru operations, so your multiport interface needs a program that does NO internal MIDI routing of its own—this is called the “do nothing” patch.
For example, if you use Opcode’s Studio Patches program (which comes with Opcode’s multiport MIDI interfaces), your “do nothing” patch would contained no modules (as shown in Figure 34).
Figure 34: “Do Nothing” Sequencing Patch
For more information about Studio Patches, see your Studio Patches manual. For more information about programming other MIDI interfaces, see their manuals.
USING QUICKTIME™ WITH OMS
OMS offers total integration with Apple’s QuickTime technology. Using OMS, you can:
• Use any MIDI sound module to play the MIDI data contained in a QuickTime movie.
• Use QuickTime Musical Instruments as your OMS playback device.
MIDI Port Numericals
Ch 5: Special Studio Setup Techniques - 40 - OMS 2.3 for Macintosh
USING A MIDISOUND MODULE
TO PLAY AQUICKTIME MOVIE OMS, when used with QuickTime 2.5 or later, can route MIDI data
contained in a QuickTime move to any MIDI device in your studio.
a Open the QuickTime™ Settings control panel.
b For the Music settings, check the OMS option.
c Use the menu next to the OMS option to select a General MIDI compatible synthesizer from those contained in your current OMS Studio Setup document.
Figure 35: QuickTime™ Settings Control Panel
d Close the Control Panel.
e Play a QuickTime file that contains MIDI data.
OMS Sends the MIDI data to the selected device. In the previous example, the E-mu ESI-32 plays the MIDI data contained in the QuickTime movie.
USING OMS TOPLAY QUICKTIME
MUSICALINSTRUMENTS
If you find yourself stuck without any external MIDI sound mod-ules, OMS can use Apple’s QuickTime Musical Instruments to play back MIDI sequences. To do so:
a In your current Studio Setup document, double-click the QuickTime Music driver to open its configuration dialog box.
Ch 5: Special Studio Setup Techniques - 41 - OMS 2.3 for Macintosh

b Click the On radio button to turn on QuickTime Musical Instruments.
IMPORTANT: QuickTime Musical Instruments are turned off by default (as indi-cated by the slash through its icon in the Studio Setup document).
This is because QuickTime Musical Instruments can interfere with digital audio playback using Sound Manager. You should not use Sound Manager and Quick-Time Musical Instruments simultaneously.
c Set the Pitch Bend Range numerical to the desired amount.
In general, most synthesizers use a pitch bend range of 2 semitones, since it pro-duces the most “natural” sounding results. However, you can set any pitch bend range you desire.
d Decide whether or not you want to use the Rock Drum Kit.
If the option is checked, your sequences play back using a drum kit equivalent to General MIDI Drum Patch #9. If the option is unchecked, your sequences play back using a drum kit equivalent to General MIDI Drum Patch #1 (standard kit).
e Click OK.
f Open an OMS-compatible application and, from any MIDI destination menu, select a QuickTime Musical Instrument.
Figure 36: Selecting a QuickTime Musical Instrument in Vision’s Control Bar
OMS routes MIDI data from your OMS-compatible application to Apple’s Quick-Time Musical Instruments driver—eliminating the need for an external sound module.
QuickTime Music Off
QuickTime Music On
Ch 5: Special Studio Setup Techniques - 42 - OMS 2.3 for Macintosh

TESTING YOUR STUDIO SETUP DOCUMENT
OMS Setup provides a test mode to check the accuracy of your Studio Setup document. To enter test mode:
a Choose File>Open Current Studio Setup if your current Studio Setup document is not active.
b Select Studio>Test Studio.
The Test Studio command toggles test mode on and off. When test mode is active, the Test Studio option will have a check next to it. Also, the cursor in the Studio Setup document will change to an eighth note when it’s over a MIDI device or inter-face icon.
TESTING MAC-TO-MIDI DEVICE
CONNECTIONS
To test the flow of MIDI data from your Macintosh into each of your MIDI devices:
a Click a MIDI device icon with the note cursor.
This sends random notes to the device on the MIDI channels on which the device receives. To make sure the notes are audible, a MIDI volume message sets every channel’s volume to 127. Listen for a cacophony of notes (or watch your device’s MIDI indicator LED).
TESTING MIDIDEVICE-TO-MAC
CONNECTIONS
To test MIDI data flow from MIDI devices into the Mac, each device must be able to generate MIDI data. On controller instruments just strike a key, pluck a string or hit a pad. When the Mac receives the MIDI data, the line connecting the two devices blinks and a voice that says “MIDI received” emanates from your Macintosh.
? NOTE: If your Studio Setup contains MIDI merging (multiple sources into one port), the wrong arrow may flash when testing MIDI connec-tions from devices connected to the merger. When MIDI arrives from a merged source, only one of them is going to flash, and it won’t nec-essarily be the one that really sent the data.
For devices that have no keyboard, the best way to test MIDI data flow to the Mac is to initiate a bulk dump from that MIDI device.
EXITING TESTMODE
a Choose Studio>Test Studio to turn-off OMS Setup’s test mode.
Ch 5: Special Studio Setup Techniques - 43 - OMS 2.3 for Macintosh
Related Documents


![Opcode 어셈명령으로 변환하기index-of.co.uk/Reverse-Engineering/opcode-[CodeEngn].pdf · 2019-03-07 · 다음은 W32Dasm 디어셈블 모습 여기까지 서로 다른 모습의](https://static.cupdf.com/doc/110x72/5f105b2c7e708231d448b475/opcode-eeoeeoe-eeindex-ofcoukreverse-engineeringopcode-codeengnpdf.jpg)