Getting Started with Microsoft ® Outlook ® with Exchange Online Software from Time Warner Cable Business Class A Guide for Administrators

Welcome message from author
This document is posted to help you gain knowledge. Please leave a comment to let me know what you think about it! Share it to your friends and learn new things together.
Transcript

Getting Started with Microsoft® Outlook® with Exchange
Online Software from Time Warner Cable Business Class
A Guide for Administrators

Getting Started with Microsoft® Outlook® with Exchange: Admin Guide TWCBC Online Software Guides
Time Warner Cable Business Class is a trademark of Time Warner Inc. Used under license. ©2010 Time Warner Cable. All rights reserved. All other trademarks are the property of their respective owners.
GSG006-0910 Page 2
Table of Contents
Requirements .......................................................................................................................................................... 3
1. Activate & Setup Online Software Account ......................................................................................................... 4
2. Create & Verify E-mail Password ........................................................................................................................ 5
Create Password: User ........................................................................................................................................ 5
Create Password: Administrator .......................................................................................................................... 6
Verify Password ................................................................................................................................................... 6
3. Download & Install E-Mail Client (Full Access) ................................................................................................... 7
Install Outlook (Windows Computers) ................................................................................................................. 7
Install Entourage (Mac Computers) ................................................................................................................... 10
Other E-Mail Clients ........................................................................................................................................... 11
4. Change DNS Records ....................................................................................................................................... 12
MX Records ....................................................................................................................................................... 12
CNAME Record (Outlook 2007) ........................................................................................................................ 13
5. Migrate Previous E-mail (Internet E-mail) ......................................................................................................... 14
6. Connect to Mobile Devices ................................................................................................................................ 22
ActiveSync ......................................................................................................................................................... 22
BlackBerry Access Add-On ............................................................................................................................... 28
Still need help? ...................................................................................................................................................... 29

Getting Started with Microsoft® Outlook® with Exchange: Admin Guide TWCBC Online Software Guides
Time Warner Cable Business Class is a trademark of Time Warner Inc. Used under license. ©2010 Time Warner Cable. All rights reserved. All other trademarks are the property of their respective owners.
GSG006-0910 Page 3
Microsoft Outlook with Exchange gives your employees access to advanced communication features from virtually any device to help drive productivity and collaboration. Get anytime, anywhere access to e-mail, contacts, calendars and tasks using multiple devices. The following diagram provides an overview of the typical steps required to set up Outlook with Exchange.
This guide details all six steps while the Outlook with Exchange Getting Started Guide for Users available at www.twcbc.com/os_outlook_user_getstarted details the steps that are typically done by end users.
Requirements
In order to use Outlook with Exchange, your company will need a domain name and ability to modify the DNS records. If you need to purchase a domain name, please call us at 1-877-253-7323, option 1.
System requirements of user computers include:
• Windows® XP with Service Pack 2 or higher, or Mac® OS X version 10.4.9 or later • Internet connection, broadband speeds recommended • Outlook Web Access requires Internet Explorer® 6.0 or later or Firefox® 3.0 or later • WinZip® application to install Outlook or Entourage (see www.winzip.com for download)
Mobile device access requires devices with data access plans and is only available with the Full Access version.
You will also need the following information to set up mailboxes for users:
• First and Last Names • Display Name: how user’s name is displayed in the address book (e.g., “John Smith” or “Smith, John”) • E-mail Alias and Address: e-mail alias is what appears before the “@” sign (e.g., “john.smith” is the e-
mail alias in the e-mail address “[email protected]”) • Other Contact Information (Optional): Phone, Title, Department, Assistant, Location, Manager, Direct
Reports
NOTE: A user’s Outlook e-mail address may be different from the e-mail login ID that is used to access the Online Software portal. If this is the case, then the e-mail address associated for all Microsoft products will use the Outlook e-mail address.
1. Activate & Setup Online
Software Account
*3. Download & Install
E-mail Client
4. Change DNS
Records
*5. Migrate Previous E-mail
(optional)
*6. Connect to Mobile
Device(optional)
Steps to Activate Outlook with Exchange
*Steps for Full Access version only.
2. Create & Verify E-mail
Password
UserAdmin User Admin Admin User / Admin
Getting Started with Microsoft® Outlook® with Exchange: Admin Guide TWCBC Online Software Guides
Time Warner Cable Business Class is a trademark of Time Warner Inc. Used under license. ©2010 Time Warner Cable. All rights reserved. All other trademarks are the property of their respective owners.
GSG006-0910 Page 4
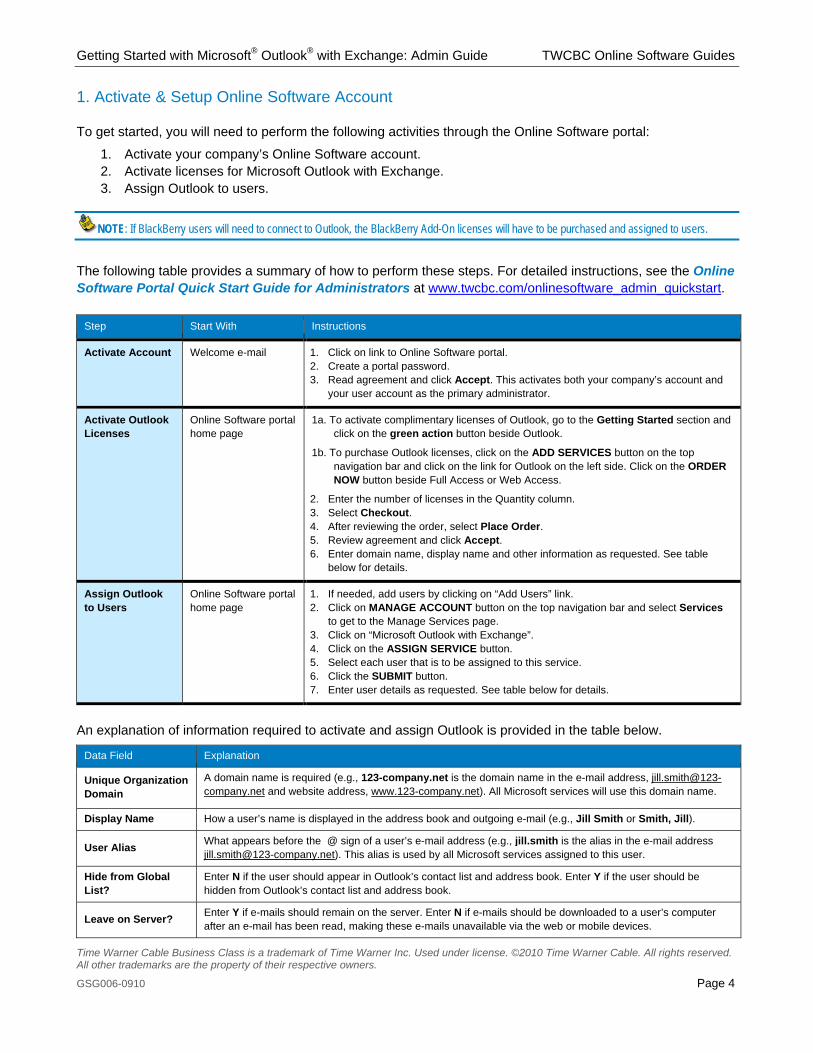
1. Activate & Setup Online Software Account
To get started, you will need to perform the following activities through the Online Software portal:
1. Activate your company’s Online Software account. 2. Activate licenses for Microsoft Outlook with Exchange. 3. Assign Outlook to users.
NOTE: If BlackBerry users will need to connect to Outlook, the BlackBerry Add-On licenses will have to be purchased and assigned to users.
The following table provides a summary of how to perform these steps. For detailed instructions, see the Online Software Portal Quick Start Guide for Administrators at www.twcbc.com/onlinesoftware_admin_quickstart.
Step Start With Instructions
Activate Account Welcome e-mail 1. Click on link to Online Software portal. 2. Create a portal password. 3. Read agreement and click Accept. This activates both your company’s account and
your user account as the primary administrator.
Activate Outlook Licenses
Online Software portal home page
1a. To activate complimentary licenses of Outlook, go to the Getting Started section and click on the green action button beside Outlook.
1b. To purchase Outlook licenses, click on the ADD SERVICES button on the top navigation bar and click on the link for Outlook on the left side. Click on the ORDER NOW button beside Full Access or Web Access.
2. Enter the number of licenses in the Quantity column. 3. Select Checkout. 4. After reviewing the order, select Place Order. 5. Review agreement and click Accept. 6. Enter domain name, display name and other information as requested. See table
below for details.
Assign Outlook to Users
Online Software portal home page
1. If needed, add users by clicking on “Add Users” link. 2. Click on MANAGE ACCOUNT button on the top navigation bar and select Services
to get to the Manage Services page. 3. Click on “Microsoft Outlook with Exchange”. 4. Click on the ASSIGN SERVICE button. 5. Select each user that is to be assigned to this service. 6. Click the SUBMIT button. 7. Enter user details as requested. See table below for details.
An explanation of information required to activate and assign Outlook is provided in the table below.
Data Field Explanation
Unique Organization Domain
A domain name is required (e.g., 123-company.net is the domain name in the e-mail address, [email protected] and website address, www.123-company.net). All Microsoft services will use this domain name.
Display Name How a user’s name is displayed in the address book and outgoing e-mail (e.g., Jill Smith or Smith, Jill).
User Alias What appears before the @ sign of a user’s e-mail address (e.g., jill.smith is the alias in the e-mail address [email protected]). This alias is used by all Microsoft services assigned to this user.
Hide from Global List?
Enter N if the user should appear in Outlook’s contact list and address book. Enter Y if the user should be hidden from Outlook’s contact list and address book.
Leave on Server? Enter Y if e-mails should remain on the server. Enter N if e-mails should be downloaded to a user’s computer after an e-mail has been read, making these e-mails unavailable via the web or mobile devices.

Getting Started with Microsoft® Outlook® with Exchange: Admin Guide TWCBC Online Software Guides
Time Warner Cable Business Class is a trademark of Time Warner Inc. Used under license. ©2010 Time Warner Cable. All rights reserved. All other trademarks are the property of their respective owners.
GSG006-0910 Page 5
2. Create & Verify E-mail Password
There are two ways to create a user’s password for Outlook – either directly by the user or else by an administrator. Note that if the user is already using Microsoft SharePoint and/or Office Communicator offered by Online Software, the login ID and password for these services will also be used by Outlook. Skip the Create Password sections and go directly to the Verify Password section on the next page.
Create Password: User
1. The user should go to the Home page or login at http://newengland.twcbcstore.com.
2. Click on the MY PROFILE tab in the main menu and select the My Services link. Click on the “Change Service Password” icon ( ) in the Actions column beside Microsoft Outlook with Exchange.
3. The user should create a password for her Outlook account. The password must be at least eight (8)
alphanumeric characters; the password cannot include any special characters. Please note that this same password will be used by other Microsoft services that are assigned to the user, including Microsoft SharePoint and Office Communicator.

Getting Started with Microsoft® Outlook® with Exchange: Admin Guide TWCBC Online Software Guides
Time Warner Cable Business Class is a trademark of Time Warner Inc. Used under license. ©2010 Time Warner Cable. All rights reserved. All other trademarks are the property of their respective owners.
GSG006-0910 Page 6
Create Password: Administrator
1. Go to the Online Software Home page or login at http://newengland.twcbcstore.com as an administrator.
2. Click on Exchange Admin Console in the My Services section. If you don’t see this link, please contact us at 1-866-442-0384 to enable this link.
3. In the Exchange Admin Console, click on Administration to see a list of users that are assigned to Outlook with Exchange. Click on the Reset Password icon beside the user who should have his password created.
Verify Password
Verify the e-mail address and password by opening a new browser. Go to https://mail.securembox.com and login with the e-mail address that was set up for this user’s Outlook account and the password created in the previous steps. If the user already has SharePoint and/or Office Communicator product assigned to him, use the e-mail address and password that is used by these Microsoft services.
NOTE: An alternate way of accessing Outlook using the web is through the Online Software portal. After a user logs into the portal at http://newengland.twcbcstore.com, the user can click on the Microsoft Outlook with Exchange in the My Services section of the home page. This option allows the user to access Outlook by using his Online Software login ID and password.
Getting Started with Microsoft® Outlook® with Exchange: Admin Guide TWCBC Online Software Guides
Time Warner Cable Business Class is a trademark of Time Warner Inc. Used under license. ©2010 Time Warner Cable. All rights reserved. All other trademarks are the property of their respective owners.
GSG006-0910 Page 7
3. Download & Install E-Mail Client (Full Access)
Microsoft Outlook with Exchange is available in two options: Web Access and Full Access. The Web Access option gives users access to their mailboxes using a web browser. The Full Access option allows users to access their mailboxes via the web or e-mail client, such as Outlook or Entourage®. This section describes how to download and install Outlook 2007 for Windows and Entourage 2008 for Mac computers.
NOTE: If a user computer uses Windows XP, Service Pack 2 or higher must be installed.
Install Outlook (Windows Computers)
1. The user should go to the Home page or login at http://newengland.twcbcstore.com.
2. In the Setting Up Services section, click on the Outlook 2007 link under “Microsoft Outlook with Exchange”. If the following Security Warning appears – “Do you want to view only the webpage content that was delivered securely?” – select No.
3. When prompted, select the Save option. Note the location where you save the file. Due to the large size of the file (over 200 MB), it will take some time to download, depending on the speed of your Internet connection.
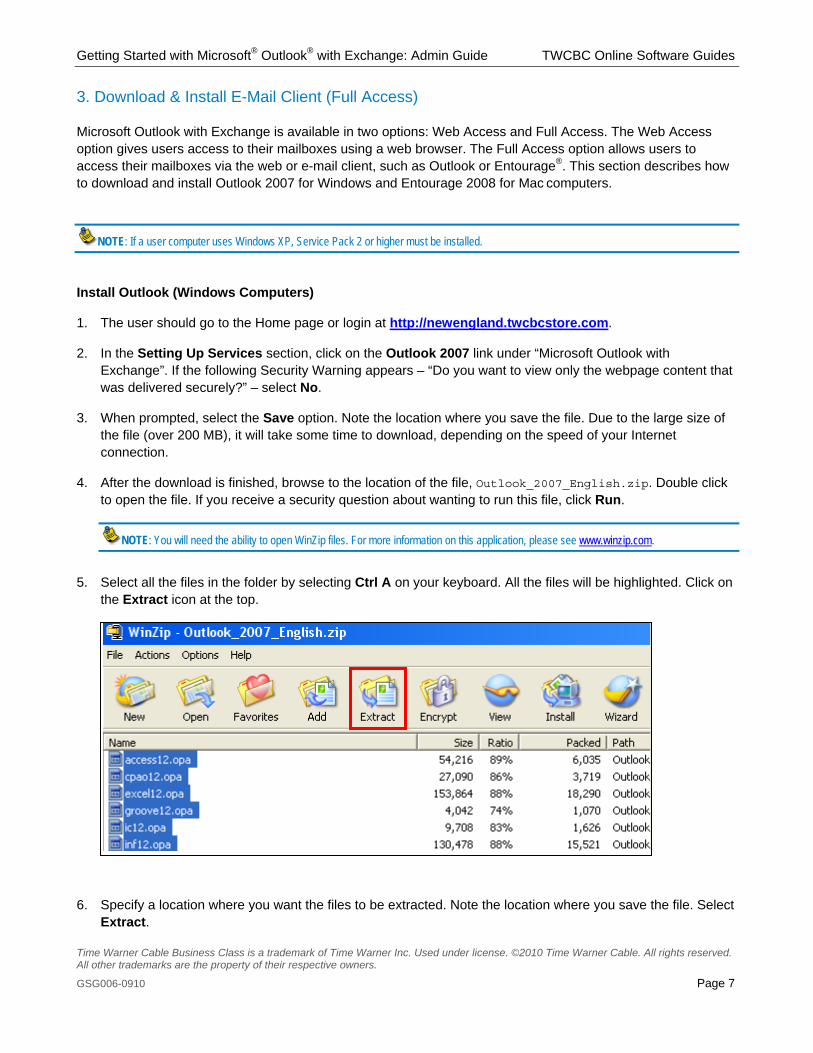
4. After the download is finished, browse to the location of the file, Outlook_2007_English.zip. Double click to open the file. If you receive a security question about wanting to run this file, click Run.
NOTE: You will need the ability to open WinZip files. For more information on this application, please see www.winzip.com.
5. Select all the files in the folder by selecting Ctrl A on your keyboard. All the files will be highlighted. Click on
the Extract icon at the top.
6. Specify a location where you want the files to be extracted. Note the location where you save the file. Select Extract.

Getting Started with Microsoft® Outlook® with Exchange: Admin Guide TWCBC Online Software Guides
Time Warner Cable Business Class is a trademark of Time Warner Inc. Used under license. ©2010 Time Warner Cable. All rights reserved. All other trademarks are the property of their respective owners.
GSG006-0910 Page 8
7. Double click on the setup.exe file to start installation.
8. When prompted for the Product Key, type in the License Key that is listed underneath the Outlook 2007 link in the Setting Up Services section of the Online Software portal home page.
9. Follow the directions in the wizard to complete the installation process.
10. After Outlook is installed, go back to the Online Software portal home page. In the Setting Up Services section, click on the Profile Connector Tool (Outlook 2007) link under “Microsoft Outlook with Exchange” section.
11. Select the Open option when prompted. Double click on the rpbcsetup_Outlook2007.vbs file. If a security warning appears due to the VBS file type, select Yes to open the file.
12. A message will appear stating that a RPC/HTTPS MAPI profile will be added to your computer. Select Yes.
13. When prompted, enter the user’s Outlook e-mail address and password that was created in the Create & Verify E-mail Password section.
ATTENTION: If the e-mail address is entered incorrectly in this step, you will need to start over by going back to Step 10.
14. When prompted to restart Outlook, click “OK”.
XXXX-XXXXX-XXXXX-XX12345

Getting Started with Microsoft® Outlook® with Exchange: Admin Guide TWCBC Online Software Guides
Time Warner Cable Business Class is a trademark of Time Warner Inc. Used under license. ©2010 Time Warner Cable. All rights reserved. All other trademarks are the property of their respective owners.
GSG006-0910 Page 9
15. When Outlook starts up again, enter the user’s Outlook e-mail address and password.
16. You will receive another window which asks for the user name and password a second time. Enter the user’s Outlook e-mail address and password again. A window will appear indicating that Outlook is preparing for first time use. It may take several minutes to complete this step.

Getting Starte
Time Warner CaAll other tradem
GSG006-0910
Install Entou
The Full Acceor Entourage
1. The user
2. In the SeExchangwas deliv
3. When prothe file totake som
4. After the Double c
NOTE:
5. Select al
the Extra
6. Specify amight wa
7. Double c
ed with Micro
able Business Clarks are the prop
urage (Mac C
ess version oe 2008 for Ma
r should go to
etting Up Sere”. If the follovered securel
ompted, seleco your Desktome time to dow
download is click to open t
You will need the
l the files in thact icon at the
a location wheant to create a
click on the Of
osoft® Outlook
lass is a trademaperty of their resp
Computers)
of Microsoft Oc users. Follo
o the Home pa
rvices sectionowing Securityy?” – select N
ct the Save oop so that youwnload, depen
finished, browhe file. If you
e ability to open W
he folder by se top.
ere you want a new folder o
ffice Installe
k® with Excha
ark of Time Warnpective owners.
utlook with Exow these step
age or login a
n, click on they Warning apNo.
option. Note thu can easily finnding on the
wse to the locreceive a sec
inZip files. For mo
selecting Ctrl
the files to beon your Deskt
r icon to start
ange: Admin G
ner Inc. Used und
xchange comps to install En
at http://newe
e Entourage 2pears – “Do y
he location whnd it. Due to tspeed of you
cation of the fcurity questio
ore information on
A on your ke
e extracted. Ntop so that yo
t installation.
Guide
der license. ©20
mes with eithentourage.
england.twcb
2008 (Mac) liyou want to v
here you savethe large sizer Internet con
ile, Mac Ento
on about want
this application, p
eyboard. All th
Note the locatou can easily
TWCBC On
10 Time Warner
r Outlook 200
bcstore.com
nk under “Miciew only the w
e the file. Youe of the file (ovnnection.
ourage 2008
ting to run this
please see www.w
he files will be
ion where yofind it. Select
nline Software
Cable. All rights
07 for Window
.
crosoft Outloowebpage con
u might want tver 400 MB),
English.zi
s file, click Ru
winzip.com.
e highlighted.
u save the filet Extract.
e Guides
s reserved.
Page 10
ws users
ok with tent that
to save it will
p. un.
Click on
e. You

Getting Started with Microsoft® Outlook® with Exchange: Admin Guide TWCBC Online Software Guides
Time Warner Cable Business Class is a trademark of Time Warner Inc. Used under license. ©2010 Time Warner Cable. All rights reserved. All other trademarks are the property of their respective owners.
GSG006-0910 Page 11
8. Follow the directions in the wizard to complete the installation process.
9. After installation is complete, open Entourage. Select Tools from the menu bar and then Accounts.
10. Click on the drop-down arrow to the right of New and select Exchange.
11. In the Account Settings dialog box, enter the following information:
– Account name: A descriptive name to identify the mailbox account (e.g., My Outlook Account) – Name: Display name (e.g., Steve Johnson) – E-mail Address: Outlook e-mail address (e.g., [email protected])
In the “Authentication” section, click on Use my account information and fill in the following information:
– Account ID: Based on the user’s Outlook e-mail address, type the first eight (8) characters of the domain name, followed by an underscore (“_”), and then the first eleven (11) characters of the e-mail alias. Note that characters include letters, numbers, periods, underscores and other special characters. Here are some examples:
- [email protected] = mycompan_steve - [email protected] = mycompan_steve.johns - [email protected] = acmeco.c_steve
– Domain: Enter shared – Password: Outlook password (created in the Create and Verify Password section) – Save password in my Mac OS keychain: Check this box to save the password on the computer – Exchange Server: Type in mail.securembox.com/exchange/[user’s Outlook e-mail address]
(e.g., mail.securembox.com/exchange/[email protected]) – This DAV service requires a secure connection (SSL): Check this box
12. Click the OK button. E-mails will be synchronized between the Exchange Server and Entourage. This step may take several minutes to complete.
Other E-Mail Clients
E-mail clients not referenced in this document may be used but are not supported by Time Warner Cable Business Class. If you wish to use other clients, you may need the following POP or IMAP information:
• Inbound server: mail.securembox.com • Outbound server: mail.securembox.com • Username: your mailbox email address • Password: your mailbox password • Require SSL (secure connection): Yes • Outbound server requires authentication: Yes

Getting Started with Microsoft® Outlook® with Exchange: Admin Guide TWCBC Online Software Guides
Time Warner Cable Business Class is a trademark of Time Warner Inc. Used under license. ©2010 Time Warner Cable. All rights reserved. All other trademarks are the property of their respective owners.
GSG006-0910 Page 12
4. Change DNS Records
Once an e-mail client has been installed on user computers, the DNS records for your domain will need to be updated. If you host your domain with Time Warner Cable Business Class, log into your DNS management page to make the changes described in this section at https://dns-email.twcbc.com and refer to the DNS User Guide available at www.twcbc.com/ne/HelpSite/ProductSupport/dns.ashx. If you need assistance, please contact us at 1-866-442-0384. If you host your domain with another company, contact the DNS provider directly if you need assistance with changing the DNS records.
MX Records
Follow the directions for creating MX records from your domain provider. The values that need to be in the MX records are displayed in the table below:
Mail Exchange or Mail Server Priority mx01.securembox.com 10 mx02.securembox.com 20 mx03.securembox.com 30 mx04.securembox.com 40
If your domain is hosted by Time Warner Cable Business Class, then follow the instructions to create a MX record in the DNS User Guide previously referenced. You will need to create four MX records by entering the Mail Exchange and Priority values listed in the table. All other fields can be left empty.
Note that it will typically take one to twenty-four hours for the MX records to completely propagate so that all e-mails are sent to Outlook with Exchange. In the meantime, users can check mail using Outlook Web Access at https://mail.securembox.com or via the Online Software portal (see page 6).

Getting Started with Microsoft® Outlook® with Exchange: Admin Guide TWCBC Online Software Guides
Time Warner Cable Business Class is a trademark of Time Warner Inc. Used under license. ©2010 Time Warner Cable. All rights reserved. All other trademarks are the property of their respective owners.
GSG006-0910 Page 13
CNAME Record (Outlook 2007)
The CNAME record only needs to be created if you are using Outlook 2007. If you are using another version of Outlook or other e-mail clients, then skip this step.
1. Add the following DNS record for each domain hosted in our Exchange platform: autodiscover CNAME redir.securembox.com
If your domain is hosted by Time Warner Cable Business Class, then follow the instructions to create a CNAME record in the DNS User Guide previously referenced. Enter the following values:
• Alias Name: autodiscover • Canonical Name (CNAME): redir.securembox.com
2. If you have multiple domain aliases, repeat Step 1 for each domain.
3. All users with Outlook 2007 will receive a message similar to the following example:
Allow this website to configure [email protected] server settings? https://autodiscover.mycompany.com/autodiscover/autodiscover.xml
4. Have the user click the check box for Don't ask me about this website and the Allow button.
5. Users will now be able to view address book offline, free/busy information on calendars, view schedule suggestions, and enable out-of-office assistant.
*NOTE: It can take up to 48 hours for the CNAME record to take effect.

Getting Started with Microsoft® Outlook® with Exchange: Admin Guide TWCBC Online Software Guides
Time Warner Cable Business Class is a trademark of Time Warner Inc. Used under license. ©2010 Time Warner Cable. All rights reserved. All other trademarks are the property of their respective owners.
GSG006-0910 Page 14
5. Migrate Previous E-mail (Internet E-mail)
This section describes how to migrate existing Internet e-mail accounts, such as Gmail, Hotmail, and Yahoo Mail, to Outlook with Exchange Full Access. If a user has Outlook with Exchange Web Access version, the user needs an Outlook client on his computer in order to migrate e-mails. Note that the Outlook client is only available with the Full Access version.
Every step in the migration process must be followed in the order listed. If you are not familiar with Microsoft Exchange or are migrating from an in-house Exchange server or from another Hosted Exchange provider, please contact us at 1-866-442-0384 for assistance.
1. All users that will be migrating to the Outlook with Exchange e-mail service must be added and assigned the Outlook with Exchange service from the Online Software portal as described in the Activate & Setup Online Software Account section (page 4).
To verify which users have been assigned Outlook, click on the MANAGE ACCOUNT tab at the top menu bar. In the Services section, a table of all services available for your account is listed. Underneath the Outlook with Exchange link, a list of assigned users for this service is provided.
2. Install and configure Microsoft Outlook or Entourage client on all user computers that will have their e-mails migrated as described in the Download & Install E-mail Client section (page 7).
3. Create a new profile.
a. From the user’s computer, click on Start in the taskbar. Select Settings and then Control Panel.
b. Click on Mail and then Show Profiles.

Getting Started with Microsoft® Outlook® with Exchange: Admin Guide TWCBC Online Software Guides
Time Warner Cable Business Class is a trademark of Time Warner Inc. Used under license. ©2010 Time Warner Cable. All rights reserved. All other trademarks are the property of their respective owners.
GSG006-0910 Page 15
c. Select Add to create a profile for the Internet e-mail account. Type in a name, such as “Internet E-mail,” and select OK.
d. In the Add New E-mail Account window, click on Cancel. Click OK to create the profile without an e-mail account. You will provide this information in a later step.
e. Select Prompt for a profile to be used and click Apply. Click OK to exit.
Getting Started with Microsoft® Outlook® with Exchange: Admin Guide TWCBC Online Software Guides
Time Warner Cable Business Class is a trademark of Time Warner Inc. Used under license. ©2010 Time Warner Cable. All rights reserved. All other trademarks are the property of their respective owners.
GSG006-0910 Page 16
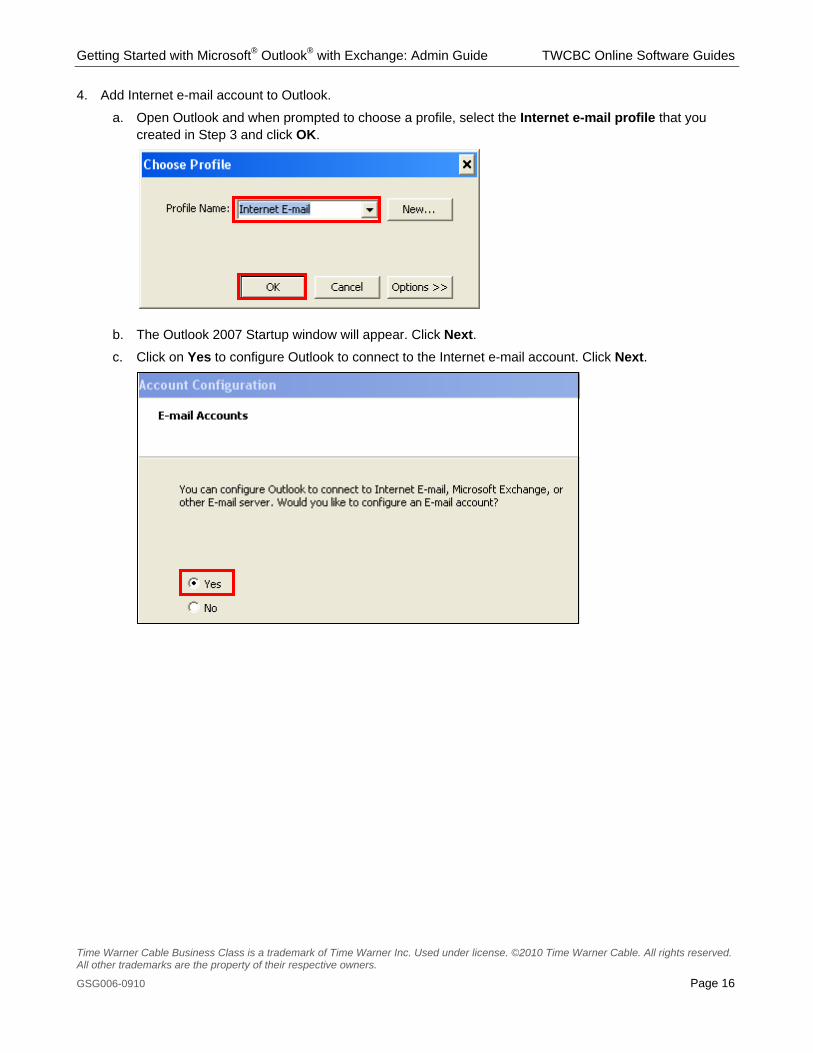
4. Add Internet e-mail account to Outlook.
a. Open Outlook and when prompted to choose a profile, select the Internet e-mail profile that you created in Step 3 and click OK.
b. The Outlook 2007 Startup window will appear. Click Next. c. Click on Yes to configure Outlook to connect to the Internet e-mail account. Click Next.
Getting Started with Microsoft® Outlook® with Exchange: Admin Guide TWCBC Online Software Guides
Time Warner Cable Business Class is a trademark of Time Warner Inc. Used under license. ©2010 Time Warner Cable. All rights reserved. All other trademarks are the property of their respective owners.
GSG006-0910 Page 17
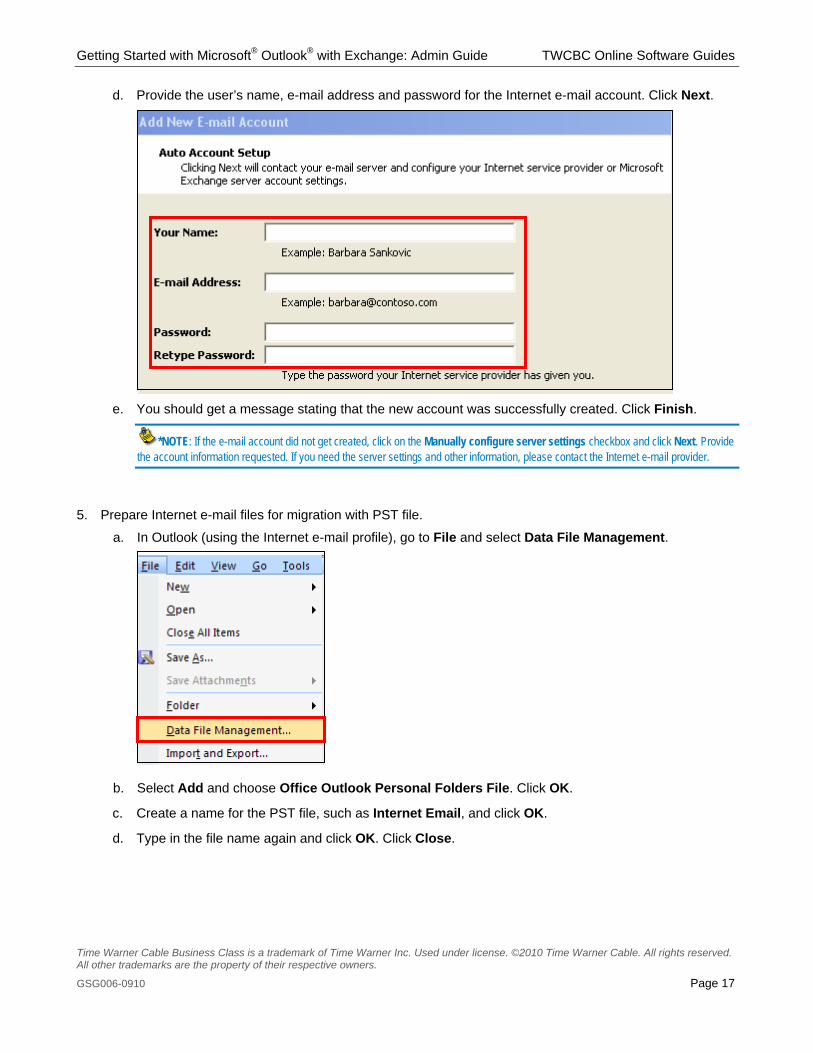
d. Provide the user’s name, e-mail address and password for the Internet e-mail account. Click Next.
e. You should get a message stating that the new account was successfully created. Click Finish.
*NOTE: If the e-mail account did not get created, click on the Manually configure server settings checkbox and click Next. Provide the account information requested. If you need the server settings and other information, please contact the Internet e-mail provider.
5. Prepare Internet e-mail files for migration with PST file.
a. In Outlook (using the Internet e-mail profile), go to File and select Data File Management.
b. Select Add and choose Office Outlook Personal Folders File. Click OK.
c. Create a name for the PST file, such as Internet Email, and click OK.
d. Type in the file name again and click OK. Click Close.

Getting Started with Microsoft® Outlook® with Exchange: Admin Guide TWCBC Online Software Guides
Time Warner Cable Business Class is a trademark of Time Warner Inc. Used under license. ©2010 Time Warner Cable. All rights reserved. All other trademarks are the property of their respective owners.
GSG006-0910 Page 18
e. Go to Inbox and select a message. Then press Ctrl A on your keyboard to select all messages. Drag and drop the highlighted messages into the PST folder you just created.
f. Click on the Calendar bar at the bottom of the screen.
Getting Started with Microsoft® Outlook® with Exchange: Admin Guide TWCBC Online Software Guides
Time Warner Cable Business Class is a trademark of Time Warner Inc. Used under license. ©2010 Time Warner Cable. All rights reserved. All other trademarks are the property of their respective owners.
GSG006-0910 Page 19
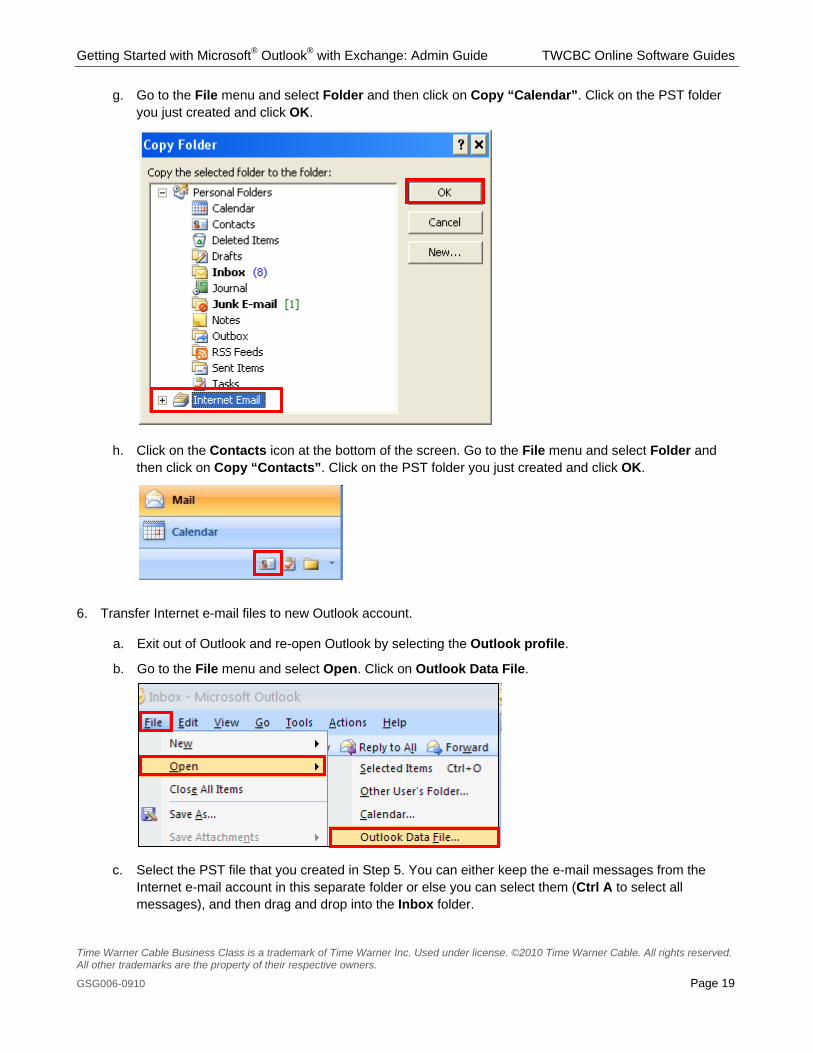
g. Go to the File menu and select Folder and then click on Copy “Calendar”. Click on the PST folder you just created and click OK.
h. Click on the Contacts icon at the bottom of the screen. Go to the File menu and select Folder and then click on Copy “Contacts”. Click on the PST folder you just created and click OK.
6. Transfer Internet e-mail files to new Outlook account.
a. Exit out of Outlook and re-open Outlook by selecting the Outlook profile.
b. Go to the File menu and select Open. Click on Outlook Data File.
c. Select the PST file that you created in Step 5. You can either keep the e-mail messages from the Internet e-mail account in this separate folder or else you can select them (Ctrl A to select all messages), and then drag and drop into the Inbox folder.
Getting Started with Microsoft® Outlook® with Exchange: Admin Guide TWCBC Online Software Guides
Time Warner Cable Business Class is a trademark of Time Warner Inc. Used under license. ©2010 Time Warner Cable. All rights reserved. All other trademarks are the property of their respective owners.
GSG006-0910 Page 20
7. Delete the Internet e-mail account configuration and change profile.
a. Exit out of Outlook and re-open Outlook by selecting the Internet e-mail profile.
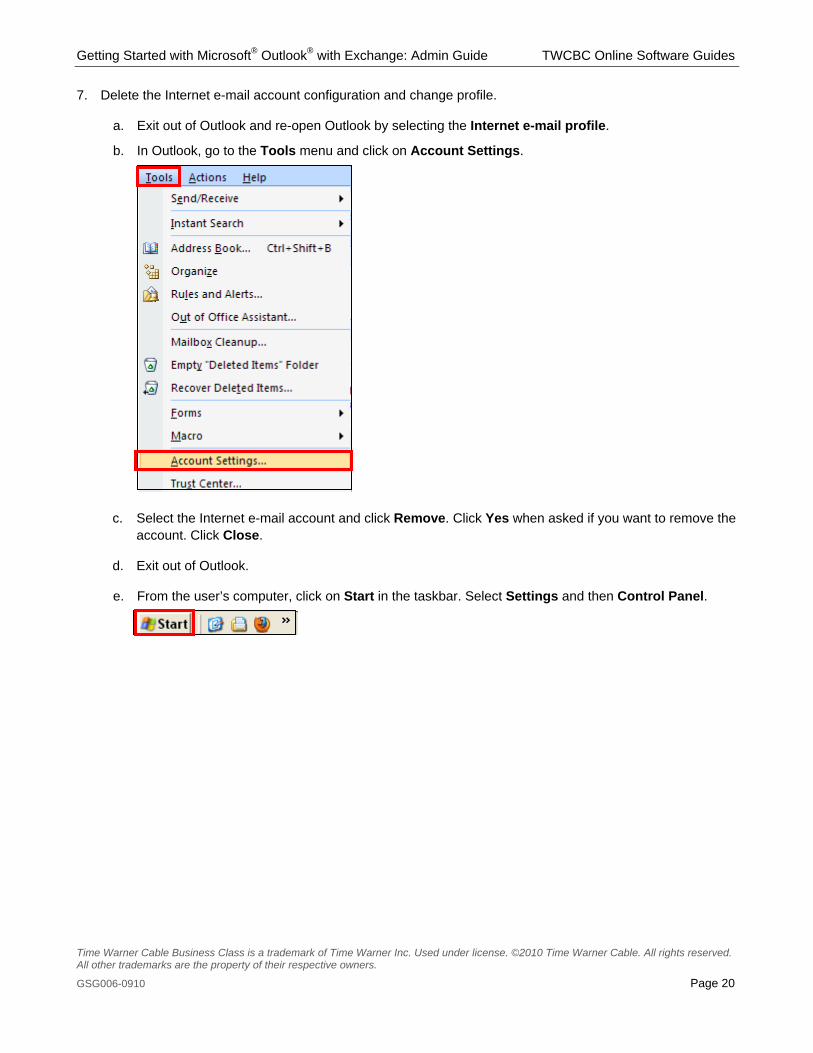
b. In Outlook, go to the Tools menu and click on Account Settings.
c. Select the Internet e-mail account and click Remove. Click Yes when asked if you want to remove the account. Click Close.
d. Exit out of Outlook.
e. From the user’s computer, click on Start in the taskbar. Select Settings and then Control Panel.

Getting Started with Microsoft® Outlook® with Exchange: Admin Guide TWCBC Online Software Guides
Time Warner Cable Business Class is a trademark of Time Warner Inc. Used under license. ©2010 Time Warner Cable. All rights reserved. All other trademarks are the property of their respective owners.
GSG006-0910 Page 21
f. Click on Mail and then Show Profiles.
g. Select Always use this profile and make sure it has the Outlook account. Select Apply and then click on OK.
Getting Started with Microsoft® Outlook® with Exchange: Admin Guide TWCBC Online Software Guides
Time Warner Cable Business Class is a trademark of Time Warner Inc. Used under license. ©2010 Time Warner Cable. All rights reserved. All other trademarks are the property of their respective owners.
GSG006-0910 Page 22
6. Connect to Mobile Devices
All users that have Outlook Full Access can connect Outlook to their mobile devices using ActiveSync®. For BlackBerry® users, follow the steps in the BlackBerry section.
ActiveSync
ActiveSync allows users to access Outlook with Exchange through mobile devices that are compatible with ActiveSync, which includes iPhone®, iPad™, Windows Mobile, Android™ and Palm® devices. ActiveSync is included with the Outlook with Exchange Full Access version and can be used to automatically synchronize e-mail, contacts, calendar and other information from Outlook to mobile devices.
Due to the large number of phones that offer ActiveSync access, it is not possible to provide detailed instructions for all devices. However, the instructions that are described for Windows Mobile and iPhone devices will generally be applicable across other devices. For specific details on other models, please review the device’s owner manual.
Regardless of the device type, the following information will need to be entered into the device to set up ActiveSync:
• Server: mail.securembox.com • Username: [user’s Outlook e-mail address] • Password: [user’s Outlook password] • Requires SSL: [Make sure this is checked or selected] • Domain Name: shared
Configure Windows Mobile 5.0+ Device
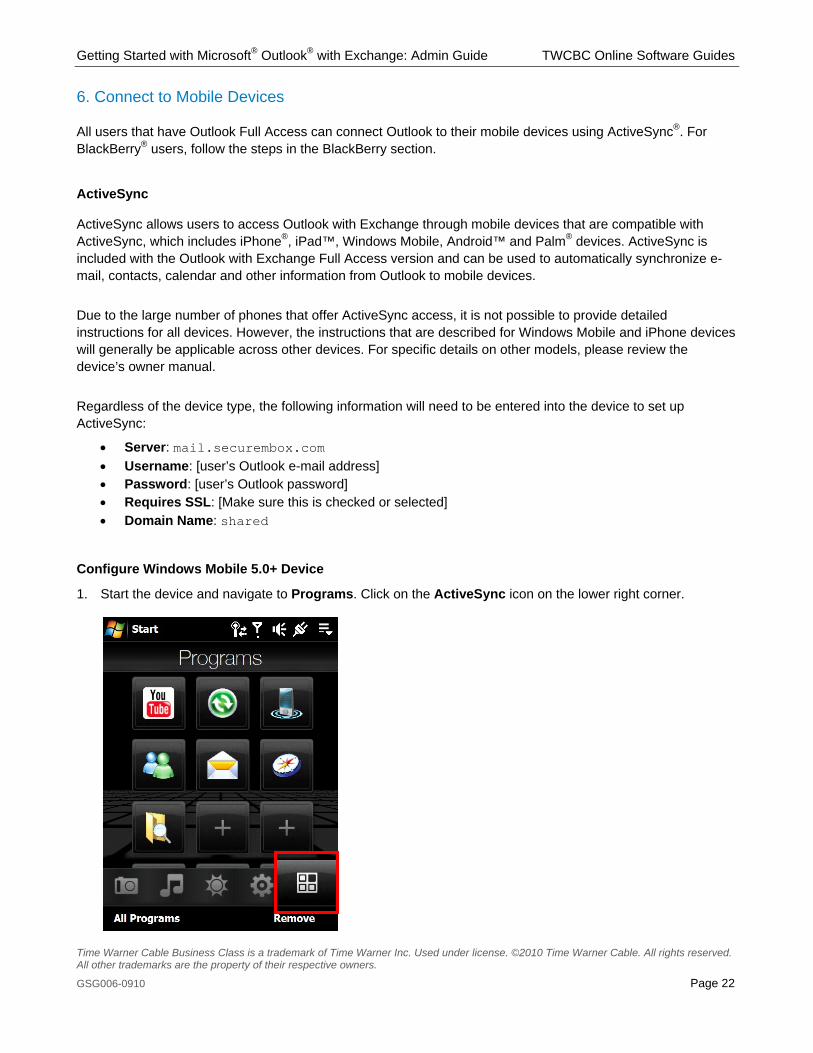
1. Start the device and navigate to Programs. Click on the ActiveSync icon on the lower right corner.

Getting Started with Microsoft® Outlook® with Exchange: Admin Guide TWCBC Online Software Guides
Time Warner Cable Business Class is a trademark of Time Warner Inc. Used under license. ©2010 Time Warner Cable. All rights reserved. All other trademarks are the property of their respective owners.
GSG006-0910 Page 23
2. Click on “set up your device to sync with it” link or else go to Menu and select Configure Server option.
3. When prompted for the Server Address, type in the mail.securembox.com. Make sure that “This server requires an encrypted (SSL) connection” checkbox is selected. Click Next.
mail.securembox.com
Getting Started with Microsoft® Outlook® with Exchange: Admin Guide TWCBC Online Software Guides
Time Warner Cable Business Class is a trademark of Time Warner Inc. Used under license. ©2010 Time Warner Cable. All rights reserved. All other trademarks are the property of their respective owners.
GSG006-0910 Page 24
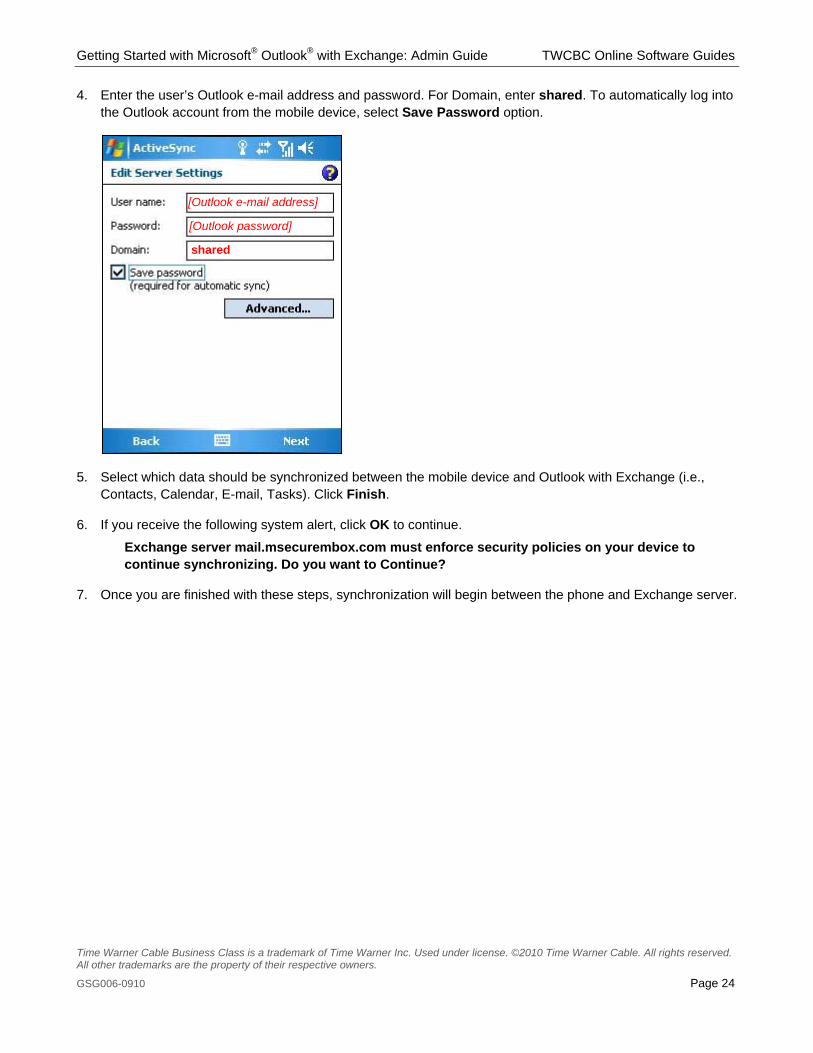
4. Enter the user’s Outlook e-mail address and password. For Domain, enter shared. To automatically log into the Outlook account from the mobile device, select Save Password option.
5. Select which data should be synchronized between the mobile device and Outlook with Exchange (i.e., Contacts, Calendar, E-mail, Tasks). Click Finish.
6. If you receive the following system alert, click OK to continue.
Exchange server mail.msecurembox.com must enforce security policies on your device to continue synchronizing. Do you want to Continue?
7. Once you are finished with these steps, synchronization will begin between the phone and Exchange server.
shared
[Outlook e-mail address]
[Outlook password]

Getting Started with Microsoft® Outlook® with Exchange: Admin Guide TWCBC Online Software Guides
Time Warner Cable Business Class is a trademark of Time Warner Inc. Used under license. ©2010 Time Warner Cable. All rights reserved. All other trademarks are the property of their respective owners.
GSG006-0910 Page 25
Configure iPhone 3.0
1. Backup contact and calendar data since the data will be erased during the ActiveSync setup process.
2. Select the Settings icon.
3. Go to Mail, Contacts, Calendars.
Getting Started with Microsoft® Outlook® with Exchange: Admin Guide TWCBC Online Software Guides
Time Warner Cable Business Class is a trademark of Time Warner Inc. Used under license. ©2010 Time Warner Cable. All rights reserved. All other trademarks are the property of their respective owners.
GSG006-0910 Page 26
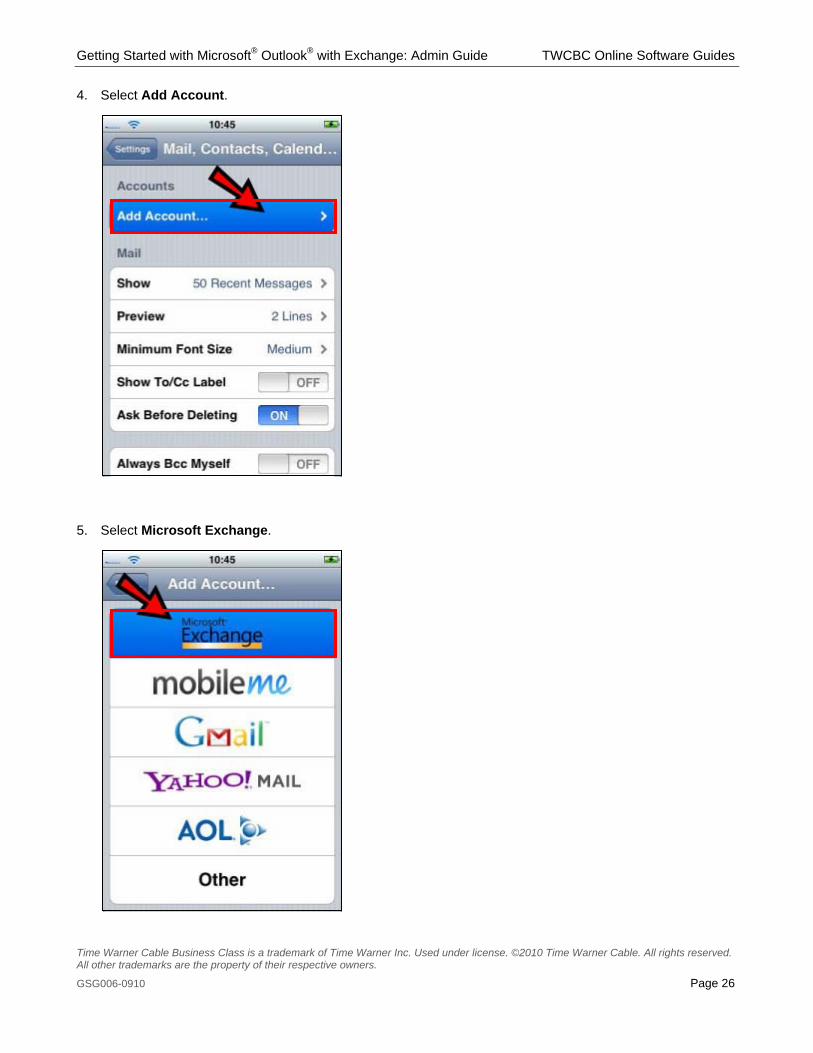
4. Select Add Account.
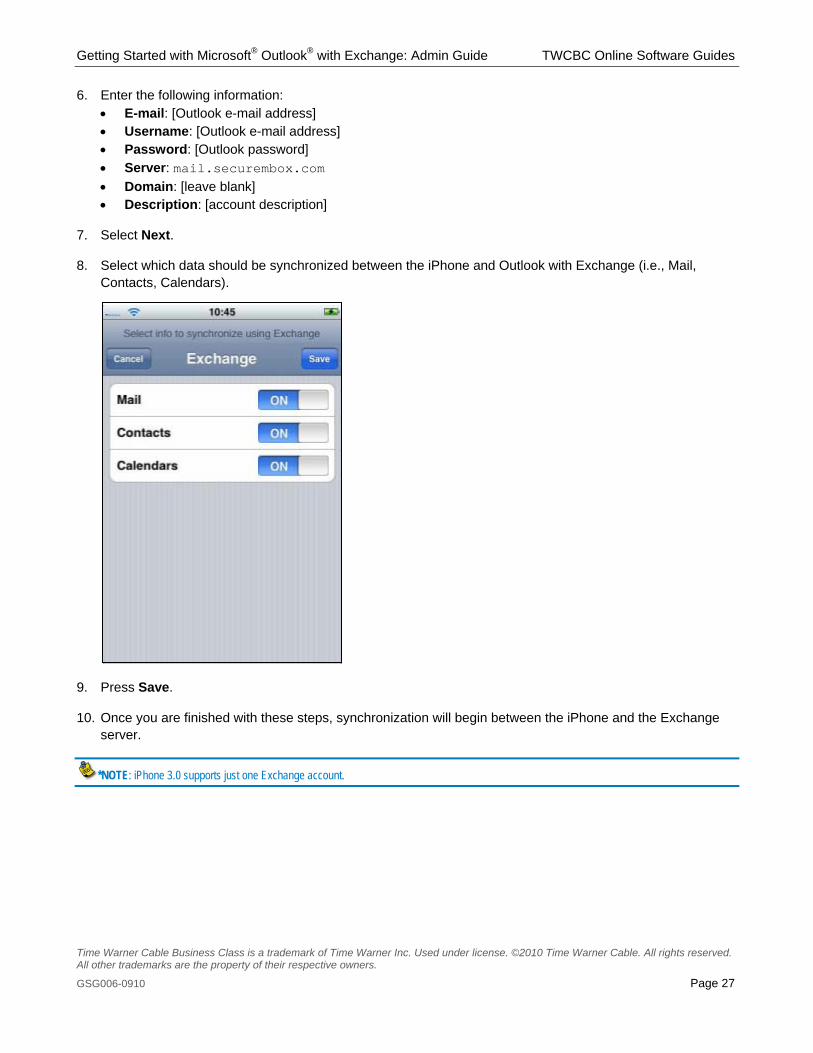
5. Select Microsoft Exchange.
Getting Started with Microsoft® Outlook® with Exchange: Admin Guide TWCBC Online Software Guides
Time Warner Cable Business Class is a trademark of Time Warner Inc. Used under license. ©2010 Time Warner Cable. All rights reserved. All other trademarks are the property of their respective owners.
GSG006-0910 Page 27
6. Enter the following information: • E-mail: [Outlook e-mail address] • Username: [Outlook e-mail address] • Password: [Outlook password] • Server: mail.securembox.com • Domain: [leave blank] • Description: [account description]
7. Select Next.
8. Select which data should be synchronized between the iPhone and Outlook with Exchange (i.e., Mail, Contacts, Calendars).
9. Press Save.
10. Once you are finished with these steps, synchronization will begin between the iPhone and the Exchange server.
*NOTE: iPhone 3.0 supports just one Exchange account.

Getting Started with Microsoft® Outlook® with Exchange: Admin Guide TWCBC Online Software Guides
Time Warner Cable Business Class is a trademark of Time Warner Inc. Used under license. ©2010 Time Warner Cable. All rights reserved. All other trademarks are the property of their respective owners.
GSG006-0910 Page 28
BlackBerry Access Add-On
Users can access Outlook with Exchange through their BlackBerry devices using the BlackBerry Access Add-on. The add-on provides connectivity to the BlackBerry Enterprise Server (BES) for real-time synchronization between a BlackBerry device and Outlook with Exchange.
Activate Device for the First Time
The following activation steps must be done within 72 hours of activating the BlackBerry licenses on the Online Software portal. If these steps are not done within 72 hours, the service will have to be un-assigned and then re-assigned to the user in the Online Software portal.
1. Activate licenses for BlackBerry Access and assign the service to users as detailed in the Activate & Setup Online Software Account section.
2. Perform a “hard reset” of the BlackBerry device to restore the phone to factory default settings. A hard reset will erase all stored data so back up any data you wish to save. For details, see the device’s owner manual.
3. From the BlackBerry device’s home screen, select Applications and then Options. Next go to Advanced Options and then Enterprise Activation.
4. Enter the user’s Outlook e-mail address. For the password, enter: 1234. Click on Activate.
5. Initial synchronization will begin and can take 5 to 30 minutes depending on the amount of information on the server.
[Outlook e-mail address] 1234
Getting Started with Microsoft® Outlook® with Exchange: Admin Guide TWCBC Online Software Guides
Time Warner Cable Business Class is a trademark of Time Warner Inc. Used under license. ©2010 Time Warner Cable. All rights reserved. All other trademarks are the property of their respective owners.
GSG006-0910 Page 29
Activate Access on a Different BlackBerry Device
If a user changes BlackBerry device, the BlackBerry service will need to be un-assigned and then re-assigned to the user through the Online Software portal. The new device will need to be activated within 72 hours of re-assigning BlackBerry on the Online Software portal or else the following steps will have to be repeated.
1. Perform a “hard reset” on both the old and new BlackBerry devices to restore the phone to factory default settings. A hard reset will erase all stored data so back up any data you wish to save. For details, see the device’s owner manual.
2. Within the Online Software portal, go to the Manage Users page by clicking on MANAGE ACCOUNT from the top blue menu and then select Users in the gray menu bar.
3. Find the user who is changing devices from the list of users. Click on the Manage Services link in the
“Services” column. Beside the BlackBerry Access service, select the icon to un-assign the service.
4. Go back to the Manage Users page and click on the checkbox beside the user name. Click on the blue ASSIGN SERVICES button. Select BlackBerry Access and then click on the SUBMIT button to re-assign the service.
5. On the new BlackBerry device, go to Options. Then select Advanced Options and click on Enterprise Activation.
6. Enter the user’s Outlook e-mail address. For the password, enter: 1234. Initial synchronization will begin.
Still need help?
Refer to the links available in the Setting Up Services or the Support sections in the Online Software portal home page. If you still need help setting up Online Software, contact us at 1-866-442-0384.
Related Documents


