Online GDR System Vendor User Guide April 2015

Welcome message from author
This document is posted to help you gain knowledge. Please leave a comment to let me know what you think about it! Share it to your friends and learn new things together.
Transcript

Online GDR System Vendor User Guide
April 2015

Online GDR System Page 2 of 15
TABLE OF CONTENTS
1 OVERVIEW ............................................................................................................................................ 3
2 PROCESS FLOWCHART...................................................................................................................... 4
3 LOGGING INTO THE ONLINE GDR SYSTEM ..................................................................................... 4
4 SEARCHING TICKETS ......................................................................................................................... 7
5 ADDING / VIEWING NOTES ................................................................................................................. 9
6 CLOSED TICKETS .............................................................................................................................. 12
7 GDR REPORT ..................................................................................................................................... 13
7.1 EXPORTING SEARCH RESULTS TO MICROSOFT EXCEL ..................................................................... 14

Online GDR System Page 3 of 15
1 OVERVIEW
The Online GTIN Discrepancy Reporting System (Online GDR System) is an interactive and online interface for tracking and resolving product data errors reported by your trading partners. The Online GDR System simplifies the GTIN discrepancy reporting process by allowing you to:
Access a master list of GTIN discrepancies, 24 hours a day/ 7 days a week, quickly and easily Track the status of GTIN discrepancies Exchange notes with your trading partners to resolve outstanding issues Extract information into Microsoft Excel for analysis
Once a retailer submits a discrepancy, an email notification is automatically sent to the vendor. Upon receipt of the email notification, the vendor logs into the Online GDR System to review the discrepancy details and add notes regarding the status of the GDR. Notes are the sole method of communication between GS1 Canada Support, the vendor and retailer regarding GTIN discrepancies. Examples of notes are:
Vendor specifies the steps required to resolve a given issue Vendor notifies that the issue is resolved Vendor requests/provides additional information Retailer requests/provides additional information Retailer notifies that a given issue is still outstanding GS1 Canada Support requests/provides additional information
As notes are added, an email notification is sent to the relevant parties advising them that updates are available for a given ticket. All communication between vendors, retailers and GS1 Canada Support is facilitated through the Notes section of the Online GDR System and not by emailing the relevant parties directly. This ensures that the history of all communications is stored in one centralized location and can be referred to quickly and easily. Once the vendor has added a note indicating that a given issue has been resolved, GS1 Canada will review and confirm the updates before changing the status to one of the following:
Import Pending – the corrected data is currently being imported into the Retailer’s systems
Pending Close – the corrected data is available for the Retailer within their systems
Open – the discrepancy remains outstanding, GS1 Canada Support will send a note notifying vendor that the status has not changed
The retailer is responsible for identifying when a discrepancy has been resolved and updating the status of the ticket to “Closed”.
Online GDR System Page 4 of 15
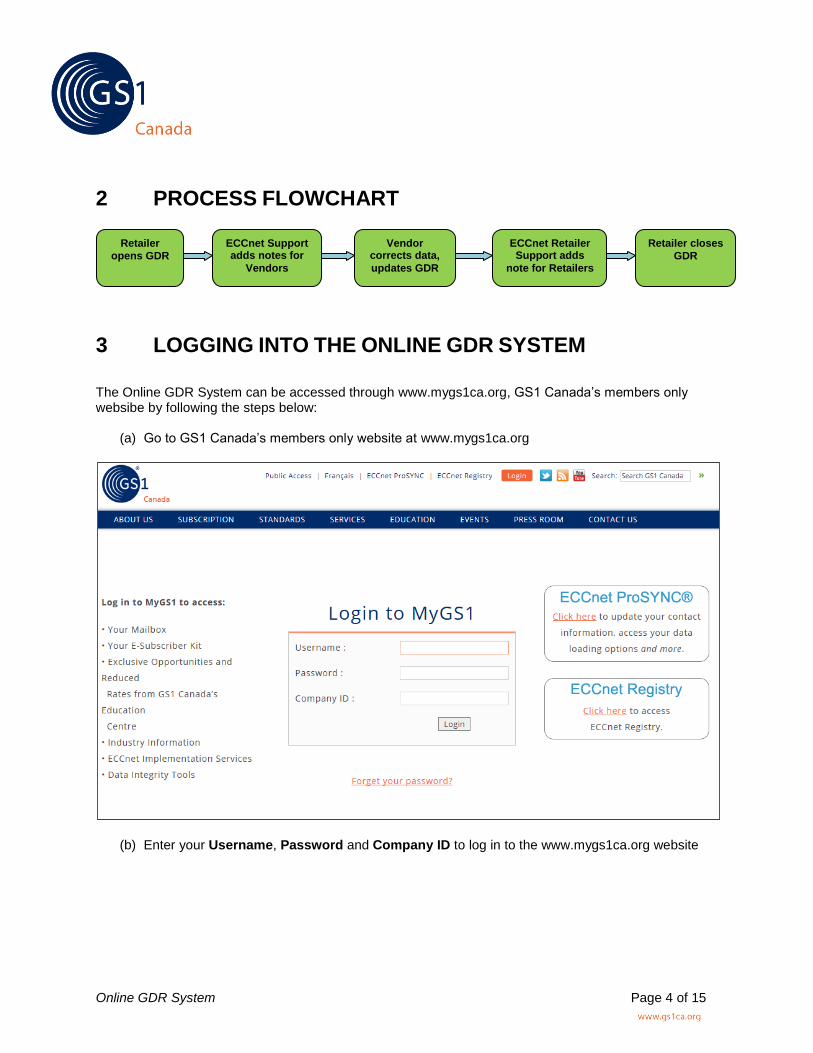
2 PROCESS FLOWCHART
3 LOGGING INTO THE ONLINE GDR SYSTEM
The Online GDR System can be accessed through www.mygs1ca.org, GS1 Canada’s members only websibe by following the steps below:
(a) Go to GS1 Canada’s members only website at www.mygs1ca.org
(b) Enter your Username, Password and Company ID to log in to the www.mygs1ca.org website
Retailer
opens GDR
ECCnet Support adds notes for
Vendors
Vendor corrects data,
updates GDR
ECCnet Retailer Support adds
note for Retailers
Retailer closes
GDR

Online GDR System Page 5 of 15
(c) Under the E-Subscriber Kit, click “GTIN Discrepancy Reporting”
(d) On the Onling GTIN Discrepancy Reporting Process page, click the “Click here” link

Online GDR System Page 6 of 15
The Online GDR System’s main menu displays the following options:
Home
This option allows you to return to the Online GDR system’s main menu
Search Ticket This option allows you to search for tickets using individual search criteria
GDR Report
This option allows you to search for tickets using combined search criteria
Logout This option allows you to logout of the Online GDR System
The current user’s vendor company name Current User Name
logged into the Online GDR System
Main Menu options
VENDOR COMPANY NAME JOHN SMITH

Online GDR System Page 7 of 15
4 SEARCHING TICKETS
In the Online GDR System, each discrepancy report represents a ticket. Once a ticket has been submitted by a retailer, the vendor an email notification (see example below). The system provides different search functions to retrieve ticket and/or incident information. To view the details of the ticket submitted, the vendor can search within the Online GDR by ticket number, GTIN, retailer company, etc.

Online GDR System Page 8 of 15
From the Search Ticket screen, you can perform searches using different criteria, including:
1. Click on the appropriate option and enter/select the search criteria in the appropriate field.
Search Criteria Description
Ticket No. Enter the ticket number as a numeric value (e.g. 92)
Retailer Name Select the appropriate retailer name from the drop-down menu
GTIN Enter the full GTIN number as a numeric value
GTIN Description Enter the full GTIN description
Problem Type Select the appropriate problem type from the drop-down menu
Incident Status Select the appropriate Incident status from the drop-down menu
Notes Updated Specify the date range during which notes were added to the tickets
Ticket Create Date Specify the date range during which the ticket was created
2. Click on “Search” to display the search results.
3. Click on the Ticket No. to view the ticket details.
Choose the appropriate searching option
Enter/Select the search criteria
Click on “Search” to display the results
Click on the “Ticket No.” to view the ticket details

Online GDR System Page 9 of 15
5 ADDING / VIEWING NOTES
Notes are used within the Online GDR System to communicate with vendors and GS1 Canada Support. Once a discrepancy has been resolved, the vendor must add a note informing the retailer and GS1 Canada Support of the resolution. An email is then sent to the retailer and GS1 Canada Support notifying them that the ticket has been updated. All communication between vendors, retailers and GS1 Canada Support is facilitated through the Notes section and not by emailing the relevant parties directly. This will ensure that the history of all communications is stored in one centralized location and can be referred to quickly and easily. Examples of vendor notes are:
Vendor requires/provides additional information Vendor notifies that the issue has been resolved
A note can be added by following the steps below:
1. Search for a given ticket using the “Search Ticket” function. 2. Click on “Ticket No.” to view the ticket details.
Click on “Detail” to view existing notes or to close the ticket
Click on “Add Notes” to add notes for vendors and/or GS1 Canada Support

Online GDR System Page 10 of 15
3. Click on “Add Notes”.
Click on “Add Notes” to add notes for the retail and/or GS1 Canada Support
Type in your comments in the “Note” section before clicking on “Submit”

Online GDR System Page 11 of 15
Comments added by the retailer, the vendor and/or GS1 Canada Support can be reviewed through the Notes section.
1. Search for the ticket using the “Search Ticket” function. 2. Click on “Ticket No.” to view the ticket’s details.
3. Click on “Detail” to view existing notes.
4. Review the notes that have been added and if necessary respond by adding another note.
Click on “Detail” to view existing notes
Review notes that have been added by the retailer, the vendor and/or GS1 Canada Support

Online GDR System Page 12 of 15
6 CLOSED TICKETS
When first submitted, a ticket is assigned the status “Open”. Once the vendor confirms that the discrepancy has been corrected by adding a note, GS1 Canada Support will review and confirm the changes before updating the status of the ticket to one the following:
Import Pending – The vendor notifies that a change has been made. However the change is still not available in the retailer’s environment because it is pending export/import.
Pending Close – The change has been exported/imported to the retailer’s environment and can therefore be reviewed by the retailer, who must confirm whether the issue has been resolved or is still outstanding.
Open – The discrepancy remains outstanding. GS1 Canada Support will send a note notifying the vendor that the status has not changed
The retailer is responsible for making the final decision of when a given discrepancy has been resolved. This will be shown when the retailer updates the status of the ticket to “Closed”
Closed - The change has been verified by the retailer, who has confirmed that the issue has been resolved.
The vendor will receive follow-up email notifications until a given issue has been resolved.

Online GDR System Page 13 of 15
7 GDR REPORT
The GDR Report allows searches using two or more of the following fields as combined search criteria:
Date Range (when the ticket was created) Problem Type Vendor Name Ticket Status.
1. Enter the appropriate search criteria for the GDR report
2. Click on “Show Report”
The report displays the number of GTIN Discrepancy Reports matching the criteria.
Enter/Select the search criteria
Number of tickets matching the search criteria

Online GDR System Page 14 of 15
7.1 Exporting search results to Microsoft Excel
The search results from the Search Ticket and the GDR Report functions can be exported into Microsoft Excel. 1. Click on the “Export to Excel” link located on the top right side of the search results.
2. Choose whether to “Save” or “Open” the Microsoft Excel report
Once the data has been exported to Microsoft Excel, it can be manipulated to generate statistics and reports for analysis.
Click on “Export to Excel” to show search results in Microsoft Excel

Related Documents