Safeguard for Privileged Passwords 6.6 Evaluation Guide

Welcome message from author
This document is posted to help you gain knowledge. Please leave a comment to let me know what you think about it! Share it to your friends and learn new things together.
Transcript
Safeguard for Privileged Passwords 6.6
Evaluation Guide

Copyright 2020 One Identity LLC.
ALL RIGHTS RESERVED.
This guide contains proprietary information protected by copyright. The software described in this guideis furnished under a software license or nondisclosure agreement. This software may be used or copiedonly in accordance with the terms of the applicable agreement. No part of this guide may be reproducedor transmitted in any form or by any means, electronic or mechanical, including photocopying andrecording for any purpose other than the purchaser’s personal use without the written permission ofOne Identity LLC .The information in this document is provided in connection with One Identity products. No license,express or implied, by estoppel or otherwise, to any intellectual property right is granted by thisdocument or in connection with the sale of One Identity LLC products. EXCEPT AS SET FORTH IN THETERMS AND CONDITIONS AS SPECIFIED IN THE LICENSE AGREEMENT FOR THIS PRODUCT,ONE IDENTITY ASSUMES NO LIABILITYWHATSOEVER AND DISCLAIMS ANY EXPRESS, IMPLIED ORSTATUTORYWARRANTY RELATING TO ITS PRODUCTS INCLUDING, BUT NOT LIMITED TO, THEIMPLIEDWARRANTY OF MERCHANTABILITY, FITNESS FOR A PARTICULAR PURPOSE, OR NON-INFRINGEMENT. IN NO EVENT SHALL ONE IDENTITY BE LIABLE FOR ANY DIRECT, INDIRECT,CONSEQUENTIAL, PUNITIVE, SPECIAL OR INCIDENTAL DAMAGES (INCLUDING,WITHOUTLIMITATION, DAMAGES FOR LOSS OF PROFITS, BUSINESS INTERRUPTION OR LOSS OFINFORMATION) ARISING OUTOF THE USE OR INABILITY TOUSE THIS DOCUMENT, EVEN IFONE IDENTITY HAS BEEN ADVISED OF THE POSSIBILITY OF SUCH DAMAGES. One Identity makes norepresentations or warranties with respect to the accuracy or completeness of the contents of thisdocument and reserves the right to make changes to specifications and product descriptions at anytime without notice. One Identity does not make any commitment to update the informationcontained in this document.If you have any questions regarding your potential use of this material, contact:
One Identity LLC.Attn: LEGAL Dept4 Polaris WayAliso Viejo, CA 92656
Refer to our Web site (http://www.OneIdentity.com) for regional and international office information.
Patents
One Identity is proud of our advanced technology. Patents and pending patents may apply to thisproduct. For the most current information about applicable patents for this product, please visit ourwebsite at http://www.OneIdentity.com/legal/patents.aspx.
Trademarks
One Identity and the One Identity logo are trademarks and registered trademarks of One IdentityLLC. in the U.S.A. and other countries. For a complete list of One Identity trademarks, please visitour website at www.OneIdentity.com/legal. All other trademarks are the property of theirrespective owners.
Legend
WARNING: A WARNING icon highlights a potential risk of bodily injury or propertydamage, for which industry-standard safety precautions are advised. This icon isoften associated with electrical hazards related to hardware.
CAUTION: A CAUTION icon indicates potential damage to hardware or loss of data ifinstructions are not followed.
Safeguard for Privileged Passwords Evaluation GuideUpdated - May 2020Version - 6.6
Contents
Introduction 5
Introduction to Safeguard for Privileged Passwords 5
Overview of the entities 7
Key features 13
Setting up Safeguard for Privileged Passwords 17
Setting up the hardware appliance 17
Setting up the virtual appliance 20
Completing the appliance setup 24
Creating authorizor admin and local admin users 28
Configuring external integration settings 30
Setting up a Starling account 30
Joining Starling 31
Setting up email notifications 32
Creating local users 33
Adding assets and accounts 34
Writing entitlements 36
Adding password release request policies 37
Adding session request policies 40
Password release workflow exercises 43
Exercise 1: Testing the password release workflow 43
Exercise 2: Testing time restrictions 46
Exercise 3: Testing priorities 47
Auditing exercises 50
Exercise 1: Creating audit data 51
Exercise 2: Accessing the Password Archive 52
Exercise 3: Viewing the Check and Change log 52
Exercise 4: Viewing the History tab 53
Exercise 5: Using the Activity Center 53
Exercise 6: Auditing access requests 54
Exercise 7: Running entitlement reports 54
Safeguard for Privileged Passwords 6.6 Evaluation Guide3
Discovery exercises 56
Exercise 1: Discovering assets 56
Exercise 2: Discovering accounts 58
About us 60
Contacting us 60
Technical support resources 60
Index 61
Safeguard for Privileged Passwords 6.6 Evaluation Guide4

1
Introduction
The Safeguard for Privileged Passwords Evaluation Guide steps you through a self-directed,hands-on demonstration of the core features of Safeguard for Privileged Passwords andwill enable you to perform a proof of concept (POC) of its capabilities in your own test lab
Introduction to Safeguard forPrivileged Passwords
The Safeguard for Privileged Passwords 3000 and 2000 Appliances are built specificallyfor use only with the Safeguard for Privileged Passwords privileged managementsoftware, which is pre-installed and ready for immediate use. The appliance is hardenedto ensure the system is secured at the hardware, operating system, and software levels.The hardened appliance approach protects the privileged management software fromattacks while simplifying deployment and ongoing management and shortening the timeframe to value.
Safeguard for Privileged Passwords virtual appliances and cloud applications are alsoavailable. When setting up a virtual environment, carefully consider the configurationaspects such as CPU, memory availability, I/O subsystem, and network infrastructure toensure the virtual layer has the necessary resources available. See One Identity's ProductSupport Policies for more information on environment virtualization.
Safeguard privileged management software suite
Safeguard privileged management software is used to control, monitor, and governprivileged user accounts and activities to identify possible malicious activities, detectentitlement risks, and provide tamper proof evidence. The Safeguard products also aidincident investigation, forensics work, and compliance efforts.
The Safeguard products' unique strengths are:
l One-stop solution for all privileged access management needs
l Easy to deploy and integrate
l Unparalleled depth of recording
Safeguard for Privileged Passwords 6.6 Evaluation Guide
Introduction5
l Comprehensive risk analysis of entitlements and activities
l Thorough Governance for privileged account
The suite includes the following modules:
l Safeguard for Privileged Passwords automates, controls, and secures theprocess of granting privileged credentials with role-based access management andautomated workflows. Deployed on a hardened appliance, Safeguard for PrivilegedPasswords eliminates concerns about secured access to the solution itself, whichhelps to speed integration with your systems and IT strategies. Plus, its user-centered design means a small learning curve and the ability to manage passwordsfrom anywhere and using nearly any device. The result is a solution that securesyour enterprise and enables your privileged users with a new level of freedom andfunctionality.
l One Identity for Privileged Sessions is part of One Identity's Privileged AccessManagement portfolio. Addressing large enterprise needs, Safeguard for PrivilegedSessions is a privileged session management solution, which provides industry-leading access control, as well as session monitoring and recording to preventprivileged account misuse, facilitate compliance, and accelerate forensicsinvestigations.
Safeguard for Privileged Sessions is a quickly deployable enterprise appliance,completely independent from clients and servers to integrate seamlessly intoexisting networks. It captures the activity data necessary for user profiling andenables full user session drill-down for forensics investigations.
l One Identity Safeguard for Privileged Analytics integrates data fromSafeguard for Privileged Sessions to use as the basis of privileged user behavioranalysis. Safeguard for Privileged Analytics uses machine learning algorithms toscrutinize behavioral characteristics, and generates user behavior profiles for eachindividual privileged user. Safeguard for Privileged Analytics compares actual useractivity to user profiles in real time, and profiles are continually adjusted usingmachine learning. Safeguard for Privileged Analytics detects anomalies and ranksthem based on risk so you can prioritize and take appropriate action and ultimatelyprevent data breaches.
Safeguard for Privileged Passwords 6.6 Evaluation Guide
Introduction6
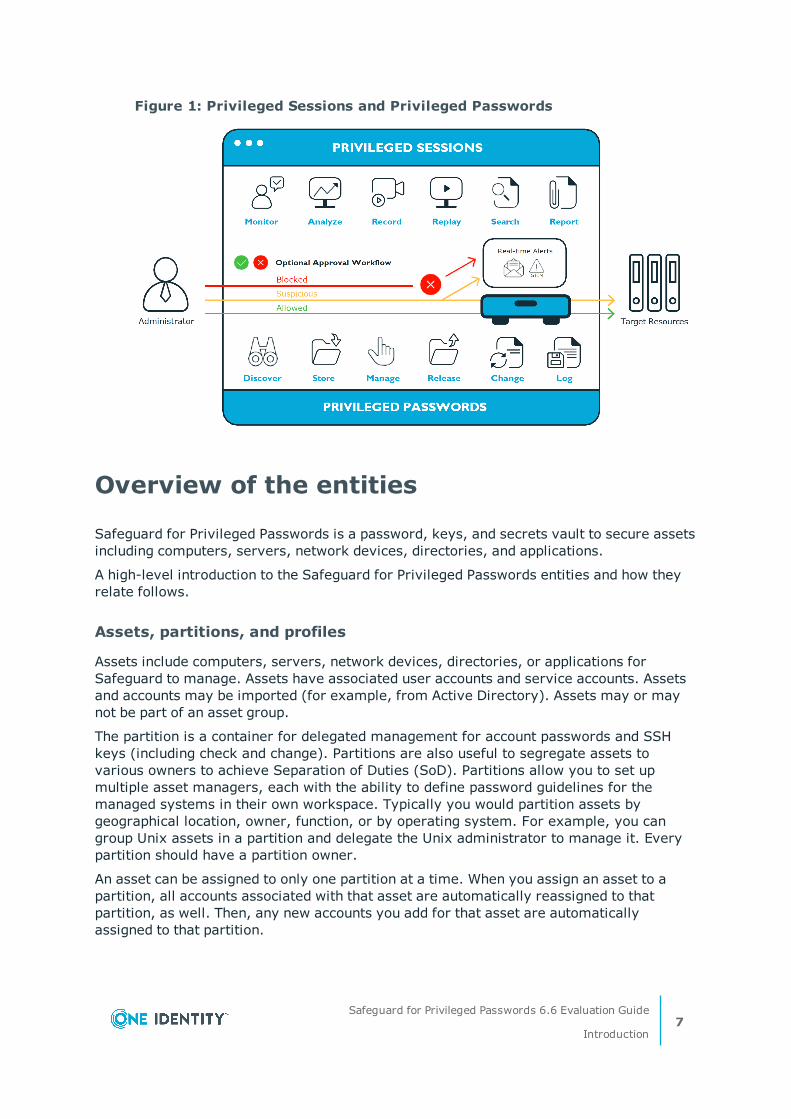
Figure 1: Privileged Sessions and Privileged Passwords
Overview of the entities
Safeguard for Privileged Passwords is a password, keys, and secrets vault to secure assetsincluding computers, servers, network devices, directories, and applications.
A high-level introduction to the Safeguard for Privileged Passwords entities and how theyrelate follows.
Assets, partitions, and profiles
Assets include computers, servers, network devices, directories, or applications forSafeguard to manage. Assets have associated user accounts and service accounts. Assetsand accounts may be imported (for example, from Active Directory). Assets may or maynot be part of an asset group.
The partition is a container for delegated management for account passwords and SSHkeys (including check and change). Partitions are also useful to segregate assets tovarious owners to achieve Separation of Duties (SoD). Partitions allow you to set upmultiple asset managers, each with the ability to define password guidelines for themanaged systems in their own workspace. Typically you would partition assets bygeographical location, owner, function, or by operating system. For example, you cangroup Unix assets in a partition and delegate the Unix administrator to manage it. Everypartition should have a partition owner.
An asset can be assigned to only one partition at a time. When you assign an asset to apartition, all accounts associated with that asset are automatically reassigned to thatpartition, as well. Then, any new accounts you add for that asset are automaticallyassigned to that partition.
Safeguard for Privileged Passwords 6.6 Evaluation Guide
Introduction7
The profile includes the schedules and rules governing the partition’s assigned assets andthe assets' accounts. For example, the profile defines how often a password check isrequired on an asset or account.
A partition can have multiple profiles, each assigned to different assets, if desired. Anaccount is governed by only one profile. If an account is not explicitly assigned to a profile,the account is governed by the one assigned to the parent asset. If that asset does not havean assigned profile, the partition's default profile is assigned.
When you create a new partition, Safeguard for Privileged Passwords creates acorresponding default profile with default schedules and rules. You can create multipleprofiles to govern the accounts assigned to a partition. Both assets and accounts areassigned to the scope of a profile.
For example, suppose you have an asset with 12 accounts and you configure the profile tocheck and change passwords every 60 days. If you want the password managed for one ofthose accounts every seven days, you can create another profile and add the individualaccount to the new profile. Now, Safeguard for Privileged Passwords will check and changeall the passwords on this asset every 60 days except for this account, which will changeevery seven days.
In the example below, Partition A has three profiles (Profile A, B, and C) and a defaultprofile. Profile A checks passwords every 30 days. Profile B checks passwords every threemonths, and Profile C has the highest level of security, checking passwords every sevendays. Note that the asset Server has two profiles each governing different accountsassociated with the asset. Profiles A, B, and C are all explicitly assigned to the accountsand assets shown. Asset cloud service doesn't have an explicitly assigned profile so thedefault will be used to manage accounts on the asset.
Safeguard for Privileged Passwords 6.6 Evaluation Guide
Introduction8
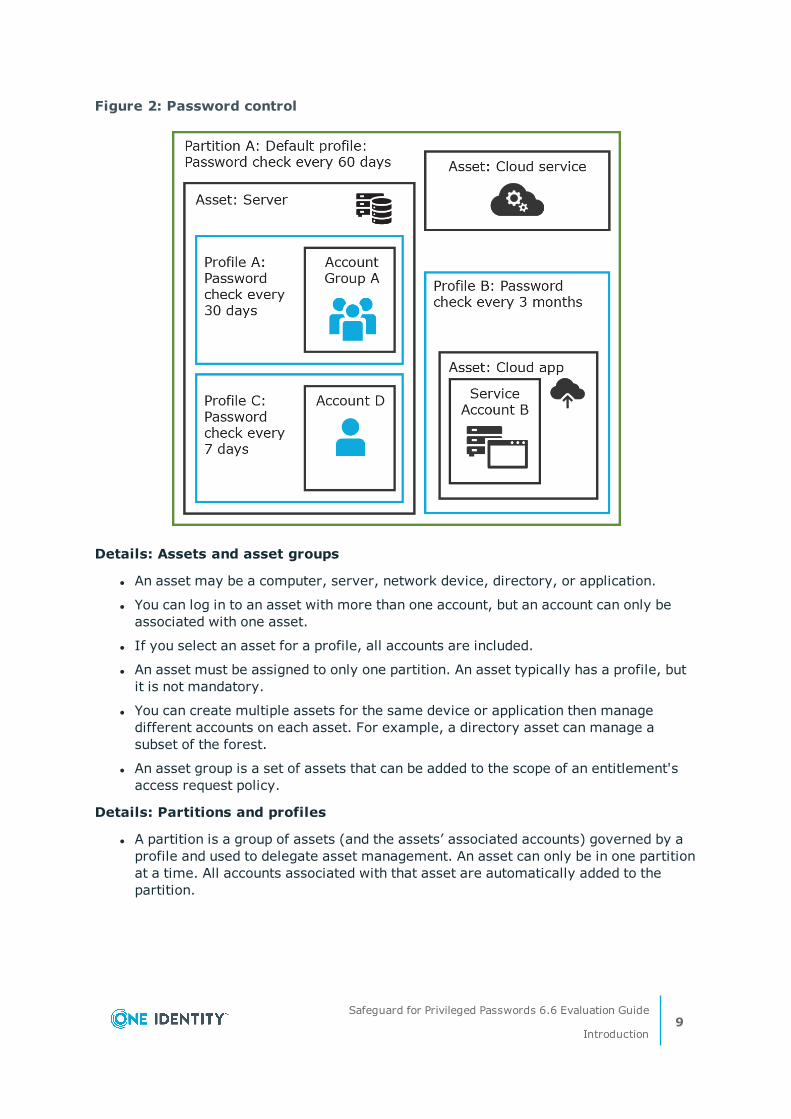
Figure 2: Password control
Details: Assets and asset groups
l An asset may be a computer, server, network device, directory, or application.
l You can log in to an asset with more than one account, but an account can only beassociated with one asset.
l If you select an asset for a profile, all accounts are included.
l An asset must be assigned to only one partition. An asset typically has a profile, butit is not mandatory.
l You can create multiple assets for the same device or application then managedifferent accounts on each asset. For example, a directory asset can manage asubset of the forest.
l An asset group is a set of assets that can be added to the scope of an entitlement'saccess request policy.
Details: Partitions and profiles
l A partition is a group of assets (and the assets’ associated accounts) governed by aprofile and used to delegate asset management. An asset can only be in one partitionat a time. All accounts associated with that asset are automatically added to thepartition.
Safeguard for Privileged Passwords 6.6 Evaluation Guide
Introduction9
l Profiles are the schedules and rules that govern a partition’s assets and the assets’accounts. You can set a default profile to assign or you can manually assign a profileto an asset or account.
l When a partition is created, a default profile is created for that partition. This profileis implicitly associated with all assets and accounts added to the partition. Later, adifferent profile can be manually assigned to assets and account which is referred toas an explicit association. Explicit associations (manual assignments) overrideimplicit associations (auto-assignments).
Accounts, account groups, entitlements, and entitlement accessrequest policies
Assets have associated accounts, like a user account or an account for a Windows service.An account can only be associated with one asset.
Entitlements grant access to users, user groups, or both. An entitlement includes one ormore access request policies and may be related to job functions like help desk support orUnix administrators.
An entitlement access request policy defines what is managed by the policy and is referredto as the "scope of the policy." Different types of access requests include password, SSHkeys, and sessions.
l To define an access request policy for a password or SSH key request, the validproperties in scope are accounts and account groups.
l To define an access request policy for a sessions request, the valid properties inscope are accounts, account groups, assets, and asset groups. If only assets or assetgroups are defined in the access request policy, the Asset Based Session Accessmust have an option other than None.
Entitlement access request policies may include:
l The access type:
l Credential access types include Password Release and SSH key
l Sessions access types include the protocols Secure SHell (SSH), RemoteDesktop Protocol (RDP), and Telnet
l The scope: Accounts, account groups, assets, and asset groups, as needed
l Requester settings: This includes a reason for the request, comment, ticket number(if applicable), and access duration
l Approver and Reviewer settings: If required, ththis includes the approvers andreviewers along with notifications
l Access configuration: Settings based on the type of access (Password, SSH key, SSHsession, or RDP session set earlier)
l Session settings: Used for recording sessions, if you use Safeguard forPrivileged Sessions
l Time restrictions: Days and hours of access, if you choose to set these
l Emergency settings: Who to contact, if you choose to specify this information
Safeguard for Privileged Passwords 6.6 Evaluation Guide
Introduction10
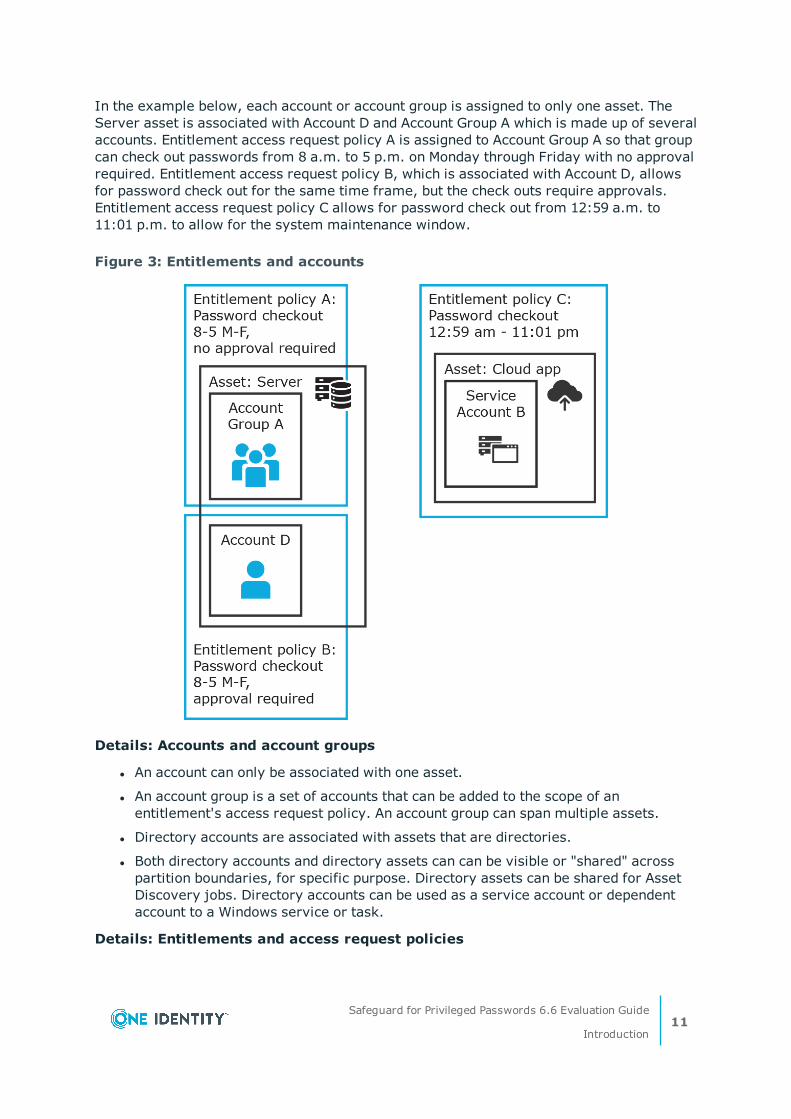
In the example below, each account or account group is assigned to only one asset. TheServer asset is associated with Account D and Account Group A which is made up of severalaccounts. Entitlement access request policy A is assigned to Account Group A so that groupcan check out passwords from 8 a.m. to 5 p.m. on Monday through Friday with no approvalrequired. Entitlement access request policy B, which is associated with Account D, allowsfor password check out for the same time frame, but the check outs require approvals.Entitlement access request policy C allows for password check out from 12:59 a.m. to11:01 p.m. to allow for the system maintenance window.
Figure 3: Entitlements and accounts
Details: Accounts and account groups
l An account can only be associated with one asset.
l An account group is a set of accounts that can be added to the scope of anentitlement's access request policy. An account group can span multiple assets.
l Directory accounts are associated with assets that are directories.
l Both directory accounts and directory assets can can be visible or "shared" acrosspartition boundaries, for specific purpose. Directory assets can be shared for AssetDiscovery jobs. Directory accounts can be used as a service account or dependentaccount to a Windows service or task.
Details: Entitlements and access request policies
Safeguard for Privileged Passwords 6.6 Evaluation Guide
Introduction11

l An entitlement is a set of access request policies that restrict resources, typicallyby job role.
l Entitlements are used to authorize users or members of user groups to accessaccounts in the scope of the set of the entitlement's access request policies. Oneentitlement may have zero, one, or multiple access request policies. Users and usergroups can be added to entitlements.
l Access request policies contain the details of the type of access as well as conditions.For example, the type of access may include password versus session (RDP session,SSH client, other protocols), time limits, individual accountability (change aftercheck-in), and other settings. Conditions may include number of approvers, time ofday, ticketing system, reason codes, and so on. An access request policy can only beassociated with one entitlement.
l Access request policies are scoped to resources. Sometimes that scoping is donedirectly to accounts and the asset is implied. Or, the scoping is done to the asset andthe access request policy identifies the account.
Users and user groups
Users are individuals. A user may be assigned administrative permissions to governassets, partitions, accounts, and entitlement access request policies. A user may beassigned more than one set of permissions by the Authorizer Administrator. It is a bestpractice to follow the principles of separation of duties (SoD) in administrationassignments. For example, the assignment of Asset Administrator, Security PolicyAdministrator, User Administrator, and Auditor should be different users.
Standard users do not have administrative permissions. They can request access, approveaccess requests, or review completed access requests.
Users can be configured for two-factor authentication.
Details: Users and user groups
l A user is a person who can log into Safeguard for Privileged Passwords. A user canbe associated with an identity provider that is local or a user can be a directory userfrom an external identity store such as Microsoft Active Directory. A user may beassociated with user groups, partitions, entitlements, and linked accounts.
l A user group is set of users that can be added to an entitlement, typically based onroles. The user group's access is governed by the entitlement’s access requestpolicies. Both local user groups and directory user groups can be added to Safeguardfor Privileged Passwords.
l A user can be assigned administrative permissions over assets, security, and so on.A standard user has no administrative permissions and performs other duties, forexample, to approve access requests.
Discovery
You can discover assets and accounts that are not being managed so you can place themunder management, if appropriate. Discovery jobs can be configured to discover assetsand accounts.
Safeguard for Privileged Passwords 6.6 Evaluation Guide
Introduction12
Access request workflow
At a high-level, an end user or custom integration application may submit an accessrequest for:
l A credential (password or SSH key) that is managed by Safeguard forPrivileged Passwords
l A session (such as RDP, SSH, or Telnet) to an asset that is managed by Safeguard forPrivileged Passwords with the addition of Safeguard for Privileged Sessions
The access request may immediately be granted, or it may first have to go through anapproval process.
Once approved, the credential or session can be checked out and used. For sessions, allconnections are proxied through Safeguard for Privileged Sessions and recorded.
After using the credentials or session, it can be checked in to signify that the user is done.The access request policy may then be configured such that a review of the request isrequired before it can be checked out again. For credential type requests, the accessrequest policy may also be configured to change the credential.
Key featuresThe One Identity portfolio includes the industry’s most comprehensive set of privilegedaccess management solutions. You can build on the capabilities of One Identity Safeguardwith solutions for granular delegation of the Unix root account and the Active Directoryadministrator account; add-ons to make open source sudo enterprise-ready; and keystrokelogging for Unix root activities – all tightly integrated with the industry’s leading ActiveDirectory bridge solution.
The following key features are available in Safeguard for Privileged Passwords.
Feature information by release is available. For more information, see the Safeguard forPrivileged Passwords Administration Guide, Appendix D: Historical changes by release.
Feature Description
Auto-login Auto-login and sessions access request launch enhances securityand compliance by never exposing the account credentials to theuser.
Activity Center Using the Activity Center, you can quickly and easily view allactions executed by Safeguard for Privileged Passwords users andintegrated processes. Activity Center reports can be searched,customized, and filtered to zero in on the actions of a single useror to audit a variety of actions across a subset of departments. Inaddition, you can schedule queries, and save or export the data.
Always online Safeguard for Privileged Passwords Appliances can be clustered toensure high availability. Passwords, SSH keys, and sessions can
Table 1: One Identity Safeguard for Privileged Passwords key features
Safeguard for Privileged Passwords 6.6 Evaluation Guide
Introduction13
Feature Description
be requested from any appliance in a Safeguard for PrivilegedPasswords cluster.
This distributed clustering design also enables the recovery orcontinuation of vital technology infrastructure and systemsfollowing a natural or human-induced disaster.
Approval Anywhere Leveraging One Identity Starling, you can approve or deny anyaccess request anywhere without being on the VPN.
Cloud support Safeguard for Privileged Passwordscan be run in the cloud usingAzure.
Directory integration You can leverage your existing directory infrastructure (such asMicrosoft Active Directory). You import directory users anddirectory groups. Directory users authenticate to Safeguard forPrivileged Passwords with their directory credentials.
Active Directory and LDAP data is automatically synchronized byasset or identity and authentication providers schema as shown inthe following lists.
Asset schema list
l Users
l Username
l Password (modifiable in LDAP and not modifiable inActive Directory)
l Description
l Groups
l Name
l Member
l Computer
l Name
l Network Address
l Operating System
l Operating System Version
l Description
Identity and Authentication Providers schema list
l Users
l Username
l First Name
Safeguard for Privileged Passwords 6.6 Evaluation Guide
Introduction14
Feature Description
l Last Name
l Work Phone
l Mobile Phone
l Email
l Description
l External Federation Authentication
l Radius Authentication
l Managed Objects
l Groups
l Name
l Members
l Description
Discovery Quickly discover any privileged account or system on yournetwork with host , directory, and network-discovery options.
Event notificationoptions
Safeguard for Privileged Passwords allows you to configure theappliance to send event notifications to external systems such asEmail, Syslog, and SNMP.
Favorites Quickly access the passwords that you use the most right from theHome screen. You can group several password requests into asingle favorite so you can get access to all the accounts you needwith a single click.
One Identity HybridSubscription
Expand the capabilities of Safeguard with the One Identity HybridSubscription, which offers immediate access to cloud deliveredfeatures and services. These include all-you-can-eat Starling Two-Factor Authentication (2FA) to protect Safeguard access andStarling Identity Analytics & Risk Intelligence for Safeguard sothat you can preemptively detect risk users and entitlements. Asingle subscription enables all One Identity solution deployments.
Partitions andProfiles
Safeguard for Privileged Passwords allows you to group managedsystems into secure work areas that can be designated fordelegated management.
Release control Manages password and SSH key requests from authorized usersfor the accounts they are entitled to access via a secure webbrowser connection with support for mobile devices.
RESTful API Safeguard for Privileged Passwords (SPP) is built with an API-firstdesign and uses a modernized API based on a REST architecturethat allows other applications and systems. Every function is
Safeguard for Privileged Passwords 6.6 Evaluation Guide
Introduction15
Feature Description
exposed through the API to enable quick and easy integrationregardless of what you want to do or which language yourapplications are written in. There are even a few things that canonly only be done via the Safeguard SPP API. The Safeguard forPrivileged Passwords API tutorial is available on GitHub at:https://github.com/oneidentity/safeguard-api-tutorial.
Role-based accesscontrol (RBAC)
Safeguard for Privileged Passwords uses a role-based accesscontrol hierarchy using administrator permissions sets. Numerousroles are available for administrating Safeguard for PrivilegedPasswords, enabling granular delegation and workflows along withleast privileged access.
Secure access tolegacy systems
Use smartcard, two-factor authentication, or other strongauthentication methods to gain access to systems. BecauseSafeguard for Privileged Passwords acts as a gateway or proxy tothe system, it enables strong authentication to targets that cannotor do not support those methods natively.
Smartcard support Authentication of your privileged users can be integrated withMicrosoft's Active Directory support for Smartcards or manuallyuploaded to the Safeguard for Privileged Passwords Applianceitself.
Two-factorauthenticationsupport
Protecting access to passwords with another password isn'tenough. Enhanced security by requiring two-factor authenticationto Safeguard for Privileged Passwords. Safeguard for PrivilegedPasswords supports any Radius-based 2FA solution and OneIdentity's Starling Two-Factor Authentication (2FA) service.
Work flow engine forpolicy-based releasecontrol
Using a secure web browser with support for mobile devices, youcan request access and provide approval for privileged passwordsand sessions. Requests can be approved automatically or requiredual/multiple approvals based on your organization’s policy. Theworkflow engine supports time restrictions, multiple approversand reviewers, emergency access, and expiration of policy. It alsoincludes the ability to input reason codes and/or integrate directlywith ticketing systems or tickets used for internal tracking only.
Sessions key features
To record and playback sessions, use Safeguard for Privileged Sessions via a join toSafeguard for Privileged Passwords.
The join is initiated from Safeguard for Privileged Sessions. For details about the joinsteps and issue resolution, see the One Identity Safeguard for Privileged SessionsAdministration Guide.
For more information, see SPP and SPS sessions appliance join guidance.
Safeguard for Privileged Passwords 6.6 Evaluation Guide
Introduction16
2
Setting up Safeguard for PrivilegedPasswords
By following these procedures, you will set up a hierarchy of administrators that ensuresyour company follows entitlement-based access control, as you step through the process ofwriting some basic policies.
l You may use the hardware appliance or virtual appliance:
l Setting up the hardware appliance
l Setting up the virtual appliance
l Completing the appliance setup
l Creating authorizor admin and local admin users
l Configuring external integration settings
l Creating local users
l Adding assets and accounts
l Writing entitlements
NOTE: To streamline your software evaluation, these instructions are not detailed. For afull explanation of the features, refer to the Safeguard for PrivilegedPasswordsAdministration Guide.
Setting up the hardware appliance
CAUTION: To maximize security, restrict the access to MGMT interface toas few users as possible. The Management web kiosk gives access tofunctions without authentication, such as pulling a support bundle orrebooting the appliance.
Follow these steps to set up and configure the Safeguard for Privileged PasswordsAppliance.
Safeguard for Privileged Passwords 6.6 Evaluation Guide
Setting up Safeguard for Privileged Passwords17
Step 1: Before you start
Ensure that you install the Microsoft .NET Framework 4.6 (or later) on yourmanagement host.
Step 2: Prepare for installation
Gather the following items before you start the appliance installation process:
l Laptop
l IP address
l IP subnet mask
l IP gateway
l DNS server address
l NTP server address
l Safeguard for Privileged Passwords license
If you purchased Safeguard for Privileged Passwords, the appropriate license filesshould have been sent to you via email. If you have not received an email or need itto be resent, visit https://support.oneidentity.com/contact-us/licensing. If you needto request a trial key, please send a request to [email protected] or call +1-800-306-9329.
Step 3: Rack the appliance
Prior to installing the racks for housing the appliance, refer to the Warnings andprecautions appendix in the One Identity Safeguard Appliance Setup Guide provided in thebox with the hardware equipment.
Step 4: Power on the appliance
Prior to powering up the appliance, see the Standardized warning statements for ACsystems appendix in the One Identity Safeguard Appliance Setup Guide.
The Safeguard for Privileged Passwords Appliance includes dual power supplies forredundant AC power and added reliability.
1. Plug the power cords to the power supply sockets on the appliance back and thenconnect the cords to AC outlets.
TIP:As a best practice, connect the two power cords to outlets on different circuits.One Identity recommends using an UPS on all appliances.
2. Press the Green check mark button on the front panel of the appliance forNO MORE THAN one second to power on the appliance.
CAUTION: Once the Safeguard for Privileged Passwords Appliance isbooted, DO NOT press and hold the Green check mark button. Holdingthis button for four or more seconds will cold reset the power of theappliance and may result in damage.
Safeguard for Privileged Passwords 6.6 Evaluation Guide
Setting up Safeguard for Privileged Passwords18
You can use the Red X button to shut down the appliance. Once the Safeguard forPrivileged Passwords Appliance is booted, press and hold the Red X button for fourseconds until it displays POWER OFF.
NOTE: If the Safeguard for Privileged Passwords Appliance is not yet booted, itmay be necessary to press the Red X button for up to 13 seconds.
CAUTION: Once the Safeguard for Privileged Passwords Appliance isbooted, DO NOT press and hold the Red X button for more than 13seconds. This will hard power off the appliance and may result indamage.
Step 5: Connect the management host to the appliance
The port used for a secure first-time configuration of the appliance is MGMT. This IPaddress is a fixed address that cannot be changed. It will always be available in case theprimary interface becomes unavailable. The MGMT IP address is: 192.168.1.105.
The primary interface that connects your appliance to the network is X0. You must changethe primary interface IP to match your network configuration. The default X0 IP is:192.168.0.105.
The appliance can take up to five minutes to boot up. In addition, ping replies have beendisabled on the appliance, so you will not be able to ping this secure appliance.
1. Connect an Ethernet cable from the laptop to the MGMT port on the back ofthe appliance.
2. Set the IP address of the laptop to 192.168.1.100, the subnet mask to 255.255.255.0,and no default gateway.
Step 6: Log in to Safeguard for Privileged Passwords
1. Open a browser on the laptop and connect to the IP address of the MGMT porthttps://192.168.1.105.
If you have problems accessing the configuration interface, check your browserSecurity Settings or try using an alternate browser.
2. Accept the certificate and continue. This is only safe when using an Ethernet cableconnected directly to the appliance.
3. Log in to the Safeguard for Privileged Passwords web client using the BootstrapAdministrator account:
l User name: admin
l Password: Admin123
The Bootstrap Administrator is a built-in account that allows you to get the applianceset up for first-time use. To keep your Safeguard for Privileged Passwords Appliancesecure, change the default password for the Bootstrap Administrator’s account. Formore information, see Completing the appliance setup on page 24.
Safeguard for Privileged Passwords 6.6 Evaluation Guide
Setting up Safeguard for Privileged Passwords19
4. Configure the primary network interface (X0):
l On the Appliance Configuration page, configure the following. Click theEdit icon to modify these settings.
l Time: Enable NTP and set the primary NTP server; if desired, set thesecondary NTP server, as well. Click Save. By default, the NTP server isset to pool.ntp.org.
l Network (X0):
l Enter the appliance's IPv4 and/or IPv6 address information (IPaddress, Subnet Mask, Gateway).Directory or network scans aresupported for IPv4 but not IPv6.
l Enter the DNS server address.
l Optional, enter the DNS suffixes.
l Click Save.
5. Log in and download the desktop client to complete the next steps. For moreinformation, see Completing the appliance setup on page 24.
Step 7: Connect the appliance to the network
l Connect an Ethernet cable from your primary interface (X0) on the appliance toyour network.
Setting up the virtual appliance
The Appliance Administrator uses the initial setup wizard to give the virtual appliance aunique identity, license the underlying operating system, and configure the network. Theinitial setup wizard only needs to be run one time after the virtual appliance is firstdeployed, but you may run it again in the future. It will not modify the appliance identity ifrun in the future.
Once set up, the Appliance Administrator can change the appliance name, license, andnetworking information, but not the appliance identity (ApplianceID). The appliance musthave a unique identity.
The steps for the Appliance Administrator to initially set up the virtual appliance follow.
Step 1: Make adequate resources available
The virtual appliances default deploy does not provide adequate resources. The minimumresources required are: 4 CPUs, 10GB RAM, and a 500GB disk. Without adequate diskspace, the patch will fail and you will need to expand disk space then re-upload the patch.
Safeguard for Privileged Passwords 6.6 Evaluation Guide
Setting up Safeguard for Privileged Passwords20
Step 2: Deploy the VM
Deploy the virtual machine (VM) to your virtual infrastructure. The virtual appliance is inthe InitialSetupRequired state.
Hyper-V zip file import and set up
If you are using Hyper-V, you will need the Safeguard Hyper-V zip file distributed by OneIdentity to setup the virtual appliance. Follow these steps to unzip the file and import:
1. Unzip the Safeguard-hyperv-prod... zip file.
2. From Hyper-V, click Options.
3. Select Action, Import Virtual Machine.
4. On the Locate Folder tab, navigate to specify the folder containing the virtualmachine to import then click Select Folder.
5. On the Locate Folder tab, click Next.
6. On the Select Virtual Machine tab, select Safeguard-hyperv-prod..., thenclick Next.
7. On the Choose Import Type tab, select Copy the virtual machine (create anew unique ID), then click Next.
8. On the Choose Destination tab, add the locations for the Virtual machineconfiguration folder, Checkpoint store, and Smart Paging folder, thenclick Next.
9. On the Choose Storage Folders tab, identifyWhere do you want to store theimported virtual hard disks for this virtual machine? then click Next.
10. Review the Summary tab, then click Finish.
11. In the Settings, Add Hardware, connect to Safeguard's MGMT and X0network adapter.
12. Right-click on the Safeguard-hyperv-prod... and click Connect... to complete theconfiguration and connect.
Step 3: Initial access
Initiate access using one of these methods:
l Via a virtual display: Connect to the virtual display of the virtual machine. You willnot be offered the opportunity to apply a patch with this access method. Upload anddownload are not available from the virtual display. Continue to step 3. If you areusing Hyper-V, make sure that Enhanced Session Mode is disabled for the display.See your Hyper-V documentation for details.
l Via a browser: Configure the networking of your virtual infrastructure to proxyhttps://192.168.1.105 on the virtual appliance to an address accessible from yourworkstation then open a browser to that address. For instructions on how to do this,consult the documentation of your virtual infrastructure (for example, VMWare). You
Safeguard for Privileged Passwords 6.6 Evaluation Guide
Setting up Safeguard for Privileged Passwords21
will be offered the opportunity to apply a patch with this access method. Upload anddownload are available from the browser. Continue to step 3.
IMPORTANT: After importing the OVA and before powering it on, check the VM tomake sure it doesn't have a USB controller. If there is a USB controller, remove it.
Step 4: Complete initial setup
Click Begin Initial Setup. Once this step is complete, the appliance resumes in theOnline state.
Step 5: Log in and configure Safeguard for PrivilegedPasswords
1. If you are applying a patch, check your resources and expand the disk space, ifnecessary. The minimum resources are: 4 CPUs, 10GB RAM, and a 500GB disk.
2. To log in, enter the following default credentials for the Bootstrap Administrator thenclick Log in.
l User Name: admin
l Password: Admin123
3. If you are using a browser connected via https://192.168.1.105, the InitialSetup pane identifies the current Safeguard version and offers the opportunity toapply a patch. Click Upload Patch to upload the patch to the current Safeguardversion or click Skip. (This is not available when using the Safeguard VirtualKiosk virtual display.)
4. In the web management console on the Initial Setup pane, enter the following.
a. Appliance Name: Enter the name of the virtual appliance.
b. Windows Licensing: Select one of the following options:
l Use KMS Server: If you leave this field blank, Safeguard will use DNSto locate the KMS Server automatically. For the KMS Server to be found,you will need to have defined the domain name in the DNS Suffixes.
If KMS is not registered with DNS, enter the network IP address of yourKMS server.
l Use Product Key: If selected, your appliance will need to be connectedto the internet for the necessary verification to add your organization'sMicrosoft activation key.
You can update this information in Administrative Tools | Settings |Appliance | Operating System Licensing. For more information, seethe Safeguard for Privileged Passwords Administration Guide, Operatingsystem license.
Safeguard for Privileged Passwords 6.6 Evaluation Guide
Setting up Safeguard for Privileged Passwords22
c. NTP: Complete the Network Time Protocol (NTP) configuration.
l Select Enable NTP to enable the protocol.
l Identify the Primary NTP Server IP address and, optionally, theSecondary NTP Server IP address.
d. Network (X0): For the X0 (public) interface, enter the IPv4 and/or IPv6information, and DNS Servers information. Directory or network scans aresupported for IPv4 but not IPv6.
5. Click Save. The virtual appliance displays progress information as it configuresSafeguard, the network adapter(s), and the operating system licensing.
6. When you see the message Maintenance is complete, click Continue.
Step 6: Access the desktop client or use the web client
You can go to the virtual appliance's IP address for the X0 (public) interface fromyour browser:
l (desktop client): Log in and download the desktop client. For more information,see the Safeguard for Privileged Passwords Administration Guide, Installing thedesktop client.
l (web client): Use the web client. For more information, see the Safeguard forPrivileged Passwords Administration Guide, Using the web client.
Step 7: Change the Bootstrap Administrator's password
For security reasons, change the password on the Bootstrap Administrator User. Fordetails, see the Safeguard for Privileged Passwords Administration Guide, Setting a localuser's password.
View or change the virtual appliance setup
You can view or change the virtual appliance setup.
l From the web management console, click Home to see the virtual appliancename, licensing, and networking information.
l After the first setup, Safeguard for Privileged Passwords updates and networking
changes can be made via the web management console by clicking Setup.
Safeguard for Privileged Passwords 6.6 Evaluation Guide
Setting up Safeguard for Privileged Passwords23
3
Completing the appliance setup
After setting up the hardware appliance, complete these steps.
During initial installation and when applying a patch, make sure the desktop client file isthe one supplied with the appliance version. If the versions are not compatible, errorswill occur.
Step 1: Install the desktop client application and desktop player
NOTE: PuTTY is used to launch the SSH client for SSH session requests and isincluded in the install. The desktop client looks for any user-installed PuTTY in thefollowing locations:
l Any reference to putty in the PATH environment variable
l c:/Program Files/Putty
l c:/Program Files(x86)/Putty
l c:/Putty
If PuTTY is not found, the desktop client uses the version of PuTTY that it installed at:
<user-home-dir>/AppData/Local/Safeguard/putty.
If the user later installs PuTTY in any of the locations above, the desktop client uses thatversion which ensures the user has the latest version of PuTTY.
Installing the Safeguard for Privileged Passwords desktop client application
1. To download the Safeguard for Privileged Passwords desktop client Windows installer.msi file, open a browser and navigate to:
https://<Appliance IP>/Safeguard.msi
Save the Safeguard.msi file in a location of your choice.
2. Run the MSI package.
3. Select Next in theWelcome dialog.
4. Accept the End-User License Agreement and select Next.
5. Select Install to begin the installation.
6. Select Finish to exit the desktop client setup wizard.
Safeguard for Privileged Passwords 6.6 Evaluation Guide24

7. Check your desktop resolution. The desktop client works the best at a resolution of1024 x 768 or greater.
Installing the Desktop Player
CAUTION: If the Desktop Player is not installed and a user tries to playback a session from the Activity Center, a message like the following willdisplay: No Desktop Player. The Safeguard Desktop Player is not installed. Wouldyou like to install it now? The user will need to click Yes to go to thedownload page to install the player following step 2 below.
1. Once the Safeguard for Privileged Passwords installation is complete, go to theWindows Start menu, Safeguard folder, and click Download Safeguard Playerto be taken to the One Identity Safeguard for Privileged Sessions - DownloadSoftware web page.
2. Follow the Install Safeguard Desktop Player section of the player user guidefound here:
a. Go to One Identity Safeguard for Privileged Sessions - TechnicalDocumentation.
b. Scroll to User Guide and click One Identity Safeguard for Privileged Sessions[version] Safeguard Desktop Player User Guide.
3. For Safeguard Desktop player version 1.8.6 and later, ensure your signed webcertificate has a Subject Alternative Name (SAN) that includes each IP address ofeach of your cluster members. If the settings are not correct, the Safeguard DesktopPlayer will generate a certificate warning like the following when replaying sessions:Unable to verify SSL certificate. To resolve this issue, import the appropriatecertificates including the root CA.
New Desktop Player versions
When you have installed a version of the Safeguard Desktop Player application, you willneed to uninstall the previous version to upgrade to a newer player version.
Step 2: Start the desktop client
1. Log in using the Bootstrap Administrator account.
2. Run the desktop client and log in with the configured IPv4 or IPv6 address for theprimary interface (X0). To log in with an IPv6 address, enter it in square brackets.
3. License Safeguard for Privileged Passwords using the provided license file. Goto Licensing:
l (web client): Click Settings on the left. The Settings: Appliance page
displays. Click Licensing .
l (desktop client): Navigate to Administrative Tools | Settings |Appliance | Licensing.
Click to upload a new license file.
Safeguard for Privileged Passwords 6.6 Evaluation Guide25
https://support.oneidentity.com/one-identity-safeguard-for-privileged-sessions/download-new-releases
4. Designate an archive server for storing session recordings. Defining archive serverconfigurations and assigning an archive server to an appliance are done from thedesktop's Administrative Tools view:
l Go to Settings | Backup and Retention | Archive Servers to configurearchive servers.
l Go to Settings | Sessions | Session Recordings Storage Management toassign an archive server to an appliance for storing recording files.
5. To configure the time zone:
a. Navigate to Administrative Tools | Settings | Safeguard Access |Time Zone.
b. Select the time zone in the Default User Time Zone drop-down menu.
6. Ensure that your Safeguard for Privileged Passwords Appliance has the latestsoftware version installed. To check the version:
a. From the Safeguard for Privileged Passwords Desktop Client, log in with adminaccount credentials.
b. Click Settings | Appliance | Appliance Information. The ApplianceVersion is displayed.
c. Go to the following product support page for the latest version:
https://support.oneidentity.com/one-identity-safeguard/download-new-releases
d. If necessary, apply a patch. Wait for maintenance. If you are installingmultiple patches, repeat as needed.
Changing the Bootstrap Administrator's password
The Bootstrap Administrator is a built-in account that allows you to get the appliance setup for first-time use. To keep your Safeguard for Privileged Passwords Appliancesecure, once the license is added, change the default password for the BootstrapAdministrator’s account.
To change the password:
l (web client): Click your user name in the upper-right corner of the screen andselect Change Password.
l (desktop client): Click your user name in the upper-right corner of the screen andselectMy Account then Change Password.
If this password is ever lost, you can reset it to the default of Admin123. See the Safeguardfor Privileged Passwords Administration Guide, Admin password reset topic.
Step 3: Backup Safeguard for Privileged Passwords
Immediately after your initial installation of Safeguard for Privileged Passwords, make abackup of your Safeguard for Privileged Passwords Appliance.
NOTE: The default backup schedule runs at 22:00 MST, which can be modified rather thanmanually running a backup.
Safeguard for Privileged Passwords 6.6 Evaluation Guide26
1. From the Safeguard for Privileged Passwords desktop Home page, selectAdministrative Tools.
2. In Settings, select Backup and Retention | Backups.
3. Click Run Now.
Step 4: Update Safeguard for Privileged Passwords
Download the latest update from: https://support.oneidentity.com/one-identity-safeguard/.
1. From the Safeguard for Privileged Passwords desktop Home page, selectAdministrative Tools.
2. In Settings, select Appliance | Updates.
3. Click Upload a File and browse to select an update file.
NOTE: When you select a file, Safeguard for Privileged Passwords uploads it to theserver, but does not install it.
4. Click Install Now to install the update file immediately.
5. Once you have updated Safeguard for Privileged Passwords, be sure to back up yourSafeguard for Privileged Passwords Appliance.
Step 5: Add a user with Authorizer administrative permissions
The Authorizer Administrator is responsible for granting administrative access toSafeguard for Privileged Passwords.
1. From the Safeguard for Privileged Passwords desktop Home page, selectAdministrative Tools.
NOTE: This is where you add all the objects you need to write access requestpolicies, such as users, accounts, and assets.
2. In Administrative Tools, select Users.
3. Click Add User to create a Safeguard for Privileged Passwords user witha local authentication provider and Authorizer Administrator permissions.
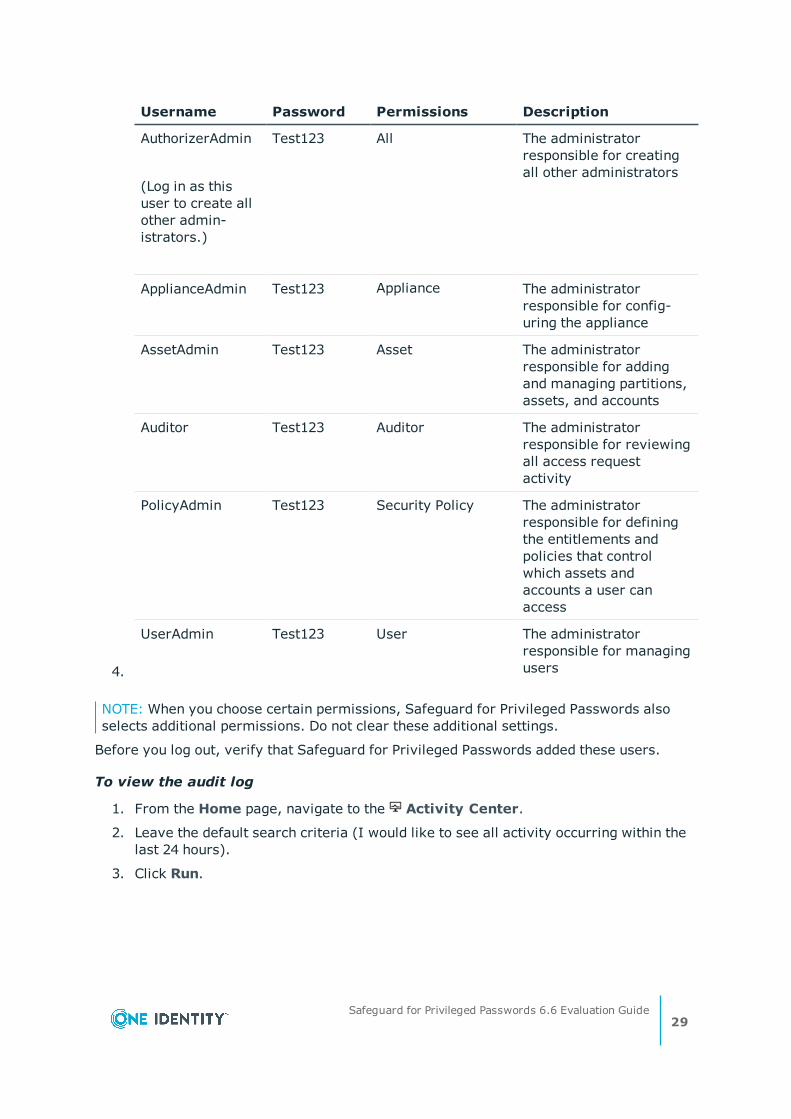
Username Password Permissions Description
AuthorizerAdmin Test123 Authorizer The administrator responsible forgranting all administrative access toSafeguard for Privileged Passwords.
NOTE: When you choose Authorizer permissions, Safeguard for PrivilegedPasswords also selects User and Help Desk permissions. These additionalsettings cannot be cleared.
Safeguard for Privileged Passwords 6.6 Evaluation Guide27

4. Log out:
a. In the upper-right corner of the screen, click the user avatar.
b. Select Log Out.
Step 6: Change the local security policy
Before Safeguard for Privileged Passwords can reset local account passwords on Windowssystems, you must change the local security policy.
1. From the Windows Start menu, open Local Security Policy.
2. Navigate to Local Policies | Security Options.
3. Disable User Account Control: Run all administrators in Admin ApprovalMode option.
4. Restart your computer.
Step 7: Enable password authentication (applies to Privileged Sessionsmodule only)
For some systems (SUSE and some Debian systems) that use SSH, you must enablepassword authentication in the package generated configuration file (sshd_config).
For example, in the debian sshd_config file, enable the following parameter:PasswordAuthentication yes
Creating authorizor admin and localadmin users
Once you have successfully installed the desktop client application, you must add theobjects you need to write access request policies, such as users, accounts, and assets. Ifyour company practices the principles of separation of duties (SoD), the AuthorizerAdministrator needs to create the following additional administrators.
NOTE: A user can be assigned more than one set of permissions.
To add local administrator users
1. Log in to the Windows desktop client application as the Bootstrap Administrator.
2. From the Home page, navigate to Administrative Tools and select Users.
3. Add the following additional local administrator users.
IMPORTANT: After creating, log out as the Bootstrap Administrator and log in asthe Authorizer Administrator. It is recommended you disable the Bootstrap Admin-istrator for security purposes.
Safeguard for Privileged Passwords 6.6 Evaluation Guide28
4.
Username Password Permissions Description
AuthorizerAdmin
(Log in as thisuser to create allother admin-istrators.)
Test123 All The administratorresponsible for creatingall other administrators
ApplianceAdmin Test123 Appliance The administratorresponsible for config-uring the appliance
AssetAdmin Test123 Asset The administratorresponsible for addingand managing partitions,assets, and accounts
Auditor Test123 Auditor The administratorresponsible for reviewingall access requestactivity
PolicyAdmin Test123 Security Policy The administratorresponsible for definingthe entitlements andpolicies that controlwhich assets andaccounts a user canaccess
UserAdmin Test123 User The administratorresponsible for managingusers
NOTE: When you choose certain permissions, Safeguard for Privileged Passwords alsoselects additional permissions. Do not clear these additional settings.
Before you log out, verify that Safeguard for Privileged Passwords added these users.
To view the audit log
1. From the Home page, navigate to the Activity Center.
2. Leave the default search criteria (I would like to see all activity occurring within thelast 24 hours).
3. Click Run.
Safeguard for Privileged Passwords 6.6 Evaluation Guide29

4. Explore the results.
As the Authorizer Administrator, you can view User Authentication and Object Historyfor Audit Events pertaining to users.
5. Log out.
Configuring external integrationsettings
First we will log in to the desktop client with an Appliance Administrator account(ApplianceAdmin) to configure the following external integration settings:
l Starling join (used for secondary authentication and Approval Anywhere)
l Email notifications
Setting up a Starling account
We will be using Starling Two-Factor Authentication (2FA) as our service provider forsecondary authentication and Approval Anywhere. To get started, you must register aStarling Organization Admin account or a Collaborator account associated with the OneIdentity Hybrid subscription. Also, you must download the Starling 2FA app on yourmobile phone to use the Approval Anywhere feature.
NOTE: For additional information and documentation regarding the Starling Cloudplatform and Starling Two-Factor Authentication, seehttps://support.oneidentity.com/starling-two-factor-authentication/hosted/technical-documents.
To sign up for a Starling One Identity Hybrid service trial account
1. Go to https://www.cloud.oneidentity.com/ and log in or register a new account forthe Starling cloud platform.
a. From the Starling home page, click Sign in to Starling.
b. Enter a valid email address and click Next.
c. Enter your password and click Sign In.
d. On the Create your Account page, enter your organization and your mobilephone number.
NOTE: If the email address you entered does not exist, you will be taken directly tothe Create your Account page to register your organization and enter yourname, password, and mobile phone number.
Safeguard for Privileged Passwords 6.6 Evaluation Guide30
When registering for the first time, you will be sent a verification email in whichyou must click the supplied link in order to complete the registration process.
2. Once logged in, click the Trial button under the One Identity Hybrid tile. Followthe prompts on the screen.
The service will be added to the My Services section and be available for use untilthe trial period has ended. The number of days left in your trail is indicated by acountdown at the top right of the service access button on the home page of Starling.At any point in the trial you can use the More Information button associated withthe service to find out how to purchase the product.
Joining Starling
One Identity Starling Two-Factor Authentication (2FA) is a Software-as-a-Service (SaaS)solution that provides two-factor authentication on a product, enabling organizations toquickly and easily verify a user's identity. This service is provided as part of the OneIdentity Starling cloud platform. In addition Starling offers a hybrid service, One IdentityHybrid, that allows you to take advantage of companion features from multiple Starlingservices, such as Starling Two-Factor Authentication.
Joining Safeguard for Privileged Passwords to Starling adds Safeguard for PrivilegedPasswords to the One Identity Hybrid service allowing you to use features from both theStarling Two-Factor Authentication.
Once Safeguard for Privileged Passwords is joined to Starling, the following Safeguard forPrivileged Passwords features are enabled and can be implemented using Starling Two-Factor Authentication:
l Secondary authentication
Safeguard for Privileged Passwords supports two-factor authentication by configuringauthentication providers, such as Starling Two-Factor Authentication, which are usedto configure Safeguard for Privileged Passwords's authentication process such that itprompts for two sources of authentication when users log in to Safeguard forPrivileged Passwords.
A Starling 2FA service provider is automatically added to Safeguard for PrivilegedPasswords when you join Safeguard for Privileged Passwords to Starling. As anAuthorizer or User Administrator, you must configure users to use Starling 2FA astheir secondary authentication provider when logging in to Safeguard for PrivilegedPasswords.
l Approval Anywhere
The Safeguard for Privileged Passwords Approval Anywhere feature integrates itsaccess request workflow with Starling Two-Factor Authentication (2FA), allowingapprovers to receive a notification through an app on their mobile device when anaccess request is submitted. The approver can then approve (or deny) accessrequests through their mobile device without needing access to the desktop or webapplication.
Safeguard for Privileged Passwords 6.6 Evaluation Guide31
Approval Anywhere is enabled when you join Safeguard for Privileged Passwords toOne Identity Starling. As a Security Policy Administrator, you must define theSafeguard for Privileged Passwords users authorized to use Approval Anywhere.
Later in the guide, we will step through the process of configuring a user to require two-factor authentication as well as logging in with two-factor authentication. We will alsodiscuss how to define the users who are authorized to use Approval Anywhere to approveaccess requests.
To join Safeguard for Privileged Passwords to Starling
1. Log in to the Windows desktop client as ApplianceAdmin.
2. From the Home page, navigate to Administrative Tools | Settings | ExternalIntegration | Starling.
3. Click Join to Starling.
NOTE: The following additional information may be required:
l If you do not have an existing session with Starling, you will be prompted toauthenticate.
l If your Starling account belongs to multiple organizations, you will beprompted to select which organization Safeguard for Privileged Passwordswill be joined with.
After the join has successfully completed, you will be returned to the Safeguard forPrivileged Passwords desktop client and the Starling settings pane will now showJoined to Starling. In addition, the Administrative Tools | Settings | ExternalIntegration | Identity and Authentication pane displays Starling 2FA as asecondary authentication provider.
Stay logged in as the ApplianceAdmin for setting up email notifications.
Setting up email notifications
To demonstrate how Safeguard for Privileged Passwords sends out event notifications, youmust configure Safeguard for Privileged Passwords to automatically send emailnotifications when certain events occur. For the purposes of this software evaluation, wehave you set up a template for Access Request Auto-Approval.
To setup email notifications
1. Navigate to Administrative Tools and select Settings.
2. In Settings, select External Integration | Email.
3. To configure the Email notifications, enter these settings for all Safeguard forPrivileged Passwords emails:
SMTP Server Enter the IP address or FQDN of the mail server.
Safeguard for Privileged Passwords 6.6 Evaluation Guide32
Address NOTE: If you are using a mail exchanger record (MXrecord), you must specify the domain name for the mailserver.
SMTP Port Enter the TCP port number for the email service.
Sender Email Enter your email address.
Require TransportLayer Security
Select this option to require that Safeguard for PrivilegedPasswords uses TLS to provide communication security overthe internet.
To validate your setup
1. Select the Test Email Settings link.
2. Enter your email address as the Send To email address and click Send.
Safeguard for Privileged Passwords sends an email using the configuration settings.
Creating local users
Standard users do not have any Safeguard for Privileged Passwords administrativepermissions. These users can be granted rights to request access, approve accessrequests, or review completed access requests. For more information, see the Safeguardfor Privileged Passwords Administration Guide, Adding a user section.
NOTE: You can perform the exercises in this guide with directory users as well aslocal users. To do that, you must add a directory, directory users, and anauthentication provider.
To streamline your software evaluation, we recommend that you simply use localusers. The access request workflow is the same no matter what users perform them.To make your user experience more realistic, you can set up other local users fromyour test lab to be a Requester, Approver, and Reviewer or use the test users wesuggest creating below.
To create local users
1. Log in to the Windows desktop client as UserAdmin.
2. From the Home page, navigate to Administrative Tools and select Users.
3. In Users, click Add User to add the following Safeguard for Privileged Passwordsnon-administrator users:
Username Password Permissions Description
Joe Test123 None The Requester user, authorized torequest access.
Safeguard for Privileged Passwords 6.6 Evaluation Guide33
Username Password Permissions Description
Abe Test123 None The Approver user, authorized toapprove access requests.
See the following procedure for moreinformation on how to configure Abefor two-factor authentication.
Ralph Test123 None The Reviewer user, authorized toreview past (or completed) accessrequests.
Pete Test123 None The delegated partition owner.
To configure a user for two-factor authentication
NOTE: Abe will be authorized to approve access requests.
1. As the UserAdmin add a new local user named Abe.
2. On the Authentication page:
a. Authentication Provider: Select Local.
b. User Name: Enter Abe.
c. Password | Confirm Password: Enter Test123.
d. Require Secondary Authentication: Select this check box.
e. Authentication Provider: Select the Starling 2FA service provider.
f. Use alternate mobile phone number: Optionally, select this check box andenter an alternate mobile number to be used for two-factor authenticationnotifications.
3. On the Contact page:
a. Mobile Phone: Enter your mobile phone number.
b. Email Address: Enter a valid email address.
4. Finish adding the local user to Safeguard for Privileged Passwords.
5. Log out of Safeguard for Privileged Passwords.
6. Log in as the PolicyAdmin and navigate to Administrative Tools | Settings |External Integration | Approval Anywhere.
7. Click Add to add Abe as a user authorized to use the Approval Anywhere feature.
8. Log out of Safeguard for Privileged Passwords.
Adding assets and accounts
Now let's add some systems so that you can see how Safeguard for Privileged Passwordsmanages them. A background in the assets, entities, partitions, and accounts will help your
Safeguard for Privileged Passwords 6.6 Evaluation Guide34

understanding. For more information see the following sections in Overview of the entities:
l Assets, partitions, and profiles
l Accounts, account groups, entitlements, and entitlement access request policies
To add partitions, assets, and accounts to Safeguard for Privileged Passwords
1. Log in as AssetAdmin and navigate to Administrative Tools.
2. In Partitions, click Add Partition to add these partitions. For more information,see the Safeguard for Privileged Passwords Administration Guide, Adding a partitionsection.
Partition Description DelegatedOwner
Linux Servers The Linux Administrator's workspace Pete
Windows Servers The Windows Administrator's workspace none
Directory The Directory Administrator's workspace none
3. Configure the Profile check and change schedules to run daily. For moreinformation, see the Safeguard for Privileged Passwords Administration Guide,Creating a password profile and Creating an SSH key profile sections.
a. Navigate to Settings | Password Management | Check Password (andChange Password).
b. Double-click each schedule to modify the schedule.
c. Select Schedule and choose the Day interval, set the time of day, and leavethe daily repeat interval set to one day.
4. In Assets, add some Linux, Windows, and Directory devices. Be sure to put theminto the appropriate partition. For more information, see the Safeguard for PrivilegedPasswords Administration Guide, Adding an asset section.
NOTE: To observe how Safeguard for Privileged Passwords automatically changespasswords, set up assets from your test lab, with actual network addresses,service accounts, and passwords.
Run Test Connection on the Connection tab to ensure that Safeguard forPrivileged Passwords can communicate with the asset.
a. Once you add an asset, add one or more unique accounts for each asset. Theseare the accounts Safeguard for Privileged Passwords will use to give peopleaccess to the asset. In Assets, select the asset and opened the Accounts tab.
Click Add Account. For more information, see the Safeguard for PrivilegedPasswords Administration Guide, Adding an account to an asset section.
b. After you add the account, right-click the new account to set the password(Account Security | Set Password).
Safeguard for Privileged Passwords 6.6 Evaluation Guide35

c. Make the asset available for discovery. Select the asset then, on the General
pane, scroll to Account Discovery and click Edit. Add the details for thediscovery including the rules.
5. Log out.
Writing entitlements
Now that we have demonstrated that Safeguard for Privileged Passwords is actuallymanaging your account passwords, let's define some rules for requesting password releaseand session access requests, such as the maximum duration, how many approvals arerequired, and so forth.
For more information see the following section in Overview of the entities
To write the entitlements that govern access requests
1. Log in as PolicyAdmin and navigate to Administrative Tools.
2. In Settings, select Access Request | Reasons and add these access requestreason codes:
Reason Description
SU Software Updates
Sys Maint System Maintenance
SSH Session SSH Session Request
RDP Session RDP Session Request
3. In User Groups add these user groups. For more information, see the Safeguard forPrivileged Passwords Administration Guide, Adding a user group section.
User Groups Description User
Approvers Users authorized to approve passwordrelease requests.
Abe
Requesters Users authorized to request passwords. Joe
Reviewers Users authorized to review passwordrelease requests.
Ralph
l On the Users tab, add each user to the specified user group.
4. In Account Groups, add the following account groups. For more information, seethe Safeguard for Privileged Passwords Administration Guide, Adding an accountgroup section.
Safeguard for Privileged Passwords 6.6 Evaluation Guide36
Account Group Description
Linux Server Accounts Accounts for the Linux machines
Windows Server Accounts Accounts for the Windows machines
Directory Server Accounts Accounts for the Directory machines
l On the Accounts tab, add the appropriate accounts to each account group.
5. In Entitlements, add the following entitlements. For more information, seethe Safeguard for Privileged Passwords Administration Guide, Adding anentitlement section.
NOTE: At this time, do not set entitlement time restrictions.
Entitlement Description
Linux Password Requests The rules that govern password releaserequests for the Linux Servers
Windows Password Requests The rules that govern password releaserequests for the Windows Servers
Directory Password Requests The rules that govern password releaserequests for the Directory Servers
Sessions Requests The rules that govern session accessrequests
6. Stay logged in as the Security Policy Administrator (PolicyAdmin) and proceed to thenext exercise.
Now let's add access request policies to each of these entitlements that restrict systemaccess to authorized users.
Adding password release request policies
We now need to define the users who are authorized to make password release requestsand add access request policies to define the scope (accounts that can be accessed) andrules for checking out passwords. For more information, see the Safeguard for PrivilegedPasswords Administration Guide, Creating an access request policy section.
To add a policy to the Linux Password Requests Entitlement
1. As PolicyAdmin, navigate to Administrative Tools | Entitlements .
2. Select the Linux Password Requests Entitlement.
Safeguard for Privileged Passwords 6.6 Evaluation Guide37
3. On the Users tab, add the Requesters user group as the user for this entitlement.
An entitlement "User" is a person who is authorized to request passwords to accountsgoverned by the polices in the entitlement.
4. On the Access Request Policies tab, create the following access request policy:
a. General tab:
l Policy Name: Linux Servers Password Release Request Policy
l Description: The rules that define the request, approval, and review ofpassword release requests for the Linux Server Accounts.
l Access Type: Password Release.
b. Scope tab:
l Linux Server Accounts group
c. Requester tab:
l Select the following reasons: SU and Sys Maint.
l Require a Reason.
l Require a Comment.
l Select the Allow Requester to Change Duration option.
d. Approver tab:
l Require one person from the Approvers user group to approve apassword release request.
e. Reviewer tab:
l Require one person from the Reviewers user group to review acompleted password release.
f. Access Config tab
l Select the Change password after check-in option.
g. Time Restrictions tab:
l Do not set policy Time Restrictions.
h. Emergency tab:
l Enable Emergency Access.
To add a policy to the Windows Password Requests Entitlement
1. As PolicyAdmin, navigate to Administrative Tools | Entitlements.
2. Select theWindows Password Requests Entitlement.
3. On the Users tab, add the Requesters user group as the user for this entitlement.
An entitlement User is a person who is authorized to request passwords to accountsgoverned by the polices in the entitlement.
4. On the Access Request Policies tab, create the following access request policy:
Safeguard for Privileged Passwords 6.6 Evaluation Guide38
a. General tab:
l Policy Name: Weekday Maintenance Policy
l Description: The rules that define the request, approval, and reviewof password release requests for the Windows Server Accounts onweekdays.
l Access Type: Password Release
b. Scope tab:
l Windows Server Accounts group
c. Requester tab:
l Do not require a Reason.
l Do not require a Comment.
l Select the Allow Requester to Change Duration option.
d. Approver tab:
l Require one person from the Approvers user group to approve apassword release request.
e. Reviewer tab:
l Require one person from the Reviewers user group to review acompleted password release.
f. Access Config tab
l Select the Change password after check-in option.
g. Time Restrictions tab:
l Allow users to access passwords in the scope of this policy anytimeMonday through Friday.
h. Emergency tab:
l Do not Enable Emergency Access.
To add a policy to the Directory Requests Entitlement
1. As PolicyAdmin navigate to Administrative Tools | Entitlements.
2. Select the Directory Password Requests Entitlement.
3. On the Users tab, add the Requesters user group as the user for this entitlement.
An entitlement User is a person who is authorized to request passwords to accountsgoverned by the polices in the entitlement.
4. On the Access Request Policies tab, create the following access request policy:
a. General tab:
l Policy Name: Weekday Maintenance Policy
l Description: The rules that define the request, approval, and reviewof password release requests for the Windows Server Accounts on
Safeguard for Privileged Passwords 6.6 Evaluation Guide39
weekdays.
l Access Type: Password Release
b. Scope tab:
l Directory Server Accounts group
c. Requester tab:
l Do not require a Reason.
l Do not require a Comment.
l Select the Allow Requester to Change Duration option.
d. Approver tab:
l Require one person from the Approvers user group to approve apassword release request.
e. Reviewer tab:
l Require one person from the Reviewers user group to review acompleted password release.
f. Access Config tab:
l Select the Change password after check-in option.
g. Time Restrictions tab:
l Allow users to access passwords in the scope of this policy anytimeMonday through Friday.
h. Emergency tab:
l Do not Enable Emergency Access.
Adding session request policies
Prior to requesting a session, you must create a session request policy that defines theusers who are authorized to access an asset or account. As part of this request policy youwill also define the protocol (SSH or RDP) to be used as well as the type of accountcredentials to be specified to access the asset or account.
To write the policies that govern session requests
1. As PolicyAdmin navigate to Administrative Tools | Entitlements.
2. Select the Sessions Requests entitlement.
3. On the Users tab, add the Requesters user group as the user.
4. On the Access Request Policies tab, create the following access request policiesfor the sessions request entitlement:
a. Create a policy for SSH sessions:
General tab:
Safeguard for Privileged Passwords 6.6 Evaluation Guide40
l Policy Name: SSH Session Request Policy
l Description: The rules that define the request, approval, and review ofsession requests using SSH protocol.
l Access Type: SSH
Scope tab:
l Linux Server Accounts group
Requester tab:
l Select the following reason: SSH Session.
l Require a Reason.
l Require a Comment.
l Select the Allow Requester to Change Duration option.
Approver tab:
l Require one person from the Approvers user group to approve asession request.
Reviewer tab:
l Require one person from the Reviewers user group to review asession release.
Access Config tab:
l Use the default settings (None is selected by default).
Session Settings tab
l Select Record Sessions.
l Select Enable Command Detection.
l Leave the SSH Controls selected:
l Allow SFTP
l Allow SCP
l Allow X11 Forwarding
Time Restrictions tab:
l Do not set policy time restrictions.
Emergency tab:
l Do not enable emergency access.
b. Create a policy for RDP sessions:
General tab:
l Policy Name: RDP Session Request Policy
l Description: The rules that define the request, approval, and review of
Safeguard for Privileged Passwords 6.6 Evaluation Guide41
session requests using RDP protocol.
l Access Type: RDP
Scope tab:
l Windows Server Accounts group.
Requester tab:
l Do not select or require a reason.
l Do not require a comment.
l Select the Allow Requester to Change Duration option.
Approver tab:
l Select Auto-approved.
l Click the To button to Notify when Account is Auto-Approved andselect the Safeguard for Privileged Passwords user to receive the emailnotification.
Reviewer tab:
l Require one person from the Reviewers user group to review a pastsession release.
Access Config tab:
l Select User Supplied.
Session Settings tab:
l Select Record Sessions.
l Leave the RDP In-Session Controls selected:
l Allow Clipboard
Time Restrictions tab:
l Do not set policy time restrictions.
Emergency tab:
l Do not enable emergency access.
5. Log out.
Safeguard for Privileged Passwords 6.6 Evaluation Guide42
4
Password release workflowexercises
Now that you have setup Safeguard for Privileged Passwords, it's time to validate theaccess request policies you created for password release requests.
Exercise 1: Testing the password release workflow
Exercise 2: Testing time restrictions
Exercise 3: Testing priorities
Exercise 1: Testing the passwordrelease workflow
This exercise demonstrates the password release workflow from request to approvalto review.
NOTE: If you setup users from your test lab as a Requester, Approver, and Revieweruser, have each of them log in to a web client using a mobile device. If mobile devicesare not available, have your users log in to the Safeguard for Privileged Passwordsdesktop client at their own workstations.
To start the web client
1. Open a browser and navigate to https://<Appliance IP Address>.
2. Start three instances of the web client, logging in as Joe, Abe, and Ralph,respectively.
NOTE: Alternatively, you can open three browser windows on a single desktop anddisplay them side-by-side to simulate mobile devices. Log in to each instance asyour Requester, Approver, and Reviewer users.
(web client) Test: Request password
As Joe, the Requester user, perform the following steps.
Safeguard for Privileged Passwords 6.6 Evaluation Guide
Password release workflow exercises43
1. From the web client, click Home or My Requests, then clickNew Request.
l If you have set up a Linux account and a Windows account, request apassword from each.
2. Use the default access options.
l Notice how the policy configuration changes the user experience.
3. Open Requests and review your pending requests.
Test: Approve password requests
(web client) Did you receive a notification on your mobile phone? You can approve therequest from your mobile device without being logged in to Safeguard for Privileged
Passwords. As Abe, the Approver user, click Approvals on the left of the page tocomplete the approval.
(desktop client) If you'd rather approve it using the desktop client proceed to thesteps below.
As Abe, the Approver user, perform the following steps.
NOTE: Notice Abe has an additional authentication step to take in order to log in toSafeguard for Privileged Passwords. In addition, since you have set up ApprovalAnywhere, you can use the Starling 2FA app on your mobile phone to complete the loginprocess.
1. Open Approvals and review the requests waiting for your approval.
2. Select Approve/Deny to approve Joe's password requests.
Test: The password and check it in
As Joe, perform the following steps.
1. Once the password becomes Available, open the requests and select ShowPassword to see the password on your screen.
Make note of the password so that you can verify that Safeguard for PrivilegedPasswords changes it after you use it.
2. Select Copy.
3. Using the password in your copy buffer, log in to the test server.
4. Log out of the test server and return to the Safeguard for PrivilegedPasswords desktop.
5. Select Check-In to complete the password check out process for thepassword requests.
Test: Review a password release
As Ralph, the Reviewer, use the web client or desktop client:
(web client)
Safeguard for Privileged Passwords 6.6 Evaluation Guide
Password release workflow exercises44
1. Click Reviews. Select the request.
2. Enter a comment.
3. Click to mark the selected request as reviewed.
(desktop client)
1. Open Reviews and review the requests that are waiting for your review.
a. Select Workflow to view the transactions that took place as part ofthe request.
b. Select Review to enter a comment and complete the review process.
Test: Request emergency access
As Joe, perform the following steps.
1. Request the password for the Linux asset again, this time use the EmergencyAccess option.
l Notice that the password becomes immediately available. That is becauseEmergency access bypasses the approval.
2. Once the password becomes Available, open the password request and selectShow Password.
l Is the password different this time? When the Change Password AfterRelease option is selected in the policy, Safeguard for Privileged Passwordsautomatically changes the password after each use.
3. Copy the password so you can use it to manually log in to the remote asset/account.
4. After you have successfully logged in to the remote asset/account, log out of the testserver and return to the Safeguard for Privileged Passwords desktop.
5. Select Check-In.
Test: Review a password release
1. As Ralph, perform the following:
l In the web client Reviews and click to mark the selected requestas reviewed.
l In the desktop client:
1. Open Reviews and review the requests that are waiting for your review.
2. Select Workflow to view the transactions that took place as part ofthe request.
3. Select Review to enter a comment and complete the review process.
TIP: If one requester checks in the request and another requester wants to use it, thesecond requester is unable to check out the password until the original request has beenreviewed. However, the Security Policy Administrator (PolicyAdmin) can Close a requestthat has not yet been reviewed. This will bypass the reviewer in the workflow and allow
Safeguard for Privileged Passwords 6.6 Evaluation Guide
Password release workflow exercises45
the account to be accessed by another requester.
Exercise 2: Testing time restrictions
Now that you have seen the end-to-end password release process from request to approvalto review, let's demonstrate how the entitlement and policy time restrictions affect apassword request.
An entitlement's time restrictions enforce when Safeguard for Privileged Passwords uses apolicy. A policy's time restrictions enforce when a user can access the account passwords.If the entitlement and the policy both have time restrictions, the user can only check outthe password for the overlapping time frame.
Time restrictions control when the entitlement or policy is in effect relative to a user's timezone. Although Safeguard for Privileged Passwords Appliances run on CoordinatedUniversal Time (UTC), the user's time zone enforces the time restrictions set in theentitlement or policy. This means that if the appliance and the user are in different timezones, Safeguard for Privileged Passwords enforces the policy in the user's time zone set inhis account profile.
Test: Entitlement time restrictions
1. In the desktop client, as PolicyAdmin, navigate to Entitlements.
2. Navigate to the General tab of the Linux Password Requests entitlement.
3. Set the entitlement Time Restrictions to allow users to access passwords onlyduring their lunch hour Monday through Friday.
4. As Joe, assuming that it is currently not during your lunch hour, request a passwordfor a Linux account, for a duration of five minutes.
l Did Safeguard for Privileged Passwords allow you to check out this password?The request dialog disables the Request Immediately option. The requesttime will automatically be set for the next unrestricted time frame that allowsthe account password to be requested.
5. Cancel the request (or return to your Home page).
Test: Entitlement expiration
1. As PolicyAdmin, set the Time Restrictions for the Linux Password Requests role to8:00 a.m. to 5:00 p.m. Monday through Friday.
2. While you are in Time Restrictions, set this entitlement to expire today in 1minute from now.
3. Wait for the entitlement to expire.
l Did you see Safeguard for Privileged Passwords's notification?
NOTE: If you do not see the notification refresh your screen.
Safeguard for Privileged Passwords 6.6 Evaluation Guide
Password release workflow exercises46
4. As Joe, request a password for a Linux account.
l Notice that the account is not available to check out. Safeguard for PrivilegedPasswords does not allow you to check out accounts associated with expiredentitlements.
5. As PolicyAdmin, remove the expiration time from the Time Restrictions, but leavethe entitlement Time Restrictions enforced.
6. As Joe, request a password for the same Linux account.
l Observe that you are now allowed to request passwords for the Linux PasswordRequests accounts.
7. Cancel the request (or return to your Home page).
Test: Policy time restrictions
1. As PolicyAdmin, set the policy Time Restrictions for the Weekday MaintenancePolicy to allow users to access passwords 8:00 a.m. to 5:00 p.m. Mondaythrough Friday.
2. As Joe, request a password for the Windows account for Sunday at 2:00 p.m.
l This request was denied because the Weekday Maintenance Policy does notallow you to check out accounts on Sunday.
3. Cancel the request (or return to your Home page).
Exercise 3: Testing priorities
To determine which policy to use for a password release, Safeguard for PrivilegedPasswords considers both entitlement and policy priorities. Safeguard for PrivilegedPasswords first considers the entitlement priority, then the priorities of policies within thatentitlement.
Test: Entitlement priorities
To test entitlement priorities, an account must be governed by two different entitlements.
1. In the desktop client, as PolicyAdmin, navigate to Entitlements.
2. Verify that the Linux Password Requests entitlement is priority #1.
NOTE:Safeguard for Privileged Passwords displays the priority number under theentitlement name.
3. In Account Groups, add the Windows account to the Linux Servers Accounts group.
4. As Joe, request a password for the Windows account, for Sunday at 9:00 a.m.
l Are Reasons and a Comment required? If so, then you know that Safeguardfor Privileged Passwords used the entitlement; the Windows PasswordRequests entitlement does not require Reasons or Comments.
Safeguard for Privileged Passwords 6.6 Evaluation Guide
Password release workflow exercises47
l Did the Time Restriction prevent you from checking out this password? TheLinux Password Requests entitlement only allows you to check out passwordsMonday through Friday, from 8:00 a.m. to 5:00 p.m.
5. Cancel the request.
6. As PolicyAdmin, change the priority of these entitlements, making the WindowsPassword Requests priority #1, and run through this test again to see if you getdifferent results.
l Are Reasons and a Comment required? If not, then you know that Safeguardfor Privileged Passwords used the Windows Password Requests entitlement asit does not require Reasons or Comments.
l Did the Time Restriction prevent you from checking out this password? TheWeekday Maintenance Policy only allows you to check out passwords Mondaythrough Friday, from 8:00 a.m. to 5:00 p.m.
7. Before you leave this test, change the priority back and remove the Windows accountfrom the Linux Servers Accounts group.
Test: Policy priorities
To test policy priorities, an account must be in the scope of two policies within the sameentitlement.
1. Log in as PolicyAdmin and navigate to Administrative Tools.
2. In Entitlements, add this new policy to the Windows Password Requestsentitlement:
General tab:
l Policy Name: Sunday Maintenance Policy.
l Description: The rules that define the request, approval, and review ofpassword requests for the Windows Server Accounts on Sundays.
l Access Type: Password Release
Scope tab:
l Windows Server Accounts group
Requester tab:
l Select all Reasons.
l Require a Reason.
l Require a Comment.
l Select the Allow Requester to Change Duration option.
Approver tab:
l Require one person to approve a password request, then select the Abeaccount.
Reviewer tab:
Safeguard for Privileged Passwords 6.6 Evaluation Guide
Password release workflow exercises48
l Require one person to review a past password release, then select theRalph account.
Access Config tab:
l Ensure access type is Password Release
l Select the Change password after Check-in check box.
Time Restrictions tab:
l Allow users to check out passwords only on Sunday.
Emergency tab:
l Enable Emergency Access.
3. Verify that the Weekday Maintenance Policy is priority #1.
4. As Joe, request a password for the Windows account, for Sunday at 9:00 a.m.
l Are you required to add a Reason for your password request?
If not, then you know Safeguard for Privileged Passwords used the WeekdayMaintenance Policy which does not have Reasons or Comments enabled.
l Did the Time Restrictions prevent you from checking out this password?
The Weekday Maintenance Policy does not permit you to request apassword on Sunday.
5. Cancel the request.
6. As PolicyAdmin, change the priority of these policies, making the SundayMaintenance Policy priority #1, and run through this test again to see if you getdifferent results.
l Are you required to add a Reason for your password request?
If so, then you know Safeguard for Privileged Passwords used the SundayMaintenance Policy; the Weekday Maintenance Policy does not have Reasonsor Comments enabled.
l Did the Time Restrictions prevent you from checking out this password?
The Sunday Maintenance Policy permits you to request a password on Sunday.
7. Before you leave this test, change the policy priority back.
8. Cancel the request and log out.
Safeguard for Privileged Passwords 6.6 Evaluation Guide
Password release workflow exercises49
5
Auditing exercises
Now that you have performed some password request activities, you can audit thetransaction data.
The appliance records all activities performed within Safeguard for Privileged Passwords.Any administrator has access to the audit log information; however, your administratorpermission set determines what audit data you can access.
Safeguard for Privileged Passwords provides several ways to audit transaction activity:
l Password Archive: Where you access a previous password for an account for aspecific date.
l SSH Key Archive: Where you access a previous SSH key for an account for aspecific date.
l Check and Change Log: Where you view an account's password and SSH keyvalidation and reset history.
l History: Where you view the details of each operation that has affected theselected item.
l Activity Center: Where you can search for and review any activity for a specifictime frame.
l Work flow: Where you can audit the transactions performed as part of the workflowprocess from request to approval to review for a specific access request.
l Reports: Where you can view and export entitlement reports that show you whichassets and accounts a selected user is authorized to access.
The exercises in this section demonstrate Safeguard for Privileged Passwords's auditingcapabilities. But before we start, let's create some password check and change activity.
These exercises will guide you through a step-by-step evaluation of the Safeguard forPrivileged Passwords auditing features.
Exercise 1: Creating audit data
Exercise 2: Accessing the Password Archive
Exercise 3: Viewing the Check and Change log
Exercise 4: Viewing the History tab
Exercise 5: Using the Activity Center
Exercise 6: Auditing access requests
Safeguard for Privileged Passwords 6.6 Evaluation Guide
Auditing exercises50
Exercise 7: Running entitlement reports
Exercise 1: Creating audit data
By following these steps, you will add some password check and change history toSafeguard for Privileged Passwords's audit log and you will learn how to manually verifyand reset account passwords.
To perform password check and change activity
1. Log in as AssetAdmin and navigate to Administrative Tools.
2. In Accounts, select an account.
3. Open the Account Security menu and notice the options: Check Password,Change Password, and Set Password using the Manual Password option.
NOTE: These same options are available from an account's context menu.
4. Check the password for the account.
NOTE: The Tasks pane opens when you start a task. You can re-size your desktopclient console so that the Tasks pane is not covering the Administrative Tools.
The "Check" option verifies the account password is synchronized with the Safeguardfor Privileged Passwords database; this action should succeed.
TIP: If Check Password fails, run Check Asset from the context menu of theasset to ensure that Safeguard for Privileged Passwords can communicate with it.Then retry the Check Password option on the account.
5. Set the password for the account to Mypass01 using the Manual Password option.
The Manual Password option manually sets the account password in the Safeguardfor Privileged Passwords database; not on the appliance; so now they are not in sync.
6. Check the password for the account.
The Check option should fail because the account password is not in sync with theSafeguard for Privileged Passwords database.
7. Change the password for the account.
The Change option creates a new account password and synchronizes it on theSafeguard for Privileged Passwords database.
8. Check the password for the account again.
This task should now be successful.
Stay logged in as the AssetAdmin for the next exercise.
Safeguard for Privileged Passwords 6.6 Evaluation Guide
Auditing exercises51
Exercise 2: Accessing the PasswordArchive
Password Archive allows you to access a previous password for an account for aspecific date.
NOTE: The Password Archive dialog only displays previously assigned passwords forthe selected asset based on the date specified. This dialog does not display the currentpassword for the asset.
To access an account's previous password
1. In Accounts, select the account you have been working with.
2. Click Password Archive from the toolbar.
3. In the Password Archive dialog, select today's (or a previous) date.
TIP: If no entries are returned, this indicates that the asset is still using thecurrent password.
4. In the View column, click to display the password for the specified date.
5. Either Copy the password, or click OK to close the dialog.
6. Close Password Archive to return to Accounts.
Stay logged in as the AssetAdmin for the next exercise.
Exercise 3: Viewing the Check andChange log
Each account has a Check and Change Log tab that allows you to view an account'spassword validation and reset history.
To view an account's change history
1. In Accounts, select the account you have been working with.
2. Select the Check and Change Log tab to view the password change history.
3. Explore the results. Sort the items by Status or Time.
Stay logged in as the AssetAdmin for the next exercise.
Safeguard for Privileged Passwords 6.6 Evaluation Guide
Auditing exercises52
Exercise 4: Viewing the History tab
Each of the Administrative Tools views has a History tab that allows you to view orexport the details of each operation that has affected a selected item.
To view the transaction history of an account
1. In Assets, select a managed system.
2. Select the History tab to view the transaction history.
3. Poke around and notice that each of the Administrative Tools (Account, Assets,Partitions, Users, and so on.) has a History tab.
4. Log out.
Exercise 5: Using the Activity Center
The Activity Center is the place to go for troubleshooting issues. The appliance recordsall activities performed within Safeguard for Privileged Passwords. Any administrator hasaccess to the audit log information; however, your administrator permission setdetermines what audit data you can access.
To run an activity report
1. Log in as the Auditor.
NOTE: The Auditor has read-only access to all features.
2. From the Home page, navigate to the Activity Center.
3. Use the default query settings: I would like to see all activity occurring within thelast 24 hours.
4. Click Run.
5. Explore the results.
6. Double-click an event to see more details then double-click to close the details.
To filter the content
1. Open the User filter list and select AssetAdmin.
2. Sort the records so the latest time is listed first.
3. Double-click a password event to view the details of the event.
Stay logged in as the Auditor for the next exercise.
Safeguard for Privileged Passwords 6.6 Evaluation Guide
Auditing exercises53

Exercise 6: Auditing access requests
The Request Workflow dialog allows you to audit the transactions that took place withina password release or session request. This dialog can be accessed using the Workflowbutton in the Activity Center view when an access request event is selected in an activityaudit log report.
The Workflow button also appears to reviewers for completed access requests.
To view the request workflow for a password release or session request
1. Log in as the Auditor.
2. From the Home page, navigate to the Activity Center.
3. Run an activity audit log report.
4. On the results page, select an access request event and click Workflow.
The Request Workflow dialog displays the workflow transactions from request toapproval to review.
5. Select Show Details to view more information about the request, approval, andreview transactions of that request.
Stay logged in as the Auditor for the next exercise.
Exercise 7: Running entitlement reports
Reports allows the Auditor and Security Policy Administrators to view and exportentitlement reports that show which assets and accounts a selected user is authorized toaccess. Reports may be exported in .csv or .json format.
Entitlement reports
Safeguard for Privileged Passwords provides these entitlement reports.
l User: Lists information about the accounts a selected user is authorized to request.
l Asset: Lists information about the accounts associated with a selected asset and theusers who have authorization to request those accounts.
l Account: Lists detailed information about the users who have authorization torequest a selected account including: Entitlement, Policy, Access Type, PasswordIncluded, Password Change, Time Restrictions, Expiration Date, Group, From LinkedAccount, and Last Accessed.
To run an entitlement report
1. As Auditor, select Reports from the Safeguard for Privileged Passwordsdesktop Home page.
Safeguard for Privileged Passwords 6.6 Evaluation Guide
Auditing exercises54
2. Choose to view entitlements by Asset.
3. Browse to select all assets and click OK.
4. In the top pane of the results screen, select an asset to see the details.
5. View both the Total Accounts tab and the People tab.
6. Select an item from the results to drill down into the details about the users andthe accounts.
7. Click Export to create a file of the search results in a location of your choice.
8. Log out.
Safeguard for Privileged Passwords 6.6 Evaluation Guide
Auditing exercises55
6
Discovery exercises
These exercises will guide you through a step-by-step evaluation of the Safeguard forPrivileged Passwords discovery features:
Exercise 1: Discovering assets
Exercise 2: Discovering accounts
Exercise 1: Discovering assets
Safeguard for Privileged Passwords allows you to set up Asset Discovery jobs to runautomatically against the directory assets you have added to Safeguard for PrivilegedPasswords. For more information, see the Safeguard for Privileged PasswordsAdministration Guide, Asset Discovery section.
To create an Asset Discovery job using the Directory Method
1. Log in as the Asset Administrator and navigate to Administrative Tools |Discovery | Asset Discovery tile.
2. Click Add to create an Asset Discovery job.
3. Provide information for the Asset Discovery job on the following tabs:
Tab Description
General tab a. Enter a name for the Asset Discovery job.
b. For Partition, browse to select the partition.
c. For Method, select Directory.
Information tab In Directory, select the directory.
Rules tab Click Add to create an Asset Discovery rule:
1. Enter a Name for the rule.
Safeguard for Privileged Passwords 6.6 Evaluation Guide
Discovery exercises56
Tab Description
2. For the Settings, click Add Condition to definecriteria, including the search scope in the directory,then click OK.
3. On the Asset Discovery Rule dialog, for ConnectionTemplate, leave the default of None.
4. For Asset Profile, use the default profile to govern thediscovered assets.
5. Keep the Manged Network default value and click OK.
Schedule tab You can skip adding the schedule to run the Asset Discoveryjob since we will run the discovery job manually for thisexercise.
Summary tab Review the discovery job and click Add Discovery.
4. In the Asset Discovery dialog, select the job and click Run Now. The Taskspop-up shows the progress of the Asset Discovery job.
5. When the Tasks pop-up indicates that the job is successful ( Success), click theAsset Discovery Results tile.
6. In the Asset Discovery Results grid:
a. Select Last 24 Hours.
b. Click Refresh to show the latest data.
c. Double-click an Asset Discovery job to see the result of the discovery.
d. Click on the number of # Assets Found to view individual discovered assets.
7. To control management of an asset:
a. Navigate to Administrative Tools | Assets.
b. Right-click the asset then click Access Requests.
c. Choose Enable Session Request or Disable Session Request.
NOTE: When you ignore an asset, Safeguard for Privileged Passwords disables itand disables/hides all associated accounts. If you choose to Enable SessionRequest the asset later, Safeguard for Privileged Passwords reenables all theassociated accounts.
8. You can also search the Activity Center for information about discovery jobs thathave run. This is the same information as presented in the the Asset DiscoveryResults grid.
a. Click Home.
b. Under I would like to see, click Edit and select Asset DiscoveryActivity.
Safeguard for Privileged Passwords 6.6 Evaluation Guide
Discovery exercises57
c. Under ... occurring within the ..., click Edit and select Last 24 Hours.
d. Keep the default of All Activity in the Last 24 Hours.
e. Click the Run button.
f. In the results grid, double-click the job to more information then click Detailsto show the progress of the Asset Discovery job.
g. The Asset Discovery events are listed in the Activity Category column.
9. To view all activity in the last 24 hours, return to the Activity Center dialog.
a. Under I would like to see, click Edit and select All Activity.
b. Click the Run button.
c. In the grid, User column, click the filter, and select your User name.
d. To display additional columns, click Column in the upper right corner andselect additional columns, such as Appliance, Asset, Object Name, andObject Type.
e. Double-click any of the rows to view additional information.
Set asset connection authentication credentials to define a service account
When None is selected as the Authentication Type, the discovered assets will not have aservice account. In the next steps you will change the Authentication Type.
These steps provide valid information only if:
l You have created a directory asset and directory accounts that will be used as theservice account for the Windows asset discovered.
l You have Linux assets that are discovered that have QAS installed and are joined tothe directory.
1. In Assets, select one of the newly discovered assets.
2. On the General tab, double-click the Connection information box or click theEdit icon next to it.
3. Choose an Authentication Type of Directory Account and provide the serviceaccount credentials.
NOTE:Safeguard for Privileged Passwords uses a service account to connect to anasset to securely manage passwords for the accounts on that asset.
Exercise 2: Discovering accounts
Safeguard for Privileged Passwords allows you to set up Account Discovery jobs to runautomatically against the assets it manages in the scope of a partition.
Safeguard for Privileged Passwords 6.6 Evaluation Guide
Discovery exercises58
To create an Account Discovery job
1. Log in as the Asset Administrator and navigate to Administrative Tools |Discovery | Account Discovery tile.
2. Click Add to create a new Account Discovery job.
a. Browse to select a partition.
b. Enter a Name for the setting, such as Daily. Description is optional.
c. Select the Discovery Type that is the platform, for example, Windows, Unix,or Directory. Make sure the Discovery Type is valid for the assets associatedwith the Partition selected earlier on this dialog. If the Discovery Type isDirectory, select the directory on which the Account Discovery job runs.
d. Schedule the discovery job to run daily starting in about five minutes.
e. In Rules, click Add to add a rule. Enter a Name, select Find All in FindBy, and click OK.
NOTE: If you opt to experiment with finding accounts based on rules, notethat all search terms return exact matches and are case-sensitive.
3. Click OK to save the Account Discovery job.
4. Wait for the Account Discovery job to run.
5. After the Account Discovery job runs see the job results and the accounts discovered.At any time, click Refresh to update the information.
a. Click the Account Discovery Results tile to see the results of thediscovery job run.
b. Click the Discovery Accounts tile to see the accounts that were discovered.
6. You can also search the Activity Center for information about discovery jobs thathave run. This is similar information as presented in the the Account DiscoveryResults grid.
a. Under I would like to see, click Edit and select PasswordManagement Activity.
b. Click the Run button.
c. In the Events column, the Account Discovery events display.
Safeguard for Privileged Passwords 6.6 Evaluation Guide
Discovery exercises59
About us
About us
One Identity solutions eliminate the complexities and time-consuming processes oftenrequired to govern identities, manage privileged accounts and control access. Our solutionsenhance business agility while addressing your IAM challenges with on-premises, cloud andhybrid environments.
Contacting us
For sales and other inquiries, such as licensing, support, and renewals, visithttps://www.oneidentity.com/company/contact-us.aspx.
Technical support resources
Technical support is available to One Identity customers with a valid maintenance contractand customers who have trial versions. You can access the Support Portal athttps://support.oneidentity.com/.
The Support Portal provides self-help tools you can use to solve problems quickly andindependently, 24 hours a day, 365 days a year. The Support Portal enables you to:
l Submit and manage a Service Request.
l View Knowledge Base articles.
l Sign up for product notifications.
l Download software and technical documentation.
l View how-to videos at www.YouTube.com/OneIdentity.
l Engage in community discussions.
l Chat with support engineers online.
l View services to assist you with your product.
Safeguard for Privileged Passwords 6.6 Evaluation Guide
About us60
I ndex
A
access historical information 50
access request workflow
password release 43
account discovery job 59
account password
change 51
check 51
set 51
Activity Center 53
add accounts 35
add assets 35
add entitlements 36
add partitions 35
add password release request policy 37
add session request policy 40
administrator users 28
appliance
complete hardware setup 24
complete virtual setup 24
hardware appliance setup 17
virtual appliance setup 20
asset discovery job 56
auditing access requests 54
B
Best Practice
use an UPS on all appliances 18
C
Check and Change Log 52
configure external integrationsettings 30
configure user for two-factor authen-tication 34
create account discovery job 59
create asset discovery job 56
create local administrator users 28
create local users 33
E
email notifications 32
entitlement report 54
entitlements 36
exercise
access password archive 52
audit access requests 54
create audit data 51
discover accounts 58
discover assets 56
password release workflow 43
run entitlement reports 54
test password release workflow 43
test priorities 47
test time restrictions 46
use Activity Center 53
view Check and Change log 52
view History tab 53
external integration settings 30
H
History tab 53
Safeguard for Privileged Passwords 6.6 Evaluation Guide
Index61
Index
J
join Safeguard to Starling 32
L
local users 33
O
One Identity Hybrid trial account 30
P
partition
about 7
password
change 51
check 51
set 51
viewing Check and Change Log 52
viewing Password Archive 52
Password Archive 52
password release request policy 37
password release workflow
overview 43
priorities
entitlement 47
policy 48
profile
about 7-8
R
Reports
about 54
run activity report 53
run entitlement report 54
require secondary authentication 34
S
Safeguard
features 13
separation of duties 28
session request policy 40
setup email notifications 32
setup hardware appliance 17
setup Starling account 30
sign up for Starling One Identity Hybridservice trial account 30
Starling account 30
Starling join 31
T
transaction history 53
V
virtual appliance
set up 20
W
Workflow command 54
Safeguard for Privileged Passwords 6.6 Evaluation Guide
Index62
Related Documents