OfficeConnect ® Fast Ethernet PCI Networking Kit User Guide MODEL NO. 3CSOHOKIT100A

Welcome message from author
This document is posted to help you gain knowledge. Please leave a comment to let me know what you think about it! Share it to your friends and learn new things together.
Transcript

Manual Cover . 7.5" X 9" Portrait. 4/C & 1 PMS Working FileLAN
Adjust spine width size according to thickness of manualP
lace in ap
pro
priate h
igh
resolu
tion
artwo
rk insid
e the arch
ed m
ask
Printed in Ireland 09-1606-001
MO
DEL N
O. 3
CS
OH
OK
IT10
0A
3Com Corporation5400 Bayfront PlazaP.O. Box 58145Santa Clara, CA 95052-8145U.S.A.
Fast Ethernet PCI N
etworking K
it
OfficeConnect®
Fast EthernetPCI Networking KitUser Guide
MODEL NO.3CSOHOKIT100A
User G
uide
www.3com.com

®
OfficeConnect®
Fast Ethernet PCI Networking Kit User Guide
http://www.3com.com/
http://www.3com.com/productreg
A member of the 3Com OfficeConnect family of productsDesigned for small businesses
Part No. 09-1606-001Published August 1999

3Com Corporation5400 Bayfront Plaza Santa Clara, California 95052-8145
Copyright © 1999, 3Com Corporation. All rights reserved. No part of this documentation may be reproduced in any form or by any means or used to make any derivative work (such as translation, transformation, or adaptation) without written permission from 3Com Corporation.
3Com Corporation reserves the right to revise this documentation and to make changes in content from time to time without obligation on the part of 3Com Corporation to provide notification of such revision or change.
3Com Corporation provides this documentation without warranty, term, or condition of any kind, either implied or expressed, including, but not limited to, the implied warranties, terms or conditions of merchantability, satisfactory quality, and fitness for a particular purpose. 3Com may make improvements or changes in the product(s) and/or the program(s) described in this documentation at any time.
If there is any software on removable media described in this documentation, it is furnished under a license agreement included with the product as a separate document, in the hard copy documentation, or on the removable media in a directory file named LICENSE.TXT or !LICENSE.TXT. If you are unable to locate a copy, please contact 3Com and a copy will be provided to you.
UNITED STATES GOVERNMENT LEGEND
If you are a United States government agency, then this documentation and the software described herein are provided to you subject to the following:
All technical data and computer software are commercial in nature and developed solely at private expense. Software is delivered as “Commercial Computer Software” as defined in DFARS 252.227-7014 (June 1995) or as a “commercial item” as defined in FAR 2.101(a) and as such is provided with only such rights as are provided in 3Com’s standard commercial license for the Software. Technical data is provided with limited rights only as provided in DFAR 252.227-7015 (Nov 1995) or FAR 52.227-14 (June 1987), whichever is applicable. You agree not to remove or deface any portion of any legend provided on any licensed program or documentation contained in, or delivered to you in conjunction with, this User Guide.
Unless otherwise indicated, 3Com registered trademarks are registered in the United States and may or may not be registered in other countries.
3Com, the 3Com logo, EtherDisk, and OfficeConnect are registered trademarks of 3Com Corporation. PACE is a trademark of 3Com Corporation. 3ComFacts is a service mark of 3Com Corporation.
Artisoft and LANtastic are registered trademarks of Artisoft, Inc. CompuServe is a registered trademark of CompuServe, Inc. DEC and PATHWORKS are registered trademarks of Digital Equipment Corporation. Deskjet and HP are registered trademarks of Hewlett-Packard Company. AT, IBM, and OS/2 are registered trademarks of International Business Machines Corporation. Microsoft, MS-DOS, Windows, and Windows NT are registered trademarks of Microsoft Corporation. Novell and NetWare are registered trademarks of Novell, Inc.
All other company and product names may be trademarks of the respective companies with which they are associated.
Guide written by Paul Roemers. Illustrated by Mary Inden. Edited by Michael Brösius. Produced by Mary Estrella.

C
ONTENTS
ABOUT THIS GUIDE
Conventions 9Year 2000 Compliance 10
1 GETTING STARTED
What This Guide Covers 11What This Chapter Covers 12Networking Kit Contents 12
OfficeConnect Network Assistant CD Contents 13Understanding Networking 13
Understanding the PC’s Role in Networking 15Understanding Network Interface Cards 17Understanding the Hub 18Understanding Network Software 20Understanding Network Servers 20
System Requirements 20Required Hardware 20Required Software 20
2 INSTALLING YOUR NETWORK HARDWARE
Getting Ready 23Installing the NIC 24Connecting NICs to the Hub 27Interpreting the LED Indicators 28
NIC Link LEDs 28Hub LED Status Indicators 30
3 INSTALLING THE NETWORK DRIVER
Windows 95 31Windows 95 Version A 32Windows 95 Version B or Version C 34
Windows 98 36Verifying Successful Installation 37
4 ENABLING FILE AND PRINTER SHARING THROUGH WINDOWS
Before Starting 39Verifying Each PC’s Identification 40Enabling File and Print Sharing 42Giving Permission to Share Resources 43
Granting Access to a PC’s Hard Drive 43Granting Access to a Printer 46
Adding the Network Printer to a PC Printers Folder 48Verifying Your Network’s Shared Resources 56Verifying Network Connectivity 58
5 INSTALLING THE WINDOWS NT DRIVER
Windows NT 3.51 59Windows NT 4.0 60
Verifying Successful Installation 61Windows NT 4.0 61Windows NT 3.51 62
6 CONFIGURING THE NICDisplaying Configuration Settings 64
A SPECIFICATIONS
Hub Specifications 69NIC Specifications 70RJ-45 Connector Pin Assignments 70Cable Specifications 71
Unshielded Twisted-Pair Cable 71100BASE-TX Operation 72100BASE-TX Specifications 72

B DESIGNING YOUR NETWORK
Determining Network Requirements 73Purpose of the Network 74Performance Factors 74Sharing Resources 74
Peer-to-Peer Network 75Client/Server Network 76
Network Checklist 77
C TROUBLESHOOTING
Basic Troubleshooting Tips 79Verifying the Protocol Configuration 80
Adding a Protocol 81Interpreting the LEDs 84Starting the 3Com NIC Diagnostics Program 85Running the NIC Self-Tests 86Running the Echo Test 88Accessing the Help System 91Viewing Release Notes, Frequently Asked Questions, and KnowledgeBase Topics 91Accessing 3Com Support Services 92Removing NIC Software 93
Windows 95 and Windows 98 93Windows NT 4.0 94Windows NT 3.51 94
Frequently Asked Questions 95Troubleshooting the Hub 97
D EXPANDING YOUR NETWORK
Understanding Connection Concepts 99Connecting Additional Hubs 100Positioning the Hub 101
Using the Nonskid Feet 101Stacking Multiple Hubs 102Wall-Mounting the Hub 104

E TECHNICAL SUPPORT
Online Technical Services 105World Wide Web Site 1053Com Knowledgebase Web Services 1053Com FTP Site 1063Com Bulletin Board Service 106
Access by Analog Modem 106Access by Digital Modem 107
3Com Facts Automated Fax Service 107Support from Your Network Supplier 107Support from 3Com 107Returning Products for Repair 109
GLOSSARY
INDEX
3COM CORPORATION LIMITED WARRANTY
FCC CLASS A VERIFICATION STATEMENT
FCC CLASS B STATEMENT
FCC DECLARATION OF CONFORMITY
INDUSTRY CANADA CLASS B EMISSION COMPLIANCE STATEMENT
AVIS DE CONFORMITÉ À LA RÉGLEMENTATION D’INDUSTRIE CANADA

VCCI CLASS B STATEMENT
3COM END USER SOFTWARE LICENSE AGREEMENT
PRODUCT REGISTRATION


ABOUT THIS GUIDE
This guide describes how to set up your own network using the 3Com® OfficeConnect® Fast Ethernet PCI Networking Kit. It includes detailed instructions on creating a peer-to-peer network through Windows 95 and Windows 98, and other network operating systems, such as Windows NT and Novell NetWare.
This guide is appropriate for anyone who is familiar with the basic elements of a PC and is interested in networking several PCs or other devices, such as a printer or scanner.
If the information in the release notes, if any, shipped with your product differs from the information in this guide, follow the instructions in the release notes.
Most user guides and release notes are available in Adobe Acrobat Reader Portable Document Format (PDF) or HTML on the 3Com World Wide Web site:
http://www.3com.com/
Conventions Table 1 and Table 2 list conventions that are used throughout this guide.
Table 1 Notice Icons
Icon Notice Type Description
Information note Information that describes important features or instructions
Caution Information that alerts you to potential loss of data or potential damage to an application, system, or device
Warning Information that alerts you to potential personal injury

10 ABOUT THIS GUIDE
Year 2000 Compliance
For information on Year 2000 compliance and 3Com products, visit the 3Com Year 2000 Web page:
http://www.3com.com/products/yr2000.html
Table 2 Text Conventions
Convention Description
Screen displays This typeface represents information as it appears on the screen.
The words “enter” and “type”
When you see the word “enter” in this guide, you must type something, and then press the Return or Enter key. Do not press the Return or Enter key when an instruction simply says “type.”
Keyboard key names If you must press two or more keys simultaneously, the key names are linked with a plus sign (+). Example:
Press Ctrl+Alt+Del
Menu commands and buttons
Menu commands or button names appear in italics. Example:
From the Help menu, select Contents.
Words in italicized type
Italics emphasize a point or denote new terms at the place where they are defined in the text.

1
GETTING STARTEDThe 3Com® OfficeConnect® Fast Ethernet PCI Networking Kit contains everything you need to create a network with your personal computers (PCs). It is the ideal networking solution for a small office or small business wanting to share files and resources, such as printers or hard disks.
What This Guide Covers
This guide provides all the information you need to install the components of your Networking Kit. It tells you how to:
■ Insert a network interface card (NIC) into each PC to be included in your network
■ Attach each network PC to a hub with cables
■ Install NIC software on each network PC
■ Configure the NIC on each network PC
This guide also provides basic instructions for configuring a simple Windows 95 or Windows 98 peer-to-peer network (a standard type of small network). However, you should be familiar with the particular operating system (Windows 95, for example) running on your PCs, so that you can configure your network correctly once you’ve installed all the components. This guide is not intended to be a substitute for your operating system documentation.
If your PCs are running Windows 95 or Windows 98, and you want to quickly install a peer-to-peer network, use the Quick Steps to Networking with Windows 95 or Windows 98 guide included in your kit.

12 CHAPTER 1: GETTING STARTED
What This Chapter Covers
This chapter defines the types of PCs that are compatible with your kit. It also describes your kit’s contents and provides a brief introduction to networking. If you’re already familiar with basic networking concepts and your kit’s contents, you can start with Chapter 2, “Installing Your Network Hardware.”
Networking Kit Contents
Your Networking Kit includes the components shown in Figure 1.
Figure 1 Contents of the Fast Ethernet Networking Kit
The Networking Kit contents are as follows:
■ OfficeConnect Fast Ethernet Hub 4
■ Two OfficeConnect Fast Ethernet Network Interface Cards (NICs)
■ Two 25-foot Category 5 unshielded twisted-pair (UTP) cables
■ AC/DC power adapter for the hub
■ Rubber nonskid feet for placing the hub on a desktop
■ A stacking clip for stacking more than one hub together
■ OfficeConnect Fast Ethernet Networking Kit User Guide
EtherDisk ®For the EtherLink ® III PC Card Family
Configuration and Diagnostics
NetWare ® 2.x, 3.x, and 4.x DOS and
OS/2 ODI DriversDOS and OS/2 NDIS 2.01 Drivers
Transcend ® and SmartAgent ™ Driver Agents
Supports both PCMCIA Release 2.1 Card
Services and PC Card Standard
Multifunction Card Services
A:>INSTALL
Version 5.0(DOS 1.44 MB)
®
83-0705-000 © 1995, 3Com Corporation. All rights reserved.
© 1994, 1995, Novell, Inc. All rights reserved.
12
34
Port Status
AlertPower
Collision
Activity
Green = OK, Yellow = Partitioned
OfficeConnect Fast Ethernet Hub 4
Version 4.01
Network AssistantAsistente de Red
Assitant ReseauNetzwerk-AssitentAssitente di Rete
OfficeConnectFast Ethernet
Hub 4
Installation software
Hub power adapter
Cables
Stacking clip
User guide
Quick steps guide
Nonskid feet
OfficeConnect10/100 NICs
Network Assistant CD

Understanding Networking 13
■ Quick Steps to Networking with Windows 95 or Windows 98
■ 3Com EtherDisk® diskette
■ OfficeConnect Network Assistant CD
OfficeConnectNetwork Assistant CD
Contents
Your Networking Kit includes the OfficeConnect Network Assistant CD. The Network Assistant CD provides information about the following topics:
■ Networking basics
■ Setting up a PC
■ Installing a hub
■ Adding a printer
■ Using your network
■ Accessing the Internet
■ Troubleshooting
In addition, the CD includes a detailed glossary of networking terms and information concerning 3Com small business solutions.
Understanding Networking
When two or more people get together to discuss topics of mutual interest, they’ve formed a network. Networking is about communication, which is sharing information, experiences, and resources. That’s what the Networking Kit is about, too.
A computer network is a group of computers connected to one another so they can share resources and information.
When you use the Networking Kit to create a network, you can:
■ Share resources—You and others on the network can share resources, such as a data file or directory, hard disk drive, printer, scanner, or modem.
■ Exchange information—You can communicate and exchange information with all designated users on the network.
■ Provide server support—You can store files and applications in a central location on one PC hard drive, where they can be accessed by any network users who have the proper authorization. (This PC is called a server. The other PCs that use the server are called clients.)

14 CHAPTER 1: GETTING STARTED
Figure 2 shows a sample OfficeConnect network composed of two PCs, a printer, and a hub.
Figure 2 Sample OfficeConnect Networking Kit Network
The Networking Kit provides a simple approach to building a network made of PCs and peripheral devices, such as printers, scanners, and modems. The network you create using the Networking Kit is easy to set up, yet flexible enough to grow as your networking needs increase.
The next few sections briefly explain the following basic components of a personal PC network:
■ PCs
■ NICs
■ Hub
■ Software
■ Server
For more information about networking, see the OfficeConnect Network Assistant CD included in your Networking Kit.
Computer1
Printer
Computer2
Hub
4
1X
Uplink/Normal
Power

Understanding Networking 15
Understandingthe PC’s Role
in Networking
Even though the PCs you’re intending to use for your network may have been built by different manufacturers, they all contain certain basic components common to all PCs (see Figure 3).
Figure 3 Components of a Typical PC
The type of PC that you’ll need for your network depends mostly on the task you want to accomplish with it. For example, if you just want the PC to be on the network to access a printer attached to another PC, you won’t need to add extra RAM and hard drive space. However, if several users will be accessing a program on the PC, you may want to make sure that the PC has sufficient RAM and hard drive space.
ISA/EISA expansionslots (bus)
PCI slots
Processor (CPU)
System board(motherboard)
Diskette drives
Hard driveScrew
Backplate

16 CHAPTER 1: GETTING STARTED
Table 3 describes each PC component. See the documentation that came with your PC for detailed information about each component.
Table 3 PC Component Definitions
PC Component Definition
Bus An electronic pathway along which signals are transmitted from one area of a PC to another.
Expansion slots Connectors on the bus into which you insert optional devices, such as NICs. They provide access to every part of the PC, including the memory and the central processing unit (CPU).
Your PC could have any mix of the following types of expansion slots:
■ ISA (black)
■ EISA (brown)
■ PCI (white and shorter than ISA/EISA slots)
Backplates The narrow metal panels that cover access to the expansion slots. They must be removed to insert NICs into the PC.
Diskette drive A storage device that reads data from and writes data to diskettes (such as 3.5” diskettes) that you insert and remove by hand.
Hard disk drive A permanent internal storage device that uses a set of rotating, magnetically coated disks to store data or programs. Your PC stores files on the hard drive.
Memory The PC workplace, where all computing activity takes place. The primary type of memory installed in a PC is random access memory (RAM).
The operating system copies applications from disk into memory, where all program execution and data processing takes place, and then writes the results back to disk.
Processor or CPU (central processing unit)
The computing and control part of the PC.
System board (motherboard) A large printed circuit board containing all the parts that make the PC work.

Understanding Networking 17
UnderstandingNetwork Interface
Cards
A network interface card (NIC) (Figure 4) is a printed circuit board that plugs into a PC expansion slot to provide added capabilities to the PC.
Figure 4 OfficeConnect Fast Ethernet PCI NIC
The NIC works with a family of programs, called a network operating system (NOS), to control the flow of information over the network. You connect the NIC to the network media (cabling, such as UTP or coaxial), which in turn connects to all the devices on the network.
Your Networking Kit contains two OfficeConnect Fast Ethernet PCI NICs. The NICS can be used to connect to either a 10BASE-TX network or a 100BASE-TX network, and are called “10/100 NICs.”
The connector on your OfficeConnect Fast Ethernet NIC uses unshielded twisted-pair (UTP) cable to connect the NIC to the hub (see the next section, “Understanding the Hub”). Your Networking Kit contains UTP Category 5 cables with an RJ-45 connector on each end.
If you need more cables than are supplied with your Networking Kit, you need to purchase them separately. Using a connector to attach two cables doesn’t work. (See cable specifications in Appendix A.) If you need cables longer than those supplied with your Networking Kit, note that the maximum Ethernet cable length allowed is 328 feet (100 meters).
The NIC slides into an expansion slot inside your PC and provides a connection for the UTP cable that connects your PC to the hub. (See Figure 2 on page 14.)
LEDs
DATA
TX
ACT10
100LNK
RJ-45 port

18 CHAPTER 1: GETTING STARTED
The NIC has an opening (port) on its backplate that looks similar to the one on the back of your telephone at home. It accepts the RJ-45 connector found on the end of the UTP cable.
CAUTION: Don’t try to plug a telephone line into the NIC or hub. The voltage differences may damage these devices.
The NIC backplate also has three light-emitting diodes (LEDs):
■ ACT (activity)
■ 10 LNK (link)
■ 100 LNK (link)
Understandingthe Hub
The hub is the heart of your network. It acts as a central concentration point for all the PCs and peripheral devices on your network.
To understand how the hub functions, visualize the wiring connecting your network as railroad tracks and the hub as a central railway station. If you try to connect every departure station with every destination station directly with a separate set of tracks, you’ll have a great tangle of rails. But if all departures feed into a central station, where they can be switched to appropriate destinations (as at a railway hub), traffic flow becomes much simpler.
Your Networking Kit contains one OfficeConnect Fast Ethernet Hub 4 (Figure 5). It is a stand-alone hub with four 100BASE-TX RJ-45 ports. You can connect up to four PCs or other network devices that have 100BASE-TX ports to the hub.
Figure 5 Front Panel of OfficeConnect Fast Ethernet Hub 4
LED displaypanel
12
34
Port Status
AlertPower
Collision
Activity
Green = OK, Yellow = Partitioned
OfficeConnect Fast Ethernet Hub 4

Understanding Networking 19
The fourth RJ-45 port on the Fast Ethernet Hub 4 (Figure 6) is a switchable port. (Ports are numbered in ascending order from right to left; the switchable port is located farthest to the left on the rear panel, next to the Uplink/Normal switch.) Keep the switchable port free unless no other ports are available. This port can be used for expansion (i.e., connecting the hub to another hub).
See Appendix D for information about expanding your network by using the switchable port.
Figure 6 Rear Panel of OfficeConnect Fast Ethernet Hub 4
The switch that controls the switchable port is located to the left of the switchable port. Table 4 describes how to use the Uplink/Normal switch.
All of the other RJ-45 ports are non-switchable, and permanently set to normal mode.
4
1X
Uplink/Normal
Power
Uplink/Normal switch
Power input
Switchableport
RJ-45 ports
Table 4 Uplink/Normal Switch Positions
Position Meaning
Normal The switchable port operates in normal mode. In this mode, you can use a straight-through cable to connect to a NIC port on a PC.
Uplink The switchable port operates in uplink mode. In this mode, you can use a straight-through cable to connect to a port operating in normal mode on another hub.

20 CHAPTER 1: GETTING STARTED
A series of LEDs on the front panel of the hub indicates the operating status. See “Hub LED Status Indicators” on page 30 for information about interpreting the hub LEDs.
UnderstandingNetwork Software
In addition to the hardware necessary to create your network, you’ll need software to run it. Windows 95 and Windows 98 have built-in support for networking, but you may require additional software for non–Windows 95/98 systems. See “System Requirements” later in this chapter for more information about software needed for your network.
UnderstandingNetwork Servers
A server is a special PC, usually containing a significant amount of additional memory and storage capacity, on which you can store programs, applications, files, and services that you want to make available to network users. When a user is able to access a network server from his or her PC, a client/server relationship exists. When a user exchanges a file or sends a message to another PC user, a client-to-client (or peer-to-peer) relationship exists.
To set up a PC as a server, you need a server NOS, such as Novell NetWare Server or Microsoft Windows NT. For more details about using a computer as a network server, contact your networking products supplier.
For more information about networking basics, see Appendix B, which has a worksheet that can help you plan your network installation or see the OfficeConnect Network Assistant CD.
System Requirements
Be sure that you have the required equipment to set up your network, as described in this section. You may need to refer to the hardware and software documentation that came with your equipment.
Required Hardware The NICs bundled with the Fast Ethernet Networking Kit can be installed in any IBM-compatible PC with an available PCI expansion slot. Almost all PCs currently on the market meet these requirements. (See “Installing the NIC” in Chapter 2 for more information about compatible expansion slots.)
Required Software If your PC is running Windows 95 or Window 98, most of the software you need (the NOS and device drivers) is already included in your operating system. You may need the troubleshooting information and programs on the 3Com EtherDisk diskette included with your Networking Kit.

System Requirements 21
If you’re not running Windows 95 or Windows 98, you’ll need operating system software to configure your NIC. You’ll also need a network operating system (NOS), such as Microsoft Windows NT.
The Networking Kit does not include an operating system or NOS software. You must purchase these components separately.
The Networking Kit’s EtherDisk diskette contains software (configuration programs, diagnostic programs, and device drivers) that allows your NIC to work with Windows 95, Windows 98, or Windows NT. The software allows you to connect to a Microsoft or a Novell network.


2
INSTALLING YOUR NETWORK HARDWAREThis chapter explains the following tasks you need to perform to get started with setting up your network. It tells you how to:
■ Insert a NIC in each PC to be networked.
■ Connect the hub to each installed NIC using the cables supplied with your kit.
Getting Ready Inspect the Networking Kit contents for damage. Familiarize yourself with the kit items (see Figure 1). You need these components:
■ EtherDisk diskette
■ NICs (see the caution on page 24 before removing the NICs from their containers)
■ Hub
■ Power adapter for the hub
■ UTP cables
■ Nonconductive tool (not supplied in your kit) for removing the PC cover and installing a NIC
If your network will be somewhat large and complex, you might want to take some time to plan it carefully before starting installation. You can use the worksheet supplied in Appendix B to design your network.
Ready? Let’s get started by installing the NIC.

24 CHAPTER 2: INSTALLING YOUR NETWORK HARDWARE
Installing the NIC To install a NIC, follow these steps:
1 Remove all jewelry from your hands and wrists. Use only insulated or nonconductive tools to prevent damaging your equipment.
CAUTION: Each NIC is packed in an antistatic container to protect it during shipment. To avoid damaging any static-sensitive components on the NIC, before you remove it from the container, touch the metal chassis of your PC. Also, be careful to handle the NIC by its edges only.
2 Turn off the PC. Unplug the power cable. Detach all other cables from the PC.
3 Remove the PC cover. (See your PC documentation for details.)
4 Find an empty PCI expansion slot and remove the corresponding slot cover (Figure 7). Keep the backplate screw. You’ll need it for step 6. Remove the backplate and store it for future use (see Figure 9).
The OfficeConnect NIC works in a PCI expansion slot. Some PCs have three types of expansion slots: PCI, ISA, and EISA.
PCI slots are usually white and shorter than the other expansion slots (see Figure 8). ISA slots are usually black. EISA slots are usually brown, and are as long as ISA slots. If you’re not sure what type of expansion slots your PC has, see your PC documentation for details.
Figure 7 Removing the Backplate
Screw
Backplate
Expansion slots

Installing the NIC 25
Figure 8 PC Expansion Slot Types
3Com PCI NICs, such as the OfficeConnect NIC, are designed to work in any bus-mastering PCI slot, preferably slot 1. Normally, slot 1 is marked on the PC motherboard and is located closest to the computer power supply. Avoid any PCI slot next to an ISA slot. This is often a shared slot and does not support bus mastering.
5 Carefully insert the NIC into the slot, pressing firmly with steady pressure until it’s seated properly (Figure 9).
The metal backplate of the NIC should be positioned so that you can easily fasten it with the backplate screw. You should not be able to see any of the edge connector of the NIC.
EISA
ISA
PCI
26 CHAPTER 2: INSTALLING YOUR NETWORK HARDWARE
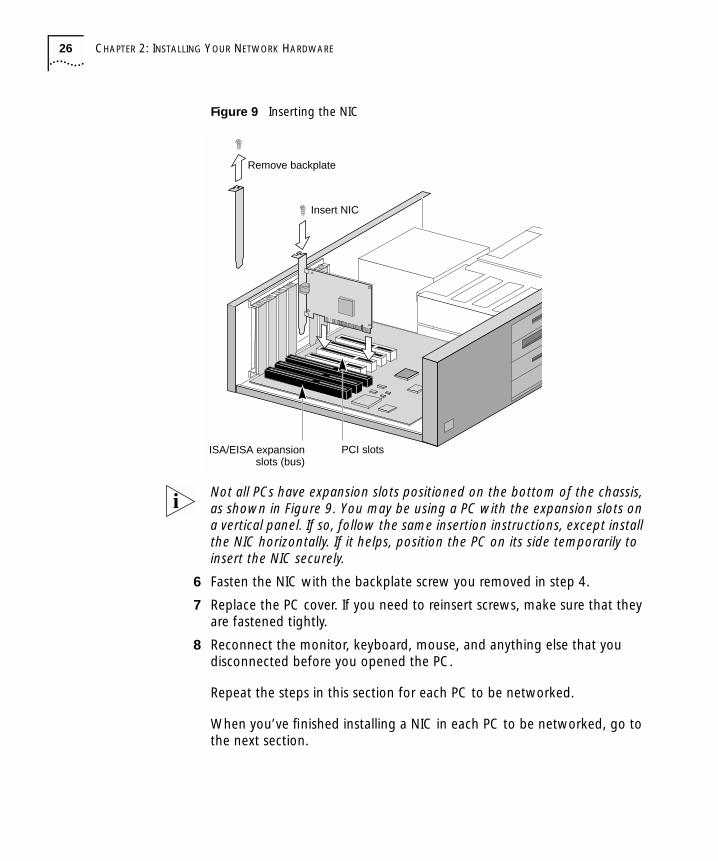
Figure 9 Inserting the NIC
Not all PCs have expansion slots positioned on the bottom of the chassis, as shown in Figure 9. You may be using a PC with the expansion slots on a vertical panel. If so, follow the same insertion instructions, except install the NIC horizontally. If it helps, position the PC on its side temporarily to insert the NIC securely.
6 Fasten the NIC with the backplate screw you removed in step 4.
7 Replace the PC cover. If you need to reinsert screws, make sure that they are fastened tightly.
8 Reconnect the monitor, keyboard, mouse, and anything else that you disconnected before you opened the PC.
Repeat the steps in this section for each PC to be networked.
When you’ve finished installing a NIC in each PC to be networked, go to the next section.
ISA/EISA expansionslots (bus)
Remove backplate
Insert NIC
PCI slots

Connecting NICs to the Hub 27
Connecting NICs to the Hub
This section describes connecting each installed NIC to the hub. Before you continue, finish installing all the NICs for your network, as described in the preceding section.
To connect the hub to each installed NIC, follow these steps:
1 Choose one of the UTP cables from your Networking Kit. Insert one of the RJ-45 connectors on the cable into the NIC RJ-45 port, as shown in Figure 10.
Figure 10 Connecting the NIC to the Hub
2 Insert the RJ-45 connector on the other end of the same UTP cable into any of the RJ-45 ports of the hub.
You can plug PCs and other peripheral devices into any port on the hub rear panel. The port farthest to the left is a switchable port that allows you to connect the hub to another hub. When connecting the hub to a NIC or other peripheral device (not another hub) via the switchable port, be sure that the Uplink/Normal switch is set to the Normal position. (For more information, see “Understanding the Hub” in Chapter 1 and “Connecting Additional Hubs” in Appendix D.)
3 Repeat steps 1 and 2 to connect the NICs in your other PCs to the hub.
RJ-45 port
RJ-45 port
Twisted pair cable
4
1X
Uplink/Normal
Power

28 CHAPTER 2: INSTALLING YOUR NETWORK HARDWARE
4 Plug the hub power adapter into the hub and then into an AC power socket (Figure 11).
Do not turn on the power to the PC.
As soon as you plug the hub power adapter into the power socket, the green Power LED on the hub lights steadily. A solid green Power LED indicates normal operation.
Figure 11 Connecting the Hub to a Power Socket
When you’ve finished connecting the hub to NICs in all the PCs to be networked, check the LED information in the next section. Then you can proceed to the software installation chapter that’s appropriate for your setup, as described at the end of this chapter.
Interpreting the LED Indicators
This section explains the meaning of the light-emitting diodes (LEDs) on the NIC and hub. The NIC has three LEDs on its backplate. The hub has a series of LEDs on its front panel.
NIC Link LEDs The NIC has three LEDs that can help indicate when there are problems with your network connection.
When you first install the NIC and start up the PC, the LEDs light, but the link is inactive. For the link LED to be active (enabled), you need to have loaded the network drivers as described in the next chapters.
4
1X
Uplink/Normal
PowerHub poweradapter
ToAC socket
Power input Switchable port
Uplink/Normal switch
Twisted-pair cable
To NICNormal
Uplink

Interpreting the LED Indicators 29
If you have any problems, first make sure that the hub is operational and then check the LED on the NIC connected to the hub.
Table 5 explains the LED states.
Table 5 LED Descriptions
LED State Meaning
10 LNK (link)
On If the network driver is installed, as described in Chapter 3, the connection to the 10BASE-T Ethernet network is active.
If the driver is not installed, the NIC is receiving power.
Off Something is preventing the connection between the NIC and the network. See the troubleshooting steps following this table.
Blinking The cable polarity is reversed. Try a different network cable.
100 LNK (link)
On If the network driver is installed, as described in Chapter 3, the connection to the 100BASE-TX Fast Ethernet network is active.
If the driver is not installed, the NIC is receiving power.
Off Something is preventing the connection between the NIC and the network. See the troubleshooting steps following this table.
ACT (activity)
Flashing Network traffic is present.
Steady Heavy network traffic is present.
Off No network traffic is present.
30 CHAPTER 2: INSTALLING YOUR NETWORK HARDWARE
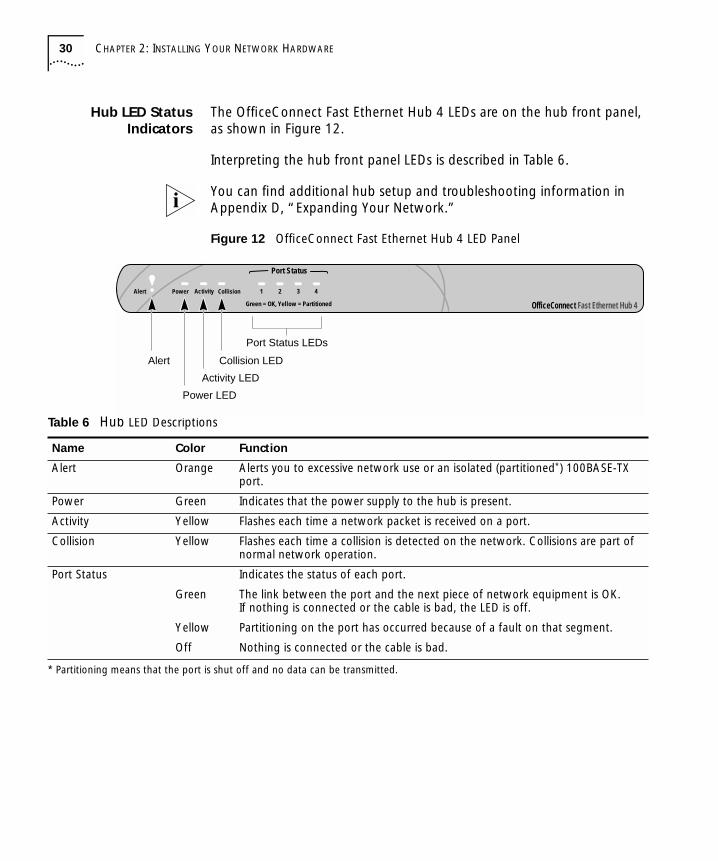
Hub LED StatusIndicators
The OfficeConnect Fast Ethernet Hub 4 LEDs are on the hub front panel, as shown in Figure 12.
Interpreting the hub front panel LEDs is described in Table 6.
You can find additional hub setup and troubleshooting information in Appendix D, “Expanding Your Network.”
Figure 12 OfficeConnect Fast Ethernet Hub 4 LED Panel
Table 6 Hub LED Descriptions
Name Color Function
Alert Orange Alerts you to excessive network use or an isolated (partitioned*) 100BASE-TX port.
Power Green Indicates that the power supply to the hub is present.
Activity Yellow Flashes each time a network packet is received on a port.
Collision Yellow Flashes each time a collision is detected on the network. Collisions are part of normal network operation.
Port Status Indicates the status of each port.
Green The link between the port and the next piece of network equipment is OK. If nothing is connected or the cable is bad, the LED is off.
Yellow Partitioning on the port has occurred because of a fault on that segment.
Off Nothing is connected or the cable is bad.
* Partitioning means that the port is shut off and no data can be transmitted.
1 2 3 4
Port Status
Alert Power CollisionActivity
Green = OK, Yellow = Partitioned OfficeConnect Fast Ethernet Hub 4
Alert
Power LED
Collision LED
Activity LED
Port Status LEDs

3
INSTALLING THE NETWORK DRIVERThis chapter explains how to install the network driver in your PC. You must install the network driver so that your NIC can transmit and receive data over the network.
Instructions are provided for the following operating systems supported by the NIC:
■ Windows 95
■ Windows 98
Go to the appropriate section in this chapter for your operating system.
If you are installing the network driver in a system running Windows NT 3.51 or 4.0, go to Chapter 5, “Installing the Windows NT Driver.”
Windows 95 To install the network driver under Windows 95, you need the Windows 95 installation files. These files may be on a CD or diskettes, or they may have been copied to your hard drive when Windows 95 was installed on your system.
The version of Windows 95 installed on your PC determines which of the driver installation procedures to use.
To determine the Windows 95 version installed on your PC:
1 Right-click the My Computer icon, and then click Properties.
The System Properties window appears.
2 Check the version number on the General screen, under System:
■ If 4.00.950 or 4.00.950A is displayed, follow the procedure for Windows 95 Version A.

32 CHAPTER 3: INSTALLING THE NETWORK DRIVER
■ If 4.00.950B is displayed, follow the procedure for Windows 95 Version B or Version C.
■ If 4.00.950C is displayed, follow the procedure for Windows 95 Version B or Version C.
Windows 95Version A
To install the network driver in a PC running version A of Windows 95, follow these steps:
1 Make sure that the NIC is installed in your PC and that it’s connected to the network, as described in Chapter 2.
2 Turn on the power to the PC.
Windows 95 detects the NIC as PCI Ethernet Controller and displays the New Hardware Found dialog box (Figure 13), prompting you for the driver you want to install for your new hardware.
Figure 13 New Hardware Found Dialog Box
3 Select Driver from disk provided by hardware manufacturer, and then click OK.
The Install from Disk dialog box appears.
4 Insert the EtherDisk diskette in drive A and make sure that A:\ appears in the Copy files from entry box.
5 Click OK.
■ If this is the first time that networking is being installed on your PC, the Identification tab of the Network window is displayed. Go to step 6.

Windows 95 33
■ If networking has already been installed, you’re prompted for the Windows 95 CD. In this case, go to step 7.
6 In the specified fields of the Identification tab screen, enter the following information, and then click OK:
■ Computer Name—Identifies the computer on the network for other users. This entry must be a unique name of 15 characters or fewer, containing no spaces.
■ Workgroup—Identifies the group (for example, your department name) to which your computer belongs. If you’re setting up a simple peer-to-peer network, this entry must be exactly the same for all the PCs in your network.
■ Computer Description—Displays additional details to other users on the network about this PC. For example, you could specify that the PC has a printer attached. Filling in this field is optional.
7 Insert the Windows 95 CD in the CD-ROM drive, and then click OK.
If you don’t have the Windows 95 CD, click OK. Enter the path for the Windows 95 installation files on your PC (such as C:\WINDOWS\OPTIONS\CABS) in the Copying Files entry box, and then click OK.
Files are copied. You’re prompted to restart your PC.
8 Remove the EtherDisk diskette from drive A, and then click Yes.
You must reboot your PC to complete the installation.
After Windows restarts, you’re prompted to enter your name and network password.
9 Enter your user name and password (if desired), and then click OK. Do not click Cancel.
When the Windows 95 desktop is displayed, note that it now shows a Network Neighborhood icon.
The driver installation is complete. To confirm successful installation, go to “Verifying Successful Installation” later in this chapter.

34 CHAPTER 3: INSTALLING THE NETWORK DRIVER
Windows 95Version B or Version C
To install the network driver in a PC running version B or version C of Windows 95 follow these steps:
1 Make sure that the NIC is installed in your PC and connected to the network, as described in Chapter 2.
2 Turn on the power to the PC.
Windows 95 detects the NIC as a PCI Ethernet Controller. The Update Device Driver Wizard (Figure 14) starts and prompts you for a diskette or CD.
Figure 14 Update Device Driver Wizard
3 Insert the EtherDisk diskette in drive A, and then click Next.
Windows finds the driver and asks if you want to use this driver.
4 Click Finish.
The Insert Disk dialog box prompts you for the OfficeConnect EtherDisk diskette.
5 Click OK.
The Copying Files dialog box appears.
6 Make sure that A:\ appears in the Copying files from entry box, and then click OK.
■ If this is the first time that networking is being installed on your PC, the Identification tab of the Network window is displayed. Go to step 7.

Windows 95 35
■ If networking has already been installed, you’re prompted for the Windows 95 CD. In this case, go to step 8.
7 In the specified fields of the Identification tab screen, enter the following information, and then click OK:
■ Computer Name—Identifies the computer on the network for other users. This entry must be a unique name of 15 characters or fewer, containing no spaces.
■ Workgroup—Identifies the group (for example, your department name) to which your computer belongs. If you’re setting up a simple peer-to-peer network, this entry must be exactly the same for all the PCs in your network.
■ Computer Description—Displays additional details to other users on the network about this PC. For example, you could specify that the PC has a printer attached. Filling in this field is optional.
8 Insert the Windows 95 CD in the CD-ROM drive, and then click OK.
If you don’t have the Windows 95 CD, click OK. Enter the path for the Windows 95 installation files on your PC (such as C:\WINDOWS\OPTIONS\CABS) in the Copying Files entry box, and then click OK.
Files are copied. You’re prompted to restart your PC.
9 Remove the EtherDisk diskette from drive A, and then click Yes.
You must reboot your PC to complete the installation.
After Windows restarts, you’re prompted for your user name and password.
10 Enter your user name and password (if desired), and then click OK. Do not click Cancel.
When the Windows 95 desktop is displayed, note that it now shows a Network Neighborhood icon.
The driver installation is complete. To confirm successful installation, go to “Verifying Successful Installation” later in this chapter.

36 CHAPTER 3: INSTALLING THE NETWORK DRIVER
Windows 98 To install the network driver in a PC running Windows 98, follow these steps:
1 Make sure that the NIC is installed in your PC and that it’s connected to the network, as described in Chapter 2.
2 Turn on the power to the PC.
Windows 98 detects the NIC as a PCI Ethernet Controller. The Add New Hardware Wizard (Figure 15) starts.
Figure 15 Add New Hardware Wizard
3 Insert the EtherDisk diskette in drive A, and then click Next.
4 Select Search for the best driver for your device (Recommended), and then click Next.
5 Select Floppy disk drives, and then click Next.
Windows finds the driver file for the device.
6 Click Next.
Files are copied.
If the Insert Disk window appears, prompting you to insert the EtherDisk diskette, click OK.
You’re then prompted for the Windows 98 CD.

Verifying Successful Installation 37
7 Insert the Windows 98 CD in the CD-ROM drive, and then click OK.
If you don’t have the Windows 98 CD, click OK. Enter the path for the Windows 98 installation files on your PC (such as C:\WINDOWS\OPTIONS\CABS) in the Copying Files entry box.
Files are copied. The installation is complete when you’re prompted to click Finish.
8 Click Finish.
You’re prompted to restart the PC.
9 Click Yes to restart the PC.
You must reboot your PC to complete the installation.
When the Windows 98 desktop is displayed, note that it now shows a Network Neighborhood icon.
The driver installation is complete. To confirm successful installation, go to “Verifying Successful Installation” next in this chapter.
Verifying Successful Installation
To confirm that the NIC is installed correctly in a PC running Windows 95 or Windows 98:
1 Right-click the My Computer icon, click Properties, and then select the Device Manager tab.
A list of devices appears, arranged by type (Figure 16).

38 CHAPTER 3: INSTALLING THE NETWORK DRIVER
Figure 16 Device Manager Screen
2 Double-click Network adapters.
The name of the installed OfficeConnect NIC appears, as shown in Figure 16.
If a yellow exclamation point (!) or a red X appears next to the NIC name, the installation wasn’t successful. Go to “Frequently Asked Questions” in Appendix C to troubleshoot the NIC.
3 Double-click the name of the NIC to display a description of the NIC and its current status.
The message in the Device status panel confirms that the OfficeConnect NIC is working properly.
4 Click Cancel to close each dialog box. Then close the My Computer window.
Congratulations! Your Networking Kit is now installed.
However, before you can effectively use your peer-to-peer network, you need to configure Windows 95 or Windows 98 to allow resource sharing. Sharing resources is described in Chapter 4, “Enabling File and Printer Sharing Through Windows.”

4
ENABLING FILE AND PRINTER SHARING THROUGH WINDOWSThis chapter explains the final few tasks you need to perform before your Windows 95 or Windows 98 peer-to-peer network will function properly. It describes how to enable (activate) file and printer sharing through Windows.
If you’re not installing a Windows 95 or Windows 98 peer-to-peer network, skip this chapter.
If your PC is running Windows 98, then the screens that appear are slightly different from those shown in this chapter.
To configure your Windows peer-to-peer network, you must perform the following five steps. You must:
1 Verify each PC’s identification.
2 Activate each PC’s file and printer sharing.
3 Give permission to share resources on each PC.
4 Add the network printer to each PC’s Printers folder.
5 Confirm your network’s shared resources.
Although this chapter focuses on enabling file and printer sharing, you can also use this method to enable sharing for other resources.
Your Windows 95 or Windows 98 documentation may be more current than the information in this guide. See your Windows documentation if the instructions in this chapter don’t match your system.
Before Starting Before starting, verify that you’ve installed the kit hardware and software as described in the preceding chapters. If you’ve completed these tasks, you’re ready to continue. To get started with enabling file and printer sharing, go to the next section.

40 CHAPTER 4: ENABLING FILE AND PRINTER SHARING THROUGH WINDOWS
Verifying Each PC’s Identification
During the NIC driver software installation, you may have been given the opportunity to define the following information for each PC:
■ Computer name
■ Workgroup
■ Computer description
There may be several PCs or other devices on your network, and each one needs to have a unique computer name. In addition, all the PCs must belong to the same workgroup to share resources. To verify that the identifying information for each PC is correct across your network, complete the following steps:
1 Right-click the Network Neighborhood icon on your Windows 95 desktop.
The Network Neighborhood menu appears.
2 Click Properties.
The Configuration tab of the Network screen appears (Figure 17).
3 Click the Identification tab to display the Computer name, Workgroup, and Computer Description fields, as shown in Figure 18.
4 Make sure that each PC has a unique computer name. Make sure that all the networked PCs have the same workgroup name. Entering a computer description is optional.
For detailed information regarding the Identification tab fields, see step 6 on page 33.
If you change any of the identifying information shown in the Identification tab (Figure 18), you’ll have to restart Windows 95 or Windows 98.
Once you’ve verified each PC’s identification, go to the next section.

Verifying Each PC’s Identification 41
Figure 17 Configuration Tab of the Network Screen
Figure 18 Identification Tab of the Network Screen

42 CHAPTER 4: ENABLING FILE AND PRINTER SHARING THROUGH WINDOWS
Enabling File and Print Sharing
Enabling (activating) file sharing on a PC allows other users in the same workgroup to access files and directories on that PC. Enabling printer sharing on a PC allows other users in the same workgroup to print files on the printer attached to that PC.
To enable file and printer sharing, follow these steps for each networked PC whose files and printer (if present) are to be accessed by other PCs in the same workgroup:
1 Right-click the Network Neighborhood icon on your Windows desktop.
The Network Neighborhood menu appears.
2 Click Properties.
The Configuration tab of the Network screen appears (Figure 17).
3 Click the File and Print Sharing button.
The File and Print Sharing screen appears (Figure 19).
Figure 19 File and Print Sharing Screen
4 Select both check boxes in the File and Print Sharing screen to display check marks as shown in Figure 19.
5 Click OK.
The Configuration tab of the Network screen appears with a new File and printer sharing for Microsoft Networks component displayed at the bottom of the component list.
6 Click OK.
Windows prompts you to restart.
7 Click Yes to restart Windows.
You‘ve just enabled overall file and print sharing for this PC. However, before users can access any resources on this PC, you must specify the

Giving Permission to Share Resources 43
resources that can be shared. The next section describes how to turn sharing on for selected resources.
Giving Permission to Share Resources
This section shows you how to set sharing (turn sharing on) for a PC hard drive and printer. Turning sharing on for these resources allows all PCs in the network workgroup to use them.
You can also restrict access to certain resources and certain users. See your Windows 95 or Windows 98 documentation for additional information.
Granting Access to aPC’s Hard Drive
Follow these steps to allow all users in the workgroup to access all the files on the hard drive of a particular PC:
1 From the Windows desktop, double-click the My Computer icon.
You can accomplish the same task by double-clicking the Explorer icon, which gives you access to specific directories and files. For this procedure, you want to grant access to all directories and files on the C hard drive, which can be accomplished through the My Computer icon.
The My Computer window appears (Figure 20).
Figure 20 My Computer Window

44 CHAPTER 4: ENABLING FILE AND PRINTER SHARING THROUGH WINDOWS
2 Right-click the hard drive icon (the C drive in this example).
The Hard Drive menu appears (Figure 21).
3 From the Hard Drive menu, select Sharing, as shown in Figure 21.
The hard drive Properties screen appears (Figure 22).
4 Select the Shared As radio button, as shown in Figure 22.
You can enter a different share name and add a comment if you want.
5 Select the Full radio button under Access Type.
This option allows complete read and write access by other network users to all files on this PC hard drive.
Figure 21 Hard Drive Menu

Giving Permission to Share Resources 45
Figure 22 Hard Drive Properties Screen
You can limit access to the hard drive by selecting Read-Only or Depends on Password. See your Windows 95 or Windows 98 documentation for details.
6 Click OK.
The My Computer window reappears, as shown in Figure 23. Note that the (C:) hard drive icon now appears with a hand under it, showing that it is a shared resource.
Figure 23 My Computer Window Showing Shared (C:) Hard Drive

46 CHAPTER 4: ENABLING FILE AND PRINTER SHARING THROUGH WINDOWS
This completes the procedure for allowing users to share the files and directories on the PC hard drive. The next section describes how to share a printer.
Granting Accessto a Printer
Follow these steps to allow all users in the workgroup to use the printer attached to a particular PC. (It’s assumed that you’ve already installed the printer through Windows 95 or Windows 98.)
1 From the Windows desktop, double-click the My Computer icon.
The My Computer window appears (Figure 24).
Figure 24 Printers Icon Selected
2 Double-click the Printers folder, as shown in Figure 24.
The Printers window appears (Figure 25). The example shows that one printer has already been installed and configured. That printer is represented by the single printer icon labeled HP DeskJet.
Figure 25 Printers Window

Giving Permission to Share Resources 47
3 Right-click the printer icon, as shown in Figure 25.
The Printer menu appears, as shown in Figure 26.
Figure 26 Printer Menu
4 From the Printer menu, select Sharing, as shown in Figure 26.
The Sharing tab of the printer Properties screen appears (Figure 27).
Figure 27 Sharing Tab of the Printer Properties Screen
5 Click the Shared As radio button.
The Sharing tab appears, as shown in Figure 27. You can enter a different share name and add a comment if you want.

48 CHAPTER 4: ENABLING FILE AND PRINTER SHARING THROUGH WINDOWS
6 Click OK.
The Printers window reappears, as shown in Figure 28. Note that the printer icon now appears with a hand under it, showing that it is a shared resource.
Figure 28 Shared Printer
This completes the procedure for granting permission to share the printer attached to a particular PC. However, other networked PCs won’t be able to access the shared printer until that printer has been added to each PC Printers folder. The next section explains this final setup task.
Adding the Network Printer to a PC Printers Folder
After granting permission to share the printer attached to one of the network PCs, you must add the shared printer to the Printers folder on all the other PCs attached to the network.
For the PCs that are not locally (directly) attached to the printer, follow these steps:
1 Make sure that your network printer is powered on, that it’s online (ready), and that the PC that’s directly attached to the printer is also powered on and ready.
2 From the Windows desktop, double-click the My Computer icon.
The My Computer window appears (Figure 29).

Adding the Network Printer to a PC Printers Folder 49
Figure 29 Printers Icon Selected
3 Double-click the Printers folder, as shown in Figure 29.
The Printers window appears (Figure 30). No printer icon is displayed in the example, indicating that this PC is not yet configured to use a printer.
Figure 30 Printers Window of a PC Not Locally Attached to the Printer
4 Double-click the Add Printer icon.
The Add Printer Wizard starts and displays the welcome screen shown in Figure 31.

50 CHAPTER 4: ENABLING FILE AND PRINTER SHARING THROUGH WINDOWS
Figure 31 Add Printer Wizard Welcome Screen
5 Click Next.
The Add Printer Wizard prompts you to select the type of printer attachment, local or network, as shown in Figure 32.
Figure 32 Attachment Type Screen
6 Select the Network printer radio button.
The printer that you’re adding is not locally (directly) attached to the PC you’re configuring. You need to attach the printer through the network.

Adding the Network Printer to a PC Printers Folder 51
7 Click Next.
The Add Printer Wizard prompts you for the printer network path, as shown in Figure 33.
Figure 33 Add Printer Wizard Network Path Screen
8 Click Browse.
The Browse for Printer screen appears, as shown in Figure 34. For this example, the network printer is currently attached to the PC named Computer_1.
Figure 34 Browse for Printer Screen

52 CHAPTER 4: ENABLING FILE AND PRINTER SHARING THROUGH WINDOWS
9 Double-click Computer_1 in the Browse for Printer screen. The printer that is locally (directly) attached to the PC named Computer_1 is displayed, as shown in Figure 35.
Figure 35 Locally Attached Printer Screen
10 Select the printer displayed in the Browse for Printer screen, as shown in Figure 36.
Figure 36 Selecting the Network Printer Screen
11 Click OK.
The Add Printer Wizard displays the network path for the printer, as shown in Figure 37.
Leave the Do you print from MS-DOS-based programs? query set to No.

Adding the Network Printer to a PC Printers Folder 53
Figure 37 Add Printer Wizard Network Path Screen (Completed)
Figure 38 Existing Driver Inquiry Screen
12 Click Next.
If the Add Printer Wizard detects that a driver is already installed for the selected printer, it asks whether you want to keep the existing driver, as shown in Figure 38.
Leave the Keep existing driver (recommended) setting selected, as shown in Figure 38.

54 CHAPTER 4: ENABLING FILE AND PRINTER SHARING THROUGH WINDOWS
13 Click Next.
The Add Printer Wizard displays a name for the printer and gives you the chance to change it, as shown in Figure 39.
Figure 39 Printer Name Screen
Changing the name here only affects the name as it’s shown in this PC’s Printers file. It doesn’t affect the PC that’s directly attached to the printer.
If Windows detects more than one printer on your network, it gives you the chance at this point to designate the printer as the default printer, forcing all your Windows applications to print directly to that printer.
14 Click Next.
The Add Printer Wizard asks whether you want to print a test page, as shown in Figure 40.
Leave the setting at Yes (recommended), so that you can confirm that your network printer connection is working.

Adding the Network Printer to a PC Printers Folder 55
Figure 40 Test Page Inquiry Screen
15 Click Finish.
Windows sends a test page to the printer and asks you to confirm that the test page printed correctly, as shown in Figure 41.
Figure 41 Printer Test Page Completed Screen
16 If the test page printed correctly, click Yes.
If the test page didn’t print correctly, click No. Follow the displayed Windows 95 or Windows 98 troubleshooting instructions.

56 CHAPTER 4: ENABLING FILE AND PRINTER SHARING THROUGH WINDOWS
Verifying Your Network’s Shared Resources
To confirm that your network’s setup and shared resources are configured correctly, you can perform the following simple test. The examples used in this procedure show a network involving two PCs, Computer_1 and Computer_2, and one printer attached to Computer_2.
1 From the Windows desktop of the first network PC (Computer_1 in this example), double-click the Network Neighborhood icon.
The Network Neighborhood window appears, as shown in Figure 42.
Figure 42 Network Neighborhood Window
If all your network PCs don’t initially appear in the list, wait 2 minutes, close the window, and then double-click the Network Neighborhood icon again.
The Network Neighborhood window shown in Figure 42 displays all of the networked PCs belonging to the workgroup you assigned (Workgroup_1 in this example), indicating that the network is configured properly.
2 Double-click Computer_2 in the Network Neighborhood window.
The Computer_2 window appears, as shown in Figure 43.

Verifying Your Network’s Shared Resources 57
Figure 43 Computer_2 Window
The Computer_2 window shows the Computer_2 resources that you configured for sharing across the network: hard drive (C) and the printer (hp) that is directly attached to Computer_2.
3 Double-click the hard drive (C) folder to confirm that you have access to all the directories and files on the Computer_2 hard drive. A window appears showing the contents of hard dive (C), as shown in Figure 44.
Your files might be shown in a different format, depending on your PC’s Windows 95 or Windows 98 viewing configuration.
Figure 44 Contents of C Drive on Computer_2
Being able to view the Computer_2 hard drive (C) directories from Computer_1 indicates that you’ve successfully completed the setup of your peer-to-peer network. Congratulations!

58 CHAPTER 4: ENABLING FILE AND PRINTER SHARING THROUGH WINDOWS
Verifying Network Connectivity
This section describes how to verify connectivity among all devices on your network. To do this, you must have successfully installed the OfficeConnect NIC in each PC, and have correctly cabled the NICs to the Fast Ethernet Hub 4. Make sure that each network device is powered on and fully operational.
To verify network connectivity, follow these steps:
1 Click the Windows 95 or Windows 98 Start button. Then highlight Find and pull-right to select Computer.
The Find: Computer dialog box appears (Figure 45).
Figure 45 Find: Computer Dialog Box
2 In the Named field, enter the name of a computer on the network.
Make sure the name you enter is that of a machine other than the one at which you are currently working.
3 Click Find Now.
The name of the computer appears in the results section of the Find window.
If you are unable to locate another computer on your network, and you are certain that both computers are installed properly, connected to the hub, and powered on, refer to “Verifying the Protocol Configuration” in Appendix C for troubleshooting assistance.

5
INSTALLING THE WINDOWS NT DRIVERThis chapter explains how to install the network driver in a PC running Microsoft Windows NT 3.51 or 4.0.
Windows NT 3.51 To install the network driver in a PC running Windows NT 3.51:
1 Make sure that the NIC is installed in your PC and connected to the network, as described in Chapter 2.
2 Turn on the power to the PC.
3 In the Main window of the Program Manager, double-click the Control Panel icon and then the Network icon.
The Network Settings window (Figure 46) appears.
Figure 46 Network Settings Window
4 Click Add Adapter.
The Add Network Adapter window appears.

60 CHAPTER 5: INSTALLING THE WINDOWS NT DRIVER
5 Click the down arrow to expand the Network Adapter Card list box, and then scroll down and select <Other> Requires disk from manufacturer.
6 Click Continue.
The Insert Disk dialog box appears.
7 Insert the EtherDisk diskette in drive A, make sure that A:\ appears in the entry box, and then click OK.
The Select OEM Option window appears.
8 Make sure that 3Com OfficeConnect 10/100 Fast Ethernet NIC is selected, and then click OK.
Files are copied. The 3Com NIC Diagnostics screen appears.
9 Click Close to continue the installation.
The Network Settings window reappears.
10 Click OK in the Network Settings window.
If the TCP/IP Configuration screen appears, enter the requested information, and then click OK. For help with this information, click the Help button on the TCP/IP Configuration screen.
See your Microsoft Windows documentation, or contact your Internet Service Provider (ISP) or network administrator, for more information on TCP/IP configuration settings.
You’re prompted to restart Windows NT.
11 Remove the EtherDisk diskette from drive A.
12 Click Restart Now.
You must reboot your PC to complete the installation.
The driver installation is complete. To confirm successful installation, go to the next section, “Verifying Successful Installation.”
Windows NT 4.0 To install the network driver in a PC running Windows NT 4.0:
1 Make sure that the NIC is installed in your PC and connected to the network, as described in Chapter 2.
2 Turn on the power to the PC.
3 Double-click the My Computer icon, then the Control Panel icon, and then the Network icon.
The Network window appears.

Verifying Successful Installation 61
4 Click the Adapters tab.
If networking hasn’t been installed on your system before, Windows NT asks you if you want to install networking. Click Yes. See the WINNT.TXT file located on the EtherDisk diskette or your Windows NT documentation for instructions.
5 Click Add.
The Select Network Adapter dialog box appears.
6 Click Have Disk.
The Insert Disk dialog box appears.
7 Insert the EtherDisk diskette in drive A, enter the path to drive A if it is not already displayed, and click OK.
The OEM Option dialog box appears.
8 If not already selected, select 3Com OfficeConnect 10/100 Fast Ethernet NIC, and click OK.
Files are copied. The 3Com NIC Diagnostics window appears.
9 Click Close to continue the installation.
The Network screen appears with the OfficeConnect NIC displayed in the list of network adapters.
10 Click Close.
The driver installation is complete. To confirm successful installation, go to “Verifying Successful Installation” below.
Verifying Successful Installation
To confirm that the NIC is installed correctly in your PC, follow the steps appropriate for your operating system.
Windows NT 4.0 To confirm that the NIC is installed correctly in a PC running Windows NT 4.0:
1 Double-click the Network icon in the Control Panel.
2 Click the Adapters tab.
The OfficeConnect NIC should appear in the list of network adapters. If it doesn’t appear, see Chapter 4 for troubleshooting information.

62 CHAPTER 5: INSTALLING THE WINDOWS NT DRIVER
Windows NT 3.51 To confirm that the NIC is installed correctly in a PC running Windows NT 3.51:
1 Double-click the File Manager icon.
2 From the Disk menu, select Connect Network Drive.
The presence of network machine names confirms successful installation.

6
CONFIGURING THE NICThis chapter explains how to display and change configuration settings for your Networking Kit NIC.
Table 7 describes the configurable settings for your NIC. The default setting for each option is in bold in the Available Settings column.
.
Table 7 NIC Configuration Settings
Option Description Available Settings
Network Driver Optimization
Specifies how to optimize the network driver for your network environment.
In a client/server environment, the network driver may use a larger percentage of the CPU in order to improve network throughput. In this case, select Minimize CPU Utilization.
In peer-to-peer networks, or on multitasking PCs, it is best to balance the CPU utilization and the network performance. In this case, select Normal.
Normal
Minimized CPU Utilization
Maximized Network Performance
Duplex Specifies the duplex mode, which controls whether the NIC transmits data across the network in both directions simultaneously (the PC sends and receives data at the same time) (full-duplex) or in one direction at a time (half-duplex). The OfficeConnect NIC supports full-duplex at 10 Mbps and 100 Mbps.
Auto Select allows the NIC to automatically connect at the duplex mode of the connected hub.
Auto Select
Full Duplex
Half Duplex
(continued)

64 CHAPTER 6: CONFIGURING THE NIC
Displaying Configuration Settings
Use the 3Com NIC Diagnostics program to display and change configuration settings for your NIC.
The 3Com NIC Diagnostics program is automatically installed when you install the network driver.
To display the current configuration settings for the NIC:
1 Make sure that the NIC is installed and is connected to the network and that the network driver is installed.
2 Double-click the 3Com icon in the Windows system tray.
If the 3Com icon isn’t visible in the Windows system tray, follow these steps:
a From the Windows Start menu, select Programs.
b Select 3Com NIC Utilities.
c Click 3nicdiag.
For PCs running Windows NT 3.51, from the File menu, select Run. At the command prompt, enter the path for the 3Com NIC Diagnostics program. The default path is C:\WINNT35\SYSTEM32\3NICDIAG.EXE.
A warning message appears, stating that your PC will be disconnected from the network.
This means that no applications other than the 3Com NIC Diagnostics program will be able to connect to the network while you run the diagnostics program.
All applications are automatically reconnected to the network when you exit the diagnostics program. If your PC doesn’t automatically reconnect to the network, reboot the PC.
Media Type Determines the type of media your network is using.
Auto Select allows the NIC to automatically select the type for you, based on the NIC’s connection to the hub.
10BASE-T (10Mb/s)
100BASE-TX (100 Mb/s)
Auto Select
Table 7 NIC Configuration Settings (continued)
Option Description Available Settings

Displaying Configuration Settings 65
3 Click OK.
The 3Com NIC Diagnostics General screen (Figure 47) appears.
Figure 47 General Screen
Click the Help button to receive information about the diagnostic screen that’s currently active.
4 Click NIC Details.
The NIC Details screen (Figure 48) appears.

66 CHAPTER 6: CONFIGURING THE NIC
Figure 48 NIC Details Screen
Each configuration setting is displayed with its current value.
For a description of each setting, click the question mark in the upper right corner of the screen, drag it to a setting, and click once. A pop-up box appears, displaying information for the selected setting.
5 Click OK to exit this screen.
Changing Configuration Settings
To change NIC configuration settings:
1 Double-click the 3Com icon in the Windows system tray.
If the 3Com icon is not visible in the Windows system tray, follow these steps:
a From the Windows Start menu, select Programs.
b Select 3Com NIC Utilities.
c Click 3nicdiag.
For PCs running Windows NT 3.51, from the File menu, select Run. At the command prompt, enter the path for the 3Com NIC Diagnostics program. The default path is C:\WINNT35\SYSTEM32\3NICDIAG.EXE.

Changing Configuration Settings 67
A warning message appears, stating that your PC will be disconnected from the network.
This means that no applications other than the 3Com NIC Diagnostics program will be able to connect to the network while you run the diagnostics program.
All applications are automatically reconnected to the network when you exit the diagnostics program. If your PC does not automatically reconnect to the network, reboot the PC.
2 Click OK.
3 Click the Properties tab.
The 3Com NIC Diagnostics Properties screen (Figure 49) appears.
Figure 49 Properties Screen
4 Change the NIC’s configuration:
■ To automatically configure the NIC to nonconflicting values with your PC, click Optimal Settings.
■ To manually configure the NIC:
a Select an option in the Individual Settings panel.
For a description of each option, see Table 7 at the beginning of this chapter.

68 CHAPTER 6: CONFIGURING THE NIC
5 Click OK to save values or Cancel to exit without saving values.
6 If changes were made, you are prompted to restart the computer. Click Yes.
b Click the down arrow in the list box and select a new value for the option.
c Repeat the process to change any other setting on the Properties screen.

A
SPECIFICATIONSThis appendix lists the specifications for both the hub and the NIC. For the NIC, it includes connector pin assignments and cable requirements.
Hub Specifications
Physical Dimensions
Length: 9 in (22.5 cm)
Width: 5.3 in (13.5 cm)
Height: 1.4 in (3.58 cm)
Weight: 1.1 lb (500 g)
Environmental Operating Range
Operating temperature: 0˚ to 40˚C (32˚ to 105˚F)
Humidity: Up to 90% noncondensing
Power Requirements
Operating voltage: 4 VA
70 APPENDIX A: SPECIFICATIONS
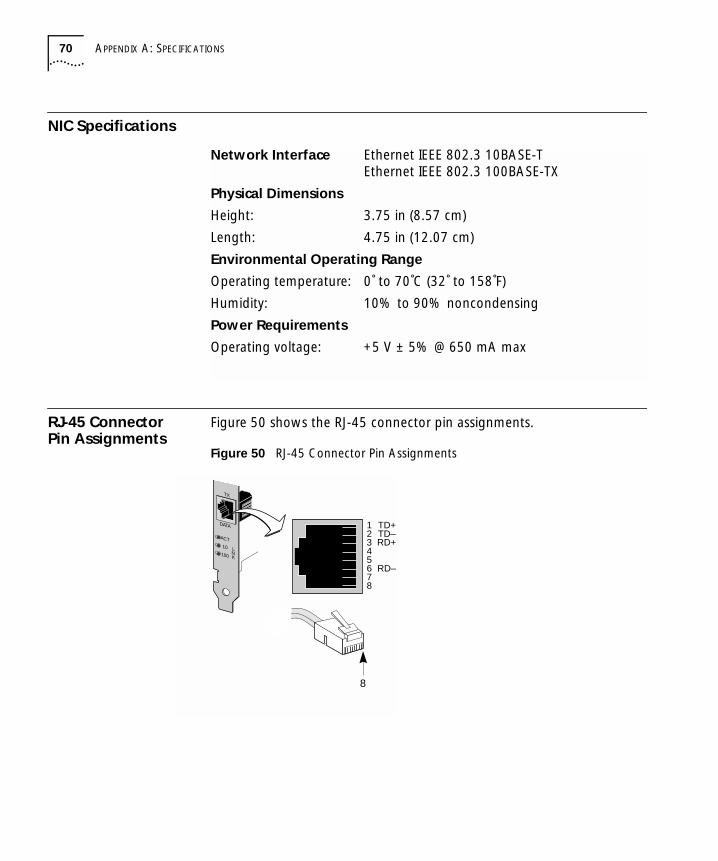
NIC Specifications
RJ-45 Connector Pin Assignments
Figure 50 shows the RJ-45 connector pin assignments.
Figure 50 RJ-45 Connector Pin Assignments
Network Interface Ethernet IEEE 802.3 10BASE-TEthernet IEEE 802.3 100BASE-TX
Physical Dimensions
Height: 3.75 in (8.57 cm)
Length: 4.75 in (12.07 cm)
Environmental Operating Range
Operating temperature: 0˚ to 70˚C (32˚ to 158˚F)
Humidity: 10% to 90% noncondensing
Power Requirements
Operating voltage: +5 V ± 5% @ 650 mA max
12345678
TD+TD_
RD_
RD+
DATA
TX
ACT10
100LNK
8

Cable Specifications 71
Cable Specifications The cable quality, distance, and connectors must comply with the Electronic Industries Association/ Telecommunications Industries Association (EIA/TIA) 568B Commercial Building Wiring Standard and the Technical Services Bulletin TSB38 standards.
UnshieldedTwisted-Pair Cable
Twisted-pair cable consists of copper wires surrounded by an insulator. Two wires are twisted together (the twisting prevents interference problems) to form a pair, and the pair forms a circuit that can transmit data. A cable is a bundle of one or more twisted pairs surrounded by an insulator.
Unshielded twisted pair (UTP) is the most commonly used type of twisted-pair cable. Shielded twisted pair (STP) provides protection against crosstalk. Twisted-pair cable is now commonly used in Ethernet, Fast Ethernet, and other network topologies.
The EIA/TIA defines five categories of unshielded twisted-pair cable (see Table 8).
Table 8 Unshielded Twisted-pair Cable Categories
Category Use
1 Traditional telephone cable.
2 Data transmissions up to 4 Mbps.
3 Voice and data transmission up to 25 Mbps. The cable typically has four pairs of wires. Category 3 is the most common type of installed cable found in older corporate wiring schemes.
4 Voice and data transmission up to 33 Mbps. The cable normally has four pairs of wire. This grade of UTP is not common.
5 Voice and data transmission up to 125 Mbps. The cable normally has four pairs of copper wire and three twists per foot. Category 5 UTP is the most popular cable used in new installations today.

72 APPENDIX A: SPECIFICATIONS
100BASE-TXOperation
100BASE-TX is the Institute of Electrical and Electronics Engineers (IEEE) 802.3u standard for Ethernet signaling over unshielded twisted-pair wire at 100 Mbps.
Fast Ethernet uses 100BASE-TX as its primary cabling scheme. Fast Ethernet’s characteristics include:
■ A data rate of 100 Mbps
■ A broadcast architecture
■ A specific media-access control (MAC) scheme
100BASE-TXSpecifications
The 100BASE-TX name indicates a signaling speed of 100 Mbps and twisted-pair wiring. Base stands for baseband, which denotes a technique for transmitting signals as direct-current pulses rather than modulating them onto separate carrier frequencies.
A wiring topology using 100BASE-T specifies a wiring hub, cable arranged in a star configuration, and unshielded twisted-pair cable. Each node has a separate cable run that must not exceed 100 meters (328 ft.) from the node to the hub.

B
DESIGNING YOUR NETWORKAfter reading the first chapter in this guide, you should have a basic understanding of networking and the various components that make up a network. Are you ready to design your own network so you can enjoy the benefits provided through networking?
By using the 3Com OfficeConnect Fast Ethernet PCI Networking Kit, you should be able to design a network that allows you to meet your current networking needs and prepares you to meet your future networking goals as your needs grow and develop.
For more information on designing your network, see the OfficeConnect Network Assistant CD that is included in your package.
Determining Network Requirements
Before your network can accomplish the desired results, you should determine what you want the network to do for you. Consider the following list of questions to help define your network requirements.
■ What do you want to do with the network (data and printer sharing, multiuser applications, and so forth)? Who needs the network?
■ How many computers and other devices do you want to connect on the network?
■ What level of performance do you expect of your network?
■ What computers will share resources with network users? What resources need to be shared (printers, files, and so forth)?
The following sections address each of these questions. As you discover your answers, you might want to record them on the checklist at the end of this appendix.

74 APPENDIX B: DESIGNING YOUR NETWORK
Purpose of theNetwork
Determining the purpose of your network helps to specify many factors. For example:
■ Does more than one person need access to certain files, such as proprietary information or accounting spreadsheets?
■ Do you want to store data files in one common location so that other users can access them?
■ Do you want to have a printer available for all users on the network?
■ Will more than one person need to access a common application program, such as a customer database, an accounting program, or a desktop publishing system?
Making a decision about these capabilities can help you decide the characteristics of each of the computers on the network. It can also help you focus on how you want to use the number of devices on the network.
Performance Factors Working in a network environment can help you to be more productive. The following factors can affect the speed or type of network performance that you can expect:
■ Network operating system (NOS)—Each NOS supports a different type of performance. One NOS may be better suited to your performance requirements than another. Before you invest in a particular NOS, refer to the documentation that’s supplied with the NOS or contact the manufacturer to determine if it suits your networking needs.
■ NIC throughput—For example, if sharing a printer is your network’s primary purpose, the NIC supplied with the Networking Kit provides adequate speed for this situation.
■ File sharing—If files and data are to be shared with other users on the network, performance is an issue. However, by using the Networking Kit, which supports the Fast Ethernet suite of protocols, you can achieve 100 Mbps data speed at relatively low cost and gain high performance.
Sharing Resources Resource sharing is one of the more common tasks that is enhanced by a network. PCs that control resources, such as printers, databases, and directories for use by other computers are often configured as servers. When acting as a server is all they do, those computers are dedicated servers. When a PC acts as both a workstation and a server, then it’s a nondedicated server. For most smaller networks, using nondedicated servers is appropriate.

Determining Network Requirements 75
You need to determine which PCs will share resources and which will not. For those PCs that you plan to use as any type of server, you may want to consider adding additional memory or hard disk storage.
As you consider the implications of sharing resources, you must determine whether you need your network to be a server-based (client/server) or peer-to-peer network.
Peer-to-Peer Network
In a peer-to-peer scheme, a two-way networking relationship exists between two or more “like” computers. Each PC may or may not make portions of its software or attached printers available to other PCs on the network. The determination of what to share is made on each individual PC.
Some sample NOSs that support peer-to-peer networking are:
■ Microsoft Windows for Workgroups (Windows 3.11)
■ Microsoft Windows 95
■ Microsoft Windows 98
■ Microsoft Windows NT
■ Novell NetWare
A peer-to-peer network provides:
■ The capability to share resources on any computer in the network—In a server-based network you can share only the resources that are on a dedicated server.
■ Flexibility in sharing resources—Setting up shared resources may involve more repetition of tasks than in a server-based network. In a server-based network, sharing is specified from the server, not each computer.
■ Use of nondedicated equipment—The network does not require a dedicated server and works with your existing equipment.

76 APPENDIX B: DESIGNING YOUR NETWORK
Client/Server Network
In a client/server network, a one-way relationship exists between two or more PCs, where one or more computers act as a server. The other PCs in this environment are clients and connect to the server to utilize its resources. The server is usually configured with large disk drives for application and data sharing as well as storage, and with local or remote attached printers for print sharing. A server-based network requires more complex management than a peer-to-peer network. The determination of who is allowed to log in or share server resources is made at the server.
Some examples of client/server NOSs are:
■ Microsoft Windows NT
■ Novell NetWare
■ Microsoft Lan Manager
■ Banyan VINES
A client/server network provides:
■ Focus on the dedicated server that shares its resources with workstations (or clients)—The workstations (clients) can access the shared resources on the server but cannot access any resources on other workstations.
■ An opportunity for better performance—Since the dedicated server does not function also as a workstation, the network usually provides better performance.
■ Greater control over resources—Permission to use the server is administered through the server, rather than at each workstation.
■ Reliance on the server—Also, the network usually is more expensive to implement because it requires a dedicated server.

Network Checklist 77
Network Checklist Now that you have examined the purpose of your network, you probably have an idea of what you want to build. Take a few moments and use Table 9 to write down the computers you want to network and the printers and other devices you want to make available.
Table 9 Network Component Checklist
Component Name Description
Put on the network?Y/N
Use as a server? If so, for what?
Primary user name
Computer 1
Computer 2
Computer 3
Computer 4
Computer 5
Computer 6
Computer 7
Computer 8
Printer 1
Printer 2
Fax/modem
Other device
Other device
Software application
Software application
Software application
Directories and files
Directories and files


C
TROUBLESHOOTINGThis appendix explains how to isolate and solve problems that may occur when you install the OfficeConnect NIC included in your Networking Kit. It also describes how to interpret your hub LEDs to identify network problems.
Basic Troubleshooting Tips
If you have trouble installing your Networking Kit NIC, or if the installation failed (as described in “Verifying Successful Installation” in Chapter 3), follow these basic troubleshooting tips.
CAUTION: Before inserting or removing the NIC from your PC, turn the power off to the PC and unplug the power cord.
■ Check the NIC installation by reviewing Chapter 2. Make sure that the NIC is seated correctly in an appropriate expansion slot. Check for specific hardware problems, such as loose or broken connections.
■ Inspect all cables and connections. Check the length and rating of the cable. Make sure that the cable and its length comply with 100BASE-TX recommendations. See Appendix A for more information.
■ Make sure that you’re running the latest BIOS for your PC. If your BIOS hasn’t been upgraded in the previous six months, contact your PC manufacturer to obtain the current version of your BIOS software.
■ Run the NIC self-tests and the Echo test, as described later in this chapter.
■ Download the latest OfficeConnect NIC driver from the 3Com World Wide Web site and install it in your PC. Run the NIC self-tests and the Echo test again, using the same option settings as those used on the failed NIC. If the tests still fail, the NIC may be defective.

80 APPENDIX C: TROUBLESHOOTING
Verifying the Protocol Configuration
In order to share files and printers on the network, each computer must be configured to use the same protocol. If you are unable to locate additional computers on your network using the Find: Computer function from the Windows Start menu, and you are certain that the adapters have been correctly installed, connected to the hub, and the other computer is powered on, verify the protocol configuration on each machine.
To verify the protocol configuration:
1 Right-click the Network Neighborhood icon on your Windows 95 or Windows 98 desktop.
The Network Neighborhood menu appears.
2 Click Properties.
The Configuration tab of the Network window appears (see Figure 51).

Verifying the Protocol Configuration 81
Figure 51 Configuration Tab of the Network Window
3 Note the names of the installed protocols, as they appear in the Configuration tab (i.e., TCP/IP or NetBEUI).
4 Verify that each computer on your network has at least one protocol in common.
Adding a Protocol If your computers do not have at least one protocol in common, you must configure the machines by adding a common protocol to the configuration. To add a protocol:
1 Right-click the Network Neighborhood icon on your Windows 95 or Windows 98 desktop.
The Network Neighborhood menu appears.

82 APPENDIX C: TROUBLESHOOTING
2 Click Properties.
The Configuration tab of the Network window appears (see Figure 52).
Figure 52 Configuration Tab of the Network Window
3 Click Add.
The Select Network Component Type window appears (see Figure 53).
Figure 53 Select Network Component Type Window

Verifying the Protocol Configuration 83
4 Select Protocol, and click Add.
The Select Network Protocol window appears (see Figure 54).
Figure 54 Select Network Protocol Window
5 From the Manufacturers: box, select Microsoft.
6 From the Network Protocols: box, select the protocol that you want to add (i.e., NetBEUI).
7 Click OK.
8 Click OK to close the Configuration tab.
You are prompted to reboot your computer.

84 APPENDIX C: TROUBLESHOOTING
Interpreting the LEDs
The OfficeConnect NIC has three light-emitting diodes (LEDs) that can help indicate when there are problems with your network connection.
See Figure 2 in Chapter 1 for a picture of the LEDs. Table 10 explains the LED states.
If the LNK (10 LNK or 100 LNK) LED is off and the PC is powered on and the network cable is connected, check the following:
1 Ensure that the network hub or device to which the NIC is connected and the cable connecting to your NIC comply with the 100BASE-TX specifications.
2 Ensure that the network hub or device to which the NIC is connected is powered on.
Table 10 LED Descriptions
LED State Meaning
10 LNK (link)
On If the network driver is installed, as described in Chapter 3, the connection to the 10BASE-T Ethernet network is active.
If the driver is not installed, the NIC is receiving power.
Off Something is preventing the connection between the NIC and the network. See the troubleshooting steps following this table.
Blinking The cable polarity is reversed. Try a different network cable.
100 LNK (link)
On If the network driver is installed, as described in Chapter 3, the connection to the 100BASE-TX Fast Ethernet network is active.
If the driver is not installed, the NIC is receiving power.
Off Something is preventing the connection between the NIC and the network. See the troubleshooting steps following this table.
Blinking The cable polarity is reversed. Try a different network cable.
ACT (activity)
Flashing Network traffic is present.
Steady Heavy network traffic is present.
Off No network traffic is present.

Starting the 3Com NIC Diagnostics Program 85
Starting the 3Com NIC Diagnostics Program
The 3Com NIC Diagnostics program allows you to run diagnostic tests, change NIC configuration settings, and access 3Com support services and Help topics.
This section describes how to use the 3Com NIC Diagnostics program to help troubleshoot problems you may encounter with the NIC.
For instructions on changing NIC configuration settings, see Chapter 6.
The 3Com NIC Diagnostics program is installed automatically when you install the network driver.
To start the 3Com NIC Diagnostics program:
1 Double-click the 3Com icon in the Windows system tray.
If the 3Com icon is not visible in the system tray, follow these steps:
a From the Windows Start menu, select Programs.
b Select 3Com NIC Utilities.
c Click 3nicdiag.
For PCs running Windows NT 3.51, from the File menu, select Run. At the command prompt, enter the path for the 3Com NIC Diagnostics program. The default path is C:\WINNT35\SYSTEM32\3NICDIAG.EXE.
A warning message appears, stating that your PC will be disconnected from the network.
This means that no applications other than the 3Com NIC Diagnostics program can connect to the network while you run the diagnostics program.
All applications are automatically reconnected to the network when you exit the diagnostics program. If your PC doesn’t automatically reconnect to the network, reboot the PC.
2 Click OK.
The 3Com NIC Diagnostics General screen (see Figure 55) appears.

86 APPENDIX C: TROUBLESHOOTING
Figure 55 General Screen
Click the Help button to receive information about the diagnostics screen that is currently active.
The General screen displays general information about the NIC. It also allows you to show or not show the 3Com icon in the Windows system tray by clicking the Enable Tray Control check box. The 3Com icon provides quick access to the 3Com NIC Diagnostics program.
3 Click Cancel to exit the 3Com NIC Diagnostics program.
Running the NIC Self-Tests
The first tests to run when you have a problem with the OfficeConnect NIC are the NIC self-tests.
The NIC self-tests can verify that the OfficeConnect NIC is working correctly by checking the physical components, connectors, and circuitry on the NIC.
To run the NIC self-tests:
1 Double-click the 3Com icon in the Windows system tray.
If the 3Com icon is not visible in the system tray, follow the instructions in the previous section, “Starting the 3Com NIC Diagnostics Program.”
2 Click OK.
The 3Com NIC Diagnostics General screen appears (see Figure 55).

Running the NIC Self-Tests 87
3 Click the Diagnostics tab.
The Diagnostics screen (see Figure 56) appears.
Figure 56 Diagnostics Screen
For a description of each test, click the Help button on the screen or click the question mark (?) at the top of the screen, move it over the test, and click once. A pop-up box displays information about the test.
4 Click Start in the Self-Test panel.
A six-test sequence begins. The status of each test (such as Passed or In Progress) is displayed in the Status column next to each test as the tests run and are completed.
You can click Stop to stop the tests at any point.
■ If all of the tests are successful, the OfficeConnect NIC is working correctly.
■ If any test failed, click the question mark (?) at the top right corner of the screen, move it over the failed test topic, and click once. A pop-up box displays information about the test and what to do if it fails.

88 APPENDIX C: TROUBLESHOOTING
Running the Echo Test
After you have confirmed that the OfficeConnect NIC is functioning correctly by running the NIC self-tests (as described in the previous section), verify that the NIC is transmitting and receiving data over the network by running the Echo test.
The Echo test checks the ability of the NIC to transmit and receive data while it’s connected to the network.
To run the Echo test, you need two PCs networked together.
■ The first PC is used to send data. This is called the sending PC.
■ The second PC receives data sent from the first PC. This is called the responding PC.
The two PCs must each have a 3Com Fast Ethernet NIC installed. Also make sure that the network driver is installed.
CAUTION: Running the Echo test while connected to an active network with more than two computers can cause intermittent failures within the test. Make sure that only two computers are connected to the network before running the Echo test.
To run the Echo test:
1 On both PCs:
a From the Windows Start menu, select Programs.
b Select 3Com NIC Utilities.
c Click 3nicdiag.
d Click OK.
e Click the Diagnostics tab to display the Diagnostics screen, as shown in Figure 56.
2 On the second PC (the responding PC):
a Click Respond in the Echo Test panel.
The Echo Test Responder screen (Figure 57) appears.

Running the Echo Test 89
Figure 57 Echo Test Responder Screen
b Click Start.
3 On the first PC (the sending PC):
a Click Send on the Diagnostics screen.
The Echo Test Sender screen (see Figure 58) appears.
Figure 58 Echo Test Sender Screen

90 APPENDIX C: TROUBLESHOOTING
b Click Start.
The two PCs attempt to transmit data to each other. Statistics appear in the window, as shown in Figure 59.
Figure 59 Echo Test Statistics Screen
■ If the values of the Bytes Received, Bytes Transmitted, Packets Received, or Packets Transmitted statistics increase, the two PCs are successfully transmitting data over the network.
■ If the values of the statistics remain at zero, or if there are excessive collisions, the two PCs aren’t transmitting data successfully over the network. Check the following:
■ Ensure that the network hub or device to which the NIC is connected and the cable connecting to your NIC comply with the 10BASE-T or 100BASE-TX specifications (see Appendix A).
■ Ensure that the network hub or device to which the NIC is connected is powered on.
For a description of each statistic, click the Help button on the screen or click the question mark (?) at the top of the screen, move it over the topic, and click once. A pop-up box displays information about the statistic.
c Close all open windows when the Echo test is finished.

Accessing the Help System 91
Accessing the Help System
The OfficeConnect NIC Help system is a Windows Help application that includes numerous Help topics about the OfficeConnect NIC.
To access the OfficeConnect NIC Help system:
1 From the Windows Start menu, select Programs.
2 Select 3Com NIC Utilities.
3 Click 3nichelp.
For PCs running Windows NT 3.51, from the File menu, select Run. At the command prompt, enter the path for the 3Com NIC Help system. The default path is C:\WINNT35\SYSTEM32\3NICDIAG.HLP.
The main Help screen appears, displaying information about the 3Com NIC Diagnostics General screen.
4 Click Help Topics to display a list of Help topics or click Find to search for a Help topic.
Viewing Release Notes, Frequently Asked Questions, and KnowledgeBase Topics
The 3Com NIC Diagnostics program contains a substantial database of support-related and service-related data that you can access in the following categories: release notes, frequently asked questions, and KnowledgeBase topics.
To access the support database:
1 Double-click the 3Com icon in the Windows system tray.
If the 3Com icon is not visible in the system tray, follow the instructions in the section “Starting the 3Com NIC Diagnostics Program” earlier in this chapter.
2 Click OK.
3 Click the Support tab.
The Support screen appears.
4 Click Release Notes.
The Release Notes Help screen appears.
■ Click the Release Notes link to display tips about installing and using the OfficeConnect NIC.

92 APPENDIX C: TROUBLESHOOTING
■ Click the Frequently Asked Questions link to display common questions asked by customers and answered by 3Com support experts.
■ Click the KnowledgeBase link to display OfficeConnect NIC compatibility topics.
Accessing 3Com Support Services
The Support screen provides access to the 3Com World Wide Web site, customer support databases (such as release notes and frequently asked questions), and the problem report generator.
To access 3Com support services:
1 Double-click the 3Com icon in the Windows system tray.
If the 3Com icon isn’t visible in the system tray, follow the instructions in the section “Starting the 3Com NIC Diagnostics Program” earlier in this chapter.
2 Click OK.
3 Click the Support tab.
The Support screen (see Figure 60) appears.
Figure 60 Support Screen

Removing NIC Software 93
■ Click Diagnostics to run the 3Com NIC diagnostic tests. See “Running the NIC Self-Tests” and “Running the Echo Test” earlier in this chapter for information on how to run the 3Com NIC diagnostic tests.
■ Click Release Notes to display customer support information databases about the OfficeConnect NIC in three categories: release notes, frequently asked questions, and the KnowledgeBase.
■ Click BBS Information to display the 3Com BBS telephone numbers and modem speeds.
■ The http://www.3com.com button displays the 3Com World Wide Web site address.
■ Click Problem Report if you want to generate a problem report file about an OfficeConnect NIC problem. You can then e-mail this file to 3Com.
Removing NIC Software
This section describes how to remove a NIC network driver and software from your PC so that you can reinstall the software or physically remove the NIC from your PC.
If you want to reinstall the OfficeConnect NIC network driver and software, you must first remove the driver and software, as described in this section.
Windows 95and Windows 98
To remove NIC software in a PC running Windows 95 or Windows 98:
1 Double-click the My Computer icon, then the Control Panel icon, and then the System icon.
2 Click the Device Manager tab.
3 Double-click Network adapters.
4 Select the name of the NIC, for example, 3Com OfficeConnect 10/100 Fast Ethernet (3CSOHO100-TX) NIC.
5 Click Remove.

94 APPENDIX C: TROUBLESHOOTING
6 Click OK to confirm the device removal.
The NIC driver and diagnostic software are removed from the PC.
You are prompted to restart the PC.
■ If you are physically removing the NIC from the PC, click No. Do not restart the PC until you shut down the system, turn the power off, and remove the NIC from the PC.
■ If you are reinstalling the NIC software, click Yes.
Windows NT 4.0 To remove NIC software in a PC running Windows NT 4.0:
1 Double-click the My Computer icon, then the Control Panel icon, and then the Network icon.
The Network screen appears.
2 Click the Adapters tab.
3 Select the name of the NIC in the Network Adapters box, and then click Remove.
4 Click Yes to confirm the removal.
5 Click Close to close the Network screen.
The NIC driver and diagnostic software are removed from the PC.
You are prompted to restart the PC.
■ If you are physically removing the NIC from the PC, click No. Do not restart the PC until you shut down the system, turn the power off, and remove the NIC from the PC.
■ If you are reinstalling the NIC software, click Yes to restart the PC.
Windows NT 3.51 To remove NIC software in a PC running Windows NT 3.51:
1 In the Main Program window, double-click the Control Panel icon, and then the Network icon.
The Network Settings window is displayed.
2 In the Installed Adapter Cards panel, select the name of the installed NIC and click Remove.
The Network Settings window displays a warning message.

Frequently Asked Questions 95
3 Click Yes.
The Network Settings window is displayed again. The NIC no longer appears in the Installed Adapter Cards panel.
4 Click OK.
The NIC driver and diagnostic software are removed from the PC.
The Network Settings Change dialog box appears, prompting you to restart.
■ If you are physically removing the NIC from the PC, click No. Do not restart the PC until you shut down the system, turn the power off, and remove the NIC from the PC.
■ If you are reinstalling the NIC software, click Restart Now.
Frequently Asked Questions
Table 11 describes some common questions and answers about the OfficeConnect NIC.
To view questions and answers online, follow the instructions in “Viewing Release Notes, Frequently Asked Questions, and KnowledgeBase Topics” earlier in this chapter.
To view additional questions and answers, see the text files located in the HELP directory on the EtherDisk diskette.
Table 11 Frequently Asked Questions
Question Answer
Why does the OfficeConnect NIC install as a “Generic PCI Ethernet Controller” under Other Devices in the Windows 95/98 Device Manager?
When Windows 95/98 is installed after the OfficeConnect NIC has already been installed, Windows 95/98 installs the NIC as a generic PCI Ethernet controller.
To work around this problem, follow these steps:
In the Device Manager, double-click Other Devices.
Click PCI Ethernet Controller.
Click Remove.
Restart your PC.
In Windows 95/98, what should I do if a yellow exclamation point (!) appears next to the NIC name?
In the Device Manager, double-click Other Devices.
Click PCI Ethernet Controller or the duplicate PCI NIC entry.
Click Remove.
Restart your PC.

96 APPENDIX C: TROUBLESHOOTING
How do I remove the 3Com icon from my Windows system tray?
Double-click the 3Com icon to start the 3Com NIC Diagnostics program.
In the bottom-right corner of the main window, click the Enable Tray Control check box to remove the check mark.
Exit the program and the icon will not appear anymore.
Which PCI slot should I use for my OfficeConnect NIC?
3Com PCI NICs, such as the OfficeConnect NIC, are designed to work in any bus-mastering PCI slot, preferably slot 1. Normally, slot 1 is marked on the PC motherboard and is located closest to the computer power supply.
Avoid any PCI slot next to an ISA slot. This is often a shared slot and does not support bus mastering. The NICs perform best in those slots that support bus-mastering data transfers.
Some PCs have three types of expansion slots: PCI, ISA, and EISA. PCI slots are usually white and shorter than the other expansion slots (see Figure 9 in Chapter 2). ISA slots are usually black. EISA slots are usually brown, and are as long as ISA slots. If you’re not sure what type of expansion slots your PC has, see your PC documentation for details. Also refer to your PC manual for information on which slots support bus-mastering data transfers.
Do I have to configure the OfficeConnect NIC? PCI is a self-configuring bus architecture. Most of the time you only need to install the NIC in your PC; PCI does the rest. However, on some PCI computers, you may be required to configure the computer BIOS manually after installing your PCI NIC. Refer to your PC documentation for more information about your PC’s BIOS.
What interrupts should I avoid? You should avoid using any interrupts used by ISA/EISA boards that do not properly support shared interrupts (level-triggered). If you do not know or are not sure whether other devices or adapters in your PC support shared interrupts, then avoid using them.
Avoid using the same interrupt as your local hard drive (normally IRQ 14 for IDE drives and IRQ 11 for most SCSI host adapters), because not all hard drives support shared interrupts at this time. Avoid using 9 because it cascades with 2.
Does the OfficeConnect NIC support full-duplex? Yes, the OfficeConnect NIC supports full-duplex operation at 10 Mbps and 100 Mbps.
Full-duplex is the ability of a device or line to transmit data simultaneously in both directions (the PC is sending and receiving data at the same time).
Table 11 Frequently Asked Questions (continued)
Question Answer

Troubleshooting the Hub 97
Troubleshooting the Hub
The more complex your network setup becomes, the greater the possibility of small problems along the way. The LEDs on the front of the hub can provide you with some basic information.
The Power and Port Status LEDs provide specific troubleshooting information, as detailed in Table 12.
The other LEDs on the panel indicate the status of each port, as described in Table 6 on page 30.
Table 12 LED Troubleshooting Indicators
Symptom Cause Solution
Power LED doesn’t glow steadily green after the power-on tests have been completed.
The hub is defective. Contact your supplier or 3Com representative.
Alert LED is continuously lit. There is either continual excessive use of your network (over 80%), or, more likely, a port has partitioned due to a loop in your network (in which case the corresponding Port status LED will be yellow).
Check your connections and remove the loop. Each piece of equipment needs only one connection to your hub.
Port Status LED is not lit for a port that has a connection.
There is a problem with this connection.
Check that the equipment connected to the hub is powered on, operating correctly, and contains a 100BASE-TX connection.
Port Status LED glows yellow. An installed NIC or the hub is defective. A loop may be present because of illegal cabling. A cable connector may not be properly seated.
Check cable connections. Confirm that the NIC or hub is not defective. Make sure that you’ve connected the switchable port on one hub to a non-switchable port on the other hub. Don’t connect two switchable ports or two non-switchable ports together between hubs.
The hub automatically enables the port and the LEDs glow green when the fault is corrected.


D
EXPANDING YOUR NETWORKAs you become more familiar with networking and as your business grows, you may want to add more PCs or other devices to your network, as detailed in this appendix. If you outgrow your first hub, you can easily add more.
For more information about expanding your network, see the OfficeConnect Network Assistant CD included in your Networking Kit.
You can connect up to four PCs and peripheral devices to a single 3Com OfficeConnect Fast Ethernet Hub 4, as well as buy additional hubs and connect them together to expand your network.
You need one NIC for each PC added to the network.
Understanding Connection Concepts
The following definitions will help you better understand how to connect OfficeConnect hubs together:
■ Switchable port––The port farthest to the left on the hub’s rear panel is switchable between normal and uplink modes (see Figure 61).
The switch that controls the switchable port is located to the left of the switchable port. Table 13 describes how to use the Uplink/Normal switch.
Table 13 Uplink/Normal Switch Positions
Position Meaning
Out (Normal) The switchable port operates in normal mode. In this mode, you can use a straight-through cable to connect to a NIC port on a PC.
In (Uplink) The switchable port operates in uplink mode. In this mode, you can use a straight-through cable to connect to a port operating in normal mode on another hub.

100 APPENDIX D: EXPANDING YOUR NETWORK
The non-switchable ports on the hub (1,2, and 3) are all permanently set to operate in normal mode. They can be connected, via straight-through cables, to other ports operating in normal mode (i.e., a port on a NIC in a PC). They can also be connected to a port operating in uplink mode (i.e., a switchable port on another hub) using a straight-through cable.
Connecting Additional Hubs
When connecting equipment, make sure that the new hub is of compatible speed and that it has ports that can be connected to your existing Office Connect Fast Ethernet Hub 4. The OfficeConnect Fast Ethernet Hub 4 included in your Networking Kit can connect to a 10BASE-T, 100BASE-TX, or 10/100BASE-TX port. When connecting two Fast Ethernet hubs, it is recommended that the maximum length of cable used not exceed 16.4 feet.
To network two hubs, as shown in Figure 61, connect one end of the UTP cable to a non-switchable port on the first hub and the other end of the cable to the switchable port on the second hub.
When you use the port farthest to the left on the hub rear panel, be sure to have the Uplink/Normal switch depressed (in) if you are connecting to a hub.
Continue this type of connection to add two more hubs for a maximum of four hubs.
CAUTION: Use only a straight-through cable to connect a non-switchable port to a switchable port, or vice versa.

Positioning the Hub 101
Figure 61 Connecting Two Hubs Using a UTP Cable.
The Uplink/Normal switch is located to the left of the switchable port. When the switch button is extended (out), the port operates in uplink mode.
Positioning the Hub When installing your OfficeConnect hub, be sure that:
■ It is out of direct sunlight and away from sources of heat.
■ Cabling is away from power lines, fluorescent lighting fixtures, and sources of electrical noise such as radios, transmitters, and broadband amplifiers.
■ Water or moisture cannot enter the case of the unit.
■ Air flow around the unit and through the vents in the side of the case is not restricted. It is recommended that you provide a minimum of 1 in. (2.5 cm) clearance.
Using theNonskid Feet
Your Networking Kit includes four self-adhesive rubber feet that can prevent your hub from sliding on a desk surface. Attach the feet to the marked areas at each corner of the hub’s underside.
4
1X
Uplink/Normal
Power
4
1X
Uplink/Normal
Power
Switchableport
Non-switchableports

102 APPENDIX D: EXPANDING YOUR NETWORK
Stacking MultipleHubs
Your Networking Kit includes a stacking clip that you can use to stack your OfficeConnect units together securely. You can stack up to a maximum of four units. Use the following method to stack your units:
1 Place the first unit on a flat surface.
2 Fit the clip across the top of the unit, as shown in Figure 62, with the longer sections of the outer fastening flanges pointing down.
3 Align the fastening flanges over the slots on each side of the unit.
4 Push the clip down gently to secure it, ensuring that the fastening flanges snap into the slots on the unit.
5 Rest the next unit on top of the clip and align it with the first unit.
6 Press down gently on the upper unit to secure it to the clip, ensuring that the fastening flanges fit into the slots of the unit, as shown in Figure 63.
7 Repeat steps 2 though 6 to stack additional units.
Figure 62 Attaching the Stacking Clip
Fastening flange

Positioning the Hub 103
Figure 63 Stacking Hubs Together
To remove an Office Connect unit from a stack:
1 Remove the top unit, along with the clip, by hooking a finger around one of the fastening flanges and then pulling up gently out of the slot.
2 Push at the center of the clip, so that it bends toward the base of the unit, and then separate when loose.

104 APPENDIX D: EXPANDING YOUR NETWORK
Wall-Mountingthe Hub
Two slots on the underside of the OfficeConnect Fast Ethernet Hub 4 are used for wall mounting. You can mount the hub with the LEDs facing upward or downward.
When wall-mounting your hub, make sure that it is within reach of the power socket.
You need two suitable screws. Make sure that the wall you’re going to use is flat, dry, and sturdy. Make two screw holes that are 5.9 in. (15 cm) apart. Fix the screws into the wall, leaving their heads 0.12 in. (3 mm) clear of the wall surface.
Remove any connections to the hub and position it over the screw heads. When in line, gently push the hub on to the wall and move it downwards to secure. When making connections, be careful not to push the hub up and off the wall.
CAUTION: You can only wall-mount single hubs. Do not wall-mount stacked hubs.

E
TECHNICAL SUPPORT3Com provides easy access to technical support information through a variety of services. This appendix describes these services.
Information contained in this appendix is correct at time of publication. For the most recent information, 3Com recommends that you access the 3Com Corporation World Wide Web site.
Online Technical Services
3Com offers worldwide product support 24 hours a day, 7 days a week, through the following online systems:
■ World Wide Web site
■ 3Com Knowledgebase Web Services
■ 3Com FTP site
■ 3Com Bulletin Board Service (3Com BBS)
■ 3Com FactsSM Automated Fax Service
World Wide Web Site To access the latest networking information on the 3Com Corporation World Wide Web site, enter this URL into your Internet browser:
http://www.3com.com/
This service provides access to online support information such as technical documentation and a software library, as well as support options that range from technical education to maintenance and professional services.
3ComKnowledgebase
Web Services
This interactive tool contains technical product information compiled by 3Com expert technical engineers around the globe. Located on the World Wide Web at http://knowledgebase.3com.com, this service gives all 3Com customers and partners complementary, round-the-clock access to technical information on most 3Com products.

106 APPENDIX E: TECHNICAL SUPPORT
3Com FTP Site Download drivers, patches, software, and MIBs across the Internet from the 3Com public FTP site. This service is available 24 hours a day, 7 days a week.
To connect to the 3Com FTP site, enter the following information into your FTP client:
■ Hostname: ftp.3com.com
■ Username: anonymous
■ Password: <your Internet e-mail address>
You do not need a user name and password with Web browser software such as Netscape Navigator and Internet Explorer.
3Com BulletinBoard Service
The 3Com BBS contains patches, software, and drivers for 3Com products. This service is available through analog modem or digital modem (ISDN) 24 hours a day, 7 days a week.
Access by Analog Modem
To reach the service by modem, set your modem to 8 data bits, no parity, and 1 stop bit. Call the telephone number nearest you:
Country Data Rate Telephone Number
Australia Up to 14,400 bps 61 2 9955 2073
Brazil Up to 28,800 bps 55 11 5181 9666
France Up to 14,400 bps 33 1 6986 6954
Germany Up to 28,800 bps 4989 62732 188
Hong Kong Up to 14,400 bps 852 2537 5601
Italy Up to 14,400 bps 39 2 27300680
Japan Up to 14,400 bps 81 3 5977 7977
Mexico Up to 28,800 bps 52 5 520 7835
P.R. of China Up to 14,400 bps 86 10 684 92351
Taiwan, R.O.C. Up to 14,400 bps 886 2 377 5840
U.K. Up to 28,800 bps 44 1442 438278
U.S.A. Up to 53,333 bps 1 847 262 6000
Support from Your Network Supplier 107
Access by Digital Modem
ISDN users can dial in to the 3Com BBS using a digital modem for fast access up to 64 Kbps. To access the 3Com BBS using ISDN, call the following number:
1 847 262 6000
3Com FactsAutomatedFax Service
The 3Com Facts automated fax service provides technical articles, diagrams, and troubleshooting instructions on 3Com products 24 hours a day, 7 days a week.
Call 3Com Facts using your Touch-Tone telephone:
1 408 727 7021
Support from Your Network Supplier
If you require additional assistance, contact your network supplier. Many suppliers are authorized 3Com service partners who are qualified to provide a variety of services, including network planning, installation, hardware maintenance, application training, and support services.
When you contact your network supplier for assistance, have the following information ready:
■ Product model name, part number, and serial number
■ A list of system hardware and software, including revision levels
■ Diagnostic error messages
■ Details about recent configuration changes, if applicable
If you are unable to contact your network supplier, see the following section on how to contact 3Com.
Support from 3Com If you are unable to obtain assistance from the 3Com online technical resources or from your network supplier, 3Com offers technical telephone support services. To find out more about your support options, call the 3Com technical telephone support phone number at the location nearest you.

108 APPENDIX E: TECHNICAL SUPPORT
When you contact 3Com for assistance, have the following information ready:
■ Product model name, part number, and serial number
■ A list of system hardware and software, including revision levels
■ Diagnostic error messages
■ Details about recent configuration changes, if applicable
Here is a list of worldwide technical telephone support numbers:
Country Telephone Number Country Telephone Number
Asia, Pacific RimAustraliaHong KongIndiaIndonesiaJapanMalaysiaNew ZealandPakistanPhilippines
1 800 678 515800 933 486+61 2 9937 5085001 800 61 0090031 61 64391800 801 7770800 446 398+61 2 9937 50851235 61 266 2602
P.R. of China
SingaporeS. Korea From anywhere in S. Korea: From Seoul:Taiwan, R.O.C.Thailand
10800 61 00137 or021 6350 1590800 6161 463
00798 611 2230(0)2 3455 64550080 611 261001 800 611 2000
EuropeFrom anywhere in Europe, call: +31 (0)30 6029900 phone
+31 (0)30 6029999 fax
Europe, South Africa, and Middle EastFrom the following countries, you may use the toll-free numbers:
AustriaBelgiumDenmarkFinland FranceGermanyHungaryIrelandIsraelItaly
0800 2974680800 71429800 173090800 1131530800 9179590800 182150200800 128131800 5531171800 94537941678 79489
NetherlandsNorwayPolandPortugalSouth AfricaSpainSwedenSwitzerlandU.K.
0800 0227788800 1137600800 31112060800 8314160800 995014900 983125020 7954820800 55 30720800 966197
Latin AmericaArgentinaBrazilChileColombia
AT&T +800 666 50650800 13 32661230 020 064598012 2127
MexicoPeruPuerto RicoVenezuela
01 800 CARE (01 800 2273)AT&T +800 666 5065800 666 5065AT&T +800 666 5065
North America 1 800 NET 3Com(1 800 638 3266)
Enterprise Customers:1 800 876-3266

Returning Products for Repair 109
Returning Products for Repair
Before you send a product directly to 3Com for repair, you must first obtain an authorization number. Products sent to 3Com without authorization numbers will be returned to the sender unopened, at the sender’s expense.
To obtain an authorization number, call or fax:
Country Telephone Number Fax Number
Asia, Pacific Rim + 65 543 6500 + 65 543 6348
Europe, South Africa, and Middle East
+ 31 30 6029900 + 31 30 6029999
Latin America 1 408 326 2927 1 408 326 3355
From the following countries, you may call the toll-free numbers; select option 2 and then option 2:
AustriaBelgiumDenmarkFinlandFranceGermanyHungaryIrelandIsraelItalyNetherlandsNorwayPolandPortugalSouth AfricaSpainSwedenSwitzerlandU.K.
0800 2974680800 71429800 173090800 1131530800 9179590800 182150200800 1281318005531171800 94537941678 794890800 0227788800 1137600800 31112060800 8314160800 995014900 983125020 7954820800 55 30720800 966197
U.S.A. and Canada 1 800 NET 3Com(1 800 638 3266)
Enterprise Customers:1 800 876 3266
1 408 326 7120(not toll-free)


GLOSSARY
10BASE-T The IEEE standard for a 10 megabit per second baseband network on twisted-pair cable.
100BASE-TX IEEE 802.3u standard for Ethernet signaling over Category 5 unshielded twisted-pair wire at 100 Mbps.
application software A program designed to perform a specific task, such as accounting, e-mail, or desktop publishing.
backbone The main transmission medium used to interconnect the workgroup areas of a network. The media type is usually coaxial or fiber cabling.
base address Also called I/O base address. The first address in a series of addresses in memory, often used to describe the beginning of a network interface card’s I/O space.
BIOS Basic input/output system. An internal set of instructions in an IBM PC (or IBM-compatible PC) that controls basic hardware functions such as interactions with the keyboard, diskette drives, and hard disk drives.
BNC A type of bayonet-lock coaxial cable connector used for video and communications.
bus An electronic pathway along which signals are transmitted from one area of a PC to another.
bus mastering Method for accessing the PC bus in which a card or device takes control of the bus in order to send data onto the bus directly, without help from the central processing unit (CPU).
CAT 3 Category 3 balanced cable. Balanced 100-ohm and 120-ohm cables and associated connecting hardware whose transmission characteristics are specified up to 16 MHz. Used by 10BASE-T and 100BASE-T4 installations.

112 GLOSSARY
CAT 5 Category 5 balanced cable. Balanced 100-ohm and 120-ohm cables and associated connecting hardware whose transmission characteristics are specified up to 100 MHz. Used by 10BASE-T and 100BASE-T installations.
client-server network A type of LAN that has at least one computer that is designated the host PC for some or all of the network’s applications. This type of LAN supports a networking relationship in which one or more PCs function as a “server,” providing application, data sharing, and storage capabilities. Other networked PCs, called “clients,” use the resources available from a server. See also peer-to-peer network.
collision A condition that results from concurrent data transmissions from multiple sources on the same data channel. When two devices transmit simultaneously, a collision occurs and the colliding devices delay their retransmissions for a random length of time. A sudden sustained increase in the number of collisions can indicate a problem with a device, particularly if it is not accompanied by a general increase in traffic. On coaxial segments an increase in collisions can also indicate faulty cabling.
configuration The software settings that allow different hardware components of a computer system to communicate with one another.
configuration files A group of files on the EtherDisk diskettes that contains configuration information and troubleshooting diagnostics specific to the functioning of the NIC with various network operating systems (NOSs).
crossover cable A patch cable wired to route the receive signals from one device to the transmit signals of another device, and vice versa.
device A component of the system’s hardware configuration. Examples include the modem, printer, mouse, sound card, or disk drive.
device driver Software that controls how a PC communicates with a peripheral device, such as a printer, mouse, or NIC. Each operating system contains a standard set of device drivers for the keyboard, the monitor, NIC, and so forth.
A network device driver is a program, usually resident in server or workstation memory, that controls the network hardware (such as adapters or controllers) or implements the protocol stacks through which higher-level applications communicate with the network hardware.

GLOSSARY 113
Ethernet A local area network (LAN) standard defining a physical medium and its method of placing data, or packet signaling, on a cable; a packet technology that operates at 10 Mbps over twisted-pair or coaxial cable and allows network devices such as workstations and hosts to communicate with each other.
Fast Ethernet 100 Mbps technology based on the 10BASE-T Ethernet network protocol.
hub A device that connects network devices. Hubs serve as traffic cops for managing network data. They restore signal amplitude and timing, detect collisions, and broadcast signals to network devices.
IEEE Institute of Electrical and Electronics Engineers. Committees that develop and propose computer standards, such as the 802 protocols, which define the physical and data link protocols of communication networks. Members represent an international cross section of users, vendors, and engineering professionals.
input/output (I/O) The method, medium, or device (such as a keyboard, monitor, floppy disk, hard disk, NIC, or printer) used to transfer data to a computing system or from the computing system back to a device, a network, etc.
interrupt A signal that a device sends to the PC when the device is ready to accept or send information. Also used when a device needs the PC’s attention.
I/O base address See base address.
IRQ Interrupt Request Level or Interrupt Request Line. Hardware line over which devices can send interrupt signals. Each device connected to the PC usually uses a different IRQ.
LAN Local area network. A communications network within a limited physical area such as a building that provides high-speed data transmission. The basic components of a LAN are the NICs that plug into each PC to connect it to the network, cabling, server hardware, and software for network control.
LED Light-emitting diode. A diode that converts voltage to light and that is commonly used in digital displays.
loop See network loop.

114 GLOSSARY
Mbps Megabits per second.
NDIS Network Driver Interface Specification. Defines the network driver architecture and interfaces that let a PC support NICs. This architecture provides a standardized way to write drivers for network NICs.
network A group of computers and associated devices such as faxes and printers (peripherals) connected by a communications channel (cables and connectors) capable of sharing files and other resources among several users. The network size or type can range from a peer-to-peer (client-to-client) network, connecting a small number of users in an office or department, to a local area network (LAN) connecting many users or groups in a relatively small area or campus, to a metropolitan area network (MAN) or wide area network (WAN) connecting users on several different networks spread over a wide geographic area.
network interfacecard
See NIC.
network loop A condition that occurs when two pieces of network equipment are connected by more than one path. The hub detects this condition and partitions (isolates) one of its ports to break the loop.
network operatingsystem
See NOS.
NIC Network interface card. A printed circuit board installed in a PC that allows network stations to communicate with each other; also called a network adapter card.
node A point in a network where one communicating device (such as a hub) is linked to the network and where information can be sent or received.
NOS Network operating system. A program running on each network PC that allows users to share files and network devices. The internal set of commands and instructions that directs a network’s activities. Windows NT, Novell NetWare, Banyan VINES, and Microsoft LAN Manager are examples of client-server NOSs.
packet The unit of information transmitted over the network, consisting of a preamble, a destination address, a source address, the data being transmitted, and a code that allows testing for correct transmission.

GLOSSARY 115
partition A hub function that isolates a particular port from the network because of an excessive number of collisions. Once the problem causing the collisions is corrected, the port is reactivated.
PCI Peripheral Component Interconnect. Advanced, high-performance local bus that supports multiple peripheral devices. A local bus is one that is connected directly to the PC central processing unit (CPU).
peer-to-peer network A network (usually with just a few PCs) in which each PC is set up to share its resources with every other PC on the network, and use the shared resources of every other PC on the network. No central server is required to administer sharing; however, peer-to-peer networking can still occur when a server is present on the network. See also client-server network.
segment The length of Ethernet cable connected to a port, whether this cable is 10BASE-T, 10BASE2 (coax), or other type. When you daisy-chain equipment together with 10BASE2 (coax) cable, all of the cable forms a single segment.
server A computer that provides disk space, printing support, file services, software applications, client/server networking. or other services to computers over a network.
STP Shielded twisted-pair. Shielded four-conductor electrical cable that offers high-speed transmission for long distances.
switch Device that can direct network traffic among several Ethernet networks.
twisted-pair Wiring similar to that found in the telephone system, consisting of two insulated wires loosely twisted around each other to help cancel out induced noise in balanced circuits. See also UTP.
UTP Unshielded twisted-pair. A cable consisting of two or more pairs of twisted copper wires that are not shielded.


INDEX
Numbers100BASE-TX 18
link LED 29, 84operation 72specifications 72
10BASE-T link LED 29, 843Com bulletin board service (3Com BBS) 93, 1063Com icon, in Windows system tray
removing 96showing 86
3Com Knowledgebase Web Services 1053Com NIC Diagnostics program
changing configuration 66starting 85
3Com support services 923Com URL 1053ComFacts 107
Aaccessing
Help 91online support 91
adding a protocol 81adding the network printer to a PC’s Printers
folder 48
Bbackplate (NIC) 16, 18bulletin board service 93, 106bus, definition of 16
Ccable
specifications 71cabling
requirements 20troubleshooting 79
client/servernetwork 76relationship 20
client-to-client relationship 20clips for stacking hubs 102computer, components of 15configuration settings
changing 66default 63displaying 64
connectingadditional hubs 100MDI/MDIX port to RJ-45 port 100NICs to the hub 27
contents of the Networking Kit 12conventions
notice icons, About This Guide 9text, About This Guide 10
CPU (central processing unit) See processorCPU utilization 63
Ddedicated server 74default configuration settings 63designing the network 73determining Windows 95 version 31diagnostic tests
NIC Echo test 88NIC self-tests 86
diagnostics program, starting 85drivers, installing
Windows 95version A 32version B 34
Windows 98 36Windows NT
version 3.51 59version 4.0 60
duplex modechanging 66default setting 63viewing 64

118 INDEX
EEcho test, running 88EIA/TIA 568 standards 71EISA slots 24enabling file and printer sharing through
Windows 95 or Windows 98 42 to 55environmental operating range 69EtherDisk diskette software categories 21expanding the network 99expansion slots
definition of 16types 25
FFast Ethernet protocol
characteristics of 72fax service (3ComFacts) 107file sharing through Windows 95 or
Windows 98 42 to 55frequently asked questions 95
viewing online 91
Ggranting access
to PC hard drive 43to printer 46
Hhard disk drive, definition of 16Help, accessing 91hub
connecting to NIC 27definition of 18multiple 102positioning 101wall-mounting 104
Iinstalling
hub 27NIC 24
installing driversverifying successful installation 37, 61Windows 95 31Windows 98 36
interrupts 96ISA slots 24, 96
KKnowledgeBase, viewing online 91
LLEDs
for troubleshooting 84hub 30, 97NIC 28
MMDI/MDIX port 19, 99, 100MDI/MDIX switch 19, 101media type
changing 66default setting 63viewing 64
memory, definition of 16MIBs 106motherboard. See system boardmultiple hubs 102
Nnetwork
client/sever 76component checklist 77expanding 99functions 13peer-to-peer 75purpose 73sample configuration 14system requirements 20
network connectivity, verifying 58network driver optimization
changing 66default setting 63viewing 64
network interface card See NICnetwork interface specifications, NIC 70network operating system
Banyan VINES 76Microsoft LAN Manager 76Microsoft NT 76Novell NetWare 76
network software 20network supplier support 107Networking Kit
contents 17software 20system requirements 20

INDEX 119
NIC 17backplate on 18configuration settings 63connecting to hub 27definition of 17installing 24installing drivers 31LEDs 84self-tests 86software, removing 93
nondedicated server 74nonskid rubber feet 101
OOfficeConnect Fast Ethernet Networking Kit
contents 12system requirements 20
OfficeConnect Fast Ethernet PCI NIC 17OfficeConnect Hub TP400 18 to 20online support services 91online technical services 105
PPCI slots 24, 96peer-to-peer networking 20, 75personal computer, components of 15physical dimensions 70positioning the hub 101power LED 28, 97power requirements
hub 69, 70NIC 70
printer sharing through Windows 95 or Windows 98 42 to 55
processor, definition of 16protocol
adding 81verifying 80
Rrelease notes, viewing online 91removing NIC software 93requirements
cabling 20software 20
returning products for repair 109RJ-45 connector, pin assignments 70rubber feet 101running diagnostic tests 86
Sself-tests, NIC 86server
dedicated 74definition of 20nondedicated 74
sharing files and printers 42 to 55, 74, 75shielded twisted-pair (STP) cable 71software, network 20software, required 20stacking clips 102stacking multiple hubs 102STP cable 71straight-through cable 100support services 92system board, definition of 16system requirements 20system tray, removing 3Com icon from 96
Ttechnical support
3Com Knowledgebase Web Services 1053Com URL 105bulletin board service 106fax service 107network suppliers 107product repair 109
testsEcho 88NIC 86
troubleshootingcable 79LEDs 84running NIC self-tests 86testing network connection 88using the 3Com NIC Diagnostics program 85
twisted-pair cable 17, 100100BASE-TX 72description 71
Uunshielded twisted-pair (UTP) cable 71URL 105

120 INDEX
Vverifying
each PC’s identification 40network connectivity 58network’s shared resources 56protocol configuration 80successful driver installation 37, 61
viewing online support databases 91
Wwall-mounting the hub 104Windows 95
confirming NIC installation 37determining the version 31installing driver 31NIC diagnostic tests, running 86removing NIC software 93, 94system requirements 20
Windows 98confirming NIC installation 37installing driver 36NIC diagnostics tests, running 86removing NIC software 93system requirements 20
Windows NTversion 3.51
confirming NIC installation 62installing driver 59NIC diagnostic tests, running 86removing NIC software 94
version 4.0confirming NIC installation 61installing driver 60NIC diagnostic tests, running 86removing NIC software 94
Windows system trayremoving 3Com icon from 96showing 3Com icon 86
World Wide Web (WWW) 105
Yyellow exclamation point, next to NIC name 95

3Com Corporation LIMITED WARRANTY
This warranty applies to Customers located in the United States, Australia, Canada (except Quebec), Ireland, New Zealand, U.K, and other English language countries, and countries for which a translation into the local language is not provided.
OfficeConnect Fast Ethernet Networking Kit
HARDWARE 3Com warrants to the end user (“Customer”) that this hardware product to be free from defects in workmanship and materials, under normal use and service, for the following length of time from the date of purchase from 3Com or its authorized reseller:
Lifetime
3Com’s sole obligation under this express warranty shall be, at 3Com’s option and expense, to repair the defective product or part, deliver to Customer an equivalent product or part to replace the defective item, or if neither of the two foregoing options is reasonably available, 3Com may, in its sole discretion, refund to Customer the purchase price paid for the defective product. All products that are replaced will become the property of 3Com. Replacement products may be new or reconditioned. 3Com warrants any replaced or repaired product or part for ninety (90) days from shipment, or the remainder of the initial warranty period, whichever is longer.
SOFTWARE 3Com warrants that each software program licensed from it will perform in substantial conformance to its program specifications, for a period of ninety (90) days from the date of purchase from 3Com or its authorized reseller. 3Com warrants the media containing software against failure during the warranty period. No updates are provided. 3Com's sole obligation under this express warranty shall be, at 3Com's option and expense, to refund the purchase price paid by Customer for any defective software product, or to replace any defective media with software which substantially conforms to applicable 3Com published specifications. Customer assumes responsibility for the selection of the appropriate applications program and associated reference materials. 3Com makes no warranty or representation that its software products will meet Customer’s requirements or work in combination with any hardware or applications software products provided by third parties, that the operation of the software products will be uninterrupted or error free, or that all defects in the software products will be corrected. For any third party products listed in the 3Com software product documentation or specifications as being compatible, 3Com will make reasonable efforts to provide compatibility, except where the non-compatibility is caused by a "bug" or defect in the third party's product or from use of the software product not in accordance with 3Com’s published specifications or user manual.
THIS 3COM PRODUCT MAY INCLUDE OR BE BUNDLED WITH THIRD PARTY SOFTWARE. THE USE OF WHICH IS GOVERNED BY A SEPARATE END USER LICENSE AGREEMENT. THIS 3COM WARRANTY DOES NOT APPLY TO SUCH THIRD PARTY SOFTWARE. FOR THE APPLICABLE WARRANTY, PLEASE REFER TO THE END USER LICENSE AGREEMENT GOVERNING THE USE OF SUCH SOFTWARE.
YEAR 2000 WARRANTY In addition to the Hardware Warranty and Software Warranty stated above, 3Com warrants that each product sold or licensed to Customer on and after January 1, 1998 that is date sensitive will continue performing properly with regard to such date data on and after January 1, 2000, provided that all other products used by Customer in connection or combination with the 3Com product, including hardware, software, and firmware, accurately exchange date data with the 3Com product, with the exception of those products identified at 3Com’s Web site, http://www.3com.com/products/yr2000.html, as not meeting this standard. If it appears that any product that is stated to meet this standard does not perform properly with regard to such date data on and after January 1, 2000, and Customer notifies 3Com before the later of April 1, 2000, or ninety (90) days after purchase of the product from 3Com or its authorized reseller, 3Com shall, at its option and expense, provide a software update which would effect the proper performance of such product, repair such product, deliver to Customer an equivalent product to replace such product, or if none of the foregoing is feasible, refund to Customer the purchase price paid for such product.
Any software update or replaced or repaired product will carry a Year 2000 Warranty for ninety (90) days after purchase or until April 1, 2000, whichever is later.
OBTAINING WARRANTY SERVICE
Customer must contact a 3Com Corporate Service Center or an Authorized 3Com Service Center within the applicable warranty period to obtain warranty service authorization. Dated proof of purchase from 3Com or its authorized reseller may be required. Products returned to 3Com's Corporate Service Center must be pre-authorized by 3Com with a Return Material Authorization (RMA) number marked on the outside of the package, and sent prepaid and packaged appropriately for safe shipment, and it is recommended that they be insured or sent by a method that provides for tracking of the package. The repaired or replaced item will be shipped to Customer, at 3Com's expense, not later than thirty (30) days after 3Com receives the defective product.
Dead- or Defective-on-Arrival. In the event a product completely fails to function or exhibits a defect in materials or workmanship within the first forty-eight (48) hours of installation but no later than thirty (30) days after the date of purchase, and this is verified by 3Com, it will be considered dead- or

defective-on-arrival (DOA) and a replacement shall be provided by advance replacement. The replacement product will normally be shipped not later than three (3) business days after 3Com’s verification of the DOA product, but may be delayed due to export or import procedures. When an advance replacement is provided and Customer fails to return the original product to 3Com within fifteen (15) days after shipment of the replacement, 3Com will charge Customer for the replacement product, at list price.
3Com shall not be responsible for any software, firmware, information, or memory data of Customer contained in, stored on, or integrated with any products returned to 3Com for repair, whether under warranty or not.
ADDITIONAL SERVICES Telephone Support. The OfficeConnect Fast Ethernet Hub 4 included in this product comes with complete technical support for ninety (90) days. This 90-day period begins on the date the product is purchased by the Customer.
Telephone technical support is available from 3Com from 9 a.m. to 5 p.m., local time, Monday through Friday, excluding local holidays. Telephone technical support is limited to the 3Com product designated above and may include assistance with installation, product-specific configuration, and identification of equipment problems. Please refer to the Technical Support appendix in the User Guide for telephone numbers.
Response to requests for telephone technical support will be in the form of a return call from a 3Com representative by close of business the following business day.
To qualify for this 90-day period of telephone technical support, you must register on the 3Com Web site at http://support.3Com.com/index.htm, and provide your date of purchase, product number, and serial number. 3Com reserves the right to modify or cancel this offer at any time, without advance notice. This offer is not available where prohibited or restricted by law.
Telephone support for the OfficeConnect Fast Ethernet NIC, with coverage for basic troubleshooting only, will be provided for the lifetime of the product, on a commercially reasonable efforts basis. Telephone support from 3Com is available from 3Com only if Customer purchased this product directly from 3Com, or if Customer’s reseller is unable to provide telephone support. Please refer to the Technical Support appendix in the User Guide for telephone numbers.
3Com’s Web and Bulletin Board Service are available at no charge, and provide software and firmware upgrades, a bug list, and technical information about 3Com products.
WARRANTIES EXCLUSIVE IF A 3COM PRODUCT DOES NOT OPERATE AS WARRANTED ABOVE, CUSTOMER'S SOLE REMEDY FOR BREACH OF THAT WARRANTY SHALL BE REPAIR, REPLACEMENT, OR REFUND OF THE PURCHASE PRICE PAID, AT 3COM'S OPTION. TO THE FULL EXTENT ALLOWED BY LAW, THE FOREGOING WARRANTIES AND REMEDIES ARE EXCLUSIVE AND ARE IN LIEU OF ALL OTHER WARRANTIES, TERMS, OR CONDITIONS, EXPRESS OR IMPLIED, EITHER IN FACT OR BY OPERATION OF LAW, STATUTORY OR OTHERWISE, INCLUDING WARRANTIES, TERMS, OR CONDITIONS OF MERCHANTABILITY, FITNESS FOR A PARTICULAR PURPOSE, SATISFACTORY QUALITY, CORRESPONDENCE WITH DESCRIPTION, AND NON-INFRINGEMENT, ALL OF WHICH ARE EXPRESSLY DISCLAIMED. 3COM NEITHER ASSUMES NOR AUTHORIZES ANY OTHER PERSON TO ASSUME FOR IT ANY OTHER LIABILITY IN CONNECTION WITH THE SALE, INSTALLATION, MAINTENANCE OR USE OF ITS PRODUCTS.
3COM SHALL NOT BE LIABLE UNDER THIS WARRANTY IF ITS TESTING AND EXAMINATION DISCLOSE THAT THE ALLEGED DEFECT OR MALFUNCTION IN THE PRODUCT DOES NOT EXIST OR WAS CAUSED BY CUSTOMER'S OR ANY THIRD PERSON'S MISUSE, NEGLECT, IMPROPER INSTALLATION OR TESTING, UNAUTHORIZED ATTEMPTS TO OPEN, REPAIR OR MODIFY THE PRODUCT, OR ANY OTHER CAUSE BEYOND THE RANGE OF THE INTENDED USE, OR BY ACCIDENT, FIRE, LIGHTNING, OTHER HAZARDS, OR ACTS OF GOD.
LIMITATION OF LIABILITY TO THE FULL EXTENT ALLOWED BY LAW, 3COM ALSO EXCLUDES FOR ITSELF AND ITS SUPPLIERS ANY LIABILITY, WHETHER BASED IN CONTRACT OR TORT (INCLUDING NEGLIGENCE), FOR INCIDENTAL, CONSEQUENTIAL, INDIRECT, SPECIAL, OR PUNITIVE DAMAGES OF ANY KIND, OR FOR LOSS OF REVENUE OR PROFITS, LOSS OF BUSINESS, LOSS OF INFORMATION OR DATA, OR OTHER FINANCIAL LOSS ARISING OUT OF OR IN CONNECTION WITH THE SALE, INSTALLATION, MAINTENANCE, USE, PERFORMANCE, FAILURE, OR INTERRUPTION OF ITS PRODUCTS, EVEN IF 3COM OR ITS AUTHORIZED RESELLER HAS BEEN ADVISED OF THE POSSIBILITY OF SUCH DAMAGES, AND LIMITS ITS LIABILITY TO REPAIR, REPLACEMENT, OR REFUND OF THE PURCHASE PRICE PAID, AT 3COM'S OPTION. THIS DISCLAIMER OF LIABILITY FOR DAMAGES WILL NOT BE AFFECTED IF ANY REMEDY PROVIDED HEREIN SHALL FAIL OF ITS ESSENTIAL PURPOSE.
DISCLAIMER Some countries, states, or provinces do not allow the exclusion or limitation of implied warranties or the limitation of incidental or consequential damages for certain products supplied to consumers, or the limitation of liability for personal injury, so the above limitations and exclusions may be limited in their application to you. When the implied warranties are not allowed to be excluded in their entirety, they will be limited to the duration of the applicable written warranty. This warranty gives you specific legal rights which may vary depending on local law.

GOVERNING LAW This Limited Warranty shall be governed by the laws of the State of California, U.S.A. excluding its conflicts of laws principles and excluding the United Nations Convention on Contracts for the International Sale of Goods.
3Com Corporation5400 Bayfront PlazaP.O. Box 58145Santa Clara, CA 95052-8145(408) 326-5000
FCC CLASS A VERIFICATION STATEMENT
WARNING: This equipment has been tested and found to comply with the limits for a Class A digital device, pursuant to Part 15 of the FCC Rules, and the Canadian Department of Communications Equipment Standards entitled, “Digital Apparatus,” ICES-003. These limits are designed to provide reasonable protection against harmful interference in a commercial installation. This equipment generates, uses and can radiate radio frequency energy and, if not installed and used in accordance with the instructions, may cause harmful interference to radio communications. Operation of this equipment in a residential area is likely to cause harmful interference, in which case, the user will be required to correct the interference at the user’s own expense.
Changes or modifications not expressly approved by 3Com could void the user’s authority to operate this equipment.
FCC CLASS B STATEMENT
This device complies with Part 15 of the FCC Rules. Operation is subject to the following two conditions:
1 This device may not cause harmful interference, and
2 This device must accept any interference received, including interference that may cause undesired operation.
WARNING: This equipment has been tested and found to comply with the limits for a Class B digital device, pursuant to Part 15 of the FCC Rules, and the Canadian Department of Communications Equipment Standards entitled, “Digital Apparatus,” ICES-003. These limits are designed to provide reasonable protection against harmful interference in a residential installation. This equipment generates, uses and can radiate radio frequency energy and, if not installed and used in accordance with the instructions, may cause harmful interference to radio communications. However, there is no guarantee that interference will not occur in a particular installation. If this equipment does cause harmful interference to radio or television reception, which can be determined by turning the equipment off and on, the user is encouraged to try to correct the interference by one or more of the following measures:
■ Reorient or relocate the receiving antenna.
■ Increase the separation between the equipment and receiver.
■ Connect the equipment into an outlet on a circuit different from the one which the receiver is connected to.
■ Consult the dealer or an experienced radio/TV technician for help.
The user may find the following booklet prepared by the Federal Communications Commission helpful:
The Interference Handbook
This booklet is available from the U.S. Government Printing Office, Washington, D.C. 20402. Stock No. 004-000-00345-4.
NOTE: In order to maintain compliance with the limits of a Class B digital device, 3Com requires that you use quality interface cables when connecting to this device. Changes or modifications not expressly approved by 3Com could void the user’s authority to operate this equipment. Refer to the manual for specifications on cabling types.
FCC DECLARATION OF CONFORMITY
We declare under our sole responsibility that the
Model: Description:3CSOHO100-TX OfficeConnect Fast Ethernet NIC3C16723A OfficeConnect Fast Ethernet Hub 4
to which this declaration relates, is in conformity with the following standards or other normative documents:
■ ANSI C63.4-1992 Methods of Measurement
■ Federal Communications Commission 47 CFR Part 15, subpart B15.107 (e) Class B Conducted Limits15.109 (g) Class B Radiated Emissions Limits
Responsible Party:3Com Corporation, 5400 Bayfront Plaza, P.O. Box 58145, Santa Clara, CA 95052-8145 (408) 326-5000
INDUSTRY CANADA CLASS B EMISSION COMPLIANCE STATEMENT
This Class B digital apparatus complies with Canadian ICES-003.
AVIS DE CONFORMITÉ À LA RÉGLEMENTATION D’INDUSTRIE CANADA
Cet appareil numérique de la classe B est conform à la norme NMB-003 du Canada.
VCCI CLASS B STATEMENT
This is a Class B product based on the standard of the Voluntary Control Council for Interference from Information Technology Equipment (VCCI). If this is used near a radio or television receiver in a domestic environment, it may cause radio interference. Install and use the equipment according to the instruction manual.
3COM END USER SOFTWARE LICENSE AGREEMENT
IMPORTANT: Read Before Using This Product
YOU SHOULD CAREFULLY READ THE FOLLOWING TERMS AND CONDITIONS BEFORE INSTALLING AND USING, THE USE OF WHICH IS LICENSED BY 3COM CORPORATION (“3COM”) TO ITS CUSTOMERS FOR THEIR USE ONLY AS SET FORTH BELOW. INSTALLING OR USING ANY PART OF THE SOFTWARE INDICATES THAT YOU ACCEPT THESE TERMS AND CONDITIONS. IF YOU DO NOT AGREE TO THE TERMS AND CONDITIONS OF THIS AGREEMENT, DO NOT INSTALL OR USE THE SOFTWARE. YOU SHOULD RETURN THE ENTIRE PRODUCT WITH THE SOFTWARE UNUSED TO THE SUPPLIER WHERE YOU OBTAINED IT.
LICENSE: 3Com grants you a nonexclusive, nontransferable (except as specified herein) license to use the accompanying software program(s) in executable form (the “Software”) and accompanying documentation (the “Documentation”), subject to the terms and restrictions set forth in this Agreement. You are not permitted to lease, rent, distribute or sublicense (except as specified herein) the Software or Documentation or to use the Software or Documentation in a time-sharing arrangement or in any other unauthorized manner. Further, no license is granted to you in the human readable code of the Software (source code). Except as provided below, this Agreement does not grant you any rights to patents, copyrights, trade secrets, trademarks, or any other rights with respect to the Software or Documentation.
Subject to the restrictions set forth herein, the Software is licensed to be used on any workstation or any network server owned by or leased to you, for your internal use, provided that the Software is used only in connection with a 3Com adapter. You may reproduce and provide one (1) copy of the Software and Documentation for each such workstation or network server on which the Software is used as permitted hereunder. Otherwise, the Software and Documentation may be copied only as essential for backup or archive purposes in support of your use of the Software as permitted hereunder. Each copy of the Software and Documentation must contain 3Com’s and its licensors’ proprietary rights and copyright notices in the same form as on the original. You agree not to remove or deface any portion of any legend provided on any licensed program or documentation delivered to you under this Agreement.

ASSIGNMENT; NO REVERSE ENGINEERING: You may transfer the Software, Documentation and the licenses granted herein to another party in the same country in which you obtained the Software and Documentation if the other party agrees in writing to accept and be bound by the terms and conditions of this Agreement. If you transfer all copies of the Software and Documentation to the party or you must destroy any copies not transferred. Except as set forth above, you may not assign or transfer your rights under this Agreement.
Modification, reverse engineering, reverse compiling, or disassembly of the Software is expressly prohibited. However, if you are a European Community (“EC”) resident, information necessary to achieve interoperability of the Software with other programs within the meaning of the EC Directive on the Legal Protection of Computer Programs is available to you from 3Com upon written request.
EXPORT RESTRICTIONS: You agree that you will not export or re-export the Software, Documentation or other technical data received hereunder (or any copies thereof) (collectively “Technical Data”) or any products utilizing the Technical Data in violation of any applicable laws or regulations of the United States or the country in which you obtained them or where you reside. In addition, the Technical Data covered by this Agreement may contain data encryption code which is unlawful to export or transfer from the United States or Canada without an approved US Department of Commerce export license and/or appropriate foreign export or import license. You are responsible for obtaining any licenses to export, re-export or import the Technical Data. In addition to the above, Technical Data may not be used, exported or re-exported (i) into or to a national or resident of any country to which the U.S. has embargoed goods; or (ii) to any one on the U.S. Treasury Department’s list of Specially Designated Nationals or the U.S. Commerce Department’s Table of Denial Orders.
TRADE SECRETS; TITLE: You acknowledge and agree that the structure, sequence and organization of the Software are the valuable trade secrets of 3Com and its suppliers. You agree to hold such trade secrets in confidence. You further acknowledge and agree that ownership of, and title to, the Software and Documentation and all subsequent copies thereof regardless of the form or media are held by 3Com and its suppliers.
UNITED STATES GOVERNMENT LEGENDS: The Software, Documentation and any other technical data provided hereunder is commercial in nature and developed solely at private expense. The Software is delivered as “Commercial Computer Software” as defined in DFARS 252.227-7014 (June 1995) or as a commercial item as defined in FAR 2.101(a) and as such is provided with only such rights as are provided in this Agreement, which is 3Com’s standard commercial license for the Software. Technical data is provided with limited rights only as provided in DFAR 252.227-7015 (Nov. 1995) or FAR 52.227-14 (June 1987), whichever is applicable.
TERM AND TERMINATION: This Agreement and license will expire fifty (50) years from the date that you install the Software and Documentation, if it is not terminated earlier. You may terminate it at any time by destroying the Software and Documentation together with all copies and merged portions in any form. It will also terminate immediately if you fail to comply with any term or condition of this Agreement. Upon such termination you agree to destroy the Software and Documentation, together with all copies and merged portions in any form.
LIMITED WARRANTIES AND LIMITATION OF LIABILITY: All warranties and limitations of liability applicable to the Software are as stated on the Limited Warranty Card or in the product manual, whether in paper or electronic form, accompanying the Software. Such warranties and limitations of liability are incorporated herein in their entirety by this reference.
GOVERNING LAW: This Agreement shall be governed by the laws of the State of California, U.S.A. excluding its conflicts of laws principles and excluding the United Nations Convention on Contracts for the International Sale of Goods.
SEVERABILITY: In the event any provision of this Agreement is found to be invalid, illegal or unenforceable, the validity, legality and enforceability of any of the remaining provisions shall not in any way be affected or impaired and a valid, legal and enforceable provision of similar intent and economic impact shall be substituted therefor.
ENTIRE AGREEMENT: This Agreement sets forth the entire understanding and agreement between you and 3Com and supersedes all prior agreements, whether written or oral, with respect to the Software and Documentation, and may be amended only in a writing signed by both parties.
Should you have any questions concerning this Agreement or if you desire to contact 3Com for any reason, please contact the 3Com subsidiary serving your country, or write: 3Com Corporation, Customer Support Information, 5400 Bayfront Plaza, Santa Clara, CA 95052
3Com is a registered trademark of 3Com Corporation.
3Com Corporation5400 Bayfront Plaza, P.O. Box 58145Santa Clara, CA 95052-8145(408) 326-5000
© Copyright 1999, 3Com Corporation. All rights reserved

PRODUCT REGISTRATION
To ensure the very best service and support, register your 3Com product now.
International customers: Visit http://www.3com.com/productreg to register.
U.S. customers: Complete and mail the attached registration card, or visit http://www.3com.com/productreg to register.

Manual Cover . 7.5" X 9" Portrait. 4/C & 1 PMS Working FileLAN
Adjust spine width size according to thickness of manual
Place in
app
rop
riate hig
h reso
lutio
n artw
ork in
side th
e arched
mask
Printed in Ireland 09-1606-001
MO
DEL N
O. 3
CS
OH
OK
IT10
0A
3Com Corporation5400 Bayfront PlazaP.O. Box 58145Santa Clara, CA 95052-8145U.S.A.
Fast Ethernet PCI N
etworking K
it
OfficeConnect®
Fast EthernetPCI Networking KitUser Guide
MODEL NO.3CSOHOKIT100A
User G
uide
www.3com.com
Related Documents