Oboe Repair Troubleshooting 1) Try playing the insment to see if it's working properly. 2) Check to make sure reed is nctioning, does it crow or make any kind of a noise? Is it too hard or too easy? 3) Check the suction. Beware, sometimes instruments with suction still don't play properly. 4) If there is no suction (or if there is suction and the instrument still doesn't play well) check r these things: a. Cracks. It is normal r an instrument to crack, and the instrument is completely fixable, as long as the crack is properly repaired. b. Check r binding. If the rods are too tight they may be propping a key open and keeping it om nctioning c. Adjusting the screws. Go through the handout attached and make sure that all the adjustments are in order. Sometimes it is impossible to fix the adjusents if the pads are seated incorrectly. You will need a screw driver and a piece of cigarette paper, remember: Do not push down the keys with your thumb (it is too heavy) and always use a very thin piece of cigette paper and when adjusting only test the pad at the very ont of the key (do not place cigarette paper under entire key). d. Pads not seated properly. Check this with cigarette paper all the way around the edge of the key, paying special attention to the ont of the key where it must be the tightest. Oboe pads are different then flute or clarinet pads because they must be more flexible and loose, fitting tighter at the ont and looser at the back, whereas flute and clarinet pads need to fit with even tension all the way around the key. Oboes shrink and expand a good deal with temperature and if the pads aren't seated properly once the weather changes everything will go out. 1

Welcome message from author
This document is posted to help you gain knowledge. Please leave a comment to let me know what you think about it! Share it to your friends and learn new things together.
Transcript
Oboe Repair Troubleshooting
1) Try playing the instrument to see if it's working properly.
2) Check to make sure reed is functioning, does it crow or make any kind of a noise?Is it too hard or too easy?
3) Check the suction. Beware, sometimes instruments with suction still don't playproperly.
4) If there is no suction (or if there is suction and the instrument still doesn't playwell) check for these things:
a. Cracks. It is normal for an instrument to crack, and the instrument iscompletely fixable, as long as the crack is properly repaired.
b. Check for binding. If the rods are too tight they may be propping a keyopen and keeping it from functioning
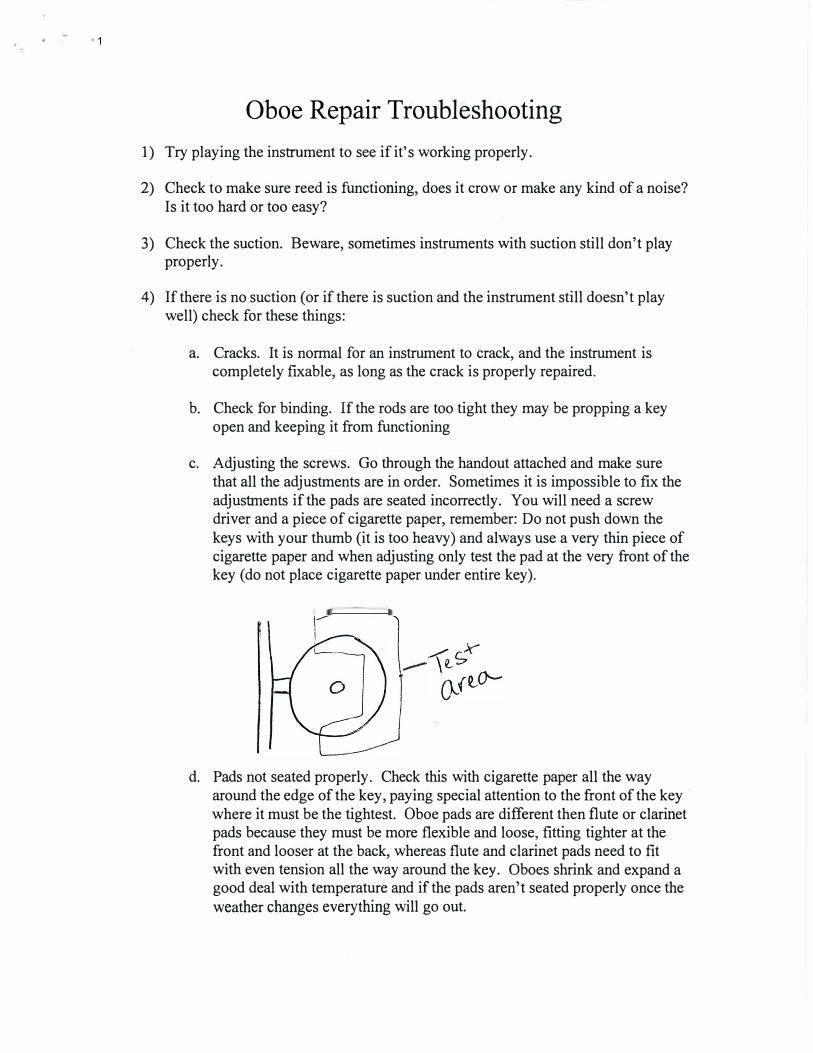
c. Adjusting the screws. Go through the handout attached and make surethat all the adjustments are in order. Sometimes it is impossible to fix theadjustments if the pads are seated incorrectly. You will need a screwdriver and a piece of cigarette paper, remember: Do not push down thekeys with your thumb (it is too heavy) and always use a very thin piece ofcigarette paper and when adjusting only test the pad at the very front of thekey (do not place cigarette paper under entire key).
d. Pads not seated properly. Check this with cigarette paper all the wayaround the edge of the key, paying special attention to the front of the keywhere it must be the tightest. Oboe pads are different then flute or clarinetpads because they must be more flexible and loose, fitting tighter at thefront and looser at the back, whereas flute and clarinet pads need to fitwith even tension all the way around the key. Oboes shrink and expand agood deal with temperature and if the pads aren't seated properly once theweather changes everything will go out.
1

. . . -· · .. ·
Oboe Adjustment Guide
-Concepts:
1. The principal key (the ones you put your fingers on, usually furtherdown the instrument) should always feel slightly heavier (more drag)than the secondary key (which is worked indirectly, usually further upthe instrument) with the cigarette paper test.
2. The adjustment screw has a direct effect on the secondary key; morespecifically, if you turn the screw to the right, it will make thesecondary key heavier and, vice versa, if you turn it to the left.
3. When turning the adjustment screw, always turn the screw one minuteat a time, and then proceed to check with the cigarette paper. Make anexception only when you can see/feel that the key is gaping open.
4. When pressing down a key to check the principal/secondary keyrelationship, always use the same amount of pressure as when you areplaying; that is, use the lightest amount of pressure possible to makethe key pad completely seal the tone hole .
. . 5. Tqe order is important! AB a rule of thumb, start at the top and progress down the Oboe.
6. The bridge keys under the right Ab must be lined up with the arm thatcomes up from the F# key. Don't split the difference between sides.
7. Joints must not wobble. (tenon cork must fit tightly)
2

·
8. Do not screw the screw directly into the bumper cork, so you won'tdent or tear it.
9. Skin pads will not grab the paper in the same way as cork pads. (less ·drag)
10 .All the keys that need to be shut when the instrument is at rest need strong enough spring action so they will remain in a close position. i.e. Forked "F" resonance key!
-Adjustment Guide, Follow this order:
1. Screw #7: Regulates the amount of "play" in the F# key. There mustbe some "play" between the F# key and the bridge key. Turning screw#7 clockwise will increase the amount of the space. Also make surethere is lost motion between the upper and middle joints on the C-Dtrill side, if there is no space, sand the corks.
2. Screw #6: Regulates the balance between the C vent and the Bb vent.If those two keys are not properly balanced, the A and B will beaffected.
3. Screw #5: Regulate A key with C vent.
4. Screw #8: Regulates the G key and the Bb vent.
5. Screw# 10: Regulates the connection between G# and F# keys. Donot over adjust!
6. Screw #14: Regulates E key with F resonance key. F resonance keyshould not be too tight.
Remember!
3

a. Tum screw # 14 counterclockwise a little, to properly adjust theE to forked F.
b. Adjust E to vent key ( forked F) with # 11.c. Adjust D to vent key (forked F) with #12.d. Add in F resonance key with # 14.
7. Screw #11: Regulates E key and vent key (forked F).
8. Screw #12: Connects D key to vent key (forked F)-Do not overadjust screw #12!
9. Screw #15: Regulates high C# and high D. They should close the Ekey when low C key is down .
. IO.Screw #13: Regulates the height of the low D key. Clockwise will lower the D key, but by doing so, it will sometimes correct a too bright or slightly sharp E.
11. Screw #16: Regulates left hand Eb going to low C. You should beable to play low C and press the left hand Eb key without changingthe tone of the low C.
12.Screw #17: This is the contact point between the left hand Eb and thelarge spring. It must have some space! It is rarely adjusted. If it is leftwithout any space between the screw and the spring, it will disturb thelinkage between the lower joint and the bell, or leave the Eb key open.
13.Screw #19: Works just like screw #16. Play low B with C# keydown. Do not over adjust screw #19.
14.B�ll Screw: Regulates the amount of"play" between the belladjusting screw and the lever that connects the bell to the middle joint.Turning the bell screw clockwise will reduce the amount of playsome lost motion is necessary. Not all Oboes have this screw.
15.Screw #18: Regulates the balance between low Band Bb. The twokeys should be equal. If screw 18 is turned clockwise, it will givemore tension to the Bb key.-Test by playing low C to low Bb, it should be clean and smooth.-When depressing the low Bb, the pads of low B and low Bb should
4

�,- ...
touch the tone holes simultaneously, but the ultimate adjustment should be done by playing low C, D, and Bb.
16. Screw # 1: Clockwise decreases the amount of opening of both octavekeys. It connects the two octave keys.
17. Screw #2: Regulates the opening of the thumb key.
18.Screw #3: Regulates the opening of the third octave.
19.Screw #4: Half-hole opening. The height of this key changes thepitch of the high C#.
20. Screw #9: Regulates the height of the A key. Usually the A key is abit higher than the G key. The little arm over the A key should closethe A key when pressing the G# key.
21. Screw #20: Regulates how much the Eb key will open when playedwith a left hand lever.
OBS: All this adjusting is only possible when all pads are seated correctly and there is enough room between the keys for adjusting. Some new instruments will come lacking the extra space needed for fine adjustment.
When changing pads, it is important to have the new pad matching the others, so the space needed for adjusting will remain.
5

'
3
1 !
1
,2
J..3
..i l/ A �
,..L. .J
C VtA·J-
Carlos E. Coelho 3854 N. Washington Blvd. Indinapolis, IN 46205 Phone/Fax 317-920-0519 email: carlosobo�itiiaol.i:om
www.carlosoboe.com
d_O
_Lt;;
J T"") �J
J..f
6
Related Documents


![3475273 ESTUDOS OBOE Joseph Sellner Oboe Method[1]](https://static.cupdf.com/doc/110x72/545e1a15af79593a708b4660/3475273-estudos-oboe-joseph-sellner-oboe-method1.jpg)