Web-Database Development with Oracle Forms Builder and Reports Builders Page 1/46 Section1: Introduction to Oracle Forms Builder In this section you will learn: • What is Oracle Forms Builder? • The components of Oracle Forms Builder • Create your forms based on your “Customer” and “Employee” tables What Is Oracle Forms Builder? Oracle Forms Builder is an Oracle tool that helps you to create forms. You can use Oracle Forms Builder to: • Design and customize your forms. • Add various functionality, like radio buttons, combo boxes, and list of values to make your forms and reports more user friendly. • Write triggers on your objects to add functionality to them and capture errors. The components of Oracle Forms Builder • Object Navigator: In this component you can view all your objects, add new objects and name/rename your objects. (F3 hot key) The Object Navigator

Welcome message from author
This document is posted to help you gain knowledge. Please leave a comment to let me know what you think about it! Share it to your friends and learn new things together.
Transcript
Web-Database Development with Oracle Forms Builder and Reports Builders
Page 1/46
Section1: Introduction to Oracle Forms Builder In this section you will learn:
• What is Oracle Forms Builder? • The components of Oracle Forms Builder • Create your forms based on your “Customer” and “Employee” tables
What Is Oracle Forms Builder?
Oracle Forms Builder is an Oracle tool that helps you to create forms. You can use Oracle Forms Builder to:
• Design and customize your forms. • Add various functionality, like radio buttons, combo boxes, and list of values
to make your forms and reports more user friendly. • Write triggers on your objects to add functionality to them and capture errors.
The components of Oracle Forms Builder
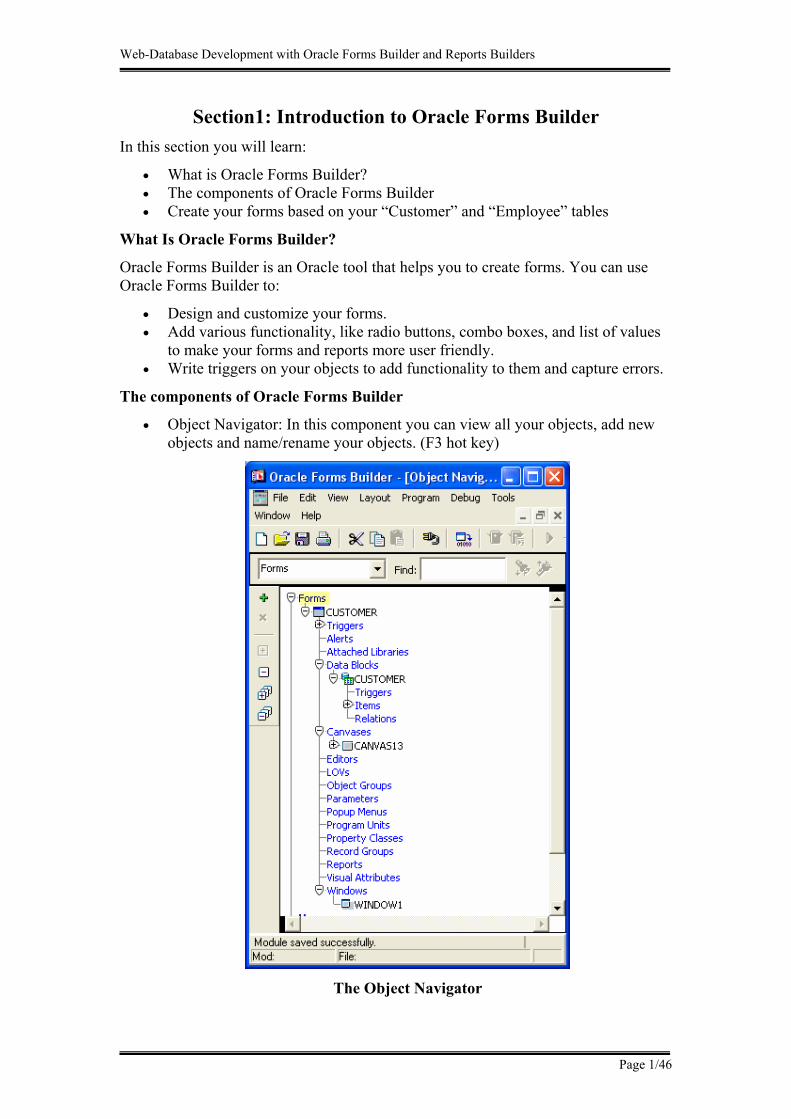
• Object Navigator: In this component you can view all your objects, add new objects and name/rename your objects. (F3 hot key)
The Object Navigator

Web-Database Development with Oracle Forms Builder and Reports Builders
Page 2/46
• Layout Editor: This component helps you design your forms and add various objects to them Such as push buttons and list boxes. (F2 hot key)
The Layout Editor
• PL/SQL Editor: This component is used to write all the codes for the triggers, procedures or functions.
The PL/SQL Editor

Web-Database Development with Oracle Forms Builder and Reports Builders
Page 3/46
• Property Palette: In this component you can view and set all properties of your objects. (F4 hot key)
The Property Palette
Creating a first form (based on Customer table in your Order System) CUSTOMER
CUST_ID: VARCHAR2(3)
TITLE: VARCHAR2(5)CUST_NAME: VARCHAR2(50)SEX: VARCHAR2(1)PROVINCE_ID: VARCHAR2(2) (FK)TELEPHONE: VARCHAR2(10)CREDIT: NUMBER(10,2)CURR_BAL: NUMBER(10,2)
EMPLOYEEEMP_ID: VARCHAR2(4)
TITLE: VARCHAR2(5)EMP_NAME: VARCHAR2(30)SEX: VARCHAR2(1)PROVINCE_ID: VARCHAR2(2) (FK)TELEPHONE: VARCHAR2(10)SALARY: NUMBER(10,2)
ORDERSORDER_ID: VARCHAR2(5)P_ID: VARCHAR2(5) (FK)
QTY: NUMBER(10)DISCOUNT: NUMBER(5,2)CUST_ID: VARCHAR2(3) (FK)EMP_ID: VARCHAR2(4) (FK)NOTE: VARCHAR2(100)
PRODUCTP_ID: VARCHAR2(5)
P_NAME: VARCHAR2(30)UNIT_PRICE: NUMBER(10,2)ONHAND: NUMBER(10)ORDER_PT: NUMBER(10)ORDER_QT: NUMBER(10)
PROVINCEPROVINCE_ID: VARCHAR2(2)
PROVINCE_NAME: VARCHAR2(100)
1. Before using Oracle Forms Builder, you have to start OC4J Instance by click
Start > Programs > Oracle9i Developer Suite - Oracle9iDS > Forms Developer > Start OC4J Instance.
2. To log on to Oracle Forms Builder, go to Start > Programs > Oracle9i Developer Suite - Oracle9iDS > Forms Developer > Forms Builder
Web-Database Development with Oracle Forms Builder and Reports Builders
Page 4/46
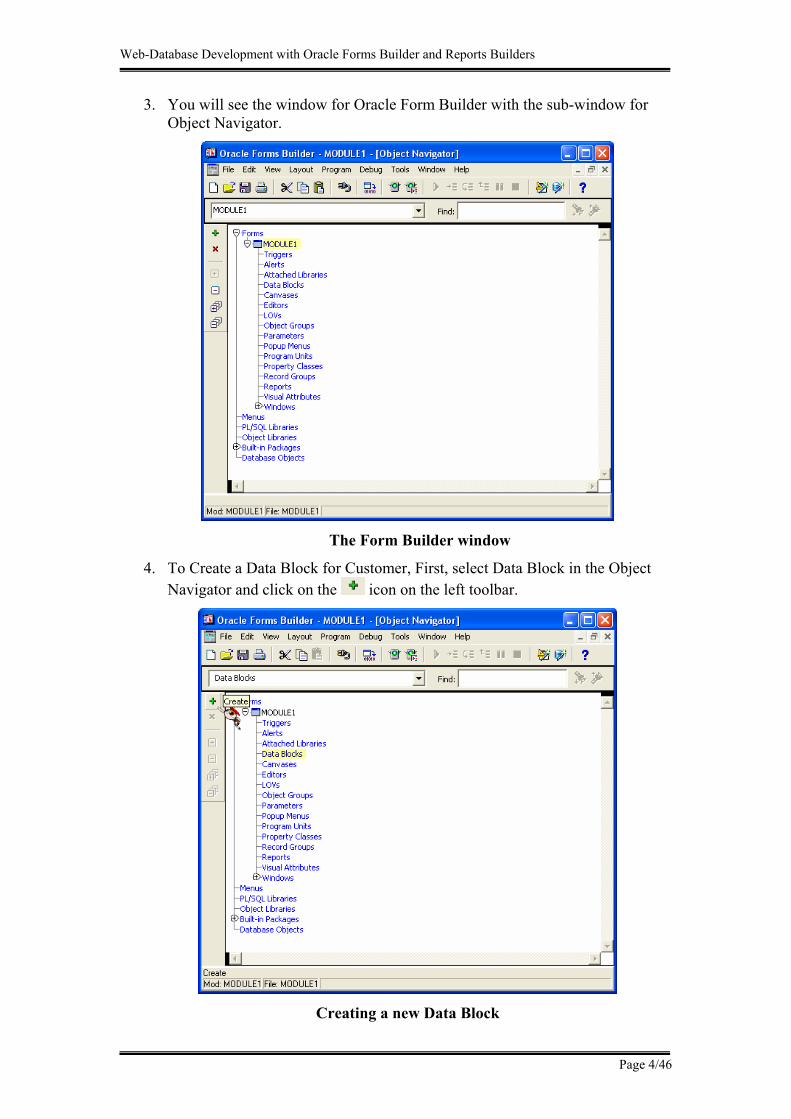
3. You will see the window for Oracle Form Builder with the sub-window for Object Navigator.
The Form Builder window
4. To Create a Data Block for Customer, First, select Data Block in the Object Navigator and click on the icon on the left toolbar.
Creating a new Data Block
Web-Database Development with Oracle Forms Builder and Reports Builders
Page 5/46
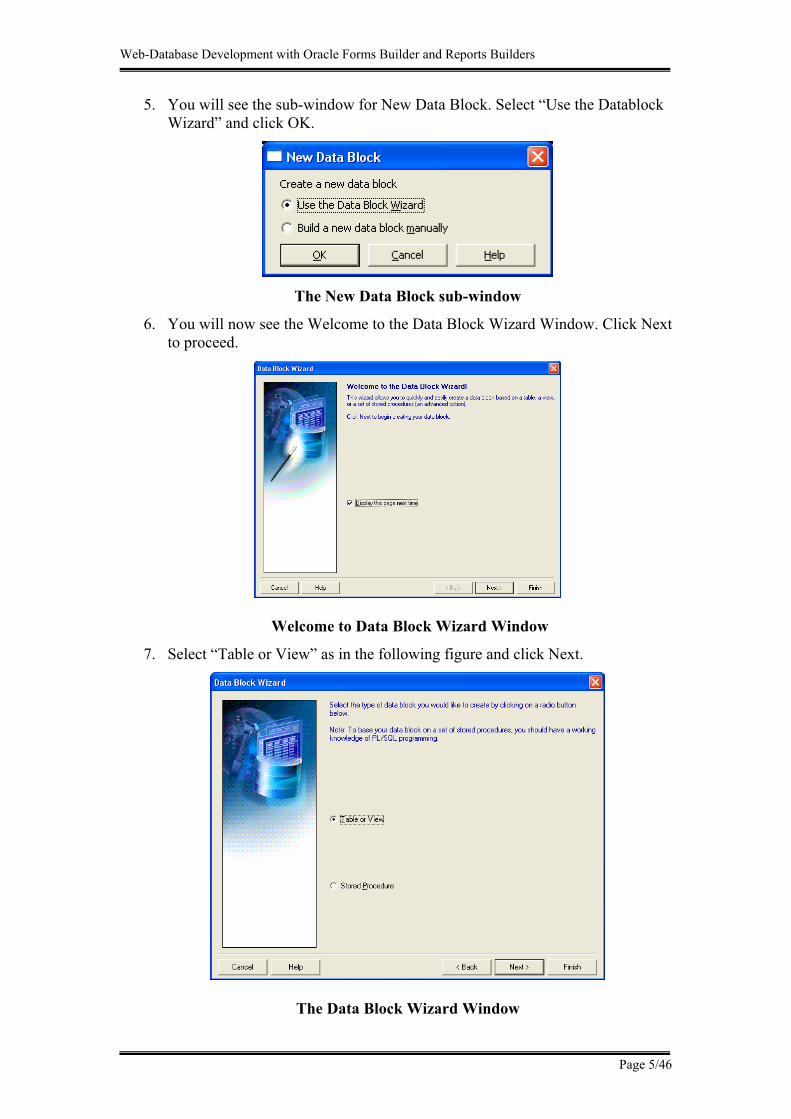
5. You will see the sub-window for New Data Block. Select “Use the Datablock Wizard” and click OK.
The New Data Block sub-window
6. You will now see the Welcome to the Data Block Wizard Window. Click Next to proceed.
Welcome to Data Block Wizard Window
7. Select “Table or View” as in the following figure and click Next.
The Data Block Wizard Window
Web-Database Development with Oracle Forms Builder and Reports Builders
Page 6/46
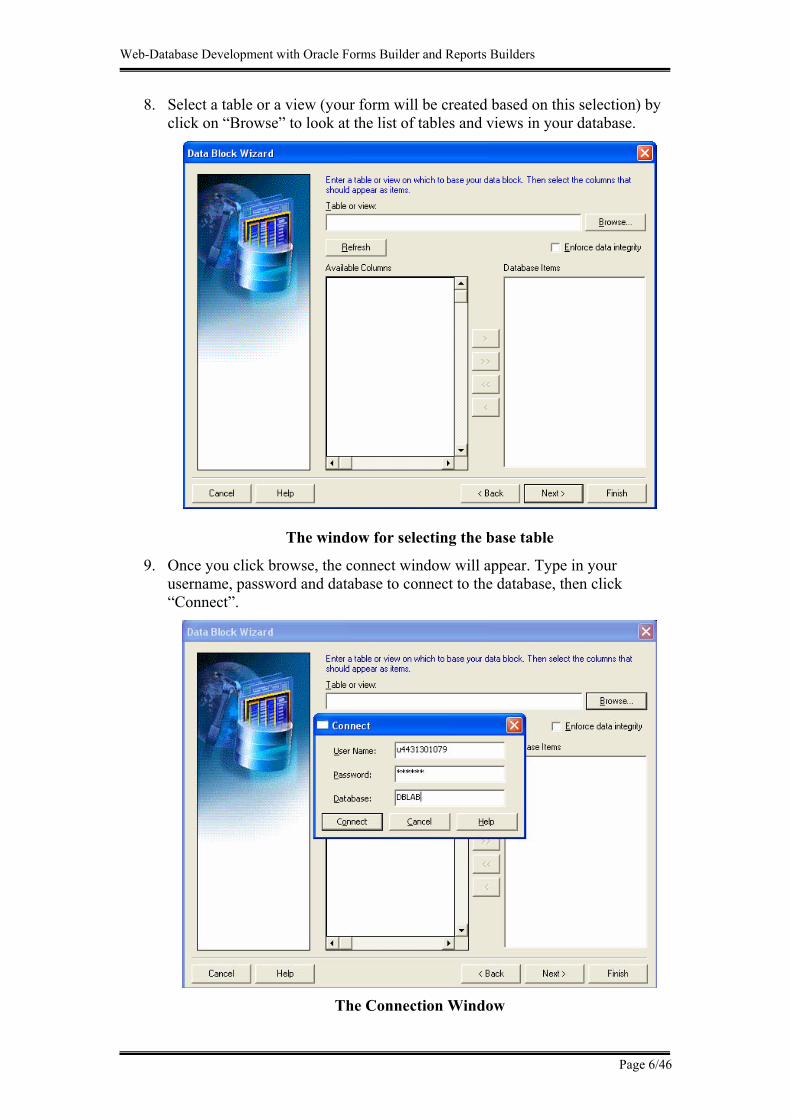
8. Select a table or a view (your form will be created based on this selection) by click on “Browse” to look at the list of tables and views in your database.
The window for selecting the base table
9. Once you click browse, the connect window will appear. Type in your username, password and database to connect to the database, then click “Connect”.
The Connection Window
Web-Database Development with Oracle Forms Builder and Reports Builders
Page 7/46
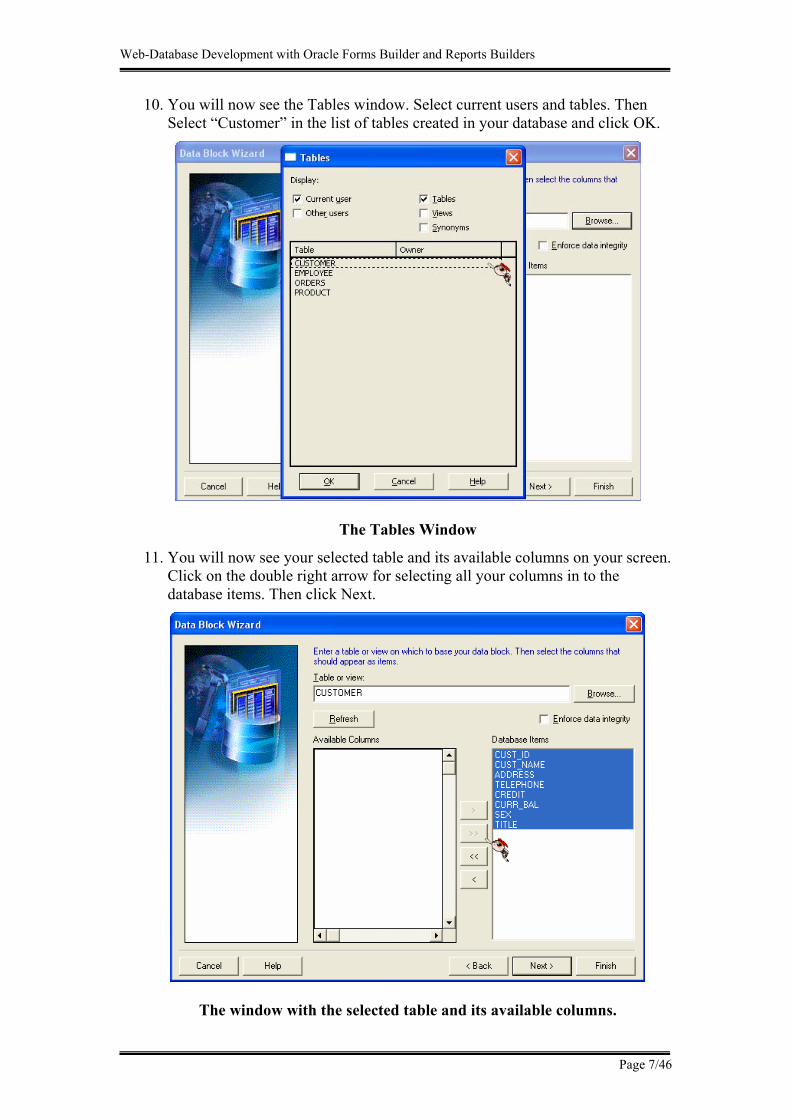
10. You will now see the Tables window. Select current users and tables. Then Select “Customer” in the list of tables created in your database and click OK.
The Tables Window
11. You will now see your selected table and its available columns on your screen. Click on the double right arrow for selecting all your columns in to the database items. Then click Next.
The window with the selected table and its available columns.

Web-Database Development with Oracle Forms Builder and Reports Builders
Page 8/46
12. You will now see the window for entering a name of your data block. Click Next to accept the default values.
The window for entering a name of the data block.
13. You will now see the Congratulations window. Select “Create the data block, then call the Layout Wizard” and click on Finish.
The Data Block Wizard Congratulations Window
Web-Database Development with Oracle Forms Builder and Reports Builders
Page 9/46
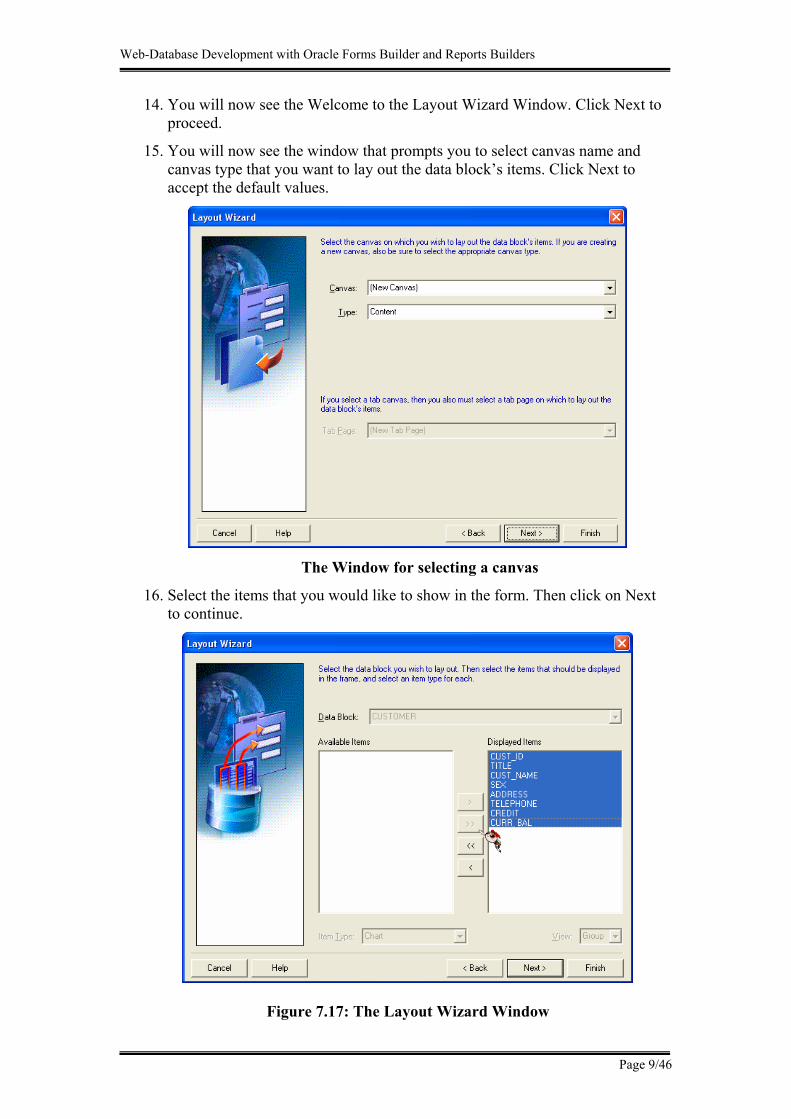
14. You will now see the Welcome to the Layout Wizard Window. Click Next to proceed.
15. You will now see the window that prompts you to select canvas name and canvas type that you want to lay out the data block’s items. Click Next to accept the default values.
The Window for selecting a canvas
16. Select the items that you would like to show in the form. Then click on Next to continue.
Figure 7.17: The Layout Wizard Window
Web-Database Development with Oracle Forms Builder and Reports Builders
Page 10/46
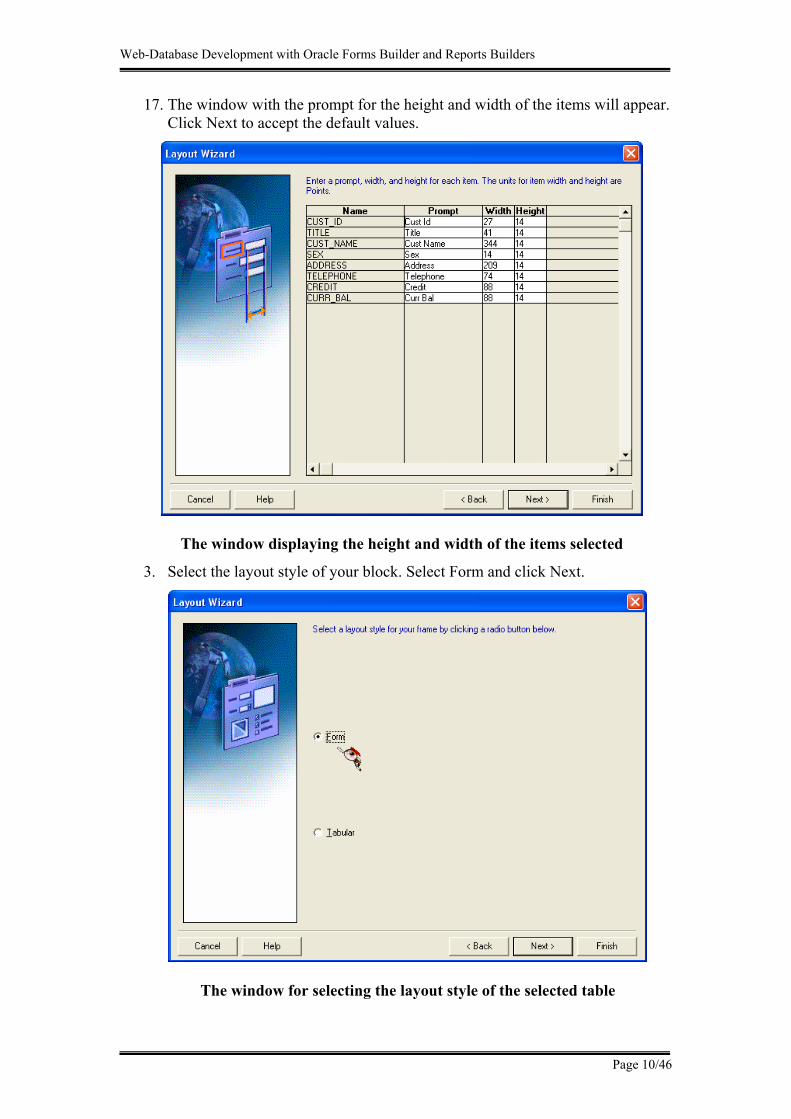
17. The window with the prompt for the height and width of the items will appear. Click Next to accept the default values.
The window displaying the height and width of the items selected
3. Select the layout style of your block. Select Form and click Next.
The window for selecting the layout style of the selected table
Web-Database Development with Oracle Forms Builder and Reports Builders
Page 11/46
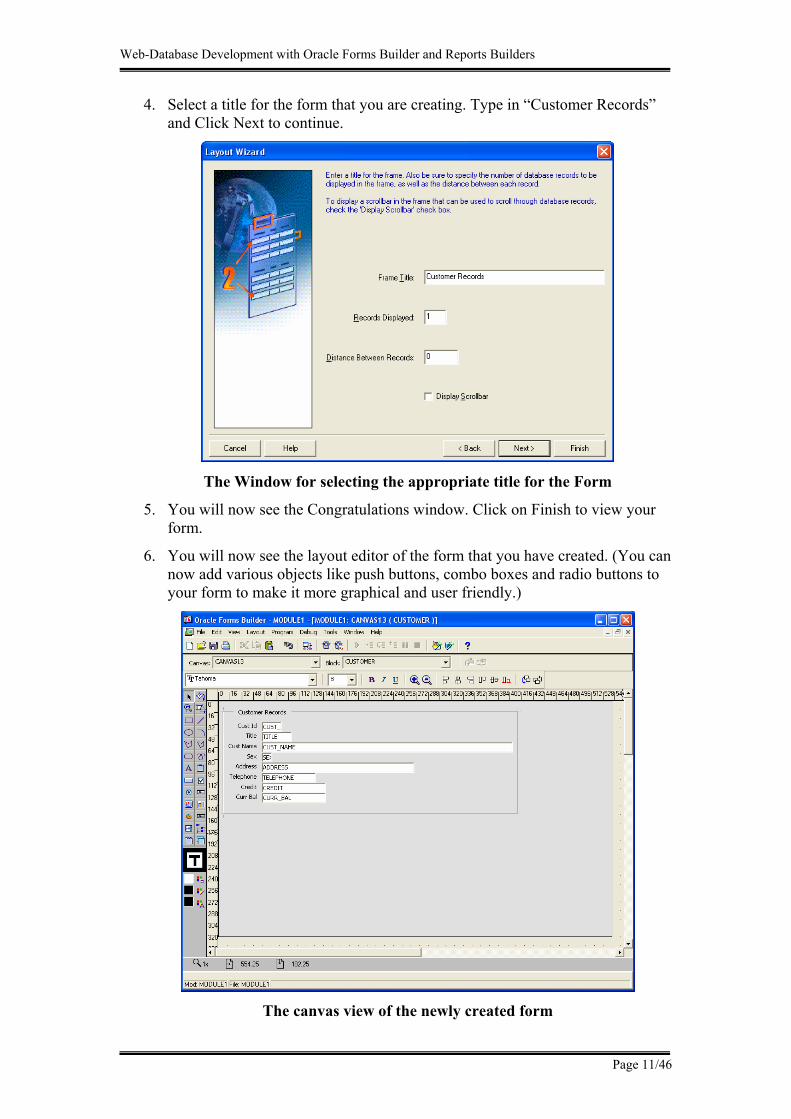
4. Select a title for the form that you are creating. Type in “Customer Records” and Click Next to continue.
The Window for selecting the appropriate title for the Form
5. You will now see the Congratulations window. Click on Finish to view your form.
6. You will now see the layout editor of the form that you have created. (You can now add various objects like push buttons, combo boxes and radio buttons to your form to make it more graphical and user friendly.)
The canvas view of the newly created form
Web-Database Development with Oracle Forms Builder and Reports Builders
Page 12/46
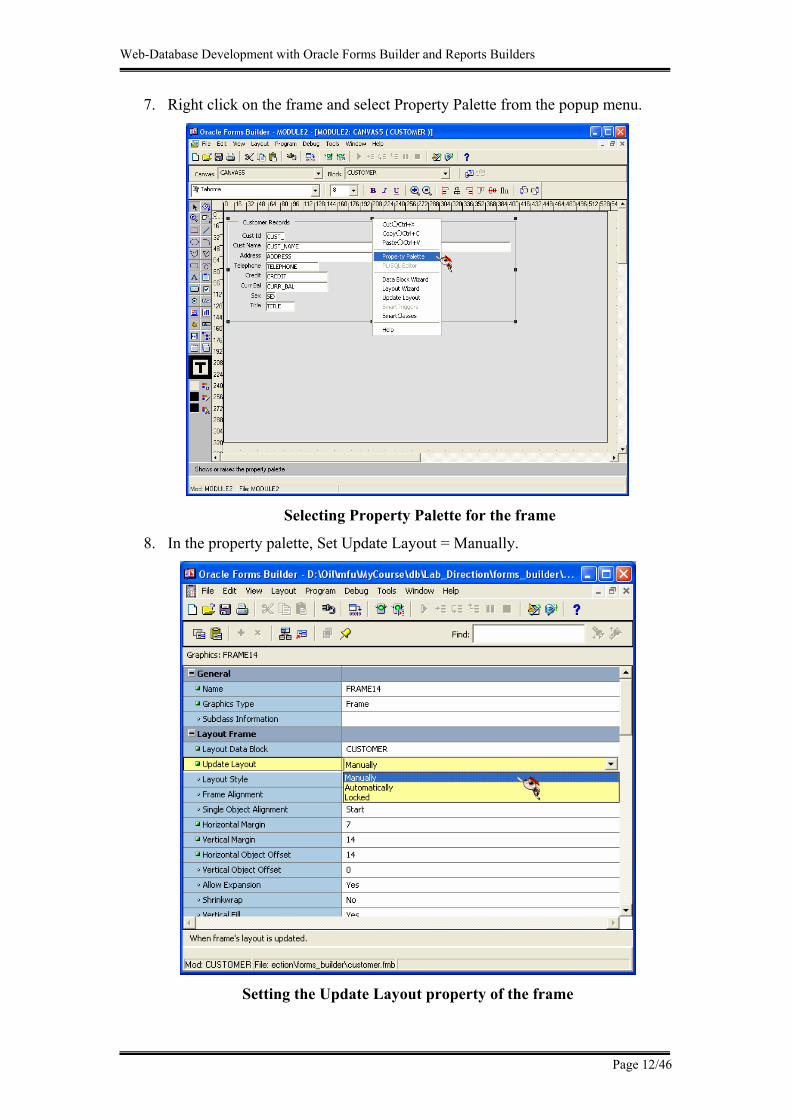
7. Right click on the frame and select Property Palette from the popup menu.
Selecting Property Palette for the frame
8. In the property palette, Set Update Layout = Manually.
Setting the Update Layout property of the frame
Web-Database Development with Oracle Forms Builder and Reports Builders
Page 13/46
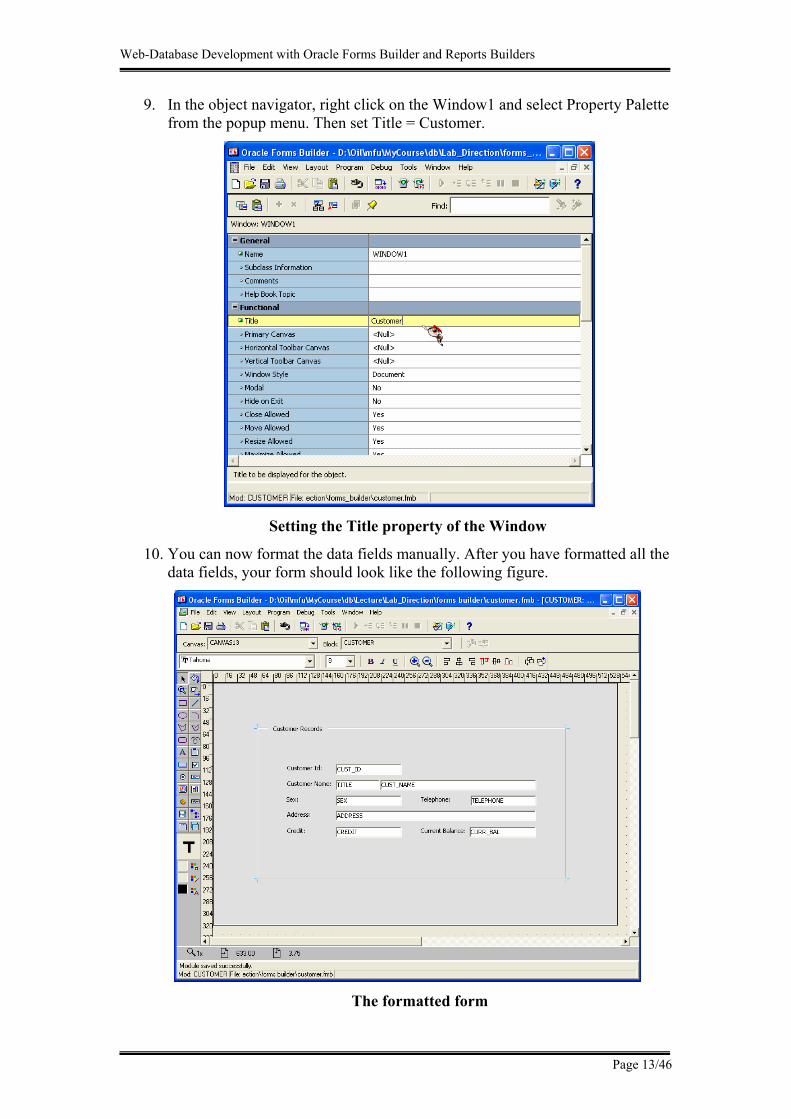
9. In the object navigator, right click on the Window1 and select Property Palette from the popup menu. Then set Title = Customer.
Setting the Title property of the Window
10. You can now format the data fields manually. After you have formatted all the data fields, your form should look like the following figure.
The formatted form
Web-Database Development with Oracle Forms Builder and Reports Builders
Page 14/46
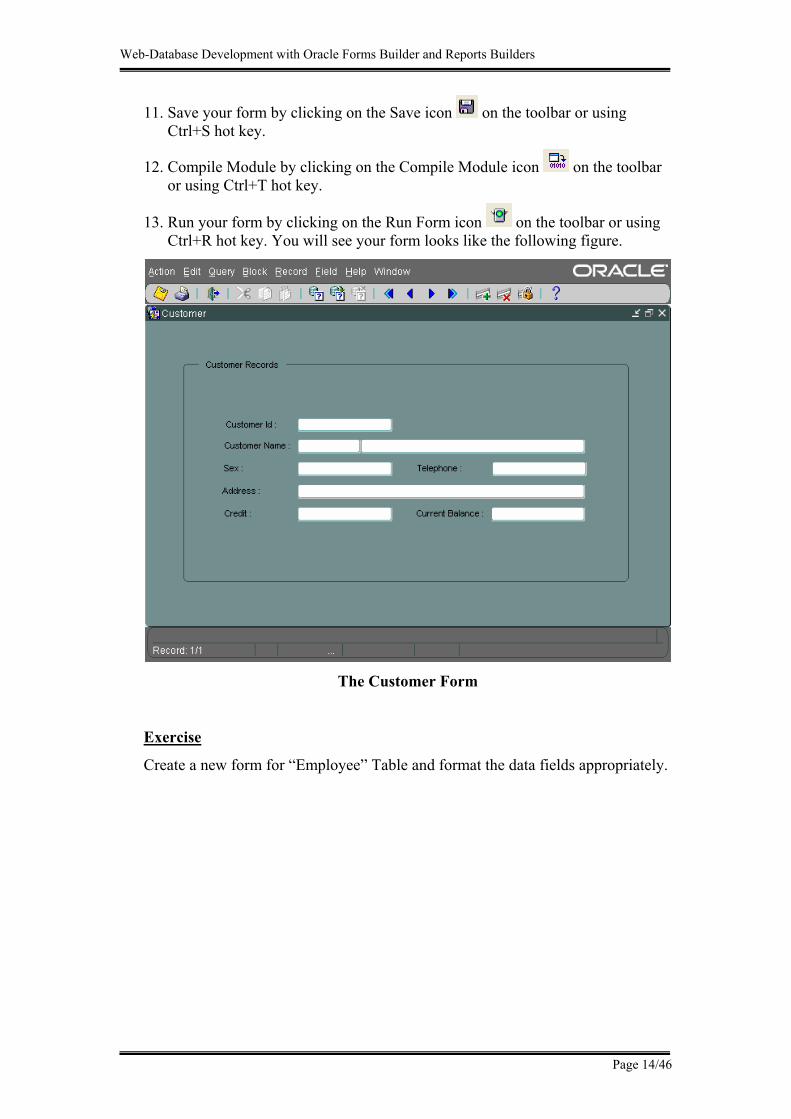
11. Save your form by clicking on the Save icon on the toolbar or using Ctrl+S hot key.
12. Compile Module by clicking on the Compile Module icon on the toolbar or using Ctrl+T hot key.
13. Run your form by clicking on the Run Form icon on the toolbar or using Ctrl+R hot key. You will see your form looks like the following figure.
The Customer Form
Exercise
Create a new form for “Employee” Table and format the data fields appropriately.
Web-Database Development with Oracle Forms Builder and Reports Builders
Page 15/46
Section2: Adding more functions to a form
In this section you will learn how to create an end-user interface and add more functionality to the basic form that we created in the previous section. Specifically, this will involve:
• Creating display items • Creating LOVs, or List of Values, where you will connect your form to
another table from which the users make their selections • Creating Radio Buttons • Creating Combo Boxes and Poplists • Creating Push Buttons • Adding triggers
Modifying a Customer form
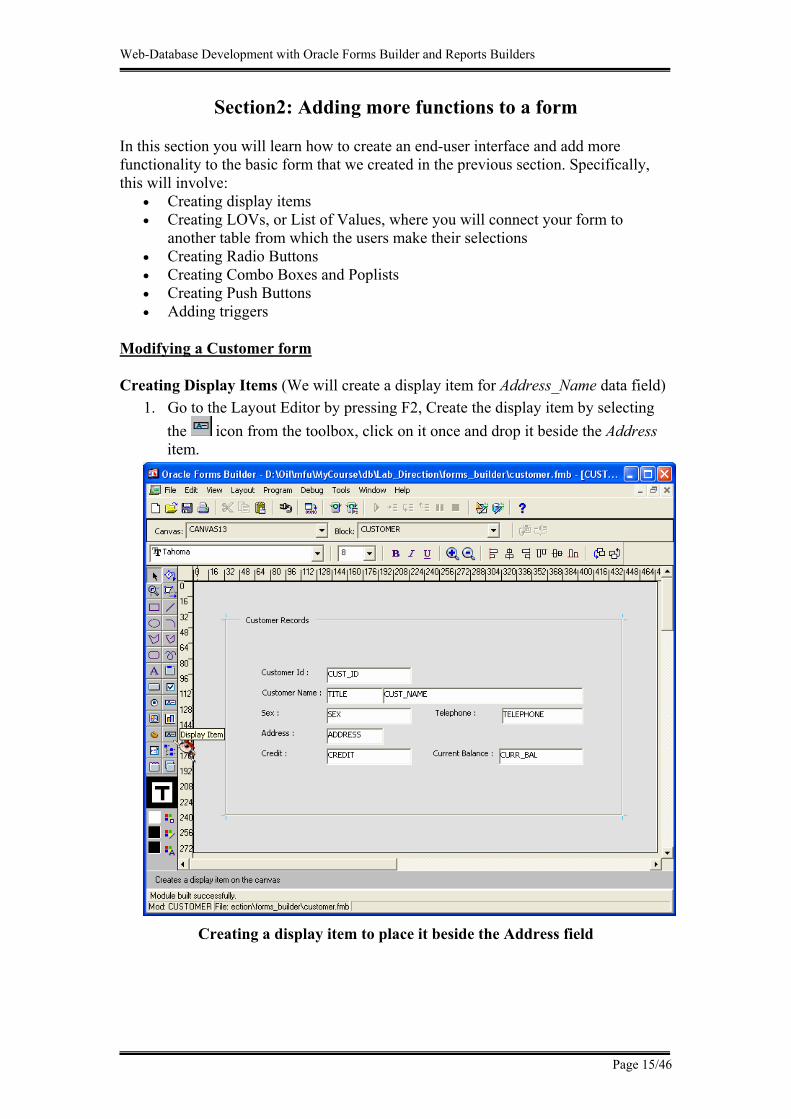
Creating Display Items (We will create a display item for Address_Name data field) 1. Go to the Layout Editor by pressing F2, Create the display item by selecting
the icon from the toolbox, click on it once and drop it beside the Address item.
Creating a display item to place it beside the Address field
Web-Database Development with Oracle Forms Builder and Reports Builders
Page 16/46
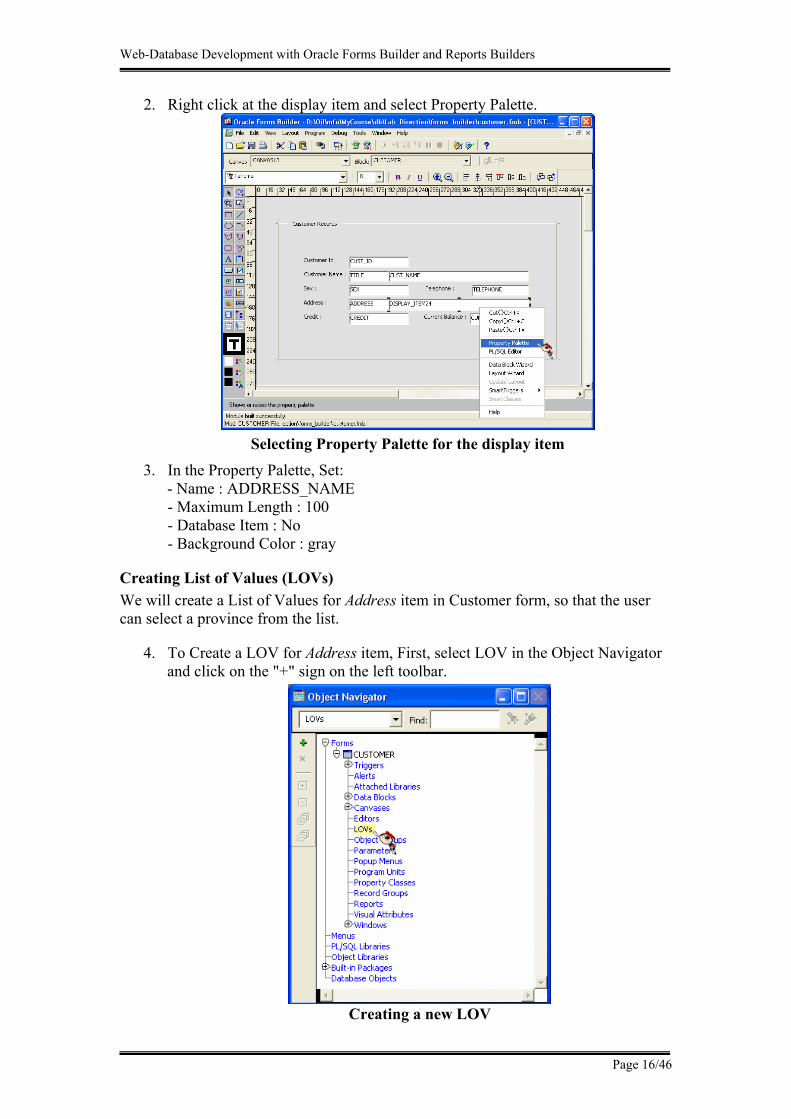
2. Right click at the display item and select Property Palette.
Selecting Property Palette for the display item
3. In the Property Palette, Set: - Name : ADDRESS_NAME - Maximum Length : 100 - Database Item : No - Background Color : gray
Creating List of Values (LOVs) We will create a List of Values for Address item in Customer form, so that the user can select a province from the list.
4. To Create a LOV for Address item, First, select LOV in the Object Navigator and click on the "+" sign on the left toolbar.
Creating a new LOV

Web-Database Development with Oracle Forms Builder and Reports Builders
Page 17/46
5. You will see the sub-window for New LOV. Select “Use the LOV Wizard” and click OK.
6. Select “New Record Group based on a query” as in the following figure and click Next.
The LOV Wizard Window
7. Type in the following Select statement in the “SQL Query Statement” area and click Next.
Select Province_id, Province_name From Province Order by Province_id
The New LOV Window with the select statement
Web-Database Development with Oracle Forms Builder and Reports Builders
Page 18/46
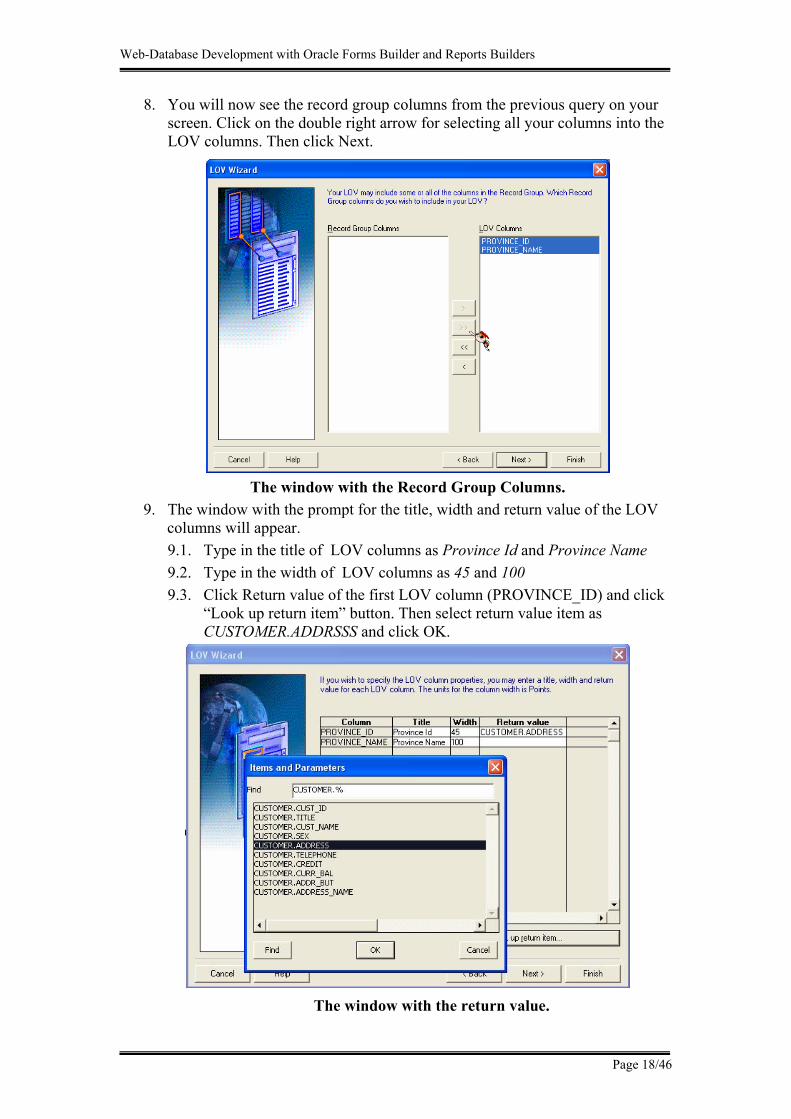
8. You will now see the record group columns from the previous query on your screen. Click on the double right arrow for selecting all your columns into the LOV columns. Then click Next.
The window with the Record Group Columns.
9. The window with the prompt for the title, width and return value of the LOV columns will appear. 9.1. Type in the title of LOV columns as Province Id and Province Name 9.2. Type in the width of LOV columns as 45 and 100 9.3. Click Return value of the first LOV column (PROVINCE_ID) and click
“Look up return item” button. Then select return value item as CUSTOMER.ADDRSSS and click OK.
The window with the return value.
Web-Database Development with Oracle Forms Builder and Reports Builders
Page 19/46
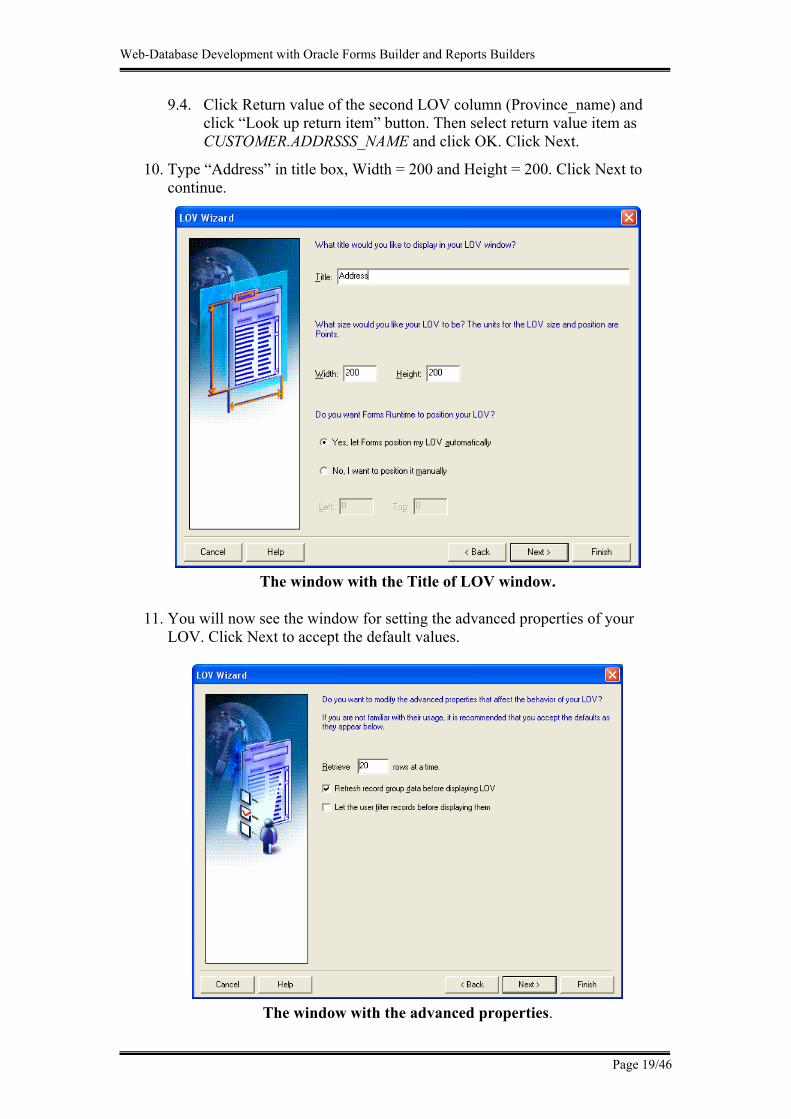
9.4. Click Return value of the second LOV column (Province_name) and click “Look up return item” button. Then select return value item as CUSTOMER.ADDRSSS_NAME and click OK. Click Next.
10. Type “Address” in title box, Width = 200 and Height = 200. Click Next to continue.
The window with the Title of LOV window.
11. You will now see the window for setting the advanced properties of your LOV. Click Next to accept the default values.
The window with the advanced properties.
Web-Database Development with Oracle Forms Builder and Reports Builders
Page 20/46
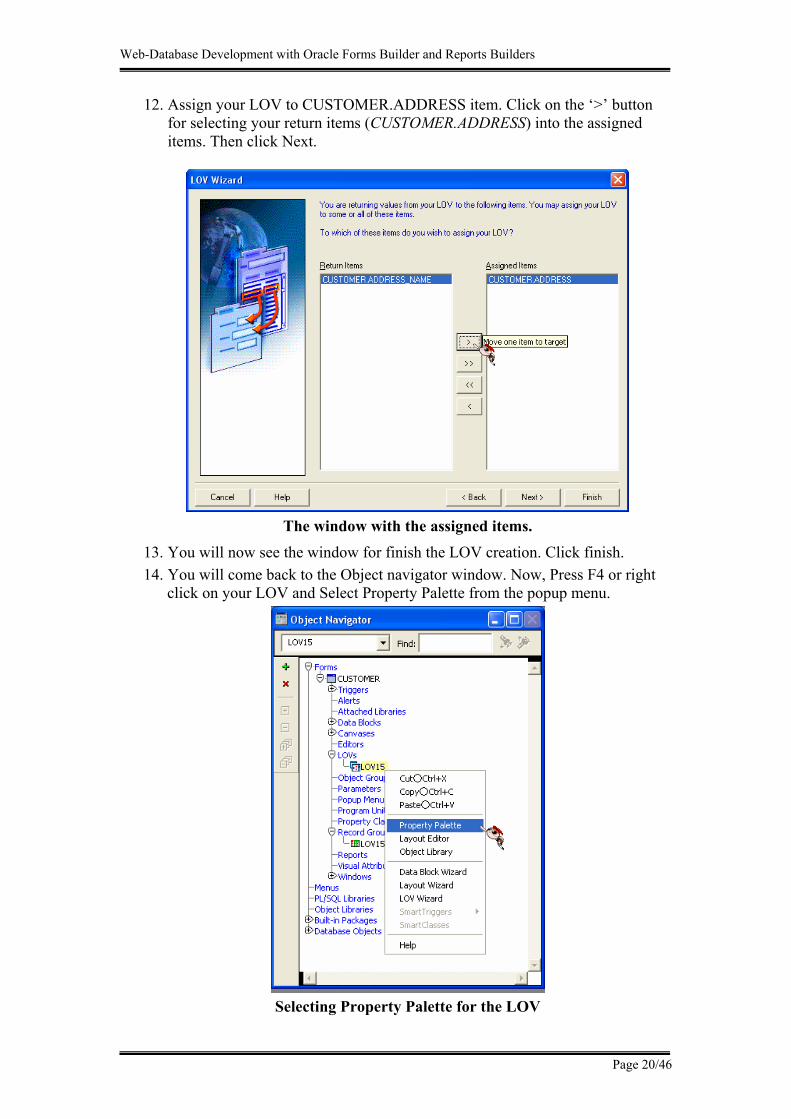
12. Assign your LOV to CUSTOMER.ADDRESS item. Click on the ‘>’ button for selecting your return items (CUSTOMER.ADDRESS) into the assigned items. Then click Next.
The window with the assigned items.
13. You will now see the window for finish the LOV creation. Click finish. 14. You will come back to the Object navigator window. Now, Press F4 or right
click on your LOV and Select Property Palette from the popup menu.
Selecting Property Palette for the LOV
Web-Database Development with Oracle Forms Builder and Reports Builders
Page 21/46
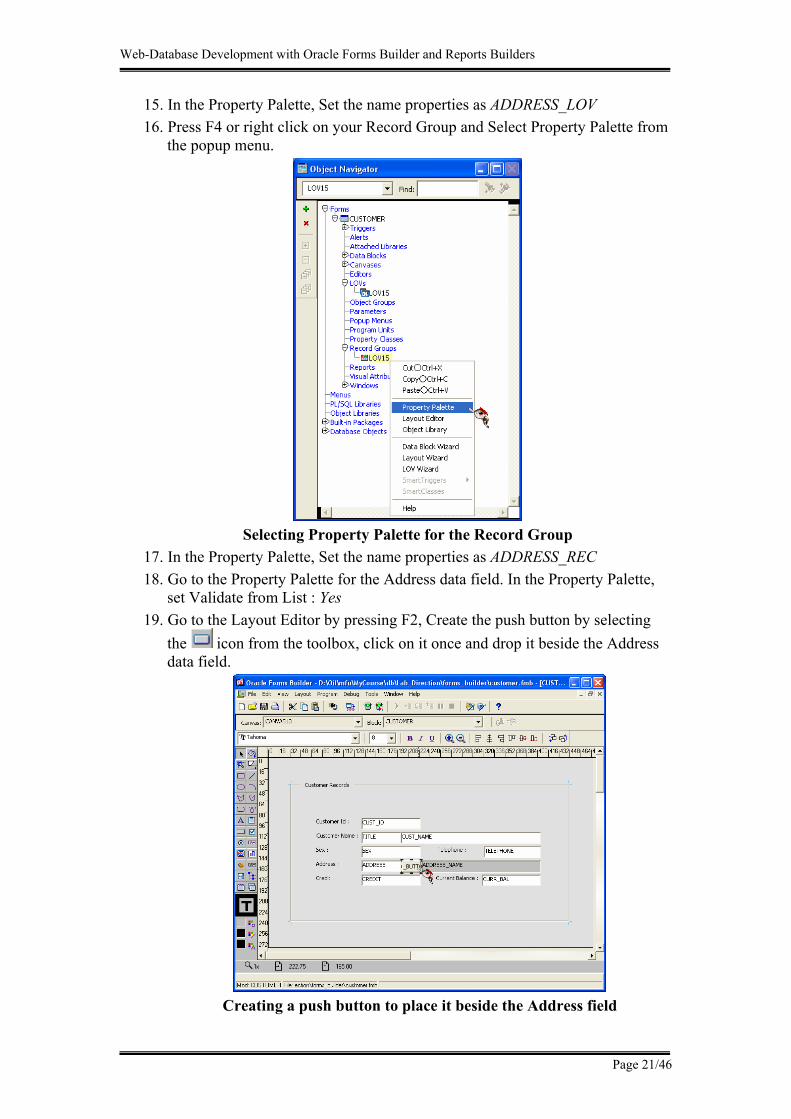
15. In the Property Palette, Set the name properties as ADDRESS_LOV 16. Press F4 or right click on your Record Group and Select Property Palette from
the popup menu.
Selecting Property Palette for the Record Group
17. In the Property Palette, Set the name properties as ADDRESS_REC 18. Go to the Property Palette for the Address data field. In the Property Palette,
set Validate from List : Yes 19. Go to the Layout Editor by pressing F2, Create the push button by selecting
the icon from the toolbox, click on it once and drop it beside the Address data field.
Creating a push button to place it beside the Address field

Web-Database Development with Oracle Forms Builder and Reports Builders
Page 22/46
20. Set the properties of the button. In the Property Palette, Set: - Name : ADDR_BUT - Label : …
21. Your form will now look like the following figure.
The Layout Editor with the Push Button for the LOV
22. Right click on the push button and this time select the PL/SQL Editor.
Selecting the PL/SQL Editor of the Button

Web-Database Development with Oracle Forms Builder and Reports Builders
Page 23/46
23. When you select the PL/SQL Editor, the window for the new trigger selection will appear.
The Window with the list of triggers available to you
24. We will write a When-Button-Pressed trigger, since we would like the code to be activated when the user presses the button. Scroll down and select WHEN-BUTTON-PRESSED trigger.
25. You will see the PL/SQL Editor window. Type in the following code in the
blank space in the Editor. After typing in the code, click Compile icon on the upper left-hand corner of the window.
The Window for the PL/SQL Editor with the code for the LOV
Web-Database Development with Oracle Forms Builder and Reports Builders
Page 24/46
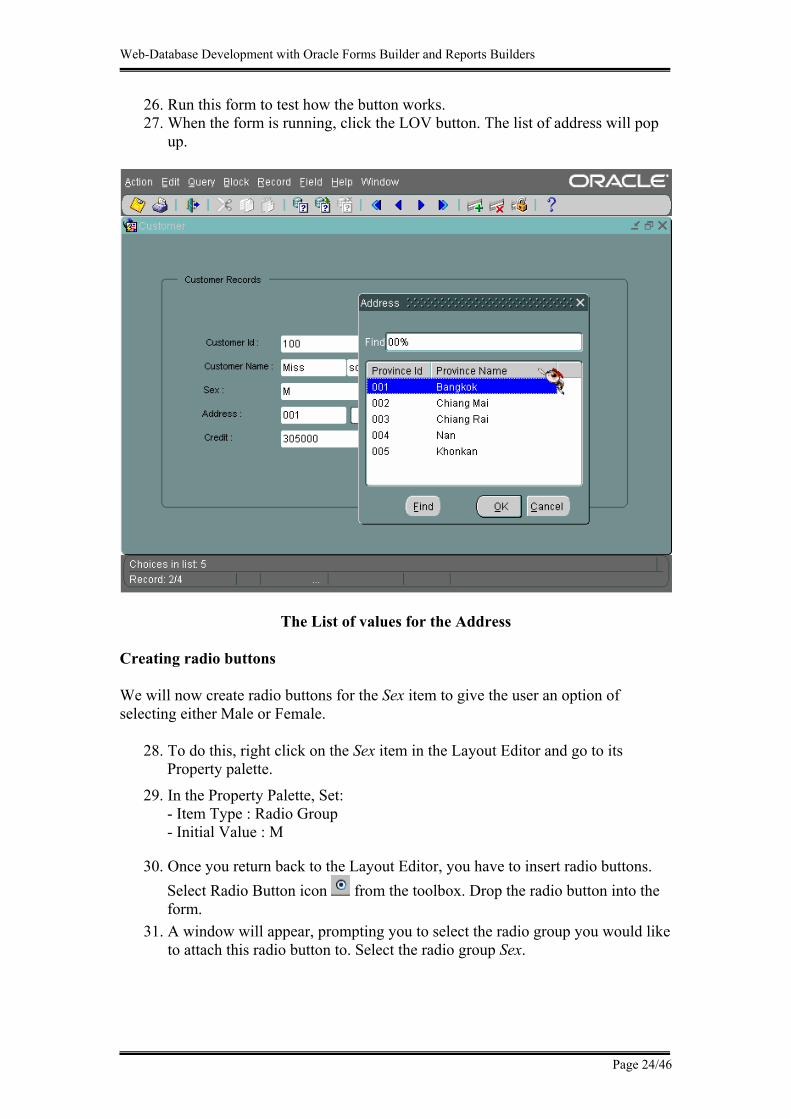
26. Run this form to test how the button works. 27. When the form is running, click the LOV button. The list of address will pop
up.
The List of values for the Address
Creating radio buttons
We will now create radio buttons for the Sex item to give the user an option of selecting either Male or Female.
28. To do this, right click on the Sex item in the Layout Editor and go to its Property palette.
29. In the Property Palette, Set: - Item Type : Radio Group - Initial Value : M
30. Once you return back to the Layout Editor, you have to insert radio buttons. Select Radio Button icon from the toolbox. Drop the radio button into the form.
31. A window will appear, prompting you to select the radio group you would like to attach this radio button to. Select the radio group Sex.

Web-Database Development with Oracle Forms Builder and Reports Builders
Page 25/46
The Window for Attaching the radio button to a radio group
32. Now right click on the radio button and go to its Property Palette. In the Property Palette, Set : - Name : MALE
- Label : Male - Radio Button Value : M - Prompt : Sex
33. In the same manner create a second radio button, attach it to the radio group Sex, gives it a name of ‘FEMALE’, label of ‘Female’ and a value of ‘F’.
34. Run your form. Your form with the newly created radio buttons should now look like the following Figure.
The form with the newly created radio buttons

Web-Database Development with Oracle Forms Builder and Reports Builders
Page 26/46
Creating drop-down poplist
We will now create a drop-down poplist for the Title item that will contain three entries: Mr, Mrs and Miss
35. Go to the Property Palette for the Title item. In the Property Palette, Set: - Item Type : List Item - Elements in List : Mr, Mrs and Miss (the List Elements and List Item Value
will be same.) - List Style : Poplist. - Initial Value : Mr - Required : Yes
The Window for the List Elements

Web-Database Development with Oracle Forms Builder and Reports Builders
Page 27/46
36. Run Form to view your newly created Poplist.
Window with the Poplist on Title
Adding Trigger
The level of Triggers in the Object Navigator Window
Form Level Trigger Data Block Level Trigger
Item Level Trigger
Web-Database Development with Oracle Forms Builder and Reports Builders
Page 28/46
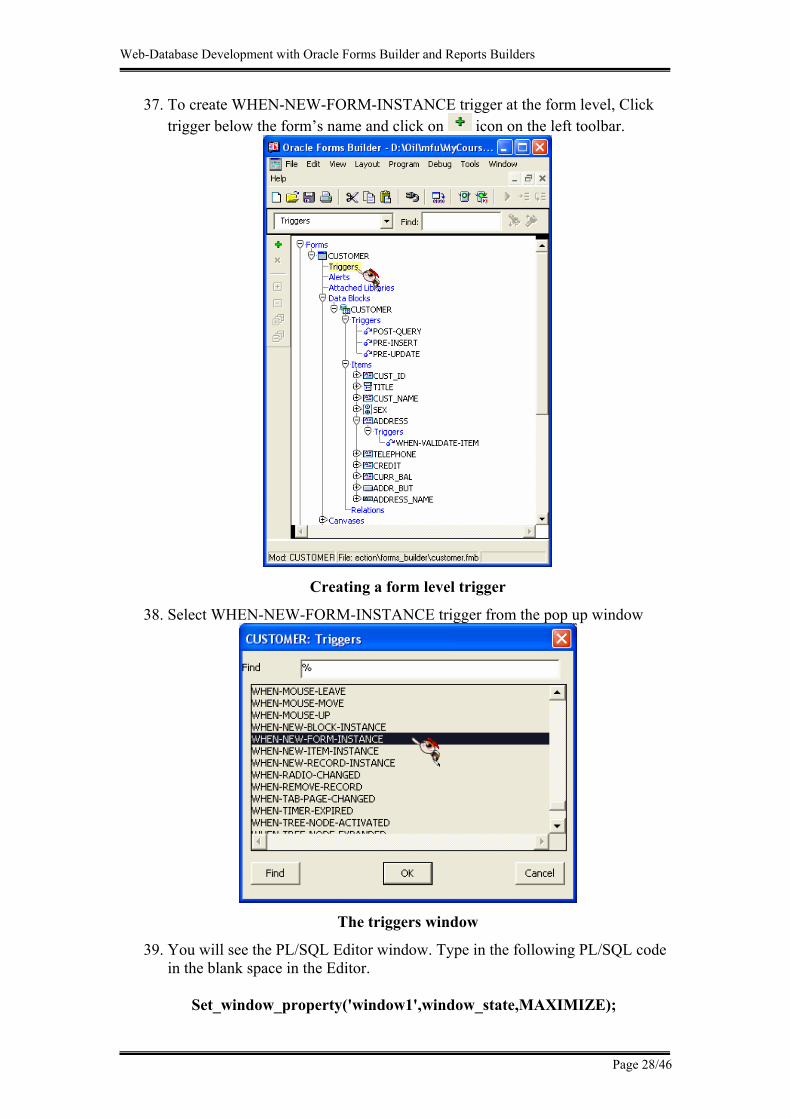
37. To create WHEN-NEW-FORM-INSTANCE trigger at the form level, Click trigger below the form’s name and click on icon on the left toolbar.
Creating a form level trigger
38. Select WHEN-NEW-FORM-INSTANCE trigger from the pop up window
The triggers window
39. You will see the PL/SQL Editor window. Type in the following PL/SQL code in the blank space in the Editor.
Set_window_property('window1',window_state,MAXIMIZE);
Web-Database Development with Oracle Forms Builder and Reports Builders
Page 29/46
40. Create POST-QUERY Trigger at the Data Block level by using the following PL/SQL code.
Select province_name Into :customer.address_name From province Where province_id = :customer.address; Exception when no_data_found then :customer.address_name := null;
41. Create WHEN-VALIDATE-ITEM Trigger at the Item level (Address Item) by using the following PL/SQL code.
If :customer.address is null Then :customer.address_name := null;
End If;
Exercise
Modify your “Employee” form by
- Creating a Lov for Address item - Creating radio buttons for Sex item - Creating a poplist for Title item
Web-Database Development with Oracle Forms Builder and Reports Builders
Page 30/46
Section3: Oracle Forms Builder (Cont.) In this lesson you will learn:
• Creating a tabular form based on your “Product” table
Creating a Tabular form
1. Create “Product” Data Block(based on Product Table) by using the Datablock Wizard (follow step 4 to 17 in Section1)
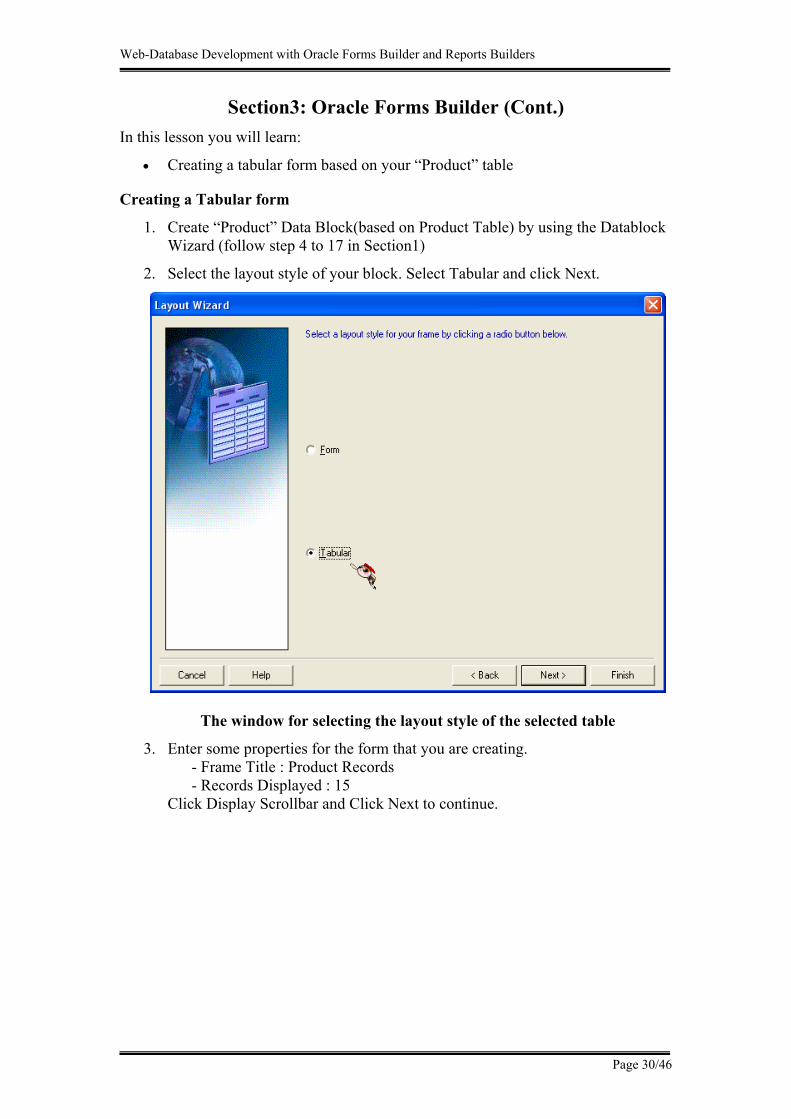
2. Select the layout style of your block. Select Tabular and click Next.
The window for selecting the layout style of the selected table
3. Enter some properties for the form that you are creating. - Frame Title : Product Records - Records Displayed : 15
Click Display Scrollbar and Click Next to continue.

Web-Database Development with Oracle Forms Builder and Reports Builders
Page 31/46
The Window for entering the appropriate properties for the Form
4. You will now see the Congratulations window. Click on Finish to view your form.
5. You will now see the layout editor of the form that you have created.
The canvas view of the newly created form
6. Set Property of the frame. In the property palette, Set Update Layout = Manually
7. In the object navigator, right click on the Window1 and select Property Palette from the popup menu. Then set Title = Product
Web-Database Development with Oracle Forms Builder and Reports Builders
Page 32/46
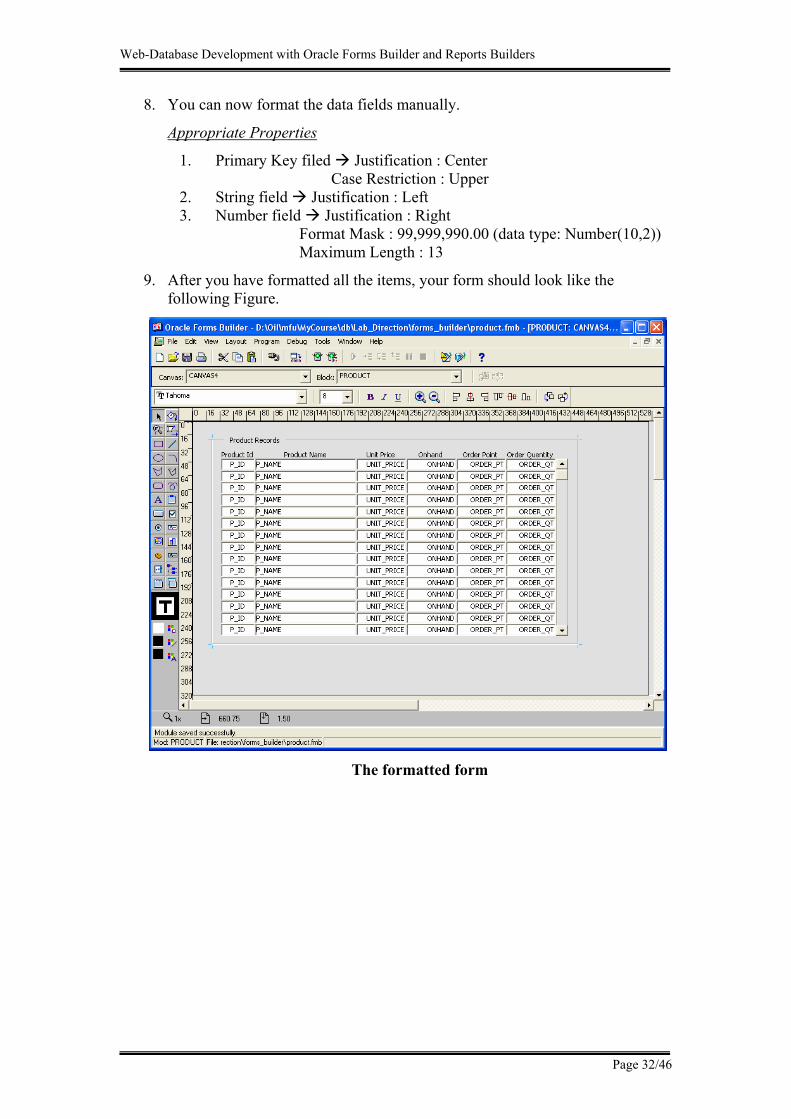
8. You can now format the data fields manually.
Appropriate Properties
1. Primary Key filed Justification : Center Case Restriction : Upper
2. String field Justification : Left 3. Number field Justification : Right
Format Mask : 99,999,990.00 (data type: Number(10,2)) Maximum Length : 13
9. After you have formatted all the items, your form should look like the following Figure.
The formatted form
Web-Database Development with Oracle Forms Builder and Reports Builders
9, 16 Sep 2005 Page 33/46
Creating Visual Attributes
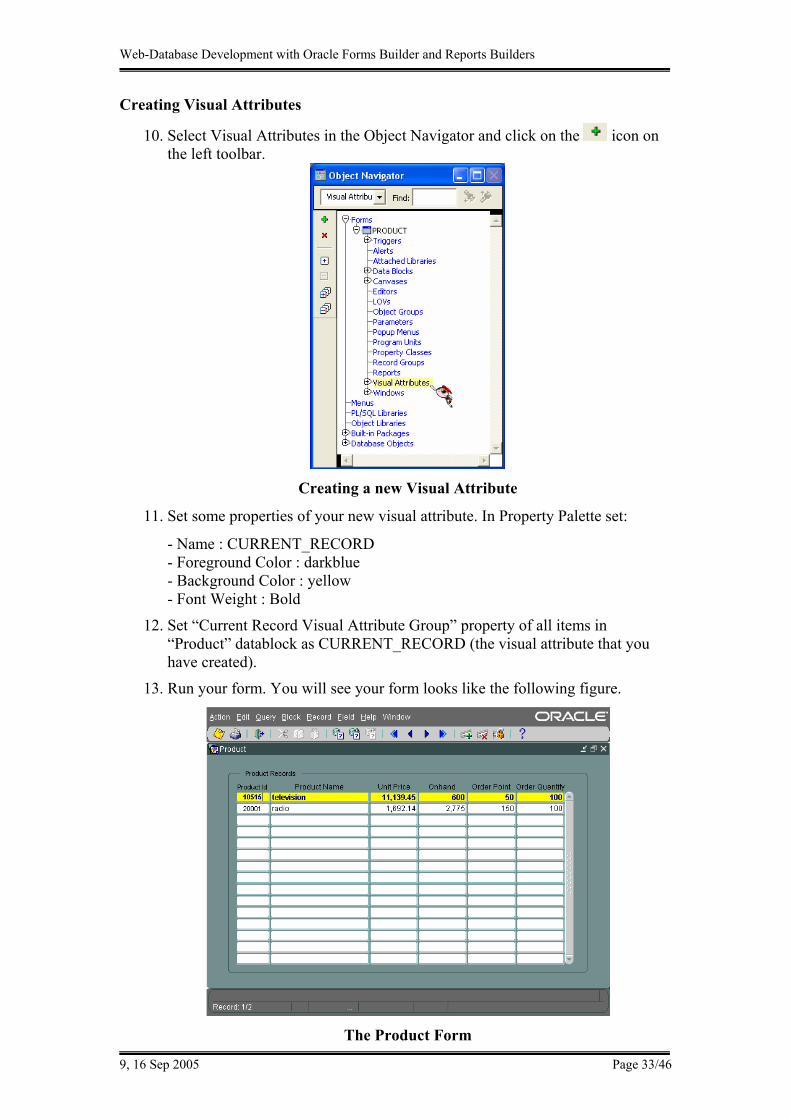
10. Select Visual Attributes in the Object Navigator and click on the icon on the left toolbar.
Creating a new Visual Attribute
11. Set some properties of your new visual attribute. In Property Palette set:
- Name : CURRENT_RECORD - Foreground Color : darkblue - Background Color : yellow - Font Weight : Bold
12. Set “Current Record Visual Attribute Group” property of all items in “Product” datablock as CURRENT_RECORD (the visual attribute that you have created).
13. Run your form. You will see your form looks like the following figure.
The Product Form

Web-Database Development with Oracle Forms Builder and Reports Builders
9, 16 Sep 2005 Page 34/46
Exercise
Create a new form for “Province” Table and format the data fields appropriately.
Section4 : Reports Builder
In this section you will learn how to create reports based on our existing Customer table. Specifically, this will involve:
• Using the Data Model Wizard • Using the Layout Editor to customize your report • Creating a Graph
Creating a report (based on Customer table in your Order System)
1. Before using Oracle Reports Builder, you have to start OC4J Instance by click Start > Programs > Oracle9i Developer Suite - Oracle9iDS > Reports Developer > Start OC4J Instance.
2. To log on to Oracle Reports Builder, go to Start > Programs > Oracle9i Developer Suite - Oracle9iDS > Reports Developer > Reports Builder
3. You will see the welcome screen. To create a new report, Select “Use the Report Wizard” and click OK.
Welcome to Reports Builder Window
4. You will now see the Welcome to the Report Wizard Window. Click Next to proceed.
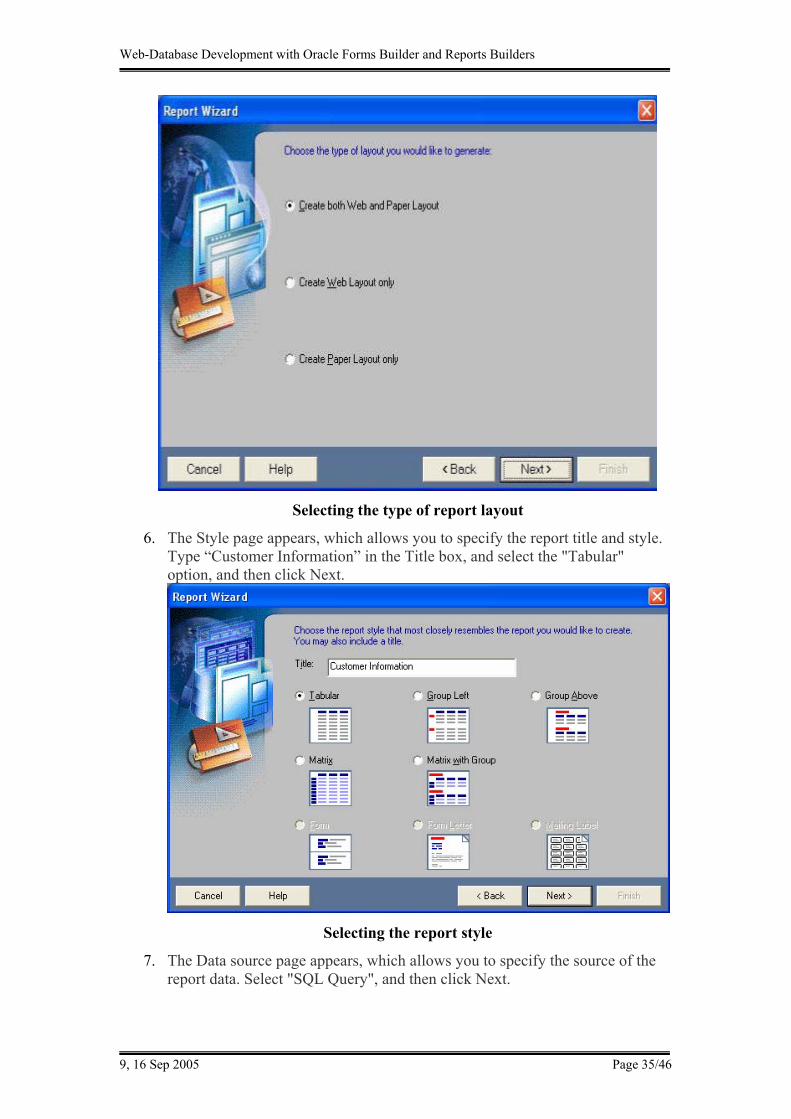
5. The Report type page appears, which allows you to specify how the report output appears in the Reports Builder environment. Select "Create both Web and Paper Layout" and then click Next.
Web-Database Development with Oracle Forms Builder and Reports Builders
9, 16 Sep 2005 Page 35/46
Selecting the type of report layout
6. The Style page appears, which allows you to specify the report title and style. Type “Customer Information” in the Title box, and select the "Tabular" option, and then click Next.
Selecting the report style
7. The Data source page appears, which allows you to specify the source of the report data. Select "SQL Query", and then click Next.
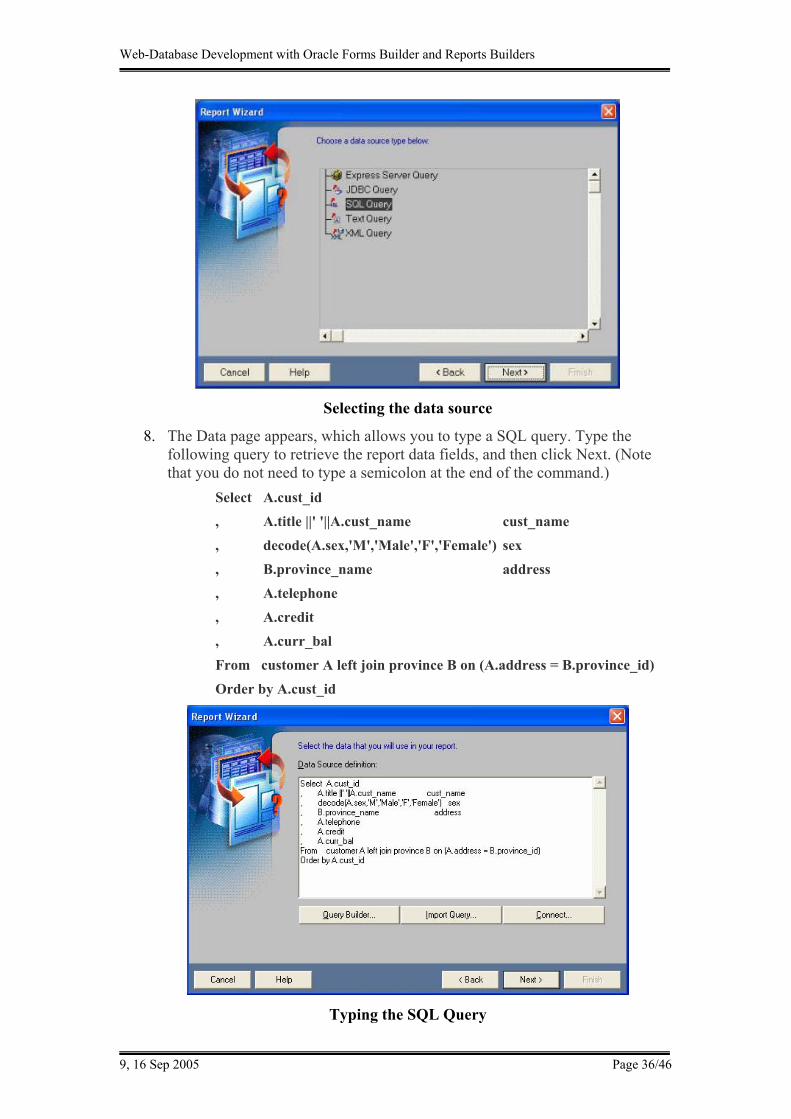
Web-Database Development with Oracle Forms Builder and Reports Builders
9, 16 Sep 2005 Page 36/46
Selecting the data source
8. The Data page appears, which allows you to type a SQL query. Type the following query to retrieve the report data fields, and then click Next. (Note that you do not need to type a semicolon at the end of the command.)
Select A.cust_id , A.title ||' '||A.cust_name cust_name , decode(A.sex,'M','Male','F','Female') sex , B.province_name address , A.telephone , A.credit , A.curr_bal From customer A left join province B on (A.address = B.province_id) Order by A.cust_id
Typing the SQL Query
Web-Database Development with Oracle Forms Builder and Reports Builders
9, 16 Sep 2005 Page 37/46
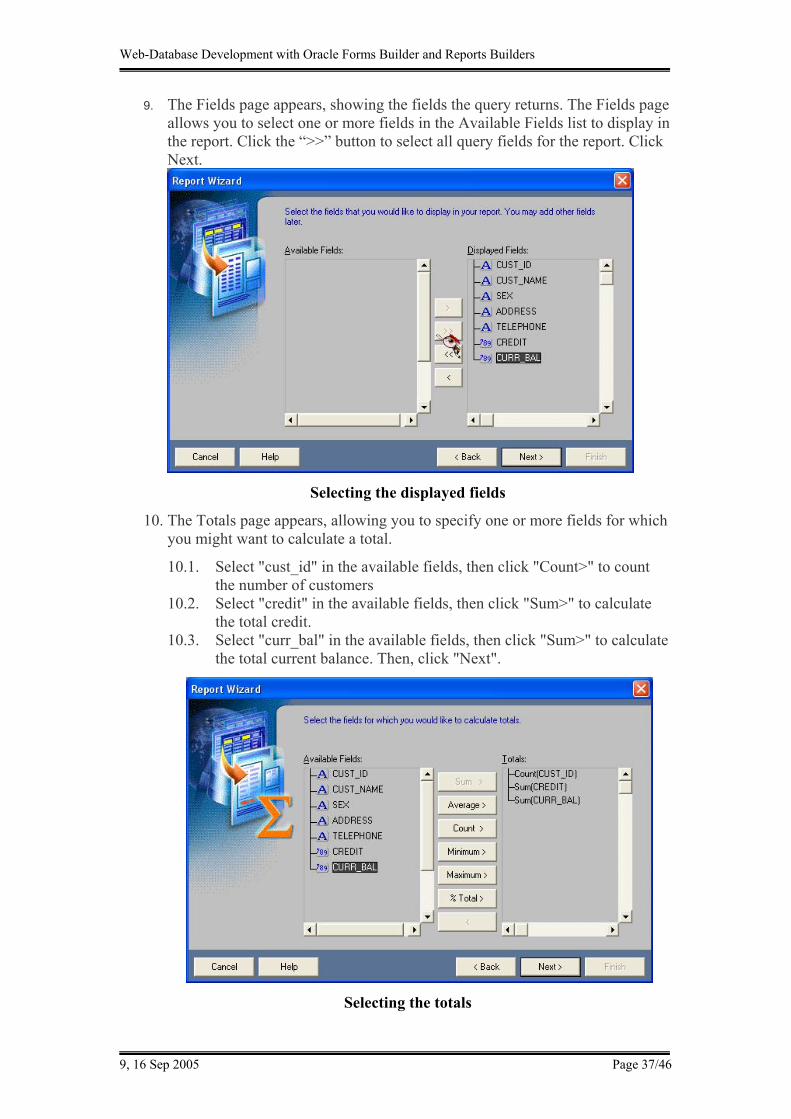
9. The Fields page appears, showing the fields the query returns. The Fields page allows you to select one or more fields in the Available Fields list to display in the report. Click the “>>” button to select all query fields for the report. Click Next.
Selecting the displayed fields
10. The Totals page appears, allowing you to specify one or more fields for which you might want to calculate a total.
10.1. Select "cust_id" in the available fields, then click "Count>" to count the number of customers
10.2. Select "credit" in the available fields, then click "Sum>" to calculate the total credit.
10.3. Select "curr_bal" in the available fields, then click "Sum>" to calculate the total current balance. Then, click "Next".
Selecting the totals
Web-Database Development with Oracle Forms Builder and Reports Builders
9, 16 Sep 2005 Page 38/46
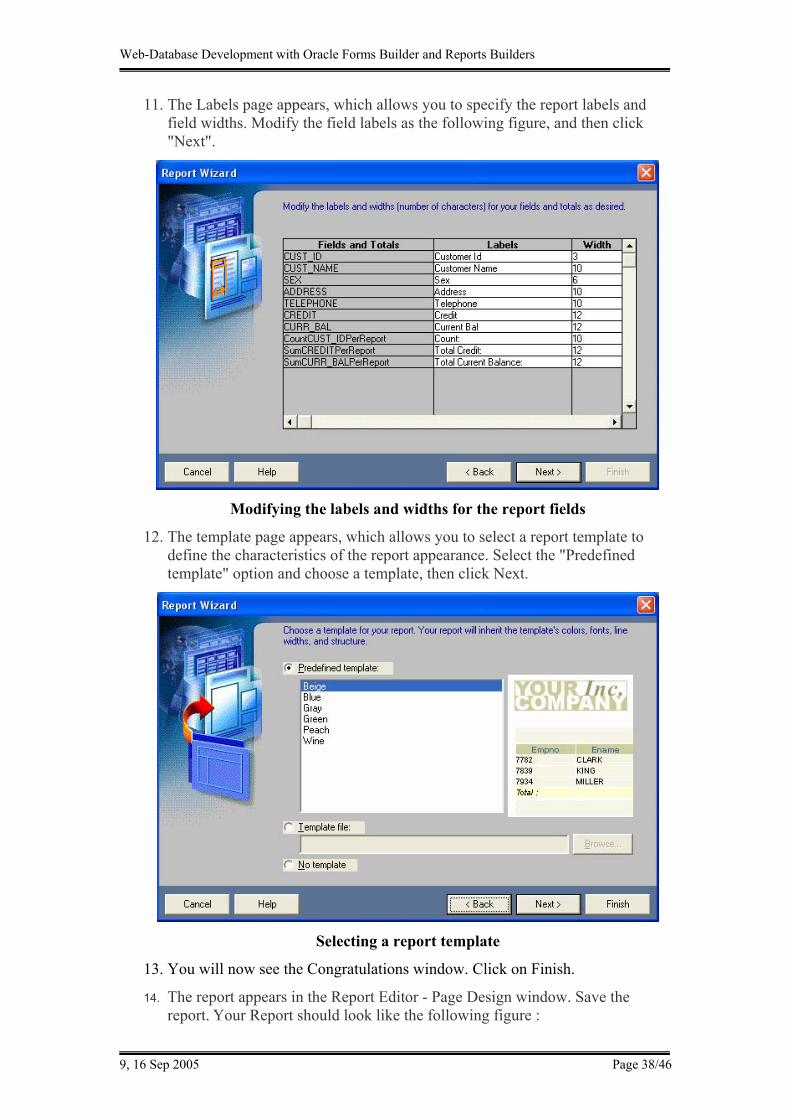
11. The Labels page appears, which allows you to specify the report labels and field widths. Modify the field labels as the following figure, and then click "Next".
Modifying the labels and widths for the report fields
12. The template page appears, which allows you to select a report template to define the characteristics of the report appearance. Select the "Predefined template" option and choose a template, then click Next.
Selecting a report template
13. You will now see the Congratulations window. Click on Finish.
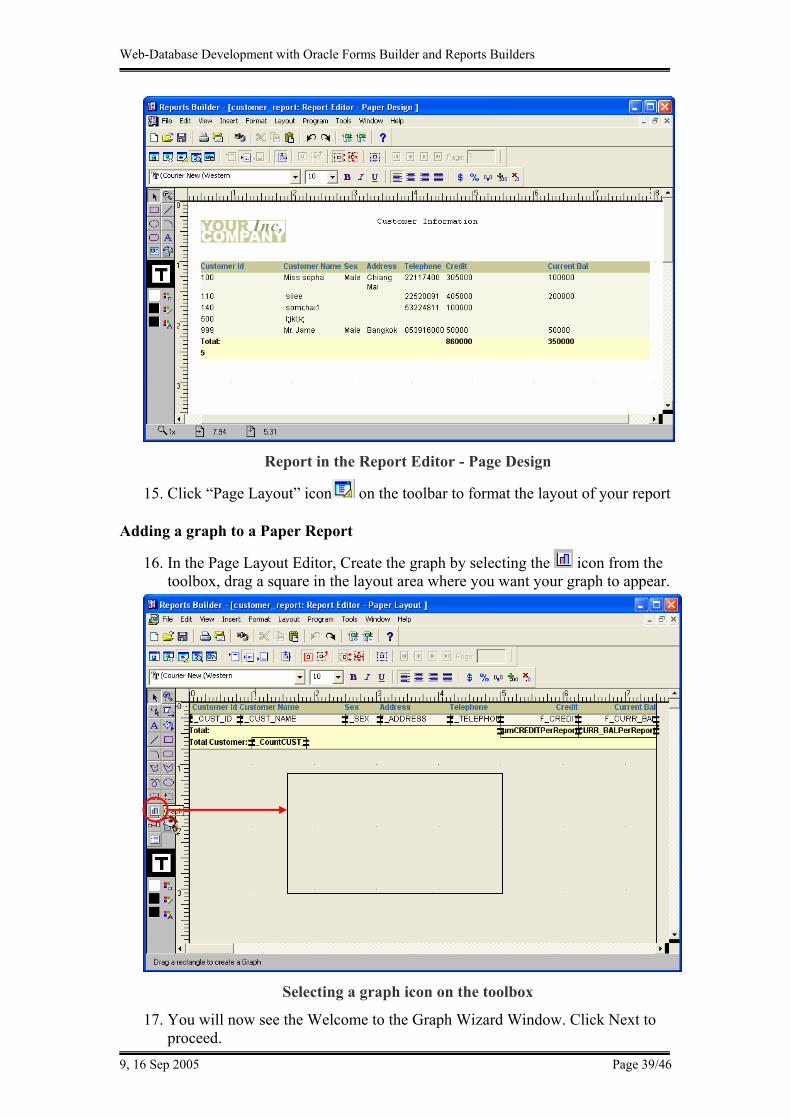
14. The report appears in the Report Editor - Page Design window. Save the report. Your Report should look like the following figure :
Web-Database Development with Oracle Forms Builder and Reports Builders
9, 16 Sep 2005 Page 39/46
Report in the Report Editor - Page Design
15. Click “Page Layout” icon on the toolbar to format the layout of your report
Adding a graph to a Paper Report
16. In the Page Layout Editor, Create the graph by selecting the icon from the toolbox, drag a square in the layout area where you want your graph to appear.
Selecting a graph icon on the toolbox
17. You will now see the Welcome to the Graph Wizard Window. Click Next to proceed.
Web-Database Development with Oracle Forms Builder and Reports Builders
9, 16 Sep 2005 Page 40/46
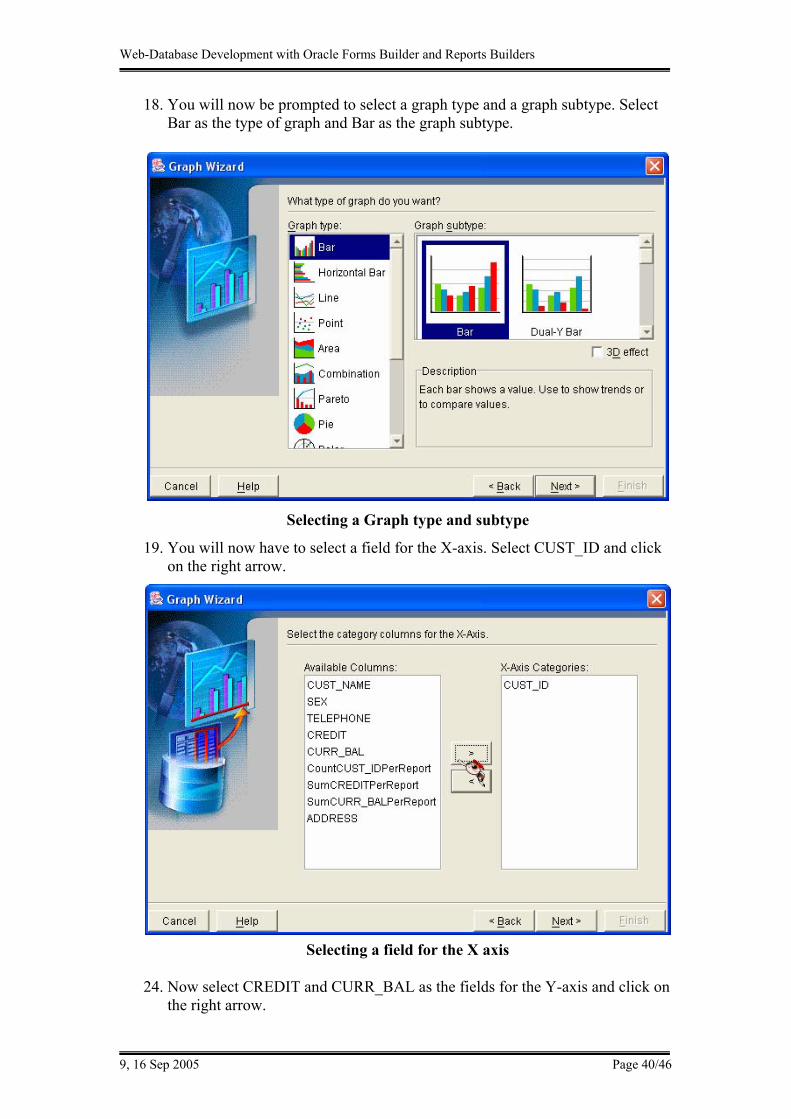
18. You will now be prompted to select a graph type and a graph subtype. Select Bar as the type of graph and Bar as the graph subtype.
Selecting a Graph type and subtype
19. You will now have to select a field for the X-axis. Select CUST_ID and click on the right arrow.
Selecting a field for the X axis
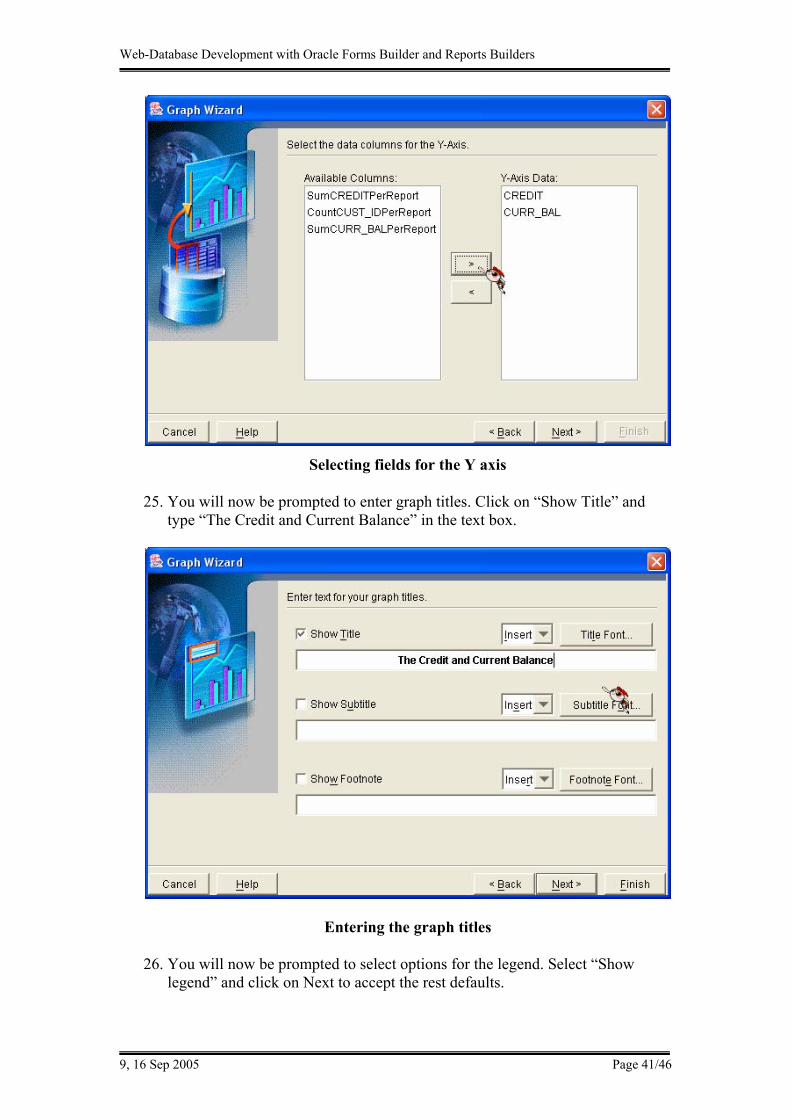
24. Now select CREDIT and CURR_BAL as the fields for the Y-axis and click on the right arrow.
Web-Database Development with Oracle Forms Builder and Reports Builders
9, 16 Sep 2005 Page 41/46
Selecting fields for the Y axis
25. You will now be prompted to enter graph titles. Click on “Show Title” and type “The Credit and Current Balance” in the text box.
Entering the graph titles
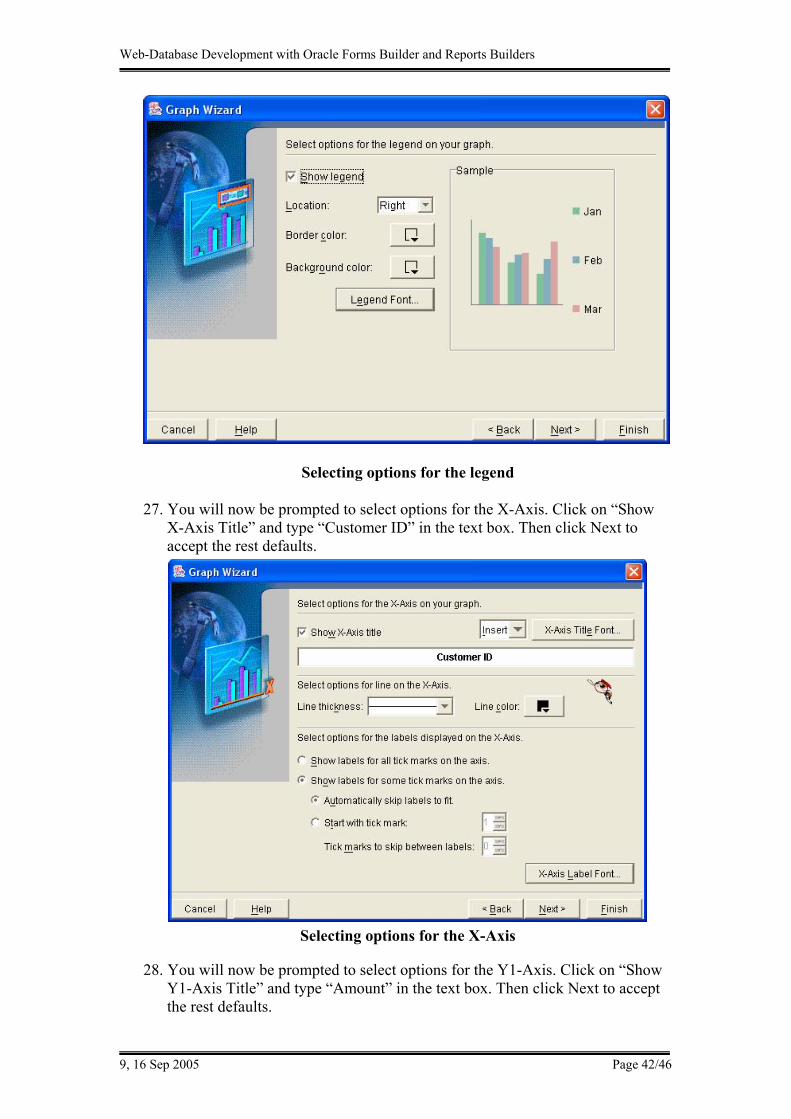
26. You will now be prompted to select options for the legend. Select “Show legend” and click on Next to accept the rest defaults.
Web-Database Development with Oracle Forms Builder and Reports Builders
9, 16 Sep 2005 Page 42/46
Selecting options for the legend
27. You will now be prompted to select options for the X-Axis. Click on “Show X-Axis Title” and type “Customer ID” in the text box. Then click Next to accept the rest defaults.
Selecting options for the X-Axis
28. You will now be prompted to select options for the Y1-Axis. Click on “Show Y1-Axis Title” and type “Amount” in the text box. Then click Next to accept the rest defaults.

Web-Database Development with Oracle Forms Builder and Reports Builders
9, 16 Sep 2005 Page 43/46
Selecting options for the Y-Axis
29. You will now be prompted to select options for the plot area such as color and border. After select the options, click Finish.
Selecting options for the plot area
30. You will now see the graph below your report fields.

Web-Database Development with Oracle Forms Builder and Reports Builders
9, 16 Sep 2005 Page 44/46
Report Layout with the graph in the paper layout
** To reenter the Graph Wizard, right click at the graph and select Graph Wizard
31. Click “Run Paper Layout” icon on the toolbar to get a view of your report with the graph at the end of it.
The Paper-Report with the graph at the end of it

Web-Database Development with Oracle Forms Builder and Reports Builders
9, 16 Sep 2005 Page 45/46
Adding a graph to a Web Report
32. Click “Web Source” icon on the toolbar to view the web source code.
33. Position your cursor in the section of the source code where you want to add a graph and select Insert > Graph from the menu.
Web Source View
34. Step through the Graph Wizard pages. (Step 16-29) After that, You will see the additional code with rw:graph tag.
** To reenter the Graph Wizard, position your cursor any where within the rw:graph tag and select Edit> Settings.
35. Click “Run Web Layout” icon on the toolbar to run your report as the web page. Your report should look like the following figure:
Web-Database Development with Oracle Forms Builder and Reports Builders
9, 16 Sep 2005 Page 46/46
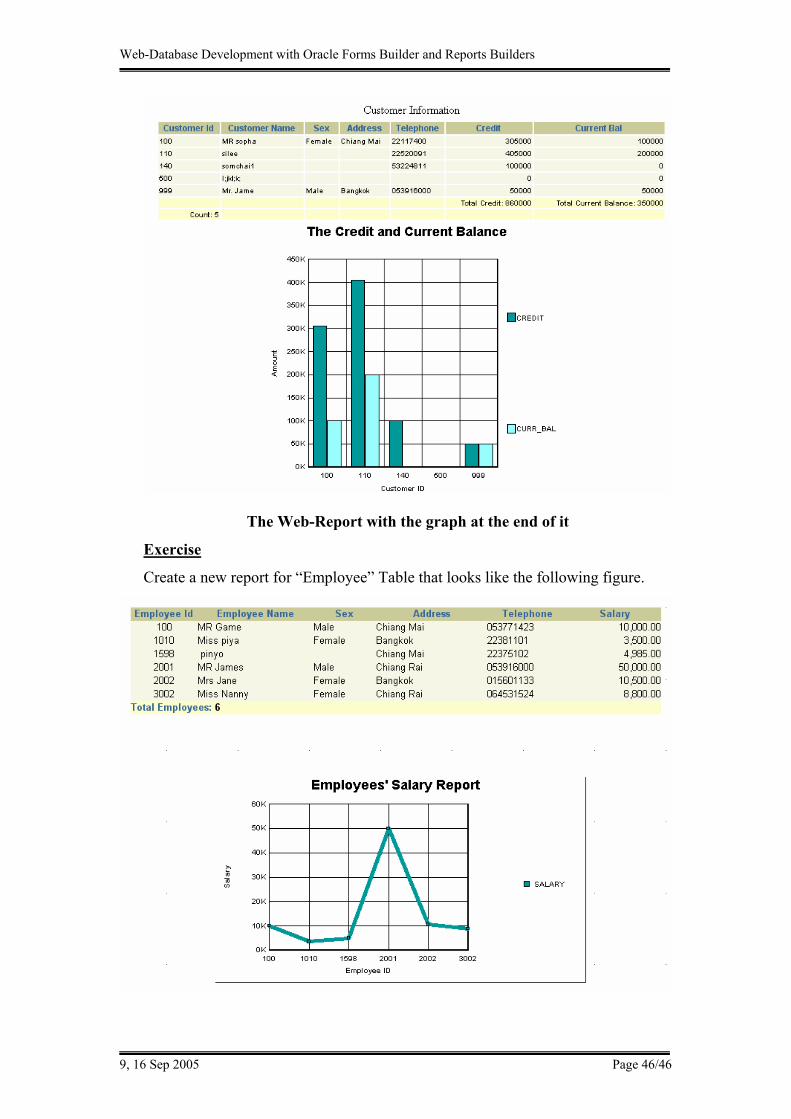
The Web-Report with the graph at the end of it
Exercise
Create a new report for “Employee” Table that looks like the following figure.
Related Documents


![(FOR PRINTING) NOTES ON LEGAL FORMS[1].doc](https://static.cupdf.com/doc/110x72/577cc2fe1a28aba71194f140/for-printing-notes-on-legal-forms1doc.jpg)
