1 OA Personalization Framework and OA Extensibility Framework Guide OA Personalization Framework and OA Extensibility Framework Guide Version 5.6 1. OA Personalization Framework: page 2 2. Creating Admin–Level Personalizations: page 7 3. Creating User–Level Personalizations: page19 4. Creating Portlet–Level Personalizations: page 29 5. Extracting Personalizations to a Flat File: page 35 6. Custom Style Sheets: page 39 7. OA Extensibility Framework: page 53

Welcome message from author
This document is posted to help you gain knowledge. Please leave a comment to let me know what you think about it! Share it to your friends and learn new things together.
Transcript
1OA Personalization Framework and OA Extensibility Framework Guide
OA Personalization Framework and OAExtensibility Framework GuideVersion 5.6
1. OA Personalization Framework: page 2
2. Creating Admin–Level Personalizations: page 7
3. Creating User–Level Personalizations: page19
4. Creating Portlet–Level Personalizations: page 29
5. Extracting Personalizations to a Flat File: page 35
6. Custom Style Sheets: page 39
7. OA Extensibility Framework: page 53
�
2 OA Personalization Framework and OA Extensibility Framework Guide
OA Personalization FrameworkOracle Self–Service Web Applications are built using OA Frameworktechnology. OA Framework version 5.5 and above includes the OAPersonalization Framework which allows you personalize your displayof Oracle Self–Service Web Applications without modifying anyunderlying code. Personalizing the appearance of or the data displayedin an Oracle Self–Service Web Application page is as easy as changingyour web browser preferences.
Attention: We recommend and only support the use of OAPersonalization Framework along with OA ExtensibilityFramework to customize your OA Framework–basedapplications. See: OA Extensibility Framework: page 53.
OA Personalization Framework supports end–users as well aslocalization, verticalization, and customization teams in their efforts totailor self–service web applications to different users. OAPersonalization Framework accomplishes this by allowing you to makepersonalizations at distinct levels so that you may target thosepersonalizations to specific audiences.
The different personalization levels are: Localization, Site, Organization,Responsibility, User, and Portlet. Any changes you make at theLocalization, Site, Organization, or Responsibility levels are referred toas Administrator–level (or Admin–level) personalizations.
All personalization levels are described as follows.
Function level
A function in Oracle Applications is a piece of application logic orfunctionality that is registered under a unique name for the purpose ofassigning it to, or excluding it from, a responsibility. You can createstandard personalizations of regions associated with a specific functionat the Function level. You can have only one set of personalizations perregion per function. See: Personalizing a Region at the Function–Level:page 17.
Localization level
As a developer, you can make personalizations at the Localization levelfor your users. All personalizations at this level apply only to thedesignated localization of the application. For example, localizationteams would make localization–level personalizations in HRapplications before delivering the applications to customers in specificcountries. You can have only one set of personalizations per region perlocalization.

3Appendix Template
Site Level
A site refers to an installation of Oracle Self–Service Web Applications.Personalizations that you make at the Site level affect all users of thecurrent installation. For example, as a system administrator, you mightwant to make a site level personalization where you change the tablecolumn labels to match your corporate standards. You can only saveone set of personalizations per region per site.
Organization Level
An Org is an organization or business unit. Depending on the context,an Org can be a plant, a warehouse, a department, a division within acompany or even a complete company. Personalizations that you makeat the Organization (or Org) level affect all users of that Org. Forexample, you might make a personalization at the Org level for aspecific Org to hide certain fields because they are not pertinent to thecontext of that Org. You can only save one set of personalizations perregion per Org.
Responsibility Level
A responsibility represents a specific level of authority within anapplication. Each responsibility lets you access specific functions or aset of product windows, menus, reports and data to fulfill your role inan application. When you make personalizations at the Responsibilitylevel for a specific responsibility, the changes are effective only for theusers of that responsibility. For example, you can personalize the OpenRequisitions Line page for the ”Office Supplies Purchasing Manager”responsibility to display only open requisition lines from a particularsupplier. As with the Site and Org levels, you can only save one set ofpersonalizations per region per responsibility.
Portlet Level
The same technology used to develop an Oracle Self–Service WebApplication is also used to develop portlets for Oracle Portal. You canpersonalize these portlets just as you can personalize page regions in anapplication. Any personalizations you make at the Portlet level onlyaffect the portlet used to display the region. You can have only one setof personalizations per region per portlet.
User Level
As a user, you can modify any user–personalizable page, and themodifications you make affect no one else. For example you can

4 OA Personalization Framework and OA Extensibility Framework Guide
personalize the Requisitions History page to display only requisitionsprepared by you. Each user can save multiple sets of personalizationsper page region. A saved set of personalizations is also known as apersonalized ”view” and can be selected and applied from the ”ViewPersonalizations” list.
Major Features
Cumulative Personalizations
The personalizations you make at the various levels are cumulative. The personalization levels are ordered as follows, from lowest tohighest: User, Portlet, Responsibility, Org, Site, Localization, andFunction. Personalizations made at lower levels take precedence overpersonalizations made at higher levels. For example, thepersonalizations made at the Portlet and User levels always overlaypersonalizations made at other higher levels. Note that personalizationsmade at the Portlet and User level are also mutually exclusive.
The granular nature of each personalization is maintained throughoutthe layering of personalizations for the different levels. For example,suppose you make a set of Site level personalizations to a region bychanging the label of four fields from a, b, c and d to w, x, y, and z. Nowsuppose you want to make additional changes to that same region,where those changes are available only for users of Org 2. You wouldthen make an Org–level change for Org 2 to the same region by hidingthe second and third fields and changing the label of the last field to zz.A user of Org 2 would see, as a result of the cumulativepersonalizations, a region with two fields labeled w and zz.
Personalization Ownership
Personalizations made at an Admin level can only be modified, viewed,or deleted by an administrator at that respective level. Similarly, apersonalized view made at the Portlet or User level can only bemodified, viewed, or deleted from the portlet where the view wascreated or by the user who created the view.
Multiple Personalizations
At the User–level, a particular region of a self–service web applicationmay have one or more sets of personalizations associated with it. Eachset of personalizations is referred to as a personalized view of theregion. You can identify a personalized view by assigning a view name
5Appendix Template
to it. OA Personalization Framework also identifies each personalizedview by assigning a unique ID to it.
Default User Personalizations
Since you may define more than one personalized view at the User level,OA Personalization Framework lets you mark a specific view as thedefault view to apply to the region when you run the application.
Personalization Caching
The personalizations that you make to a region do not cause anyperformance degradation in your application. Admin–levelpersonalizations for a region are statically cached on the JVM (JavaVirtual Machine) and User–level personalizations are cached on thesession.
Profile Options Required By the OA Personalization Framework
Two system profile options affect the behavior of the OA PersonalizationFramework:
Personalize Self–Service Defn (FND_CUSTOM_OA_DEFINTION)
You should set this profile option to Yes or No at the user level for anadministrator or at the responsibility level for the system administrator.When you set this profile option to Yes, two things occur when you logon as an Admin–level user or responsibility:
• A global Personalize button appears on each self–service webapplication page. When you select the global Personalize buttonon any page, the personalization user interface prompts you forthe administrative level at which you wish to create yourpersonalizations. A navigation tree then lets you navigate to theregion (or nested region) to personalize.
• Personalize Region links appear for every personalizable regionon each self–service web application page. When you select aPersonalize Region link, the personalization user interface firstprompts you for the administrative level at which you wish tocreate your personalization, then takes you directly to the page topersonalize.
You can choose the Personalize button or Personalize Region links tocreate your personalizations.
6 OA Personalization Framework and OA Extensibility Framework Guide
Disable Self–Service Personal(FND_DISABLE_OA_CUSTOMIZATIONS)
You can set this profile option to Yes or No at the site or applicationlevel. If this system profile option is set to Yes, any personalizations youmake, regardless of the level at which you make the personalizations,will not be applied. Only the original base definition of each self–serviceweb application page is ever displayed. This profile option helps Oraclesupport staff determine whether a problem arises from appliedpersonalizations or from the base application.
7OA Personalization Framework and OA Extensibility Framework Guide
Creating Admin–Level Personalizations
Before anyone can personalize a region at an Admin level, you mustperform these initial steps:
1. Define an administrative user in Oracle Applications.
2. Set the ”Personalize Self–Service Defn” profile option to Yes for thatuser. Every self–service web application page contains a globalPersonalize button. This profile option enables the globalPersonalize button on every page and displays Personalize Regionlinks for every personalizable region so that the administrative usercan personalize any page or region.
Admin–Level Personalizations
� To Personalize a Region at an Admin level:
1. Sign–on to Oracle Self–Service Web Applications as a user who hasAdmin–level personalization access.
2. Select a responsibility.
3. Navigate to the application page that contains the region you wishto personalize.
4. Choose the Personalize global button or select the PersonalizeRegion link for a region.
5. In the Personalization Level field, as shown below, select the Adminlevel at which you wish to personalize the region.
The following figure shows an example of personalizing the OracleWorkflow Worklist region using OA Personalization Framework,

8 OA Personalization Framework and OA Extensibility Framework Guide
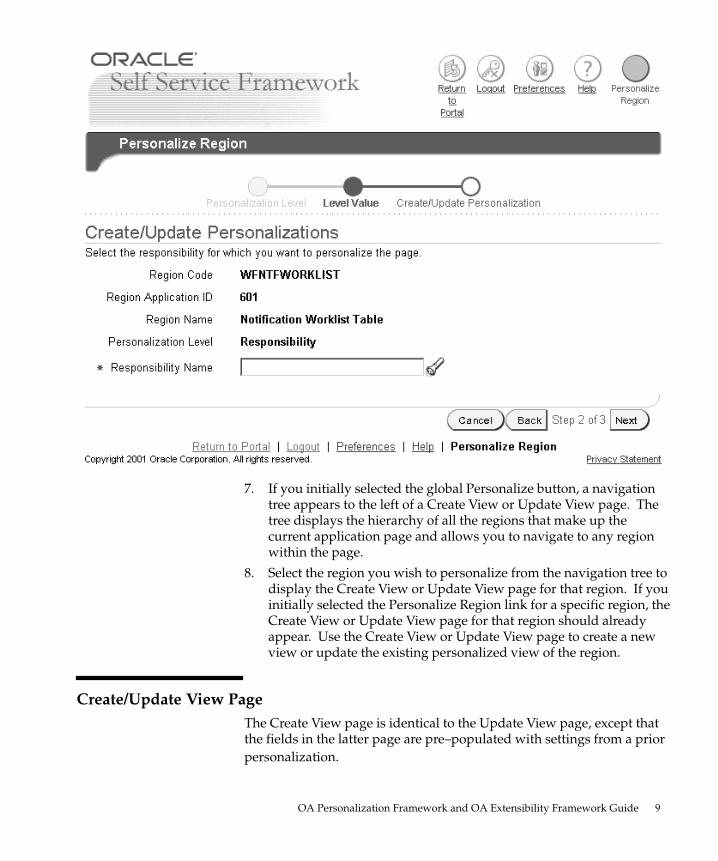
6. On the next page, enter a value appropriate for the Admin level youselected.
The Site level does not require any value as the personalizationapplies to all users of the current site. Other levels, such asResponsibility or Function, for example, require a specificresponsibility or function name, respectively. See: Personalizing aRegion at the Function–Level: page 17.
9OA Personalization Framework and OA Extensibility Framework Guide
7. If you initially selected the global Personalize button, a navigationtree appears to the left of a Create View or Update View page. Thetree displays the hierarchy of all the regions that make up thecurrent application page and allows you to navigate to any regionwithin the page.
8. Select the region you wish to personalize from the navigation tree todisplay the Create View or Update View page for that region. If youinitially selected the Personalize Region link for a specific region, theCreate View or Update View page for that region should alreadyappear. Use the Create View or Update View page to create a newview or update the existing personalized view of the region.
Create/Update View PageThe Create View page is identical to the Update View page, except thatthe fields in the latter page are pre–populated with settings from a priorpersonalization.
�
10 OA Personalization Framework and OA Extensibility Framework Guide
Attention: Although a region may be personalizable, not allregion items in a region are personalizable. Each region item ina region has an ADMIN_CUSTOMIZABLE flag associated withit. If the flag is turned off by the developer of the region, theregion item is not personalizable at the Admin level. Forexample, a developer would very likely turn theADMIN_CUSTOMIZABLE flag off for the vertical spacer itemin a table layout region to prevent disruption of the spacing in atable.
11OA Personalization Framework and OA Extensibility Framework Guide

12 OA Personalization Framework and OA Extensibility Framework Guide
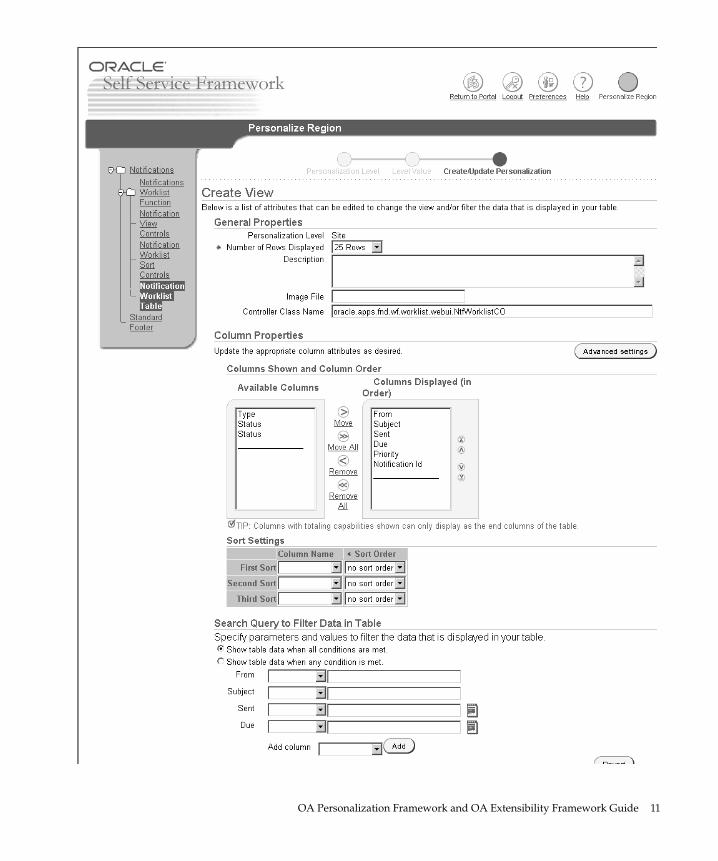
� General Properties
1. If your selected region is a table, select the number of rows of datayou wish to display. If your region is not a table, the Number ofRows Displayed field does not appear.
2. Enter a description for this personalized view.
3. You can specify your own GIF image file to change the productbranding logo or icon displayed in the region. If the region you arepersonalizing is not nested within other regions, that is, it is a pagelayout region, the image in your custom image file replaces theproduct branding image that appears beneath the Oracle logo. Ifyour region is a nested region, such as a header level region, theimage in your custom image file replaces the icon that appears nextto the header.
4. If you are creating a personalization at an Admin–level that ishigher than Localization, you have the option of associating adifferent controller class name with the region. This is useful if youare creating Localization–level personalizations and want toassociate different controller classes with different localizations.
Note: You cannot change the controller class name associatedwith a region if you are creating an Org–or Site–levelpersonalization, that is, a personalization at an Admin–levellower than Localization.
� Column Properties
Edit the Column Properties section to specify the items you wish todisplay in the region and the order in which to display them.
1. Select an item from the Available Columns or Columns Displayedlist and use the buttons between these lists to either move theselected item to or remove the selected item from the ColumnsDisplayed list.
Note: Items that are required fields in a page appear with anasterisk (*) and cannot be removed from the Columns Displayedlist.
2. Once you are satisfied with the items to display, use the buttons tothe right of the list to reorder their sequence.
Suggestion: You can hide or reorder the display of specificregions in a page by personalizing the region items of the toplevel region, that is, the parent container or page layout region.
3. Choose Advanced Settings to alter other settings for your items orextend your region. See: Advanced Settings: page 15 and OAExtensibility Framework: page 53.
13OA Personalization Framework and OA Extensibility Framework Guide
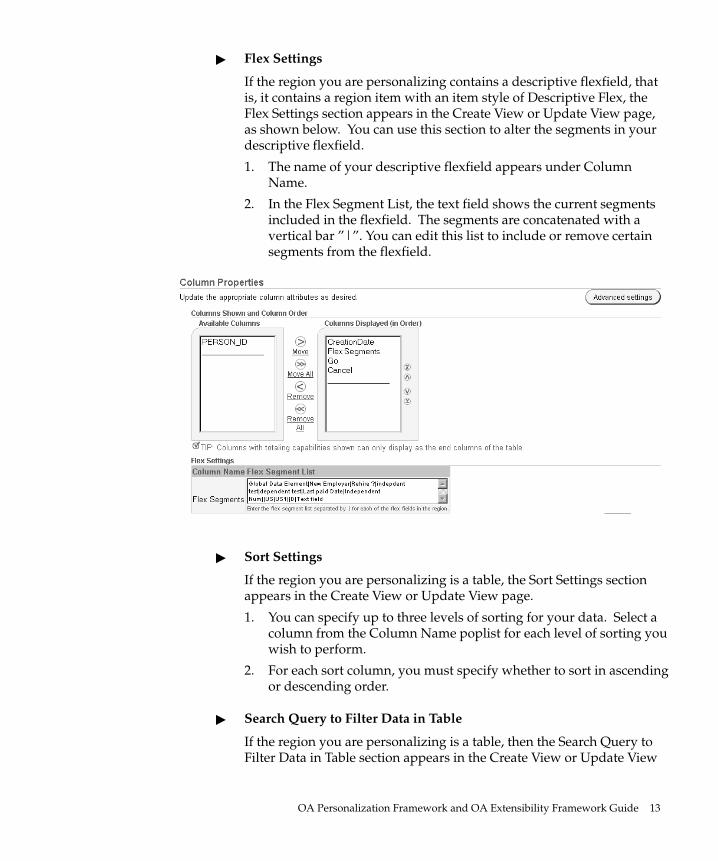
� Flex Settings
If the region you are personalizing contains a descriptive flexfield, thatis, it contains a region item with an item style of Descriptive Flex, theFlex Settings section appears in the Create View or Update View page,as shown below. You can use this section to alter the segments in yourdescriptive flexfield.
1. The name of your descriptive flexfield appears under ColumnName.
2. In the Flex Segment List, the text field shows the current segmentsincluded in the flexfield. The segments are concatenated with avertical bar ”|”. You can edit this list to include or remove certainsegments from the flexfield.
� Sort Settings
If the region you are personalizing is a table, the Sort Settings sectionappears in the Create View or Update View page.
1. You can specify up to three levels of sorting for your data. Select acolumn from the Column Name poplist for each level of sorting youwish to perform.
2. For each sort column, you must specify whether to sort in ascendingor descending order.
� Search Query to Filter Data in Table
If the region you are personalizing is a table, then the Search Query toFilter Data in Table section appears in the Create View or Update View
14 OA Personalization Framework and OA Extensibility Framework Guide
page. You can filter the data that is displayed in the table based oncriteria that you specify.
1. Indicate how you want the filter to match your search conditions byselecting one of the following radio buttons:
• Show table data when all conditions are met.
• Show table data when any condition is met.
2. The first four columns of the table are listed for you to specifysearch criteria. Using the poplist following the column name,choose a search condition and enter a value to search for in thatcolumn.
3. Select a column from the Add column poplist and choose Add toadd more search criteria to your filter.
4. If you leave the search criteria blank for a column, the filter will notsearch on that column.
� Saving Your Personalized View
1. When you are done personalizing your view of the region, chooseApply to apply your personalizations to the region.
2. If you choose Revert to revert to default settings, the followingoccurs depending on the page you are using:
• Create View page - the page defaults to the preseeded displaysettings. Also, if the region is a table, no query options are set.
• Update View page - the page defaults to the display settings ofthe saved existing view. If the region is a table, the page alsodefaults to the query options of the saved existing view.

�
15OA Personalization Framework and OA Extensibility Framework Guide
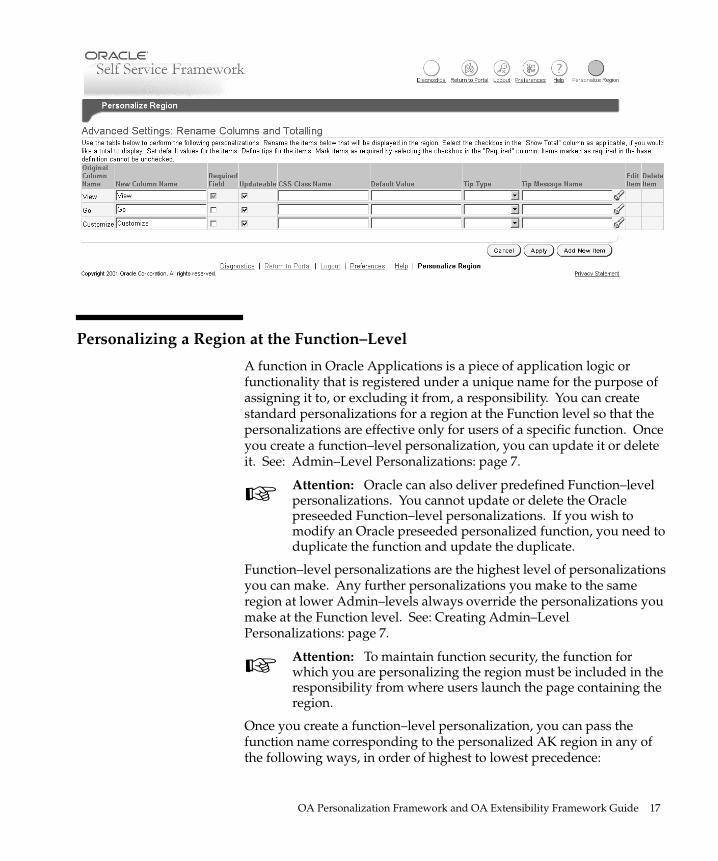
Advanced Settings
1. You can change the labels for the items that you chose to display.
2. If an item is not originally marked as Required, but you want it tobecome Required, you can check the Required Field checkbox. Forexample, you may need to create a Localization levelpersonalization to a region where column A is required for OracleSelf–Service Web Application users in the US, but not for users inthe UK.
Attention: Items originally marked as Required always remainrequired and cannot be changed with the Required Fieldcheckbox.
3. Use the Updatable checkbox to mark whether the data for an item isupdatable.
4. If you are personalizing a table, the Show Total column appears.You may check Show Total to turn on totaling for a specificitem/column in your table, if it is applicable to the underlying data.
Suggestion: If you choose to display a column with totalingcapabilities, you may want to display this column as the lastcolumn of the table.
5. You may change an item’s CSS style by entering the CSS Class nameof the new style in the CSS Class Name field.

�
�
16 OA Personalization Framework and OA Extensibility Framework Guide
Suppose your current item has a class attribute value ofOraFieldText and appears as Arial 10pt black(#000000). That style isdefined in blaf.xss by the style selector ”.OraFieldText” and OAFramework applies that style to any HTML element with a classattribute value of ”OraFieldText”. If you to want to simply changethe text color of that specific item to blue(#336699), which alsohappens to be defined in blaf.xss as the style ”.OraTipText”, you canenter ”OraTipText” in the CSS Class Name field for that item. Ifthere is no such style defined in the custom.xss, oa.xss or blaf.xssstyle sheet documents, you need to define a new style with thosedesired properties in custom.xss and specify the name of that newstyle in the CSS Class Name field for the item to which you wish toapply.
You can use the CSS Styles Lookup page to see what your item lookslike when you apply a specific CSS style before actually changingthe style. See: Custom Style Sheets: page 39 and CSS Styles Lookup:page 48.
Attention: Table heading styles are fixed and cannot bechanged.
6. You may specify a default value for an item.
7. You can display a static text message or tip for a column or regionitem. For example, suppose you need to add a tip on how to enterdata into a specific column for your users in Japan. You can create aLocalization level personalization for Japan where the static textrefers to a message in Japanese stored in the FND messagedictionary. In the Tip Type field, specify whether the tip is of typeshort or long. In the Tip Message Name field, enter the name of theFND message you’ve defined.
Standard messages have a tip type of Short. A tip type of Long, onthe other hand, displays the message in a separate window, whichcan be opened by clicking on a tip icon in the region.
8. Choose Apply to accept your changes and return to the Create Viewor Update View page.
9. If the region you are personalizing is not a table, you may access theOA Extensibility Framework to add new items to the region.Choose the Add New Item button to extend your region. See: OAExtensibility Framework: page 53 and Adding a New Item: page 53.
Attention: OA Extensibility Framework does not currentlysupport adding a new item to a table, since all items in a tablemust be set to the same BC4J view usage name.
�
�
17OA Personalization Framework and OA Extensibility Framework Guide
Personalizing a Region at the Function–Level
A function in Oracle Applications is a piece of application logic orfunctionality that is registered under a unique name for the purpose ofassigning it to, or excluding it from, a responsibility. You can createstandard personalizations for a region at the Function level so that thepersonalizations are effective only for users of a specific function. Onceyou create a function–level personalization, you can update it or deleteit. See: Admin–Level Personalizations: page 7.
Attention: Oracle can also deliver predefined Function–levelpersonalizations. You cannot update or delete the Oraclepreseeded Function–level personalizations. If you wish tomodify an Oracle preseeded personalized function, you need toduplicate the function and update the duplicate.
Function–level personalizations are the highest level of personalizationsyou can make. Any further personalizations you make to the sameregion at lower Admin–levels always override the personalizations youmake at the Function level. See: Creating Admin–LevelPersonalizations: page 7.
Attention: To maintain function security, the function forwhich you are personalizing the region must be included in theresponsibility from where users launch the page containing theregion.
Once you create a function–level personalization, you can pass thefunction name corresponding to the personalized AK region in any ofthe following ways, in order of highest to lowest precedence:
18 OA Personalization Framework and OA Extensibility Framework Guide
• Specify the function name on the URL using the parameterOAFunc. For example:
http://<server.com>:<portID>/OA_HTML/OA.jsp?
OAFunc=<custom_function>&...
OAFunc can be used in two different ways:
– If OAFunc is used without akRegionCode/akRegionApplId,then the function corresponding to it is launched.
– If OAFunc is used in addition toakRegionCode/akRegionApplId, then it used for setting thefunction context for that page.
• Navigate to the AK Regions HTML form and search for the pagelayout region you just personalized. In the Function Namecolumn, enter the name of the function that you specified for theFunction–level personalization.
19OA Personalization Framework and OA Extensibility Framework Guide
Creating User–Level Personalizations
In Oracle Self–Service Web Applications, end–users may onlypersonalize regions that are tables. A table is personalizable only if it isdefined as a child of a region with region style ”Query”, and if a sectioncalled View Personal Configurations appears above the table. Apersonal configuration refers to the saved set of personalizations youmake to a table.
In self–service web applications, tables are used to display results from asearch. The section above the table generally displays the search panelwhere you specify the search criteria. You may see any one of thesepossible search panels above a table:
• Simple Search - allows you to specify simple search criteria.
• Simple Search or Advanced Search - buttons allow you to togglebetween a simple search panel and an advanced search panel tospecify search criteria
If a table is personalizable, you may also see any one of these possiblepanels above the table:
• View Personalizations or Simple Search - buttons allow you totoggle between a panel that lets you view and edit personalconfigurations and a simple search panel.
• View Saved Search only - allows you to view and edit personalconfigurations.
Often times, if a table is personalizable, you may notice that seededpersonalized views for that table already exist.
Personalizing a Table Region at the User Level
You can create a personalized view of a table using one of two methods:
� Method 1:
1. Navigate to the application page that contains the personalizabletable you wish to alter.
2. Use the search panel to query for specific results in the table.

20 OA Personalization Framework and OA Extensibility Framework Guide
3. Select Save Search to save the search criteria that queried for theseresults.
4. When you select Save Search, the Create View page appears,allowing you to save this search as a new personalized view of thetable. You can also edit other attributes and properties of the table.
5. Once you Apply your changes, the saved search becomes apersonalized view that you can select from a panel that lists yourpersonal views.

21OA Personalization Framework and OA Extensibility Framework Guide
� Method 2:
1. Navigate to the application page that contains the table you wish topersonalize.
2. If the page does not already show the View Saved Search or ViewPersonalizations panel, select View Personalizations.
Note: If the region does not have any predefinedpersonalizations, the View Personalizations region does notappear. Instead the Search region appears and you can create apersonalization by choosing the Save Search button afterspecifying and performing a search.
3. In the View Saved Search or View Personalizations panel, you havetwo options:
22 OA Personalization Framework and OA Extensibility Framework Guide
• Apply a specific personal view, if one exists, by selecting a viewfrom the View poplist and choosing Go.
• Create a new view or update an existing view by choosingPersonalize to display the Personal Table Views console.
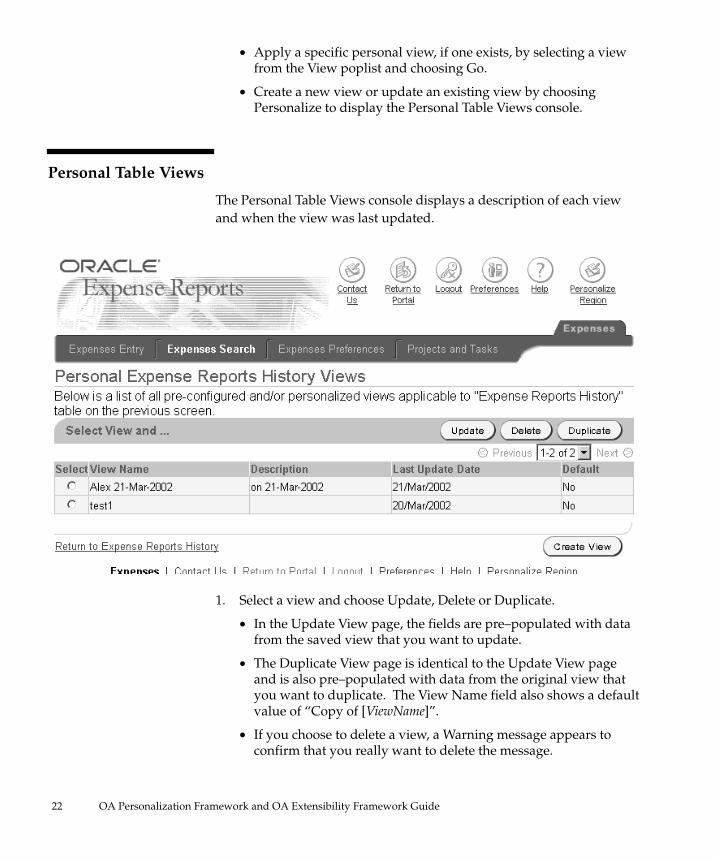
Personal Table Views
The Personal Table Views console displays a description of each viewand when the view was last updated.
1. Select a view and choose Update, Delete or Duplicate.
• In the Update View page, the fields are pre–populated with datafrom the saved view that you want to update.
• The Duplicate View page is identical to the Update View pageand is also pre–populated with data from the original view thatyou want to duplicate. The View Name field also shows a defaultvalue of “Copy of [ViewName]”.
• If you choose to delete a view, a Warning message appears toconfirm that you really want to delete the message.
23OA Personalization Framework and OA Extensibility Framework Guide
2. If you wish to create a new personalized view of the table, chooseCreate View.
Create/Update/Duplicate View Page
The Create View page is identical to the Update View and DuplicateView pages, except that the fields in the latter pages are pre–populatedwith settings from the selected view.

24 OA Personalization Framework and OA Extensibility Framework Guide
25OA Personalization Framework and OA Extensibility Framework Guide
� General Properties
1. Enter a user–friendly View Name to identify your personalizations.
2. Select the number of rows of data you wish to display in yourpersonalized view.
3. Check Set as Default if you wish to make this view your defaultview. There can only be one default view at any time. If youchecked Set as Default for the current view, than any view that youpreviously marked as the default becomes unmarked.
Note: If you wish to mark a predefined seeded personalizedview as your default, create a duplicate of the seeded view, andcheck Set as Default for the duplicate view.
4. Enter a description for this personalized view.
5. If other attributes in this table can be personalized, you also seesections on this page called Column Properties, Sort Settings, andSearch Query to Filter Data in Table.
� Column Properties
The columns of the table region appear in the Available Columns list. Edit the Column Properties to specify the columns you wish to displayand the order in which to display them.
1. Select an item from the Available Columns or Columns Displayedlist and use the buttons between these lists to either move theselected item to or remove the selected item from the ColumnsDisplayed list.
Note: Columns that are required fields in a page appear withan asterisk (*) and cannot be removed from the ColumnsDisplayed list.
2. Once you are satisfied with the items to display, select an item fromthe Columns Displayed list and use the buttons to the right of thelist to reorder the sequence in which the item appears.
3. Choose Advanced Settings to alter other settings for your columns.See: Advanced Settings: page 27.
� Sort Settings
1. You can specify up to three levels of sorting for your data. Select acolumn from the Column Name poplist for each level of sorting youwish to perform.
26 OA Personalization Framework and OA Extensibility Framework Guide
2. For each column to sort, you must specify whether to sort inascending or descending order.
� Search Query to Filter Data in Table
You can filter the data that is displayed in the table based on criteria thatyou specify.
1. Indicate how you want the filter to match your search conditions byselecting one of the following radio buttons:
• Show table data when all conditions are met.
• Show table data when any condition is met.
2. The first four columns of the table are listed for you to specifysearch criteria. Using the poplist following the column name,choose a search condition and enter a value to search for in thatcolumn.
3. Select a column from the Add column poplist and choose Add toadd more search criteria to your filter.
4. If you leave the search criteria blank for a column, the filter will notsearch on that column.
� Saving Your Personalized View
1. When you are done personalizing your view of the table, chooseApply.
2. If you choose Revert to revert to default settings, the followingoccurs depending on the page you are using:
• Create View page - the page defaults to the preseeded displaysettings and no query options are set.
• Update View or Duplicate View page - the page defaults to thedisplay settings and query options of the saved existing view youare trying to update or duplicate.
27OA Personalization Framework and OA Extensibility Framework Guide
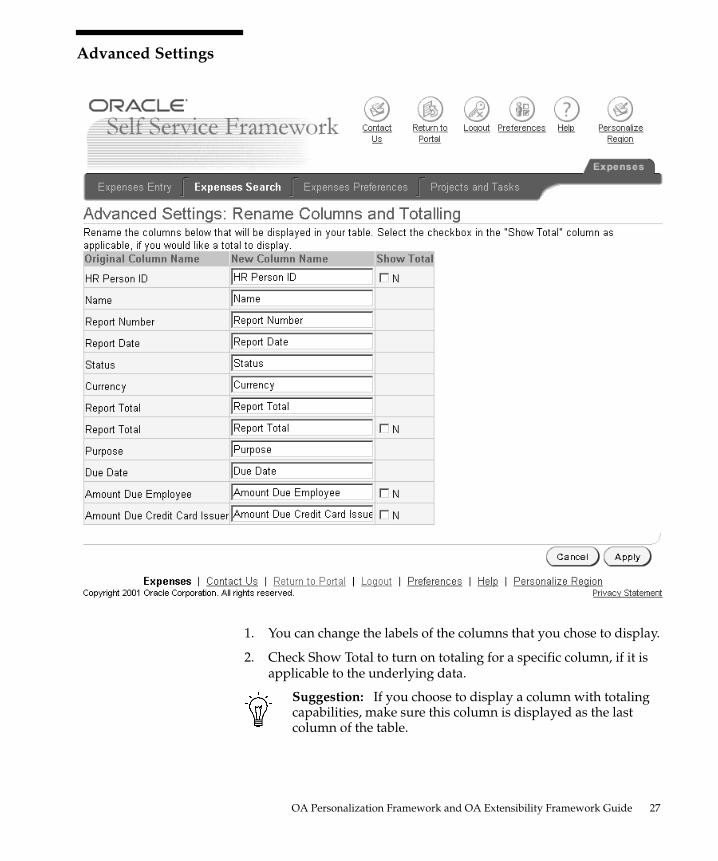
Advanced Settings
1. You can change the labels of the columns that you chose to display.
2. Check Show Total to turn on totaling for a specific column, if it isapplicable to the underlying data.
Suggestion: If you choose to display a column with totalingcapabilities, make sure this column is displayed as the lastcolumn of the table.

28 OA Personalization Framework and OA Extensibility Framework Guide
3. Choose Apply to accept your changes and return to the Create Viewor Update View page.
29OA Personalization Framework and OA Extensibility Framework Guide
Creating Portlet–Level Personalizations
In Oracle Self–Service Web Applications, a specific region of anapplication page can be displayed as a portlet in Oracle Portal. OraclePortal provides you with a common, integrated starting point foraccessing all your data. Since Oracle Portal lets you personalize thecontent and look of your page, you can also personalize the applicationregion that is displayed as a portlet. Any personalizations you make tothat portlet region appear only when you display that region from thesame portlet.
Note: If you implement a More link (Step 3 in the Web Portaland Portlets tutorial) in your portlet that drills down to apersonalizable region, then any portlet–level personalizationyou make to that region also applies to the drill–down region(from the More link).
Personalizing a Portlet
� To Personalize a Region at the Portlet level:
1. Display Oracle Portal in your web browser and login.
2. Select the link to display the portlet region you wish to personalize.
3. Select the Personalize Region link within the portlet region.
4. Use the Create View or Update View page that appears to makeyour personalizations to the portlet region.
Create/Update View Page
The Create View page is identical to the Update View page, except thatthe fields in the latter page are pre–populated with settings from a priorpersonalization.
30 OA Personalization Framework and OA Extensibility Framework Guide
31OA Personalization Framework and OA Extensibility Framework Guide
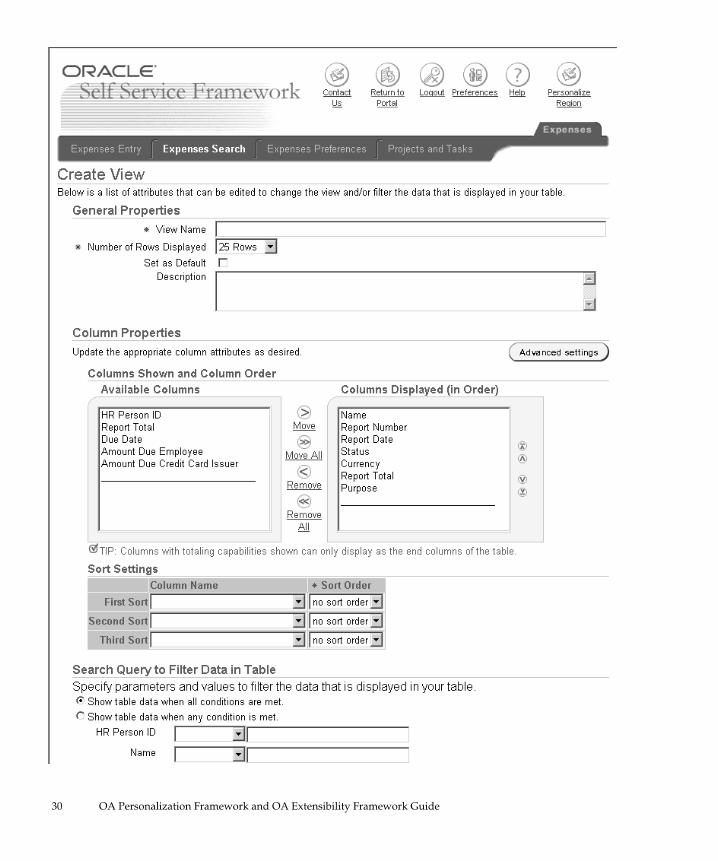
� General Properties
If your portlet region is not a table, the Create View or Update Viewpage displays only the General Properties of the region for you topersonalize.
1. Enter a user–friendly View Name to identify your personalizations.
2. Select the number of rows of data you wish to display in yourpersonalized view.
3. Enter a description for this personalized view.
� Column Properties
If the portlet region is a table, the columns of the table region appear inthe Available Columns list. Edit the Column Properties to specify thecolumns you wish to display and the order in which to display them.
1. Select a column from the Available Columns or Columns Displayedlist and use the buttons between these lists to either move theselected column item to or remove the selected column from theColumns Displayed list.
Note: Columns that are required fields in a page appear withan asterisk (*) and cannot be removed from the ColumnsDisplayed list.
2. Once you are satisfied with the columns to display, use the buttonsto the right of the Columns Displayed list to reorder their sequence.
3. Choose Advanced Settings to alter other settings for your columns.
� Sort Settings
1. You can specify up to three levels of sorting for your data. Select acolumn from the Column Name poplist for each level of sorting youwish to perform.
2. For each column to sort, you must specify whether to sort inascending or descending order.
� Search Query to Filter Data in Table
You can filter the data that is displayed in the table based on criteria thatyou specify.
1. Indicate how you want the filter to match your search conditions byselecting one of the following radio buttons:

32 OA Personalization Framework and OA Extensibility Framework Guide
• Show table data when all conditions are met.
• Show table data when any condition is met.
2. The first four columns of the table are listed for you to specifysearch criteria. Using the poplist following the column name,choose a search condition and enter a value to search for in thatcolumn.
3. Select a column from the Add column poplist and choose Add toadd more search criteria to your filter.
4. If you leave the search criteria blank for a column, the filter will notsearch on that column.
� Saving Your Personalized View
1. When you are done personalizing your view of the portlet region,choose Apply.
2. If you choose Revert to revert to default settings, the followingoccurs depending on the page you are using:
• Create View page - the page defaults to the preseeded displaysettings and no query options are set.
• Update View or Duplicate View page - the page defaults to thedisplay settings and query options of the saved existing view youare trying to update or duplicate.
33OA Personalization Framework and OA Extensibility Framework Guide
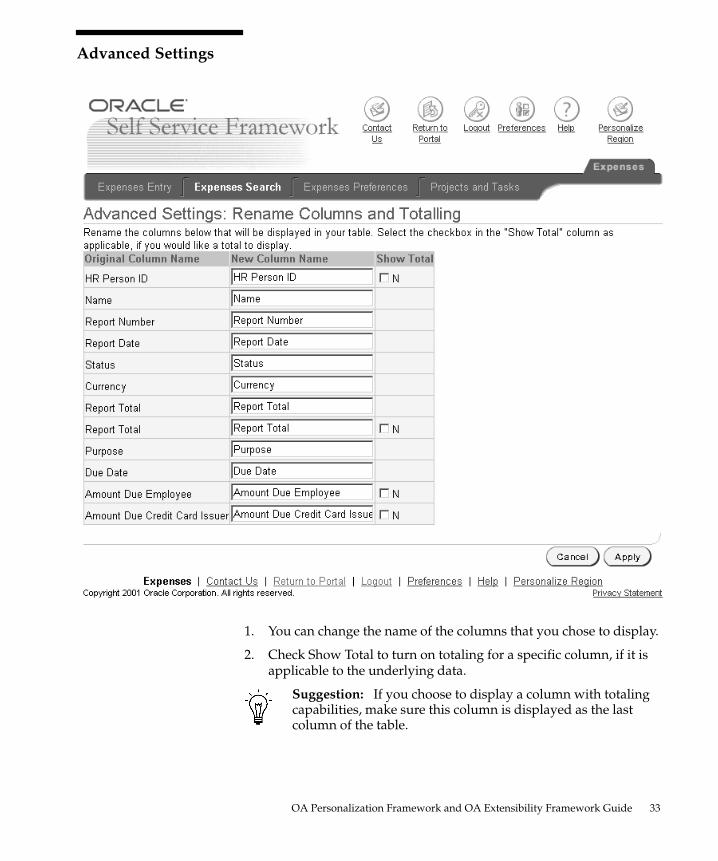
Advanced Settings
1. You can change the name of the columns that you chose to display.
2. Check Show Total to turn on totaling for a specific column, if it isapplicable to the underlying data.
Suggestion: If you choose to display a column with totalingcapabilities, make sure this column is displayed as the lastcolumn of the table.

34 OA Personalization Framework and OA Extensibility Framework Guide
3. Choose Apply to accept your changes and return to the Create Viewor Update View page.

35OA Personalization Framework and OA Extensibility Framework Guide
Extracting Personalizations to a Flat FileBoth Admin–level and User–Level personalizations may be extractedfrom your database into a flat file. The executable you use to performthis function is akload, a Java program that lets you downloadcomponents defined in the AK Runtime Dictionary into an XML–likefile format called a .jlt file. These .jlt files can then be uploaded to otherdatabases, again using the akload Java program.
Requirements for akload in Release 11i are as follows: JDK (version 1.1.8or above) and Oracle JDBC (version 8.0.6.0.0 or above). If usingParameters.class version 115.12 or above, no Oracle client softwareneeds to be installed on the PC. Otherwise, if running from a PC,Oracle8 Client must be installed on the PC. Your classpath, path andenvironment should be set up similar to the environment required forapplying the latest AD patch.
AKLOAD
The syntax for using akload to download or upload personalization datafrom AK Runtime Dictionary in a Oracle database is:
java oracle.apps.ak.akload
<P1><P2><P3><P4><P5><P6><P7><P8><P9><P10><P11>...<Pn–1><Pn>
<P8a><P8ai>
The parameters P1 through P8 should be replaced as follows:
Note: Replace italicized text with a value as indicated.
• P1 – Username (Required)
• P2 – Password (Required)
• P3 – JDBC Driver Type (Required) = THIN
• P4 – Database Address (Required)
• P5 – Loader Option (Required) =
– DOWNLOAD – Downloads AK data from an Oracledatabase into a flat file.
– UPLOAD – Uploads AK data from a flat file back into anOracle database.
• P6 – File Name (Required) = Name of flat file to be downloaded oruploaded. For example: C:\data\x.jlt (PC) or/home/myhome/x.jlt (UNIX)

�
36 OA Personalization Framework and OA Extensibility Framework Guide
• P7 – Get/Update Option (Required) =
– UPDATE – Valid only when P5 = UPLOAD. InstructsAKLOAD to update any existing records in the database,with values from the flat file.
– NCUPDATE – Valid only when P5 = UPLOAD. InstructsAKLOAD to only update existing records which have notbeen updated by customers in the database, with valuesfrom the flat file.
– NOUPDATE – Valid only when P5 = UPLOAD. InstructsAKLOAD to not update any existing records in the database.Thus, the flat file values will be discarded wheneverAKLOAD encounters an existing record in the database.
– GET – Valid only when P5 = DOWNLOAD. Downloads aspecific business object from an Oracle database into a flatfile based on the values specified by parameters P6 throughP8.
• P8 – Business Object (Required) or NLS_LANG (Optional) =
– Business Object = CUSTOM_REGION (Valid only when P5 =DOWNLOAD.) Business object to be downloaded from anOracle database into a flat file.
Attention: Note that when you download personalizations,akload returns all of the related:
Regions
Region Items
Region_LOV_Relations
Category_Usages
Attributes
Personalization
Custom_Region
Custom_Region_Item
Criteria
NLS_LANG = (Valid only when P5 = UPLOAD.) Specify thevalue of $NLS_LANG if uploading a .jlt file which is in alanguage that is different from the OS language. For example:AMERICAN_AMERICA.WE8ISO8859P1
• P9 – Download With or Without Attributes Option (Optional)
– WATTRIBUTE – Valid only when P5 = DOWNLOAD.Downloads the attributes with the specified business object.This is the default behavior if you don’t set this parameter.

�
37OA Personalization Framework and OA Extensibility Framework Guide
– NOATTRIBUTE – Valid only when P5 = DOWNLOAD.Attributes are not downloaded with the specified businessobject.
• P10 P11 – Application Short Name and Business Object’s Key(Required) Valid only when P5 = DOWNLOAD and P7 = GET.
Attention: P10 and P11 must be specified together as a pairand may be repeated as many times as the operating systemallows. You must have at least one Application Short Name andBusiness Object’s key value pair. If you do not want to specify aBusiness Object’s key, enter ”” as a place holder.
• ...
• Pn–1 Pn – Application Short Name and Business Object’s Key(Optional) Valid only when P5 = DOWNLOAD and P7 = GET.
• P8a – Administrator Personalization Level (Optional – Valid onlywhen P8 = CUSTOM_REGION) =
– LEVEL=SITE
– LEVEL=ORGANIZATION
– LEVEL=RESPONSIBILITY
– LEVEL=FUNCTION
• P8ai – Primary Key Value of Personalization Level Entity (Requiredonly if P8a is specified) =
– ”” – if P8a = LEVEL=SITE
– Value of ORGANIZATION_CODE – if P8a =LEVEL=ORGANIZATION
– Value of RESPONSIBILITY_KEY – if P8a =LEVEL=RESPONSIBILITY
– Value of FUNCTION_CODE – if P8a = LEVEL=FUNCTION
Note: Use ”” whenever you want to specify an embeddedspace in your input string.
Examples
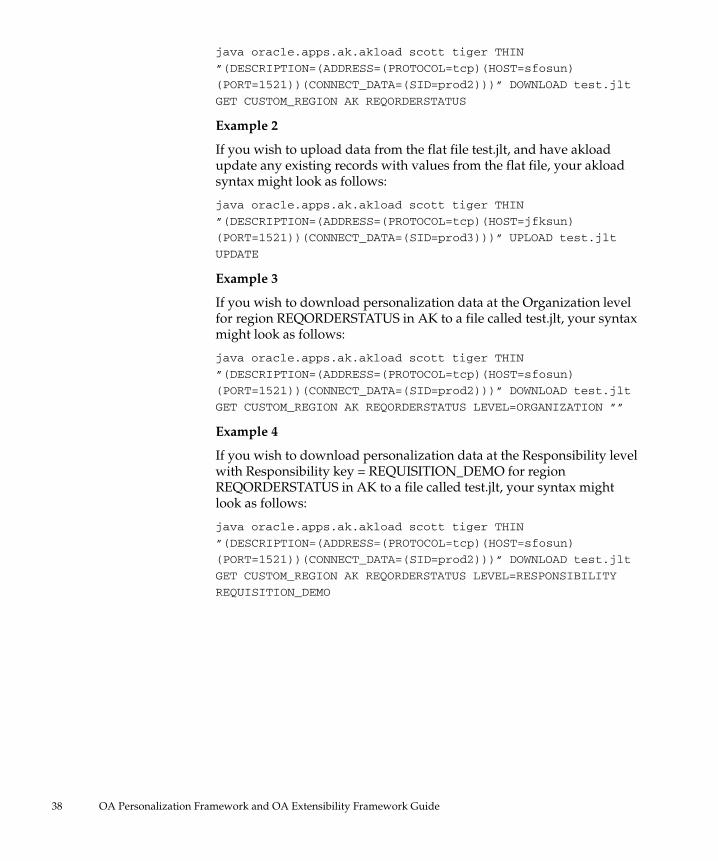
Example 1
If you wish to download personalization data for regionREQORDERSTATUS in AK to a file called test.jlt, your syntax mightlook as follows:
38 OA Personalization Framework and OA Extensibility Framework Guide
java oracle.apps.ak.akload scott tiger THIN
”(DESCRIPTION=(ADDRESS=(PROTOCOL=tcp)(HOST=sfosun)
(PORT=1521))(CONNECT_DATA=(SID=prod2)))” DOWNLOAD test.jlt
GET CUSTOM_REGION AK REQORDERSTATUS
Example 2
If you wish to upload data from the flat file test.jlt, and have akloadupdate any existing records with values from the flat file, your akloadsyntax might look as follows:
java oracle.apps.ak.akload scott tiger THIN
”(DESCRIPTION=(ADDRESS=(PROTOCOL=tcp)(HOST=jfksun)
(PORT=1521))(CONNECT_DATA=(SID=prod3)))” UPLOAD test.jlt
UPDATE
Example 3
If you wish to download personalization data at the Organization levelfor region REQORDERSTATUS in AK to a file called test.jlt, your syntaxmight look as follows:
java oracle.apps.ak.akload scott tiger THIN
”(DESCRIPTION=(ADDRESS=(PROTOCOL=tcp)(HOST=sfosun)
(PORT=1521))(CONNECT_DATA=(SID=prod2)))” DOWNLOAD test.jlt
GET CUSTOM_REGION AK REQORDERSTATUS LEVEL=ORGANIZATION ””
Example 4
If you wish to download personalization data at the Responsibility levelwith Responsibility key = REQUISITION_DEMO for regionREQORDERSTATUS in AK to a file called test.jlt, your syntax mightlook as follows:
java oracle.apps.ak.akload scott tiger THIN
”(DESCRIPTION=(ADDRESS=(PROTOCOL=tcp)(HOST=sfosun)
(PORT=1521))(CONNECT_DATA=(SID=prod2)))” DOWNLOAD test.jlt
GET CUSTOM_REGION AK REQORDERSTATUS LEVEL=RESPONSIBILITY
REQUISITION_DEMO
39OA Personalization Framework and OA Extensibility Framework Guide
Custom Style SheetsOA Personalization Framework uses custom style sheets (.xss files) tospecify and manage the visual characteristics of Oracle Self–Service WebApplications. One of the goals of custom style sheets is to allowpresentation styles, such as fonts and colors, to be separated from theHTML content to which the styles are applied. This enables you tomaintain a consistent look and feel for the application, yet allow you tomanage the customizations of styles for different target audiences.
The custom style sheets employ XML Style Sheets (XSS) language, alanguage that is based on Cascading Style Sheets (CSS), but is designedfor easy extraction of style information. This document provides a briefoverview of XSS and assumes a basic knowledge of CSS styles.
The BLAF (Browser Look and Feel) style sheet (blaf.xss) defines Oracle’scorporate look and feel for HTML applications.
XSS OverviewA XSS document consists of a set of style sheets, each of which defines aset of visual styles to be applied to the contents of a web page.
<styleSheet> Element
Each style sheet is defined with a <styleSheet> element. You candesignate which end–user environment to apply a style sheet to byassigning attributes, also called ”variants”, to the <styleSheet> element.XSS supports the following five variants:
• Locale (e.g. locales=”ja” or ”en_US”)
• Reading direction (e.g. direction=”rtl” or ”ltr”)
• Browser (e.g. browsers=”Netscape” or ”Internet Explorer”)
• Browser major version (e.g. versions=”4” or ”5”)
• Operating system (e.g. platforms=”Windows” or ”Linux”)
A style sheet that contains no variant attributes is known as a base stylesheet. The following example shows a style sheet that defines styles forInternet Explorer users in the Japanese locale:
<stylesheet locales=”ja” browsers=”ie”>
...
</styleSheet>
<style> Element
Each <styleSheet> element contains one or more <style> elements. A<style> element consists of a ”selector”, which associates the style with a
40 OA Personalization Framework and OA Extensibility Framework Guide
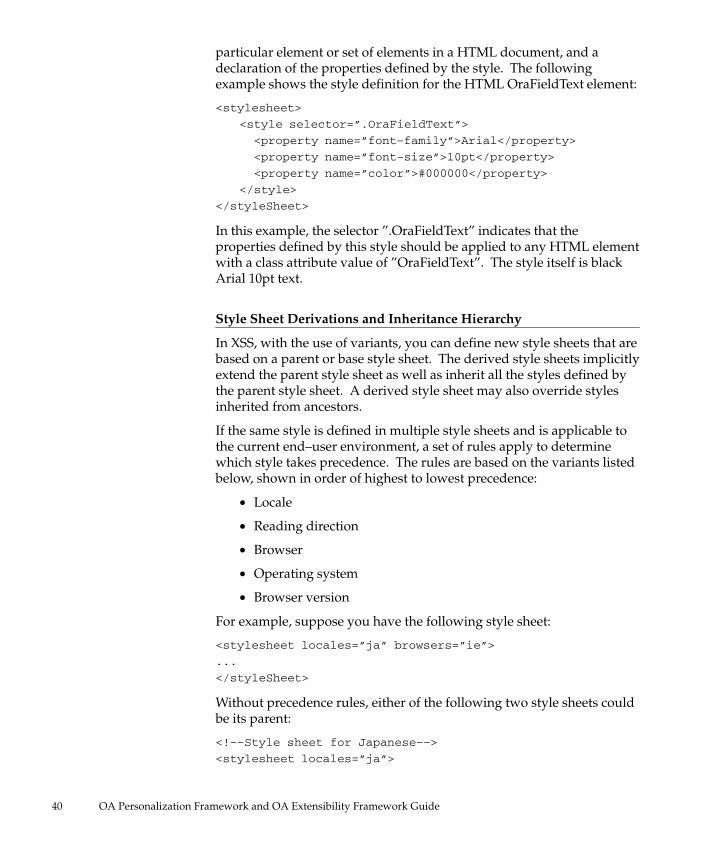
particular element or set of elements in a HTML document, and adeclaration of the properties defined by the style. The followingexample shows the style definition for the HTML OraFieldText element:
<stylesheet>
<style selector=”.OraFieldText”>
<property name=”font–family”>Arial</property>
<property name=”font–size”>10pt</property>
<property name=”color”>#000000</property>
</style>
</styleSheet>
In this example, the selector ”.OraFieldText” indicates that theproperties defined by this style should be applied to any HTML elementwith a class attribute value of ”OraFieldText”. The style itself is blackArial 10pt text.
Style Sheet Derivations and Inheritance Hierarchy
In XSS, with the use of variants, you can define new style sheets that arebased on a parent or base style sheet. The derived style sheets implicitlyextend the parent style sheet as well as inherit all the styles defined bythe parent style sheet. A derived style sheet may also override stylesinherited from ancestors.
If the same style is defined in multiple style sheets and is applicable tothe current end–user environment, a set of rules apply to determinewhich style takes precedence. The rules are based on the variants listedbelow, shown in order of highest to lowest precedence:
• Locale
• Reading direction
• Browser
• Operating system
• Browser version
For example, suppose you have the following style sheet:
<stylesheet locales=”ja” browsers=”ie”>
...
</styleSheet>
Without precedence rules, either of the following two style sheets couldbe its parent:
<!––Style sheet for Japanese––>
<stylesheet locales=”ja”>
41OA Personalization Framework and OA Extensibility Framework Guide
...
</styleSheet>
<!––Style sheet for Internet Explorer––>
<stylesheet browsers=”ie”>
...
</styleSheet>
With precedence rules, the complex inheritance hierarchy is simplifiedso that the derived style sheet has only a single parent. In this example,the Japanese for Internet Explorer style sheet inherits styles from theparent Japanese style sheet, which in turn inherits styles from its parentInternet Explorer style sheet.
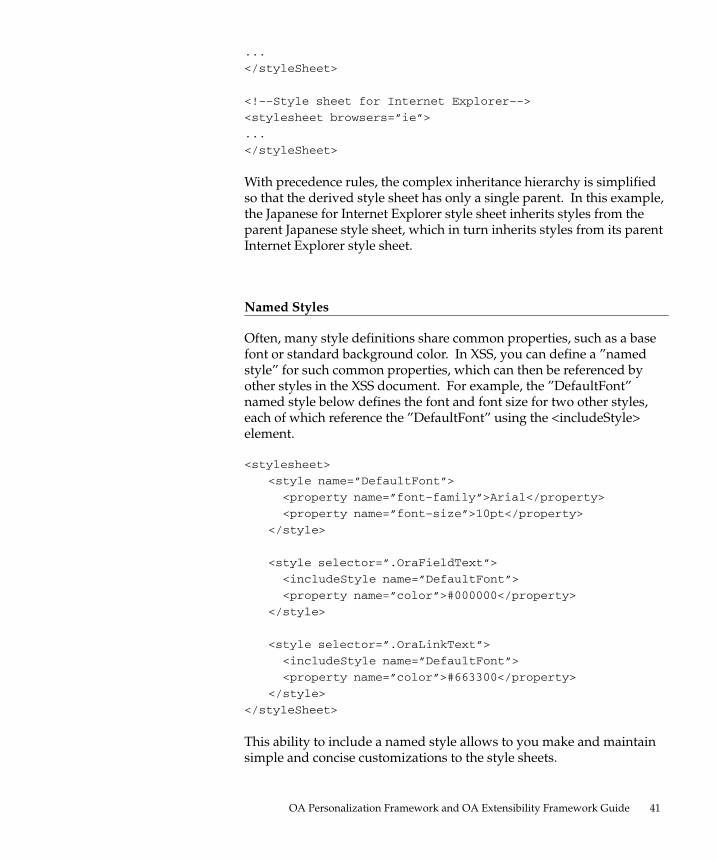
Named Styles
Often, many style definitions share common properties, such as a basefont or standard background color. In XSS, you can define a ”namedstyle” for such common properties, which can then be referenced byother styles in the XSS document. For example, the ”DefaultFont”named style below defines the font and font size for two other styles,each of which reference the ”DefaultFont” using the <includeStyle>element.
<stylesheet>
<style name=”DefaultFont”>
<property name=”font–family”>Arial</property>
<property name=”font–size”>10pt</property>
</style>
<style selector=”.OraFieldText”>
<includeStyle name=”DefaultFont”>
<property name=”color”>#000000</property>
</style>
<style selector=”.OraLinkText”>
<includeStyle name=”DefaultFont”>
<property name=”color”>#663300</property>
</style>
</styleSheet>
This ability to include a named style allows to you make and maintainsimple and concise customizations to the style sheets.

42 OA Personalization Framework and OA Extensibility Framework Guide
Custom Style Sheets in OA Framework
In OA Framework, style definitions for the look and feel of the OracleSelf–Service Web Applications are defined by the blaf.xss style sheetdocument. Specific Oracle Self–Service Web Applications products maymodify or extend those default styles to address product–specificrequirements for their audience. These product–specific styles aredefined in the oa.xss style sheet document, which includes blaf.xss.
As a customer, you may also want to modify existing styles in blaf.xss oroa.xss, or add new styles to suit your needs. Rather than directlymodify blaf.xss or oa.xss, you should place all your style sheetcustomizations in a style sheet document called custom.xss, located inOA_HTML/cabo/styles.
The content of the file is shown below. Be sure to edit only thosesections of the file designated for customizations.
<?xml versions=”1.0”?>
<styleSheetDocument xmlns=”http://...”>
<import href=”oa.xss”/>
<styleSheeet>
<!––Please start your customizations of the base stylesheet
here––>
<!––Please end your customizations of the base stylesheet
here––>
</styleSheet>
<!––Please start browser or platform specific style sheet
customizations here––>
<!––Please end browser or platform specific style sheet
customizations here––>
</styleSheetDocument>
As of version 5.5.2 and higher, OA Framework always calls custom.xssas its main style sheet. The document custom.xss uses the <import>element to include all the styles defined in oa.xss, as illustrated above.The document oa.xss, in turn, uses the <import> element to include allthe styles defined in blaf.xss.
The benefit of this hierarchy is that you can make customizations to”base” styles without altering base style definitions. In addition, if

43OA Personalization Framework and OA Extensibility Framework Guide
Oracle ever updates oa.xss or blaf.xss, your customizations tocustom.xss are preserved and automatically reflect any updates made tothe named styles that you include in your custom styles.
All style sheet documents reside under OA_HTML/cabo/styles.
Customizing the Font Family
One of the most common customizations you may wish to make to thelook and feel of the Oracle Self–Service Web Applications user interfaceis to modify the default font. Although blaf.xss defines many differentstyles that affect font properties, all these styles refer to a single namedstyle that defines the default font family.
<!–– The default font family ––>
<style name=”DefaultFontFamily”>
<property name=”font–family”>Arial, Helvetica, Geneva,
sans–serif</property>
</style>
As a result, if you wish to change the font family properties for all thestyles defined in blaf.xss, you need to make only a single style overridein custom.xss. For example, suppose you want to change the defaultfont family for all styles to the CSS ”serif” font family, but specify”Arial” as the font family for the .OraFieldText style. You would simplyedit custom.xss as follows:
<?xml versions=”1.0”?>
<styleSheetDocument xmlns=”http://...”>
<import href=”oa.xss”/>
<styleSheeet>
<!––Please start your customizations of the base stylesheet
here––>
<!–– Override DefaultFontFamily ––>
<style name=”DefaultFontFamily”>
<property name=”font–family”>serif</property>
</style>
<!–– Keep using Arial for .OraFieldText ––>
<style selector=”.OraFieldText”>
<property name=”font–family”>Arial</property>
</style>
<!––Please end your customizations of the base stylesheet
here––>
</styleSheet>
44 OA Personalization Framework and OA Extensibility Framework Guide
...
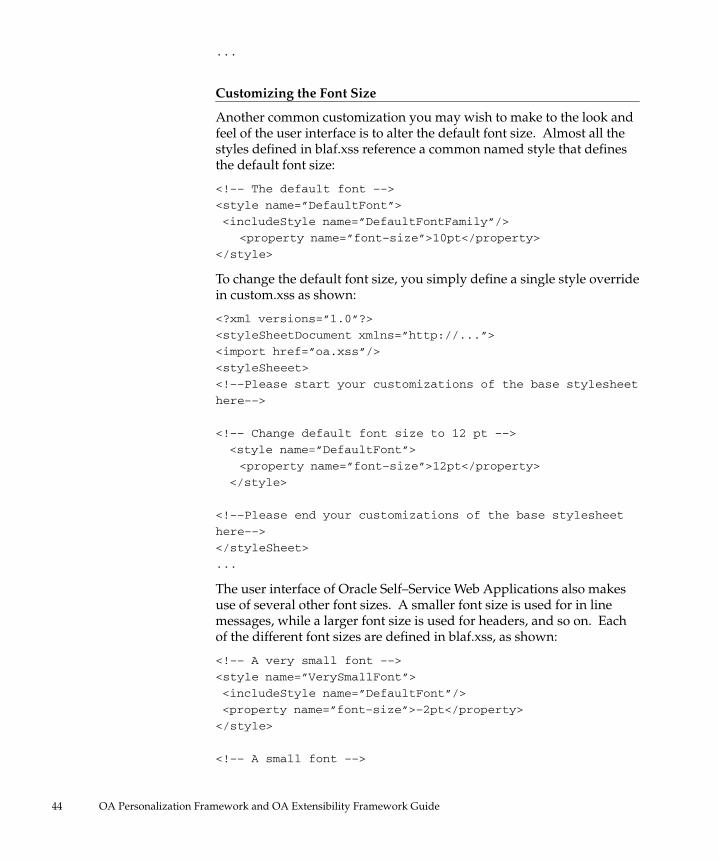
Customizing the Font Size
Another common customization you may wish to make to the look andfeel of the user interface is to alter the default font size. Almost all thestyles defined in blaf.xss reference a common named style that definesthe default font size:
<!–– The default font ––>
<style name=”DefaultFont”>
<includeStyle name=”DefaultFontFamily”/>
<property name=”font–size”>10pt</property>
</style>
To change the default font size, you simply define a single style overridein custom.xss as shown:
<?xml versions=”1.0”?>
<styleSheetDocument xmlns=”http://...”>
<import href=”oa.xss”/>
<styleSheeet>
<!––Please start your customizations of the base stylesheet
here––>
<!–– Change default font size to 12 pt ––>
<style name=”DefaultFont”>
<property name=”font–size”>12pt</property>
</style>
<!––Please end your customizations of the base stylesheet
here––>
</styleSheet>
...
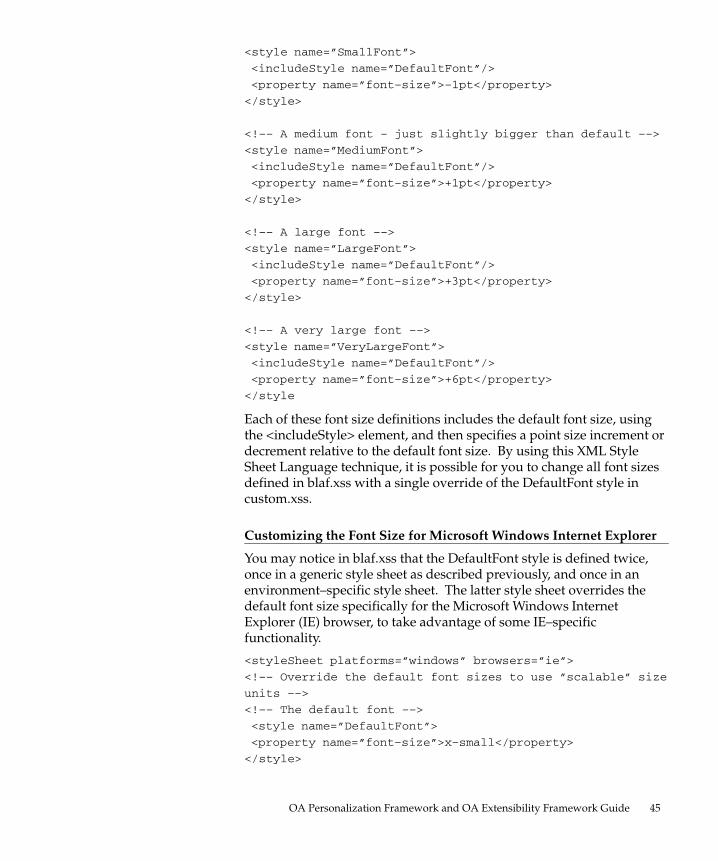
The user interface of Oracle Self–Service Web Applications also makesuse of several other font sizes. A smaller font size is used for in linemessages, while a larger font size is used for headers, and so on. Eachof the different font sizes are defined in blaf.xss, as shown:
<!–– A very small font ––>
<style name=”VerySmallFont”>
<includeStyle name=”DefaultFont”/>
<property name=”font–size”>–2pt</property>
</style>
<!–– A small font ––>
45OA Personalization Framework and OA Extensibility Framework Guide
<style name=”SmallFont”>
<includeStyle name=”DefaultFont”/>
<property name=”font–size”>–1pt</property>
</style>
<!–– A medium font – just slightly bigger than default ––>
<style name=”MediumFont”>
<includeStyle name=”DefaultFont”/>
<property name=”font–size”>+1pt</property>
</style>
<!–– A large font ––>
<style name=”LargeFont”>
<includeStyle name=”DefaultFont”/>
<property name=”font–size”>+3pt</property>
</style>
<!–– A very large font ––>
<style name=”VeryLargeFont”>
<includeStyle name=”DefaultFont”/>
<property name=”font–size”>+6pt</property>
</style
Each of these font size definitions includes the default font size, usingthe <includeStyle> element, and then specifies a point size increment ordecrement relative to the default font size. By using this XML StyleSheet Language technique, it is possible for you to change all font sizesdefined in blaf.xss with a single override of the DefaultFont style incustom.xss.
Customizing the Font Size for Microsoft Windows Internet Explorer
You may notice in blaf.xss that the DefaultFont style is defined twice,once in a generic style sheet as described previously, and once in anenvironment–specific style sheet. The latter style sheet overrides thedefault font size specifically for the Microsoft Windows InternetExplorer (IE) browser, to take advantage of some IE–specificfunctionality.
<styleSheet platforms=”windows” browsers=”ie”>
<!–– Override the default font sizes to use ”scalable” size
units ––>
<!–– The default font ––>
<style name=”DefaultFont”>
<property name=”font–size”>x–small</property>
</style>

46 OA Personalization Framework and OA Extensibility Framework Guide
<!–– A very small font ––>
<style name=”VerySmallFont”>
<property name=”font–size”>67%</property>
</style>
...
</styleSheet>
In particular, IE provides a text zooming feature that allows you to scaletext to a larger or smaller size, via the View –> Text Size menu. Thisfunctionality does not work with sizes specified in point units, but doeswork with sizes specified using the CSS ”absolute size” keywords.Hence, the IE–specific style sheet uses the ”x–small” keyword for itsdefault font size, which is rendered as 10 point text by default. The sizeis scalable, so the other font sizes defined for IE are specified as apercentage of the default font size.
To change the default font size for IE, you simply define a single styleoverride in a Microsoft Windows IE–specific style sheet in custom.xss asshown:
<?xml versions=”1.0”?>
<styleSheetDocument xmlns=”http://...”>
<import href=”oa.xss”/>
<styleSheeet>
<!––Please start your customizations of the base stylesheet
here––>
<!––Please end your customizations of the base stylesheet
here––>
</styleSheet>
<!––Please start browser or platform specific style sheet
customizations here––>
<styleSheet platforms=”windows” browsers=”ie”>
<!–– Change default font size to small ––>
<style name=”DefaultFont”>
<property name=”font–size”>small</property>
</style>
</styleSheet>
<!––Please end browser or platform specific style sheet
customizations here––>
47OA Personalization Framework and OA Extensibility Framework Guide
</styleSheetDocument>
Customizing Colors
The Oracle Browser Look and Feel standards make use of four colorsthat you may potentially want to change:
• Text foreground color—Color used for almost all text. The defaultis black.
• Text background color—Color used for almost all content. Thedefault is white.
• Core background color—This is the default blue color thatappears throughout the user interface. For example, the color isused as the background color for the selected link in the level onetab bar, as well as the background color of the global header andfooter. The file blaf.xss also derives a color ramp that includeslighter and darker shades based on the core background color.An example is the light blue foreground color for a selected linkin the level one tab bar.
• Accent background color—This is the default tan color thatappears through the user interface. For example, the color is usedas the background color for the unselected links in the level onetab bar. As with the core background color, blaf.xss derives acolor ramp based on the accent background color. For example,the dark brown foreground color used for hypertext links, as wellas the lighter yellow colors used for action button backgroundsare variations of the accent background color.
As is the case with fonts, blaf.xss uses the <includeStyle> element toshare the set of color–related named styles with other defined styles. Soif you wish to change the colors in the user interface, you need onlyoverride the following four named styles:
<!–– TextForeground is the (black) foreground color used
for almost all text in the Browser Look And Feel ––>
<style name=”TextForeground”>
<property name=”color”>#000000</property>
</style>
<!–– TextBackground is the (white) background color used
for almost all text in the Browser Look And Feel ––>
<style name=”TextBackground”>
<property name=”background–color”>#ffffff</property>
</style>
48 OA Personalization Framework and OA Extensibility Framework Guide
<!–– DarkBackground defines the primary color in the core
(blue) color ramp. All other colors in the core color ramp
are defined relative to the DarkBackground color. ––>
<style name=”DarkBackground”>
<property name=”background–color”>#336699</property>
</style>
<!–– DarkAccentBackground defines the primary color in the
accent (tan) color ramp. All other colors in the core
color ramp are defined relative to the DarkBackground
color. ––>
<style name=”DarkAccentBackground”>
<property name=”background–color”>#cccc99</property>
</style>
The ”DarkBackground” and ”DarkAccentBackground” styles define theprimary colors in the core and accent background color rampsrespectively.
If you decide to customize the colors for the user interface, you shouldtry to maintain the contrasts between the text foreground andbackground colors, as well as between the core and accent colors.
In general, try to select colors from the web safe color palette, as thesecolors have the most consistent results across the widest range ofbrowsers and platforms. The web safe color palette is a set of 216 colors,where each red, green, or blue component of that color is a multiple of51 (1, 51, 102, 153, 204, or 255) or #33 for hexadecimal values (#00, #33,#66, #99, #cc, or #ff).
Also consider, that when you select a new core or accent backgroundcolor, blaf.xss derives a ramp of lighter and darker shades from thatcolor. As a result, selecting very dark or very light color values mayresult in less distinction between various darker or lighter shades in thecolor ramp.
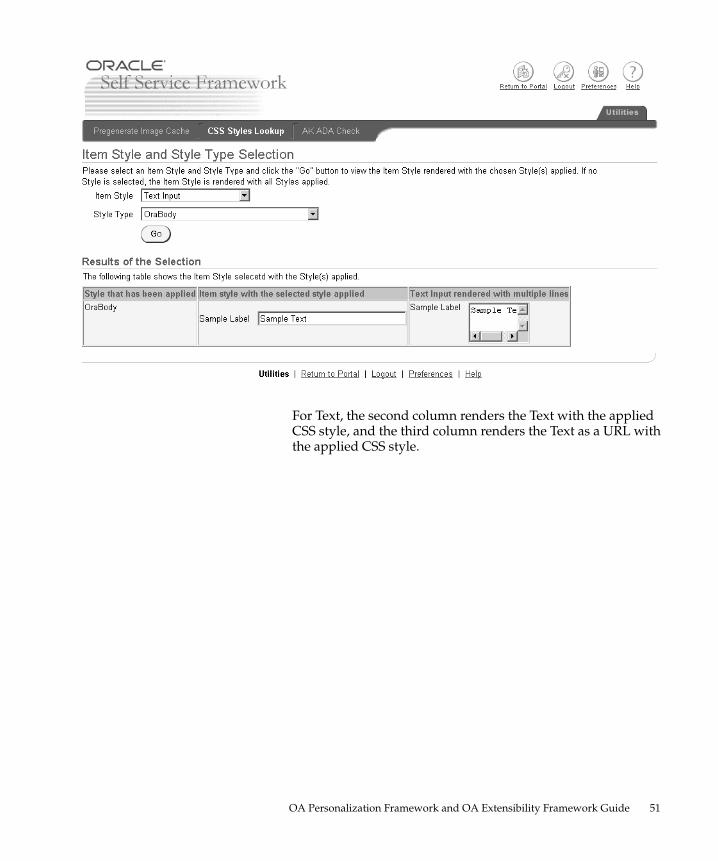
CSS Styles Lookup
In OA Framework version 5.6 and above, you can use a new interactiveuser interface called CSS Styles Lookup to preview a specific item styleapplied with a selected CSS Style. You should use CSS Style Lookup tosimulate the look and feel of an item style before making the actual CSSstyle change to your pages with OA Personalization Framework. See:Admin–Level Personalizations: page 7 and Advanced Settings: page 15.
49OA Personalization Framework and OA Extensibility Framework Guide
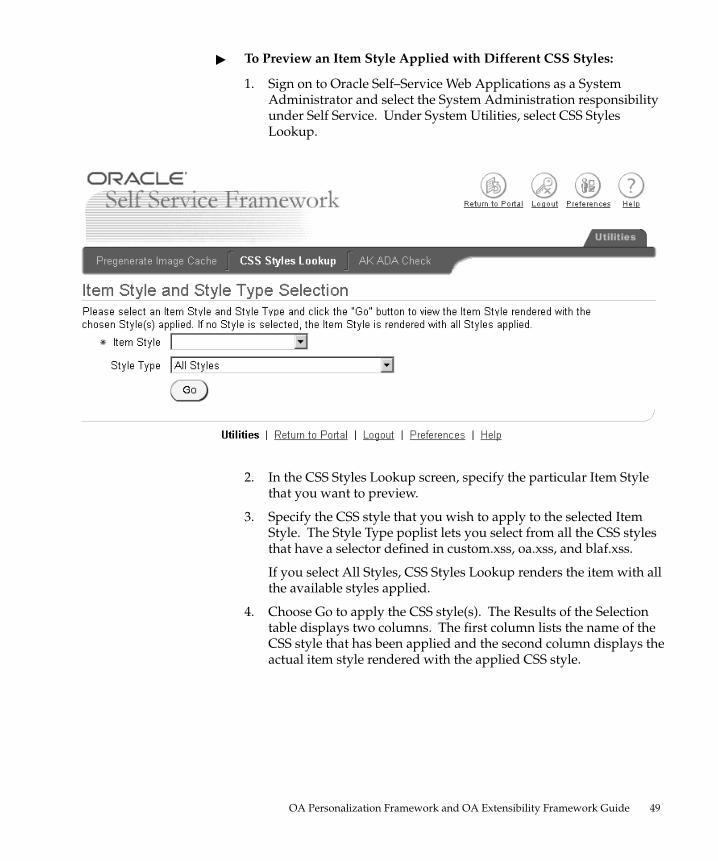
� To Preview an Item Style Applied with Different CSS Styles:
1. Sign on to Oracle Self–Service Web Applications as a SystemAdministrator and select the System Administration responsibilityunder Self Service. Under System Utilities, select CSS StylesLookup.
2. In the CSS Styles Lookup screen, specify the particular Item Stylethat you want to preview.
3. Specify the CSS style that you wish to apply to the selected ItemStyle. The Style Type poplist lets you select from all the CSS stylesthat have a selector defined in custom.xss, oa.xss, and blaf.xss.
If you select All Styles, CSS Styles Lookup renders the item with allthe available styles applied.
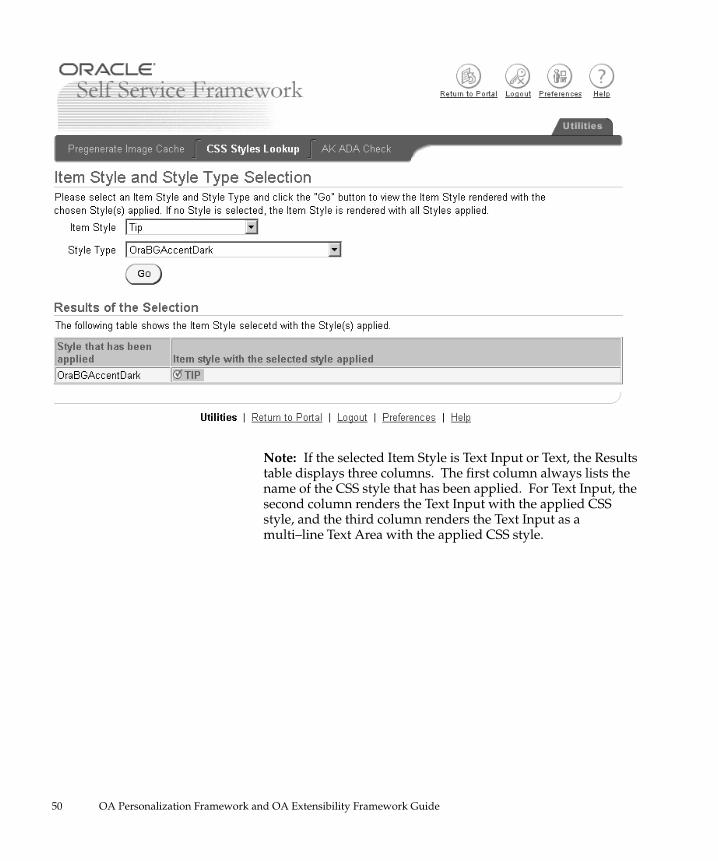
4. Choose Go to apply the CSS style(s). The Results of the Selectiontable displays two columns. The first column lists the name of theCSS style that has been applied and the second column displays theactual item style rendered with the applied CSS style.
50 OA Personalization Framework and OA Extensibility Framework Guide
Note: If the selected Item Style is Text Input or Text, the Resultstable displays three columns. The first column always lists thename of the CSS style that has been applied. For Text Input, thesecond column renders the Text Input with the applied CSSstyle, and the third column renders the Text Input as amulti–line Text Area with the applied CSS style.
51OA Personalization Framework and OA Extensibility Framework Guide
For Text, the second column renders the Text with the appliedCSS style, and the third column renders the Text as a URL withthe applied CSS style.

�
�
52 OA Personalization Framework and OA Extensibility Framework Guide
Attention: If you select a supported item style, such as NestedRegions, for which applying a CSS style is not relevant, thescreen displays the message ”Styles cannot be applied to theItem Style selected.” when you select Go.
Attention: If you select an unsupported item style, such asImage Button, the screen displays a message indicating that theWeb Bean style is not supported when you select Go.

�
53Appendix Template
OA Extensibility Framework
In OA Framework version 5.6 and above, you can use OA ExtensibilityFramework to declaratively add new items or fields to OracleSelf–Service Web Applications. OA Extensibility Framework is tightlyintegrated with OA Personalization Framework. Both OAConfiguration Framework and OA Extensibility Framework provideyou with a mechanism to personalize and extend your product whilemaintaining its upgradeability.
Since you can only add new items to a self–service application page atthe Admin–level, you need to first enable Admin–Level personalizationsfor your application by setting the ”Personalize Self–Service Defn”profile option to Yes. You then navigate to the Create/Update View forthe page you wish to personalize or extend, and then choose AdvanceSettings. See: Admin–Level Personalizations: page 7 andCreate/Update View UI: page 9.
The Advanced Settings page includes an Add New Item button. Selectthis button to navigate to a region where you can add new fields to yourpage, as well as edit or delete items you have created. See: AdvancedSettings: page 15.
Attention: A region is extensible in OA ExtensibilityFramework only if the developer sets the Add Indexed Childrenflag for that region.
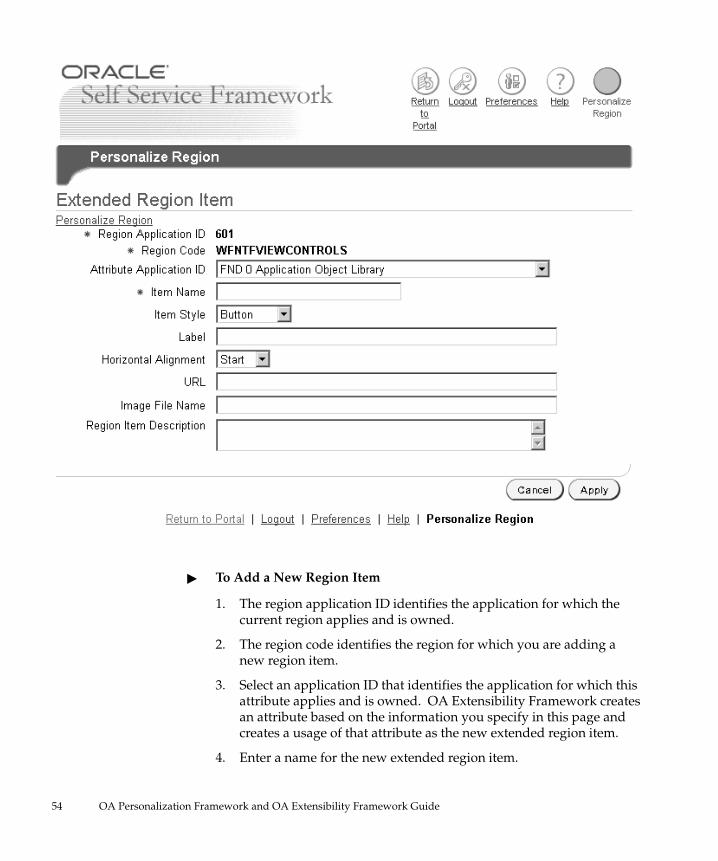
Adding a New Item
When you select Add New Item from the Advanced Settings screen, anew screen called Extended Region Item appears, that lets you define anew region item. Recall that a region item is a usage of an attribute in aregion. Properties of the region item are copied from the base attributethat the region item references. If an attribute does not exist, it iscreated. You can only add simple item styles, such as links, buttons, orfields not tied to a View Object.
54 OA Personalization Framework and OA Extensibility Framework Guide
� To Add a New Region Item
1. The region application ID identifies the application for which thecurrent region applies and is owned.
2. The region code identifies the region for which you are adding anew region item.
3. Select an application ID that identifies the application for which thisattribute applies and is owned. OA Extensibility Framework createsan attribute based on the information you specify in this page andcreates a usage of that attribute as the new extended region item.
4. Enter a name for the new extended region item.
55Appendix Template
5. Use the Item Style poplist to select the type of HTML User Interfaceobject that represents the data for the new extended item. The itemstyles that you may choose are:
• Button—A button represents an action that you can perform on aregion. OA Framework generates buttons as images thatrepresent the underlying function.
• Images—An image can be a plain image that simply appears onthe page, or can have a URL associated with it so that the user canclick on it to navigate elsewhere. Although icon images aregenerally used as global buttons in Oracle Self–Service WebApplications, an icon image may also be used next to text tovisually quantify its content, as in the case of tips, or in linemessages
• Raw Text—Any type of text. For example, the raw text styleallows you to enter HTML tags to display text in bold.
• Reset Button—A button that resets the values in a page.
• Separator—A line to separate portions of a region. By default, theseparator is rendered as a blue dotted line.
• Spacer—A space that you can include in a region to improve theappearance of its layout.
• Static Text—Text that is for display only and not for editingpurposes. For example, if you wish to create a URL link, youwould define its item style as static text.
• Text—A text field that can be updated and have a default value.
• Tip—Text that provides a tip about the contents of the region.When you select Tip as the Item Style, and then select Apply aftercompleting the remainder of the Extended Region Item page, youreturn to Advanced Settings. In the Advanced Settings page, youcan then specify the Tip Type and Tip Message name for the Tipregion item.
6. Enter a label for the extended region item. The value you enter getsdisplayed as the label of the region item. For example, if the itemstyle of your region is Button, the label appears as the button label.
7. Specify the horizontal and vertical alignment of the region item. Ahorizontal alignment of Start results in left alignment for languagesthat read left to right or in right alignment for languages that readright to left.
8. Specify a URL if your region item style is an Image, and you want tonavigate to another URL when your user clicks on the image.

�
56 OA Personalization Framework and OA Extensibility Framework Guide
Note: If you want to navigate to some arbitrary URL from thisregion item, you should specify the following in the URLdefinition field:
<protocol>://<machine>:<port>/...
For example:
http://www.abcompany.com/home/page1.htm
Note: If you want to call an Oracle Applications function, omitthe protocol://machine:port specification in the URL, and onlyenter OA.jsp? and the syntax that follows as shown below. OAFramework automatically prepends the correct syntax for theOA_HTML directory path so that your function runs properly.Enter the following in the URL definition field:
OA.jsp?OAFunc=<Apps function you want to call>
For example, to call the PL/SQL General Preferences page froman OA Framework page, you would enter the following in theURL definition:
OA.jsp?OAFunc=ICX_USER_PREFERENCES
9. If your region item style is Image, specify filename of your imagefile. Do not include any path information, as all image files mustreside in OA_MEDIA.
10. Enter a description for your region item.
11. Choose Apply to create the new extended region item. The newextended region item should now appear in the Advanced Settingsscreen.
12. If you are the creator of the extended region item, you can select theEdit Item or Delete Item column icons in the Advanced Settingspage to edit or delete the region item. If you are not the owner ofthe extended region item, or the region item is not created from OAExtensibility Framework, the Edit Item and Delete Item icons aredisabled.
The Edit Item icon takes you back to the Extended Region Item pagewhere you can update the information for a region item.
Attention: A region item that you add using the ExtendedRegion Item page can be customized at Admin–levels that arelower than the Admin–level at which it was added. See: OAPersonalization Framework: page 2
Example: Extending the Advanced Worklist Page
OA Extensibility Framework provides you with the ability to add newitems to a personalizable region. Note that this capability also enables
�
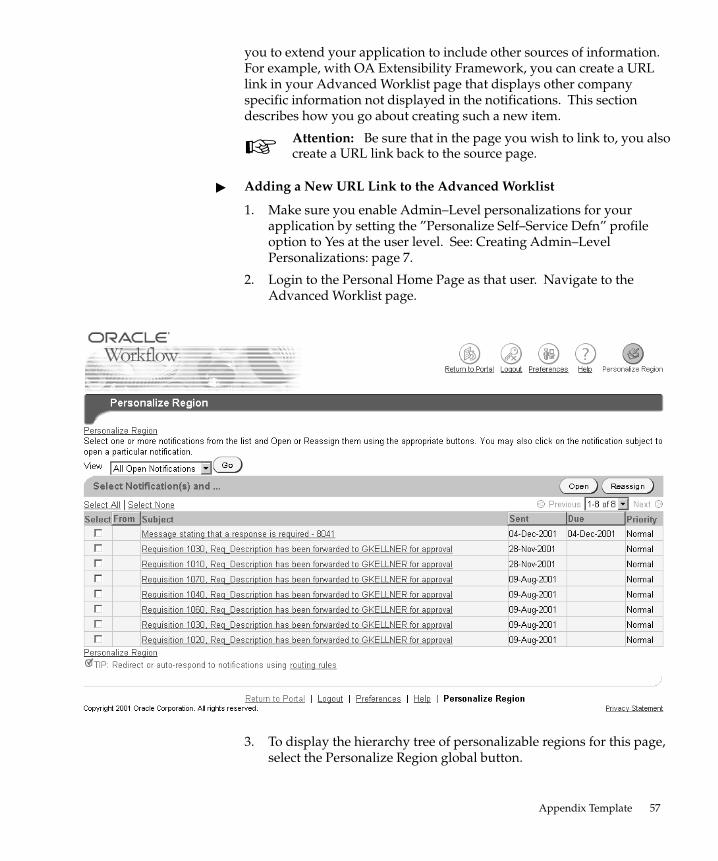
57Appendix Template
you to extend your application to include other sources of information.For example, with OA Extensibility Framework, you can create a URLlink in your Advanced Worklist page that displays other companyspecific information not displayed in the notifications. This sectiondescribes how you go about creating such a new item.
Attention: Be sure that in the page you wish to link to, you alsocreate a URL link back to the source page.
� Adding a New URL Link to the Advanced Worklist
1. Make sure you enable Admin–Level personalizations for yourapplication by setting the ”Personalize Self–Service Defn” profileoption to Yes at the user level. See: Creating Admin–LevelPersonalizations: page 7.
2. Login to the Personal Home Page as that user. Navigate to theAdvanced Worklist page.
3. To display the hierarchy tree of personalizable regions for this page,select the Personalize Region global button.

58 OA Personalization Framework and OA Extensibility Framework Guide
4. Follow the appropriate screens to personalize the region at the Sitelevel. See: Admin–Level Personalizations: page 7.
5. A hierarchy tree of the regions appear on the left side of the screen.Choose the top level region called Notifications as the region topersonalize.

59Appendix Template
6. Select the Advanced Settings button.
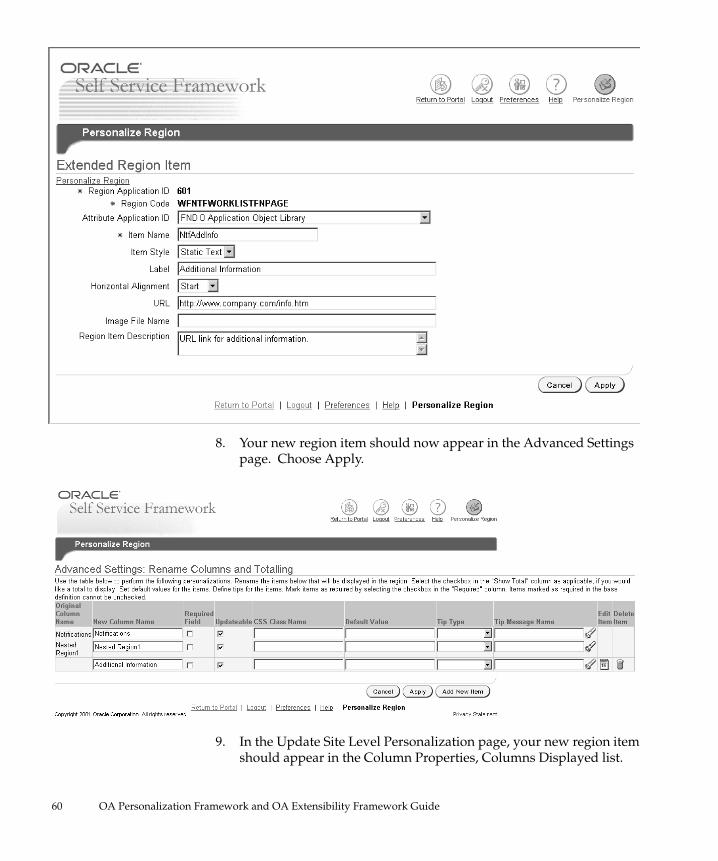
7. Choose Add New Item. In the Extended Region Item page thatappears, specify an Item Name such as NtfAddInfo, specify an ItemStyle of Static Text, enter a Label such as Additional Information, setthe Horizontal Alignment to Start, enter a URL that you want yourlink to access, and enter an optional region item description.Choose Apply when you are done.
Note: If you want to navigate to some arbitrary URL from thisregion item, you should specify the following in the URLdefinition field:
<protocol>://<machine>:<port>/...
For example:
http://www.abcompany.com/home/page1.htm
Note: If you want to call an Oracle Applications function, omitthe protocol://machine:port specification in the URL, and onlyenter OA.jsp? and the syntax that follows as shown below. OAFramework automatically prepends the correct syntax for theOA_HTML directory path so that your function runs properly.Enter the following in the URL definition field:
OA.jsp?OAFunc=<Apps function you want to call>
For example, to call the PL/SQL General Preferences page froman OA Framework page, you would enter the following in theURL definition:
OA.jsp?OAFunc=ICX_USER_PREFERENCES
60 OA Personalization Framework and OA Extensibility Framework Guide
8. Your new region item should now appear in the Advanced Settingspage. Choose Apply.
9. In the Update Site Level Personalization page, your new region itemshould appear in the Column Properties, Columns Displayed list.
61Appendix Template
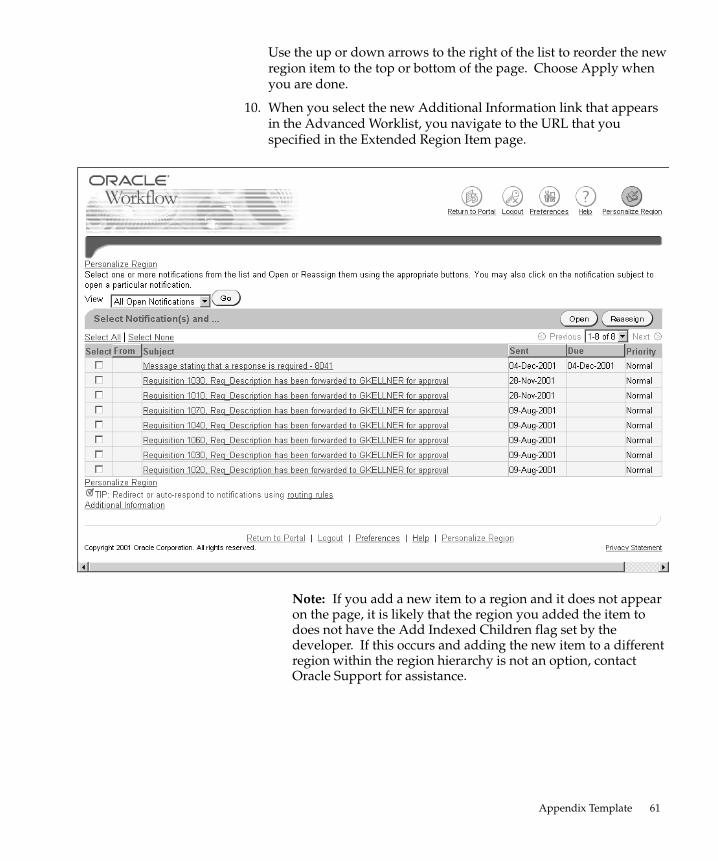
Use the up or down arrows to the right of the list to reorder the newregion item to the top or bottom of the page. Choose Apply whenyou are done.
10. When you select the new Additional Information link that appearsin the Advanced Worklist, you navigate to the URL that youspecified in the Extended Region Item page.
Note: If you add a new item to a region and it does not appearon the page, it is likely that the region you added the item todoes not have the Add Indexed Children flag set by thedeveloper. If this occurs and adding the new item to a differentregion within the region hierarchy is not an option, contactOracle Support for assistance.
62 OA Personalization Framework and OA Extensibility Framework Guide
Example: Adding New Instruction Text to a Page
OA Extensibility Framework lets you provide additional instructionaltext for your users in the form of tips. This section describes how yougo about creating such a new item.
� Adding Page–Level Instruction Text to a Region
1. Make sure you enable Admin–Level personalizations for yourapplication by setting the ”Personalize Self–Service Defn” profileoption to Yes at the user level. See: Creating Admin–LevelPersonalizations: page 7.
2. Login to the Personal Home Page as that user. Navigate to the pagein which you want to add new instruction text.
3. Select the Personalize Region global button in the upper right cornerof the screen.
4. Follow the appropriate screens to personalize the region at the Sitelevel. See: Admin–Level Personalizations: page 7.
5. A hierarchy tree of the regions appear on the left side of the screen.Choose the top level page layout region as the region to personalize.
6. Select the Advanced Settings button.
7. Choose Add New Item. In the Extended Region Item page thatappears, specify an Item Name such as HRPageTip, specify an ItemStyle of Tip, and enter a Label such as HR Page Tip. Choose Applywhen you are done.
8. Your new region item should now appear in the Advanced Settingspage. In the Advanced Settings page, for the new region item youadded, select the tip type of Short Tip and then select the TipMessage Name you would like to use as the basis for the tip help forthat item. Choose Apply.
9. In the Update Site Level Personalization page, your new region itemshould appear in the Column Properties, Columns Displayed list.Use the top up arrow control to the right of the list to move the HRPage Tip to the top of the page. Choose Apply when you are done.
10. You should now see the new tip message at the top of the page.
Note: If you add a new item to a region and it does not appearon the page, it is likely that the region you added the item todoes not have the Add Indexed Children flag set by thedeveloper. If this occurs and adding the new item to a differentregion within the region hierarchy is not an option, contactOracle Support for assistance.
Related Documents