IMPORTANT HELPFUL HINTS & TIPS OPERATING INSTRUCTIONS MANUAL “NSF CERTIFIED TO THE ASTM SAFETY SPECIFICATION F 2208” “SAFETY BUOY” ABOVE GROUND POOL ALARM MODEL PGRM-SB 85dB Horn at 10 Feet This product has been designed to aid in the detection of unwanted intrusions into unsupervised pools. POOLGUARD IS A SAFETY ALARM SYSTEM AND NOT A LIFE SAVING DEVICE. “This device is not intended to replace any other safety consideration - i.e., adult supervision, lifeguards, fences, gates, pool covers, locks, etc., and some devices may not detect gradual entry.” READ THOROUGHLY BEFORE USING ALARM

Welcome message from author
This document is posted to help you gain knowledge. Please leave a comment to let me know what you think about it! Share it to your friends and learn new things together.
Transcript

IMPORTANT
HELPFUL HINTS & TIPS
OPERATING INSTRUCTIONSMANUAL
“NSF CERTIFIED TO THE ASTM SAFETY SPECIFICATION F 2208”
“SAFETY BUOY” ABOVE GROUND POOL ALARM MODEL PGRM-SB
85dB Horn at 10 Feet
This product has been designed to aid in the detection of unwanted intrusions into unsupervised pools. POOLGUARD IS A SAFETY ALARM SYSTEM AND NOT A LIFE SAVING DEVICE. “This device is not intended to replace any other safety consideration - i.e., adult supervision, lifeguards, fences, gates, pool covers, locks, etc., and some devices may not detect gradual entry.”
READ THOROUGHLY BEFORE USING ALARM
PG Buoy Manual 5.5x8.5 031116.indd 1 3/22/16 2:02 PM
CERTIFICATION
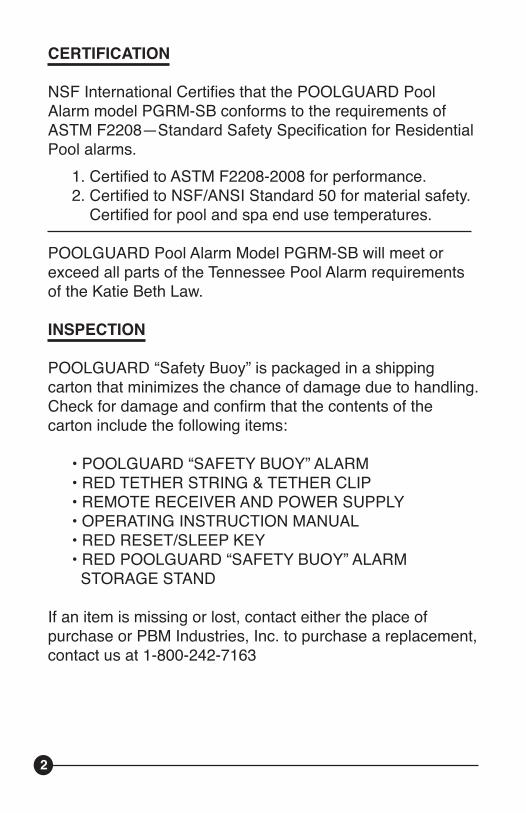
NSF International Certifies that the POOLGUARD Pool Alarm model PGRM-SB conforms to the requirements of ASTM F2208—Standard Safety Specification for Residential Pool alarms. 1. Certified to ASTM F2208-2008 for performance. 2. Certified to NSF/ANSI Standard 50 for material safety. Certified for pool and spa end use temperatures.
POOLGUARD Pool Alarm Model PGRM-SB will meet or exceed all parts of the Tennessee Pool Alarm requirements of the Katie Beth Law.
INSPECTION
POOLGUARD “Safety Buoy” is packaged in a shipping carton that minimizes the chance of damage due to handling. Check for damage and confirm that the contents of the carton include the following items:
• POOLGUARD “SAFETY BUOY” ALARM • RED TETHER STRING & TETHER CLIP • REMOTE RECEIVER AND POWER SUPPLY • OPERATING INSTRUCTION MANUAL • RED RESET/SLEEP KEY • RED POOLGUARD “SAFETY BUOY” ALARM STORAGE STAND
If an item is missing or lost, contact either the place of purchase or PBM Industries, Inc. to purchase a replacement, contact us at 1-800-242-7163
2 19
QUICK DO’S AND DON’TS• Do read the manual carefully
• Do install a 9 volt battery
• Do untie the bow on the power supply
• Do test the alarm properly
• Do turn your return line eyeball fittings towards the bottom of the pool
• Do use the red storage stand
• Do remove alarm before swimming
• DON’T leave alarm in pool while swimming
• DON’T drop your alarm, it may break
• DON’T attach your alarm to a pool ladder
• DON’T install your alarm immediately after swimming
• DON’T turn your return eyeball fittings towards the top of the pool
• DON’T use your alarm on extremely windy days
• DON’T lay the alarm on the ground
PG Buoy Manual 5.5x8.5 031116.indd 2 3/22/16 2:02 PM

CARE AND HANDLING
POOLGUARD “Safety Buoy” is constructed to withstand the adverse moisture environment of a swimming pool. Care needs to be taken when handling your alarm and be sure to remove the alarm when the pool is being used and place it on the Red “Safety Buoy” Alarm Storage Stand. Remember to always remove the alarm from the pool before swimming.CAUTION: KEEP THE RED RESET/SLEEP KEY OUT OF THE REACH OF CHILDREN. INTERNAL MAGNET MAY BE HARMFUL IF SWALLOWED!
OPERATING YOUR ALARM
RESET/ SLEEP MODE (See Figure 1)
RESET: When the pool unit is installed in the pool and the horn is sounding; place the red reset/sleep key on the reset/sleep decal to silence the alarm. The alarm is now monitoring your pool for intrusion.
SLEEP MODE: When the pool unit is removed from the pool and the horn is sounding; place the red reset/sleep key on the reset/sleep decal for 3-4 seconds to activate sleep mode and silence the alarm, place the alarm on its storage stand. Note: The horn will sound if the Sensor Assembly is moved. The pool unit will automatically wake up when it is installed in the pool.
SILENT INSTALLATION AND REMOVAL FEATURE: The POOLGUARD system will sound an alarm (Horn will sound) when you install or remove the pool unit from your pool. If you would like the POOLGUARD system not to sound (Horn will not sound) when you install or remove the pool unit from your pool. Follow these directions.
18 3continued page 4
NOTES
PG Buoy Manual 5.5x8.5 031116.indd 3 3/22/16 2:02 PM

1. SILENT INSTALLATION (HORN WILL NOT SOUND) Hold the red reset/sleep key on the reset/sleep decal for 1 second until you hear the pool units horn beep. Remove the red reset/sleep key, you now have 10 seconds to install the pool unit into your pool without the horn sounding. AFTER 10 SECONDS THE POOL UNITS HORN WILL BEEP INDICATING THAT POOLGUARD IS NOW MONITORING YOUR POOL FOR AN INTRUSION. IF THE POOL UNITWAS NOT INSTALLED INTO YOUR POOL, IT WILL GO TO SLEEP.*
2. SILENT REMOVAL (HORN WILL NOT SOUND)Before removing the pool unit from your pool, place the red reset/sleep key on the reset/sleep decal for 1 second until you hear the pool units horn beep. Remove the red reset/sleep key, you now have 5 seconds to remove the pool unit from your pool without the horn sounding. AFTER 5 SECONDS THE POOL UNITS HORN WILL BEEP. IMPORTANT: IF THE POOL UNIT WAS REMOVED FROM YOUR POOL, THE POOL UNIT WILL GO TO SLEEP. BE SURE TO STORE YOUR ALARM ON THE RED STORAGE STAND. IF THE POOL UNIT WAS NOT REMOVED FROM YOUR POOL, IT WILL CONTINUE TO MONITOR YOUR POOL FOR AN INTRUSION.
3. POOLGUARD has designed this feature for “ONLY” those who have the responsibility of removing the alarm from the pool!
STORING YOUR ALARM (See Figure 1)
Always use the Red “Safety Buoy” Storage Stand to hold the “Safety Buoy” alarm when it’s not in the pool. Do not lay the alarm on its side, this could cause the alarm to sound and increase the chances of damage. Use the Storage Stand to hold the alarm when installing the battery. Only use the storage stand on a hard flat surface and in a location where it cannot be stepped on or damaged.
ALARM WILL NOT SOUND
CHECK THE CONNECTION BETWEEN THE BATTERY AND THE BATTERY SNAP. If you are testing and it does not alarm, be sure you are testing properly; putting your feet in the pool, splashing with your hands, making waves with a leaf skimmer, or dropping something into the pool that does not have the proper size, weight and volume WILL NOT SET THE POOLGUARD ALARM OFF! Testing is very important and should be done correctly. BE SURE YOUR RETURN LINE EYEBALL FITTING IS POINTING DOWN.
REMOTE RECEIVER
The only thing that can put the remote receiver into the alarm mode is the poolside unit. It sends a coded RF (Radio Frequency) message from the poolside unit to the in-house remote receiver. When the unit at the pool alarms, the remote receiver will sound. Maximum Range for the remote is 200 feet from the poolside unit. Avoid placing the remote in basements or around metal walls. Be sure that the red light on the remote is on. Remember the poolside unit must be beeping (alarming) for the remote to work. If your remote receiver is not getting a clear signal or no signal from the poolside unit, try the following: Before plugging in the remote power supply, be sure to stretch out the cord; do not leave it tied in a bow as packaged. Your Remote Receiver is similar to a small portable radio. If your remote is not sounding when the poolside unit is sounding-move the remote to different locations, and stand back for a few seconds for the remote to pick up the signal. You may only have to move your remote a little to the left or right to bring in the signal-in some cases you might have to move the remote to a different location or another room. If you cannot get a signal on your remote Call Customer Service at 1-(800) 242-7163.
4 17
PG Buoy Manual 5.5x8.5 031116.indd 4 3/22/16 2:02 PM

HELPFUL HINTS AND TROUBLESHOOTING
POWER SUPPLYREMOTE RECEIVER
FALSE ALARMS
All pool alarms will false alarm on occasion for different reasons. False alarms can be minimized; however, it is important to remember that a false alarm is better than no alarm at all. WEATHER & WIND may trigger a false alarm if it is strong enough or steady enough that it causes the water in the pool to rock or bounce up and down the pool wall. On extremely windy days when the pool water is rocking it is advised to remove the alarm from the pool and place on it’s storage stand. LIGHT WIND OR RAIN WILL NOT EFFECT THE POOLGUARD ALARM. Another false alarm occurs when the pool owner tries to install the alarm too soon after swimming. After swimming, the water in the pool will rock or bounce up and down the pool wall for some time depending on the size of the pool and the type of swimming activity. Before installing the alarm, after swimming, the pool must be given time to calm. Time will vary (around 10 to 30 minutes); once the pool owner sees that the pool water is no longer rocking up and down the pool wall, it is time to install the alarm. Certain automatic cleaners may set thePOOLGUARD unit off in some cases. If the cleaner head or the cleaner hose hits the POOLGUARD alarm it may cause it to false alarm. Solutions to this problem are to use your cleaner at night and your alarm during the day. Another option would be to find a place around the pool where the cleaner does not interfere with the alarm. Certain water features such as waterfalls can cause POOLGUARD to false alarm. To avoid this problem do not install the POOLGUARD alarm too close to the water feature. If you are having a problem with any type of water feature call POOLGUARD at 1-800-242-7163.
Green LED
Reset/Sleep Decal
Black Nut
Black Screw
Floating Platform
Sensor ProbeSensor Assembly
Sensor Clip
Mounting Base
Red Alarm Storage Stand
Red Buoy Housing
FIGURE 1
16 5
PG Buoy Manual 5.5x8.5 031116.indd 5 3/22/16 2:03 PM

BATTERY INSTALLATION/ REPLACEMENT
(Battery not included)POOLGUARD “Safety Buoy” is powered by a standard 9 volt alkaline battery. POOLGUARD recommends Energizer Brand No. 522 standard 9 volt battery. Follow these steps to install or replace the battery: 1. Place the ‘Safety Buoy” on its Storage Stand and remove the four (4) black screws/nuts holding the red buoy housing to the mounting base. (See Figure 1) 2. Lift the red buoy housing off of the mounting base to expose the circuit board and allow you access to the battery compartment, do not pull or jerk on the internal hookup cable, or bend the antenna. (See Figure 2) 3. Install the battery by attaching the battery snap to the battery terminals (BE SURE THE CONNECTION IS TIGHT) IMPORTANT: This will cause the horn to sound. To silence the alarm, put the alarm into sleep mode by holding the Red Reset/Sleep Key for 3-4 seconds close to the end of the circuit board that the Reset/ Sleep Arrow on the mounting base points towards. (See Figure 2). 4. Place battery in battery holder and snap into place, the battery should be secure. If you are replacing a old battery, clean any leakage or corrosion before installing a new battery. 5. Re-assemble the alarm by matching up the reset/sleep decal on the red buoy housing to the reset/ sleep arrow on the mounting base (DO NOT PINCH INTERNAL HOOKUP CABLE, OR BEND THE ANTENNA). Reinstall the four (4) black screws and nuts, do not over tigthen. • To prevent possible damage, battery should be removed whenever storing the alarm for an extended period of time.
WARRANTY AND REPAIRS
POOLGUARD is sold with a limited warranty to cover defects in parts and workmanship for one year from date of purchase, (retain proof of purchase).
If POOLGUARD exhibits a defect, please call Customer Service at 1-800-242-7163. Unauthorized returns will not be accepted. Proper repair is only ensured when the unit is returned to the manufacturer. Visit our website at www.poolguard.com to fill out your warranty registration information. The model number and serial number are located on the back of the remote receiver.
SEND CORRESPONDENCE TO:
P.O. BOX 658, NORTH VERNON, IN 472651-800-242-7163
REV. 3/2016
This product has been designed to aid in the detection of unwanted intrusions into unsupervised pools.POOLGUARD IS A SAFETY ALARM SYSTEM AND NOT A LIFE SAVING DEVICE. “This device is not intendedto replace any other safety consideration - i.e., adult supervi-sion, lifeguards, fences, gates, pool covers, locks, etc.,and some devices may not detect gradual entry.”
6 15
PG Buoy Manual 5.5x8.5 031116.indd 6 3/22/16 2:03 PM
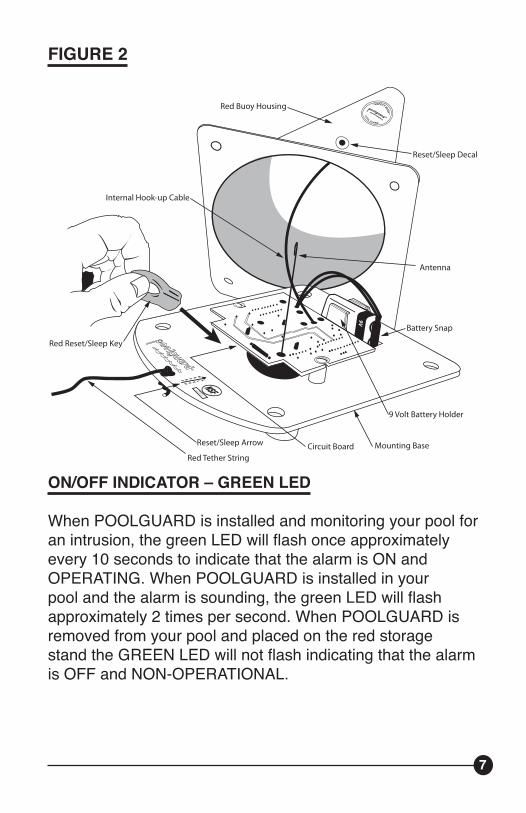
ON/OFF INDICATOR – GREEN LED
When POOLGUARD is installed and monitoring your pool for an intrusion, the green LED will flash once approximately every 10 seconds to indicate that the alarm is ON and OPERATING. When POOLGUARD is installed in your pool and the alarm is sounding, the green LED will flash approximately 2 times per second. When POOLGUARD is removed from your pool and placed on the red storage stand the GREEN LED will not flash indicating that the alarm is OFF and NON-OPERATIONAL.
SWIMMING POOL SAFETY TIPS
• Supervise children at all times. • Never permit swimming alone. Never leave a child alone, even to answer the telephone. • Always remove the entire solar cover from a pool before swimming. • Remember that alcohol and water safety do not mix. • Have your pool area fenced and the gate locked to prevent unauthorized entry to the pool,and install a gate alarm. • Lock and secure all doors in the house which permit easy access to the pool,and install a door alarm. • Have a responsible adult teach swimming and water safety to your children. • Maintain clean,clear water in the pool. • Do not swim during electrical storms. • Do not permit bottles,glass,or sharp objects to be used around the pool. • Ask your pool dealer how you can improve your pool safety—they will be glad to assist you. • Above all: remember that common sense, awareness, and caution will allow you to enjoy your pool.
FIGURE 2
14 7
PG Buoy Manual 5.5x8.5 031116.indd 7 3/22/16 2:03 PM

LOW BATTERY FUNCTION
The POOL UNIT AND THE REMOTE RECEIVER will beep once approximately every 10 seconds to alert you that the 9 volt battery is low in the pool unit and needs replaced
PLACEMENT IN YOUR POOL
POOLGUARD “SAFETY BUOY” automatically compensates for variations in your pools water level.
Figure 3 illustrates locations best suited for detecting intru-sions from any area of the pool. POOLGUARD “SAFETY BUOY” model PGRM-SB is designed to work with Above Ground pools up to 30’ in diameter and up to 18’X36’, and is ideal for Spas. If your pool is larger than this, or if you have an irregular shaped pool or water features such as water-falls, please call customer service to clarify the recommend-ed number of alarms and locations for alarms.
Call customer service at 1-800-242-7163. POOLGUARD Pool Alarms have been tested and comply with the ASTM Standard Specifications for Residential Pool Alarms ASTM F 2208, in a 16’X 32’ pool.
• The “SAFETY BUOY” ALARM should not be placed too close to a pool water return line. If your return line has an eyeball fitting, this must be pointing down, (See Figure 4).
replaced. After you have purchased your POOLGUARD alarm and you wish to add another remote receiver to your alarm system you can acquire one from PBM Industries, Inc. Contact PBM by phone or mail or contact your place of purchase.
POWER SUPPLY
REMOTE RECEIVER
85dB Horn at 10 feet
FIGURE 5
TO OPERATE YOUR REMOTE RECEIVER
Try to locate your REMOTE RECEIVER in a convenient part of your house close to the pool. Avoid steel walls or any other large metal objects or obstructions that might interfere with the signal reception. The REMOTE RECEIVER has to be placed on the same level or a level above the pool in the house (do not place receiver in an underground basement).The ideal location for your REMOTE RECEIVER would be by a window overlooking your pool. Test your REMOTE RECEIVER in different locations in your house to find the best working place for your receiver. Connect the power supply to any 120V, electrical outlet and insert the jack into the receiver. Check that indicator light is on. Your REMOTE RECEIVER unit is now ready to receive a transmission from your POOLGUARD unit. DO NOT USE YOUR REMOTE RECEIVER OUTDOORS.
NOTE: THE MANUFACTURER IS NOT RESPONSIBLE FOR ANY RADIO OR TV INTERFERENCE CAUSED BY UNAUTHORIZED MODIFICATIONS TO THIS EQUIPMENT. SUCH MODIFICATIONS COULD VOID THE USER’S AUTHORITY TO OPERATE THE EQUIPMENT.
8 13
PG Buoy Manual 5.5x8.5 031116.indd 8 3/22/16 2:03 PM
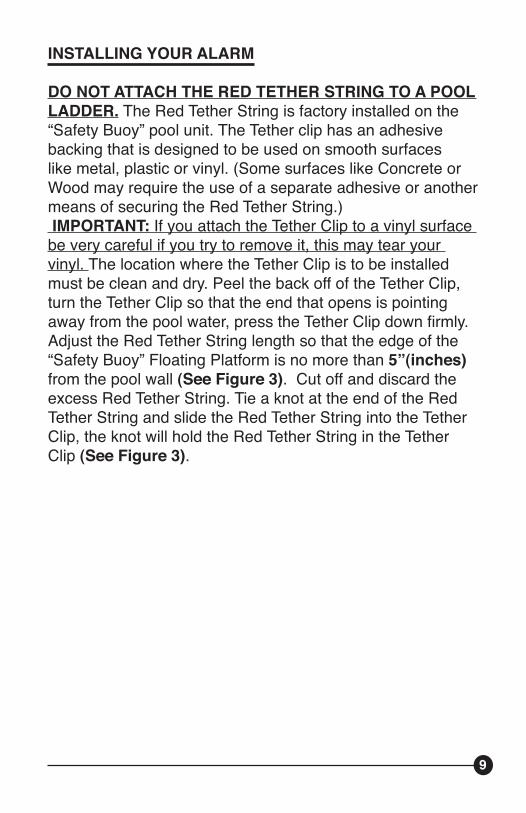
INSTALLING YOUR ALARM
DO NOT ATTACH THE RED TETHER STRING TO A POOL LADDER. The Red Tether String is factory installed on the “Safety Buoy” pool unit. The Tether clip has an adhesive backing that is designed to be used on smooth surfaces like metal, plastic or vinyl. (Some surfaces like Concrete or Wood may require the use of a separate adhesive or another means of securing the Red Tether String.) IMPORTANT: If you attach the Tether Clip to a vinyl surface be very careful if you try to remove it, this may tear your vinyl. The location where the Tether Clip is to be installed must be clean and dry. Peel the back off of the Tether Clip, turn the Tether Clip so that the end that opens is pointing away from the pool water, press the Tether Clip down firmly. Adjust the Red Tether String length so that the edge of the “Safety Buoy” Floating Platform is no more than 5”(inches) from the pool wall (See Figure 3). Cut off and discard the excess Red Tether String. Tie a knot at the end of the Red Tether String and slide the Red Tether String into the Tether Clip, the knot will hold the Red Tether String in the Tether Clip (See Figure 3).
POOLGUARD REMOTE RECEIVER
The POOLGUARD REMOTE RECEIVER has been integrated with the standard POOLGUARD unit to provide a wireless remote alert operating at distances of up to 200 feet. The POOLGUARD REMOTE RECEIVER sounds an alarm in the house when the POOLGUARD unit is activated at the pool. The remote system consists of the following functional elements: • A coded pulse receiver (Remote Receiver), (See Figure 5). • A standard wall outlet power supply, (See Figure 5).The REMOTE RECEIVER is a compact unit powered by a UL and CSA approved AC/DC power supply. The REMOTE RECEIVER can be placed on a table or a counter top inside the house. The pulse coded radio frequency signal is transmitted from the pool unit and is received and decoded to sound the remote receiver. The remote receiver will sound for an additional 3 seconds after the pool unit has been silenced. If the REMOTE RECEIVER beeps once approximately every 10 seconds,it is indicating that the 9v battery in the pool unit is low and needs to be
FIGURE 4
continued page 1312 9
PG Buoy Manual 5.5x8.5 031116.indd 9 3/22/16 2:03 PM

TEST BEFORE USING
To ensure effectiveness, test “Safety Buoy” every time you place it into the pool by performing the following procedure: • “SAFETY BUOY” DOES NOT HAVE AN ON/OFF SWITCH When the alarm is in the pool it is always in the ON position and cannot be turned off. The on/off indicator Green LED will flash approximately every 10 seconds to let you know your alarm is on and operational.
• To test your alarm, push an object of appropriate volume and weight off the top edge/rail at the farthest location from the alarm. (A four (4) gallon jug of water or 3-one (1) gallon jugs of water tied together are ideal for testing.) The alarm should sound when the water action caused by the intrusion reaches the unit. It may take a few seconds for the alarm to react to the water action. • Reset the alarm and allowing time for the water action to settle. Repeat the procedure from another point in the pool until you are confident of detection performance. Because the “Safety Buoy” may detect an intrusion more than once, you may want to remove the alarm from the pool and put it in sleep mode while the pool settles. • “SAFETY BUOY” includes a timer function which automatically resets the unit after the alarm has sounded for approximately 5 minutes.
ADJUSTING YOUR RETURN LINE FITTING
The “SAFETY BUOY” alarm should not be placed too close to a return line, also do not place “SAFETY BUOY” in a location in the pool where a return line is pointing in the alarms direction. Water turbulence may be too strong, falsely setting the alarm off or the water turbulence may interfere with the alarms ability to detect and intrusion. If you have more than 2 return lines please call customer service at 1-800-242-7163. It is very important in pools to adjust the eyeball fittings on your return lines so that the water flow will not interfere with your pool alarm. Point all the eyeball fitting down and your pool will still circulate properly and this will allow “Safety Buoy” to function properly, (See Figure 4). Pointing the eyeball fittings down also helps prevent algae growth.
RECTANGLE
Pool Filter& Return
OVAL
Pool Filter& Return
ROUND
Pool Filter& Return
SAFETY BUOY Floating Platform
5” Max
DETAIL
Pool Wall
Tether Clip
Red Tether String
FIGURE 3
10 11
PG Buoy Manual 5.5x8.5 031116.indd 10 3/22/16 2:03 PM

INSTALLING YOUR ALARM
DO NOT ATTACH THE RED TETHER STRING TO A POOL LADDER. The Red Tether String is factory installed on the “Safety Buoy” pool unit. The Tether clip has an adhesive backing that is designed to be used on smooth surfaces like metal, plastic or vinyl. (Some surfaces like Concrete or Wood may require the use of a separate adhesive or another means of securing the Red Tether String.) IMPORTANT: If you attach the Tether Clip to a vinyl surface be very careful if you try to remove it, this may tear your vinyl. The location where the Tether Clip is to be installed must be clean and dry. Peel the back off of the Tether Clip, turn the Tether Clip so that the end that opens is pointing away from the pool water, press the Tether Clip down firmly. Adjust the Red Tether String length so that the edge of the “Safety Buoy” Floating Platform is no more than 5”(inches) from the pool wall (See Figure 3). Cut off and discard the excess Red Tether String. Tie a knot at the end of the Red Tether String and slide the Red Tether String into the Tether Clip, the knot will hold the Red Tether String in the Tether Clip (See Figure 3).
POOLGUARD REMOTE RECEIVER
The POOLGUARD REMOTE RECEIVER has been integrated with the standard POOLGUARD unit to provide a wireless remote alert operating at distances of up to 200 feet. The POOLGUARD REMOTE RECEIVER sounds an alarm in the house when the POOLGUARD unit is activated at the pool. The remote system consists of the following functional elements: • A coded pulse receiver (Remote Receiver), (See Figure 5). • A standard wall outlet power supply, (See Figure 5).The REMOTE RECEIVER is a compact unit powered by a UL and CSA approved AC/DC power supply. The REMOTE RECEIVER can be placed on a table or a counter top inside the house. The pulse coded radio frequency signal is transmitted from the pool unit and is received and decoded to sound the remote receiver. The remote receiver will sound for an additional 3 seconds after the pool unit has been silenced. If the REMOTE RECEIVER beeps once approximately every 10 seconds,it is indicating that the 9v battery in the pool unit is low and needs to be
FIGURE 4
continued page 1312 9
PG Buoy Manual 5.5x8.5 031116.indd 9 3/22/16 2:03 PM

LOW BATTERY FUNCTION
The POOL UNIT AND THE REMOTE RECEIVER will beep once approximately every 10 seconds to alert you that the 9 volt battery is low in the pool unit and needs replaced
PLACEMENT IN YOUR POOL
POOLGUARD “SAFETY BUOY” automatically compensates for variations in your pools water level.
Figure 3 illustrates locations best suited for detecting intru-sions from any area of the pool. POOLGUARD “SAFETY BUOY” model PGRM-SB is designed to work with Above Ground pools up to 30’ in diameter and up to 18’X36’, and is ideal for Spas. If your pool is larger than this, or if you have an irregular shaped pool or water features such as water-falls, please call customer service to clarify the recommend-ed number of alarms and locations for alarms.
Call customer service at 1-800-242-7163. POOLGUARD Pool Alarms have been tested and comply with the ASTM Standard Specifications for Residential Pool Alarms ASTM F 2208, in a 16’X 32’ pool.
• The “SAFETY BUOY” ALARM should not be placed too close to a pool water return line. If your return line has an eyeball fitting, this must be pointing down, (See Figure 4).
replaced. After you have purchased your POOLGUARD alarm and you wish to add another remote receiver to your alarm system you can acquire one from PBM Industries, Inc. Contact PBM by phone or mail or contact your place of purchase.
POWER SUPPLY
REMOTE RECEIVER
85dB Horn at 10 feet
FIGURE 5
TO OPERATE YOUR REMOTE RECEIVER
Try to locate your REMOTE RECEIVER in a convenient part of your house close to the pool. Avoid steel walls or any other large metal objects or obstructions that might interfere with the signal reception. The REMOTE RECEIVER has to be placed on the same level or a level above the pool in the house (do not place receiver in an underground basement).The ideal location for your REMOTE RECEIVER would be by a window overlooking your pool. Test your REMOTE RECEIVER in different locations in your house to find the best working place for your receiver. Connect the power supply to any 120V, electrical outlet and insert the jack into the receiver. Check that indicator light is on. Your REMOTE RECEIVER unit is now ready to receive a transmission from your POOLGUARD unit. DO NOT USE YOUR REMOTE RECEIVER OUTDOORS.
NOTE: THE MANUFACTURER IS NOT RESPONSIBLE FOR ANY RADIO OR TV INTERFERENCE CAUSED BY UNAUTHORIZED MODIFICATIONS TO THIS EQUIPMENT. SUCH MODIFICATIONS COULD VOID THE USER’S AUTHORITY TO OPERATE THE EQUIPMENT.
8 13
PG Buoy Manual 5.5x8.5 031116.indd 8 3/22/16 2:03 PM

ON/OFF INDICATOR – GREEN LED
When POOLGUARD is installed and monitoring your pool for an intrusion, the green LED will flash once approximately every 10 seconds to indicate that the alarm is ON and OPERATING. When POOLGUARD is installed in your pool and the alarm is sounding, the green LED will flash approximately 2 times per second. When POOLGUARD is removed from your pool and placed on the red storage stand the GREEN LED will not flash indicating that the alarm is OFF and NON-OPERATIONAL.
SWIMMING POOL SAFETY TIPS
• Supervise children at all times. • Never permit swimming alone. Never leave a child alone, even to answer the telephone. • Always remove the entire solar cover from a pool before swimming. • Remember that alcohol and water safety do not mix. • Have your pool area fenced and the gate locked to prevent unauthorized entry to the pool,and install a gate alarm. • Lock and secure all doors in the house which permit easy access to the pool,and install a door alarm. • Have a responsible adult teach swimming and water safety to your children. • Maintain clean,clear water in the pool. • Do not swim during electrical storms. • Do not permit bottles,glass,or sharp objects to be used around the pool. • Ask your pool dealer how you can improve your pool safety—they will be glad to assist you. • Above all: remember that common sense, awareness, and caution will allow you to enjoy your pool.
FIGURE 2
14 7
PG Buoy Manual 5.5x8.5 031116.indd 7 3/22/16 2:03 PM

BATTERY INSTALLATION/ REPLACEMENT
(Battery not included)POOLGUARD “Safety Buoy” is powered by a standard 9 volt alkaline battery. POOLGUARD recommends Energizer Brand No. 522 standard 9 volt battery. Follow these steps to install or replace the battery: 1. Place the ‘Safety Buoy” on its Storage Stand and remove the four (4) black screws/nuts holding the red buoy housing to the mounting base. (See Figure 1) 2. Lift the red buoy housing off of the mounting base to expose the circuit board and allow you access to the battery compartment, do not pull or jerk on the internal hookup cable, or bend the antenna. (See Figure 2) 3. Install the battery by attaching the battery snap to the battery terminals (BE SURE THE CONNECTION IS TIGHT) IMPORTANT: This will cause the horn to sound. To silence the alarm, put the alarm into sleep mode by holding the Red Reset/Sleep Key for 3-4 seconds close to the end of the circuit board that the Reset/ Sleep Arrow on the mounting base points towards. (See Figure 2). 4. Place battery in battery holder and snap into place, the battery should be secure. If you are replacing a old battery, clean any leakage or corrosion before installing a new battery. 5. Re-assemble the alarm by matching up the reset/sleep decal on the red buoy housing to the reset/ sleep arrow on the mounting base (DO NOT PINCH INTERNAL HOOKUP CABLE, OR BEND THE ANTENNA). Reinstall the four (4) black screws and nuts, do not over tigthen. • To prevent possible damage, battery should be removed whenever storing the alarm for an extended period of time.
WARRANTY AND REPAIRS
POOLGUARD is sold with a limited warranty to cover defects in parts and workmanship for one year from date of purchase, (retain proof of purchase).
If POOLGUARD exhibits a defect, please call Customer Service at 1-800-242-7163. Unauthorized returns will not be accepted. Proper repair is only ensured when the unit is returned to the manufacturer. Visit our website at www.poolguard.com to fill out your warranty registration information. The model number and serial number are located on the back of the remote receiver.
SEND CORRESPONDENCE TO:
P.O. BOX 658, NORTH VERNON, IN 472651-800-242-7163
REV. 3/2016
This product has been designed to aid in the detection of unwanted intrusions into unsupervised pools.POOLGUARD IS A SAFETY ALARM SYSTEM AND NOT A LIFE SAVING DEVICE. “This device is not intendedto replace any other safety consideration - i.e., adult supervi-sion, lifeguards, fences, gates, pool covers, locks, etc.,and some devices may not detect gradual entry.”
6 15
PG Buoy Manual 5.5x8.5 031116.indd 6 3/22/16 2:03 PM

HELPFUL HINTS AND TROUBLESHOOTING
POWER SUPPLYREMOTE RECEIVER
FALSE ALARMS
All pool alarms will false alarm on occasion for different reasons. False alarms can be minimized; however, it is important to remember that a false alarm is better than no alarm at all. WEATHER & WIND may trigger a false alarm if it is strong enough or steady enough that it causes the water in the pool to rock or bounce up and down the pool wall. On extremely windy days when the pool water is rocking it is advised to remove the alarm from the pool and place on it’s storage stand. LIGHT WIND OR RAIN WILL NOT EFFECT THE POOLGUARD ALARM. Another false alarm occurs when the pool owner tries to install the alarm too soon after swimming. After swimming, the water in the pool will rock or bounce up and down the pool wall for some time depending on the size of the pool and the type of swimming activity. Before installing the alarm, after swimming, the pool must be given time to calm. Time will vary (around 10 to 30 minutes); once the pool owner sees that the pool water is no longer rocking up and down the pool wall, it is time to install the alarm. Certain automatic cleaners may set thePOOLGUARD unit off in some cases. If the cleaner head or the cleaner hose hits the POOLGUARD alarm it may cause it to false alarm. Solutions to this problem are to use your cleaner at night and your alarm during the day. Another option would be to find a place around the pool where the cleaner does not interfere with the alarm. Certain water features such as waterfalls can cause POOLGUARD to false alarm. To avoid this problem do not install the POOLGUARD alarm too close to the water feature. If you are having a problem with any type of water feature call POOLGUARD at 1-800-242-7163.
Green LED
Reset/Sleep Decal
Black Nut
Black Screw
Floating Platform
Sensor ProbeSensor Assembly
Sensor Clip
Mounting Base
Red Alarm Storage Stand
Red Buoy Housing
FIGURE 1
16 5
PG Buoy Manual 5.5x8.5 031116.indd 5 3/22/16 2:03 PM

1. SILENT INSTALLATION (HORN WILL NOT SOUND) Hold the red reset/sleep key on the reset/sleep decal for 1 second until you hear the pool units horn beep. Remove the red reset/sleep key, you now have 10 seconds to install the pool unit into your pool without the horn sounding. AFTER 10 SECONDS THE POOL UNITS HORN WILL BEEP INDICATING THAT POOLGUARD IS NOW MONITORING YOUR POOL FOR AN INTRUSION. IF THE POOL UNITWAS NOT INSTALLED INTO YOUR POOL, IT WILL GO TO SLEEP.*
2. SILENT REMOVAL (HORN WILL NOT SOUND)Before removing the pool unit from your pool, place the red reset/sleep key on the reset/sleep decal for 1 second until you hear the pool units horn beep. Remove the red reset/sleep key, you now have 5 seconds to remove the pool unit from your pool without the horn sounding. AFTER 5 SECONDS THE POOL UNITS HORN WILL BEEP. IMPORTANT: IF THE POOL UNIT WAS REMOVED FROM YOUR POOL, THE POOL UNIT WILL GO TO SLEEP. BE SURE TO STORE YOUR ALARM ON THE RED STORAGE STAND. IF THE POOL UNIT WAS NOT REMOVED FROM YOUR POOL, IT WILL CONTINUE TO MONITOR YOUR POOL FOR AN INTRUSION.
3. POOLGUARD has designed this feature for “ONLY” those who have the responsibility of removing the alarm from the pool!
STORING YOUR ALARM (See Figure 1)
Always use the Red “Safety Buoy” Storage Stand to hold the “Safety Buoy” alarm when it’s not in the pool. Do not lay the alarm on its side, this could cause the alarm to sound and increase the chances of damage. Use the Storage Stand to hold the alarm when installing the battery. Only use the storage stand on a hard flat surface and in a location where it cannot be stepped on or damaged.
ALARM WILL NOT SOUND
CHECK THE CONNECTION BETWEEN THE BATTERY AND THE BATTERY SNAP. If you are testing and it does not alarm, be sure you are testing properly; putting your feet in the pool, splashing with your hands, making waves with a leaf skimmer, or dropping something into the pool that does not have the proper size, weight and volume WILL NOT SET THE POOLGUARD ALARM OFF! Testing is very important and should be done correctly. BE SURE YOUR RETURN LINE EYEBALL FITTING IS POINTING DOWN.
REMOTE RECEIVER
The only thing that can put the remote receiver into the alarm mode is the poolside unit. It sends a coded RF (Radio Frequency) message from the poolside unit to the in-house remote receiver. When the unit at the pool alarms, the remote receiver will sound. Maximum Range for the remote is 200 feet from the poolside unit. Avoid placing the remote in basements or around metal walls. Be sure that the red light on the remote is on. Remember the poolside unit must be beeping (alarming) for the remote to work. If your remote receiver is not getting a clear signal or no signal from the poolside unit, try the following: Before plugging in the remote power supply, be sure to stretch out the cord; do not leave it tied in a bow as packaged. Your Remote Receiver is similar to a small portable radio. If your remote is not sounding when the poolside unit is sounding-move the remote to different locations, and stand back for a few seconds for the remote to pick up the signal. You may only have to move your remote a little to the left or right to bring in the signal-in some cases you might have to move the remote to a different location or another room. If you cannot get a signal on your remote Call Customer Service at 1-(800) 242-7163.
4 17
PG Buoy Manual 5.5x8.5 031116.indd 4 3/22/16 2:02 PM

CARE AND HANDLING
POOLGUARD “Safety Buoy” is constructed to withstand the adverse moisture environment of a swimming pool. Care needs to be taken when handling your alarm and be sure to remove the alarm when the pool is being used and place it on the Red “Safety Buoy” Alarm Storage Stand. Remember to always remove the alarm from the pool before swimming.CAUTION: KEEP THE RED RESET/SLEEP KEY OUT OF THE REACH OF CHILDREN. INTERNAL MAGNET MAY BE HARMFUL IF SWALLOWED!
OPERATING YOUR ALARM
RESET/ SLEEP MODE (See Figure 1)
RESET: When the pool unit is installed in the pool and the horn is sounding; place the red reset/sleep key on the reset/sleep decal to silence the alarm. The alarm is now monitoring your pool for intrusion.
SLEEP MODE: When the pool unit is removed from the pool and the horn is sounding; place the red reset/sleep key on the reset/sleep decal for 3-4 seconds to activate sleep mode and silence the alarm, place the alarm on its storage stand. Note: The horn will sound if the Sensor Assembly is moved. The pool unit will automatically wake up when it is installed in the pool.
SILENT INSTALLATION AND REMOVAL FEATURE: The POOLGUARD system will sound an alarm (Horn will sound) when you install or remove the pool unit from your pool. If you would like the POOLGUARD system not to sound (Horn will not sound) when you install or remove the pool unit from your pool. Follow these directions.
18 3continued page 4
NOTES
PG Buoy Manual 5.5x8.5 031116.indd 3 3/22/16 2:02 PM

CERTIFICATION
NSF International Certifies that the POOLGUARD Pool Alarm model PGRM-SB conforms to the requirements of ASTM F2208—Standard Safety Specification for Residential Pool alarms. 1. Certified to ASTM F2208-2008 for performance. 2. Certified to NSF/ANSI Standard 50 for material safety. Certified for pool and spa end use temperatures.
POOLGUARD Pool Alarm Model PGRM-SB will meet or exceed all parts of the Tennessee Pool Alarm requirements of the Katie Beth Law.
INSPECTION
POOLGUARD “Safety Buoy” is packaged in a shipping carton that minimizes the chance of damage due to handling. Check for damage and confirm that the contents of the carton include the following items:
• POOLGUARD “SAFETY BUOY” ALARM • RED TETHER STRING & TETHER CLIP • REMOTE RECEIVER AND POWER SUPPLY • OPERATING INSTRUCTION MANUAL • RED RESET/SLEEP KEY • RED POOLGUARD “SAFETY BUOY” ALARM STORAGE STAND
If an item is missing or lost, contact either the place of purchase or PBM Industries, Inc. to purchase a replacement, contact us at 1-800-242-7163
2 19
QUICK DO’S AND DON’TS• Do read the manual carefully
• Do install a 9 volt battery
• Do untie the bow on the power supply
• Do test the alarm properly
• Do turn your return line eyeball fittings towards the bottom of the pool
• Do use the red storage stand
• Do remove alarm before swimming
• DON’T leave alarm in pool while swimming
• DON’T drop your alarm, it may break
• DON’T attach your alarm to a pool ladder
• DON’T install your alarm immediately after swimming
• DON’T turn your return eyeball fittings towards the top of the pool
• DON’T use your alarm on extremely windy days
• DON’T lay the alarm on the ground
PG Buoy Manual 5.5x8.5 031116.indd 2 3/22/16 2:02 PM

IMPORTANT
HELPFUL HINTS & TIPS
OPERATING INSTRUCTIONSMANUAL
“NSF CERTIFIED TO THE ASTM SAFETY SPECIFICATION F 2208”
“SAFETY BUOY” ABOVE GROUND POOL ALARM MODEL PGRM-SB
85dB Horn at 10 Feet
This product has been designed to aid in the detection of unwanted intrusions into unsupervised pools. POOLGUARD IS A SAFETY ALARM SYSTEM AND NOT A LIFE SAVING DEVICE. “This device is not intended to replace any other safety consideration - i.e., adult supervision, lifeguards, fences, gates, pool covers, locks, etc., and some devices may not detect gradual entry.”
READ THOROUGHLY BEFORE USING ALARM
PG Buoy Manual 5.5x8.5 031116.indd 1 3/22/16 2:02 PM
Related Documents