NotifySync User Guide NotifySync for BlackBerry 1 NotifySync for BlackBerry User Guide NotifySync for BlackBerry Version 4.11.x

Welcome message from author
This document is posted to help you gain knowledge. Please leave a comment to let me know what you think about it! Share it to your friends and learn new things together.
Transcript

NotifySync User Guide NotifySync for BlackBerry 1
NotifySync for BlackBerry
User Guide NotifySync for BlackBerry Version 4.11.x
NotifySync User Guide NotifySync for BlackBerry 2
Table of Contents
NotifySync for BlackBerry 1
Installation and Registration 4
NotifySync Requirements ............................................................................................. 4 Installing NotifySync ...................................................................................................... 5
Over-the-Air Installation ................................................................................... 6 Wired Installation ............................................................................................. 9
Registering Your Device ............................................................................................. 11 Advanced Network Settings ........................................................................... 14 Manual Setup ................................................................................................. 15
Upgrading Your NotifySync Software ......................................................................... 16
Customizing NotifySync 17
Account Settings ......................................................................................................... 19 Check For Updates ..................................................................................................... 20 Device Info .................................................................................................................. 20 Display Settings .......................................................................................................... 21 Email Settings ............................................................................................................. 22 Folder Settings ............................................................................................................ 24 General Settings ......................................................................................................... 26 Log Settings ................................................................................................................ 27 Network Settings ......................................................................................................... 28 Notification Settings .................................................................................................... 29 Out of Office Assistant ................................................................................................ 31 Push Settings .............................................................................................................. 32 Security Preferences ................................................................................................... 34
Emergency Settings ....................................................................................... 34 General Security ............................................................................................ 36 Lock Settings.................................................................................................. 36 Password Settings ......................................................................................... 39
Status .......................................................................................................................... 40 Sync Settings .............................................................................................................. 41
Using NotifySync 44
Email: Reading ............................................................................................................ 46 Email Folders ................................................................................................. 47 Email Follow Up ............................................................................................. 48 Message List: Menu Options and Keyboard Shortcuts ................................. 49 Search Your Messages .................................................................................. 51 Viewing an Open Message ............................................................................ 52 Open Message: Menu Options and Keyboard Shortcuts .............................. 52 Active Text Fields ........................................................................................... 54 Attachment Retrieval ...................................................................................... 55
Email: Writing ............................................................................................................. 55 Compose Email Messages ............................................................................ 55 Compose Email from the Address Book ........................................................ 56 Using Auto Complete ..................................................................................... 57 Email Address Look Up Tools........................................................................ 57 Attaching a File .............................................................................................. 58 Message Priority ............................................................................................ 58

NotifySync User Guide NotifySync for BlackBerry 3
Attachments ................................................................................................................ 58 Downloading, Viewing, and Saving Attachments .......................................... 58 Sending Attachments ..................................................................................... 61 Attachment Troubleshooting .......................................................................... 61
Calendar ...................................................................................................................... 62 Creating New Calendar Events ..................................................................... 62 Calendar Menu Options and Shortcut Keys .................................................. 63 Calendar Preferences .................................................................................... 64 Meeting Requests .......................................................................................... 64
Contacts ...................................................................................................................... 66 Adding New Contacts .................................................................................... 66 Contacts Menu Options ................................................................................. 66 Contacts Preferences .................................................................................... 67 Accessing the Company Directory ................................................................. 67
Tasks ........................................................................................................................... 69 Adding New Tasks ......................................................................................... 69 Task Menu Options ........................................................................................ 70 Task Preferences ........................................................................................... 71
Memos ........................................................................................................................ 71 Adding New Memos ....................................................................................... 72 MemoPad Menu Options ............................................................................... 72
Supported PIM Fields ................................................................................................. 73
Maintenance and Usage Tips 75
Using a Recovery Password ....................................................................................... 75 Uninstall the NotifySync Application ........................................................................... 76 Move NotifySync Icons to the Home Screen .............................................................. 76 What to Do If You Change Devices ............................................................................ 76 Conserving Battery Power .......................................................................................... 77
Appendix A: Network Connection Options 78

NotifySync User Guide Installation and Registration 4
Installation and Registration
NotifySync Requirements
License Requirements
There is a license key associated with the NotifySync application. You may need this license key to register your device. Check with your Administrator.
Service Requirements
You will need one of the following:
Cellular connection supporting data transmission.
WiFi connection with internet access.
Please refer to your device User Guide or contact your carrier/manufacturer for help in configuring this service.
Memory Requirements
1.8 MB of free space is required to install the NotifySync application.
Additional memory is needed to download and store email, calendar events, contacts, and tasks.
BlackBerry Operating System (OS) Requirements
BlackBerry® OS versions 4.5 – 7.1
Supported Groupware Servers
The NotifySync application synchronizes Email and PIM items with groupware servers supporting the Exchange ActiveSync® protocol. See Knowledge Base article for details.
Note: If you are synchronizing with a Microsoft Exchange 2007 server that has been upgraded to Service Pack 1, please read Knowledge Base article.

NotifySync User Guide Installation and Registration 5
Verify the Requirements on Your Device
Check the OS version on which your device is operating
Go to Options > Device > About Device Versions.
Check Available Memory Go to Options > Device > Device and Status Information.
Check whether your device has been provisioned for data connection
Test #1: If you can connect to the internet from the browser, chances are you are data provisioned.
Test #2: Check whether your device supports BlackBerry Internet Service (BIS). From the Home screen select Options > Advanced System Settings > Service Book. If there is a service book called, IPPP for BIBS [IPPP], the carrier supports BIS and the device is data provisioned.
Check whether your device is WiFi equipped
If your device is equipped with network connection alternatives (WiFi, Bluetooth, etc.) you will see an option called Manage Connections on the device’s main screen. If the device only has an option to Turn Wireless On/Off, this indicates that the device does not offer connection alternatives.
Installing NotifySync You can install the NotifySync application over-the-air or via the BlackBerry Desktop Manager.
Over-The-Air (OTA) Installation – This is the recommended method. Install NotifySync on the device via Internet or WiFi connections.
BlackBerry Desktop Manager Installation - Use your computer workstation with the device connected through a USB cable. Wired installation requires that you first download BlackBerry Desktop Manager software v5.0 or higher onto your computer workstation
Localization
NotifySync has been adapted to accommodate the following languages in addition to the original English (US):
Chinese (Simplified) Italian
Chinese (Traditional) Japanese
French Spanish
German
Although the language setting can be changed at any time, if done after installation of NotifySync, the language conversion will be only 95% complete. During installation, NotifySync performs certain initialization processes that are not performed at any other time. As a result, items that are a part of these processes are rendered in the language the device is set to at the time of installation.

NotifySync User Guide Installation and Registration 6
Follow these best practices if you plan to use language settings other than English (US):
New Installations: Set the device to the language of your choice prior to installing NotifySync (Options > Language). Doing so will ensure a more complete language conversion.
If you are using NotifySync in English, but wish to change the language setting: For the most complete translation, you should uninstall NotifySync, set the desired language (Options > Language), then re-install NotifySync. (Restored data from device backups will not undergo a full language conversion.)
Over-the-Air Installation
Before you Begin Over-the-Air Installation Review the NotifySync Requirements section thoroughly.
If you plan to use a BIS Email Account (gmail, aol, yahoo, etc.) on the device along with your NotifySync account, set up your BIS Email account first. Wait for the service books to be sent down to the device, then delete the CICAL service book from the device before you install NotifySync. See knowledge base article for more details.
Disable the Encryption (≥OS v5.0) or Content Protection (<OS v5.0) option on your BlackBerry as it will prevent NotifySync from accessing the Contact, Calendar, and Task information stored on the device. Access these settings from the BlackBerry Home screen.
o For OS versions ≥5.0 - Select Options > Security > Encryption and disable the Encrypt option for Device Memory.
o For OS versions <5.0 - Select Options > Security Options > General Settings and disable Content Protection.
Set the device to the language of your choice prior to installing NotifySync (Options > Language). Doing so will ensure a more complete language conversion. Of the NotifySync application.
Backup your device. If your device contains information such as Contacts, Calendar events, Tasks, Memos, or messages that you do not wish to lose, backup your device before you begin the installation process. Wired devices may use the Backup and Restore application in the Desktop Manager.
Security Prompts. After the installation is completed and you have rebooted your device, you will see several security prompts which ask you to give the NotifySync application permission to run. For any NotifySync related security prompt: Check the box titled, Do not ask again and select the Allow button.
Considerations for Over-the-Air Installation Check your device for the “IPPP for BIBS” service book for the Internet Browser (a protocol for
BlackBerry Internet Browsing Service). Presence of this service book indicates that the carrier supports BlackBerry Internet Service (BIS), which is required for over-the-air downloads. Check for this service book by selecting Options > Advanced Options > Service Books.
Time Requirements. The application download may take several minutes to complete. Download time may vary depending upon: carrier, network type, network coverage, device type or the number of optional applications that you install.
Wireless Coverage. Stay in an area with good data coverage while you are downloading the application. This helps to prevent network errors, which would require you to restart the download.
To Install Over-the-Air:

NotifySync User Guide Installation and Registration 7
Step 1:
Open the device browser and enter the Web address:
http://m.notifysync.com
Step 2:
Review and accept the End User License Agreement.
Step 3:
Select the Download button to download the application.
Hint: Leave the Set applications permissions box unchecked, unless you wish to manually adjust your BlackBerry’s permission settings.
A progression displays as the application downloads.
An Application Permissions screen prompts you to grant NotifySync trusted application status.
Select Yes.
A dialog displays indicating that the installation was successful. Select Run.
NotifySync User Guide Installation and Registration 8
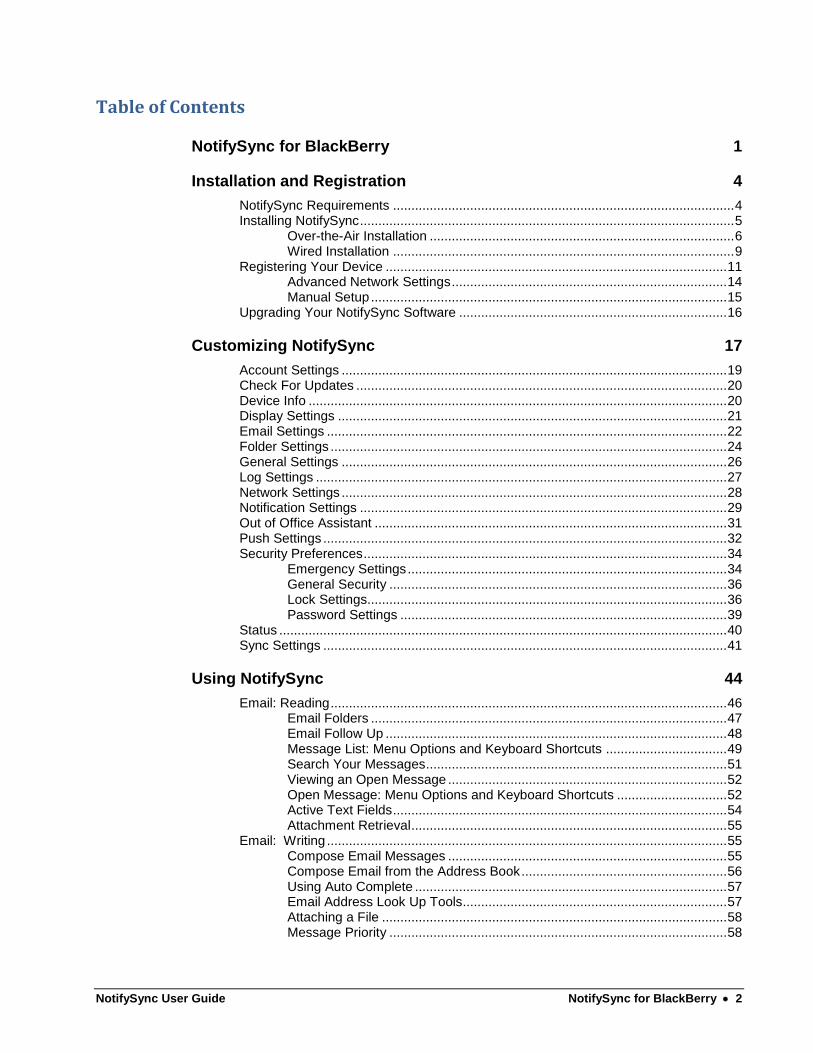
NotifySync opens to the registration screen.
You are now ready to register your NotifySync account. See Registering Your Device.
The NotifySync icon appears on your Applications or Downloads page. You can move the NotifySync icon to the screen of
your choice. See instructions.
Application Permissions
You may see other Application Permissions requests. Always grant requests that reference the NotifySync application.
OTA Installation Troubleshooting
Problem Cause and Solution
“Error 903: Loss of service” The connection between the device and server was interrupted during the download. Ensure that the device is in a good data coverage area and download the application again.
“Error 907: Invalid Jar” One of the modules downloaded is invalid. This is usually caused by a network error during the download process. Ensure that the device is in a good data coverage area and download the application again.
“Insufficient space for application”
There is not enough free memory to download and install the applications that were selected. Free up some memory by deleting unneeded email, calendar/contact/task items, or applications.
When I go to the download page I get an error stating: “You must use the Internet Browser on your BlackBerry device to download this application.”
The BlackBerry Internet Browser on your BlackBerry device is the only browser that can download the application. If a different browser is used to access the download page, this message is displayed along with the “User Agent” header that your browser sent to the page.
NotifySync application does not open when I click on the NotifySync icon.
You did not reset the device after installation completed. Reboot the device.

NotifySync User Guide Installation and Registration 9
Wired Installation
Before you Begin a Wired Installation Review the NotifySync Requirements section thoroughly.
If you are using an OS version older than 5.0 and you plan to use a BIS Email Account (gmail, aol, yahoo, etc.) on the device along with your NotifySync account, set up your BIS Email account first. Wait for the service books to be sent down to the device, then delete the CICAL service book from the device before you install NotifySync. See knowledge base article for more details.
Disable the Encryption (≥OS v5.0) or Content Protection (<OS v5.0) option on your BlackBerry as it will prevent NotifySync from accessing the Contact, Calendar, and Task information stored on the device. Access these settings from the BlackBerry Home screen.
o For OS versions ≥5.0 - Select Options > Security > Encryption and disable the Encrypt option for Device Memory.
o For OS versions <5.0 - Select Options > Security Options > General Settings and disable Content Protection.
Set the device to the language of your choice prior to installing NotifySync (Options > Language). Doing so will ensure a more complete language conversion. Of the NotifySync application.
Backup your device. If your device contains information such as Contacts, Calendar events, Tasks, Memos, or messages that you do not wish to lose, backup your device before you begin the installation process. Wired devices may use the Backup and Restore application in the Desktop Manager.
Security Prompts. After the installation is completed and you have rebooted your device, you will see several security prompts which ask you to give the NotifySync application permission to run. For any NotifySync related security prompt: Check the box titled, Do not ask again and select the Allow button.
Considerations for Wired Installation BlackBerry Desktop Software is required to perform a wired installation of NotifySync for
BlackBerry. Downloaded to your computer workstation, this software provides tools for application loading, backups, and restorations. Download the most current version available.
Accessing and Installing the BlackBerry Software
Links to the BlackBerry software can be obtained from the NotifySync portal page and are listed by carrier/by device. Many of them are BlackBerry sites. Some are carrier sites. Most of these sites give you access to both the BlackBerry Desktop Software and the BlackBerry Handheld Software.
1. From a browser on your computer workstation, enter the web address,
http://notifysync.notify.net/Portal.asp and select the NotifySync Desktop Installer link. 2. Fill out the user information page and accept the End User License Agreement. 3. Install the Desktop Manager onto your computer workstation. Use BlackBerry Desktop Software v5.0
or later. BlackBerry Desktop Software. You are now ready to install NotifySync.
Wired NotifySync Installation
Download the NotifySync application. 1. Open the BlackBerry Desktop Manager on your computer workstation.
Hint: If the Desktop Manager icon does not appear on your desktop, you can find the program, DesktopMgr, in the BlackBerry folder of your installation directory. The default path is: C:\Program Files\Research in Motion\BlackBerry\DesktopMgr.
2. Select the Application Loader icon. When the Application Loader Wizard appears, select Next.
NotifySync User Guide Installation and Registration 10
3. Select the NotifySync application. If the NotifySync application does not appear on the list you will need to add it. Click the Add button on the application list. Navigate to the Loader Files directory and open the NotifySync.alx file.
4. Once all the applications you want to load are in the list and check marked, select Next to continue.
Hint: An error reading, “Some required files are missing,” indicates that you have not installed the BlackBerry Handheld Software for your device.
5. A summary screen displays. It shows the applications to be loaded, a summary of how much space is available on the device, and how much space is needed to load the selected applications. Select Finish to start loading the applications.
You are now ready to register your NotifySync account.
See Registering Your Device.

NotifySync User Guide Installation and Registration 11
Registering Your Device Once the NotifySync installation is complete, you can create and register your user account. Email and PIM synchronization will not begin until you are registered.
The registration screens have USER ASSISTANCE
Select Show Help from the menu to display help text.
WATCH THE VIDEO
If the Registration screen is not already displayed, select the NotifySync icon from your BlackBerry menu
Hint: It may be located in the Applications or the Downloads folder.
NotifySync Icon
Step 1:
Enter the Email address and Password associated with your ActiveSync server account.
The Network Setting field allows you to choose what NotifySync uses when opening network connections. The default is Auto Detect, which chooses an appropriate network setting based on available services. Accept Auto Detect and prioritize the connection types from the Advanced… screen, or select your Preferred Network type. See Advanced Network Settings.
Notes: You can change your network setting at any time. See Network Settings. If you intend to use Direct Push synchronization, you must select TCP as your preferred network setting.
Select Next to allow the registration process to autodiscover your server address. This may take several minutes depending on your network setting.
OR
Select Manual Setup to manually enter your username, domain, and server address, and choose whether or not to use an HTTPS connection. You can disable the Autodiscover option as well, if your mail server does not support it. See Manual Setup.
NotifySync User Guide Installation and Registration 12
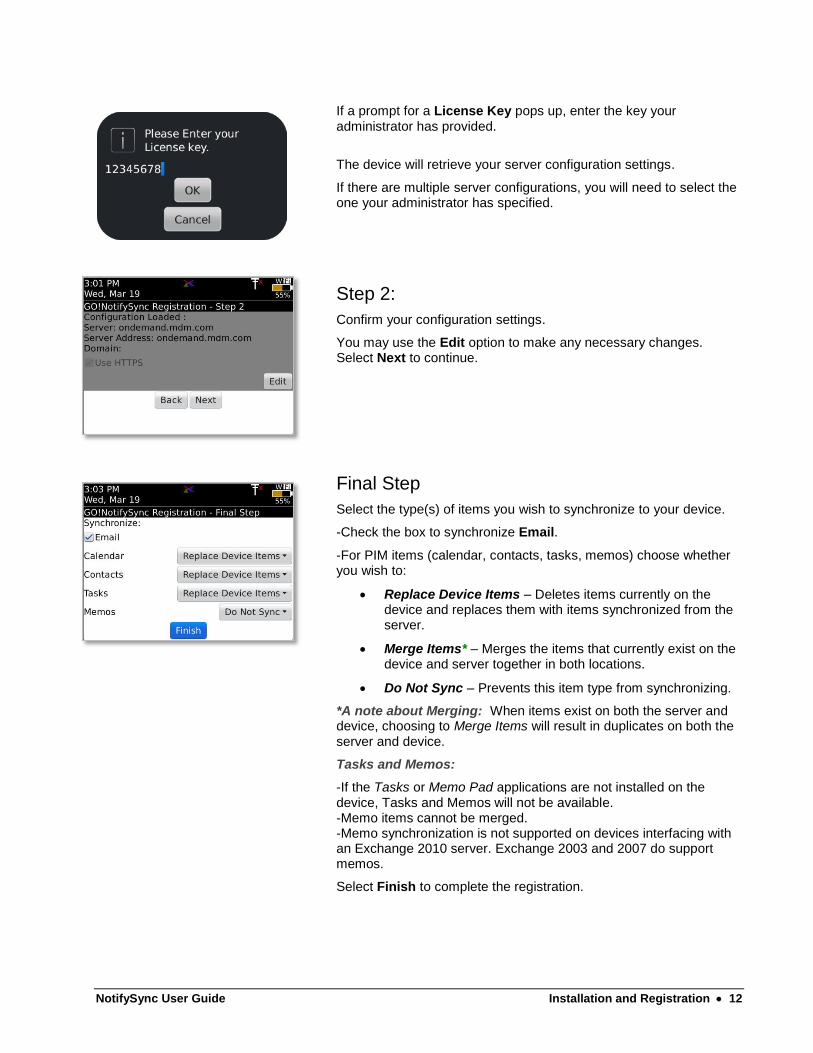
If a prompt for a License Key pops up, enter the key your administrator has provided.
The device will retrieve your server configuration settings.
If there are multiple server configurations, you will need to select the one your administrator has specified.
Step 2:
Confirm your configuration settings.
You may use the Edit option to make any necessary changes. Select Next to continue.
Final Step
Select the type(s) of items you wish to synchronize to your device.
-Check the box to synchronize Email.
-For PIM items (calendar, contacts, tasks, memos) choose whether you wish to:
Replace Device Items – Deletes items currently on the device and replaces them with items synchronized from the server.
Merge Items* – Merges the items that currently exist on the device and server together in both locations.
Do Not Sync – Prevents this item type from synchronizing.
*A note about Merging: When items exist on both the server and device, choosing to Merge Items will result in duplicates on both the server and device.
Tasks and Memos:
-If the Tasks or Memo Pad applications are not installed on the device, Tasks and Memos will not be available. -Memo items cannot be merged. -Memo synchronization is not supported on devices interfacing with an Exchange 2010 server. Exchange 2003 and 2007 do support memos.
Select Finish to complete the registration.

NotifySync User Guide Installation and Registration 13
If you chose to merge or replace any of the PIM items, a dialog appears indicating the affect merging or replacing has on existing data.
Before continuing, you may wish to backup important items that may be lost in this process.
When you are ready to proceed, select Yes.
You will see the device Inbox once the registration is completed.
Check the top-left corner to verify that the correct time and date are showing.
The Inbox will populate as the device completes its first synchronization cycle.
Email Address Synchronization NotifySync will verify the email address you entered during registration against the email address(es) associated with the active user account on the server.
The dialog box at left appears only if there is a discrepancy and allows you to choose another address from those listed on the server.
You are now registered with NotifySync.
NotifySync User Guide Installation and Registration 14
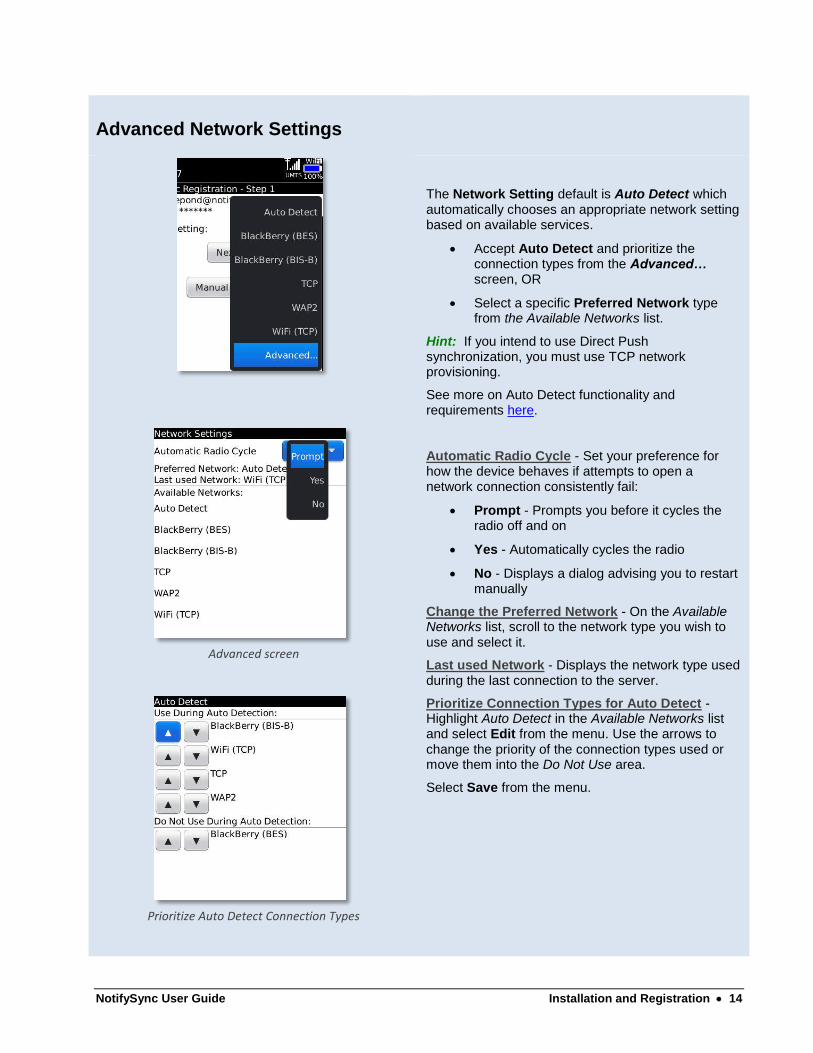
Advanced Network Settings
Advanced screen
Prioritize Auto Detect Connection Types
The Network Setting default is Auto Detect which automatically chooses an appropriate network setting based on available services.
Accept Auto Detect and prioritize the connection types from the Advanced… screen, OR
Select a specific Preferred Network type from the Available Networks list.
Hint: If you intend to use Direct Push synchronization, you must use TCP network provisioning.
See more on Auto Detect functionality and requirements here.
Automatic Radio Cycle - Set your preference for how the device behaves if attempts to open a network connection consistently fail:
Prompt - Prompts you before it cycles the radio off and on
Yes - Automatically cycles the radio
No - Displays a dialog advising you to restart manually
Change the Preferred Network - On the Available Networks list, scroll to the network type you wish to use and select it.
Last used Network - Displays the network type used during the last connection to the server.
Prioritize Connection Types for Auto Detect - Highlight Auto Detect in the Available Networks list and select Edit from the menu. Use the arrows to change the priority of the connection types used or move them into the Do Not Use area.
Select Save from the menu.

NotifySync User Guide Installation and Registration 15
Manual Setup
Enter the License Key your administrator has provided.
In the Username field, enter the username associated with your ActiveSync server account (usually everything before the @). OR Check Use Email as Username if you are required to use your Email address as the username for authentication with the ActiveSync Server. Then skip to the Server Address field.
Hint: This option is provided for hosted mail systems, such as Microsoft Online, who require the full email address because there are multiple domains associated with the same server address. Check with your IT administrator or email provider to verify whether you should use your full Email address for the Username or just the part to the left of the @ sign.
Enter the Domain name associated with your ActiveSync server account.
Your Domain may be one of the following:
The login you use to access Web mail may contain the Domain. The login is often in the format: Domain/username. Try using the text before the / as the domain.
Sometimes the text that comes after the @ sign in your Email address is considered the Domain. EX: If your Email address is: [email protected], your Domain may be company.com.
Sometimes the domain may use part of the text that comes after the @ sign in your Email address, with “.local” appended to it instead of “.com”. EX: If your Email address is: [email protected], your Domain may be company.local.
Sometimes the NotifySync registration can be completed by leaving the Domain field blank.
Enter the Server Address. This is the external address or domain name of your ActiveSync server. This is usually the same address you use to log into Web mail.
Check with your IT administrator to verify whether SSL is used on your ActiveSync server and whether Autodiscover is supported.
If your server has an SSL certificate, mark the Use HTTPS checkbox to enable SSL encryption for secure data transfer between the server and your device.
Disable Autodiscover if your server does not support it.
Select Next to proceed.
NotifySync User Guide Installation and Registration 16
Upgrading Your NotifySync Software
Check For Updates provides a way for you to keep your NotifySync software up-to-date. Choosing this option initiates a check for available application updates. Use the Perform Updates menu option to apply the updates.
Automatic Check for Updates. You can set your device to check for updates automatically and notify you when an update is available. Enable the following options in the NotifySync General Settings:
Enable the Automatically Check for Updates option to allow the device to check for available updates once every 24 hours.
Enable the Update Notifications option to have a notification sent to your Inbox when an update is available.
Upgrading Your NotifySync Software
1. Open NotifySync and press the menu button.
2. Select Preferences > Check for Updates. This initiates a check.
3. If there are available updates, place a checkmark next to the application update(s) you wish to install.
4. Choose Continue or select Perform Updates from the menu.
Operating System Updates
Any time you update NotifySync, make sure you have the latest operating system software available for your device as well, since the OS update may unlock NotifySync functionality that is compatible with newer OS versions. See also Knowledge Base article. Check for OS updates for your carrier/device at: http://us.blackberry.com/support/downloads/download_sites.jsp
NotifySync User Guide Customizing NotifySync 17
Customizing NotifySync
Once you have installed NotifySync and registered your device against the NotifySync Registration Server, you will want to explore the various settings that the application offers and choose preferences that will govern how your mail and PIM data (calendar, contacts, tasks and memos) synchronize to the device.
Note: If a Preference option is gray and you cannot access it, this means that there is a policy setting in place on your ActiveSync server which does not allow you to change the setting on the device. Some options may be accessible, but have limitations in place on the ActiveSync server that may limit the choices you make on the device.
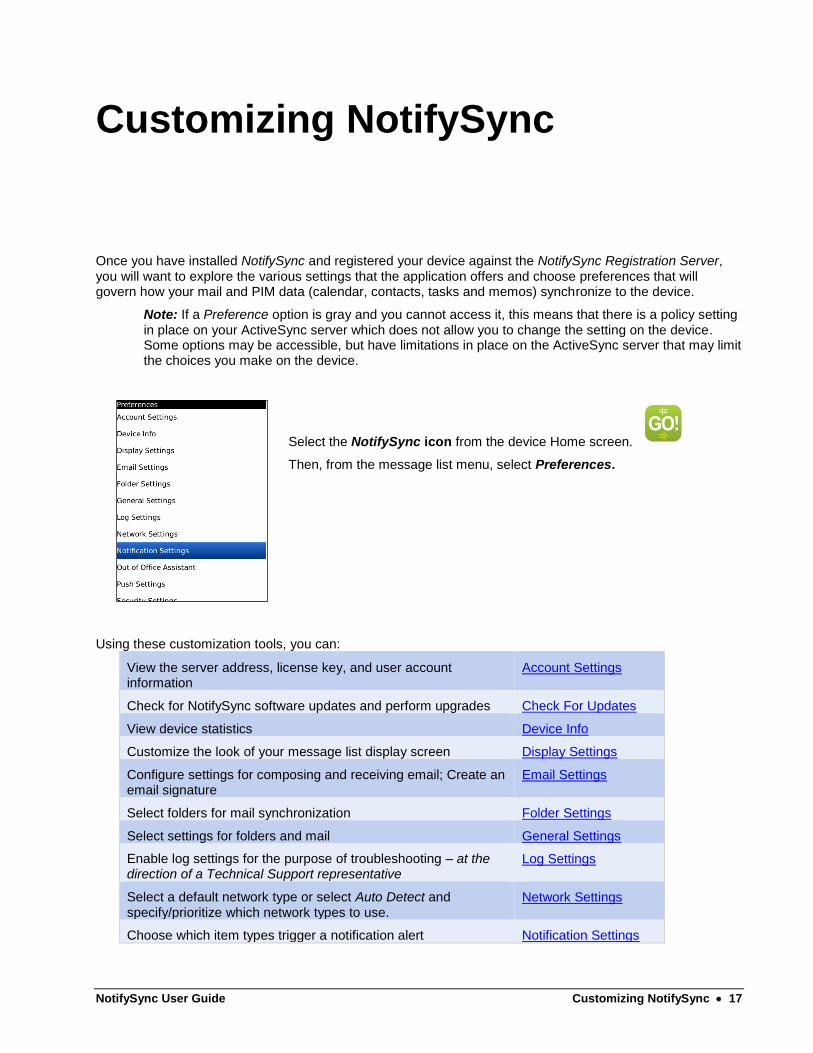
Select the NotifySync icon from the device Home screen.
Then, from the message list menu, select Preferences.
Using these customization tools, you can:
View the server address, license key, and user account information
Account Settings
Check for NotifySync software updates and perform upgrades Check For Updates
View device statistics Device Info
Customize the look of your message list display screen Display Settings
Configure settings for composing and receiving email; Create an email signature
Email Settings
Select folders for mail synchronization Folder Settings
Select settings for folders and mail General Settings
Enable log settings for the purpose of troubleshooting – at the direction of a Technical Support representative
Log Settings
Select a default network type or select Auto Detect and specify/prioritize which network types to use.
Network Settings
Choose which item types trigger a notification alert Notification Settings

NotifySync User Guide Customizing NotifySync 18
Create an automatic reply to incoming messages for periods when you are not checking email
Out of Office Assistant
Choose the network with which the device connects and how often to connect for synchronization
Push Settings
Set encryption keys, emergency call settings, passwords, and lock options for your device
Security Settings
View the device’s last synchronization and status of its network connections, power and memory or perform a diagnostic test
Status
Choose what data is synchronized to the device Sync Settings
USER ASSISTANCE Press the menu button and choose Show Help.
All NotifySync Preferences options have on-screen help text that assists you in configuring the settings.
Show Help menu option
General Settings with help text turned on

NotifySync User Guide Customizing NotifySync 19
Account Settings Account Settings allow you to view all of the properties of your NotifySync account, including the information associated with the corresponding ActiveSync server account.
You should not make changes to these settings unless instructed to do so by your IT administrator.
If your device has a storage card, Account Settings also gives you the ability to backup your NotifySync Preferences and restore them on a different device.
This settings option has USER ASSISTANCE
Select Show Help from the menu to display help text.
View the Account Settings
1. Open NotifySync and press the menu button.
2. Select Preferences > Account Settings.
3. View or edit the following settings:
Current Account This is the currently selected NotifySync account. To change it, select Change Account Name from the popup menu.
Server Address This is the external server address or domain name of your ActiveSync server, which you entered at registration. It should not be altered unless your IT administrator specifically instructs you to do so.
Server Port This is the port used to connect to the ActiveSync server. Consult your network administrator for the correct value.
Use HTTPS Check this box to encrypt data-in-motion using the SSL security protocol.
SSL is a protocol developed for transmitting private information over the Internet. An SSL certificate must be installed on your ActiveSync server in order for you to use SSL. Ask your IT administrator if SSL is available to you.
Enable Autodiscover
This option should be enabled only if your server supports the autodiscover process for discovering server address and user credentials.
Username and Password
The username and password associated with your mail account on the ActiveSync server.
NotifySync User Guide Customizing NotifySync 20
Domain This is the domain name of your mail account on the ActiveSync server.
Email The full email address associated with your mail account on the ActiveSync server. This address must be stored here in order for you to send meeting requests from the device.
License Key The code that authenticates your account with the NotifySync registration server, enabling you to use the NotifySyncTM service. It should not be altered unless your IT administrator specifically instructs you to do so.
Reload Server Configuration
Select this option to reload your current server configuration.
4. If you have made changes, select Save from the menu.
Backup Your NotifySync Settings
If your device has a storage card, you can backup your NotifySync Preferences and restore them on a different device. Press the menu button and select Backup Configuration.
See What to Do If You Change Devices for configuration restoration instructions.
Check For Updates See Upgrading Your NotifySync Software
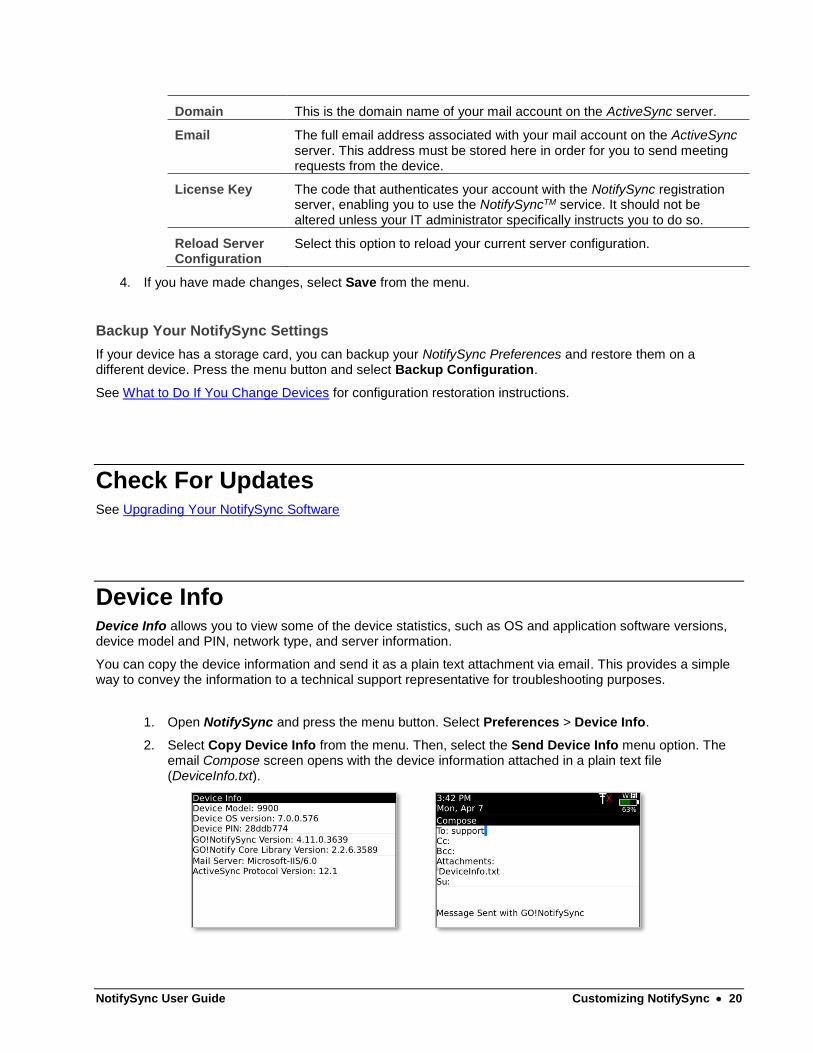
Device Info Device Info allows you to view some of the device statistics, such as OS and application software versions, device model and PIN, network type, and server information.
You can copy the device information and send it as a plain text attachment via email. This provides a simple way to convey the information to a technical support representative for troubleshooting purposes.
1. Open NotifySync and press the menu button. Select Preferences > Device Info.
2. Select Copy Device Info from the menu. Then, select the Send Device Info menu option. The email Compose screen opens with the device information attached in a plain text file (DeviceInfo.txt).
NotifySync User Guide Customizing NotifySync 21
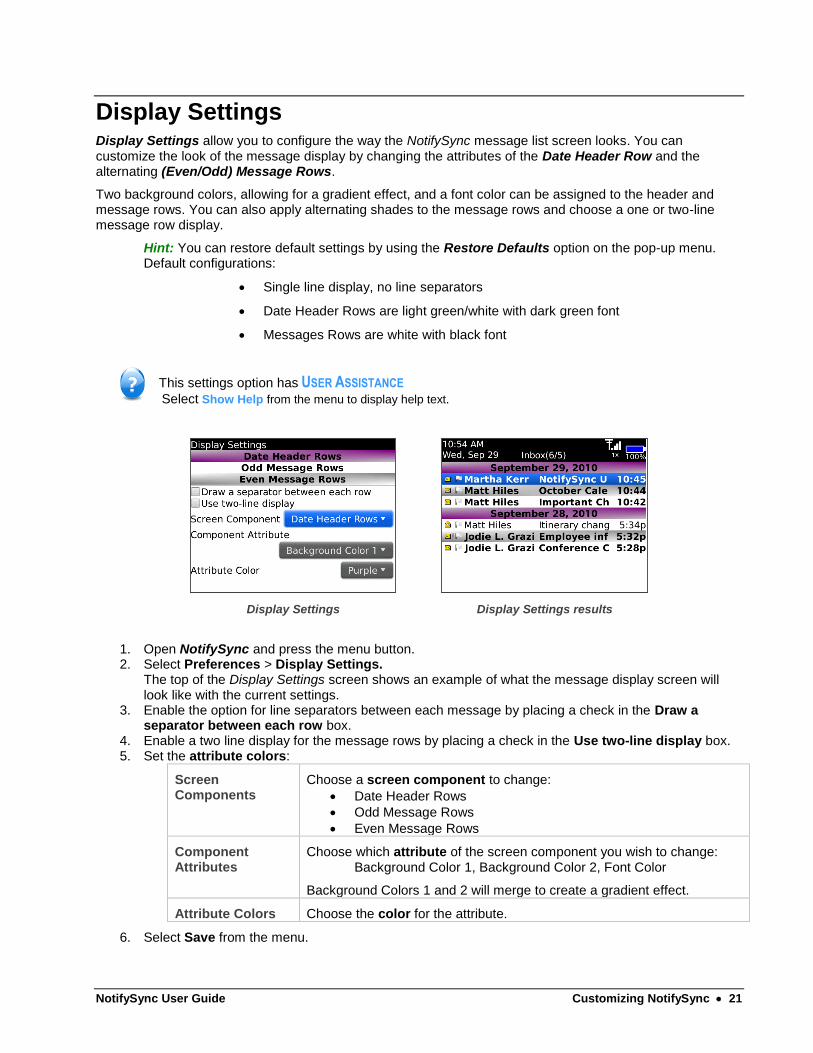
Display Settings Display Settings allow you to configure the way the NotifySync message list screen looks. You can customize the look of the message display by changing the attributes of the Date Header Row and the alternating (Even/Odd) Message Rows.
Two background colors, allowing for a gradient effect, and a font color can be assigned to the header and message rows. You can also apply alternating shades to the message rows and choose a one or two-line message row display.
Hint: You can restore default settings by using the Restore Defaults option on the pop-up menu. Default configurations:
Single line display, no line separators
Date Header Rows are light green/white with dark green font
Messages Rows are white with black font
This settings option has USER ASSISTANCE
Select Show Help from the menu to display help text.
Display Settings
Display Settings results
1. Open NotifySync and press the menu button. 2. Select Preferences > Display Settings.
The top of the Display Settings screen shows an example of what the message display screen will look like with the current settings.
3. Enable the option for line separators between each message by placing a check in the Draw a separator between each row box.
4. Enable a two line display for the message rows by placing a check in the Use two-line display box. 5. Set the attribute colors:
Screen Components
Choose a screen component to change:
Date Header Rows
Odd Message Rows
Even Message Rows
Component Attributes
Choose which attribute of the screen component you wish to change: Background Color 1, Background Color 2, Font Color
Background Colors 1 and 2 will merge to create a gradient effect.
Attribute Colors Choose the color for the attribute.
6. Select Save from the menu.
NotifySync User Guide Customizing NotifySync 22
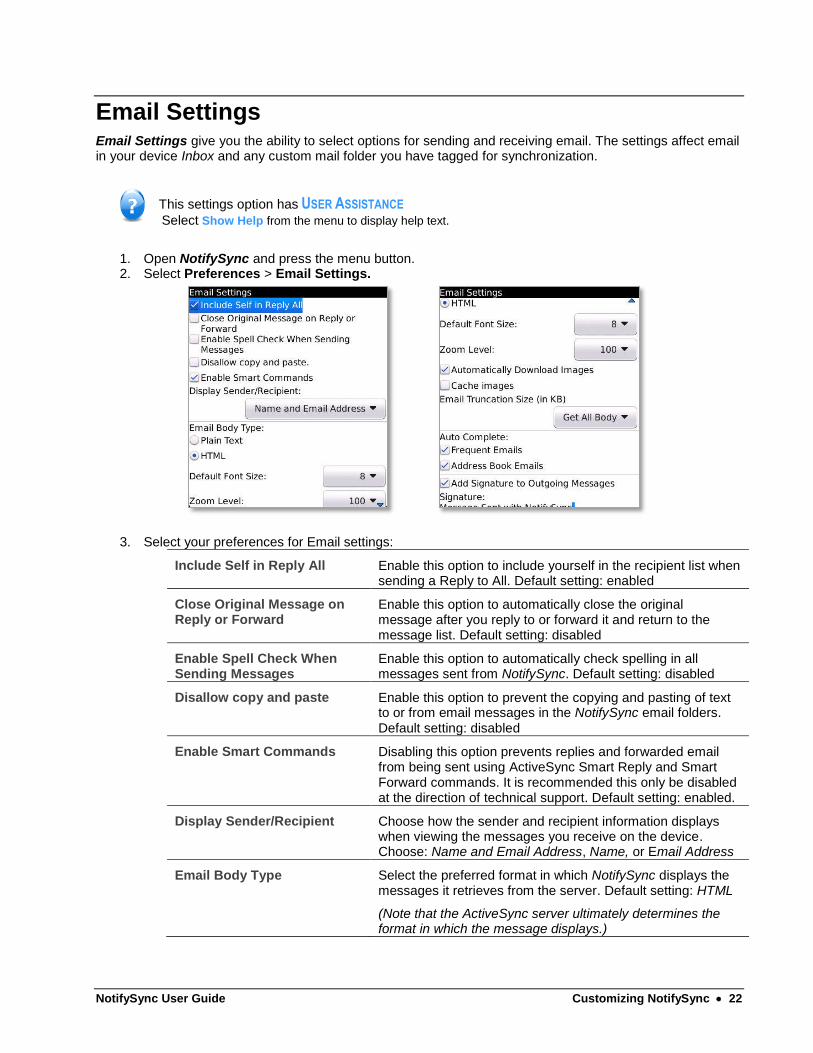
Email Settings Email Settings give you the ability to select options for sending and receiving email. The settings affect email in your device Inbox and any custom mail folder you have tagged for synchronization.
This settings option has USER ASSISTANCE
Select Show Help from the menu to display help text.
1. Open NotifySync and press the menu button. 2. Select Preferences > Email Settings.
3. Select your preferences for Email settings:
Include Self in Reply All Enable this option to include yourself in the recipient list when sending a Reply to All. Default setting: enabled
Close Original Message on Reply or Forward
Enable this option to automatically close the original message after you reply to or forward it and return to the message list. Default setting: disabled
Enable Spell Check When Sending Messages
Enable this option to automatically check spelling in all messages sent from NotifySync. Default setting: disabled
Disallow copy and paste Enable this option to prevent the copying and pasting of text to or from email messages in the NotifySync email folders. Default setting: disabled
Enable Smart Commands Disabling this option prevents replies and forwarded email from being sent using ActiveSync Smart Reply and Smart Forward commands. It is recommended this only be disabled at the direction of technical support. Default setting: enabled.
Display Sender/Recipient Choose how the sender and recipient information displays when viewing the messages you receive on the device. Choose: Name and Email Address, Name, or Email Address
Email Body Type Select the preferred format in which NotifySync displays the messages it retrieves from the server. Default setting: HTML
(Note that the ActiveSync server ultimately determines the format in which the message displays.)

NotifySync User Guide Customizing NotifySync 23
Plain Text: Displays all email in plain text (contains no formatting), converting HTML emails to plain text as well.
HTML: Displays email in HTML (text formatted for the Web) whenever possible. There are several options for HTML email:
Default Font Size: Choose from a 1 – 16 point size. Locks the font size, eliminating the need to change size for every email viewed. Default setting: 8.
Zoom Level: Choose 50, 100, 150, or 200 percent. Locks the zoom level, eliminating the need to change the level for every email viewed (functional with OS v5.0 or higher). Default setting: 100 percent.
Automatically Download Images: If enabled, images embedded in the HTML body download automatically. If disabled, the images may be downloaded by using the message view menu option, Retrieve Content. Default setting: enabled
Cache Images: If enabled, HTML images are cached once they are downloaded. Choose where images are cached: Device or Media Card. A cached image is removed from the device when the email it is associated with is removed. Default setting: disabled
Before enabling this option, please read the highlighted information below on device performance.
Email Truncation Size (in KB): Select Get Portion and define the maximum body size (in KB) of messages received on the device; or select Get All Body or Get Headers Only.
Note: Truncation size options may vary depending on what your corporate policy allows.
Auto Complete If enabled, email addresses, currently stored on the device, are automatically completed as you type them into recipient fields. Default setting: Enabled for both Frequent and Address Book emails
Frequent Emails – If checked, pulls completed addresses from your frequent contact list (addresses to which you have recently sent emails).
Address Book Emails – If checked, pulls completed addresses from your device’s address book.
Add Signature to Outgoing Messages
Enable this option to add a signature to all outgoing messages sent from NotifySync. Compose the signature here as well. Default setting: enabled with generic signature
Select Add Signature Image from the menu to select a graphic to add to your signature. You may select an image from the BlackBerry File System or from a Web Link.
4. Select Save from the menu.

NotifySync User Guide Customizing NotifySync 24
Clear the Frequent Emails List
The Frequent Emails list used by Auto Complete is comprised of addresses to which you have recently sent Email. It stores the ten most recently used addresses for each letter of the alphabet. You can clear the list by selecting Clear Frequent Emails from the menu. The list will build again from addresses you enter in recipient fields from this point forward.
Enabling Cache Images Having Cache Images enabled can accumulate excessive data charges or may cause you to experience a more rapid battery deterioration and slower message processing.
Performance Statistics When Cache Images is Enabled The statistics presented here are what have been observed in testing:
BlackBerry OS: 7.0 Average message size: 35 KB Average number of images/message: 55 Results may vary depending on device hardware
Number of Msg processed
Msg. download times with Cache Images ON
Msg. download times with Cache Images OFF
1 10 seconds 1 second
5 ~2 minutes 2-3 seconds
20 13 minutes 3 minutes
Folder Settings If you want mail from folders, in addition to the Inbox, to be synchronized to the device, you must tag them for synchronization using Folder Settings.
Your mail folder structure is replicated on the device. Changes to the folder structure in the mail account will synchronize as well. However, in order for the actual folder contents (the mail inside a folder) to synchronize, the folder must be selected for synchronization on the device. The Inbox is the only folder selected for synchronization by default. All other folders must be tagged for synchronization via Folder Settings.
Moving Items between Folders. You can move messages around within the folder structure, regardless of whether or not the folder is tagged for synchronization.
Folder Size. Folders that contain more than 100 items will synchronize to the device in batches of 100 or less. One batch is sent per synchronization cycle, until all the items have been sent. Only mail within the set synchronization range will come down to the device. See Sync Settings.
Sent Items and Trash Folders
Like all other email folders, Sent Items and Trash folders can be selected for synchronization.
When these folders are selected for synchronization, mail that is sent or deleted from the device synchronizes to the server before it appears in the device’s Sent Items or Trash folder. If these folders are not selected for synchronization, sent or deleted mail is completely removed from the device.

NotifySync User Guide Customizing NotifySync 25
Sent Items. Messages in the device Outbox that are successfully sent are not automatically moved to the Sent Items folder on the device. Instead, the server creates an item in the mail account Sent Items folder and then synchronizes the item to the device’s Sent Items folder.
Deleted Items. Mail deleted on the device is not automatically moved to the Trash folder on the device. Instead, a delete synchronization message is sent to the server. The server moves the deleted message to the mail account Trash folder and then synchronizes the item to the device’s Trash folder.
Low Memory Cleanup of Trash Folder
NotifySync has an automatic low memory cleanup operation that is carried out when the device enters a low memory state. If the trash folder is selected for synchronization, items in the trash are removed from the device in an attempt to free up device memory. This affects the local trash folder only and does not affect email in the mail account trash folder. See also knowledge base article.
This settings option has USER ASSISTANCE
Select Show Help from the menu to display help text.
Select Folders for Synchronization
1. Open NotifySync and press the menu button.
2. Select Preferences > Folder Settings.
3. Folders available for synchronization have a check box beside them. Check the box beside any mail folder(s) you want to tag for synchronization. (Folders without a check box are not available for, or are automatically tagged for synchronization.)
Hint: Expand and collapse the folder tree by using the Expand All and Collapse All options on the pop-up menu. Find a folder by using the Find Folder option on the menu.
4. Select Save from the menu.

NotifySync User Guide Customizing NotifySync 26
General Settings General Settings allow you to set the following preferences:
Save Folder History
Show Inbox at Startup
Send Outgoing Items Immediately
This settings option has USER ASSISTANCE
Select Show Help from the menu to display help text.
1. Open NotifySync and press the menu button.
2. Select Preferences > General Settings.
3. Check the boxes beside the options you wish to enable.
Save Folder History If enabled, device tracks and remembers your movement through the Email folders. Pressing the Back button will move you back through ten previous folders you have viewed. Default setting: disabled
Show Inbox at Startup Each time you enter NotifySync the Inbox is displayed. If this option is not enabled, you will return to the folder that was last viewed. Default setting: enabled
Send outgoing items immediately
Messages sent from the device will process immediately. If this option is not enabled, sent messages will sit in your Outbox until the next scheduled or manual synchronization.
Note: Since synchronization is always a two-way process (sending and receiving are not independent processes), immediate synchronization may result in messages on the server being retrieved as well. Default setting: enabled
Automatically Check for Updates
If enabled, the device automatically checks for NotifySync software updates once every 24 hours. Default setting: enabled
Update Notifications If enabled, NotifySync sends notifications to the device Inbox when a software update is available. Default setting: enabled
4. Select Save from the menu.

NotifySync User Guide Customizing NotifySync 27
Log Settings Log Settings are for debugging and troubleshooting. Enabling the settings may impact the performance of NotifySync and should, therefore, be done only at the direction of a Technical Support representative.
This settings option has USER ASSISTANCE
Select Show Help from the menu to display help text.
1. Open NotifySync and press the menu button. 2. Select Preferences > Log Settings. 3. Check the box next to Enable Logging to turn logging on. Logs will be written to your SD card if you
have one installed on the device. 4. Select Save from the menu.
Sending Log Files
Attach the log files to an email and send them to Technical Support for review.
Navigate to the log files: /Media Card/BlackBerry/NotifyLogFiles
Each day has its own log and is named using the following format: YYYYMMDD.txt. Example: a log for April 21, 2014 is 20140421.txt
Files for the most recent seven (7) days are stored. If logging was enabled on Monday, April 21, 2014 and is allowed to run all week long, the log for Monday, April 28, 2014 will overwrite the previous Monday’s log.
Combine all of the logs into one .zip file and email them in.

NotifySync User Guide Customizing NotifySync 28
Network Settings Network Settings allows you to change your preference for which network type NotifySync uses when opening network connections. These preferences can be configured at registration or through these settings.
The default at registration is Auto Detect. This setting detects the available networks on the device and uses those networks in the order in which you have prioritized them. See Network Connection Options for additional information.
This settings option has USER ASSISTANCE
Select Show Help from the menu to display help text.
Choose Your Preferred Network
1. Open NotifySync and press the menu button.
2. Select Preferences > Network Settings.
3. Set your preference for the Automatic Radio Cycle. If attempts to open a network connection consistently fail, the device can:
Prompt - Prompt you before it cycles the radio off and on
Yes - Automatically cycle the radio
No - Display a dialog advising you to restart your device manually
4. Select a Preferred Network from the Available Networks list or choose Auto Detect then select and prioritize the connection types. You can also view the Last used Network here. This is the network type used for the last device connection.
Hint: If you intend to use Direct Push synchronization, you must use TCP network provisioning.
NotifySync User Guide Customizing NotifySync 29
Prioritize Connection Types for Auto Detect
If you choose Auto Detect for the Preferred Network, arrange the list of available networks in the order that you want them to be used. The first item in the list will always be used by default. If connection is not successful with the default, attempts are made with the other networks in the order in which they are listed. You can also disable the network types you do not wish to use. See also Network Connection Options for information on network connection restrictions associated with Auto Detect.
1. Highlight the Auto Detect option in the Available Networks list and select Edit from the menu.
2. Use the arrows to change the priority of the connection types used or disable the type(s) you do not want to use by moving them into the Do Not Use area.
3. Select Save from the menu.
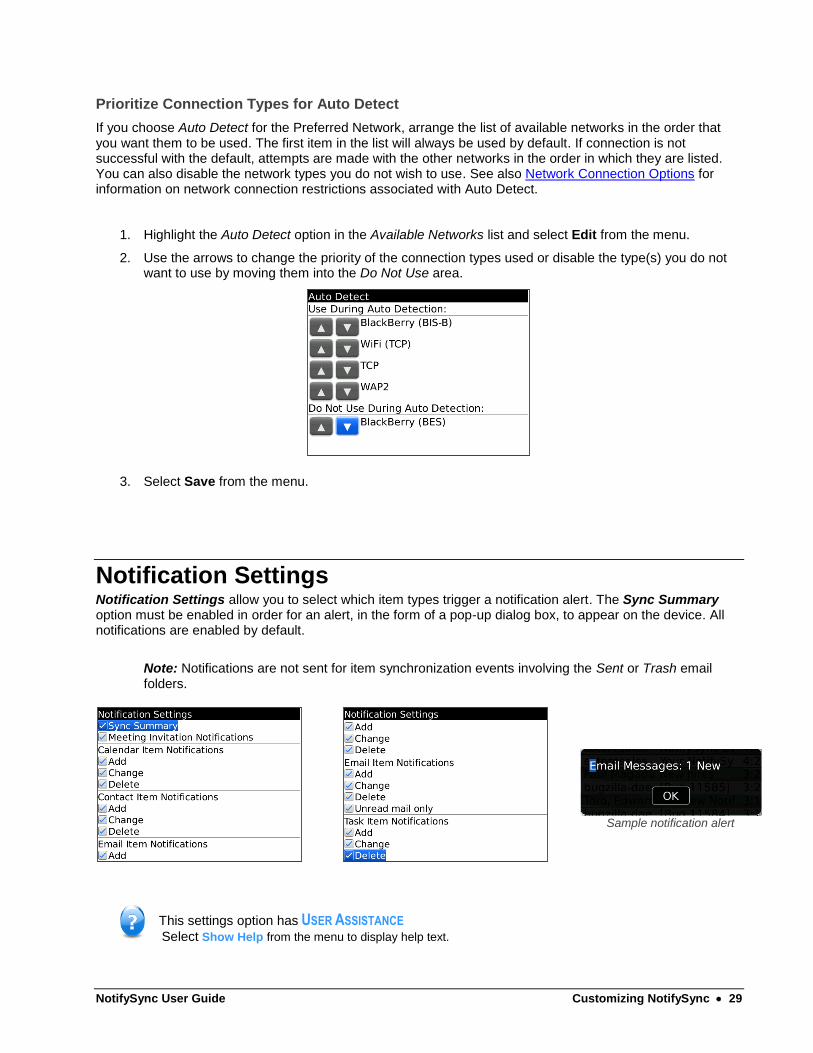
Notification Settings Notification Settings allow you to select which item types trigger a notification alert. The Sync Summary option must be enabled in order for an alert, in the form of a pop-up dialog box, to appear on the device. All notifications are enabled by default.
Note: Notifications are not sent for item synchronization events involving the Sent or Trash email folders.
Sample notification alert
This settings option has USER ASSISTANCE
Select Show Help from the menu to display help text.

NotifySync User Guide Customizing NotifySync 30
1. Open NotifySync and press the menu button. 2. Select Preferences > Notification Settings. 3. Use the checkboxes to enable or disable the generation of notifications for each item type. You can
also use pop-up menu options, All Notifications Off and All Notifications On.
Sync Summary If enabled, a dialog displays after each synchronization summarizing all the items that were processed. The notification indicates the type of item, the number of items, and whether they are new (New), updated (Upd), or deleted (Del) items. See sample above.
Meeting Invitation Notifications If enabled, meeting invitations generate notifications.
Calendar Item Notifications If enabled, calendar additions, updates, or deletions generate notifications.
Contact Item Notifications If enabled, contact additions, updates, or deletions generate notifications.
Email Item Notifications If enabled, email additions, updates (read/unread status changes), or deletions generate notifications. There is also an option to generate notifications for Unread mail only (which does not affect notifications for email deletions).
Memo Item Notifications If enabled, memo additions, updates, or deletions generate notifications.
Task item Notifications If enabled, task additions, updates, or deletions generate notifications.
4. Select Save from the menu.

NotifySync User Guide Customizing NotifySync 31
Out of Office Assistant The Out of office Assistant enables you to set up an automatic reply to emails received during periods that you are not checking email. You may configure the settings to send the automatic response to some or all of the people who send you messages. The configuration features include:
Schedule Out of Office automatic replies in advance. Schedule the begin and end dates and times that the auto-replies should be sent.
Send auto-replies to people inside or outside your organization. You can also customize the message that is sent to each.
Note: Please note that Microsoft Exchange Server 2003 does not support the Out of Office feature. This preference option will not appear on your device unless you are synchronizing with Exchange 2007 or 2010.
1. Open NotifySync and press the menu button. 2. Select Preferences > Out of Office Assistant. 3. Check the Send Out of Office auto-replies box. 4. If you wish to set in advance the time period during which auto-replies are sent, check Send Out of
Office auto-replies only during this time period, then define the begin and end dates and times. (This setting is optional. If left unchecked, auto-replies will begin to send as soon as you save the changes and will not end until you manually disable Out of Office replies.)
5. Enter the Out of Office Message for Internal Senders (people within your organization). 6. If you wish to send auto-replies to people outside your organization, check Send Out of Office auto-
replies to External Senders. Define the following:
Choose only external senders in your Contacts list or anyone outside your organization.
Enter a custom Out of Office message. 7. Select Save from the menu.

NotifySync User Guide Customizing NotifySync 32
Push Settings Use Push Settings to define the mode of synchronization your device uses (Scheduled Push or Direct Push) and the interval at which connections to the server are made.
You may define different settings for weekdays and weekends and set synchronization to operate all day, for a defined period of the day or to be turned off altogether.
Definitions
Scheduled Push Mode – The device periodically checks the server to see if new messages have arrived and then requests a delivery.
Direct Push Mode – The device establishes a synchronization session with the server. A series of device requests and server responses regarding the availability of new messages and PIM items are continuously exchanged during the session. Consequently, the server can push new items to the device, as soon as they are available. Session length can be defined by the user, however, the default length for the sessions is 15 minutes (shorter sessions often defeat the purpose of direct push’s up-to-the-minute synchronization capabilities). Users should also enable the “Dynamic Interval” option which allows the device to adjust the interval to an optimal length based on performance. See reference document, Direct Push Technology, for more information on the Direct Push synchronization method.
Push Mode Network Requirements
Direct Push mode is supported on devices provisioned for TCP by the carrier network.
Scheduled Push mode is supported on devices provisioned for BIS or TCP
WiFi connections require the use of either BIS or TCP WiFi.
See Network Settings for more information.
Temporarily Disable Synchronization
Push Settings offers an option to temporarily disable all synchronization without having to edit your permanent settings. While synchronization is off, a pop-up message displays if you try to send a reply or newly composed message, or if you attempt to initiate a manual synchronization. A red X appears at the top center of NotifySync’s main screen. You will be prompted to save outgoing messages as drafts when synchronization is off.
Press the menu button and selecting Disable NotifySync. To enable synchronization again, select Enable NotifySync.
Direct Push Mode Can Switch to Scheduled Push
A device may automatically change from Direct Push to Scheduled Push if circumstances warrant a switch. See the knowledge base article for a list of possible scenarios.
If a switch occurs, you will receive a pop-up notification indicating that the push mode has changed from Direct Push to Scheduled Push.
This settings option has USER ASSISTANCE
Select Show Help from the menu to display help text.

NotifySync User Guide Customizing NotifySync 33
Set Your Push Preferences
1. Open NotifySync and press the menu button.
2. Select Preferences > Push Settings.
3. Select the Push Type. Choose Scheduled Push or Direct Push. Default is Scheduled Push.
a. For Schedule Push, define the following:
Weekday Settings
Set to: Off, Interval, or All Day to determine when the device will synchronize Mondays through Fridays. Default is Interval.
Weekend Settings
Set to: Off, Interval, or All Day to determine when the device will synchronize on Saturdays and Sundays. Default is Interval.
Push Frequency
If you have set Weekdays/Weekends to All Day or Interval, enter the number of minutes (1-90) between synchronizations. The default is 5 minutes, resulting in the device synchronizing every 5 minutes.
Range If you have set Weekdays/Weekends to Interval, choose the time synchronization should start and end. Times must be within one 24-hour period. The defaults settings are 7:00 AM to 7:00 PM.
b. For Direct Push, define the following:
Direct Push Timeout
Set the duration of a direct push session (the length of time the device connection to the server stays open for synchronization). The default setting is 15 minutes.
Check the Dynamic Interval box to allow the device to monitor the performance of the direct push session and adjust the duration to an optimal value.
Weekday Settings
Set to: Off, Interval, or All Day to determine when the device will synchronize Mondays through Fridays. The default is Interval.
Weekend Settings
Set to: Off, Interval, or All Day to determine when the device will synchronize on Saturdays and Sundays. The default is Interval.
Range If you have set Weekdays/Weekends to Interval, choose the time synchronization should start and end. Times must be within one 24-hour period. The defaults settings are 7:00 AM to 7:00 PM.
4. Select Save from the menu.
NotifySync User Guide Customizing NotifySync 34
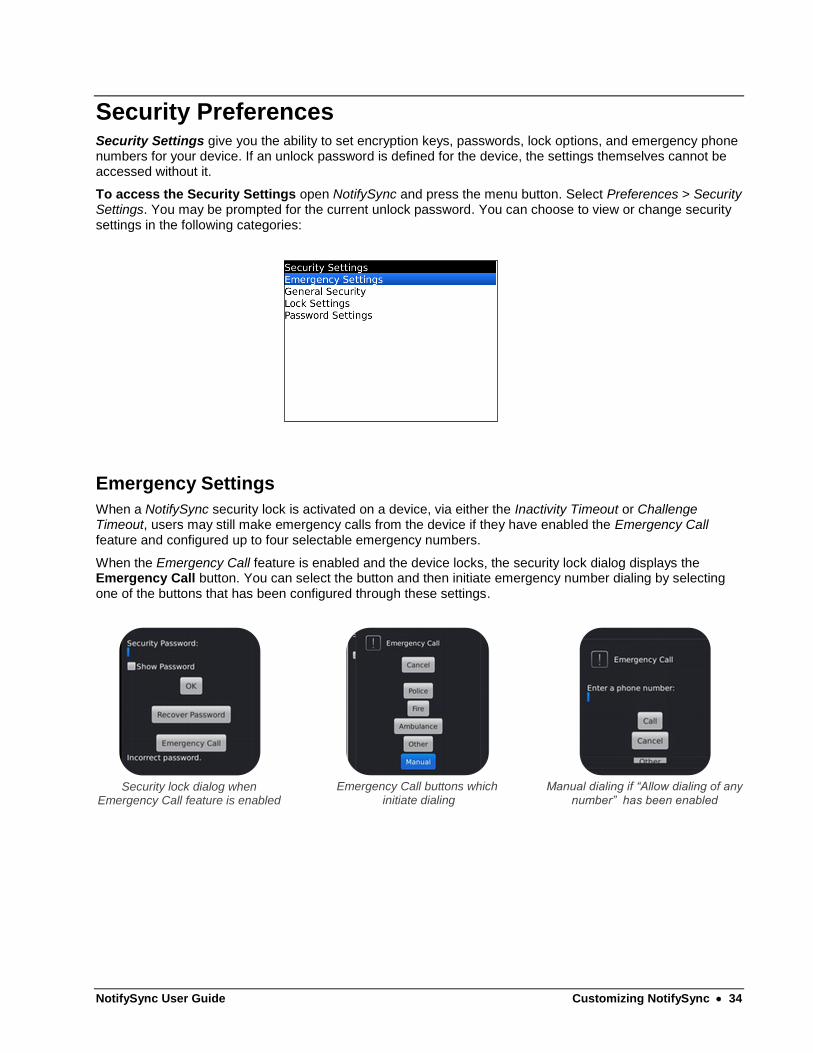
Security Preferences Security Settings give you the ability to set encryption keys, passwords, lock options, and emergency phone numbers for your device. If an unlock password is defined for the device, the settings themselves cannot be accessed without it.
To access the Security Settings open NotifySync and press the menu button. Select Preferences > Security Settings. You may be prompted for the current unlock password. You can choose to view or change security settings in the following categories:
Emergency Settings
When a NotifySync security lock is activated on a device, via either the Inactivity Timeout or Challenge Timeout, users may still make emergency calls from the device if they have enabled the Emergency Call feature and configured up to four selectable emergency numbers.
When the Emergency Call feature is enabled and the device locks, the security lock dialog displays the Emergency Call button. You can select the button and then initiate emergency number dialing by selecting one of the buttons that has been configured through these settings.
Security lock dialog when
Emergency Call feature is enabled
Emergency Call buttons which
initiate dialing
Manual dialing if “Allow dialing of any
number” has been enabled

NotifySync User Guide Customizing NotifySync 35
NotifySync also prompts to you edit the emergency number fields when:
You turn on Inactivity Timeout or Challenge Timeout.
See Lock Settings
You change the time zone setting on your device.
(A reminder to update the fields with local numbers)
This settings option has USER ASSISTANCE
Select Show Help from the menu to display help text.
1. Open NotifySync and press the menu button. 2. Select Preferences > Security Settings > Emergency Settings. 3. Check the Emergency Calling box to enable the Emergency Call feature.
4. Enter the phone numbers for the following emergency number fields:
Allow dialing of any number
Police
Fire
Ambulance
Other
The default for each field is 911. The current time zone at which the device is set is also displayed.
The phone number fields accept valid phone number characters including *, #, +, - and alphabetic characters. For example, 1-800-ABC-ABCD will translate to 1-800-111-1112.
5. Mark the Confirm Emergency Call checkbox to avoid accidental calls. 6. Select Save from the menu.
NotifySync User Guide Customizing NotifySync 36
General Security
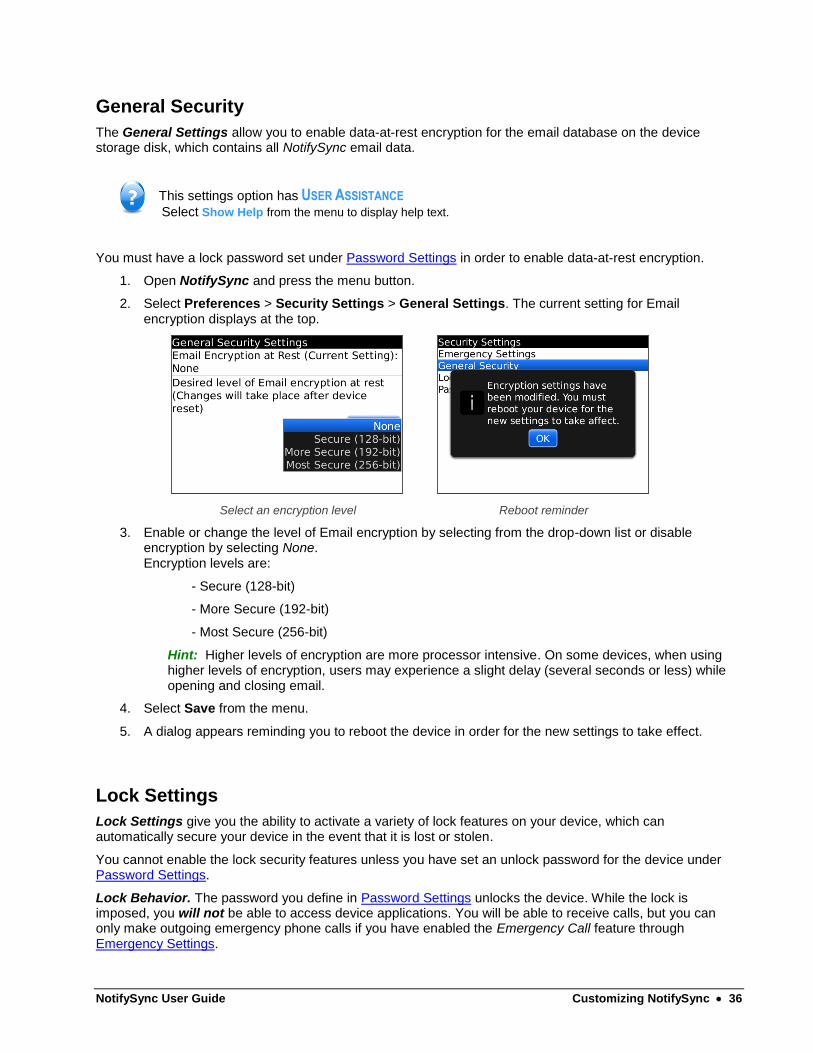
The General Settings allow you to enable data-at-rest encryption for the email database on the device storage disk, which contains all NotifySync email data.
This settings option has USER ASSISTANCE
Select Show Help from the menu to display help text.
You must have a lock password set under Password Settings in order to enable data-at-rest encryption.
1. Open NotifySync and press the menu button.
2. Select Preferences > Security Settings > General Settings. The current setting for Email encryption displays at the top.
Select an encryption level
Reboot reminder
3. Enable or change the level of Email encryption by selecting from the drop-down list or disable encryption by selecting None. Encryption levels are:
- Secure (128-bit)
- More Secure (192-bit)
- Most Secure (256-bit)
Hint: Higher levels of encryption are more processor intensive. On some devices, when using higher levels of encryption, users may experience a slight delay (several seconds or less) while opening and closing email.
4. Select Save from the menu.
5. A dialog appears reminding you to reboot the device in order for the new settings to take effect.
Lock Settings
Lock Settings give you the ability to activate a variety of lock features on your device, which can automatically secure your device in the event that it is lost or stolen.
You cannot enable the lock security features unless you have set an unlock password for the device under Password Settings.
Lock Behavior. The password you define in Password Settings unlocks the device. While the lock is imposed, you will not be able to access device applications. You will be able to receive calls, but you can only make outgoing emergency phone calls if you have enabled the Emergency Call feature through Emergency Settings.

NotifySync User Guide Customizing NotifySync 37
When you enable the Inactivity Timeout or Challenge Timeout, you will be prompted to update Emergency Call numbers. The following dialog will display when you enable the timeout locks.
This settings option has USER ASSISTANCE
Select Show Help from the menu to display help text.
1. Open NotifySync and press the menu button.
2. Select Preferences > Security Settings > Lock Settings.
3. Define the lock settings described below:
Lock Setting Description Limits Default
Inactivity Timeout
▼ Interval (in minutes)
Check to enable and enter number of minutes before the device locks due to inactivity. Must be less than the Challenge Timeout.
When enabled this will also cause the device to lock when powered on, requiring a password entry to unlock.
If a security policy is sent to the device, the timeout in the policy will be the maximum timeout you can set. EX: If the policy’s inactivity timeout is 20 minutes, you may set the timeout on your device to any value between 1 and 20.
1-60 min 10

NotifySync User Guide Customizing NotifySync 38
Challenge Timeout
▼ Timeout (in minutes)
Check to enable and enter the number of minutes before the device locks. This lock is initiated regardless of inactivity and is intended to challenge the use of the device if it is lost or stolen. It must be greater than the Inactivity Timeout.
10-300 min
60
Password Echo
▼ Number of attempts
Check to enable and enter the number of password entry attempts before the last password you typed is unmasked. This serves to inform you of the entry error you are making (i.e. caps lock is on, transposing characters, etc.) It should be less than the Wipe on Failed Unlock Attempts.
1-15 times 9
Wipe on Failed Unlock
▼ Number of attempts
Check to enable and enter the number of failed unlock attempts before all account information, email and PIM (calendar, contacts, tasks) is wiped from the device and SD card. This limits the chances an unauthorized user has to guess a password.
To prevent a device from accidentally wiping, a popup displays three attempts prior to the wipe, requiring you to enter a displayed codeword before continuing to enter passwords.
5-15 times 10
Duress Notification
Check to enable and enter an Email address to which a duress notification will be sent.
User activates the duress notification if he/she is forced to unlock the device under duress by entering the password in an altered format (shift all characters to the left). EX: If lock password is “guarddog”, the duress password is “uarddogg”.
A high priority Email notification is sent to the specified Email address with the Subject: “NotifySync Duress Notification.” The notification is completely hidden from view. It does not appear in the device’s Outbox, Sent Items, or Deleted Items folders.
Email address format
None
Wipe Device on Duress
If enabled, a wipe occurs when a Duress Notification is issued, deleting all account information, email and PIM from the device and SD card. This option is exposed only when Duress Notification is enabled.
- Disabled
Allow keypad responses during phone calls when
locked
When enabled, if device is locked during a phone call, users can successfully use the keypad for responding to voice automated calls.
- Disabled
Lock Message The message that displays whenever the device goes into a locked state.
500 characters
None
4. Select Save from the menu.
NotifySync User Guide Customizing NotifySync 39
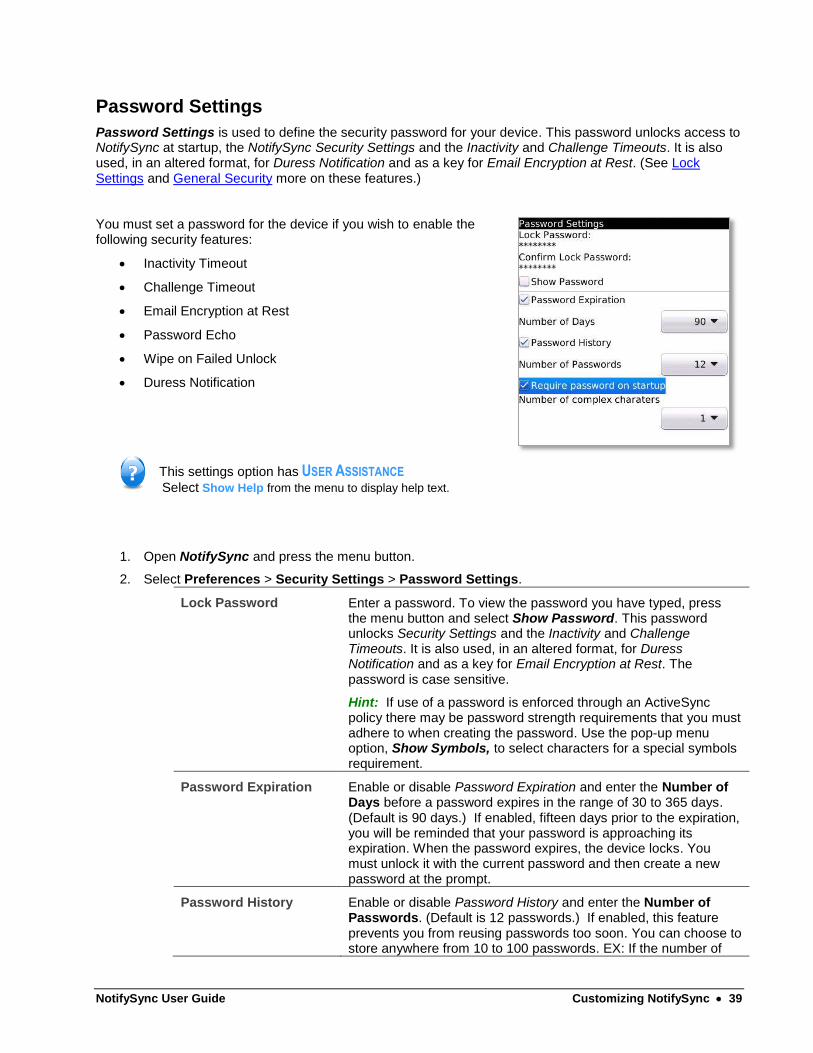
Password Settings
Password Settings is used to define the security password for your device. This password unlocks access to NotifySync at startup, the NotifySync Security Settings and the Inactivity and Challenge Timeouts. It is also used, in an altered format, for Duress Notification and as a key for Email Encryption at Rest. (See Lock Settings and General Security more on these features.)
You must set a password for the device if you wish to enable the following security features:
Inactivity Timeout
Challenge Timeout
Email Encryption at Rest
Password Echo
Wipe on Failed Unlock
Duress Notification
This settings option has USER ASSISTANCE
Select Show Help from the menu to display help text.
1. Open NotifySync and press the menu button.
2. Select Preferences > Security Settings > Password Settings.
Lock Password Enter a password. To view the password you have typed, press the menu button and select Show Password. This password unlocks Security Settings and the Inactivity and Challenge Timeouts. It is also used, in an altered format, for Duress Notification and as a key for Email Encryption at Rest. The password is case sensitive.
Hint: If use of a password is enforced through an ActiveSync policy there may be password strength requirements that you must adhere to when creating the password. Use the pop-up menu option, Show Symbols, to select characters for a special symbols requirement.
Password Expiration Enable or disable Password Expiration and enter the Number of Days before a password expires in the range of 30 to 365 days. (Default is 90 days.) If enabled, fifteen days prior to the expiration, you will be reminded that your password is approaching its expiration. When the password expires, the device locks. You must unlock it with the current password and then create a new password at the prompt.
Password History Enable or disable Password History and enter the Number of Passwords. (Default is 12 passwords.) If enabled, this feature prevents you from reusing passwords too soon. You can choose to store anywhere from 10 to 100 passwords. EX: If the number of

NotifySync User Guide Customizing NotifySync 40
stored passwords is 10, you will not be able to use the past ten passwords. When you create the 11th password, the oldest stored password becomes available for use again.
Require password on startup
Enable this option to require a password entry when starting NotifySync.
Number of complex characters
When the server does not or cannot define a setting for character types required in a password, you can set the number of each type of character required. Choose 0, 1, 2, or 3 characters. (Example: If number of complex characters is 2, the password must have 2 uppercase, 2 lowercase, 2 numeric, and 2 symbol characters.)
3. Select Save from the menu.
Status Status allows you to view the device’s last synchronization time and the status of its network connections, power and memory. A diagnostic test can be performed to test connections to the mail and license servers.
1. Open NotifySync and press the menu button.
2. Select Preferences > Status.
To test the connections to the mail and license servers, select Diagnostics Test from the menu.

NotifySync User Guide Customizing NotifySync 41
Sync Settings Sync Settings allow you to select the accounts to process for email, calendar, contacts, tasks and memos and the folders to which items will synchronize.
You can also specify synchronization ranges for mail and calendar information. The mail and calendar synchronization ranges serve as cleanup filters which allow users to control the amount of data that is kept on a device.
Synchronize Multiple Server-side PIM Folders
Multiple Calendar, Contact, Task, and Memo folders on the server can be synchronized to the device using Sync Settings. In the example below, the user has chosen to synchronize multiple calendar folders, “Personal” and “Calendar,” to the device’s “Default” Calendar.
Memo Synchronization
“Memo” items on the device map to “Notes” on the server, the term used by the ActiveSync protocol for this type of PIM item.
This settings option has USER ASSISTANCE
Select Show Help from the menu to display help text.
Set Your Sync Preferences
1. Open NotifySync and press the menu button.
2. Select Preferences > Sync Settings.
3. Specify your preferences for the information synchronized from the server:
Sync while roaming
Check this box to allow the device to synchronize when you are roaming. Default setting: disabled
If this option is disabled, the device displays a dialog indicating when it is roaming and that synchronization is off. The message also appears if you attempt to manually synchronize. Disabling the option prevents the device from accumulating large data charges whiles roaming.
NotifySync User Guide Customizing NotifySync 42
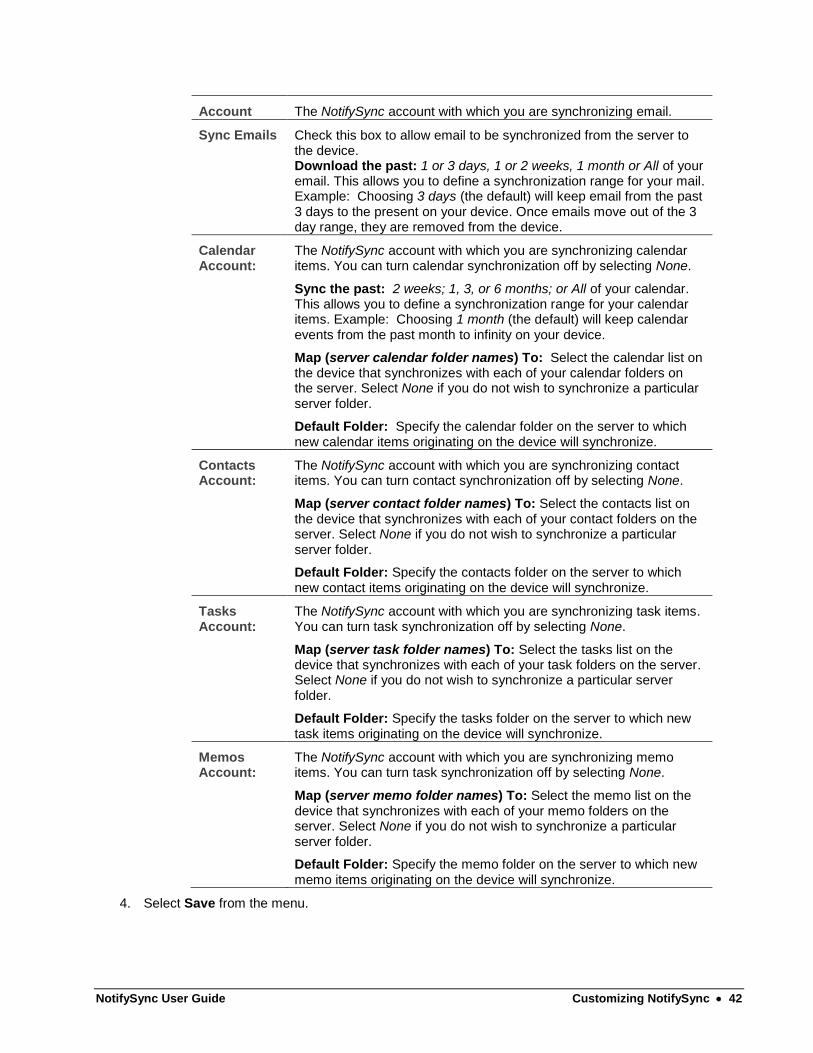
Account The NotifySync account with which you are synchronizing email.
Sync Emails Check this box to allow email to be synchronized from the server to the device. Download the past: 1 or 3 days, 1 or 2 weeks, 1 month or All of your email. This allows you to define a synchronization range for your mail. Example: Choosing 3 days (the default) will keep email from the past 3 days to the present on your device. Once emails move out of the 3 day range, they are removed from the device.
Calendar Account:
The NotifySync account with which you are synchronizing calendar items. You can turn calendar synchronization off by selecting None.
Sync the past: 2 weeks; 1, 3, or 6 months; or All of your calendar. This allows you to define a synchronization range for your calendar items. Example: Choosing 1 month (the default) will keep calendar events from the past month to infinity on your device.
Map (server calendar folder names) To: Select the calendar list on the device that synchronizes with each of your calendar folders on the server. Select None if you do not wish to synchronize a particular server folder.
Default Folder: Specify the calendar folder on the server to which new calendar items originating on the device will synchronize.
Contacts Account:
The NotifySync account with which you are synchronizing contact items. You can turn contact synchronization off by selecting None.
Map (server contact folder names) To: Select the contacts list on the device that synchronizes with each of your contact folders on the server. Select None if you do not wish to synchronize a particular server folder.
Default Folder: Specify the contacts folder on the server to which new contact items originating on the device will synchronize.
Tasks Account:
The NotifySync account with which you are synchronizing task items. You can turn task synchronization off by selecting None.
Map (server task folder names) To: Select the tasks list on the device that synchronizes with each of your task folders on the server. Select None if you do not wish to synchronize a particular server folder.
Default Folder: Specify the tasks folder on the server to which new task items originating on the device will synchronize.
Memos Account:
The NotifySync account with which you are synchronizing memo items. You can turn task synchronization off by selecting None.
Map (server memo folder names) To: Select the memo list on the device that synchronizes with each of your memo folders on the server. Select None if you do not wish to synchronize a particular server folder.
Default Folder: Specify the memo folder on the server to which new memo items originating on the device will synchronize.
4. Select Save from the menu.

NotifySync User Guide Customizing NotifySync 43
Sync Settings Menu Options
Sync Settings has menu options that may be used for troubleshooting and maintenance related to synchronization. These options should only be used at the direction of a Technical Support team member.
Reload TimeZone Table can be used in the event that updates to time zones occur. This gives you a way to download new information regarding time zones, which are used by NotifySync in the synchronization of calendar items.
Resync All removes all email and PIM data from the device and resynchronizes current information from the server. This is used as a troubleshooting measure and should not be used to initiate a normal synchronization session. That can be done using the message list menu option, Sync.

NotifySync User Guide Using NotifySync 44
Using NotifySync
The topics that follow provide information on using NotifySync to synchronize email and PIM items between your device and your user account on an ActiveSync server.
Menus
Menus for devices running BlackBerry operating system version 6.0 or greater have a different format than menus on devices with older OS versions. Menus for the newer operating systems can appear in a list or as pop-ups with icons and text.
Menu on devices running BlackBerry OS versions less than 6.0
Menus with icons on devices running BlackBerry OS v6.0 or greater
The NotifySync Screen Header
Example 1: Device with radio signal Example 2: A charging device using WiFi
The NotifySync header displays a variety of indicators that communicate information such as: current date and time, folder name, push status, radio signal, WiFi status, network type, battery status, charging status, and Outbox errors.
The header appears in the following NotifySync screens:
Message List Screen
Compose Screen
Open Message Screen
Remote Lookup Screen
Request Meeting Screen
Registration Screen
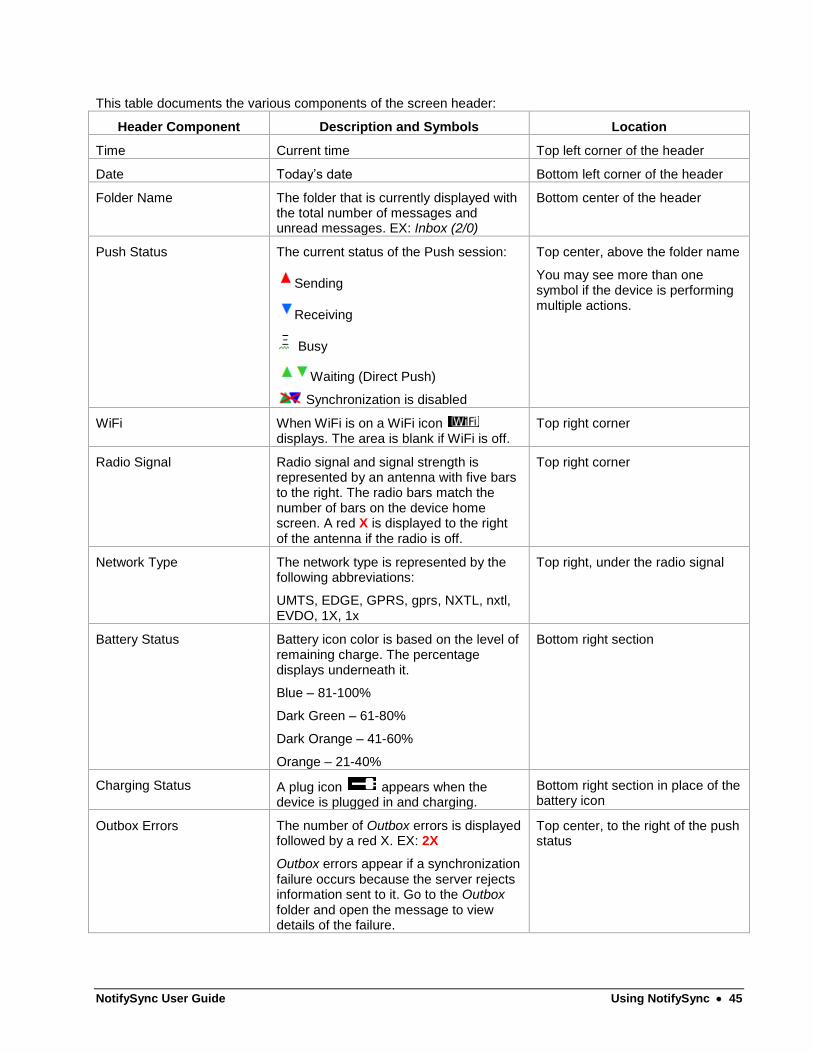
NotifySync User Guide Using NotifySync 45
This table documents the various components of the screen header:
Header Component Description and Symbols Location
Time Current time Top left corner of the header
Date Today’s date Bottom left corner of the header
Folder Name The folder that is currently displayed with the total number of messages and unread messages. EX: Inbox (2/0)
Bottom center of the header
Push Status The current status of the Push session:
Sending
Receiving
Busy
Waiting (Direct Push)
Synchronization is disabled
Top center, above the folder name
You may see more than one symbol if the device is performing multiple actions.
WiFi When WiFi is on a WiFi icon displays. The area is blank if WiFi is off.
Top right corner
Radio Signal Radio signal and signal strength is represented by an antenna with five bars to the right. The radio bars match the number of bars on the device home screen. A red X is displayed to the right of the antenna if the radio is off.
Top right corner
Network Type The network type is represented by the following abbreviations:
UMTS, EDGE, GPRS, gprs, NXTL, nxtl, EVDO, 1X, 1x
Top right, under the radio signal
Battery Status Battery icon color is based on the level of remaining charge. The percentage displays underneath it.
Blue – 81-100%
Dark Green – 61-80%
Dark Orange – 41-60%
Orange – 21-40%
Bottom right section
Charging Status A plug icon appears when the device is plugged in and charging.
Bottom right section in place of the battery icon
Outbox Errors The number of Outbox errors is displayed followed by a red X. EX: 2X
Outbox errors appear if a synchronization failure occurs because the server rejects information sent to it. Go to the Outbox folder and open the message to view details of the failure.
Top center, to the right of the push status
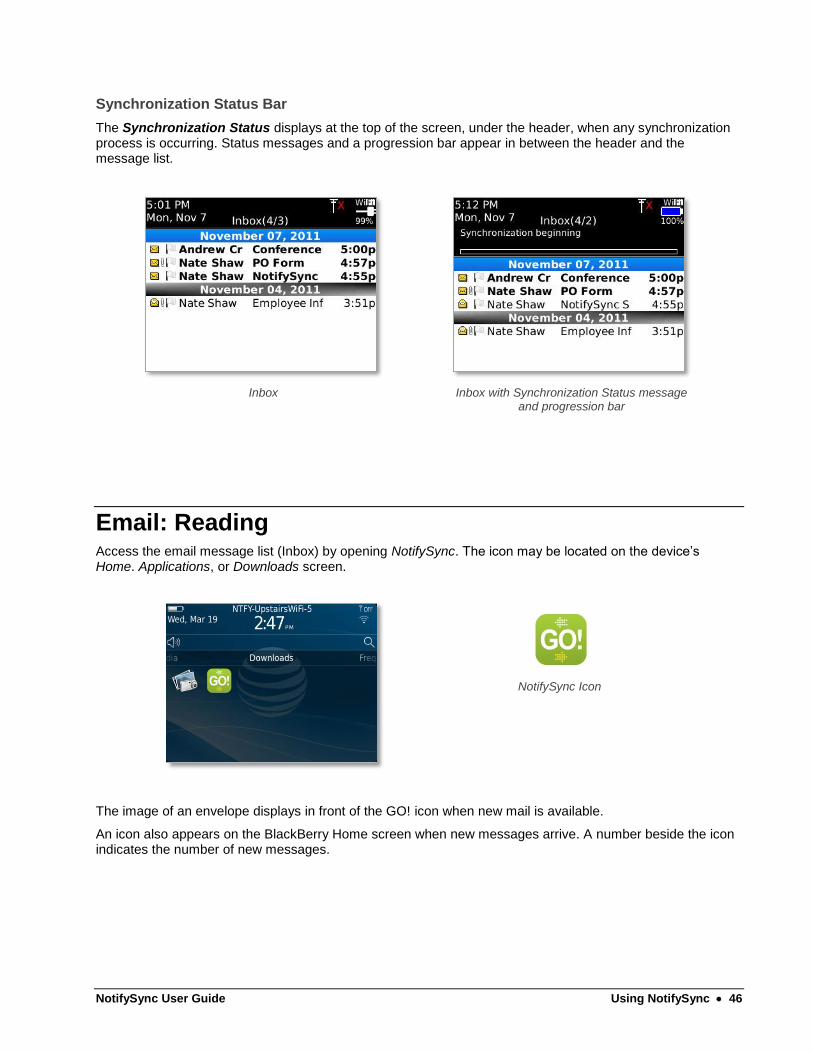
NotifySync User Guide Using NotifySync 46
Synchronization Status Bar
The Synchronization Status displays at the top of the screen, under the header, when any synchronization process is occurring. Status messages and a progression bar appear in between the header and the message list.
Inbox
Inbox with Synchronization Status message and progression bar
Email: Reading Access the email message list (Inbox) by opening NotifySync. The icon may be located on the device’s Home. Applications, or Downloads screen.
NotifySync Icon
The image of an envelope displays in front of the GO! icon when new mail is available.
An icon also appears on the BlackBerry Home screen when new messages arrive. A number beside the icon indicates the number of new messages.

NotifySync User Guide Using NotifySync 47
Email Folders
All folders can be accessed from the message list screen. Select View Folder from the menu and choose a folder from the folder tree.
Folder Functionality
The folder list contains the entire mail folder structure from your mail account on the ActiveSync server. This enables you to move messages around within the folder structure. However, in order for the actual contents of your ActiveSync account folders to synchronize to the device folders, the folders must be selected for synchronization on the device via Folder Settings. The Inbox is the only email folder tagged for synchronization by default. All other folders must be tagged for synchronization in order for the actual folder contents (the mail inside the folder) to synchronize. See Folder Settings.
All selected email folders will contain only email that falls within the synchronization date range you have set for the device. See Sync Settings.
Inbox The only folder that is tagged for synchronization by default.
Sent Items Must be tagged for synchronization via Folder Settings. Messages sent from the device synchronize to the server before they appear in the device Sent Items folder.
Outbox Messages are stored here pending the next synchronization cycle unless you change an option, via General Settings, that will enable messages to be sent immediately.
Drafts Must be tagged for synchronization via Folder Settings.
Deleted Items Must be tagged for synchronization via Folder Settings. Messages deleted from the device synchronize to the server before they appear in the device Deleted Items folder.
Custom Folders Must be tagged for synchronization via Folder Settings.
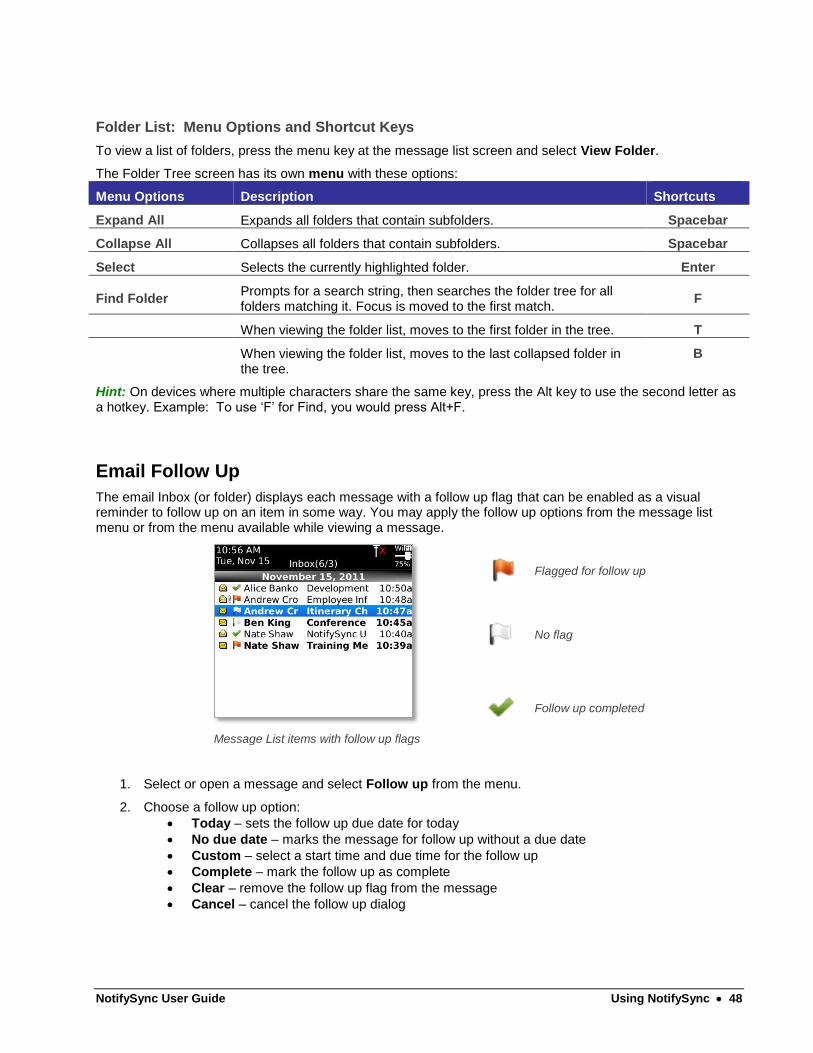
NotifySync User Guide Using NotifySync 48
Folder List: Menu Options and Shortcut Keys
To view a list of folders, press the menu key at the message list screen and select View Folder.
The Folder Tree screen has its own menu with these options:
Menu Options Description Shortcuts
Expand All Expands all folders that contain subfolders. Spacebar
Collapse All Collapses all folders that contain subfolders. Spacebar
Select Selects the currently highlighted folder. Enter
Find Folder Prompts for a search string, then searches the folder tree for all folders matching it. Focus is moved to the first match.
F
When viewing the folder list, moves to the first folder in the tree. T
When viewing the folder list, moves to the last collapsed folder in the tree.
B
Hint: On devices where multiple characters share the same key, press the Alt key to use the second letter as a hotkey. Example: To use ‘F’ for Find, you would press Alt+F.
Email Follow Up
The email Inbox (or folder) displays each message with a follow up flag that can be enabled as a visual reminder to follow up on an item in some way. You may apply the follow up options from the message list menu or from the menu available while viewing a message.
Message List items with follow up flags
Flagged for follow up
No flag
Follow up completed
1. Select or open a message and select Follow up from the menu.
2. Choose a follow up option:
Today – sets the follow up due date for today
No due date – marks the message for follow up without a due date
Custom – select a start time and due time for the follow up
Complete – mark the follow up as complete
Clear – remove the follow up flag from the message
Cancel – cancel the follow up dialog
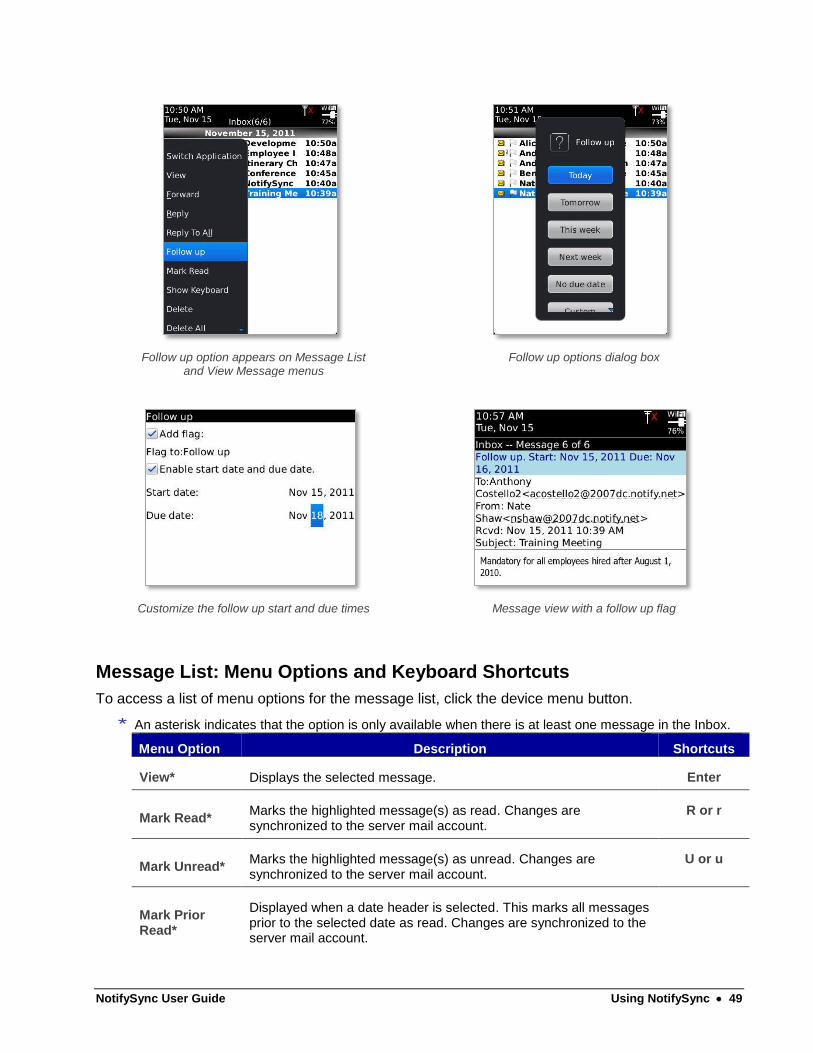
NotifySync User Guide Using NotifySync 49
Follow up option appears on Message List and View Message menus
Follow up options dialog box
Customize the follow up start and due times
Message view with a follow up flag
Message List: Menu Options and Keyboard Shortcuts
To access a list of menu options for the message list, click the device menu button.
* An asterisk indicates that the option is only available when there is at least one message in the Inbox.
Menu Option Description Shortcuts
View* Displays the selected message. Enter
Mark Read* Marks the highlighted message(s) as read. Changes are synchronized to the server mail account.
R or r
Mark Unread* Marks the highlighted message(s) as unread. Changes are synchronized to the server mail account.
U or u
Mark Prior Read*
Displayed when a date header is selected. This marks all messages prior to the selected date as read. Changes are synchronized to the server mail account.
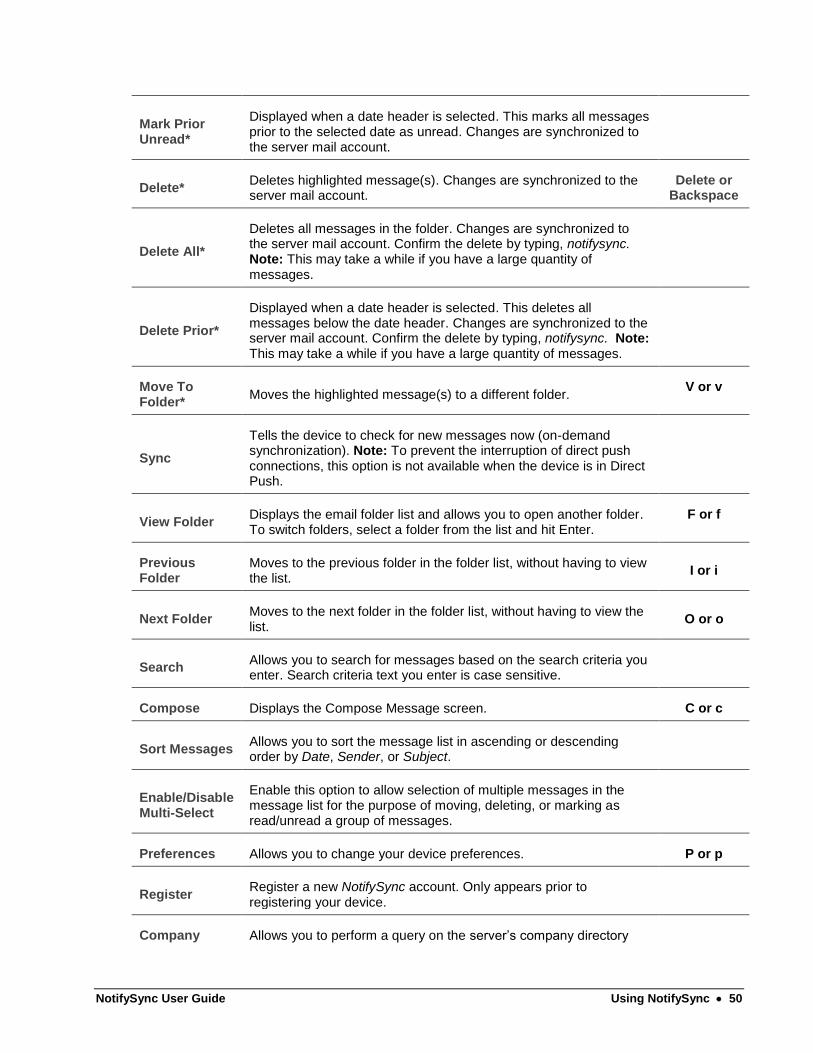
NotifySync User Guide Using NotifySync 50
Mark Prior Unread*
Displayed when a date header is selected. This marks all messages prior to the selected date as unread. Changes are synchronized to the server mail account.
Delete* Deletes highlighted message(s). Changes are synchronized to the server mail account.
Delete or Backspace
Delete All*
Deletes all messages in the folder. Changes are synchronized to the server mail account. Confirm the delete by typing, notifysync. Note: This may take a while if you have a large quantity of messages.
Delete Prior*
Displayed when a date header is selected. This deletes all messages below the date header. Changes are synchronized to the server mail account. Confirm the delete by typing, notifysync. Note: This may take a while if you have a large quantity of messages.
Move To Folder*
Moves the highlighted message(s) to a different folder. V or v
Sync
Tells the device to check for new messages now (on-demand synchronization). Note: To prevent the interruption of direct push connections, this option is not available when the device is in Direct Push.
View Folder Displays the email folder list and allows you to open another folder. To switch folders, select a folder from the list and hit Enter.
F or f
Previous Folder
Moves to the previous folder in the folder list, without having to view the list.
I or i
Next Folder Moves to the next folder in the folder list, without having to view the list.
O or o
Search Allows you to search for messages based on the search criteria you enter. Search criteria text you enter is case sensitive.
Compose Displays the Compose Message screen. C or c
Sort Messages Allows you to sort the message list in ascending or descending order by Date, Sender, or Subject.
Enable/Disable Multi-Select
Enable this option to allow selection of multiple messages in the message list for the purpose of moving, deleting, or marking as read/unread a group of messages.
Preferences Allows you to change your device preferences. P or p
Register Register a new NotifySync account. Only appears prior to registering your device.
Company Allows you to perform a query on the server’s company directory
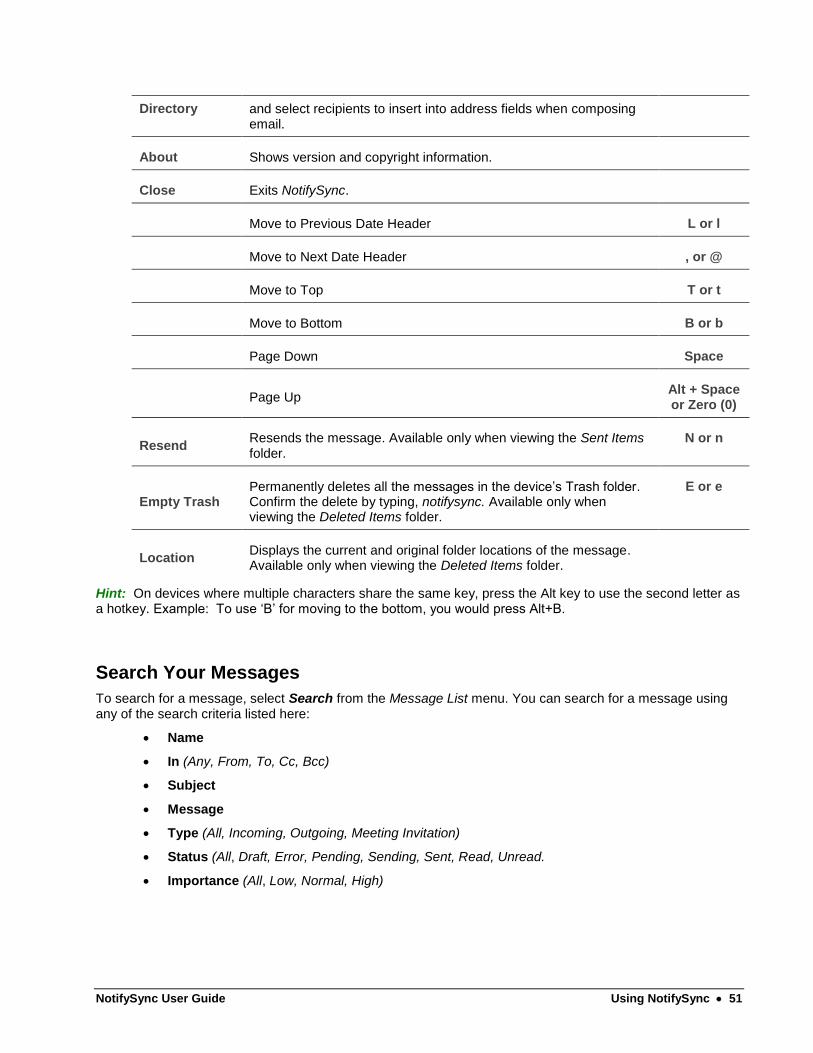
NotifySync User Guide Using NotifySync 51
Directory and select recipients to insert into address fields when composing email.
About Shows version and copyright information.
Close Exits NotifySync.
Move to Previous Date Header L or l
Move to Next Date Header , or @
Move to Top T or t
Move to Bottom B or b
Page Down Space
Page Up Alt + Space or Zero (0)
Resend Resends the message. Available only when viewing the Sent Items folder.
N or n
Empty Trash Permanently deletes all the messages in the device’s Trash folder. Confirm the delete by typing, notifysync. Available only when viewing the Deleted Items folder.
E or e
Location Displays the current and original folder locations of the message. Available only when viewing the Deleted Items folder.
Hint: On devices where multiple characters share the same key, press the Alt key to use the second letter as a hotkey. Example: To use ‘B’ for moving to the bottom, you would press Alt+B.
Search Your Messages
To search for a message, select Search from the Message List menu. You can search for a message using any of the search criteria listed here:
Name
In (Any, From, To, Cc, Bcc)
Subject
Message
Type (All, Incoming, Outgoing, Meeting Invitation)
Status (All, Draft, Error, Pending, Sending, Sent, Read, Unread.
Importance (All, Low, Normal, High)
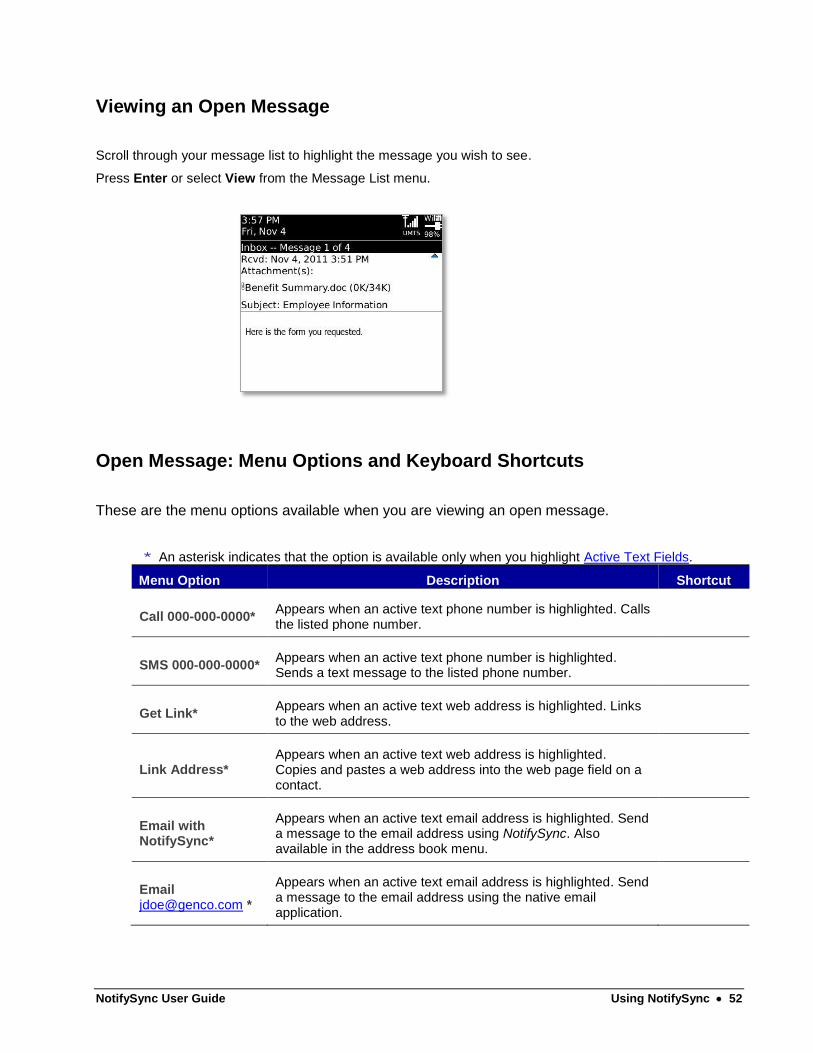
NotifySync User Guide Using NotifySync 52
Viewing an Open Message
Scroll through your message list to highlight the message you wish to see.
Press Enter or select View from the Message List menu.
Open Message: Menu Options and Keyboard Shortcuts
These are the menu options available when you are viewing an open message.
* An asterisk indicates that the option is available only when you highlight Active Text Fields.
Menu Option Description Shortcut
Call 000-000-0000* Appears when an active text phone number is highlighted. Calls the listed phone number.
SMS 000-000-0000* Appears when an active text phone number is highlighted. Sends a text message to the listed phone number.
Get Link* Appears when an active text web address is highlighted. Links to the web address.
Link Address* Appears when an active text web address is highlighted. Copies and pastes a web address into the web page field on a contact.
Email with NotifySync*
Appears when an active text email address is highlighted. Send a message to the email address using NotifySync. Also available in the address book menu.
Email [email protected] *
Appears when an active text email address is highlighted. Send a message to the email address using the native email application.
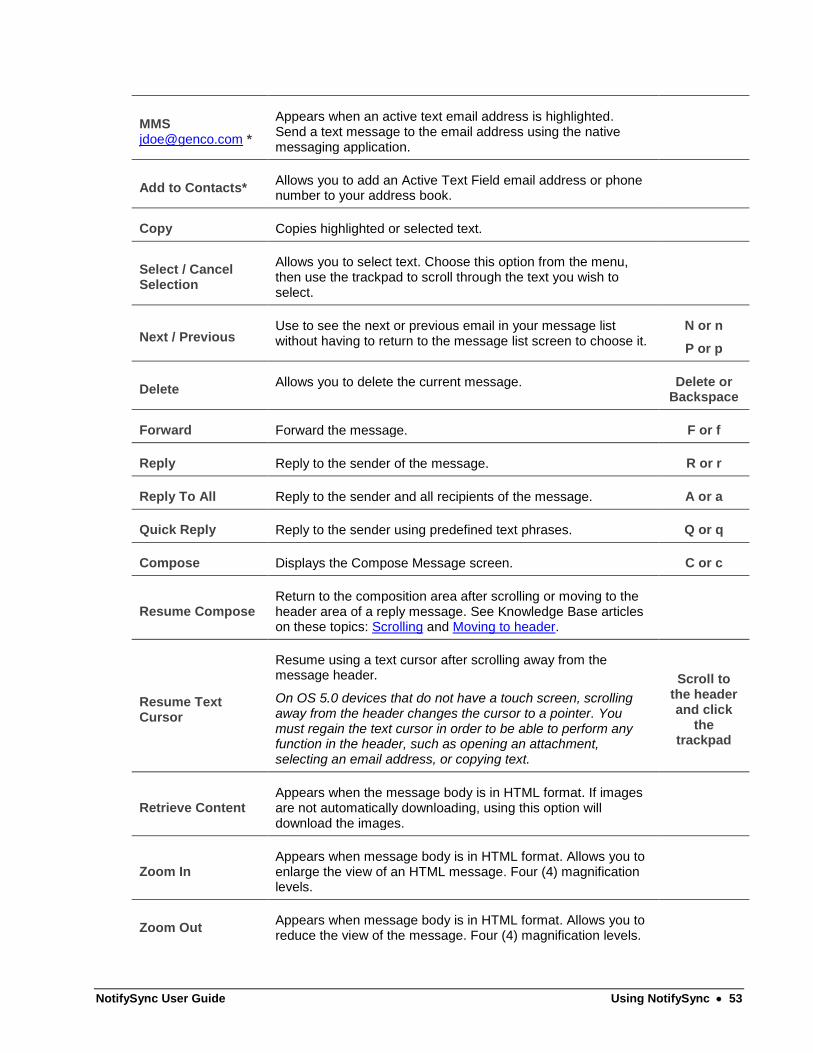
NotifySync User Guide Using NotifySync 53
MMS [email protected] *
Appears when an active text email address is highlighted. Send a text message to the email address using the native messaging application.
Add to Contacts* Allows you to add an Active Text Field email address or phone number to your address book.
Copy Copies highlighted or selected text.
Select / Cancel Selection
Allows you to select text. Choose this option from the menu, then use the trackpad to scroll through the text you wish to select.
Next / Previous Use to see the next or previous email in your message list without having to return to the message list screen to choose it.
N or n
P or p
Delete Allows you to delete the current message. Delete or
Backspace
Forward Forward the message. F or f
Reply Reply to the sender of the message. R or r
Reply To All Reply to the sender and all recipients of the message. A or a
Quick Reply Reply to the sender using predefined text phrases. Q or q
Compose Displays the Compose Message screen. C or c
Resume Compose Return to the composition area after scrolling or moving to the header area of a reply message. See Knowledge Base articles on these topics: Scrolling and Moving to header.
Resume Text Cursor
Resume using a text cursor after scrolling away from the message header.
On OS 5.0 devices that do not have a touch screen, scrolling away from the header changes the cursor to a pointer. You must regain the text cursor in order to be able to perform any function in the header, such as opening an attachment, selecting an email address, or copying text.
Scroll to the header and click
the trackpad
Retrieve Content Appears when the message body is in HTML format. If images are not automatically downloading, using this option will download the images.
Zoom In Appears when message body is in HTML format. Allows you to enlarge the view of an HTML message. Four (4) magnification levels.
Zoom Out Appears when message body is in HTML format. Allows you to reduce the view of the message. Four (4) magnification levels.

NotifySync User Guide Using NotifySync 54
Commands Gives you commands to temporarily suspend email notification or block/unblock email from specific email addresses. (See Commands below.)
Download Attachments
Appears when there is an attachment associated with a message.
View Recipients See a list of recipients. Lists email addresses in the To:, Cc:, Bcc:, and From: fields.
Scroll right when viewing an HTML message. (Applies only to users with devices running BlackBerry OS 5.0 or greater.)
ALT + d
Scroll left when viewing an HTML message. (Applies only to users with devices running BlackBerry OS 5.0 or greater.)
ALT + a
Move to Top T or t
Move to Bottom B or b
Scroll down Space
Scroll up ALT +Space
Hint: On devices where multiple characters share the same key, press the Alt key to use the second letter as a shortcut key. Example: To use ‘C’ for Compose, you would press Alt+C.
Active Text Fields
Email addresses, phone numbers, and web addresses are all active text fields. When composing an email or viewing an email or plaintext attachment you will see this type of information underlined. If you highlight this text, additional menu items become available so that you can:
Send a message to the email address using NotifySync
Send a message to the email address using the native email application
Add the email address to your address book
Call the listed phone number
Send a text message to the listed phone number
Add the phone number to your address book
Link to the web address
Copy and paste a web address to the web page field of a contact
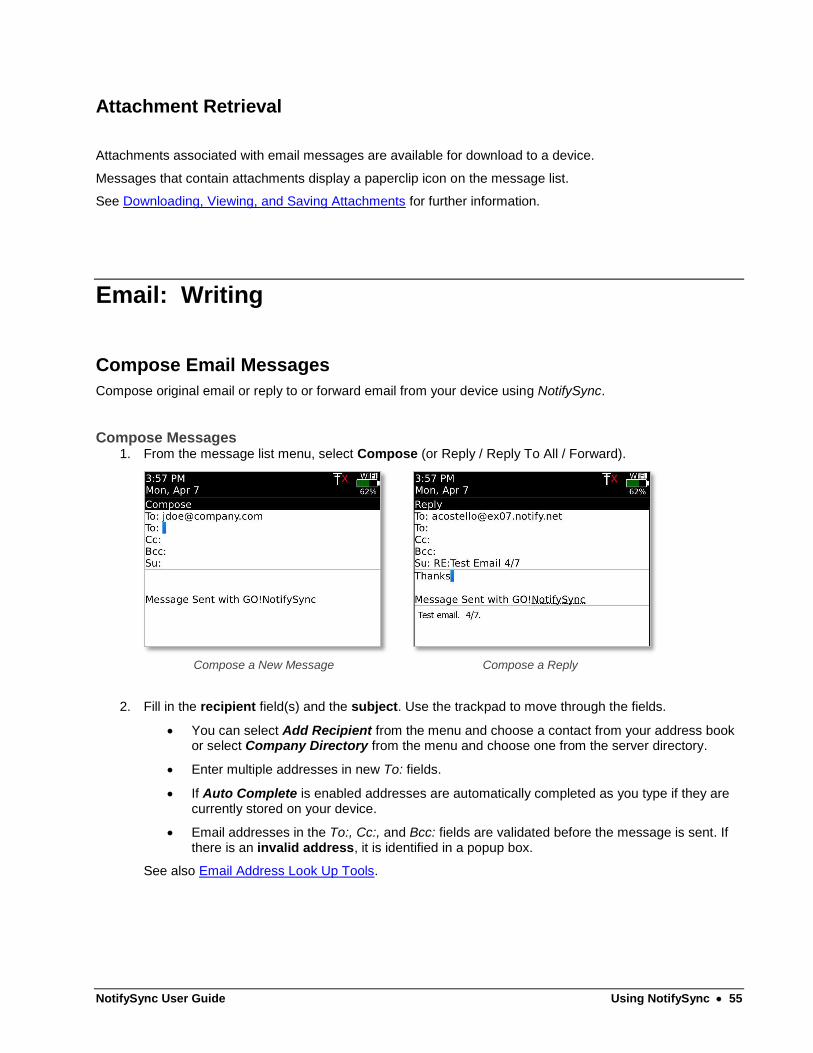
NotifySync User Guide Using NotifySync 55
Attachment Retrieval
Attachments associated with email messages are available for download to a device.
Messages that contain attachments display a paperclip icon on the message list.
See Downloading, Viewing, and Saving Attachments for further information.
Email: Writing
Compose Email Messages
Compose original email or reply to or forward email from your device using NotifySync.
Compose Messages 1. From the message list menu, select Compose (or Reply / Reply To All / Forward).
Compose a New Message
Compose a Reply
2. Fill in the recipient field(s) and the subject. Use the trackpad to move through the fields.
You can select Add Recipient from the menu and choose a contact from your address book or select Company Directory from the menu and choose one from the server directory.
Enter multiple addresses in new To: fields.
If Auto Complete is enabled addresses are automatically completed as you type if they are currently stored on your device.
Email addresses in the To:, Cc:, and Bcc: fields are validated before the message is sent. If there is an invalid address, it is identified in a popup box.
See also Email Address Look Up Tools.
NotifySync User Guide Using NotifySync 56
3. Type the body of your email.
When composing a message, the BlackBerry AutoText feature is enabled. Auto text replaces misspelled and abbreviated words as you type. A list of AutoText entries can be found under Options > AutoText. You can add to or edit the list.
You can invoke a spell check by selecting Check Spelling from the menu. You can also enable automatic spell checking via NotifySync Email Settings which results in an automatic
scan of the email body when you press send.
4. From the menu, select Save to work on and/or send the message later. Saved messages are stored
in the Drafts folder.
OR
From the menu, select Send to send the message now. Sent messages go to the Outbox where they wait to be processed.
Replies and Forwards Sent From the Device
Replies and forwarded email messages sent from your device may appear to recipients in one of two formats.
Inline Email: Recipients see a vertical display of the conversational threads and the original message, beginning with any text you may have added.
Attachment: Recipients see text you added in the body of the message and the conversational threads and original message are attached in .eml file.
Tip: Use the Resume Compose option on the menu to return to the composition area after scrolling or moving to the header area of a reply message. This may be necessary if you are using BlackBerry OS 5.0. See Knowledge Base articles on these topics: Scrolling and Moving to header.
Choose When NotifySync Sends Email
Email originating on the device is stored in the device Outbox until the next scheduled synchronization or the next manual synchronization. This is the default behavior.
Users may change a NotifySync Preferences setting to allow outgoing messages to send immediately instead. However, since synchronization is always a two-way process (sending and receiving are not independent processes), immediate synchronization may result in messages on the server being retrieved as well.
To allow outgoing messages to send immediately, go to:
Preferences > General and enable the Send Outgoing Items Immediately option. See also General Settings.
Compose Email from the Address Book
You can create a new email message directly from the device address book using the NotifySync email application.
1. Open Contacts and highlight the contact you wish to email.
2. From the menu, select Email with NotifySync. You will automatically be placed in the compose
screen with contact you selected in the To: field.
NOTE: If the contact has multiple email addresses, you can select which address to use.
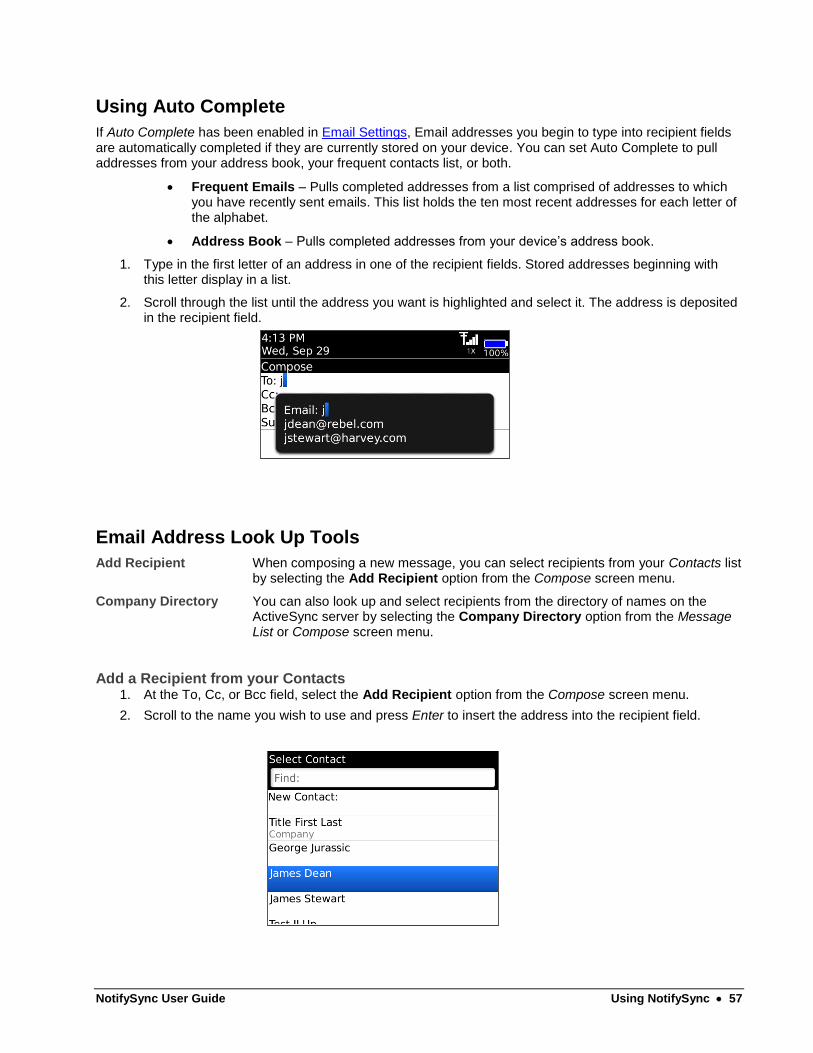
NotifySync User Guide Using NotifySync 57
Using Auto Complete
If Auto Complete has been enabled in Email Settings, Email addresses you begin to type into recipient fields are automatically completed if they are currently stored on your device. You can set Auto Complete to pull addresses from your address book, your frequent contacts list, or both.
Frequent Emails – Pulls completed addresses from a list comprised of addresses to which you have recently sent emails. This list holds the ten most recent addresses for each letter of the alphabet.
Address Book – Pulls completed addresses from your device’s address book.
1. Type in the first letter of an address in one of the recipient fields. Stored addresses beginning with this letter display in a list.
2. Scroll through the list until the address you want is highlighted and select it. The address is deposited in the recipient field.
Email Address Look Up Tools
Add Recipient When composing a new message, you can select recipients from your Contacts list by selecting the Add Recipient option from the Compose screen menu.
Company Directory You can also look up and select recipients from the directory of names on the ActiveSync server by selecting the Company Directory option from the Message List or Compose screen menu.
Add a Recipient from your Contacts 1. At the To, Cc, or Bcc field, select the Add Recipient option from the Compose screen menu.
2. Scroll to the name you wish to use and press Enter to insert the address into the recipient field.

NotifySync User Guide Using NotifySync 58
Add a Recipient from a Company Directory
If there is a public address book enabled on the ActiveSync server, you can use the Company Directory option to search for contacts, add contacts to your device contact list, or insert email addresses into email recipient fields.
See Accessing the Company Directory.
Attaching a File
To include an attachment with your email message select Add Attachment from the menu when composing a message.
See Sending Attachments for details.
Message Priority
You can assign a level of importance to a message. The default is Normal, however, you can assign a low or high level of importance to a message.
1. Select the Change Priority option from the Compose screen menu.
2. Select Low, Normal or High priority.
Attachments
Downloading, Viewing, and Saving Attachments
Messages that contain attachments display a paperclip icon on the message list.
Attachments associated with email messages are available for download to a device, provided that an attachment viewing application that supports the file type is installed on the device.
Attachment Viewing Applications
Documents To Go®:
BlackBerry OS v7.0 and later come with Documents To Go® Premium Edition, which includes Word To Go®, Sheet To Go®, Slideshow To Go®, and PDF To Go®. These applications allow you to view attachments in their native file format and also provide editing tools allowing you to work with Word, Excel, and PowerPoint files directly on the smartphone.
BlackBerry OS v4.5.0 – 6.x come with DataViz® Documents To Go® Standard Edition, which includes Word To Go®, Sheet To Go®, and Slideshow To Go®. These applications allow you to view attachments in their native file format. To install or upgrade your Documents To Go application, follow instructions outlined in our Knowledge Base article. Note that the Standard Edition does not include PDF To Go®, nor does it provide attachment editing capabilities. Upgrade to BlackBerry OS v7.0 or later, which includes these features, if
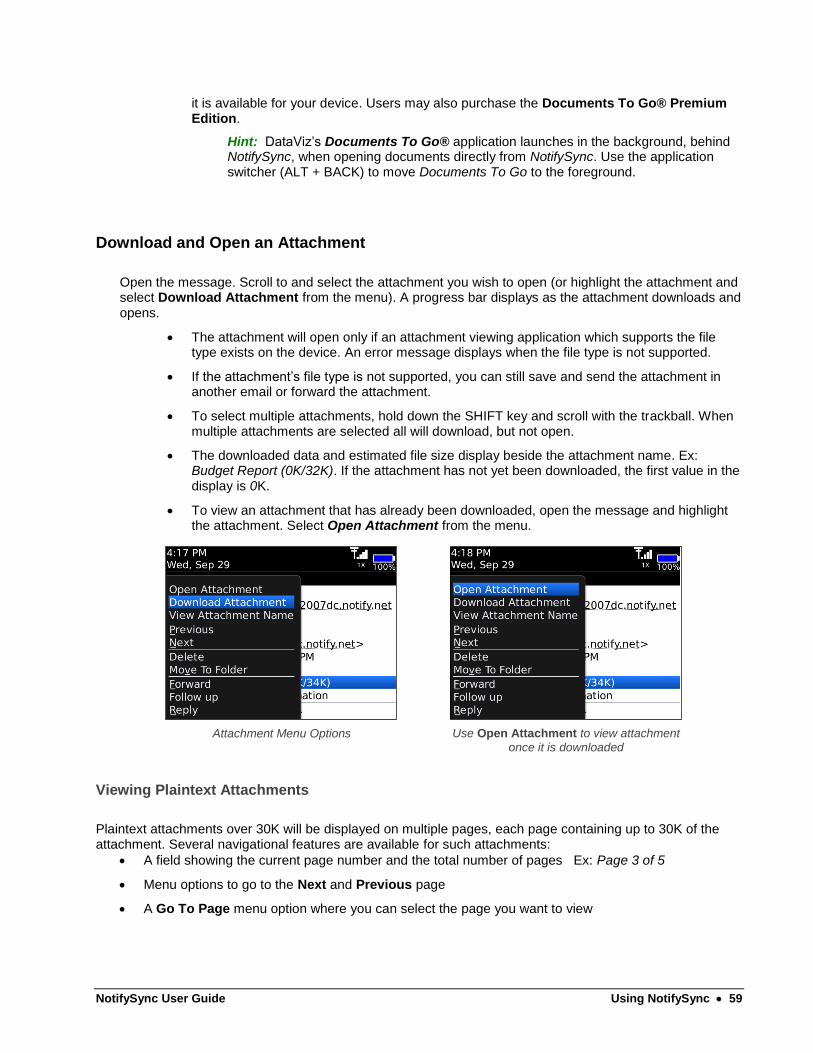
NotifySync User Guide Using NotifySync 59
it is available for your device. Users may also purchase the Documents To Go® Premium Edition.
Hint: DataViz’s Documents To Go® application launches in the background, behind NotifySync, when opening documents directly from NotifySync. Use the application switcher (ALT + BACK) to move Documents To Go to the foreground.
Download and Open an Attachment
Open the message. Scroll to and select the attachment you wish to open (or highlight the attachment and select Download Attachment from the menu). A progress bar displays as the attachment downloads and opens.
The attachment will open only if an attachment viewing application which supports the file type exists on the device. An error message displays when the file type is not supported.
If the attachment’s file type is not supported, you can still save and send the attachment in another email or forward the attachment.
To select multiple attachments, hold down the SHIFT key and scroll with the trackball. When multiple attachments are selected all will download, but not open.
The downloaded data and estimated file size display beside the attachment name. Ex: Budget Report (0K/32K). If the attachment has not yet been downloaded, the first value in the display is 0K.
To view an attachment that has already been downloaded, open the message and highlight the attachment. Select Open Attachment from the menu.
Attachment Menu Options
Use Open Attachment to view attachment
once it is downloaded
Viewing Plaintext Attachments
Plaintext attachments over 30K will be displayed on multiple pages, each page containing up to 30K of the attachment. Several navigational features are available for such attachments:
A field showing the current page number and the total number of pages Ex: Page 3 of 5
Menu options to go to the Next and Previous page
A Go To Page menu option where you can select the page you want to view

NotifySync User Guide Using NotifySync 60
Save or Delete an Attachment
Saving an Attachment File to the Device
All attachment types may be saved to the device or an SD card (if device is equipped). Saving an attachment moves the downloaded data from the NotifySync database to the location you choose in the device file system.
1. Open the message highlight the attachment(s) you wish to save.
2. Select Save Attachment As from the menu.
3. When the attachment finishes loading, designate where to save the attachment. Navigate through the device’s file system following this path: /store/home/user/
4. Highlight the appropriate directory and select Save from the menu. The screen will read, “Saving” while it saves.
Deleting an Attachment 1. Open the message highlight the attachment(s) you wish to delete.
2. Select Delete Attachment from the menu. The downloaded data for all of the selected attachments is deleted. The downloaded data indicator returns to 0K.
NOTE: If the file has been saved to a location in the device file system, you do not have the option to delete it here. You must navigate to the file location and delete it from the file system.

NotifySync User Guide Using NotifySync 61
Sending Attachments
To include an attachment with your email message select Add Attachment from the menu when composing a message. Choose a file from the device file system and select Open.
1. Select Add Attachment from the menu when composing a message.
2. When the device finishes loading, browse to the location of the file you wish to attach. If selecting an attachment from the device file system, browse to /store/home/user/. You may select attachments from directories containing documents, pictures, music, etc.
3. Highlight and select the file you want. The attachment(s) you choose will appear above the subject field of the email you are composing.
Attachment Troubleshooting
When trying to download a file, a network error occurs.
This usually happens if the server is unavailable, or the device was not able to make a connection. A dialog will be shown with details about the error. If the problem persists, try turning the radio on/off or perform a soft reset.
I am getting an error message when trying to download an attachment, which states: “There is not enough free memory to download the selected attachment.”
There is not enough memory to save the attachment on the device. You can free some memory by deleting some data in some applications and trying again later. Hitting the details button when the error is shown will show the size of the attachment trying to be downloaded and the amount of free memory being reported by the device.
A message with attachments is not sending. It is staying in the Outbox with a status icon that looks like an x.
Open the message in the Outbox. The top of the message should have an error message as to why sending failed. If the error states, "File not found. Filename: xxx", the file that was attached to the message may have been moved or may not be able to be opened. Verify that the file exists and that it can be opened. Once the issue is resolved resend the message by highlighting it and selecting “Resend” from the menu.

NotifySync User Guide Using NotifySync 62
Calendar
From the Calendar screen you may create or edit a calendar event and view existing events. Calendar synchronization settings will determine whether or not calendar events are synchronized and what range of dates is synchronized. See Sync Settings for more information.
NOTE: All PIM functions (Calendar, Contacts, Tasks, and Memos) use the BlackBerry user interface, but process the data through the NotifySync application.
NOTE: PIM items synchronize to the device in batches of 100 items or less. When there are more than 100, one batch is sent per synchronization cycle until all items have been synchronized. Only items within the set calendar synchronization range will come down to the device.
Creating New Calendar Events
1. From the calendar menu, select New.
2. Enter the information for any or all of the optional fields or accept the defaults (in bold).
NOTE: If there is a scheduling conflict, a message will display on the New Appointment screen indicating that this time conflicts with another appointment.
Field Action
Subject: Type in a subject.
Location: Enter a location.
All Day Event: Check the box to mark as an all day event.
Start: Enter a start date and time or accept the default.
End: Enter an end date and time or accept the default.
Duration: Length of the appointment. Defaults to 1 hour.
Time Zone: Time zone in which the appointment takes place. Defaults to the device’s current time zone.
Show Time As: Busy status. Choose from Free, Tentative, Busy, Out of Office. Defaults to Busy.
Reminder: Enter amount of time prior to an event for a reminder to occur. Choose from number of minutes, hours, days, or weeks. Defaults to 15 minutes. Default can be changed through Options.
Recurrence: Choose frequency if it is a recurring appointment: None, Daily, Weekly, Monthly, or Yearly. Default is None.
Mark as Private: Check the box to mark as private.
3. Select Save from the menu.
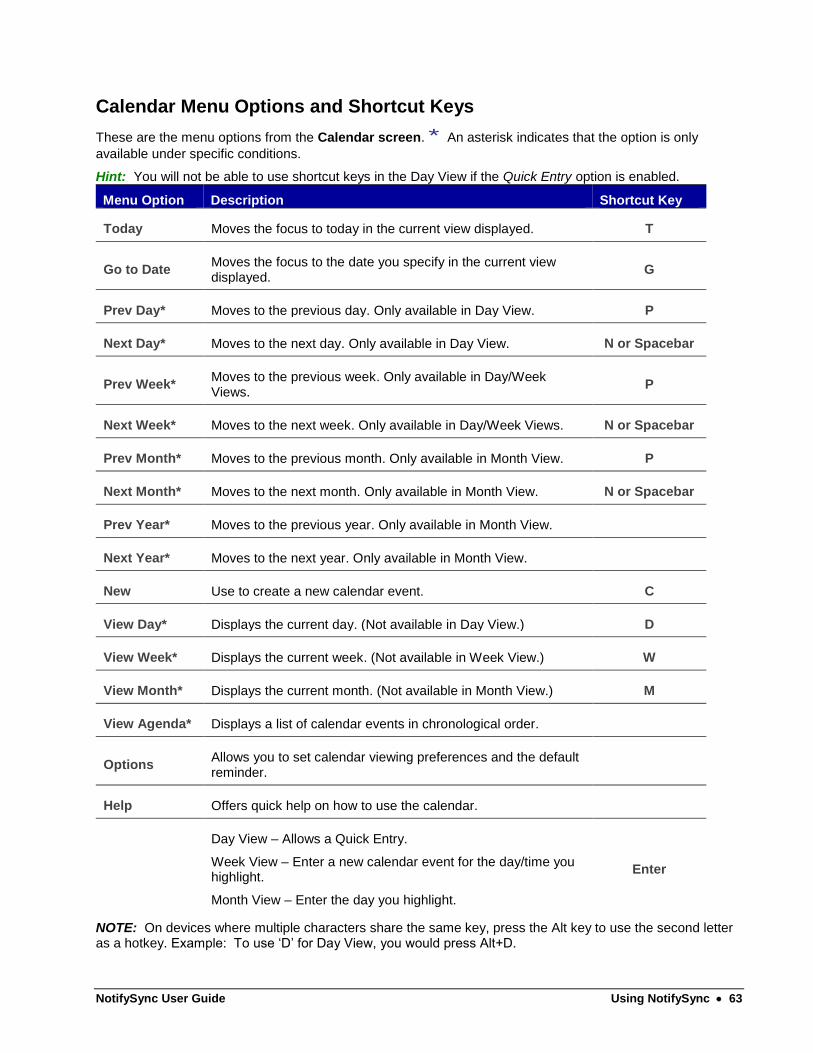
NotifySync User Guide Using NotifySync 63
Calendar Menu Options and Shortcut Keys
These are the menu options from the Calendar screen. * An asterisk indicates that the option is only
available under specific conditions.
Hint: You will not be able to use shortcut keys in the Day View if the Quick Entry option is enabled.
Menu Option Description Shortcut Key
Today Moves the focus to today in the current view displayed. T
Go to Date Moves the focus to the date you specify in the current view displayed.
G
Prev Day* Moves to the previous day. Only available in Day View. P
Next Day* Moves to the next day. Only available in Day View. N or Spacebar
Prev Week* Moves to the previous week. Only available in Day/Week Views.
P
Next Week* Moves to the next week. Only available in Day/Week Views. N or Spacebar
Prev Month* Moves to the previous month. Only available in Month View. P
Next Month* Moves to the next month. Only available in Month View. N or Spacebar
Prev Year* Moves to the previous year. Only available in Month View.
Next Year* Moves to the next year. Only available in Month View.
New Use to create a new calendar event. C
View Day* Displays the current day. (Not available in Day View.) D
View Week* Displays the current week. (Not available in Week View.) W
View Month* Displays the current month. (Not available in Month View.) M
View Agenda* Displays a list of calendar events in chronological order.
Options Allows you to set calendar viewing preferences and the default reminder.
Help Offers quick help on how to use the calendar.
Day View – Allows a Quick Entry.
Week View – Enter a new calendar event for the day/time you highlight.
Month View – Enter the day you highlight.
Enter
NOTE: On devices where multiple characters share the same key, press the Alt key to use the second letter as a hotkey. Example: To use ‘D’ for Day View, you would press Alt+D.
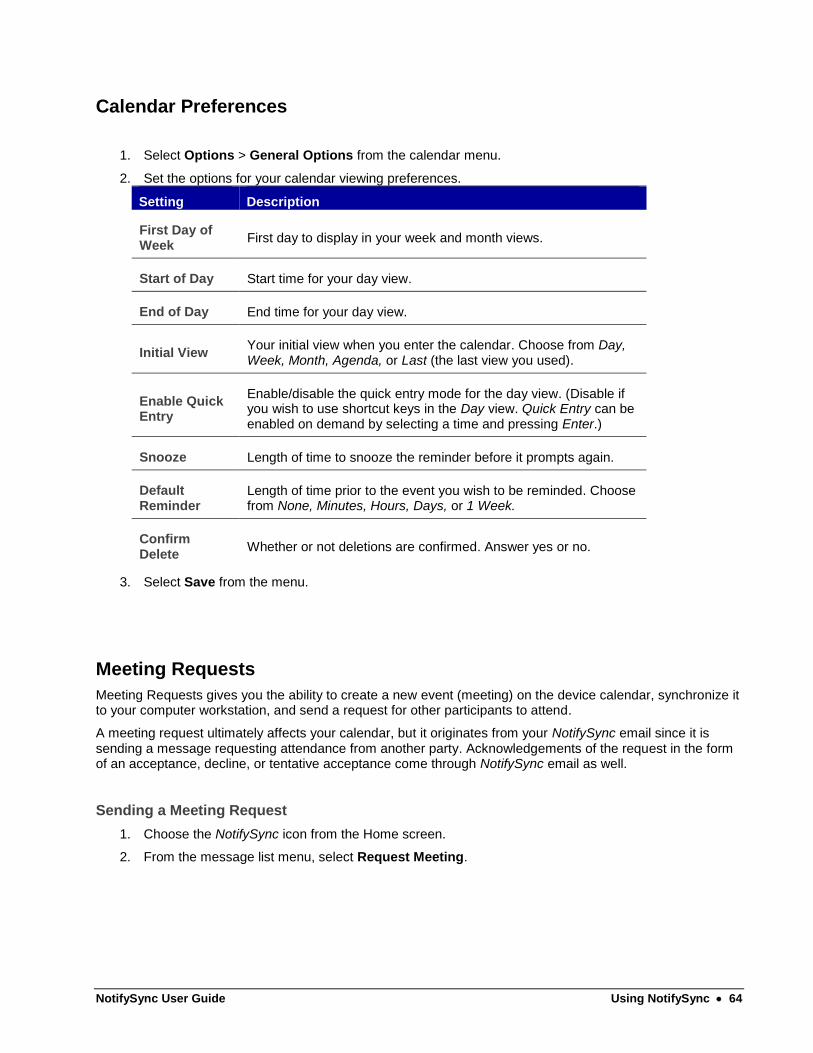
NotifySync User Guide Using NotifySync 64
Calendar Preferences
1. Select Options > General Options from the calendar menu.
2. Set the options for your calendar viewing preferences.
Setting Description
First Day of Week
First day to display in your week and month views.
Start of Day Start time for your day view.
End of Day End time for your day view.
Initial View Your initial view when you enter the calendar. Choose from Day, Week, Month, Agenda, or Last (the last view you used).
Enable Quick Entry
Enable/disable the quick entry mode for the day view. (Disable if you wish to use shortcut keys in the Day view. Quick Entry can be enabled on demand by selecting a time and pressing Enter.)
Snooze Length of time to snooze the reminder before it prompts again.
Default Reminder
Length of time prior to the event you wish to be reminded. Choose from None, Minutes, Hours, Days, or 1 Week.
Confirm Delete
Whether or not deletions are confirmed. Answer yes or no.
3. Select Save from the menu.
Meeting Requests
Meeting Requests gives you the ability to create a new event (meeting) on the device calendar, synchronize it to your computer workstation, and send a request for other participants to attend.
A meeting request ultimately affects your calendar, but it originates from your NotifySync email since it is sending a message requesting attendance from another party. Acknowledgements of the request in the form of an acceptance, decline, or tentative acceptance come through NotifySync email as well.
Sending a Meeting Request
1. Choose the NotifySync icon from the Home screen.
2. From the message list menu, select Request Meeting.

NotifySync User Guide Using NotifySync 65
3. In the To: field, enter (or use the Add Recipient option on the menu) the addresses of meeting attendees separated by commas.
4. Enter an Event title.
5. Enter a Location for the event.
6. Check the All Day Event box if applicable.
7. Enter the Begin and End time/date for the meeting.
8. Select Send from the menu to send the meeting request and update your calendar.
Acknowledging Meeting Requests You Have Received
If you are a recipient of a meeting request email message, issued from a user on the same groupware server, you can accept, decline or tentatively accept the meeting appointment. You can include a message for the organizer with your response. When you respond, the email is removed from your Inbox and, in cases where you have accepted or tentatively accepted, your calendar is updated with the event.
Note: Meeting requests sent to you from users on external groupware servers may appear as messages in your Inbox. You can reply to these messages, however, you will not be able to accept or decline the meeting, nor will the request initiate a change to your calendar.
1. Select the meeting request email from your Inbox.
2. From the menu, select Accept, Tentative, or Decline.
3. If you wish to include a message with your response, choose Yes at the prompt and enter a message.
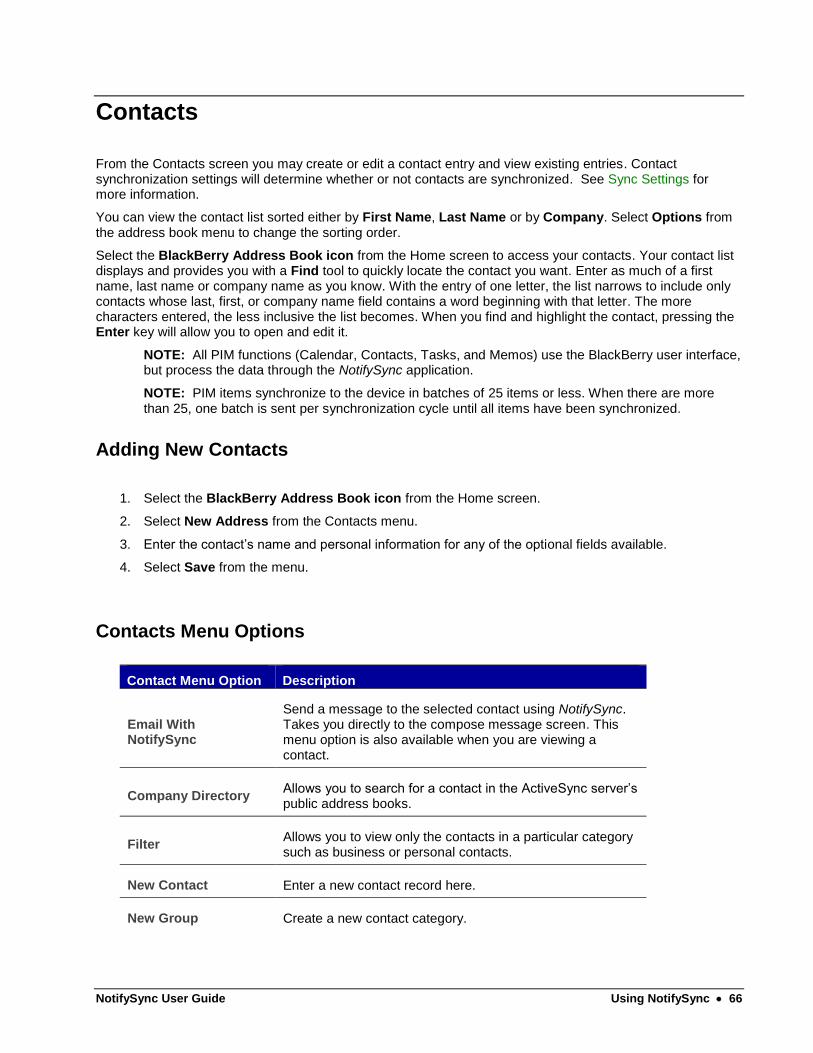
NotifySync User Guide Using NotifySync 66
Contacts
From the Contacts screen you may create or edit a contact entry and view existing entries. Contact synchronization settings will determine whether or not contacts are synchronized. See Sync Settings for more information.
You can view the contact list sorted either by First Name, Last Name or by Company. Select Options from the address book menu to change the sorting order.
Select the BlackBerry Address Book icon from the Home screen to access your contacts. Your contact list displays and provides you with a Find tool to quickly locate the contact you want. Enter as much of a first name, last name or company name as you know. With the entry of one letter, the list narrows to include only contacts whose last, first, or company name field contains a word beginning with that letter. The more characters entered, the less inclusive the list becomes. When you find and highlight the contact, pressing the Enter key will allow you to open and edit it.
NOTE: All PIM functions (Calendar, Contacts, Tasks, and Memos) use the BlackBerry user interface, but process the data through the NotifySync application.
NOTE: PIM items synchronize to the device in batches of 25 items or less. When there are more than 25, one batch is sent per synchronization cycle until all items have been synchronized.
Adding New Contacts
1. Select the BlackBerry Address Book icon from the Home screen.
2. Select New Address from the Contacts menu.
3. Enter the contact’s name and personal information for any of the optional fields available.
4. Select Save from the menu.
Contacts Menu Options
Contact Menu Option Description
Email With NotifySync
Send a message to the selected contact using NotifySync. Takes you directly to the compose message screen. This menu option is also available when you are viewing a contact.
Company Directory Allows you to search for a contact in the ActiveSync server’s public address books.
Filter Allows you to view only the contacts in a particular category such as business or personal contacts.
New Contact Enter a new contact record here.
New Group Create a new contact category.

NotifySync User Guide Using NotifySync 67
View View the contact information.
Edit Edit the contact information.
Delete Delete the contact from the address book.
SIM Phone Book View the contacts in your SIM card phone book. (Option appears on device menu only if a SIM card is being used.)
Send as Attachment Takes you directly to the compose screen where the selected contact has been attached to the message.
Options Allows you to set address book viewing preferences.
Contacts Preferences
1. Select Options > General Options from the Contacts menu.
2. Set the options for your address book viewing preferences.
Setting Description
Sort By: Choose how your Contacts list will be sorted. Choose from First Name, Last Name, or Company.
Separators Choose the type of separator for the contacts in the Contacts list. Choose from None, Lines, or Stripes.
Allow Duplicate Names
Choose whether you will allow contact entries that duplicate the first and last name of another entry. Answer yes or no.
Confirm Delete Whether or not deletions are confirmed. Answer yes or no.
3. Select Save from the menu.
Accessing the Company Directory
If there is a public address book enabled on the ActiveSync server, you can use the Company Directory feature to search for contacts, add contacts to your device contact list, or insert email addresses into email recipient fields.
Note: Company Directory is not supported on Zimbra mail servers
NotifySync sends search criteria you enter on the device to the ActiveSync server. It is the ActiveSync server that determines what Contact fields are searchable and what constitutes a match between the search criteria and the searchable fields.
Company Directory can be accessed from:
The Contacts application menu

NotifySync User Guide Using NotifySync 68
The Email application (Message List) menu
Any email recipient field (To/Cc/Bcc) on the Compose, Reply To, Reply To All, or Forward screens.
Search the Company Directory
1. From the menu or any recipient field (To, Cc, Bcc), choose Company Directory. The screen will either say Empty or it will display the saved results from the last completed search. You can clear old results from the screen by selecting Erase Results from the menu.
2. If the search query box is not already displayed, select Search from the menu.
3. Type in a search string. You can use one character or a partial string of characters for any field (name, email address, phone number, etc.) on which you wish to search. The more you type, the narrower the search results.
4. Press Enter to begin the search to find contacts that meet the criteria. The first 100 results will display. If more exist, you can choose More Results from the menu.
The Search Results
Search Results
View a Contact
Add a name to your address book from the search results: Highlight a name and select Save from the menu.
View the details of a name on the search results list: Highlight a name and select View from the menu.
Add a name to an email: When the search is done from the Email message list or an email recipient field, select a name from the list and scroll to the email address. Press Enter to insert the address into the recipient field.

NotifySync User Guide Using NotifySync 69
Search Results Menu Options
Contact Menu Option Description
Search Perform a query on the Company Directory.
View Displays all the contact information for the selected item in the list.
Save Save a contact to the device address book.
More Results Requests and displays the next 100 results when more than 100 results are returned from the server.
Email with NotifySync Send a message to the email address highlighted using NotifySync.
Erase Results Clears the search results list.
Tasks
From the Tasks screen you may create new tasks and delete or view existing tasks. Task synchronization settings will determine whether or not tasks are synchronized. See Sync Settings for more information.
You can view the task list sorted either by Subject, Priority, Due Date, or Status. Select Options from the task menu to change the sorting order.
Select the BlackBerry Tasks icon from the Home screen to access your task list. The list displays and provides you with a Find tool to quickly locate the task you want. Enter as much of the task subject as you know. With the entry of one letter, the list narrows to include only tasks whose subject contains a word beginning with that letter. The more characters entered, the less inclusive the list becomes. When you find and highlight the task, pressing the Enter key will allow you to open and edit it.
NOTE: All PIM functions (Calendar, Contacts, Tasks, and Memos) use the BlackBerry user interface, but process the data through the NotifySync application.
NOTE: PIM items synchronize to the device in batches of 100 items or less. When there are more than 100, one batch is sent per synchronization cycle until all items have been synchronized.
Adding New Tasks
1. Select New from the task menu.
2. Enter the subject in the Task field.

NotifySync User Guide Using NotifySync 70
3. Enter information for any or all of the optional fields or accept the defaults (in bold).
Field Action
Status: Status choices are: Not started, In Progress, Completed, Waiting, or Deferred. Note: Status is only synchronized to the server as Complete or Not Complete.
Priority: Choose High, Normal, or Low.
Due: Enter a date the task should be completed or None.
Time Zone: Time Zone in which the due date and reminder will occur. Defaults to the devices current time zone.
Reminder: Enter a date and time you want to be reminded about the task or enter None.
Categories: Choose from Business or Personal.
Notes: Enter details about the task.
4. Select Save from the menu.
Task Menu Options
Menu Option Description
Filter Allows you to view only the tasks in a particular category such as business or personal tasks.
Forward As Forward the selected task as Email, MMS, PIN or SMS Text.
New Enter a new task record here.
Open Open and edit a task.
Delete Delete a task.
Delete Completed Delete all completed tasks.
Mark Completed Marks selected task as completed. You can also mark a task as completed by selecting it and press the space bar.
Mark in Progress Changes a completed task’s status back to “in progress.”
Hide/Show Completed
Hides or exposes completed tasks.
Options Allows you to set task viewing preferences.
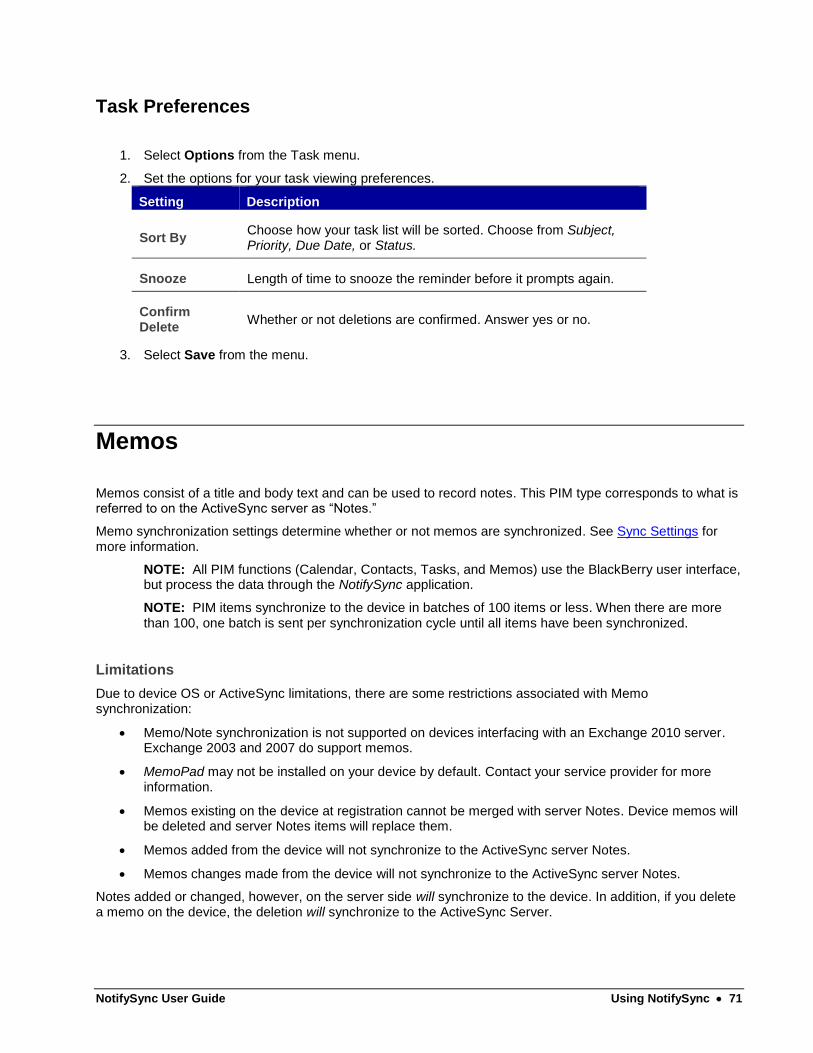
NotifySync User Guide Using NotifySync 71
Task Preferences
1. Select Options from the Task menu.
2. Set the options for your task viewing preferences.
Setting Description
Sort By Choose how your task list will be sorted. Choose from Subject, Priority, Due Date, or Status.
Snooze Length of time to snooze the reminder before it prompts again.
Confirm Delete
Whether or not deletions are confirmed. Answer yes or no.
3. Select Save from the menu.
Memos
Memos consist of a title and body text and can be used to record notes. This PIM type corresponds to what is referred to on the ActiveSync server as “Notes.”
Memo synchronization settings determine whether or not memos are synchronized. See Sync Settings for more information.
NOTE: All PIM functions (Calendar, Contacts, Tasks, and Memos) use the BlackBerry user interface, but process the data through the NotifySync application.
NOTE: PIM items synchronize to the device in batches of 100 items or less. When there are more than 100, one batch is sent per synchronization cycle until all items have been synchronized.
Limitations
Due to device OS or ActiveSync limitations, there are some restrictions associated with Memo synchronization:
Memo/Note synchronization is not supported on devices interfacing with an Exchange 2010 server. Exchange 2003 and 2007 do support memos.
MemoPad may not be installed on your device by default. Contact your service provider for more information.
Memos existing on the device at registration cannot be merged with server Notes. Device memos will be deleted and server Notes items will replace them.
Memos added from the device will not synchronize to the ActiveSync server Notes.
Memos changes made from the device will not synchronize to the ActiveSync server Notes.
Notes added or changed, however, on the server side will synchronize to the device. In addition, if you delete a memo on the device, the deletion will synchronize to the ActiveSync Server.

NotifySync User Guide Using NotifySync 72
Use the Find Tool
Select the BlackBerry MemoPad icon from the Home screen to access your memo list. The list displays and provides you with a Find tool to quickly locate the memo you want. Enter as much of the memo title as you know. With the entry of one letter, the list narrows to include only memos whose title contains a word beginning with that letter. The more characters entered, the less inclusive the list becomes. When you find and highlight the memo, pressing the Enter key will allow you to open and edit it.
Adding New Memos
1. Select New from the MemoPad menu.
2. Enter a title for the memo and press enter.
3. Enter the body of the memo.
4. Select Save from the menu.
MemoPad Menu Options
Menu Option Description
Filter Allows you to view only the memos in a particular category such as business or personal memos. Categories can be used on the device, but will not synchronize to the ActiveSync server Notes.
Forward As Forward the selected memo as Email, MMS, PIN or SMS Text.
New Enter a new memo record here.
Edit Open and edit a memo.
Delete Delete a memo.
Options Allows you to enable/disable delete confirmation.

NotifySync User Guide Using NotifySync 73
Supported PIM Fields
PIM items (calendar events, contacts, tasks, and memos) synchronized to the device contain supported and unsupported fields.
Supported fields can be added to, changed on, or deleted from a PIM item via the device.
Unsupported fields cannot be added, updated, or deleted via the device. However, unsupported fields that come down from the server are stored in mirrored PIM databases. Thus, when a PIM item is updated on the device, all unsupported fields are preserved and synced back to the server.
Supported PIM Fields Unsupported PIM Fields
Calendar
All Day Event Organizer Email
Attendees Organizer Name
Busy Status
Categories
End Date
End Time
Location
Notes
Recurrence
Reminder
Sensitivity (Mark as Private)
Start Date
Start Time
Subject
Supported PIM Fields Unsupported PIM Fields
Contacts
Birthday Anniversary
Categories Assistant Name
Company Name Assistant Phone Number
Email One Fax Number
Email Two Work Fax Number
Email Three Car Phone Number
Home City Department
Home Country Home Street Two
Home Phone Number One Home Fax Number
Home Phone Number Two Home URL
Home State Name Prefix
Home Street One Office Location
Home Zip Code Other City
Title (job title) Other Country
First Name Other State
Last Name Other Street
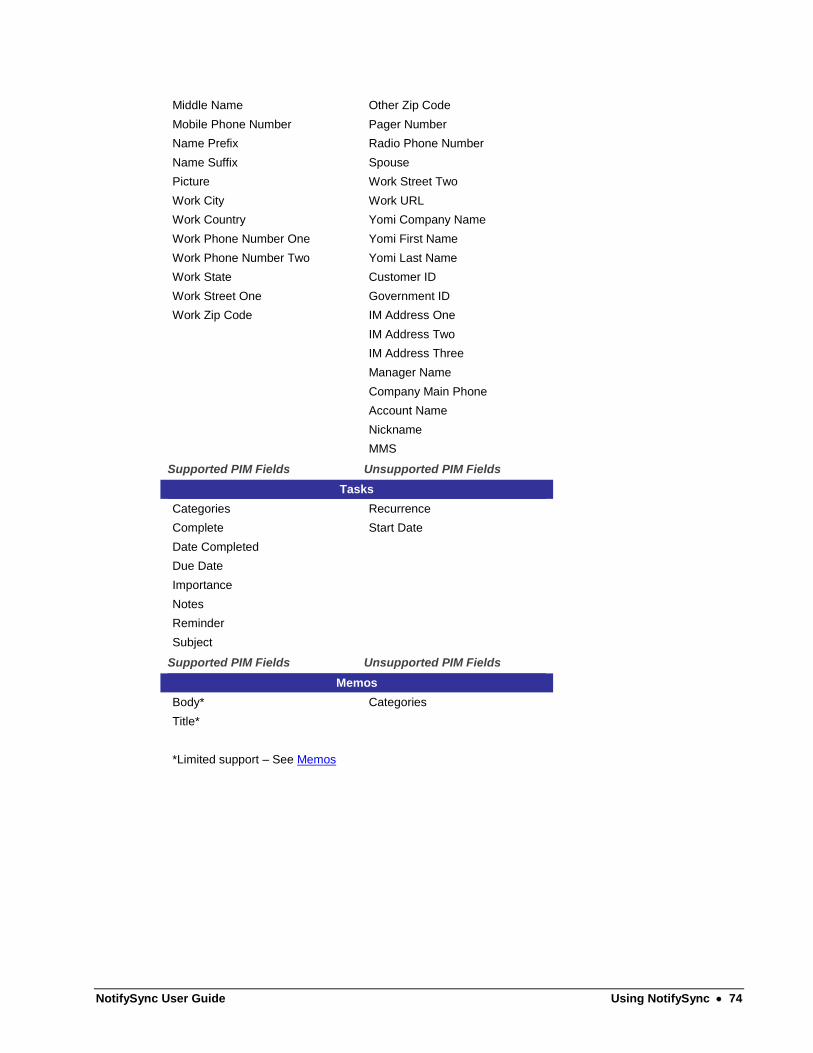
NotifySync User Guide Using NotifySync 74
Middle Name Other Zip Code
Mobile Phone Number Pager Number
Name Prefix Radio Phone Number
Name Suffix Spouse
Picture Work Street Two
Work City Work URL
Work Country Yomi Company Name
Work Phone Number One Yomi First Name
Work Phone Number Two Yomi Last Name
Work State Customer ID
Work Street One Government ID
Work Zip Code IM Address One
IM Address Two
IM Address Three
Manager Name
Company Main Phone
Account Name
Nickname
MMS
Supported PIM Fields Unsupported PIM Fields
Tasks
Categories Recurrence
Complete Start Date
Date Completed
Due Date
Importance
Notes
Reminder
Subject
Supported PIM Fields Unsupported PIM Fields
Memos
Body* Categories
Title*
*Limited support – See Memos

NotifySync User Guide Maintenance and Usage Tips 75
Maintenance and Usage Tips
Using a Recovery Password If your device is locked due to an inactivity or challenge timeout, and you do not remember your unlock password, you can use the Recovery Password feature on your device to generate a temporary unlock password.
1. When the device locks, scroll down and select the Recover Password option.
2. Enter the word, NotifySync to confirm that you want to generate a recovery password and select OK. A dialog box displays confirming that the password has been generated.
3. The recovery password can be viewed by logging in to your email account through OWA. From Options, select Mobile Devices. Select the tab labeled, Display Recovery Password.
Note: You must log in to OWA using Internet Explorer in order to access the recovery password option.
4. Enter the temporary password to unlock your device. The device will then prompt you to choose a new password.
NotifySync User Guide Maintenance and Usage Tips 76
Uninstall the NotifySync Application NotifySync can be uninstalled from the device using the BlackBerry application list. When NotifySync is uninstalled using this method, all application data files are removed as well.
Access the device’s application list to delete the NotifySync application.
1. Select Options > Advanced Options > Applications OR Options > Device > Application Management.
2. Highlight the NotifySync for BlackBerry application and select Delete from the menu.
Move NotifySync Icons to the Home Screen
Move the NotifySync icon to the Home screen for easy access
1. Locate the NotifySync icon in the Applications or Downloads folder.
2. Highlight the icon and press the Menu key.
3. Click Move to folder, then click Home.
Reposition the NotifySync icon on the Home screen
1. Highlight the NotifySync icon and press the Menu key.
2. Click Move.
3. Roll the trackball to the new location.
4. Click the trackball to paste the icon in its new position.
What to Do If You Change Devices If you change devices or get a new device your NotifySync account must be deactivated before you can register the new device.
Backup Your NotifySync Settings (optional)
If your old device has a storage card, you can backup your NotifySync Preferences and restore them on the new device.
1. On the old device, open NotifySync and press the menu button.
2. Select Preferences > Account Settings.
3. Press the menu button and select Backup Configuration.
4. Remove the storage card and insert it in the new device before you register the NotifySync app on it.
NotifySync User Guide Maintenance and Usage Tips 77
Deactivate Your Account
1. Access the deactivation web site at www.notifysync.com/deactivate
2. Enter the license key (found in Account Settings) and the device PIN (found in Device Info) or the username/domain (found in Account Settings).
3. Click Submit.
4. Once your account has been deactivated, download and install NotifySync on the new device and register it. This allows the registration server to obtain the new device PIN.
On the New Device: Install, Restore Configuration (optional), and Register Download and install NotifySync on the new device and register it. The NotifySync registration server
will obtain the new device PIN and your account will be reactivated.
As you register the new device, restore the NotifySync Preferences from your old device (if you saved them to a storage card). At the first registration screen, press the menu button and select Restore Configuration.
On the Old Device: Uninstall NotifySync
Uninstall NotifySync from the old device. This removes the NotifySync application and all the application data files. See Uninstall the NotifySync Application.
Conserving Battery Power
Make some adjustments to device settings.
Change the device’s backlight settings. From the BlackBerry Options (wrench icon), select Screen/Keyboard and adjust the Backlight Brightness and Backlight Timeout.
Set ringtone to a lower volume and reduce or eliminate vibration alerts. These settings can be adjusted from the BlackBerry Profiles (speaker icon).
Set connectivity options wisely. Turn off one or all of the options if you are not using them or know you are out of range. When WiFi or Bluetooth are on, they constantly try to connect to networks or devices. Even the device’s cellular radio constantly communicates with cellular towers to check whether or not you are in range. These options can be turned off and on via BlackBerry’s Manage Connections icon (tower icon).
Make adjustments that reduce the frequency of the email traffic going to your device.
Adjust your Push Settings. Select NotifySync > Preferences > Push Settings
- Set the Scheduled Push frequency to a higher interval.
- Decrease the range of your synchronization period by adjusting the Start/Stop time
Synchronize essential email folders only. Select NotifySync > Preferences > Folder Settings
On the mail server, create Filters for email you do not need synchronized from your mail account to the device.
NotifySync User Guide Appendix A: Network Connection Options 78
Appendix A: Network Connection Options
A Network Setting, selected during registration or via Network Settings, determines how your device establishes the HTTP connection to the ActiveSync server for message checking. WiFi connectivity is an option if your device is so equipped. NotifySync will also accommodate a device operating in a BES (BlackBerry Enterprise Server) environment.
Auto Detect is the default network setting. For information on how to change the Network Setting, see Network Settings.
Auto Detect
The Network Setting for NotifySync defaults to Auto Detect at registration. This setting detects the available networks on the device and uses those networks in the order in which you have prioritized them.
During auto detection, the device checks available connections by cycling through a prioritized list. You may adjust the order or remove network connection types that do not apply or that may incur additional data charges. The default order of the list is as follows:
BlackBerry (BES) BlackBerry (BIS-B) WiFi (TCP) TCP WAP2
You can also change the Network Setting at registration or via the Network Settings preferences option so that it is set to consistently use a specific connection type instead of auto detection.
Network Connection Restrictions
WiFi availability is not determined by whether or not the device is within range of any WiFi network, but whether or not it is within range of a WiFi network that the device has been associated with via the device’s Connection Manager.
Select the BlackBerry Manage Connections icon to check associated WiFi network(s).

NotifySync User Guide Appendix A: Network Connection Options 79
Mobile Network Connections
The NotifySync device client supports the following methods of connecting to the NotifySync server:
Network Setting Description SSL Support Limitations
BIS-B
BlackBerry Internet Service
Recommended setting because of its consistency.
Uses the BlackBerry Internet Service (BIS) gateway to establish an http connection to the ActiveSync server.
Supported on OS v4.5 – 7.0 devices with carriers that support BIS.
If your device is WiFi equipped, the BIS network setting automatically uses a WiFi connection when available.
SSL is supported
NOT supported on some carriers
TCP / WiFi (TCP)
Transmission Control Protocol
Required for Direct Push synchronization.
Creates a TCP connection from the device to the ActiveSync server.
Supported on devices that have 16 MB or more memory.
If your device is WiFi equipped, you can manually switch to the WiFi TCP setting via Network Settings to use an available WiFi connection or change the Preferred Network to Auto Detect and allow the device to detect and use WiFi availability automatically.
SSL is supported
NOT supported on some carriers (See chart below)
WAP2
Wireless Application Protocol
Supported on OS v4.5 – 7.0 devices with carriers that support WAP2.
Carrier sends down a service book to the device containing predefined WAP settings.
SSL is supported
BIS: Does my device support BIS?
BlackBerry Internet Service (BIS) is the recommended setting because of its consistency. BIS provisioning is required to download software applications (including the NotifySync device client) over-the-air.
Check whether your device supports BIS 1. From the Home screen select Options > Advanced Options > Service Books 2. If there is a service book named, IPPP for BIBS [IPPP], the carrier supports BIS and the
BlackBerry setting can be used.
TCP: Where do I enter APN Username and Password?
A Transmission Control Protocol (TCP) network setting is required if you plan to use Direct Push synchronization. If you choose a TCP network setting, you may have to enter an APN username and password. This depends on the carrier. The chart below shows carriers that support TCP networks.

NotifySync User Guide Appendix A: Network Connection Options 80
To Enter the APN Settings on Your Device 1. From the Home screen select Options (wrench icon) > Advanced Options > TCP. 2. Enter the APN, Username, Password specific to the carrier being used.
Carriers Supporting TCP Networks
AT & T APN: Proxy
Cingular APN: wap.cingular Username: [email protected] Password: CINGULAR1
Nextel
Rogers APN: internet.com
Sprint
Telus(iDen)
TMobile-US APN: wap.voicestream.com
Verizon
Carriers That Do Not Support TCP Networks
Alltel
Bell Mobility
Telus(CDMA)
WiFi Network Connections
Is my device WiFi equipped? If your device is equipped with network connection alternatives (WiFi, Bluetooth, etc.) you may see a radio tower icon labeled Manage Connections on the device’s main screen. Select this option and check for WiFi related menu items. Some devices may only have an option to Turn Wireless On/Off. This indicates that the device operates with a mobile connection only and does not offer connection alternatives.
Connectivity Indicators on the NotifySync screens. WiFi equipped devices display a WiFi signal indicator in the upper right corner of the NotifySync screens - next to the mobile network indicator. The indicators function alike. Bars indicate the signal level and an “X” indicates that the service is turned off or there is no connectivity.
In this example, WiFi is disconnected, but the mobile network indicator
shows a signal.

NotifySync User Guide Appendix A: Network Connection Options 81
WiFi Connectivity Indicators on the BlackBerry Home screen
+ WiFi network name
A bold print icon with the WiFi network name next to it indicates that you are connected and can send/receive email messages and use the browser over a WiFi connection.
+ WiFi network name
A grayed out icon with the WiFi network name next to it indicates that your device is connected to a WiFi network, but does not have access to BlackBerry services over the WiFi connection.
A grayed out icon indicates that your connection to a WiFi network is turned on, but you are not in a WiFi coverage area.
Related Documents