1 5-in-1 Air Compressor with Pre-Set Mechanical Auto Cut-Off Function with low pressure inflator/deflator RAC-MV016 Environmental Protection 01/2006 Waste electrical products should not be disposed of with household waste. Please recycle where facilities exist. Check with your local authority or retailer for recycling advice. 4 Using your 5-in-1 Air Compressor Press the air switch to the “ON” position, the compressor will now start. CAREFULLY watch the operation and ensure that you do not over inflate the item. When the item is sufficiently inflated, switch the unit to the “OFF” position. Remove the adaptor from the item. NOTE: Air will still escape from the air supply cable at the same time, this is normal. Do not try to stop this. 4) Attach the appropriate adaptor required for the item to be deflated to the red hose and ensure that it is securely fitted. Note: Many items have a one-way valve fitted, the selected adaptor should open this valve allowing air to escape. Press the air switch to “ON” position, the compressor will now start. When the item is sufficiently deflated, switch the unit to the “OFF” position. Remove the adaptor from the item. IMPORTANT! Prevent hose from kinking. Do not cover or obstruct the outlet and inlet of the inflator/deflator. 5) Lighting Operation: Turn the light switch to “ON” for spot light operation. 6) Troubleshooting If your compressor is not working, check the following: a. The lighter socket fuse is not damaged (15amp). b. The plug adaptor is pushed in firmly. If your spot light does not work, check the following: a. The "LIGHT" switch has clicked into position correctly. b. The light bulb is securely inserted and the filament is undamaged (Dia. 3). 020951 DC12V Replacing the light bulb: Ensure the compressor is switched OFF and the power cord is removed from the 12V DC cigarette socket before replacing the light bulb. Remove the work light cover ring by turning anti-clockwise (Dia, 3). Remove the damaged light bulb from the bulb holder and replace it with a new light bulb. Replace the light bulb cover ring back onto the compressor by turning clockwise. To test the light bulb is functioning correctly plug the power cord into a 12V DC cigarette socket and press the light switch to “ON” position. Deflating: Fit the connector socket (item 3, Dia. 6) to the end of the red hose (item 2, Dia. 6) then onto the socket on the front of the compressor marked “IN” (see Dia. 5).

Welcome message from author
This document is posted to help you gain knowledge. Please leave a comment to let me know what you think about it! Share it to your friends and learn new things together.
Transcript

1
5-in-1 Air Compressor withPre-Set Mechanical Auto Cut-Off Function
with low pressure inflator/deflator
RAC-MV016
Environmental Protection
01/2006
Waste electrical products should not be disposed of with household waste.Please recycle where facilities exist. Check with your local authority or retailerfor recycling advice.
4
Using your 5-in-1 Air CompressorPress the air switch to the “ON” position, the compressor will now start.CAREFULLY watch the operation and ensure that you do not over inflate the item.When the item is sufficiently inflated, switch the unit to the “OFF” position.Remove the adaptor from the item.
NOTE: Air will still escape from the air supply cable at the same time,this is normal. Do not try to stop this.
4)
Attach the appropriate adaptor required for the item to be deflated to the red hoseand ensure that it is securely fitted.Note: Many items have a one-way valve fitted, the selected adaptor should openthis valve allowing air to escape.Press the air switch to “ON” position, the compressor will now start.When the item is sufficiently deflated, switch the unit to the “OFF” position.Remove the adaptor from the item.
IMPORTANT!Prevent hose from kinking.Do not cover or obstruct the outlet and inlet of the inflator/deflator.
5) Lighting Operation:Turn the light switch to “ON” for spot light operation.
6)
TroubleshootingIf your compressor is not working, check the following:
a. The lighter socket fuse is not damaged (15amp).b. The plug adaptor is pushed in firmly.
If your spot light does not work, check the following:a. The "LIGHT" switch has clicked into position correctly.b. The light bulb is securely inserted and the filament is undamaged (Dia. 3).
020951
DC12V
Replacing the light bulb: Ensure the compressor is switched OFF and the power cord is removed from the 12V DC cigarette socket before replacing the light bulb. Remove the work light cover ring by turning anti-clockwise (Dia, 3). Remove the damaged light bulb from the bulb holder and replace it with a new light bulb. Replace the light bulb cover ring back onto the compressor by turning clockwise. To test the light bulb is functioning correctly plug the power cord into a 12V DC cigarette socket and press the light switch to “ON” position.
Deflating:Fit the connector socket (item 3, Dia. 6) to the end of the red hose (item 2, Dia. 6) then onto the socket on the front of the compressor marked “IN” (see Dia. 5).
2
Safety InstructionsRead the instructions for use carefully before using this product.
• Do not over - inflate your tyres or any other inflatable object.
• Do not leave the compressor unattended.• Ensure you are safely positioned away from traffic if you have to inflate
a tyre on a road.
• Keep your face a safe distance away from the compressor and the objectbeing inflated - do not get too close.
•
• Keep out of reach of children.
• CAUTION: Bursting items can cause injury so do not exceed recommendedpressure levels. The cigarette lighter socket should be fused with a 15 amp fuse.
• It is advisable to check the vehicle manufacturers recommended tyre pressuresto ensure correct inflation levels (Keep this information with you in the car).
Features
3
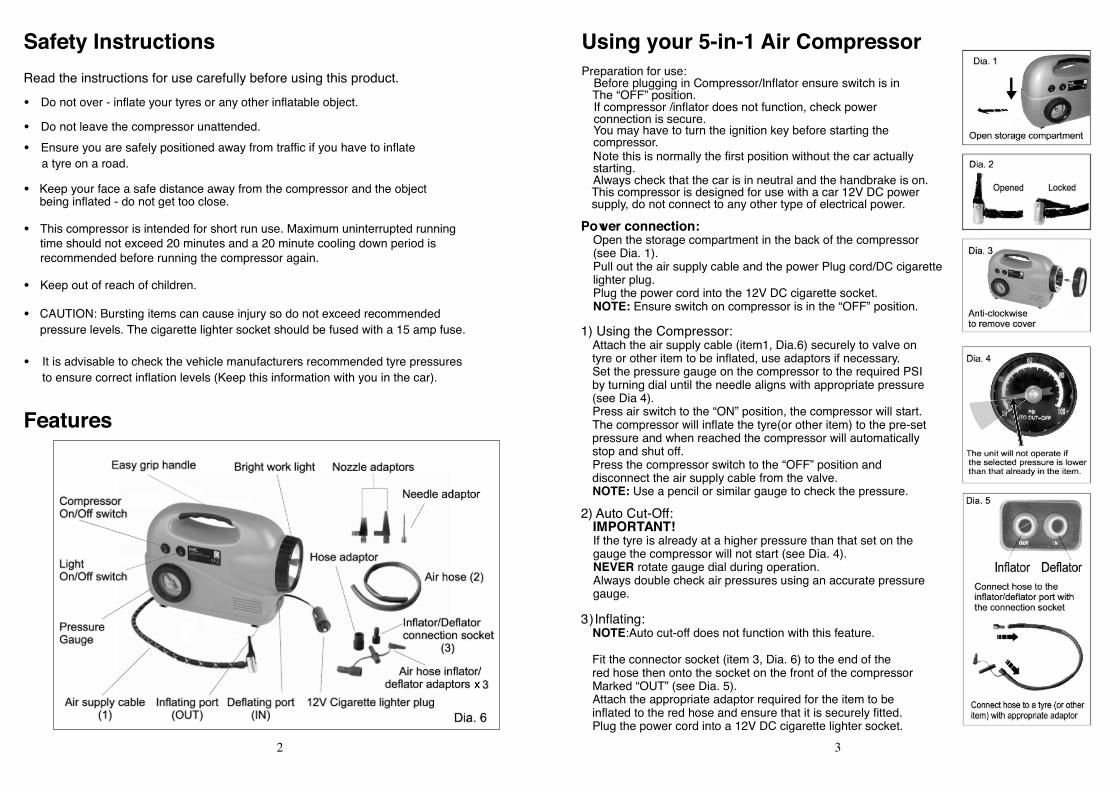
Using your 5-in-1 Air CompressorPreparation for use:
Before plugging in Compressor/Inflator ensure switch is inThe “OFF” position.If compressor /inflator does not function, check powerconnection is secure.
Note this is normally the first position without the car actuallystarting.Always check that the car is in neutral and the handbrake is on.This compressor is designed for use with a car 12V DC powersupply, do not connect to any other type of electrical power.
Power connection:Open the storage compartment in the back of the compressor(see Dia. 1).Pull out the air supply cable and the power Plug cord/DC cigarettelighter plug.Plug the power cord into the 12V DC cigarette socket.NOTE: Ensure switch on compressor is in the “OFF” position.
1) Using the Compressor:Attach the air supply cable (item1, Dia.6) securely to valve ontyre or other item to be inflated, use adaptors if necessary.Set the pressure gauge on the compressor to the required PSIby turning dial until the needle aligns with appropriate pressure(see Dia 4).Press air switch to the “ON” position, the compressor will start.The compressor will inflate the tyre(or other item) to the pre-setpressure and when reached the compressor will automaticallystop and shut off.Press the compressor switch to the “OFF” position anddisconnect the air supply cable from the valve.NOTE: Use a pencil or similar gauge to check the pressure.
2) Auto Cut-Off:IMPORTANT!If the tyre is already at a higher pressure than that set on thegauge the compressor will not start (see Dia. 4).NEVER rotate gauge dial during operation.Always double check air pressures using an accurate pressuregauge.
3)Inflating:NOTE:Auto cut-off does not function with this feature.
Fit the connector socket (item 3, Dia. 6) to the end of thered hose then onto the socket on the front of the compressorMarked “OUT” (see Dia. 5).Attach the appropriate adaptor required for the item to beinflated to the red hose and ensure that it is securely fitted.Plug the power cord into a 12V DC cigarette lighter socket.
You may have to turn the ignition key before starting the compressor.
This compressor is intended for short run use. Maximum uninterrupted running time should not exceed 20 minutes and a 20 minute cooling down period is recommended before running the compressor again.

5
If faults cannot be remedied, contact the Helpline on [email protected]
GUARANTEEThis product is guaranteed for domestic use for a period of 12 months againstfaulty manufacture or materials.
This Guarantee does not affect the statutory rights of the consumer. If in theevent of any problem occurring please Contact our Helpline at the number abovefor advice. This product is not guaranteed for HIRE purpose.
Manufactured under licence.Imported by Hilka Pro Imports. 1 ROEBUCK PLACE, ROEBUCK ROAD, CHESSINGTON, SURREY KT9 1EU
750-0053 RAC-MV016-Issue1-R.W.08-07-06
Related Documents