Nmap/Zenmap/Metasploit/Armitage website: http://nmap.org/ http://www.metasploit.com April 20 th 2015

Welcome message from author
This document is posted to help you gain knowledge. Please leave a comment to let me know what you think about it! Share it to your friends and learn new things together.
Transcript

Nmap/Zenmap/Metasploit/Armitagewebsite: http://nmap.org/
http://www.metasploit.comApril 20th 2015
Only perform scans and exploitations after receiving
permission from the owner of the machine/device.

Nmap Purpose
● Scan a network/server/computer for various information
– TCP ports: which are open– OS: what is it running– Network: what does the topology look like, what
type of firewall is being used, ...● Used during the information gathering part of a
penetration testing● Zenmap is nmap but with a user interface
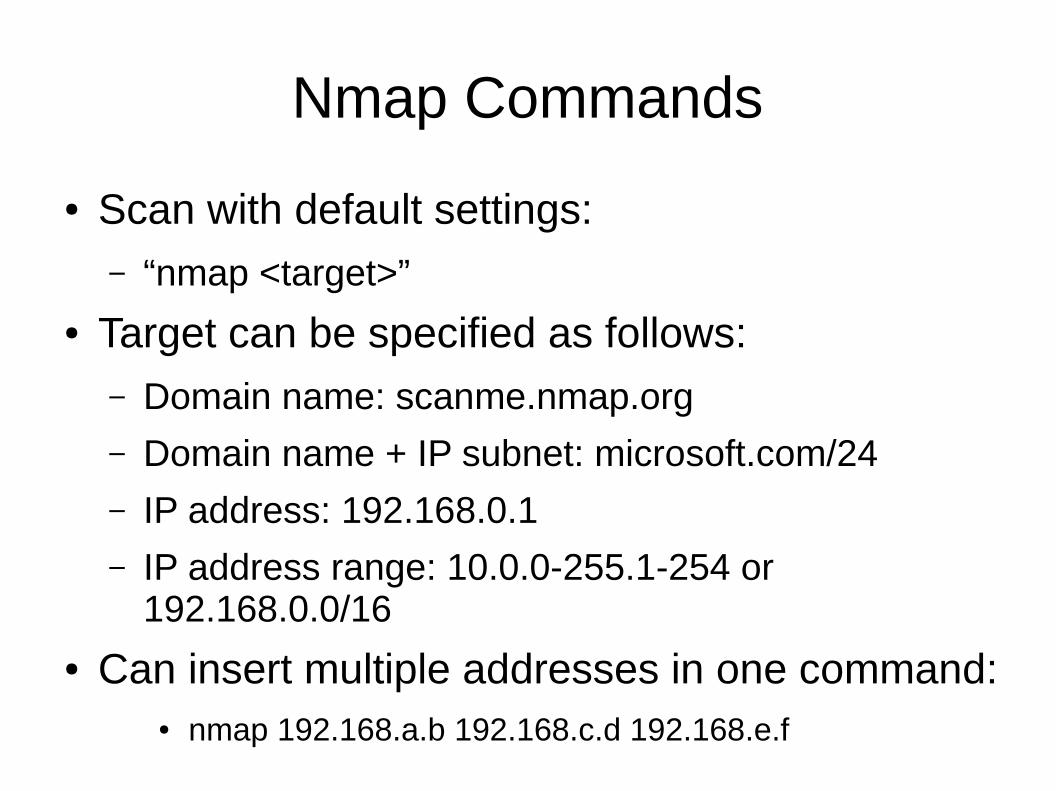
Nmap Commands
● Scan with default settings:– “nmap <target>”
● Target can be specified as follows:– Domain name: scanme.nmap.org
– Domain name + IP subnet: microsoft.com/24
– IP address: 192.168.0.1
– IP address range: 10.0.0-255.1-254 or 192.168.0.0/16
● Can insert multiple addresses in one command:● nmap 192.168.a.b 192.168.c.d 192.168.e.f

Nmap Ping Sweep
● Used to find active hosts on the network● Only works if the active hosts respond to ICMP
echo request packets● Command example:
– nmap -sP 192.168.0.0/16
● Benefit of using nmap over ping is the ease of use

Nmap TCP SYN Scan
● Use TCP SYN packets to find any hidden hosts– These hosts might not respond to ICMP packets
● Command:– nmap -PS 192.168.x.y
– By default the TCP header destination port is 80, but if you wanted to scan port 22 you would type
– nmap -PS22 192.168.x.y
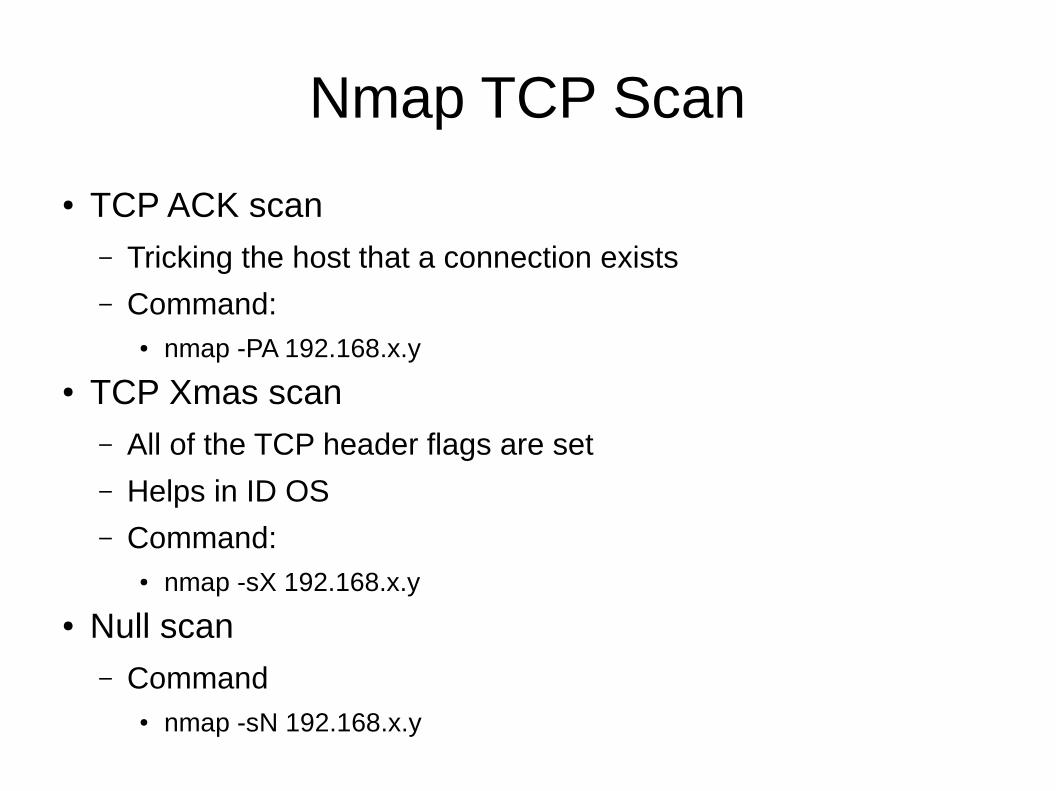
Nmap TCP Scan
● TCP ACK scan– Tricking the host that a connection exists
– Command:● nmap -PA 192.168.x.y
● TCP Xmas scan– All of the TCP header flags are set
– Helps in ID OS
– Command:● nmap -sX 192.168.x.y
● Null scan– Command
● nmap -sN 192.168.x.y

Additional Nmap Commands
● Nmap outputs a lot of packets which makes it easy to detect
● Save your scans:– Don't have to rerun scans if you don't recall a piece
of info
– Command:● nmap 192.168.x.y -oN OUTPUTFILE.txt

Additional Nmap Commands
● Determine what OS is running– Command:
● nmap -O 192.168.x.y
– Scan a machine with TCP destination port 80
– nmap -p80 -O 192.168.x.y
● Spoofing an IP address– nmap 192.168.x.y -D 192.168.z.w
– 192.168.z.w is the spoofed address

Nmap Zombie Scan
● By doing a zombie scan the firewall/IDS wont know who is performing the scan– Zombie scanning is when you are using another
machine with a different IP address than yours
– nmap -p- -sI <zombie_host> <target>
– I is a capitol I, zombie_host is the machine performing the scan for you, and -p- is stating to scan port 1-65535

Nmap Zombie Scan
● http://nmap.org/book/idlescan.html

Zenmap
● GUI to nmap● Makes it easier to use● Lots of functionality● Can save scans

Zenmap Fields
● Fields:– Target = victim
– Profile = type of scan
– Command = nmap
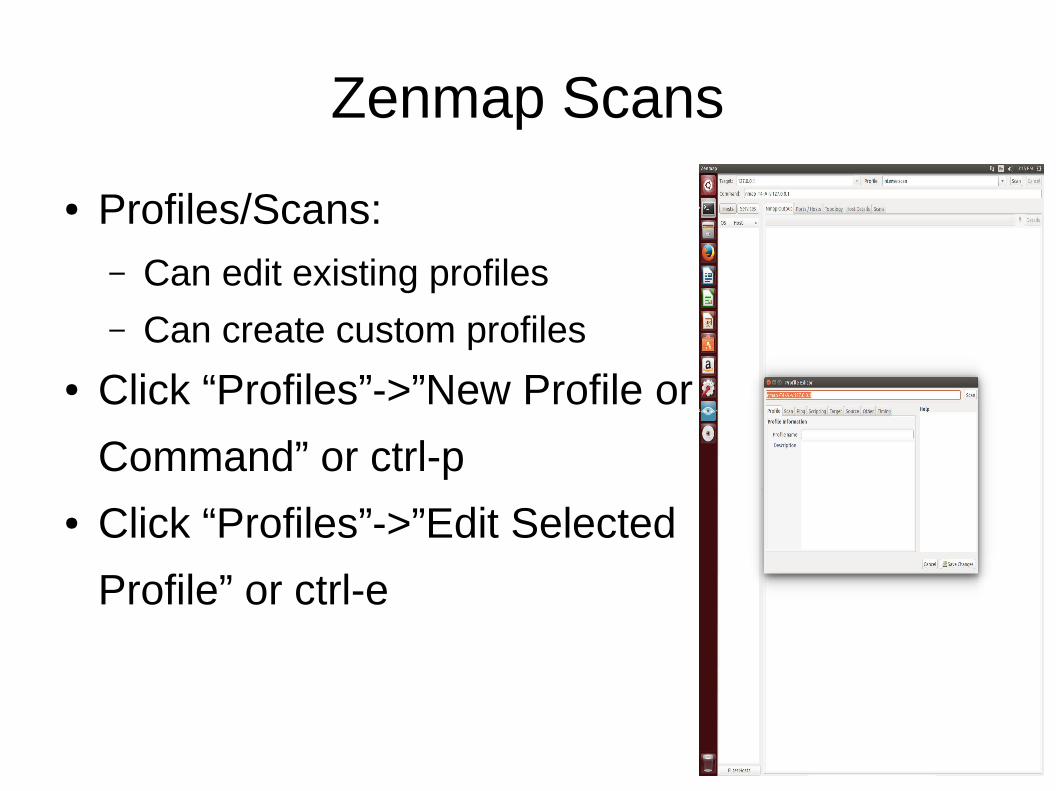
Zenmap Scans
● Profiles/Scans:– Can edit existing profiles
– Can create custom profiles
● Click “Profiles”->”New Profile or
Command” or ctrl-p● Click “Profiles”->”Edit Selected
Profile” or ctrl-e

Zenmap Comments
● “Host Details”->”Comments” to include any notes– Good section to write any information you found
outside of nmap

Zenmap View
● Can view scan results based on the IP address/host or a type of service

Zenmap
● Can save scans– Which in effect save the notes
– “Scan”->”Save Scan”
● Compare to scans– “Tools”->”Compare Results”
Armitage/Metasploit
● Written in Java● Armitage is the GUI to Metasploit● A new tab is generate for every output● Some windows don't have a “Cancel” or “X”
button– Instead right click on the top of the window and click
close

Armitage/Metasploit Add Host
● After running a nmap scan you can upload a saved file– “hosts”->”import hosts”
● Manually add hosts (not recommended)– “hosts”->”add hosts”
● Run nmap within Armitage– Slower
– “hosts”->”nmap scan”

Armitage/Metasploit Organize Host
● A window will contain all hosts● At first it will look messy● Clean it up by:
– Right click within the specified window
– Click “autolayout”->”none”
– Right click within the specified window
– Click “layout”->”stack”
● Remove hosts by:– Right clicking on them
– Click “host”->”remove host”

Armitage/Metasploit Scan Host
● Scan for OS– Same feature as nmap
● Click/highlight intended target(s)● Go to “hosts”->”msf scan”
Armitage/Metasploit After Scan
● After the “msf scan” click/highlight intended target(s)
● Then right click and select “services”● Like nmaps output it will show the target(s)
services– But with the addition of what program is running the
services

Armitage/Metasploit Find Vulnerabilities
● After the click/highlight intended target(s)● Ether perform a very loud attack by clicking
“attacks”->”hail mary”● Or scan the target(s) for vulnerabilities first
– Vulnerabilities are found in a database
– Based on the services and open ports
● And then you select the attack– “attacks”->”find attacks”

Armitage/Metasploit Check Vulnerabilities
● After finding the vulnerabilities you can execute them one by one or perform a double check
● View attacks:– Right click on the intended target
– Go to the “attacks” section
● At the bottom of the list there is a “Check exploits...” feature– This will perform a more detailed “scan” to determine if the attack
will work
– Doesn't execute the attack, only checks it
– Not all attacks can be checked
– Attacks may fail even if the check says it should succeed

Armitage/Metasploit Perform Attack
● Right click on intended target● Go to “attacks” section● Find the one you want to execute● Click on it● A window will pop up:
– Details of the attack are provided (what it does and who are vulnerable)
– You modify parts of the attack
– Double click on option (like renaming a file in windows)
– Click “Launch” to execute the attack

Armitage/Metasploit Perform Attack
● Instead of right clicking on the target to attack you can use the search bar– Underneath the trees: auxiliary (scans), exploit
(attacks), payload (meterpreter), post
● The icon of the target will change when a successful attack was executed
● Right click on the icon and go to “meterpreterX”– X: 1,2,3,4,5
– You might have multiple hosts that were exploited

Armitage/Metasploit Meterpreter
● After successfully exploiting the attack● Escalate privileges, look at files/processes,
obtain all password hashes, and use a feature called pivoting
● Pivoting feature:– Conduct further scans/attacks through the exploit
machine
– By using another machine you can use ARP scanning to view a new subnetwork
Armitage/Metasploit End Exploit
● Before closing Armitage its best to end the exploit you executed
● Right click on exploited target● Select “kill”

Only perform scans and exploitations after receiving
permission from the owner of the machine/device.
Related Documents