For more information, contact your local Motion Reseller or Motion Representative. © 2014 Motion Computing, Inc. All rights reserved. Motion and Motion Computing are registered trademarks of Motion Computing, Inc . www.MotionComputing.com Nissan X Trail Install Guide

Welcome message from author
This document is posted to help you gain knowledge. Please leave a comment to let me know what you think about it! Share it to your friends and learn new things together.
Transcript

For more information, contact your local Motion Reseller or Motion Representative.
© 2014 Motion Computing, Inc. All rights reserved. Motion and Motion Computing are registered trademarks of Motion Computing, Inc .
www.MotionComputing.com
Nissan X Trail Install Guide

For more information, contact your local Motion Reseller or Motion Representative.
© 2014 Motion Computing, Inc. All rights reserved. Motion and Motion Computing are registered trademarks of Motion Computing, Inc .
www.MotionComputing.com
1) Using plas6c trim panel removal tools, carefully release the radio trim panel as shown.
Nissan X Trail Install Guide

For more information, contact your local Motion Reseller or Motion Representative.
© 2014 Motion Computing, Inc. All rights reserved. Motion and Motion Computing are registered trademarks of Motion Computing, Inc .
www.MotionComputing.com
3) Remove the two screws indicated securing the leC side of the radio.
2) Release the cable loom from the radio trim panel.
Nissan X Trail Install Guide

For more information, contact your local Motion Reseller or Motion Representative.
© 2014 Motion Computing, Inc. All rights reserved. Motion and Motion Computing are registered trademarks of Motion Computing, Inc .
www.MotionComputing.com
4) Remove the two screws indicated securing the right side of the radio.
Nissan X Trail Install Guide
5) Remove the two upper radio bracket retaining screws as shown.
For more information, contact your local Motion Reseller or Motion Representative.
© 2014 Motion Computing, Inc. All rights reserved. Motion and Motion Computing are registered trademarks of Motion Computing, Inc .
www.MotionComputing.com
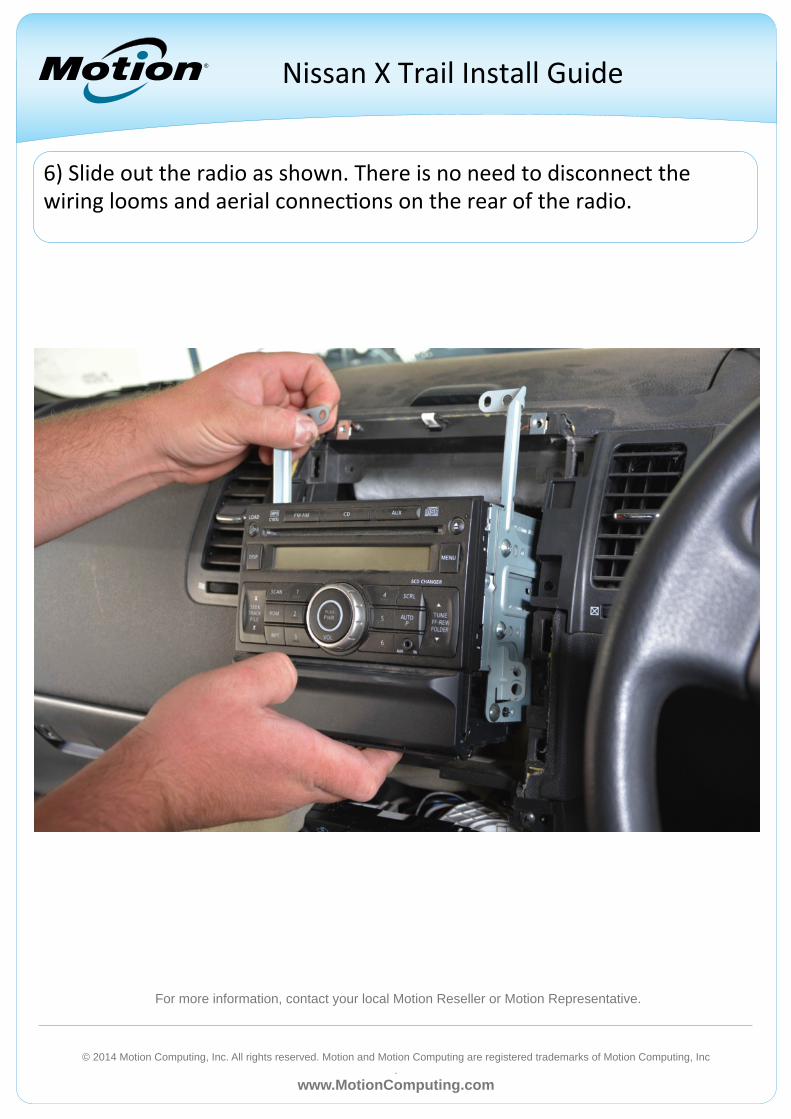
6) Slide out the radio as shown. There is no need to disconnect the wiring looms and aerial connec6ons on the rear of the radio.
Nissan X Trail Install Guide

For more information, contact your local Motion Reseller or Motion Representative.
© 2014 Motion Computing, Inc. All rights reserved. Motion and Motion Computing are registered trademarks of Motion Computing, Inc .
www.MotionComputing.com
7) Remove the three screws securing the metal bracket to the right hand side of the radio unit as shown. Leave the other two screws in place as it is not necessary to completely remove the bracket.
Nissan X Trail Install Guide
For more information, contact your local Motion Reseller or Motion Representative.
© 2014 Motion Computing, Inc. All rights reserved. Motion and Motion Computing are registered trademarks of Motion Computing, Inc .
www.MotionComputing.com
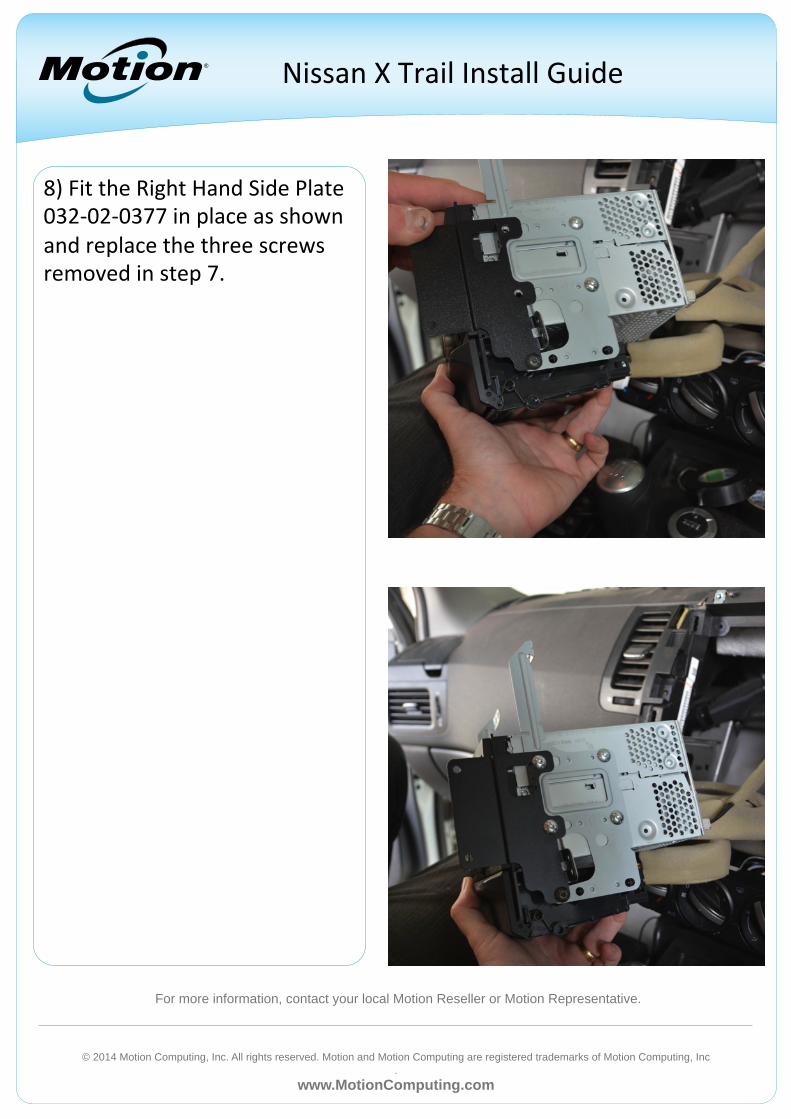
8) Fit the Right Hand Side Plate 032-‐02-‐0377 in place as shown and replace the three screws removed in step 7.
Nissan X Trail Install Guide
For more information, contact your local Motion Reseller or Motion Representative.
© 2014 Motion Computing, Inc. All rights reserved. Motion and Motion Computing are registered trademarks of Motion Computing, Inc .
www.MotionComputing.com
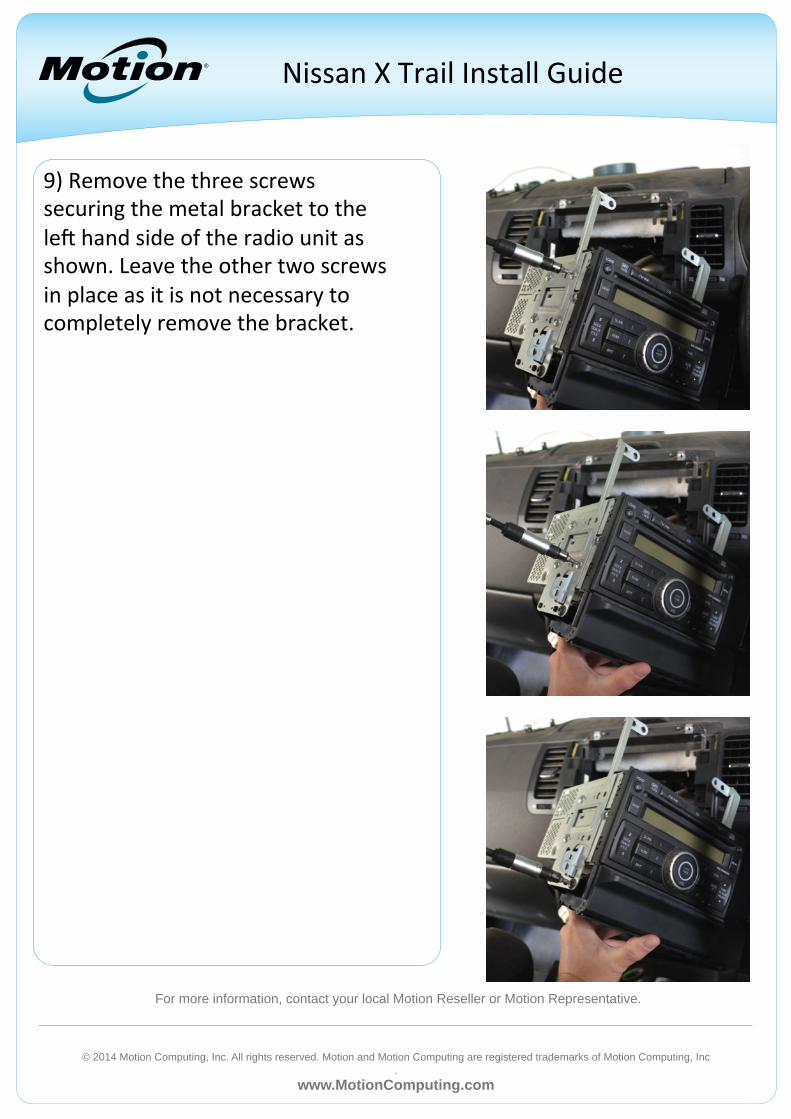
9) Remove the three screws securing the metal bracket to the leC hand side of the radio unit as shown. Leave the other two screws in place as it is not necessary to completely remove the bracket.
Nissan X Trail Install Guide
For more information, contact your local Motion Reseller or Motion Representative.
© 2014 Motion Computing, Inc. All rights reserved. Motion and Motion Computing are registered trademarks of Motion Computing, Inc .
www.MotionComputing.com
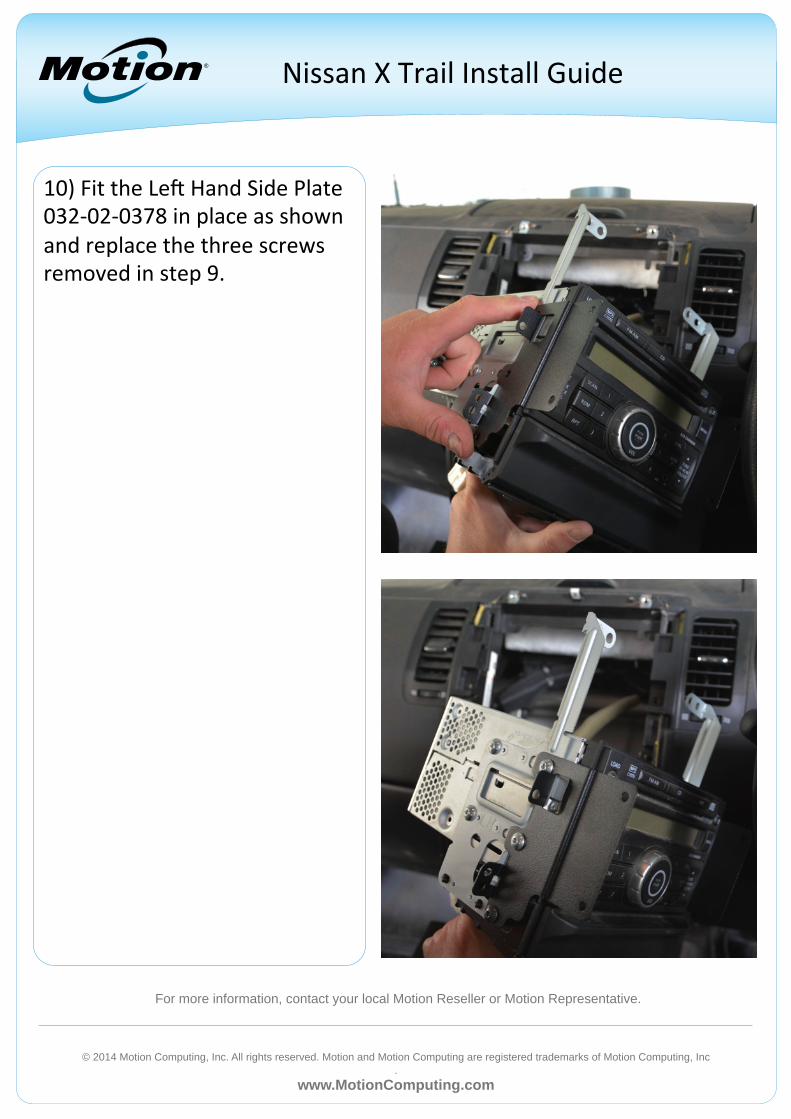
10) Fit the LeC Hand Side Plate 032-‐02-‐0378 in place as shown and replace the three screws removed in step 9.
Nissan X Trail Install Guide

For more information, contact your local Motion Reseller or Motion Representative.
© 2014 Motion Computing, Inc. All rights reserved. Motion and Motion Computing are registered trademarks of Motion Computing, Inc .
www.MotionComputing.com
11) Slide the radio unit back into its housing and replace the two screws removed in step 5 that secure the top of the metal brackets as shown.
Nissan X Trail Install Guide
12) Replace the two screws removed in step 3 that secure the leC hand side of the radio.
For more information, contact your local Motion Reseller or Motion Representative.
© 2014 Motion Computing, Inc. All rights reserved. Motion and Motion Computing are registered trademarks of Motion Computing, Inc .
www.MotionComputing.com
Nissan X Trail Install Guide
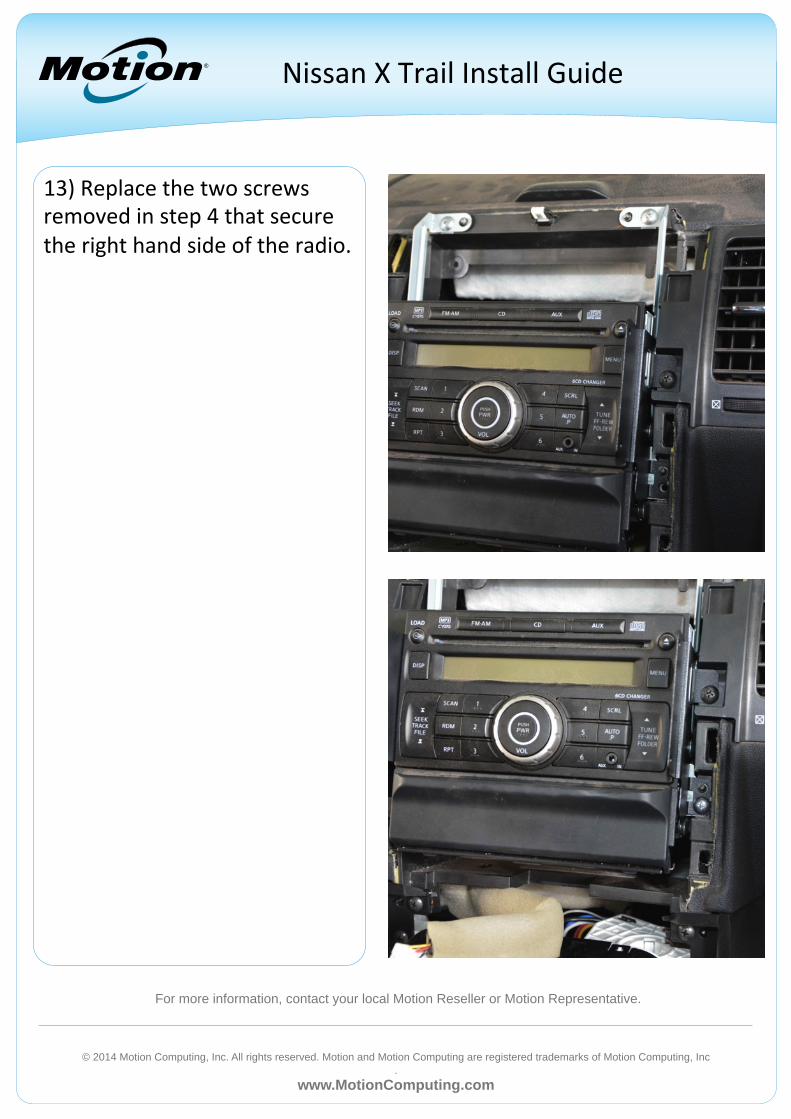
13) Replace the two screws removed in step 4 that secure the right hand side of the radio.

For more information, contact your local Motion Reseller or Motion Representative.
© 2014 Motion Computing, Inc. All rights reserved. Motion and Motion Computing are registered trademarks of Motion Computing, Inc .
www.MotionComputing.com
Nissan X Trail Install Guide
14) Refit the cable loom to the radio trim panel as shown.
15) Refit the radio trim panel as shown.
For more information, contact your local Motion Reseller or Motion Representative.
© 2014 Motion Computing, Inc. All rights reserved. Motion and Motion Computing are registered trademarks of Motion Computing, Inc .
www.MotionComputing.com
Nissan X Trail Install Guide
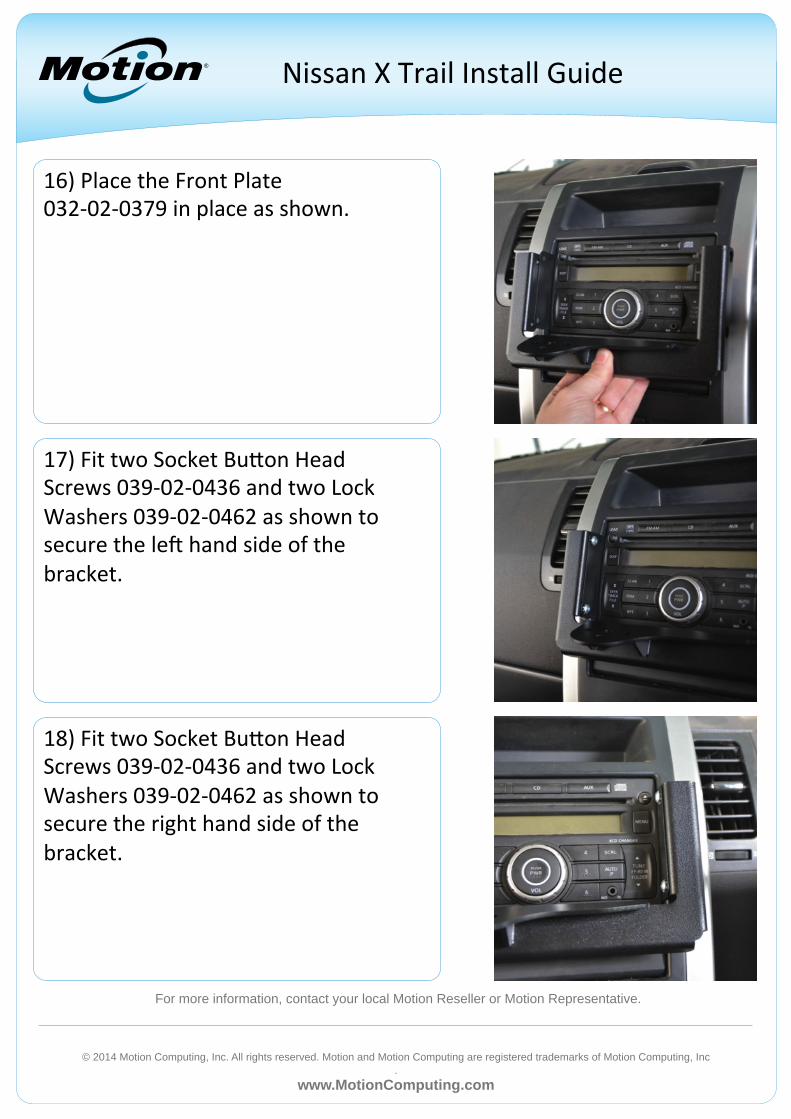
16) Place the Front Plate 032-‐02-‐0379 in place as shown.
17) Fit two Socket BuVon Head Screws 039-‐02-‐0436 and two Lock Washers 039-‐02-‐0462 as shown to secure the leC hand side of the bracket.
18) Fit two Socket BuVon Head Screws 039-‐02-‐0436 and two Lock Washers 039-‐02-‐0462 as shown to secure the right hand side of the bracket.
For more information, contact your local Motion Reseller or Motion Representative.
© 2014 Motion Computing, Inc. All rights reserved. Motion and Motion Computing are registered trademarks of Motion Computing, Inc .
www.MotionComputing.com
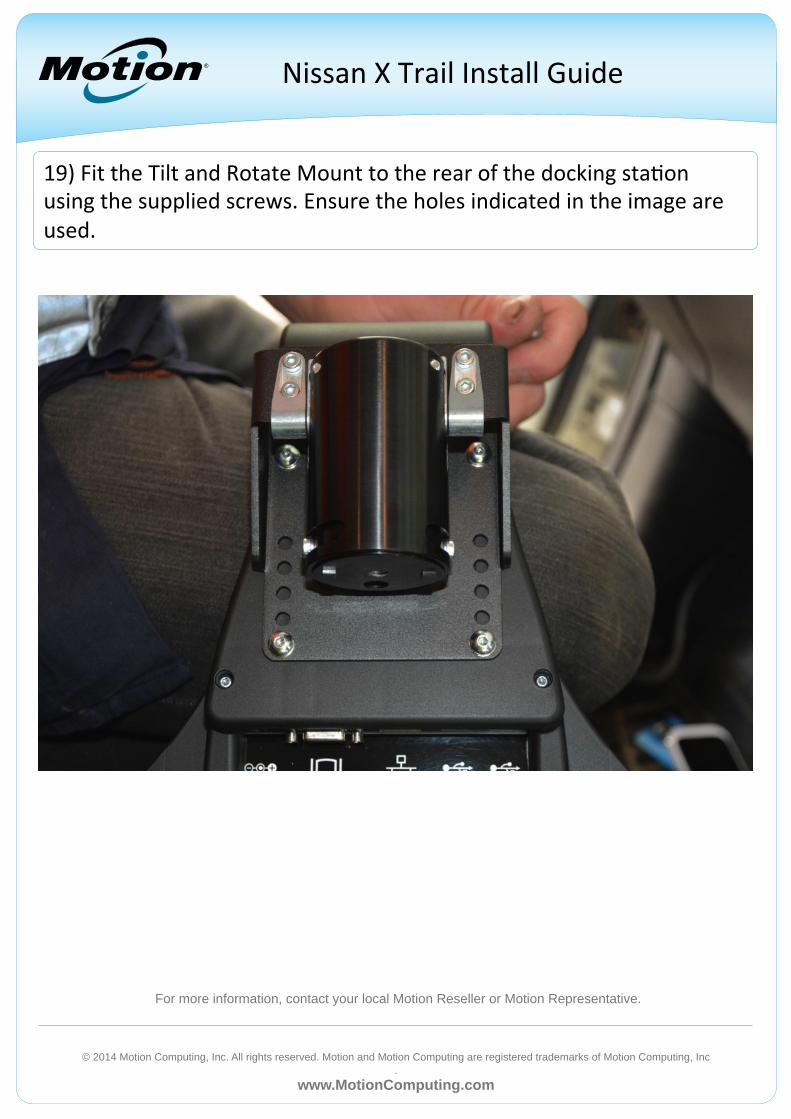
19) Fit the Tilt and Rotate Mount to the rear of the docking sta6on using the supplied screws. Ensure the holes indicated in the image are used.
Nissan X Trail Install Guide
For more information, contact your local Motion Reseller or Motion Representative.
© 2014 Motion Computing, Inc. All rights reserved. Motion and Motion Computing are registered trademarks of Motion Computing, Inc .
www.MotionComputing.com
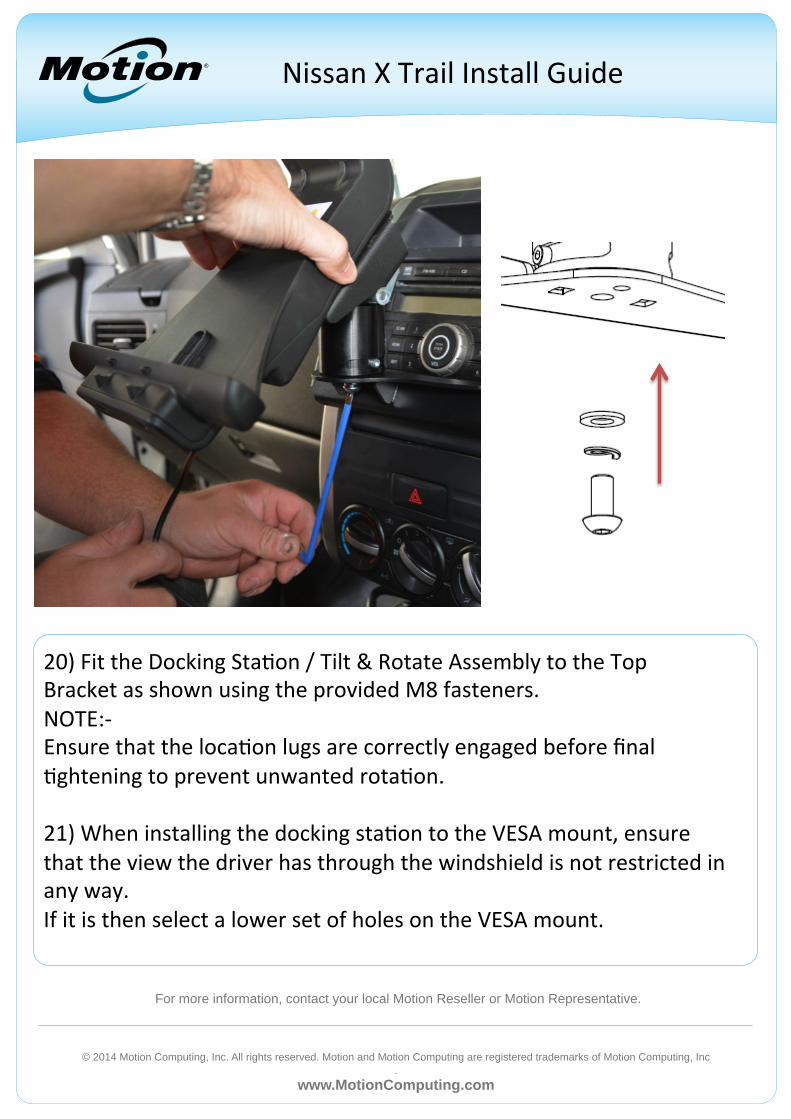
20) Fit the Docking Sta6on / Tilt & Rotate Assembly to the Top Bracket as shown using the provided M8 fasteners. NOTE:-‐ Ensure that the loca6on lugs are correctly engaged before final 6ghtening to prevent unwanted rota6on. 21) When installing the docking sta6on to the VESA mount, ensure that the view the driver has through the windshield is not restricted in any way. If it is then select a lower set of holes on the VESA mount.
Nissan X Trail Install Guide
For more information, contact your local Motion Reseller or Motion Representative.
© 2014 Motion Computing, Inc. All rights reserved. Motion and Motion Computing are registered trademarks of Motion Computing, Inc .
www.MotionComputing.com
�
�
��
��
5(9,6,216
(&1
5(9�
'(6&5,37,21
'$7(
$3352
9('
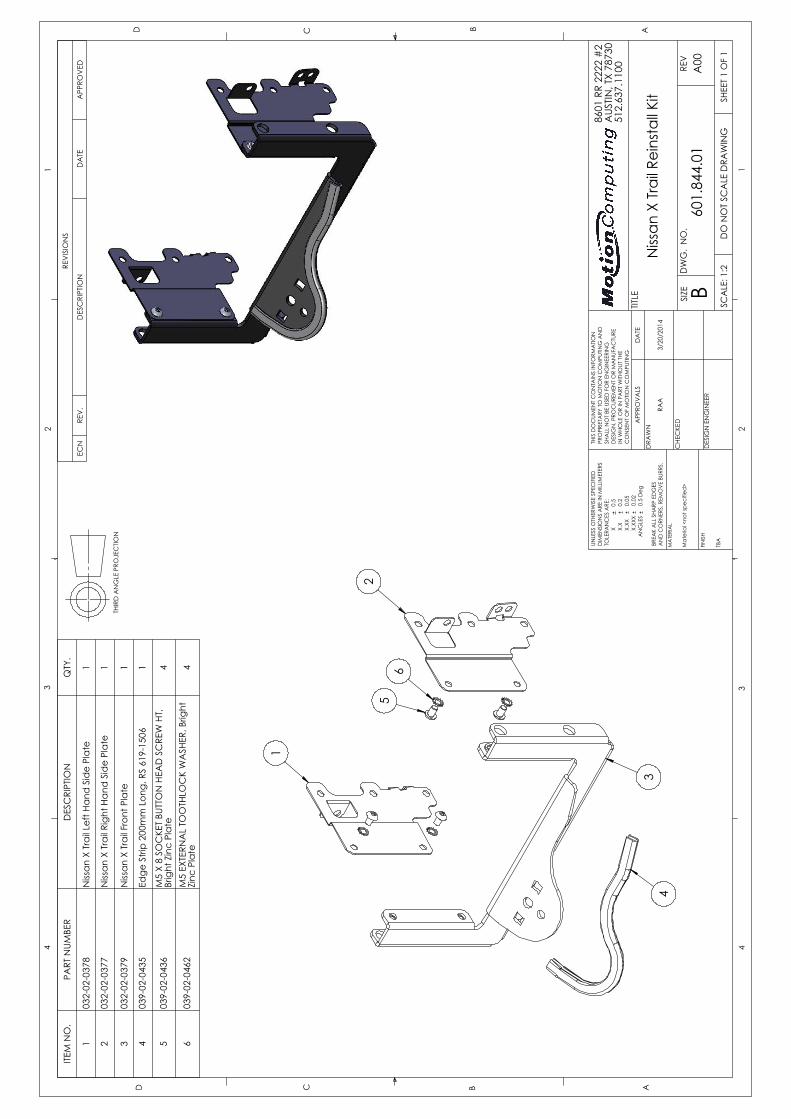
,7(0�12�
3$57�180
%(5
'(6&5,37,21
47<�
������������
1LVVDQ
�;�7UDLO�/HIW�+
DQG�6LGH�3ODWH
�
������������
1LVVDQ
�;�7UDLO�5
LJKW�+DQ
G�6LGH�3ODWH
�
������������
1LVVDQ
�;�7UDLO�)URQW�3ODWH
�
������������
(GJH
�6WULS����P
P�/RQ
J��56���������
�
������������
0��;���62
&.(7�%8
7721�+($
'�6&5(:�+7��
%ULJKW�=LQF�3ODWH
�
������������
0��(;7(51
$/�72
27+/2
&.�:$6+(5��%ULJKW�
=LQF�3ODWH
�
' & % $$%&'
��
���
�
81/(66�27+(5:,6(�63(&
,),('
',0(1
6,216�$5(�,1
�0,//,0(7(56
72/(5$
1&(6�$5(�
����������;��������
������
����������;�;�����
������
����������;�;;���
�������
����������;�;;;
�������������
������$1*/(6�
�������'HJ
%5($
.�$//�6+$
53�('*(6
$1'�&251
(56��5(0
29(�%8
556�
0$7(5,$/
),1,6+
0DWHULDO��QR
W�VSH
FLILHG!
7%$
7,7/( 6,=( %
':*���12�
5(9
6&$/(�����
$��
5$$
���������
1LVVDQ
�;�7UDLO�5
HLQVWDOO�.
LW 6+((7��
�2)��
����������
'2�127�6&
$/(�'5$
:,1*
�
�
�����55��������
$867,1
��7;������
������������
7+,6�'2&80
(17�&217$,16�,1)2
50$7,2
135235,(7$5<�72�027,2
1�&2038
7,1*�$1'
6+$//�127�%(�86('�)25�(1
*,1((5,1*
'(6,*1��352
&85
(0(1
7�25�0$18)$&785(
,1�:
+2/(�25�,1�3$57�:
,7+287�7+(
&216(17�2)�027,2
1�&2038
7,1*
$3352
9$/6
'$7(
'5$
:1
&+(&
.('
'(6,*1�(1*,1((5
7+,5'�$1*/(�352
-(&7,2
1
Related Documents