Nipper Studio – Beginner’s Guide Multiple Award Winning Security Software Version 2.5.17 Published April 2019 © Titania Limited 2018. All Rights Reserved This document is intended to provide advice and assistance for the installation and running of Nipper Studio software. While Titania takes care to ensure that all the information included in this document is accurate and relevant, customers are advised to seek further assistance from our support staff if required. No part of this documentation may be copied or otherwise duplicated on any medium without prior written consent of Titania Limited, publisher of this work. The use of Nipper Studio software is subject to the acceptance of the license agreement. Titania Limited Security House Barbourne Road Worcester WR1 1RS Telephone: (+44)1905 888 785 Technical Support: [email protected] Licensing: [email protected] Nipper Studio Support: https://www.titania.com/support/nipper-studio

Welcome message from author
This document is posted to help you gain knowledge. Please leave a comment to let me know what you think about it! Share it to your friends and learn new things together.
Transcript
Nipper Studio – Beginner’s Guide
Multiple Award Winning Security Software
Version 2.5.17 Published April 2019
© Titania Limited 2018. All Rights Reserved
This document is intended to provide advice and assistance for the installation and running of Nipper Studio software. While Titania takes care to ensure that all the information included in this document is accurate and relevant, customers are advised to seek further assistance from our support staff if required. No part of this documentation may be copied or otherwise duplicated on any medium without prior written consent of Titania Limited, publisher of this work. The use of Nipper Studio software is subject to the acceptance of the license agreement.
Titania Limited Security House Barbourne Road Worcester WR1 1RS
Telephone: (+44)1905 888 785 Technical Support: [email protected] Licensing: [email protected]
Nipper Studio Support: https://www.titania.com/support/nipper-studio
Page 2 of 38
Contents Contents......................................................................................................................... 2
What is Nipper Studio? .................................................................................................. 3
What is the Nipper Studio Beginner’s Guide? ................................................................ 5
Installing Nipper Studio .................................................................................................. 6
Installing Nipper Studio - general information ................................................................ 8
Installing Nipper Studio on Windows Operating Systems .............................................. 9
Installing Nipper Studio on Linux Operating Systems .................................................. 12
SE Linux ................................................................................................................... 12
CentOS 6 (x32) ........................................................................................................ 12
CentOS 6 (x64) ........................................................................................................ 12
CentOS 7 (x64) ........................................................................................................ 13
Ubuntu ...................................................................................................................... 13
Fedora 32bit/64bit .................................................................................................... 13
openSUSE 13.2 ....................................................................................................... 13
Installing Nipper Studio on Mac Operating Systems .................................................... 14
Adding a license to Nipper Studio ................................................................................ 16
Navigating around Nipper Studio ................................................................................. 17
Obtaining device configuration files ............................................................................. 18
Creating your first report with Nipper Studio ................................................................ 22
Adding the configuration files ................................................................................... 22
Adding files remotely to Nipper Studio ......................................................................... 24
Report options .............................................................................................................. 25
Customising reports with company details ................................................................... 29
General .................................................................................................................... 29
Reports ........................................................................................................................ 30
Reporting .................................................................................................................. 31
Excluding Issues .......................................................................................................... 33
Adding Issue Notes ...................................................................................................... 34
Saving Your Reports .................................................................................................... 35
Report comparison ....................................................................................................... 36
Managing licenses ....................................................................................................... 37
Conclusion ................................................................................................................... 38

Page 3 of 38
What is Nipper Studio? Nipper Studio from Titania is a computer program, which creates comprehensive audit reports on network devices.
The reports are written in plain English. Where relevant, the reports explain security vulnerabilities that are found along with ratings for how potentially dangerous they are. The following reports are currently available: Configuration Reports; Nipper Studio analyses the configuration of your device and presents it an accessible and ordered way. Comprehensive Security Audits; The software will process the configuration, analyses it for security weaknesses, and once again present it clearly to you. Security vulnerabilities will be graded according to the risk they pose to the organisation, the ease of exploiting the vulnerability and available remediation. Vulnerability Audits; Where firmware/operating system is provided by the user (for example, a ‘show version’ command is run when the configuration is collected), Nipper Studio will report on known vulnerabilities based on the OVAL and NVD repositories. Compliance Reports (against a variety of standards); At the time of writing, Nipper Studio can report your compliance with the following standards: STIG, PCI and SANS. Change Tracking; Where raw configuration or security audit reports are run, you can save the result as an XML file for later comparison against another raw configuration or security audit report on the same device. Raw configuration details; Where possible, Nipper Studio will decrypt configuration files (if required) and output the results in a human readable form.

Page 4 of 38
Filtering Complexity; This report will highlight conflicting, redundant and overlapping rules and will notify you where thresholds for a given device or group have been exceeded. The reports can be customised to your organisations standards.
Nipper Studio is typically installed and run from a workstation and most customers choose to manually retrieve their device configuration files, but there is support for network based collection of configuration files for some of our most popular supported devices.
Once collated, the configuration files are audited by the software (usually very quickly) and one or more reports are generated according to user’s choices.
Nipper Studio is not a scanner. It does not create network traffic by default. It is a configuration analyser. It is a tool that will significantly aid you in auditing infrastructure security, or as part of a penetration test.

Page 5 of 38
What is the Nipper Studio Beginner’s Guide?
The purpose of this document is to provide a beginner’s guide to Nipper Studio. The intended audience is therefore either anyone new to the Nipper Studio software or anyone who needs a refresher on the features. It may be useful as a reference for users; however, the scope is limited by design to those who are less familiar with the software. There are many options in the software and it is not practical to include them all in this Guide.
This Guide will therefore explain how to install, run and activate Nipper Studio, and take you through some of its most common/popular features.
This Beginner’s Guide is based on the original Nipper Studio Manual, which is made obsolete on the publication of this Guide.
It is based on Nipper Studio Release 2.5.12
At the time of writing we are in the process of updating the support section of our website. In the meantime, should you have any further technical support questions about the software, please contact us: [email protected]
Prepared May, 2018 by the Titania Technical Services Team

Page 6 of 38
Installing Nipper Studio
Nipper Studio can be downloaded on a number of platforms including Windows, Mac and various Linux distributions.
Once you are a registered user of our website (https://www.titania.com, you can download Nipper Studio by going to your account page (click on ‘Your Account’, top right).
On this screen, you will be able to initiate the download process by clicking download files under “My product Licenses”.
Page 7 of 38
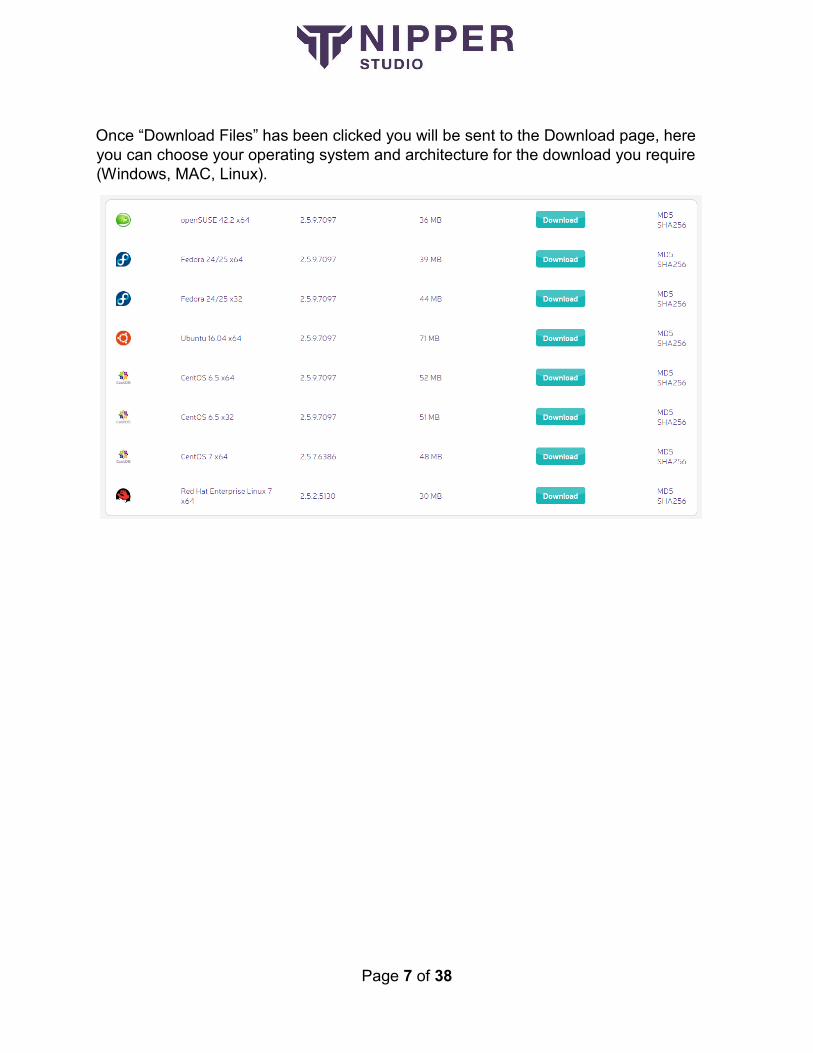
Once “Download Files” has been clicked you will be sent to the Download page, here you can choose your operating system and architecture for the download you require (Windows, MAC, Linux).

Page 8 of 38
Installing Nipper Studio - general information
Nipper Studio is installed and run from a local machine. That is, Nipper Studio cannot be installed on a server and accessed remotely.
The software has been tested on server operating systems, but if installed as such you would still be required to operate the software locally, working at the same machine on which Nipper Studio is installed.
The following chapter gives detailed instructions with screenshots on how to install Nipper Studio on Windows operating systems. There are then two briefer chapters explaining how to install on Linux and Mac.
Please note that on some Linux operating systems, further commands and installation of dependencies may be required. This applies to Security Enhanced Linux and CentOS / Red Hat distributions. Please see the Linux installation chapter and/or the website for details.
Nipper Studio downloads come supplied with both SHA1 and MD5 hashes on the website, allowing you to check the integrity of the download.
The packages are code signed wherever possible and are both built in a clean, secure environment undergoing rigorous testing before upload to our servers.

Page 9 of 38
Installing Nipper Studio on Windows Operating Systems
NB: We installed Nipper Studio on Windows 10 x64 - naturally, Nipper Studio is also supported on other Windows versions.
To install Nipper Studio, double-click on the Nipper Studio download file and the Welcome Wizard box will appear. Click ‘Next’ to continue.
Read and agree to the license and click ‘I Agree’ to continue.

Page 10 of 38
In the next window, choose where to install Nipper Studio. You can browse to a different location if you wish, or if you are happy with the default location, click ‘Next’.
Next, you can choose the Start Menu folder where you want to install the shortcuts. Once you have done so, click ‘Next’ to continue.

Page 11 of 38
The next stage is to choose the components you want to install with Nipper Studio.
When you have selected your components and pressed ‘Install’, the software will install to your specifications and you will be taken to the final Nipper Studio installation screen. To complete, select ‘Finish’.
Page 12 of 38
Installing Nipper Studio on Linux Operating Systems
On Linux operating systems, the preferred method is to install via the GUI and allow the package manager to deal with the installation.
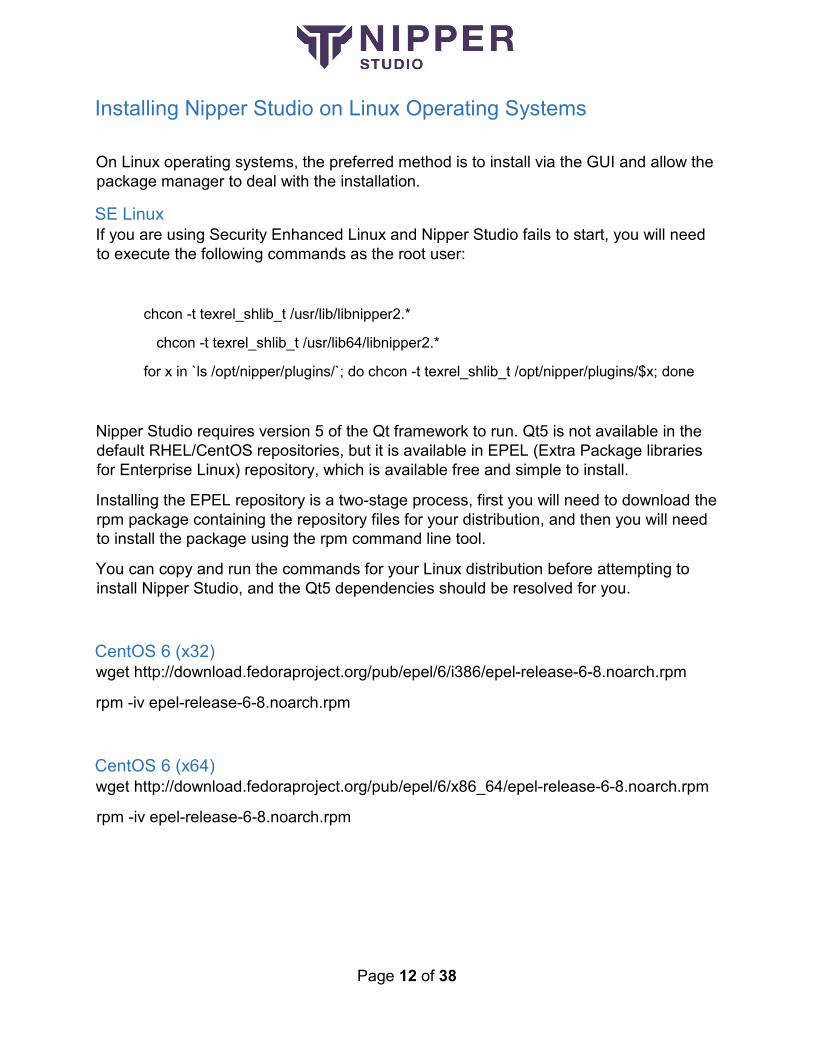
SE Linux If you are using Security Enhanced Linux and Nipper Studio fails to start, you will need to execute the following commands as the root user:
chcon -t texrel_shlib_t /usr/lib/libnipper2.*
chcon -t texrel_shlib_t /usr/lib64/libnipper2.*
for x in `ls /opt/nipper/plugins/`; do chcon -t texrel_shlib_t /opt/nipper/plugins/$x; done
Nipper Studio requires version 5 of the Qt framework to run. Qt5 is not available in the default RHEL/CentOS repositories, but it is available in EPEL (Extra Package libraries for Enterprise Linux) repository, which is available free and simple to install.
Installing the EPEL repository is a two-stage process, first you will need to download the rpm package containing the repository files for your distribution, and then you will need to install the package using the rpm command line tool.
You can copy and run the commands for your Linux distribution before attempting to install Nipper Studio, and the Qt5 dependencies should be resolved for you.
CentOS 6 (x32) wget http://download.fedoraproject.org/pub/epel/6/i386/epel-release-6-8.noarch.rpm
rpm -iv epel-release-6-8.noarch.rpm
CentOS 6 (x64) wget http://download.fedoraproject.org/pub/epel/6/x86_64/epel-release-6-8.noarch.rpm
rpm -iv epel-release-6-8.noarch.rpm

Page 13 of 38
CentOS 7 (x64) The new repository for epel’s that CentOS 7 requires to run Nipper Studio can be found here: http://dl.fedoraproject.org/pub/epel/7/x86_64/Packages/e/epel-release-7-11.noarch.rpm Once you downloaded it onto the machine run the following command to remove the old repository: “rpm –e epel-release-[version-number].noarch”. In order to install the new repository onto your machine, run the command: “rpm –iv epel-release-7-11.noarch.rpm” If you still encounter issues running Nipper Studio on CentOS 7, try editing the repository file in: /etc/yum.repos.d/epel.repo Ubuntu With Ubuntu usually the dependencies are already met but if your Ubuntu machine doesn’t install Nipper Studio try to retrieve the QT5 dependencies:
sudo apt-get install build-essential
sudo apt-get install libx11-xcb-dev libglu1-mesa-dev
Fedora 32bit/64bit When installing Nipper Studio via the command dnf it should automatically detect the required dependencies
When you installed the file, you will now be able to install Nipper Studio, to do this download the most recent Nipper Studio version for OpenSuse, and simply click the file and it will install.
To install nipper through the CLI go to the directory that the file is held in and
type sudo zypper install nipperstudio-* Then Nipper Studio will install.
openSUSE 13.2 Firstly before installing Nipper Studio you will need to install a separate file called 'libstdc++33-3.3.3-7.5.i586.rpm', this file contains the dependences that Nipper Studio needs in order to work. This can be downloaded here.
When you have this file you will need to install it, this can be done through the GUI or CLI.
To install the file through the GUI simply click the file and follow the onscreen prompts and the file will be installed.
To install the file through the CLI, firstly go to the directory that the file is stored in through the CLI e.g cd Desktop/OpenSUSE\ 13.2/

Page 14 of 38
When inside the directory, you can check the file is there by typing
ls
This will list the files in that directory. To install the file type
sudo zypper install libstdc++33-3.3.3-7.5.i586.rpm The CLI
will install the file.
When you installed the file, you will now be able to install Nipper Studio, to do this download the most recent Nipper Studio version for OpenSuse, and simply click the file and it will install.
To install nipper through the CLI go to the directory that the file is held in and
type sudo zypper install nipperstudio-* Then Nipper Studio will install.
You can also download Nipper from a browser of your choosing by logging in to
www.titania.com navigating to the downloads page and downloading the relevant
files.
Installing Nipper Studio on Mac Operating Systems
Before installing Nipper Studio on to your Mac device, you must first remove any previous versions of Nipper Studio from the device. Using the terminal of the Mac with these commands-
sudo rm -rf /usr/bin/nipper*
sudo rm -rf /usr/lib/libnipper*
sudo rm -rf /Library/Frameworks/Qt*
sudo rm -rf /Library/Frameworks/libnipper*
sudo rm -rf /Applications/Nipper\ Studio.app/
sudo rm –rf ~/Library/Preferences/com.titania.*

Page 15 of 38
Now you can install Nipper Studio, go to the Titania website and download the latest Nipper Studio program: https://www.titania.com/
Now simply double click the Nipper Studio file, which will begin the install process. The Mac will now verify the download.
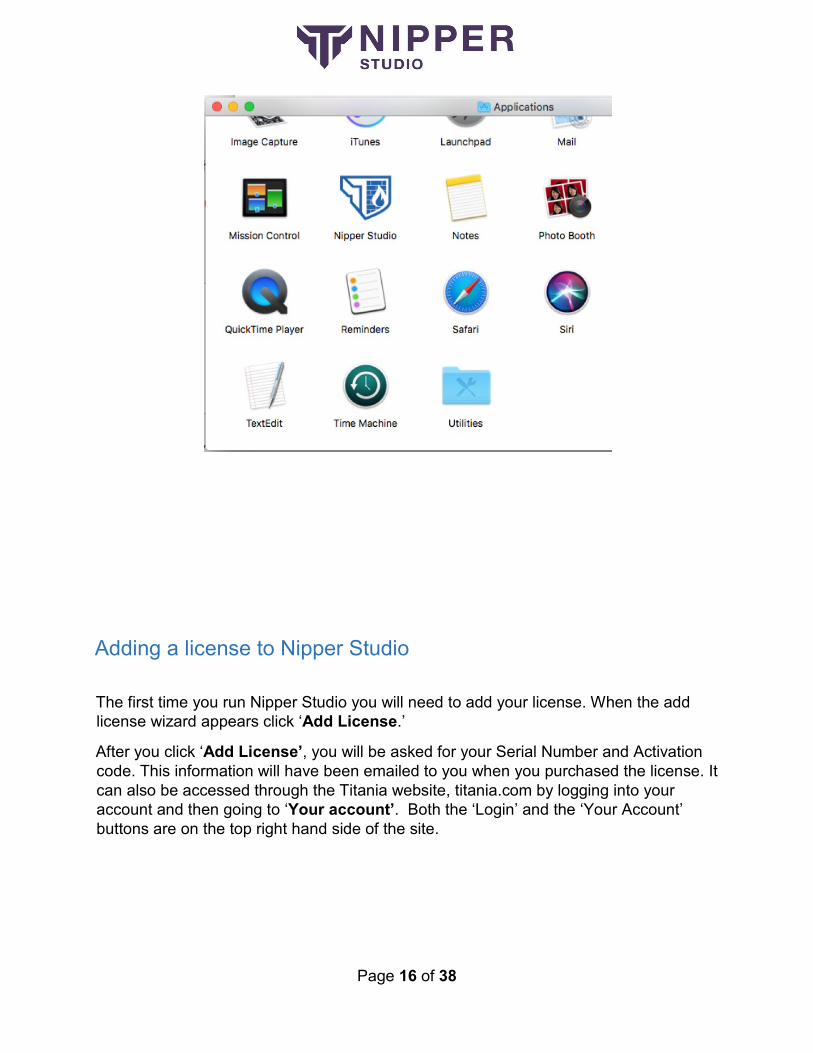
You will now be shown a window with the Nipper Studio logo and the Applications folder within it, simply drag the nipper studio icon into the application folder and this will now install Nipper Studio on to the Mac.
After this just open the applications folder and launch Nipper Studio.
Page 16 of 38
Adding a license to Nipper Studio
The first time you run Nipper Studio you will need to add your license. When the add license wizard appears click ‘Add License.’
After you click ‘Add License’, you will be asked for your Serial Number and Activation code. This information will have been emailed to you when you purchased the license. It can also be accessed through the Titania website, titania.com by logging into your account and then going to ‘Your account’. Both the ‘Login’ and the ‘Your Account’ buttons are on the top right hand side of the site.
Page 17 of 38
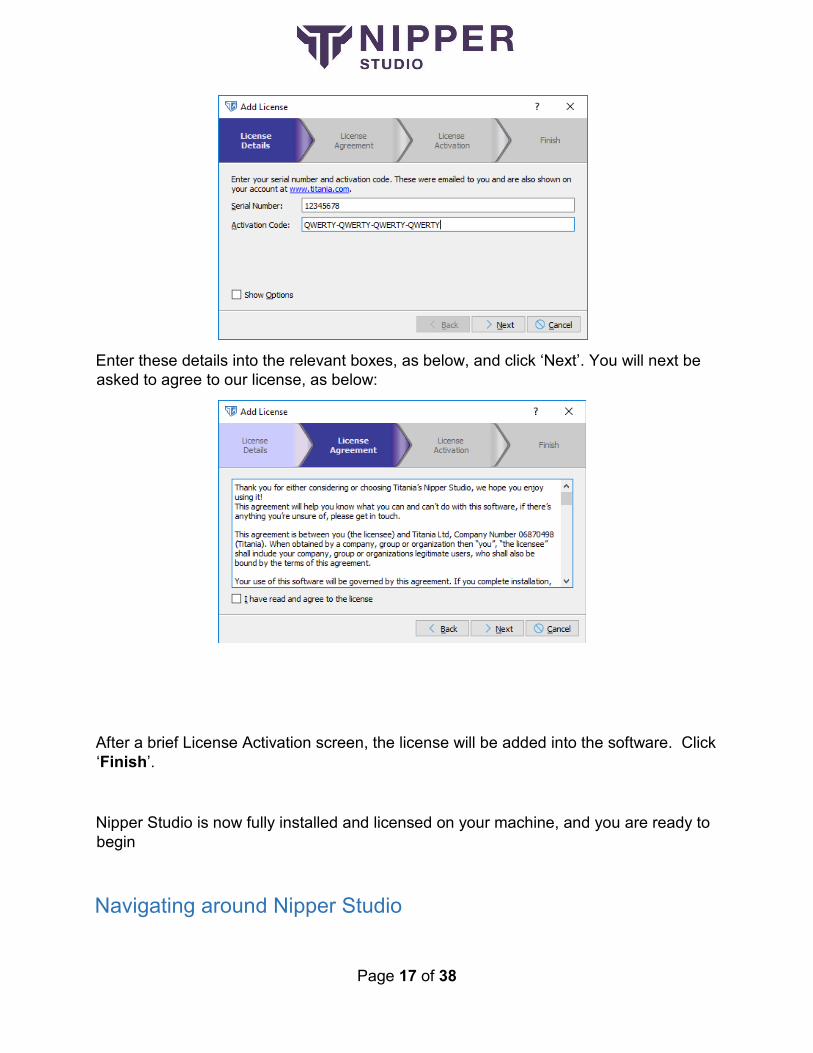
Enter these details into the relevant boxes, as below, and click ‘Next’. You will next be asked to agree to our license, as below:
After a brief License Activation screen, the license will be added into the software. Click ‘Finish’.
Nipper Studio is now fully installed and licensed on your machine, and you are ready to begin
Navigating around Nipper Studio

Page 18 of 38
This is the Nipper Studio homepage:
We have highlighted navigation icons on the top left of the page and the search toolbar at the bottom of the page.
Also, when moving around Nipper Studio, for example when you have a report open, you can right click on the Nipper Studio window to bring up a ‘Go Back’ icon which, as it says, will take you back a screen.
Obtaining device configuration files
In order to perform an audit of your device(s), Nipper Studio needs to access the native configuration file of the relevant device(s).
There are presently two ways to achieve this:
You can manually extract the configuration file(s) you need;
For some devices you can access the configuration file over the network.

Page 19 of 38
Many of our customers still prefer to manually extract the configuration file from the device, because it is arguably more secure and does not increase network traffic. For others, the convenience of network access is a bonus.
In the next section we will briefly demonstrate both methods. Here, we explain how you can find instructions on how to manually retrieve your configuration files.
First open Nipper Studio, whereupon you will be presented with the homepage:

Page 20 of 38
Click on ‘Help & Information’, which will present you with the following screen:
Page 21 of 38
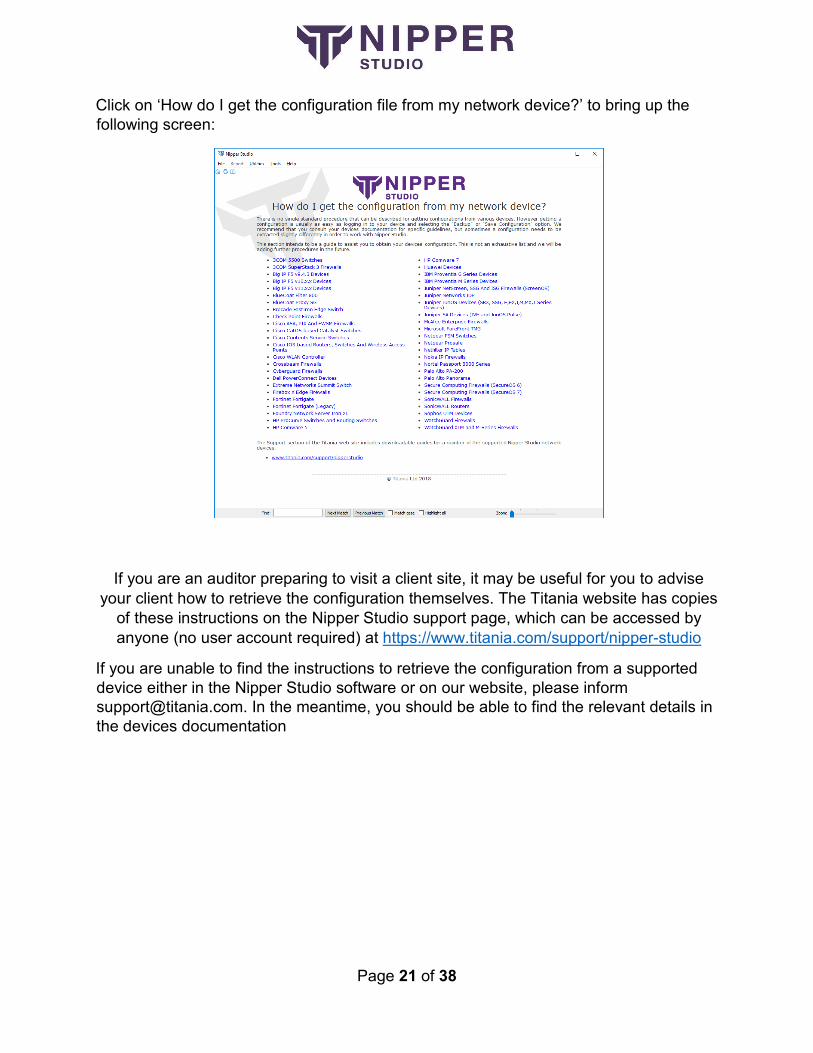
Click on ‘How do I get the configuration file from my network device?’ to bring up the following screen:
If you are an auditor preparing to visit a client site, it may be useful for you to advise your client how to retrieve the configuration themselves. The Titania website has copies
of these instructions on the Nipper Studio support page, which can be accessed by anyone (no user account required) at https://www.titania.com/support/nipper-studio
If you are unable to find the instructions to retrieve the configuration from a supported device either in the Nipper Studio software or on our website, please inform [email protected]. In the meantime, you should be able to find the relevant details in the devices documentation
Page 22 of 38
Creating your first report with Nipper Studio
Adding the configuration files
Here we will add files to Nipper Studio and demonstrate how to create a report using remote files.
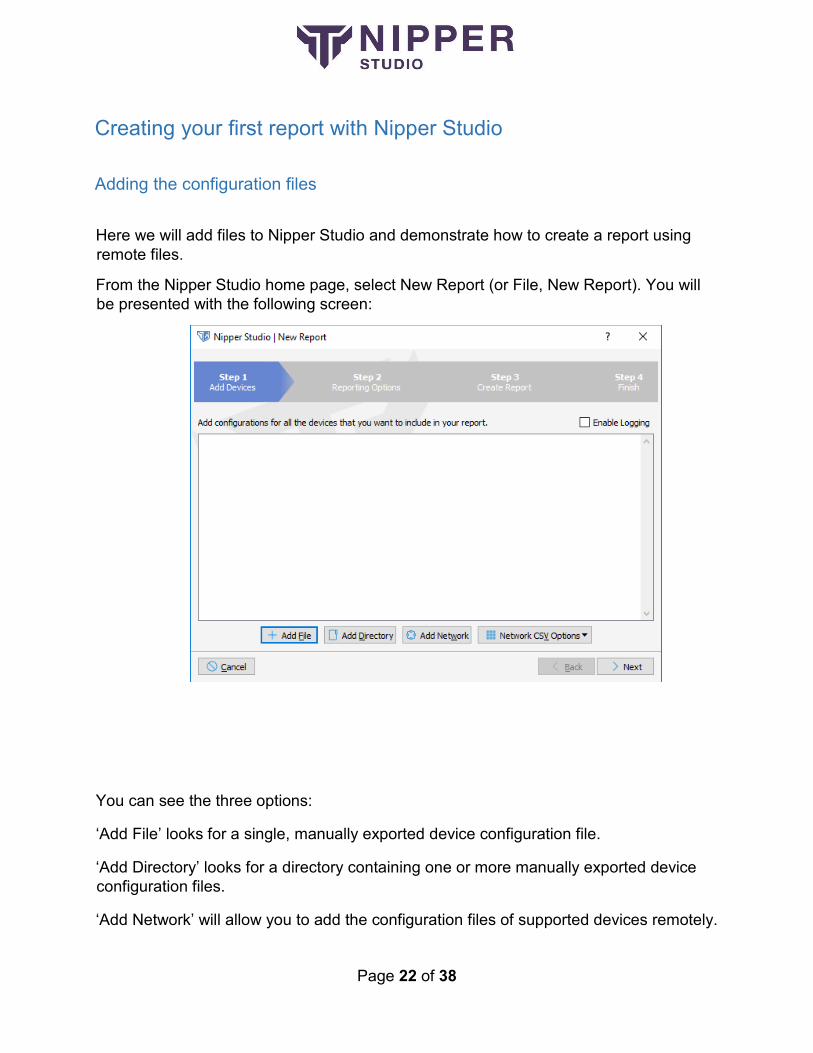
From the Nipper Studio home page, select New Report (or File, New Report). You will be presented with the following screen:
You can see the three options:
‘Add File’ looks for a single, manually exported device configuration file.
‘Add Directory’ looks for a directory containing one or more manually exported device configuration files.
‘Add Network’ will allow you to add the configuration files of supported devices remotely.
Page 23 of 38
Under ‘Network CSV Option’ there are two options:
‘Import Network CSV’ will enable you to add a large amount of devices via a CSV input.
‘Export Network Devices as CSV’ generates a CSV from the networks that are available in the format that can be re-imported using ‘Import Network CSV’.
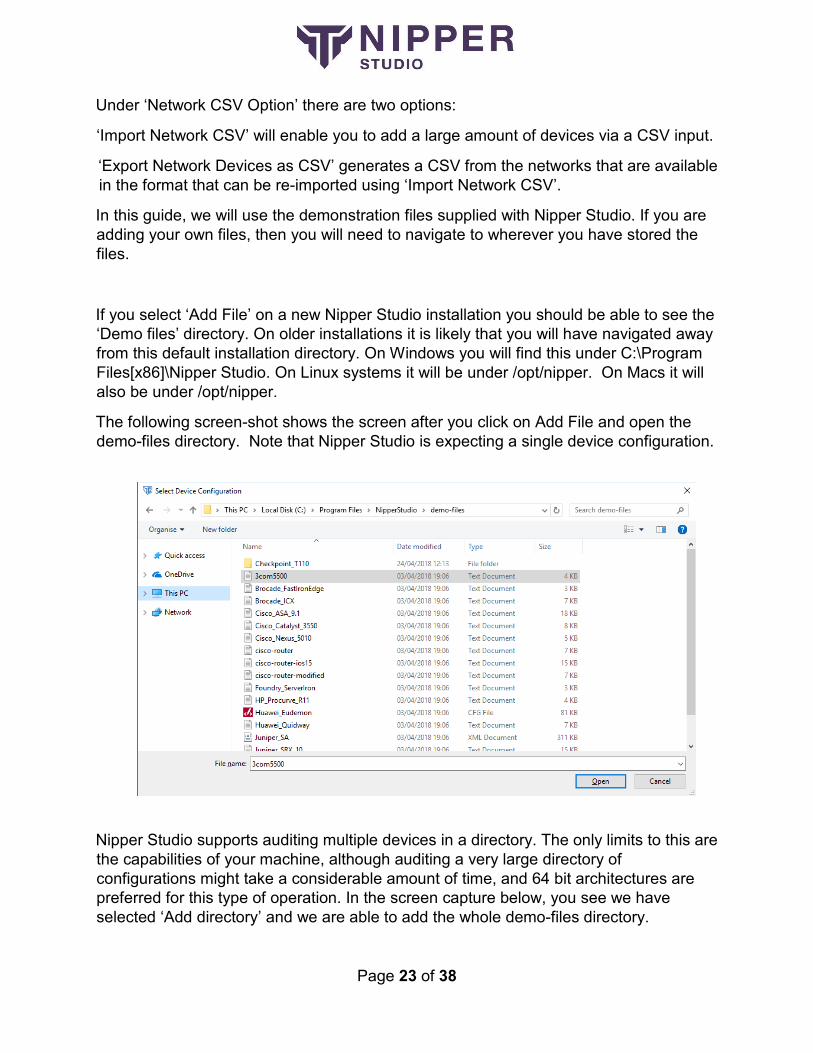
In this guide, we will use the demonstration files supplied with Nipper Studio. If you are adding your own files, then you will need to navigate to wherever you have stored the files.
If you select ‘Add File’ on a new Nipper Studio installation you should be able to see the ‘Demo files’ directory. On older installations it is likely that you will have navigated away from this default installation directory. On Windows you will find this under C:\Program Files[x86]\Nipper Studio. On Linux systems it will be under /opt/nipper. On Macs it will also be under /opt/nipper.
The following screen-shot shows the screen after you click on Add File and open the demo-files directory. Note that Nipper Studio is expecting a single device configuration.
Nipper Studio supports auditing multiple devices in a directory. The only limits to this are the capabilities of your machine, although auditing a very large directory of configurations might take a considerable amount of time, and 64 bit architectures are preferred for this type of operation. In the screen capture below, you see we have selected ‘Add directory’ and we are able to add the whole demo-files directory.

Page 24 of 38
Adding files remotely to Nipper Studio
Selecting ‘Add Network’ presents you with the following screen:
Page 25 of 38
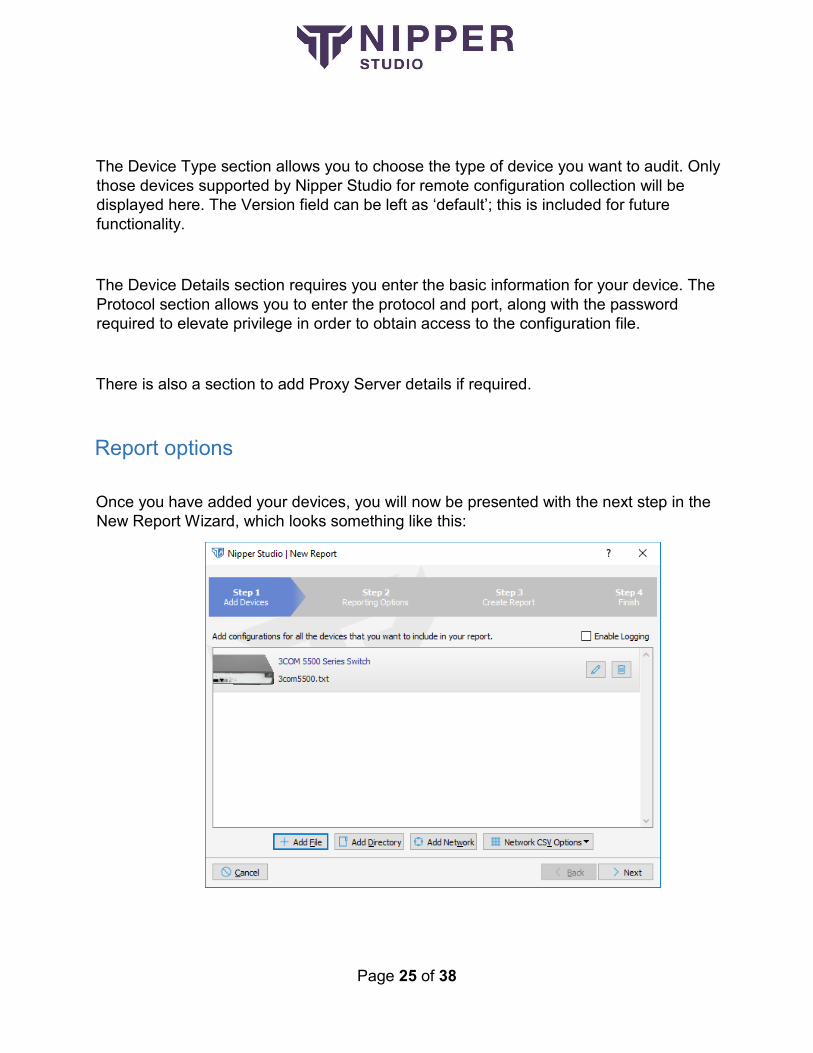
The Device Type section allows you to choose the type of device you want to audit. Only those devices supported by Nipper Studio for remote configuration collection will be displayed here. The Version field can be left as ‘default’; this is included for future functionality.
The Device Details section requires you enter the basic information for your device. The Protocol section allows you to enter the protocol and port, along with the password required to elevate privilege in order to obtain access to the configuration file.
There is also a section to add Proxy Server details if required.
Report options
Once you have added your devices, you will now be presented with the next step in the New Report Wizard, which looks something like this:

Page 26 of 38
As you can see, the most recently added device is shown, along with the same options to add additional devices as previously discussed. You can add multiple devices if you wish to generate a multi device report.
Each device also has the tool icon and the remove device icon next to it. Naturally, the bin icon simply removes the device. Clicking on the pencil icon brings up the following menu:
You will see in this case (as is normal) Nipper Studio has automatically detected the device type. The ‘General’ tab allows you to add further details if you wish, such as the device Hostname, Model and OS version. Note that you can also have Nipper Studio automatically detect the OS version by running the ‘show version’ or equivalent command on your device when you are retrieving the configuration.
The ‘Audit’ and ‘Interfaces’ tabs will not be discussed in this guide, but more information is available on the website or via our support team.
Page 27 of 38
When you have finished making any changes you need here, click ‘OK’ to return to the New Report Wizard.
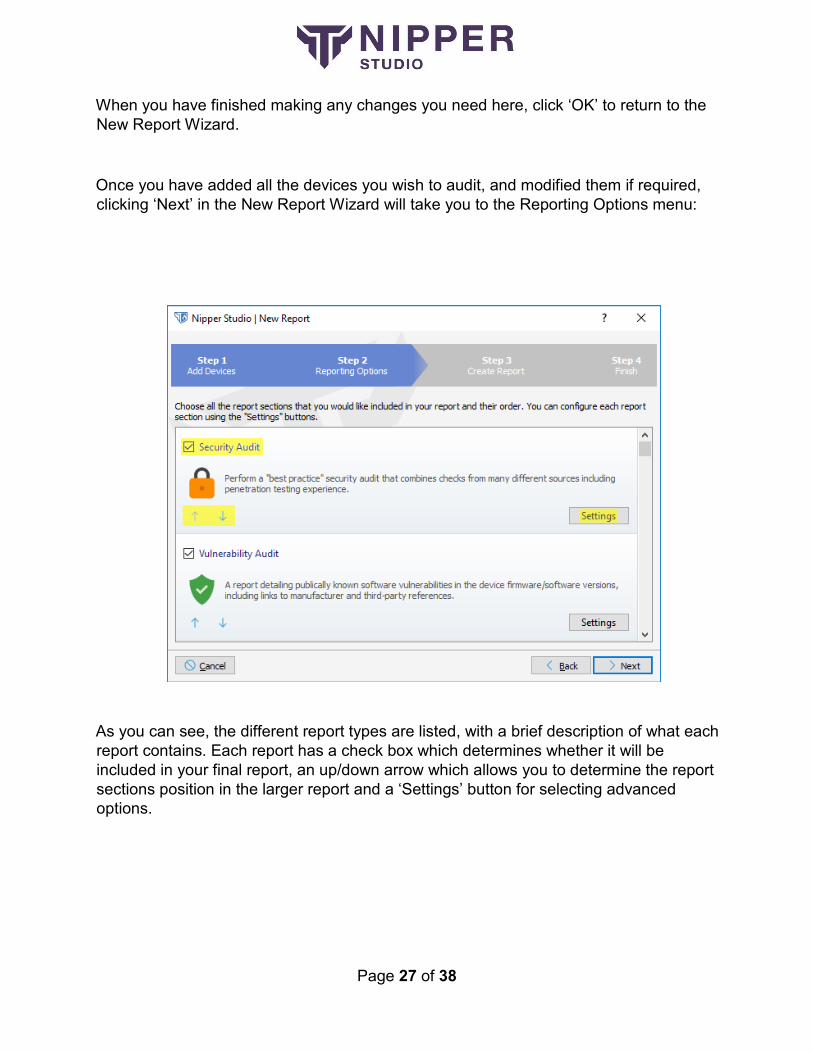
Once you have added all the devices you wish to audit, and modified them if required, clicking ‘Next’ in the New Report Wizard will take you to the Reporting Options menu:
As you can see, the different report types are listed, with a brief description of what each report contains. Each report has a check box which determines whether it will be included in your final report, an up/down arrow which allows you to determine the report sections position in the larger report and a ‘Settings’ button for selecting advanced options.

Page 28 of 38
Once you have chosen your reporting options, click ‘Next’ to proceed. The next screen may allow you to run a comparison against a previous report:
This screen will appear if you have ‘Security Audit’ or ‘Raw Change Tracking’ selected in Reporting Options, and we will return to how to do this later in the guide.
Click next again and you will now generate your first report, like so:
You will see the time taken to generate the report is displayed. This is often extremely quick, although it can take longer depending on what options are selected.
You may now like to take the time to read through the report and see the issues highlighted. Next we will move on to various options for customising your reports
Page 29 of 38
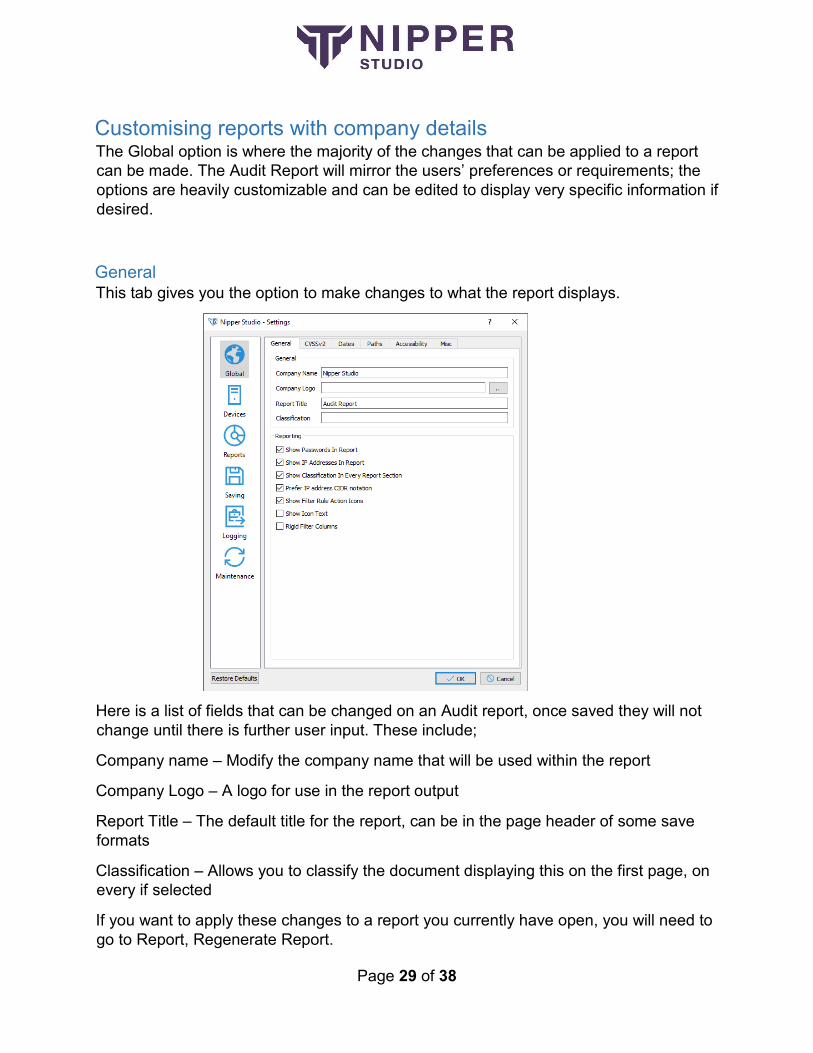
Customising reports with company details The Global option is where the majority of the changes that can be applied to a report can be made. The Audit Report will mirror the users’ preferences or requirements; the options are heavily customizable and can be edited to display very specific information if desired.
General This tab gives you the option to make changes to what the report displays.
Here is a list of fields that can be changed on an Audit report, once saved they will not change until there is further user input. These include;
Company name – Modify the company name that will be used within the report
Company Logo – A logo for use in the report output
Report Title – The default title for the report, can be in the page header of some save formats
Classification – Allows you to classify the document displaying this on the first page, on every if selected
If you want to apply these changes to a report you currently have open, you will need to go to Report, Regenerate Report.

Page 30 of 38
Reports From this icon the user can manage and customize the types of audits they do, the different settings behind each Audit and also the Audits can be moved into a specific order by using the arrow buttons, the order in which they are saved here will also be the order that the Audit report will show them.
Security Audit
Perform a “best practice” security audit that combines checks from many difference sources including penetration testing experience. Following clicking settings, there are a number of categories that can be changed these are listed below;
Coverage
This tab allows the user to specifically tailor their reports to meet any criteria. By selecting or de-selecting the Security Coverage Audit a well-defined Audit Report will be the end result.

Page 31 of 38
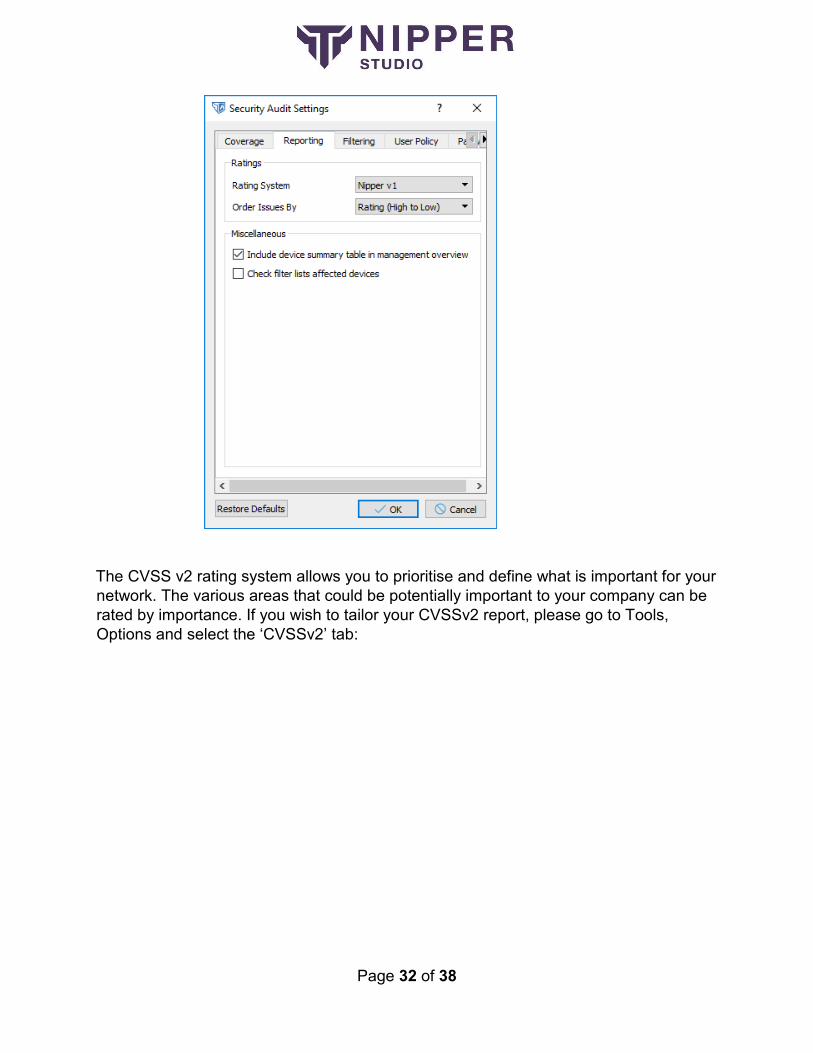
Reporting This tab details how the report will be rated and how issues can be ordered and device summaries. There are two default rating systems included with Nipper Studio these are Nipper V1 and CVSS v2.
The user can pick between the two rating systems (Nipper Studio is default). The issues found from a report can be ordered by High to Low (Default), Low to High or Related Issue. You can also include a device summary table in the management overview if desired.
Here on the drop-down menu, you can select the rating system you wish to use (Tools> Global> CVSSv2).
Page 32 of 38
The CVSS v2 rating system allows you to prioritise and define what is important for your network. The various areas that could be potentially important to your company can be rated by importance. If you wish to tailor your CVSSv2 report, please go to Tools, Options and select the ‘CVSSv2’ tab:
Page 33 of 38
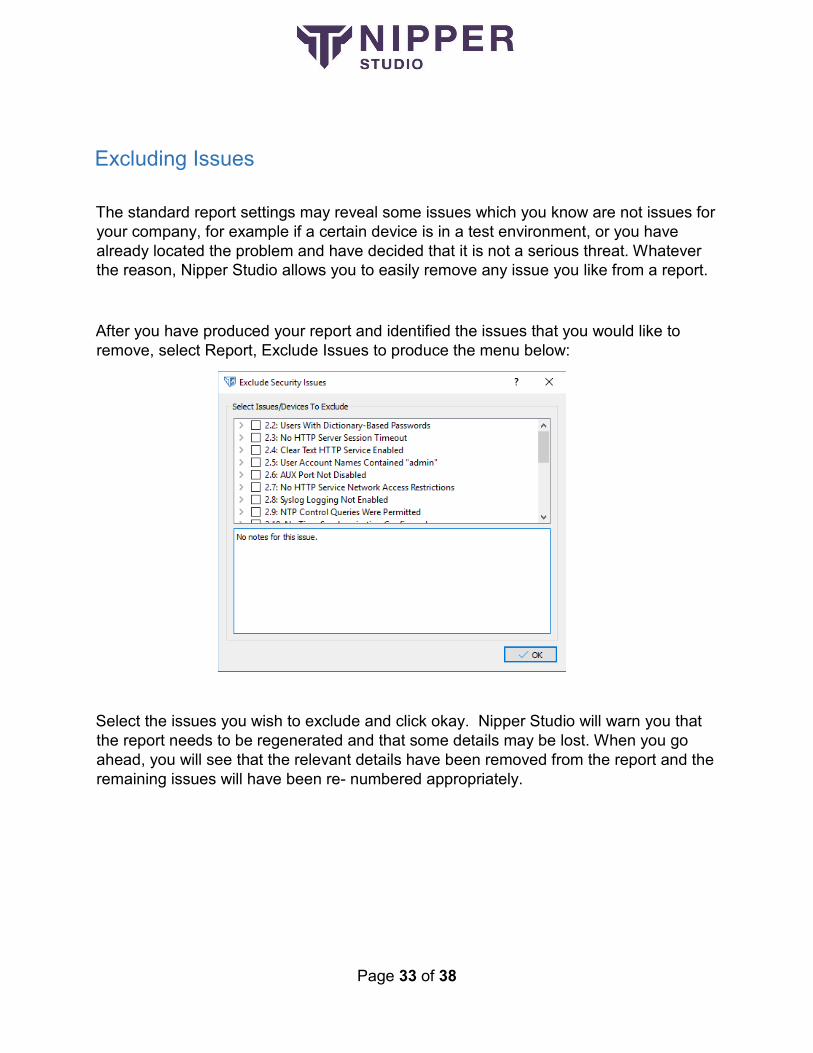
Excluding Issues
The standard report settings may reveal some issues which you know are not issues for your company, for example if a certain device is in a test environment, or you have already located the problem and have decided that it is not a serious threat. Whatever the reason, Nipper Studio allows you to easily remove any issue you like from a report.
After you have produced your report and identified the issues that you would like to remove, select Report, Exclude Issues to produce the menu below:
Select the issues you wish to exclude and click okay. Nipper Studio will warn you that the report needs to be regenerated and that some details may be lost. When you go ahead, you will see that the relevant details have been removed from the report and the remaining issues will have been re- numbered appropriately.

Page 34 of 38
Adding Issue Notes
You can also add your own notes for each issue by going to Report (once you have generated and audit report), Add Issue Notes. Again simply select the issue and then write what you would like to include.

Page 35 of 38
Saving Your Reports
Nipper Studio reports can be saved out into a variety of formats, including PDF, HTML and XML. You can view the saving options by selecting File, Save.
Saving Tables
You can save out all or some of the tables in the Nipper Studio report. Go to the Save menu and select Table to CSV or Table to SQL. You are given the option of what section of tables that you would like to save out or you can select individual tables (shown below).
Simply click OK and save the files.
Page 36 of 38
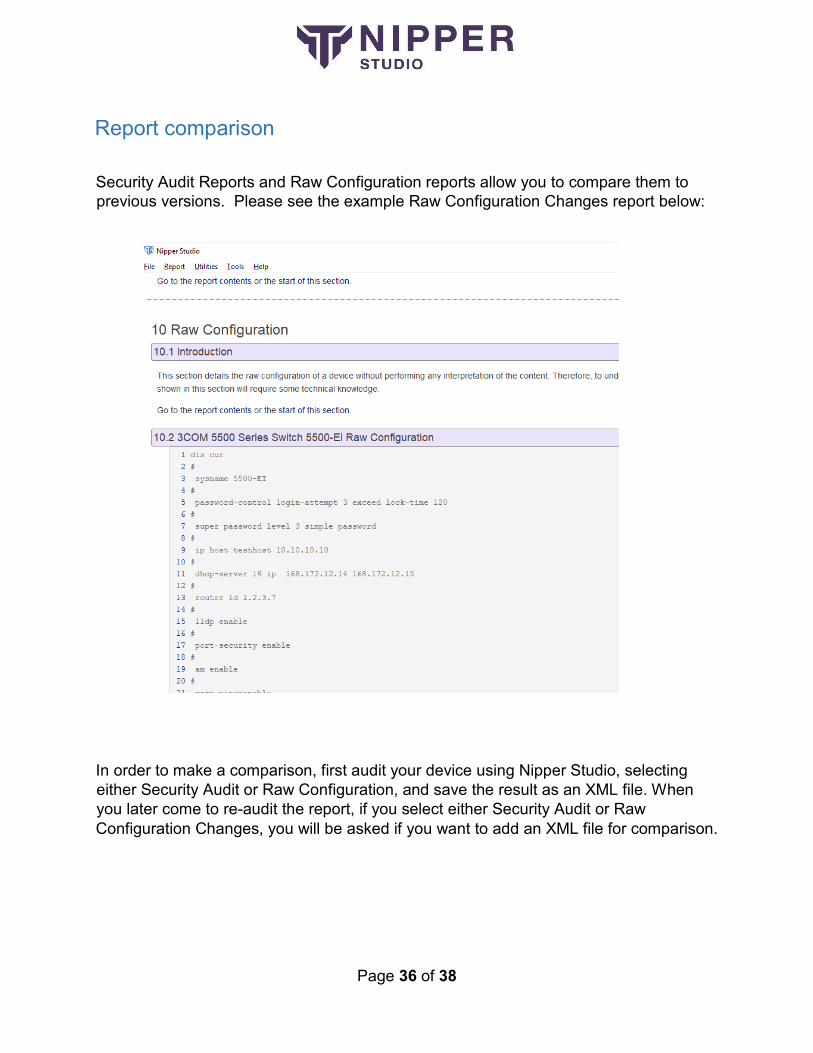
Report comparison
Security Audit Reports and Raw Configuration reports allow you to compare them to previous versions. Please see the example Raw Configuration Changes report below:
In order to make a comparison, first audit your device using Nipper Studio, selecting either Security Audit or Raw Configuration, and save the result as an XML file. When you later come to re-audit the report, if you select either Security Audit or Raw Configuration Changes, you will be asked if you want to add an XML file for comparison.

Page 37 of 38
Managing licenses
Nipper Studio allows you to add and view your licenses, manage multiple licenses and view a list of the devices you have audited. To do this, go to ‘Tools’, ‘Manage Licenses’. The window below will appear:
The tabs along the top of the window are: ‘Overview’, ‘Options’, ‘Licensee’ and ‘License’. The ‘Overview’ tab is above, listing key details of the license. ‘Options’ explains what features are enabled in the license, ‘Licensee’ has the details you entered on the website when you registered and ‘License’ has the license text, agreed when you activated.
The tabs on the left hand side are labelled with the serial numbers of your respective licenses, allowing you to look through them for information on each individual license.
Page 38 of 38
You will also see the ‘Make Live’ and ‘Remove’ buttons at the base of this license and note that the ‘Make Live’ button is currently greyed out. Where you have multiple licenses and are currently viewing an inactive license, this button will make it live. ‘Remove’ will remove the current license.
To add another license click on ‘Add License’ then follow the instructions (which will be the same as those in ‘Adding a license to Nipper Studio’, page 14 of this guide).
If you click on the ‘View’ button next to the device usage, Nipper Studio will list the devices you have audited, by their hostname and the date they were audited.
Conclusion
We hope that you have found our Beginner’s Guide to Nipper Studio useful and now feel confident in navigating your way around Nipper Studio’s features.
There are many more features. If you would like to know more about how to get the most out of Nipper Studio or have any questions then please feel free to contact our support team on:
Telephone Number: (+44)1905 888 785 E-mail: [email protected]
Further support documents can also be found on our website www.titania.com
Related Documents