Nimsoft Documentation: Service Level Manager 1 Nimsoft Service Level Manager Nimsoft Documentation Nimsoft Service Level Manager Documentation version number: 5.00, Last updated November 25, 2010 Copyright© 1998-2010, Nimsoft Corporation www.nimsoft.com

Welcome message from author
This document is posted to help you gain knowledge. Please leave a comment to let me know what you think about it! Share it to your friends and learn new things together.
Transcript
Nimsoft Documentation: Service Level Manager 1
Nimsoft Service Level Manager
Nimsoft Documentation
Nimsoft Service Level Manager Documentation version number: 5.00,
Last updated November 25, 2010
Copyright© 1998-2010, Nimsoft Corporation
www.nimsoft.com

Nimsoft Documentation: Service Level Manager 2
Content
Nimsoft Service Level Manager ............................................................................................................................. 1
Content ................................................................................................................................................................... 2
Updating this documentation ........................................................................................................................... 5
Document History .................................................................................................................................................. 6
SLM Overview ........................................................................................................................................................ 7
What is Service Level Management?............................................................................................................... 7
SLM Concept ..................................................................................................................................................... 9 Data Collection ............................................................................................................................................. 10 Data Transport ............................................................................................................................................... 10 Data Repository ............................................................................................................................................. 10
Setting up a Probe to Deliver Quality of Service Data ................................................................................. 11 Troubleshooting ............................................................................................................................................ 12
SLM Database structure ................................................................................................................................. 13 QoS data tables .............................................................................................................................................. 13 SLA configuration tables .............................................................................................................................. 14 SLA calculation tables .................................................................................................................................. 14 Account tables ............................................................................................................................................... 15
SLA Engine ...................................................................................................................................................... 15 An Overview ................................................................................................................................................. 15
Data Engine ..................................................................................................................................................... 16 Defining the Quality of Service Object ......................................................................................................... 16 Populating the Quality of Service Tables ...................................................................................................... 17
Report Engine .................................................................................................................................................. 18 Generating SLA Reports Based on the Computations done by the data_engine. .......................................... 18 Generating QoS Related Graphs and Reports. .............................................................................................. 18 Running a Light-weight Web Server ............................................................................................................ 19 Performing File Transfer Services to Publish the QoS/SLA Reports ............................................................ 19 How to Customize your SLA Reports ........................................................................................................... 19 Adding the Report to Existing Web Frames ................................................................................................. 20
The Service Level Manager Application ....................................................................................................... 21
Compliance Calculation ....................................................................................................................................... 22
Introduction ..................................................................................................................................................... 22
Definition of Compliance Percentage ............................................................................................................ 23
Defining the Calculation Terms and Conditions .......................................................................................... 25 Calculation Terms and Conditions for the QoS ............................................................................................ 25 Calculation Terms and Conditions for the SLO ............................................................................................ 26 Calculation Terms and Conditions for the SLA ............................................................................................ 28 Summary ....................................................................................................................................................... 29
Definition of Multi-series Calculation ........................................................................................................... 30
Calculation Examples ..................................................................................................................................... 31 Example 1, one QoS and one SLO ................................................................................................................ 31 Example 2, two QoS’s and one SLO ............................................................................................................. 31 Example 3, two QoS’s and one SLO, using Calculation method AND or OR .............................................. 32

Nimsoft Documentation: Service Level Manager 3
Example 4, two SLOs, each with 3 QoSs ...................................................................................................... 33
Service Level Manager Reference Guide ............................................................................................................ 35
The Menu Bar .................................................................................................................................................. 35 File ................................................................................................................................................................ 36 View .............................................................................................................................................................. 38 Tools ............................................................................................................................................................. 39 Window ......................................................................................................................................................... 41 Help ............................................................................................................................................................... 42
The Toolbar ..................................................................................................................................................... 43
The Navigation Pane ....................................................................................................................................... 44 Service Level Agreements ............................................................................................................................ 44 Operating Periods .......................................................................................................................................... 49 FTP Profiles .................................................................................................................................................. 50 Calculation Profiles ....................................................................................................................................... 50 Quality of Service ......................................................................................................................................... 52 Web reports ................................................................................................................................................... 57
Main Window Pane ......................................................................................................................................... 59
The Status Bar ................................................................................................................................................. 61
Service Level Manager User Guide ..................................................................................................................... 62
Login ................................................................................................................................................................. 62
Creating Service Level Agreements ............................................................................................................... 64 Creating a SLA .............................................................................................................................................. 64 Creating a Service Level Objective (SLO) .................................................................................................... 75 Defining a Quality of Service object ............................................................................................................. 81 Defining QoS Constraints ............................................................................................................................. 82 Distributing Importance (weight) .................................................................................................................. 84 Creating a Compliance period ....................................................................................................................... 85 Creating an Operating Period ........................................................................................................................ 86 Creating a FTP Profile .................................................................................................................................. 88 Creating a Calculation Profile ....................................................................................................................... 89 Excluding Quality of Service Data ................................................................................................................ 95
Example - Defining a simple Service Level Agreement ............................................................................... 99 Step 1 – Define an Operating Period ............................................................................................................. 99 Step 2 – Create a new SLA and Define the Service Level Compliance Requirement ................................ 100 Step 3 – Define the Individual Service Level Objectives ............................................................................ 102 Step 4 – Advanced Functions ...................................................................................................................... 104 Step 5 – Excluding Periods ......................................................................................................................... 106
Creating a SLA, using the SLA Wizard ...................................................................................................... 107
Creating QoS Monitor Profiles .................................................................................................................... 116 Baseline Value Definition ........................................................................................................................... 117 QoS Monitors List ....................................................................................................................................... 118 QoS Monitor Properties .............................................................................................................................. 119
Web Reports .................................................................................................................................................. 124 SLA Reports ................................................................................................................................................ 125 QoS Reports ................................................................................................................................................ 135 Customizing Reports ................................................................................................................................... 148 Printing Reports .......................................................................................................................................... 148
Viewing the Quality of Service (QoS) Data ................................................................................................. 155 Generating a Graph ..................................................................................................................................... 156 Including the Target in your Service Objective (SLO) ............................................................................... 163
Exporting the QoS data series ...................................................................................................................... 164 Exporting QoS data, using copy and paste .................................................................................................. 164 Exporting QoS data, using Export QoS Data wizard .................................................................................. 165

Nimsoft Documentation: Service Level Manager 4
Data Management ......................................................................................................................................... 171 Viewing the Actual Database Usage ........................................................................................................... 172 Managing your QoS Data ............................................................................................................................ 177
Watching SLA Calculations ......................................................................................................................... 179
Sending SQL Queries to the database ......................................................................................................... 183
Setting the Connection Properties ............................................................................................................... 184
Viewing Historic Data ................................................................................................................................... 189
Handling Service Level Alarms ......................................................................................................................... 192
The Alarm SubConsole Window ................................................................................................................. 192 Modifying the layout of the list in the window ........................................................................................... 194 Right-clicking in the Alarm Window .......................................................................................................... 195 The Toolbar in the Alarm Window ............................................................................................................. 199
Working with Alarms ................................................................................................................................... 202 The Alarm Window..................................................................................................................................... 203 Handling Alarms ......................................................................................................................................... 203
Working with Views in Lists ........................................................................................................................ 204 The Toolbar in the list ................................................................................................................................. 205 Right-clicking a column header .................................................................................................................. 206 Right-clicking in a list ................................................................................................................................. 208
SLM Terms and definitions ............................................................................................................................... 214
Index ................................................................................................................................................................... 219

Nimsoft Documentation: Service Level Manager 5
Updating this documentation The documentation system is a set of HTML-
files compiled into a single .chm file. You can
easily update this documentation by
downloading a copy from the support Web
here.
1. Make sure no On-line help is active,
including this one.
2. Copy the downloaded file to the
...\Nimsoft\docs directory.
NOTE:
With security update 896358 or Microsoft
Windows Server 2003 Service Pack 1 (SP1)
installed, you may experience one or both of
the following symptoms after you click a link
to an HTML Help .chm file in Internet
Explorer:
Topics in the .chm file cannot be
viewed when you click Open
instead of Save in the File
Download dialog box.
Topics in the .chm file cannot be
viewed when you click Save in the
File Download dialog box, and
you then try to open the file.
See
http://support.microsoft.com/kb/902225/#kb2
for a description of how to solve this problem.

Nimsoft Documentation: Service Level Manager 6
Document History
Date/version What’s new?
Version 3.60 Added support for Hub with LDAP authentication.
The possibility to create monitoring profiles that are based on QoS
data, provided that the qos_engine probe is installed.
Version 4.0 Updated for NimBUS Server 4.0 Release
Version 4.1 Updated for NimBUS Server 4.1 Release
Version 4.2 Changed “NimBUS” to “Nimsoft”
Updated for Nimsoft Server 4.2 Release
Version 4.3 Corrected faulty links and text errors in the document
Version 5.0 Updated for logical expressions
Nimsoft Documentation: Service Level Manager 7
SLM Overview
This chapter describes the different
components and elements involved in Service
Level Management.
What is Service Level Management? Service-level management is the set of people
and systems that allows the organization to
ensure that SLAs are being met and that the
necessary resources are being provided
efficiently.
A service level agreement (SLA) is an
agreement between a client and a provider of
the service. It is vital to the contract and the
relationship between the client and the service
provider that both parties identify and
document their service needs.
In short, Service Level Management embraces
a set of tools to monitor and ensure the validity
of a set of SLAs for internal customers (e.g. an
IT-department providing services for a user-
department) and external customers. We like to
visualize the Service Level Management task
as the following hierarchy:
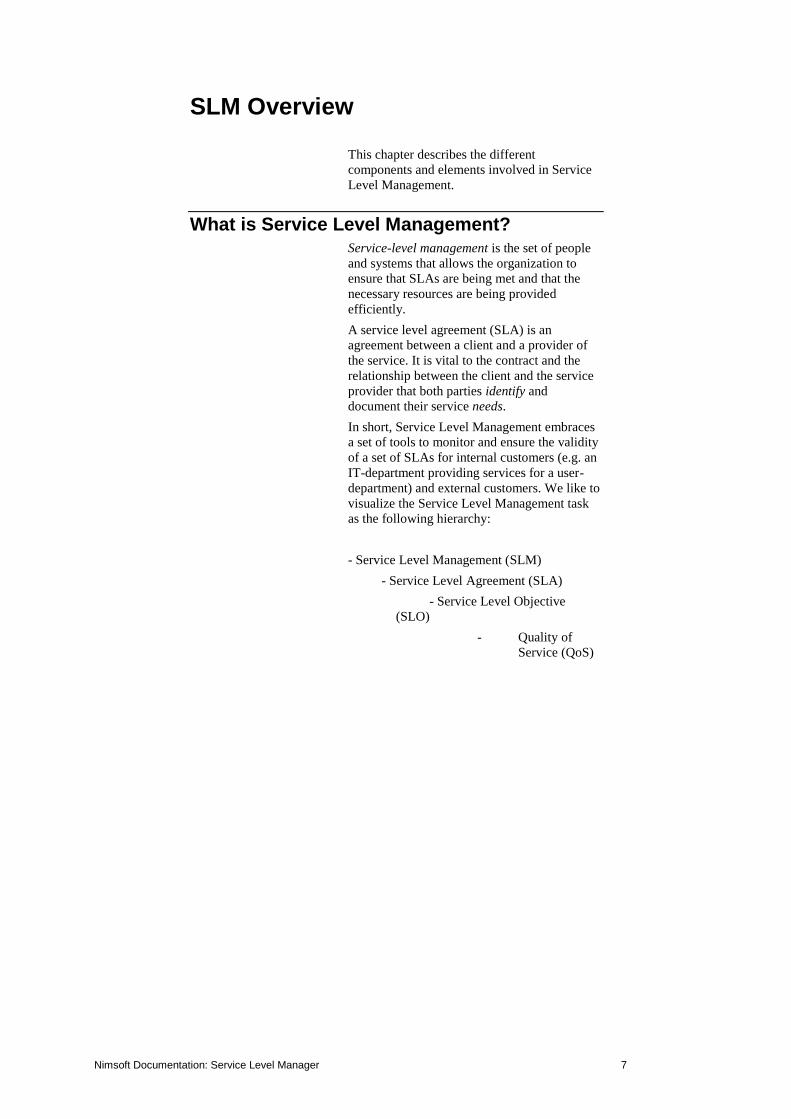
- Service Level Management (SLM)
- Service Level Agreement (SLA)
- Service Level Objective
(SLO)
- Quality of
Service (QoS)

Nimsoft Documentation: Service Level Manager 8

Nimsoft Documentation: Service Level Manager 9
SLM Concept This overview explains the various components
of Service Level Management (SLM). Our
design principle is to break down the Service
Level Agreement (SLA) into smaller
components, making it simple to build
powerful, extendable and measurable
agreements between you and your clients.
The illustration shows the various components
that may be contained within a Service Level
Agreement. This SLA contains 3 service level
objectives (SLO) that contain one or more
constrained Quality of Service (QoS) objects.
The QoS is the smallest measurable entity
within the SLM, typically a checkpoint value
(e.g. CPU usage, Network usage) provided by
a Probe capable of sending QoS.
The SLM product is, as stated above, built on
the concept of modules. This eliminates the
needs to install one big lump of program on
your system. The Nimsoft architecture is
highly modularised, thus spreading the
workload across multiple nodes in your
network. Some probes may monitor and report
network traffic on one system, while another
reports URL response etc.
To build a successful SLM environment we
need to understand the areas of:
Data collection
Data transport
Data repository
Nimsoft Documentation: Service Level Manager 10
Data Collection
Data collection is normally performed by task-
oriented software (probes) dedicated to
monitor and report changes and threshold
breaches. A QoS enabled probe, such as the
cdm (the CPU, Disk and Memory monitoring
probe) will generate a Quality of Service
message each time it checks its objective,
hence giving us the opportunity to gather the
collected data and perform various processing
techniques on the data.
You may browse the QoS data-series in the
Service Level Manager and utilize the same
data in your Service Level Objectives.
NOTE:
When computers hosting QoS enabled probes
are renamed or when moving the monitoring
from one machine to another or renaming a
machine, the QoS objects will be stored in new
tables in the QoS database. To keep your
existing data you can merge the existing data
with the new data, giving you one table with
the full data series (see description of merging
QoS objects in the section The Active Objects
Tab).
Data Transport
The underlying infrastructure of the transport
mechanism is the message-bus. This message-
bus is based on a high-availability architecture
in a multi-platform environment.
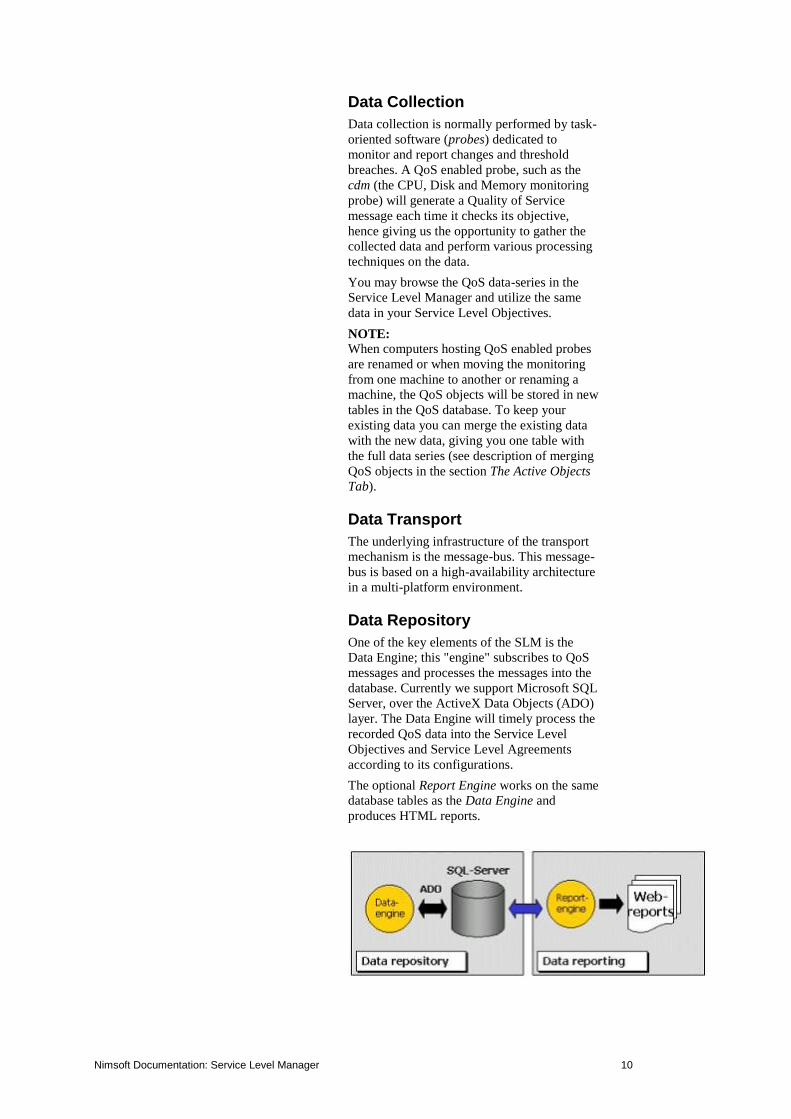
Data Repository
One of the key elements of the SLM is the
Data Engine; this "engine" subscribes to QoS
messages and processes the messages into the
database. Currently we support Microsoft SQL
Server, over the ActiveX Data Objects (ADO)
layer. The Data Engine will timely process the
recorded QoS data into the Service Level
Objectives and Service Level Agreements
according to its configurations.
The optional Report Engine works on the same
database tables as the Data Engine and
produces HTML reports.

Nimsoft Documentation: Service Level Manager 11
Setting up a Probe to Deliver Quality of Service Data
Let's configure a probe to generate QoS data
while monitoring your system. In this example,
we use the cdm probe.
Launch the property window of the cdm probe
of your choice (assuming that you have
Nimsoft administrative rights) from the
Infrastructure Manager.
The cdm probe supports QoS for each disk,
CPU, Memory, Paging activity and
Processor Queue length. All QoS definitions,
except for the disk properties, are located under
the advanced tab. Check the ones you are
interested in.
The QoS definitions for the disk properties are
located under the Status tab. Double-click the
disk you are interested in and check the Disk
Usage QoS Message (in Mb and/or %) option
in the dialog popping up.

Nimsoft Documentation: Service Level Manager 12
Reply Yes when prompted for a restart.
The probe will initially send a
QOS_DEFINITION message to the
data_engine causing the SLM system to
recognize the new QoS Object.
Please note that this procedure differs from
probe to probe.
Troubleshooting
1. The probe has been configured, but no
QoS object is recorded in SLM.
This situation could easily occur if
you configured the probe to deliver
QoS prior to installing the
data_engine. The QOS_DEFINITION
message was then ignored, hence not
defining the QoS object.
Solution Restart the probe (deactivate/activate)
or restart the robot (this is probably
the best idea if you have modified the
configuration for more than one
probe).
2. I've restarted the probe/robot but still
no QoS object is present under the
QoS nodes.
Solution There is probably only some delay in
the system, wait a few

Nimsoft Documentation: Service Level Manager 13
seconds/minutes and select update
from the action (popup) menu.
SLM Database structure The tables in the SLM database all have
prefixes indicating the type of data it contains.
The name convention for the tables is on the
form:
S_ for tables used to store system
data.
D_ for data tables.
H_ for tables containing historic data.
HN_ for data tables containing
historic/compressed data.
RN_ for data tables containing
unprocessed (raw) data directly from
the probes.
Tips:
If you want to take a look at the SLA database
schema, you can do that by opening the SQL
Server Enterprise Manager and select the SLA
database node.
This node has a child called Diagrams. Select
that child and right-click on it.
Select New Database Diagram. The Create
Database Diagram Wizard is started. Follow
the instructions in the wizard and select all the
tables starting with S_ and D_.
Finishing the wizard will give you the
complete database schema for SLA
QoS data tables
The QoS data structure is dynamically created
by the data_engine on the first start-up, and on
the first unique QOS_DEFINITION or
QOS_MESSAGE message received from a
probe.
The S_QOS_DEFINITION table contains the
definitions of known QoS types (e.g.
QOS_CPU_USAGE), and is updated when a
probe sends a QOS_DEFINITION describing a
new QoS type.
The S_QOS_DATA table contains an index of
all data tables for the QoS objects. When a
probe sends a QOS_MESSAGE containing a
QoS object that is not already defined in the
S_QOS_TABLE, a new entry is added to the
table and the data is inserted into the table
referenced in column r_table (typically
RN_QOS_DATA_nnnn) with the table_id that
Nimsoft Documentation: Service Level Manager 14
the new row is given when inserted into the
S_QOS_DATA table.
Note! Do not drop the data tables manually; instead
delete the entry from the S_QOS_DATA table,
and the tables will be dropped by a trigger.
You must restart the data_engine afterwards.
SLA configuration tables
The Service Level Manager is used to describe
the SLAs and the descriptions are stored in the
following key tables:
S_SLA_DEFINITION
S_SLO_DEFINITION
S_QOS_CONSTRAINTS
There are also other tables, containing data
about exclude periods, operating periods, FTP
profiles and so on. Here is a list of some of
these tables.
S_SLA_EXCLUDE_PERIOD,
S_SLO_EXCLUDE_PERIODS
S_SLA_NOTES, S_SLO_NOTES
S_SLA_CALCULATION
S_SLO_CALCULATION
S_QOS_CALCULATION
S_OPERATING_PERIOD
S_TIME_SPECIFICATION
SLA calculation tables
The first step for a SLA to be calculated is that
a job is added to the D_SLA_JOBS table
manually by a user or automatically by the
sla_engine. The sla_engine detects that there
is a new calculation job and performs the
calculations. The results are stored in these
tables:
D_SLA_COMPLIANCE
D_SLO_COMPLIANCE
D_QOS_COMPLIANCE
When the last job for a SLA in the compliance
period is calculated, the result will be added to
the historic tables:
H_SLA_COMPLIANCE
H_SLO_COMPLIANCE
H_QOS_COMPLIANCE

Nimsoft Documentation: Service Level Manager 15
Account tables
The following tables were added to the
database in Nimsoft Release 3.30 to support
the Account views and data ownership
functionality.
Accounts Table (CM_ACCOUNT)
Contacts Table (CM_CONTACT)
Account-SLA reference Table
(CM_ACCOUNT_SLA)
Account Web Profile Table
(CM_ACCOUNT_WEB_PROFILES)
Origins Table
(CM_ACCOUNT_OWNERSHIP)
Roles Table (CM_ROLE)
SLA Engine
An Overview
The primary task of the SLA Engine is to
compute Service Level Agreement compliance
for the SLAs, based on the settings for the
different SLAs done in the Service Level
Manager.
Calculation jobs are automatically started and
run on a schedule specified in the sla_engine
user interface.
For more details, please refer to SLM Probes
sla_engine sla_engine Configuration
section in the Probes online help.
However, calculation jobs may also be started
manually (see Watching SLA Calculations).
The result of these calculation jobs is sent to
the report_engine, which generates SLA
reports.
These reports are available under the WEB
Reports node in the Navigation Pane of the
Service Level Manager.
The reports generated by the report_engine
may be also be published to other systems by
the use of the File Transfer Protocol (see the
sections FTP Profiles and Creating a FTP
Profile).

Nimsoft Documentation: Service Level Manager 16
Data Engine The Data Engine has two primary focus areas:
Subscribes to Quality of Service
messages.
Inserts QoS data into the database.
The Data Engine should ideally be installed as
close to the database server as possible,
preferably on the same server to reduce the
network traffic. A subscriber channel is opened
to the primary Hub, and this hub will be
referred to as the SLM Hub. QoS messages are
fed to the Data Engine using this channel. The
incoming messages will be reacted upon, and
database operations will be performed
accordingly.
Quality of Service Messages
Please note that the Quality of Service requires
a valid license (SLM-QOS) in the Data
Engine.
For more details, please refer to SLM Probes
data_engine data_engine
Configuration section in the Probes online
help.
Defining the Quality of Service Object
Any QoS enabled probe will initiate itself
(during startup) by sending a
QOS_DEFINITION message. This is picked up
by the Data Engine and decoded for
information. The content of this message refers
to a Quality of Service object in the database.
The object will automatically be created in the
database with the provided information. You
may, however, also create the QOS object
manually, by adding the definition using the
Service Level Manager.
This is done by selecting File > New > Quality
of Service in the menu bar.

Nimsoft Documentation: Service Level Manager 17
The following table describes the various fields
in the dialog form:
Field Description
Name The actual object name.
Description A short description of the QoS object.
Group The group the object belongs to (drop-down
list).
Unit A string stating the unit (e.g. Milliseconds,
Centimeter, etc.).
Unit abbreviation Used by reports and views (e.g. ms, cm, %
etc).
Has maximum
value
Defines the object with a maximum value.
Is of type
Boolean
Sets the type of the object to be Boolean
(True/False).
Populating the Quality of Service Tables
The QoS enabled probe will issue a
QOS_MESSAGE on each run. This message
refers to an object that should be defined in the
database and contains sample data (such as
time, value, source, target, etc.)
You can display the database usage (which
objects that occupies most space) by selecting
Tools/Database status on the Service Level
Manager menu-bar.

Nimsoft Documentation: Service Level Manager 18
Report Engine The Report Engine has the following primary
focus areas:
Generating SLA reports based on the
computations done by the
data_engine.
Generating Quality of Service related
graphs and reports.
Optionally Generating Dynamic
reports, grouped as defined in the
Nimsoft Group Server probe.
Running a lightweight web server for
QoS and SLA reports.
Performing file transfer (FTP)
services to publish the reports to e.g.
inter/intranet web servers.
Possibilities to customize the reports
by modifying templates.
For more details, please refer to SLM Probes
report_engine report_engine
Configuration section in the Probes online
help.
Generating SLA Reports Based on the Computations done by the data_engine.
SLA reports are automatically generated on a
schedule defined in the sla_engine user
interface. Different templates define fonts,
colors, etc. These templates can be selected
from the report_engine configuration tool.
The data_engine will regularly compute the
fulfillment of the compliance percentage. The
reports contain a status view and a historic
view for each SLA definition. The structure of
the data representation is similar to how things
are presented from the Service Level Manager.
See also the section SLA Reports.
Generating QoS Related Graphs and Reports.
Opposite to the SLA reports, QoS reports are
not automatically generated. You can create
and administer the QoS reports by configuring
the report_engine probe. Double-click the
Quality of Service Reports node in the

Nimsoft Documentation: Service Level Manager 19
Navigation Pane to launch the report_engine
configuration tool.
Under the QoS Reports node in the Navigation
Pane, you will also find the Dynamic Reports
child-node, containing Dynamic Reports if the
Dynamic Reports option is ticked.
See also the section QoS Reports.
Running a Light-weight Web Server
The report_engine runs a small web service
(httpd) to serve the report browser in the
Service Level Manager and other browsers.
Please note that this web server is designed to
handle up to 20 concurrent users. Use the web-
publishing features of SLM if you want to
make the reports available to larger
communities. The web-server defaults to port
tcp/8080.
Performing File Transfer Services to Publish the QoS/SLA Reports
All reports generated by the report_engine may
be published to other systems by the use of the
File Transfer Protocol (FTP). Profiles defined
in the Service Level Manager contain enough
information to move the reports and images
across the network to a remote location.
How to Customize your SLA Reports
SLA reports are generated using a template
architecture. If you want to incorporate the
QoS and SLA reports in your own look-and-
feel, company colors, etc. then simply modify
the template and regenerate.
All reports are based on a report template
found in the report_engine directory
Templates. The templates use Cascading Style
Sheets (CSS) to implement the style. More
information about CSS is found at
http://www.w3.org/Style/CSS/.
You may modify the template, or create a new
one, using any HTML editor (such as
Microsoft FrontPage) to fit your specific needs
(layout, logo, language, etc.)
Follow these steps to create your own custom
report:
1. Copy one of the existing template
directories (located in the Templates
directory, e.g. the Default directory)
to a new directory (e.g. called
Classic).
Nimsoft Documentation: Service Level Manager 20
2. Open and modify the slm.css file in
the new directory to your style by
modifying background color, fonts,
etc.
3. Change the colors of the images:
- nav_left_edge.gif
- nav_right_edge.gif
- nav_top_history.gif
- nav_top_status.gif
4. Save the file and launch the
report_engine configuration tool.
5. The template Classic will now be
available in the report_engine.
6. Select the template and click the
Apply button in the report_engine
configuration tool.
If you want to do some smaller changes to one
of the reports, you could create a file called
custom.css and put it into your report
directory. The style changes found in this file
will override the values set in slm.css.
Adding the Report to Existing Web Frames
There is another way to "customize" the looks
of the reports, besides from using CSS. Simply
replace the default.html file in the template
directory.
The following three HTML pages represents
the report:
default.html - is part of the template.
slm_header.html - is part of the
template.
index.html - is generated by the
report_engine.

Nimsoft Documentation: Service Level Manager 21
The default.html page has two frames that
refer the two other pages (slm_header.html
and index.html). You can change the look of
your report by replacing the default.html page
in the template with your own default.html
file, but you must remember to include the
index.html file in one of the frames.
The Service Level Manager Application Service level monitoring is mostly an
automated task. When the SLA is defined and
activated, data is recorded and computed in the
background. Alarms will be generated and the
Data Engine and the Report Engine will write
reports automatically.
The Service Level Manager enables the
administrator to quickly define and deploy
SLAs based on objectives present in the
agreements between the client and the service-
provider. It interfaces the database using ADO,
to display and modify the configuration, to
display historic data, current data etc.
You will find this application in the
Start/Nimsoft Software folder.

Nimsoft Documentation: Service Level Manager 22
Compliance Calculation
Introduction The primary task of the Nimsoft SLA Engine is
to compute Service Level Agreement
compliance for the SLAs, based on the settings
for the different SLAs done in the Service
Level Manager.
Calculation jobs are automatically started and
run on a schedule specified in the sla_engine
user interface.
For more details, please refer to SLM Probes
sla_engine sla_engine Configuration
section in the Probes online help.
However, calculation jobs may also be started
manually (see Watching SLA Calculations).
The result of these calculation jobs is sent to
the report_engine, which generates SLA
reports.
These reports are available under the WEB
Reports node in the Navigation Pane of the
Service Level Manager.
The reports generated by the report_engine
may be also be published to other systems by
the use of the File Transfer Protocol (see the
sections FTP Profiles and Creating a FTP
Profile).

Nimsoft Documentation: Service Level Manager 23
Definition of Compliance Percentage The compliance percentage is defined to be the
percentage of time that the QoS, constrained by
e.g. operating period and thresholds, should be
considered compliant within the compliance
period.
Each sample is checked within the compliance
period by the data_engine and summarized as
failed or successful. The result is compared
against the expected compliance percentage
(defined by the user).

Nimsoft Documentation: Service Level Manager 24
Consider the data represented by the
illustration. The red line represents the
threshold value, the green line represents the
average value and the blue line represents the
actual sample values.
How many samples within the operating period
are above the threshold settings?
Zero samples breach the threshold line within
the operating periods, thus fulfilling 100% of
our compliance requirements. The 5 samples
that breach the threshold are outside the
compliance period, which was e.g. Monday to
Monday, with operating periods, every
weekday from 08:00 to 17:00.
Let's assume that the total number of samples
within the operating period is 129, with 9
samples breaching the threshold. This implies
that 6.98% of the samples are accounted for as
out of compliance (9 * 100/129).
If our Service Level Agreement requires a
compliance of 98.50% (or better) and the only
data defined in this SLA is the above data, then
our requirements to the SLA is breached due
to a current compliance percentage of 100% -
6.98% = 93.02%.

Nimsoft Documentation: Service Level Manager 25
Defining the Calculation Terms and Conditions
A SLA consists of one or more SLOs, each
with one or more QoS constraints.
The compliance is calculated on each
QoS and forwarded to the SLO.
The SLO handles the received
compliance data from the underlying
QoS’s, makes its calculations and
forwards the result to the SLA.
The SLA handles the received
compliance data from the underlying
SLOs and calculates the total
compliance percentage.
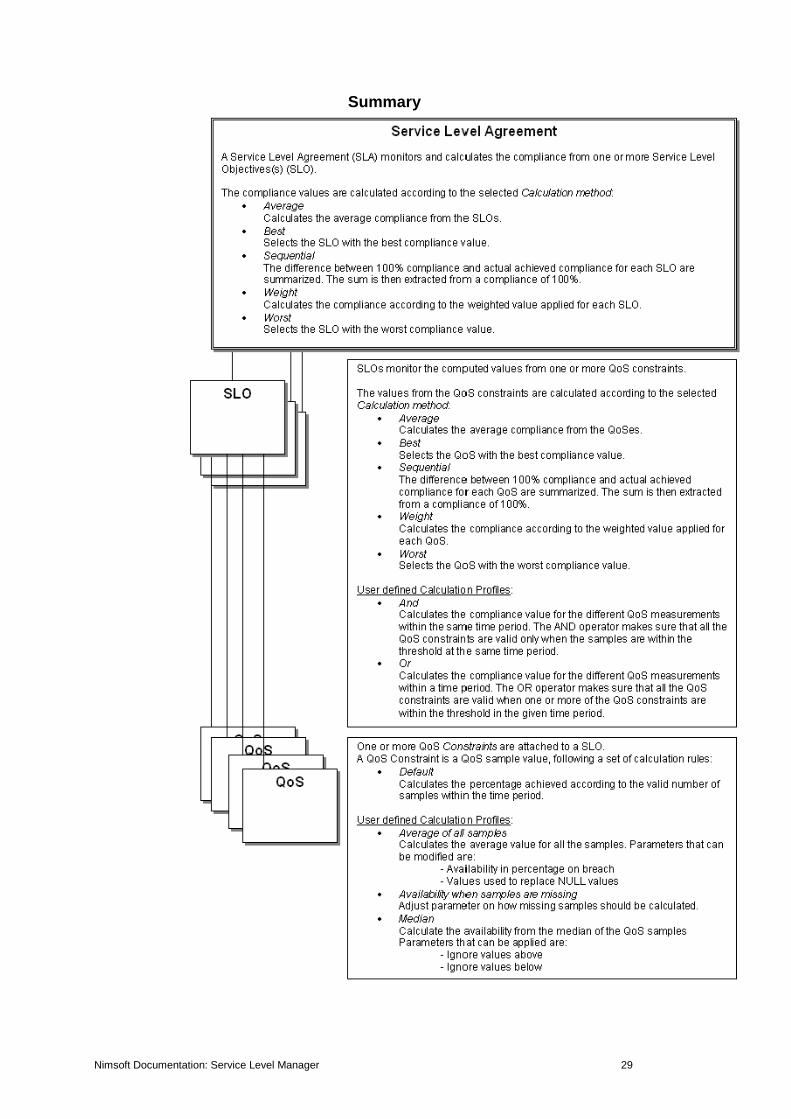
QoS Constraints
Each of the QoS constraints compares the collected data values from the probes with the defined threshold value and calculates the compliance percentage.
SLOs
The SLO collects the compliance values from the QoS constraints and computes the compliance percentage based on a selected calculation method (selects the best value, the worst value, the average value etc.). The result is made available for the SLA.
SLA
The SLA collects the compliance value from the two SLOs and calculates the total compliance value, also based on a selected calculation method.
Calculation Terms and Conditions for the QoS
The QoS reflects the data series measured by
the probes. The compliance percentage is
calculated for each QoS, and the results are
presented to the SLO.
The compliance percentage for a QoS is
calculated, based on the following parameter
settings:
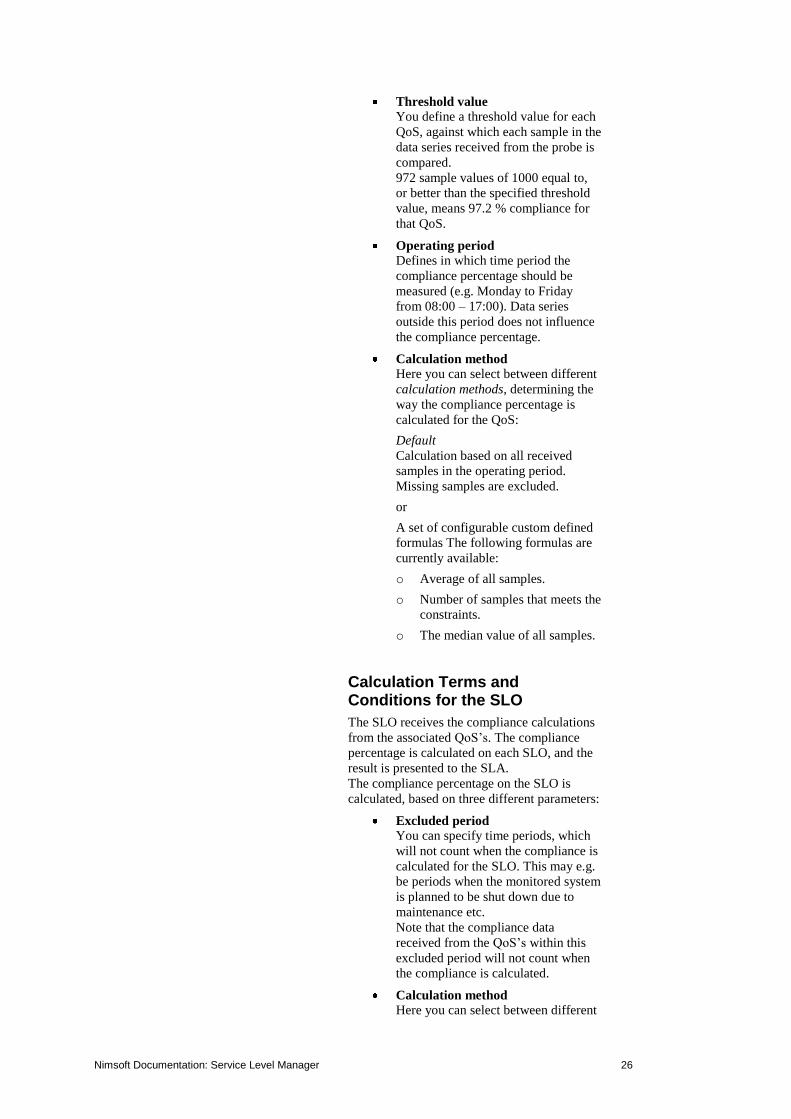
Nimsoft Documentation: Service Level Manager 26
Threshold value You define a threshold value for each
QoS, against which each sample in the
data series received from the probe is
compared.
972 sample values of 1000 equal to,
or better than the specified threshold
value, means 97.2 % compliance for
that QoS.
Operating period Defines in which time period the
compliance percentage should be
measured (e.g. Monday to Friday
from 08:00 – 17:00). Data series
outside this period does not influence
the compliance percentage.
Calculation method Here you can select between different
calculation methods, determining the
way the compliance percentage is
calculated for the QoS:
Default
Calculation based on all received
samples in the operating period.
Missing samples are excluded.
or
A set of configurable custom defined
formulas The following formulas are
currently available:
o Average of all samples.
o Number of samples that meets the
constraints.
o The median value of all samples.
Calculation Terms and Conditions for the SLO
The SLO receives the compliance calculations
from the associated QoS’s. The compliance
percentage is calculated on each SLO, and the
result is presented to the SLA.
The compliance percentage on the SLO is
calculated, based on three different parameters:
Excluded period You can specify time periods, which
will not count when the compliance is
calculated for the SLO. This may e.g.
be periods when the monitored system
is planned to be shut down due to
maintenance etc.
Note that the compliance data
received from the QoS’s within this
excluded period will not count when
the compliance is calculated.
Calculation method Here you can select between different

Nimsoft Documentation: Service Level Manager 27
calculation methods determining the
way the compliance percentage is
calculated for the SLO.
You may select between two different
types of calculation methods, Formula
or Profile:
o Formula
Here you can select a
mathematical formula to calculate
the compliance percentage, based
on the input from the QoS’s:
Average
Calculates the average value of
the input from the QoS’s.
Best
Looks for the QoS with the best
result and selects this result.
Sequential
The difference between 100 %
and the achieved compliance for
each QoS is summarized and then
extracted from 100%.
Example: The SLO receives the
compliance calculations from two
QoS’s with compliance of 70%
and 90 %.
Calculated compliance: 100 % - ((100 % -70 %) + (100 % -90 %)): 60 %.
Weight
The possibility to weigh the
importance of the different QoSs
Worst
Looks for the QoS with the worst
result and selects this result.
o Profile
A set of configurable custom
defined formulas, currently
available are:
AND. The values of all samples
in all QoS's are AND-ed,
resulting in one compliance
value. AND means that all
sample values from all QoS’s
simultaneously must equal or be
better than the threshold value to
be compliant.
See also the section Definition of
Multi-series Calculation.
OR. The values of all samples in
all QoS's are OR-ed, resulting in
one compliance value. OR means
that at least one of the sample
values must equal or be better
Nimsoft Documentation: Service Level Manager 28
than the threshold value to be
compliant.
See also the section Definition of
Multi-series Calculation.
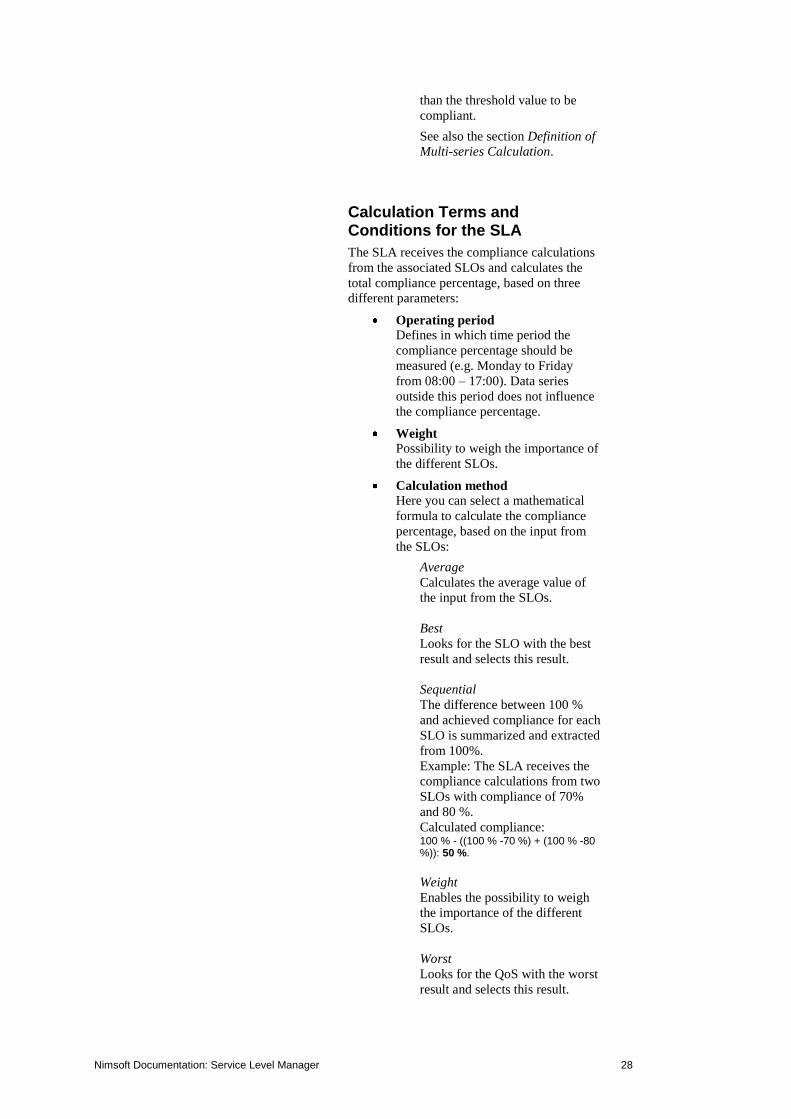
Calculation Terms and Conditions for the SLA
The SLA receives the compliance calculations
from the associated SLOs and calculates the
total compliance percentage, based on three
different parameters:
Operating period
Defines in which time period the
compliance percentage should be
measured (e.g. Monday to Friday
from 08:00 – 17:00). Data series
outside this period does not influence
the compliance percentage.
Weight Possibility to weigh the importance of
the different SLOs.
Calculation method Here you can select a mathematical
formula to calculate the compliance
percentage, based on the input from
the SLOs:
Average
Calculates the average value of
the input from the SLOs.
Best
Looks for the SLO with the best
result and selects this result.
Sequential
The difference between 100 %
and achieved compliance for each
SLO is summarized and extracted
from 100%.
Example: The SLA receives the
compliance calculations from two
SLOs with compliance of 70%
and 80 %.
Calculated compliance: 100 % - ((100 % -70 %) + (100 % -80 %)): 50 %.
Weight
Enables the possibility to weigh
the importance of the different
SLOs.
Worst
Looks for the QoS with the worst
result and selects this result.
Nimsoft Documentation: Service Level Manager 29
Summary

Nimsoft Documentation: Service Level Manager 30
Definition of Multi-series Calculation When defining the calculation settings for a
SLO, you have the option to select a multi-
series calculation profile.
(These profiles are custom-defined - see the
section Creating a Calculation Profile).
Currently supported profiles are:
OR Compliant if one of the QoS
constraints equals or are better than
the threshold value.
AND Compliant when all of the QoS
constraints equals or are better than
the threshold value.
Example OR:
OR - At least one of the data series must equal
to or be better (in this example lower) than the
expected value:
In the graph above, this is achieved, except for
the period marked red.
Example AND:
AND – Both data series must be equal to or
better (in this example lower) than the expected
value:
In the graph above, this is achieved, except for
the period marked red.

Nimsoft Documentation: Service Level Manager 31
Calculation Examples
QoS Constraints
Each of the QoS constraints compares the collected data values from the probes with the defined threshold value and calculates the compliance percentage.
SLOs
The SLO collects the compliance values from the QoS constraints and computes the compliance percentage based on a selected calculation method (selects the best value, the worst value, the average value etc.). The result is made available for the SLA.
SLA
The SLA collects the compliance value from the two SLOs and calculates the total compliance value, also based on a selected calculation method.
Example 1, one QoS and one SLO
If using calculation method other than Default
for the QoS, see the section Creating a
Calculation Profile.
Example 2, two QoS’s and one SLO
If using calculation method other than Default
for the QoS, see the section Creating a
Calculation Profile.

Nimsoft Documentation: Service Level Manager 32
Example 3, two QoS’s and one SLO, using Calculation method AND or OR
If using calculation method other than Default
for the QoS, see the section Creating a
Calculation Profile.

Nimsoft Documentation: Service Level Manager 33
Example 4, two SLOs, each with 3 QoSs
If using calculation method other than Default
for the QoS, see the section Creating a
Calculation Profile.
The figure at the bottom of this page shows a
SLA with two SLOs, each with three QoS
constraints.
Example assumptions:
On the figure below:
SLO 1:
Calculating the compliance
percentage from QoS 1, 2 and 3, using
calculation method Worst makes a
compliance percentage of 70 %.
SLO 2:
Calculating the compliance
percentage from QoS 4, 5 and 6, using
calculation method Average makes a
compliance percentage of 90 %.
The table below the figure shows the total SLA
compliance percentage, using different
calculation methods for the SLA.
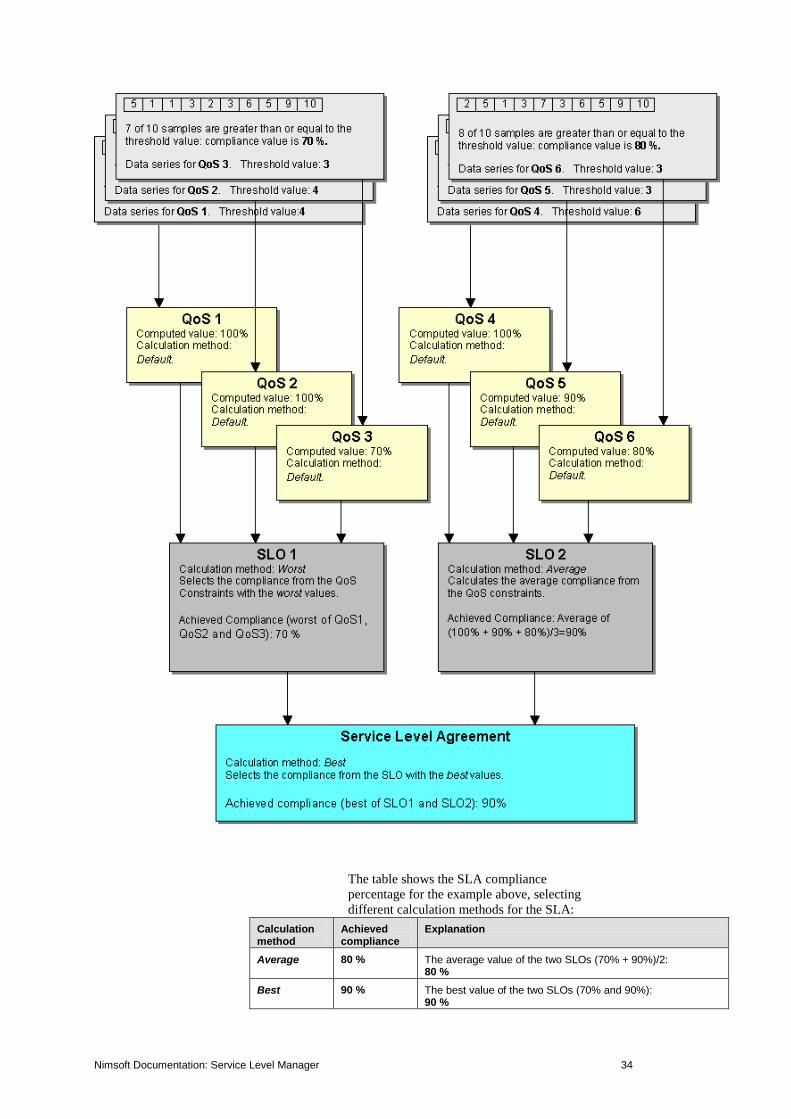
Nimsoft Documentation: Service Level Manager 34
The table shows the SLA compliance
percentage for the example above, selecting
different calculation methods for the SLA:
Calculation method
Achieved compliance
Explanation
Average 80 % The average value of the two SLOs (70% + 90%)/2: 80 %
Best 90 % The best value of the two SLOs (70% and 90%): 90 %
Nimsoft Documentation: Service Level Manager 35
Worst 70 % The worst value of the two SLOs (70% and 90%): 70 %
Sequential 60 % The difference between 100 % and achieved compliance for each SLO is summarized and extracted from 100%:
100 % - ((100 % -70 %) + (100 % -90 %)): 60 %.
Weight 82 % Assuming that the weight distribution between SLO 1 and SLO 2 is set to 40 / 60 for the SLA:
(70 % * 40/100) + (90 % * 60/100) = 82 %.
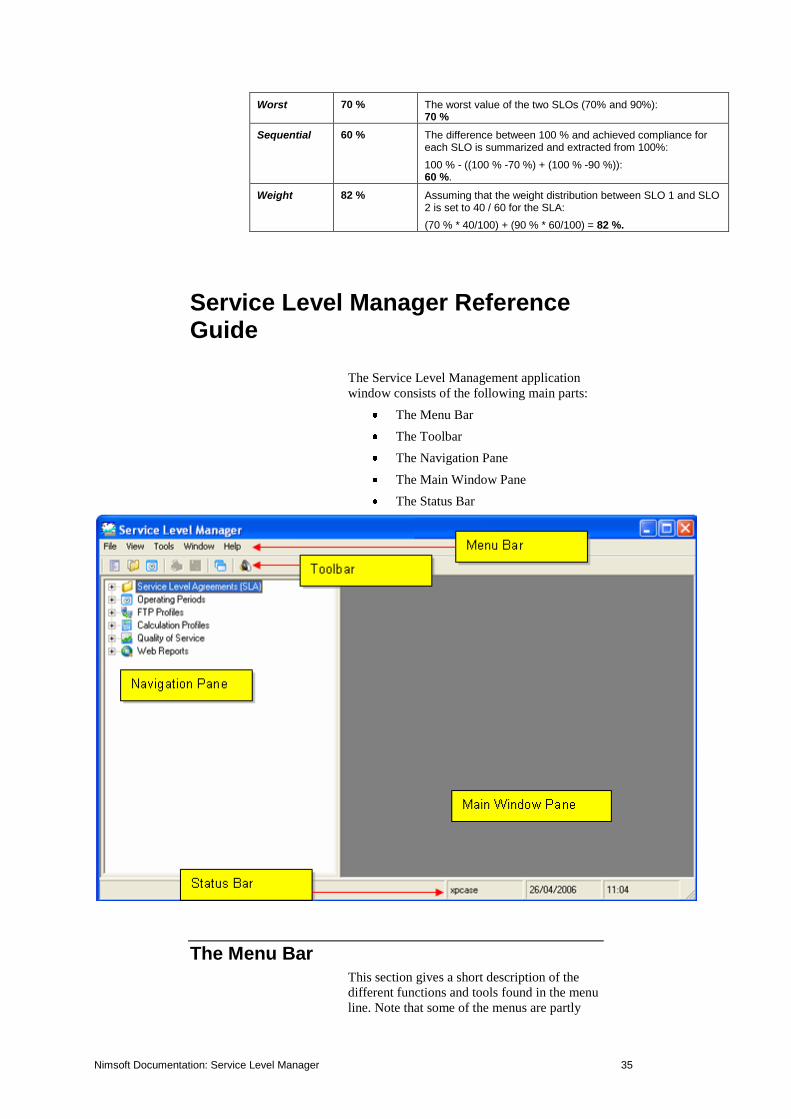
Service Level Manager Reference Guide
The Service Level Management application
window consists of the following main parts:
The Menu Bar
The Toolbar
The Navigation Pane
The Main Window Pane
The Status Bar
The Menu Bar This section gives a short description of the
different functions and tools found in the menu
line. Note that some of the menus are partly

Nimsoft Documentation: Service Level Manager 36
restricted, depending if your user is classified
as operator or superuser.
File
New
This option can be used when
defining a new:
o Service Level Agreement
Opens the Service Level
Agreement dialog, where you can
create new SLAs. See description
in the section Creating Service
Level Agreement.
o Quality of Service
Opens the QoS Definition dialog;
see description in the section
Defining a Quality of Service
object.
o Operating Period
Opens the Operating Period
dialog; see description in the
section Creating an Operating
Period.
o FTP Profile
Opens the FTP Profiles dialog;
see description in the section
Creating a FTP Profile.
Save Lets you save new definitions (as
described under New (above), or any
modifications in existing definitions.
Properties Opens the Properties dialog which has
two tabs.
Also note that the Properties dialog
pops up if the SLM Hub you are
connected to gets unavailable.

Nimsoft Documentation: Service Level Manager 37
See the section Setting the Connection
Properties for a detailed description
of the properties dialog.
Print This option lets you print the report for the opened and
selected SLA. You can select the current report or an
older one.
Note that you can select a template, determining the
layout of the report printout, and clicking the Preview
button lets you see the result before clicking the OK
button to start the printout.
Exit Exits the Service Level Manager.

Nimsoft Documentation: Service Level Manager 38
View
Toolbar
When selected, the Toolbar appears in
the upper part of the window,
otherwise not.
Status Bar When selected, the Status Bar appears
at the bottom of the window,
otherwise not.
Maximized Windows
When selected, all windows opened in
the Main Window Pane will appear in
maximized state.
When this option is selected, an icon
will appear in the left part of the
Menu Bar. The icon represents the
currently active window (in this case
an Operating Period dialog).
XP Style If running another OS than XP, you
may convert the SLM window to
appear with XP style, rather than the
normal classic style. This requires a
restart of the SLM.
Collapse Node
Collapses the selected node in the
Navigation Pane, hiding the sub-
nodes.
Note that you may also collapse the
selected node by pressing the – key on
the numeric keypad on your keyboard.
Expand Node Expands the node selected in the
Navigation Pane, showing the sub-
nodes.
Note that you may also expand the
selected node by pressing the + key on
the numeric keypad on your keyboard.
Nimsoft Documentation: Service Level Manager 39
Refresh Refreshes the Navigation Window to
display current information.
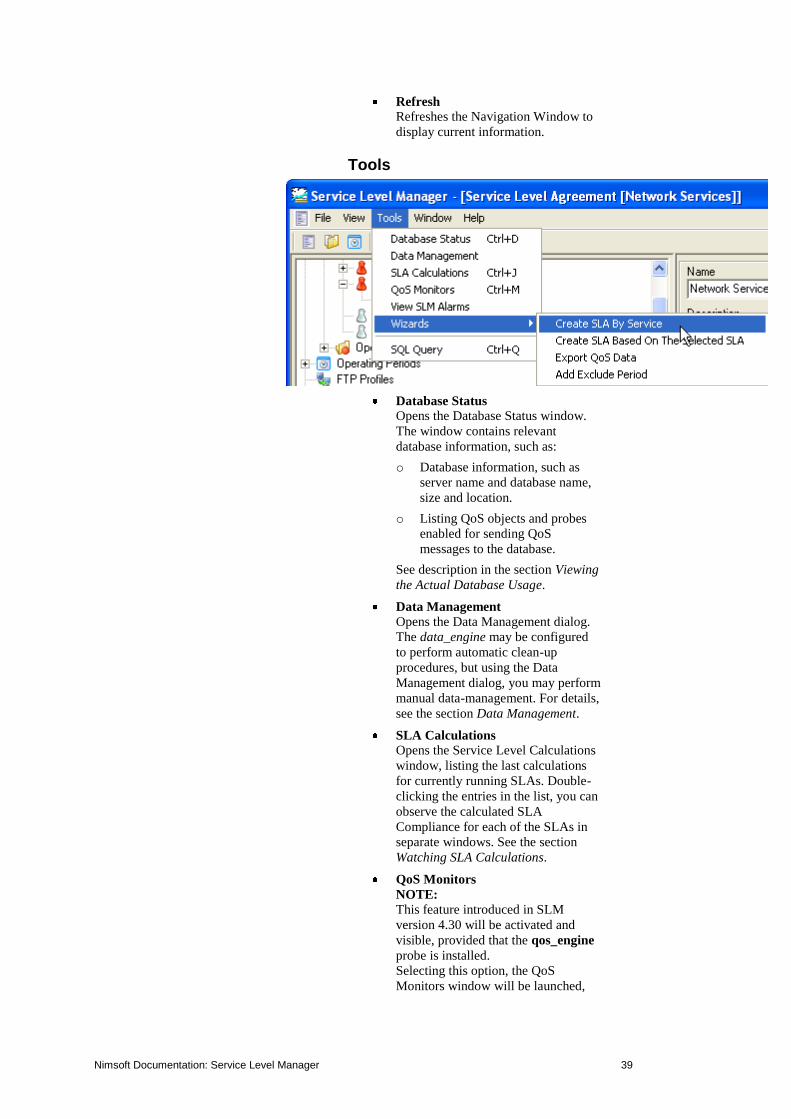
Tools
Database Status Opens the Database Status window.
The window contains relevant
database information, such as:
o Database information, such as
server name and database name,
size and location.
o Listing QoS objects and probes
enabled for sending QoS
messages to the database.
See description in the section Viewing
the Actual Database Usage.
Data Management Opens the Data Management dialog.
The data_engine may be configured
to perform automatic clean-up
procedures, but using the Data
Management dialog, you may perform
manual data-management. For details,
see the section Data Management.
SLA Calculations Opens the Service Level Calculations
window, listing the last calculations
for currently running SLAs. Double-
clicking the entries in the list, you can
observe the calculated SLA
Compliance for each of the SLAs in
separate windows. See the section
Watching SLA Calculations.
QoS Monitors
NOTE:
This feature introduced in SLM
version 4.30 will be activated and
visible, provided that the qos_engine
probe is installed.
Selecting this option, the QoS
Monitors window will be launched,
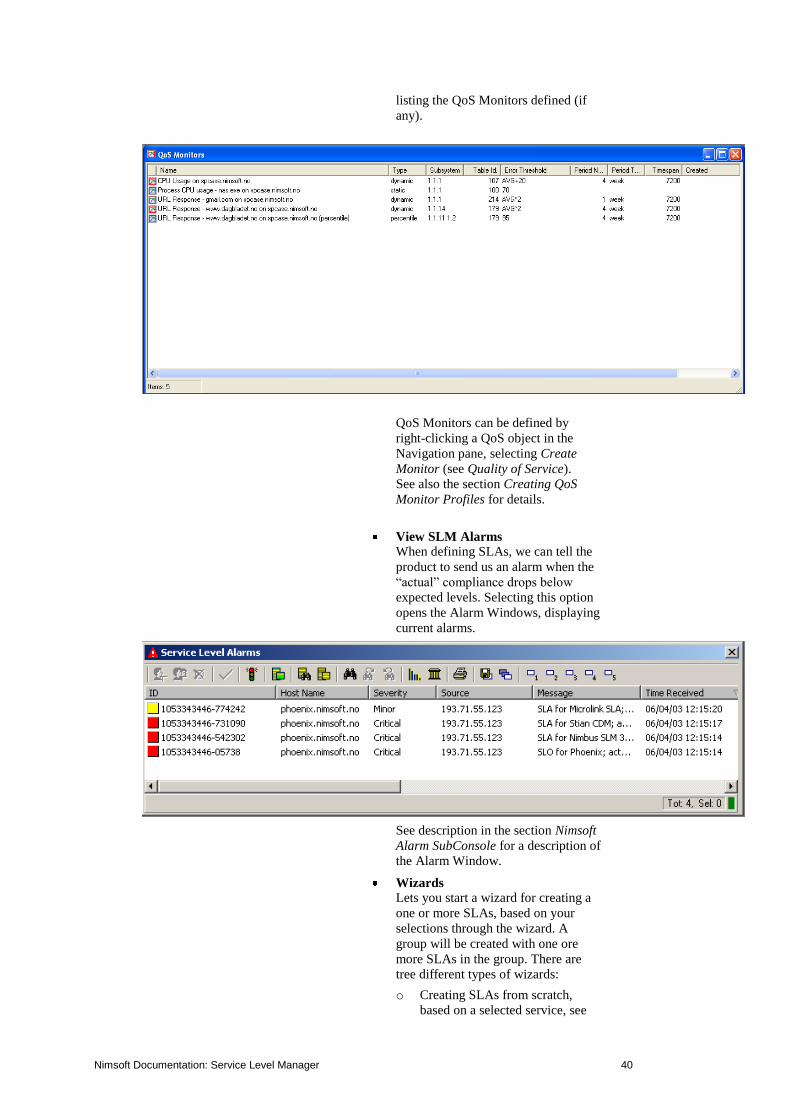
Nimsoft Documentation: Service Level Manager 40
listing the QoS Monitors defined (if
any).
QoS Monitors can be defined by
right-clicking a QoS object in the
Navigation pane, selecting Create
Monitor (see Quality of Service).
See also the section Creating QoS
Monitor Profiles for details.
View SLM Alarms
When defining SLAs, we can tell the
product to send us an alarm when the
“actual” compliance drops below
expected levels. Selecting this option
opens the Alarm Windows, displaying
current alarms.
See description in the section Nimsoft
Alarm SubConsole for a description of
the Alarm Window.
Wizards Lets you start a wizard for creating a
one or more SLAs, based on your
selections through the wizard. A
group will be created with one ore
more SLAs in the group. There are
tree different types of wizards:
o Creating SLAs from scratch,
based on a selected service, see

Nimsoft Documentation: Service Level Manager 41
Example – Creating a SLA based
on a service.
o Creating SLAs based on an
existing SLA. Selecting a SLA in
the Navigation Pane, the wizard
will create a new SLA, based on
the properties for the selected
SLA.
o Exporting QoS data, see
Exporting QoS data, using Export
QoS Data wizard.
o Adding an Excluded period.
Normally this is done
individually for SLAs/SLOs in
the respective dialogs. Using this
wizard, you can add an Excluded
period and attach the period to
some or all of your existing
SLAs/SLOs.
SQL Query Opens the SQL query dialog, enabling
you to send SQL queries to the
database. This is useful if you want to
test and view the database contents.
Also see the section Sending SQL
Queries to the database.
Window
In addition to the menu options described
below, you have the following possibilities to
handle child-windows opened in the Main
Window Pane:
o The ESC-key
Closes opened child-windows,
one by one.
o CTRL + TAB-key
Toggles between the opened
windows
Cascade Useful function when you have a lot
of opened child-windows and dialogs
Nimsoft Documentation: Service Level Manager 42
spread around. The Cascade function
will then place the child-windows in a
nice row in the Main Window Pane.
Save Preferences Use this option to save new
definitions, or any modifications in
existing definitions.
Tile Horizontal Tiles the opened child-windows
horizontally with the selected child-
windows on top.
Tile Vertical Tiles the opened child-windows
vertically with the selected child-
windows on top.
Arrange Icons Opened child-windows that are
minimized will be arranged in a row
in the lower part of the Main Window
Pane.
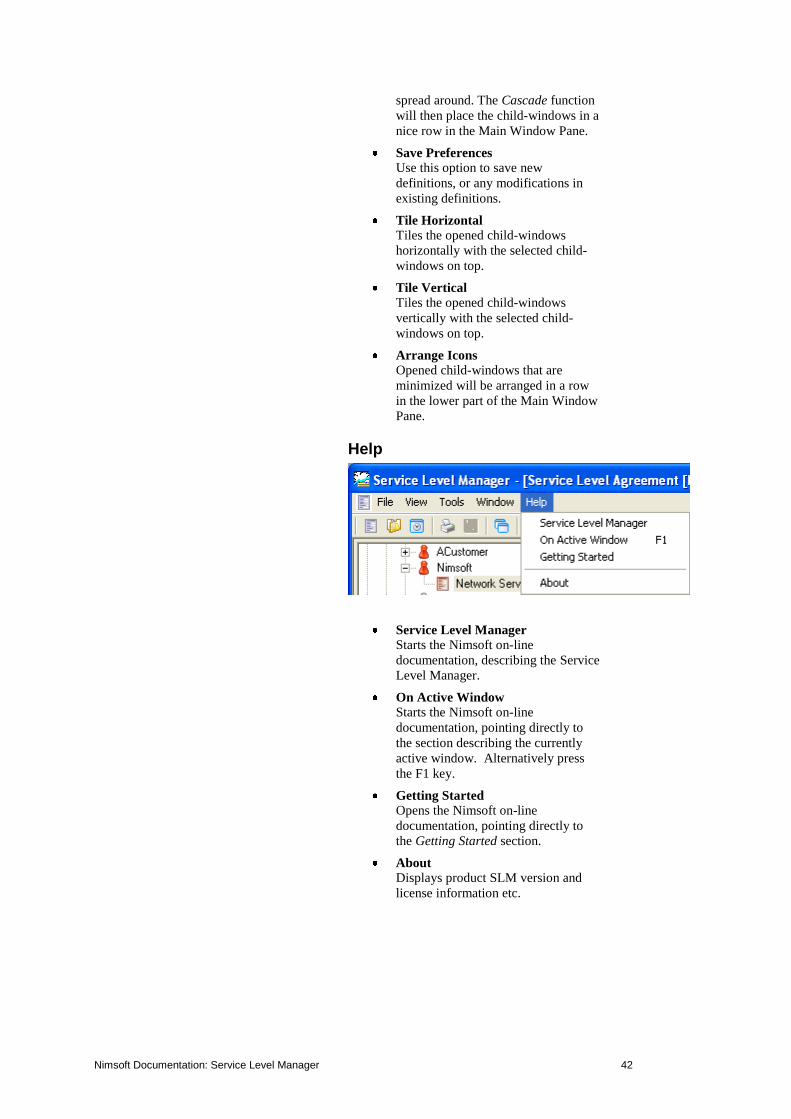
Help
Service Level Manager Starts the Nimsoft on-line
documentation, describing the Service
Level Manager.
On Active Window Starts the Nimsoft on-line
documentation, pointing directly to
the section describing the currently
active window. Alternatively press
the F1 key.
Getting Started
Opens the Nimsoft on-line
documentation, pointing directly to
the Getting Started section.
About Displays product SLM version and
license information etc.

Nimsoft Documentation: Service Level Manager 43
The Toolbar The toolbar contains shortcuts to different tasks
and operations:
Printing and saving operations
Creating new Service Level
Agreements, Service Level Agreement
groups, Operating Periods and
Quality of Services.
Cascade windows, a useful function
when you have a lot of opened
windows and dialogs spread around.
The Cascade function will place the
windows in a nice row in the main
window.
Launching the Service Level Alarms
window.

Nimsoft Documentation: Service Level Manager 44
The Navigation Pane The Navigation Pane is "fixed" to the left-hand
side of the application. It contains a tree-like
structure, showing the various elements/nodes
in the Nimsoft Service Level Management
product suite.
Selecting View>Refresh refreshes the contents
of Navigation Pane. You may also
increase/decrease the width of the Navigation
Pane by pressing the right edge of the window
and simultaneously dragging it to your
left/right.
The nodes shown in the pane are organized in a
tree-structure with a top-level node and one ore
more levels of sub-nodes and groups.
You may expand/collapse nodes and sub-nodes
by double-clicking on them.
Note that you may also collapse the selected
node by pressing the – key on the numeric
keypad on your keyboard, and that you may
expand the selected node by pressing the + key
on the numeric keypad on your keyboard.
You may also use the options View > Collapse
Node and View > Expand Node.
Service Level Agreements
This node lists all defined SLAs. The SLAs
may appear as:
Single SLAs
Grouped SLAs. The SLAs may be
placed in one group, or in sub-groups
on multiple levels under the main
group. SLAs can be moved between

Nimsoft Documentation: Service Level Manager 45
groups, using drag-and-drop.
SLAs attached to Accounts.
Under the Accounts node, you will
find all Accounts available. When
creating SLAs, these can be attached
to one of these Accounts. Under these
Accounts, you may again create
groups where you place the SLAs.
SLAs can be moved between groups,
using drag-and-drop.
Right-clicking a node enables you to define
new SLAs or SLA groups, launch the Service
Level Alarms window and update the contents
of the tree structure to reflect the current status.
The colour of the indicator for the SLAs (or
SLA group or Account) indicates the current
status:
o Red means that the
compliance level for the SLA is
breached.
If a SLA in a SLA group or an
Account is breached (red), the
state will be propagated to the
group/Account top node.
o Green that the SLA (and all
SLAs in the SLA group or
Account) are compliant.

Nimsoft Documentation: Service Level Manager 46
o Yellow indicator means that
the current compliance (the last
computed value) of the SLA (or
one of the SLAs in a group or
Account) breaches the alarm
warning level.
o White means unknown
status of the SLA (or one of the
SLAs in a group or Account)
Right-clicking in the Navigation Pane opens a
small menu with different options, depending
what is selected.
The SLA Node is selected:
o New SLA
Opens an empty SLA dialog,
where can define a new SLA (see
the section Creating Service
Level Agreement).
o New Group
Opens a New Group dialog,
where can define a new SLA
group. Give the new group a
name and optionally a
description. Note that you may
also attach the group to one of the
ftp profiles available, listed under
the FTP Profiles node (see
below).
o View Alarms
Opens the Service Level Alarms
window (see Service Level
Alarms ).
o Update
Updates the Service Level
Nimsoft Documentation: Service Level Manager 47
Manager to reflect the latest
modifications.
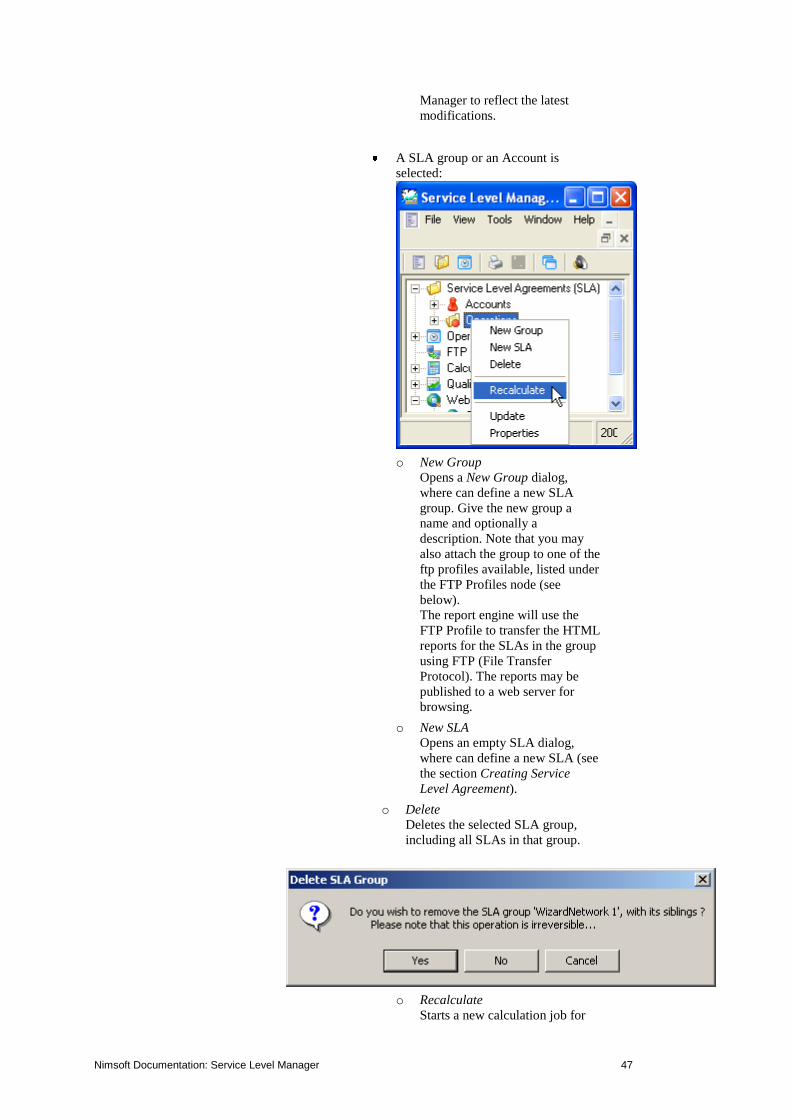
A SLA group or an Account is
selected:
o New Group
Opens a New Group dialog,
where can define a new SLA
group. Give the new group a
name and optionally a
description. Note that you may
also attach the group to one of the
ftp profiles available, listed under
the FTP Profiles node (see
below).
The report engine will use the
FTP Profile to transfer the HTML
reports for the SLAs in the group
using FTP (File Transfer
Protocol). The reports may be
published to a web server for
browsing.
o New SLA
Opens an empty SLA dialog,
where can define a new SLA (see
the section Creating Service
Level Agreement).
o Delete
Deletes the selected SLA group,
including all SLAs in that group.
o Recalculate
Starts a new calculation job for

Nimsoft Documentation: Service Level Manager 48
all SLAs in the selected group.
The Job Properties dialog is
opened, allowing you to edit the
job parameters.
o Regenerate
This option is available only
when a wizard-created group is
selected.
Starts the wizard, enabling you to
make modifications.
o Update
Updates the Service Level
Manager to reflect the latest
modifications.
o Properties
Opens the SLA group dialog for
the selected SLA group, where
you can edit the conditions and
properties for the group.
A SLA is selected:
o New
Opens an empty SLA dialog,
where can define a new SLA (see
the section Creating Service
Level Agreement).
o New Clone
Makes a copy of the selected
SLA.
o New Based on
Starts the SLA wizard, enabling
you to create a new SLA, based
on the selected one. Note that you
are not allowed to edit all
parameter input fields (some of
them are locked).
o Delete
Deletes the selected SLA.
o History
Enables you to view the historic
Nimsoft Documentation: Service Level Manager 49
compliance of the current SLA.
You can select the period you are
interested in, and you can toggle
between general and graphical
view.
o Regenerate
Starts a new calculation job for
the selected SLA. The Job
Properties dialog is opened,
allowing you to edit the job
parameters.
o Update
Updates the Service Level
Manager to reflect the latest
modifications.
o Properties
Opens the SLA dialog for the
selected SLA, where you can edit
the conditions and properties for
the SLA (see the section Creating
Service Level Agreement).
Operating Periods
This node lists the defined operating periods.
Operating Periods are used to constrain the
measured QoS values to specific hours of any
day (the period the QoS constraint is valid.)
The operating period is defined to be a
collection of time periods, and is used when we
define new SLAs. We use the Operating
Periods when defining the QoS constraints (see
the section Defining QoS Constraints)
This means that samples falling outside these
time specifications will not influence the
SLO/SLA compliance requirements.
Right-clicking the node opens an empty dialog,
enabling you to define a new Operating Period
(see the section Creating an Operating
Period).
Right-clicking one of the defined Operating
Periods listed under the node opens a small
menu containing 4 options:
New Opens an empty dialog, enabling you
to define a new Operating Period.
Delete Deletes the selected Operating Period.
Update Updates the Service Level Manager to
reflect the latest modifications.
Properties Opens the dialog for the selected
Operation Period, where you can edit
parameters like name, description and
time specifications.

Nimsoft Documentation: Service Level Manager 50
FTP Profiles
All reports generated by the report_engine may
be published to other systems by the use of the
File Transfer Protocol (FTP). Under this node
you find a list of all FTP-Profiles defined in the
Service Level Manager. These FTP profiles are
useful when defining new SLAs.
Right-clicking one of the defined FTP profiles
listed under the node opens a small menu
containing 4 options:
New Opens an empty dialog, enabling you
to define a new FTP profile.
Delete Deletes the selected FTP profile.
If the profile is used by any of the
SLAs, you will receive a warning,
telling you that you have to remove all
references from SLAs using this FTP
profile before you are allowed to
delete the profile.
Update Updates the Service Level Manager to
reflect the latest modifications.
Properties Opens the dialog for the selected FTP
profile, where you can edit options
and parameters. Also see the section
Creating a FTP Profile.
Calculation Profiles
This option allows users to define their own
calculation profiles.
These calculation profiles are used when
defining the calculation properties for Service
Level Objects and Quality of Service
Constraints.

Nimsoft Documentation: Service Level Manager 51
When defining calculation profiles, the profiles
will be grouped either as SLO calculations or
as QoS calculations, depending on if the
selected plug-in supports single-data or multi-
data series. See the section Creating a
Calculation Profile and

Nimsoft Documentation: Service Level Manager 52
Compliance Calculation.
Right-clicking the SLO Calculation
sub-node (or one of the defined SLO
calculation profiles), selecting New,
opens an empty dialog enabling you
to define a new SLO Calculation
profile.
Right-clicking the QoS Calculation
sub-node (or one of the defined QoS
calculation profiles), selecting New,
opens an empty dialog enabling you
to define a new QoS Calculation
profile.
The right-click menu offers three other options,
common for both sub-nodes.
o Delete Deletes the selected Calculation
profile.
o Update Updates the Service Level
Manager to reflect the latest
modifications.
o Properties Opens the dialog for the selected
Calculation profile, where you
can edit options and parameters.
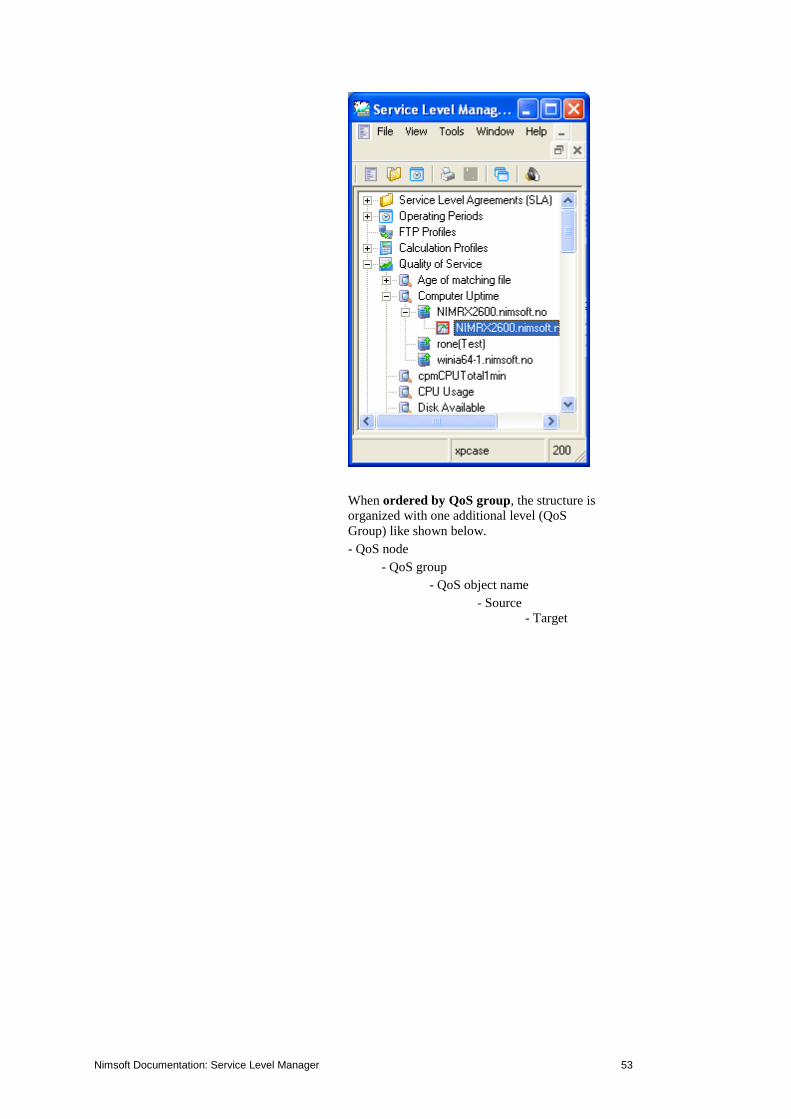
Quality of Service
Under this node you will find the available
registered QoS objects, grouped into logical
groups based on the description field in the
QoS object. This view enables the user to
quickly browse the database for particular data-
series.
By default, it is possible to sort the QoS objects
in two different ways:
Order by QoS
Order by QoS group
In addition, you have the possibility to define
your own sorting criteria (views) by using the
Browse Menu Editor (see further down on the
page).
When ordered by QoS, the structure is
organized like shown below.
- QoS node
- QoS object name
- Source
- Target
Nimsoft Documentation: Service Level Manager 53
When ordered by QoS group, the structure is
organized with one additional level (QoS
Group) like shown below.
- QoS node
- QoS group
- QoS object name
- Source
- Target

Nimsoft Documentation: Service Level Manager 54
Right-clicking the QoS node opens a small
menu containing 4 options:
Browse Menu Editor Launches the Browse Menu Editor,
enabling you to define your own ways
to group and sort the QoS objects
listed under the QoS Node.

Nimsoft Documentation: Service Level Manager 55
Clicking the Add button , a new
sorting view will be added to the list.
The new entry will by default be
given the name New Menu Item.
Rename it, giving it a descriptive
name.
Select your sorting criteria, one or
more, from the Data Selector drop-
down menus and select descending or
ascending sorting order.
Click the OK button, and you will be
asked if you want to save the view.
Clicking the Delete button , the
selected view will be deleted.
When saved, the entries in the list will
appear as menu items in the menu
available when right-clicking the QoS
node in the Navigation Pane.
They will be presented in the order
they appear ain the list in the Browse
Menu Editor.
Use the positioning buttons
to move items up and down until the
entries are listed in your preferred
order.
When saved, the new views will
appear as menu items when right-
clicking the QoS node in the
Navigation Pane.
Order by QoS group All QoS objects will be presented in
their logical groups.
In addition, see the section Properties
for information on sorting and
organizing QoS objects in folders.

Nimsoft Documentation: Service Level Manager 56
Order by QoS
All QoS objects will be listed
alphabetically (and not grouped).
In addition, see the section Properties
for information on sorting and
organizing QoS objects in folders.
Update Refreshes the Service Level Manager
application window to reflect the
latest modifications or changes.
Right-clicking one of the QoS names under a
group opens a small menu containing 4
options:
New Opens an empty dialog, enabling you
to define a new QoS definition.
Delete Deletes the selected QoS and all
associated data. You must also
remove all references to this QoS
from SLAs before you are allowed to
remove the object. The QoS will be
recreated after a while if the probe
still sends QoS data.
Update Refreshes the Service Level Manager
application window to reflect the
latest modifications or changes.
Properties Opens the dialog for the selected QoS
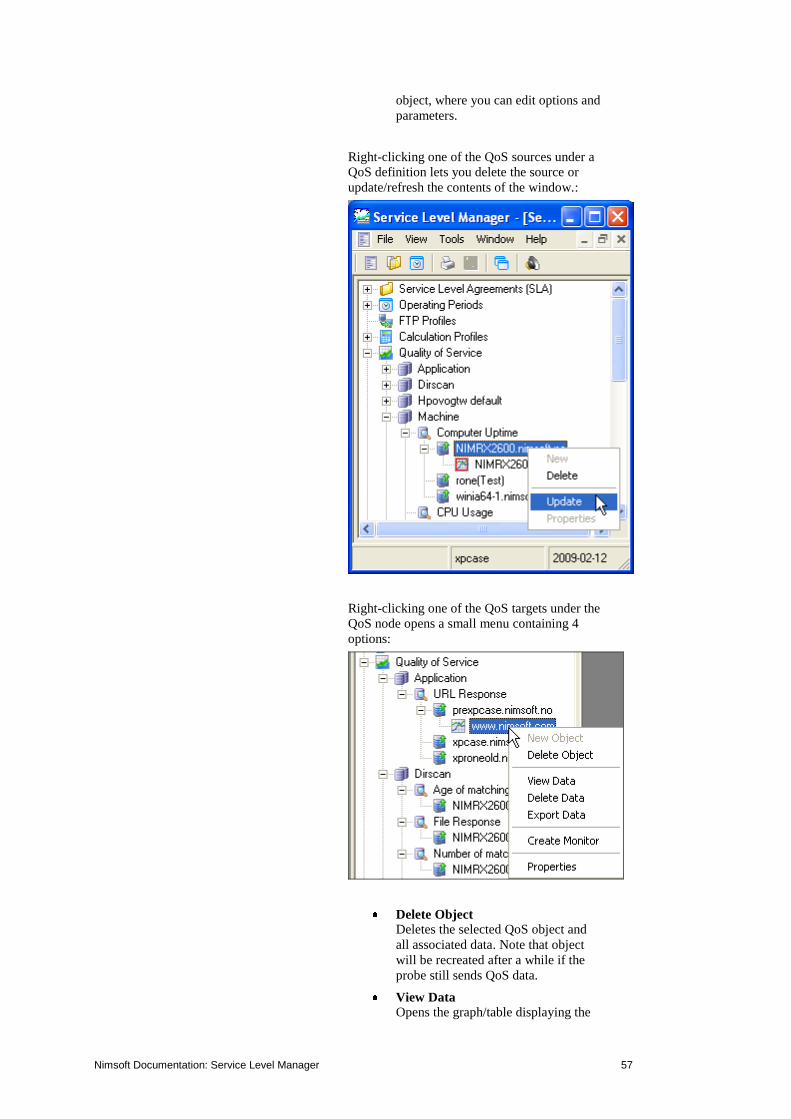
Nimsoft Documentation: Service Level Manager 57
object, where you can edit options and
parameters.
Right-clicking one of the QoS sources under a
QoS definition lets you delete the source or
update/refresh the contents of the window.:
Right-clicking one of the QoS targets under the
QoS node opens a small menu containing 4
options:
Delete Object Deletes the selected QoS object and
all associated data. Note that object
will be recreated after a while if the
probe still sends QoS data.
View Data Opens the graph/table displaying the

Nimsoft Documentation: Service Level Manager 58
data series for the selected QoS target.
Also see the section Viewing the
Quality of Service (QoS) Data.
Delete Data
Opens the Data Management dialog
for the selected QoS object, allowing
you to delete the complete QoS data
series, or just for a selected period.
The QoS object is not deleted
selecting this option, and data will
continue to be stored in the database
table.
Create Monitor
NOTE:
This feature introduced in SLM
version 4.30 will be activated and
visible, provided that the qos_engine
probe is installed.
Opens the QoS Monitor dialog, letting
you create monitoring profile(s) for
the selected QoS object. This way you
can monitor the QoS data for an
object. Thresholds can be set, and
alarms will be issued if these
thresholds are breached.
This feature was introduced in SLM
version 4.30.
If one or more monitoring profiles
have been created for the QoS object,
the icon will get a red frame.
Clicking Tools > Options in the menu
bar (see Tools), a separate window
will be launched, listing all QoS
monitors created. Selecting one of the
QoS monitors in the list, you can view
the graph/table for the QoS object and
also modify the monitoring properties.
See the section Creating QoS Monitor
Profiles to learn more about creating
QoS Monitors.
Properties Opens the dialog for the selected QoS
target, where you can edit options and
parameters.
Properties Opens the dialog for the selected QoS
target, where you can edit options and
parameters.
Web reports
Here you will find the SLA- and QoS-reports.

Nimsoft Documentation: Service Level Manager 59
SLA reports Under this node you will find SLA reports for
all defined SLAs. The reports will be grouped
and have a tree-structure identical to the tree-
structure of the SLAs. You can navigate to
SLAs that are placed in groups by expanding
the group child node.
Double-clicking one of the reports (or right-
clicking the report and selecting View Report)
opens the report in a separate window.
Right-clicking the SLA Reports node or a
group of SLA reports and selecting View
Summary opens a summary report for all
reports in that group, where you can drill down
to the individual reports.
QoS reports Lists all defined Quality of Service reports
defined in the Nimsoft Report Engine. Double-
clicking one of the reports (or right-clicking the
report and selecting View Report) opens the
report in a separate window.
Right-clicking the QoS Reports node (or one of
the QoS reports under the node) and selecting
Configure, opens the report_engine
configuration tool, where you can define QoS-
reports. Reports defined in the report_engine
will be listed as QoS reports under the QoS
Reports node, located in a three-structure

Nimsoft Documentation: Service Level Manager 60
identical to the report-structure in the
Navigation Pane of the report-engine.
Dynamic Reports Under the QoS Reports child-node, you will
also find the Dynamic Reports, generated by
the Report Engine probe, provided that the
Dynamic Reports option in the Report Engine
probe is activated.
These Dynamic reports are sorted in groups as
defined in the Nimsoft Group Server probe.
The end-node will represent a Dynamic Report
representing a device or host in your Nimsoft
Infrastructure. Clicking the end node will
launch the report in the main window. Note
that the Report Engine probe lets you choose
between different report-layouts, using
templates. You may also edit these templates to
match your needs.
For additional information on reports, see the
section Web Reports.
Main Window Pane This is the application frame. All child-
windows will be contained within the frame of
the main-window, thus following the
minimize/maximize schemes.

Nimsoft Documentation: Service Level Manager 61
Handling Child-windows
In addition to the menu options described
below, you have the following possibilities to
handle child-windows opened in the Main
Window Pane:
o The ESC-key
Closes opened child-windows,
one by one.
o CTRL + TAB-key
Toggles between the opened
windows
Using the Windows option in the Menu bar:
Cascade Useful function when you have a lot
of opened child-windows and dialogs
spread around. The Cascade function
will then place the child-windows in a
nice row in the Main Window Pane.
Save Preferences Use this option to save new
definitions, or any modifications in
existing definitions.
Tile Horizontal Tiles the opened child-windows
horizontally with the selected child-
windows on top.
Tile Vertical Tiles the opened child-windows
vertically with the selected child-
windows on top.
Arrange Icons Opened child-windows that are
minimized will be arranged in a row
in the lower part of the Main Window
Pane.

Nimsoft Documentation: Service Level Manager 62
The Status Bar The status bar, located at the bottom of the
window, contains four fields, from left to right:
1. Status messages.
2. Current SLM Hub (your login hub).
3. The current date.
4. The current time.

Nimsoft Documentation: Service Level Manager 63
Service Level Manager User Guide
The Service Level Manager application is your
tool to create and modify Service Level
Agreements (SLAs) and to view and print
reports and graphs.
The main components involved in Service
Level Management are:
Probes that must be prepared to
deliver Quality of Service Data (see
the section Setting up a Probe to
Deliver Quality of Service Data).
The SLM database, the Nimsoft Data
Engine, the Nimsoft SLA Engine and
the Nimsoft Report Engine, all
installed during the SLM installation.
The SLM application, with which we
can perform a lot of management
tasks, such as:
o Define SLAs (see Example -
Defining a simple Service Level
Agreement or Creating Service
Level Agreement).
o Watch the reports (see also the
section Web Reports).
o Print the reports (see Printing
Reports).
o Customize the reports (see
Dynamic Reports).
o Handle alarms (see the section
Handling Alarms).
Service level monitoring is mostly an
automated task. When the SLA and the
underlying structure is defined and activated,
data is recorded and computed in the
background. Alarms will be generated and the
Data Engine and the Report Engine will
generate reports automatically.
Login The Login dialog is simpler than that of the
Infrastructure Manager and Enterprise Console.
You must specify a valid Nimsoft user name
and password.
Note: If already logged on (if e.g. running the
Infrastructure Manager, Enterprise Console
etc.), the login dialog will not appear at all
when launching the SLM application.

Nimsoft Documentation: Service Level Manager 64
Note the Reconfigure button. Clicking this
button launches the SLM Properties dialog,
enabling you to change the SLM connection
properties. You are allowed to change SLM
Hub and Nimsoft Alarm Server.
For further information, see the Properties
description and the section Setting the
Connection Properties.
Note that all defined Nimsoft user names are
associated with an ACL (Access Control List),
defining the privileges for the user.
There are ACLs for different types of users
needing different privileges, such as operator,
guest, superuser, administrator etc.
These ACLs can be modified by users with
administrator privileges.
If attempting to log on as a Nimsoft user
without valid privileges, the following message
will appear:
Ask your Nimsoft administrator to upgrade
your privileges.
See the section <A HREF="ms-its:\Manager.chm::/managingthea
ccesscontrollistacl.htm">
Managing the Access Control List</a> in the
Infrastructure Manager on-line documentation
for further information.
If logging on as a Nimsoft user with limited
privileges (e.g. Operator), some of the options
and tool in the application are grayed out and
not active.
Note: With Service Level Manager 4.20 or newer, it
is also possible to log on the Nimsoft consoles
as a LDAP user. See the Infrastructure
Manager documentation for further
information.

Nimsoft Documentation: Service Level Manager 65
Creating Service Level Agreements The process of creating Service Level
Agreements consists of the following steps:
Create a new SLA and define your
o Compliance requirement.
o Compliance period.
o Calculation method.
o Excluded periods.
o Optionally attach the SLA to an
account.
Create your SLO(s) and define your
o Calculation method.
o Excluded periods.
o Optional advanced Options:
adding notes, FTP details and
alarms.
Defining QoS constraints with
o QoS Object and source.
o Defined expected QoS value.
o Operating period.
o Calculation method.
Creating a SLA
There are several ways to invoke the Service
Level Agreement dialog:
If you first want to create a new group
for the SLA, you right-click the
Service Level Agreement Node in the
Navigation Pane and select New
Group.
If you want to place the SLA in a
specific SLA group, you right-click
that group in the Navigation Pane and
select NewSLA.
Create a new SLA by:
o Selecting File > New > Service
Level Agreement.
o Right-click the Service Level
Agreement Node in the
Navigation Pane and select New
SLA.
o Choose one of the SLA wizards
available by selecting Tools >
Wizards from the Menu bar.
Note that you may move a SLA from one
group to another in the Navigation Pane, using
drag-and drop.
Introduction
Enter a descriptive name and a complete
description of the SLA.
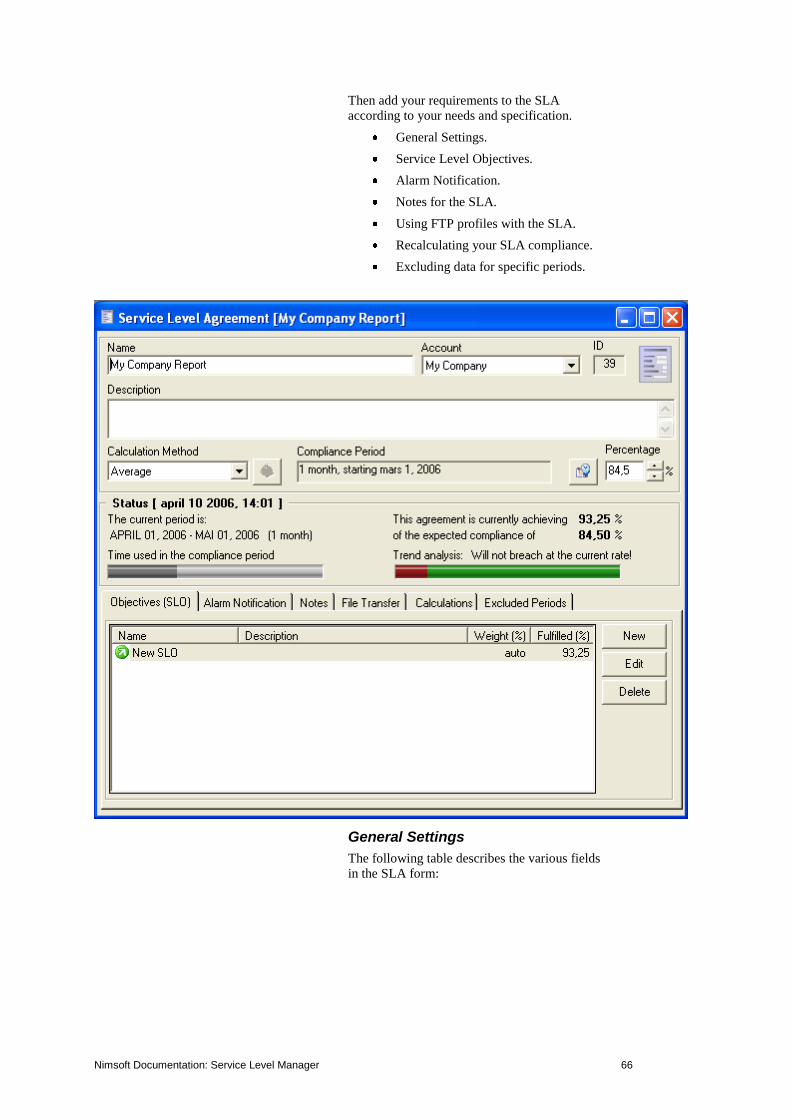
Nimsoft Documentation: Service Level Manager 66
Then add your requirements to the SLA
according to your needs and specification.
General Settings.
Service Level Objectives.
Alarm Notification.
Notes for the SLA.
Using FTP profiles with the SLA.
Recalculating your SLA compliance.
Excluding data for specific periods.
General Settings
The following table describes the various fields
in the SLA form:
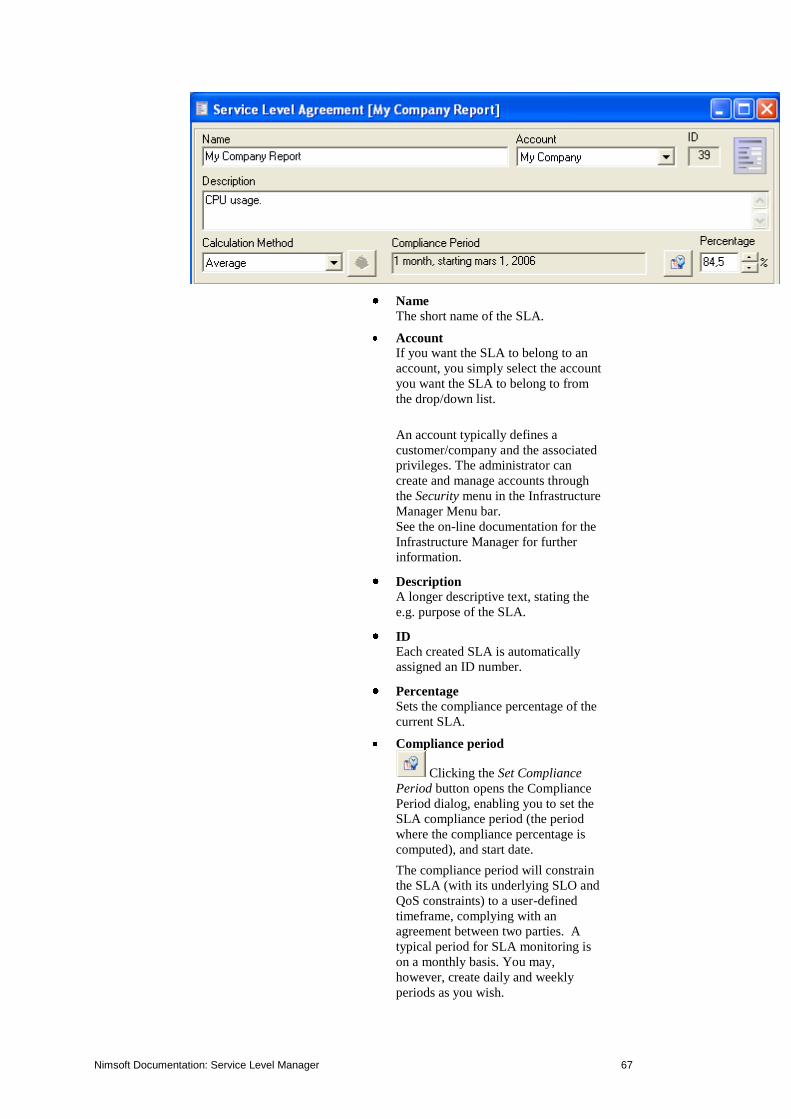
Nimsoft Documentation: Service Level Manager 67
Name The short name of the SLA.
Account
If you want the SLA to belong to an
account, you simply select the account
you want the SLA to belong to from
the drop/down list.
An account typically defines a
customer/company and the associated
privileges. The administrator can
create and manage accounts through
the Security menu in the Infrastructure
Manager Menu bar.
See the on-line documentation for the
Infrastructure Manager for further
information.
Description A longer descriptive text, stating the
e.g. purpose of the SLA.
ID
Each created SLA is automatically
assigned an ID number.
Percentage Sets the compliance percentage of the
current SLA.
Compliance period
Clicking the Set Compliance
Period button opens the Compliance
Period dialog, enabling you to set the
SLA compliance period (the period
where the compliance percentage is
computed), and start date.
The compliance period will constrain
the SLA (with its underlying SLO and
QoS constraints) to a user-defined
timeframe, complying with an
agreement between two parties. A
typical period for SLA monitoring is
on a monthly basis. You may,
however, create daily and weekly
periods as you wish.

Nimsoft Documentation: Service Level Manager 68
The compliance period will,
depending on its type (weekly and
monthly) have fixed starting dates.
For weekly reports the starting day is
Mondays, and for the monthly reports
the starting day is the first day of the
month. However, it is possible to
modify the starting day according to
your specific needs. E.g. let’s say you
need monthly reports running from
the 15th; then you adjust the starting
date accordingly.
The difference in the interpretation of
the starting date for the compliance
period types is listed below:
o Daily
The starting date is irrelevant.
o Weekly
The starting date defines the
starting day in every week.
Monthly
The starting date defines starting
day of every month.
Example:
1 month, starting April 01, 2006,
means that the compliance is
measured and recorded into the
database as soon as the next
period starts.
Timezone Setting
This option enables you to set the
time zone for your location. By
default, the time zone of the
location where the data engine is
located is selected. As long as the
SLM and the data engine are
located in the same time zone,
this setting should normally be
used.
Nimsoft Documentation: Service Level Manager 69
If you collect data from another
time zone, and you want the SLA
report to reflect the time in that
zone, you can select this time
zone here.
Calculation method
The SLA Monitors the compliance
from the SLO(s). Calculation method
is the way the SLA calculates the
compliance input from the SLOs (see
the section

Nimsoft Documentation: Service Level Manager 70
Compliance Calculation). It is
possible to define excluded periods,
where the measured compliance will
not influence the SLA (e.g. planned
maintenance, company holiday etc.)
The sample values are calculated
according to the selected Calculation
method:
o Average
Calculates the average
compliance from the SLOs.
o Best
Selects the compliance from the
SLO, if more than one, with the
best values.
o Sequential
Summarizes the periods when the
expected value is not met for all
SLOs and calculates the
compliance.
The difference between 100 %
and achieved compliance for each
SLO is summarized and extracted
from 100%.
o Weight
Weights the compliance from the
different SLOs, according to
importance (either auto- or
manually defined).
Selecting this option opens the
Weight Properties dialog, where
you can weigh the importance of
the different SLOs, either
manually or automatically (see
the section Distributing
Importance (weight)).
o Worst
Selects the compliance from the
SLO with the worst values.
Status
The status field gives you the following
information:
The current period Shows the current period defined by the
compliance period settings (see above).
Time used in the compliance period Shows the current placement in the compliance
period. The dark part indicates how much time
is spent of the period.
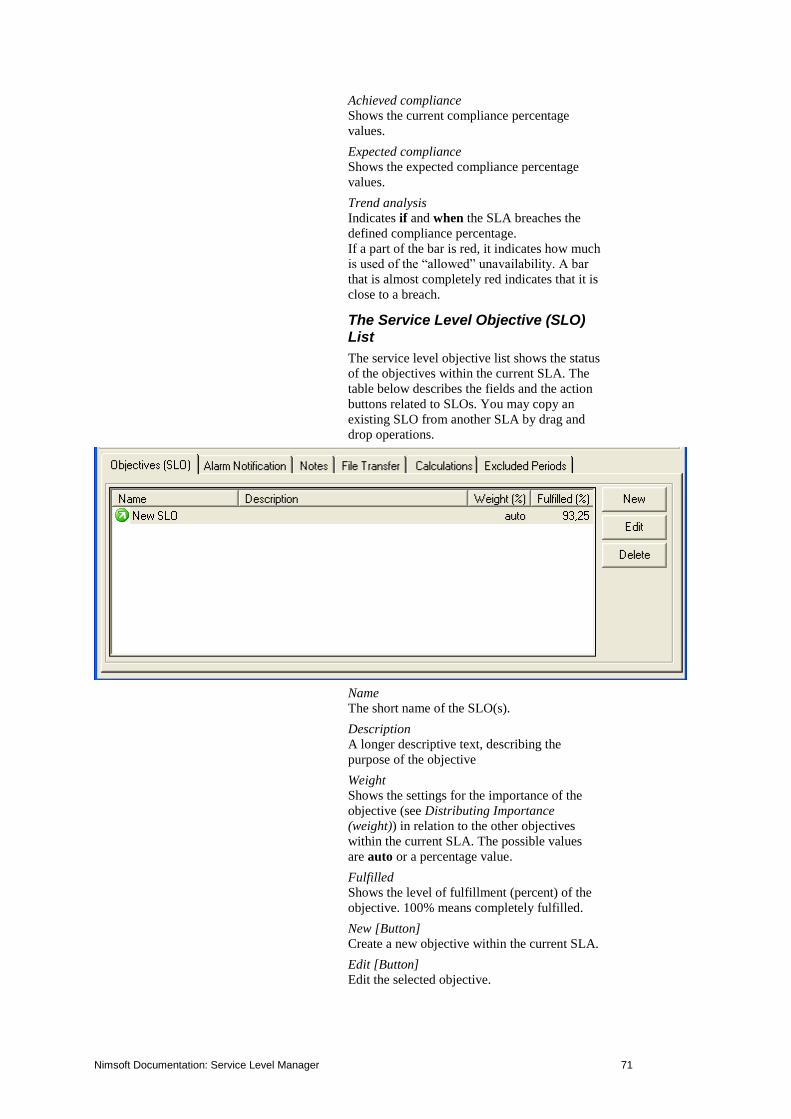
Nimsoft Documentation: Service Level Manager 71
Achieved compliance Shows the current compliance percentage
values.
Expected compliance Shows the expected compliance percentage
values.
Trend analysis Indicates if and when the SLA breaches the
defined compliance percentage.
If a part of the bar is red, it indicates how much
is used of the “allowed” unavailability. A bar
that is almost completely red indicates that it is
close to a breach.
The Service Level Objective (SLO) List
The service level objective list shows the status
of the objectives within the current SLA. The
table below describes the fields and the action
buttons related to SLOs. You may copy an
existing SLO from another SLA by drag and
drop operations.
Name The short name of the SLO(s).
Description A longer descriptive text, describing the
purpose of the objective
Weight Shows the settings for the importance of the
objective (see Distributing Importance
(weight)) in relation to the other objectives
within the current SLA. The possible values
are auto or a percentage value.
Fulfilled Shows the level of fulfillment (percent) of the
objective. 100% means completely fulfilled.
New [Button] Create a new objective within the current SLA.
Edit [Button] Edit the selected objective.

Nimsoft Documentation: Service Level Manager 72
Delete [Button] Removes the selected objective from the
current SLA.
Legend
-The SLO is compliant with the
requirements stated by the SLA and the QoS
constraints defined within the SLO.
-The SLO is not compliant.
-No compliance values are currently
available.
Alarm Notification
SLM is capable of generating alerts whenever a
SLA has breached the defined compliance
settings. The alert is treated as any alarm, and
may be forwarded to e.g. email, paging etc.
Generate alarm when breaching the
compliance percentage Check this option if you want to be notified
upon SLA breach. A standard Alarm is issued
when the compliance breaches the value you
specify in the Expected field (see below).
Expected %
Specify the threshold value for the alarm.
Issue warning message at Check this if you want to be notified prior to
the SLA breach, and also the threshold for
generating the warning.
Notes
Any system administrator will comply with the
fact that "unscheduled things may happen".
This information is included in the reporting
feature of SLM. E.g. you may want to notify
about an event that occurred in the operating
Nimsoft Documentation: Service Level Manager 73
period and therefore affected the outcome of
the SLA compliance.
Date Ties the note to a specific date/time.
Title A descriptive text, describing the reason for the
note.
Official Defines the note to be official (included in the
reports).
Text The actual text body of the note
New [Button]
Create a note within the current SLA. The Note
editor appears, enabling you to type your note.
Edit [Button] Edit the selected note.
Delete [Button] Removes the selected note from the current
SLA.

Nimsoft Documentation: Service Level Manager 74
File Transfer
The report engine will use the profiles defined
in this list to transfer the HTML reports using
FTP (File Transfer Protocol). The reports may
be published to a web server for browsing.
Simply drag the FTP profile(s) from the
navigation-tree into the list to activate the FTP
mechanism.
New [Button] Assign a FTP Profile to the current SLA. Also
see the section Creating a FTP Profile.
Delete [Button] Removes the selected FTP profile from the
current SLA.
Calculations
A compliance calculation is automatically
performed on schedules as specified in the
sla_engine. You may, however, require a
recalculation due to various reasons by creating
a new calculation.
The list shows all available compliance jobs
related to the current SLA.
Job Id.
The job identification number assigned to a
new job.
Period Begin
Defines the starting date/time of the
compliance calculation period.
Period End
Defines the end date/time of the compliance
calculation period.
Owner
The name of the operator that requested the
calculation job

Nimsoft Documentation: Service Level Manager 75
Job Start
Defines the date/time for when the compliance
calculation job should start.
Job Expire
Defines the date/time for when the job is
automatically removed from the SLM system.
History
Indicates that compliance data should
recorded/saved for historic reports.
New [Button]
Initiates a new compliance calculation using
the current SLA.
Edit [Button]
Edit the selected job (only available when the
job is queued).
Delete [Button]
Deletes the job from the system.
View [Button] View the result of the compliance calculation.
Also see the section Watching SLA
Calculations.
Excluded Periods
In normal system management scenarios,
services are subject to maintenance. Some
maintenance is scheduled and some is not.
Depending on the service level agreement
between the parties involved, data may (or may
not) be excluded due to unavailability of the
service. The unavailability will most certainly
affect the SLA compliance.
New [Button]
Opens the Exclude period dialog,
enabling you to define an exclude
period for the current SLA.
Nimsoft Documentation: Service Level Manager 76
o From Date Defines the starting date/time for
when to exclude data.
o To Date Defines the starting date/time for
when to exclude data.
o Note The textual note (title and a
description) related to this
exclude period.
o Official Should the exclude period appear
on the reports.
Edit [Button]
Edit the exclude period and note.
Delete [Button]
Deletes the exclude period from the
current SLA.
When clicking the OK button, the excluded
period newly created will appear in the list

Nimsoft Documentation: Service Level Manager 77
See also the section Excluding Quality of
Service Data.
Creating a Service Level Objective (SLO)
Pressing the New button creates a new SLO
form for you to complete. Enter a descriptive
name and a complete description of the
objective.

Nimsoft Documentation: Service Level Manager 78
A SLO is built around one or more constrained
Quality of Service (QoS) objects. The
constraint is a combination of source, target,
threshold and operating period settings for the
QoS object.
You may invalidate the objective for certain
periods, either known scheduled "down-time"
due to maintenance etc. or unforeseen
situations.
Breaches of the objective may also be reported
as alarms, as you could with SLAs.
These are the various fields in the main SLO
form:
Name The short name of the SLO.
Description A longer descriptive text, stating the e.g.
purpose of the SLO.
Achieved (status) Shows the compliance percentage of the
current SLO.
Expected (status) Shows the expected compliance percentage.
The Quality of Service Tab
QoS Name The official name of the Quality of Service
object.
QoS Description The description of the Quality of Service object
Source States the source of the QoS data. E.g.
computer, device etc
Target States the target of the QoS data. E.g. the disk,
network service, CPU, etc
Weight Shows the importance of the QoS constraint in
relation to the other QoS objects within the
Nimsoft Documentation: Service Level Manager 79
current SLO. The possible values are auto or a
percentage value.
Fulfilled Shows the level of fulfillment (percent) of the
QoS constraint. 100% means completely
fulfilled.
Operator
The operator code for the value comparison
Threshold
The value set as expected QoS value for the
QoS constraint.
Op.period
The defined operating period for the QoS
constraint
OK
The number of samples that are validated
against the threshold + operator and found to
be ok.
Total
The number of sampled data used in the
calculations.
Accuracy
The accuracy of the sampled data
Calc.method
The selected calculation method for the QoS
constraint
Order
The order of the QoS constraint in the list.
New [Button] Create a new QoS constraint within the current
SLO.
Edit [Button] Edit the selected QoS constraint.
Delete [Button] Removes the selected QoS constraint from the
current SLO.
Browse [Button] Browses the QoS samples related to the current
compliance period.
The Quality of Service constraints for the
current SLO shows a current state based on the
last computations by the SLA Engine. A green
indicator illustrates a positive direction, i.e. the
QoS is above the SLA compliance percentage.
A red indicator means that the QoS is not
conformant with the expected SLA fulfillment,
this may however, not mean that the objective
is breached. This depends on the weight of the
QoS constraint in relation to the other
constraints. The legend is as follows:
-The QoS is compliant within the defined
constraints (source, target, threshold and
period).
Nimsoft Documentation: Service Level Manager 80
-The QoS is not compliant.
-No compliance values are currently
available.
These buttons let you move QoS constraints up
or down in the list. Note that the buttons will
not appear if using a pre Nimsoft 3.30 SLM
database.
The Excluded Periods Tab
The service level objective list shows the status
of the objectives within the current SLA. The
table below describes the fields and the action
buttons related to SLOs.
From date Start of the exclusion period.
To date End of the exclusion period
New [Button] Create a new period within the current SLO.
Edit [Button] Edit the selected period.
Delete [Button] Removes the selected period from the current
SLO.
The Alarm Notification Tab
Breaches of the SLO may be reported as
alarms.
Nimsoft Documentation: Service Level Manager 81
Generate alarm on compliancy breaches
Check this option if you want an alarm to be
generated when the SLO breaches the value
specified in the Expected field (see below). A
standard Alarm is issued.
Expected
Set the compliance level threshold value for the
alarm.
Issue warning at
Check this option if you want a warning to be
issued at a specified compliance level prior to
the SLO breach
The Calculation Settings Tab
Here you can select the way the compliance for
the SLO is computed (see the section

Nimsoft Documentation: Service Level Manager 82
Compliance Calculation).
Calculation methods available depend on the
selected Calculation type.
Calculation type
If Formula is selected, you are
allowed to select one of the
Calculation methods from the drop-
down menu.
The calculation methods determine
how to use the calculated compliance
percentage from the QoS constraints.
The compliance percentage is defined
to be the percentage of time that the
QoS, constrained by e.g. operating
period and thresholds, should be
considered compliant within the
compliance period.
o Average
Calculates the average
compliance percentage from the
QoS constraints.
o Best
Selects and uses the compliance
percentage from the QoS
constraint with the best
compliance.
o Sequential
Summarizes the periods when the
expected value is not met for all
QoS constraints and calculates
the compliance.
The difference between 100 %
and achieved compliance for each
QoS is summarized and extracted
from 100%.
o Weight
Weights the compliance from the
different QoS constraints,
according to importance. When
weight is selected, the Weight
Properties dialog is opened,
enabling you to set the
importance of the different QoS
constraints.

Nimsoft Documentation: Service Level Manager 83
o Worst
Selects and uses the compliance
percentage from the QoS
constraint with the worst
compliance.
If Profile is selected, you are allowed
to select one of the defined
Calculation profiles (if any) from the
drop-down list. Note that these are
listed under the Calculation Profiles
node in the Navigation Pane.
You will then get the compliance
percentage for the SLO.
Defining a Quality of Service object
Any QoS enabled probe will initiate itself
(during startup) by sending a
QOS_DEFINITION message. This is picked up
by the Data Engine and decoded for
information. The content of this message refers
to a Quality of Service object in the database.
The object will automatically be created in the
database with the provided information. You
may, however, also create the QOS object
manually, by adding the definition using the
Service Level Manager. Select File > New <
Quality of Service from the menu bar.
The following table describes the various fields
in the dialog form:
Nimsoft Documentation: Service Level Manager 84
Field Description
Name The actual object name on the form QoS_xxx.
Description A short descriptive text.
Group The group the object belongs to.
Unit A string stating the unit (e.g. Milliseconds, Centimeter, etc.)
Unit
abbreviation
Used by reports and views (e.g. ms, cm)
Has maximum value
Defines the object with a maximum value.
Is of type
Boolean
Sets the type of the object to be Boolean (True/False).
Defining QoS Constraints
The Quality of Service data itself has no value
to the service objective unless it is constrained
to a specific time-period, specific source/target
information and rules to check the actual
sample values.
Pressing the New button in the SLO form
triggers the QoS constraint dialog-box.

Nimsoft Documentation: Service Level Manager 85
The following table describes the various fields
in the dialog-box:
Field Description
Object The Quality of Service object.
Description A short descriptive text.
Source From where the sample-value originates.
Target The target name of the sample, e.g. a disk, URL etc.
Value (Expect
Quality of Service to be)
The threshold value, used in conjunction with the rules
(greater than, less than etc.
Unit A QoS definition describes a unit for the QoS value (e.g.
kilo, % mS etc). This will be the default unit. For some QoS
objects you can select other units.
This drop-down list lets you select another unit, if available.
Note that the value will automatically be converted to
match the new value.
Example:
If the value initially is 1 second, and you change the unit to milliseconds, the value will automatically change to 1000.
Operating
period
The period the constraint is valid. You can select one of the
defined operating periods or select Always (means 24 hours
a day, 7 days a week).
Calculation
method
Here you can select Default or one of the custom-made
Calculation Profiles (if any) for QoS calculations. See the
sections Compliance Calculation, Calculation Profiles and
Creating a Calculation Profile. These settings describe the
way the SLO will calculate the compliance input from the
QoS constraints.
NOTE:
If selecting calculation method AND or OR, this will have

Nimsoft Documentation: Service Level Manager 86
the following effect on the SLA reports: The Weight,
Achieved and Expected columns will display N/A instead of a value.
The reason is that there is no individual calculation of the QoS series (all data series are calculated equally).
The value dropdown list will (if available)
reveal the following values:
Minimum sample Smallest value in sample range (last 24 hours)
Average sample Average value the last 24 hours.
Maximum
sample
Highest value in the sample range.
Defined
maximum value
The QoS definition states that a maximum value exists for
this QoS object, such as a disk sample.
Viewing the current sample-values
Use the QoS sample browser (see Viewing the
Quality of Service (QoS) Data) to determine
the best possible values for your QoS threshold
settings.
Distributing Importance (weight)
When setting up service level agreements and
objectives, we recognize the fact that some
objectives are more important than others. The
same fact applies to QoS constraints. The
weight distribution feature will help the user to
either automatically or manually set up
importance (measured in percent) for SLO or
QoS constraints. Clicking the Weight button in
the SLA dialog opens the weight dialog,
showing a pie chart representing the
importance (%).

Nimsoft Documentation: Service Level Manager 87
Automatic Weight Distribution
The weight will automatically be computed
based on the number of objects available
(objectives or constraints). This is the default
method.
Manual Weight Distribution
This mode enables the user to manually
distribute weight using the selected object
(from the list) and the slider. Please note that
all of the 100% needs to be distributed.
Creating a Compliance period
The compliance period will constrain the SLA
(with its underlying SLO and QoS constraints)
to a user-defined timeframe, complying with an
agreement between two parties. A typical
period for SLA monitoring is on a monthly
basis. You may, however, create daily and
weekly periods as you wish.
The compliance period will, depending on its
type (weekly and monthly) have fixed starting
dates. For weekly reports the starting day is
Mondays, and for the monthly reports the
starting day is the first day of the month.
However, it is possible to modify the starting
day according to your specific needs. E.g. let’s
say you need monthly reports running from the
15th
; then you adjust the starting date
accordingly.
Click the Compliance Period button on
the SLA dialog to open the Compliance Period
dialog.

Nimsoft Documentation: Service Level Manager 88
See below for a description of the difference in
the interpretation of the starting date (at the
bottom of the dialog) for the compliance period
types.
Daily The starting date is irrelevant.
Weekly The starting date defines the starting day in
every week.
Monthly The starting date defines starting day of every
month.
Timezone Setting
This option enables you to set the time zone for
your location. By default, the time zone of the
location where the data engine is located is
selected. As long as the SLM and the data
engine are located in the same time zone, this
setting should normally be used.
If you collect data from another time zone, and
you want the SLA report to reflect the time in
that zone, you can select this time zone here.
Creating an Operating Period
Operating periods are used to constrain the
measured values (Quality of Service) to
specific hours of any day.
The operating period is defined to be a
collection of time periods, and is used when we
define new SLAs. We use the Operating
Periods when defining the QoS constraints.
Samples falling outside these time
specifications will not influence the SLO/SLA
compliance requirements.
The Operating Period dialog is opened by
right-clicking the Operating Period Node in

Nimsoft Documentation: Service Level Manager 89
the Navigation Pane and selecting the New
option.
Give the operating period a name and an
optional description. Click the New button in
the dialog to add days and time specifications.
To edit an entry in the list, simply double-click
the entry to open the time specification dialog
for the selected entry.
For example, let's create an operating period
we can call Company Hours. First let's define
our work-hours. Normally, they are Monday-
Friday, from 0700 to 1700. The scheduled
downtime is every Tuesday at 1500-2000 (*).
The "Company Hours" profile will contain a
list of time-specifications (days and time) like
the one below:
Day From To
Monday 07:00 17:00
Tuesday 07:00 15:00 *
Wednesday 07:00 17:00
Thursday 07:00 17:00
Friday 07:00 17:00
* We simply ignore the scheduled downtime
because it is outside our "work hours".
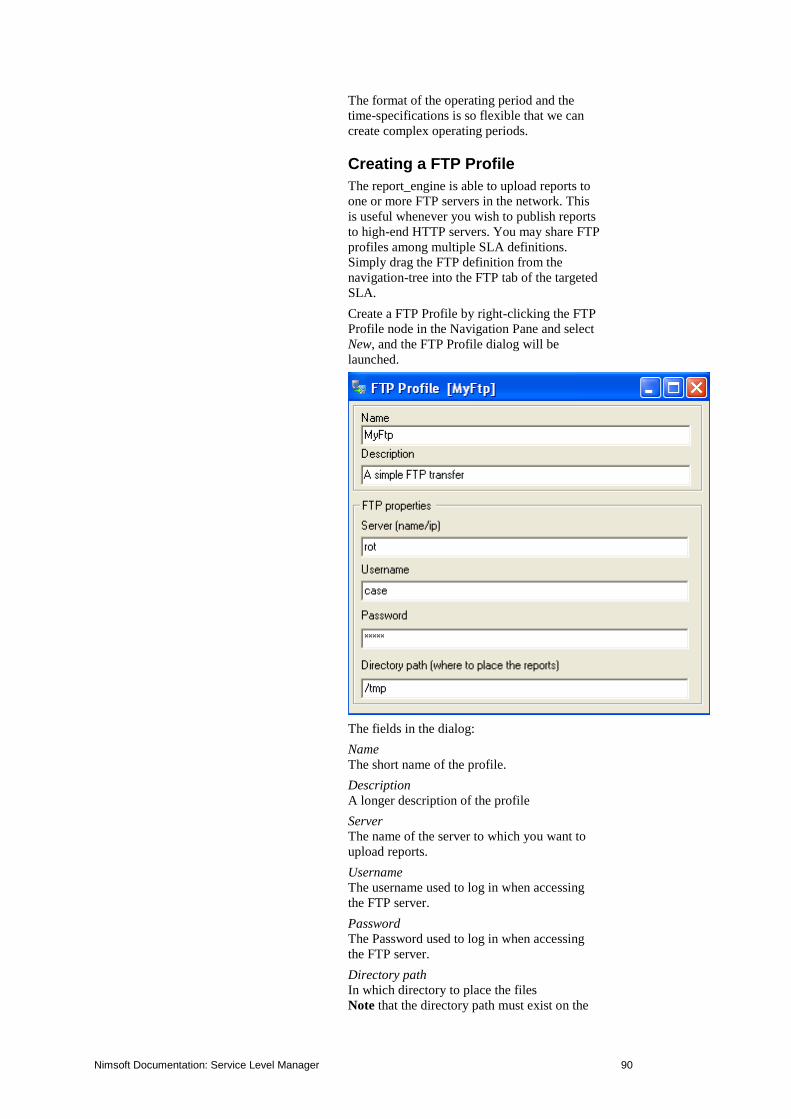
Nimsoft Documentation: Service Level Manager 90
The format of the operating period and the
time-specifications is so flexible that we can
create complex operating periods.
Creating a FTP Profile
The report_engine is able to upload reports to
one or more FTP servers in the network. This
is useful whenever you wish to publish reports
to high-end HTTP servers. You may share FTP
profiles among multiple SLA definitions.
Simply drag the FTP definition from the
navigation-tree into the FTP tab of the targeted
SLA.
Create a FTP Profile by right-clicking the FTP
Profile node in the Navigation Pane and select
New, and the FTP Profile dialog will be
launched.
The fields in the dialog:
Name The short name of the profile.
Description A longer description of the profile
Server The name of the server to which you want to
upload reports.
Username The username used to log in when accessing
the FTP server.
Password The Password used to log in when accessing
the FTP server.
Directory path In which directory to place the files
Note that the directory path must exist on the
Nimsoft Documentation: Service Level Manager 91
target computer and that the user specified
must have sufficient privileges.
Creating a Calculation Profile
Users are allowed to define their own
calculation profiles. This is done by right-
clicking one of the Calculation Profiles sub-
nodes in the Navigation Pane and selecting
New.
Right-clicking the SLO Calculation
sub-node (or one of the defined SLO
calculation profiles), selecting New,
opens an empty dialog enabling you
to define a new SLO Calculation
profile.
Right-clicking the QoS Calculation
sub-node (or one of the defined QoS
calculation profiles), selecting New,
opens an empty dialog enabling you
to define a new QoS Calculation
profile.
These Calculation Profiles can be selected
when defining the calculation properties for
Service Level Objects (SLOs) and Quality of
Service Constraints.
The profiles are based on built-in plug-ins
distributed with the Service Level Manager
application.

Nimsoft Documentation: Service Level Manager 92
Name Give the new Calculation profile a
name in this field.
Description Give a short description of the
Calculation profile in this field.
Calculation You can select one of the available
calculation plug-ins from the drop-
down list.
Available plug-ins in the list depends
on if you have opened the dialog for a
SLO calculation profile (multi-series
calculations) or the list for a QoS
calculation (single-series
calculations).
The figure above shows the dialog for
the QoS calculation profiles.
We currently have four plug-ins:
For QoS calculations:
Calculate availability from the
average of all samples.
Finds the average value of all
samples and compares this value
against the defined threshold
value.
- If the average value of all
samples meets the constraints, the
availability for that QoS is 100%.
- If the average value of all
samples does not meet the
constraints, the availability for

Nimsoft Documentation: Service Level Manager 93
that QoS is by default set to 0%.
Note: Setting the Breach value to
another value, using Variable
configuration (see below), and
the percentage (on breach) can be
set to another value than 0%.
Also note that you can define the
way NULL values are handled.
(NULL value, typically if a probe
does not measure a value from
the target due to a timeout, e.g. no
answer to a ping).
Example:
Threshold: 5
Samples: 5,4,8,6,2 and one
NULL sample.
Define NULL sample as ignored
and Breach Value as 35%, using
the Variables Configuration.
Availability: The NULL sample is
ignored, giving an average value
of (5+4+8+6+2)/5= 4.6.
This is below the threshold (5),
and therefore a breach condition
(which we have set to 35%).
o Calculate availability from
number of samples that meets the
constraints.
This profile calculates the
availability by finding the
percentage of samples that meets
the constraints.
Note that you may, using the
Variables Configuration, define
how missing samples should be
treated: either ignored (and not
influencing the availability) or
treated as samples not meeting
the constraints.
Example:
Threshold: 5
Samples: 5,4,8,6,2 and one
sample missing.
Define missing samples as
ignored, using the Variables
Configuration).
Availability: One sample missing
(ignored), 3 of four samples
meets the constraints, giving an
availability of 75%.
o Calculate availability from the
median.
The median of a number of
values is found by sorting the
values in a row in descending
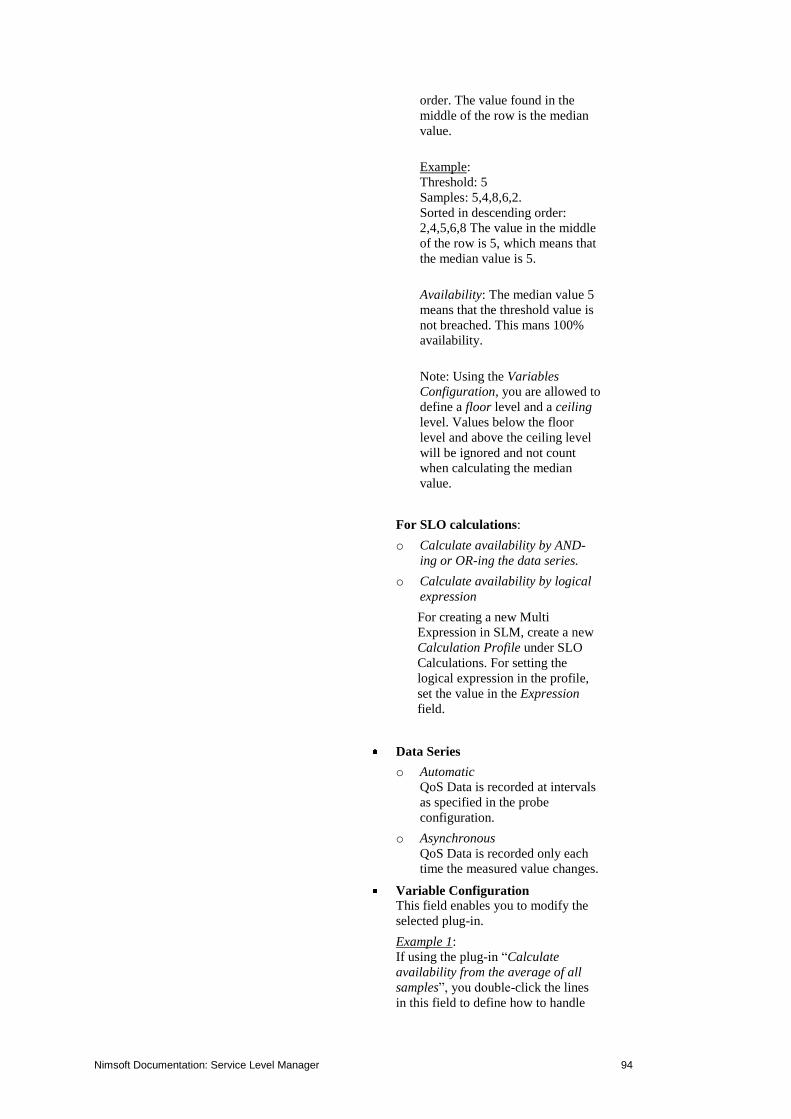
Nimsoft Documentation: Service Level Manager 94
order. The value found in the
middle of the row is the median
value.
Example:
Threshold: 5
Samples: 5,4,8,6,2.
Sorted in descending order:
2,4,5,6,8 The value in the middle
of the row is 5, which means that
the median value is 5.
Availability: The median value 5
means that the threshold value is
not breached. This mans 100%
availability.
Note: Using the Variables
Configuration, you are allowed to
define a floor level and a ceiling
level. Values below the floor
level and above the ceiling level
will be ignored and not count
when calculating the median
value.
For SLO calculations:
o Calculate availability by AND-
ing or OR-ing the data series.
o Calculate availability by logical
expression
For creating a new Multi
Expression in SLM, create a new
Calculation Profile under SLO
Calculations. For setting the
logical expression in the profile,
set the value in the Expression
field.
Data Series
o Automatic
QoS Data is recorded at intervals
as specified in the probe
configuration.
o Asynchronous
QoS Data is recorded only each
time the measured value changes.
Variable Configuration This field enables you to modify the
selected plug-in.
Example 1:
If using the plug-in “Calculate
availability from the average of all
samples”, you double-click the lines
in this field to define how to handle
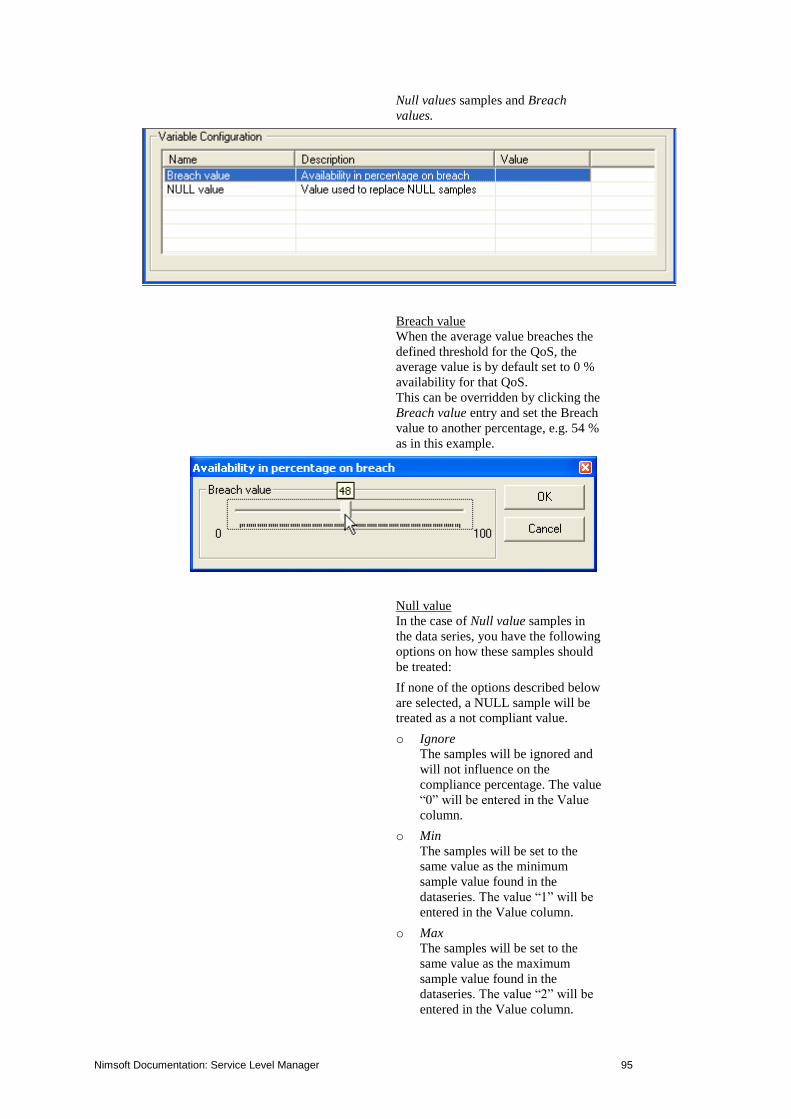
Nimsoft Documentation: Service Level Manager 95
Null values samples and Breach
values.
Breach value
When the average value breaches the
defined threshold for the QoS, the
average value is by default set to 0 %
availability for that QoS.
This can be overridden by clicking the
Breach value entry and set the Breach
value to another percentage, e.g. 54 %
as in this example.
Null value
In the case of Null value samples in
the data series, you have the following
options on how these samples should
be treated:
If none of the options described below
are selected, a NULL sample will be
treated as a not compliant value.
o Ignore
The samples will be ignored and
will not influence on the
compliance percentage. The value
“0” will be entered in the Value
column.
o Min
The samples will be set to the
same value as the minimum
sample value found in the
dataseries. The value “1” will be
entered in the Value column.
o Max
The samples will be set to the
same value as the maximum
sample value found in the
dataseries. The value “2” will be
entered in the Value column.
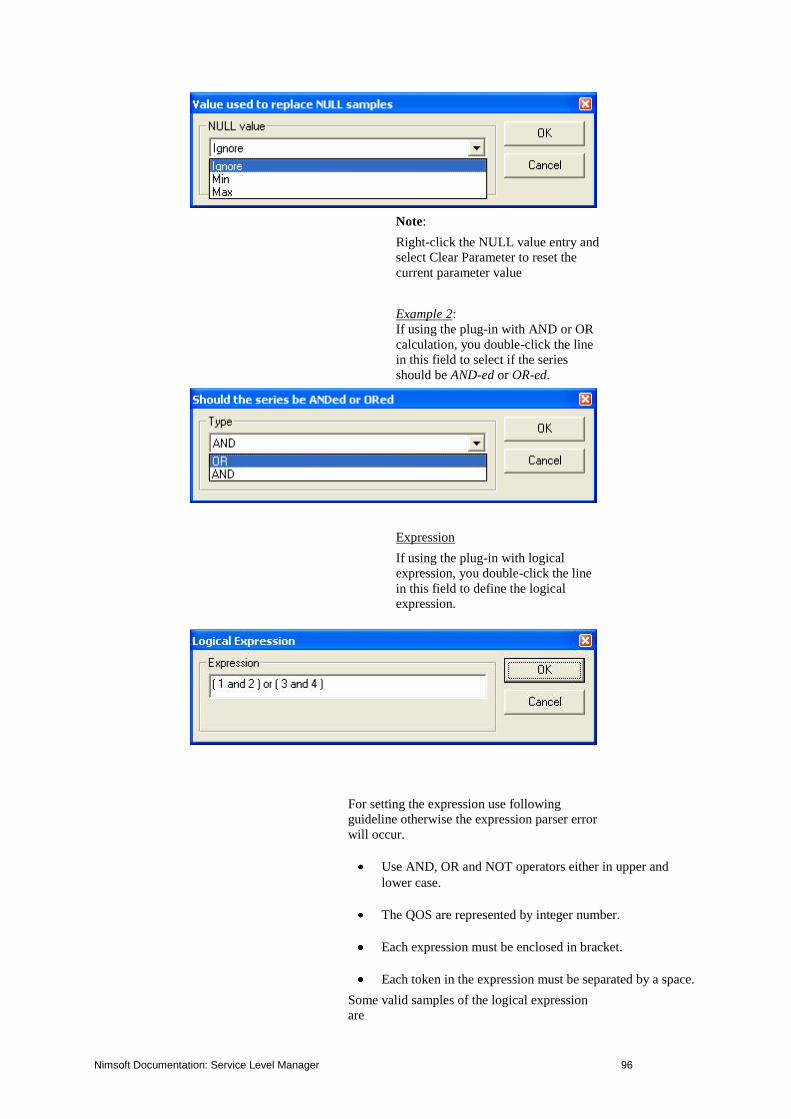
Nimsoft Documentation: Service Level Manager 96
Note:
Right-click the NULL value entry and
select Clear Parameter to reset the
current parameter value
Example 2:
If using the plug-in with AND or OR
calculation, you double-click the line
in this field to select if the series
should be AND-ed or OR-ed.
Expression
If using the plug-in with logical
expression, you double-click the line
in this field to define the logical
expression.
For setting the expression use following
guideline otherwise the expression parser error
will occur.
Use AND, OR and NOT operators either in upper and
lower case.
The QOS are represented by integer number.
Each expression must be enclosed in bracket.
Each token in the expression must be separated by a space.
Some valid samples of the logical expression
are

Nimsoft Documentation: Service Level Manager 97
( 1 or 2 )
( 1 AND 2 )
( 1 and ( NOT 2 ) )
( 1 AND 2 ) OR ( 3 AND ( not 4 ) )
Excluding Quality of Service Data
Backup, hardware/software upgrades etc. are
normal system administrative tasks that make
the systems unavailable for shorter or longer
periods of time. Normally these procedures are
placed to off-hours, such as evenings and
weekends. Scheduled maintenance is covered
by the agreement between the service provider
and the customer. SLM allows you to exclude
data for the period in question prior to the
event, or after the event (this requires a
recalculation of the SLA compliance).
Excluded periods may be created in two
different ways:
You may create an excluded period
for a specific SLA by or SLO.
You may create an excluded period
for multiple SLAs by running the Add
Exclude Period wizard (see the
section Creating an Exclude Period,
using the Add Exclude Period
Wizard).
Creating an Exclude Period
You may create an excluded period for a
specific SLA by or SLO by selecting the
Excluded Periods tab in the SLA/SLO dialog
and clicking the New button. This opens the
Exclude Period dialog. Note that Ticking the
Add Note option expands the dialog to display
the Note section, which otherwise is hidden.

Nimsoft Documentation: Service Level Manager 98
From Defines the start date/time for the exclude
period.
To Defines the end date/time for the exclude
period.
Add Note Checking this option expands the dialog to
display the Note section, which otherwise is
hidden.
The textual note related to this exclude period.
Official note (on reports) If this option is checked, the excluded period
and the note will appear on the reports
Title and text
A title and a short text, describing the reason
for the excluded period
You may exclude data for the entire SLA or
per SLO. The excluded data will not influence
the SLA compliance calculations, and should
therefore also be present in the report as a note.
Creating an Exclude Period, using the Add Exclude Period Wizard
You may create an exclude period for multiple
SLAs by running the Add Exclude Period
wizard. Launch this wizard by selecting Tools
> Wizards > Add Exclude Period from the
menu bar.
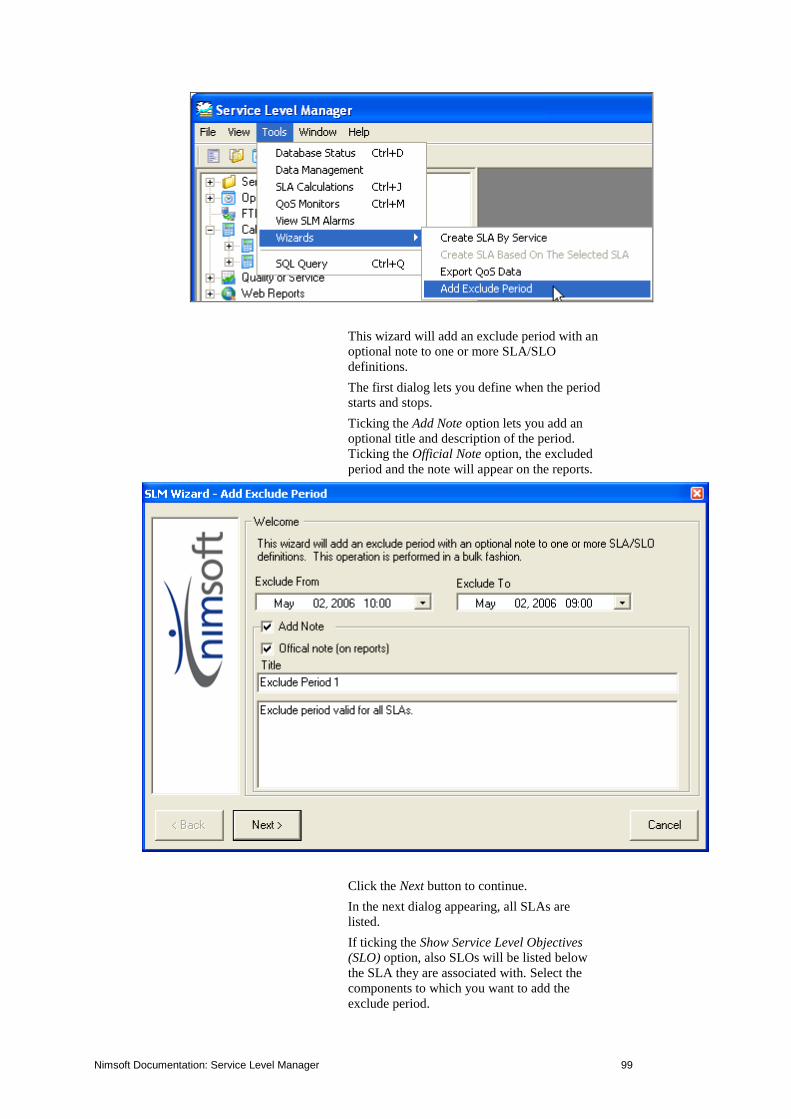
Nimsoft Documentation: Service Level Manager 99
This wizard will add an exclude period with an
optional note to one or more SLA/SLO
definitions.
The first dialog lets you define when the period
starts and stops.
Ticking the Add Note option lets you add an
optional title and description of the period.
Ticking the Official Note option, the excluded
period and the note will appear on the reports.
Click the Next button to continue.
In the next dialog appearing, all SLAs are
listed.
If ticking the Show Service Level Objectives
(SLO) option, also SLOs will be listed below
the SLA they are associated with. Select the
components to which you want to add the
exclude period.
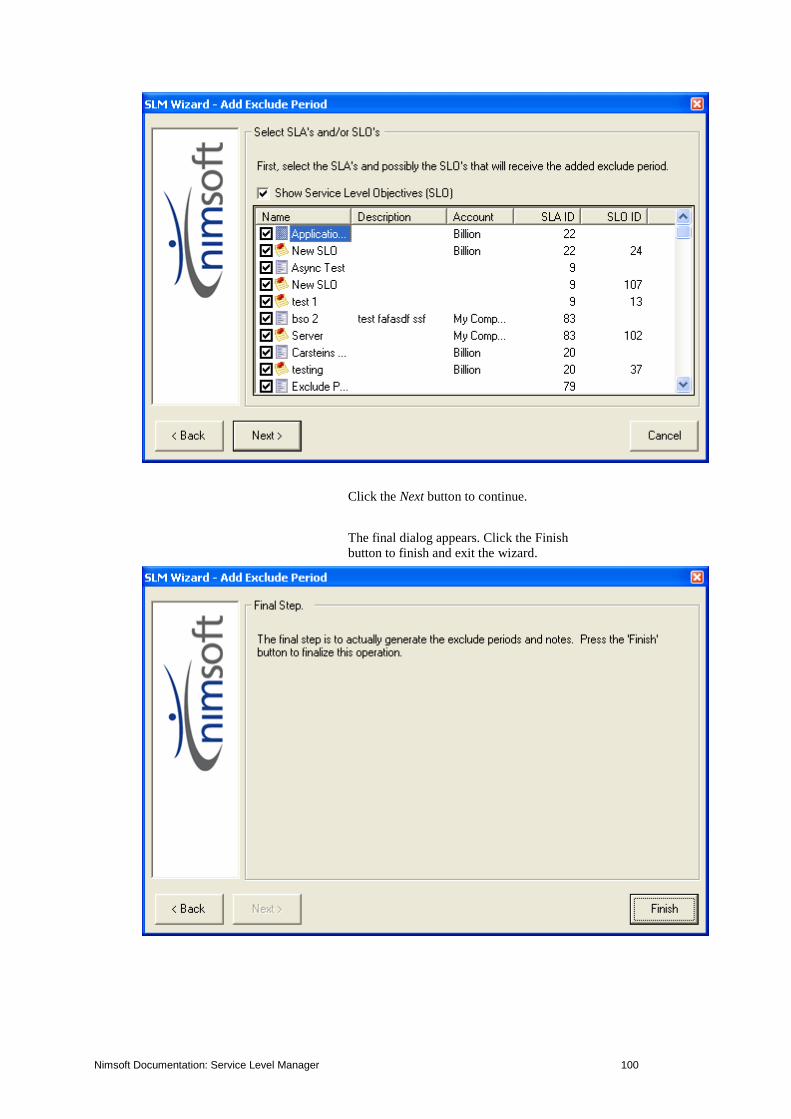
Nimsoft Documentation: Service Level Manager 100
Click the Next button to continue.
The final dialog appears. Click the Finish
button to finish and exit the wizard.

Nimsoft Documentation: Service Level Manager 101
Example - Defining a simple Service Level Agreement
Important prerequisite: To be able to measure the service level, you
must ensure that the probes monitoring your
system are configured to generate QoS (see
description in the section Setting up a Probe to
Deliver Quality of Service Data).
The steps involved when defining a simple
SLA are as follows:
Define your operating periods.
Create a new SLA and define your
compliance requirement and measure
period.
Define the Service Level Objectives
that make up your agreement.
Advanced Options: adding notes, FTP
details and alarms.
Excluded periods.
Step 1 – Define an Operating Period
The first step is to define an operating period.
You will need it in step 3.
Select File > New > Operating Period.
Defining no period will default to a 24 hours x
7 days per week service availability, but most
organizations have a little more complexity
than that. E.g. there may be a regularly
scheduled maintenance window when services
do not have to be available, or some services
may only need to be available during business
hours. In the example below we have chosen to
define a “business hours” period.
You can define multiple periods for multiple
different services as appropriate.
See also the section Creating an Operating
Period for more information.
Defined operating periods will appear in the
Operating Periods node in the Navigation
Pane, available when defining new SLAs.

Nimsoft Documentation: Service Level Manager 102
Step 2 – Create a new SLA and Define the Service Level Compliance Requirement
Select File > New > SLA.
Give the new SLA a name and a description,
and set the compliance percentage to 99,9 %.

Nimsoft Documentation: Service Level Manager 103
Click the Set period button.
This is the period over which the service level
will be measured and your committed
compliance amount (measured as a percentage)
i.e. if you are going to define a service level of
say 99.9% availability; over which period will
this be measured? You could define this as a
daily service level, in which case your SLA

Nimsoft Documentation: Service Level Manager 104
compliance will be measured on a day-to-day
basis, or it could be measured weekly or
monthly. You also define when you want the
measurement period to start.
In this case we have selected a weekly service
level that starts on a Monday and ends on
Sunday and we are committed to 99.9%
compliance.
Leave the Timezone field empty if your SLM
is located in the same time zone as the data
engine.
Also see the section

Nimsoft Documentation: Service Level Manager 105
Compliance Calculation for selecting a
Calculation method different from Average,
which is default.
Step 3 – Define the Individual Service Level Objectives
Each Service Level Agreement is comprised of
one or more Service Level Objectives. Each
objective is a data point that we can measure
and calculate into the report – the available
data points are automatically prompted to the
user by using the pull-down tabs.
Make sure the Objectives (SLO) folder is
selected and click the New button.
The Service Level Objective window appears.
(Note that the section Creating a Service Level
Objective (SLO) contains additional
information).
Give the new Service Level Objective a name
and a description. Select the Quality of Service
folder and click the New button.
Now the Quality of Service Constrains dialog
appears.
In this case we have selected the download
time for our home page (URL Response) to be

Nimsoft Documentation: Service Level Manager 106
less than or equal to 6 seconds and we have
selected that this objective should be measured
in the “business hours” period that we defined
in step 1. We also have the ability to manually
“weight” each objective – so that if there are
several objectives for us to meet, we can tell
the product to apply either equal weightings
(automatically selected) or to weight one
objective more heavily than others. In this case
we will just select a single objective. See also
the section Manual Weight Distribution for
more information.
If you don’t want to use the default calculation
method, you also have the possibility to select
one of the customer-made Calculation Profiles
(if any). See the section Calculation Profiles.
These profiles describe the way the SLO will
calculate the compliance input from the QoS
constraints.
The definition of the Service Level Agreement
is now complete. Step 4 describes several more
advanced functions that may be interesting.
Otherwise proceed with
Step 5 – Excluding Periods
Step 4 – Advanced Functions
Actually, we have now completed the setup of
the service level agreement but there are
several advanced functions that we will now
introduce as follows:
Alarming
Notes
File Transfer
Step 4a – Alarming

Nimsoft Documentation: Service Level Manager 107
We can tell the product to send us an alarm
when the “actual” compliance drops below
expected levels. In this case we have asked for
an alarm to be generated if the actual
compliance is 99.8% or lower. Alarms can be
issued to the Enterprise Console, can be
forwarded to other commonly used alarm
consoles such as OpenView, Unicenter, Tivoli
etc, or can be forwarded to email, pagers or cell
phones.
Step 4b – Notes
We can enter a note here as a reminder of some
information if we wish. If we check the “offical
note” box then this note will appear on our
reports. In this example we are informing our
users of when the SLA monitoring started.

Nimsoft Documentation: Service Level Manager 108
Step 4c – File Transfer
The generated reports can automatically be put
into a web directory for the pages to be served
up by your web server. All reports are
generated in HTML. Alternatively, we can
select an FTP site to send the reports to.
For more information, see the section Creating
a FTP Profile.
Step 5 – Excluding Periods
Now the SLA setup is complete. But what
happens if there is an event outside our control
that we want to “exclude” from the SLA
calculation? Some examples of this could be
that you have agreed with your customers that
there will be a one-off maintenance window

Nimsoft Documentation: Service Level Manager 109
required for applying some much needed
Service Packs. Or, maybe there was a complete
power outage to your building that you agree
should not count towards the SLA calculation
or perhaps a company holiday.
We simply enter the period that we wish to
exclude, and add a “note” to that exclusion.
Again, by selecting the “official note” box, this
note will appear on the reports that everyone
gets to see. This feature is extremely useful,
because it means that we no longer have to go
back and manually recalculate data.
In this case, we have agreed with our web-
hosting provider that there was critical
maintenance to be performed on our SQL
Server database to protect it from the latest
Internet worm. We have agreed to take a 2-
hour outage that will not count towards the
SLA Measurement.
For more information, see the section Creating
Service Level Agreement.
Once we save our work, the product then goes
into action to generate the reports. It will by
default generate a new SLM report every hour,
although you can change that period to your
own specifications. Once the report is
generated, we can go back into our SLM
definition where we can observe trending
information (i.e. are we trending towards a
breach in the future). We can also see the
historical information for this service level.
The reports can be viewed either through your
internal web server, from the FTP site you sent
them to or within the product itself.
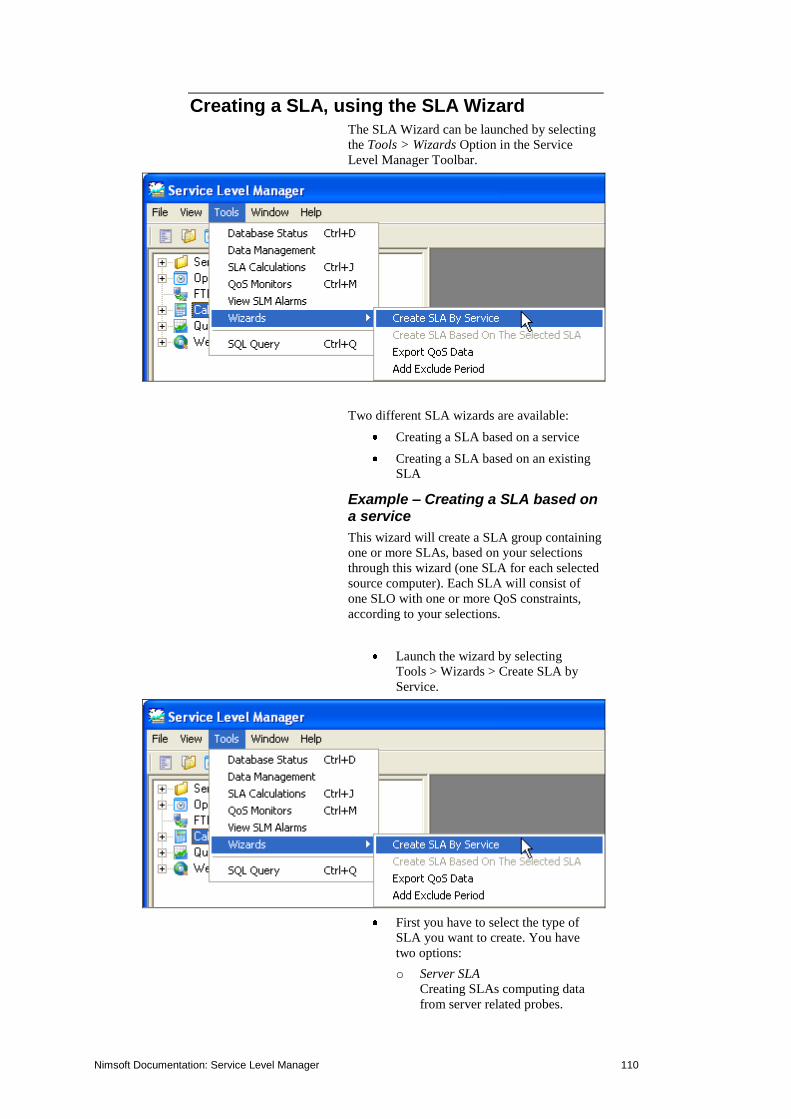
Nimsoft Documentation: Service Level Manager 110
Creating a SLA, using the SLA Wizard The SLA Wizard can be launched by selecting
the Tools > Wizards Option in the Service
Level Manager Toolbar.
Two different SLA wizards are available:
Creating a SLA based on a service
Creating a SLA based on an existing
SLA
Example – Creating a SLA based on a service
This wizard will create a SLA group containing
one or more SLAs, based on your selections
through this wizard (one SLA for each selected
source computer). Each SLA will consist of
one SLO with one or more QoS constraints,
according to your selections.
Launch the wizard by selecting
Tools > Wizards > Create SLA by
Service.
First you have to select the type of
SLA you want to create. You have
two options:
o Server SLA
Creating SLAs computing data
from server related probes.
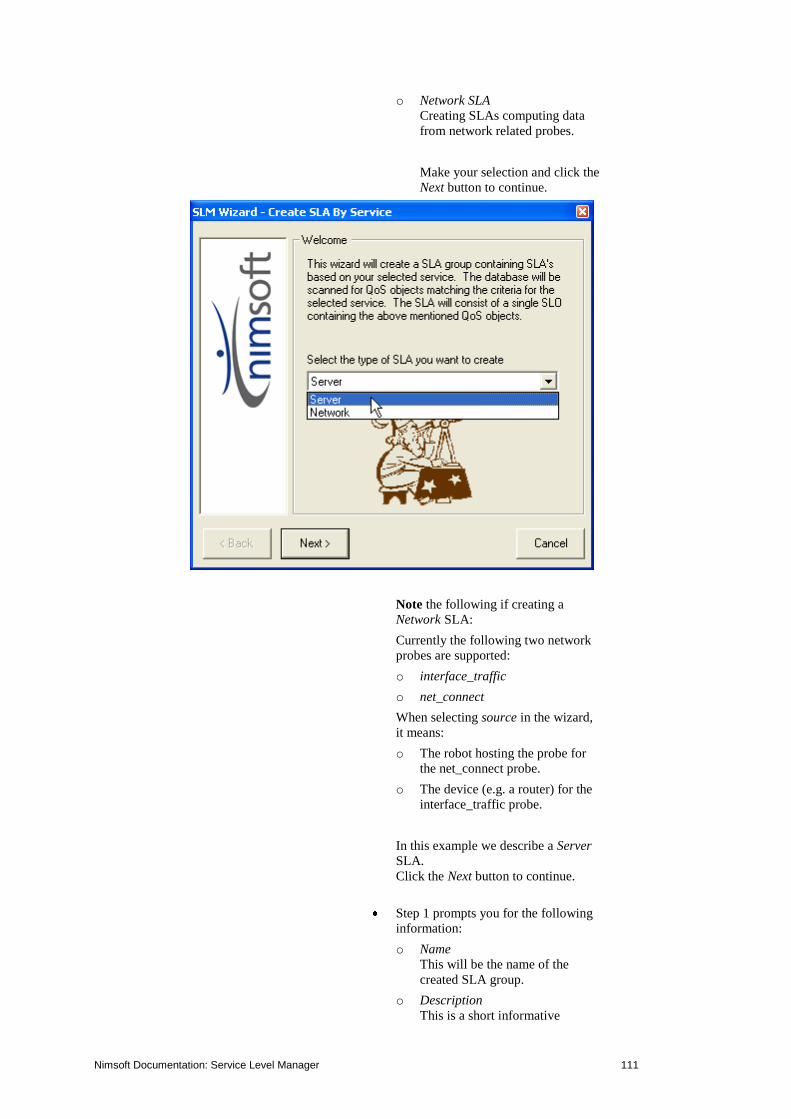
Nimsoft Documentation: Service Level Manager 111
o Network SLA
Creating SLAs computing data
from network related probes.
Make your selection and click the
Next button to continue.
Note the following if creating a
Network SLA:
Currently the following two network
probes are supported:
o interface_traffic
o net_connect
When selecting source in the wizard,
it means:
o The robot hosting the probe for
the net_connect probe.
o The device (e.g. a router) for the
interface_traffic probe.
In this example we describe a Server
SLA.
Click the Next button to continue.
Step 1 prompts you for the following
information:
o Name
This will be the name of the
created SLA group.
o Description
This is a short informative

Nimsoft Documentation: Service Level Manager 112
description of the SLA. This
information will be displayed in
the Description field of each of
the SLAs created through this
wizard.
o Select Compliance percentage,
Compliance period, QoS
calculation method and QoS
calculation method as described
in the chapter Creating Service
Level Agreements.
Optionally attach the SLA to an
account.
Click the Next button to continue.
Step 2 enables you select the cdm
properties for the SLAs. You can
select:
o If you want to include CPU
usage, Memory usage and Disk
usage.
o Which disks to include?
o If you want to completely skip
the cdm part (selecting Do not
include).
Click the Next button to continue.

Nimsoft Documentation: Service Level Manager 113
Step 3 enables you select the
ntservices properties for the SLAs.
You can select:
o One or more of the services
listed.
o If you want to completely skip
the services part.
Click the Next button to continue.

Nimsoft Documentation: Service Level Manager 114
Step 4 enables you select the
processes properties for the SLAs.
You can select:
o One or more of the processes
listed.
o If you want to completely skip
the processes part.
Click the Next button to continue.
Finally you can select one or more
QoS Source. One SLA will be created
for each of the selected QoS sources,
and the SLAs will be placed in the
SLA group created with the name
specified in step 1.
Click the Next button to continue.
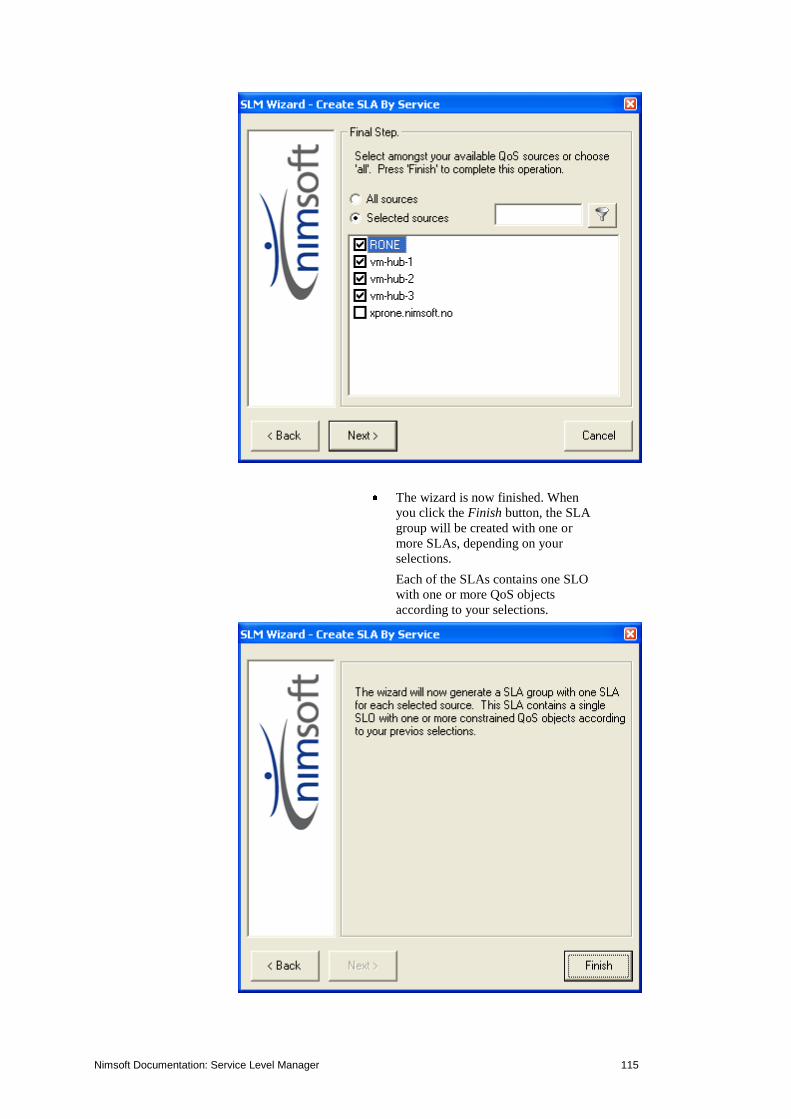
Nimsoft Documentation: Service Level Manager 115
The wizard is now finished. When
you click the Finish button, the SLA
group will be created with one or
more SLAs, depending on your
selections.
Each of the SLAs contains one SLO
with one or more QoS objects
according to your selections.

Nimsoft Documentation: Service Level Manager 116
Example – Creating a SLA based on the selected SLA
This wizard will create a SLA, based on a SLA
selected in the Navigation Pane. The
underlying SLO(s) and QoS definitions for the
selected SLA will be used as a template.
Launch the wizard by selecting
Tools > Wizards > Create SLA Based
On The Selected SLA.
Give the new SLA a name and an
optionally short description.
The SLA Description field will
initially contain the description of the
SLA that we use as basis for the new
SLA.
The Based on field will contain the
name of the SLA you have selected to
use as a template.
Select an account from the drop-down
list at the bottom of the dialog if you
want to attach the new SLA to an
account, otherwise leave the field
empty.
Click the Next button to continue.

Nimsoft Documentation: Service Level Manager 117
The next dialogs ask you to choose a
source and a target for all of the QoS
definitions defined for the template
SLA. Select your definitions (note
that you may skip one or more QoS
objects for the new SLA by checking
the Skip this QoS object option).
Click the Next button to continue.

Nimsoft Documentation: Service Level Manager 118
When all QoS objects are defined, the
following dialog appears:
Click the Finish button, and the newly
defined SLA will appear in the
Navigation Pane.
If the new SLA is based on a SLA in a
SLA group, the new SLA will be
placed in the same group.
Creating QoS Monitor Profiles The possibility to create monitoring profiles
that are based on QoS data instead of live
information from a system the way a normal
probe works was introduced in SLM version
4.30.
The feature will be activated and visible,
provided that the qos_engine probe is
installed.
For each QoS Object you will be allowed to
create one or more monitoring profiles of same
or different types.
A dedicated probe (the qos_engine) will
subscribe to QoS messages, each QoS message
will be checked to see if it fits a monitoring
profile (a QoS can match to more than one
profile). If one or more profiles match the
incoming QoS message, the values are
evaluated and alarms issued if a threshold
violation is detected.
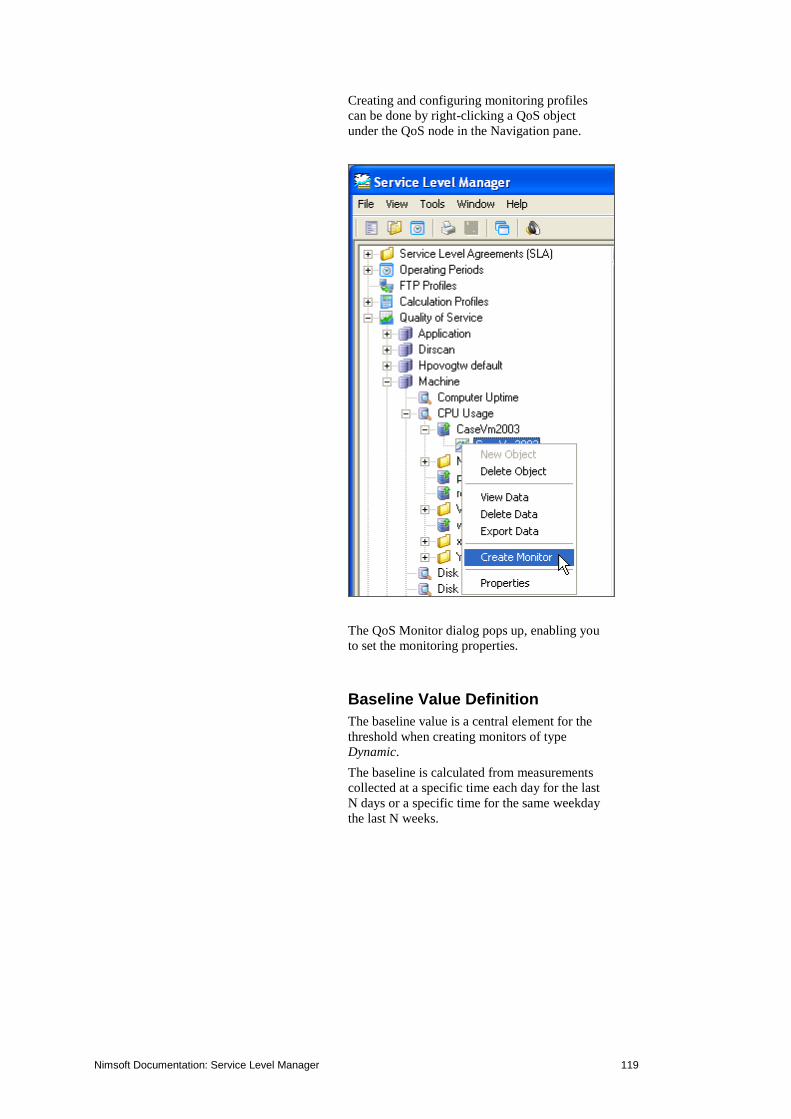
Nimsoft Documentation: Service Level Manager 119
Creating and configuring monitoring profiles
can be done by right-clicking a QoS object
under the QoS node in the Navigation pane.
The QoS Monitor dialog pops up, enabling you
to set the monitoring properties.
Baseline Value Definition
The baseline value is a central element for the
threshold when creating monitors of type
Dynamic.
The baseline is calculated from measurements
collected at a specific time each day for the last
N days or a specific time for the same weekday
the last N weeks.
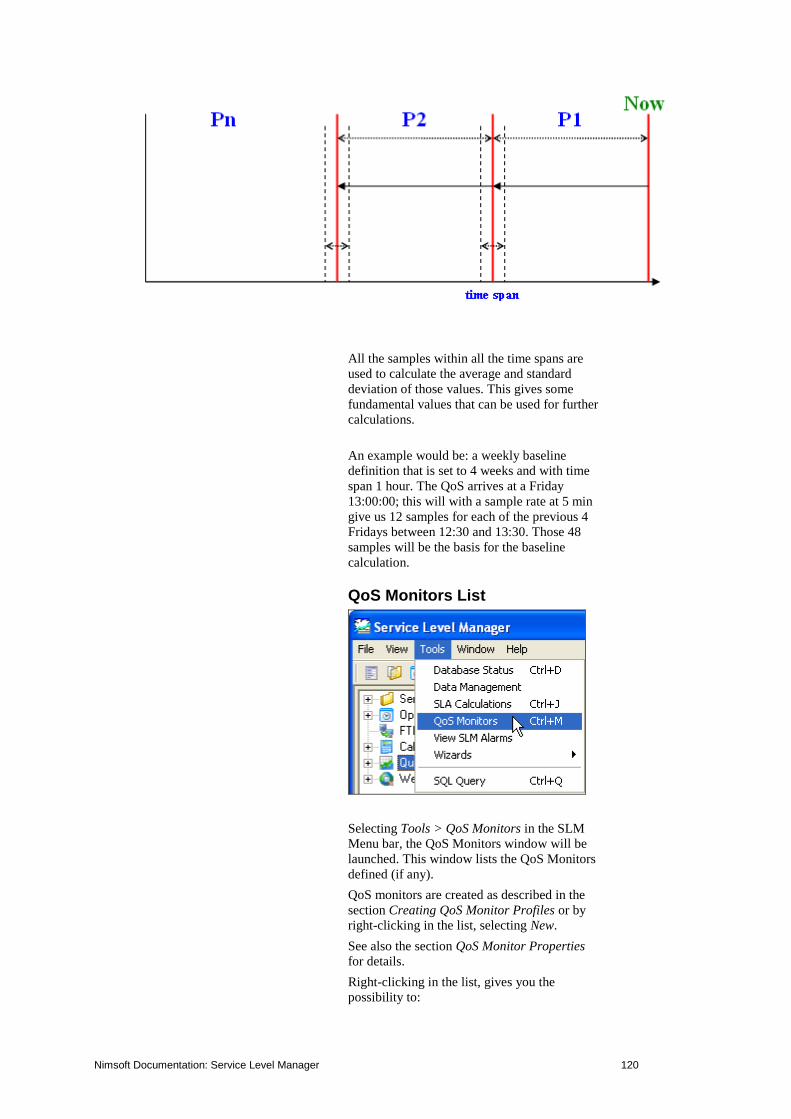
Nimsoft Documentation: Service Level Manager 120
All the samples within all the time spans are
used to calculate the average and standard
deviation of those values. This gives some
fundamental values that can be used for further
calculations.
An example would be: a weekly baseline
definition that is set to 4 weeks and with time
span 1 hour. The QoS arrives at a Friday
13:00:00; this will with a sample rate at 5 min
give us 12 samples for each of the previous 4
Fridays between 12:30 and 13:30. Those 48
samples will be the basis for the baseline
calculation.
QoS Monitors List
Selecting Tools > QoS Monitors in the SLM
Menu bar, the QoS Monitors window will be
launched. This window lists the QoS Monitors
defined (if any).
QoS monitors are created as described in the
section Creating QoS Monitor Profiles or by
right-clicking in the list, selecting New.
See also the section QoS Monitor Properties
for details.
Right-clicking in the list, gives you the
possibility to:

Nimsoft Documentation: Service Level Manager 121
Create new QoS monitors.
Edit the properties for the selected
QoS monitor (see QoS Monitor
Properties).
Delete QoS monitors.
View the baseline values for the
selected monitor (see Baseline Value
Definition).
QoS Monitor Properties

Nimsoft Documentation: Service Level Manager 122
Monitor Name
The monitor name is automatically filled in,
based on the QoS name, source and target. This
name may be overruled by a name of your own
choice
Monitor Subsystem
This field is automatically filled in with the
sub-system ID for the device, identifying from
which part which part of the system the QoS
and alarms come. The sub-system IDs are
maintained by the Nimsoft Alarm Server (nas).
Monitor Types
Select a monitor type to be used as a basis for
the threshold calculation. Your choice here
depends on what you want to achieve:
Static
Use Static if you want alarms to be issued if
the QoS value exceeds the threshold specified.
You may specify the threshold as an absolute
value or as a percentage of the maximum value

Nimsoft Documentation: Service Level Manager 123
(maximum value is only available for QoS
types with maximum size, otherwise grayed
out). You may also select that at least n
consecutive breaches must occur before an
alarm will be issued.
Dynamic
Use Dynamic if you for example want to
consider that the QoS values have a regular
fluctuation, such as high during the work hours
and low at night.
Alarms will be issued if the QoS value exceeds
the threshold, calculated from the baseline
value.
You must specify Period Type, Periods and
Timespan to find the baseline value, which will
be used to calculate the error threshold.
Period Type is day or week.
Periods are numbers, defining how
many days or weeks to be used to
calculate the Baseline.
Timespan is the time window within
each period, from which samples
should be used to calculate the
Baseline value.
The baseline is calculated from measurements
collected at a specific time each day for the
last N days or a specific time for the same
weekday the last N weeks.
The threshold is defined as an expression that
is calculated in a Lua script. The expression
can contain the following variables that are
calculated based on the baseline settings:
AVG
STDEV
MIN
MAX
COUNT
Example:
Period Type: Day
Periods: 4
Timespan 1 hour
A sample collected at for example 12.15
o’clock, will be compared with the threshold,
which is calculated from the Baseline value.
The Baseline value will be calculated based on
the average value of the samples collected
within the timespan (1 hour) for the four past
days.

Nimsoft Documentation: Service Level Manager 124
The threshold can be by either selecting one of
the formulas in the drop-down list, such as
20% Above Baseline.
Selecting Custom, you may specify a threshold
manually.
Percentile
As for Dynamic (see above), you may use
Percentile if you for example want to consider
that the QoS values have regular fluctuations.
Alarms will be issued if the QoS value exceeds
the threshold, which is a percentile of the
values of the samples collected within the time
spans for the periods specified.
The threshold can be specified as for example
greater than the 95 percentile of the calculated
value.
Alarm thresholds:
Error thresholds must be defined for the QoS
monitors in order to have alarm messages
issued on threshold breaches.
For monitors configured to use monitor type
Static and Dynamic, it is also possible to define
a warning threshold, and you may also select to
monitor for unavailable data.
12.15 12.15 12.15 12.15 12.15
4 3 2 1 Days
1 HOUR
1 HOUR
1 HOUR
1 HOUR

Nimsoft Documentation: Service Level Manager 125
The operands available to be used to set the
error- and warning thresholds are:
Less Than
Less Than Or Equals To
Equals to
Greater Than
Greater Than Or Equals To
Threshold values
Custom
Selecting Custom, you can compose
your own threshold value. If first
selecting one of the predefined
threshold values, and then selecting
Custom
Baseline
The baseline is calculated from
measurements collected at a specific
time each day for the last N days or a
specific time for the same weekday
the last N weeks.
10 % Above Baseline
20 % Above Baseline
Baseline + Standard Deviation
Baseline + 20 % of Stdev
Baseline Period Minimum
Baseline Period Maximum

Nimsoft Documentation: Service Level Manager 126
The alarm message text can contain some
variables that will be expanded before the
alarm is sent. The following variables are
supported:
NAME
MONID
VALUE
OPERATOR
THRESHOLD
AVG (dynamic)
STDEV (dynamic)
MIN (dynamic)
MAX (dynamic)
COUNT (dynamic)
A typical alarm message example would be:
$NAME has breached the threshold value
($THRESHOLD)
Web Reports Web reports can be opened and watched by
double-clicking the report icon under the WEB
Reports Node in the Navigation Pane.
The reports are divided into two groups:
SLA Reports.
These are automatically generated for
each of the SLAs on a schedule
defined in the sla_engine
configuration tool.
Note that the reports are grouped with
the same structure as under the SLA
node in the Navigation Pane.
QoS Reports.
These reports have to be created.
Right-clicking the QoS Reports sub-
node and selecting Configure, opens
the report_engine configuration tool,
where you can define QoS-reports.
Report templates Note that the layout of the reports is
determined by the selected report template.
These templates are selected using the report_
engine configuration tool.
For more details, please refer to SLM Probes
report_engine report_engine
Configuration section in the Probes online
help.

Nimsoft Documentation: Service Level Manager 127
The templates can easily be modified as
described here:
Customizing SLA reports
See the section How to Customize your SLA
Reports.
Customizing QoS reports
See SLM Probes report_engine
report_engine Configuration section in the
Probes online help.
SLA Reports
The following reports are generated:
Service Level Agreement (SLA)
reports
It is not necessary to define these
reports, as they are automatically
generated (one report for each SLA)
as scheduled in the sla_engine.
The report_engine configuration tool
(see) lets you select templates
determining the layout of the reports.
The generated SLA reports are
composed of the following pages:
o SLA overview page, reflecting
the status for the SLA and for
each of the SLOs.
o SLO reports (one for each SLO),
reflecting the status for the SLO
and for each of the QoS
constraints.
o QoS graphs for each of the QoS
constraints.
o SLA history page, where you can
watch the historical SLA trend
and also see previous reports.
Note that right-clicking a group and selecting
View Summary opens a summary report for all
reports in that group, where you can drill down
to the individual reports.
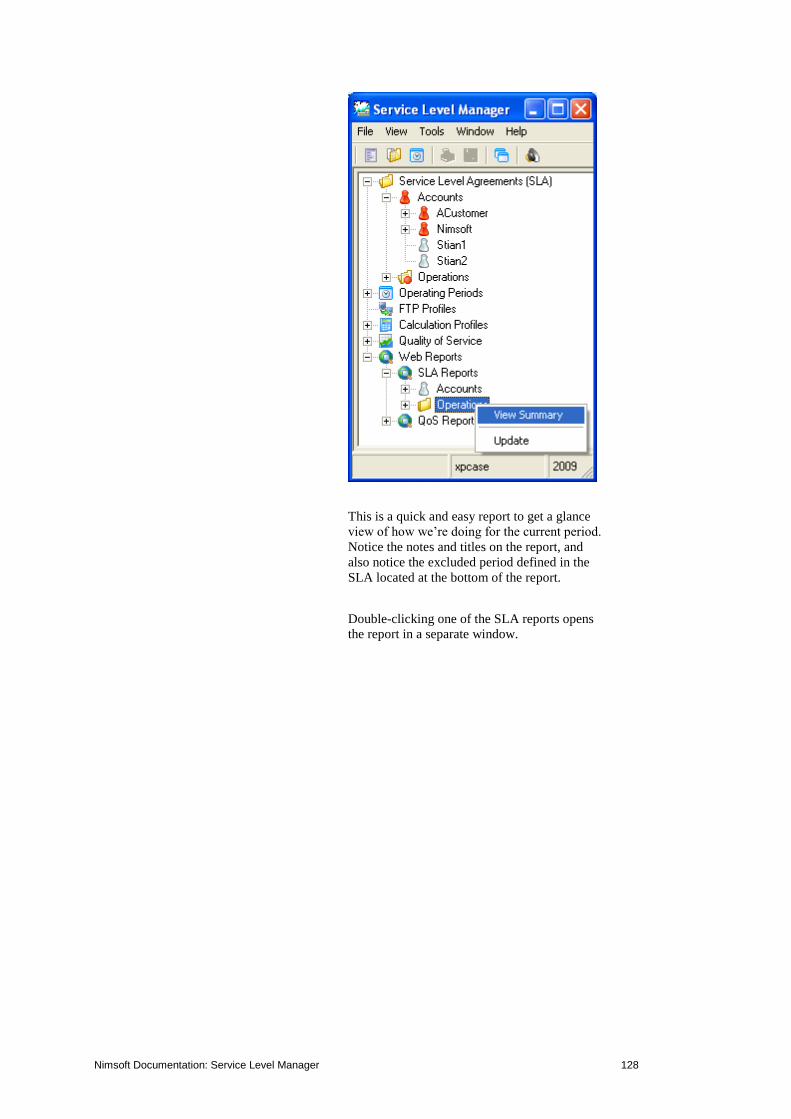
Nimsoft Documentation: Service Level Manager 128
This is a quick and easy report to get a glance
view of how we’re doing for the current period.
Notice the notes and titles on the report, and
also notice the excluded period defined in the
SLA located at the bottom of the report.
Double-clicking one of the SLA reports opens
the report in a separate window.

Nimsoft Documentation: Service Level Manager 129
The SLOs defined in the SLA are listed in the
in the table with status info, weight information
and expected / achieved compliance
percentage.
Clicking one of the SLOs opens the report for
that SLO.
The QoS constraints defined in the SLO (in
this case four QoS’s) are listed in the in the
table with status info, source/target, weight
information and expected / achieved
compliance percentage.

Nimsoft Documentation: Service Level Manager 130
Clicking one of the listed QoS constraints lets
you see the graph for the current compliance
period for the selected QoS constraint.
NOTE:
If selecting calculation method AND or OR,
this will have the following effect on the SLA
reports: The Weight, Achieved and Expected
columns will display N/A instead of a value.
The reason is that there is no individual
calculation of the QoS series (all data series are
calculated equally).
See the graphs below for an explanation of the
different elements used:
1. Outside Operating period
In addition to the data series, the
graph shows periods that are outside
the defined operating period, and the
option Data Outside Operating
Period is set to Show in the
report_engine configuration tool.

Nimsoft Documentation: Service Level Manager 131
These periods therefore are marked in
the graph, but you can still see that
period.
2. Data series outside Operating period
is hidden
In addition to the data series, the
graph shows periods that are outside
the defined operating period, and the
option Data Outside Operating
Period is set to Hide in the
report_engine configuration tool.
These periods therefore appear as grey
fields in the graph.
3. Unavailable
In addition to the data series, the
graph shows periods that are outside
the defined operating period and a
period when data was unavailable
(e.g. the monitored computer did not
respond).
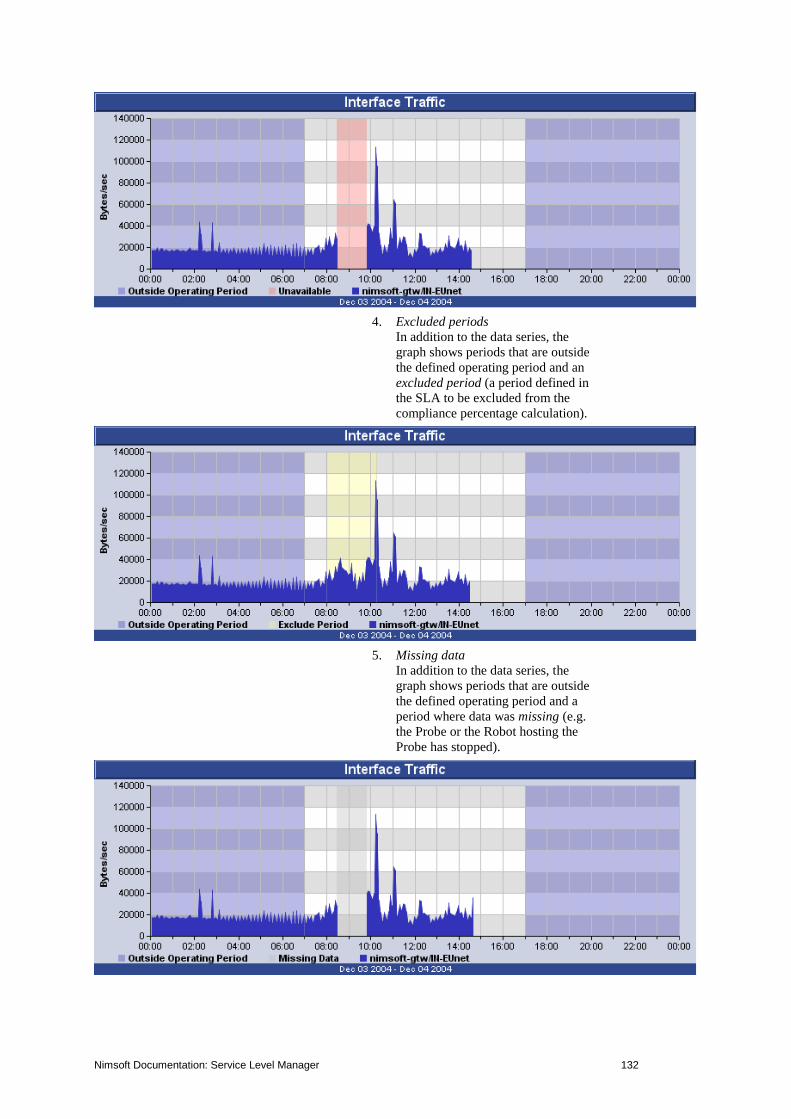
Nimsoft Documentation: Service Level Manager 132
4. Excluded periods
In addition to the data series, the
graph shows periods that are outside
the defined operating period and an
excluded period (a period defined in
the SLA to be excluded from the
compliance percentage calculation).
5. Missing data
In addition to the data series, the
graph shows periods that are outside
the defined operating period and a
period where data was missing (e.g.
the Probe or the Robot hosting the
Probe has stopped).

Nimsoft Documentation: Service Level Manager 133
The Unavailability Report Below the graph, you will find a report,
summarizing the periods with threshold
breaches and where the service is unavailable.
The table contains the following information:
Status (why the data was unavailable).
Period start
Period end
Duration, how long the data was
unavailable.
Two following two icons indicates the status:
Data is unavailable (NULL values) in the
period.
Data has breached the threshold value in the
period.

Nimsoft Documentation: Service Level Manager 134
Historical SLA Report
If we select the history tab from this report then
you will see the historical periods (see
Historical SLA Report).
Historical SLA Report
By selecting the history tab from a report, you
can see each SLA period and the actual
compliance for that period.

Nimsoft Documentation: Service Level Manager 135
The upper part of the report contains a graphic
view of the SLA history.
Below you will find another graph showing the
historic SLA trend.
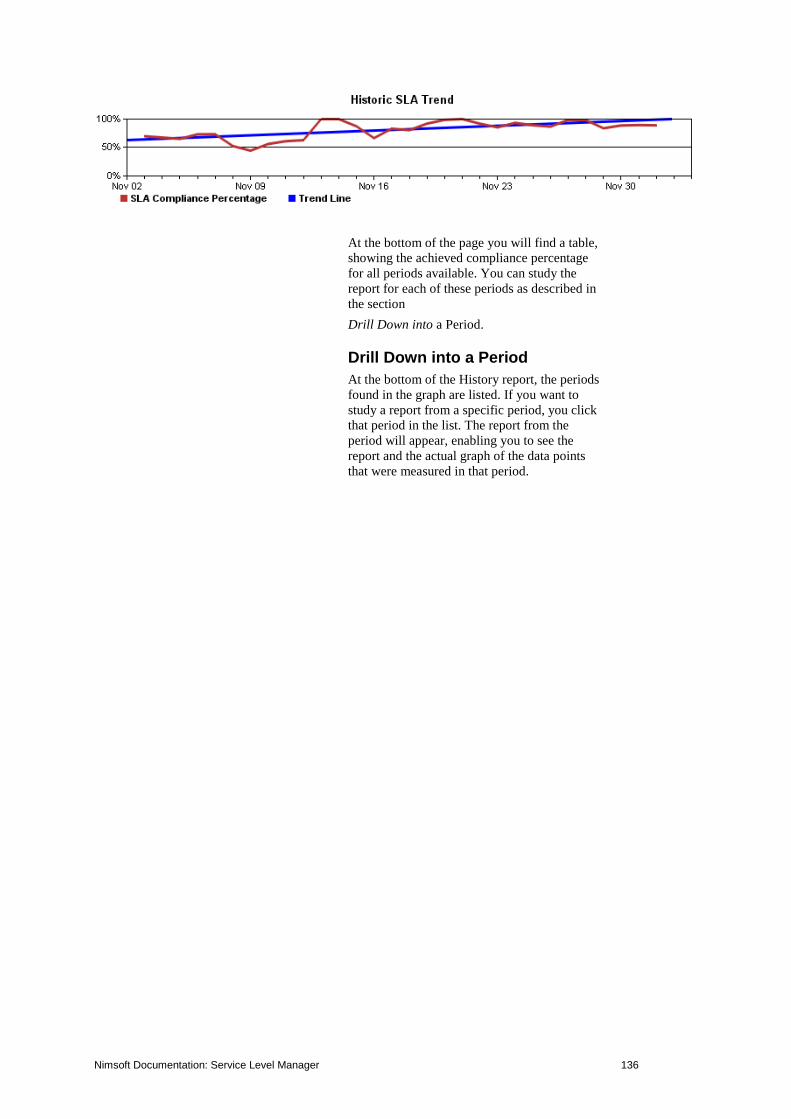
Nimsoft Documentation: Service Level Manager 136
At the bottom of the page you will find a table,
showing the achieved compliance percentage
for all periods available. You can study the
report for each of these periods as described in
the section
Drill Down into a Period.
Drill Down into a Period
At the bottom of the History report, the periods
found in the graph are listed. If you want to
study a report from a specific period, you click
that period in the list. The report from the
period will appear, enabling you to see the
report and the actual graph of the data points
that were measured in that period.

Nimsoft Documentation: Service Level Manager 137
QoS Reports
The Quality of Service (QoS) reports must be
defined using the report_engine configuration
tool.
The generated QoS reports are composed of the
following pages:
o Current reports:
Last day (last 24 hours),
Last week report (last 7 days) and
Last month reports (last 30 days).
o Daily, Weekly, Monthly and
Quarterly reports.
Note that the report_engine
configuration tool lets you hide or
show all or just some of these
reports.
Create your own QoS Report
You may create and administer the QoS reports
by configuring the report_engine probe. Right-
click the Quality of Service Reports node in the
navigation pane and select Configure

Nimsoft Documentation: Service Level Manager 138
The report_engine user configuration tool
appears.
Add a new report by clicking the Report
button.
Build a new QoS report by performing the
steps described below:
1. Click the Report button in the
Toolbar,
or (if you want to create a folder and
place the new report in that folder)
Click the Folder button, select the
folder, right-click and select New
Report.
If you don’t care to rename, the folder
will be named New Folder and the
report New report. These names will
appear in the report_engine only and
not be visible in the report or
anywhere else.

Nimsoft Documentation: Service Level Manager 139
2. Double-click the new report to open
its properties dialog.
o Make sure the Active option is
checked.
o Give the report a title. This name
will appear as the heading of the
report and also appear as the
report name under the QoS
Reports sub-node in the
Navigation Pane of the Service
Level Manager when you have
saved your configuration.
o You may also give footer to the
report, overriding the default
footer specified under the Setup
tab.
o The folder in which you created
the new folder is now selected in
the Folder field. Selecting
another folder here will move the
report to that folder.
o Select the Template you want to
determine the layout of your
report. Note that you may modify
the templates or make new ones,
using the Graph Templates
editor.
o Clicking the Colors field, you
may select a background color for
the report.
o You may also enable for File
Transfer. Specifying a host (or IP
addr.), a valid username /
password and a directory, your
report will, when generated, be

Nimsoft Documentation: Service Level Manager 140
transferred to the Host and stored
in the directory you specify.
o When finished, click the OK
button.
3. Now you are ready to start inserting
elements into the report, such as
headings, graphs etc.
4. If you want your report to have a
heading, click the Text button in the
Toolbar. A text object will appear in
the Right window pane. Double-click
the object to open the Text property
dialog and type your heading title in
the Text body field. You may also
select another text style from the Text
formatting combo box in the dialog.
5. Click the Graph button in the Toolbar
to insert a graph object into the report.
o Double-click the new graph to
open the Graph properties dialog.

Nimsoft Documentation: Service Level Manager 141
o Make sure the General tab is
selected and that the Active
option is checked.
o Give the Graph a name in the
Title field. This name will appear
as the title of the graph inside the
report.
o Select the QoS object you want to
measure from the Quality of
Service combo box.
o Click the New button to select the
Data series (which source and
target to measure).
o Optionally add more Data series
to appear in the graph.
o Double-click each of the Data
series you have defined to set
their layout properties, i.e. how
they will appear in the graph:
Color
Line (solid, dotted etc.)
Chart (line, bar, area etc.)

Nimsoft Documentation: Service Level Manager 142
o Also note the optional properties
under the two other tabs:
Graph properties (if you want to
set a min./max. value of the graph
etc.) and Scaling (if you want to
overrule the unit name, unit
abbreviation etc.)
NOTE:
If you want to see how the definitions
made so far will appear in the report,
you click the Apply button in the
report_engine configuration tool. You
will be notified that the report_engine
has to be restarted to activate your
changes. Click Yes and open the
report_engine configuration tool
again, right-click your new report in
the left pane and select View report.
Your report will be opened. If graphs
etc. appear as expected, you may
continue inserting more objects into
your report.
Otherwise you make modifications
and view the report again until you are
satisfied.
6. You may also insert separators
(horizontal rulers) into the report by
clicking the Separators icon in the
Toolbar. It could be convenient to
insert separators to separate the graphs
from each other (if you insert more
than one graph).
Double-clicking the Separator in the
Main Window Pane opens the
properties dialog, allowing you to
specify the width and thickness of the
separator line.
Note that all separators and all other
inserted elements can be moved
upwards or downwards, using the Up
and Down buttons in the Toolbar.
7. Clicking the URL button lets you
insert a hypertext link into the report.
You may specify the link as a relative
path, or a full URL. You may refer to
other reports, or e.g. your own
homepage.

Nimsoft Documentation: Service Level Manager 143
8. Clicking the image object inserts an
image into the report. You may
specify the image as a relative path, or
a full URL. Hint: If you have access
to web images/pages, simply refer
them into your report using their
URL.
9. Finish the report by clicking the Apply
button in the report_engine dialog.
You must answer Yes to the following
question to enable the new report.
10. Finally click the OK button in the
report_engine dialog.
The new report will now appear as a new QoS
report (with the name specified as Title in the
Report properties dialog) under the QoS
Reports sub-node in the Navigation Pane.
Double-click it to see how your new report
appears.
Viewing a QoS Report
Double-clicking one of the QoS reports in the
Navigation Pane opens the report in a separate
window.

Nimsoft Documentation: Service Level Manager 144
Note the drop-down menus located in the upper
part of the report. These enable you to select
which report to view.
Current reports:
Last day (last 24 hours),
Last week report (last 7 days) and
Last month reports (last 30 days).
Daily, Weekly, Monthly and Quarterly
reports.
Note that the report_engine
configuration tool lets you hide or
show all or just some of these reports.

Nimsoft Documentation: Service Level Manager 145
The report shows the QoS graph(s) specified
when creating the QoS report (see the section
Create your own QoS Report).
The tables below the graphs contain the
following information for the period shown in
the graph (all fields will display N/A if no data
was available in the period):
Source
The computer hosting the probe
sending the QoS data.
Target
The device/target being monitored,
supplying the probe with QoS data.
Maximum
Shows the maximum value for the
QoS, if available. Some QoS’s have
an absolute maximum value, such as
Disk usage, CPU usage etc.
For other QoS’s, not having a
maximum value (such as URL
Response etc.) this field will display
N/A.
Average
Average of all the samples within the
report period (using the AVG()
function in SQL Server).
Stdev
Standard deviation of all the samples
within the report period (using the
STDEV() function in SQL Server).
See the graphs below for an explanation of the
different elements used:

Nimsoft Documentation: Service Level Manager 146
1. The graph below shows QoS data for
CPU USAGE (in percent) for the
computer xpcase.nimsoft.no, and the
graph is presented as a filled area (can
be configured in the report_engine
configuration tool).
Note, as explained above, that this
QoS has a maximum value 100.00%).
2. Missing data
The graph below shows QoS data for
EXCHANGE WEB RESPONSE
(URL Response) in milliseconds,
and the graph is presented as a line
area (can be configured in the
report_engine configuration tool).
Note, as explained above, that this
QoS has no maximum value. Note,
however, that the graph has two
periods where data is missing.
3. Data unavailable
The graph below shows QoS data for
URL RESPONSE in milliseconds.
The probe is hosted by the
xpcase.nimsoft.no computer,
monitoring the download time of the
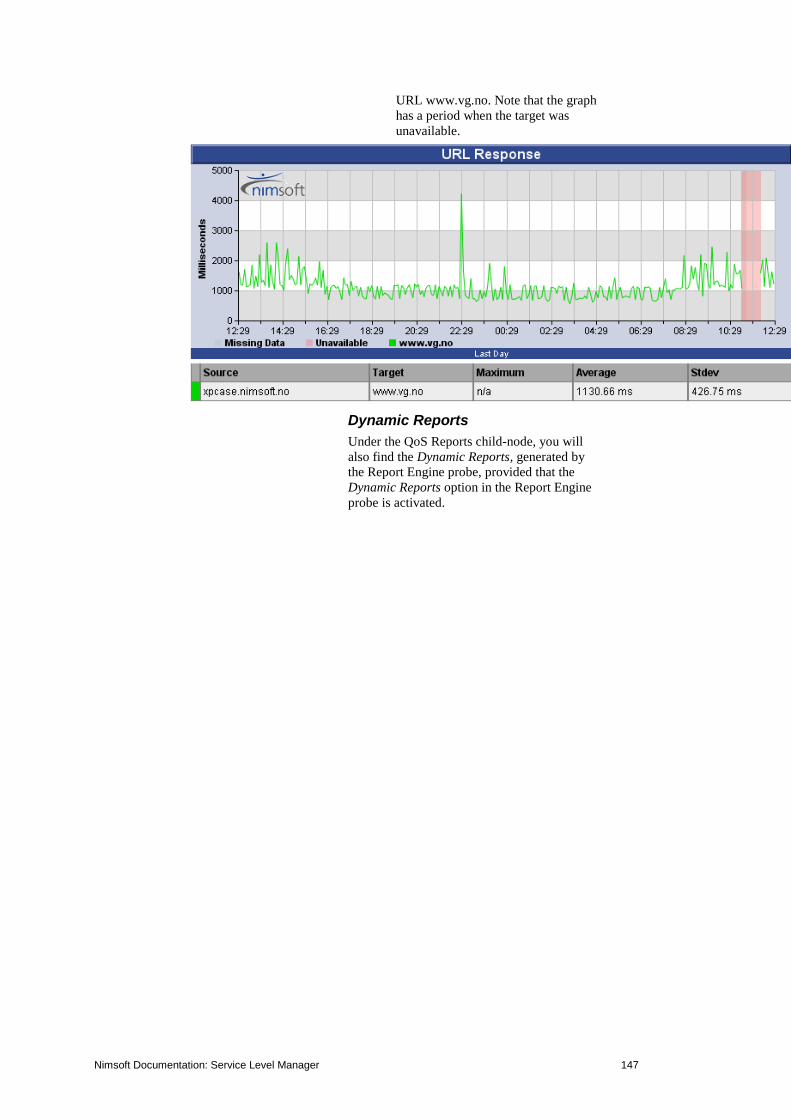
Nimsoft Documentation: Service Level Manager 147
URL www.vg.no. Note that the graph
has a period when the target was
unavailable.
Dynamic Reports
Under the QoS Reports child-node, you will
also find the Dynamic Reports, generated by
the Report Engine probe, provided that the
Dynamic Reports option in the Report Engine
probe is activated.

Nimsoft Documentation: Service Level Manager 148
These Dynamic reports are sorted in groups as
defined in the Nimsoft Group Server probe.
The end-node will represent a Dynamic Report
representing a device or host in your Nimsoft
Infrastructure. Clicking the end node will
launch the report in the main window. Note
that the Report Engine probe lets you choose
between different report-layouts, using
templates. You may also edit these templates to
match your needs.

Nimsoft Documentation: Service Level Manager 149
Drop-down menus in the reports let you choose
between the following views:
o Current reports:
Last day (last 24 hours),
Last week report (last 7 days) and
Last month reports (last 30 days).
o Daily, Weekly, Monthly and
Quarterly reports.
Note that the report_engine
configuration tool lets you hide or
show all or just some of these
reports.
Nimsoft Documentation: Service Level Manager 150
Customizing Reports
The report_engine generates its reports using a
template-based architecture. This means that
you can with simple means change the looks of
the QoS and SLA reports.
Templates for QoS reports and QoS graphs in
SLA reports can be modified using the Graph
Templates Editor.
For more details about the Graph Templates
Editor, please refer to SLM Probes
report_engine The Graph Template
Editor section in the Probes online help.
Templates for SLA reports can be modified as
described in the section How to Customize
your SLA Reports.
Printing Reports
There are two different methods of printing
reports.
Printing reports opened from the
Navigation Pane The first method is to open a report, SLA
report or QoS report, from the Web Reports
sub-node in the Navigation Pane. This activates
the Printer icon in the Toolbar, and you may
print the selected report. These reports will,
when printed, appear as defined by the report
templates selected in the report_engine
configuration tool.
Printing reports directly from an opened
SLA/SLO
The other method is to open a SLA or a SLO.
This activates the Printer icon in the Toolbar.
Clicking the Printer icon opens the Print report
dialog. The dialog lets you select which of the
available reports for the selected SLA/SLO to
print, and also select one of the available
printout templates. The presentation and layout
of these reports depends on the selected
printout template and are quite different from
the ones opened from the Web Reports sub-
node.

Nimsoft Documentation: Service Level Manager 151
You may print or preview the report for the
selected SLO or SLA using a template found in
the templates pull-down list. If you choose to
preview the report, a window containing the
report will be presented. Print the previewed
report by pressing the printer icon on the
toolbar.
You may modify (or copy and modify) the
printout templates to fit your corporate
standards, such as logo, fonts, backgrounds etc.
Read more about it in the section Reports. The
printout templates are located in the Program
Files/ Nimsoft /SLM/Templates/SLA
or Program Files/ Nimsoft
/SLM/Templates/SLO folders locally on the
computer you are running.
It is also possible to save the report to a file, for
later retrieval or web publishing.
Using Tokens in your Custom Reports
A report is quite often subject to corporate
standards such as fonts, logos, backgrounds
etc. The SLM supports a set of tokens that you
may use in your report-templates that will be
replaced prior to printing (and previewing).
You may modify the template, or create a new
one, in any HTML editor (such as Microsoft
FrontPage) to fit your specific needs (layout,
logo, language, etc.).
The template is a standard HTML file
including a set of variables (or tokens) that are
expanded by the Service Level Manager before
previewing or printing.
General Tokens
$DATE Today's date e.g.
$SYSDATE Today's date, using the default date format.

Nimsoft Documentation: Service Level Manager 152
$BLOCK_BEGIN_SLO Initiates a repetitive SLO block. References
each SLO within a SLA.
$BLOCK_END_SLO Terminates a repetitive SLO block.
$BLOCK_BEGIN_QOS Initiates a repetitive QoS block. Often used
within a SLO block.
$BLOCK_END_QOS Terminates a repetitive QoS block.
Tokens Related to the Current SLA
$SLA_sla_id The identification number of the SLA.
$SLA_name The name of the SLA.
$SLA_description A longer descriptive text, stating the e.g.
purpose of the SLA.
$SLA_period_begin The starting date of compliance period.
$SLA_period_end The ending date of compliance period.
$SLA_period_code The period type (day, week and month)
$SLA_percentage The achieved compliance percentage.
$SLA_compliance_percentage The expected compliance percentage.
$SLA_compliance_warning_level The warning threshold value for the SLA.
Tokens Related to the Current SLO
$SLO_slo_id The identification number of the SLO
$SLO_name The name of the objective
$SLO_description A longer descriptive text, stating the e.g.
purpose of the current objective.
$SLO_weight The weight distribution
$SLO_percentage The achieved compliance percentage
$SLO_compliance_percentage The expected compliance percentage
$SLO_compliance_warning_level The warning threshold value for the SLO
Tokens Related to Quality of Service (QoS)
Nimsoft Documentation: Service Level Manager 153
$QOS_const_id The identification number of the constrained
QoS.
$QOS_name The name of the current QoS
$QOS_description The QoS description
$QOS_target The QoS target specification
$QOS_source The QoS source specification
$QOS_weight The QoS weight percentage settings
$QOS_operator The operator code for the value comparison
$QOS_threshold The threshold value used with the
QOS_operator to validate the data
$QOS_percentage The achieved percentage within the defined
period
$QOS_accuracy The accuracy of the sampled data
$QOS_excpected_accuracy The expected accuracy of the data
$QOS_total The number of sampled data used in the
calculations
$QOS_ok The number of samples that are validated
against the threshold + operator and found to
be ok
Formatting Codes
The formatting codes are placed directly after
the primitive on the form ='formatting code',
e.g. $SLA_period_begin='d mmmm yyyy',
where the actual HTML code is not split in the
source.
Date Format using the date formatting codes below.
e.g. $SLA_period_begin='d mmmm yyyy'
Example:

Nimsoft Documentation: Service Level Manager 154
Name $SLA_name ($SLA_sla_id)
Description $SLA_description
Period $SLA_period_begin - $SLA_period_end
Service level $SLA_percentage%, expected $SLA_compliance_percentage%
$BLOCK_BEGIN_SLO
$SLO_name
Description: $SLO_description
Compliance: $SLO_percentage % (expected: $SLA_compliance_percentage%)
Quality of
Service Description Weight Achieved
$BLOCK_BEGIN_QOS
$QOS_description $QOS_source/$QOS_target $QOS_weight $QOS_percentage%
$BLOCK_END_QOS
$BLOCK_END_SLO
Date formatting codes:
The following table identifies characters you
can use to create user-defined date/time
formats:
(:) Time separator. In some locales, other
characters may be used to represent the time
separator. The time separator separates hours,
minutes, and seconds when time values are
formatted. The actual character used as the
time separator in formatted output is
determined by your system settings.
(/) Date separator. In some locales, other
characters may be used to represent the date
separator. The date separator separates the day,
month, and year when date values are
formatted. The actual character used as the date
separator in formatted output is determined by
your system settings.
c Display the date as ddddd and display the
time as ttttt, in that order. Display only date
information if there is no fractional part to the
date serial number; display only time
information if there is no integer portion.
d Display the day as a number without a leading
zero (1 – 31).
dd Display the day as a number with a leading
zero (01 – 31).
ddd Display the day as an abbreviation (Sun – Sat).

Nimsoft Documentation: Service Level Manager 155
dddd Display the day as a full name (Sunday –
Saturday).
ddddd Display the date as a complete date (including
day, month, and year), formatted according to
your system's short date format setting. The
default short date format is m/d/yy.
dddddd Display a date serial number as a complete date
(including day, month, and year) formatted
according to the long date setting recognized
by your system. The default long date format is
mmmm dd, yyyy.
aaaa The same as dddd, only it's the localized
version of the string.
w
Display the day of the week as a number (1 for
Sunday through 7 for Saturday).
ww Display the week of the year as a number (1 –
54).
m Display the month as a number without a
leading zero (1 – 12). If m immediately follows
h or hh, the minute rather than the month is
displayed.
mm Display the month as a number with a leading
zero (01 – 12). If m immediately follows h or
hh, the minute rather than the month is
displayed.
mmm Display the month as an abbreviation (Jan –
Dec).
mmmm Display the month as a full month name
(January – December).
oooo The same as mmmm, only it's the localized
version of the string.
q Display the quarter of the year as a number (1
– 4).
y Display the day of the year as a number (1 –
366).
yy Display the year as a 2-digit number (00 – 99).
yyyy Display the year as a 4-digit number (100 –
9999).
Nimsoft Documentation: Service Level Manager 156
h Display the hour as a number without leading
zeros (0 – 23).
hh Display the hour as a number with leading
zeros (00 – 23).
N Display the minute as a number without
leading zeros (0 – 59).
Nn Display the minute as a number with leading
zeros (00 – 59).
S Display the second as a number without
leading zeros (0 – 59).
Ss Display the second as a number with leading
zeros (00 – 59).
t t t t t Display a time as a complete time (including
hour, minute, and second), formatted using the
time separator defined by the time format
recognized by your system. A leading zero is
displayed if the leading zero option is selected
and the time is before 10:00 A.M. or P.M. The
default time format is h:mm:ss.
AM/PM Use the 12-hour clock and display an
uppercase AM with any hour before noon;
display an uppercase PM with any hour
between noon and 11:59 P.M.
am/pm Use the 12-hour clock and display a lowercase
AM with any hour before noon; display a
lowercase PM with any hour between noon and
11:59 P.M.
A/P Use the 12-hour clock and display an
uppercase A with any hour before noon;
display an uppercase P with any hour between
noon and 11:59 P.M.
a/p Use the 12-hour clock and display a lowercase
A with any hour before noon; display a
lowercase P with any hour between noon and
11:59 P.M.
AMPM Use the 12-hour clock and display the AM
string literal as defined by your system with
any hour before noon; display the PM string
literal as defined by your system with any hour
between noon and 11:59 P.M. AMPM can be
either uppercase or lowercase, but the case of
the string displayed matches the string as
defined by your system settings. The default
format is AM/PM.
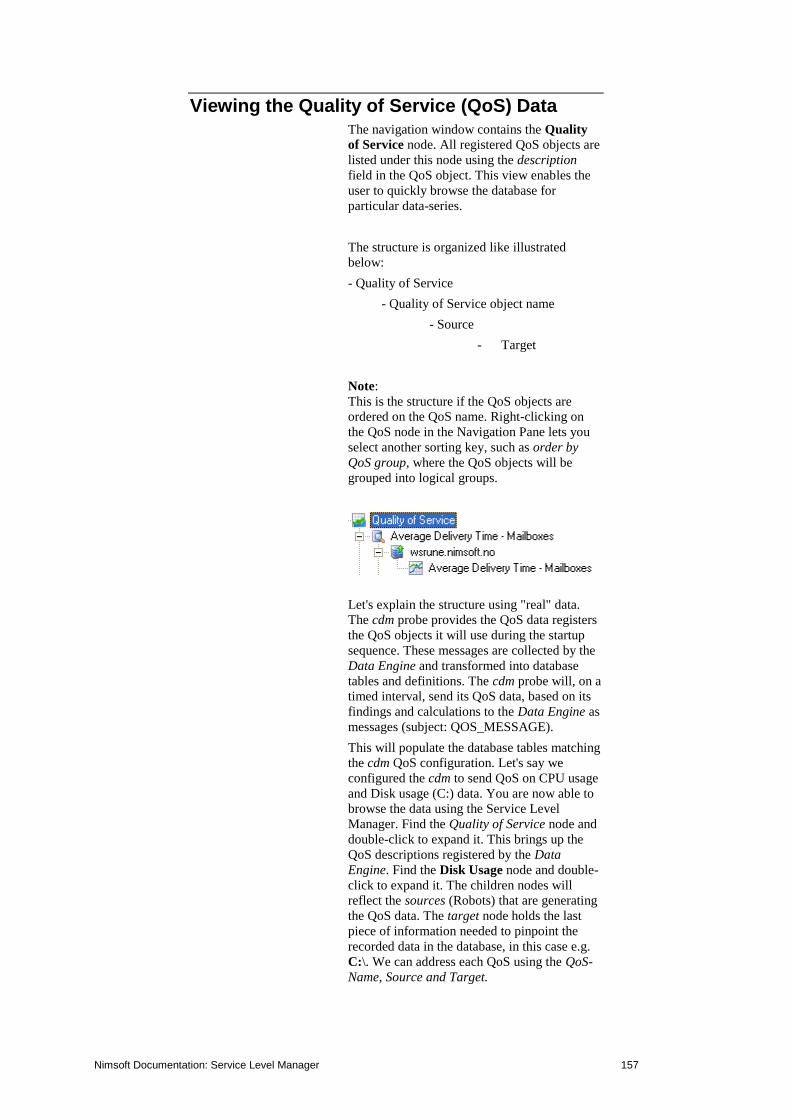
Nimsoft Documentation: Service Level Manager 157
Viewing the Quality of Service (QoS) Data The navigation window contains the Quality
of Service node. All registered QoS objects are
listed under this node using the description
field in the QoS object. This view enables the
user to quickly browse the database for
particular data-series.
The structure is organized like illustrated
below:
- Quality of Service
- Quality of Service object name
- Source
- Target
Note:
This is the structure if the QoS objects are
ordered on the QoS name. Right-clicking on
the QoS node in the Navigation Pane lets you
select another sorting key, such as order by
QoS group, where the QoS objects will be
grouped into logical groups.
Let's explain the structure using "real" data.
The cdm probe provides the QoS data registers
the QoS objects it will use during the startup
sequence. These messages are collected by the
Data Engine and transformed into database
tables and definitions. The cdm probe will, on a
timed interval, send its QoS data, based on its
findings and calculations to the Data Engine as
messages (subject: QOS_MESSAGE).
This will populate the database tables matching
the cdm QoS configuration. Let's say we
configured the cdm to send QoS on CPU usage
and Disk usage (C:) data. You are now able to
browse the data using the Service Level
Manager. Find the Quality of Service node and
double-click to expand it. This brings up the
QoS descriptions registered by the Data
Engine. Find the Disk Usage node and double-
click to expand it. The children nodes will
reflect the sources (Robots) that are generating
the QoS data. The target node holds the last
piece of information needed to pinpoint the
recorded data in the database, in this case e.g.
C:\. We can address each QoS using the QoS-
Name, Source and Target.

Nimsoft Documentation: Service Level Manager 158
Generating a Graph
The Service Level Manager generates a graph
when right-clicking and selecting View on a
QoS objects target node in the Navigation
Pane.
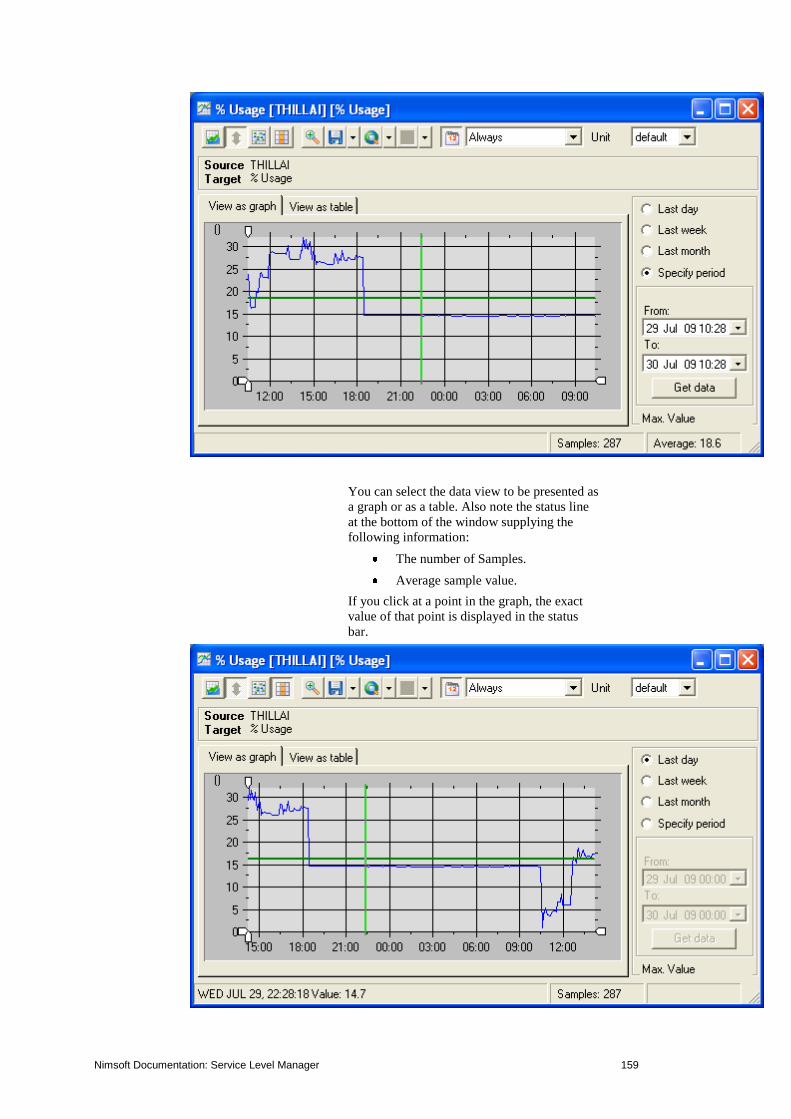
Nimsoft Documentation: Service Level Manager 159
You can select the data view to be presented as
a graph or as a table. Also note the status line
at the bottom of the window supplying the
following information:
The number of Samples.
Average sample value.
If you click at a point in the graph, the exact
value of that point is displayed in the status
bar.
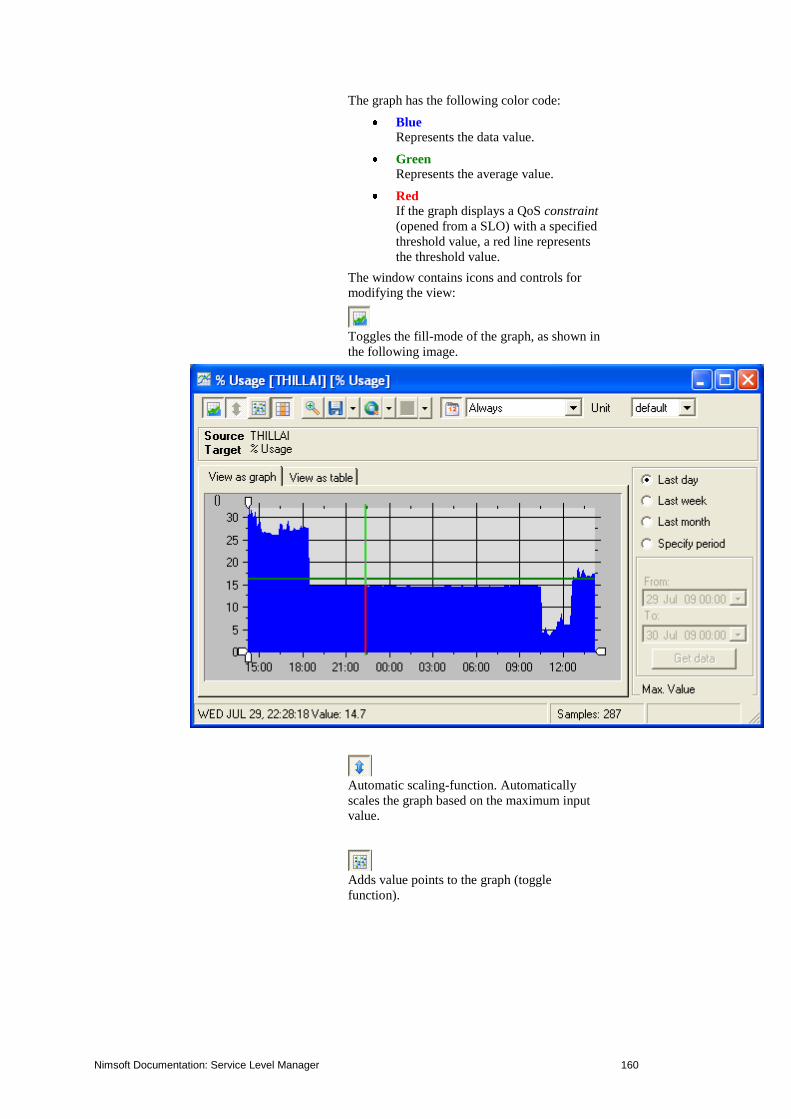
Nimsoft Documentation: Service Level Manager 160
The graph has the following color code:
Blue Represents the data value.
Green Represents the average value.
Red If the graph displays a QoS constraint
(opened from a SLO) with a specified
threshold value, a red line represents
the threshold value.
The window contains icons and controls for
modifying the view:
Toggles the fill-mode of the graph, as shown in
the following image.
Automatic scaling-function. Automatically
scales the graph based on the maximum input
value.
Adds value points to the graph (toggle
function).

Nimsoft Documentation: Service Level Manager 161
Shows periods when data is missing in the
graph (toggle function).
Zooms in on the data samples (1 day period).
Left-click the point in the graph where you
want detailed view and then click this button.
Return to normal view by selecting period
(week, month etc.) by using the radio-buttons
on the right.
The Export QoS data to file icon lets you
export the QoS data as a CSV file or as a
picture file. As shown in the following image,
click the down arrow key next to the save icon.

Nimsoft Documentation: Service Level Manager 162
Click Export QoS Data to File
Option to save the QoS data to file.
The Export QoS Data dialog opens.
Enter file name in the File name box.
Click Next. In the next step, CSV file
is generated at the given path, as
shown in the following figure.

Nimsoft Documentation: Service Level Manager 163
Select save graph as a picture option
to save the graph as an image.
The supported graphic file formats are
PNG, JPEG and TIF.

Nimsoft Documentation: Service Level Manager 164
The Time zone icon of the graph lets you
generate the graph based on different time
zones. Click on the down arrow key next to the
icon to open a list of time zone. Select the
appropriate time zone from it.
Restricts the data to the selected operating
period. When selected, this function disables
the possibility to select other operating periods
(see below).
This field lets you select operating period
(from those defined and located under the
Operating Periods Node in the Navigation
Pane.
This field allows you to specify the Unit for the
graph. The number of units available will be
different for the various QoS types.

Nimsoft Documentation: Service Level Manager 165
You may select the period by using the radio-
buttons (last day, last week etc.).
Using the field in the lower right corner, you
may also set the maximum value of the vertical
axis in the graph to a proper value to compress
the graph in cases where you have "peaks".
Including the Target in your Service Objective (SLO)
The quickest and simplest way of including
QoS in your SLO is to drag the target into the
QoS list in the SLO form.
This opens the standard QoS constraints dialog
preset with the QoS name, source and target

Nimsoft Documentation: Service Level Manager 166
information. Just set the threshold value, the
operating period and the calculation method
before clicking the OK button to save and close
the dialog.
Exporting the QoS data series You may export QoS data to a file, using the
one of the following methods
Copy the data table from the QoS
dialog and paste into e.g. a worksheet
in Excel.
Using the Export QoS Data wizard,
accessible from the right-click menu
in the Database Status dialog (see
Viewing the Actual Database Usage).
Note that this wizard may also be
started, right-clicking the QoS
constraint under the QoS node in the
Navigation pane and selecting Export
data.
Exporting QoS data, using copy and paste
You can export the QoS data series for the
selected period by:
Opening the QoS dialog by double-
clicking it (either under the Quality of
Service node in the Navigation Pane
or in a SLO).
Clicking the View as table tab.
Marking the columns (left-click the
first column and shift + left-click the
last).

Nimsoft Documentation: Service Level Manager 167
Pressing ctrl + c.
Opening the export target (e.g. a
worksheet in Excel), placing the
cursor in a cell and pressing ctrl + v.
Exporting QoS data, using Export QoS Data wizard
Select Tools > Wizards > Export QoS
Data from the menu-bar to launch the
wizard.
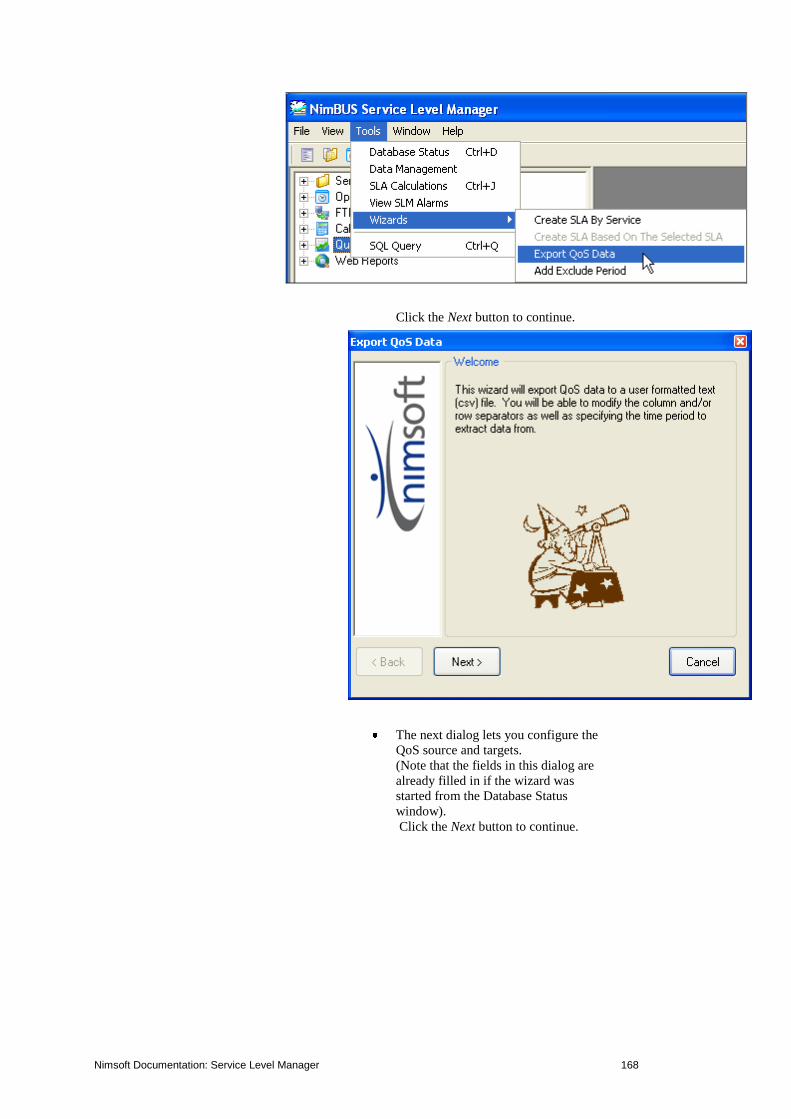
Nimsoft Documentation: Service Level Manager 168
Click the Next button to continue.
The next dialog lets you configure the
QoS source and targets.
(Note that the fields in this dialog are
already filled in if the wizard was
started from the Database Status
window).
Click the Next button to continue.

Nimsoft Documentation: Service Level Manager 169
The next dialog lets you select which
period to export. Configure the period
to select data from and click the Next
button to continue.
The next dialog lets you specify a
name and a destination path of the

Nimsoft Documentation: Service Level Manager 170
exported file, and the format of the
file.
If typing a file name, the file will by
default be stored on your C: drive.
If using the Browse function, a name
and format as shown will be
suggested.
You can modify the column and or
row separators, and you can include or
exclude column headers in the
formatted file.

Nimsoft Documentation: Service Level Manager 171
Click the Next button to continue to
the last dialog, where you click the
Finish button to finish and exit the
wizard.
Two other ways to launch the Export Data wizard:
You may also launch the wizard by selecting
Tools > Database Status from the menu-bar.
This will open the Database Status window,
showing you various information related to the
QoS data stored in your database.
Right-clicking in the list opens a small menu.
Selecting the Export Data option will launch
the wizard.

Nimsoft Documentation: Service Level Manager 172
Also right-clicking a QoS object under the QoS
node in the Navigation pane and selecting
Export Data will launch the Export wizard.

Nimsoft Documentation: Service Level Manager 173
Data Management All Quality of Service data is received by the
data_engine and inserted into the database. The
data_engine may be configured to perform
automatic clean-up procedures by defining
configuring the data management section of the
data_engine.
You may, however, perform manual data-
management by using the Service Level
Manager.
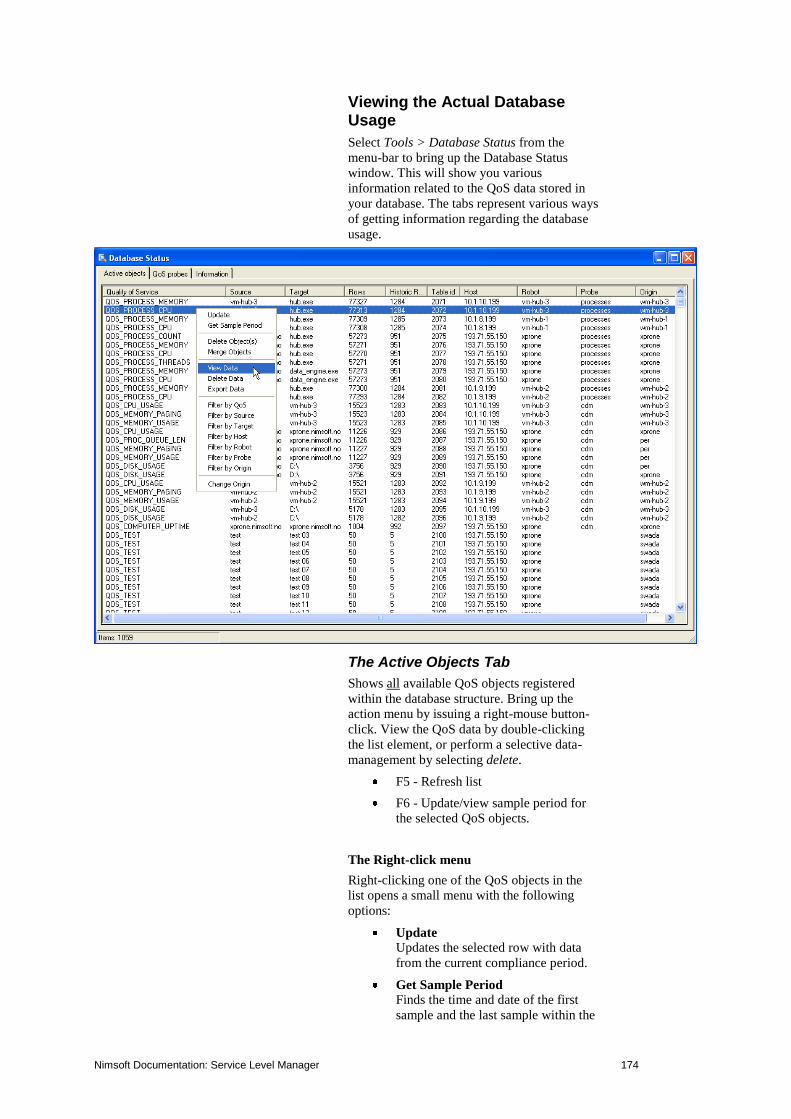
Nimsoft Documentation: Service Level Manager 174
Viewing the Actual Database Usage
Select Tools > Database Status from the
menu-bar to bring up the Database Status
window. This will show you various
information related to the QoS data stored in
your database. The tabs represent various ways
of getting information regarding the database
usage.
The Active Objects Tab
Shows all available QoS objects registered
within the database structure. Bring up the
action menu by issuing a right-mouse button-
click. View the QoS data by double-clicking
the list element, or perform a selective data-
management by selecting delete.
F5 - Refresh list
F6 - Update/view sample period for
the selected QoS objects.
The Right-click menu
Right-clicking one of the QoS objects in the
list opens a small menu with the following
options:
Update Updates the selected row with data
from the current compliance period.
Get Sample Period
Finds the time and date of the first
sample and the last sample within the

Nimsoft Documentation: Service Level Manager 175
current compliance period.
This information will then be found in
the respective columns (First sample
and Last sample) in the window.
Delete Object(s) Deletes the selected QoS object(s)
(not only the data series) from the
database. The deleted QoS object will
disappear from the database and will
not be re-created before the probe is
restarted.
Merge Objects
Allows you to merge two QoS objects
of the same type. Left-click the first
object and <ctrl>+left-click the next
object. Right-click and select the
merge object option.
Note that you can toggle the direction
of the merge operation by clicking the
arrow in the middle of the dialog.
The newly merged QoS objects will
take the “destination” QoS object’s
name.
You also have the option to delete the
“source” QoS after the merge
operation.
The deleted QoS object will disappear
from the database and will not be re-
created before the probe is restarted.

Nimsoft Documentation: Service Level Manager 176
View Data Opens the graph, displaying the data
for the current compliance period.
Delete Data Opens the Data Management dialog
for the selected QoS constraint,
allowing you to delete the complete
QoS data series, or just for a selected
period. The QoS object is not deleted
selecting this option, and data for the
selected QoS constraint will continue
to be stored in the database table.
Export Data Opens the Export QoS Data wizard,
enabling you to export the data series
for the selected QoS constraint dialog
to a file. See the section Exporting the
QoS data series.
Filter by QoS
Selecting one entry in the list and
selecting Filter by QoS, all entries
with the same QoS as the selected one
will be listed, all others will be
removed from the list.
In the example below, all entries with
QOS_CPU_USAGE will be collected
in a list; all others will be removed
from the list.
Right-click and select Update to
return to the original list.

Nimsoft Documentation: Service Level Manager 177
Filter by Source
Same as Filter by QoS, but in this case
entries with identical source will be
collected in the list.
Filter by Target
Same as Filter by QoS, but in this case
entries with identical target will be
collected in the list.
Filter by Host
Same as Filter by QoS, but in this case
entries with identical host will be
collected in the list.
Filter by Robot
Same as Filter by QoS, but in this case
entries with identical robot will be
collected in the list.
Filter by Probe
Same as Filter by QoS, but in this case
entries with identical probe will be
collected in the list.
Filter by Origin
Same as Filter by QoS, but in this case
entries with identical origin will be
collected in the list.
All messages received by a given hub
are stamped with an origin element.
The default origin name will be the
HUB name.
Change origin
Selecting one or more entries in the
list, right-clicking and selecting
Change origin lets you change origin
for the selected entries (all messages
received by a given hub is stamped
with an origin element. The default
origin name will be the HUB name).
Available origins will be listed in the
dialog popping up. You can also
create a new origin by clicking the
Add button.

Nimsoft Documentation: Service Level Manager 178
The columns in the window
The followings columns appear in the window
when the Active Objects tab is selected:
Quality of Service The name of the QoS object.
Source From where the sample originates.
Target The target of the sample.
Rows The number of rows in the database
table containing data for the QoS
Object.
Historic rows The number of rows in the historic
database table containing data for the
QoS Object.
First sample
The time and date of the first sample
within the current compliance period.
Note that this information is made
available when right-clicking the
entry and selecting Get sample period.
Last sample The time and date of the last sample
within the current compliance period.
Note that this information is made
available when right-clicking the
entry and selecting Get sample period.
Table id An id number assigned to each of the
QoS objects registered within the
database structure.
S.min.
The number of samples per minute.
Note that this information is made
available when right-clicking the
entry and selecting Get sample period.
Originator
The address of the computer running
the probe.
Host
The IP-address of the host hosting the
probe from which the sample
originates.
Robot The name of the robot from which the
sample originates.
Probe The name of the probe from which the
sample originates.
Origin This is the origin of the QoS sample.
All messages received by a given hub

Nimsoft Documentation: Service Level Manager 179
are stamped with an origin element.
The default origin name will be the
HUB name.
The QoS Probes Tab
Shows the QoS objects registered per probe.
Delete the selected data-series by right-clicking
and selecting Delete Data. This operation
deletes all objects matching the "host" field and
the "QoS" field.
The followings columns appear in the window
when the QoS Probes tab is selected:
Registered The time the QoS object was
registered in the database,
Host The IP address of the host where the
probe sending the QoS data is
installed.
Probe The name of the probe sending the
QoS data.
Quality of Service The name of the QoS object.
The Database Status Tab
Shows information related to the database,
such as:
Database server name
Database name
Database version
Database owner
When the database was created
Database usage
Database location
Managing your QoS Data
Select Tools > Data Management from the
menu-bar to bring up the Data Management
Dialog, where you can change the period
settings and delete historic data for the selected
QoS constraint. The various fields in the dialog
are described below:

Nimsoft Documentation: Service Level Manager 180
Quality of Service
o Description The QoS description string.
o Object The QoS object name.
o Source The source of the QoS data. E.g.
computer, device etc.
o Target The target of the QoS data. E.g.
the disk, network service, CPU,
etc.
Operation
o Delete Data: Select this option to
delete the QoS data related to the
source and target settings.
o Invalidate Data: Select this option
to invalidate the QoS data related
to the source and target settings.
o Delete Historic data: Select this
check box to delete the historic
data for this QoS constraint
Period settings You can select a period, or you can
select Ignore, which means that the
measurement is not restricted to
specific periods.

Nimsoft Documentation: Service Level Manager 181
Watching SLA Calculations Selecting Tools > SLA Calculations in the
Menu bar opens the Service Level Calculations
window, listing the current calculations for the
SLAs.
A service level agreement (SLA) will
automatically get recalculated for the current
period by the sla_engine (on a schedule as
specified in the sla_engine user interface), but
you can manually recalculate a SLA by
selecting New in the right-click-menu (see
below), or by right-clicking the SLA in the
Navigation Pane and selecting Regenerate.
The Right-click menu
Right-clicking one of the QoS objects in the
list opens a small menu with the following
options:
New
Using this option, you may manually
recalculate the SLAs.
The Job properties dialog is opened,
allowing you to select a SLA to be
recalculated.
The time period for the report can be
specified, either as a Fixed report,
where you can select one or more
fixed periods, or as a Custom report,
where you can select a time range.
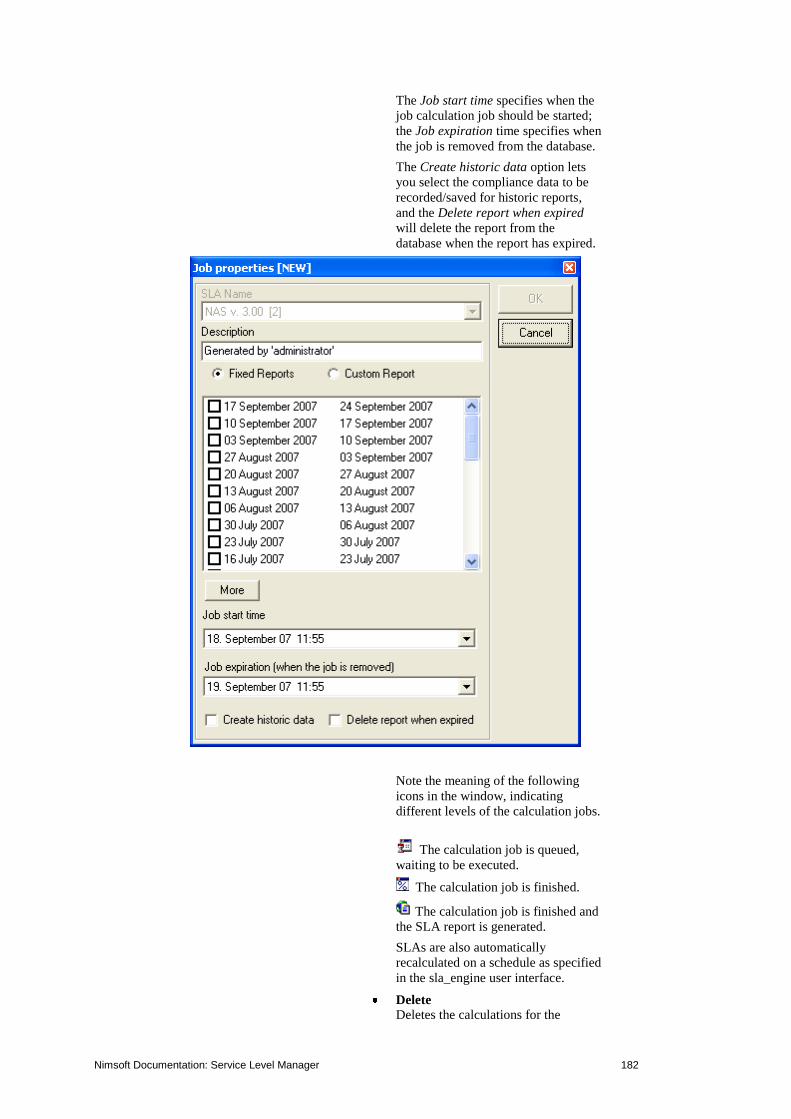
Nimsoft Documentation: Service Level Manager 182
The Job start time specifies when the
job calculation job should be started;
the Job expiration time specifies when
the job is removed from the database.
The Create historic data option lets
you select the compliance data to be
recorded/saved for historic reports,
and the Delete report when expired
will delete the report from the
database when the report has expired.
Note the meaning of the following
icons in the window, indicating
different levels of the calculation jobs.
The calculation job is queued,
waiting to be executed.
The calculation job is finished.
The calculation job is finished and
the SLA report is generated.
SLAs are also automatically
recalculated on a schedule as specified
in the sla_engine user interface.
Delete Deletes the calculations for the

Nimsoft Documentation: Service Level Manager 183
selected SLA from the list in the
window.
Update Updates the selected row with data
from the current compliance period.
View This option opens the compliance job
description window for the selected
SLA.
Properties
Opens the Job Properties window for
the selected SLA. This option is only
available for currently running
recalculation jobs, manually started by
the New option (see description
above). A wait cursor indicates that a
recalculation job currently is running.
The columns in the window
The Service Level Calculations window
contains the following columns:
Job Id
The job identification number assigned to a
new job.
SLA Shows the name of the SLA being calculated.
Description Indicates if the calculation job runs
automatically as scheduled, or if it was
manually started by the administrator.
Period Begin
Displays the starting date/time of the
compliance calculation period.
Period End Displays the end date/time of the compliance
calculation period.
Owner The name of the operator that requested the
calculation job
Job Start Defines the date/time for when the compliance
calculation job should start.
Job Expire Defines the date/time for when the job is
automatically removed from the SLM system.
History Indicates that compliance data should be
recorded/saved for historic reports.
Double-clicking (or right-clicking and
selecting View) one of the SLAs in the window

Nimsoft Documentation: Service Level Manager 184
opens the Calculated SLA Compliance job
window for that SLA.
The window displays:
The selected Compliance period
The name and description of the SLA
The Status, with the expected and the
achieved value.
The SLOs, listed in the lower left
corner.
The QoS constraints, listed in the
lower right corner, supplying the
following information:
o The name of the QoS object.
o The name of the source computer.
o The name of the target computer.
o The achieved compliance.
o The expected compliance.
o The number of samples returning
an OK result.
o The total number of samples.
Double-clicking one of the QoS
constraints brings up the QoS
graph (also see the section
Generating a Graph).

Nimsoft Documentation: Service Level Manager 185
Sending SQL Queries to the database Selecting the Tool > SQL Query option from
the Menu Bar opens the SQL Query dialog.
This function can be used to query the database
directly, and is useful for testing- and
verification purposes.
Warning:
This function should be used by experienced
users only.
Here you can select a query from the combo
box, and the query is sent to the database by
clicking the Start query button.
The result of the query will be presented in a
table under the Recordset tab. The number of
rows found is also displayed on the tab header.
Note that you may run multiple queries
simultaneously by typing queries in the list in
addition to the one selected from the combo
box. Clicking the Start query button will run
all queries in the list.
If selecting (highlighting) one of the queries in
the list, just that query will be run when
clicking the Start query button.

Nimsoft Documentation: Service Level Manager 186
Note that a started and running query can be
stopped, using the Stop query button.
Setting the Connection Properties The Service Level Manager requires a
successful login to a Hub managing a Data
Engine. This probe provides the SLM products
with the necessary database information. The
information is entered during the initial setup
of the SLM products through the Installation
Wizard.
The wizard is located in the Start/ Nimsoft
Software/Tools folder, and should be used
when database parameters change (e.g.
username, password etc.).
Selecting File > Properties from the Menu Bar
activates the connection properties dialog.
The SLM Connection tab
SLM Hub

Nimsoft Documentation: Service Level Manager 187
The hostname or IP-address of the
computer running a Hub with SLM
responsibilities
Query [button]
This button must be pressed to
confirm the change in the SLM Hub
field.
Data Engine
Displays the Nimsoft address of the
Data Engine
SLA Engine
Displays the Nimsoft address of the
SLA Engine
Report Engine
Displays a list of available Report
Engines Select the preferred from the
list
Alarm Server
Displays a list of available Alarm
Servers Select the preferred one from
the list
Save window preferences on exit
Window size (and position) will be
stored and used the next time you
launch a form.
The User Preferences tab
The following options and properties are
available:
Save window preferences on exit

Nimsoft Documentation: Service Level Manager 188
Any window preferences you select
will be saved on application exit, and
these preferences will be active the
next time you launch the SLM
application.
Edit QoS Constraint on double-click
- When this option is checked, double-
clicking a QoS constraint in a SLO
dialog opens the properties dialog for
the QoS constraint.
- When this option is NOT checked,
double-clicking a QoS constraint in a
SLO dialog opens the QoS constraint
graph.
Note that pressing the Shift key when
double-clicking a QoS constraint in a
SLO dialog will toggle this
functionality.
The following options and properties are
available:
Save window preferences on exit
Any window preferences you select
will be saved on application exit, and
these preferences will be active the
next time you launch the SLM
application.
Edit QoS Constraint on double-click
- When this option is checked, double-
clicking a QoS constraint in a SLO
dialog opens the properties dialog for
the QoS constraint.
- When this option is NOT checked,
double-clicking a QoS constraint in a
SLO dialog opens the QoS constraint
graph.
Note that pressing the Shift key when
simultaneously double-clicking a QoS
constraint in a SLO dialog will toggle
this functionality.
QoS Data Folders
This option lets you organize the QoS
objects located under the QoS node in
the Navigation Pane into folders.
Folder is created on:
Lets you define the minimum number
of objects that must be present to
enable for automatically organizing
the objects into folders.
If set to e.g. 5, the Disk Usage
group of objects shown below
will not be grouped (only 4
objects present in the group)

Nimsoft Documentation: Service Level Manager 189
If set to e.g. 4, the group of
objects will be grouped like this:
Note that the way the objects are
grouped depend on the other
settings (described below).
o Network Folders
Organizes objects where an IP-
address is used as the name of the
object into folders.
You may also select the number
of octets of the IP-address to be
used when organizing the objects.
Example: Object name is
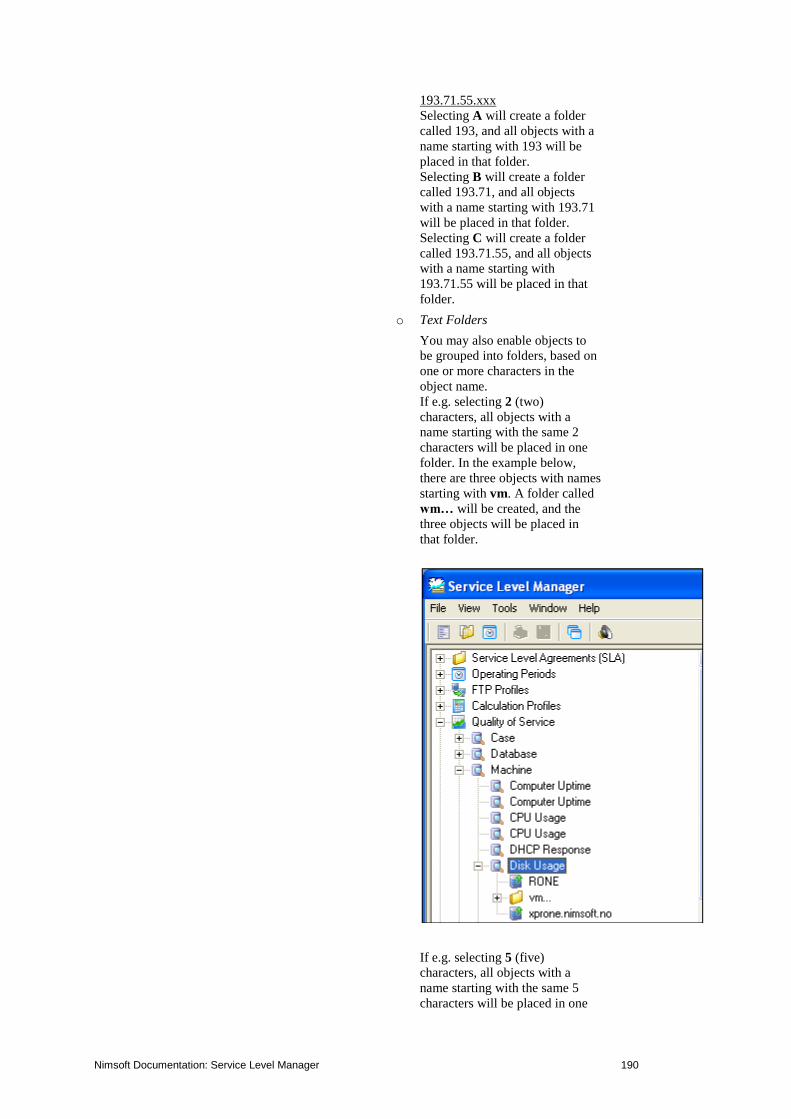
Nimsoft Documentation: Service Level Manager 190
193.71.55.xxx
Selecting A will create a folder
called 193, and all objects with a
name starting with 193 will be
placed in that folder.
Selecting B will create a folder
called 193.71, and all objects
with a name starting with 193.71
will be placed in that folder.
Selecting C will create a folder
called 193.71.55, and all objects
with a name starting with
193.71.55 will be placed in that
folder.
o Text Folders
You may also enable objects to
be grouped into folders, based on
one or more characters in the
object name.
If e.g. selecting 2 (two)
characters, all objects with a
name starting with the same 2
characters will be placed in one
folder. In the example below,
there are three objects with names
starting with vm. A folder called
wm… will be created, and the
three objects will be placed in
that folder.
If e.g. selecting 5 (five)
characters, all objects with a
name starting with the same 5
characters will be placed in one

Nimsoft Documentation: Service Level Manager 191
folder. In the example below,
there are objects with names
starting with vm-hu. A folder
called wm-hu… will be created,
and the objects will be placed in
that folder.
Clicking the Reset button resets the
preferences to the factory default
values.
Press OK to save the changes. You may
change between multiple SLA environments by
setting the SLM Hub property.
Viewing Historic Data The Data Engine will store the current SLA
and SLO compliance data before starting a new
period. This data can be viewed and examined
from the Service Level Manager Right-clicking
a SLA in the Navigation Pane and selecting
History.

Nimsoft Documentation: Service Level Manager 192
This brings up the Historic SLA compliance
window.
You can select the period you are interested in,
and you can toggle between general and
graphical view.

Nimsoft Documentation: Service Level Manager 193
The graphical view contains a combination
graph showing the actual compliance
percentage as a blue line with value plots and
the expected compliance as a red line.
You may change / zoom in on a smaller period
by using the zoom handles. Scroll the zoomed
period by right-clicking and moving your
mouse
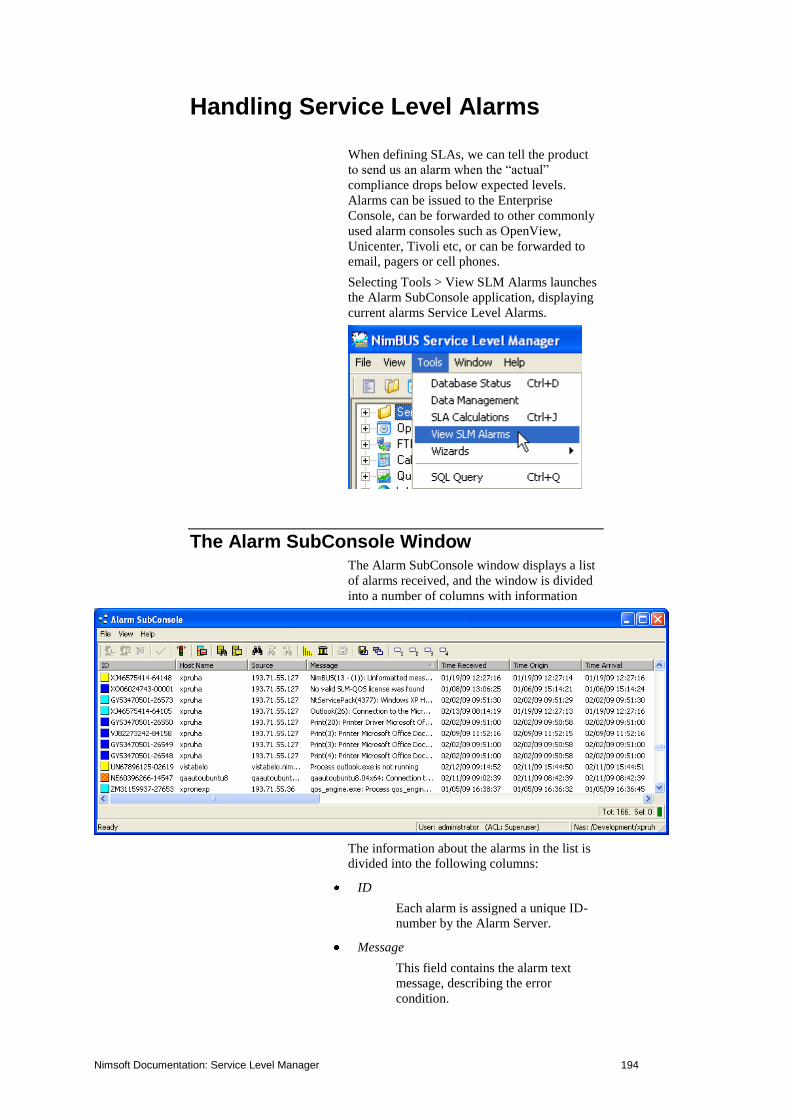
Nimsoft Documentation: Service Level Manager 194
Handling Service Level Alarms
When defining SLAs, we can tell the product
to send us an alarm when the “actual”
compliance drops below expected levels.
Alarms can be issued to the Enterprise
Console, can be forwarded to other commonly
used alarm consoles such as OpenView,
Unicenter, Tivoli etc, or can be forwarded to
email, pagers or cell phones.
Selecting Tools > View SLM Alarms launches
the Alarm SubConsole application, displaying
current alarms Service Level Alarms.
The Alarm SubConsole Window The Alarm SubConsole window displays a list
of alarms received, and the window is divided
into a number of columns with information
The information about the alarms in the list is
divided into the following columns:
ID
Each alarm is assigned a unique ID-
number by the Alarm Server.
Message
This field contains the alarm text
message, describing the error
condition.

Nimsoft Documentation: Service Level Manager 195
Time Received
The last time the alarm was received
by the nas.
Time Origin
The time when the alarm was sent
from the probe
Time Arrival
The time when the alarm was received
by the nas
Severity
All alarms are stamped with a code
indicating the severity level,
indicating the seriousness of the
alarm. Note that the severity level also
appears as colored icons in the ID
column, making the most important
ones stand out. The severity levels
are:
o Clear (Green)
o Informational (Cyan)
o Warning (Blue)
o Minor (Yellow)
o Major (Orange)
o Critical (Red)
Host Name
The name of the computer sending the
alarm
Note: Occasionally host computers
are represented with their IP address
in this column.
You may try to convert these by
setting the following string in Registry
to 1:
HKEY_CURRENT_USER > Software
> Nimsoft Software > Nimsoft
Manager > Options >
StripHostNameIp
However, be aware of that this may
result in timeouts!
Source
The IP-address of the computer
sending the alarm
Subsystem
This identifies which part of the
monitored computer the alarm was
sent from (CPU, disk network etc.).
Subsystem ID
The subsystem ID is a field,
containing one or more numbers
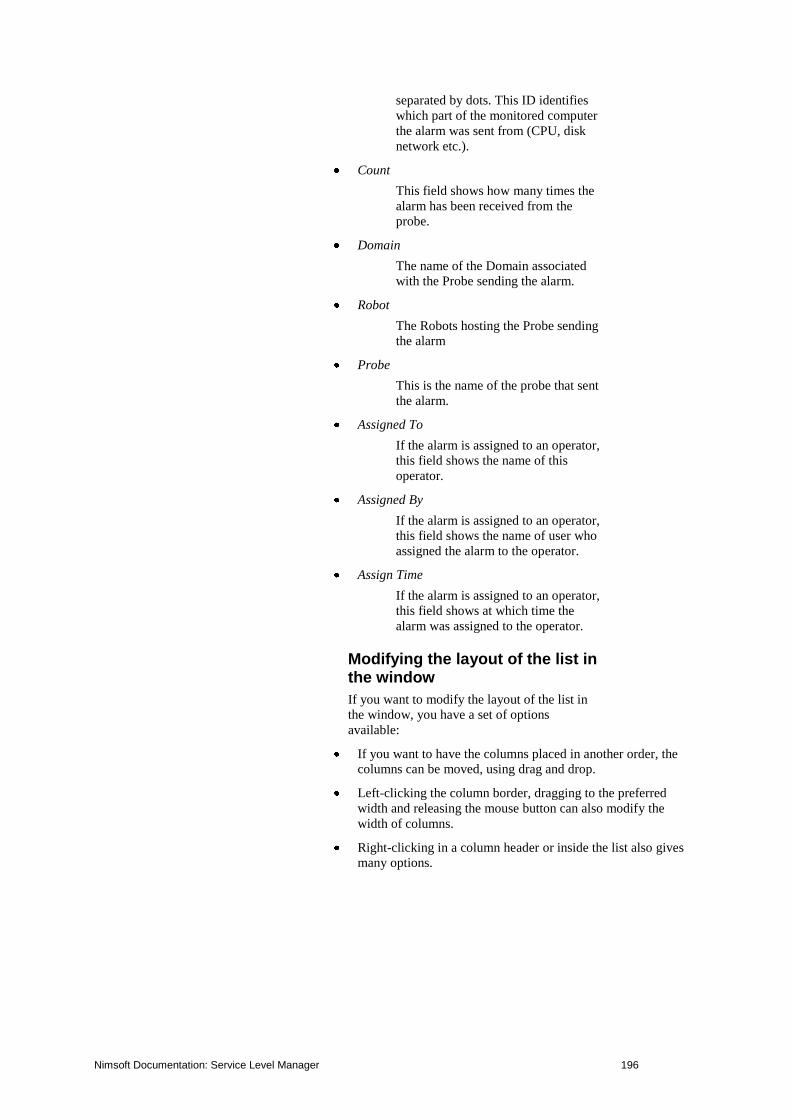
Nimsoft Documentation: Service Level Manager 196
separated by dots. This ID identifies
which part of the monitored computer
the alarm was sent from (CPU, disk
network etc.).
Count
This field shows how many times the
alarm has been received from the
probe.
Domain
The name of the Domain associated
with the Probe sending the alarm.
Robot
The Robots hosting the Probe sending
the alarm
Probe
This is the name of the probe that sent
the alarm.
Assigned To
If the alarm is assigned to an operator,
this field shows the name of this
operator.
Assigned By
If the alarm is assigned to an operator,
this field shows the name of user who
assigned the alarm to the operator.
Assign Time
If the alarm is assigned to an operator,
this field shows at which time the
alarm was assigned to the operator.
Modifying the layout of the list in the window
If you want to modify the layout of the list in
the window, you have a set of options
available:
If you want to have the columns placed in another order, the
columns can be moved, using drag and drop.
Left-clicking the column border, dragging to the preferred
width and releasing the mouse button can also modify the
width of columns.
Right-clicking in a column header or inside the list also gives
many options.
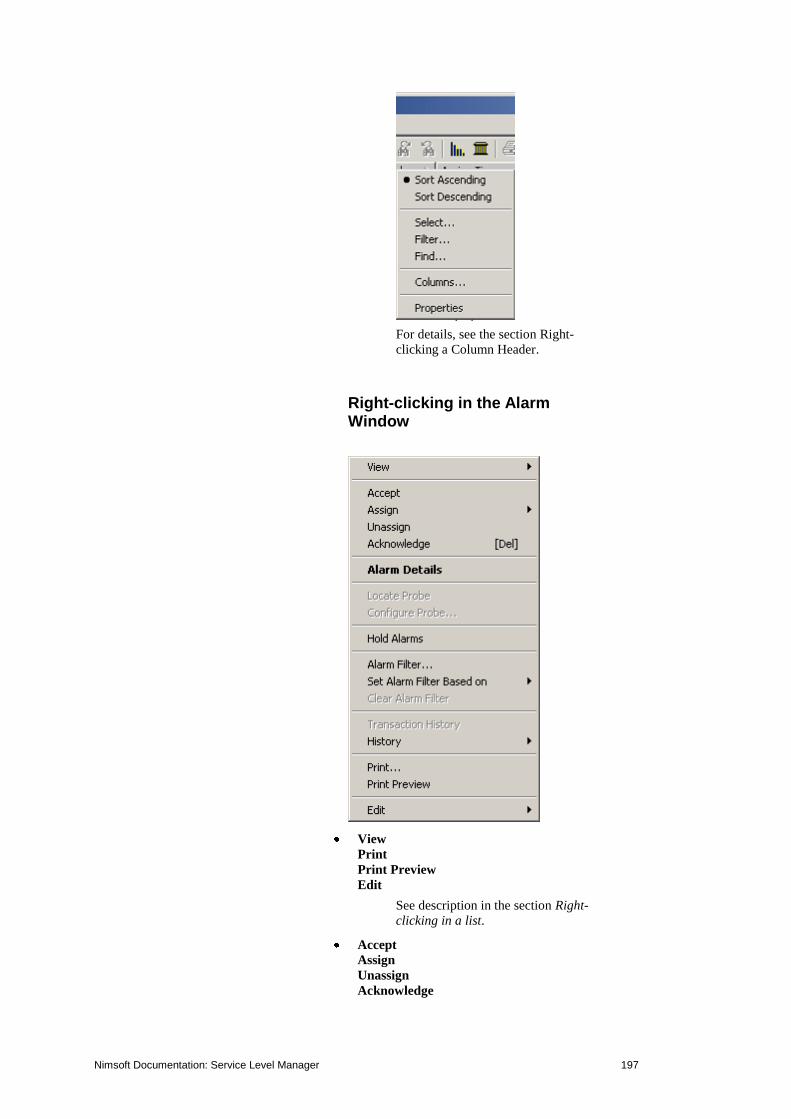
Nimsoft Documentation: Service Level Manager 197
For details, see the section Right-
clicking a Column Header.
Right-clicking in the Alarm Window
View
Print Preview
Edit
See description in the section Right-
clicking in a list.
Accept
Assign
Unassign
Acknowledge

Nimsoft Documentation: Service Level Manager 198
Alarm Details
Hold Alarms
See the description in the section
Handling Alarms for these options.
Locate Probe
Right-clicking an alarm message and selecting
this option searches and finds the probe that
sent the selected alarm message.
If the option is selected in the Alarm
SubConsole integrated in the Infrastructure
Manager, the probe will be selected in the
Main Window Pane.
If the option is selected in the Alarm
SubConsole integrated in the Enterprise
Console, or when the Alarm SubConsole is
running stand-alone, a message will appear on
the screen, displaying the complete probe
address (Domain/Hub/Robot/Probe).
Configure Probe…
Right-clicking an alarm message and selecting
this option opens the Probe configurator for the
probe that sent the selected alarm message.
This enables you to edit the options and
configuration parameters for the Probe.
Alarm Filter… Using the alarm filter, you can configure the
alarm objects to display:
Alarms from selected source(s), subsystems,
probes, etc.
Only alarms with severities as specified.
Alarms containing specific text
Time when the alarms were received
Alarms assigned to or by specific users, etc.
Also note the two options Set Alarm Filter
Based on and Clear Alarm Filter (see below).
Set Alarm Filter Based on Selecting (by left-clicking) one of the alarms in
the window, you can use this option to filter on
parameters like:
Source
Severity
Host Name
Probe
Etc.

Nimsoft Documentation: Service Level Manager 199
Then only alarms sent by the source, probe etc.
that sent the selected alarm will be displayed in
the window.
Another example: If selecting an alarm with
severity Warning and filtering on Severity,
only alarms with severity Warning will be
displayed.
Clear Alarm Filter Clears alarm filters (as described under Set
Alarm Filters based on, see above), if any.
Transaction History Marking an alarm in the list and selecting
Transaction History opens a separate window,
containing transaction information about the
selected alarm.
History Even if an alarm message is acknowledged, it
can still be traced in the nas history database.
Using the History option, you can list and see
alarms from the selected time frame (today,
last hour, last week, last month, last 24 hours,
last 3 days or last 7 days).
The alarms will be opened in a separate
window.
Selecting the Query option, a filter dialog
appears, enabling you to filter the historical
alarms you want to see for the period specified.
You can select one of the same predefined time
periods as mentioned above, or you can select
Custom and specify a custom period (From
time and To time).
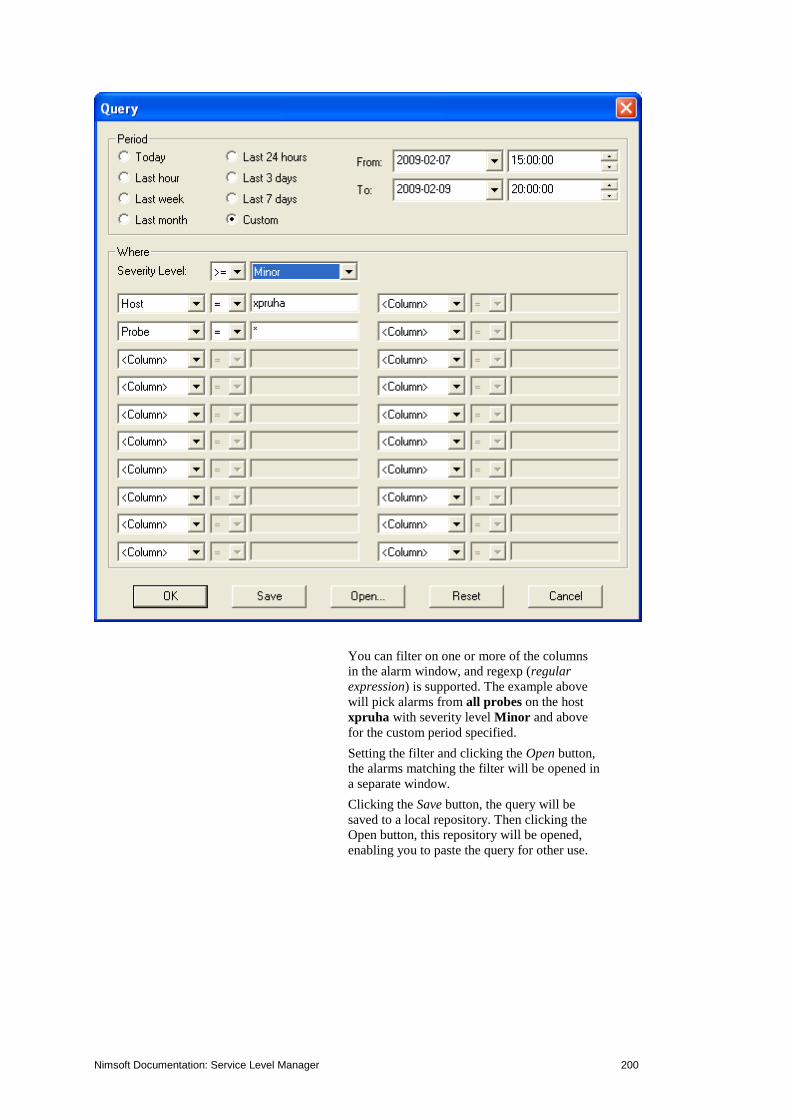
Nimsoft Documentation: Service Level Manager 200
You can filter on one or more of the columns
in the alarm window, and regexp (regular
expression) is supported. The example above
will pick alarms from all probes on the host
xpruha with severity level Minor and above
for the custom period specified.
Setting the filter and clicking the Open button,
the alarms matching the filter will be opened in
a separate window.
Clicking the Save button, the query will be
saved to a local repository. Then clicking the
Open button, this repository will be opened,
enabling you to paste the query for other use.

Nimsoft Documentation: Service Level Manager 201
Clicking the OK button, the filter dialog will be
filled in according the selected query.
Clicking the Delete button will delete the query
from the repository.
Note Double-clicking a query will open the query in
a new dialog, making long queries easier to
read.
The Toolbar in the Alarm Window
The upper part of the Alarm Window contains
a toolbar, enabling you to find, sort and handle
alarms, manage views etc.
Nimsoft Documentation: Service Level Manager 202
Accept Ma nage views Hold alarms Sort
Unassign Select Find next Columns
Assign Save view Alarm filter Filter Find previous
Acknowle d ge Print
Find
See the description in the section Handling
Alarms for the following (leftmost) tool
buttons.
Accept
Assign
Unassign
Acknowledge
Hold Alarms
Accept Hold alarms
Unassign
Assign
Acknowle d ge
Alarm Filter… Using the alarm filter, you can configure the alarm objects to
display:
o Alarms from selected source(s), subsystems, probes, etc.
o Only alarms with severities as specified.
o Alarms containing specific text.
Nimsoft Documentation: Service Level Manager 203
o Time when the alarms were received.
o Alarms assigned to or by specific users, etc.
See the description in the section Right-
clicking a column header for the following tool
buttons:
Select
Filter
Find
Find next
Find Previous
Select Find next
Filter Find previous
Find
See description in the section Right-clicking in
a list for a description of the right-most
buttons:
Sort
Columns
Save views
Manage views

Nimsoft Documentation: Service Level Manager 204
Ma nage views Sort
Columns
Save view
Working with Alarms Once an alarm is generated, the Enterprise
Console provides a powerful area where
operators can view and manage the alarms. The
basic alarm management architecture ensures
that alarms are positively assigned and
acknowledged (closed) before they disappear
from the screen. Obviously some alarms can be
set to timeout after a certain period and other
alarms can be automatically closed based on
the receipt of a clearing event.
The basic flow of alarm management is:
Alarm generated by the probe.
Alarm appears on the Enterprise
Console.
An operator takes ownership of the
alarm.
The operator gets more detail about
the problem and fixes it.
The operator closes the alarm, and the
alarm is therefore removed from the
console.
The basic alarm window allows the operator to
decide which columns to display (see the
section Working with views in lists), in which
order to display them and how to sort the
display. The operator can save preferred
methods of viewing the alarms for future use.
Selecting any one of the icons at the top of the
screen will filter the display to show only
alarms associated with that source, or multiple
servers can be grouped together to create a
technology or business- view – e.g. see all
alarms from File Servers.

Nimsoft Documentation: Service Level Manager 205
Each alarm offers a menu of actions by right
clicking on the alarm.
From this menu, the operator can assign the
alarm, close the alarm or look at the history of
an alarm (i.e. look at all previous occurrences
and what state changes have occurred).
Numerous other options are available to
improve the operator’s efficiency.
The Alarm Window
The Alarm window displays alarms received
by the nas belonging to the Hub you are
currently logged on to.
If no alarm filters are active, the window will
display all alarms received.
Note that if you click an alarm object in a
Dashboard, you implicitly set a filter. Click on
an empty part of the Dashboard to clear the
filter, or go through the Set Filter dialog to
clear it manually.
Handling Alarms
Alarm details Double-clicking an alarm in the Alarm
Window opens the alarm and displays it in a
separate window called Alarm Details.
The window provides detailed alarm
information and some function buttons (going
to the previous/next alarm in the Alarm
Window, the alarms’ history and some
functions for handling the alarm).
Assign
The Assign function found in the alarm
windows’ toolbar could be used when
assigning an alarm to a specific user. You can

Nimsoft Documentation: Service Level Manager 206
also assign an alarm by right-clicking it and
select Assign.
A white dot will appear in the lower right part
of the colored alarm symbol when the alarm is
assigned.
Assigned alarms can be unassigned again (see
below).
Unassign
The Unassign function found in the alarm
windows’ toolbar could be used when
unassigning an alarm that has been assigned.
You can also unassign an alarm by right-
clicking it and select Unassign.
Acknowledge
Acknowledges an alarm. The alarm gets closed
and disappears from the alarm window.
History
Opens the Alarm History window, showing the
transaction log for the selected alarm.
Hold Alarms
The alarm window will not be updated when
this function is active. May be useful when the
alarm traffic is heavy.
Accept
The user assigns selected alarms to himself
Working with Views in Lists If you want to modify the layout of a list in a
window (e.g. the alarm list in the Alarm
SubConsole), you have a set of options
available:
Left-clicking the column border, dragging to the preferred
width and releasing the mouse button can also modify the
width of columns.
If you want to have the columns placed in another order, the
columns can be moved, using drag and drop. You left-click the
column you want to move, drags it to the preferred position and
drop it by releasing the mouse-button.
Left-clicking the column border, dragging to the preferred
width and releasing the mouse button can also modify the
width of columns.
Right-clicking a column header also gives many options.

Nimsoft Documentation: Service Level Manager 207
See the section Right-clicking a
column header.
Right-clicking inside the list also gives many options. Some of
the options are special for the different lists, and will be
described in the sections describing the different lists.
The other options, which are common
for all lists are described in the section
Right-clicking in a list.
Further, the Toolbar in the upper part of the lists contains a set
of functional buttons; see the section The Toolbar in the list.
The Toolbar in the list
The Toolbar integrated in the upper part of the
list includes a set of functional tool buttons
making it easier to navigate in the pane. Note
that this toolbar can be selected / deselected by
right-clicking in the list and selecting View >
Toolbar.
The options in the toolbar are also available
when either right-clicking in the list or when
right-clicking a column-header.
See the section Right-clicking in a list for an
explanation of the following options in the
Toolbar:
o Sort
o Columns
o Print
o Save view
o Manage views
See the section Right-clicking a Column
header for an explanation of the following
options in the Toolbar:
o Select
o Filter
o Find
o Find next

Nimsoft Documentation: Service Level Manager 208
o Find previous
Right-clicking a column header
Right-clicking a column header gives many
options.
Sort Ascending / Descending
The entries in the list can be sorted, ascending
or descending, based on the entries in the
column under the header you right-click.
Select
This option can be used to select specific rows
in the list. You can select all rows, or you can
specify a select pattern in the Select what field.
All rows matching the specified pattern will be
selected.
Clicking the Match whole column value option,
only rows containing exactly the pattern
entered will be selected.
There is also an option for case sensitive
selection. In this example, all list entries
containing the word warning will be
highlighted.
Filter
Entries in the list can be filtered by defining a
select pattern (i.e. text). Only entries in the list
containing this pattern will be displayed in the
list, others will be hidden.
In this example, only alarms containing the
word wsrune will be displayed.
Using the option Dynamic filtering, the

Nimsoft Documentation: Service Level Manager 209
filtering starts immediately (while you are
writing the select pattern).
To reset to normal view, with all list entries
displayed, open the filter dialog again and click
the Reset button.
Find
You can search for specific list entries by
defining a select pattern (i.e. text), and the first
list entry containing this pattern will be
highlighted.
Clicking the Match whole column value option,
the find function searches for a column with
exactly the contents entered in the Find what
field.
You may also select the find function to be
case sensitive.
Clicking the Find Next button highlights the
next entry containing the select pattern, while
clicking the Find Previous button will find the
previous entry containing the select pattern.
Columns
Columns can be removed from the list. You
select the column you want to remove and
click the <<Remove button. If you later want
the removed columns back again, you simply
select them and click the add>> button, or you
click the Reset button.
You may also change the order of the columns.
Selecting a column in the list and clicking the
Move Up button, moves the column one step
up, which means that the column will be
moved one position leftwards in the list.

Nimsoft Documentation: Service Level Manager 210
Properties
In the Properties dialog, you can modify the
selected column’s title. Note that for the Assign
Time column, you may also specify the time
format. You may also select between Fixed
column width and Automatic Adjustment (the
width is automatically adjusted to fit the length
of the longest text string in the column.
Right-clicking in a list
Right-clicking inside the list offers a lot
options. Some of the options are special for the
different lists, and will be described in the
sections describing the different lists.

Nimsoft Documentation: Service Level Manager 211
The other options, which are common for all
lists are described in this section.
Right-clicking in a list in a window (e.g. the
alarm list in the Alarm SubConsole) gives you
the possibility to modify the appearance of the
list.
Views
The View function can be used to manipulate
the view (the appearance of the list in the
window). You may create your own views or
make modifications of the layout of a list and
save the views, giving them descriptive names
(see Save View).
You can then toggle between different defined
views.
Persistent view
If you have no default view specified, you can
turn on or off a switch telling the system
whether you want to save the changes you have
made to a list during an ongoing session or not.
If the switch 'Persistent View' is set, the sort
levels and column ordering will appear in the
same manner at start-up as when you exited the
application.
Save View
This option can be used if you want to define
specific views. If you change the layout of the
list to match your specific needs, you can save
the view and give it a specific name.

Nimsoft Documentation: Service Level Manager 212
Manage views
The View function can be used to manipulate
the view (the appearance of the list in the
window) and to create your own views.
The Manage View function can be used to
manipulate these defined views.
You can:
Activate a view
Delete views that are no longer required
Specify which view should be set initially when the application
is started. A blue arrow will indicate this selection in the list
containing your defined views.
If you have no default view specified, you can
turn on or off a switch telling the system
whether you want to persistently save the
changes you have made to a list during an
ongoing session or not. If the switch Persistent
view is set, the sort levels and column ordering
will appear in the same manner at start-up as
when you exited the application.
Reset view
Resets to a basic view, with application default
values.
Sort By
This function can be used to sort the list based
on the different columns in the view.
Nimsoft Documentation: Service Level Manager 213
Row Details
Marking an entry in the list and selecting Row
Details opens a separate window containing
detailed information about the selected list
entry.
Sort
A more sophisticated sorting function, where
you can specify multiple sorting keys.
You may sort by a first column, then by a
second and finally by a third column.
You may select to sort in ascending or
descending order and also choose case
sensitive sorting.
Columns
This function allows you to add or remove
columns from the view.
Columns can be added by marking the column
you want to add in the Available Columns field
of the dialog and clicking the Add>> button.
The column will move to the Displayed
Columns field (note the Add All button, which
moves all columns).
Columns can also be removed by marking the
column you want to remove in the Displayed
Columns field of the dialog and clicking the
<<Remove button. The column will move to
the Available Columns field (note the Remove
All button, which removes all columns).
Further you may change the order of the
columns by using the Move Up / Move Down
button.

Nimsoft Documentation: Service Level Manager 214
Toolbar
Lets you include or remove the Toolbar (see
the section The Toolbar in the list) from the top
of the list.
Status Bar
Lets you include or remove the Status Bar from
the bottom of the list.
Properties
Opens the properties box for the list.
There is a General tab for selecting background
color, text color and font etc. for the list.
Further you may select:
The Grid Lines option, which will make the list appear with
grid lines (as a table).
The Full Row select, which makes it possible to select the full
row in the list by left-clicking it.
In addition, there is a tab for each column,
where you can modify the column title and
column width.

Nimsoft Documentation: Service Level Manager 215
Prints the contents of the window. The printer
dialog appears, allowing you to select a printer
and to modify the printer properties, such as
page orientation, number of copies etc.
Print Preview
Displays a preview of the contents of the list,
as it will appear on a printout.
Edit
This option enables you to select, filter and
find alarms in the list. These functions are also
available in the Toolbar, and more information
about these functions can be found in the
section The Toolbar in the list.
You may also copy selected alarms to the
clipboard.

Nimsoft Documentation: Service Level Manager 216
SLM Terms and definitions
Automatic (Interval) data type
QoS Data is recorded at intervals, individually
specified in the probe configuration for each of
the probes.
Asynchronous data type
QoS Data is recorded only each time the
measured value changes.
Calculation profile
Calculation profiles are user-created profiles
that can be used when defining the calculation
properties for Service Level Objects and
Quality of Service Constraints. These profiles
are based on built-in plug-ins distributed with
the Service Level Manager application.
When defining calculation profiles, the profiles
will be grouped either as SLO calculations as
QoS calculations, depending on if the selected
plug-in supports single-data or multi-data
series.
Calculation method
Calculation method is the set of rules and
conditions determining the way the SLA
compliance is calculated.
Compliance period
The compliance period defines the period of
time that the SLA should meet the
requirements stated by the compliance
percentage, typically a day, a week or a month.
The illustration shows the relationship between
the operating period and the compliance
period.
The gray area illustrates the compliance period,
and the blue area illustrates an operating period
with 5 time-specifications.
Example:
Let's say that the compliance period (gray area)
is defined to be one week (Monday to
Monday). Our requirements for the SLA is
defined to be between 08:00 and 17:00 every
weekday (operating period). Notice that the
data (blue plot) within the operating periods
(blue area) are included in the SLA
computations.

Nimsoft Documentation: Service Level Manager 217
Compliance percentage
The compliance percentage is defined to be the
percentage of time that the QoS, constrained by
e.g. operating period and thresholds, should be
considered compliant within the compliance
period..
Each sample is checked within the compliance
period by the data_engine and summarized as
failed or successful. The result is compared
against the expected compliance percentage
(defined by the user).
Consider the data represented by the
illustration. The red line represents the
threshold value, the green line represents the
average value and the blue line represents the
actual sample values.
How many samples within the operating period
are above the threshold settings?
Zero samples breach the threshold line within
the operating periods, thus fulfilling 100% of
our compliance requirements. The 5 samples
that breach the threshold are outside the
compliance period which was e.g. Monday to
Monday, with operating periods every
weekday from 08:00 to 17:00.
Let's assume that the total number of samples
within the operating period is 129, with 9
samples breaching the threshold. This implies

Nimsoft Documentation: Service Level Manager 218
that 6.98% of the samples are accounted for as
out of compliance ( 9 * 100/129).
If our Service Level Agreement requires a
compliance of 98.50% (or better) and the only
data defined in this SLA is the above data, then
our requirements to the SLA is breached due
to a current compliance percentage of 100% -
6.98% = 93.02%.
Data Types
We use the following different data types when
calculating the compliance:
Automatic (Interval)
QoS Data is recorded at intervals,
individually specified in the probe
configuration for each of the probes.
Asynchronous
QoS Data is recorded only each time
the measured value changes.
Domain
The Domain is the top-level node in the
hierarchy, and a site is normally set up with
one Domain. It is used to group one or more
Hubs in a logical set such as a company or
enterprise.
Hub
The Hub is a message concentrator and re-
distributor. It is the collection point for all
messages coming from the various installed
Robots. Many other Nimsoft components can
connect to the Hub to receive dedicated
messages and perform other specific activities.
One such component is the Alarm server.
NULL value
A NULL value will be recorded into the
database typically if a probe does not measure
a value from the target due to a timeout, e.g. no
answer to a ping). In the QoS Calculation
Profiles, available under the Calculation
Profiles Node in the Navigation Pane of the
SLM, you may define how these NULL values
are handled in a compliance calculation.
Operating period
The operating period constrains the QoS
samples to one or more time-specifications
within the compliance period. This means that
samples falling outside these time
specifications will not influence the SLO/SLA
compliance requirements. Each operating
period is defined as a union of one or more
time-specifications.

Nimsoft Documentation: Service Level Manager 219
Probes
Probes are small dedicated pieces of software
that monitor specific resources or events. Each
probe can be easily configured for your own
specific monitoring requirements.
Robot
The Robot is the first line of management for
the Probes. The Robot starts and stops the
probes at the required times, collects, queues
and forwards messages from the probes onto
the specified Hub.
Service Level Aagreement (SLA)
A Service Level Agreement (SLA) is an
agreement to deliver a service within a
specified/fixed time-period to an extent where
both parties agree on a measurable service
levels. The parties may be an IT department
delivering services to another department
within the company, or by a company and an
external service provider.
The services included in the SLA may be a
collection of monitored objectives we call
Service Level Objectives (SLO). These
objectives (or group of objectives) are
monitored by dedicated programs (often
standard probes) that monitor e.g. network
connectivity, application (Oracle, Exchange, e-
mail) availability and service (DNS, DHCP)
availability.
SLA
A (SLA) is an agreement to deliver a service
within a specified/fixed time-period to an
extent where both parties agree on a
measurable service levels. The parties may be
an IT department delivering services to another
department within the company, or by a
company and an external service provider.
The services included in the SLA may be a
collection of monitored objectives we call
Service Level Objectives (SLO). These
objectives (or group of objectives) are
monitored by dedicated programs (often
standard probes) that monitor e.g. network
connectivity, application (Oracle, Exchange, e-
mail) availability and service (DNS, DHCP)
availability.
SLO
A Service Level Objective (SLO) is a
combination of one or more component
measurements (Quality of Service) to which
constraints are applied. A SLO is said to be in
compliance if the underlying measurement
values are within the specified constraints.
Nimsoft Documentation: Service Level Manager 220
SLO's may have operating periods during
which the SLO has to be compliant.
SLM
The Service Level Manager (SLM) is the
application where service level configuration
and monitoring is performed. The application
needs a valid license to operate.
QoS
The Quality of Service (QoS) is the atom of the
Service Level Management. The QoS is the
actual value (sample) collected and used
centrally to determine the state of the service
level objective. This value is normally
collected by a probe like cdm, net_connect,
url_response etc. The value is first used for
alarm purposes, but if the probe is configured
to deliver Quality of Service, then a QoS
message is issued.
A QoS constrained by threshold, source, target
and operating period settings is used as the
building blocks for SLO's.
QoS object
The QoS object is defined by its QoS name,
source and target. All sample-data with this
unique combination form data-series that may
be used as part of any Service Level Objective.
QoS constraint
A constrained QoS object is defined by its QoS
name, source, target, threshold and
operating period. This constrained object is
the building block of the Service Level
Objective.
Nimsoft Documentation: Service Level Manager 221
Index
A
Accept ......................................................................... 198 Access Control List......................................................... 58 account ........................................................................ 105 Acknowledge .............................................................. 198 ACL ................................................................................ 58 Add Exclude Period wizard. ........................................... 91 Alarm Filter ......................................................... 190, 194 Alarm window
Right-clicking in the Alarm Window .............................................................. 189
Alarm Window The Toolbar ............................................................. 193 viewing .................................................................... 197
Alarms handling .................................................................. 197 working with ........................................................... 196
Assign .......................................................................... 197 Assign Time ................................................................. 188 Assigned By ................................................................. 188 Assigned To ................................................................. 188 Asynchronous data type ................................................ 87 Automatic data type ...................................................... 87 Average ......................................................................... 85
C
calculation jobs.............................................................. 17 calculation jobs, started manually ................................. 17 Calculation method Default ........................................... 21 Calculation multi-series ..................................... 22, 23, 25 Calculation Profiles ........................................................ 84 chm file ............................................................................ 2 Clear ............................................................................ 187 Clear Alarm Filter ........................................................ 191 Columns....................................................................... 201 Compliance job scheduling ............................................ 17 Compliance percentage ................................................. 18 Count ........................................................................... 188 Critical ......................................................................... 187
D
Data collection ................................................................ 5 Data Collection ................................................................ 6 Data Engine ................................................................... 12 Data missing ................................................................ 125 Data Outside Operating Period ................................... 123 Data repository................................................................ 5 Data Repository ............................................................... 6 Data Series .................................................................... 87 Data transport ................................................................. 5 Data Transport ................................................................ 6 Database ......................................................................... 9 Database tables ............................................................... 9 Defaultcalculation method ............................................ 21 define a new SLA group ........................................... 41, 42
Dynamic Report .................................................... 54, 140 Dynamic reports .......................................................... 140
E
Edit .............................................................................. 189
F
Filter .................................................................... 168, 200 Filter by QoS ............................................................... 168 Filter by Source ........................................................... 169 Filter by Target ........................................................... 169 Find ............................................................................. 201
G
Grouping QoS objects in folders ................................. 180
H
History ........................................................................ 191 Hold Alarms ................................................................ 198 Host Name .................................................................. 187
I
ID 186 Informational .............................................................. 187 Interval .......................................................................... 86
L
Login.............................................................................. 57
M
Major .......................................................................... 187 Manage views ............................................................. 204 Median .......................................................................... 86 Message ...................................................................... 186 Minor .......................................................................... 187 Missing data ............................................................... 125 multi-series Calculation................................................. 25
N
NULL value ............................................................ 86, 210
O
Operating period, outside ........................................... 123 Operating periods ......................................................... 44 organize ...................................................................... 180 organizing Qos objects ................................................ 180 organizing QoS objects ................................................ 180 Outside Operating period ............................................ 123

Nimsoft Documentation: Service Level Manager 222
P
Persistent view ............................................................ 203 printout templates ...................................................... 143 Probe ........................................................................... 188 Properties .................................................................... 202 Properties, SLM ............................................................. 31
Q
QoS .................................................................................. 3 QoS data structure .......................................................... 9 QoS data tables ............................................................... 9 Qos objects, organizing ............................................... 180 QoS Related Graphs ...................................................... 14 QoS Templates ............................................................ 142 QOS_DEFINITION ............................................................. 9
R
Report Engine ................................................................ 14 reset to normal view ................................................... 201 Right-clicking a column header ........................... 198, 200 Right-clicking in a column header ............................... 188
S
Save View .................................................................... 203 schedule ........................................................................ 17 scheduling compliance jobs........................................... 17 Select ........................................................................... 200 Service-level management .............................................. 3 Set Alarm Filter Based on ........................................... 190 Set Filter ...................................................................... 197 Severity ........................................................................ 187 SLA ................................................................................... 3 SLA calculation tables .................................................... 10 SLA configuration tables ................................................ 10 SLA wizards ................................................................... 35 SLM .................................................................................. 3 SLM database .................................................................. 9
SLM Overview ................................................................. 5 SLM Properties .............................................................. 31 SLO .................................................................................. 3 Sort Ascending / Descending ...................................... 200 Source ......................................................................... 187 StripHostNameIp ......................................................... 187 Subsystem ................................................................... 187 Subsystem ID ............................................................... 187
T
Tables QoS data .............................................................. 9 Tables SLA calculation ................................................... 10 Tables SLA configuration ............................................... 10 Target Unavailable ...................................................... 124 Templates QoS ............................................................ 142 Time Arrival ................................................................. 187 Time Origin .................................................................. 187 Time Received ............................................................. 187 Toolbar
Toolbar in the Alarm Window ................................ 193 Transaction History .................................................... 191
U
Unassign ..................................................................... 198 Unavailable target ...................................................... 124 Using multi-series Calculation
Profiles ...................................................................... 25
V
Views working with ........................................................... 198
W
Warning ...................................................................... 187 wizard ........................................................................... 93 Wizards ......................................................................... 35 Wizards SLA .................................................................. 35
Related Documents