NextGen ® PM System Configuration Training Workbook Community Health Centers Version 5.8

Welcome message from author
This document is posted to help you gain knowledge. Please leave a comment to let me know what you think about it! Share it to your friends and learn new things together.
Transcript
NextGen® PM
System Configuration Training Workbook Community Health Centers
Version 5.8

Copyright © 1994-2013 NextGen Healthcare Information Systems, Inc. All Rights Reserved.
NextGen is a registered trademark and service mark of NextGen Healthcare Information Systems, Inc.
Notice:
Adobe and Acrobat are registered trademarks of Adobe Systems Incorporated in the United States and/or
other countries.
Microsoft, SQL Server, Windows, Windows Vista, Internet Explorer, Office, Word, Excel and Outlook are
registered trademarks of Microsoft Corporation in the United States and/or other countries. Although a
Microsoft trademark may appear in certain images within this document, Microsoft Corporation is not
responsible for warranty support on the NextGen® software products.
In as much as possible, default procedures in this guide were developed using the most current Microsoft
operating system and most current Microsoft server operating system. When required, procedures in this
guide were developed based on the Microsoft Windows 7 operating system and/or Windows Server 2008
and SQL Server 2008, unless otherwise noted. Screenshots in this document were primarily developed
using the Windows 7, Windows Server 2008 and SQL Server 2008 systems. Note: Other Windows
operating systems that support this product may work differently.
All other names and marks are the property of their respective owners.
The examples contained within this publication are strictly present to show functionality of the software
and are not intended to be guidelines for medical decisions or clinical approaches.
Although we have exercised great care in creating this publication, NextGen Healthcare Information
Systems, Inc. assumes no responsibility for errors or omissions that may appear in this publication and
reserves the right to change this publication at any time without notice.
Although NextGen Healthcare provides accurate documentation at the time of publication, it cannot
guarantee going forward that websites links to third-party vendors listed in this document do not become
obsolete. NextGen Healthcare is not responsible for the contents of any such linked sites or any link
contained in a link site, or any changes or updates to such sites. The inclusion of any link does not imply
endorsement by NextGen Healthcare of the site and is solely being provided to you as a convenience. Use
of any such linked web site is at the user’s own risk.
Notice:
The following are all registered trademarks or trademarks of NextGen Healthcare Information Systems,
Inc.:
NextGen® Ambulatory EHR NextGen® EHR Connect NextGen® Optical
Management
NextGen® Appointment
Scheduling
NextGen Financial Insight™ NextGen® Patient Portal
NextGen® Billing Service
Management
NextGen™ HIE NextGen® Practice
Management
NextGen® CHC Reporting
Module
NextGen® HQM NextGen® Real Time
Services
NextGen® Dashboard NextGen® KBM NextGen® Remote Patient
Chart Synchronization
NextGen® Document
Management
NextGen® Mobile NextPen™
The following terms may be used interchangeably throughout this document:
NextGen Ambulatory EHR and NextGen EHR
NextGen Practice Management and NextGen EPM
NextGen Optical Management and NextGen Optik
NextGen Document Management and NextGen ICS
NextGen Patient Portal and NextMD
NextGen Remote Patient Chart Synchronization and NextGen PatientSync
NextGen CHS and NextGen HIE
Address comments concerning this document to: [email protected], Web site:
http://www.nextgen.com
NOTE: This EPM SCT Workbook was created using NextGen EPM version 5.8. Slight variations in the
steps performed, graphic images, and screens depicted may occur depending on the versions of the EPM
you are using. The fundamental concepts will remain the same.
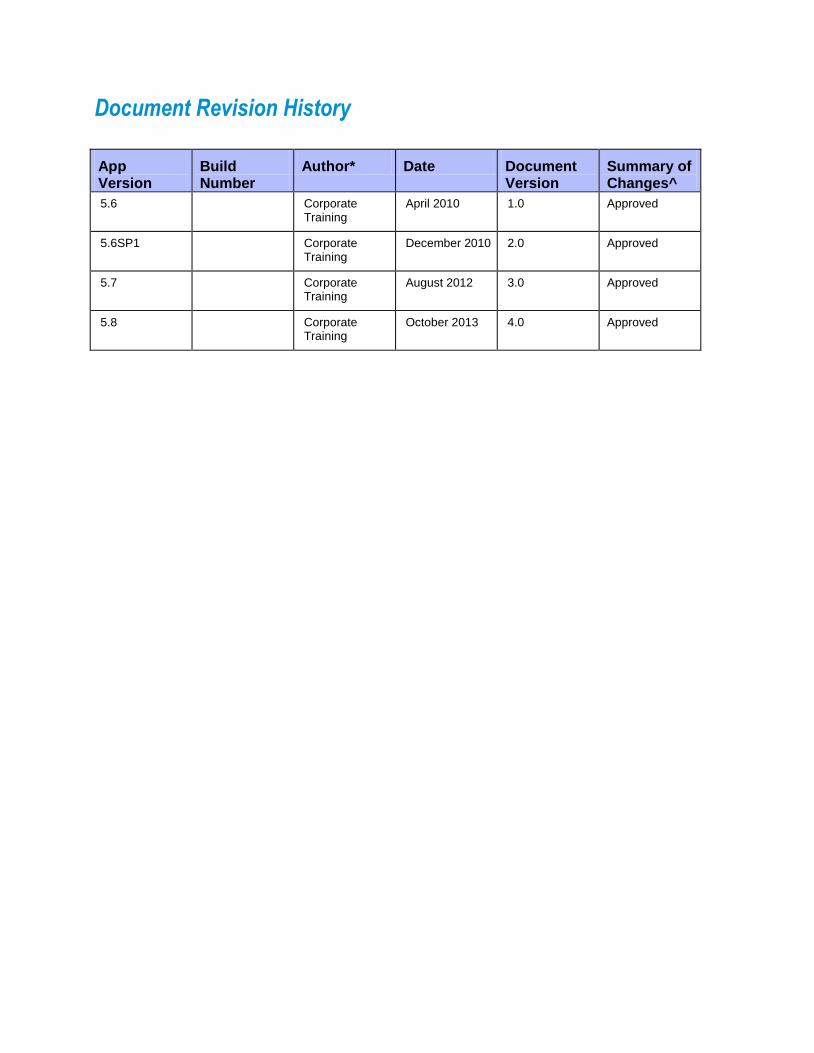
Document Revision History App Version
Build Number
Author* Date Document Version
Summary of Changes^
5.6 Corporate Training
April 2010 1.0 Approved
5.6SP1 Corporate Training
December 2010 2.0 Approved
5.7 Corporate Training
August 2012 3.0 Approved
5.8 Corporate Training
October 2013 4.0 Approved

This page is intentionally left blank.


NextGen Healthcare
6
Contents:
Preparation for System Configuration Training ___________________________________ 15
Getting Started ______________________________________________________________ 17
Application Launcher ................................................................................................................. 17 Create Shortcut/Menu Item ................................................................................................... 18 SetDB .................................................................................................................................... 19 License Manager .................................................................................................................. 20 System Administrator ............................................................................................................ 21 File Maintenance ................................................................................................................... 22
Understanding the NextGen System File Structure .................................................................. 23 System Level ........................................................................................................................ 24 Enterprise Level .................................................................................................................... 25 Practice Level ....................................................................................................................... 26 Location Level ....................................................................................................................... 27 Tax ID Numbers .................................................................................................................... 27 Association ............................................................................................................................ 28
System Basics ______________________________________________________________ 30
Login .......................................................................................................................................... 30
Keyboard Shortcuts ................................................................................................................... 31
File Maintenance > Master Files > System ________________________________________ 32
Enterprises ................................................................................................................................ 32 Enterprise Preferences ......................................................................................................... 32
Enterprise Preferences > UDS Tab .................................................................................. 33 Enterprise Preferences > Client Defined Tab ................................................................... 34
Locations ................................................................................................................................... 36 Location Defaults Tab ........................................................................................................... 36 Defaults 2 Tab ....................................................................................................................... 38 Practice Tab .......................................................................................................................... 40 Credentialing Tab .................................................................................................................. 41 External Tab .......................................................................................................................... 42 Other Tabs ............................................................................................................................ 43
Practices .................................................................................................................................... 44 Practice Defaults Tab ............................................................................................................ 44 External Tab .......................................................................................................................... 46 Import Tab ............................................................................................................................. 47 Practice Preferences ............................................................................................................. 48
Practice Preferences > Chart Tab .................................................................................... 48
System Administrator ________________________________________________________ 49
Practice Level Security .............................................................................................................. 50 Groups .................................................................................................................................. 50
New Group........................................................................................................................ 50 New Group – General Tab ............................................................................................... 51 New Group - Rights Tab ................................................................................................... 52 Import Permissions ........................................................................................................... 54 Export Permissions ........................................................................................................... 56 Add Existing Groups ......................................................................................................... 58 Delete Group .................................................................................................................... 60
7
NextGen® PM System Configuration Training Workbook for CHC, Version 5.8
Users ..................................................................................................................................... 61 New User – General Tab .................................................................................................. 62 New User – Practice Rights Tab ...................................................................................... 65 New User – Preferences Tab ........................................................................................... 66 New User – External Tab ................................................................................................. 67 New User – Locations Tab ............................................................................................... 68 New User – Location Restrictions Tab ............................................................................. 69 Add Existing User ............................................................................................................. 71 User/Group Assignment ................................................................................................... 72 Deactivate User ................................................................................................................ 74 Restore User..................................................................................................................... 75
System Level Security ............................................................................................................... 76 Edit Menu .............................................................................................................................. 76
Find ................................................................................................................................... 77 Association Maintenance .................................................................................................. 77 Full App Launcher Access ................................................................................................ 78
View Menu ............................................................................................................................ 79 Password Requirements .................................................................................................. 79 Significant Events ............................................................................................................. 80
File Maintenance > Master Lists ________________________________________________ 81
Address Type ............................................................................................................................ 81
Appointment Cancellation Reasons .......................................................................................... 82
Appointment Rescheduling Reasons ........................................................................................ 82
Appointment User Defined 5 – 8 ............................................................................................... 83
Bad Debt Statuses .................................................................................................................... 83
Blood Quantum ......................................................................................................................... 84
Case Category .......................................................................................................................... 84
Case Contact Role .................................................................................................................... 85
Case Markets ............................................................................................................................ 85
Church ....................................................................................................................................... 86
Classification/Beneficiary .......................................................................................................... 86
Community Code ....................................................................................................................... 87
Contact Preferences.................................................................................................................. 87
Contract Subgrouping ............................................................................................................... 88
Counties .................................................................................................................................... 88
Countries ................................................................................................................................... 89
Credentialing ............................................................................................................................. 89
Departments .............................................................................................................................. 90
Descendency ............................................................................................................................. 90
Diagnosis Subgroupings ........................................................................................................... 91
Enterprise Client Defined 1 – 14 ............................................................................................... 91
Ethnicity ..................................................................................................................................... 92
Financial Classes ...................................................................................................................... 92
NextGen Healthcare
8
Homeless Status ....................................................................................................................... 93
IHS Eligibility Status .................................................................................................................. 93
Language .................................................................................................................................. 94
Language Barrier ....................................................................................................................... 94
Location Subgroupings ............................................................................................................. 95
Marketing Plan Sub-Groups ...................................................................................................... 95
Migrant Worker Status............................................................................................................... 96
Modalities .................................................................................................................................. 97
Name Prefix ............................................................................................................................... 97
Name Suffix ............................................................................................................................... 98
Occupations .............................................................................................................................. 98
Patient Status Change Reasons ............................................................................................... 99
Patient Types ............................................................................................................................ 99
Payer Subgroupings ................................................................................................................ 100
Privacy Notices ........................................................................................................................ 100
Provider Expiration Reasons ................................................................................................... 101
Provider Subgroupings ............................................................................................................ 101
Provider Types ........................................................................................................................ 102
Public Housing Primary Care .................................................................................................. 103
Race ........................................................................................................................................ 104
Reason Code Subgroupings ................................................................................................... 105
Religion ................................................................................................................................... 105
School Based Health Center ................................................................................................... 106
Service Type ........................................................................................................................... 106
Task Completion Reasons ...................................................................................................... 107
Task Subgroupings ................................................................................................................. 107
Tribal Affiliation ........................................................................................................................ 108
Type of Benefit ........................................................................................................................ 108
Vaccine Manufacturer ............................................................................................................. 109
XDS Tables ............................................................................................................................. 109
Zones ...................................................................................................................................... 109
File Maintenance > Master Files > System _______________________________________ 110
Transaction Codes .................................................................................................................. 110 System Generated Transaction Codes ............................................................................... 112 Pre-Installed Transaction Codes ........................................................................................ 113
Payers ..................................................................................................................................... 115 Payer Defaults-1 Tab .......................................................................................................... 116 Defaults-2 Tab .................................................................................................................... 118 System Tab ......................................................................................................................... 120
9
NextGen® PM System Configuration Training Workbook for CHC, Version 5.8
Claims Sub-Tab .............................................................................................................. 120 Claims-2 Sub-Tab ........................................................................................................... 121 COB Electronic Claims Sub-Tab .................................................................................... 124
Practice Tab ........................................................................................................................ 125 Claims Sub-Tab .............................................................................................................. 125 Secondary References Sub-Tab .................................................................................... 127 Other Sub-Tab ................................................................................................................ 128 UB Sub-Tab .................................................................................................................... 132 Transactions Sub-Tab .................................................................................................... 138 Libraries Sub-Tab ........................................................................................................... 139
Alt (Alternate) Payer Tab .................................................................................................... 141 External Tab ........................................................................................................................ 142 Co-Pays Tab ....................................................................................................................... 143 Order Module Tab ............................................................................................................... 144 Payers - Other Functions .................................................................................................... 145
Import Practice Payer ..................................................................................................... 145 Print Payers .................................................................................................................... 146 Practice Access .............................................................................................................. 147
Setup for UB Claims ........................................................................................................... 148 Setup for Alternate Payer “Split Billing” .............................................................................. 152 Setup for “Wrap Payer” Billing ............................................................................................ 159 Setup for Dental Billing ....................................................................................................... 164
Setup for Dental Payers on ADA Claims ........................................................................ 168 Setup for Dental Payers on UB Claims .......................................................................... 173
File Maintenance > Master Files > Practice ______________________________________ 180
Groups ..................................................................................................................................... 180
File Maintenance > Master Files > System _______________________________________ 183
Providers ................................................................................................................................. 183 Demographics Tab .............................................................................................................. 183 System Tab ......................................................................................................................... 184 Notes Tab............................................................................................................................ 185 Elig/Ref Tab ........................................................................................................................ 186 Credentialing Tab ................................................................................................................ 187 Provider Types Tab ............................................................................................................. 188 Practice Tab ........................................................................................................................ 189 Categories Tab ................................................................................................................... 192 External Tab ........................................................................................................................ 193 EHR Tab ............................................................................................................................. 194 Chart Tracking Tab ............................................................................................................. 195 Order Module Tab ............................................................................................................... 196 Practice Access .................................................................................................................. 197
AutoFlow Sequences .............................................................................................................. 198
Budget Statement Messages .................................................................................................. 198
Case Contacts ......................................................................................................................... 199
CMN Information ..................................................................................................................... 200
Collection Agencies ................................................................................................................. 201
Counters .................................................................................................................................. 202
CPT4 Codes ............................................................................................................................ 203
Diagnosis Categories .............................................................................................................. 204 Practice Access .................................................................................................................. 205
NextGen Healthcare
10
DME Regions .......................................................................................................................... 206 System Tab ......................................................................................................................... 206 Practice Tab ........................................................................................................................ 208
Employers ............................................................................................................................... 209
Form Templates ...................................................................................................................... 210
Formats ................................................................................................................................... 211
ICD9CM Codes ....................................................................................................................... 212
Label Products ........................................................................................................................ 213
Label Templates ...................................................................................................................... 214
Locality Tax Rate ..................................................................................................................... 215
Patient Responsibility .............................................................................................................. 217
Revenue Codes ....................................................................................................................... 218
Sliding Fee Schedules............................................................................................................. 219 Setup for Sliding Fee Schedules ........................................................................................ 219
Line Item Based vs. Encounter Based using Minimum Value Mode.............................. 226 Line Item Based vs. Encounter Based using Flat Rate Mode ........................................ 228
Practice Access .................................................................................................................. 230 Practice Preferences > Sliding Fee Tab ............................................................................. 231 Alternatives to Standard Sliding Fee Schedules ................................................................ 233
Sliding Fee Schedules for Flat Encounter Rate Co-Pay ................................................ 233 Payers with Contracts for Flat Encounter Rate Co-Pay ................................................. 236
Specialties ............................................................................................................................... 241
Statement Messages............................................................................................................... 242
Task Types .............................................................................................................................. 243
Taxonomy Codes .................................................................................................................... 244
User Notes Descriptions ......................................................................................................... 245
Zip Codes ................................................................................................................................ 246
File Maintenance > Master Files > Practice ______________________________________ 247
Appointment Reminders .......................................................................................................... 247
Default User Preferences – General ....................................................................................... 248
Default User Preferences – Locations .................................................................................... 249
Default User Preferences – Scheduling .................................................................................. 250
Dunning Messages .................................................................................................................. 251
Letters ..................................................................................................................................... 252
Marketing Plans ....................................................................................................................... 254
Patient Statuses ...................................................................................................................... 255
Recall Plans ............................................................................................................................ 256
Report Types ........................................................................................................................... 258
Statement Parameter Mappings ............................................................................................. 259
Task Approval Profiles ............................................................................................................ 260
11
NextGen® PM System Configuration Training Workbook for CHC, Version 5.8
Task Workgroups .................................................................................................................... 261
Practices > Import Tab ............................................................................................................ 262
File Maintenance > Libraries __________________________________________________ 263
Library Concepts ..................................................................................................................... 263
Behavioral Health Billing ......................................................................................................... 265 Charge Options Tab ............................................................................................................ 265 Claim Options Tab .............................................................................................................. 267
Budget Statement .................................................................................................................... 269
Claim Edits .............................................................................................................................. 270
Claim Modifiers ........................................................................................................................ 271 Anesthesia Modifier ............................................................................................................ 271 Rental Modifier .................................................................................................................... 272 Behavioral Health Modifier .................................................................................................. 273
Claim Printing .......................................................................................................................... 274 Common Rules Tab ............................................................................................................ 274 Exceptions When Payer is Primary/Secondary/Tertiary Tabs ............................................ 275
Claim Status Profiles ............................................................................................................... 276
Diagnosis Codes ..................................................................................................................... 277 General Tab ........................................................................................................................ 280 Payer Tab............................................................................................................................ 281 Other Tab ............................................................................................................................ 282 Add Codes from ICD Master File ........................................................................................ 283 GEMS Update ..................................................................................................................... 284
Eligibility Profiles ..................................................................................................................... 287
Encounter Rate Billing ............................................................................................................. 288 Setup for Encounter Rate Billing ......................................................................................... 290
GPCI Codes ............................................................................................................................ 317 GPCI Import ........................................................................................................................ 320
NDC ......................................................................................................................................... 321 NDC Import ......................................................................................................................... 323
Non-Coordinated SIM Library ................................................................................................. 326
Places of Service ..................................................................................................................... 330
Reason Codes ......................................................................................................................... 331 HIPAA X12 Standard Reason Codes ................................................................................. 331 Reason Code Priority .......................................................................................................... 334
Remittance Profiles ................................................................................................................. 335
RVU ......................................................................................................................................... 336 RVU Import ......................................................................................................................... 339
Service Items ........................................................................................................................... 340 General Tab ........................................................................................................................ 342 Other Tab ............................................................................................................................ 348 Payer Tab............................................................................................................................ 349 Setup for Roll-Up Billing ...................................................................................................... 351
Roll-Up Billing by Revenue Code ................................................................................... 351 Roll-Up Billing by CPT4 Code ........................................................................................ 358
NextGen Healthcare
12
Labels Tab .......................................................................................................................... 366 Notes/Significant Events Tab .............................................................................................. 367 Drugs Tab ........................................................................................................................... 368 RVU Update ........................................................................................................................ 370 SIM Exceptions ................................................................................................................... 371 SIM Global Update .............................................................................................................. 374 SIM Groups ......................................................................................................................... 377
SIM Pricing Regions ................................................................................................................ 378
SIM Pricing Template .............................................................................................................. 379
Statement ................................................................................................................................ 380
Submitter Profiles .................................................................................................................... 381 Common Options Tab ......................................................................................................... 381 Exception Options Tab ........................................................................................................ 382 Real Time Adjudication Tab ................................................................................................ 382
Tax Exemption ........................................................................................................................ 383 State Tab............................................................................................................................. 383 Location Tab ....................................................................................................................... 384
Tax Rate .................................................................................................................................. 385
Types of Service ...................................................................................................................... 388
Contracts ................................................................................................................................. 389 NextGen® Contract Utility ................................................................................................... 389 General Tab ........................................................................................................................ 390 Fee Schedule Tab ............................................................................................................... 393 Modifier Reimbursement Tab ............................................................................................. 396 Multiple Procedure Discounting Tab ................................................................................... 397 Link Contract to Payer(s) and Providers ............................................................................. 398 Contract Exceptions ............................................................................................................ 400
Link Contract Exception to Provider(s) ........................................................................... 402 Contract Global Update ...................................................................................................... 403 Contracts for Encounter Rate Billing ................................................................................... 406
Contract with 80% Adjustment and 20% Co-Pay ........................................................... 407 Contract with 100% Adjustment ..................................................................................... 411
Preferences ________________________________________________________________ 414
Enterprise Preferences............................................................................................................ 415 General Tab ........................................................................................................................ 415 UDS Tab ............................................................................................................................. 419 Autoflow Stored/Procedure Tab .......................................................................................... 421 Client Defined Tab .............................................................................................................. 422 ICS Tab ............................................................................................................................... 424 Libraries Tab ....................................................................................................................... 425 External Tab ........................................................................................................................ 426 Vendor Labels Tab .............................................................................................................. 427
Practice Preferences ............................................................................................................... 428 Alerts Tab ............................................................................................................................ 428 Appt Scheduling Tab ........................................................................................................... 432 AutoFlow Tab ...................................................................................................................... 437 Budget Accounts Tab .......................................................................................................... 438 Charge Entry Tab ................................................................................................................ 441 Chart Tab ............................................................................................................................ 445 Claims Tab .......................................................................................................................... 448
13
NextGen® PM System Configuration Training Workbook for CHC, Version 5.8
Contract Edits Tab .............................................................................................................. 451 Data\Fee Ticket Tab ........................................................................................................... 455 EHR Tab ............................................................................................................................. 458 Encounters Tab ................................................................................................................... 459 External Tab ........................................................................................................................ 464 Forms Tab ........................................................................................................................... 465 General Tab ........................................................................................................................ 467 Holidays Tab ....................................................................................................................... 471 Imaging Tab ........................................................................................................................ 473 Invoices Tab ........................................................................................................................ 474 Itemized Bills Tab ................................................................................................................ 476 Libraries Tab ....................................................................................................................... 478 Medication Tab ................................................................................................................... 480 NextGenEDI Uploading Tab ............................................................................................... 481 Order Module Tab ............................................................................................................... 482 Patient Information Bar Tab ................................................................................................ 483 Patient Pay Tab .................................................................................................................. 484 Payment Processing Tab .................................................................................................... 485 Printing Tab ......................................................................................................................... 486 Provider Tab ....................................................................................................................... 487 Reports Tab ........................................................................................................................ 488 Resources Tab .................................................................................................................... 489 RTS Tab .............................................................................................................................. 490 Sliding Fee Tab ................................................................................................................... 491 Statements Tab ................................................................................................................... 493 Tasks Tab ........................................................................................................................... 500 Taxes Tab ........................................................................................................................... 502 Trans Codes Tab ................................................................................................................ 504 Transactions Tab ................................................................................................................ 506 Wait List Tab ....................................................................................................................... 510
File Maintenance > Code Tables _______________________________________________ 511
Code Tables ............................................................................................................................ 511
Scheduling Administration ___________________________________________________ 516
Practice Preferences > Appt Scheduling Tab ......................................................................... 516
Classes .................................................................................................................................... 517
Resources ............................................................................................................................... 518 General Tab ........................................................................................................................ 519 External Tab ........................................................................................................................ 520
Events ..................................................................................................................................... 521 Overrides Tab ..................................................................................................................... 523 Default Resource Tab ......................................................................................................... 524 Limits Tab............................................................................................................................ 525 SIMs Tab ............................................................................................................................. 526 Locations Tab ..................................................................................................................... 527 External Tab ........................................................................................................................ 528 Note Template Tab ............................................................................................................. 529
Event Chains ........................................................................................................................... 530
Categories ............................................................................................................................... 532
Weekly Templates ................................................................................................................... 533
Daily Templates ....................................................................................................................... 535
NextGen Healthcare
14
Apply Templates ...................................................................................................................... 537 Apply Weekly Templates .................................................................................................... 538 Apply Daily Templates ........................................................................................................ 539 Template Exceptions .......................................................................................................... 540
Fee Tickets ________________________________________________________________ 541
Example NextGen Fee Ticket ................................................................................................. 541
Fee Ticket Header and Footer ................................................................................................ 542
Fee Ticket Body ...................................................................................................................... 542 Example Fee Ticket Body in Microsoft® Excel ................................................................... 543 Supported File Formats ...................................................................................................... 543
Convert Excel Format to Supported Format using Microsoft® PowerPoint ................... 544 Convert Excel Format to Supported Format using Microsoft® Paint ............................. 548
Import Converted Fee Ticket into NextGen® EPM ................................................................. 552 Import a Fee Ticket for the Practice .................................................................................... 552 Import a Fee Ticket for a Practice > Provider ..................................................................... 552 Import a Fee Ticket for a Practice > Event > Provider ........................................................ 553 Import a Fee Ticket for a Practice > Location > Provider ................................................... 553
15
NextGen® PM System Configuration Training Workbook for CHC, Version 5.8
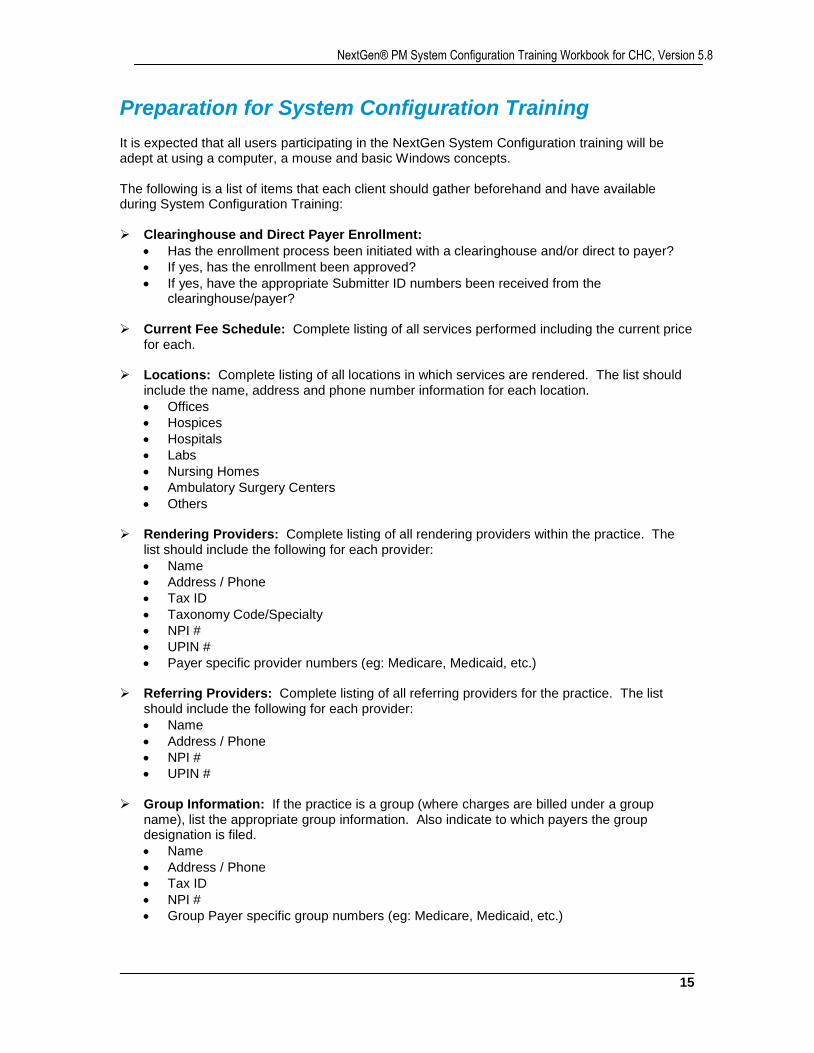
Preparation for System Configuration Training It is expected that all users participating in the NextGen System Configuration training will be adept at using a computer, a mouse and basic Windows concepts. The following is a list of items that each client should gather beforehand and have available during System Configuration Training: Clearinghouse and Direct Payer Enrollment:
Has the enrollment process been initiated with a clearinghouse and/or direct to payer?
If yes, has the enrollment been approved?
If yes, have the appropriate Submitter ID numbers been received from the clearinghouse/payer?
Current Fee Schedule: Complete listing of all services performed including the current price
for each. Locations: Complete listing of all locations in which services are rendered. The list should
include the name, address and phone number information for each location.
Offices
Hospices
Hospitals
Labs
Nursing Homes
Ambulatory Surgery Centers
Others Rendering Providers: Complete listing of all rendering providers within the practice. The
list should include the following for each provider:
Name
Address / Phone
Tax ID
Taxonomy Code/Specialty
NPI #
UPIN #
Payer specific provider numbers (eg: Medicare, Medicaid, etc.) Referring Providers: Complete listing of all referring providers for the practice. The list
should include the following for each provider:
Name
Address / Phone
NPI #
UPIN # Group Information: If the practice is a group (where charges are billed under a group
name), list the appropriate group information. Also indicate to which payers the group designation is filed.
Name
Address / Phone
Tax ID
NPI #
Group Payer specific group numbers (eg: Medicare, Medicaid, etc.)
NextGen Healthcare
16
Payers: Complete listing of all payers to which claims will be filed. The list should include the following information:
Payer Name
Address / Phone
Claim Type (1500, UB, ADA)
Media Type (Electronic 837 or Paper)
Clearinghouse ID # Appointment Schedule Templates: Copies of current templates for all providers and
resources for which appointments are made. Sliding Fee Schedules: Copies of schedules if the practice adjusts charges based on family
size and income for those patients that qualify for sliding fee discounts. Fee Ticket(s): Paper copies of all fee tickets (super-bills, charge sheets) currently being
utilized. Sample Claim Forms: Paper copies of actual claims (1500, UB, ADA) for large payers.
Also, paper copies of actual state specific claim forms, if applicable. Letters, Forms and/or Labels: Paper copies of all applicable forms currently being utilized. Users: Complete listing of names for all users and their role within the organization. FOR ON-SITE TRAINING ONLY: Overhead projector (for NextGen Trainer) Overhead projection screen Computer workstation for each trainee
17
NextGen® PM System Configuration Training Workbook for CHC, Version 5.8
Getting Started This Workbook has been organized to follow the training agenda for System Configuration Training (SCT).
Application Launcher
eLearning Curriculum: Getting Started Setting Up NextGen eLearning Course: Application Launcher
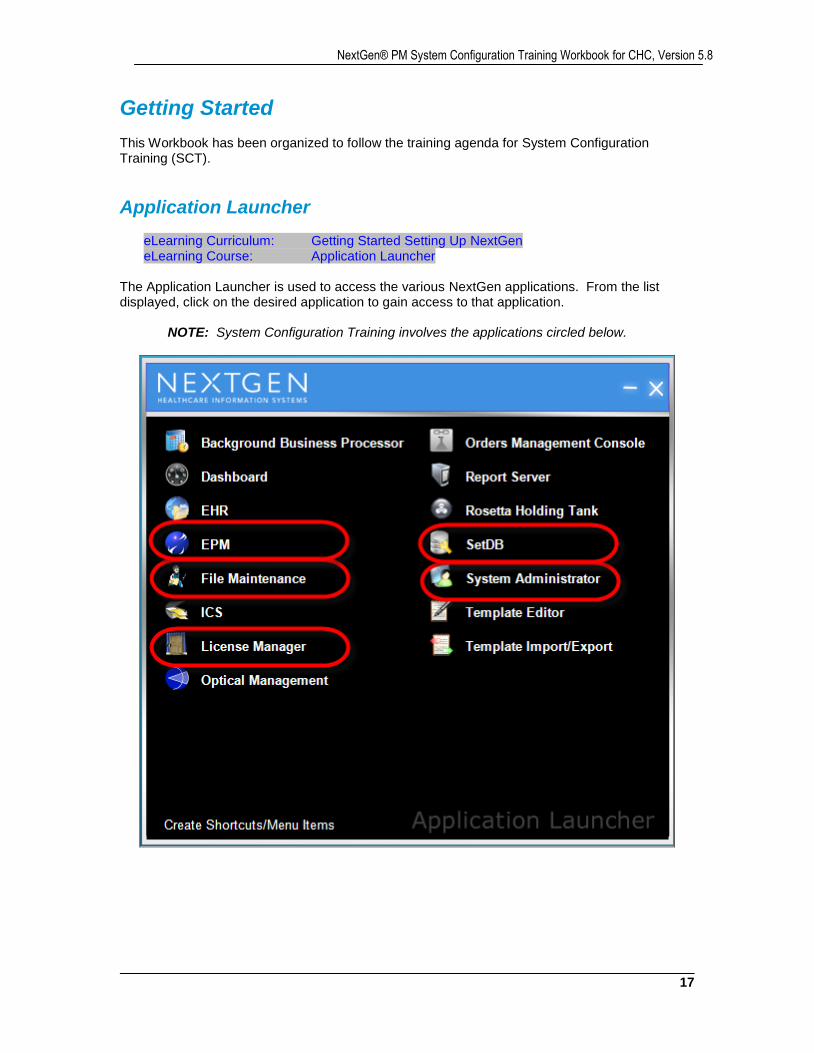
The Application Launcher is used to access the various NextGen applications. From the list displayed, click on the desired application to gain access to that application. NOTE: System Configuration Training involves the applications circled below.
NextGen Healthcare
18
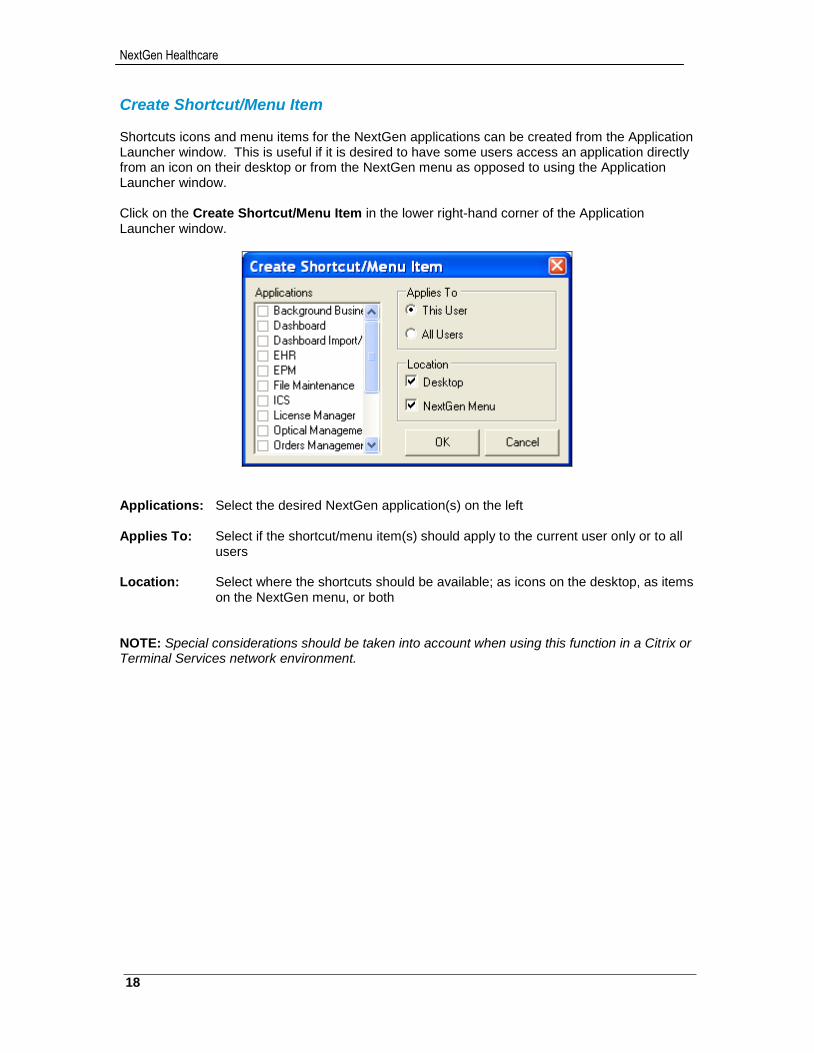
Create Shortcut/Menu Item Shortcuts icons and menu items for the NextGen applications can be created from the Application Launcher window. This is useful if it is desired to have some users access an application directly from an icon on their desktop or from the NextGen menu as opposed to using the Application Launcher window. Click on the Create Shortcut/Menu Item in the lower right-hand corner of the Application Launcher window.
Applications: Select the desired NextGen application(s) on the left Applies To: Select if the shortcut/menu item(s) should apply to the current user only or to all
users Location: Select where the shortcuts should be available; as icons on the desktop, as items
on the NextGen menu, or both NOTE: Special considerations should be taken into account when using this function in a Citrix or Terminal Services network environment.
19
NextGen® PM System Configuration Training Workbook for CHC, Version 5.8
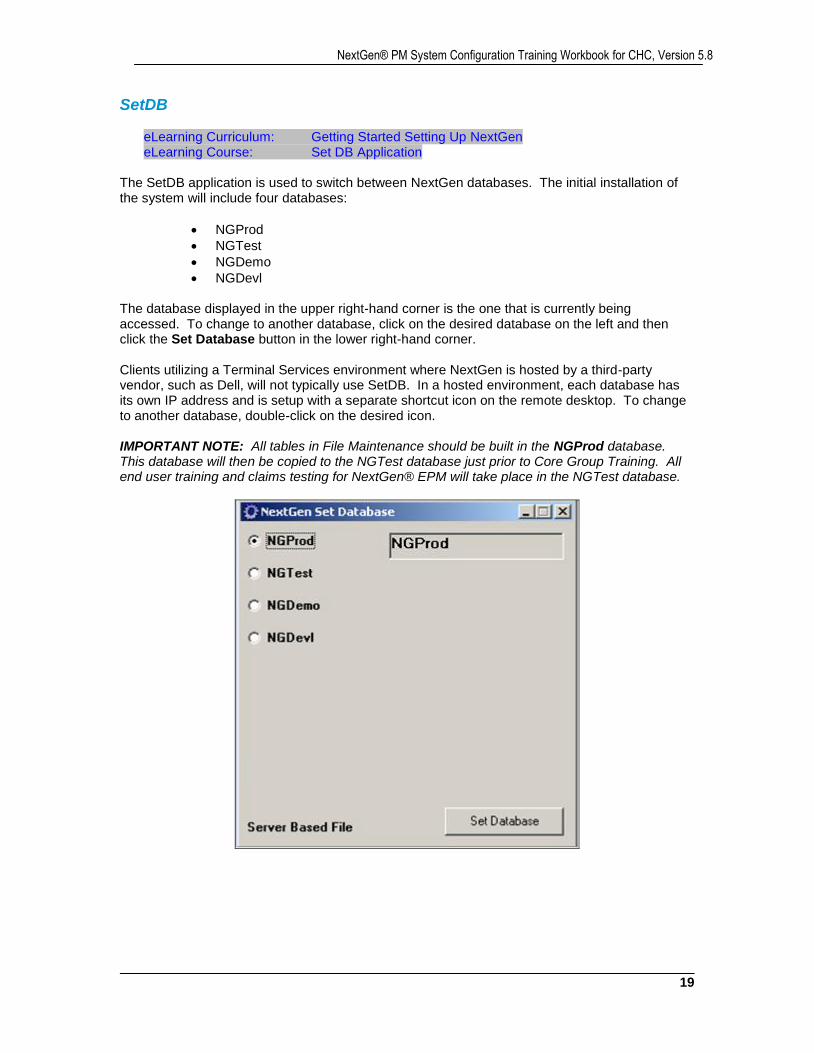
SetDB
eLearning Curriculum: Getting Started Setting Up NextGen eLearning Course: Set DB Application
The SetDB application is used to switch between NextGen databases. The initial installation of the system will include four databases:
NGProd
NGTest
NGDemo
NGDevl The database displayed in the upper right-hand corner is the one that is currently being accessed. To change to another database, click on the desired database on the left and then click the Set Database button in the lower right-hand corner. Clients utilizing a Terminal Services environment where NextGen is hosted by a third-party vendor, such as Dell, will not typically use SetDB. In a hosted environment, each database has its own IP address and is setup with a separate shortcut icon on the remote desktop. To change to another database, double-click on the desired icon. IMPORTANT NOTE: All tables in File Maintenance should be built in the NGProd database. This database will then be copied to the NGTest database just prior to Core Group Training. All end user training and claims testing for NextGen® EPM will take place in the NGTest database.
NextGen Healthcare
20
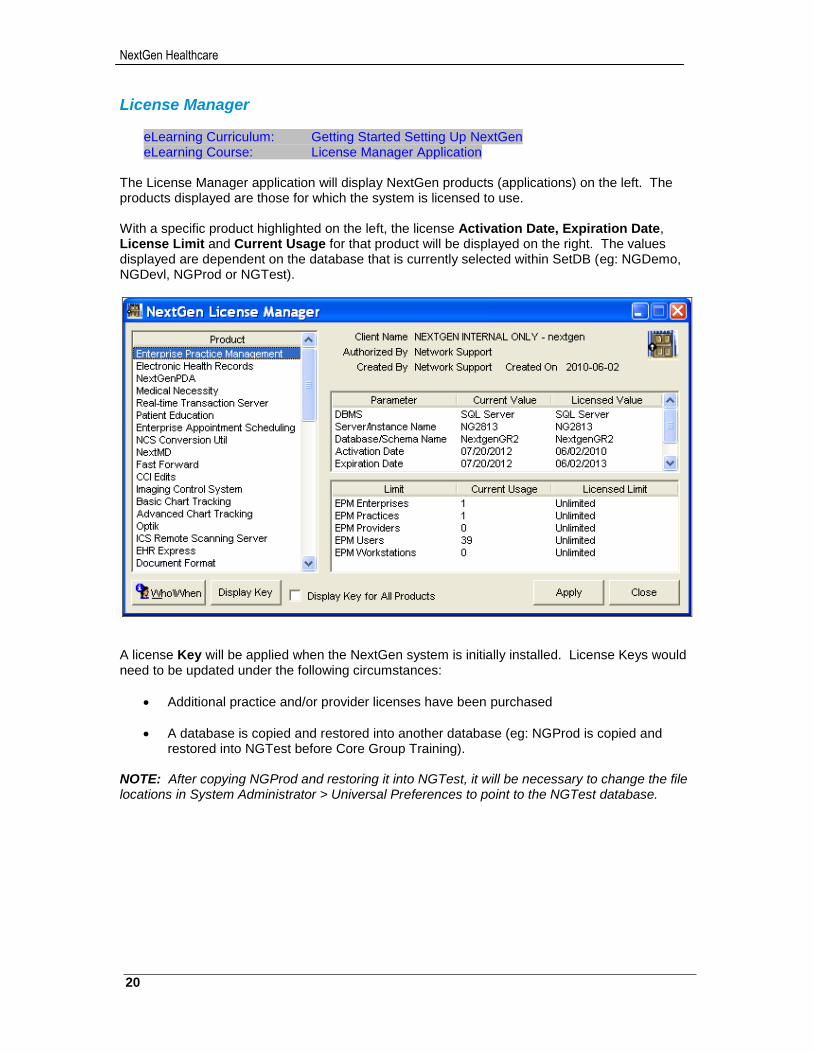
License Manager
eLearning Curriculum: Getting Started Setting Up NextGen eLearning Course: License Manager Application
The License Manager application will display NextGen products (applications) on the left. The products displayed are those for which the system is licensed to use. With a specific product highlighted on the left, the license Activation Date, Expiration Date, License Limit and Current Usage for that product will be displayed on the right. The values displayed are dependent on the database that is currently selected within SetDB (eg: NGDemo, NGDevl, NGProd or NGTest).
A license Key will be applied when the NextGen system is initially installed. License Keys would need to be updated under the following circumstances:
Additional practice and/or provider licenses have been purchased
A database is copied and restored into another database (eg: NGProd is copied and restored into NGTest before Core Group Training).
NOTE: After copying NGProd and restoring it into NGTest, it will be necessary to change the file locations in System Administrator > Universal Preferences to point to the NGTest database.
21
NextGen® PM System Configuration Training Workbook for CHC, Version 5.8
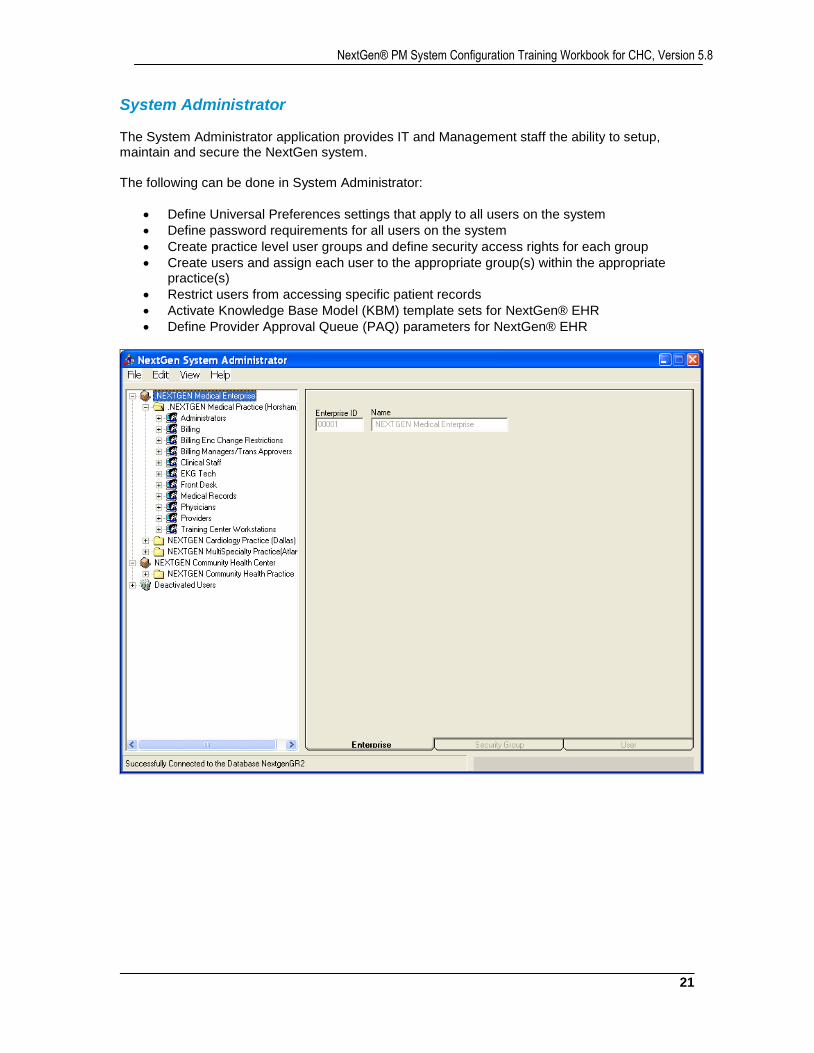
System Administrator The System Administrator application provides IT and Management staff the ability to setup, maintain and secure the NextGen system. The following can be done in System Administrator:
Define Universal Preferences settings that apply to all users on the system
Define password requirements for all users on the system
Create practice level user groups and define security access rights for each group
Create users and assign each user to the appropriate group(s) within the appropriate practice(s)
Restrict users from accessing specific patient records
Activate Knowledge Base Model (KBM) template sets for NextGen® EHR
Define Provider Approval Queue (PAQ) parameters for NextGen® EHR
NextGen Healthcare
22
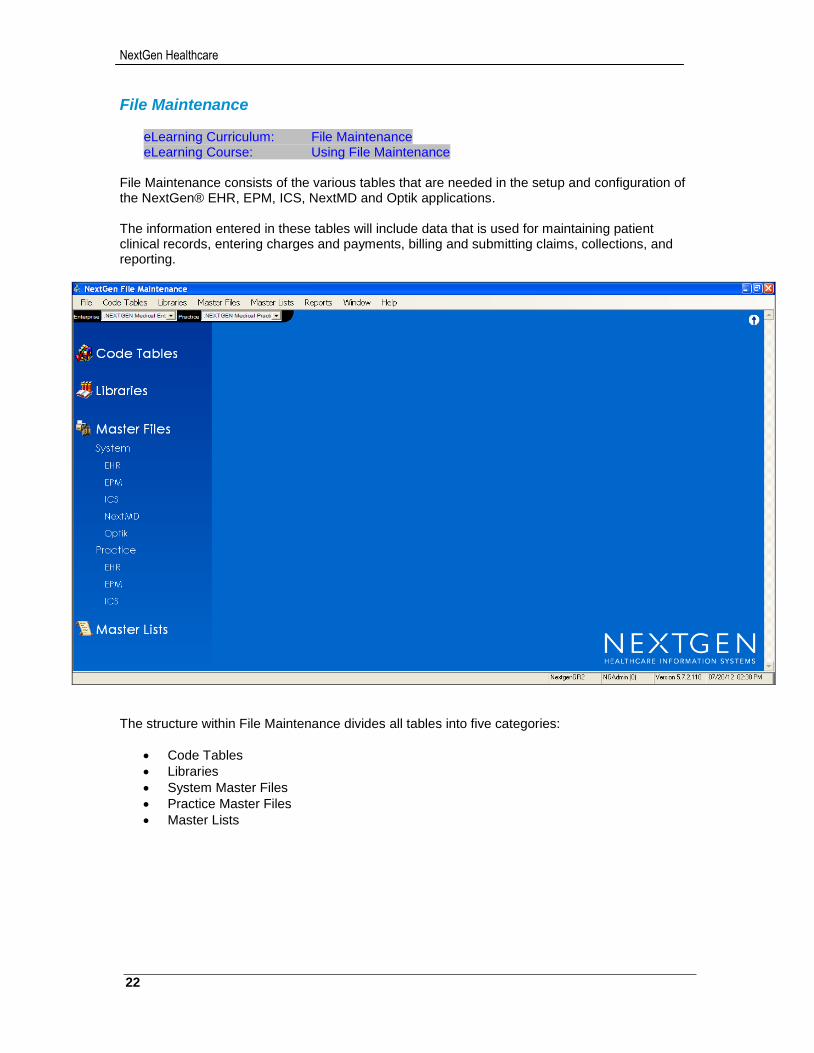
File Maintenance
eLearning Curriculum: File Maintenance eLearning Course: Using File Maintenance
File Maintenance consists of the various tables that are needed in the setup and configuration of the NextGen® EHR, EPM, ICS, NextMD and Optik applications. The information entered in these tables will include data that is used for maintaining patient clinical records, entering charges and payments, billing and submitting claims, collections, and reporting.
The structure within File Maintenance divides all tables into five categories:
Code Tables
Libraries
System Master Files
Practice Master Files
Master Lists
23
NextGen® PM System Configuration Training Workbook for CHC, Version 5.8
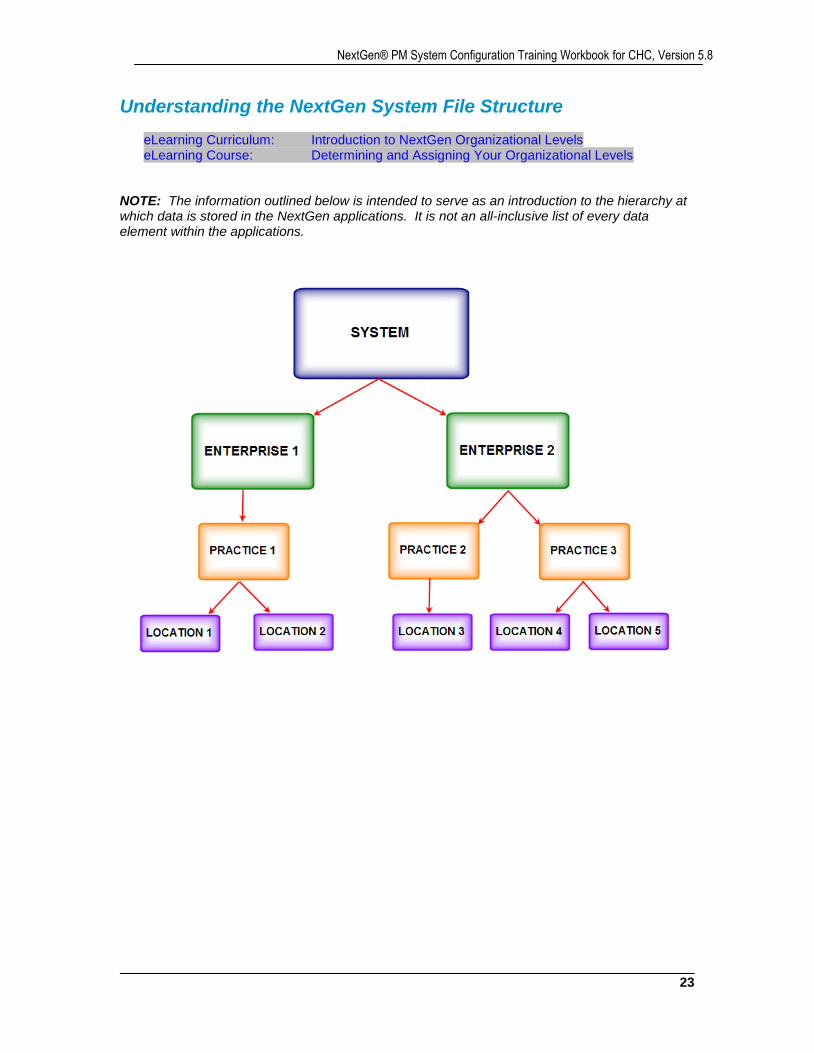
Understanding the NextGen System File Structure
eLearning Curriculum: Introduction to NextGen Organizational Levels eLearning Course: Determining and Assigning Your Organizational Levels
NOTE: The information outlined below is intended to serve as an introduction to the hierarchy at which data is stored in the NextGen applications. It is not an all-inclusive list of every data element within the applications.
NextGen Healthcare
24
System Level A NextGen System is equivalent to a database. The System consists of one or more Enterprises. Some data is stored at the System Level, which means the data exists for all users within the System.
System Level Information:
File Maintenance > Code Tables
File Maintenance > Master Files > System
File Maintenance > Master Lists o All except those from Enterprise Preferences > Client Defined tab
System Administrator > Users
NextGen® EHR Knowledge Base Model (KBM)
Master Person Index (MPI) o Person MPI information includes demographics (name, DOB, gender, address, etc.)
and the insurance attached to the demographic record. By default, the MPI is defined at the System Level. This implies that all users on the System access a common patient MPI record. Changes made to that common patient MPI record are seen by all users on the System. In this definition, System is synonymous to MPI access.
Optional System Level Information:
File Maintenance > Libraries o System level only if all practices from all enterprises have been given Practice
Access
25
NextGen® PM System Configuration Training Workbook for CHC, Version 5.8
Enterprise Level An Enterprise is a grouping of one or more Practices. Some data is stored at the Enterprise Level, which means the data exists for all users within the same Enterprise.
Enterprise Level Information:
Enterprise Preferences
File Maintenance > Master Lists o Only those from Enterprise Preferences > Client Defined tab
NextGen® EHR Drug Utilization Review (DUR)
Demographic Interfaces between NextGen and External Systems
Optional Enterprise Level Information:
Master Person Index (MPI) o If a single person MPI record cannot be shared by all users on the System, an
additional MPI record is needed. This can be achieved by configuring the System with multiple Enterprises, each Enterprise having a separate MPI record. This configuration must be done by NextGen Support. By changing from a single System level MPI record to separate Enterprise level MPI records, the Enterprise is synonymous to MPI access.
File Maintenance > Libraries o Enterprise level only if all practices within the same enterprise have been given
Practice Access
NextGen® EHR Enterprise Chart o Enterprise level only if Enterprise Preferences > General tab > “Enterprise Chart” is
enabled The following EHR chart information is shared between Practices within the
same Enterprise: - Allergies, Procedures, Diagnoses (read only), Images (read only),
Documents (read only), Medical Records Templates (read only), Lab Order Results (read only), Medications, To Do Tasks (read only), Case Management
Reports o By default, reports include only the Practice in which they are created. Reports can
be Enterprise level only if users with security access rights select Practices within the same Enterprise and/or from another Enterprise on the report.
NextGen Healthcare
26
Practice Level A Practice is equivalent to a business entity that shares patient information. Each Practice maintains its own clinical chart (EHR) and financial chart (EPM) for each patient. A Practice consists of one or more Locations. Some data is stored at the Practice Level, which means the data exists for all users within the same Practice.
Practice Level Information:
Practice Preferences
File Maintenance > Libraries
File Maintenance > Master Files > System o Only those System Level tables that include Practice Level Information (Practice tab)
DME Regions Locations Payers Providers Task Types
File Maintenance > Master Files > Practice
Scheduling Administration
Appointments
NextGen® EPM Chart
NextGen® EHR Chart
NextGen® EHR Workflow
Encounters
Case Management
Reports o By default, reports include only the Practice in which they are created
System Administrator > Groups > Security Rights
Interfaces between NextGen and External Systems o Appointments o Charges o Labs
Optional Practice Level Information:
File Maintenance > Master Files > System o Only if Enterprise Preferences > General tab > “Practice Access” is enabled
Payers Providers
27
NextGen® PM System Configuration Training Workbook for CHC, Version 5.8
Location Level A Location is equivalent to a place where patients are seen by providers and at which services are rendered. Locations are used for billing, clinical and reporting purposes. Each Location is typically a separate physical location with a unique address. However, multiple locations can be created for the same address (eg: Family Practice, Pediatrics, OB/Gyn, etc. within a Multi-Specialty clinic). Locations may include Clinics, Hospitals, Nursing Homes, Ambulatory Surgery Centers, etc. The Locations table in File Maintenance is a System Level table, which means any one Location can be associated to multiple Practices.
Tax ID Numbers For billing purposes, Tax ID Numbers can be setup in File Maintenance at the following levels:
Practice
Location
Provider Group
Individual Provider Reporting by Tax ID can be accomplished by filtering reports at the following levels:
Practice
Location
Provider Subgrouping
Individual Provider
NextGen Healthcare
28
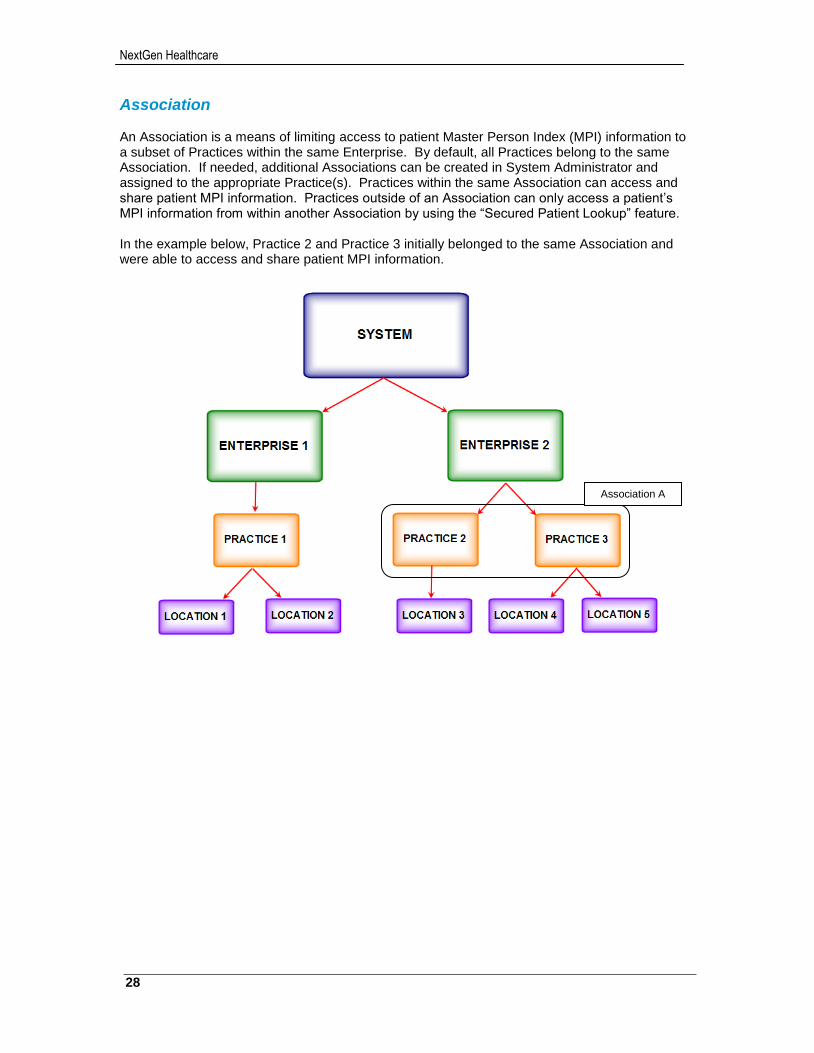
Association An Association is a means of limiting access to patient Master Person Index (MPI) information to a subset of Practices within the same Enterprise. By default, all Practices belong to the same Association. If needed, additional Associations can be created in System Administrator and assigned to the appropriate Practice(s). Practices within the same Association can access and share patient MPI information. Practices outside of an Association can only access a patient’s MPI information from within another Association by using the “Secured Patient Lookup” feature. In the example below, Practice 2 and Practice 3 initially belonged to the same Association and were able to access and share patient MPI information.
Association A
29
NextGen® PM System Configuration Training Workbook for CHC, Version 5.8
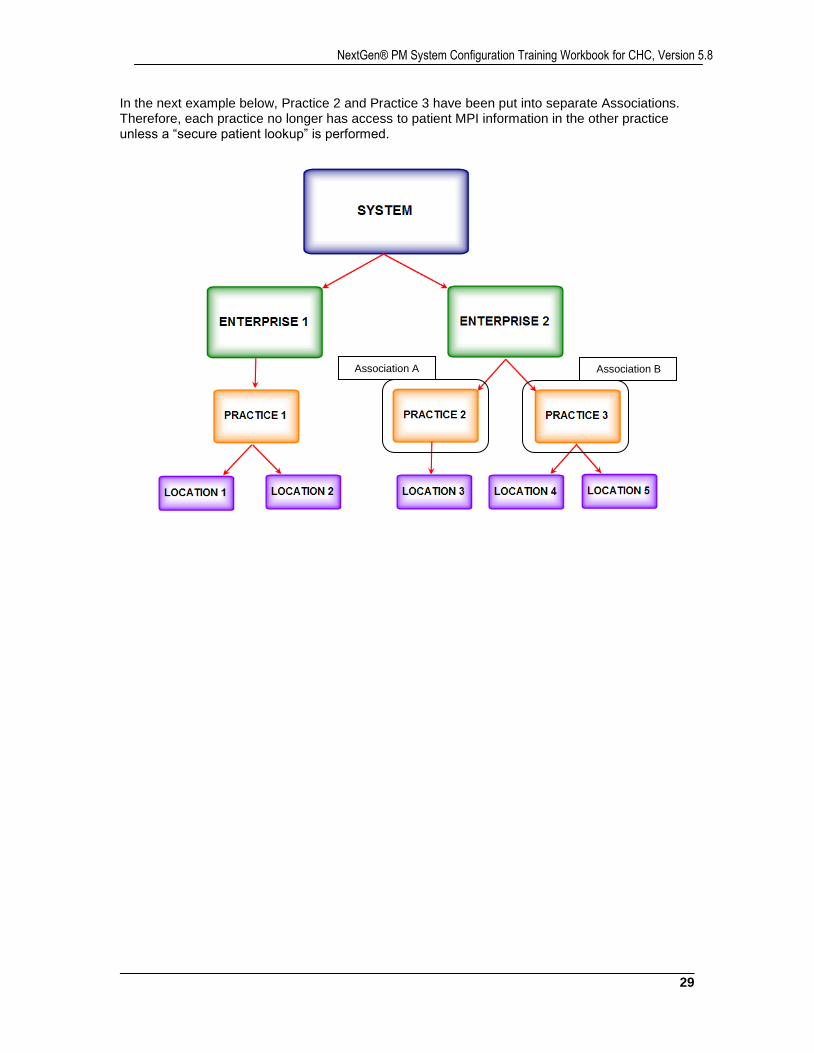
In the next example below, Practice 2 and Practice 3 have been put into separate Associations. Therefore, each practice no longer has access to patient MPI information in the other practice unless a “secure patient lookup” is performed.
Association B Association A
NextGen Healthcare
30
System Basics
Login
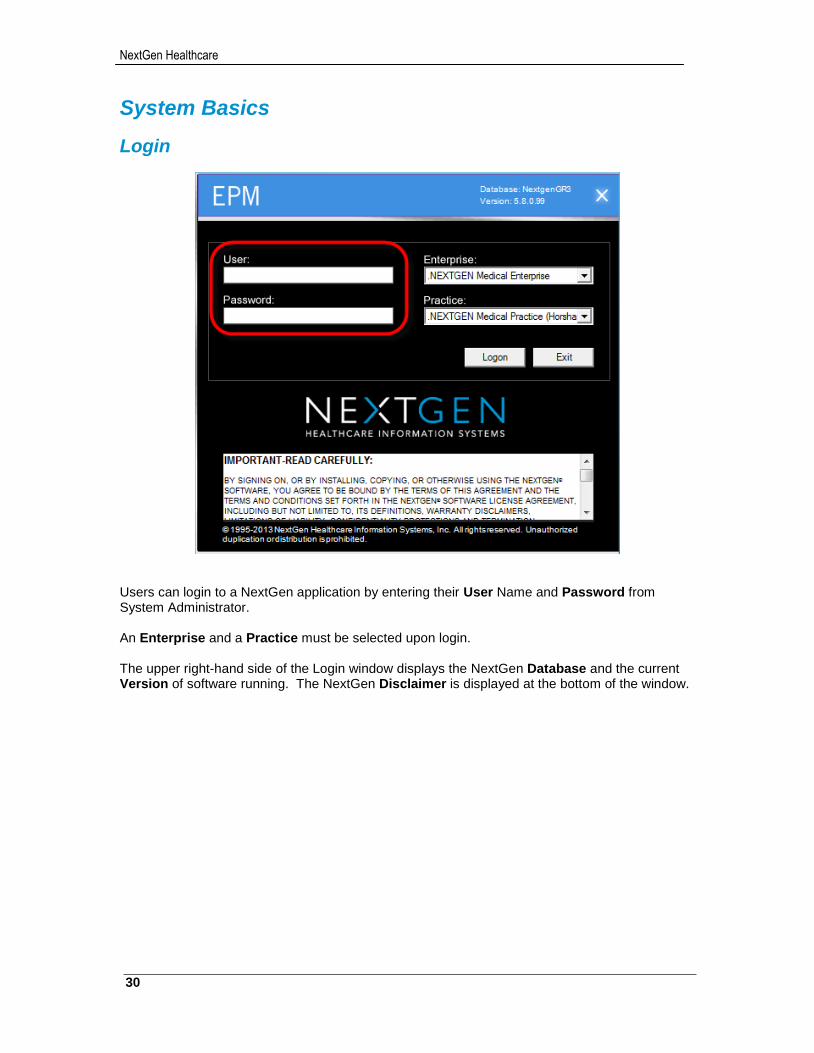
Users can login to a NextGen application by entering their User Name and Password from System Administrator. An Enterprise and a Practice must be selected upon login. The upper right-hand side of the Login window displays the NextGen Database and the current Version of software running. The NextGen Disclaimer is displayed at the bottom of the window.
31
NextGen® PM System Configuration Training Workbook for CHC, Version 5.8
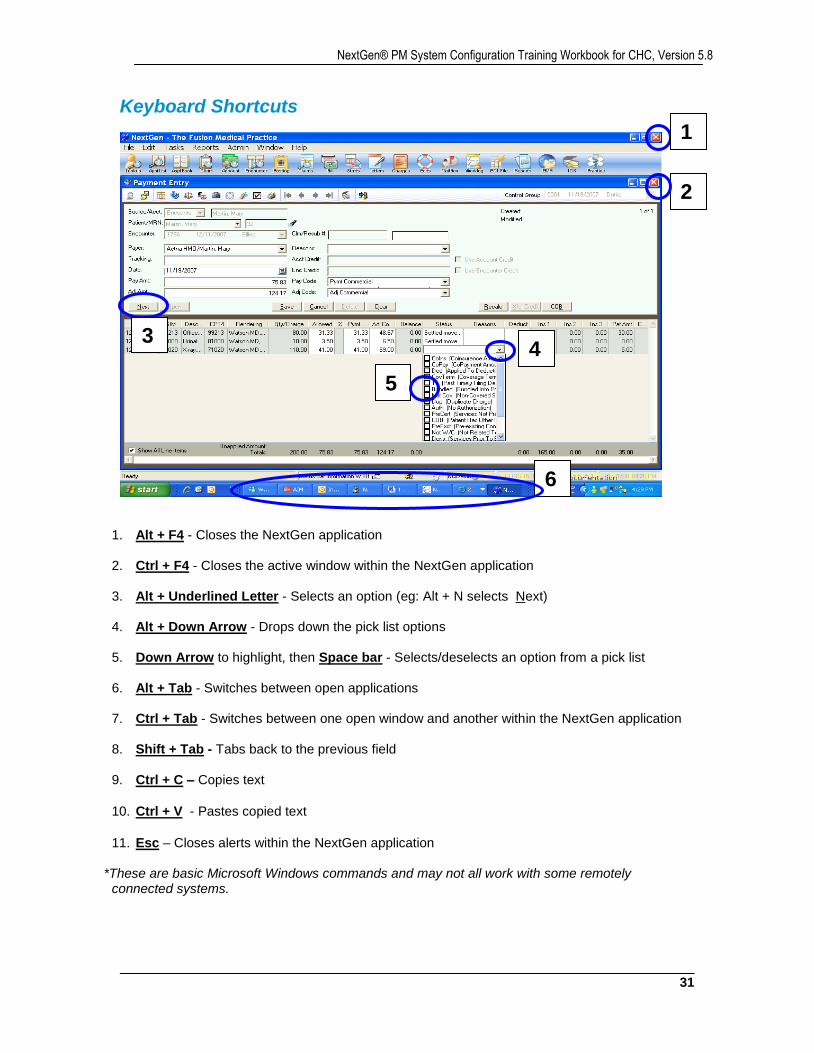
Keyboard Shortcuts
1. Alt + F4 - Closes the NextGen application 2. Ctrl + F4 - Closes the active window within the NextGen application 3. Alt + Underlined Letter - Selects an option (eg: Alt + N selects Next)
4. Alt + Down Arrow - Drops down the pick list options
5. Down Arrow to highlight, then Space bar - Selects/deselects an option from a pick list
6. Alt + Tab - Switches between open applications 7. Ctrl + Tab - Switches between one open window and another within the NextGen application
8. Shift + Tab - Tabs back to the previous field 9. Ctrl + C – Copies text
10. Ctrl + V - Pastes copied text
11. Esc – Closes alerts within the NextGen application
*These are basic Microsoft Windows commands and may not all work with some remotely connected systems.
3
2
4
5
1
6
NextGen Healthcare
32
File Maintenance > Master Files > System
Enterprises
eLearning Curriculum: Introduction To NextGen Organizational Levels eLearning Course: Creating Enterprises
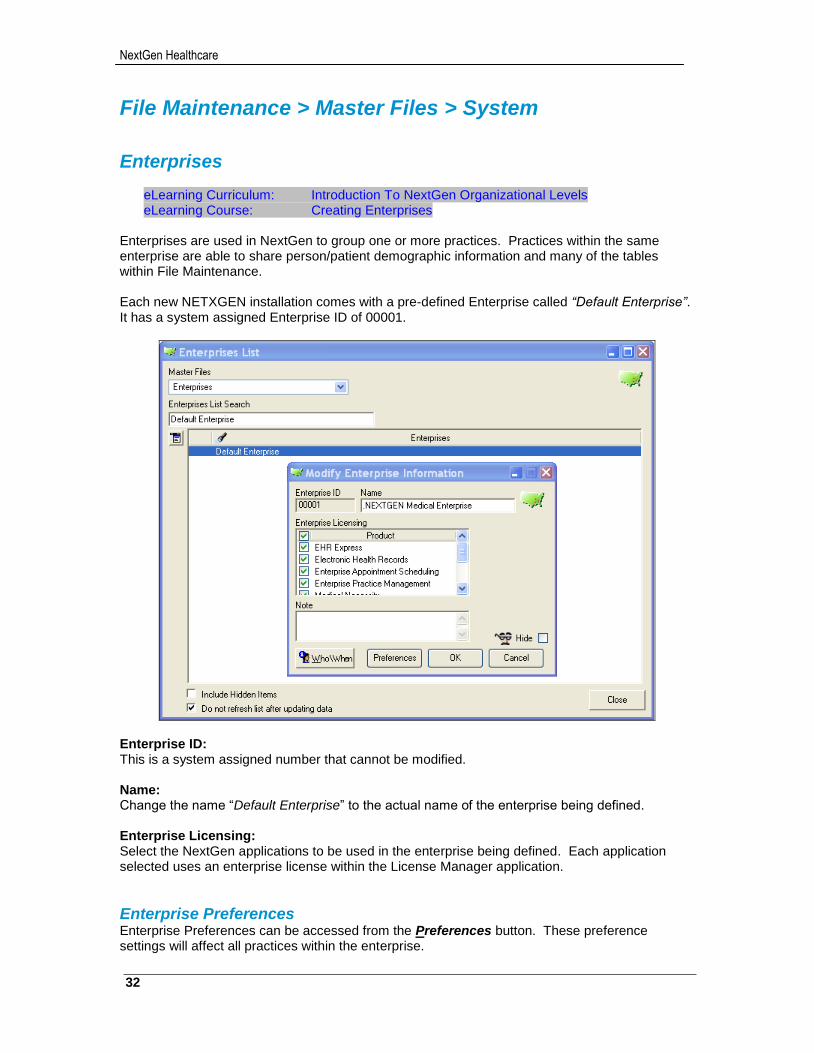
Enterprises are used in NextGen to group one or more practices. Practices within the same enterprise are able to share person/patient demographic information and many of the tables within File Maintenance. Each new NETXGEN installation comes with a pre-defined Enterprise called “Default Enterprise”. It has a system assigned Enterprise ID of 00001.
Enterprise ID: This is a system assigned number that cannot be modified. Name: Change the name “Default Enterprise” to the actual name of the enterprise being defined. Enterprise Licensing: Select the NextGen applications to be used in the enterprise being defined. Each application selected uses an enterprise license within the License Manager application.
Enterprise Preferences
Enterprise Preferences can be accessed from the Preferences button. These preference settings will affect all practices within the enterprise.
33
NextGen® PM System Configuration Training Workbook for CHC, Version 5.8
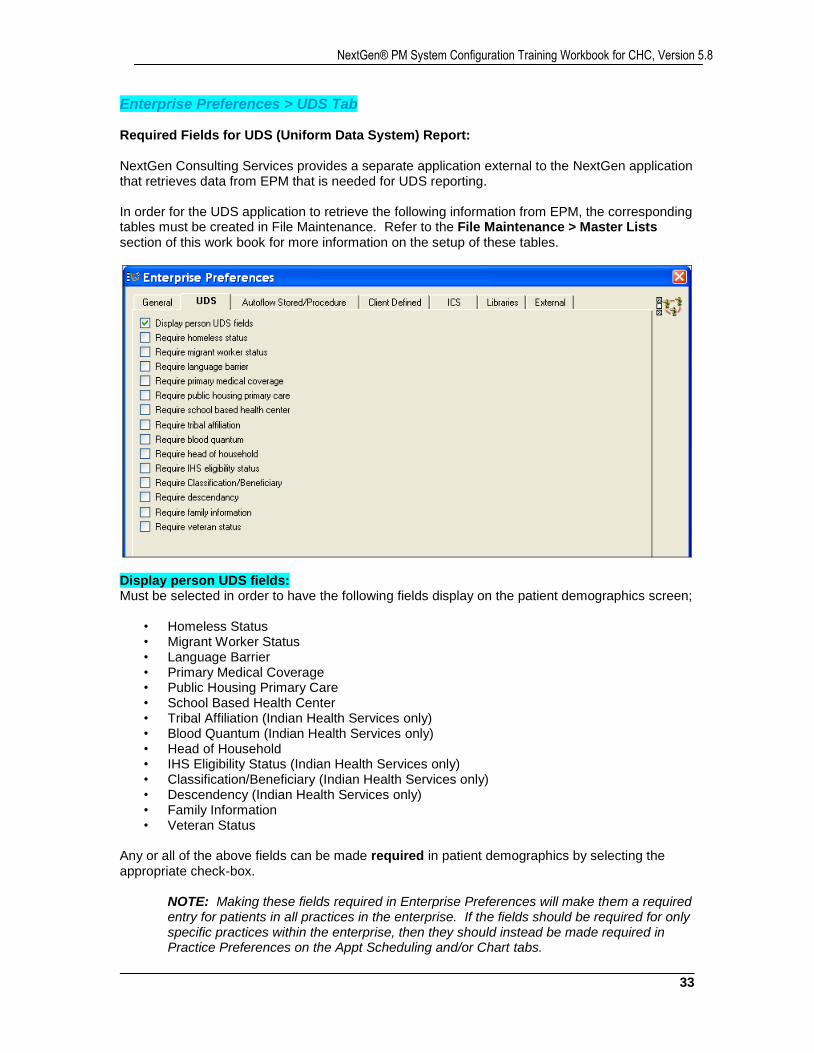
Enterprise Preferences > UDS Tab Required Fields for UDS (Uniform Data System) Report: NextGen Consulting Services provides a separate application external to the NextGen application that retrieves data from EPM that is needed for UDS reporting. In order for the UDS application to retrieve the following information from EPM, the corresponding tables must be created in File Maintenance. Refer to the File Maintenance > Master Lists section of this work book for more information on the setup of these tables.
Display person UDS fields: Must be selected in order to have the following fields display on the patient demographics screen;
• Homeless Status • Migrant Worker Status • Language Barrier • Primary Medical Coverage • Public Housing Primary Care • School Based Health Center • Tribal Affiliation (Indian Health Services only) • Blood Quantum (Indian Health Services only) • Head of Household • IHS Eligibility Status (Indian Health Services only) • Classification/Beneficiary (Indian Health Services only) • Descendency (Indian Health Services only) • Family Information • Veteran Status
Any or all of the above fields can be made required in patient demographics by selecting the appropriate check-box.
NOTE: Making these fields required in Enterprise Preferences will make them a required entry for patients in all practices in the enterprise. If the fields should be required for only specific practices within the enterprise, then they should instead be made required in Practice Preferences on the Appt Scheduling and/or Chart tabs.
NextGen Healthcare
34
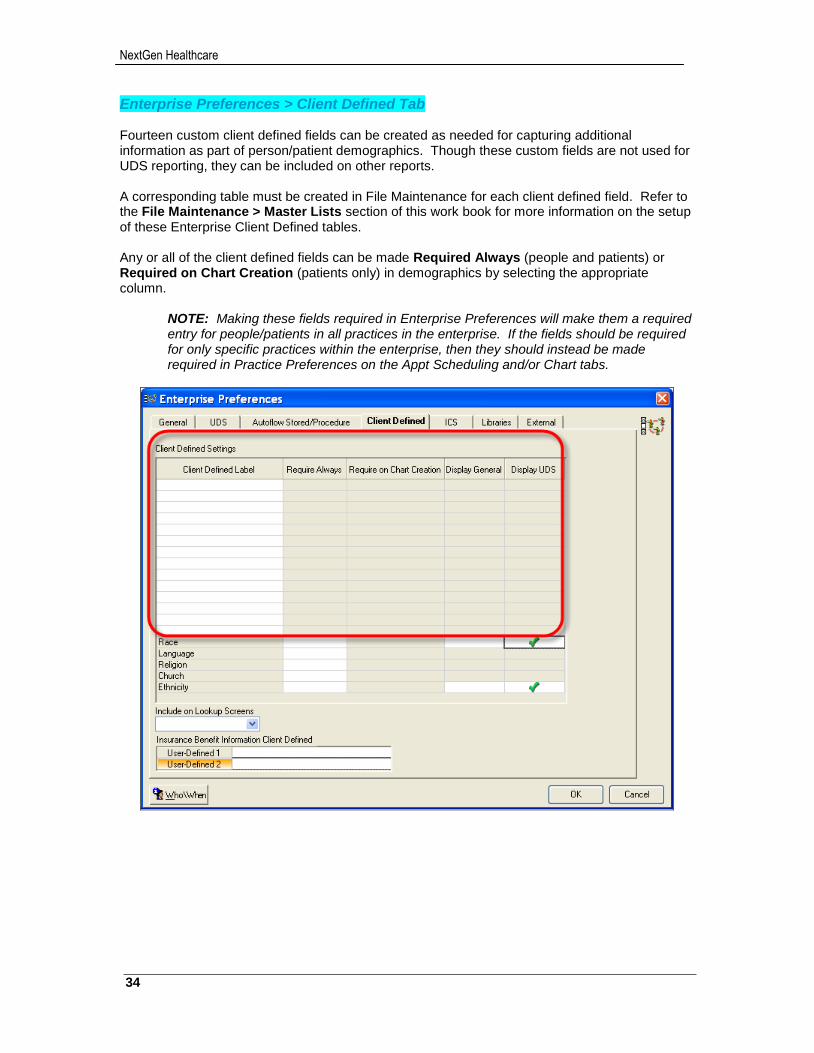
Enterprise Preferences > Client Defined Tab Fourteen custom client defined fields can be created as needed for capturing additional information as part of person/patient demographics. Though these custom fields are not used for UDS reporting, they can be included on other reports. A corresponding table must be created in File Maintenance for each client defined field. Refer to the File Maintenance > Master Lists section of this work book for more information on the setup of these Enterprise Client Defined tables. Any or all of the client defined fields can be made Required Always (people and patients) or Required on Chart Creation (patients only) in demographics by selecting the appropriate column.
NOTE: Making these fields required in Enterprise Preferences will make them a required entry for people/patients in all practices in the enterprise. If the fields should be required for only specific practices within the enterprise, then they should instead be made required in Practice Preferences on the Appt Scheduling and/or Chart tabs.
35
NextGen® PM System Configuration Training Workbook for CHC, Version 5.8
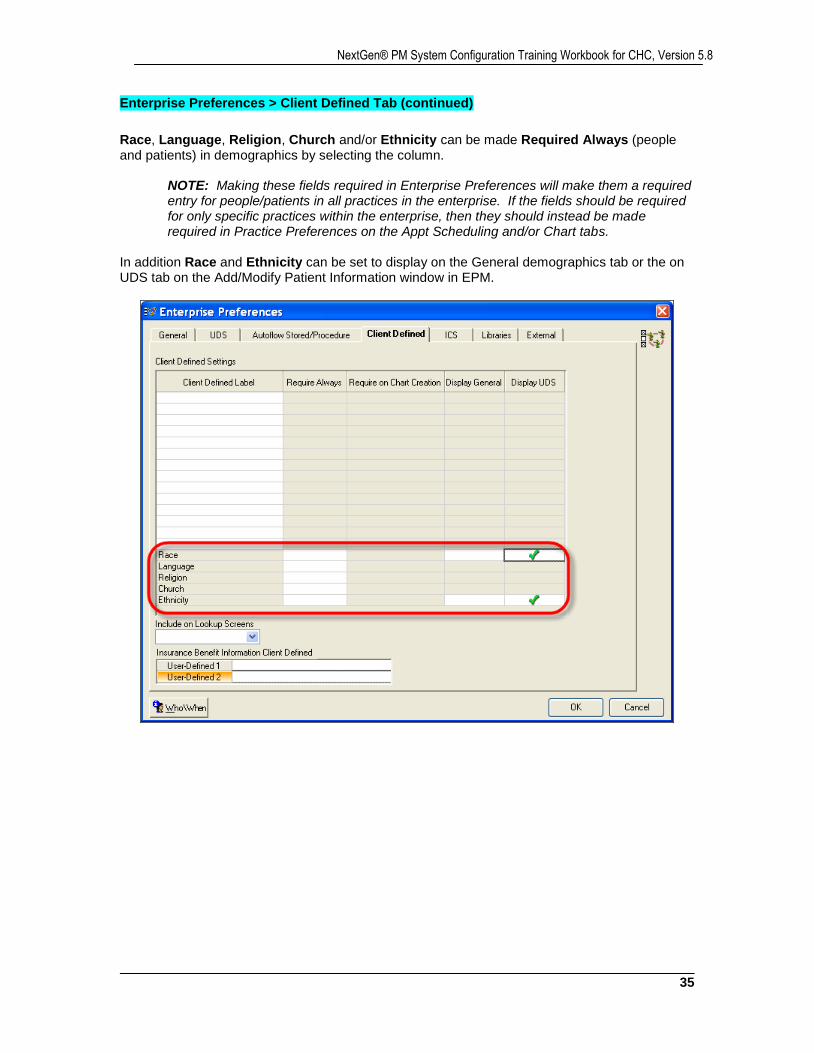
Enterprise Preferences > Client Defined Tab (continued)
Race, Language, Religion, Church and/or Ethnicity can be made Required Always (people and patients) in demographics by selecting the column.
NOTE: Making these fields required in Enterprise Preferences will make them a required entry for people/patients in all practices in the enterprise. If the fields should be required for only specific practices within the enterprise, then they should instead be made required in Practice Preferences on the Appt Scheduling and/or Chart tabs.
In addition Race and Ethnicity can be set to display on the General demographics tab or the on UDS tab on the Add/Modify Patient Information window in EPM.
NextGen Healthcare
36
Locations
eLearning Curriculum 1: Introduction To NextGen Organizational Levels eLearning Course 1: Creating Locations
eLearning Curriculum 2: Setting Up System Master Files - EPM eLearning Course 2: System Master File – Locations
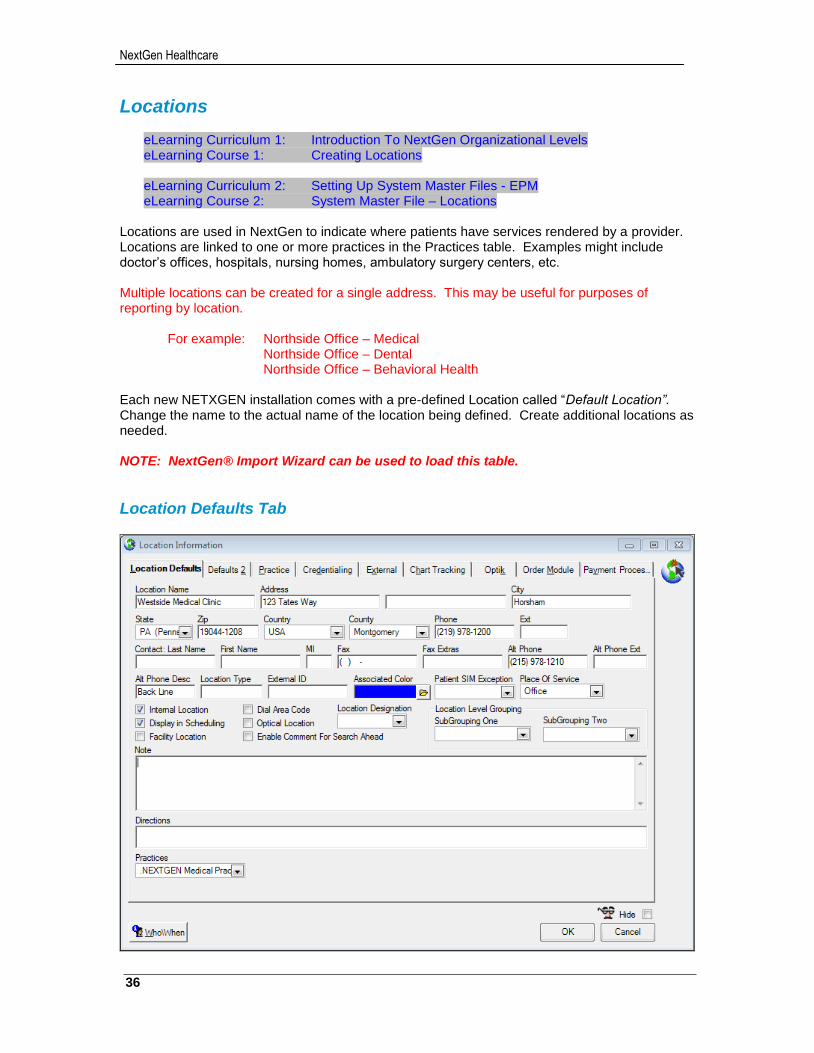
Locations are used in NextGen to indicate where patients have services rendered by a provider. Locations are linked to one or more practices in the Practices table. Examples might include doctor’s offices, hospitals, nursing homes, ambulatory surgery centers, etc. Multiple locations can be created for a single address. This may be useful for purposes of reporting by location.
For example: Northside Office – Medical Northside Office – Dental Northside Office – Behavioral Health
Each new NETXGEN installation comes with a pre-defined Location called “Default Location”. Change the name to the actual name of the location being defined. Create additional locations as needed. NOTE: NextGen® Import Wizard can be used to load this table.
Location Defaults Tab
37
NextGen® PM System Configuration Training Workbook for CHC, Version 5.8
Location Name: Change the name “Default Location” to the actual name of the location being defined. Address: Enter the address, city, state, zip, county and country for the location being defined.
NOTE: Electronic claims in ASC X12 Version 5010 format require locations to have a 9 digit zip code.
Location Type: This is used only for HL7 interfaces to external systems. B = Bed C = Clinic D = Department E = Exam Room
L = Other Location N = Nursing Home O = operating Room R = Room Associated Color: Select a color for the location being defined as it should appear in the appointment book. Place of Service: Enter the place of service that is needed for charges in Box 24B on 1500 claims for services performed at the location being defined.
NOTE: Place of service can be defined for each SIM code in the Service Item Library. If POS is blank for a SIM code, the POS defined for the location will be used. If POS is blank for the SIM code and for the location, then POS is a required entry to the end user during charge posting.
Internal Location: The Internal Location setting is used to setup location/provider cross references for use in NextGen® EHR. A location must be selected as an internal location in order to cross-reference the location with providers in the Providers table. Display in Scheduling: Select this check-box to have the location display in NextGen® EPM as an available Service Location option when creating scheduling templates in Scheduling Administration. Facility Location: Select this check-box to have the location appear as an available Facility in the Create Encounter and Encounter Maintenance screens.
NOTE: The HCFA Box 32 check-box on the Defaults-2 tab must also be selected for this to appear as a Facility in NextGen® EPM.
Location Level SubGrouping One and SubGrouping Two: Select one or two Location Subgroupings. These are used to group Locations for reporting purposes in EPM.
NOTE: The captions for these two fields can be changed in Enterprise Preferences > General tab. The subgroups listed and available for selection in these fields are from the Location Subgroupings master list table in File Maintenance.
Practices: Each location must be attached to the Practice(s) in which it will be used.
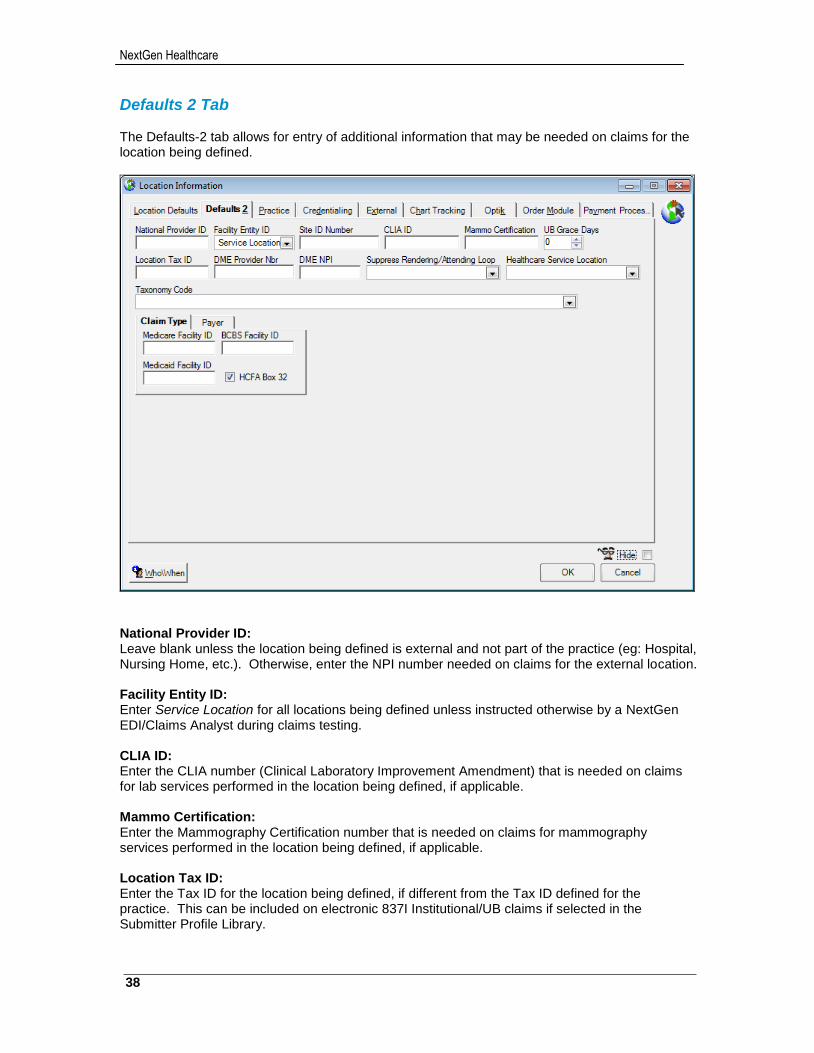
NextGen Healthcare
38
Defaults 2 Tab The Defaults-2 tab allows for entry of additional information that may be needed on claims for the location being defined.
National Provider ID: Leave blank unless the location being defined is external and not part of the practice (eg: Hospital, Nursing Home, etc.). Otherwise, enter the NPI number needed on claims for the external location. Facility Entity ID: Enter Service Location for all locations being defined unless instructed otherwise by a NextGen EDI/Claims Analyst during claims testing. CLIA ID: Enter the CLIA number (Clinical Laboratory Improvement Amendment) that is needed on claims for lab services performed in the location being defined, if applicable. Mammo Certification: Enter the Mammography Certification number that is needed on claims for mammography services performed in the location being defined, if applicable. Location Tax ID: Enter the Tax ID for the location being defined, if different from the Tax ID defined for the practice. This can be included on electronic 837I Institutional/UB claims if selected in the Submitter Profile Library.
39
NextGen® PM System Configuration Training Workbook for CHC, Version 5.8
DME Provider Nbr: If the practice does Durable Medical Equipment billing, enter the DME Provider Number needed on DMERC claims for the location being defined. If blank, the DME Provider Number defined for the practice will be used on claims. DME NPI: If the practice does Durable Medical Equipment billing, enter the National Provider ID needed on DMERC claims for the location being defined. If blank, the DME NPI defined for the practice will be used on claims. HCFA Box 32: Select this check-box to have the location name and address appear in box 32 on 1500 claims.
NOTE: This check-box must also be selected for the location to appear as a Facility in the Create Encounter and Encounter Maintenance screens.
Medicare / BCBS / Medicaid / Other Payer Facility ID: Enter the payer specific Facility ID numbers that are needed in Box 32 on 1500 claims for the location being defined, if applicable.
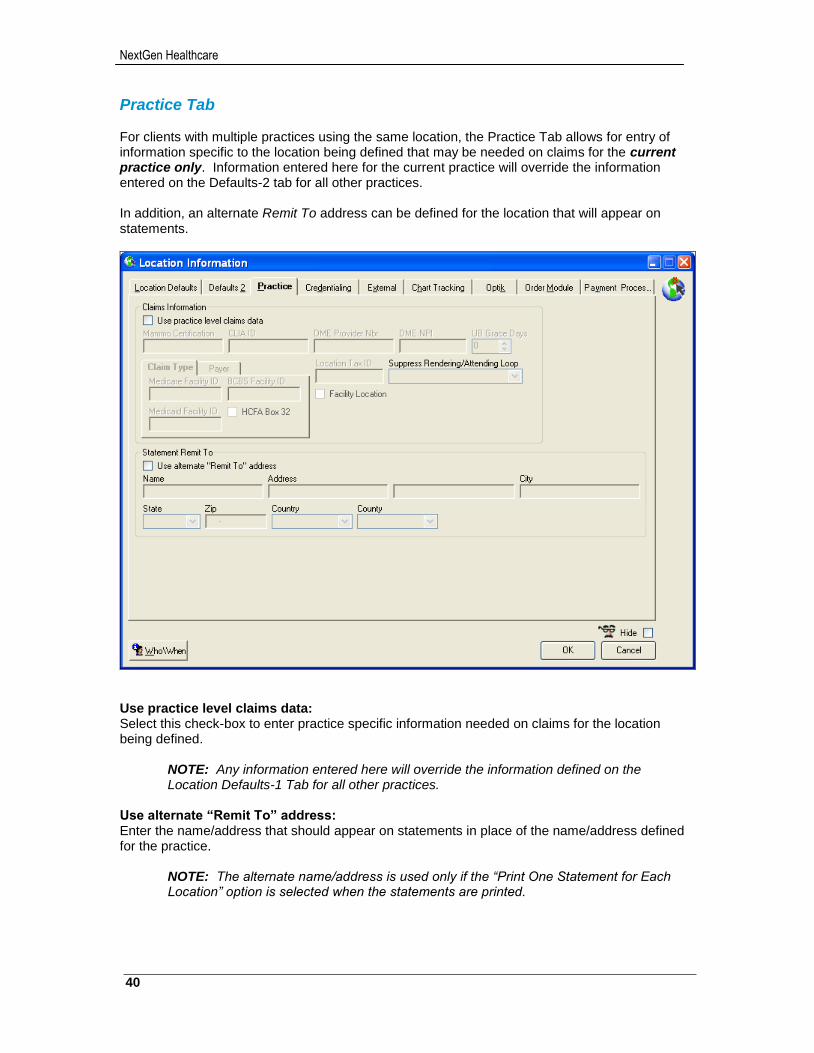
NextGen Healthcare
40
Practice Tab For clients with multiple practices using the same location, the Practice Tab allows for entry of information specific to the location being defined that may be needed on claims for the current practice only. Information entered here for the current practice will override the information entered on the Defaults-2 tab for all other practices. In addition, an alternate Remit To address can be defined for the location that will appear on statements.
Use practice level claims data: Select this check-box to enter practice specific information needed on claims for the location being defined.
NOTE: Any information entered here will override the information defined on the Location Defaults-1 Tab for all other practices.
Use alternate “Remit To” address: Enter the name/address that should appear on statements in place of the name/address defined for the practice.
NOTE: The alternate name/address is used only if the “Print One Statement for Each Location” option is selected when the statements are printed.
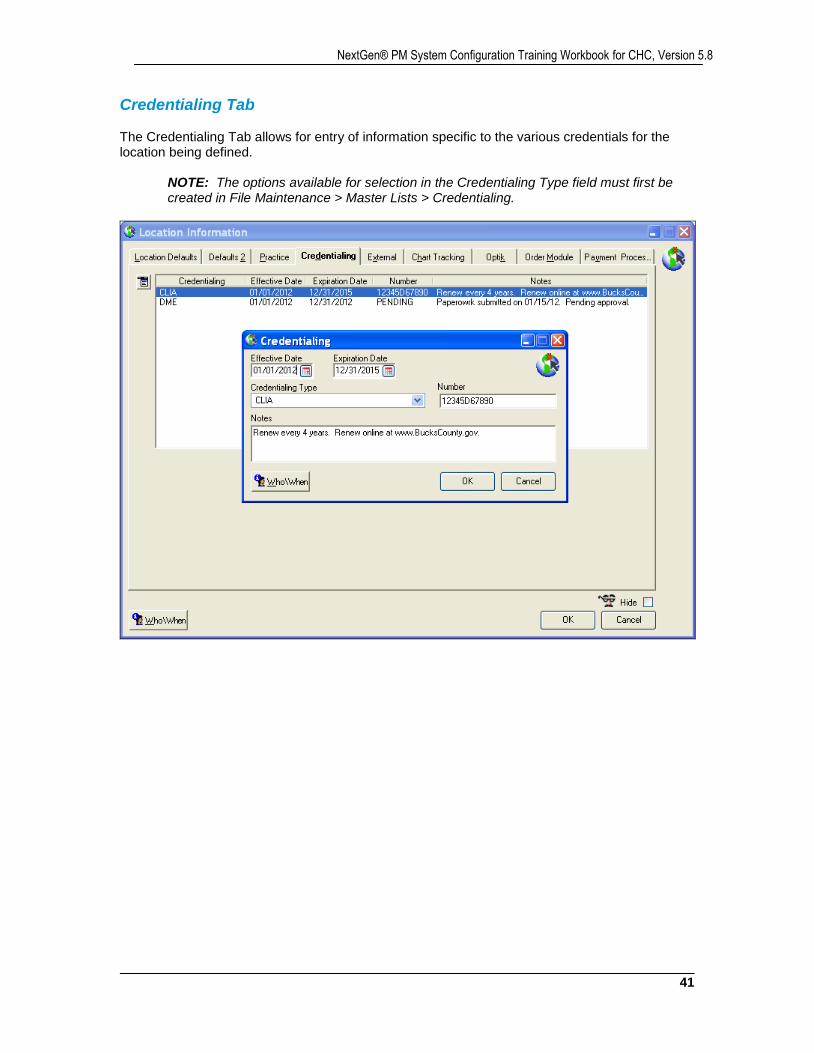
41
NextGen® PM System Configuration Training Workbook for CHC, Version 5.8
Credentialing Tab The Credentialing Tab allows for entry of information specific to the various credentials for the location being defined.
NOTE: The options available for selection in the Credentialing Type field must first be created in File Maintenance > Master Lists > Credentialing.
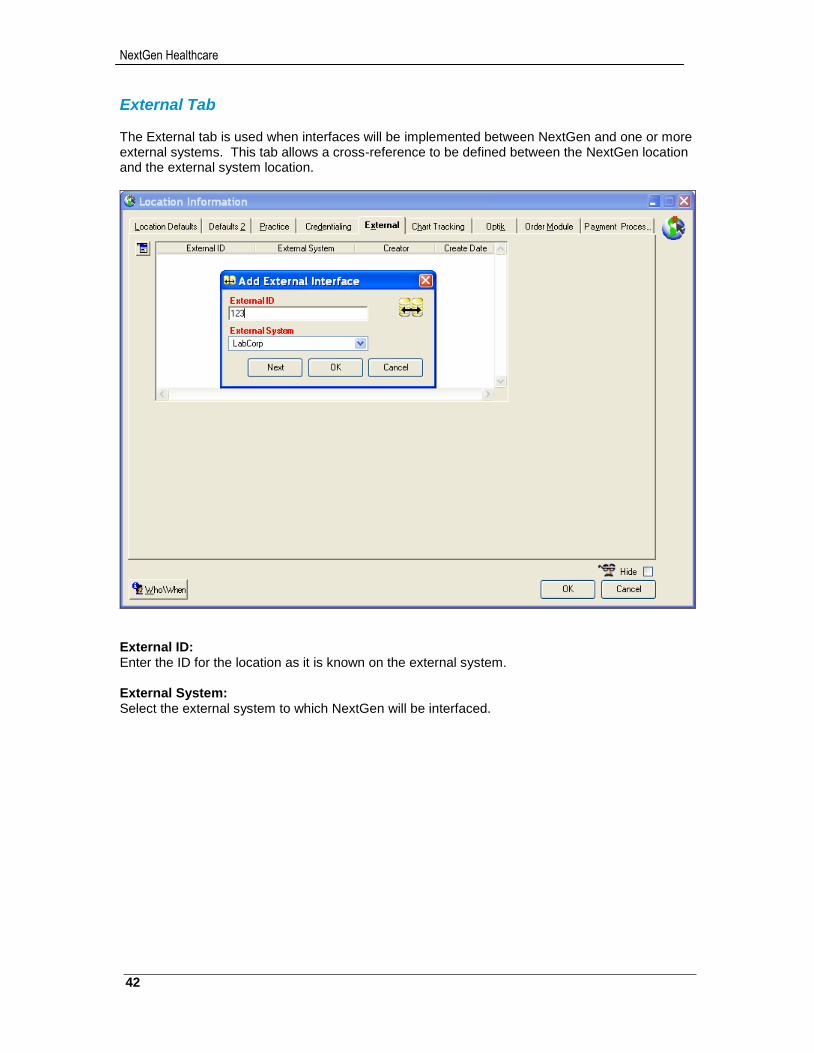
NextGen Healthcare
42
External Tab The External tab is used when interfaces will be implemented between NextGen and one or more external systems. This tab allows a cross-reference to be defined between the NextGen location and the external system location.
External ID: Enter the ID for the location as it is known on the external system. External System: Select the external system to which NextGen will be interfaced.
43
NextGen® PM System Configuration Training Workbook for CHC, Version 5.8
Other Tabs
Chart Tracking Tab: The Chart Tracking tab displays only if the system is licensed for the NextGen® Chart Tracking module. NOTE: Chart Tracking is a legacy module that is no longer available to clients.
Optik Tab: The Optik tab displays only if the system is licensed for the NextGen® Optical Management application. This tab is used in the setup of a VisionWeb interface by downloading the VisionWeb catalog and supplier accounts prior to implementing Optical Management.
NOTE: Training on Optical Management is covered in separate training sessions.
Order Module Tab: The Order Module tab is used in the setup of Medical Necessity in NextGen® EHR. Medicare Part A or Part B and the state for the location can be defined. These parameters are then used with Medical Necessity checks in EHR when lab orders are entered for Medicare patients.
NOTE: Training on Medical Necessity in EHR is covered in a separate training session.
Payment Processing Tab: The Payment Processing tab is used in the setup of credit card and electronic check transactions in NextGen® EPM. Location specific credentials assigned by TransFirst or InstaMed (transaction processing vendors) can be defined. These credentials are then included in patient payment transactions submitted from EPM to the vendor for real-time approval/denial results.
NOTE: Training on credit card transactions in EPM is covered in a separate WebEx training session.
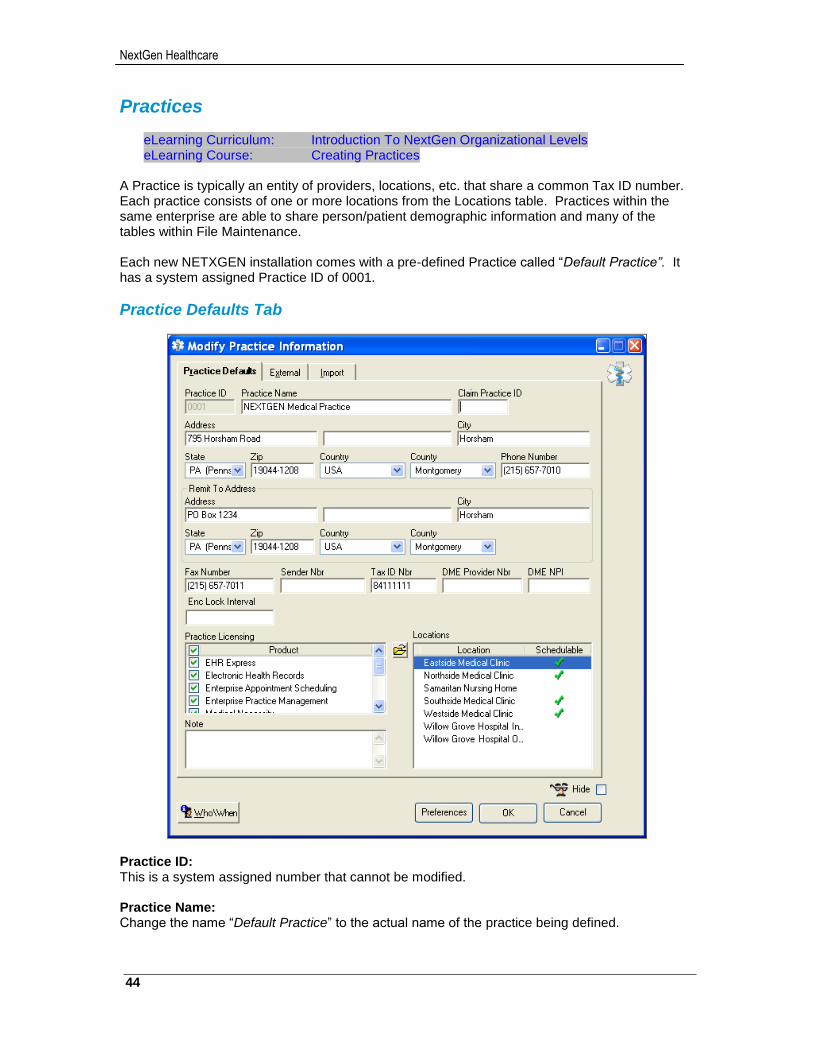
NextGen Healthcare
44
Practices
eLearning Curriculum: Introduction To NextGen Organizational Levels eLearning Course: Creating Practices
A Practice is typically an entity of providers, locations, etc. that share a common Tax ID number. Each practice consists of one or more locations from the Locations table. Practices within the same enterprise are able to share person/patient demographic information and many of the tables within File Maintenance. Each new NETXGEN installation comes with a pre-defined Practice called “Default Practice”. It has a system assigned Practice ID of 0001.
Practice Defaults Tab
Practice ID: This is a system assigned number that cannot be modified. Practice Name: Change the name “Default Practice” to the actual name of the practice being defined.
45
NextGen® PM System Configuration Training Workbook for CHC, Version 5.8
Address: Enter the address for the practice as it should appear on Statements, Fee Tickets, Invoices, Encounter Bills, Budget Letters and Demand Account/Encounter Letters. Remit To Address: If applicable, enter an alternate address for the practice as it should appear in the “Remit To” section on Statements, Fee Tickets, Invoices, Encounter Bills, Budget Letters and Demand Account/Encounter Letters. Tax ID Nbr: Enter the Tax ID number for the practice being defined. DME Provider Nbr: If the practice does Durable Medical Equipment billing, enter the DME Provider Number needed on DMERC claims. DME NPI: If the practice does Durable Medical Equipment billing, enter the National Provider ID needed on DMERC claims. Practice Licensing: Select the NextGen applications to be used in the practice being defined. Each application selected uses a practice license within the License Manager application. Locations: From the yellow folder, select from the list of available Locations on the left those that should be included in this practice by moving each location to the right with the blue arrow.
NOTE: At least one “schedulable” location must be included in every practice.
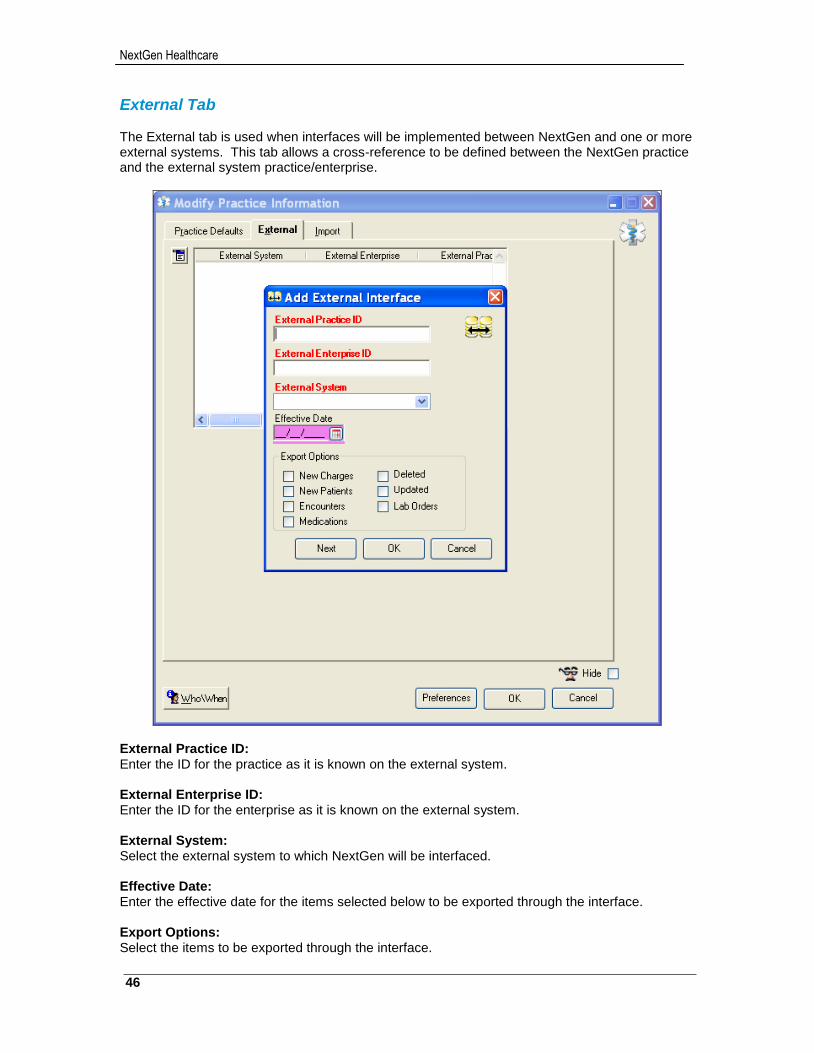
NextGen Healthcare
46
External Tab The External tab is used when interfaces will be implemented between NextGen and one or more external systems. This tab allows a cross-reference to be defined between the NextGen practice and the external system practice/enterprise.
External Practice ID: Enter the ID for the practice as it is known on the external system. External Enterprise ID: Enter the ID for the enterprise as it is known on the external system. External System: Select the external system to which NextGen will be interfaced. Effective Date: Enter the effective date for the items selected below to be exported through the interface. Export Options: Select the items to be exported through the interface.

47
NextGen® PM System Configuration Training Workbook for CHC, Version 5.8
Import Tab For clients with multiple practices using the same Practice Level Tables, the Import Tab allows selected tables to be imported from one practice into another practice.
Choose practice to import from: Select the practice from which the tables will be imported. Choose data to import: Select the tables to be imported from the above practice and click the Import button.
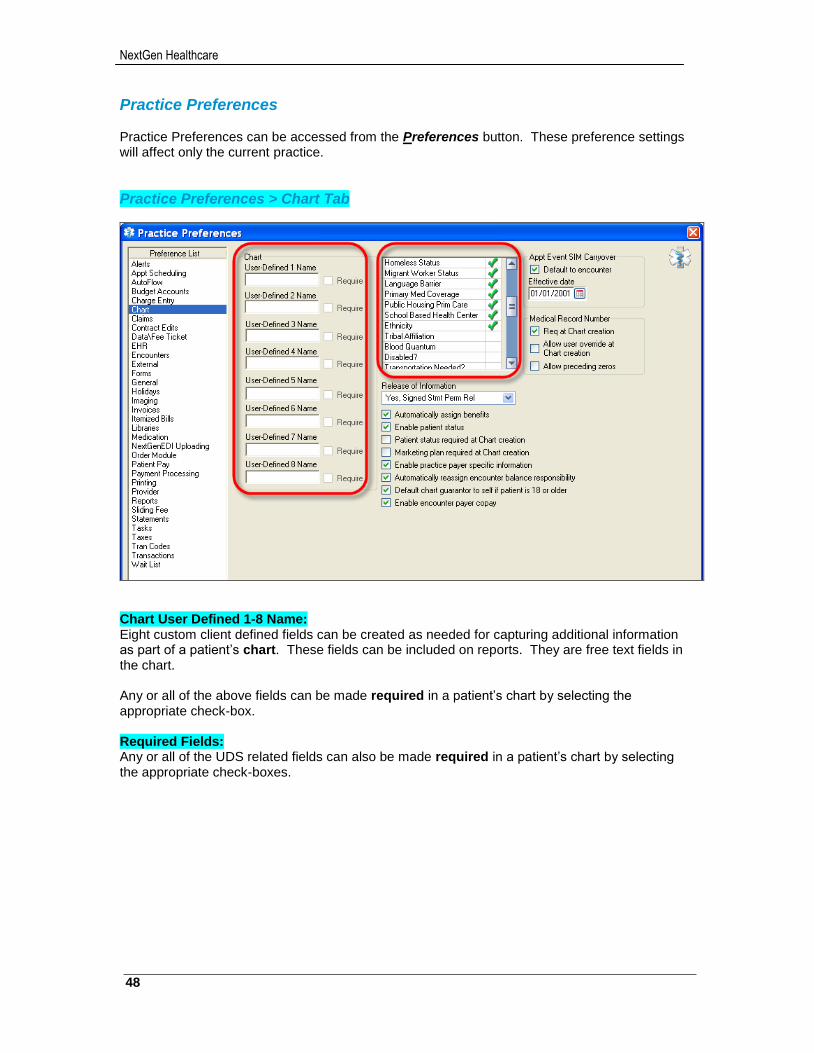
NextGen Healthcare
48
Practice Preferences
Practice Preferences can be accessed from the Preferences button. These preference settings will affect only the current practice.
Practice Preferences > Chart Tab
Chart User Defined 1-8 Name: Eight custom client defined fields can be created as needed for capturing additional information as part of a patient’s chart. These fields can be included on reports. They are free text fields in the chart. Any or all of the above fields can be made required in a patient’s chart by selecting the appropriate check-box. Required Fields: Any or all of the UDS related fields can also be made required in a patient’s chart by selecting the appropriate check-boxes.
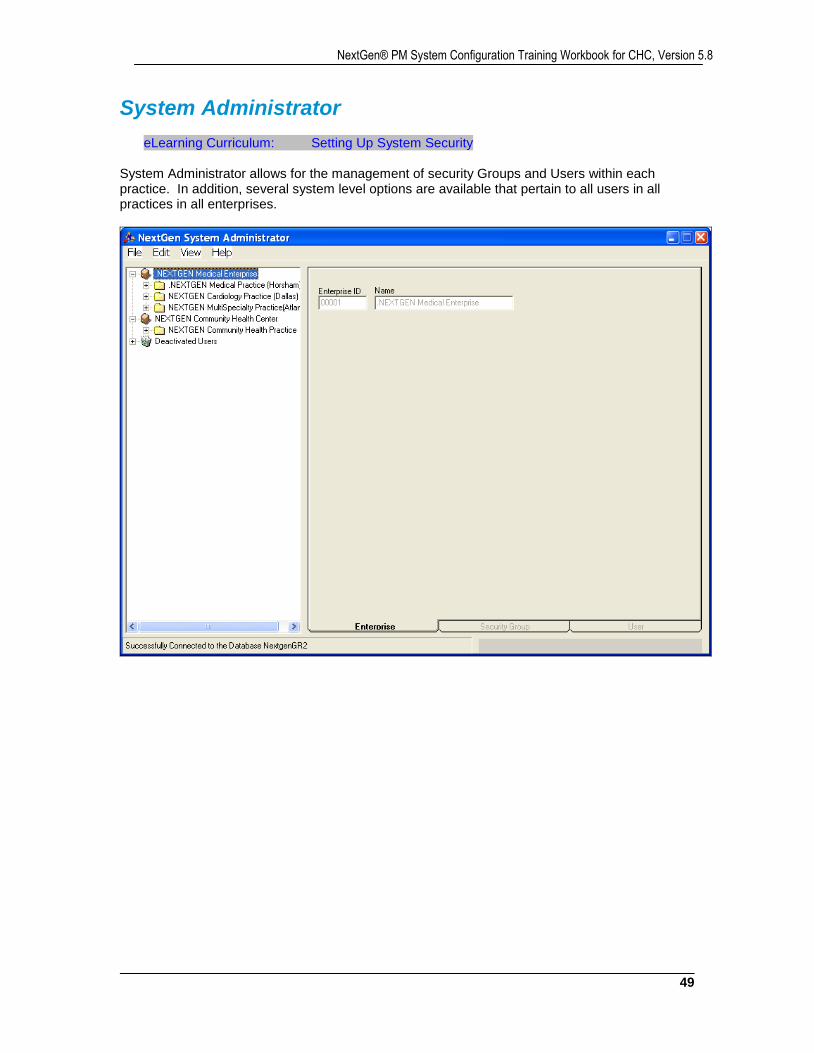
49
NextGen® PM System Configuration Training Workbook for CHC, Version 5.8
System Administrator
eLearning Curriculum: Setting Up System Security System Administrator allows for the management of security Groups and Users within each practice. In addition, several system level options are available that pertain to all users in all practices in all enterprises.
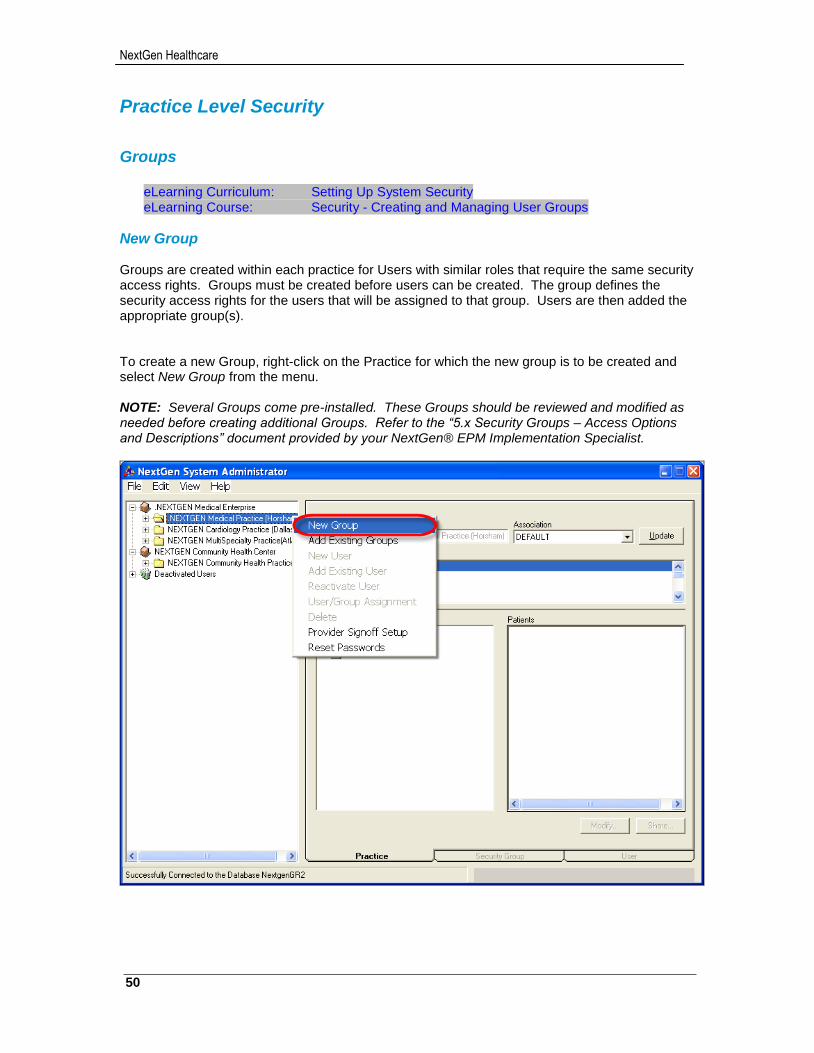
NextGen Healthcare
50
Practice Level Security
Groups
eLearning Curriculum: Setting Up System Security eLearning Course: Security - Creating and Managing User Groups
New Group Groups are created within each practice for Users with similar roles that require the same security access rights. Groups must be created before users can be created. The group defines the security access rights for the users that will be assigned to that group. Users are then added the appropriate group(s). To create a new Group, right-click on the Practice for which the new group is to be created and select New Group from the menu. NOTE: Several Groups come pre-installed. These Groups should be reviewed and modified as needed before creating additional Groups. Refer to the “5.x Security Groups – Access Options and Descriptions” document provided by your NextGen® EPM Implementation Specialist.
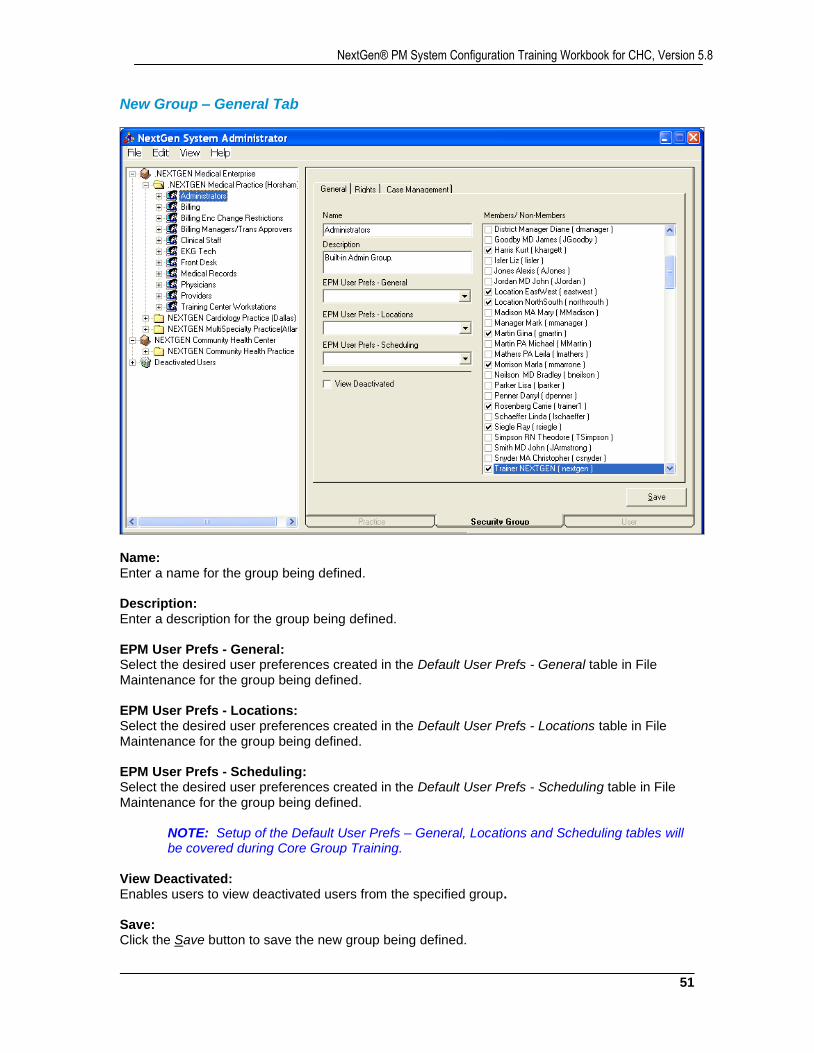
51
NextGen® PM System Configuration Training Workbook for CHC, Version 5.8
New Group – General Tab
Name: Enter a name for the group being defined. Description: Enter a description for the group being defined. EPM User Prefs - General: Select the desired user preferences created in the Default User Prefs - General table in File Maintenance for the group being defined. EPM User Prefs - Locations: Select the desired user preferences created in the Default User Prefs - Locations table in File Maintenance for the group being defined. EPM User Prefs - Scheduling: Select the desired user preferences created in the Default User Prefs - Scheduling table in File Maintenance for the group being defined.
NOTE: Setup of the Default User Prefs – General, Locations and Scheduling tables will be covered during Core Group Training.
View Deactivated: Enables users to view deactivated users from the specified group. Save: Click the Save button to save the new group being defined.

NextGen Healthcare
52
New Group - Rights Tab
eLearning Curriculum: Setting Up System Security eLearning Course: Security – Rights and Permissions
By default, a newly created Group has full security access rights to all options available in all NextGen applications. To customize the security access rights for the new Group being defined, it is necessary to evaluate each of the available options listed under the +Modules and +Operations categories to determine how each option should be set for the new Group. NOTE: Refer to the “5.x Security Groups - Access Options and Descriptions” document provided by your NextGen® EPM Implementation Specialist.
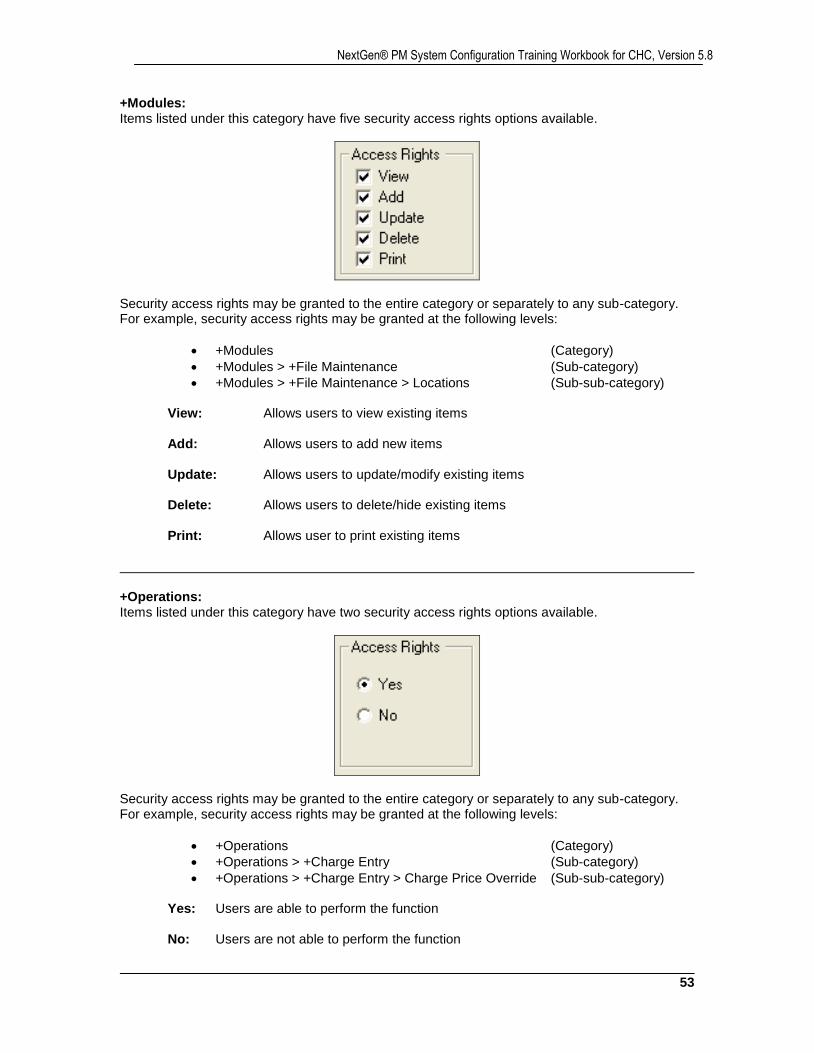
53
NextGen® PM System Configuration Training Workbook for CHC, Version 5.8
+Modules: Items listed under this category have five security access rights options available.
Security access rights may be granted to the entire category or separately to any sub-category. For example, security access rights may be granted at the following levels:
+Modules (Category)
+Modules > +File Maintenance (Sub-category)
+Modules > +File Maintenance > Locations (Sub-sub-category)
View: Allows users to view existing items
Add: Allows users to add new items
Update: Allows users to update/modify existing items
Delete: Allows users to delete/hide existing items
Print: Allows user to print existing items +Operations: Items listed under this category have two security access rights options available.
Security access rights may be granted to the entire category or separately to any sub-category. For example, security access rights may be granted at the following levels:
+Operations (Category)
+Operations > +Charge Entry (Sub-category)
+Operations > +Charge Entry > Charge Price Override (Sub-sub-category)
Yes: Users are able to perform the function
No: Users are not able to perform the function
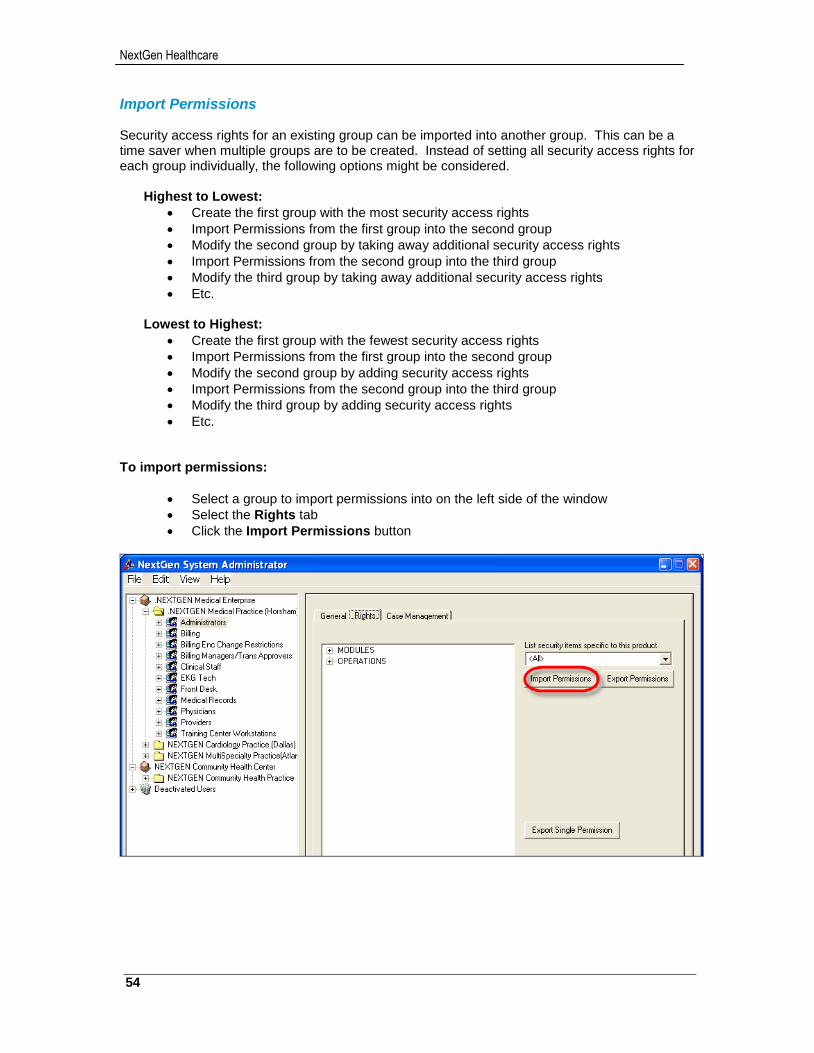
NextGen Healthcare
54
Import Permissions Security access rights for an existing group can be imported into another group. This can be a time saver when multiple groups are to be created. Instead of setting all security access rights for each group individually, the following options might be considered.
Highest to Lowest:
Create the first group with the most security access rights
Import Permissions from the first group into the second group
Modify the second group by taking away additional security access rights
Import Permissions from the second group into the third group
Modify the third group by taking away additional security access rights
Etc.
Lowest to Highest:
Create the first group with the fewest security access rights
Import Permissions from the first group into the second group
Modify the second group by adding security access rights
Import Permissions from the second group into the third group
Modify the third group by adding security access rights
Etc. To import permissions:
Select a group to import permissions into on the left side of the window
Select the Rights tab
Click the Import Permissions button
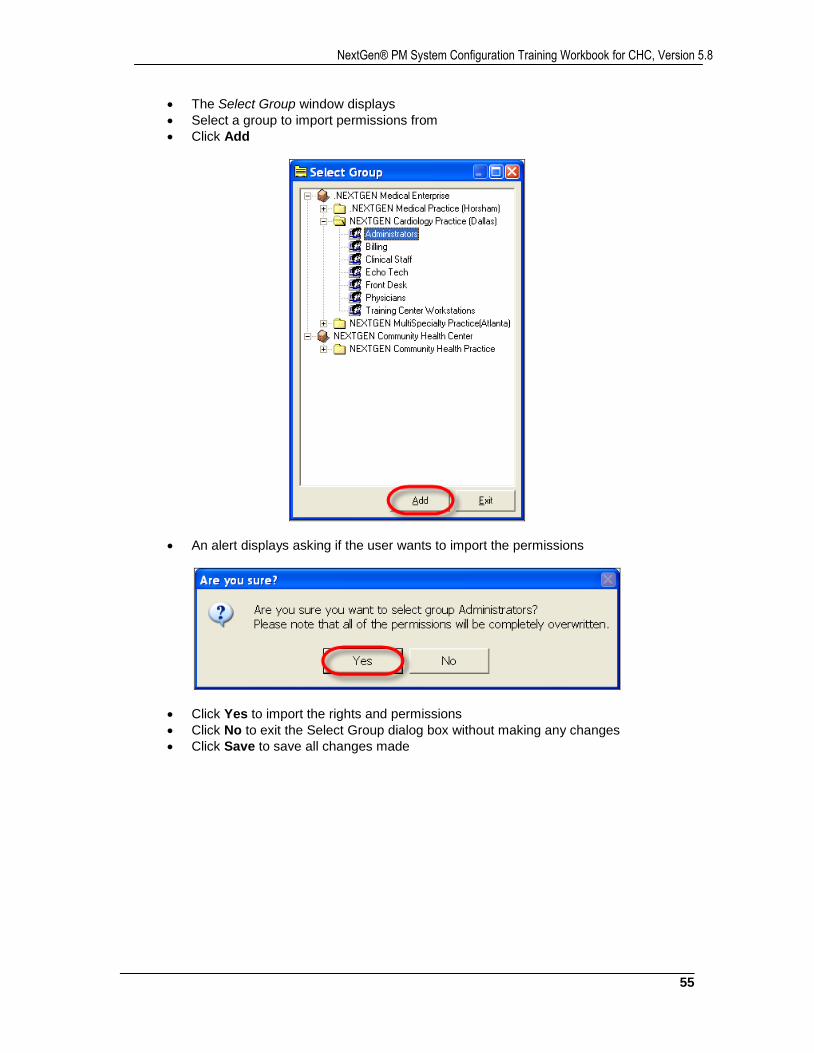
55
NextGen® PM System Configuration Training Workbook for CHC, Version 5.8
The Select Group window displays
Select a group to import permissions from
Click Add
An alert displays asking if the user wants to import the permissions
Click Yes to import the rights and permissions
Click No to exit the Select Group dialog box without making any changes
Click Save to save all changes made
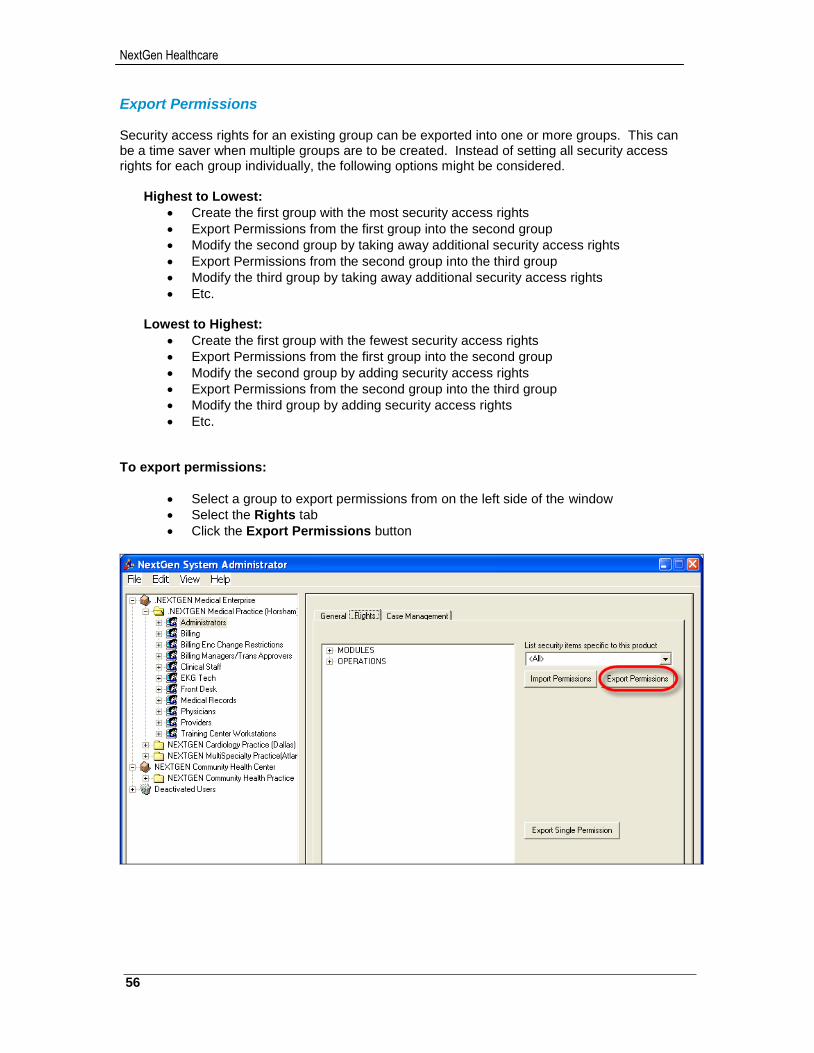
NextGen Healthcare
56
Export Permissions Security access rights for an existing group can be exported into one or more groups. This can be a time saver when multiple groups are to be created. Instead of setting all security access rights for each group individually, the following options might be considered.
Highest to Lowest:
Create the first group with the most security access rights
Export Permissions from the first group into the second group
Modify the second group by taking away additional security access rights
Export Permissions from the second group into the third group
Modify the third group by taking away additional security access rights
Etc.
Lowest to Highest:
Create the first group with the fewest security access rights
Export Permissions from the first group into the second group
Modify the second group by adding security access rights
Export Permissions from the second group into the third group
Modify the third group by adding security access rights
Etc. To export permissions:
Select a group to export permissions from on the left side of the window
Select the Rights tab
Click the Export Permissions button
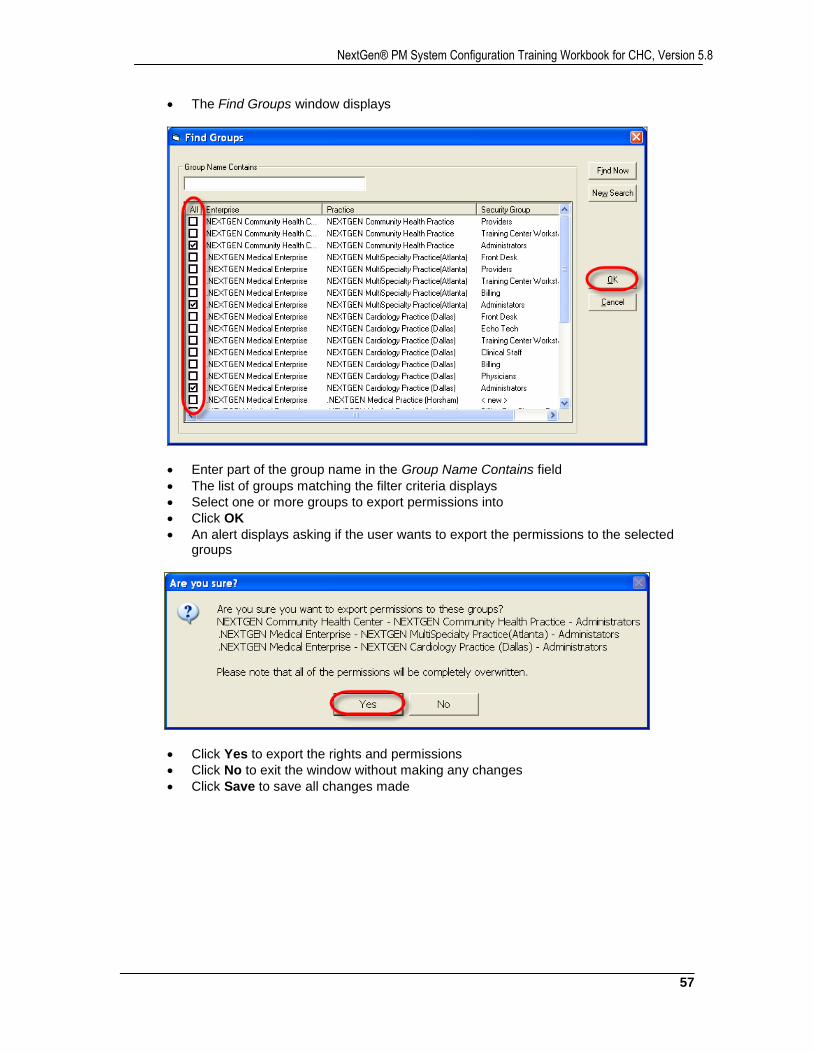
57
NextGen® PM System Configuration Training Workbook for CHC, Version 5.8
The Find Groups window displays
Enter part of the group name in the Group Name Contains field
The list of groups matching the filter criteria displays
Select one or more groups to export permissions into
Click OK
An alert displays asking if the user wants to export the permissions to the selected groups
Click Yes to export the rights and permissions
Click No to exit the window without making any changes
Click Save to save all changes made

NextGen Healthcare
58
Add Existing Groups The Add Existing Groups option allows a group that exists in one practice to be added into a second practice. The group’s Name, Description, and security access Rights are copied into the second practice, but the Users are not. To Add Existing Groups:
Right-click on the practice into which the existing group(s) will be added.
Select Add Existing Groups from the menu.
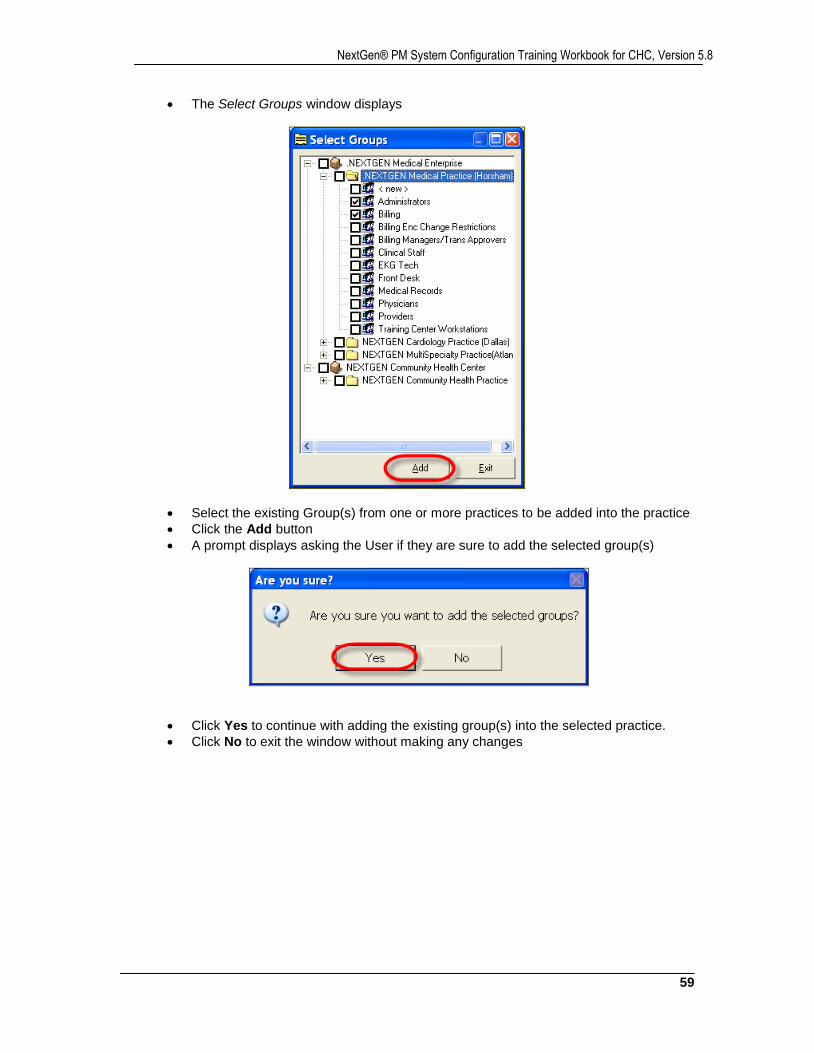
59
NextGen® PM System Configuration Training Workbook for CHC, Version 5.8
The Select Groups window displays
Select the existing Group(s) from one or more practices to be added into the practice
Click the Add button
A prompt displays asking the User if they are sure to add the selected group(s)
Click Yes to continue with adding the existing group(s) into the selected practice.
Click No to exit the window without making any changes
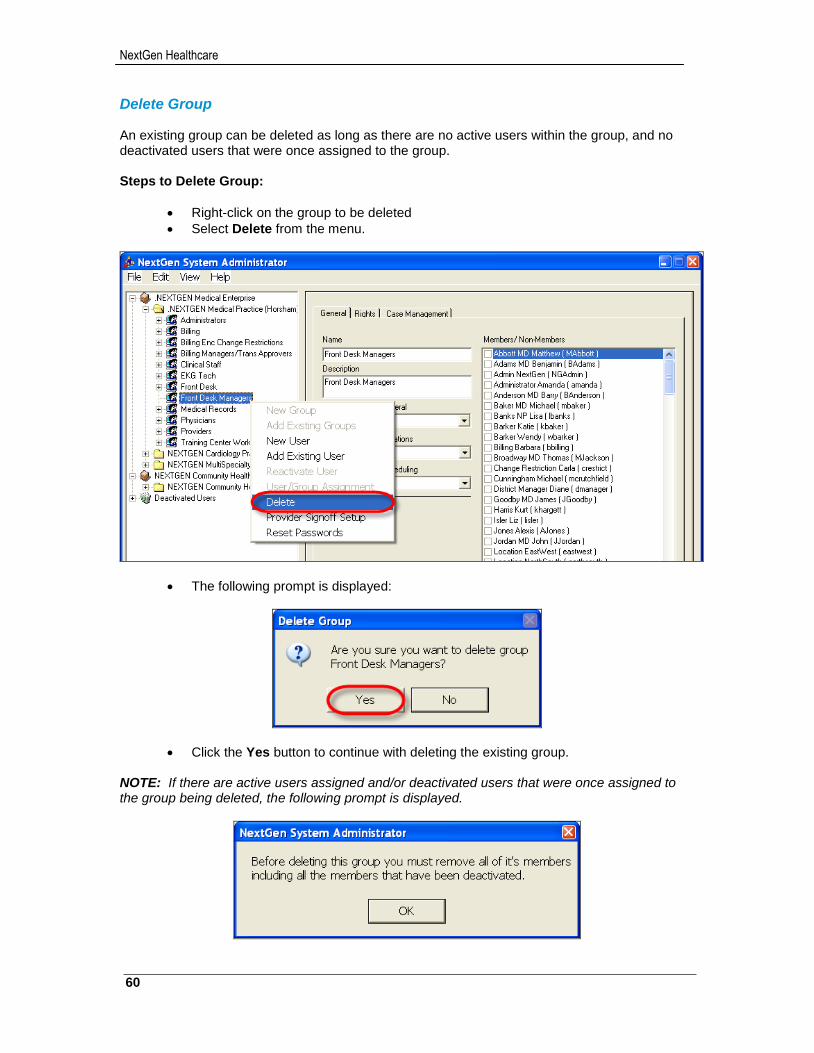
NextGen Healthcare
60
Delete Group An existing group can be deleted as long as there are no active users within the group, and no deactivated users that were once assigned to the group. Steps to Delete Group:
Right-click on the group to be deleted
Select Delete from the menu.
The following prompt is displayed:
Click the Yes button to continue with deleting the existing group. NOTE: If there are active users assigned and/or deactivated users that were once assigned to the group being deleted, the following prompt is displayed.
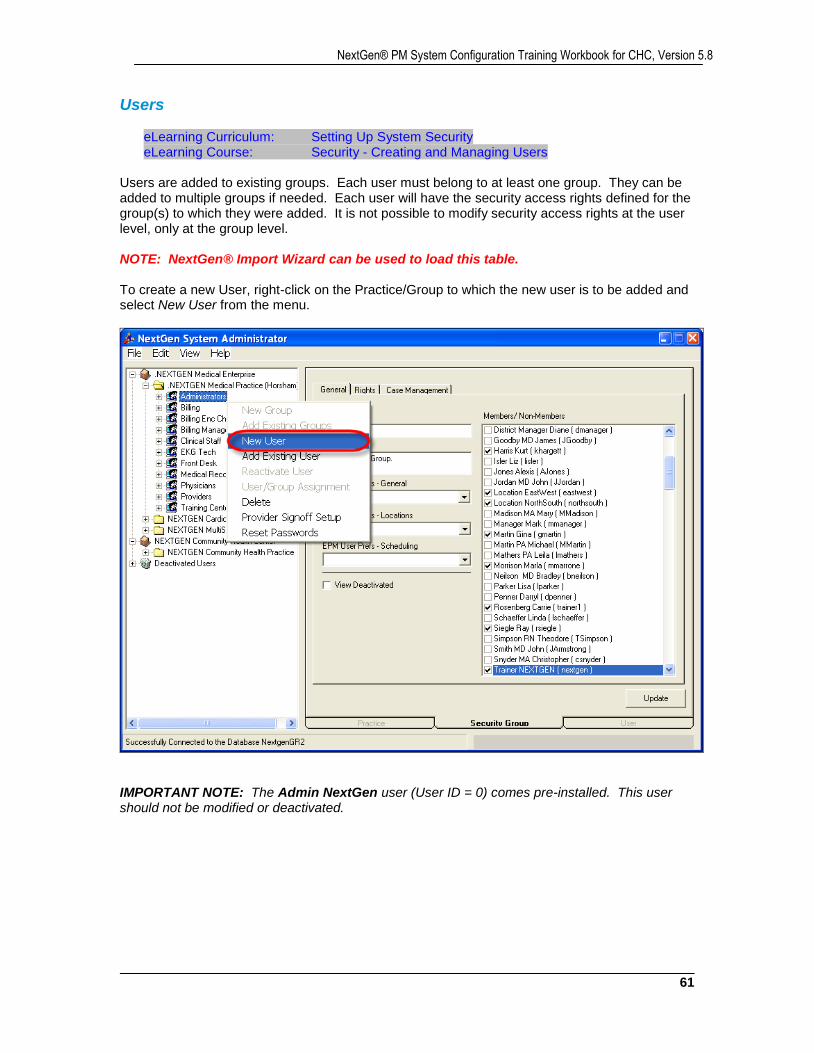
61
NextGen® PM System Configuration Training Workbook for CHC, Version 5.8
Users
eLearning Curriculum: Setting Up System Security eLearning Course: Security - Creating and Managing Users
Users are added to existing groups. Each user must belong to at least one group. They can be added to multiple groups if needed. Each user will have the security access rights defined for the group(s) to which they were added. It is not possible to modify security access rights at the user level, only at the group level. NOTE: NextGen® Import Wizard can be used to load this table. To create a new User, right-click on the Practice/Group to which the new user is to be added and select New User from the menu.
IMPORTANT NOTE: The Admin NextGen user (User ID = 0) comes pre-installed. This user should not be modified or deactivated.

NextGen Healthcare
62
New User – General Tab
Last / First / Middle Names: Enter the name of the user being defined. Privacy Level: Enter a Privacy Level of 0 – 5 for the user being defined.
NOTE: Privacy level is used in NextGen® EHR. Patients can be assigned a privacy level on the demographics template. Users with a privacy level lower than that of the patient will not have access to that patient’s clinical record.
Employee Nbr: Enter an employee number for the user being defined. This can be an internal number assigned by the client and is for informational purposes only. Credentials: Enter credentials, if any, for a user that is not a provider. This field can be included on documents and reports in NextGen® EHR. User ID: A system defined User ID number is assigned to each user. The number cannot be modified.
63
NextGen® PM System Configuration Training Workbook for CHC, Version 5.8
Assigned Provider / Provider Relationship / Provider Start/End Dates: Select the rendering provider for which the user being defined should have access to the PAQ (Provider Approval Queue) in NextGen® EHR.
NOTE: This also affects receiving results from lab interfaces and tasking from NextGen® ICS to EHR.
E-Mail Address / E-Mail Profile Name / E-Mail Password: Enter the user's e-mail address, account profile name and password for the external e-mail system, such as Microsoft® Outlook, that is to be used with the Workflow module in NextGen® EHR. User can change password: Select this check-box if the user being defined should be able to change their password. Force new password at next login: Select this check-box if the user being defined should be forced to change their password the next time they login to an application. This is useful when the same generic password is initially assigned to all users. Password Expires / Date: Select this check-box and enter a date if the password for the user being defined should expire on a specific date. This is useful when temporary employees have been hired. Logon Name: Enter a Logon Name for the user being defined. The name must be at least 6 characters long and will be entered in the User field when logging into a NextGen application.
NOTE: This is a required entry for all users. Password / Confirm Password: Enter a Password for the user being defined. The password will be entered when logging into a NextGen application.
NOTE: This is a required entry for all users. HIPAA requires passwords to be a minimum length of 6 characters.
Members: Defaults to the Group selected when the new user is created. If needed, additional groups can be selected for the user. User Licensing: Select all NextGen applications to which the user being defined should have access. Each application selected uses a user license within the License Manager application.

NextGen Healthcare
64
Inclusion/Exclusion List: By default, all users have access to all patients in the NextGen applications. This option enables patient information to be included or excluded for the user being defined.
Inclusion: Select this check-box to create a list of patients that are to be the ONLY patients to which the user being defined will have access.
Exclusion: Select this check-box to create a list of patients that are to be the ONLY
patients to which the user being defined will not have access.
NOTE: Once inclusion/exclusion lists have been created for one user from the Modify button, the lists can be shared with other users, security groups, or task workgroups from the Share button.
Optik User: If the system is licensed for the NextGen® Optical Management application and the user is an optician or technician, select this check-box. In Optical Management, the user's name will display and be available for selection in the User/Tech field when entering information for an optical order. App Launcher Application Access: Defaults to the NextGen applications that have been selected for all users under the Edit > Full App Launcher Access menu option. Select additional applications to which the user being defined should have access to from the Application Launcher window.
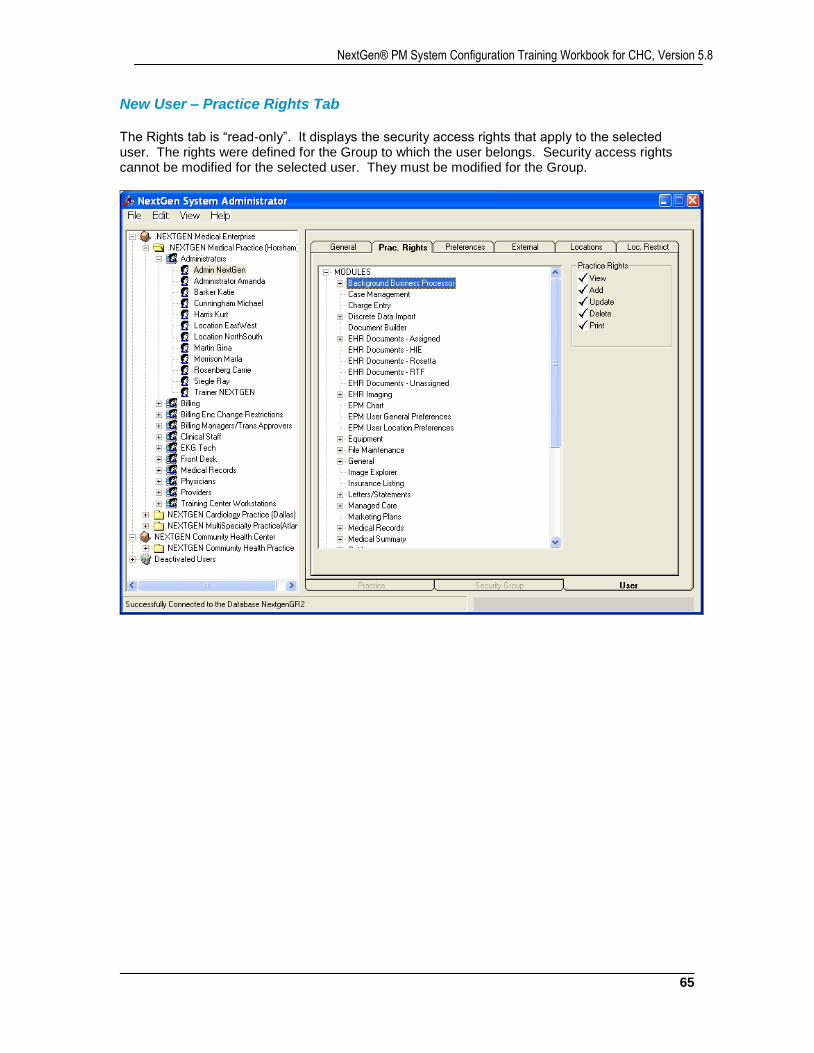
65
NextGen® PM System Configuration Training Workbook for CHC, Version 5.8
New User – Practice Rights Tab The Rights tab is “read-only”. It displays the security access rights that apply to the selected user. The rights were defined for the Group to which the user belongs. Security access rights cannot be modified for the selected user. They must be modified for the Group.
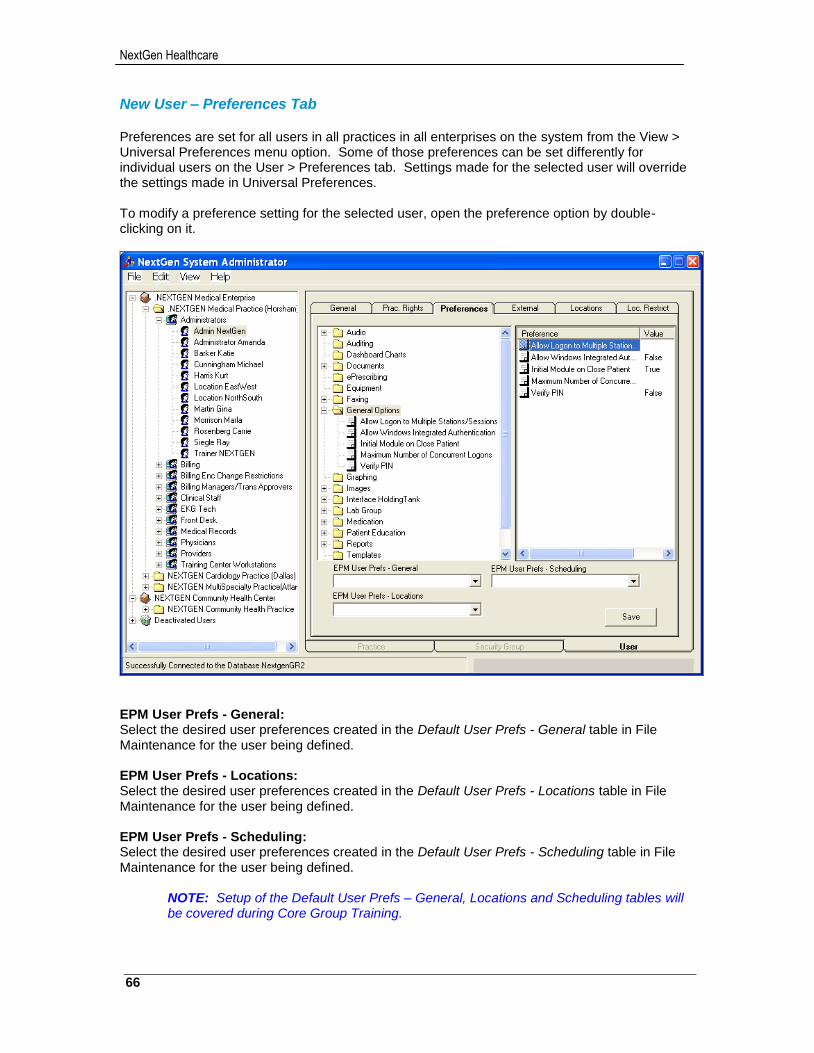
NextGen Healthcare
66
New User – Preferences Tab Preferences are set for all users in all practices in all enterprises on the system from the View > Universal Preferences menu option. Some of those preferences can be set differently for individual users on the User > Preferences tab. Settings made for the selected user will override the settings made in Universal Preferences. To modify a preference setting for the selected user, open the preference option by double-clicking on it.
EPM User Prefs - General: Select the desired user preferences created in the Default User Prefs - General table in File Maintenance for the user being defined. EPM User Prefs - Locations: Select the desired user preferences created in the Default User Prefs - Locations table in File Maintenance for the user being defined. EPM User Prefs - Scheduling: Select the desired user preferences created in the Default User Prefs - Scheduling table in File Maintenance for the user being defined.
NOTE: Setup of the Default User Prefs – General, Locations and Scheduling tables will be covered during Core Group Training.
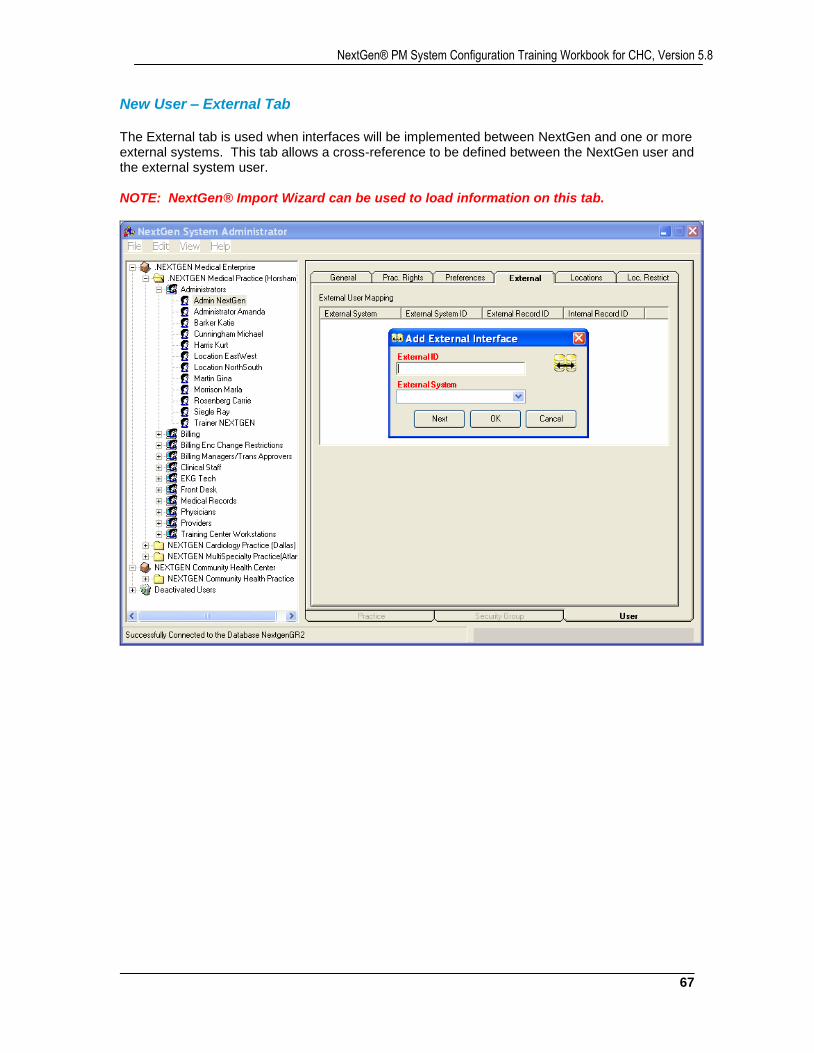
67
NextGen® PM System Configuration Training Workbook for CHC, Version 5.8
New User – External Tab The External tab is used when interfaces will be implemented between NextGen and one or more external systems. This tab allows a cross-reference to be defined between the NextGen user and the external system user. NOTE: NextGen® Import Wizard can be used to load information on this tab.
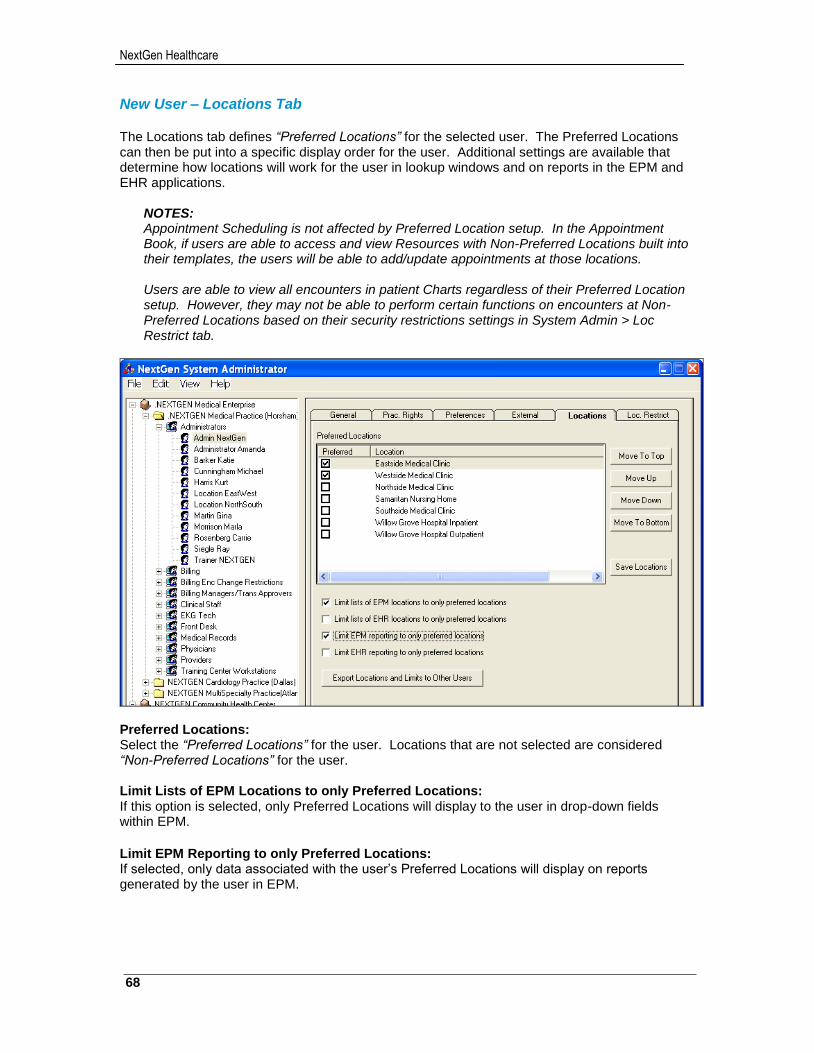
NextGen Healthcare
68
New User – Locations Tab The Locations tab defines “Preferred Locations” for the selected user. The Preferred Locations can then be put into a specific display order for the user. Additional settings are available that determine how locations will work for the user in lookup windows and on reports in the EPM and EHR applications.
NOTES: Appointment Scheduling is not affected by Preferred Location setup. In the Appointment Book, if users are able to access and view Resources with Non-Preferred Locations built into their templates, the users will be able to add/update appointments at those locations. Users are able to view all encounters in patient Charts regardless of their Preferred Location setup. However, they may not be able to perform certain functions on encounters at Non-Preferred Locations based on their security restrictions settings in System Admin > Loc Restrict tab.
Preferred Locations: Select the “Preferred Locations” for the user. Locations that are not selected are considered “Non-Preferred Locations” for the user. Limit Lists of EPM Locations to only Preferred Locations: If this option is selected, only Preferred Locations will display to the user in drop-down fields within EPM.
Limit EPM Reporting to only Preferred Locations: If selected, only data associated with the user’s Preferred Locations will display on reports generated by the user in EPM.
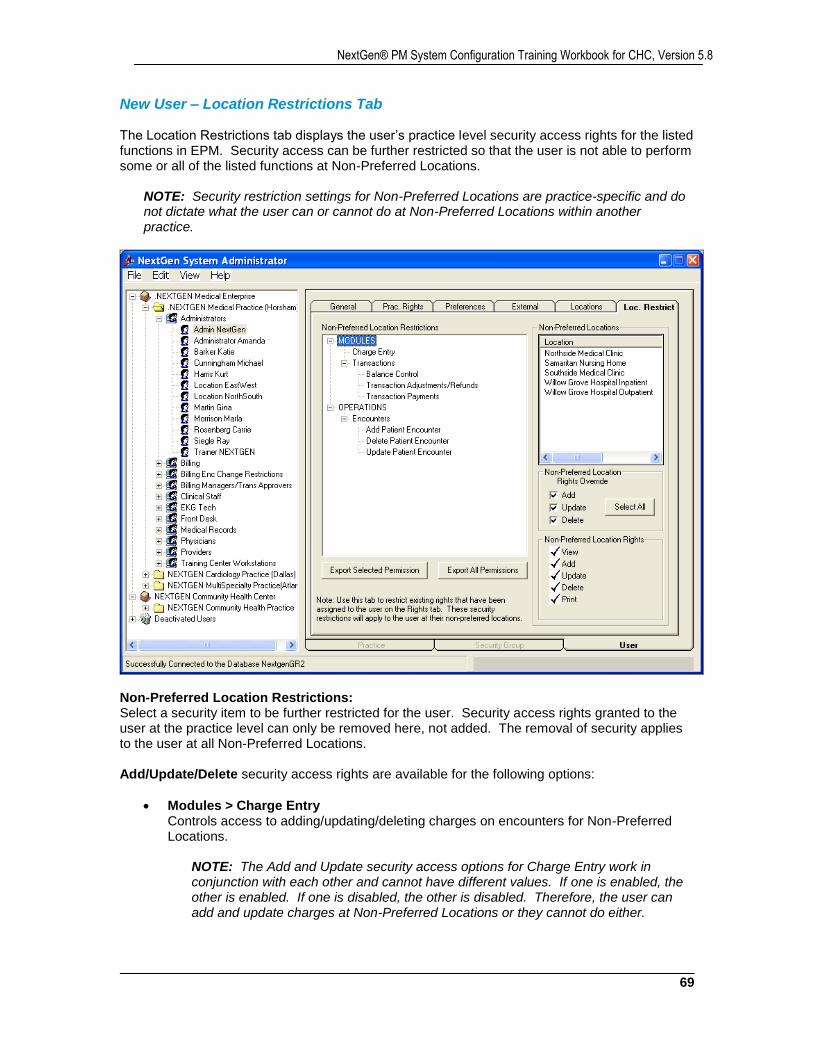
69
NextGen® PM System Configuration Training Workbook for CHC, Version 5.8
New User – Location Restrictions Tab The Location Restrictions tab displays the user’s practice level security access rights for the listed functions in EPM. Security access can be further restricted so that the user is not able to perform some or all of the listed functions at Non-Preferred Locations.
NOTE: Security restriction settings for Non-Preferred Locations are practice-specific and do not dictate what the user can or cannot do at Non-Preferred Locations within another practice.
Non-Preferred Location Restrictions: Select a security item to be further restricted for the user. Security access rights granted to the user at the practice level can only be removed here, not added. The removal of security applies to the user at all Non-Preferred Locations. Add/Update/Delete security access rights are available for the following options:
Modules > Charge Entry Controls access to adding/updating/deleting charges on encounters for Non-Preferred Locations.
NOTE: The Add and Update security access options for Charge Entry work in conjunction with each other and cannot have different values. If one is enabled, the other is enabled. If one is disabled, the other is disabled. Therefore, the user can add and update charges at Non-Preferred Locations or they cannot do either.
NextGen Healthcare
70
Modules > Transactions > Balance Control Controls access to Balance Control on encounters for Non-Preferred Locations.
Modules > Transactions > Transaction Adjustments/Refunds Controls access to adding/updating/deleting adjustments and/or refunds within a transaction batch on encounters for Non-Preferred Locations.
Modules > Transactions > Transaction Payments Controls access to adding/updating/deleting payments within a transaction batch on encounters for Non-Preferred Locations.
Yes/No security access rights are available for the following options:
Operations > Encounters > Add Patient Encounter Controls access to creating new encounters for Non-Preferred Locations.
Operations > Encounters > Delete Patient Encounter Controls access to deleting encounters for Non-Preferred Locations.
Operations > Encounters > Update Patient Encounter Controls access to updating all fields on the Encounter Maintenance window for Non-Preferred Locations.
Non-Preferred Locations: This section displays (read-only) all practice level Non-Preferred Locations for the user. Non-Preferred Locations are those that are not selected as Preferred on the Locations tab. This section cannot be edited. Non-Preferred Location Rights Override: This section displays the user’s current access rights for the highlighted security item at all Non-Preferred Locations. The initial settings are derived from the Practice Rights tab for the Group. Further restrictions can be made by deselecting the desired rights. Deselected items can be reselected. However, Non-Preferred Location level security settings cannot have greater access than what is defined at the practice level. Non-Preferred Location Rights: This section displays (read-only) the user’s current access rights for the highlighted security item at all Non-Preferred Locations. The settings are derived from the Practice Rights tab in conjunction with the Non-Preferred Location Rights Override settings above. This section cannot be edited.
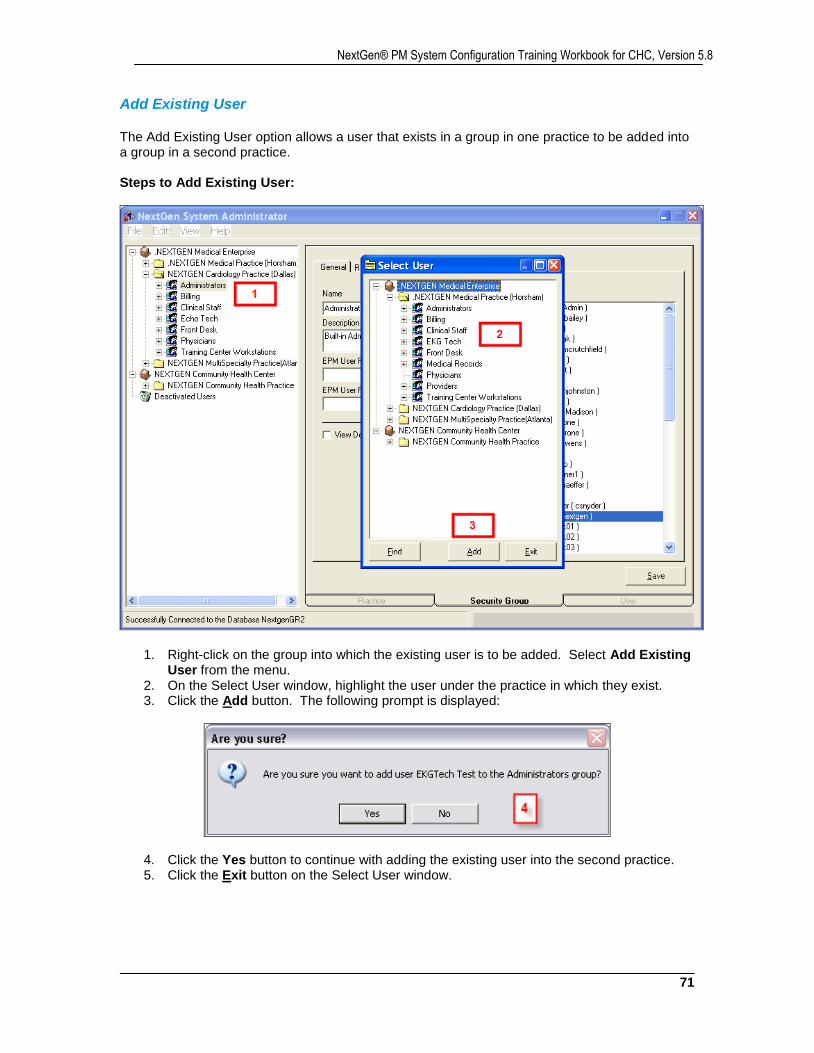
71
NextGen® PM System Configuration Training Workbook for CHC, Version 5.8
Add Existing User The Add Existing User option allows a user that exists in a group in one practice to be added into a group in a second practice. Steps to Add Existing User:
1. Right-click on the group into which the existing user is to be added. Select Add Existing User from the menu.
2. On the Select User window, highlight the user under the practice in which they exist. 3. Click the Add button. The following prompt is displayed:
4. Click the Yes button to continue with adding the existing user into the second practice. 5. Click the Exit button on the Select User window.
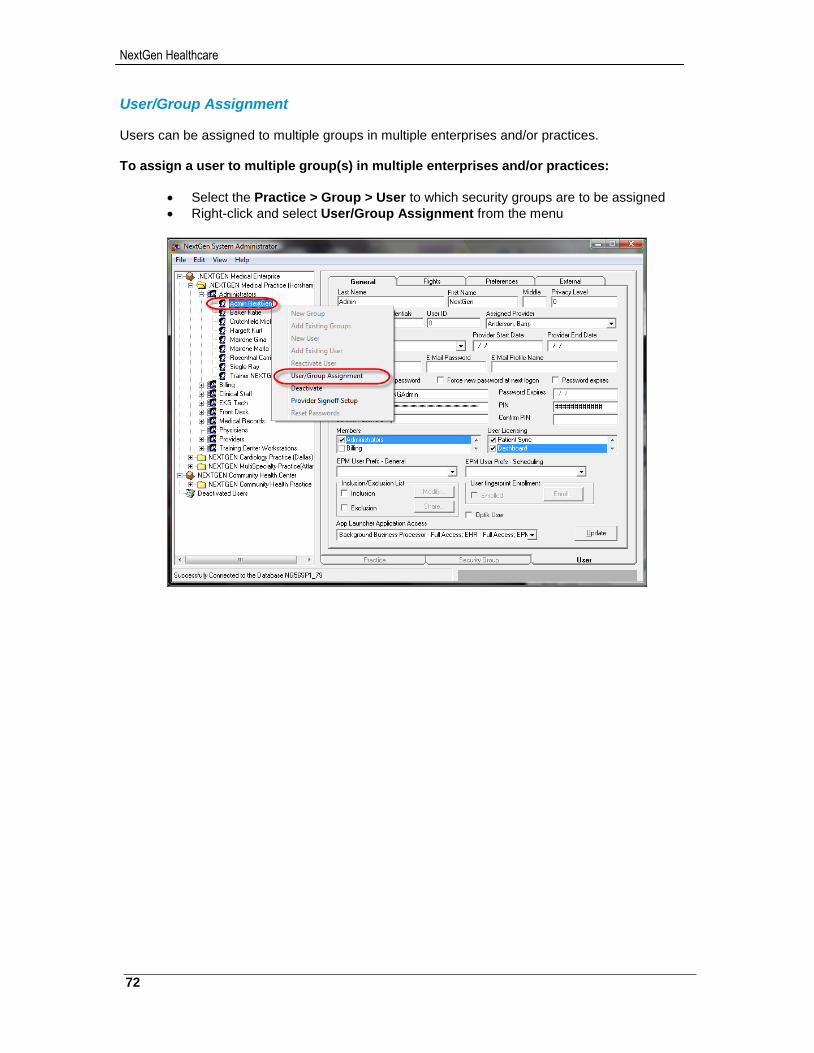
NextGen Healthcare
72
User/Group Assignment Users can be assigned to multiple groups in multiple enterprises and/or practices. To assign a user to multiple group(s) in multiple enterprises and/or practices:
Select the Practice > Group > User to which security groups are to be assigned
Right-click and select User/Group Assignment from the menu
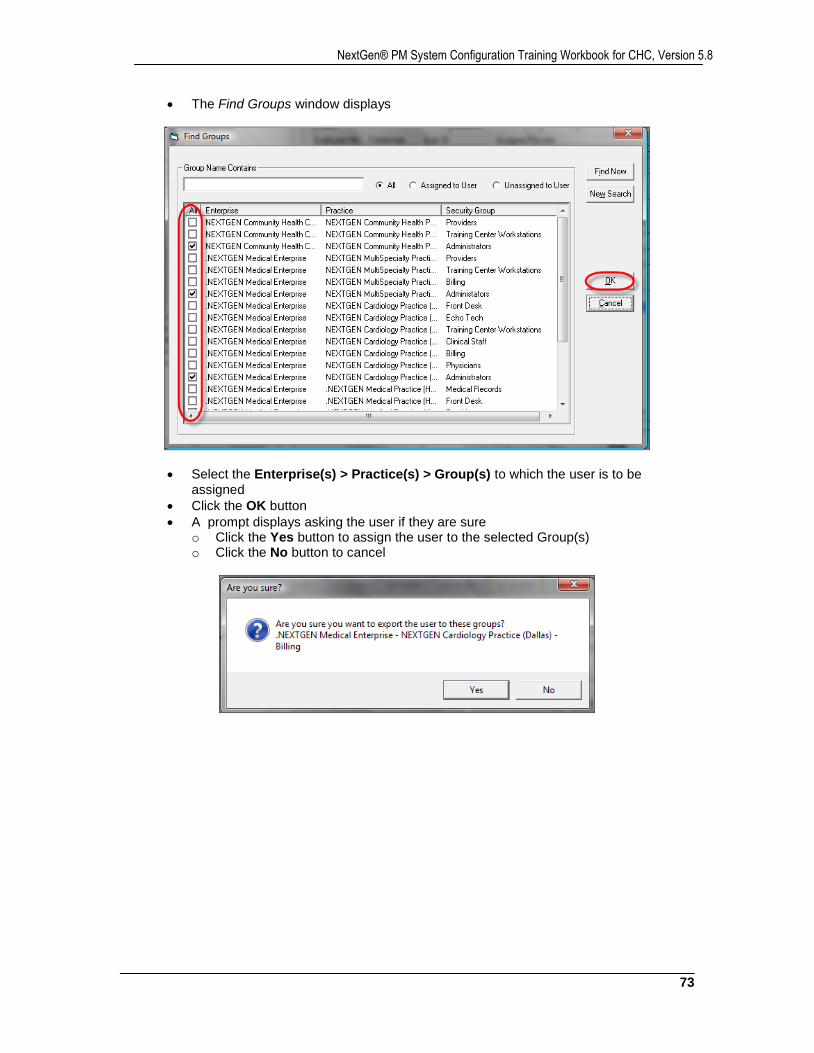
73
NextGen® PM System Configuration Training Workbook for CHC, Version 5.8
The Find Groups window displays
Select the Enterprise(s) > Practice(s) > Group(s) to which the user is to be assigned
Click the OK button
A prompt displays asking the user if they are sure o Click the Yes button to assign the user to the selected Group(s) o Click the No button to cancel
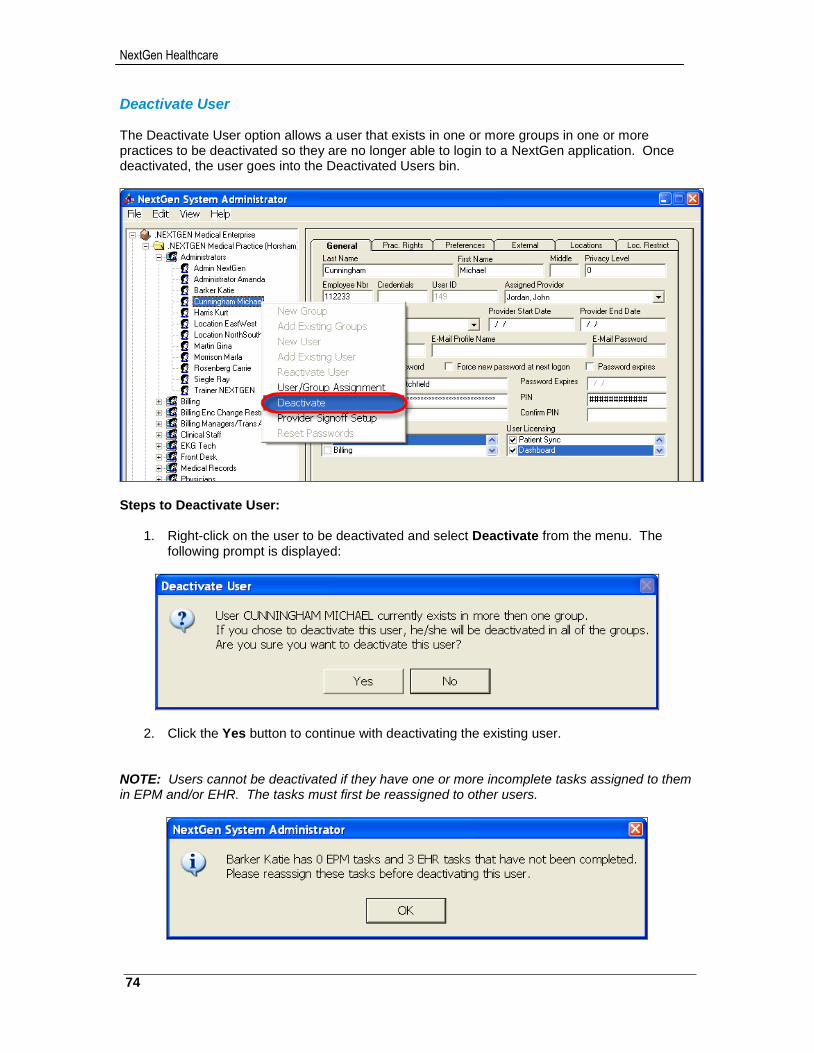
NextGen Healthcare
74
Deactivate User The Deactivate User option allows a user that exists in one or more groups in one or more practices to be deactivated so they are no longer able to login to a NextGen application. Once deactivated, the user goes into the Deactivated Users bin.
Steps to Deactivate User:
1. Right-click on the user to be deactivated and select Deactivate from the menu. The following prompt is displayed:
2. Click the Yes button to continue with deactivating the existing user. NOTE: Users cannot be deactivated if they have one or more incomplete tasks assigned to them in EPM and/or EHR. The tasks must first be reassigned to other users.
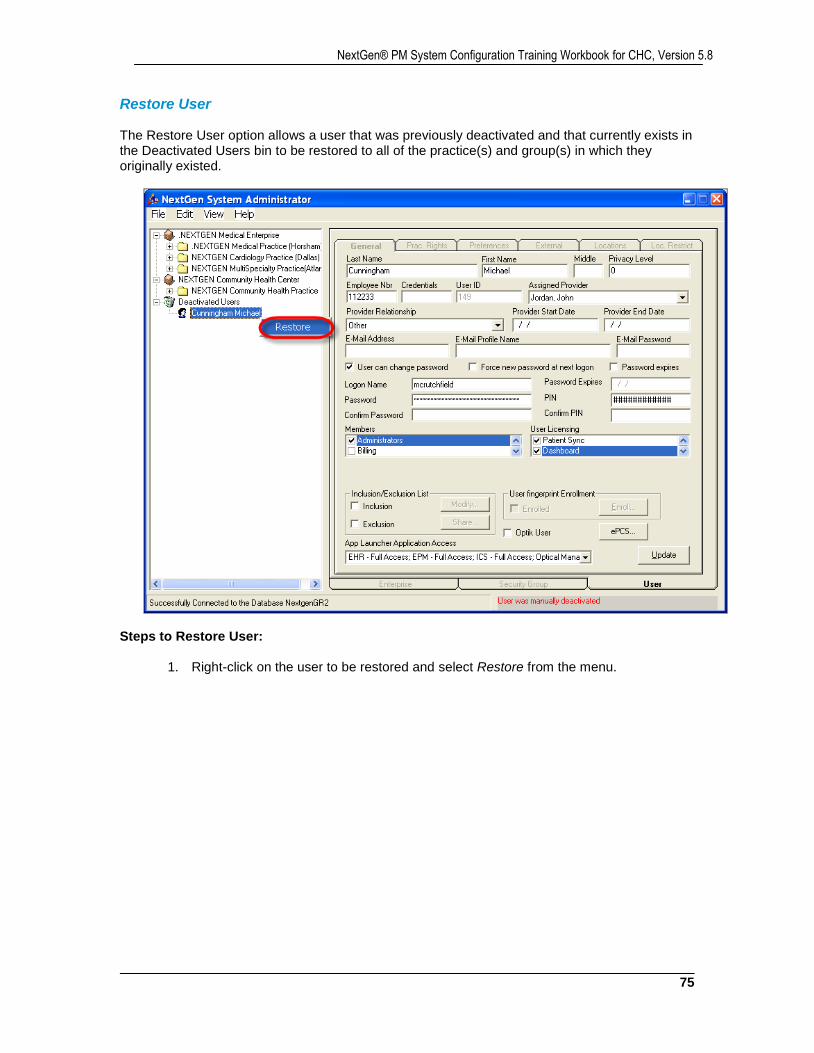
75
NextGen® PM System Configuration Training Workbook for CHC, Version 5.8
Restore User The Restore User option allows a user that was previously deactivated and that currently exists in the Deactivated Users bin to be restored to all of the practice(s) and group(s) in which they originally existed.
Steps to Restore User:
1. Right-click on the user to be restored and select Restore from the menu.
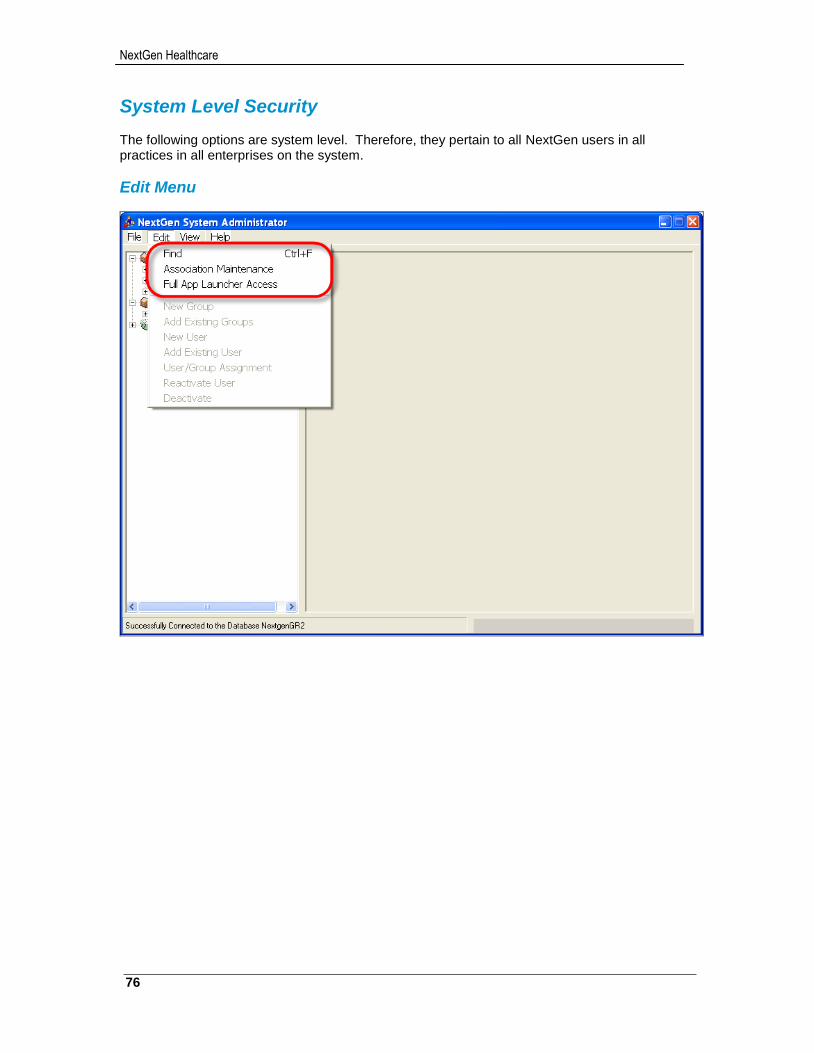
NextGen Healthcare
76
System Level Security The following options are system level. Therefore, they pertain to all NextGen users in all practices in all enterprises on the system.
Edit Menu
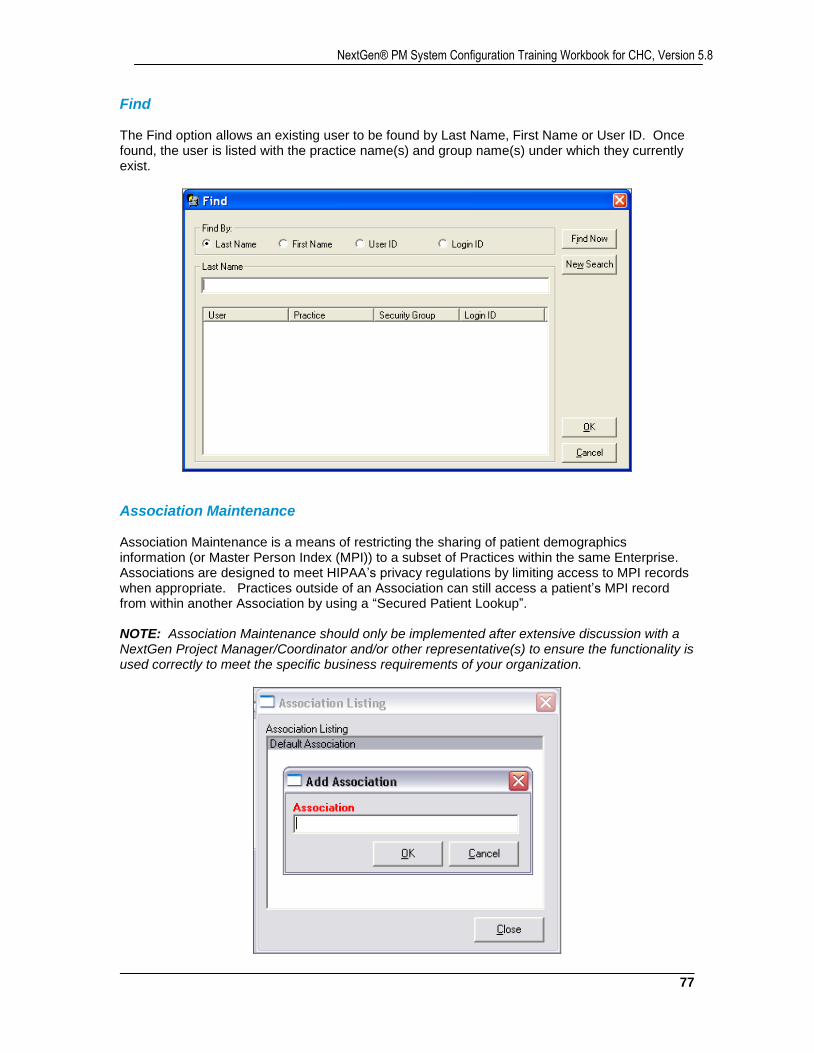
77
NextGen® PM System Configuration Training Workbook for CHC, Version 5.8
Find The Find option allows an existing user to be found by Last Name, First Name or User ID. Once found, the user is listed with the practice name(s) and group name(s) under which they currently exist.
Association Maintenance Association Maintenance is a means of restricting the sharing of patient demographics information (or Master Person Index (MPI)) to a subset of Practices within the same Enterprise. Associations are designed to meet HIPAA’s privacy regulations by limiting access to MPI records when appropriate. Practices outside of an Association can still access a patient’s MPI record from within another Association by using a “Secured Patient Lookup”. NOTE: Association Maintenance should only be implemented after extensive discussion with a NextGen Project Manager/Coordinator and/or other representative(s) to ensure the functionality is used correctly to meet the specific business requirements of your organization.
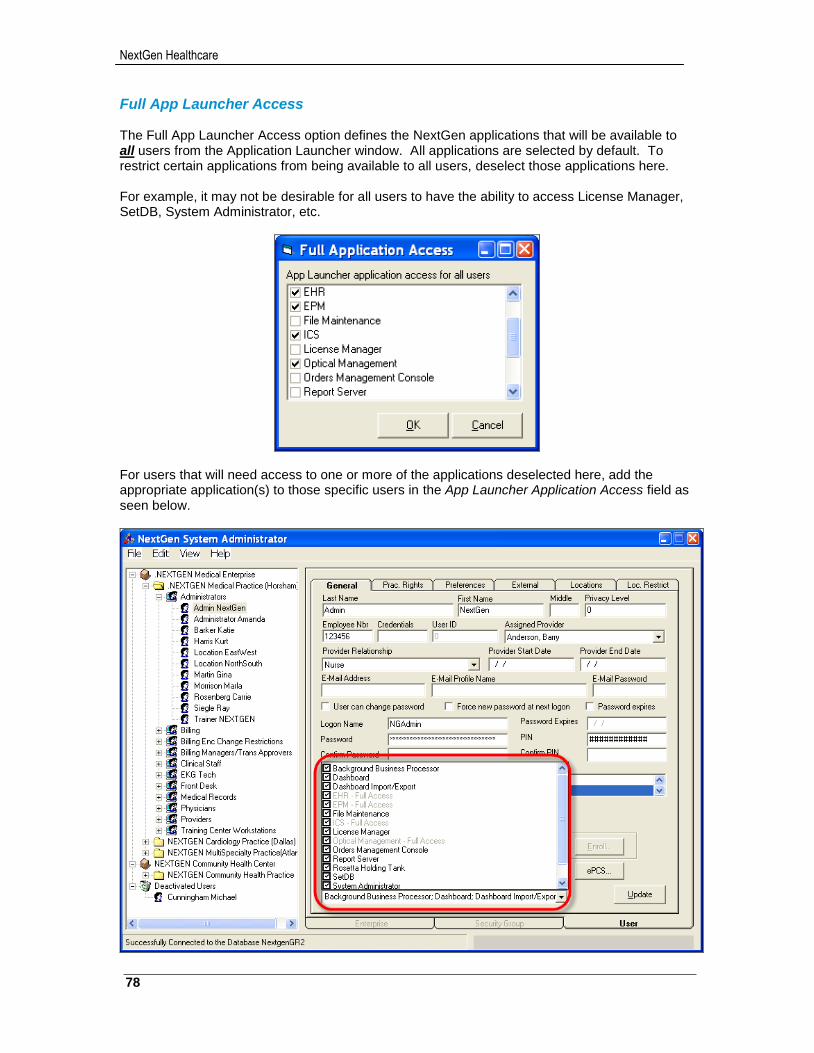
NextGen Healthcare
78
Full App Launcher Access The Full App Launcher Access option defines the NextGen applications that will be available to all users from the Application Launcher window. All applications are selected by default. To restrict certain applications from being available to all users, deselect those applications here. For example, it may not be desirable for all users to have the ability to access License Manager, SetDB, System Administrator, etc.
For users that will need access to one or more of the applications deselected here, add the appropriate application(s) to those specific users in the App Launcher Application Access field as seen below.
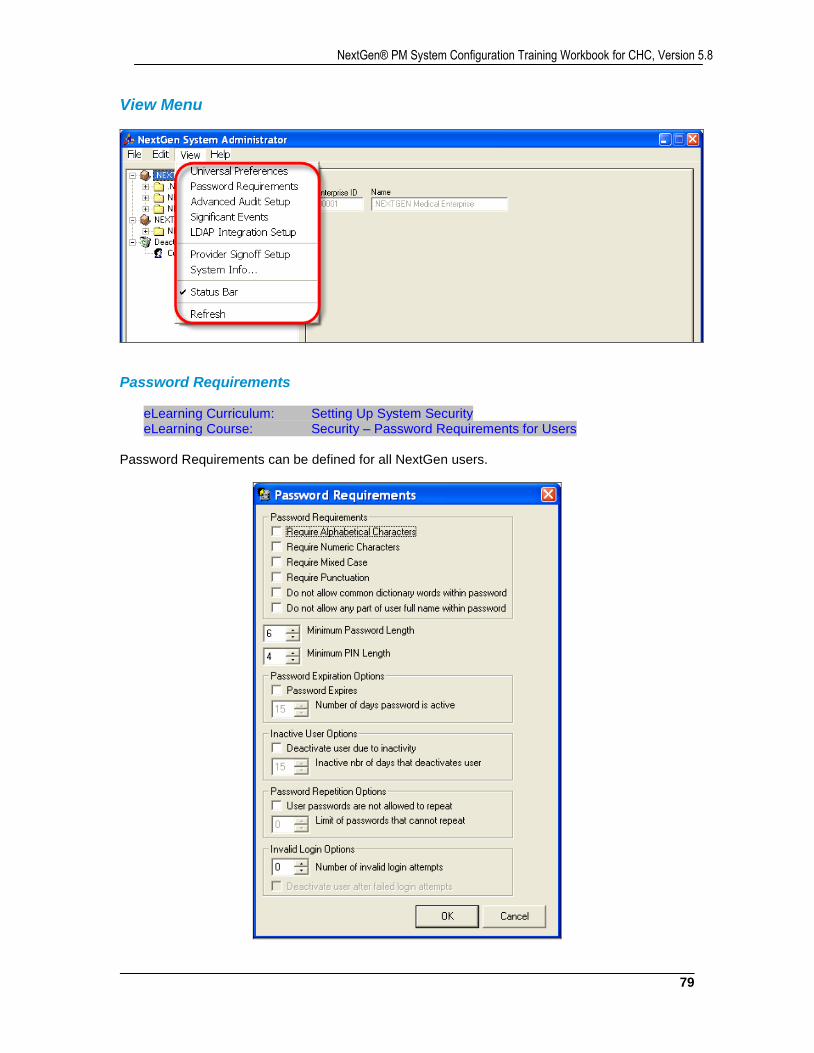
79
NextGen® PM System Configuration Training Workbook for CHC, Version 5.8
View Menu
Password Requirements
eLearning Curriculum: Setting Up System Security eLearning Course: Security – Password Requirements for Users
Password Requirements can be defined for all NextGen users.
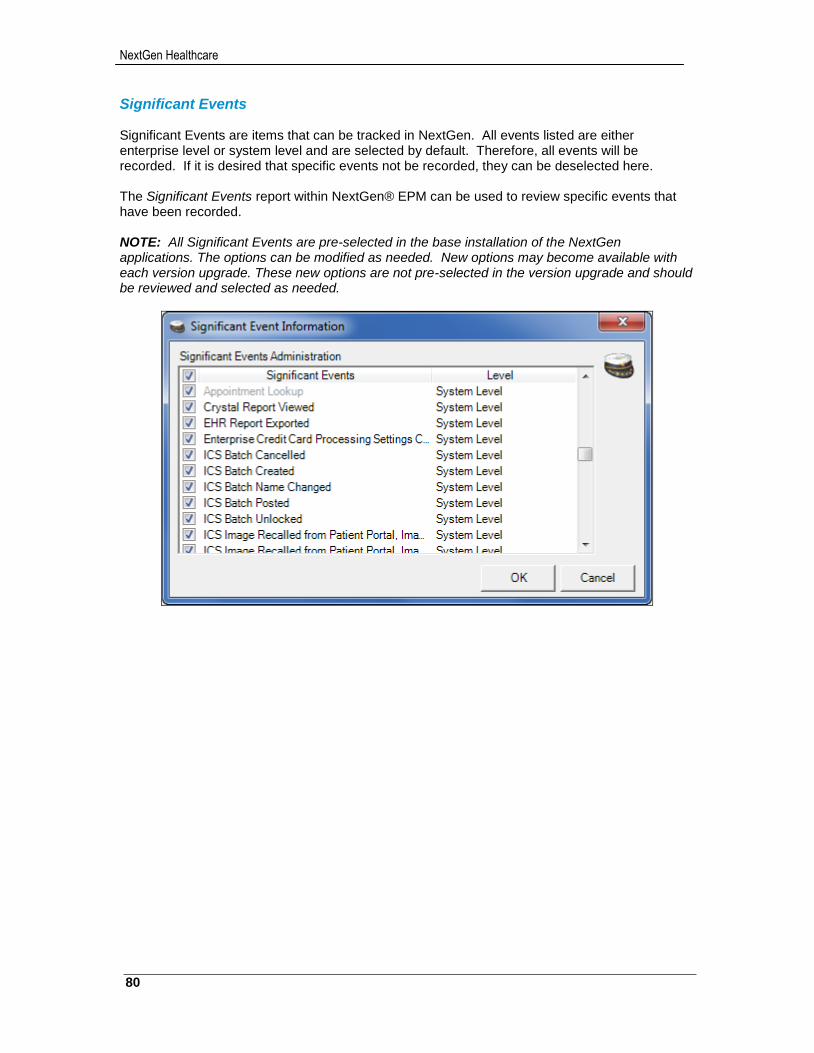
NextGen Healthcare
80
Significant Events Significant Events are items that can be tracked in NextGen. All events listed are either enterprise level or system level and are selected by default. Therefore, all events will be recorded. If it is desired that specific events not be recorded, they can be deselected here. The Significant Events report within NextGen® EPM can be used to review specific events that have been recorded. NOTE: All Significant Events are pre-selected in the base installation of the NextGen applications. The options can be modified as needed. New options may become available with each version upgrade. These new options are not pre-selected in the version upgrade and should be reviewed and selected as needed.
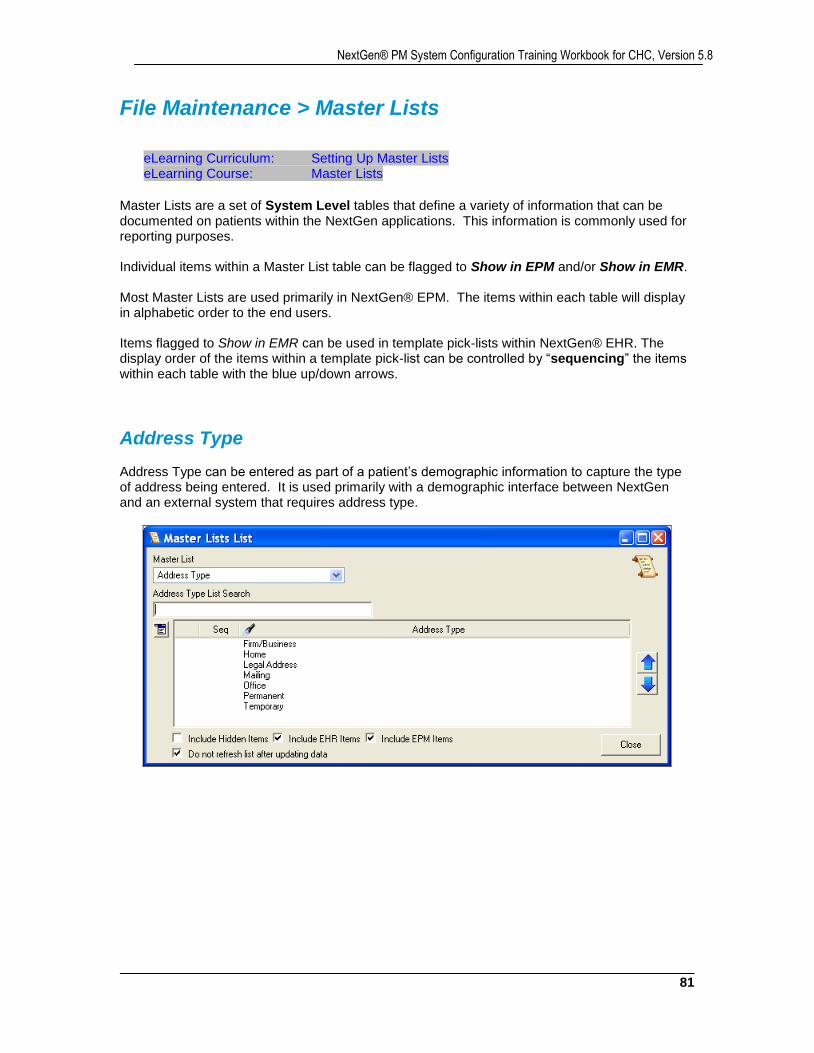
81
NextGen® PM System Configuration Training Workbook for CHC, Version 5.8
File Maintenance > Master Lists
eLearning Curriculum: Setting Up Master Lists eLearning Course: Master Lists
Master Lists are a set of System Level tables that define a variety of information that can be documented on patients within the NextGen applications. This information is commonly used for reporting purposes. Individual items within a Master List table can be flagged to Show in EPM and/or Show in EMR. Most Master Lists are used primarily in NextGen® EPM. The items within each table will display in alphabetic order to the end users. Items flagged to Show in EMR can be used in template pick-lists within NextGen® EHR. The display order of the items within a template pick-list can be controlled by “sequencing” the items within each table with the blue up/down arrows.
Address Type Address Type can be entered as part of a patient’s demographic information to capture the type of address being entered. It is used primarily with a demographic interface between NextGen and an external system that requires address type.
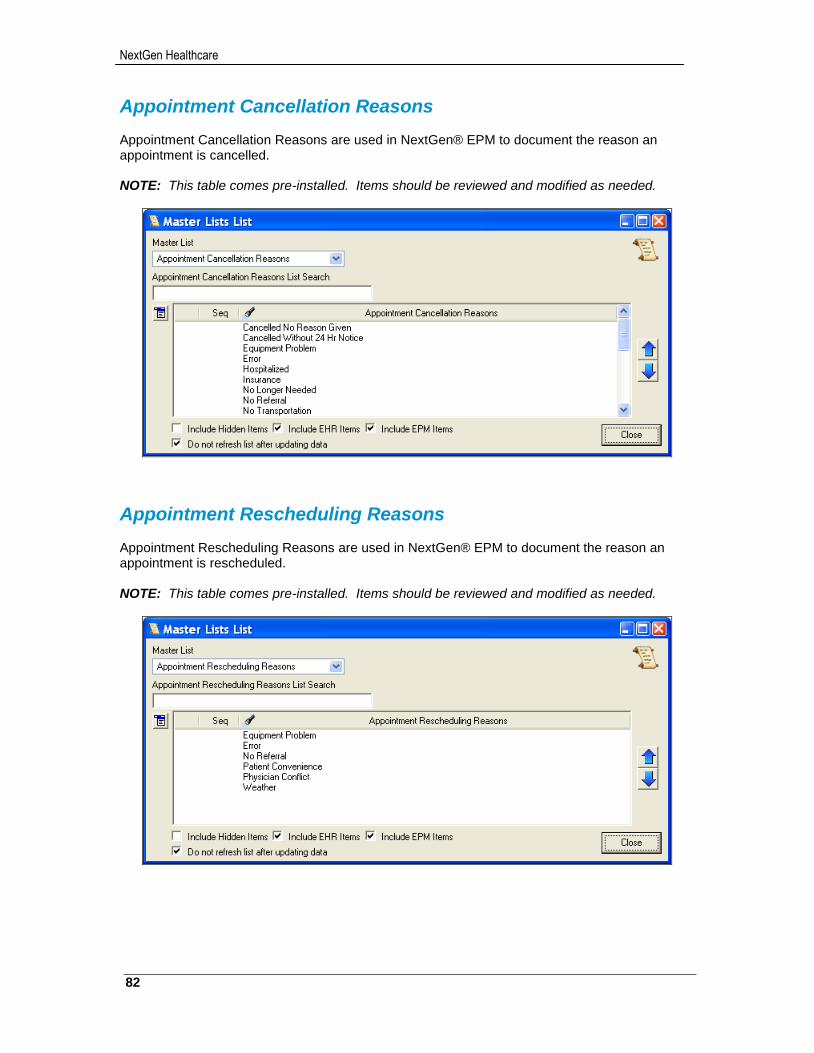
NextGen Healthcare
82
Appointment Cancellation Reasons Appointment Cancellation Reasons are used in NextGen® EPM to document the reason an appointment is cancelled. NOTE: This table comes pre-installed. Items should be reviewed and modified as needed.
Appointment Rescheduling Reasons Appointment Rescheduling Reasons are used in NextGen® EPM to document the reason an appointment is rescheduled. NOTE: This table comes pre-installed. Items should be reviewed and modified as needed.
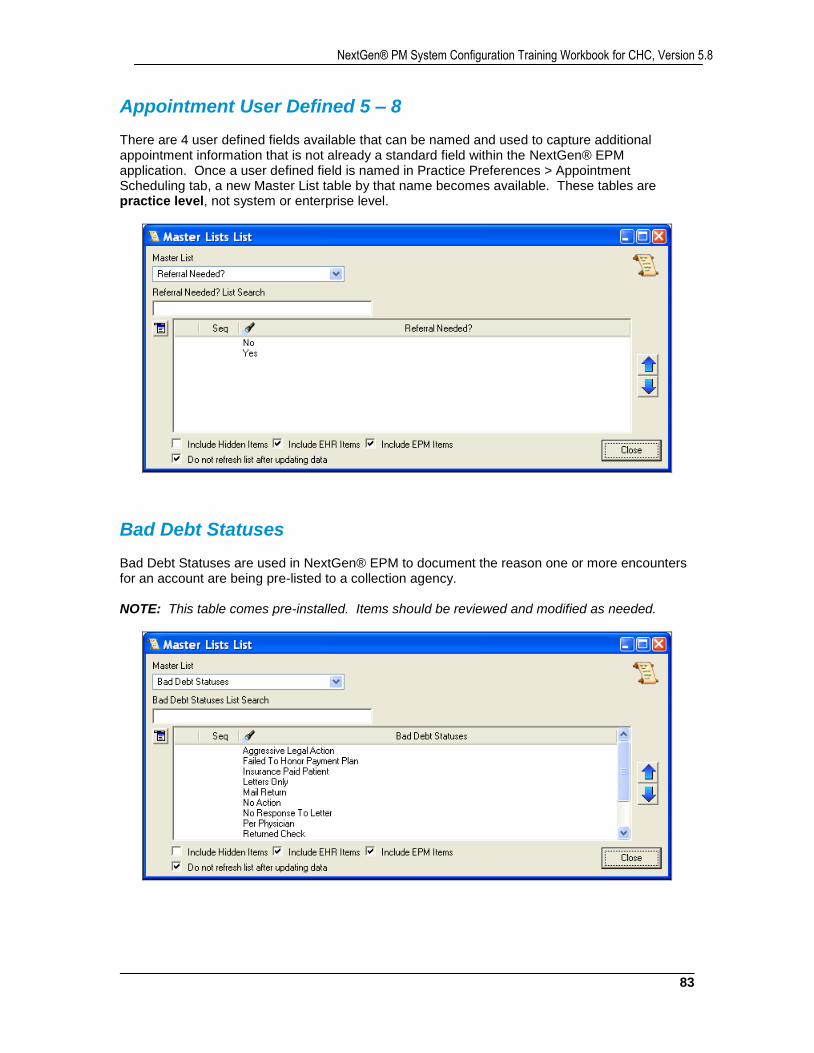
83
NextGen® PM System Configuration Training Workbook for CHC, Version 5.8
Appointment User Defined 5 – 8 There are 4 user defined fields available that can be named and used to capture additional appointment information that is not already a standard field within the NextGen® EPM application. Once a user defined field is named in Practice Preferences > Appointment Scheduling tab, a new Master List table by that name becomes available. These tables are practice level, not system or enterprise level.
Bad Debt Statuses Bad Debt Statuses are used in NextGen® EPM to document the reason one or more encounters for an account are being pre-listed to a collection agency. NOTE: This table comes pre-installed. Items should be reviewed and modified as needed.
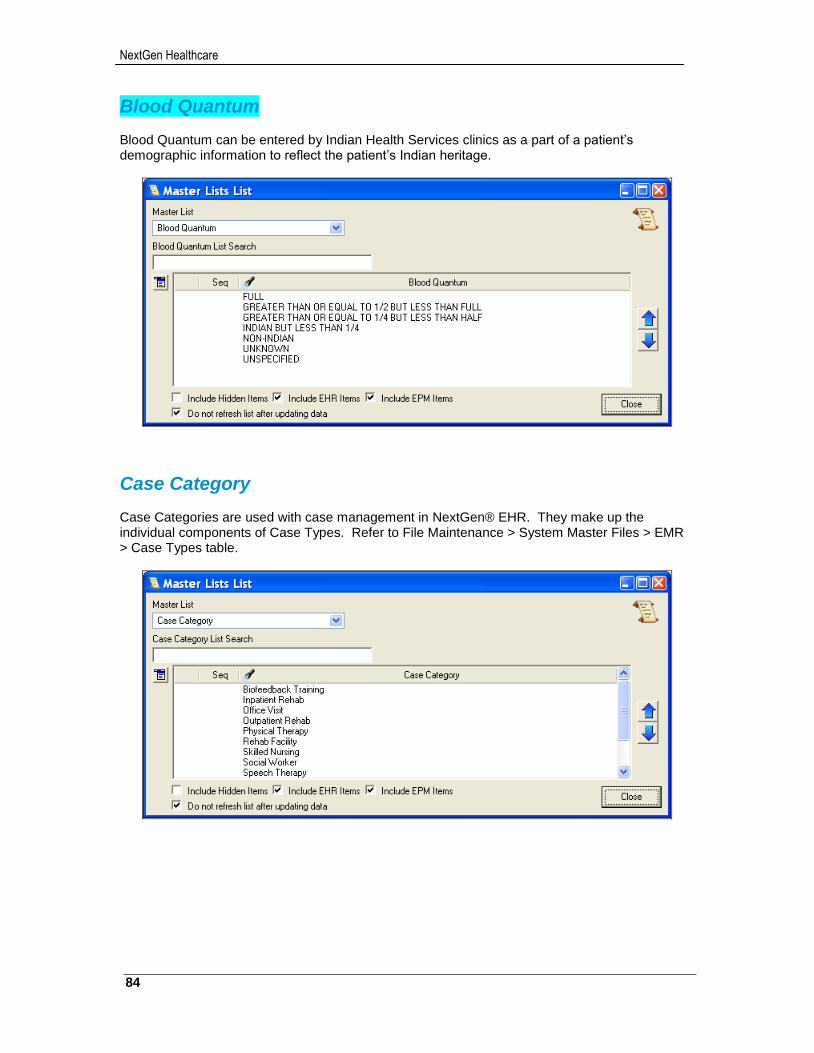
NextGen Healthcare
84
Blood Quantum Blood Quantum can be entered by Indian Health Services clinics as a part of a patient’s demographic information to reflect the patient’s Indian heritage.
Case Category Case Categories are used with case management in NextGen® EHR. They make up the individual components of Case Types. Refer to File Maintenance > System Master Files > EMR > Case Types table.
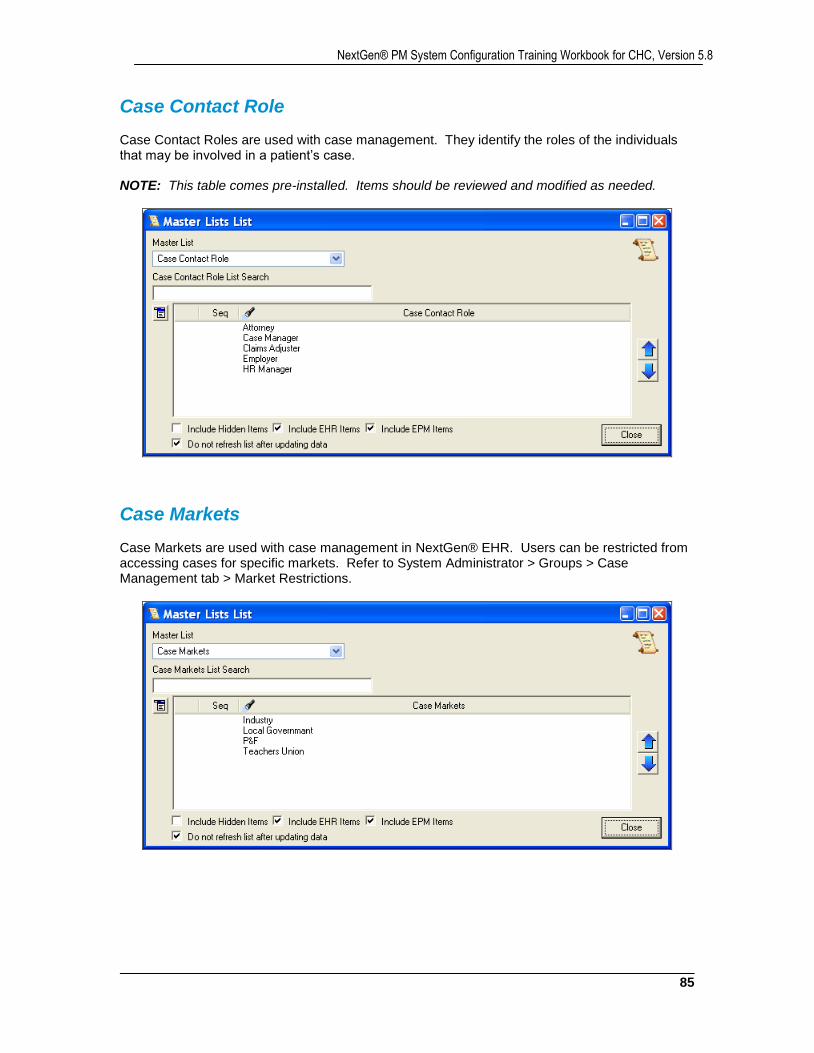
85
NextGen® PM System Configuration Training Workbook for CHC, Version 5.8
Case Contact Role Case Contact Roles are used with case management. They identify the roles of the individuals that may be involved in a patient’s case. NOTE: This table comes pre-installed. Items should be reviewed and modified as needed.
Case Markets Case Markets are used with case management in NextGen® EHR. Users can be restricted from accessing cases for specific markets. Refer to System Administrator > Groups > Case Management tab > Market Restrictions.
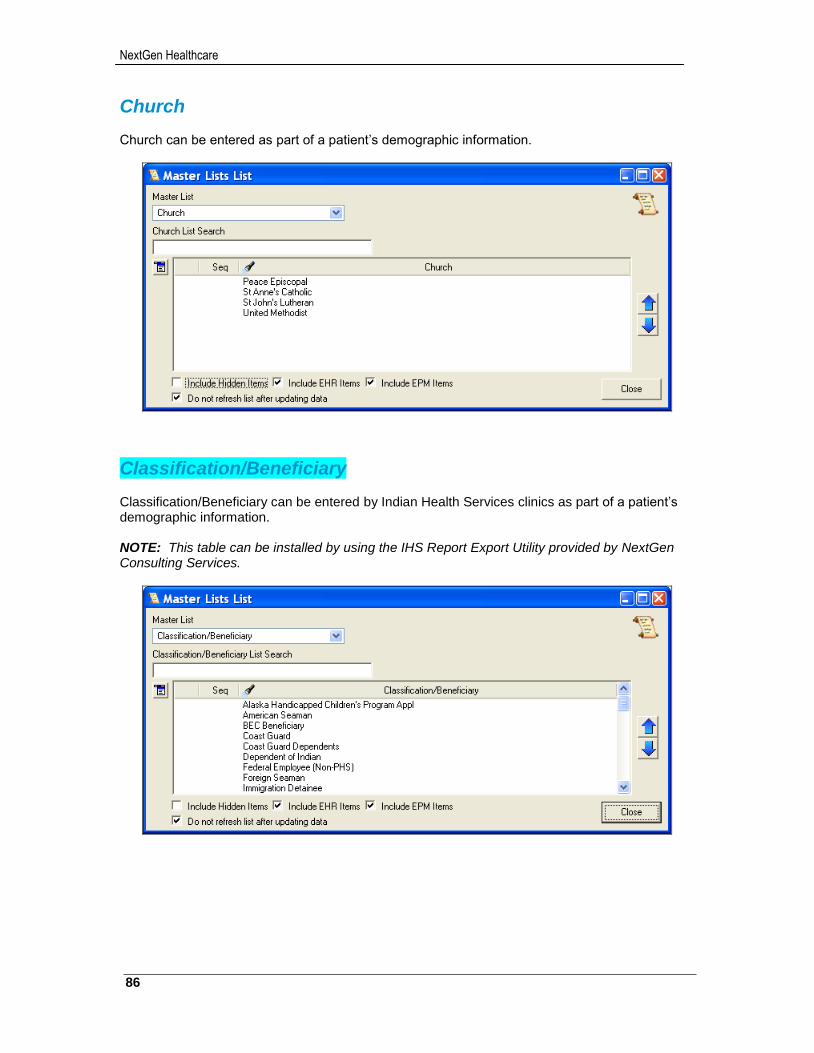
NextGen Healthcare
86
Church Church can be entered as part of a patient’s demographic information.
Classification/Beneficiary Classification/Beneficiary can be entered by Indian Health Services clinics as part of a patient’s demographic information. NOTE: This table can be installed by using the IHS Report Export Utility provided by NextGen Consulting Services.
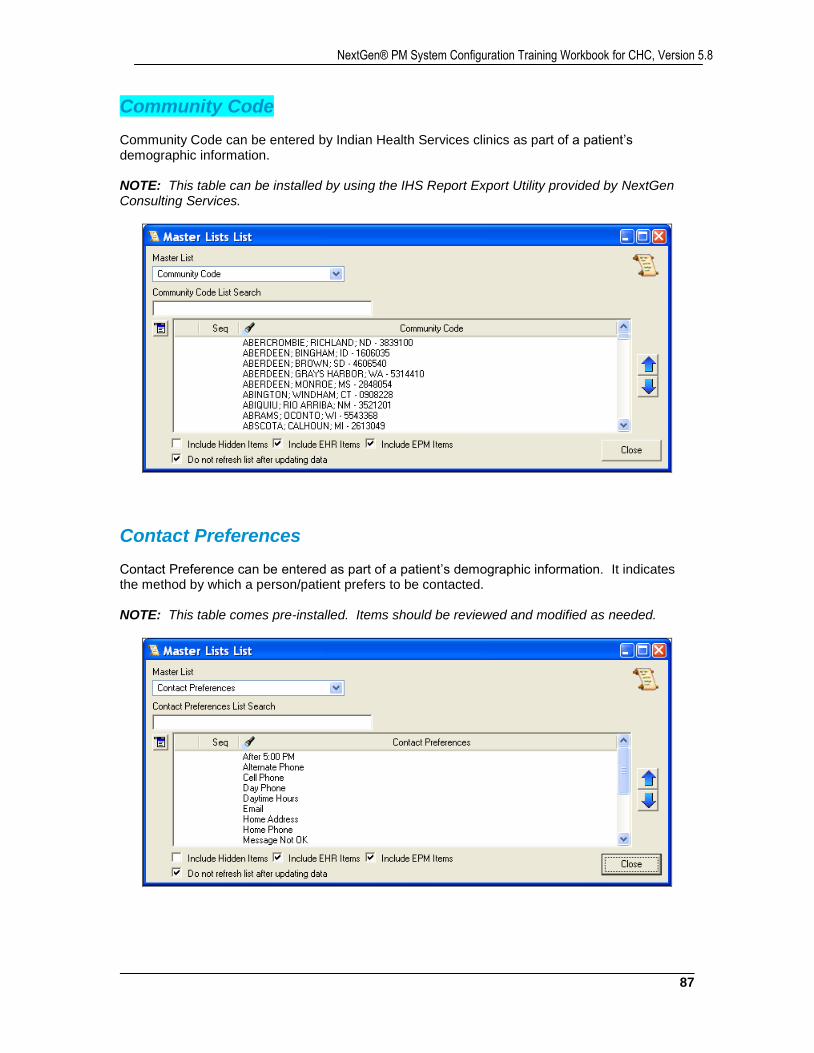
87
NextGen® PM System Configuration Training Workbook for CHC, Version 5.8
Community Code Community Code can be entered by Indian Health Services clinics as part of a patient’s demographic information. NOTE: This table can be installed by using the IHS Report Export Utility provided by NextGen Consulting Services.
Contact Preferences Contact Preference can be entered as part of a patient’s demographic information. It indicates the method by which a person/patient prefers to be contacted. NOTE: This table comes pre-installed. Items should be reviewed and modified as needed.

NextGen Healthcare
88
Contract Subgrouping Contract Subgroupings are linked to payer Contracts created in File Maintenance > Libraries. They are a way to group contracts, and then used to link participating providers to those groups of contracts.
Counties Counties are used in any NextGen application whenever an address is entered. For example, person/patient’s address, payer’s address, provider’s address, etc. NOTE: This table comes pre-installed. New entries can be built “on-the-fly” by users.
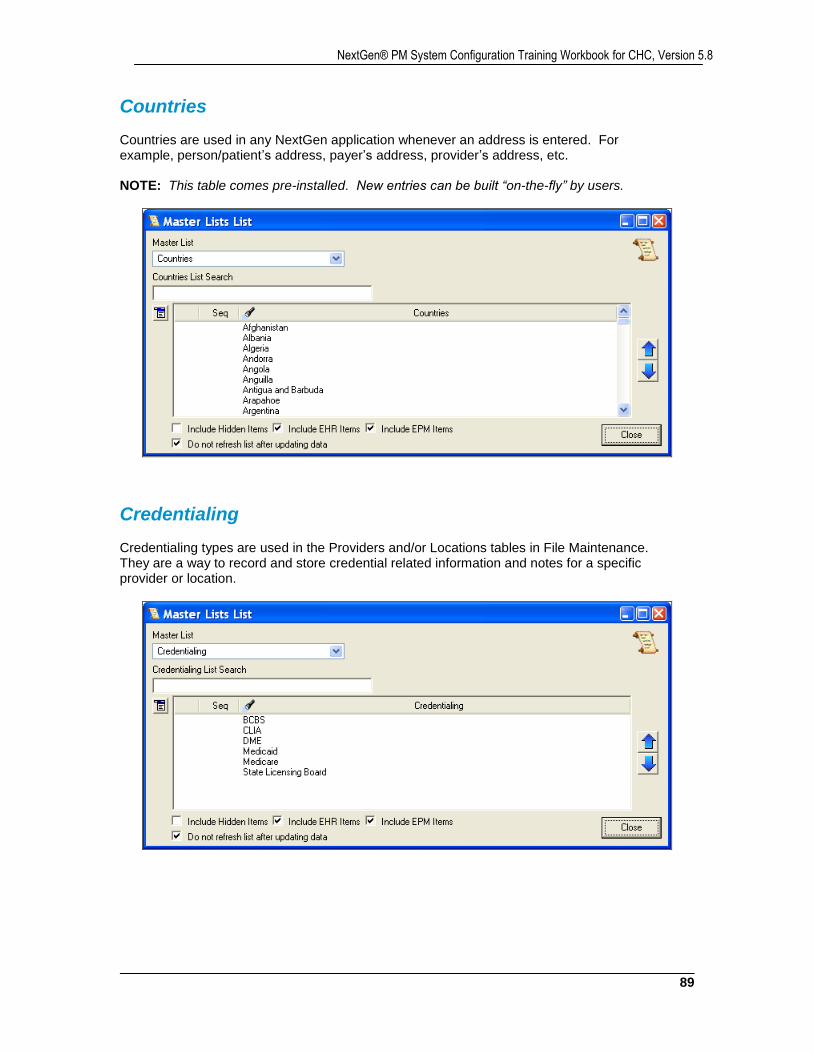
89
NextGen® PM System Configuration Training Workbook for CHC, Version 5.8
Countries Countries are used in any NextGen application whenever an address is entered. For example, person/patient’s address, payer’s address, provider’s address, etc. NOTE: This table comes pre-installed. New entries can be built “on-the-fly” by users.
Credentialing Credentialing types are used in the Providers and/or Locations tables in File Maintenance. They are a way to record and store credential related information and notes for a specific provider or location.

NextGen Healthcare
90
Departments Departments are used in NextGen® EPM to group codes in the Service Item Library for reporting purposes. Departments are used in NextGen® EHR to determine the flow of templates in the Navigational Toolbar and the predetermined global values for E&M coding. NOTE: This table comes pre-installed with codes for EHR. The pre-installed codes have a Sequence = 0 and should not be modified. Departments should be added for reporting purposes in EPM.
Descendency Descendency can be entered by Indian Health Services clinics as part of a patient’s demographic information.
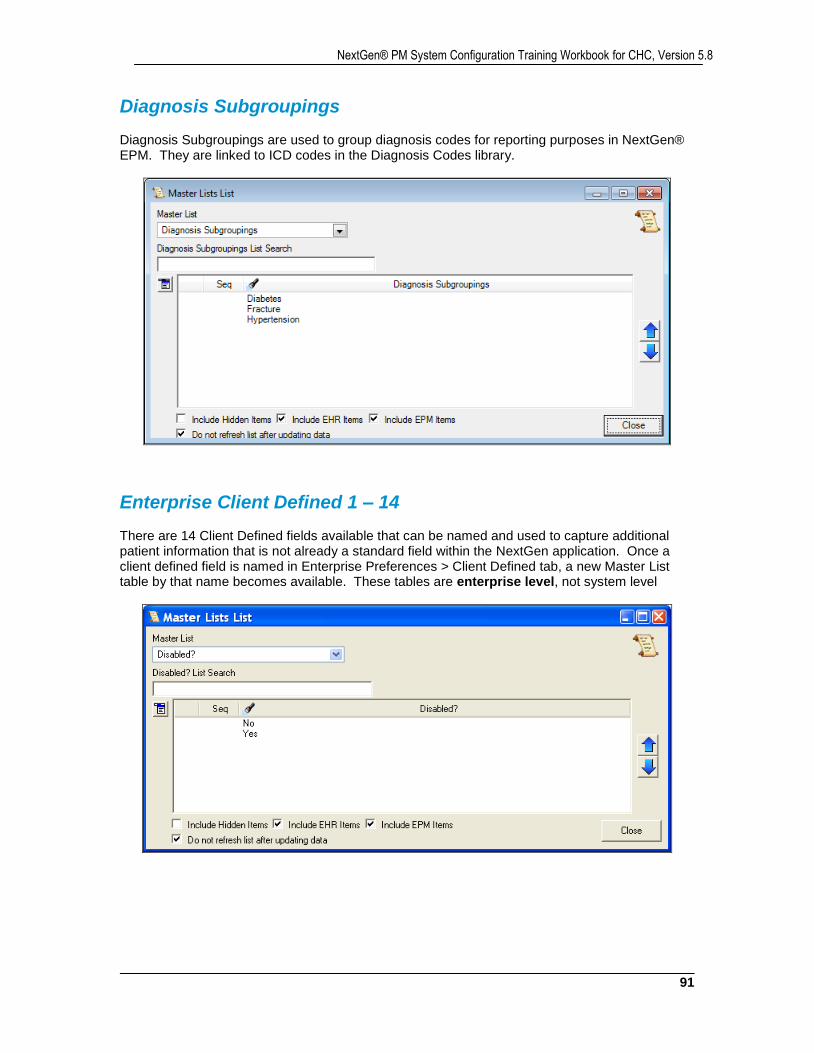
91
NextGen® PM System Configuration Training Workbook for CHC, Version 5.8
Diagnosis Subgroupings Diagnosis Subgroupings are used to group diagnosis codes for reporting purposes in NextGen® EPM. They are linked to ICD codes in the Diagnosis Codes library.
Enterprise Client Defined 1 – 14 There are 14 Client Defined fields available that can be named and used to capture additional patient information that is not already a standard field within the NextGen application. Once a client defined field is named in Enterprise Preferences > Client Defined tab, a new Master List table by that name becomes available. These tables are enterprise level, not system level
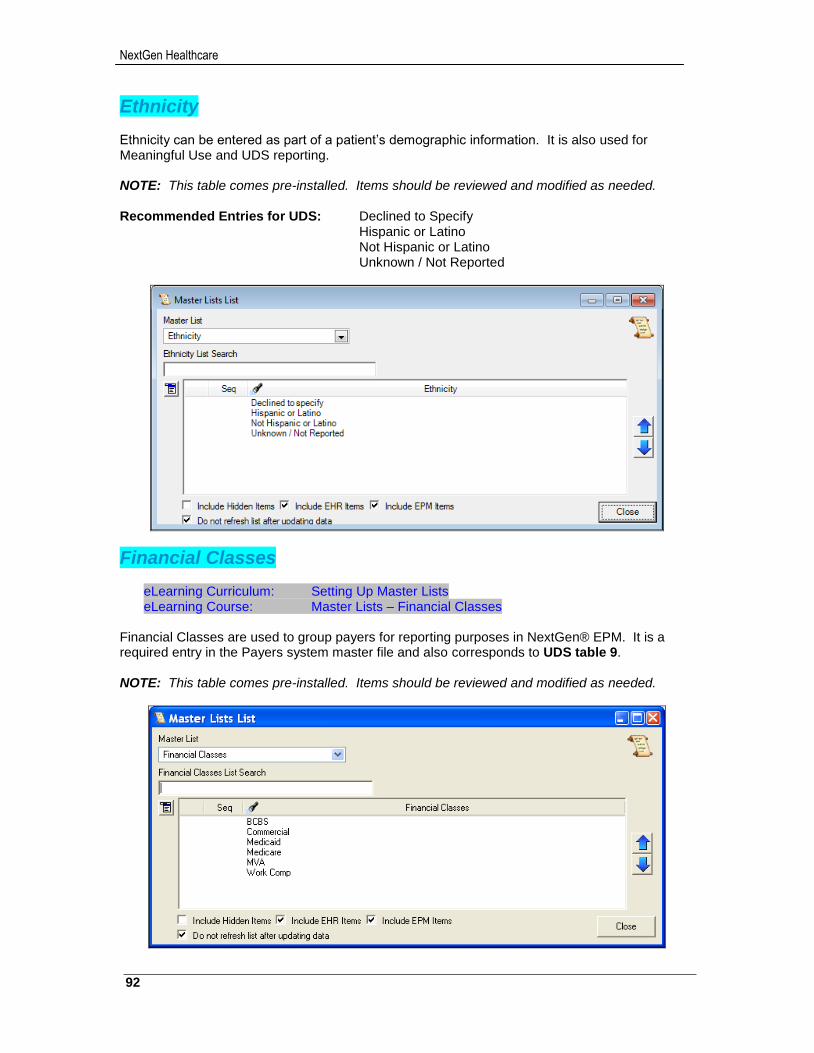
NextGen Healthcare
92
Ethnicity Ethnicity can be entered as part of a patient’s demographic information. It is also used for Meaningful Use and UDS reporting. NOTE: This table comes pre-installed. Items should be reviewed and modified as needed. Recommended Entries for UDS: Declined to Specify
Hispanic or Latino Not Hispanic or Latino Unknown / Not Reported
Financial Classes
eLearning Curriculum: Setting Up Master Lists eLearning Course: Master Lists – Financial Classes
Financial Classes are used to group payers for reporting purposes in NextGen® EPM. It is a required entry in the Payers system master file and also corresponds to UDS table 9. NOTE: This table comes pre-installed. Items should be reviewed and modified as needed.
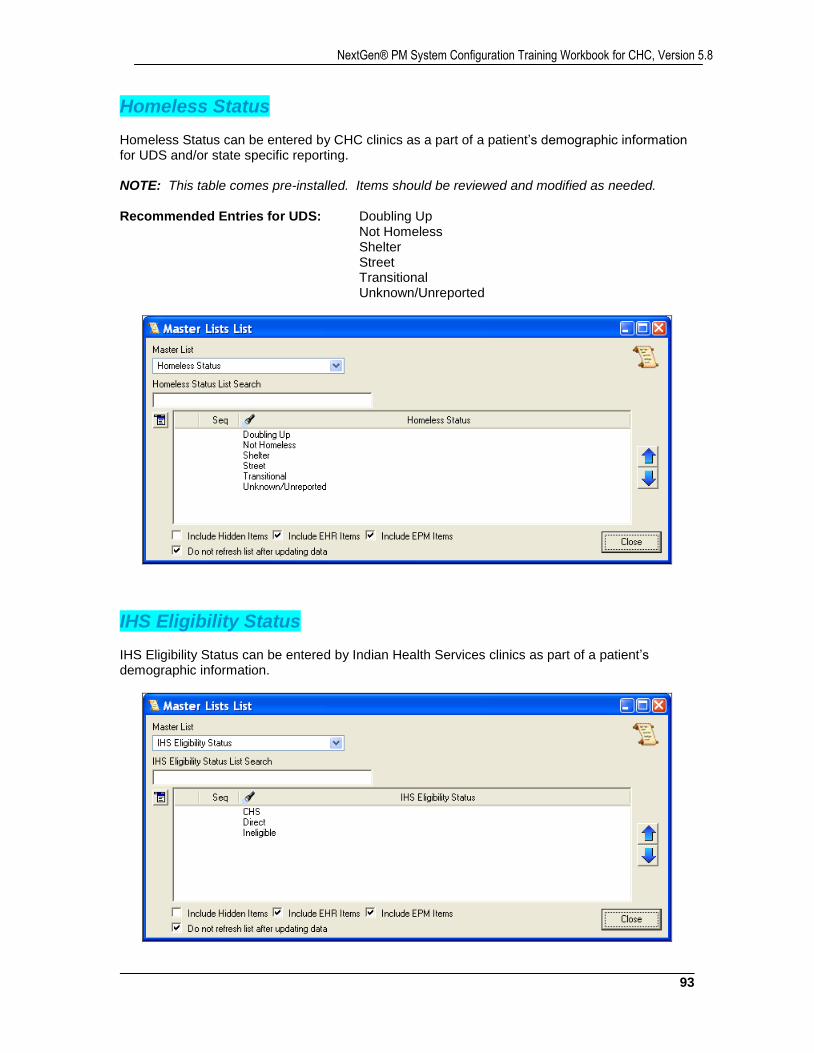
93
NextGen® PM System Configuration Training Workbook for CHC, Version 5.8
Homeless Status Homeless Status can be entered by CHC clinics as a part of a patient’s demographic information for UDS and/or state specific reporting. NOTE: This table comes pre-installed. Items should be reviewed and modified as needed. Recommended Entries for UDS: Doubling Up
Not Homeless Shelter Street Transitional Unknown/Unreported
IHS Eligibility Status IHS Eligibility Status can be entered by Indian Health Services clinics as part of a patient’s demographic information.
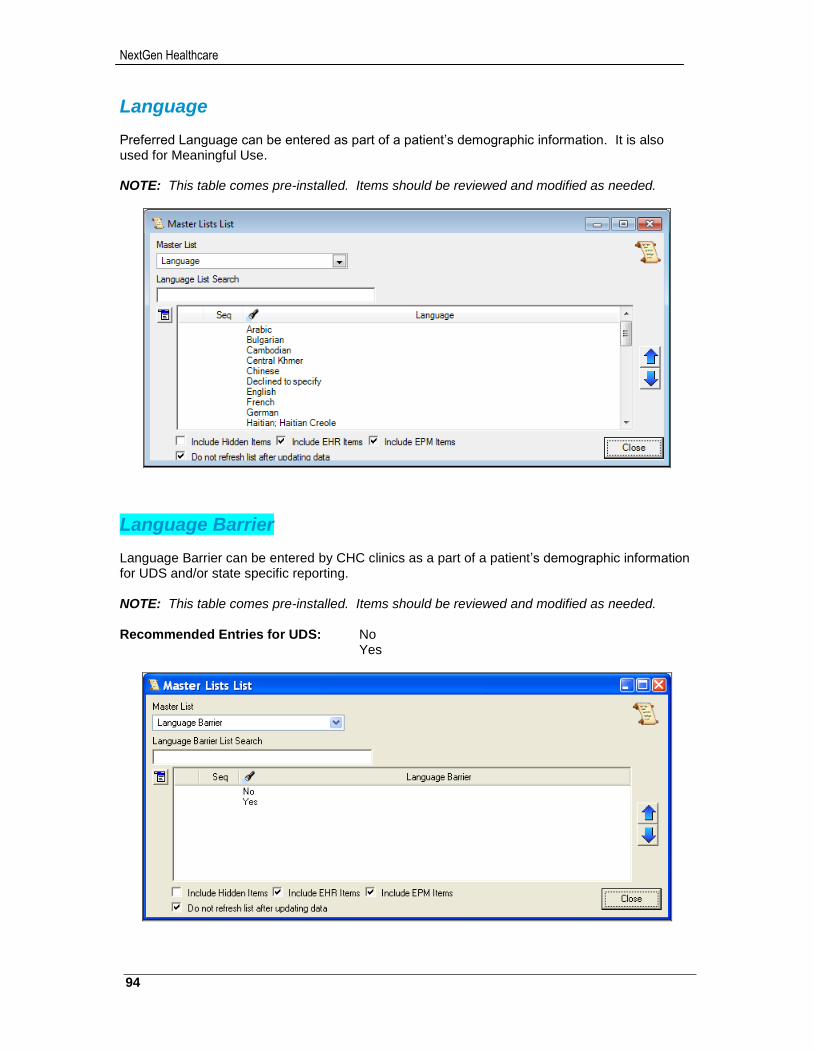
NextGen Healthcare
94
Language Preferred Language can be entered as part of a patient’s demographic information. It is also used for Meaningful Use. NOTE: This table comes pre-installed. Items should be reviewed and modified as needed.
Language Barrier Language Barrier can be entered by CHC clinics as a part of a patient’s demographic information for UDS and/or state specific reporting. NOTE: This table comes pre-installed. Items should be reviewed and modified as needed. Recommended Entries for UDS: No
Yes

95
NextGen® PM System Configuration Training Workbook for CHC, Version 5.8
Location Subgroupings Location Subgroupings are used to group locations for reporting purposes in NextGen® EPM. They are linked in the Locations table > Location Defaults tab.
Marketing Plan Sub-Groups Marketing Plan Sub-Groups are used in patient charts in NextGen® EPM to document how patients learned of or heard about the practice. This table is used in conjunction with the Marketing Plans table found in File Maintenance > Practice Master Files. NOTE: This table comes pre-installed. Items should be reviewed and modified as needed.
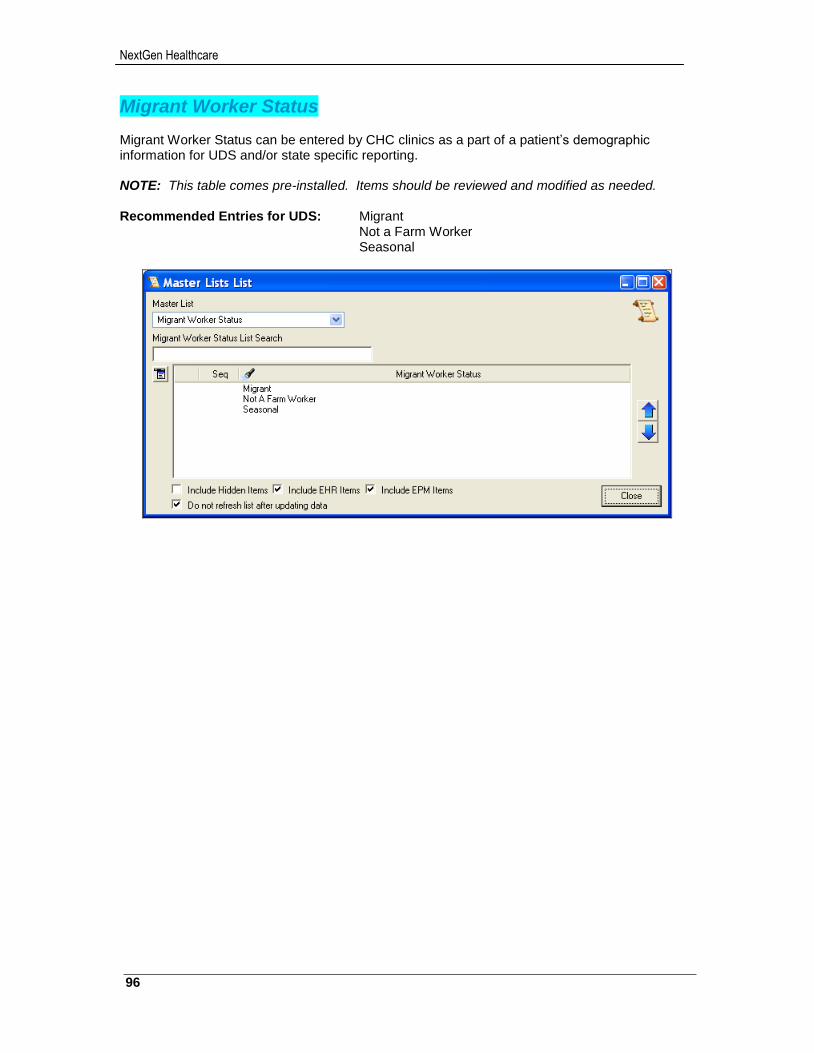
NextGen Healthcare
96
Migrant Worker Status Migrant Worker Status can be entered by CHC clinics as a part of a patient’s demographic information for UDS and/or state specific reporting. NOTE: This table comes pre-installed. Items should be reviewed and modified as needed. Recommended Entries for UDS: Migrant Not a Farm Worker Seasonal

97
NextGen® PM System Configuration Training Workbook for CHC, Version 5.8
Modalities Modalities are used in NextGen® EPM to group codes in the Service Item Library for reporting purposes. They are a further breakdown of the Departments listed above. Examples: Department = Consult Modalities = New Patient, Established Patient
Department = Radiology Modalities = X-Ray, MRI, CT Scan
Name Prefix Name Prefix can be entered as a part of a patient’s demographics information.
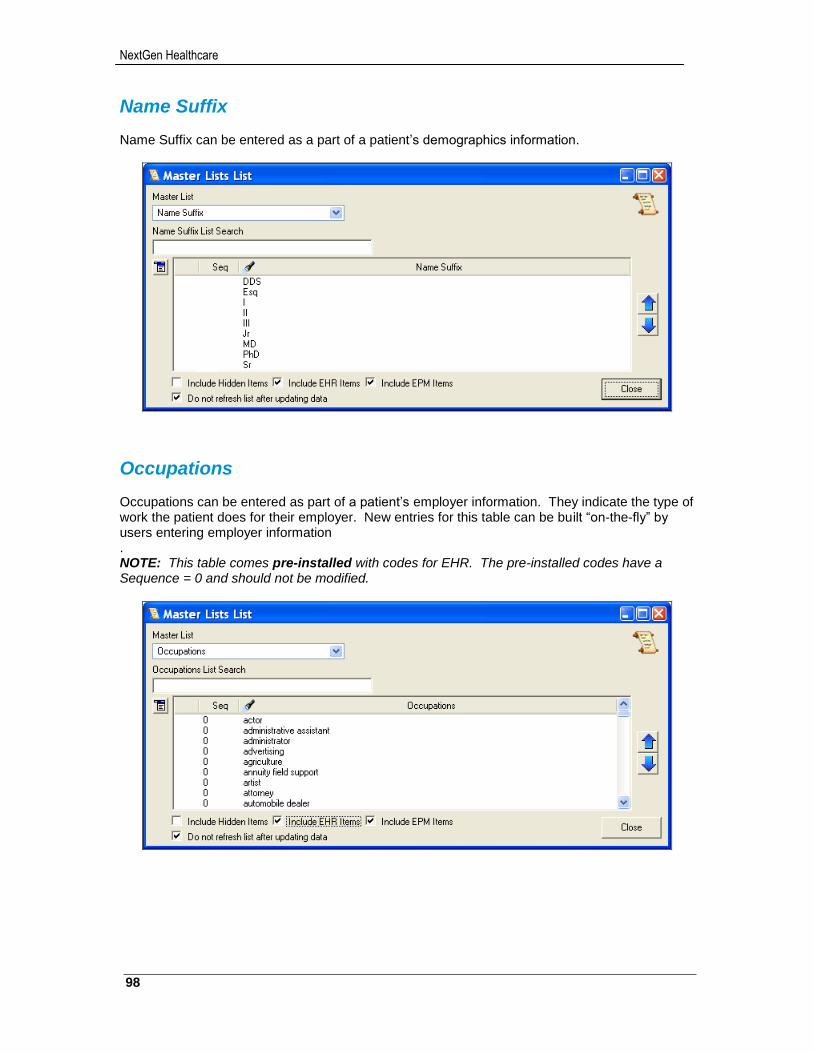
NextGen Healthcare
98
Name Suffix Name Suffix can be entered as a part of a patient’s demographics information.
Occupations Occupations can be entered as part of a patient’s employer information. They indicate the type of work the patient does for their employer. New entries for this table can be built “on-the-fly” by users entering employer information . NOTE: This table comes pre-installed with codes for EHR. The pre-installed codes have a Sequence = 0 and should not be modified.
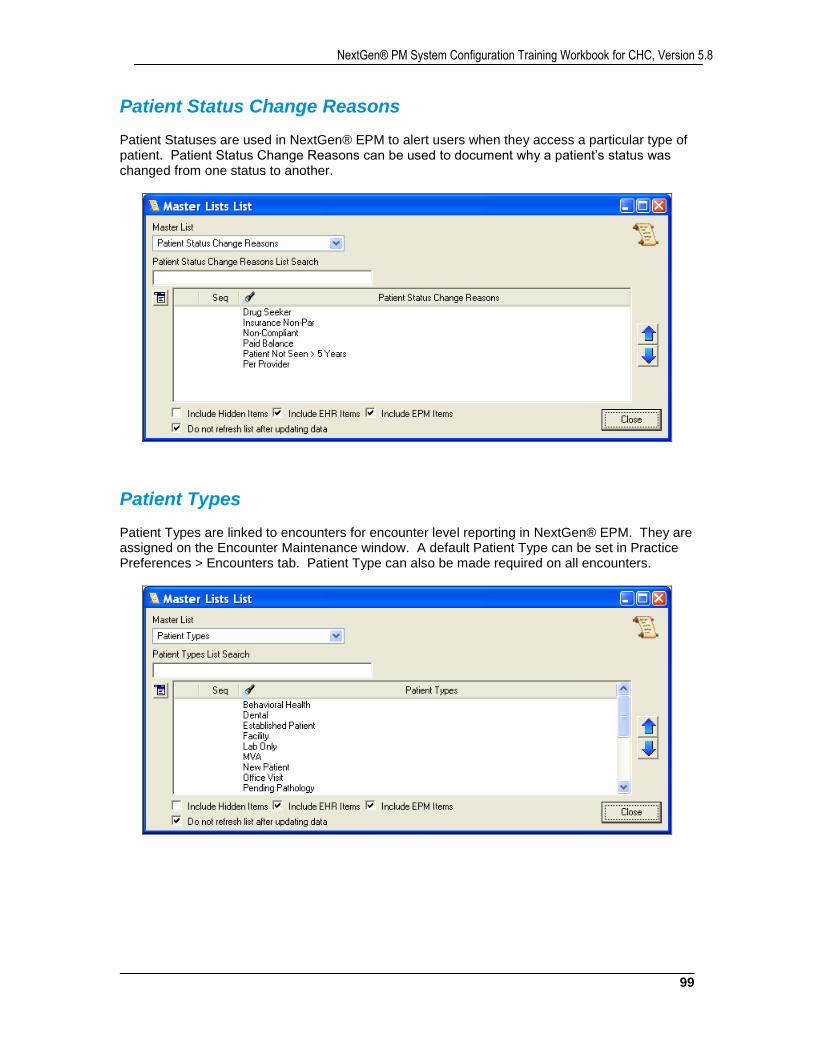
99
NextGen® PM System Configuration Training Workbook for CHC, Version 5.8
Patient Status Change Reasons Patient Statuses are used in NextGen® EPM to alert users when they access a particular type of patient. Patient Status Change Reasons can be used to document why a patient’s status was changed from one status to another.
Patient Types Patient Types are linked to encounters for encounter level reporting in NextGen® EPM. They are assigned on the Encounter Maintenance window. A default Patient Type can be set in Practice Preferences > Encounters tab. Patient Type can also be made required on all encounters.
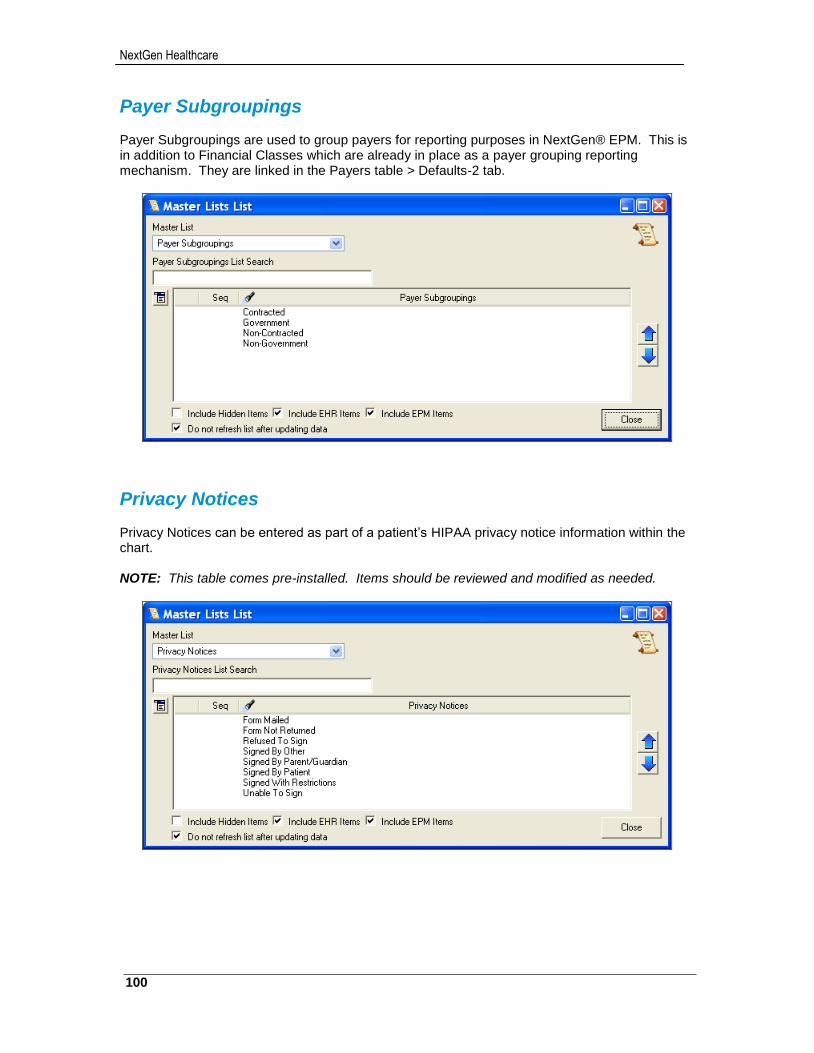
NextGen Healthcare
100
Payer Subgroupings Payer Subgroupings are used to group payers for reporting purposes in NextGen® EPM. This is in addition to Financial Classes which are already in place as a payer grouping reporting mechanism. They are linked in the Payers table > Defaults-2 tab.
Privacy Notices Privacy Notices can be entered as part of a patient’s HIPAA privacy notice information within the chart. NOTE: This table comes pre-installed. Items should be reviewed and modified as needed.

101
NextGen® PM System Configuration Training Workbook for CHC, Version 5.8
Provider Expiration Reasons Provider Expiration Reasons are used in NextGen® EPM. There is an option available in Practice Preferences > Provider tab that enables a practice to document up to 12 types of providers for their patients during person/patient information entry. For example, a family practice might be interested in documenting the various specialists that a patient sees. Provider Expiration Reasons can be used to document why a patient no longer sees a particular provider.
Provider Subgroupings Provider Subgroupings are used to group providers for reporting purposes in NextGen® EPM. They are linked in the Providers table > System tab.
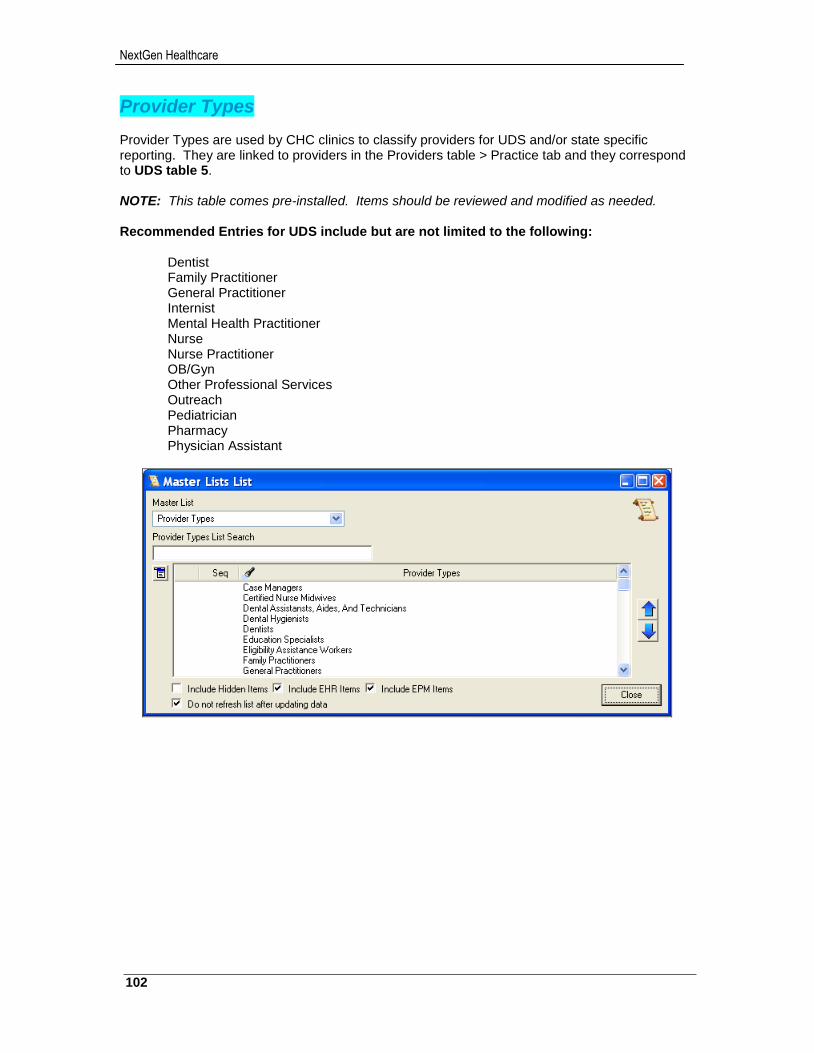
NextGen Healthcare
102
Provider Types Provider Types are used by CHC clinics to classify providers for UDS and/or state specific reporting. They are linked to providers in the Providers table > Practice tab and they correspond to UDS table 5. NOTE: This table comes pre-installed. Items should be reviewed and modified as needed. Recommended Entries for UDS include but are not limited to the following:
Dentist Family Practitioner General Practitioner Internist Mental Health Practitioner Nurse Nurse Practitioner OB/Gyn Other Professional Services Outreach Pediatrician Pharmacy Physician Assistant
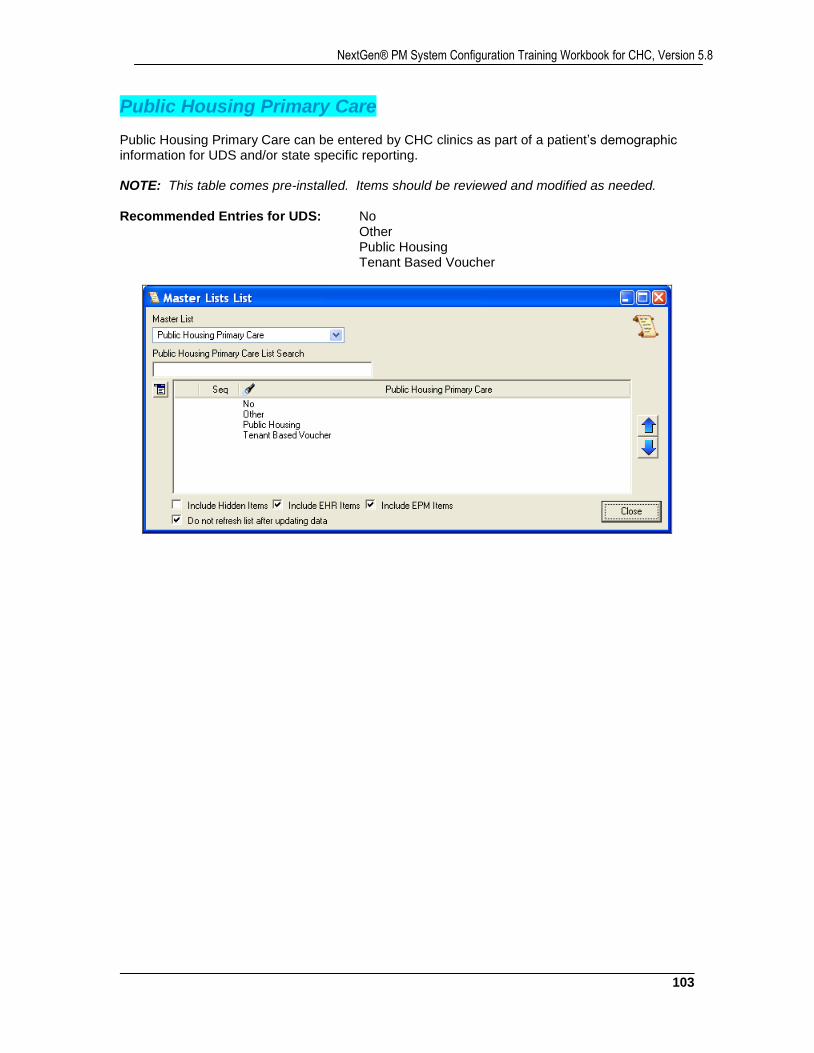
103
NextGen® PM System Configuration Training Workbook for CHC, Version 5.8
Public Housing Primary Care Public Housing Primary Care can be entered by CHC clinics as part of a patient’s demographic information for UDS and/or state specific reporting. NOTE: This table comes pre-installed. Items should be reviewed and modified as needed. Recommended Entries for UDS: No Other Public Housing Tenant Based Voucher
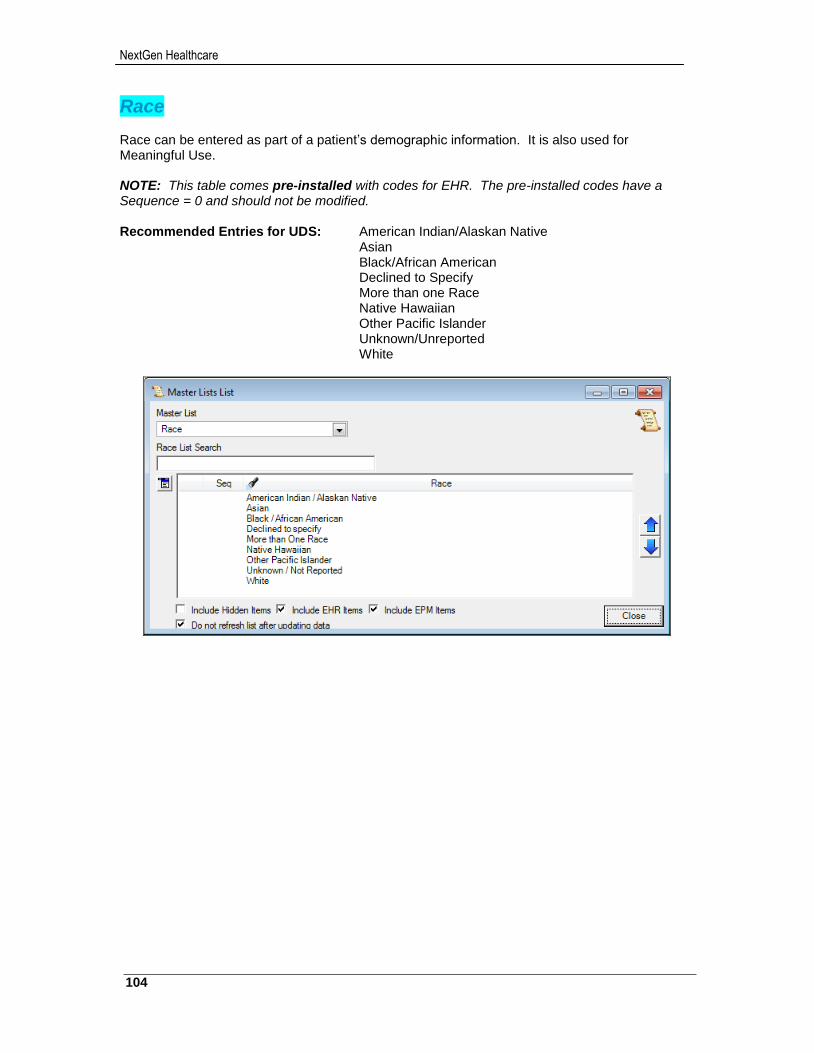
NextGen Healthcare
104
Race Race can be entered as part of a patient’s demographic information. It is also used for Meaningful Use. NOTE: This table comes pre-installed with codes for EHR. The pre-installed codes have a Sequence = 0 and should not be modified. Recommended Entries for UDS: American Indian/Alaskan Native
Asian Black/African American
Declined to Specify More than one Race Native Hawaiian
Other Pacific Islander Unknown/Unreported White
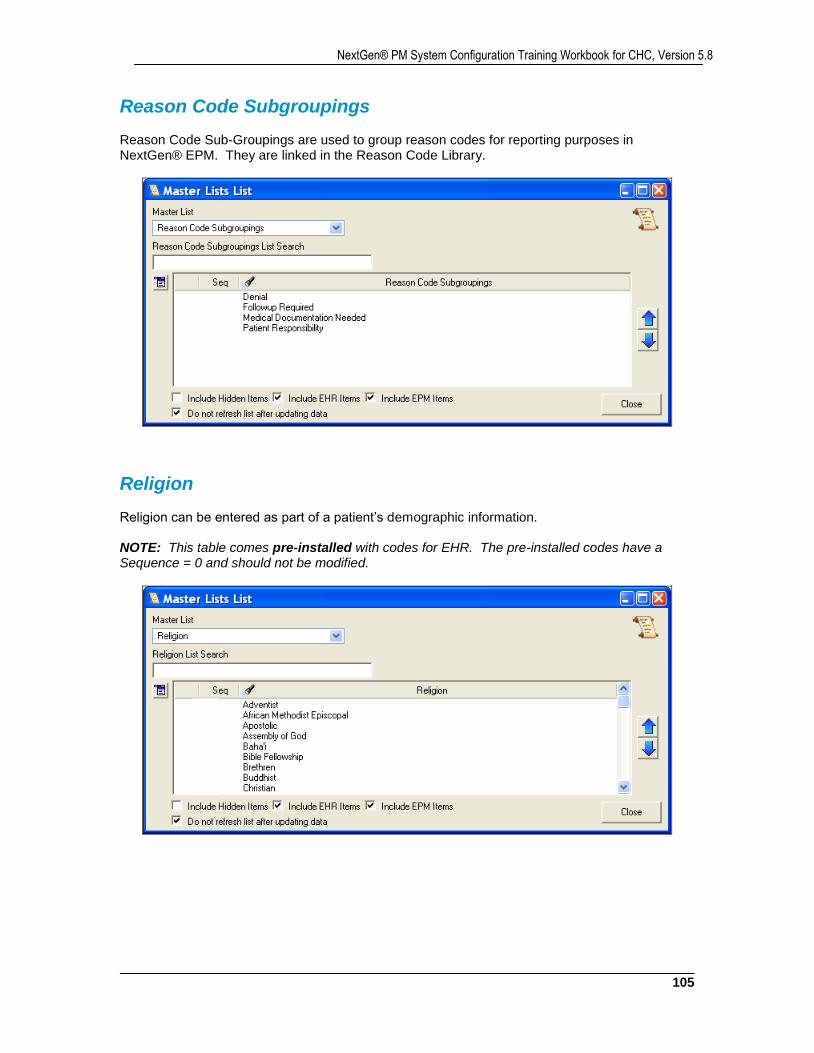
105
NextGen® PM System Configuration Training Workbook for CHC, Version 5.8
Reason Code Subgroupings Reason Code Sub-Groupings are used to group reason codes for reporting purposes in NextGen® EPM. They are linked in the Reason Code Library.
Religion Religion can be entered as part of a patient’s demographic information. NOTE: This table comes pre-installed with codes for EHR. The pre-installed codes have a Sequence = 0 and should not be modified.
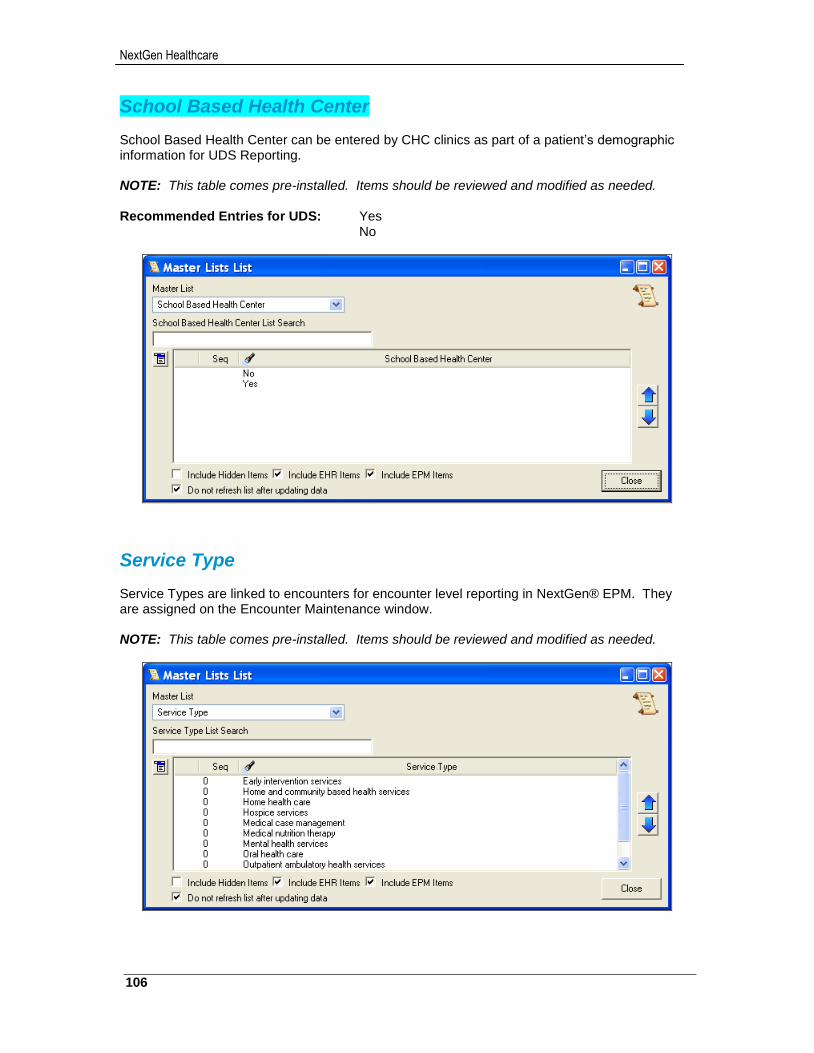
NextGen Healthcare
106
School Based Health Center School Based Health Center can be entered by CHC clinics as part of a patient’s demographic information for UDS Reporting. NOTE: This table comes pre-installed. Items should be reviewed and modified as needed. Recommended Entries for UDS: Yes No
Service Type Service Types are linked to encounters for encounter level reporting in NextGen® EPM. They are assigned on the Encounter Maintenance window. NOTE: This table comes pre-installed. Items should be reviewed and modified as needed.
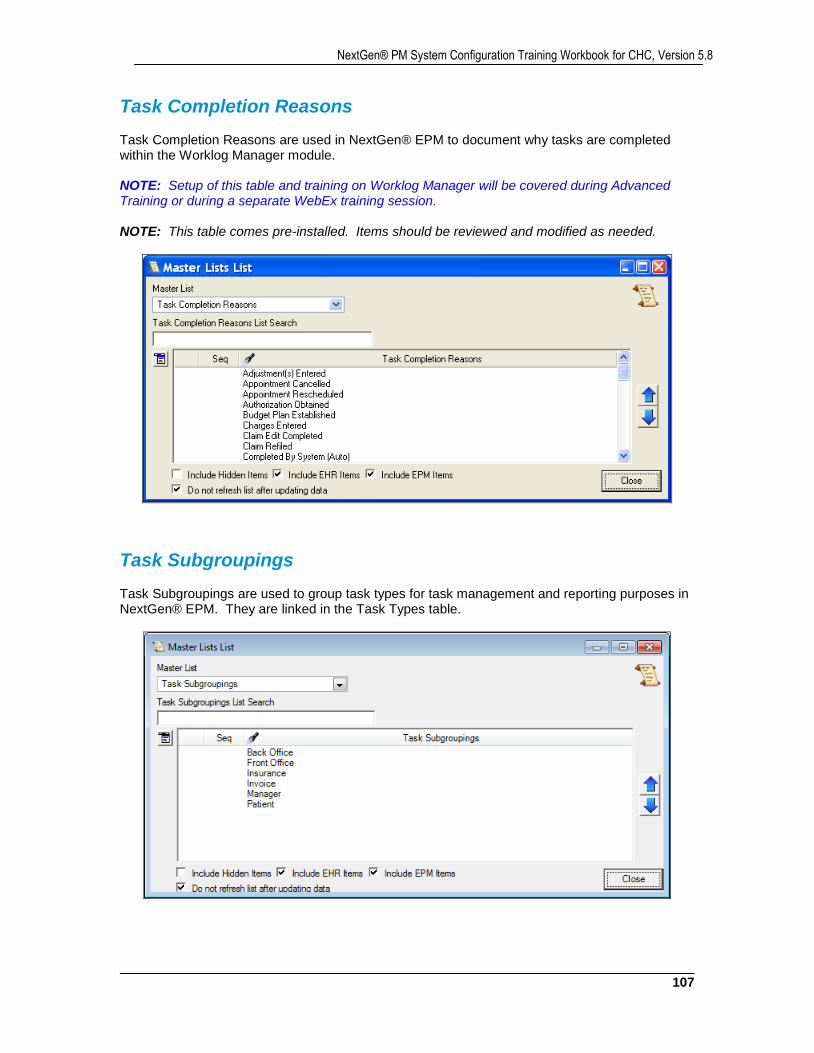
107
NextGen® PM System Configuration Training Workbook for CHC, Version 5.8
Task Completion Reasons Task Completion Reasons are used in NextGen® EPM to document why tasks are completed within the Worklog Manager module. NOTE: Setup of this table and training on Worklog Manager will be covered during Advanced Training or during a separate WebEx training session. NOTE: This table comes pre-installed. Items should be reviewed and modified as needed.
Task Subgroupings Task Subgroupings are used to group task types for task management and reporting purposes in NextGen® EPM. They are linked in the Task Types table.
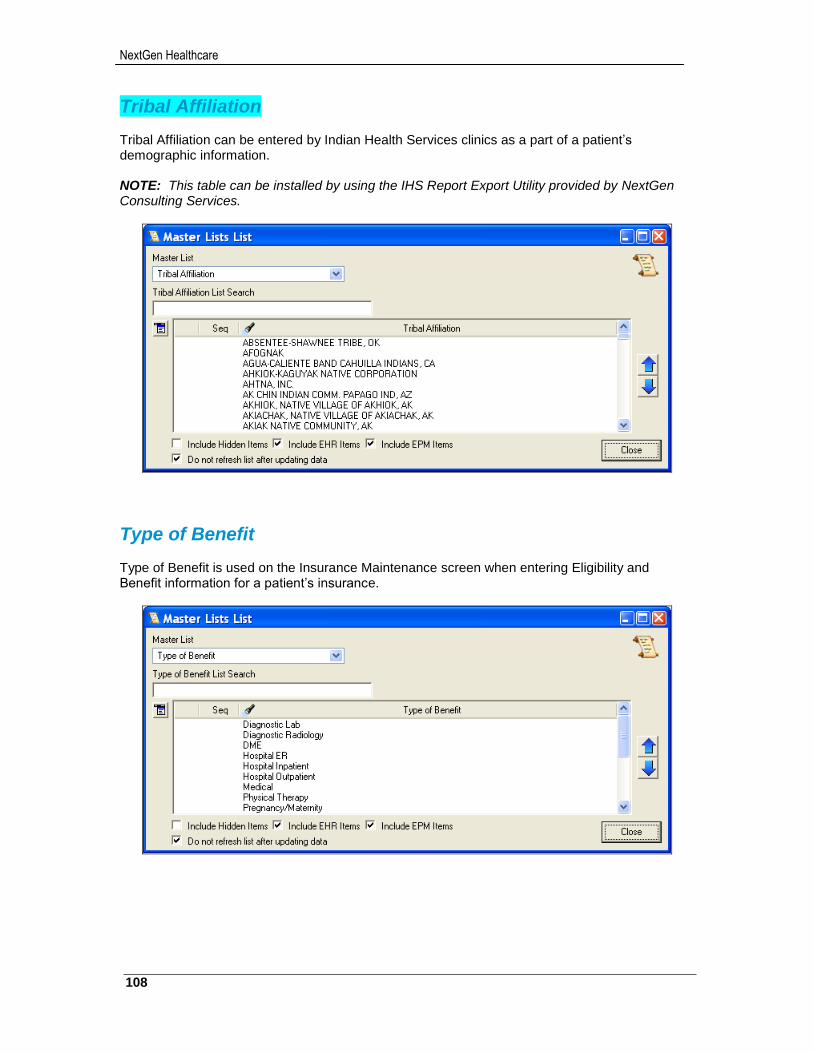
NextGen Healthcare
108
Tribal Affiliation Tribal Affiliation can be entered by Indian Health Services clinics as a part of a patient’s demographic information. NOTE: This table can be installed by using the IHS Report Export Utility provided by NextGen Consulting Services.
Type of Benefit Type of Benefit is used on the Insurance Maintenance screen when entering Eligibility and Benefit information for a patient’s insurance.
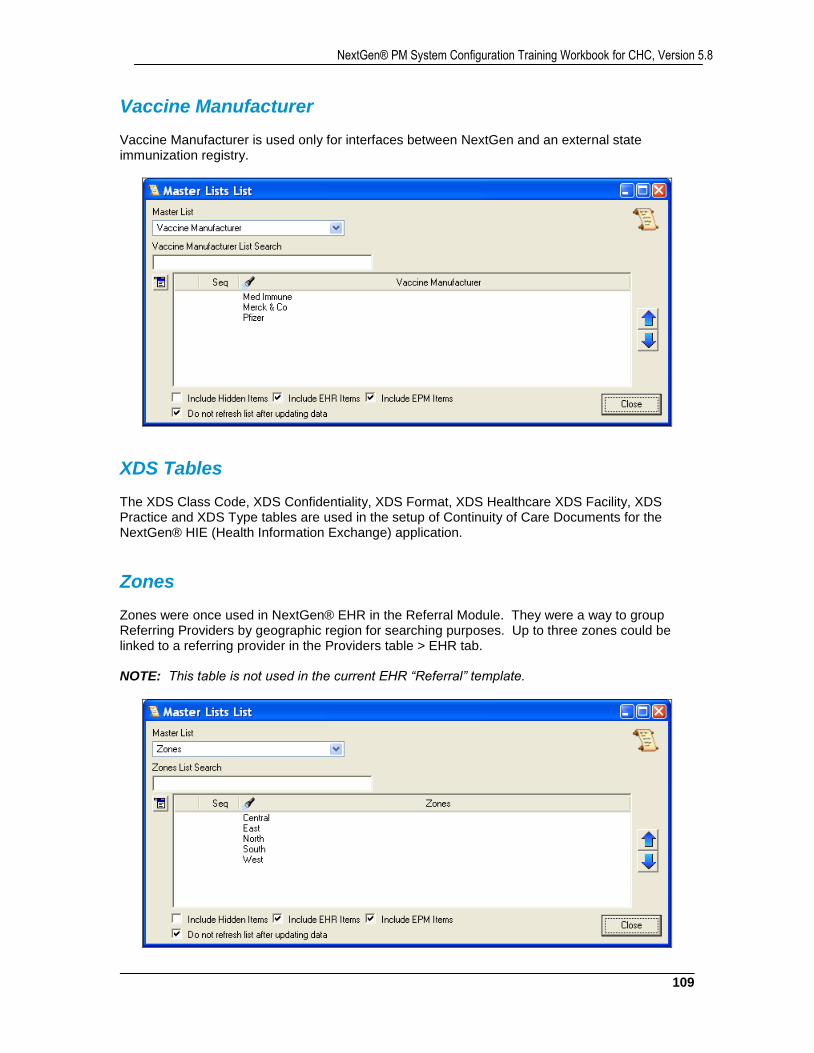
109
NextGen® PM System Configuration Training Workbook for CHC, Version 5.8
Vaccine Manufacturer Vaccine Manufacturer is used only for interfaces between NextGen and an external state immunization registry.
XDS Tables The XDS Class Code, XDS Confidentiality, XDS Format, XDS Healthcare XDS Facility, XDS Practice and XDS Type tables are used in the setup of Continuity of Care Documents for the NextGen® HIE (Health Information Exchange) application.
Zones Zones were once used in NextGen® EHR in the Referral Module. They were a way to group Referring Providers by geographic region for searching purposes. Up to three zones could be linked to a referring provider in the Providers table > EHR tab. NOTE: This table is not used in the current EHR “Referral” template.
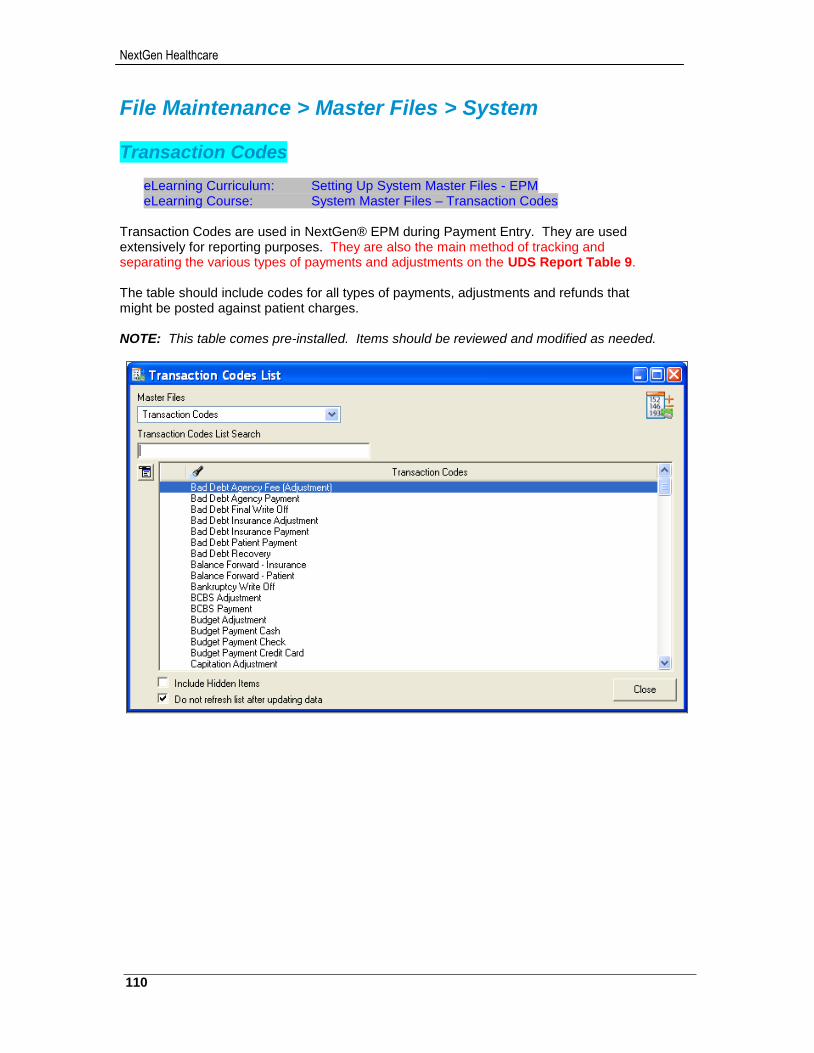
NextGen Healthcare
110
File Maintenance > Master Files > System Transaction Codes
eLearning Curriculum: Setting Up System Master Files - EPM eLearning Course: System Master Files – Transaction Codes
Transaction Codes are used in NextGen® EPM during Payment Entry. They are used extensively for reporting purposes. They are also the main method of tracking and separating the various types of payments and adjustments on the UDS Report Table 9. The table should include codes for all types of payments, adjustments and refunds that might be posted against patient charges. NOTE: This table comes pre-installed. Items should be reviewed and modified as needed.
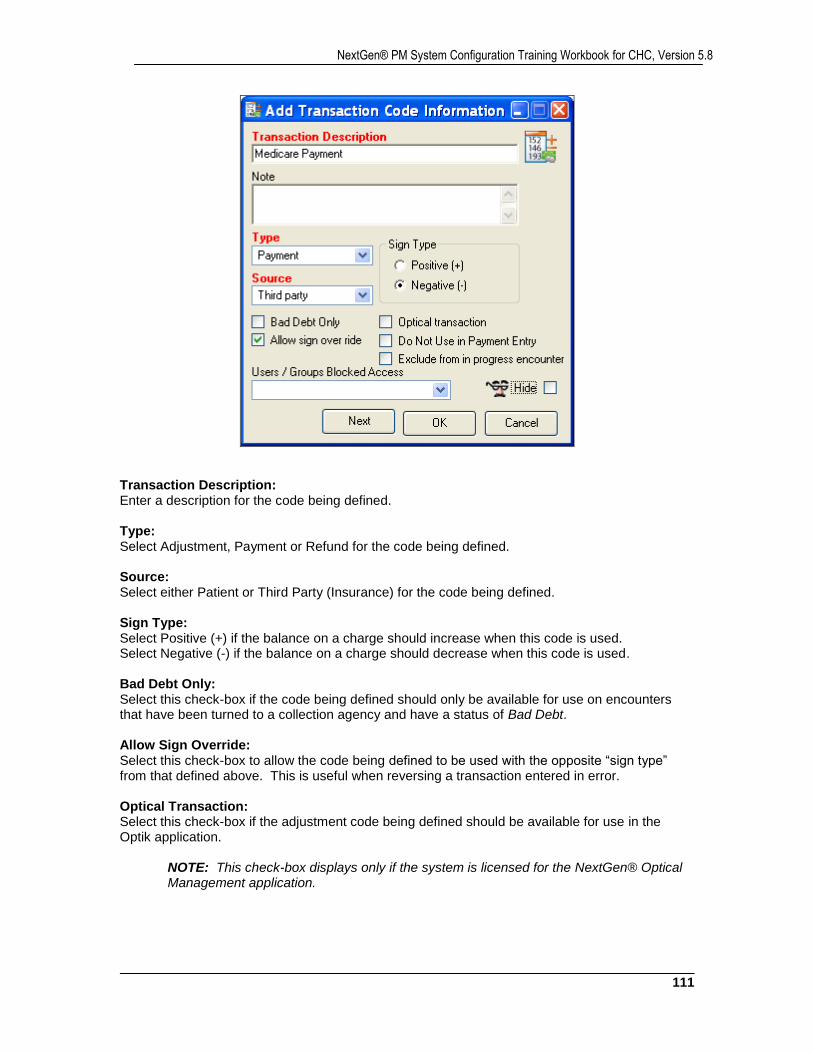
111
NextGen® PM System Configuration Training Workbook for CHC, Version 5.8
Transaction Description: Enter a description for the code being defined. Type: Select Adjustment, Payment or Refund for the code being defined. Source: Select either Patient or Third Party (Insurance) for the code being defined. Sign Type: Select Positive (+) if the balance on a charge should increase when this code is used. Select Negative (-) if the balance on a charge should decrease when this code is used. Bad Debt Only: Select this check-box if the code being defined should only be available for use on encounters that have been turned to a collection agency and have a status of Bad Debt. Allow Sign Override: Select this check-box to allow the code being defined to be used with the opposite “sign type” from that defined above. This is useful when reversing a transaction entered in error. Optical Transaction: Select this check-box if the adjustment code being defined should be available for use in the Optik application.
NOTE: This check-box displays only if the system is licensed for the NextGen® Optical Management application.
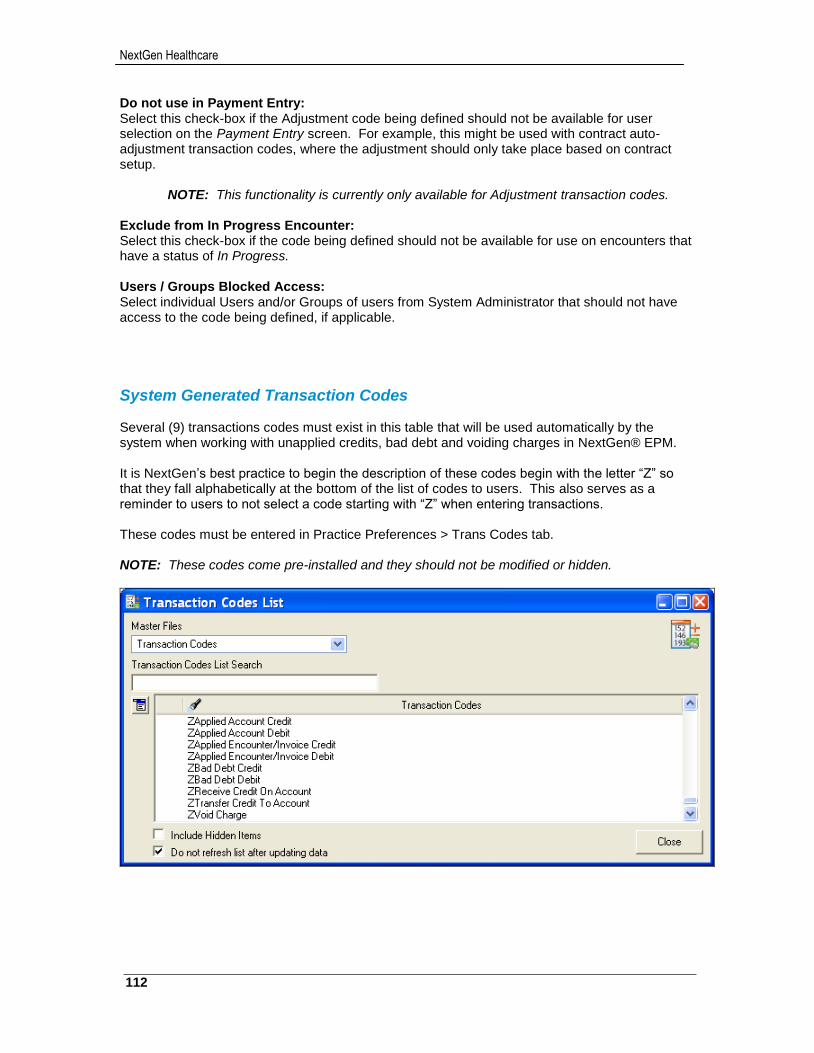
NextGen Healthcare
112
Do not use in Payment Entry: Select this check-box if the Adjustment code being defined should not be available for user selection on the Payment Entry screen. For example, this might be used with contract auto-adjustment transaction codes, where the adjustment should only take place based on contract setup.
NOTE: This functionality is currently only available for Adjustment transaction codes. Exclude from In Progress Encounter: Select this check-box if the code being defined should not be available for use on encounters that have a status of In Progress. Users / Groups Blocked Access: Select individual Users and/or Groups of users from System Administrator that should not have access to the code being defined, if applicable.
System Generated Transaction Codes Several (9) transactions codes must exist in this table that will be used automatically by the system when working with unapplied credits, bad debt and voiding charges in NextGen® EPM. It is NextGen’s best practice to begin the description of these codes begin with the letter “Z” so that they fall alphabetically at the bottom of the list of codes to users. This also serves as a reminder to users to not select a code starting with “Z” when entering transactions. These codes must be entered in Practice Preferences > Trans Codes tab. NOTE: These codes come pre-installed and they should not be modified or hidden.
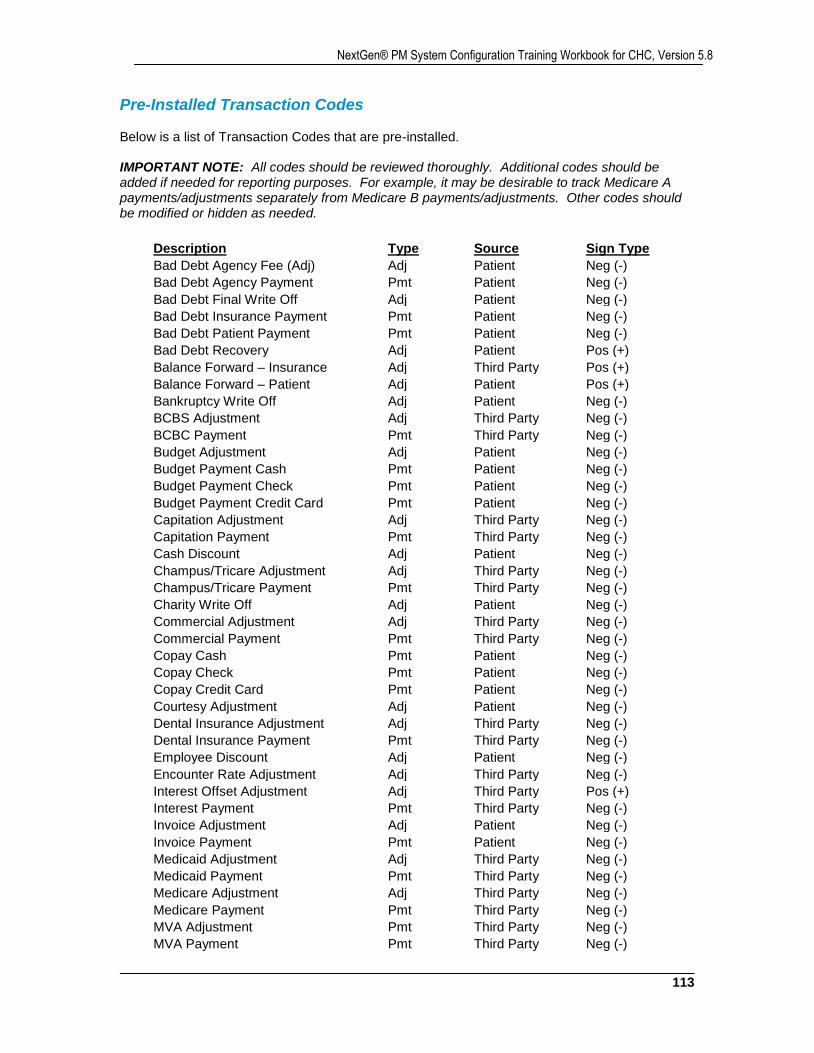
113
NextGen® PM System Configuration Training Workbook for CHC, Version 5.8
Pre-Installed Transaction Codes Below is a list of Transaction Codes that are pre-installed. IMPORTANT NOTE: All codes should be reviewed thoroughly. Additional codes should be added if needed for reporting purposes. For example, it may be desirable to track Medicare A payments/adjustments separately from Medicare B payments/adjustments. Other codes should be modified or hidden as needed.
Description Type Source Sign Type
Bad Debt Agency Fee (Adj) Adj Patient Neg (-)
Bad Debt Agency Payment Pmt Patient Neg (-)
Bad Debt Final Write Off Adj Patient Neg (-)
Bad Debt Insurance Payment Pmt Patient Neg (-)
Bad Debt Patient Payment Pmt Patient Neg (-)
Bad Debt Recovery Adj Patient Pos (+)
Balance Forward – Insurance Adj Third Party Pos (+)
Balance Forward – Patient Adj Patient Pos (+)
Bankruptcy Write Off Adj Patient Neg (-)
BCBS Adjustment Adj Third Party Neg (-)
BCBC Payment Pmt Third Party Neg (-)
Budget Adjustment Adj Patient Neg (-)
Budget Payment Cash Pmt Patient Neg (-)
Budget Payment Check Pmt Patient Neg (-)
Budget Payment Credit Card Pmt Patient Neg (-)
Capitation Adjustment Adj Third Party Neg (-)
Capitation Payment Pmt Third Party Neg (-)
Cash Discount Adj Patient Neg (-)
Champus/Tricare Adjustment Adj Third Party Neg (-)
Champus/Tricare Payment Pmt Third Party Neg (-)
Charity Write Off Adj Patient Neg (-)
Commercial Adjustment Adj Third Party Neg (-)
Commercial Payment Pmt Third Party Neg (-)
Copay Cash Pmt Patient Neg (-)
Copay Check Pmt Patient Neg (-)
Copay Credit Card Pmt Patient Neg (-)
Courtesy Adjustment Adj Patient Neg (-)
Dental Insurance Adjustment Adj Third Party Neg (-)
Dental Insurance Payment Pmt Third Party Neg (-)
Employee Discount Adj Patient Neg (-)
Encounter Rate Adjustment Adj Third Party Neg (-)
Interest Offset Adjustment Adj Third Party Pos (+)
Interest Payment Pmt Third Party Neg (-)
Invoice Adjustment Adj Patient Neg (-)
Invoice Payment Pmt Patient Neg (-)
Medicaid Adjustment Adj Third Party Neg (-)
Medicaid Payment Pmt Third Party Neg (-)
Medicare Adjustment Adj Third Party Neg (-)
Medicare Payment Pmt Third Party Neg (-)
MVA Adjustment Pmt Third Party Neg (-)
MVA Payment Pmt Third Party Neg (-)
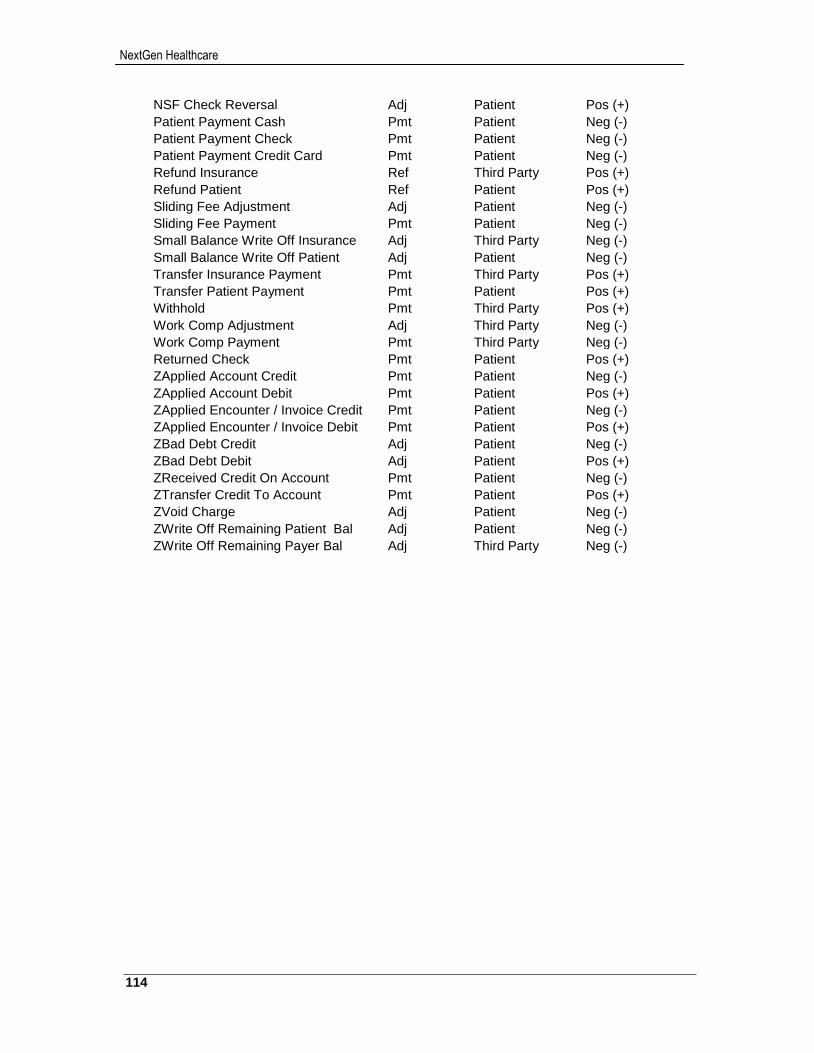
NextGen Healthcare
114
NSF Check Reversal Adj Patient Pos (+)
Patient Payment Cash Pmt Patient Neg (-)
Patient Payment Check Pmt Patient Neg (-)
Patient Payment Credit Card Pmt Patient Neg (-)
Refund Insurance Ref Third Party Pos (+)
Refund Patient Ref Patient Pos (+)
Sliding Fee Adjustment Adj Patient Neg (-)
Sliding Fee Payment Pmt Patient Neg (-)
Small Balance Write Off Insurance Adj Third Party Neg (-)
Small Balance Write Off Patient Adj Patient Neg (-)
Transfer Insurance Payment Pmt Third Party Pos (+)
Transfer Patient Payment Pmt Patient Pos (+)
Withhold Pmt Third Party Pos (+)
Work Comp Adjustment Adj Third Party Neg (-)
Work Comp Payment Pmt Third Party Neg (-)
Returned Check Pmt Patient Pos (+)
ZApplied Account Credit Pmt Patient Neg (-)
ZApplied Account Debit Pmt Patient Pos (+)
ZApplied Encounter / Invoice Credit Pmt Patient Neg (-)
ZApplied Encounter / Invoice Debit Pmt Patient Pos (+)
ZBad Debt Credit Adj Patient Neg (-)
ZBad Debt Debit Adj Patient Pos (+)
ZReceived Credit On Account Pmt Patient Neg (-)
ZTransfer Credit To Account Pmt Patient Pos (+)
ZVoid Charge Adj Patient Neg (-)
ZWrite Off Remaining Patient Bal Adj Patient Neg (-)
ZWrite Off Remaining Payer Bal Adj Third Party Neg (-)
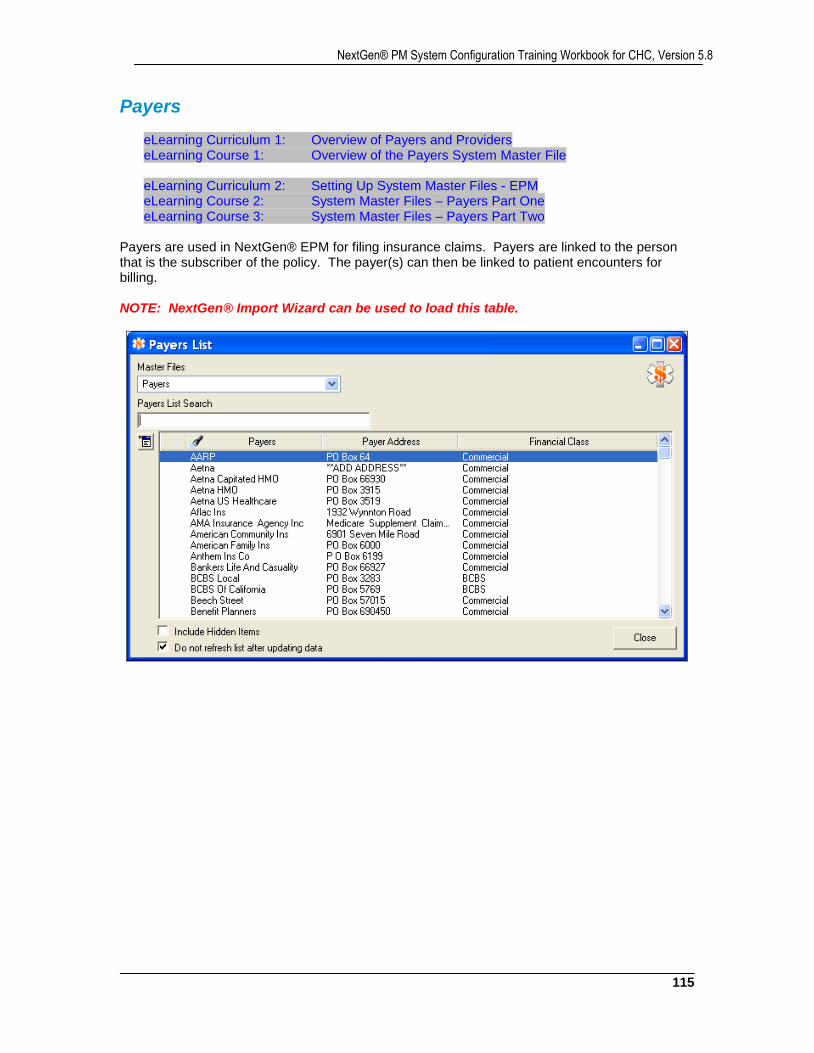
115
NextGen® PM System Configuration Training Workbook for CHC, Version 5.8
Payers
eLearning Curriculum 1: Overview of Payers and Providers eLearning Course 1: Overview of the Payers System Master File eLearning Curriculum 2: Setting Up System Master Files - EPM eLearning Course 2: System Master Files – Payers Part One eLearning Course 3: System Master Files – Payers Part Two
Payers are used in NextGen® EPM for filing insurance claims. Payers are linked to the person that is the subscriber of the policy. The payer(s) can then be linked to patient encounters for billing. NOTE: NextGen® Import Wizard can be used to load this table.
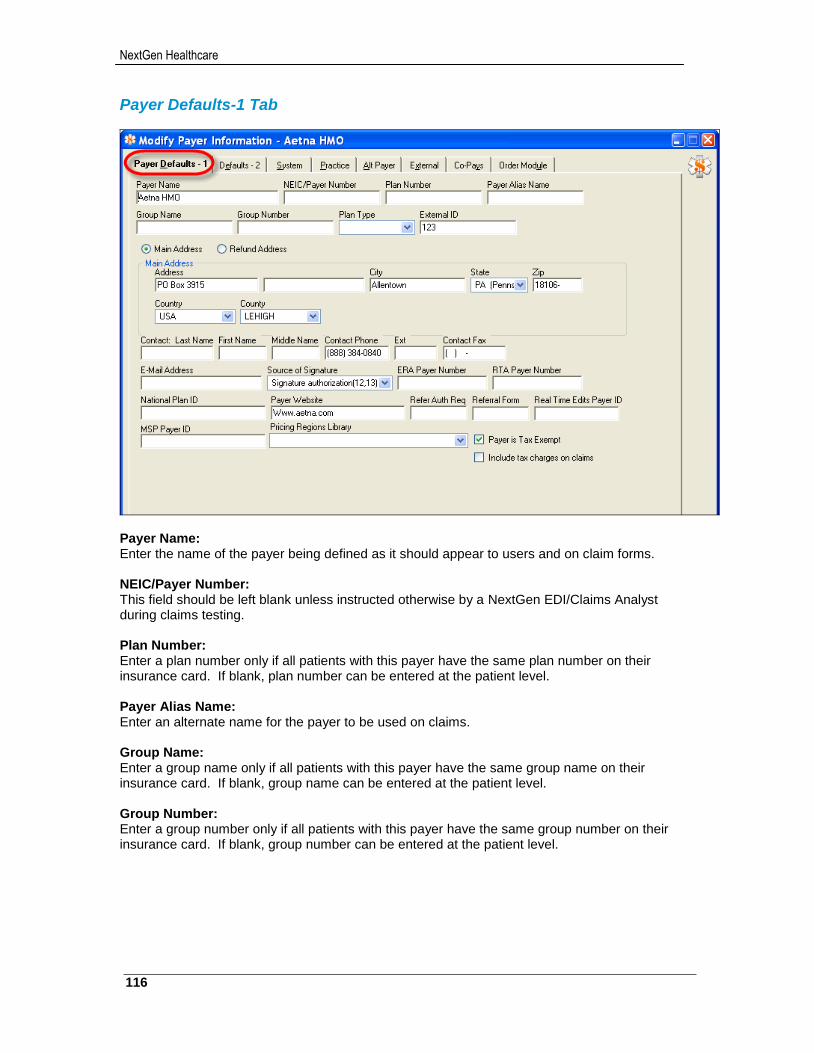
NextGen Healthcare
116
Payer Defaults-1 Tab
Payer Name: Enter the name of the payer being defined as it should appear to users and on claim forms. NEIC/Payer Number: This field should be left blank unless instructed otherwise by a NextGen EDI/Claims Analyst during claims testing. Plan Number: Enter a plan number only if all patients with this payer have the same plan number on their insurance card. If blank, plan number can be entered at the patient level. Payer Alias Name: Enter an alternate name for the payer to be used on claims. Group Name: Enter a group name only if all patients with this payer have the same group name on their insurance card. If blank, group name can be entered at the patient level. Group Number: Enter a group number only if all patients with this payer have the same group number on their insurance card. If blank, group number can be entered at the patient level.
117
NextGen® PM System Configuration Training Workbook for CHC, Version 5.8
Plan Type: Plan Type is needed for lab interfaces to Quest and LabCorp. Below are guidelines to use for the setup of each payer.
Payer Plan Type Medicare Medicare Number Medicaid Medicaid Number BC/BS Blue Shield Number HMO Payers HMO Number All Other Payers Private Number
Main Address: Enter the mailing address for the payer as it should appear on paper claims. Refund Address: Enter the refund address for the payer if different from the main address. Contact Phone: Enter the phone number for the payer. Source of Signature: Select if the verbiage “Signature on File” should appear on paper 1500 claims in Box 12 only (12), Box 13 only (13) or both Boxes 12 and 13 (12,13)
NOTE: Electronic claims in ASC X12 Version 5010 format no longer include this information. Since it is a required field for paper claims, it is recommended that the “Signature authorization (12, 13)” option be selected for all payers.
Payer Website: Enter the website address for the payer. This will give end users in NextGen® EPM direct access to the payer’s website from within the patient’s insurance information.
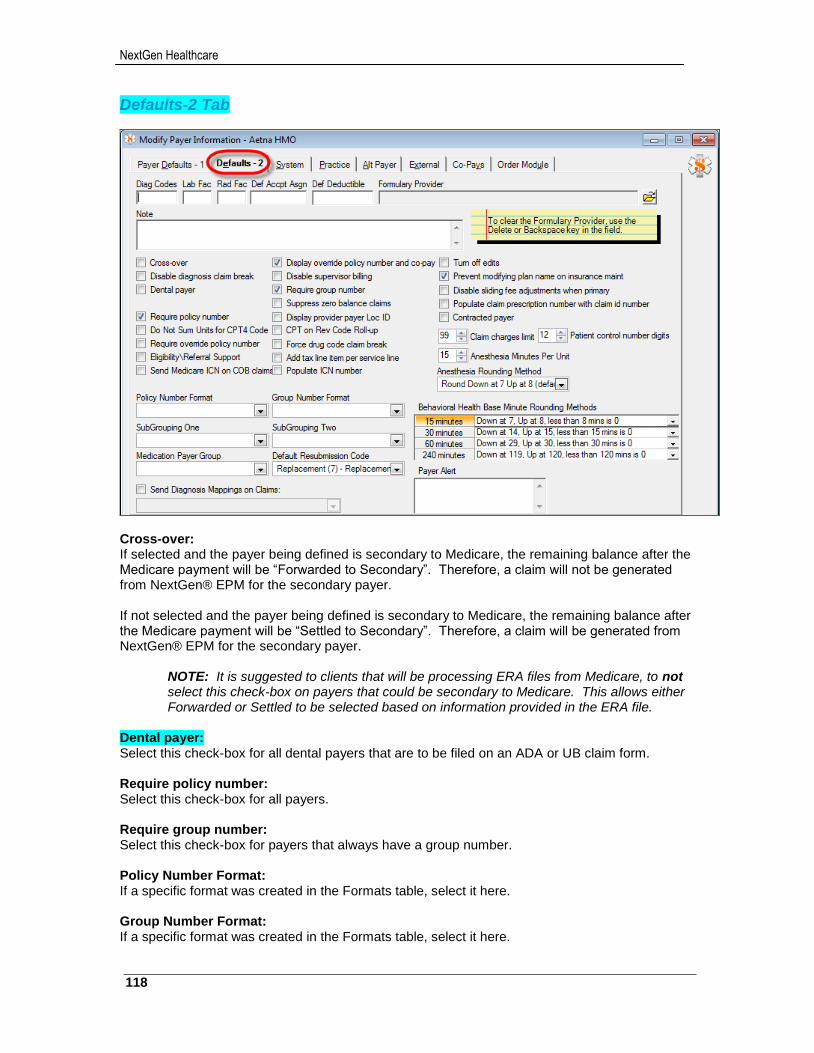
NextGen Healthcare
118
Defaults-2 Tab
Cross-over: If selected and the payer being defined is secondary to Medicare, the remaining balance after the Medicare payment will be “Forwarded to Secondary”. Therefore, a claim will not be generated from NextGen® EPM for the secondary payer. If not selected and the payer being defined is secondary to Medicare, the remaining balance after the Medicare payment will be “Settled to Secondary”. Therefore, a claim will be generated from NextGen® EPM for the secondary payer.
NOTE: It is suggested to clients that will be processing ERA files from Medicare, to not select this check-box on payers that could be secondary to Medicare. This allows either Forwarded or Settled to be selected based on information provided in the ERA file.
Dental payer: Select this check-box for all dental payers that are to be filed on an ADA or UB claim form. Require policy number: Select this check-box for all payers. Require group number: Select this check-box for payers that always have a group number. Policy Number Format: If a specific format was created in the Formats table, select it here. Group Number Format: If a specific format was created in the Formats table, select it here.

119
NextGen® PM System Configuration Training Workbook for CHC, Version 5.8
Display override policy number and co-pay: Select this check-box for payers where a single policy may cover multiple family members and each family member may have a different policy number and/or copay.
Example: John Smith is the subscriber of an Aetna policy that covers his entire family. The policy number for each family member is the same as John’s except for the two-digit suffix. The suffix differentiates the policy number for each dependent. With this option selected for the payer, the Encounter Maintenance screen in EPM will display two fields; one for the subscriber’s policy number/copay, and another for the dependent’s policy number/copay.
Family Member Policy # Copay John/Dad (Subscriber) 12345678900 $20.00 Carol/Mom 12345678901 $20.00 Greg/Child 12345678902 $10.00
Prevent modifying plan name on insurance maint: Select this check-box for all payers to prevent users from modifying the Payer Name after selecting the payer for a patient.
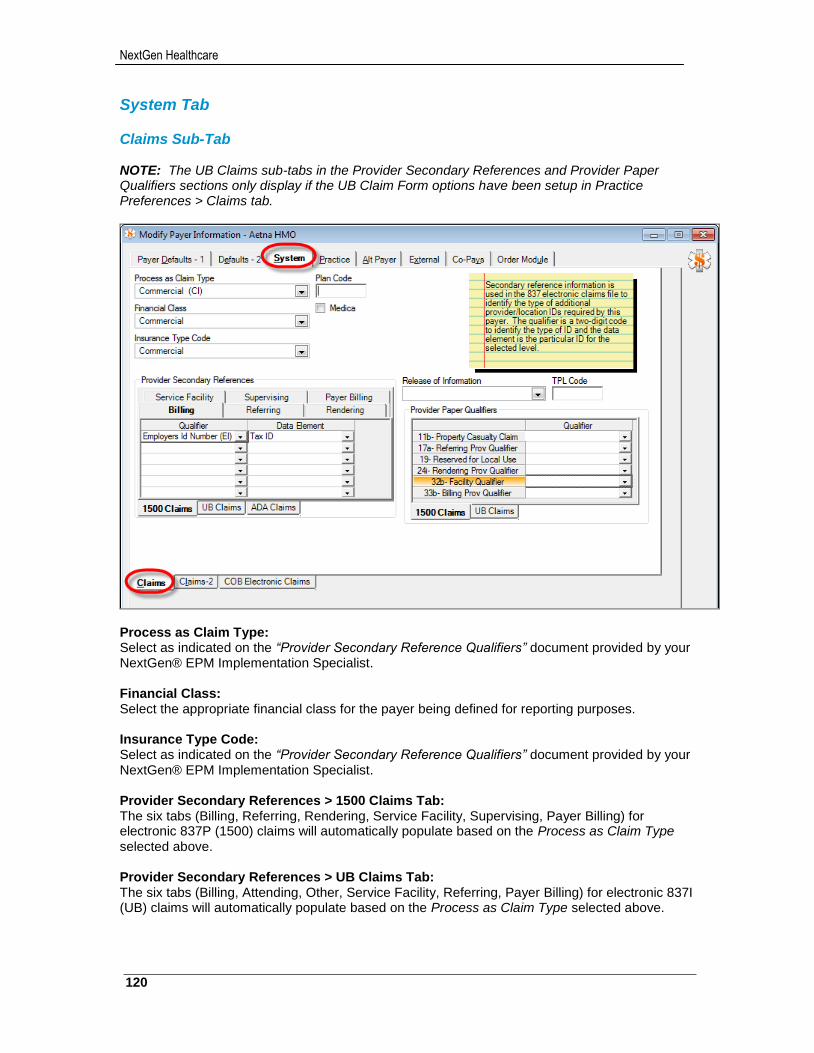
NextGen Healthcare
120
System Tab
Claims Sub-Tab NOTE: The UB Claims sub-tabs in the Provider Secondary References and Provider Paper Qualifiers sections only display if the UB Claim Form options have been setup in Practice Preferences > Claims tab.
Process as Claim Type: Select as indicated on the “Provider Secondary Reference Qualifiers” document provided by your NextGen® EPM Implementation Specialist. Financial Class: Select the appropriate financial class for the payer being defined for reporting purposes. Insurance Type Code: Select as indicated on the “Provider Secondary Reference Qualifiers” document provided by your NextGen® EPM Implementation Specialist. Provider Secondary References > 1500 Claims Tab: The six tabs (Billing, Referring, Rendering, Service Facility, Supervising, Payer Billing) for electronic 837P (1500) claims will automatically populate based on the Process as Claim Type selected above. Provider Secondary References > UB Claims Tab: The six tabs (Billing, Attending, Other, Service Facility, Referring, Payer Billing) for electronic 837I (UB) claims will automatically populate based on the Process as Claim Type selected above.
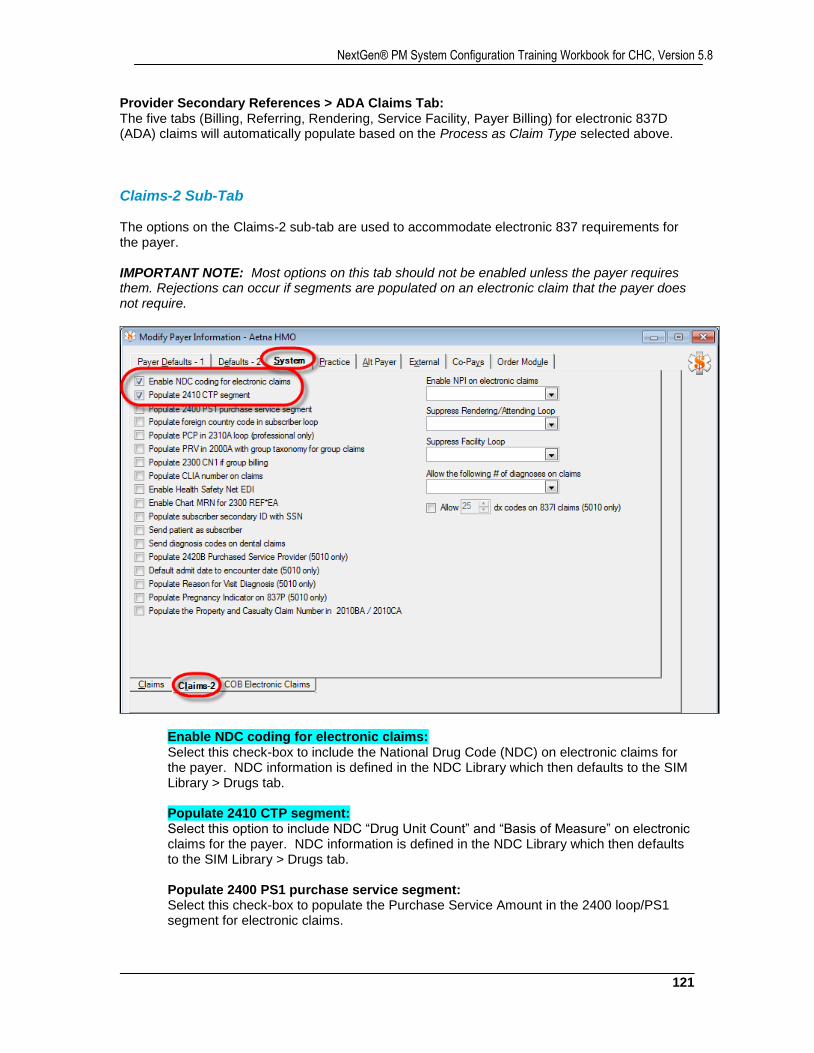
121
NextGen® PM System Configuration Training Workbook for CHC, Version 5.8
Provider Secondary References > ADA Claims Tab: The five tabs (Billing, Referring, Rendering, Service Facility, Payer Billing) for electronic 837D (ADA) claims will automatically populate based on the Process as Claim Type selected above.
Claims-2 Sub-Tab The options on the Claims-2 sub-tab are used to accommodate electronic 837 requirements for the payer. IMPORTANT NOTE: Most options on this tab should not be enabled unless the payer requires them. Rejections can occur if segments are populated on an electronic claim that the payer does not require.
Enable NDC coding for electronic claims: Select this check-box to include the National Drug Code (NDC) on electronic claims for the payer. NDC information is defined in the NDC Library which then defaults to the SIM Library > Drugs tab. Populate 2410 CTP segment: Select this option to include NDC “Drug Unit Count” and “Basis of Measure” on electronic claims for the payer. NDC information is defined in the NDC Library which then defaults to the SIM Library > Drugs tab. Populate 2400 PS1 purchase service segment: Select this check-box to populate the Purchase Service Amount in the 2400 loop/PS1 segment for electronic claims.
NextGen Healthcare
122
Populate foreign country code in subscriber loop: Select this check-box to populate Patient and Subscriber loops with a two-character country code in electronic claims. Currently, this setting only supports Canada and Mexico as valid foreign countries. Populate PCP in 2310A loop (professional only): Select this check-box to create the 2310A PCP iteration of the 837P electronic file and populate it with the referring provider's information. Populate PRV in 2000A with group taxonomy for group claims: Select this check-box and, if there is a taxonomy code in the Group master file, the group taxonomy code is used in the 2000A PRV segment in the 837P and in the 837I. You might need to select this check-box, for example, if the taxonomy code is required but your practice bills as a group and each group has a taxonomy code. This check-box enables you to use the group taxonomy code in the 2000A PRV segment. Populate 2300 CN1 if group billing: Select this option for group billed claims, to create a CN1 segment when the 837 professional claim file is generated for the payer.
NOTE: This option is specifically for Oklahoma Medicaid and generates as follows: CN1*09**G~.
Populate CLIA number on claims: Select this option to populate the CLIA number in the electronic file for this payer even if the payer is not a Medicare or Medicaid claim type. Enable Health Safety Net EDI: Select this option to enable Health Safety Net Office. Along with this option, the Payer Alias Name field on the Payer Defaults -1 tab must have an entry of HSNO. Enable NPI on electronic claims: Select how you want to handle enabling the NPI from the options below. For more detailed information about enabling the NPI, see the National Provider ID Dual Submission Setup white paper available from www.NextGen.com.
<none> / Blank: This setting is the default and indicates that the NPI is enabled or disabled according to the setting at the next higher level. For example, if the practice level setting is <none>, but the system level setting is Enabled, then the NPI is used. Disable: NPI is off. This setting overrides the submitter profile setting. Enable: NPI is on. This setting overrides the Submitter Profile setting. If either the payer system or practice level setting is enabled, the NPI is also enabled for the alternate payer.
Suppress Rendering/Attending Loop: Select the option to determine whether the Attending (2310A) and Rendering (2310B) loops should be suppressed. See the NextGen® EPM Claims Guide for more information about suppressing the 2310A Attending and 2310B Rendering loops.

123
NextGen® PM System Configuration Training Workbook for CHC, Version 5.8
Suppress Facility Loop (2310D): To suppress the 2310D loop for a place of service (POS), select the one of the following place of service (POS) or combination POS options:
<none>
Home (12) only
Home (12) or Office (11)
Home (12) or Office (11) or Outpatient (22)
Office (11) only
Outpatient (22) only
NOTE: This setting overrides the setting for the Submitter Profile library > Common Options tab > Suppress service facility loop for place(s) of service option. However, if <none> is selected for the Payer master file setting, the Submitter Profile library option is used.
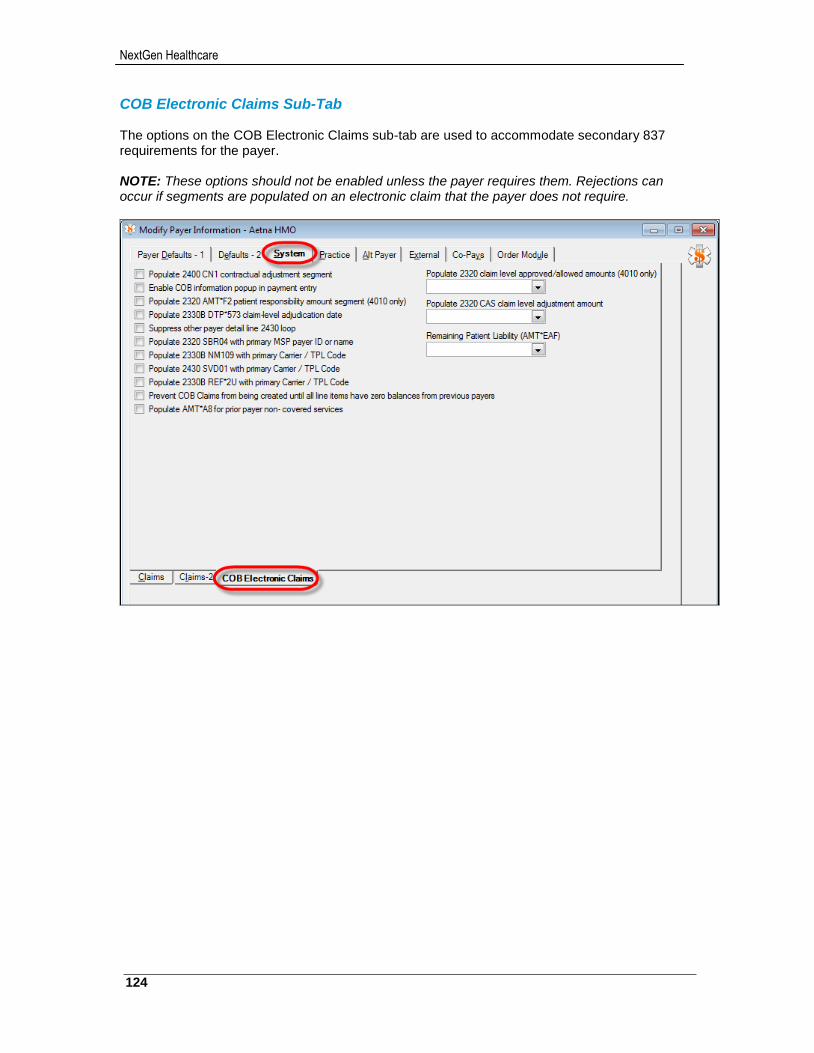
NextGen Healthcare
124
COB Electronic Claims Sub-Tab The options on the COB Electronic Claims sub-tab are used to accommodate secondary 837 requirements for the payer. NOTE: These options should not be enabled unless the payer requires them. Rejections can occur if segments are populated on an electronic claim that the payer does not require.
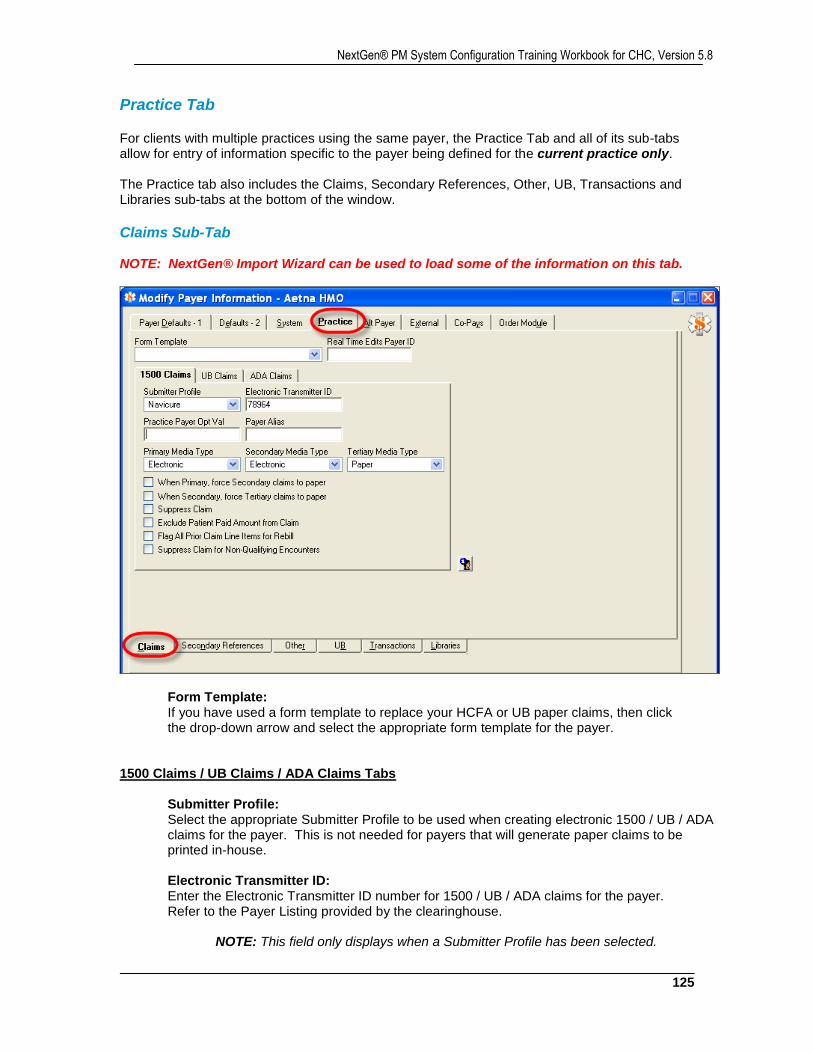
125
NextGen® PM System Configuration Training Workbook for CHC, Version 5.8
Practice Tab For clients with multiple practices using the same payer, the Practice Tab and all of its sub-tabs allow for entry of information specific to the payer being defined for the current practice only. The Practice tab also includes the Claims, Secondary References, Other, UB, Transactions and Libraries sub-tabs at the bottom of the window.
Claims Sub-Tab NOTE: NextGen® Import Wizard can be used to load some of the information on this tab.
Form Template: If you have used a form template to replace your HCFA or UB paper claims, then click the drop-down arrow and select the appropriate form template for the payer.
1500 Claims / UB Claims / ADA Claims Tabs
Submitter Profile: Select the appropriate Submitter Profile to be used when creating electronic 1500 / UB / ADA claims for the payer. This is not needed for payers that will generate paper claims to be printed in-house. Electronic Transmitter ID: Enter the Electronic Transmitter ID number for 1500 / UB / ADA claims for the payer. Refer to the Payer Listing provided by the clearinghouse.
NOTE: This field only displays when a Submitter Profile has been selected.
NextGen Healthcare
126
Practice Payer Opt Val: Enter the practice/payer-specific value. Payer Alias: Enter an alternative payer name when a name that differs from the name that appears in the payer's Payer master file is required. Primary Media Type: Select Electronic for those payers that should generate electronic primary claims. Select Paper for those payers that should generate paper primary claims.
Secondary Media Type: Select Electronic for those payers that can accept electronic secondary claims. Select
Paper for those payers that should generate paper secondary claims.
Tertiary Media Type: Select Electronic for those payers that can accept electronic tertiary claims. Select
Paper for those payers that should generate paper tertiary claims. When Primary, force Secondary claims to paper: Do not select this check-box. This option is no longer used. When Secondary, force Tertiary claims to paper: Do not select this check-box. This option is no longer used. Suppress Claim: Select this box to suppress claims for this payer when creating claims in batch mode only. Exclude Patient Paid Amount from Claim: Select this check-box for all payers to exclude patient payments from the claim.
Flag All Prior Claim Line Items for Rebill: Select this option to include line items with a $0.00 amount with the other line item charges when you rebill an archived claim. Suppress Claim for Non-Qualifying Encounter: Select this check-box to suppress claims for this payer when creating claims for non-qualifying encounters to a federally qualified health center.
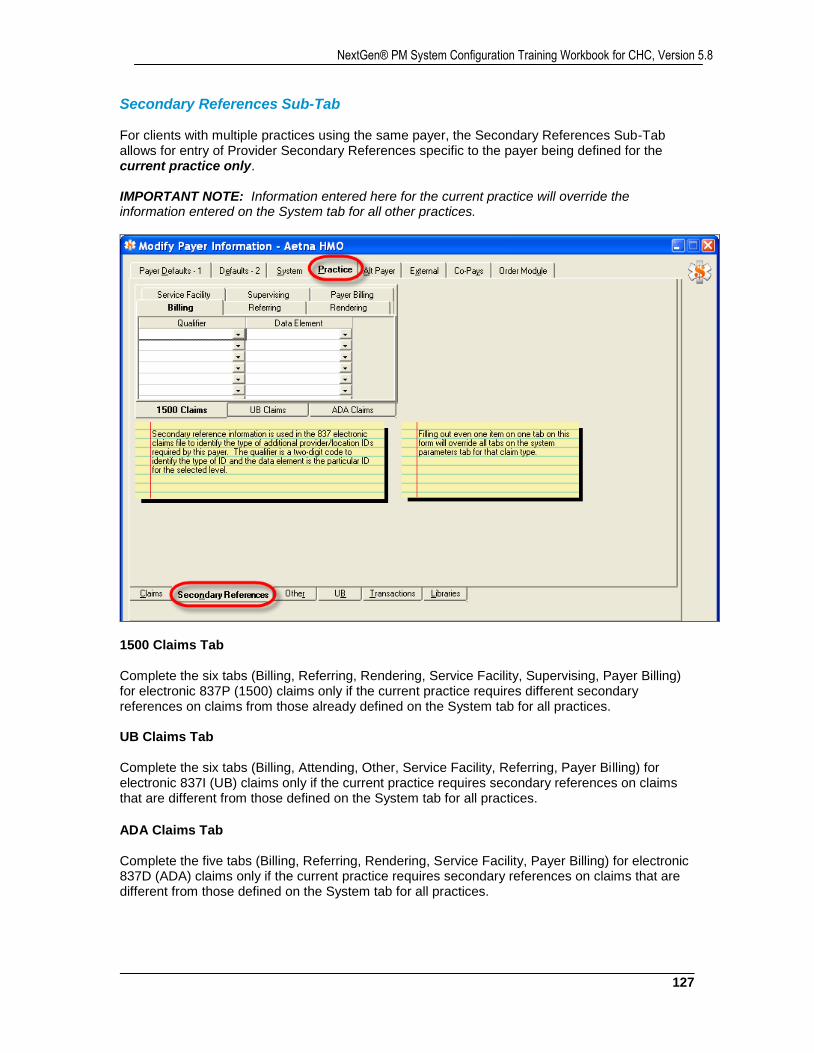
127
NextGen® PM System Configuration Training Workbook for CHC, Version 5.8
Secondary References Sub-Tab For clients with multiple practices using the same payer, the Secondary References Sub-Tab allows for entry of Provider Secondary References specific to the payer being defined for the current practice only. IMPORTANT NOTE: Information entered here for the current practice will override the information entered on the System tab for all other practices.
1500 Claims Tab Complete the six tabs (Billing, Referring, Rendering, Service Facility, Supervising, Payer Billing) for electronic 837P (1500) claims only if the current practice requires different secondary references on claims from those already defined on the System tab for all practices. UB Claims Tab Complete the six tabs (Billing, Attending, Other, Service Facility, Referring, Payer Billing) for electronic 837I (UB) claims only if the current practice requires secondary references on claims that are different from those defined on the System tab for all practices.
ADA Claims Tab Complete the five tabs (Billing, Referring, Rendering, Service Facility, Payer Billing) for electronic 837D (ADA) claims only if the current practice requires secondary references on claims that are different from those defined on the System tab for all practices.
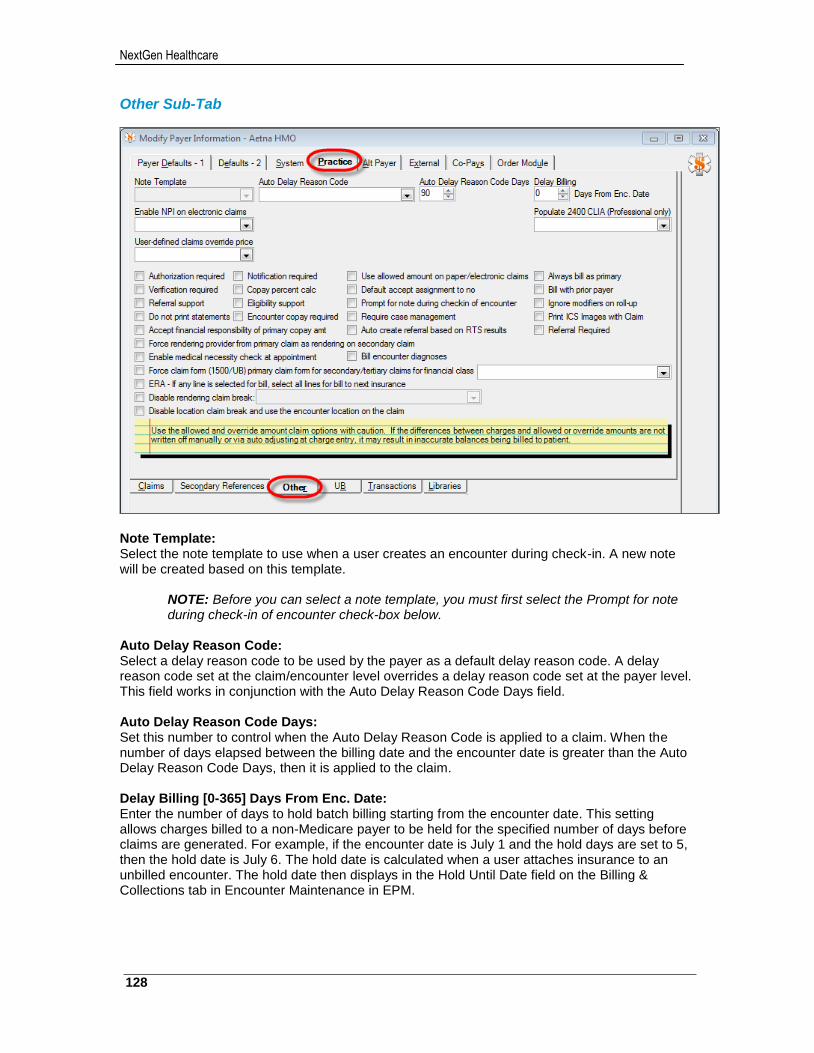
NextGen Healthcare
128
Other Sub-Tab
Note Template: Select the note template to use when a user creates an encounter during check-in. A new note will be created based on this template.
NOTE: Before you can select a note template, you must first select the Prompt for note during check-in of encounter check-box below.
Auto Delay Reason Code: Select a delay reason code to be used by the payer as a default delay reason code. A delay reason code set at the claim/encounter level overrides a delay reason code set at the payer level. This field works in conjunction with the Auto Delay Reason Code Days field. Auto Delay Reason Code Days: Set this number to control when the Auto Delay Reason Code is applied to a claim. When the number of days elapsed between the billing date and the encounter date is greater than the Auto Delay Reason Code Days, then it is applied to the claim. Delay Billing [0-365] Days From Enc. Date: Enter the number of days to hold batch billing starting from the encounter date. This setting allows charges billed to a non-Medicare payer to be held for the specified number of days before claims are generated. For example, if the encounter date is July 1 and the hold days are set to 5, then the hold date is July 6. The hold date is calculated when a user attaches insurance to an unbilled encounter. The hold date then displays in the Hold Until Date field on the Billing & Collections tab in Encounter Maintenance in EPM.
129
NextGen® PM System Configuration Training Workbook for CHC, Version 5.8
NOTES: Even though this setting works only with batch billing, users can still force billing with demand billing for specific encounters. If an encounter is still within the allotted hold days, it does not display during encounter lookup and, therefore, is not in the list for batch billing. You can also delay Medicare billing. However, note that the delay billing setting for a specific payer overrides delayed Medicare billing.
Enable NPI on electronic claims: Select how you want to handle enabling the NPI from the options below. For more detailed information about enabling the NPI, see the National Provider ID Dual Submission Setup white paper available from www.NextGen.com.
<none>: This setting is the default and indicates that the NPI is enabled or disabled according to the setting at the next higher level. For example, if the practice level setting is <none>, but the system level setting is Enabled, then the NPI is used.
Disable: NPI is off. This setting overrides the submitter profile setting. Enable: NPI is on. This setting overrides the submitter profile setting. If either the
payer system or practice level setting is enabled, the NPI is also enabled for the alternate payer.
The payer master file setting on the Practice > Other tab overrides both the submitter profile setting and the system level setting. Authorization Required: Select this check-box for the payer being defined only if an authorization is required on every claim for every encounter for every patient with this insurance. (Example: HMO insurances at a specialty clinic) Verification Required: Select this check-box for the payer being defined only if verification of coverage is required on every encounter for every patient with this insurance. (Example: Medicaid) Referral Support and Eligibility Support: These check-boxes display only if the “Enable Eligibility\Referral” option has been selected in Practice Preferences > General Tab. This will be used in the NextGen® RTS (Real-Time Transaction Server) module. RTS provides the following functionalities:
Real-Time Referral Requests/Responses
Real-Time Referral History Requests/Responses
Real-Time Eligibility Requests/Responses
Real-Time Claim Status Requests/Responses NOTE: Setup and training for the RTS module will be covered in a separate training session by a NextGen® RTS representative.
Do not print statements: Check this check-box to exclude printing encounters on statements for this payer. This option only applies to batch mode for those encounters where the check-box is checked for the primary payer and the encounter has a zero patient balance. An encounter will print on a statement even if this check-box is checked for the primary payer, if there is a balance in the patient bucket.
NextGen Healthcare
130
Accept financial responsibility of primary copay amount: Select this check-box if the copay from a patient’s primary insurance should be billed to the payer being defined (as the patient’s secondary insurance) instead of billed to the patient. Force rendering provider from primary claim as rendering on secondary claim: Select this check-box to use the rendering provider from the primary claim to create the secondary claim, regardless of the provider being credentialed. Enable medical necessity check at appointment: Select this check-box to trigger a medical necessity check for specified payers during appointment creation and for payers who are added at check-in. Notification required: Select this check-box if the payer requires notification. Copay percent calc: Select this check-box give users the choice of entering either a dollar amount or a percentage on the Insurance Maintenance dialog box in EPM. Encounter Copay Required: Select this check-box to make the encounter Co-pay Amt field required. Use allowed amount on paper/electronic claims: Select this check-box to bill the allowed amount instead of the charge amount on paper and electronic claims. The amount is related to contracts. If you select this check-box, you must also setup the allowed amount in a contract to pull on the claim. Default Accept Assignment to No: Select this check-box to set the default assignment of benefits to No for all encounters for this payer when the rendering provider is a non-participating provider on the contract associated with the insurance. This check-box is unchecked by default. When this option is selected, the first line in the Verification section of the Patient Chart - encounters/Insurance tab will display Benefits NOT Assigned. In Addition, on the paper and electronic claim, Accept Assignment will be set to No. The Default Accept Assignment to No option will always have priority over the Default Non-Participating Provider's Accept Assignment to No option. When this option is selected, the Default Non-Participating Provider's Accept Assignment to No option will automatically be checked and disabled. Prompt for note during checkin of encounter: Select this check-box so that a new note is automatically created when a user creates an encounter during the check-in process. When you select this check-box, the Note Template field becomes available. The note is based on the selected template in the Note Template field. The note is not required; the user can close the note without saving it. Require case management: Select this check-box to require case management in EPM. When this payer is attached to an encounter, a case is required. Populate 2400 CLIA ID (Professional Only): Select this check-box to send the CLIA number at the line level for SIMs that have been designated as purchased services. Because this option applies only to Medicaid and Medicare claims, you must also select either Medicaid or Medicare in the Process as Claim Type field on the System tab > Claims tab. If this option is not selected, then CLIA will populate in the 2300 loop.
131
NextGen® PM System Configuration Training Workbook for CHC, Version 5.8
Auto create referral based on RTS results: Select this option to automatically create a referral from the RTS results when a 278 is successfully returned. Bill encounter diagnoses:
Select this option and the Enable billing of encounter diagnoses option in practice preference
to fill in any "empty" diagnosis slots on the claim header during billing with encounter diagnoses not already present on the claim. Always bill as primary: Select this check-box if you want all claims billed at this practice with this payer in the secondary or tertiary encounter payer COB position to bill as primary and to have no information on any other payers included on the claim. Bill with primary: Select this check-box if you want charges created for this payer at this practice to automatically flag this payer's COB to be billed along with the primary payer's COB when the primary payer's COB flag is checked on. Ignore modifiers on roll-up: When selected, the Ignore modifiers on roll-up check-box ignores modifiers when charges are billed and roll-up is enabled. For example, the ignored modifiers do not print on claims. Referral required: Select this check-box to require a referral. When this check-box is selected, the Referral Required check-box is enabled on the Insurance Maintenance dialog box in EPM.

NextGen Healthcare
132
UB Sub-Tab This sub-tab displays only if the UB Claim Form parameters have been set in Practice Preferences > Claims tab. Completing these parameters will enable UB related setup options within File Maintenance, and UB related functionality within NextGen® EPM. In addition, it defines the 3-digit code that will populate Field Locator 4 (Type of Bill) on UB claims.
Type of Facility: The selected Type of Facility prints in the first position of Field Locator 4 on UB claims. It also sets the default on the Payers > Practice tab > UB sub-tab in File Maintenance and on the Encounter Maintenance > UB tab in NextGen® EPM. Bill Classification: The selected Bill Classification prints in the second position of Field Locator 4 on UB claims. It also sets the default on the Payers > Practice tab > UB sub-tab in File Maintenance and on the Encounter Maintenance > UB tab in NextGen® EPM. Frequency of Bill: The selected Frequency of Bill prints in the third position of Field Locator 4 on UB claims. It also sets the default on the Payers > Practice tab > UB sub-tab in File Maintenance and on the Encounter Maintenance > UB tab in NextGen® EPM.
NOTE: For regular UB billing, this field is usually set to 1. For recurring UB claims billing, this field must be blank. This will allow the application to apply the proper frequency based on where the encounter lies in the sequence of recurring encounters.
Source of Admission: This setting populates Field Locator 15 on UB claims. The selected Source of Admission sets the default on the Encounter Maintenance > UB tab in NextGen® EPM.
NOTE: “Source of Admission” is required on electronic UB / 837I claims in ASC X12 Version 5010 format.
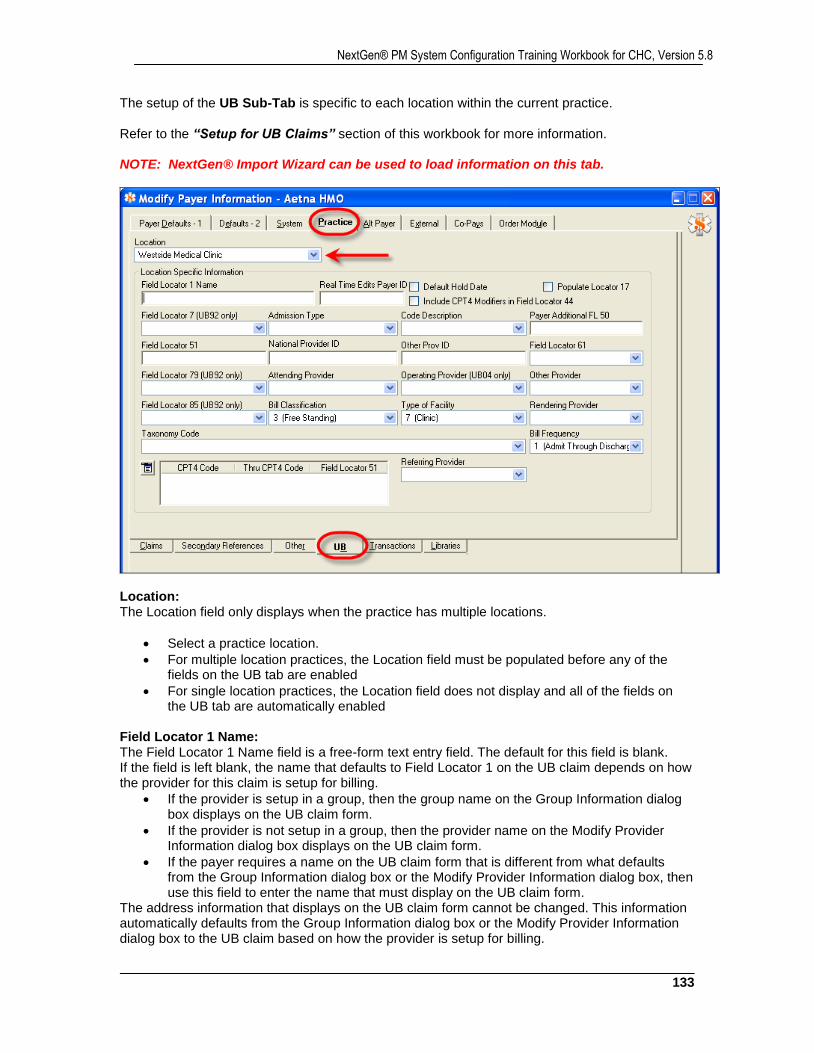
133
NextGen® PM System Configuration Training Workbook for CHC, Version 5.8
The setup of the UB Sub-Tab is specific to each location within the current practice. Refer to the “Setup for UB Claims” section of this workbook for more information. NOTE: NextGen® Import Wizard can be used to load information on this tab.
Location: The Location field only displays when the practice has multiple locations.
Select a practice location.
For multiple location practices, the Location field must be populated before any of the fields on the UB tab are enabled
For single location practices, the Location field does not display and all of the fields on the UB tab are automatically enabled
Field Locator 1 Name: The Field Locator 1 Name field is a free-form text entry field. The default for this field is blank. If the field is left blank, the name that defaults to Field Locator 1 on the UB claim depends on how the provider for this claim is setup for billing.
If the provider is setup in a group, then the group name on the Group Information dialog box displays on the UB claim form.
If the provider is not setup in a group, then the provider name on the Modify Provider Information dialog box displays on the UB claim form.
If the payer requires a name on the UB claim form that is different from what defaults from the Group Information dialog box or the Modify Provider Information dialog box, then use this field to enter the name that must display on the UB claim form.
The address information that displays on the UB claim form cannot be changed. This information automatically defaults from the Group Information dialog box or the Modify Provider Information dialog box to the UB claim based on how the provider is setup for billing.
NextGen Healthcare
134
Default Hold Date: If this check-box is checked, the hold date will default to the Hold Date field located on the Encounter Maintenance dialog box on the UB tab. The default hold date is generated by the system and is based on the last day of the month of the encounter date, plus any grace days that were set in the Grace Days field on the Service Location Information dialog box. For example, if the last day of the month of the encounter date is June 30th and the Grace Days field is set to 3, then the hold date would be July 3rd. Include CPT4 Modifiers: The default for this check-box is unchecked. If left unchecked, Field Locator 44 on the UB claim form only populates with the CPT4 code. If this check-box is checked, Field Locator 44 populates with the CPT4 code, Modifier 1, and Modifier 2. Populate Locator 17: When the Populate Admission Date check-box is selected, Field Locator 17, Field Locator 18, and Field Locator 21 on the UB92 claim form are affected:
Field Locator 17 on the UB claim form populates with the Admit Date from the Create Encounter Maintenance dialog box
Field Locator 18 and Field Locator 21 on the UB claim form populate with the value 99, which cannot be changed.
Field Locator 7 (UB92 only): Field Locator 6 and Field Locator 7 on the UB claim form are affected by the option you choose here. Use the drop-down arrow to make the appropriate selection based on the following descriptions: The <none> option and the default for this field, which is a blank field, populates Field Locator 6 on the claim form with the Svc Dates (from and to) of the first line item charge from the Charge Posting dialog box. Field Locator 7 on the claim form will be blank. The Total Days in billing cycle option will populate the From section of Field Locator 6 on the claim form with the first (from) Svc Dates of the first line item charge on the Charge Posting dialog box. The Through section of Field Locator 6 on the claim form populates with the second (through) Svc Dates of the last line item charge listed on the Charge Posting dialog box. Field Locator 7 on the claim form populates with the total number of service days, which is calculated from the two dates in Field Locator 6 on the claim form. The Total Units in billing cycle option will populate the From and Through sections of Field Locator 6 on the claim form with the Svc Dates (from and through) of the first line item charge on the Charge Posting dialog box. Field Locator 7 on the claim form populates with a value based on the sum of all the units listed in the Field Locator 46 column of the UB claim form. Admission Type: Support for Field Locator 19 includes the Type of Admission code table. These codes are used to setup the Type of Admission at the payer master level, which defaults to the encounter level. Once the Field Locator 19 is configured appropriately on the Payer Information dialog box, the default for the Encounter Information dialog box assumes the same default. In other words, you can change the type of admission code on a per encounter basis by changing the default admission code type on the UB tab of the Encounter Information dialog box. The following table lists the standard UB Type of Admission codes:
Elective - 3
Emergency - 1
Information Not Available - 9
Newborn - 4
Urgent – 2
135
NextGen® PM System Configuration Training Workbook for CHC, Version 5.8
Code Description: Select the drop-down arrow to make the appropriate selection based on the following descriptions:
<none> option and the default for this field, which is a blank field, populates Field Locator 43 on the UB claim with the CPT4 Description.
CPT4 Description option prints the CPT4 or alternate CPT4 description on the UB claim.
Revenue Code Description option prints the revenue code description on the UB claim. Payer Additional FL50: Support for Field Locator 50 includes this free form text field, Payer Locator FL50, on the UB tab of the Add/Modify Payer Information dialog box. This field is limited to a 2-character,alphanumeric entry, which defaults to the UB claim form in combination with the payer's name and is the Source of Payment code associated with the payer. Field Locator 51: This is a free-form text entry field. This is a required field for Enhanced UB users. You must use this field to enter the number provided to you by the payer when creating a UB claim. The default for this field is blank. If you are an Enhanced UB user and you leave this field blank and generate a UB claim, an edit will occur during the claims process that reads: Loc 51 Provider Number is missing. National Provider ID: Enter the National Provider Identifier (NPI) for the payer.
NOTE: The NPI is the standard unique identifier for health care providers to use in filing and processing health care claims and other transactions. For more information about entering NPIs see Entering the NPI in the Master Files.
Other Prov ID: This is a 13-character, free-form text field. Any information is entered in this field for a particular payer displays in the Field Locator 56 box on the UB paper claim forms. Field Locator 61: Select the drop-down arrow to make the appropriate selection based on the following descriptions:
<none> option, and the default for this field, which is a blank field, prints nothing in the Field Locator 61 box on the UB claim form.
Group Name option prints the group name from the Group Name field on the patient's Insurance Maintenance dialog box in the Field Locator 61 box on the UB claim form.
Payer Name option prints the payer's name in the Field Locator 61 box on the UB claim form.
Field Locator 79 (UB92 only): Select the drop-down arrow to make the appropriate selection based on the following descriptions:
<none> option and the default for this field, which is a blank field, populates Field Locator 79 on the UB claim with the value 4. This value corresponds to the CPT4 coding method.
CPT4 Coding Method option displays the value 4 on the UB claim.
ICD-9 Coding Method option displays the value 9 on the UB claim.
NextGen Healthcare
136
Attending Provider: Select the drop-down arrow to make the appropriate selection based on the following descriptions:
<none> option and the default for this field, which is a blank field, will populate Field Locator 82 on the UB claim with the Rendering Physician and UPIN that is attached to the first line item charge on the Charge Posting dialog box.
1st Consult, 2nd Consult, Admitting, Referring, Rendering, and Supervisor options default from the corresponding fields on the Create Encounter Maintenance dialog box. Field Locator 82 on the UB claim populates with the doctor's name and UPIN that is entered in that field. If, on the Create Encounter Maintenance dialog box the field that corresponds to the option you selected is blank or the provider is not setup as a provider with the payer, an edit will occur during the claims process, which reads: Provider for Loc82 was not found on NSF.
Operating Provider (UB04 only): This field is available for electronic institutional claims and for paper UB04 claims. If you select a provider in the Operating Provider field, the Operating Provider's information is used to create the 2310B loop. If you select a provider in the Operating Provider field and the Claim Print library option is enabled, the appropriate information prints in FL77 on the UB04 form. If you do not select a provider in the Operating Provider field, the 2310B Operating loop does not automatically create. Creation of the loop then falls to the Submitter Profile option. The submitter profile option Populate Operating Physician information if applicable only creates the 2310B loop if a provider is selected in the Other Provider field on the UB tab of the Payer master file. Other Provider: Select the drop-down arrow to make the appropriate selection based on the following descriptions:
<none> option is the default for this field, which is a blank field, will leave Field Locator 83 on the UB claim blank.
1st Consult, 2nd Consult, Admitting, Referring, Rendering, and Supervisor options default from the corresponding fields on the Create Encounter Maintenance dialog box. Field Locator 83 on the UB claim populates with the doctor's name and UPIN that is entered in that field. If, on the Create Encounter Maintenance dialog box, the field that corresponds to the option you selected is blank or the provider is not setup as a provider with the payer, an edit will occur during the claims process, which reads: Provider for Loc83 was not found on NSF.
Field Locator 85 (UB92 only): Select the drop-down arrow to make the appropriate selection based on the following descriptions:
<none> option and the default for this field, which is a blank field, populates Field Locator 85 on the UB92 claim with the rendering physician, but no UPIN, that is attached to the first line item of the charges on the Charge Posting dialog box.
1st Consult, 2nd Consult, Admitting, Referring, Rendering, and Supervisor options default from the corresponding fields on the Create Encounter Maintenance dialog box. Field Locator 85 on the UB92 claim populates with the doctor's name, but no UPIN, that is entered in that field. If, on the Create Encounter Maintenance dialog box, the field that corresponds to the option you selected is blank or the provider is not setup as a provider with the payer, an edit will occur during the claims process, which reads: Provider for Loc85 was not found on NSF
137
NextGen® PM System Configuration Training Workbook for CHC, Version 5.8
Bill Classification: The Bill Classification field is also located on the Practice Preferences dialog box, Claims tab, which was discussed at the beginning. The default for this field displays the entry from the Bill Classification field on the Claims tab of the Practice Preferences dialog box. If nothing is entered in the field on the Claims tab, the field on the UB tab automatically fills in with a value based on other criteria. To override the default value and description, select another value from the list. If you override the default that displays in this field, the override only affects encounters attached to this payer for Enhanced UB users. The value that displays in this field automatically populates the second digit on Field Locator 4 on the UB claim form. This field must be populated with the value 4 (Outpatient Rehab Facility), if you want to use the automated UB claims process. Type of Facility: The Type of Facility field is also located on the Claims tab of the Practice Preferences dialog box. The default for this field displays what was entered in the Type of Facility field on the Claims tab of the Practice Preferences dialog box. To override the default value and description, select another value from the list. If you override the default that displays in this field, the override only affects encounters attached to this payer for Enhanced UB users. The value that displays in this field automatically populates the first digit in Field Locator 4 on the UB claim form. This field must be populated with the value 7 (Clinic) if you want to use the automated UB claims process. Rendering Provider: Select the appropriate rendering provider or providers that are available in the drop-down list. All the rendering providers configured as rendering providers for the practice display in the drop-down list. Check the check-box next to each provider name set as a UB rendering provider for this payer. The selected doctors always have a UB claim generated when charges are billed to this payer. If the Field Locator 51 field is populated, any doctor that is selected in this field always has a UB claim generated, regardless of the Service Item Form setting, when they have charges that are being billed to this payer. Bill Frequency: This field corresponds to the field located on the Claims tab of the Practice Preferences dialog box labeled Frequency of Bill. The default for this field is the value entered in the Frequency of Bill field on the Practice Preferences dialog box, Claims tab. If the Frequency of Bill field is left blank, this field is also blank. To override the default, select another value from the list. If you override the default that displays in this field, the override only affects encounters attached to this payer for Enhanced UB users. The value that displays in this field automatically populates the third digit in Field Locator 4 on the UB claim form. This field must be left blank if you want to use the automated UB claims process. Taxonomy Code: Select the taxonomy code to use for group billing of UB claims. If a taxonomy code is selected in the Group master file, the code selected here overrides it. CPT4 Field Locator 51: The CPT4 Field Locator 51 is a required field. Click the Open Menu button to the left of the field box to open the Field Loc 51 for a CPT4 Range dialog box. Then, select the beginning CPT4 code for the range. The question mark button to the right of the range boxes enables you to search for specific codes. Repeat this for the Thru CPT4 ending range box. The CPT4 range boxes are required entries. You must enter a provider number in the Field Locator 51 field. This is required. If no provider number is entered, there is no CPT4 codes associated with a provider rendering billing impossible.
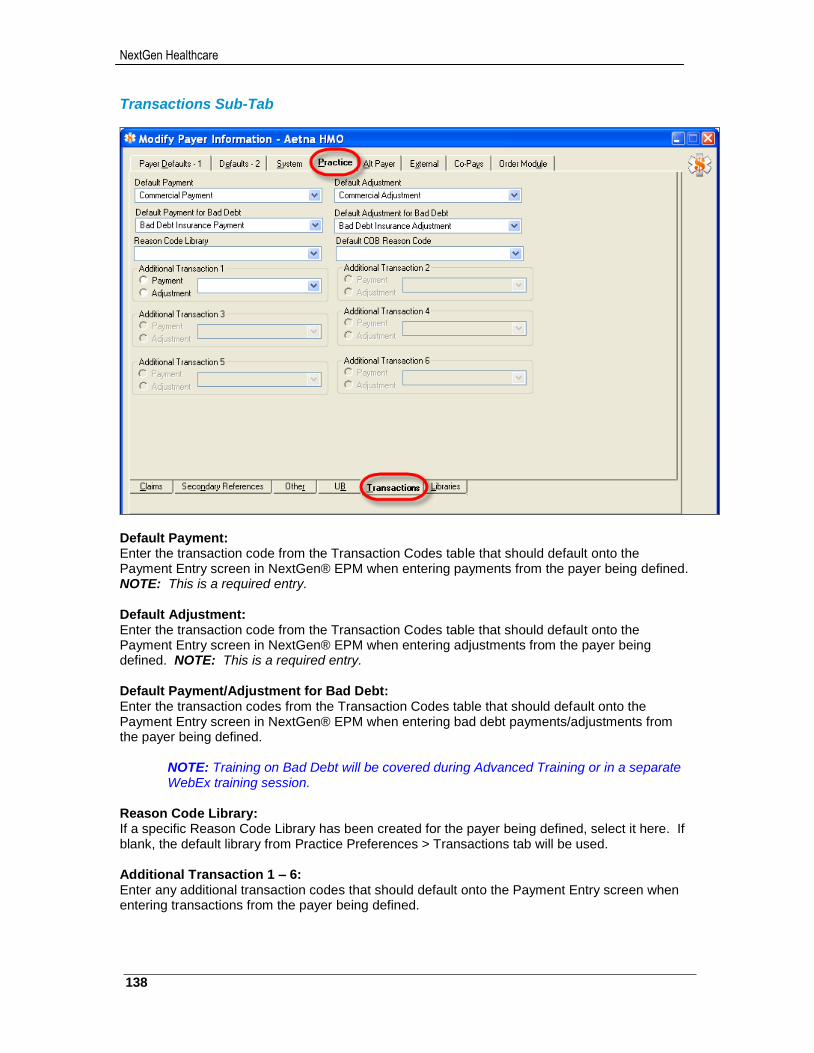
NextGen Healthcare
138
Transactions Sub-Tab
Default Payment: Enter the transaction code from the Transaction Codes table that should default onto the Payment Entry screen in NextGen® EPM when entering payments from the payer being defined. NOTE: This is a required entry. Default Adjustment: Enter the transaction code from the Transaction Codes table that should default onto the Payment Entry screen in NextGen® EPM when entering adjustments from the payer being defined. NOTE: This is a required entry. Default Payment/Adjustment for Bad Debt: Enter the transaction codes from the Transaction Codes table that should default onto the Payment Entry screen in NextGen® EPM when entering bad debt payments/adjustments from the payer being defined.
NOTE: Training on Bad Debt will be covered during Advanced Training or in a separate WebEx training session.
Reason Code Library: If a specific Reason Code Library has been created for the payer being defined, select it here. If blank, the default library from Practice Preferences > Transactions tab will be used. Additional Transaction 1 – 6: Enter any additional transaction codes that should default onto the Payment Entry screen when entering transactions from the payer being defined.
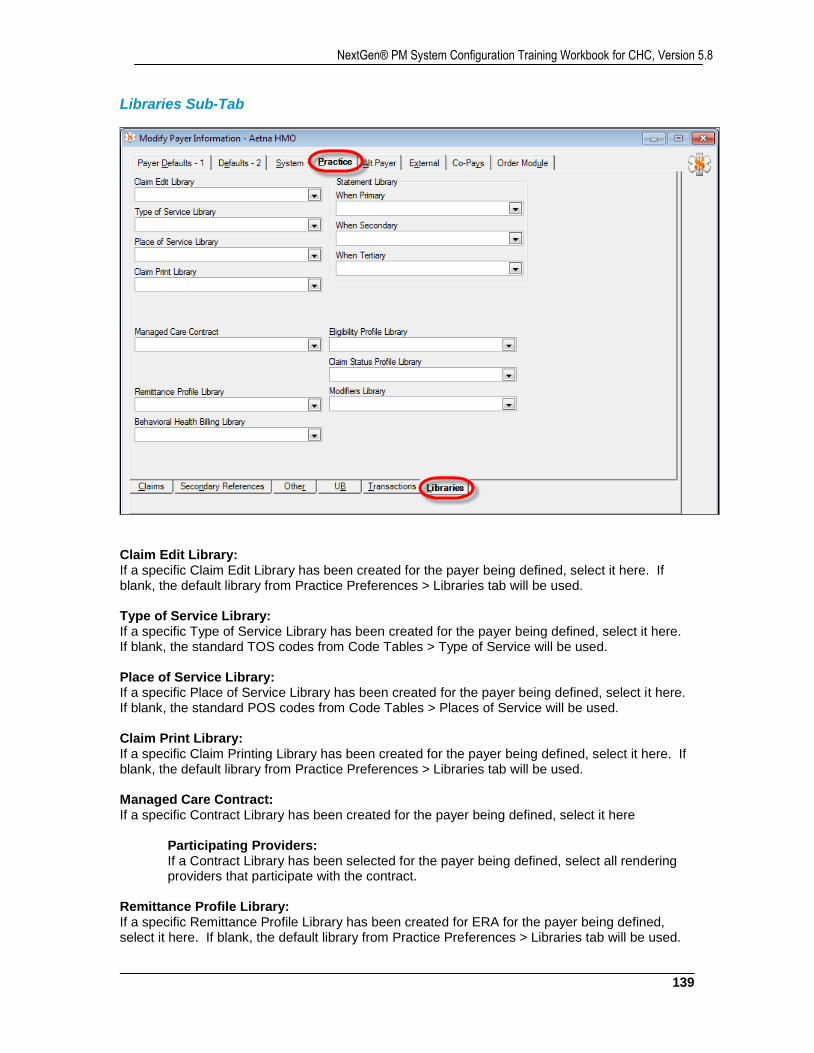
139
NextGen® PM System Configuration Training Workbook for CHC, Version 5.8
Libraries Sub-Tab
Claim Edit Library: If a specific Claim Edit Library has been created for the payer being defined, select it here. If blank, the default library from Practice Preferences > Libraries tab will be used. Type of Service Library: If a specific Type of Service Library has been created for the payer being defined, select it here. If blank, the standard TOS codes from Code Tables > Type of Service will be used. Place of Service Library: If a specific Place of Service Library has been created for the payer being defined, select it here. If blank, the standard POS codes from Code Tables > Places of Service will be used. Claim Print Library: If a specific Claim Printing Library has been created for the payer being defined, select it here. If blank, the default library from Practice Preferences > Libraries tab will be used. Managed Care Contract: If a specific Contract Library has been created for the payer being defined, select it here Participating Providers:
If a Contract Library has been selected for the payer being defined, select all rendering providers that participate with the contract.
Remittance Profile Library: If a specific Remittance Profile Library has been created for ERA for the payer being defined, select it here. If blank, the default library from Practice Preferences > Libraries tab will be used.
NextGen Healthcare
140
Behavioral Health Billing Library: If a specific Behavioral Health Billing Library has been created for the payer being defined, select it here. If blank, the default library from Practice Preferences > Libraries tab will be used. Statement Library: Select the statement libraries to use when the associated payer is the primary, secondary, and tertiary payer.
NOTE: These payer-specific settings override the ones in the Statement Parameter Mappings master file.
Eligibility Profile Library: Select an Eligibility Profiles library to attach to the payer. The Eligibility Profiles library is required for submitting eligibility inquiries in batch mode. This library enables you to setup rules to automatically complete the required fields and additional data for batch mode that you would manually enter when running an eligibility status check in real-time mode. For more information, see the NextGen® EPM Real-time Transaction Server Guide. Claim Status Profile Library: Select a Claim Status Profiles library to attach to the payer. The Claim Status Profile library is required for submitting claim status inquiries. This library enables you to setup rules to automatically complete the required fields and additional data for batch mode processing. For more information, see the NextGen® EPM Real-time Transaction Server Guide. Modifiers Library: If a specific Claim Modifiers Library has been created for anesthesia, recurring rental and/or behavioral health billing for the payer being defined, select it here. If blank, the default library from Practice Preferences > Libraries tab will be used.
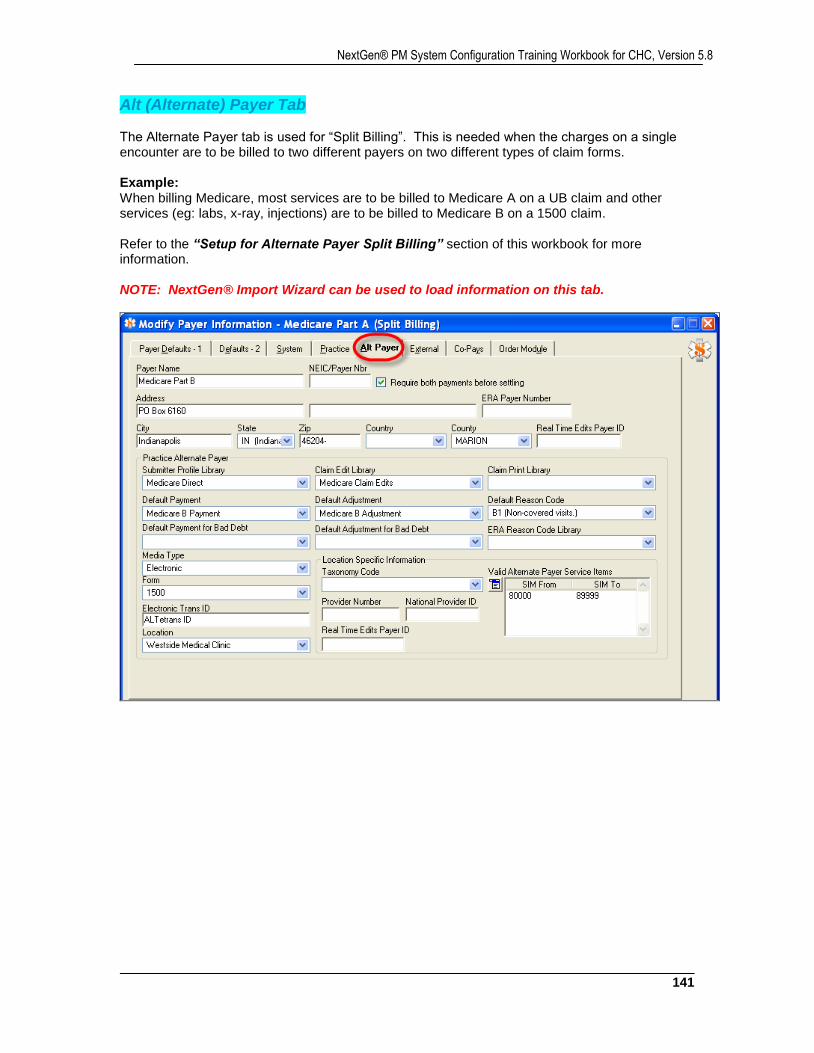
141
NextGen® PM System Configuration Training Workbook for CHC, Version 5.8
Alt (Alternate) Payer Tab The Alternate Payer tab is used for “Split Billing”. This is needed when the charges on a single encounter are to be billed to two different payers on two different types of claim forms. Example: When billing Medicare, most services are to be billed to Medicare A on a UB claim and other services (eg: labs, x-ray, injections) are to be billed to Medicare B on a 1500 claim. Refer to the “Setup for Alternate Payer Split Billing” section of this workbook for more information. NOTE: NextGen® Import Wizard can be used to load information on this tab.

NextGen Healthcare
142
External Tab The External tab is used when interfaces will be implemented between NextGen and one or more external systems. This tab allows a cross-reference to be defined between the NextGen payer and the external system payer. NOTE: NextGen® Import Wizard can be used to load information on this tab.
External ID: Enter the ID for the payer as it is known on the external system. External System: Select the external system to which NextGen will be interfaced.
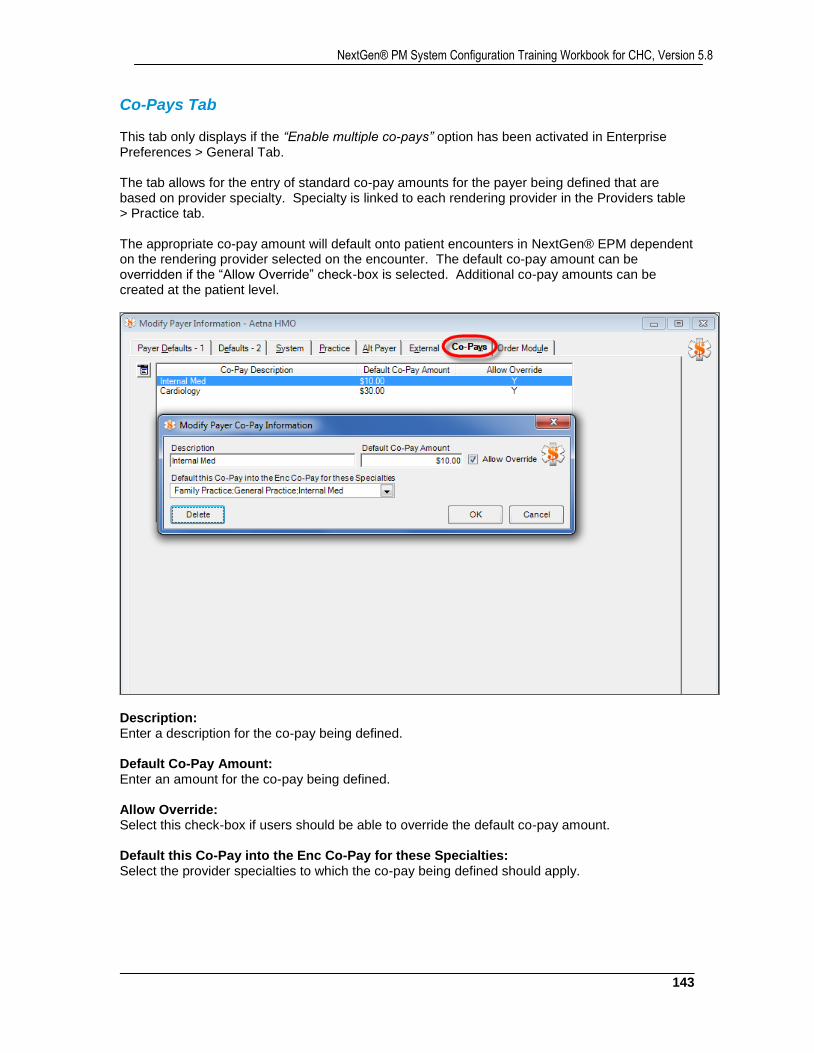
143
NextGen® PM System Configuration Training Workbook for CHC, Version 5.8
Co-Pays Tab This tab only displays if the “Enable multiple co-pays” option has been activated in Enterprise Preferences > General Tab. The tab allows for the entry of standard co-pay amounts for the payer being defined that are based on provider specialty. Specialty is linked to each rendering provider in the Providers table > Practice tab. The appropriate co-pay amount will default onto patient encounters in NextGen® EPM dependent on the rendering provider selected on the encounter. The default co-pay amount can be overridden if the “Allow Override” check-box is selected. Additional co-pay amounts can be created at the patient level.
Description: Enter a description for the co-pay being defined. Default Co-Pay Amount: Enter an amount for the co-pay being defined. Allow Override: Select this check-box if users should be able to override the default co-pay amount. Default this Co-Pay into the Enc Co-Pay for these Specialties: Select the provider specialties to which the co-pay being defined should apply.
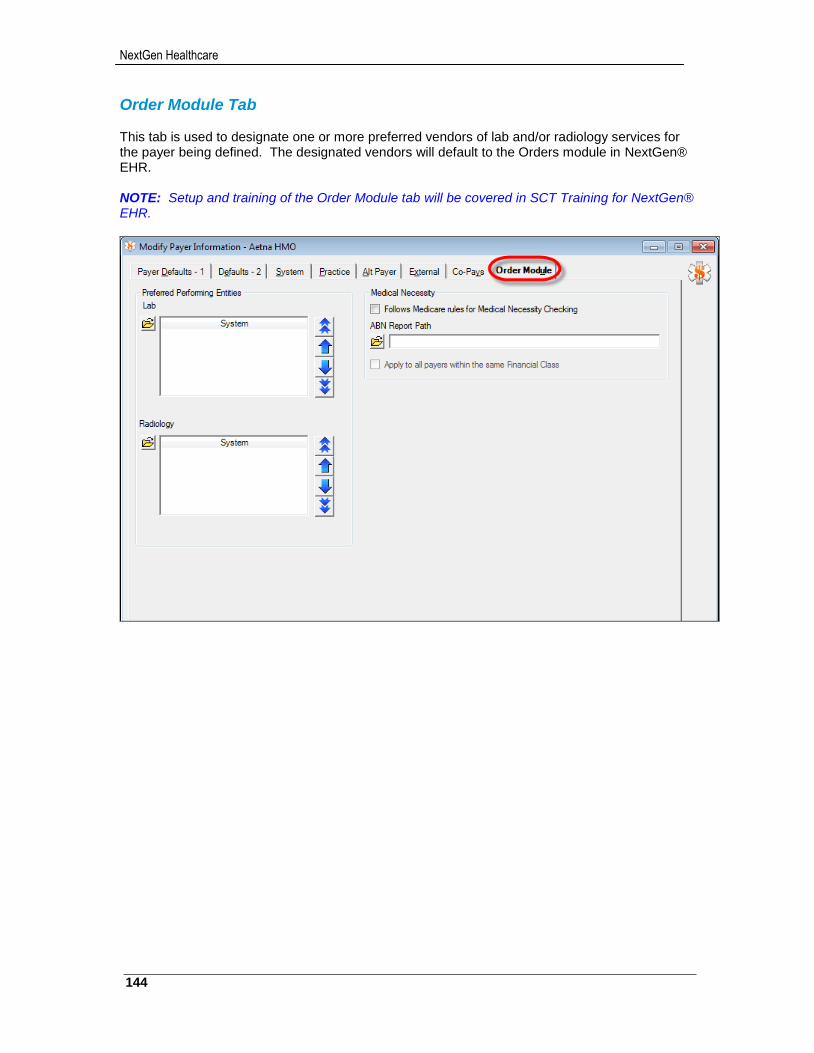
NextGen Healthcare
144
Order Module Tab This tab is used to designate one or more preferred vendors of lab and/or radiology services for the payer being defined. The designated vendors will default to the Orders module in NextGen® EHR. NOTE: Setup and training of the Order Module tab will be covered in SCT Training for NextGen® EHR.
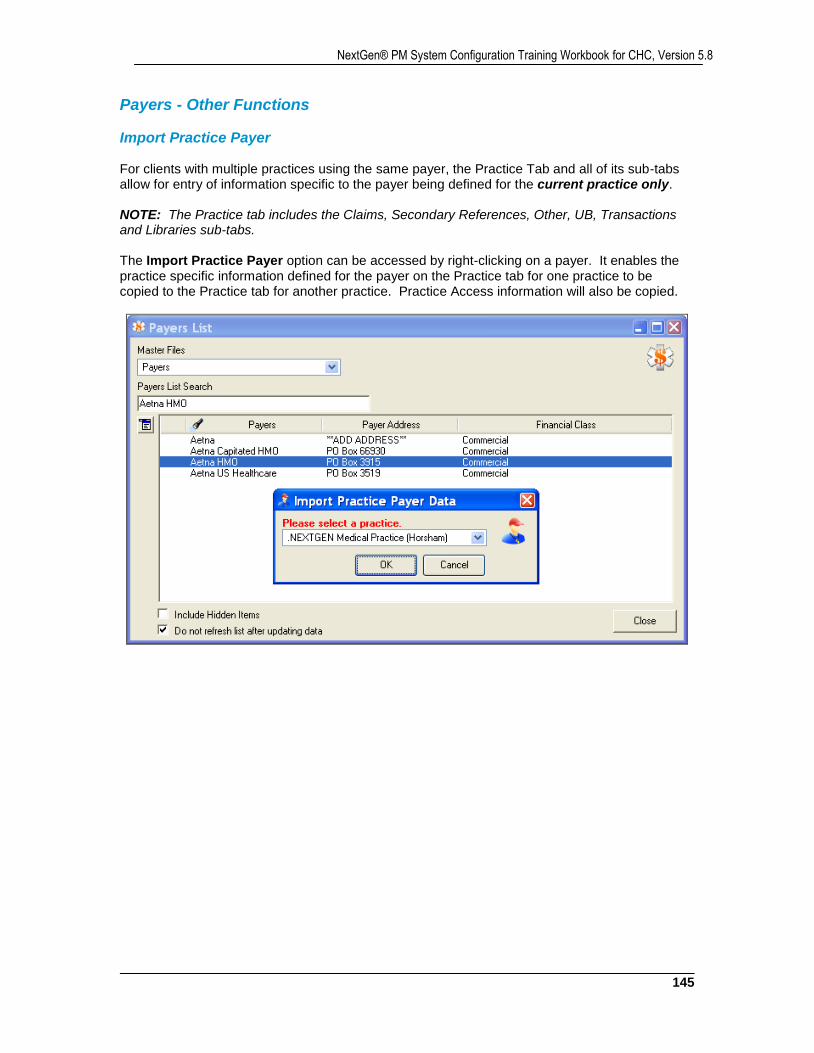
145
NextGen® PM System Configuration Training Workbook for CHC, Version 5.8
Payers - Other Functions
Import Practice Payer For clients with multiple practices using the same payer, the Practice Tab and all of its sub-tabs allow for entry of information specific to the payer being defined for the current practice only. NOTE: The Practice tab includes the Claims, Secondary References, Other, UB, Transactions and Libraries sub-tabs. The Import Practice Payer option can be accessed by right-clicking on a payer. It enables the practice specific information defined for the payer on the Practice tab for one practice to be copied to the Practice tab for another practice. Practice Access information will also be copied.
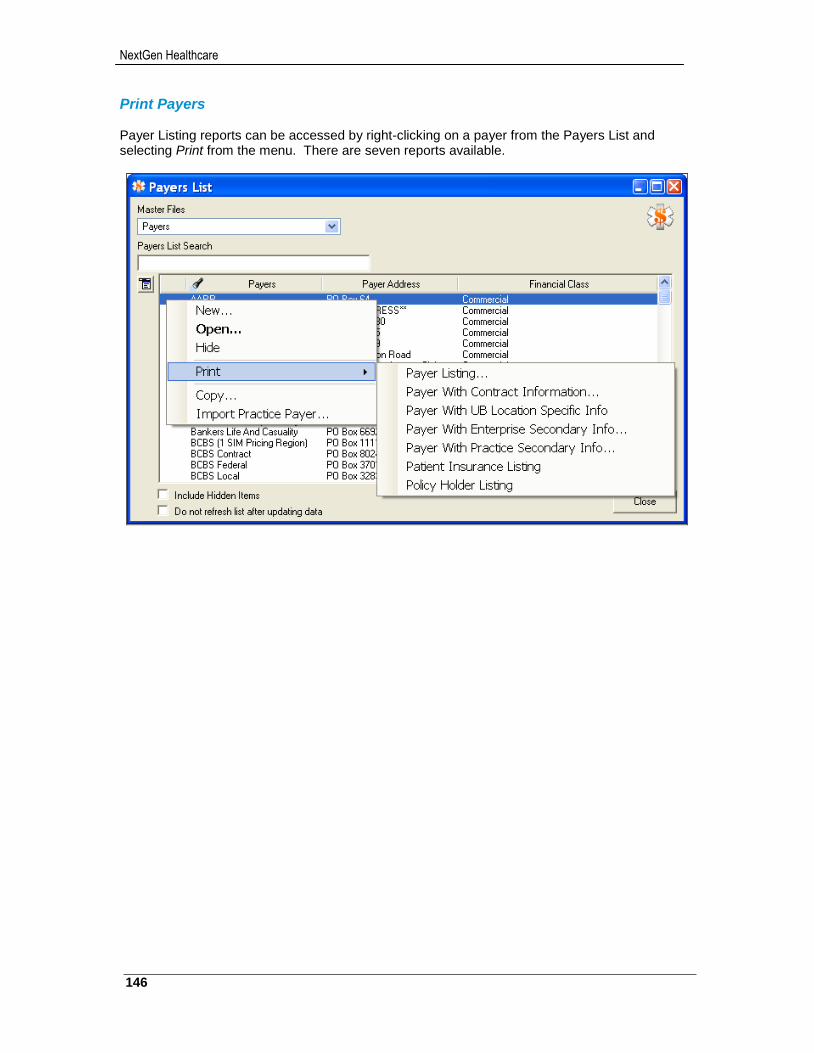
NextGen Healthcare
146
Print Payers Payer Listing reports can be accessed by right-clicking on a payer from the Payers List and selecting Print from the menu. There are seven reports available.
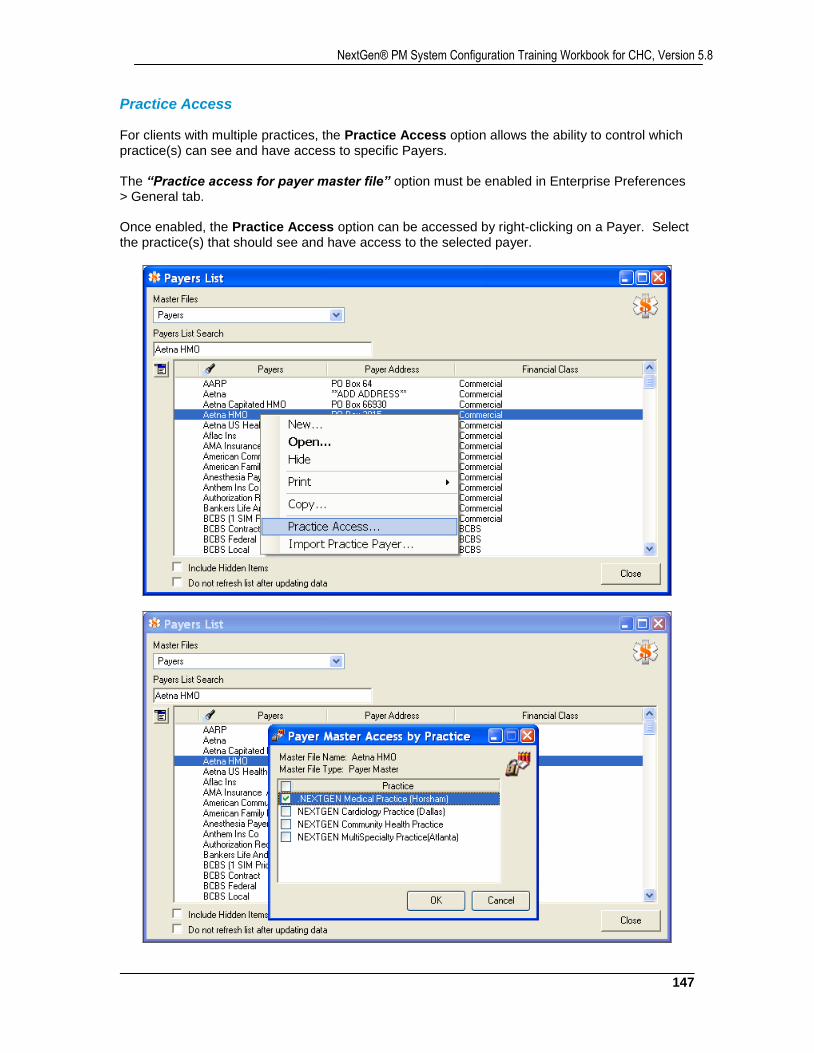
147
NextGen® PM System Configuration Training Workbook for CHC, Version 5.8
Practice Access For clients with multiple practices, the Practice Access option allows the ability to control which practice(s) can see and have access to specific Payers. The “Practice access for payer master file” option must be enabled in Enterprise Preferences > General tab. Once enabled, the Practice Access option can be accessed by right-clicking on a Payer. Select the practice(s) that should see and have access to the selected payer.
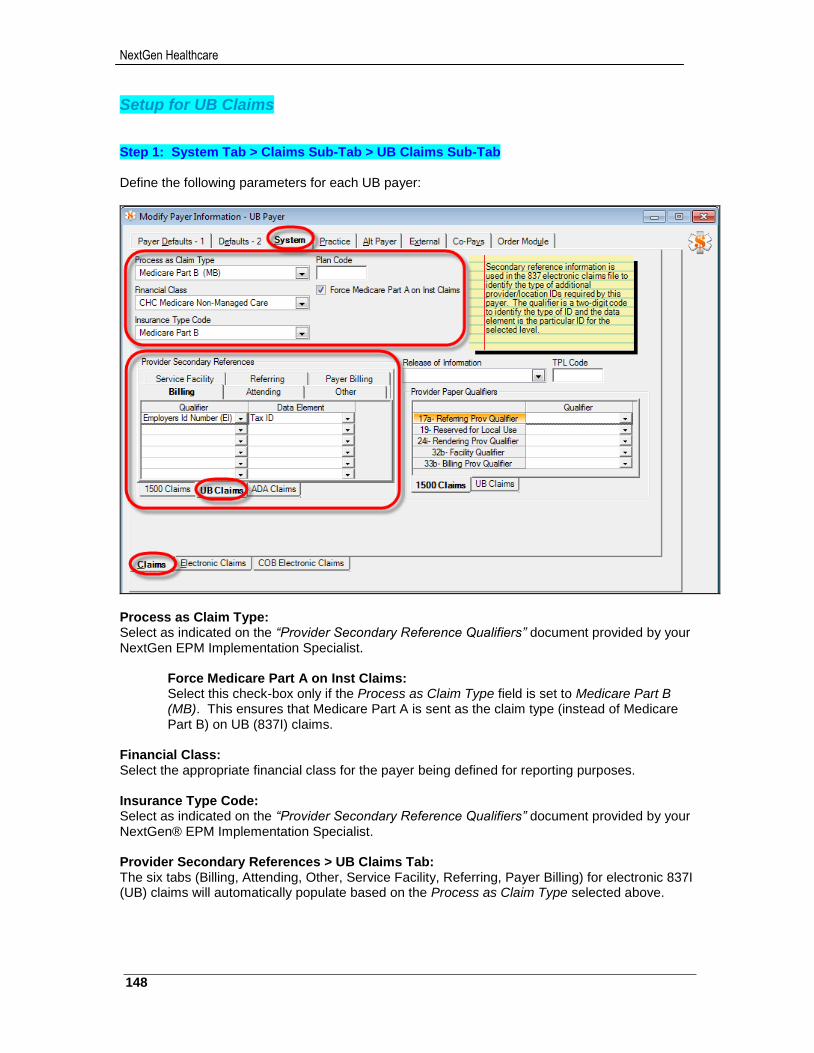
NextGen Healthcare
148
Setup for UB Claims Step 1: System Tab > Claims Sub-Tab > UB Claims Sub-Tab Define the following parameters for each UB payer:
Process as Claim Type: Select as indicated on the “Provider Secondary Reference Qualifiers” document provided by your NextGen EPM Implementation Specialist.
Force Medicare Part A on Inst Claims: Select this check-box only if the Process as Claim Type field is set to Medicare Part B (MB). This ensures that Medicare Part A is sent as the claim type (instead of Medicare Part B) on UB (837I) claims.
Financial Class: Select the appropriate financial class for the payer being defined for reporting purposes. Insurance Type Code: Select as indicated on the “Provider Secondary Reference Qualifiers” document provided by your NextGen® EPM Implementation Specialist. Provider Secondary References > UB Claims Tab: The six tabs (Billing, Attending, Other, Service Facility, Referring, Payer Billing) for electronic 837I (UB) claims will automatically populate based on the Process as Claim Type selected above.
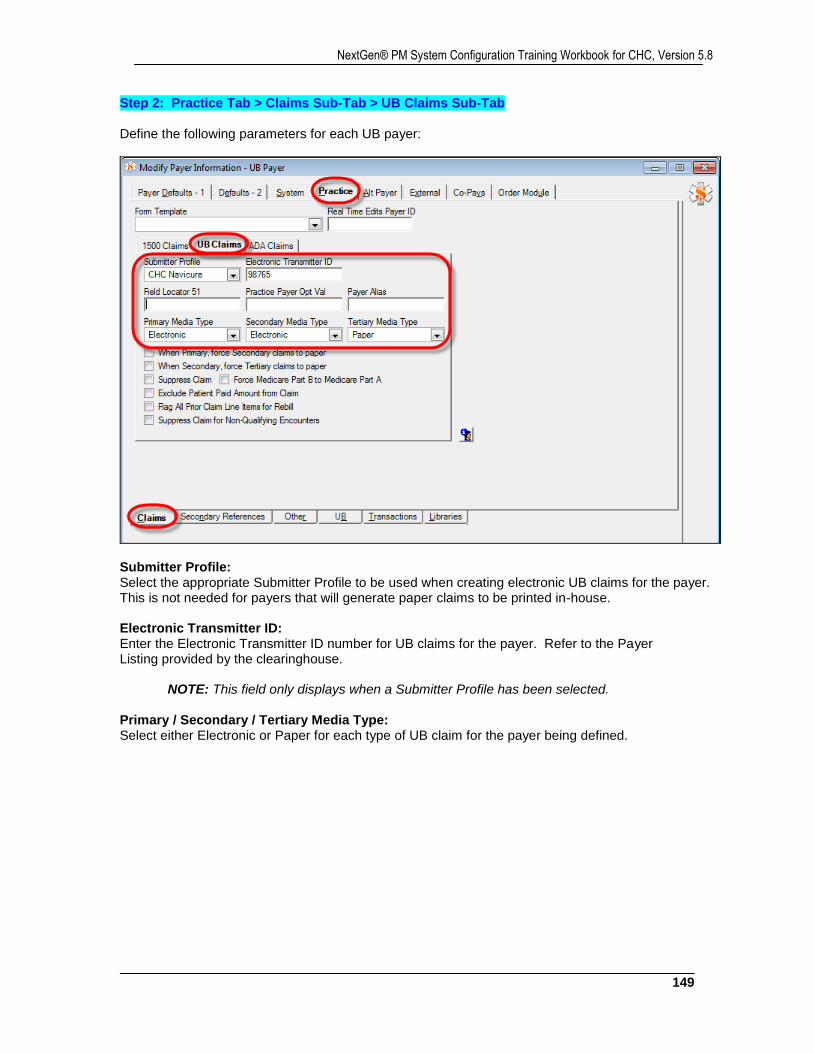
149
NextGen® PM System Configuration Training Workbook for CHC, Version 5.8
Step 2: Practice Tab > Claims Sub-Tab > UB Claims Sub-Tab Define the following parameters for each UB payer:
Submitter Profile: Select the appropriate Submitter Profile to be used when creating electronic UB claims for the payer. This is not needed for payers that will generate paper claims to be printed in-house. Electronic Transmitter ID: Enter the Electronic Transmitter ID number for UB claims for the payer. Refer to the Payer Listing provided by the clearinghouse.
NOTE: This field only displays when a Submitter Profile has been selected. Primary / Secondary / Tertiary Media Type: Select either Electronic or Paper for each type of UB claim for the payer being defined.
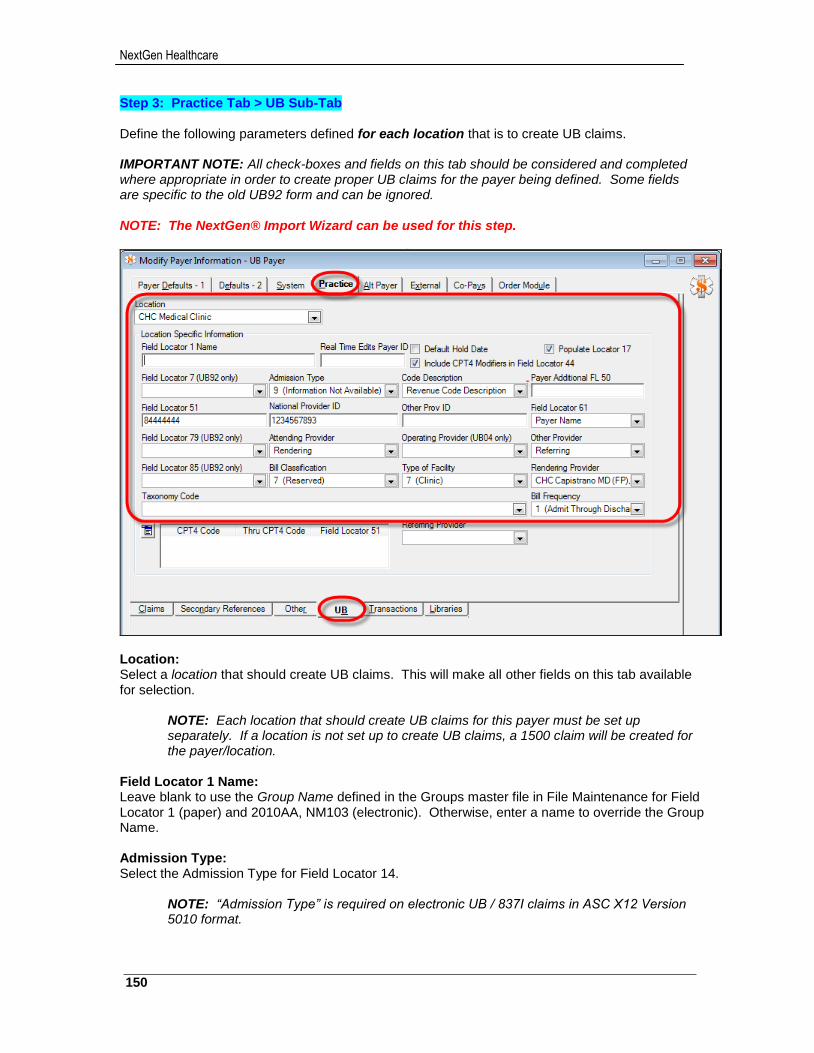
NextGen Healthcare
150
Step 3: Practice Tab > UB Sub-Tab Define the following parameters defined for each location that is to create UB claims. IMPORTANT NOTE: All check-boxes and fields on this tab should be considered and completed where appropriate in order to create proper UB claims for the payer being defined. Some fields are specific to the old UB92 form and can be ignored. NOTE: The NextGen® Import Wizard can be used for this step.
Location: Select a location that should create UB claims. This will make all other fields on this tab available for selection.
NOTE: Each location that should create UB claims for this payer must be set up separately. If a location is not set up to create UB claims, a 1500 claim will be created for the payer/location.
Field Locator 1 Name: Leave blank to use the Group Name defined in the Groups master file in File Maintenance for Field Locator 1 (paper) and 2010AA, NM103 (electronic). Otherwise, enter a name to override the Group Name. Admission Type: Select the Admission Type for Field Locator 14.
NOTE: “Admission Type” is required on electronic UB / 837I claims in ASC X12 Version 5010 format.
151
NextGen® PM System Configuration Training Workbook for CHC, Version 5.8
Code Description: Select CPT4 Description or Revenue Code Description for Field Locator 43 (paper only) Field Locator 51: Enter the legacy Payer ID or Tax ID for Field Locator 51 (paper) and 2010AA, REF02 (electronic).
NOTE: This is a required entry.
National Provider ID: Enter the NPI number for Field Locator 56 (paper) and 2010AA, NM109 (electronic). An NPI number entered here will override numbers defined at the Group and Provider levels. Field Locator 61: Select Group Name or Payer Name from the Insurance Maintenance window for Field Locator 61 (paper only). Attending Provider: Select Rendering for Field Locator 76 (paper) and 2310A, NM103-04 (electronic). Operating Provider: Select the encounter Provider, if applicable, for Field Locator 77 (paper) and 2310B, NM103-04 (electronic). Other Provider: Select the encounter Provider, if applicable, for Field Locator 78 (paper) and 2310C, NM102-04 (electronic).
NOTE: The above providers pull from the Encounter Maintenance window. Options include: 1
st Consult, 2
nd Consult, Admitting, Referring, Rendering, and Supervisor.
Bill Classification: Defaults for Field Locator 4 (paper) and 2300 CLM05-2 (electronic). Type of Facility: Defaults for Field Locator 4 (paper) and 2300 CLM05-1 (electronic). Bill Frequency: Defaults for Field Locator 4 (paper) and 2300 CLM05-3 (electronic).
NOTE: The above three fields create the 3-digit code for Field Locator 4. The defaults were defined in Practice Preferences > Claims tab. The defaults can be changed for the payer if needed.
Rendering Provider: Select all rendering providers that should have UB claims created for this payer/location.
NOTE: If a provider is not selected, a 1500 form will be created for the provider/payer/location, unless there is additional UB specific setup in the SIM Library.
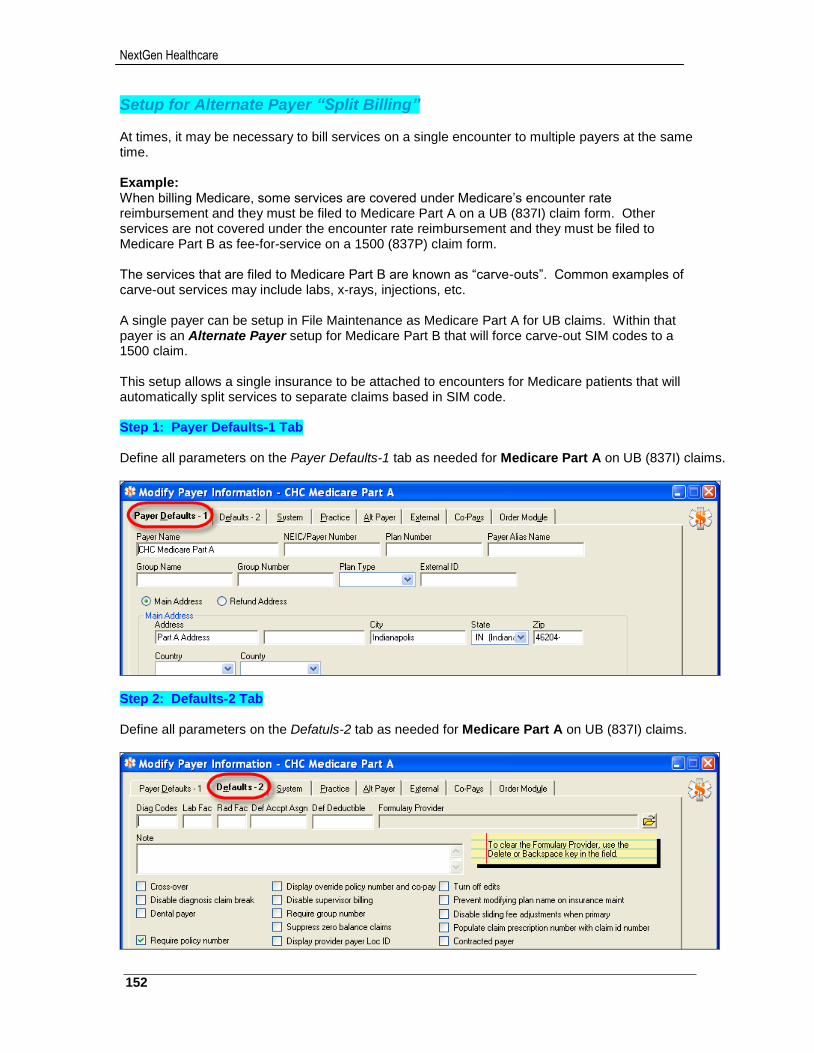
NextGen Healthcare
152
Setup for Alternate Payer “Split Billing” At times, it may be necessary to bill services on a single encounter to multiple payers at the same time. Example: When billing Medicare, some services are covered under Medicare’s encounter rate reimbursement and they must be filed to Medicare Part A on a UB (837I) claim form. Other services are not covered under the encounter rate reimbursement and they must be filed to Medicare Part B as fee-for-service on a 1500 (837P) claim form. The services that are filed to Medicare Part B are known as “carve-outs”. Common examples of carve-out services may include labs, x-rays, injections, etc. A single payer can be setup in File Maintenance as Medicare Part A for UB claims. Within that payer is an Alternate Payer setup for Medicare Part B that will force carve-out SIM codes to a 1500 claim. This setup allows a single insurance to be attached to encounters for Medicare patients that will automatically split services to separate claims based in SIM code. Step 1: Payer Defaults-1 Tab Define all parameters on the Payer Defaults-1 tab as needed for Medicare Part A on UB (837I) claims.
Step 2: Defaults-2 Tab Define all parameters on the Defatuls-2 tab as needed for Medicare Part A on UB (837I) claims.
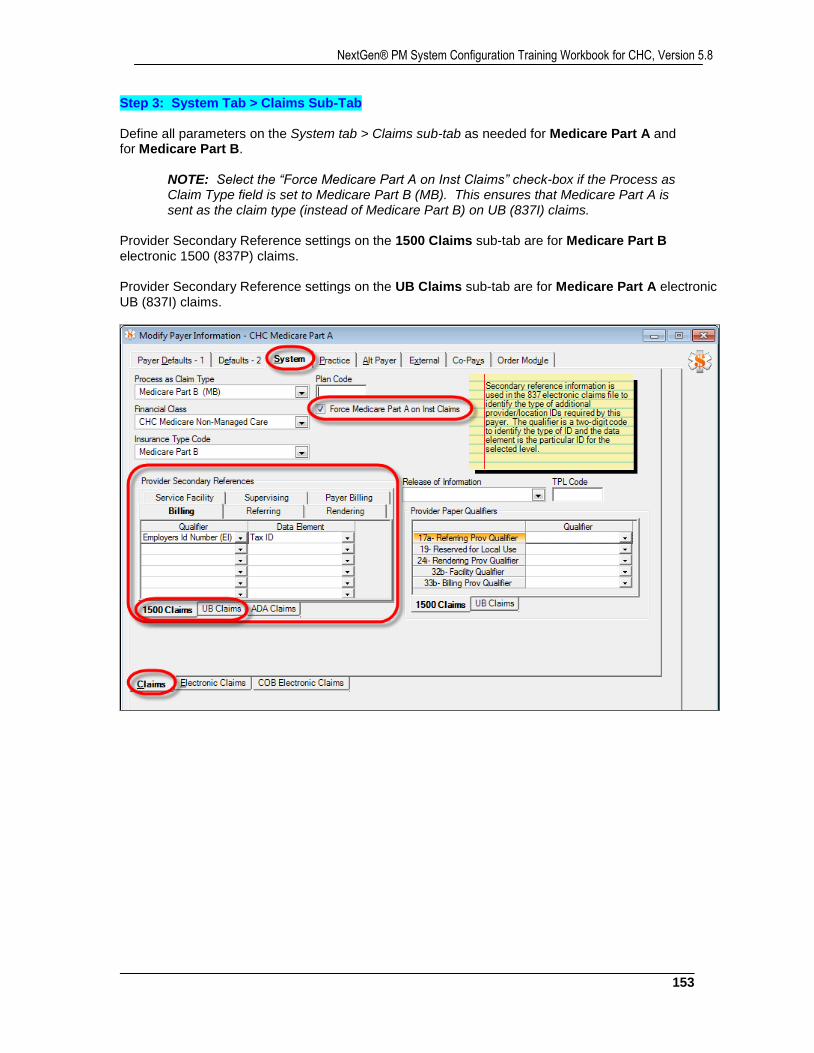
153
NextGen® PM System Configuration Training Workbook for CHC, Version 5.8
Step 3: System Tab > Claims Sub-Tab Define all parameters on the System tab > Claims sub-tab as needed for Medicare Part A and for Medicare Part B.
NOTE: Select the “Force Medicare Part A on Inst Claims” check-box if the Process as Claim Type field is set to Medicare Part B (MB). This ensures that Medicare Part A is sent as the claim type (instead of Medicare Part B) on UB (837I) claims.
Provider Secondary Reference settings on the 1500 Claims sub-tab are for Medicare Part B electronic 1500 (837P) claims. Provider Secondary Reference settings on the UB Claims sub-tab are for Medicare Part A electronic UB (837I) claims.
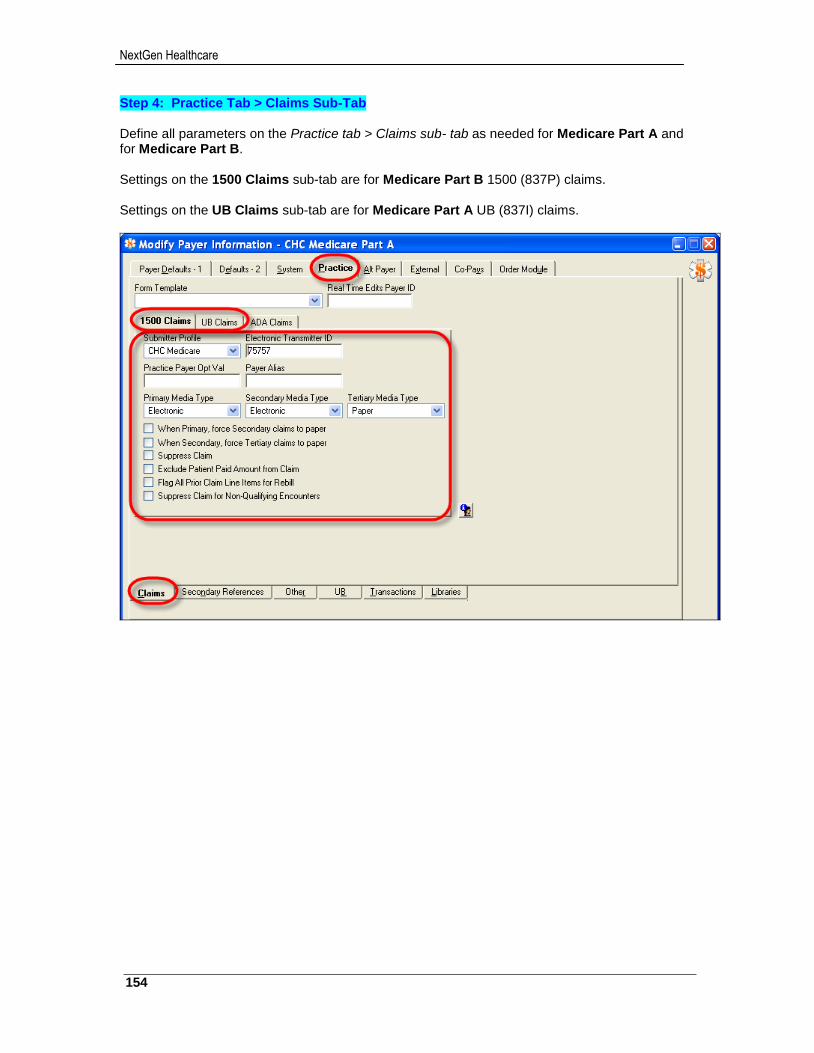
NextGen Healthcare
154
Step 4: Practice Tab > Claims Sub-Tab Define all parameters on the Practice tab > Claims sub- tab as needed for Medicare Part A and for Medicare Part B. Settings on the 1500 Claims sub-tab are for Medicare Part B 1500 (837P) claims. Settings on the UB Claims sub-tab are for Medicare Part A UB (837I) claims.
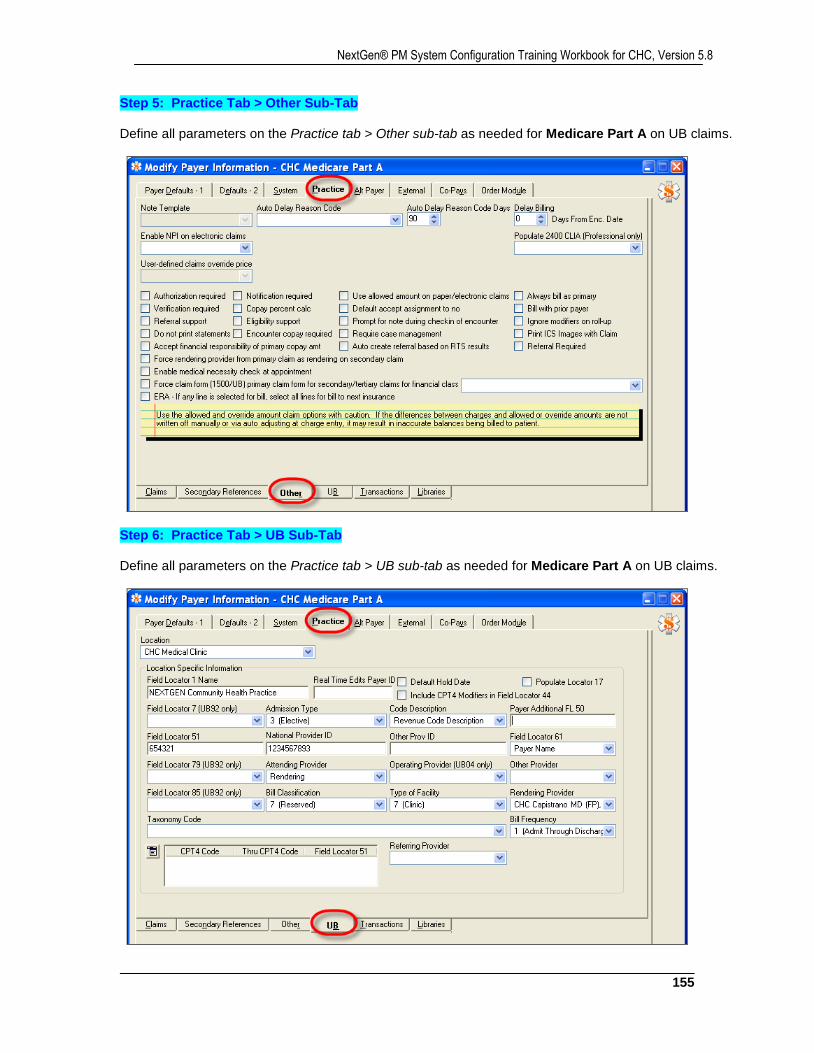
155
NextGen® PM System Configuration Training Workbook for CHC, Version 5.8
Step 5: Practice Tab > Other Sub-Tab Define all parameters on the Practice tab > Other sub-tab as needed for Medicare Part A on UB claims.
Step 6: Practice Tab > UB Sub-Tab Define all parameters on the Practice tab > UB sub-tab as needed for Medicare Part A on UB claims.
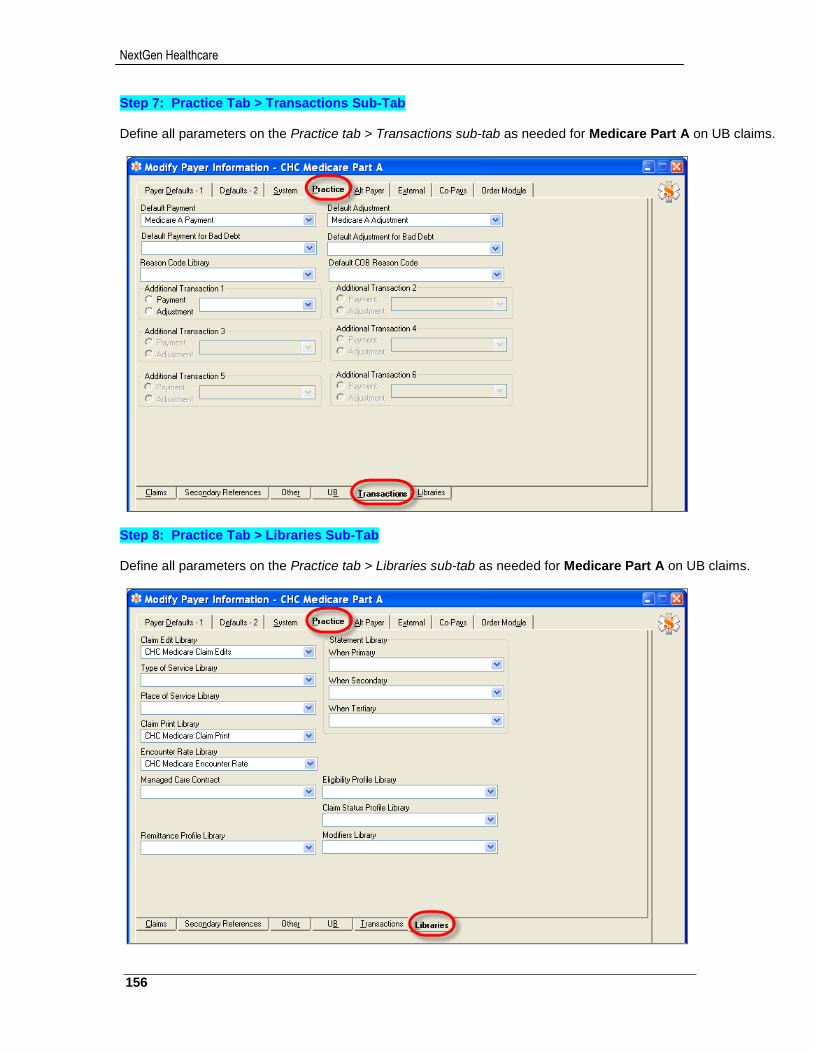
NextGen Healthcare
156
Step 7: Practice Tab > Transactions Sub-Tab Define all parameters on the Practice tab > Transactions sub-tab as needed for Medicare Part A on UB claims.
Step 8: Practice Tab > Libraries Sub-Tab Define all parameters on the Practice tab > Libraries sub-tab as needed for Medicare Part A on UB claims.

157
NextGen® PM System Configuration Training Workbook for CHC, Version 5.8
Step 9: Alt Payer Tab Define all parameters on the Alt Payer tab as needed for Medicare Part B on 1500 claims.
Payer Name: Enter Medicare Part B
Address: Enter the address for claims Submitter Profile Library: Select the Submitter Profile to be used for electronic
1500 (837P) claims
Claim Edit Library: Select the Claim Edit Library to be used for Medicare Part B
Claim Print Library: Select the Claim Print Library to be used for Medicare Part B
Default Payment/Adjustment: Select the default Transactions Codes to be used for Medicare Part B
Default Reason Code: Select the default Reason Code to be used for Medicare Part B
Media Type: Select Electronic
Form: Select 1500
ERA Reason Code Library: Select the Reason Code Library to be used for Medicare Part B
Electronic Trans ID: Enter the Electronic Transmitter ID number for Medicare Part B
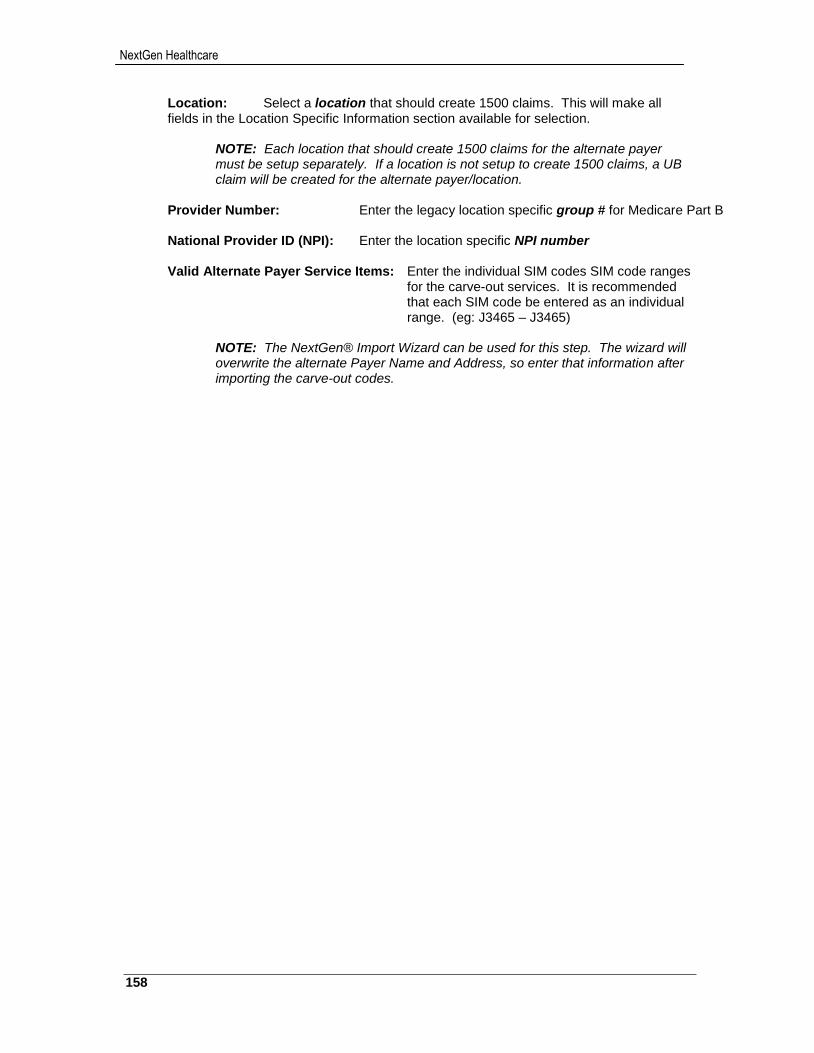
NextGen Healthcare
158
Location: Select a location that should create 1500 claims. This will make all fields in the Location Specific Information section available for selection.
NOTE: Each location that should create 1500 claims for the alternate payer must be setup separately. If a location is not setup to create 1500 claims, a UB claim will be created for the alternate payer/location.
Provider Number: Enter the legacy location specific group # for Medicare Part B
National Provider ID (NPI): Enter the location specific NPI number
Valid Alternate Payer Service Items: Enter the individual SIM codes SIM code ranges
for the carve-out services. It is recommended that each SIM code be entered as an individual range. (eg: J3465 – J3465)
NOTE: The NextGen® Import Wizard can be used for this step. The wizard will overwrite the alternate Payer Name and Address, so enter that information after importing the carve-out codes.
159
NextGen® PM System Configuration Training Workbook for CHC, Version 5.8
Setup for “Wrap Payer” Billing The advent of Managed Care programs to privatize Medicare, and in some states Medicaid, brings with it some special billing considerations. Some patients may have a Medicare or Medicaid Managed Care program as their primary insurance. Therefore, claims for the patient’s encounters will be filed to the managed care payer. Some Managed Care programs will be billed as fee-for-service. Other programs will require the health center to bill the claim as they would for the true Medicare NGS and/or Medicaid counterpart. Medicare With Medicare managed care programs that reimburse on a fee for service or capitated basis, Medicare will allow health centers to bill an additional claim to Medicare NGS for what is referred to as a “wrap payment”. The purpose of a wrap payment is to ensure that the health center will get reimbursed their full Medicare per diem/encounter rate, since the managed care program may reimburse less than that amount. In order to file a claim for a wrap payment to Medicare NGS, they must have the contract for the managed care program on file. The Medicare NGS wrap claim must appear as if it were a primary claim. Medicaid In states where Medicaid managed care programs are prevalent (eg: NY, CA, TX), Medicaid will allow health centers to bill an additional claim to their local Medicaid carrier for a “wrap payment”. The purpose of a wrap payment is to ensure that the health center will get reimbursed their full Medicaid per diem/encounter rate, since the managed care may reimburse less than that amount. A claim for a wrap payment to Medicaid may or may not need to appear as if it were a primary claim. It may also need to be filed at the same time the claim is filed to the managed care plan.
NOTE: If the claim for the wrap payer is filed at the same time the claim is filed to the primary managed care plan, there will be no primary payment information on the claim for the wrap payer.
NextGen Healthcare
160
Tips for Setup of Wrap Payers:
The wrap payer should always be set-up as a separate payer (eg: Medicaid Wrap Payer). This ensures that wrap payments will be separated and accurately reported in the financials on the UDS Report – Table 9C.
The Medicare/Medicaid payer and the Medicare/Medicaid wrap payer should be setup in File Maintenance to have the same functionality. (eg: Encounter Rate Billing, Roll-Up Billing, etc.)
If the Medicare/Medicaid payer uses Encounter Rate Billing, then a separate Encounter Rate Billing Library must be setup for the Medicare/Medicaid wrap payer.
Verify with Medicare/Medicaid as to whether they expect the wrap claim to appear as if it were a primary claim or as a secondary claim.
Depending on the state, the claim for the Medicare/Medicaid wrap payer may need to look slightly different than the claim for the Medicare/Medicaid managed care plan. For example, California follows these guidelines:
o If the Medicare payer is setup for Encounter Rate Billing using code 0521 (or Roll-Up
Billing by Revenue Code 0521), then the Medicare wrap payer should be setup to use code 0519.
o If the CA Medi-Cal payer is setup for Encounter Rate Billing using code 01 with the encounter rate amount, the Medi-Cal wrap payer should be setup to use code 18 with the encounter rate amount.
A Payer Alert can be tied to the Medicare/Medicaid payer in File Maintenance to remind users to also select the Medicare/Medicaid wrap payer as a secondary insurance for the patient. The alert can be setup in Practice Preferences > Alerts tab to display during check-in and/or check-out.
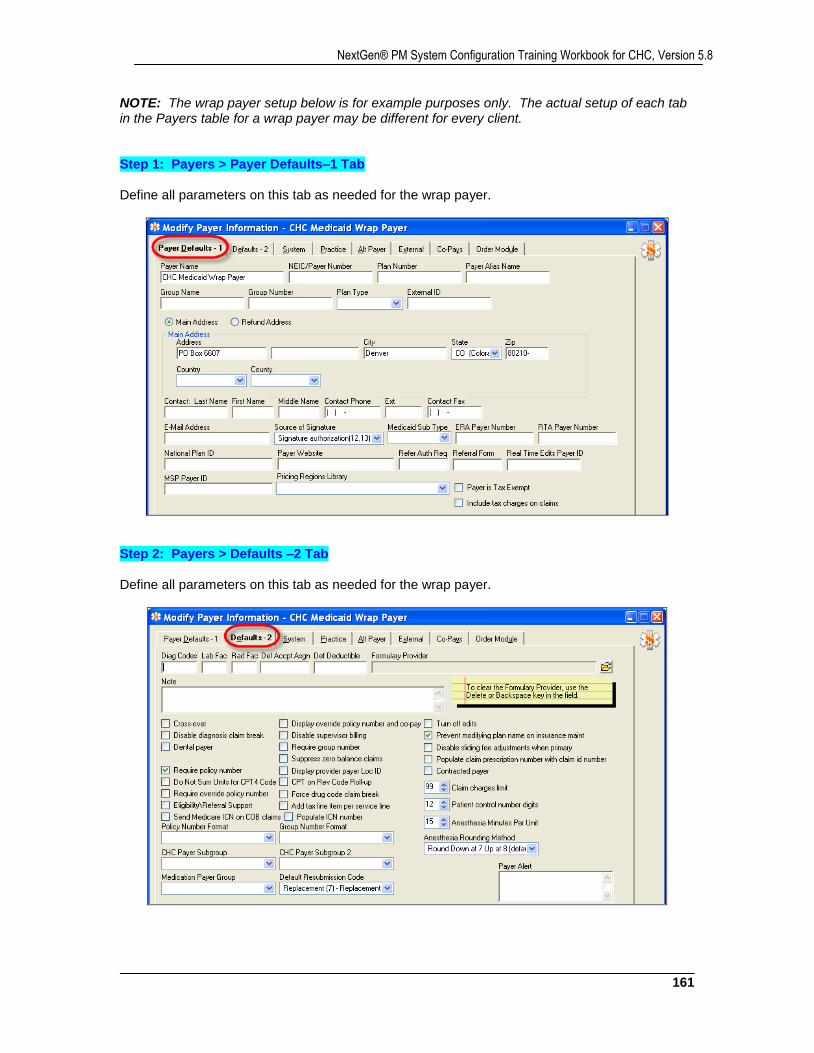
161
NextGen® PM System Configuration Training Workbook for CHC, Version 5.8
NOTE: The wrap payer setup below is for example purposes only. The actual setup of each tab in the Payers table for a wrap payer may be different for every client. Step 1: Payers > Payer Defaults–1 Tab Define all parameters on this tab as needed for the wrap payer.
Step 2: Payers > Defaults –2 Tab Define all parameters on this tab as needed for the wrap payer.
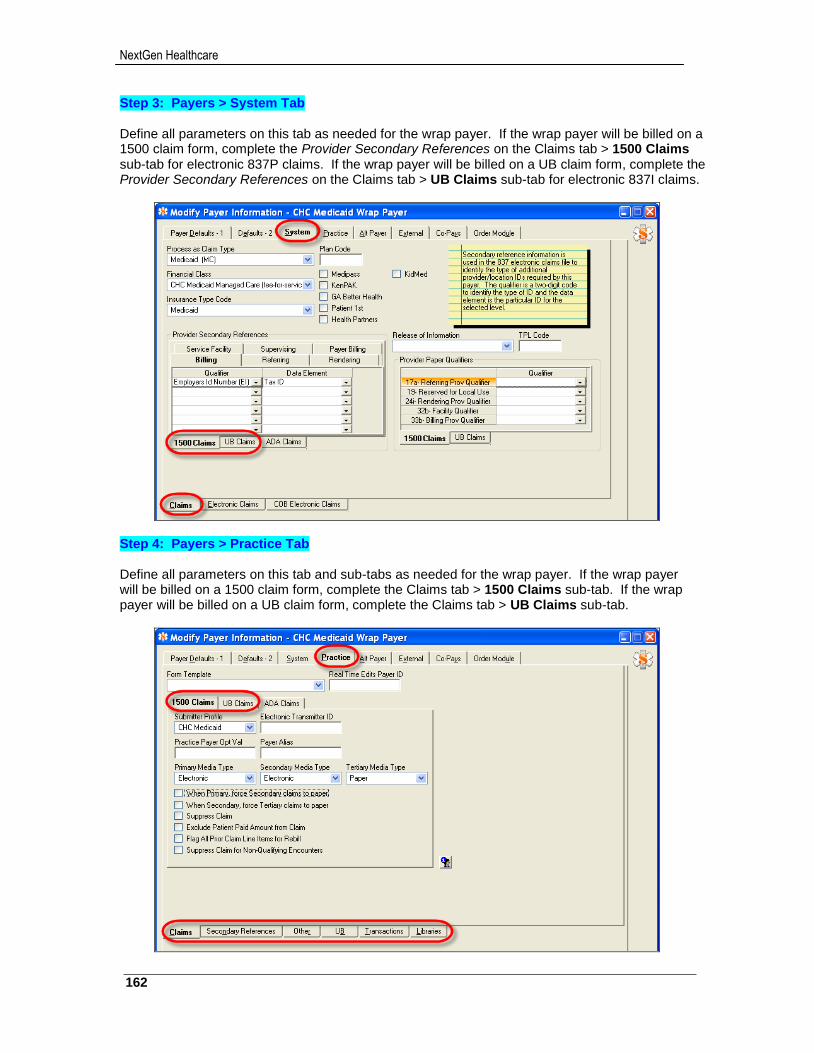
NextGen Healthcare
162
Step 3: Payers > System Tab Define all parameters on this tab as needed for the wrap payer. If the wrap payer will be billed on a 1500 claim form, complete the Provider Secondary References on the Claims tab > 1500 Claims sub-tab for electronic 837P claims. If the wrap payer will be billed on a UB claim form, complete the Provider Secondary References on the Claims tab > UB Claims sub-tab for electronic 837I claims.
Step 4: Payers > Practice Tab Define all parameters on this tab and sub-tabs as needed for the wrap payer. If the wrap payer will be billed on a 1500 claim form, complete the Claims tab > 1500 Claims sub-tab. If the wrap payer will be billed on a UB claim form, complete the Claims tab > UB Claims sub-tab.
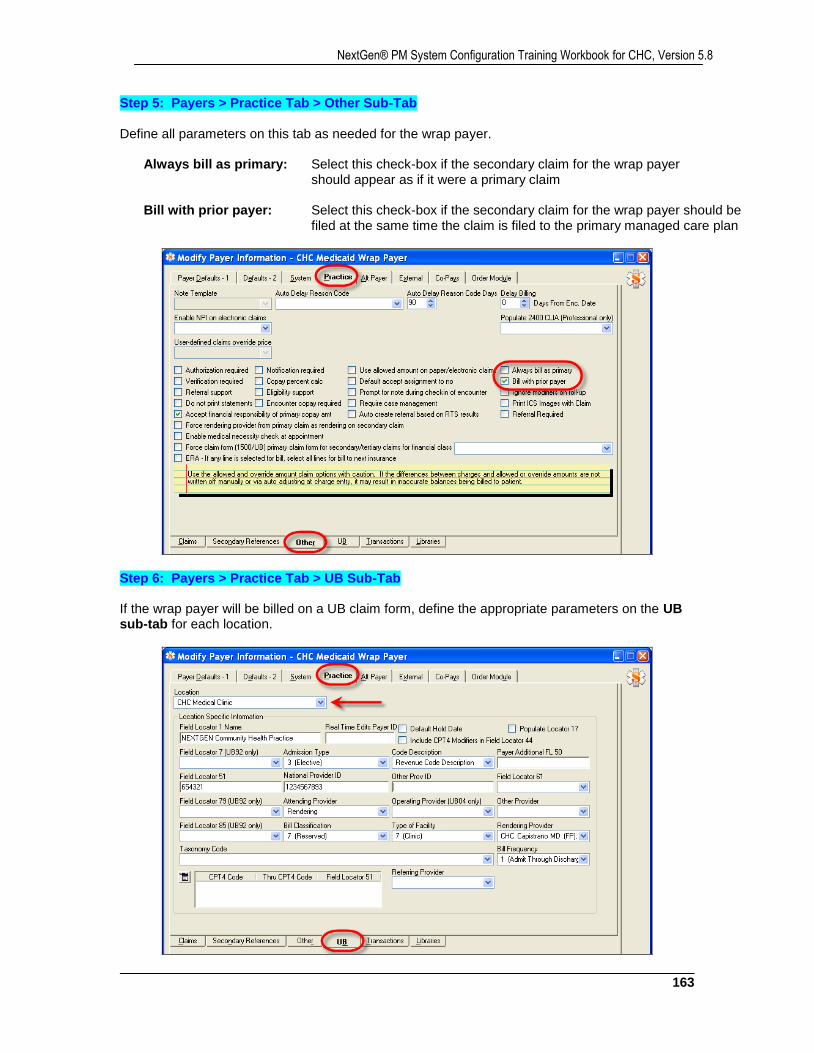
163
NextGen® PM System Configuration Training Workbook for CHC, Version 5.8
Step 5: Payers > Practice Tab > Other Sub-Tab Define all parameters on this tab as needed for the wrap payer.
Always bill as primary: Select this check-box if the secondary claim for the wrap payer should appear as if it were a primary claim
Bill with prior payer: Select this check-box if the secondary claim for the wrap payer should be
filed at the same time the claim is filed to the primary managed care plan
Step 6: Payers > Practice Tab > UB Sub-Tab If the wrap payer will be billed on a UB claim form, define the appropriate parameters on the UB sub-tab for each location.
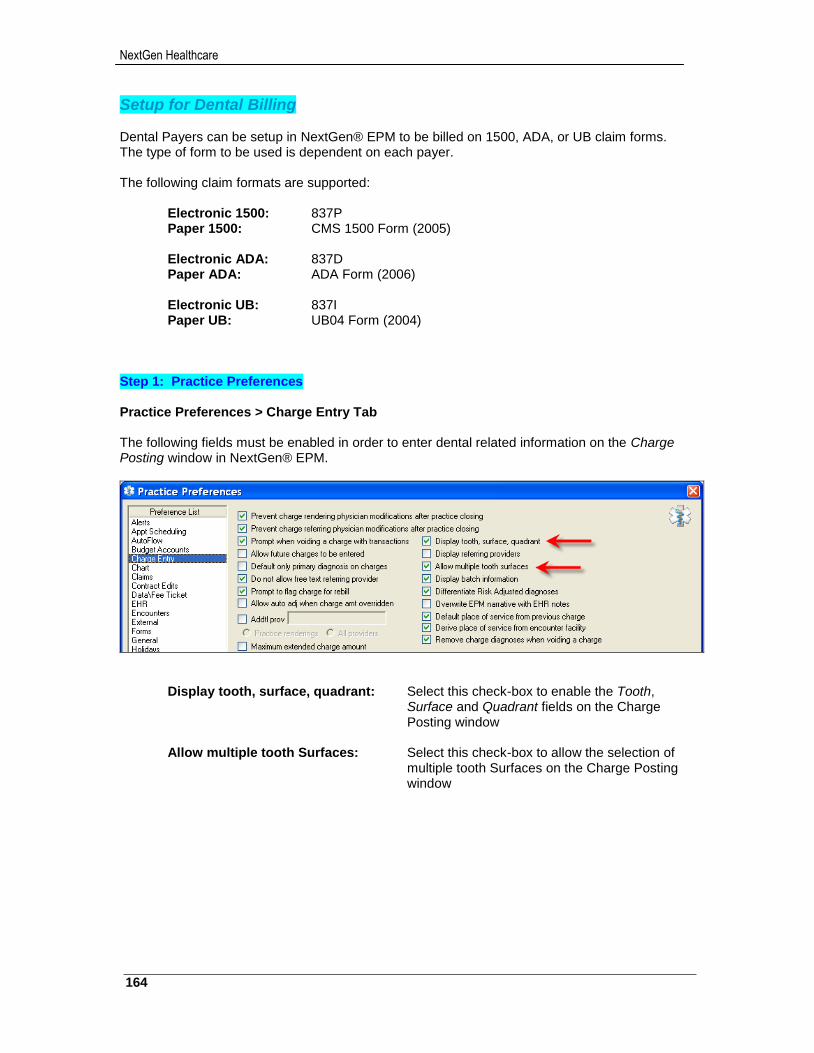
NextGen Healthcare
164
Setup for Dental Billing Dental Payers can be setup in NextGen® EPM to be billed on 1500, ADA, or UB claim forms. The type of form to be used is dependent on each payer. The following claim formats are supported:
Electronic 1500: 837P Paper 1500: CMS 1500 Form (2005) Electronic ADA: 837D Paper ADA: ADA Form (2006) Electronic UB: 837I Paper UB: UB04 Form (2004)
Step 1: Practice Preferences Practice Preferences > Charge Entry Tab The following fields must be enabled in order to enter dental related information on the Charge Posting window in NextGen® EPM.
Display tooth, surface, quadrant: Select this check-box to enable the Tooth, Surface and Quadrant fields on the Charge Posting window
Allow multiple tooth Surfaces: Select this check-box to allow the selection of
multiple tooth Surfaces on the Charge Posting window
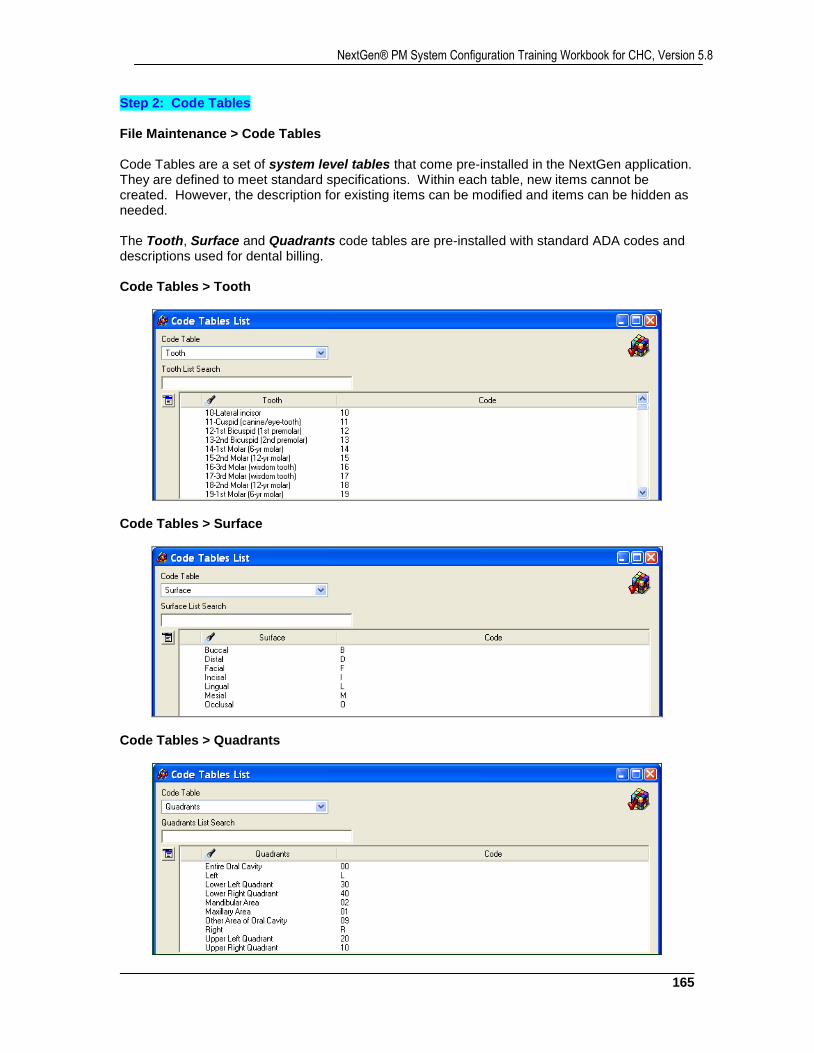
165
NextGen® PM System Configuration Training Workbook for CHC, Version 5.8
Step 2: Code Tables File Maintenance > Code Tables Code Tables are a set of system level tables that come pre-installed in the NextGen application. They are defined to meet standard specifications. Within each table, new items cannot be created. However, the description for existing items can be modified and items can be hidden as needed. The Tooth, Surface and Quadrants code tables are pre-installed with standard ADA codes and descriptions used for dental billing. Code Tables > Tooth
Code Tables > Surface
Code Tables > Quadrants
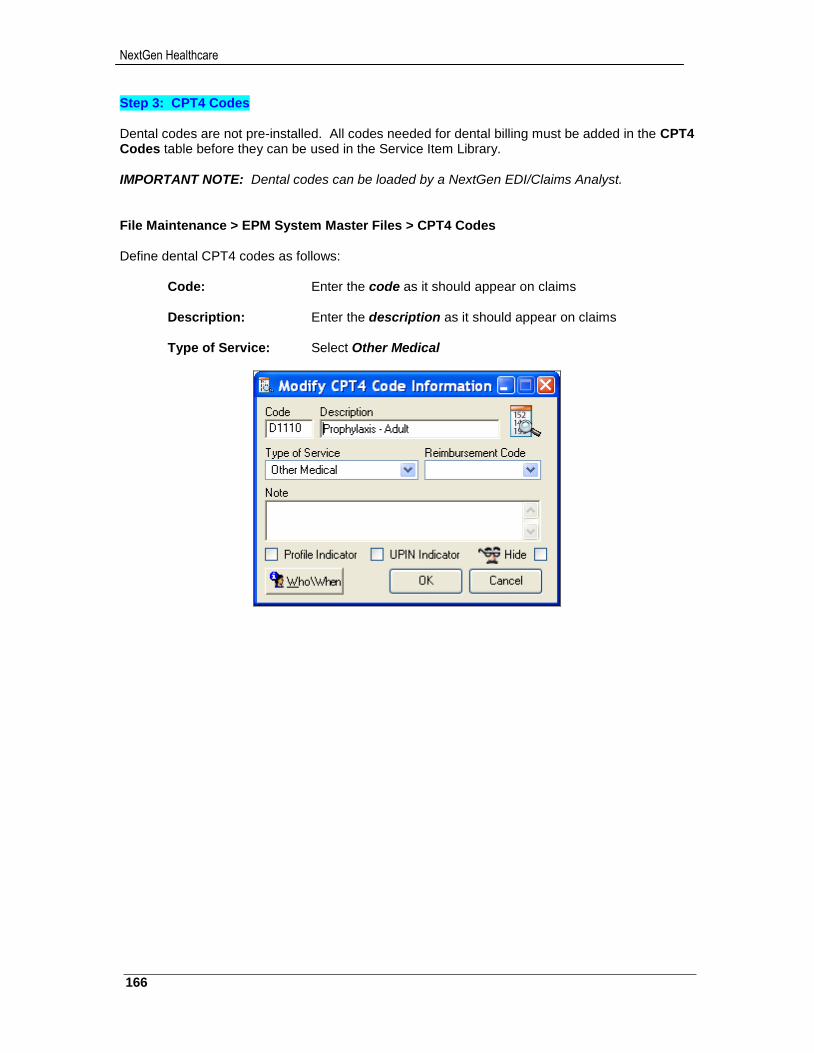
NextGen Healthcare
166
Step 3: CPT4 Codes Dental codes are not pre-installed. All codes needed for dental billing must be added in the CPT4 Codes table before they can be used in the Service Item Library. IMPORTANT NOTE: Dental codes can be loaded by a NextGen EDI/Claims Analyst. File Maintenance > EPM System Master Files > CPT4 Codes Define dental CPT4 codes as follows:
Code: Enter the code as it should appear on claims Description: Enter the description as it should appear on claims Type of Service: Select Other Medical
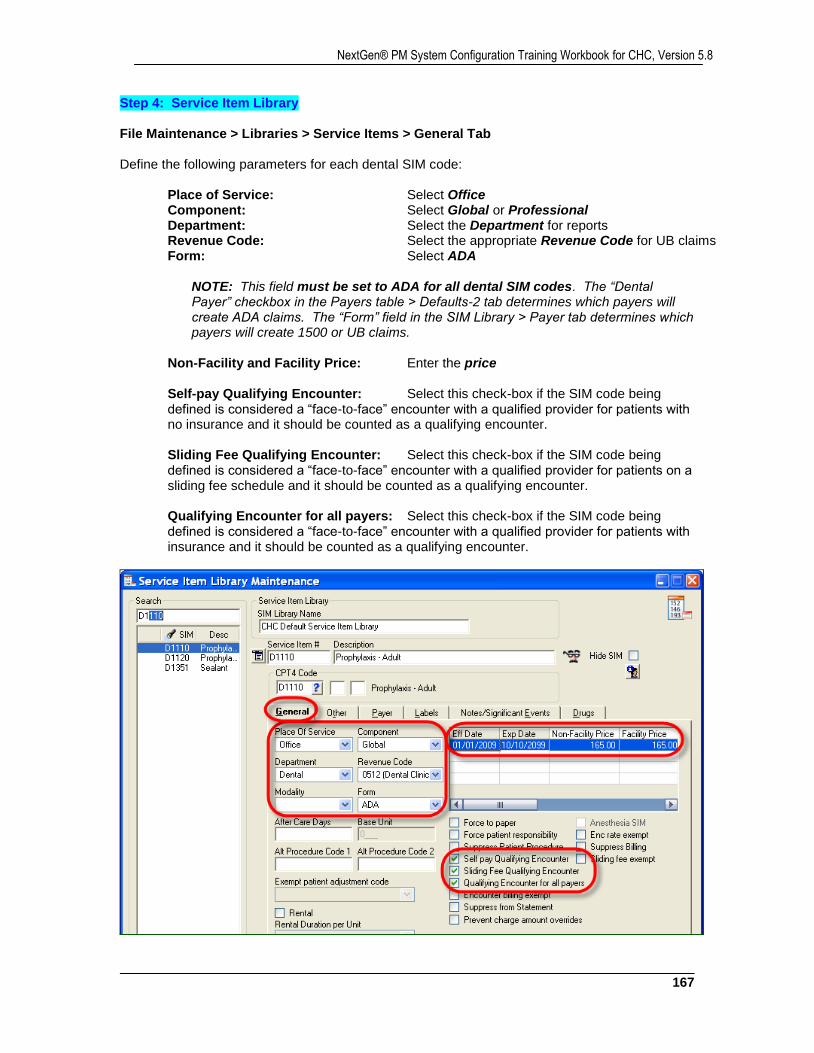
167
NextGen® PM System Configuration Training Workbook for CHC, Version 5.8
Step 4: Service Item Library File Maintenance > Libraries > Service Items > General Tab Define the following parameters for each dental SIM code:
Place of Service: Select Office Component: Select Global or Professional Department: Select the Department for reports Revenue Code: Select the appropriate Revenue Code for UB claims Form: Select ADA
NOTE: This field must be set to ADA for all dental SIM codes. The “Dental Payer” checkbox in the Payers table > Defaults-2 tab determines which payers will create ADA claims. The “Form” field in the SIM Library > Payer tab determines which payers will create 1500 or UB claims.
Non-Facility and Facility Price: Enter the price
Self-pay Qualifying Encounter: Select this check-box if the SIM code being defined is considered a “face-to-face” encounter with a qualified provider for patients with no insurance and it should be counted as a qualifying encounter. Sliding Fee Qualifying Encounter: Select this check-box if the SIM code being defined is considered a “face-to-face” encounter with a qualified provider for patients on a sliding fee schedule and it should be counted as a qualifying encounter. Qualifying Encounter for all payers: Select this check-box if the SIM code being defined is considered a “face-to-face” encounter with a qualified provider for patients with insurance and it should be counted as a qualifying encounter.
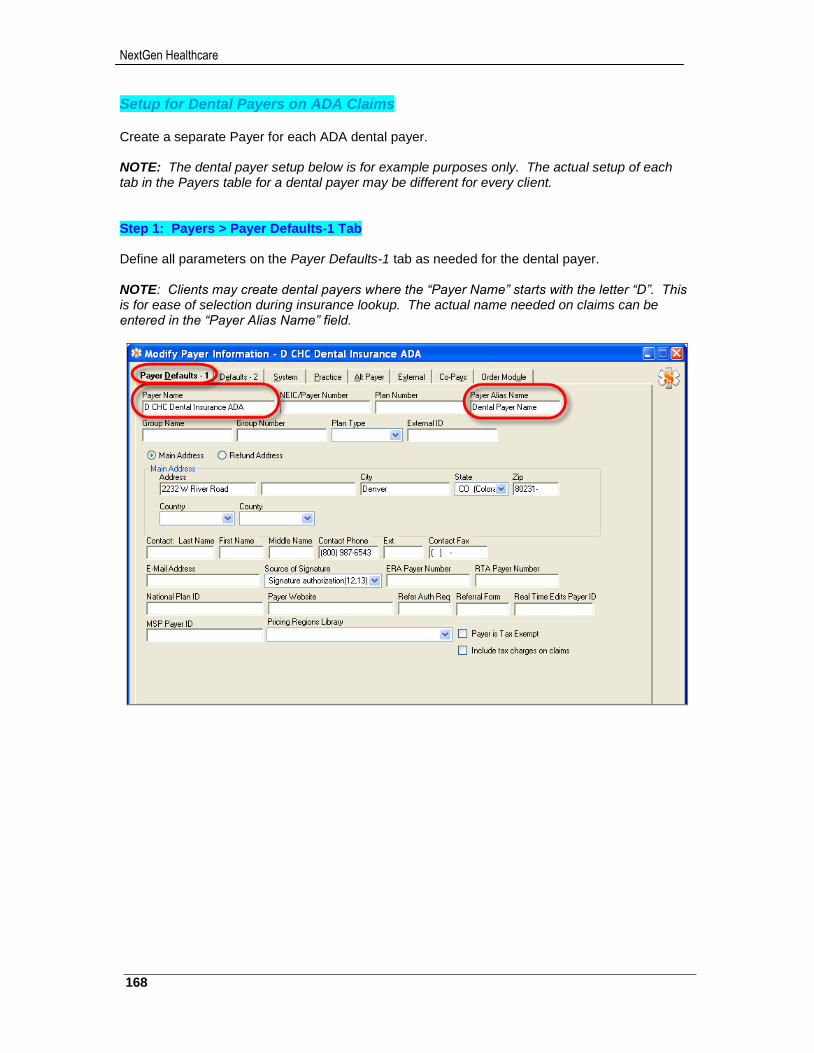
NextGen Healthcare
168
Setup for Dental Payers on ADA Claims Create a separate Payer for each ADA dental payer. NOTE: The dental payer setup below is for example purposes only. The actual setup of each tab in the Payers table for a dental payer may be different for every client. Step 1: Payers > Payer Defaults-1 Tab Define all parameters on the Payer Defaults-1 tab as needed for the dental payer. NOTE: Clients may create dental payers where the “Payer Name” starts with the letter “D”. This is for ease of selection during insurance lookup. The actual name needed on claims can be entered in the “Payer Alias Name” field.
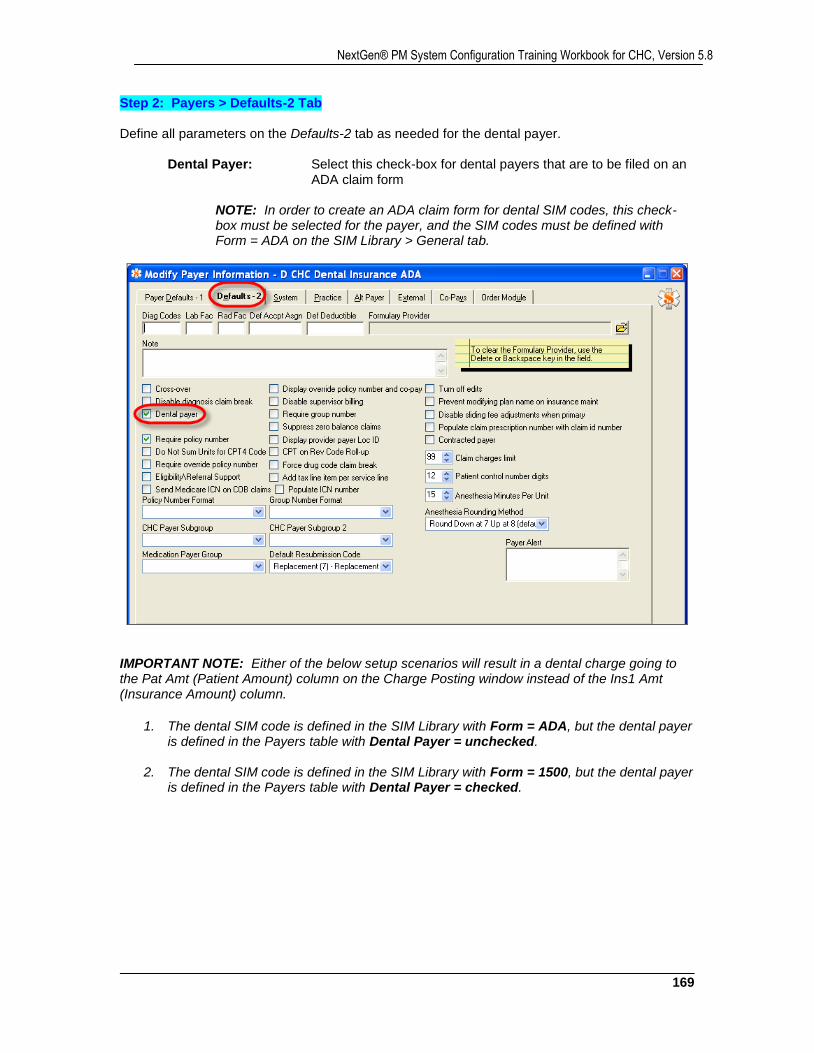
169
NextGen® PM System Configuration Training Workbook for CHC, Version 5.8
Step 2: Payers > Defaults-2 Tab Define all parameters on the Defaults-2 tab as needed for the dental payer.
Dental Payer: Select this check-box for dental payers that are to be filed on an ADA claim form
NOTE: In order to create an ADA claim form for dental SIM codes, this check-box must be selected for the payer, and the SIM codes must be defined with Form = ADA on the SIM Library > General tab.
IMPORTANT NOTE: Either of the below setup scenarios will result in a dental charge going to the Pat Amt (Patient Amount) column on the Charge Posting window instead of the Ins1 Amt (Insurance Amount) column.
1. The dental SIM code is defined in the SIM Library with Form = ADA, but the dental payer
is defined in the Payers table with Dental Payer = unchecked.
2. The dental SIM code is defined in the SIM Library with Form = 1500, but the dental payer is defined in the Payers table with Dental Payer = checked.
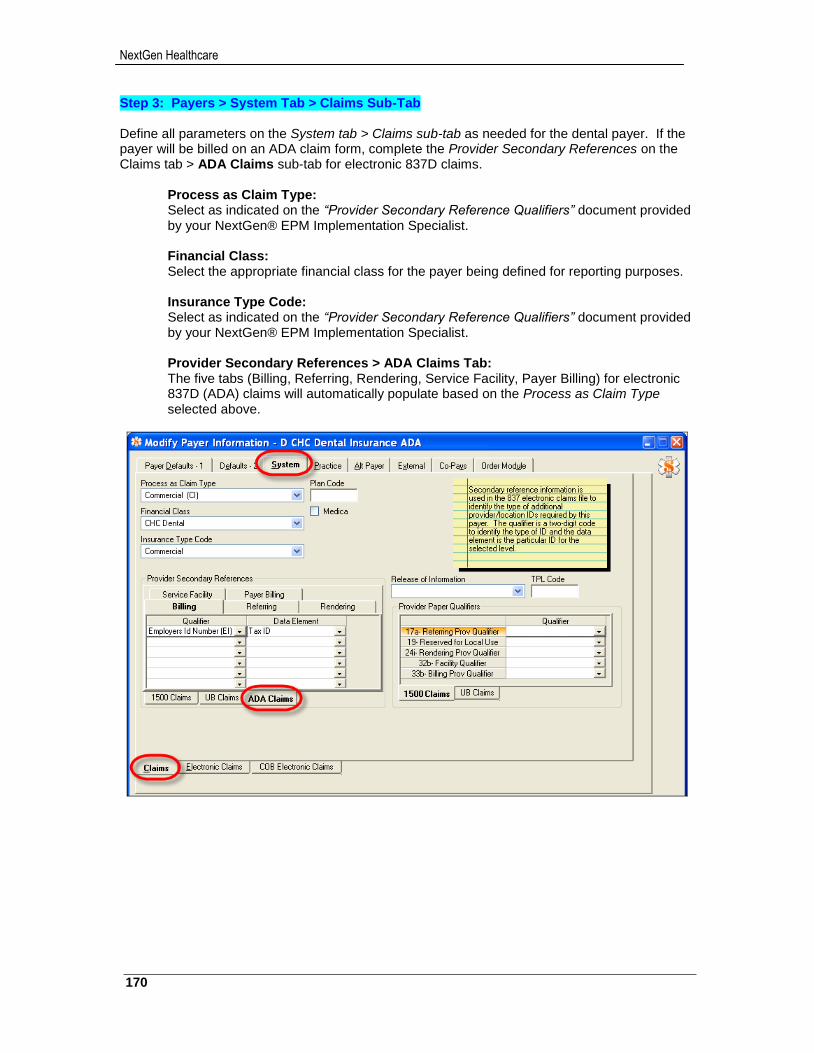
NextGen Healthcare
170
Step 3: Payers > System Tab > Claims Sub-Tab Define all parameters on the System tab > Claims sub-tab as needed for the dental payer. If the payer will be billed on an ADA claim form, complete the Provider Secondary References on the Claims tab > ADA Claims sub-tab for electronic 837D claims.
Process as Claim Type: Select as indicated on the “Provider Secondary Reference Qualifiers” document provided by your NextGen® EPM Implementation Specialist.
Financial Class: Select the appropriate financial class for the payer being defined for reporting purposes.
Insurance Type Code: Select as indicated on the “Provider Secondary Reference Qualifiers” document provided by your NextGen® EPM Implementation Specialist.
Provider Secondary References > ADA Claims Tab: The five tabs (Billing, Referring, Rendering, Service Facility, Payer Billing) for electronic 837D (ADA) claims will automatically populate based on the Process as Claim Type selected above.
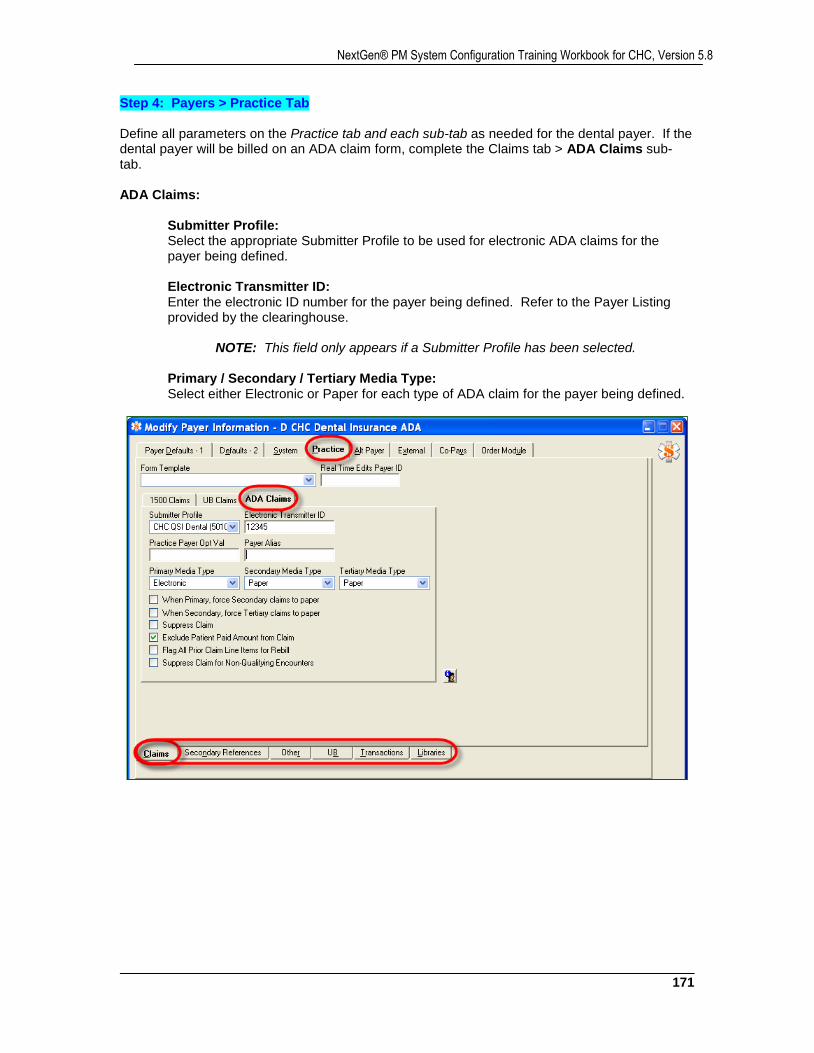
171
NextGen® PM System Configuration Training Workbook for CHC, Version 5.8
Step 4: Payers > Practice Tab Define all parameters on the Practice tab and each sub-tab as needed for the dental payer. If the dental payer will be billed on an ADA claim form, complete the Claims tab > ADA Claims sub-tab. ADA Claims:
Submitter Profile: Select the appropriate Submitter Profile to be used for electronic ADA claims for the payer being defined. Electronic Transmitter ID: Enter the electronic ID number for the payer being defined. Refer to the Payer Listing provided by the clearinghouse.
NOTE: This field only appears if a Submitter Profile has been selected. Primary / Secondary / Tertiary Media Type: Select either Electronic or Paper for each type of ADA claim for the payer being defined.
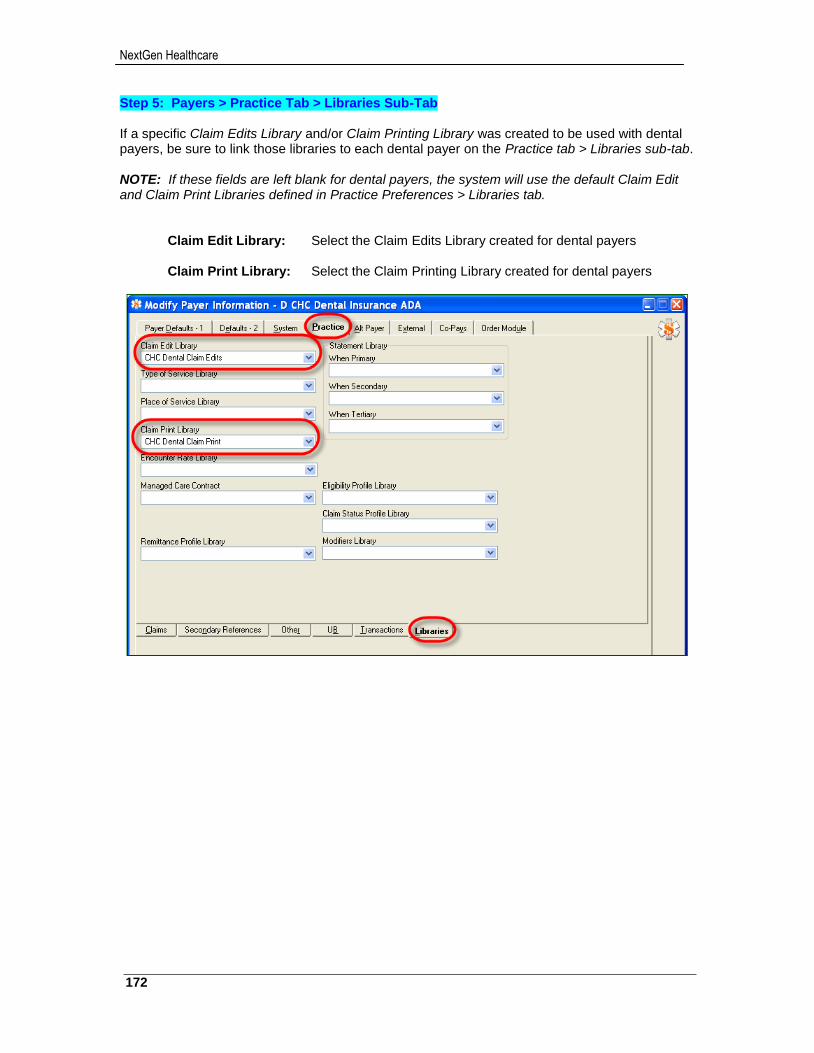
NextGen Healthcare
172
Step 5: Payers > Practice Tab > Libraries Sub-Tab If a specific Claim Edits Library and/or Claim Printing Library was created to be used with dental payers, be sure to link those libraries to each dental payer on the Practice tab > Libraries sub-tab. NOTE: If these fields are left blank for dental payers, the system will use the default Claim Edit and Claim Print Libraries defined in Practice Preferences > Libraries tab.
Claim Edit Library: Select the Claim Edits Library created for dental payers Claim Print Library: Select the Claim Printing Library created for dental payers
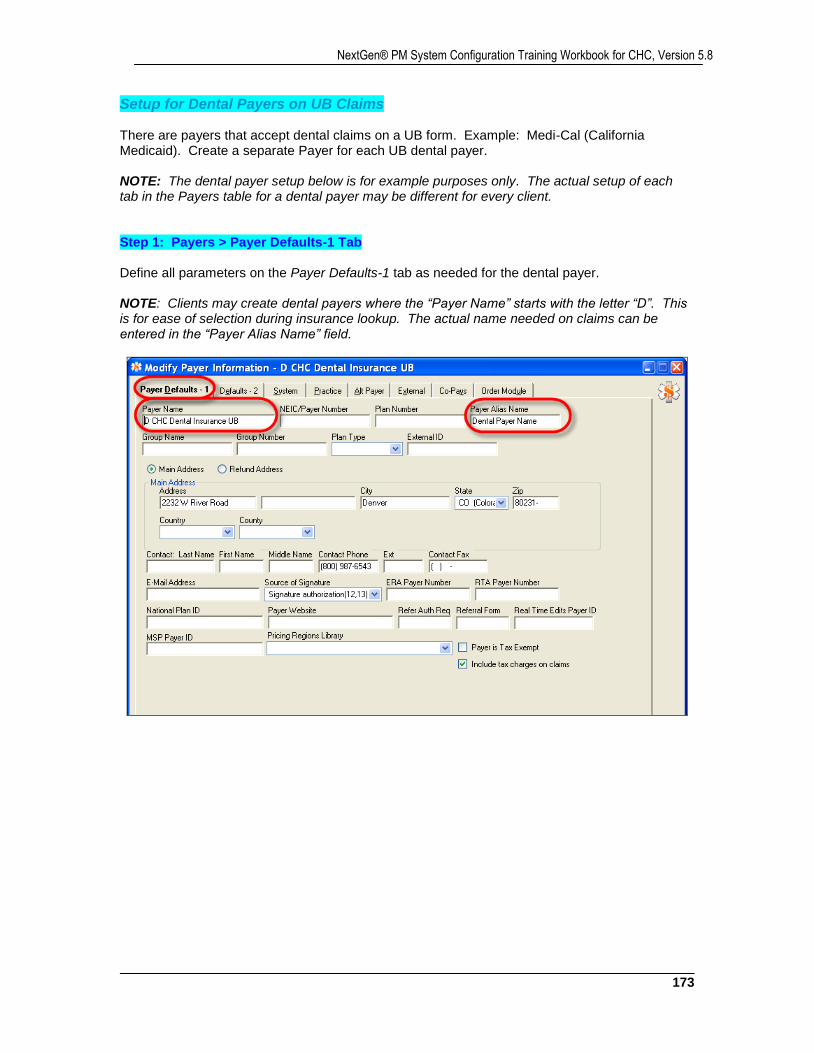
173
NextGen® PM System Configuration Training Workbook for CHC, Version 5.8
Setup for Dental Payers on UB Claims There are payers that accept dental claims on a UB form. Example: Medi-Cal (California Medicaid). Create a separate Payer for each UB dental payer. NOTE: The dental payer setup below is for example purposes only. The actual setup of each tab in the Payers table for a dental payer may be different for every client. Step 1: Payers > Payer Defaults-1 Tab Define all parameters on the Payer Defaults-1 tab as needed for the dental payer. NOTE: Clients may create dental payers where the “Payer Name” starts with the letter “D”. This is for ease of selection during insurance lookup. The actual name needed on claims can be entered in the “Payer Alias Name” field.
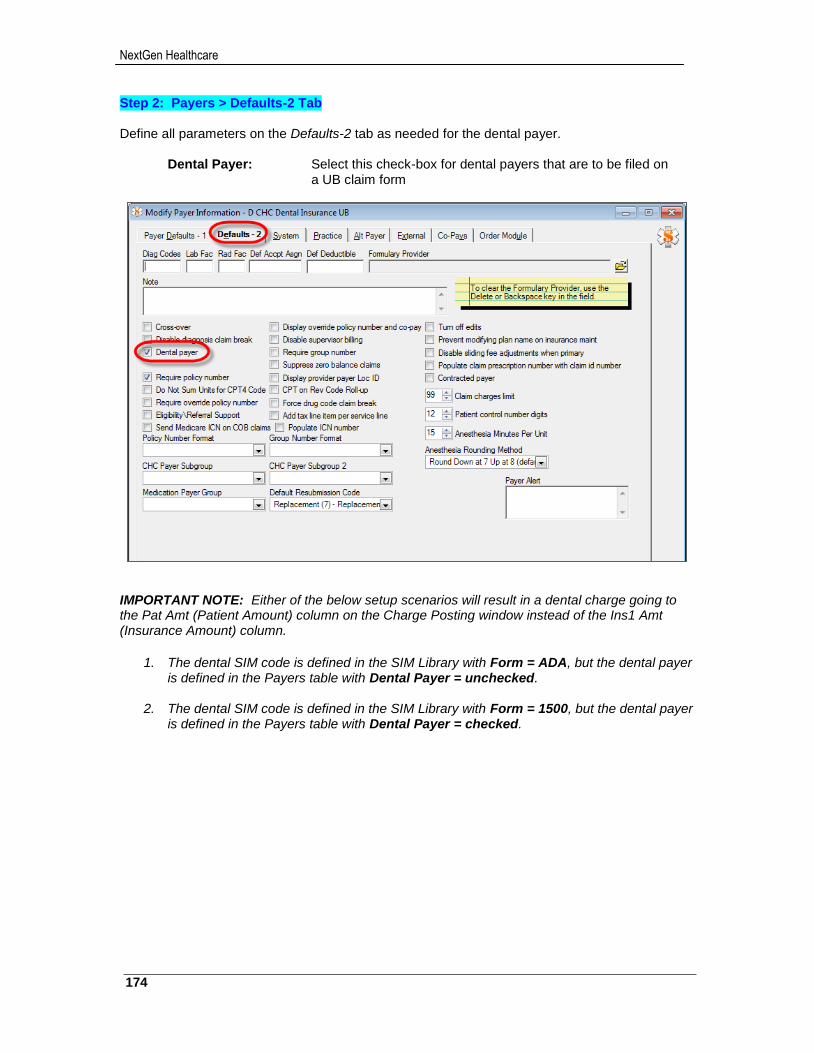
NextGen Healthcare
174
Step 2: Payers > Defaults-2 Tab Define all parameters on the Defaults-2 tab as needed for the dental payer.
Dental Payer: Select this check-box for dental payers that are to be filed on a UB claim form
IMPORTANT NOTE: Either of the below setup scenarios will result in a dental charge going to the Pat Amt (Patient Amount) column on the Charge Posting window instead of the Ins1 Amt (Insurance Amount) column.
1. The dental SIM code is defined in the SIM Library with Form = ADA, but the dental payer
is defined in the Payers table with Dental Payer = unchecked.
2. The dental SIM code is defined in the SIM Library with Form = 1500, but the dental payer is defined in the Payers table with Dental Payer = checked.
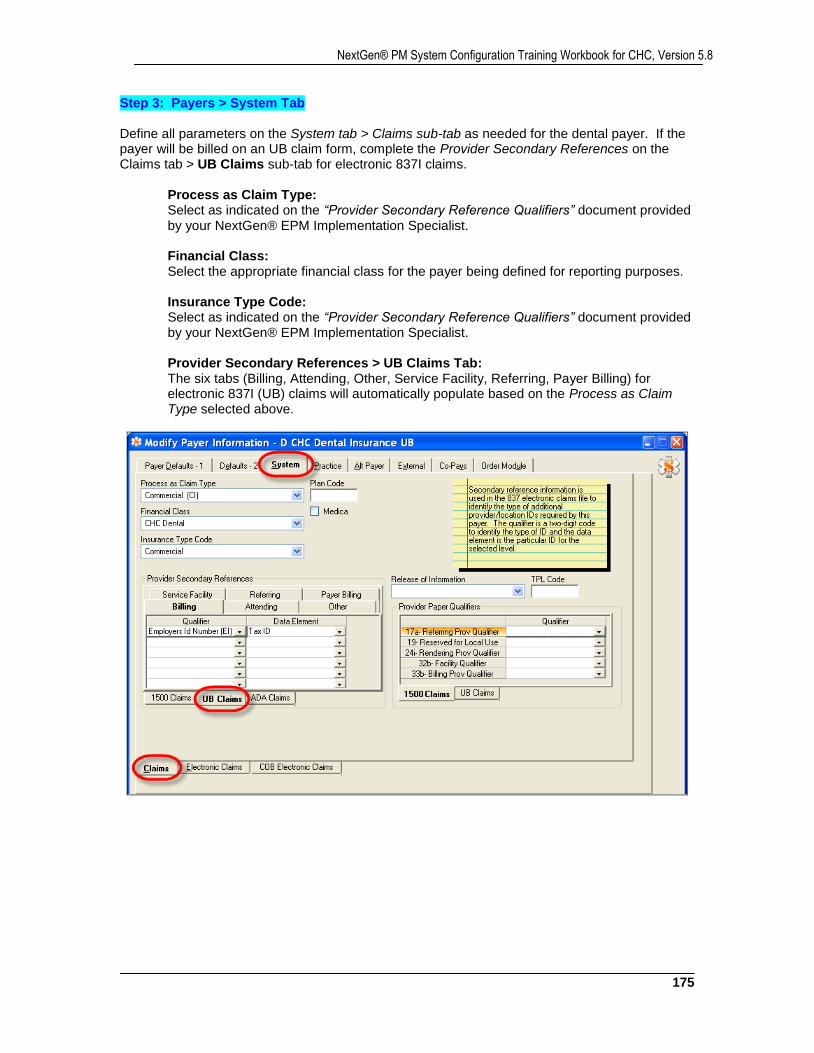
175
NextGen® PM System Configuration Training Workbook for CHC, Version 5.8
Step 3: Payers > System Tab Define all parameters on the System tab > Claims sub-tab as needed for the dental payer. If the payer will be billed on an UB claim form, complete the Provider Secondary References on the Claims tab > UB Claims sub-tab for electronic 837I claims.
Process as Claim Type: Select as indicated on the “Provider Secondary Reference Qualifiers” document provided by your NextGen® EPM Implementation Specialist.
Financial Class: Select the appropriate financial class for the payer being defined for reporting purposes.
Insurance Type Code: Select as indicated on the “Provider Secondary Reference Qualifiers” document provided by your NextGen® EPM Implementation Specialist.
Provider Secondary References > UB Claims Tab: The six tabs (Billing, Attending, Other, Service Facility, Referring, Payer Billing) for electronic 837I (UB) claims will automatically populate based on the Process as Claim Type selected above.
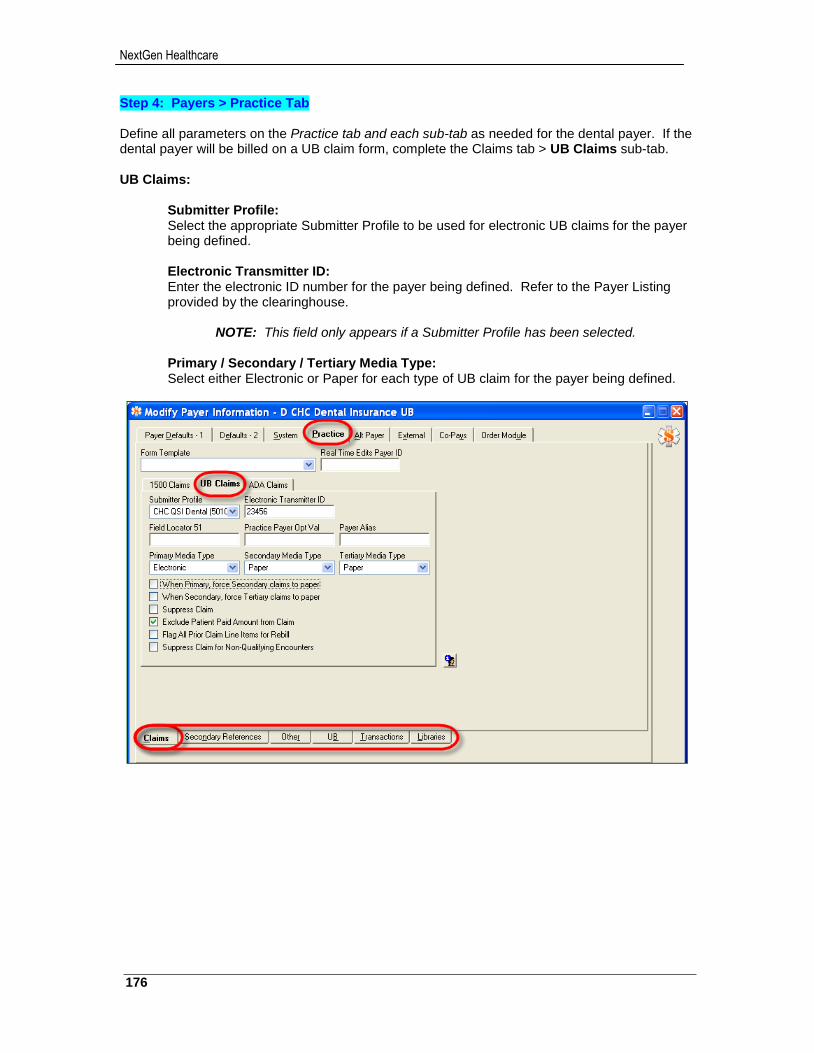
NextGen Healthcare
176
Step 4: Payers > Practice Tab Define all parameters on the Practice tab and each sub-tab as needed for the dental payer. If the dental payer will be billed on a UB claim form, complete the Claims tab > UB Claims sub-tab. UB Claims:
Submitter Profile: Select the appropriate Submitter Profile to be used for electronic UB claims for the payer being defined. Electronic Transmitter ID: Enter the electronic ID number for the payer being defined. Refer to the Payer Listing provided by the clearinghouse.
NOTE: This field only appears if a Submitter Profile has been selected. Primary / Secondary / Tertiary Media Type: Select either Electronic or Paper for each type of UB claim for the payer being defined.
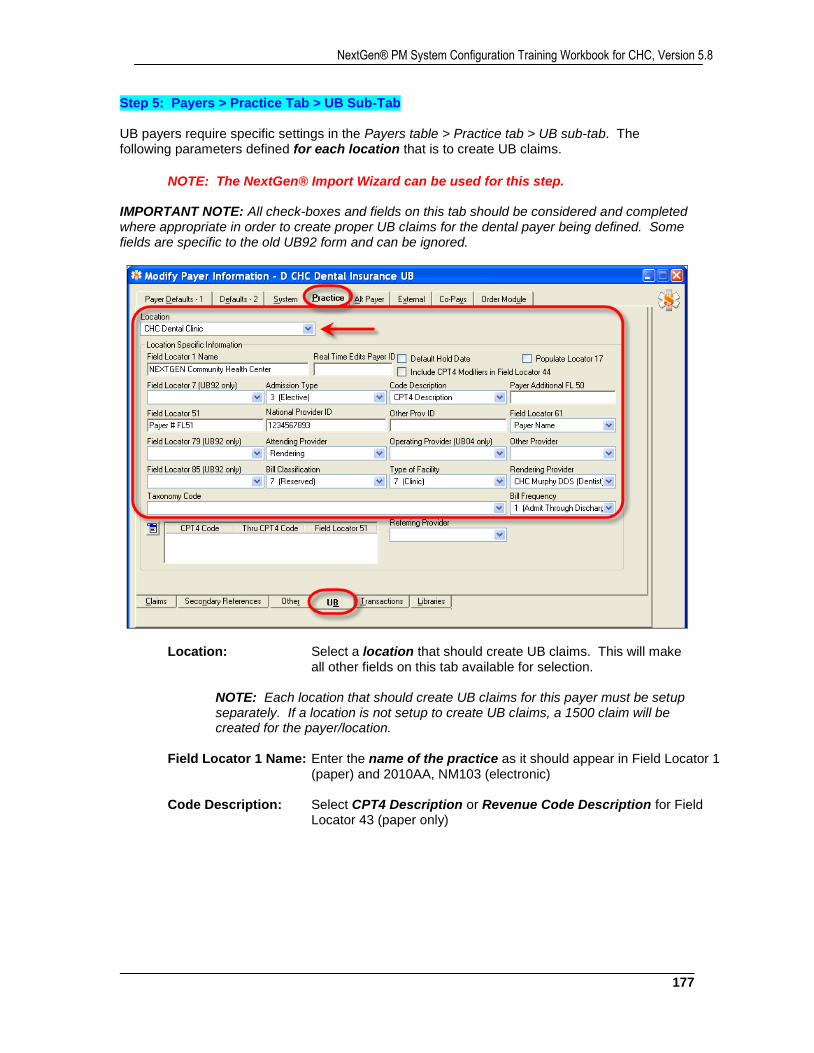
177
NextGen® PM System Configuration Training Workbook for CHC, Version 5.8
Step 5: Payers > Practice Tab > UB Sub-Tab UB payers require specific settings in the Payers table > Practice tab > UB sub-tab. The following parameters defined for each location that is to create UB claims.
NOTE: The NextGen® Import Wizard can be used for this step. IMPORTANT NOTE: All check-boxes and fields on this tab should be considered and completed where appropriate in order to create proper UB claims for the dental payer being defined. Some fields are specific to the old UB92 form and can be ignored.
Location: Select a location that should create UB claims. This will make
all other fields on this tab available for selection.
NOTE: Each location that should create UB claims for this payer must be setup separately. If a location is not setup to create UB claims, a 1500 claim will be created for the payer/location.
Field Locator 1 Name: Enter the name of the practice as it should appear in Field Locator 1
(paper) and 2010AA, NM103 (electronic)
Code Description: Select CPT4 Description or Revenue Code Description for Field Locator 43 (paper only)
NextGen Healthcare
178
Field Locator 51: Enter the legacy Payer ID or Tax ID for Field Locator 51 (paper) and 2010AA, REF02 (electronic)
NOTE: This is a required entry.
National Provider ID: Enter the location specific NPI number for Field Locator 56
(paper) and 2010AA, NM109 (electronic)
Field Locator 61: Select Group Name or Payer Name from the Insurance Maintenance window for Field Locator 61 (paper only)
Attending Provider: Select Rendering for Field Locator 76 (paper) and 2310A, NM103-04
(electronic)
Operating Provider: Select the encounter Provider, if applicable, for Field Locator 77 (paper) and 2310B, NM103-04 (electronic)
Other Provider: Select the encounter Provider, if applicable, for Field Locator 78
(paper) and 2310C, NM102-04 (electronic)
NOTE: The above providers pull from the Encounter Maintenance window. Options include: 1
st Consult, 2
nd Consult, Admitting, Referring, Rendering, Supervisor
Bill Classification: Defaults for Field Locator 4 (paper) and 2300 CLM05-2 (electronic)
Type of Facility: Defaults for Field Locator 4 (paper) and 2300 CLM05-1 (electronic)
Bill Frequency: Defaults for Field Locator 4 (paper) and 2300 CLM05-3 (electronic)
NOTE: The above three fields create the 3-digit code for Field Locator 4. The defaults were defined in Practice Preferences > Claims tab. The defaults can be changed for the payer if needed.
Rendering Provider: Select all rendering providers that should have UB claims
created for this payer/location.
NOTE: If a provider is not selected, a 1500 form will be created for the provider/payer/location.
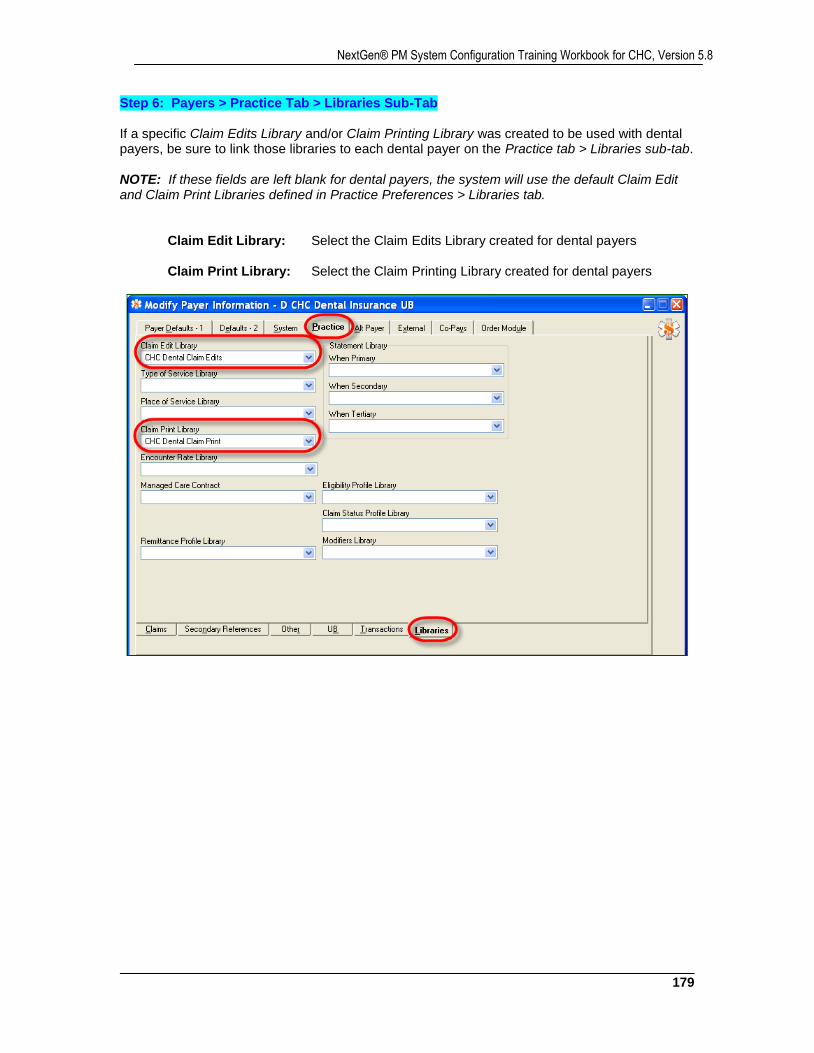
179
NextGen® PM System Configuration Training Workbook for CHC, Version 5.8
Step 6: Payers > Practice Tab > Libraries Sub-Tab If a specific Claim Edits Library and/or Claim Printing Library was created to be used with dental payers, be sure to link those libraries to each dental payer on the Practice tab > Libraries sub-tab. NOTE: If these fields are left blank for dental payers, the system will use the default Claim Edit and Claim Print Libraries defined in Practice Preferences > Libraries tab.
Claim Edit Library: Select the Claim Edits Library created for dental payers Claim Print Library: Select the Claim Printing Library created for dental payers
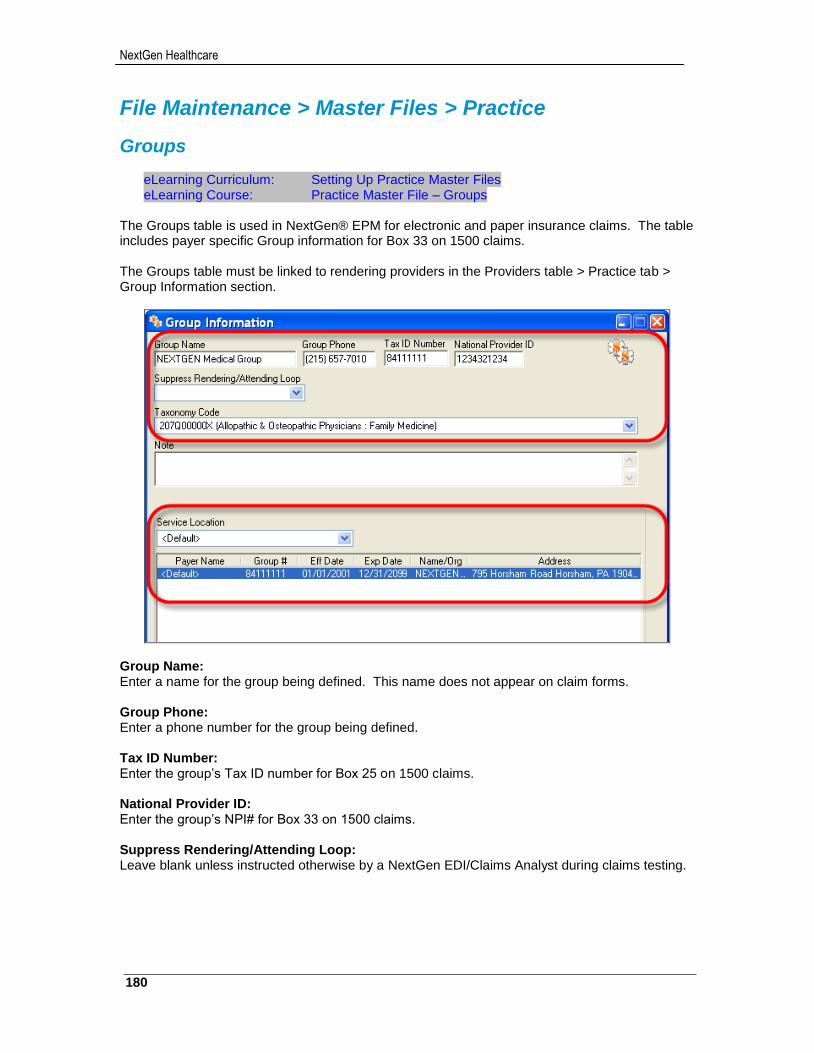
NextGen Healthcare
180
File Maintenance > Master Files > Practice
Groups
eLearning Curriculum: Setting Up Practice Master Files eLearning Course: Practice Master File – Groups
The Groups table is used in NextGen® EPM for electronic and paper insurance claims. The table includes payer specific Group information for Box 33 on 1500 claims. The Groups table must be linked to rendering providers in the Providers table > Practice tab > Group Information section.
Group Name: Enter a name for the group being defined. This name does not appear on claim forms. Group Phone: Enter a phone number for the group being defined. Tax ID Number: Enter the group’s Tax ID number for Box 25 on 1500 claims. National Provider ID: Enter the group’s NPI# for Box 33 on 1500 claims. Suppress Rendering/Attending Loop: Leave blank unless instructed otherwise by a NextGen EDI/Claims Analyst during claims testing.
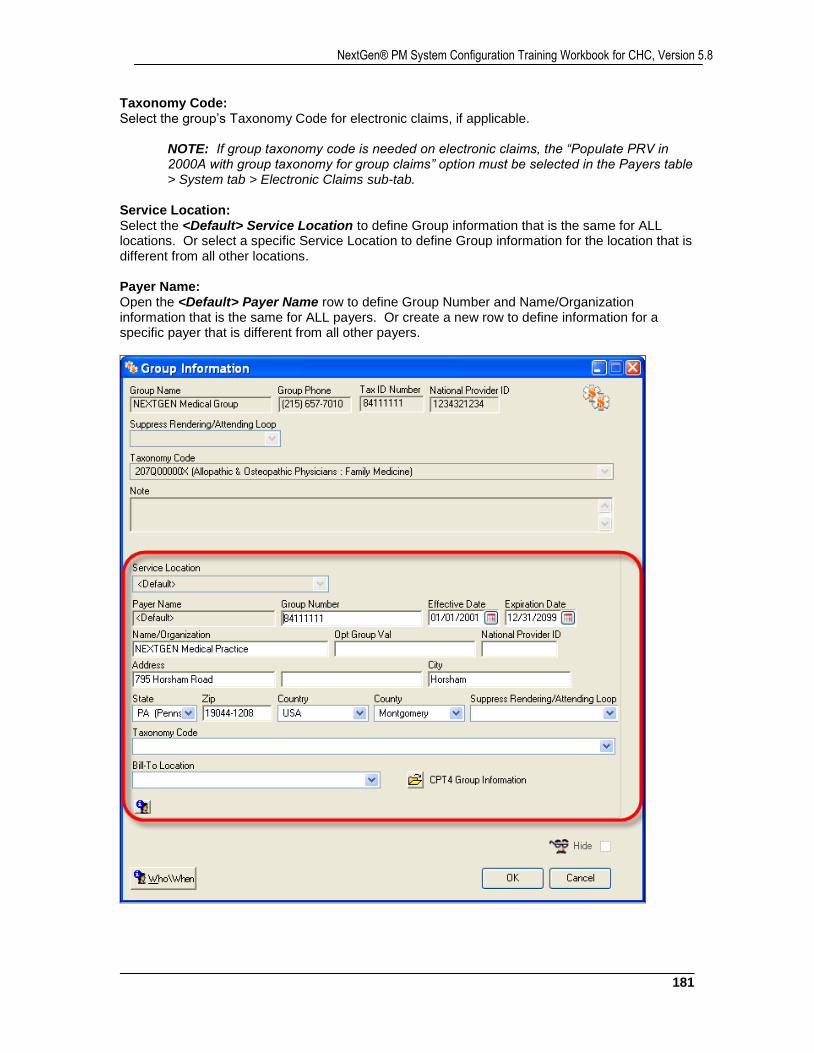
181
NextGen® PM System Configuration Training Workbook for CHC, Version 5.8
Taxonomy Code: Select the group’s Taxonomy Code for electronic claims, if applicable.
NOTE: If group taxonomy code is needed on electronic claims, the “Populate PRV in 2000A with group taxonomy for group claims” option must be selected in the Payers table > System tab > Electronic Claims sub-tab.
Service Location: Select the <Default> Service Location to define Group information that is the same for ALL locations. Or select a specific Service Location to define Group information for the location that is different from all other locations. Payer Name: Open the <Default> Payer Name row to define Group Number and Name/Organization information that is the same for ALL payers. Or create a new row to define information for a specific payer that is different from all other payers.
NextGen Healthcare
182
Group Number: Enter the group number for Box 33 on 1500 claims for the location/payer.
NOTE: This will typically be Tax ID for most payers. Effective/Expiration Date: Enter effective and expiration dates for the group information being defined for the location/payer.
NOTE: For claims testing, the Effective Date should be 6-8 weeks prior to EPM Go-Live. Name/Organization: Enter the group name for Box 33 on 1500 claims for the location/payer. Address: Enter the group address, city, state, zip, county and country for Box 33 on 1500 claims for the location/payer.
NOTE: Electronic claims in ASC X12 Version 5010 format requires that the group’s “billing provider” address be a physical address, not a PO Box address, with a 9 digit zip code.
Taxonomy Code: Select the taxonomy code for electronic claims for the location/payer only if it is different from the code selected for the group at the top of the window. Bill-To Location: If a PO Box address was entered above, select a location with a physical address to be sent as the “billing provider” address on electronic claims.
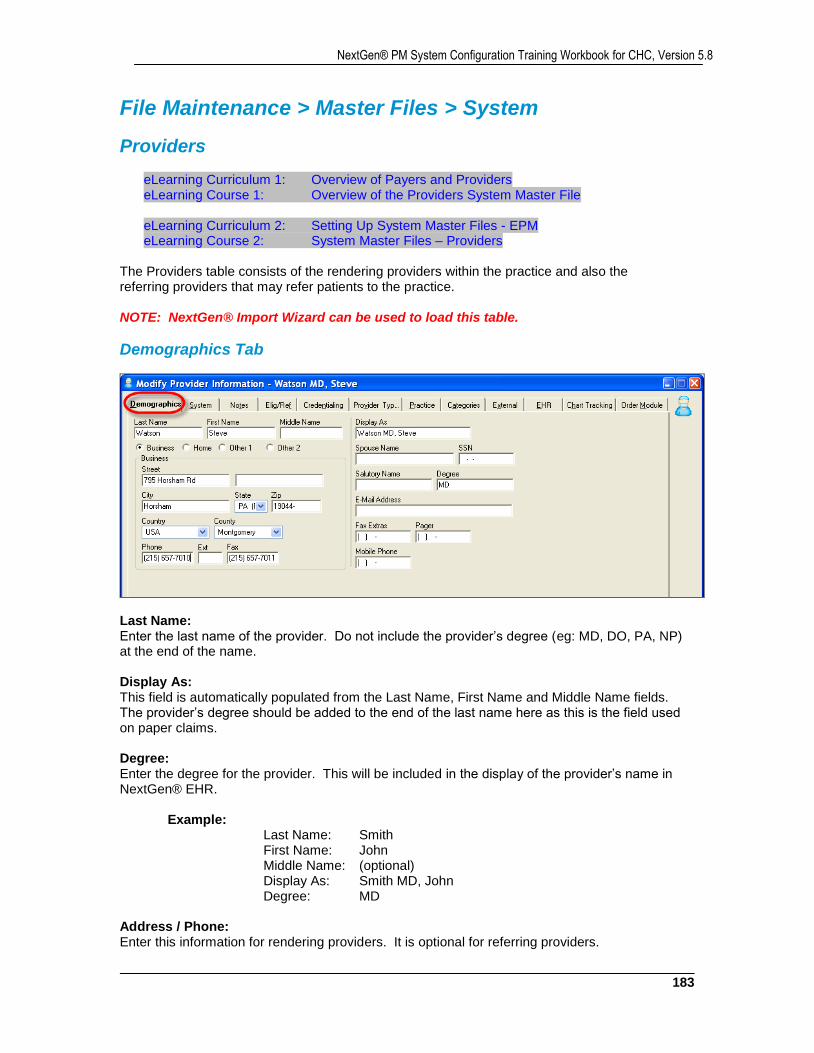
183
NextGen® PM System Configuration Training Workbook for CHC, Version 5.8
File Maintenance > Master Files > System
Providers
eLearning Curriculum 1: Overview of Payers and Providers eLearning Course 1: Overview of the Providers System Master File eLearning Curriculum 2: Setting Up System Master Files - EPM eLearning Course 2: System Master Files – Providers
The Providers table consists of the rendering providers within the practice and also the referring providers that may refer patients to the practice. NOTE: NextGen® Import Wizard can be used to load this table.
Demographics Tab
Last Name: Enter the last name of the provider. Do not include the provider’s degree (eg: MD, DO, PA, NP) at the end of the name. Display As: This field is automatically populated from the Last Name, First Name and Middle Name fields. The provider’s degree should be added to the end of the last name here as this is the field used on paper claims. Degree: Enter the degree for the provider. This will be included in the display of the provider’s name in NextGen® EHR. Example:
Last Name: Smith First Name: John Middle Name: (optional) Display As: Smith MD, John Degree: MD
Address / Phone: Enter this information for rendering providers. It is optional for referring providers.
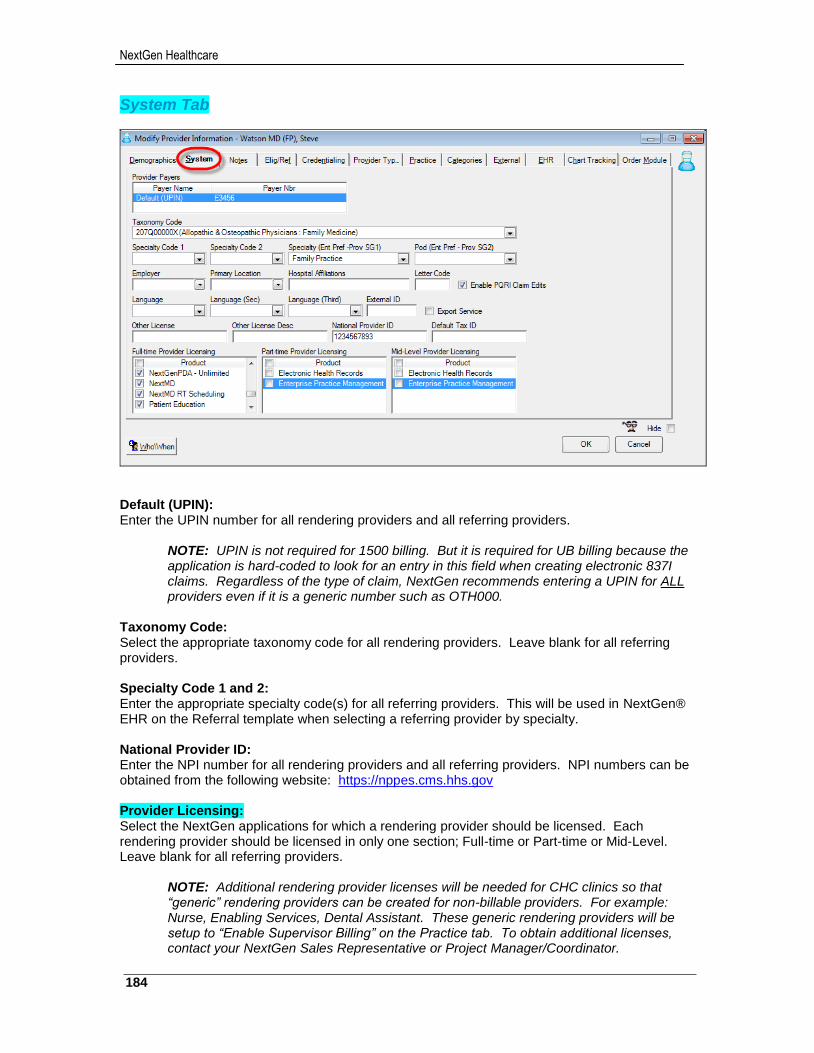
NextGen Healthcare
184
System Tab
Default (UPIN): Enter the UPIN number for all rendering providers and all referring providers.
NOTE: UPIN is not required for 1500 billing. But it is required for UB billing because the application is hard-coded to look for an entry in this field when creating electronic 837I claims. Regardless of the type of claim, NextGen recommends entering a UPIN for ALL providers even if it is a generic number such as OTH000.
Taxonomy Code: Select the appropriate taxonomy code for all rendering providers. Leave blank for all referring providers. Specialty Code 1 and 2: Enter the appropriate specialty code(s) for all referring providers. This will be used in NextGen® EHR on the Referral template when selecting a referring provider by specialty. National Provider ID: Enter the NPI number for all rendering providers and all referring providers. NPI numbers can be obtained from the following website: https://nppes.cms.hhs.gov Provider Licensing: Select the NextGen applications for which a rendering provider should be licensed. Each rendering provider should be licensed in only one section; Full-time or Part-time or Mid-Level. Leave blank for all referring providers.
NOTE: Additional rendering provider licenses will be needed for CHC clinics so that “generic” rendering providers can be created for non-billable providers. For example: Nurse, Enabling Services, Dental Assistant. These generic rendering providers will be setup to “Enable Supervisor Billing” on the Practice tab. To obtain additional licenses, contact your NextGen Sales Representative or Project Manager/Coordinator.
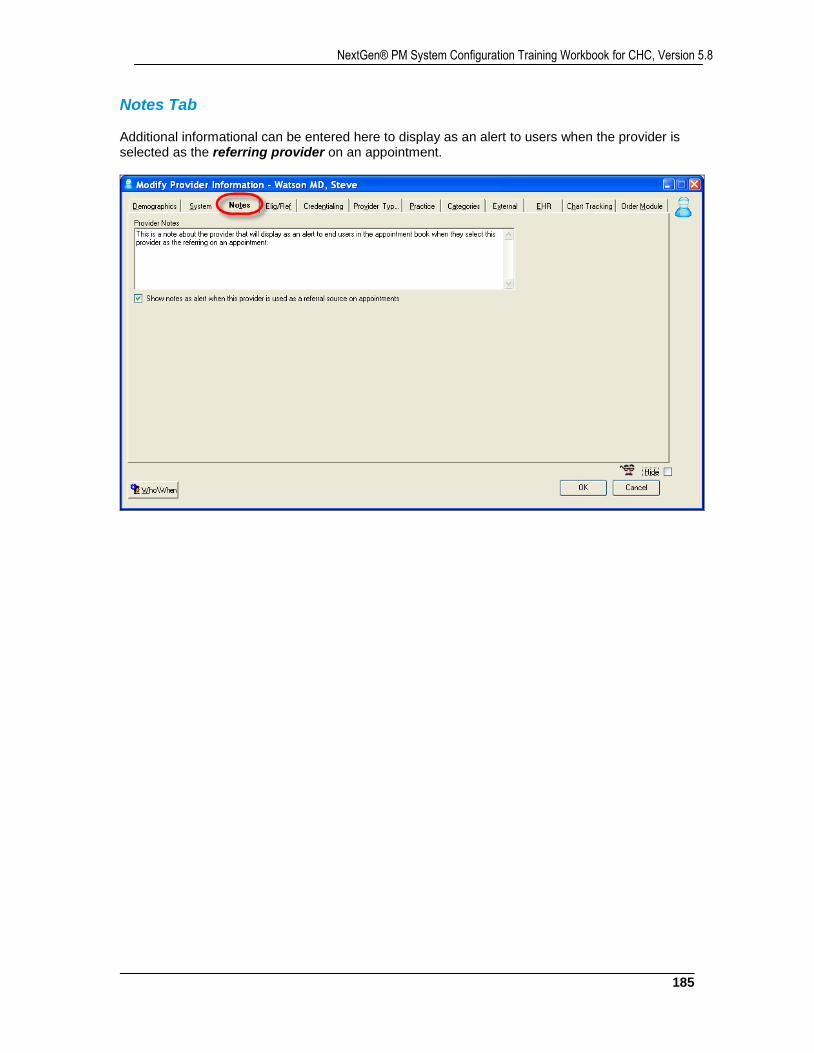
185
NextGen® PM System Configuration Training Workbook for CHC, Version 5.8
Notes Tab Additional informational can be entered here to display as an alert to users when the provider is selected as the referring provider on an appointment.
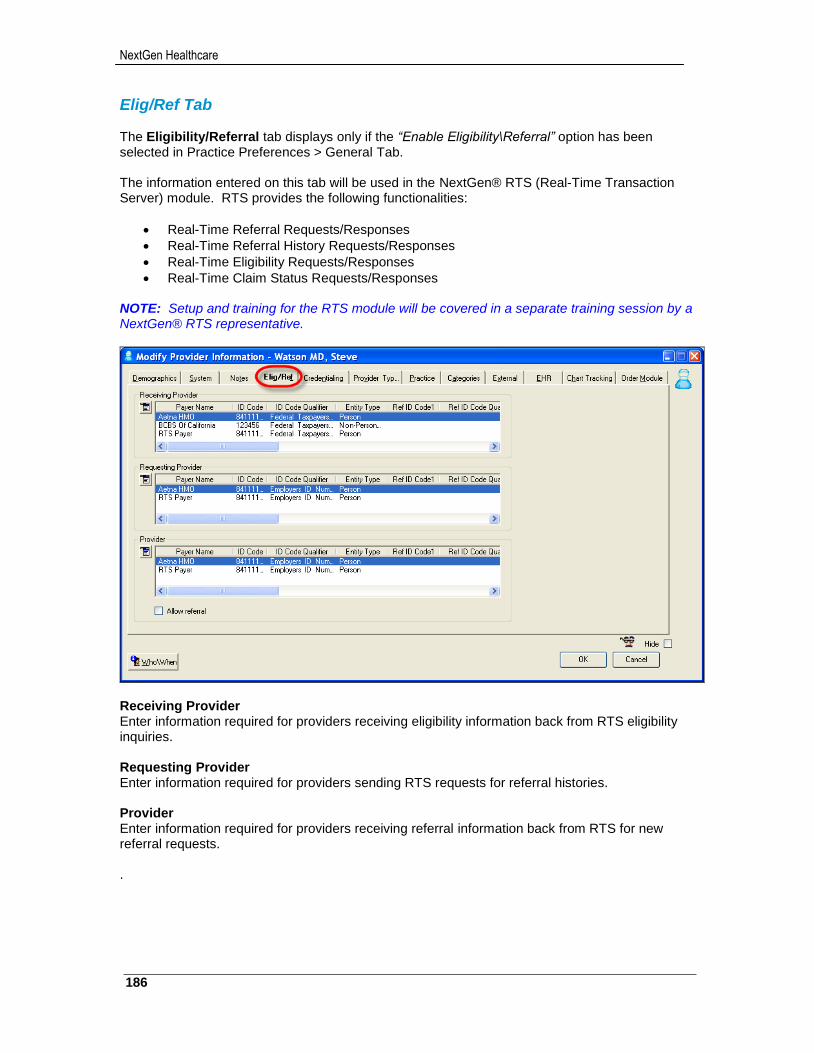
NextGen Healthcare
186
Elig/Ref Tab The Eligibility/Referral tab displays only if the “Enable Eligibility\Referral” option has been selected in Practice Preferences > General Tab. The information entered on this tab will be used in the NextGen® RTS (Real-Time Transaction Server) module. RTS provides the following functionalities:
Real-Time Referral Requests/Responses
Real-Time Referral History Requests/Responses
Real-Time Eligibility Requests/Responses
Real-Time Claim Status Requests/Responses NOTE: Setup and training for the RTS module will be covered in a separate training session by a NextGen® RTS representative.
Receiving Provider Enter information required for providers receiving eligibility information back from RTS eligibility inquiries. Requesting Provider Enter information required for providers sending RTS requests for referral histories. Provider Enter information required for providers receiving referral information back from RTS for new referral requests. .
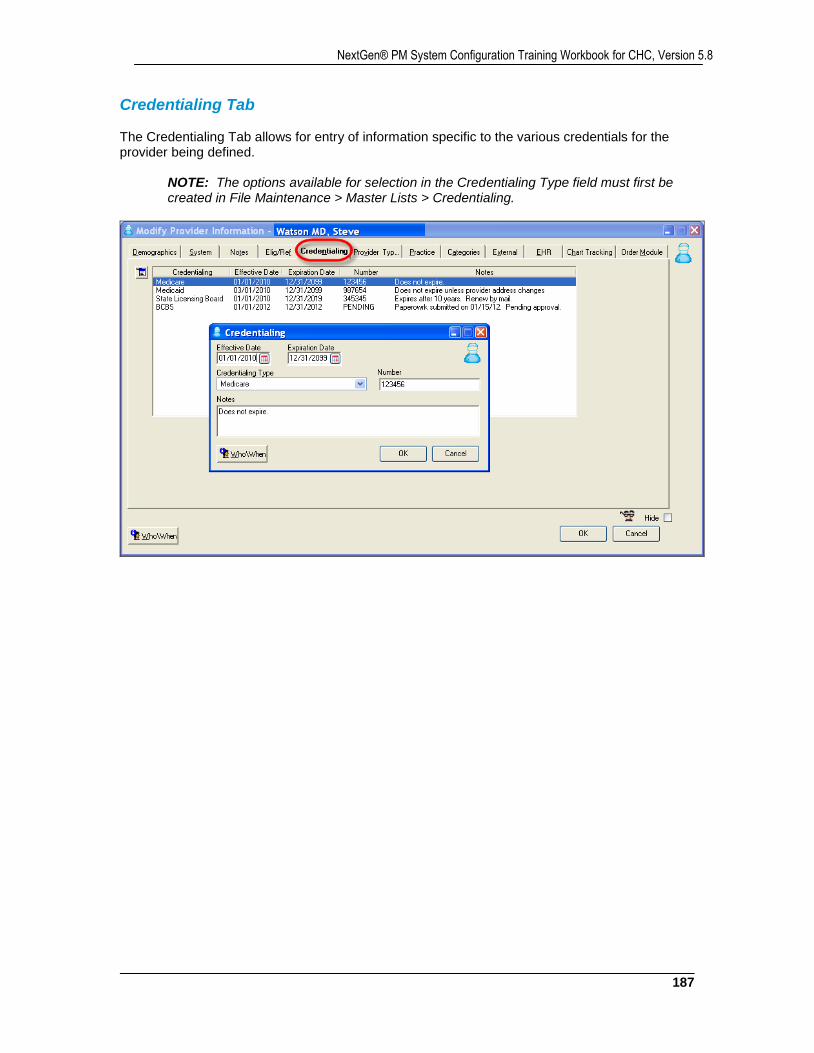
187
NextGen® PM System Configuration Training Workbook for CHC, Version 5.8
Credentialing Tab The Credentialing Tab allows for entry of information specific to the various credentials for the provider being defined.
NOTE: The options available for selection in the Credentialing Type field must first be created in File Maintenance > Master Lists > Credentialing.
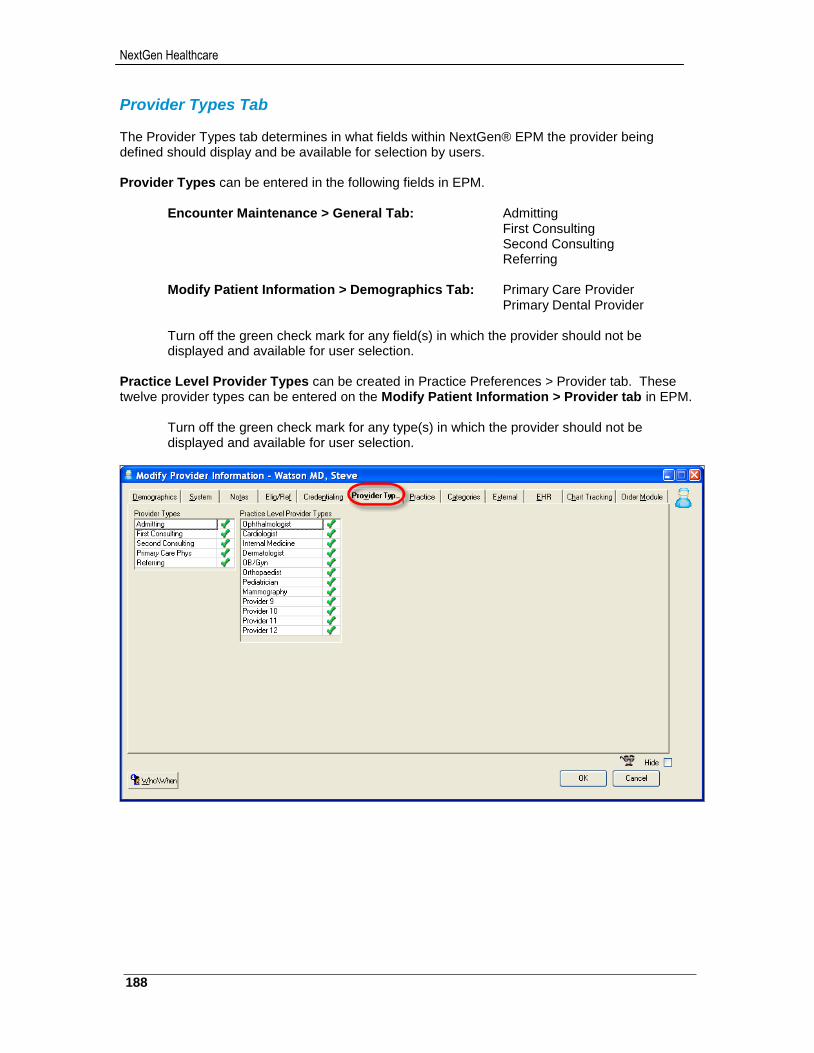
NextGen Healthcare
188
Provider Types Tab The Provider Types tab determines in what fields within NextGen® EPM the provider being defined should display and be available for selection by users. Provider Types can be entered in the following fields in EPM.
Encounter Maintenance > General Tab: Admitting First Consulting Second Consulting Referring
Modify Patient Information > Demographics Tab: Primary Care Provider
Primary Dental Provider
Turn off the green check mark for any field(s) in which the provider should not be displayed and available for user selection.
Practice Level Provider Types can be created in Practice Preferences > Provider tab. These twelve provider types can be entered on the Modify Patient Information > Provider tab in EPM.
Turn off the green check mark for any type(s) in which the provider should not be displayed and available for user selection.
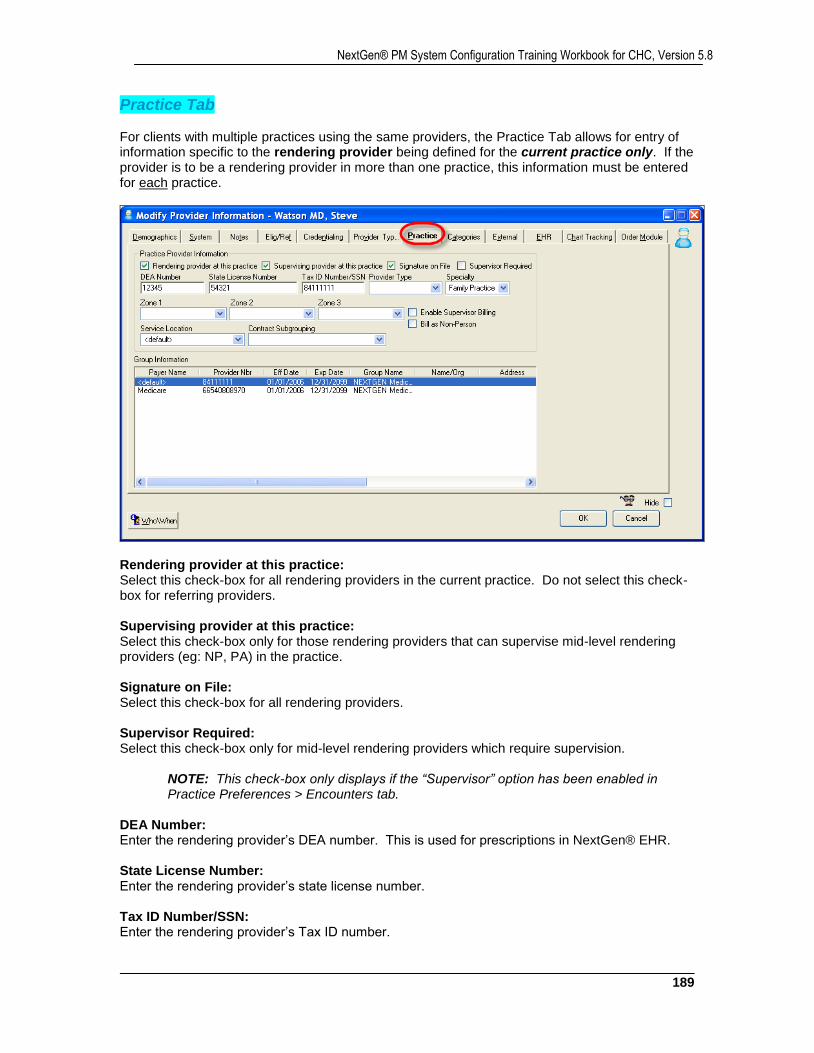
189
NextGen® PM System Configuration Training Workbook for CHC, Version 5.8
Practice Tab For clients with multiple practices using the same providers, the Practice Tab allows for entry of information specific to the rendering provider being defined for the current practice only. If the provider is to be a rendering provider in more than one practice, this information must be entered for each practice.
Rendering provider at this practice: Select this check-box for all rendering providers in the current practice. Do not select this check-box for referring providers. Supervising provider at this practice: Select this check-box only for those rendering providers that can supervise mid-level rendering providers (eg: NP, PA) in the practice. Signature on File: Select this check-box for all rendering providers. Supervisor Required: Select this check-box only for mid-level rendering providers which require supervision.
NOTE: This check-box only displays if the “Supervisor” option has been enabled in Practice Preferences > Encounters tab.
DEA Number: Enter the rendering provider’s DEA number. This is used for prescriptions in NextGen® EHR. State License Number: Enter the rendering provider’s state license number. Tax ID Number/SSN: Enter the rendering provider’s Tax ID number.
NextGen Healthcare
190
Provider Type: Select the appropriate provider type for the rendering provider. This is used by CHC clinics and is required for the UDS report. Specialty: Select the appropriate specialty for the rendering provider. Enable Supervisor Billing: Select this check-box only for mid-level rendering providers for which claims may be created in the name of a supervising provider. This enables supervisor billing at the provider level.
NOTE: Supervisor billing can be enabled at four levels:
Provider – Claims for the mid-level provider will be created in the supervisor’s name for patients seen in any location with any payer.
Provider/Payer – Claims for the mid-level provider are created in the supervisor’s name for patients seen in any location with a specific payer.
Provider/Location – Claims for the mid-level provider are created in the supervisor’s name for patients seen in a specific location with any payer.
Provider/Location/Payer – Claims for the mid-level provider are created in the supervisor’s name for patients seen in a specific location with a specific payer.

191
NextGen® PM System Configuration Training Workbook for CHC, Version 5.8
Service Location and Group Information NOTE: ALL rendering providers must have at least one row defined for <Default> Service Location and <Default> Payer using Tax ID# as the Provider Number. Service Location: Select the <Default> Service Location to define Provider information that is the same for ALL locations. Or select a specific Service Location to define Provider information for the location that is different from all other locations. Payer Name: Open the <Default> Payer Name row to define Provider Number and Group Name information that is the same for ALL payers. Or create a new row to define information for a specific payer that is different from all other payers.
Provider Number: Enter the provider number for Box 24J on 1500 claims for the location/payer.
NOTE: This will typically be Tax ID for most payers. Effective/Expiration Date: Enter effective and expiration dates for the provider information being defined for the location/payer.
NOTE: For claims testing, the Effective Date should be 6-8 weeks prior to EPM Go-Live. Group Name: Select the group name from the Groups table for Box 33 on 1500 claims for the location/payer.
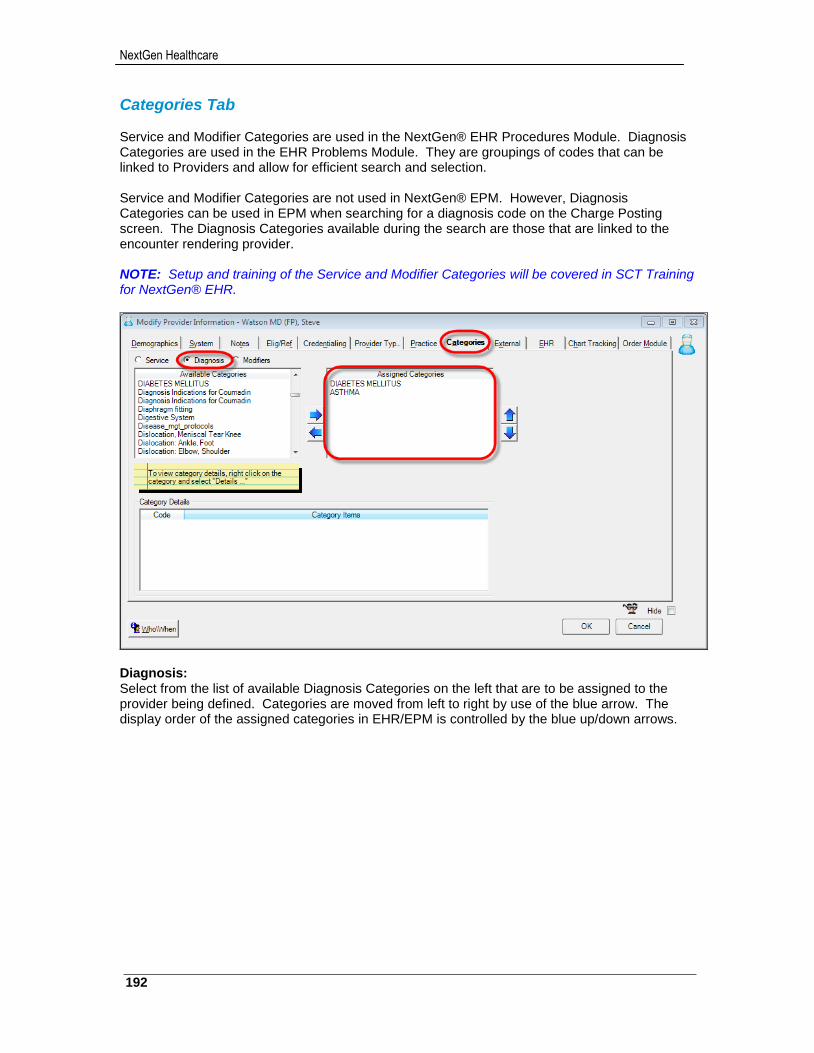
NextGen Healthcare
192
Categories Tab Service and Modifier Categories are used in the NextGen® EHR Procedures Module. Diagnosis Categories are used in the EHR Problems Module. They are groupings of codes that can be linked to Providers and allow for efficient search and selection. Service and Modifier Categories are not used in NextGen® EPM. However, Diagnosis Categories can be used in EPM when searching for a diagnosis code on the Charge Posting screen. The Diagnosis Categories available during the search are those that are linked to the encounter rendering provider. NOTE: Setup and training of the Service and Modifier Categories will be covered in SCT Training for NextGen® EHR.
Diagnosis: Select from the list of available Diagnosis Categories on the left that are to be assigned to the provider being defined. Categories are moved from left to right by use of the blue arrow. The display order of the assigned categories in EHR/EPM is controlled by the blue up/down arrows.
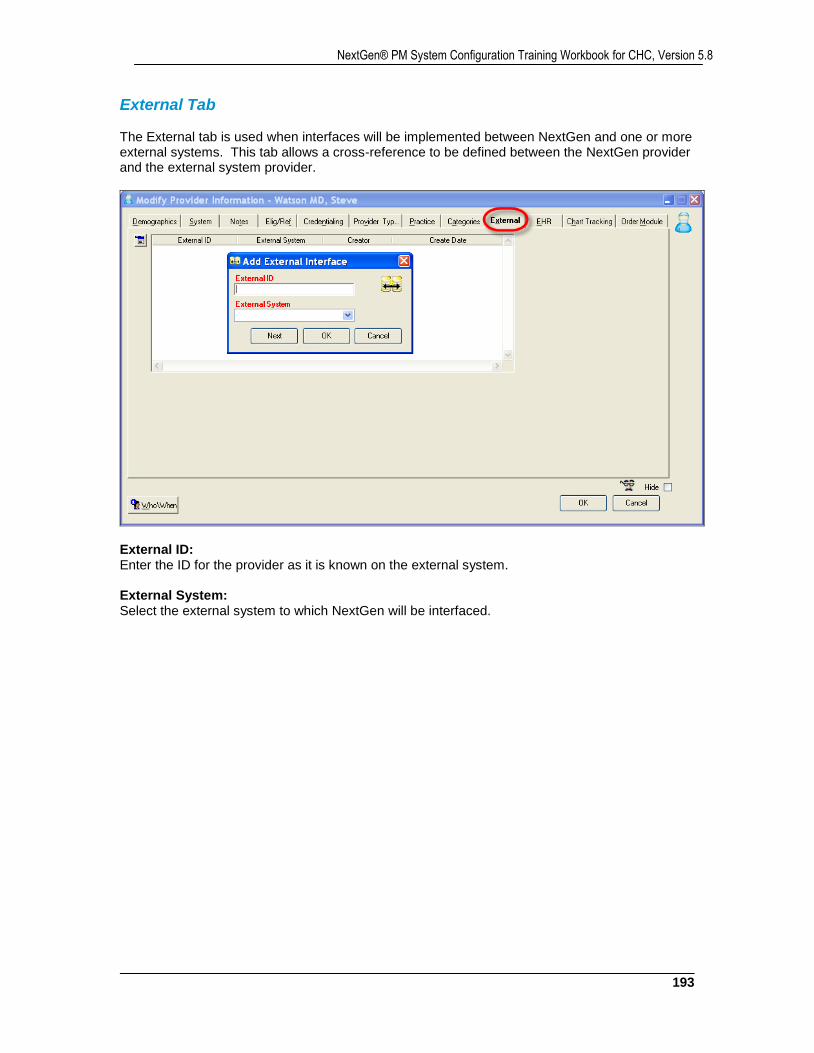
193
NextGen® PM System Configuration Training Workbook for CHC, Version 5.8
External Tab The External tab is used when interfaces will be implemented between NextGen and one or more external systems. This tab allows a cross-reference to be defined between the NextGen provider and the external system provider.
External ID: Enter the ID for the provider as it is known on the external system. External System: Select the external system to which NextGen will be interfaced.
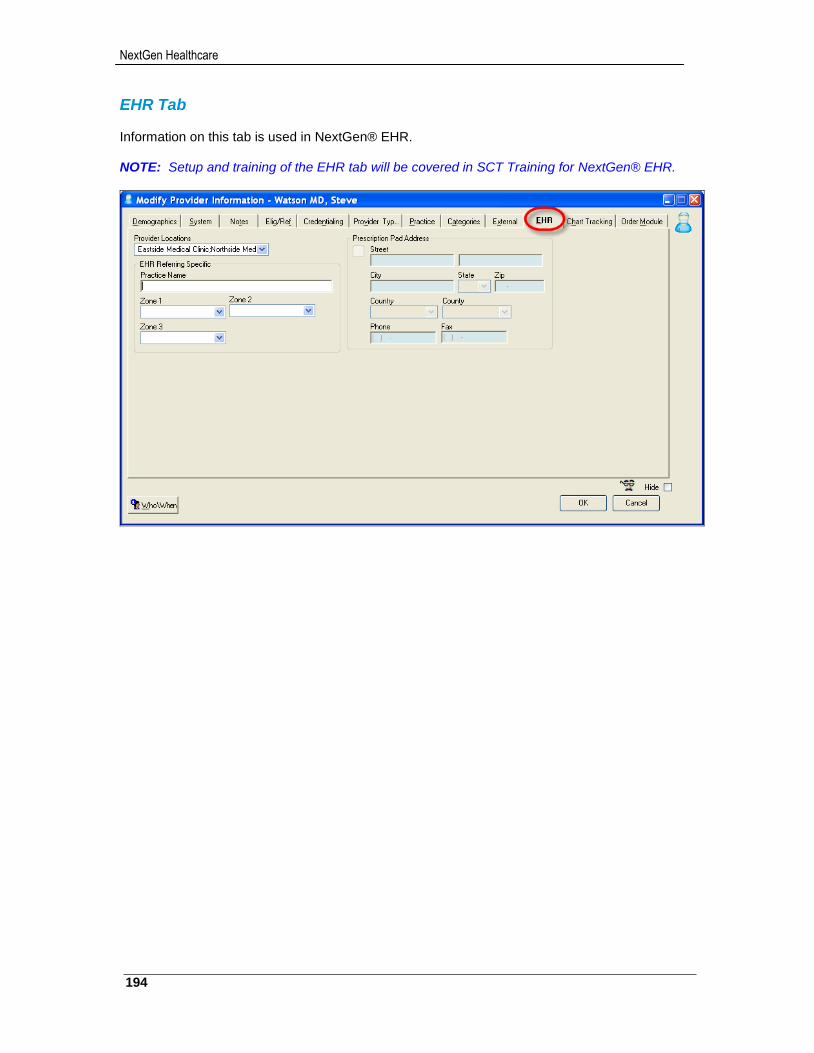
NextGen Healthcare
194
EHR Tab Information on this tab is used in NextGen® EHR. NOTE: Setup and training of the EHR tab will be covered in SCT Training for NextGen® EHR.
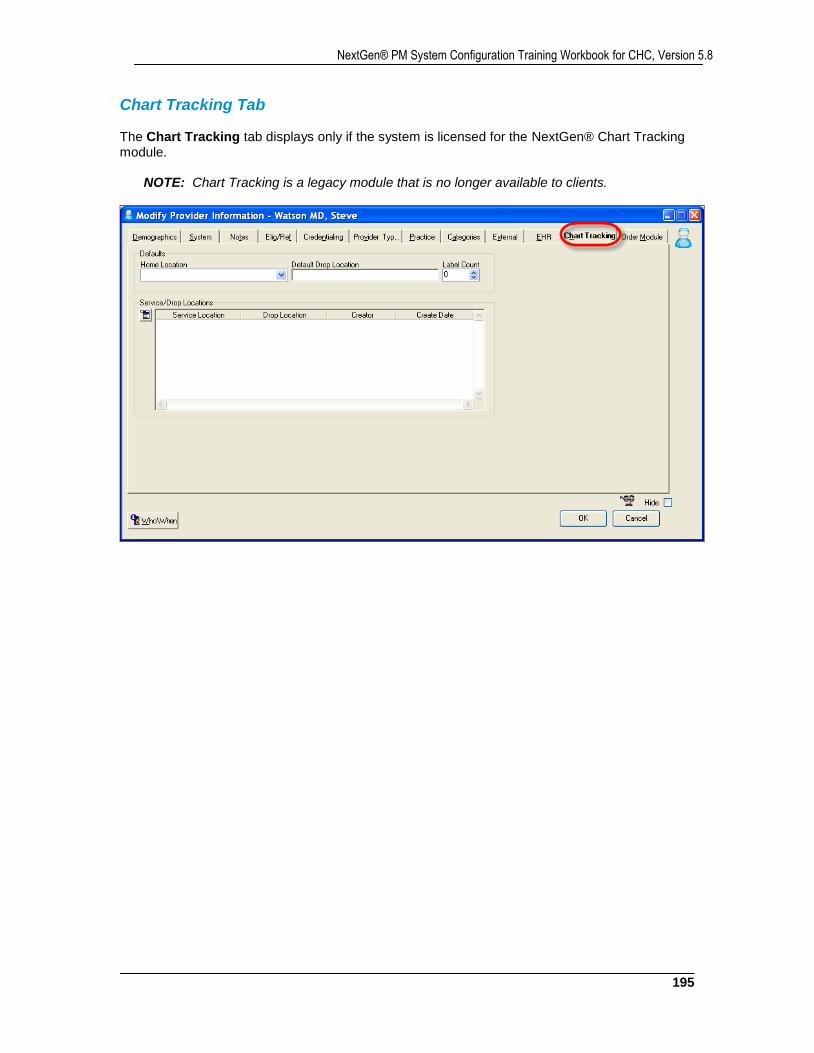
195
NextGen® PM System Configuration Training Workbook for CHC, Version 5.8
Chart Tracking Tab The Chart Tracking tab displays only if the system is licensed for the NextGen® Chart Tracking module. NOTE: Chart Tracking is a legacy module that is no longer available to clients.

NextGen Healthcare
196
Order Module Tab This tab is used to designate Test Favorites (commonly used) for the provider being defined. These are used in the NextGen® EHR Orders Module. NOTE: Setup and training of the Order Module tab will be covered in SCT Training for NextGen® EHR.
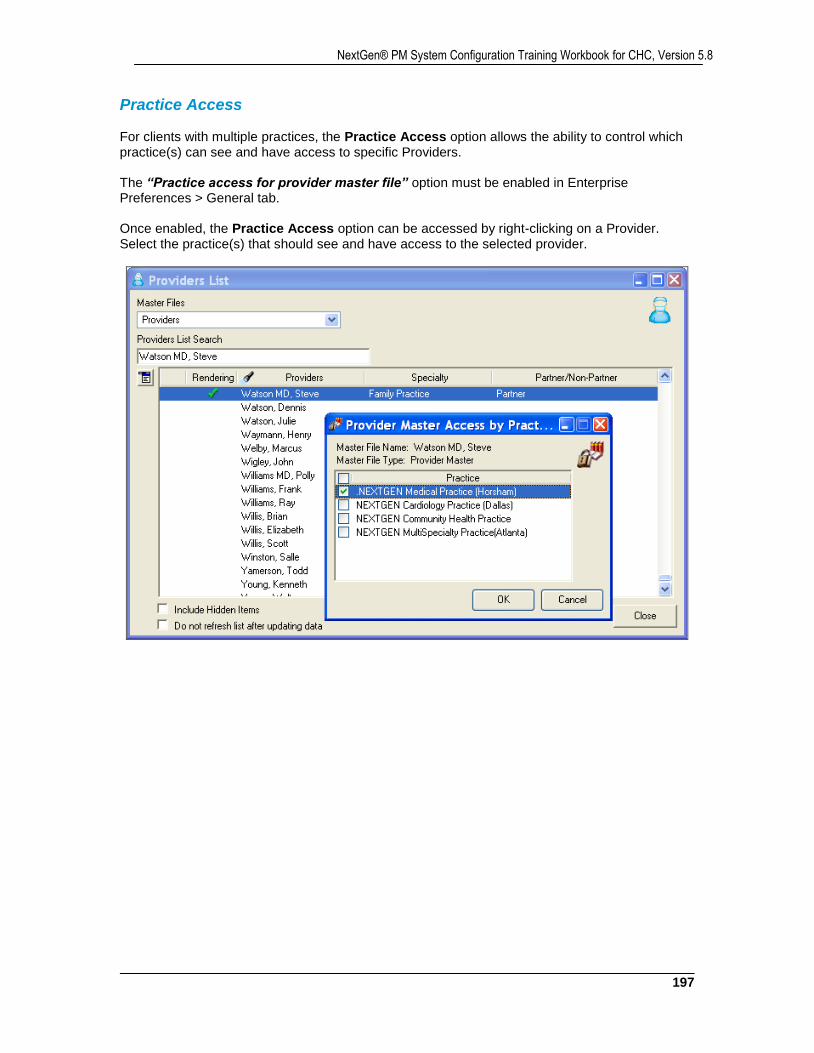
197
NextGen® PM System Configuration Training Workbook for CHC, Version 5.8
Practice Access For clients with multiple practices, the Practice Access option allows the ability to control which practice(s) can see and have access to specific Providers. The “Practice access for provider master file” option must be enabled in Enterprise Preferences > General tab. Once enabled, the Practice Access option can be accessed by right-clicking on a Provider. Select the practice(s) that should see and have access to the selected provider.
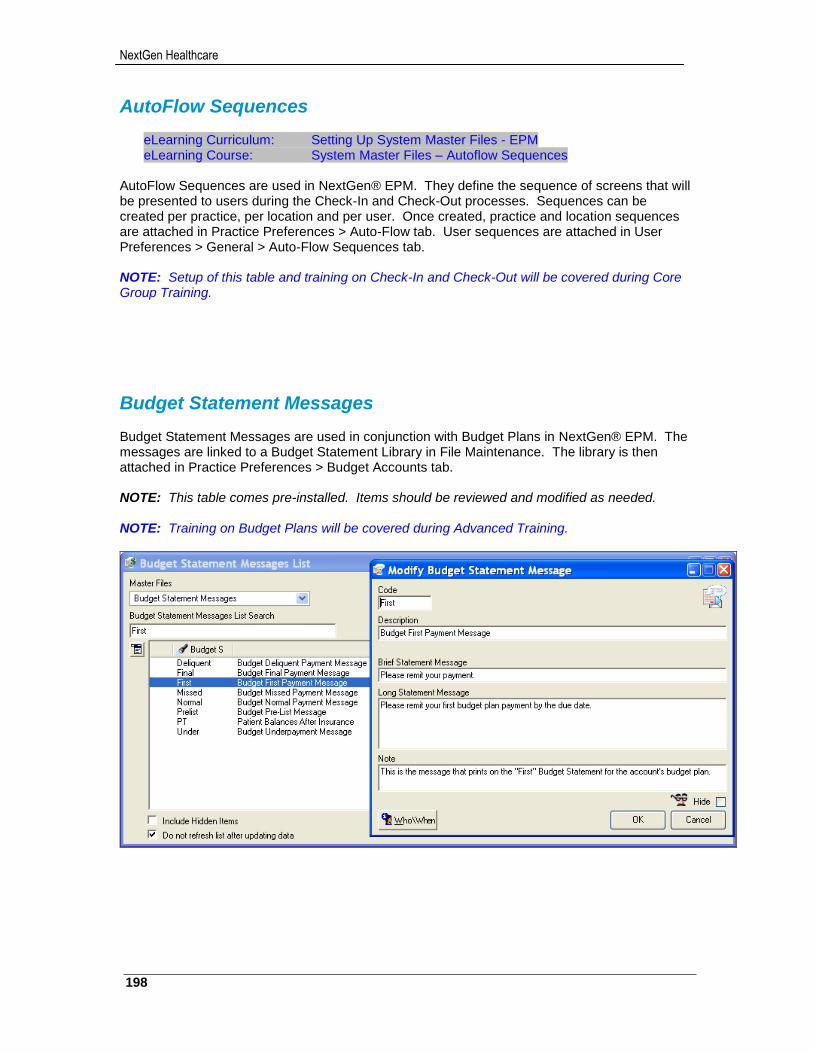
NextGen Healthcare
198
AutoFlow Sequences
eLearning Curriculum: Setting Up System Master Files - EPM eLearning Course: System Master Files – Autoflow Sequences
AutoFlow Sequences are used in NextGen® EPM. They define the sequence of screens that will be presented to users during the Check-In and Check-Out processes. Sequences can be created per practice, per location and per user. Once created, practice and location sequences are attached in Practice Preferences > Auto-Flow tab. User sequences are attached in User Preferences > General > Auto-Flow Sequences tab. NOTE: Setup of this table and training on Check-In and Check-Out will be covered during Core Group Training.
Budget Statement Messages Budget Statement Messages are used in conjunction with Budget Plans in NextGen® EPM. The messages are linked to a Budget Statement Library in File Maintenance. The library is then attached in Practice Preferences > Budget Accounts tab. NOTE: This table comes pre-installed. Items should be reviewed and modified as needed. NOTE: Training on Budget Plans will be covered during Advanced Training.
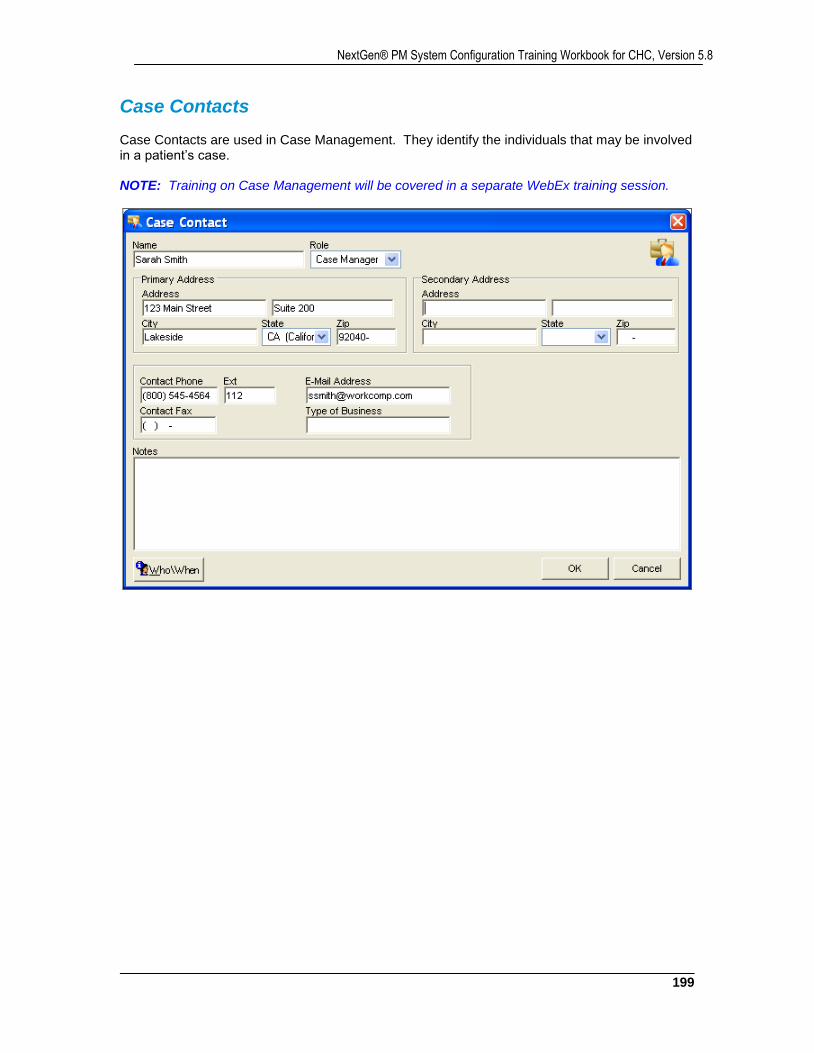
199
NextGen® PM System Configuration Training Workbook for CHC, Version 5.8
Case Contacts Case Contacts are used in Case Management. They identify the individuals that may be involved in a patient’s case. NOTE: Training on Case Management will be covered in a separate WebEx training session.

NextGen Healthcare
200
CMN Information
Certificate of Medical Necessity (CMN) forms can be created for specific DME devices by SIM code. The forms include specific questions and answer formats required by payers for that DME device. The CMN forms are then used in EPM to capture information and answer the form questions for patients DME devices. The information is then included in electronic 837P (1500) claim files for payers that requiring CMN information for those specific CPT4 codes.

201
NextGen® PM System Configuration Training Workbook for CHC, Version 5.8
Collection Agencies
eLearning Curriculum: Setting Up System Master Files - EPM eLearning Course: System Master Files – Collection Agencies
Collection Agencies are used in NextGen® EPM when sending one or more encounters for an account to collections (Bad Debt). NOTE: Training on Collections/Bad Debt will be covered during Advanced Training.
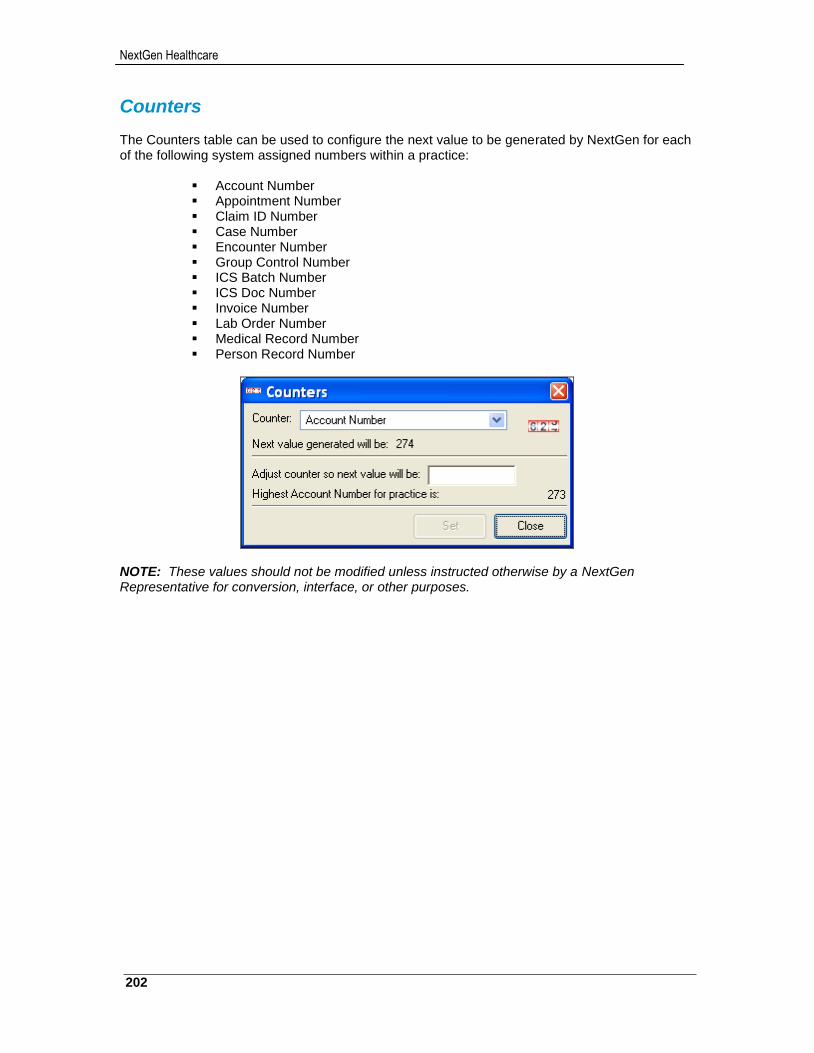
NextGen Healthcare
202
Counters The Counters table can be used to configure the next value to be generated by NextGen for each of the following system assigned numbers within a practice:
Account Number Appointment Number Claim ID Number Case Number Encounter Number Group Control Number ICS Batch Number ICS Doc Number Invoice Number Lab Order Number Medical Record Number Person Record Number
NOTE: These values should not be modified unless instructed otherwise by a NextGen Representative for conversion, interface, or other purposes.
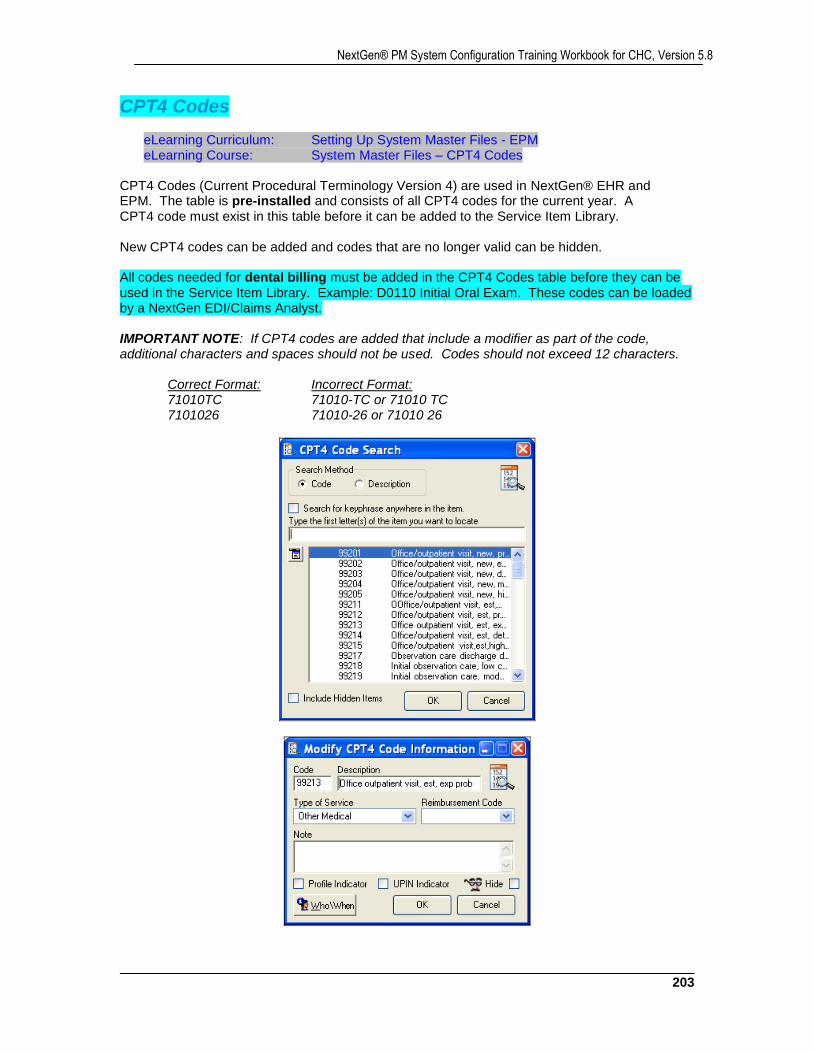
203
NextGen® PM System Configuration Training Workbook for CHC, Version 5.8
CPT4 Codes
eLearning Curriculum: Setting Up System Master Files - EPM eLearning Course: System Master Files – CPT4 Codes
CPT4 Codes (Current Procedural Terminology Version 4) are used in NextGen® EHR and EPM. The table is pre-installed and consists of all CPT4 codes for the current year. A CPT4 code must exist in this table before it can be added to the Service Item Library. New CPT4 codes can be added and codes that are no longer valid can be hidden. All codes needed for dental billing must be added in the CPT4 Codes table before they can be used in the Service Item Library. Example: D0110 Initial Oral Exam. These codes can be loaded by a NextGen EDI/Claims Analyst. IMPORTANT NOTE: If CPT4 codes are added that include a modifier as part of the code, additional characters and spaces should not be used. Codes should not exceed 12 characters.
Correct Format: Incorrect Format: 71010TC 71010-TC or 71010 TC
7101026 71010-26 or 71010 26
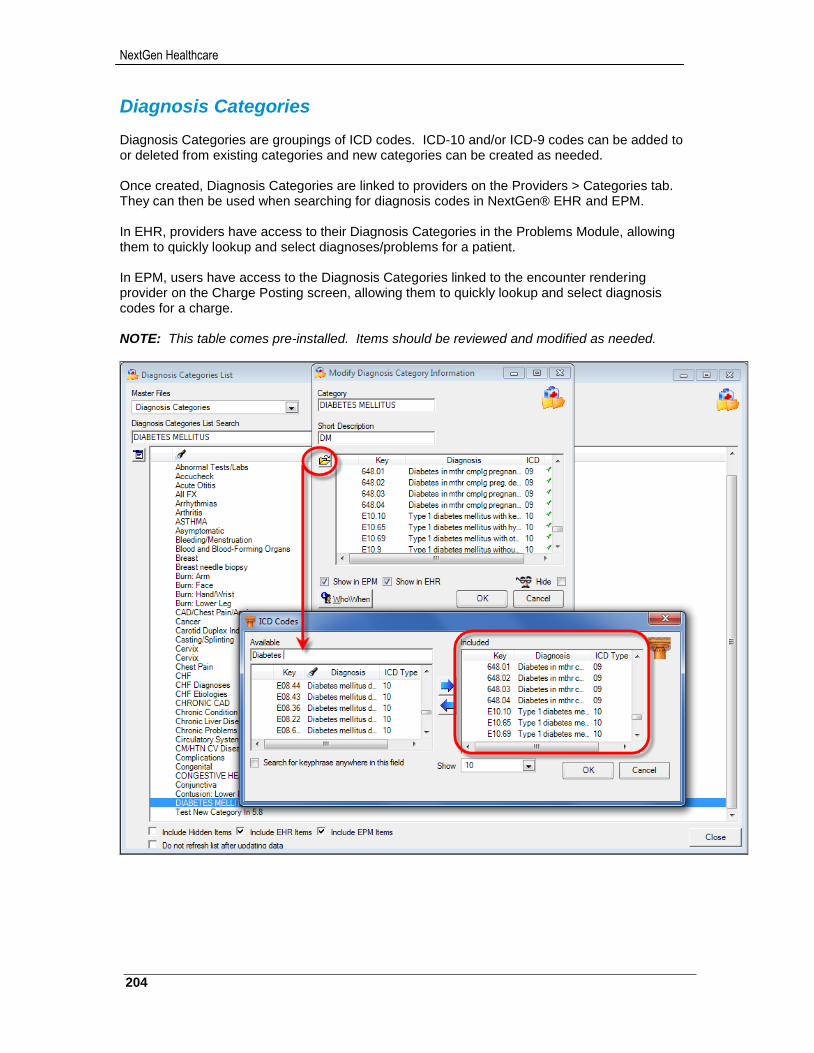
NextGen Healthcare
204
Diagnosis Categories Diagnosis Categories are groupings of ICD codes. ICD-10 and/or ICD-9 codes can be added to or deleted from existing categories and new categories can be created as needed. Once created, Diagnosis Categories are linked to providers on the Providers > Categories tab. They can then be used when searching for diagnosis codes in NextGen® EHR and EPM. In EHR, providers have access to their Diagnosis Categories in the Problems Module, allowing them to quickly lookup and select diagnoses/problems for a patient. In EPM, users have access to the Diagnosis Categories linked to the encounter rendering provider on the Charge Posting screen, allowing them to quickly lookup and select diagnosis codes for a charge. NOTE: This table comes pre-installed. Items should be reviewed and modified as needed.
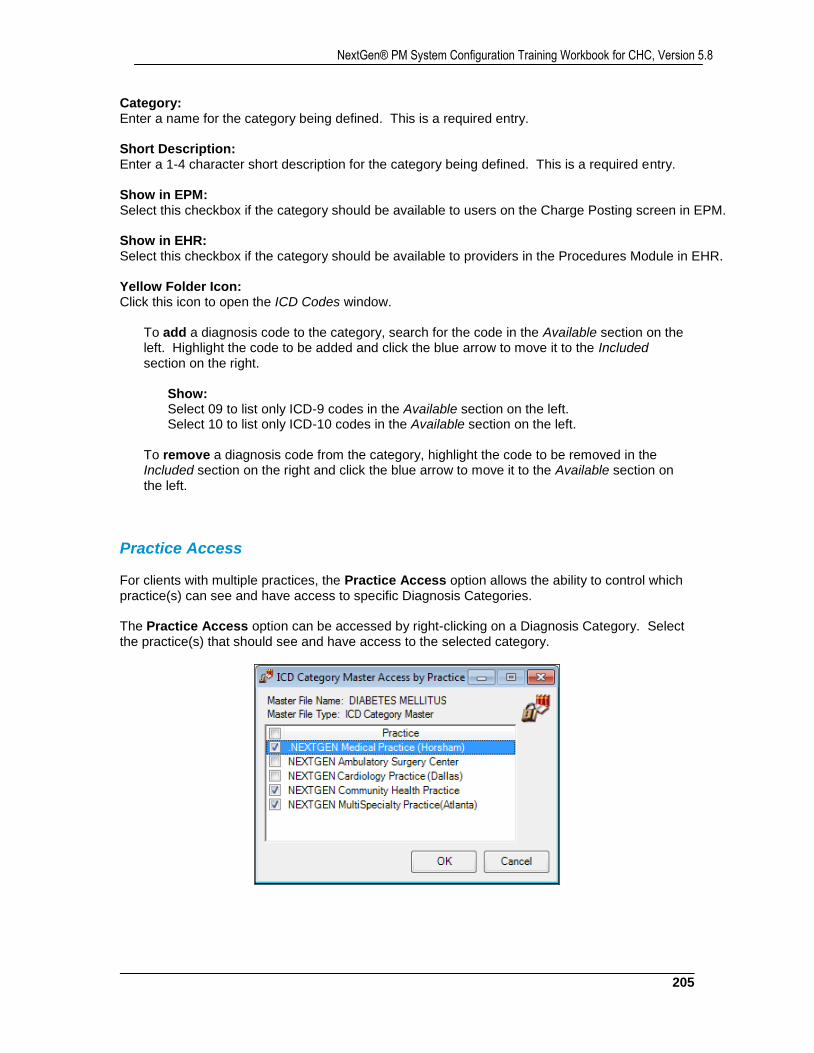
205
NextGen® PM System Configuration Training Workbook for CHC, Version 5.8
Category: Enter a name for the category being defined. This is a required entry. Short Description: Enter a 1-4 character short description for the category being defined. This is a required entry. Show in EPM: Select this checkbox if the category should be available to users on the Charge Posting screen in EPM. Show in EHR: Select this checkbox if the category should be available to providers in the Procedures Module in EHR. Yellow Folder Icon: Click this icon to open the ICD Codes window.
To add a diagnosis code to the category, search for the code in the Available section on the left. Highlight the code to be added and click the blue arrow to move it to the Included section on the right.
Show: Select 09 to list only ICD-9 codes in the Available section on the left. Select 10 to list only ICD-10 codes in the Available section on the left.
To remove a diagnosis code from the category, highlight the code to be removed in the Included section on the right and click the blue arrow to move it to the Available section on the left.
Practice Access For clients with multiple practices, the Practice Access option allows the ability to control which practice(s) can see and have access to specific Diagnosis Categories. The Practice Access option can be accessed by right-clicking on a Diagnosis Category. Select the practice(s) that should see and have access to the selected category.
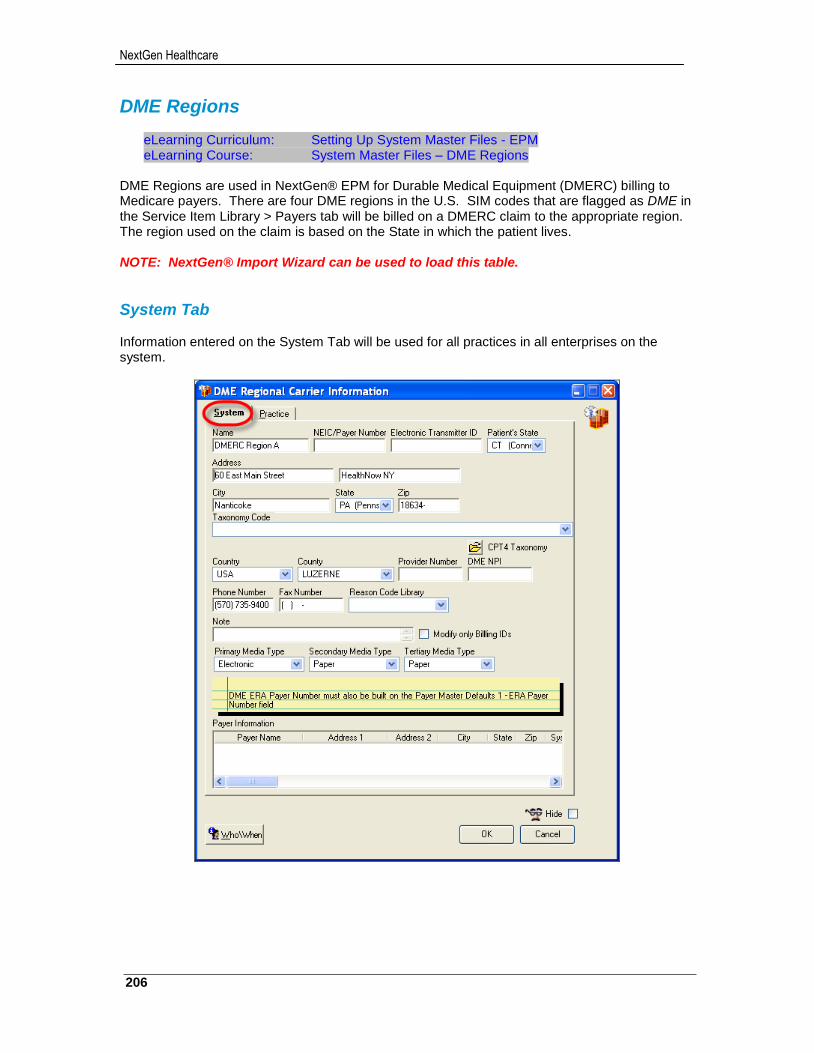
NextGen Healthcare
206
DME Regions
eLearning Curriculum: Setting Up System Master Files - EPM eLearning Course: System Master Files – DME Regions
DME Regions are used in NextGen® EPM for Durable Medical Equipment (DMERC) billing to Medicare payers. There are four DME regions in the U.S. SIM codes that are flagged as DME in the Service Item Library > Payers tab will be billed on a DMERC claim to the appropriate region. The region used on the claim is based on the State in which the patient lives. NOTE: NextGen® Import Wizard can be used to load this table.
System Tab Information entered on the System Tab will be used for all practices in all enterprises on the system.

207
NextGen® PM System Configuration Training Workbook for CHC, Version 5.8
Name/Address: Enter the name for the DME region as it should appear on claims. Address: Enter the address, city, state, zip, county and country for the DME region as it should appear on claims. Patient’s State: Select the states that are part of the DME region. Taxonomy Code: Enter the Taxonomy Code needed on DME claims for the region. Provider Number: Enter the Provider Number needed on DME claims for the region. DME NPI: Enter the National Provider ID needed on DME claims for the region. Primary / Secondary / Tertiary Media Type: Select either Electronic or Paper for DME claims for the region. Payer Information Section: This section can be used to define specific payers that require different, address, provider number, DME NPI, media type, etc. Information on DME claims.
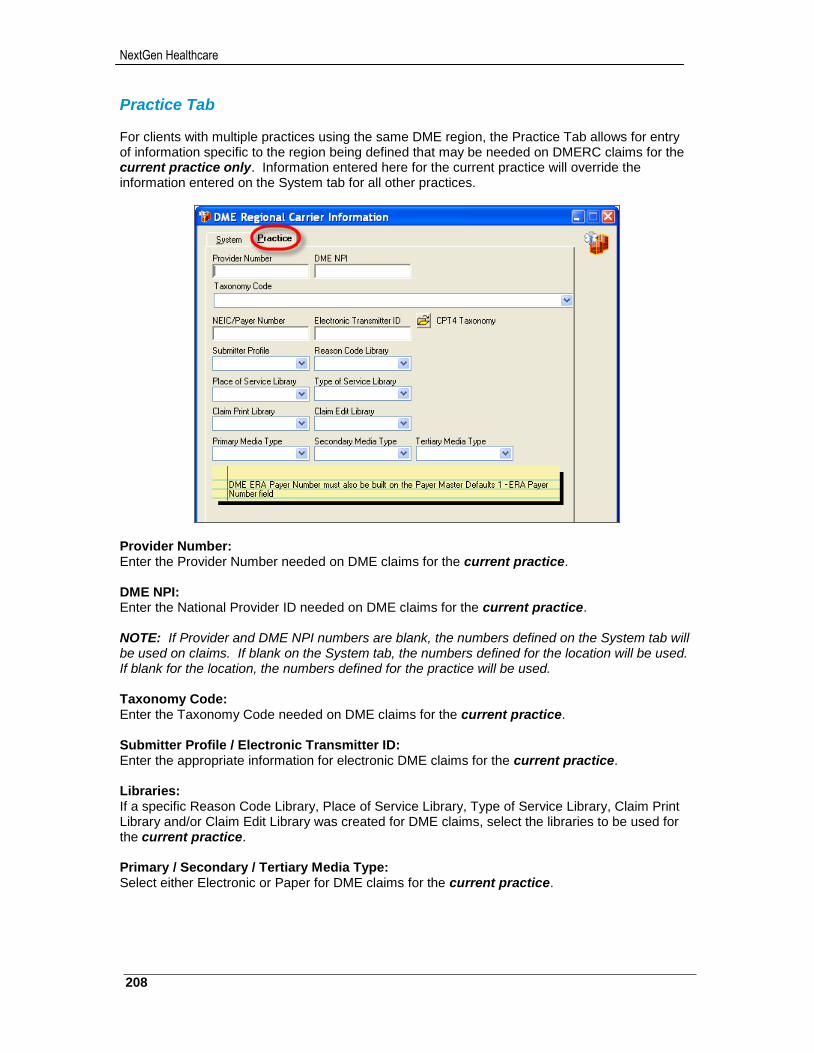
NextGen Healthcare
208
Practice Tab For clients with multiple practices using the same DME region, the Practice Tab allows for entry of information specific to the region being defined that may be needed on DMERC claims for the current practice only. Information entered here for the current practice will override the information entered on the System tab for all other practices.
Provider Number: Enter the Provider Number needed on DME claims for the current practice. DME NPI: Enter the National Provider ID needed on DME claims for the current practice. NOTE: If Provider and DME NPI numbers are blank, the numbers defined on the System tab will be used on claims. If blank on the System tab, the numbers defined for the location will be used. If blank for the location, the numbers defined for the practice will be used. Taxonomy Code: Enter the Taxonomy Code needed on DME claims for the current practice. Submitter Profile / Electronic Transmitter ID: Enter the appropriate information for electronic DME claims for the current practice. Libraries: If a specific Reason Code Library, Place of Service Library, Type of Service Library, Claim Print Library and/or Claim Edit Library was created for DME claims, select the libraries to be used for the current practice. Primary / Secondary / Tertiary Media Type: Select either Electronic or Paper for DME claims for the current practice.
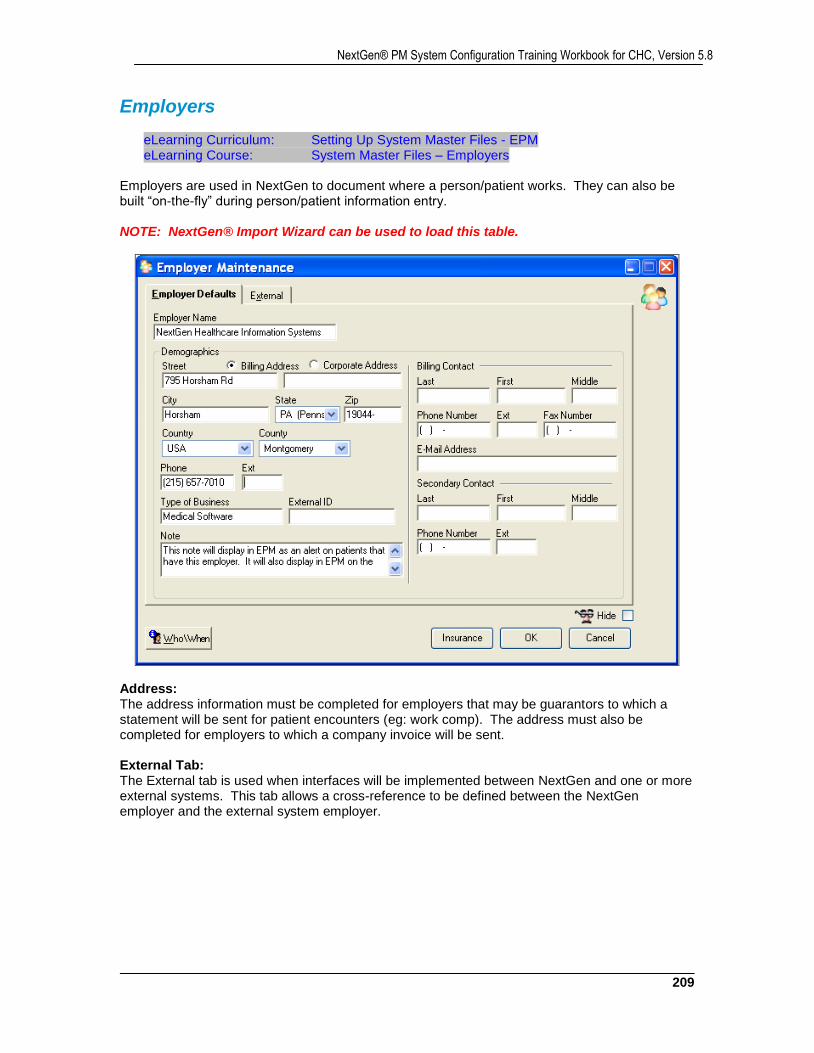
209
NextGen® PM System Configuration Training Workbook for CHC, Version 5.8
Employers
eLearning Curriculum: Setting Up System Master Files - EPM eLearning Course: System Master Files – Employers
Employers are used in NextGen to document where a person/patient works. They can also be built “on-the-fly” during person/patient information entry. NOTE: NextGen® Import Wizard can be used to load this table.
Address: The address information must be completed for employers that may be guarantors to which a statement will be sent for patient encounters (eg: work comp). The address must also be completed for employers to which a company invoice will be sent. External Tab: The External tab is used when interfaces will be implemented between NextGen and one or more external systems. This tab allows a cross-reference to be defined between the NextGen employer and the external system employer.
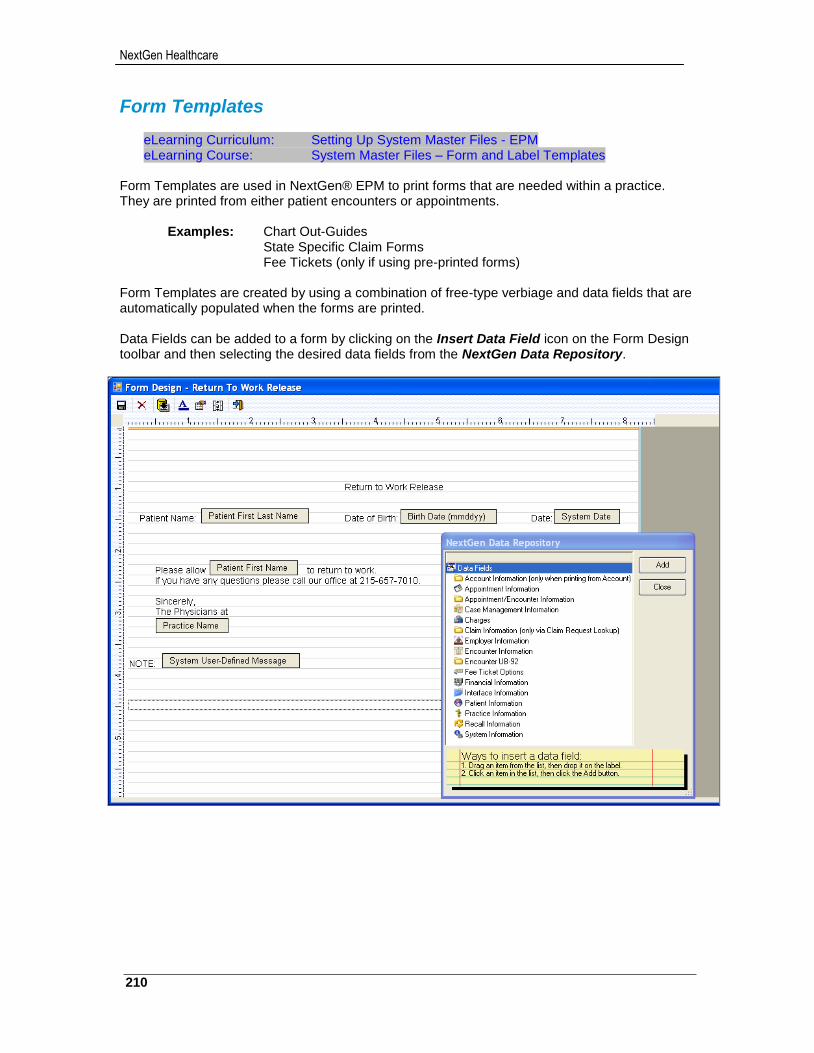
NextGen Healthcare
210
Form Templates
eLearning Curriculum: Setting Up System Master Files - EPM eLearning Course: System Master Files – Form and Label Templates
Form Templates are used in NextGen® EPM to print forms that are needed within a practice. They are printed from either patient encounters or appointments.
Examples: Chart Out-Guides State Specific Claim Forms Fee Tickets (only if using pre-printed forms)
Form Templates are created by using a combination of free-type verbiage and data fields that are automatically populated when the forms are printed. Data Fields can be added to a form by clicking on the Insert Data Field icon on the Form Design toolbar and then selecting the desired data fields from the NextGen Data Repository.
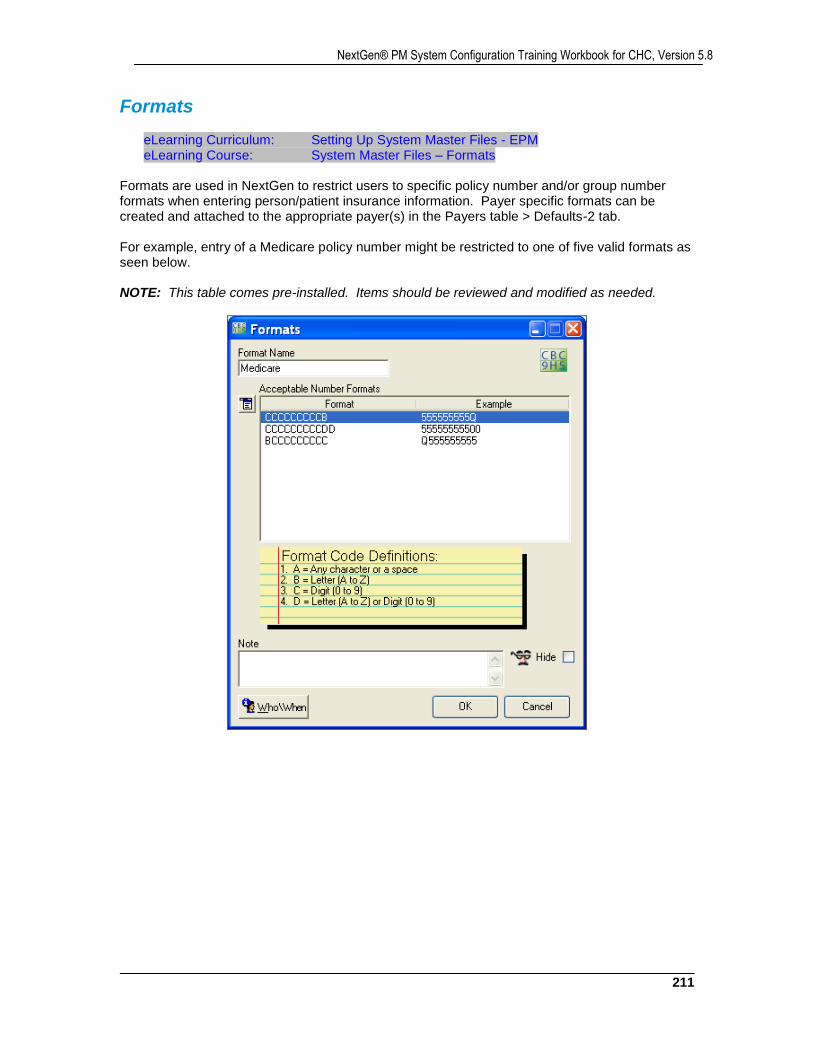
211
NextGen® PM System Configuration Training Workbook for CHC, Version 5.8
Formats
eLearning Curriculum: Setting Up System Master Files - EPM eLearning Course: System Master Files – Formats
Formats are used in NextGen to restrict users to specific policy number and/or group number formats when entering person/patient insurance information. Payer specific formats can be created and attached to the appropriate payer(s) in the Payers table > Defaults-2 tab. For example, entry of a Medicare policy number might be restricted to one of five valid formats as seen below. NOTE: This table comes pre-installed. Items should be reviewed and modified as needed.
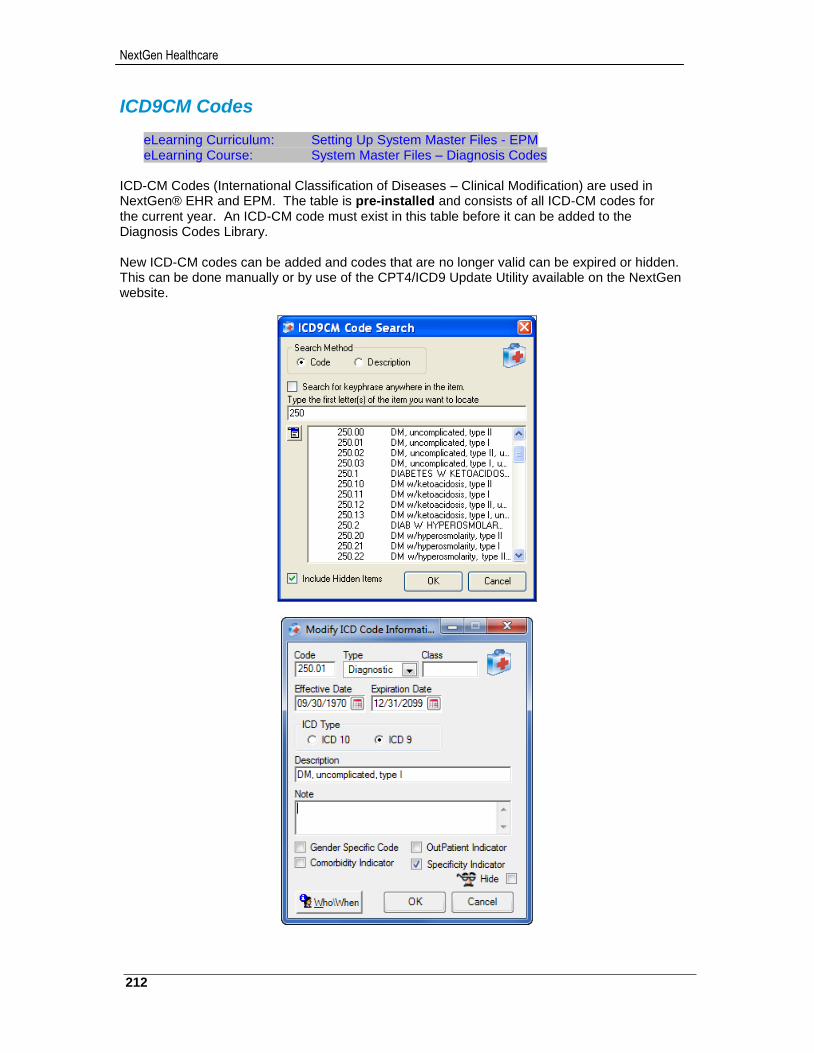
NextGen Healthcare
212
ICD9CM Codes
eLearning Curriculum: Setting Up System Master Files - EPM eLearning Course: System Master Files – Diagnosis Codes
ICD-CM Codes (International Classification of Diseases – Clinical Modification) are used in NextGen® EHR and EPM. The table is pre-installed and consists of all ICD-CM codes for the current year. An ICD-CM code must exist in this table before it can be added to the Diagnosis Codes Library. New ICD-CM codes can be added and codes that are no longer valid can be expired or hidden. This can be done manually or by use of the CPT4/ICD9 Update Utility available on the NextGen website.
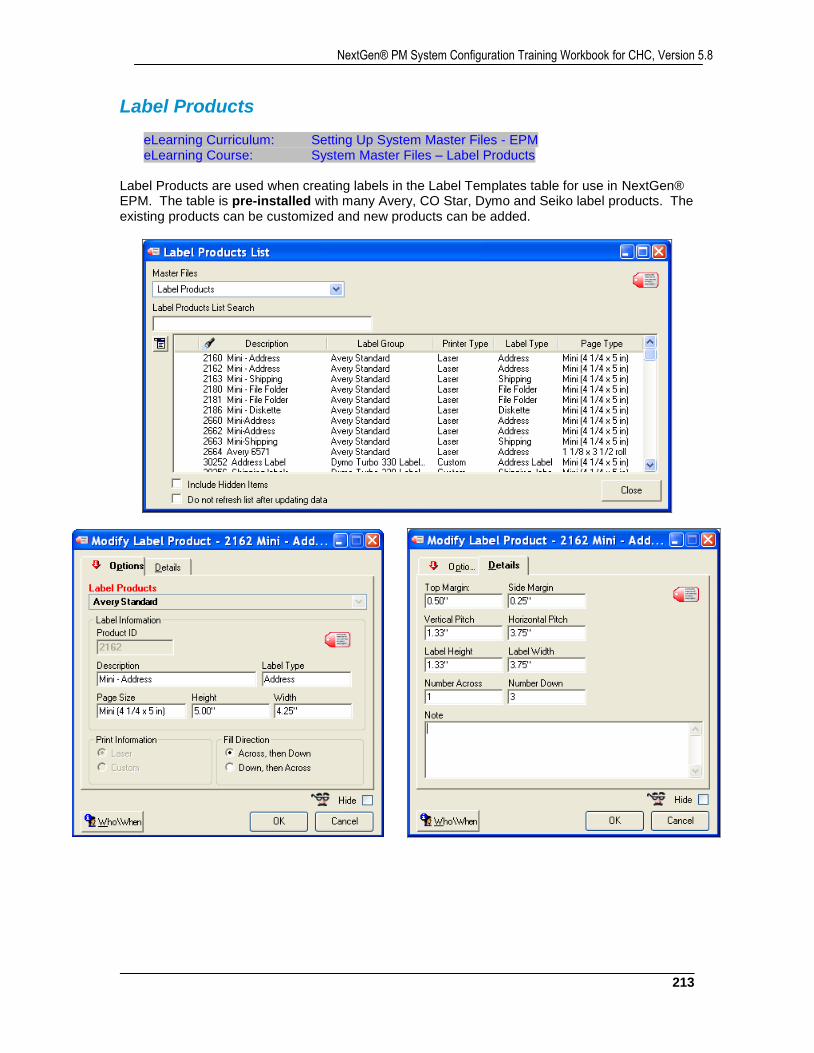
213
NextGen® PM System Configuration Training Workbook for CHC, Version 5.8
Label Products
eLearning Curriculum: Setting Up System Master Files - EPM eLearning Course: System Master Files – Label Products
Label Products are used when creating labels in the Label Templates table for use in NextGen® EPM. The table is pre-installed with many Avery, CO Star, Dymo and Seiko label products. The existing products can be customized and new products can be added.
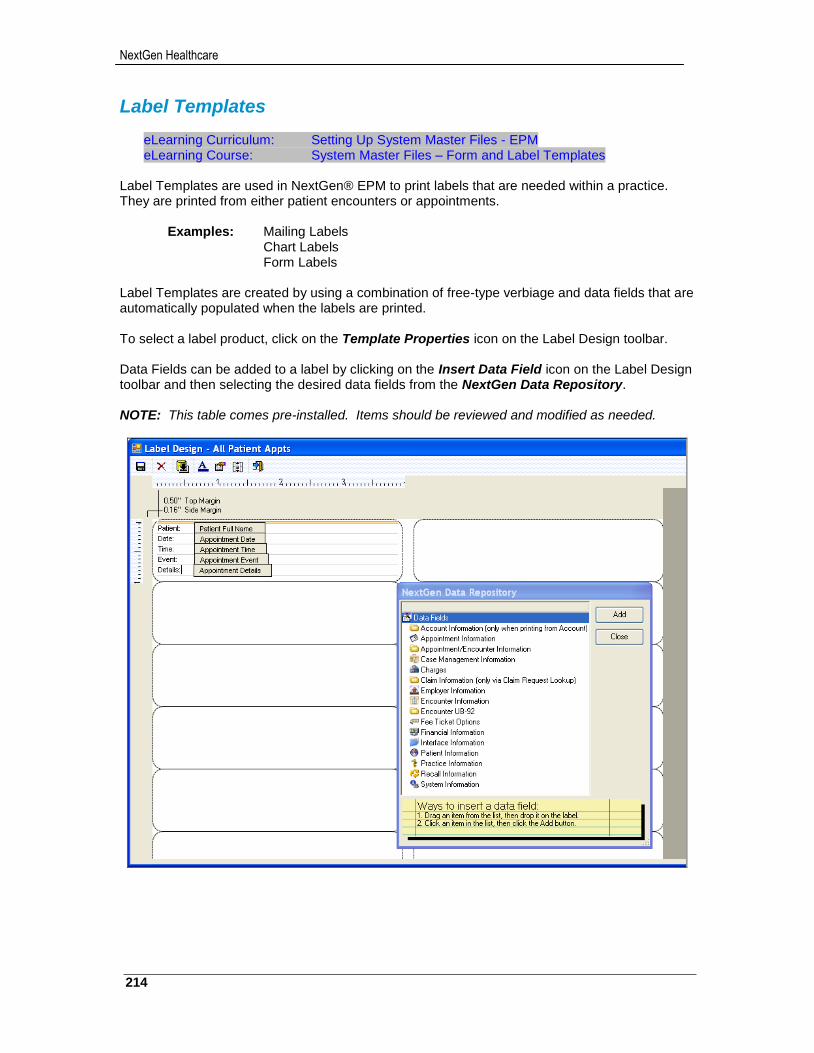
NextGen Healthcare
214
Label Templates
eLearning Curriculum: Setting Up System Master Files - EPM eLearning Course: System Master Files – Form and Label Templates
Label Templates are used in NextGen® EPM to print labels that are needed within a practice. They are printed from either patient encounters or appointments.
Examples: Mailing Labels Chart Labels Form Labels
Label Templates are created by using a combination of free-type verbiage and data fields that are automatically populated when the labels are printed. To select a label product, click on the Template Properties icon on the Label Design toolbar. Data Fields can be added to a label by clicking on the Insert Data Field icon on the Label Design toolbar and then selecting the desired data fields from the NextGen Data Repository. NOTE: This table comes pre-installed. Items should be reviewed and modified as needed.
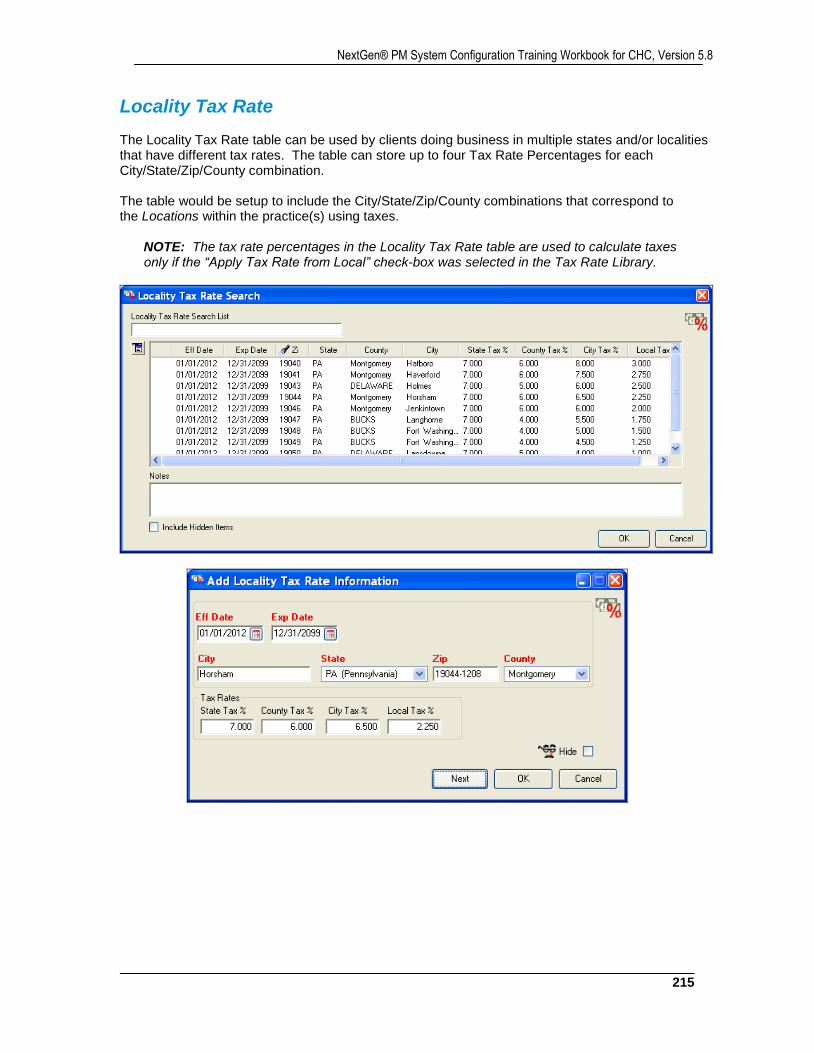
215
NextGen® PM System Configuration Training Workbook for CHC, Version 5.8
Locality Tax Rate The Locality Tax Rate table can be used by clients doing business in multiple states and/or localities that have different tax rates. The table can store up to four Tax Rate Percentages for each City/State/Zip/County combination. The table would be setup to include the City/State/Zip/County combinations that correspond to the Locations within the practice(s) using taxes.
NOTE: The tax rate percentages in the Locality Tax Rate table are used to calculate taxes only if the “Apply Tax Rate from Local” check-box was selected in the Tax Rate Library.
NextGen Healthcare
216
Eff / Exp Dates: Enter an Effective Date and Expiration Date for the tax rate percentages being defined. The charge Service Date is compared to the Effective/Expiration Dates to determine the tax rates to be applied to charges.
NOTE: Dates cannot overlap for a City/State/Zip/County. One row must expire before another row goes into effect.
City / State / Zip / County: Enter the City, State, Zip, and County for the tax rate percentages being defined. The charge Location is compared to the City/State/Zip/County to determine the tax rates to be applied to charges.
NOTE: Entering the Zip Code first will populate the City, State and County fields.
State Tax % / County Tax % / City Tax % / Local Tax %: Enter the tax rate percentages for the city/state/zip/county combination (up to 3 decimal places).
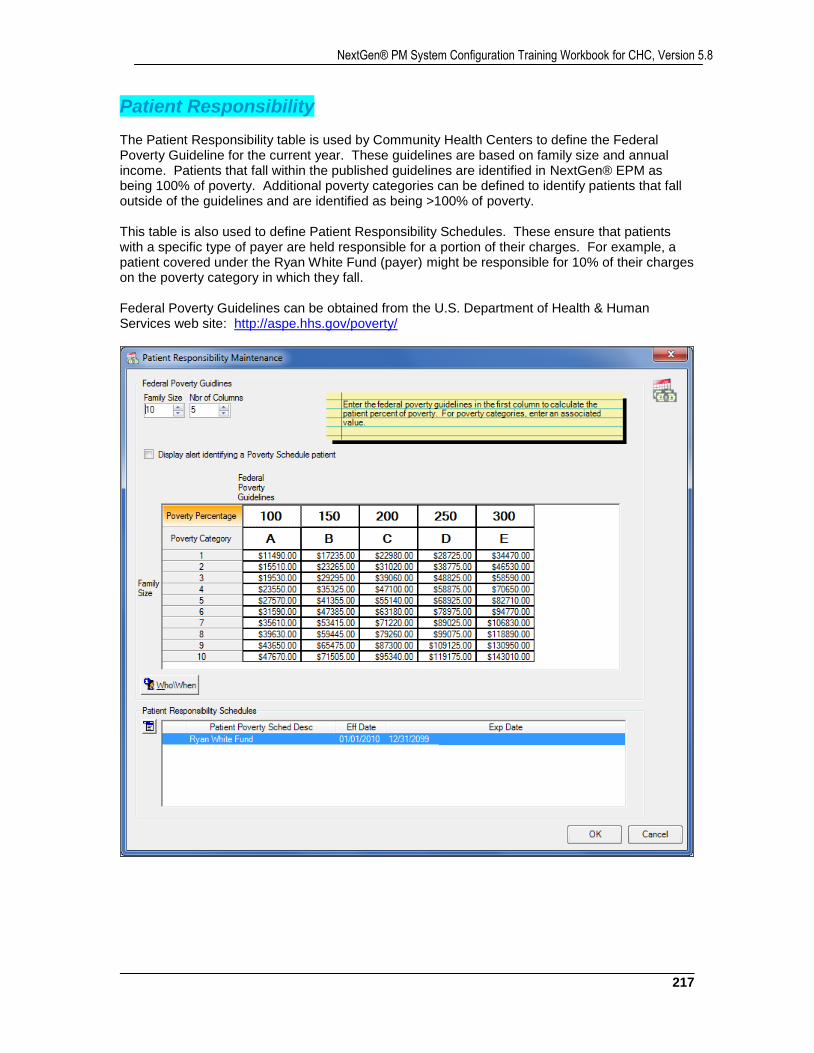
217
NextGen® PM System Configuration Training Workbook for CHC, Version 5.8
Patient Responsibility The Patient Responsibility table is used by Community Health Centers to define the Federal Poverty Guideline for the current year. These guidelines are based on family size and annual income. Patients that fall within the published guidelines are identified in NextGen® EPM as being 100% of poverty. Additional poverty categories can be defined to identify patients that fall outside of the guidelines and are identified as being >100% of poverty. This table is also used to define Patient Responsibility Schedules. These ensure that patients with a specific type of payer are held responsible for a portion of their charges. For example, a patient covered under the Ryan White Fund (payer) might be responsible for 10% of their charges on the poverty category in which they fall. Federal Poverty Guidelines can be obtained from the U.S. Department of Health & Human Services web site: http://aspe.hhs.gov/poverty/
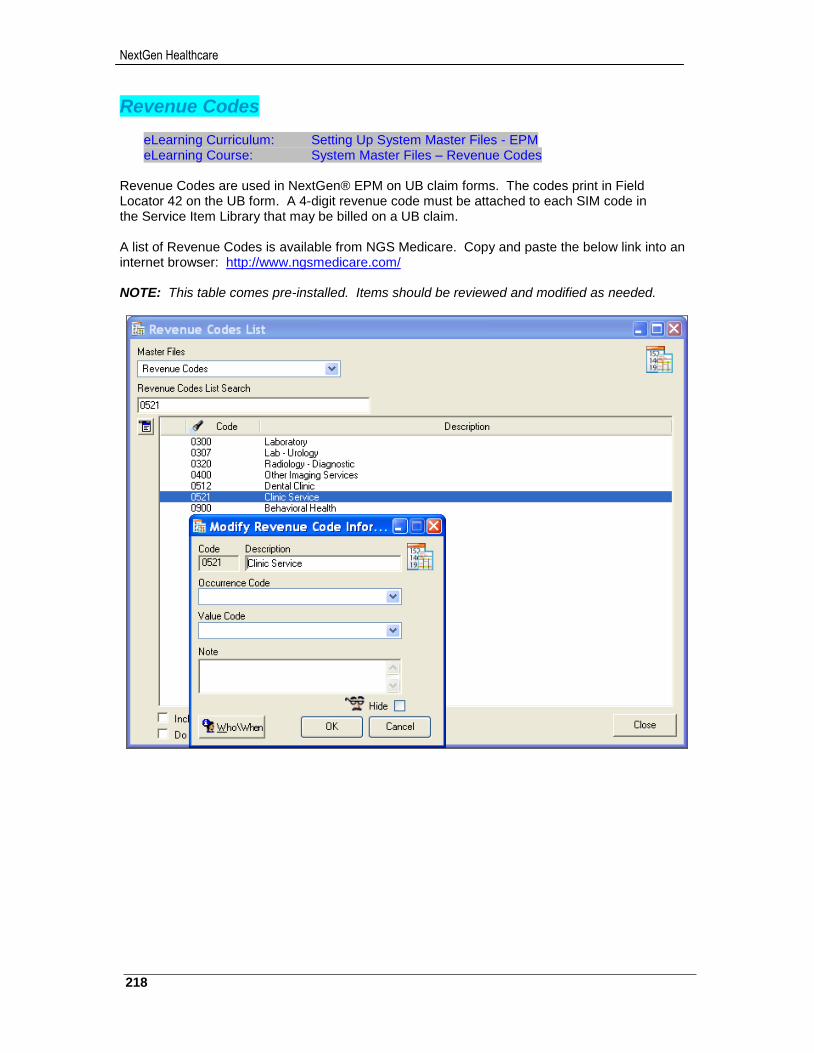
NextGen Healthcare
218
Revenue Codes
eLearning Curriculum: Setting Up System Master Files - EPM eLearning Course: System Master Files – Revenue Codes
Revenue Codes are used in NextGen® EPM on UB claim forms. The codes print in Field Locator 42 on the UB form. A 4-digit revenue code must be attached to each SIM code in the Service Item Library that may be billed on a UB claim. A list of Revenue Codes is available from NGS Medicare. Copy and paste the below link into an internet browser: http://www.ngsmedicare.com/ NOTE: This table comes pre-installed. Items should be reviewed and modified as needed.
219
NextGen® PM System Configuration Training Workbook for CHC, Version 5.8
Sliding Fee Schedules
eLearning Curriculum: Setting Up System Master Files - EPM eLearning Course: System Master Files – Sliding Fee Schedules
Sliding Fee Schedules are linked to a patient in NextGen® EPM. They can also be linked to a specific patient encounter. Once linked, a percentage of the charge amounts entered on an encounter will be automatically adjusted off. The percentage of the automatic adjustment is based on household family size and annual income. Multiple sliding fee schedules can be created if needed. For example, if the percentage discounts vary for medical, dental, vision and/or behavioral health services, separate schedules can be created for each. Sliding Fee Schedule adjustments are reported on the UDS Report – Table 9D.
Setup for Sliding Fee Schedules Step 1: Transaction Codes Create a unique Adjustment transaction to be attached to the sliding fee schedules that will adjust off charges during charge posting. Create another unique Payment transaction that will be used during payment entry. Having unique transaction codes will assist in separating sliding fee adjustments/payments from other types of adjustments/payments on financial reports. The adjustment/payment transactions can be generic and intended for use with all sliding fee schedules. For example: Sliding Fee Adjustment Sliding Fee Payment Or the adjustment/payment transactions can be specific and intended for use with each different type of sliding fee schedule. For example:
Medical Sliding Fee Adjustment Medical Sliding Fee Payment Vision Sliding Fee Adjustment Vision Sliding Fee Payment
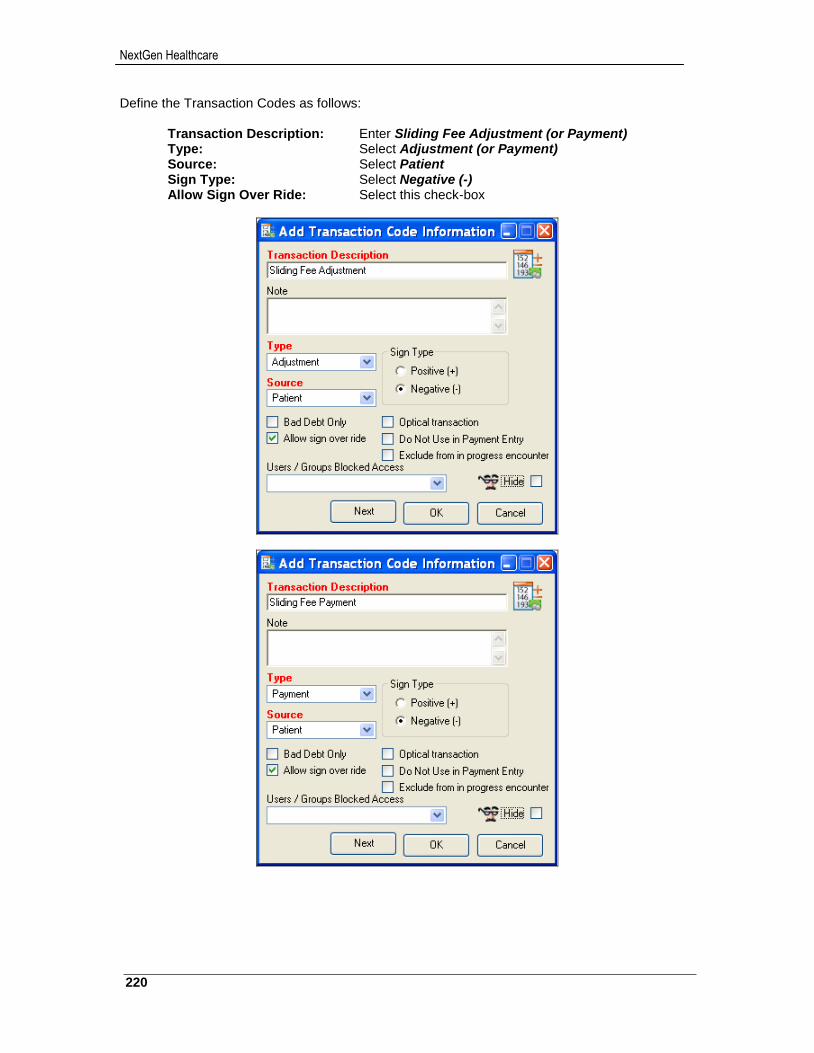
NextGen Healthcare
220
Define the Transaction Codes as follows:
Transaction Description: Enter Sliding Fee Adjustment (or Payment) Type: Select Adjustment (or Payment) Source: Select Patient Sign Type: Select Negative (-) Allow Sign Over Ride: Select this check-box
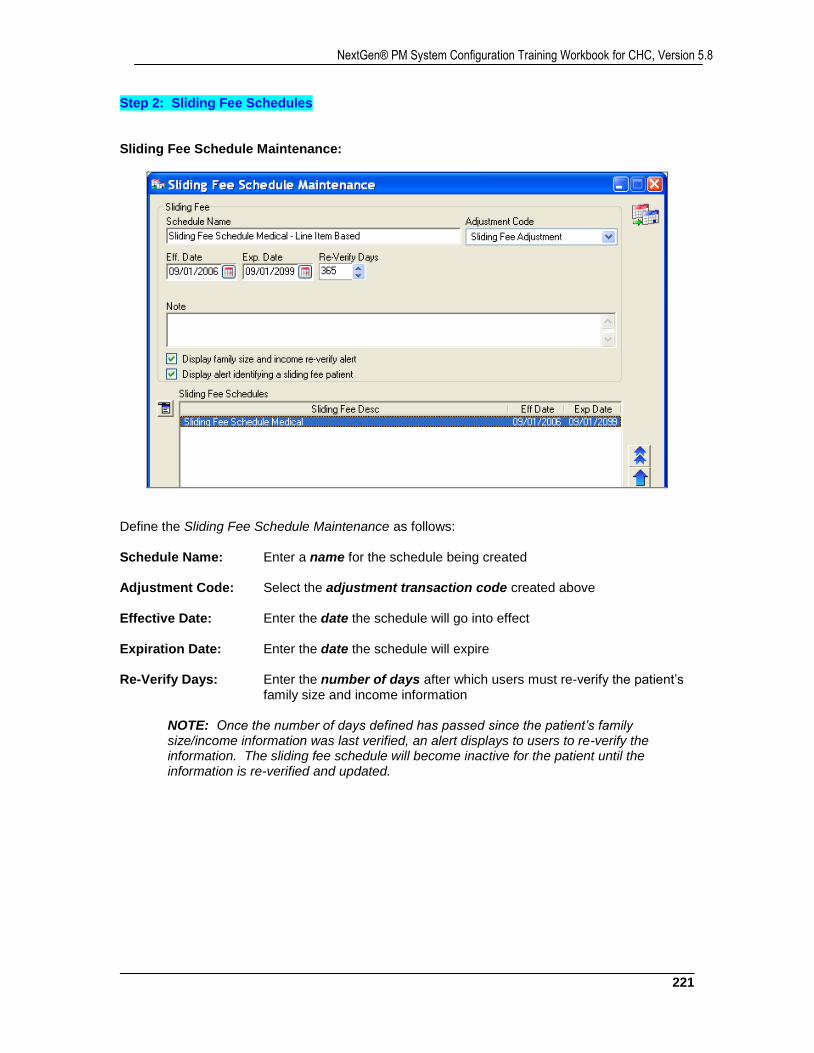
221
NextGen® PM System Configuration Training Workbook for CHC, Version 5.8
Step 2: Sliding Fee Schedules Sliding Fee Schedule Maintenance:
Define the Sliding Fee Schedule Maintenance as follows: Schedule Name: Enter a name for the schedule being created Adjustment Code: Select the adjustment transaction code created above Effective Date: Enter the date the schedule will go into effect Expiration Date: Enter the date the schedule will expire Re-Verify Days: Enter the number of days after which users must re-verify the patient’s
family size and income information
NOTE: Once the number of days defined has passed since the patient’s family size/income information was last verified, an alert displays to users to re-verify the information. The sliding fee schedule will become inactive for the patient until the information is re-verified and updated.
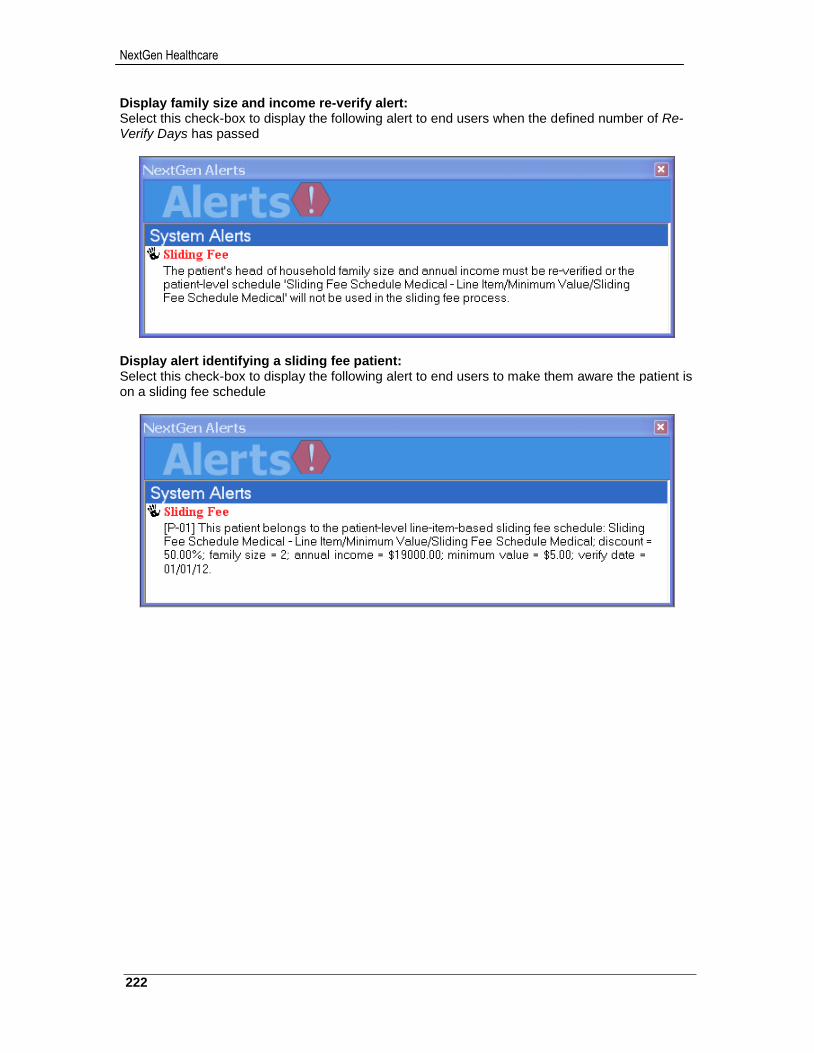
NextGen Healthcare
222
Display family size and income re-verify alert: Select this check-box to display the following alert to end users when the defined number of Re-Verify Days has passed
Display alert identifying a sliding fee patient: Select this check-box to display the following alert to end users to make them aware the patient is on a sliding fee schedule

223
NextGen® PM System Configuration Training Workbook for CHC, Version 5.8
Sliding Fee Schedule Detail Maintenance > Top Section:
Define the Sliding Fee Schedule Detail Maintenance top section as follows: Name: Enter a name for the schedule being defined Effective Date: Enter the effective date for the schedule being defined
Expiration Date: Enter the expiration date for the schedule being defined
NOTE: The Expiration Date for the current year’s family size and income schedule is typically extended until values are obtained for the next year. Once new values are obtained for the next year, expire the current year’s schedule and create a new schedule.
Family Size: Select the number of rows for the schedule Number of Columns: Select the number of columns for the schedule Schedule Fee Mode:
Line Item Based: A separate adjustment will take place after each charge is entered on the encounter
Encounter Based: A single adjustment will take place after all charges have been entered on the encounter
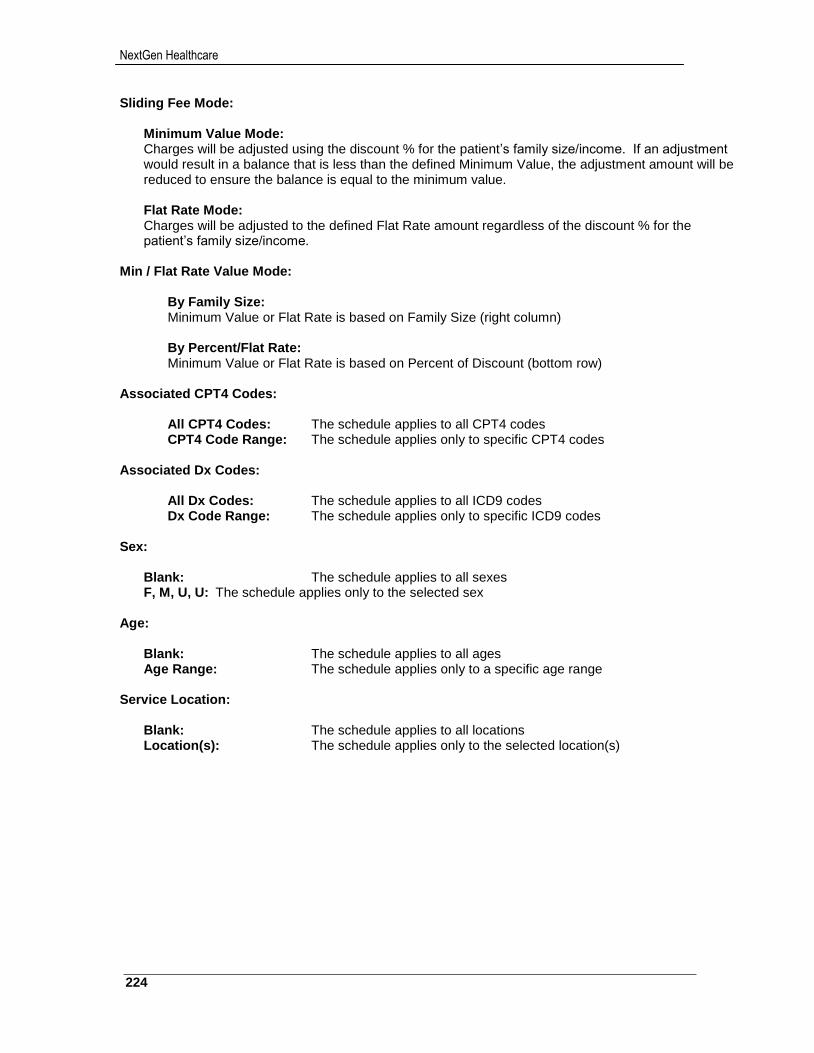
NextGen Healthcare
224
Sliding Fee Mode:
Minimum Value Mode: Charges will be adjusted using the discount % for the patient’s family size/income. If an adjustment would result in a balance that is less than the defined Minimum Value, the adjustment amount will be reduced to ensure the balance is equal to the minimum value.
Flat Rate Mode: Charges will be adjusted to the defined Flat Rate amount regardless of the discount % for the patient’s family size/income.
Min / Flat Rate Value Mode:
By Family Size: Minimum Value or Flat Rate is based on Family Size (right column)
By Percent/Flat Rate: Minimum Value or Flat Rate is based on Percent of Discount (bottom row)
Associated CPT4 Codes:
All CPT4 Codes: The schedule applies to all CPT4 codes CPT4 Code Range: The schedule applies only to specific CPT4 codes
Associated Dx Codes:
All Dx Codes: The schedule applies to all ICD9 codes Dx Code Range: The schedule applies only to specific ICD9 codes
Sex:
Blank: The schedule applies to all sexes F, M, U, U: The schedule applies only to the selected sex
Age:
Blank: The schedule applies to all ages Age Range: The schedule applies only to a specific age range
Service Location:
Blank: The schedule applies to all locations Location(s): The schedule applies only to the selected location(s)
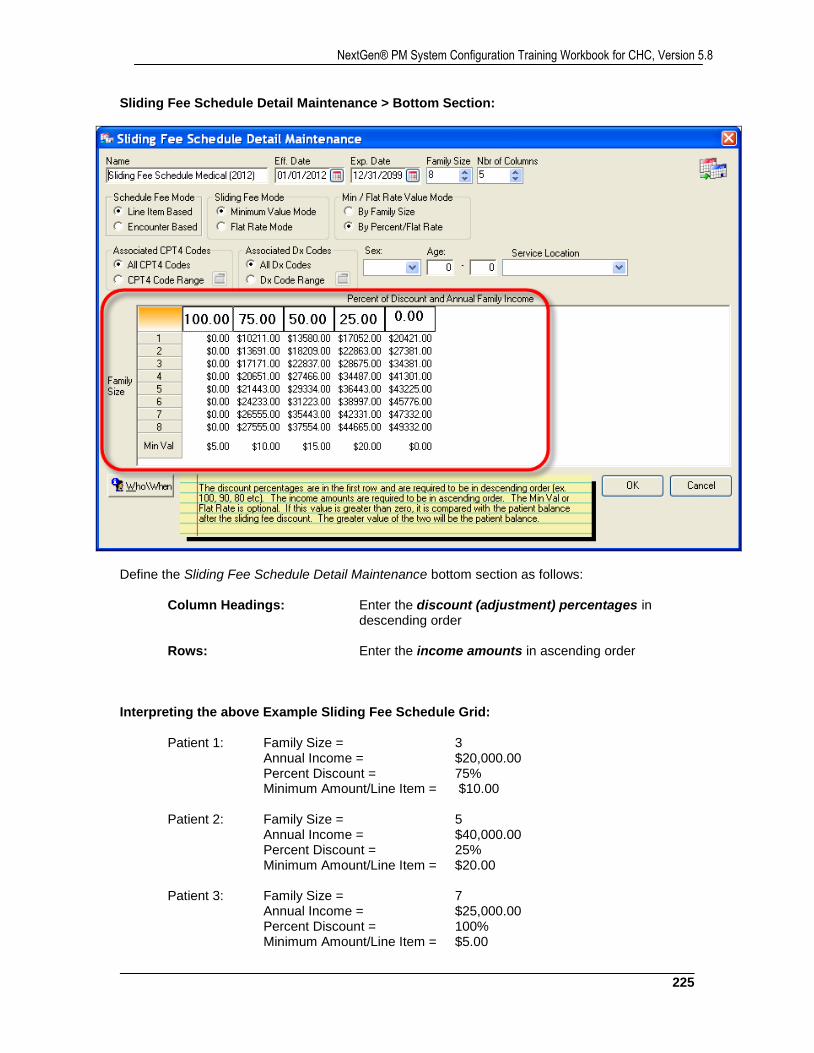
225
NextGen® PM System Configuration Training Workbook for CHC, Version 5.8
Sliding Fee Schedule Detail Maintenance > Bottom Section:
Define the Sliding Fee Schedule Detail Maintenance bottom section as follows:
Column Headings: Enter the discount (adjustment) percentages in descending order
Rows: Enter the income amounts in ascending order
Interpreting the above Example Sliding Fee Schedule Grid:
Patient 1: Family Size = 3 Annual Income = $20,000.00 Percent Discount = 75% Minimum Amount/Line Item = $10.00
Patient 2: Family Size = 5
Annual Income = $40,000.00 Percent Discount = 25% Minimum Amount/Line Item = $20.00
Patient 3: Family Size = 7
Annual Income = $25,000.00 Percent Discount = 100% Minimum Amount/Line Item = $5.00
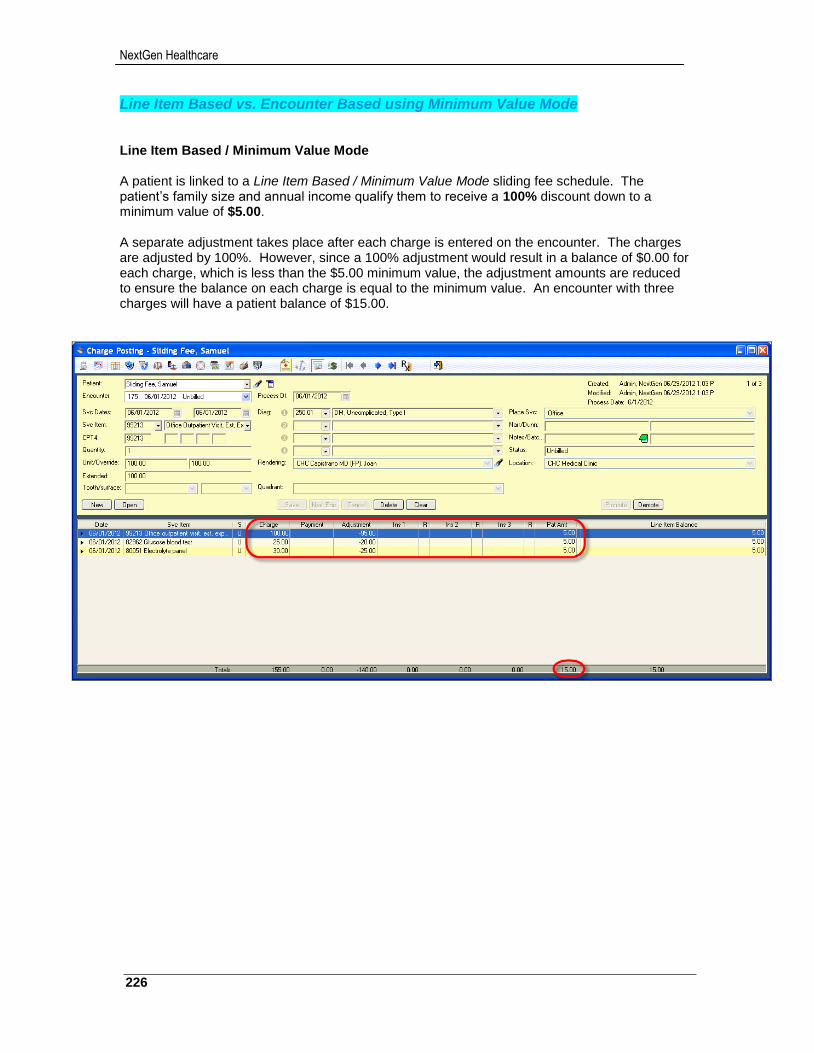
NextGen Healthcare
226
Line Item Based vs. Encounter Based using Minimum Value Mode Line Item Based / Minimum Value Mode A patient is linked to a Line Item Based / Minimum Value Mode sliding fee schedule. The patient’s family size and annual income qualify them to receive a 100% discount down to a minimum value of $5.00. A separate adjustment takes place after each charge is entered on the encounter. The charges are adjusted by 100%. However, since a 100% adjustment would result in a balance of $0.00 for each charge, which is less than the $5.00 minimum value, the adjustment amounts are reduced to ensure the balance on each charge is equal to the minimum value. An encounter with three charges will have a patient balance of $15.00.
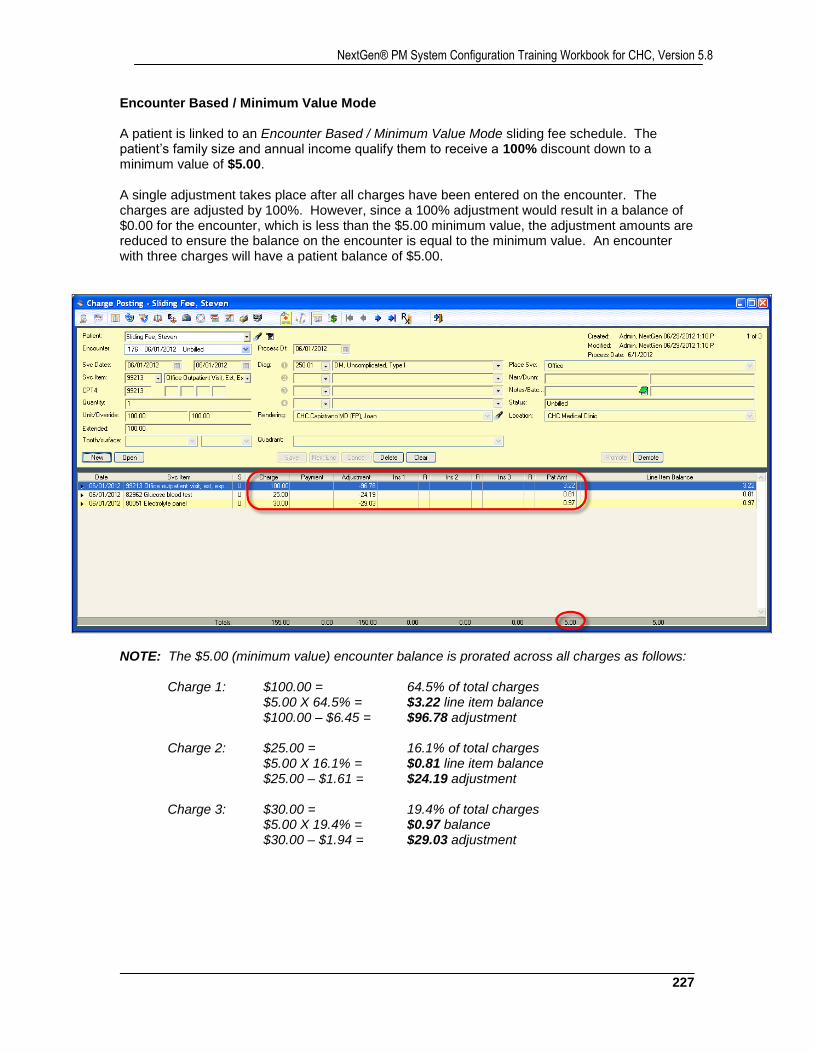
227
NextGen® PM System Configuration Training Workbook for CHC, Version 5.8
Encounter Based / Minimum Value Mode A patient is linked to an Encounter Based / Minimum Value Mode sliding fee schedule. The patient’s family size and annual income qualify them to receive a 100% discount down to a minimum value of $5.00. A single adjustment takes place after all charges have been entered on the encounter. The charges are adjusted by 100%. However, since a 100% adjustment would result in a balance of $0.00 for the encounter, which is less than the $5.00 minimum value, the adjustment amounts are reduced to ensure the balance on the encounter is equal to the minimum value. An encounter with three charges will have a patient balance of $5.00.
NOTE: The $5.00 (minimum value) encounter balance is prorated across all charges as follows: Charge 1: $100.00 = 64.5% of total charges $5.00 X 64.5% = $3.22 line item balance $100.00 – $6.45 = $96.78 adjustment Charge 2: $25.00 = 16.1% of total charges
$5.00 X 16.1% = $0.81 line item balance $25.00 – $1.61 = $24.19 adjustment
Charge 3: $30.00 = 19.4% of total charges $5.00 X 19.4% = $0.97 balance
$30.00 – $1.94 = $29.03 adjustment
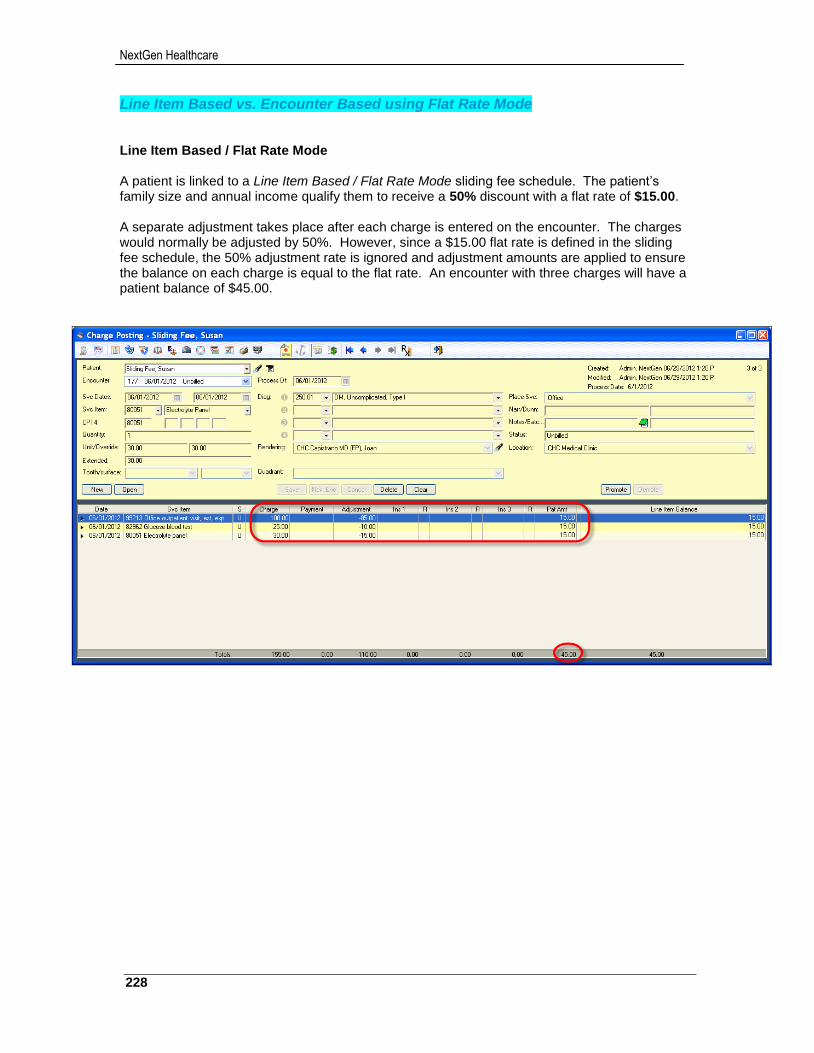
NextGen Healthcare
228
Line Item Based vs. Encounter Based using Flat Rate Mode Line Item Based / Flat Rate Mode A patient is linked to a Line Item Based / Flat Rate Mode sliding fee schedule. The patient’s family size and annual income qualify them to receive a 50% discount with a flat rate of $15.00. A separate adjustment takes place after each charge is entered on the encounter. The charges would normally be adjusted by 50%. However, since a $15.00 flat rate is defined in the sliding fee schedule, the 50% adjustment rate is ignored and adjustment amounts are applied to ensure the balance on each charge is equal to the flat rate. An encounter with three charges will have a patient balance of $45.00.
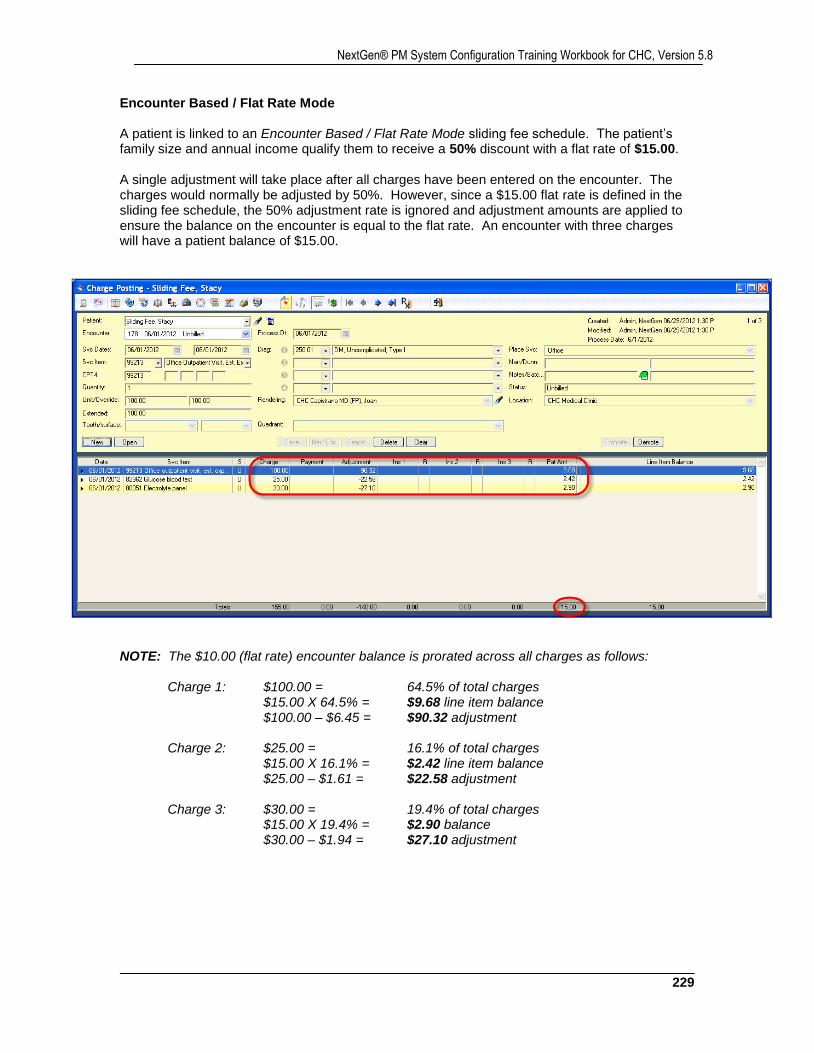
229
NextGen® PM System Configuration Training Workbook for CHC, Version 5.8
Encounter Based / Flat Rate Mode A patient is linked to an Encounter Based / Flat Rate Mode sliding fee schedule. The patient’s family size and annual income qualify them to receive a 50% discount with a flat rate of $15.00. A single adjustment will take place after all charges have been entered on the encounter. The charges would normally be adjusted by 50%. However, since a $15.00 flat rate is defined in the sliding fee schedule, the 50% adjustment rate is ignored and adjustment amounts are applied to ensure the balance on the encounter is equal to the flat rate. An encounter with three charges will have a patient balance of $15.00.
NOTE: The $10.00 (flat rate) encounter balance is prorated across all charges as follows: Charge 1: $100.00 = 64.5% of total charges $15.00 X 64.5% = $9.68 line item balance $100.00 – $6.45 = $90.32 adjustment Charge 2: $25.00 = 16.1% of total charges
$15.00 X 16.1% = $2.42 line item balance $25.00 – $1.61 = $22.58 adjustment
Charge 3: $30.00 = 19.4% of total charges $15.00 X 19.4% = $2.90 balance
$30.00 – $1.94 = $27.10 adjustment
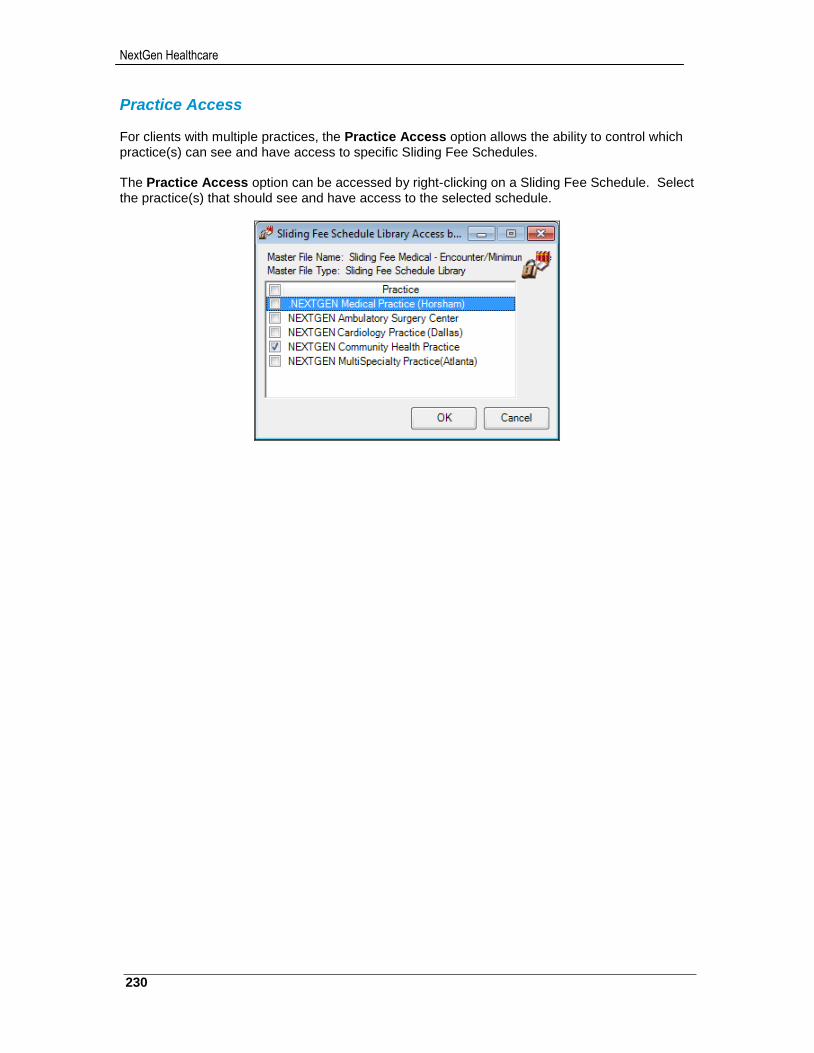
NextGen Healthcare
230
Practice Access For clients with multiple practices, the Practice Access option allows the ability to control which practice(s) can see and have access to specific Sliding Fee Schedules. The Practice Access option can be accessed by right-clicking on a Sliding Fee Schedule. Select the practice(s) that should see and have access to the selected schedule.
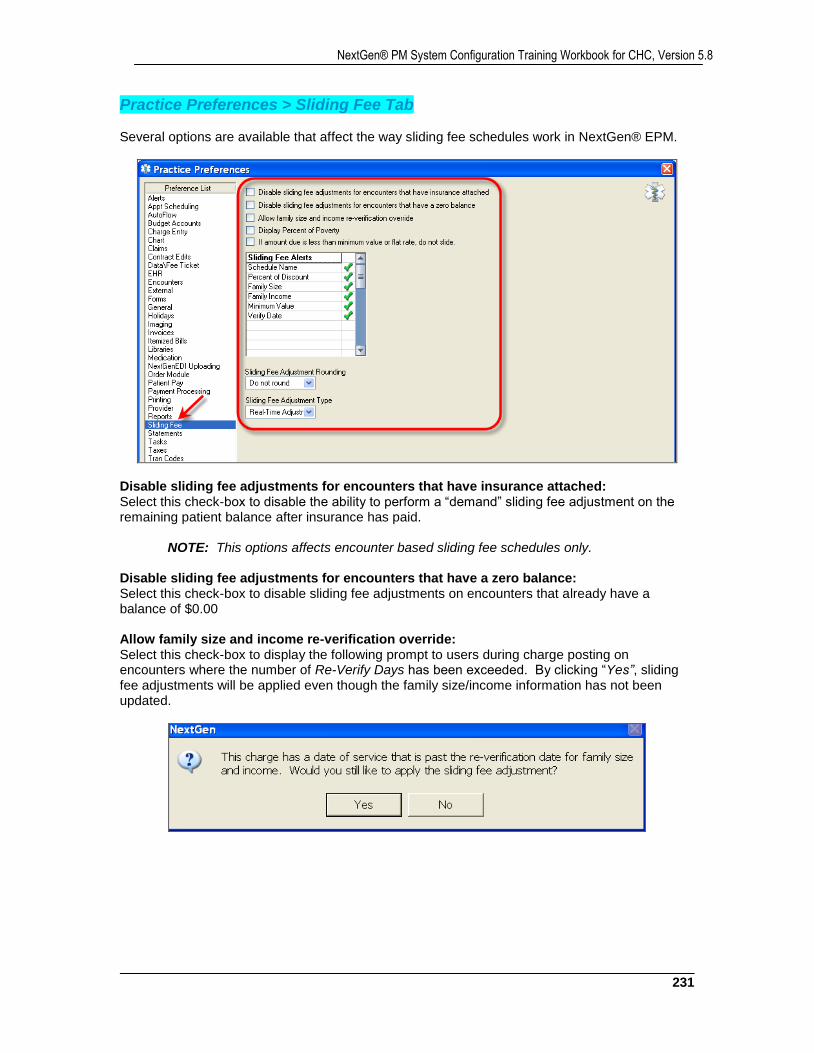
231
NextGen® PM System Configuration Training Workbook for CHC, Version 5.8
Practice Preferences > Sliding Fee Tab Several options are available that affect the way sliding fee schedules work in NextGen® EPM.
Disable sliding fee adjustments for encounters that have insurance attached: Select this check-box to disable the ability to perform a “demand” sliding fee adjustment on the remaining patient balance after insurance has paid. NOTE: This options affects encounter based sliding fee schedules only. Disable sliding fee adjustments for encounters that have a zero balance: Select this check-box to disable sliding fee adjustments on encounters that already have a balance of $0.00 Allow family size and income re-verification override: Select this check-box to display the following prompt to users during charge posting on encounters where the number of Re-Verify Days has been exceeded. By clicking “Yes”, sliding fee adjustments will be applied even though the family size/income information has not been updated.
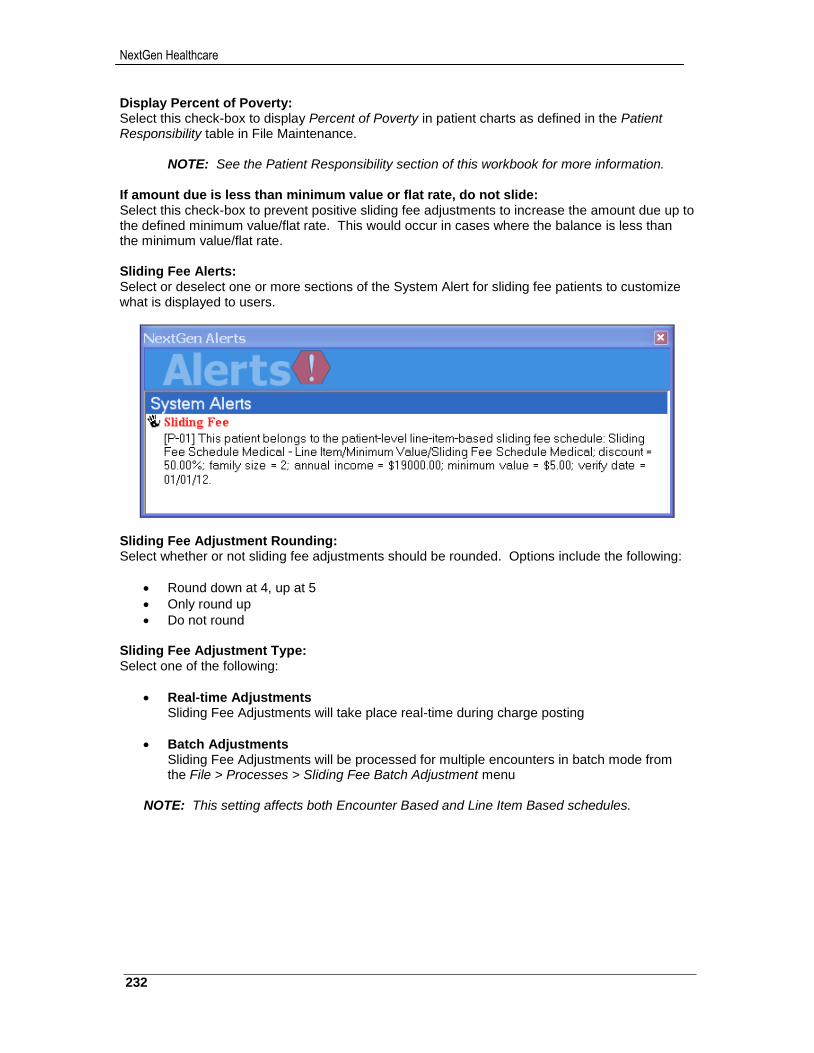
NextGen Healthcare
232
Display Percent of Poverty: Select this check-box to display Percent of Poverty in patient charts as defined in the Patient Responsibility table in File Maintenance.
NOTE: See the Patient Responsibility section of this workbook for more information. If amount due is less than minimum value or flat rate, do not slide: Select this check-box to prevent positive sliding fee adjustments to increase the amount due up to the defined minimum value/flat rate. This would occur in cases where the balance is less than the minimum value/flat rate. Sliding Fee Alerts: Select or deselect one or more sections of the System Alert for sliding fee patients to customize what is displayed to users.
Sliding Fee Adjustment Rounding: Select whether or not sliding fee adjustments should be rounded. Options include the following:
Round down at 4, up at 5
Only round up
Do not round Sliding Fee Adjustment Type: Select one of the following:
Real-time Adjustments Sliding Fee Adjustments will take place real-time during charge posting
Batch Adjustments Sliding Fee Adjustments will be processed for multiple encounters in batch mode from the File > Processes > Sliding Fee Batch Adjustment menu
NOTE: This setting affects both Encounter Based and Line Item Based schedules.
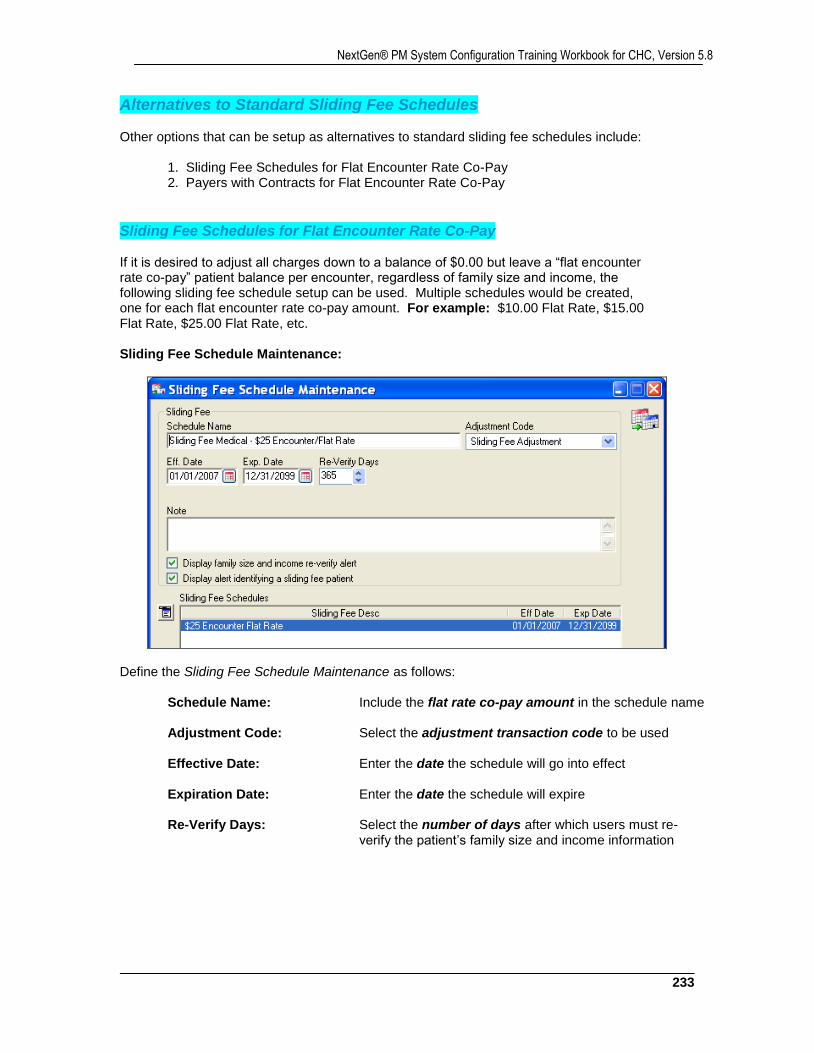
233
NextGen® PM System Configuration Training Workbook for CHC, Version 5.8
Alternatives to Standard Sliding Fee Schedules Other options that can be setup as alternatives to standard sliding fee schedules include:
1. Sliding Fee Schedules for Flat Encounter Rate Co-Pay 2. Payers with Contracts for Flat Encounter Rate Co-Pay
Sliding Fee Schedules for Flat Encounter Rate Co-Pay If it is desired to adjust all charges down to a balance of $0.00 but leave a “flat encounter rate co-pay” patient balance per encounter, regardless of family size and income, the following sliding fee schedule setup can be used. Multiple schedules would be created, one for each flat encounter rate co-pay amount. For example: $10.00 Flat Rate, $15.00 Flat Rate, $25.00 Flat Rate, etc. Sliding Fee Schedule Maintenance:
Define the Sliding Fee Schedule Maintenance as follows:
Schedule Name: Include the flat rate co-pay amount in the schedule name Adjustment Code: Select the adjustment transaction code to be used
Effective Date: Enter the date the schedule will go into effect
Expiration Date: Enter the date the schedule will expire Re-Verify Days: Select the number of days after which users must re-
verify the patient’s family size and income information
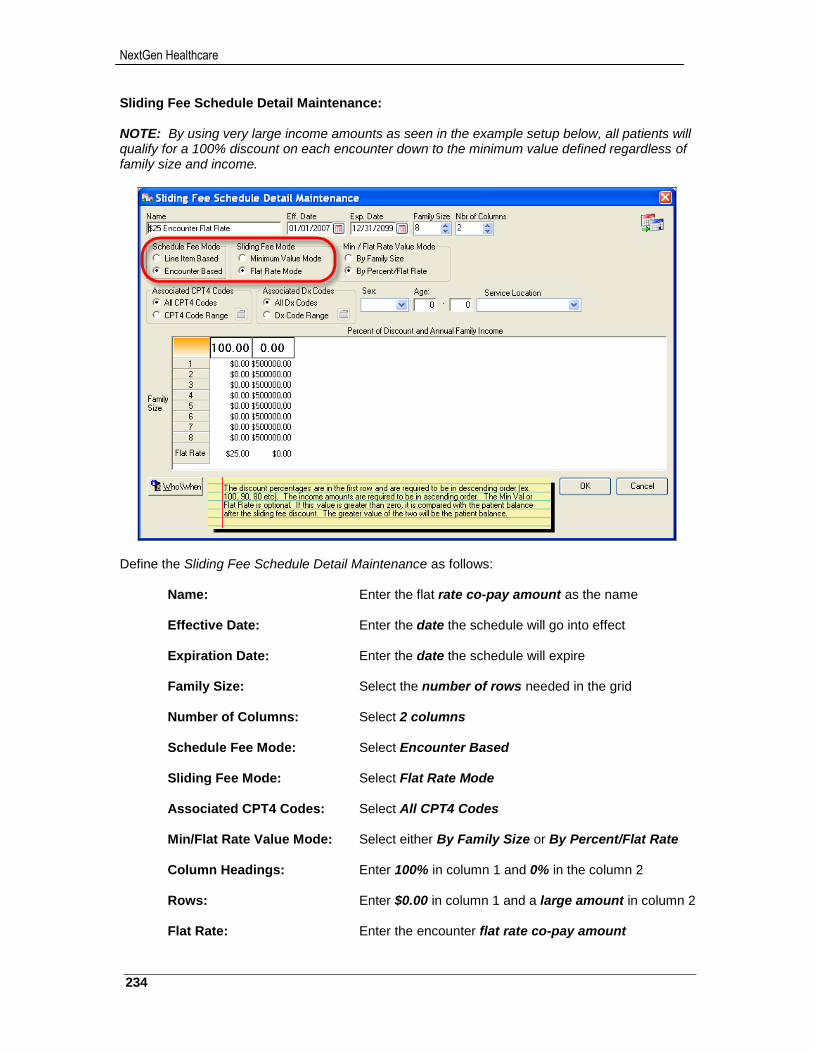
NextGen Healthcare
234
Sliding Fee Schedule Detail Maintenance: NOTE: By using very large income amounts as seen in the example setup below, all patients will qualify for a 100% discount on each encounter down to the minimum value defined regardless of family size and income.
Define the Sliding Fee Schedule Detail Maintenance as follows:
Name: Enter the flat rate co-pay amount as the name Effective Date: Enter the date the schedule will go into effect Expiration Date: Enter the date the schedule will expire Family Size: Select the number of rows needed in the grid Number of Columns: Select 2 columns Schedule Fee Mode: Select Encounter Based Sliding Fee Mode: Select Flat Rate Mode Associated CPT4 Codes: Select All CPT4 Codes Min/Flat Rate Value Mode: Select either By Family Size or By Percent/Flat Rate
Column Headings: Enter 100% in column 1 and 0% in the column 2 Rows: Enter $0.00 in column 1 and a large amount in column 2 Flat Rate: Enter the encounter flat rate co-pay amount
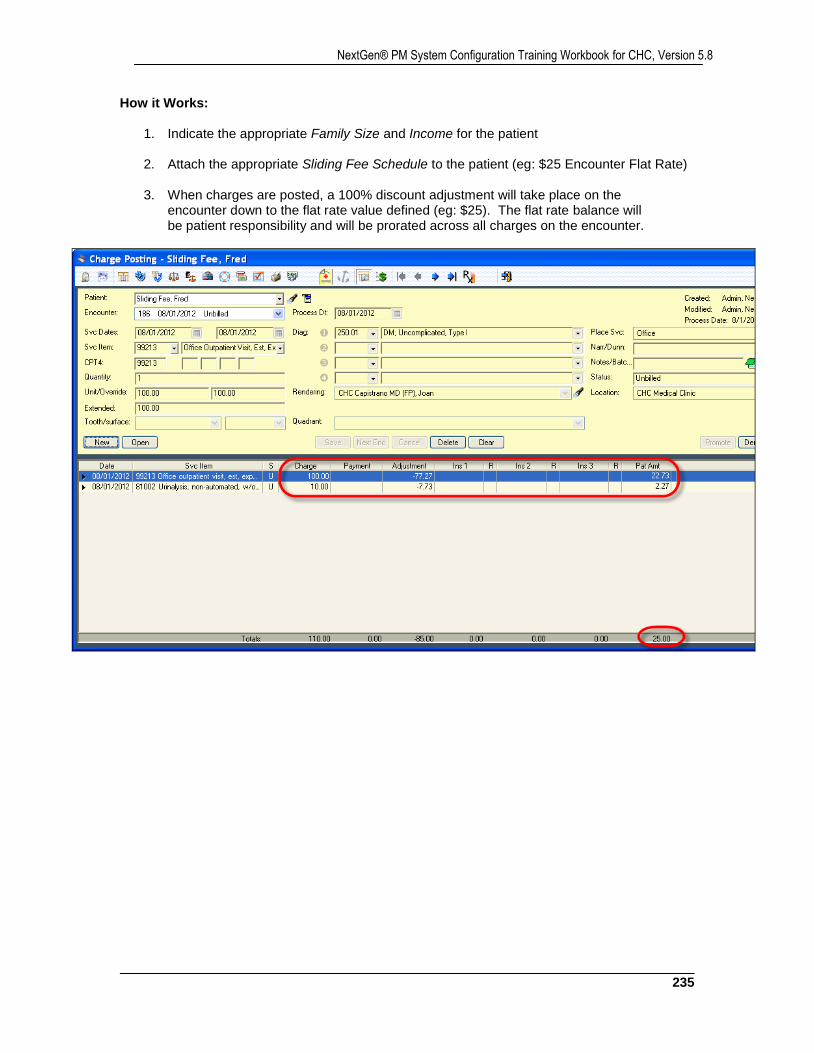
235
NextGen® PM System Configuration Training Workbook for CHC, Version 5.8
How it Works:
1. Indicate the appropriate Family Size and Income for the patient
2. Attach the appropriate Sliding Fee Schedule to the patient (eg: $25 Encounter Flat Rate)
3. When charges are posted, a 100% discount adjustment will take place on the encounter down to the flat rate value defined (eg: $25). The flat rate balance will be patient responsibility and will be prorated across all charges on the encounter.
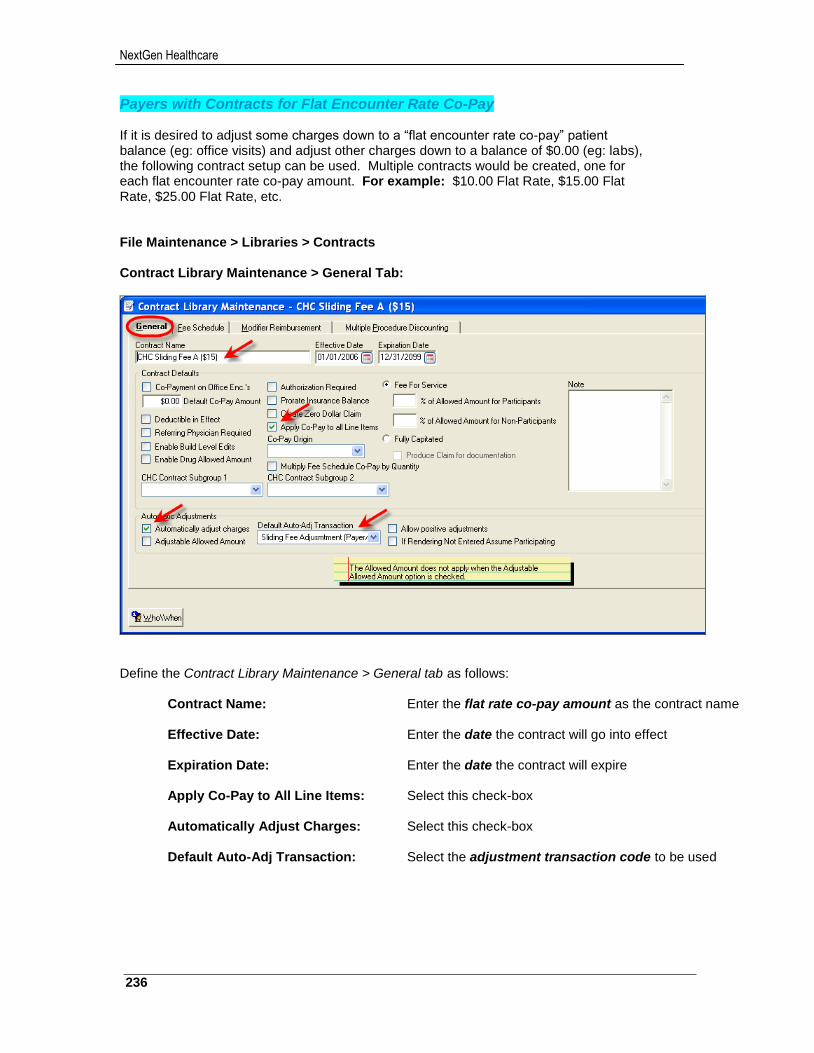
NextGen Healthcare
236
Payers with Contracts for Flat Encounter Rate Co-Pay If it is desired to adjust some charges down to a “flat encounter rate co-pay” patient balance (eg: office visits) and adjust other charges down to a balance of $0.00 (eg: labs), the following contract setup can be used. Multiple contracts would be created, one for each flat encounter rate co-pay amount. For example: $10.00 Flat Rate, $15.00 Flat Rate, $25.00 Flat Rate, etc. File Maintenance > Libraries > Contracts Contract Library Maintenance > General Tab:
Define the Contract Library Maintenance > General tab as follows:
Contract Name: Enter the flat rate co-pay amount as the contract name Effective Date: Enter the date the contract will go into effect Expiration Date: Enter the date the contract will expire Apply Co-Pay to All Line Items: Select this check-box Automatically Adjust Charges: Select this check-box Default Auto-Adj Transaction: Select the adjustment transaction code to be used
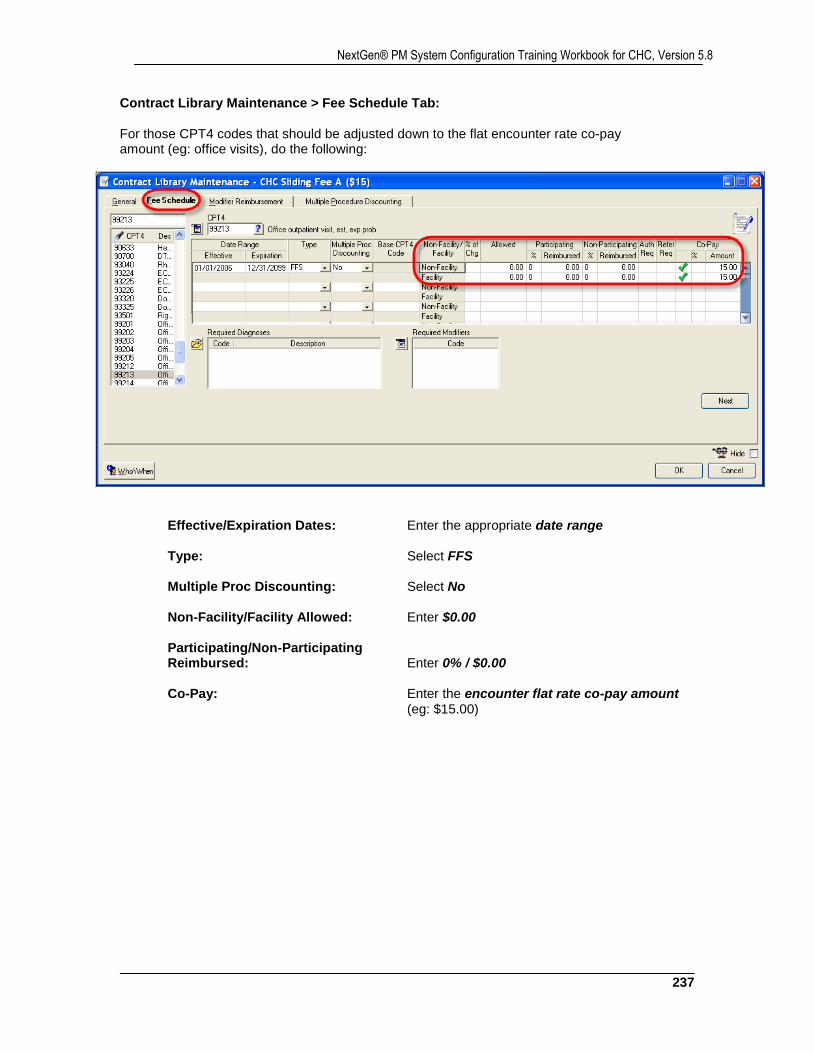
237
NextGen® PM System Configuration Training Workbook for CHC, Version 5.8
Contract Library Maintenance > Fee Schedule Tab: For those CPT4 codes that should be adjusted down to the flat encounter rate co-pay amount (eg: office visits), do the following:
Effective/Expiration Dates: Enter the appropriate date range Type: Select FFS Multiple Proc Discounting: Select No Non-Facility/Facility Allowed: Enter $0.00 Participating/Non-Participating Reimbursed: Enter 0% / $0.00 Co-Pay: Enter the encounter flat rate co-pay amount
(eg: $15.00)
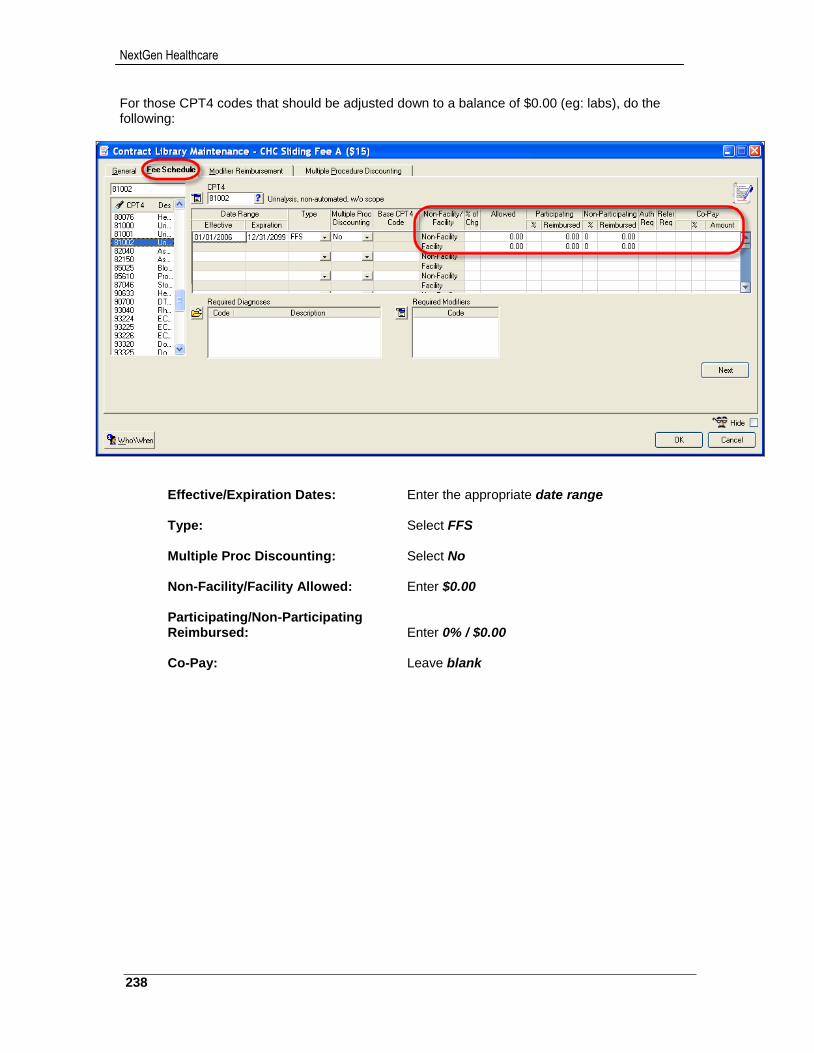
NextGen Healthcare
238
For those CPT4 codes that should be adjusted down to a balance of $0.00 (eg: labs), do the following:
Effective/Expiration Dates: Enter the appropriate date range Type: Select FFS Multiple Proc Discounting: Select No Non-Facility/Facility Allowed: Enter $0.00 Participating/Non-Participating Reimbursed: Enter 0% / $0.00 Co-Pay: Leave blank
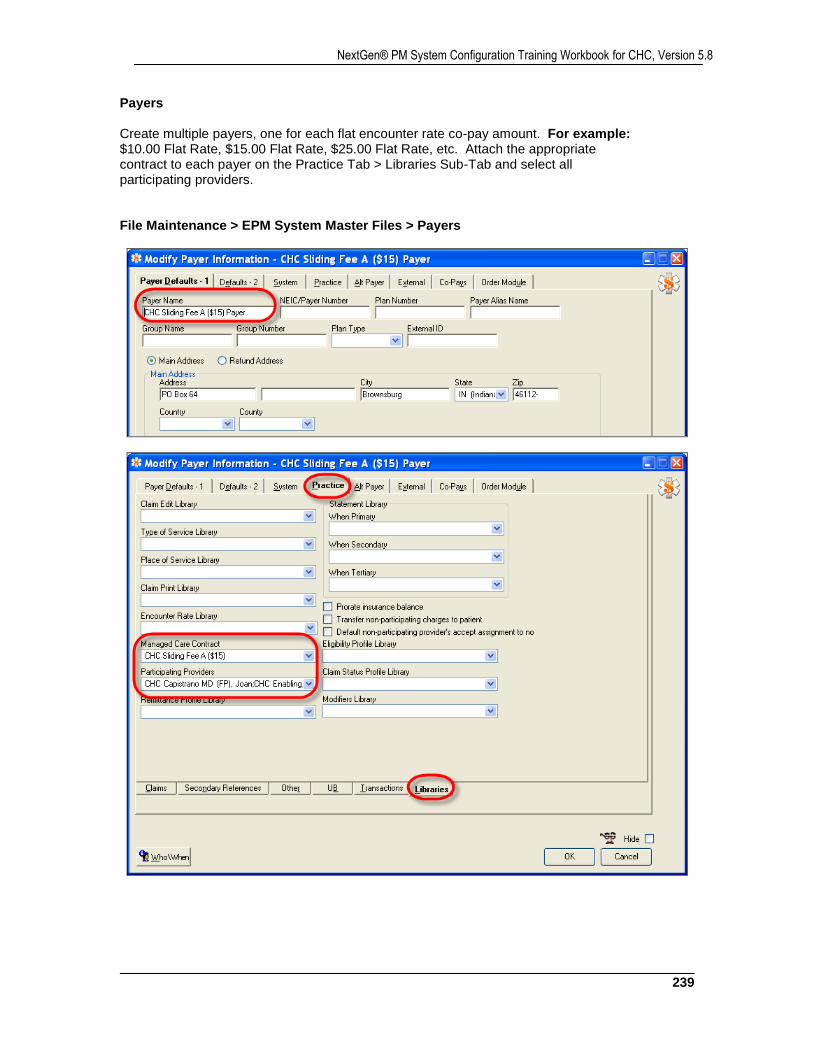
239
NextGen® PM System Configuration Training Workbook for CHC, Version 5.8
Payers Create multiple payers, one for each flat encounter rate co-pay amount. For example: $10.00 Flat Rate, $15.00 Flat Rate, $25.00 Flat Rate, etc. Attach the appropriate contract to each payer on the Practice Tab > Libraries Sub-Tab and select all participating providers. File Maintenance > EPM System Master Files > Payers
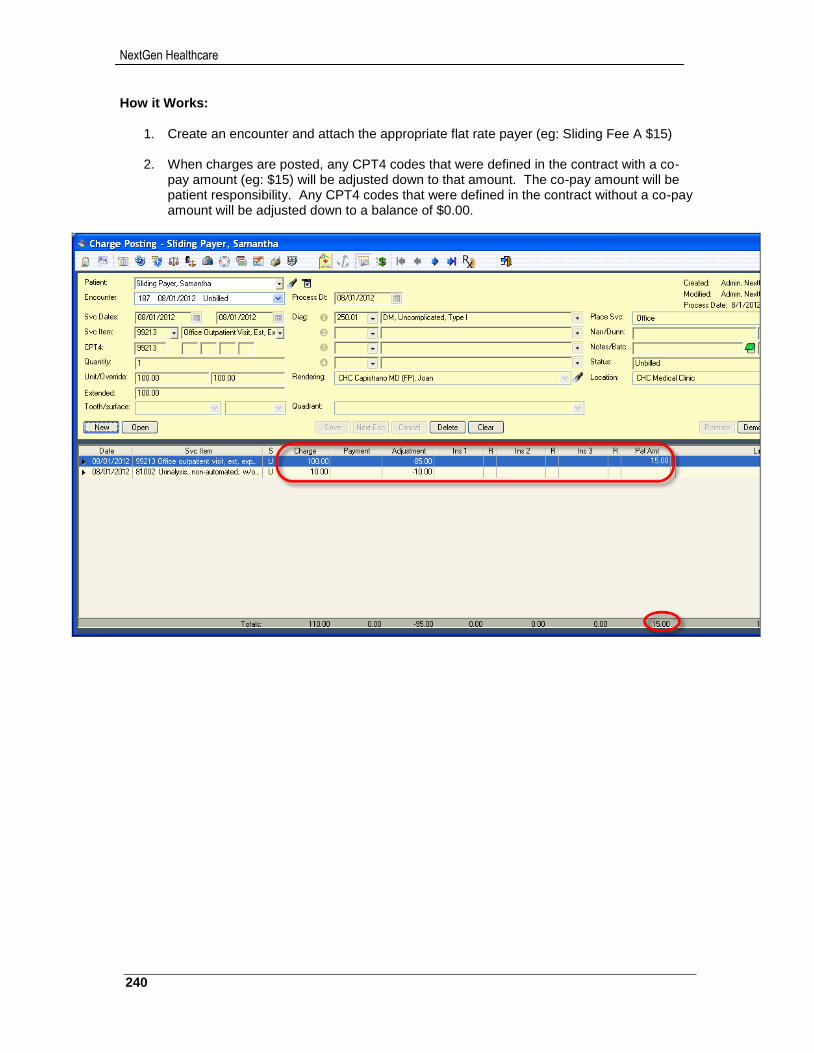
NextGen Healthcare
240
How it Works:
1. Create an encounter and attach the appropriate flat rate payer (eg: Sliding Fee A $15)
2. When charges are posted, any CPT4 codes that were defined in the contract with a co-pay amount (eg: $15) will be adjusted down to that amount. The co-pay amount will be patient responsibility. Any CPT4 codes that were defined in the contract without a co-pay amount will be adjusted down to a balance of $0.00.
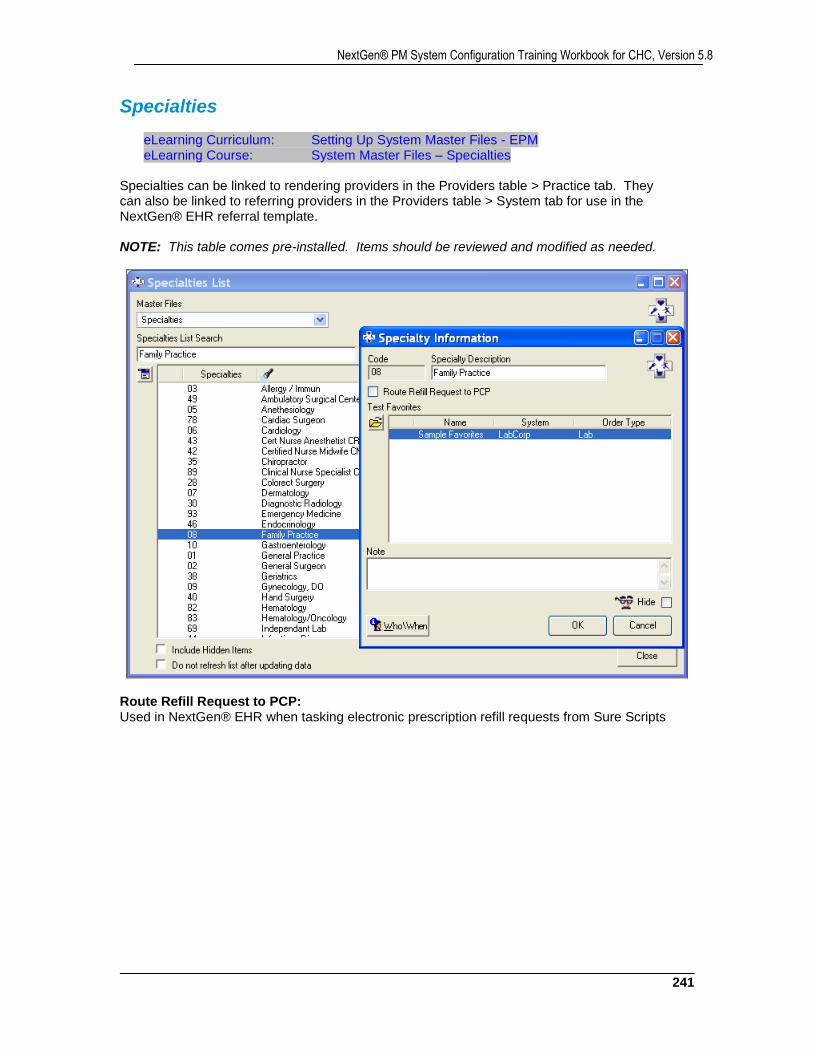
241
NextGen® PM System Configuration Training Workbook for CHC, Version 5.8
Specialties
eLearning Curriculum: Setting Up System Master Files - EPM eLearning Course: System Master Files – Specialties
Specialties can be linked to rendering providers in the Providers table > Practice tab. They can also be linked to referring providers in the Providers table > System tab for use in the NextGen® EHR referral template. NOTE: This table comes pre-installed. Items should be reviewed and modified as needed.
Route Refill Request to PCP: Used in NextGen® EHR when tasking electronic prescription refill requests from Sure Scripts
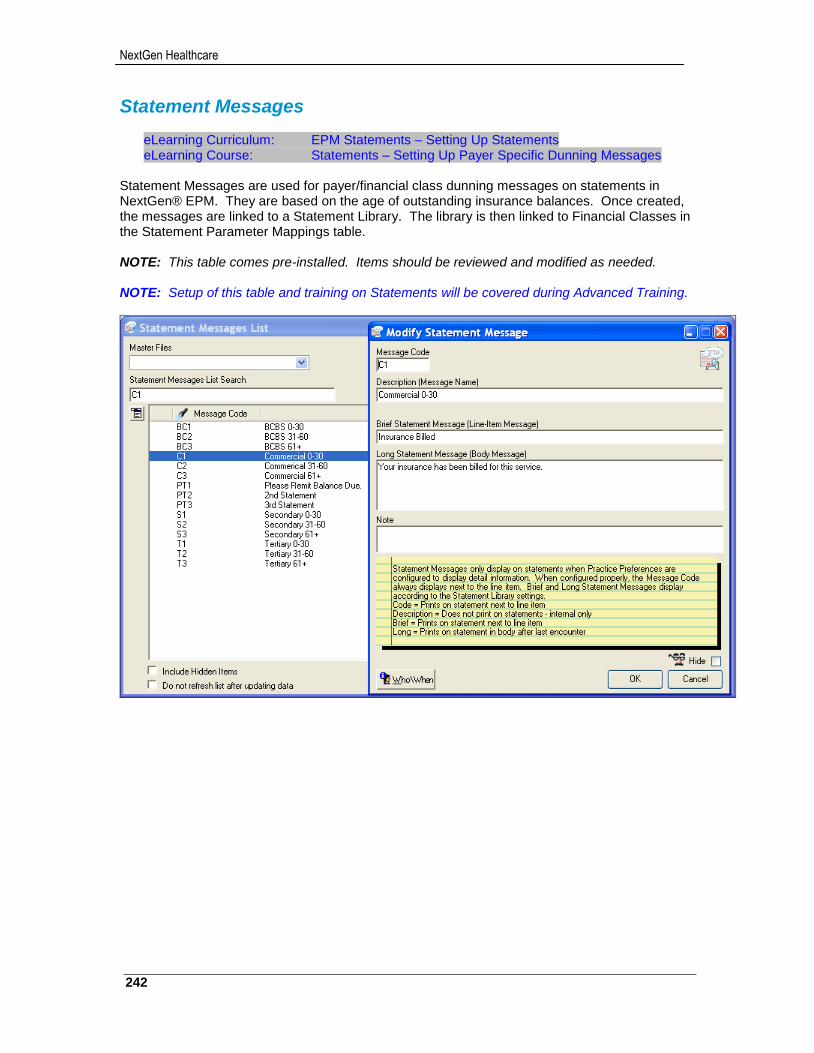
NextGen Healthcare
242
Statement Messages
eLearning Curriculum: EPM Statements – Setting Up Statements eLearning Course: Statements – Setting Up Payer Specific Dunning Messages
Statement Messages are used for payer/financial class dunning messages on statements in NextGen® EPM. They are based on the age of outstanding insurance balances. Once created, the messages are linked to a Statement Library. The library is then linked to Financial Classes in the Statement Parameter Mappings table. NOTE: This table comes pre-installed. Items should be reviewed and modified as needed. NOTE: Setup of this table and training on Statements will be covered during Advanced Training.
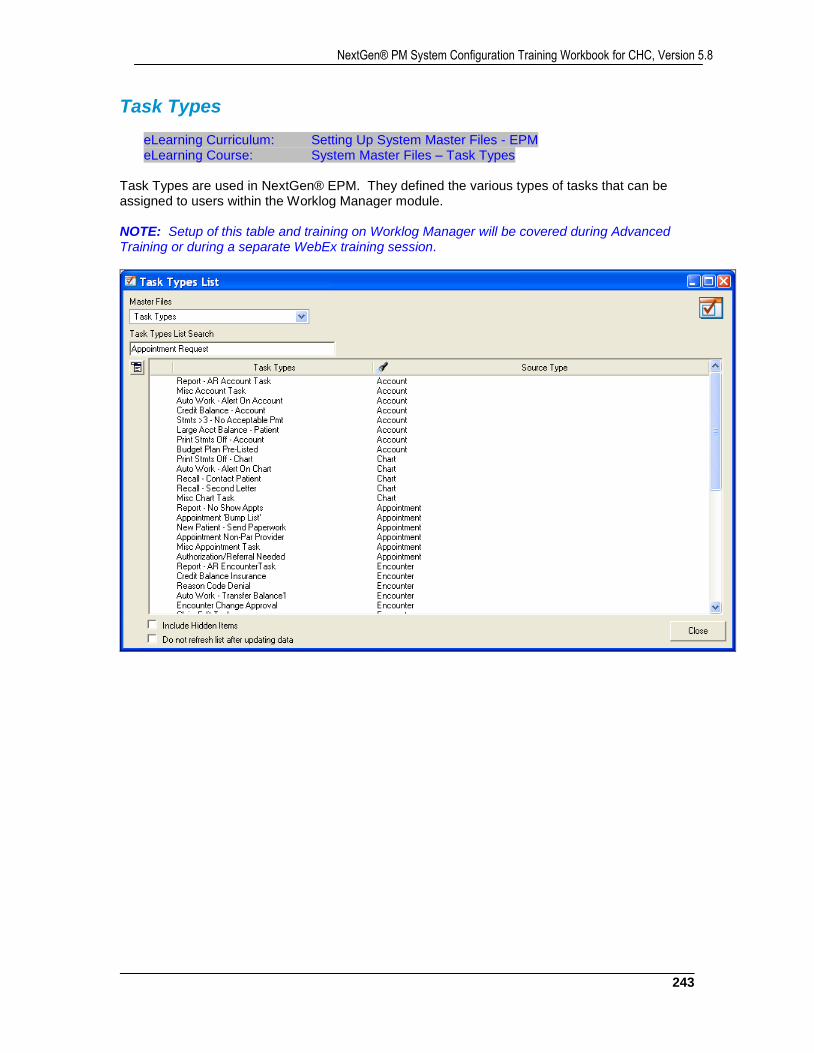
243
NextGen® PM System Configuration Training Workbook for CHC, Version 5.8
Task Types
eLearning Curriculum: Setting Up System Master Files - EPM eLearning Course: System Master Files – Task Types
Task Types are used in NextGen® EPM. They defined the various types of tasks that can be assigned to users within the Worklog Manager module. NOTE: Setup of this table and training on Worklog Manager will be covered during Advanced Training or during a separate WebEx training session.
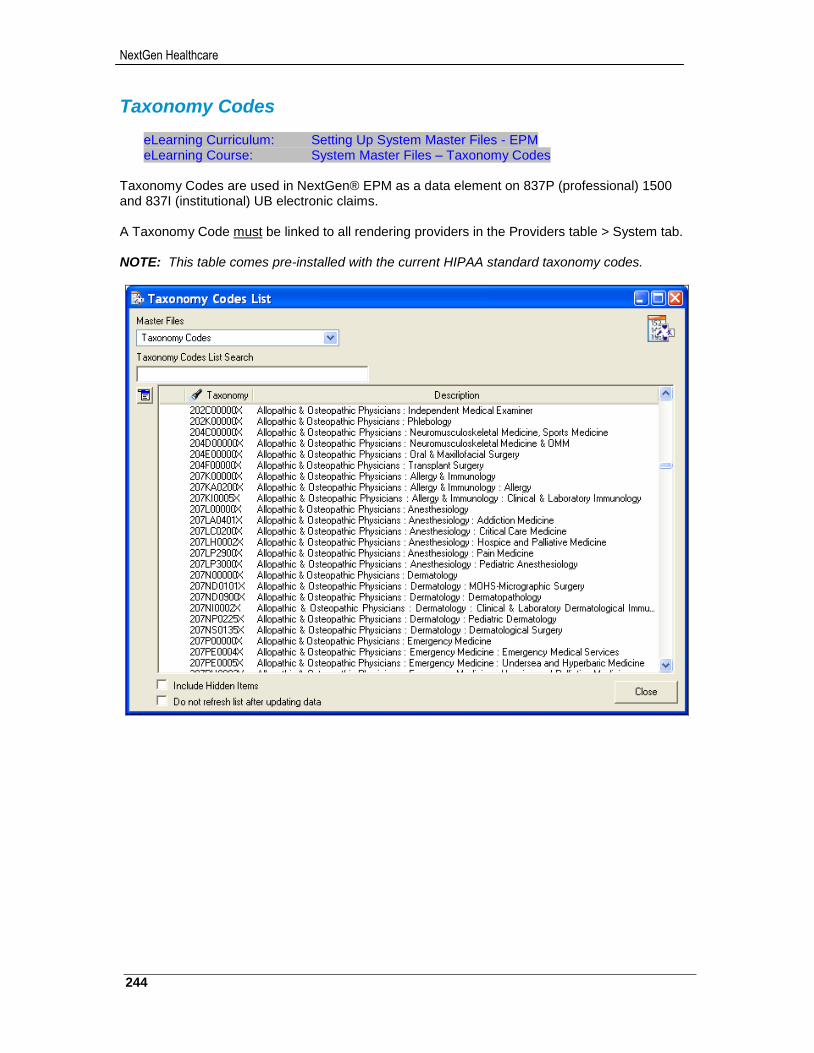
NextGen Healthcare
244
Taxonomy Codes
eLearning Curriculum: Setting Up System Master Files - EPM eLearning Course: System Master Files – Taxonomy Codes
Taxonomy Codes are used in NextGen® EPM as a data element on 837P (professional) 1500 and 837I (institutional) UB electronic claims. A Taxonomy Code must be linked to all rendering providers in the Providers table > System tab. NOTE: This table comes pre-installed with the current HIPAA standard taxonomy codes.
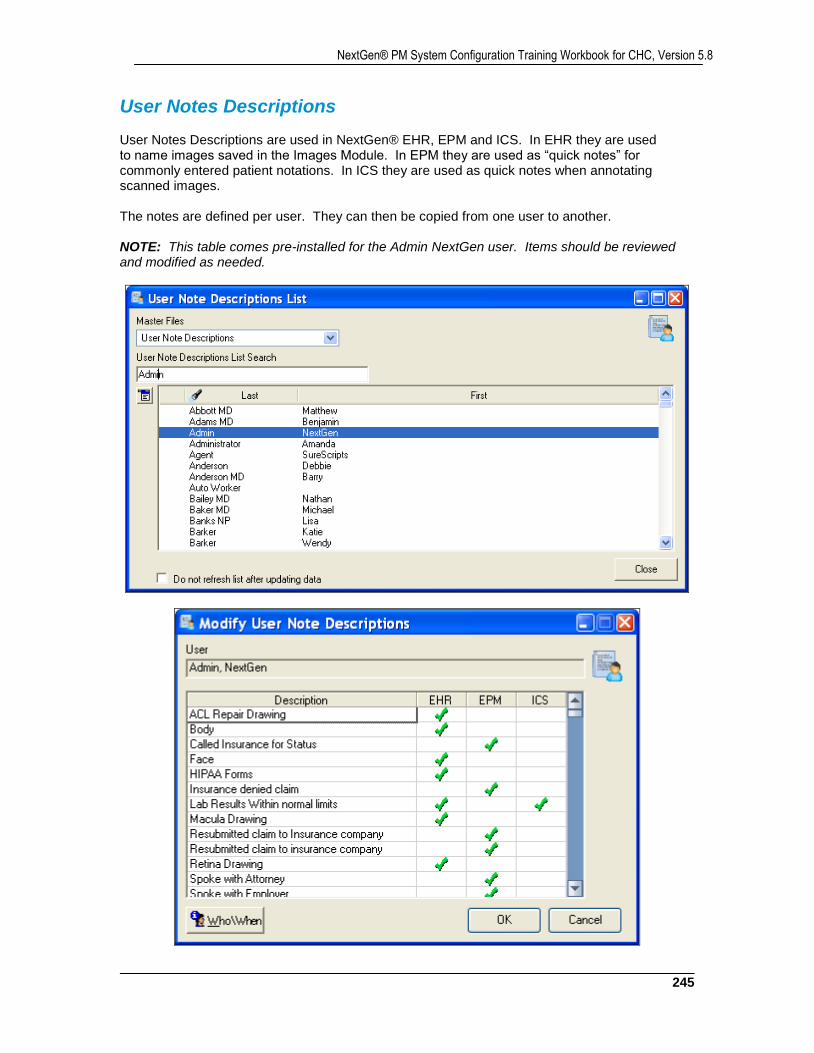
245
NextGen® PM System Configuration Training Workbook for CHC, Version 5.8
User Notes Descriptions User Notes Descriptions are used in NextGen® EHR, EPM and ICS. In EHR they are used to name images saved in the Images Module. In EPM they are used as “quick notes” for commonly entered patient notations. In ICS they are used as quick notes when annotating scanned images. The notes are defined per user. They can then be copied from one user to another. NOTE: This table comes pre-installed for the Admin NextGen user. Items should be reviewed and modified as needed.
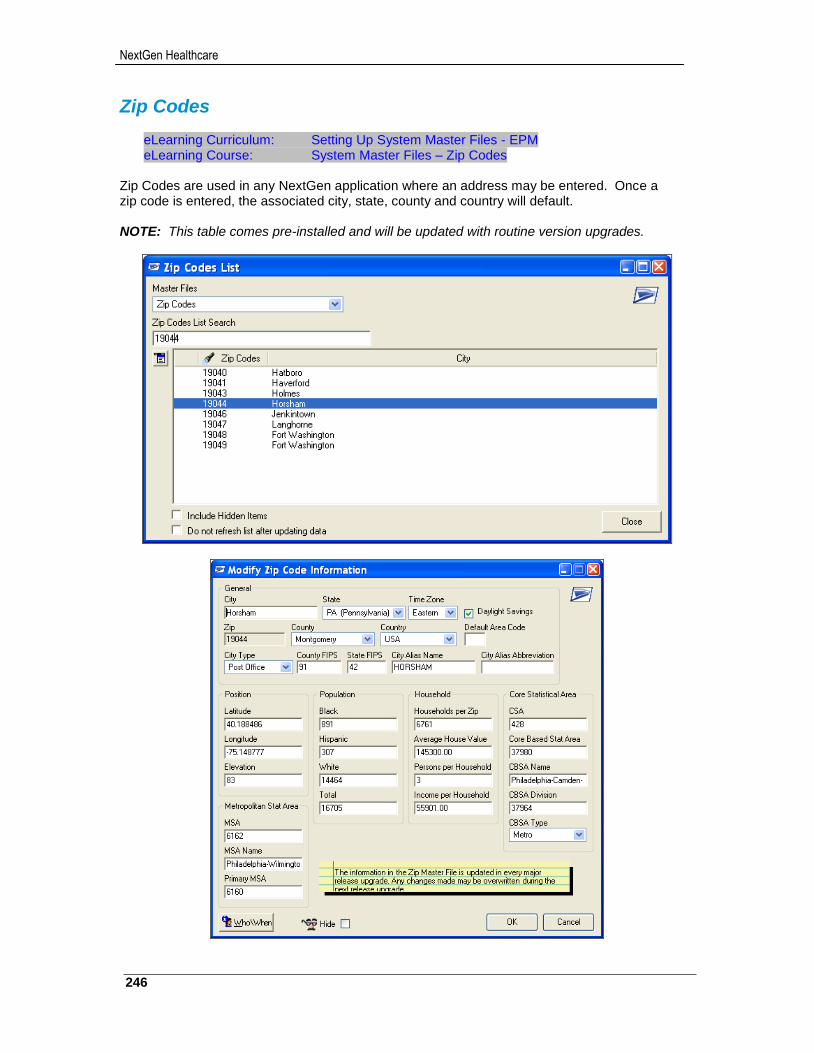
NextGen Healthcare
246
Zip Codes
eLearning Curriculum: Setting Up System Master Files - EPM eLearning Course: System Master Files – Zip Codes
Zip Codes are used in any NextGen application where an address may be entered. Once a zip code is entered, the associated city, state, county and country will default. NOTE: This table comes pre-installed and will be updated with routine version upgrades.
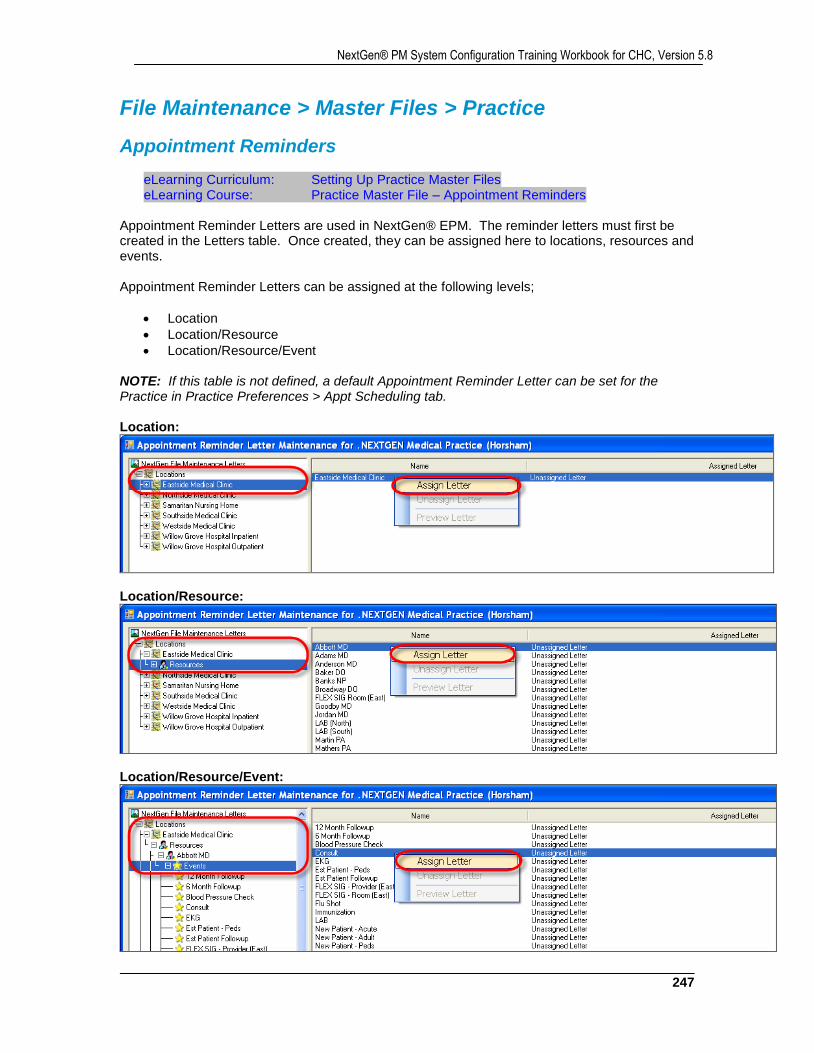
247
NextGen® PM System Configuration Training Workbook for CHC, Version 5.8
File Maintenance > Master Files > Practice
Appointment Reminders
eLearning Curriculum: Setting Up Practice Master Files eLearning Course: Practice Master File – Appointment Reminders
Appointment Reminder Letters are used in NextGen® EPM. The reminder letters must first be created in the Letters table. Once created, they can be assigned here to locations, resources and events. Appointment Reminder Letters can be assigned at the following levels;
Location
Location/Resource
Location/Resource/Event NOTE: If this table is not defined, a default Appointment Reminder Letter can be set for the Practice in Practice Preferences > Appt Scheduling tab. Location:
Location/Resource:
Location/Resource/Event:
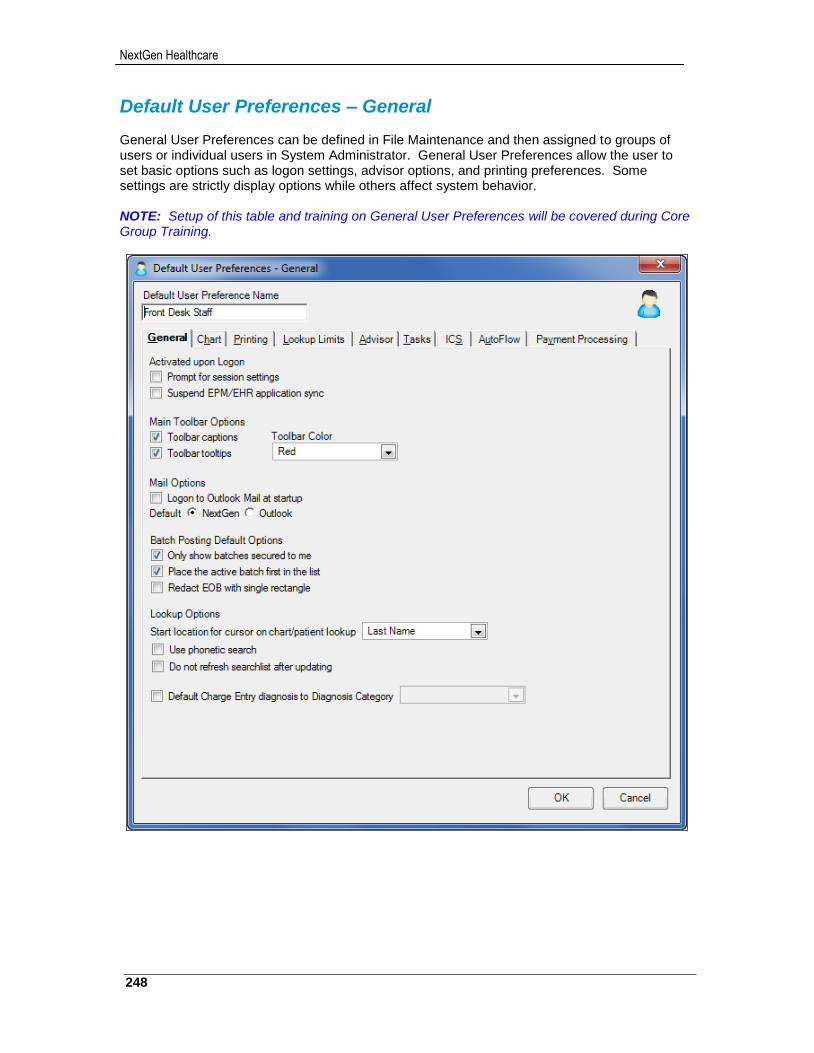
NextGen Healthcare
248
Default User Preferences – General General User Preferences can be defined in File Maintenance and then assigned to groups of users or individual users in System Administrator. General User Preferences allow the user to set basic options such as logon settings, advisor options, and printing preferences. Some settings are strictly display options while others affect system behavior. NOTE: Setup of this table and training on General User Preferences will be covered during Core Group Training.
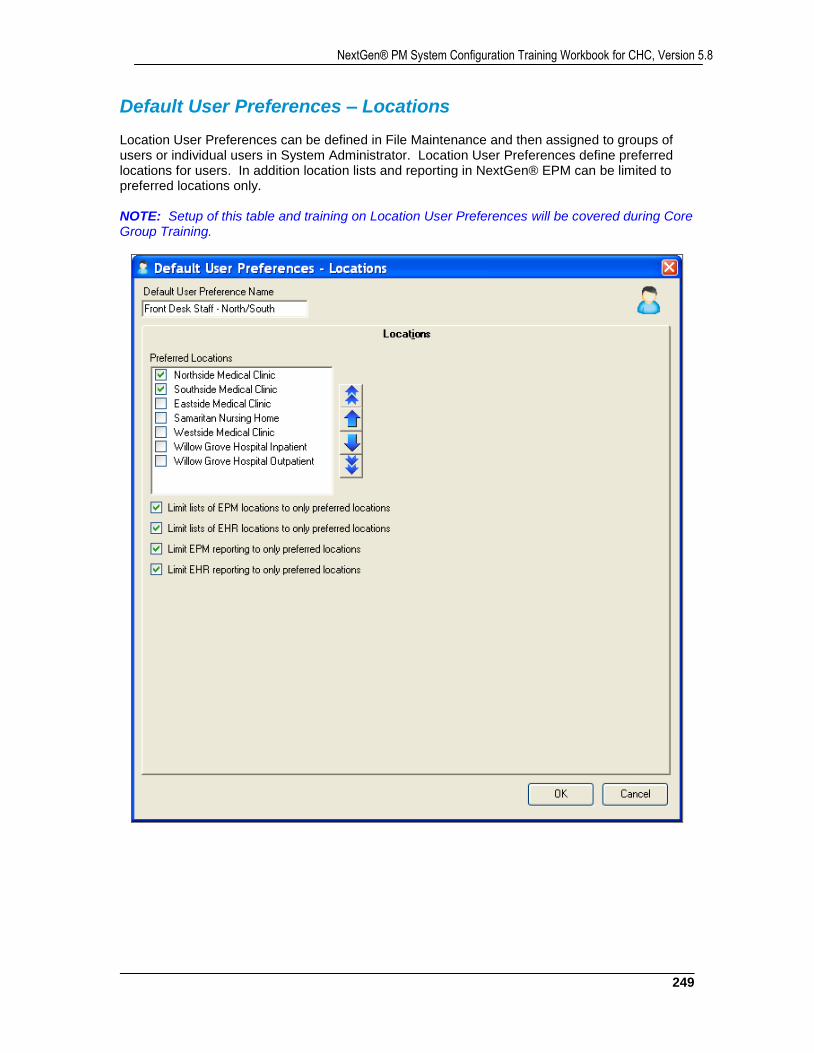
249
NextGen® PM System Configuration Training Workbook for CHC, Version 5.8
Default User Preferences – Locations Location User Preferences can be defined in File Maintenance and then assigned to groups of users or individual users in System Administrator. Location User Preferences define preferred locations for users. In addition location lists and reporting in NextGen® EPM can be limited to preferred locations only. NOTE: Setup of this table and training on Location User Preferences will be covered during Core Group Training.
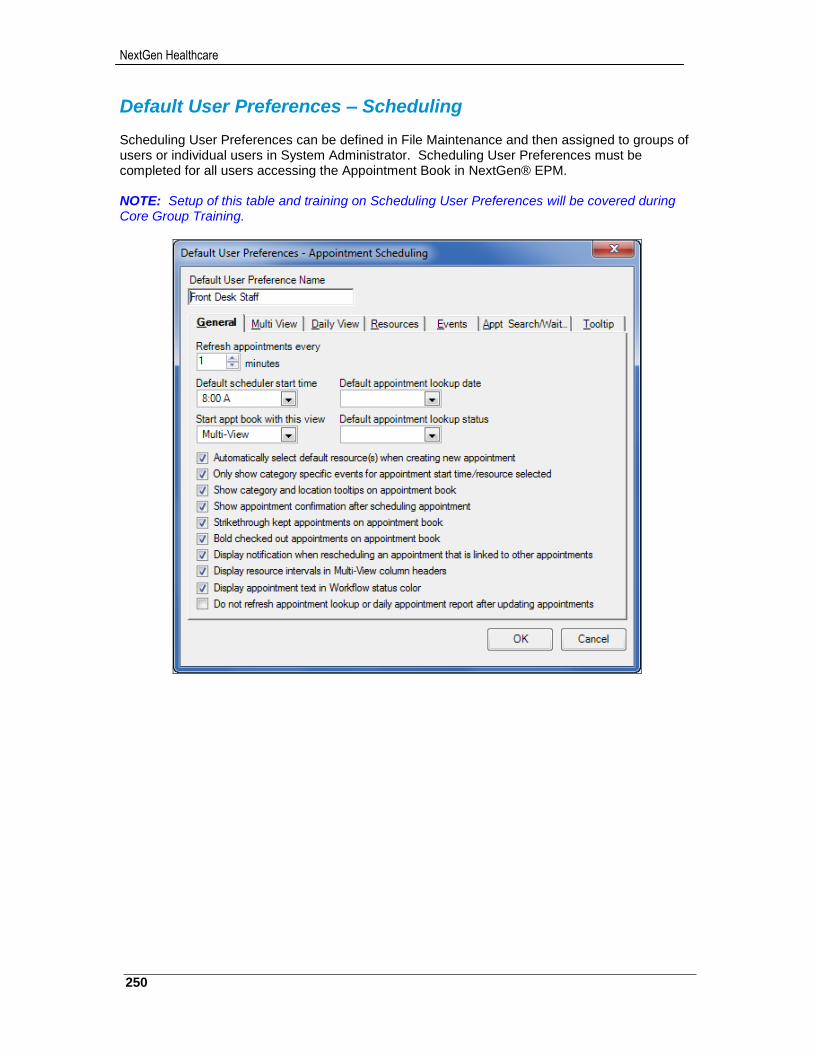
NextGen Healthcare
250
Default User Preferences – Scheduling Scheduling User Preferences can be defined in File Maintenance and then assigned to groups of users or individual users in System Administrator. Scheduling User Preferences must be completed for all users accessing the Appointment Book in NextGen® EPM. NOTE: Setup of this table and training on Scheduling User Preferences will be covered during Core Group Training.
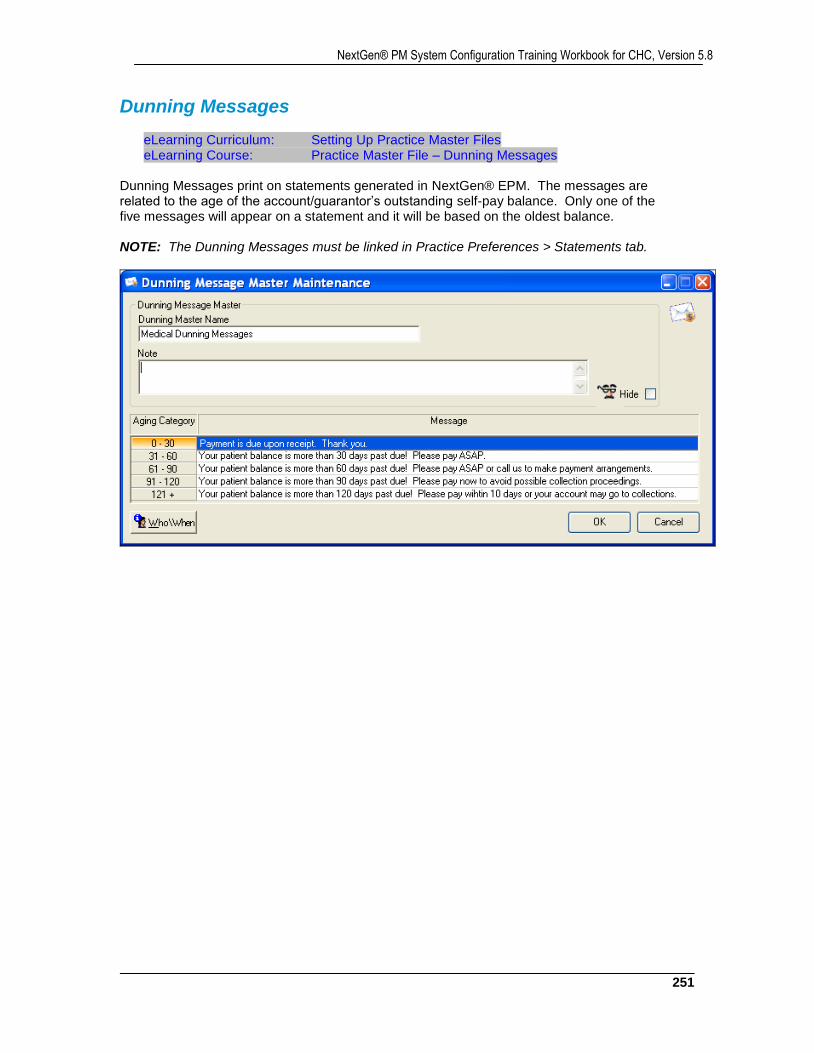
251
NextGen® PM System Configuration Training Workbook for CHC, Version 5.8
Dunning Messages
eLearning Curriculum: Setting Up Practice Master Files eLearning Course: Practice Master File – Dunning Messages
Dunning Messages print on statements generated in NextGen® EPM. The messages are related to the age of the account/guarantor’s outstanding self-pay balance. Only one of the five messages will appear on a statement and it will be based on the oldest balance. NOTE: The Dunning Messages must be linked in Practice Preferences > Statements tab.
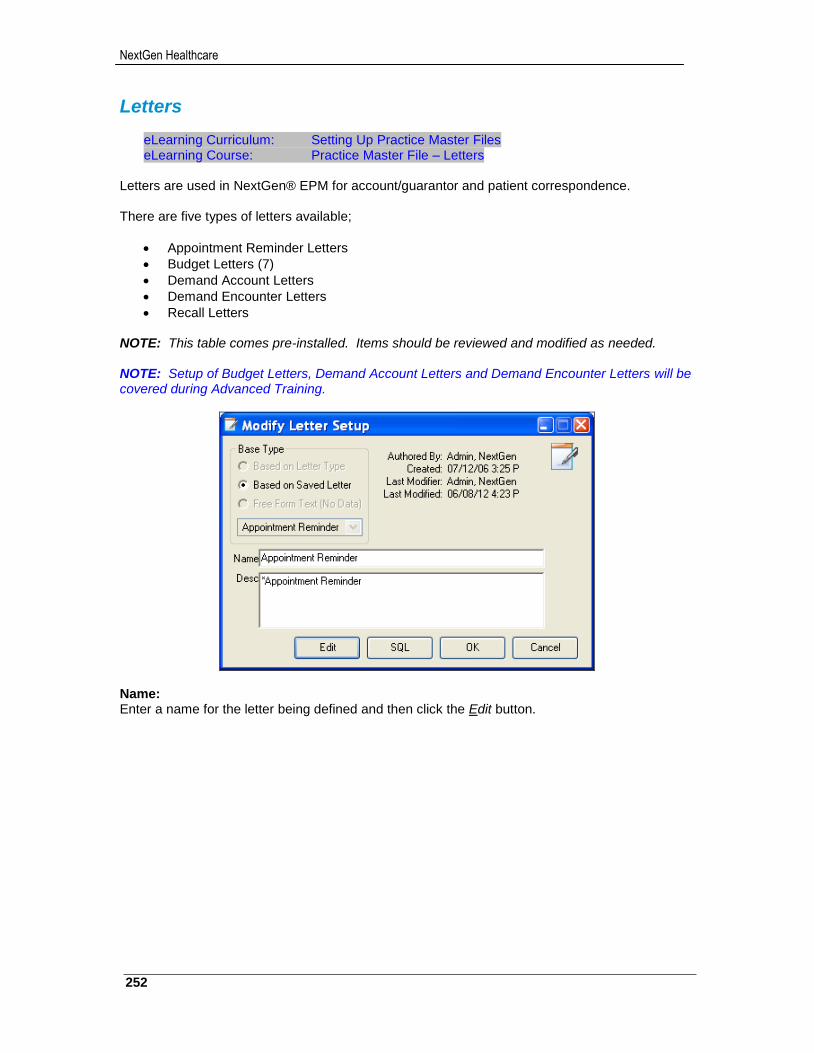
NextGen Healthcare
252
Letters
eLearning Curriculum: Setting Up Practice Master Files eLearning Course: Practice Master File – Letters
Letters are used in NextGen® EPM for account/guarantor and patient correspondence. There are five types of letters available;
Appointment Reminder Letters
Budget Letters (7)
Demand Account Letters
Demand Encounter Letters
Recall Letters NOTE: This table comes pre-installed. Items should be reviewed and modified as needed. NOTE: Setup of Budget Letters, Demand Account Letters and Demand Encounter Letters will be covered during Advanced Training.
Name: Enter a name for the letter being defined and then click the Edit button.
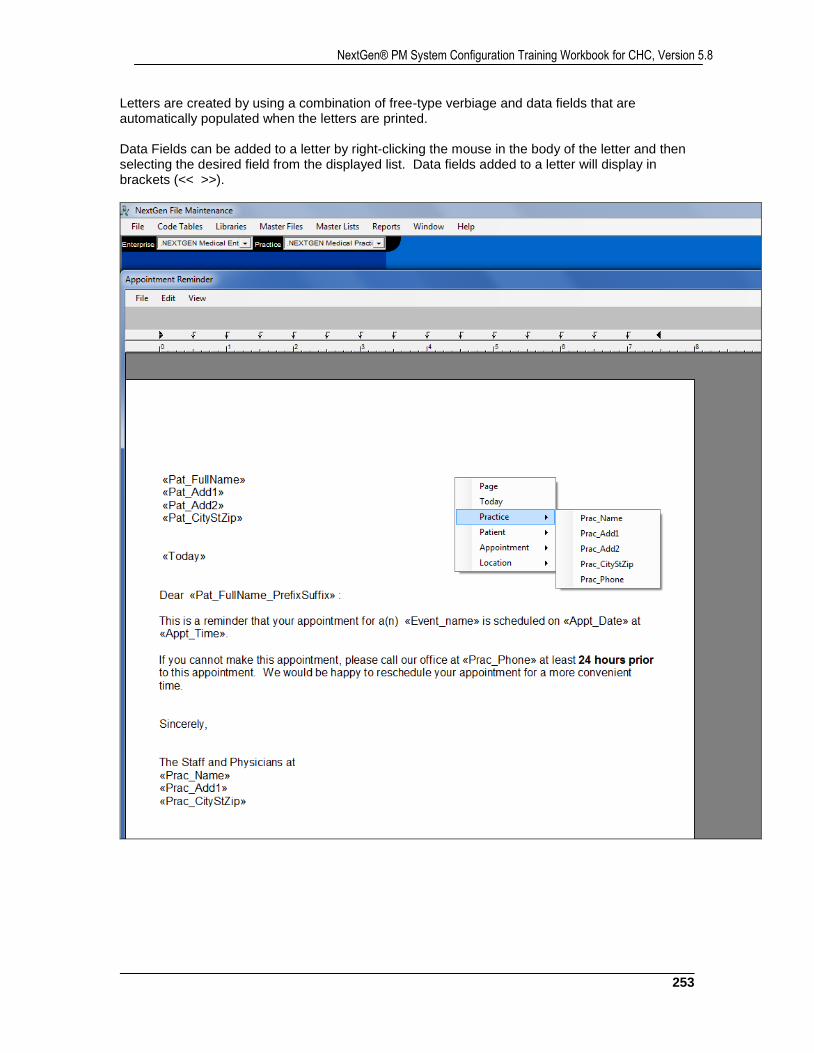
253
NextGen® PM System Configuration Training Workbook for CHC, Version 5.8
Letters are created by using a combination of free-type verbiage and data fields that are automatically populated when the letters are printed. Data Fields can be added to a letter by right-clicking the mouse in the body of the letter and then selecting the desired field from the displayed list. Data fields added to a letter will display in brackets (<< >>).
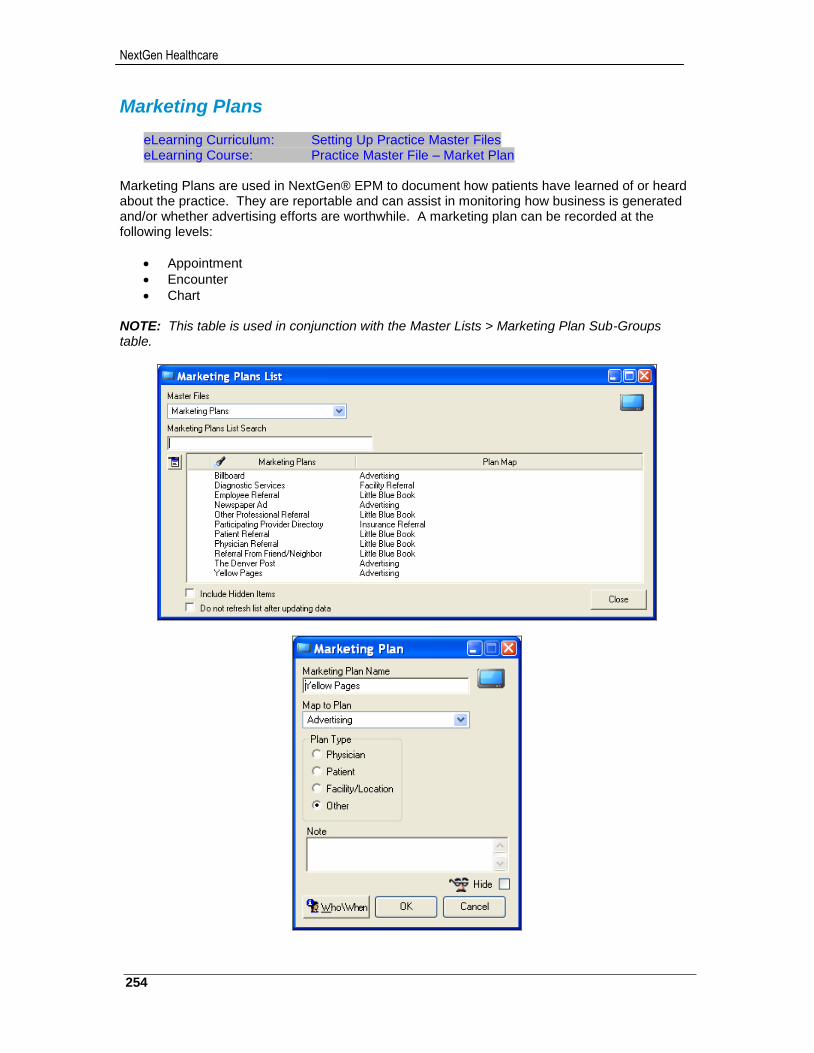
NextGen Healthcare
254
Marketing Plans
eLearning Curriculum: Setting Up Practice Master Files eLearning Course: Practice Master File – Market Plan
Marketing Plans are used in NextGen® EPM to document how patients have learned of or heard about the practice. They are reportable and can assist in monitoring how business is generated and/or whether advertising efforts are worthwhile. A marketing plan can be recorded at the following levels:
Appointment
Encounter
Chart NOTE: This table is used in conjunction with the Master Lists > Marketing Plan Sub-Groups table.
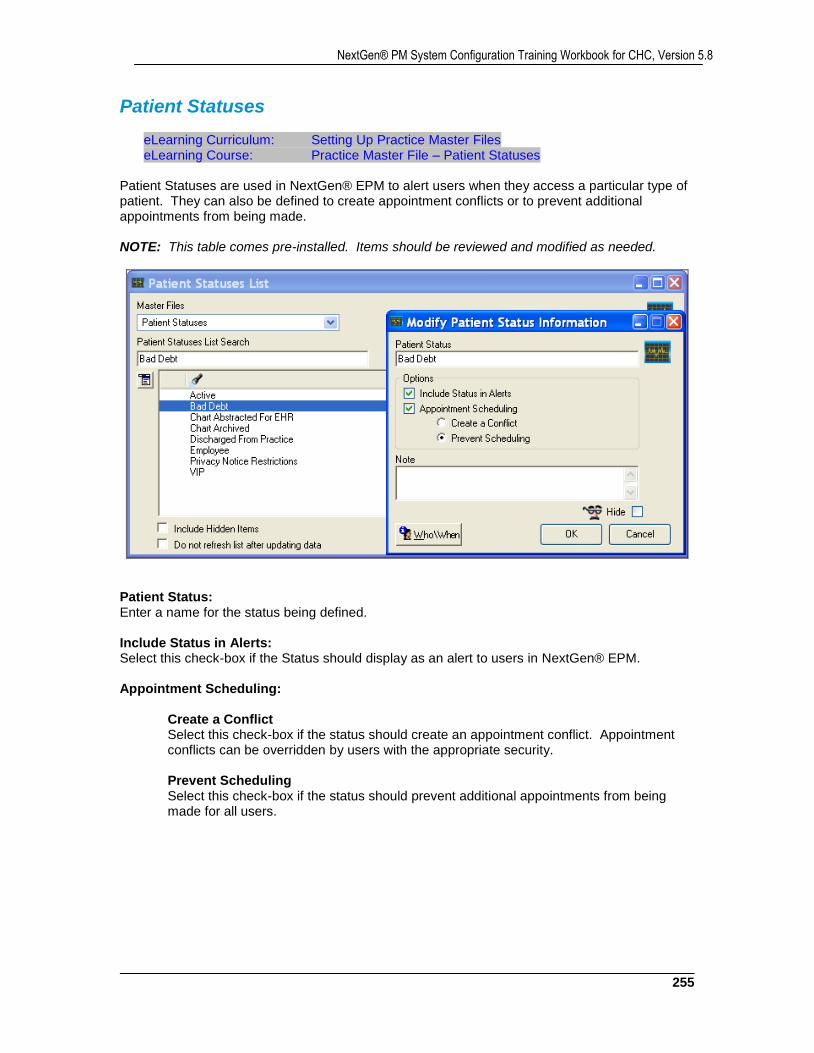
255
NextGen® PM System Configuration Training Workbook for CHC, Version 5.8
Patient Statuses
eLearning Curriculum: Setting Up Practice Master Files eLearning Course: Practice Master File – Patient Statuses
Patient Statuses are used in NextGen® EPM to alert users when they access a particular type of patient. They can also be defined to create appointment conflicts or to prevent additional appointments from being made. NOTE: This table comes pre-installed. Items should be reviewed and modified as needed.
Patient Status: Enter a name for the status being defined. Include Status in Alerts: Select this check-box if the Status should display as an alert to users in NextGen® EPM. Appointment Scheduling: Create a Conflict
Select this check-box if the status should create an appointment conflict. Appointment conflicts can be overridden by users with the appropriate security.
Prevent Scheduling
Select this check-box if the status should prevent additional appointments from being made for all users.
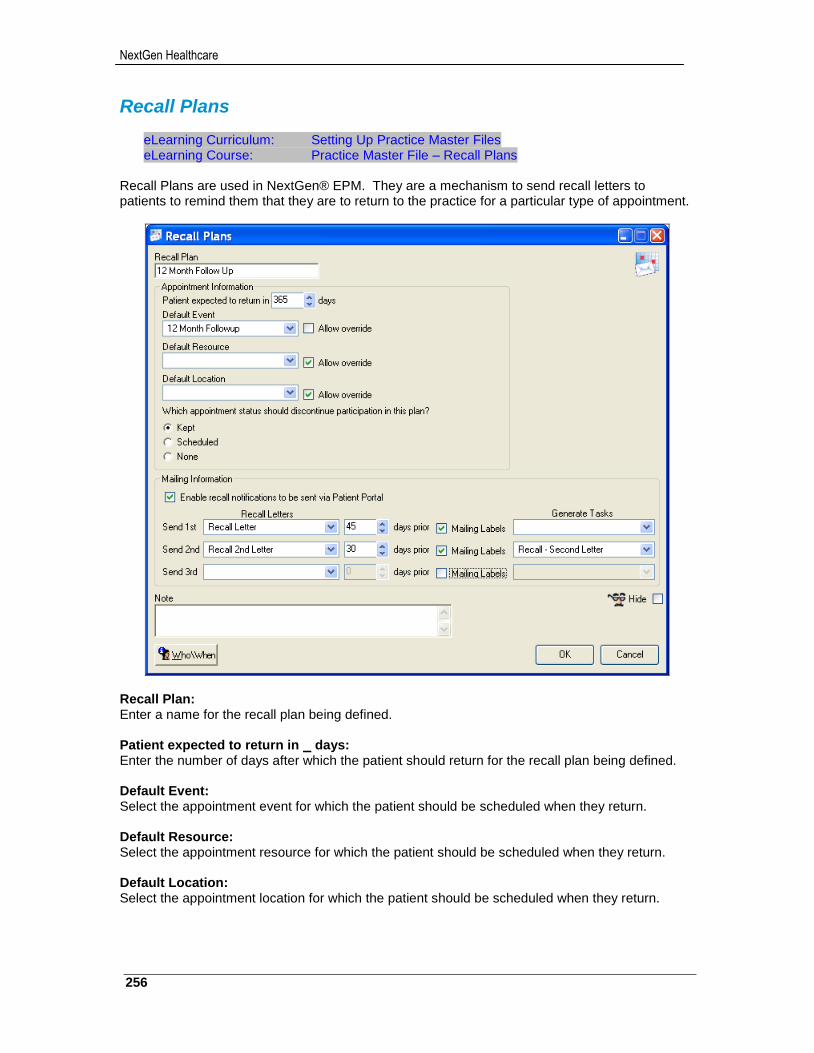
NextGen Healthcare
256
Recall Plans
eLearning Curriculum: Setting Up Practice Master Files eLearning Course: Practice Master File – Recall Plans
Recall Plans are used in NextGen® EPM. They are a mechanism to send recall letters to patients to remind them that they are to return to the practice for a particular type of appointment.
Recall Plan: Enter a name for the recall plan being defined. Patient expected to return in days: Enter the number of days after which the patient should return for the recall plan being defined. Default Event: Select the appointment event for which the patient should be scheduled when they return. Default Resource: Select the appointment resource for which the patient should be scheduled when they return. Default Location: Select the appointment location for which the patient should be scheduled when they return.
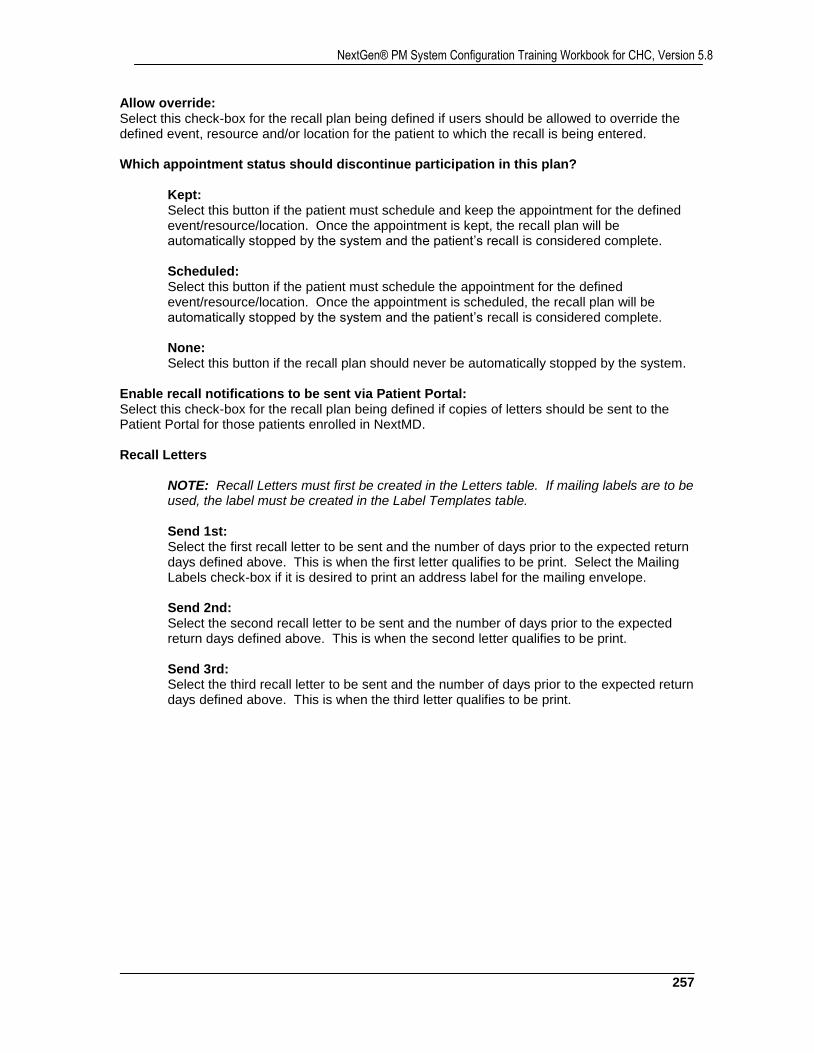
257
NextGen® PM System Configuration Training Workbook for CHC, Version 5.8
Allow override: Select this check-box for the recall plan being defined if users should be allowed to override the defined event, resource and/or location for the patient to which the recall is being entered. Which appointment status should discontinue participation in this plan?
Kept: Select this button if the patient must schedule and keep the appointment for the defined event/resource/location. Once the appointment is kept, the recall plan will be automatically stopped by the system and the patient’s recall is considered complete. Scheduled: Select this button if the patient must schedule the appointment for the defined event/resource/location. Once the appointment is scheduled, the recall plan will be automatically stopped by the system and the patient’s recall is considered complete. None: Select this button if the recall plan should never be automatically stopped by the system.
Enable recall notifications to be sent via Patient Portal: Select this check-box for the recall plan being defined if copies of letters should be sent to the Patient Portal for those patients enrolled in NextMD. Recall Letters
NOTE: Recall Letters must first be created in the Letters table. If mailing labels are to be used, the label must be created in the Label Templates table.
Send 1st: Select the first recall letter to be sent and the number of days prior to the expected return days defined above. This is when the first letter qualifies to be print. Select the Mailing Labels check-box if it is desired to print an address label for the mailing envelope. Send 2nd: Select the second recall letter to be sent and the number of days prior to the expected return days defined above. This is when the second letter qualifies to be print. Send 3rd: Select the third recall letter to be sent and the number of days prior to the expected return days defined above. This is when the third letter qualifies to be print.
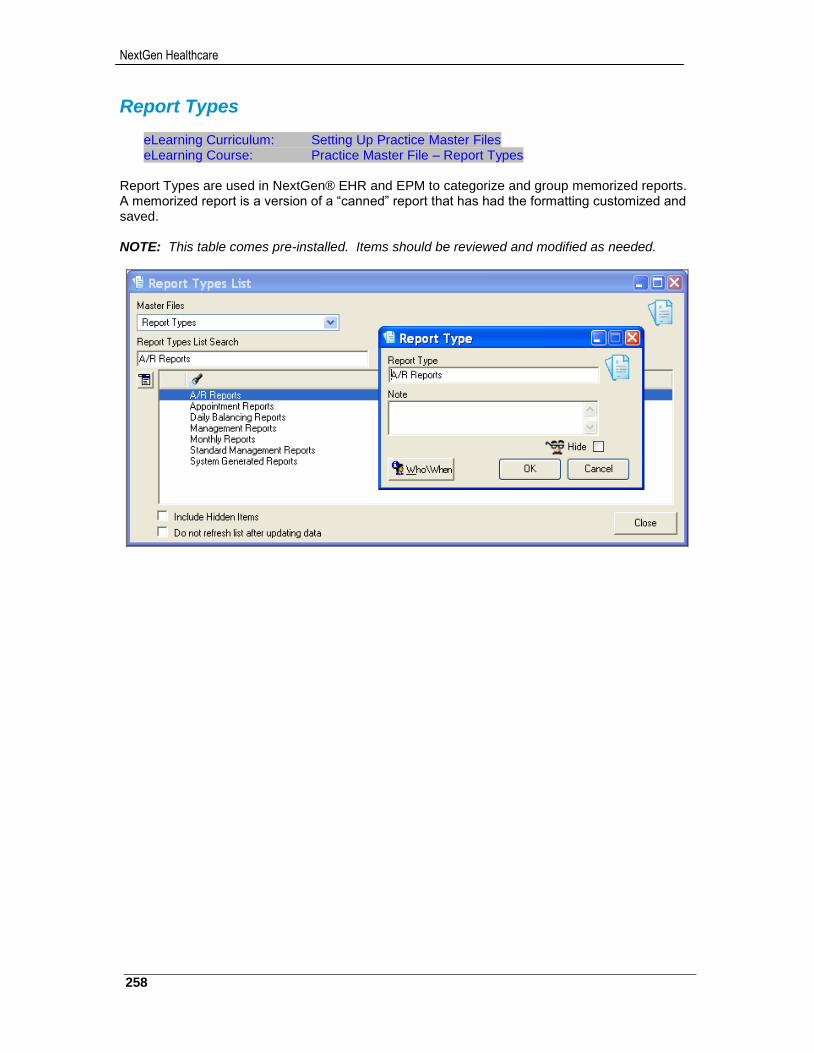
NextGen Healthcare
258
Report Types
eLearning Curriculum: Setting Up Practice Master Files eLearning Course: Practice Master File – Report Types
Report Types are used in NextGen® EHR and EPM to categorize and group memorized reports. A memorized report is a version of a “canned” report that has had the formatting customized and saved. NOTE: This table comes pre-installed. Items should be reviewed and modified as needed.
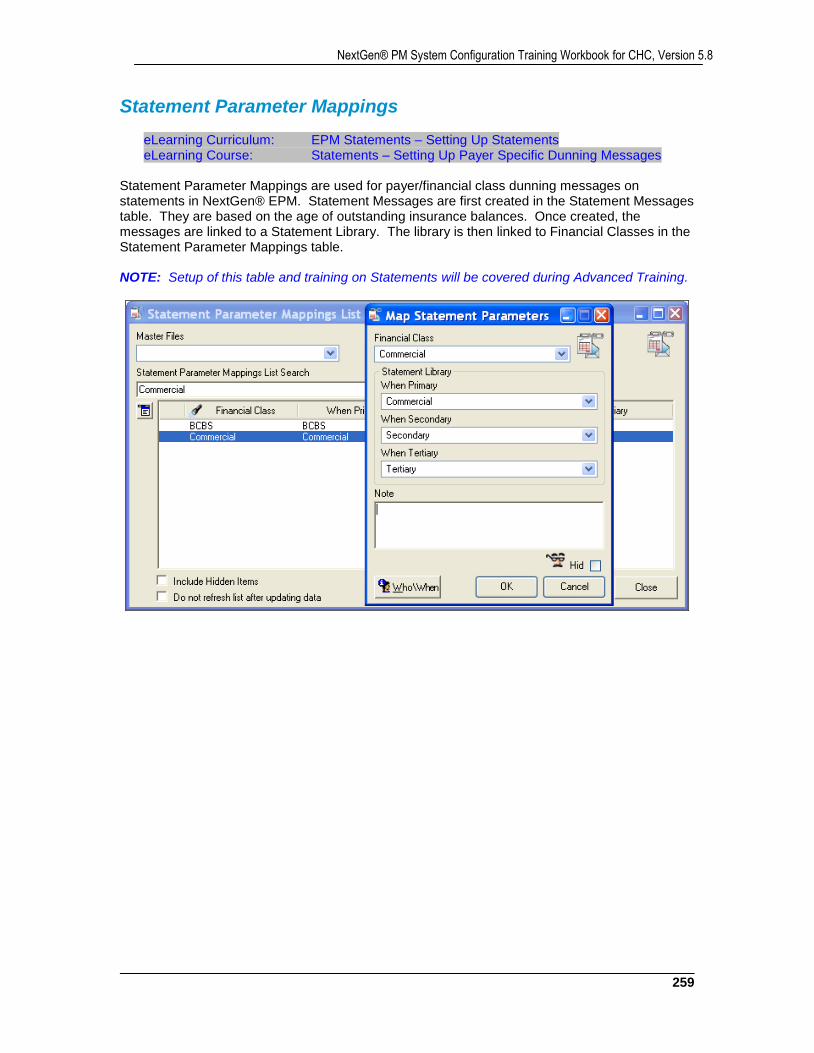
259
NextGen® PM System Configuration Training Workbook for CHC, Version 5.8
Statement Parameter Mappings
eLearning Curriculum: EPM Statements – Setting Up Statements eLearning Course: Statements – Setting Up Payer Specific Dunning Messages
Statement Parameter Mappings are used for payer/financial class dunning messages on statements in NextGen® EPM. Statement Messages are first created in the Statement Messages table. They are based on the age of outstanding insurance balances. Once created, the messages are linked to a Statement Library. The library is then linked to Financial Classes in the Statement Parameter Mappings table. NOTE: Setup of this table and training on Statements will be covered during Advanced Training.
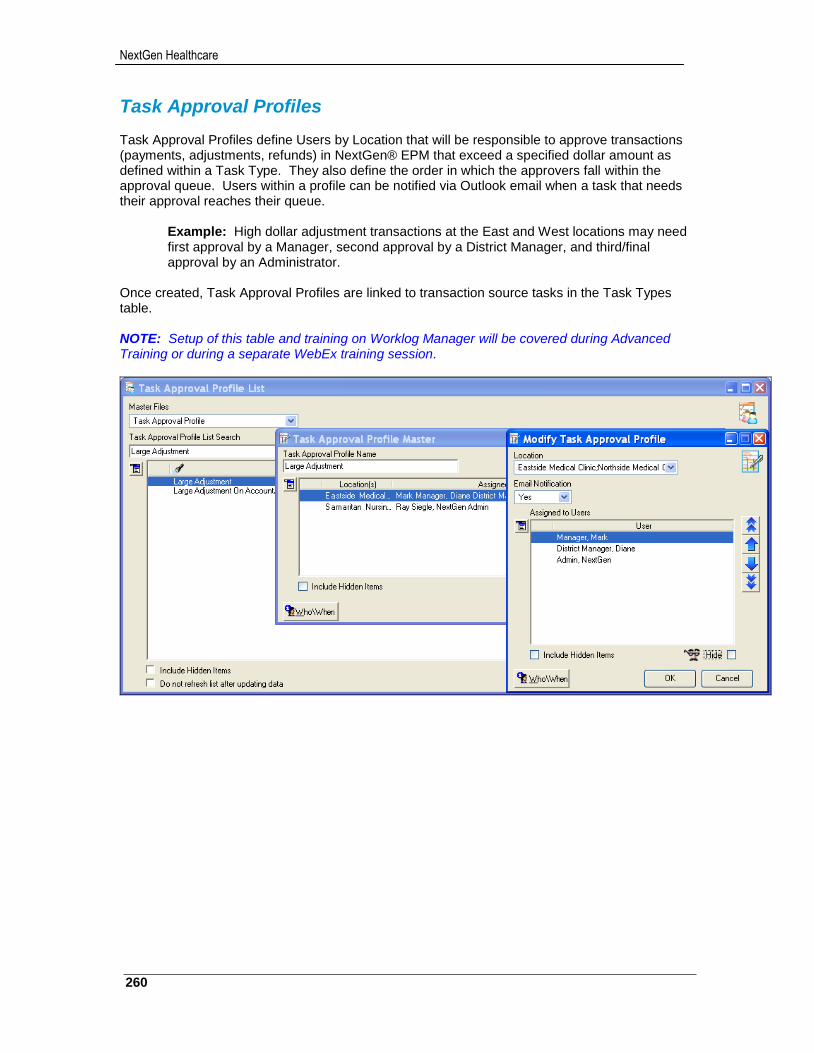
NextGen Healthcare
260
Task Approval Profiles Task Approval Profiles define Users by Location that will be responsible to approve transactions (payments, adjustments, refunds) in NextGen® EPM that exceed a specified dollar amount as defined within a Task Type. They also define the order in which the approvers fall within the approval queue. Users within a profile can be notified via Outlook email when a task that needs their approval reaches their queue.
Example: High dollar adjustment transactions at the East and West locations may need first approval by a Manager, second approval by a District Manager, and third/final approval by an Administrator.
Once created, Task Approval Profiles are linked to transaction source tasks in the Task Types table. NOTE: Setup of this table and training on Worklog Manager will be covered during Advanced Training or during a separate WebEx training session.
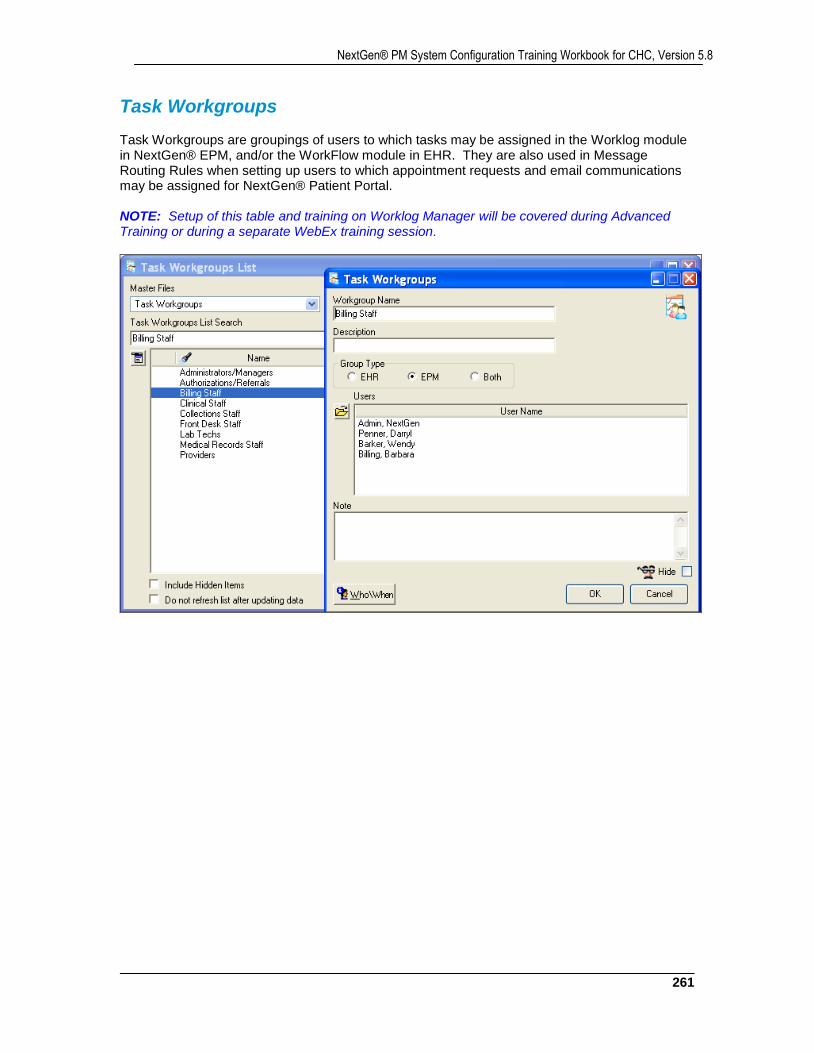
261
NextGen® PM System Configuration Training Workbook for CHC, Version 5.8
Task Workgroups Task Workgroups are groupings of users to which tasks may be assigned in the Worklog module in NextGen® EPM, and/or the WorkFlow module in EHR. They are also used in Message Routing Rules when setting up users to which appointment requests and email communications may be assigned for NextGen® Patient Portal. NOTE: Setup of this table and training on Worklog Manager will be covered during Advanced Training or during a separate WebEx training session.
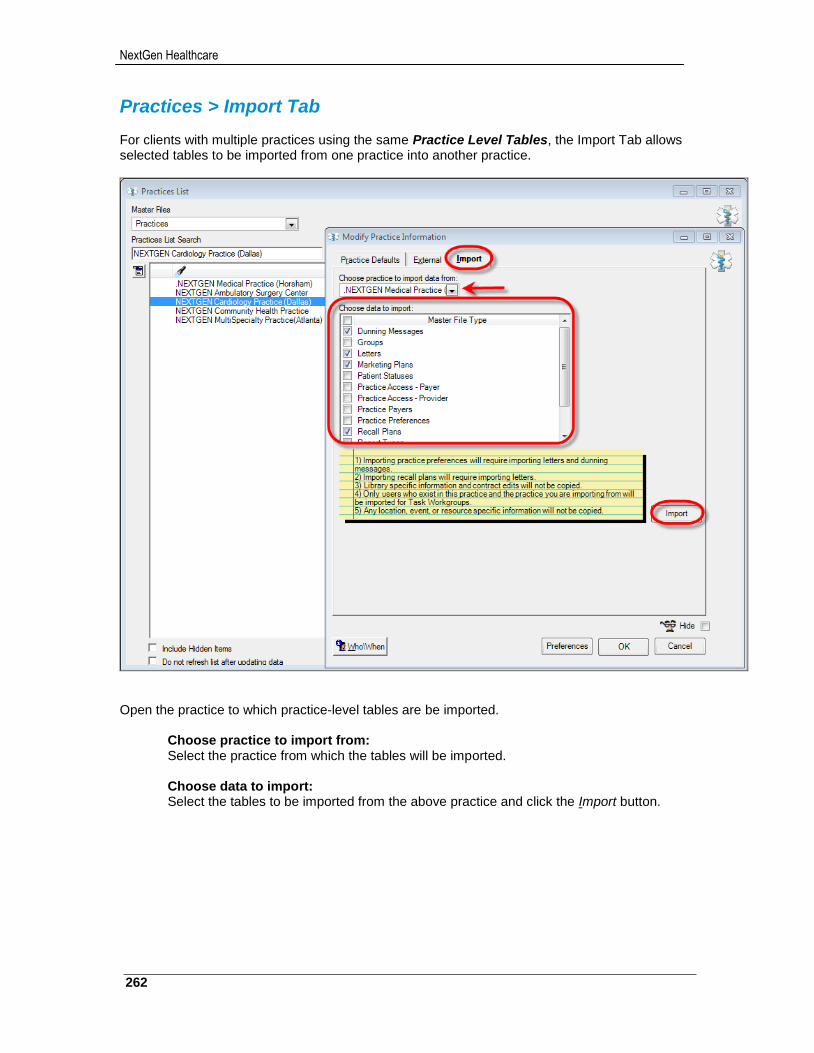
NextGen Healthcare
262
Practices > Import Tab For clients with multiple practices using the same Practice Level Tables, the Import Tab allows selected tables to be imported from one practice into another practice.
Open the practice to which practice-level tables are be imported.
Choose practice to import from: Select the practice from which the tables will be imported. Choose data to import: Select the tables to be imported from the above practice and click the Import button.
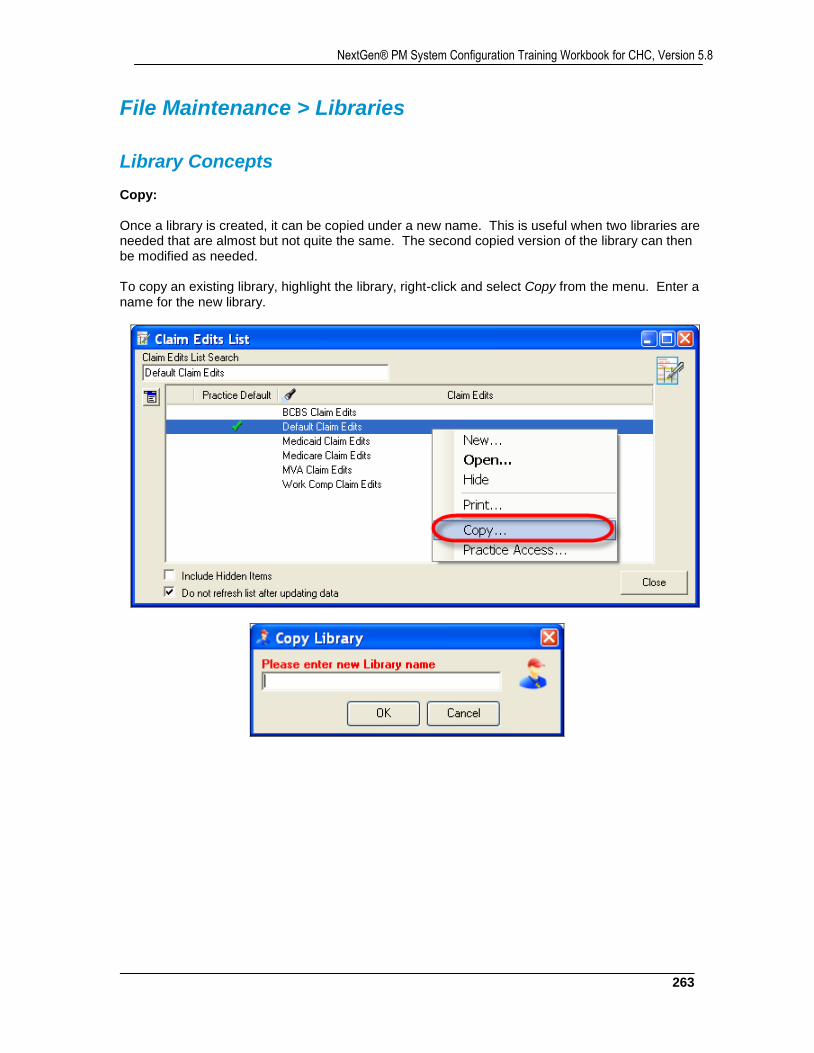
263
NextGen® PM System Configuration Training Workbook for CHC, Version 5.8
File Maintenance > Libraries
Library Concepts Copy: Once a library is created, it can be copied under a new name. This is useful when two libraries are needed that are almost but not quite the same. The second copied version of the library can then be modified as needed. To copy an existing library, highlight the library, right-click and select Copy from the menu. Enter a name for the new library.
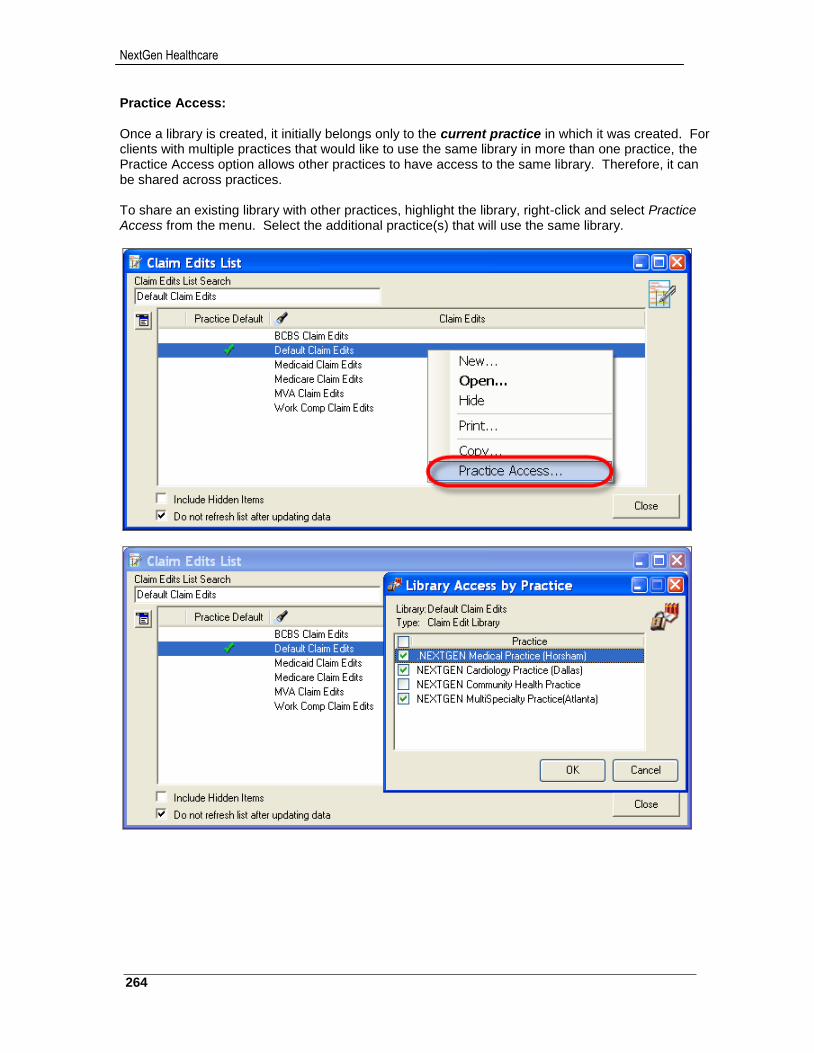
NextGen Healthcare
264
Practice Access: Once a library is created, it initially belongs only to the current practice in which it was created. For clients with multiple practices that would like to use the same library in more than one practice, the Practice Access option allows other practices to have access to the same library. Therefore, it can be shared across practices. To share an existing library with other practices, highlight the library, right-click and select Practice Access from the menu. Select the additional practice(s) that will use the same library.
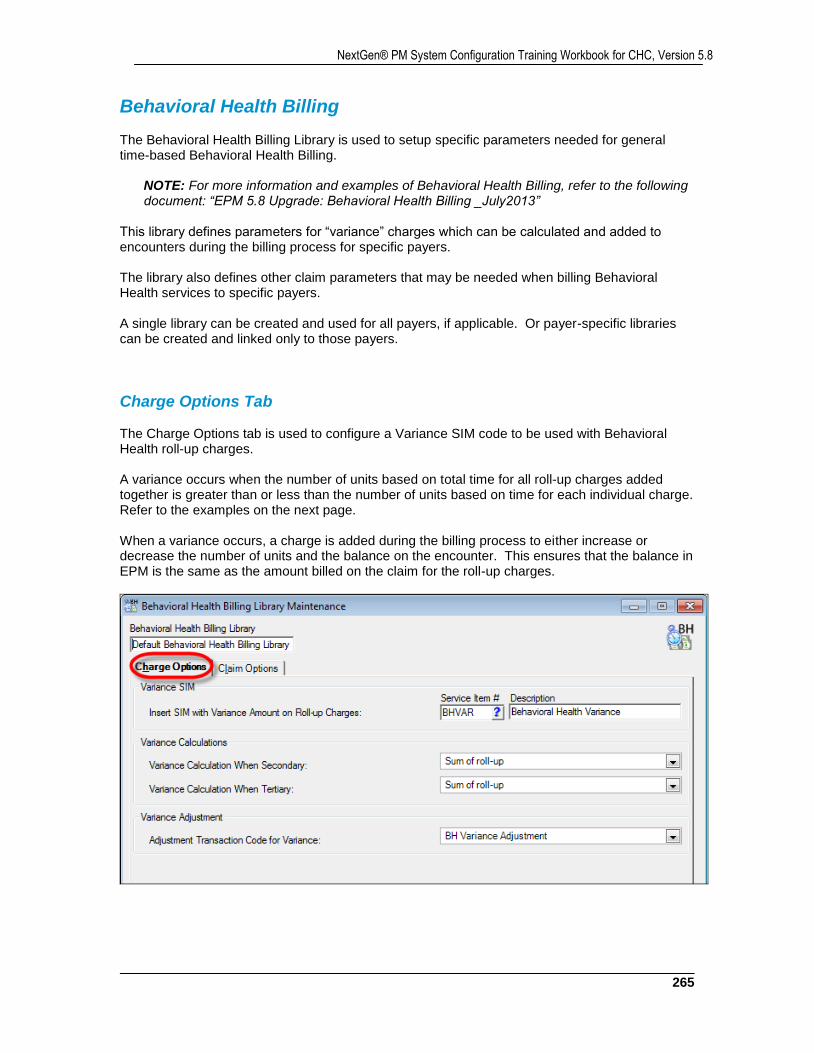
265
NextGen® PM System Configuration Training Workbook for CHC, Version 5.8
Behavioral Health Billing The Behavioral Health Billing Library is used to setup specific parameters needed for general time-based Behavioral Health Billing.
NOTE: For more information and examples of Behavioral Health Billing, refer to the following document: “EPM 5.8 Upgrade: Behavioral Health Billing _July2013”
This library defines parameters for “variance” charges which can be calculated and added to encounters during the billing process for specific payers. The library also defines other claim parameters that may be needed when billing Behavioral Health services to specific payers. A single library can be created and used for all payers, if applicable. Or payer-specific libraries can be created and linked only to those payers.
Charge Options Tab The Charge Options tab is used to configure a Variance SIM code to be used with Behavioral Health roll-up charges. A variance occurs when the number of units based on total time for all roll-up charges added together is greater than or less than the number of units based on time for each individual charge. Refer to the examples on the next page. When a variance occurs, a charge is added during the billing process to either increase or decrease the number of units and the balance on the encounter. This ensures that the balance in EPM is the same as the amount billed on the claim for the roll-up charges.
NextGen Healthcare
266
Variance SIM Insert SIM with Variance Amount on Roll-up Charges: Select the SIM code that will be added to encounters as an additional charge during the billing process when there is a “variance” in units for timed behavioral health charges that roll-up. This is a required entry.
The SIM code must first be created in the SIM Library as follows:
Service Item #: User Defined
CPT4 Code: User Defined
Non-Facility/Facility Price: $0.00
Behavioral Health: Unchecked
Variance Calculations
Variance Calculation when Secondary: Select one of the following for calculating the variance charge amount when billing the secondary payer on the encounter.
NOTE: This setting applies when the primary payer on the encounter is not using a Behavioral Health Billing Library and therefore a variance charge was not already added to the encounter when the primary payer was billed.
Sum of roll-up less prior payer transactions: (Default) Select this option to calculate a variance charge amount for the secondary payer that is based on the sum of the roll-up charges minus any payment/adjustment transaction amounts already posted from the primary payer.
Sum of roll-up: Select this option to calculate a variance charge amount for the secondary payer that is based on the sum of the roll-up charges.
Variance Calculation when Tertiary: Select one of the following for calculating the variance charge amount when billing the tertiary payer on the encounter.
NOTE: This setting applies when the primary and secondary payers on the encounter are not using a Behavioral Health Billing Library and therefore a variance charge was not already added to the encounter when the primary and secondary payers were billed.
Sum of roll-up less prior payer transactions: (Default) Select this option to calculate a variance charge amount for the tertiary payer that is based on the sum of the roll-up charges minus any payment/adjustment transaction amounts already posted from the primary and secondary payers.
Sum of roll-up: Select this option to calculate a variance charge amount for the tertiary payer that is based on the sum of the roll-up charges.
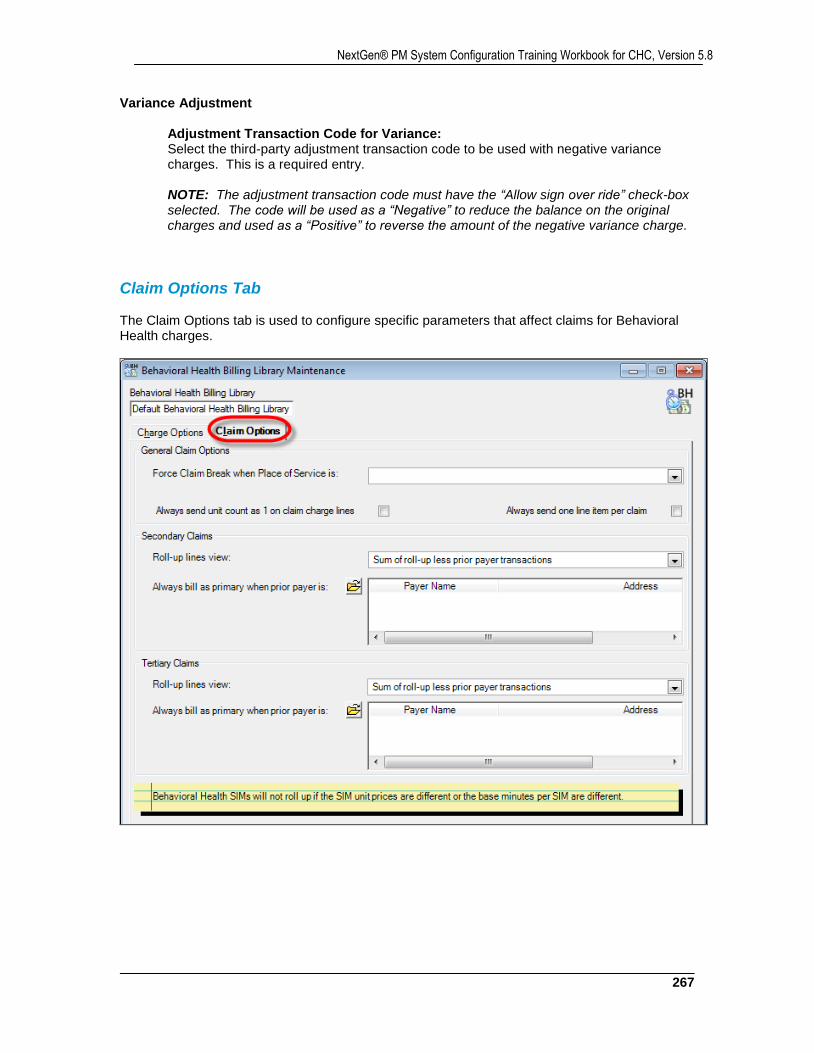
267
NextGen® PM System Configuration Training Workbook for CHC, Version 5.8
Variance Adjustment
Adjustment Transaction Code for Variance: Select the third-party adjustment transaction code to be used with negative variance charges. This is a required entry.
NOTE: The adjustment transaction code must have the “Allow sign over ride” check-box selected. The code will be used as a “Negative” to reduce the balance on the original charges and used as a “Positive” to reverse the amount of the negative variance charge.
Claim Options Tab The Claim Options tab is used to configure specific parameters that affect claims for Behavioral Health charges.
NextGen Healthcare
268
General Claim Options Force Claim Break when Place of Service is: Select one or more Place of Service codes that will cause charges with the selected POS to break to a separate claim, if applicable.
Always send unit count as 1 on claim charge lines: Select this check-box if the number of charge units should always be sent as 1 on claims, regardless of the actual charge units. For example, the number of units based on time for a charge is 3. If this option is selected, the number of units on the claim for that charge will be 1.
Always send one line item per claim: Select this check-box if claims should only include 1 line item. For example, an encounter has three charges. Two of the charges roll-up and the third charge is not part of the roll-up. If this option is selected, two claims will be created for the encounter, each with 1 line item.
Secondary Claims
Roll-up lines view: Select one of the following for the roll-up charge amount on secondary claims.
Sum of roll-up less prior payer transactions: (Default) Select this option to send the charge amount on claims for the secondary payer as the sum of the roll-up charges minus any payment/adjustment transaction amounts already posted from the primary payer.
Sum of roll-up: Select this option to send the charge amount on claims for the secondary payer as the sum of the roll-up charges.
Always bill as primary when prior payer is: From the yellow folder icon, select one or more payers, if applicable. If one of the selected payers is primary on the encounter, the claim for the secondary payer will appear as if it’s a primary claim.
Tertiary Claims
Roll-up lines view: Select one of the following for the roll-up charge amount on tertiary claims.
Sum of roll-up less prior payer transactions: (Default) Select this option to send the charge amount on claims for the tertiary payer as the sum of the roll-up charges minus any payment/adjustment transaction amounts already posted from the primary and secondary payers.
Sum of roll-up: Select this option to send the charge amount on claims for the tertiary payer as the sum of the roll-up charges.
Always bill as primary when prior payer is: From the yellow folder icon, select one or more payers, if applicable. If one of the selected payers is secondary on the encounter, the claim for the tertiary payer will appear as if it’s a primary claim.

269
NextGen® PM System Configuration Training Workbook for CHC, Version 5.8
Budget Statement The Budget Statement Library is used in conjunction with Budget Plans in NextGen® EPM. The library consists of messages that are created in the Budget Statement Messages table. The library is then attached in Practice Preferences > Budget Accounts tab. NOTE: Setup of this library and training on Budget Plans will be covered during Advanced Training.
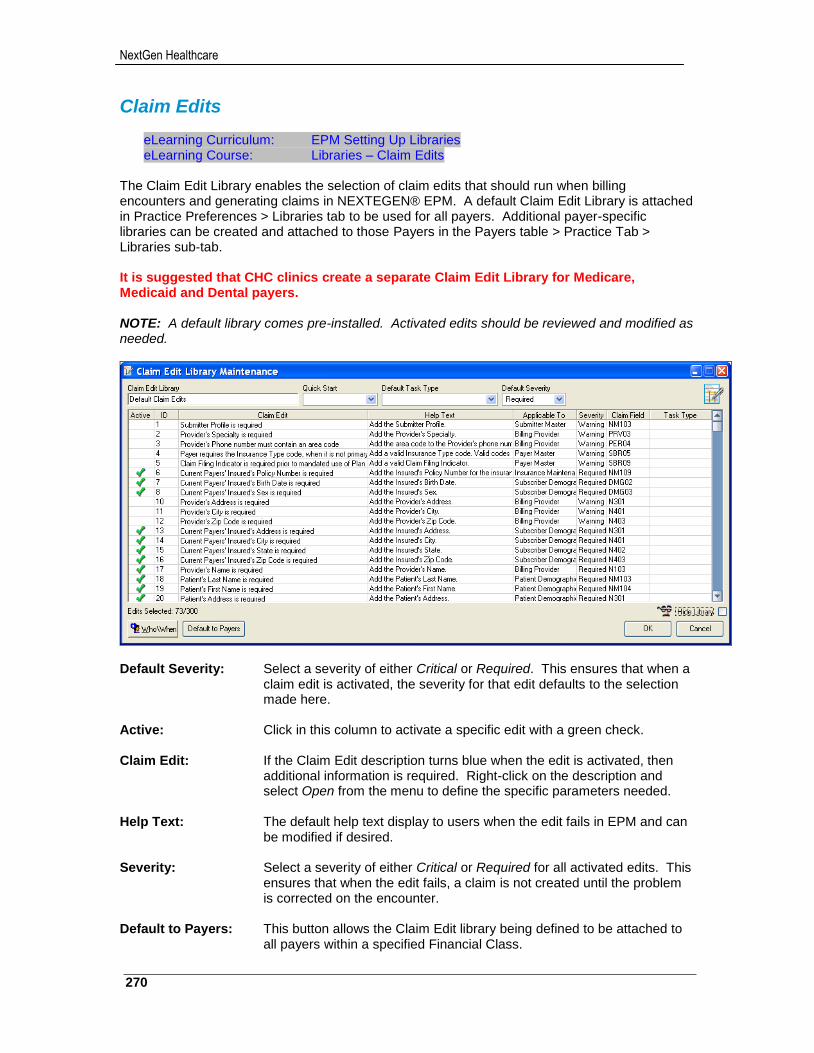
NextGen Healthcare
270
Claim Edits
eLearning Curriculum: EPM Setting Up Libraries eLearning Course: Libraries – Claim Edits
The Claim Edit Library enables the selection of claim edits that should run when billing encounters and generating claims in NEXTEGEN® EPM. A default Claim Edit Library is attached in Practice Preferences > Libraries tab to be used for all payers. Additional payer-specific libraries can be created and attached to those Payers in the Payers table > Practice Tab > Libraries sub-tab. It is suggested that CHC clinics create a separate Claim Edit Library for Medicare, Medicaid and Dental payers. NOTE: A default library comes pre-installed. Activated edits should be reviewed and modified as needed.
Default Severity: Select a severity of either Critical or Required. This ensures that when a
claim edit is activated, the severity for that edit defaults to the selection made here.
Active: Click in this column to activate a specific edit with a green check. Claim Edit: If the Claim Edit description turns blue when the edit is activated, then
additional information is required. Right-click on the description and select Open from the menu to define the specific parameters needed.
Help Text: The default help text display to users when the edit fails in EPM and can
be modified if desired. Severity: Select a severity of either Critical or Required for all activated edits. This
ensures that when the edit fails, a claim is not created until the problem is corrected on the encounter.
Default to Payers: This button allows the Claim Edit library being defined to be attached to
all payers within a specified Financial Class.
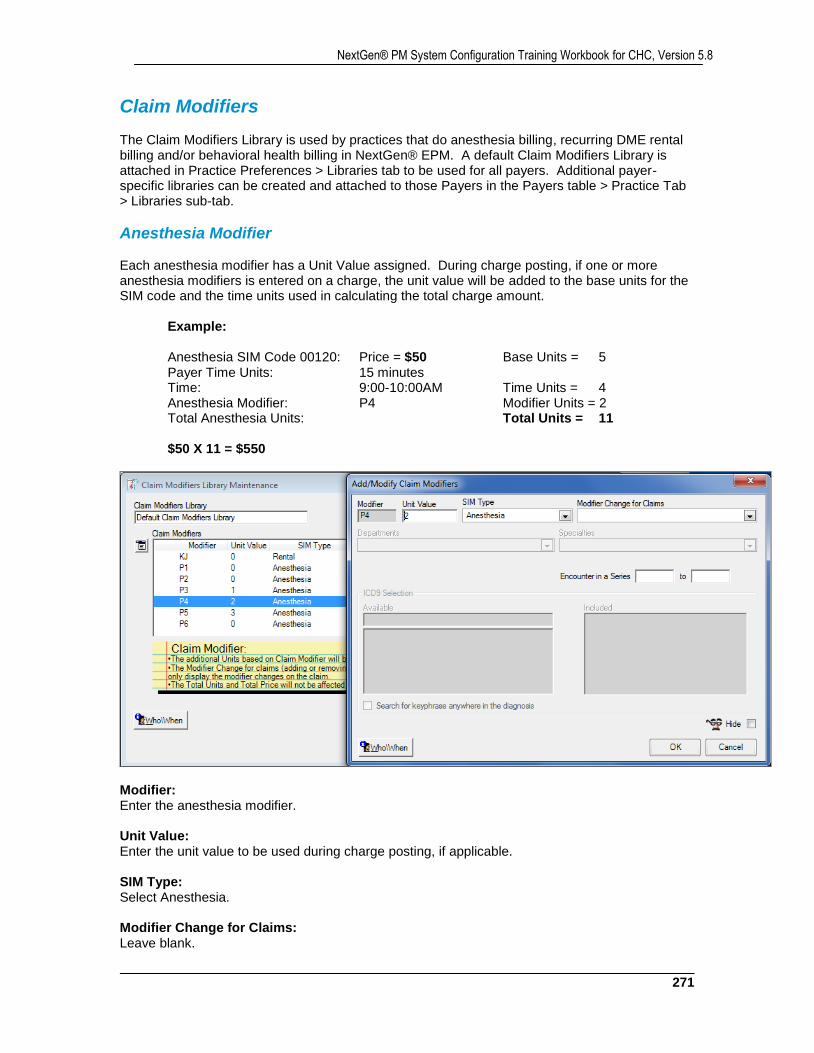
271
NextGen® PM System Configuration Training Workbook for CHC, Version 5.8
Claim Modifiers The Claim Modifiers Library is used by practices that do anesthesia billing, recurring DME rental billing and/or behavioral health billing in NextGen® EPM. A default Claim Modifiers Library is attached in Practice Preferences > Libraries tab to be used for all payers. Additional payer-specific libraries can be created and attached to those Payers in the Payers table > Practice Tab > Libraries sub-tab.
Anesthesia Modifier Each anesthesia modifier has a Unit Value assigned. During charge posting, if one or more anesthesia modifiers is entered on a charge, the unit value will be added to the base units for the SIM code and the time units used in calculating the total charge amount.
Example:
Anesthesia SIM Code 00120: Price = $50 Base Units = 5 Payer Time Units: 15 minutes Time: 9:00-10:00AM Time Units = 4 Anesthesia Modifier: P4 Modifier Units = 2 Total Anesthesia Units: Total Units = 11 $50 X 11 = $550
Modifier: Enter the anesthesia modifier. Unit Value: Enter the unit value to be used during charge posting, if applicable. SIM Type: Select Anesthesia. Modifier Change for Claims: Leave blank.
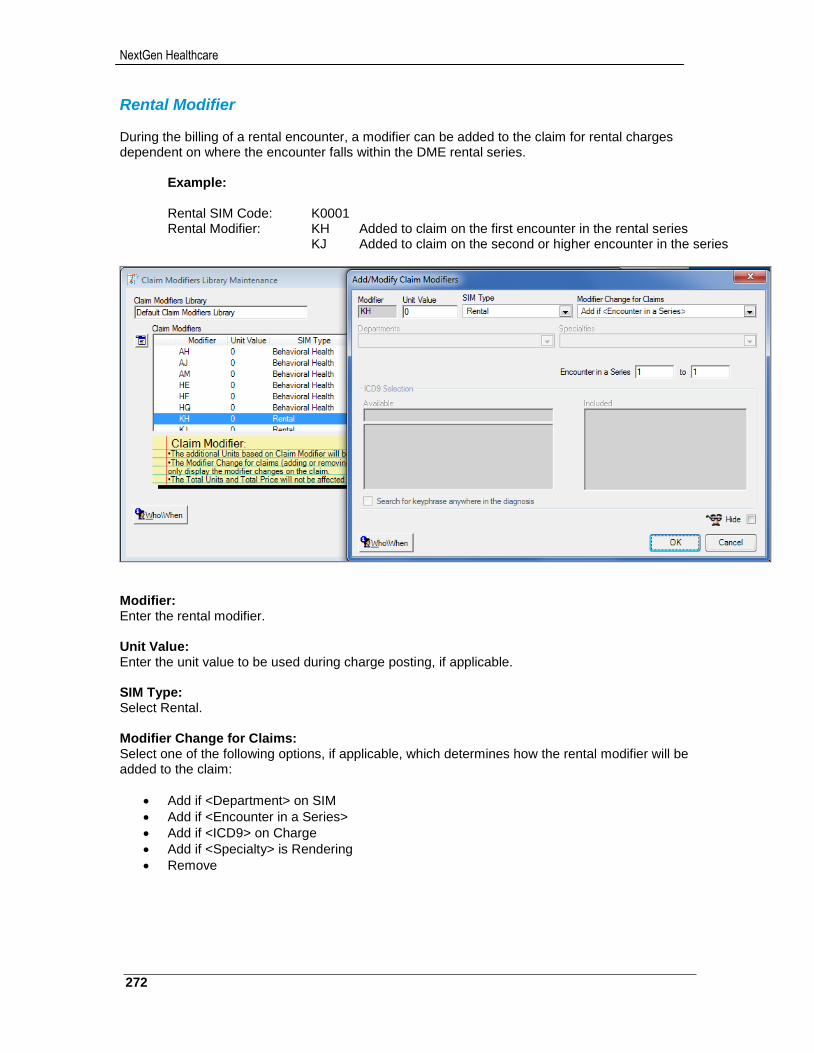
NextGen Healthcare
272
Rental Modifier During the billing of a rental encounter, a modifier can be added to the claim for rental charges dependent on where the encounter falls within the DME rental series.
Example:
Rental SIM Code: K0001 Rental Modifier: KH Added to claim on the first encounter in the rental series KJ Added to claim on the second or higher encounter in the series
Modifier: Enter the rental modifier. Unit Value: Enter the unit value to be used during charge posting, if applicable. SIM Type: Select Rental. Modifier Change for Claims: Select one of the following options, if applicable, which determines how the rental modifier will be added to the claim:
Add if <Department> on SIM
Add if <Encounter in a Series>
Add if <ICD9> on Charge
Add if <Specialty> is Rendering
Remove
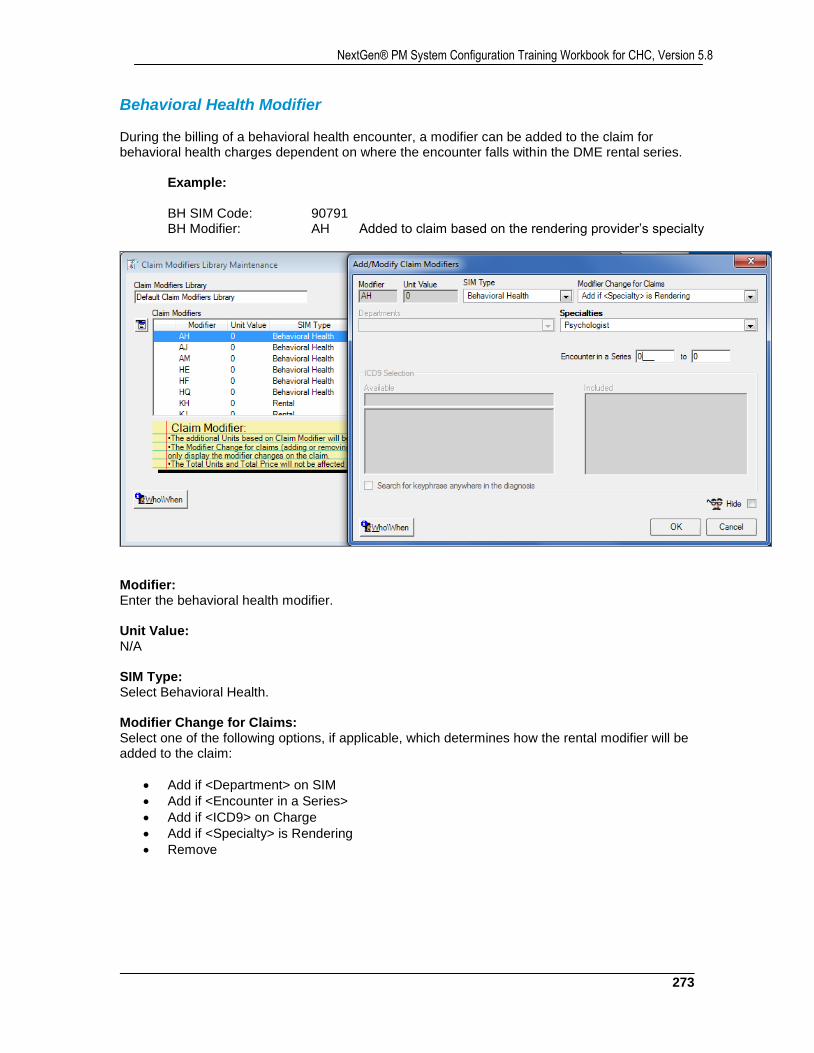
273
NextGen® PM System Configuration Training Workbook for CHC, Version 5.8
Behavioral Health Modifier During the billing of a behavioral health encounter, a modifier can be added to the claim for behavioral health charges dependent on where the encounter falls within the DME rental series.
Example:
BH SIM Code: 90791 BH Modifier: AH Added to claim based on the rendering provider’s specialty
Modifier: Enter the behavioral health modifier. Unit Value: N/A SIM Type: Select Behavioral Health. Modifier Change for Claims: Select one of the following options, if applicable, which determines how the rental modifier will be added to the claim:
Add if <Department> on SIM
Add if <Encounter in a Series>
Add if <ICD9> on Charge
Add if <Specialty> is Rendering
Remove
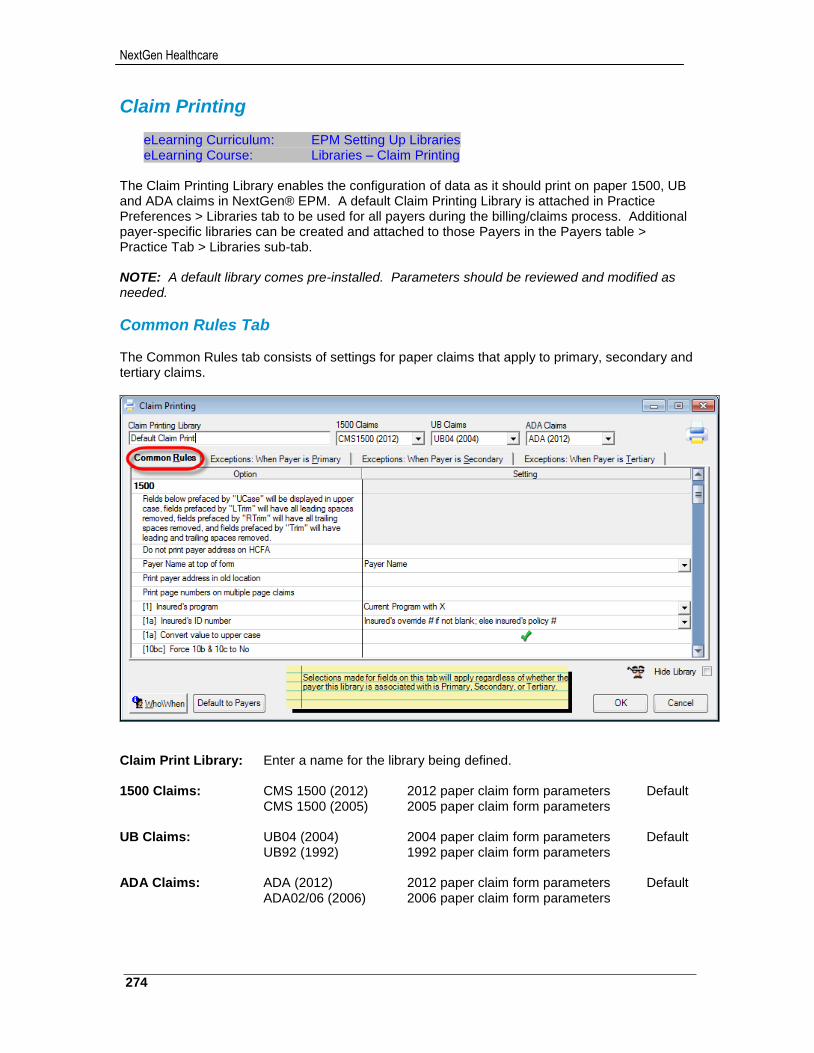
NextGen Healthcare
274
Claim Printing
eLearning Curriculum: EPM Setting Up Libraries eLearning Course: Libraries – Claim Printing
The Claim Printing Library enables the configuration of data as it should print on paper 1500, UB and ADA claims in NextGen® EPM. A default Claim Printing Library is attached in Practice Preferences > Libraries tab to be used for all payers during the billing/claims process. Additional payer-specific libraries can be created and attached to those Payers in the Payers table > Practice Tab > Libraries sub-tab. NOTE: A default library comes pre-installed. Parameters should be reviewed and modified as needed.
Common Rules Tab The Common Rules tab consists of settings for paper claims that apply to primary, secondary and tertiary claims.
Claim Print Library: Enter a name for the library being defined. 1500 Claims: CMS 1500 (2012) 2012 paper claim form parameters Default CMS 1500 (2005) 2005 paper claim form parameters UB Claims: UB04 (2004) 2004 paper claim form parameters Default UB92 (1992) 1992 paper claim form parameters ADA Claims: ADA (2012) 2012 paper claim form parameters Default
ADA02/06 (2006) 2006 paper claim form parameters
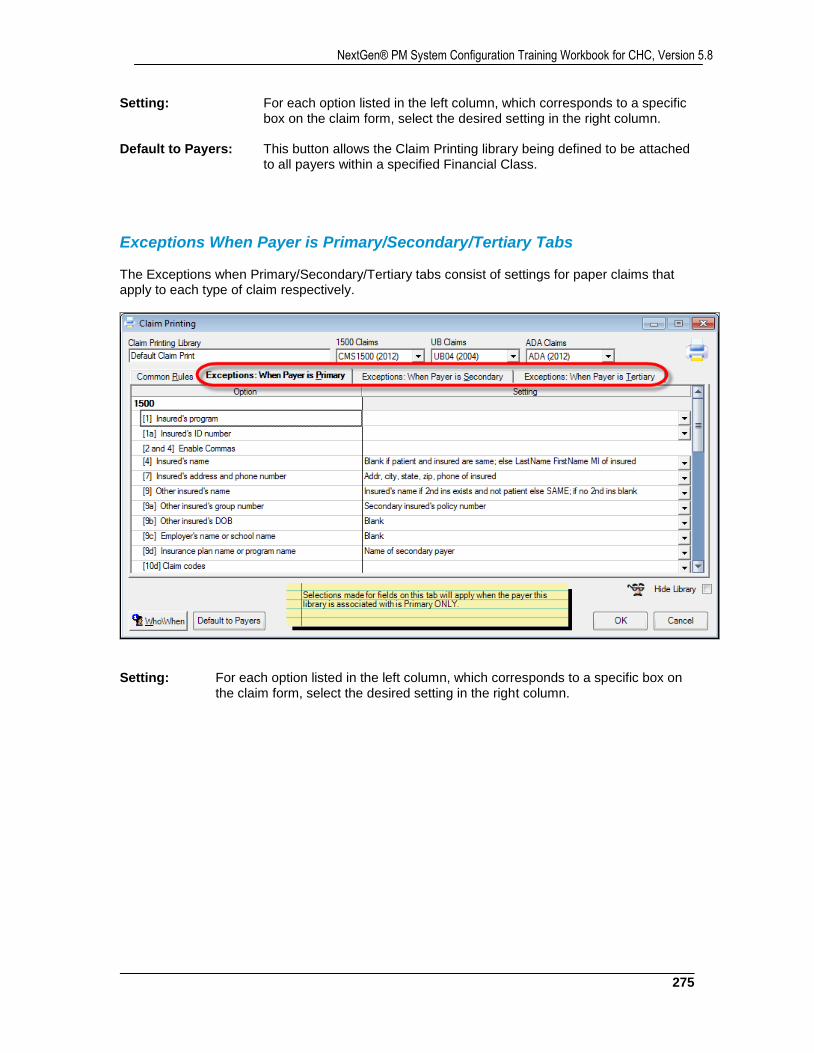
275
NextGen® PM System Configuration Training Workbook for CHC, Version 5.8
Setting: For each option listed in the left column, which corresponds to a specific box on the claim form, select the desired setting in the right column.
Default to Payers: This button allows the Claim Printing library being defined to be attached
to all payers within a specified Financial Class.
Exceptions When Payer is Primary/Secondary/Tertiary Tabs The Exceptions when Primary/Secondary/Tertiary tabs consist of settings for paper claims that apply to each type of claim respectively.
Setting: For each option listed in the left column, which corresponds to a specific box on
the claim form, select the desired setting in the right column.
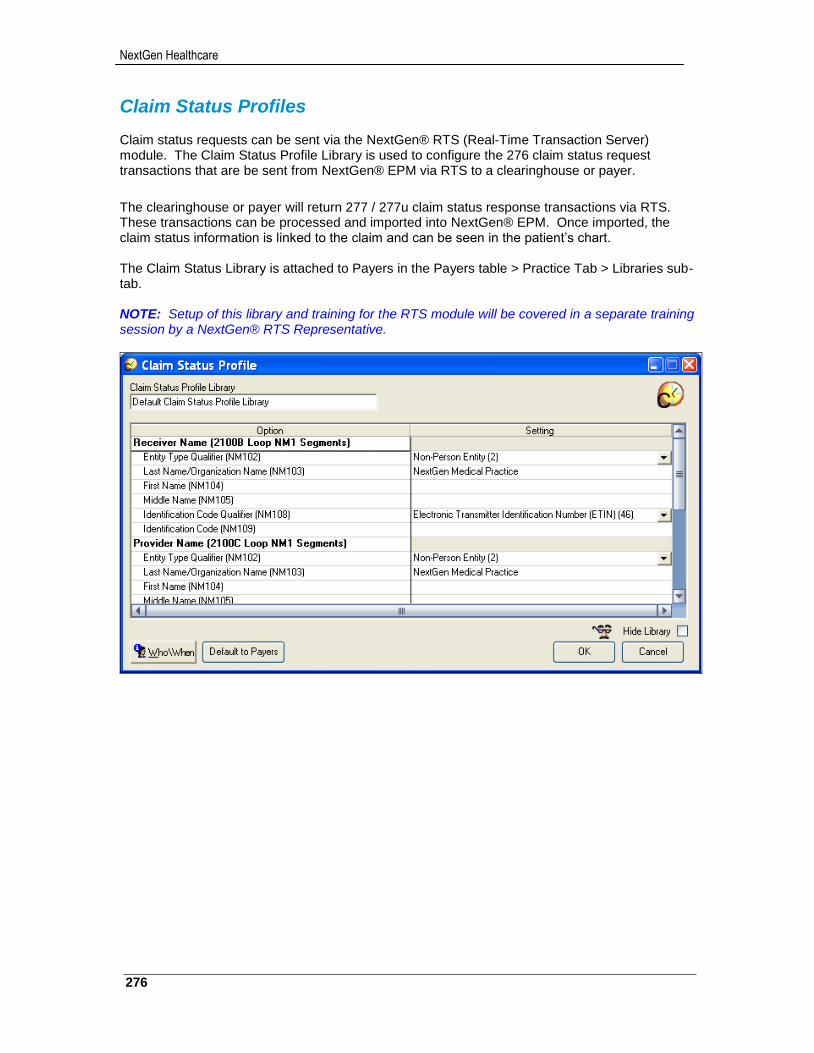
NextGen Healthcare
276
Claim Status Profiles Claim status requests can be sent via the NextGen® RTS (Real-Time Transaction Server) module. The Claim Status Profile Library is used to configure the 276 claim status request transactions that are be sent from NextGen® EPM via RTS to a clearinghouse or payer.
The clearinghouse or payer will return 277 / 277u claim status response transactions via RTS. These transactions can be processed and imported into NextGen® EPM. Once imported, the claim status information is linked to the claim and can be seen in the patient’s chart. The Claim Status Library is attached to Payers in the Payers table > Practice Tab > Libraries sub-tab. NOTE: Setup of this library and training for the RTS module will be covered in a separate training session by a NextGen® RTS Representative.
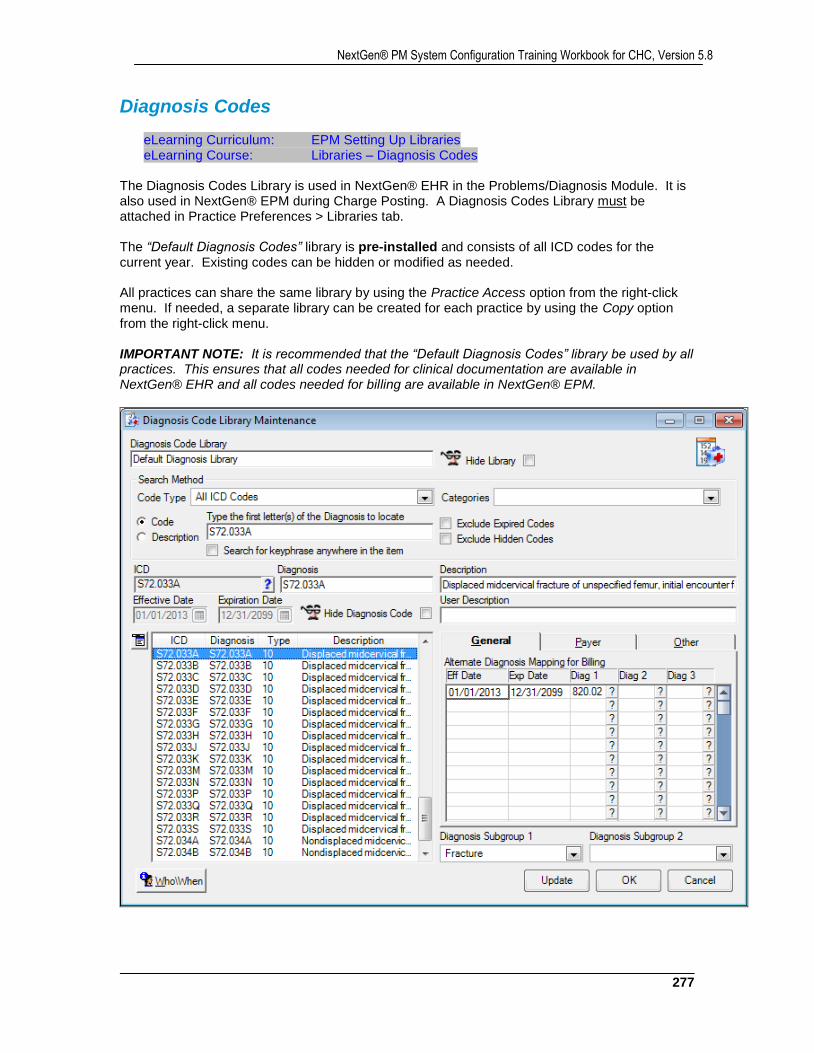
277
NextGen® PM System Configuration Training Workbook for CHC, Version 5.8
Diagnosis Codes
eLearning Curriculum: EPM Setting Up Libraries eLearning Course: Libraries – Diagnosis Codes
The Diagnosis Codes Library is used in NextGen® EHR in the Problems/Diagnosis Module. It is also used in NextGen® EPM during Charge Posting. A Diagnosis Codes Library must be attached in Practice Preferences > Libraries tab. The “Default Diagnosis Codes” library is pre-installed and consists of all ICD codes for the current year. Existing codes can be hidden or modified as needed. All practices can share the same library by using the Practice Access option from the right-click menu. If needed, a separate library can be created for each practice by using the Copy option from the right-click menu. IMPORTANT NOTE: It is recommended that the “Default Diagnosis Codes” library be used by all practices. This ensures that all codes needed for clinical documentation are available in NextGen® EHR and all codes needed for billing are available in NextGen® EPM.
NextGen Healthcare
278
Diagnosis Code Library: Enter a name for the library. Hide Library: Select this check-box to discontinue use of the library and to prevent it from being linked to a practice in Practice Preferences > Libraries. Search Method The parameters selected in the Search Method section of the window determine which ICD codes are displayed in the lower-left search results section of the window. Code Type: Select one of the following: All ICD Codes (Default): Display both ICD-9 and ICD-10 codes ICD-10: Display ICD-10 codes only ICD-9: Display ICD-9 codes only Code: Select this button to search by code. Type the first letter(s) of the Diagnosis to locate:
Enter the first few characters of an ICD code. All codes that start with the characters entered will display.
Description: Select this button to search by description. Type the first letter(s) of the Diagnosis to locate:
Enter the first few characters of an ICD description. All codes with descriptions that start with the characters entered will display.
Search for keyphrase anywhere in the item:
Select this check-box to search for all codes that have the characters entered above anywhere in the description.
Categories:
Select a Diagnosis Category to display only those ICD codes that are included in the selected category.
NOTE: The categories listed and available for selection are from the Diagnosis Categories system master file in File Maintenance.
Exclude Expired Codes:
Select this checkbox to exclude expired ICD codes from the search. Exclude Hidden Codes:
Select this checkbox to exclude hidden ICD codes from the search.
279
NextGen® PM System Configuration Training Workbook for CHC, Version 5.8
Highlight an ICD code in the lower-left search results section of the window to display the following:
ICD: Displays the code used for searching in EPM/EHR and on claims in EPM. The ICD code cannot be changed. Diagnosis: Defaults to the same code displayed in the ICD field. The Diagnosis code can be changed to an alternate code used for searching. Effective/Expiration Dates: Displays the effective and expiration dates for the code from the ICDCM Codes system master file. Hide Diagnosis Code: Select this check-box to discontinue use of the code and to prevent it from being selected by users in EPM/EHR. Description: Defaults from the ICDCM Codes system master file. The Description is used for searching in EPM/EHR and can be changed if needed.
User Description: Enter an alternate description used for searching. Diagnosis Subgroup 1 and 2: Select one or two Diagnosis Subgroups. These are similar to other subgroupings in EPM (eg: Location, Payer, Provider) and can be used to group ICD codes for reporting purposes.
NOTE: The subgroups listed and available for selection are from the Diagnosis Subgroupings master list table in File Maintenance.

NextGen Healthcare
280
General Tab The General tab allows ICD codes to be mapped to one or more alternate codes for billing purposes. Not all payers are necessarily required to implement ICD-10 codes on October 1, 2014. For example, payers that are not covered by the Health Insurance Portability Accountability Act (HIPAA) may still require ICD-9 codes on claims. This tab allows an ICD-10 code to be mapped back to one or more ICD-9 codes on claims for these types of payers.
Alternate Diagnosis Mapping for Billing Highlight an ICD-10 code in the lower-left search results section of the window and enter the following: Eff Date:
Enter the effective date for the ICD-10 to ICD-9 mapping being defined. Exp Date:
Enter the expiration date for the ICD-10 to ICD-9 mapping being defined. Diag 1, Diag 2 and Diag 3:
Enter up to three ICD-9 codes as alternate codes for the selected ICD-10 code on claims.
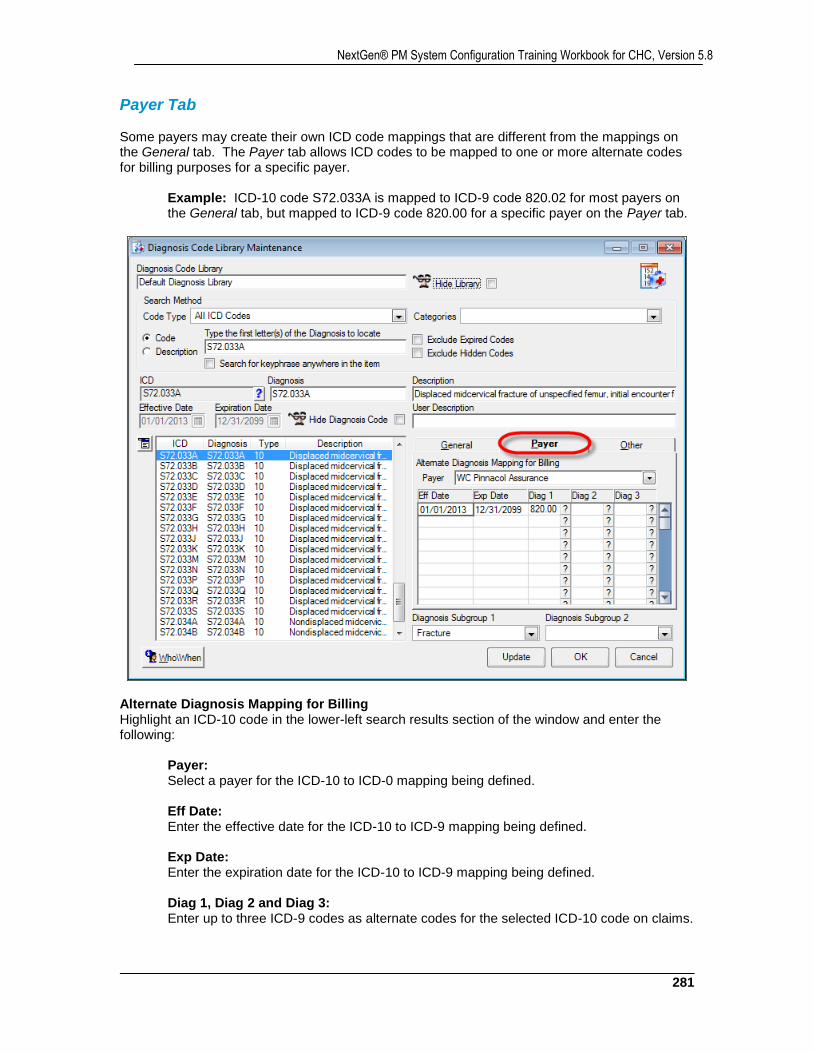
281
NextGen® PM System Configuration Training Workbook for CHC, Version 5.8
Payer Tab Some payers may create their own ICD code mappings that are different from the mappings on the General tab. The Payer tab allows ICD codes to be mapped to one or more alternate codes for billing purposes for a specific payer.
Example: ICD-10 code S72.033A is mapped to ICD-9 code 820.02 for most payers on the General tab, but mapped to ICD-9 code 820.00 for a specific payer on the Payer tab.
Alternate Diagnosis Mapping for Billing Highlight an ICD-10 code in the lower-left search results section of the window and enter the following: Payer:
Select a payer for the ICD-10 to ICD-0 mapping being defined.
Eff Date: Enter the effective date for the ICD-10 to ICD-9 mapping being defined.
Exp Date:
Enter the expiration date for the ICD-10 to ICD-9 mapping being defined. Diag 1, Diag 2 and Diag 3:
Enter up to three ICD-9 codes as alternate codes for the selected ICD-10 code on claims.
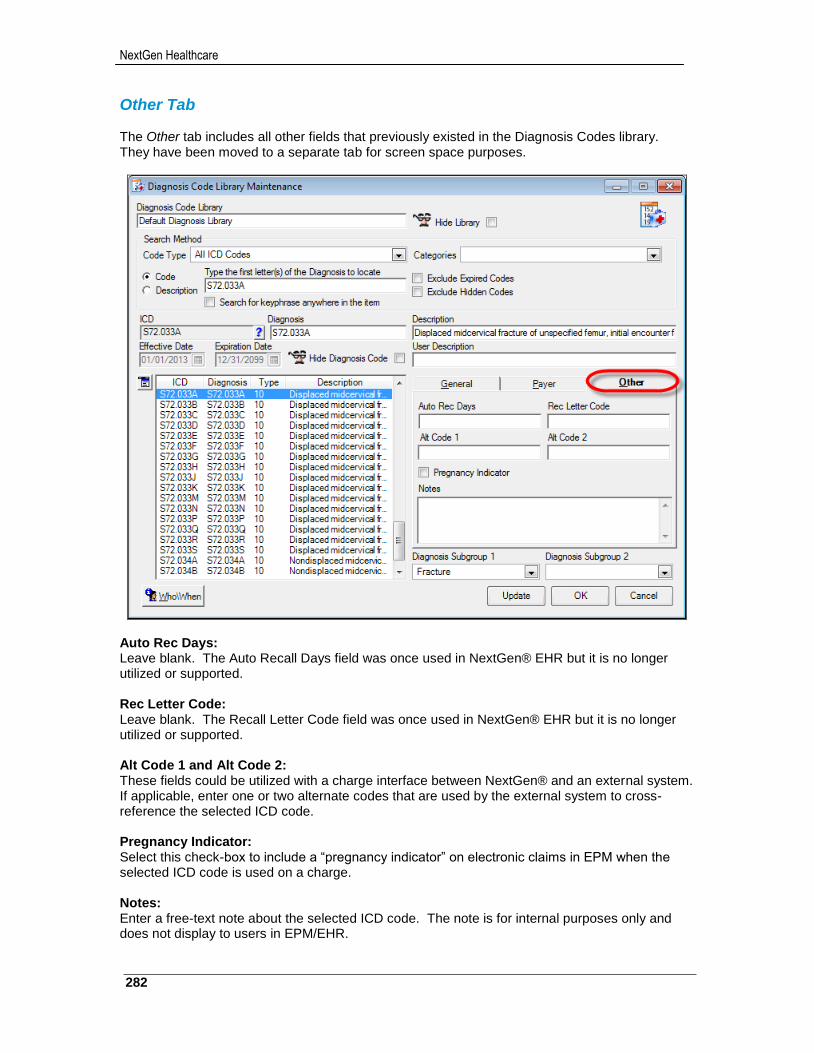
NextGen Healthcare
282
Other Tab The Other tab includes all other fields that previously existed in the Diagnosis Codes library. They have been moved to a separate tab for screen space purposes.
Auto Rec Days: Leave blank. The Auto Recall Days field was once used in NextGen® EHR but it is no longer utilized or supported. Rec Letter Code: Leave blank. The Recall Letter Code field was once used in NextGen® EHR but it is no longer utilized or supported. Alt Code 1 and Alt Code 2: These fields could be utilized with a charge interface between NextGen® and an external system. If applicable, enter one or two alternate codes that are used by the external system to cross-reference the selected ICD code. Pregnancy Indicator: Select this check-box to include a “pregnancy indicator” on electronic claims in EPM when the selected ICD code is used on a charge. Notes: Enter a free-text note about the selected ICD code. The note is for internal purposes only and does not display to users in EPM/EHR.
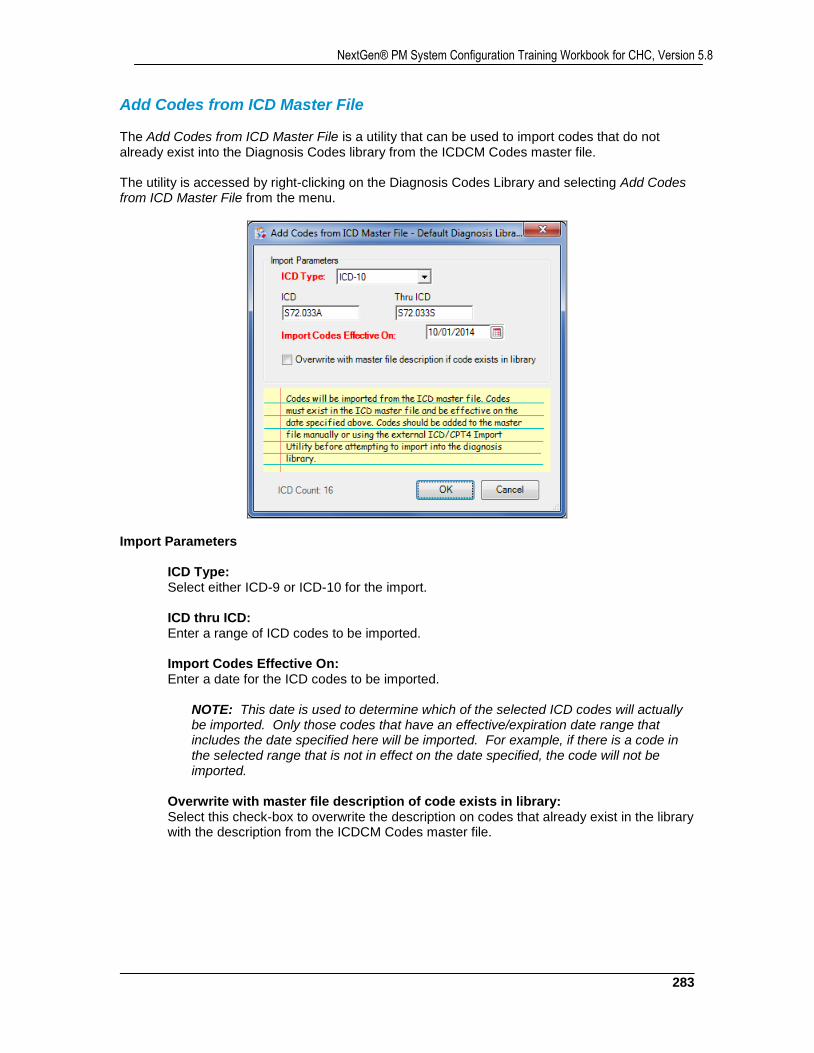
283
NextGen® PM System Configuration Training Workbook for CHC, Version 5.8
Add Codes from ICD Master File The Add Codes from ICD Master File is a utility that can be used to import codes that do not already exist into the Diagnosis Codes library from the ICDCM Codes master file. The utility is accessed by right-clicking on the Diagnosis Codes Library and selecting Add Codes from ICD Master File from the menu.
Import Parameters
ICD Type: Select either ICD-9 or ICD-10 for the import. ICD thru ICD: Enter a range of ICD codes to be imported. Import Codes Effective On: Enter a date for the ICD codes to be imported.
NOTE: This date is used to determine which of the selected ICD codes will actually be imported. Only those codes that have an effective/expiration date range that includes the date specified here will be imported. For example, if there is a code in the selected range that is not in effect on the date specified, the code will not be imported.
Overwrite with master file description of code exists in library: Select this check-box to overwrite the description on codes that already exist in the library with the description from the ICDCM Codes master file.
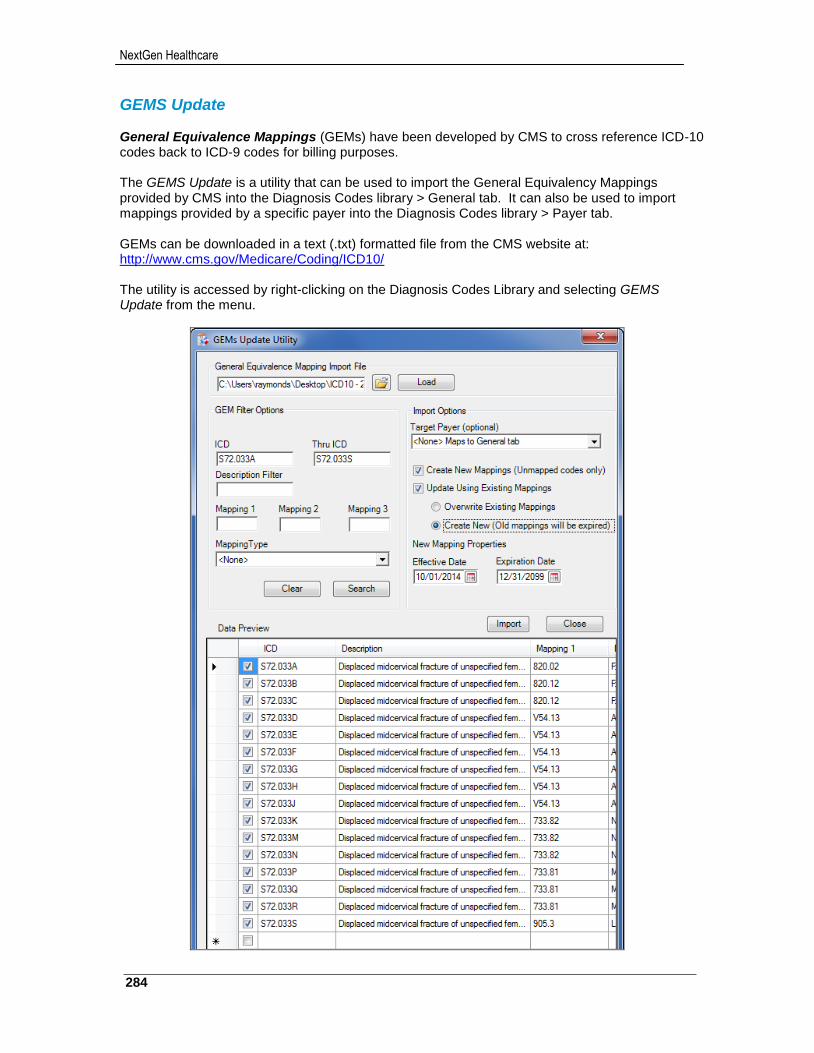
NextGen Healthcare
284
GEMS Update General Equivalence Mappings (GEMs) have been developed by CMS to cross reference ICD-10 codes back to ICD-9 codes for billing purposes. The GEMS Update is a utility that can be used to import the General Equivalency Mappings provided by CMS into the Diagnosis Codes library > General tab. It can also be used to import mappings provided by a specific payer into the Diagnosis Codes library > Payer tab. GEMs can be downloaded in a text (.txt) formatted file from the CMS website at: http://www.cms.gov/Medicare/Coding/ICD10/ The utility is accessed by right-clicking on the Diagnosis Codes Library and selecting GEMS Update from the menu.
285
NextGen® PM System Configuration Training Workbook for CHC, Version 5.8
General Equivalence Mapping Import File
Yellow Folder Icon: Click this icon and browse to select the text (.txt) file to be used with the GEMs Update Utility. Load Button: Click this button to load the file selected above. The Data Preview section of the window displays all ICD codes within the file with their corresponding mappings.
GEM Filter Options Parameters entered in this section can be used to narrow down the ICD codes displayed in the Data Preview section of the window.
ICD thru ICD: Enter a range of ICD codes to be displayed.
Description Filter: Enter a word in the description of the ICD codes to be displayed. Mapping 1, 2 and 3: Enter an ICD-9 code to display ICD-10 codes with the specified ICD-9 code in the corresponding “Mapping” column.
For example, entering 995.91 (ICD-9) in the Mapping 2 field will display all ICD-10 codes that have 995.91 in the Mapping 2 column.
Mapping Type: Select one of the following to display ICD codes with the selected type in the Mapping Type column.
Exact Match Approximate Match No Match Combination Match Approximate/Combination Match
Clear Button: Click this button to clear all parameters entered in the GEM Filter Option section.
Search Button: Click this button to display ICD codes that match all parameters entered in the GEM Filter Options section.
NextGen Healthcare
286
Import Options Parameters entered in this section affect the mappings that are to be imported.
Target Payer: Select <None> Maps to General Tab to import mappings to the Diagnosis Code Library > General tab.
Select a specific Payer to import mappings to the Diagnosis Codes Library > Payer tab.
Create New Mappings (Unmapped codes only): Select this checkbox to import mappings for ICD codes that do not yet have mappings.
Update Using Existing Mappings: Select this checkbox to import mappings for ICD codes that already have mappings.
Overwrite Existing Mappings: For ICD codes that already have mappings, select this button to import new mappings that will overwrite the existing mappings. Create New (Old mappings will be expired): For ICD codes that already have mappings, select this button to import mappings to a new row with effective and expiration dates as entered below. The row with the existing mappings will be expired one day prior to the effective date of the new row.
New Mapping Properties:
Effective / Expiration Dates: Enter effective and expiration dates for new mappings to be imported.
Data Preview: Select all ICD codes in the list that are to have mappings imported into the Diagnosis Codes Library. Deselect any ICD codes in the list that are not to have mappings imported into the Diagnosis Codes Library. Import Button: Click this button to import the selected mappings into the Diagnosis Codes Library. Close Button: Click this button to close the GEMs Update Utility window.
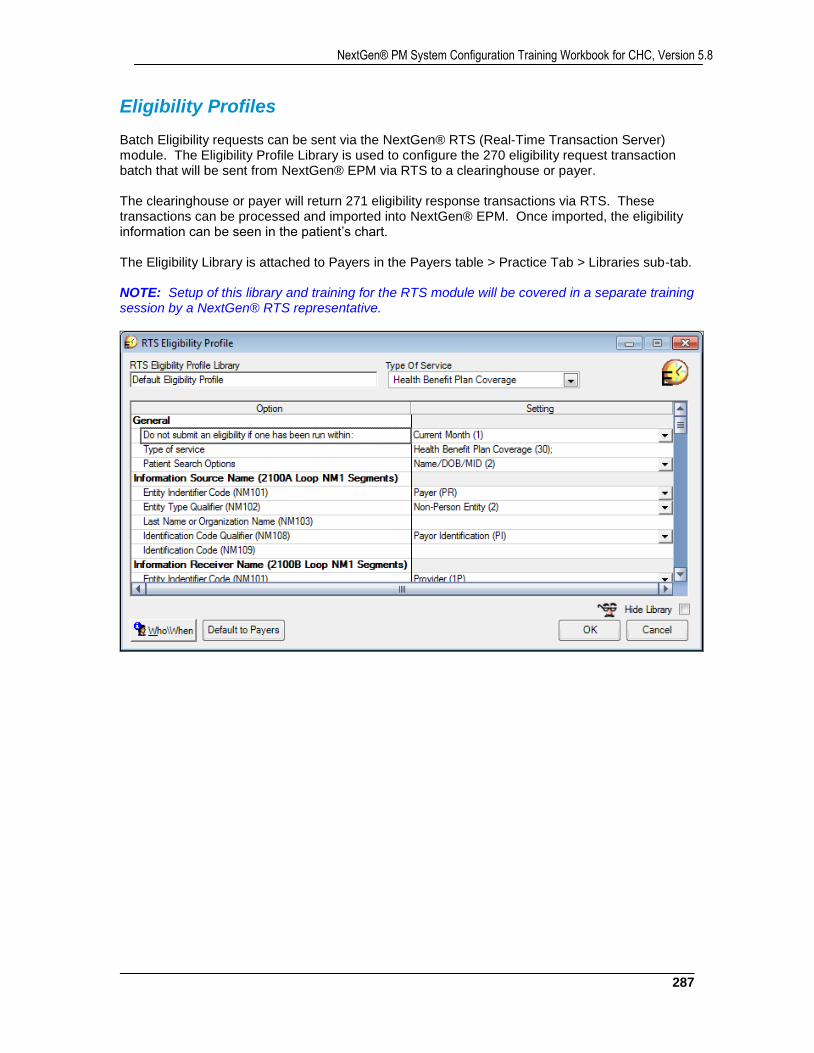
287
NextGen® PM System Configuration Training Workbook for CHC, Version 5.8
Eligibility Profiles Batch Eligibility requests can be sent via the NextGen® RTS (Real-Time Transaction Server) module. The Eligibility Profile Library is used to configure the 270 eligibility request transaction batch that will be sent from NextGen® EPM via RTS to a clearinghouse or payer. The clearinghouse or payer will return 271 eligibility response transactions via RTS. These transactions can be processed and imported into NextGen® EPM. Once imported, the eligibility information can be seen in the patient’s chart. The Eligibility Library is attached to Payers in the Payers table > Practice Tab > Libraries sub-tab. NOTE: Setup of this library and training for the RTS module will be covered in a separate training session by a NextGen® RTS representative.
NextGen Healthcare
288
Encounter Rate Billing The Encounter Rate Library is used for payers such as Medicare (FQHC / RHC) and Medicaid that have very unique and specific billing and claim requirements, and that reimburse at a flat encounter rate. Encounter Rate Billing provides the ability to automatically adjust charges so that the balance reflects the payer’s expected encounter reimbursement rate/amount. In addition, an “encounter rate” code required by the payer on claims can be automatically inserted onto each encounter. For example, a 0521 Revenue Code line item may be required on Medicare UB claims, and a T1015 CPT4 Code line item may be required on Medicaid 1500 claims. The setup and configuration of the Encounter Rate Billing library also defines which of the original charge line items on an encounter will be included on the claim.
IMPORTANT NOTE: FQHC clients must use Encounter Rate Billing for Medicare. It is the only option available that will meet CMS’s complex requirements and guidelines for claims.
Considerations:
Claims are configurable within the setup of the Encounter Rate Library setup
The Encounter Rate Library is easy to maintain for various payers and SIM codes
Works well with ERA payments (Electronic Remittance Advice)
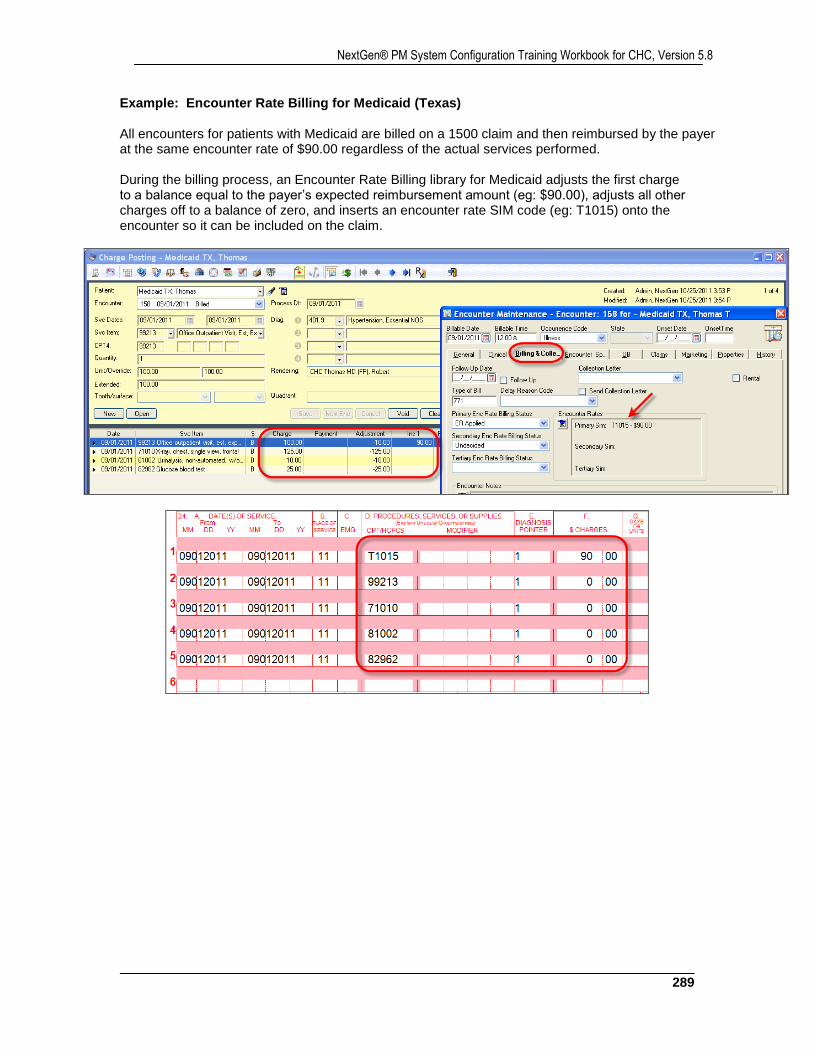
289
NextGen® PM System Configuration Training Workbook for CHC, Version 5.8
Example: Encounter Rate Billing for Medicaid (Texas) All encounters for patients with Medicaid are billed on a 1500 claim and then reimbursed by the payer at the same encounter rate of $90.00 regardless of the actual services performed. During the billing process, an Encounter Rate Billing library for Medicaid adjusts the first charge to a balance equal to the payer’s expected reimbursement amount (eg: $90.00), adjusts all other charges off to a balance of zero, and inserts an encounter rate SIM code (eg: T1015) onto the encounter so it can be included on the claim.
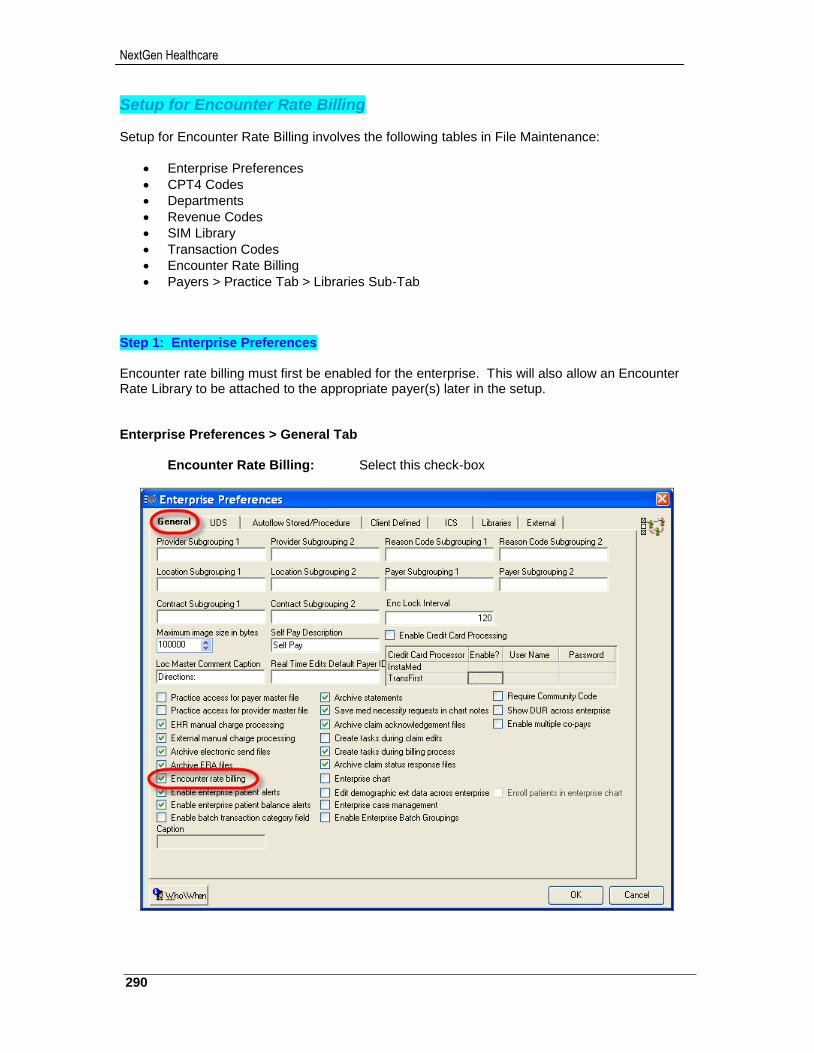
NextGen Healthcare
290
Setup for Encounter Rate Billing Setup for Encounter Rate Billing involves the following tables in File Maintenance:
Enterprise Preferences
CPT4 Codes
Departments
Revenue Codes
SIM Library
Transaction Codes
Encounter Rate Billing
Payers > Practice Tab > Libraries Sub-Tab Step 1: Enterprise Preferences Encounter rate billing must first be enabled for the enterprise. This will also allow an Encounter Rate Library to be attached to the appropriate payer(s) later in the setup. Enterprise Preferences > General Tab
Encounter Rate Billing: Select this check-box
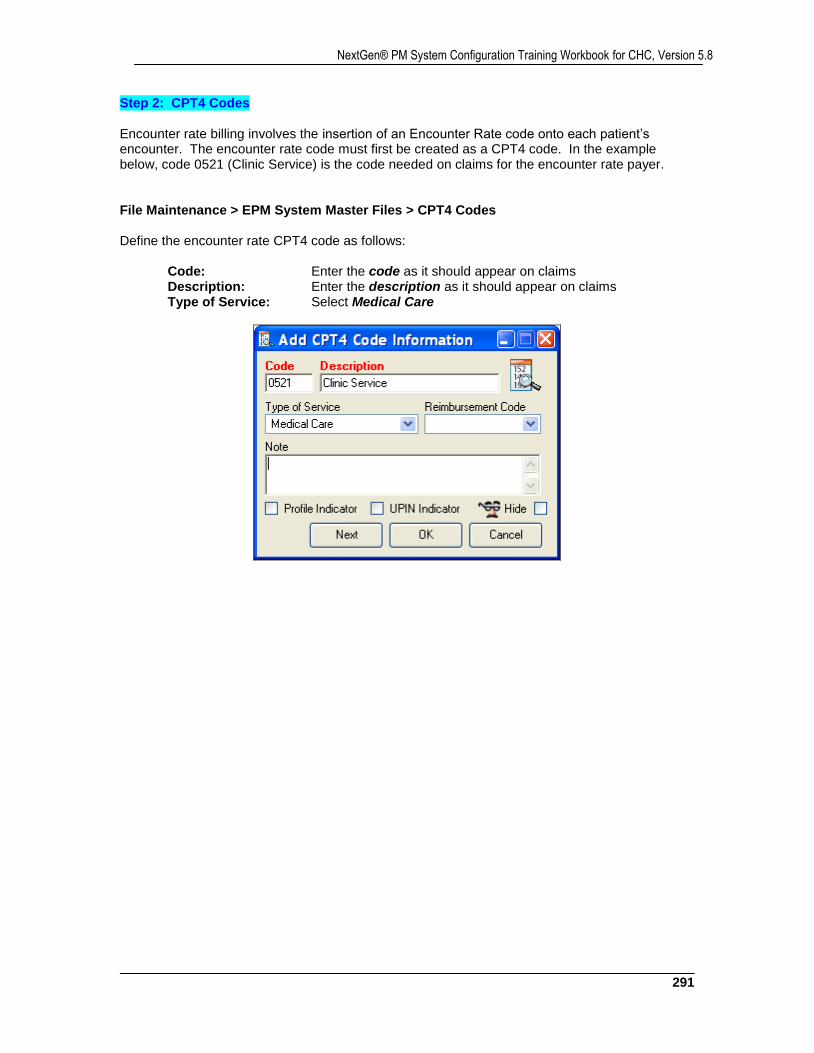
291
NextGen® PM System Configuration Training Workbook for CHC, Version 5.8
Step 2: CPT4 Codes Encounter rate billing involves the insertion of an Encounter Rate code onto each patient’s encounter. The encounter rate code must first be created as a CPT4 code. In the example below, code 0521 (Clinic Service) is the code needed on claims for the encounter rate payer. File Maintenance > EPM System Master Files > CPT4 Codes Define the encounter rate CPT4 code as follows:
Code: Enter the code as it should appear on claims Description: Enter the description as it should appear on claims Type of Service: Select Medical Care
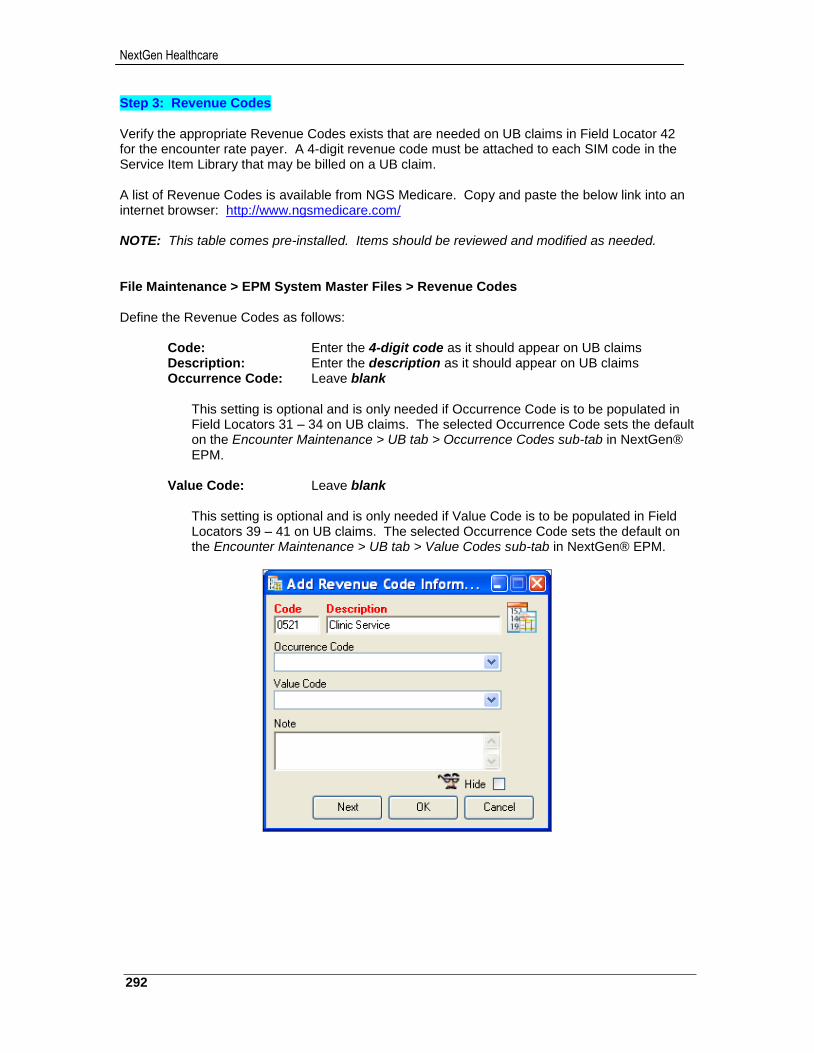
NextGen Healthcare
292
Step 3: Revenue Codes Verify the appropriate Revenue Codes exists that are needed on UB claims in Field Locator 42 for the encounter rate payer. A 4-digit revenue code must be attached to each SIM code in the Service Item Library that may be billed on a UB claim. A list of Revenue Codes is available from NGS Medicare. Copy and paste the below link into an internet browser: http://www.ngsmedicare.com/ NOTE: This table comes pre-installed. Items should be reviewed and modified as needed. File Maintenance > EPM System Master Files > Revenue Codes Define the Revenue Codes as follows:
Code: Enter the 4-digit code as it should appear on UB claims Description: Enter the description as it should appear on UB claims Occurrence Code: Leave blank
This setting is optional and is only needed if Occurrence Code is to be populated in Field Locators 31 – 34 on UB claims. The selected Occurrence Code sets the default on the Encounter Maintenance > UB tab > Occurrence Codes sub-tab in NextGen® EPM.
Value Code: Leave blank
This setting is optional and is only needed if Value Code is to be populated in Field Locators 39 – 41 on UB claims. The selected Occurrence Code sets the default on the Encounter Maintenance > UB tab > Value Codes sub-tab in NextGen® EPM.
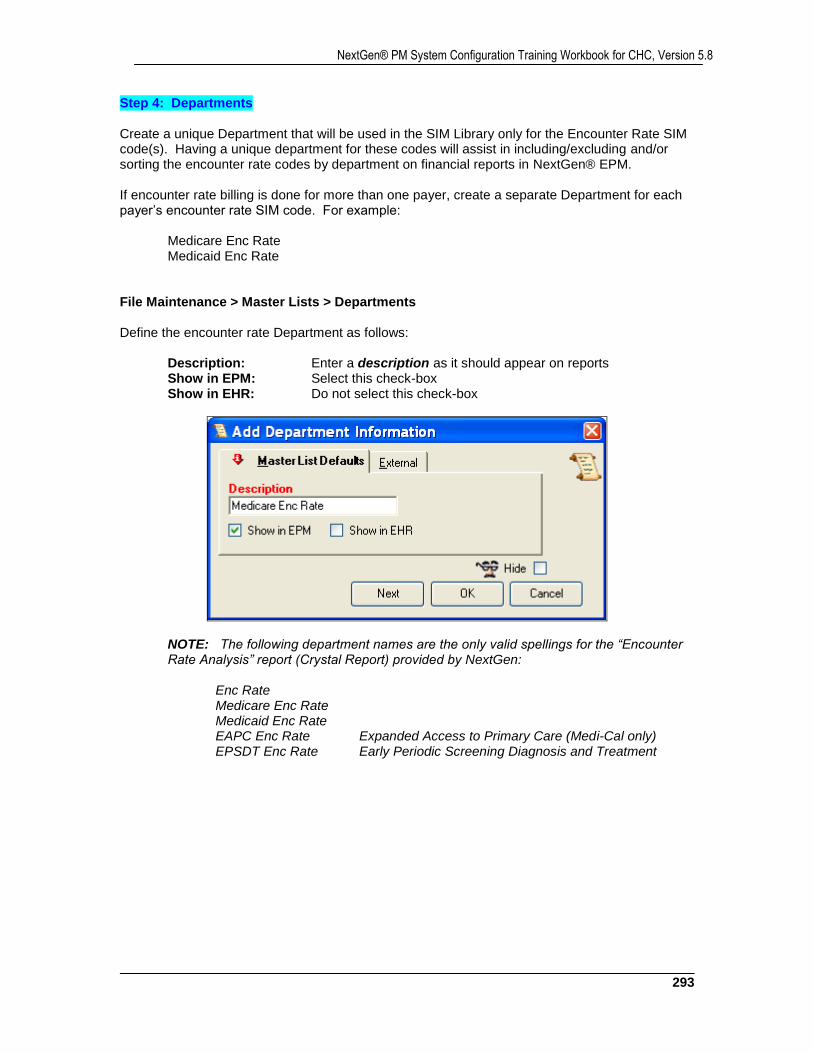
293
NextGen® PM System Configuration Training Workbook for CHC, Version 5.8
Step 4: Departments Create a unique Department that will be used in the SIM Library only for the Encounter Rate SIM code(s). Having a unique department for these codes will assist in including/excluding and/or sorting the encounter rate codes by department on financial reports in NextGen® EPM. If encounter rate billing is done for more than one payer, create a separate Department for each payer’s encounter rate SIM code. For example:
Medicare Enc Rate Medicaid Enc Rate
File Maintenance > Master Lists > Departments Define the encounter rate Department as follows:
Description: Enter a description as it should appear on reports Show in EPM: Select this check-box Show in EHR: Do not select this check-box
NOTE: The following department names are the only valid spellings for the “Encounter Rate Analysis” report (Crystal Report) provided by NextGen:
Enc Rate Medicare Enc Rate Medicaid Enc Rate
EAPC Enc Rate Expanded Access to Primary Care (Medi-Cal only) EPSDT Enc Rate Early Periodic Screening Diagnosis and Treatment

NextGen Healthcare
294
Step 5: Service Item Library Create a Service Item Code (SIM) that matches the Encounter Rate CPT4 code created above. File Maintenance > Libraries > Service Items > General Tab Define the encounter rate SIM code as follows:
Place of Service: Select Office
NOTE: Place of service must be selected for all Encounter Rate SIM codes (eg: 0521 for Medicare, T1015 for Medicaid, 01 for Medi-Cal, etc.)
Component: Select Professional Department: Select the unique department created above Revenue Code: Select the appropriate revenue code Form: Select 1500 Non-Facility and Facility Price: Enter $0.00
NOTE: The price fields can be set to $0.00 so the amount/price defined within the Encounter Rate Library will be used.
Self-Pay Qualifying Encounter: Select this check-box Sliding Fee Qualifying Encounter: Select this check-box Qualifying Encounter for all payers: Select this check-box

295
NextGen® PM System Configuration Training Workbook for CHC, Version 5.8
Step 6: Transaction Codes If the Encounter Rate Library for the payer will be configured to auto-adjust charges, create a unique Transaction Code that will be used specifically for the encounter rate adjustments. Having a unique transaction code assists in differentiating encounter rate adjustments from other types of adjustments on the UDS report. It also assists in either including or excluding encounter rate adjustments on financial reports in NextGen® EPM. If encounter rate billing is done for more than one payer, create a separate Transaction Code for each payer. For example:
Medicare Enc Rate Adjustment Medicaid Enc Rate Adjustment
File Maintenance > EPM System Master Files > Transaction Codes Define the encounter rate adjustment Transaction Code as follows:
Transaction Description: Enter Encounter Rate Adjustment Type: Select Adjustment Source: Select Third Party Sign Type: Select Negative (-) Allow Sign Over Ride: Select this check-box
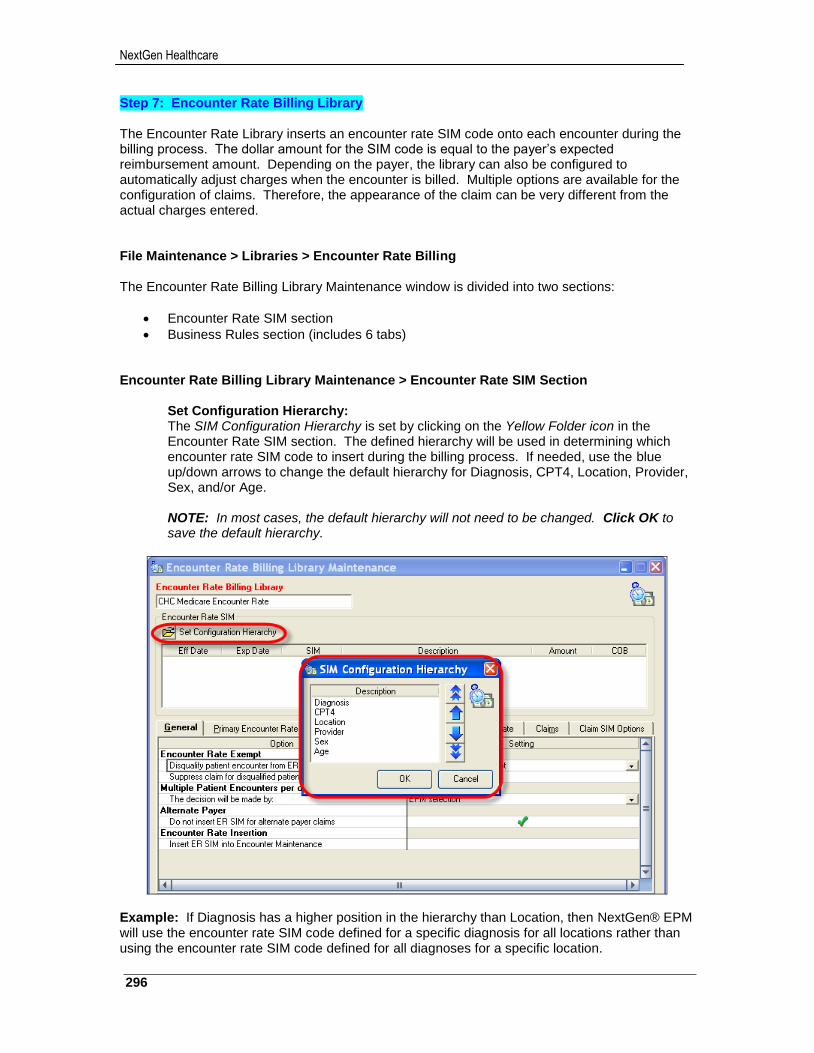
NextGen Healthcare
296
Step 7: Encounter Rate Billing Library The Encounter Rate Library inserts an encounter rate SIM code onto each encounter during the billing process. The dollar amount for the SIM code is equal to the payer’s expected reimbursement amount. Depending on the payer, the library can also be configured to automatically adjust charges when the encounter is billed. Multiple options are available for the configuration of claims. Therefore, the appearance of the claim can be very different from the actual charges entered. File Maintenance > Libraries > Encounter Rate Billing The Encounter Rate Billing Library Maintenance window is divided into two sections:
Encounter Rate SIM section
Business Rules section (includes 6 tabs) Encounter Rate Billing Library Maintenance > Encounter Rate SIM Section
Set Configuration Hierarchy: The SIM Configuration Hierarchy is set by clicking on the Yellow Folder icon in the Encounter Rate SIM section. The defined hierarchy will be used in determining which encounter rate SIM code to insert during the billing process. If needed, use the blue up/down arrows to change the default hierarchy for Diagnosis, CPT4, Location, Provider, Sex, and/or Age.
NOTE: In most cases, the default hierarchy will not need to be changed. Click OK to save the default hierarchy.
Example: If Diagnosis has a higher position in the hierarchy than Location, then NextGen® EPM will use the encounter rate SIM code defined for a specific diagnosis for all locations rather than using the encounter rate SIM code defined for all diagnoses for a specific location.
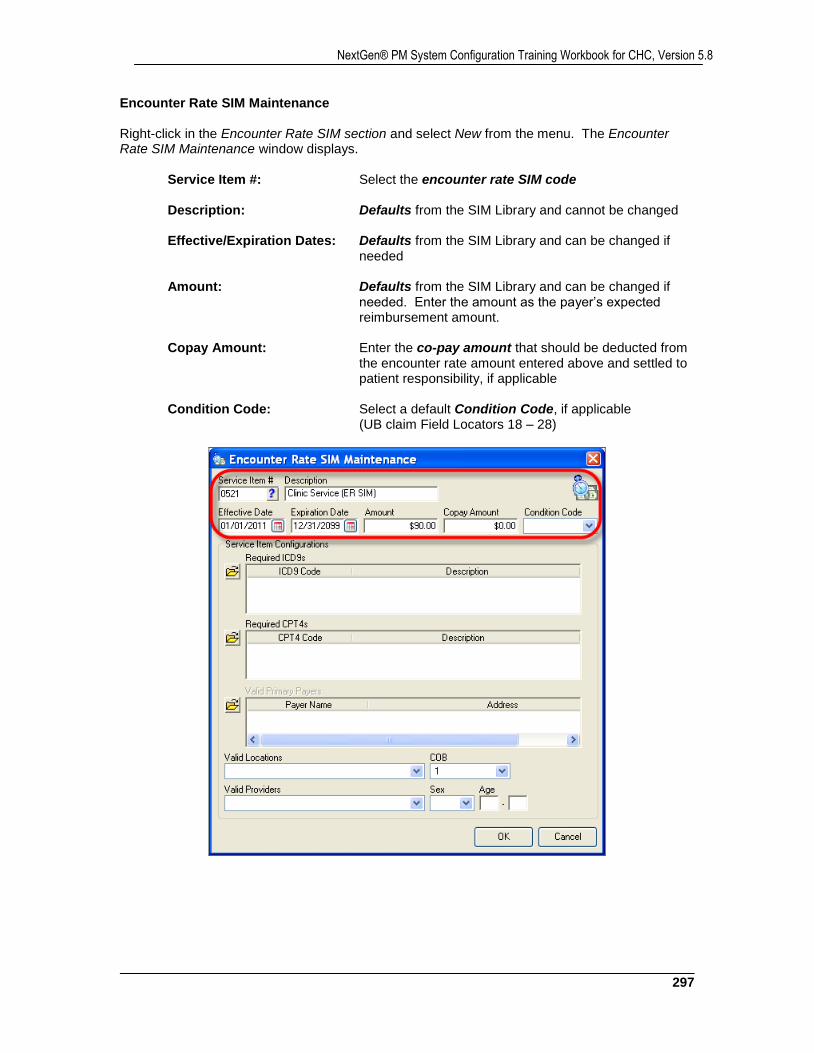
297
NextGen® PM System Configuration Training Workbook for CHC, Version 5.8
Encounter Rate SIM Maintenance Right-click in the Encounter Rate SIM section and select New from the menu. The Encounter Rate SIM Maintenance window displays.
Service Item #: Select the encounter rate SIM code Description: Defaults from the SIM Library and cannot be changed Effective/Expiration Dates: Defaults from the SIM Library and can be changed if
needed Amount: Defaults from the SIM Library and can be changed if
needed. Enter the amount as the payer’s expected reimbursement amount.
Copay Amount: Enter the co-pay amount that should be deducted from
the encounter rate amount entered above and settled to patient responsibility, if applicable
Condition Code: Select a default Condition Code, if applicable
(UB claim Field Locators 18 – 28)
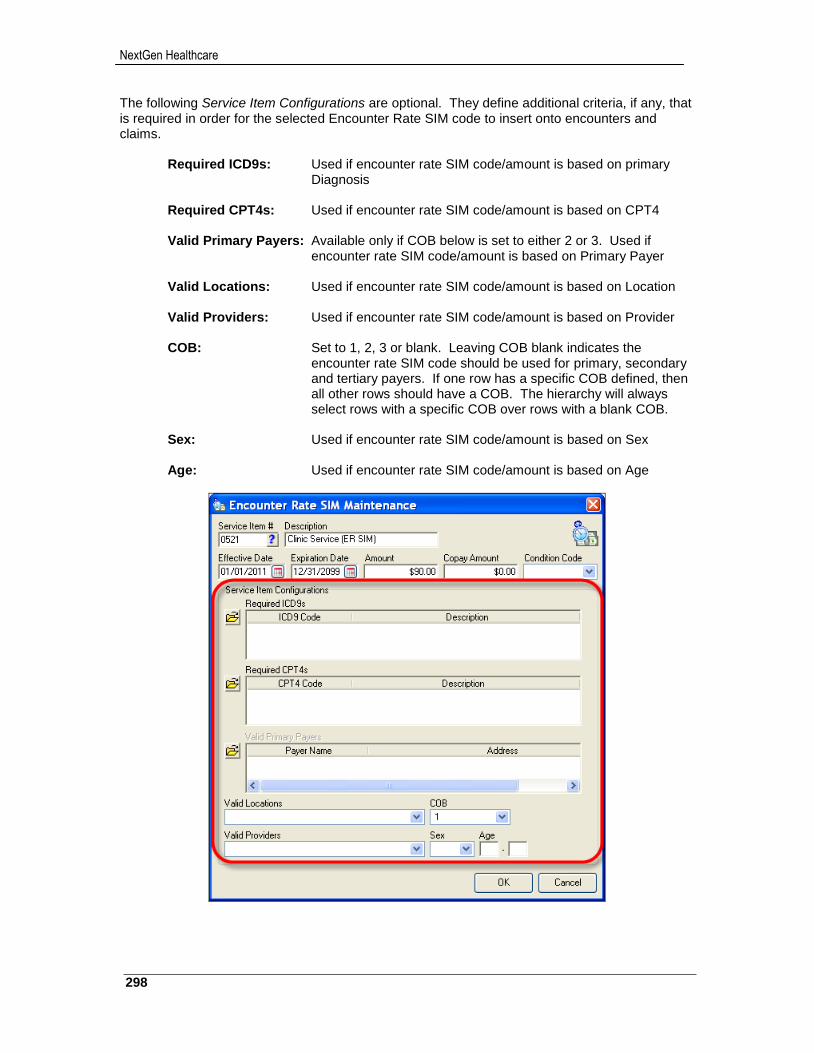
NextGen Healthcare
298
The following Service Item Configurations are optional. They define additional criteria, if any, that is required in order for the selected Encounter Rate SIM code to insert onto encounters and claims.
Required ICD9s: Used if encounter rate SIM code/amount is based on primary Diagnosis
Required CPT4s: Used if encounter rate SIM code/amount is based on CPT4 Valid Primary Payers: Available only if COB below is set to either 2 or 3. Used if
encounter rate SIM code/amount is based on Primary Payer Valid Locations: Used if encounter rate SIM code/amount is based on Location Valid Providers: Used if encounter rate SIM code/amount is based on Provider COB: Set to 1, 2, 3 or blank. Leaving COB blank indicates the
encounter rate SIM code should be used for primary, secondary and tertiary payers. If one row has a specific COB defined, then all other rows should have a COB. The hierarchy will always select rows with a specific COB over rows with a blank COB.
Sex: Used if encounter rate SIM code/amount is based on Sex Age: Used if encounter rate SIM code/amount is based on Age

299
NextGen® PM System Configuration Training Workbook for CHC, Version 5.8
Example 1: Different Encounter Rate SIM codes for primary and secondary claims with different amounts for each. (Medi-Cal is primary vs. Medi-Cal is secondary)
Example 2: Different Encounter Rate SIM codes for primary, secondary, dental, and vision
claims with different amounts for each
NOTE: Dental and Vision rows are configured by CPT4 code, Location or Provider.
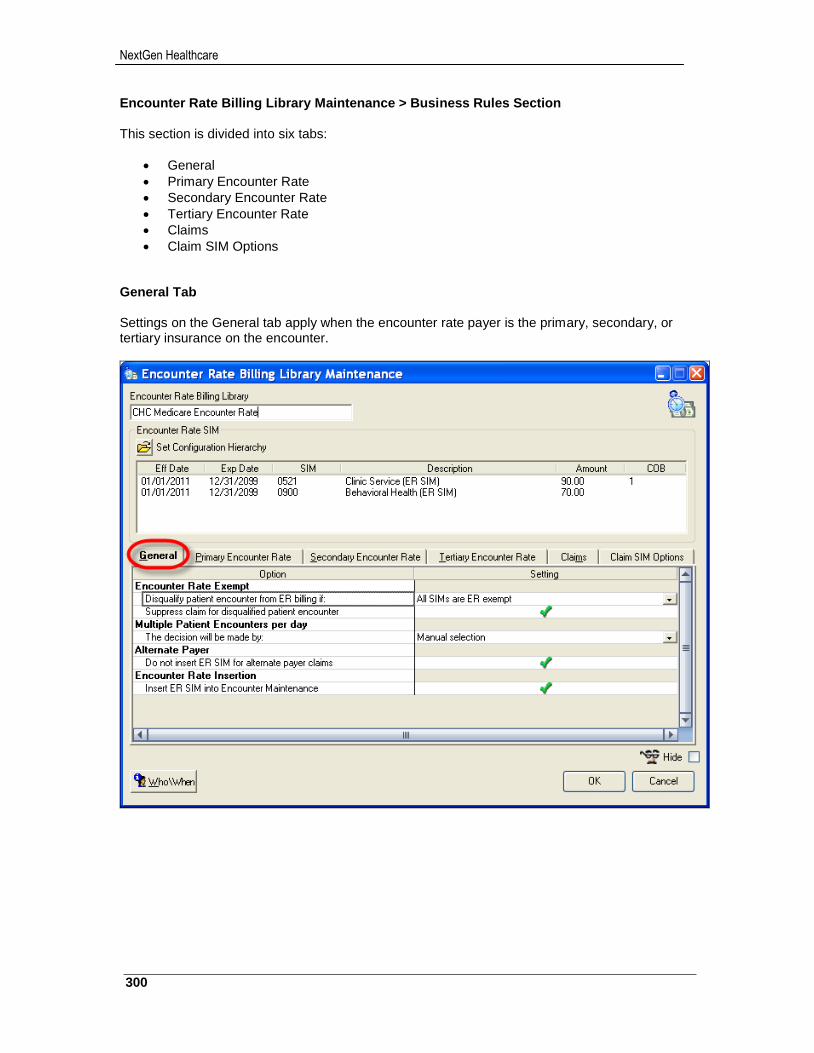
NextGen Healthcare
300
Encounter Rate Billing Library Maintenance > Business Rules Section This section is divided into six tabs:
General
Primary Encounter Rate
Secondary Encounter Rate
Tertiary Encounter Rate
Claims
Claim SIM Options General Tab Settings on the General tab apply when the encounter rate payer is the primary, secondary, or tertiary insurance on the encounter.
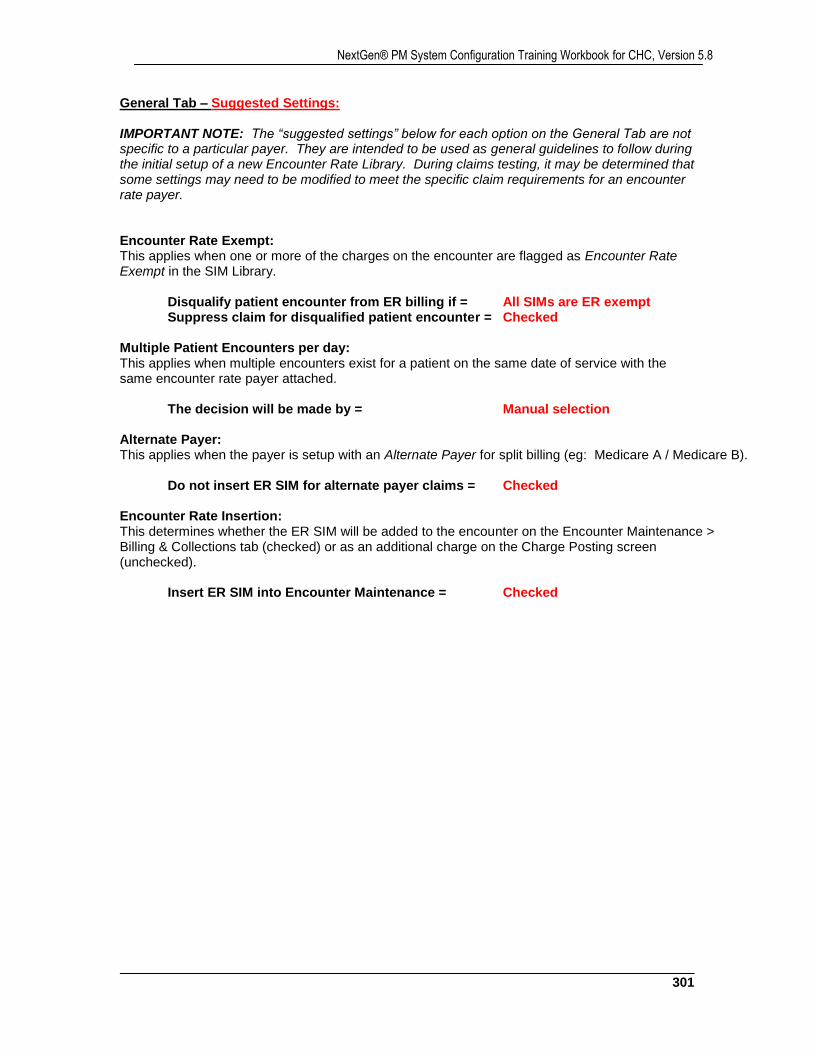
301
NextGen® PM System Configuration Training Workbook for CHC, Version 5.8
General Tab – Suggested Settings: IMPORTANT NOTE: The “suggested settings” below for each option on the General Tab are not specific to a particular payer. They are intended to be used as general guidelines to follow during the initial setup of a new Encounter Rate Library. During claims testing, it may be determined that some settings may need to be modified to meet the specific claim requirements for an encounter rate payer. Encounter Rate Exempt: This applies when one or more of the charges on the encounter are flagged as Encounter Rate Exempt in the SIM Library.
Disqualify patient encounter from ER billing if = All SIMs are ER exempt Suppress claim for disqualified patient encounter = Checked
Multiple Patient Encounters per day: This applies when multiple encounters exist for a patient on the same date of service with the same encounter rate payer attached.
The decision will be made by = Manual selection Alternate Payer: This applies when the payer is setup with an Alternate Payer for split billing (eg: Medicare A / Medicare B).
Do not insert ER SIM for alternate payer claims = Checked Encounter Rate Insertion: This determines whether the ER SIM will be added to the encounter on the Encounter Maintenance > Billing & Collections tab (checked) or as an additional charge on the Charge Posting screen (unchecked).
Insert ER SIM into Encounter Maintenance = Checked
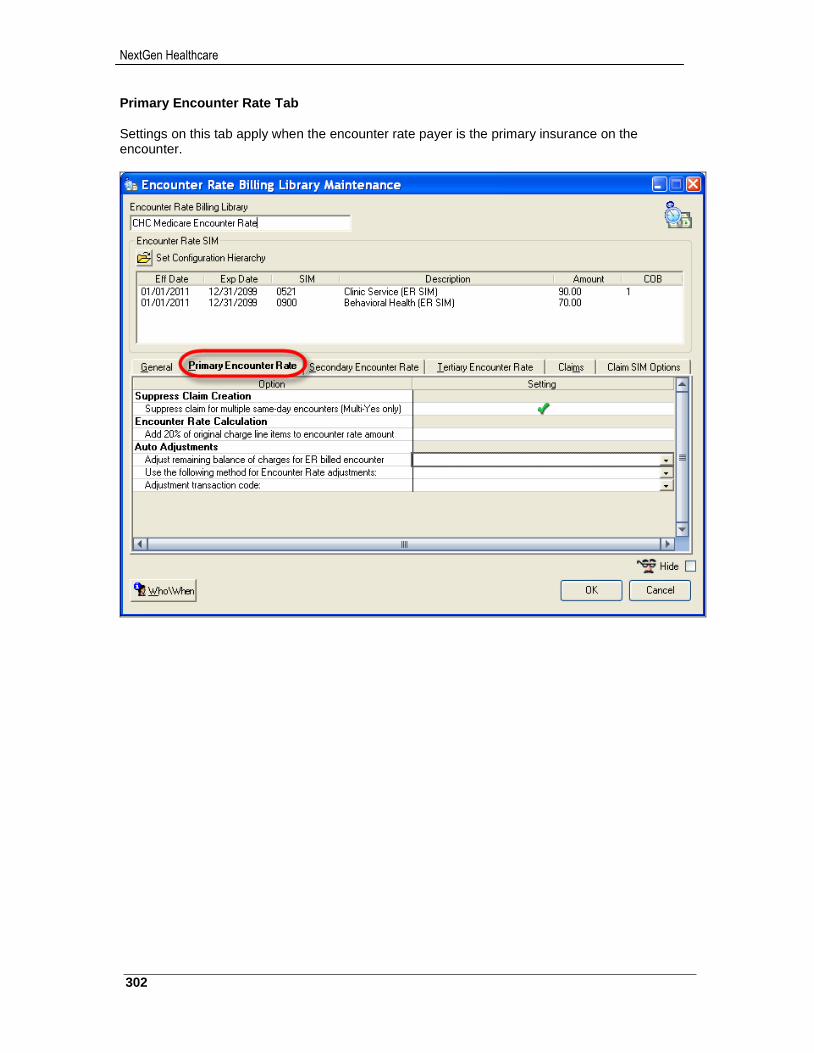
NextGen Healthcare
302
Primary Encounter Rate Tab Settings on this tab apply when the encounter rate payer is the primary insurance on the encounter.
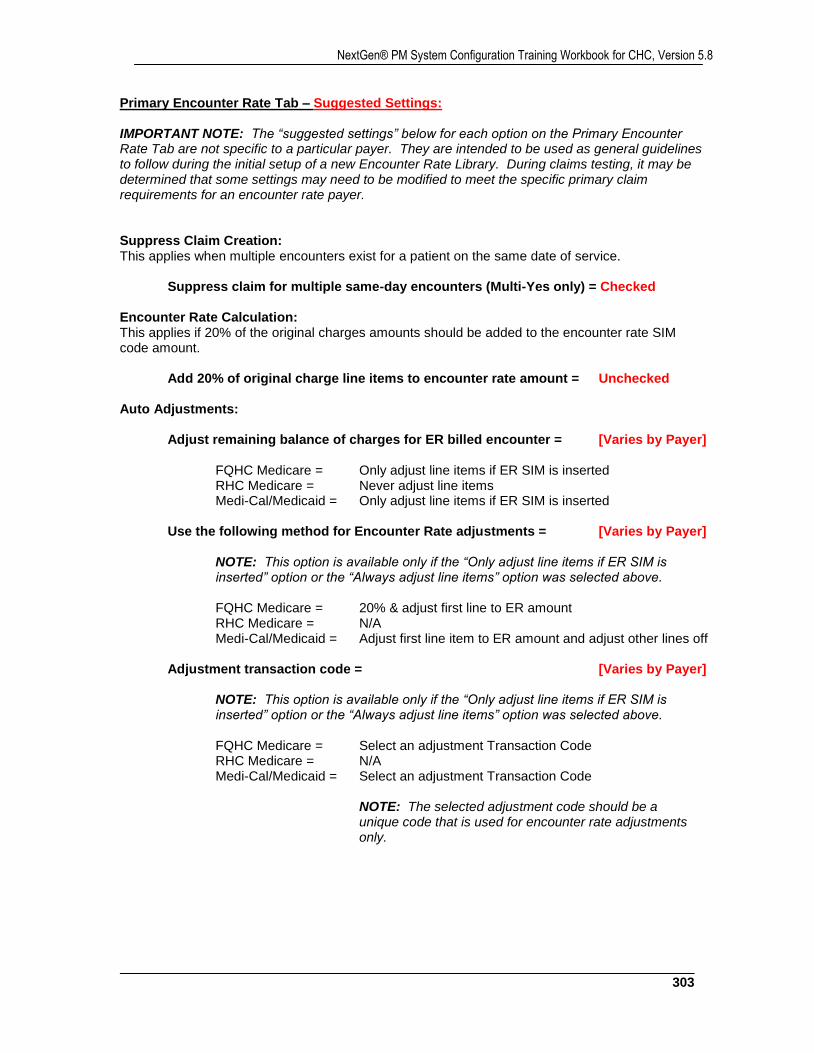
303
NextGen® PM System Configuration Training Workbook for CHC, Version 5.8
Primary Encounter Rate Tab – Suggested Settings: IMPORTANT NOTE: The “suggested settings” below for each option on the Primary Encounter Rate Tab are not specific to a particular payer. They are intended to be used as general guidelines to follow during the initial setup of a new Encounter Rate Library. During claims testing, it may be determined that some settings may need to be modified to meet the specific primary claim requirements for an encounter rate payer. Suppress Claim Creation: This applies when multiple encounters exist for a patient on the same date of service.
Suppress claim for multiple same-day encounters (Multi-Yes only) = Checked Encounter Rate Calculation: This applies if 20% of the original charges amounts should be added to the encounter rate SIM code amount.
Add 20% of original charge line items to encounter rate amount = Unchecked Auto Adjustments:
Adjust remaining balance of charges for ER billed encounter = [Varies by Payer] FQHC Medicare = Only adjust line items if ER SIM is inserted RHC Medicare = Never adjust line items Medi-Cal/Medicaid = Only adjust line items if ER SIM is inserted
Use the following method for Encounter Rate adjustments = [Varies by Payer]
NOTE: This option is available only if the “Only adjust line items if ER SIM is inserted” option or the “Always adjust line items” option was selected above.
FQHC Medicare = 20% & adjust first line to ER amount RHC Medicare = N/A Medi-Cal/Medicaid = Adjust first line item to ER amount and adjust other lines off
Adjustment transaction code = [Varies by Payer]
NOTE: This option is available only if the “Only adjust line items if ER SIM is inserted” option or the “Always adjust line items” option was selected above.
FQHC Medicare = Select an adjustment Transaction Code RHC Medicare = N/A Medi-Cal/Medicaid = Select an adjustment Transaction Code
NOTE: The selected adjustment code should be a unique code that is used for encounter rate adjustments only.
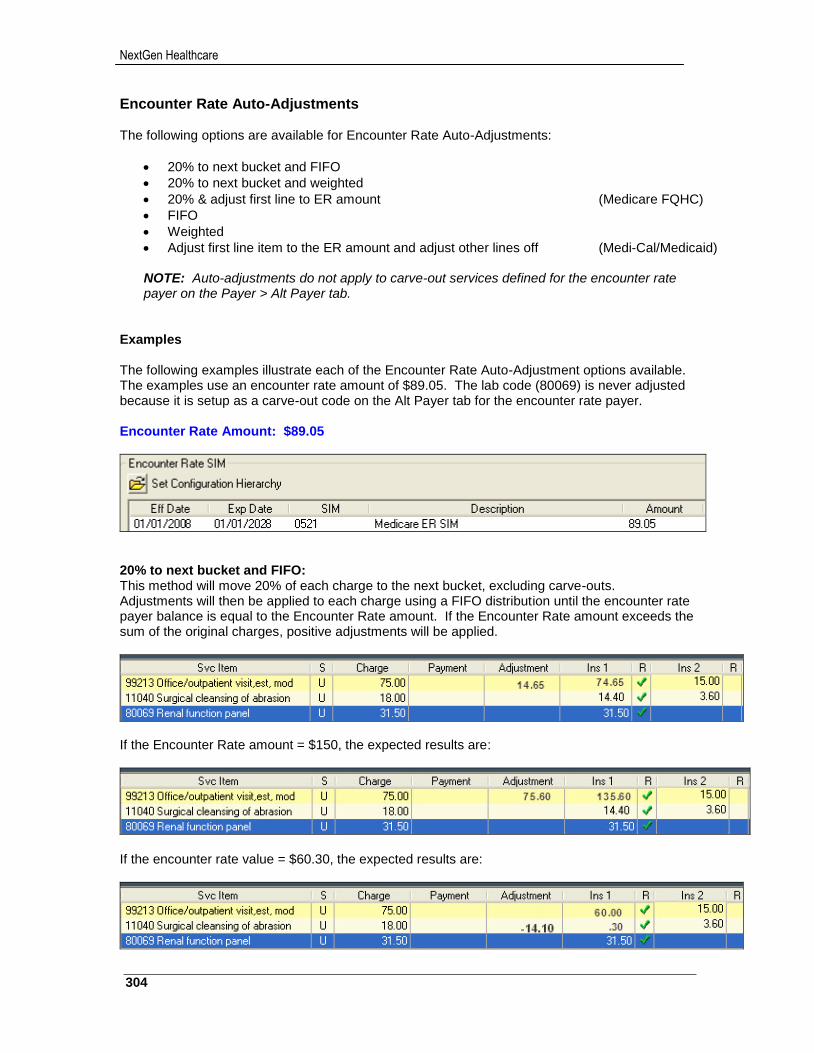
NextGen Healthcare
304
Encounter Rate Auto-Adjustments The following options are available for Encounter Rate Auto-Adjustments:
20% to next bucket and FIFO
20% to next bucket and weighted
20% & adjust first line to ER amount (Medicare FQHC)
FIFO
Weighted
Adjust first line item to the ER amount and adjust other lines off (Medi-Cal/Medicaid)
NOTE: Auto-adjustments do not apply to carve-out services defined for the encounter rate payer on the Payer > Alt Payer tab.
Examples The following examples illustrate each of the Encounter Rate Auto-Adjustment options available. The examples use an encounter rate amount of $89.05. The lab code (80069) is never adjusted because it is setup as a carve-out code on the Alt Payer tab for the encounter rate payer. Encounter Rate Amount: $89.05
20% to next bucket and FIFO: This method will move 20% of each charge to the next bucket, excluding carve-outs. Adjustments will then be applied to each charge using a FIFO distribution until the encounter rate payer balance is equal to the Encounter Rate amount. If the Encounter Rate amount exceeds the sum of the original charges, positive adjustments will be applied.
If the Encounter Rate amount = $150, the expected results are:
If the encounter rate value = $60.30, the expected results are:
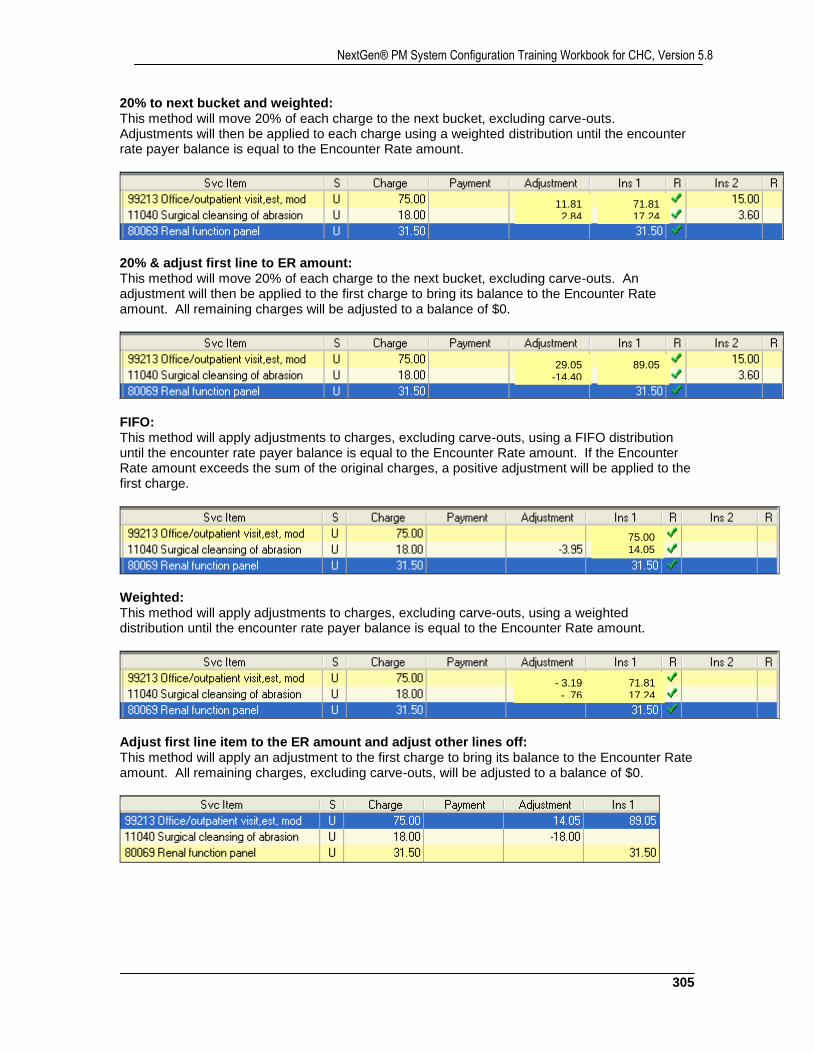
305
NextGen® PM System Configuration Training Workbook for CHC, Version 5.8
20% to next bucket and weighted: This method will move 20% of each charge to the next bucket, excluding carve-outs. Adjustments will then be applied to each charge using a weighted distribution until the encounter rate payer balance is equal to the Encounter Rate amount.
20% & adjust first line to ER amount: This method will move 20% of each charge to the next bucket, excluding carve-outs. An adjustment will then be applied to the first charge to bring its balance to the Encounter Rate amount. All remaining charges will be adjusted to a balance of $0.
FIFO: This method will apply adjustments to charges, excluding carve-outs, using a FIFO distribution until the encounter rate payer balance is equal to the Encounter Rate amount. If the Encounter Rate amount exceeds the sum of the original charges, a positive adjustment will be applied to the first charge.
Weighted: This method will apply adjustments to charges, excluding carve-outs, using a weighted distribution until the encounter rate payer balance is equal to the Encounter Rate amount.
Adjust first line item to the ER amount and adjust other lines off: This method will apply an adjustment to the first charge to bring its balance to the Encounter Rate amount. All remaining charges, excluding carve-outs, will be adjusted to a balance of $0.
11.81 2.84
71.81 17.24
75.00 14.05
- 3.19 - .76
71.81 17.24
29.05 -14.40
89.05
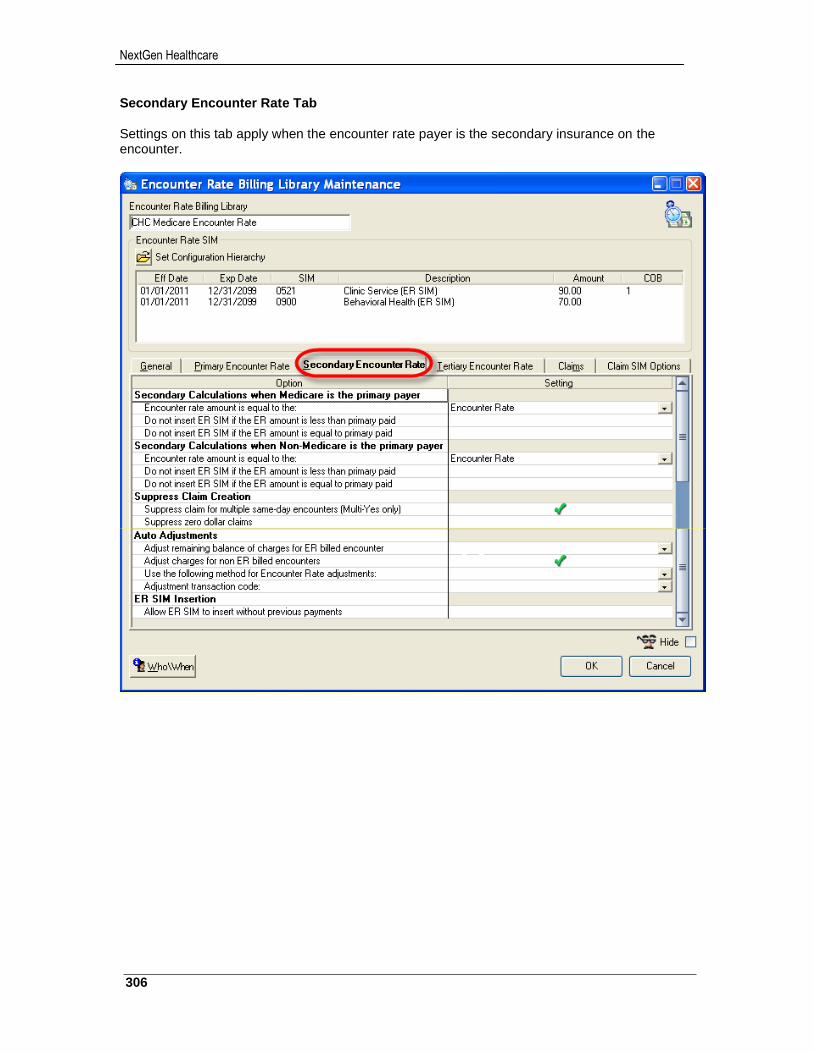
NextGen Healthcare
306
Secondary Encounter Rate Tab Settings on this tab apply when the encounter rate payer is the secondary insurance on the encounter.
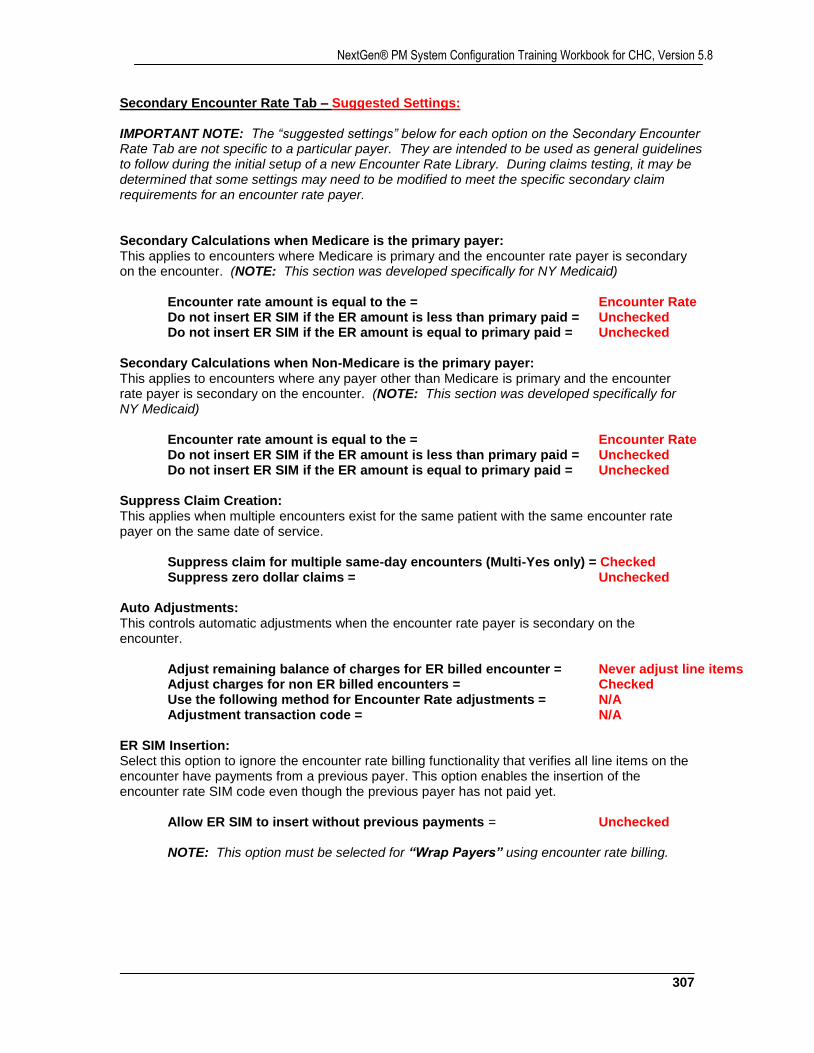
307
NextGen® PM System Configuration Training Workbook for CHC, Version 5.8
Secondary Encounter Rate Tab – Suggested Settings: IMPORTANT NOTE: The “suggested settings” below for each option on the Secondary Encounter Rate Tab are not specific to a particular payer. They are intended to be used as general guidelines to follow during the initial setup of a new Encounter Rate Library. During claims testing, it may be determined that some settings may need to be modified to meet the specific secondary claim requirements for an encounter rate payer. Secondary Calculations when Medicare is the primary payer: This applies to encounters where Medicare is primary and the encounter rate payer is secondary on the encounter. (NOTE: This section was developed specifically for NY Medicaid)
Encounter rate amount is equal to the = Encounter Rate Do not insert ER SIM if the ER amount is less than primary paid = Unchecked Do not insert ER SIM if the ER amount is equal to primary paid = Unchecked
Secondary Calculations when Non-Medicare is the primary payer: This applies to encounters where any payer other than Medicare is primary and the encounter rate payer is secondary on the encounter. (NOTE: This section was developed specifically for NY Medicaid)
Encounter rate amount is equal to the = Encounter Rate Do not insert ER SIM if the ER amount is less than primary paid = Unchecked Do not insert ER SIM if the ER amount is equal to primary paid = Unchecked
Suppress Claim Creation: This applies when multiple encounters exist for the same patient with the same encounter rate payer on the same date of service.
Suppress claim for multiple same-day encounters (Multi-Yes only) = Checked Suppress zero dollar claims = Unchecked
Auto Adjustments: This controls automatic adjustments when the encounter rate payer is secondary on the encounter.
Adjust remaining balance of charges for ER billed encounter = Never adjust line items Adjust charges for non ER billed encounters = Checked Use the following method for Encounter Rate adjustments = N/A Adjustment transaction code = N/A
ER SIM Insertion: Select this option to ignore the encounter rate billing functionality that verifies all line items on the encounter have payments from a previous payer. This option enables the insertion of the encounter rate SIM code even though the previous payer has not paid yet.
Allow ER SIM to insert without previous payments = Unchecked
NOTE: This option must be selected for “Wrap Payers” using encounter rate billing.
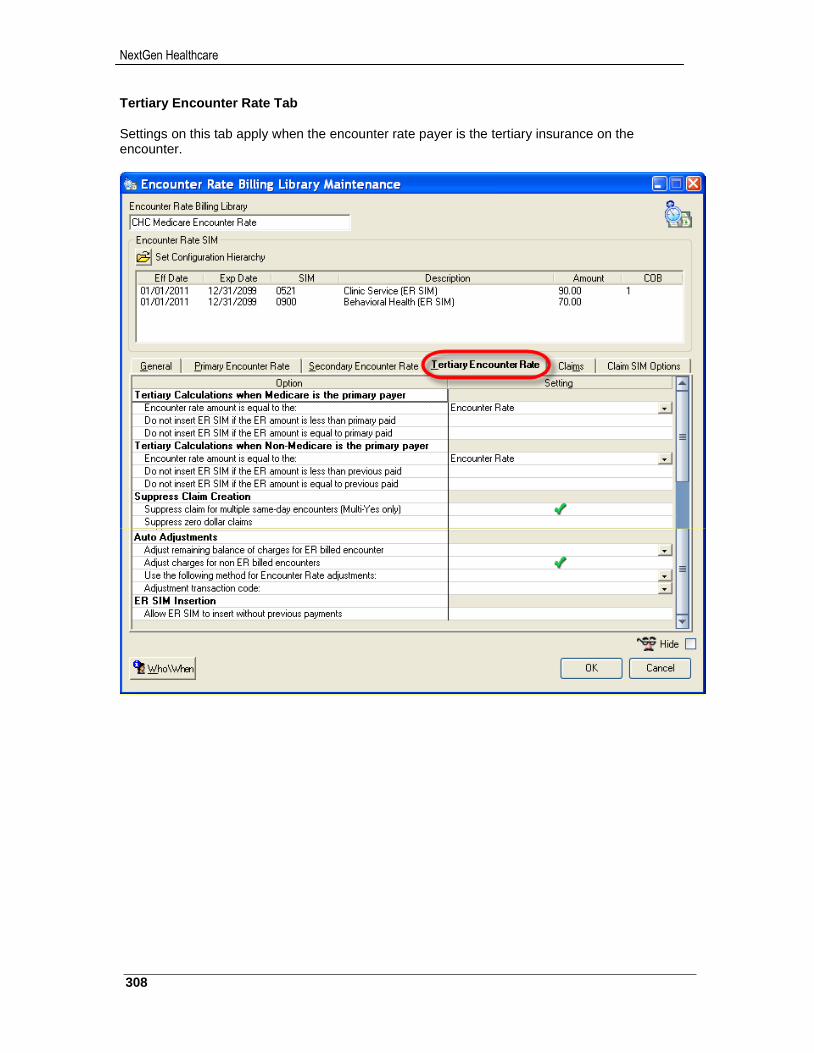
NextGen Healthcare
308
Tertiary Encounter Rate Tab Settings on this tab apply when the encounter rate payer is the tertiary insurance on the encounter.
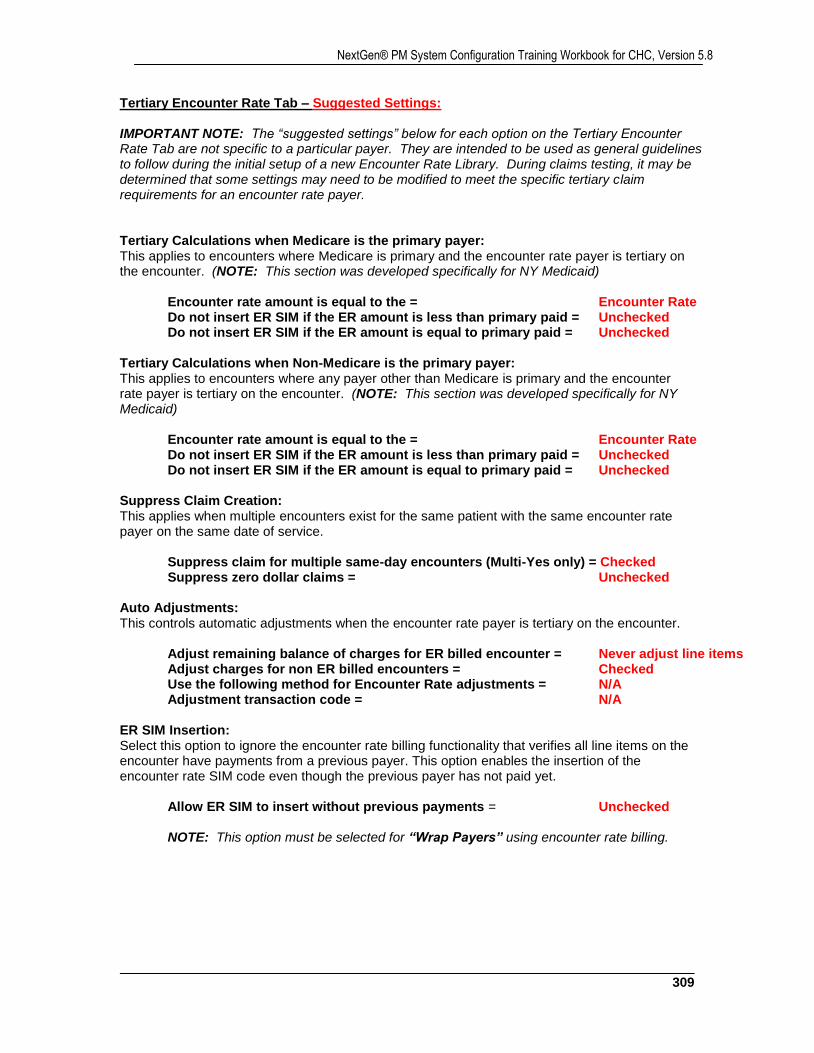
309
NextGen® PM System Configuration Training Workbook for CHC, Version 5.8
Tertiary Encounter Rate Tab – Suggested Settings: IMPORTANT NOTE: The “suggested settings” below for each option on the Tertiary Encounter Rate Tab are not specific to a particular payer. They are intended to be used as general guidelines to follow during the initial setup of a new Encounter Rate Library. During claims testing, it may be determined that some settings may need to be modified to meet the specific tertiary claim requirements for an encounter rate payer. Tertiary Calculations when Medicare is the primary payer: This applies to encounters where Medicare is primary and the encounter rate payer is tertiary on the encounter. (NOTE: This section was developed specifically for NY Medicaid)
Encounter rate amount is equal to the = Encounter Rate Do not insert ER SIM if the ER amount is less than primary paid = Unchecked Do not insert ER SIM if the ER amount is equal to primary paid = Unchecked
Tertiary Calculations when Non-Medicare is the primary payer: This applies to encounters where any payer other than Medicare is primary and the encounter rate payer is tertiary on the encounter. (NOTE: This section was developed specifically for NY Medicaid)
Encounter rate amount is equal to the = Encounter Rate Do not insert ER SIM if the ER amount is less than primary paid = Unchecked Do not insert ER SIM if the ER amount is equal to primary paid = Unchecked
Suppress Claim Creation: This applies when multiple encounters exist for the same patient with the same encounter rate payer on the same date of service.
Suppress claim for multiple same-day encounters (Multi-Yes only) = Checked Suppress zero dollar claims = Unchecked
Auto Adjustments: This controls automatic adjustments when the encounter rate payer is tertiary on the encounter.
Adjust remaining balance of charges for ER billed encounter = Never adjust line items Adjust charges for non ER billed encounters = Checked Use the following method for Encounter Rate adjustments = N/A Adjustment transaction code = N/A
ER SIM Insertion: Select this option to ignore the encounter rate billing functionality that verifies all line items on the encounter have payments from a previous payer. This option enables the insertion of the encounter rate SIM code even though the previous payer has not paid yet.
Allow ER SIM to insert without previous payments = Unchecked
NOTE: This option must be selected for “Wrap Payers” using encounter rate billing.
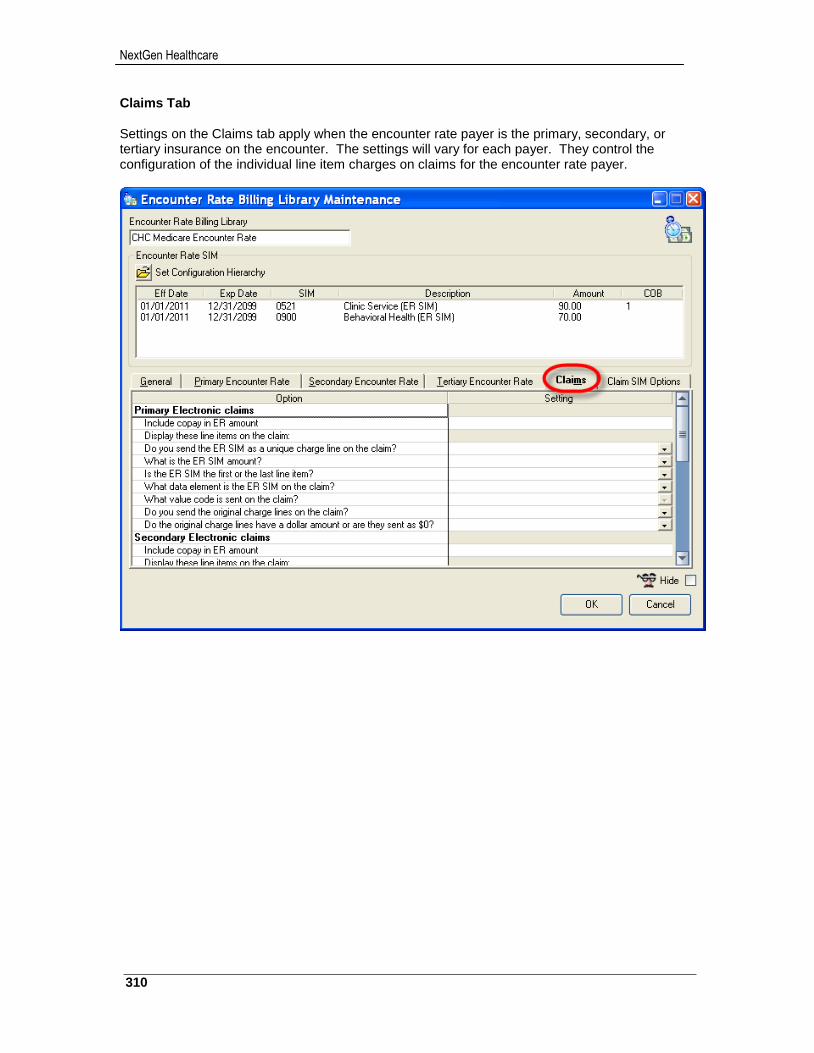
NextGen Healthcare
310
Claims Tab Settings on the Claims tab apply when the encounter rate payer is the primary, secondary, or tertiary insurance on the encounter. The settings will vary for each payer. They control the configuration of the individual line item charges on claims for the encounter rate payer.
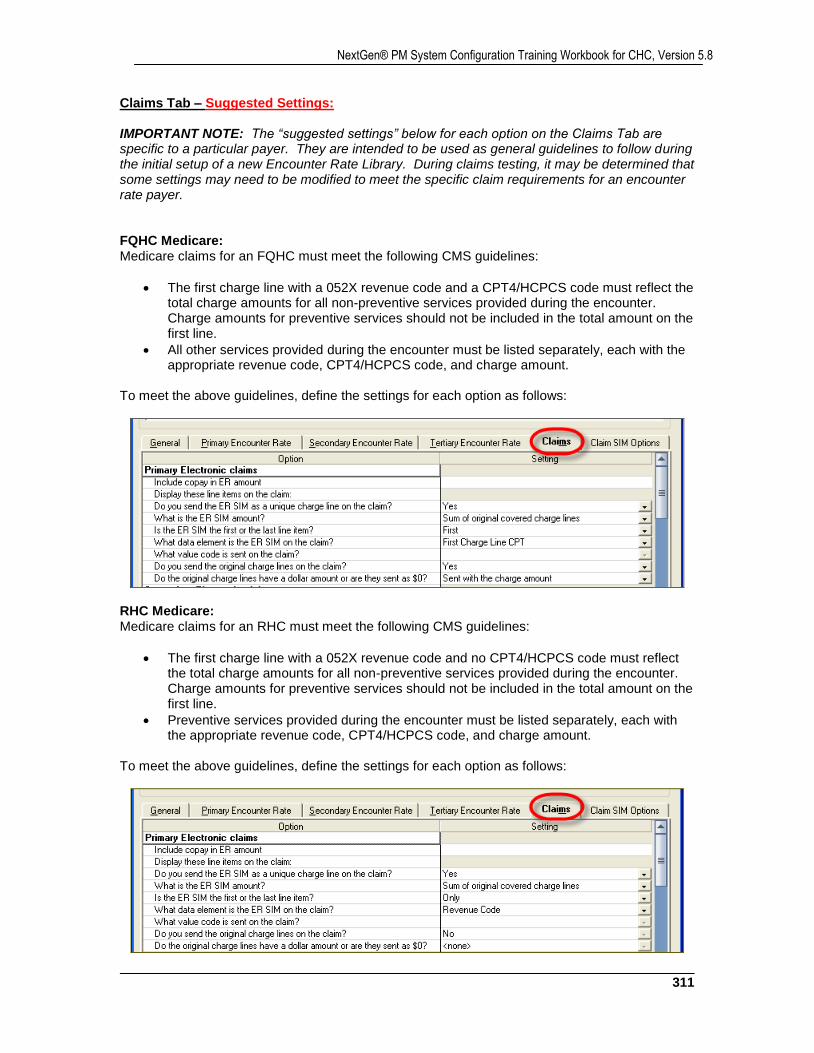
311
NextGen® PM System Configuration Training Workbook for CHC, Version 5.8
Claims Tab – Suggested Settings: IMPORTANT NOTE: The “suggested settings” below for each option on the Claims Tab are specific to a particular payer. They are intended to be used as general guidelines to follow during the initial setup of a new Encounter Rate Library. During claims testing, it may be determined that some settings may need to be modified to meet the specific claim requirements for an encounter rate payer. FQHC Medicare: Medicare claims for an FQHC must meet the following CMS guidelines:
The first charge line with a 052X revenue code and a CPT4/HCPCS code must reflect the total charge amounts for all non-preventive services provided during the encounter. Charge amounts for preventive services should not be included in the total amount on the first line.
All other services provided during the encounter must be listed separately, each with the appropriate revenue code, CPT4/HCPCS code, and charge amount.
To meet the above guidelines, define the settings for each option as follows:
RHC Medicare: Medicare claims for an RHC must meet the following CMS guidelines:
The first charge line with a 052X revenue code and no CPT4/HCPCS code must reflect the total charge amounts for all non-preventive services provided during the encounter. Charge amounts for preventive services should not be included in the total amount on the first line.
Preventive services provided during the encounter must be listed separately, each with the appropriate revenue code, CPT4/HCPCS code, and charge amount.
To meet the above guidelines, define the settings for each option as follows:
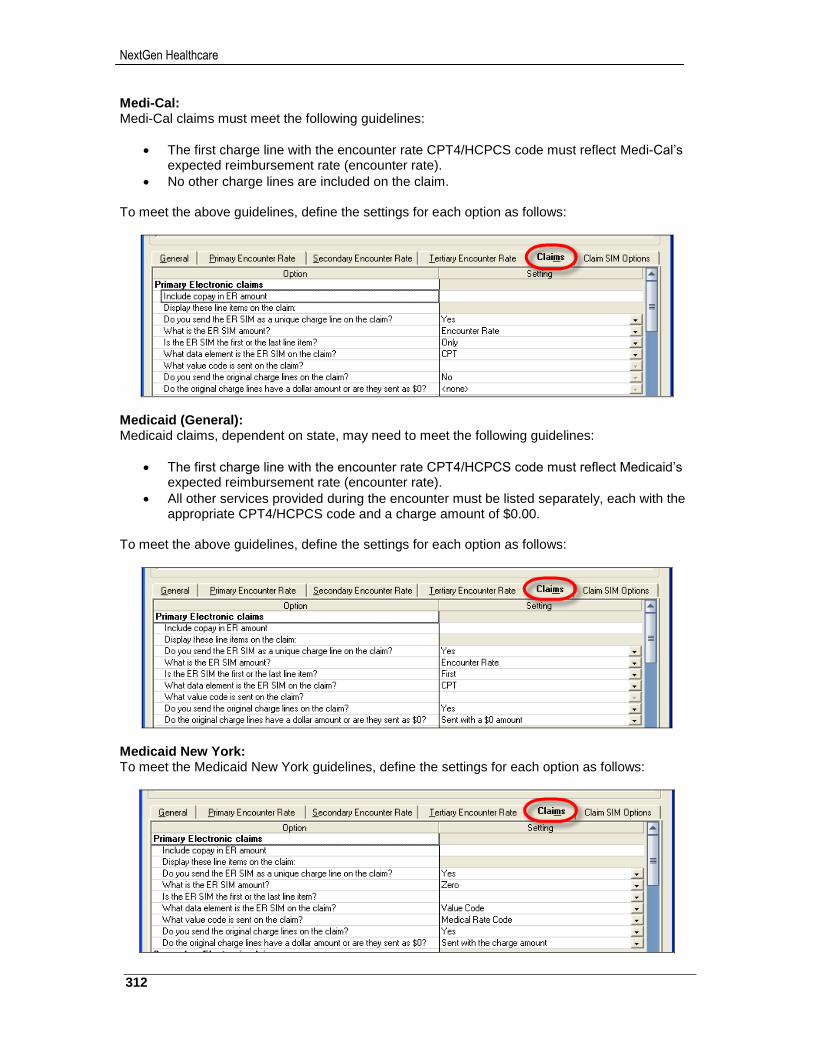
NextGen Healthcare
312
Medi-Cal: Medi-Cal claims must meet the following guidelines:
The first charge line with the encounter rate CPT4/HCPCS code must reflect Medi-Cal’s expected reimbursement rate (encounter rate).
No other charge lines are included on the claim. To meet the above guidelines, define the settings for each option as follows:
Medicaid (General): Medicaid claims, dependent on state, may need to meet the following guidelines:
The first charge line with the encounter rate CPT4/HCPCS code must reflect Medicaid’s expected reimbursement rate (encounter rate).
All other services provided during the encounter must be listed separately, each with the appropriate CPT4/HCPCS code and a charge amount of $0.00.
To meet the above guidelines, define the settings for each option as follows:
Medicaid New York: To meet the Medicaid New York guidelines, define the settings for each option as follows:
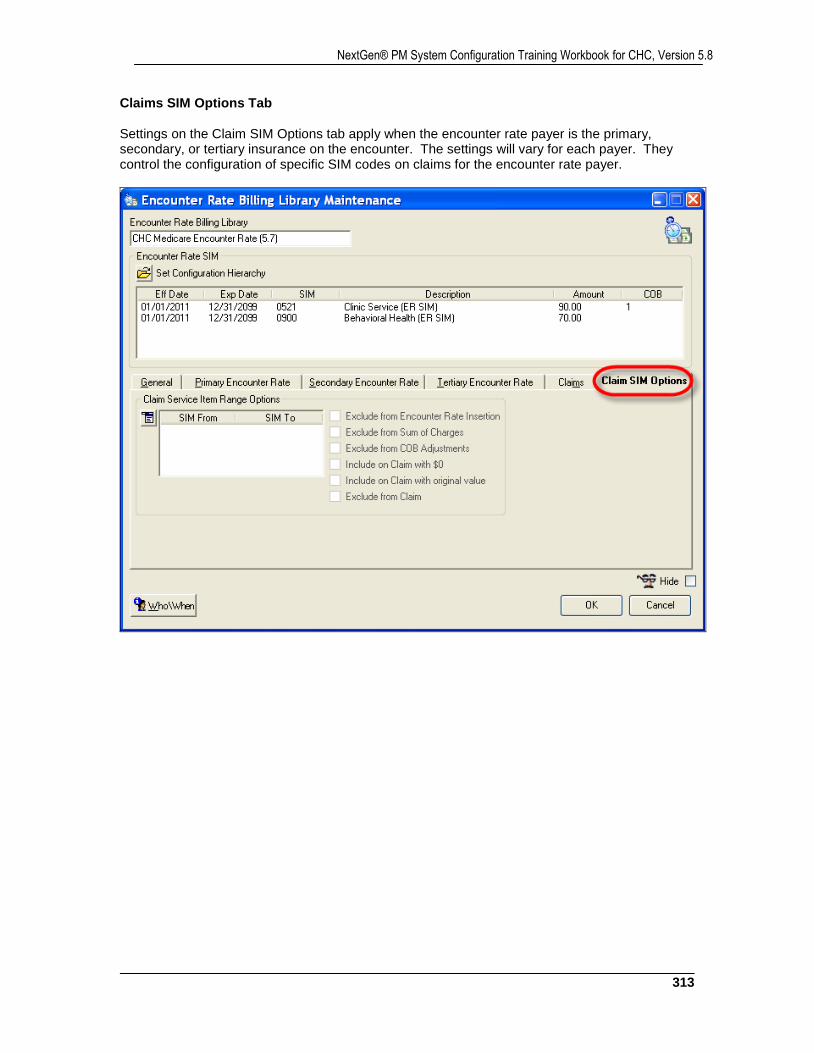
313
NextGen® PM System Configuration Training Workbook for CHC, Version 5.8
Claims SIM Options Tab Settings on the Claim SIM Options tab apply when the encounter rate payer is the primary, secondary, or tertiary insurance on the encounter. The settings will vary for each payer. They control the configuration of specific SIM codes on claims for the encounter rate payer.
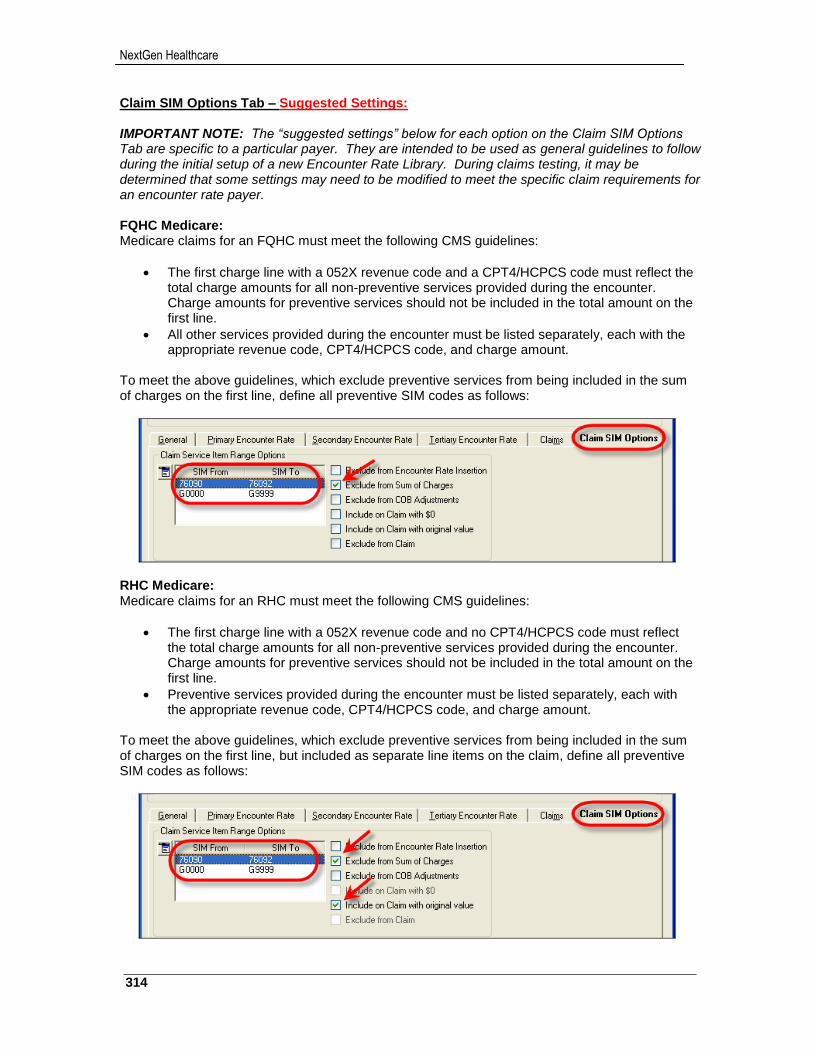
NextGen Healthcare
314
Claim SIM Options Tab – Suggested Settings: IMPORTANT NOTE: The “suggested settings” below for each option on the Claim SIM Options Tab are specific to a particular payer. They are intended to be used as general guidelines to follow during the initial setup of a new Encounter Rate Library. During claims testing, it may be determined that some settings may need to be modified to meet the specific claim requirements for an encounter rate payer. FQHC Medicare: Medicare claims for an FQHC must meet the following CMS guidelines:
The first charge line with a 052X revenue code and a CPT4/HCPCS code must reflect the total charge amounts for all non-preventive services provided during the encounter. Charge amounts for preventive services should not be included in the total amount on the first line.
All other services provided during the encounter must be listed separately, each with the appropriate revenue code, CPT4/HCPCS code, and charge amount.
To meet the above guidelines, which exclude preventive services from being included in the sum of charges on the first line, define all preventive SIM codes as follows:
RHC Medicare: Medicare claims for an RHC must meet the following CMS guidelines:
The first charge line with a 052X revenue code and no CPT4/HCPCS code must reflect the total charge amounts for all non-preventive services provided during the encounter. Charge amounts for preventive services should not be included in the total amount on the first line.
Preventive services provided during the encounter must be listed separately, each with the appropriate revenue code, CPT4/HCPCS code, and charge amount.
To meet the above guidelines, which exclude preventive services from being included in the sum of charges on the first line, but included as separate line items on the claim, define all preventive SIM codes as follows:
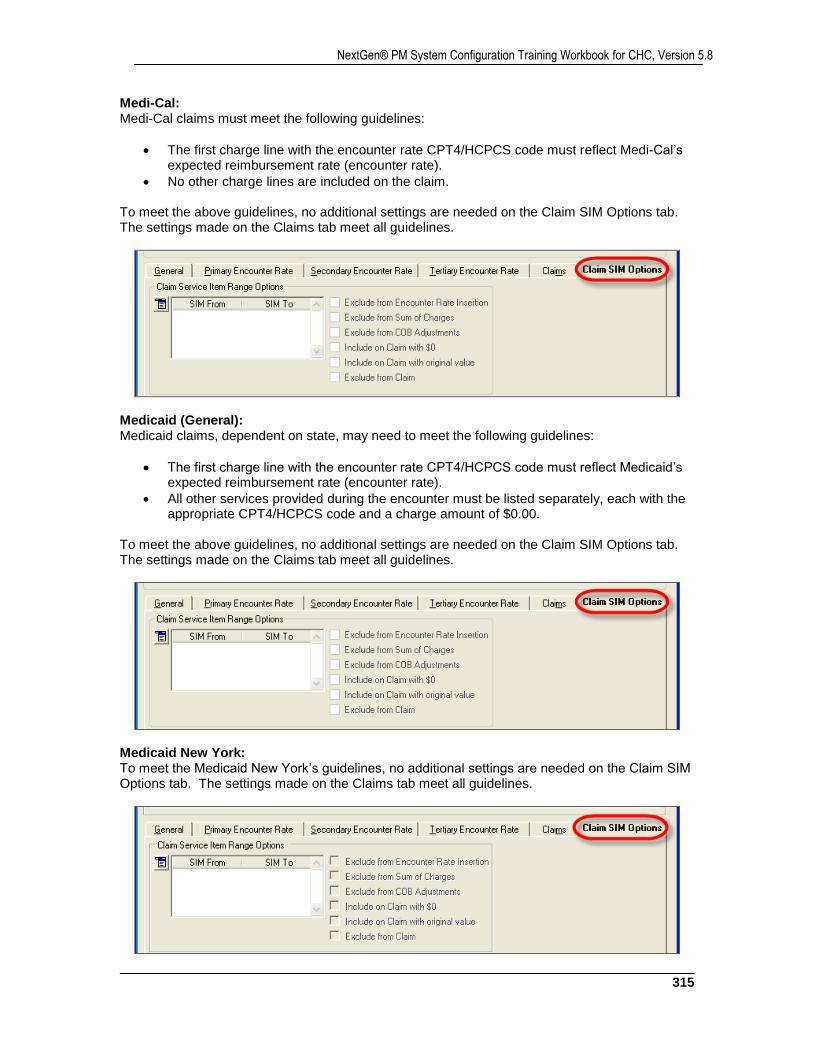
315
NextGen® PM System Configuration Training Workbook for CHC, Version 5.8
Medi-Cal: Medi-Cal claims must meet the following guidelines:
The first charge line with the encounter rate CPT4/HCPCS code must reflect Medi-Cal’s expected reimbursement rate (encounter rate).
No other charge lines are included on the claim. To meet the above guidelines, no additional settings are needed on the Claim SIM Options tab. The settings made on the Claims tab meet all guidelines.
Medicaid (General): Medicaid claims, dependent on state, may need to meet the following guidelines:
The first charge line with the encounter rate CPT4/HCPCS code must reflect Medicaid’s expected reimbursement rate (encounter rate).
All other services provided during the encounter must be listed separately, each with the appropriate CPT4/HCPCS code and a charge amount of $0.00.
To meet the above guidelines, no additional settings are needed on the Claim SIM Options tab. The settings made on the Claims tab meet all guidelines.
Medicaid New York: To meet the Medicaid New York’s guidelines, no additional settings are needed on the Claim SIM Options tab. The settings made on the Claims tab meet all guidelines.
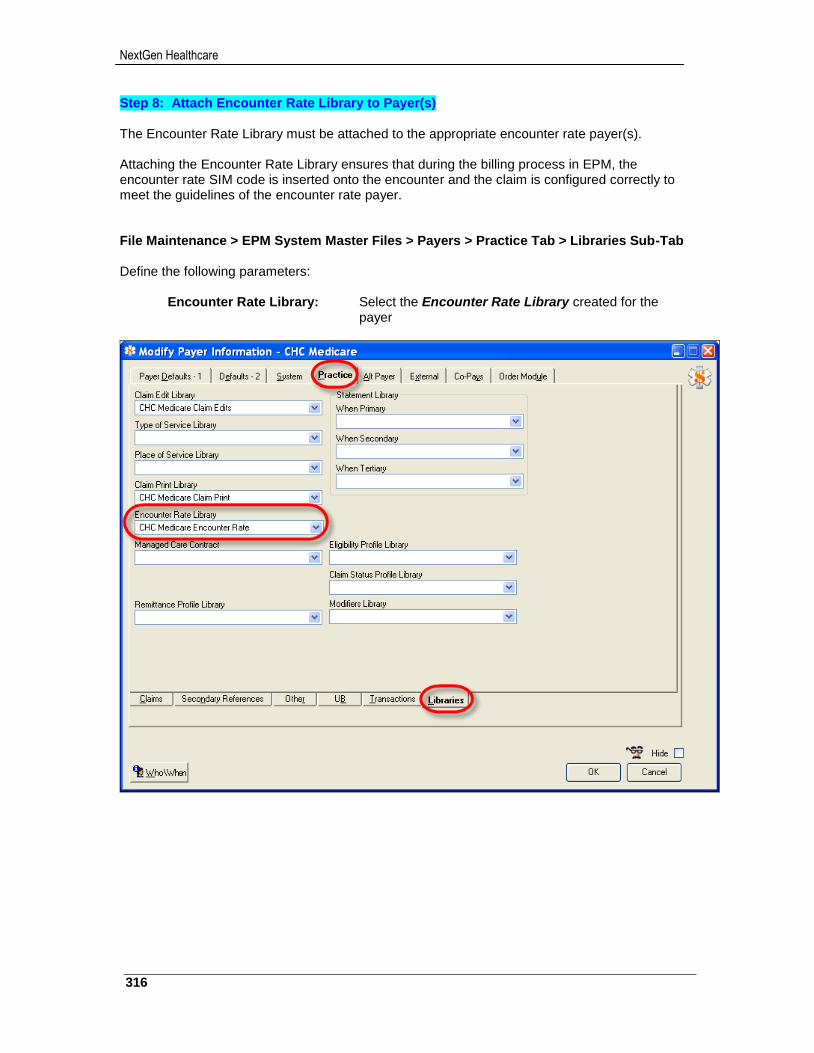
NextGen Healthcare
316
Step 8: Attach Encounter Rate Library to Payer(s) The Encounter Rate Library must be attached to the appropriate encounter rate payer(s). Attaching the Encounter Rate Library ensures that during the billing process in EPM, the encounter rate SIM code is inserted onto the encounter and the claim is configured correctly to meet the guidelines of the encounter rate payer. File Maintenance > EPM System Master Files > Payers > Practice Tab > Libraries Sub-Tab Define the following parameters:
Encounter Rate Library: Select the Encounter Rate Library created for the payer
317
NextGen® PM System Configuration Training Workbook for CHC, Version 5.8
GPCI Codes
eLearning Curriculum: EPM Setting Up Libraries eLearning Course: Libraries – GPCI Codes
GPCI (Geographic Practice Cost Index) provides an adjustment for the cost of living variances by geographic locality. There are three GPCI components as follows.
1. Work GPCI: Adjustment based on the earnings of professionals by geographic locality.
2. Practice Expense GPCI: Adjustment based on the expenses for staff wages, office space, equipment, supplies, etc. by geographic locality.
3. Practice Liability (Malpractice) GPCI:
Adjustment based on the cost of malpractice insurance by geographic locality. GPCI is constructed to have a national average of 1.0. Geographic areas that have costs above the national average have index values >1.0. Geographic areas that have costs below the national average have index values <1.0. Medicare uses GPCI and RVU values together in a formula to determine physician reimbursement.
Medicare’s Non-Facility Fee Reimbursement Formula: [(Work RVU * Work GPCI) + (Non-Facility PE RVU * PE GPCI) + (Malpractice RVU * PLI GPCI)] * Conversion Factor
Medicare’s Facility Fee Reimbursement Formula:
[(Work RVU * Work GPCI) + (Facility RVU * PE GPCI) + (Malpractice RVU * PLI GPCI)] * Conversion Factor
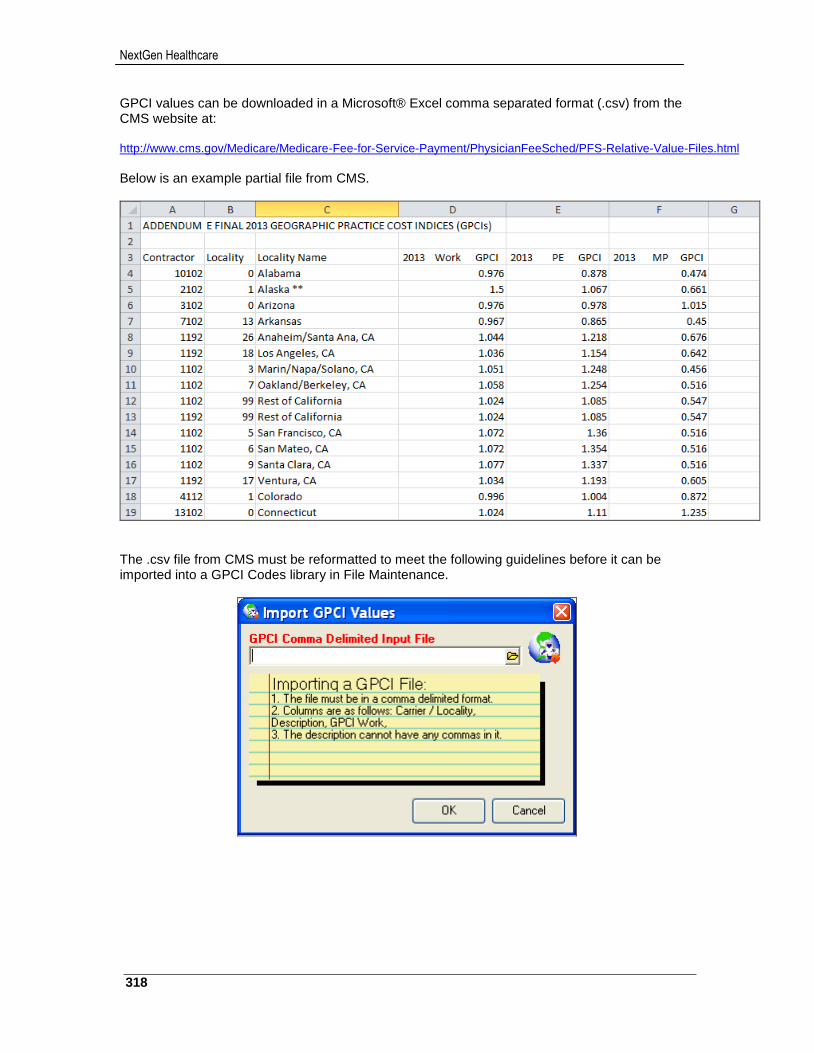
NextGen Healthcare
318
GPCI values can be downloaded in a Microsoft® Excel comma separated format (.csv) from the CMS website at: http://www.cms.gov/Medicare/Medicare-Fee-for-Service-Payment/PhysicianFeeSched/PFS-Relative-Value-Files.html
Below is an example partial file from CMS.
The .csv file from CMS must be reformatted to meet the following guidelines before it can be imported into a GPCI Codes library in File Maintenance.
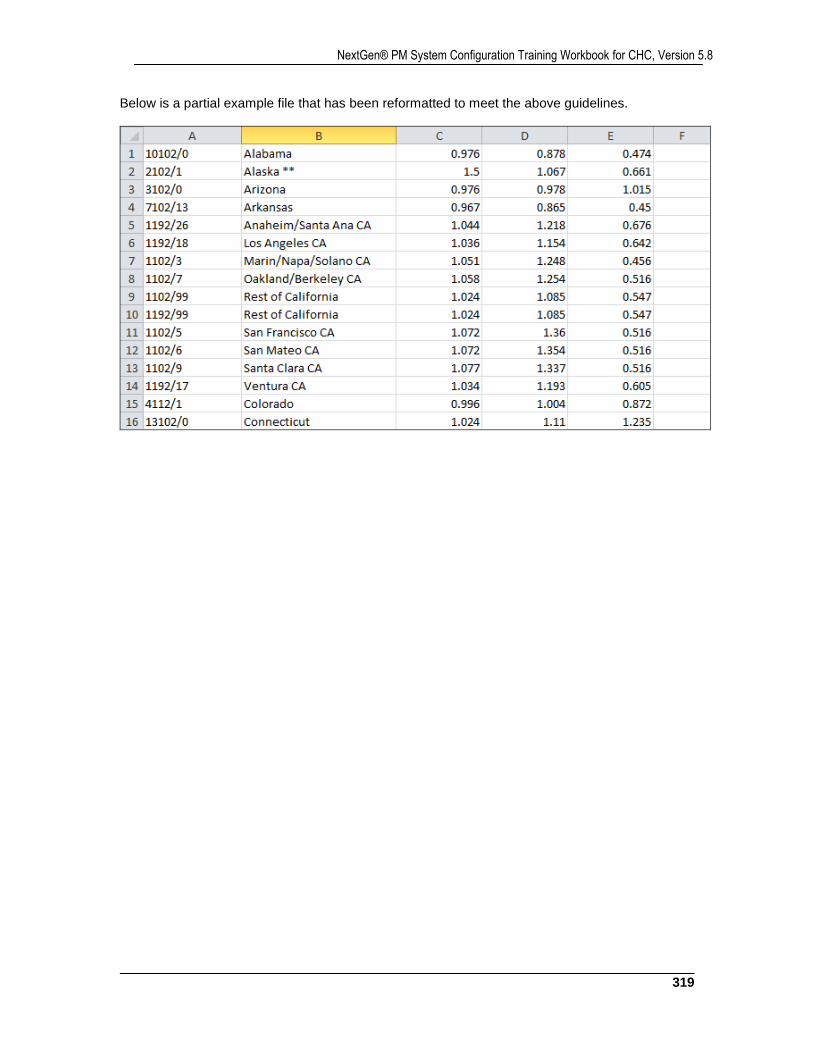
319
NextGen® PM System Configuration Training Workbook for CHC, Version 5.8
Below is a partial example file that has been reformatted to meet the above guidelines.
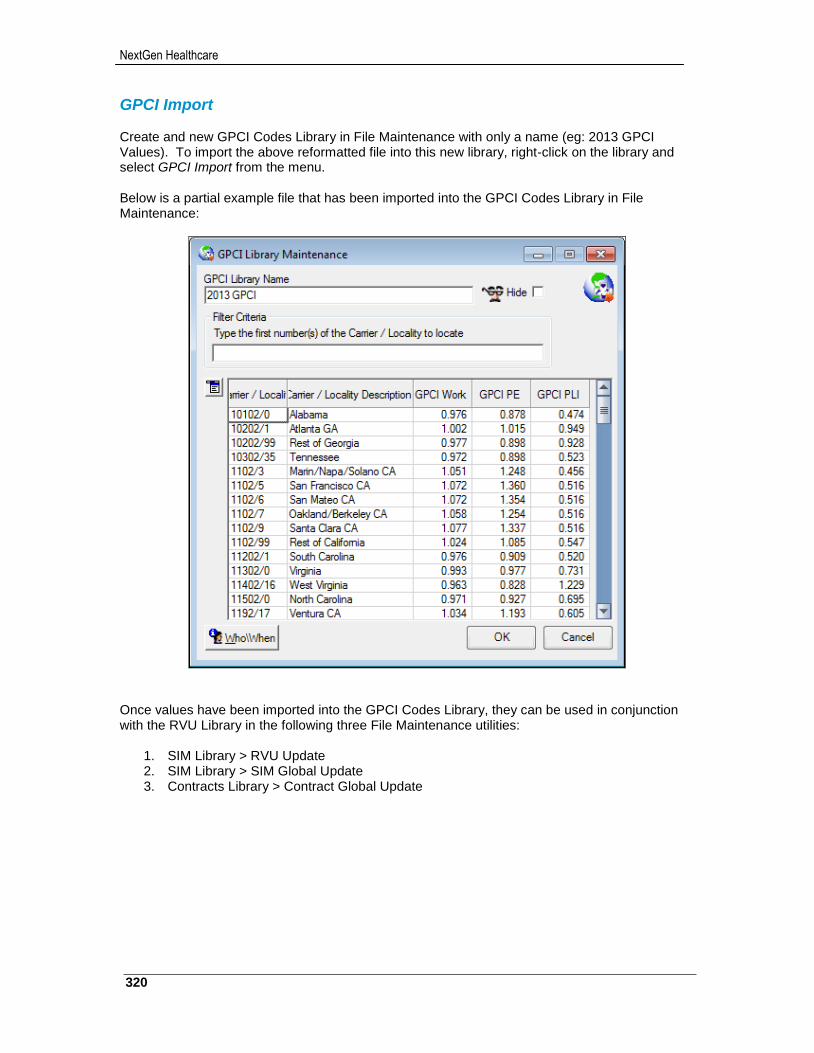
NextGen Healthcare
320
GPCI Import Create and new GPCI Codes Library in File Maintenance with only a name (eg: 2013 GPCI Values). To import the above reformatted file into this new library, right-click on the library and select GPCI Import from the menu. Below is a partial example file that has been imported into the GPCI Codes Library in File Maintenance:
Once values have been imported into the GPCI Codes Library, they can be used in conjunction with the RVU Library in the following three File Maintenance utilities:
1. SIM Library > RVU Update 2. SIM Library > SIM Global Update 3. Contracts Library > Contract Global Update
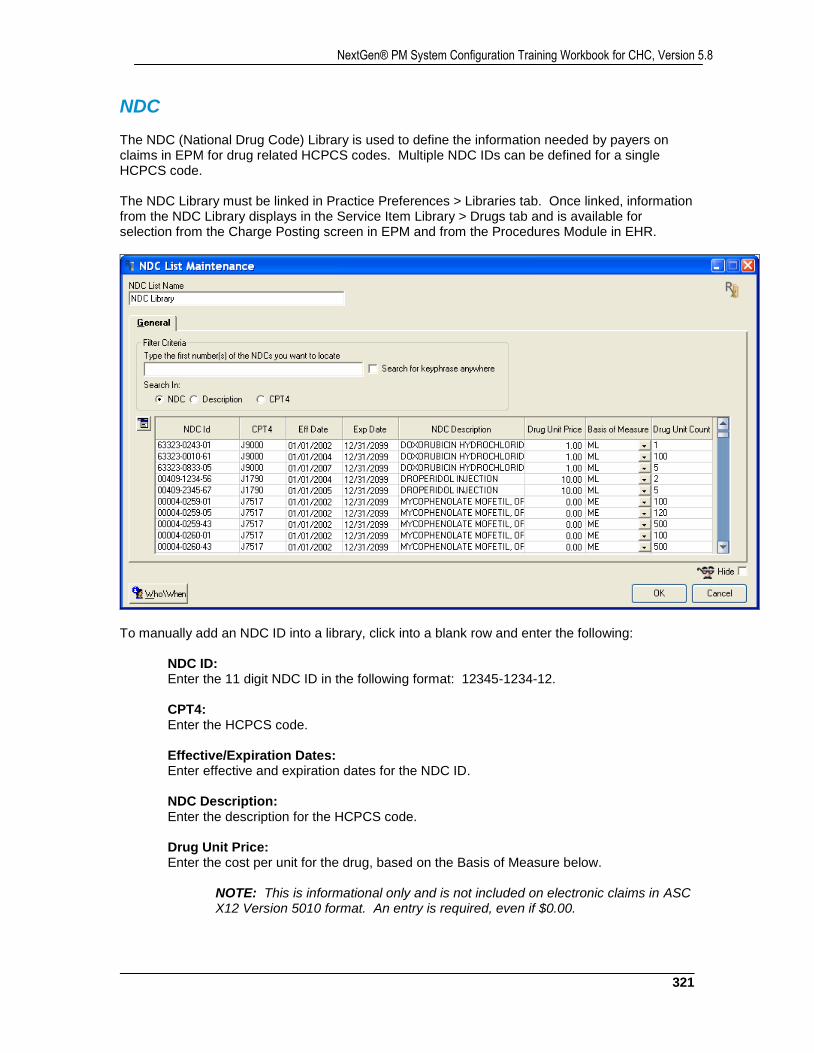
321
NextGen® PM System Configuration Training Workbook for CHC, Version 5.8
NDC The NDC (National Drug Code) Library is used to define the information needed by payers on claims in EPM for drug related HCPCS codes. Multiple NDC IDs can be defined for a single HCPCS code. The NDC Library must be linked in Practice Preferences > Libraries tab. Once linked, information from the NDC Library displays in the Service Item Library > Drugs tab and is available for selection from the Charge Posting screen in EPM and from the Procedures Module in EHR.
To manually add an NDC ID into a library, click into a blank row and enter the following:
NDC ID: Enter the 11 digit NDC ID in the following format: 12345-1234-12. CPT4: Enter the HCPCS code. Effective/Expiration Dates: Enter effective and expiration dates for the NDC ID. NDC Description: Enter the description for the HCPCS code. Drug Unit Price: Enter the cost per unit for the drug, based on the Basis of Measure below.
NOTE: This is informational only and is not included on electronic claims in ASC X12 Version 5010 format. An entry is required, even if $0.00.
NextGen Healthcare
322
Basis of Measure: Select the appropriate units for the drug. Options include:
International Unit (F2) Gram (GR) Milligram (ME) Milliliter (ML) Unit (UN)
Drug Unit Count: Enter the number of units per dose for the drug, based on the Basis of Measure above.
IMPORTANT NOTE: In order for NDC information to be included on electronic claims, the following two options must be selected in the Payers table > System tab > Electronic Claims sub-tab:
Enable NDC coding for electronic claims: Select this check-box to include the National Drug Code (NDC) on electronic claims for the payer. NDC information is defined in the NDC Library which then defaults to the SIM Library > Drugs tab. Populate 2410 CTP segment: Select this option to include NDC “Drug Unit Count” and “Basis of Measure” on electronic claims for the payer. NDC information is defined in the NDC Library which then defaults to the SIM Library > Drugs tab.
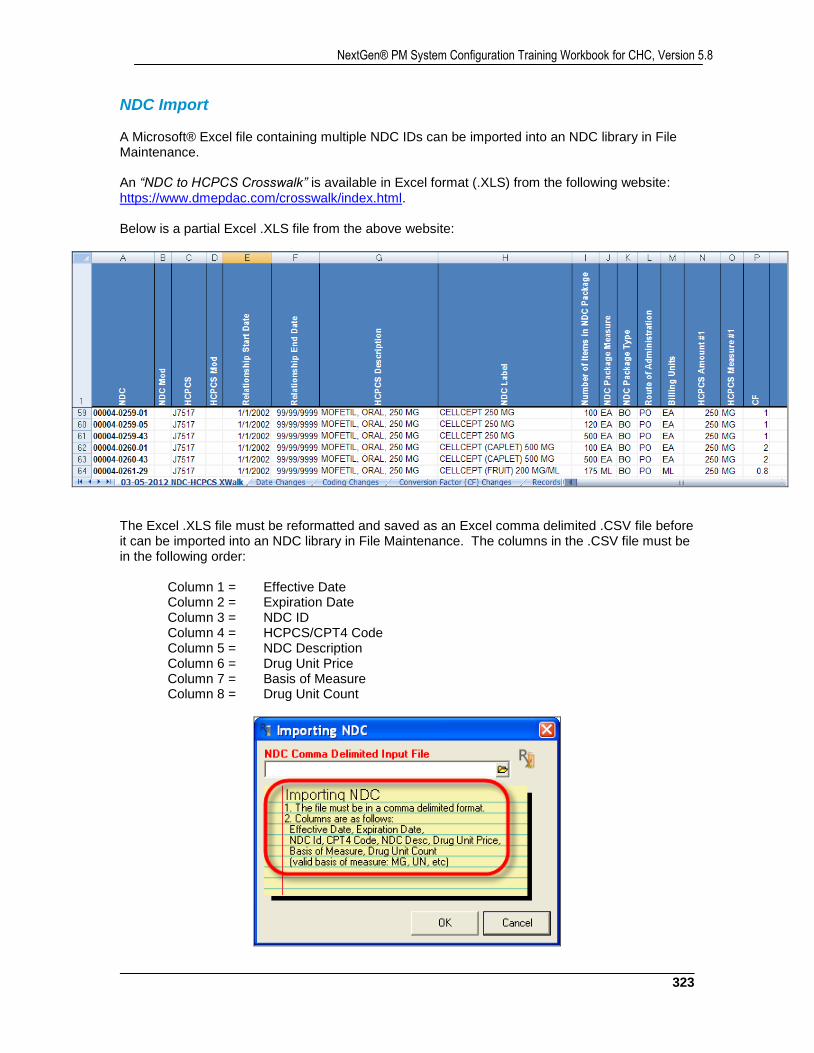
323
NextGen® PM System Configuration Training Workbook for CHC, Version 5.8
NDC Import A Microsoft® Excel file containing multiple NDC IDs can be imported into an NDC library in File Maintenance. An “NDC to HCPCS Crosswalk” is available in Excel format (.XLS) from the following website: https://www.dmepdac.com/crosswalk/index.html. Below is a partial Excel .XLS file from the above website:
The Excel .XLS file must be reformatted and saved as an Excel comma delimited .CSV file before it can be imported into an NDC library in File Maintenance. The columns in the .CSV file must be in the following order:
Column 1 = Effective Date Column 2 = Expiration Date Column 3 = NDC ID Column 4 = HCPCS/CPT4 Code Column 5 = NDC Description Column 6 = Drug Unit Price Column 7 = Basis of Measure Column 8 = Drug Unit Count
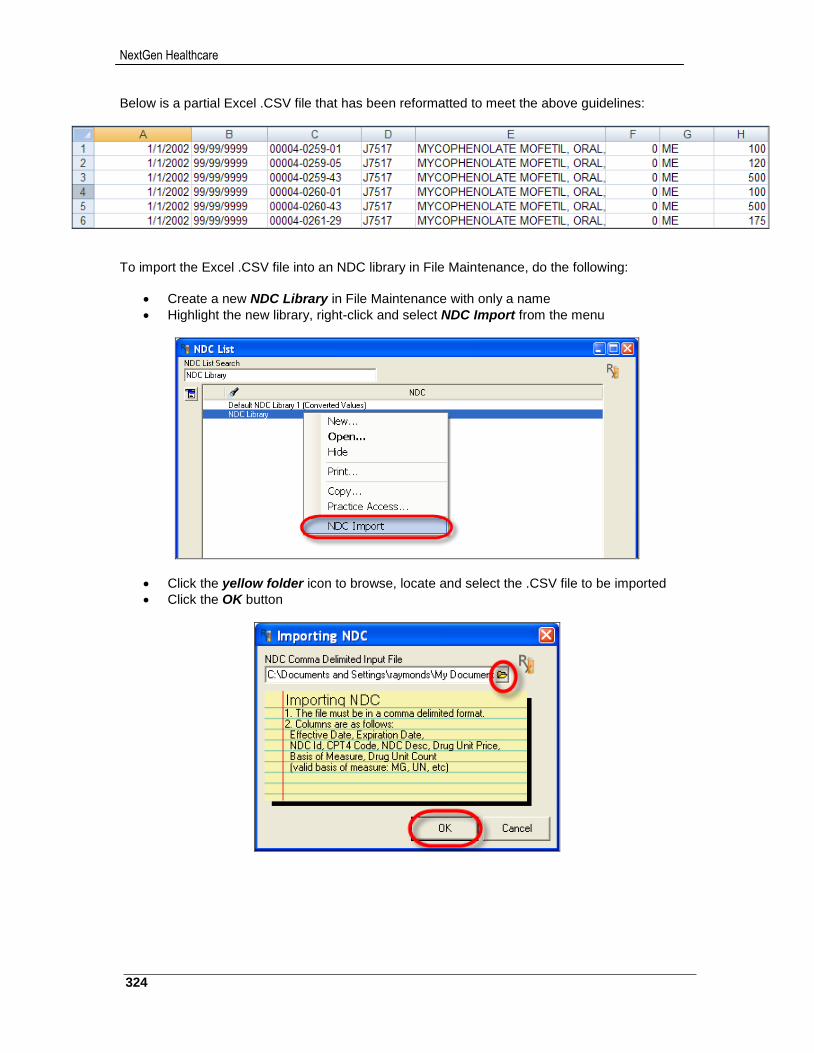
NextGen Healthcare
324
Below is a partial Excel .CSV file that has been reformatted to meet the above guidelines:
To import the Excel .CSV file into an NDC library in File Maintenance, do the following:
Create a new NDC Library in File Maintenance with only a name
Highlight the new library, right-click and select NDC Import from the menu
Click the yellow folder icon to browse, locate and select the .CSV file to be imported
Click the OK button
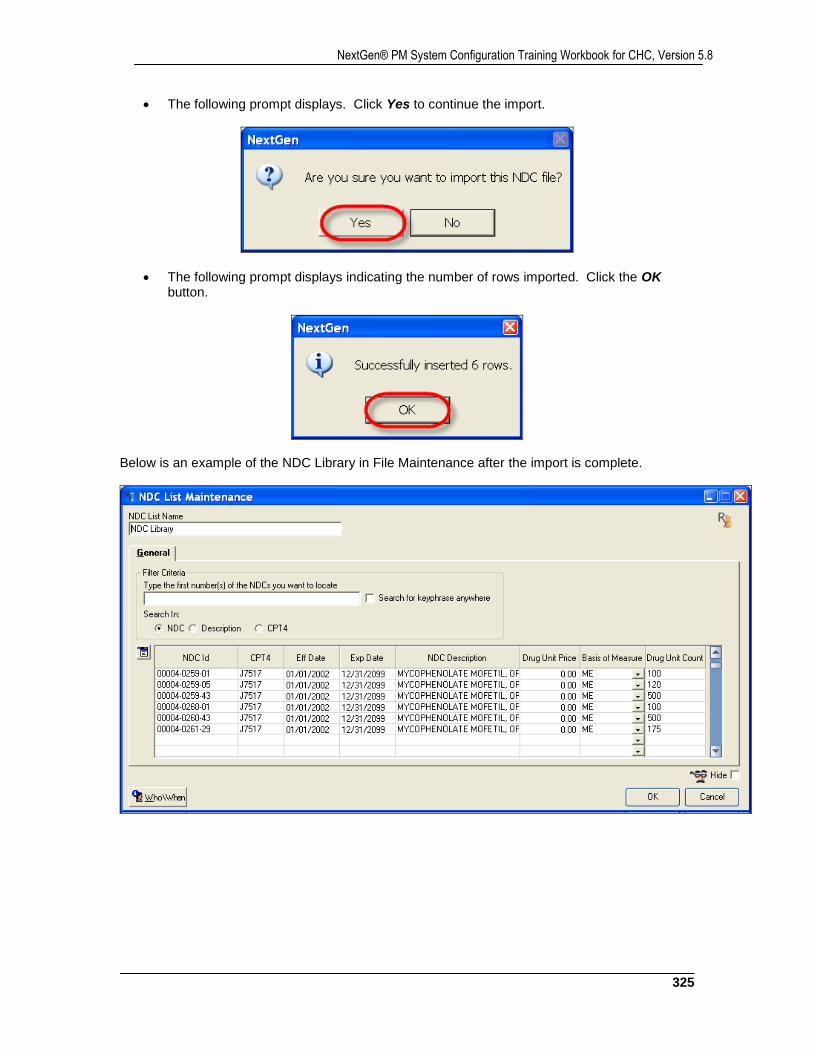
325
NextGen® PM System Configuration Training Workbook for CHC, Version 5.8
The following prompt displays. Click Yes to continue the import.
The following prompt displays indicating the number of rows imported. Click the OK button.
Below is an example of the NDC Library in File Maintenance after the import is complete.
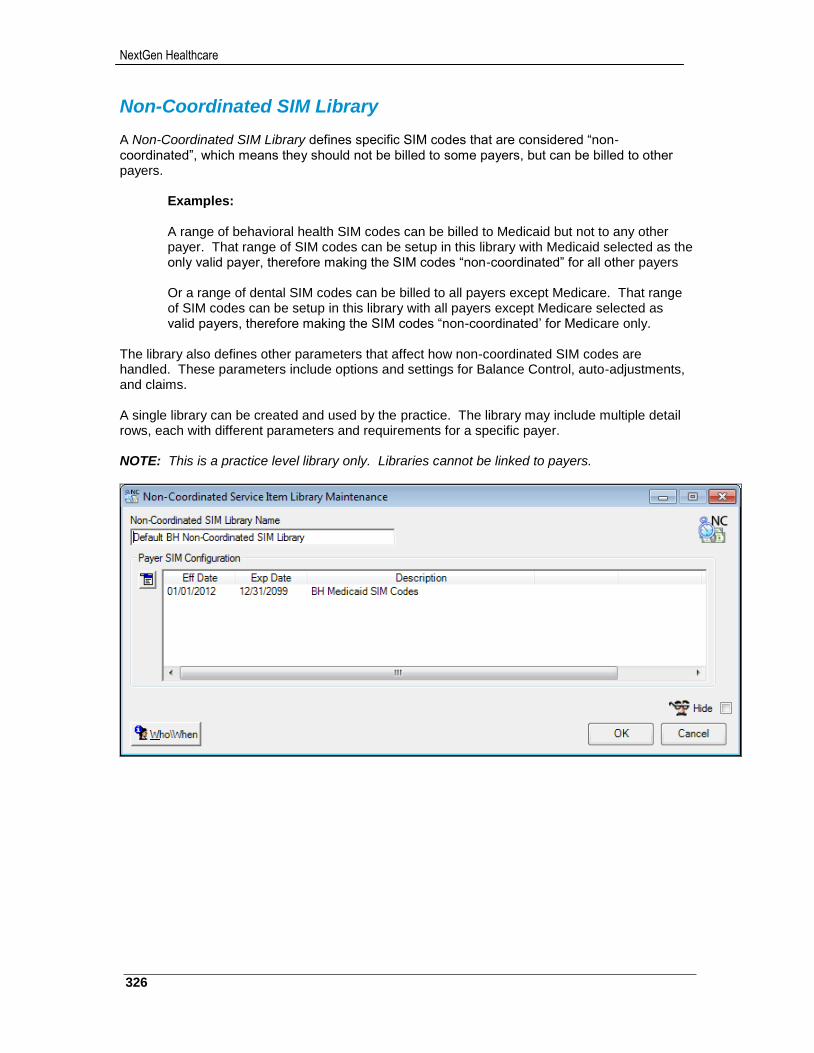
NextGen Healthcare
326
Non-Coordinated SIM Library A Non-Coordinated SIM Library defines specific SIM codes that are considered “non-coordinated”, which means they should not be billed to some payers, but can be billed to other payers.
Examples:
A range of behavioral health SIM codes can be billed to Medicaid but not to any other payer. That range of SIM codes can be setup in this library with Medicaid selected as the only valid payer, therefore making the SIM codes “non-coordinated” for all other payers
Or a range of dental SIM codes can be billed to all payers except Medicare. That range of SIM codes can be setup in this library with all payers except Medicare selected as valid payers, therefore making the SIM codes “non-coordinated’ for Medicare only.
The library also defines other parameters that affect how non-coordinated SIM codes are handled. These parameters include options and settings for Balance Control, auto-adjustments, and claims. A single library can be created and used by the practice. The library may include multiple detail rows, each with different parameters and requirements for a specific payer. NOTE: This is a practice level library only. Libraries cannot be linked to payers.
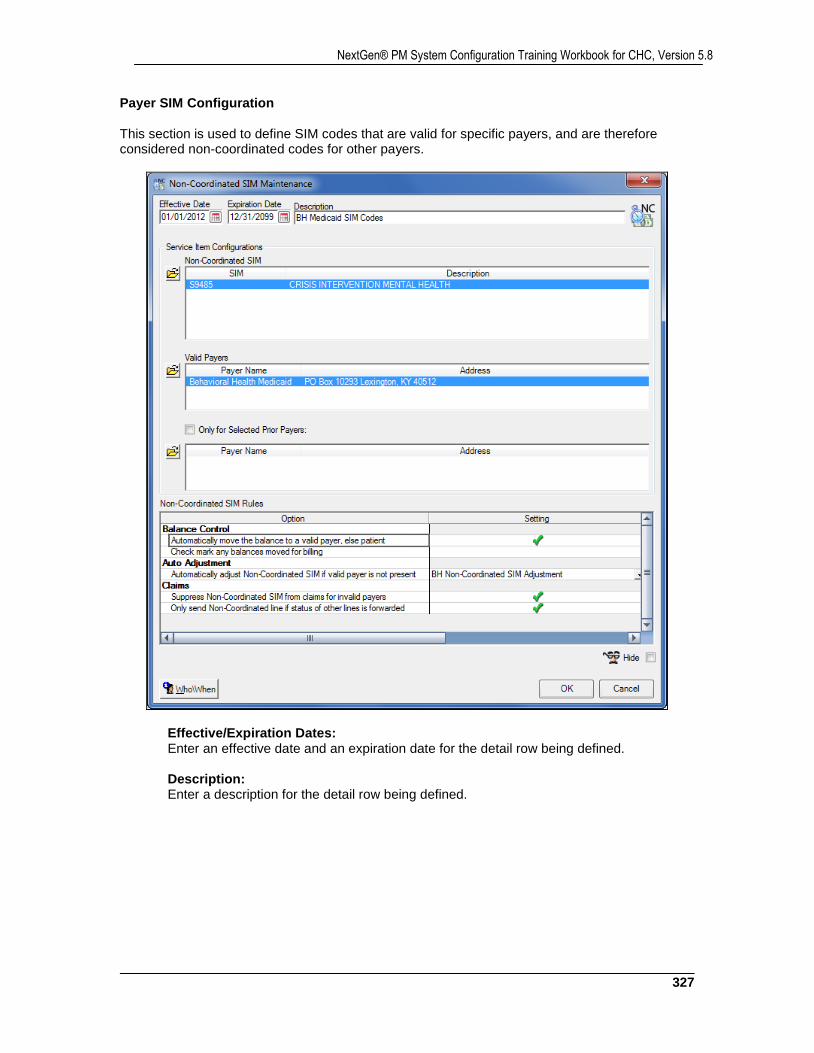
327
NextGen® PM System Configuration Training Workbook for CHC, Version 5.8
Payer SIM Configuration This section is used to define SIM codes that are valid for specific payers, and are therefore considered non-coordinated codes for other payers.
Effective/Expiration Dates: Enter an effective date and an expiration date for the detail row being defined.
Description: Enter a description for the detail row being defined.
NextGen Healthcare
328
Service Item Configurations
Non-Coordinated SIM: From the yellow folder icon, select one or more non-coordinated SIM codes that should only be billed to specific payers.
Example: Select SIM codes that should only be billed to Medicaid.
Valid Payers: From the yellow folder icon, select one or more payers. The non-coordinated SIM code(s) selected in the previous section are valid and billable codes for the payer(s) selected here. The non-coordinated SIM codes are not valid and should not be billed to all other payers.
Example: Select Medicaid to indicate the above SIM codes are valid only for Medicaid.
Only for Selected Prior Payers: Select this check-box to enable the next parameter. From the yellow folder icon, select one or more prior payers, if applicable.
If one or more payers are selected here, this Non-Coordinated SIM / Valid Payer detail row will only apply when one of these payers is prior to a valid payer on an encounter.
If no payers are selected here (blank), this Non-Coordinated SIM / Valid Payer detail row will apply when any payer is prior to a valid payer on an encounter.
Example: Select Medicare to indicate the above SIM codes that are valid for Medicaid are to be considered non-coordinated SIM codes for Medicare only when Medicare is the payer prior to Medicaid on an encounter. (eg: Primary = Medicare / Secondary = Medicaid)
Non-Coordinated SIM Rules
Balance Control: Automatically move the balance to a valid payer, else patient: Select this option if each non-coordinated SIM charge should be moved to the first valid payer bucket in Balance Control. If this option is selected and there is no valid payer on the encounter, each non-coordinated SIM charge will be moved to the Pat Amt bucket in Balance Control.
Check mark any balances moved for billing: Select this option if each non-coordinated SIM charge moved to a valid payer bucket should be green checked so those charges get billed to the valid payer in the next billing/claims process.
Auto Adjustment:
Automatically adjust Non-Coordinated SIM if valid payer is not present: If there is no valid payer on the encounter, each non-coordinated SIM charge was moved to the Pat Amt bucket in Balance Control, and the patient should not be responsible to pay for those charges, select the patient adjustment transaction code to be used to auto-adjust the non-coordinated SIM charges to a balance of $0.00.
329
NextGen® PM System Configuration Training Workbook for CHC, Version 5.8
Claims:
Suppress Non-Coordinated SIM from claims for invalid payers: Select this option to prevent non-coordinated SIM codes from appearing on claims for payers other than valid payers.
NOTE: This option applies only if the Balance Control > “Automatically move the balance to a valid payer, else patient” option was not selected above.
Only send Non-Coordinated line if status of other lines is forwarded: Select this option if claims for a valid payer should include only non-coordinated SIM charges when the other charges were forwarded to the valid payer by the prior payer.
Example: A charge is entered that is to be billed to Medicare (primary) and Medicaid (secondary), and a second non-coordinated charge is entered that is to be billed to Medicaid (secondary) only. A claim is created for Medicare that includes only the first charge. A Medicare transaction is entered on the first charge and the balance is forwarded to Medicaid. When the transaction batch is posted, only the non-coordinated second charge is flagged to bill to Medicaid. The Medicaid claim will not include the first charge since it was already forwarded to Medicaid by Medicare.
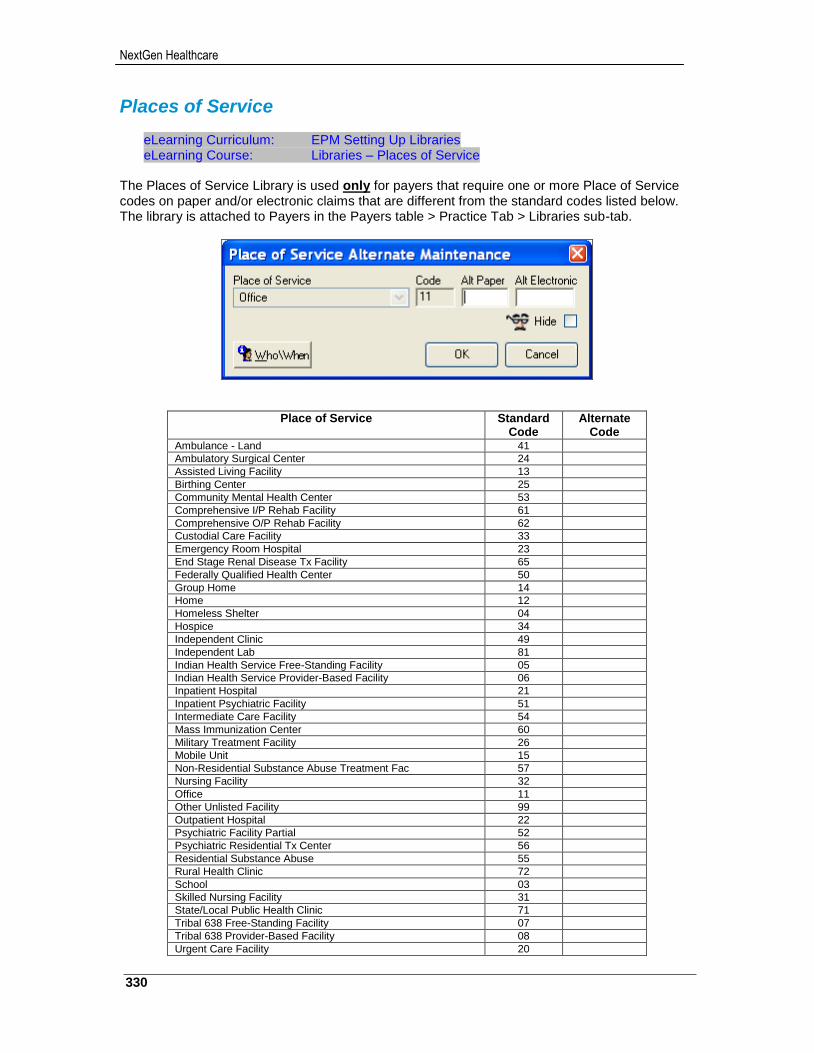
NextGen Healthcare
330
Places of Service
eLearning Curriculum: EPM Setting Up Libraries eLearning Course: Libraries – Places of Service
The Places of Service Library is used only for payers that require one or more Place of Service codes on paper and/or electronic claims that are different from the standard codes listed below. The library is attached to Payers in the Payers table > Practice Tab > Libraries sub-tab.
Place of Service Standard Code
Alternate Code
Ambulance - Land 41
Ambulatory Surgical Center 24
Assisted Living Facility 13
Birthing Center 25
Community Mental Health Center 53
Comprehensive I/P Rehab Facility 61
Comprehensive O/P Rehab Facility 62
Custodial Care Facility 33
Emergency Room Hospital 23
End Stage Renal Disease Tx Facility 65
Federally Qualified Health Center 50
Group Home 14
Home 12
Homeless Shelter 04
Hospice 34
Independent Clinic 49
Independent Lab 81
Indian Health Service Free-Standing Facility 05
Indian Health Service Provider-Based Facility 06
Inpatient Hospital 21
Inpatient Psychiatric Facility 51
Intermediate Care Facility 54
Mass Immunization Center 60
Military Treatment Facility 26
Mobile Unit 15
Non-Residential Substance Abuse Treatment Fac 57
Nursing Facility 32
Office 11
Other Unlisted Facility 99
Outpatient Hospital 22
Psychiatric Facility Partial 52
Psychiatric Residential Tx Center 56
Residential Substance Abuse 55
Rural Health Clinic 72
School 03
Skilled Nursing Facility 31
State/Local Public Health Clinic 71
Tribal 638 Free-Standing Facility 07
Tribal 638 Provider-Based Facility 08
Urgent Care Facility 20
331
NextGen® PM System Configuration Training Workbook for CHC, Version 5.8
Reason Codes
eLearning Curriculum: EPM Setting Up Libraries eLearning Course: Libraries – Reason Codes
Reason Codes are used in NextGen® EPM during Payment Entry. They are a way to record additional information regarding the transaction (payment, adjustment, refund) being entered. Default Reason Codes Libraries must be attached in Practice Preferences > Transactions tab. One library is used when entering transactions from all payers. The other library is used when entering transactions from patients. The same library can be used for both payer and patient transactions if desired. Additional payer-specific libraries can be created, if needed, and attached to those Payers in the Payers table > Practice Tab > Transactions sub-tab.
HIPAA X12 Standard Reason Codes The “HIPAA X12 Standard Reason Codes” library comes pre-installed and consists of standardized codes typically received from payers in 835 ERA (Electronic Remittance Advice) files and on paper EOB (Explanation of Benefit) forms. Specific parameters and options can be modified for individual codes if needed. Any code(s) received in an ERA file that does not already exist in the HIPAA X12 will be added to the library “on-the-fly”, if the appropriate option is selected in the setup of the payer’s Remittance Profile Library. It is recommended that the “HIPAA X12 Standard Reason Codes” be selected as the default library in Practice Preferences > Transactions tab and therefore used when posting transactions from all payers. If it is desired to modify parameters for one or more reason codes for a specific payer, the “HIPAA X12 Standard Reason Codes” library should be copied. The new library created from the copy can then be modified as needed and linked to the specific payer. IMPORTANT NOTE: The “HIPAA X12 Standard Reason Codes” library name should not be changed as this is the name referenced by the COB secondary electronic claims functionality in NextGen® EPM. The HIPAA X12 Standard Reason Codes library consists of codes from five categories:
1. CO Contractual Obligation Provider is financially liable 2. CR Correction and Reversal No financial liability 3. OA Other Adjustment No financial liability 4. PI Payer Initiated No financial liability specified 5. PR Patient Responsibility Patient is financially liable
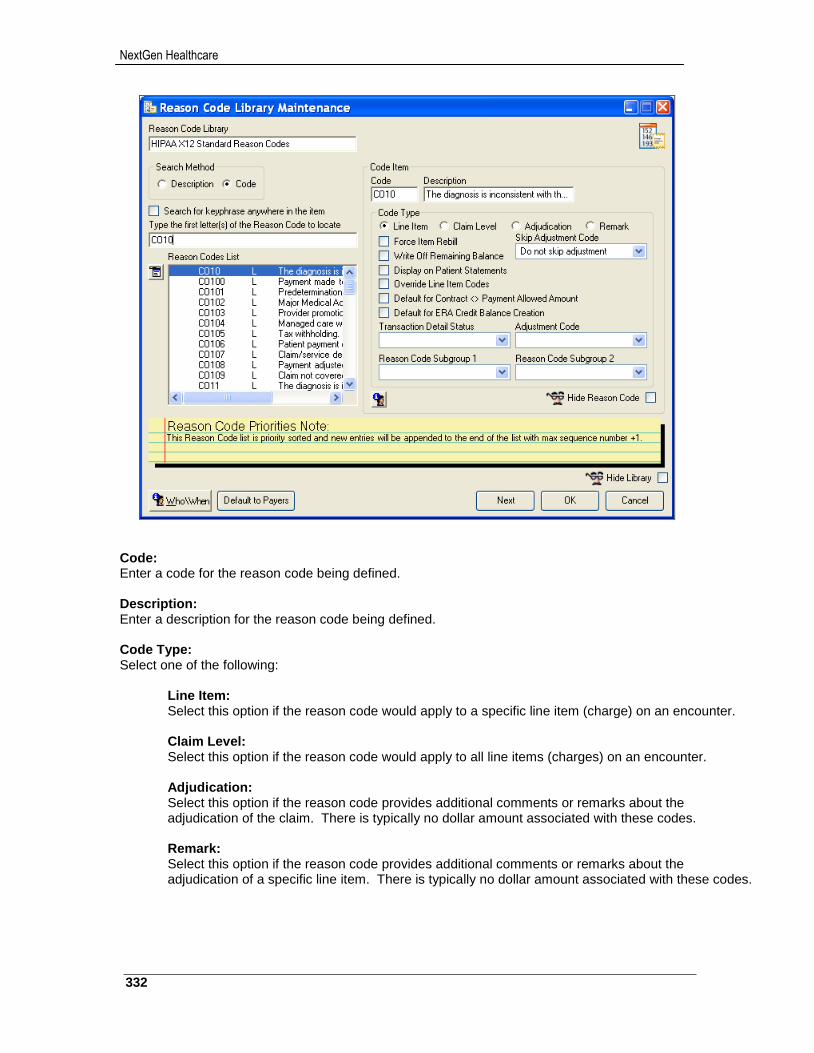
NextGen Healthcare
332
Code: Enter a code for the reason code being defined. Description: Enter a description for the reason code being defined. Code Type: Select one of the following:
Line Item: Select this option if the reason code would apply to a specific line item (charge) on an encounter.
Claim Level: Select this option if the reason code would apply to all line items (charges) on an encounter. Adjudication: Select this option if the reason code provides additional comments or remarks about the adjudication of the claim. There is typically no dollar amount associated with these codes.
Remark: Select this option if the reason code provides additional comments or remarks about the adjudication of a specific line item. There is typically no dollar amount associated with these codes.
333
NextGen® PM System Configuration Training Workbook for CHC, Version 5.8
Force Item Rebill: Select this check-box if the reason code, when used, should flag the charge to be rebilled on another claim to the same insurance. Write Off Remaining Balance: Select this check-box if the reason code, when used, should adjust off the remaining balance of the charge to $0.00. Display on Patient Statements: Select this check-box if the reason code and description, when used, should appear on patient statements.
NOTE: The “Display detail information on statement” option must be selected in Practice Preferences > Statements tab.
Override Line Item Codes: Select this check-box if the reason code, when used, should override all line item reason codes previously entered on the transaction. Skip Adjustment Code: Select one of the following for the reason code when used in the ERA process:
Do not skip Adjustment
Skip ERA Adjustment
Use $0 Adj Amount Default for Contract <> Payment Allowed Amount: Select this check-box if the reason code should automatically default onto any line item where the allowed amount specified on the transaction does not match the allowed amount defined in the contract for the payer. Transaction Detail Status: Select the transaction status that should automatically default onto any line item where the reason code is used. Adjustment Code: Select the adjustment transaction code that should be used if the “Write Off Remaining Balance” check-box above is selected.
NOTE: The adjustment code selected here is used to write-off the remaining balance when the transaction was processed via ERA. The adjustment code selected in Practice Preferences > Transactions tab is used to write-off the remaining balance when the transaction is manually entered.
Default to Payers Button: This button allows the Reason Code library being defined to be attached to all payers within a specified financial class .
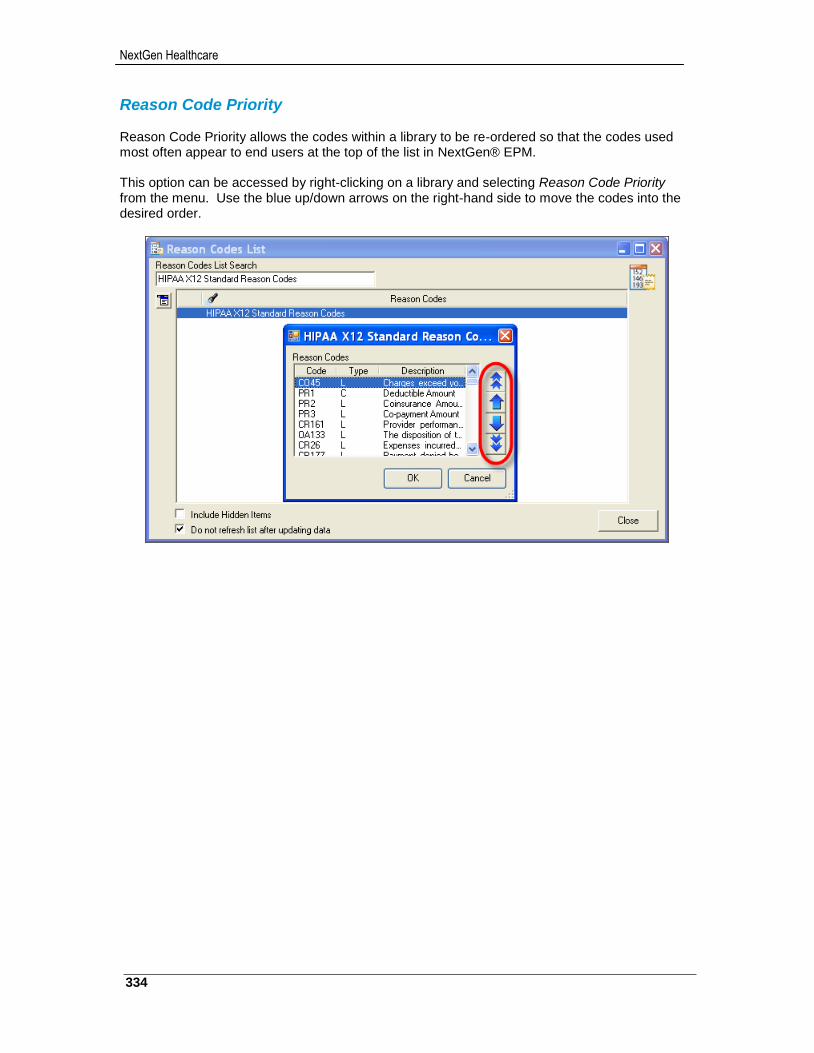
NextGen Healthcare
334
Reason Code Priority Reason Code Priority allows the codes within a library to be re-ordered so that the codes used most often appear to end users at the top of the list in NextGen® EPM. This option can be accessed by right-clicking on a library and selecting Reason Code Priority from the menu. Use the blue up/down arrows on the right-hand side to move the codes into the desired order.
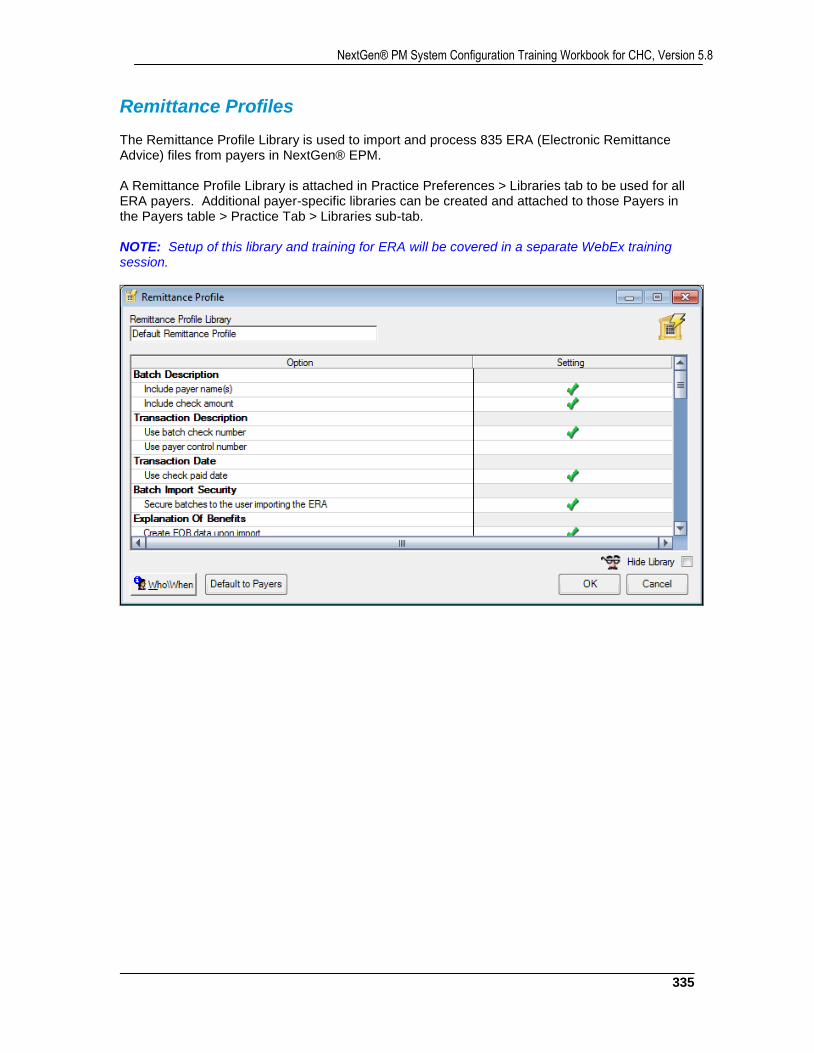
335
NextGen® PM System Configuration Training Workbook for CHC, Version 5.8
Remittance Profiles The Remittance Profile Library is used to import and process 835 ERA (Electronic Remittance Advice) files from payers in NextGen® EPM. A Remittance Profile Library is attached in Practice Preferences > Libraries tab to be used for all ERA payers. Additional payer-specific libraries can be created and attached to those Payers in the Payers table > Practice Tab > Libraries sub-tab. NOTE: Setup of this library and training for ERA will be covered in a separate WebEx training session.
NextGen Healthcare
336
RVU RVU (Relative Value Units) provides a relative comparison between CPT4 codes to account for various components of performing each service. There are four RVU components as follows:
1. Work RVU - The work and/or skill required in performing each service. Practice Expense RVU - The expenses required in performing each service (staff, equipment, supplies, etc.).
2. Non-Facility Practice Expense RVU Services performed outside a facility (eg: Office). 3. Facility Practice Expense RVU Services performed within a facility (eg: ASC, Hospital).
4. Malpractice RVU - The malpractice risk associated with performing each service.
Medicare uses RVU and GPCI values together in a formula to determine physician reimbursement.
Medicare’s Non-Facility Fee Reimbursement Formula: [(Work RVU * Work GPCI) + (Non-Facility PE RVU * PE GPCI) + (Malpractice RVU * PLI GPCI)] * Conversion Factor
Medicare’s Facility Fee Reimbursement Formula:
[(Work RVU * Work GPCI) + (Facility RVU * PE GPCI) + (Malpractice RVU * PLI GPCI)] * Conversion Factor
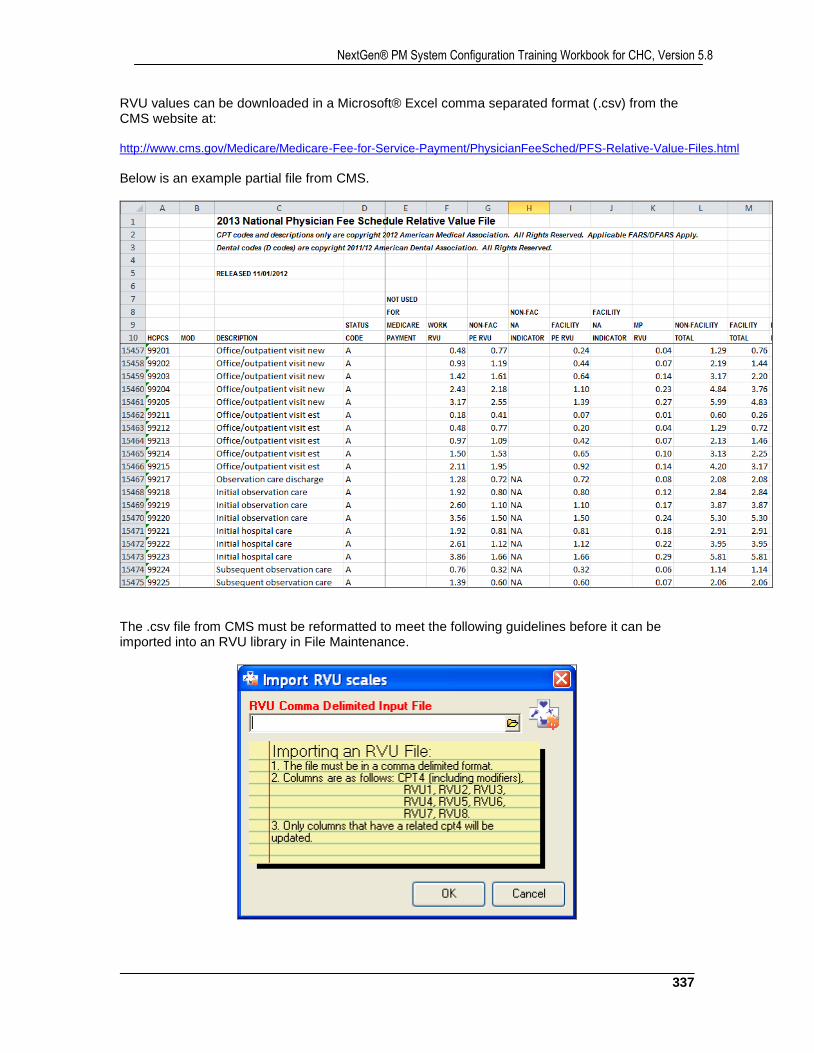
337
NextGen® PM System Configuration Training Workbook for CHC, Version 5.8
RVU values can be downloaded in a Microsoft® Excel comma separated format (.csv) from the CMS website at: http://www.cms.gov/Medicare/Medicare-Fee-for-Service-Payment/PhysicianFeeSched/PFS-Relative-Value-Files.html
Below is an example partial file from CMS.
The .csv file from CMS must be reformatted to meet the following guidelines before it can be imported into an RVU library in File Maintenance.
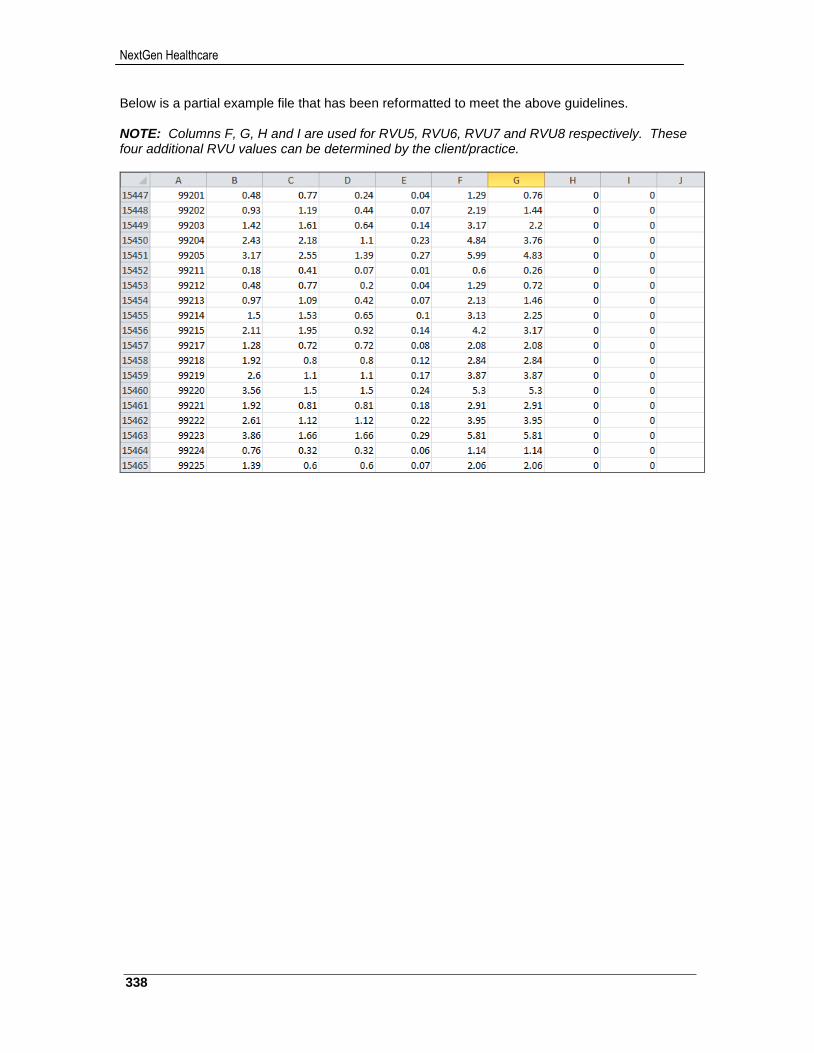
NextGen Healthcare
338
Below is a partial example file that has been reformatted to meet the above guidelines. NOTE: Columns F, G, H and I are used for RVU5, RVU6, RVU7 and RVU8 respectively. These four additional RVU values can be determined by the client/practice.
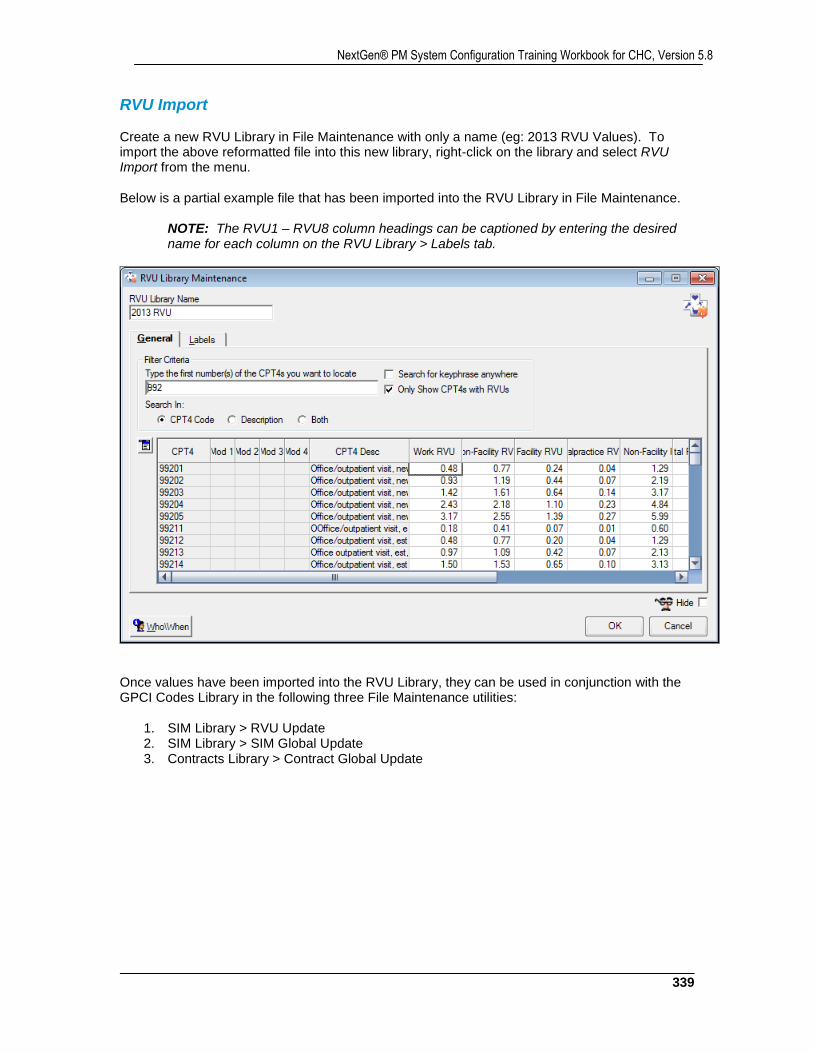
339
NextGen® PM System Configuration Training Workbook for CHC, Version 5.8
RVU Import Create a new RVU Library in File Maintenance with only a name (eg: 2013 RVU Values). To import the above reformatted file into this new library, right-click on the library and select RVU Import from the menu. Below is a partial example file that has been imported into the RVU Library in File Maintenance.
NOTE: The RVU1 – RVU8 column headings can be captioned by entering the desired name for each column on the RVU Library > Labels tab.
Once values have been imported into the RVU Library, they can be used in conjunction with the GPCI Codes Library in the following three File Maintenance utilities:
1. SIM Library > RVU Update 2. SIM Library > SIM Global Update 3. Contracts Library > Contract Global Update
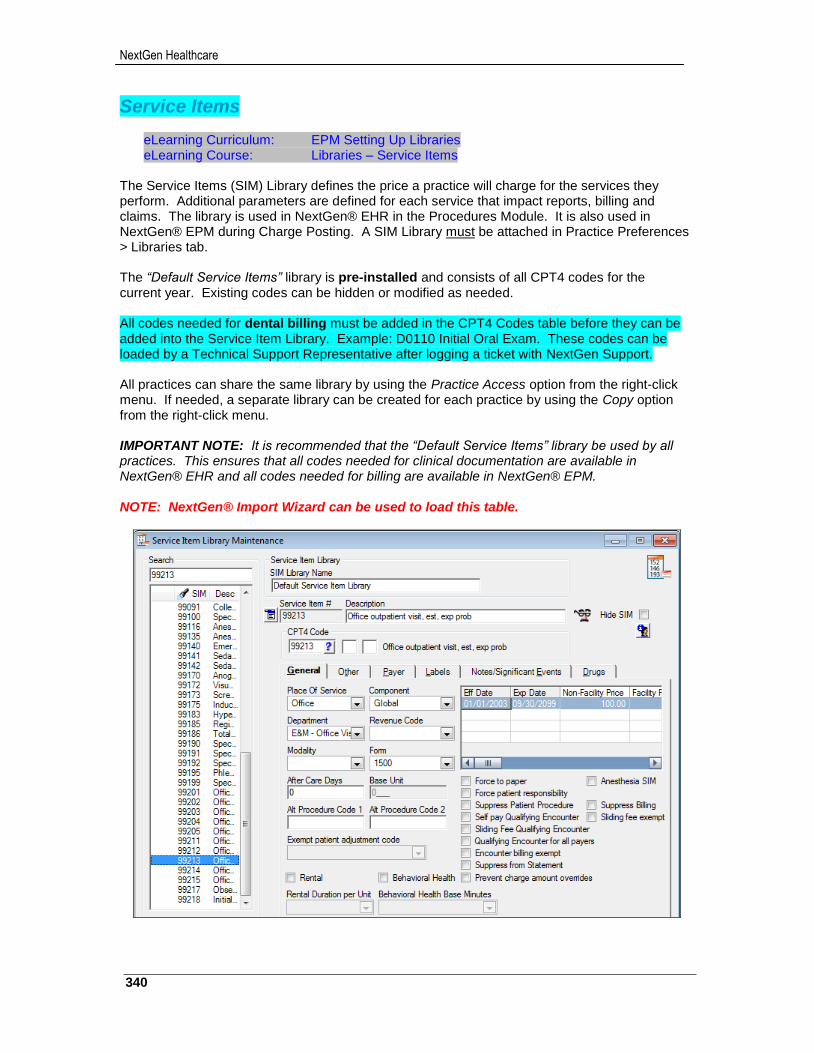
NextGen Healthcare
340
Service Items
eLearning Curriculum: EPM Setting Up Libraries eLearning Course: Libraries – Service Items
The Service Items (SIM) Library defines the price a practice will charge for the services they perform. Additional parameters are defined for each service that impact reports, billing and claims. The library is used in NextGen® EHR in the Procedures Module. It is also used in NextGen® EPM during Charge Posting. A SIM Library must be attached in Practice Preferences > Libraries tab. The “Default Service Items” library is pre-installed and consists of all CPT4 codes for the current year. Existing codes can be hidden or modified as needed. All codes needed for dental billing must be added in the CPT4 Codes table before they can be added into the Service Item Library. Example: D0110 Initial Oral Exam. These codes can be loaded by a Technical Support Representative after logging a ticket with NextGen Support. All practices can share the same library by using the Practice Access option from the right-click menu. If needed, a separate library can be created for each practice by using the Copy option from the right-click menu. IMPORTANT NOTE: It is recommended that the “Default Service Items” library be used by all practices. This ensures that all codes needed for clinical documentation are available in NextGen® EHR and all codes needed for billing are available in NextGen® EPM. NOTE: NextGen® Import Wizard can be used to load this table.
341
NextGen® PM System Configuration Training Workbook for CHC, Version 5.8
Search: Located on the left side of the window, this section enables users to search for specific Service Items. If there are fewer than 50 Service Items defined in the library, all codes will automatically display in the Search list. If there are more than 50 Service Items defined in the library, codes do not automatically display. Instead, the user must manually enter the SIM code or the first few digits of the code in the Search field.
To find a specific SIM code, type the first few digits of the code. SIM codes with matching digits will display.
To list all SIM codes, type an asterisk. SIM Library Name: Enter the Service Item Library name here to find that SIM. Service Item #: Defaults from the CPT4 code entered. The SIM code can be modified if needed. It is the code entered/selected by end users.
NOTE: SIM codes that include a modifier as part of the code should not include additional characters or spaces.
Correct Format: Incorrect Format: 71010TC 71010-TC or 71010 TC
7101026 71010-26 or 71010 26 Description: Defaults from the CPT4 code entered. The description can be modified if needed. It is the description seen by end users. CPT4 Code: Enter the CPT4 code for the Service Item # (SIM code) being defined. The CPT4 code appears on claims.
NOTE: CPT4 codes that include a modifier as part of the code should not include additional characters or spaces.
Correct Format: Incorrect Format: 71010TC 71010-TC or 71010 TC
7101026 71010-26 or 71010 26 Modifier 1 and 2: Enter one or two modifiers in the fields to the right of the CPT4 Code. The modifier(s) will default on the Charge Posting screen for the SIM code being defined. Hide SIM: Select this check-box if you want to hide the selected SIM code. In the Search list, the Hidden icon displays next to hidden SIM codes. Users cannot access hidden SIM codes.
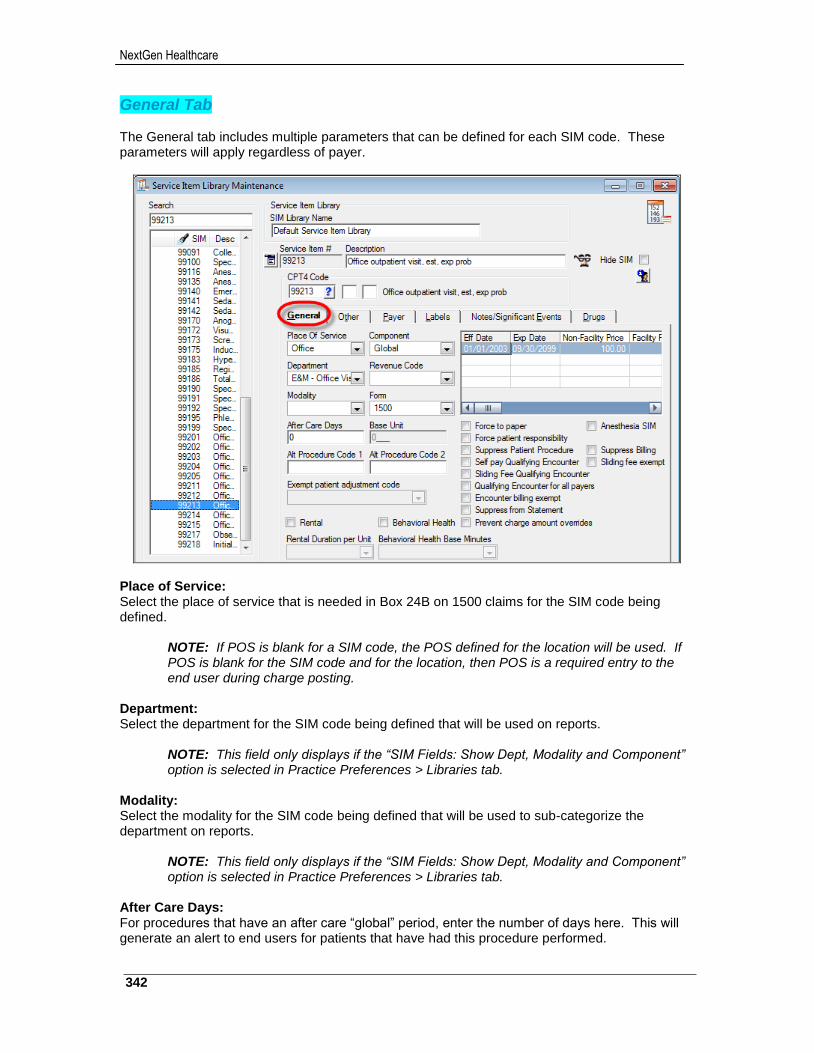
NextGen Healthcare
342
General Tab The General tab includes multiple parameters that can be defined for each SIM code. These parameters will apply regardless of payer.
Place of Service: Select the place of service that is needed in Box 24B on 1500 claims for the SIM code being defined.
NOTE: If POS is blank for a SIM code, the POS defined for the location will be used. If POS is blank for the SIM code and for the location, then POS is a required entry to the end user during charge posting.
Department: Select the department for the SIM code being defined that will be used on reports.
NOTE: This field only displays if the “SIM Fields: Show Dept, Modality and Component” option is selected in Practice Preferences > Libraries tab.
Modality: Select the modality for the SIM code being defined that will be used to sub-categorize the department on reports.
NOTE: This field only displays if the “SIM Fields: Show Dept, Modality and Component” option is selected in Practice Preferences > Libraries tab.
After Care Days: For procedures that have an after care “global” period, enter the number of days here. This will generate an alert to end users for patients that have had this procedure performed.

343
NextGen® PM System Configuration Training Workbook for CHC, Version 5.8
Component: Select Global, Professional or Technical for the SIM code being defined. This is not used on claims or reports. It is informational only.
NOTE: This field only displays if the “SIM Fields: Show Dept, Modality and Component” option is selected in Practice Preferences > Libraries tab.
Revenue Code: Select the revenue code for the SIM code being defined. A 4-digit revenue code is required for any SIM code that may be billed on a UB claim form. The setup in the Payers table determines which payers will generate UB claims. Form: Select 1500 for all non-dental SIM codes. The setup in the Payers table determines which payers will generate UB claims. Select ADA for all dental SIM codes. The setup in the Payers table determines which payers will generate ADA claims. The SIM Library > Payers tab is used for dental payers that require a 1500 claim. Base Unit: For anesthesia codes, enter the number of base units for the SIM code being defined. This is used in conjunction with the “Anesthesia SIM” check-box below. Alt Procedure Code 1 & 2: These fields are used for interfaces between NextGen and external systems. Enter the cross-reference code(s) used by the external system for the SIM code being defined. Exempt patient adjustment code: Select the adjustment transaction code that should be used to adjust the SIM code being defined down to a balance of $0.00. This is used in conjunction with the “Encounter billing exempt” check-box below. Rental: Select this check-box if the SIM code being defined will be used with recurring DME rental billing. Rental Duration per Unit: If the “Rental” check-box was selected above, select one of the following;
Day: The price defined for the rental SIM code is per day Month: The price defined for the rental SIM code is per month
Behavioral Health: Select this check-box if the SIM code being defined will be used with Behavioral Health timed billing. Behavioral Health Base Minutes: If the “Behavioral Health” check-box was selected above, select one of the following;
15 minutes: The price defined for the SIM code is per 15 minutes 30 minutes: The price defined for the SIM code is per 30 minutes 60 minutes: The price defined for the SIM code is per 60 minutes 240 minutes: The price defined for the SIM code is per 240 minutes Use default units: The price defined for the SIM code is not based on time
NextGen Healthcare
344
Effective / Expiration Date: Enter the effective and expiration dates for the price to be defined for the SIM code. NOTE: Additional rows are available for future updates to prices. Non-Facility Price: Enter the price for the SIM code when the service is performed in a non-facility setting (eg: Office) Facility Price: Enter the price for the SIM code when the service is performed in a facility setting (eg: Hospital) Cost to Perform: Enter the amount is costs the practice to perform the SIM code on patients. NOTE: This is for information purposes only. If unknown, leave blank. Time to Perform: Enter the amount of time it takes the practice to perform the SIM code on patients. NOTE: This is for information purposes only. If unknown, leave blank. RVU 1 – RVU 8: Enter up to eight RVU values for the SIM code.
NOTE: RVU values can be entered manually for each SIM code or they can be imported for all SIM codes from an RVU Library using the RVU Update utility.
Additional Price Fields: The following price fields display only if “Advanced SIM Library Mode” has been enabled in Enterprise Preferences > Libraries tab.
IMPORTANT NOTE: Advanced Service Item Library Mode should not be enabled in Enterprise Preferences without fully understanding all of the related maintenance and functionality involved. Once it has been enabled, it cannot be disabled.
UD1 Price / UD1 Price – Facility: Enter a user-defined non-facility price and facility price for the SIM code. These prices are not used during charge posting in EPM. They can be used on reports for comparison purposes. They can also print on claims for specific payers if the “User-defined claims override price” option is selected for the payer on the Payer > Practice tab > Other sub-tab.
NOTE: These two user-defined price fields can be captioned in Enterprise Preferences > Libraries tab.
UD2 Price / UD2 Price – Facility: Enter a user-defined non-facility price and facility price for the SIM code. These prices are not used during charge posting in EPM. They can be used on reports for comparison purposes. They can also print on claims for specific payers if the “User-defined claims override price” option is selected for the payer on the Payer > Practice tab > Other sub-tab.
NOTE: These two user-defined price fields can be captioned in Enterprise Preferences > Libraries tab.
345
NextGen® PM System Configuration Training Workbook for CHC, Version 5.8
Non-Fac Unassigned Price / Fac Unassigned Price: Enter a non-facility price and facility price for the SIM code that will be used during charge posting in EPM on encounters where the “Assignment of Benefits” has been set to “No” in the Chart > Encounters tab > Insurance sub-tab > Verification section.
Force to paper: Select this check-box if the SIM code being defined should never be sent on an electronic claim and should always drop to a paper claim. Force patient responsibility: Select this check-box if the SIM code being defined should never be billed to insurance but always billed directly to the patient. Suppress Patient Procedure: Select this check-box if the SIM code being defined, when entered during charge posting in NextGen® EPM, should not appear on the encounter in NextGen® EHR. Qualifying Encounter Check-Boxes: More information is available at the end of this section regarding Qualifying Encounters on the UDS Report.
Self-pay Qualifying Encounter: Select this check-box if the SIM code being defined is considered a “face-to-face” encounter with a qualified provider for patients with no insurance and it should be counted as a qualifying encounter. Sliding Fee Qualifying Encounter: Select this check-box if the SIM code being defined is considered a “face-to-face” encounter with a qualified provider for patients on a sliding fee schedule and it should be counted as a qualifying encounter. Qualifying Encounter for all payers: Select this check-box if the SIM code being defined is considered a “face-to-face” encounter with a qualified provider for patients with insurance and it should be counted as a qualifying encounter.
Encounter billing exempt: Select this check-box if the SIM code being defined should be charged on a patient encounter but should not be billed. This is used in conjunction with the “Exempt patient adjustment code” field above. Suppress from Statement: Select this check-box to suppress the SIM code being defined from printing on statements. This can be used for SIM codes that must be entered as a charge on the encounter for billing purposes but should not display on the patient’s statement. Prevent charge amount overrides: Select this check-box if users should not be able to override the price defined for the SIM code during Charge Posting in EPM. Anesthesia SIM: Select this check-box for anesthesia SIM codes. This is used in conjunction with the “Base Unit” field above.
NextGen Healthcare
346
Encounter Rate Exempt: Select this check-box if the SIM code being defined should be exempt from Encounter Rate Billing and appear on the claim as a separate line item from the encounter rate code. Suppress Billing: Select this check-box if the SIM code being defined, when entered in the procedures module in NextGen® EHR, should not appear on the encounter in NextGen® EPM for billing. Sliding fee exempt: Select this check-box if the SIM code being defined should be exempt from Sliding Fee Schedule automatic adjustments.
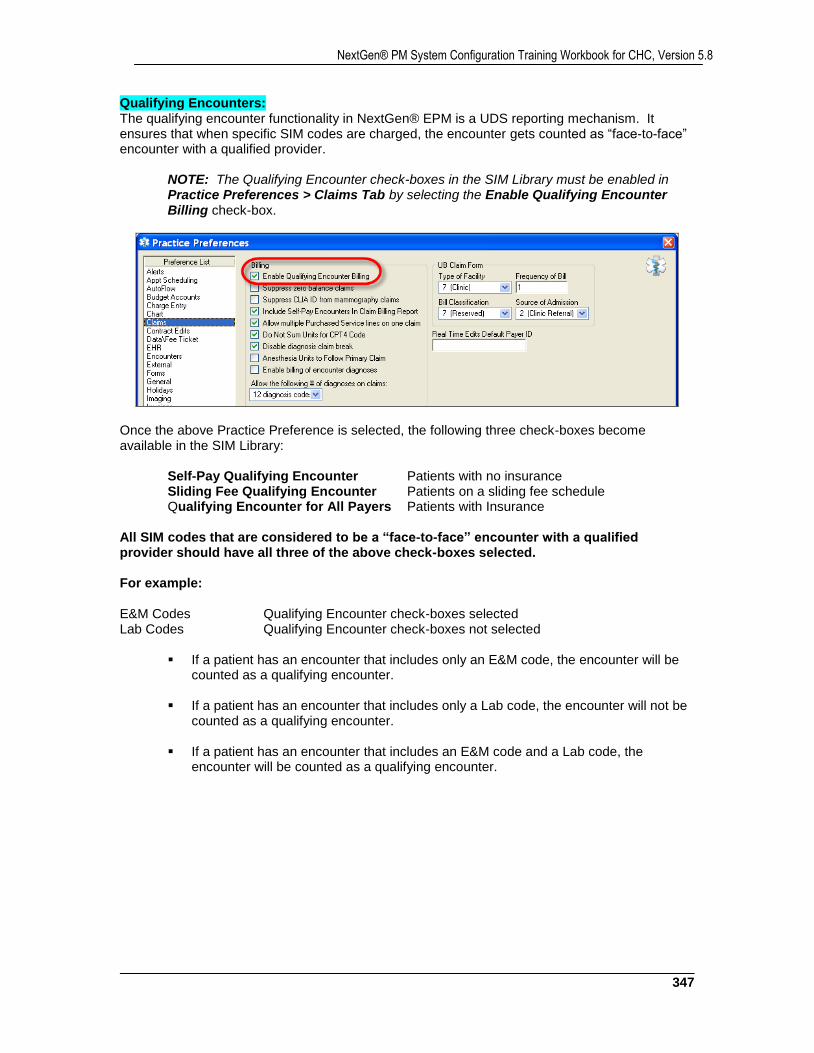
347
NextGen® PM System Configuration Training Workbook for CHC, Version 5.8
Qualifying Encounters: The qualifying encounter functionality in NextGen® EPM is a UDS reporting mechanism. It ensures that when specific SIM codes are charged, the encounter gets counted as “face-to-face” encounter with a qualified provider.
NOTE: The Qualifying Encounter check-boxes in the SIM Library must be enabled in Practice Preferences > Claims Tab by selecting the Enable Qualifying Encounter Billing check-box.
Once the above Practice Preference is selected, the following three check-boxes become available in the SIM Library:
Self-Pay Qualifying Encounter Patients with no insurance Sliding Fee Qualifying Encounter Patients on a sliding fee schedule Qualifying Encounter for All Payers Patients with Insurance
All SIM codes that are considered to be a “face-to-face” encounter with a qualified provider should have all three of the above check-boxes selected. For example: E&M Codes Qualifying Encounter check-boxes selected Lab Codes Qualifying Encounter check-boxes not selected
If a patient has an encounter that includes only an E&M code, the encounter will be
counted as a qualifying encounter.
If a patient has an encounter that includes only a Lab code, the encounter will not be counted as a qualifying encounter.
If a patient has an encounter that includes an E&M code and a Lab code, the
encounter will be counted as a qualifying encounter.
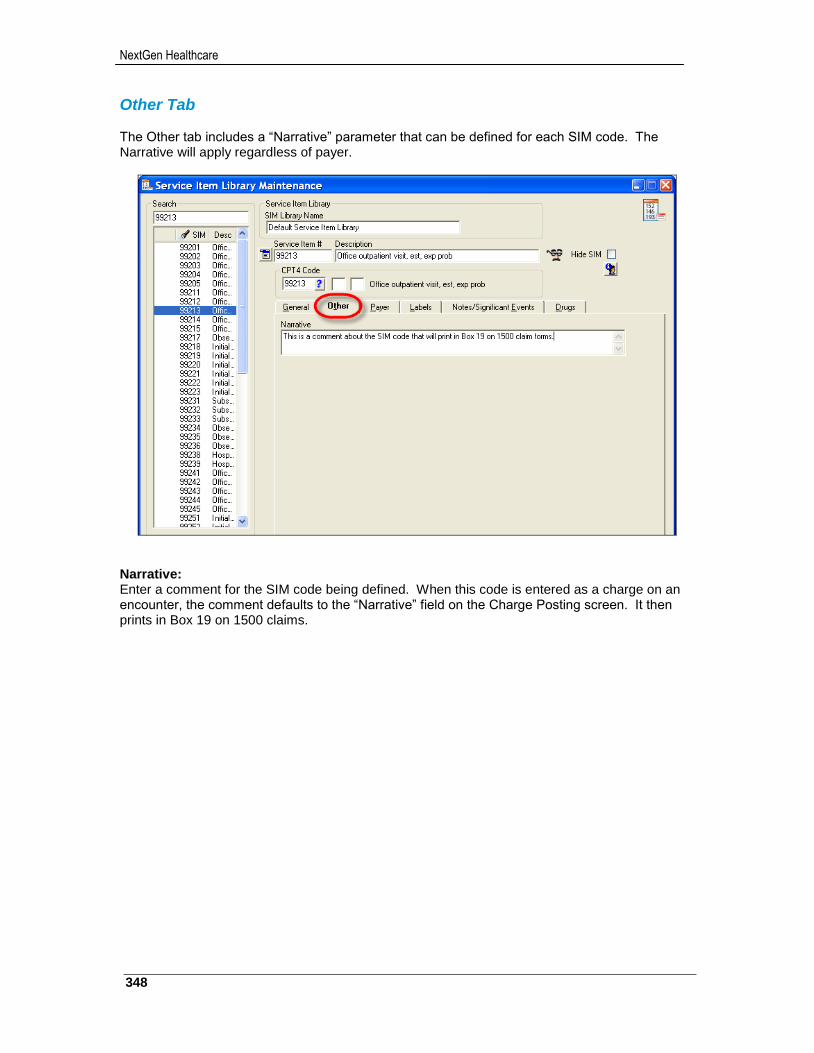
NextGen Healthcare
348
Other Tab The Other tab includes a “Narrative” parameter that can be defined for each SIM code. The Narrative will apply regardless of payer.
Narrative: Enter a comment for the SIM code being defined. When this code is entered as a charge on an encounter, the comment defaults to the “Narrative” field on the Charge Posting screen. It then prints in Box 19 on 1500 claims.
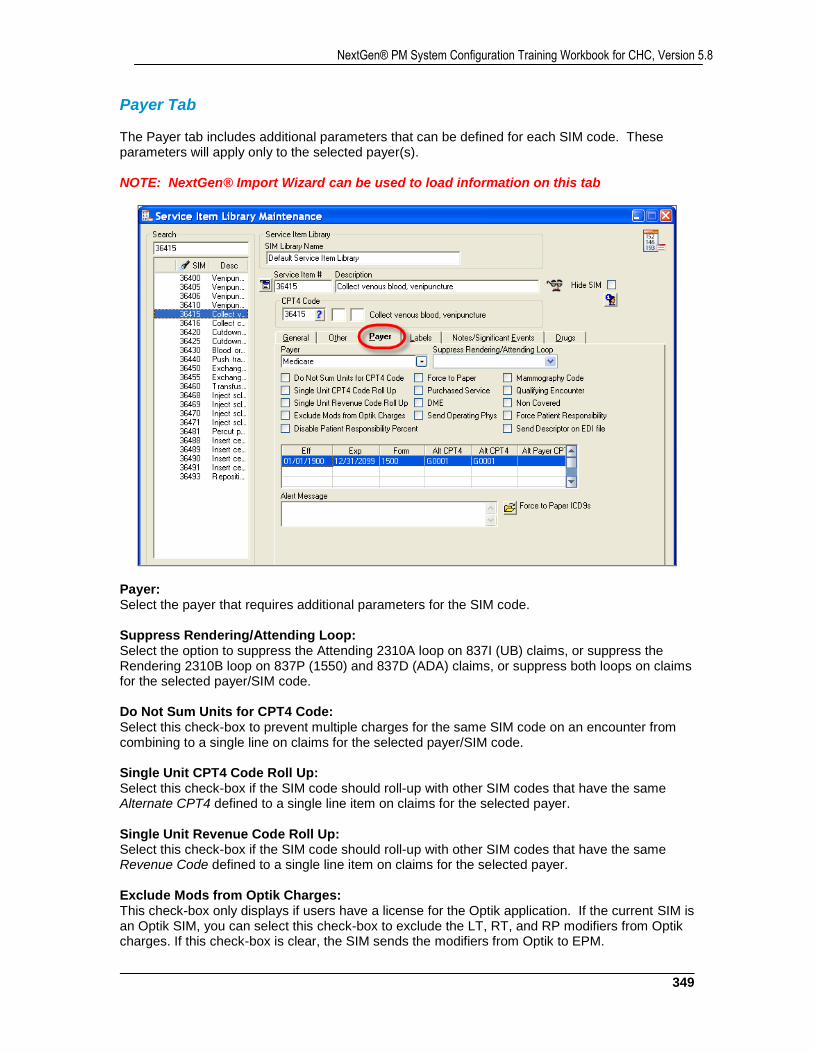
349
NextGen® PM System Configuration Training Workbook for CHC, Version 5.8
Payer Tab The Payer tab includes additional parameters that can be defined for each SIM code. These parameters will apply only to the selected payer(s). NOTE: NextGen® Import Wizard can be used to load information on this tab
Payer: Select the payer that requires additional parameters for the SIM code. Suppress Rendering/Attending Loop: Select the option to suppress the Attending 2310A loop on 837I (UB) claims, or suppress the Rendering 2310B loop on 837P (1550) and 837D (ADA) claims, or suppress both loops on claims for the selected payer/SIM code. Do Not Sum Units for CPT4 Code: Select this check-box to prevent multiple charges for the same SIM code on an encounter from combining to a single line on claims for the selected payer/SIM code. Single Unit CPT4 Code Roll Up: Select this check-box if the SIM code should roll-up with other SIM codes that have the same Alternate CPT4 defined to a single line item on claims for the selected payer. Single Unit Revenue Code Roll Up: Select this check-box if the SIM code should roll-up with other SIM codes that have the same Revenue Code defined to a single line item on claims for the selected payer. Exclude Mods from Optik Charges: This check-box only displays if users have a license for the Optik application. If the current SIM is an Optik SIM, you can select this check-box to exclude the LT, RT, and RP modifiers from Optik charges. If this check-box is clear, the SIM sends the modifiers from Optik to EPM.
NextGen Healthcare
350
Disable Patient Responsibility Percent: It is useful when you want to force the SIM to payer responsibility. Select this check-box to assign the entire charge amount for the specified Service Item to the payer. Force to Paper: Select this check-box to require the claims form type for claims generated for the payer to be paper. Purchased Service: Check this check-box to designate a SIM as a Purchased Service Indicator for the selected payer. DME: Check this check-box to specify the SIM as a DME (Durable Medical Equipment) SIM for the payer. Send Operating Phys: Select this check-box to create the 2310B loop (Operating Physician) from the rendering provider on the claim. The 2310B loop is created on an electronic institutional claim (UB) for the selected SIM and payer combination. The loop is created even if the existing Populate Operating Physician Information if applicable option on the Submitter Profile library > Exception Options tab is deactivated. Mammography Code: Select this check-box to specify the SIM as a Mammography code for the payer. Qualifying Encounter: Select this check-box to specify the SIM code is considered a “Qualifying Encounter” code for the selected payer on the UDS report. Non Covered: Select this check-box to change the SIM to a non-covered charge. Non-covered charges report at the line item level on paper and electronic UB92 claims. The amounts display:
On the paper form in FL-48 when you build a UB92 claim with that SIM Item.
In SV207 of the 2400 Loop when you generate the 837I. Force Patient Responsibility: This setting only takes effect when it is selected for the primary payer. It is useful when you want to force the SIM to patient responsibility for individual payers. Select this check-box to assign the entire charge amount for the specified Service Item to the patient. This charge does not appear on the HCFA 1500, UB92, or ADA forms. Send Descriptor on EDI File: Select this check-box to have the “Narrative” populate the 2400 SV101-7 segment on electronic claims for the selected payer/SIM code. Alert Message: Enter a free text note that should display as an alert to users when entering a charge on an encounter for the selected payer/SIM code.
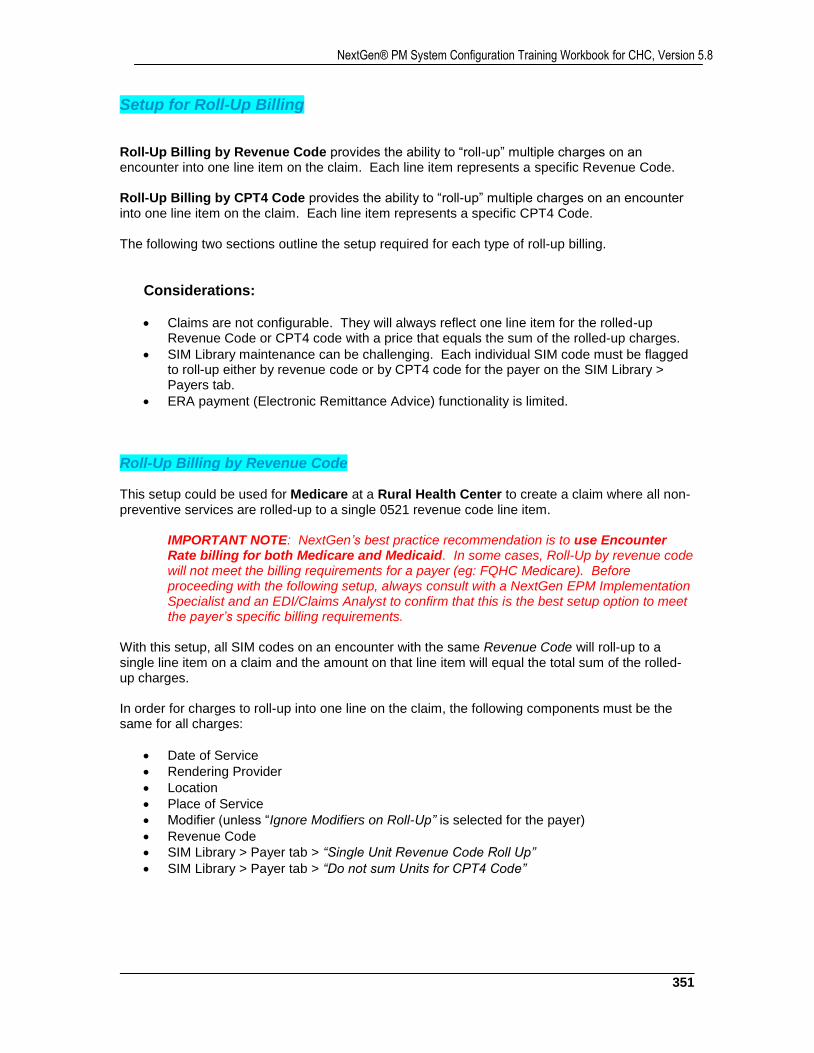
351
NextGen® PM System Configuration Training Workbook for CHC, Version 5.8
Setup for Roll-Up Billing Roll-Up Billing by Revenue Code provides the ability to “roll-up” multiple charges on an encounter into one line item on the claim. Each line item represents a specific Revenue Code. Roll-Up Billing by CPT4 Code provides the ability to “roll-up” multiple charges on an encounter into one line item on the claim. Each line item represents a specific CPT4 Code. The following two sections outline the setup required for each type of roll-up billing.
Considerations:
Claims are not configurable. They will always reflect one line item for the rolled-up Revenue Code or CPT4 code with a price that equals the sum of the rolled-up charges.
SIM Library maintenance can be challenging. Each individual SIM code must be flagged to roll-up either by revenue code or by CPT4 code for the payer on the SIM Library > Payers tab.
ERA payment (Electronic Remittance Advice) functionality is limited.
Roll-Up Billing by Revenue Code This setup could be used for Medicare at a Rural Health Center to create a claim where all non-preventive services are rolled-up to a single 0521 revenue code line item.
IMPORTANT NOTE: NextGen’s best practice recommendation is to use Encounter Rate billing for both Medicare and Medicaid. In some cases, Roll-Up by revenue code will not meet the billing requirements for a payer (eg: FQHC Medicare). Before proceeding with the following setup, always consult with a NextGen EPM Implementation Specialist and an EDI/Claims Analyst to confirm that this is the best setup option to meet the payer’s specific billing requirements.
With this setup, all SIM codes on an encounter with the same Revenue Code will roll-up to a single line item on a claim and the amount on that line item will equal the total sum of the rolled-up charges. In order for charges to roll-up into one line on the claim, the following components must be the same for all charges:
Date of Service
Rendering Provider
Location
Place of Service
Modifier (unless “Ignore Modifiers on Roll-Up” is selected for the payer)
Revenue Code
SIM Library > Payer tab > “Single Unit Revenue Code Roll Up”
SIM Library > Payer tab > “Do not sum Units for CPT4 Code”
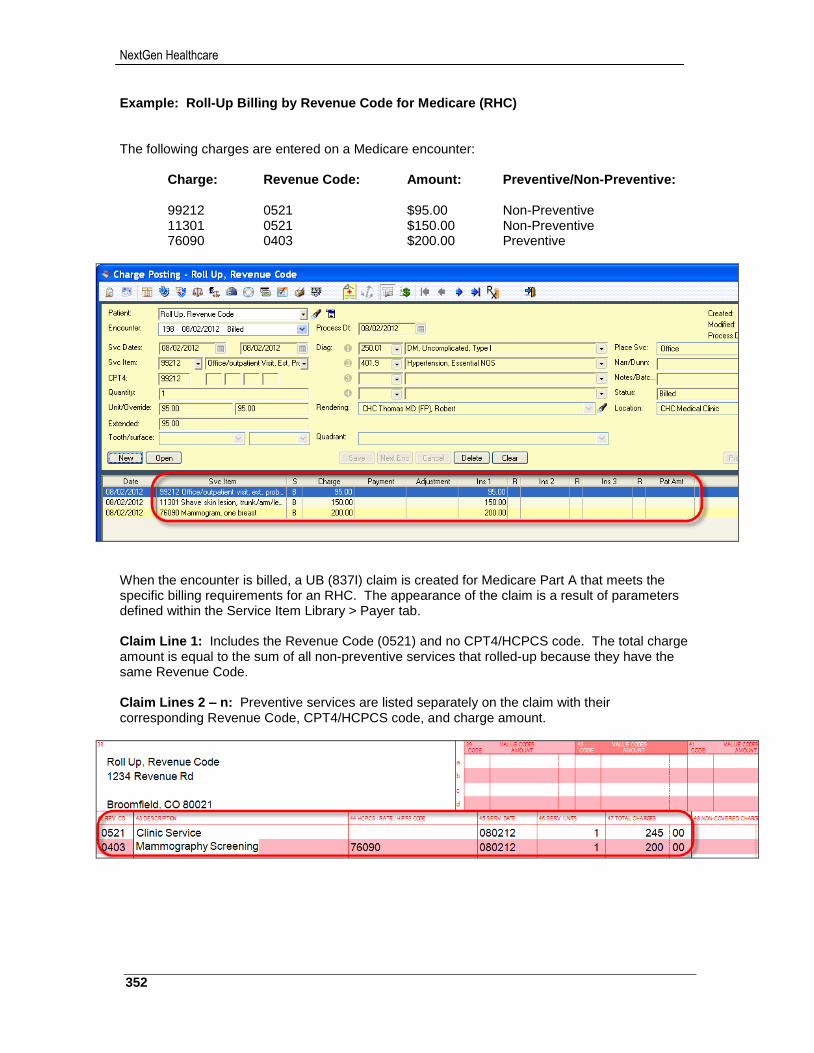
NextGen Healthcare
352
Example: Roll-Up Billing by Revenue Code for Medicare (RHC) The following charges are entered on a Medicare encounter:
Charge: Revenue Code: Amount: Preventive/Non-Preventive:
99212 0521 $95.00 Non-Preventive 11301 0521 $150.00 Non-Preventive 76090 0403 $200.00 Preventive
When the encounter is billed, a UB (837I) claim is created for Medicare Part A that meets the specific billing requirements for an RHC. The appearance of the claim is a result of parameters defined within the Service Item Library > Payer tab. Claim Line 1: Includes the Revenue Code (0521) and no CPT4/HCPCS code. The total charge amount is equal to the sum of all non-preventive services that rolled-up because they have the same Revenue Code. Claim Lines 2 – n: Preventive services are listed separately on the claim with their corresponding Revenue Code, CPT4/HCPCS code, and charge amount.
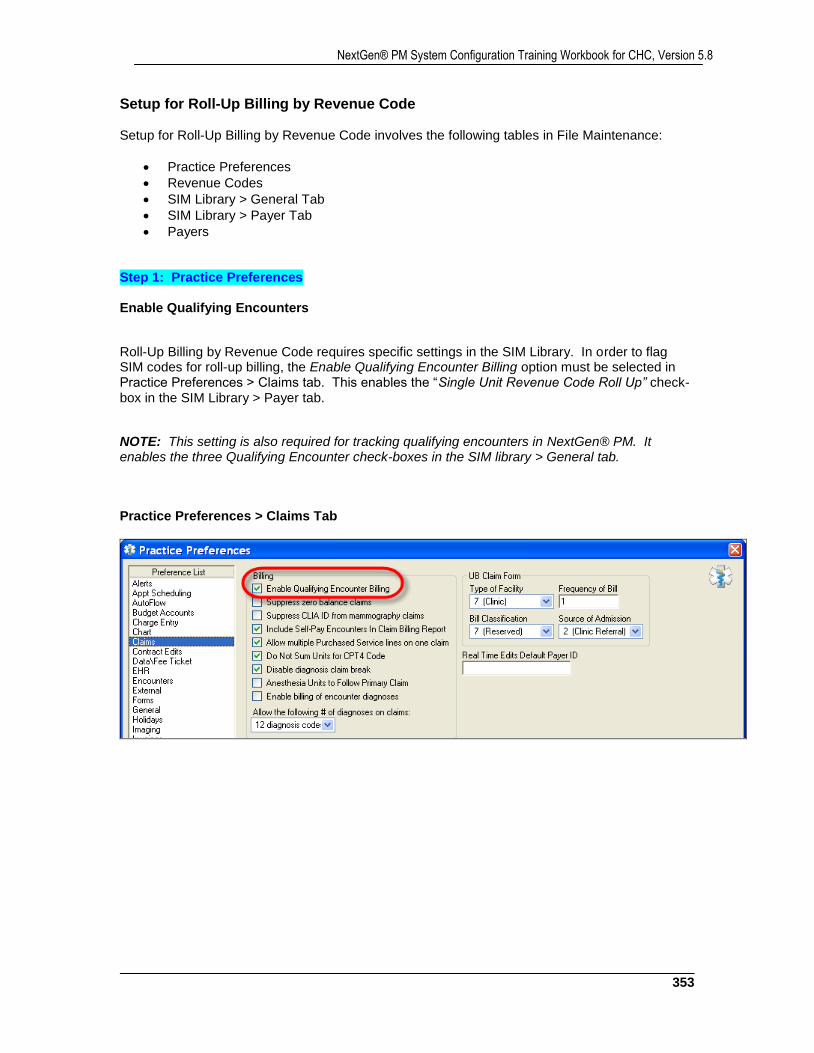
353
NextGen® PM System Configuration Training Workbook for CHC, Version 5.8
Setup for Roll-Up Billing by Revenue Code Setup for Roll-Up Billing by Revenue Code involves the following tables in File Maintenance:
Practice Preferences
Revenue Codes
SIM Library > General Tab
SIM Library > Payer Tab
Payers Step 1: Practice Preferences Enable Qualifying Encounters
Roll-Up Billing by Revenue Code requires specific settings in the SIM Library. In order to flag SIM codes for roll-up billing, the Enable Qualifying Encounter Billing option must be selected in Practice Preferences > Claims tab. This enables the “Single Unit Revenue Code Roll Up” check-box in the SIM Library > Payer tab.
NOTE: This setting is also required for tracking qualifying encounters in NextGen® PM. It enables the three Qualifying Encounter check-boxes in the SIM library > General tab.
Practice Preferences > Claims Tab

NextGen Healthcare
354
Step 2: Revenue Codes Verify the appropriate Revenue Codes exist that are needed on UB claims in Field Locator 42 for the roll-up payer. A 4-digit revenue code must be attached to each SIM code in the Service Item Library that may be billed on a UB claim. A list of Revenue Codes is available from NGS Medicare. Copy and paste the below link into an internet browser: http://www.ngsmedicare.com/ NOTE: This table comes pre-installed. Items should be reviewed and modified as needed. File Maintenance > EPM System Master Files > Revenue Codes Define the Revenue Codes as follows:
Code: Enter the 4-digit code as it should appear in UB claims Description: Enter the description as it should appear on UB claims Occurrence Code: Leave blank
This setting is optional and is only needed if Occurrence Code is to be populated in Field Locators 31 – 31 on UB claims. The selected Occurrence Code sets the default on the Encounter Maintenance > UB tab > Occurrence Codes sub-tab in NextGen® EPM.
Value Code: Leave blank
This setting is optional and is only needed if Value Code is to be populated in Field Locators 39 – 41 on UB claims. The selected Occurrence Code sets the default on the Encounter Maintenance > UB tab > Value Codes sub-tab in NextGen® EPM.
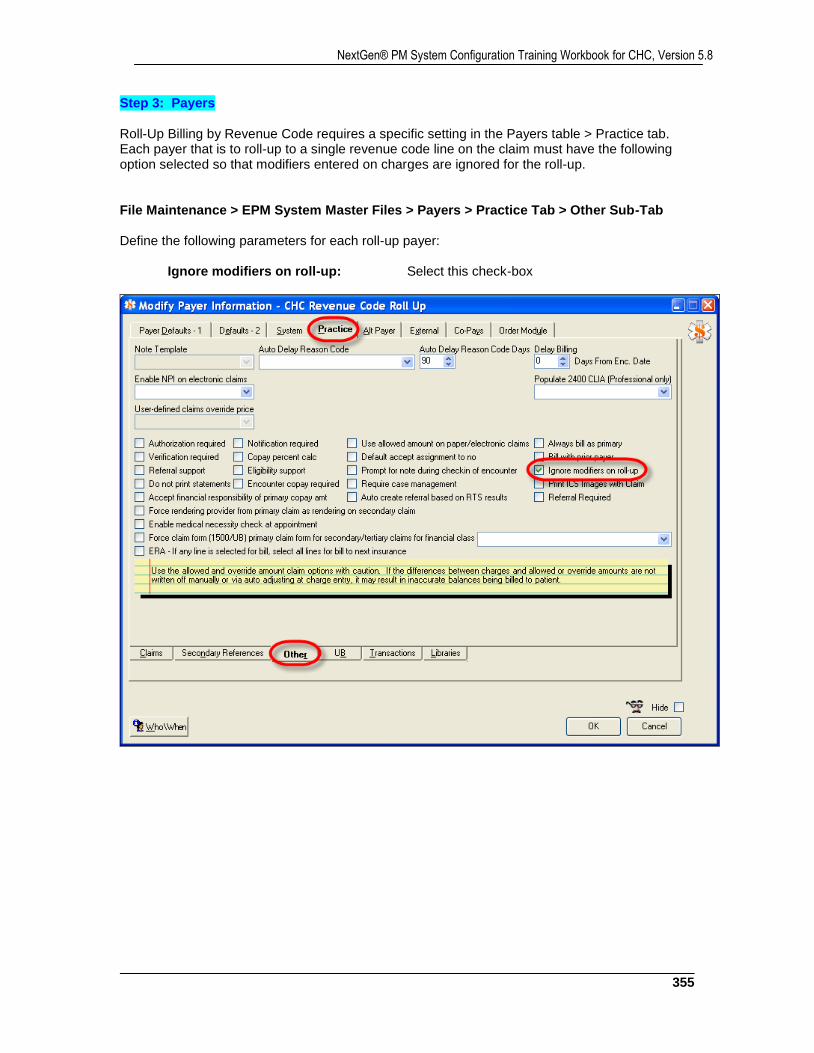
355
NextGen® PM System Configuration Training Workbook for CHC, Version 5.8
Step 3: Payers Roll-Up Billing by Revenue Code requires a specific setting in the Payers table > Practice tab. Each payer that is to roll-up to a single revenue code line on the claim must have the following option selected so that modifiers entered on charges are ignored for the roll-up. File Maintenance > EPM System Master Files > Payers > Practice Tab > Other Sub-Tab Define the following parameters for each roll-up payer:
Ignore modifiers on roll-up: Select this check-box
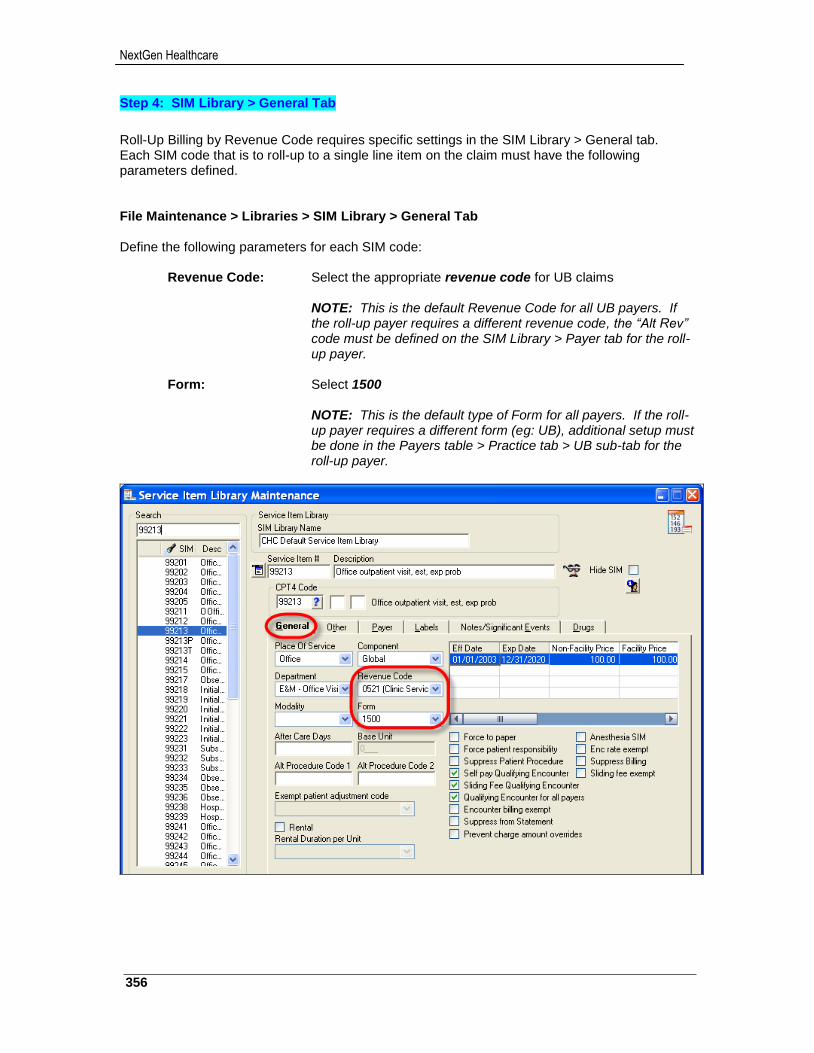
NextGen Healthcare
356
Step 4: SIM Library > General Tab
Roll-Up Billing by Revenue Code requires specific settings in the SIM Library > General tab. Each SIM code that is to roll-up to a single line item on the claim must have the following parameters defined. File Maintenance > Libraries > SIM Library > General Tab Define the following parameters for each SIM code:
Revenue Code: Select the appropriate revenue code for UB claims
NOTE: This is the default Revenue Code for all UB payers. If the roll-up payer requires a different revenue code, the “Alt Rev” code must be defined on the SIM Library > Payer tab for the roll-up payer.
Form: Select 1500
NOTE: This is the default type of Form for all payers. If the roll-up payer requires a different form (eg: UB), additional setup must be done in the Payers table > Practice tab > UB sub-tab for the roll-up payer.
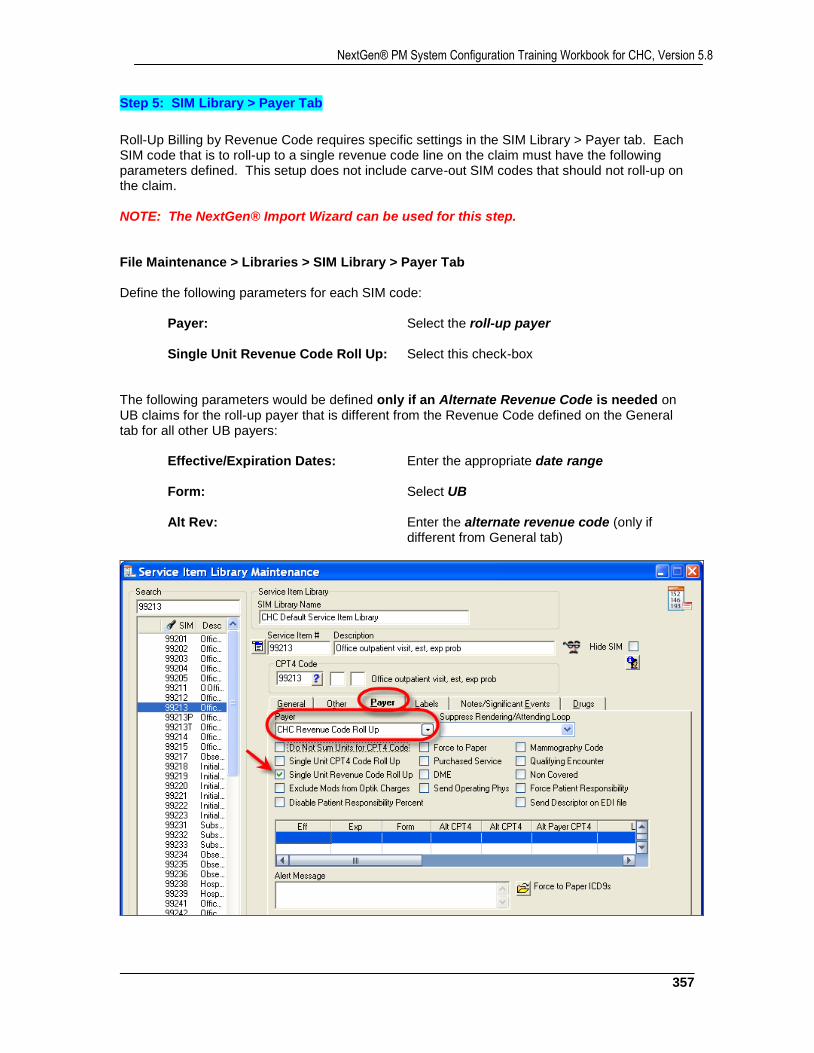
357
NextGen® PM System Configuration Training Workbook for CHC, Version 5.8
Step 5: SIM Library > Payer Tab
Roll-Up Billing by Revenue Code requires specific settings in the SIM Library > Payer tab. Each SIM code that is to roll-up to a single revenue code line on the claim must have the following parameters defined. This setup does not include carve-out SIM codes that should not roll-up on the claim. NOTE: The NextGen® Import Wizard can be used for this step. File Maintenance > Libraries > SIM Library > Payer Tab Define the following parameters for each SIM code:
Payer: Select the roll-up payer Single Unit Revenue Code Roll Up: Select this check-box
The following parameters would be defined only if an Alternate Revenue Code is needed on UB claims for the roll-up payer that is different from the Revenue Code defined on the General tab for all other UB payers:
Effective/Expiration Dates: Enter the appropriate date range Form: Select UB Alt Rev: Enter the alternate revenue code (only if
different from General tab)
NextGen Healthcare
358
Roll-Up Billing by CPT4 Code This option is rarely used. It could be used for any payer that requires multiple services to be rolled-up to a single CPT4 code line item on the claim.
IMPORTANT NOTE: NextGen’s best practice recommendation is to use Encounter Rate billing for both Medicare and Medicaid. In some cases, Roll-Up by CPT4 code will not meet the billing requirements for a payer (eg: FQHC/RHC Medicare). Before proceeding with the following setup, always consult with a NextGen EPM Implementation Specialist and an EDI/Claims Analyst to confirm that this is the best setup option to meet the payer’s specific billing requirements.
With this setup, all SIM codes on an encounter with the same Alternate CPT4 Code will roll-up to a single line item on a claim and the amount on that line item will equal the total sum of the rolled-up charges. In order for charges to roll-up into one line on the claim, the following components must be the same for all charges:
Date of Service
Rendering Provider
Location
Place of Service
SIM Library > Payer tab > “Single Unit CPT4 Code Roll Up”
SIM Library > Payer tab > “Alternate CPT4”
SIM Library > Payer tab > “Do not sum Units for CPT4 Code”
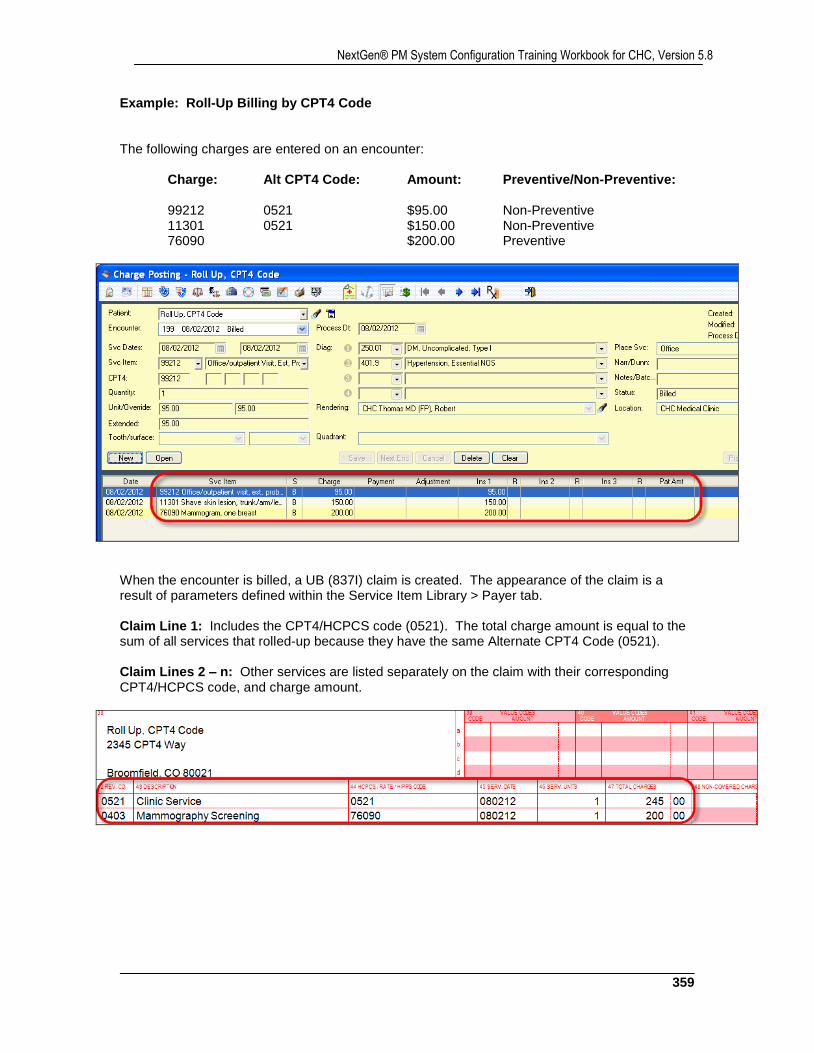
359
NextGen® PM System Configuration Training Workbook for CHC, Version 5.8
Example: Roll-Up Billing by CPT4 Code The following charges are entered on an encounter:
Charge: Alt CPT4 Code: Amount: Preventive/Non-Preventive:
99212 0521 $95.00 Non-Preventive 11301 0521 $150.00 Non-Preventive 76090 $200.00 Preventive
When the encounter is billed, a UB (837I) claim is created. The appearance of the claim is a result of parameters defined within the Service Item Library > Payer tab. Claim Line 1: Includes the CPT4/HCPCS code (0521). The total charge amount is equal to the sum of all services that rolled-up because they have the same Alternate CPT4 Code (0521). Claim Lines 2 – n: Other services are listed separately on the claim with their corresponding CPT4/HCPCS code, and charge amount.
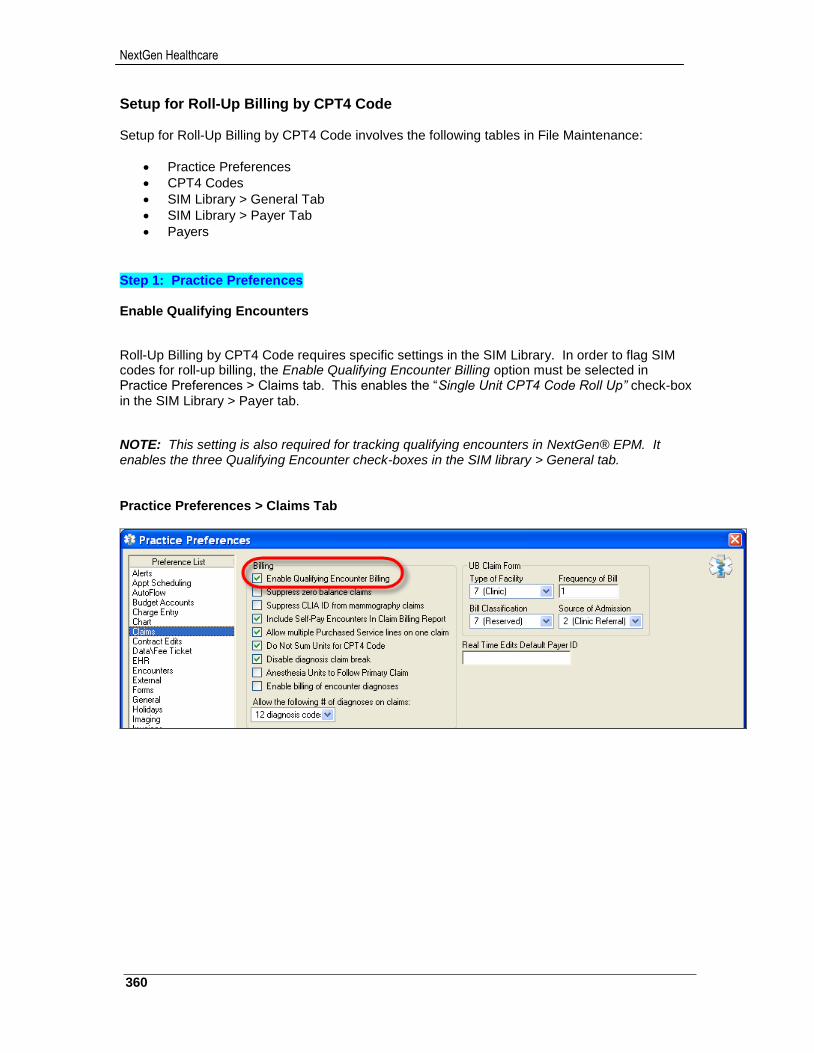
NextGen Healthcare
360
Setup for Roll-Up Billing by CPT4 Code Setup for Roll-Up Billing by CPT4 Code involves the following tables in File Maintenance:
Practice Preferences
CPT4 Codes
SIM Library > General Tab
SIM Library > Payer Tab
Payers
Step 1: Practice Preferences Enable Qualifying Encounters
Roll-Up Billing by CPT4 Code requires specific settings in the SIM Library. In order to flag SIM codes for roll-up billing, the Enable Qualifying Encounter Billing option must be selected in Practice Preferences > Claims tab. This enables the “Single Unit CPT4 Code Roll Up” check-box in the SIM Library > Payer tab.
NOTE: This setting is also required for tracking qualifying encounters in NextGen® EPM. It enables the three Qualifying Encounter check-boxes in the SIM library > General tab. Practice Preferences > Claims Tab
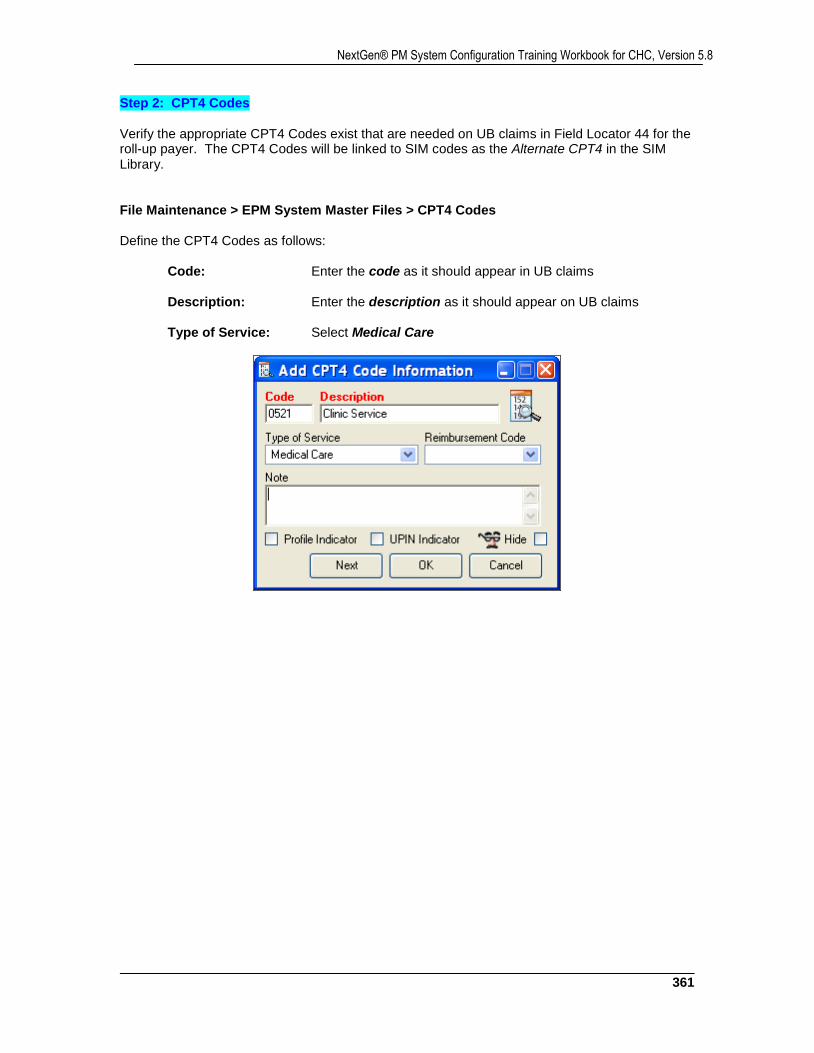
361
NextGen® PM System Configuration Training Workbook for CHC, Version 5.8
Step 2: CPT4 Codes Verify the appropriate CPT4 Codes exist that are needed on UB claims in Field Locator 44 for the roll-up payer. The CPT4 Codes will be linked to SIM codes as the Alternate CPT4 in the SIM Library. File Maintenance > EPM System Master Files > CPT4 Codes Define the CPT4 Codes as follows:
Code: Enter the code as it should appear in UB claims Description: Enter the description as it should appear on UB claims Type of Service: Select Medical Care
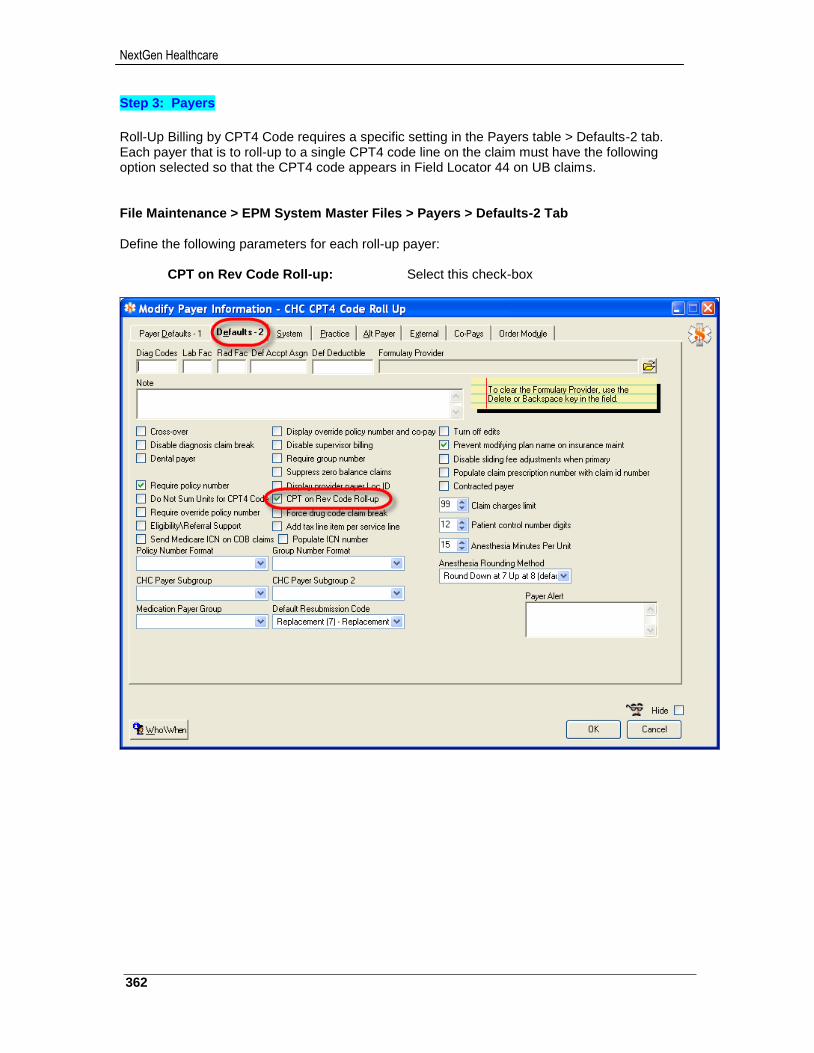
NextGen Healthcare
362
Step 3: Payers
Roll-Up Billing by CPT4 Code requires a specific setting in the Payers table > Defaults-2 tab. Each payer that is to roll-up to a single CPT4 code line on the claim must have the following option selected so that the CPT4 code appears in Field Locator 44 on UB claims. File Maintenance > EPM System Master Files > Payers > Defaults-2 Tab Define the following parameters for each roll-up payer:
CPT on Rev Code Roll-up: Select this check-box
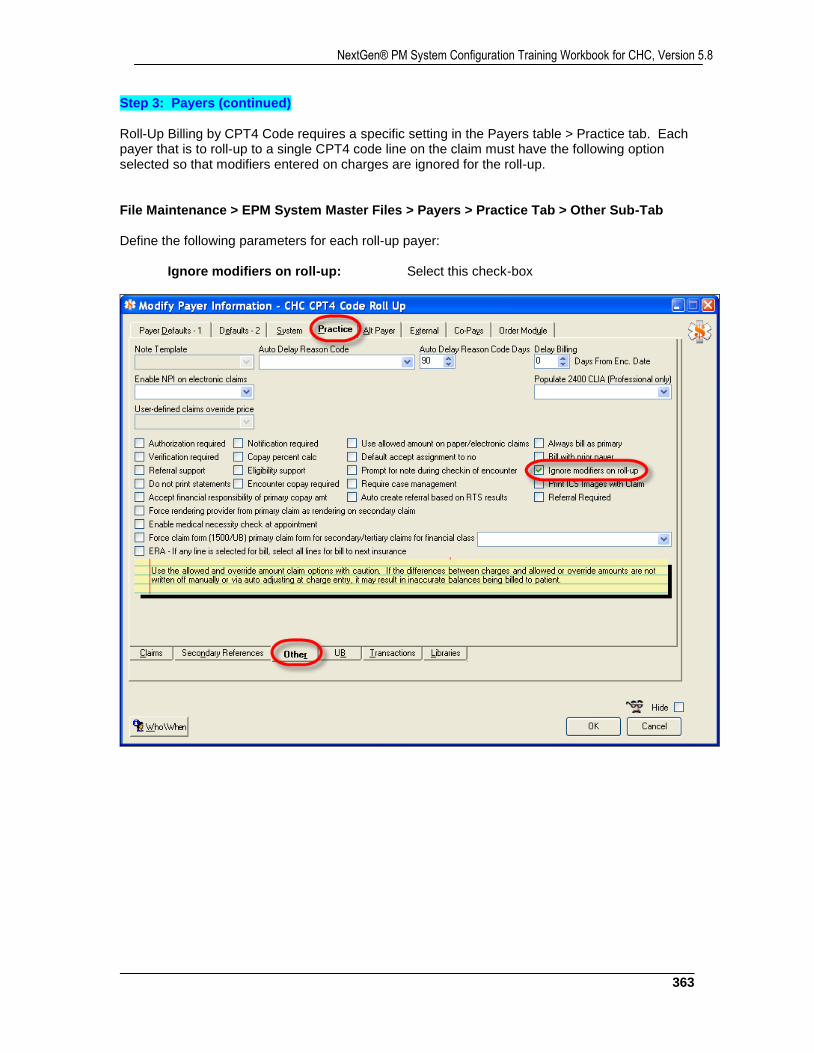
363
NextGen® PM System Configuration Training Workbook for CHC, Version 5.8
Step 3: Payers (continued) Roll-Up Billing by CPT4 Code requires a specific setting in the Payers table > Practice tab. Each payer that is to roll-up to a single CPT4 code line on the claim must have the following option selected so that modifiers entered on charges are ignored for the roll-up. File Maintenance > EPM System Master Files > Payers > Practice Tab > Other Sub-Tab Define the following parameters for each roll-up payer:
Ignore modifiers on roll-up: Select this check-box
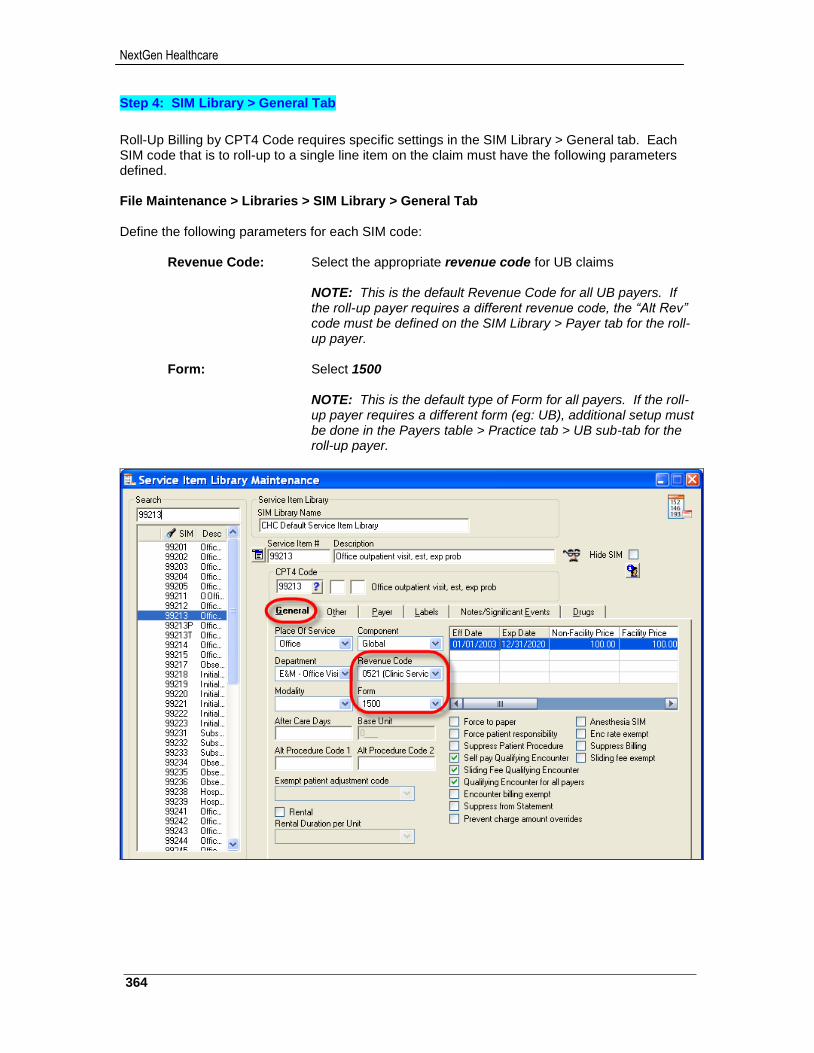
NextGen Healthcare
364
Step 4: SIM Library > General Tab
Roll-Up Billing by CPT4 Code requires specific settings in the SIM Library > General tab. Each SIM code that is to roll-up to a single line item on the claim must have the following parameters defined. File Maintenance > Libraries > SIM Library > General Tab Define the following parameters for each SIM code:
Revenue Code: Select the appropriate revenue code for UB claims
NOTE: This is the default Revenue Code for all UB payers. If the roll-up payer requires a different revenue code, the “Alt Rev” code must be defined on the SIM Library > Payer tab for the roll-up payer.
Form: Select 1500
NOTE: This is the default type of Form for all payers. If the roll-up payer requires a different form (eg: UB), additional setup must be done in the Payers table > Practice tab > UB sub-tab for the roll-up payer.
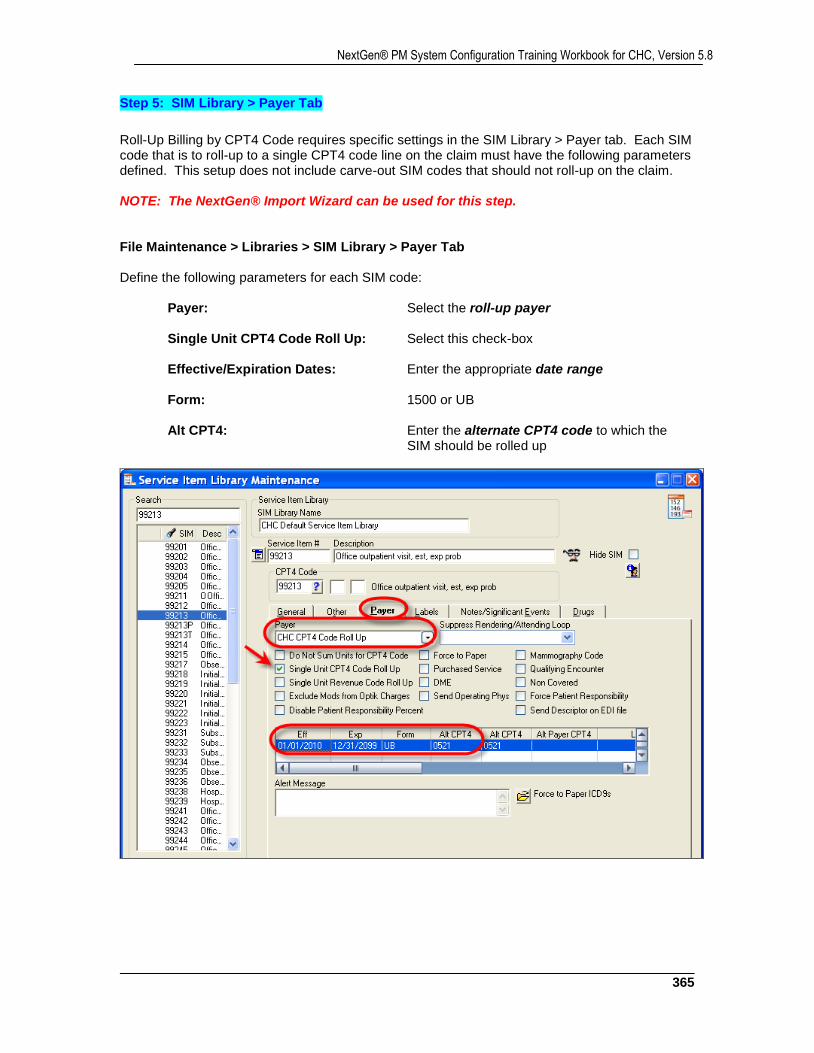
365
NextGen® PM System Configuration Training Workbook for CHC, Version 5.8
Step 5: SIM Library > Payer Tab
Roll-Up Billing by CPT4 Code requires specific settings in the SIM Library > Payer tab. Each SIM code that is to roll-up to a single CPT4 code line on the claim must have the following parameters defined. This setup does not include carve-out SIM codes that should not roll-up on the claim. NOTE: The NextGen® Import Wizard can be used for this step. File Maintenance > Libraries > SIM Library > Payer Tab Define the following parameters for each SIM code:
Payer: Select the roll-up payer Single Unit CPT4 Code Roll Up: Select this check-box
Effective/Expiration Dates: Enter the appropriate date range Form: 1500 or UB Alt CPT4: Enter the alternate CPT4 code to which the
SIM should be rolled up
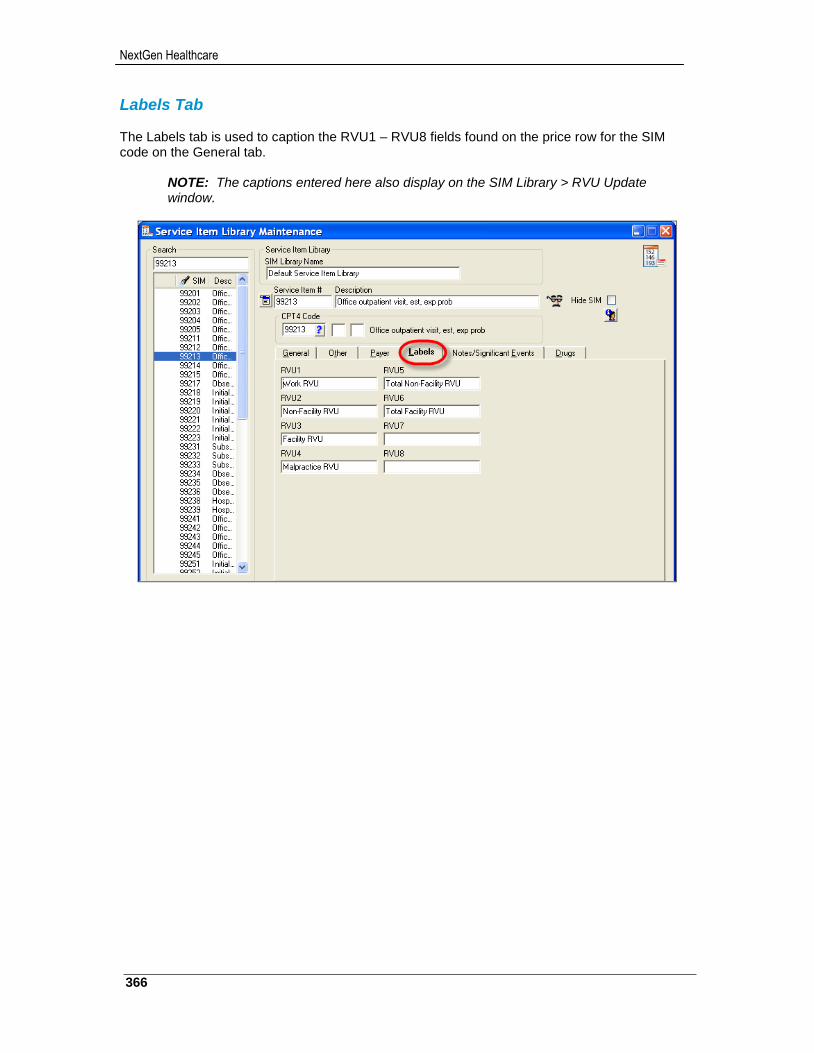
NextGen Healthcare
366
Labels Tab The Labels tab is used to caption the RVU1 – RVU8 fields found on the price row for the SIM code on the General tab.
NOTE: The captions entered here also display on the SIM Library > RVU Update window.
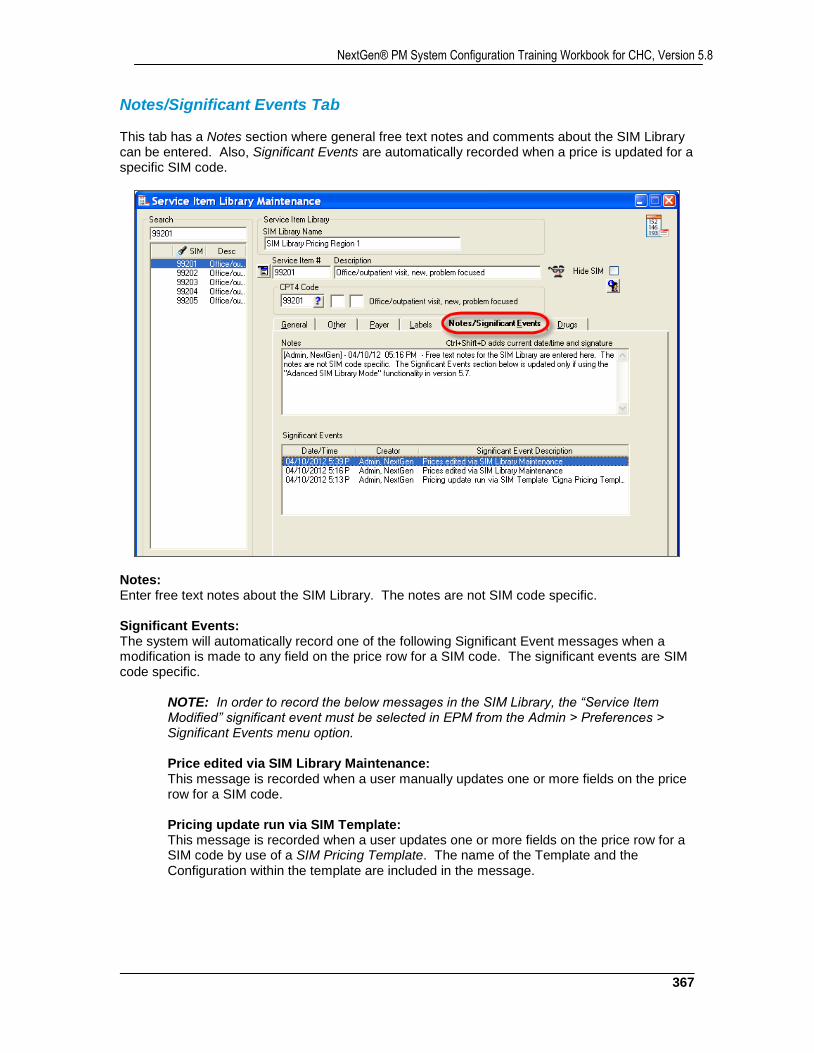
367
NextGen® PM System Configuration Training Workbook for CHC, Version 5.8
Notes/Significant Events Tab This tab has a Notes section where general free text notes and comments about the SIM Library can be entered. Also, Significant Events are automatically recorded when a price is updated for a specific SIM code.
Notes: Enter free text notes about the SIM Library. The notes are not SIM code specific. Significant Events: The system will automatically record one of the following Significant Event messages when a modification is made to any field on the price row for a SIM code. The significant events are SIM code specific.
NOTE: In order to record the below messages in the SIM Library, the “Service Item Modified” significant event must be selected in EPM from the Admin > Preferences > Significant Events menu option.
Price edited via SIM Library Maintenance: This message is recorded when a user manually updates one or more fields on the price row for a SIM code.
Pricing update run via SIM Template: This message is recorded when a user updates one or more fields on the price row for a SIM code by use of a SIM Pricing Template. The name of the Template and the Configuration within the template are included in the message.
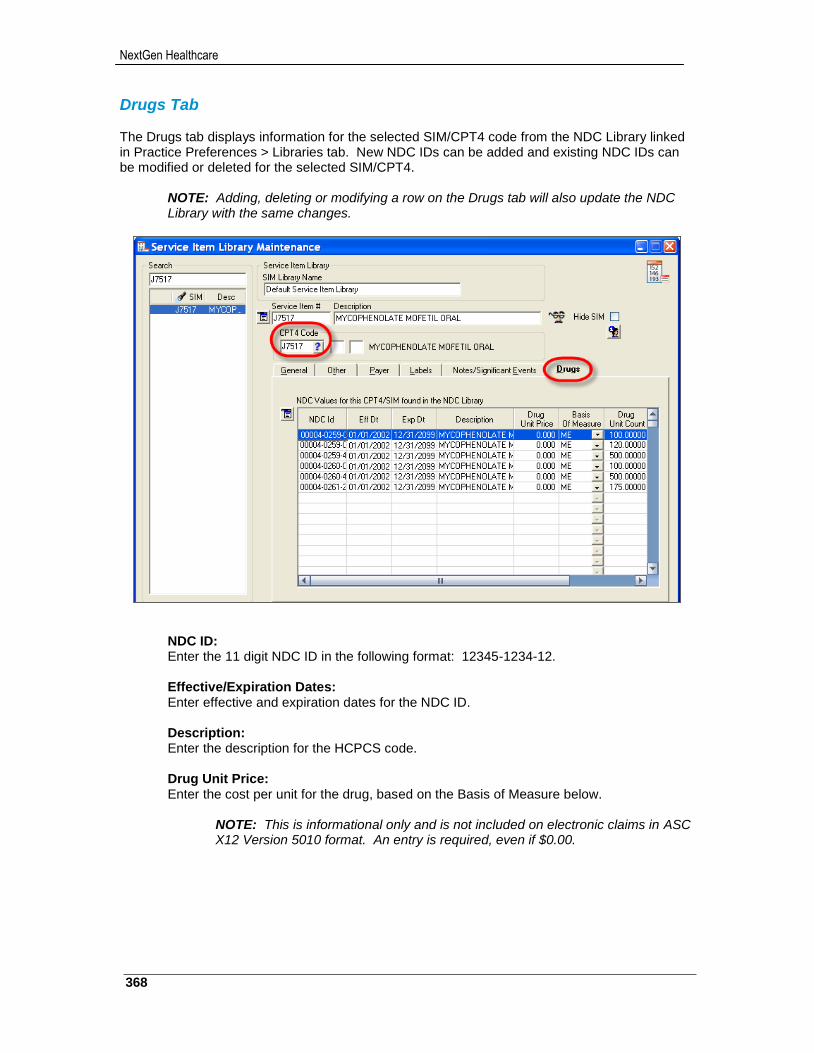
NextGen Healthcare
368
Drugs Tab The Drugs tab displays information for the selected SIM/CPT4 code from the NDC Library linked in Practice Preferences > Libraries tab. New NDC IDs can be added and existing NDC IDs can be modified or deleted for the selected SIM/CPT4.
NOTE: Adding, deleting or modifying a row on the Drugs tab will also update the NDC Library with the same changes.
NDC ID: Enter the 11 digit NDC ID in the following format: 12345-1234-12.
Effective/Expiration Dates: Enter effective and expiration dates for the NDC ID. Description: Enter the description for the HCPCS code. Drug Unit Price: Enter the cost per unit for the drug, based on the Basis of Measure below.
NOTE: This is informational only and is not included on electronic claims in ASC X12 Version 5010 format. An entry is required, even if $0.00.
369
NextGen® PM System Configuration Training Workbook for CHC, Version 5.8
Basis of Measure: Select the appropriate units for the drug. Options include:
International Unit (F2) Gram (GR) Milligram (ME) Milliliter (ML) Unit (UN)
Drug Unit Count: Enter the number of units per dose for the drug, based on the Basis of Measure above.
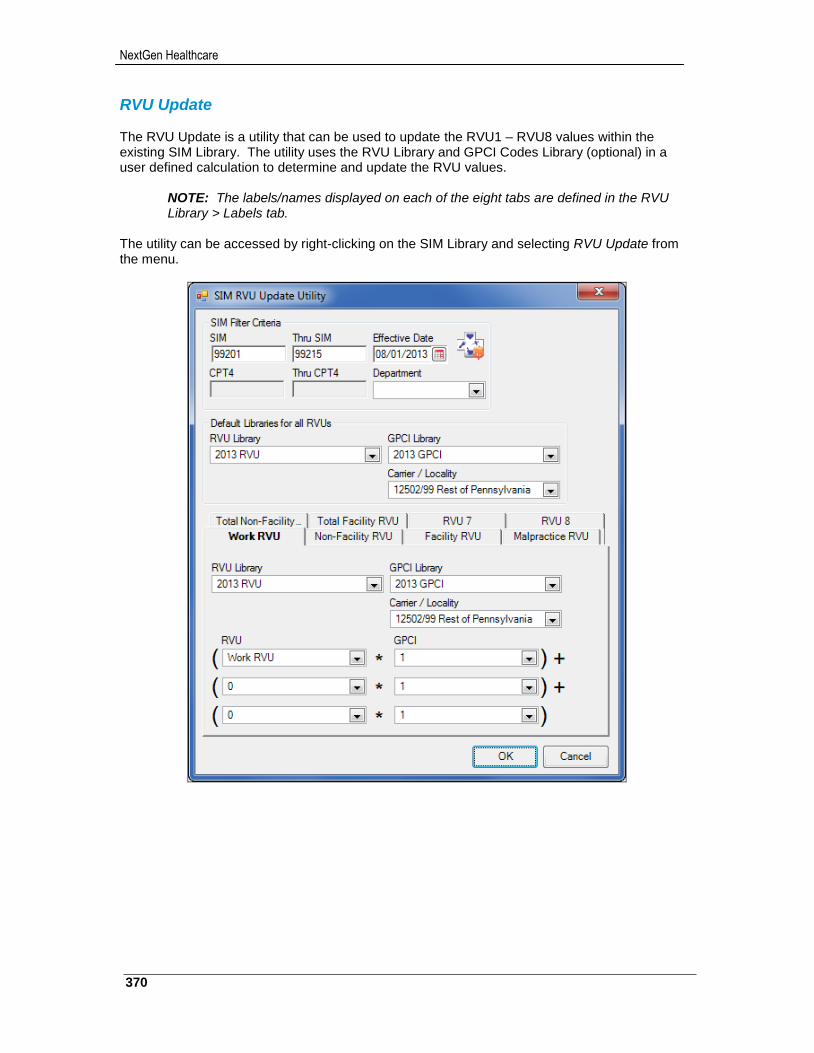
NextGen Healthcare
370
RVU Update The RVU Update is a utility that can be used to update the RVU1 – RVU8 values within the existing SIM Library. The utility uses the RVU Library and GPCI Codes Library (optional) in a user defined calculation to determine and update the RVU values.
NOTE: The labels/names displayed on each of the eight tabs are defined in the RVU Library > Labels tab.
The utility can be accessed by right-clicking on the SIM Library and selecting RVU Update from the menu.
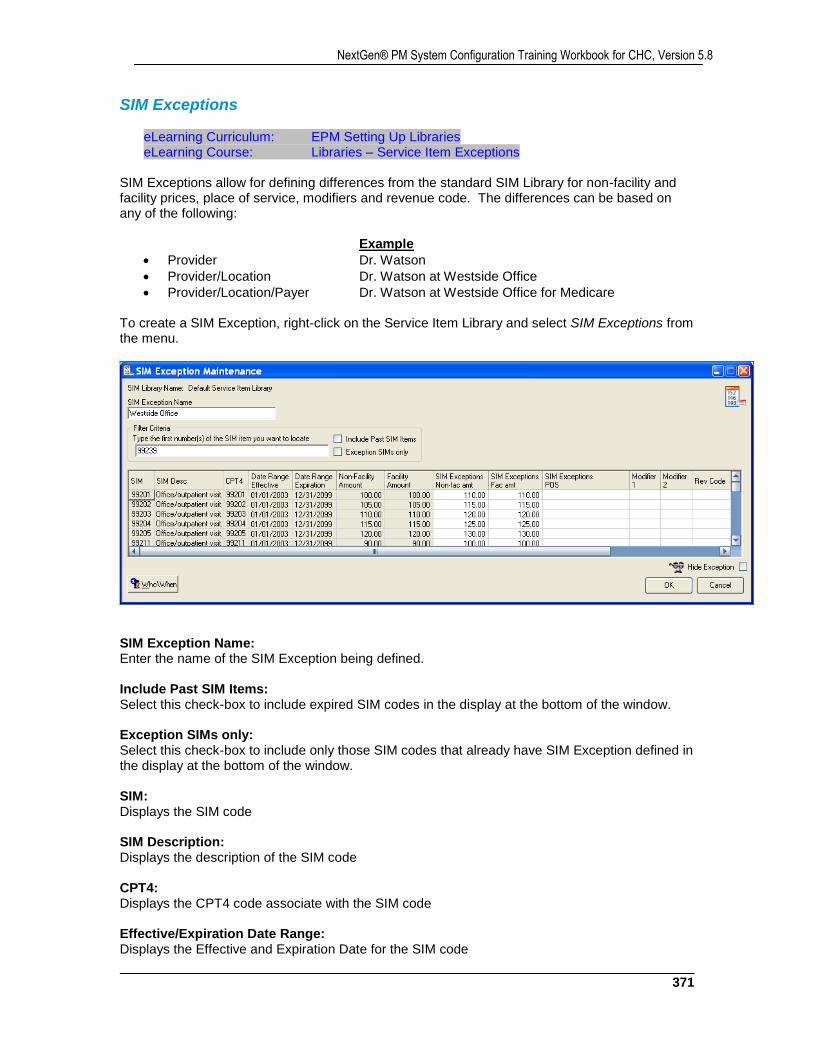
371
NextGen® PM System Configuration Training Workbook for CHC, Version 5.8
SIM Exceptions
eLearning Curriculum: EPM Setting Up Libraries eLearning Course: Libraries – Service Item Exceptions
SIM Exceptions allow for defining differences from the standard SIM Library for non-facility and facility prices, place of service, modifiers and revenue code. The differences can be based on any of the following: Example
Provider Dr. Watson
Provider/Location Dr. Watson at Westside Office
Provider/Location/Payer Dr. Watson at Westside Office for Medicare To create a SIM Exception, right-click on the Service Item Library and select SIM Exceptions from the menu.
SIM Exception Name: Enter the name of the SIM Exception being defined. Include Past SIM Items: Select this check-box to include expired SIM codes in the display at the bottom of the window. Exception SIMs only: Select this check-box to include only those SIM codes that already have SIM Exception defined in the display at the bottom of the window. SIM: Displays the SIM code SIM Description: Displays the description of the SIM code CPT4: Displays the CPT4 code associate with the SIM code Effective/Expiration Date Range: Displays the Effective and Expiration Date for the SIM code
NextGen Healthcare
372
Non Facility Amount: Displays the standard Non-Facility price for the SIM code Facility Amount: Displays the standard Facility price for the SIM code SIM Exceptions Non-Facility Amount: Enter the alternate Non-Facility price for the SIM Exception being defined, if applicable SIM Exceptions Facility Amount: Enter the alternate Facility price for the SIM Exception being defined, if applicable POS: Select the alternate Place of Service for the SIM Exception being defined, if applicable Modifier 1: Enter the first alternate Modifier for the SIM Exception being defined, if applicable Modifier 2: Enter the second alternate Modifier for the SIM Exception being defined, if applicable Revenue Code: Enter the alternate Revenue code for UB claims for the SIM Exception being defined, if applicable
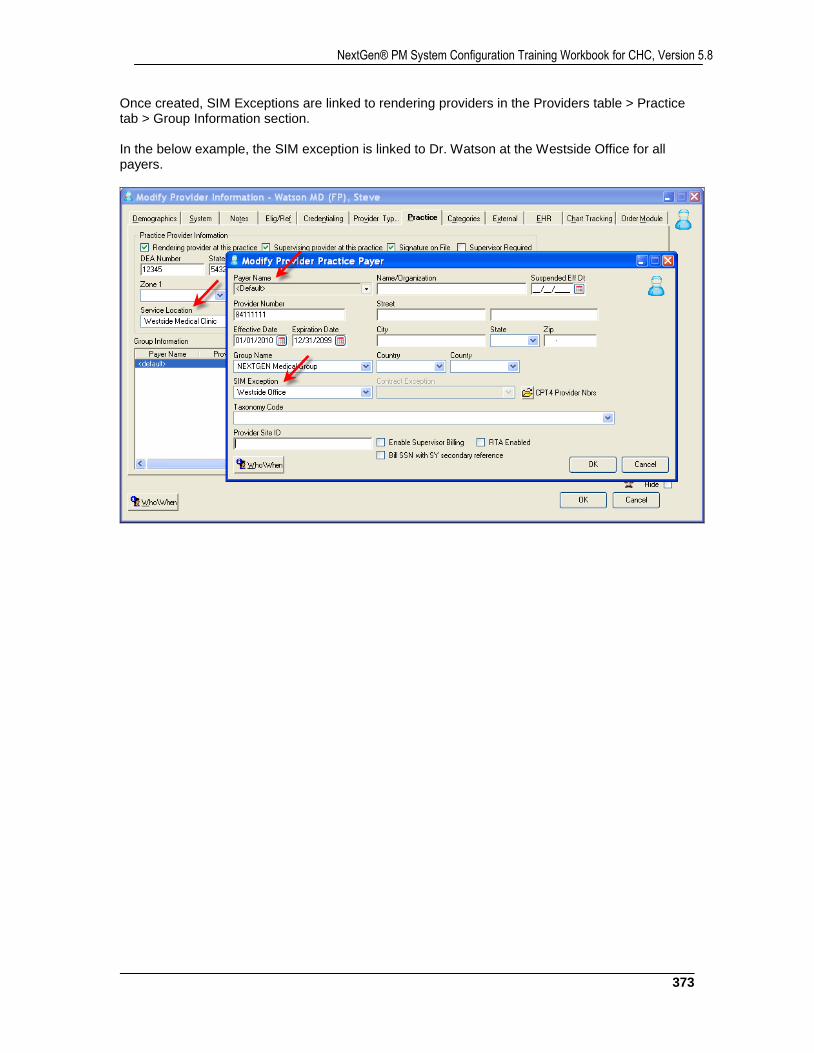
373
NextGen® PM System Configuration Training Workbook for CHC, Version 5.8
Once created, SIM Exceptions are linked to rendering providers in the Providers table > Practice tab > Group Information section. In the below example, the SIM exception is linked to Dr. Watson at the Westside Office for all payers.
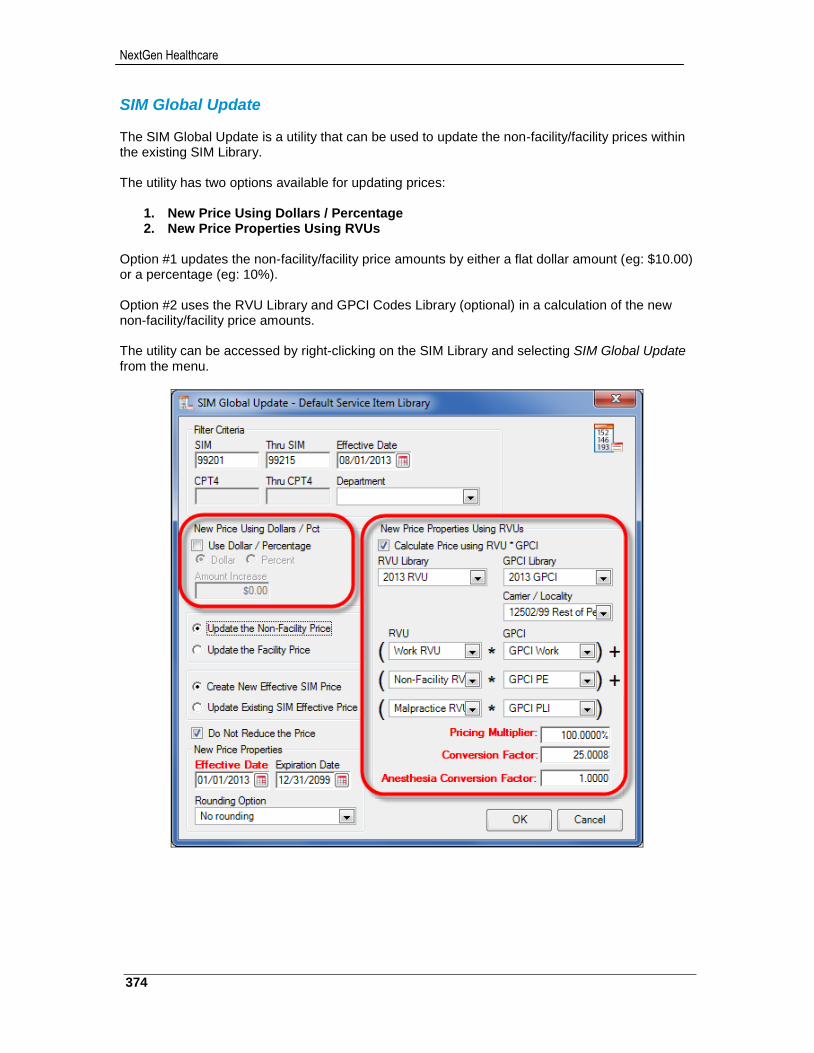
NextGen Healthcare
374
SIM Global Update The SIM Global Update is a utility that can be used to update the non-facility/facility prices within the existing SIM Library. The utility has two options available for updating prices:
1. New Price Using Dollars / Percentage 2. New Price Properties Using RVUs
Option #1 updates the non-facility/facility price amounts by either a flat dollar amount (eg: $10.00) or a percentage (eg: 10%). Option #2 uses the RVU Library and GPCI Codes Library (optional) in a calculation of the new non-facility/facility price amounts. The utility can be accessed by right-clicking on the SIM Library and selecting SIM Global Update from the menu.
375
NextGen® PM System Configuration Training Workbook for CHC, Version 5.8
Filter Criteria
SIM: Starting SIM code, if not using a CPT4 code range Thru SIM: Ending SIM code, if not using a CPT4 code range Effective Date: Enter the Effective Date for the SIM codes to be update.
NOTE: Only those SIM codes in effect on the date specified will be updated. CPT4: Starting CPT4 code, if not using a SIM code range Thru CPT4: Ending CPT4 code, if not using a SIM code range Department: Select a Department to update only those SIM codes within the selected department
New Price Using Dollars / Percentage
Use Dollar/Percentage: Select the check-box to update the price on the codes selected in the Filter Criteria section by either a flat dollar amount or a percentage
Dollar:
Select this option to update the price on the codes selected in the Filter Criteria section by a flat dollar amount
Percentage:
Select this option to update the price on the codes selected in the Filter Criteria section by a percentage
Amount Increase:
Enter the dollar amount or percentage to be used in the price update for the codes selected in the Filter Criteria section
New Price Properties Using RVU’s
Calculate Price using RVU * GPCI: Select this check-box to update the price on the codes selected in the Filter Criteria section using an RVU Library and a GPCI Library (optional) in a pricing calculation RVU Library: Select the RVU Library to be used in the pricing calculation GPCI Library: Select the GPCI Library to be used in the pricing calculation, if applicable
NextGen Healthcare
376
Carrier/Locality: Select the Carrier/Locality from the GPCI Library to be used in the pricing calculation, if applicable
RVU / GPCI Calculation: Create the pricing calculation to be used
Pricing Multiplier: The percentage entered here will be multiplied by the total from the calculation defined above Conversion Factor: The conversion factor entered here will be multiplied by the total from the calculation defined above
Anesthesia Factor: The anesthesia conversion factor entered here, if applicable, will be multiplied by the total from the calculation defined above
Update the Non Facility Price: Select this option to update the Non-Facility price on the selected codes Update the Facility Price: Select this option to update the Facility price on the codes selected codes Create New Effective SIM Price: Select this option to create a new price row for the selected codes Update Existing SIM Effective Price: Select this option to update the existing price row for the selected codes Do Not Reduce the Price: Select this check-box to prevent the price from being reduced for the selected codes during the update New Price Properties
Effective Date: Enter the Effective Date for the new price Expiration Date: Enter the Expiration Date for the new price Rounding Option: Select the method in which the new prices will be rounded, if applicable
No rounding: Prices are not rounded
Round down to nearest dollar: Prices are rounded down to the nearest dollar
Round down to nearest quarter: Prices are rounded down to the nearest quarter
Round to nearest quarter: Prices are rounded to the nearest quarter
Round up to the nearest dollar: Prices are rounded to the nearest whole dollar
Round up to the nearest quarter: Prices are rounded up to the nearest quarter
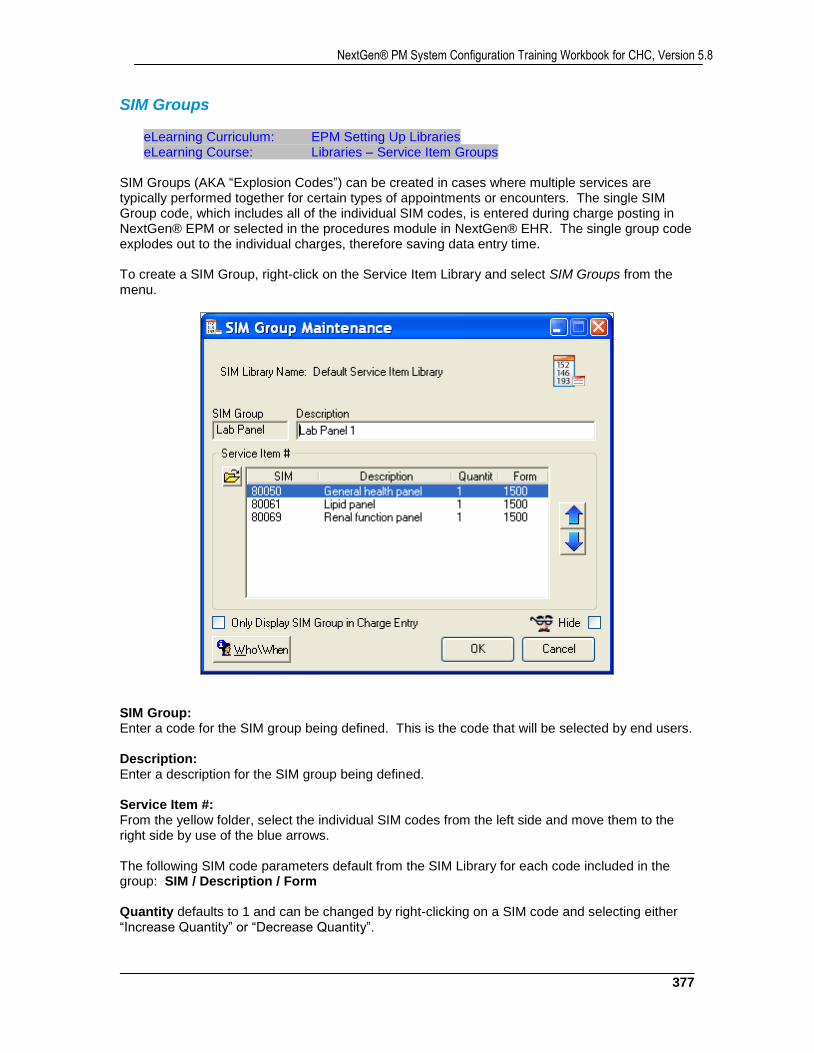
377
NextGen® PM System Configuration Training Workbook for CHC, Version 5.8
SIM Groups
eLearning Curriculum: EPM Setting Up Libraries eLearning Course: Libraries – Service Item Groups
SIM Groups (AKA “Explosion Codes”) can be created in cases where multiple services are typically performed together for certain types of appointments or encounters. The single SIM Group code, which includes all of the individual SIM codes, is entered during charge posting in NextGen® EPM or selected in the procedures module in NextGen® EHR. The single group code explodes out to the individual charges, therefore saving data entry time. To create a SIM Group, right-click on the Service Item Library and select SIM Groups from the menu.
SIM Group: Enter a code for the SIM group being defined. This is the code that will be selected by end users. Description: Enter a description for the SIM group being defined. Service Item #: From the yellow folder, select the individual SIM codes from the left side and move them to the right side by use of the blue arrows. The following SIM code parameters default from the SIM Library for each code included in the group: SIM / Description / Form Quantity defaults to 1 and can be changed by right-clicking on a SIM code and selecting either “Increase Quantity” or “Decrease Quantity”.
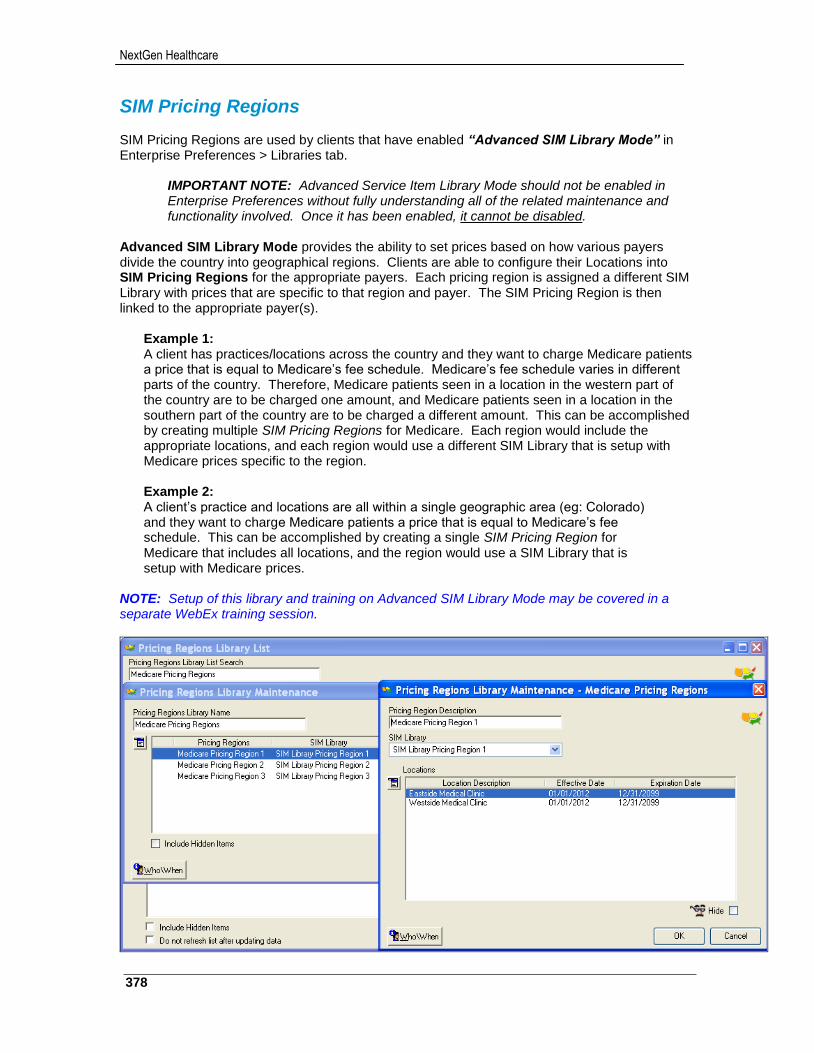
NextGen Healthcare
378
SIM Pricing Regions SIM Pricing Regions are used by clients that have enabled “Advanced SIM Library Mode” in Enterprise Preferences > Libraries tab.
IMPORTANT NOTE: Advanced Service Item Library Mode should not be enabled in Enterprise Preferences without fully understanding all of the related maintenance and functionality involved. Once it has been enabled, it cannot be disabled.
Advanced SIM Library Mode provides the ability to set prices based on how various payers divide the country into geographical regions. Clients are able to configure their Locations into SIM Pricing Regions for the appropriate payers. Each pricing region is assigned a different SIM Library with prices that are specific to that region and payer. The SIM Pricing Region is then linked to the appropriate payer(s).
Example 1: A client has practices/locations across the country and they want to charge Medicare patients a price that is equal to Medicare’s fee schedule. Medicare’s fee schedule varies in different parts of the country. Therefore, Medicare patients seen in a location in the western part of the country are to be charged one amount, and Medicare patients seen in a location in the southern part of the country are to be charged a different amount. This can be accomplished by creating multiple SIM Pricing Regions for Medicare. Each region would include the appropriate locations, and each region would use a different SIM Library that is setup with Medicare prices specific to the region.
Example 2:
A client’s practice and locations are all within a single geographic area (eg: Colorado) and they want to charge Medicare patients a price that is equal to Medicare’s fee schedule. This can be accomplished by creating a single SIM Pricing Region for Medicare that includes all locations, and the region would use a SIM Library that is setup with Medicare prices.
NOTE: Setup of this library and training on Advanced SIM Library Mode may be covered in a separate WebEx training session.
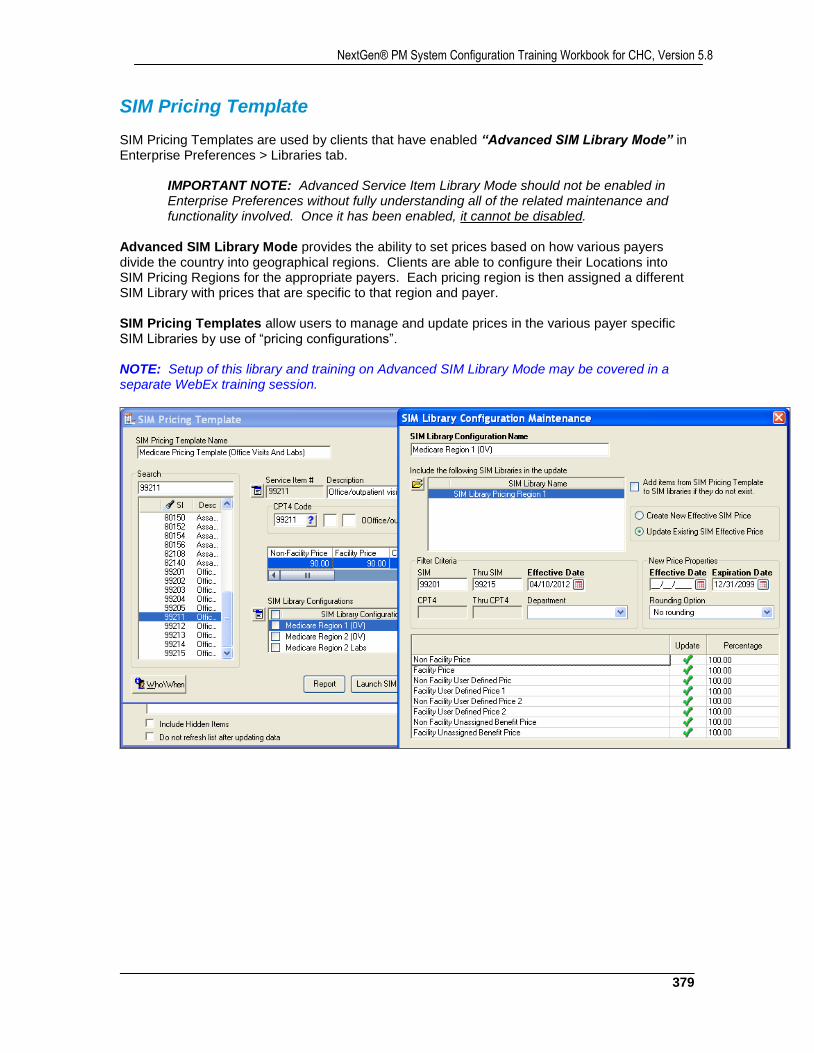
379
NextGen® PM System Configuration Training Workbook for CHC, Version 5.8
SIM Pricing Template SIM Pricing Templates are used by clients that have enabled “Advanced SIM Library Mode” in Enterprise Preferences > Libraries tab.
IMPORTANT NOTE: Advanced Service Item Library Mode should not be enabled in Enterprise Preferences without fully understanding all of the related maintenance and functionality involved. Once it has been enabled, it cannot be disabled.
Advanced SIM Library Mode provides the ability to set prices based on how various payers divide the country into geographical regions. Clients are able to configure their Locations into SIM Pricing Regions for the appropriate payers. Each pricing region is then assigned a different SIM Library with prices that are specific to that region and payer. SIM Pricing Templates allow users to manage and update prices in the various payer specific SIM Libraries by use of “pricing configurations”. NOTE: Setup of this library and training on Advanced SIM Library Mode may be covered in a separate WebEx training session.
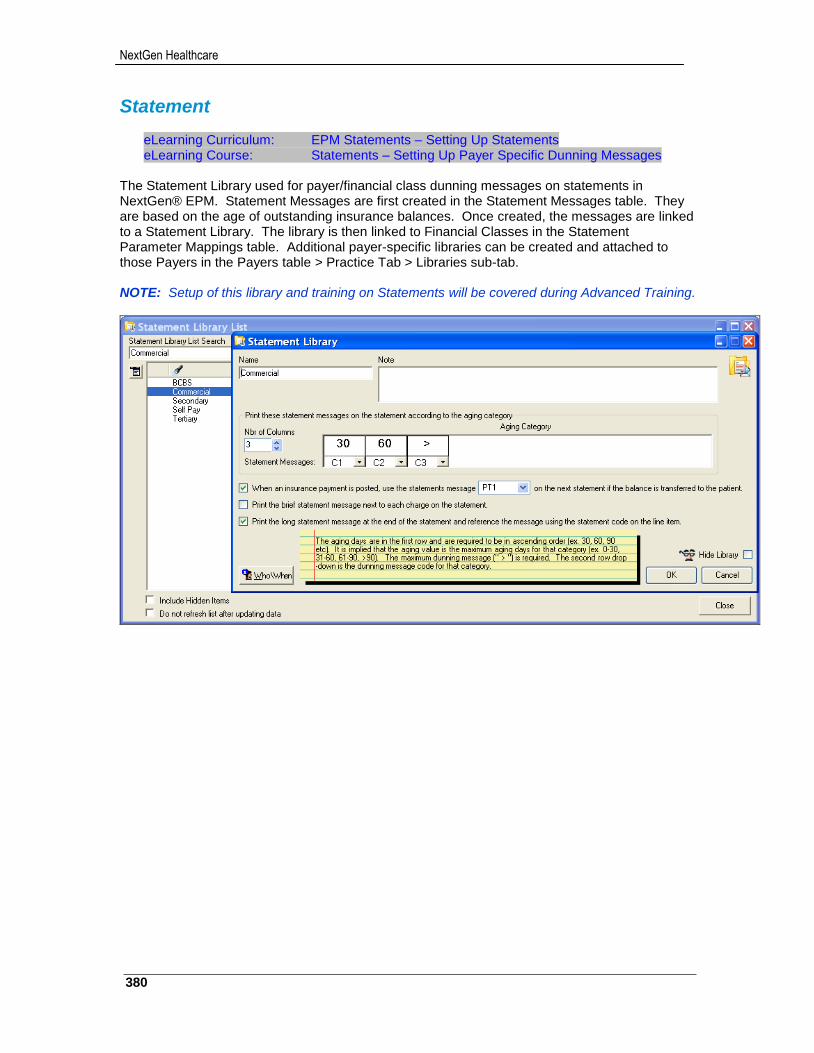
NextGen Healthcare
380
Statement
eLearning Curriculum: EPM Statements – Setting Up Statements eLearning Course: Statements – Setting Up Payer Specific Dunning Messages
The Statement Library used for payer/financial class dunning messages on statements in NextGen® EPM. Statement Messages are first created in the Statement Messages table. They are based on the age of outstanding insurance balances. Once created, the messages are linked to a Statement Library. The library is then linked to Financial Classes in the Statement Parameter Mappings table. Additional payer-specific libraries can be created and attached to those Payers in the Payers table > Practice Tab > Libraries sub-tab. NOTE: Setup of this library and training on Statements will be covered during Advanced Training.
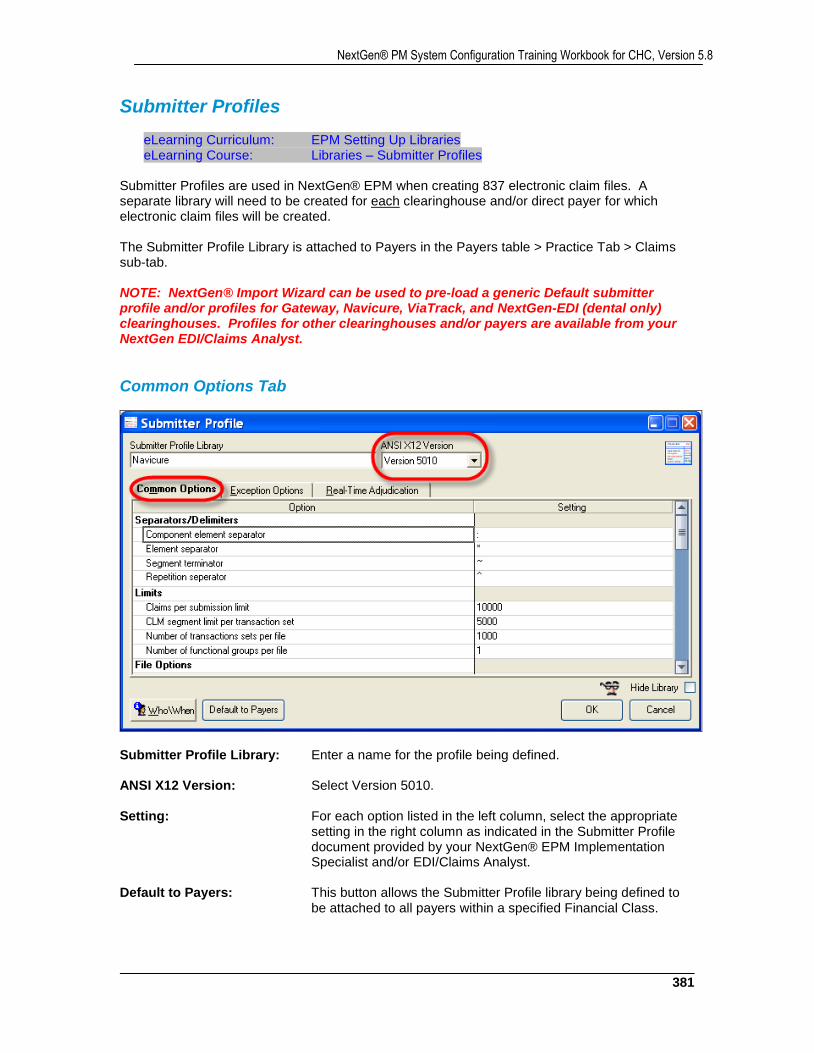
381
NextGen® PM System Configuration Training Workbook for CHC, Version 5.8
Submitter Profiles
eLearning Curriculum: EPM Setting Up Libraries eLearning Course: Libraries – Submitter Profiles
Submitter Profiles are used in NextGen® EPM when creating 837 electronic claim files. A separate library will need to be created for each clearinghouse and/or direct payer for which electronic claim files will be created. The Submitter Profile Library is attached to Payers in the Payers table > Practice Tab > Claims sub-tab. NOTE: NextGen® Import Wizard can be used to pre-load a generic Default submitter profile and/or profiles for Gateway, Navicure, ViaTrack, and NextGen-EDI (dental only) clearinghouses. Profiles for other clearinghouses and/or payers are available from your NextGen EDI/Claims Analyst.
Common Options Tab
Submitter Profile Library: Enter a name for the profile being defined. ANSI X12 Version: Select Version 5010. Setting: For each option listed in the left column, select the appropriate
setting in the right column as indicated in the Submitter Profile document provided by your NextGen® EPM Implementation Specialist and/or EDI/Claims Analyst.
Default to Payers: This button allows the Submitter Profile library being defined to
be attached to all payers within a specified Financial Class.

NextGen Healthcare
382
Exception Options Tab
Setting: For each option listed in the left column, select the appropriate setting in the right
column as indicated in the Submitter Profile document provided by your NextGen® EPM Implementation Specialist and/or EDI/Claims Analyst.
Real Time Adjudication Tab This is used with the NextGen® RTS (Real-Time Transaction Server) module for real-time claim adjudication requests. NOTE: Setup and training for the RTS module will be covered in a separate training session by a NextGen RTS representative.
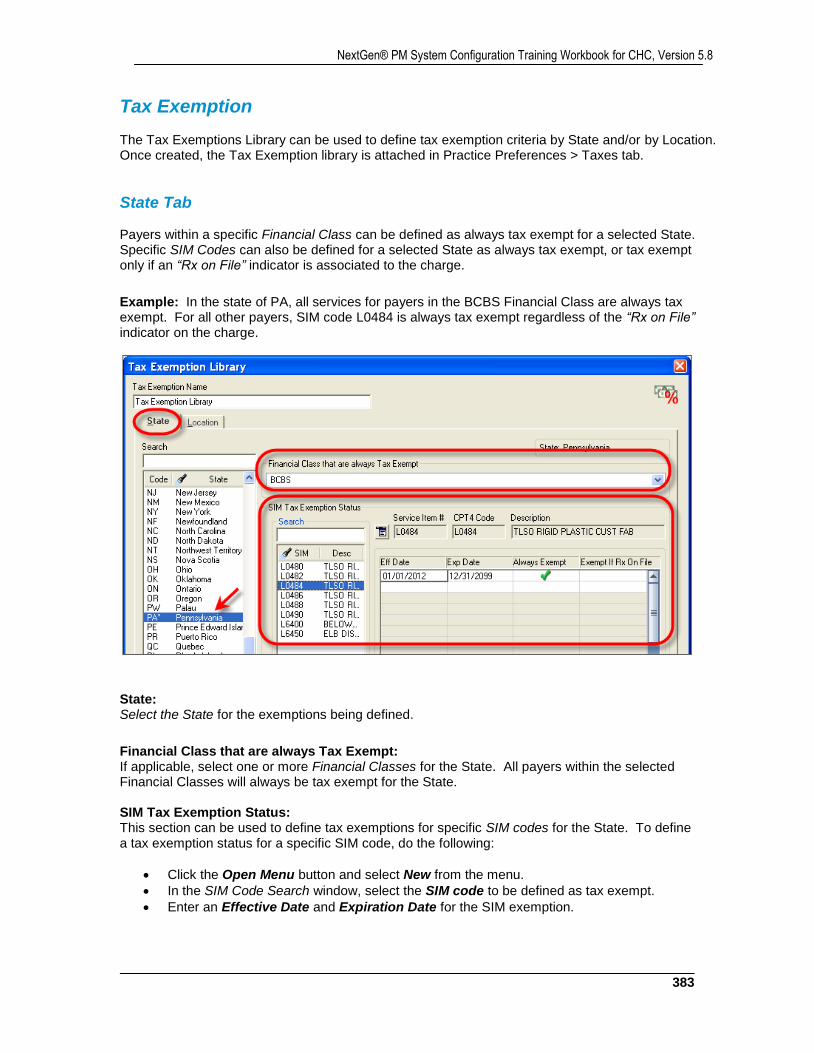
383
NextGen® PM System Configuration Training Workbook for CHC, Version 5.8
Tax Exemption The Tax Exemptions Library can be used to define tax exemption criteria by State and/or by Location. Once created, the Tax Exemption library is attached in Practice Preferences > Taxes tab.
State Tab Payers within a specific Financial Class can be defined as always tax exempt for a selected State. Specific SIM Codes can also be defined for a selected State as always tax exempt, or tax exempt only if an “Rx on File” indicator is associated to the charge.
Example: In the state of PA, all services for payers in the BCBS Financial Class are always tax exempt. For all other payers, SIM code L0484 is always tax exempt regardless of the “Rx on File” indicator on the charge.
State: Select the State for the exemptions being defined.
Financial Class that are always Tax Exempt: If applicable, select one or more Financial Classes for the State. All payers within the selected Financial Classes will always be tax exempt for the State. SIM Tax Exemption Status: This section can be used to define tax exemptions for specific SIM codes for the State. To define a tax exemption status for a specific SIM code, do the following:
Click the Open Menu button and select New from the menu.
In the SIM Code Search window, select the SIM code to be defined as tax exempt.
Enter an Effective Date and Expiration Date for the SIM exemption.
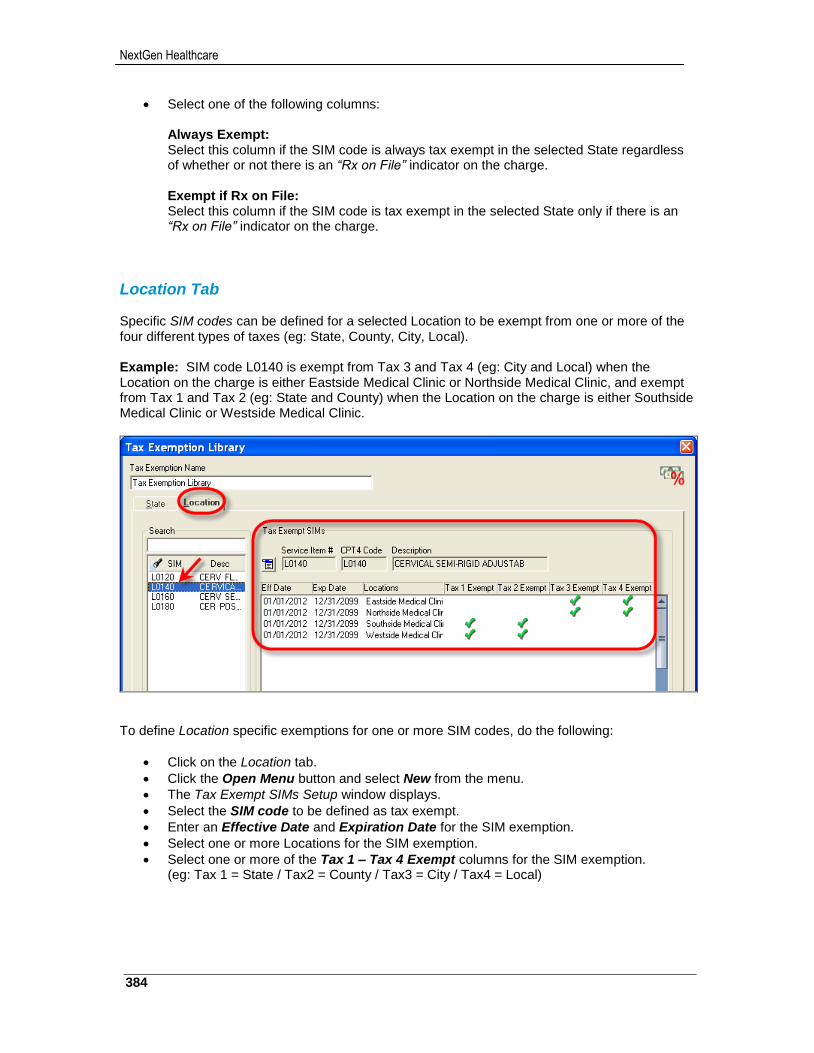
NextGen Healthcare
384
Select one of the following columns: Always Exempt: Select this column if the SIM code is always tax exempt in the selected State regardless of whether or not there is an “Rx on File” indicator on the charge.
Exempt if Rx on File: Select this column if the SIM code is tax exempt in the selected State only if there is an “Rx on File” indicator on the charge.
Location Tab Specific SIM codes can be defined for a selected Location to be exempt from one or more of the four different types of taxes (eg: State, County, City, Local). Example: SIM code L0140 is exempt from Tax 3 and Tax 4 (eg: City and Local) when the Location on the charge is either Eastside Medical Clinic or Northside Medical Clinic, and exempt from Tax 1 and Tax 2 (eg: State and County) when the Location on the charge is either Southside Medical Clinic or Westside Medical Clinic.
To define Location specific exemptions for one or more SIM codes, do the following:
Click on the Location tab.
Click the Open Menu button and select New from the menu.
The Tax Exempt SIMs Setup window displays.
Select the SIM code to be defined as tax exempt.
Enter an Effective Date and Expiration Date for the SIM exemption.
Select one or more Locations for the SIM exemption.
Select one or more of the Tax 1 – Tax 4 Exempt columns for the SIM exemption. (eg: Tax 1 = State / Tax2 = County / Tax3 = City / Tax4 = Local)
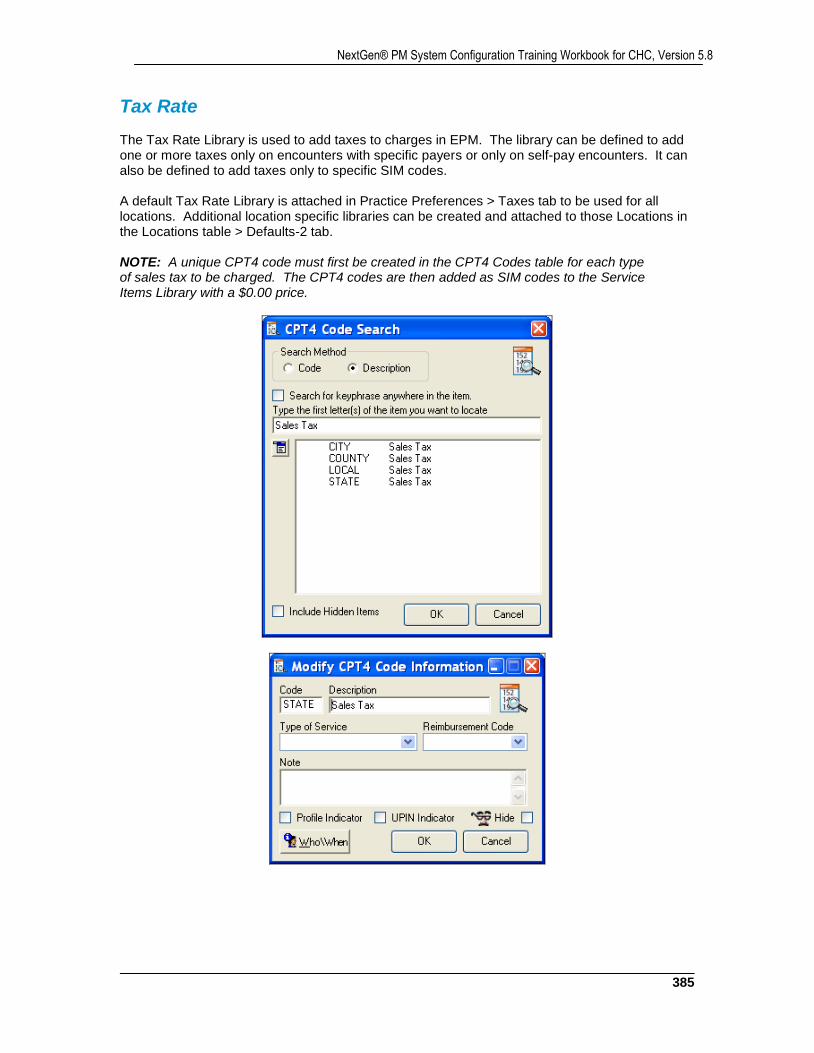
385
NextGen® PM System Configuration Training Workbook for CHC, Version 5.8
Tax Rate The Tax Rate Library is used to add taxes to charges in EPM. The library can be defined to add one or more taxes only on encounters with specific payers or only on self-pay encounters. It can also be defined to add taxes only to specific SIM codes. A default Tax Rate Library is attached in Practice Preferences > Taxes tab to be used for all locations. Additional location specific libraries can be created and attached to those Locations in the Locations table > Defaults-2 tab. NOTE: A unique CPT4 code must first be created in the CPT4 Codes table for each type of sales tax to be charged. The CPT4 codes are then added as SIM codes to the Service Items Library with a $0.00 price.
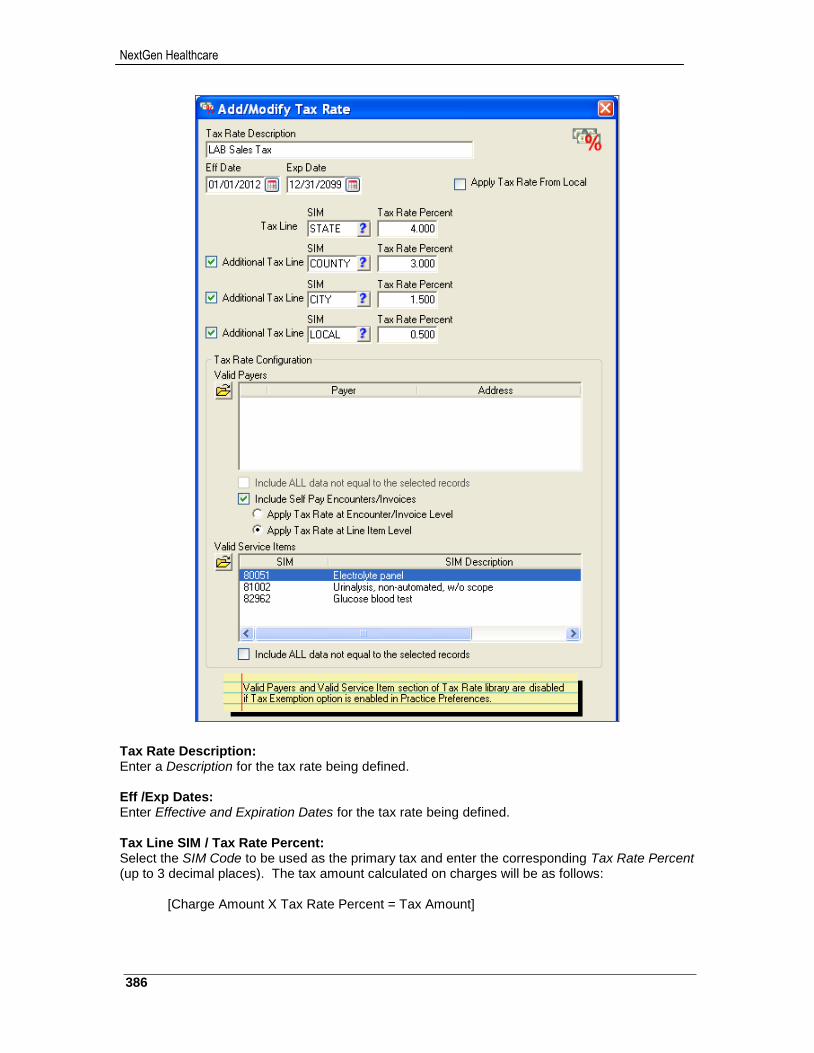
NextGen Healthcare
386
Tax Rate Description: Enter a Description for the tax rate being defined. Eff /Exp Dates: Enter Effective and Expiration Dates for the tax rate being defined. Tax Line SIM / Tax Rate Percent: Select the SIM Code to be used as the primary tax and enter the corresponding Tax Rate Percent (up to 3 decimal places). The tax amount calculated on charges will be as follows:
[Charge Amount X Tax Rate Percent = Tax Amount]
387
NextGen® PM System Configuration Training Workbook for CHC, Version 5.8
Additional Tax Lines 2-4 SIM / Tax Rate Percent: Select up to three additional SIM Codes to be used for other taxes and enter the corresponding Tax Rate Percent for each (up to 3 decimal places). Apply Tax Rate from Local: Do not select this check-box if the Tax Rate Percent defined for each SIM code is to be used to calculate the taxes on charges. Select this check-box if the Tax Rate Percent defined for each SIM code is not to be used to calculate the taxes on charges. The Tax Rate Percent defined in the Locality Tax Rate master file will be used instead. NOTE: The Tax Rate Percent fields become unavailable when this option is selected. Valid Payers: From the yellow folder, select the Payers to which the tax rate applies.
Include ALL data not equal to selected records: Select this check-box to exclude the payers selected above from the tax rate. The tax rate will then apply to all other payers.
Include Self-pay Encounters/Invoices: Select this check-box if the tax rate applies to self-pay encounters and invoices.
Apply Tax Rate at Encounter/Invoice Level: Select this option if each type of tax should be added once for the entire encounter/invoice.
NOTE: If the “Enable Advanced Service Item Library Mode” option has been enabled in Enterprise Preferences > Libraries tab, this option becomes disabled in the Tax Rate Library. All taxes will be applied at line item level.
Apply Tax Rate at Line Item Level: Select this option if each type of tax should be added to each line item/charge on the encounter/invoice.
Valid Service Items: From the yellow folder, select the SIM Codes to which the tax rate applies. Include ALL data not equal to selected records: Select this check-box to exclude the SIM codes selected above from the tax rate. The tax rate will then apply to all other SIM codes.
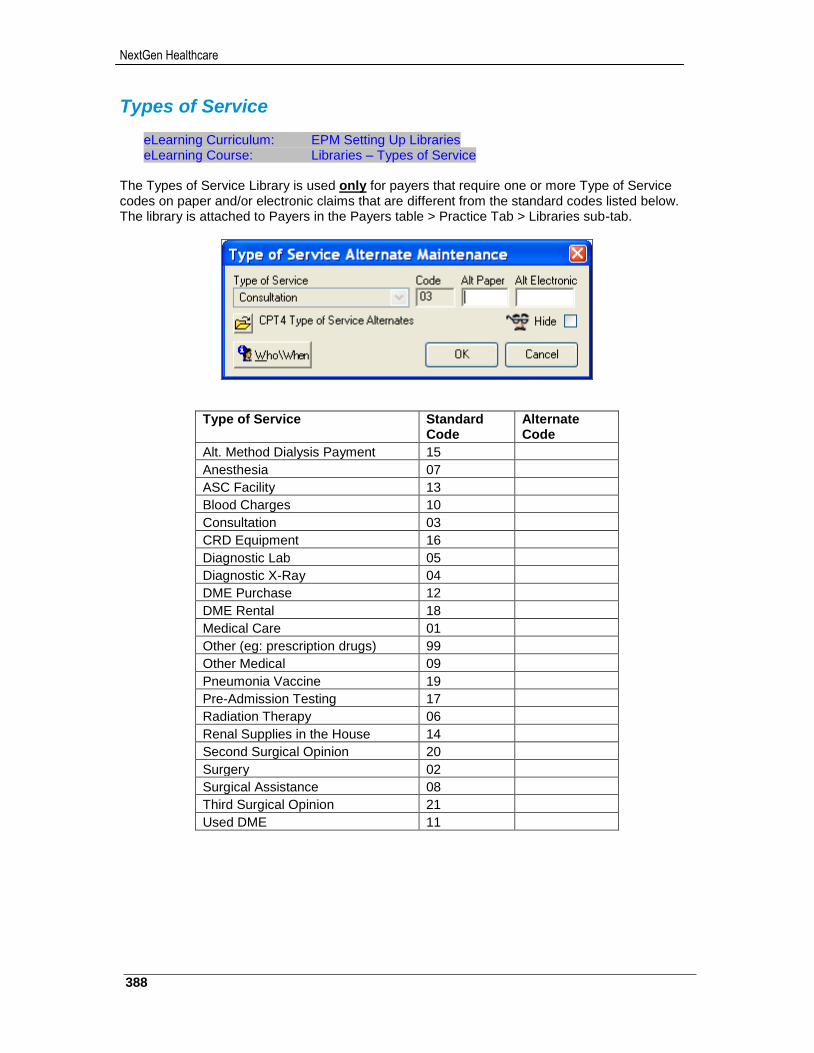
NextGen Healthcare
388
Types of Service
eLearning Curriculum: EPM Setting Up Libraries eLearning Course: Libraries – Types of Service
The Types of Service Library is used only for payers that require one or more Type of Service codes on paper and/or electronic claims that are different from the standard codes listed below. The library is attached to Payers in the Payers table > Practice Tab > Libraries sub-tab.
Type of Service Standard Code
Alternate Code
Alt. Method Dialysis Payment 15
Anesthesia 07
ASC Facility 13
Blood Charges 10
Consultation 03
CRD Equipment 16
Diagnostic Lab 05
Diagnostic X-Ray 04
DME Purchase 12
DME Rental 18
Medical Care 01
Other (eg: prescription drugs) 99
Other Medical 09
Pneumonia Vaccine 19
Pre-Admission Testing 17
Radiation Therapy 06
Renal Supplies in the House 14
Second Surgical Opinion 20
Surgery 02
Surgical Assistance 08
Third Surgical Opinion 21
Used DME 11
389
NextGen® PM System Configuration Training Workbook for CHC, Version 5.8
Contracts
eLearning Curriculum: EPM Setting Up Libraries eLearning Course: Libraries – Contracts
The Contracts Library is commonly used in NextGen® EPM to:
Streamline payment entry by defaulting the payer’s allowed, payment and adjustment amounts
Automatically adjust charges during charge posting so that A/R reflects expected reimbursement
Track expected vs. actual reimbursement with the Contractual Analysis report
Define requirements for specific CPT4 codes. For example: authorization required, referring provider required, co-pay amount, diagnosis code required, modifier required, etc.
NextGen® Contract Utility The Contract Utility is a separate application that can be used to update fee schedules for existing contracts in File Maintenance by use of a Microsoft® Excel workbook. The utility can also be used to create new contracts, links contracts to payers, and select participating providers for contracts. Clients running NextGen® version 5.5 or higher can download the Contract Utility and the User Guide from the following website: http://www.ncslive.com. NOTE: The Contract Utility will be covered during a separate WebEx training session.
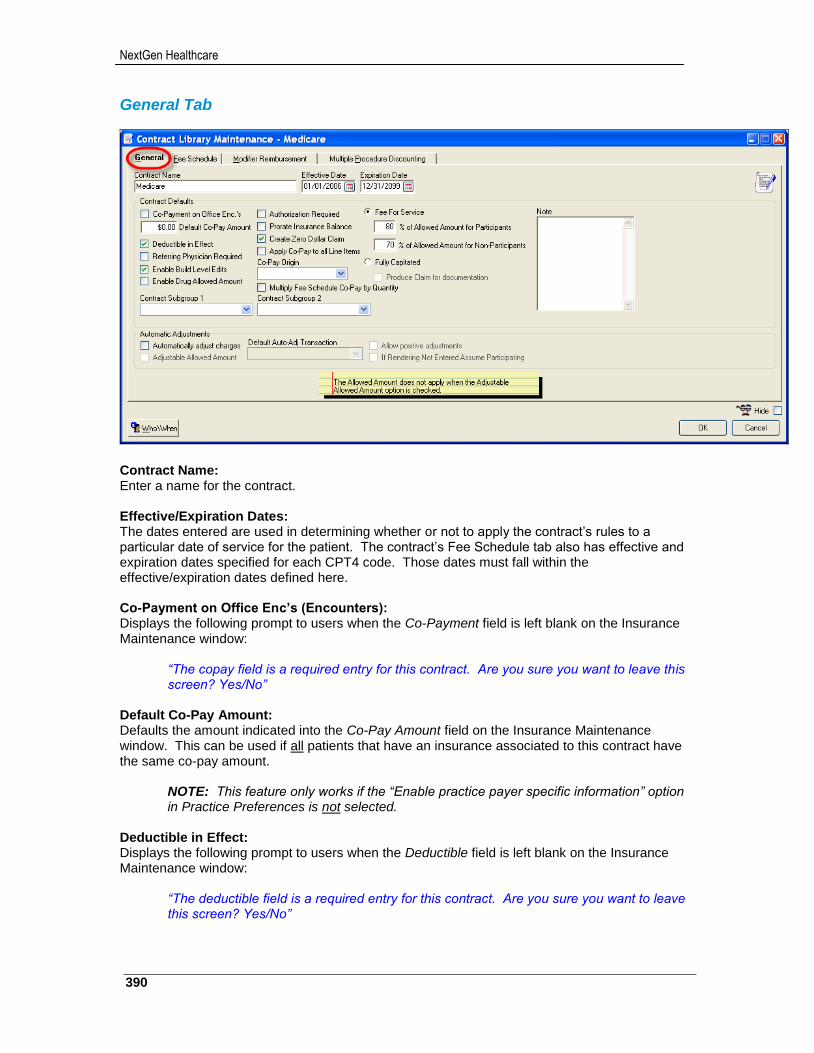
NextGen Healthcare
390
General Tab
Contract Name: Enter a name for the contract. Effective/Expiration Dates: The dates entered are used in determining whether or not to apply the contract’s rules to a particular date of service for the patient. The contract’s Fee Schedule tab also has effective and expiration dates specified for each CPT4 code. Those dates must fall within the effective/expiration dates defined here. Co-Payment on Office Enc’s (Encounters): Displays the following prompt to users when the Co-Payment field is left blank on the Insurance Maintenance window:
“The copay field is a required entry for this contract. Are you sure you want to leave this screen? Yes/No”
Default Co-Pay Amount: Defaults the amount indicated into the Co-Pay Amount field on the Insurance Maintenance window. This can be used if all patients that have an insurance associated to this contract have the same co-pay amount.
NOTE: This feature only works if the “Enable practice payer specific information” option in Practice Preferences is not selected.
Deductible in Effect: Displays the following prompt to users when the Deductible field is left blank on the Insurance Maintenance window:
“The deductible field is a required entry for this contract. Are you sure you want to leave this screen? Yes/No”
391
NextGen® PM System Configuration Training Workbook for CHC, Version 5.8
Referring Physician Required: Displays the following contract edit alert to users on the Charge Posting window for any CPT4 code entered:
“Referring Physician is required for this procedure” Enable Build Level Edits: Generates a claim edit failure on the Claim Production Status Report during the billing process and stops a claim from being created if an encounter is missing any of the criteria defined within the contract. Enable Drug Allowed Amounts: Enables allowed amounts for each CPT4 code to be entered with three decimal places on the contract’s Fee Schedule tab. ($0.000) Contract Subgroup 1 and 2: A contract can be linked to one or two Contract Subgroupings which are defined in File Maintenance / Master Lists and used to associate providers and contracts together. Providers linked to the same subgroup(s) in the Providers table can easily be assigned or unassigned as participating providers for the contract. Authorization Required: Displays the following contract edit alert to users on the Charge Posting window for any CPT4 code entered:
“Authorization is required for this procedure”
Prorate Insurance Balance: Charge balances on an encounter will be prorated in the Balance Control window between the primary and secondary insurances (or between the primary insurance and the patient if no secondary insurance exists). The prorated amount is based on the fee for service percentage defined in the contract’s fee schedule.
NOTE: The “Prorate insurance balance” option must also be selected for the Payer on the Practice tab > Libraries sub-tab.
Create Zero Dollar Claim: Enables $0.00 charges to be included and billed on insurance claim forms. Unless this option is selected, the application does not normally include $0.00 charges on claims. Apply Co-Pay to All Line Items: Enables multiple charges on a single encounter to have a co-pay applied if the Co-Pay Amount or Co-Pay % has been defined for each CPT4 code in the contract’s fee schedule. Unless this option is selected, the application applies a co-payment only to the first charge entered on an encounter, regardless of the CPT4 code entered Co-Pay Origin: Determines if the Co-Pay% indicated in the contract’s fee schedule should be based on the Allowed Amount or the Reimbursed Amount defined for each CPT4 code.
NOTE: The “Co-pay percent calc” option within the Payers table in File Maintenance must also be selected.
Multiply Fee Schedule Co-Pay by Quantity The copay amount indicated for a CPT4 code on the Fee Schedule tab of the contract will be multiplied by the quantity entered during charge posting.
NextGen Healthcare
392
Fee for Service: Defaults “FFS” into the Type field for each CPT4 code added to the contract’s fee schedule. % of Allowed Amount for Participants / Non-Participants: The percentage defined here will be multiplied by the price from the SIM Library for any CPT4 code not defined in the contract’s fee schedule. The multiplied value will default onto the Payment Entry window as the expected payment amount. Fully Capitated / Produce Claim for Documentation: Charges for CPT4 codes not defined in the contract’s fee schedule will be adjusted to a balance of $0.00 on the Payment Entry window. The adjustment amount is equal to the price from the SIM Library. The adjustment code used is the Default Adjustment code from the Payers table. Also defaults “Capitated” into the Type field for each CPT4 code added to the contract’s fee schedule. Automatically Adjust Charges: Charges will be adjusted at the time of entry on the Charge Posting window. The adjustment amount is calculated as the difference between the price from the SIM Library and the allowed amount from the contract’s fee schedule.
[Charge - Allowed = Adjustment]
Adjustable Allowed Amount: Charges will be adjusted at the time of entry on the Charge Posting window. The adjustment amount is calculated as the difference between the price from the SIM Library and the reimbursed amount from the contract’s fee schedule plus the patient’s co-pay amount.
[Charge - (Reimbursed + Co-Pay) = Adjustment]
Default Auto-Adj Transaction: Required entry if the “Automatically Adjust Charges” option is selected. Enter the third party adjustment Transaction Code to be used when charges are adjusted at the time of entry on the Charge Posting window. Allow Positive Adjustments: Charges will be adjusted at the time of entry on the Charge Posting window. If the price from the SIM Library is less than the allowed amount from the contract’s fee schedule, a positive adjustment will be added to bring the balance of the charge up to the allowed amount. If Rendering Not Entered Assume Participating: If the Rendering field is left blank on the Encounter Maintenance window (and therefore is also left blank on the Charge Posting window) the system will assume that the “no rendering” is a participating provider and the adjustment amount will be calculated accordingly.
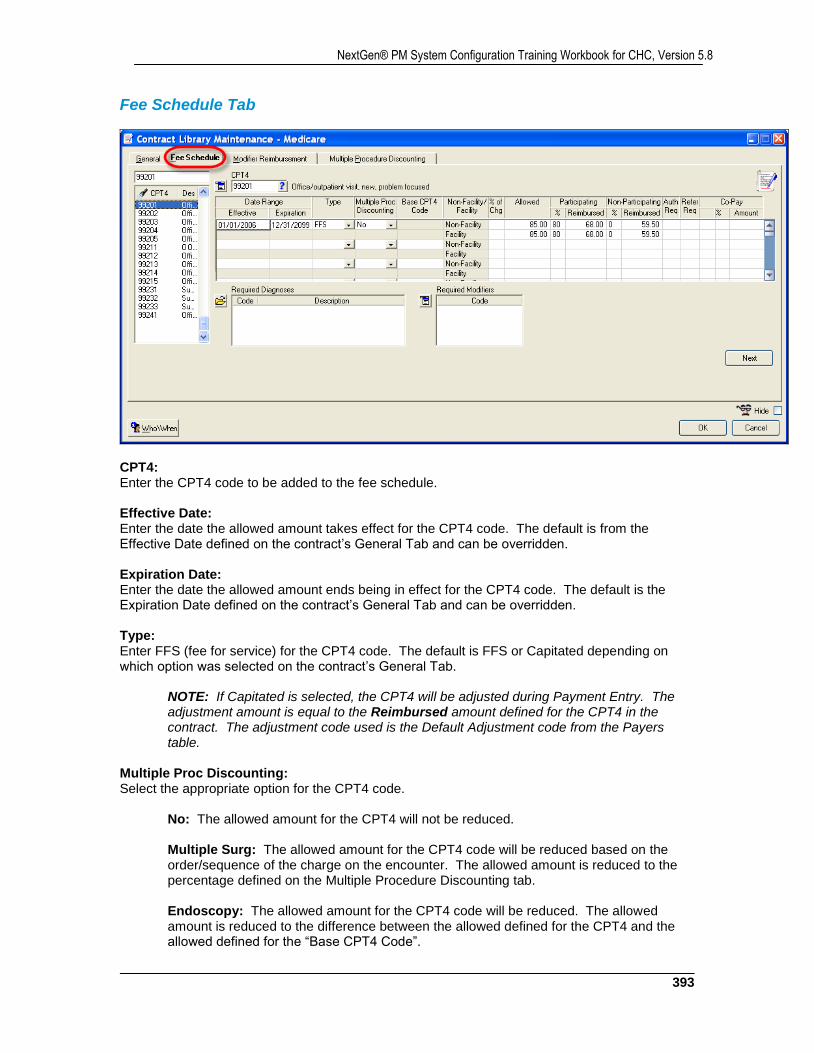
393
NextGen® PM System Configuration Training Workbook for CHC, Version 5.8
Fee Schedule Tab
CPT4: Enter the CPT4 code to be added to the fee schedule. Effective Date: Enter the date the allowed amount takes effect for the CPT4 code. The default is from the Effective Date defined on the contract’s General Tab and can be overridden. Expiration Date: Enter the date the allowed amount ends being in effect for the CPT4 code. The default is the Expiration Date defined on the contract’s General Tab and can be overridden. Type: Enter FFS (fee for service) for the CPT4 code. The default is FFS or Capitated depending on which option was selected on the contract’s General Tab.
NOTE: If Capitated is selected, the CPT4 will be adjusted during Payment Entry. The adjustment amount is equal to the Reimbursed amount defined for the CPT4 in the contract. The adjustment code used is the Default Adjustment code from the Payers table.
Multiple Proc Discounting: Select the appropriate option for the CPT4 code.
No: The allowed amount for the CPT4 will not be reduced.
Multiple Surg: The allowed amount for the CPT4 code will be reduced based on the order/sequence of the charge on the encounter. The allowed amount is reduced to the percentage defined on the Multiple Procedure Discounting tab.
Endoscopy: The allowed amount for the CPT4 code will be reduced. The allowed amount is reduced to the difference between the allowed defined for the CPT4 and the allowed defined for the “Base CPT4 Code”.
NextGen Healthcare
394
Base CPT4 Code: Select the “Base Code” for the endoscopy CPT4 code.
NOTE: This field is required if “Endoscopy” was selected in the “Multiple Proc Discounting” field.
Non-Facility / Facility: Allows for differences in allowed and reimbursed amounts depending on where a service is performed. (eg: Office = Non-Facility and Inpatient Hospital = Facility) % of Chg: Select this column (green check) if the allowed amount for the CPT4 code is to be a percentage of the charge amount from the SIM Library.
NOTE: When this column is selected, the Allowed field becomes a % amount, not a $ amount and the Participating/Non-Participating Reimbursed fields become unavailable.
Non-Facility Allowed Enter the non-facility allowed amount for the CPT4 code. An adjustment will be made to the charge if the non-facility price from the SIM Library and the non-facility allowed amount from the contract’s fee schedule are not the same.
NOTE: The charge will be adjusted at the time of entry on the Charge Posting window if the “Automatically Adjust Charges” option is selected on the contract’s General Tab. Otherwise, the charge will be adjusted during Payment Entry.
Facility Allowed Enter the allowed amount for the CPT4 code. An adjustment will be made to the charge if the price from the SIM Library and the facility allowed amount from the contract’s fee schedule are not the same.
NOTE: The charge will be adjusted at the time of entry on the Charge Posting window if the “Automatically Adjust Charges” option is selected on the contract’s General Tab. Otherwise, the charge will be adjusted during Payment Entry.
Participating %: Enter the percentage of the allowed amount that is expected as reimbursement for a participating provider. The Participating Reimbursed amount will be calculated from the percentage entered. Participating Reimbursed: Enter the reimbursement amount that is expected for a participating provider. The Participating % will be calculated from the amount entered. Non-Participating %: Enter the percentage of the allowed amount that is expected as reimbursement for a non-participating provider. The Non-Participating Reimbursed amount will default to $0.00 as an entry is not required in both fields. Non-Participating Reimbursed: Enter the reimbursement amount that is expected for a non-participating provider. The Non-Participating % will default to $0.00 as an entry is not required in both fields.
395
NextGen® PM System Configuration Training Workbook for CHC, Version 5.8
Auth Req: Select this option if an authorization is required for the CPT4 code. The following contract edit alert will display to users on the Charge Posting window:
“Authorization is required for this procedure”.
NOTE: This will override the “Authorization Required” option setting on the General Tab.
Refer Req: Select this option if a referring physician is required for the CPT4 code. The following contract edit alert will display to users on the Charge Posting window:
“Referring Physician is required for this procedure”.
NOTE: This will override the “Referring Physician Required” option setting on the General Tab.
Co-Pay √ : Select this option if a co-payment should be applied to the CPT4 code. The co-pay applied will be the amount defined in the Default Co-Pay Amount field on the contract’s General Tab. If no co-pay amount is defined on the contract’s General Tab, the co-pay applied will be the amount entered in the Co-Pay Amount field on the patient’s Insurance Maintenance window. Co-Pay %: If the co-payment to be applied to the CPT4 code should be calculated as a percentage of the allowed amount defined in the contract’s fee schedule, enter the percentage here.
NOTE: This percentage co-payment will override both the “Default Co-Pay Amount” defined on the contract’s General Tab and the Co-Pay Amount defined on the patient’s Insurance Maintenance window.
Co-Pay Amount: If the co-payment to be applied to the CPT4 code should be a specific dollar amount, enter the amount here.
NOTE: This co-payment amount will override both the “Default Co-Pay Amount” defined on the contract’s General Tab and the Co-Pay Amount defined on the patient’s Insurance Maintenance window.
Required Diagnoses: If the payer requires that a specific diagnosis code be associated to this CPT4 code, add the ICD9(s) here. The following contract edit alert displays to users on the Charge Posting window if a required ICD9 code is not entered:
“Warning: The contract requires the primary diagnosis code to be one of the following diagnosis code(s): code1, code2, code3, etc.”
Required Modifiers: If the payer requires that a specific modifier be associated to this CPT4 code, add the modifier(s) here. The following contract edit alert displays to users on the Charge Posting window if a required modifier is not entered:
“Warning: According to the contract the following modifier code(s) are required for this procedure: code1, code2, code3, etc.”
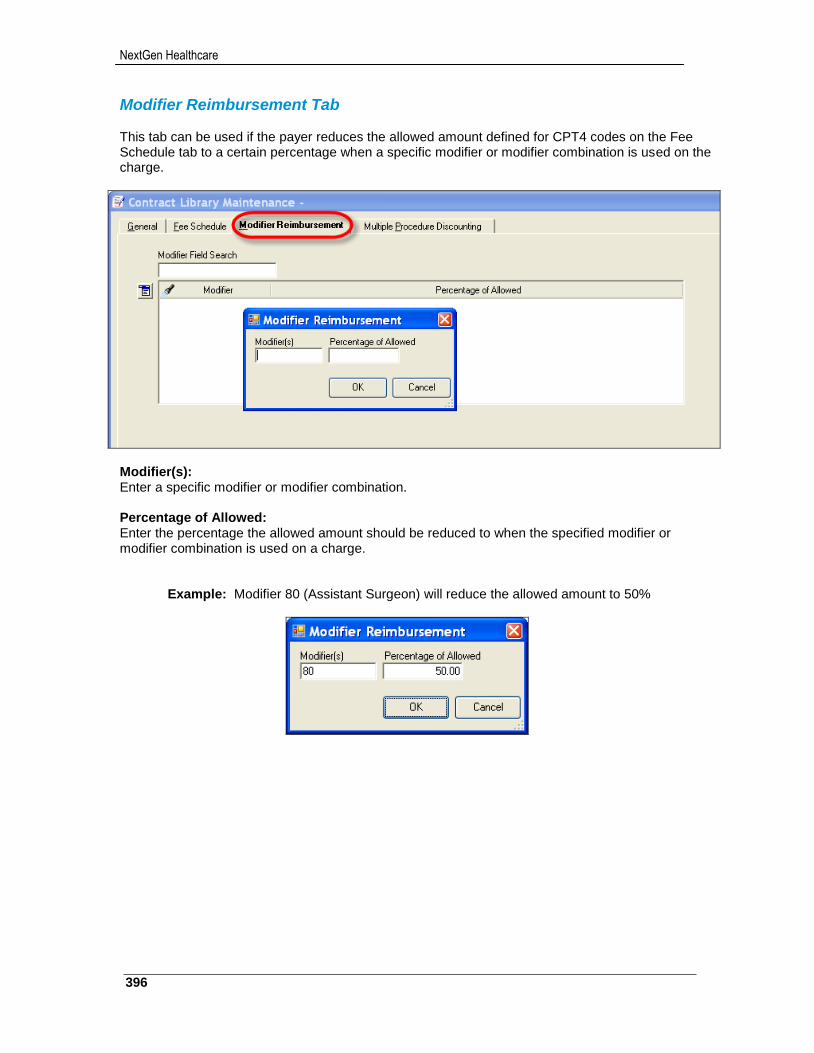
NextGen Healthcare
396
Modifier Reimbursement Tab This tab can be used if the payer reduces the allowed amount defined for CPT4 codes on the Fee Schedule tab to a certain percentage when a specific modifier or modifier combination is used on the charge.
Modifier(s): Enter a specific modifier or modifier combination. Percentage of Allowed: Enter the percentage the allowed amount should be reduced to when the specified modifier or modifier combination is used on a charge.
Example: Modifier 80 (Assistant Surgeon) will reduce the allowed amount to 50%

397
NextGen® PM System Configuration Training Workbook for CHC, Version 5.8
Multiple Procedure Discounting Tab This tab can be used if the payer reduces the allowed amount defined for CPT4 codes on the Fee Schedule tab to a certain percentage when those codes are setup as a “Multiple Surg”. The allowed amount is reduced based on the charge order/sequence on the encounter.
Sequence: Defaults a number as follows and cannot be changed:
First entry = 1 Second entry = 2 Etc.
Percentage of Allowed: Enter the percentage the allowed amount should be reduced to when the charge falls into the defined order/sequence on the encounter.
Example: First charge: The allowed amount will remain at 100% Second charge: The allowed amount will be reduced to 75% Third or more charges: The allowed amount will be reduced to 50%
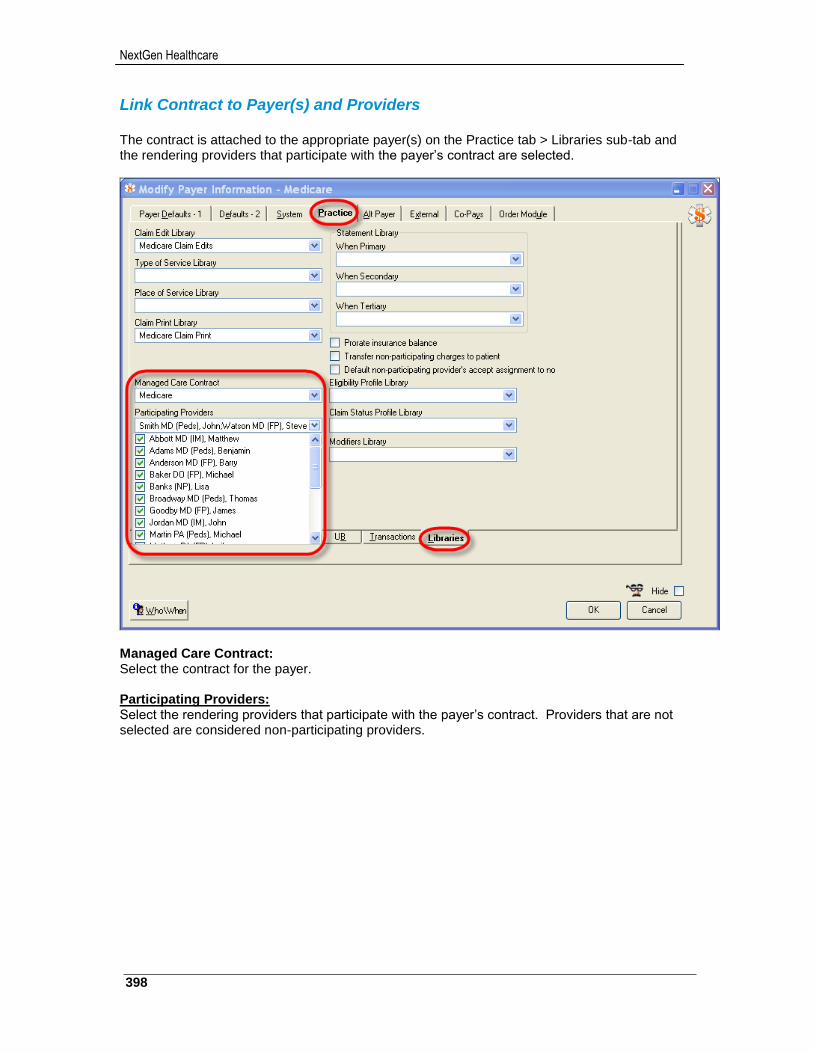
NextGen Healthcare
398
Link Contract to Payer(s) and Providers The contract is attached to the appropriate payer(s) on the Practice tab > Libraries sub-tab and the rendering providers that participate with the payer’s contract are selected.
Managed Care Contract: Select the contract for the payer.
Participating Providers: Select the rendering providers that participate with the payer’s contract. Providers that are not selected are considered non-participating providers.
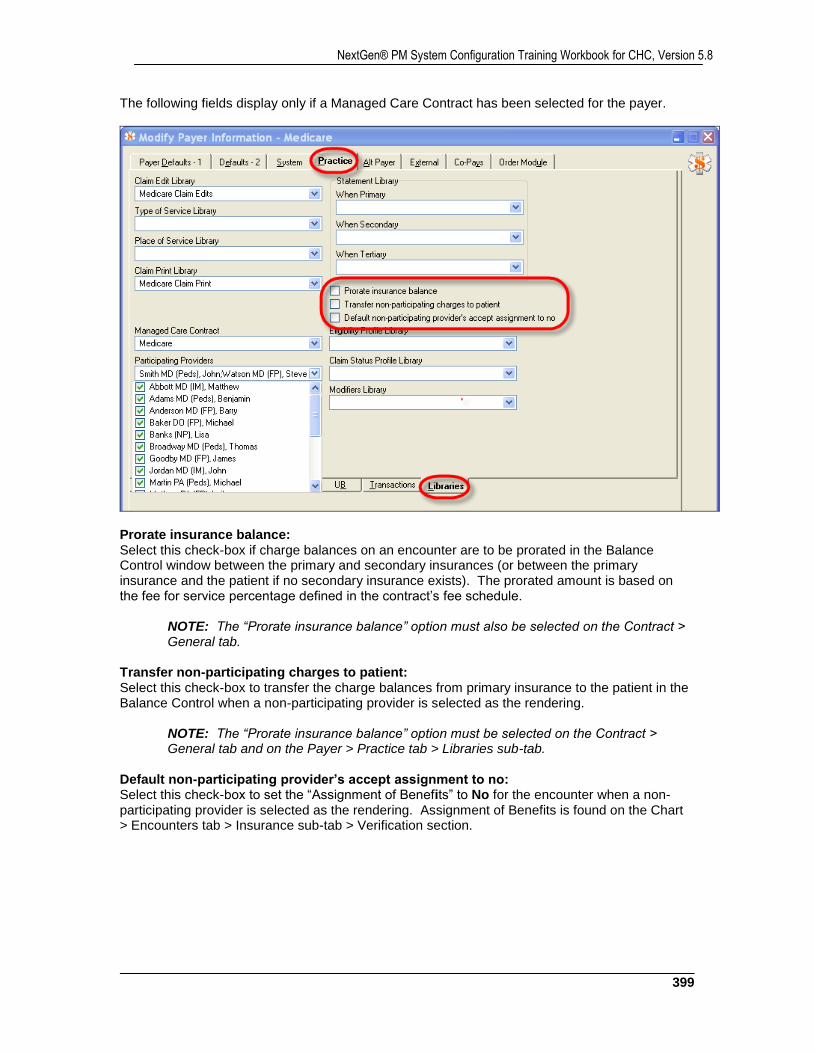
399
NextGen® PM System Configuration Training Workbook for CHC, Version 5.8
The following fields display only if a Managed Care Contract has been selected for the payer.
Prorate insurance balance: Select this check-box if charge balances on an encounter are to be prorated in the Balance Control window between the primary and secondary insurances (or between the primary insurance and the patient if no secondary insurance exists). The prorated amount is based on the fee for service percentage defined in the contract’s fee schedule.
NOTE: The “Prorate insurance balance” option must also be selected on the Contract > General tab.
Transfer non-participating charges to patient: Select this check-box to transfer the charge balances from primary insurance to the patient in the Balance Control when a non-participating provider is selected as the rendering.
NOTE: The “Prorate insurance balance” option must be selected on the Contract > General tab and on the Payer > Practice tab > Libraries sub-tab.
Default non-participating provider’s accept assignment to no: Select this check-box to set the “Assignment of Benefits” to No for the encounter when a non-participating provider is selected as the rendering. Assignment of Benefits is found on the Chart > Encounters tab > Insurance sub-tab > Verification section.
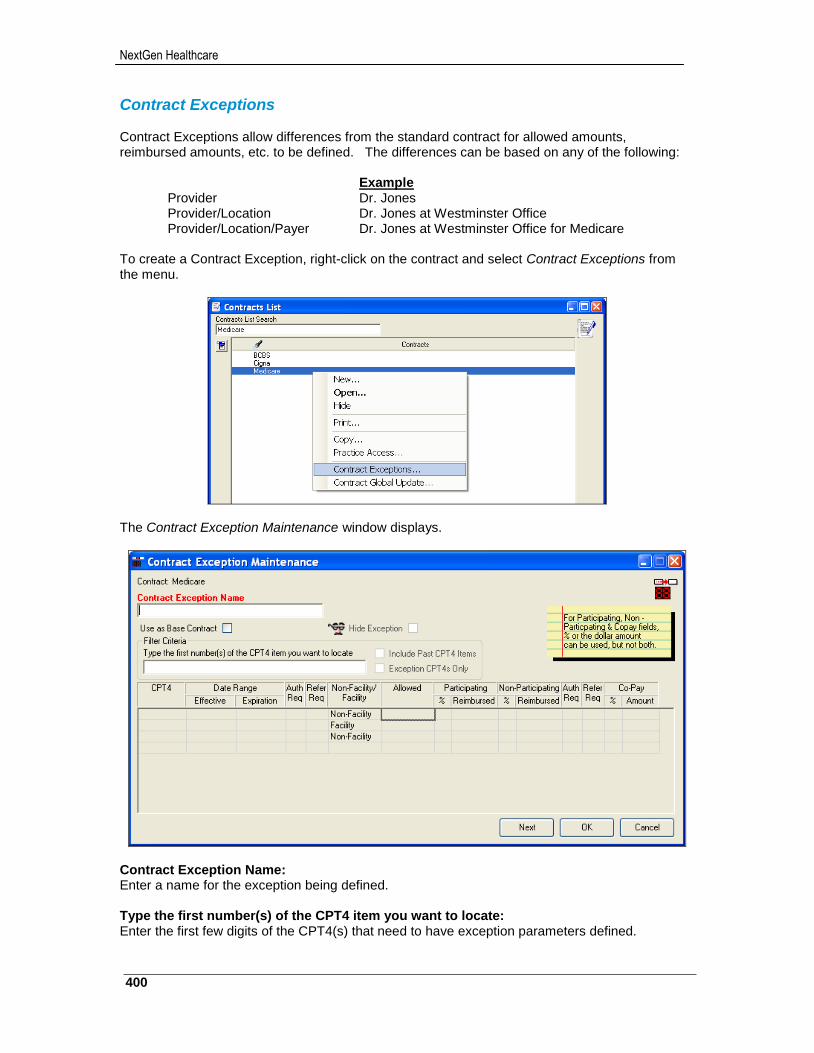
NextGen Healthcare
400
Contract Exceptions Contract Exceptions allow differences from the standard contract for allowed amounts, reimbursed amounts, etc. to be defined. The differences can be based on any of the following: Example
Provider Dr. Jones Provider/Location Dr. Jones at Westminster Office Provider/Location/Payer Dr. Jones at Westminster Office for Medicare
To create a Contract Exception, right-click on the contract and select Contract Exceptions from the menu.
The Contract Exception Maintenance window displays.
Contract Exception Name: Enter a name for the exception being defined. Type the first number(s) of the CPT4 item you want to locate: Enter the first few digits of the CPT4(s) that need to have exception parameters defined.
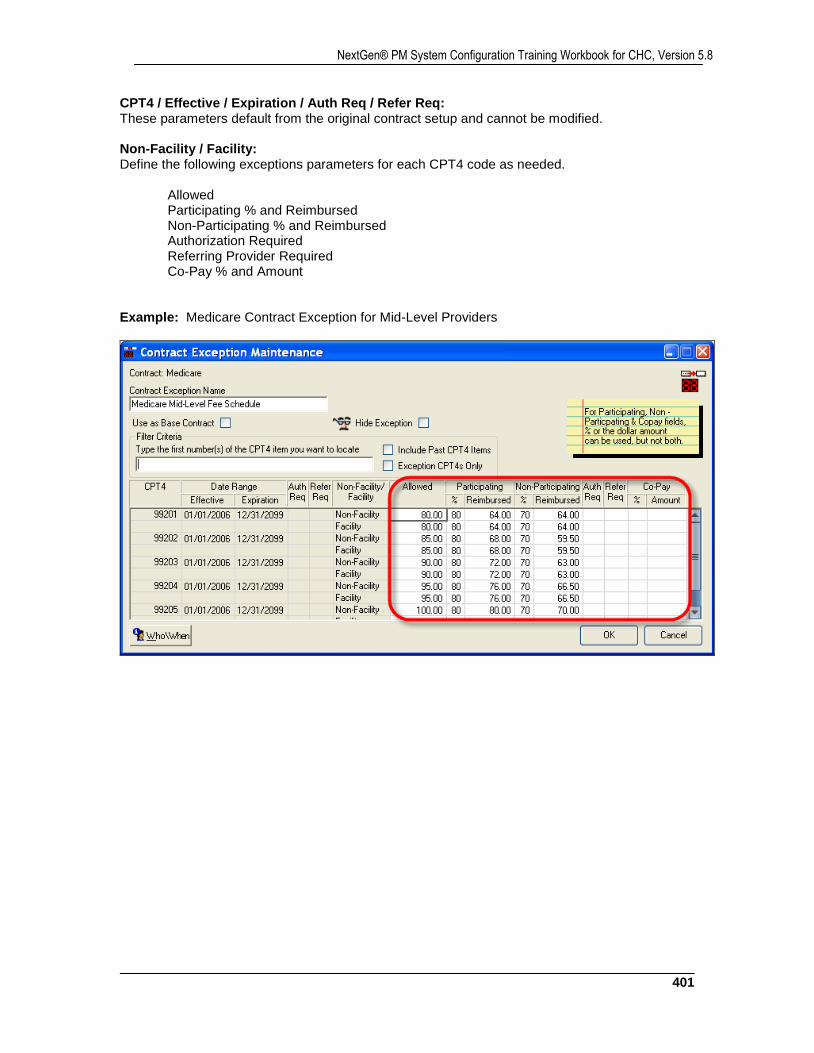
401
NextGen® PM System Configuration Training Workbook for CHC, Version 5.8
CPT4 / Effective / Expiration / Auth Req / Refer Req: These parameters default from the original contract setup and cannot be modified. Non-Facility / Facility: Define the following exceptions parameters for each CPT4 code as needed. Allowed Participating % and Reimbursed Non-Participating % and Reimbursed Authorization Required Referring Provider Required Co-Pay % and Amount Example: Medicare Contract Exception for Mid-Level Providers
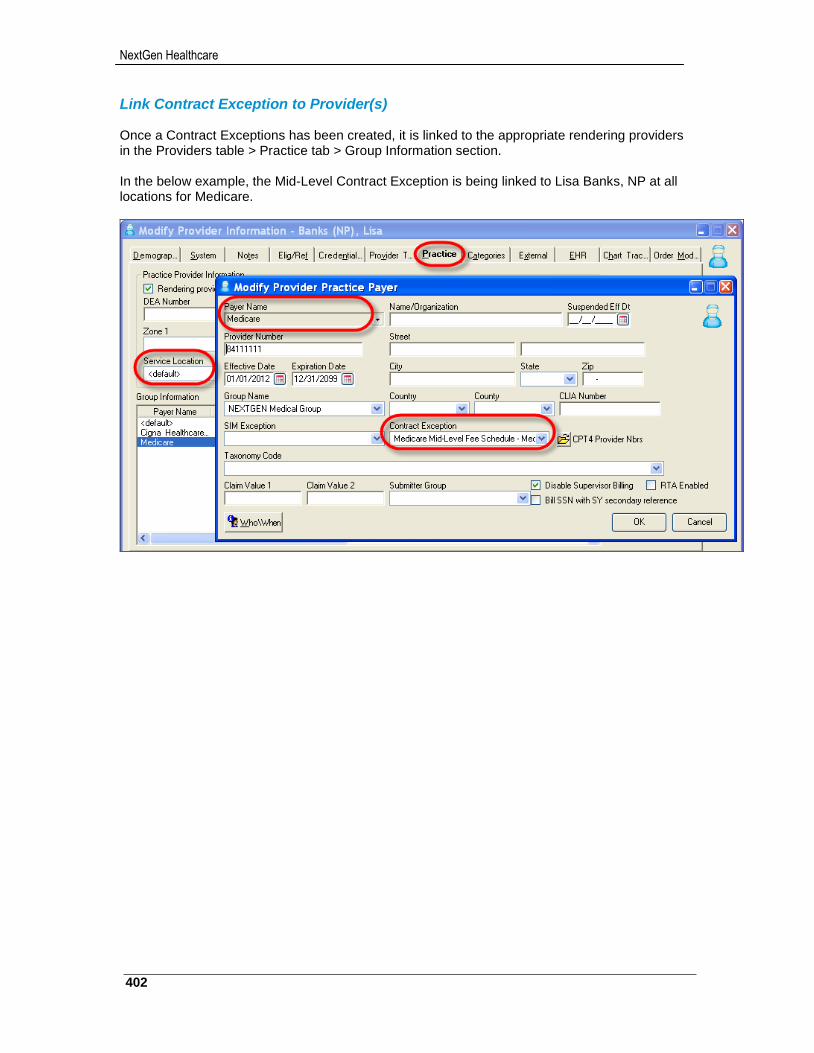
NextGen Healthcare
402
Link Contract Exception to Provider(s) Once a Contract Exceptions has been created, it is linked to the appropriate rendering providers in the Providers table > Practice tab > Group Information section. In the below example, the Mid-Level Contract Exception is being linked to Lisa Banks, NP at all locations for Medicare.

403
NextGen® PM System Configuration Training Workbook for CHC, Version 5.8
Contract Global Update The Contract Global Update is a utility that can be used to update the Non-Facility / Facility allowed amounts and reimbursement amounts within an existing contract. The utility uses the RVU Library and GPCI Codes Library (optional) in the calculation of the new allowed/reimbursement amounts. The utility can be accessed by right-clicking on the contract and selecting Contract Global Update from the menu. To access the Contract Global Update, right-click on the contract and select Contract Global Update from the menu.
The Contract Global Update window displays.
NextGen Healthcare
404
Filter Criteria
CPT4: Starting CPT4 code in the contract to be updated with new fees Thru CPT4: Ending CPT4 code in the contract to be updated with new fees Effective Date: Enter an Effective Date for the selected CPT4 codes
NOTE: Only CPT4 codes in effect on the date specified will be updated. Calculate Using RVU * GPCI
RVU Library: Select the RVU Library to be used in the fee update calculation GPCI Library: Select the GPCI Library to be used in the fee update calculation, if applicable Carrier/Locality: Select the Carrier/Locality from the GPCI Library to be used in the fee update calculation, if applicable
RVU / GPCI Calculation:
Create the fee update calculation to be used
Conversion Factor: The conversion factor entered here will be multiplied by the total from the calculation defined above
Anesthesia Conversion Factor: The anesthesia conversion factor entered here, if applicable, will be multiplied by the total from the calculation defined above
Set the New Allowed Amount to (n) % of the Calculated Payment: The percentage entered here will be multiplied by the total from the calculation defined above. This will become the new allowed amount in the contract for the selected CPT4 codes. Set the New Participating Reimbursement to (n) % of the New Allowed Amount The percentage entered here will be multiple by the new allowed amount. This will become the expected reimbursement amount in the contract for participating providers for the selected CPT4 codes. Determine the New Non-Participating Allowed Amount to (n) % of the New Allowed Amount The percentage entered here will be multiple by the new allowed amount. This will become the allowed amount for non-participating providers for the selected CPT4 codes. Set the New Non-Participating reimbursement Amount to (n) % of the determined non-participating allowed amounts: The percentage entered here will be multiple by the non-participating allowed amount. This will become the expected reimbursement amount in the contract for non-participating providers for the selected CPT4 codes.
405
NextGen® PM System Configuration Training Workbook for CHC, Version 5.8
Other Values
Keep Existing Values for Old Fee Schedules: Select this check-box to retain the current settings on the Fee Schedule tab in the contract for the selected CPT4 codes. The settings include:
Auth Req Authorization Required
Refer Req Referring Provider Required
√ Co-Pay Indicator
Co-Pay % Co-Pay Percentage
Co-Pay Amount Co-Pay Dollar Amount
Do not select this check-box if it is desired to change the current setting on the Fee Schedule tab in the contract for the selected codes. The settings that can be changed include:
Type: Select FFS (Fee for Service) or Capitated Auth Required: Select this checkbox to activate Auth Req for the selected codes Referral Required: Select this checkbox to activate Refer Req for the selected codes CoPay: Select this checkbox to activate the Co-Pay Indicator ( √ ) for the selected codes
%: If the co-pay for the selected codes should be a percentage of
the allowed amount, enter the percentage here.
$: If the co-pay for the selected codes should be a specific dollar amount, enter the amount here.
Update the Non Facility: Select this option to update the Non-Facility fee row in the contract for the selected codes
Update the Facility: Select this option to update the Facility fee row in the contract for the codes selected codes
Expire Old, and create new row in contract: Select this option to expire the existing fee row and create a new fee row for the selected codes
Update the existing row in the contract: Select this option to update the existing fee row for the selected codes
Effective Date: Enter the Effective Date for the fee row
Expiration Date: Enter the Expiration Date for the fee row
NextGen Healthcare
406
Contracts for Encounter Rate Billing Depending on the setup and configuration of the Encounter Rate Library for a payer, a Contract might be used to automatically adjust charges.
NOTE: Because the Encounter Rate Library can be configured to automatically adjust charges during the billing process, a Contract to auto-adjust charges during charge posting will typically not be needed.
Example Scenario: The Encounter Rate Library for a payer has been configured to insert an ER SIM onto the encounter as an additional charge. The library is configured to include only the ER SIM code and none of the original charges on claims for the payer. The library is also configured to not auto-adjust the original charges that will not be reimbursed by the payer. In this scenario, a contract may be appropriate to auto-adjust the original charges. If a Contract will be used to auto-adjust charges for a payer instead of using the Encounter Rate Library for auto-adjustments, the contract may typically be setup in one of the following ways:
Contract with 80% Adjustment and 20% Co-Pay Adjusts off 80% of each charge as it is entered, leaving a balance of 20% to be billed to a secondary payer as co-insurance or to the patient as co-pay.
Contract with 100% Adjustment Adjusts off 100% of each charge as it is entered, leaving a balance of $0.00.
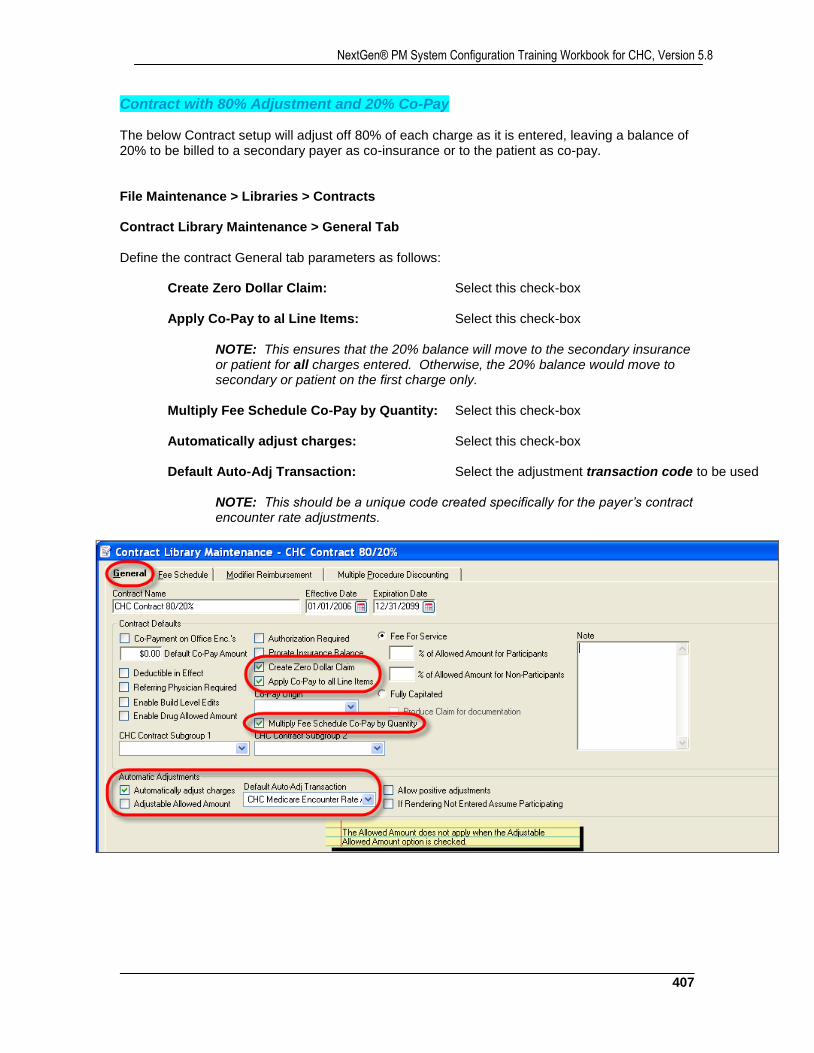
407
NextGen® PM System Configuration Training Workbook for CHC, Version 5.8
Contract with 80% Adjustment and 20% Co-Pay The below Contract setup will adjust off 80% of each charge as it is entered, leaving a balance of 20% to be billed to a secondary payer as co-insurance or to the patient as co-pay. File Maintenance > Libraries > Contracts Contract Library Maintenance > General Tab Define the contract General tab parameters as follows:
Create Zero Dollar Claim: Select this check-box
Apply Co-Pay to al Line Items: Select this check-box
NOTE: This ensures that the 20% balance will move to the secondary insurance or patient for all charges entered. Otherwise, the 20% balance would move to secondary or patient on the first charge only.
Multiply Fee Schedule Co-Pay by Quantity: Select this check-box Automatically adjust charges: Select this check-box
Default Auto-Adj Transaction: Select the adjustment transaction code to be used
NOTE: This should be a unique code created specifically for the payer’s contract encounter rate adjustments.
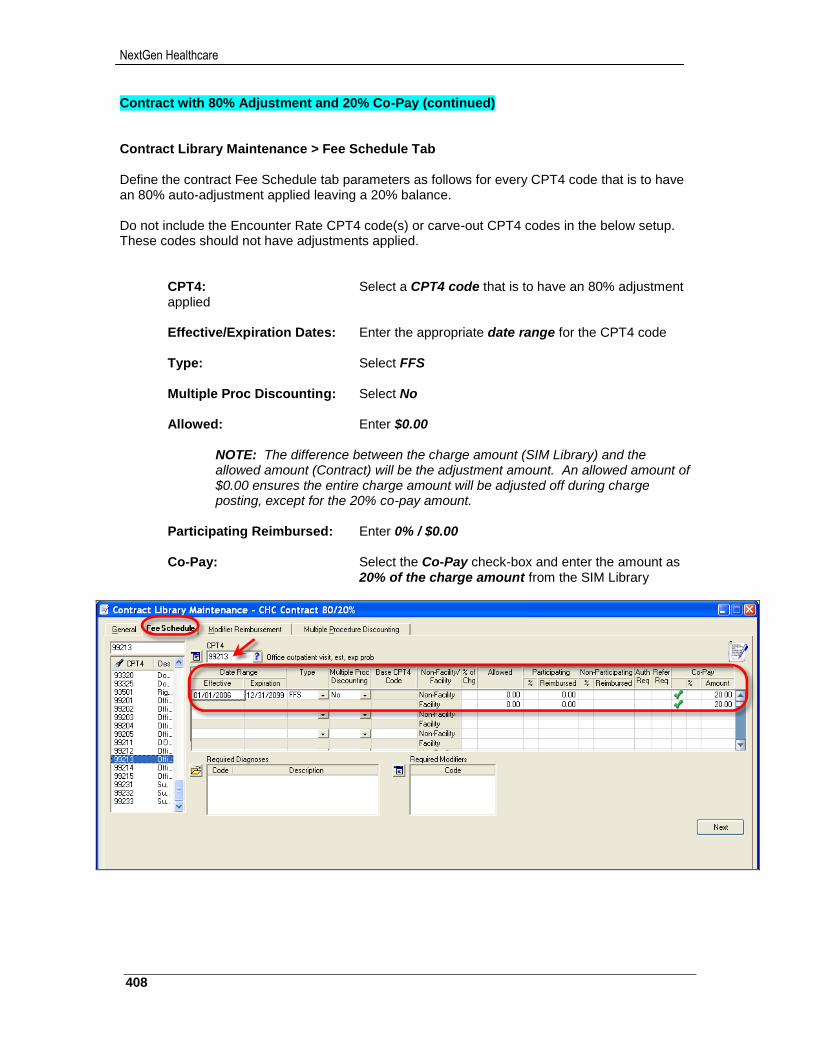
NextGen Healthcare
408
Contract with 80% Adjustment and 20% Co-Pay (continued) Contract Library Maintenance > Fee Schedule Tab Define the contract Fee Schedule tab parameters as follows for every CPT4 code that is to have an 80% auto-adjustment applied leaving a 20% balance. Do not include the Encounter Rate CPT4 code(s) or carve-out CPT4 codes in the below setup. These codes should not have adjustments applied.
CPT4: Select a CPT4 code that is to have an 80% adjustment applied
Effective/Expiration Dates: Enter the appropriate date range for the CPT4 code
Type: Select FFS
Multiple Proc Discounting: Select No
Allowed: Enter $0.00
NOTE: The difference between the charge amount (SIM Library) and the allowed amount (Contract) will be the adjustment amount. An allowed amount of $0.00 ensures the entire charge amount will be adjusted off during charge posting, except for the 20% co-pay amount.
Participating Reimbursed: Enter 0% / $0.00
Co-Pay: Select the Co-Pay check-box and enter the amount as
20% of the charge amount from the SIM Library
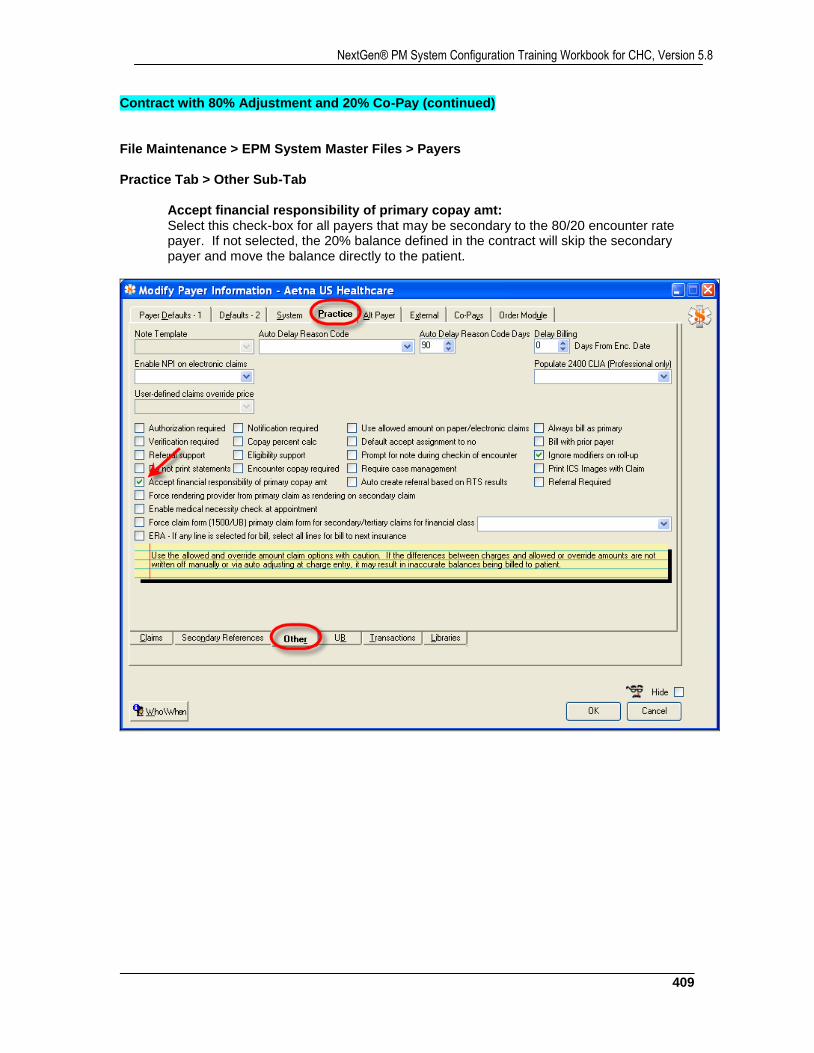
409
NextGen® PM System Configuration Training Workbook for CHC, Version 5.8
Contract with 80% Adjustment and 20% Co-Pay (continued) File Maintenance > EPM System Master Files > Payers Practice Tab > Other Sub-Tab
Accept financial responsibility of primary copay amt: Select this check-box for all payers that may be secondary to the 80/20 encounter rate payer. If not selected, the 20% balance defined in the contract will skip the secondary payer and move the balance directly to the patient.
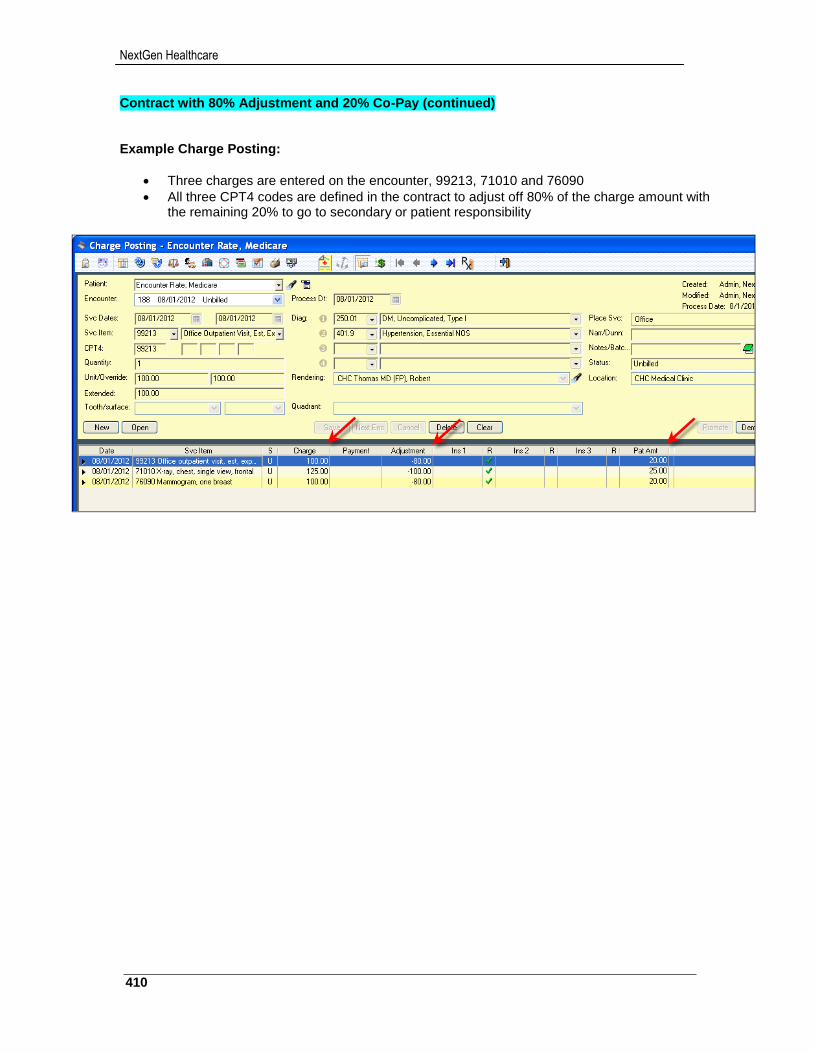
NextGen Healthcare
410
Contract with 80% Adjustment and 20% Co-Pay (continued) Example Charge Posting:
Three charges are entered on the encounter, 99213, 71010 and 76090
All three CPT4 codes are defined in the contract to adjust off 80% of the charge amount with the remaining 20% to go to secondary or patient responsibility
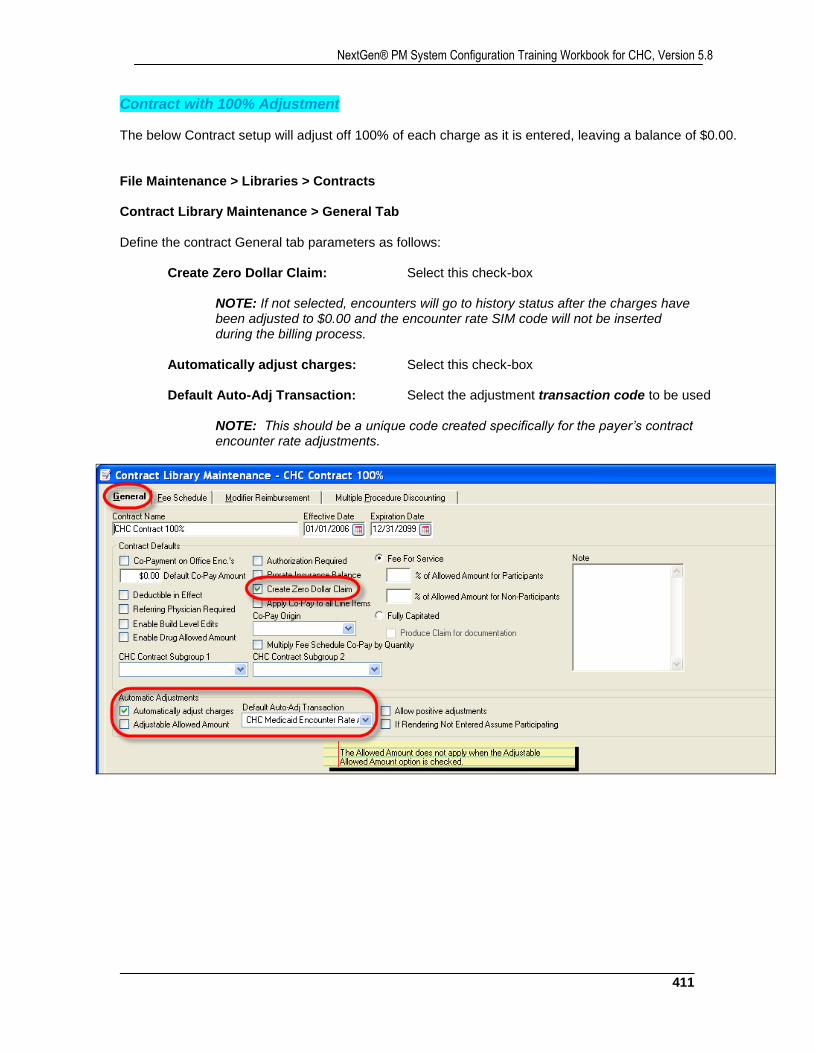
411
NextGen® PM System Configuration Training Workbook for CHC, Version 5.8
Contract with 100% Adjustment The below Contract setup will adjust off 100% of each charge as it is entered, leaving a balance of $0.00. File Maintenance > Libraries > Contracts Contract Library Maintenance > General Tab Define the contract General tab parameters as follows:
Create Zero Dollar Claim: Select this check-box
NOTE: If not selected, encounters will go to history status after the charges have been adjusted to $0.00 and the encounter rate SIM code will not be inserted during the billing process.
Automatically adjust charges: Select this check-box
Default Auto-Adj Transaction: Select the adjustment transaction code to be used
NOTE: This should be a unique code created specifically for the payer’s contract encounter rate adjustments.
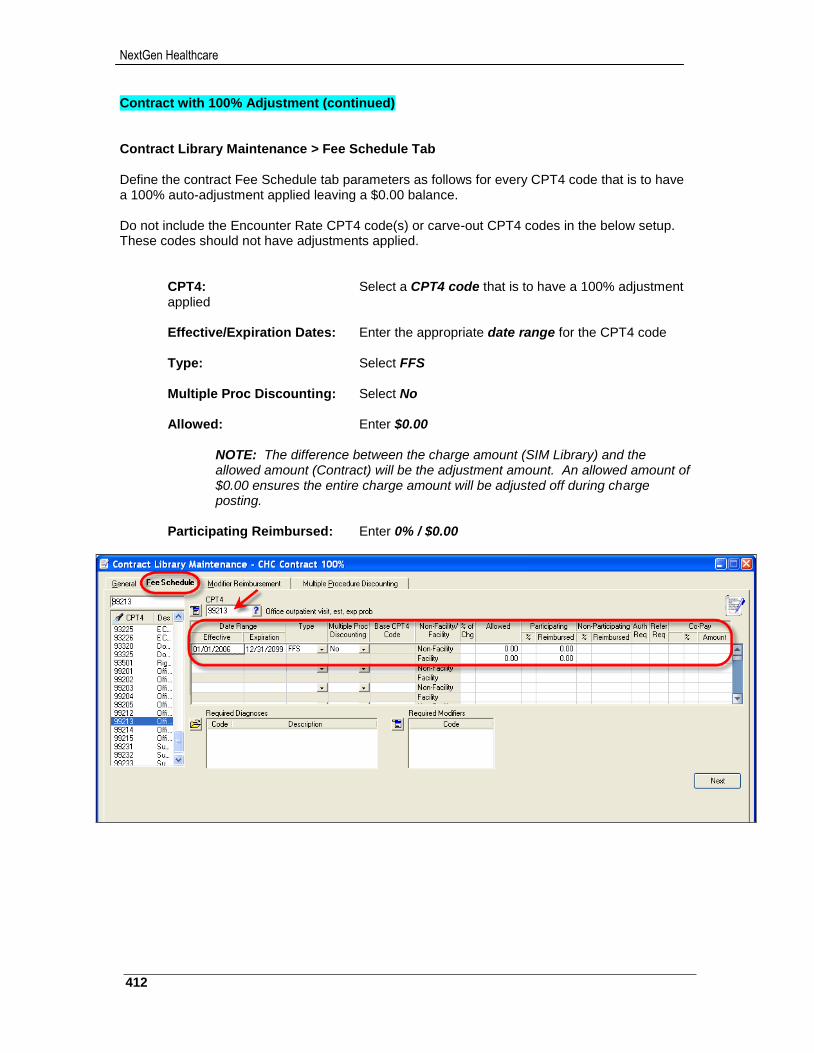
NextGen Healthcare
412
Contract with 100% Adjustment (continued) Contract Library Maintenance > Fee Schedule Tab Define the contract Fee Schedule tab parameters as follows for every CPT4 code that is to have a 100% auto-adjustment applied leaving a $0.00 balance. Do not include the Encounter Rate CPT4 code(s) or carve-out CPT4 codes in the below setup. These codes should not have adjustments applied.
CPT4: Select a CPT4 code that is to have a 100% adjustment applied
Effective/Expiration Dates: Enter the appropriate date range for the CPT4 code
Type: Select FFS
Multiple Proc Discounting: Select No
Allowed: Enter $0.00
NOTE: The difference between the charge amount (SIM Library) and the allowed amount (Contract) will be the adjustment amount. An allowed amount of $0.00 ensures the entire charge amount will be adjusted off during charge posting.
Participating Reimbursed: Enter 0% / $0.00

413
NextGen® PM System Configuration Training Workbook for CHC, Version 5.8
Contract with 100% Adjustment (continued) Example Charge Posting:
Three charges are entered on the encounter, 99213, 71010 and 76090
All three CPT4 codes are defined in the contract to adjust off 100% of the charge amount
NextGen Healthcare
414
Preferences “Best Practice” recommended settings for Enterprise and Practice Preferences for a typical client implementation are preset in the base installation of the NextGen application. Over the course of your implementation, your NextGen® EPM and/or EHR Implementation Specialists will work with you to understand and modify these settings as needed to suit the individual business needs of your organization. Enterprise Preferences:
eLearning Curriculum: Setting Up Enterprise Preferences eLearning Course: Setting Up Enterprise Preferences
These preference settings will affect all practices within the enterprise. Enterprise Preferences can be accessed from:
File Maintenance > System Master Files > Enterprises > Preferences button
EPM > Admin > Preferences > Enterprise menu option Practice Preferences:
eLearning Curriculum: Setting Up Practice Preferences
These preference settings will affect only the current practice. Therefore, settings can be different for each practice within the enterprise. Practice Preferences can be accessed from:
File Maintenance > System Master Files > Practices > Preferences button
EPM > Admin > Preferences > Practice menu option
NOTE: A “Practice Preferences Questionnaire” is available from your NextGen® EPM Project Manager/Coordinator or Implementation Specialist. The questionnaire briefly describes each selection within Practice Preferences and can be completed and used by clients to better understand their available options.
User Preferences:
These preference settings will affect only specific users. User Preferences can be created in File Maintenance from:
EPM Practice Master Files > Default User Prefs – General / Scheduling
User Preferences created in File Maintenance are attached to groups of users or individual users within System Administrator.
Individual users can also access and maintain their own User Preferences from:
EPM > Admin > Preferences > User menu option
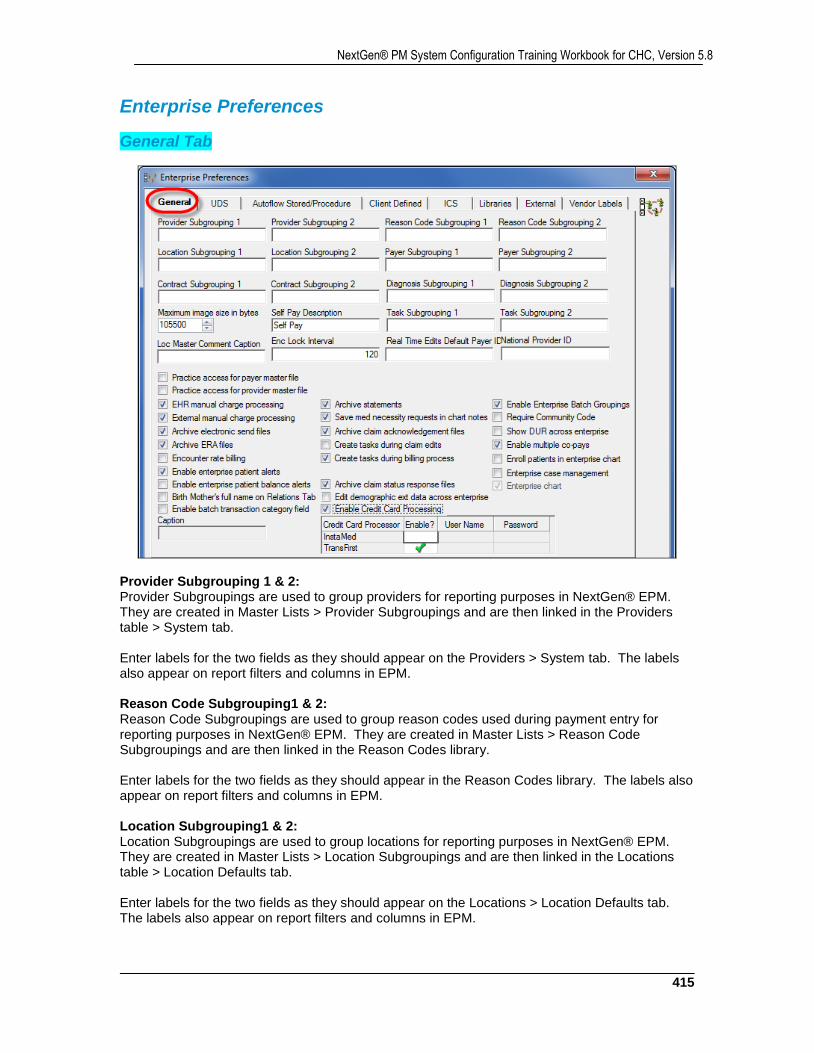
415
NextGen® PM System Configuration Training Workbook for CHC, Version 5.8
Enterprise Preferences
General Tab
Provider Subgrouping 1 & 2: Provider Subgroupings are used to group providers for reporting purposes in NextGen® EPM. They are created in Master Lists > Provider Subgroupings and are then linked in the Providers table > System tab. Enter labels for the two fields as they should appear on the Providers > System tab. The labels also appear on report filters and columns in EPM. Reason Code Subgrouping1 & 2: Reason Code Subgroupings are used to group reason codes used during payment entry for reporting purposes in NextGen® EPM. They are created in Master Lists > Reason Code Subgroupings and are then linked in the Reason Codes library. Enter labels for the two fields as they should appear in the Reason Codes library. The labels also appear on report filters and columns in EPM. Location Subgrouping1 & 2: Location Subgroupings are used to group locations for reporting purposes in NextGen® EPM. They are created in Master Lists > Location Subgroupings and are then linked in the Locations table > Location Defaults tab. Enter labels for the two fields as they should appear on the Locations > Location Defaults tab. The labels also appear on report filters and columns in EPM.
NextGen Healthcare
416
Payer Subgrouping1 & 2: Payer Subgroupings are used to group payers for reporting purposes in NextGen® EPM. They are created in Master Lists > Payer Subgroupings and are then linked in the Payers table > Defaults-2 tab. Enter labels for the two fields as they should appear on the Payers > Defaults-2 tab. The labels also appear on report filters and columns in EPM. Contract Subgrouping1 & 2: Contract Subgroupings are a way to group contracts. They are used to link/unlink participating providers to those groups of contracts. They are created in Master Lists > Contract Subgroupings and are then linked in the Contracts library > General tab. Enter labels for the two fields as they should appear on the Contracts > General tab. Diagnosis Subgrouping1 & 2: Diagnosis Subgroupings are used to group ICD codes used during charge posting for reporting purposes in NextGen® EPM. They are created in Master Lists > Diagnosis Subgroupings and are then linked in the Diagnosis Codes library. Enter labels for the two fields as they should appear in the Diagnosis Codes library. The labels also appear on report filters and columns in EPM. Task Subgrouping1 & 2: Task Subgroupings are used to group task types for reporting purposes in NextGen® EPM. They are created in Master Lists > Task Subgroupings and are then linked in the Task Types table. Enter labels for the two fields as they should appear in the Task Types table. The labels also appear on report filters and columns in EPM. Maximum image size in bytes: Use the up and down arrows to enter the maximum size of an image (in bytes) that can be stored in the database. This field enables you to configure the image size and can be especially helpful when scanning large files or small networks. When this feature is used, it also controls disk space requirements. Self-Pay Description: Type a description for self-pay encounters, for example encounters for which the patient does not have insurance. Location Master Comment Caption: Enter a caption to change the name of the “Directions” field on the Location Defaults tab in the Locations master file. Practice access for payer master file: Select this check-box to limit a practice's access to certain payer master files. For instructions for setting this up, see field definitions under Enabling Practice Access for Payer Master File. Practice access for provider master file: Select this check-box to limit a practice's access to certain provider master files. For instructions for setting this up, see field definitions under Setting Up Practice Access for Provider Master File. EHR manual charge processing: Select this check-box to hold charges sent from NextGen EHR until the biller processes them in the NextGen EPM Charge Entry dialog box. It also enables you to generate reports from the reconciliation process.
417
NextGen® PM System Configuration Training Workbook for CHC, Version 5.8
External manual charge processing: Select this check-box to hold charges in the Charge Holding Tank that were sent from third party applications through the HL7 Interface. The charges are held until the user processes them in the EPM Charge Entry dialog box. This option also enables you to generate reports from the reconciliation process. Archive electronic send files: Select this check-box to archive 837 electronic claim files created in NextGen® EPM. Archive ERA files: Select this check-box to archive 833 electronic ERA files received from payers and imported into NextGen® EPM. Encounter rate billing: Select this check-box to enable Encounter Rate Billing and to cause the Encounter Rate Library field to display in the Payer master file (on the Other tab of the Practice tab). Enable enterprise patient alerts: If this check-box is selected, then when a user is adding a chart alert to a patient chart to EPM, the user can select which practices within the enterprise will also see the alert when the patient's information is accessed. For information about adding patient alerts, see Adding an Alert to a Patient's Chart in the NextGen EPM User Guide. Enable enterprise patient balance alerts: Select this check-box to display the Patient Balance check-box displays on the Alerts tab in Practice Preferences. When both of the check-boxes are selected, an alert displays the patient balances for each practice that a user has access to. Birth Mother’s full name on Relations Tab: Select this check-box to display the “Birth Mother’s full name on Relations Tab” option in Practice Preferences > Chart. Archive statements: Select this check-box to archive statements created in NextGen® EPM within the account profile screen for each guarantor. Save med necessity requests in chart notes: Select this check-box to create chart notes for each Medical Necessity request submitted. This option is enabled only if you have purchased Medical Necessity. Archive claim acknowledgement files: Select this check-box to archive 997 electronic claim functional acknowledgement files received from clearinghouses and imported into NextGen® EPM. Create tasks during claim edits: Select the Create tasks during claim edits check-box to automatically create a worklog task when a task fails while edits are being run against an encounter. The created task is based on the default task set in the Claim Edits Library Maintenance dialog box in the File Maintenance Claim Edits library. Create tasks during billing process: When an encounter is being billed and a task fails, a worklog task gets created. The created task is based on the default task set in the Claim Edits Library Maintenance dialog box in the File Maintenance Claim Edits Library.
NextGen Healthcare
418
Write EPM active information to XML file: Select this check-box to write out an XML file any time the patient information changes. The resulting XML file contains data elements such as user, encounter number, and HIN. One reason you might want to write the information to an XML file is to synchronize data to another system. Archive claim status response files: Select this check-box to archive 277 electronic claim status files received from payers and imported into NextGen® EPM. Enterprise Chart: You can configure the enterprise to permit the ICS and EHR applications to synchronize across practices. When you activate the Enterprise Chart option on the General tab of Enterprise Preferences, you enable users in the EHR application to view ICS images that are maintained in any of the practices within the enterprise. When the Enterprise Chart option is not activated, an EHR user can view only those ICS images that are maintained for the same practice.
NOTE: After you activate the Enterprise Chart option, you cannot turn it off. Enterprise case management: If you are sure you need this option, select the check-box to makes cases available to all practices within the same enterprise.
NOTE: Once you activate this option, you cannot turn it off. For more information, see Enterprise Case.
Enable enterprise batch groupings: Select this check-box to enable users to create enterprise batches that group practice-level transaction batches. When this check-box is selected, it enables the Enable enterprise batch groupings check-box in the Transactions Practice Preferences.
NOTE: For more information about enabling enterprise batch groupings, see Enabling Enterprise Batch Grouping.
Require community code: Select this field to require users to enter the Community Health Code in the Community Code field on the Demographics tab of the patient chart in EPM. Require this field if you must report the code for the annual IHS (Indian Health Services) report for funding. You can also make the Community Code field required at the practice level. Enable multiple co-pays: Select this check-box to enable the Co-Pays tab in the payers table in File Maintenance. This allows co-pays by specialty to be defined for specific payers. Enroll patients in enterprise chart: If you select Enterprise Chart and want the patients to become enterprise patients, select this check-box.
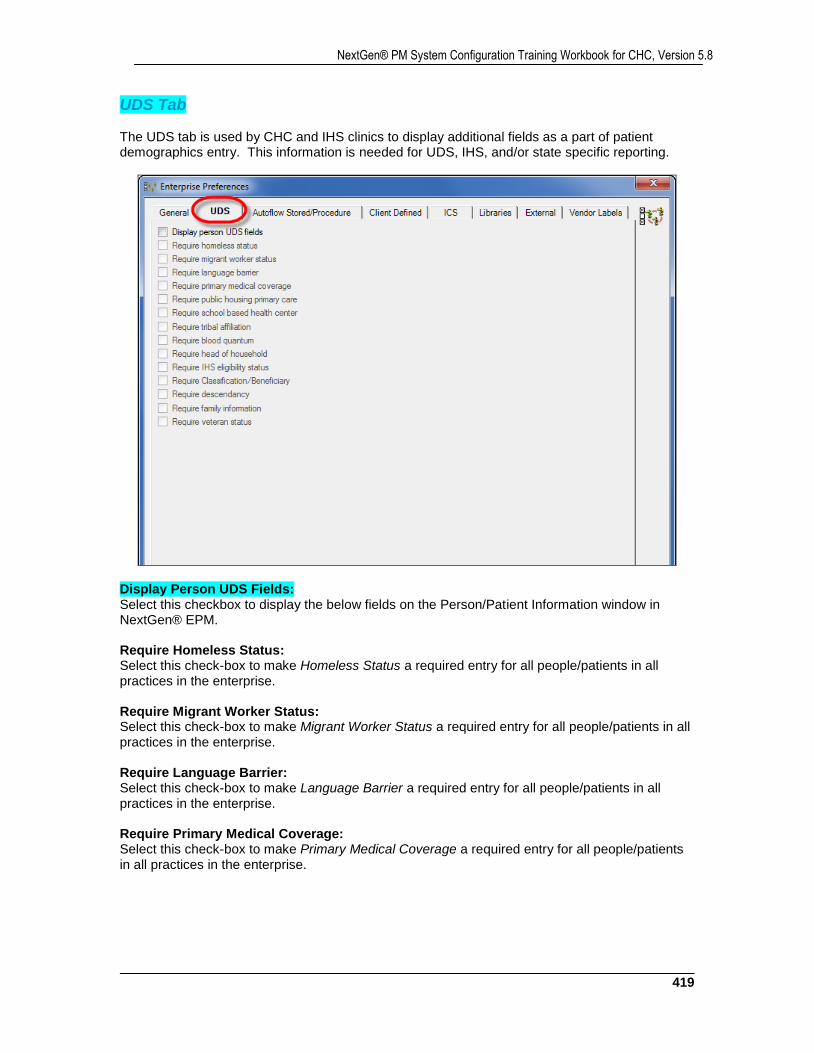
419
NextGen® PM System Configuration Training Workbook for CHC, Version 5.8
UDS Tab The UDS tab is used by CHC and IHS clinics to display additional fields as a part of patient demographics entry. This information is needed for UDS, IHS, and/or state specific reporting.
Display Person UDS Fields: Select this checkbox to display the below fields on the Person/Patient Information window in NextGen® EPM. Require Homeless Status: Select this check-box to make Homeless Status a required entry for all people/patients in all practices in the enterprise. Require Migrant Worker Status: Select this check-box to make Migrant Worker Status a required entry for all people/patients in all practices in the enterprise. Require Language Barrier: Select this check-box to make Language Barrier a required entry for all people/patients in all practices in the enterprise. Require Primary Medical Coverage: Select this check-box to make Primary Medical Coverage a required entry for all people/patients in all practices in the enterprise.
NextGen Healthcare
420
Require Public Housing Primary Care: Select this check-box to make Public Housing Primary Care a required entry for all people/patients in all practices in the enterprise. Require School Based Health Center: Select this check-box to make School Based Health Center a required entry for all people/patients in all practices in the enterprise. Require Tribal Affiliation: Select this check-box to make Tribal Affiliation a required entry for all people/patients in all practices in the enterprise. Require Blood Quantum: Select this check-box to make Blood Quantum a required entry for all people/patients in all practices in the enterprise. Require Head of Household: Select this check-box to make Head of Household a required entry for all people/patients in all practices in the enterprise Require IHS Eligibility Status: Select this check-box to make IHS eligibility status a required entry for all people/patients in all practices in the enterprise Require Classification/Beneficiary: Select this check-box to make Classification/Beneficiary a required entry for all people/patients in all practices in the enterprise Require Descendency: Select this check-box to make Descendency a required entry for all people/patients in all practices in the enterprise
Require Family Information: Select this check-box to make Family Information (family size and income) a required entry for all people/patients in all practices in the enterprise
Require Veteran Status: Select this check-box to make Veteran Status a required entry for all people/patients in all practices in the enterprise
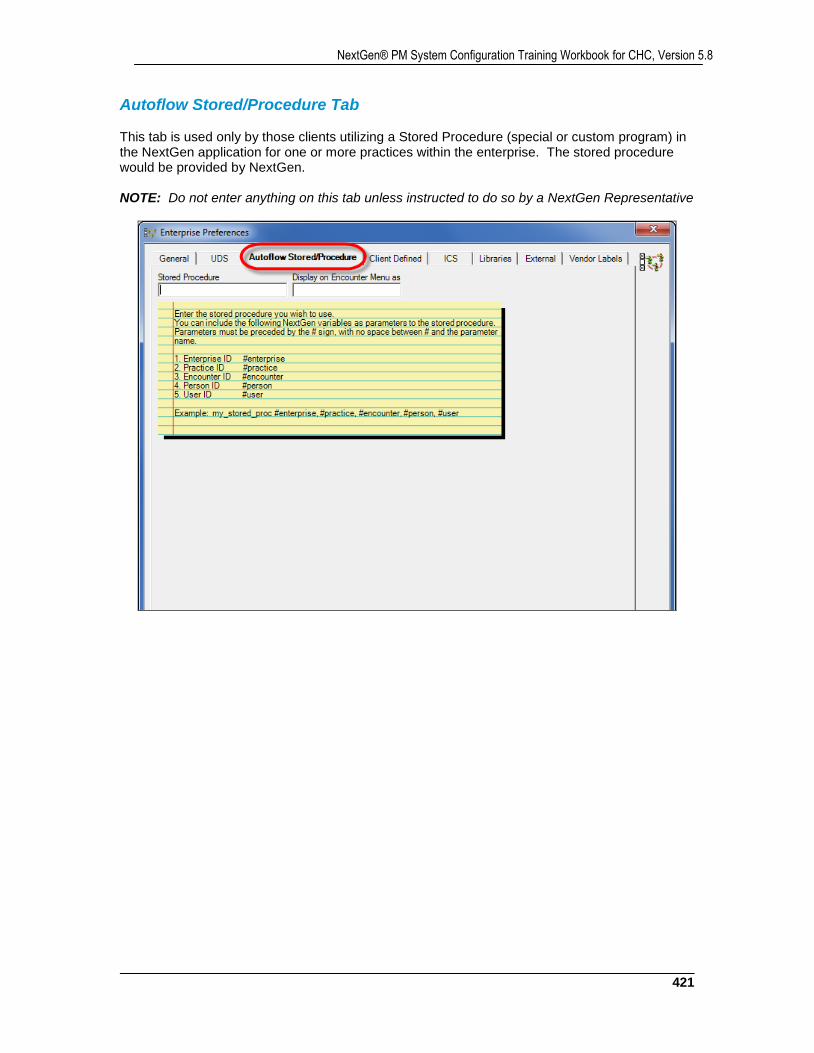
421
NextGen® PM System Configuration Training Workbook for CHC, Version 5.8
Autoflow Stored/Procedure Tab This tab is used only by those clients utilizing a Stored Procedure (special or custom program) in the NextGen application for one or more practices within the enterprise. The stored procedure would be provided by NextGen. NOTE: Do not enter anything on this tab unless instructed to do so by a NextGen Representative

NextGen Healthcare
422
Client Defined Tab There are 14 Client Defined fields available that can be named and used to capture additional patient information that is not already a standard field within the NextGen® EPM application. Once a client defined field is named in Enterprise Preferences > Client Defined tab, a new Master List table by that name becomes available in File Maintenance. Any of the client defined fields can be made a required entry in EPM. Race, Language, Religion, Church and/or Ethnicity can be made required entries in EPM. In addition, Race and Ethnicity can display on either the Demographics tab (Display General) or the UDS tab (Display UDS) on the Patient Information window in EPM.
Client Defined Label: Enter captions as the client defined fields should appear on the Patient Information window > Client Defined tab in EPM.
Require Always: Select this check-box if the client defined field should be a required entry in EPM for both people (globe) and patient (chart) demographic records. Require on Chart Creation: Select this check-box if the client defined field should be a required entry in EPM for only patient (chart) demographic records.
423
NextGen® PM System Configuration Training Workbook for CHC, Version 5.8
Race / Language / Religion / Church / Ethnicity: Require Always: Select this check-box if the one or more of these fields should be a required entry in EPM for both people (globe) and patient (chart) demographic records.
Race / Ethnicity:
Display General: Select this check-box if these fields should display on the Patient Information > Demographics tab in EPM. Display UDS: Select this check-box if these fields should display on the Patient Information > UDS tab in EPM.
Include on Lookup Screen: If desired, select one of the 14 client defined fields to be used as an additional person/patient lookup option in EPM. Insurance Benefit Information Client Defined:
User Defined 1 and 2: Enter captions as the user defined fields should appear on the Insurance Maintenance window > Benefit Information tab > Eligibility and Benefits sub-tab in EPM.

NextGen Healthcare
424
ICS Tab This tab displays only if the system is licensed for NextGen® ICS (Image Control System). Settings on this tab will affect the ICS application for all practices within the enterprise. NOTE: Setup of this tab will be covered in a separate NextGen® ICS training session.
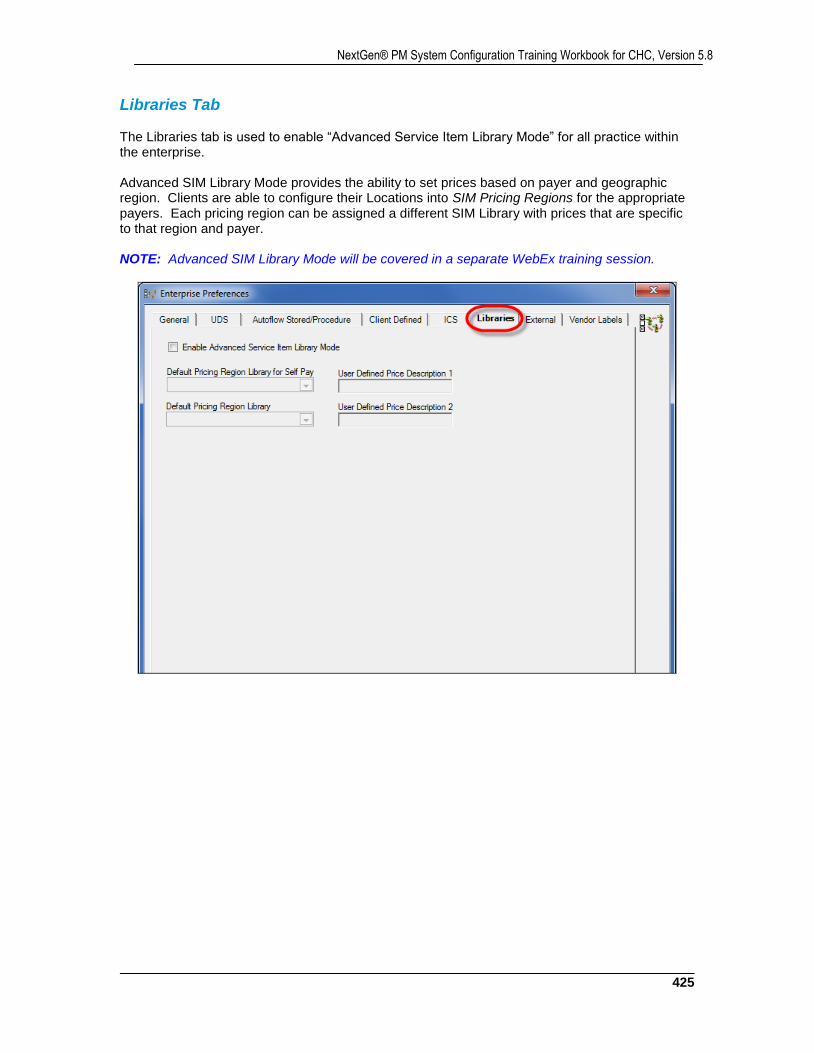
425
NextGen® PM System Configuration Training Workbook for CHC, Version 5.8
Libraries Tab The Libraries tab is used to enable “Advanced Service Item Library Mode” for all practice within the enterprise. Advanced SIM Library Mode provides the ability to set prices based on payer and geographic region. Clients are able to configure their Locations into SIM Pricing Regions for the appropriate payers. Each pricing region can be assigned a different SIM Library with prices that are specific to that region and payer. NOTE: Advanced SIM Library Mode will be covered in a separate WebEx training session.
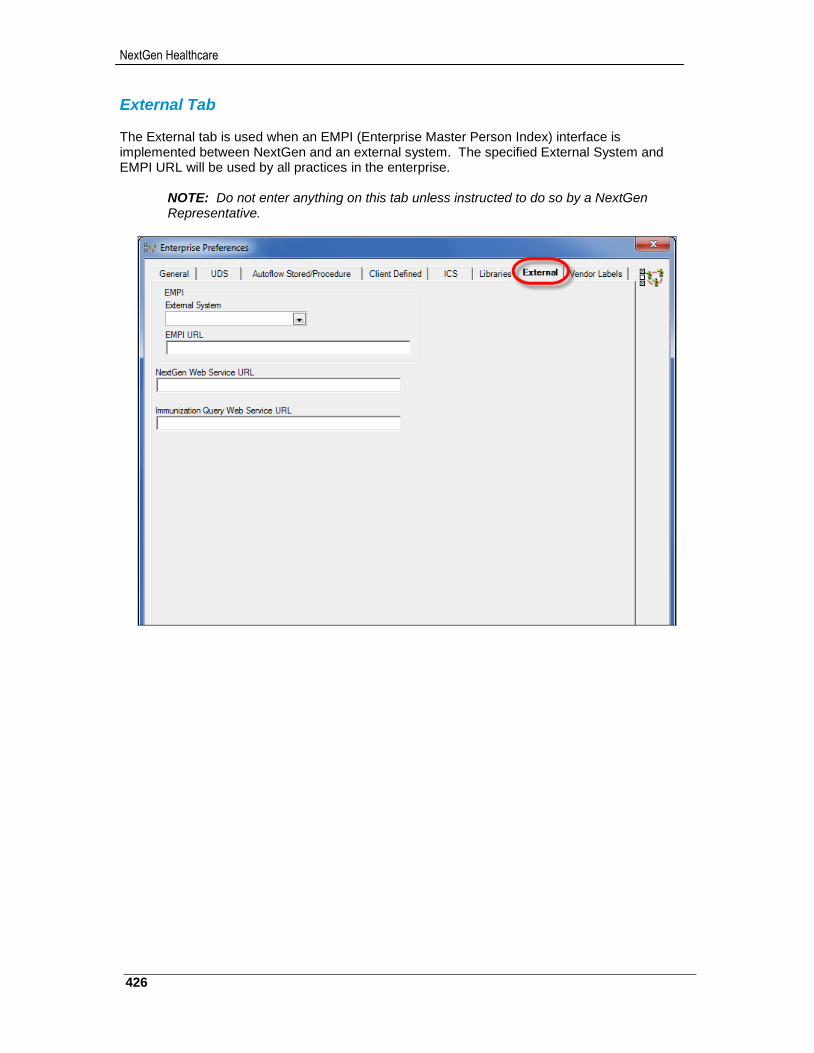
NextGen Healthcare
426
External Tab The External tab is used when an EMPI (Enterprise Master Person Index) interface is implemented between NextGen and an external system. The specified External System and EMPI URL will be used by all practices in the enterprise.
NOTE: Do not enter anything on this tab unless instructed to do so by a NextGen Representative.
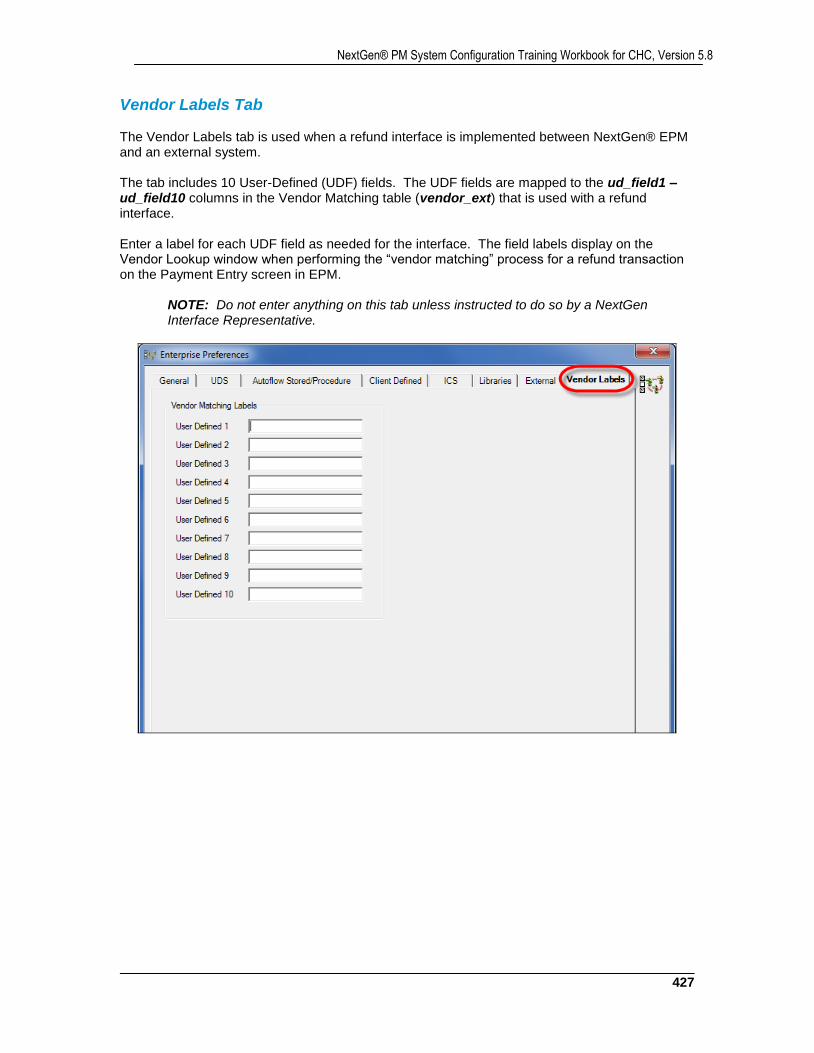
427
NextGen® PM System Configuration Training Workbook for CHC, Version 5.8
Vendor Labels Tab The Vendor Labels tab is used when a refund interface is implemented between NextGen® EPM and an external system. The tab includes 10 User-Defined (UDF) fields. The UDF fields are mapped to the ud_field1 – ud_field10 columns in the Vendor Matching table (vendor_ext) that is used with a refund interface. Enter a label for each UDF field as needed for the interface. The field labels display on the Vendor Lookup window when performing the “vendor matching” process for a refund transaction on the Payment Entry screen in EPM.
NOTE: Do not enter anything on this tab unless instructed to do so by a NextGen Interface Representative.

NextGen Healthcare
428
Practice Preferences
Alerts Tab
eLearning Course: Setting Up Practice Preferences – Alerts Tab This tab allows the alerts to be configured for all users in the practice.
Chart Alerts Display Alerts when accessing: These settings control when chart-level alerts display in EPM.
Account: Chart alerts display when a guarantor’s Account is accessed. Chart: Chart alerts display when a patient's Chart is accessed. Encounter: Chart alerts display when a patient's Encounter is accessed. Task: Chart alerts display when a patient's Task is accessed. Appointment: Chart alerts display when a patient's Appointment is accessed.
429
NextGen® PM System Configuration Training Workbook for CHC, Version 5.8
System The System options under Chart Alerts display system-generated alerts with chart alerts.
Expired: Alert indicating a patient has been marked as expired on the People Maintenance window. Co-managed: Alert indicating a patient has been marked as co-managed on the Chart Details window. Unapplied Pmts: Alert indicating there are unapplied payments for the patient. Reference Scheduling System Alerts: The items that you have checked under the Appointment Scheduling with the System Alerts checked in the Chart Alerts section. After Care Days: Alert indicating a patient has been charged for a service item with an after care period attached to it. Pending EHR Charges: An alert when a user opens an encounter that has pending EHR charges. Privacy Notice: An alert each time a user accesses the chart of a patient who has not been issued a Privacy Notice. Patient Balance: An alert with the patient balances for each practice that a user has access to displays. This check-box displays only when the Enable enterprise patient balance alerts check-box is selected on the General tab in Enterprise Preferences. Open Cases: An alert that lists all open cases on the patient's chart. The list includes the case description, case employer, onset date and case status (Active or Inactive) so that the user can identify exactly which cases exist.
Account Alerts Display Alerts when accessing: These settings control when account-level alerts display in EPM.
Account: Account alerts display when a guarantor's Account is accessed. Responsible Chart: Account alerts display when a patient's Chart that the guarantor is responsible for is accessed. Responsible Encounter: Account alerts display when a patient's Encounter that the guarantor is responsible for is accessed.
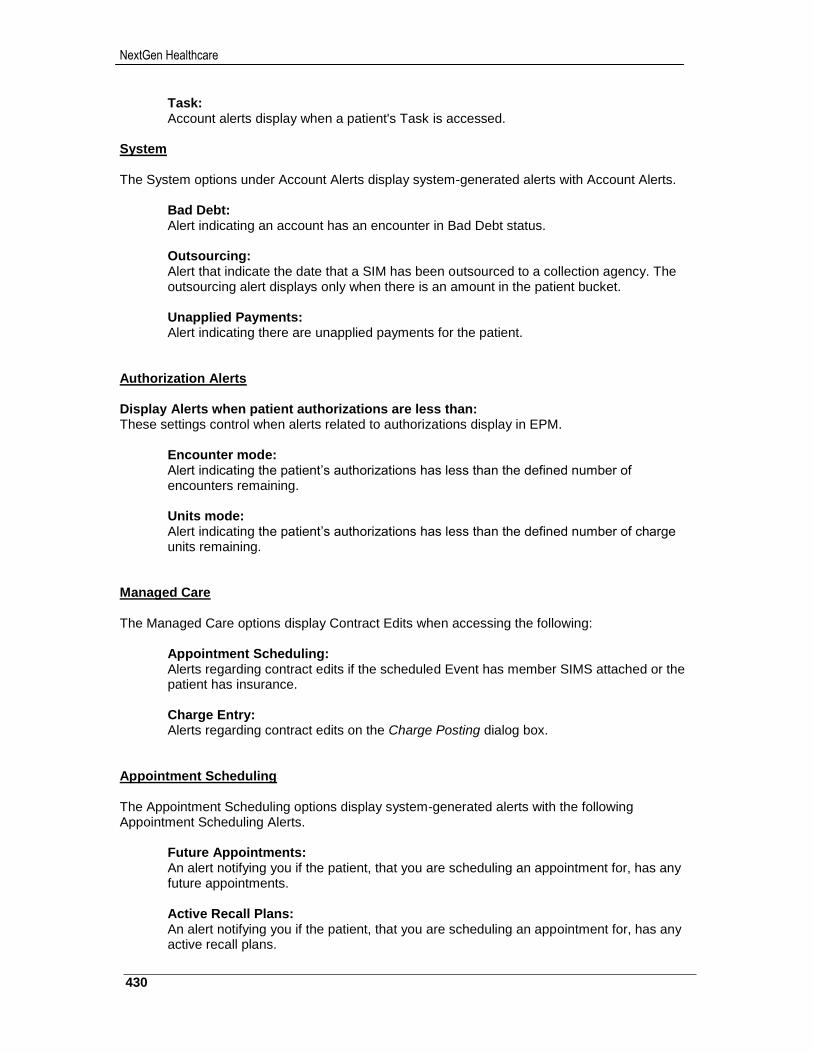
NextGen Healthcare
430
Task: Account alerts display when a patient's Task is accessed.
System The System options under Account Alerts display system-generated alerts with Account Alerts.
Bad Debt: Alert indicating an account has an encounter in Bad Debt status. Outsourcing: Alert that indicate the date that a SIM has been outsourced to a collection agency. The outsourcing alert displays only when there is an amount in the patient bucket. Unapplied Payments: Alert indicating there are unapplied payments for the patient.
Authorization Alerts Display Alerts when patient authorizations are less than: These settings control when alerts related to authorizations display in EPM. Encounter mode:
Alert indicating the patient’s authorizations has less than the defined number of encounters remaining.
Units mode:
Alert indicating the patient’s authorizations has less than the defined number of charge units remaining.
Managed Care The Managed Care options display Contract Edits when accessing the following:
Appointment Scheduling: Alerts regarding contract edits if the scheduled Event has member SIMS attached or the patient has insurance. Charge Entry: Alerts regarding contract edits on the Charge Posting dialog box.
Appointment Scheduling The Appointment Scheduling options display system-generated alerts with the following Appointment Scheduling Alerts.
Future Appointments: An alert notifying you if the patient, that you are scheduling an appointment for, has any future appointments. Active Recall Plans: An alert notifying you if the patient, that you are scheduling an appointment for, has any active recall plans.
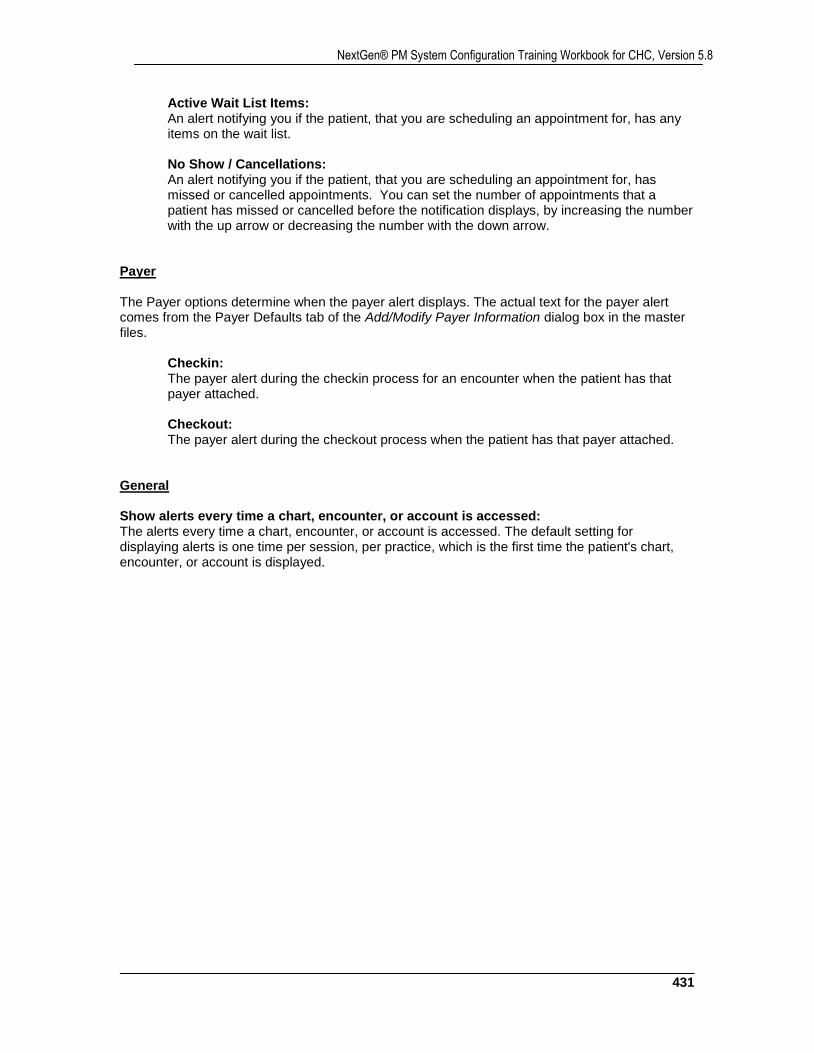
431
NextGen® PM System Configuration Training Workbook for CHC, Version 5.8
Active Wait List Items: An alert notifying you if the patient, that you are scheduling an appointment for, has any items on the wait list. No Show / Cancellations: An alert notifying you if the patient, that you are scheduling an appointment for, has missed or cancelled appointments. You can set the number of appointments that a patient has missed or cancelled before the notification displays, by increasing the number with the up arrow or decreasing the number with the down arrow.
Payer The Payer options determine when the payer alert displays. The actual text for the payer alert comes from the Payer Defaults tab of the Add/Modify Payer Information dialog box in the master files.
Checkin: The payer alert during the checkin process for an encounter when the patient has that payer attached. Checkout: The payer alert during the checkout process when the patient has that payer attached.
General Show alerts every time a chart, encounter, or account is accessed: The alerts every time a chart, encounter, or account is accessed. The default setting for displaying alerts is one time per session, per practice, which is the first time the patient's chart, encounter, or account is displayed.
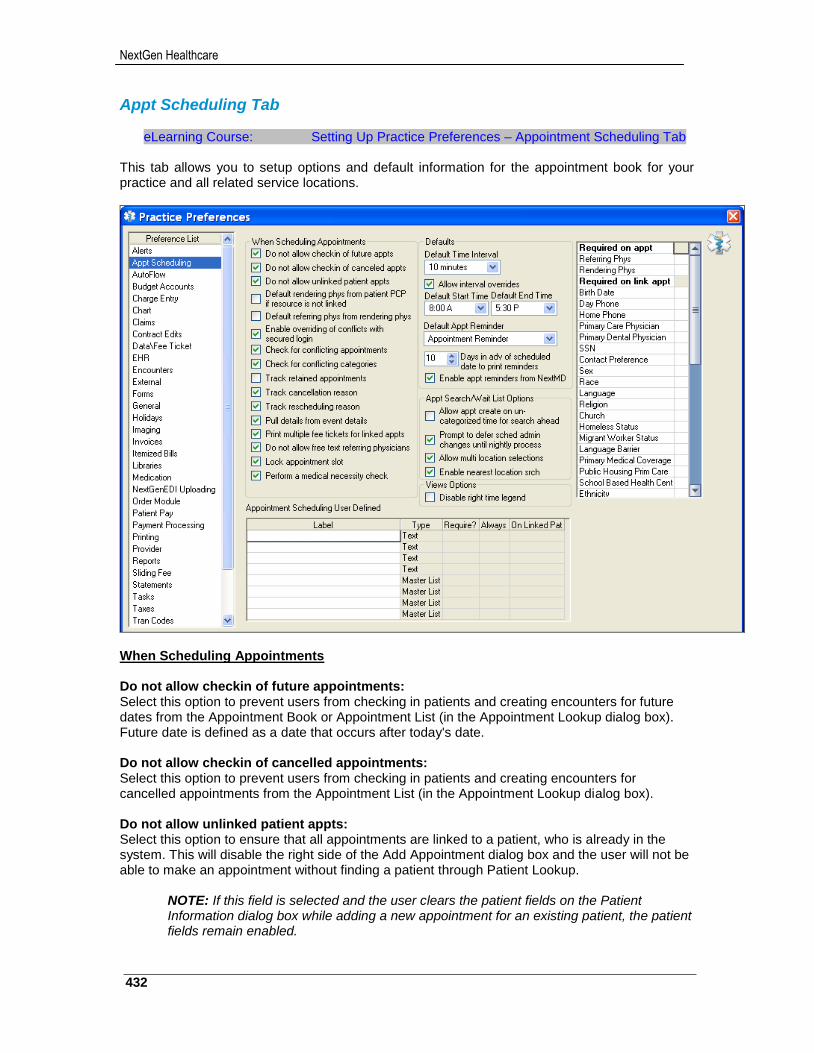
NextGen Healthcare
432
Appt Scheduling Tab
eLearning Course: Setting Up Practice Preferences – Appointment Scheduling Tab This tab allows you to setup options and default information for the appointment book for your practice and all related service locations.
When Scheduling Appointments Do not allow checkin of future appointments: Select this option to prevent users from checking in patients and creating encounters for future dates from the Appointment Book or Appointment List (in the Appointment Lookup dialog box). Future date is defined as a date that occurs after today's date. Do not allow checkin of cancelled appointments: Select this option to prevent users from checking in patients and creating encounters for cancelled appointments from the Appointment List (in the Appointment Lookup dialog box). Do not allow unlinked patient appts: Select this option to ensure that all appointments are linked to a patient, who is already in the system. This will disable the right side of the Add Appointment dialog box and the user will not be able to make an appointment without finding a patient through Patient Lookup.
NOTE: If this field is selected and the user clears the patient fields on the Patient Information dialog box while adding a new appointment for an existing patient, the patient fields remain enabled.
433
NextGen® PM System Configuration Training Workbook for CHC, Version 5.8
Default rendering phys from patient PCP if resource is not linked: Select this check-box to use the primary care physician from the patient chart demographics as the default for the rendering when you create a new appointment and the selected "non-physician" resource does not have a linked physician. Default referring phys from rendering phys: Select this check-box if you want the rendering physician selected on the Add/Edit Appointment dialog box to be used as the default for the referring physician. Enable overriding of conflicts with secured login: Select this check-box to enable users with the appropriate rights to bypass scheduling conflicts by entering a PIN or user name and password. Check for conflicting appointments: Select this check-box to display a warning message when scheduling an appointment at a time where an appointment is already scheduled for that resource. Check for conflicting categories: Select this check-box to display a warning message when scheduling an appointment in a category time that does not specify the event as a member of the category. For more information about category setup, please refer to "Categories Tab" in the Scheduling Administration section. Track retained appointments: Select this option to flag any retained appointments and display them in the patient's appointment history. A "retained" appointment is one that has been scheduled and is related to an appointment that was cancelled or no-show. Track cancellation reason: Select this option to require entering the reason for canceling an appointment on the Edit Appointment dialog box. Track rescheduling reason: Select this option to require entering the reason for rescheduling an appointment in the dialog box that displays from the Edit Appointment dialog box. Pull details from event details: Select this option to automatically display the details (as defined on the Event Add/Edit dialog box) on the Add/Edit Appointment dialog box each time the event is scheduled. Print multiple fee tickets for linked appts: Select to print fee tickets for all linked appointments. When a user attempts to print a fee ticket for an appointment that is linked to other appointments, all fee tickets print. Do not allow free text referring physicians: Select to prevent users from typing in a physician name in an applicable field. Instead, users must choose the provider from a list. The list they use is setup in the System Master Files for Providers. Lock appointment slot: Select to prevent users from scheduling multiple appointments in the same time slot. When a user is in the process of adding an appointment and accesses the Appointment Search Ahead dialog box, the time slot is locked to prevent others from adding an appointment in the same time slot.
NextGen Healthcare
434
Defaults Default Time Interval: Select a default value for the standard time interval to use when users schedule appointments in the appointment book. The time in the Default Time Interval field becomes the default interval in all scheduling fields that deal with time increments, such as template and resource time intervals and event durations. This time is also used as the default duration when you are adding or modifying an event override. This interval can be overridden if you select the Allow interval overrides check-box. Allow interval overrides: Select this check-box if you need the ability to create time interval overrides at the resource, template, and event levels. Important: This check-box affects many areas of EPM and File Maintenance. Before you select this check-box, you should understand its extensive effects. If the check-box is selected and you want to clear it to prevent interval overrides, you should first make sure all intervals set for events, event chains, resources, and templates are increments of the practice default time interval. For example, if the default interval is 10 minutes, then all other intervals must be increments of 10 such as 10, 20, 30, and so on. Default Start Time: Select the default value for the standard start time when using Appointment Search Ahead to find available appointments. Default End Time: Select a default value for the standard end time when using Appointment Search Ahead to find available appointments. Default Appt Reminder: Enter the default letter for standard appointment reminders to be printed. This field may be overridden when running reminders. For more information about printing appointment reminders, see the "Forms, Letters, and Labels" chapter in the NextGen EPM User Guide. Days in advance of scheduled date to print reminders: Enter the default value for the number of days prior to scheduled appointment dates for reminders to be printed. Appt Search/Wait List Options Allow appointment creation on uncategorized time for search ahead: Because future appointment dates may not have assigned categories until templates are assigned to them, you can select this option to allow users to schedule appointments at uncategorized times (within the start and end times setup in Practice Preferences > Appt Scheduling tab) when they are using the Search Ahead dialog box. Prompt to defer scheduling admin changes until automated nightly process: Select this option to defer scheduling administration changes until the nightly process. Depending on your setup, changes to scheduling administration can take some time because the process requires that changes are made to the appointment search engine. Because this process occurs in real time and takes place during business hours, making such a change can take several minutes and could impact users who are currently scheduling appointments. You could even experience performance-related problems.
435
NextGen® PM System Configuration Training Workbook for CHC, Version 5.8
Allow multiple location selections: Select this option to specify whether to allow multiple locations to be searched in Appointment Search Ahead in EPM. If the option is checked, then you can select more than one location to search on in the Service Locations drop-down list on the Appointment Search Ahead dialog box. If the check-box is not selected, then only one location can be selected to search on at one time. Enable nearest location search: Select this check-box to enable the distance criteria on the Appointment Search Ahead dialog box. The criteria restricts the search to locations near a specific ZIP Code. View Options Disable right time legend: Select to .hide the appointment time slots that display on the right side of the window in multi-view and weekly view For additional information, see Hiding the Time Slots on the Right Side of the Scheduler Book. Required on Appt
Require rendering physician – Select this check-box to require a rendering physician when creating an appointment.
Require referring physician – Select this check-box to require a referring physician when creating a linked appointment.
Required on Linked Appt:
Birth Date
Day Phone
Home Phone
Primary Care Phys
SSN
Contact Preference
Sex
Demographic Client Defined fields (Church, Language, Race, and Religion) from the Enterprise Preferences > General tab
Client Defined fields from the Enterprise Preferences > Client Defined tab
UDS fields (Homeless Status, Migrant Worker status, Language Barrier, and so on)
NOTES: The UDS fields display only when the Enterprise Preferences >UDS tab is enabled. If a UDS field is set as required in Enterprise Preferences, the required check marks display with a gray background. You cannot clear these check marks in Practice Preferences.
NextGen Healthcare
436
Appointment Scheduling User-Defined
Label: In the Label column, type a name for each text and master list type of appointment user-defined field as needed. Type: UDF 1 – 4 = Text UDF 5 – 8 = Master List Require?: Select this option to require this field and then, select one of the following options:
Always: Select this option to require this field every time an appointment is made. On linked patient: Select this option to require this field only when a linked appointment is made.
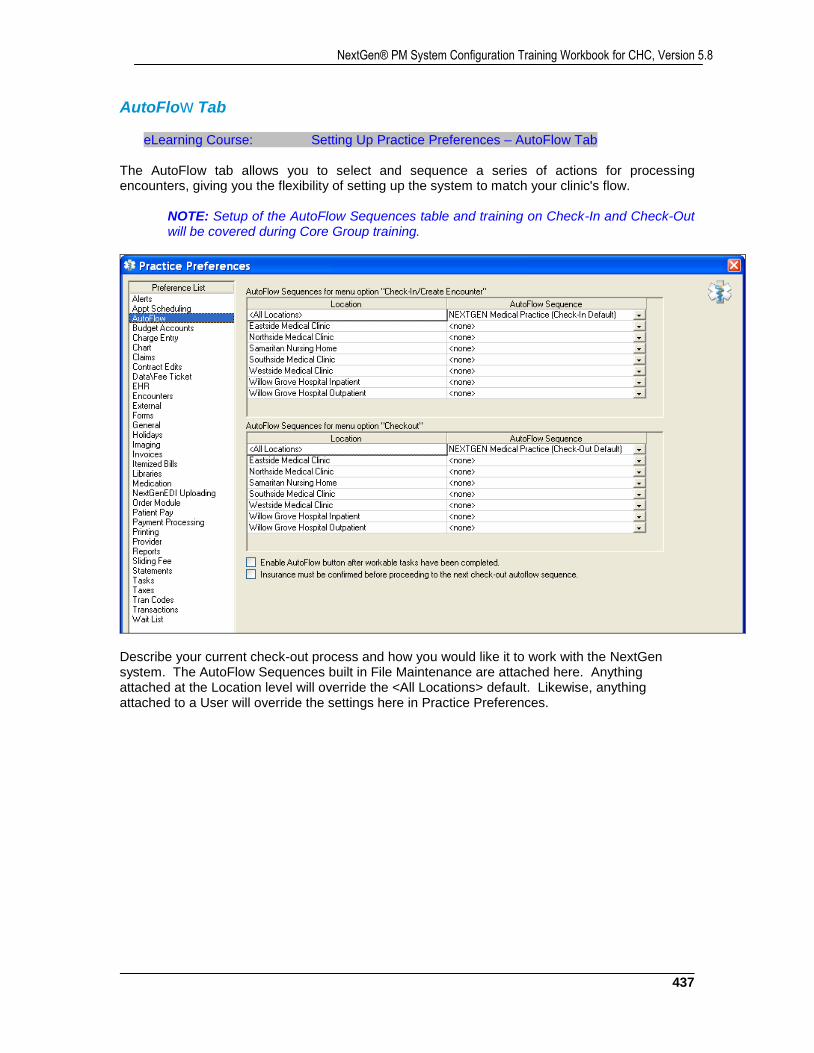
437
NextGen® PM System Configuration Training Workbook for CHC, Version 5.8
AutoFlow Tab
eLearning Course: Setting Up Practice Preferences – AutoFlow Tab The AutoFlow tab allows you to select and sequence a series of actions for processing encounters, giving you the flexibility of setting up the system to match your clinic's flow.
NOTE: Setup of the AutoFlow Sequences table and training on Check-In and Check-Out will be covered during Core Group training.
Describe your current check-out process and how you would like it to work with the NextGen system. The AutoFlow Sequences built in File Maintenance are attached here. Anything attached at the Location level will override the <All Locations> default. Likewise, anything attached to a User will override the settings here in Practice Preferences.

NextGen Healthcare
438
Budget Accounts Tab
eLearning Course: Setting Up Practice Preferences – Budget Accounts Tab
NOTE: Training on Budget Plans will be covered during Advanced Training.
Budget Communication Select the method of communication your practice uses to create budget-related notifications.
Budget Letters: This option enables the EPM menu path: File > Print Forms > Letters > Budget Letters. Budget letters communicate information about a plan in a separate letter. If you select this method, you can select the default letters to print for budget plans. Budget Statements: This option enables the EPM menu path: File > Print Forms > Budget Statements. Budget statements communicate dunning messages about a budget plan as additional information printed on the guarantor's statements instead of as a separate letter. If you select this method, you can select the default dunning messages.
Budget Letters If you selected Budget Letters as your budget communication method, then you can select the default letters to use with the budget plans. These budget letters come from the letter templates setup in the Letters master file.
NOTE: If you selected Budget Statements, the budget letters here do not apply.
439
NextGen® PM System Configuration Training Workbook for CHC, Version 5.8
To set the budget letters to send for each kind of letter: Select a default letter template for each type. When a user prints one of these letter types in EPM, he or she can choose to use the default template or choose another.
First Letter: Select the first letter that is sent to the guarantor after an account is setup on a budget plan. The letter usually contains the payment terms of the budget plan. EPM only creates this letter one time. Normal Letter: Select the letter to send to the guarantor on a recurring basis during the normal course of the budget plan. This type of letter can reflect the last payment received and can act as reminder of the next payment. Final Letter: Select the letter to send as the final letter for the budget plan. This letter normally shows the final payment due and is sent when the result of the final payment is a zero balance. Delinquent Letter: Select the letter to send when the guarantor's budget payment is late as determined by the budget plan terms. If payment is not received within the number of days specified in the Number of days after delinquency before pre-list field, the Pre-List Letter prints in the next letter cycle. Pre-List Letter: Select the letter to send when the guarantor has failed to meet the budget plan obligations and will be turned over to collections. The budget plan now becomes defunct. Underpayment Letter: Select the letter to send (instead of the Normal Letter) when the payment received is less than the amount defined in the budget plan. Missed Payment Letter: Select the letter to send (instead of the Normal Letter) when the guarantor has not sent a payment within the number of days specified in the Allowable number of days to receive payment from due date field. The budget plan becomes delinquent.
Budget Defaults The Budget Defaults section defines the default options to use when EPM calculates budget plan amounts. Default budget type: Select one of the following:
Perpetual: The budget plan enables encounters to "roll-on" to an existing budget plan without have to re-establish the plan. Non-Perpetual: The budget plan remains specific to the encounter.
Minimum flat dollar payment amount: Enter the amount for the minimum allowed payment for a budget plan. Payment amount cannot be less than this amount. A warning message displays in EPM when the amount entered on any budget plan is less than the minimum.
NextGen Healthcare
440
Acceptable % of self-pay balance for perpetual payments: Enter the minimum percentage of the perpetual budget plan balance that can be allowed as a recurring payment. For example, if you enter 12% as acceptable, then the minimum payment must be at least 12% of the total self-pay balance. A warning message displays in EPM when the payment amount entered is less than the percentage. Minimum payment interval: Select the minimum number of days between payment cycles. Budget plans cannot be setup for less than the defined interval. To allow time for statement and payment mailing, the interval cannot be set to less than 7 days. Maximum number of months for non-perpetual budgets: Set the maximum length for the duration of non-perpetual budget plans. When a user creates a non-perpetual budget plan, the expected plan duration cannot exceed the maximum. When the value is set to zero (0), there is no maximum. Default collection agency: Select the collection agency to use as the default when a budget is terminated. Termination automatically pre-lists the encounters.
NOTE: You can modify collection agencies in the Collection Agencies master file. Days in advance of scheduled due date to print letters: Enter the number of days before the budget "Next Letter Date" that letters should be printed. The number you enter here depends on how often your practice prints letters. The "Next Letter Date" is the payment due date, so in determining an appropriate number, it is helpful to factor in the time needed to print and mail the correspondence. For example, if you set the field to 5 days and a user sets up a Budget Payment Plan and attempts to enter today or tomorrow as the start date, then an message displays that the minimum start date must be at least 5 days from today. Allowable number of days to receive payment from due date: Enter the number of grace period days after the budget due date that payment must be received by. This preference controls the "Must Receive By" date that optionally prints on statements and letters. For example, if you set this preference to 15 days, and the first payment date is June 1, then the date that the payment must be received by is June 16. Number of days after delinquency before pre-list: Enter the number of days that must pass after a budget plan has reached delinquent status before it goes into pre-list status. Number of days after pre-list before termination: Enter the number of days that must pass after a budget plan has reached pre-list status before it will be terminated and put on a pre-list for collections. Default Dunning Messages: If you selected Budget Statements as your budget communication method, select the Budget Statements library that contains the default dunning messages to include on the statements. You can modify the messages in the Budget Statement Messages master file and then attach the messages to the appropriate statuses in the Budget Statement library.
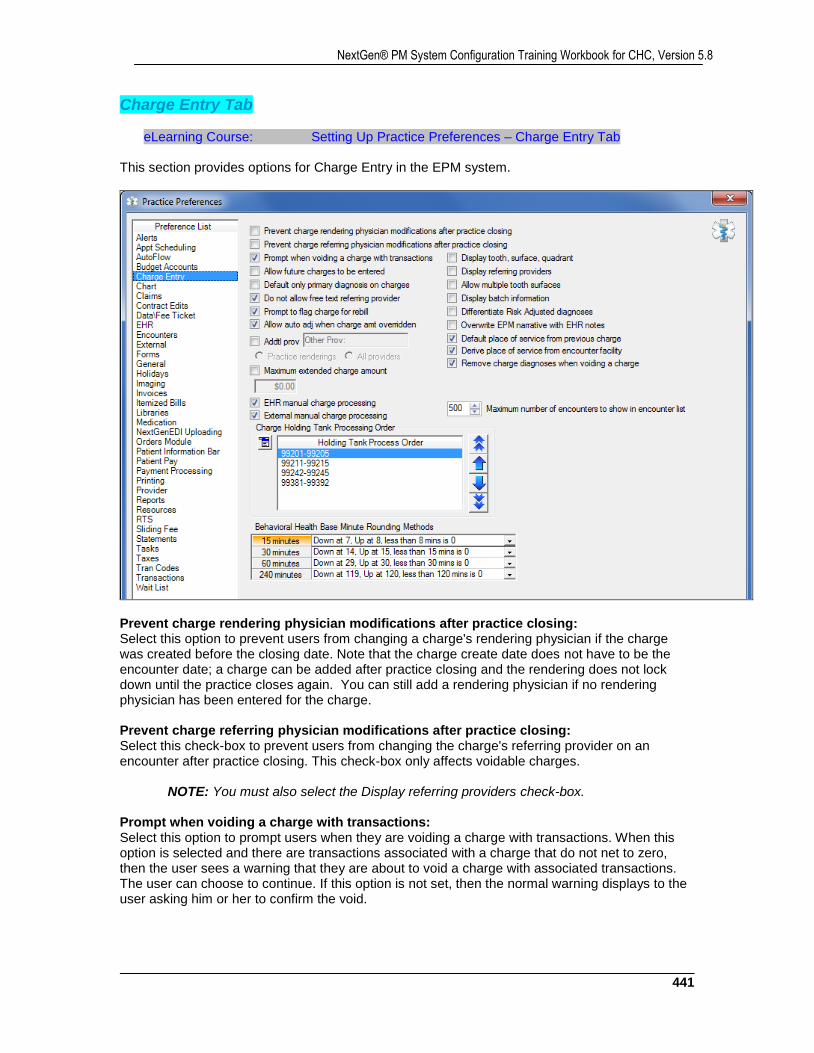
441
NextGen® PM System Configuration Training Workbook for CHC, Version 5.8
Charge Entry Tab
eLearning Course: Setting Up Practice Preferences – Charge Entry Tab This section provides options for Charge Entry in the EPM system.
Prevent charge rendering physician modifications after practice closing: Select this option to prevent users from changing a charge's rendering physician if the charge was created before the closing date. Note that the charge create date does not have to be the encounter date; a charge can be added after practice closing and the rendering does not lock down until the practice closes again. You can still add a rendering physician if no rendering physician has been entered for the charge. Prevent charge referring physician modifications after practice closing: Select this check-box to prevent users from changing the charge's referring provider on an encounter after practice closing. This check-box only affects voidable charges.
NOTE: You must also select the Display referring providers check-box. Prompt when voiding a charge with transactions: Select this option to prompt users when they are voiding a charge with transactions. When this option is selected and there are transactions associated with a charge that do not net to zero, then the user sees a warning that they are about to void a charge with associated transactions. The user can choose to continue. If this option is not set, then the normal warning displays to the user asking him or her to confirm the void.
NextGen Healthcare
442
Allow future charges to be entered: Select this check-box to allow a service date greater than the system date ("today") to be entered on the Charge Posting dialog box. Default only primary diagnosis on charges: Select this check-box to set the primary diagnosis for an encounter default to the Charge Posting dialog box. This box controls how diagnoses default to charges. This check-box controls defaulting diagnoses in the following ways: If this box is selected, the primary diagnosis for an encounter is defaulted to the first charge. The diagnoses for subsequent charges for that encounter default from the previous charge. If this box is not checked, the top four diagnoses for an encounter are defaulted to the first charge. The diagnoses for subsequent charges for that encounter default from the previous charge.
NOTE: There is one exception to this default behavior. When you save a charge, leave the Charge Posting dialog box, and return to the Charge Posting dialog box to enter another charge for the same encounter, the diagnoses will default from the first charge and not the last charge entered.
Do not allow free text referring provider: Select to prevent users from typing a provider name in an applicable field. Instead, users must choose the provider from a list that is setup in the System Master Files for Providers. Prompt to flag charge for rebill: If this option is selected and a user updates a billed charge, the user will be prompted to manually flag the charge for rebill. If this option is not selected, the charge is automatically flagged for rebill. The Rebill Encounter check-box on the Balance Control dialog box in EPM is automatically selected. Allow auto adjustment when charge amt overridden: Select this check-box so that when a user creates a new charge that is setup for auto adjustment and then overrides the price, the auto adjustment is created anyway. If this check-box is not selected and a user creates a new charge that is setup for an auto adjustment and overrides the price, then the auto adjustment does not occur. Additional Provider (and field caption): Select this check-box to enable users to add an additional provider at the charge level for reporting purposes. The Additional Provider field is commonly used when referring to a Physician Assistant, Midwife, or Nurse Practitioner within the practice. First, select this check-box to add a field to the Charge Posting dialog box so that users can add an additional provider. Then, the default caption for the added field on the Charge Posting dialog box is Mid-level. To change the field caption to best represent the additional providers in your practice, type another name in the “Addl prov” field. Finally, select one of the following to determine the type of providers users can select from for the field:
Practice renderings: To show the additional providers that are setup as rendering physicians in the current practice. All providers: To show all providers that are listed in the Provider master file.
443
NextGen® PM System Configuration Training Workbook for CHC, Version 5.8
Maximum extended charge amount: Select this check-box and then type a maximum charge amount in the associated field to prevent users from manually entering a line item charge in EPM Charge Posting that is higher than that amount. Then, if a user manually enters a charge line item in an amount that exceeds the Maximum extended charge amount value, EPM displays a warning and does not save the charge amount. EHR manual charge processing: Select this check-box to hold charges sent from NextGen EHR for a user in EPM to review and accept before the billing process is run.
NOTE: To access the two EHR Manual Charge Processing reports in EPM, this option must be selected in both Enterprise Preferences > General tab and in here in Practice Preferences.
External manual charge processing: Select this check-box to hold charges sent from a third party application through an HL7 interface for a user in EPM to review and accept before the billing process is run.
NOTE: To access the two External Manual Charge Processing reports in EPM, this option must be selected in both Enterprise Preferences > General tab and in here in Practice Preferences.
Display tooth, surface, quadrant: Select this check-box to display the dental-related fields (Tooth, Surface, Quadrants) on the Charge Entry dialog box when users enter charges. Display referring providers: Select this check-box to display the referring providers in EPM Charge Posting. This field can be used in conjunction with the Prevent charge referring physician modifications after practice closing field described earlier in this table. EPM displays referring providers for charges received from other applications only when the Display referring providers option is selected. Allow multiple tooth surfaces: Select this option to select more than one surface for a single tooth on the Charge Entry dialog box. Display batch information: Select this check-box to display the Batch Info field on the Charge Posting dialog box so that users can enter information that can be used for batch charge entry. Differentiate Risk Adjusted diagnoses: You can distinguish risk adjustment diagnoses from regular diagnoses. Select the Differentiate Risk Adjusted diagnoses check-box to have the Risk Adjust Indicator display on the Add/Modify ICD9CM Code Information dialog box. Then, set the Risk Adjustment Indicator. Overwrite EPM narrative with EHR notes: Select this option to, at charge creation, overwrite the EPM narrative, including the SIM narrative if one exists, with the notes from EHR so the information can be used on claims.
NextGen Healthcare
444
Default place of service from previous charge: Select this option so that when a user changes the place of service for a new or existing charge, the place of service becomes the default used for subsequent charges during a Charge Posting session only for the current encounter.
NOTE: If the user closes and then reopens the charge entry window or changes encounters, the default place of service used becomes the one selected in the SIM library. If this check-box is cleared, then the default place of service from the service item library is used.
Derive place of service from encounter facility: If you select this check-box, then while a user enters the charges in EPM during charge entry, the place of service is determined by the Facility field on the Encounter Maintenance > General tab instead of the Service Location field. If the check-box is cleared, then the Service Location field is used. Remove charge diagnoses when voiding a charge: Select this check-box if you want all diagnoses attached to a charge to be removed when the charge is voided. Tax Rate: If you want the practice to use a specific tax rate, select this check-box. If you select the check-box, you can select an applicable Tax Rate library at the:
Practice level by selecting a library in the field next to the Tax Rate check-box.
Location level by selecting a library in the Locations master file > Defaults 2 tab > Tax Rate Library field.
Charge Holding Tank Processing Order: Set the code range rules that determine the order that incoming EHR and external (HL7) charges are processed by EPM. The EHR charges listed on the Process Pending Charges dialog box are ordered first by encounter number and then by the sequence rules setup here. Incoming charges from an interface that go into the holding tank are processed in the order setup here when you accept them.
Maximum number of encounters to show in encounter list: This option controls the number of encounters that display for a patient in the Encounter field on the Charge Posting window.
The default setting for this option is 500
If set to “0” all patient encounters are listed Behavioral Health Base Minute Rounding Methods: Settings define the rounding methods for Behavioral Health timed billing on self-pay encounters. The rounding methods apply to Behavioral Health SIM codes that have been defined in the SIM Library with 15, 30, 60, or 240 Base Minutes. The rounding method affects how the units are calculated on a behavioral health charge for a patient based on the total time entered for the charge.
NOTE: Rounding methods for encounters with insurance are defined for each payer on the Payers > Defaults-2 tab.
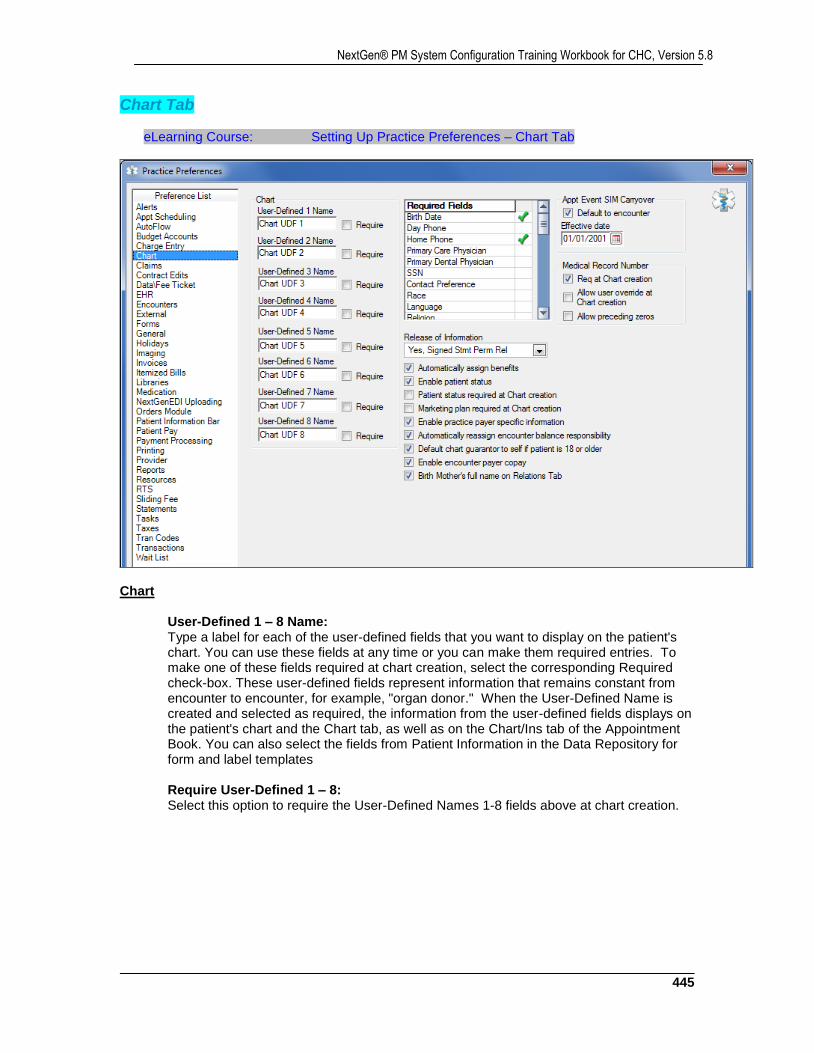
445
NextGen® PM System Configuration Training Workbook for CHC, Version 5.8
Chart Tab
eLearning Course: Setting Up Practice Preferences – Chart Tab
Chart
User-Defined 1 – 8 Name: Type a label for each of the user-defined fields that you want to display on the patient's chart. You can use these fields at any time or you can make them required entries. To make one of these fields required at chart creation, select the corresponding Required check-box. These user-defined fields represent information that remains constant from encounter to encounter, for example, "organ donor." When the User-Defined Name is created and selected as required, the information from the user-defined fields displays on the patient's chart and the Chart tab, as well as on the Chart/Ins tab of the Appointment Book. You can also select the fields from Patient Information in the Data Repository for form and label templates Require User-Defined 1 – 8: Select this option to require the User-Defined Names 1-8 fields above at chart creation.
NextGen Healthcare
446
Required Fields
Click in the column to the right of the field that you want to make a required field when users create new charts. The following fields can be set as required: Birth Date, Day Phone, Home Phone, Primary Care Phys, SSN, Contact Preference, the four Demographic Client Defined fields (Church, Language, Race, and Religion) from the Enterprise Preferences > General tab, the Client Defined fields from the Enterprise Preferences > Client Defined tab, and Community Code. If the UDS fields are enabled, you can also require them (Homeless Status, Migrant Worker status, Language Barrier, and so on). NOTES:
The UDS fields display only when the Enterprise Preferences >UDS tab is enabled.
If a UDS field is set as required in Enterprise Preferences, the required check marks display with a gray background. You cannot clear these check marks in Practice Preferences.
If you select Require SSN, a red arrow displays on the General tab and you must either select the Exclude all unknown SSNs field or enter a Social Security number in the Unknown SSN field on the General tab.
If you require Contact Preference, you must select the Display Contact Preference option on the General tab.
Release of information: Select to set the default for the release of information when a payer is attached to an encounter. The default is stored in the insurance record and displays on the Patient Insurance - Encounter dialog box. Automatically assign benefits: Select this box to automatically select the Assignment of Benefits box on the Patient Insurance - Encounter dialog box on the Encounters tab of the patient's chart. Enable patient status: Select this option to display the:
Patient Status tab on the People/Patient Maintenance dialog box.
Patient Status section on the patient chart. When a user selects the Patient Status and Pt Status Reason on the Patient Status tab, the information also displays on the People/Patient Maintenance dialog box. Patient status required at Chart creation: Select this option to require users to enter a patient's status at chart creation. Marketing plan required at Chart creation: Select this option to require marketing information when a chart is being created. This option allows you to track how patients found out about your practice. You can create marketing plans in the Practice master files. Enable practice payer specific information: Select this check-box to setup the co-pay as practice-specific. The co-pay is pulled from the Practice Level section of the Insurance Maintenance dialog box. If the check-box is not selected, the co-pay will be setup as enterprise-wide. For more information, refer to the section How Co-Payments are Used in the Application.
447
NextGen® PM System Configuration Training Workbook for CHC, Version 5.8
Automatically reassign encounter balance responsibility: Select this check-box to reassign the encounter balance to the next insurance (secondary or tertiary) or to the patient balance once the insurance is posted, eg: the line item status will be "Settled to [next payer]". Refer to the "Posting Transactions" chapter in the NextGen EPM User Guide for more information. Default chart guarantor to self if patient is 18 or older: Select this option to use the patient as a default guarantor when users create charts for patient who are 18 years or older. This feature applies to the Patient Chart > Demographics tab, and to the Create Encounters dialog boxes. Enable encounter payer copay: Select this check-box to display the Encounter Co-payment field and the Copay Exempt check-box on the Insurance Maintenance dialog box. For more information about turning on copay exemption for an encounter, see the NextGen EPM Claims Guide. Birth Mother’s full name on Relations Tab: Select this check-box to display fields for the patient’s birth mother’s First, Middle, Last, Maiden names on the Modify Patient Information > Relations tab.
NOTE: This option displays only if the “Birth Mother’s full name on Relations Tab” option has been selected in Enterprise Preferences > General tab.
Appt Event SIM Carryover
Default to encounter: Select this check-box to automatically populate the Charge Posting dialog box with the associated service items when it is initially accessed if an encounter is created for an appointment for an event. Effective date: Enter the date set for the SIM carryover to start.
Medical Record Number The Medical Record Number is used in both EPM and EHR. In EPM, it displays at the top of the patient chart.
Req at Chart creation: Select this check-box to require assigning the Medical Record Number when the chart is created. The default chart number is the next available number as determined by the Counter master file. If this box is not selected, then no medical record numbers are added to new charts. Allow user override at Chart creation: If you selected the Require at Chart Creation check-box, then you can select this check-box to enable the user to override the system-generated medical record number by entering a different chart number. Allow preceding zeros: If you selected the Require at Chart Creation check-box, then you can select this check-box to have zeros precede all medical record numbers for new and existing charts in the practice. Because the Medical Record field is a twelve-digit field, enough zeros display at the beginning of the number to make the total number of digits equal twelve.

NextGen Healthcare
448
Claims Tab
Billing
Enable Qualifying Encounter Billing: Select this check-box to activate qualifying encounter billing for all encounters with line items marked as a Qualifying SIM. To complete the setup for Qualifying Encounter Billing, you must configure one or more SIMs to be a Qualifying SIM. Suppress zero balance claims: Select this check-box to suppress claims with a $0 (zero) balance during batch billing. Suppress CLIA ID from mammography claims: Select this check-box to make Mammography Certification Codes and CLIA IDs mutually exclusive on electronic claims. When this option is selected and the application identifies a mammography code on a claim, it prints the mammography code and not the CLIA ID for Medicare claims. When this option is not selected, both the mammography code and the CLIA code are printed on the claim. Reference: For this option to work, you must set a SIM as a Mammography Code and this code must appear on the claim. For information on setting a SIM as a Mammography Code, see Attaching a Payer in the Service Item Library section of the System Setup chapter. Include Self-Pay Encounters In Claim Billing Report: Select this check-box to include charges and encounters billed to patients when a SIM is flagged as a patient self-pay encounter. The billing report will then display charges and encounters billed to both payers and patients.
449
NextGen® PM System Configuration Training Workbook for CHC, Version 5.8
Allow multiple Purchased Service lines on one claim: Select this check-box to bill multiple purchased service charges for an encounter on one claim. If the check-box is not selected, the system generates separate claims for each purchased service item. Do Not Sum Units for CPT4 Code: Select this check-box to indicate that for this practice, multiple identical charge lines are prevented from being combined on one line and summed on the paper claim. The identical charges display on separate lines on the paper HCFA 1500 claim or are entered individually in an electronic send file. When the check-box is cleared (the application default), the application sums identical line items and indicates multiple units for billing on a paper HCFA 1500 or in an electronic send file.
NOTE: You can also set this option at the SIM or payer levels. Disable diagnosis claim break: Select this check-box to prevent claim breaks when there are more than four diagnoses on a claim; an error generates and the claim is not produced because there are too many diagnoses to bill. If the check-box is clear and there are more than four diagnoses, the charges automatically split onto multiple separate claims as adequate to handle the number of diagnoses.
NOTE: You can also set this option at the payer level on the Payer master file > Payer Defaults – 2 tab.
Allow eight diagnoses: Select this check-box to display eight diagnoses (instead of four) on the Charge Posting window in EPM. This check-box is in both in the Claims and EHR practice preferences. If you change the check-box for one preference, it automatically changes for the other preference. Anesthesia Units to Follow Primary Claim: Select this check-box to ignore both the rounding setting in the Payer master file and the Anesthesia Modifiers library and to instead use the total Anesthesia units that were calculated on the Primary claim for all COBs (secondary and tertiary). For example, if a charge/modifier combination has different unit calculations depending on the payer, then: When units are calculated with the payer settings, a primary Medicare claim has 10 total anesthesia units while a primary Aetna claim has 12 total anesthesia units. Therefore, for primary Medicare and secondary Aetna claims, both primary and secondary claims would go out with 10 units because Medicare is the primary. And for primary Aetna and secondary Medicare claims, both primary and secondary claims would go out with 12 units because Aetna is the primary.
NOTE: For more information about anesthesia billing, see the Anesthesia Billing white paper available from the Web site www.NextGen.com.
Anesthesia Units to Follow Primary Claim: Enable billing of encounter diagnoses: Select this option to display the Bill encounter diagnoses option in the Payer master file.
NextGen Healthcare
450
UB Claim Form Select the information to print on the UB Claim Form NOTE: To access the UB Claims tab in the Payer master file, you must select a Type of Facility and a Bill Classification.
Type of Facility: The selected Type of Facility prints in the first position of Field Locator 4 on UB claims. It also sets the default on the Payers > Practice tab > UB sub-tab in File Maintenance and on the Encounter Maintenance > UB tab in NextGen® EPM.
Bill Classification: The selected Bill Classification prints in the second position of Field Locator 4 on UB claims. It also sets the default on the Payers > Practice tab > UB sub-tab in File Maintenance and on the Encounter Maintenance > UB tab in NextGen® EPM.
Frequency of Bill: The selected Frequency of Bill prints in the third position of Field Locator 4 on UB claims. It also sets the default on the Payers > Practice tab > UB sub-tab in File Maintenance and on the Encounter Maintenance > UB tab in NextGen® EPM.
NOTE: For regular UB billing, this field is usually set to 1. For recurring UB claims billing, this field must be blank. This will allow the application to apply the proper frequency based on where the encounter lies in the sequence of recurring encounters.
Source of Admission: This setting populates Field Locator 15 on UB claims. The selected Source of Admission sets the default on the Encounter Maintenance > UB tab in NextGen® EPM.
NOTE: “Source of Admission” is required on electronic UB / 837I claims in ASC X12 Version 5010 format.
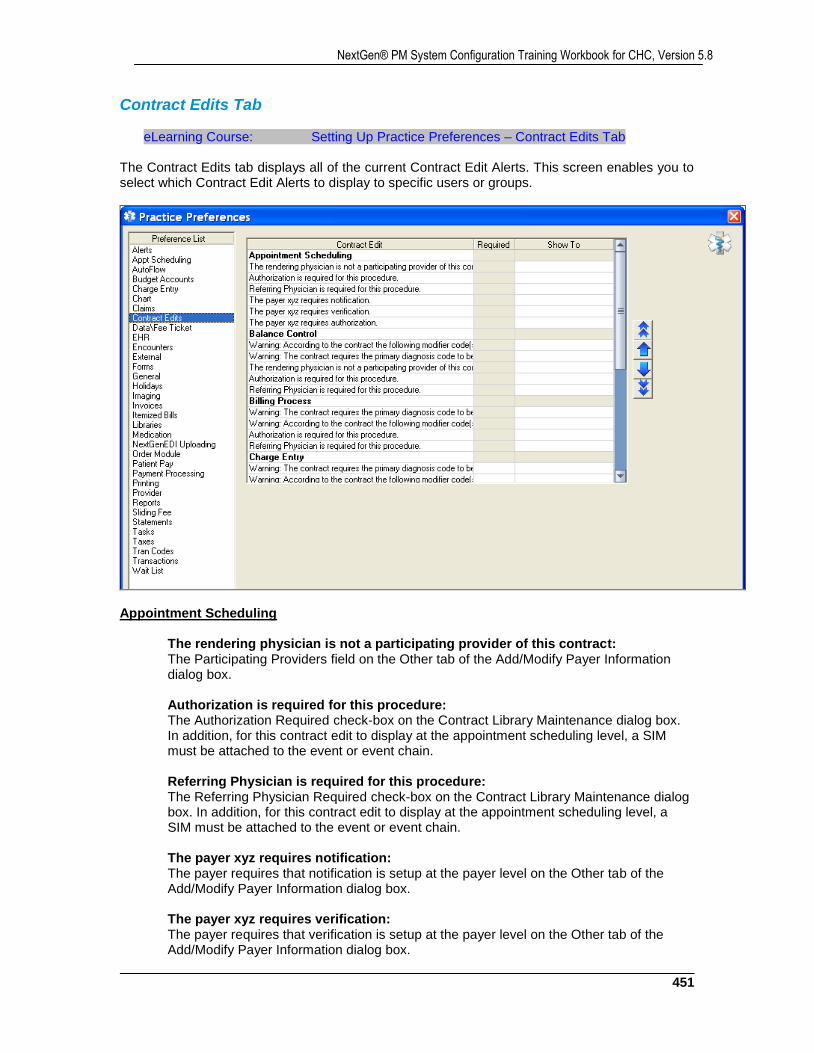
451
NextGen® PM System Configuration Training Workbook for CHC, Version 5.8
Contract Edits Tab
eLearning Course: Setting Up Practice Preferences – Contract Edits Tab The Contract Edits tab displays all of the current Contract Edit Alerts. This screen enables you to select which Contract Edit Alerts to display to specific users or groups.
Appointment Scheduling
The rendering physician is not a participating provider of this contract: The Participating Providers field on the Other tab of the Add/Modify Payer Information dialog box. Authorization is required for this procedure: The Authorization Required check-box on the Contract Library Maintenance dialog box. In addition, for this contract edit to display at the appointment scheduling level, a SIM must be attached to the event or event chain. Referring Physician is required for this procedure: The Referring Physician Required check-box on the Contract Library Maintenance dialog box. In addition, for this contract edit to display at the appointment scheduling level, a SIM must be attached to the event or event chain. The payer xyz requires notification: The payer requires that notification is setup at the payer level on the Other tab of the Add/Modify Payer Information dialog box. The payer xyz requires verification: The payer requires that verification is setup at the payer level on the Other tab of the Add/Modify Payer Information dialog box.

NextGen Healthcare
452
The payer xyz requires authorization: The payer requires that authorization is setup at the payer level on the Other tab of the Add/Modify Payer Information dialog box.
Balance Control
Warning: The contract requires the primary diagnosis code to be one of the following code(s): The Required Diagnosis section on the Contract Library Maintenance dialog box for the service item entered on the Charge Entry dialog box. Warning: According to the contract the following modifier code(s) are required for this procedure: xyz: The Required Modifiers section on the Contract Library Maintenance dialog box for the service item entered on the Charge Entry dialog box. The rendering provider is not a participating provider of this contract: The Participating Providers field on the Other tab of the Add/Modify Payer Information dialog box. Authorization is required for this procedure: The Authorization Required check-box on the Contract Library Maintenance dialog box, which is checked for the service item. Referring Physician is required for this procedure: The Referring Physician Required check-box on the Contract Library Maintenance dialog box.
Billing Process
Warning: The contract requires the primary diagnosis code to be one of the following code(s): The Required Diagnosis section on the Contract Library Maintenance dialog box for the service item entered on the Charge Entry dialog box. Warning: According to the contract the following modifier code(s) are required for this procedure: xyz The Required Modifiers section on the Contract Library Maintenance dialog box for the service item entered on the Charge Entry dialog box. Authorization is required for this procedure: The Authorization Required check-box on the Contract Library Maintenance dialog box. Referring Physician is required for this procedure: The Referring Physician Required check-box on the Contract Library Maintenance dialog box.
453
NextGen® PM System Configuration Training Workbook for CHC, Version 5.8
Charge Entry
Warning: The contract requires the primary diagnosis code to be one of the following code(s): The Required Diagnosis section on the Contract Library Maintenance dialog box for the service item entered on the Charge Entry dialog box. Warning: According to the contract the following modifier code(s) are required for this procedure: xyz. The Required Modifiers section on the Contract Library Maintenance dialog box for the service item entered on the Charge Entry dialog box. A $0.00 automatic adjustment has been created for this charge: System-generated based on the information in the Automatic Adjustments section of the Contract Library Maintenance dialog box for the service item entered on the Charge Entry dialog box. The procedure code xyz has been defaulted onto the encounter: System-generated based on the information on the Payer tab of the Service Item Library Maintenance dialog box. The diagnostic code xyz has been defaulted onto the encounter: System-generated based on the information on the Payer tab of the Service Item Library Maintenance dialog box. The rendering provider is not a participating provider of this contract: The Participating Providers field on the Other tab on the Add/Modify Payer Information dialog box. Authorization is required for this procedure: The Authorization Required check-box on the Contract Library Maintenance dialog box. Referring Physician is required for this procedure: The Referring Physician Required check-box on the Contract Library Maintenance dialog box. A $0.00 sliding fee adjustment has been created for this charge: System-generated based on the active Sliding Fee Schedule information maintained on the Sliding Fee Schedule Detail Maintenance dialog box and the patient having a Self-pay status for the charge. The SIM code has an attached alert message: The Alert Message field on the Payer tab of the Service Item Maintenance dialog box and the payer has the contract associated with it.
Insurance Modification
Warning: The contract requires the primary diagnosis code to be one of the following code(s): The Required Diagnosis section on the Contract Library Maintenance dialog box for the service item entered on the Charge Entry dialog box. Warning: According to the contract the following modifier code(s) are required for this procedure: xyz: The Required Modifiers section on the Contract Library Maintenance dialog box for the service item entered on the Charge Entry dialog box.
NextGen Healthcare
454
The rendering provider is not a participating provider of this contract: The Participating Providers field on the Other tab on the Add/Modify Payer Information dialog box. Authorization is required for this procedure: The Authorization Required check-box on the Contract Library Maintenance dialog box. Referring Physician is required for this procedure: Referring physician line items in EPM.
Payment Entry
The rendering physician is not a participating provider of this contract: The Rendering column in the ledger area on the Payment Entry dialog box.
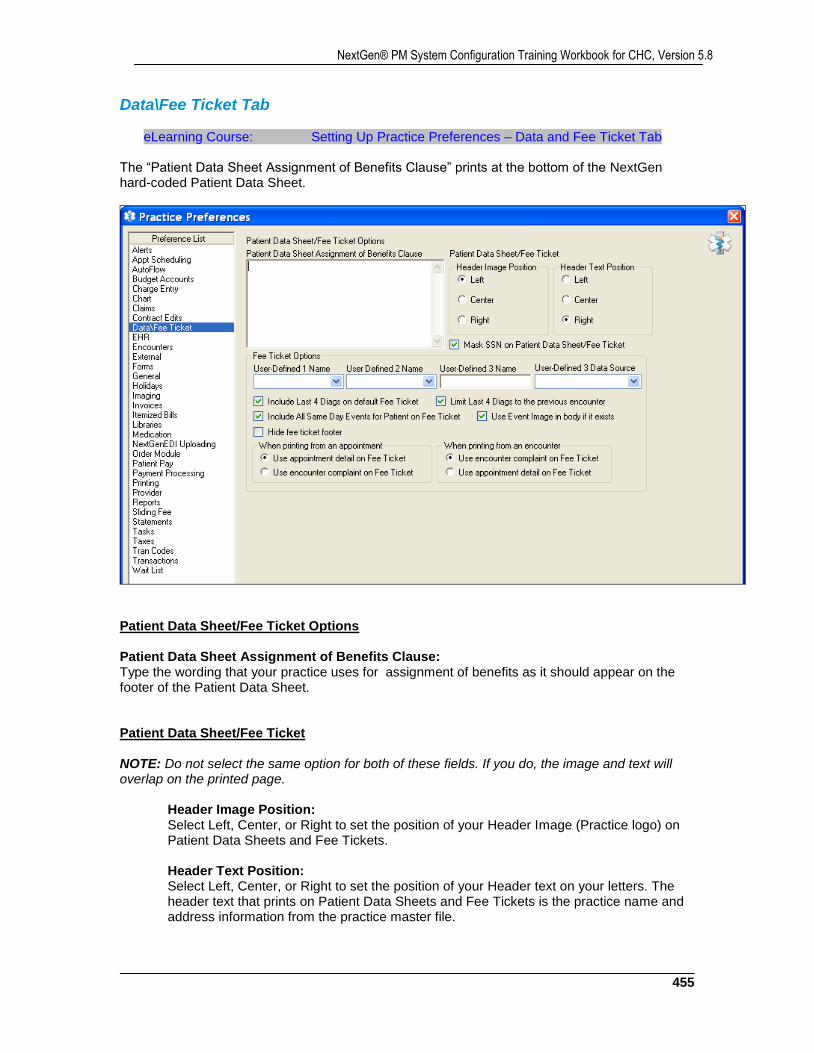
455
NextGen® PM System Configuration Training Workbook for CHC, Version 5.8
Data\Fee Ticket Tab
eLearning Course: Setting Up Practice Preferences – Data and Fee Ticket Tab The “Patient Data Sheet Assignment of Benefits Clause” prints at the bottom of the NextGen hard-coded Patient Data Sheet.
Patient Data Sheet/Fee Ticket Options Patient Data Sheet Assignment of Benefits Clause: Type the wording that your practice uses for assignment of benefits as it should appear on the footer of the Patient Data Sheet. Patient Data Sheet/Fee Ticket NOTE: Do not select the same option for both of these fields. If you do, the image and text will overlap on the printed page.
Header Image Position: Select Left, Center, or Right to set the position of your Header Image (Practice logo) on Patient Data Sheets and Fee Tickets.
Header Text Position: Select Left, Center, or Right to set the position of your Header text on your letters. The header text that prints on Patient Data Sheets and Fee Tickets is the practice name and address information from the practice master file.
NextGen Healthcare
456
Mask SSN on Patient Data Sheet/Fee Ticket: Select this check-box to display only the last four digits of the Social Security numbers on printed data sheets and fee tickets. The number displays in the format ### - ## - 1234. If this check-box is cleared, then the numbers display in their entirety.
Fee Ticket Options User-Defined 1 Name / User-Defined 2 Name: On the Fee Ticket, you can choose any two of the following fields to print on the last line of the Fee Ticket header.
Appointment - Location
Appointment - UDF 1-2
Case Description
Case Employer
Case Number
Charts - UDF 1-8
Clinical - UDF 1-4
Encounter - Admitting
Encounter - Consult 1-2
Encounter - ENC 1-12
Encounter - UDF 1-4
Encounter Onset Date (for example, the date of injury)
Family Income
Family Size
Next Future Appointment
Primary Care Physician
SF (Sliding Fee) Discount Percent User-Defined 3 Name: Enter the name you want to use to label the user-defined 3 field. This information prints on the fourth line of the fee ticket. User-Defined 3 Data Source: Select a data source to correspond with name entered in the User-Defined 3 Name field. The data sources you can select include the same fields used in the User-Defined 1 & 2 Fields and also includes two additional options:
Last Global Exp. Dt: Pulls data from the After Care Days field on the Service Item Library Maintenance dialog box and calculates the after-care expiration date. If the patient's chart has encounters with multiple after-care procedures, the after-care expiration date furthest in the future prints on the fee ticket. Weight/Height: Pulls data from the Height and Weight fields on the Clinical tab on the Encounter Maintenance dialog box. This information is pulled from the last encounter.
If no data is in the field where data is being pulled from, this field is blank on the fee ticket. However, if a name was entered in the User-Defined 3 Name field, the name prints with or without data. This information prints on the fourth line of the fee ticket.
457
NextGen® PM System Configuration Training Workbook for CHC, Version 5.8
Include Last 4 Diags on default Fee Ticket: Select this check-box to print a patient's last four diagnosis codes and descriptions at the bottom of the standard (default) fee ticket. These diagnosis codes are based on the most recent encounter date and the order that the diagnosis is attached to the encounter. If less than four codes are attached to the most recent encounter, additional codes are extracted from previous encounters until there are four total. If this check-box is not selected, no diagnoses print on the fee ticket. See the NextGen® EPM User Guide for additional information about printing diagnosis codes on fee tickets. Limit Last 4 Diags to the previous encounter: If you select the Include Last 4 Diags on default Fee Ticket check-box, you can also select this check-box to limit the four diagnoses to be only from the previous encounter instead of from all previous encounters. This setting prevents too many old diagnoses from being printed on the fee ticket. For example, if a patient only has two diagnoses on the current encounter but has only one diagnosis on the next most recent encounter, only the older diagnosis prints on the fee ticket. However, if two newer diagnoses are added, that one older diagnosis will no longer print. Include All Same Day Events for Patient on Fee Ticket: Select this check-box to include multiple events for the same day on the patient's fee ticket. The application can display up to three events on the fee ticket, listing them in chronological order for the day. The events print in the Event box on the fee ticket. When displaying more than one event on the fee ticket, the application uses the short name for the event. Short names for events must be setup ahead of time in the Scheduling Administration section of the application. Hide fee ticket footer: Select this check-box to prevent the footer from printing on the fee ticket. Instead, the fee ticket body image stretches to the area where the footer normally prints. Use Event Image in body if it exists: Select this check-box to print an Event Image fee ticket when a fee ticket is attached to an event/resource and an appointment is scheduled and an encounter is created. If this option is not selected or an event image does not exist, the application goes to the next level to find an image and continues this process until an image if found. If there is, and the Practice Preference of Use Event Image in body if it exists is selected, the fee ticket prints correctly before and after a check in. When printing from an appointment: Determine whether to use appointment detail or the encounter complaint when users print fee tickets from an appointment by selecting one of the following:
Use appointment detail on Fee Ticket
Use encounter complaint on Fee Ticket When printing from an encounter: Determine whether to use appointment detail or the encounter complaint when users print fee tickets from an encounter by selecting one of the following:
Use encounter complaint on Fee Ticket
Use appointment detail on Fee Ticket

NextGen Healthcare
458
EHR Tab This tab controls various settings related to the NextGen® EHR application.
NOTE: Training on these settings will be covered during a separate EHR training session.
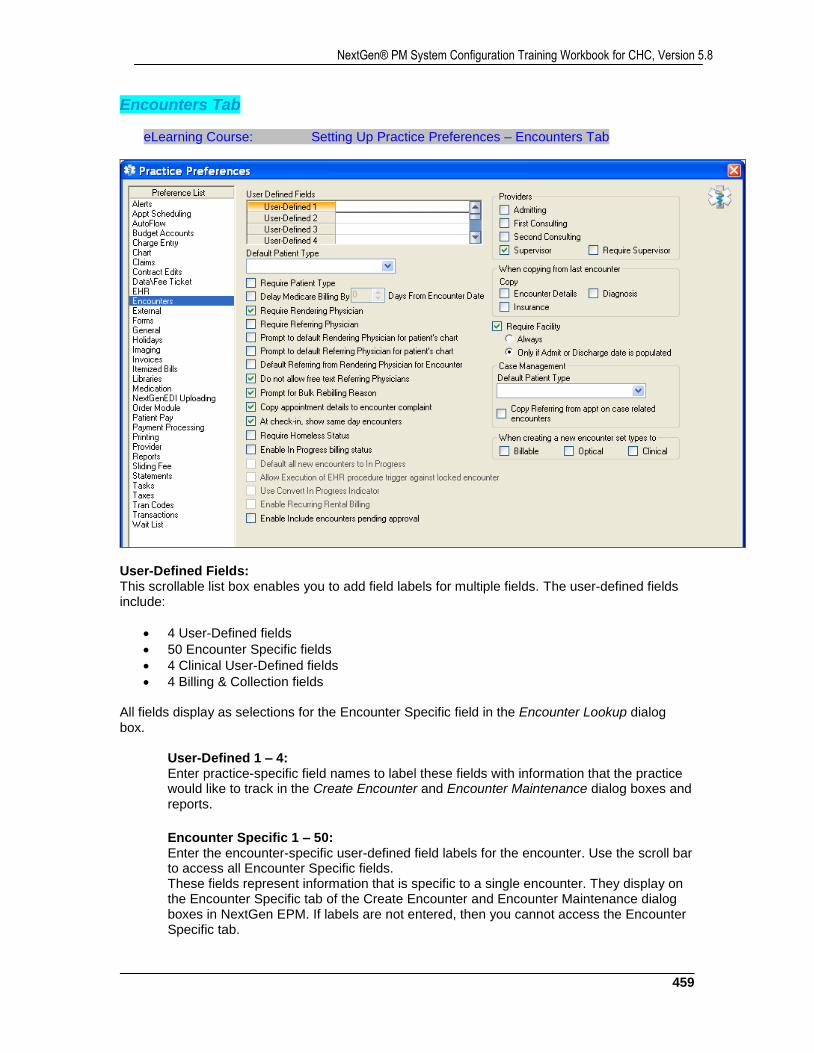
459
NextGen® PM System Configuration Training Workbook for CHC, Version 5.8
Encounters Tab
eLearning Course: Setting Up Practice Preferences – Encounters Tab
User-Defined Fields: This scrollable list box enables you to add field labels for multiple fields. The user-defined fields include:
4 User-Defined fields
50 Encounter Specific fields
4 Clinical User-Defined fields
4 Billing & Collection fields All fields display as selections for the Encounter Specific field in the Encounter Lookup dialog box.
User-Defined 1 – 4: Enter practice-specific field names to label these fields with information that the practice would like to track in the Create Encounter and Encounter Maintenance dialog boxes and reports.
Encounter Specific 1 – 50: Enter the encounter-specific user-defined field labels for the encounter. Use the scroll bar to access all Encounter Specific fields. These fields represent information that is specific to a single encounter. They display on the Encounter Specific tab of the Create Encounter and Encounter Maintenance dialog boxes in NextGen EPM. If labels are not entered, then you cannot access the Encounter Specific tab.
NextGen Healthcare
460
Clinical UD 1 – 4: Enter the clinical user-defined field labels for the encounter. These fields are located on the Clinical tab of the Encounter Maintenance dialog box, and represent information that is specific to a single encounter. If a label is not entered, then the field will not display. Bill & Collection UD 1 – 4: Enter the user-defined field labels for the billing and collection information for the encounter. These fields can be accessed and used in the following areas of the application:
The Billing & Collections tab on the Encounter Maintenance dialog box
The Form and Label Data Repository
The following Accounts Receivable and Encounter reports: Billed Encounters, Unbilled Encounters, Collections Follow-up, and Daily Encounters
Default Patient Type: Select the default patient type to be used when creating your encounters. Patient types are defined in the Master Lists. Require Patient Type: Select this check-box to require users to select a patient type when they create an encounter. Patient types are defined in the Master Lists. Delay Medicare Billing By [0-30] Days from Encounter Date: Enter the number of days to hold Medicare batch billing starting from the encounter date. This setting allows charges billed to Medicare to be held for the specified number of days before claims are generated. For example, if the encounter date is July 1 and the hold days are set to 5, then the hold date is July 6. The hold date is calculated when a user attaches a Medicare payer to an unbilled encounter. The hold date then displays in the Hold Until Date field on the Billing & Collections tab in Encounter Maintenance in EPM.
NOTE: Even though this setting works only with batch billing, users can still force billing with demand billing for specific encounters. If an encounter is still within the allotted hold days, it does not display during encounter lookup and, therefore, is not in the list for batch billing. You can also delay billing for other payers. If you do so, the payer setting overrides delayed Medicare billing.
Require Rendering Physician: Select this check-box to require a Rendering Physician for the encounter. Require Referring Physician: Select this check-box to require a Referring Physician for the encounter. Prompt to default Rendering Physician for patient's chart: Select this check-box to display a message when a user creates an encounter that asks if the user wants to use the rendering physician as the default.
461
NextGen® PM System Configuration Training Workbook for CHC, Version 5.8
Prompt to default Referring Physician for patient's chart: Select this check-box to display a message when a user creates an encounter that asks if the user wants to use the referring physician as the default on the patient's chart. When you set a referring physician to be the default for a patient's chart, the referring physician's name automatically displays in the fields on the following dialog boxes:
The Referring Physician field on the Add Appointment dialog box
The Referring field on the Patient Chart dialog box, Encounters tab under the Providers section
The Default Referring Physician field on the Chart Details dialog box
The Referring field on the Create Encounter dialog box
NOTE: The name for the default referring physician prints under Referring Physician on the Patient Data Sheet in EPM.
Default Referring from Rendering Physician for Encounter: Select this check-box to default the Referring Physician from the Rendering field when creating an encounter. For more information on this option, refer to the Capturing General Encounter Information section of the Encounters chapter in the NextGen EPM User Guide.
NOTE: The name for the default referring physician prints under Referring Physician on the Patient Data Sheet in EPM.
Do not allow free text Referring Physicians: Select this check-box to prevent users from typing in a physician name in an applicable field. Instead, users must choose the provider from a list. This list is setup in the Provider master file. Prompt for Bulk Rebilling Reason: Select this check-box to require a reason for rebilling a claim. The reason then will be populated to all encounters associated with the claim. Copy appointment details to encounter complaint: Select this check-box to copy appointment details to encounter complaints when someone checks in an appointment. At check-in, show same day encounters: Providers: Select the kinds of providers that you would like to capture in the encounter. The items that are checked display on the Encounter Maintenance dialog box.
Admitting: The admitting physician for the encounter. First Consulting: The primary consulting physician for the encounter.
NOTE: For Optik users, this check-box must be checked to display in the Optik application. When you create an encounter, the First Consulting field displays on the Create Encounter dialog box. The name you select in the First Consulting field displays in the Consulting field on the Optik order form.
Second Consulting: The secondary consulting physician for the encounter.

NextGen Healthcare
462
Supervisor: Indicates an additional provider (such as a Physician Assistant, Midwife, or Nurse Practitioner) with a Supervising Physician's credentials, based on payer requirements. Provider information is setup on the Modify Provider Information dialog box. Require Supervisor: For "Incident-To" billing, select this check-box to require a supervisor on the Encounter Maintenance dialog box. For more information on "Incident-To" billing, see the NextGen® EPM Claims Guide.
When copying from last encounter: Copy Select the kind of information to copy from the last encounter to the new encounter when a user clicks the Last Enc button when scheduling an appointment in the Appointment Book in EPM. The options are:
Encounter Details: Copies the last encounter information to the current encounter. If the last encounter has a patient type of new patient, the current encounter will also have a patient type of new patient. In this case, you would want to modify the encounter information after it is copied. Insurance: Copies the insurance information that was applied to the last encounter to the current encounter. This check-box bypasses a message that asks if users want to copy the previous insurance only if the click the Last Enc button. If users do not click Last Enc, the message will display to give the users the option to copy insurance at their discretion. Diagnosis: Copies the diagnosis from the last encounter to the current encounter. Diagnoses can be copied from EPM to EPM, from EHR to EHR, from EHR to EPM or vice versa.
Require Facility If the practice does regular UB92 claims billing, select the situation in which a user is required to select a facility on the Create Encounter or Encounter Maintenance dialog boxes. Clear the check-box if the practice does enhanced UB92 claims billing. Always – Select to always require that a facility is selected.
NOTE: If you select Always, you must also select the HCFA Box 32 and the Facility Location check-boxes on the Locations List dialog box for the Locations master file. Only if Admit or Discharge date is populated – Select to require that a facility is selected only when a date has been entered in the Admit Date or Discharge Date field.
Case Management: Default Patient Type: Select the default patient type to use when users create new encounters with new cases. Copy referring from appt on case-related encounters – Select this check-box to use the referring provider from the appointment as the default whenever a user creates a new encounter from an appointment with a case attached. If the check-box is cleared, then the referring provider from the case is the default.
463
NextGen® PM System Configuration Training Workbook for CHC, Version 5.8
When creating a new encounter, set types to: Select the encounter type(s) that should default ion the Create Encounter dialog box for every new encounter created.
IMPORTANT NOTE: Check with your NextGen Project Manager and/or Implementation Specialist before selecting any of these options.
Select Billable for EPM
Select Clinical for EHR
Select Optical for Optik
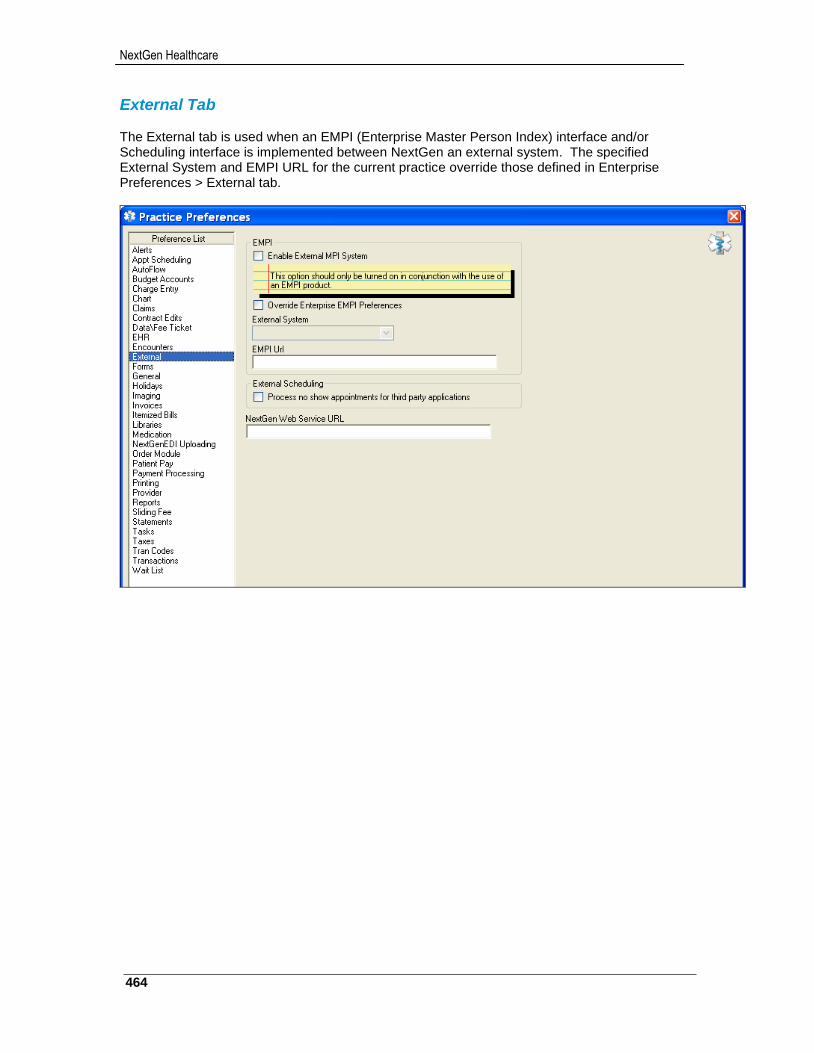
NextGen Healthcare
464
External Tab The External tab is used when an EMPI (Enterprise Master Person Index) interface and/or Scheduling interface is implemented between NextGen an external system. The specified External System and EMPI URL for the current practice override those defined in Enterprise Preferences > External tab.
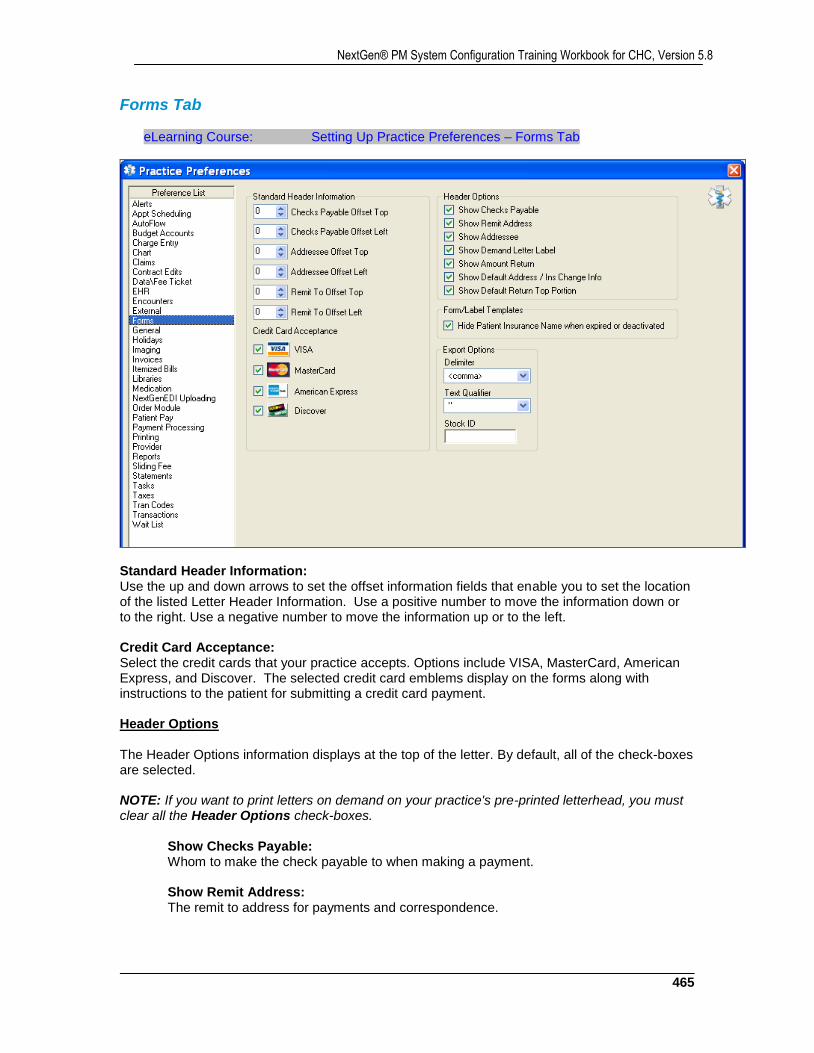
465
NextGen® PM System Configuration Training Workbook for CHC, Version 5.8
Forms Tab
eLearning Course: Setting Up Practice Preferences – Forms Tab
Standard Header Information: Use the up and down arrows to set the offset information fields that enable you to set the location of the listed Letter Header Information. Use a positive number to move the information down or to the right. Use a negative number to move the information up or to the left. Credit Card Acceptance: Select the credit cards that your practice accepts. Options include VISA, MasterCard, American Express, and Discover. The selected credit card emblems display on the forms along with instructions to the patient for submitting a credit card payment. Header Options The Header Options information displays at the top of the letter. By default, all of the check-boxes are selected. NOTE: If you want to print letters on demand on your practice's pre-printed letterhead, you must clear all the Header Options check-boxes.
Show Checks Payable: Whom to make the check payable to when making a payment. Show Remit Address: The remit to address for payments and correspondence.
NextGen Healthcare
466
Show Addressee The name and address of the recipient of the letter.
Show Demand Letter Label The type of letter being sent and the encounter number for reference.
Show Amount Return: A field labeled Show Amount Paid Here. This field is used by the recipient to enter the amount they are remitting.
Show Default Address / Ins Change Info: A check-box for the recipient to check if the addressee's address or insurance information has changed and to indicate any change on the reverse side of the letter.
Show Default Return Top Portion: Instructions for the recipient to detach and return the top portion with their payment.
Form/Label Templates Hide Patient Insurance name when expired or deactivated:
When selected, this option will prevent a patient’s insurance from printing on Form Templates and Label Templates if the insurance is expired or deactivated.
NOTE: Expired/Deactivated insurance does not print on Form/Label Templates for the following Data Repository fields:
Patient Primary Name
Patient Secondary Name Export Options
Delimiter: Select the character you want to use as a field delimiter when exporting statements to an ASCII file.
Text Qualifier: Select the character to be used to encapsulate and distinguish the text as a field in the statement export file.
Stock ID: Type the code, comprised of one letter and five digits that will populate the Stock ID segment of the A1 header in the EDI export file that is generated from NextGen EPM.
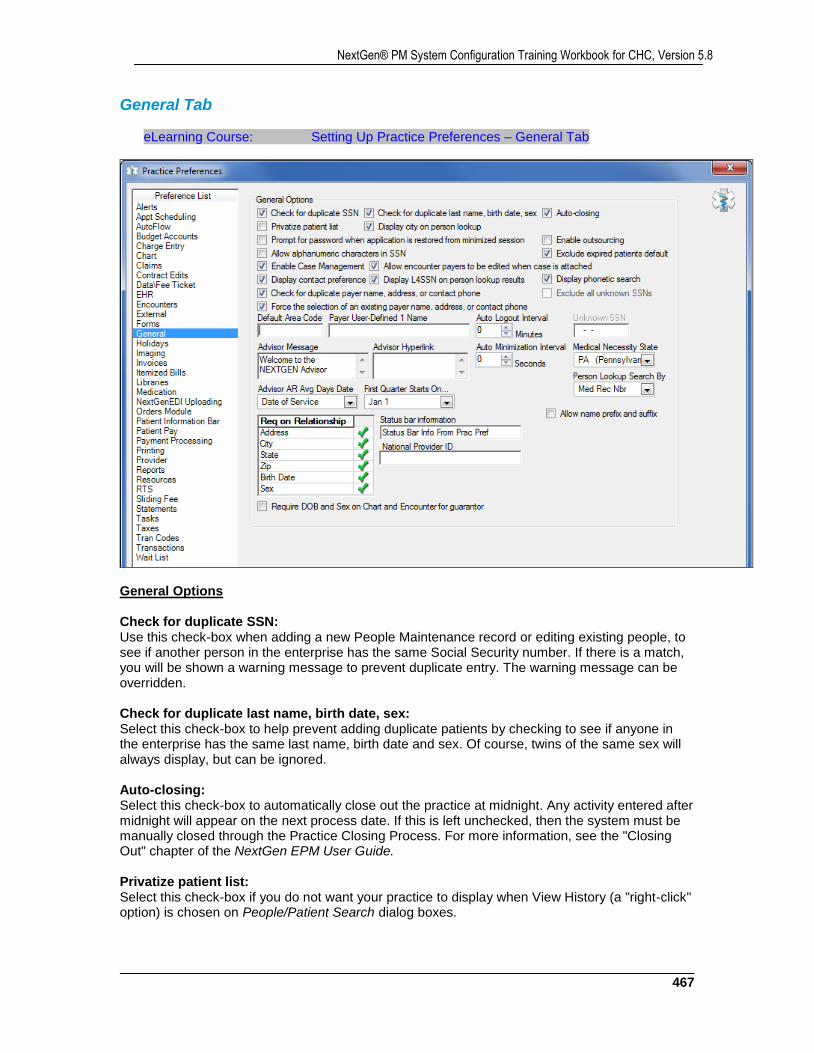
467
NextGen® PM System Configuration Training Workbook for CHC, Version 5.8
General Tab
eLearning Course: Setting Up Practice Preferences – General Tab
General Options Check for duplicate SSN: Use this check-box when adding a new People Maintenance record or editing existing people, to see if another person in the enterprise has the same Social Security number. If there is a match, you will be shown a warning message to prevent duplicate entry. The warning message can be overridden. Check for duplicate last name, birth date, sex: Select this check-box to help prevent adding duplicate patients by checking to see if anyone in the enterprise has the same last name, birth date and sex. Of course, twins of the same sex will always display, but can be ignored. Auto-closing: Select this check-box to automatically close out the practice at midnight. Any activity entered after midnight will appear on the next process date. If this is left unchecked, then the system must be manually closed through the Practice Closing Process. For more information, see the "Closing Out" chapter of the NextGen EPM User Guide. Privatize patient list: Select this check-box if you do not want your practice to display when View History (a "right-click" option) is chosen on People/Patient Search dialog boxes.
NextGen Healthcare
468
Display city on people lookup: Select this check-box to display the City field on the People Lookup dialog box. The City field enables users to enter the city from a person's address as criteria when they perform a person lookup. Enable eligibility\referral: Select this check-box to provide access to menu items for the Eligibility/Referral System. This field only displays if you have purchased the Managed Care Server module. Prompt for password when application is restored from minimized session: Select this check-box to require users to re-enter their password when restoring a minimized session window of the application. Enable outsourcing: Select this check-box to enable users who are working with a patient chart to outsource the patient's outstanding charges to an external collection agency. For more outsourcing information, see the chapter "Collections" in the NextGen EPM User Guide. Allow alphanumeric characters in SSN: Select this option so that the Social Security number field accepts the entry of any combination of upper or lower-case characters and numbers, not to exceed a maximum of nine characters. Exclude expired patients default: Select this check-box to have the Exclude Expired Patients check-box always selected by default on the Patient Lookup dialog box. Enable Case Management: Select this check-box to make the Case Management features available. Allow encounter payers to be edited when case is attached: Select to enable users to change the payers that are selected on Encounter Insurance Selection dialog box. If the check-box is not selected, then users cannot change the payers that are selected on Encounter Insurance Selection dialog box if the payers are the same ones listed on the case. However, users can still open the insurance and edit the information. If the payers on the encounter are different from the ones on the case, then the user can change the payers in the encounter. Display contact preference: Select this check-box so that EPM displays the Contact Preference field on the Person and Patient Demographic dialog boxes. The field enables users to specify the method to use when they contact a patient. You can make contact preference information required in Practice Preferences on the Chart tab and on the Appt Scheduling tab. Display L4SSN on person lookup results: Select this check-box to display only the last four digits of the Social Security numbers in the results of a person lookup. The SSN column in the results displays the numbers in the format ### - ## - 1234. If this check-box is cleared, then the SSNs display in their entirety. Check for duplicate payer name, address, or contact phone: This setting makes EPM compare the payer name that a user types to all other payer names in the Payer master file. If this option is enabled when a new insurance is attached to a person, a check is performed for an existing payer based on the payer name, address, or contact phone number. The user can then select from a list of existing payers or can ignore the list and type the new plan name. This setting takes effect only in conjunction with the Payer master Prevent modifying plan name on insurance maint check-box.
469
NextGen® PM System Configuration Training Workbook for CHC, Version 5.8
Force the selection of an existing payer name, address, or contact phone: Select this option so that when a user is attaching insurance to an encounter and is notified of a potential existing payer, the Ignore button is disabled on the Potential Existing Payer dialog box and they must select an existing payer. To enable this check-box, you must select the Check for duplicate payer name, address, or contact phone check-box. Exclude all unknown SSNs: This field is enabled when the Require SSN check-box is selected on the Chart tab. Select this check-box to exclude unknown Social Security numbers from the check for duplicate SSNs. Unknown SSNs include 123-45-6789 and numbers in which all digits are the same (for example, 222-22-2222).
NOTE: When this check-box is selected, the Unknown SSN field is disabled. Unknown SSN: This field is enabled when the Require SSN check-box is selected on the Chart tab. Enter a Social Security number in the Unknown SSN field that your practice uses as the default number when a patient, such as a newborn infant, does not have a Social Security number. Because this number can be applied to multiple patients, it is excluded from the check for duplicate SSNs. Default Area Code: Enter the area code that is used most frequently in your practice. This will default in the area code for any phone number found in the system, but can be overwritten as necessary. Payer User-Defined 1 Name: Enter the name you want to assign to the payer. Once this field has been assigned a label it will appear on the Add Payer Information dialog box under the Practice tab > Other tab. Auto Logout Interval: Use the up and down arrows to set the number of minutes that NextGen EPM uses to determine when to automatically log you out if you are not using the system. For example, if you want the system to log you out if you have not used it for 20 minutes, then enter "20" here. If you do not want to use this feature, then enter "0". Auto Minimization Interval: Use the arrows to set the number of seconds that NextGen EPM remains viewable when it is not being used. If that time passes and there has been no activity, the EPM automatically minimizes. The minimization time interval is set in 15-second increments. The default value is zero. If the interval is set to zero, automatic minimization does not occur. Whenever you change this interval, EPM must be restarted for the setting to take effect. Advisor Message: Enter information that you want to display in the upper left area of the Advisor in NextGen EPM. Advisor Hyperlink: Type the URL of a Web page to attach to the Advisor Message. When users open the Advisor in EPM, the message displays as a hyperlink that they can click on to view the associated Web page.
NOTE: The Advisor Hyperlink only works when there is information in the Advisor Message.
NextGen Healthcare
470
Medical Necessity State: Select the state/location code from the Medical Necessity State drop-down list. The code is broken down into a two digit state and one digit location (section of a state) code that enables you to select a state and location according to the Local Medical Review Policy databases. The location code is used for some states, but not all states. This state displays as the default in the Medical Necessity State field on the Medical Necessity dialog box used to submit a request. The Medical Necessity State field is required.
NOTE: This field only displays if you are licensed for Medical Necessity. First Quarter Starts On: If your practice needs to customize when the first quarter starts, select the starting date of the first quarter. This setting customizes the fiscal year for EPM reporting, appointment lookup, eligibility referral lookup, and waitlist lookup. For example, if you select the date Apr 1, then the first quarter on reports ranges from April 1 to June 30. Person Lookup Search By: Select the default to use on the Patient Lookup dialog box for searching for patients by:
Med Rec Nbr (Medical Record Number) Person Nbr (Person Number) Other ID Number
Req on Relationship: Click in the column to the right of the field that you want to make a required field when users create or update a relationship to a person. These preferences apply when you validate a new or existing contact, head of household, relationship, or insured. The following fields can be set as required: Birth Date, Sex, Address, City, State, and Zip.
NOTE: When you update a chart or encounter guarantor, the address, city, state, and ZIP code are always required. Date of birth and sex are always required when the guarantor is not "Self".
Status Bar Information: To display customized text in the status bar of EHR, EPM, and ICS, type the text in this field.
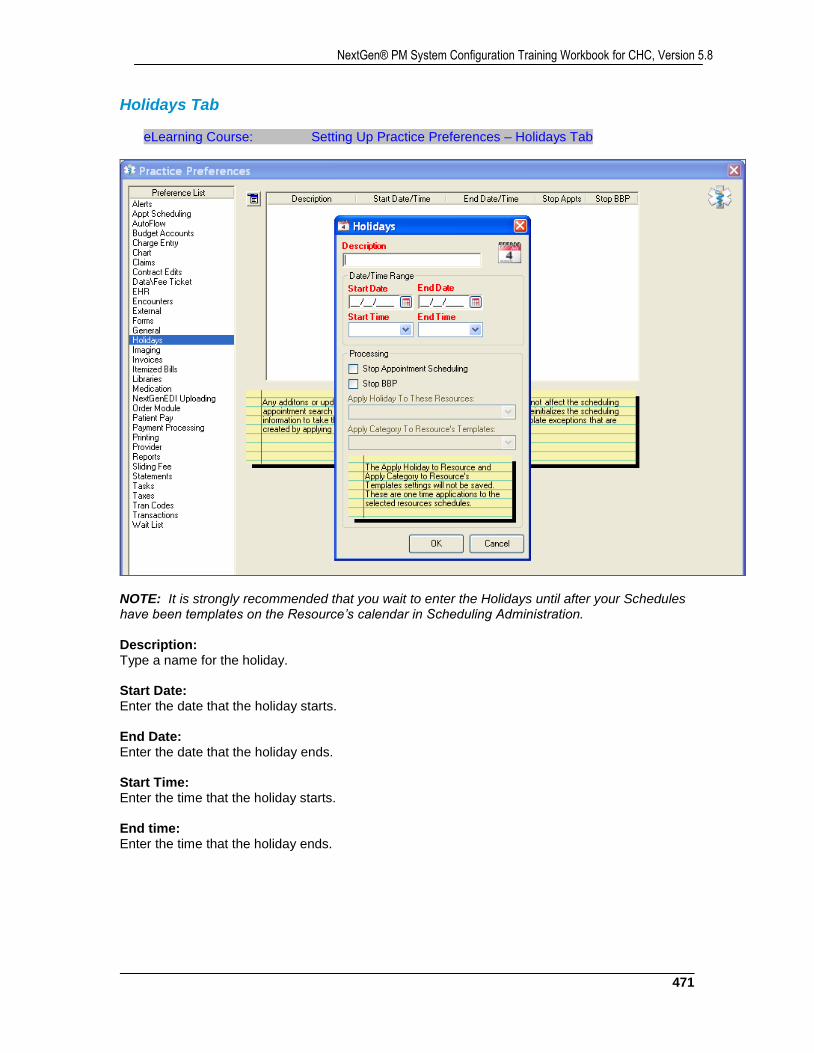
471
NextGen® PM System Configuration Training Workbook for CHC, Version 5.8
Holidays Tab
eLearning Course: Setting Up Practice Preferences – Holidays Tab
NOTE: It is strongly recommended that you wait to enter the Holidays until after your Schedules have been templates on the Resource’s calendar in Scheduling Administration. Description: Type a name for the holiday. Start Date: Enter the date that the holiday starts. End Date: Enter the date that the holiday ends. Start Time: Enter the time that the holiday starts. End time: Enter the time that the holiday ends.
NextGen Healthcare
472
Suspend Appointment Scheduling: Select the check-box to prevent appointments from being scheduled on the holiday. If someone tries to schedule a resource on a holiday, a message informs that the date is a global holiday and the resource cannot be scheduled. Also, the resource is not available for Appointment Search Ahead for the holiday or for a multiple-day event chain that includes the holiday. When you select this check-box, you can select additional resource and category options.
NOTE: You can override this setting for a specific resource in the Scheduling Admin in NextGen EPM.
Stop BBP: Select the check-box to prevent the BBP schedules from running packages on the holiday. See the NextGen® BBP User Guide for more information
NOTE: You can override this setting for a specific schedule in the Background Business Processor.
Apply Holiday to These Resources: Select the resources that you want to create template exceptions for based on the holiday information.
NOTE: The template exceptions are created, but the appointment slot information does not update until the nightly process runs or the process is manually run.
Apply Category To Resource's Templates Select the category to apply to the time slots that are within the company holiday date and time range.
NOTE: If you do not choose a category, then the existing categories that are present in the resource's templates are removed and no category is assigned.
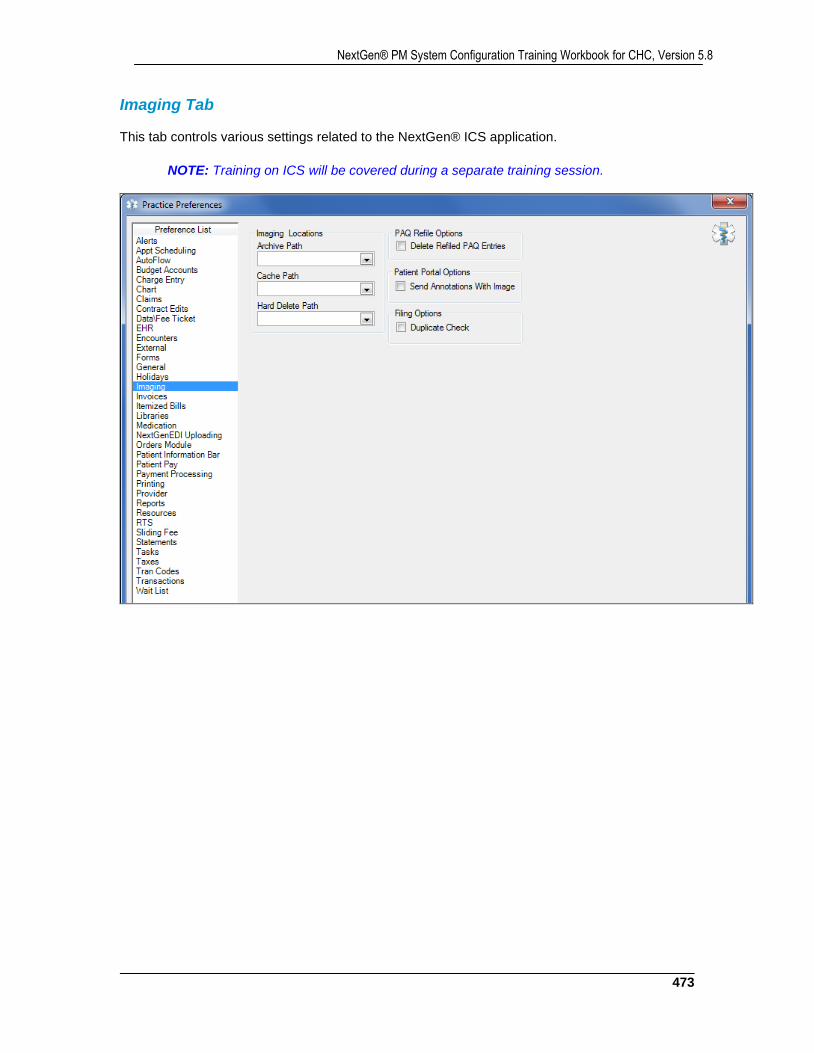
473
NextGen® PM System Configuration Training Workbook for CHC, Version 5.8
Imaging Tab This tab controls various settings related to the NextGen® ICS application.
NOTE: Training on ICS will be covered during a separate training session.
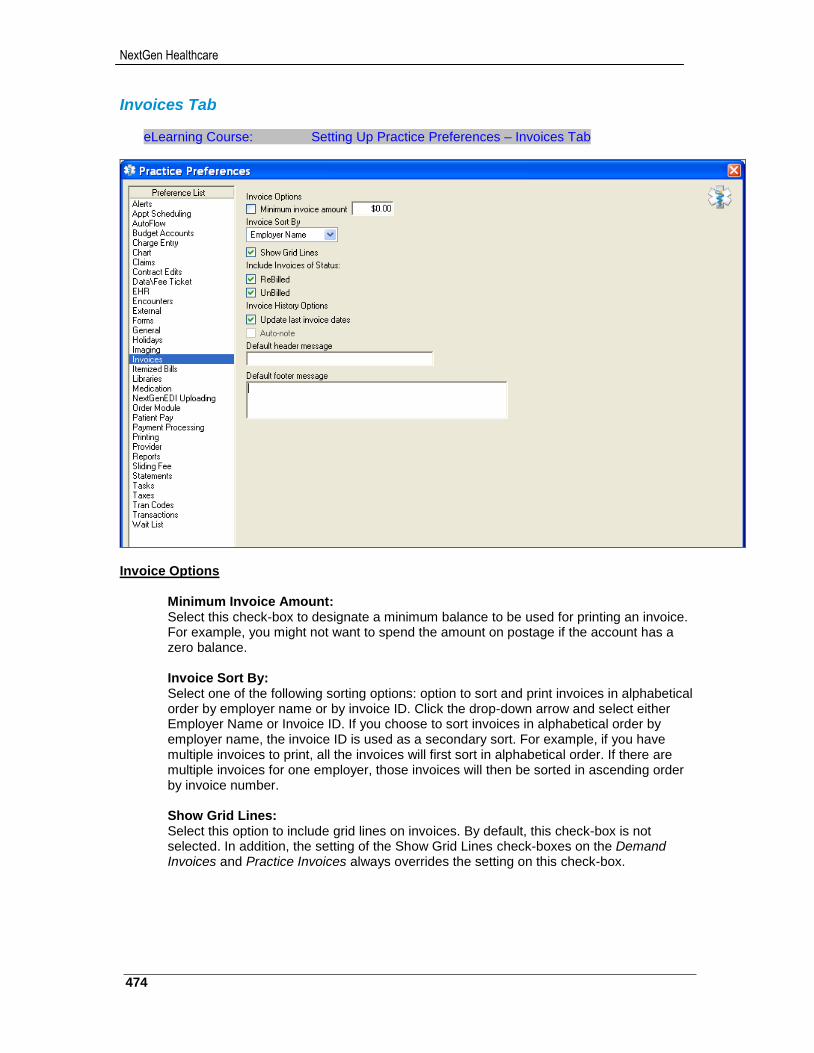
NextGen Healthcare
474
Invoices Tab
eLearning Course: Setting Up Practice Preferences – Invoices Tab
Invoice Options
Minimum Invoice Amount: Select this check-box to designate a minimum balance to be used for printing an invoice. For example, you might not want to spend the amount on postage if the account has a zero balance. Invoice Sort By: Select one of the following sorting options: option to sort and print invoices in alphabetical order by employer name or by invoice ID. Click the drop-down arrow and select either Employer Name or Invoice ID. If you choose to sort invoices in alphabetical order by employer name, the invoice ID is used as a secondary sort. For example, if you have multiple invoices to print, all the invoices will first sort in alphabetical order. If there are multiple invoices for one employer, those invoices will then be sorted in ascending order by invoice number. Show Grid Lines: Select this option to include grid lines on invoices. By default, this check-box is not selected. In addition, the setting of the Show Grid Lines check-boxes on the Demand Invoices and Practice Invoices always overrides the setting on this check-box.
475
NextGen® PM System Configuration Training Workbook for CHC, Version 5.8
Include Invoices of Status: Select one of the following to print invoices with a status of:
Rebilled
Unbilled
Both Rebilled and Unbilled Invoice History Options
Update last invoice dates: Select this check-box to update the "Last Invoice Print Date" and the "Next Print Date" in the employer's account profile each time an invoice is printed. The invoice status will also be changed to "Billed". Auto Note: This feature is not available at this time. Default header message Type the message that you want to print at the top of the invoice. It can be up to 40 characters long. This is a good place to put in your practice's phone number used for inquiries. Default footer message: Type the message that you want to print on the bottom of the statement. It is recommended that you do not use hard returns (ENTER key) in the message.
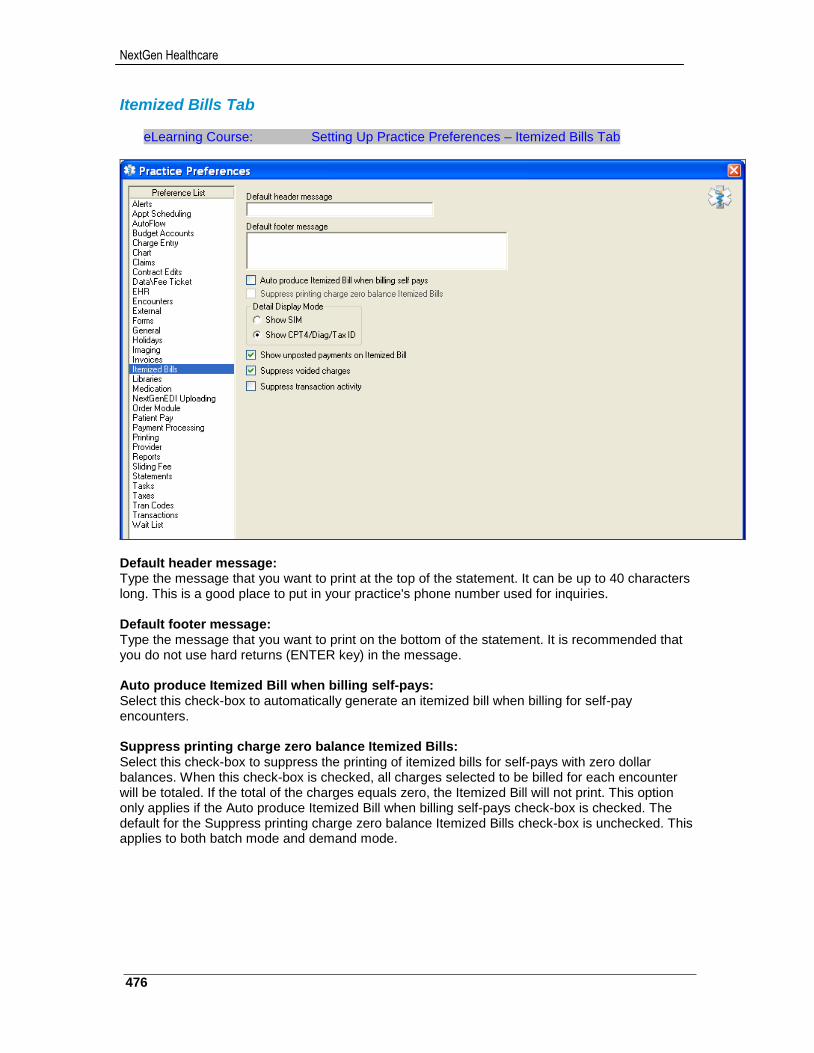
NextGen Healthcare
476
Itemized Bills Tab
eLearning Course: Setting Up Practice Preferences – Itemized Bills Tab
Default header message: Type the message that you want to print at the top of the statement. It can be up to 40 characters long. This is a good place to put in your practice's phone number used for inquiries. Default footer message: Type the message that you want to print on the bottom of the statement. It is recommended that you do not use hard returns (ENTER key) in the message. Auto produce Itemized Bill when billing self-pays: Select this check-box to automatically generate an itemized bill when billing for self-pay encounters. Suppress printing charge zero balance Itemized Bills: Select this check-box to suppress the printing of itemized bills for self-pays with zero dollar balances. When this check-box is checked, all charges selected to be billed for each encounter will be totaled. If the total of the charges equals zero, the Itemized Bill will not print. This option only applies if the Auto produce Itemized Bill when billing self-pays check-box is checked. The default for the Suppress printing charge zero balance Itemized Bills check-box is unchecked. This applies to both batch mode and demand mode.
477
NextGen® PM System Configuration Training Workbook for CHC, Version 5.8
Detail Display Mode: Select one of the following display options:
Show SIM: Displays the SIM number and description Show CPT4/Diag/Tax ID: Displays the CPT4 code and description, the primary diagnosis for the charge, and the tax ID for the rendering physician (for the encounter). For additional information, refer to the Billing Encounters chapter of the NextGen® EPM User Guide.
Show unposted payments on Itemized Bill: Select this check-box to display transactions that have been entered but not posted. Suppress voided charges: Select this check-box to suppress voided charges so they do not appear on the encounter itemized bill. Suppress transaction activity: Select this check-box to suppress transactions so they do not appear on the encounter itemized bill.
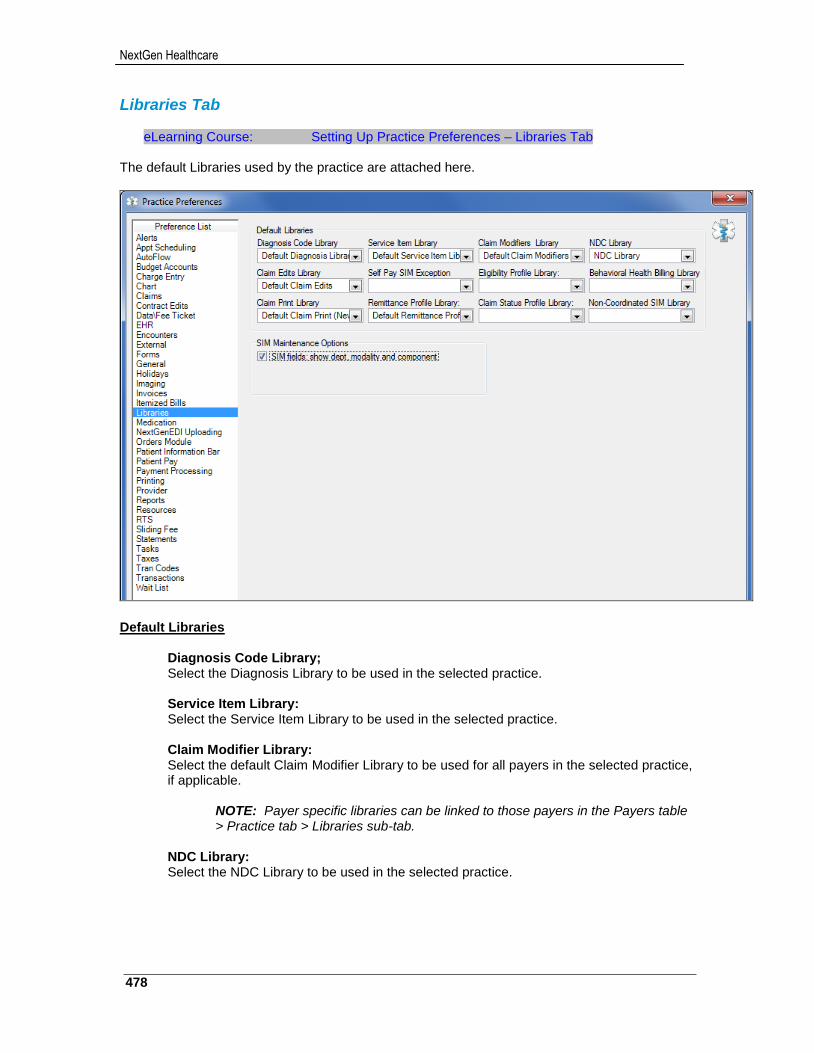
NextGen Healthcare
478
Libraries Tab
eLearning Course: Setting Up Practice Preferences – Libraries Tab The default Libraries used by the practice are attached here.
Default Libraries
Diagnosis Code Library; Select the Diagnosis Library to be used in the selected practice. Service Item Library: Select the Service Item Library to be used in the selected practice. Claim Modifier Library: Select the default Claim Modifier Library to be used for all payers in the selected practice, if applicable.
NOTE: Payer specific libraries can be linked to those payers in the Payers table > Practice tab > Libraries sub-tab.
NDC Library: Select the NDC Library to be used in the selected practice.
479
NextGen® PM System Configuration Training Workbook for CHC, Version 5.8
Claim Edits Library: Select the default Claim Edits Library to be used for all payers in the selected practice.
NOTE: Payer specific libraries can be linked to those payers in the Payers table > Practice tab > Libraries sub-tab.
Self-Pay SIM Exception: Select the SIM Exception to be used for all self-pay patients in the selected practice, if applicable. Eligibility Profile Library: Select the default Eligibility Profile Library to be used for all RTS payers in the selected practice, if applicable.
NOTE: Payer specific libraries can be linked to those payers in the Payers table > Practice tab > Libraries sub-tab.
Behavioral Health Billing Library: Select the default Behavioral Health Billing Library to be used for all payers in the selected practice, if applicable.
NOTE: Payer specific libraries can be linked to those payers in the Payers table > Practice tab > Libraries sub-tab.
Claim Print Library: Select the default Claim Print Library to be used for all payers in the selected practice.
NOTE: Payer specific libraries can be linked to those payers in the Payers table > Practice tab > Libraries sub-tab.
Remittance Profile Library: Select the default Remittance Profile Library to be used for all ERA payers in the selected practice, if applicable.
NOTE: Payer specific libraries can be linked to those payers in the Payers table > Practice tab > Libraries sub-tab.
Claim Status Profile Library: Select the default Claim Status Profile Library to be used for all RTS payers in the selected practice, if applicable.
NOTE: Payer specific libraries can be linked to those payers in the Payers table > Practice tab > Libraries sub-tab.
Non-Coordinate SIM Library: Select the default Non-Coordinated SIM Library to be used for all payers in the selected practice, if applicable.
SIM Maintenance Options
SIM fields: show dept, modality and component: Select this check-box to display the Department, Modality and Component fields in the Service Item Library.
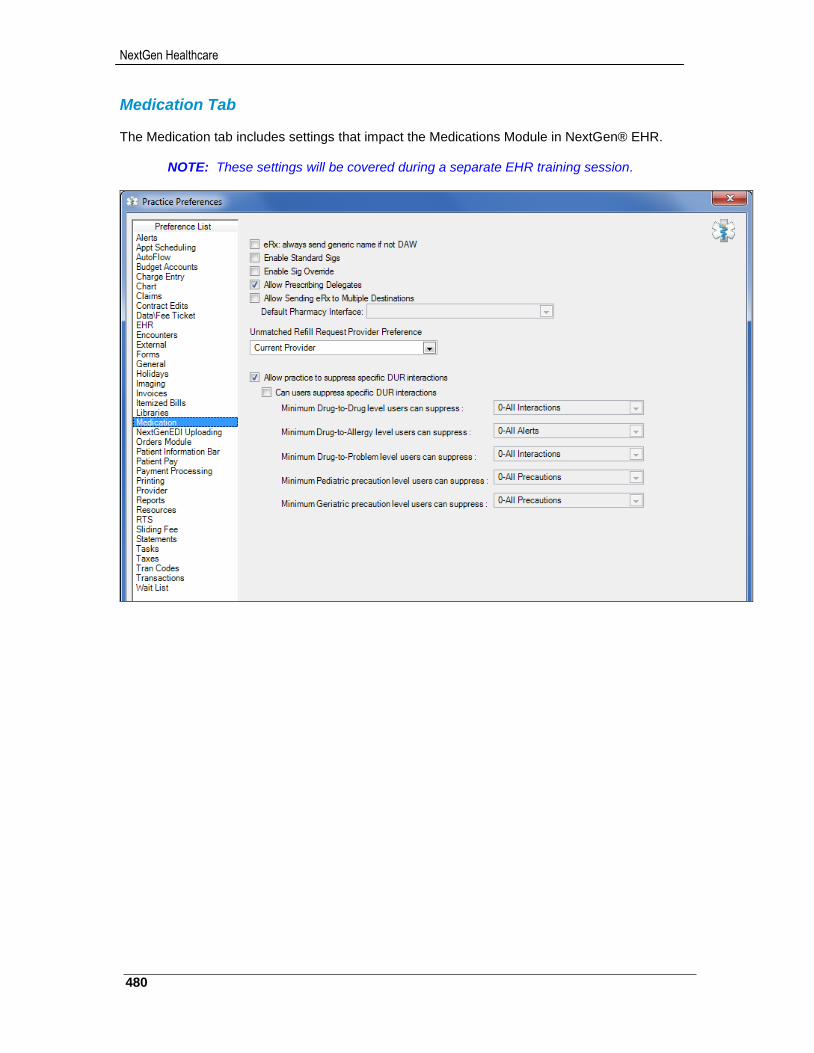
NextGen Healthcare
480
Medication Tab
The Medication tab includes settings that impact the Medications Module in NextGen® EHR.
NOTE: These settings will be covered during a separate EHR training session.
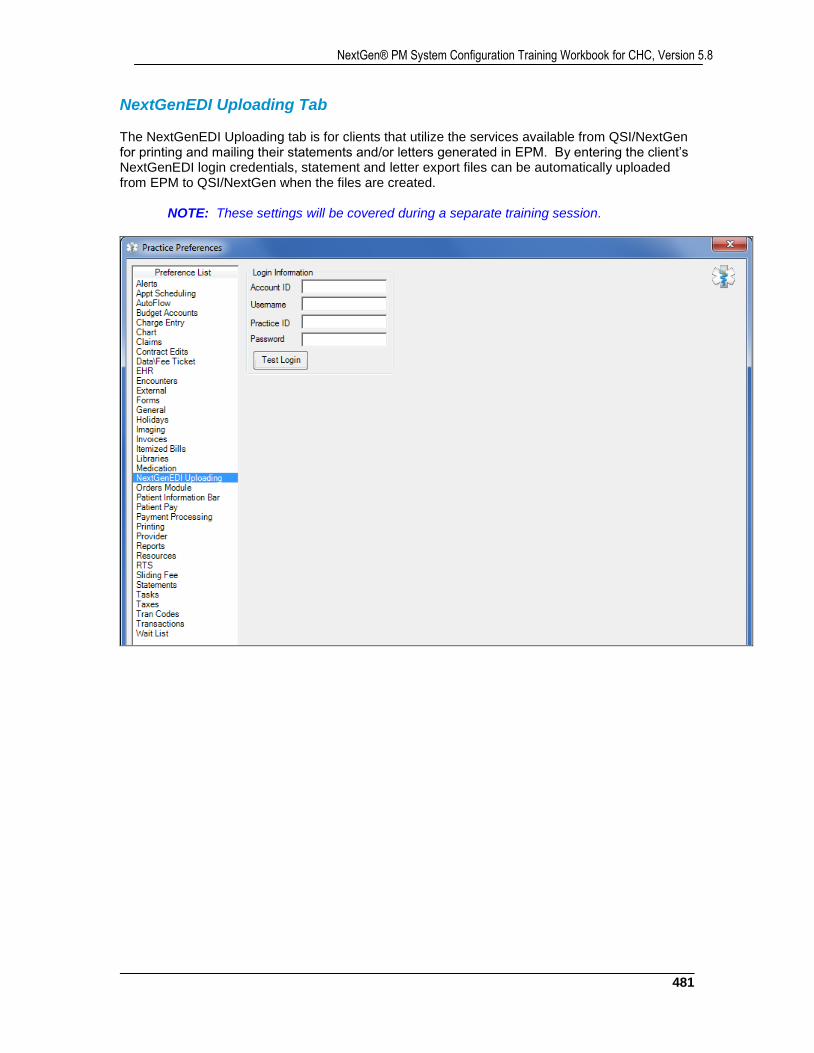
481
NextGen® PM System Configuration Training Workbook for CHC, Version 5.8
NextGenEDI Uploading Tab
The NextGenEDI Uploading tab is for clients that utilize the services available from QSI/NextGen for printing and mailing their statements and/or letters generated in EPM. By entering the client’s NextGenEDI login credentials, statement and letter export files can be automatically uploaded from EPM to QSI/NextGen when the files are created.
NOTE: These settings will be covered during a separate training session.
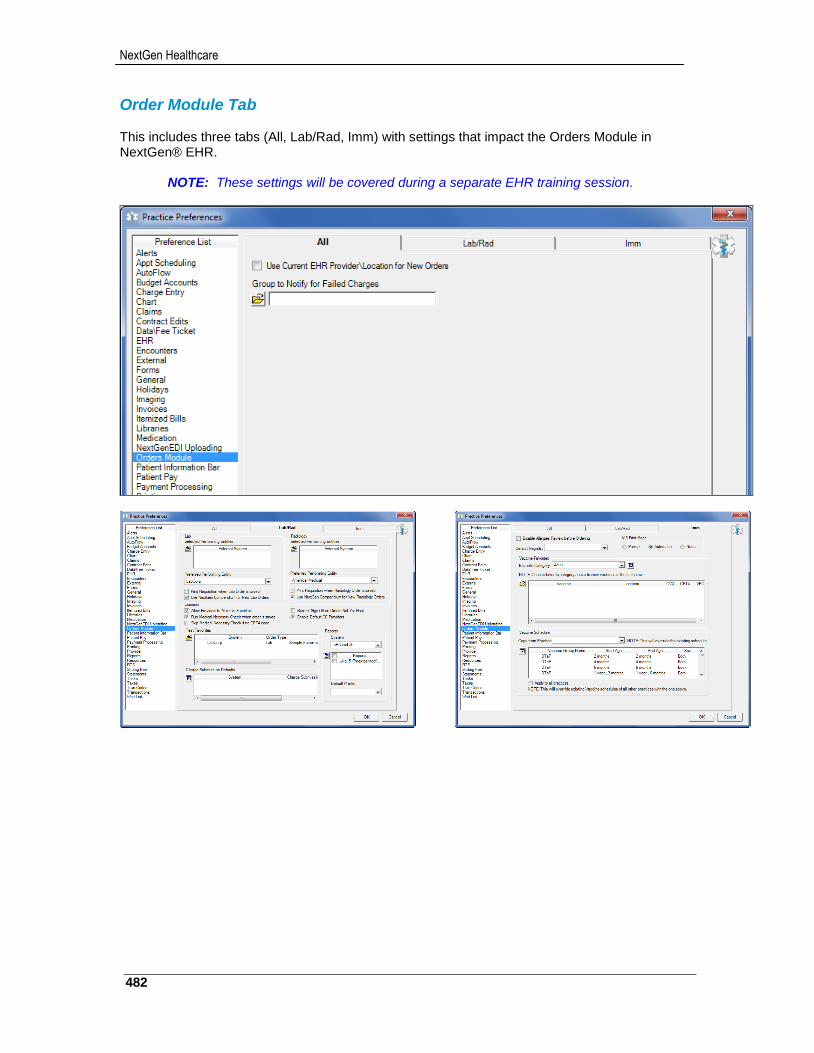
NextGen Healthcare
482
Order Module Tab
This includes three tabs (All, Lab/Rad, Imm) with settings that impact the Orders Module in NextGen® EHR.
NOTE: These settings will be covered during a separate EHR training session.
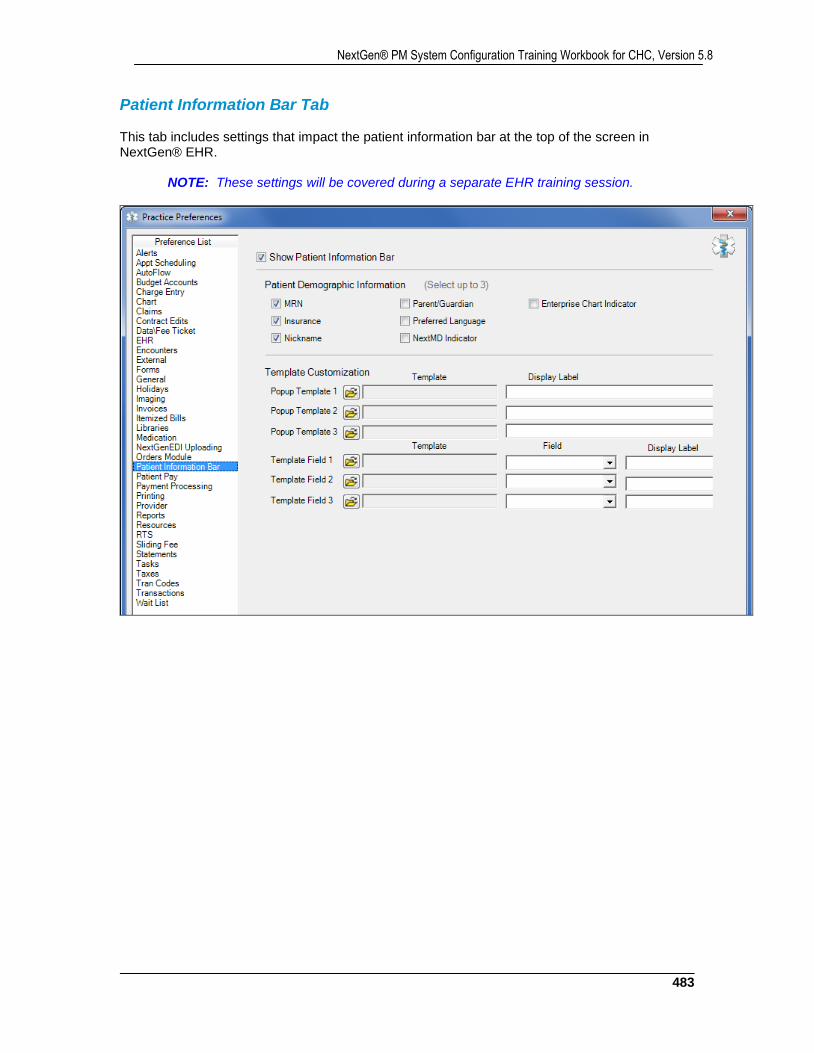
483
NextGen® PM System Configuration Training Workbook for CHC, Version 5.8
Patient Information Bar Tab This tab includes settings that impact the patient information bar at the top of the screen in NextGen® EHR.
NOTE: These settings will be covered during a separate EHR training session.
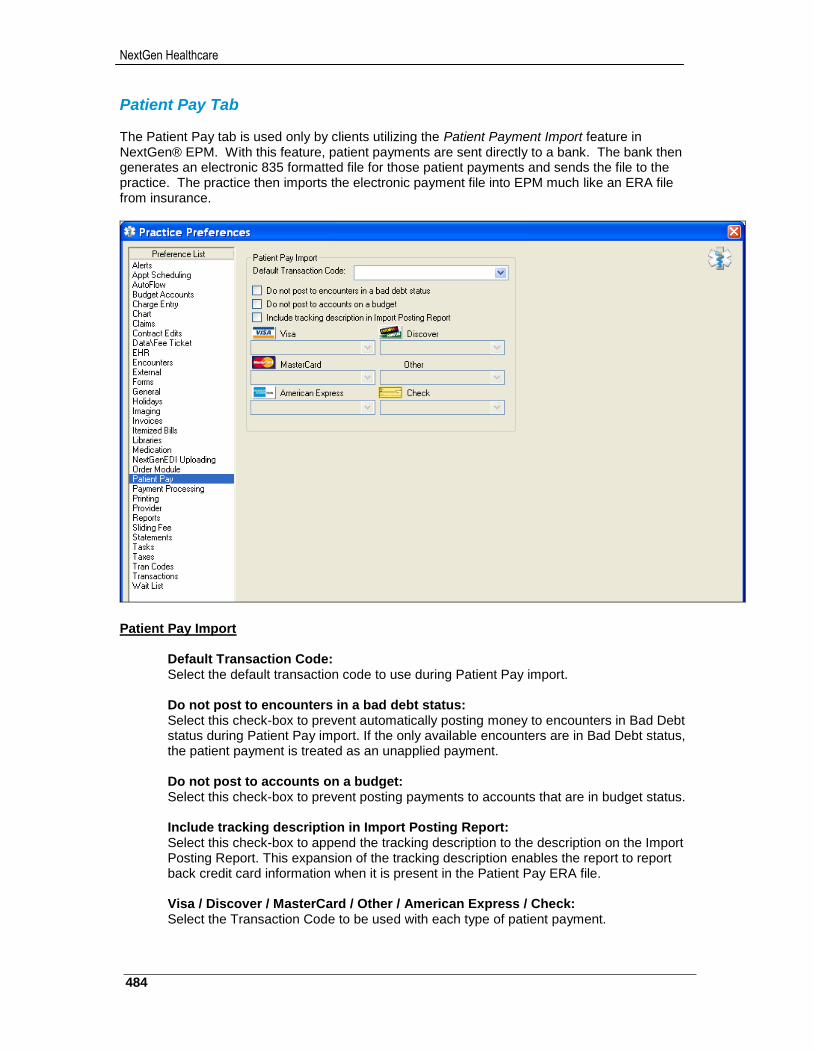
NextGen Healthcare
484
Patient Pay Tab
The Patient Pay tab is used only by clients utilizing the Patient Payment Import feature in NextGen® EPM. With this feature, patient payments are sent directly to a bank. The bank then generates an electronic 835 formatted file for those patient payments and sends the file to the practice. The practice then imports the electronic payment file into EPM much like an ERA file from insurance.
Patient Pay Import
Default Transaction Code: Select the default transaction code to use during Patient Pay import. Do not post to encounters in a bad debt status: Select this check-box to prevent automatically posting money to encounters in Bad Debt status during Patient Pay import. If the only available encounters are in Bad Debt status, the patient payment is treated as an unapplied payment. Do not post to accounts on a budget: Select this check-box to prevent posting payments to accounts that are in budget status. Include tracking description in Import Posting Report: Select this check-box to append the tracking description to the description on the Import Posting Report. This expansion of the tracking description enables the report to report back credit card information when it is present in the Patient Pay ERA file.
Visa / Discover / MasterCard / Other / American Express / Check: Select the Transaction Code to be used with each type of patient payment.
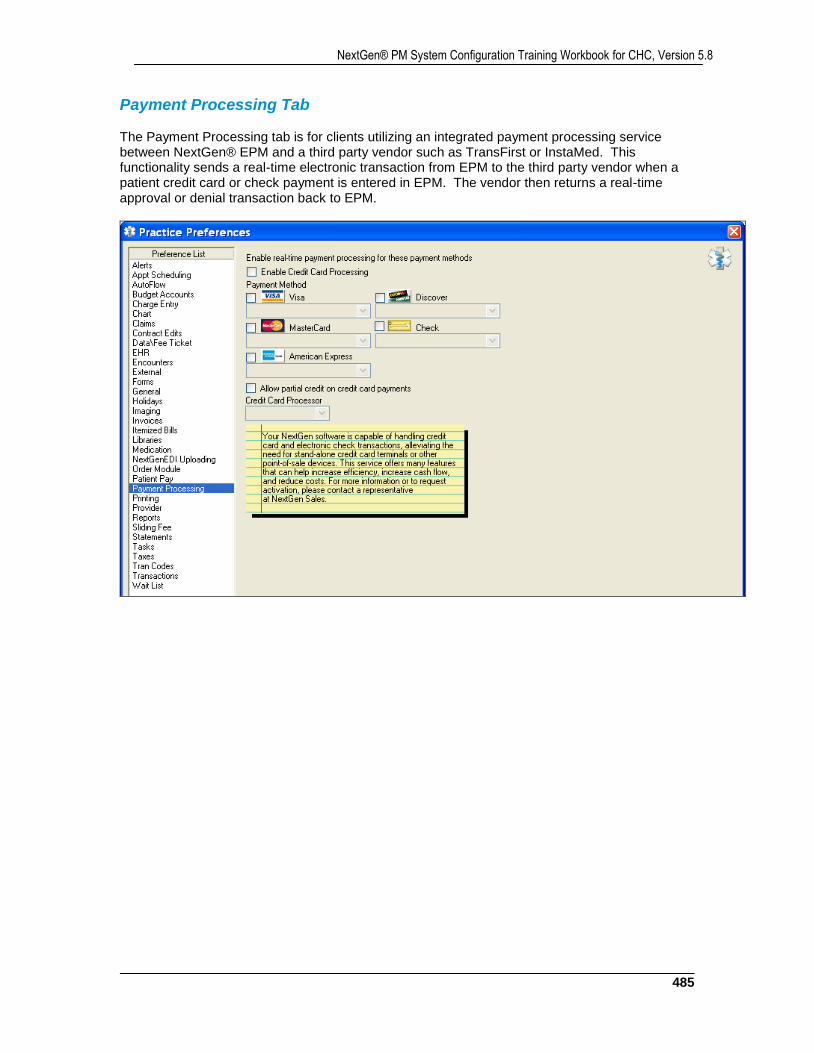
485
NextGen® PM System Configuration Training Workbook for CHC, Version 5.8
Payment Processing Tab The Payment Processing tab is for clients utilizing an integrated payment processing service between NextGen® EPM and a third party vendor such as TransFirst or InstaMed. This functionality sends a real-time electronic transaction from EPM to the third party vendor when a patient credit card or check payment is entered in EPM. The vendor then returns a real-time approval or denial transaction back to EPM.
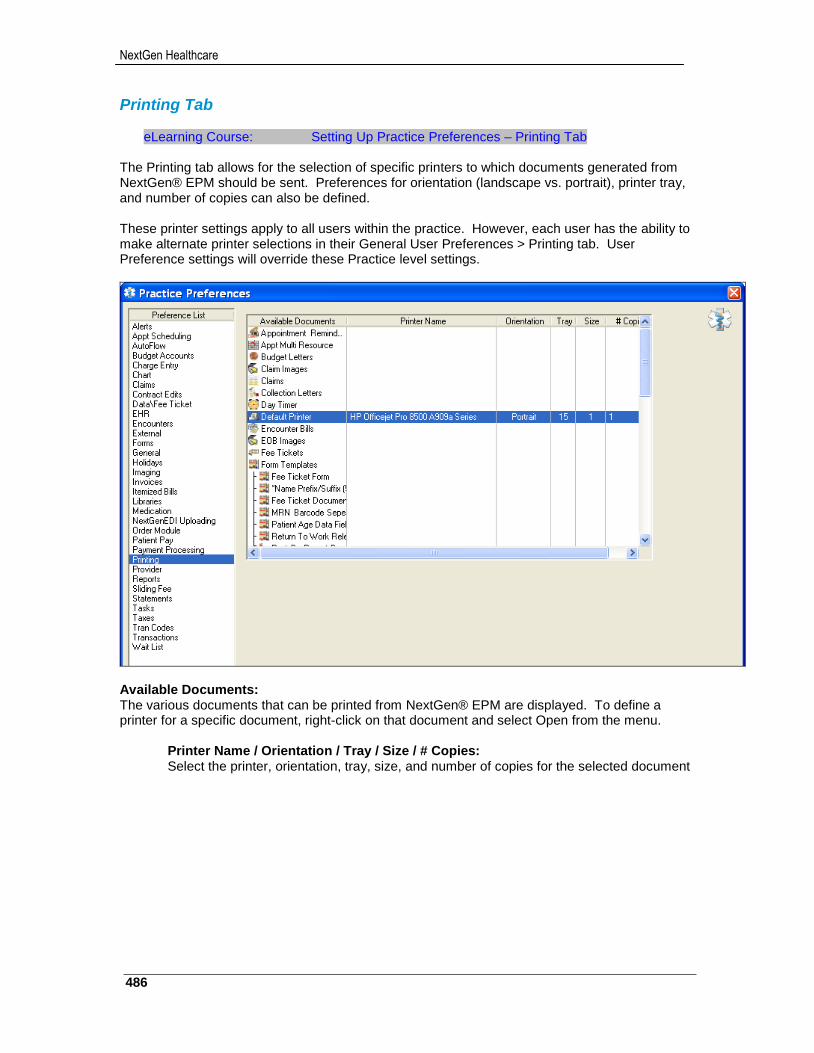
NextGen Healthcare
486
Printing Tab
eLearning Course: Setting Up Practice Preferences – Printing Tab The Printing tab allows for the selection of specific printers to which documents generated from NextGen® EPM should be sent. Preferences for orientation (landscape vs. portrait), printer tray, and number of copies can also be defined. These printer settings apply to all users within the practice. However, each user has the ability to make alternate printer selections in their General User Preferences > Printing tab. User Preference settings will override these Practice level settings.
Available Documents: The various documents that can be printed from NextGen® EPM are displayed. To define a printer for a specific document, right-click on that document and select Open from the menu.
Printer Name / Orientation / Tray / Size / # Copies: Select the printer, orientation, tray, size, and number of copies for the selected document
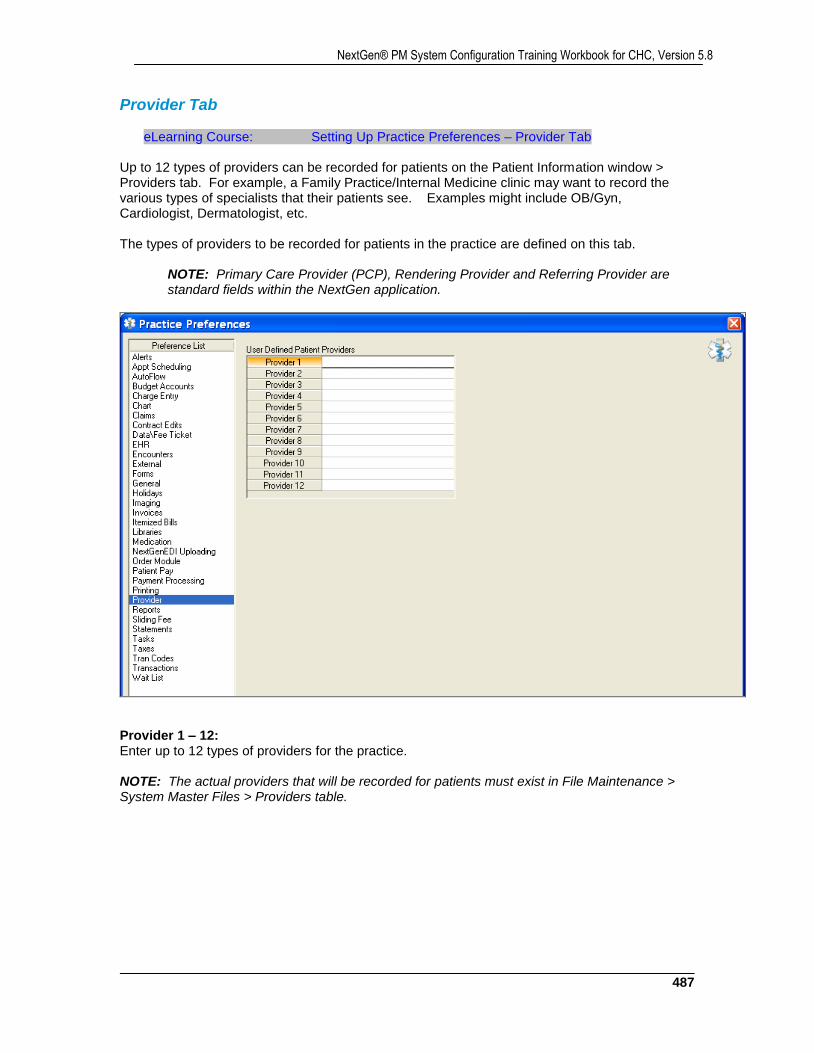
487
NextGen® PM System Configuration Training Workbook for CHC, Version 5.8
Provider Tab
eLearning Course: Setting Up Practice Preferences – Provider Tab Up to 12 types of providers can be recorded for patients on the Patient Information window > Providers tab. For example, a Family Practice/Internal Medicine clinic may want to record the various types of specialists that their patients see. Examples might include OB/Gyn, Cardiologist, Dermatologist, etc. The types of providers to be recorded for patients in the practice are defined on this tab.
NOTE: Primary Care Provider (PCP), Rendering Provider and Referring Provider are standard fields within the NextGen application.
Provider 1 – 12: Enter up to 12 types of providers for the practice. NOTE: The actual providers that will be recorded for patients must exist in File Maintenance > System Master Files > Providers table.
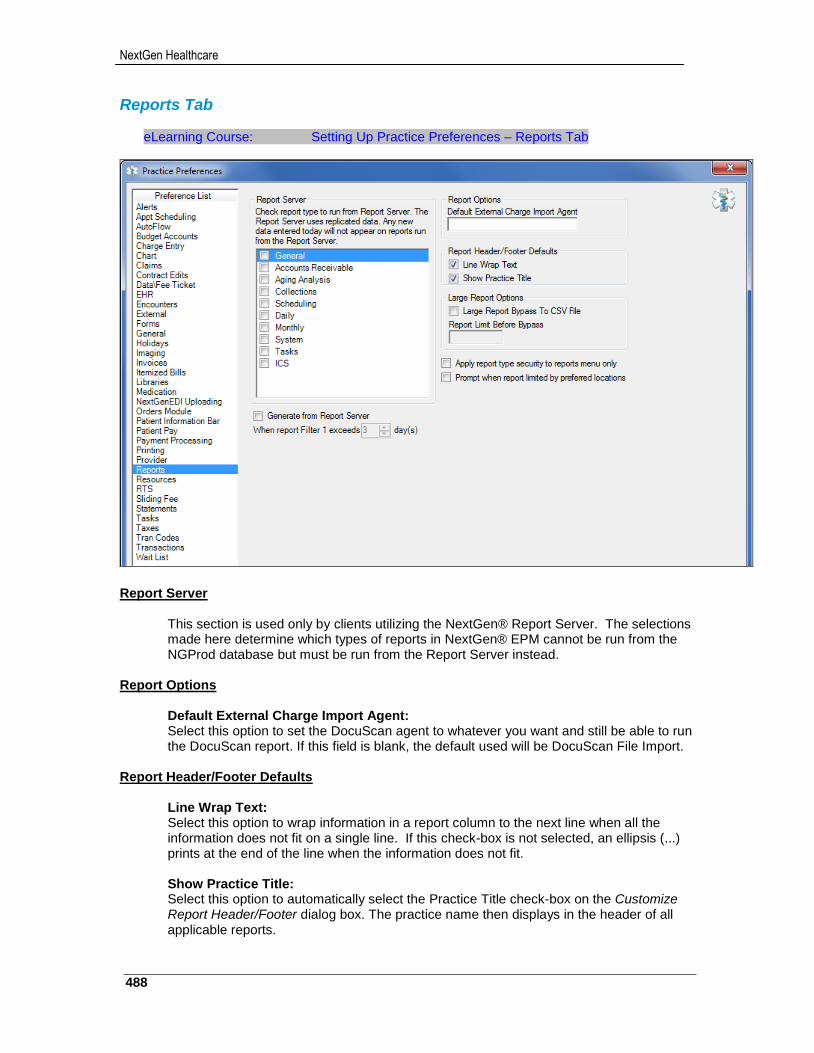
NextGen Healthcare
488
Reports Tab
eLearning Course: Setting Up Practice Preferences – Reports Tab
Report Server
This section is used only by clients utilizing the NextGen® Report Server. The selections made here determine which types of reports in NextGen® EPM cannot be run from the NGProd database but must be run from the Report Server instead.
Report Options
Default External Charge Import Agent: Select this option to set the DocuScan agent to whatever you want and still be able to run the DocuScan report. If this field is blank, the default used will be DocuScan File Import.
Report Header/Footer Defaults
Line Wrap Text: Select this option to wrap information in a report column to the next line when all the information does not fit on a single line. If this check-box is not selected, an ellipsis (...) prints at the end of the line when the information does not fit. Show Practice Title: Select this option to automatically select the Practice Title check-box on the Customize Report Header/Footer dialog box. The practice name then displays in the header of all applicable reports.
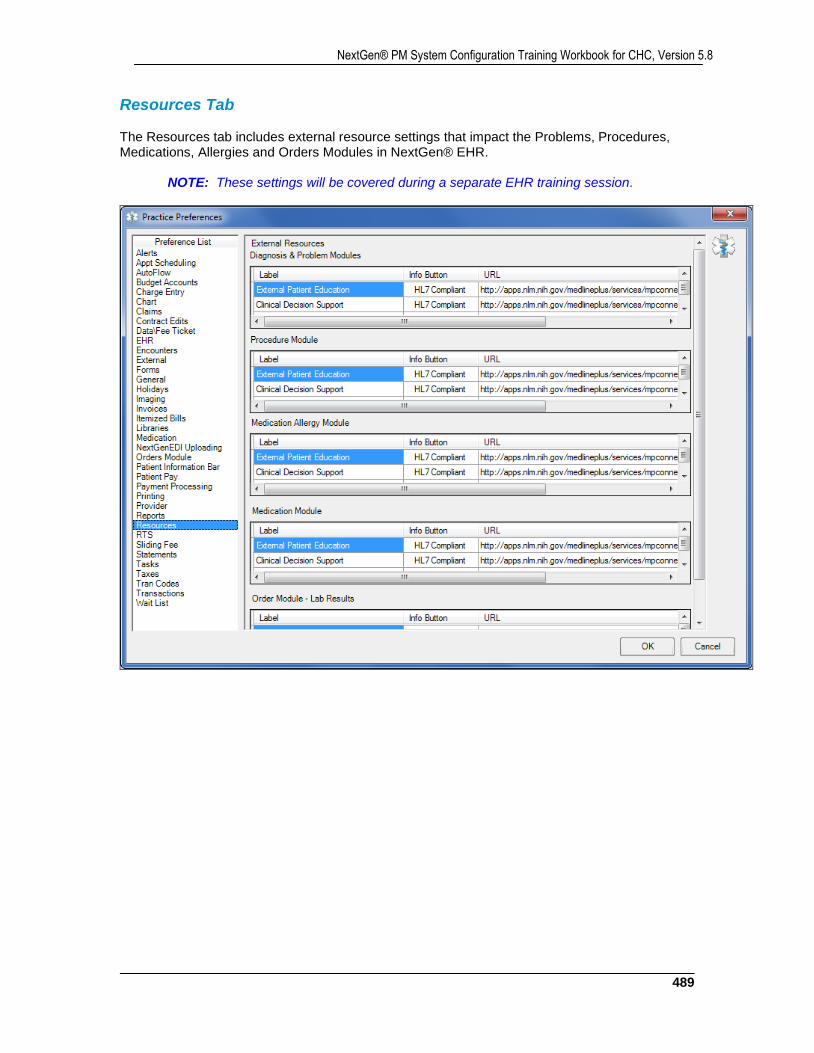
489
NextGen® PM System Configuration Training Workbook for CHC, Version 5.8
Resources Tab The Resources tab includes external resource settings that impact the Problems, Procedures, Medications, Allergies and Orders Modules in NextGen® EHR.
NOTE: These settings will be covered during a separate EHR training session.
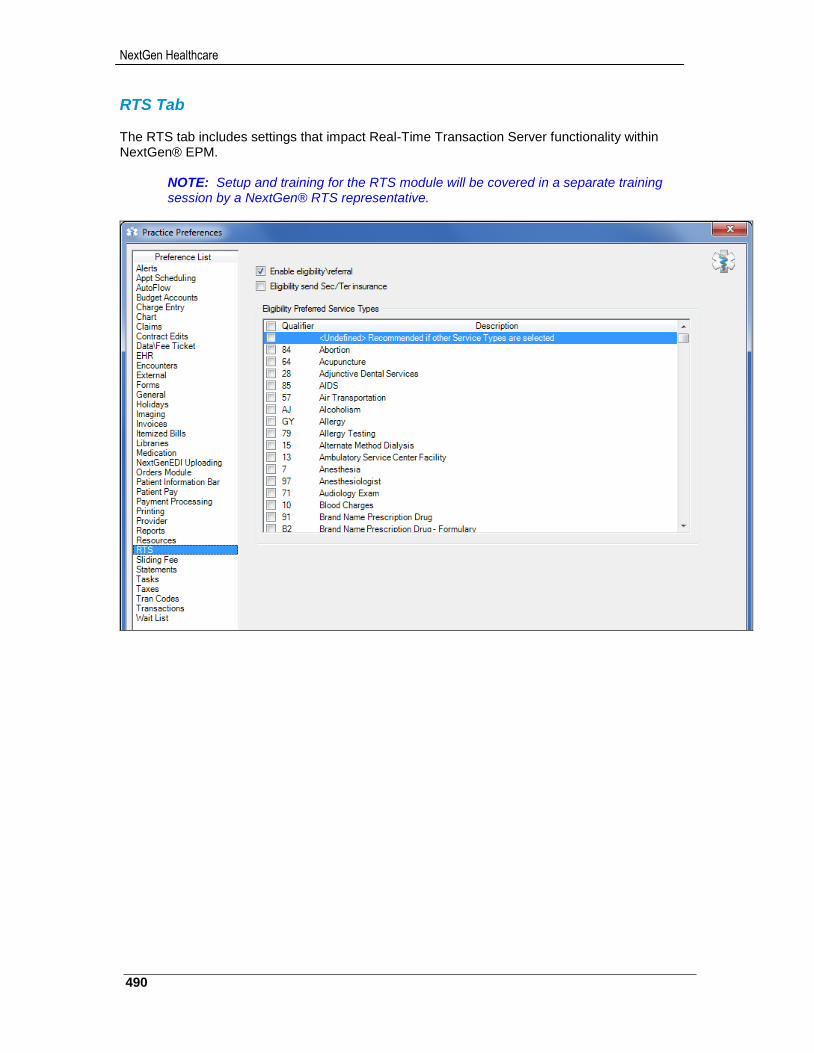
NextGen Healthcare
490
RTS Tab The RTS tab includes settings that impact Real-Time Transaction Server functionality within NextGen® EPM.
NOTE: Setup and training for the RTS module will be covered in a separate training session by a NextGen® RTS representative.
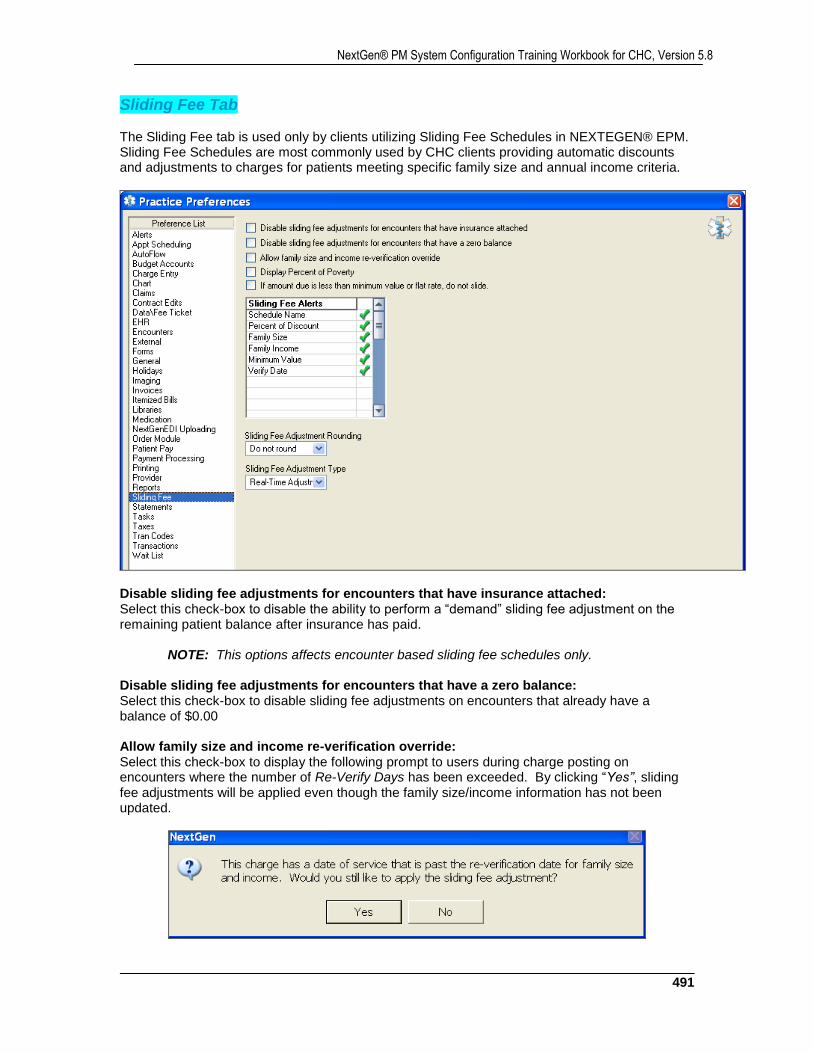
491
NextGen® PM System Configuration Training Workbook for CHC, Version 5.8
Sliding Fee Tab The Sliding Fee tab is used only by clients utilizing Sliding Fee Schedules in NEXTEGEN® EPM. Sliding Fee Schedules are most commonly used by CHC clients providing automatic discounts and adjustments to charges for patients meeting specific family size and annual income criteria.
Disable sliding fee adjustments for encounters that have insurance attached: Select this check-box to disable the ability to perform a “demand” sliding fee adjustment on the remaining patient balance after insurance has paid. NOTE: This options affects encounter based sliding fee schedules only. Disable sliding fee adjustments for encounters that have a zero balance: Select this check-box to disable sliding fee adjustments on encounters that already have a balance of $0.00 Allow family size and income re-verification override: Select this check-box to display the following prompt to users during charge posting on encounters where the number of Re-Verify Days has been exceeded. By clicking “Yes”, sliding fee adjustments will be applied even though the family size/income information has not been updated.
NextGen Healthcare
492
Display Percent of Poverty: Select this check-box to display Percent of Poverty in patient charts as defined in the Patient Responsibility table in File Maintenance.
NOTE: See the Patient Responsibility section of this workbook for more information. If amount due is less than minimum value or flat rate, do not slide: Select this check-box to prevent positive sliding fee adjustments to increase the amount due up to the defined minimum value/flat rate. This would occur in cases where the balance is less than the minimum value/flat rate. Sliding Fee Alerts: Select or deselect one or more sections of the System Alert for sliding fee patients to customize what is displayed to users. Sliding Fee Adjustment Rounding: Select whether or not sliding fee adjustments should be rounded. Options include the following:
Round down at 4, up at 5
Only round up
Do not round Sliding Fee Adjustment Type: Select one of the following:
Real-time Adjustments Sliding Fee Adjustments will take place real-time during charge posting
Batch Adjustments Sliding Fee Adjustments will be processed for multiple encounters in batch mode from the File > Processes > Sliding Fee Batch Adjustment menu
NOTE: This setting affects both Encounter Based and Line Item Based schedules.
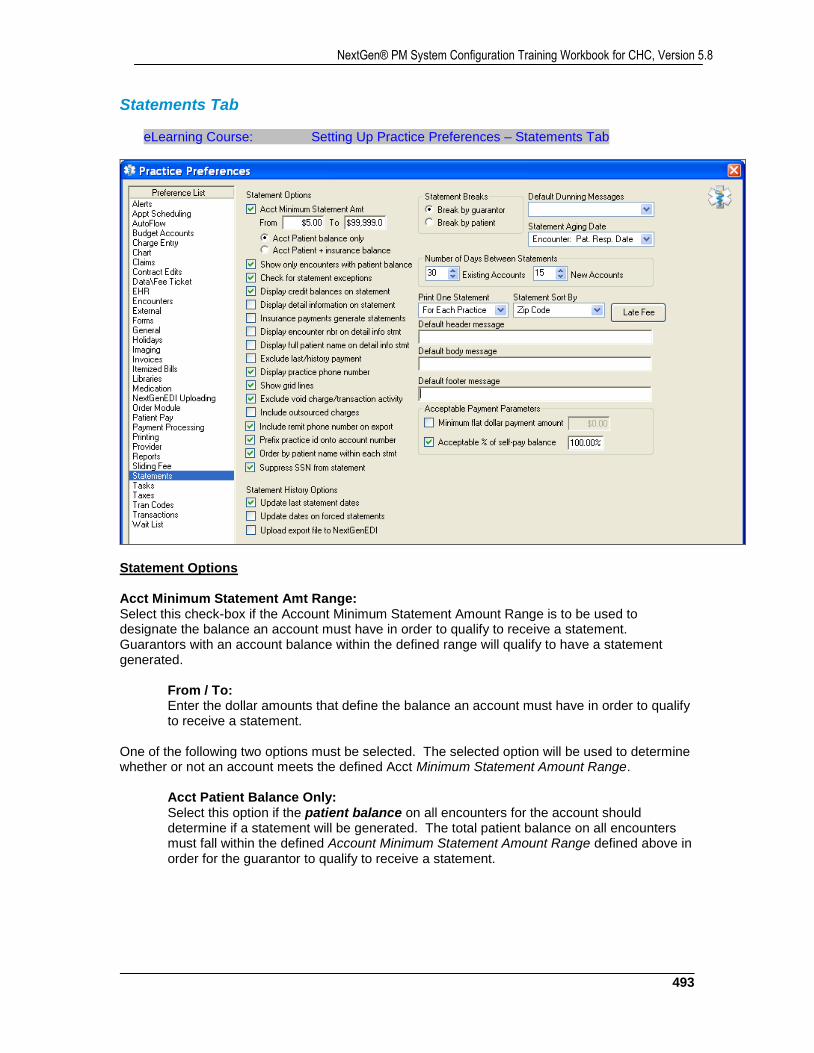
493
NextGen® PM System Configuration Training Workbook for CHC, Version 5.8
Statements Tab
eLearning Course: Setting Up Practice Preferences – Statements Tab
Statement Options Acct Minimum Statement Amt Range: Select this check-box if the Account Minimum Statement Amount Range is to be used to designate the balance an account must have in order to qualify to receive a statement. Guarantors with an account balance within the defined range will qualify to have a statement generated.
From / To: Enter the dollar amounts that define the balance an account must have in order to qualify to receive a statement.
One of the following two options must be selected. The selected option will be used to determine whether or not an account meets the defined Acct Minimum Statement Amount Range.
Acct Patient Balance Only:
Select this option if the patient balance on all encounters for the account should determine if a statement will be generated. The total patient balance on all encounters must fall within the defined Account Minimum Statement Amount Range defined above in order for the guarantor to qualify to receive a statement.
NextGen Healthcare
494
Acct Patient + Insurance Balance: Select this option if the patient balance plus insurance balance on all encounters for the account should determine if a statement will be generated. The total patient plus insurance balance on all encounters for the account must fall within the defined Account Minimum Statement Amount Range defined above in order for the guarantor to qualify to receive a statement.
Show only encounters with patient balance: This option is available only if the Acct Patient Balance Only option has been selected above. Select this check-box if only those encounters on the account with an outstanding patient balance should display on the statement. If an encounter has an outstanding insurance balance but no patient balance, the encounter will not display on the statement. If this option is not selected, all encounters with an outstanding balance will display on the statement, whether the balance is out to insurance or to patient. Check for statement exceptions: Select this check-box if a Statement Exceptions Report should generate during the statement run process showing any encounters that do not have a rendering provider. Display credit balances on statement: Select this option if the total Unapplied Credits (account and encounter) should display on the statement. An unapplied credit is a patient payment that has been entered but not applied to a charge.
NOTE: The total unapplied credits for an account/guarantor will display in the footer of the statement in place of the defined “Default footer message” defined below.
Display detail information on statement: Select this check-box for “detail” statements. Detail statements will display a separate line for each charge on the encounter. Additional lines for each posted transaction (payment, adjustment, refund) will display below the charge. Do not select this check-box for “non-detail” statements. Non-detail statements will display a separate line for each charge on the encounter. Total posted transactions (payments, adjustment, refunds) will be included on the same line as the charge. Insurance payments generate statements: Select this check-box if accounts should receive an additional statement in the next run because an insurance payment was posted to one or more encounters for the account. Display encounter nbr on detail info stmt: Select this check-box to show the encounter number on the detail statements.
NOTE: This only applies if the “Display detail information on statement” option is selected above.
Display full patient name on detail info stmt: Select this check-box to display the patient's full name in the ledger section of the statement in the format Last name, First name. If this check-box is not selected, only the first name displays on the statement. Exclude last / history payment: Select this check-box to exclude encounters that were paid in full since the last statement from appearing on the next statement. If this option is not selected, encounters that were paid in full will appear on the next statement showing the payment and a $0.00 balance.
495
NextGen® PM System Configuration Training Workbook for CHC, Version 5.8
Display practice phone number: Select this check-box to show the practice's phone number in the header section of statements.
NOTE: The practice phone number from the Practices table in File Maintenance is used. Show grid lines: Select this check-box to print alternating rows of gray and white grid lines in the body section of statements. Exclude void charge/ transaction activity: Select this check-box to prevent voided charges and their associated transactions from appearing on statements. Include outsourced charges: Select this check-box to include any encounters/charges that have been outsourced to an external agency on statements.
NOTE: The outsourcing feature in NextGen® EPM is enable in Practice Preferences > General tab.
Include remit phone number on export: Select this check-box to include the practice's phone number in the header section of statements that are exported to a third party for processing (printing/mailing).
NOTE: The practice phone number from the Practices table in File Maintenance is used. Prefix practice ID onto account number: Select this check-box to prefix account numbers on statements (printed or exported) with the four digit “Practice ID” from the Practices table in File Maintenance. The account numbers will appear as 16 digit numbers. For example: 0001000000001234 where 0001 is the practice ID and 1234 is the account number.
NOTE: For exported statements, the third party vendor must be able to accommodate this extended number format.
Order by patient name within each statement: Select this check-box to display multiple patients/family members on a single statement in alphabetical order by first name. If not selected, patients/family members will display in numerical order by encounter number. Suppress SSN from statement: Select this check-box to prevent a patient’s SSN from printing on statements when an employer is the guarantor on the encounter. This is for patient privacy purposes.
NextGen Healthcare
496
Statement History Options Update last statement dates: This check-box sets the default for the Update Last Statement Dates option on the Statement Options window used when processing statements. If selected, the option will be preselected and the Last Statement Print Date will therefore be updated on the Account Profile window for all guarantors/accounts in the statement run. Update dates on forced statements: This check-box sets the default for the Update Dates on Forced Statements option on the Statement Options window used when processing statements. If selected, the option will be preselected and the Last Statement Print Date will therefore be updated on the Account Profile window for any guarantor/account that had the Generate Statement Next Run option selected. Upload export file to NextGenEDI: Statement Breaks Select one of the following:
Break by guarantor: Select this option to print one statement for accounts/guarantors that includes all patients on the account.
Break by patient: Select this option to print multiple statements for accounts/guarantors. A separate statement will print for each patient on the account.
Print One Statement Select one of the following:
For Each Practice: Select this option to print one statement for accounts/guarantors that includes encounters from all rendering providers at all locations within the practice. For Each Provider: Select this option to print multiple statements for accounts/guarantors. A separate statement will print for each rendering provider seen within the practice. For Each Location: Select this option to print multiple statements for accounts/guarantors. A separate statement will print for each location visited within the practice.
497
NextGen® PM System Configuration Training Workbook for CHC, Version 5.8
Number of Days Between Statements Existing Accounts: Select the Number of Days between Statements for existing accounts. This number represents the number of days in the statement cycle. When a statement is generated for an existing account/guarantor, the number of days defined must pass before the account/guarantor will qualify for their next statement. New Accounts: Select the Number of Days between Statements for new accounts. A new account is created when a guarantor is selected for the first time on a patient’s encounter. This number represents the number of days that must pass from the date of that encounter before a new account/guarantor will qualify for their first statement.
NOTE: When NextGen® EPM is first implemented, all accounts/guarantors are considered to be new accounts.
Statement Sort By Select one of the following:
Account ID: Select this option to sort each batch of statements numerically by account number. Last Name: Select this option to sort each batch of statements alphabetically by account last name.
Pay This Amt: Select this option to sort each batch of statements by the dollar amount in the Please Pay This Amount box found in the footer of statements. The account with the largest amount will print first in the batch and the account with the smallest amount will print last. Zip Code: Select this option to sort each batch of statements numerically by zip code.
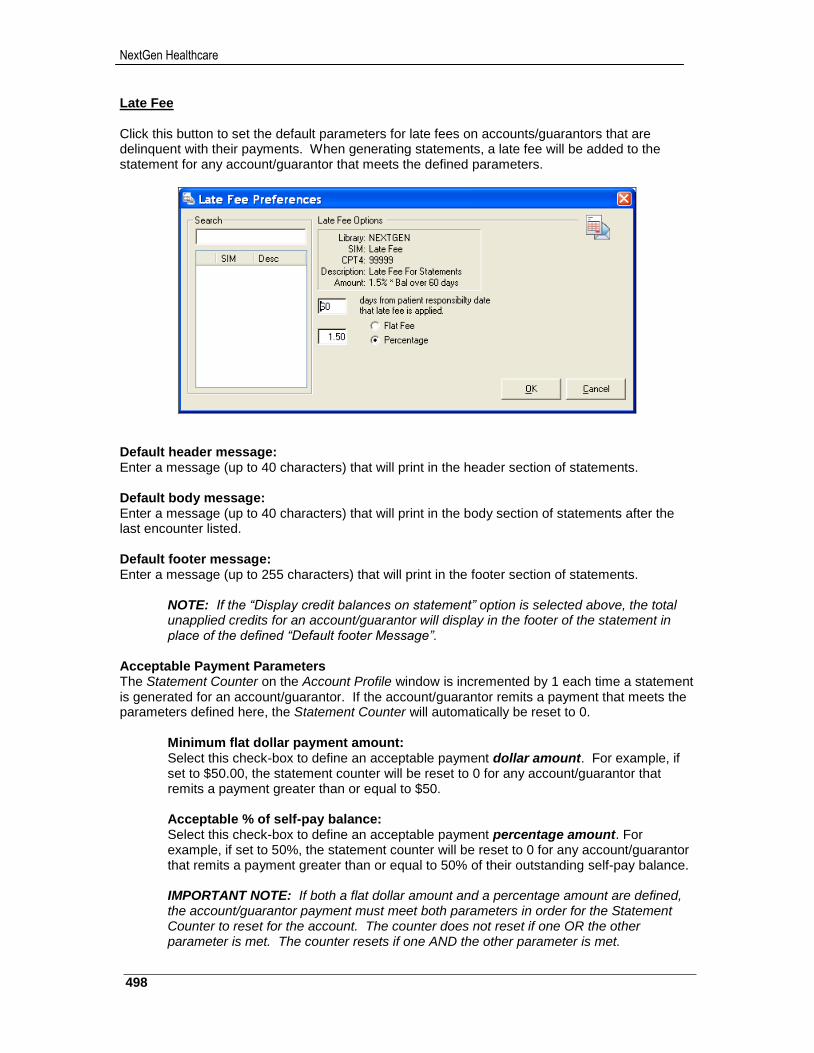
NextGen Healthcare
498
Late Fee Click this button to set the default parameters for late fees on accounts/guarantors that are delinquent with their payments. When generating statements, a late fee will be added to the statement for any account/guarantor that meets the defined parameters.
Default header message: Enter a message (up to 40 characters) that will print in the header section of statements. Default body message: Enter a message (up to 40 characters) that will print in the body section of statements after the last encounter listed. Default footer message: Enter a message (up to 255 characters) that will print in the footer section of statements.
NOTE: If the “Display credit balances on statement” option is selected above, the total unapplied credits for an account/guarantor will display in the footer of the statement in place of the defined “Default footer Message”.
Acceptable Payment Parameters The Statement Counter on the Account Profile window is incremented by 1 each time a statement is generated for an account/guarantor. If the account/guarantor remits a payment that meets the parameters defined here, the Statement Counter will automatically be reset to 0.
Minimum flat dollar payment amount: Select this check-box to define an acceptable payment dollar amount. For example, if set to $50.00, the statement counter will be reset to 0 for any account/guarantor that remits a payment greater than or equal to $50. Acceptable % of self-pay balance: Select this check-box to define an acceptable payment percentage amount. For example, if set to 50%, the statement counter will be reset to 0 for any account/guarantor that remits a payment greater than or equal to 50% of their outstanding self-pay balance. IMPORTANT NOTE: If both a flat dollar amount and a percentage amount are defined, the account/guarantor payment must meet both parameters in order for the Statement Counter to reset for the account. The counter does not reset if one OR the other parameter is met. The counter resets if one AND the other parameter is met.
499
NextGen® PM System Configuration Training Workbook for CHC, Version 5.8
Example 1: Minimum flat dollar payment amount = $25 Acceptable % of self-pay balance = 100% If the guarantor has a $5 balance, a $5 payment will not reset the statement counter to 0 because even though it’s 100% of the balance, it is still less than the minimum flat dollar amount defined. Example 2: Minimum flat dollar payment amount = $5 Acceptable % of self-pay balance = 100% If the guarantor has a $25 balance, a $20 payment will not reset the statement counter to 0 because even though it’s greater than $5, it is still less than acceptable % of self-pay balance defined.
Default Dunning Messages: Select the appropriate set of Dunning Messages to appear on statements.
NOTE: The messages are related to the age of the account/guarantor’s outstanding self-pay balance.
Statement Aging Date Select one of the following:
Charge Service Date: Select this option if the outstanding balances should be aged at the bottom of the statement based on the Service Date indicated on the charges.
Encounter Patient Responsibility Date: Select this option if the outstanding balances should be aged at the bottom of the statement based on the Patient Responsibility Date indicated on the encounter. NOTE: This date occurs on the encounter when the balances on all charges have been settled to the Pat Amt bucket and there is no remaining balance in the Ins1, Ins2 or Ins3 Amt buckets in Balance Control.
Encounter Date: Select this option if the outstanding balances should be aged at the bottom of the statement based on the Billable Date indicated on the encounter.

NextGen Healthcare
500
Tasks Tab
eLearning Course: Setting Up Practice Preferences – Tasks Tab The Tasks tab is used in conjunction with the Worklog Manager module in NextGen® EPM.
NOTE: Setup of this tab and training on Worklog Manager will be covered during Advanced Training or during a separate WebEx training session.
Required Fields: Select the fields that should be required when a user creates a new task:
Subject
Details
Status
Priority
Assigned To
Start Date
Follow Up Date
Expiration Date
Task Subgrouping 1 & 2
501
NextGen® PM System Configuration Training Workbook for CHC, Version 5.8
When Status is Completed: Select the fields that should be required when a user completes a task:
Require Completed By
Require Completion Date
Require Completion Reason Select the fields that should default information when a user completes a task:
Default Completed By with Current User
Default Completion Date with Current Date Select the fields that should not be modified when a user completes a task:
Do Not Allow Past Completion Dates
Do Not Allow Modification of Completion Date
Do Not Allow Modification of Completed By Claim Edits Skip claim edit with completed tasks: Select this option to allow claim edits to pass when the task associated with it is complete. If the preference is turned on and the severity is set to something other than Warning, then when an edit triggers and there is already a completed task associated with it, the severity resets to Warning for that line item on the Claims Productions Status report. This severity allows the claim to be created clean when it otherwise would have created a dirty claim.
NOTE: The default is that this setting is turned off, therefore, any claim edit continues to display regardless of whether the tasks are completed. The claim edit is still created with the severity you assigned to it in Claim Edit Library Maintenance.
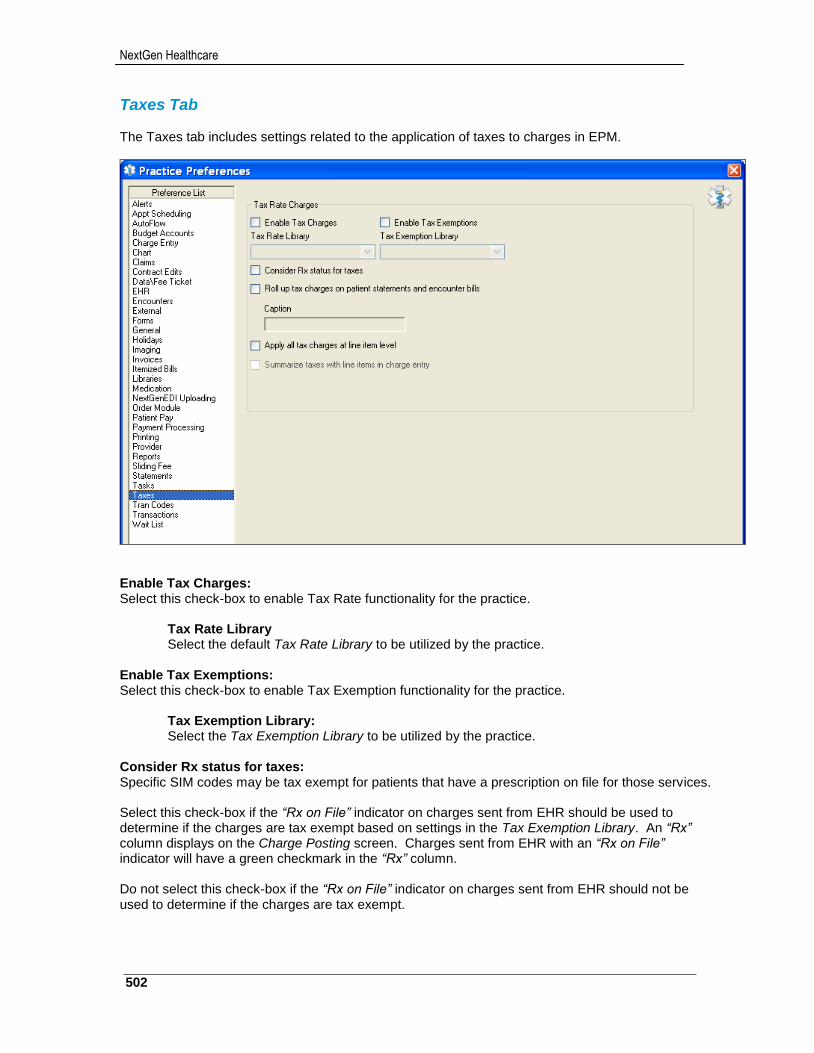
NextGen Healthcare
502
Taxes Tab The Taxes tab includes settings related to the application of taxes to charges in EPM.
Enable Tax Charges: Select this check-box to enable Tax Rate functionality for the practice.
Tax Rate Library Select the default Tax Rate Library to be utilized by the practice.
Enable Tax Exemptions: Select this check-box to enable Tax Exemption functionality for the practice.
Tax Exemption Library: Select the Tax Exemption Library to be utilized by the practice.
Consider Rx status for taxes: Specific SIM codes may be tax exempt for patients that have a prescription on file for those services.
Select this check-box if the “Rx on File” indicator on charges sent from EHR should be used to determine if the charges are tax exempt based on settings in the Tax Exemption Library. An “Rx” column displays on the Charge Posting screen. Charges sent from EHR with an “Rx on File” indicator will have a green checkmark in the “Rx” column. Do not select this check-box if the “Rx on File” indicator on charges sent from EHR should not be used to determine if the charges are tax exempt.
503
NextGen® PM System Configuration Training Workbook for CHC, Version 5.8
Roll up tax charges on patient statements and encounter bills: Select this check-box to have all tax charges display as a singled rolled up tax code with a total tax amount on patient Statements and Encounter Bills.
Caption: This field is required if the above option is selected. Enter a caption for the single rolled up tax code and tax amount on Statements and Encounter Bills.
Apply all tax charges at line item level: Select this check-box to have all tax charges applied at the line item level. If selected, Tax Rate Libraries cannot be setup in File Maintenance to apply tax charges at the encounter level.
NOTE: If the “Enable Advanced Service Item Library Mode” option has been enabled in Enterprise Preferences > Libraries tab, this option will be automatically selected and disabled so it cannot be changed. All taxes will be applied at line item level.
Summarize taxes with line items in charge entry: Select this check-box to display a “Summarize Taxes” option on the Charge Posting screen. If the “Summarize Taxes” option is enabled, all tax charges will be summed and displayed on the same line as the “parent” charge in a separate “Tax” column. If the “Summarize Taxes” option is not enabled, all tax charges will be listed separately below the “parent” charge. By not selecting this check-box, a “Summarize Taxes” option is not available on the Charge Posting screen. All tax charges will always be listed separately below the “parent” charge.
NOTE: This option is disabled if the “Apply all tax charges at line item level” option has not been selected.
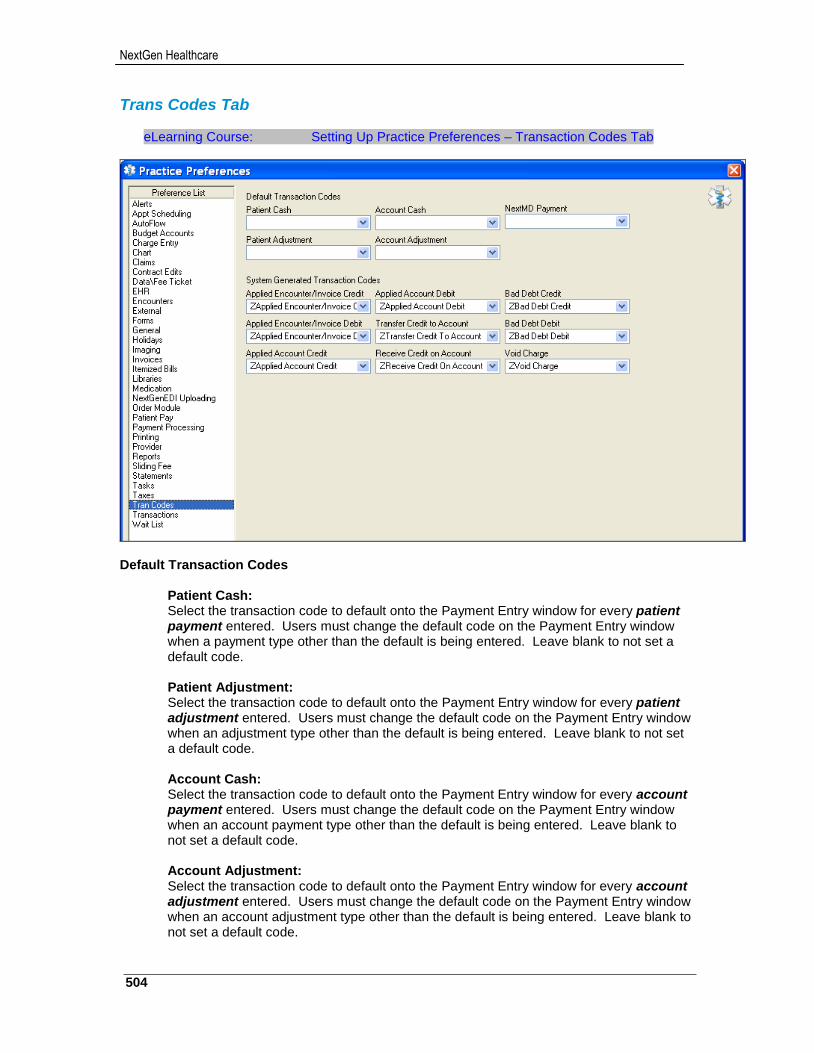
NextGen Healthcare
504
Trans Codes Tab
eLearning Course: Setting Up Practice Preferences – Transaction Codes Tab
Default Transaction Codes
Patient Cash: Select the transaction code to default onto the Payment Entry window for every patient payment entered. Users must change the default code on the Payment Entry window when a payment type other than the default is being entered. Leave blank to not set a default code. Patient Adjustment: Select the transaction code to default onto the Payment Entry window for every patient adjustment entered. Users must change the default code on the Payment Entry window when an adjustment type other than the default is being entered. Leave blank to not set a default code. Account Cash: Select the transaction code to default onto the Payment Entry window for every account payment entered. Users must change the default code on the Payment Entry window when an account payment type other than the default is being entered. Leave blank to not set a default code. Account Adjustment: Select the transaction code to default onto the Payment Entry window for every account adjustment entered. Users must change the default code on the Payment Entry window when an account adjustment type other than the default is being entered. Leave blank to not set a default code.
505
NextGen® PM System Configuration Training Workbook for CHC, Version 5.8
NextMD Payment: Select the transaction code to default onto the Payment Entry window for every patient payment received via the NextGen® Patient Portal (NextMD).
System Generated Transaction Codes
Applied Encounter/Invoice Credit: Select the ZApplied Encounter/Invoice Credit transaction code. This code will be used when a user applies an encounter/invoice unapplied credit to one or more charges on the encounter. NOTE: This reduces the balance of the charge(s) on the encounter. Applied Encounter/Invoice Debit: Select the ZApplied Encounter/Invoice Debit transaction code. This code will be used when a user applies an encounter/invoice unapplied credit to one or more charges on the encounter. NOTE: This reduces the amount of unapplied credits on the encounter. Applied Account Credit: Select the ZApplied Account Credit transaction code. This code will be used when a user applies an account unapplied credit to charges on one or more encounter. NOTE: This reduces the balance of the charge(s) on the encounter. Applied Account Debit: Select the ZApplied Account Debit transaction code. This code will be used when a user applies an account unapplied credit to charges on one or more encounter. NOTE: This reduces the amount of unapplied credits on the account. Transfer Credit to Account: Select the ZTransfer Credit to Account transaction code. This code will be used when a user clicks the Xfer Credit button on the Payment Entry window to transfer an encounter unapplied credit to the account. NOTE: This removes the unapplied credit amount from the encounter. Receive Credit on Account: Select the ZReceive Credit on Account transaction code. This code will be used when a user clicks the Xfer Credit button on the Payment Entry window to transfer an encounter unapplied credit to the account. NOTE: This increases the amount of unapplied credits on the account. Bad Debt Credit: Select the ZBad Debt Credit transaction code. This code will be used when a user processes an encounter with one or more charges to Bad Debt (collections). NOTE: This removes the self-pay balance on the encounter. Bad Debt Debit: Select the ZBad Debt Debit transaction code. This code will be used when a user processes an encounter with one or more charges to Bad Debt (collections). NOTE: This increases the bad debt balance on the encounter. Void Charge: Select the ZVoid Charge transaction code. This code will be used when a user clicks the Void button on the Charge Posting window to remove a charge that was entered in error. NOTE: This reverses the original charge amount and quantity.
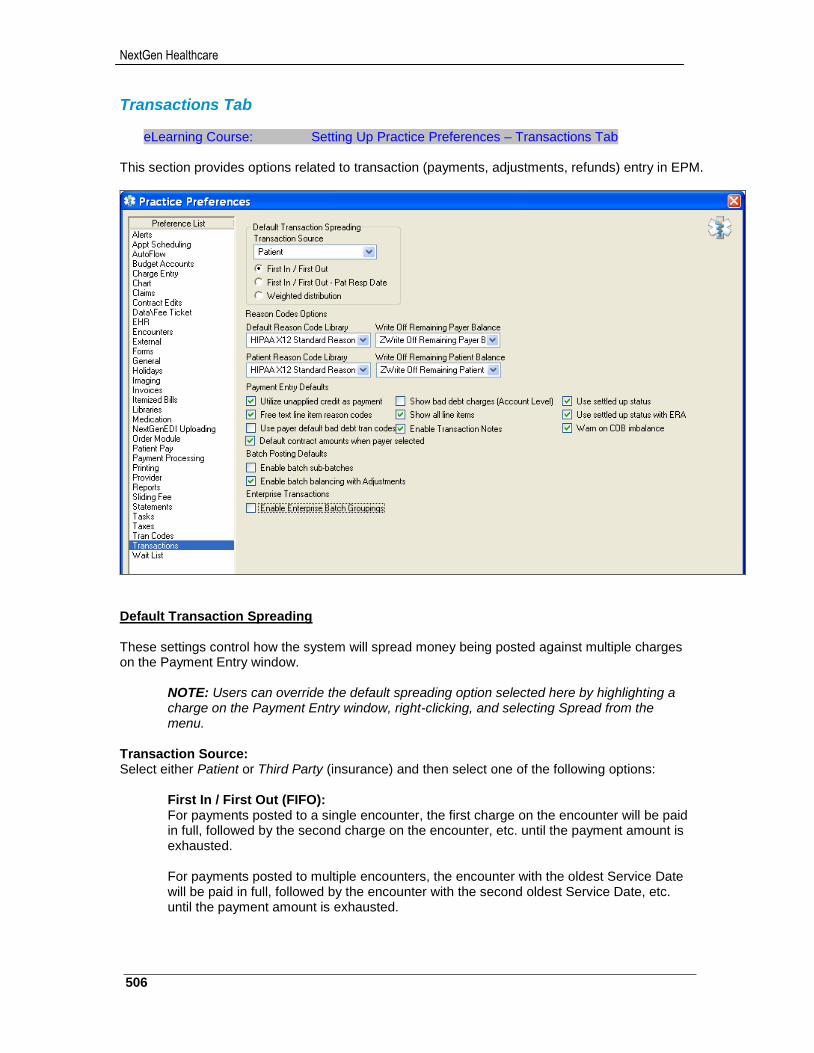
NextGen Healthcare
506
Transactions Tab
eLearning Course: Setting Up Practice Preferences – Transactions Tab This section provides options related to transaction (payments, adjustments, refunds) entry in EPM.
Default Transaction Spreading These settings control how the system will spread money being posted against multiple charges on the Payment Entry window.
NOTE: Users can override the default spreading option selected here by highlighting a charge on the Payment Entry window, right-clicking, and selecting Spread from the menu.
Transaction Source: Select either Patient or Third Party (insurance) and then select one of the following options:
First In / First Out (FIFO): For payments posted to a single encounter, the first charge on the encounter will be paid in full, followed by the second charge on the encounter, etc. until the payment amount is exhausted. For payments posted to multiple encounters, the encounter with the oldest Service Date will be paid in full, followed by the encounter with the second oldest Service Date, etc. until the payment amount is exhausted.
507
NextGen® PM System Configuration Training Workbook for CHC, Version 5.8
First In / First Out - Pat Resp Date: For payments posted to a single encounter, the first charge on the encounter will be paid in full, followed by the second charge on the encounter, etc. until the payment amount is exhausted. For payments posted to multiple encounters, the encounter with the oldest Patient Responsibility Date will be paid in full, followed by the encounter with the second oldest Patient Responsibility Date, etc. until the payment amount is exhausted.
Weighted distribution: For payments posted to a single encounter, a portion of the payment is applied to all charges on the encounter. The amount applied to each charge is determined by each charge’s percentage of the total.
For payments posted to multiple encounters, the encounter with the oldest Service Date will be paid in full, with a portion of the payment applied to all charges on the encounter, followed by the encounter with the second oldest Service Date, etc. until the payment amount is exhausted. The amount applied to each charge is determined by each charge’s percentage of the total
Reason Codes Options Default Reason Code Library: Select the default Reason Code Library to be used on the Payment Entry window for payments from all payers in the selected practice.
NOTE: Payer specific libraries can be linked to those payers in the Payers table > Practice tab > Transactions sub-tab.
Patient Reason Code Library Select the default Reason Code Library to be used on the Payment Entry window for payments from all patients in the selected practice. Write Off Remaining Patient Balance: Select the adjustment transaction code that will automatically adjust off the patient balance when the Write Off Remaining Patient Balance option is checked in the Reason Code Library for the reason code used during manual payment entry.
NOTE: This does not apply to ERA payments. ERA payments use the adjustment code selected in the Reason Code Library.
Write Off Remaining Payer Balance: Select the adjustment transaction code that will automatically adjust off the insurance balance when the Write Off Remaining Patient Balance option is checked in the Reason Code Library for the reason code used during manual payment entry.
NOTE: This does not apply to ERA payments. ERA payments use the adjustment code selected in the Reason Code Library.
NextGen Healthcare
508
Payment Entry Defaults Utilize unapplied credit as payment: Select this check-box to use unapplied credits as payments. If the check-box is not selected, unapplied credits are applied as adjustments.
NOTE: If you select the check-box, the following fields change to contain payment transaction types:
Free text line item reason codes: Select this check-box to allow users to type line item reason codes during payment entry instead of selecting the reason codes from a list. When users type multiple reason codes, they must separate them with commas - for example, CO18, CO42, PR1. If any of the typed codes are incorrect, then the incorrect codes display along with the list of reason codes from the Reason Code library that the users can select. Use payer default bad debt tran codes: Select this check-box to allow the default bad debt transaction codes defined for payers to automatically display in Payment Entry when insurance payments/adjustments are entered on a bad debt encounter. Default contract amounts when payer selected: Select this check-box to use the Allowed, Adjustment and Payment amounts defined in the Contracts library as the default amounts during payment entry in EPM. Show bad debt charges (Account Level): Select this check-box to make bad debt charges display in Payment Entry in EPM when Account is selected in the Source field. If this check-box is not selected, the bad debt charges do not display. Show all line items: Select this check-box to have the Show All Line Items check-box selected by default on the Payment Entry dialog box. Enable Transaction Notes: Select this check-box to display the Notes free-text comment field on the Payment Entry screen in EPM. Use settled up status: Select this check-box to settle a balance upwards during manual payment entry when the secondary payer pays before the primary payer. Then, when the primary pays, the balance skips the secondary payer and settles to the tertiary payer or to the patient. Use settled up status with ERA: Select this check-box to settle a balance upwards during ERA payment processing when the secondary payer pays before the primary payer. Then, when the primary pays, the balance skips the secondary payer and settles to the tertiary payer or to the patient.
509
NextGen® PM System Configuration Training Workbook for CHC, Version 5.8
Batch Posting Defaults Enable batch sub-batches: Select this check-box to setup sub-batches when setting up batch header records. For more information on sub-batches, see the Posting Transactions chapter of the NextGen EPM User Guide. Enable batch balancing with Adjustments: Select this check-box to enable the Total Adjusted field on the Batch Maintenance dialog box in EPM so that users can include the total amount of adjustments in the batch balancing criteria. Enterprise Transactions Enable Enterprise Batch Groupings: Select this check-box to enable users to include transaction batches from this practice in batch groupings. Batch groupings enable users to enter, balance, and post transactions from multiple practices. This check-box is enabled only when the Enable Enterprise Batch Groupings check-box is selected on the Enterprise Preferences > General tab.
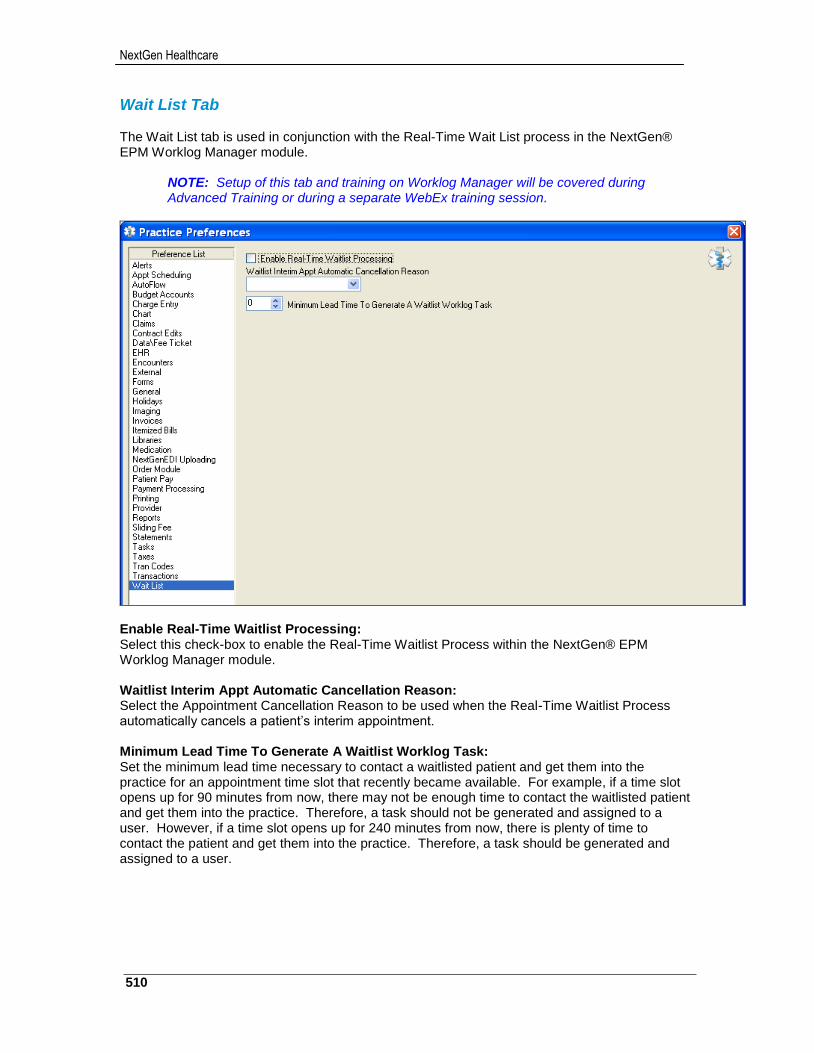
NextGen Healthcare
510
Wait List Tab The Wait List tab is used in conjunction with the Real-Time Wait List process in the NextGen® EPM Worklog Manager module.
NOTE: Setup of this tab and training on Worklog Manager will be covered during Advanced Training or during a separate WebEx training session.
Enable Real-Time Waitlist Processing: Select this check-box to enable the Real-Time Waitlist Process within the NextGen® EPM Worklog Manager module. Waitlist Interim Appt Automatic Cancellation Reason: Select the Appointment Cancellation Reason to be used when the Real-Time Waitlist Process automatically cancels a patient’s interim appointment. Minimum Lead Time To Generate A Waitlist Worklog Task: Set the minimum lead time necessary to contact a waitlisted patient and get them into the practice for an appointment time slot that recently became available. For example, if a time slot opens up for 90 minutes from now, there may not be enough time to contact the waitlisted patient and get them into the practice. Therefore, a task should not be generated and assigned to a user. However, if a time slot opens up for 240 minutes from now, there is plenty of time to contact the patient and get them into the practice. Therefore, a task should be generated and assigned to a user.
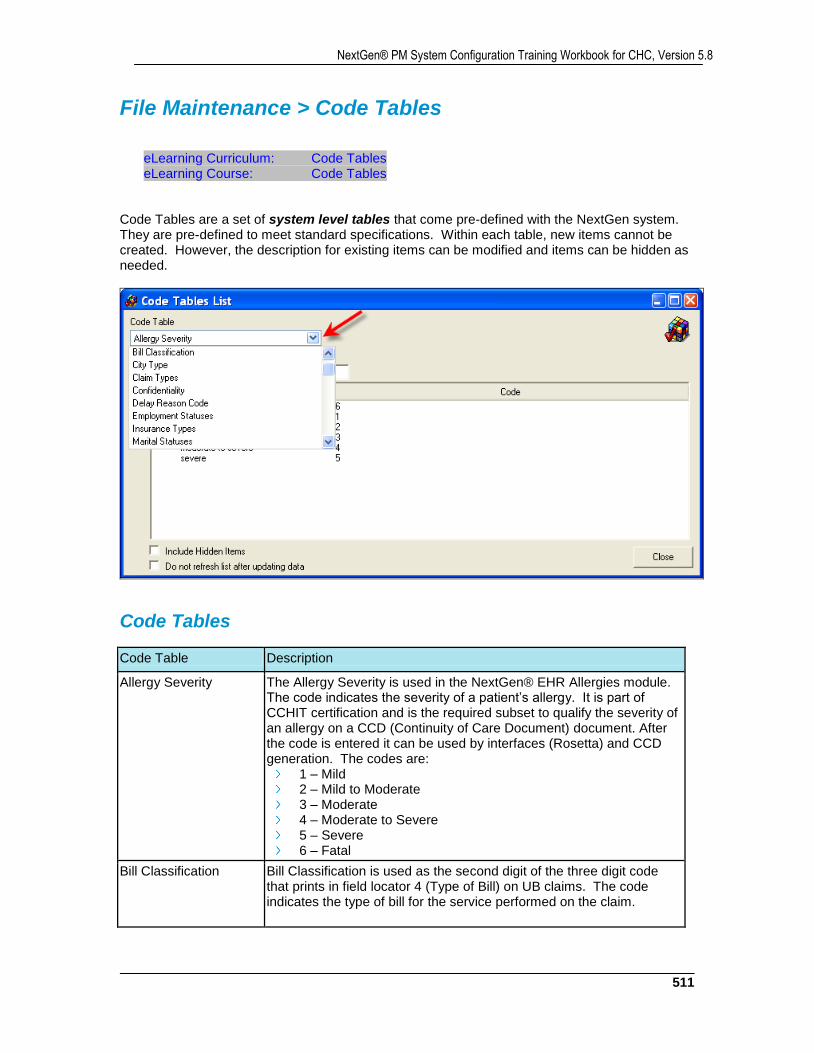
511
NextGen® PM System Configuration Training Workbook for CHC, Version 5.8
File Maintenance > Code Tables
eLearning Curriculum: Code Tables eLearning Course: Code Tables
Code Tables are a set of system level tables that come pre-defined with the NextGen system. They are pre-defined to meet standard specifications. Within each table, new items cannot be created. However, the description for existing items can be modified and items can be hidden as needed.
Code Tables
Code Table Description
Allergy Severity The Allergy Severity is used in the NextGen® EHR Allergies module. The code indicates the severity of a patient’s allergy. It is part of CCHIT certification and is the required subset to qualify the severity of an allergy on a CCD (Continuity of Care Document) document. After the code is entered it can be used by interfaces (Rosetta) and CCD generation. The codes are:
1 – Mild 2 – Mild to Moderate 3 – Moderate 4 – Moderate to Severe 5 – Severe 6 – Fatal
Bill Classification Bill Classification is used as the second digit of the three digit code that prints in field locator 4 (Type of Bill) on UB claims. The code indicates the type of bill for the service performed on the claim.
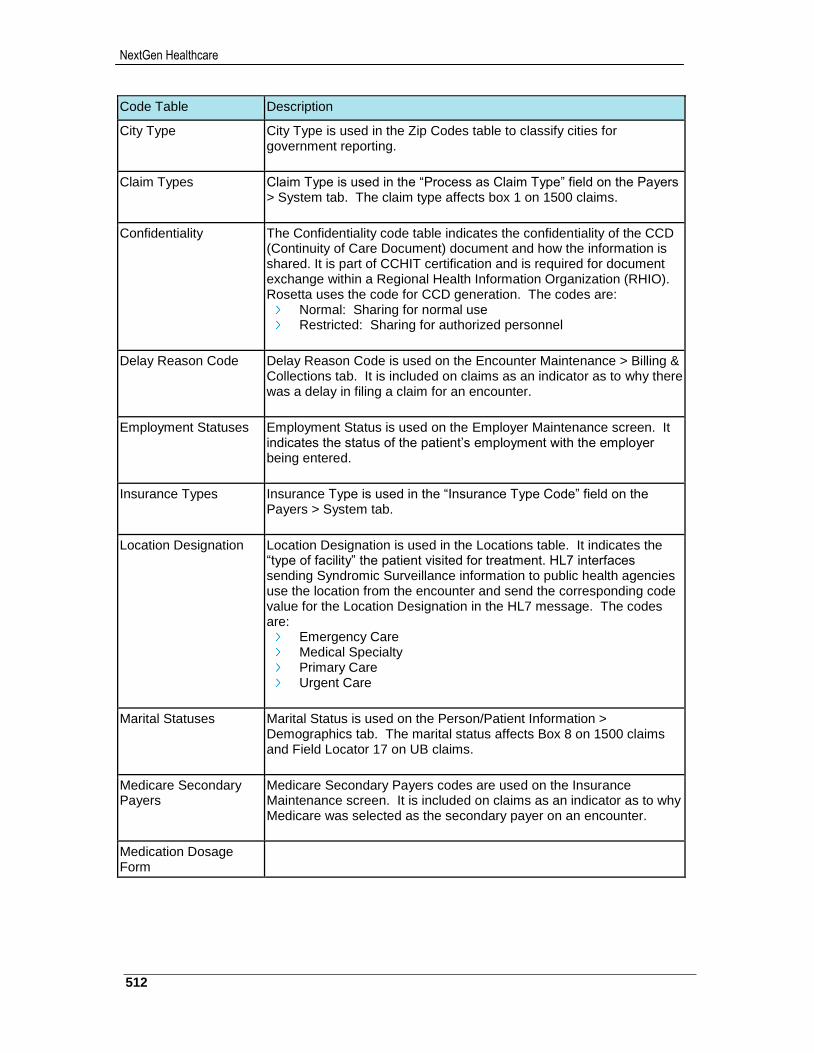
NextGen Healthcare
512
Code Table Description
City Type City Type is used in the Zip Codes table to classify cities for government reporting.
Claim Types Claim Type is used in the “Process as Claim Type” field on the Payers > System tab. The claim type affects box 1 on 1500 claims.
Confidentiality The Confidentiality code table indicates the confidentiality of the CCD (Continuity of Care Document) document and how the information is shared. It is part of CCHIT certification and is required for document exchange within a Regional Health Information Organization (RHIO). Rosetta uses the code for CCD generation. The codes are:
Normal: Sharing for normal use Restricted: Sharing for authorized personnel
Delay Reason Code Delay Reason Code is used on the Encounter Maintenance > Billing & Collections tab. It is included on claims as an indicator as to why there was a delay in filing a claim for an encounter.
Employment Statuses Employment Status is used on the Employer Maintenance screen. It indicates the status of the patient’s employment with the employer being entered.
Insurance Types Insurance Type is used in the “Insurance Type Code” field on the Payers > System tab.
Location Designation Location Designation is used in the Locations table. It indicates the “type of facility” the patient visited for treatment. HL7 interfaces sending Syndromic Surveillance information to public health agencies use the location from the encounter and send the corresponding code value for the Location Designation in the HL7 message. The codes are:
Emergency Care Medical Specialty Primary Care Urgent Care
Marital Statuses Marital Status is used on the Person/Patient Information > Demographics tab. The marital status affects Box 8 on 1500 claims and Field Locator 17 on UB claims.
Medicare Secondary Payers
Medicare Secondary Payers codes are used on the Insurance Maintenance screen. It is included on claims as an indicator as to why Medicare was selected as the secondary payer on an encounter.
Medication Dosage Form
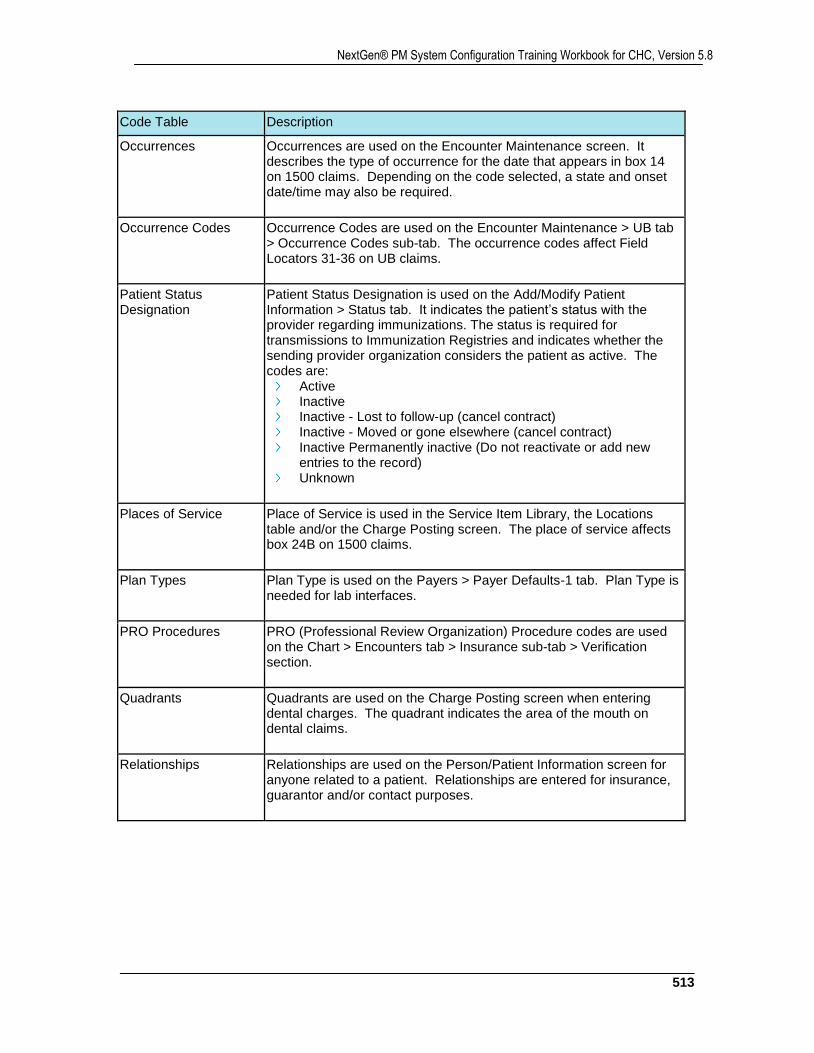
513
NextGen® PM System Configuration Training Workbook for CHC, Version 5.8
Code Table Description
Occurrences Occurrences are used on the Encounter Maintenance screen. It describes the type of occurrence for the date that appears in box 14 on 1500 claims. Depending on the code selected, a state and onset date/time may also be required.
Occurrence Codes Occurrence Codes are used on the Encounter Maintenance > UB tab > Occurrence Codes sub-tab. The occurrence codes affect Field Locators 31-36 on UB claims.
Patient Status Designation
Patient Status Designation is used on the Add/Modify Patient Information > Status tab. It indicates the patient’s status with the provider regarding immunizations. The status is required for transmissions to Immunization Registries and indicates whether the sending provider organization considers the patient as active. The codes are:
Active Inactive Inactive - Lost to follow-up (cancel contract) Inactive - Moved or gone elsewhere (cancel contract) Inactive Permanently inactive (Do not reactivate or add new
entries to the record) Unknown
Places of Service Place of Service is used in the Service Item Library, the Locations table and/or the Charge Posting screen. The place of service affects box 24B on 1500 claims.
Plan Types
Plan Type is used on the Payers > Payer Defaults-1 tab. Plan Type is needed for lab interfaces.
PRO Procedures PRO (Professional Review Organization) Procedure codes are used on the Chart > Encounters tab > Insurance sub-tab > Verification section.
Quadrants Quadrants are used on the Charge Posting screen when entering dental charges. The quadrant indicates the area of the mouth on dental claims.
Relationships Relationships are used on the Person/Patient Information screen for anyone related to a patient. Relationships are entered for insurance, guarantor and/or contact purposes.

NextGen Healthcare
514
Code Table Description
Rx Type
The Rx Type code table indicates the medication type. It is a part of CCHIT certification and is the required subset to qualify the prescription type in a CCD document. After the code is entered in the Medication module of NextGen EHR, it can be used by interfaces (Rosetta) and CCD generation. The codes are:
O: Over-the-counter F: Prescriptions
Sexes Sexes are used on the Person/Patient Information > Demographics tab.
Signature Source Signature Source is used in the “Source of Signature” field on the Payers > Payer Defaults-1 tab. The signature source affects boxes 12 and 13 on 1500 claims.
Source of Admission Source of Admission is used on the Encounter Maintenance > UB tab. The source of admission affects Field Locator 15 on UB claims.
State State is used in the Zip Codes table and anywhere else that an address is entered.
Student Status Student Status is used on the Person/Patient Information > Demographics tab.
Support Role Type Patient Status Designation is used on the Add/Modify Patient Information > Relations/Roles tab. It indicates the “type of role” a person has in relationship to the patient. HL7 interfaces sending Syndromic Surveillance information to public health agencies use the corresponding code value for the Support Role Type in the HL7 message. The codes are:
Caregiver Emergency Contact Next of Kin
Surface Surface is used on the Charge Posting screen when entering dental charges. The surface is indicated on dental claims.
Time Zone Time Zone is used in the Zip Codes table.
Tooth Tooth is used on the Charge Posting screen when entering dental charges. The tooth is indicated on dental claims.
Type of Admission Type of Admission is used on the Encounter Maintenance > UB tab. The type of admission affects Field Locator 14 on UB claims.
Type of Facility Type of Facility is used as the first digit of the three digit code that prints in Field Locator 4 (Type of Bill) on UB claims. The code indicates the type of facility where the service was performed on the claim.
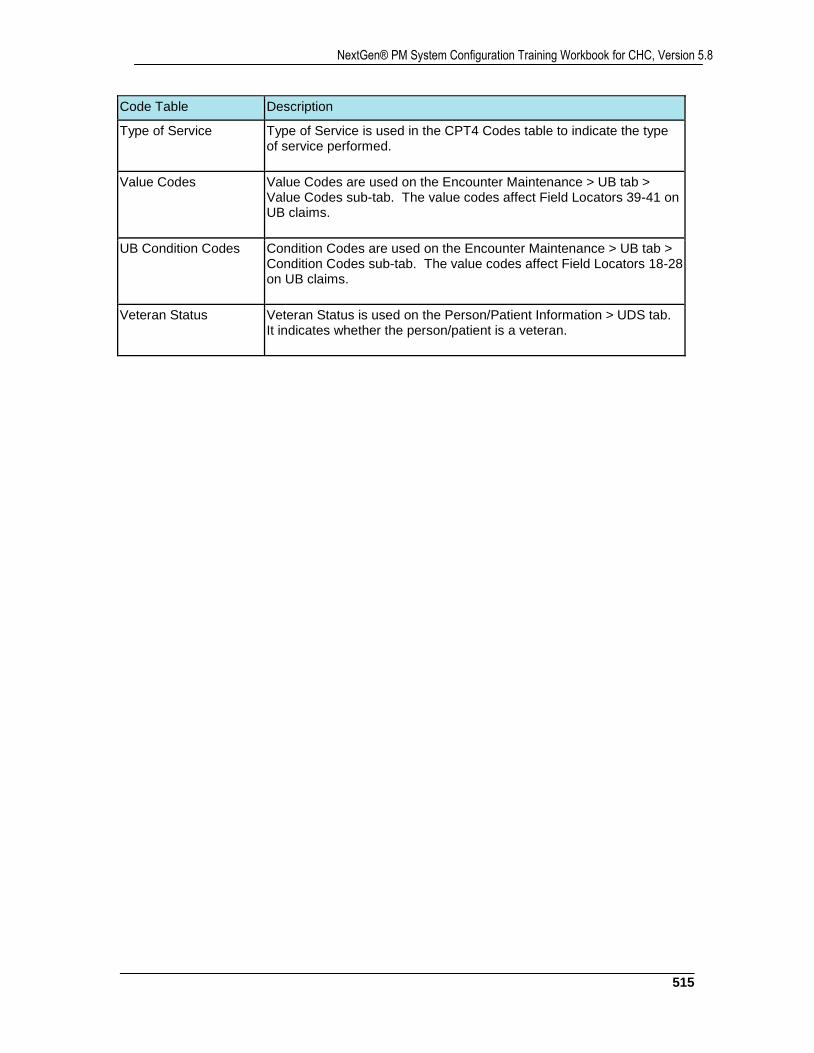
515
NextGen® PM System Configuration Training Workbook for CHC, Version 5.8
Code Table Description
Type of Service Type of Service is used in the CPT4 Codes table to indicate the type of service performed.
Value Codes Value Codes are used on the Encounter Maintenance > UB tab > Value Codes sub-tab. The value codes affect Field Locators 39-41 on UB claims.
UB Condition Codes Condition Codes are used on the Encounter Maintenance > UB tab > Condition Codes sub-tab. The value codes affect Field Locators 18-28 on UB claims.
Veteran Status Veteran Status is used on the Person/Patient Information > UDS tab. It indicates whether the person/patient is a veteran.
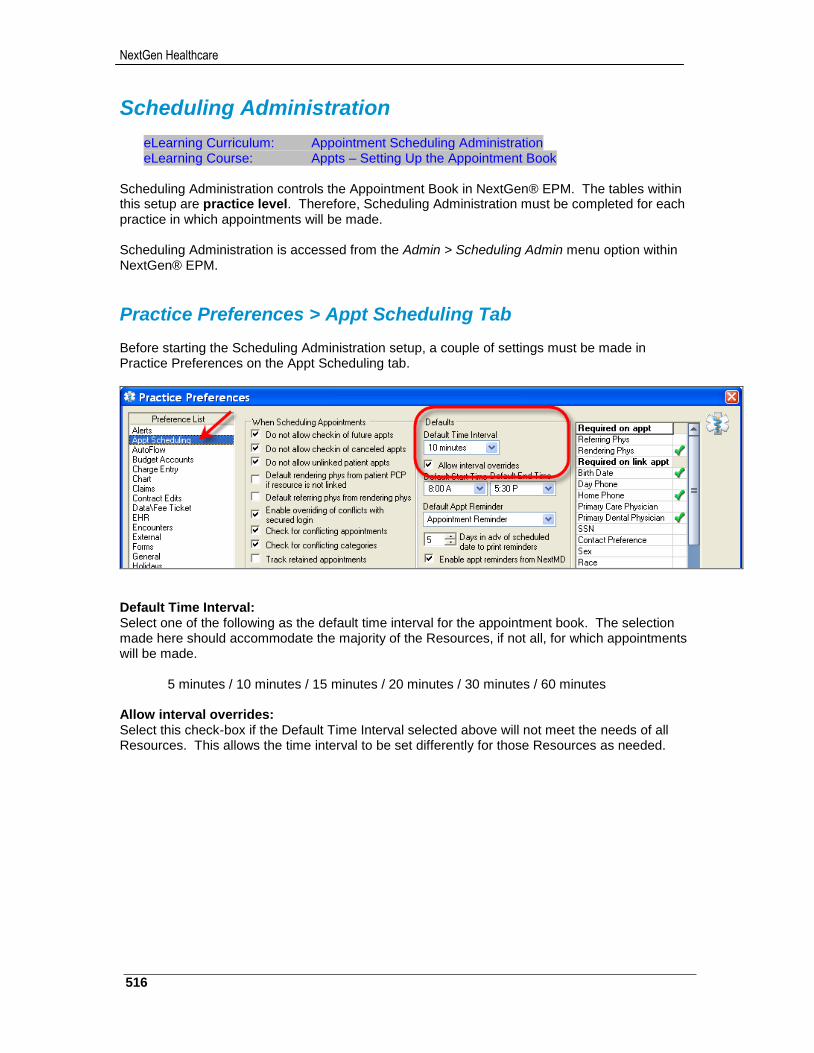
NextGen Healthcare
516
Scheduling Administration
eLearning Curriculum: Appointment Scheduling Administration eLearning Course: Appts – Setting Up the Appointment Book
Scheduling Administration controls the Appointment Book in NextGen® EPM. The tables within this setup are practice level. Therefore, Scheduling Administration must be completed for each practice in which appointments will be made. Scheduling Administration is accessed from the Admin > Scheduling Admin menu option within NextGen® EPM.
Practice Preferences > Appt Scheduling Tab Before starting the Scheduling Administration setup, a couple of settings must be made in Practice Preferences on the Appt Scheduling tab.
Default Time Interval: Select one of the following as the default time interval for the appointment book. The selection made here should accommodate the majority of the Resources, if not all, for which appointments will be made.
5 minutes / 10 minutes / 15 minutes / 20 minutes / 30 minutes / 60 minutes Allow interval overrides: Select this check-box if the Default Time Interval selected above will not meet the needs of all Resources. This allows the time interval to be set differently for those Resources as needed.
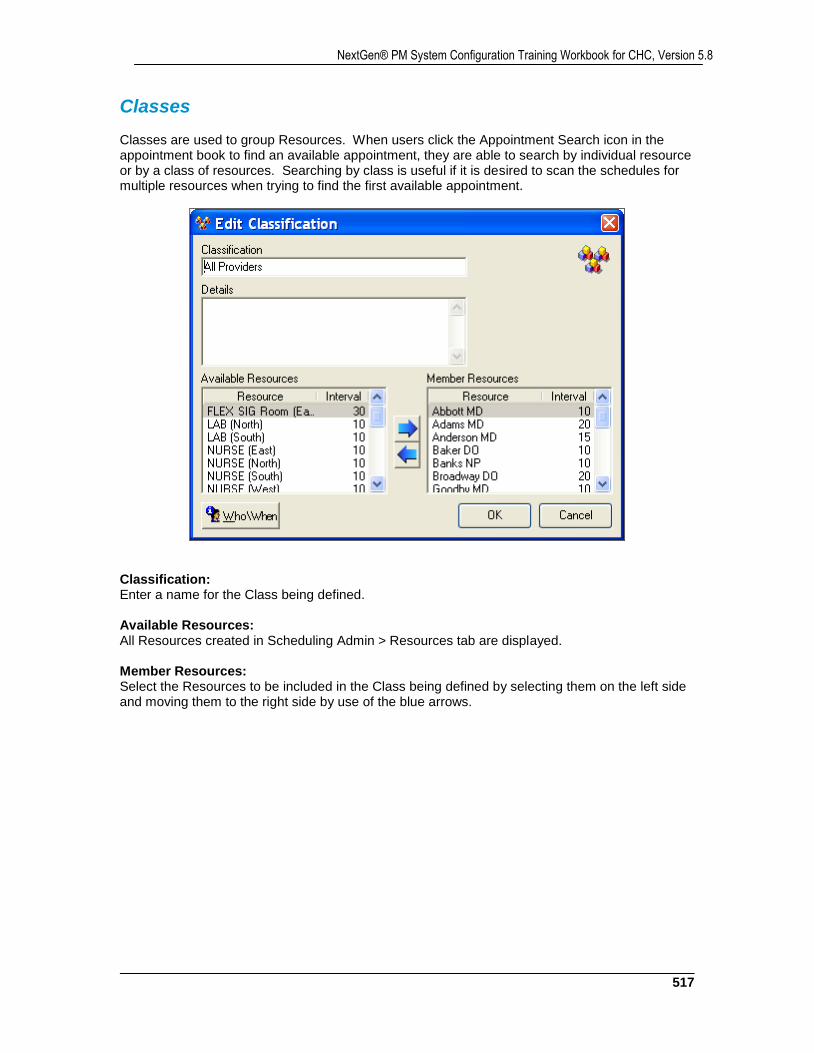
517
NextGen® PM System Configuration Training Workbook for CHC, Version 5.8
Classes Classes are used to group Resources. When users click the Appointment Search icon in the appointment book to find an available appointment, they are able to search by individual resource or by a class of resources. Searching by class is useful if it is desired to scan the schedules for multiple resources when trying to find the first available appointment.
Classification: Enter a name for the Class being defined. Available Resources: All Resources created in Scheduling Admin > Resources tab are displayed. Member Resources: Select the Resources to be included in the Class being defined by selecting them on the left side and moving them to the right side by use of the blue arrows.
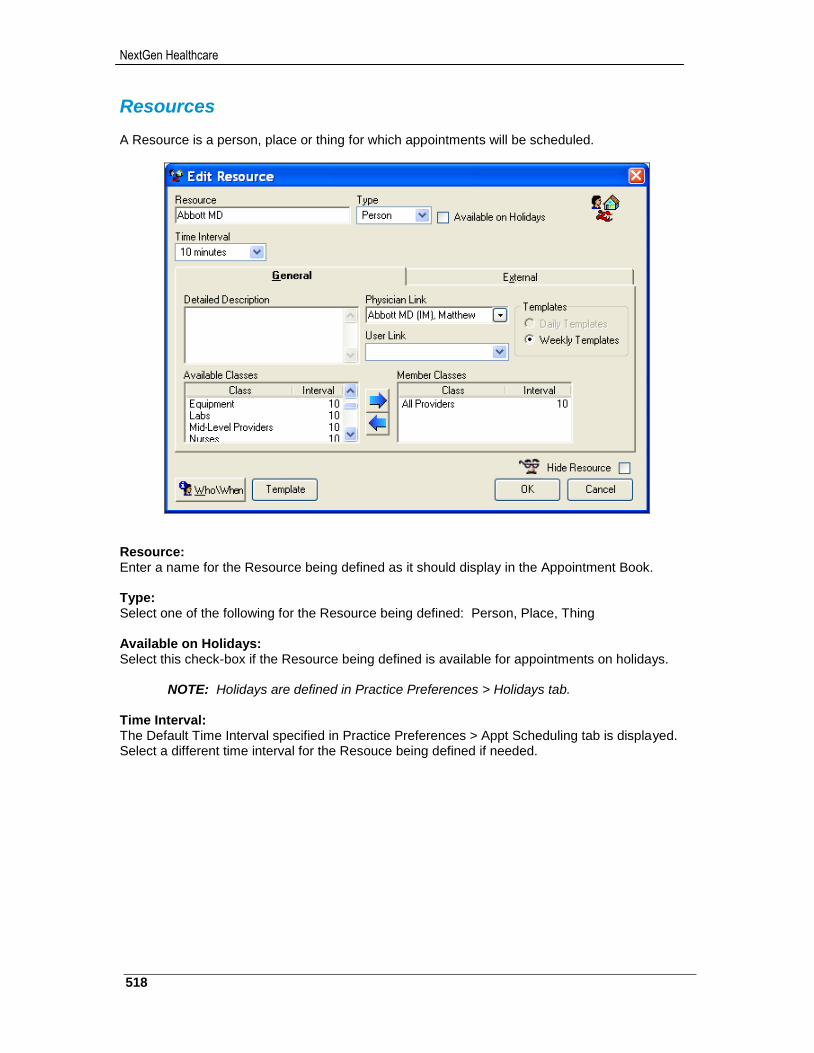
NextGen Healthcare
518
Resources A Resource is a person, place or thing for which appointments will be scheduled.
Resource: Enter a name for the Resource being defined as it should display in the Appointment Book. Type: Select one of the following for the Resource being defined: Person, Place, Thing Available on Holidays: Select this check-box if the Resource being defined is available for appointments on holidays.
NOTE: Holidays are defined in Practice Preferences > Holidays tab. Time Interval: The Default Time Interval specified in Practice Preferences > Appt Scheduling tab is displayed. Select a different time interval for the Resouce being defined if needed.
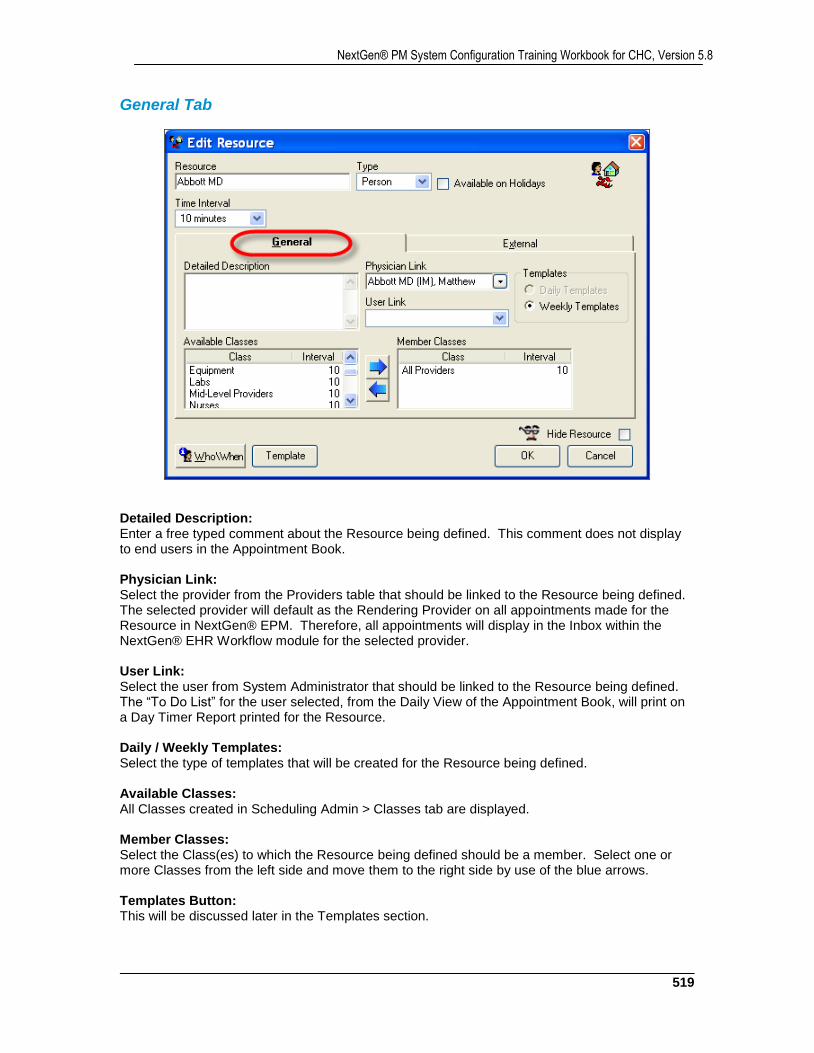
519
NextGen® PM System Configuration Training Workbook for CHC, Version 5.8
General Tab
Detailed Description: Enter a free typed comment about the Resource being defined. This comment does not display to end users in the Appointment Book. Physician Link: Select the provider from the Providers table that should be linked to the Resource being defined. The selected provider will default as the Rendering Provider on all appointments made for the Resource in NextGen® EPM. Therefore, all appointments will display in the Inbox within the NextGen® EHR Workflow module for the selected provider. User Link: Select the user from System Administrator that should be linked to the Resource being defined. The “To Do List” for the user selected, from the Daily View of the Appointment Book, will print on a Day Timer Report printed for the Resource. Daily / Weekly Templates: Select the type of templates that will be created for the Resource being defined. Available Classes: All Classes created in Scheduling Admin > Classes tab are displayed. Member Classes: Select the Class(es) to which the Resource being defined should be a member. Select one or more Classes from the left side and move them to the right side by use of the blue arrows. Templates Button: This will be discussed later in the Templates section.

NextGen Healthcare
520
External Tab The External tab is used when interfaces will be implemented between NextGen and one or more external systems. This tab allows a cross-reference to be defined between the NextGen resource and the external system resource. NOTE: A NextGen Interface Analyst will review the appropriate setup during the interface implementation.
External ID: The alpha-numeric ID assigned by the vendor for the Resource being defined. External System: Select the vendor for the interface
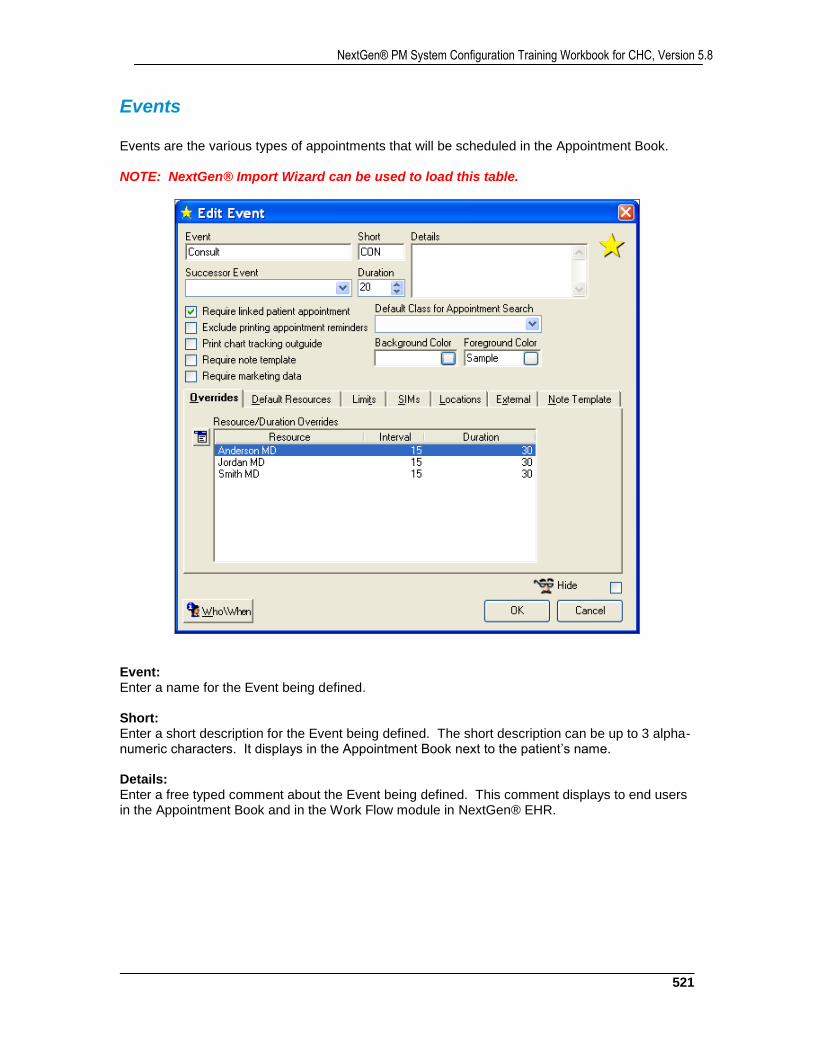
521
NextGen® PM System Configuration Training Workbook for CHC, Version 5.8
Events Events are the various types of appointments that will be scheduled in the Appointment Book. NOTE: NextGen® Import Wizard can be used to load this table.
Event: Enter a name for the Event being defined. Short: Enter a short description for the Event being defined. The short description can be up to 3 alpha-numeric characters. It displays in the Appointment Book next to the patient’s name. Details: Enter a free typed comment about the Event being defined. This comment displays to end users in the Appointment Book and in the Work Flow module in NextGen® EHR.
NextGen Healthcare
522
Successor Event: Select an Event that should be scheduled after the Event being defined. During check-in of the current event, the following prompt displays:
Duration: Select the duration for the Event being defined that accommodates the majority of the Resources, if not all, for which the Event will be scheduled. Require linked patient appointment: Select this check-box if the Event being defined should always have a patient linked to it. For example, an Adult Physical event would require a patient, but a Meeting event would not. Exclude printing appointment reminders: Select this check-box if the Event being defined should not qualify for appointment reminder letters. Print chart tracking outguide: This check-box displays only if the system is licensed for the NextGen® Chart Tracking module. NOTE: Chart Tracking is a legacy module that is no longer available to clients. Require note template: Select this check-box for the Event being defined if users should be required to complete a Micrsoft® Word document template (.dot) when the event is scheduled.
NOTE: The document template is specified on the Note Template tab. Require marketing data: Select this check-box if the Event being defined should require users to capture a Marketing Plan when the event is being scheduled. Default Class for Appointment Search: Select the Class that should default when users click the Appointment Search icon in the appointment book to find the first available time slot for the Event being defined. Background Color: Click the button to select a background color for the Event being defined. The color will display to users in the Appointment Book on the time slots where the Event is scheduled. Foreground Color: Click the button to select a foreground color for the Event being defined. The color will display the patient’s name in the selected color to users in the Appointment Book.
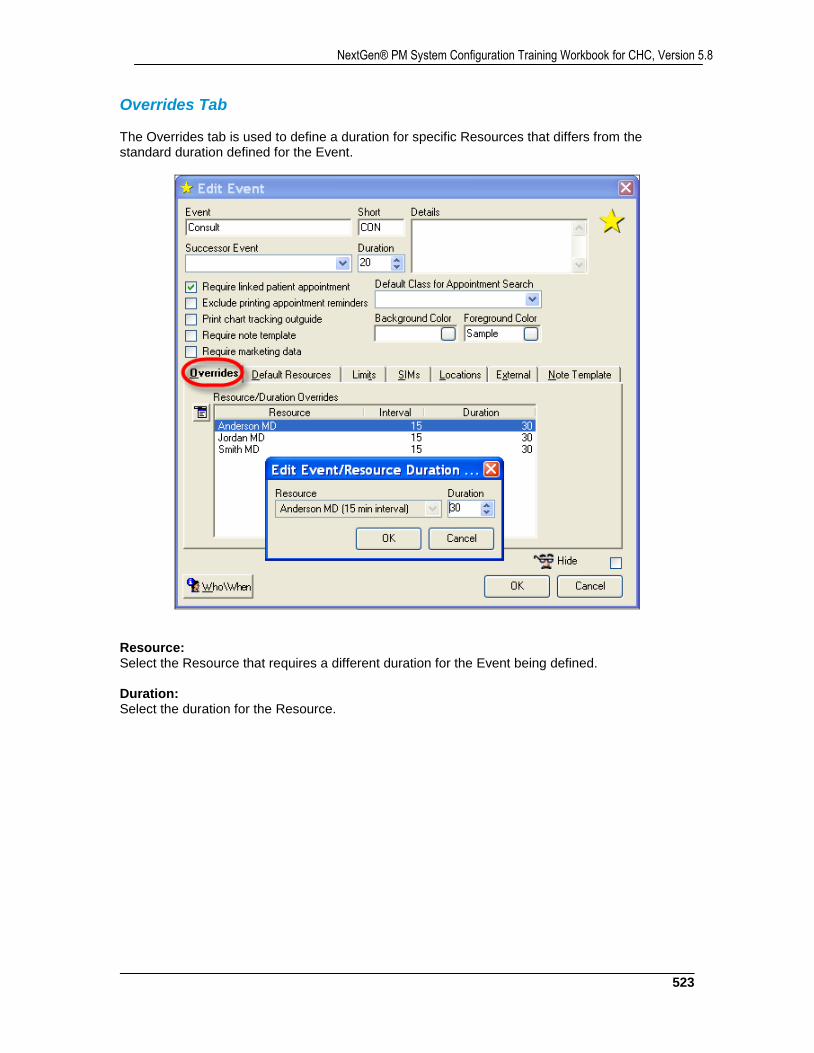
523
NextGen® PM System Configuration Training Workbook for CHC, Version 5.8
Overrides Tab The Overrides tab is used to define a duration for specific Resources that differs from the standard duration defined for the Event.
Resource: Select the Resource that requires a different duration for the Event being defined. Duration: Select the duration for the Resource.
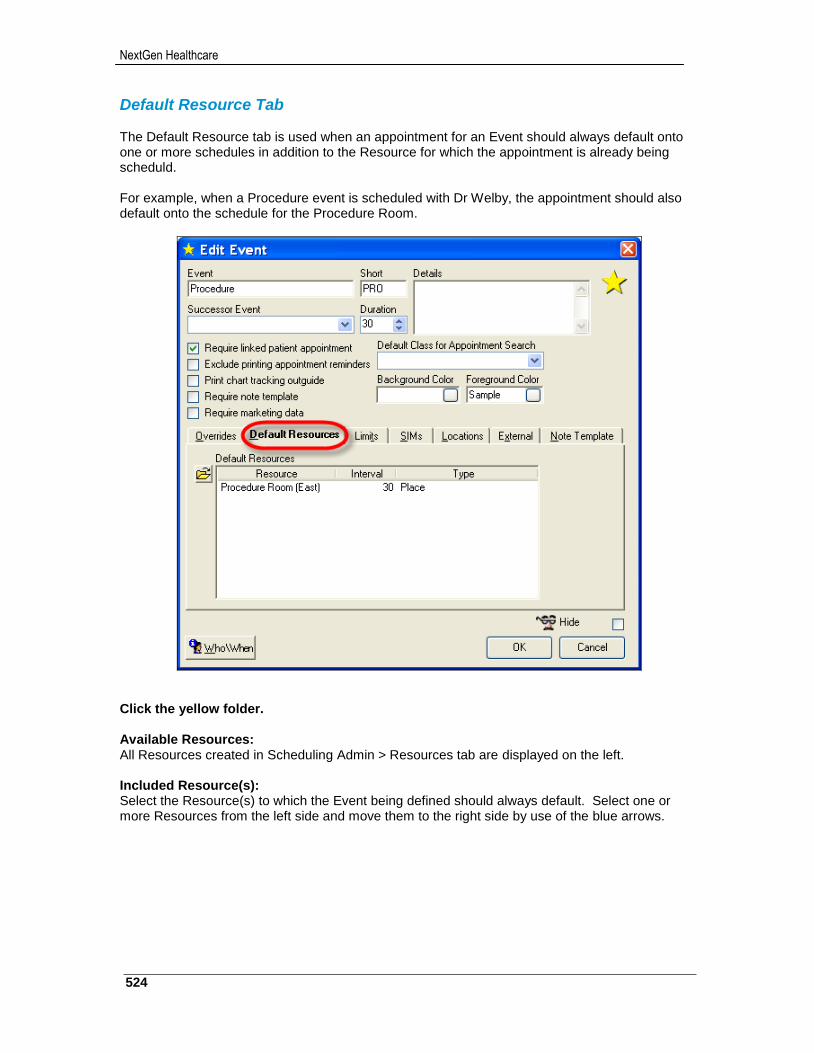
NextGen Healthcare
524
Default Resource Tab The Default Resource tab is used when an appointment for an Event should always default onto one or more schedules in addition to the Resource for which the appointment is already being scheduld. For example, when a Procedure event is scheduled with Dr Welby, the appointment should also default onto the schedule for the Procedure Room.
Click the yellow folder. Available Resources: All Resources created in Scheduling Admin > Resources tab are displayed on the left. Included Resource(s): Select the Resource(s) to which the Event being defined should always default. Select one or more Resources from the left side and move them to the right side by use of the blue arrows.
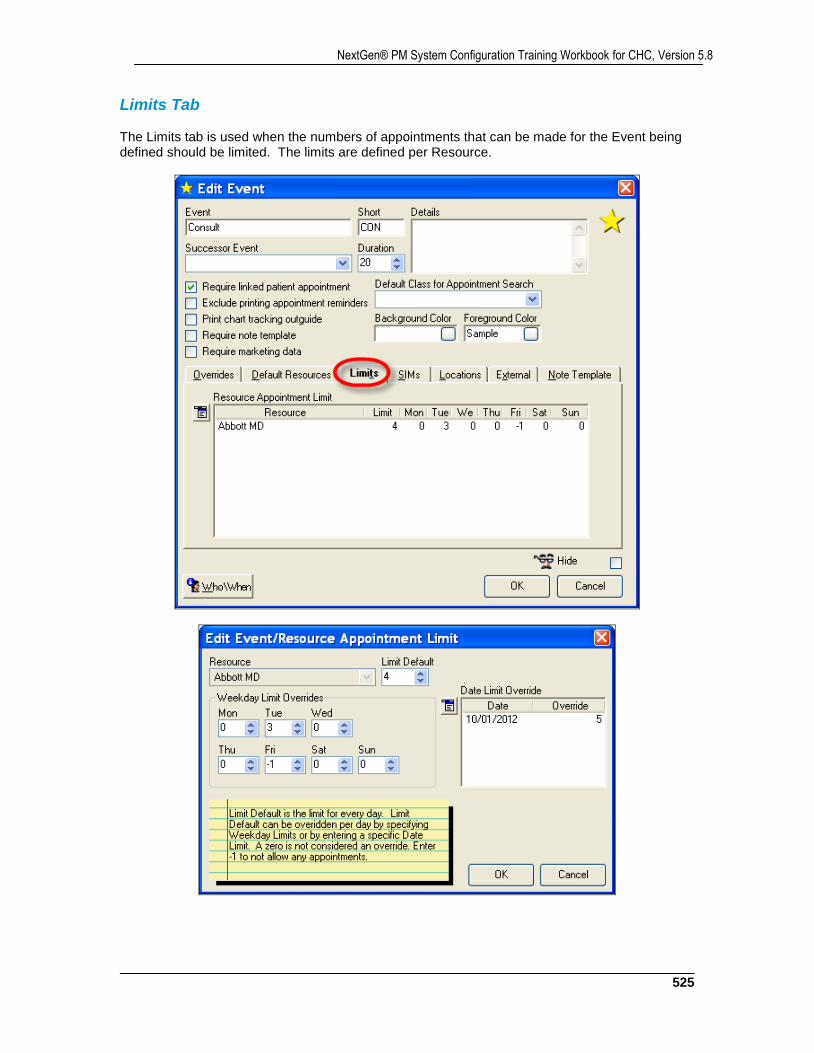
525
NextGen® PM System Configuration Training Workbook for CHC, Version 5.8
Limits Tab The Limits tab is used when the numbers of appointments that can be made for the Event being defined should be limited. The limits are defined per Resource.
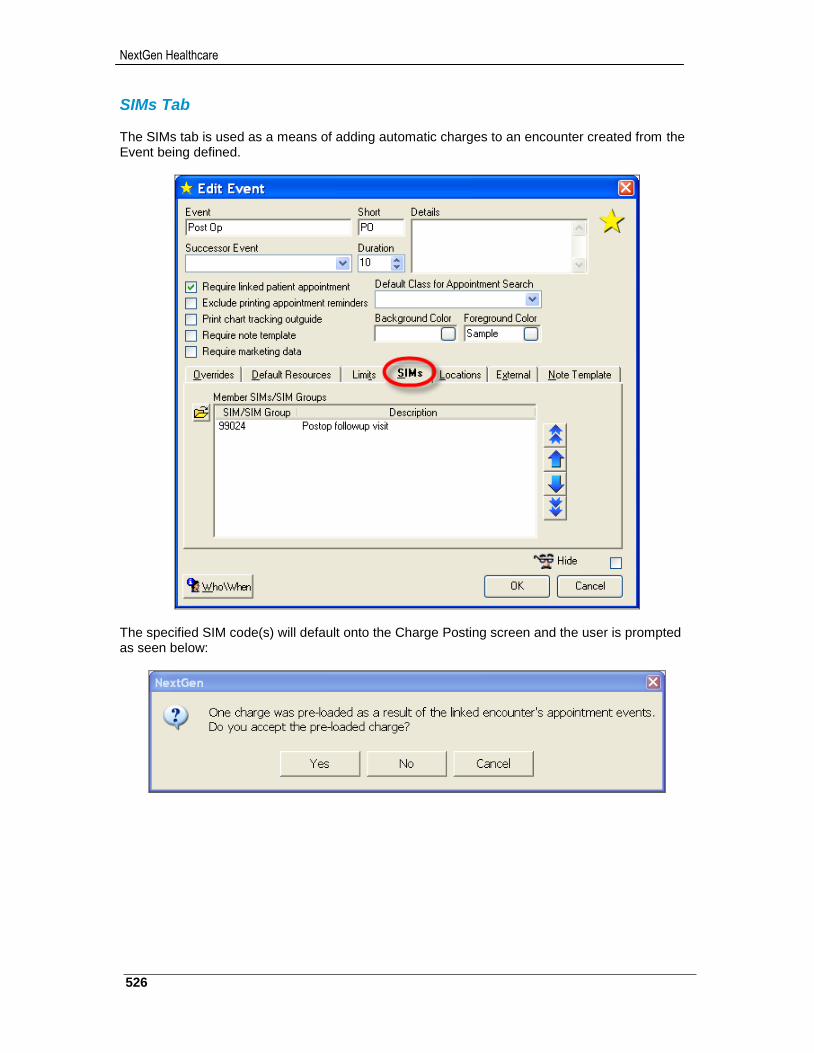
NextGen Healthcare
526
SIMs Tab The SIMs tab is used as a means of adding automatic charges to an encounter created from the Event being defined.
The specified SIM code(s) will default onto the Charge Posting screen and the user is prompted as seen below:
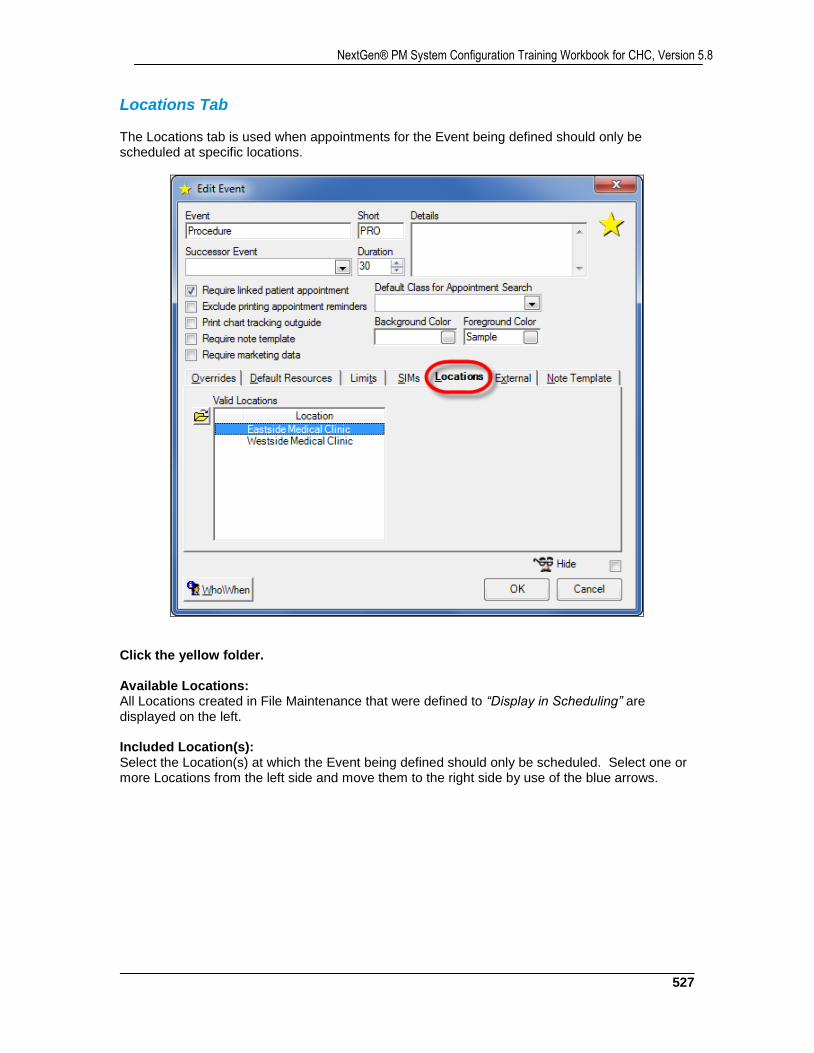
527
NextGen® PM System Configuration Training Workbook for CHC, Version 5.8
Locations Tab The Locations tab is used when appointments for the Event being defined should only be scheduled at specific locations.
Click the yellow folder. Available Locations: All Locations created in File Maintenance that were defined to “Display in Scheduling” are displayed on the left. Included Location(s): Select the Location(s) at which the Event being defined should only be scheduled. Select one or more Locations from the left side and move them to the right side by use of the blue arrows.
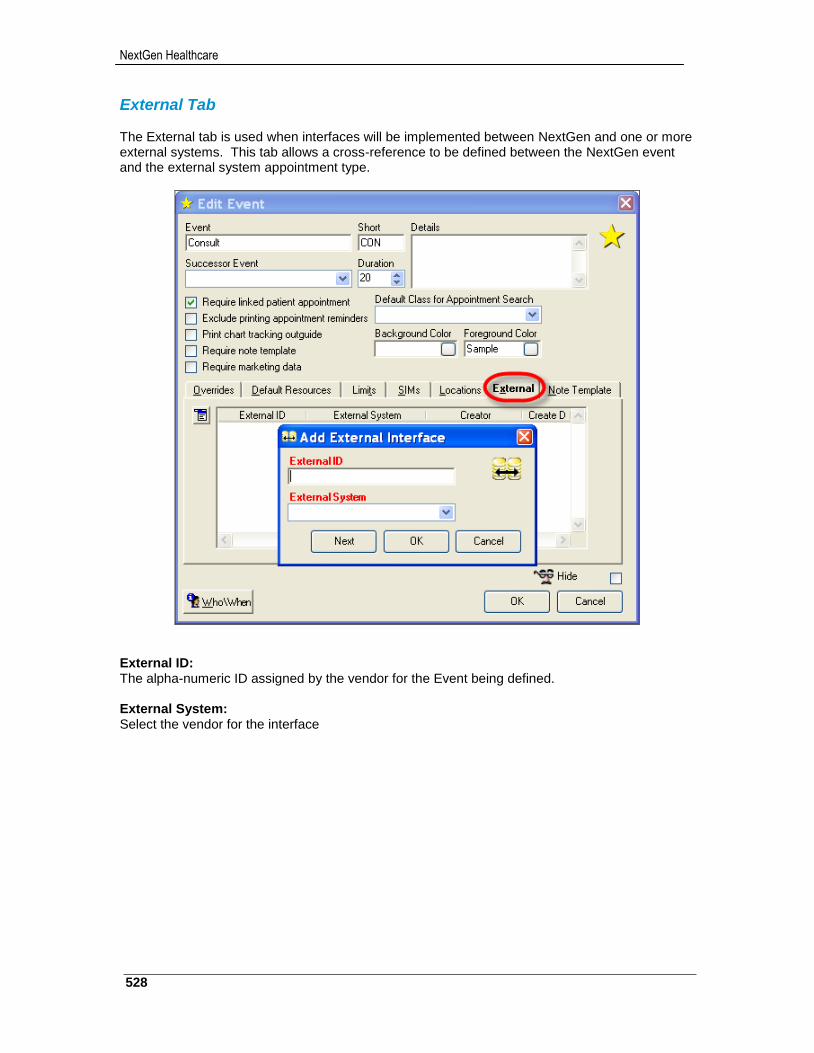
NextGen Healthcare
528
External Tab The External tab is used when interfaces will be implemented between NextGen and one or more external systems. This tab allows a cross-reference to be defined between the NextGen event and the external system appointment type.
External ID: The alpha-numeric ID assigned by the vendor for the Event being defined. External System: Select the vendor for the interface
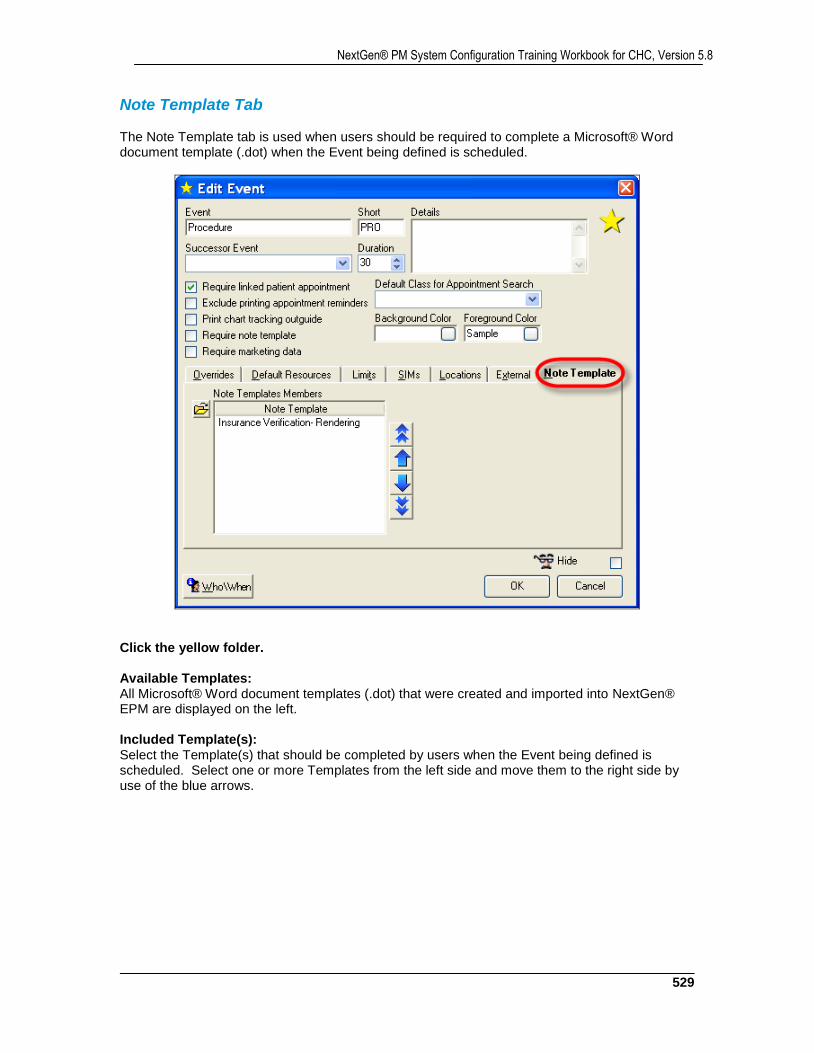
529
NextGen® PM System Configuration Training Workbook for CHC, Version 5.8
Note Template Tab The Note Template tab is used when users should be required to complete a Microsoft® Word document template (.dot) when the Event being defined is scheduled.
Click the yellow folder. Available Templates: All Microsoft® Word document templates (.dot) that were created and imported into NextGen® EPM are displayed on the left. Included Template(s): Select the Template(s) that should be completed by users when the Event being defined is scheduled. Select one or more Templates from the left side and move them to the right side by use of the blue arrows.
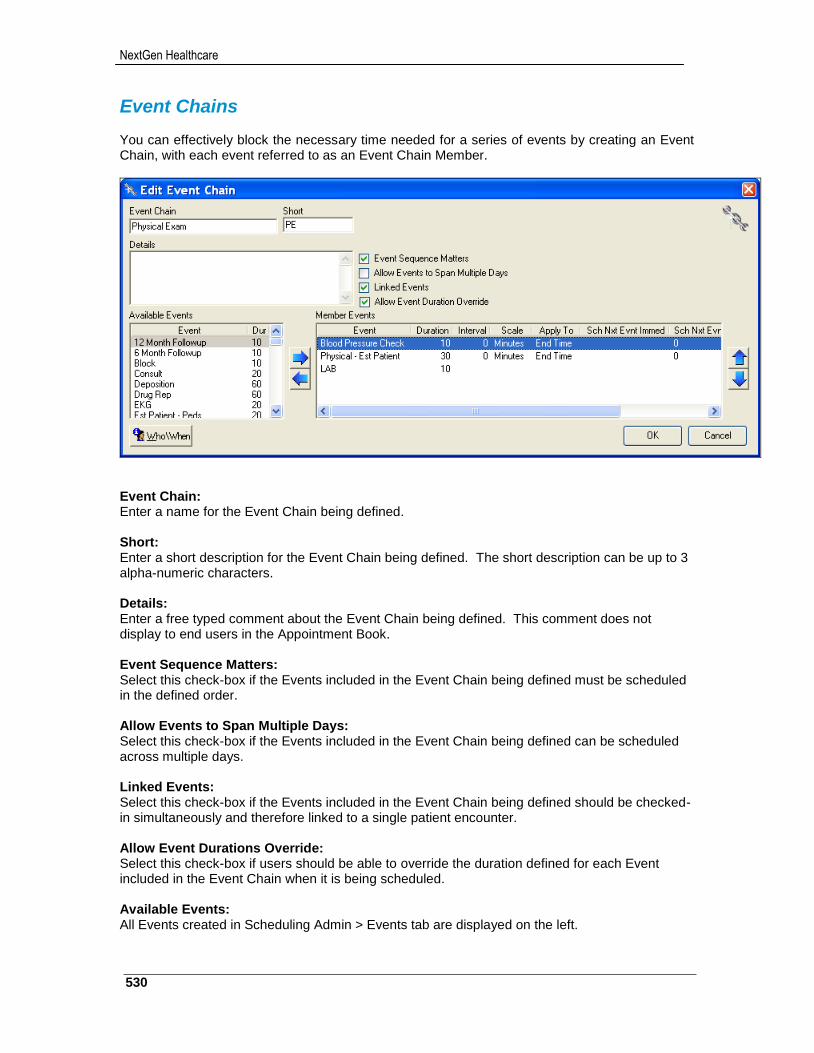
NextGen Healthcare
530
Event Chains You can effectively block the necessary time needed for a series of events by creating an Event Chain, with each event referred to as an Event Chain Member.
Event Chain: Enter a name for the Event Chain being defined. Short: Enter a short description for the Event Chain being defined. The short description can be up to 3 alpha-numeric characters. Details: Enter a free typed comment about the Event Chain being defined. This comment does not display to end users in the Appointment Book. Event Sequence Matters: Select this check-box if the Events included in the Event Chain being defined must be scheduled in the defined order. Allow Events to Span Multiple Days: Select this check-box if the Events included in the Event Chain being defined can be scheduled across multiple days. Linked Events: Select this check-box if the Events included in the Event Chain being defined should be checked-in simultaneously and therefore linked to a single patient encounter. Allow Event Durations Override: Select this check-box if users should be able to override the duration defined for each Event included in the Event Chain when it is being scheduled. Available Events: All Events created in Scheduling Admin > Events tab are displayed on the left.
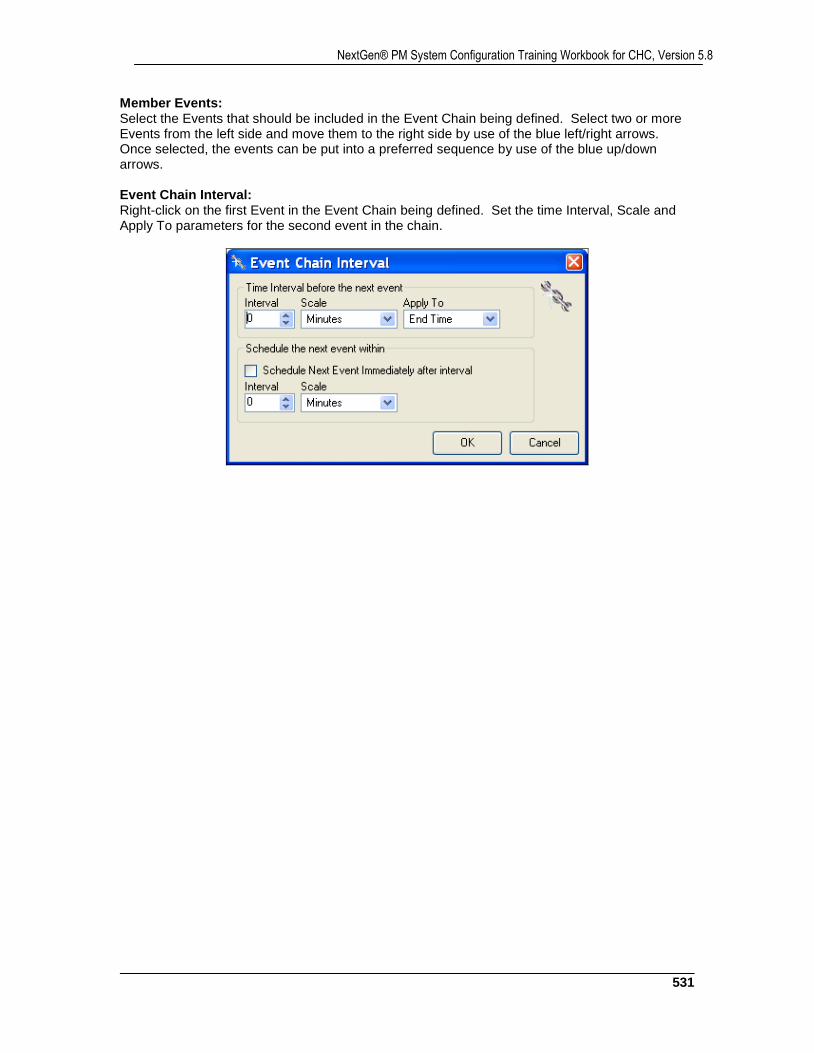
531
NextGen® PM System Configuration Training Workbook for CHC, Version 5.8
Member Events: Select the Events that should be included in the Event Chain being defined. Select two or more Events from the left side and move them to the right side by use of the blue left/right arrows. Once selected, the events can be put into a preferred sequence by use of the blue up/down arrows. Event Chain Interval: Right-click on the first Event in the Event Chain being defined. Set the time Interval, Scale and Apply To parameters for the second event in the chain.
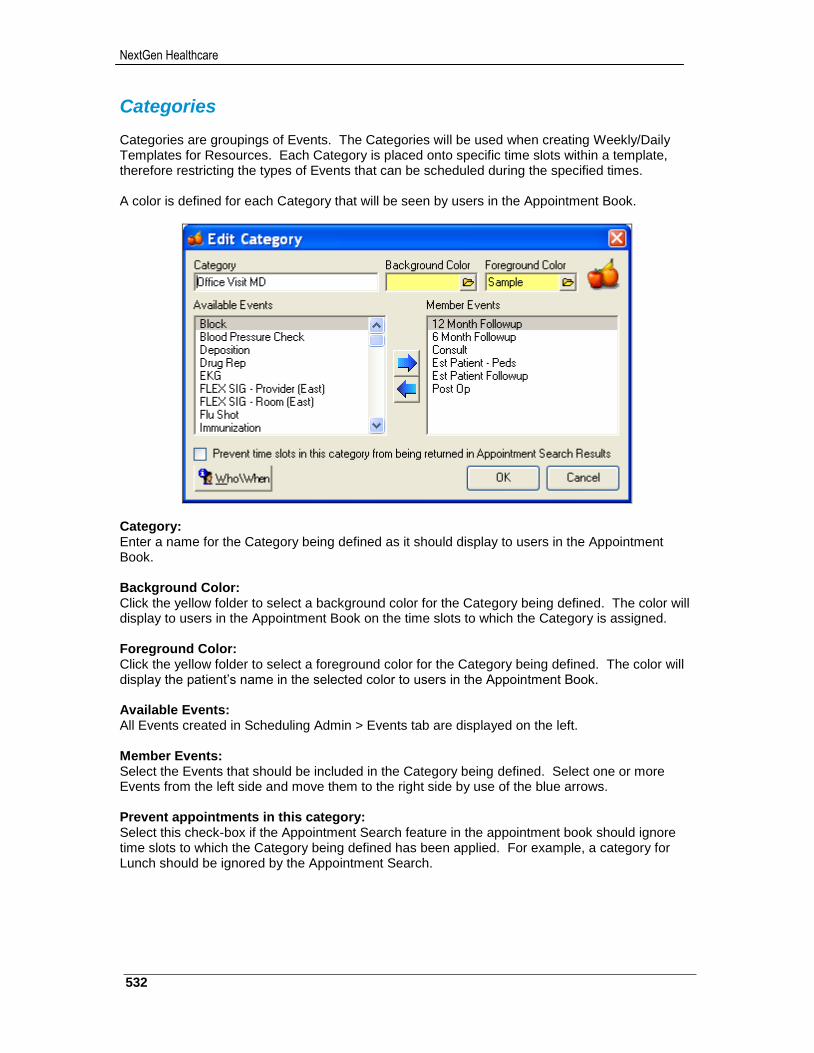
NextGen Healthcare
532
Categories Categories are groupings of Events. The Categories will be used when creating Weekly/Daily Templates for Resources. Each Category is placed onto specific time slots within a template, therefore restricting the types of Events that can be scheduled during the specified times. A color is defined for each Category that will be seen by users in the Appointment Book.
Category: Enter a name for the Category being defined as it should display to users in the Appointment Book. Background Color: Click the yellow folder to select a background color for the Category being defined. The color will display to users in the Appointment Book on the time slots to which the Category is assigned. Foreground Color: Click the yellow folder to select a foreground color for the Category being defined. The color will display the patient’s name in the selected color to users in the Appointment Book. Available Events: All Events created in Scheduling Admin > Events tab are displayed on the left. Member Events: Select the Events that should be included in the Category being defined. Select one or more Events from the left side and move them to the right side by use of the blue arrows. Prevent appointments in this category: Select this check-box if the Appointment Search feature in the appointment book should ignore time slots to which the Category being defined has been applied. For example, a category for Lunch should be ignored by the Appointment Search.
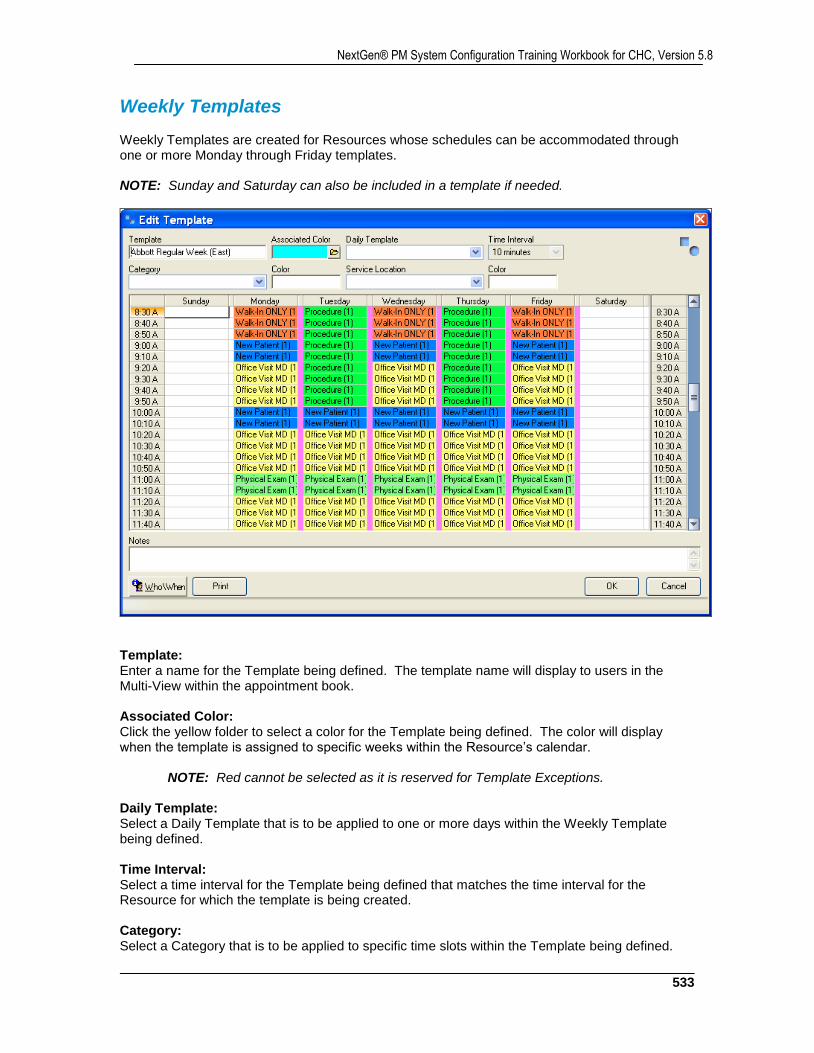
533
NextGen® PM System Configuration Training Workbook for CHC, Version 5.8
Weekly Templates Weekly Templates are created for Resources whose schedules can be accommodated through one or more Monday through Friday templates. NOTE: Sunday and Saturday can also be included in a template if needed.
Template: Enter a name for the Template being defined. The template name will display to users in the Multi-View within the appointment book. Associated Color: Click the yellow folder to select a color for the Template being defined. The color will display when the template is assigned to specific weeks within the Resource’s calendar.
NOTE: Red cannot be selected as it is reserved for Template Exceptions. Daily Template: Select a Daily Template that is to be applied to one or more days within the Weekly Template being defined. Time Interval: Select a time interval for the Template being defined that matches the time interval for the Resource for which the template is being created. Category: Select a Category that is to be applied to specific time slots within the Template being defined.
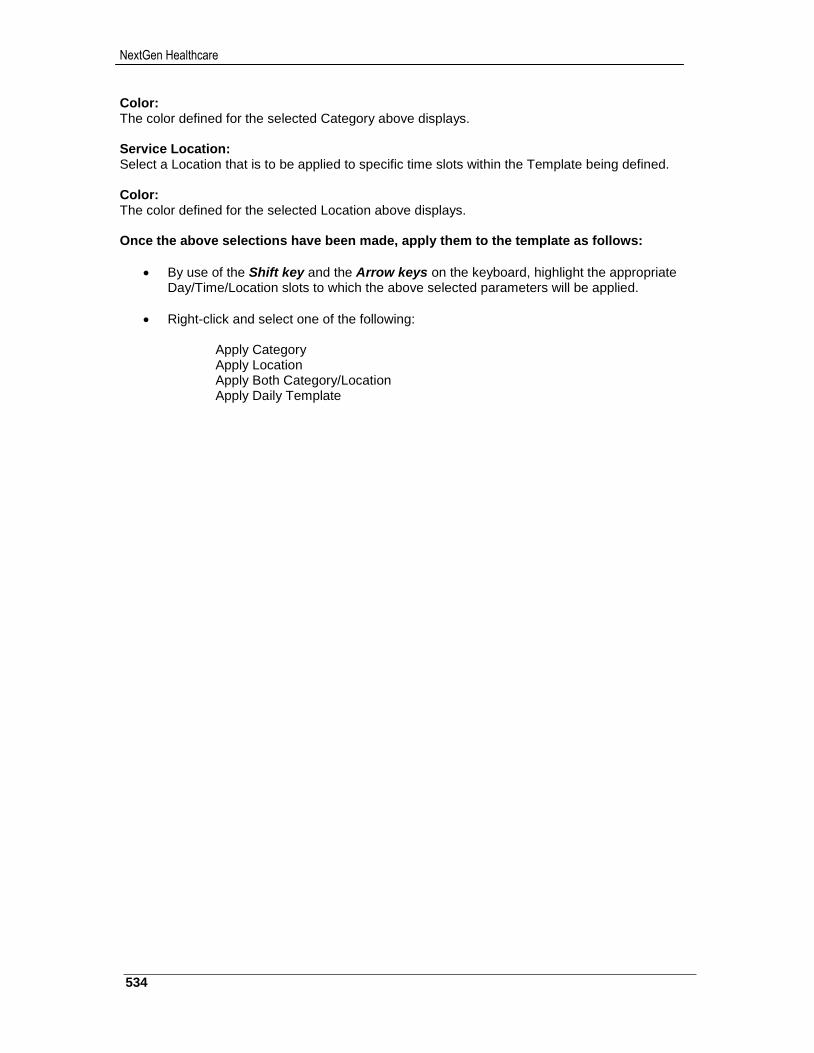
NextGen Healthcare
534
Color: The color defined for the selected Category above displays. Service Location: Select a Location that is to be applied to specific time slots within the Template being defined. Color: The color defined for the selected Location above displays. Once the above selections have been made, apply them to the template as follows:
By use of the Shift key and the Arrow keys on the keyboard, highlight the appropriate Day/Time/Location slots to which the above selected parameters will be applied.
Right-click and select one of the following:
Apply Category Apply Location Apply Both Category/Location Apply Daily Template

535
NextGen® PM System Configuration Training Workbook for CHC, Version 5.8
Daily Templates Daily Templates are created for Resources whose schedules cannot be accommodated through one or more Monday through Friday weekly templates.
Template: Enter a name for the Template being defined. The template name will display to users in the Multi-View within the appointment book. Associated Color: Click the yellow folder to select a color for the Template being defined. The color will display when the template is assigned to specific days within the Resource’s calendar.
NOTE: Red cannot be selected as it is reserved for Template Exceptions.
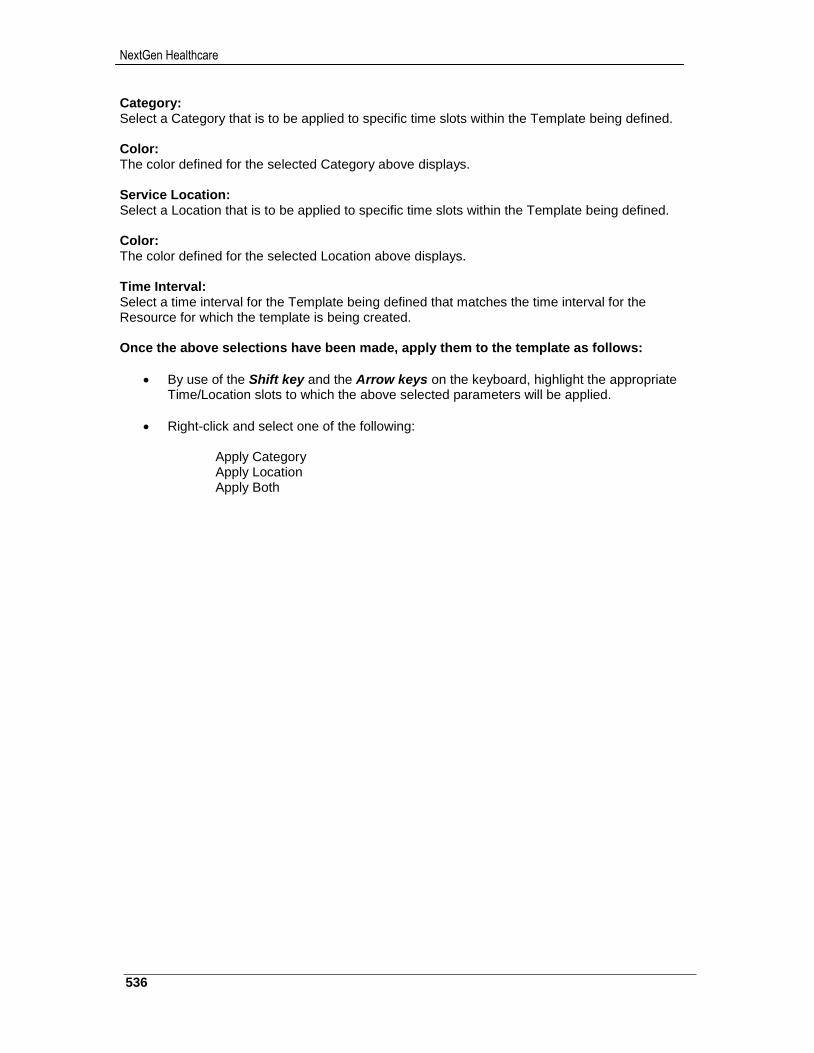
NextGen Healthcare
536
Category: Select a Category that is to be applied to specific time slots within the Template being defined. Color: The color defined for the selected Category above displays. Service Location: Select a Location that is to be applied to specific time slots within the Template being defined. Color: The color defined for the selected Location above displays. Time Interval: Select a time interval for the Template being defined that matches the time interval for the Resource for which the template is being created. Once the above selections have been made, apply them to the template as follows:
By use of the Shift key and the Arrow keys on the keyboard, highlight the appropriate Time/Location slots to which the above selected parameters will be applied.
Right-click and select one of the following:
Apply Category Apply Location Apply Both
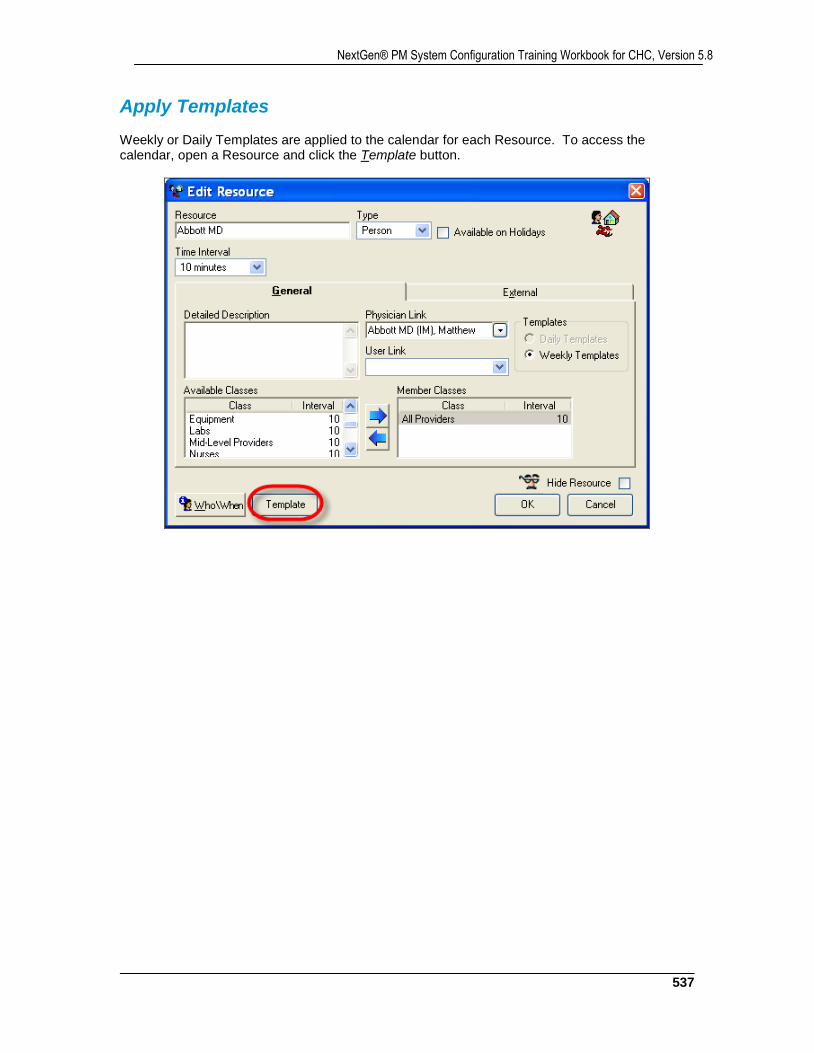
537
NextGen® PM System Configuration Training Workbook for CHC, Version 5.8
Apply Templates Weekly or Daily Templates are applied to the calendar for each Resource. To access the calendar, open a Resource and click the Template button.
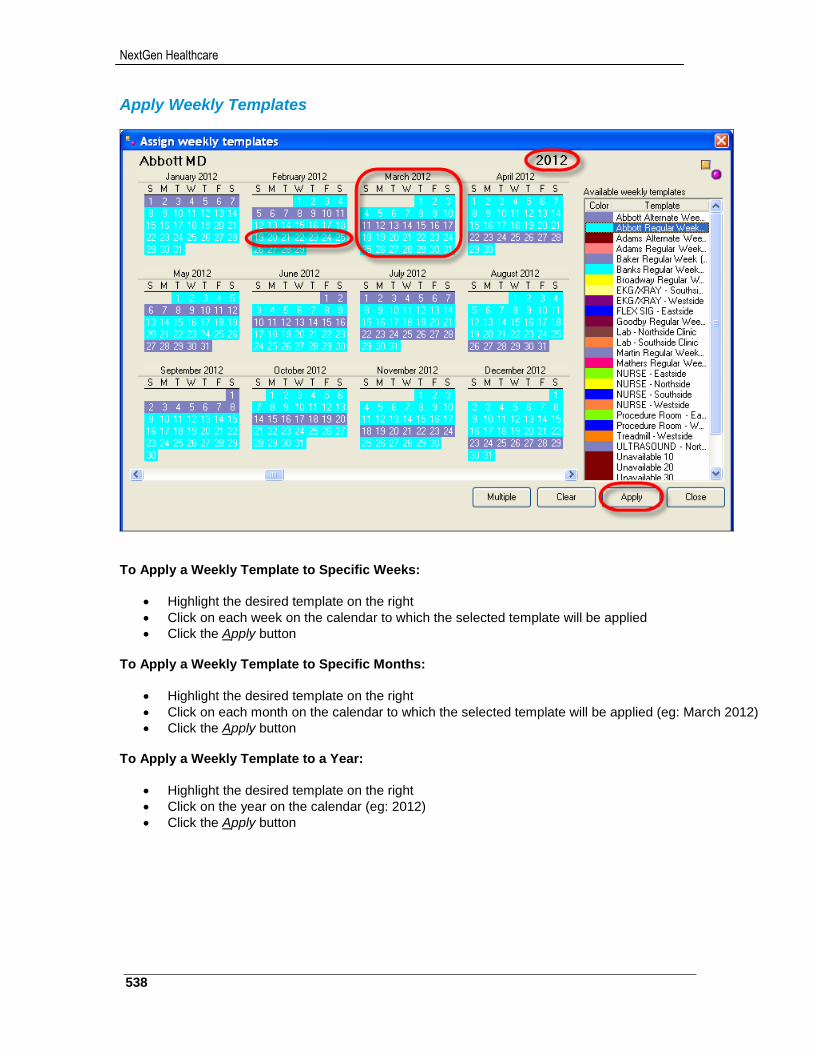
NextGen Healthcare
538
Apply Weekly Templates
To Apply a Weekly Template to Specific Weeks:
Highlight the desired template on the right
Click on each week on the calendar to which the selected template will be applied
Click the Apply button To Apply a Weekly Template to Specific Months:
Highlight the desired template on the right
Click on each month on the calendar to which the selected template will be applied (eg: March 2012)
Click the Apply button To Apply a Weekly Template to a Year:
Highlight the desired template on the right
Click on the year on the calendar (eg: 2012)
Click the Apply button
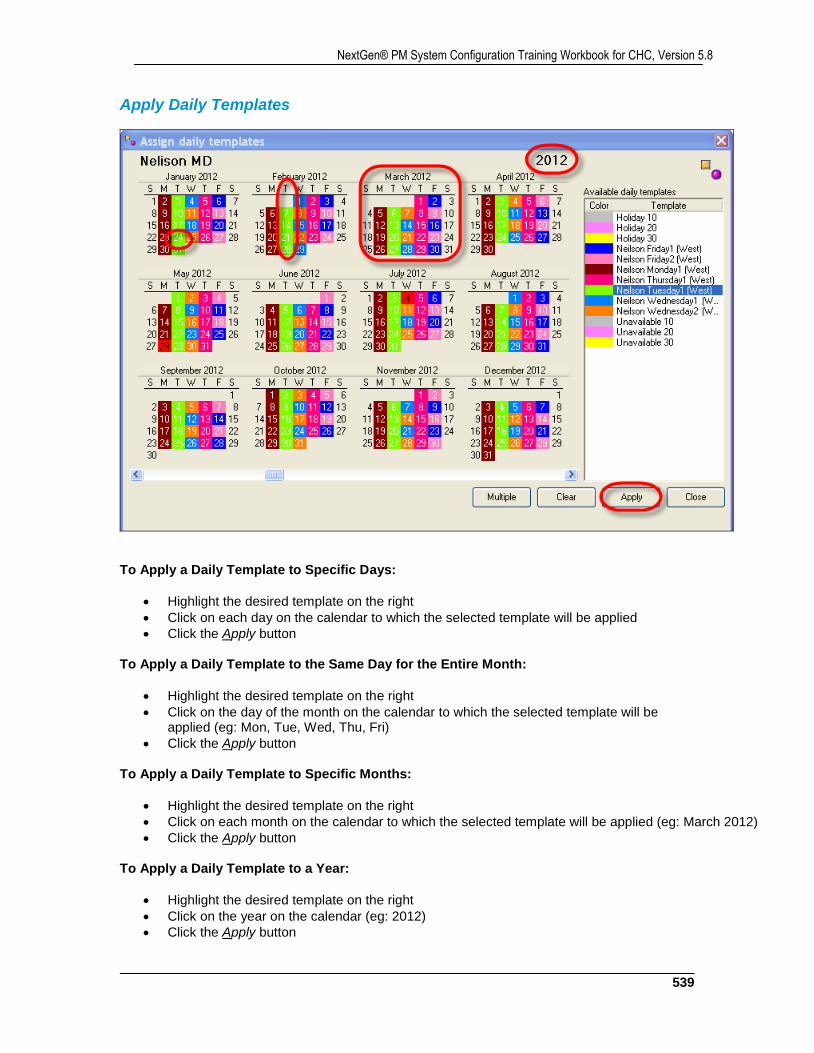
539
NextGen® PM System Configuration Training Workbook for CHC, Version 5.8
Apply Daily Templates
To Apply a Daily Template to Specific Days:
Highlight the desired template on the right
Click on each day on the calendar to which the selected template will be applied
Click the Apply button To Apply a Daily Template to the Same Day for the Entire Month:
Highlight the desired template on the right
Click on the day of the month on the calendar to which the selected template will be applied (eg: Mon, Tue, Wed, Thu, Fri)
Click the Apply button To Apply a Daily Template to Specific Months:
Highlight the desired template on the right
Click on each month on the calendar to which the selected template will be applied (eg: March 2012)
Click the Apply button To Apply a Daily Template to a Year:
Highlight the desired template on the right
Click on the year on the calendar (eg: 2012)
Click the Apply button
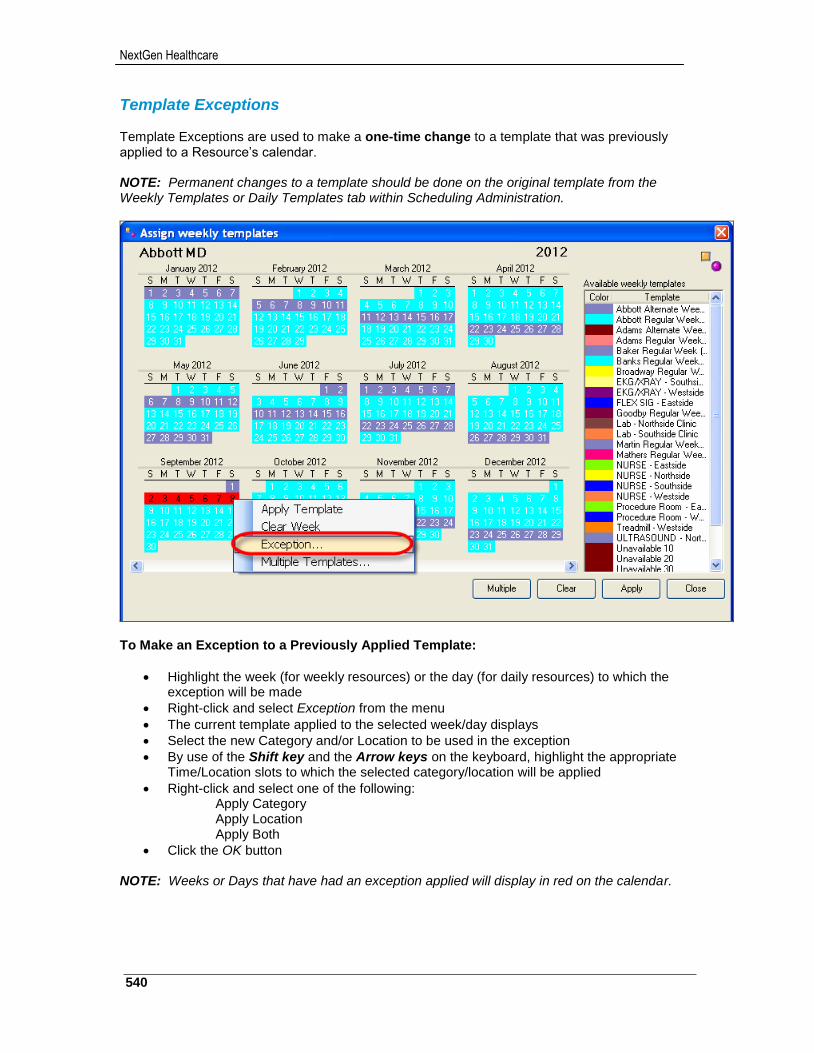
NextGen Healthcare
540
Template Exceptions Template Exceptions are used to make a one-time change to a template that was previously applied to a Resource’s calendar. NOTE: Permanent changes to a template should be done on the original template from the Weekly Templates or Daily Templates tab within Scheduling Administration.
To Make an Exception to a Previously Applied Template:
Highlight the week (for weekly resources) or the day (for daily resources) to which the exception will be made
Right-click and select Exception from the menu
The current template applied to the selected week/day displays
Select the new Category and/or Location to be used in the exception
By use of the Shift key and the Arrow keys on the keyboard, highlight the appropriate Time/Location slots to which the selected category/location will be applied
Right-click and select one of the following: Apply Category Apply Location Apply Both
Click the OK button NOTE: Weeks or Days that have had an exception applied will display in red on the calendar.
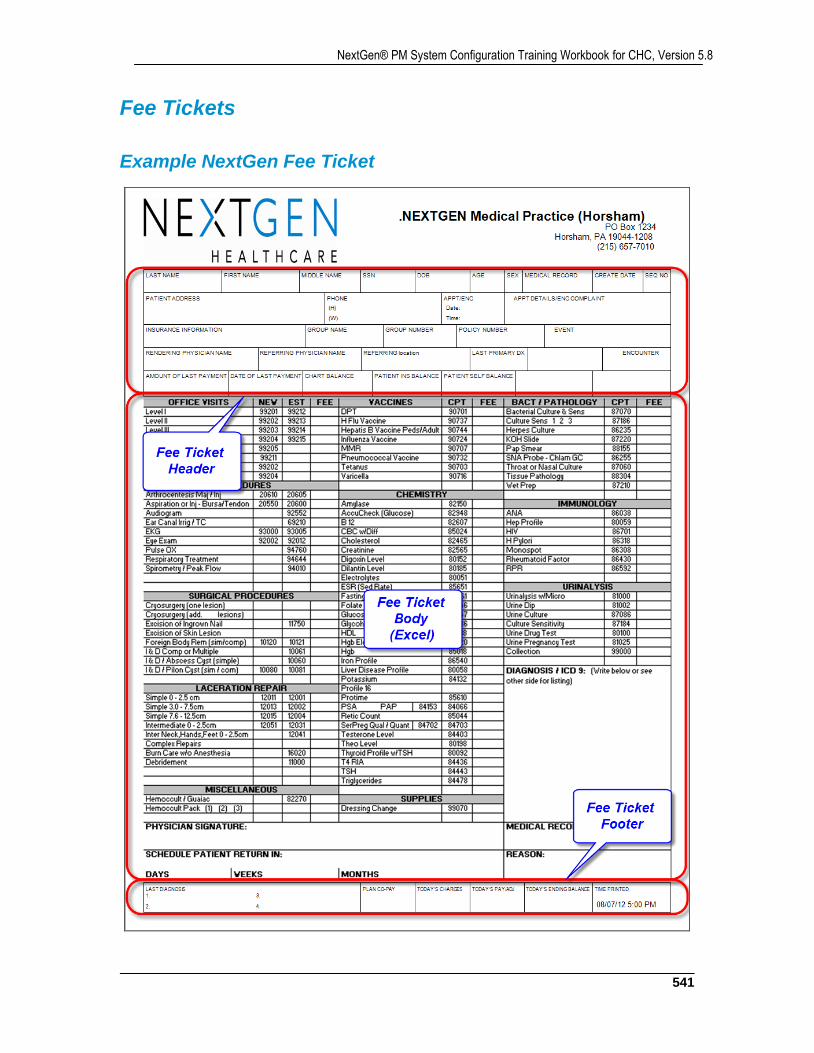
541
NextGen® PM System Configuration Training Workbook for CHC, Version 5.8
Fee Tickets
Example NextGen Fee Ticket
NextGen Healthcare
542
NextGen Fee Tickets can be utilized in EPM at any of the following four levels. Therefore, multiple fee tickets can be created if needed and then imported into EPM to accommodate the needs of each Practice, Provider, and/or Location.
Practice: Fee ticket used by all providers in all locations within the practice
Practice > Provider: Fee ticket used by specific providers within the practice
Practice > Event > Provider: Fee ticket used by specific providers for specific types of appointments (events)
Practice > Location > Provider: Fee ticket used by specific providers at specific locations
The NextGen Fee Ticket consists of a header section, a body section, and a footer section.
Fee Ticket Header and Footer The Fee Ticket header and footer sections are hard-coded in the NextGen® EPM application. There are a few options available in Practice Preferences > Data\Fee Ticket tab for slight customizations to these sections.
Fee Ticket Body The fee ticket body section is created by the client in Microsoft® Excel using a special worksheet with a static red line border. This worksheet can be obtained from your NextGen® EPM Implementation Specialist. It is important to stay within the red line border when creating a fee ticket body. This ensures that when the Excel file is converted and then imported into EPM, it fits correctly between the hard-coded header and footer sections.
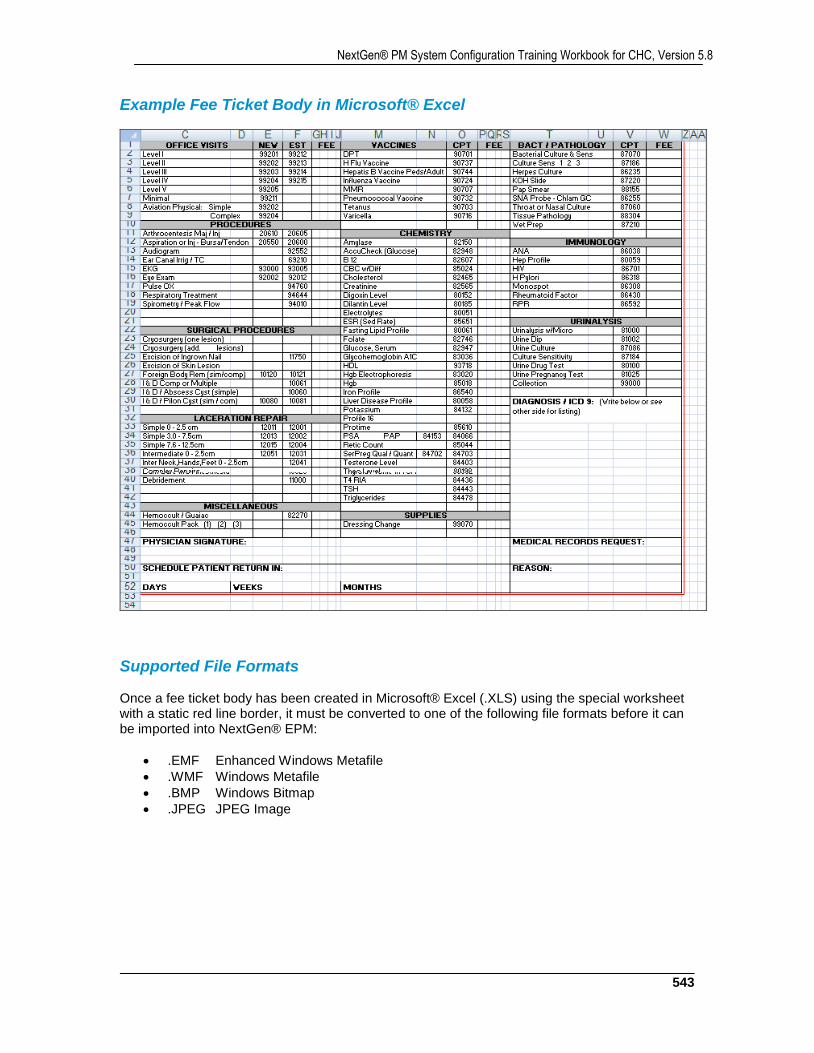
543
NextGen® PM System Configuration Training Workbook for CHC, Version 5.8
Example Fee Ticket Body in Microsoft® Excel
Supported File Formats Once a fee ticket body has been created in Microsoft® Excel (.XLS) using the special worksheet with a static red line border, it must be converted to one of the following file formats before it can be imported into NextGen® EPM:
.EMF Enhanced Windows Metafile
.WMF Windows Metafile
.BMP Windows Bitmap
.JPEG JPEG Image
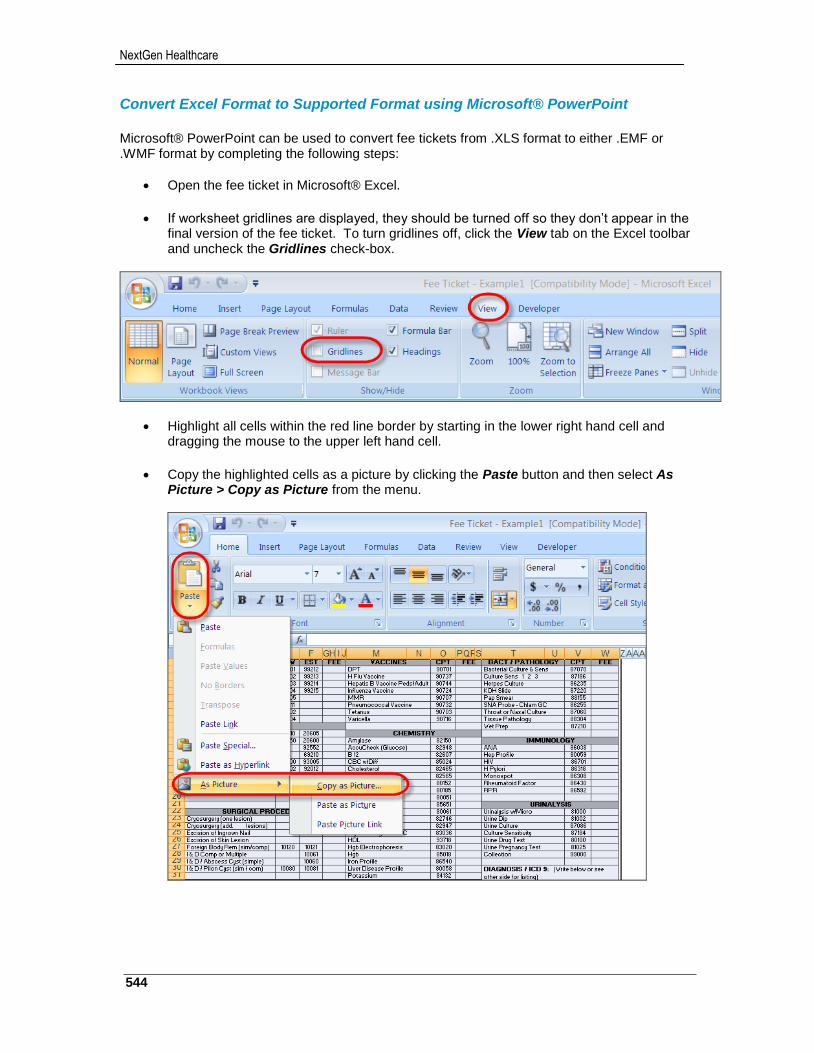
NextGen Healthcare
544
Convert Excel Format to Supported Format using Microsoft® PowerPoint
Microsoft® PowerPoint can be used to convert fee tickets from .XLS format to either .EMF or .WMF format by completing the following steps:
Open the fee ticket in Microsoft® Excel.
If worksheet gridlines are displayed, they should be turned off so they don’t appear in the
final version of the fee ticket. To turn gridlines off, click the View tab on the Excel toolbar and uncheck the Gridlines check-box.
Highlight all cells within the red line border by starting in the lower right hand cell and dragging the mouse to the upper left hand cell.
Copy the highlighted cells as a picture by clicking the Paste button and then select As
Picture > Copy as Picture from the menu.
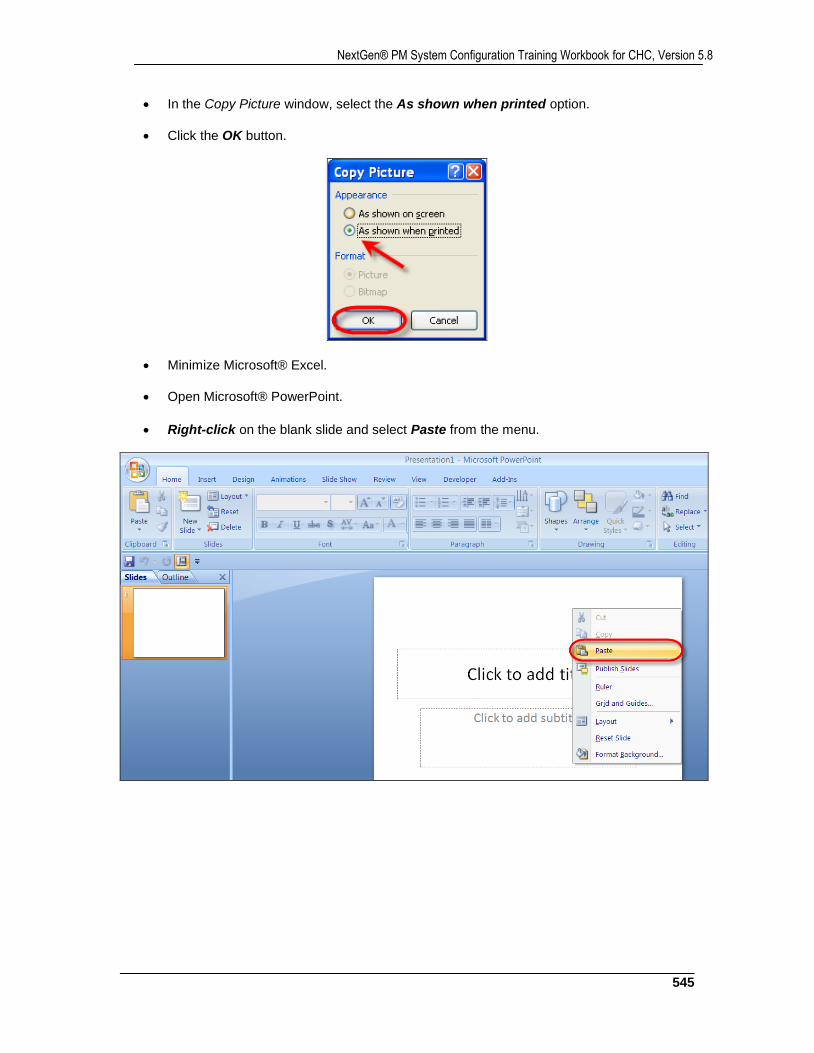
545
NextGen® PM System Configuration Training Workbook for CHC, Version 5.8
In the Copy Picture window, select the As shown when printed option.
Click the OK button.
Minimize Microsoft® Excel.
Open Microsoft® PowerPoint.
Right-click on the blank slide and select Paste from the menu.
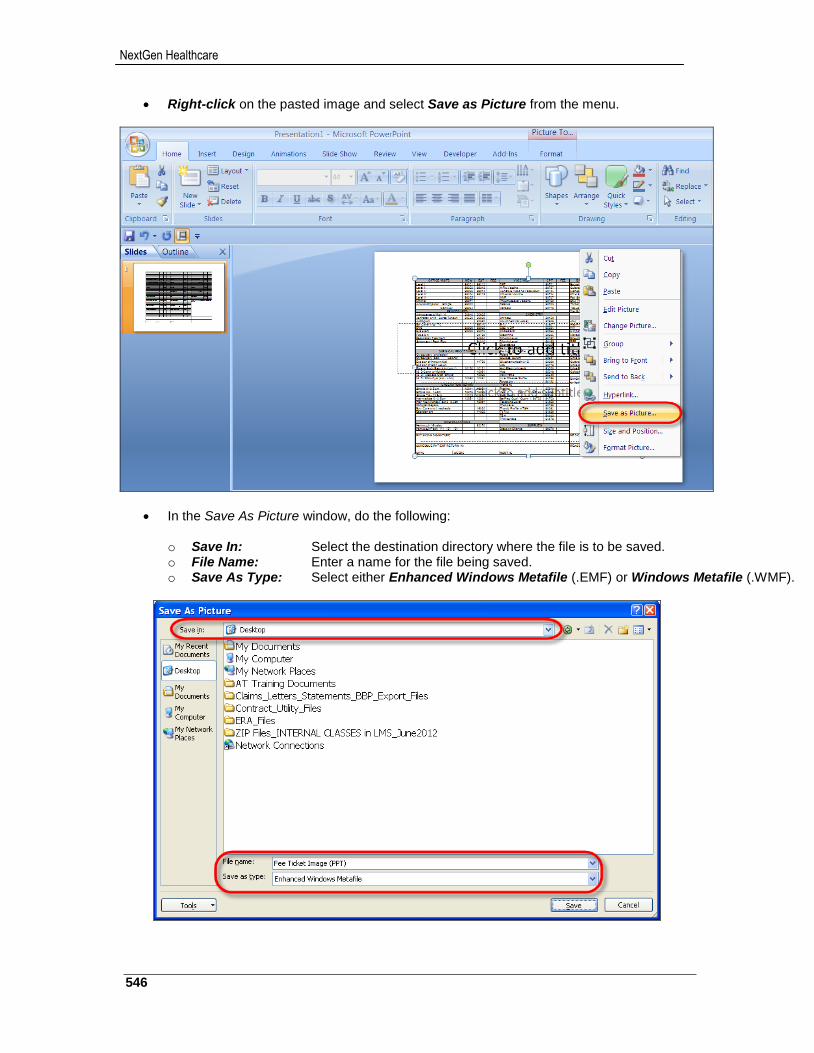
NextGen Healthcare
546
Right-click on the pasted image and select Save as Picture from the menu.
In the Save As Picture window, do the following:
o Save In: Select the destination directory where the file is to be saved. o File Name: Enter a name for the file being saved. o Save As Type: Select either Enhanced Windows Metafile (.EMF) or Windows Metafile (.WMF).
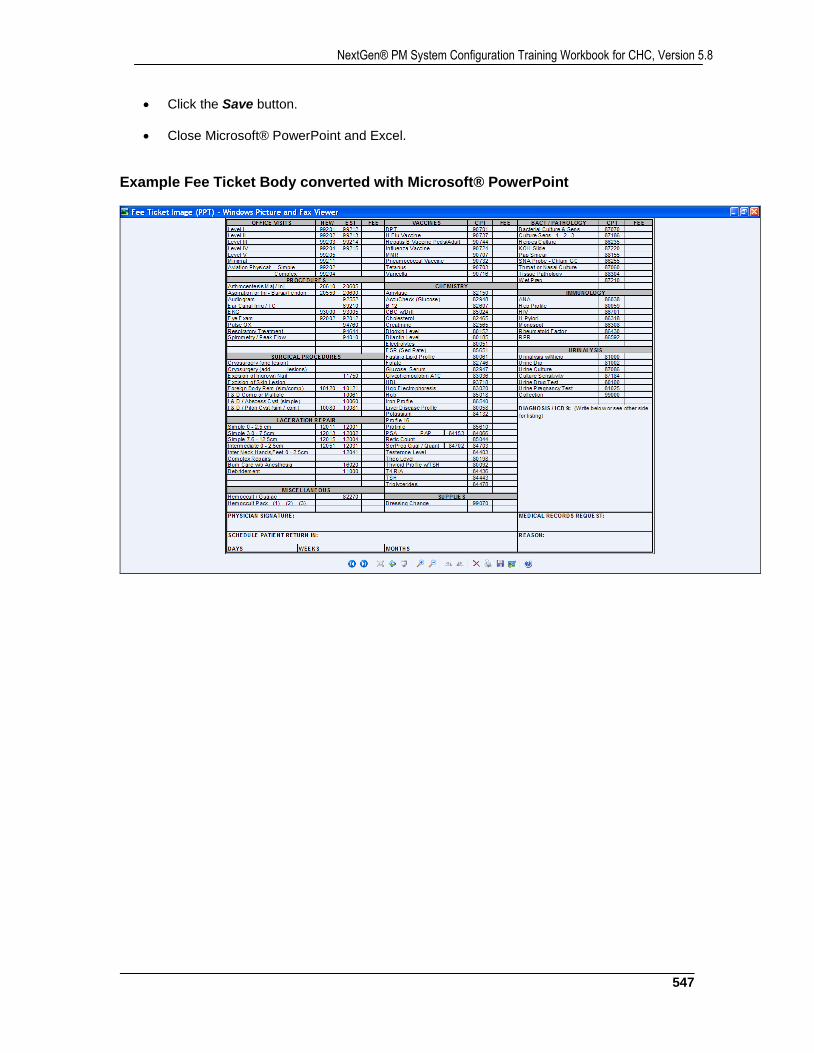
547
NextGen® PM System Configuration Training Workbook for CHC, Version 5.8
Click the Save button.
Close Microsoft® PowerPoint and Excel.
Example Fee Ticket Body converted with Microsoft® PowerPoint
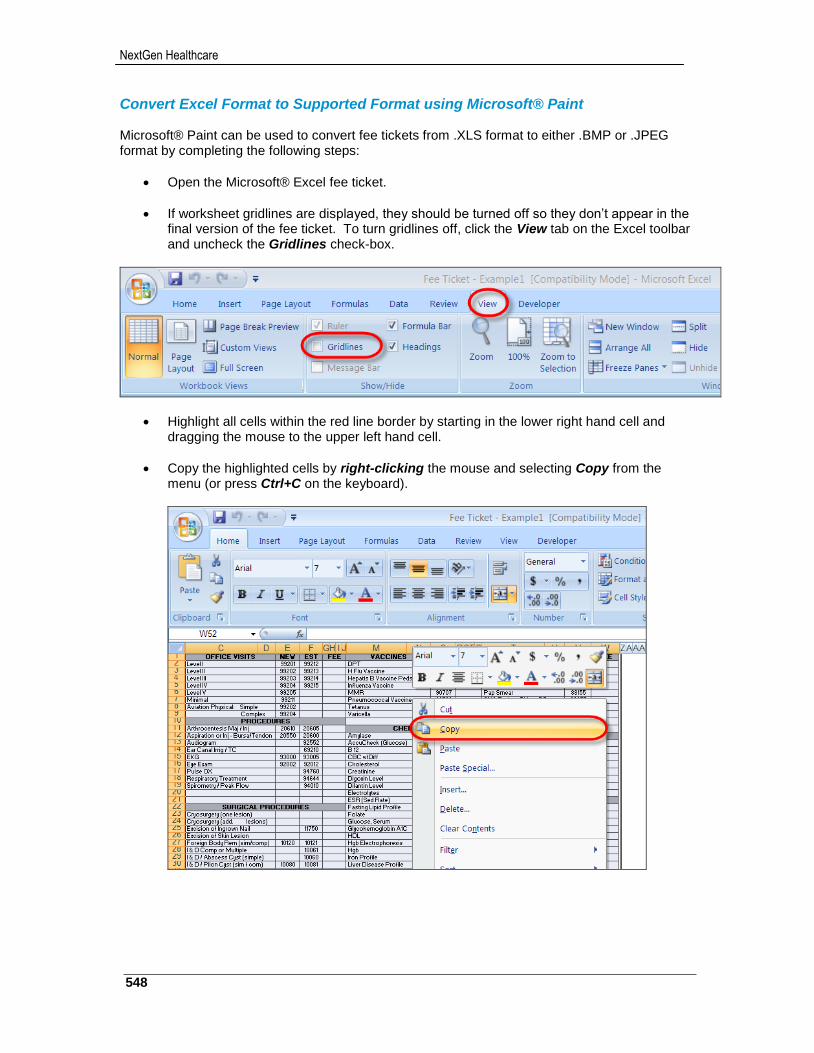
NextGen Healthcare
548
Convert Excel Format to Supported Format using Microsoft® Paint Microsoft® Paint can be used to convert fee tickets from .XLS format to either .BMP or .JPEG format by completing the following steps:
Open the Microsoft® Excel fee ticket.
If worksheet gridlines are displayed, they should be turned off so they don’t appear in the final version of the fee ticket. To turn gridlines off, click the View tab on the Excel toolbar and uncheck the Gridlines check-box.
Highlight all cells within the red line border by starting in the lower right hand cell and dragging the mouse to the upper left hand cell.
Copy the highlighted cells by right-clicking the mouse and selecting Copy from the menu (or press Ctrl+C on the keyboard).
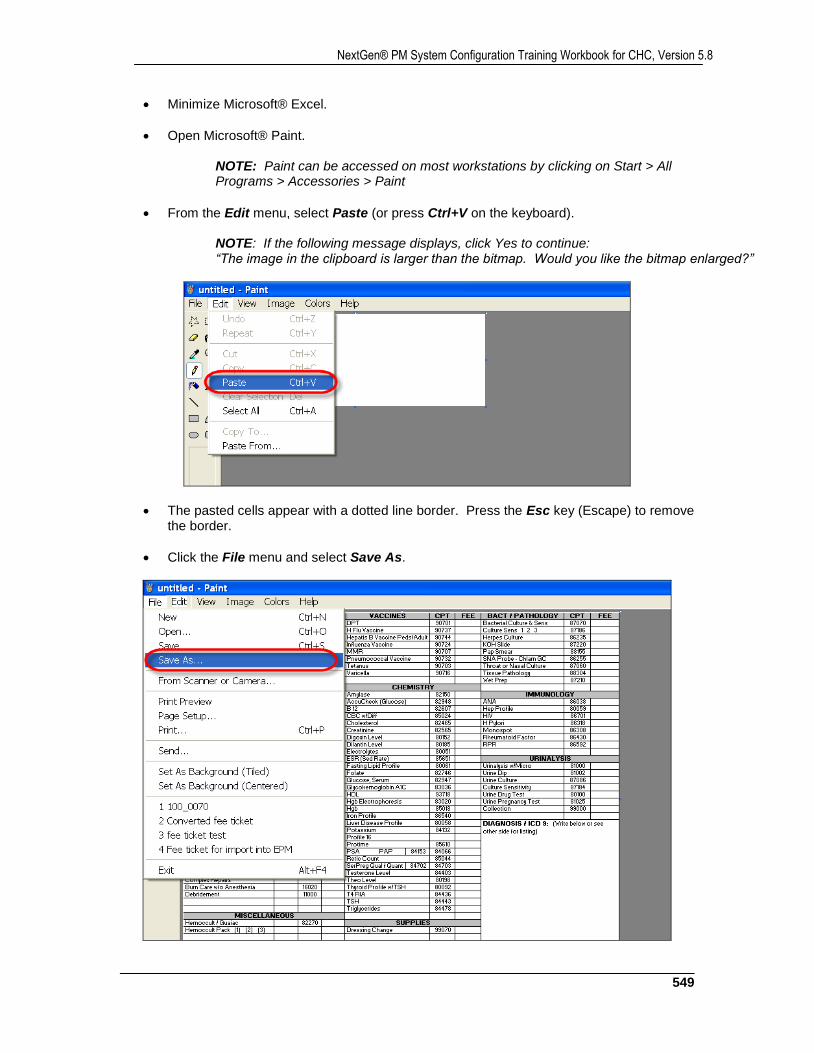
549
NextGen® PM System Configuration Training Workbook for CHC, Version 5.8
Minimize Microsoft® Excel.
Open Microsoft® Paint.
NOTE: Paint can be accessed on most workstations by clicking on Start > All Programs > Accessories > Paint
From the Edit menu, select Paste (or press Ctrl+V on the keyboard).
NOTE: If the following message displays, click Yes to continue: “The image in the clipboard is larger than the bitmap. Would you like the bitmap enlarged?”
The pasted cells appear with a dotted line border. Press the Esc key (Escape) to remove the border.
Click the File menu and select Save As.
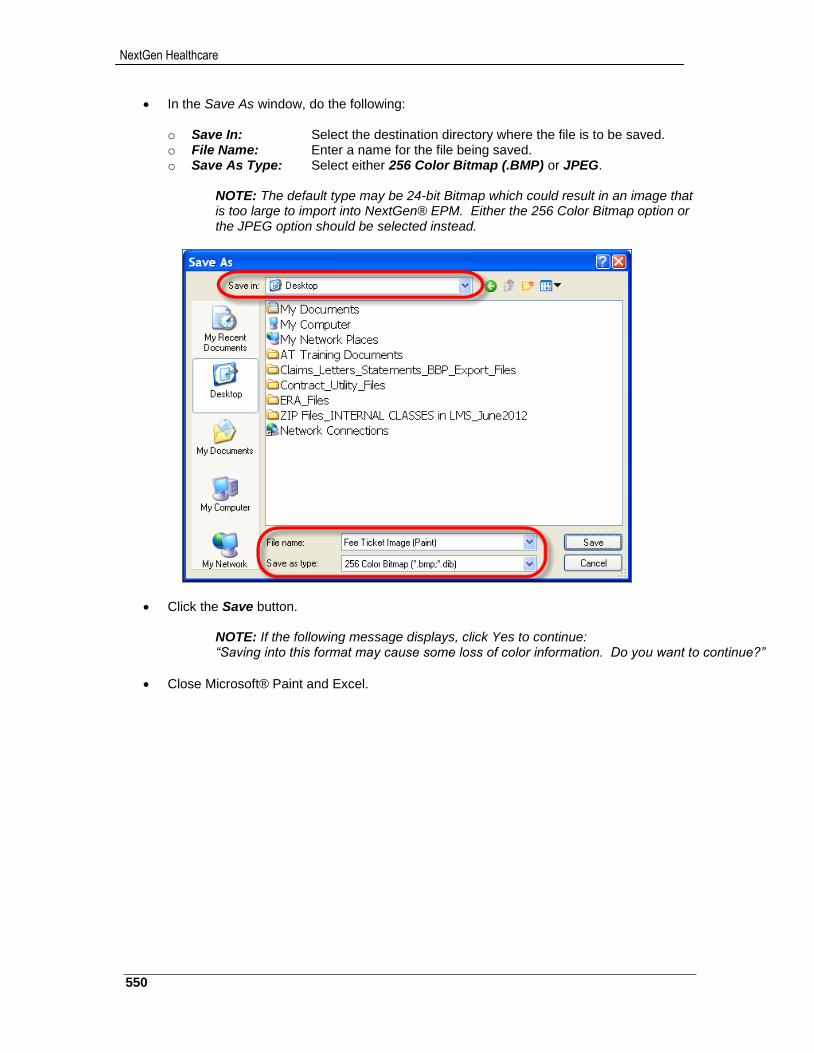
NextGen Healthcare
550
In the Save As window, do the following:
o Save In: Select the destination directory where the file is to be saved. o File Name: Enter a name for the file being saved. o Save As Type: Select either 256 Color Bitmap (.BMP) or JPEG.
NOTE: The default type may be 24-bit Bitmap which could result in an image that is too large to import into NextGen® EPM. Either the 256 Color Bitmap option or the JPEG option should be selected instead.
Click the Save button.
NOTE: If the following message displays, click Yes to continue: “Saving into this format may cause some loss of color information. Do you want to continue?”
Close Microsoft® Paint and Excel.
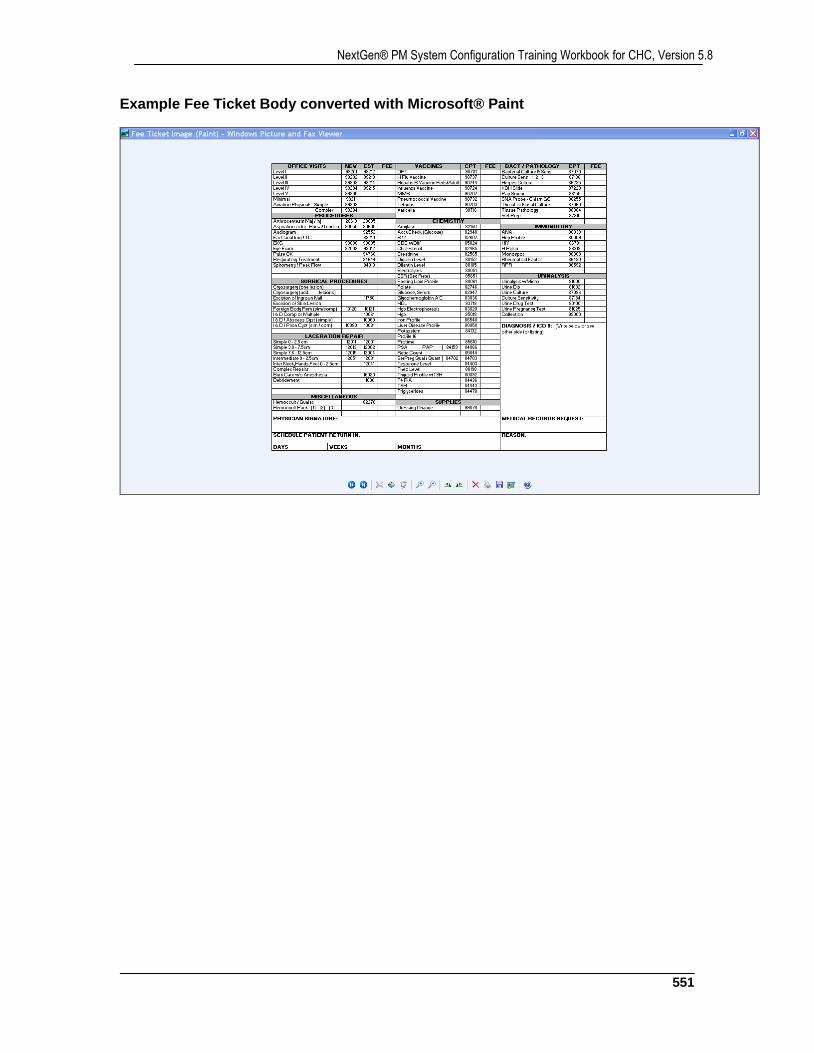
551
NextGen® PM System Configuration Training Workbook for CHC, Version 5.8
Example Fee Ticket Body converted with Microsoft® Paint
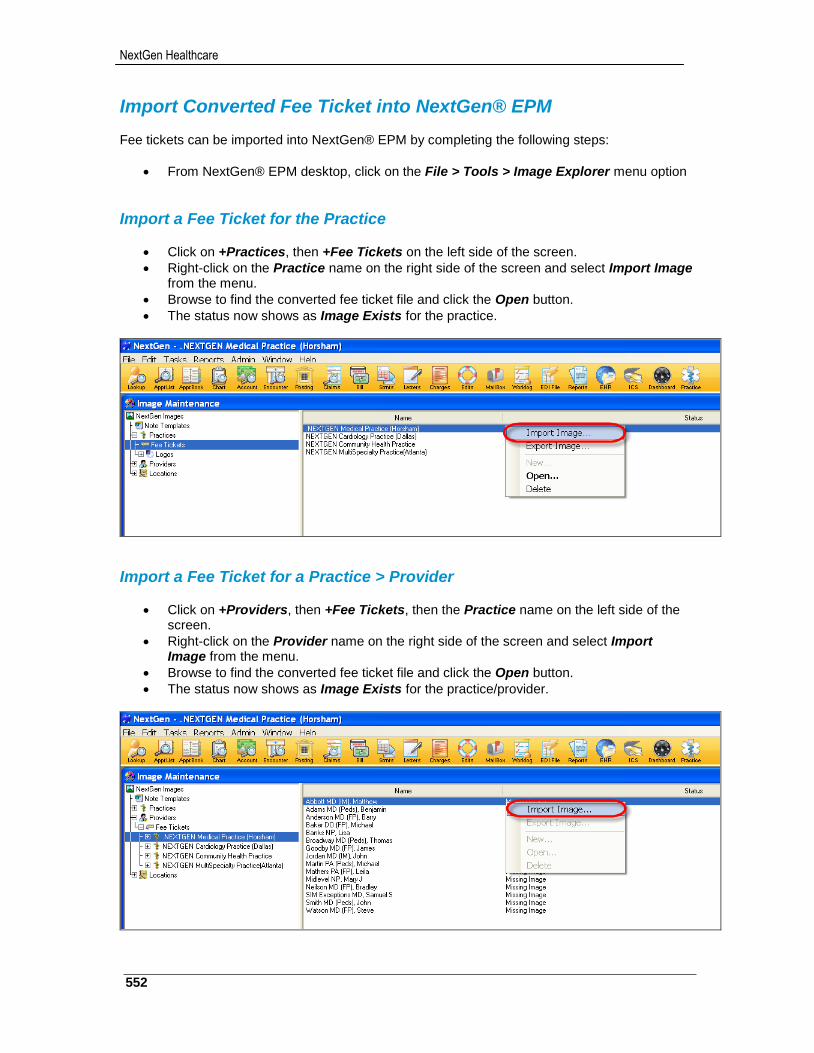
NextGen Healthcare
552
Import Converted Fee Ticket into NextGen® EPM Fee tickets can be imported into NextGen® EPM by completing the following steps:
From NextGen® EPM desktop, click on the File > Tools > Image Explorer menu option
Import a Fee Ticket for the Practice
Click on +Practices, then +Fee Tickets on the left side of the screen.
Right-click on the Practice name on the right side of the screen and select Import Image from the menu.
Browse to find the converted fee ticket file and click the Open button.
The status now shows as Image Exists for the practice.
Import a Fee Ticket for a Practice > Provider
Click on +Providers, then +Fee Tickets, then the Practice name on the left side of the screen.
Right-click on the Provider name on the right side of the screen and select Import Image from the menu.
Browse to find the converted fee ticket file and click the Open button.
The status now shows as Image Exists for the practice/provider.
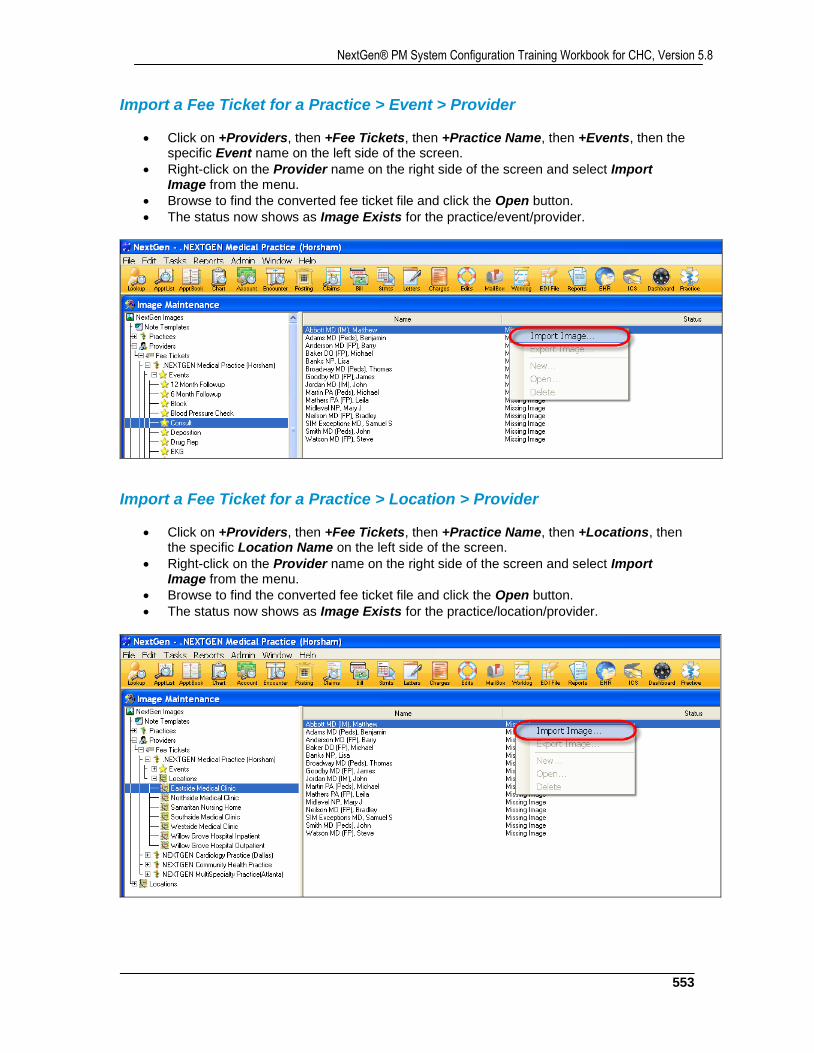
553
NextGen® PM System Configuration Training Workbook for CHC, Version 5.8
Import a Fee Ticket for a Practice > Event > Provider
Click on +Providers, then +Fee Tickets, then +Practice Name, then +Events, then the specific Event name on the left side of the screen.
Right-click on the Provider name on the right side of the screen and select Import Image from the menu.
Browse to find the converted fee ticket file and click the Open button.
The status now shows as Image Exists for the practice/event/provider.
Import a Fee Ticket for a Practice > Location > Provider
Click on +Providers, then +Fee Tickets, then +Practice Name, then +Locations, then the specific Location Name on the left side of the screen.
Right-click on the Provider name on the right side of the screen and select Import Image from the menu.
Browse to find the converted fee ticket file and click the Open button.
The status now shows as Image Exists for the practice/location/provider.
Related Documents