©2017 Check Point Software Technologies Ltd. All rights reserved | P. 1 [Protected] Distribution or modification is subject to approval Next Generation Data Center Security vSEC for AWS Training Lab guide Ver. 4.0 Table of Contents Introduction: ................................................................................................................................................. 2 vSEC for AWS training environment: ............................................................................................................ 4 Connecting and setting up you work environment: ..................................................................................... 5 Exercise #1 – Build your own AWS environment .......................................................................................... 8 Exercise #2 - Deploy Check Point R80.10 Management server .................................................................. 12 Exercise #3 - Deploy Check Point vSEC cluster on AWS .............................................................................. 22 Exercise #4 – Configuring the vSEC Controller ............................................................................................ 37 Exercise #5 – Advanced scenarios............................................................................................................... 43

Welcome message from author
This document is posted to help you gain knowledge. Please leave a comment to let me know what you think about it! Share it to your friends and learn new things together.
Transcript

©2017 Check Point Software Technologies Ltd. All rights reserved | P. 1
[Protected] Distribution or modification is subject to approval
Next Generation Data Center Security vSEC for AWS Training Lab guide
Ver. 4.0
Table of Contents Introduction: ................................................................................................................................................. 2 vSEC for AWS training environment: ............................................................................................................ 4 Connecting and setting up you work environment: ..................................................................................... 5 Exercise #1 – Build your own AWS environment .......................................................................................... 8 Exercise #2 - Deploy Check Point R80.10 Management server .................................................................. 12 Exercise #3 - Deploy Check Point vSEC cluster on AWS .............................................................................. 22 Exercise #4 – Configuring the vSEC Controller ............................................................................................ 37 Exercise #5 – Advanced scenarios ............................................................................................................... 43

©2017 Check Point Software Technologies Ltd. All rights reserved | P. 2
[Protected] Distribution or modification is subject to approval
Introduction: Organizations are starting to adopt public cloud environments as an extension of their internal Data Centers (DC) to gain operational flexibility and lower operational costs. The increasing number of applications in the DC has led to a dramatic increase in network traffic between the different servers / application inside the DC (east-west traffic). However, when it comes to security, the focus has been on protecting the entrance to the DC, the perimeter, and there are few controls to secure east-west traffic inside the data center. This represents a critical security risk where threats can traverse unimpeded once inside the data center. Furthermore, traditional security approaches to this problem are unable to keep pace with the dynamic network changes and rapid provisioning of applications in a cloud environment. Check Point vSEC For AWS with its advanced threat prevention capabilities will allow you to deal with that security risk and minimize it. This document will provide you with getting started steps required to get familiar with the AWS environment & how to deploy a basic day to day scenario with vSEC in place. You will understand and simulate a real-life use case to grasp the ease of deploying automated advanced security protections within the AWS cloud. We have prepared a few simple to follow exercises, to illustrate the benefits of having security integrated into a virtual networking platform. Those exercises are incremental; they start from basic setup and progress into more advanced scenarios.

©2017 Check Point Software Technologies Ltd. All rights reserved | P. 3
[Protected] Distribution or modification is subject to approval
Securing AWS IaaS infrastructure Hands-on lab Objectives:
The target of this hands-on lab exercises is to provide you with practical real-life experience with the Check Point’s vSEC For AWS product. The objectives of the hands-on training are:
1. Prepare your Public Cloud environment for deployment This exercise is meant to get you familiar with the AWS console and concepts.
2. Deploy Check Point R80 management server on AWS The exercise will show you how to deploy R80 Management server in your newly created environment on AWS. You will also learn how to launch new web servers from the marketplace.
3. Deploy Check Point vSEC cluster on AWS This exercise will demo to you how to deploy a vSEC cluster into your AWS environment to improve transparency and enforcement of network traffic traversing through/from the environment.
4. Configuring vSEC Controller In this exercise you will configure the vSEC controller to connect into your account in AWS.
5. Optional Advanced troubleshooting This optional exercise will teach you how to do basic debugging and validate that your cluster is running as designed.
Note: In this lab guide, there are two steps that are missing. This is to aid the training process.
Good Luck

©2017 Check Point Software Technologies Ltd. All rights reserved | P. 4
[Protected] Distribution or modification is subject to approval
vSEC for AWS training environment:
Getting to know your training environment
IP address
vSEC MemberA – External 10.0.0.20/24
vSEC MemberA - Internal 10.0.1.20/24
vSEC MemberB – External 10.0.0.30/24
vSEC MemberB - Internal 10.0.1.30/24
Management Server 10.0.0.100/24
Web Server 10.0.1.5

©2017 Check Point Software Technologies Ltd. All rights reserved | P. 5
[Protected] Distribution or modification is subject to approval
Connecting and setting up you work environment: Purpose: To get familiar with the console and its options
Register and sign-in to AWS
1. Browse to the link that your trainer has provided for you
2. Fill in your details for registration and click “Submit”
3. On the next screen, Click on “Launch Lab”

©2017 Check Point Software Technologies Ltd. All rights reserved | P. 6
[Protected] Distribution or modification is subject to approval
4. You’re On Demand Lab session has started and the session is active for several hours (as described on the page). The browser window will show your credentials for this session and the sign-in link (you will also get an email with this information).
5. Browse to the Amazon AWS portal using the provided sign-in link and use the credentials you were provided
Get familiar with AWS console
1. Add one click navigation shortcuts to the top bar by clicking on the Drawing Pin at the top of the page
2. From the dropdown window that shows up, drag the following services to the top bar (as shown in the screenshot below):
EC2
VPC
IAM
S3
CloudFormation
Naturally, you can add any desired service from the drop down window and also set its location on the bar at your convenience. When you are done, just click the Drawing Pin to finish editing mode
3. Take a few minutes to review Amazon’s different services (understanding the full breadth of the service offering)
4. Feel free to wander around those services (by clicking on them and reviewing their “landing page”)
5. When you’re done, go back to the portal home page by clicking on the home image on the left top corner of the screen

©2017 Check Point Software Technologies Ltd. All rights reserved | P. 7
[Protected] Distribution or modification is subject to approval
Please progress to the next exercise where we will be preparing our environment for use.

©2017 Check Point Software Technologies Ltd. All rights reserved | P. 8
[Protected] Distribution or modification is subject to approval
Exercise #1 – Build your own AWS environment Purpose: To create the basic environment (VPC and subnets)
Description This exercise will guide you through the steps required to setup your own private AWS environment in which we will be deploying our instances.
Method Using AWS console you will create a new VPC (Virtual Private Cloud) in a designated region. You will then create subnets and locate them in a certain AZ (availability Zone). This newly created environment will be used in later exercise as new instances will be provisioned into this environment. Create VPC
1. In the top navigation bar in the AWS console, on the top-right, take note of the region in which you'll be creating
the VPC (choose a region like Frankfurt or Ohio). Ensure that you continue working in the same region for the rest of the exercises, as you cannot launch an instance into your VPC from a different region.
2. In the top navigation bar, click “VPC” dashboard, and then click “Start VPC Wizard”.
3. Choose the first option, VPC with a Single Frontend Subnet, and then click Select.
4. On the configuration page, enter a name for your VPC in the VPC name field (ie. AWS-Training), and enter a
name for your subnet in the Subnet name field (ie. Public subnet). This helps you to identify the VPC and subnet in the AWS VPC console after you've created them. Fill in the info as described:

©2017 Check Point Software Technologies Ltd. All rights reserved | P. 9
[Protected] Distribution or modification is subject to approval
The IP CIDR block displays the IP address range that you'll use for your VPC (10.0.0.0/16), and the Public
subnet’s IPv4 CIDR field displays the IP address range you'll use for the subnet (10.0.0.0/24). If you don't want to use the default CIDR ranges, you can specify your own.
The Availability Zone list enables you to select the Availability Zone in which to create the subnet. Choose the one that ends with “1a” for you region.
The “Enable DNS hostnames option”, when set to Yes, ensures that instances that are launched into your VPC automatically receive a DNS hostname.
The Hardware tenancy option enables you to select whether instances launched into your VPC are run on shared or dedicated hardware. Selecting a dedicated tenancy incurs additional costs.
5. Click “Create VPC” to start creating the VPC with single subnet.
6. A status window shows the work in progress. When the work completes you will see the following message:
7. We’ve created a VPC with 1 public subnet; now let’s add another (Private) subnet to our environment.
Create subnet
1. On the left side menu click “Subnets” and then click on “Create Subnet”.

©2017 Check Point Software Technologies Ltd. All rights reserved | P. 10
[Protected] Distribution or modification is subject to approval
2. In the window that appears;
Fill in the fields:
Name tag: Private subnet VPC: AWS-Training Availability Zone: the same as step 4 (the one that ends with “1a”) IPv4 CIDR block: 10.0.1.0/24
3. Click “Yes, Create” The following screen should appear:

©2017 Check Point Software Technologies Ltd. All rights reserved | P. 11
[Protected] Distribution or modification is subject to approval
Create AWS Key Pair
1. When you will deploy the instances later you need a Key Pair that are used for authentication to the instances. In the top navigation bar, click “EC2” dashboard, and then click “Key Pairs”.
2. Click “Create Key Pair”
3. Choose a name (ie. MyKeyPair) and click “Create”
4. You are prompted to save the private key (pem file). Please save it somewhere convenient Top tip: To be able to use the private key with Putty, the pem file must be converted For help see here http://docs.aws.amazon.com/AWSEC2/latest/UserGuide/putty.html You successfully finished Exercise #1

©2017 Check Point Software Technologies Ltd. All rights reserved | P. 12
[Protected] Distribution or modification is subject to approval
Exercise #2 - Deploy Check Point R80.10 Management server Purpose: To deploy the Check Point management server using a CloudFormation template
Description This exercise will guide you through the deployment of a Check Point R80.10 security management server in AWS.
Method Using AWS portal you will provision a Check Point R80.10 virtual appliance on your AWS public cloud environment Provision the R80.10 Management server instance using CloudFormation template
1. Open SK111013 in your browser
2. Review the available CloudFormation templates
3. Click the “Launch Stack” button of the “Check Point vSEC - Security Management Server” on the right side of
the page
4. This will open the AWS console into the CloudFormation -> Stacks -> Create Stack window
5. The Check Point CloudFormation template for deploying a R80.10 Security Management Server is automatically chosen Click “Next”
6. The next screen includes the information needed for deploying the R80.10 management server automatically Fill in the different fields as listed below:

©2017 Check Point Software Technologies Ltd. All rights reserved | P. 13
[Protected] Distribution or modification is subject to approval
Stack name: can be left as the default VPC: AWS-Training Subnet: Public subnet Name: R80-10MNG Instance Type: m4.xlarge Key name: choose your own keys (which you can created in exercise #1) License: R80.10-BYOL Admin shell: /bin/bash/ Password hash: you can create the hash in this link: https://quickhash.com/ (must use MD5-Crypt3 algorithm) Installation Type: Management Server Primary management: true Administrator addresses: 0.0.0.0/0 Gateway addresses: 0.0.0.0/0
Keep other settings as default and click “Next”
7. On the next screen, click “Next”
8. Review your defined configuration, acknowledge the remark and click “Create”

©2017 Check Point Software Technologies Ltd. All rights reserved | P. 14
[Protected] Distribution or modification is subject to approval
9. In the top navigation bar, click “CloudFormation” dashboard
10. If you mark the Check-Point-Management and click the Events tab you will be able to monitor the progress
11. In the top navigation bar, click “EC2” dashboard

©2017 Check Point Software Technologies Ltd. All rights reserved | P. 15
[Protected] Distribution or modification is subject to approval
Click on “Instances” on the left pane and the below window will appear.
Once the Instance State shows “Running” and Status Checks says “2/2 checks passed”, it’s up, but the Check Point First Time Wizard might still be running. Please note –The total deployment might take ~30 min as it is installing and configuring our management server for the first time. Do Not Try to connect to the machine with SmartConsole before the it has finished the deployment If you see the following message when connecting to the WebUI of the Management server, then the First Time Wizard is still running.
Notice that you can also see the public IP assigned to the Management server.
12. From the EC2 dashboard we can look at the instance screenshot. Click on “Action -> Instance Settings -> Get Instance Screenshot”
13. You can see the following screen that shows that the system is still not finished

©2017 Check Point Software Technologies Ltd. All rights reserved | P. 16
[Protected] Distribution or modification is subject to approval
Provision the Web Server instance from Marketplace
14. While waiting for our R80.10 Management Server to finish the First Time Wizard, lets deploy our web server
15. In the top navigation bar, click “EC2” dashboard, and click “Launch Instance”
16. In the following window, choose “AWS Marketplace” and search for “LAMP Bitnami” (as shown)
Click “Select”

©2017 Check Point Software Technologies Ltd. All rights reserved | P. 17
[Protected] Distribution or modification is subject to approval
17. Click “Continue”
18. Choose the t2.micro server type
And then click on “Next: configure Instance Details” at the lower right corner of the screen.
19. On the next screen fill in the fields as described below:
©2017 Check Point Software Technologies Ltd. All rights reserved | P. 18
[Protected] Distribution or modification is subject to approval
Network: AWS-Training Subnet: Private subnet Auto-assign public IP: Disable Tenancy: Shared Network Interface – Primary IP: 10.0.1.5
20. Click “Next”, and again “Next” till you are at step 5
21. On the Add Tags page, click on “Add Tag”
Fill in the fields: Key=web, Value=server
22. Finish the instance deployment process by clicking “Review and Launch”
23. Review the configuration and then click “Launch” in the lower right part of the screen

©2017 Check Point Software Technologies Ltd. All rights reserved | P. 19
[Protected] Distribution or modification is subject to approval
24. When asked, use the same key pair that you’ve already used before and check the box. Then click “Launch
Instances”
25. The next screen will show you the deployment status
26. In the top navigation bar, click “EC2” dashboard
27. Click on “Instances” on the left pane and the below window will appear.
Once you mark that newly created server you will see the following screen:

©2017 Check Point Software Technologies Ltd. All rights reserved | P. 20
[Protected] Distribution or modification is subject to approval
Once the Instance State shows “Running” and Status Checks says “2/2 checks passed”, it’s up and ready.
Download SmartConsole and log in to Check Point Management
28. Next step is to download the SmartConsole GUI to allow us to define the rules on our Check Point Gateway to allow access to the Web (LAMP) server
29. We need to make sure the management server is running and has completed the First Time Wizard. There are several ways to check this:
a. Open an SSH session to the Management server using your predefined Key (for example you may use Putty) Check for ‘First time configuration was completed!’ with: ‘tail –f /var/log/cloud-user-data’

©2017 Check Point Software Technologies Ltd. All rights reserved | P. 21
[Protected] Distribution or modification is subject to approval
b. Connect to the Gaia portal of the Management server via the public IP, using HTTPS. You can find the public IP of the Management server on the EC2 Instances screen. I you get in, the First Time Wizard was completed.
30. When the Management is up and running, connect to the Gaia portal of the Management server via the public IP, using HTTPS. You can find the public IP of the Management server on the EC2 Instances screen
31. If you already have Check Point R80.10 SmartConsole installed, skip this step. If not, download it from the link on the upper central screen:
32. Install it with the default configuration.
33. Open the SmartConsole and log in using your credentials:
User: admin Password: the one that you defined in exercise 2 step 6 (the password that you created a hash of) IP address: public ip of the management server
34. Wander around and inspect the GUI and make yourself familiar with its options
You successfully finished Exercise #2

©2017 Check Point Software Technologies Ltd. All rights reserved | P. 22
[Protected] Distribution or modification is subject to approval
Exercise #3 - Deploy Check Point vSEC cluster on AWS Purpose: To deploy a Check Point vSEC Gateway cluster using a CloudFormation template
Description This exercise will guide you through the deployment of a Check Point’s vSEC cluster on the environment created in AWS.
Method Using AWS portal you will provision the latest vSEC Gateway Cluster to protect workloads deployed on your AWS public cloud environment Provision the R80.10 vSEC Cluster instances using CloudFormation template
1. Open SK111013 in your browser
2. Review the available CloudFormation templates
3. Click on the “Launch Stack” button of the “Check Point vSEC – Cluster / Deploys a vSEC Cluster into an
existing VPC” on the right side of the page.
4. This will open the AWS console into the CloudFormation -> Stacks -> Create Stack window
5. The Check Point CloudFormation template for deploying vSEC Cluster is automatically chosen Click “Next”
6. The next screen includes the information needed for deploying the R80.10 vSEC Cluster automatically Fill in the different fields as listed below:

©2017 Check Point Software Technologies Ltd. All rights reserved | P. 23
[Protected] Distribution or modification is subject to approval
Stack name: can be left as the default VPC: AWS-Training Availability zone: the same as in previous exercises (the one that ends with “1a”) External subnet: Public subnet Internal subnet: Private subnet
7. Continue filling the fields as per the data below:

©2017 Check Point Software Technologies Ltd. All rights reserved | P. 24
[Protected] Distribution or modification is subject to approval
Cluster Network Configuration section: leave at the default Instance type: You can leave at the default or change per the instructor guideline Key name: use the same key pair that you’ve already used in previous exercises License: R80.10-BYOL Admin shell: /bin/bash Password hash: use the same as defined on the management on exercise 2 step 6 SIC key: choose your own (ie. secret123) (Note: SIC must be minimum 8 alpha numeric characters)
When you are done, please click “Next”
8. The following window appears, this is where you can tag your instances (optional)
Click “Next” when done
9. In the next window, you can review the new Cluster about to be provisioned and when you’re done, check the box at the bottom and click on “Create”
10. The Cluster will now be created. You will be transferred into the “CloudFormation” page. Refresh to see the progress. You can see more details of the creation process when you mark a line and choose “Events” at the bottom part (as shown)

©2017 Check Point Software Technologies Ltd. All rights reserved | P. 25
[Protected] Distribution or modification is subject to approval
Log in to SmartConsole and configure the cluster object
11. Once deployment process is done, log in to our R80.10 SmartCenter Server and configure the cluster object
(detailed instructions can be found in SK104418, note to use the private IP addresses):
a. Open the SmartConsole and log in using your credentials:
User: admin Password: the one that you defined in exercise 2 step 6 (the password that you created a hash of) IP address: public IP of the management server
b. Click the GATEWAYS & SERVERS on the left side of the screen

©2017 Check Point Software Technologies Ltd. All rights reserved | P. 26
[Protected] Distribution or modification is subject to approval
c. In the upper middle of the screen choose to add new Cluster object
d. In the window that opens choose Wizard Mode
e. Fill in the details on the opened window as described below:

©2017 Check Point Software Technologies Ltd. All rights reserved | P. 27
[Protected] Distribution or modification is subject to approval
Cluster name: AWS-cluster Cluster IPv4 Address: 10.0.0.10 Leave the rest untouched and click “Next”
f. Click “Add / New Cluster Member”
g. On the next window you will enter the members details, Enter the details for member A (we can use the private IP since the member and management are located on the same subnet)

©2017 Check Point Software Technologies Ltd. All rights reserved | P. 28
[Protected] Distribution or modification is subject to approval
Name: MemberA IPv4 address: 10.0.0.20 Activation Key: The SIC key you defined on step 7 of this exercise. Click on Initialize and make sure it changed into “Trust established”. Click OK to close this screen.
h. Now do the same for the second member
Name: MemberB IPv4 address: 10.0.0.30 Activation Key: as you defined on step 7 of this exercise. Click on Initialize and make sure it changed into “Trust established”. Click OK to close this screen.

©2017 Check Point Software Technologies Ltd. All rights reserved | P. 29
[Protected] Distribution or modification is subject to approval
i. Click “Next” and then “Finish” (disregard the notice).
j. Open the Cluster object & move into Network Management
k. Click on the “Get Interfaces” and verify that they are imported correctly
l. Double-click on eth0 and change the Network Type to Cluster, add the IP (10.0.0.10) and mask (24),
then click “OK”
m. Double-click on eth1 and change the Network Type into Cluster + Sync, add the IP (10.0.1.10) and
mask (24), then click “OK”

©2017 Check Point Software Technologies Ltd. All rights reserved | P. 30
[Protected] Distribution or modification is subject to approval
n. Click “OK” to close the Cluster object window
o. On the upper left side click “Install Policy”
p. Click “Publish & Install”
q. In next window, uncheck Threat Prevention and click “Install”

©2017 Check Point Software Technologies Ltd. All rights reserved | P. 31
[Protected] Distribution or modification is subject to approval
r. You can see the progress on the bottom left side
Adapt the route table to the cluster
1. In the AWS console in the top navigation bar, click “EC2” dashboard
2. On the Instances screen, mark one of the members of the cluster and check if it is holding the VIP address by
looking at the IP addresses of the machine (10.0.0.10 and 10.0.1.10 means that it is), if it is not, change to the other one
3. Click on the eth1

©2017 Check Point Software Technologies Ltd. All rights reserved | P. 32
[Protected] Distribution or modification is subject to approval
4. Write down the Interface ID (starts with eni). You will need it later
5. Our next step is to define a route to forward the traffic from the Private subnet via the Check Point Gateway
cluster. Click “VPC” (on the top level bar) and choose Route Tables on the left side menu
6. Mark one of the routing tables and check under Subnet Association to find the one for network 10.0.1.0 (at
the bottom of the screen)
©2017 Check Point Software Technologies Ltd. All rights reserved | P. 33
[Protected] Distribution or modification is subject to approval
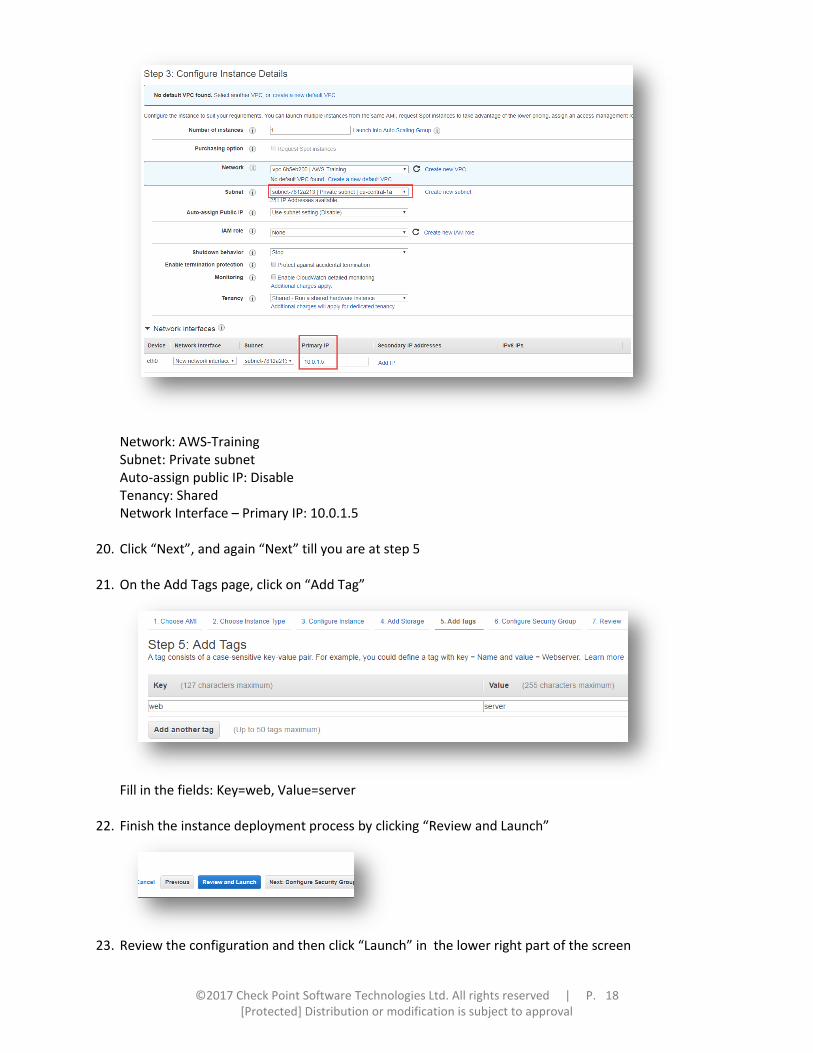
7. Move into the Routes tab and click “Edit”
8. Change the Target field of the 0.0.0.0/0 route to the Interface ID that we’ve found on step 15
9. Click “Save”
Create objects, access rules and NAT rules in SmartConsole
1. In the Check Point SmartConsole GUI, on the left bar choose SECURITY POLICIES
2. Create objects, access rules and NAT rules like these. For details, review Appendix #1 below
Allow and log ssh, http and https from Internet to cluster external IP
NAT Hide WebServer behind cluster

©2017 Check Point Software Technologies Ltd. All rights reserved | P. 34
[Protected] Distribution or modification is subject to approval
NAT anyone accessing cluster external IP on ssh or http to WebServer
3. Install the policy
Test your environment
4. To test that your Web server is accessible from Internet, browse to the cluster public VIP address
TIP: In EC2 / Instances. The active member holds the cluster public VIP address. The cluster public VIP address is the one without a star

©2017 Check Point Software Technologies Ltd. All rights reserved | P. 35
[Protected] Distribution or modification is subject to approval
5. Success!!
6. Review logs
7. To test outgoing communication, SSH to cluster public VIP address with the key we created before (username: bitnami). And generate some traffic. Ie. “curl google.com”

©2017 Check Point Software Technologies Ltd. All rights reserved | P. 36
[Protected] Distribution or modification is subject to approval
You successfully finished Exercise #3

©2017 Check Point Software Technologies Ltd. All rights reserved | P. 37
[Protected] Distribution or modification is subject to approval
Exercise #4 – Configuring the vSEC Controller Purpose: To configure vSEC Controller trust to AWS account
Enable vSEC Controller
1. Open an SSH session to the Management server using your predefined Key (for example you may use Putty):
2. Run command vsec on
Enable Identity Awareness Web API
3. In Check Point SmartConsole, on the upper right section choose New object
4. Choose “Host…”
5. Create a new host object with the following parameters:
Name: Localhost IPv4 address: 127.0.0.1 Click “OK”

©2017 Check Point Software Technologies Ltd. All rights reserved | P. 38
[Protected] Distribution or modification is subject to approval
6. At the left bar choose GATEWAYS & SERVERS
7. Double-click the cluster object and move into the General Properties tab, and check the Identity Awareness
Blade.
8. A window will be open, select the Terminal Servers and uncheck the AD Query, Click “Next”

©2017 Check Point Software Technologies Ltd. All rights reserved | P. 39
[Protected] Distribution or modification is subject to approval
9. Select the option: “I do not wish to configure an Active Directory at this time” and then click “Next” -> “Finish”
10. Move into the Identity Awareness section
11. Uncheck Terminal Servers, check Identity Web API and click “Settings”

©2017 Check Point Software Technologies Ltd. All rights reserved | P. 40
[Protected] Distribution or modification is subject to approval
12. On the new window, click the green + sign on the right
13. Choose the Localhost object
14. Click “OK” twice
15. A message will popup, click “Yes”
Connect vSEC Controller to AWS
16. Now we will create the trusted connection between the vSEC Controller and the AWS account In SmartConsole, create a new server object. “More -> Server -> Data Center - > AWS…”

©2017 Check Point Software Technologies Ltd. All rights reserved | P. 41
[Protected] Distribution or modification is subject to approval
17. Choose a name for the new object
Configure credentials for the AWS server using Access Key and Secret Key (you got these in the email when the On Demand Lab session was started was started). If you don’t use the On Demand Lab training accounts, see Appendix #2 below, to create your own keys. Choose the AWS region where your environment operates Click “Test Connection”, and it should say “Connected”
18. Install the policy
Verify vSEC Controller
1. Import the WebServer object from the created AWS Server to your policy using the Import option (look for 3 ways for doing that)

©2017 Check Point Software Technologies Ltd. All rights reserved | P. 42
[Protected] Distribution or modification is subject to approval
You can import the object via:
a) Region view to import AWS VPCs, Subnets or Instances to your Security Policy. b) Tags view to import all instances that have specific Tag Key or to import all instances that have
specific Tag Key with a specific value. c) Search view to import the object directly
You successfully finished Exercise #4
©2017 Check Point Software Technologies Ltd. All rights reserved | P. 43
[Protected] Distribution or modification is subject to approval
Exercise #5 – Advanced scenarios If you are done with the rest of the exercises, (well done) you are welcome to dive deeper with the following scenarios Test Scenarios
1. Verify that the script in charge of communicating with AWS is running on each cluster member.
[Expert@HostName]# cpwd_admin list | grep -E "PID|AWS_HAD"
The output should have a line similar to:
APP PID STAT #START START_TIME MON COMMAND
AWS_HAD 3663 E 1 [12:58:48] 15/1/2015 N python
/opt/CPsuite-R77/fw1/scripts/aws_had.py
2. Connect to the one of the Gateways via SSH & run a script to check that the definitions of the cluster are properly configured: [Expert@HostName]# cd $FWDIR/scripts/
[Expert@HostName]# $FWDIR/Python/bin/python -m aws_ha_test
If all tests were successful, the script should output:
All tests were successful! Otherwise, an error message is displayed that should help you troubleshoot the problem.
3. Verify that the cluster members are communicating properly: cphaprob state Example: [Expert@HostName:0]# cphaprob state
Cluster Mode: High Availability (Active Up) with IGMP Membership
Number Unique Address Assigned Load State
1 (local) 10.0.1.20 0% Active
2 10.0.1.30 100% Standby
4. Initiate “fw monitor” on the active cluster node and inspect traffic traversing the cluster. Look at sk30583 for “fw
monitor” usage
5. Activate Threat Protection blades (Anti-Virus, Anti-Bot, URL filtering, Application control) on the cluster & inspect the logs and check which traffic is hitting our environment (are you able to identify malicious traffic targeting our environment)?
6. Initiate a cluster Failover in one of the following ways a. Initiate “clusterXL_admin down” command (don’t forget to set it up again when done, by replacing
“down” with up”) b. “ifdown” one of the interfaces on the active member (don’t forget to up it by replacing “ifdown” with
“ifup” when done” c. Reboot active member
Review the route table for the Private subnet and which member holds the VIP’s before and after a failover. Noticed the change? Make sure test web site is still accessible after failover

©2017 Check Point Software Technologies Ltd. All rights reserved | P. 44
[Protected] Distribution or modification is subject to approval
Appendix #1: Check Point policy
1. In the Check Point SmartConsole GUI, on the left bar choose SECURITY POLICIES
2. Create a new rule by clicking the “Add rule above” icon from the upper middle bar
3. This rule will allow http traffic from the Web server to the internet .
Fill in the relevant fields:
s. Source: (click on the + sign, choose new -> Host)
Name: Web Server IPv4 Address: 10.0.1.5
Click OK.

©2017 Check Point Software Technologies Ltd. All rights reserved | P. 45
[Protected] Distribution or modification is subject to approval
t. Destination: (click on the + sign) choose “All_Internet” u. Services & Applications: (click on the + sign) search for HTTP and HTTPS v. Action: Allow w. Track: Log
4. Mark the newly created rule and create a new rule by choosing the Add rule below from the upper middle
bar
5. This rule will allow traffic from the internet into the Web server (in order to allow access into the web
server, Fill in the relevant fields:
x. Source: Leave “Any” y. Destination: (click on the + sign) choose “AWS_cluster” z. Services & Applications: (click on the + sign) search for HTTP, HTTPS and SSH aa. Action: Allow bb. Track: Log
6. Change into the NAT section,
7. The next step will add a NAT rule (the first rule) that translate the IP of the cluster into the Web server.
Choose “Add rule to top” from the upper middle bar
8. Fill in the relevant fields:
cc. Original Source: Leave “All_Internet” dd. Original Destination: (click on the + sign)

©2017 Check Point Software Technologies Ltd. All rights reserved | P. 46
[Protected] Distribution or modification is subject to approval
Name: Cluster_External IPv4 Address: 10.0.0.10
Click OK.
ee. Services & Applications: (click on the + sign) search for HTTP ff. Translated Source: Original gg. Translated Destination: (click on the + sign) choose “Web server”
9. Mark the newly created rule, Choose the Add rule below from the upper middle bar
10. Fill in the relevant fields:
hh. Original Source: Leave “All_Internet” ii. Original Destination: (click on the + sign)
Name: Cluster_External IPv4 Address: 10.0.0.10

©2017 Check Point Software Technologies Ltd. All rights reserved | P. 47
[Protected] Distribution or modification is subject to approval
Click OK.
jj. Services & Applications: (click on the + sign) search for SSH kk. Translated Source: Original ll. Translated Destination: (click on the + sign) choose “Web server”
11. Mark the newly created rule, Choose the Add rule Above from the upper middle bar
12. Fill in the relevant fields:
mm. Original Source: Leave “Web Server” nn. Original Destination: Any oo. Services & Applications: (click on the + sign) search for HTTP pp. Translated Source: (click on the + sign)
Name: Cluster_Internal IPv4 Address: 10.0.1.10
Click OK.

©2017 Check Point Software Technologies Ltd. All rights reserved | P. 48
[Protected] Distribution or modification is subject to approval
qq. Translated Destination: Original 13. Mark the newly created rule, Choose the Add rule below from the upper middle bar
14. Fill in the relevant fields:
rr. Original Source: Leave “Web Server” ss. Original Destination: Any tt. Services & Applications: (click on the + sign) search for HTTPS uu. Translated Source: Cluster_Inetrnal vv. Translated Destination: Original
15. On the upper left side click “Install Policy”
16. Click the “Publish & Install”

©2017 Check Point Software Technologies Ltd. All rights reserved | P. 49
[Protected] Distribution or modification is subject to approval
17. In the opened screen uncheck the Threat prevention and click Install
18. You can see the progress on the bottom left side

©2017 Check Point Software Technologies Ltd. All rights reserved | P. 50
[Protected] Distribution or modification is subject to approval
Appendix #2: vSEC Controller Access key generation
1. Go to the AWS console. On the upper right side under the user name choose My Security credentials.
2. Expend the Access Keys section by pressing the + sign
3. Choose Create New access Key. Copy the newly created keys into a safe place since you can’t review the
Secret Access Key once you leave this screen.
4. Click “Close”

©2017 Check Point Software Technologies Ltd. All rights reserved | P. 51
[Protected] Distribution or modification is subject to approval
Answers to the tricks:
1. If the deployment of the cluster fails, you need to go and approve the EULA for the gateway in the marketplace first. Search in the marketplace for Check Point vSEC & run through the installation process until you start to deploy. Then you can kill the installation. Then rerun the cloud formation template again. Easy way! Browse to https://aws.amazon.com/marketplace/pp/B071GRKY38?ref=cns_srchrow Click “Continue”, “Manual Launch” and then “Accept Software Terms”
2. If your password does not work at the Gaia portal, connect to the management server via SSH & run command: set user admin password, this will reset the password for the Gaia portal.
Related Documents