NEURAXIAL BLOCKADE ANATOMY AND LANDMARKS Developing Countries Regional Anesthesia Lecture Series Daniel D. Moos CRNA, Ed.D. U.S.A. [email protected] Lecture 5 Soli Deo Glori

Neuraxial Blockade Anatomy and Landmarks
Jan 13, 2016
Soli Deo Gloria. Neuraxial Blockade Anatomy and Landmarks. Developing Countries Regional Anesthesia Lecture Series Daniel D. Moos CRNA, Ed.D . U.S.A. [email protected]. Lecture 5. Disclaimer. - PowerPoint PPT Presentation
Welcome message from author
This document is posted to help you gain knowledge. Please leave a comment to let me know what you think about it! Share it to your friends and learn new things together.
Transcript

NEURAXIAL BLOCKADE ANATOMY AND LANDMARKS
Developing Countries Regional Anesthesia Lecture Series Daniel D. Moos CRNA, Ed.D. U.S.A. [email protected] 5
Soli Deo Gloria

Disclaimer
Every effort was made to ensure that material and information contained in this presentation are correct and up-to-date. The author can not accept liability/responsibility from errors that may occur from the use of this information. It is up to each clinician to ensure that they provide safe anesthetic care to their patients.

Knowledge of anatomy for neuraxial blockade is essential!

Vertebral Anatomy
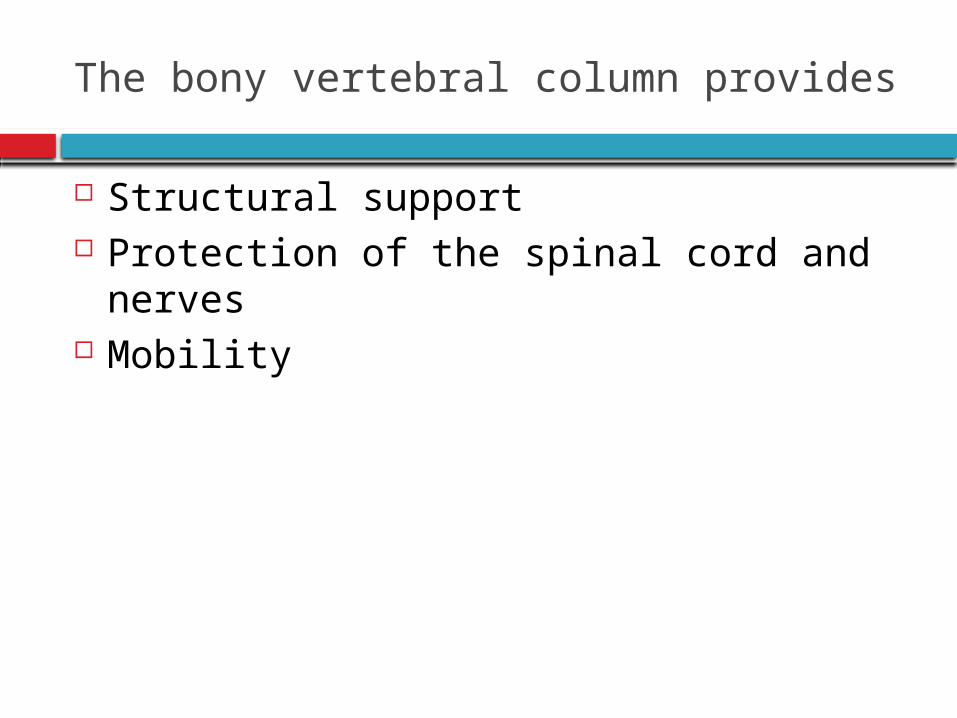
The bony vertebral column provides
Structural support Protection of the spinal cord and nerves Mobility

Vertebral Anatomy
7 cervical vertebrae 12 thoracic vertebrae 5 lumbar vertebrae Sacrum Coccyx

LumbarVertebrae
ThoracicVertebrae
CervicalVertebrae

Atlas or 1st Cervical Vertebrae The 1st cervical vertebrae has unique
articulations that allow it to articulate to the base of the skull and the 2nd cervical vertebrae.
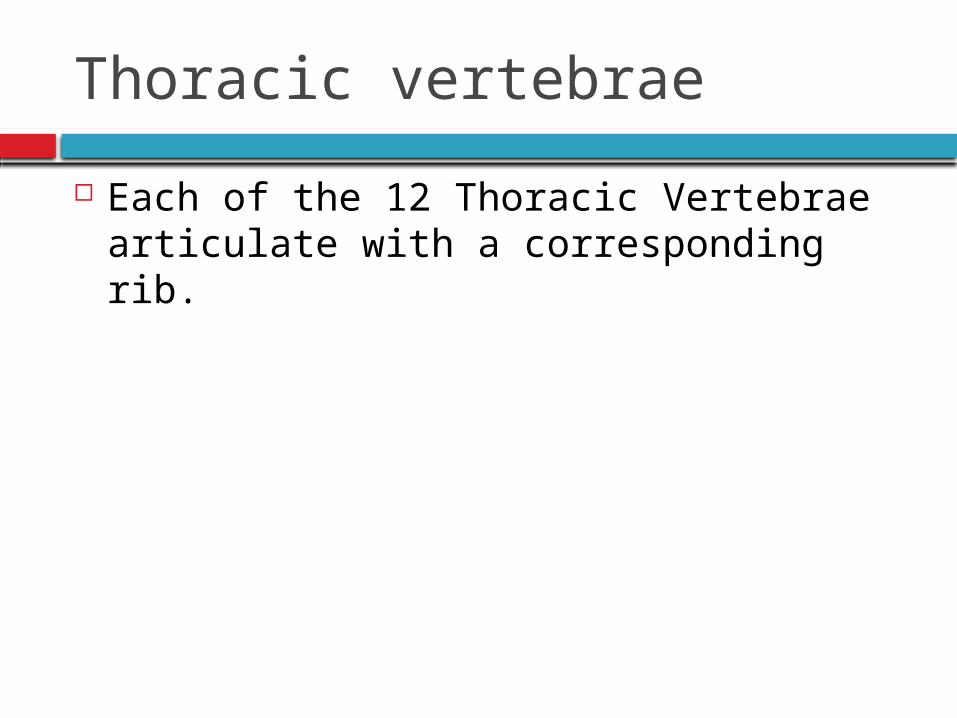
Thoracic vertebrae
Each of the 12 Thoracic Vertebrae articulate with a corresponding rib.
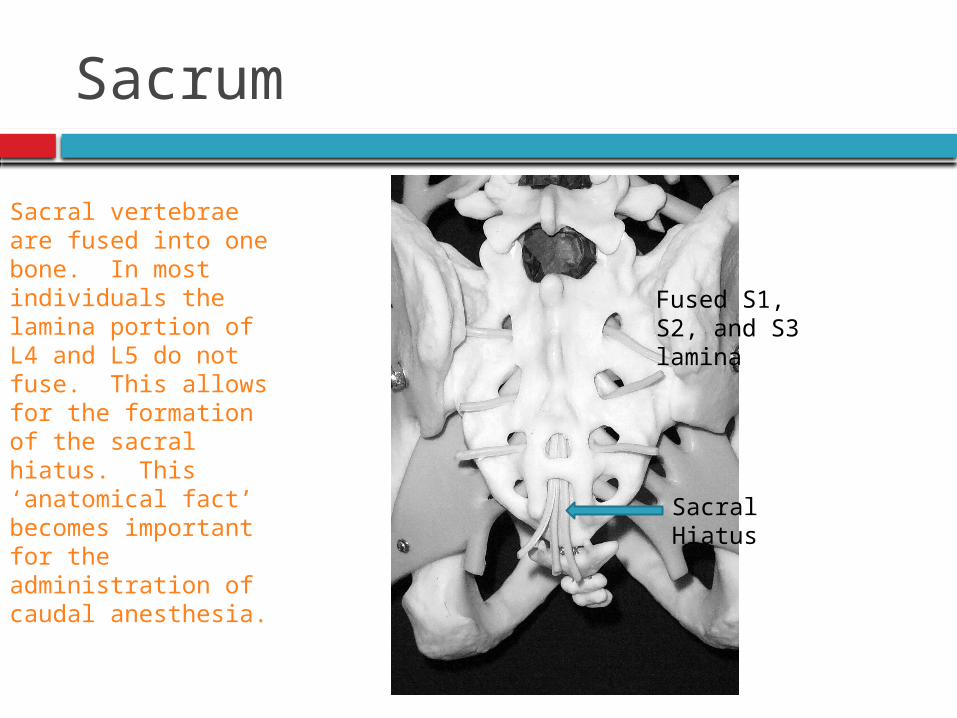
Sacrum
Sacral vertebrae are fused into one bone. In most individuals the lamina portion of L4 and L5 do not fuse. This allows for the formation of the sacral hiatus. This ‘anatomical fact’ becomes important for the administration of caudal anesthesia.
Fused S1, S2, and S3 lamina
Sacral Hiatus

Individual Vertebrae Anatomy

Vertebral Anatomy
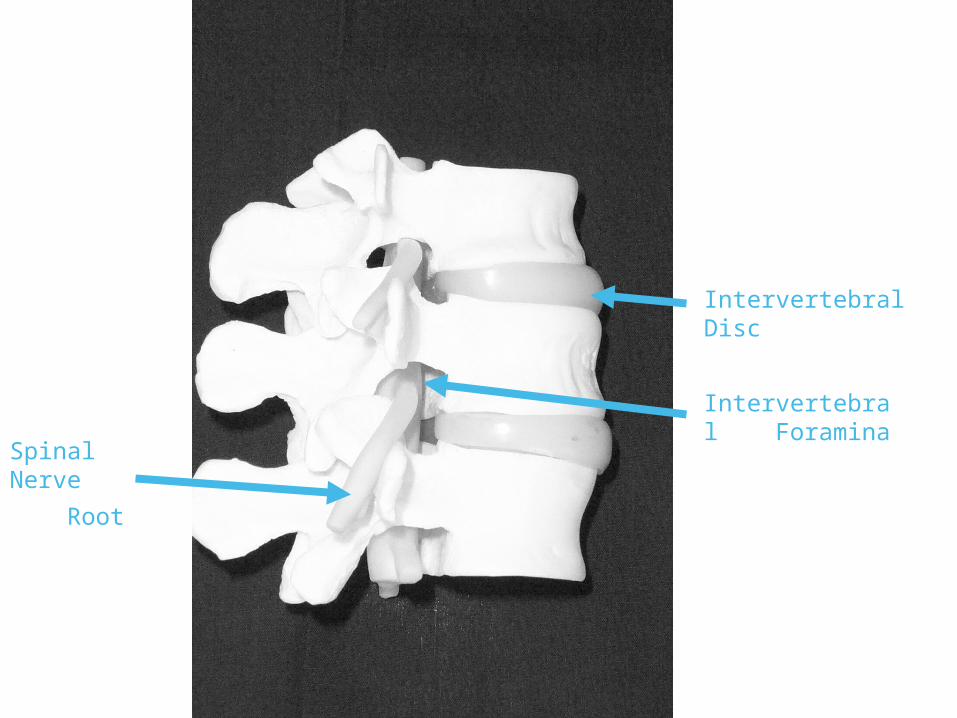
Each vertebra consists of a pedicle, transverse process, superior and inferior articular processes, and a spinous process.
Each vertebra is connected to the next by intervertebral disks.
There are 2 superior and inferior articular processes (synovial joints) on each vertebra that allows for articulation.
Pedicles contain a notch superiorly and inferiorly to allow the spinal nerve root to exit the vertebral column.

Vertebral Anatomy- Side View
Inferior Articular Process
Superior Articular Process
Spinous Process

Vertebral Anatomy- Top View
Transverse Process
Vertebral Body
Spinal Canal
Spinous Process
Lamina
Intervertebral Disc
Intervertebral Foramina
Spinal Nerve
Root
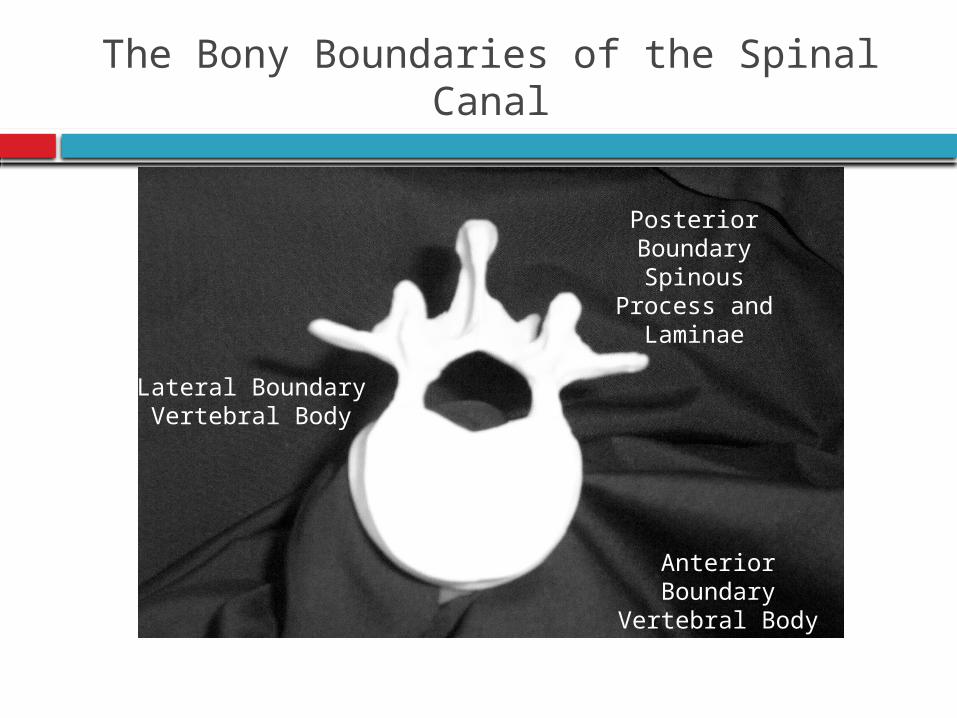
The Bony Boundaries of the Spinal Canal
Anterior Boundary
Vertebral Body
Lateral BoundaryVertebral Body
Posterior Boundary
Spinous Process and Laminae
Angle of Transverse Process and Size of Interlaminar Spaces

ThoracicVertebrae
LumbarVertebrae
Angule of transverse process will affect how the needle is orientated for epidural anesthesia or analgesia.
With flexion the spinous process in the lumbar region is almost horizontal. In the thoracic region the spinous process is angled in a slight caudad angle.

L 2
L 5
Interlaminar spaces are larger in the lower lumbar region. If an anesthesia provider finds it challenging at one level it is important to remember that moving down one space may provide a larger space.
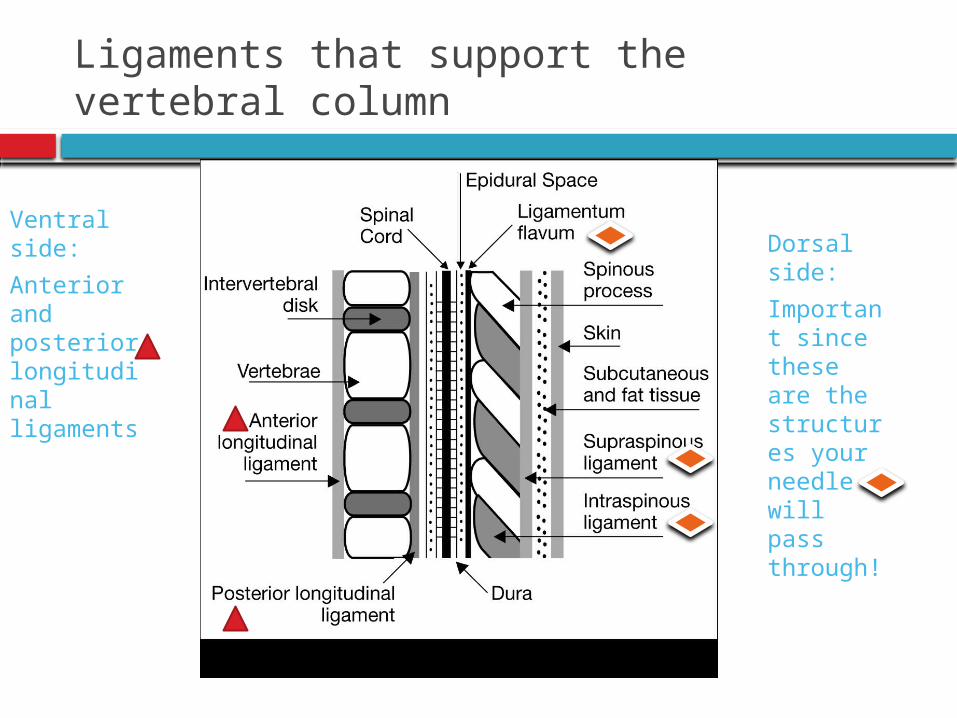
Ligaments that support the vertebral column
Ventral side:
Anterior and posterior longitudinal ligaments
Dorsal side:
Important since these are the structures your needle will pass through!
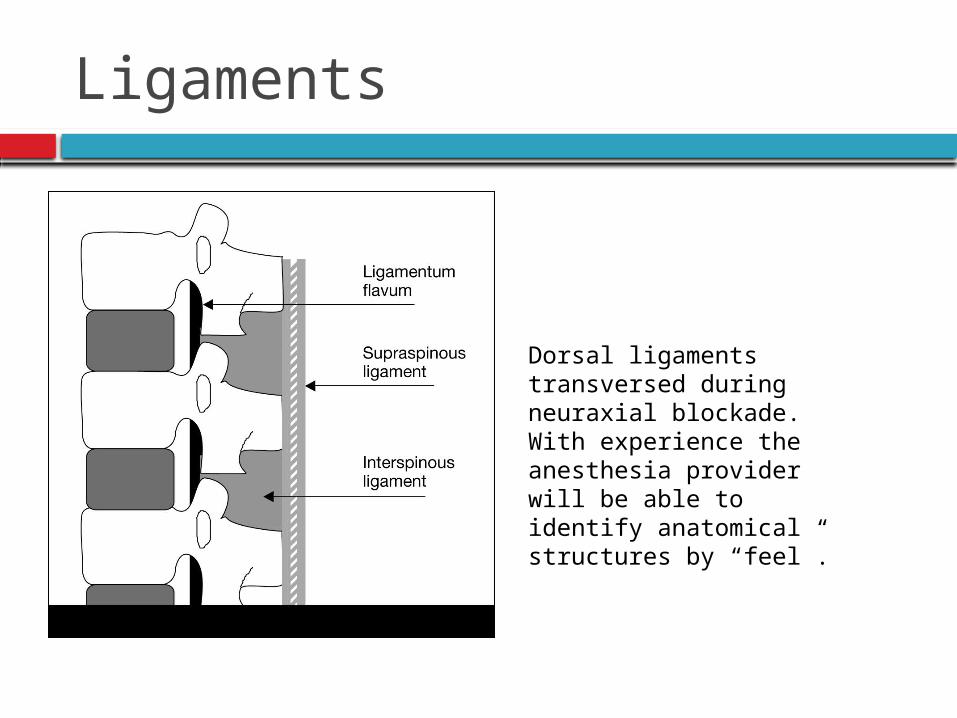
Ligaments
Dorsal ligaments transversed during neuraxial blockade. With experience the anesthesia provider will be able to identify anatomical structures by “feel”.

Blood Supply to the Spinal Cord
Blood supply from a single anterior spinal artery & paired posterior arteries. The single anterior spinal artery is (formed by the vertebral artery at the base of the skull. It supplies 2/3rds of the anterior spinal cord.
Posterior spinal arteries are formed by posterior cerebellar arteries and travel down the dorsal surface of the spinal cord just medial to the dorsal nerve roots. They supply 1/3rd of the posterior cord. Additional blood flow is contributed by the anterior and posterior spinal arteries from the intercostal and lumbar arteries.
Anterior Spinal Artery Posterior Spinal Artery
Blood Supply to the Spinal Cord
Artery of Adamkiewicz
The artery of Adamkiewicz is a radicular artery arising from the aorta. It is large and unilateral (found on the left side). It supplies the lower anterior 2/3rds of the spinal cord. Injury results in anterior spinal artery syndrome.
The Subarachnoid Space is a continuous space that contains
CSF Spinal cord Conus medullaris
It is in direct communication with the Brain Stem
Via the foramen magnum Terminating in the conus medullaris at
the sacral hiatus. In effect the subarachnoid space extends
from the cerebral ventricles down to S2.
Sterile Technique is Essential! Remember the continuous/direct communication!
Anatomical Considerations of the Spinal Cord and Neuraxial Blockade.

Be careful where you place your needle!

Termination of Spinal Cord
In adults usually ends at L1.
Infants L3
There are anatomical variations. For most adults it is generally safe to place a spinal needle below L2 unless there is a known anatomic variation.
For The Anatomically Challenged Dorsal- is another term for posterior Ventral- is another term for anterior

Spinal Nerve Roots
Anterior and posterior nerve roots join each other and exit intervertebral foramina forming spinal nerves from C1-S5.
Cervical level- rise above the foramina resulting in 8 cervical spinal nerves but only 7 cervical vertebrae.
Thoracic level- exit below the foramina. Lumbar level- form cauda equina and course
down the spinal canal. Exit from their respective foramina. Dural sheath covers the nerve roots for a small distance after they exit.

Spinal Nerve Roots
Vary in size and structure from patient to patient
Dorsal (posterior) roots are responsible for sensory blockade
Anterior (ventral) roots are responsible for motor blockade
Dorsal roots (sensory), though larger, are blocked easier due to a large surface area being exposed to local anesthetic solution
Sensory is the first to go…motor last and a bit harder to block
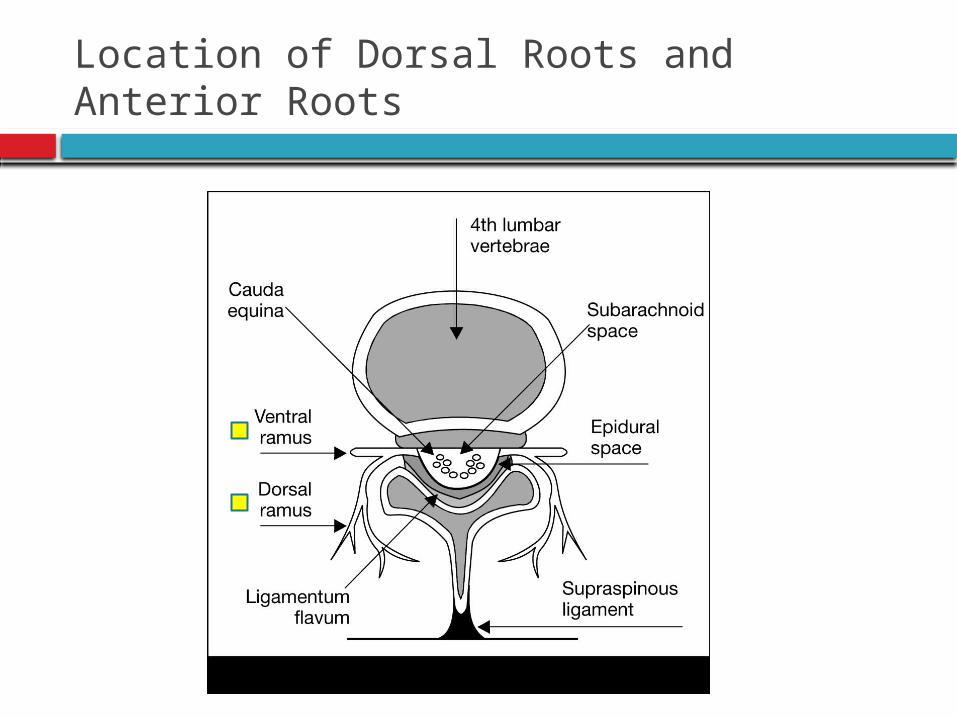
Location of Dorsal Roots and Anterior Roots
Cerebral Spinal Fluid (CSF)

CSF
Clear fluid that fills the subarachnoid space
Total volume in adults is 100-150 ml Volume found in the subarachnoid space
is 25-35 ml Continually produced at a rate of 450 ml
per 24 hour period replacing itself 3-4 times

CSF
Reabsorbed into the blood stream by arachnoid villi and granulations
Specific gravity is between 1.003-1.009 (this will play a crucial role in the baracity of local anesthetic that one chooses)
CSF plays a role the patient to patient variability in relation to block height and sensory/motor regression (80% of the patient to patient variability)
Body wt is the only measurement that coincides with CSF volume (this becomes important in the obese and pregnant)

Surrounding Membranes

Membranes that surround the spinal cord
Pia mater- highly vascular, covers the spinal cord and brain, attaches to the periosteum of the coccyx
Arachnoid mater- non vascular and attached to the dura mater. Principal barrier to the migration of medications in and out of the CSF
Dura mater (“tough mother”)- extension of the cranial dura mater, extends from the foramen magnum to S2 (ending at the filum terminale)

Adapted with permission from “Unintended subdural injection: a complication of epidural anesthesia- a case report”, AANA Journal, vol. 74, no. 3, 2006.

Filum Terminale
An extension of the pia mater that attaches to the periosteum of the coccyx.

Membranes that surround the spinal cord
Sub dural space- potential space that is found between the dura mater and arachnoid mater.
Contains a small amount of serous fluid that acts as a lubricant
Inadvertent injection into this space can lead to a failed spinal or total spinal
Aspiration may appear negative during testing prior to epidural administration of local anesthetics

Subdural space- a potential space between the dura mater and arachnoid mater
Adapted with permission from “Unintended subdural injection: a complication of epidural anesthesia- a case report”, AANA Journal, vol. 74, no. 3, 2006.

Epidural Space Anatomy

Epidural Space Anatomy
Extends from the formen magnum to the sacral hiatus
Is segmented and not uniform in distribution

Epidural Space is not uniform
Epidural Space Anatomy
The epidural space surrounds the dura mater anteriorly, laterally, and most importantly to us posteriorly.
The Bounds of the Epidural Space are as follows:
Anterior- posterior longitudinal ligament Lateral- pedicles and intervertebral
ligaments Posterior- ligamentum flavum
Contents of the Epidural Space Fat Areolar tissue Lymphatics Blood vessels including the Baston
venous plexus

Age induced changes of the epidural space
As we age the adipose tissue in the epidural space diminishes as does the intervertebral foramina size
No correlation with decreased anesthetic amounts and intervertebral size but there may be a correlation with the decrease in adipose tissue.

Ligamentum Flavum
Posterior to the epidural space Extends from the foramen magnum to
the sacral hiatus Is not one continuous ligament but
composed a right and left ligamenta flava which meet in the middle to form an acute angle

Ligamentum Flavum
May or may not be fused in the middle Varies in respect to thickness, distance
to dura, skin to surface distance, and varies with the area of the vertebral canal

Ligamentum Flavum
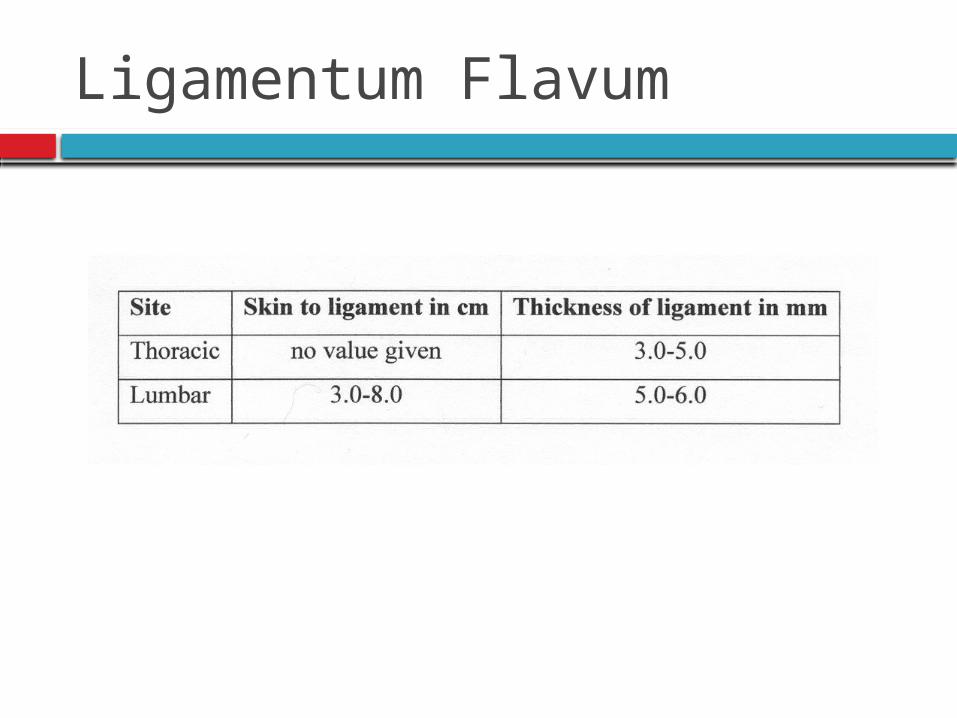
Distance from skin to ligament varies from 3-8 cm in the lumbar area. It is 4 cm in 50% of the patients and 4-6 cm in 80% of the patients.
Thickness of the ligamentum flavum also varies. In the thoracic area it can range from 3-5 mm and in the lumbar it can range from 5-6 mm.
Ligamentum Flavum
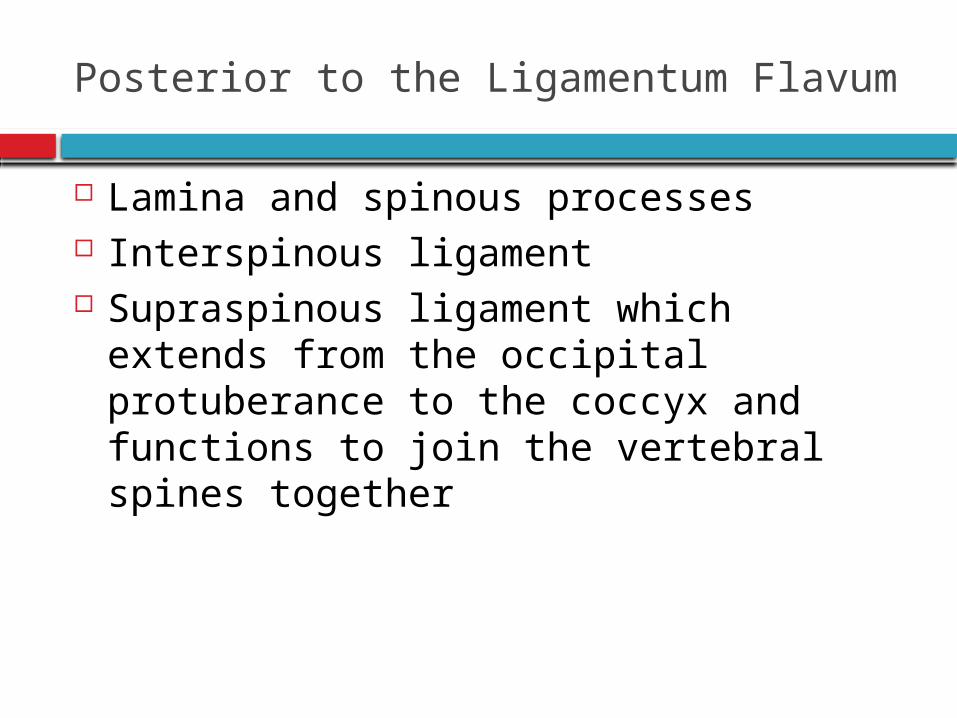
Posterior to the Ligamentum Flavum
Lamina and spinous processes Interspinous ligament Supraspinous ligament which extends
from the occipital protuberance to the coccyx and functions to join the vertebral spines together

Unilateral Anesthesia and Epidural Anatomy
May be related to a dorsomedian band in the midline of the epidural space, presence of epidural space septa, presence of a midline epidural fat pad
Fortunately unilateral anesthesia is uncommon

Surface Anatomy and Landmarks

Spinous Processes
Generally are palpable to help identify the midline
If unable to palpate the spinous process one can look at the upper crease of the buttocks and line up the midline as long as there is no scoliosis or other deformities of the spine

Palpation of Spinous Process
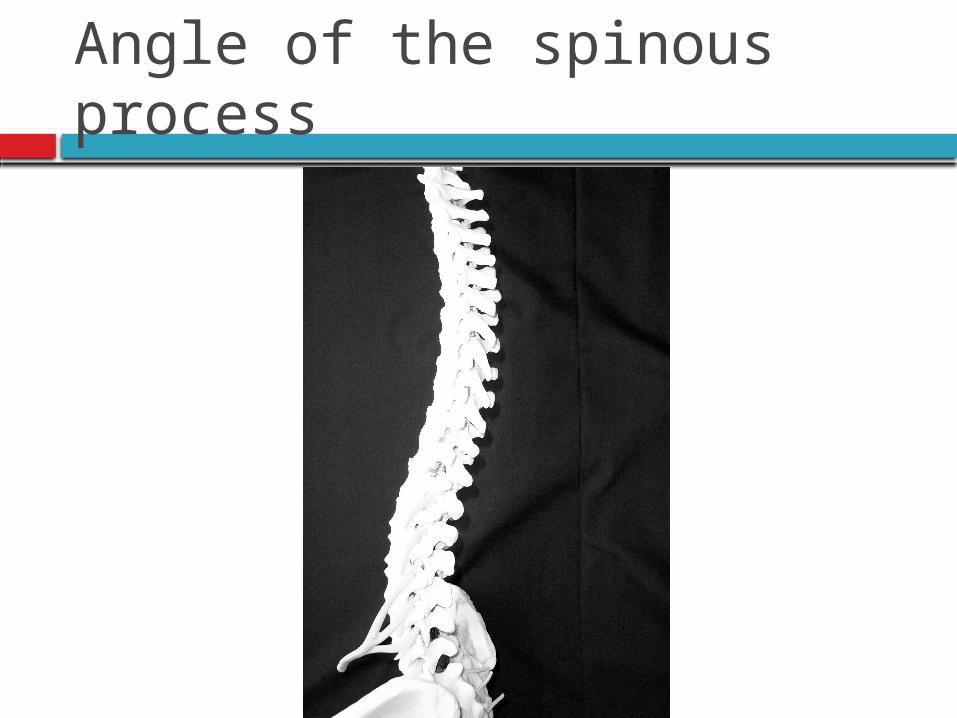
Angle of the spinous process

Spinous Processes
In the cervical and lumbar areas the spinous processes are nearly horizontal so with flexion you would only need to angle the needle slightly cephalad
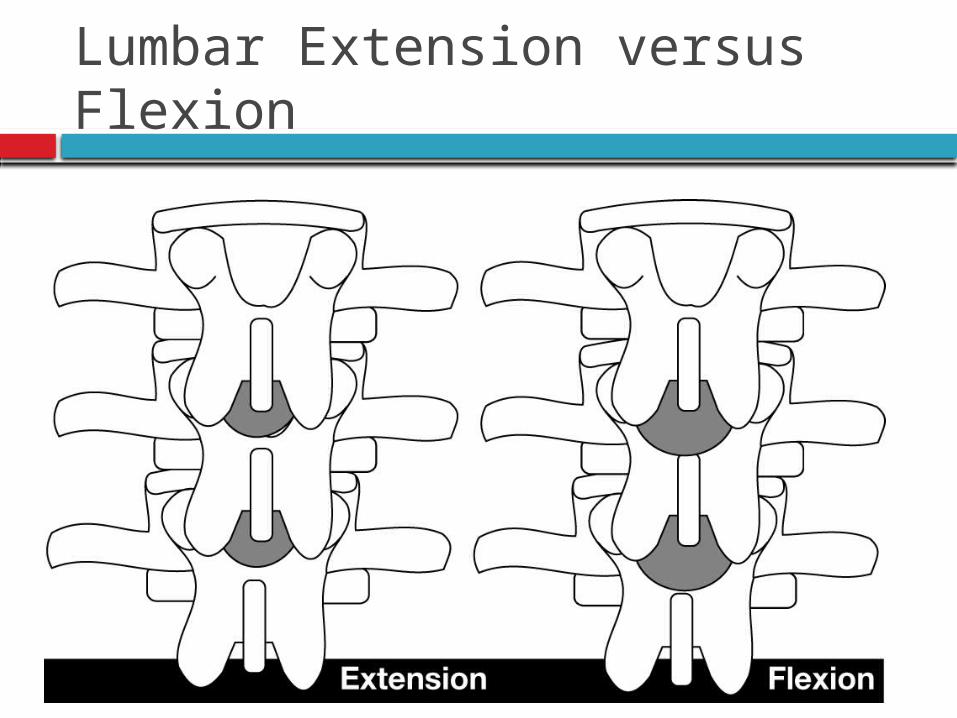
Lumbar Extension versus Flexion

Spinous Processes
In the thoracic area the spinous processes are slanted in a caudad direction and so you would need to angle the needle more cephalad
Locating prominent cervical and thoracic vertebrae
C2 is the first palpable vertebrae C7 is the most prominent cervical
vertebrae With the patients arms at the side the tip
of the scapula generally corresponds with T7

Importance of these Landmarks Knowing these landmarks is important
for the administration of thoracic epidurals
It is helpful to count up and down to help ensure you are placing the thoracic epidural in the appropriate area for postoperative analgesia

What is Tuffier’s Line?
A line drawn between the highest points of both iliac crests will yield either the body of L4 or the L4-L5 interspace.


The Posterior Iliac Spines
Generally cross S2
Don’t count on the conus medullaris moving up with spinal flexion
Traditional teaching has been that positioning the patient in flexion will cause the conus medullaris moving in a cephalad direction.
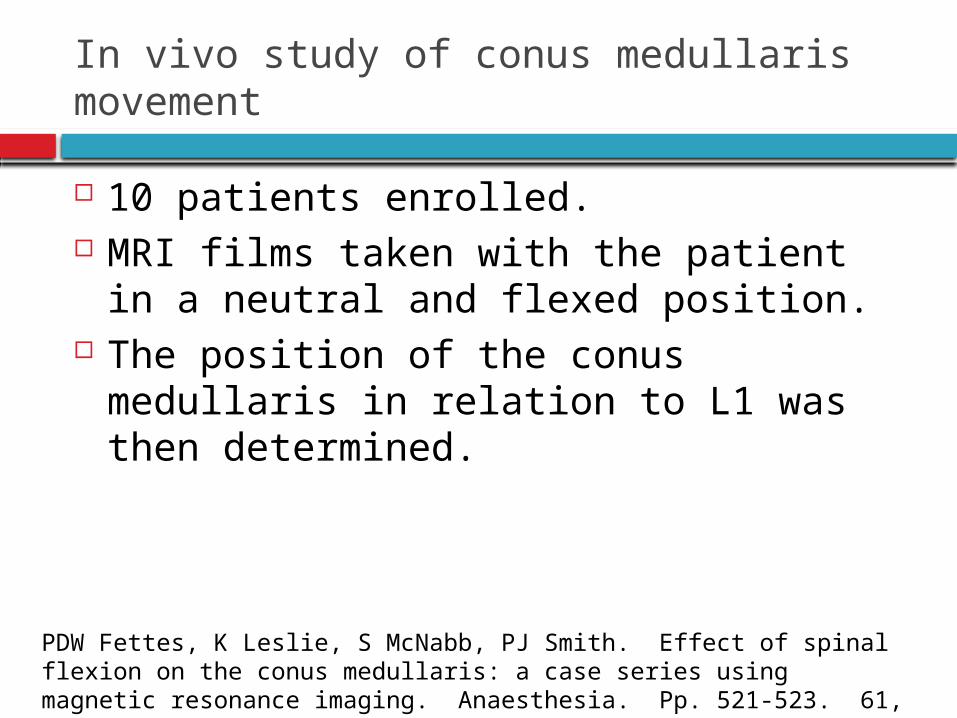
In vivo study of conus medullaris movement
10 patients enrolled. MRI films taken with the patient in a
neutral and flexed position. The position of the conus medullaris in
relation to L1 was then determined.
PDW Fettes, K Leslie, S McNabb, PJ Smith. Effect of spinal flexion on the conus medullaris: a case series using magnetic resonance imaging. Anaesthesia. Pp. 521-523. 61, 2006.

Findings
With spinal flexion the following occurred:
The conus medullaris moved in a cephalad manner in 3 of the 10 subjects
The conus medullaris moved in a caudad manner in 3 of the 10 subjects
The conus medullaris did not move in either direction in 4 of the 10 subjects
PDW Fettes, K Leslie, S McNabb, PJ Smith. Effect of spinal flexion on the conus medullaris: a case series using magnetic resonance imaging. Anaesthesia. Pp. 521-523. 61, 2006.

Spinal cord damage can occur due to improper needle placement due to:
Normal anatomic variability Abnormal conditions (tethered cord) Inaccurate vertebral level assessment Cephalad angulation of the needle Performing a dural puncture at an
inappropriately high vertebral level
PDW Fettes, K Leslie, S McNabb, PJ Smith. Effect of spinal flexion on the conus medullaris: a case series using magnetic resonance imaging. Anaesthesia. Pp. 521-523. 61, 2006.
Implications
Spinal flexion confers NO protection against spinal cord damage when performing a spinal anesthetic (especially at higher levels)
PDW Fettes, K Leslie, S McNabb, PJ Smith. Effect of spinal flexion on the conus medullaris: a case series using magnetic resonance imaging. Anaesthesia. Pp. 521-523. 61, 2006.

References
Brown, D.L. (2005). Spinal, epidural, and caudal anesthesia. In R.D. Miller Miller’s Anesthesia, 6th edition. Philadelphia: Elsevier Churchill Livingstone.
Burkard J, Lee Olson R., Vacchiano CA. (2005) Regional Anesthesia. In JJ Nagelhout & KL Zaglaniczny (eds) Nurse Anesthesia 3rd edition. Pages 977-1030.
Kleinman, W. & Mikhail, M. (2006). Spinal, epidural, & caudal blocks. In G.E. Morgan et al Clinical Anesthesiology, 4th edition. New York: Lange Medical Books.
Warren, D.T. & Liu, S.S. (2008). Neuraxial Anesthesia. In D.E. Longnecker et al (eds) Anesthesiology. New York: McGraw-Hill Medical.
Related Documents


