Network Administration User’s Guide

Welcome message from author
This document is posted to help you gain knowledge. Please leave a comment to let me know what you think about it! Share it to your friends and learn new things together.
Transcript

Network AdministrationUser’s Guide
User
’s Gu
ide
*XXXXXXXX00*
*XXXXXXXX00*
Konica Minolta Business Solutions Europe GmbHEuropaallee 17 30855 Langenhagen • GermanyTel.: +49 (0) 511 74 04-0Fax: +49 (0) 511 74 10 50www.konicaminolta.eu
© 2009 Konica MinoltaBusiness Solutions Europe GmbHAll rights reserved. Printed in Germany.
00-EN

.

bizhub 42/36 Contents-1
Table of contents
1 Introduction
1.1 Welcome .......................................................................................................................................... 1-3
1.1.1 User's guides ..................................................................................................................................... 1-31.1.2 User's Guide ...................................................................................................................................... 1-31.2 Conventions used in this manual .................................................................................................. 1-4
1.2.1 Symbols used in this manual ............................................................................................................. 1-4To use this machine safely................................................................................................................. 1-4Procedural instruction........................................................................................................................ 1-4Key symbols....................................................................................................................................... 1-5
1.2.2 Document and paper indications....................................................................................................... 1-5Original and paper sizes .................................................................................................................... 1-5Original and paper indications ........................................................................................................... 1-5
2 Control Panel Keys
2.1 Control Panel and functions .......................................................................................................... 2-3
2.2 Utility/Counter ................................................................................................................................. 2-5
2.3 Basic operations in Administrator Settings.................................................................................. 2-6
2.3.1 Displaying the Administrator Settings screen.................................................................................... 2-6
3 Using PageScope Web Connection
3.1 Connecting to network................................................................................................................... 3-3
3.1.1 Basic settings for TCP/IP communication ......................................................................................... 3-3[TCP/IP].............................................................................................................................................. 3-3[Network Speed] ................................................................................................................................ 3-3
3.1.2 Communicating using IPv6 ................................................................................................................ 3-4[TCP/IP].............................................................................................................................................. 3-4
3.2 Using PageScope Web Connection .............................................................................................. 3-5
3.2.1 [TCP/IP].............................................................................................................................................. 3-53.2.2 [Device Certificate] ............................................................................................................................. 3-53.2.3 [SSL/TLS Settings] ............................................................................................................................. 3-53.3 Logging in to the administrator mode .......................................................................................... 3-6
3.4 Specifying the Automatic Logout Time......................................................................................... 3-8[Auto Logout] ..................................................................................................................................... 3-8
4 [Admin Settings]
4.1 [Machine Settings] .......................................................................................................................... 4-4
4.2 [Administrator Registration] .......................................................................................................... 4-6
4.3 [Address Registration].................................................................................................................... 4-7
4.3.1 [Address Book]................................................................................................................................... 4-74.3.2 [Group] ............................................................................................................................................... 4-84.3.3 [Program] ........................................................................................................................................... 4-94.4 [Authentication Setting]................................................................................................................ 4-10
4.5 [Ethernet] ....................................................................................................................................... 4-11
4.5.1 [TCP/IP]............................................................................................................................................ 4-114.5.2 [Netware] .......................................................................................................................................... 4-134.5.3 [AppleTalk] ....................................................................................................................................... 4-144.5.4 [Network Speed] .............................................................................................................................. 4-144.5.5 [IEEE802.1X]..................................................................................................................................... 4-154.5.6 [Binary Division]................................................................................................................................ 4-15

Contents-2 bizhub 42/36
4.5.7 [S/MIME Comm. Setting] ................................................................................................................. 4-164.6 [External Memory Print] ............................................................................................................... 4-17
4.7 [Job Timeout] ................................................................................................................................ 4-18
4.8 [Copy Settings].............................................................................................................................. 4-19
4.9 [Print Settings]............................................................................................................................... 4-20
4.9.1 [Startup Page Setting]...................................................................................................................... 4-204.9.2 [Auto Continue] ................................................................................................................................ 4-204.9.3 [Paper].............................................................................................................................................. 4-214.9.4 [Hold Job Timeout]........................................................................................................................... 4-224.9.5 [Quality Settings] .............................................................................................................................. 4-234.9.6 [Emulation] ....................................................................................................................................... 4-244.10 [Maintenance Menu] ..................................................................................................................... 4-26
4.10.1 [Print Menu]...................................................................................................................................... 4-264.10.2 [Printer Adjustment] ......................................................................................................................... 4-27
[Leading Edge Adjustment].............................................................................................................. 4-29[Leading Edge Adjustment Tray]...................................................................................................... 4-29[Side Edge Adjustment] ................................................................................................................... 4-30[Max. Density Adjustment] ............................................................................................................... 4-31[Gradation Adjustment] .................................................................................................................... 4-32
4.10.3 [Drum Dry] ........................................................................................................................................ 4-334.10.4 [Finisher Settings]............................................................................................................................. 4-33
[Paper Alignment Plate Settings] ..................................................................................................... 4-33
4.11 [Folder Settings]............................................................................................................................ 4-34
4.12 [Security Settings]......................................................................................................................... 4-35
4.12.1 [Administrator Password]................................................................................................................. 4-354.12.2 [Security Details] .............................................................................................................................. 4-364.12.3 [Enhanced Security Mode]............................................................................................................... 4-37
Required settings............................................................................................................................. 4-37Settings to forcibly changed ........................................................................................................... 4-37
4.12.4 [HDD Settings] ................................................................................................................................. 4-38[Overwrite All Data] .......................................................................................................................... 4-38
4.12.5 [SSD Low-level Format] ................................................................................................................... 4-404.13 [Restore Defaults] ......................................................................................................................... 4-41
4.14 [HDD Format] ................................................................................................................................ 4-42
4.15 [Paper Empty]................................................................................................................................ 4-43
4.16 [Restriction Code Settings].......................................................................................................... 4-44
4.17 [Erase Job Log] ............................................................................................................................. 4-45
4.18 [Fax Settings]................................................................................................................................. 4-46
4.18.1 [Sender Settings].............................................................................................................................. 4-464.18.2 [Header/Footer Settings].................................................................................................................. 4-474.18.3 [Comm. Settings] ............................................................................................................................. 4-494.18.4 [Function Settings] ........................................................................................................................... 4-504.18.5 [Fax Function Settings] .................................................................................................................... 4-514.18.6 [Memory RX] .................................................................................................................................... 4-524.18.7 [Closed Network RX Password]....................................................................................................... 4-534.18.8 [Forward TX Settings]....................................................................................................................... 4-544.18.9 [Remote RX Settings] ....................................................................................................................... 4-554.18.10 [PC-Fax RX Settings] ....................................................................................................................... 4-564.18.11 [Nighttime RX Settings] .................................................................................................................... 4-574.18.12 [PBX Connection Settings]............................................................................................................... 4-584.18.13 [Fax Report]...................................................................................................................................... 4-594.18.14 [List Print] ......................................................................................................................................... 4-604.18.15 [Fax Target] ...................................................................................................................................... 4-604.18.16 [Fax Factory Default] ........................................................................................................................ 4-614.18.17 [Fax Image Initialized]....................................................................................................................... 4-61

bizhub 42/36 Contents-3
5 Configuring from PageScope Web Connection
5.1 [System] tab..................................................................................................................................... 5-3
5.1.1 [Device Information] ........................................................................................................................... 5-3[Summary] .......................................................................................................................................... 5-3[Paper Source] ................................................................................................................................... 5-4[Output Tray] ...................................................................................................................................... 5-4[Storage]............................................................................................................................................. 5-5[Interface Information] ........................................................................................................................ 5-5[Consumables] ................................................................................................................................... 5-6
5.1.2 [Counter] ............................................................................................................................................ 5-6[Total Counter] ................................................................................................................................... 5-6[Sheets Printed by Paper Size] .......................................................................................................... 5-7[Sheets Printed by Paper Type] ......................................................................................................... 5-8
5.1.3 [Online Assistance]............................................................................................................................. 5-85.1.4 [Import/Export] ................................................................................................................................... 5-9
[Job Log] ............................................................................................................................................ 5-9[Authentication] ................................................................................................................................ 5-10[Address] .......................................................................................................................................... 5-11
5.1.5 [Date/Time Settings]......................................................................................................................... 5-12[Manual Settings] ............................................................................................................................. 5-12[Time Adjustment Settings] .............................................................................................................. 5-13[Daylight Saving Time Settings] ....................................................................................................... 5-14
5.1.6 [Machine Settings] ........................................................................................................................... 5-155.1.7 [ROM Version] .................................................................................................................................. 5-165.1.8 [Maintenance]................................................................................................................................... 5-16
[Clear Settings]................................................................................................................................. 5-16[Reset] .............................................................................................................................................. 5-17
5.1.9 [Notification Settings]....................................................................................................................... 5-17[Status Notification Settings] ........................................................................................................... 5-17[Total Counter Notification Settings] ................................................................................................ 5-19
5.1.10 [Sender Registration] ....................................................................................................................... 5-205.2 [Security] tab ................................................................................................................................. 5-21
5.2.1 [Authentication] ................................................................................................................................ 5-21[General Settings]............................................................................................................................. 5-21[User List] ......................................................................................................................................... 5-23[User List] (New Registration/Edit) ................................................................................................... 5-24[Account Track List] ......................................................................................................................... 5-25[Account Track List] (New Registration/Edit) ................................................................................... 5-26[External Server List] ........................................................................................................................ 5-27[External Server List] (Edit) ............................................................................................................... 5-28[Default Function Permission] .......................................................................................................... 5-30[Public User Registration] ................................................................................................................ 5-31
5.2.2 [ID & Print Settings] .......................................................................................................................... 5-325.2.3 [Authentication Device Settings] ...................................................................................................... 5-33
[General Settings]............................................................................................................................. 5-33[FeliCa (SSFC) Settings]................................................................................................................... 5-34
5.2.4 [PKI Settings] ................................................................................................................................... 5-35[Device Certificate] ........................................................................................................................... 5-35[Device Certificate] (New Registration) ............................................................................................ 5-36[Device Certificate] (Request a Certificate) ...................................................................................... 5-38[Device Certificate] (Install a Certificate) .......................................................................................... 5-38[Device Certificate] (Edit) .................................................................................................................. 5-39[SSL/TLS Settings] ........................................................................................................................... 5-40[Protocol Settings]............................................................................................................................ 5-41[Protocol Settings] (IEEE802.1X) ...................................................................................................... 5-42[Protocol Settings] (S/MIME)............................................................................................................ 5-43[Protocol Settings] (HTTP Server) .................................................................................................... 5-43[Protocol Settings] (E-mail Send (SMTP)) ........................................................................................ 5-44[Protocol Settings] (E-mail Receive (POP)) ...................................................................................... 5-45[Protocol Settings] (TCP Socket) ..................................................................................................... 5-46[Protocol Settings] (LDAP) ............................................................................................................... 5-47[Protocol Settings] (WebDAV Client) ................................................................................................ 5-48

Contents-4 bizhub 42/36
[Protocol Settings] (OpenAPI) .......................................................................................................... 5-49[Protocol Settings] (Web Service) .................................................................................................... 5-50[External Certificate]......................................................................................................................... 5-51[External Certificate] (New Registration) .......................................................................................... 5-52[Validate Certificate] ......................................................................................................................... 5-53
5.2.5 [IPsec] .............................................................................................................................................. 5-54[General Settings]............................................................................................................................. 5-55[IKE Settings].................................................................................................................................... 5-56[IPsec SA Settings]........................................................................................................................... 5-56[IPsec Peer Settings]........................................................................................................................ 5-57
5.2.6 [IP Address Filtering] ........................................................................................................................ 5-585.2.7 [IEEE802.1X]..................................................................................................................................... 5-595.2.8 [Limiting Access to Destination]....................................................................................................... 5-60
[Restrict User Access]...................................................................................................................... 5-60
5.2.9 [Auto Logout] ................................................................................................................................... 5-615.2.10 [Administrator Password]................................................................................................................. 5-625.3 [Job] tab......................................................................................................................................... 5-63
5.3.1 [Current Jobs] .................................................................................................................................. 5-63[Print] ................................................................................................................................................ 5-63[Send] ............................................................................................................................................... 5-64[Receive]........................................................................................................................................... 5-65[Save] ............................................................................................................................................... 5-65
5.3.2 [Job History]..................................................................................................................................... 5-66[Print] ................................................................................................................................................ 5-66[Send] ............................................................................................................................................... 5-67[Receive]........................................................................................................................................... 5-67[Save] ............................................................................................................................................... 5-68[Job History] (Detail) ......................................................................................................................... 5-68
5.3.3 [Communication List] ....................................................................................................................... 5-69[Scan] ............................................................................................................................................... 5-69[Fax TX] ............................................................................................................................................ 5-70[Fax RX]............................................................................................................................................ 5-70[Communication List] (Detail) ........................................................................................................... 5-71
5.4 [Print] tab ....................................................................................................................................... 5-72
5.4.1 [Default Settings].............................................................................................................................. 5-72[General Settings]............................................................................................................................. 5-72[Paper Source Settings] ................................................................................................................... 5-73[Tray Mapping Settings] ................................................................................................................... 5-74[PCL Settings] .................................................................................................................................. 5-75[PostScript Settings] ........................................................................................................................ 5-75[XPS Settings] .................................................................................................................................. 5-76
5.4.2 [Font/Form] ...................................................................................................................................... 5-76[PCL Font] ........................................................................................................................................ 5-76[PostScript Font] .............................................................................................................................. 5-77[Form Overlay].................................................................................................................................. 5-77
5.4.3 [Download Font/Form] ..................................................................................................................... 5-78[PostScript Font] .............................................................................................................................. 5-78[Form Overlay].................................................................................................................................. 5-79
5.4.4 [Report Types].................................................................................................................................. 5-795.4.5 [Direct Print] ..................................................................................................................................... 5-805.5 [Storage] tab.................................................................................................................................. 5-81
5.5.1 [Scan to HDD] .................................................................................................................................. 5-81[Scan to HDD] (View)........................................................................................................................ 5-81[Scan to HDD] (File Information)....................................................................................................... 5-82
5.5.2 [PC-Fax] ........................................................................................................................................... 5-83[PC-Fax] (File Information) ............................................................................................................... 5-83
5.6 [Address] tab ................................................................................................................................. 5-84
5.6.1 [Address Book]................................................................................................................................. 5-84[Address Book List].......................................................................................................................... 5-84[Address Book List] (New Registration) ........................................................................................... 5-85[Address Book List] (New Registration/Edit: E-mail)........................................................................ 5-86

bizhub 42/36 Contents-5
[Address Book List] (New Registration/Edit: FTP) ........................................................................... 5-87[Address Book List] (New Registration/Edit: SMB) .......................................................................... 5-88[Address Book List] (New Registration/Edit: WebDAV) ................................................................... 5-89[Address Book List] (New Registration/Edit: Fax) ............................................................................ 5-90[Address Book List] (New Registration/Edit: I-Fax).......................................................................... 5-91
5.6.2 [Group] ............................................................................................................................................. 5-92[Group List] ...................................................................................................................................... 5-92[Group List] (New Registration) ........................................................................................................ 5-93[Group List] (New Registration/Edit: Scan) ...................................................................................... 5-93[Group List] (New Registration/Edit: Fax)......................................................................................... 5-94
5.6.3 [Program] ......................................................................................................................................... 5-95[Program List]................................................................................................................................... 5-95[Program List] (New Registration: Communication Setting) ............................................................ 5-96[Program List] (New Registration: Destination Setting).................................................................... 5-97[Program List] (New Registration: Address Book) ........................................................................... 5-98[Program List] (New Registration: Group) ........................................................................................ 5-99[Program List] (Edit)........................................................................................................................ 5-100
5.6.4 [Subject] ......................................................................................................................................... 5-108[Subject Registration]..................................................................................................................... 5-108
5.6.5 [Text] .............................................................................................................................................. 5-109[Text Registration] .......................................................................................................................... 5-109
5.7 [Network] tab............................................................................................................................... 5-110
5.7.1 [General Settings]........................................................................................................................... 5-110[Ethernet Settings].......................................................................................................................... 5-110[Local Interface Settings] ............................................................................................................... 5-111
5.7.2 [TCP/IP Settings]............................................................................................................................ 5-112[TCP/IP Settings]............................................................................................................................ 5-112[IPv4 Settings] ................................................................................................................................ 5-113[IPv6 Settings] ................................................................................................................................ 5-114[RAW Port Settings] ....................................................................................................................... 5-115[DNS Settings]................................................................................................................................ 5-116
5.7.3 [E-mail Settings] ............................................................................................................................. 5-117[E-mail TX (SMTP)] ......................................................................................................................... 5-117[E-mail RX (POP)] ........................................................................................................................... 5-119[S/MIME] ........................................................................................................................................ 5-120
5.7.4 [LDAP Settings] .............................................................................................................................. 5-121[LDAP Settings] .............................................................................................................................. 5-121[LDAP Server Registration] ............................................................................................................ 5-122
5.7.5 [HTTP Settings] .............................................................................................................................. 5-1235.7.6 [IPP Settings].................................................................................................................................. 5-1245.7.7 [FTP Settings]................................................................................................................................. 5-125
[FTP Server Settings] ..................................................................................................................... 5-125[FTP TX Settings] ........................................................................................................................... 5-126
5.7.8 [SNMP Settings]............................................................................................................................. 5-1275.7.9 [SMB Settings] ............................................................................................................................... 5-129
[WINS Settings] .............................................................................................................................. 5-129[SMB Client Settings] ..................................................................................................................... 5-130[Direct Hosting Settings] ................................................................................................................ 5-131
5.7.10 [Web Service Settings]................................................................................................................... 5-132[Common Settings] ........................................................................................................................ 5-132[Printer Settings]............................................................................................................................. 5-133[Scanner Settings].......................................................................................................................... 5-134
5.7.11 [Bonjour Settings]........................................................................................................................... 5-1355.7.12 [NetWare Settings] ......................................................................................................................... 5-136
[NetWare Settings] ......................................................................................................................... 5-136In Remote Printer mode using the NetWare 4.x Bindery Emulation.............................................. 5-137In Print Server mode using the NetWare 4.x Bindery Emulation ................................................... 5-137In NetWare 4.x Remote Printer mode (NDS).................................................................................. 5-138In the NetWare 4.x/5.x/6 Print Server mode (NDS)........................................................................ 5-138For NetWare 5.x/6 Novell Distributed Print Service (NDPS) .......................................................... 5-139[NetWare Status] ............................................................................................................................ 5-140

Contents-6 bizhub 42/36
5.7.13 [AppleTalk Settings] ....................................................................................................................... 5-1415.7.14 [Network Fax Settings]................................................................................................................... 5-1425.7.15 [WebDAV Settings]......................................................................................................................... 5-1435.7.16 [OpenAPI Settings]......................................................................................................................... 5-1445.7.17 [TCP Socket Settings].................................................................................................................... 5-1455.7.18 [LLTD Settings]............................................................................................................................... 5-146
6 Configuration Depending on Your Needs
6.1 Restricting users of this machine (MFP authentication) ............................................................. 6-3
6.1.1 [General Settings]............................................................................................................................... 6-46.1.2 [ID & Print Settings] ............................................................................................................................ 6-46.1.3 User Registration ............................................................................................................................... 6-46.1.4 Account Track Registration ............................................................................................................... 6-56.2 Restricting users of this machine (Active Directory) ................................................................... 6-6
6.2.1 [TCP/IP].............................................................................................................................................. 6-66.2.2 External Server Settings..................................................................................................................... 6-66.2.3 [General Settings]............................................................................................................................... 6-76.2.4 [ID & Print Settings] ............................................................................................................................ 6-76.2.5 [Default Function Permission] ............................................................................................................ 6-76.2.6 [Date/Time Setting] ............................................................................................................................ 6-76.3 Restricting users of this machine (Windows domain or workgroup)......................................... 6-8
6.3.1 [TCP/IP].............................................................................................................................................. 6-86.3.2 External Server Settings..................................................................................................................... 6-86.3.3 [General Settings]............................................................................................................................... 6-96.3.4 [ID & Print Settings] ............................................................................................................................ 6-96.3.5 [Default Function Permission] ............................................................................................................ 6-96.3.6 [WINS Settings] .................................................................................................................................. 6-96.3.7 [Direct Hosting Settings] .................................................................................................................... 6-96.4 Restricting users of this machine (NDS over IPX/SPX) ............................................................. 6-10
6.4.1 External Server Settings................................................................................................................... 6-106.4.2 [General Settings]............................................................................................................................. 6-106.4.3 [ID & Print Settings] .......................................................................................................................... 6-116.4.4 [Default Function Permission] .......................................................................................................... 6-116.4.5 [NetWare Settings] ........................................................................................................................... 6-116.5 Restricting users of this machine (NDS over TCP/IP) ............................................................... 6-12
6.5.1 [TCP/IP]............................................................................................................................................ 6-126.5.2 External Server Settings................................................................................................................... 6-126.5.3 [General Settings]............................................................................................................................. 6-136.5.4 [ID & Print Settings] .......................................................................................................................... 6-136.5.5 [Default Function Permission] .......................................................................................................... 6-136.6 Restricting users of this machine (LDAP)................................................................................... 6-14
6.6.1 [TCP/IP]............................................................................................................................................ 6-146.6.2 External Server Settings................................................................................................................... 6-146.6.3 [General Settings]............................................................................................................................. 6-156.6.4 [ID & Print Settings] .......................................................................................................................... 6-156.6.5 [Default Function Permission] .......................................................................................................... 6-156.6.6 LDAP over SSL ................................................................................................................................ 6-16
External Server Settings................................................................................................................... 6-16LDAP Server Registration ................................................................................................................ 6-16Certificate Verification Settings........................................................................................................ 6-16

bizhub 42/36 Contents-7
7 Authentication unit
7.1 Using authentication unit ............................................................................................................... 7-3
7.1.1 Configuring this machine ................................................................................................................... 7-47.1.2 Registering a user .............................................................................................................................. 7-5
Registering a user using the Control Panel of this machine .............................................................. 7-5Registering a user using Data Administrator ..................................................................................... 7-7Checking the version of the installed Data Administrator.................................................................. 7-7Setup.................................................................................................................................................. 7-7User registration................................................................................................................................. 7-8Associating the user with card using authentication device............................................................ 7-13
8 Appendix
8.1 Product specifications (Network functions) ................................................................................. 8-3
8.2 Error Message................................................................................................................................. 8-4
8.3 Glossary ........................................................................................................................................... 8-5
9 Index
9.1 Index by item ................................................................................................................................... 9-3
9.2 Index by button................................................................................................................................ 9-5

Contents-8 bizhub 42/36

1 Introduction


bizhub 42/36 1-3
1.1 Welcome 1
1 Introduction
1.1 Welcome
Thank you for purchasing this machine.
This User's Guide describes the functions, operating instructions, precautions for correct operation, and sim-ple troubleshooting guidelines of this machine. In order to obtain maximum performance from this machine and use it effectively, please read this User's Guide as necessary.
1.1.1 User's guides
1.1.2 User's Guide
This User's Guide is intended for users ranging from those using this machine for the first time to administra-tors.
It describes basic operations, functions that enable more convenient operations, maintenance procedures, simple troubleshooting operations, and various setting methods of this machine.
Note that basic technical knowledge about the product is required to enable users to perform maintenance work or troubleshooting operations. Limit your maintenance and troubleshooting operations to the areas ex-plained in this manual.
Should you experience any problems, please contact your service representative.
Printed manual Overview
[Quick Guide Copy/Print/Fax/Scan Operations] This manual describes operating procedures and the functions that are most frequently used in order to en-able you to begin using this machine immediately. This manual also contains notes and precautions that should be followed to ensure safe usage of this ma-chine.Please be sure to read this manual before using this machine.
User's guide DVD manuals Overview
[User's Guide Copy Operations] This manual describes details on copy mode opera-tions and the settings of this machine.• Specifications of originals and copy paper• Copy function• Maintaining this machine• Troubleshooting
[User's Guide Print Operations] This manual describes details on printer functions.• Printer settings and operations• Printer troubleshooting
[User's Guide Scan Operations] This manual describes details on scan functions.• Scan settings and operations• Scan troubleshooting
[User's Guide Fax Operations] This manual describes details on fax functions.• Fax settings and operations• Fax troubleshooting
[User's Guide Administrator Operations] This manual describes the functions or settings that the administrator of the machine uses.• Settings using the Control Panel• Settings using PageScope Web Connection

Conventions used in this manual1
1-4 bizhub 42/36
1.2
1.2 Conventions used in this manual
1.2.1 Symbols used in this manual
Symbols are used in this manual to express various types of information.
The following describes each symbol related to correct and safe usage of this machine.
To use this machine safely
7 WARNING
- This symbol indicates that a failure to heed the instructions may lead to death or serious injury.
7 CAUTION
- This symbol indicates that negligence of the instructions may lead to mishandling that may cause injury or property damage.
NOTICEThis symbol indicates a risk that may result in damage to this machine or documents. Follow the instructions to avoid property damage.
Procedural instruction
0 This check mark indicates an option that is required in order to use conditions or functions that are pre-requisite for a procedure.
1 This format number "1" represents the first step.
2 This format number represents the order of serial steps.
% This symbol indicates a supplementary explanation of a pro-cedural instruction.
% This symbol indicates transition of the Control Panel to access a desired menu item.
This symbol indicates a desired page.
d Reference
This symbol indicates a reference.
View the reference as required.
The operation pro-cedures are de-scribed usingillustrations.
bizhub 42/36 1-5
1.2 Conventions used in this manual 1
Key symbols
[ ]Key names on the Touch Panel or computer screen, or a name of user's guide are indicated by these brack-ets.
Bold text Key names on the Control Panel, part names, product names and option names are indicated in bold text.
1.2.2 Document and paper indications
Original and paper sizes
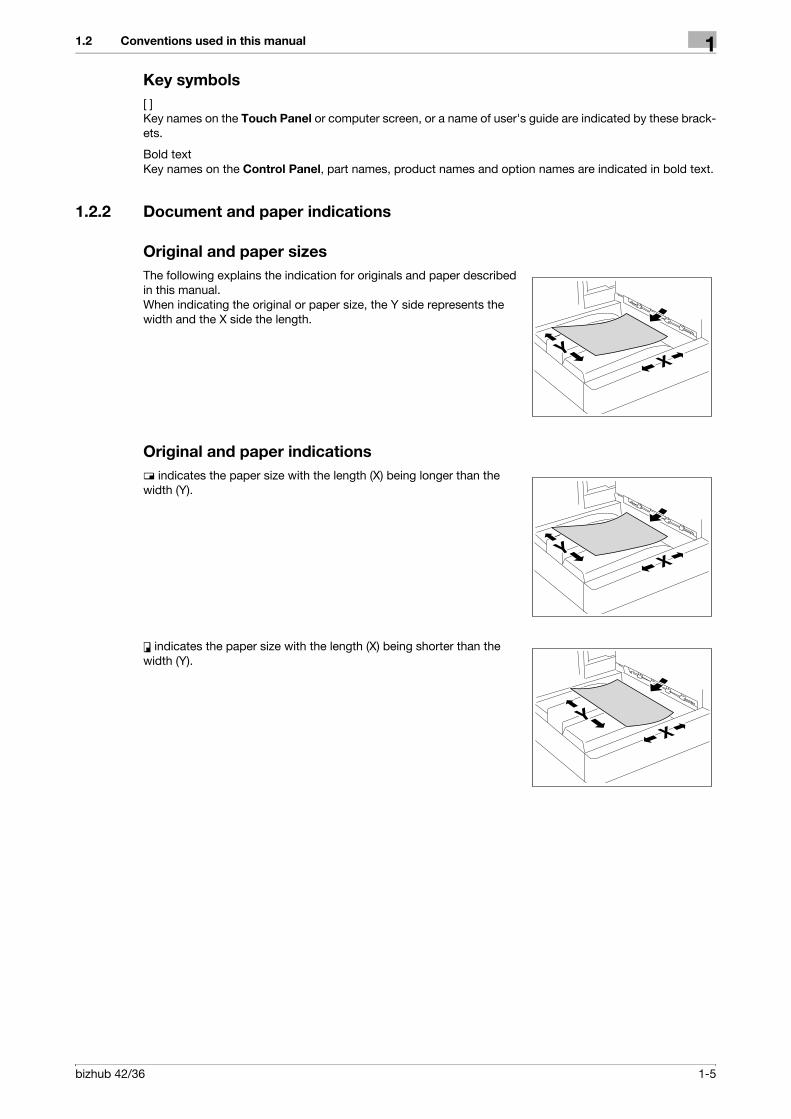
The following explains the indication for originals and paper described in this manual. When indicating the original or paper size, the Y side represents the width and the X side the length.
Original and paper indications
w indicates the paper size with the length (X) being longer than the width (Y).
v indicates the paper size with the length (X) being shorter than the width (Y).

Conventions used in this manual1
1-6 bizhub 42/36
1.2

2 Control Panel Keys


bizhub 42/36 2-3
2.1 Control Panel and functions 2
2 Control Panel Keys
This section describes the functions of the keys on the Control Panel.
2.1 Control Panel and functions
Press the keys on the Control Panel to use the Copy, Folder, E-mail, Fax, or other functions.
No. Name Description
1 Touch Panel Various screens and messages are displayed. You can configure various settings by directly pressing the Touch Panel.
2 Power Save Press to enter Sleep Mode. While the machine is in Sleep Mode, the indicator on the Power Save key lights up in green and the touch panel goes off. To cancel Sleep Mode, press the Power Save key again.
3 Fax Press this key to enter Fax mode. While the machine is in Fax mode, the indicator on the Fax key lights up in green.Allows you to use this function if the Fax Kit FK-509 is installed and the fax function is available.For details on the fax function, refer to the [User's Guide Fax Op-erations].
4 E-mail Press this key to enter Scan to E-mail mode. While the machine is in Scan to E-mail mode, the indicator on the E-mail key lights up in green.For details on the Scan to E-mail function, refer to the [User's Guide Scan Operations].
5 Folder Press this key to enter Scan to Folder mode. While the machine is in Scan to Folder mode, the indicator on the Folder key lights up in green.For details on the Scan to Folder function, refer to the [User's Guide Scan Operations].
6 Copy Press this key to enter Copy mode. While the machine is in Copy mode, the indicator on the Copy key lights up in green.For details on the copy function, refer to the [User's Guide Copy Operations].
7 Reset Press this key to reset settings (except programmed settings) en-tered using the Control Panel and Touch Panel.

Control Panel and functions2
2-4 bizhub 42/36
2.1
8 Interrupt Press this key to enter Interrupt mode. While the machine is in In-terrupt mode, the indicator on the Interrupt key lights up in green. To cancel Interrupt mode, press the Interrupt key again.
9 Stop Pressing this key while copying, scanning or printing temporarily stops the operation.
10 Start Press to start the copy, scan or fax operation.
11 Keypad Allows you to specify the number of copies. Allows you to enter the magnification. Allows you to enter various settings.
12 C (Clear) Clears a value (such as the number of copies, a zoom ratio and size) entered using the Keypad.
13 Error Indicator Flashes in orange if an error occurred.Lights up in orange when the service representative is being called.
14 Data Indicator Flashes in blue while a print job is being received. Lights up in blue when a print job is queued to be printed or while it is being printed.
15 Utility/Counter Press to display the [Utility Settings] screen. From the [Utility Set-tings] screen, settings can be specified for the parameters in the [Accessibility], [Meter Count], [Address Registration], [User Set-tings], and [Admin Settings] screens.
16 Mode Memory Allows you to register (store) the desired copy/fax/scan settings as a program or to recall a registered program.
17 Access If user authentication or account track settings have been applied, press the Access key after entering the user name and password (for user authentication) or the account name and password (for account track) in order to use this machine.While logged on, press the Access key to log off.
No. Name Description

bizhub 42/36 2-5
2.2 Utility/Counter 2
2.2 Utility/Counter
Press the Utility/Counter key to display the Utility screen. You can configure the machine settings and check its use status in the Utility menu screen.
% Press the Utility/Counter key.
Settings
[Accessibility] Provides items on machine settings.For details on [Accessibility], refer to the [User's Guide Copy Operations].
[Meter Count] Provides data on the operations made on the machine according to type of operation.For details on [Meter Count], refer to the [Quick Guide].
[Address Registration] Provides items on registration and deletion of addresses used on the ma-chine.For details on [Address Registration], refer to the [User's Guide Scan Op-erations] and [User's Guide Fax Operations].
[User Settings] Provides setting items that can be operated by the user.
[Admin Settings] Provides setting items that can only be operated by the administrator of the machine.

Basic operations in Administrator Settings2
2-6 bizhub 42/36
2.3
2.3 Basic operations in Administrator Settings
2.3.1 Displaying the Administrator Settings screen
1 Press the Utility/Counter key.
2 Press [ ].
3 Press [Admin Settings].

bizhub 42/36 2-7
2.3 Basic operations in Administrator Settings 2
4 Enter the password, and then press [OK].
% For details on setting or changing the password, refer to page 4-35.
The Administrator Settings screen appears.
% To finish configuring the Utility mode settings, press the Utility/Counter key.% To return through the hierarchy of the Utility menu, press [Close] until the desired screen appears.

Basic operations in Administrator Settings2
2-8 bizhub 42/36
2.3

3 Using PageScope Web
Connection


bizhub 42/36 3-3
3.1 Connecting to network 3
3 Using PageScope Web Connection
3.1 Connecting to network
3.1.1 Basic settings for TCP/IP communication
Configure settings to use this machine in the TCP/IP network environment.
These settings are required before using this machine via the network.
[TCP/IP]
In [Admin Settings] on the Control Panel, select [Ethernet] ö [TCP/IP].
d Reference
For details on the menu structure of the [Ethernet] in the Control Panel, refer to page 4-11.
For details on how to use this machine in the IPv6 environment, refer to page 3-4.
[Network Speed]
In [Admin Settings] on the Control Panel, select [Ethernet] ö [Network Speed].
d Reference
For details on the menu structure of the [Network Speed] in the Control Panel, refer to page 4-14.

Connecting to network3
3-4 bizhub 42/36
3.1
3.1.2 Communicating using IPv6
Reference- If the IPv6 environment does not operate normally, the machine cannot be connected to the IPv4 net-
work. In this case, disable settings for IPv6.
Configure settings for IPv6 communication.
These settings are required if you want use this machine with an IPv6 address assigned. You can use IPv6 together with IPv4, but you cannot use IPv6 alone.
When you use this machine in an IPv6 environment, the following restrictions apply.- No scanned data can be sent with SMB (but it is allowed for the Direct Hosting service).- NTLM authentication is not supported (but it is allowed for the Direct Hosting service).- You cannot use the IP filtering function.- You cannot use the installer of the printer driver (available for Windows Vista/7/Server 2008/Server 2008
R2).
d Reference
For details on the Direct Hosting service, refer to the sections listed below.
[Direct Hosting Settings] (p. 5-131)
[TCP/IP]
In [Admin Settings] on the Control Panel, select [Ethernet] ö [TCP/IP].
For details on the menu structure of the [Ethernet] in the Control Panel, refer to page 4-11.

bizhub 42/36 3-5
3.2 Using PageScope Web Connection 3
3.2 Using PageScope Web Connection
Configure settings to use PageScope Web Connection.
PageScope Web Connection is a device management utility that is supported by the HTTP server built into this machine. Using a Web browser on a computer connected to the network, you can change machine set-tings and check the status of the machine. You can also handle some settings, which are to be configured on the Control Panel of this machine, through your computer.
Use the following flowchart to configure settings. Clicking a step jumps to the associated procedure.
3.2.1 [TCP/IP]
Configure settings to use this machine in the TCP/IP network environment.
For details, refer to page 3-3.
3.2.2 [Device Certificate]
Configure device certificate settings for encrypting communication from a computer to this machine using SSL.
For details, refer to page 5-35.
3.2.3 [SSL/TLS Settings]
Select whether or not to use SSL in communication from a computer to the machine.
For details, refer to page 5-40.
[TCP/IP]
Do you use SSL communi-cation?
Yes No
[Device Certificate]
[SSL/TLS Settings]
Finish

Logging in to the administrator mode3
3-6 bizhub 42/36
3.3
3.3 Logging in to the administrator mode
To configure this machine with PageScope Web Connection, log in to the administrator mode. The following shows a procedure to log in to the administrator mode.
Reference- As many as 8 sessions (users and administrators) can log on to PageScope Web Connection at the
same time. These can be logged on as Administrator.
1 In the login page, select [Administrator] and click [Log in].
% If necessary, select the [Language].
2 Enter the administrator password of this machine.
% If an incorrect password is entered the specified number of times, it will no longer be possible to log in to the administrator mode. To turn the Power Switch off and on, first turn the power off, and then turn it on after 10 or more seconds have elapsed.

bizhub 42/36 3-7
3.3 Logging in to the administrator mode 3
3 Click [OK].
The administrator mode window appears.

Specifying the Automatic Logout Time3
3-8 bizhub 42/36
3.4
3.4 Specifying the Automatic Logout Time
Configure time before auto logout from the administrator or user mode of PageScope Web Connection.
If no operation is performed for a predefined length of time, the user will automatically be logged out.
[Auto Logout]
In the administrator mode of PageScope Web Connection, select [Security] ö [Auto Logout] ö [Auto Lo-gout].
Item Description
[Admin Mode Logout Time]
Specify the time period before the user will automatically be logged out when no operations have been performed in the administrator mode.
[User Mode Logout Time]
Specify the time period before the user will automatically be logged out when no operations have been performed in the user mode.

4 [Admin Settings]


bizhub 42/36 4-3
4
4 [Admin Settings]
[Admin Settings] are used only by the administrator to adjust the settings. Logging on to Administrator Set-tings requires the administrator password.
Settings
[Machine Settings] Configure the basic functions of this machine.
[Administrator Registra-tion]
Register administrator information and E-mail address of this machine.
[Address Registration] The destination lists for [Address Book], [Group] and [Program] can be printed.
[Authentication Setting] Configure authentication settings.
[Ethernet] Configure network settings.
[External Memory Print] Configure external memory print settings.
[Job Timeout] Configure job timeout settings.
[Copy Settings] Configure the settings for copy functions to be used in copy operations.
[Print Settings] Configure settings for the print operations.
[Maintenance Menu] Configure machine maintenance settings.
[Folder Settings] Configure settings on data stored on the machine HDD.
[Security Settings] Configure settings to restrict the functions of this machine for processing secret data.
[Restore Defaults] Configure settings applied when restoring default on the machine.
[HDD Format] Configure HDD format settings.
[Paper Empty] Configure indication settings applied when paper runs out in a tray.
[Restriction Code Settings] Configure settings to prevent our deprecated OpenAPI connection appli-cation from being registered in this machine.
[Erase Job Log] Configure job log deletion settings.
[Fax Settings] Configure settings for the fax and network fax operations.

[Machine Settings]4
4-4 bizhub 42/36
4.1
4.1 [Machine Settings]
Configure the basic functions of this machine.
% Press the Utility/Counter key ö [Admin Settings] ö [Machine Settings].
Settings
[Sleep Time Setting] Set a time period before switching to the sleep mode when this machine is not being operated. The following items can be set; [1 min.], [2 min.], [5 min.], [6 min.], [7 min.], [8 min.], [9 min.], [10 min.], [11 min.], [12 min.], [13 min.], [14 min.], [15 min.], [30 min.], [45 min.], [1 Hour], or [3 Hours].Sleep mode refers to a power saving state into which the machine auto-matically enters and in which the touch panel goes off if the machine is not used over a period of time.
[Auto Power OFF Setting] Select whether or not to automatically turn the machine off.
[Auto Power OFF Time] Configure the time from 00:00 to 23:59 to automatically turn this machine off.This item is not displayed if [Auto Power OFF Setting] is set to [OFF].
[Date & Time Settings] [Date (xx.xx.xx)] Specify the current date.The default setting is set in the order month, day, then year (MM.DD.YY) for 120V model, month, then year (DD.MM.YY) for 220V model (Europe), and year, month, then day (YY.MM.DD) for 220V model (Asia and China).
[Time] Specify the current time.
[Time Zone] Specify the time difference from UTC (Coordinate Universal Time).
[Daylight Saving Time] [Enable] Specify whether to apply daylight saving time in the time display on this machine.
[Offset] If [ON] is selected, this item displays the time that is ahead of the current time by the specified number of minutes.This item is not displayed if the [Daylight Saving Time] setting is disabled.
[List/Counter] [Job Settings List] The machine settings can be printed.
[Report Input Tray] Select the paper tray loaded with the paper used to print reports.

bizhub 42/36 4-5
4.1 [Machine Settings] 4
[Auto Reset Settings] [Enable] Select whether or not to exit the current screen and return to the home screen if the machine is not used over a period of time.
d ReferenceIf user authentication or enhanced se-curity mode is enabled, the adminis-trator settings mode or user authentication mode is logged off ac-cording to the setting for System Auto Reset Time.
[Auto Reset] Specify the period of time before the auto reset function starts working.
[Priority Mode] Configure a screen to be displayed in the system auto reset mode.
[Shift Output Each Job] Select whether to shift the output paper for each job. This item is displayed if the Finisher FS-529 is installed.
[Low Power Mode Setting] Set whether or not exchanged to low power mode. Low power mode refers to a power saving state into which the machine automatically enters and in which the touch panel goes off if the machine is not used over a period of time.
[LowPowerMode Time Set-ting]
Set a time period before switching to the low power mode when this ma-chine is not being operated. The following items can be set; [1 min.], [2 min.], [3 min.], [4 min.], [5 min.], [6 min.], [7 min.], [8 min.], [9 min.], [10 min.], [11 min.], [12 min.], [13 min.], [14 min.], [15 min.], [30 min.], [45 min.], [1 Hour], or [3 Hours]. The low power switching time is always as long as the sleeping time. If the switching time is longer, the sleep mode may come be-fore the low power mode. This item is not displayed if [Low Power Mode Setting] is set to [OFF].
Factory default
[Sleep Time Setting] bizhub 42[1 Hour]bizhub 36[45 min.]
[Auto Power OFF Setting] This value varies depending on the area.
[Time Zone] [00:00]
[Daylight Saving Time] [OFF]
[Report Input Tray] [Tray 2]
[Auto Reset Settings] [Enable]: [ON][Auto Reset]: [1][Priority Mode]: [Home]
[Shift Output Each Job] [ON]
[Low Power Mode Setting] [ON]
[LowPowerMode Time Set-ting]
[15 min.]
Settings

[Administrator Registration]4
4-6 bizhub 42/36
4.2
4.2 [Administrator Registration]
Register administrator information and E-mail address of this machine.
0 The device name entered under the Machine Settings may not be supported by your operating system.
% Press the Utility/Counter key ö [Admin Settings] ö [Administrator Registration].
Settings
[Administrator Registra-tion]
Register the name of the administrator, extension number(s), E-mail ad-dress of the administrator.The E-mail address of the administrator can be used as From address in E-mails and Internet Fax sent from the machine. Notification on the status of the machine is sent from the administrator's E-mail address.
[Machine Settings] Register the device name and E-mail address of this machine. The E-mail address is set as the From address for E-mail transmission and Internet Fax by default.
Factory default
[Device Name] The default abbreviation is input for the device name. If necessary, it can be changed freely.

bizhub 42/36 4-7
4.3 [Address Registration] 4
4.3 [Address Registration]
Print the lists of addresses registered in Address Book, Groups, and Programs.
For details, refer to the [User's Guide Fax Operations] and [User's Guide Scan Operations].
4.3.1 [Address Book]
Output the addresses registered in Address Book according to type of transmission.
% Press the Utility/Counter key ö [Admin Settings] ö [Address Registration] ö [Address Book] ö [Ad-dress Book].
Settings
[E-mail] Individual lists of addresses registered in Address Book are printed ac-cording to type of transmission.[Start Number]: Select this button to specify the start number of the desti-nation numbers you wish to output to the list.[Number of Addresses]: Select this button to specify the number of ad-dresses to be output to the list.[List Output]: Select this button to output the list of address book destina-tions defined by [Start Number] and [Number of Addresses].[Fax] and [Internet Fax] are displayed when the optional Fax Kit FK-509 is installed.
[FTP]
[WebDAV]
[SMB]
[Fax]
[Internet Fax]
Factory default
[Start Number] [1]
[Number of Addresses] [100]
[List Output] [Print]

[Address Registration]4
4-8 bizhub 42/36
4.3
4.3.2 [Group]
Output the addresses registered in Groups.
% Press the Utility/Counter key ö [Admin Settings] ö [Address Registration] ö [Address Book] ö [Group].
Settings
[Start Number] Select this button to specify the start number of the destination numbers you wish to output to the list.
[Number of Addresses] Select this button to specify the number of addresses to be output to the list.
[List Output] Select this button to output the list of group destinations defined by [Start Number] and [Number of Addresses].
Factory default
[Start Number] [1]
[Number of Addresses] [20]
[List Output] [Print]

bizhub 42/36 4-9
4.3 [Address Registration] 4
4.3.3 [Program]
Output the addresses registered in Programs.
% Press the Utility/Counter key ö [Admin Settings] ö [Address Registration] ö [Address Book] ö [Pro-gram].
Settings
[E-mail] Individual lists of addresses registered in Programs are printed according to type of transmission.[Start Number]: Select this button to specify the start number of the desti-nation numbers you wish to output to the list.[Number of Addresses]: Select this button to specify the number of ad-dresses to be output to the list.[List Output]: Select this button to output the list of program destinations defined by [Start Number] and [Number of Addresses].[Fax] and [Internet Fax] are displayed when the optional Fax Kit FK-509 is installed.
[FTP]
[WebDAV]
[SMB]
[Address Book]
[Group Address]
[Fax]
[Internet Fax]
Factory default
[Start Number] [1]
[Number of Addresses] [50]
[List Output] [Print]
[Authentication Setting]4
4-10 bizhub 42/36
4.4
4.4 [Authentication Setting]
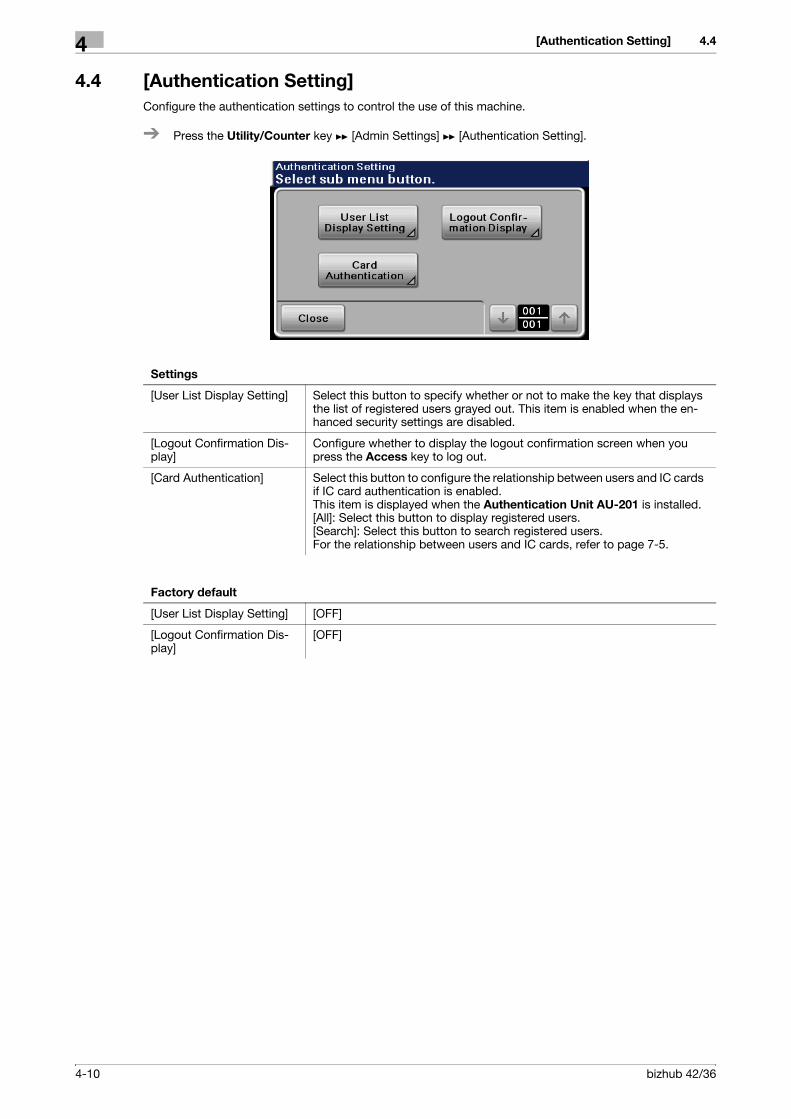
Configure the authentication settings to control the use of this machine.
% Press the Utility/Counter key ö [Admin Settings] ö [Authentication Setting].
Settings
[User List Display Setting] Select this button to specify whether or not to make the key that displays the list of registered users grayed out. This item is enabled when the en-hanced security settings are disabled.
[Logout Confirmation Dis-play]
Configure whether to display the logout confirmation screen when you press the Access key to log out.
[Card Authentication] Select this button to configure the relationship between users and IC cards if IC card authentication is enabled.This item is displayed when the Authentication Unit AU-201 is installed.[All]: Select this button to display registered users.[Search]: Select this button to search registered users.For the relationship between users and IC cards, refer to page 7-5.
Factory default
[User List Display Setting] [OFF]
[Logout Confirmation Dis-play]
[OFF]

bizhub 42/36 4-11
4.5 [Ethernet] 4
4.5 [Ethernet]
Configure network settings.
These settings are required before using this machine via the network.
4.5.1 [TCP/IP]
Specify network settings for the machine. If you change the setting items below and exit the Ethernet menu, the machine is rebooted.- [Enable]- [DHCP]- [BOOTP]- [ARP/PING]- [SLP]- [SNMP]- [IPv6]-[Enable]- [Auto Setting]
% Press the Utility/Counter key ö [Admin Settings] ö [Ethernet] ö [TCP/IP].
Settings
[Enable] Select the TCP/IP setting.[ON]: Enables the TCP/IP setting.[OFF]: Disables the TCP/IP setting. Items except for this one are not dis-played.
[IP Address] To directly specify the IP address, enter the IP address of this machine.Format: *.*.*.* (Asterisk * can be 0 to 255)If the IP address is specified here, the following items are set to [OFF].• DHCP• BOOTP• ARP/PING
[Subnet Mask] When directly entering the IP address, configure the subnet mask of the network to be connected.Format: *.*.*.* (Asterisk * can be 0 to 255)
[Gateway] When directly entering the IP address, specify the default gateway of the network to be connected.Format: *.*.*.* (Asterisk * can be 0 to 255)
[DHCP] If there is a DHCP server on the network, specify whether the IP address and other network information are automatically assigned by the DHCP server.If the IP address is manually specified, [DHCP] is automatically set to [OFF].
[BOOTP] If there is a BOOTP server on the network, specify whether the IP address and other network information are automatically assigned by the BOOTP server.If the IP address is manually specified, [BOOTP] is automatically set to [OFF].

[Ethernet]4
4-12 bizhub 42/36
4.5
[ARP/PING] Select whether or not the ARP/PING command is used when the IP ad-dress is assigned.If the IP address is manually specified, [ARP/PING] is automatically set to [OFF].
[HTTP] Select whether or not to enable HTTP.
[FTP] Select whether or not to enable the FTP server.
[Telnet] Select whether or not to enable Telnet transmissions.
[Bonjour] To display the machine as a connected device via Bonjour, select [Enable].
[Dynamic DNS] Select [Enable] when automatically registering the host name with the DNS server that supports the Dynamic DNS function.
[IPP] To use IPP print, select [Enable].
[RAW Port] [Enable] To use RAW port (Port 9100) print, select [Yes].
[Bidirectional] Select whether or not to enable RAW port bidirec-tional communication.If the RAW port setting is disabled, this item is not displayed.
[SLP] Select whether or not to enable SLP.
[SMTP] Select whether or not to enable E-mail transmission operations for this ma-chine.
[SNMP] Select whether or not to enable SNMP.
[WSD Print] Select whether or not to enable WSD printing.
[IPSec] Select whether or not to enable IPsec.
[IP Address Filter] [Permit Access] Select [Enable] to allow access from certain IP addresses.
[Deny Access] Select [Enable] to deny access from certain IP ad-dresses.
[IPv6] [Enable] [ON]: Enable the IPv6 Setting.[OFF]: Disable the IPv6 Setting. Buttons except for this one are not displayed.
[Auto Setting] To obtain the IPv6 address automatically, select [Enable].
[Link Local] Displays the link-local address generated from the MAC address.
[Global Address] Displays the global address.
[Gateway Address] Displays the gateway address.
Factory default
[Enable] [ON]
[IP Address] [0.0.0.0]
[Subnet Mask] [0.0.0.0]
[Gateway] [0.0.0.0]
[DHCP] [ON]
[BOOTP] [OFF]
[ARP/PING] [OFF]
[HTTP] [Enable]
[FTP] [Enable]
[Telnet] [Enable]
[Bonjour] [Enable]
[Dynamic DNS] [Disable]
Settings

bizhub 42/36 4-13
4.5 [Ethernet] 4
4.5.2 [Netware]
Specify Netware setting.
If you change this setting and exit the Ethernet menu, the machine is rebooted.
% Press the Utility/Counter key ö [Admin Settings] ö [Ethernet] ö [Netware].
[IPP] [Enable]
[RAW Port] [Enable]: [Yes][Bidirectional]: [OFF]
[SLP] [Enable]
[SMTP] [Enable]
[SNMP] [Enable]
[WSD Print] [Enable]
[IPSec] [Disable]
[IP Address Filter] [Permit Access]: [Disable][Deny Access]: [Disable]
[IPv6] [Enable]: [ON][Auto Setting]: [Enable]
Factory default
Settings
[Enable] Select whether or not to enable NetWare.
[Disable]
Factory default
[Netware] [Disable]

[Ethernet]4
4-14 bizhub 42/36
4.5
4.5.3 [AppleTalk]
Specify AppleTalk setting.
% Press the Utility/Counter key ö [Admin Settings] ö [Ethernet] ö [AppleTalk].
4.5.4 [Network Speed]
Specify Network speed setting.
% Press the Utility/Counter key ö [Admin Settings] ö [Ethernet] ö [Network Speed].
Settings
[Enable] Select whether or not to enable AppleTalk.
[Disable]
Factory default
[AppleTalk] [Enable]
Settings
[Auto] Select whether or not to enable network speed.
[10Mbps Full Duplex]
[10Mbps Half Duplex]
[100Mbps Full Duplex]
[100Mbps Half Duplex]
[1Gbps Full Duplex]
Factory default
[Network Speed] [Auto]

bizhub 42/36 4-15
4.5 [Ethernet] 4
4.5.5 [IEEE802.1X]
If you use this machine in a wired LAN environment having the IEEE802.1x authentication system, you must configure the supplicant (authentication client) function of this machine.
If you change this setting and exit the Ethernet menu, the machine is rebooted.
% Press the Utility/Counter key ö [Admin Settings] ö [Ethernet] ö [IEEE802.1X].
4.5.6 [Binary Division]
Select whether or not transmission data is divided.
If the E-mail software that received an E-mail does not have a restoration function, you may not be able to read the E-mail.
% Press the Utility/Counter key ö [Admin Settings] ö [Ethernet] ö [Binary Division].
Settings
[Enable] Select whether or not to enable IEEE802.1X.
[Disable]
Factory default
[IEEE802.1X] [Disable]
Settings
[ON] Select whether or not to enable binary division.
[OFF]
Factory default
[Binary Division] [OFF]

[Ethernet]4
4-16 bizhub 42/36
4.5
4.5.7 [S/MIME Comm. Setting]
Select whether or not to use S/MINE communication when sending E-mails from the machine.
% Press the Utility/Counter key ö [Admin Settings] ö [Ethernet] ö [S/MIME Comm. Setting].
Settings
[S/MIME Enabled] Select the S/MIME communication setting.[Enable]: Enable the S/MIME setting.[Disable]: Disable the S/MIME setting. Items except for this one are grayed out.
[Digital Signature] Select whether or not to attach a digital signature in S/MIME communica-tion.
[Encryption Method] Specify the E-mail text encryption format.
Factory default
[S/MIME Enabled] [Disable]
[Digital Signature] [Do not add signature]
[Encryption Method] [3DES]

bizhub 42/36 4-17
4.6 [External Memory Print] 4
4.6 [External Memory Print]
Use the setting to print data stored in the external memory.
% Press the Utility/Counter key ö [Admin Settings] ö [External Memory Print].
d Reference
For details on how to print data from the external memory, refer to [User's Guide Printer Operations].
Settings
[Enable] Select whether or not to enable the External Memory Print function.
[Disable]
Factory default
[External Memory Print] [Enable]

[Job Timeout]4
4-18 bizhub 42/36
4.7
4.7 [Job Timeout]
Specify the amount of time applied to job timeout.
% Press the Utility/Counter key ö [Admin Settings] ö [Job Timeout].
Settings
[Job Timeout] Specify the amount of time applied to any single job sent from the machine.
Factory default
[Job Timeout] [15]
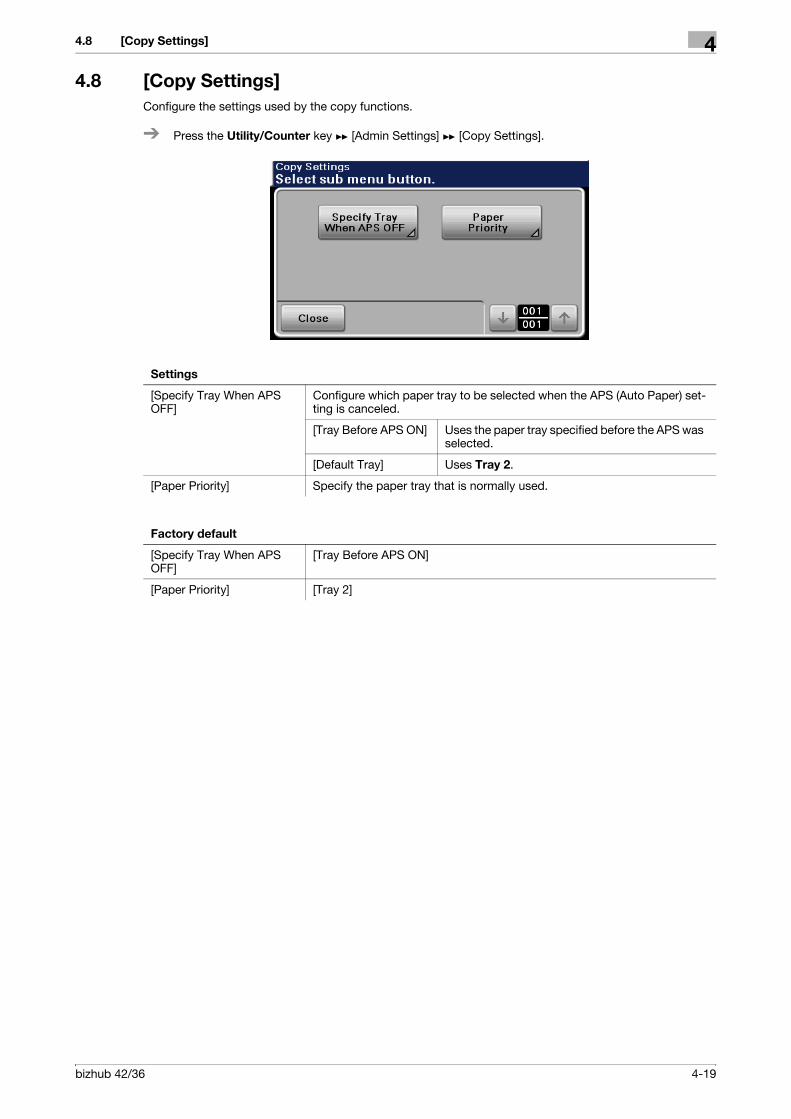
bizhub 42/36 4-19
4.8 [Copy Settings] 4
4.8 [Copy Settings]
Configure the settings used by the copy functions.
% Press the Utility/Counter key ö [Admin Settings] ö [Copy Settings].
Settings
[Specify Tray When APS OFF]
Configure which paper tray to be selected when the APS (Auto Paper) set-ting is canceled.
[Tray Before APS ON] Uses the paper tray specified before the APS was selected.
[Default Tray] Uses Tray 2.
[Paper Priority] Specify the paper tray that is normally used.
Factory default
[Specify Tray When APS OFF]
[Tray Before APS ON]
[Paper Priority] [Tray 2]

[Print Settings]4
4-20 bizhub 42/36
4.9
4.9 [Print Settings]
Configure printer settings.
4.9.1 [Startup Page Setting]
Select whether or not a startup page is printed when the machine is turned on.
% Press the Utility/Counter key ö [Admin Settings] ö [Print Settings] ö [Startup Page Setting].
4.9.2 [Auto Continue]
Select whether or not to continue printing if the size and type of paper is different from the one specified by the print job.
% Press the Utility/Counter key ö [Admin Settings] ö [Print Settings] ö [Auto Continue].
Settings
[ON] Select [ON] to print a startup page (Configuration page) when the power of the machine is turned on.
[OFF]
Factory default
[Startup Page Setting] [OFF]
Settings
[ON] Select whether or not to continue printing if the size and type of paper of a print job is different from the one loaded in the specified paper feed tray.
[OFF]
Factory default
[Auto Continue] [OFF]

bizhub 42/36 4-21
4.9 [Print Settings] 4
4.9.3 [Paper]
Specify the paper to be used unless you specify an alternative.
% Press the Utility/Counter key ö [Admin Settings] ö [Print Settings] ö [Paper].
Settings
[Default Paper] [Paper Size] Select the paper size.
[Custom Size] Specify odd size paper.[Width]: Specifies the paper width. (3.55 to 11.69 inches (90 to 297mm))[Length]: Specifies the paper length. (5.50 to 14.00 inches (140 to 356 mm))These settings can be specified if [Paper Size] is set to [Custom Size].
[Paper Type] Select the paper type.
[Measurement Unit Setting] Select the measurement units.
Factory default
[Paper Size] [Letter] ([A4])
[Custom Size] This value varies depending on the area.
[Paper Type] [Plain Paper]
[Measurement Unit Setting] This value varies depending on the area.

[Print Settings]4
4-22 bizhub 42/36
4.9
4.9.4 [Hold Job Timeout]
Specify the period of time before jobs saved on the hard disk are deleted.
% Press the Utility/Counter key ö [Admin Settings] ö [Print Settings] ö [Hold Job Timeout].
Settings
[Disable] Specify the length of time until print jobs saved on the hard disk are delet-ed.
[1 Hour]
[4 Hours]
[1 Day]
[1 Week]
Factory default
[Hold Job Timeout] [Disable]

bizhub 42/36 4-23
4.9 [Print Settings] 4
4.9.5 [Quality Settings]
Configure image quality settings.
% Press the Utility/Counter key ö [Admin Settings] ö [Print Settings] ö [Quality Settings].
Settings
[Brightness] The brightness of the printed image can be adjusted.
[Contrast] Adjust the copy density balance.
[Halftone] [Image Printing] Select how halftones in images, text and graphics are reproduced.[Line Art]: Halftones are reproduced with high precision.[Detail]: Halftones are reproduced with detail.[Smooth]: Halftones are reproduced with smooth-ness.
[Text Printing]
[Graphics Printing]
[Edge Enhancement] [Image Printing] Edges of characters, graphics, and images are emphasized so that small characters are made more visible.[Text Printing]
[Graphics Printing]
[Edge Strength] Select the desired amount that edges are emphasized.
[Economy Print] Select whether to print graphics with a adjusted density by reducing the amount of toner that is used.
[Gradation Adjustment] [Tone Calibration] Select whether or not to enable image quality ad-justment.
[Density] Adjusts the density of Highlight, Middle, and Shadow.
Factory default
[Brightness] [0]
[Contrast] [0]
[Halftone] [Image Printing]: [Detail][Text Printing]: [Line Art][Graphics Printing]: [Detail]
[Edge Enhancement] [Image Printing]: [OFF][Text Printing]: [ON][Graphics Printing]: [ON]
[Edge Strength] [Middle]
[Economy Print] [OFF]
[Tone Calibration] [ON]
[Density] [Highlight]: [0][Middle]: [0][Shadow]: [0]

[Print Settings]4
4-24 bizhub 42/36
4.9
4.9.6 [Emulation]
Configure default of printer languages and fonts.
% Press the Utility/Counter key ö [Admin Settings] ö [Print Settings] ö [Emulation].
Settings
[Default Emulation] Select the machine emulation language.If [Auto] is selected, the machine automatically selects the machine emu-lation language from the data stream.
[PS] [Wait Timeout] Specify the time until an error is determined to be a PostScript error.If [0] is selected, no timeout is performed.
[Print PS Errors] Select whether or not an error page is printed when a Postscript error occurs.
[PS Protocol] Select the protocol for data transmissions with a PostScript data stream.If [Auto] is selected, the machine automatically selects an applicable protocol from the data stream.
[PCL] [CR/LF Mapping] Select the definitions of the CR/LF codes in the PCL language.
[Line/Page] Specify the number of lines per page in the PCL language.
[Font Setting] • [Font Number]: Specify the default font in the PCL language. The font numbers that appear correspond to the PCL font list.
• [Pitch Size]: Specify the font size in the PCL language. If the setting selected for [Font Number] is for a bitmap font, [Pitch Size] ap-pears. If the setting selected for [Font Number] is for an outline font, [Point Size] ap-pears.
• [Symbol Set]: Specify the symbol set used with the PCL language.
[XPS] [Digital Signature] Select whether or not to enable XPS digital signa-tures.
[Print XPS Errors] Select whether or not an error report is printed af-ter an XPS error has occurred.
Factory default
[Default Emulation] [Auto]
[Wait Timeout] [0]
[Print PS Errors] [OFF]
[PS Protocol] [Auto]
[CR/LF Mapping] [CR=CR LF=LF]

bizhub 42/36 4-25
4.9 [Print Settings] 4
[Line/Page] This value varies depending on the area.
[Font Setting] [Font Number]: [000][Symbol Set]: [PC8]
[Digital Signature] [Disable]
[Print XPS Errors] [ON]
Factory default

[Maintenance Menu]4
4-26 bizhub 42/36
4.10
4.10 [Maintenance Menu]
Configure machine adjustment settings.
4.10.1 [Print Menu]
Print error logs, halftone patterns, and reports.
% Press the Utility/Counter key ö [Admin Settings] ö [Maintenance Menu] ö [Print Menu].
Settings
[Event Log] Select this button to print event logs such as error history and consumable replacement history.
[Black 64] Prints the halftone pattern using a 25% density.
[Black 128] Prints the halftone pattern using a 50% density.
[Black 256] Prints the halftone pattern using a 100% density.
[Gradation] Prints the gradation pattern.
[Activity Report] Select this button to print reports where transmission and reception are re-corded.This item is displayed if the Fax Kit FK-509 is installed.
[Scan Send Report Print] Select this button to print reports where scan transmission is recorded.
[Scan Event Log] Select this button to print reports where errors that have occurred in scan-ner are recorded.

bizhub 42/36 4-27
4.10 [Maintenance Menu] 4
4.10.2 [Printer Adjustment]
Adjust the starting print position and defective print images caused by paper type features.
d Reference
The starting print position is factory-adjusted. Normally, you are not required to change the set values.
% Press the Utility/Counter key ö [Admin Settings] ö [Maintenance Menu] ö [Printer Adjustment].
Settings
[Leading Edge Adjustment] [Plain Paper] Adjust the top margin for various types of media.For details, refer to page 4-29.
[Thick 1]
[Thick 2]
[Envelope]
[Transparency]
[Leading Edge Adj. Side 2 (Dx)]
Adjust the top margin for media fed from each paper tray with 2-sided printing.For details, refer to page 4-29.
[Leading Edge Adjustment Tray]
[Tray 1] Adjust the top margin for media fed from each pa-per tray.For details, refer to page 4-29.[Tray 2]
[Tray 3]
[Tray 4]
[Tray 5]
[Side Edge Adjustment] [Tray 1] Adjust the side margins for media fed from each paper tray.For details, refer to page 4-30.[Tray 2]
[Tray 3]
[Tray 4]
[Tray 5]
[Left ADJ Duplex] [Tray 1] Adjust the side margins for media fed from each paper tray with 2-sided printing.For details, refer to page 4-30.[Tray 2]
[Tray 3]
[Tray 4]
[Tray 5]
[Engine DipSW] [Engine DipSW 1] to [Engine DipSW 28]
Use to change engine settings.Normally, there is no need to change the settings.If it becomes necessary to change the settings, contact your service representative.

[Maintenance Menu]4
4-28 bizhub 42/36
4.10
[Feed Zoom] [Plain Paper] Adjust the feed direction zoom ratio of paper types.
[Thick 1]
[Thick 2]
[Envelope]
[Paper Separation Adjust-ment]
[First Side] Adjust the paper position where the two sides are separated for 2-sided print.
[Second Side]
[Gradation Adjustment] Adjust irregular gradation levels of print images.
[Max. Density Adjust-ment]
This function is useful when the required printing result is not obtained, for example, the printing density is too high or too low. Scan the amount of toner adhered on an output test pattern, and ad-just to the optimal density.For details, refer to page 4-31.
[Gradation Adjust-ment]
This function is useful when a print image is not reproduced with consistent density. Scan the density of an output test pattern and adjust to the optimal gradation.For details, refer to page 4-32.
[Max Image Density Adj] This function is useful when the required printing result is not obtained, for example, the printing density is too high or too low. Adjust the amount of toner that is to be adhered to the paper based on the printing density value set to the highest level in order to fine-adjust the entire printing density set-ting (amount of toner).If the required printing density result is not obtained after the maximum im-age density has been adjusted, contact your service representative.
[Replenish Toner] Directly after replacing the toner bottle or after printing a large number of originals with many black areas, the machine cannot sufficiently replenish the toner, and printing density may fall temporarily. In this case, using this function forcibly replenishes the toner.Press Start to start replenishing toner.
Factory default
[Paper Separation Adjust-ment]
[0.0mm]
[Max Image Density Adj] [0]
Settings

bizhub 42/36 4-29
4.10 [Maintenance Menu] 4
[Leading Edge Adjustment]
Adjust the starting print position at the leading edge of each type of paper (with respect to the paper feed direction).
0 Only 8-1/2 e 11 v (A4 v) paper can be used to adjust the Bypass Tray.
1 Press the Utility/Counter key ö [Admin Settings] ö [Maintenance Menu] ö [Printer Adjustment] ö [Leading Edge Adjustment].
% To adjust the starting print position at the leading edge of the second side for 2-sided printing (with respect to the paper feed direction), press [Leading Edge Adj. Side 2 (Dx)].
2 Select a paper type to be adjusted.
3 Load the paper into the Tray 1 (Bypass Tray).
4 Press the Start key.
A test pattern is printed.
5 Check that the distance from the starting print position of the test pattern to the edge of the paper (a) is 3/16 inches (4.2 mm).
% Press [+] or [-] to adjust the width. Press the Start key to print a test pattern.
6 Press [OK].
[Leading Edge Adjustment Tray]
Adjust the starting print position at the leading edge of each paper tray (with respect to the paper feed direc-tion).
0 Only 8-1/2 e 11 v (A4 v) paper can be used to adjust the each tray.
1 Press the Utility/Counter key ö [Admin Settings] ö [Maintenance Menu] ö [Printer Adjustment] ö [Leading Edge Adjustment Tray].
2 Select a paper tray to be adjusted.
3 Load the paper into the selected paper tray.
4 Press the Start key.
A test pattern is printed.
5 Check that the distance from the starting print position of the test pattern to the edge of the paper (a) is 3/16 inches (4.2 mm).
% Press [+] or [-] to adjust the width. Press the Start key to print a test pattern.
6 Press [OK].
a: 4.2 mm
a: 4.2 mm

[Maintenance Menu]4
4-30 bizhub 42/36
4.10
[Side Edge Adjustment]
Adjust the print position at the side edge of each paper tray (with respect to the paper feed direction).
0 Only 8-1/2 e 11 v (A4 v) paper can be used to adjust the each tray.
1 Press the Utility/Counter key ö [Admin Settings] ö [Maintenance Menu] ö [Printer Adjustment] ö [Side Edge Adjustment].
% To adjust the print position at the side edge of the second side for 2-sided printing (with respect to the paper feed direction), press [Left ADJ Duplex].
2 Select a paper tray to be adjusted.
3 Press the Start key.
A test pattern is printed.
4 Check that the difference between (b) and (c) (distance between the side edge of paper and the print position) is 0 ± 1/16 inches (0 ± 1.0 mm).
% Press [+] or [-] to adjust the width. Press the Start key to print a test pattern.
5 Press [OK].
b-c: 0±1.0 mm

bizhub 42/36 4-31
4.10 [Maintenance Menu] 4
[Max. Density Adjustment]
This function is useful when the required printing result is not obtained, for example, the printing density is too high or too low. Scan the amount of toner adhered on an output test pattern, and adjust to the optimal density.
0 Before correcting the maximum density, fine-adjust the printing density (amount of toner) using [Max. Image Density Adj].
0 After correcting the maximum density, be sure to also correct the gradation.0 If the required printing density result is not obtained even after the maximum density has been correct-
ed, contact your service representative.
1 Press the Utility/Counter key ö [Admin Settings] ö [Maintenance Menu] ö [Printer Adjustment] ö [Gradation Adjustment].
2 Press [Max. Density Adjustment].
3 Press [Print].
4 Press [OK].
5 Two test pattern are printed.
6 Press [Scan].
7 Place the first printed test pattern on the Touch Panel in the orientation displayed in the Original Glass.
8 Place 10 or more sheets of blank paper on top of the test pattern to prevent it from becoming transpar-ent.
9 Close the ADF.
10 Press the Start key.
The test pattern is scanned.
11 Place the second printed test pattern on the Touch Panel in the orientation displayed in the Original
Glass.
12 Place 10 or more sheets of blank paper on top of the test pattern to prevent it from becoming transpar-ent.
13 Close the ADF.
14 Press the Start key.
The test pattern is scanned.

[Maintenance Menu]4
4-32 bizhub 42/36
4.10
[Gradation Adjustment]
This function is useful when a print image is not reproduced with consistent density. Scan the density of an output test pattern and adjust to the optimal gradation.
1 Press the Utility/Counter key ö [Admin Settings] ö [Maintenance Menu] ö [Printer Adjustment] ö [Gradation Adjustment].
2 Press [Gradation Adjustment].
3 Press [Print].
4 Press [OK].
5 A test pattern is printed.
6 Press [Scan].
7 Place the printed test pattern on the Touch Panel in the orientation displayed in the Original Glass.
8 Place 10 or more sheets of blank paper on top of the test pattern to prevent it from becoming transpar-ent.
9 Close the ADF.
10 Press the Start key.
The test pattern is scanned.

bizhub 42/36 4-33
4.10 [Maintenance Menu] 4
4.10.3 [Drum Dry]
Perform Drum Dry to prevent condensation around the photo conductor.
% Press the Utility/Counter key ö [Admin Settings] ö [Maintenance Menu] ö [Drum Dry].
4.10.4 [Finisher Settings]
Adjust the width of the paper alignment plate to align the output sheets of paper.
0 This item is available if the Finisher FS-529 is installed.
% Press the Utility/Counter key ö [Admin Settings] ö [Maintenance Menu] ö [Finisher Settings].
[Paper Alignment Plate Settings]
Adjust the width of the paper alignment plate to align the output sheets of paper.
1 Press the Utility/Counter key ö [Admin Settings] ö [Maintenance Menu] ö [Finisher Settings] ö [Alignment Plate Position (Side)] or [Alignment Plate Position (Back)].
2 Select the paper alignment plate position.
3 Press [+] or [-] to adjust the position.
4 Press [OK].
Settings
[Drum Dry] If the room temperature changes rapidly or the humidity is high, dew may form around the photo conductor in this machine, causing smudgy images to be generated. In this case, using this function removes dew condensa-tion from around the photo conductor.Press [Execute], and press [OK] to start drum dry processing.

[Folder Settings]4
4-34 bizhub 42/36
4.11
4.11 [Folder Settings]
Specify the processing method of data saved in the hard disk.
% Press the Utility/Counter key ö [Admin Settings] ö [Folder Settings].
Settings
[Auto Del Interval] Select the length of time until files saved on the hard disk are automatically deleted.
[Auto Document Delete Time]
The administrator can specify the period between the time when docu-ments are saved and the time when they are automatically deleted.
[Document Hold Setting] Select whether or not to save documents when transmitting or printing them.
Factory default
[Auto Del Interval] [Erase Disabled]
[Auto Document Delete Time]
[1 Day]
[Document Hold Setting] [Disable]

bizhub 42/36 4-35
4.12 [Security Settings] 4
4.12 [Security Settings]
Configure the settings for the restricting the functions of this machine for processing secret data.
4.12.1 [Administrator Password]
Change the administrator password.
0 The administrator password can be entered using 0 through 8 digits.0 If password rules are specified, an 8-digit password must be entered.0 If you enter an incorrect administrator password a configured number of times, you are prohibited from
using this machine. In this case, turn the power of the machine off and on again.
1 Press the Utility/Counter key ö [Admin Settings] ö [Security Settings] ö [Administrator Password].
2 Press the upper [Password] button, enter a new administrator password, and press [OK].
3 Press the lower [Password] button, enter a new administrator password, and press [OK].
4 Press [OK].
The password is changed.
d Reference
To configure password rule settings:
Press the Utility/Counter key ö [Admin Settings] ö [Security Settings] ö [Security Details] ö [Password Rules].
Factory default
[Administrator Password] 12345678

[Security Settings]4
4-36 bizhub 42/36
4.12
4.12.2 [Security Details]
Configure security detail settings to restrict the functions of this machine. You can restrict the functions to enhance security.
% Press the Utility/Counter key ö [Admin Settings] ö [Security Settings] ö [Security Details].
Settings
[Password Rules] Configure whether to enable the password rules.When enabled, the restrictions are applied to the following passwords. The set passwords must be changed to ones that meet the conditions.• Administrator Password• User password• Account password• SNMP password• Secured Job password
<Conditions of the password rules>• Specify a password in 8 or more digits.• Uppercase and lowercase letters are differentiated.• Only half-width symbols can be used. For some of the passwords,
specification of "'", "\", """, "#", and "space" is restricted.• A password that consists of a repetition of the same character cannot
be specified.• The same password as one before being changed cannot be regis-
tered.
[Registering and Changing Addr.]
Select whether or not to prohibit editing of the address book. If [Restrict] is selected, the address book cannot be edited.
[Manual Destination Input] Specify whether to allow manual destination input. If [Restrict] is selected, destinations for fax and scan operations cannot be entered directly.
[Hide Personal Data] Select whether or not to display transmission destinations in the job log. If [ON] is selected, transmission destinations are not displayed.
[Disable Job History Dis-play]
Select whether or not to display the communication log. If [ON] is selected, the communication log is not displayed.
[Restrict Scan to USB] Select whether or not to prohibit the Scan to USB function. If [Restrict] is selected, the Scan to USB function cannot be used.
Factory default
[Password Rules] [OFF]
[Registering and Changing Addr.]
[Allow]
[Manual Destination Input] [Allow]
[Hide Personal Data] [OFF]
[Disable Job History Dis-play]
[OFF]
[Restrict Scan to USB] [Allow]

bizhub 42/36 4-37
4.12 [Security Settings] 4
4.12.3 [Enhanced Security Mode]
If Enhanced Security settings is enabled, various security functions are configured to allow you to ensure higher-level security of data management.
The enhanced security mode cannot be enabled when any of the current functional settings conflict with the enhanced security mode.
When the enhanced security mode is enabled, the settings required for the mode or the settings that have been forcibly switched when entering the mode cannot be changed.
Required settings
To enable the enhanced security mode, the following settings must have been configured.
Settings to forcibly changed
When the enhanced security is enabled, the following settings are forced.- The changed settings will not revert when the enhanced security mode is turned off.- After the password rules have been changed, any passwords that do not comply with the changed rules
will not be authenticated. For details on the password rules, refer to page 4-36.
Administrator Settings Required settings
[Security] / [Authentication] / [General Settings] in PageScope Web Connection
Select either [Device] or [External Server] (Active Directory) in [User Authentication].
[Security Settings] / [Administrator Password] Set a password complying with password rules.
[Security Settings] / [Security Details] / [Password Rules]
Select [ON].
[Security] / [PKI Settings] / [Device Certificate] in PageScope Web Connection
Register a self-signed certificate in order to per-form SSL communications.
Administrator Settings Settings to forcibly changed
[Authentication Setting] / [User List Display Setting] Set to [OFF].
[Ethernet] / [TCP/IP] / [Telnet] Set to [Disable].
[Security] / [Authentication] / [General Settings] / [Public Access] in PageScope Web Connection
Set to [Restrict].
[Security] / [Authentication] / [General Settings] / [Print without Authentication] in PageScope Web Connection
Set to [Restrict].
[Security] / [PKI Settings] / [SSL/TLS Settings] / [SSL/TLS] in PageScope Web Connection
Set to [Enable].
[Security] / [PKI Settings] / [SSL/TLS Settings] / [Encryption strength] in PageScope Web Con-nection
Unable to be set to the setting that includes en-cryption strength lower than [AES-256, 3DES].
[Network] / [SNMP Settings] / [SNMPv1/v2c Set-tings] in PageScope Web Connection
[Write] is set to [Disable].
[Network] / [SNMP Settings] / [SNMPv3 Settings] in PageScope Web Connection
In [Write User], [Security Level] cannot be set to [None].Specify both of auth-password and auth/priv-password in more than 8 digits.
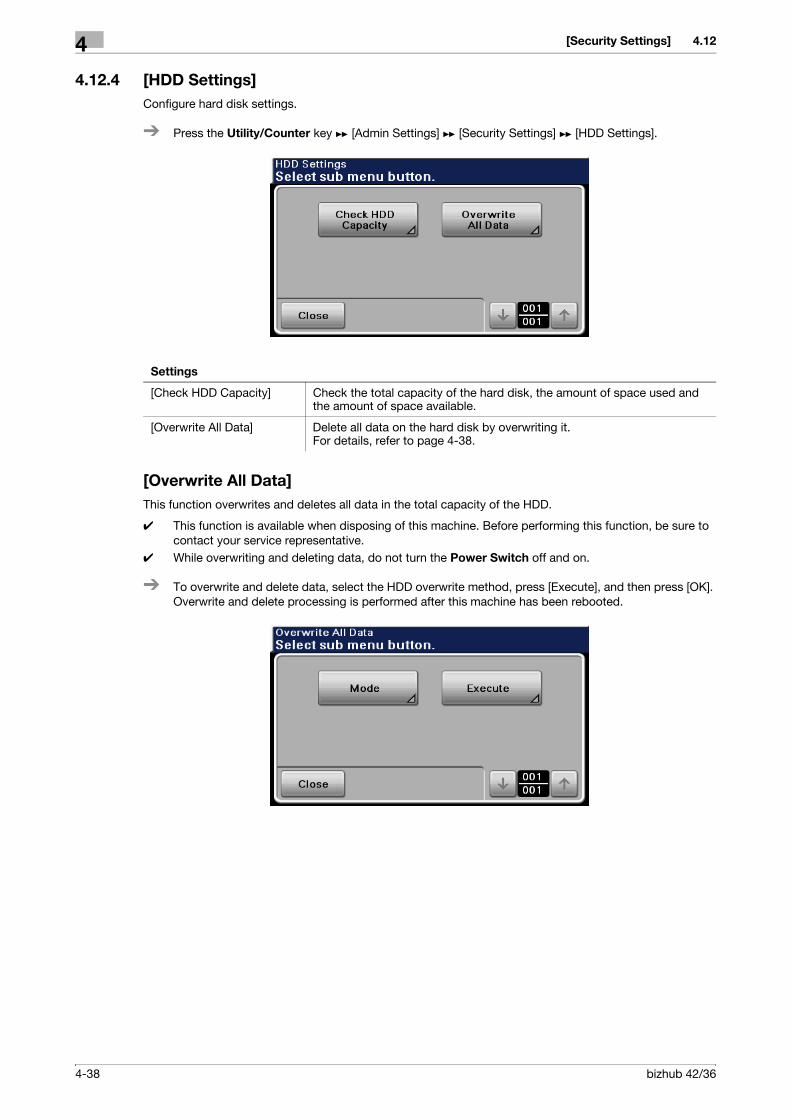
[Security Settings]4
4-38 bizhub 42/36
4.12
4.12.4 [HDD Settings]
Configure hard disk settings.
% Press the Utility/Counter key ö [Admin Settings] ö [Security Settings] ö [HDD Settings].
[Overwrite All Data]
This function overwrites and deletes all data in the total capacity of the HDD.
0 This function is available when disposing of this machine. Before performing this function, be sure to contact your service representative.
0 While overwriting and deleting data, do not turn the Power Switch off and on.
% To overwrite and delete data, select the HDD overwrite method, press [Execute], and then press [OK]. Overwrite and delete processing is performed after this machine has been rebooted.
Settings
[Check HDD Capacity] Check the total capacity of the hard disk, the amount of space used and the amount of space available.
[Overwrite All Data] Delete all data on the hard disk by overwriting it.For details, refer to page 4-38.

bizhub 42/36 4-39
4.12 [Security Settings] 4
Settings
[Mode] Select the method for overwriting the data on the hard disk.
[Mode 1] Overwritten with 0x00
[Mode 2] Overwritten with 1-byte random numbers ö Overwritten with 1-byte random numbers ö Overwritten with 0x00
[Mode 3] Overwritten with 0x00 ö Overwritten with 0xff ö Overwritten with 1-byte random numbers ö Ver-ified
[Mode 4] Overwritten with 1-byte random numbers ö Overwritten with 0x00 ö Overwritten with 0xff
[Mode 5] Overwritten with 0x00 ö Overwritten with 0xff ö Overwritten with 0x00 ö Overwritten with 0xff
[Mode 6] Overwritten with 0x00 ö Overwritten with 0xff ö Overwritten with 0x00 ö Overwritten with 0xff ö Overwritten with 0x00 ö Overwritten with 0xff ö Overwritten with specified 512-byte data
[Mode 7] Overwritten with 0x00 ö Overwritten with 0xff ö Overwritten with 0x00 ö Overwritten with 0xff ö Overwritten with 0x00 ö Overwritten with 0xff ö Overwritten with 0xaa
[Mode 8] Overwritten with 0x00 ö Overwritten with 0xff ö Overwritten with 0x00 ö Overwritten with 0xff ö Overwritten with 0x00 ö Overwritten with 0xff ö Overwritten with 0xaa ö Verified
[Execute] Overwrite the hard disk.The following data is deleted.• Registered user authentication data• Registered account track data• Registered information for secured printing and saved files• Image files• SSL certificates• S/MIME certificates (digital certificates)
Factory default
[Mode] [Mode 1]

[Security Settings]4
4-40 bizhub 42/36
4.12
4.12.5 [SSD Low-level Format]
Overwrite and delete data stored in SSD.
0 This function is available when disposing of this machine. Before performing this function, be sure to contact your service representative.
0 While overwriting and deleting data, do not turn the Power Switch off and on.
% To overwrite and delete data, press [OK]. Overwrite and delete processing is performed after this ma-chine has been rebooted.
% Press the Utility/Counter key ö [Admin Settings] ö [Security Settings] ö [SSD Low-level Format].
Settings
[SSD Low-level Format] Overwrite and delete data stored in SSD.The following data is deleted.• Image files• Address book (E-mail address and telephone number destination data)• S/MIME certificates (Encryption certification)• Sent and received fax data

bizhub 42/36 4-41
4.13 [Restore Defaults] 4
4.13 [Restore Defaults]
Restore the network and system defaults.
% Press the Utility/Counter key ö [Admin Settings] ö [Restore Defaults].
Settings
[Restore Network] Resets the network settings to their defaults.After this is pressed, the machine is automatically restarted.
[Restore System] Resets the system settings to their defaults.After this is pressed, the machine is automatically restarted.
[Restore All] Resets all settings to their defaults.After this is pressed, the machine is automatically restarted.

[HDD Format]4
4-42 bizhub 42/36
4.14
4.14 [HDD Format]
Format the hard disk.
% Press the Utility/Counter key ö [Admin Settings] ö [HDD Format].
Settings
[User Area (Print)] Format the area where print jobs are stored.After this is pressed, the machine is automatically restarted.
[User Area (Scan)] Format the area where scanned jobs are stored.After this is pressed, the machine is automatically restarted.
[All] Format all the hard disk area.After this is pressed, the machine is automatically restarted.

bizhub 42/36 4-43
4.15 [Paper Empty] 4
4.15 [Paper Empty]
Select whether or not to display a warning message when paper runs out in a tray.
% Press the Utility/Counter key ö [Admin Settings] ö [Paper Empty].
Settings
[Tray 1] Select whether or not a message appears when Tray 1 has run out of pa-per.
[Tray 2] Select whether or not a message appears when Tray 2 has run out of pa-per.
[Tray 3] Select whether or not a message appears when Tray 3has run out of pa-per.
[Tray 4] Select whether or not a message appears when Tray 4has run out of pa-per.This item is displayed if the Paper Feed Cabinet PC-211 is installed.
[Tray 5] Select whether or not a message appears when Tray 5 has run out of pa-per.This item is displayed if the Paper Feed Cabinet PC-211 is installed.
Factory default
[Tray 1] [OFF]
[Tray 2] [OFF]
[Tray 3] [OFF]
[Tray 4] [OFF]
[Tray 5] [OFF]

[Restriction Code Settings]4
4-44 bizhub 42/36
4.16
4.16 [Restriction Code Settings]
Disable registering of the applications, which work with OpenAPI and which we do not recommend, in the machine.
% Press the Utility/Counter key ö [Admin Settings] ö [Restriction Code Settings].
Settings
[Restriction Code Settings] Displays the inhibited codes of the OpenAPI connection applications.You can register new restriction codes using the [New] button.
[New] Select this button to register new restriction codes of applications that work with OpenAPI. For restriction codes, you can enter data of Index, Vendor, and Application.Before registering the code, be sure to contact your service representative.

bizhub 42/36 4-45
4.17 [Erase Job Log] 4
4.17 [Erase Job Log]
Manually erase job logs.
% Press the Utility/Counter key ö [Admin Settings] ö [Erase Job Log].
Settings
[Erase Job Log] Click [OK] to erase the following types of log file.• Accounting log• Counting log• Audit log
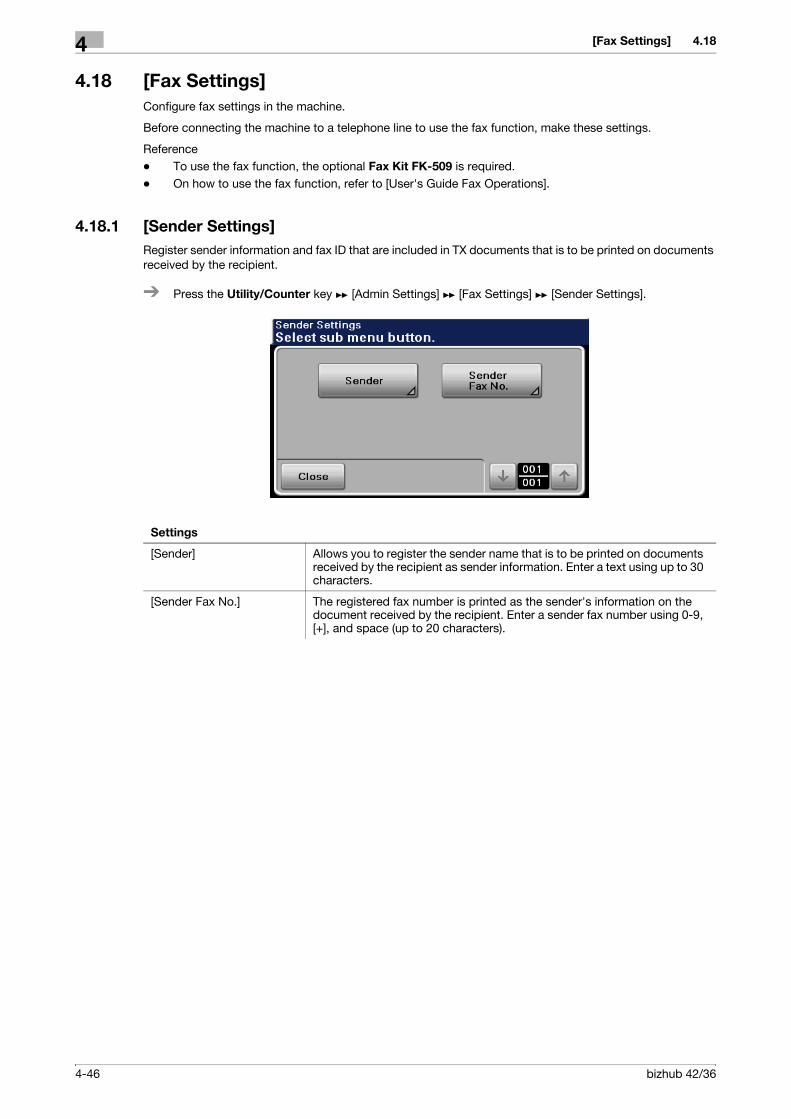
[Fax Settings]4
4-46 bizhub 42/36
4.18
4.18 [Fax Settings]
Configure fax settings in the machine.
Before connecting the machine to a telephone line to use the fax function, make these settings.
Reference- To use the fax function, the optional Fax Kit FK-509 is required.- On how to use the fax function, refer to [User's Guide Fax Operations].
4.18.1 [Sender Settings]
Register sender information and fax ID that are included in TX documents that is to be printed on documents received by the recipient.
% Press the Utility/Counter key ö [Admin Settings] ö [Fax Settings] ö [Sender Settings].
Settings
[Sender] Allows you to register the sender name that is to be printed on documents received by the recipient as sender information. Enter a text using up to 30 characters.
[Sender Fax No.] The registered fax number is printed as the sender's information on the document received by the recipient. Enter a sender fax number using 0-9, [+], and space (up to 20 characters).

bizhub 42/36 4-47
4.18 [Fax Settings] 4
4.18.2 [Header/Footer Settings]
Specify the position on a page where sender information and fax ID that are printed on received documents.
% Press the Utility/Counter key ö [Admin Settings] ö [Fax Settings] ö [Header/Footer Settings].
The following indicates where to print sender information or reception information.- [Inside Body Text]: The sender or receiving information is added so that it is overlaid on part of the orig-
inal image before the fax is being sent.
Settings
[Header Position] Specify the position of the sender information to be added on a fax docu-ment sent from this machine. The added sender information is printed as a part of the image on the document received by the recipient. If you select [OFF], the sender information will not be added. [OFF] is not displayed if [Fax Target] is set to [U.S.A] or [Hong Kong].
[Fax TX Header Name] Specify the items to be added as the sender information.
[Footer Position] Specify the position of the reception information (reception time and re-ception number) to be printed on a document received by this machine. If you select [RX Ft. OFF], the reception information will not be printed.
Factory default
[Header Position] [Outside Body Text]
[Fax TX Header Name] [ON]
[Footer Position] [RX Ft. OFF]
FROM:MFP01 TO:123456789 2011/04/25 13:22:11 #138 P.001/001

[Fax Settings]4
4-48 bizhub 42/36
4.18
- [Outside Body Text]: The sender or receiving information is added to the outside of the original image area before the fax is being sent.
- [OFF], [RX Ft. OFF]: The sender or receiving information is not added. [OFF] is not displayed if [Fax Tar-get] is set to [U.S.A] or [Hong Kong].
The following indicate how sender information is printed.- [ON]: The sender name, destination name (TO: xxxxx), transmission start date and time, transmission
number, and the number of pages are added as sender information.
- [OFF]: The sender name, fax ID of this machine, transmission start date and time, transmission number, and the number of pages are added as sender information.
FROM:MFP01 TO:123456789 2011/04/25 13:22:11 #138 P.001/001
FROM:MFP01 TO:123456789 2011/04/25 13:22:11 #138 P.001/001
FROM:MFP01 987654321 2011/04/25 13:22:11 #138 P.001/001

bizhub 42/36 4-49
4.18 [Fax Settings] 4
4.18.3 [Comm. Settings]
Configure items related to fax transmission and reception.
% Press the Utility/Counter key ö [Admin Settings] ö [Fax Settings] ö [Comm. Settings].
Settings
[PB/DP] Select one of the dialing methods from PB/10pps/20pps.
[RX Mode] Select a receive mode.• [Auto RX]: Automatically receives faxes.• [Manual RX]: If you expect frequent phone calls, for example if an ex-
ternal telephone is connected to this machine, set this mode to Manual RX.
• [DRPD]: If the receiver rings with the pattern selected from the four ring patterns available, the incoming call is automatically received as a fax. If [DRPD] is selected, select the ring pattern for faxing with [Ring Pat-tern].
[Number of RX Call Rings] Set the number of incoming call rings. (The setting range varies depending on the local standard.)
[Redial] Set the number of redials (for busy, no-answer, and so on). (The setting range varies depending on the local standard.)
[Redial Interval] Set redial intervals. (The setting range varies depending on the local stand-ard.)
[Line Monitor] Select whether the line monitoring tone is produced during communica-tion.[OFF]: No line monitoring tone is produced.[Until Connection Complete]: The line monitoring tone is produced until the connection with the destination has been completed after dialing.[Until Transmission Complete]: The line monitoring tone is produced until the fax transmission has been completed after dialing.
[Line Monitor Volume] Select the volume of the line monitoring tone.
[Ring Pattern] Select the ring pattern for faxing when [RX Mode] is set to [DRPD].
[Manual RX V.34 OFF] Select whether or not V.34 is automatically turned off during manual recep-tion.
Factory default
[PB/DP] This value varies depending on the area.
[RX Mode] [Auto RX]
[Line Monitor] [OFF]
[Line Monitor Volume] [Low]
[Ring Pattern] [Double]
[Manual RX V.34 OFF] [No]

[Fax Settings]4
4-50 bizhub 42/36
4.18
4.18.4 [Function Settings]
Configure the printing method for RX operations.
% Press the Utility/Counter key ö [Admin Settings] ö [Fax Settings] ö [Function Settings].
Settings
[Inch Paper Priority] Specify [ON] to select inch size paper for printing received documents pri-ory to other paper size.
[Paper Priority] • [Auto Select]: Print paper is automatically selected.• [Fixed Size]: Paper of the specified size is used for printing.• [Size Priority]: Paper of the size specified as the preferred size is used
for printing. If no preferred size is specified, paper of the closest size is used for printing.
[Print Paper Size] Specify paper size for printing received documents. The initial setting var-ies depending on the setting for [Inch Paper Priority].
d ReferenceTo enable the setting for the print paper size, set [Tray Selection for RX Print] to [Auto].
[Tray Selection for RX Print] If you want to fix the paper tray used to print received faxes, select the pa-per tray.The available tray types vary depending on the options that are installed.
[Min. Reduction for RX Print]
Specify the reduction ratio for received document to Full Size or a value be-tween 87 and 96%.If the reduction rate for RX print is set to [100%], the items below are set as follows:• [Paper Priority]: [Auto Select]• [Tray Selection for RX Print]: [Auto]• [Print Separate Fax Pages]: [OFF]
[Print Separate Fax Pages] If this item is set to [ON], a document longer than the standard size is print-ed on separate pages.• This item does not appear if [Duplex Print (RX)] is set to [ON].
[Duplex Print (RX)] If Duplex Print (RX) is set to [ON], the original received is printed on both sides of the paper.• This item does not appear if [Print Separate Fax Pages] is set to [ON].
Factory default
[Inch Paper Priority] [OFF]
[Paper Priority] [Auto Select]
[Print Paper Size] [Letter], [A4]
[Tray Selection for RX Print] [Auto]
[Min. Reduction for RX Print]
[96]
[Print Separate Fax Pages] [OFF]

bizhub 42/36 4-51
4.18 [Fax Settings] 4
4.18.5 [Fax Function Settings]
Configure the fax function settings.
% Press the Utility/Counter key ö [Admin Settings] ö [Fax Settings] ö [Fax Function Settings].
[Duplex Print (RX)] [OFF]
Factory default
Settings
[F-Code TX] Specify whether to use F-Code TX.• F-Code TX provides two methods: confidential transmission and relay
transmission.
[Dest. Check Display Func.]
Specify whether to display the list of the specified destinations when send-ing a fax.
[Confirm Addr (TX)] When specifying a fax destination with direct input, a screen appears prompting you to enter the fax number again for confirmation. Entering the fax number twice prevents one from entering incorrect destinations.• When Confirm Address (TX) is enabled, you cannot specify a destina-
tion using [Off-Hook]. You cannot specify the fax address using [Log] either.
[Confirm Addr (Register)] When the user specify a fax destination when the user registers a program, configures the fax forwarding settings, or registers a one-touch destina-tion, the user must enter the destination twice for confirmation. By entering twice, you can prevent the destination from being incorrectly entered.
[Restrict Fax TX] Select whether to restrict fax transmissions.If [ON] is selected, the fax transmission function is unavailable in the fax screen.
[Restrict Fax RX] Select whether to restrict fax receptions.If [ON] is selected, the fax reception function is unavailable in the fax screen.
[Restrict PC-Fax TX] Select whether to restrict PC-Fax transmissions.If [ON] is selected, the PC-Fax transmission function is unavailable.
[Restrict Internet Fax TX] Select whether to restrict Internet Fax transmissions.If [ON] is selected, the internet fax transmission function is unavailable in the fax screen.
[Restrict Internet Fax RX] Select whether to restrict Internet Fax receptions.If [ON] is selected, the internet fax reception function is unavailable in the fax screen.
Factory default
[F-Code TX] [ON]
[Dest. Check Display Func.]
[OFF]
[Confirm Addr (TX)] [OFF]

[Fax Settings]4
4-52 bizhub 42/36
4.18
4.18.6 [Memory RX]
Specify whether to use Memory RX Setting function. To use the function, specify a password for print.
% Press the Utility/Counter key ö [Admin Settings] ö [Fax Settings] ö [Memory RX].
The following items are not available if Memory RX Settings are configured.- PC-Fax RX Settings- Forward TX Settings- Nighttime RX Settings
[Confirm Addr (Register)] [ON]
[Restrict Fax TX] [OFF]
[Restrict Fax RX] [OFF]
[Restrict PC-Fax TX] [OFF]
[Restrict Internet Fax TX] [OFF]
[Restrict Internet Fax RX] [OFF]
Factory default
Settings
[Memory RX] Specify whether to use Memory RX Setting function.If [ON] is selected, received fax data is stored in the memory and is not au-tomatically printed.
[Password] Specify the password to be entered from the ten key pad when outputting the data stored in the memory. (8 digits or less)
Factory default
[Memory RX] [OFF]

bizhub 42/36 4-53
4.18 [Fax Settings] 4
4.18.7 [Closed Network RX Password]
Specify whether to use the Closed Network RX function. To use the function, specify a password that is used for Closed Network RX.
% Press the Utility/Counter key ö [Admin Settings] ö [Fax Settings] ö [Closed Network RX Password].
Reference- Closed Network RX is only available when the receiver has password transmission function.
Settings
[Enable] Specify whether to use the Closed Network RX function.
[Password] Specify a password using the keypad. (up to 4 digits)
Factory default
[Enable] [No]

[Fax Settings]4
4-54 bizhub 42/36
4.18
4.18.8 [Forward TX Settings]
You can forward received documents to a preset recipient.
% Press the Utility/Counter key ö [Admin Settings] ö [Fax Settings] ö [Forward TX Settings].
The following items are not available if Forward TX Setting is configured.- PC-Fax RX Settings- Memory RX- Nighttime RX Settings
Reference- If a document with a resolution of 300 e 300 dpi is received as an Internet Fax, it can not be forwarded
to a fax (G3) destination. In this case, this machine prints the document.
If [Confirm Addr (Register)] is [ON], a screen for entering the fax number again appears after you press [OK]. Enter the fax number and then press [OK].
d Reference
For details on the Confirm Address function, refer to page 4-51.
Settings
[Forward TX Setting] Specify whether to use the Forward TX function.
[Forwarding Address] Allows you to enter a destination (fax number or E-mail address) using up to 38 digits. It is also possible to select it from the address book.
[Forward & Print] [Forward & Print]: Received document are forwarded and printed on this machine.[Forward & Print (If TX Fails)]: Received documents are forwarded and, if forwarding fails, are printed on the machine.
Factory default
[Forward TX Setting] [OFF]
[Forward & Print] [Forward & Print (If TX Fails)]

bizhub 42/36 4-55
4.18 [Fax Settings] 4
4.18.9 [Remote RX Settings]
Send a request of reception from an external telephone to the machine by entering the remote reception number from the external telephone.
% Press the Utility/Counter key ö [Admin Settings] ö [Fax Settings] ö [Remote RX Settings].
Settings
[Remote RX Enabled] Select whether or not the remote reception function is used.
[Remote RX No.] Type in the remote reception number (2 digits) for performing remote re-ception.
Factory default
[Remote RX Enabled] [OFF]

[Fax Settings]4
4-56 bizhub 42/36
4.18
4.18.10 [PC-Fax RX Settings]
Specify whether to use the PC-Fax RX function. To use the function, configure the following items.
% Press the Utility/Counter key ö [Admin Settings] ö [Fax Settings] ö [PC-Fax RX Settings].
Reference- The documents received by fax are saved in the TIFF format.
The following items are not available if PC-Fax RX Setting is configured.- Forward TX Settings- Memory RX- Nighttime RX Settings
Settings
[PC-Fax RX Setting] Specify whether to use the PC-Fax RX function.
[PC-Fax RX Print] Specify whether to print a fax after receiving.
Factory default
[PC-Fax RX Setting] [OFF]
[PC-Fax RX Print] [OFF]

bizhub 42/36 4-57
4.18 [Fax Settings] 4
4.18.11 [Nighttime RX Settings]
Specify whether to use the Nighttime RX function.
% Press the Utility/Counter key ö [Admin Settings] ö [Fax Settings] ö [Nighttime RX Settings].
The following items are not available if Nighttime RX Setting is configured.- Forward TX Settings- Memory RX- PC-Fax RX Settings
Settings
[Night Fax RX Print] If [ON] is selected, printing of documents received during the night hours are forbidden. All documents received during the night hours are printed after the period.
[Night RX Start Time] Specify the start time for the night using the key pad.
[Night RX End Time] Specify the end time for the night using the key pad.
Factory default
[Night Fax RX Print] [OFF]
[Night RX Start Time] [00:00]
[Night RX End Time] [00:00]
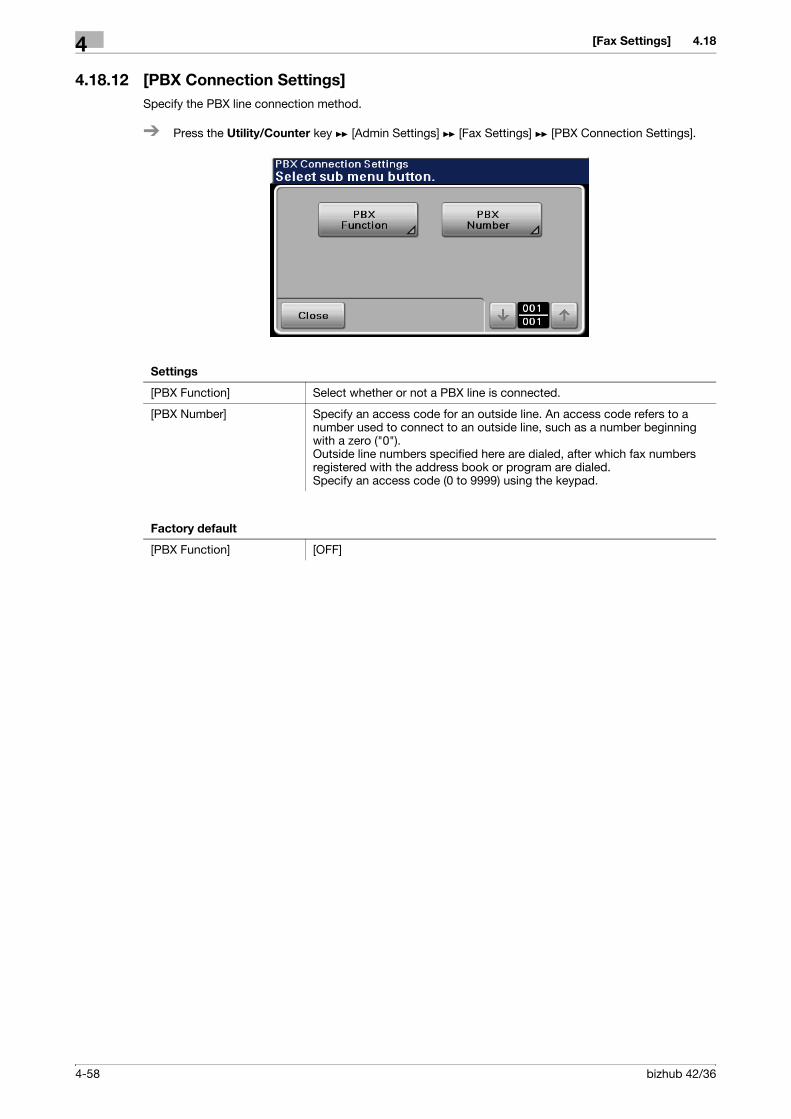
[Fax Settings]4
4-58 bizhub 42/36
4.18
4.18.12 [PBX Connection Settings]
Specify the PBX line connection method.
% Press the Utility/Counter key ö [Admin Settings] ö [Fax Settings] ö [PBX Connection Settings].
Settings
[PBX Function] Select whether or not a PBX line is connected.
[PBX Number] Specify an access code for an outside line. An access code refers to a number used to connect to an outside line, such as a number beginning with a zero ("0").Outside line numbers specified here are dialed, after which fax numbers registered with the address book or program are dialed.Specify an access code (0 to 9999) using the keypad.
Factory default
[PBX Function] [OFF]

bizhub 42/36 4-59
4.18 [Fax Settings] 4
4.18.13 [Fax Report]
Specify a way to output reports.
% Press the Utility/Counter key ö [Admin Settings] ö [Fax Settings] ö [Fax Report].
Settings
[Activity Report] Configure output settings for Activity Report. To output the report, config-ure the following settings.
[Output Settings] Specify the time when the report is to be output.[Every 100 comm.]: Outputs the report for every 100 communication jobs.[Every Day]: Outputs the report every day at a cer-tain time.[100/ Daily]: Outputs the latest 100 communica-tion jobs every day at a certain time.[No]: Is not output.
[Output Time Setting] Allows you to specify this item if [Every Day] or [100/ Daily] is selected for [Output Settings]. Specify the time when to output the report.
[Output Limit Setting] If [Output Settings] is set to [Every Day] or [100/ Daily], select your output preference for Activity Report.[Journal 100]: Outputs the information for the 100 most recent communication jobs.[Within 24 Hours]: Outputs the information for a maximum 100 communication jobs within the past 24 hours.
[TX Result Report] Configure the output settings for TX Result Report. Select output condi-tions.
[TX Result Report Image] Specify whether or not an image of the first page of the document is out-putted in the TX Results Report.
[TX Reserve] Configure the output settings for TX Reserve Report.Specify whether to output the report.
[PC-Fax TX Error Report] Configure the output settings for PC-Fax TX Error Report. Specify whether to output the report.
[Broadcast Report] Configure the output settings for Broadcast Report. Specify whether to output the report.
[Broadcast Result Report] Configure the output settings for Broadcast Result Report. Select a way to output the report.• With [Mode Once] selected, a broadcast result report is output only
when a transmission still fails after a redial attempt. No report is output when transmission is completed successfully.
[TX Result Report Screen] Configure display settings for TX Result Report Screen. Specify whether to display the report.
[I-Fax RX Error Report] Specify whether or not to output a reception error report when reception of an Internet fax fails.

[Fax Settings]4
4-60 bizhub 42/36
4.18
4.18.14 [List Print]
Specify whether or not to outputs a list of settings related to faxes.
% Press the Utility/Counter key ö [Admin Settings] ö [Fax Settings] ö [List Print].
4.18.15 [Fax Target]
Select the country where this machine is installed. Select the setting when installing the machine.
% Press the Utility/Counter key ö [Admin Settings] ö [Fax Settings] ö [Fax Target].
Factory default
[Output Settings] [Every 100 comm.]
[Output Time Setting] [00:00]
[Output Limit Setting] [Journal 100]
[TX Result Report] [If TX Fails]
[TX Result Report Image] [OFF]
[TX Reserve] [ON]
[PC-Fax TX Error Report] [ON]
[Broadcast Report] [ON]
[Broadcast Result Report] [All Dest.]
[TX Result Report Screen] [OFF]
[I-Fax RX Error Report] [ON]

bizhub 42/36 4-61
4.18 [Fax Settings] 4
4.18.16 [Fax Factory Default]
Select whether or not to reset the fax related settings to factory default.
% Press the Utility/Counter key ö [Admin Settings] ö [Fax Settings] ö [Fax Factory Default].
4.18.17 [Fax Image Initialized]
Select whether or not to initialize fax image data stored in the machine's memory.
% Press the Utility/Counter key ö [Admin Settings] ö [Fax Settings] ö [Fax Image Initialized].
Reference- After the completion of initialization, the machine is rebooted.- Registered addresses are not deleted.

[Fax Settings]4
4-62 bizhub 42/36
4.18

5 Configuring from PageScope
Web Connection


bizhub 42/36 5-3
5.1 [System] tab 5
5 Configuring from PageScope Web Connection
This section describes the operations for the administrator in PageScope Web Connection, device manage-ment utility.
For the basic operations of the utility and the operations in user mode, refer to [User's Guide Print Opera-tions], [User's Guide Scan Operations], or [User's Guide Fax Operations].
For details on how to log in to the administrator mode of PageScope Web Connection, refer to page 3-6.
In PageScope Web Connection, there are menus that you can specify from the Control Panel. For these menus, the pages you can refer to are shown in the tables.
5.1 [System] tab
This page allows you to configure several user- and printer-specific items.
5.1.1 [Device Information]
[Summary]
The current status of the machine is available.
Select [System] ö [Device Information] ö [Summary].
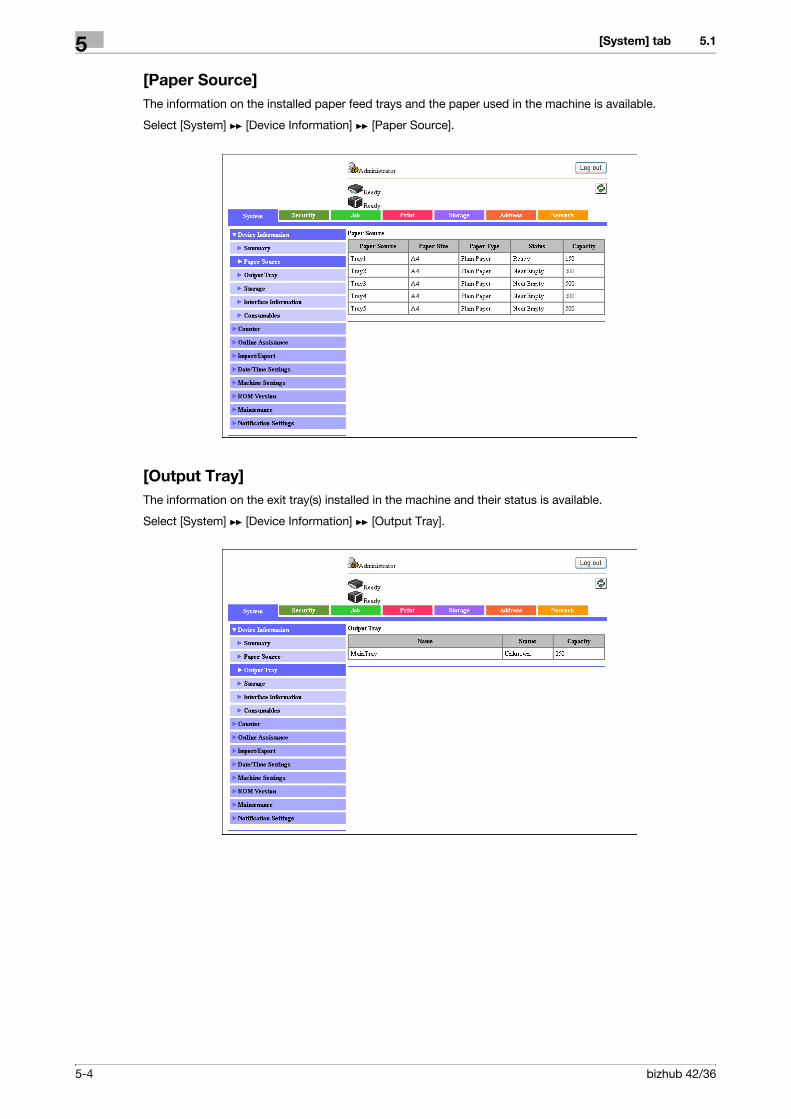
[System] tab5
5-4 bizhub 42/36
5.1
[Paper Source]
The information on the installed paper feed trays and the paper used in the machine is available.
Select [System] ö [Device Information] ö [Paper Source].
[Output Tray]
The information on the exit tray(s) installed in the machine and their status is available.
Select [System] ö [Device Information] ö [Output Tray].

bizhub 42/36 5-5
5.1 [System] tab 5
[Storage]
The status of the hard disk installed in the machine is available.
Select [System] ö [Device Information] ö [Storage].
[Interface Information]
The information on the network specified in the machine is available.
Select [System] ö [Device Information] ö [Interface Information].

[System] tab5
5-6 bizhub 42/36
5.1
[Consumables]
The information on the machine's consumables is available.
Select [System] ö [Device Information] ö [Consumables].
5.1.2 [Counter]
The counter information on the machine are available.
[Total Counter]
Number of pages (counting each side printed as one page) printed in the machine is available according to type of function.
Select [System] ö [Counter] ö [Total Counter].

bizhub 42/36 5-7
5.1 [System] tab 5
[Sheets Printed by Paper Size]
Number of pages (counting each side printed as one page) printed in the machine is available according to size of paper.
Select [System] ö [Counter] ö [Sheets Printed by Paper Size].

[System] tab5
5-8 bizhub 42/36
5.1
[Sheets Printed by Paper Type]
Number of pages (counting each side printed as one page) printed in the machine is available according to type of paper.
Select [System] ö [Counter] ö [Sheets Printed by Paper Type].
5.1.3 [Online Assistance]
The information you wish to provide users with the help function are specified.
Select [System] ö [Online Assistance] ö [Online Assistance].
Item Description
[Contact Name] Enter the name of the person or organization responsible for providing as-sistance with the machine. (Up to 63 characters)
[Contact Information] Enter the contact name information for the machine such as the URL (up to 127 characters).
[Product Help URL] Enter the URL of the Web page for product information (up to 127 charac-ters).
[Corporate URL] Enter the URL of the Web page for the manufacturer (up to 127 characters).
[Supplies and Accessories] Enter consumables supplier information (up to 127 characters).
[Contact Utility Link] Enter the link to the Device Management Utilities (up to 127 characters).
[Driver URL] Enter the driver storage location (up to 127 characters).

bizhub 42/36 5-9
5.1 [System] tab 5
5.1.4 [Import/Export]
You can save (export) the configuration information being stored in this machine to the computer. You can also write (import) the information from the computer to this machine. (If Enhanced Security Mode is enabled, this menu item will not be displayed.)
[Job Log]
You can delete and download log data (accounting log, counting log, or audit log) of the jobs that were exe-cuted in this machine.
(This page appears when [Job Log] (in the [System] ö [Machine Settings] page) is set to [Enable].)
Select [System] ö [Import/Export] ö [Job Log].
Item Description
[Export] Specify the number of job logs to be retrieved. The specified number of job logs is retrieved from the most recent job logs. If the specified number of job logs is larger than the number of job logs available, all job logs are re-trieved. When downloading job log data, click [Export].
[Clear] Click to delete all job log information.

[System] tab5
5-10 bizhub 42/36
5.1
[Authentication]
User registration information and authentication data can be imported or exported.
(This page appears when [User Authentication] (in the [Security] ö [Authentication] ö [General Settings] page) is set to [Device] or [External Server].)
Select [System] ö [Import/Export] ö [Authentication].
Reference- You cannot edit exported files.
Item Description
[Import] Imports the registered user authentication information to the device. If the optional authentication device is used on the machine, authentication data can be imported.
[Export] Exports the registered user authentication information to the computer. If the optional authentication device is used on the machine, authentication data can be exported.
[Clear] Click to delete user authentication/account track data.

bizhub 42/36 5-11
5.1 [System] tab 5
[Address]
Addresses can be imported or exported.
Select [System] ö [Import/Export] ö [Address].
Reference- You cannot edit exported files.
Item Description
[Import] Click to send to the machine the file containing the registered destination information.
[Export] Click to export to the computer all destination information registered on the machine.
[Clear] Click to delete all destination information registered on the machine.

[System] tab5
5-12 bizhub 42/36
5.1
5.1.5 [Date/Time Settings]
Specify the date and time of the clock built into this machine.
[Manual Settings]
Date and time can be set manually.
Select [System] ö [Date/Time Settings] ö [Manual Settings].
Item Description Control Panel
[Year] Enter the year. page 4-4
[Month] Enter the month.
[Day] Enter the day.
[Hour] Enter the hour.
[Minute] Enter the minute.
[Time Zone] Specify the time difference from GMT.

bizhub 42/36 5-13
5.1 [System] tab 5
[Time Adjustment Settings]
Time adjustment that uses NTP (Network Time Protocol) is available.
Select [System] ö [Date/Time Settings] ö [Time Adjustment Settings].
Item Description
[Time Adjustment] Select whether or not the time is automatically adjusted with NTP.
[NTP Server Address] Enter the NTP server address.Format: *.*.*.* (Asterisk * can be 0 to 255)If the DNS server has already been configured, you can enter the host name instead. For the host name, specify a fully-qualified domain name (FQDN).When using IPv6, you can specify the IPv6 address.
[Port Number] Enter a port number.Default setting: 123
[Time Zone] Specify the time difference from GMT.
[Adjustment Time] Shows the last modification date and time.

[System] tab5
5-14 bizhub 42/36
5.1
[Daylight Saving Time Settings]
Specify the daylight saving time.
Select [System] ö [Date/Time Settings] ö [Daylight Saving Time Settings].
Item Description Control Panel
[Daylight Saving Time] Select whether or not daylight saving time is ob-served.
page 4-4

bizhub 42/36 5-15
5.1 [System] tab 5
5.1.6 [Machine Settings]
Register the administrator information and the address of this machine.
Select [System] ö [Machine Settings] ö [Machine Settings].
Item Description Control Panel
[Device Name] Enter the device name (up to 127 characters).This name is used as a part of an Internet fax sub-ject name.
d ReferenceUse alphanumeric characters and symbols.
[Device Location] Enter the installation location of this machine (up to 127 characters).
[Device Information] Enter the information of this machine (up to 127 characters).
[Administrator Name] Enter the administrator name of this machine (up to 127 characters).
page 4-6
[Administrator E-mail Ad-dress]
Enter the administrator's E-mail address.If the administrator's E-mail address is omitted, you will not be able to send an E-mail.
page 4-6
[Do Startup Page] Select whether or not a startup page is printed when the printer is turned on.
page 4-20
[Unit of Measure] Select the measurement units used to indicate lengths.
page 4-21
[Energy Saver Time] Enter a time interval before transition to the Sleep mode since the last operation of this machine.
page 4-4
[Low Power] Set whether or not exchange to the low power mode when this machine is not being operated.
page 4-4
[Low Power Time] Set a time period before switching to the low pow-er mode when this machine is not being operated.
page 4-4
[Job Log] Select whether or not the Job Log function is used.
[Hide Personal Information] Select whether or not the names of printed files ([Document Name]) are displayed in the [Job] tab.

[System] tab5
5-16 bizhub 42/36
5.1
5.1.7 [ROM Version]
Check the ROM version of this machine.
Select [System] ö [ROM Version] ö [ROM Version].
5.1.8 [Maintenance]
You can initialize the settings (to the factory defaults), and reset the controller.
[Clear Settings]
You can initialize the network settings and system settings.
Select [System] ö [Maintenance] ö [Clear Settings].
Item Description Control Panel
[System Settings] Resets the system settings to their defaults.After this is pressed, the machine is automatically restarted.
page 4-41
[Network Settings] Resets the network settings to their defaults.After this is pressed, the machine is automatically restarted.
[All Settings] Resets all settings to their defaults.After this is pressed, the machine is automatically restarted.

bizhub 42/36 5-17
5.1 [System] tab 5
[Reset]
If you click [Reset], the controller is reset.
Select [System] ö [Maintenance] ö [Reset].
5.1.9 [Notification Settings]
You can send the setting information being managed on this machine to the specified destination.
[Status Notification Settings]
You can send the status of this machine to the specified destination.
Select [System] ö [Notification Settings] ö [Status Notification Settings].

[System] tab5
5-18 bizhub 42/36
5.1
Item Description
[IP Address] [Notification Ad-dress]
Enter the destination IP address.Format: *.*.*.* (Asterisk * can be 0 to 255)If the DNS server has already been configured, you can enter the host name instead. For the host name, specify a fully-qual-ified domain name (FQDN).When using IPv6, you can specify the IPv6 address.
[Port Number] Enter the port number of the SNMP trap.Default setting: 123
[Community Name]
Enter a community name (up to 15 characters).
[IPX Address] [Notification Ad-dress]
Enter the IPX address using an 8-digit hexadecimal value.
[Node Address] Enter the node address using a 12-digit hexadecimal value.
[Community Name]
Enter a community name (up to 15 characters).
[E-mail Address] [Notification Ad-dress]
Enter the destination E-mail address (up to 320 characters).
[Alert] [Paper Empty] Sends a notification when the paper tray is empty.
[Paper Jam] Sends a notification when a page has been jammed.
[Maintenance] Sends a notification when the periodical inspection is required.
[Toner Out] Sends a notification when the toner is empty.
[Output Tray Full] Sends a notification when the capacity of the output tray has been exceeded.
[Fuser Unit End] Sends a notification when the fusing unit needs to be replaced.
[Operator Call] Sends a notification when a error has occurred.
[Service Call] Sends a notification when a service call has occurred.
[Job Complete] Sends a notification when the job has finished.
[Job Error] Sends a notification when the job has ended abnormally.

bizhub 42/36 5-19
5.1 [System] tab 5
[Total Counter Notification Settings]
You can send the counter information being managed on this machine to the specified destination by E-mail.
Select [System] ö [Notification Settings] ö [Total Counter Notification Settings].
Item Description
[Model Name] Enter a model name to be included in the notification mail message (up to 20 characters).
[Schedule Setting] Specify the conditions for the notification schedule.Schedules 1 and 2 can be registered with different settings.
[Register Notification Ad-dress]
Enter the destination E-mail address (up to 320 characters).In addition, select a notification schedule.

[System] tab5
5-20 bizhub 42/36
5.1
5.1.10 [Sender Registration]
Register sender information that is included in Fax TX documents that is to be printed on documents received by the recipient.
Select [System] ö [Sender Registration] ö [Sender Registration].
Item Description Control Panel
[Sender] Allows you to register the sender name that is to be printed on documents received by recipient as sender information (up to 30 characters).
page 4-46

bizhub 42/36 5-21
5.2 [Security] tab 5
5.2 [Security] tab
From the [Security] tab, all settings related to user authentication and network security can be specified.
5.2.1 [Authentication]
[General Settings]
User authentication/account track settings can be configured.
If a setting is changed for any of the following parameters, all registered user/account information as well as job data/images related to users/accounts are cleared.- User Authentication- Account Track- Account Track Method- Number of Counters Assigned for Users
However, if the user authentication method is changed ([Device] or [External Server]), the user/account infor-mation is not cleared.
(If you use PageScope Authentication Manager for authentication, items other than [Print without Authen-tication] are not displayed.)
Select [Security] ö [Authentication] ö [General Settings].
Item Description
[User Authentication] Select whether or not user authentication is performed.[Device]: Select this setting for user authentication to be performed by the machine.[External Server]: Select this setting for user authentication to be per-formed by an external server.
[Public Access] Select whether to allow the public user access.If [Allow] is selected, the public user can use this machine by selecting [Public User] in the login page to log in to the machine.If [Allow (without Login)] is selected, the public user can use this machine without logging in to the machine in the login page.This setting is required when select [Device] or [External Server] from [User Authentication].
[Ticket Hold Time (Active Directory)]
Enter a time to hold the Kerberos authentication tickets.This setting is required when select [External Server] from [User Authenti-cation].
[Account Track] To enable account track, select [On].

[Security] tab5
5-22 bizhub 42/36
5.2
If Enhanced security mode is enabled, restriction is applied as follows.- You cannot select [Off] in [User Authentication].- You cannot select [Allow] and [Allow (without Login] in [Public Access].- You cannot select [Allow] in [Print without Authentication].
[Account Track Method] To use the account track function, select its authentication method.This setting is required when you only use the account track function.
[Synchronize User Authen-tication & Account Track]
To synchronize user authentication with account track and manage users for each account track, select [Synchronize].Once you specify the account name of the user at user registration, you will be able to log in by entering only the user name. If you have omitted the account name, the user must specify the account name when logging in for the first time. The account name that the user specify at the first login time will be registered as the account name of the user.This setting is required when set [ON] for [Account Track] when select [De-vice] or [External Server] from [User Authentication].
[Number of Counters As-signed for Users]
Enter a number of user counters to be assigned if user authentication and account track are enabled.You can aggregate the counter by user or account track, and assign up to 1,000 counters to users and account tracks. For example, if the number of user counters to be assigned is set to 950, you can register up to 50 ac-count tracks.This setting is required when set [ON] for [Account Track] when select [De-vice] or [External Server] from [User Authentication].
[Print without Authentica-tion]
Select the way in which the machine functions when it receives a job with-out authentication information (a print job sent with user authentication or account track disabled in the printer driver) or a public user job.[Allow]: Select this option to print the received job.[Restrict]: Select this option to delete the received job.This setting is required when select [Device] or [External Server] from [User Authentication].
Item Description

bizhub 42/36 5-23
5.2 [Security] tab 5
[User List]
(This page appears when [User Authentication] (in the [Security] ö [Authentication] ö [General Settings] page) is set to [Device] or [External Server].)
(If you use PageScope Authentication Manager for authentication, this item is not displayed.)
Select [Security] ö [Authentication] ö [User List].
Item Description
[New Registration] Click to register a new user.
[Search for Number] Select the range of user registration numbers ([No.]) to be displayed.
[Edit] Click to edit the information for the registered user.
[Delete] Click to delete the registered user.
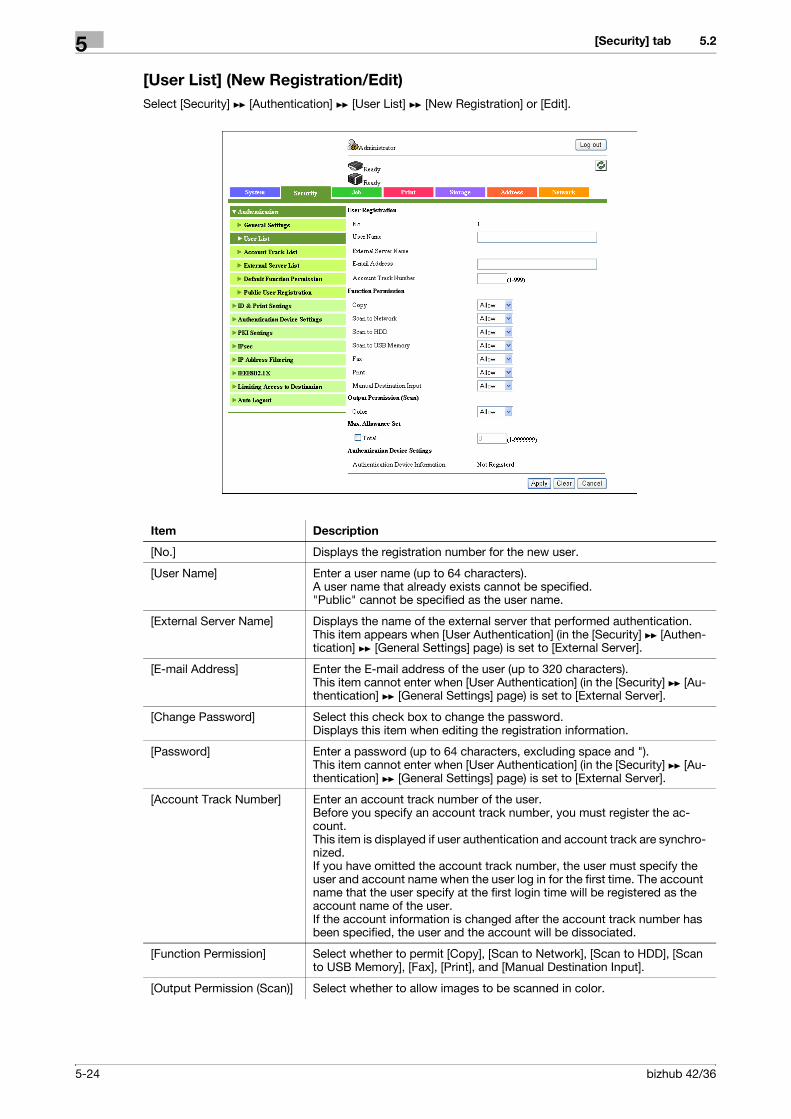
[Security] tab5
5-24 bizhub 42/36
5.2
[User List] (New Registration/Edit)
Select [Security] ö [Authentication] ö [User List] ö [New Registration] or [Edit].
Item Description
[No.] Displays the registration number for the new user.
[User Name] Enter a user name (up to 64 characters).A user name that already exists cannot be specified."Public" cannot be specified as the user name.
[External Server Name] Displays the name of the external server that performed authentication.This item appears when [User Authentication] (in the [Security] ö [Authen-tication] ö [General Settings] page) is set to [External Server].
[E-mail Address] Enter the E-mail address of the user (up to 320 characters).This item cannot enter when [User Authentication] (in the [Security] ö [Au-thentication] ö [General Settings] page) is set to [External Server].
[Change Password] Select this check box to change the password.Displays this item when editing the registration information.
[Password] Enter a password (up to 64 characters, excluding space and ").This item cannot enter when [User Authentication] (in the [Security] ö [Au-thentication] ö [General Settings] page) is set to [External Server].
[Account Track Number] Enter an account track number of the user.Before you specify an account track number, you must register the ac-count.This item is displayed if user authentication and account track are synchro-nized.If you have omitted the account track number, the user must specify the user and account name when the user log in for the first time. The account name that the user specify at the first login time will be registered as the account name of the user.If the account information is changed after the account track number has been specified, the user and the account will be dissociated.
[Function Permission] Select whether to permit [Copy], [Scan to Network], [Scan to HDD], [Scan to USB Memory], [Fax], [Print], and [Manual Destination Input].
[Output Permission (Scan)] Select whether to allow images to be scanned in color.

bizhub 42/36 5-25
5.2 [Security] tab 5
Reference- You cannot register a password less than eight characters when [Security Settings] ö [Security Details]
ö [Password Rules] is set to [ON] in the [Admin Settings] on the Control Panel. If a user password containing less than eight characters has already been registered, change the password so that it con-tains eight characters before setting [Password Rules] to [ON].
- If you permit the public user access, you can configure the Function Permission for the public user. For details, refer to page 5-31.
- If you specify a user whose name includes " (double quotation mark) from the printer driver and try to print a job or save it into a HDD when user authentication is enabled on this machine, login error occurs on the machine and the print job is deleted.
- When [Security Settings] ö [Security Details] ö [Manual Destination Input] is set to [Restrict] in [Admin Settings] on the Control Panel, the user cannot manually enter the address regardless of the setting of this function.
[Account Track List]
(This page appears when [Account Track] (in the [Security] ö [Authentication] ö [General Settings] page) is set to [On].)
(If you use PageScope Authentication Manager for authentication, this item is not displayed.)
Select [Security] ö [Authentication] ö [Account Track List].
[Max. Allowance Set] Specify the maximum number of pages that can be printed.To specify the limit, select the appropriate check box and enter the desired limit value.
[Authentication Device Set-tings]
Shows whether or not an authentication device has been registered.
Item Description
Item Description
[New Registration] Click to register a new account.
[Search for Number] Select the range of account registration numbers ([No.]) to be displayed.
[Edit] Click to edit the information for the registered account.
[Delete] Click to delete the registered account.

[Security] tab5
5-26 bizhub 42/36
5.2
[Account Track List] (New Registration/Edit)
Select [Security] ö [Authentication] ö [Account Track List] ö [New Registration] or [Edit].
Item Description
[No.] Displays the registration number for the new account.
[Account Name] Enter an account name (up to 8 characters, excluding space and ").An account name that already exists cannot be specified.
[Change Password] Select this check box to change the password.Displays this item when editing the registration information.
[Password] Enter a password (up to 8 characters, excluding space and ").
[Output Permission (Scan)] Select whether to allow images to be scanned in color.
[Max. Allowance Set] Specify the maximum number of pages that can be printed.To specify the limit, select the appropriate check box and enter the desired limit value.

bizhub 42/36 5-27
5.2 [Security] tab 5
[External Server List]
(This page appears when [User Authentication] (in the [Security] ö [Authentication] ö [General Settings] page) is set to [External Server].)
(If you use PageScope Authentication Manager for authentication, this item is not displayed.)
Select [Security] ö [Authentication] ö [External Server List].
Item Description
[Default] Select the default external server.
[Edit] Click to edit the information for the registered external server.
[Delete] Click to delete the registered external server.

[Security] tab5
5-28 bizhub 42/36
5.2
[External Server List] (Edit)
Select [Security] ö [Authentication] ö [External Server List] ö [Edit].
Item Description
[External Server (Active Di-rectory)]
[No.] Displays the registration number.
[Name] Enter the name of an external server (up to 32 characters).
[Server Type] Displays the external server type.
[Default Domain Name]
Enter the default domain name of Active Directory (up to 64 characters).
[External Server (NTLM)] [No.] Displays the registration number.
[Name] Enter the name of an external server (up to 32 characters).
[Server Type] Select the new external server type.[NTLMv2] is applied on the Windows NT 4.0 (Service Pack 4) and later.
[Default Domain Name]
Enter the NTLM default domain name (up to 64 characters).The default domain name must be uppercase let-ters.
[External Server (NDS)] [No.] Displays the registration number.
[Name] Enter the name of an external server (up to 32 characters).
[Server Type] Displays the external server type.
[Default Tree] Enter the default NDS tree name (up to 63 char-acters).
[Default Context] Enter the default NDS context name (up to 191 characters).

bizhub 42/36 5-29
5.2 [Security] tab 5
[External Server (LDAP)] [No.] Displays the registration number.
[Name] Enter the name of an external server (up to 32 characters).
[Server Type] Displays the external server type.
[Server Address] Specify the LDAP server address.Format: *.*.*.* (Asterisk * can be 0 to 255)If the DNS server has already been configured, you can enter the host name instead. For the host name, specify a fully-qualified domain name (FQDN).When using IPv6, you can specify the IPv6 ad-dress.
[Port Number] Enter a port number.Default setting: 389
[SSL] Select whether or not SSL is used.
[Port Number (SSL)] Enter a SSL port number.Default setting: 636
[Search Base] Enter the search starting point in the directory structure under the LDAP server (up to 255 char-acters).This search function also covers subdirectories under the entered starting point.
[Timeout] Enter the timeout period for LDAP search.
[Authentication Method]
Select the authentication method to log in to the LDAP server.Select the same authentication method as that used on the LDAP server.
[Search Attribute] Enter attributes to be used for search of user ac-count (up to 64 characters, the only symbol al-lowed is a hyphen (-)).
Item Description

[Security] tab5
5-30 bizhub 42/36
5.2
[Default Function Permission]
Select [Security] ö [Authentication] ö [Default Function Permission].
(If you use PageScope Authentication Manager for authentication, this item is not displayed.)
Reference- When [Security Settings] ö [Security Details] ö [Manual Destination Input] is set to [Restrict] in [Admin
Settings] on the Control Panel, the user cannot manually enter the address regardless of the setting of this function.
Item Description
[Copy] Configure the default settings for function permissions to users who are authenticated on the external server.If a user not registered on this machine is authenticated on the external server, the user will be registered on this machine with the function permis-sions that you configure here.Once the function permissions of a user have been registered on this ma-chine, you can edit them in [User Registration].
[Scan to Network]
[Scan to HDD]
[Scan to USB Memory]
[Fax]
[Print]
[Manual Destination Input]

bizhub 42/36 5-31
5.2 [Security] tab 5
[Public User Registration]
(This page appears when [Public Access] (in the [Security] ö [Authentication] ö [General Settings] page) is set to [Allow] or [Allow (without Login].)
(If you use PageScope Authentication Manager for authentication, this item is not displayed.)
Select [Security] ö [Authentication] ö [Public User Registration].
Reference- When [Security Settings] ö [Security Details] ö [Manual Destination Input] is set to [Restrict] in [Admin
Settings] on the Control Panel, the user cannot manually enter the address regardless of the setting of this function.
Item Description
[Function Permission] Specify whether to permit [Copy], [Scan to Network], [Scan to HDD], [Scan to USB Memory], [Fax], [Print], and [Manual Destination Input].
[Output Permission (Scan)] Select whether to allow images to be scanned in color.

[Security] tab5
5-32 bizhub 42/36
5.2
5.2.2 [ID & Print Settings]
[ID & Print Settings] can be configured.
(This page appears when [User Authentication] (in the [Security] ö [Authentication] ö [General Settings] page) is set to [Device] or [External Server].)
Select [Security] ö [ID & Print Settings] ö [ID & Print Settings].
d Reference
For details on the ID & print function, refer to the [User's Guide Print Operations].
Item Description
[ID & Print] Select whether to process all print jobs requested from a registered user as ID & print jobs.If you select [Enable], all print jobs requested from a registered user are processed as ID & print jobs even when [ID & Print] is not enabled on the printer driver.If you select [Disable], print jobs are processed as ID & print jobs only when [ID & Print] is enabled on the printer driver.A print job requested from a registered user is processed as a normal one if [ID & Print] is not enabled on the printer driver.
[Public User] Select the operation required when receiving a job without authentication information (a job for which printing is instructed while user authentication or account track is not enabled on the printer driver) or receiving a public user's job.If you select [Print Immediately], the received job is printed as it is.If you select [Save], the received job is saved in the hard disk.
[Default Operation Selec-tion]
Select the default operation you want to apply after Authentication has been completed on the authentication unit (success in login).If you select [Begin Printing], ID & print jobs are executed after authentica-tion has been completed.If you select [Access Basic Screen], you can log in to the basic window af-ter authentication has been completed. In this case, ID & print jobs are not executed.

bizhub 42/36 5-33
5.2 [Security] tab 5
5.2.3 [Authentication Device Settings]
IC card authentication settings can be configured.
(This page appears when the optional Authentication Unit AU-201 is installed in this machine.)
[General Settings]
Select [Security] ö [Authentication Device Settings] ö [General Settings].
Reference- When a setting on this menu is changed, the card information saved on the machine is erased.
Item Description
[Authentication Type] Select the authentication method.Select [Card Authentication] to authenticate only by IC card reading.Select [Card Authentication+Password] to authenticate by IC card reading and password entry.
[IC Card Type] Displays the types of cards supported by the loadable driver.

[Security] tab5
5-34 bizhub 42/36
5.2
[FeliCa (SSFC) Settings]
(If the optional Authentication Unit AU-201 is installed and FeliCa (SSFC) is supported, this menu is dis-played.)
Select [Security] ö [Authentication Device Settings] ö [FeliCa (SSFC) Settings].
Reference- When a setting on this menu is changed, the card information saved on the machine is erased.
Item Description
[Room Code] Specify the room number.Default Setting: 0
[Floor Code] Specify the floor number.Default Setting: 0
[Building Code] Specify the building number.Default Setting: 0
[Area Code] Specify the region number.Default Setting: 0
[Security Level] Select the security level.Default Setting: 0
[Company Identification Code]
Specify the company identification code.
[Company Code] Specify the company code.

bizhub 42/36 5-35
5.2 [Security] tab 5
5.2.4 [PKI Settings]
You can configure SSL communication settings and device certificate.
[Device Certificate]
Select [Security] ö [PKI Settings] ö [Device Certificate].
Item Description
[New Registration] Register a new device certificate.Select a registration method: creating a self-signed certificate, requesting an issuance of a certificate, or importing a certificate.Up to 10 certificates can be registered.If 10 certificates have already been registered, [New Registration] does not appear.
[Default] Specify the default device certificate.When not using device certificates depending on protocols, specify the de-fault device certificate.
[Issued By] Displays an issuer of a device certificate.
[Issued To] Displays a destination to issue a device certificate to.
[Expiration Date] Displays the validity period of a device certificate.
[Detail] Enables you to confirm detailed information about a device certificate.
[Edit] Enables you to remove or export a device certificate if it is installed.If [Requesting] is displayed in [Issued To] of the device certificate, you can install a CA-issued certificate in this machine.

[Security] tab5
5-36 bizhub 42/36
5.2
[Device Certificate] (New Registration)
Select [Security] ö [PKI Settings] ö [Device Certificate] ö [Device Certificate] (New Registration).
Item Description
[Create a Self-signed Cer-tificate]
[Common Name] Displays the IP address or domain name of this machine.This item shows the set value used to access this machine.
[Organization] Enter an organization or association name (up to 63 characters).
[Organization Unit] Enter an account name (up to 63 characters).You can also specify a null.
[Locality] Enter a city, ward, town, or village name (up to 127 characters).
[State/Province] Enter a prefecture name (up to 127 characters).
[Country] Enter the country name with a country code de-fined in ISO03166 (2 characters).United States: US, Great Britain: GB, Italy: IT, Australia: AU, The Netherlands: NL, Canada: CA, Spain: ES, Czech Republic: CZ, China: CN, Den-mark: DK, Germany: DE, Japan: JP, France: FR, Belgium: BE, Russia: RU
[E-mail Address] Enter the E-mail address of the administrator (up to 128 characters, excluding a space).
[Validity Start Date] Displays the validity period starting date.
[Validity Period] Enter the validity period of a certificate with the number of days that have elapsed since the start-ing date.

bizhub 42/36 5-37
5.2 [Security] tab 5
[Request a Certificate] [Common Name] Displays the IP address or domain name of this machine.This item shows the set value used to access this machine.
[Organization] Enter an organization or association name (up to 63 characters).
[Organization Unit] Enter an account name (up to 63 characters).You can also specify a null.
[Locality] Enter a city, ward, town, or village name (up to 127 characters).
[State/Province] Enter a prefecture name (up to 127 characters).
[Country] Enter the country name with a country code de-fined in ISO03166 (2 characters).United States: US, Great Britain: GB, Italy: IT, Australia: AU, The Netherlands: NL, Canada: CA, Spain: ES, Czech Republic: CZ, China: CN, Den-mark: DK, Germany: DE, Japan: JP, France: FR, Belgium: BE, Russia: RU
[E-mail Address] Enter the E-mail address of the administrator (up to 128 characters, excluding a space).
[Import a Certificate] [File] Specify the file name of the device certificate to be imported.Click [Browse] to specify where to save a certifi-cate file.
[Password] Enter the password to decode the encrypted cer-tificate file (up to 32 characters).
[Retype Password] Reenter the password for confirmation (up to 32 characters).
Item Description

[Security] tab5
5-38 bizhub 42/36
5.2
[Device Certificate] (Request a Certificate)
Displays request data to create [Request a Certificate].
[Device Certificate] (Install a Certificate)
Ask the CA to issue a certificate, and install the certificate sent from the CA in this machine.
Item Description
[Request a Certificate] Displays request data to issue a device certificate.Send the displayed character string to the CA.
[Save] Click this button to save certificate signing request data in your computer as a file.
Item Description
[File] Select the data sent from the CA.
[Apply] Click this button to install a certificate.

bizhub 42/36 5-39
5.2 [Security] tab 5
[Device Certificate] (Edit)
Select [Security] ö [PKI Settings] ö [Device Certificate] ö [Edit].
Reference- If Enhanced Security Mode is enabled, the device certificate cannot be deleted.
Item Description
[Certificate Information] Select to view detailed information about the device certificate.
[Export a Certificate] [Password] Enter the password (up to 32 characters).The entered password is required when importing a certificate.
[Retype Password] Reenter the password for confirmation (up to 32 characters).
[Delete a Certificate] Click [OK] to remove the registered device certificate.

[Security] tab5
5-40 bizhub 42/36
5.2
[SSL/TLS Settings]
Select [Security] ö [PKI Settings] ö [SSL/TLS Settings].
Item Description
[SSL/TLS] Select the PageScope Web Connection mode to apply SSL.Click [Disable] to disable SSL.
[Encryption Strength] Specify the SSL encryption strength.

bizhub 42/36 5-41
5.2 [Security] tab 5
[Protocol Settings]
Select [Security] ö [PKI Settings] ö [Protocol Settings].
Item Description
[Protocol] Displays the classification for each protocol.
[Issued By] Displays the issuer of the device certificate.If no device certificates have been registered, [Not Installed] appears.If a protocol has been specified as the default, [Default] appears.
[Issued To] Displays the destination of the device certificate.
[Edit] Click to change the device certificate or confirm the details of the device certificate.

[Security] tab5
5-42 bizhub 42/36
5.2
[Protocol Settings] (IEEE802.1X)
Select [Security] ö [PKI Settings] ö [Protocol Settings] ö [Edit] (IEEE802.1X).
Item Description
[Protocol Settings] Displays the name of the selected protocol.
[Certificate Verification Settings]
Specify settings for verifying the server certificate.[Validity Period]: Select whether to check that the server certificate is within the validity period.[CN]: Select whether to check that the CN of the server certificate matches the server address.[Chain]: Select whether to check that the server certificate chain (certifica-tion path) is correct.
[Device Certificate] Select the certificate to be used.

bizhub 42/36 5-43
5.2 [Security] tab 5
[Protocol Settings] (S/MIME)
Select [Security] ö [PKI Settings] ö [Protocol Settings] ö [Edit] (S/MIME).
[Protocol Settings] (HTTP Server)
Select [Security] ö [PKI Settings] ö [Protocol Settings] ö [Edit] (HTTP Server).
Item Description
[Protocol Settings] Displays the name of the selected protocol.
[Device Certificate] Select the certificate to be used.
Item Description
[Protocol Settings] Displays the name of the selected protocol.
[Device Certificate] Select the certificate to be used.

[Security] tab5
5-44 bizhub 42/36
5.2
[Protocol Settings] (E-mail Send (SMTP))
Select [Security] ö [PKI Settings] ö [Protocol Settings] ö [Edit] (E-mail Send (SMTP)).
Item Description
[Protocol Settings] Displays the name of the selected protocol.
[Certificate Verification Settings]
Specify settings for verifying the server certificate.[Validity Period]: Select whether to check that the server certificate is within the validity period.[CN]: Select whether to check that the CN of the server certificate matches the server address.[Chain]: Select whether to check that the server certificate chain (certifica-tion path) is correct.[Key Usage]: Select whether to check that the server certificate is used ac-cording to the purpose approved by the issuer.[Check CRL Expiration]: Select whether to use the certificate revocation list (CRL) to check that the server certificate has not expired.[Check OCSP Expiration]: Select whether to use the Online Certificate Sta-tus Protocol (OCSP) to check that the server certificate has not expired.
[Device Certificate] Select the certificate to be used.

bizhub 42/36 5-45
5.2 [Security] tab 5
[Protocol Settings] (E-mail Receive (POP))
Select [Security] ö [PKI Settings] ö [Protocol Settings] ö [Edit] (E-mail Receive (POP)).
Item Description
[Protocol Settings] Displays the name of the selected protocol.
[Certificate Verification Settings]
Specify settings for verifying the server certificate.[Validity Period]: Select whether to check that the server certificate is within the validity period.[CN]: Select whether to check that the CN of the server certificate matches the server address.[Chain]: Select whether to check that the server certificate chain (certifica-tion path) is correct.[Key Usage]: Select whether to check that the server certificate is used ac-cording to the purpose approved by the issuer.[Check CRL Expiration]: Select whether to use the certificate revocation list (CRL) to check that the server certificate has not expired.[Check OCSP Expiration]: Select whether to use the Online Certificate Sta-tus Protocol (OCSP) to check that the server certificate has not expired.
[Device Certificate] Select the certificate to be used.

[Security] tab5
5-46 bizhub 42/36
5.2
[Protocol Settings] (TCP Socket)
Select [Security] ö [PKI Settings] ö [Protocol Settings] ö [Edit] (TCP Socket).
Item Description
[Protocol Settings] Displays the name of the selected protocol.
[Device Certificate] Select the certificate to be used.

bizhub 42/36 5-47
5.2 [Security] tab 5
[Protocol Settings] (LDAP)
Select [Security] ö [PKI Settings] ö [Protocol Settings] ö [Edit] (LDAP).
Item Description
[Protocol Settings] Displays the name of the selected protocol.
[Certificate Verification Settings]
Specify settings for verifying the server certificate.[Validity Period]: Select whether to check that the server certificate is within the validity period.[CN]: Select whether to check that the CN of the server certificate matches the server address.[Chain]: Select whether to check that the server certificate chain (certifica-tion path) is correct.[Key Usage]: Select whether to check that the server certificate is used ac-cording to the purpose approved by the issuer.[Check CRL Expiration]: Select whether to use the certificate revocation list (CRL) to check that the server certificate has not expired.[Check OCSP Expiration]: Select whether to use the Online Certificate Sta-tus Protocol (OCSP) to check that the server certificate has not expired.
[Device Certificate] Select the certificate to be used.

[Security] tab5
5-48 bizhub 42/36
5.2
[Protocol Settings] (WebDAV Client)
Select [Security] ö [PKI Settings] ö [Protocol Settings] ö [Edit] (WebDAV Client).
Item Description
[Protocol Settings] Displays the name of the selected protocol.
[Certificate Verification Settings]
Specify settings for verifying the server certificate.[Validity Period]: Select whether to check that the server certificate is within the validity period.[CN]: Select whether to check that the CN of the server certificate matches the server address.[Chain]: Select whether to check that the server certificate chain (certifica-tion path) is correct.[Key Usage]: Select whether to check that the server certificate is used ac-cording to the purpose approved by the issuer.[Check CRL Expiration]: Select whether to use the certificate revocation list (CRL) to check that the server certificate has not expired.[Check OCSP Expiration]: Select whether to use the Online Certificate Sta-tus Protocol (OCSP) to check that the server certificate has not expired.
[Device Certificate] Select the certificate to be used.

bizhub 42/36 5-49
5.2 [Security] tab 5
[Protocol Settings] (OpenAPI)
Select [Security] ö [PKI Settings] ö [Protocol Settings] ö [Edit] (OpenAPI).
Item Description
[Protocol Settings] Displays the name of the selected protocol.
[Certificate Verification Settings]
Specify settings for verifying the server certificate.[Validity Period]: Select whether to check that the server certificate is within the validity period.[CN]: Select whether to check that the CN of the server certificate matches the server address.[Chain]: Select whether to check that the server certificate chain (certifica-tion path) is correct.[Key Usage]: Select whether to check that the server certificate is used ac-cording to the purpose approved by the issuer.[Check CRL Expiration]: Select whether to use the certificate revocation list (CRL) to check that the server certificate has not expired.[Check OCSP Expiration]: Select whether to use the Online Certificate Sta-tus Protocol (OCSP) to check that the server certificate has not expired.[Client Certificate]: Select whether to request for client certificates.
[Device Certificate] Select the certificate to be used.

[Security] tab5
5-50 bizhub 42/36
5.2
[Protocol Settings] (Web Service)
Select [Security] ö [PKI Settings] ö [Protocol Settings] ö [Edit] (Web Service).
Item Description
[Protocol Settings] Displays the name of the selected protocol.
[Certificate Verification Settings]
Specify settings for verifying the server certificate.[Validity Period]: Select whether to check that the server certificate is within the validity period.[Chain]: Select whether to check that the server certificate chain (certifica-tion path) is correct.[Key Usage]: Select whether to check that the server certificate is used ac-cording to the purpose approved by the issuer.[Check CRL Expiration]: Select whether to use the certificate revocation list (CRL) to check that the server certificate has not expired.[Check OCSP Expiration]: Select whether to use the Online Certificate Sta-tus Protocol (OCSP) to check that the server certificate has not expired.[Client Certificate]: Select whether to request for client certificates.
[Device Certificate] Select the certificate to be used.

bizhub 42/36 5-51
5.2 [Security] tab 5
[External Certificate]
Select [Security] ö [PKI Settings] ö [External Certificate].
Item Description
[New Registration] Click this button to register a new external certificate.Click [Browse] in the new registration window to specify a new external certificate to be registered.
[Certification Type] Select the type of external certificates to be displayed.External certificates of the selected type appear in the list.
[Issued By] Displays the issuer of an external certificate.
[Issued To] Displays the destination of an external certificate.
[Expiration Date] Displays the validity period of an external certificate.
[Detail] Check detailed information about an external certificate.
[Delete] Displays a message asking you to confirm deletion, enables you to delete an external certificate.

[Security] tab5
5-52 bizhub 42/36
5.2
[External Certificate] (New Registration)
Select [Security] ö [PKI Settings] ö [External Certificate] ö [New Registration].
Item Description
[Certification Type] Select the type of external certificate to be registered.If [Trusted Root Certification Authorities] is selected, a root certificate from a trusted certificate authority (CA) will be registered.If [Trusted Intermediate Certification Authorities] is selected, an interim cer-tificate from a trusted certificate authority (CA) will be registered.If [Trusted Certificate] is selected, trusted certificates will be individually registered.If [Untrusted Certificate] is selected, untrusted certificates will be individu-ally registered.
[File] Click [Browse] to specify a new external certificate to be registered.

bizhub 42/36 5-53
5.2 [Security] tab 5
[Validate Certificate]
Select [Security] ö [PKI Settings] ö [Validate Certificate].
Item Description
[Certificate Verification] Select whether or not certificate verification is performed.
[Timeout] Enter the timeout period for expiration date confirmation.
[OCSP Service] Select this check box to use the OCSP service.
[URL] Enter the URL of the OCSP service (up to 511 characters).If this item is left blank, the machine accesses the URL of the OCSP service embedded in the certificate. If the URL of the OCSP service is not embed-ded in the certificate, an error will occur.
[Proxy Server Address] To confirm the expiration date via a proxy server, enter its address.Format: *.*.*.* (Asterisk * can be 0 to 255)If the DNS server has already been configured, you can enter the host name instead. For the host name, specify a fully-qualified domain name (FQDN).When using IPv6, you can specify the IPv6 address.
[Proxy Server Port Number] Enter the port number of a proxy server.
[User Name] Enter the user name to log in to the proxy server (up to 63 characters).
[Change Password] Select this check box to change the password.
[Password] Enter the password to log in to the proxy server (up to 63 characters).
[No Proxy for following do-main]
To enable expiration date confirmation, specify an address that does not use the proxy server depending on your environment.Format: *.*.*.* (Asterisk * can be 0 to 255)If the DNS server has already been configured, you can enter the host name instead. For the host name, specify a fully-qualified domain name (FQDN).When using IPv6, you can specify the IPv6 address.

[Security] tab5
5-54 bizhub 42/36
5.2
5.2.5 [IPsec]
You can configure IPsec settings.
Select [Security] ö [IPsec] ö [IPsec].
Item Description
[General Settings] [IPsec] Displays whether or not the IPsec function is en-abled.
[IKE Life Time] Displays the length of the life for the IKE.
[IKE Diffie-Hellman Group]
Displays the IKE Diffie-Hellman group.
[IPsec SA Life Time] Displays the length of the life for the IPsec SA.
[Edit] Click this button to edit [General Settings].
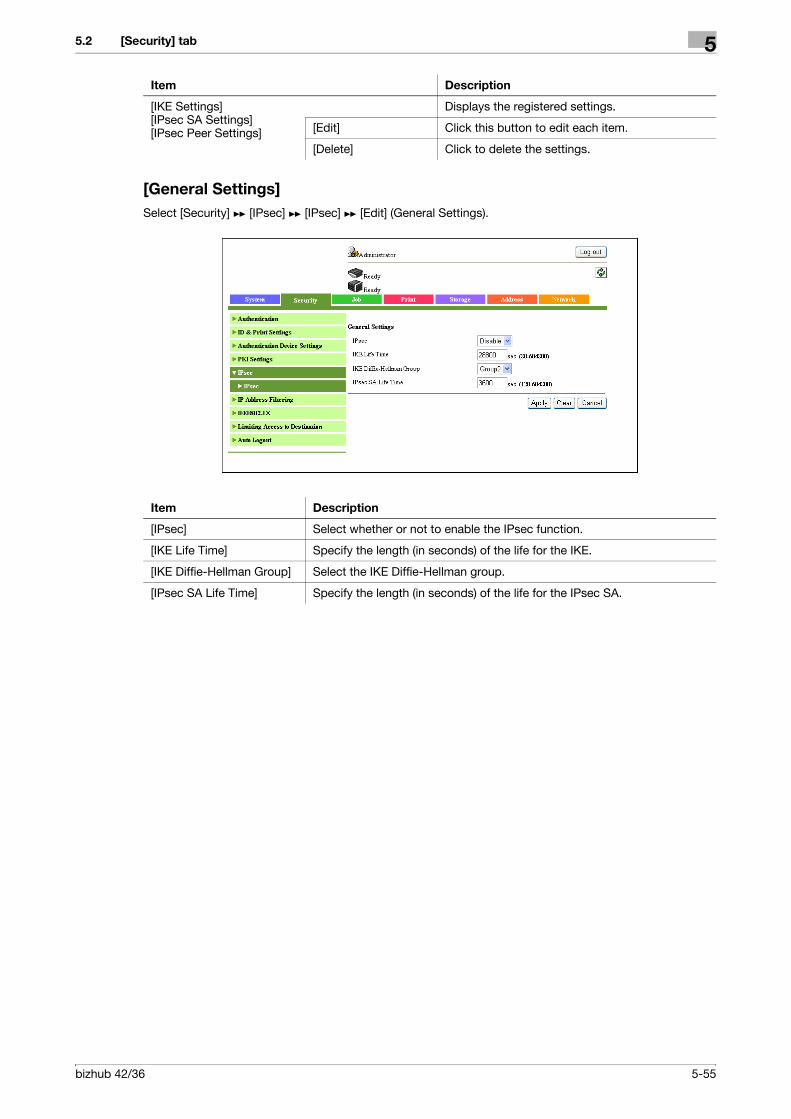
bizhub 42/36 5-55
5.2 [Security] tab 5
[General Settings]
Select [Security] ö [IPsec] ö [IPsec] ö [Edit] (General Settings).
[IKE Settings][IPsec SA Settings][IPsec Peer Settings]
Displays the registered settings.
[Edit] Click this button to edit each item.
[Delete] Click to delete the settings.
Item Description
Item Description
[IPsec] Select whether or not to enable the IPsec function.
[IKE Life Time] Specify the length (in seconds) of the life for the IKE.
[IKE Diffie-Hellman Group] Select the IKE Diffie-Hellman group.
[IPsec SA Life Time] Specify the length (in seconds) of the life for the IPsec SA.
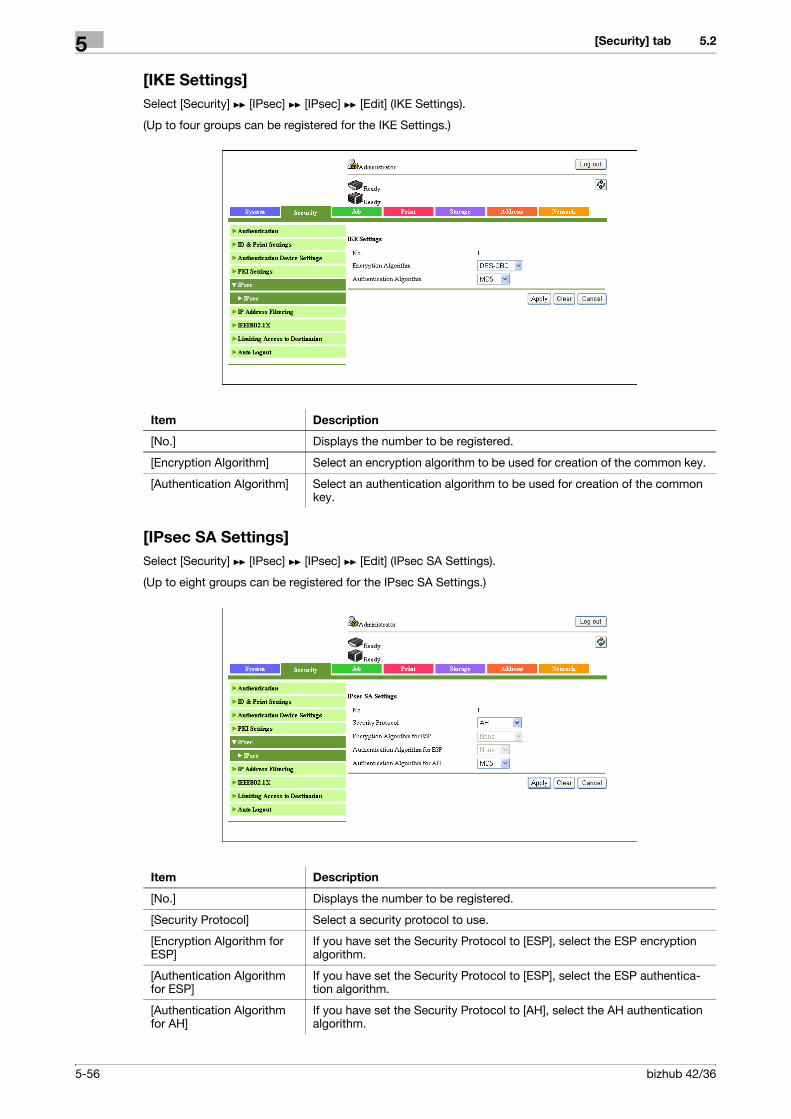
[Security] tab5
5-56 bizhub 42/36
5.2
[IKE Settings]
Select [Security] ö [IPsec] ö [IPsec] ö [Edit] (IKE Settings).
(Up to four groups can be registered for the IKE Settings.)
[IPsec SA Settings]
Select [Security] ö [IPsec] ö [IPsec] ö [Edit] (IPsec SA Settings).
(Up to eight groups can be registered for the IPsec SA Settings.)
Item Description
[No.] Displays the number to be registered.
[Encryption Algorithm] Select an encryption algorithm to be used for creation of the common key.
[Authentication Algorithm] Select an authentication algorithm to be used for creation of the common key.
Item Description
[No.] Displays the number to be registered.
[Security Protocol] Select a security protocol to use.
[Encryption Algorithm for ESP]
If you have set the Security Protocol to [ESP], select the ESP encryption algorithm.
[Authentication Algorithm for ESP]
If you have set the Security Protocol to [ESP], select the ESP authentica-tion algorithm.
[Authentication Algorithm for AH]
If you have set the Security Protocol to [AH], select the AH authentication algorithm.

bizhub 42/36 5-57
5.2 [Security] tab 5
[IPsec Peer Settings]
Select [Security] ö [IPsec] ö [IPsec] ö [Edit] (IPsec Peer Settings).
(Up to 10 peers can be registered.)
Item Description
[No.] Displays the number to be registered.
[Encapsulation Mode] Select an IPsec operation mode.
[Peer's Address] Enter the IP address of the peer.When using IPv6, you can specify the IPv6 address.
[Perfect Forward Secrecy] To increase the IKE security level, select [Use].If you have selected [Use], the communication time increases.
[Pre-Shared Key] Enter the Pre-Shared Key text to be shared with the peer (up to 64 charac-ters).This text must be the same as that used at the peer.

[Security] tab5
5-58 bizhub 42/36
5.2
5.2.6 [IP Address Filtering]
You can specify the range of IP addresses from which access to the machine is permitted.
Select [Security] ö [IP Address Filtering] ö [IP Address Filtering].
Reference- If the range of permitted IP addresses in [Access Permission Address] overlaps the range of refused IP
addresses in [Access Refuse Address], the refused addresses in [Access Refuse Address] are given pri-ority.
- To specify a single IP address, type the same IP address into both the box for the starting IP address and for the ending IP address, or type "0.0.0.0" into the box for either the starting IP address or the ending IP address.
Item Description
[Access Permission Ad-dress]
To specify addresses you permit access from, select [Enable].
Range of IP address per-mitted access
Enter the start and end addresses of ranges you permit access from.Format: *.*.*.* (Asterisk * can be 0 to 255)
[Access Refuse Address] To specify addresses you deny access from, select [Enable].
Range of IP address re-fused access
Specify the start and end addresses of ranges you deny access from.Format: *.*.*.* (Asterisk * can be 0 to 255)

bizhub 42/36 5-59
5.2 [Security] tab 5
5.2.7 [IEEE802.1X]
You can configure IEEE802.1X settings.
Select [Security] ö [IEEE802.1X] ö [IEEE802.1X].
Item Description
[IEEE802.1X] Select whether or not to enable the IEEE802.1X function.
[EAP Type] Select an EAP authentication method.If you select [Server Specification], the EAP-Type provided by the authen-tication server will be used for authentication.Configure the supplicant settings as required for this machine according to the EAP-Type provided by the authentication server.Do not set this item to [None].
[User ID] Enter a user ID (up to 128 characters).This user ID is used for all EAP-Type options.
[Change Password] Select this check box to change the password.
[Password] Enter the password (up to 128 characters).The password is used for all EAP-Type options other than [EAP-TLS].
[TTLS Anonymous Name] Enter an anonymous name to be used for EAP-TTLS authentication (up to 128 characters).This item is available if [EAP-Type] is set to [EAP-TTLS] or [Server Specifi-cation].If [EAP Type] is set to [Server Specification] while the actual authentication method is EAP-MD5, type in the same name as that specified for [User ID].
[TTLS Authentication Type] Select an EAP-TTLS inner authentication protocol.This item is available if [EAP-Type] is set to [EAP-TTLS] or [Server Specifi-cation].
[Send Client Certificate] Select whether to encrypt authentication information using client certifi-cates of this machine. You can configure this setting when client certifi-cates are registered in this machine.If [EAP-Type] is [EAP-TLS], the client certificates are always required.This setting can be configured even if [EAP-Type] is set to [EAP-TTLS] or [PEAP].
[Server ID] Enter a server ID (up to 64 characters).This setting is required if you verify the CN of the server certificate.

[Security] tab5
5-60 bizhub 42/36
5.2
5.2.8 [Limiting Access to Destination]
You can configure the setting that prohibits user operation.
[Restrict User Access]
Select [Security] ö [Limiting Access to Destination] ö [Restrict User Access].
[Encryption Strength] Select an encryption strength level for encrypted communication with TLS.• [Low]: Keys of any length are used for communication.• [Medium]: Keys that are more than 56 bits in length are used for com-
munication.• [High]: Keys that are more than 128 bits in length are used for commu-
nication.This item is available if [EAP-Type] is set to anything other than [None] or [EAP-MD5].
[Network Stop] If an authentication process does not succeed within the specified time, all network communication will stop. To specify the delay between the start of an authentication process and the stop of network communication, se-lect [Enable].
[Limit Time] Specify the delay (sec.) between the start of an authentication process and the stop of network communication.To restart the authentication process after network communication has stopped, turn the power of this machine off and on again.
Item Description
Item Description
[Registering and Changing Addresses]
Select whether or not to prohibit users from registering or editing destina-tions.

bizhub 42/36 5-61
5.2 [Security] tab 5
5.2.9 [Auto Logout]
Logout time can be set.
Select [Security] ö [Auto Logout] ö [Auto Logout].
Item Description
[Admin Mode Logout Time] Specify the time period before the user will automatically be logged out when no operations have been performed in the administrator mode.
[User Mode Logout Time] Specify the time period before the user will automatically be logged out when no operations have been performed in the user mode.

[Security] tab5
5-62 bizhub 42/36
5.2
5.2.10 [Administrator Password]
Configure the administrator password of this machine.
Select [Security] ö [Administrator Password] ö [Administrator Password].
Reference- If Enhanced Security Mode is enabled, this page will not be displayed.- If a device certificate has not been registered, this page will not be displayed.- This page does not appear if [SSL/TLS] is set to [Disable] in [Security] ö [PKI Settings] ö [SSL Set-
tings], when a device certificate is already registered.
Reference- You cannot register a password less than eight characters when [Security Settings] ö [Security Details]
ö [Password Rules] is set to [ON] in the [Admin Settings] on the Control Panel.
Item Description
[Current Password] Enter a currently specified administrator password.
[New Password] Enter a new administrator password (up to 8 characters, excluding space and ").
[Retype New Password] Enter the new administrator password again for confirmation.
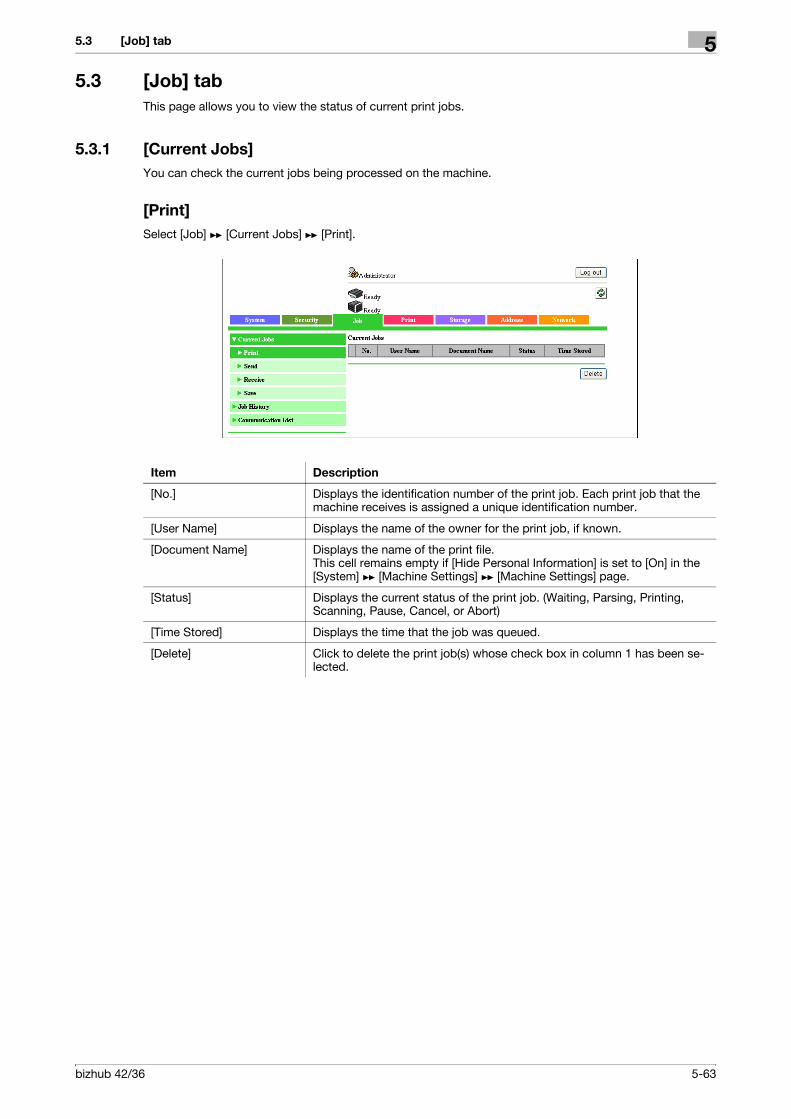
bizhub 42/36 5-63
5.3 [Job] tab 5
5.3 [Job] tab
This page allows you to view the status of current print jobs.
5.3.1 [Current Jobs]
You can check the current jobs being processed on the machine.
[Print]
Select [Job] ö [Current Jobs] ö [Print].
Item Description
[No.] Displays the identification number of the print job. Each print job that the machine receives is assigned a unique identification number.
[User Name] Displays the name of the owner for the print job, if known.
[Document Name] Displays the name of the print file.This cell remains empty if [Hide Personal Information] is set to [On] in the [System] ö [Machine Settings] ö [Machine Settings] page.
[Status] Displays the current status of the print job. (Waiting, Parsing, Printing, Scanning, Pause, Cancel, or Abort)
[Time Stored] Displays the time that the job was queued.
[Delete] Click to delete the print job(s) whose check box in column 1 has been se-lected.

[Job] tab5
5-64 bizhub 42/36
5.3
[Send]
Select [Job] ö [Current Jobs] ö [Send].
Item Description
[No.] Displays the identification number of the transmission job. Each job sent by the machine is assigned a unique identification number.
[User Name] Displays the name of the owner for the transmission job, if known.
[Document Name] Displays the name of the transmission file.This cell remains empty if [Hide Personal Information] is set to [On] in the [System] ö [Machine Settings] ö [Machine Settings] page.
[Status] Displays the current status of the transmission job. (Waiting, Spooling, Parsing, Printing, Scanning, Transferring, Pause, Sending, Dialing, Wait To Redial or TimerTx)
[Time Stored] Displays the time that the job was queued.
[Delete] Click to delete the transmission job(s) whose check box in column 1 has been selected.

bizhub 42/36 5-65
5.3 [Job] tab 5
[Receive]
Select [Job] ö [Current Jobs] ö [Receive].
[Save]
Select [Job] ö [Current Jobs] ö [Save].
Item Description
[No.] Displays the identification number of the reception job. Each job received by the machine is assigned a unique identification number.
[User Name] Displays the name of the owner for the reception job, if known.
[Document Name] Displays the name of the reception file.This cell remains empty if [Hide Personal Information] is set to [On] in the [System] ö [Machine Settings] ö [Machine Settings] page.
[Status] Displays the current status of the reception job. (Waiting, Printing, Trans-ferring, Pause, Receiving, Dialing or Wait To Redial)
[Time Stored] Displays the time that the job was queued.
[Delete] Click to delete the reception job(s) whose check box in column 1 has been selected.
Item Description
[No.] Displays the identification number of the stored job. Each job stored on the machine is assigned a unique identification number.
[User Name] Displays the name of the owner for the stored job, if known.
[Document Name] Displays the name of the stored file.This cell remains empty if [Hide Personal Information] is set to [On] in the [System] ö [Machine Settings] ö [Machine Settings] page.
[Status] Displays the current status of the stored job. (Scanning or Pause)
[Time Stored] Displays the time that the job was queued.
[Delete] Click to delete the stored job(s) whose check box in column 1 has been se-lected.

[Job] tab5
5-66 bizhub 42/36
5.3
5.3.2 [Job History]
You can check the jobs that have been completed on the machine.
[Print]
Select [Job] ö [Job History] ö [Print].
Item Description
[No.] Displays the identification number of the print job. Each print job that the machine receives is assigned a unique identification number.
[User Name] Displays the name of the owner for the print job, if known.
[Document Name] Displays the name of the print file.This cell remains empty if [Hide Personal Information] is set to [On] in the [System] ö [Machine Settings] ö [Machine Settings] page.
[Result] Displays the result of the print job. (OK, Error, or Canceled)
[Detail] Click to display a page containing details.

bizhub 42/36 5-67
5.3 [Job] tab 5
[Send]
Select [Job] ö [Job History] ö [Send].
[Receive]
Select [Job] ö [Job History] ö [Receive].
Item Description
[No.] Displays the identification number of the transmission job. Each job sent by the machine is assigned a unique identification number.
[User Name] Displays the name of the owner for the transmission job, if known.
[Document Name] Displays the name of the transmission file.This cell remains empty if [Hide Personal Information] is set to [On] in the [System] ö [Machine Settings] ö [Machine Settings] page.
[Result] Displays the result of the transmission job. (OK, Error, or Canceled)
[Detail] Click to display a page containing details.
Item Description
[No.] Displays the identification number of the reception job. Each job received by the machine is assigned a unique identification number.
[User Name] Displays the name of the owner for the reception job, if known.
[Document Name] Displays the name of the reception file.This cell remains empty if [Hide Personal Information] is set to [On] in the [System] ö [Machine Settings] ö [Machine Settings] page.
[Result] Displays the result of the reception job. (OK, Error, or Canceled)
[Detail] Click to display a page containing details.

[Job] tab5
5-68 bizhub 42/36
5.3
[Save]
Select [Job] ö [Job History] ö [Save].
[Job History] (Detail)
Select [Job] ö [Job History] ö [Detail].
Reference- As an example, a description of the [Job] ö [Job History] ö [Print] ö [Detail] page is provided below.
Item Description
[No.] Displays the identification number of the stored job. Each job stored on the machine is assigned a unique identification number.
[User Name] Displays the name of the owner for the stored job, if known.
[Document Name] Displays the name of the stored file.This cell remains empty if [Hide Personal Information] is set to [On] in the [System] ö [Machine Settings] ö [Machine Settings] page.
[Result] Displays the result of the stored job. (OK, Error, or Canceled)
[Detail] Click to display a page containing details.
Item Description
[No.] Displays the identification number of the print job. Each print job that the machine receives is assigned a unique identification number.
[Type] Displays the job type.
[User Name] Displays the name of the owner for the print job, if known.
[Document Name] Displays the name of the print file.This item remains empty if [Hide Personal Information] is set to [On] in the [System] ö [Machine Settings] ö [Machine Settings] page.

bizhub 42/36 5-69
5.3 [Job] tab 5
5.3.3 [Communication List]
You can check the list of communication completed in the machine.
[Scan]
Select [Job] ö [Communication List] ö [Scan].
[Number of Originals] Displays the number of pages in the document.This item is not displayed in the [Detail] window of [Send], [Receive], and [Save].
[Copies] Displays the number of printed copies.
[Result] Displays the result of the print job (OK, Error, or Canceled)
[Time Stored] Displays the time that the job was queued.
[Time Finished] Displays the time that printing finished.
[OK] Click to return to the previous page.
Item Description
Item Description
[No.] Displays the transmission ID.
[Destination] Displays the transmission recipient.
[Start Time] Displays the time that the job started.
[Result] Displays the results of the job.
[Detail] Click to display a page containing details.

[Job] tab5
5-70 bizhub 42/36
5.3
[Fax TX]
Select [Job] ö [Communication List] ö [Fax TX].
[Fax RX]
Select [Job] ö [Communication List] ö [Fax RX].
Item Description
[No.] Displays the transmission ID.
[Destination] Displays the transmission recipient.
[Start Time] Displays the time that the job started.
[Result] Displays the results of the job.
[Detail] Click to display a page containing details.
Item Description
[No.] Displays the transmission ID.
[Destination] Displays the transmission recipient.
[Start Time] Displays the time that the job started.
[Result] Displays the results of the job.
[Detail] Click to display a page containing details.

bizhub 42/36 5-71
5.3 [Job] tab 5
[Communication List] (Detail)
Select [Job] ö [Communication List] ö [Detail].
Reference- As an example, the [Job] ö [Communication List] ö [Fax TX] ö [Detail] page is shown.
Item Description
[No.] Displays the transmission ID.
[Destination] Displays the transmission recipient.
[Mode] Displays the communication type.
[Start Time] Displays the time that the job started.
[Communication Time] Displays the transmission time.
[Number of Originals] Displays the number of pages in the document.
[Result] Displays the results of the job.
[OK] Click to return to the previous page.
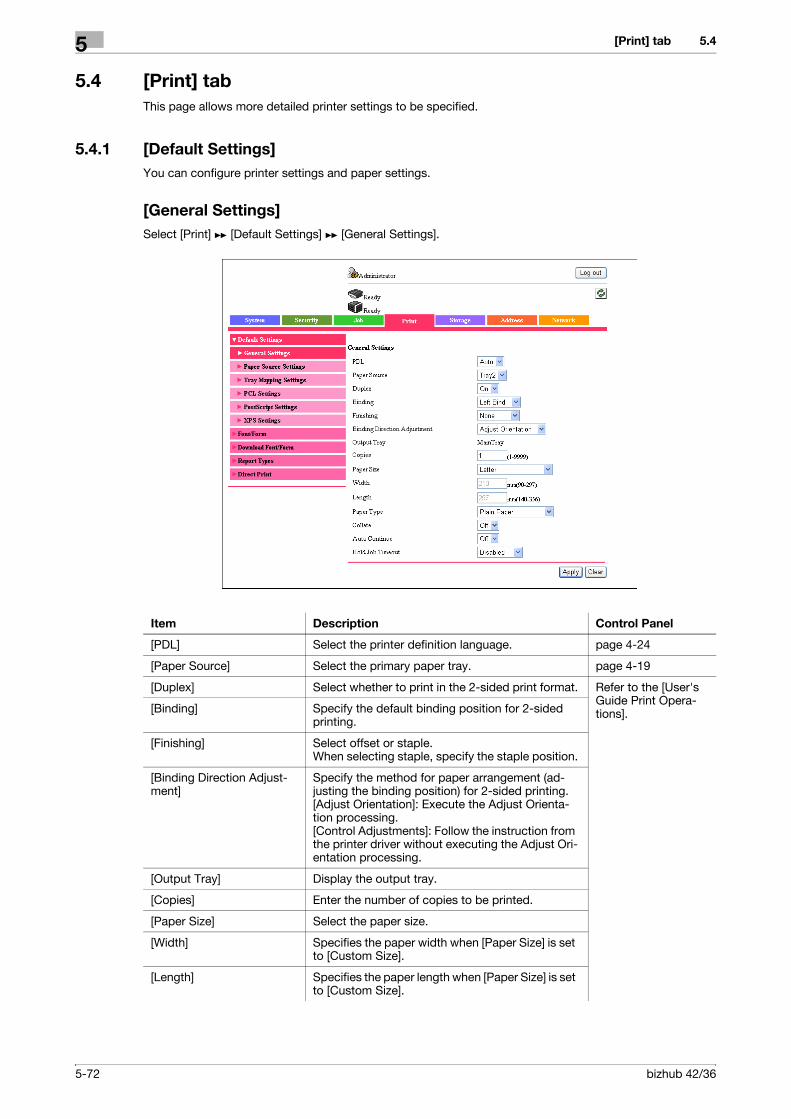
[Print] tab5
5-72 bizhub 42/36
5.4
5.4 [Print] tab
This page allows more detailed printer settings to be specified.
5.4.1 [Default Settings]
You can configure printer settings and paper settings.
[General Settings]
Select [Print] ö [Default Settings] ö [General Settings].
Item Description Control Panel
[PDL] Select the printer definition language. page 4-24
[Paper Source] Select the primary paper tray. page 4-19
[Duplex] Select whether to print in the 2-sided print format. Refer to the [User's Guide Print Opera-tions].[Binding] Specify the default binding position for 2-sided
printing.
[Finishing] Select offset or staple.When selecting staple, specify the staple position.
[Binding Direction Adjust-ment]
Specify the method for paper arrangement (ad-justing the binding position) for 2-sided printing.[Adjust Orientation]: Execute the Adjust Orienta-tion processing.[Control Adjustments]: Follow the instruction from the printer driver without executing the Adjust Ori-entation processing.
[Output Tray] Display the output tray.
[Copies] Enter the number of copies to be printed.
[Paper Size] Select the paper size.
[Width] Specifies the paper width when [Paper Size] is set to [Custom Size].
[Length] Specifies the paper length when [Paper Size] is set to [Custom Size].

bizhub 42/36 5-73
5.4 [Print] tab 5
[Paper Source Settings]
Select [Print] ö [Default Settings] ö [Paper Source Settings].
[Paper Type] Select the type of paper loaded in the selected tray.
Refer to the [User's Guide Print Opera-tions].
[Collate] Select whether or not collating pages sequentially when printing multiple sets of copies.
[Auto Continue] Select whether or not printing continues if the size or type of paper in the selected paper tray is differ-ent from the size or type of paper for the print job.
page 4-20
[Hold Job Timeout] Select the length of time until print jobs saved on the hard disk are deleted.
page 4-22
Item Description Control Panel
Item Description Control Panel
[Tray1] [Size Detection Mode]
Select whether or not to automatically detect the size of paper loaded in the Tray 1.If [Auto] is selected, [Paper Size] is grayed out.
Refer to the [Us-er's Guide Print Operations].
[Paper Size] Specifies the setting for the size of paper loaded into Tray 1.
[Width] Specifies the paper width when [Paper Size] is set to [Custom Size].
[Length] Specifies the paper length when [Paper Size] is set to [Custom Size].
[Paper Type] Specifies the setting for the type of paper loaded into Tray 1.
[Tray2] [Paper Size] Displays the setting for the size of paper loaded into Tray 2.
[Paper Type] Specifies the setting for the type of paper loaded into Tray 2.

[Print] tab5
5-74 bizhub 42/36
5.4
Reference- When the optional Paper Feed Cabinet PC-211 is installed, [Tray4] or [Tray5] is displayed.
[Tray Mapping Settings]
Select [Print] ö [Default Settings] ö [Tray Mapping Settings].
[Tray3] [Paper Size] Displays the setting for the size of paper loaded into Tray 3.
Refer to the [Us-er's Guide Print Operations].
[Paper Type] Specifies the setting for the type of paper loaded into Tray 3.
[Tray4] [Paper Size] Displays the setting for the size of paper loaded into Tray 4.
[Paper Type] Specifies the setting for the type of paper loaded into Tray 4.
[Tray5] [Paper Size] Displays the setting for the size of paper loaded into Tray 5.
[Paper Type] Specifies the setting for the type of paper loaded into Tray 5.
[Tray Chaining] Select whether a paper tray loaded with paper of the same size is selected automatically when a paper tray that was selected manually becomes empty while printing copies.
Refer to the [Us-er's Guide Copy Operations].
Item Description Control Panel
Item Description Control Panel
[Tray Mapping Mode] Select whether or not the Tray Mapping function is used.
Refer to the [User's Guide Print Opera-tions].
[Logical Tray 0] to [Logical Tray 9]
Select the tray that is used for printing when a print job is received from another manufacturer's print-er driver.

bizhub 42/36 5-75
5.4 [Print] tab 5
[PCL Settings]
Select [Print] ö [Default Settings] ö [PCL Settings].
[PostScript Settings]
Select [Print] ö [Default Settings] ö [PostScript Settings].
Item Description Control Panel
[Font Number] Specify the default font in the PCL language. page 4-24
[Symbol Set] Select the symbol set used with the PCL lan-guage.
[Lines Per Page] Specify the number of lines per page in the PCL language.
[Font Point Size] Specify the font size in the PCL language.
[Font Pitch Size] Specify the font pitch in the PCL language.
[CL/LF Mapping] Select the definitions of the CR/LF codes in the PCL language.
Item Description Control Panel
[Wait Timeout] Specify the length of time until Postscript times out."0" means that no timeout control is applied.
page 4-24
[PS Protocol] Select the PS protocol.
[Print to PS Error] Select whether to print error information when an error occurs during PS rasterization.

[Print] tab5
5-76 bizhub 42/36
5.4
[XPS Settings]
Select [Print] ö [Default Settings] ö [XPS Settings].
5.4.2 [Font/Form]
You can check the fonts and forms saved on the machine.
[PCL Font]
Select [Print] ö [Font/Form] ö [PCL Font].
Item Description Control Panel
[Digital Signature] Specify whether to verify digital signature. When [Enable] is selected, the document without a valid digital signature is not printed.
page 4-24
[Print to XPS Error] Specify whether to print error message if the dig-ital signature of XPS data is invalid.
Item Description
[No.] Displays the control number of the font.
[Font Name] Displays the name of the font.
[Source] Displays the location of the font.

bizhub 42/36 5-77
5.4 [Print] tab 5
[PostScript Font]
Select [Print] ö [Font/Form] ö [PostScript Font].
[Form Overlay]
Select [Print] ö [Font/Form] ö [Form Overlay].
Item Description
[Font Name] Displays the name of the font.
[Source] Displays the location of the font.
Item Description
[File Name] Displays the name of the overlay.
[Source] Displays the location of the overlay.

[Print] tab5
5-78 bizhub 42/36
5.4
5.4.3 [Download Font/Form]
Configuration is necessary if you wish to download fonts and forms to the machine.
[PostScript Font]
Select [Print] ö [Download Font/Form] ö [PostScript Font].
Item Description
[Download Post-Script Font]
[Source] Specify the download destination of the font.
[File] Specify the file name for the PostScript font to be downloaded.Click [Browse] to display a dialog box for browsing to the Post-Script font file.
[Download] Click to download the specified PostScript font file to the ma-chine.
[Delete Post-Script Font]
[Font Name] Displays the name of the fonts.
[Source] Displays the storage source of the font.
[Delete] Deletes the PostScript font file(s) whose check boxes the left end are checked.

bizhub 42/36 5-79
5.4 [Print] tab 5
[Form Overlay]
Select [Print] ö [Download Font/Form] ö [Form Overlay].
5.4.4 [Report Types]
Specified reports can be printed.
Select [Print] ö [Report Types] ö [Report Types].
Item Description
[Download Form Overlay]
[Source] Specify the download destination of the form overlay file.
[File] Specify the file name for the form overlay to be downloaded.Click [Browse] to display a dialog box for browsing to the form overlay file.
[Download] Click to download the specified form overlay file to the ma-chine.
[Delete Form Overlay]
[File Name] Displays the name of the overlays.
[Source] Displays the storage source of the form overlay.
[Delete] Deletes the form overlay file(s) whose check boxes the left end are checked.
Item Description
[Configuration Page] Prints the printer configuration page.
[PCL Font Page] Prints the PCL font lists.
[PostScript Font Page] Prints the PostScript font lists.
[Statistics Page] Prints the statistics page such as the number of pages printed.
[Directory Listing Page] Prints the directory list on the hard disk.

[Print] tab5
5-80 bizhub 42/36
5.4
5.4.5 [Direct Print]
Specified files can be printed.
Select [Print] ö [Direct Print] ö [Direct Print].
Reference- The following file formats can be printed using direct printing: PDF, TIFF, JPEG, and XPS.
Item Description
[File] Specify the location of the file to be printed.Click [Browse], and then select the file.
[Send] Click to send the specified file to the machine.

bizhub 42/36 5-81
5.5 [Storage] tab 5
5.5 [Storage] tab
From this tab, image data saved on the machine can be managed.
5.5.1 [Scan to HDD]
You can manage the scanned data stored in the HDD.
Select [Storage] ö [Scan to HDD] ö [Scan to HDD].
[Scan to HDD] (View)
Select [Storage] ö [Scan to HDD] ö [Scan to HDD] ö [View].
Item Description
[Search for Number] Select the range of user registration numbers ([No.]) to be displayed.
[No.] Displays the registration number for the user.
[User Name] Displays the registered user name.
[View] Click to view the image of the first page of the file stored by the user.
[Delete] Click to delete all files stored by the user.
Item Description
[Search for Number] Select the range of registration numbers to be displayed.
[Thumbnail] Displays the image of the first page of the stored file.
[File Name] Displays the name of the stored file.
[Copy] Click to download the stored file.
[Delete] Click to delete the stored file from the machine's hard disk.

[Storage] tab5
5-82 bizhub 42/36
5.5
[Scan to HDD] (File Information)
Select a thumbnail or file name in the [Storage] ö [Scan to HDD] ö [Scan to HDD] ö [View] page.
Item Description
[File Name] Displays the name of the file.
[Time Stored] Displays the date that the file was stored.
[Number of Originals] Displays the number of document pages in the file.
[Color Type] Displays the color information for the file.
[File Format] Displays the file format.
[File Size] Displays the file size.
[Copy] Click to download the file.
[Delete] Click to delete the file from the machine's hard disk.
[Cancel] Click to deselect this file and return to the [Scan to HDD] (View) page.

bizhub 42/36 5-83
5.5 [Storage] tab 5
5.5.2 [PC-Fax]
You can manage the data stored on the machine with Forced memory reception and PC-Fax.
Select [Storage] ö [PC-Fax] ö [PC-Fax].
Reference- If a memory reception password has been specified, a page appears so that the password can be typed
in. If the correct password has been typed in, the following page appears.
[PC-Fax] (File Information)
Select a thumbnail or file name in the [Storage] ö [PC-Fax] ö [PC-Fax] page.
Item Description
[Search for Number] Select the range of registration numbers to be displayed.
[Thumbnail] Displays the image of the first page of the stored file.
[File Name] Displays the name of the stored file.
[Copy] Click to download the stored file.
[Print] Click to print the stored file. After the file is printed, it is deleted from the machine.
[Delete] Click to delete the stored file.
Item Description
[File Name] Displays the name of the file.
[Time Stored] Displays the date that the file was stored.
[Number of Originals] Displays the number of document pages in the file.
[File Size] Displays the file size.
[Copy] Click to download the file.
[Print] Click to print the file. After the file is printed, it is deleted from the machine.
[Delete] Click to delete the file from the machine's hard disk.
[Cancel] Click to deselect the file and return to the [PC-Fax] page.

[Address] tab5
5-84 bizhub 42/36
5.6
5.6 [Address] tab
From the [Address] tab, settings can be specified for destination information registered on the machine and for e-mail message subject and body text.
Reference- If invalid data has been entered (left blank) when the [Apply] is clicked, an error message does not ap-
pear, but the entered data is cleared and the destination is not registered.
If the destination does not appear in the list, enter valid data, and then click the [Apply].
5.6.1 [Address Book]
You can manage destinations data.
[Address Book List]
Select [Address] ö [Address Book] ö [Address Book List].
Item Description
[New Registration] Add new destinations to the address book.
[Search by Number] Select a range of registration numbers to display the list of destinations in the selected range.
[Search from Index] Select an index to display the list of destinations registered with the select-ed index.
[No.] Displays the registration number.
[Function] Displays the registered functions.
[Name] Displays the registered name.
[Edit] Click this button to edit the registered address.
[Delete] Delete an address from the address book.

bizhub 42/36 5-85
5.6 [Address] tab 5
[Address Book List] (New Registration)
Select [Address] ö [Address Book] ö [Address Book List] ö [New Registration].
Item Description
[E-mail] Select this setting to register an e-mail destination.For details, refer to page 5-86.
[FTP] Select this setting to register an FTP destination.For details, refer to page 5-87.
[SMB] Select this setting to register an SMB destination.For details, refer to page 5-88.
[WebDAV] Select this setting to register a WebDAV destination. For details, refer to page 5-89.
[Fax] Select this setting to register a fax destination.For details, refer to page 5-90.This item appears when the optional Fax Kit FK-509 is installed.
[I-Fax] Select this setting to register an I-Fax destination.For details, refer to page 5-91.This item appears when the optional Fax Kit FK-509 is installed.

[Address] tab5
5-86 bizhub 42/36
5.6
[Address Book List] (New Registration/Edit: E-mail)
Select [Address] ö [Address Book] ö [Address Book List] ö [New Registration] ö [E-mail].
Item Description
[No.] Specify the registration number of the destination.
[Name] Enter the destination name.
[Index] Select the index character used when searching for the destination.It is convenient to select the [Main] check box for a frequently used desti-nation.
[E-mail Address] Enter the E-mail address of the destination (up to 320 characters).
[S/MIME Certification] Displays whether a certificate is registered.
[Edit a Certification] Select the check box to edit information for the certificate.[Register a Certification]: Select this option to specify a certificate file and register a certificate.[Delete a Certification]: Select this option to delete a registered certificate.

bizhub 42/36 5-87
5.6 [Address] tab 5
[Address Book List] (New Registration/Edit: FTP)
Select [Address] ö [Address Book] ö [Address Book List] ö [New Registration] ö [FTP].
Item Description
[No.] Specify the registration number of the destination.
[Name] Enter the destination name.
[Index] Select the index character used when searching for the destination.It is convenient to select the [Main] check box for a frequently used desti-nation.
[Host Address] Enter the IP address of the destination FTP server.Format: *.*.*.* (Asterisk * can be 0 to 255)If the DNS server has already been configured, you can enter the host name instead. For the host name, specify a fully-qualified domain name (FQDN).When using IPv6, you can specify the IPv6 address.
[File Path] Specify the destination directory (up to 127 bytes).
[anonymous] Select whether to allow anonymous users to access the FTP server.
[User ID] Enter the user ID to log in to the destination FTP server (up to 63 bytes).
[Change Password] Select this check box to change the password.
[Password] Enter the password to log in to the destination FTP server (up to 63 bytes, excluding space and ").
[PASV Mode] Select whether to communicate in PASV mode.
[Proxy] Select whether to use a proxy server.
[Port Number] Enter a port number.

[Address] tab5
5-88 bizhub 42/36
5.6
[Address Book List] (New Registration/Edit: SMB)
Select [Address] ö [Address Book] ö [Address Book List] ö [New Registration] ö [SMB].
Item Description
[No.] Specify the registration number of the destination.
[Name] Enter the destination name.
[Index] Select the index character used when searching for the destination.It is convenient to select the [Main] check box for a frequently used desti-nation.
[Host Address] Enter the IP address of the destination computer.Format: *.*.*.* (Asterisk * can be 0 to 255)If the DNS server has already been configured, you can enter the host name instead. For the host name, specify a fully-qualified domain name (FQDN).When using IPv6, you can specify the IPv6 address. If you perform SMB transmission using an IPv6 address, Direct Hosting needs to be enabled. For details on the Direct Hosting service, refer to page 5-131.
[File Path] Specify the destination directory (up to 255 bytes).
[User ID] Enter the user ID to log in to the destination computer (up to 127 bytes).
[Change Password] Select this check box to change the password.
[Password] Enter the password to log in to the destination computer (up to 127 bytes, excluding space and ").

bizhub 42/36 5-89
5.6 [Address] tab 5
[Address Book List] (New Registration/Edit: WebDAV)
Select [Address] ö [Address Book] ö [Address Book List] ö [New Registration] ö [WebDAV].
Item Description
[No.] Specify the registration number of the destination.
[Name] Enter the destination name.
[Index] Select the index character used when searching for the destination.It is convenient to select the [Main] check box for a frequently used desti-nation.
[Host Address] Enter the IP address of the destination WebDAV server.Format: *.*.*.* (Asterisk * can be 0 to 255)If the DNS server has already been configured, you can enter the host name instead. For the host name, specify a fully-qualified domain name (FQDN).When using IPv6, you can specify the IPv6 address.
[File Path] Specify the destination directory. (up to 142 bytes)
[User ID] Enter the user ID to log in to the destination WebDAV server. (up to 63 bytes)
[Change Password] Select this check box to change the password.
[Password] Enter the password to log in to the destination WebDAV server. (up to 63 bytes)
[SSL] Select whether to use SSL for encryption.
[Proxy] Select whether to use a proxy server.
[Port Number] Enter a port number.

[Address] tab5
5-90 bizhub 42/36
5.6
[Address Book List] (New Registration/Edit: Fax)
Select [Address] ö [Address Book] ö [Address Book List] ö [New Registration] ö [Fax].
(This item appears when the optional Fax Kit FK-509 is installed.)
Item Description
[No.] Specify the registration number of the destination.
[Name] Enter the destination name.
[Index] Select the index character used when searching for the destination.It is convenient to select the [Main] check box for a frequently used desti-nation.
[Destination] Enter the fax number of the destination (up to 38 characters).
[Communication Setting] Specify the communication settings.Select the check box for [V34 Off], [ECM Off] or [Check Destination] to en-able the corresponding function.

bizhub 42/36 5-91
5.6 [Address] tab 5
[Address Book List] (New Registration/Edit: I-Fax)
Select [Address] ö [Address Book] ö [Address Book List] ö [New Registration] ö [I-Fax].
(This item appears when the optional Fax Kit FK-509 is installed.)
Item Description
[No.] Specify the registration number of the destination.
[Name] Enter the destination name.
[Index] Select the index character used when searching for the destination.It is convenient to select the [Main] check box for a frequently used desti-nation.
[E-mail Address] Enter the E-mail address of the destination (up to 320 characters).

[Address] tab5
5-92 bizhub 42/36
5.6
5.6.2 [Group]
You can manage the destinations data registered as Group.
[Group List]
Select [Address] ö [Group] ö [Group List].
Item Description
[New Registration] Click this button to register a new group.
[Search by Number] Select a range of registration numbers to display the list of group destina-tions in the selected range.
[No.] Displays the registration number.
[Function] Displays the registered function.
[Name] Displays the registered name.
[Edit] Click this button to edit the registered group. The available items are the same as those for registration.
[Delete] Click this button to delete the group.

bizhub 42/36 5-93
5.6 [Address] tab 5
[Group List] (New Registration)
Select [Address] ö [Group] ö [Group List] ö [New Registration].
[Group List] (New Registration/Edit: Scan)
Select [Address] ö [Group] ö [Group List] ö [New Registration] ö [Scan].
Item Description
[Scan] Select this setting to register a group destination where scan data is to be sent.For details, refer to page 5-93.
[Fax] Select this setting to register a group destination where faxes are to be sent.For details, refer to page 5-94.This item appears when the optional Fax Kit FK-509 is installed.
Item Description
[Name] Enter the destination name.
[Search by Number] Select a range of registration numbers to display the list of destinations in the selected range.
[Search from Index] Select an index to display the list of destinations registered with the select-ed index.
[Search from Function] Select a function from the list to display the list of destinations registered with the selected function.

[Address] tab5
5-94 bizhub 42/36
5.6
[Group List] (New Registration/Edit: Fax)
Select [Address] ö [Group] ö [Group List] ö [New Registration] ö [Fax].
(This item appears when the optional Fax Kit FK-509 is installed.)
Destinations list Select the check boxes for the destinations to be added to the group, and then click [Apply].
Item Description
Item Description
[Name] Enter the destination name.
[Search by Number] Select a range of registration numbers to display the list of destinations in the selected range.
[Search from Index] Select an index to display the list of destinations registered with the select-ed index.
[Search from Function] Select a function from the list to display the list of destinations registered with the selected function.
Destinations list Select the check boxes for the destinations to be added to the group, and then click [Apply].

bizhub 42/36 5-95
5.6 [Address] tab 5
5.6.3 [Program]
You can register or edit a program destination.
You can register a combination of address information, communication information, and original information as a program destination.
[Program List]
Select [Address] ö [Program] ö [Program List].
Item Description
[Search by Number] Select a range of registration numbers to display the list of program desti-nations in the selected range.
[No.] Displays the registration number.
[Function] Displays the registered function.
[Name] Displays the registered name.
[Edit] Click to register a program destination or edit an existing one.If no program destinations have been registered when this button is clicked, the [New Registration] page appears. Select the communication method for the program destination to be registered. For details, refer to page 5-96.If a program destination has already been registered when this button is clicked, the [Program] page appears. Change the settings for the regis-tered program destination. For details, refer to page 5-100.
[Delete] Click to delete the program destination.

[Address] tab5
5-96 bizhub 42/36
5.6
[Program List] (New Registration: Communication Setting)
Select [Address] ö [Program] ö [Program List] ö [Edit].
Item Description
[E-mail] Select the communication method for the new program destination to be registered.Select a communication method, and then click [Next]. A page for specify-ing the destination information appears, corresponding to the selected communication method.[Fax] and [I-Fax] appear when the optional Fax Kit FK-509 is installed.
[FTP]
[SMB]
[WebDAV]
[Fax]
[I-Fax]
[Address Book]
[Group]

bizhub 42/36 5-97
5.6 [Address] tab 5
[Program List] (New Registration: Destination Setting)
Select [Address] ö [Program] ö [Program List] ö [Edit] ö [Destination Setting].
Item Description
[Program (E-mail)] Registers program destinations used for E-mail transmission.The items of destination settings are same as those for the registration in address book.For details, refer to page 5-86.Specify detailed settings for the program destination after registering the destinations.
[Program (FTP)] Registers program destinations used for FTP transmission.The items of destination settings are same as those for the registration in address book.For details, refer to page 5-87.Specify detailed settings for the program destination after registering the destinations.
[Program (SMB)] Registers program destinations used for SMB transmission.The items of destination settings are same as those for the registration in address book.For details, refer to page 5-88.Specify detailed settings for the program destination after registering the destinations.
[Program (WebDAV)] Registers program destinations used for WebDAV transmission.The items of destination settings are same as those for the registration in address book.For details, refer to page 5-89.Specify detailed settings for the program destination after registering the destinations.
[Program (Fax)] Register Program destinations used for fax transmission.The items of destination settings are same as those for the registration in address book.For details, refer to page 5-90.Specify detailed settings for the program destination after registering the destinations.
[Program (I-Fax)] Register Program destinations used for I-Fax transmission.The items of destination settings are same as those for the registration in address book.For details, refer to page 5-91.Specify detailed settings for the program destination after registering the destinations.
[Program (Address Book)] Registers program destinations using the data of address book.For details, refer to page 5-98.
[Program (Group)] Registers program destinations using data registered in a group.For details, refer to page 5-99.

[Address] tab5
5-98 bizhub 42/36
5.6
[Program List] (New Registration: Address Book)
Select [Address] ö [Program] ö [Program List] ö [Edit] ö [Address Book].
[Apply] Click to display the [Program] page, and then specify detailed settings for the program destination. For details, refer to page 5-100.
Item Description
Item Description
[No.] Displays the registration number of the destination.
[Name] Enter the destination name.
[Search by Number] Select a range of registration numbers to display the list of destinations in the selected range.
[Search from Index] Select an index to display the list of destinations registered with the select-ed index.
[Search from Function] Select a function from the list to display the list of destinations registered with the selected function.
Destinations list Select the radio button on the left for the destination you wish to add and click [Apply] to register the destination as Program destination.

bizhub 42/36 5-99
5.6 [Address] tab 5
[Program List] (New Registration: Group)
Select [Address] ö [Program] ö [Program List] ö [Edit] ö [Group].
Item Description
[No.] Displays the registration number of the destination.
[Name] Enter the destination name.
[Search by Number] Select a range of registration numbers to display the list of destinations in the selected range.
Group list Select the radio button on the left for the group you wish to add and click [Apply] to register the group as Program destination.

[Address] tab5
5-100 bizhub 42/36
5.6
[Program List] (Edit)
Select [Address] ö [Program] ö [Program List] ö [Edit].
[Edit] ö [E-mail]
Item Description
[Destination Settings] Displays the destination information.Click [Edit] to specify the destination information.
[Resolution] Select the resolution used for scanning the original.
[File Type] Select the file type for saving scanned data.
[Page Setting] Select whether to save the whole scanned pages in one file, or to divide a file into one page when saving the data.
[Subject] Specify the subject of the E-mail message.If you select [Not Specified], the default subject is used.
[Text] Specify the body text of the E-mail message.If you select [Not Specified], the default body text is used.
[Simplex/Duplex] Select whether to scan one side or both sides of the original.You can scan one side of the first page of the original, and then scan both sides of the remaining pages.
[Original Type] Select the original type, such as text or photo.
[Auto Color] Select whether the color information for a document is automatically de-tected and the document is scanned with the appropriate setting.
[Monotone] Select the color setting for scanning in black and white.

bizhub 42/36 5-101
5.6 [Address] tab 5
[Edit] ö [FTP]
[Separate Scan] Select whether to divide the original to scan.
[Density] Select the density.
[Background Removal] Adjust the density of the background.
[Sharpness] Adjust the sharpness.
[Scan Size] Select the paper size of the original.If you select [Standard Size], select the size.If you select [Custom Size], specify the height and width.
[Original Direction] Select the orientation of the original.
[2-Sided Binding Direction] Select the binding position of the original.
Item Description
[Destination Settings] Displays the destination information.Click [Edit] to specify the destination information.
[Resolution] Select the resolution used for scanning the original.
[File Type] Select the file type for saving scanned data.
[Page Setting] Select whether to save the whole scanned pages in one file, or to divide a file into one page when saving the data.
[Simplex/Duplex] Select whether to scan one side or both sides of the original.You can scan one side of the first page of the original, and then scan both sides of the remaining pages.
[Original Type] Select the original type, such as text or photo.
[Auto Color] Select whether the color information for a document is automatically de-tected and the document is scanned with the appropriate setting.
[Monotone] Select the color setting for scanning in black and white.
[Separate Scan] Select whether to divide the original to scan.
[Density] Select the density.
[Background Removal] Adjust the density of the background.
[Sharpness] Adjust the sharpness.
[Scan Size] Select the paper size of the original.If you select [Standard Size], select the size.If you select [Custom Size], specify the height and width.
[E-mail Notification] Specify whether to notify via E-mail the destination URL defined for saving scanned data.To notify the URL, specify the notification addresses.
[Original Direction] Select the orientation of the original.
[2-Sided Binding Direction] Select the binding position of the original.
Item Description

[Address] tab5
5-102 bizhub 42/36
5.6
[Edit] ö [SMB]
Item Description
[Destination Settings] Displays the destination information.Click [Edit] to specify the destination information.
[Resolution] Select the resolution used for scanning the original.
[File Type] Select the file type for saving scanned data.
[Page Setting] Select whether to save the whole scanned pages in one file, or to divide a file into one page when saving the data.
[Simplex/Duplex] Select whether to scan one side or both sides of the original.You can scan one side of the first page of the original, and then scan both sides of the remaining pages.
[Original Type] Select the original type, such as text or photo.
[Auto Color] Select whether the color information for a document is automatically de-tected and the document is scanned with the appropriate setting.
[Monotone] Select the color setting for scanning in black and white.
[Separate Scan] Select whether to divide the original to scan.
[Density] Select the density.
[Background Removal] Adjust the density of the background.
[Sharpness] Adjust the sharpness.
[Scan Size] Select the paper size of the original.If you select [Standard Size], select the size.If you select [Custom Size], specify the height and width.
[E-mail Notification] Specify whether to notify via E-mail the destination URL defined for saving scanned data.To notify the URL, specify the notification addresses.
[Original Direction] Select the orientation of the original.
[2-Sided Binding Direction] Select the binding position of the original.

bizhub 42/36 5-103
5.6 [Address] tab 5
[Edit] ö [WebDAV]
Item Description
[Destination Settings] Displays the destination information.Click [Edit] to specify the destination information.
[Resolution] Select the resolution used for scanning the original.
[File Type] Select the file type for saving scanned data.
[Page Setting] Select whether to save the whole scanned pages in one file, or to divide a file into one page when saving the data.
[Simplex/Duplex] Select whether to scan one side or both sides of the original.You can scan one side of the first page of the original, and then scan both sides of the remaining pages.
[Original Type] Select the original type, such as text or photo.
[Auto Color] Select whether the color information for a document is automatically de-tected and the document is scanned with the appropriate setting.
[Monotone] Select the color setting for scanning in black and white.
[Separate Scan] Select whether to divide the original to scan.
[Density] Select the density.
[Background Removal] Adjust the density of the background.
[Sharpness] Adjust the sharpness.
[Scan Size] Select the paper size of the original.If you select [Standard Size], select the size.If you select [Custom Size], specify the height and width.
[E-mail Notification] Specify whether to notify via E-mail the destination URL defined for saving scanned data.To notify the URL, specify the notification addresses.
[Original Direction] Select the orientation of the original.
[2-Sided Binding Direction] Select the binding position of the original.

[Address] tab5
5-104 bizhub 42/36
5.6
[Edit] ö [Fax]
(This item appears when the optional Fax Kit FK-509 is installed.)
[Edit] ö [I-Fax]
(This item appears when the optional Fax Kit FK-509 is installed.)
Item Description
[Destination Settings] Displays the destination information.Click [Edit] to specify the destination information.
[Resolution] Select the resolution used for scanning the original.
[Simplex/Duplex] Select whether to scan one side or both sides of the original.You can scan one side of the first page of the original, and then scan both sides of the remaining pages.
[Original Type] Select the original type, such as text or photo.
[Separate Scan] Select whether to divide the original to scan.
[Density] Select the density.
[Background Removal] Adjust the density of the background.
[Sharpness] Adjust the sharpness.
[Scan Size] Select the paper size of the original.If you select [Standard Size], select the size.If you select [Custom Size], specify the height and width.
[2-Sided Binding Direction] Select the binding position of the original.
[Special Original] If the original being sent is a long original, select whichever is relevant.
[Timer TX] Select whether to perform timer transmission. To perform timer transmis-sion, enter the send time.
[Password TX] Select whether to perform password transmission. To perform password transmission, enter the password.
[F-Code] Select whether to use the F-code for transmission. To use this function, en-ter the SUB address and password.
Item Description
[Destination Settings] Displays the destination information.Click [Edit] to specify the destination information.
[Simplex/Duplex] Select whether to scan one side or both sides of the original.You can scan one side of the first page of the original, and then scan both sides of the remaining pages.
[Original Type] Select the original type, such as text or photo.
[Separate Scan] Select whether to divide the original to scan.
[Density] Select the density.
[Background Removal] Adjust the density of the background.
[Sharpness] Adjust the sharpness.
[Scan Size] Select the paper size of the original.If you select [Standard Size], select the size.If you select [Custom Size], specify the height and width.
[2-Sided Binding Direction] Select the binding position of the original.
[Special Original] If the original being sent is a long original, select whichever is relevant.

bizhub 42/36 5-105
5.6 [Address] tab 5
[Edit] ö [Address Book]
Item Description
[Destination Settings] Displays the destination information.Click [Edit] to specify the destination information.
[Resolution] Select the resolution used for scanning the original.
[File Type] Select the file type for saving scanned data.
[Page Setting] Select whether to save the whole scanned pages in one file, or to divide a file into one page when saving the data.
[Subject] Specify the subject of the E-mail message.If you select [Not Specified], the default subject is used.
[Text] Specify the body text of the E-mail message.If you select [Not Specified], the default body text is used.
[Simplex/Duplex] Select whether to scan one side or both sides of the original.You can scan one side of the first page of the original, and then scan both sides of the remaining pages.
[Original Type] Select the original type, such as text or photo.
[Auto Color] Select whether the color information for a document is automatically de-tected and the document is scanned with the appropriate setting.
[Monotone] Select the color setting for scanning in black and white.
[Separate Scan] Select whether to divide the original to scan.
[Density] Select the density.
[Background Removal] Adjust the density of the background.
[Sharpness] Adjust the sharpness.
[Scan Size] Select the paper size of the original.If you select [Standard Size], select the size.If you select [Custom Size], specify the height and width.
[Original Direction] Select the orientation of the original.
[2-Sided Binding Direction] Select the binding position of the original.
[Special Original] If the original being sent is a long original, select whichever is relevant.
[Timer TX] Select whether to perform timer transmission. To perform timer transmis-sion, enter the send time.
[Password TX] Select whether to perform password transmission. To perform password transmission, enter the password.
[F-Code] Select whether to use the F-code for transmission. To use this function, en-ter the SUB address and password.

[Address] tab5
5-106 bizhub 42/36
5.6
[Edit] ö [Group (Scan)]
Item Description
[Destination Settings] Displays the destination information.Click [Edit] to specify the destination information.
[Resolution] Select the resolution used for scanning the original.
[File Type] Select the file type for saving scanned data.
[Page Setting] Select whether to save the whole scanned pages in one file, or to divide a file into one page when saving the data.
[Subject] Specify the subject of the E-mail message.If you select [Not Specified], the default subject is used.
[Text] Specify the body text of the E-mail message.If you select [Not Specified], the default body text is used.
[Simplex/Duplex] Select whether to scan one side or both sides of the original.You can scan one side of the first page of the original, and then scan both sides of the remaining pages.
[Original Type] Select the original type, such as text or photo.
[Auto Color] Select whether the color information for a document is automatically de-tected and the document is scanned with the appropriate setting.
[Monotone] Select the color setting for scanning in black and white.
[Separate Scan] Select whether to divide the original to scan.
[Density] Select the density.
[Background Removal] Adjust the density of the background.
[Sharpness] Adjust the sharpness.
[Scan Size] Select the paper size of the original.If you select [Standard Size], select the size.If you select [Custom Size], specify the height and width.
[E-mail Notification] Specify whether to notify via E-mail the destination URL defined for saving scanned data.To notify the URL, specify the notification addresses.
[Original Direction] Select the orientation of the original.
[2-Sided Binding Direction] Select the binding position of the original.

bizhub 42/36 5-107
5.6 [Address] tab 5
[Edit] ö [Group (Fax)]
Item Description
[Destination Settings] Displays the destination information.Click [Edit] to specify the destination information.
[Resolution] Select the resolution used for scanning the original.
[Simplex/Duplex] Select whether to scan one side or both sides of the original.You can scan one side of the first page of the original, and then scan both sides of the remaining pages.
[Original Type] Select the original type, such as text or photo.
[Separate Scan] Select whether to divide the original to scan.
[Density] Select the density.
[Background Removal] Adjust the density of the background.
[Sharpness] Adjust the sharpness.
[Scan Size] Select the paper size of the original.If you select [Standard Size], select the size.If you select [Custom Size], specify the height and width.
[2-Sided Binding Direction] Select the binding position of the original.
[Special Original] If the original being sent is a long original, select whichever is relevant.
[Timer TX] Select whether to perform timer transmission. To perform timer transmis-sion, enter the send time.
[Password TX] Select whether to perform password transmission. To perform password transmission, enter the password.
[F-Code] Select whether to use the F-code for transmission. To use this function, en-ter the SUB address and password.

[Address] tab5
5-108 bizhub 42/36
5.6
5.6.4 [Subject]
Register the subject used for sending E-mail messages or Internet faxes.
Select [Address] ö [Subject] ö [Subject List].
[Subject Registration]
Select [Address] ö [Subject] ö [Subject List] ö [Edit].
Item Description
[No.] Displays the registration number.
[E-mail Default] Select the e-mail subject to be used as the default.
[Subject] Displays the name of the e-mail subject.
[Edit] Click to display the [Subject Registration] page in order to edit the regis-tered e-mail subject.
[Delete] Click to delete the e-mail subject.
Item Description
[No.] Displays the registration number.
[Subject] Register the subject of the E-mail message (up to 64 characters).

bizhub 42/36 5-109
5.6 [Address] tab 5
5.6.5 [Text]
Register the message body used for sending E-mail messages or Internet faxes.
Select [Address] ö [Text] ö [Text List].
[Text Registration]
Select [Address] ö [Text] ö [Text List] ö [Edit].
Item Description
[No.] Displays the registration number.
[E-mail Default] Select the e-mail body text to be used as the default.
[Text] Displays the name of the e-mail body text.
[Edit] Click to display the [Text Registration] page in order to edit the registered e-mail body text.
[Delete] Click to delete the e-mail body text.
Item Description
[No.] Displays the registration number.
[Text] Register the E-mail body (up to 256 characters).

[Network] tab5
5-110 bizhub 42/36
5.7
5.7 [Network] tab
This tab allows you to configure network settings.
5.7.1 [General Settings]
You can specify the network speed and the settings for local connection.
[Ethernet Settings]
Select [Network] ö [General Settings] ö [Ethernet Settings].
Item Description Control Panel
[Speed/Duplex] Select the operating mode and speed for Ethernet. page 4-14
[MAC Address] Displays the MAC address of the network inter-face card of this machine.

bizhub 42/36 5-111
5.7 [Network] tab 5
[Local Interface Settings]
Select [Network] ö [General Settings] ö [Local Interface Settings].
Item Description
[I/O Timeout] Specify the reception timeout period.

[Network] tab5
5-112 bizhub 42/36
5.7
5.7.2 [TCP/IP Settings]
Configure the settings for TCP/IP function.
[TCP/IP Settings]
Select [Network] ö [TCP/IP Settings] ö [TCP/IP Settings].
Item Description Control Panel
[TCP/IP] Select whether or not to make a connection via TCP/IP.
page 4-11
[LPD] Select whether or not LPD is used.
[SLP] Select whether or not SLP is used. Select [Enable] to search for this machine using TWAIN.
page 4-11
[LLMNR] To perform name resolution to send data to a computer with Windows Vista/7/Server 2008/Server 2008 R2 installed in the environment where the DNS server is not running, select [Ena-ble].To perform the name resolution especially in the IPv6-only communication environment, enable this setting.

bizhub 42/36 5-113
5.7 [Network] tab 5
[IPv4 Settings]
Select [Network] ö [TCP/IP Settings] ö [IPv4 Settings].
Reference- If the specified address is outside of the allowable range, the value is not changed, even after [Apply]
is clicked. Instead, the setting returns to the previous value.
Item Description Control Panel
[IP Address Setting Meth-od]
Select the automatic assigning method for the ma-chine IP address.
page 4-11
[IP Address] To directly specify the IP address, enter the IP ad-dress of this machine.Format: *.*.*.* (Asterisk * can be 0 to 255)
[Subnet Mask] When directly entering the IP address, configure the subnet mask of the network to be connected.Format: *.*.*.* (Asterisk * can be 0 to 255)
[Default Gateway] When directly entering the IP address, specify the default gateway of the network to be connected.Format: *.*.*.* (Asterisk * can be 0 to 255)
[Domain Name Automatic Acquisition]
Select whether to automatically obtain the domain name.This item is necessary when DHCP is enabled.
[DNS Server Automatic Ac-quisition]
Select whether to automatically obtain the DNS server address.This item is necessary when DHCP is enabled.

[Network] tab5
5-114 bizhub 42/36
5.7
[IPv6 Settings]
Select [Network] ö [TCP/IP Settings] ö [IPv6 Settings].
Item Description Control Panel
[IPv6] Select whether or not IPv6 is used. page 4-11
[IPv6 Auto Setting] Select whether or not the IPv6 auto setting is used.
[IPv6 Link Local Address] Displays the link-local address generated from the MAC address.
[IPv6 Global Address] If you do not obtain the IPv6 address automatical-ly, enter the IPv6 global address. (up to 43 charac-ters)
[IPv6 Gateway Address] If you do not obtain the IPv6 address automatical-ly, enter the IPv6 gateway address. (up to 39 char-acters)
[DHCPv6] To use DHCPv6 to obtain the IPv6 address, select [Enable].
[DNS Server Automatic Ac-quisition]
Select whether or not the DNS server address is automatically acquired from the DHCPv6 server to overwrite the current setting.
[Search Domain Name Au-tomatic Acquisition]
Select whether or not the default DNS search do-main name is automatically acquired from the DHCPv6 server to overwrite the current setting.
[NTP Server Automatic Ac-quisition]
Select whether or not the NTP server address is automatically acquired from the DHCPv6 server to overwrite the current setting.

bizhub 42/36 5-115
5.7 [Network] tab 5
[RAW Port Settings]
Select [Network] ö [TCP/IP Settings] ö [RAW Port Settings].
Item Description Control Panel
[RAW Port] Select whether or not a RAW port is used. page 4-11
[RAW Port Number] Specify the number of the machine's RAW port.The currently used port number and numbers 80, 161, 427, 443, 515, 631 and 4567 cannot be spec-ified.
[RAW Port Bidirectional] Select whether or not RAW port bidirectional is used.
page 4-11

[Network] tab5
5-116 bizhub 42/36
5.7
[DNS Settings]
Select [Network] ö [TCP/IP Settings] ö [DNS Settings].
Item Description Control Panel
[Host Name] Specify the host name of this machine (up to 63 characters).
[Domain Name] Specify the name of the domain that contains this machine (up to 63 characters).
[DNS Server Address (IPv4)]
Specify the IPv4 DNS server address. Up to three can be registered.Format: *.*.*.* (Asterisk * can be 0 to 255)
[DNS Server Address (IPv6)]
Specify the IPv6 DNS server address (up to 43 characters).Up to three can be registered.
[Search Domain Name] Specify the DNS search domain name (up to 253 characters).
[Dynamic DNS] Select [Enable] when automatically registering the host name specified in [Host Name] with the DNS server that supports the Dynamic DNS function.
page 4-11

bizhub 42/36 5-117
5.7 [Network] tab 5
5.7.3 [E-mail Settings]
Configure the settings for E-mail function.
[E-mail TX (SMTP)]
Select [Network] ö [E-mail Settings] ö [E-mail TX (SMTP)].
Item Description Control Panel
[E-mail TX (SMTP)] If [Enable] is selected, e-mail messages can be sent.If [Disable] is selected, [Scan to E-mail], [E-mail Notification], [Total Counter Notification], and [De-vice E-mail Address] are grayed out.
page 4-11
[Scan to E-mail] If [Enable] is selected, the Scan to E-mail opera-tion is enabled.
[E-mail Notification] If [Enable] is selected, e-mail notification is ena-bled.
[Total Counter Notification] If [Enable] is selected, total counter notification is enabled.
[SMTP Server Address] Enter the SMTP server address.Format: *.*.*.* (Asterisk * can be 0 to 255)If the DNS server has already been configured, you can enter the host name instead. For the host name, specify a fully-qualified domain name (FQDN).When using IPv6, you can specify the IPv6 ad-dress.
[Port Number] Specify number of the port for communicating with the SMTP server.

[Network] tab5
5-118 bizhub 42/36
5.7
Reference- When specifying a setting for [SMTP Server Address], also specify a setting for [Device E-mail Address].
[SSL/TLS] Select whether or not to encrypt a communication between this machine and the SMTP server using SSL/TLS.If [Disable] is selected, [Port Number (SSL)] is grayed out.
[Port Number (SSL)] Enter the port number to be used for SSL commu-nication.
[Connection Timeout] Select the length of time until the connection with the SMTP server times out.
[Administrator E-mail Ad-dress]
Displays the e-mail address of the administrator.
[Device E-mail Address] Specify the e-mail address of the device.In order to perform network scanning, be sure to specify an address for [Device E-mail Address].
page 4-6
[Max Mail Size] Select whether to limit the size of an E-mail to be sent.If [No Limit] is selected, you cannot configure the [Server Capacity] setting.
[Server Capacity] Enter the SMTP server capacity. A mail that ex-ceeds the upper limit of the server capacity will be discarded.If an E-mail is divided, this setting is made invalid.
[Binary Division] Select whether or not to divide an E-mail.If the E-mail software that received an E-mail does not have a restoration function, you may not be able to read the E-mail.If [Off] is selected, you cannot configure the [Divid-ed Mail Size] setting.
page 4-15
[Divided Mail Size] Enter the divided mail size to divide an E-mail.
[POP Before SMTP] Select [Enable] to perform POP before SMTP au-thentication.
[POP Before SMTP Time] Enter the period from a time you log in to the POP server to a time you access the SMTP server.If the POP and SMTP servers are in different com-puters, it will take time to notify the SMTP server that you have logged in to the POP server. There-fore, if a too short time is specified, sending of E-mails may fail.
[SMTP Authentication] If [Enable] is selected, SMTP authentication is en-abled.For SMTP authentication, the authentication method with the highest strength that is supported by the SMTP server is automatically selected from Digest-MD5, CRAM-MD5, PLAIN, and LOGIN.If [Disable] is selected, you cannot configure the [Account], [Password], [Domain Name] setting.
[Account] Enter the user ID for SMTP authentication (up to 255 bytes).
[Change Password] Select this check box to change the password.
[Password] Enter the password for SMTP authentication (up to 128 bytes).
[Domain Name] Enter the domain name (realm) for SMTP authen-tication (up to 255 characters).This setting is required when the authentication method is set to Digest-MD5.
Item Description Control Panel

bizhub 42/36 5-119
5.7 [Network] tab 5
[E-mail RX (POP)]
Select [Network] ö [E-mail Settings] ö [E-mail RX (POP)].
Item Description
[E-mail RX (POP)] If [Enable] is selected, e-mail messages can be received.
[POP Server Address] Enter the POP server address.Format: *.*.*.* (Asterisk * can be 0 to 255)If the DNS server has already been configured, you can enter the host name instead. For the host name, specify a fully-qualified domain name (FQDN).When using IPv6, you can specify the IPv6 address.
[Port Number] Specify number of the port for communicating with the POP server.
[SSL/TLS] Select whether or not to encrypt a communication between this machine and the POP server using SSL/TLS.If [Disable] is selected, [Port Number (SSL)] is grayed out.
[Port Number (SSL)] Enter the port number to be used for SSL communication.
[Login Name] Enter the login name of the POP server (up to 63 characters).
[Change Password] Select this check box to change the password.
[Password] Enter the password to log in to the POP server (up to 15 characters).
[Connection Timeout] Specify the timeout period for a communication with a server.
[APOP Authentication] Select [Enable] to encrypt the login name and password when logging on to the POP server.The password is encrypted with MD5 when APOP is used to log on to the POP server. Before selecting [Enable], check whether the POP server sup-ports APOP. If the POP server does not support APOP, an error will occur, resulting in communication failure.
[Auto Check of Arrival] Select whether or not automatic reception is performed.If [Disable] is selected, you cannot configure the [Polling Rate] setting.
[Polling Rate] Enter the interval where reception is checked via automatic connection to the POP server.

[Network] tab5
5-120 bizhub 42/36
5.7
[S/MIME]
Select [Network] ö [E-mail Settings] ö [S/MIME].
Item Description Control Panel
[S/MIME] Select whether or not to use S/MIME.If [Disable] is selected, [Digital Signature], [E-mail Text Encryption Method], and [Digital Signature Type] are grayed out.
page 4-16
[Digital Signature] Select whether or not a digital signature is applied to e-mail messages.
[E-mail Text Encryption Method]
Select the e-mail text encryption format.
[Digital Signature Type] Select the type of digital signature applied.

bizhub 42/36 5-121
5.7 [Network] tab 5
5.7.4 [LDAP Settings]
Configure the settings for LDAP function.
[LDAP Settings]
Select [Network] ö [LDAP Settings] ö [LDAP Settings].
Item Description
[LDAP] Select whether or not the LDAP server is used.

[Network] tab5
5-122 bizhub 42/36
5.7
[LDAP Server Registration]
Select [Network] ö [LDAP Settings] ö [LDAP Server Registration].
Item Description
[Server Address] Specify the LDAP server address.Format: *.*.*.* (Asterisk * can be 0 to 255)If the DNS server has already been configured, you can enter the host name instead. For the host name, specify a fully-qualified domain name (FQDN).When using IPv6, you can specify the IPv6 address.
[Port Number] Enter a port number.
[SSL/TLS] Select whether or not SSL/TLS is used.If [Disable] is selected, [Port Number (SSL)] is grayed out.
[Port Number (SSL)] Enter the port number to be used for SSL communication.
[Search Base] Enter the search starting point in the directory structure under the LDAP server (up to 255 characters).This search function also covers subdirectories under the entered starting point.
[Timeout] Enter the timeout period for LDAP search.
[Max. Search Result] Enter the maximum number of items that can be received as LDAP search results.
[Authentication Method] Select the authentication method to log in to the LDAP server.The authentication method must match that used in the LDAP server.If [anonymous] is selected, [Login Name], [Password], and [Domain Name] can be omitted.If [GSS-SPNEGO] is selected, log in to the server in the Kerberos authen-tication method. The Kerberos authentication method is supported by Ac-tive Directory.
[Login Name] Enter the login name to log in to the LDAP server (up to 255 characters).

bizhub 42/36 5-123
5.7 [Network] tab 5
5.7.5 [HTTP Settings]
Configure the settings for HTTP server function.
Select [Network] ö [HTTP Settings] ö [HTTP Server Settings].
[Change Password] Select this check box to change the password.
[Password] Enter the password to log in to the LDAP server (up to 128 characters).
[Domain Name] Enter the domain name to log in to the LDAP server (up to 64 characters).If [GSS-SPNEGO] is selected, enter the domain name of Active Directory.
[User Referral] Select whether to use the referral function.Make an appropriate choice to fit the LDAP server environment.
[Search Condition At-tributes]
Select the attribute of the name used for LDAP searching.You can toggle this attribute between [Name] (cn) and [Nickname] (display-Name).
[Initial Setting for Search Details]
Specify LDAP search conditions.
Item Description
Item Description Control Panel
[HTTP Server] Select whether or not the HTTP server is used. page 4-11
[Port Number] Specify the port number of the HTTP server.Do not set the port number to [25], otherwise a connection cannot be established with Page-Scope Web Connection.
[SSL/TLS] Select whether or not SSL/TLS is used.If [Disable] is selected, [Port Number (SSL)] is grayed out.
[Port Number (SSL)] Enter the port number to be used for SSL commu-nication.

[Network] tab5
5-124 bizhub 42/36
5.7
5.7.6 [IPP Settings]
Configure the settings for IPP function.
Select [Network] ö [IPP Settings] ö [IPP Settings].
Item Description Control Panel
[IPP Print] Select whether or not to use IPP. page 4-11
[Accept IPP Job] Select whether or not to accept IPP jobs.
[Printer Name] Enter a printer name (up to 127 characters).
[Printer Location] Enter a printer location (up to 127 characters).
[Printer Information] Enter printer information (up to 127 characters).
[Printer URI] Displays the URI of the printer that can print data using the IPP.
[Operational Support] Select the check box of each job to be executed using the IPP.
[Print Job] Select whether to allow a print job.Select this check box to enable IPP printing.
[Validate Job] Select whether to allow confirmation of a valid job.
[Cancel Job] Select whether to allow canceling the job.
[Get Job Attributes] Select whether to obtain job attributes.
[Get Jobs] Select whether to obtain a list of job attributes.
[Get Print Attributes] Select whether to obtain printer attributes.
[IPP Authentication] Select an authentication method.
[User Name] Enter a user name (up to 20 characters, excluding a colon (:)).This entry is required if you have selected [Basic] or [Digest] for the [IPP Authentication].
[Change Password] Select this check box to change the password.
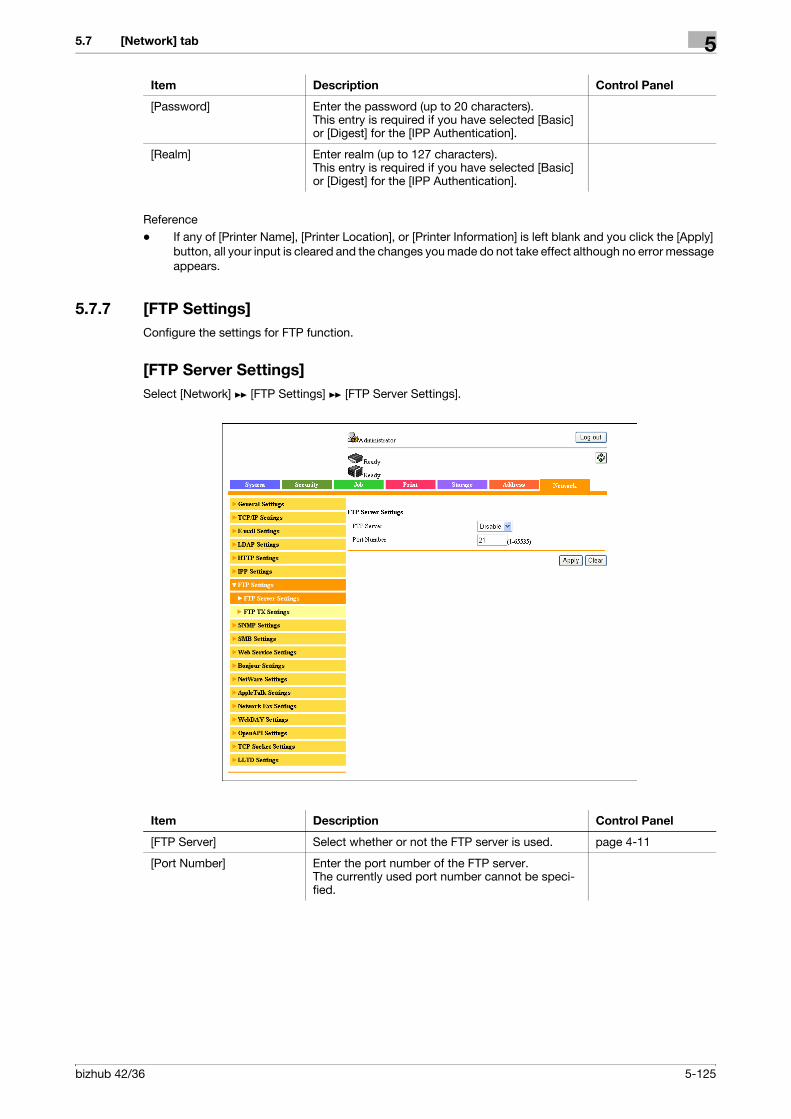
bizhub 42/36 5-125
5.7 [Network] tab 5
Reference- If any of [Printer Name], [Printer Location], or [Printer Information] is left blank and you click the [Apply]
button, all your input is cleared and the changes you made do not take effect although no error message appears.
5.7.7 [FTP Settings]
Configure the settings for FTP function.
[FTP Server Settings]
Select [Network] ö [FTP Settings] ö [FTP Server Settings].
[Password] Enter the password (up to 20 characters).This entry is required if you have selected [Basic] or [Digest] for the [IPP Authentication].
[Realm] Enter realm (up to 127 characters).This entry is required if you have selected [Basic] or [Digest] for the [IPP Authentication].
Item Description Control Panel
Item Description Control Panel
[FTP Server] Select whether or not the FTP server is used. page 4-11
[Port Number] Enter the port number of the FTP server.The currently used port number cannot be speci-fied.

[Network] tab5
5-126 bizhub 42/36
5.7
[FTP TX Settings]
Select [Network] ö [FTP Settings] ö [FTP TX Settings].
Item Description
[FTP TX] If [Enable] is selected, FTP transmission is enabled.
[Connection Timeout] Enter the timeout period for a communication with a server.
[Proxy Server Address] To perform transmissions via a proxy server, enter its address.Format: *.*.*.* (Asterisk * can be 0 to 255)If the DNS server has already been configured, you can enter the host name instead. For the host name, specify a fully-qualified domain name (FQDN).When using IPv6, you can specify the IPv6 address.
[Proxy Server Port Number] Enter the port number of a proxy server.

bizhub 42/36 5-127
5.7 [Network] tab 5
5.7.8 [SNMP Settings]
Configure the settings for SNMP function.
Select [Network] ö [SNMP Settings] ö [SNMP Settings].
Item Description Control Panel
[SNMP] If [Enable] is selected, SNMP is enabled. page 4-11
[SNMP v1/v2c(IP)] If [Enable] is selected, SNMPv1/v2c (IP) is ena-bled.
[SNMP v3(IP)] If [Enable] is selected, SNMPv3 (IP) is enabled.
[SNMP v1(IPX)] If [Enable] is selected, SNMPv1 (IPX) is enabled.
[UDP Port] Enter a UDP port number.The currently used port number cannot be speci-fied.
[SNMP v1/v2c Settings] Configure the settings for SNMP v1/v2c.
[Read Community Name] Enter a community name used for reading (up to 15 characters, excluding " ' # \ and space).
[Write] If [Enable] is selected, the Write function is ena-bled.
[Write Community Name] Enter a community name used for reading and writing (up to 15 characters, excluding " ' # \ and space).
[SNMP v3 Settings] Configure the settings for SNMP v3.
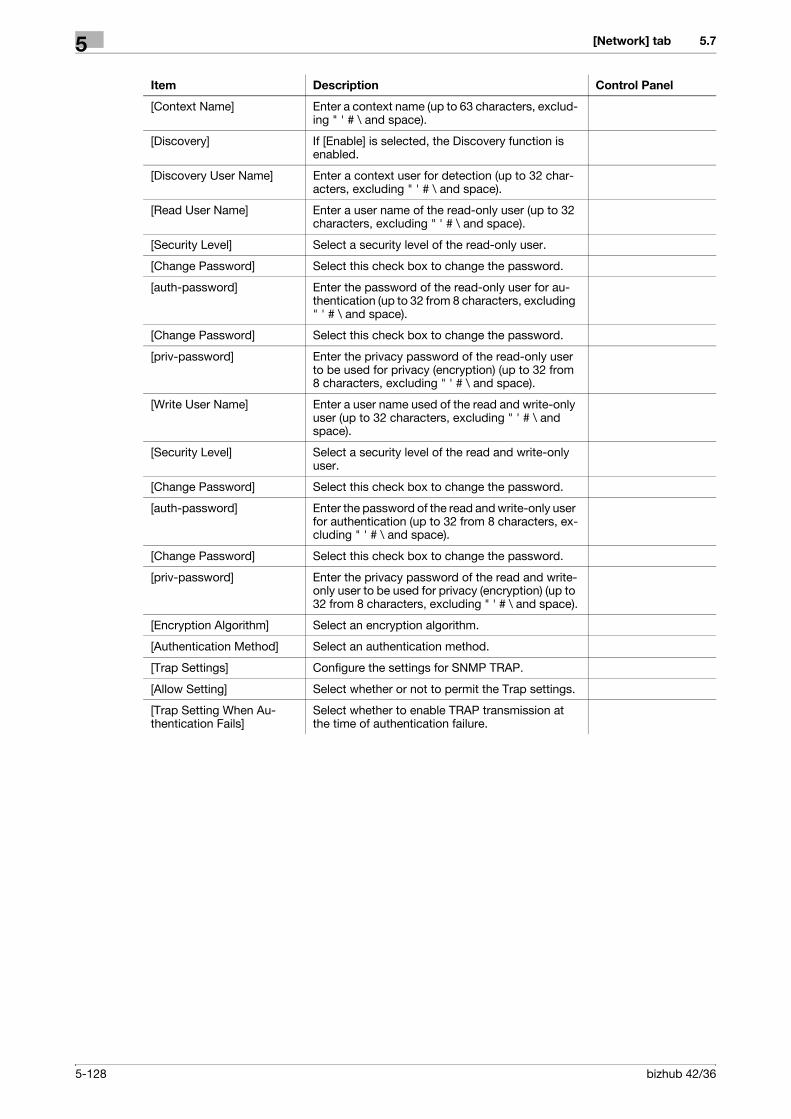
[Network] tab5
5-128 bizhub 42/36
5.7
[Context Name] Enter a context name (up to 63 characters, exclud-ing " ' # \ and space).
[Discovery] If [Enable] is selected, the Discovery function is enabled.
[Discovery User Name] Enter a context user for detection (up to 32 char-acters, excluding " ' # \ and space).
[Read User Name] Enter a user name of the read-only user (up to 32 characters, excluding " ' # \ and space).
[Security Level] Select a security level of the read-only user.
[Change Password] Select this check box to change the password.
[auth-password] Enter the password of the read-only user for au-thentication (up to 32 from 8 characters, excluding " ' # \ and space).
[Change Password] Select this check box to change the password.
[priv-password] Enter the privacy password of the read-only user to be used for privacy (encryption) (up to 32 from 8 characters, excluding " ' # \ and space).
[Write User Name] Enter a user name used of the read and write-only user (up to 32 characters, excluding " ' # \ and space).
[Security Level] Select a security level of the read and write-only user.
[Change Password] Select this check box to change the password.
[auth-password] Enter the password of the read and write-only user for authentication (up to 32 from 8 characters, ex-cluding " ' # \ and space).
[Change Password] Select this check box to change the password.
[priv-password] Enter the privacy password of the read and write-only user to be used for privacy (encryption) (up to 32 from 8 characters, excluding " ' # \ and space).
[Encryption Algorithm] Select an encryption algorithm.
[Authentication Method] Select an authentication method.
[Trap Settings] Configure the settings for SNMP TRAP.
[Allow Setting] Select whether or not to permit the Trap settings.
[Trap Setting When Au-thentication Fails]
Select whether to enable TRAP transmission at the time of authentication failure.
Item Description Control Panel

bizhub 42/36 5-129
5.7 [Network] tab 5
5.7.9 [SMB Settings]
Configure the settings for SMB function.
[WINS Settings]
Select [Network] ö [SMB Settings] ö [WINS Settings].
Item Description
[WINS] To use the WINS server, select [Enable].
[WINS Automatic Retrieval] To automatically obtain the WINS server address, select [Enable].This item is necessary when DHCP is enabled.
[WINS Server Address 1]/[WINS Server Address 2]
Enter the WINS server address.Format: *.*.*.* (Asterisk * can be 0 to 255)
[Node Type] Specify the name resolution method.• [B Node]: Query by broadcast• [P Node]: Query the WINS server• [M Node]: Query by broadcast, and then query the WINS server• [H Node]: Query the WINS server, and then query by broadcast

[Network] tab5
5-130 bizhub 42/36
5.7
[SMB Client Settings]
Select [Network] ö [SMB Settings] ö [SMB Client Settings].
Item Description
[SMB Client] If [Enable] is selected, the SMB client function is enabled.
[NTLM] Specify the NTLM version.To perform SMB transmission for Windows sharing (Mac OS X) or Samba (Linux/Unix), select [v1].To perform SMB transmission for Windows 98SE or Windows Me, select [v1/v2] or [v1].
[DFS] To perform SMB transmission in a DFS (Distributed File System) environ-ment, select [Enable].

bizhub 42/36 5-131
5.7 [Network] tab 5
[Direct Hosting Settings]
Select [Network] ö [SMB Settings] ö [Direct Hosting Settings].
Item Description
[Direct Hosting] To use IPv6 addresses for communication, select [Enable].

[Network] tab5
5-132 bizhub 42/36
5.7
5.7.10 [Web Service Settings]
Configure the settings for WSD function.
[Common Settings]
Select [Network] ö [Web Service Settings] ö [Common Settings].
Item Description
[Friendly Name] Enter a Friendly Name (up to 127 characters).
[Secure Mode] If [Enable] is selected, SSL is enabled.

bizhub 42/36 5-133
5.7 [Network] tab 5
[Printer Settings]
Select [Network] ö [Web Service Settings] ö [Printer Settings].
Item Description
[Print Function] If [Enable] is selected, the WSD print function is enabled.
[Printer Name] Enter a printer name (up to 127 characters, excluding ! \ and ,).
[Printer Location] Enter a printer location (up to 127 characters).
[Printer Information] Enter printer information (up to 127 characters).

[Network] tab5
5-134 bizhub 42/36
5.7
[Scanner Settings]
Select [Network] ö [Web Service Settings] ö [Scanner Settings].
Item Description
[Scan Function] If [Enable] is selected, the WSD scan function is enabled.
[Scanner Name] Enter a scanner name (up to 127 characters).
[Scanner Location] Enter a scanner location (up to 127 characters).
[Scanner Information] Enter scanner information (up to 127 characters).
[Connection Timeout] Enter a connection timeout.

bizhub 42/36 5-135
5.7 [Network] tab 5
5.7.11 [Bonjour Settings]
Configure the settings for Bonjour function.
Select [Network] ö [Bonjour Settings] ö [Bonjour Settings].
Item Description Control Panel
[Bonjour] Select whether or not to enable the Bonjour func-tion.
page 4-11
[Printer Name] Enter a Bonjour name that is displayed as the name of connected device (up to 63 characters).
[Priority Protocol] Select the connection protocol given priority with Bonjour.

[Network] tab5
5-136 bizhub 42/36
5.7
5.7.12 [NetWare Settings]
Configure settings for printing in a NetWare environment.
[NetWare Settings]
Select [Network] ö [NetWare Settings] ö [NetWare Settings].
d Reference
For details on how to install the printer driver, refer to the [User's Guide Print Operations].
Item Description
[IPX/SPX] If [Enable] is selected, the IPX/SPX function is enabled.
[Ethernet Frame Type] Select a frame type to be used.
[NetWare Print Mode] Select the NetWare configuration mode.
[Print Server Name] Enter a print server name to be operated as PServer (up to 63 characters, excluding / \ : ; , * [ ] < > | + = ? .).
[Change Password] Select this check box to change the password.
[Print Server Password] Enter a print server password if necessary (up to 63 characters).
[Print Queue Scan Rate] Set a job inquiry interval.
[Bindery/NDS] Select the bindery options.
[Preferred File Server] Enter the priority file server name to be used in the Bindery emulation mode (up to 47 characters, excluding / \ : ; , * [ ] < > | + = ? .).
[Preferred NDS Context Name]
Enter an NDS context name for print server connection (up to 191 charac-ters, excluding / \ : ; , * [ ] < > | + = ?).
[Preferred NDS Tree Name] Enter an NDS tree name for print server connection (up to 63 characters, excluding / \ : ; , * [ ] < > | + = ? .).
[Printer Name] Enter a printer name to be operated as the NPrinter/RPrinter (up to 63 char-acters, excluding / \ : ; , * [ ] < > | + = ? .).
[Printer Number] Enter the NPrinter/RPrinter number.

bizhub 42/36 5-137
5.7 [Network] tab 5
In Remote Printer mode using the NetWare 4.x Bindery Emulation
0 When you use the Bindery Emulation, make sure that the Bindery Emulation has been enabled on the NetWare server.
1 From the client, log in the NetWare file system as Bindery with the administrator authority.
2 Start Pconsole.
3 Select [Quick Setup] from [Available Options] list box, and press the Enter key.
4 Fill in [Print Server Name], [Printer Name], and [Print Queue Name]. Set the [Type] of the printer to [Oth-er/Unknown], and save them.
5 Terminate Pconsole by pressing the Esc key.
6 Load the PSERVER.NLM file on the NetWare Server console.
Then, configure the following settings in [NetWare Setting].
In Print Server mode using the NetWare 4.x Bindery Emulation
0 When you use the Bindery Emulation, make sure that the Bindery Emulation has been enabled on the NetWare server.
0 When you select the Print Server mode, the IPX protocol must already be loaded on the NetWare server.
1 From the client, log in the NetWare file system as Bindery with the administrator authority.
2 Start Pconsole.
3 Select [Quick Setup] from [Available Options] list box, and press the Enter key.
4 Fill in [Print Server Name], [Printer Name], and [Print Queue Name]. Set the [Type] of the printer to [Oth-er/Unknown], and save them.
5 Terminate Pconsole by pressing the Esc key.
Then, configure the following settings in [NetWare Setting].
Item Description Prior check
[IPX/SPX] Select [Enable].
[Ethernet Frame Type]
Select a frame type to be used. Frame type
[NetWare Print Mode]
Select [NPrinter/RPrinter].
[Printer Name] Enter a printer name to be operated as the NPrint-er/RPrinter (up to 63 characters, excluding / \ : ; , * [ ] < > | + = ? .).
The print server name specified in Step 4
[Printer Number] Enter the NPrinter/RPrinter number.
Item Description Prior check
[IPX/SPX] Select [Enable].
[Ethernet Frame Type]
Select a frame type to be used. Frame type
[NetWare Print Mode]
Select [PServer].
[Print Server Name] Enter a print server name to be operated as PServer (up to 63 characters, excluding / \ : ; , * [ ] < > | + = ? .).
The print server name specified in Step 4
[Print Server Pass-word]
Enter a print server password if necessary (up to 63 char-acters).

[Network] tab5
5-138 bizhub 42/36
5.7
In NetWare 4.x Remote Printer mode (NDS)
1 From the client, log in the NetWare file system with administrator authority.
2 Start NWAdmin.
3 Select an organization or department container for the print service, and select [Print Services Quick Setup] from the Tools menu.
4 Fill in [Print Server Name], [Printer Name], [Print Queue Name], and [Print Queue Volume]. Then, set the [Type] of the printer to [Other/Unknown] and save them.
5 Load the PSERVER.NLM file on the NetWare Server console.
Then, configure the following settings in [NetWare Setting].
In the NetWare 4.x/5.x/6 Print Server mode (NDS)
0 When you select the Print Server mode, the IPX protocol must already be loaded on the NetWare server.
1 From the client, log in the NetWare file system with administrator authority.
2 Start NWAdmin.
3 Select an organization or department container for the print service, and select [Print Services Quick Setup (non-NDPS)] from the Tools menu.
4 Fill in [Print Server Name], [Printer Name], [Print Queue Name], and [Print Queue Volume]. Then, set the [Type] of the printer to [Other/Unknown] and click [Create].
Then, configure the following settings in [NetWare Setting].
[Print Queue Scan Rate]
Set a job inquiry interval.
[Bindery/NDS] Select [Bindery/NDS].
[Preferred File Server]
Enter the priority file server name to be used in the Bindery emulation mode (up to 47 characters, excluding / \ : ; , * [ ] < > | + = ? .).
Item Description Prior check
[IPX/SPX] Select [Enable].
[Ethernet Frame Type]
Select a frame type to be used. Frame type
[NetWare Print Mode]
Select [NPrinter/RPrinter].
[Printer Name] Enter a printer name to be operated as the NPrint-er/RPrinter (up to 63 characters, excluding / \ : ; , * [ ] < > | + = ? .).
The print server name specified in Step 4
[Printer Number] Enter the NPrinter/RPrinter number.
Item Description Prior check
[IPX/SPX] Select [Enable].
[Ethernet Frame Type]
Select a frame type to be used. Frame type
[NetWare Print Mode]
Select [PServer].
[Print Server Name] Enter a print server name to be operated as PServer (up to 63 characters, excluding / \ : ; , * [ ] < > | + = ? .).
The print server name specified in Step 4
Item Description Prior check

bizhub 42/36 5-139
5.7 [Network] tab 5
For NetWare 5.x/6 Novell Distributed Print Service (NDPS)
0 Before starting the NDPS setting, make sure that an NDPS broker and NDPS manager have already been created and loaded.
0 Make sure that the TCP/IP protocol has been set on the NetWare server, an IP address of this machine has been set, and this machine has already been started.
1 From the client, log in the NetWare file system with administrator authority.
2 Start NWAdmin.
3 Right-click the [Organization] and [Organization unit] containers for printer agent creation, and select [NDPS Printer] from Create.
4 Enter a [NDPS Printer Name] in the [Printer Name] field.
5 Select [Create a New Printer Agent] in the [Printer Agent Source] field, and click [Create].
6 Confirm the printer agent name, and browse and register the NDPS manager in the [NDPS Manager Name] field.
7 Set the [Gateway Types] to [Novell Printer Gateway], and register it.
8 In the [Configure Novell NDPS for Printer Agent] window, set the Printer to [(None)] and the port handler to [Novell Port Handler], and register the settings.
9 Set the [Connection type] to [Remote (LPR on IP)] and register the setting.
10 For the host address, enter the IP address of this machine you have configured. Enter [Print] for the printer name, and then press [Finish] to register the settings.
11 When printer driver registration windows appear, select [None] for each OS and finish the registration.
[Print Server Pass-word]
Enter a print server password if necessary (up to 63 char-acters).
[Print Queue Scan Rate]
Set a job inquiry interval.
[Bindery/NDS] Select [NDS].
[Preferred NDS Context Name]
Enter an NDS context name for print server connection (up to 191 characters, excluding / \ : ; , * [ ] < > | + = ?).
[Preferred NDS Tree Name]
Enter an NDS tree name for print server connection (up to 63 characters, excluding / \ : ; , * [ ] < > | + = ? .).
Item Description Prior check

[Network] tab5
5-140 bizhub 42/36
5.7
[NetWare Status]
Select [Network] ö [NetWare Settings] ö [NetWare Status].
Item Description
[File Server] Displays the current NetWare file server.
[Queue Name] Displays the current NetWare queue name.
[Queue Status] Displays the current NetWare status.

bizhub 42/36 5-141
5.7 [Network] tab 5
5.7.13 [AppleTalk Settings]
Configure the settings for AppleTalk function.
Select [Network] ö [AppleTalk Settings] ö [AppleTalk Settings].
Item Description Control Panel
[AppleTalk] If [Enable] is selected, AppleTalk is enabled. page 4-14
[Printer Name] Enter a printer name to be displayed on the selec-tor (up to 31 characters, excluding = and ~).
[Zone Name] Enter a name of zone this machine belongs to (up to 31 characters).
[Current Zone Name] The current zone name is displayed.

[Network] tab5
5-142 bizhub 42/36
5.7
5.7.14 [Network Fax Settings]
Configure the settings for Network Fax function.
(This menu appears when the optional Fax Kit FK-509 is installed.)
Select [Network] ö [Network Fax Settings] ö [Network Fax Function Settings].
Item Description
[I-Fax] Select whether or not the I-Fax is used.

bizhub 42/36 5-143
5.7 [Network] tab 5
5.7.15 [WebDAV Settings]
Configure the settings for WebDAV function.
Select [Network] ö [WebDAV Settings] ö [WebDAV Client Settings].
Item Description
[WebDAV Client] Select whether or not the WebDAV client is used.
[Proxy Server Address] To perform transmissions via a proxy server, enter its address.Format: *.*.*.* (Asterisk * can be 0 to 255)If the DNS server has already been configured, you can enter the host name instead. For the host name, specify a fully-qualified domain name (FQDN).When using IPv6, you can specify the IPv6 address.
[Proxy Server Port Number] Enter the port number of a proxy server.
[Proxy Server User Name] Enter the user name to log in to the proxy server (up to 63 characters).
[Change Password] Select this check box to change the password.
[Proxy Server Password] Enter the password to log in to the proxy server (up to 63 characters).
[Connection Timeout] Enter the timeout period for a communication with a server.

[Network] tab5
5-144 bizhub 42/36
5.7
5.7.16 [OpenAPI Settings]
Configure the settings for OpenAPI function.
Select [Network] ö [OpenAPI Settings] ö [OpenAPI Settings].
Item Description
[OpenAPI] Select whether or not OpenAPI is used.
[Port Number] Enter a port number.The currently used port number cannot be specified.
[SSL/TLS] Select whether or not SSL/TLS is used.You can configure this setting if device certificate(s) is registered in [Secu-rity] ö [PKI Settings] ö [Device Certificate].
[Port Number (SSL/TLS)] Enter the port number to be used for SSL communication.The currently used port number cannot be specified.
[Authentication] Select whether or not to perform OpenAPI authentication.
[Login Name] Enter the login name used with OpenAPI authentication (up to 8 charac-ters, excluding symbols).
[Change Password] Select this check box to change the password.
[Password] Enter the password used with OpenAPI authentication (up to 8 characters, excluding symbols).

bizhub 42/36 5-145
5.7 [Network] tab 5
5.7.17 [TCP Socket Settings]
Configure the settings for TCP Socket function.
Select [Network] ö [TCP Socket Settings] ö [TCP Socket Settings].
Item Description
[TCP Socket] Select whether or not the TCP socket is used.
[Port Number] Enter a port number.The currently used port number cannot be specified.
[SSL/TLS] Select whether or not SSL/TLS is used.You can configure this setting if device certificate(s) is registered in [Secu-rity] ö [PKI Settings] ö [Device Certificate].
[Port Number (SSL/TLS)] Enter the port number to be used for SSL communication.The currently used port number cannot be specified.

[Network] tab5
5-146 bizhub 42/36
5.7
5.7.18 [LLTD Settings]
Configure the settings for LLTD function.
Select [Network] ö [LLTD Settings] ö [LLTD Settings].
Item Description
[LLTD] Select whether or not LLTD is used.

6 Configuration Depending on
Your Needs


bizhub 42/36 6-3
6.1 Restricting users of this machine (MFP authentication) 6
6 Configuration Depending on Your Needs
6.1 Restricting users of this machine (MFP authentication)
Configure settings to restrict users who can use this machine by MFP authentication.
You can configure the user authentication and account track settings to restrict use of this machine. Specify user authentication when managing individual users, and specify account track when managing a group or multiple users.
You can use a combination of user authentication and account track for management of each user for each department. You can use this function to assign the counter to both the department and user counters, and to aggregate the resulting values of both counters.
Use the following flowchart to configure settings. Clicking a step jumps to the associated procedure.
[General Settings]
[ID & Print Settings]
(1) User authentication(2) Account track(3) Synchronize user au-thentication with account track
(1) (2) (3)
User Registration Account Track Registration Account Track Registration
User Registration
Finish

Restricting users of this machine (MFP authentication)6
6-4 bizhub 42/36
6.1
6.1.1 [General Settings]
In the administrator mode of PageScope Web Connection, select [Security] ö [Authentication] ö [General Settings].
(If you use PageScope Authentication Manager for authentication, the following items are not displayed.)
Reference- If Enhanced Security Mode is enabled, you cannot select [Off] in [Authentication] ö [General Settings]
ö [User Authentication]. Also, you cannot allow the public user access.
6.1.2 [ID & Print Settings]
Configure settings to use or operate the ID & Print function.
For details, refer to page 5-32.
Reference- For details on the ID & print function, refer to the [User's Guide Print Operations].
6.1.3 User Registration
Configure user registration settings.
(If you use PageScope Authentication Manager for authentication, this item is not displayed.)
For details, refer to page 5-24.
Item Description Prior check
[User Authentica-tion]
Select [Device].
[Public Access] Select whether to allow the public user access.If [Allow] is selected, the public user can use this machine by selecting [Public User] in the login page to log in to the machine.If [Allow (without Login)] is selected, the public user can use this machine without logging in to the machine in the login page.
Do you permit the public user access?
[Account Track] To enable account track, select [On].To select [On], specify the authentication method first, and then register accounts in [Account Track List].
Do you use the ac-count track func-tion?
[Account Track Method]
To use the account track function, select its authentication method.This setting is required when you only use the account track function.
[Synchronize User Authentication & Account Track]
To synchronize user authentication with account track and manage users for each account track, select [Synchro-nize].Once you specify the account name of the user at user registration, you will be able to log in by entering only the user name. If you have omitted the account name, the user must specify the account name when logging in for the first time. The account name that the user specify at the first login time will be registered as the account name of the user.
Do you synchronize user authentication with account track?
[Number of Counters As-signed for Users]
Enter a number of user counters to be assigned if user au-thentication and account track are enabled.You can aggregate the counter by user or account track, and assign up to 1,000 counters to users and account tracks. For example, if the number of user counters to be assigned is set to 950, you can register up to 50 account tracks.

bizhub 42/36 6-5
6.1 Restricting users of this machine (MFP authentication) 6
6.1.4 Account Track Registration
Configure account track registration settings.
(If you use PageScope Authentication Manager for authentication, this item is not displayed.)
For details, refer to page 5-26.

Restricting users of this machine (Active Directory)6
6-6 bizhub 42/36
6.2
6.2 Restricting users of this machine (Active Directory)
Configure settings to restrict users who use this machine by Active Directory authentication.
These settings are required if you wish to use the user authentication with Active Directory on the Windows Server. You can restrict the functions available to each user.
You can also restrict users who use this machine using Active Directory authentication in an IPv6 environment configured by the Active Directory function of Windows Server 2008/Server 2008 R2.
Use the following flowchart to configure settings. Clicking a step jumps to the associated procedure.
6.2.1 [TCP/IP]
Configure settings to use this machine in the TCP/IP network environment.- To use Active Directory, register the DNS server connected to Active Directory in this machine.- To perform Active Directory authentication in an IPv6 environment configured by the Active Directory
function of Windows Server 2008/Server 2008 R2, configure IPv6. For details on the IPv6 settings, refer to page 3-4.
For details, refer to page 3-3.
6.2.2 External Server Settings
Configure external server (Active Directory) registration settings.
(If you use PageScope Authentication Manager for authentication, this item is not displayed.)
For details, refer to page 5-28.
[TCP/IP]
External Server Settings
[General Settings]
[ID & Print Settings]
[Default Function Permis-sion]
[Date/Time Setting]
Finish

bizhub 42/36 6-7
6.2 Restricting users of this machine (Active Directory) 6
6.2.3 [General Settings]
In the administrator mode of PageScope Web Connection, select [Security] ö [Authentication] ö [General Settings].
(If you use PageScope Authentication Manager for authentication, the following items are not displayed.)
6.2.4 [ID & Print Settings]
Configure settings to use or operate the ID & Print function.
For details, refer to page 5-32.
6.2.5 [Default Function Permission]
Configure the default settings for function permissions to users who are authenticated on the external server.
For details, refer to page 5-30.
6.2.6 [Date/Time Setting]
To use Active Directory, specify the date and time of this machine.- You cannot log in to Active Directory if the system time of this machine and Active Directory is extremely
different. Specify the date and time for this machine to match the system time of Active Directory.
For details, refer to page 5-12.
Item Description Prior check
[User Authentica-tion]
Select [External Server].
[Public Access] Select whether to allow the public user access.If [Allow] is selected, the public user can use this machine by selecting [Public User] in the login page to log in to the machine.If [Allow (without Login)] is selected, the public user can use this machine without logging in to the machine in the login page.
Do you permit the public user access?
[Ticket Hold Time (Active Directory)]
Enter a time to hold the Kerberos authentication tickets.
[Account Track] To enable account track, select [On].To select [On], specify the authentication method first, and then register accounts in [Account Track List].
Do you use the ac-count track func-tion?
[Synchronize User Authentication & Account Track]
To synchronize user authentication with account track and manage users for each account track, select [Synchro-nize].To synchronize, specify the account name when logging in for the first time. The account name that the user specify at the first login time will be registered as the account name of the user.
Do you synchronize user authentication with account track?

Restricting users of this machine (Windows domain or workgroup)6
6-8 bizhub 42/36
6.3
6.3 Restricting users of this machine (Windows domain or work-
group)
Configure settings to restrict users who can use this machine by NTLM authentication.
These settings are required if you wish to use NTLM authentication when using the Windows NT 4.0 system or when using Active Directory (NT-compatible domain environment) in the Windows Server system. You can restrict the functions available to each user.
You can also restrict users who can use this machine by NTLM authentication in an IPv6 environment con-figured by the Active Directory function (NT-compatible domain environment) of Windows Server 2008/Server 2008 R2.
To use NTLM authentication in the IPv6 environment, you must enable the Direct Hosting service. To resolve the names using a DNS server, prepare the DNS server and configure the DNS settings of this machine.
Use the following flowchart to configure settings. Clicking a step jumps to the associated procedure.
6.3.1 [TCP/IP]
Configure settings to use this machine in the TCP/IP network environment.- To perform NTLM authentication in an IPv6 environment configured by the Active Directory function
(NT-compatible domain environment) of Windows Server 2008/Server 2008 R2, configure IPv6. For de-tails on the IPv6 settings, refer to page 3-4.
- To use NTLM authentication in the IPv6 environment, you must enable the Direct Hosting service. To resolve the names using a DNS server, prepare the DNS server and configure the DNS settings of this machine.
For details, refer to page 3-3.
6.3.2 External Server Settings
Configure external server (NTLM) registration settings.
(If you use PageScope Authentication Manager for authentication, this item is not displayed.)
For details, refer to page 5-28.
[TCP/IP]
External Server Settings
[General Settings]
[ID & Print Settings]
[Default Function Permis-sion]
In an IPv6 environment?
No Yes
Do you use a WINS serv- [Direct Hosting Settings]
Yes No
[WINS Settings]
Finish

bizhub 42/36 6-9
6.3 Restricting users of this machine (Windows domain or workgroup) 6
6.3.3 [General Settings]
In the administrator mode of PageScope Web Connection, select [Security] ö [Authentication] ö [General Settings].
(If you use PageScope Authentication Manager for authentication, the following items are not displayed.)
6.3.4 [ID & Print Settings]
Configure settings to use or operate the ID & Print function.
For details, refer to page 5-32.
6.3.5 [Default Function Permission]
Configure the default settings for function permissions to users who are authenticated on the external server.
For details, refer to page 5-30.
6.3.6 [WINS Settings]
When you start NTLM authentication via the router, you must set up the WINS server.
For details, refer to page 5-129.
6.3.7 [Direct Hosting Settings]
To use NTLM authentication in the IPv6 environment, you must enable the direct hosting service.
For details, refer to page 5-131.
Item Description Prior check
[User Authentica-tion]
Select [External Server].
[Public Access] Select whether to allow the public user access.If [Allow] is selected, the public user can use this machine by selecting [Public User] in the login page to log in to the machine.If [Allow (without Login)] is selected, the public user can use this machine without logging in to the machine in the login page.
Do you permit the public user access?
[Account Track] To enable account track, select [On].To select [On], specify the authentication method first, and then register accounts in [Account Track List].
Do you use the ac-count track func-tion?
[Synchronize User Authentication & Account Track]
To synchronize user authentication with account track and manage users for each account track, select [Synchro-nize].To synchronize, specify the account name when logging in for the first time. The account name that the user specify at the first login time will be registered as the account name of the user.
Do you synchronize user authentication with account track?

Restricting users of this machine (NDS over IPX/SPX)6
6-10 bizhub 42/36
6.4
6.4 Restricting users of this machine (NDS over IPX/SPX)
Configure settings to restrict users who use this machine by NDS over IPX/SPX authentication.
These settings are required if you use the NetWare 5.1 or later and use the NDS authentication in the IPX/SPX environment. You can restrict the functions available to each user.
Use the following flowchart to configure settings. Clicking a step jumps to the associated procedure.
6.4.1 External Server Settings
Configure external server (NDS) registration settings.
(If you use PageScope Authentication Manager for authentication, this item is not displayed.)
For details, refer to page 5-28.
6.4.2 [General Settings]
In the administrator mode of PageScope Web Connection, select [Security] ö [Authentication] ö [General Settings].
(If you use PageScope Authentication Manager for authentication, the following items are not displayed.)
External Server Settings
[General Settings]
[ID & Print Settings]
[Default Function Permis-sion]
[NetWare Settings]
Finish
Item Description Prior check
[User Authentica-tion]
Select [External Server].
[Public Access] Select whether to allow the public user access.If [Allow] is selected, the public user can use this machine by selecting [Public User] in the login page to log in to the machine.If [Allow (without Login)] is selected, the public user can use this machine without logging in to the machine in the login page.
Do you permit the public user access?
[Account Track] To enable account track, select [On].To select [On], specify the authentication method first, and then register accounts in [Account Track List].
Do you use the ac-count track func-tion?
[Synchronize User Authentication & Account Track]
To synchronize user authentication with account track and manage users for each account track, select [Synchro-nize].To synchronize, specify the account name when logging in for the first time. The account name that the user specify at the first login time will be registered as the account name of the user.
Do you synchronize user authentication with account track?

bizhub 42/36 6-11
6.4 Restricting users of this machine (NDS over IPX/SPX) 6
6.4.3 [ID & Print Settings]
Configure settings to use or operate the ID & Print function.
For details, refer to page 5-32.
6.4.4 [Default Function Permission]
Configure the default settings for function permissions to users who are authenticated on the external server.
For details, refer to page 5-30.
6.4.5 [NetWare Settings]
In the administrator mode of PageScope Web Connection, select [Network] ö [NetWare Settings] ö [Net-Ware Settings].
Item Description Prior check
[IPX/SPX] Select [Enable].
[Ethernet Frame Type]
Select a frame type to be used. Frame type

Restricting users of this machine (NDS over TCP/IP)6
6-12 bizhub 42/36
6.5
6.5 Restricting users of this machine (NDS over TCP/IP)
Configure settings to restrict users who use this machine by NDS over TCP/IP authentication.
These settings are required if you use the NetWare 5.1 or later and use NDS authentication in the TCP/IP environment. You can restrict the functions available to each user.
To use the authentication with NDS over TCP/IP, you must specify the DNS server in [TCP/IP]. During user authentication, the tree name and context name are inquired to the specified DNS server to obtain the IP ad-dress of the NDS authentication server.
Use the following flowchart to configure settings. Clicking a step jumps to the associated procedure.
Reference- Apply the latest service pack to each NetWare version.
6.5.1 [TCP/IP]
Configure settings to use this machine in the TCP/IP network environment.- To use the authentication with NDS over TCP/IP, you must specify the DNS server.
For details, refer to page 3-3.
6.5.2 External Server Settings
Configure external server (NDS) registration settings.
(If you use PageScope Authentication Manager for authentication, this item is not displayed.)
For details, refer to page 5-28.
[TCP/IP]
External Server Settings
[General Settings]
[ID & Print Settings]
[Default Function Permis-sion]
Finish

bizhub 42/36 6-13
6.5 Restricting users of this machine (NDS over TCP/IP) 6
6.5.3 [General Settings]
In the administrator mode of PageScope Web Connection, select [Security] ö [Authentication] ö [General Settings].
(If you use PageScope Authentication Manager for authentication, the following items are not displayed.)
6.5.4 [ID & Print Settings]
Configure settings to use or operate the ID & Print function.
For details, refer to page 5-32.
6.5.5 [Default Function Permission]
Configure the default settings for function permissions to users who are authenticated on the external server.
For details, refer to page 5-30.
Item Description Prior check
[User Authentica-tion]
Select [External Server].
[Public Access] Select whether to allow the public user access.If [Allow] is selected, the public user can use this machine by selecting [Public User] in the login page to log in to the machine.If [Allow (without Login)] is selected, the public user can use this machine without logging in to the machine in the login page.
Do you permit the public user access?
[Account Track] To enable account track, select [On].To select [On], specify the authentication method first, and then register accounts in [Account Track List].
Do you use the ac-count track func-tion?
[Synchronize User Authentication & Account Track]
To synchronize user authentication with account track and manage users for each account track, select [Synchro-nize].To synchronize, specify the account name when logging in for the first time. The account name that the user specify at the first login time will be registered as the account name of the user.
Do you synchronize user authentication with account track?

Restricting users of this machine (LDAP)6
6-14 bizhub 42/36
6.6
6.6 Restricting users of this machine (LDAP)
Configure settings to restrict users who use this machine by LDAP authentication.
These settings are required if you use the LDAP server for user authentication. You can restrict the functions available to each user.
Use the following flowchart to configure settings. Clicking a step jumps to the associated procedure.
Reference- To use the same LDAP server for both user authentication and destination search, the certificate veri-
fication settings of the LDAP server for user authentication specified in [External Server List] are deter-mined according to the certificate verification settings of the LDAP server for destination search specified in [Network] ö [LDAP Settings] ö [LDAP Server Registration]. For details on LDAP server set-tings for destination search and certificate verification settings, refer to page 5-47.
6.6.1 [TCP/IP]
Configure settings to use this machine in the TCP/IP network environment.
For details, refer to page 3-3.
6.6.2 External Server Settings
Configure external server (LDAP) registration settings.
(If you use PageScope Authentication Manager for authentication, this item is not displayed.)
For details, refer to page 5-28.
[TCP/IP]
External Server Settings
[General Settings]
[ID & Print Settings]
[Default Function Per-mission]
Do you have an SSL communication with the LDAP server?
Yes No
LDAP over SSL
Finish

bizhub 42/36 6-15
6.6 Restricting users of this machine (LDAP) 6
6.6.3 [General Settings]
In the administrator mode of PageScope Web Connection, select [Security] ö [Authentication] ö [General Settings].
(If you use PageScope Authentication Manager for authentication, the following items are not displayed.)
6.6.4 [ID & Print Settings]
Configure settings to use or operate the ID & Print function.
For details, refer to page 5-32.
6.6.5 [Default Function Permission]
Configure the default settings for function permissions to users who are authenticated on the external server.
For details, refer to page 5-30.
Item Description Prior check
[User Authentica-tion]
Select [External Server].
[Public Access] Select whether to allow the public user access.If [Allow] is selected, the public user can use this machine by selecting [Public User] in the login page to log in to the machine.If [Allow (without Login)] is selected, the public user can use this machine without logging in to the machine in the login page.
Do you permit the public user access?
[Account Track] To enable account track, select [On].To select [On], specify the authentication method first, and then register accounts in [Account Track List].
Do you use the ac-count track func-tion?
[Synchronize User Authentication & Account Track]
To synchronize user authentication with account track and manage users for each account track, select [Synchro-nize].To synchronize, specify the account name when logging in for the first time. The account name that the user specify at the first login time will be registered as the account name of the user.
Do you synchronize user authentication with account track?

Restricting users of this machine (LDAP)6
6-16 bizhub 42/36
6.6
6.6.6 LDAP over SSL
External Server Settings
In the administrator mode of PageScope Web Connection, select [Security] ö [Authentication] ö [External Server List] ö [Edit].
(If you use PageScope Authentication Manager for authentication, this item is not displayed.)
LDAP Server Registration
Specify the device certificate used in LDAP protocol.
For details, refer to page 5-47.
Certificate Verification Settings
Configure settings used to verify certificates.
For details, refer to page 5-53.
Item Description Prior check
[SSL] Select [Enable] to encrypt an SSL communication be-tween this machine and the LDAP server.
Does the server sup-port SSL?
[Port Number (SSL)]
Enter the port number to be used for SSL communication. Server port number

7 Authentication unit


bizhub 42/36 7-3
7.1 Using authentication unit 7
7 Authentication unit
This chapter describes the Authentication Unit AU-201.
1. Authentication Unit AU-201
7.1 Using authentication unit
The Authentication Unit AU-201 is an "IC card authentication" system that reads the IC card to perform per-sonal authentication. Using this system, you can perform authentication with an IC card to log in to this ma-chine or execute a print job when User Authentication is enabled in this machine.
To use the authentication unit, first register the card ID of the user in this machine. The registered user, who is authenticated with the card ID, can log in to this machine or execute a print job. This section explains how to configure the required settings in this machine, and register users.
NOTICEAuthentication Unit AU-201 must be installed inside the Working Table WT-510.
Do not disconnect the USB cable while using the authentication unit. Doing so may cause the system to be-come unstable.
Do not leave the IC card within 1-9/16 inch (40 mm) of the card reader.
1

Using authentication unit7
7-4 bizhub 42/36
7.1
7.1.1 Configuring this machine
NOTICETo configure IC card authentication, the loadable driver needs to be installed in the machine. For details, con-tact your service representative.
User authentication settings must be configured with MFP authentication on this machine. You configure user authentication using PageScope Web Connection.
This device does not support external server authentication. For [Public Access] or [Account Track] settings, refer to page 5-21. To combine account track settings with user authentication settings, set Synchronize User Authentication & Account Track to [Synchronize].
1 Log in to the administrator mode of PageScope Web Connection.
% For details on how to log in to the administrator mode of PageScope Web Connection, refer to page 3-6.
2 Select [Security] ö [Authentication] ö [General Settings].
3 Set [User Authentication] to [Device].
4 Click [Apply].
5 In the [General Settings] window of [Authentication Device Settings], select your option for [Authentica-tion Type] and [IC Card Type].

bizhub 42/36 7-5
7.1 Using authentication unit 7
% In [IC Card Type], specify the required IC card type.% For [Authentication Type], specify how to log in to this machine after registration.
[Card Authentication]: Allows the user to log in by simply placing the IC card. [Card Authentication+Password]: Allows the user to log in by placing the IC card and entering the password.
6 Click [Apply].
7 Exit PageScope Web Connection.
7.1.2 Registering a user
The following two methods can be used to register a user.- Connect the authentication unit to this machine, and directly register the target user in this machine- Connect the authentication unit to your computer, and use Data Administrator to register the target
userNOTICEThe registered user data is saved in the HDD of this machine. Changing the user authentication type of this machine or formatting the HDD will erase the registered user data.
Registering a user using the Control Panel of this machine
1 Use the Control Panel of this machine to display the Administrator Settings screen.
2 Press [Authentication Setting].
3 Press [Card Authentication].

Using authentication unit7
7-6 bizhub 42/36
7.1
4 Select the user name to be registered and press [OK].
% Press [All] to display all users. Press [Search] to extract target users with search characters.
5 Press [Edit].
% Press [Edit] also if the IC card information which has previously been registered is to be modified or a card ID has been registered through [Input the card ID directly] of Data Administrator.
% To delete a previously registered IC card information, press [Delete]. Select [Yes] and press [OK] on the confirmation screen that will appear.
6 Place the IC card on the Working Table WT-510 and press [OK].

bizhub 42/36 7-7
7.1 Using authentication unit 7
7 Press [Close].
Registering a user using Data Administrator
To use Data Administrator, configure this machine, and set up Data Administrator. For setup, install the IC
Card Driver (USB-Driver) of the authentication unit, and then install Data Administrator IC Card Plugin.
NOTICEBefore setup, install Data Administrator V4.0 or later in your computer. For the Data Administrator operat-ing environment and installation procedure, refer to the Data Administrator User's Guide.
Checking the version of the installed Data Administrator
1 From the [Help] menu of Data Administrator, select [Version Information].
NOTICEThis software cannot be used if the version is "3.x". Install "4.x".
If Data Administrator V3.x is installed, it is removed when V4.x is installed.
2 Click [Plug-in version].
3 In [Plug-in information list], confirm the plugin version of Data Administrator.
% This software is available if the plugin version is "4.x".
Setup
1 Turn the Power Switch of this machine off, and disconnect the authentication unit from this machine.
2 Install IC Card Driver (USB-Driver).
Connect the authentication unit to the USB port of your computer.The [Found New Hardware] dialog box appears.
3 Select [Locate and install driver software (recommended)].
4 Insert the application DVD-ROM provided with the authentication unit into the DVD-ROM drive of the computer.
5 Click the [Browse my computer for driver software (advanced)].
6 Check that the driver's search location is the application DVD-ROM, and then click [Next].
% When the driver's search location is not the application DVD-ROM, click [Browse]. Select the IC
Card Driver (USB-Driver) folder in the DVD-ROM, and click [OK].Installation starts.
7 Click [Close].
Installation of the IC Card Driver (USB-Driver) is completed.

Using authentication unit7
7-8 bizhub 42/36
7.1
8 Install Data Administrator IC Card Plugin.
Open the IC_Card_Plugin folder on the application DVD-ROM, and then click setup.exe.
9 Select a language, and then click [OK].
The installation program starts.
10 Follow the on-screen instructions to proceed with the installation.
11 Click [Next].
12 Select [I accept the terms in the license agreement], and then click [Next].
13 Click [Install].
14 Click [Finish].
Installation of the Data Administrator IC Card Plugin is completed, which completes the setup.
User registration
To register a user with Data Administrator, connect the authentication unit to the USB port of the computer, and also connect the computer to this machine via network.
1 If the authentication unit is already connected to this machine, turn the Power Switch of this machine off, and then disconnect the authentication unit.
% When the authentication unit is already connected to the computer, go to step 4.
NOTICETo turn the Power Switch off and on, first turn the Power Switch off, and then turn it on after 10 or more seconds has elapsed. Not doing so may result in an operation failure.
When connecting or disconnecting the USB cable, hold the plug. Otherwise, the machine may be dam-aged or a failure may occur.
2 Turn on the Power Switch of this machine.
3 Connect the authentication unit to the USB port of the computer that contains Data Administrator.
NOTICEDo not connect another USB device to the same port as for the authentication unit. Doing so reduces the USB power supply, resulting in an operation failure.
To use the USB hub, be sure to connect the self-power USB hub that supplies 500 mA or more.
Restart the procedure 5 or more seconds after connecting the authentication unit.

bizhub 42/36 7-9
7.1 Using authentication unit 7
4 Data Administrator starts, and device information of this machine is imported.
The Device Information window appears.% For details on how to import device information, refer to the Data Administrator User's Guide.
5 In Select Function, select [Authentication Settings] - [User Authentication Settings], and then click [Add].

Using authentication unit7
7-10 bizhub 42/36
7.1
6 Select the desired template, and then click [OK].
The User Registration window appears.
7 Enter the user name and password, and select the [IC card authentication] tab.
% Enter the E-mail address and other information as required.
8 Place the IC card on the authentication unit, and click [Start reading].
% If necessary, click [Input the card ID directory] to register the card ID.

bizhub 42/36 7-11
7.1 Using authentication unit 7
9 Click [OK].
% Repeat steps 5 to 9 to register all users.
10 Click [Export to the device].
% Select the user name and click [Edit] to change the registered data.

Using authentication unit7
7-12 bizhub 42/36
7.1
11 Click [Write].
% Data Administrator provides the batch copy function that batch-configures the registered user data in multiple machines with the authentication unit enabled.
The registered user data is configured in this machine.
12 Click [OK].
13 Disconnect the authentication unit from the USB port of the computer.
14 Turn the Power Switch of this machine off, connect the authentication unit to this machine, and turn the Power Switch of this machine on.
NOTICETo turn the Power Switch off and on, first turn the Power Switch off, and then turn it on after 10 or more seconds has elapsed. Not doing so may result in an operation failure.
When connecting or disconnecting the USB cable, hold the plug. Otherwise, the machine may be dam-aged or a failure may occur.
bizhub 42/36 7-13
7.1 Using authentication unit 7
Associating the user with card using authentication device
When a user and card ID have been registered using Data Administrator, the user must be associated with the card in the Administrator Settings of the machine.
1 Use the Control Panel of this machine to display the Administrator Settings screen.
2 Press [Authentication Setting].
3 Press [Card Authentication].
4 Select a user to be registered, and press [OK].
% Press [All] to display all users. Press [Search] to extract target users with search characters.
5 Press [Edit].
% Press [Delete] to cancel the registration when IC card information is already registered.
6 Place the IC card on Working Table WT-510, and press [OK].
% This associates the user with the IC card and registers the IC card for the user.

Using authentication unit7
7-14 bizhub 42/36
7.1

8 Appendix


bizhub 42/36 8-3
8.1 Product specifications (Network functions) 8
8 Appendix
8.1 Product specifications (Network functions)
* When using the Lotus Domino Server, and setting the search condition to "OR", the function will not work correctly.
Item Specification
Type Embedded
Frame type IEEE802.2/802.3/Ethernet II/IEEE802.3SNAP
Cable type 10Base-T/100Base-TX/1000Base-T
Connector RJ-45
Main supported proto-cols
TCP/IP (IPv4/IPv6), BOOTP, ARP, ICMP, DHCP, DHCPv6, AutoIP, SLP, SNMP, FTP, LPR/LPD, RAW Socket, SMB over TCP/IP, IPP, HTTP, POP, SMTP, LDAP, NTP, SSL, IPX/SPX, AppleTalk, Bonjour, WebDAV, DPWS, S/MIME, IPsec, DNS, DynamicDNS, LLMNR, LLTD, SSDP, SOAP
Supported LDAP Serv-ers
OpenLDAP 2.1x, Active Directory, Exchange 5.5/2000, Sun Java Directory Server (Netscape/iPlanet Directory Server), Novell NetWare 5.x/6.x NDS, Novell eDirectory 8.6/8.7, and Lotus Domino Server (5.x/6.x)*.
Supported LDAP pro-tocol
LDAP Protocol Version 3 (Version 2 is not supported)
Supported SSL ver-sions
SSL2, SSL3, and TLS1.0 (An x.509 certificate must be installed on the server.)
Multiprotocol Auto detection
Operating environ-ments of PageScope Web Connection
Compatible Web browsers:<For Windows XP/Server 2003/Vista/7/Server 2008/Server 2008 R2>• Microsoft Internet Explorer Ver. 6/7/8 (JavaScript and Cookies enabled) • Mozilla Firefox 3.6 or later (JavaScript and Cookies enabled)<For Macintosh Mac OS X>• Mozilla Firefox 3.6 or later (JavaScript and Cookies enabled)<For Linux>• Mozilla Firefox 3.6 or later (JavaScript and Cookies enabled)
Settings Saved to non-volatile memory

Error Message8
8-4 bizhub 42/36
8.2
8.2 Error Message
Follow the instructions below if error messages are displayed.
Message Possible Cause Remedy
[Configuration of Options Changed][Configuration of options has been changed. Power OFF and ON.]
While the power of the machine was ON, the configuration of options was changed.
Turn the machine off, then on again.
[Job Log Error][The job log has reached the maximum allowed. Contact the administrator.]
The write area of the job log has reached the maximum allowed.
Delete the job log using the Con-trol Panel or PageScope Web Connection.
[Card Authentication Registra-tion Error][Authentication failure. Try again from the beginning.]
Error occurred while reading IC card.
Restart registration from the be-ginning.
[Counter reached its limit.][Counter has reached its maxi-mum allowance. Please delete the job.]
The upper limit of the counter is exceeded.
Delete a job.
[Expiration Error][The Enhanced Server Authenti-cation application has expired. Change the User Authentication method to one other than En-hanced Server Authentication.]
In external server authentica-tion, the account is expired.
Contact your server administra-tor.
[IEEE802.1x Authentication fail-ure.][Please reboot.]
Due to timeout during IEEE802.1X port authentication, user was automatically forced to log off.
Reboot the machine, perform IEEE802.1X port authentication, and log in.
[IEEE802.1x Authenticating][Please wait.]
IEEE 802.1X port authentication is being performed.
If authentication is successful, the message is cleared.If authentication times out, turn the machine off, then on again.
[Incorrect HDD][Format HDD.]
The HDD used in another ma-chine is installed.
Format the HDD from the control panel.

bizhub 42/36 8-5
8.3 Glossary 8
8.3 Glossary
Term Description
10Base-T/100Base-TX/1000Base-T
A set of specifications under the Ethernet standards.Those cables that consist of twisted copper wire pairs are used.The transmission speed of 10Base-T is 10 Mbps, of 100Base-TX is 100 Mbps, and of 1000Base-T is 1000 Mbps.
2in1 A function to send the original by double-page spread, consolidating two pages on a sheet.
2-Sided Binding Di-rection
A function to specify the binding position of a double-sided document when it is sent using ADF. Two types of binding positions are available for a double-sided original: One is the top/bottom binding with the binding position at the top or bot-tom of the original. The other is left/right binding with the binding position at the left (or right) of the original. Note that the second side of the original has a different top/bottom relationship.
Abbreviated/ad-dress
A function to register frequently used fax numbers of recipients. When registering abbreviated/addresses, you should also register the destination name and the search string, so that you can specify the destination using the search string to select.
Active Directory A network service provided by Microsoft. Active Directory can centrally manage all types of information including servers, clients, printers and other hardware re-sources, as well as properties and access permissions of users on the network.
Anonymous FTP While FTP sites are usually protected using some account name and password mechanism, an anonymous FTP system permits anyone to access the FTP site by simply entering "anonymous" as the account name, without a password.
APOP The acronym for Authenticated Post Office Protocol. While usual POP does not encrypt the password used for receiving an E-mail, APOP encrypts the password. This authentication method helps enhance the E-mail security.
AppleTalk The generic name for the protocol suite developed by Apple Computer for com-puter networking.
Auto IP A function to obtain an IP address automatically. If one fails to get an IP address via DHCP, the auto IP gets an IP address from the space of "169.254.0.0".
Background Remov-al
A function to adjust the shading of background color before sending the original.
Batch transmission A function to send documents as one document at a specified time if the docu-ments have the same transmission conditions such as destination, transmission time, memory transmission or resolution, and are stored in the same memory.
Baudrate The transmission rate of a modem. This machine can communicate at a high transmission rate of 33,600bps. When selecting overseas communication mode, the machine communicates at 7200bps or 4800bps, a rate suitable for noise-re-sistance.
bit The abbreviation for binary digit. The smallest unit of information (data quantity) handled by a computer or printer. A bit uses only a 0 or a 1 to indicate data.
Bitmap Font A font using a collection of dots to present characters. Jagged edges are con-spicuous for the larger size Bitmap Font characters.
BMP The abbreviation for bitmap. It is a file format used to save image data. (The file extension is ".bmp").Commonly used on Windows platforms. BMP covers the color depth from mon-ochrome (2 values) to full color (16,777,216 colors). BMP images are not suitable for compressed storage.
Bonjour A Macintosh network technology, automatically detecting a device connected to the network for automatic configuration. Previously called "Rendezvous", and has been changed to "Bonjour" since Mac OS X v10.4.
Book Copy A function to separate the front cover, back cover, right pages, and left pages into individual pages when sending a book or catalog by fax.
BOOTP The abbreviation for Bootstrap Protocol. The protocol is used for a client compu-ter on the TCP/IP network to load network configuration automatically from a server.Instead of BOOTP, DHCP, an advanced protocol based on BOOTP, is typically used today.

Glossary8
8-6 bizhub 42/36
8.3
bps The acronym for bit per second, which is a unit of data transmission, indicating the amount of data transmitted per second.
Broadcast A transmission of a single original to multiple recipients in one operation.
Bulletin board A function to post documents to be viewed, or to store the documents to be transmitted via polling.
Byte A byte indicates a unit of information (data quantity) handled by a computer or printer. A byte consists of eight bits.
Client A computer using services provided by servers via the network.
Closed Network RX A function to accept only transmissions from recipient machines with a matching password.
Compact PDF/XPS A compression method for minimizing the data size using the PDF or XPS format, used when digitalizing color documents.Compact PDF allows high compression performance by identifying the text and image regions, and applying the resolution and compression method optimized for each region.The compact PDF method can be selected in this machine when using the scan-ning function to digitalize documents.
Confidential com-munication
A function used to transmit an original only to specific people who you want to read it. Originals sent via confidential communication are not printed when re-ceived, and are saved in a confidential box of the recipient's fax machine. The document can be printed by some specific operation such as entering the access code for the confidential box.
Contrast The difference in intensity between the light and dark parts of the image (light/dark variation). "Low contrast" indicates an image with little light/dark vari-ation, while "High contrast" an image with large light/dark variation.
CSV The acronym for Comma Separated Values, which is one of the formats used for saving database or spreadsheet data as a text file. (The file extension is ".csv".) Data can be shared among different applications by being separated by commas (as the delimiter).
Default An initial setting. The settings selected in advance and enabled when the machine is turned on, or the settings selected in advance and enabled when the function is activated.
Default Gateway A device, such as a computer or router, used as a "gateway" to access comput-ers on different LANs.
Default value A setting value configured for the machine prior to shipment from the factory. Some default values can be changed by using the settings menu. It will be con-venient to set a frequently used value to the default value according to your ap-plication.
Density The amount of density of an image.
Density Compensa-tion
A color tone correction function used for output devices such as printers and dis-plays.
DHCP The acronym for Dynamic Host Configuration Protocol.The protocol is used for a client computer on the TCP/IP network to load network configuration automatically from a server.Just using a DHCP server to centrally manage IP addresses of the DHCP clients enables you to construct a network without IP address conflicts or other troubles.
Dialing Method There are three Dialing methods: PB (push-button dialing), 10PPS (pulse dialing /10 pps), and 20PPS (pulse dialing /20 pps).
Dither A method of presenting the quasi-shading of gray using black and white colors. This method is easier to process than error diffusion, but may stir some uneven-ness on the image.
DNS The acronym for Domain Name System.DNS allows for obtaining the IP address corresponding to a host name in network environments. This system enables a user to access other computers on the net-work by specifying host names instead of elusive and non-intuitive IP addresses.
Term Description

bizhub 42/36 8-7
8.3 Glossary 8
DPI (dpi) The acronym for Dots Per Inch. A unit of resolution used for printers and scan-ners.This indicates the number of dots used to represent an inch.The higher this value, the higher the resolution.
Driver Software that works as a bridge between a computer and a peripheral device.
DSN The acronym for Delivery Status Notifications, which is a delivery status notifica-tion message being returned from a receiver to a sender when the E-mail is de-livered to the receiver's mail server.
Dynamic authentica-tion (LDAP setting)
An authentication method option used when connecting to a LDAP server form a multifunctional product. Select this option if you want an user to enter the login name and password each time the user logs on the LDAP server to refer to des-tination information.
ECM The acronym for Error Correction Mode.An error resending method used for G3 communication. ECM checks whether the data is correctly sent to the destination, and should it be not the case, ECM re-sends the same data while maintains the serial communication. If a receiver also provides the ECM mode, this machine uses the ECM-based communication with the receiver unless the ECM mode is disabled.
Erase A function of erasing dark shadow around the document before transmitting it via fax, when scanning a booklet form document or a document with ADF kept open.
Ethernet LAN transmission line standard.
F-Code A communication procedure related to the usage of subaddress of T.30* stand-ardized by ITU-T (international telecommunication union). F-code is provided by Japanese Communications Industrial Corporation. Various kinds of capabilities are available for the communication among fax machines with the F-code func-tion irrespective of difference of the fax machine brand. This machine uses F-code for the bulletin boards, relay request, confidential communication, and password transmission. (* a communication standard)
File extension Characters added to a file name for the recognition of the file format. The file ex-tension is added after a dot of a file name, for example, ".bmp" or ".jpg".
Forced memory re-ception
A function to store received documents in memory, and print them when re-quired.
Frame type A type of communication format used in NetWare environments.For mutual communication, the same frame type is required.
FTP The acronym for File Transfer Protocol, which is used to transfer files via the In-ternet, intranet or other TCP/IP network.
G3 A fax communication mode standardized by the ITU-T (International Telecommu-nication Union). G3 and G4 are provided for the communication modes. Today, G3 is more widely used than G4.
Gateway Hardware and software used as the point where a network is connected to a net-work. A gateway not only connects networks but also changes data formats, ad-dresses, and protocols according to the connected networks.
Gradation The shading levels of an image. Larger number of the levels can reproduce smoother transition of the shading.
Gray scale A form presenting monochrome image by using the gradation information shifting from black to white.
Group The grouping of multiple abbreviation numbers. It will be convenient to use the group when a volume of serial broadcasts or serial pollings are distributed to the same destination addresses.
GSS-SPNEGO/ Simple/Digest MD5
Authentication methods used for logging in to the LDAP server. The different au-thentication method, GSS-SPNEGO, SIMPLE or Digest MD5 is used for a LDAP server depending on the type of the server being used or server settings.
Halftone A method for presenting the shading of an image by using different sizes of black and white dots
Hard disk A large capacity storage device for storing data. The data is retained even after the power is turned off.
Host name The name of a device on the network.
Term Description

Glossary8
8-8 bizhub 42/36
8.3
HTTP The acronym for HyperText Transfer Protocol. This is a protocol used to send or receive data between a Web server and a client (such as a Web browser). HTTP can exchange files such as images, sounds, and movies that are associated with documents, including their presentation formats and other information.
IEEE802.1X A standard used in a wired or wireless LAN to authenticate terminals gaining ac-cess to the network.A LAN switch compatible with IEEE802.1X permits a user to connect with the LAN after authentication (to confirm whether the user is authorized).
Install To install hardware, operating systems, applications, printer drivers, or other soft-ware on to a computer.
Internet Fax A transmission method by which the scanned original data is transmitted among Internet fax machines and computers as TIFF format E-mail attachments via the intranet (in-house network) and the Internet.
IP Address An address or a code used to identify an individual network device on the Inter-net. IPv4 (Internet Protocol version 4), a protocol widely used today, adopts a 32-bit number for an IP address separated into four sections. An example of an IPv4 IP address is: 192.168.1.10. On the other hand, IPv6 (Internet Protocol version 6), the next generation protocol, adopts 128-bit IP addresses. The IP address is as-signed to every computer or other device connected to the Internet.
IPP The acronym for Internet Printing Protocol, which is used to send or receive print data or control printers via the Internet or other TCP/IP network. IPP can also send and print data to printers in remote areas via the Internet.
IPsec The name of a security technology used for the TCP/IP network. IPsec allows service with enhanced security by determining the protocol used for the encryp-tion of transmit packets and for authentication.
IPv6 The acronym for Internet Protocol version 6.With the number of devices on the Internet increasing, the IPv6 protocol has been arranged to replace the current IPv4 protocol.128-bit IP addressing system and expanded security features.
IPX One of the protocols used for NetWare. IPX runs in the network layer of the OSI reference model.
IPX/SPX The abbreviation for Internetwork Packet Exchange/Sequenced Packet Ex-change, which is a protocol developed by Novell, Inc., typically used in NetWare environments.
JPEG The acronym for Joint Photographic Experts Group. It is a file format used to save image data. The compression ratio is generally 1/10 to 1/100. JPEG is an effective method to compress photographs and other natural images.
Kerberos A network authentication system used for Windows 2000 or later, used as the Ac-tive Directory authentication. Kerberos arranges an authentic site within the net-work to provide two-phase authentication processes of users login and the use of network resources, allowing users to be securely and efficiently authenticated.
LAN The acronym for Local Area Network, which is a network constructed by connect-ing computers on the same floor, in the same building, or in neighboring build-ings.
LDAP The acronym for Lightweight Directory Access Protocol, which is a protocol used to access a database that can manage E-mail addresses and environmental in-formation of network users on the Internet, intranet, or other TCP/IP network.
LLMNR The acronym for Link-local Multicast Name Resolution,which is a protocol used for the name resolution of neighboring computers. LLMNR uses simple exchange of request and response messages to perform name resolution of neighboring computers without configuring DNS server or clients.
LLTD The acronym for Link Layer Topology Discovery,which is a technology investigat-ing how the devices on the network are connected.Network devices with this technology are recognized by Windows Vista/Server 2008/7 on the network, and displayed as icons configured on the network map of Windows Vista/7
Local printer A printer connected to a parallel or USB port of a computer.
Long Original A function to send original pages longer than the standard size. Long size docu-ments can be sent by selecting this function.
Term Description

bizhub 42/36 8-9
8.3 Glossary 8
LPD The acronym for Line Printer Daemon. This is a platform-independent printer pro-tocol running on the TCP/IP network. The protocol was originally developed for BSD UNIX, and has become one of the printing protocols typically used among general computers.
LPR/LPD The acronym for Line Printer Request/Line Printer Daemon. This is a printing method implemented via networks, used for Windows NT or UNIX based sys-tems. It uses TCP/IP to output printing data from Windows or UNIX to a printer on the network.
MAC address MAC is the acronym for Media Access Control. A MAC address is an ID number unique to each Ethernet card, enabling sending or receiving data to or from other Ethernet cards. A Mac address consists of 48-bit numbers. The first 24 bits are controlled by IEEE and used to allocate a unique number to each manufacture, whereas the latter 24 bits are used by each manufacturer to assign a unique number to each card.
Main Scanning The operation of scanning a document optically, and converting the document into image data.
Main scanning di-rection
The horizontal direction for scanning originals.
Manual transmission An operation to send a fax while checking the status of the receiver.
MDN The acronym for Message Disposition Notifications,which is a message sent to confirm that the mail has been unsealed, a response to a sender when the sender requests for doing so.
Memory A storage device used for storing data temporarily.Some types of memory retain data even after the power is turned off, while others not.
Memory overflow A condition where the fax memory becomes full while scanned documents or temporarily stored documents are saved.
Memory transmis-sion
A method used to start a fax transmission after scanning originals and storing them in memory. If memory transmission is used, the total number of pages are automatically printed in the page number of the transmission source information and an image of the first page of the sent document is printed in the transmission report. However, the memory may become full if the document contains many pages, or there is a large amount of information due to high image quality.
MIB The acronym for Management Information Base, which defines the format of management information for network devices that are collected using SNMP in TCP/IP communication. Two types of MIB are provided, that is, the private MIB specific to each manufacturer and the standardized MIB.
Multi Page TIFF A TIFF file that contains multiple pages.
NDPS The acronym for Novell Distributed Print Services. This provides a high perform-ance printing solution in NDS environments. By using the NDPS as a printer serv-er, you can output from the desired printer, automatically download the printer driver of a newly installed printer, simplify and automate complicated manage-ment environments related to printer use, and integrate management related to the network printer.
NDS The acronym for Novell Directory Services.This allows the centralized management in a hierarchical structure of shared re-sources such as servers, printers and users information on the network, as well as the access privilege and other information related to the users.
NetBIOS The abbreviation for Network Basic Input Output System,which is a communica-tion interface developed by IBM.
NetWare A network operating system developed by Novell.This uses NetWare IPX/SPX for the communication protocol.
Nprinter/Rprinter A remote printer support module used when using a printer server in NetWare en-vironments.Rprinter is used for NetWare 3.x, and Nprinter for NetWare 4.x.
NTLM The acronym for NT LAN Manager, which is a user authentication method used for Windows NT or later. NTLM encodes password using MD4 or MD5 encoding method.
Term Description

Glossary8
8-10 bizhub 42/36
8.3
NTP The acronym for Network Time Protocol, which is a protocol used to adjust the computer's internal clock precisely via the network. In a hierarchical method, the time is adjusted with the server at the highest level using GPS to acquire the cor-rect time, which is then referenced by each lower level host.
Number of Originals Transmission with information of the total number of pages. A function used for quick memory transmission. This allows the recipient to check whether the all pages were received or not (In case of memory transmission, the total no. of pag-es are automatically added).
OCR The acronym for Optical Character Reader, which is a device or software that converts handwritten or printed characters to text data by optically scanning them and comparing them with previously stored patterns for identification.
OHP/OHT A transparent sheet used for OHP (Overhead projector). This is used for presen-tations.
OS The acronym for Operating System. This is base software used to control the sys-tem of a computer. Windows, Mac OS, or Unix is an OS.
Password TX A function to send a fax with a password. If the recipient's fax machine is set to closed network reception, the sender's fax machine should transmit the same password as used for the closed network reception.
PASV The abbreviation for PASsiVe, a mode used to connect to an FTP server from within a firewall. If this mode is not selected, the firewall regards the access as unauthorized and blocks the connection, disabling any file transmission.
Pause A temporary break in dialing. In this machine, each pause creates a one second break during dialing.
PB A push telephone line.
PC-FAX A function to send a fax directly from a computer without using paper.
PDF The acronym for Portable Document Format. This is an electronically formatted document with file extension of ".pdf". PDF is a PostScript based format, and can be viewed using Adobe Acrobat Reader, a free viewer software.
PDL The acronym for Page Description Language. This is a language used to instruct a page printer about images being printed on each page.
Peer-to-peer A type of network allowing connected devices to communicate each other with-out using a dedicated server.
Pixel The smallest constitutional unit of an image.
Plug and play A mechanism of immediately detecting a peripheral device when it is connected to a computer, and automatically searching an appropriate driver so that the de-vice becomes operable.
Polling A function available on the receiver's side to request a sender to send originals set or stored in the sender's machine or memory.
POP Before SMTP A user authentication method used when sending E-mail messages. POP Before SMTP receives E-mail messages first, then authenticates the user using the POP server. The IP address, passed through the user authentication by the POP serv-er, is then permitted to use the SMTP server. This method prevents third parties without permission to use the mail server from sending mail messages.
POP3 The acronym for Post Office Protocol - Version 3,which is a commonly used transmission protocol (transmission convention) for the transmission and recep-tion of E-mail. POP3 has functions including mail box authentication, E-mail download, list information check, and E-mail deletion.
Port Number A number used to identify the transmission port assigned to each process run-ning on a computer on the network. The same port cannot be used by multiple processes.
PostScript A typical page-descriptive language developed by Adobe and is commonly used for high quality printing.
Preview A function allowing you to view an image before being processed for printing or scanning.
Print job Print request transmitted from a computer to a printing device.
Print queue A software system used by a spooler to save generated print jobs.
Term Description

bizhub 42/36 8-11
8.3 Glossary 8
Printer buffer A memory area temporarily used for processing data of print jobs.
Printer driver Software that works as a bridge between a computer and a printer.
Program A function to register frequently used destination fax numbers, or stereotyped transmission operation procedures. By simply pressing a program key, you can specify the destination, or configure a function automatically to start communica-tion.
Property Attribute information.When using a printer driver, you can use its property to configure different func-tions.Also by using a file property, you can check the attribute information about the file.
Protocol A rule enabling a computer to communicate with other computers or peripherals.
Proxy server A server installed for the connection with the Internet. A proxy server acts as a proxy of client computers to contact the Internet to ensure security effectively for the total organization.
PServer A print server module available in Netware environments.This module monitors, changes, pauses, restarts, or cancels print jobs.
Queue name A logical printer name required for LPD/LPR printing.A name assigned to each device for allowing printing to the device via network.
Quick memory transmission
A method used to start sending fax immediately after scanning a page of the orig-inal. This method allows even an original with many pages to be sent without overflowing the memory.
RAW port number A TCP port number used when the RAW protocol is selected for Windows or oth-er TCP printing. The RAW port number is usually set to 9100.
realm (IPP setting) An area used for allowing security functions. The area is used to organize user names, passwords and other authentication information, and define the security policy in the area.
Receiving A fax machine status when it receives a call.
Redial A function to re-dial a fax number after waiting for a specified length of time when recipient's line is busy. Both manual redial and automatic redial functions are available.
Reference Allowed Level
A feature for specifying settings so that only certain people are able to view cer-tain destination information for the security of the information. When synchro-nized with user authentication, only information with an access permission level matching that specified for the user can be viewed.
Referral setting (LDAP setting)
If no relevant destination data is found on an LDAP server, the LDAP server itself instructs which LDAP server to be searched for the next. The referral setting con-figures whether the multifunctional product is responsible for searching the next LDAP server.
Resending A function to select and resend a document that was not send but stored in the memory. The document can be resent either to the same destination or to another destination.
Resolution The resolution value indicates how much detail of an object can be reproduced precisely on an image or a print matter.
RIP The acronym for Raster Image Processor. RIP extracts picture images from text data created using PostScript or other page description language. This processor is usually integrated into a printer.
S/MIME The acronym for Secure/Multipurpose Internet Mail Extensions,which is a proto-col used to add encryption, digital signature, and other features to MIME (E-mail operations).Public key method is used for encryption, using a different key for encryption and decryption.
Samba UNIX server software which uses SMB (Server Message Block) to make UNIX system resources available to Windows environments.
Term Description

Glossary8
8-12 bizhub 42/36
8.3
Scan Size A function to specify the scanning size of an original to transmit it. If the width of the paper in the recipient's fax machine is smaller than that of the transmitted document, the document will usually be reduced for printing purposes. If you do not want to reduce the document size, specify the same document size as that of the paper in the recipient's fax machine, so that you can send the document with its original size.
Scanning The reading of an image in scanner operation by moving aligned image sensors step by step. The direction of moving image sensors is called the main scanning direction, and the direction of image sensors alignment is called the sub-scan-ning direction.
Screen font A font used for displaying characters/symbols on a CRT or other monitor.
Screen frequency The density of dots used to create the image.
Sender Fax No. An identification code used for the mutual recognition for fax transmission. Usu-ally the fax number is registered for the fax ID.
Sender Name The name of a sender. On the receiver's side, the name is printed as a part of the sender's information at the edge of the transmitted original.
Sending Sending indicates making a call. For fax, sending indicates sending originals or dialing for pollings.
Shared printer A printer connected to a server on the network and configured to be used by mul-tiple computers.
Sharpness A function to enhance the edge of characters before sending the document.
Single-page TIFF A TIFF file that contains only a single page.
SLP The acronym for Service Location Protocol, which is a protocol capable of finding services on the TCP/IP network, and the automatic configuration of clients.
SMB The acronym for Server Message Block, which is a protocol allowing the share of files and printers mainly over the Windows network.
SMTP The acronym for Simple Mail Transfer Protocol, which is a protocol used to trans-mit or transfer E-mail.
SNMP The acronym for Simple Network Management Protocol, which is a management protocol in the TCP/IP network environments.
Spool The acronym for Simultaneous Peripheral Operation On-Line.Data to be output to a printer is not sent directly to the printer, but is temporarily stored in another location. The stored data is then sent collectively to the printer.
SSL/TLS The acronym for Secure Socket Layer/Transport Layer Security,which is an en-coding method used to transmit data between the Web server and a browser in a secure manner.
Subnet mask A value used to divide a TCP/IP network into small networks (subnetworks).This is used to identify how many higher-order bits of an IP address are used for the network address.
Sub-scanning direc-tion
The vertical direction for scanning originals.
Super G3 (SG3) A G3 communication mode complying with ITU-T V.34. Compared with usual G3 communication, it allows the higher rate transmission (up to 33,400bps).
TCP/IP The acronym for Transmission Control Protocol/Internet Protocol, which is a de facto standard protocol widely used for the Internet.An IP address is used to identify each network device.
TCP Socket TCP Socket indicates an API used for the TCP/IP network. This socket is used to open a transmission route for input or output of usual files.
Temporary docu-ment saving
A function to save received documents automatically to memory when the ma-chine is unable to print the documents for some reason such as running out of paper. When a proper action is taken such as refilling of paper, the temporarily saved document is printed out.
Thumbnail A function to display the content of an image or document file as a small image (image displayed when the file is opened).
Term Description

bizhub 42/36 8-13
8.3 Glossary 8
TIFF The acronym for Tagged Image File Format. It is a file format used to save image data. (The file extension is ".tif"). By using the "tag" indicating the data type, in-formation for various image formats can be saved in a single image data.
Timer TX A function to transmit a fax at the specified time. It reduce costs by transmitting faxes in the late evening or early morning when discount telephone services are available.
Transmission reser-vation
A function to program the next transmission during transmission or printing.
Transmission source record
The transmission time, name, telephone number, page number, and other infor-mation on the sender's side printed at the edge of the document on the receiver's side.
Transmission time The time needed to send a fax. The higher the resolution or larger the paper, the longer the transmission takes.
TrueType A type of outline font developed by Apple and Microsoft, and currently used as a standard font type for Macintosh and Windows.This type of font can be used both for display and printing.
TSI The acronym for Transmitting Subscriber Identification, which is the ID of a fax transmission terminal.
TWAIN An interface standard defined for between imaging devices including scanners and digital cameras and applications including graphics software. To use a TWAIN compatible device, a relevant TWAIN driver is required.
Uninstallation To delete software installed on a computer
USB The acronym for Universal Serial Bus,which is a general-purpose interface de-fined for connecting a mouse, printer, and other devices with a computer.
V34 A communication mode used for super G3 fax transmission. Super G3 mode transmission may not be activated because of a telephone line status where the receiver's or sender's machine is connected to a telephone line via a private branch exchange switchboard. If this occurs, the G3 mode should be disabled by turning V34 off.
Web browser Software used to view Web pages.Typical Web browsers include Internet Explorer and Netscape Navigator.
Web service Which is a technology useful for detecting a device on the network, using the de-vice functions or obtaining the device information. Web service comes equipped with Windows Vista/7, and is used to detect devices on the network and to per-form printing or scanning via the network.
WINS The acronym for Windows Internet Naming Service. This is a service, available in Windows environments, to call the name server responsible for conversion be-tween a computer name and an IP address.
Zone A name used for an AppleTalk network. Zone is used to group multiple devices on the AppleTalk network.
Term Description

Glossary8
8-14 bizhub 42/36
8.3

9 Index


bizhub 42/36 9-3
9.1 Index by item 9
9 Index
9.1 Index by item
A
Account track method 5-22Account track number 5-24Active directory 6-6Address 5-84Address registration 4-7Admin settings 4-3Administrator mode 3-6Administrator password 4-35Administrator registration 4-6Administrator settings 2-6AppleTalk 4-14Authentication device settings 5-25, 5-33Authentication setting 4-10Authentication unit (IC card type) 7-3Auto continue 4-20Automatic logout time 3-8
B
Binary division 4-15
C
Certificate information 5-39Certificate verification 5-53Change password 5-53Closed network RX password 4-53Comm. settings 4-49Contact utility link 5-8Control panel 2-3Copy settings 4-19Create a self-signed certificate 5-36Custom size 4-21
D
Default operation selection 5-32Default paper 4-21Delete a certificate 5-39Driver URL 5-8Drum dry 4-33
E
Emulation 4-24Encryption method 4-16Encryption strength 5-40Enhanced security mode 4-37Erase job log 4-45Error message 8-4Ethernet 4-11Export a certificate 5-39External memory print 4-17
F
Fax factory default 4-61Fax function settings 4-51Fax image initialized 4-61Fax report 4-59Fax settings 4-46Fax target 4-60Finisher settings 4-33Folder settings 4-34Forward TX settings 4-54Function permission 5-24Function settings 4-50
G
Gradation adjustment 4-32
H
HDD format 4-42HDD settings 4-38Header/footer settings 4-47Hold job timeout 4-22
I
IC card type 7-3ID & print 5-32IKE settings 5-55Import a certificate 5-37IPsec 5-54IPsec peer settings 5-55IPsec SA settings 5-55IPv6 3-4
J
Job 5-63Job timeout 4-18
L
LDAP 5-121, 6-14LDAP over SSL 6-16Leading edge adj. side 2 (Dx) 4-29Leading edge adjustment 4-29Leading edge adjustment tray 4-29Left ADJ duplex 4-30List print 4-60Low Power 5-15Low Power Mode Setting 4-5Low Power Time 5-15LowPowerMode Time Setting 4-5

9-4 bizhub 42/36
Index by item9 9.1
M
Machine settings 4-4Maintenance menu 4-26Max. allowance set 5-25Max. density adjustment 4-31Measurement unit setting 4-21Memory RX 4-52MFP authentication 6-3
N
NDS over IPX/SPX 6-10NDS over TCP/IP 6-12Netware 4-13Network 5-110Network speed 4-14Nighttime RX settings 4-57No proxy for following domain 5-53NTLM authentication 6-8Number of counters assigned for users 5-22
O
OCSP service 5-53Output permission (Scan) 5-24Overwrite all data 4-38
P
PageScope Web Connection 3-5, 5-3Paper 4-21Paper alignment plate settings 4-33Paper empty 4-43Paper size 4-21Paper type 4-21Password 5-24, 5-53PBX connection settings 4-58PC-Fax RX settings 4-56PKI settings 5-35Print 5-72Print menu 4-26Print settings 4-20Print without authentication 5-22Printer adjustment 4-27Proxy server address 5-53Proxy server port number 5-53Public user 5-32
Q
Quality settings 4-23
R
Remote RX settings 4-55Request a certificate 5-37Restore defaults 4-41Restriction code settings 4-44
S
S/MIME comm. setting 4-16Security 5-21Security details 4-36Security settings 4-35Sender 5-20Sender settings 4-46Shift output each job 4-5Side edge adjustment 4-30Specification 8-3SSD low-level format 4-40SSL/TLS 5-40Startup page setting 4-20Storage 5-81Supplies and accessories 5-8Synchronize user authentication & account track 5-22System 5-3
T
TCP socket 5-145TCP/IP 3-3, 4-11Timeout 5-53
U
URL 5-53User authentication 6-3, 6-6, 6-8, 6-10, 6-12, 6-14User name 5-53Utility/counter 2-5
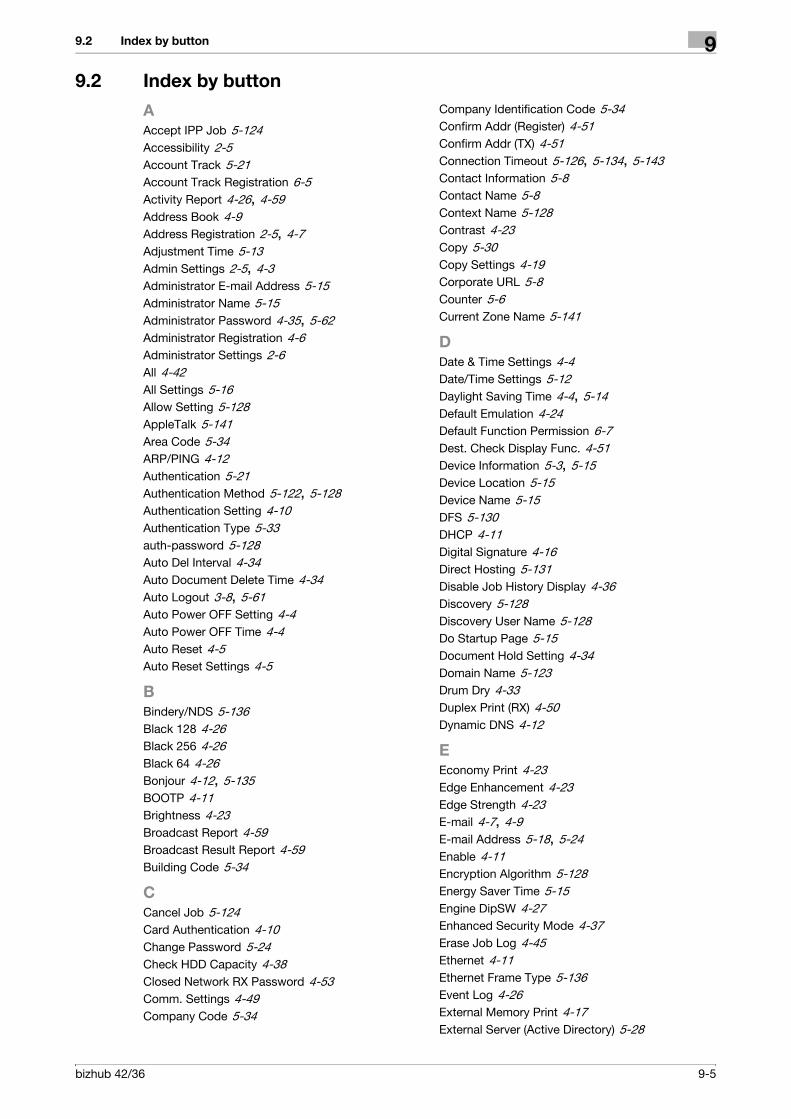
bizhub 42/36 9-5
9.2 Index by button 9
9.2 Index by button
A
Accept IPP Job 5-124Accessibility 2-5Account Track 5-21Account Track Registration 6-5Activity Report 4-26, 4-59Address Book 4-9Address Registration 2-5, 4-7Adjustment Time 5-13Admin Settings 2-5, 4-3Administrator E-mail Address 5-15Administrator Name 5-15Administrator Password 4-35, 5-62Administrator Registration 4-6Administrator Settings 2-6All 4-42All Settings 5-16Allow Setting 5-128AppleTalk 5-141Area Code 5-34ARP/PING 4-12Authentication 5-21Authentication Method 5-122, 5-128Authentication Setting 4-10Authentication Type 5-33auth-password 5-128Auto Del Interval 4-34Auto Document Delete Time 4-34Auto Logout 3-8, 5-61Auto Power OFF Setting 4-4Auto Power OFF Time 4-4Auto Reset 4-5Auto Reset Settings 4-5
B
Bindery/NDS 5-136Black 128 4-26Black 256 4-26Black 64 4-26Bonjour 4-12, 5-135BOOTP 4-11Brightness 4-23Broadcast Report 4-59Broadcast Result Report 4-59Building Code 5-34
C
Cancel Job 5-124Card Authentication 4-10Change Password 5-24Check HDD Capacity 4-38Closed Network RX Password 4-53Comm. Settings 4-49Company Code 5-34
Company Identification Code 5-34Confirm Addr (Register) 4-51Confirm Addr (TX) 4-51Connection Timeout 5-126, 5-134, 5-143Contact Information 5-8Contact Name 5-8Context Name 5-128Contrast 4-23Copy 5-30Copy Settings 4-19Corporate URL 5-8Counter 5-6Current Zone Name 5-141
D
Date & Time Settings 4-4Date/Time Settings 5-12Daylight Saving Time 4-4, 5-14Default Emulation 4-24Default Function Permission 6-7Dest. Check Display Func. 4-51Device Information 5-3, 5-15Device Location 5-15Device Name 5-15DFS 5-130DHCP 4-11Digital Signature 4-16Direct Hosting 5-131Disable Job History Display 4-36Discovery 5-128Discovery User Name 5-128Do Startup Page 5-15Document Hold Setting 4-34Domain Name 5-123Drum Dry 4-33Duplex Print (RX) 4-50Dynamic DNS 4-12
E
Economy Print 4-23Edge Enhancement 4-23Edge Strength 4-23E-mail 4-7, 4-9E-mail Address 5-18, 5-24Enable 4-11Encryption Algorithm 5-128Energy Saver Time 5-15Engine DipSW 4-27Enhanced Security Mode 4-37Erase Job Log 4-45Ethernet 4-11Ethernet Frame Type 5-136Event Log 4-26External Memory Print 4-17External Server (Active Directory) 5-28

9-6 bizhub 42/36
Index by button9 9.2
External Server (LDAP) 5-29External Server (NDS) 5-28External Server (NTLM) 5-28External Server Name 5-24External Server Settings 6-6, 6-8, 6-10, 6-12, 6-14, 6-16
F
Fax 4-7, 4-9, 5-30Fax Factory Default 4-61Fax Function Settings 4-51Fax Image Initialized 4-61Fax Report 4-59Fax Settings 4-46Fax Target 4-60Fax TX Header Name 4-47F-Code TX 4-51Feed Zoom 4-28File Server 5-140Floor Code 5-34Folder Settings 4-34Footer Position 4-47Forward TX Settings 4-54Friendly Name 5-132FTP 4-7, 4-9, 4-12FTP Server 5-125FTP TX 5-126Function Settings 4-50
G
Gateway 4-11General Settings 6-4, 6-7, 6-9, 6-10, 6-13, 6-15Get Job Attributes 5-124Get Jobs 5-124Get Print Attributes 5-124Gradation 4-26Gradation Adjustment 4-23, 4-28Group Address 4-9
H
Halftone 4-23HDD Format 4-42HDD Settings 4-38Header Position 4-47Header/Footer Settings 4-47Hide Personal Data 4-36Hide Personal Information 5-15HTTP 4-12HTTP Server 5-123
I
IC Card Type 5-33ID & Print Settings 5-32, 6-4IEEE802.1X 5-59I-Fax 5-142I-Fax RX Error Report 4-59Import/Export 5-9
Inch Paper Priority 4-50Internet Fax 4-7, 4-9IP Address 4-11, 5-18IP Address Filter 4-12IPP 4-12IPP Authentication 5-124IPP Print 5-124IPSec 4-12IPv6 4-12IPX Address 5-18IPX/SPX 5-136
J
Job Log 5-9, 5-15Job Timeout 4-18
L
Leading Edge Adj. Side 2 (Dx) 4-27, 4-29Leading Edge Adjustment 4-27, 4-29Leading Edge Adjustment Tray 4-27, 4-29Left ADJ Duplex 4-27, 4-30Limiting Access to Destination 5-60Line Monitor 4-49Line Monitor Volume 4-49List Output 4-8List Print 4-60List/Counter 4-4LLTD 5-146Logout Confirmation Display 4-10
M
Machine Settings 4-4, 4-6Maintenance Menu 4-26Manual Destination Input 4-36, 5-30Manual RX V.34 OFF 4-49Max Image Density Adj 4-28Max. Density Adjustment 4-31Max. Search Result 5-122Memory RX 4-52Meter Count 2-5Min. Reduction for RX Print 4-50Model Name 5-19
N
NetWare Print Mode 5-136NetWare Settings 6-11Network Settings 5-16Network Speed 3-3Night Fax RX Print 4-57Night RX End Time 4-57Night RX Start Time 4-57Nighttime RX Settings 4-57No. 5-24Node Type 5-129NTLM 5-130NTP Server Address 5-13Number of Addresses 4-8

bizhub 42/36 9-7
9.2 Index by button 9
Number of RX Call Rings 4-49
O
Online Assistance 5-8OpenAPI 5-144Operational Support 5-124Overwrite All Data 4-38
P
PageScope Web Connection 5-3Paper Empty 4-43Paper Priority 4-19, 4-50Paper Separation Adjustment 4-28Password Rules 4-36PB/DP 4-49PBX Connection Settings 4-58PBX Function 4-58PBX Number 4-58PC-Fax RX Print 4-56PC-Fax RX Settings 4-56PC-Fax TX Error Report 4-59PCL 4-24Port Number 5-13, 5-122, 5-123, 5-125, 5-144, 5-145Port Number (SSL) 5-122, 5-123Port Number (SSL/TLS) 5-144, 5-145Preferred File Server 5-136Preferred NDS Context Name 5-136Preferred NDS Tree Name 5-136Print 5-30Print Function 5-133Print Job 5-124Print Paper Size 4-50Print Queue Scan Rate 5-136Print Separate Fax Pages 4-50Print Server Name 5-136Print Server Password 5-136Print Settings 4-20Printer Information 5-124, 5-133Printer Location 5-124, 5-133Printer Name 5-124, 5-133, 5-135, 5-136, 5-141Printer Number 5-136Printer URI 5-124Priority Mode 4-5Priority Protocol 5-135priv-password 5-128Product Help URL 5-8Proxy Server Address 5-126, 5-143Proxy Server Password 5-143Proxy Server Port Number 5-126, 5-143Proxy Server User Name 5-143PS 4-24Public Access 5-21
Q
Queue Name 5-140Queue Status 5-140
R
RAW Port 4-12Read Community Name 5-127Read User Name 5-128Realm 5-125Redial 4-49Redial Interval 4-49Register Notification Address 5-19Registering and Changing Addr. 4-36Remote RX Enabled 4-55Remote RX No. 4-55Remote RX Settings 4-55Replenish Toner 4-28Report Input Tray 4-4Restore All 4-41Restore Defaults 4-41Restore Network 4-41Restore System 4-41Restrict Fax RX 4-51Restrict Fax TX 4-51Restrict Internet Fax RX 4-51Restrict Internet Fax TX 4-51Restrict PC-Fax TX 4-51Restrict Scan to USB 4-36Restriction Code Settings 4-44Ring Pattern 4-49Room Code 5-34RX Mode 4-49
S
S/MIME Enabled 4-16Scan Event Log 4-26Scan Function 5-134Scan Send Report Print 4-26Scan to HDD 5-30Scan to Network 5-30Scan to USB Memory 5-30Scanner Information 5-134Scanner Location 5-134Scanner Name 5-134Schedule Setting 5-19Search Base 5-122Secure Mode 5-132Security Details 4-36Security Level 5-34, 5-128Security Settings 4-35Sender 4-46Sender Fax No. 4-46Sender Settings 4-46Server Address 5-122Side Edge Adjustment 4-27, 4-30Sleep Time Setting 4-4SLP 4-12SMB 4-7, 4-9SMB Client 5-130SMTP 4-12

9-8 bizhub 42/36
Index by button9 9.2
SNMP 4-12, 5-127SNMP v1(IPX) 5-127SNMP v1/v2c Settings 5-127SNMP v1/v2c(IP) 5-127SNMP v3 Settings 5-127SNMP v3(IP) 5-127Specify Tray When APS OFF 4-19SSD Low-level Format 4-40SSL/TLS 5-122, 5-123, 5-144, 5-145Start Number 4-8Subnet Mask 4-11System Settings 5-16
T
TCP/IP Setting 3-4TCP/IP Settings 3-3Telnet 4-12Ticket Hold Time (Active Directory) 5-21Time Adjustment 5-13Time Adjustment Settings 5-13Time Zone 4-4, 5-13Timeout 5-122Trap Setting When Authentication Fails 5-128Trap Settings 5-128Tray Selection for RX Print 4-50TX Reserve 4-59TX Result Report 4-59TX Result Report Image 4-59TX Result Report Screen 4-59
U
UDP Port 5-127Unit of Measure 5-15User Area (Print) 4-42User Area (Scan) 4-42User Authentication 5-21User List Diplay Setting 4-10User Name 5-24, 5-124User Referral 5-123User Registration 6-4User Settings 2-5Utility/Counter 2-5
V
Validate Job 5-124
W
WebDAV 4-7, 4-9WebDAV Client 5-143WINS 5-129WINS Automatic Retrieval 5-129WINS Server Address 1 5-129WINS Server Address 2 5-129Write 5-127Write Community Name 5-127Write User Name 5-128WSD Print 4-12
X
XPS 4-24
Z
Zone Name 5-141
Related Documents