Version 8.03 | Last Updated 2020-12-08 Copyright ©2004-2020 NetBrain Technologies, Inc. All rights reserved. NetBrain ® Integrated Edition 8.0 System Upgrade Guide Distributed Deployment

Welcome message from author
This document is posted to help you gain knowledge. Please leave a comment to let me know what you think about it! Share it to your friends and learn new things together.
Transcript
Version 8.03 | Last Updated 2020-12-08 Copyright ©2004-2020 NetBrain Technologies, Inc. All rights reserved.
NetBrain® Integrated Edition 8.0 System Upgrade Guide Distributed Deployment

Contents
1. Upgrading System ........................................................................................................................................................................ 4
1.1. Terminating System Tasks ................................................................................................................................................... 6
1.2. Stopping Server Services ..................................................................................................................................................... 6
1.3. Backing Up MongoDB Data ................................................................................................................................................ 6
1.4. Upgrading MongoDB ........................................................................................................................................................... 8
1.5. Upgrading Elasticsearch ....................................................................................................................................................... 9
1.6. Upgrading License Agent .................................................................................................................................................. 11
1.7. Upgrading Redis ................................................................................................................................................................. 13
1.8. Upgrading RabbitMQ ......................................................................................................................................................... 15
1.9. Upgrading Web/Web API Server ...................................................................................................................................... 16
1.10. Upgrading Worker Server .............................................................................................................................................. 21
1.11. Upgrading Task Engine .................................................................................................................................................. 25
1.12. Upgrading Front Server Controller ............................................................................................................................... 28
1.13. Upgrading Front Server ................................................................................................................................................. 31
1.13.1. Upgrading Front Server on Linux ........................................................................................................................... 31
1.13.2. Upgrading Front Server on Windows .................................................................................................................... 33
1.14. Upgrading Service Monitor Agent ............................................................................................................................... 34
1.14.1. Upgrading Service Monitor Agent on Linux ......................................................................................................... 35
1.14.2. Upgrading Service Monitor Agent on Windows .................................................................................................. 37
1.15. Verifying Upgrade Results ............................................................................................................................................. 38
1.16. Customizing MongoDB Disk Alert Rules ..................................................................................................................... 39
1.17. Tuning Live Access .......................................................................................................................................................... 40
1.18. Scheduling Benchmark Task .......................................................................................................................................... 41

2. Appendix: Editing a File with VI Editor ..................................................................................................................................... 42
3. Appendix: Offline Installing Third-party Dependencies ......................................................................................................... 43
4. Appendix: Restoring MongoDB Data ....................................................................................................................................... 44
5. Appendix: Dumping MongoDB Data ....................................................................................................................................... 46
4 | NetBrain Integrated Edition 8.0 System Upgrade Guide (Distributed Deployment)
1. Upgrading System
The upgrade process ensures data integrity, which means that the data in the current system will be still available after upgrading. If you encounter any issues during the upgrade process, contact NetBrain Support Team for help.
Note: Before upgrading your system, check its current version and the network connectivity requirements.
Upgrade from IEv8.0x
1. Terminate System Tasks
2. Stop Server Services
3. Back Up MongoDB Data
4. Upgrade MongoDB
5. Upgrade Elasticsearch
6. Upgrade License Agent
7. Upgrade Redis
8. Upgrade RabbitMQ
9. Upgrade Web/Web API Server
10. Upgrade Worker Server
11. Upgrade Task Engine
12. Upgrade Front Server Controller
13. Upgrade Front Server
14. Upgrade Service Monitor Agent
15. Verify Upgrade Results
16. Customize MongoDB Disk Alert Rules
17. Tune Live Access
18. Schedule Benchmark Task
Note: If you have installed Smart CLI and Ansible Agent before, you need to run the latest installation packages to upgrade the two components. See Installing Smart CLI and Installing Ansible Agent for more details.
To obtain the installation package of Ansible Agent:
Option 1: If the Linux server has no access to the Internet, obtain the netbrain-ansibleagent-linux-x86_64-rhel7-8.0.3.tar.gz file from NetBrain and then upload it to the /opt/netbraintemp8.0.3 directory by using a file transfer tool.
Option 2: If the Linux server has access to the Internet, run the wget http://download.netbraintech.com/netbrain-ansibleagent-linux-x86_64-rhel7-8.0.3.tar.gz
NetBrain Integrated Edition 8.0 System Upgrade Guide (Distributed Deployment) | 5
command under the /opt/netbraintemp8.0.3 directory to directly download the netbrain-ansibleagent-linux-x86_64-rhel7-8.0.3.tar.gz file from NetBrain official download site.
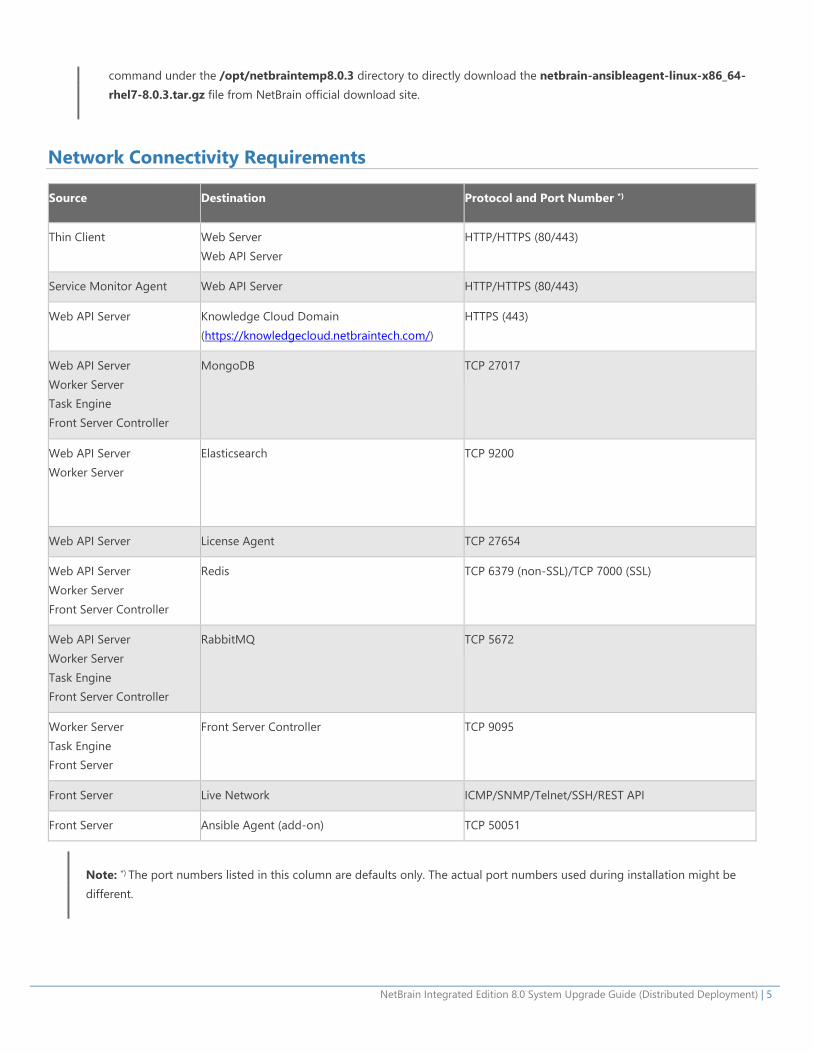
Network Connectivity Requirements
Source Destination Protocol and Port Number *)
Thin Client Web Server Web API Server
HTTP/HTTPS (80/443)
Service Monitor Agent Web API Server HTTP/HTTPS (80/443)
Web API Server Knowledge Cloud Domain (https://knowledgecloud.netbraintech.com/)
HTTPS (443)
Web API Server Worker Server Task Engine Front Server Controller
MongoDB TCP 27017
Web API Server Worker Server
Elasticsearch TCP 9200
Web API Server License Agent TCP 27654
Web API Server Worker Server Front Server Controller
Redis TCP 6379 (non-SSL)/TCP 7000 (SSL)
Web API Server Worker Server Task Engine Front Server Controller
RabbitMQ TCP 5672
Worker Server Task Engine Front Server
Front Server Controller TCP 9095
Front Server Live Network ICMP/SNMP/Telnet/SSH/REST API
Front Server Ansible Agent (add-on) TCP 50051
Note: *) The port numbers listed in this column are defaults only. The actual port numbers used during installation might be different.

6 | NetBrain Integrated Edition 8.0 System Upgrade Guide (Distributed Deployment)
1.1. Terminating System Tasks
1. Log in to the System Management page.
2. In the System Management page, select Operations > Task Manager from the quick access toolbar.
3. Select all running tasks and click End Process.
1.2. Stopping Server Services
To avoid any further dataset changes or data corruption while reinstalling MongoDB/Elasticsearch binary files or restoring MongoDB/Elasticsearch data, stop the relevant services.
Log in to the Windows servers where NetBrain applications are installed and stop the following services in the Task Manager.
Tip: If you have deployed a Worker Server cluster or Web API Server cluster, stop the services on each node.
NetBrain Component Service Name
Web API Server W3SVC
Web API Server WAS
Worker Server NetBrainWorkerServer
Front Server NetBrainFrontServer
Task Engine NetBrainTaskEngine
Front Server Controller NetBrainFrontServerController
Service Monitor Agent NetBrain Agent
Knowledge Cloud Proxy NetBrainKCProxy
1.3. Backing Up MongoDB Data
Before upgrading the system, it is highly recommended to back up all MongoDB data in case of any data loss or corruption during the upgrade process. The backup data will be used to restore data after MongoDB is reinstalled. See Restoring MongoDB Data for more details.
NetBrain Integrated Edition 8.0 System Upgrade Guide (Distributed Deployment) | 7
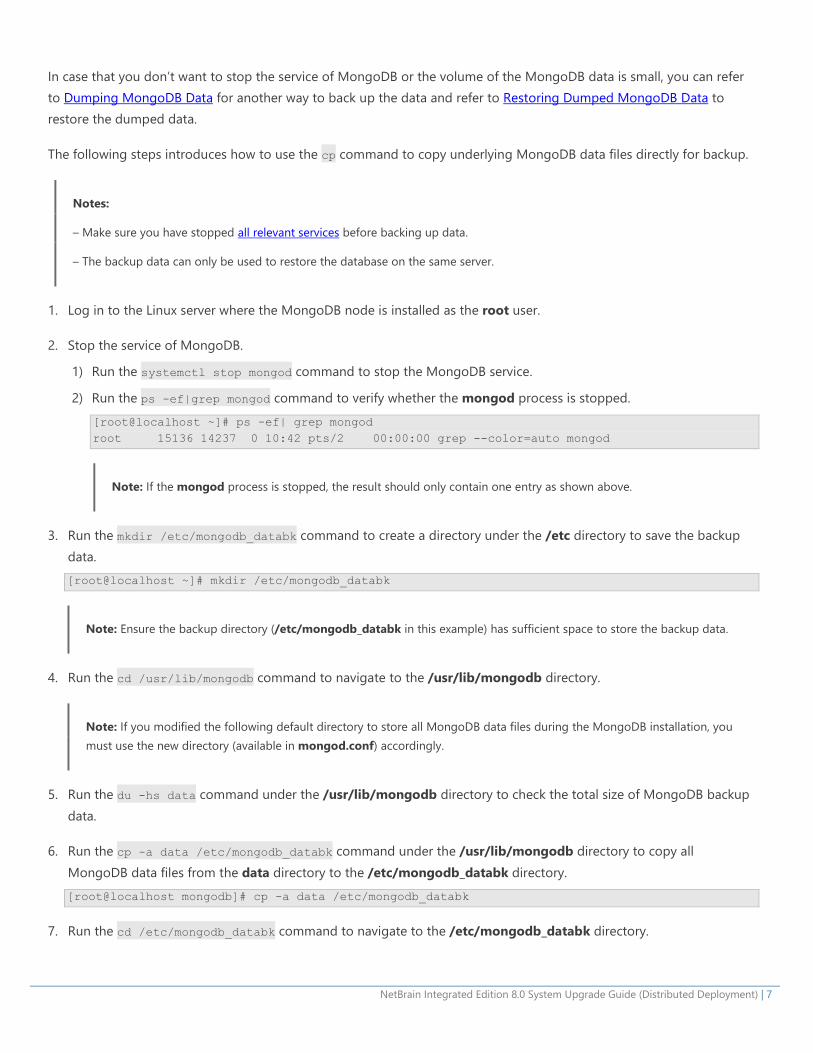
In case that you don’t want to stop the service of MongoDB or the volume of the MongoDB data is small, you can refer to Dumping MongoDB Data for another way to back up the data and refer to Restoring Dumped MongoDB Data to restore the dumped data.
The following steps introduces how to use the cp command to copy underlying MongoDB data files directly for backup.
Notes:
– Make sure you have stopped all relevant services before backing up data.
– The backup data can only be used to restore the database on the same server.
1. Log in to the Linux server where the MongoDB node is installed as the root user.
2. Stop the service of MongoDB.
1) Run the systemctl stop mongod command to stop the MongoDB service.
2) Run the ps -ef|grep mongod command to verify whether the mongod process is stopped. [root@localhost ~]# ps -ef| grep mongod root 15136 14237 0 10:42 pts/2 00:00:00 grep --color=auto mongod
Note: If the mongod process is stopped, the result should only contain one entry as shown above.
3. Run the mkdir /etc/mongodb_databk command to create a directory under the /etc directory to save the backup data. [root@localhost ~]# mkdir /etc/mongodb_databk
Note: Ensure the backup directory (/etc/mongodb_databk in this example) has sufficient space to store the backup data.
4. Run the cd /usr/lib/mongodb command to navigate to the /usr/lib/mongodb directory.
Note: If you modified the following default directory to store all MongoDB data files during the MongoDB installation, you must use the new directory (available in mongod.conf) accordingly.
5. Run the du -hs data command under the /usr/lib/mongodb directory to check the total size of MongoDB backup data.
6. Run the cp -a data /etc/mongodb_databk command under the /usr/lib/mongodb directory to copy all MongoDB data files from the data directory to the /etc/mongodb_databk directory. [root@localhost mongodb]# cp -a data /etc/mongodb_databk
7. Run the cd /etc/mongodb_databk command to navigate to the /etc/mongodb_databk directory.
8 | NetBrain Integrated Edition 8.0 System Upgrade Guide (Distributed Deployment)
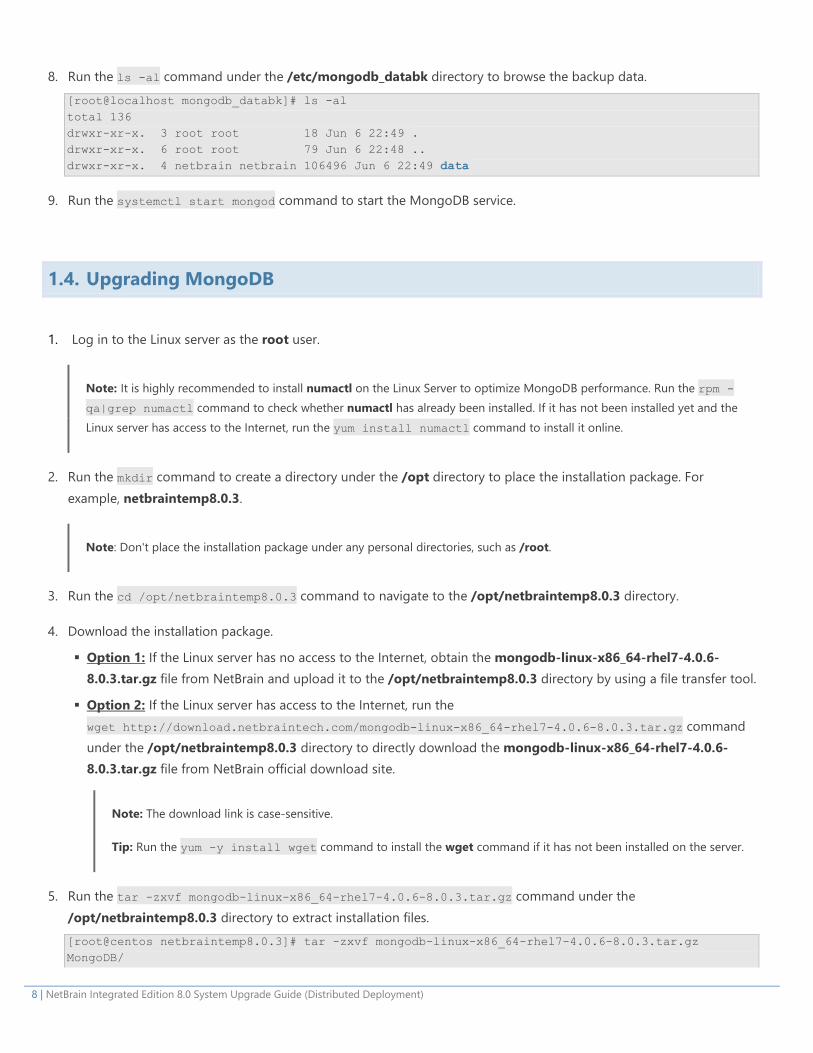
8. Run the ls -al command under the /etc/mongodb_databk directory to browse the backup data. [root@localhost mongodb_databk]# ls -al total 136 drwxr-xr-x. 3 root root 18 Jun 6 22:49 . drwxr-xr-x. 6 root root 79 Jun 6 22:48 .. drwxr-xr-x. 4 netbrain netbrain 106496 Jun 6 22:49 data
9. Run the systemctl start mongod command to start the MongoDB service.
1.4. Upgrading MongoDB
1. Log in to the Linux server as the root user.
Note: It is highly recommended to install numactl on the Linux Server to optimize MongoDB performance. Run the rpm -qa|grep numactl command to check whether numactl has already been installed. If it has not been installed yet and the Linux server has access to the Internet, run the yum install numactl command to install it online.
2. Run the mkdir command to create a directory under the /opt directory to place the installation package. For example, netbraintemp8.0.3.
Note: Don't place the installation package under any personal directories, such as /root.
3. Run the cd /opt/netbraintemp8.0.3 command to navigate to the /opt/netbraintemp8.0.3 directory.
4. Download the installation package.
Option 1: If the Linux server has no access to the Internet, obtain the mongodb-linux-x86_64-rhel7-4.0.6-8.0.3.tar.gz file from NetBrain and upload it to the /opt/netbraintemp8.0.3 directory by using a file transfer tool.
Option 2: If the Linux server has access to the Internet, run the wget http://download.netbraintech.com/mongodb-linux-x86_64-rhel7-4.0.6-8.0.3.tar.gz command under the /opt/netbraintemp8.0.3 directory to directly download the mongodb-linux-x86_64-rhel7-4.0.6-8.0.3.tar.gz file from NetBrain official download site.
Note: The download link is case-sensitive.
Tip: Run the yum -y install wget command to install the wget command if it has not been installed on the server.
5. Run the tar -zxvf mongodb-linux-x86_64-rhel7-4.0.6-8.0.3.tar.gz command under the /opt/netbraintemp8.0.3 directory to extract installation files. [root@centos netbraintemp8.0.3]# tar -zxvf mongodb-linux-x86_64-rhel7-4.0.6-8.0.3.tar.gz MongoDB/
NetBrain Integrated Edition 8.0 System Upgrade Guide (Distributed Deployment) | 9
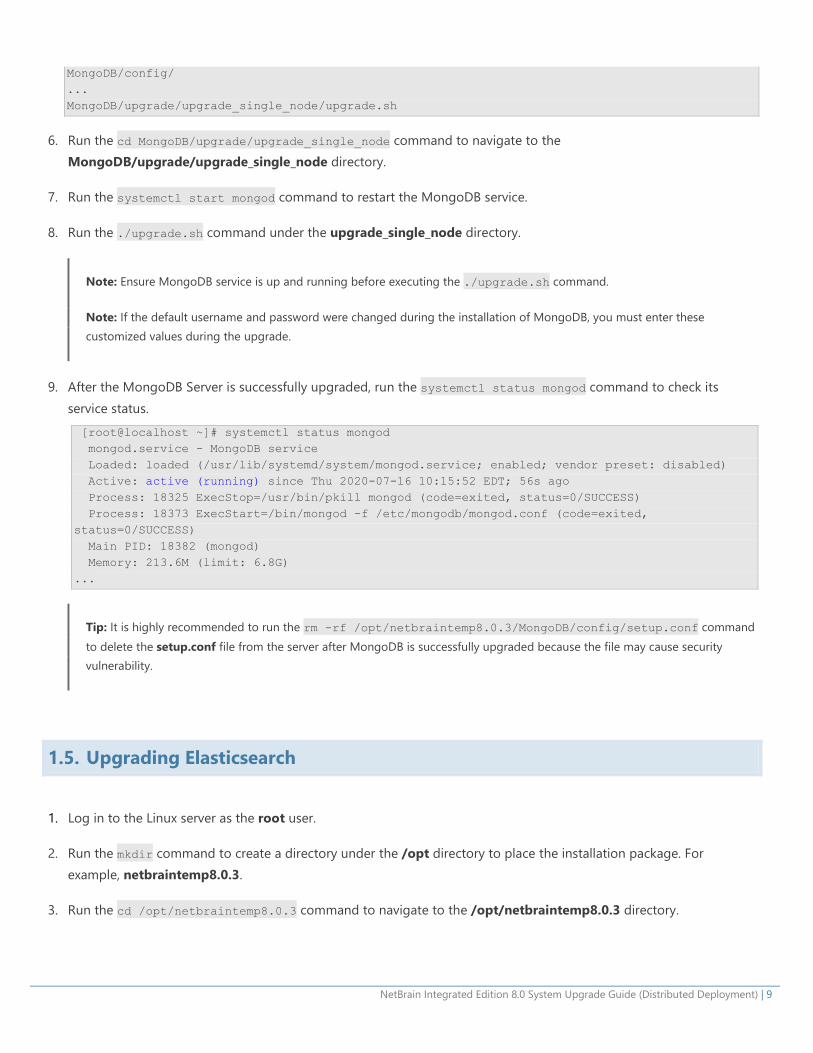
MongoDB/config/ ... MongoDB/upgrade/upgrade_single_node/upgrade.sh
6. Run the cd MongoDB/upgrade/upgrade_single_node command to navigate to the MongoDB/upgrade/upgrade_single_node directory.
7. Run the systemctl start mongod command to restart the MongoDB service.
8. Run the ./upgrade.sh command under the upgrade_single_node directory.
Note: Ensure MongoDB service is up and running before executing the ./upgrade.sh command.
Note: If the default username and password were changed during the installation of MongoDB, you must enter these customized values during the upgrade.
9. After the MongoDB Server is successfully upgraded, run the systemctl status mongod command to check its service status. [root@localhost ~]# systemctl status mongod mongod.service - MongoDB service Loaded: loaded (/usr/lib/systemd/system/mongod.service; enabled; vendor preset: disabled) Active: active (running) since Thu 2020-07-16 10:15:52 EDT; 56s ago Process: 18325 ExecStop=/usr/bin/pkill mongod (code=exited, status=0/SUCCESS) Process: 18373 ExecStart=/bin/mongod -f /etc/mongodb/mongod.conf (code=exited, status=0/SUCCESS) Main PID: 18382 (mongod) Memory: 213.6M (limit: 6.8G) ...
Tip: It is highly recommended to run the rm -rf /opt/netbraintemp8.0.3/MongoDB/config/setup.conf command to delete the setup.conf file from the server after MongoDB is successfully upgraded because the file may cause security vulnerability.
1.5. Upgrading Elasticsearch
1. Log in to the Linux server as the root user.
2. Run the mkdir command to create a directory under the /opt directory to place the installation package. For example, netbraintemp8.0.3.
3. Run the cd /opt/netbraintemp8.0.3 command to navigate to the /opt/netbraintemp8.0.3 directory.
10 | NetBrain Integrated Edition 8.0 System Upgrade Guide (Distributed Deployment)
4. Download the installation package.
Option 1: If the Linux server has no access to the Internet, obtain the elasticsearch-linux-x86_64-rhel7-6.7.2-8.0.3.tar.gz file from NetBrain and then upload it to the /opt/netbraintemp8.0.3 directory by using a file transfer tool.
Option 2: If the Linux server has access to the Internet, run the wget http://download.netbraintech.com/elasticsearch-linux-x86_64-rhel7-6.7.2-8.0.3.tar.gz command under the /opt/netbraintemp8.0.3 directory to directly download the elasticsearch-linux-x86_64-rhel7-6.7.2-8.0.3.tar.gz file from NetBrain official download site.
Note: The download link is case-sensitive.
Tip: Run the yum -y install wget command to install the wget command if it has not been installed on the server.
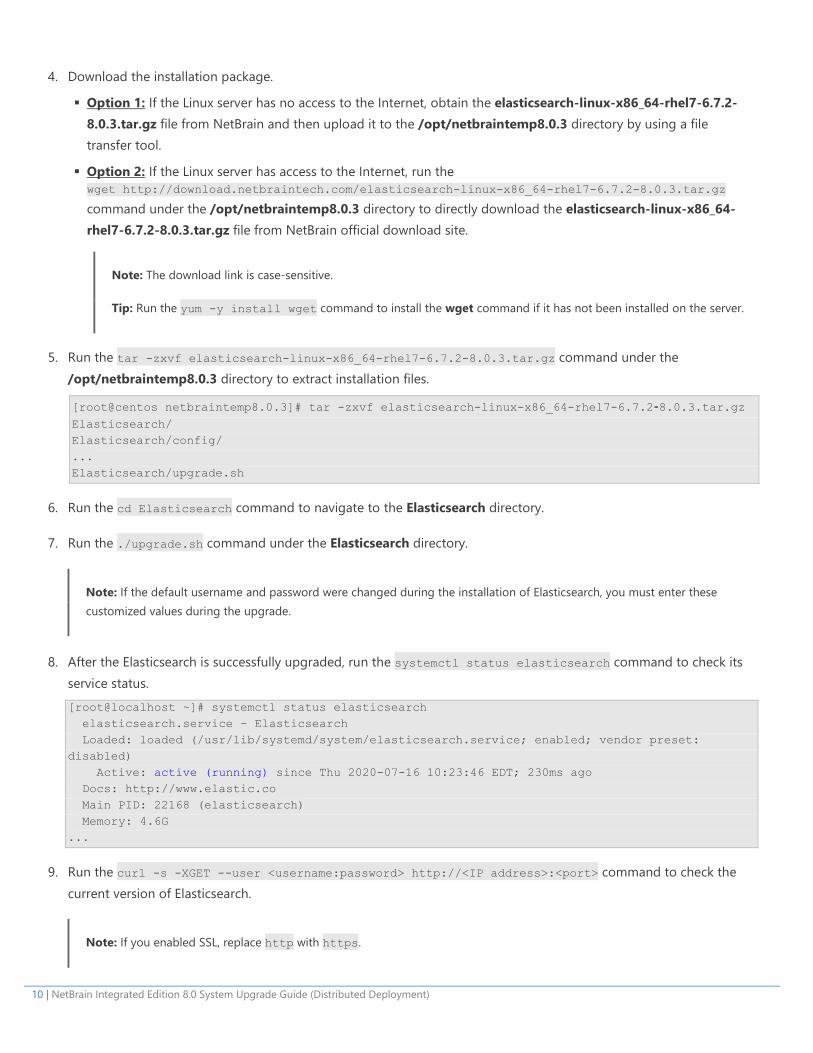
5. Run the tar -zxvf elasticsearch-linux-x86_64-rhel7-6.7.2-8.0.3.tar.gz command under the /opt/netbraintemp8.0.3 directory to extract installation files.
[root@centos netbraintemp8.0.3]# tar -zxvf elasticsearch-linux-x86_64-rhel7-6.7.2-8.0.3.tar.gz Elasticsearch/ Elasticsearch/config/ ... Elasticsearch/upgrade.sh
6. Run the cd Elasticsearch command to navigate to the Elasticsearch directory.
7. Run the ./upgrade.sh command under the Elasticsearch directory.
Note: If the default username and password were changed during the installation of Elasticsearch, you must enter these customized values during the upgrade.
8. After the Elasticsearch is successfully upgraded, run the systemctl status elasticsearch command to check its service status. [root@localhost ~]# systemctl status elasticsearch elasticsearch.service - Elasticsearch Loaded: loaded (/usr/lib/systemd/system/elasticsearch.service; enabled; vendor preset: disabled) Active: active (running) since Thu 2020-07-16 10:23:46 EDT; 230ms ago Docs: http://www.elastic.co Main PID: 22168 (elasticsearch) Memory: 4.6G ...
9. Run the curl -s -XGET --user <username:password> http://<IP address>:<port> command to check the current version of Elasticsearch.
Note: If you enabled SSL, replace http with https.
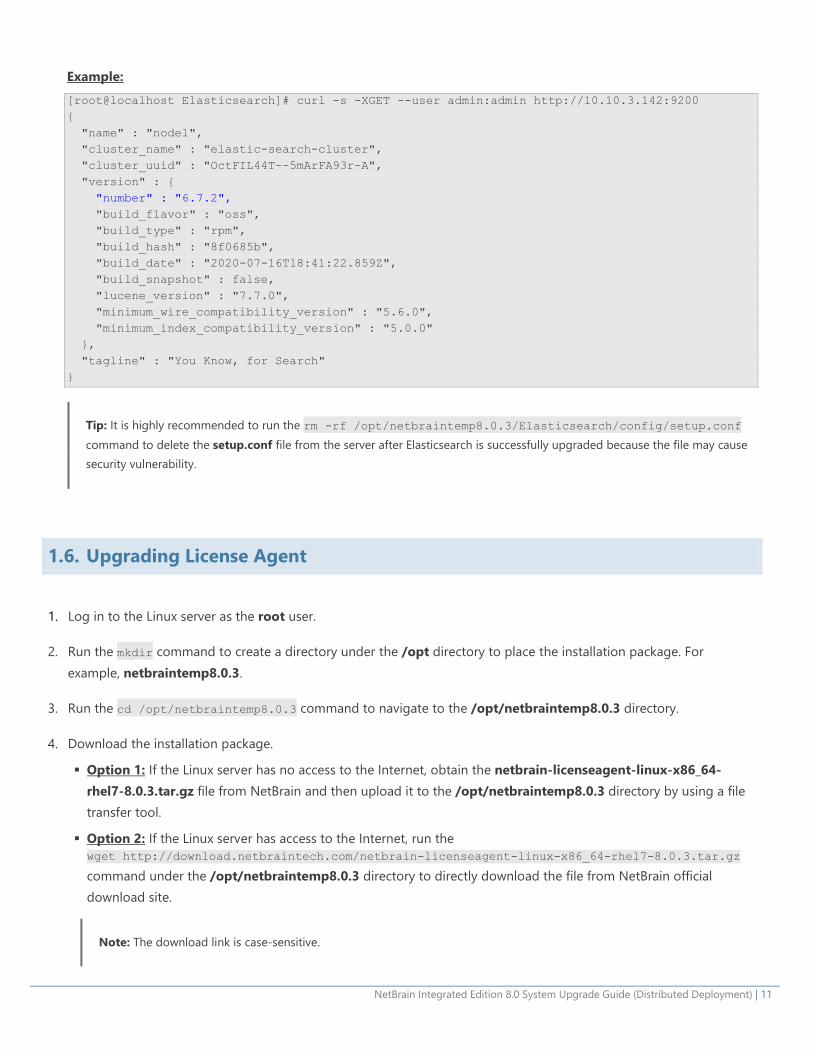
NetBrain Integrated Edition 8.0 System Upgrade Guide (Distributed Deployment) | 11
Example: [root@localhost Elasticsearch]# curl -s -XGET --user admin:admin http://10.10.3.142:9200 { "name" : "node1", "cluster_name" : "elastic-search-cluster", "cluster_uuid" : "OctFIL44T--5mArFA93r-A", "version" : { "number" : "6.7.2", "build_flavor" : "oss", "build_type" : "rpm", "build_hash" : "8f0685b", "build_date" : "2020-07-16T18:41:22.859Z", "build_snapshot" : false, "lucene_version" : "7.7.0", "minimum_wire_compatibility_version" : "5.6.0", "minimum_index_compatibility_version" : "5.0.0" }, "tagline" : "You Know, for Search" }
Tip: It is highly recommended to run the rm -rf /opt/netbraintemp8.0.3/Elasticsearch/config/setup.conf command to delete the setup.conf file from the server after Elasticsearch is successfully upgraded because the file may cause security vulnerability.
1.6. Upgrading License Agent
1. Log in to the Linux server as the root user.
2. Run the mkdir command to create a directory under the /opt directory to place the installation package. For example, netbraintemp8.0.3.
3. Run the cd /opt/netbraintemp8.0.3 command to navigate to the /opt/netbraintemp8.0.3 directory.
4. Download the installation package.
Option 1: If the Linux server has no access to the Internet, obtain the netbrain-licenseagent-linux-x86_64-rhel7-8.0.3.tar.gz file from NetBrain and then upload it to the /opt/netbraintemp8.0.3 directory by using a file transfer tool.
Option 2: If the Linux server has access to the Internet, run the wget http://download.netbraintech.com/netbrain-licenseagent-linux-x86_64-rhel7-8.0.3.tar.gz command under the /opt/netbraintemp8.0.3 directory to directly download the file from NetBrain official download site.
Note: The download link is case-sensitive.

12 | NetBrain Integrated Edition 8.0 System Upgrade Guide (Distributed Deployment)
Tip: Run the yum -y install wget command to install the wget command if it has not been installed on the server.
5. Run the tar -zxvf netbrain-licenseagent-linux-x86_64-rhel7-8.0.3.tar.gz command under the /opt/netbraintemp8.0.3 directory to extract installation files. [root@localhost netbraintemp8.0.3]# tar -zxvf netbrain-licenseagent-linux-x86_64-rhel7-8.0.3.tar.gz License/ License/config/ License/config/install_licenseagent.conf License/config/setup.conf ... License/upgrade.sh
6. Run the cd License command to navigate to the License directory.
7. Run the ./upgrade.sh command under the License directory.
1) Read the license agreement, and then type YES and press the Enter key.
2) Type I ACCEPT and press the Enter key to accept the license agreement. The script starts to check whether the system configuration of the Linux server meets the requirement, and all required dependent packages are installed for License Agent. [root@localhost License]# ./upgrade.sh Please read the End User License Agreement (“EULA”) for the license type (perpetual or subscription) purchased in the order form at https://www.netbraintech.com/legal-tc/ carefully. I have read the subscription EULA, if I have purchased a subscription license, or the perpetual EULA, if I have purchased a perpetual license, at the link provided above. Please type “YES” if you have read the applicable EULA and understand its and understand its contents, or “NO” if you have not read the applicable EULA. [YES/NO]: YES Do you accept the terms in the subscription EULA, if you have purchased a subscription license, or the perpetual EULA, if you have purchased a perpetual license? If you accept, and to continue with the installation, please type "I Accept" to continue. If you do not accept, and to quit the installation script, please type "CANCEL" to stop. [I ACCEPT/CANCEL]: I ACCEPT ... INFO: Component Name: License Agent INFO: RPM name: netbrainlicense INFO: RPM package list: INFO: Starting to check system ... INFO: Successfully installed License Agent. Service is running. INFO: Backing up uninstall.sh SUCCEEDED. INFO: Upgrading License Agent SUCCEEDED.
NetBrain Integrated Edition 8.0 System Upgrade Guide (Distributed Deployment) | 13
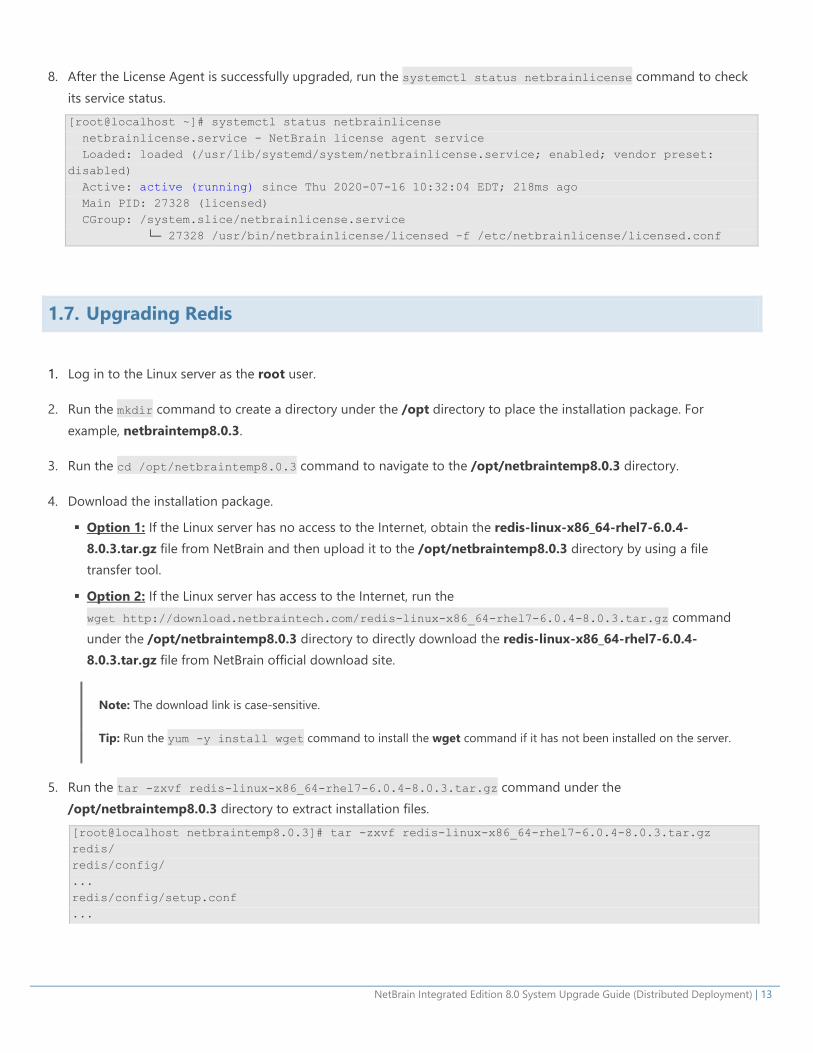
8. After the License Agent is successfully upgraded, run the systemctl status netbrainlicense command to check its service status. [root@localhost ~]# systemctl status netbrainlicense netbrainlicense.service - NetBrain license agent service Loaded: loaded (/usr/lib/systemd/system/netbrainlicense.service; enabled; vendor preset: disabled) Active: active (running) since Thu 2020-07-16 10:32:04 EDT; 218ms ago Main PID: 27328 (licensed) CGroup: /system.slice/netbrainlicense.service └─ 27328 /usr/bin/netbrainlicense/licensed -f /etc/netbrainlicense/licensed.conf
1.7. Upgrading Redis
1. Log in to the Linux server as the root user.
2. Run the mkdir command to create a directory under the /opt directory to place the installation package. For example, netbraintemp8.0.3.
3. Run the cd /opt/netbraintemp8.0.3 command to navigate to the /opt/netbraintemp8.0.3 directory.
4. Download the installation package.
Option 1: If the Linux server has no access to the Internet, obtain the redis-linux-x86_64-rhel7-6.0.4-8.0.3.tar.gz file from NetBrain and then upload it to the /opt/netbraintemp8.0.3 directory by using a file transfer tool.
Option 2: If the Linux server has access to the Internet, run the wget http://download.netbraintech.com/redis-linux-x86_64-rhel7-6.0.4-8.0.3.tar.gz command under the /opt/netbraintemp8.0.3 directory to directly download the redis-linux-x86_64-rhel7-6.0.4-8.0.3.tar.gz file from NetBrain official download site.
Note: The download link is case-sensitive.
Tip: Run the yum -y install wget command to install the wget command if it has not been installed on the server.
5. Run the tar -zxvf redis-linux-x86_64-rhel7-6.0.4-8.0.3.tar.gz command under the /opt/netbraintemp8.0.3 directory to extract installation files. [root@localhost netbraintemp8.0.3]# tar -zxvf redis-linux-x86_64-rhel7-6.0.4-8.0.3.tar.gz redis/ redis/config/ ... redis/config/setup.conf ...
14 | NetBrain Integrated Edition 8.0 System Upgrade Guide (Distributed Deployment)
redis/upgrade.sh ...
6. Run the cd redis command to navigate to the redis directory.
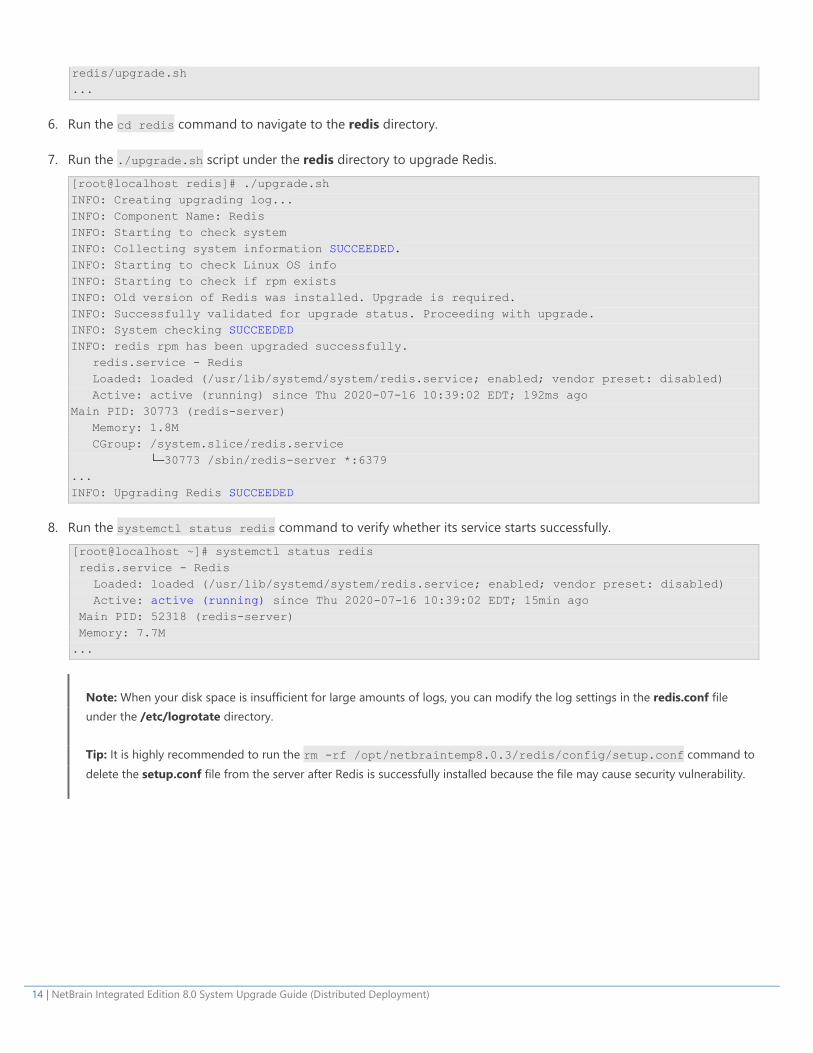
7. Run the ./upgrade.sh script under the redis directory to upgrade Redis. [root@localhost redis]# ./upgrade.sh INFO: Creating upgrading log... INFO: Component Name: Redis INFO: Starting to check system INFO: Collecting system information SUCCEEDED. INFO: Starting to check Linux OS info INFO: Starting to check if rpm exists INFO: Old version of Redis was installed. Upgrade is required. INFO: Successfully validated for upgrade status. Proceeding with upgrade. INFO: System checking SUCCEEDED INFO: redis rpm has been upgraded successfully. redis.service - Redis Loaded: loaded (/usr/lib/systemd/system/redis.service; enabled; vendor preset: disabled) Active: active (running) since Thu 2020-07-16 10:39:02 EDT; 192ms ago Main PID: 30773 (redis-server) Memory: 1.8M CGroup: /system.slice/redis.service └─30773 /sbin/redis-server *:6379 ... INFO: Upgrading Redis SUCCEEDED
8. Run the systemctl status redis command to verify whether its service starts successfully. [root@localhost ~]# systemctl status redis redis.service - Redis Loaded: loaded (/usr/lib/systemd/system/redis.service; enabled; vendor preset: disabled) Active: active (running) since Thu 2020-07-16 10:39:02 EDT; 15min ago Main PID: 52318 (redis-server) Memory: 7.7M ...
Note: When your disk space is insufficient for large amounts of logs, you can modify the log settings in the redis.conf file under the /etc/logrotate directory.
Tip: It is highly recommended to run the rm -rf /opt/netbraintemp8.0.3/redis/config/setup.conf command to delete the setup.conf file from the server after Redis is successfully installed because the file may cause security vulnerability.
NetBrain Integrated Edition 8.0 System Upgrade Guide (Distributed Deployment) | 15
1.8. Upgrading RabbitMQ
Note: RabbitMQ has dependencies on the third-party package socat and logrotate. Before you install the RabbitMQ, run the rpm -qa|grep socat and rpm -qa|grep logrotate commands to check whether they have been installed on the server. If they have not been installed yet, you can choose either option below to install the dependencies.
o Online Install: run the yum -y install socat and yum -y install logrotate commands to install them online.
o Offline Install: refer to Offline Installing Third-party Dependencies for more details.
1. Log in to the Linux server as the root user.
2. Run the mkdir command to create a directory under the /opt directory to place the installation package. For example, netbraintemp8.0.3.
3. Run the cd /opt/netbraintemp8.0.3 command to navigate to the /opt/netbraintemp8.0.3 directory.
4. Download the installation package.
Option 1: If the Linux server has no access to the Internet, obtain the rabbitmq-linux-x86_64-rhel7-3.8.1-8.0.3.tar.gz file from NetBrain and then upload it to the /opt/netbraintemp8.0.3 directory by using a file transfer tool.
Option 2: If the Linux server has access to the Internet, run the wget http://download.netbraintech.com/rabbitmq-linux-x86_64-rhel7-3.8.1-8.0.3.tar.gz command under the /opt/netbraintemp8.0.3 directory to directly download the rabbitmq-linux-x86_64-rhel7-3.8.1-8.0.3.tar.gz file from NetBrain official download site.
Note: The download link is case-sensitive.
Tip: Run the yum -y install wget command to install the wget command if it has not been installed on the server.
5. Run the tar -zxvf rabbitmq-linux-x86_64-rhel7-3.8.1-8.0.3.tar.gz command under the /opt/netbraintemp8.0.3 directory to extract installation files. [root@localhost netbraintemp8.0.3]# tar -zxvf rabbitmq-linux-x86_64-rhel7-3.8.1-8.0.3.tar.gz rabbitmq/ rabbitmq/config/ rabbitmq/config/setup.conf ... rabbitmq/upgrade.sh ..
6. Run the cd rabbitmq command to navigate to the rabbitmq directory.
7. Run the ./upgrade.sh script under the rabbitmq directory to upgrade RabbitMQ.
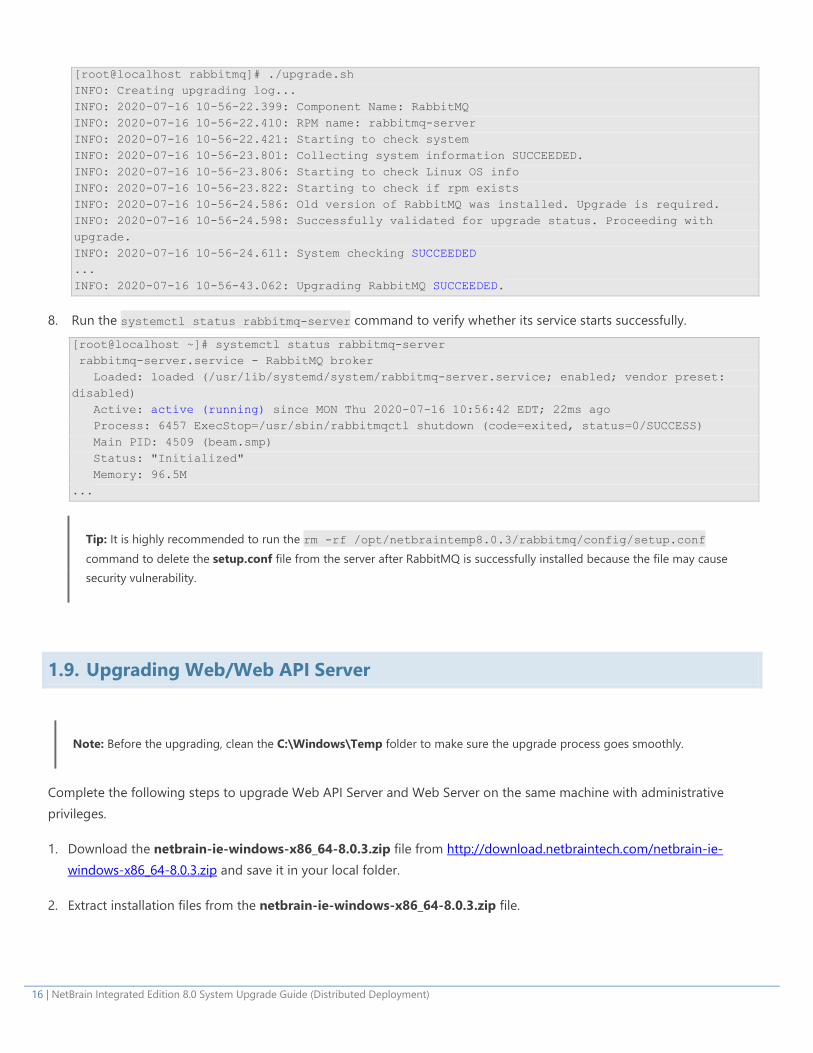
16 | NetBrain Integrated Edition 8.0 System Upgrade Guide (Distributed Deployment)
[root@localhost rabbitmq]# ./upgrade.sh INFO: Creating upgrading log... INFO: 2020-07-16 10-56-22.399: Component Name: RabbitMQ INFO: 2020-07-16 10-56-22.410: RPM name: rabbitmq-server INFO: 2020-07-16 10-56-22.421: Starting to check system INFO: 2020-07-16 10-56-23.801: Collecting system information SUCCEEDED. INFO: 2020-07-16 10-56-23.806: Starting to check Linux OS info INFO: 2020-07-16 10-56-23.822: Starting to check if rpm exists INFO: 2020-07-16 10-56-24.586: Old version of RabbitMQ was installed. Upgrade is required. INFO: 2020-07-16 10-56-24.598: Successfully validated for upgrade status. Proceeding with upgrade. INFO: 2020-07-16 10-56-24.611: System checking SUCCEEDED ... INFO: 2020-07-16 10-56-43.062: Upgrading RabbitMQ SUCCEEDED.
8. Run the systemctl status rabbitmq-server command to verify whether its service starts successfully. [root@localhost ~]# systemctl status rabbitmq-server rabbitmq-server.service - RabbitMQ broker Loaded: loaded (/usr/lib/systemd/system/rabbitmq-server.service; enabled; vendor preset: disabled) Active: active (running) since MON Thu 2020-07-16 10:56:42 EDT; 22ms ago Process: 6457 ExecStop=/usr/sbin/rabbitmqctl shutdown (code=exited, status=0/SUCCESS) Main PID: 4509 (beam.smp) Status: "Initialized" Memory: 96.5M ...
Tip: It is highly recommended to run the rm -rf /opt/netbraintemp8.0.3/rabbitmq/config/setup.conf command to delete the setup.conf file from the server after RabbitMQ is successfully installed because the file may cause security vulnerability.
1.9. Upgrading Web/Web API Server
Note: Before the upgrading, clean the C:\Windows\Temp folder to make sure the upgrade process goes smoothly.
Complete the following steps to upgrade Web API Server and Web Server on the same machine with administrative privileges.
1. Download the netbrain-ie-windows-x86_64-8.0.3.zip file from http://download.netbraintech.com/netbrain-ie-windows-x86_64-8.0.3.zip and save it in your local folder.
2. Extract installation files from the netbrain-ie-windows-x86_64-8.0.3.zip file.
NetBrain Integrated Edition 8.0 System Upgrade Guide (Distributed Deployment) | 17
3. Right-click the netbrain-ie-windows-x86_64-8.0.3.exe file, and then select Run as administrator to start the Installation Wizard.
4. Follow the Installation Wizard to complete the upgrade step by step:
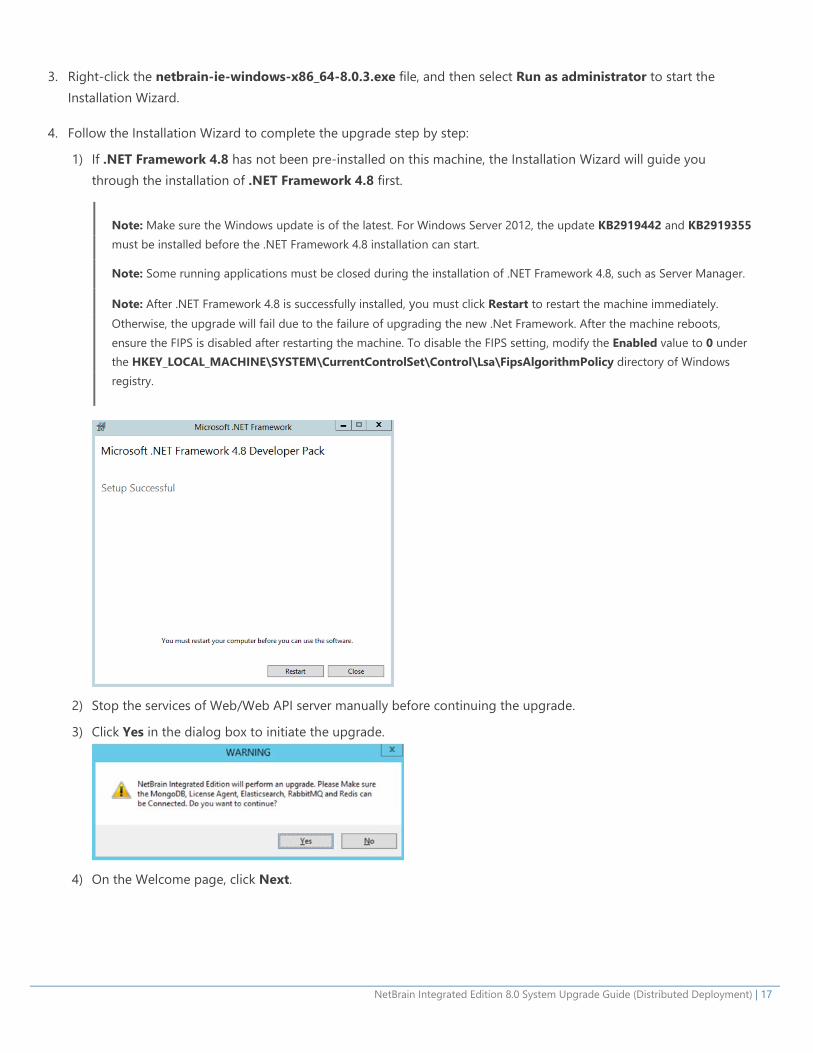
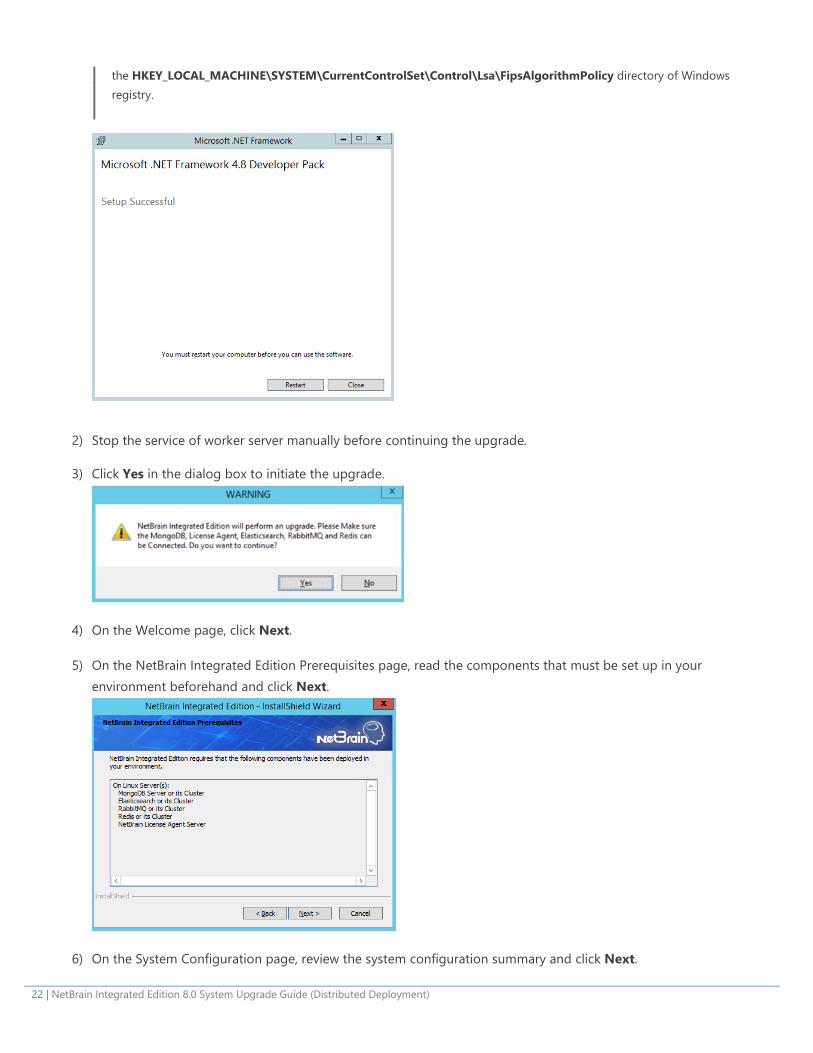
1) If .NET Framework 4.8 has not been pre-installed on this machine, the Installation Wizard will guide you through the installation of .NET Framework 4.8 first.
Note: Make sure the Windows update is of the latest. For Windows Server 2012, the update KB2919442 and KB2919355 must be installed before the .NET Framework 4.8 installation can start.
Note: Some running applications must be closed during the installation of .NET Framework 4.8, such as Server Manager.
Note: After .NET Framework 4.8 is successfully installed, you must click Restart to restart the machine immediately. Otherwise, the upgrade will fail due to the failure of upgrading the new .Net Framework. After the machine reboots, ensure the FIPS is disabled after restarting the machine. To disable the FIPS setting, modify the Enabled value to 0 under the HKEY_LOCAL_MACHINE\SYSTEM\CurrentControlSet\Control\Lsa\FipsAlgorithmPolicy directory of Windows registry.
2) Stop the services of Web/Web API server manually before continuing the upgrade.
3) Click Yes in the dialog box to initiate the upgrade.
4) On the Welcome page, click Next.
18 | NetBrain Integrated Edition 8.0 System Upgrade Guide (Distributed Deployment)
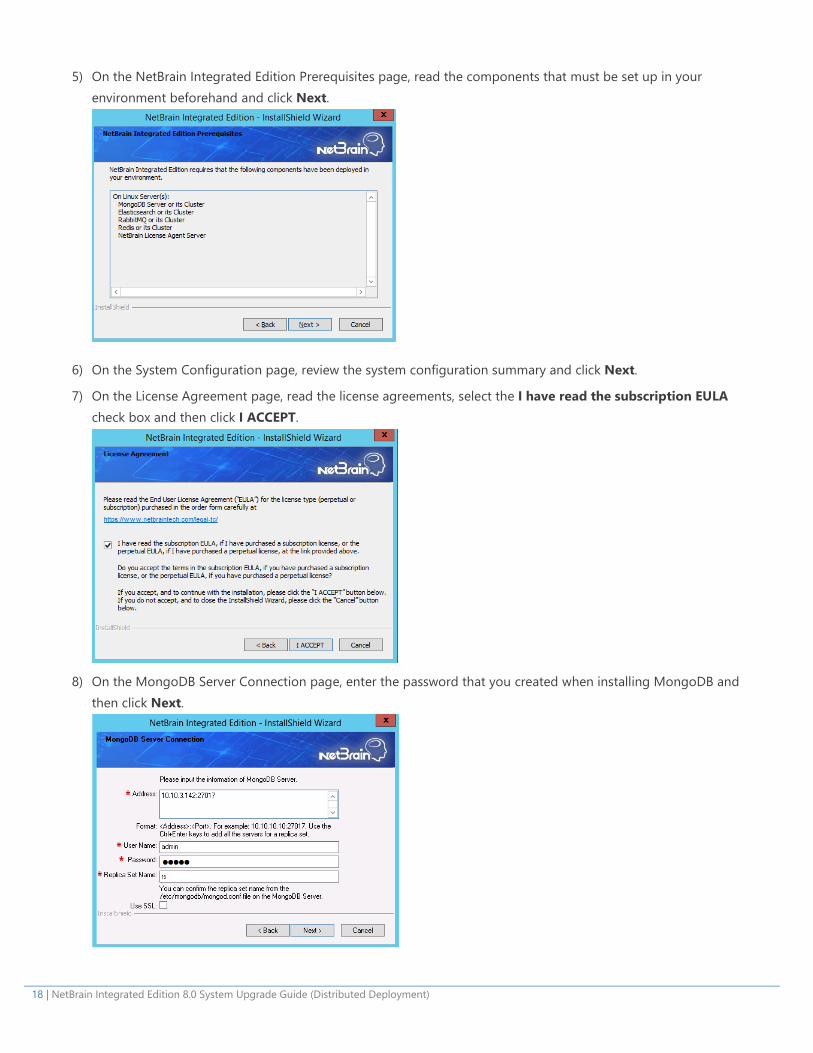
5) On the NetBrain Integrated Edition Prerequisites page, read the components that must be set up in your environment beforehand and click Next.
6) On the System Configuration page, review the system configuration summary and click Next.
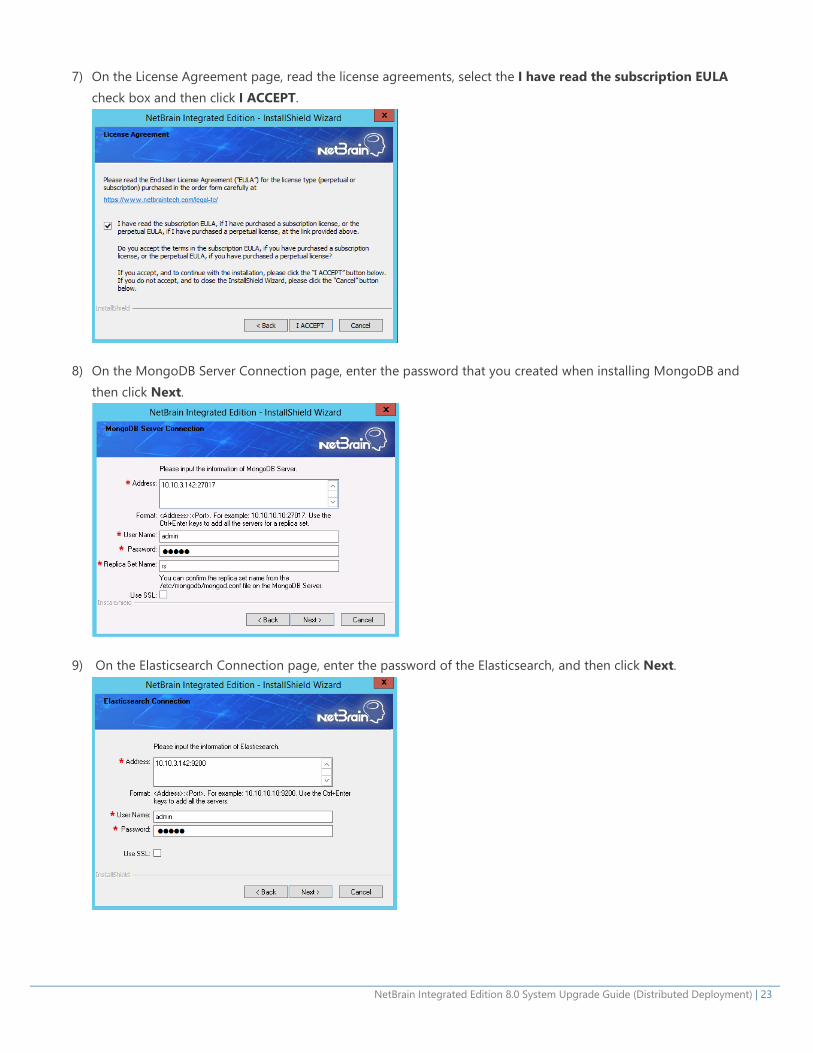
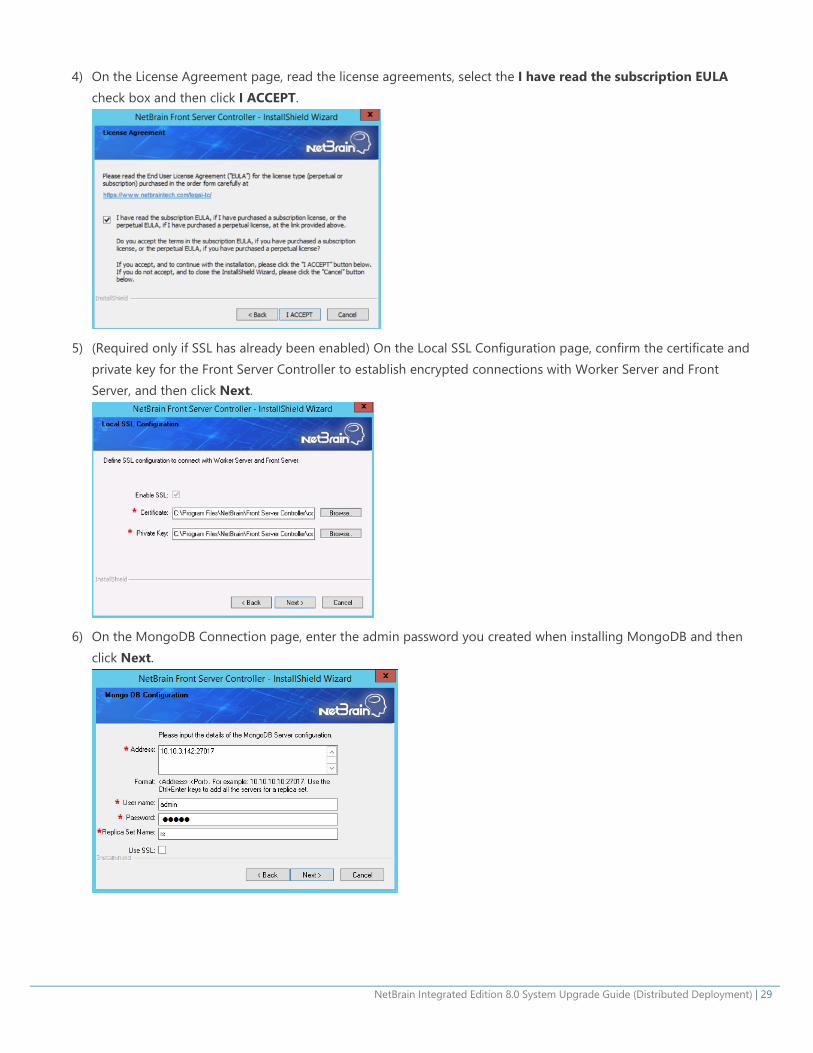
7) On the License Agreement page, read the license agreements, select the I have read the subscription EULA check box and then click I ACCEPT.
8) On the MongoDB Server Connection page, enter the password that you created when installing MongoDB and
then click Next.
NetBrain Integrated Edition 8.0 System Upgrade Guide (Distributed Deployment) | 19
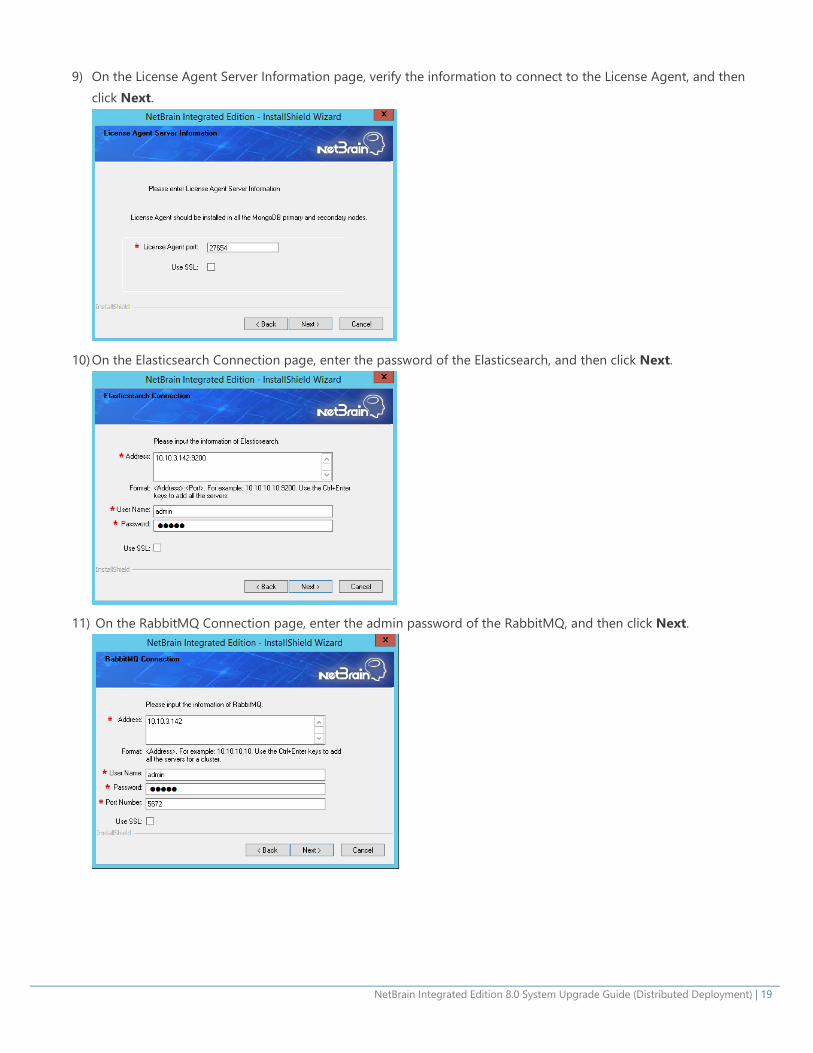
9) On the License Agent Server Information page, verify the information to connect to the License Agent, and then click Next.
10) On the Elasticsearch Connection page, enter the password of the Elasticsearch, and then click Next.
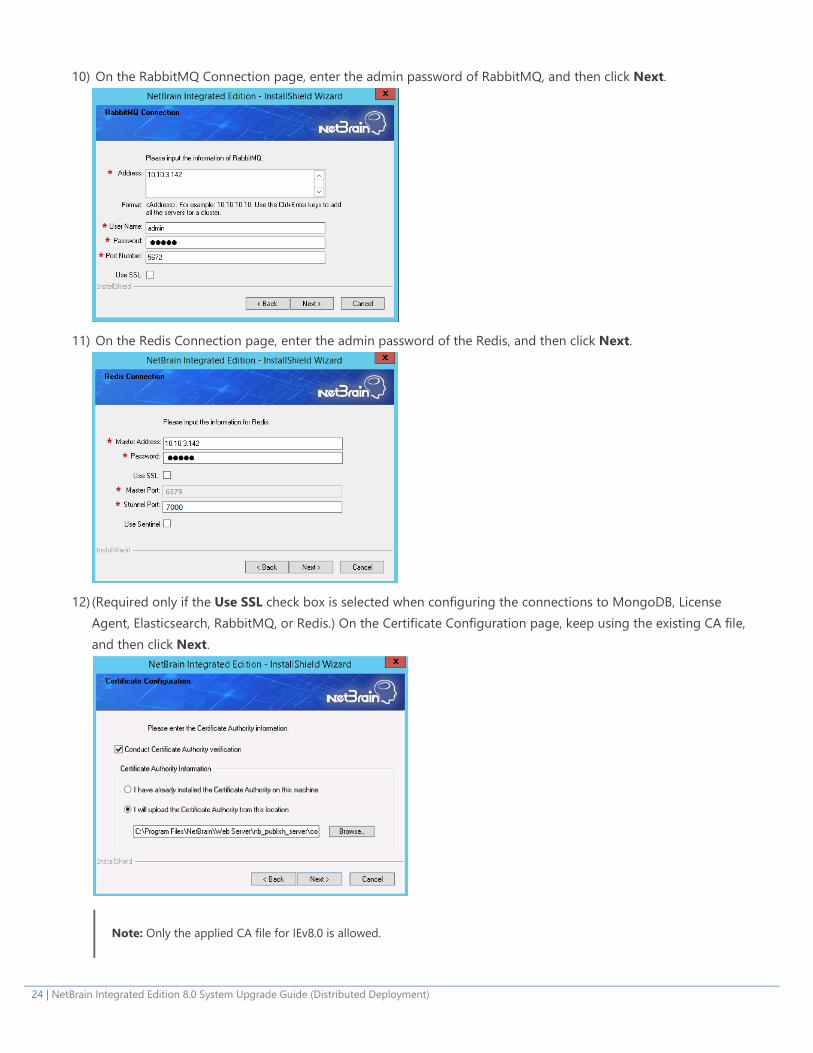
11) On the RabbitMQ Connection page, enter the admin password of the RabbitMQ, and then click Next.
20 | NetBrain Integrated Edition 8.0 System Upgrade Guide (Distributed Deployment)
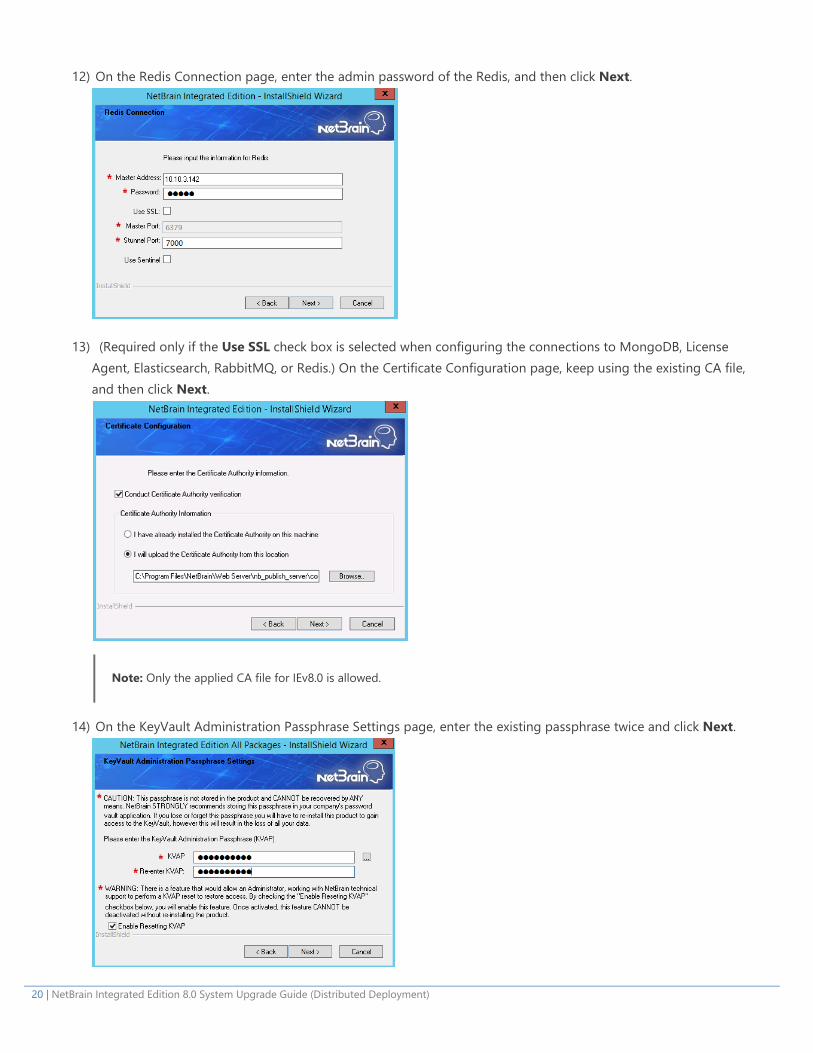
12) On the Redis Connection page, enter the admin password of the Redis, and then click Next.
13) (Required only if the Use SSL check box is selected when configuring the connections to MongoDB, License Agent, Elasticsearch, RabbitMQ, or Redis.) On the Certificate Configuration page, keep using the existing CA file, and then click Next.
Note: Only the applied CA file for IEv8.0 is allowed.
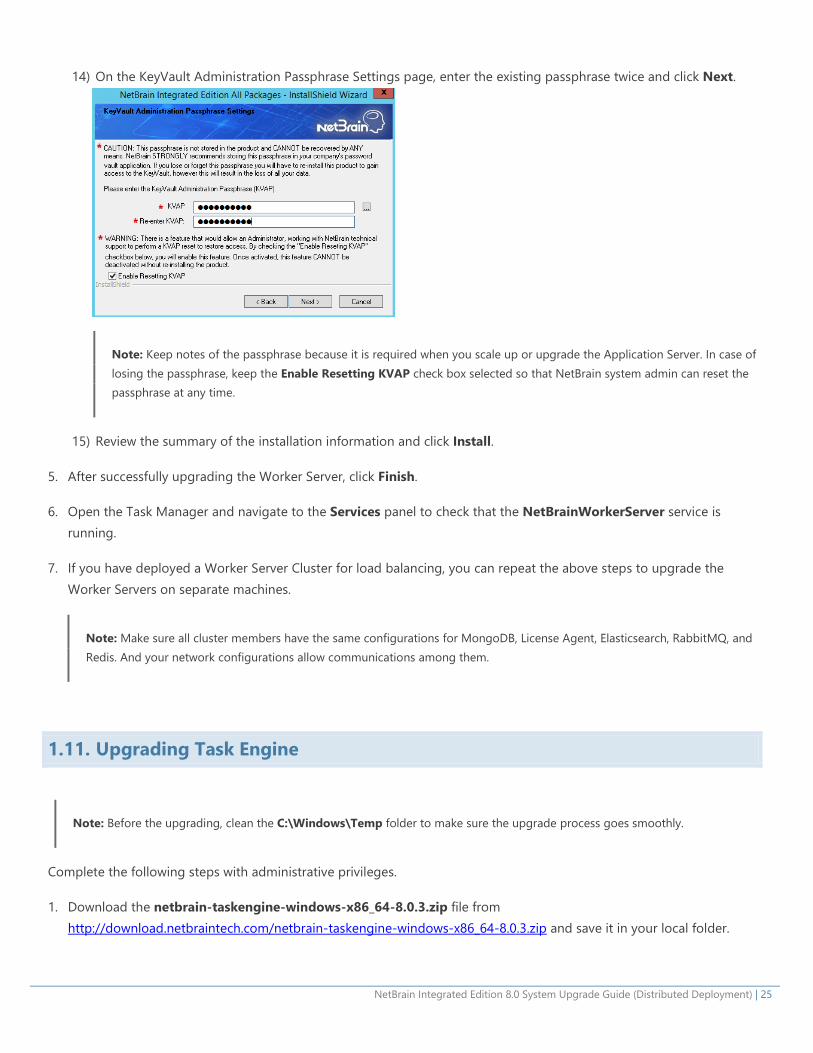
14) On the KeyVault Administration Passphrase Settings page, enter the existing passphrase twice and click Next.

NetBrain Integrated Edition 8.0 System Upgrade Guide (Distributed Deployment) | 21
Note: Keep notes of the passphrase because it is required when you scale up or upgrade these servers. In case of losing the passphrase, keep the Enable Resetting KVAP check box selected so that NetBrain system admin can reset the passphrase at any time.
15) Review the summary of the installation settings and click Install. The installation will take some time and it depends on the scale of your database.
5. After successfully upgrading the Web Server and Web API Server, click Finish.
6. Open the IIS Manager to check that the Default Web Site and ServicesAPI service exist.
7. Open the Task Manager to check that the NetBrainKCProxy service is running.
1.10. Upgrading Worker Server
Note: Before the upgrading, clean the C:\Windows\Temp folder to make sure the upgrade process goes smoothly.
Complete the following steps with administrative privileges.
1. Download the netbrain-ie-windows-x86_64-8.0.3.zip file from http://download.netbraintech.com/netbrain-ie-windows-x86_64-8.0.3.zip and save it in your local folder.
2. Extract installation files from the netbrain-ie-windows-x86_64-8.0.3.zip file.
3. Right-click the netbrain-ie-windows-x86_64-8.0.3.exe file, and then select Run as administrator to launch the Installation Wizard.
4. Follow the Installation Wizard to complete the upgrade step by step:
1) If .NET Framework 4.8 has not been pre-installed on this machine, the Installation Wizard will guide you through the installation of .NET Framework 4.8 first.
Note: Make sure the Windows update is of the latest. For Windows Server 2012, the update KB2919442 and KB2919355 must be installed before the .NET Framework 4.8 installation can start.
Note: Some running applications must be closed during the installation of .NET Framework 4.8, such as Server Manager.
Note: After .NET Framework 4.8 is successfully installed, you must click Restart to restart the machine immediately. Otherwise, the upgrade will fail due to the failure of upgrading the new .Net Framework. After the machine reboots, ensure the FIPS is disabled after restarting the machine. To disable the FIPS setting, modify the Enabled value to 0 under
22 | NetBrain Integrated Edition 8.0 System Upgrade Guide (Distributed Deployment)
the HKEY_LOCAL_MACHINE\SYSTEM\CurrentControlSet\Control\Lsa\FipsAlgorithmPolicy directory of Windows registry.
2) Stop the service of worker server manually before continuing the upgrade.
3) Click Yes in the dialog box to initiate the upgrade.
4) On the Welcome page, click Next.
5) On the NetBrain Integrated Edition Prerequisites page, read the components that must be set up in your environment beforehand and click Next.
6) On the System Configuration page, review the system configuration summary and click Next.
NetBrain Integrated Edition 8.0 System Upgrade Guide (Distributed Deployment) | 23
7) On the License Agreement page, read the license agreements, select the I have read the subscription EULA check box and then click I ACCEPT.
8) On the MongoDB Server Connection page, enter the password that you created when installing MongoDB and then click Next.
9) On the Elasticsearch Connection page, enter the password of the Elasticsearch, and then click Next.
24 | NetBrain Integrated Edition 8.0 System Upgrade Guide (Distributed Deployment)
10) On the RabbitMQ Connection page, enter the admin password of RabbitMQ, and then click Next.
11) On the Redis Connection page, enter the admin password of the Redis, and then click Next.
12) (Required only if the Use SSL check box is selected when configuring the connections to MongoDB, License
Agent, Elasticsearch, RabbitMQ, or Redis.) On the Certificate Configuration page, keep using the existing CA file, and then click Next.
Note: Only the applied CA file for IEv8.0 is allowed.
NetBrain Integrated Edition 8.0 System Upgrade Guide (Distributed Deployment) | 25
14) On the KeyVault Administration Passphrase Settings page, enter the existing passphrase twice and click Next.
Note: Keep notes of the passphrase because it is required when you scale up or upgrade the Application Server. In case of losing the passphrase, keep the Enable Resetting KVAP check box selected so that NetBrain system admin can reset the passphrase at any time.
15) Review the summary of the installation information and click Install.
5. After successfully upgrading the Worker Server, click Finish.
6. Open the Task Manager and navigate to the Services panel to check that the NetBrainWorkerServer service is running.
7. If you have deployed a Worker Server Cluster for load balancing, you can repeat the above steps to upgrade the Worker Servers on separate machines.
Note: Make sure all cluster members have the same configurations for MongoDB, License Agent, Elasticsearch, RabbitMQ, and Redis. And your network configurations allow communications among them.
1.11. Upgrading Task Engine
Note: Before the upgrading, clean the C:\Windows\Temp folder to make sure the upgrade process goes smoothly.
Complete the following steps with administrative privileges.
1. Download the netbrain-taskengine-windows-x86_64-8.0.3.zip file from http://download.netbraintech.com/netbrain-taskengine-windows-x86_64-8.0.3.zip and save it in your local folder.
26 | NetBrain Integrated Edition 8.0 System Upgrade Guide (Distributed Deployment)
2. Extract installation files from the netbrain-taskengine-windows-x86_64-8.0.3.zip file.
3. Right-click the netbrain-taskengine-windows-x86_64-8.0.3.exe file, and then select Run as administrator to start the Installation Wizard.
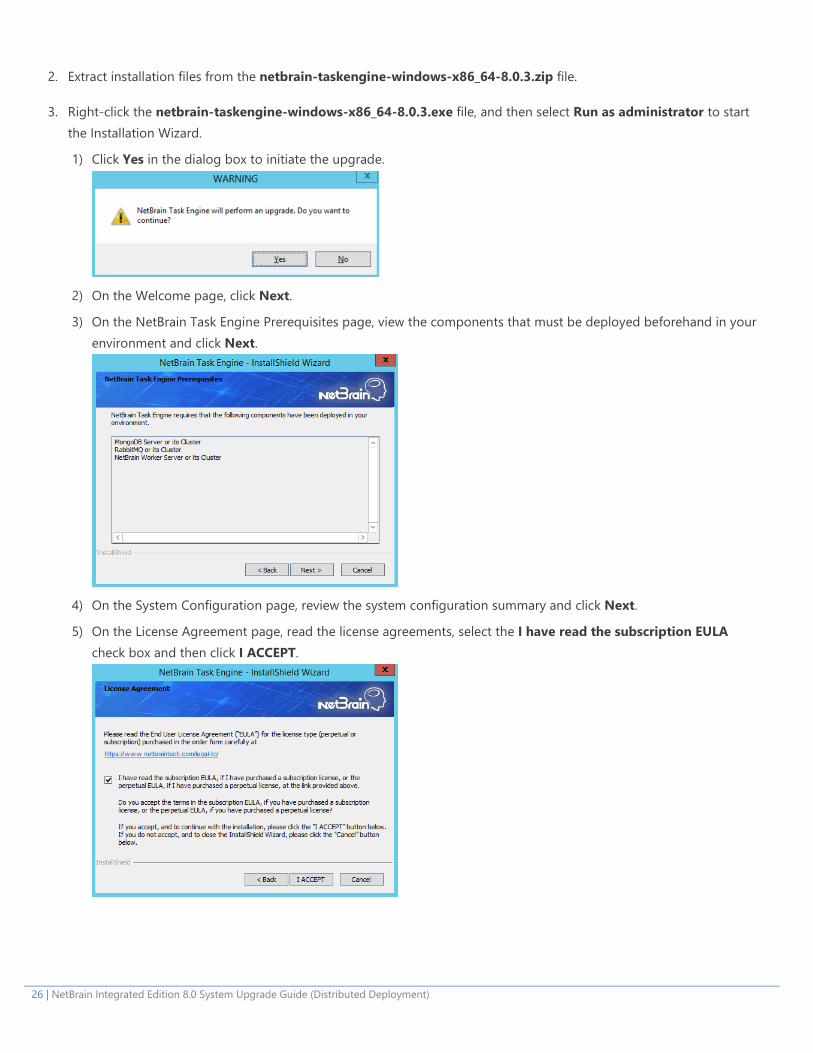
1) Click Yes in the dialog box to initiate the upgrade.
2) On the Welcome page, click Next.
3) On the NetBrain Task Engine Prerequisites page, view the components that must be deployed beforehand in your environment and click Next.
4) On the System Configuration page, review the system configuration summary and click Next.
5) On the License Agreement page, read the license agreements, select the I have read the subscription EULA check box and then click I ACCEPT.
NetBrain Integrated Edition 8.0 System Upgrade Guide (Distributed Deployment) | 27
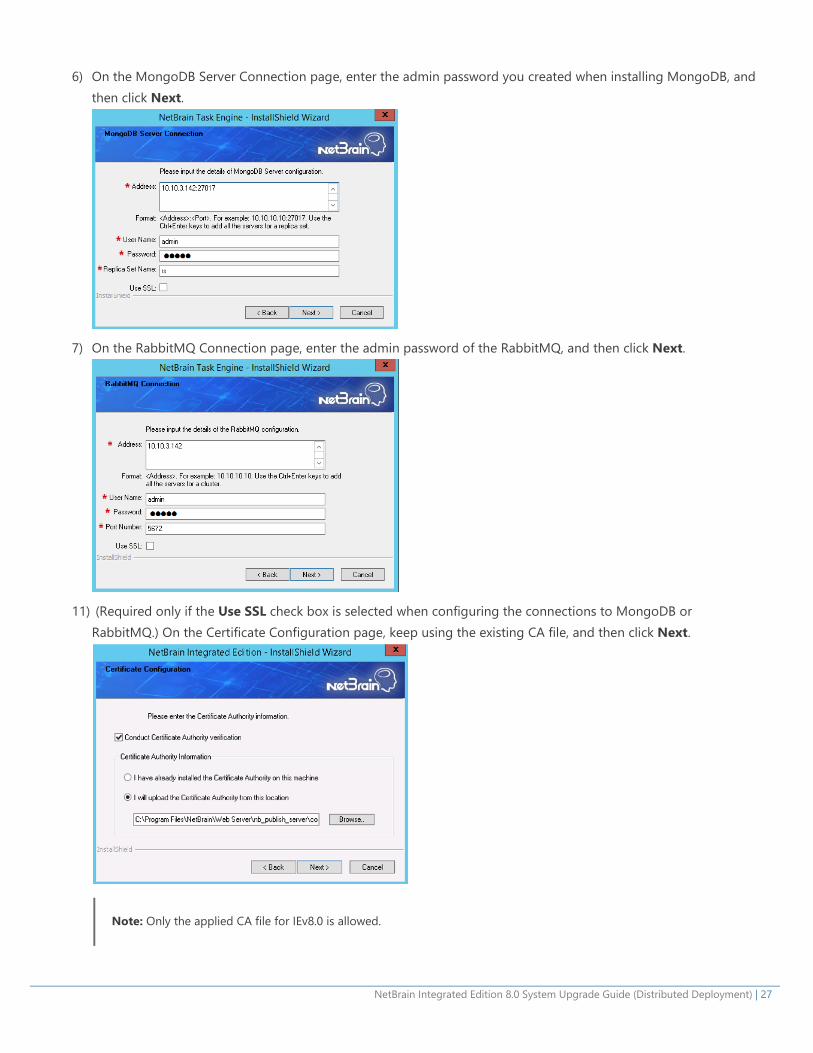
6) On the MongoDB Server Connection page, enter the admin password you created when installing MongoDB, and then click Next.
7) On the RabbitMQ Connection page, enter the admin password of the RabbitMQ, and then click Next.
11) (Required only if the Use SSL check box is selected when configuring the connections to MongoDB or
RabbitMQ.) On the Certificate Configuration page, keep using the existing CA file, and then click Next.
Note: Only the applied CA file for IEv8.0 is allowed.
28 | NetBrain Integrated Edition 8.0 System Upgrade Guide (Distributed Deployment)
12) Review the summary of the installation information and then click Install.
4. After successfully upgrading the Task Engine, click Finish.
5. Open the Task Manager and navigate to the Services panel to check that the NetBrainTaskEngine service is running.
1.12. Upgrading Front Server Controller
Note: Before the upgrading, clean the C:\Windows\Temp folder to make sure the upgrade process goes smoothly.
Complete the following steps with administrative privileges.
1. Download the netbrain-frontservercontroller-windows-x86_64-8.0.3.zip file from http://download.netbraintech.com/netbrain-frontservercontroller-windows-x86_64-8.0.3.zip and save it in your local folder.
2. Extract installation files from the netbrain-frontservercontroller-windows-x86_64-8.0.3.zip file.
3. Right-click the netbrain-frontservercontroller-windows-x86_64-8.0.3.exe file, and then select Run as administrator to start the Installation Wizard.
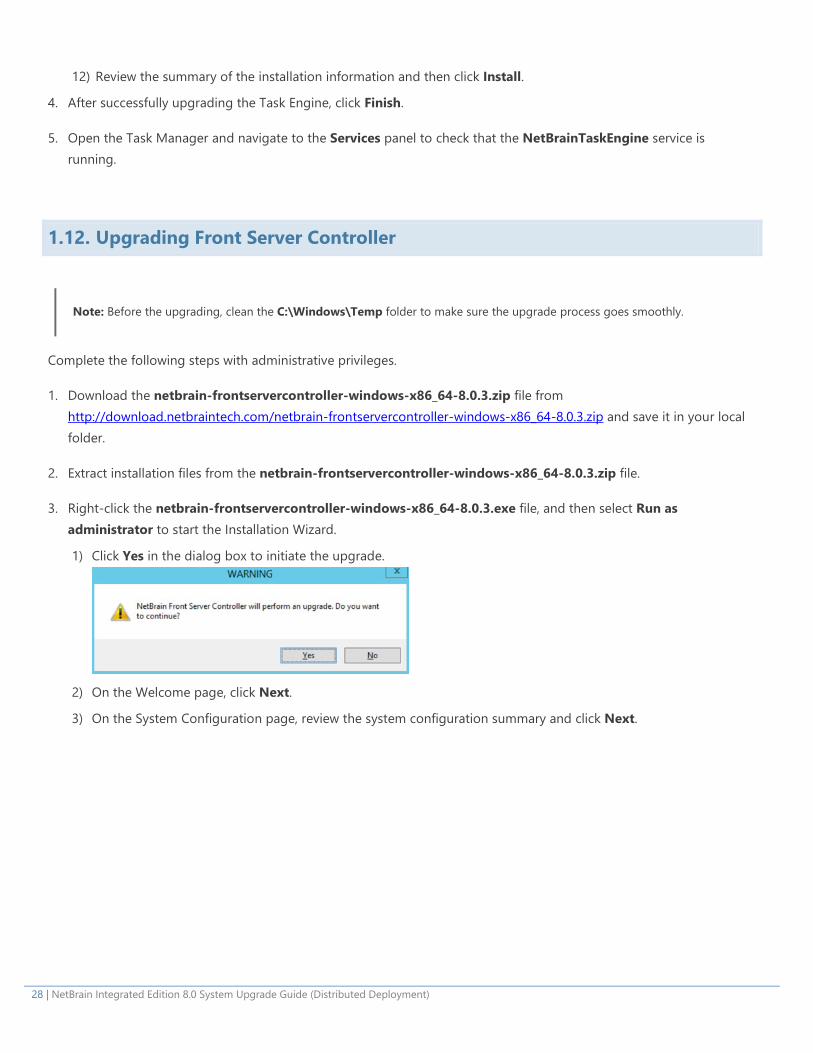
1) Click Yes in the dialog box to initiate the upgrade.
2) On the Welcome page, click Next.
3) On the System Configuration page, review the system configuration summary and click Next.
NetBrain Integrated Edition 8.0 System Upgrade Guide (Distributed Deployment) | 29
4) On the License Agreement page, read the license agreements, select the I have read the subscription EULA check box and then click I ACCEPT.
5) (Required only if SSL has already been enabled) On the Local SSL Configuration page, confirm the certificate and
private key for the Front Server Controller to establish encrypted connections with Worker Server and Front Server, and then click Next.
6) On the MongoDB Connection page, enter the admin password you created when installing MongoDB and then
click Next.
30 | NetBrain Integrated Edition 8.0 System Upgrade Guide (Distributed Deployment)
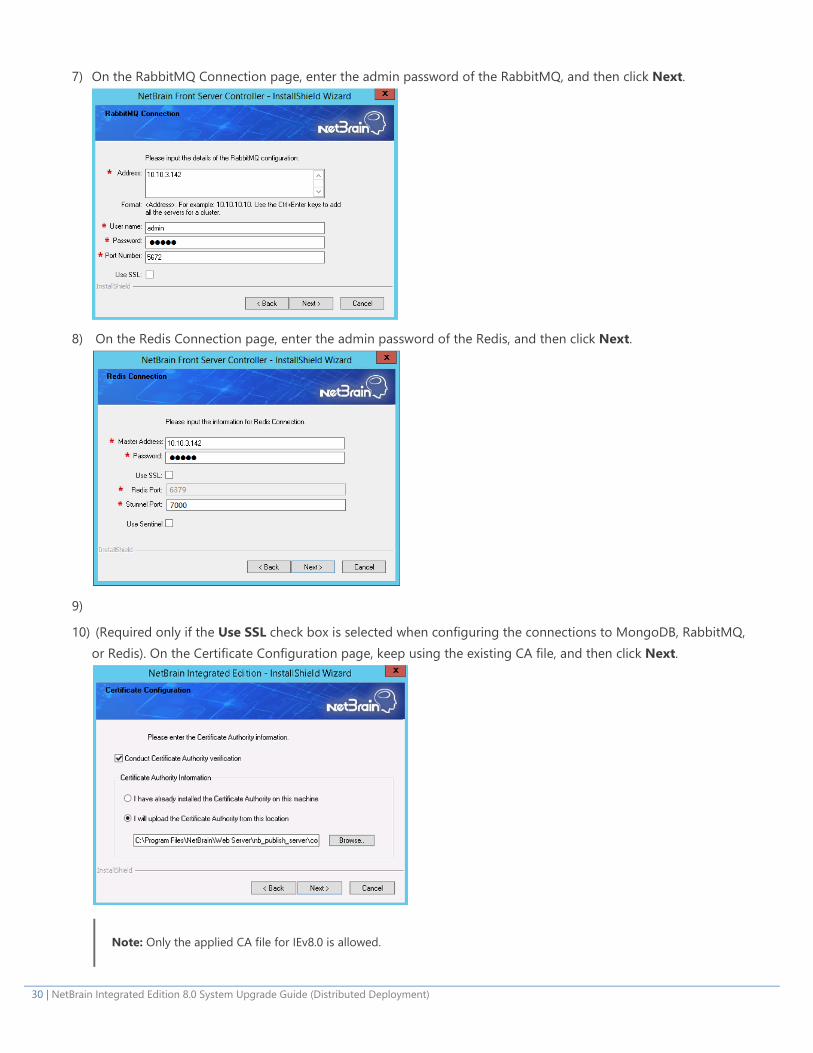
7) On the RabbitMQ Connection page, enter the admin password of the RabbitMQ, and then click Next.
8) On the Redis Connection page, enter the admin password of the Redis, and then click Next.
9)
10) (Required only if the Use SSL check box is selected when configuring the connections to MongoDB, RabbitMQ, or Redis). On the Certificate Configuration page, keep using the existing CA file, and then click Next.
Note: Only the applied CA file for IEv8.0 is allowed.
NetBrain Integrated Edition 8.0 System Upgrade Guide (Distributed Deployment) | 31
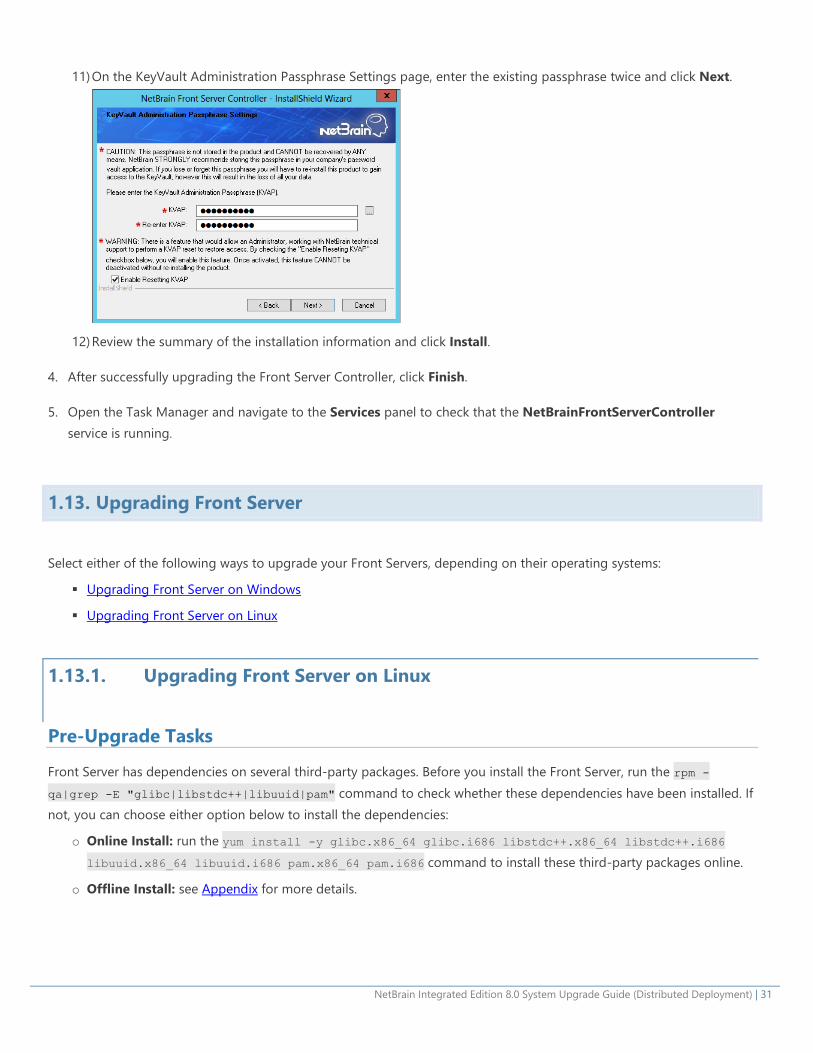
11) On the KeyVault Administration Passphrase Settings page, enter the existing passphrase twice and click Next.
12) Review the summary of the installation information and click Install.
4. After successfully upgrading the Front Server Controller, click Finish.
5. Open the Task Manager and navigate to the Services panel to check that the NetBrainFrontServerController service is running.
1.13. Upgrading Front Server
Select either of the following ways to upgrade your Front Servers, depending on their operating systems:
Upgrading Front Server on Windows
Upgrading Front Server on Linux
1.13.1. Upgrading Front Server on Linux
Pre-Upgrade Tasks
Front Server has dependencies on several third-party packages. Before you install the Front Server, run the rpm -qa|grep -E "glibc|libstdc++|libuuid|pam" command to check whether these dependencies have been installed. If not, you can choose either option below to install the dependencies:
o Online Install: run the yum install -y glibc.x86_64 glibc.i686 libstdc++.x86_64 libstdc++.i686
libuuid.x86_64 libuuid.i686 pam.x86_64 pam.i686 command to install these third-party packages online.
o Offline Install: see Appendix for more details.
32 | NetBrain Integrated Edition 8.0 System Upgrade Guide (Distributed Deployment)
Upgrading Front Server on Linux
1. Log in to the Linux server as the root user.
2. Run the mkdir command to create a directory under the /opt directory to place the Front Server installation package. For example, netbraintemp8.0.3.
3. Run the cd /opt/netbraintemp8.0.3 command to navigate to the /opt/netbraintemp8.0.3 directory.
4. Download the installation package.
Option 1: If the Linux server has no access to the Internet, obtain the netbrain-frontserver-linux-x86_64-rhel7-8.0.3.tar.gz file from NetBrain and then upload it to the /opt/netbraintemp8.0.3 directory by using a file transfer tool.
Option 2: If the Linux server has access to the Internet, run the wget http://download.netbraintech.com/netbrain-frontserver-linux-x86_64-rhel7-8.0.3.tar.gz command under the /opt/netbraintemp8.0.3 directory to directly download the netbrain-frontserver-linux-x86_64-rhel7-8.0.3.tar.gz file from NetBrain official download site.
Note: The download link is case-sensitive.
Tip: Run the yum -y install wget command to install the wget command if it has not been installed on the server.
5. Run the tar -zxvf netbrain-frontserver-linux-x86_64-rhel7-8.0.3.tar.gz command under the /opt/netbraintemp8.0.3 directory to extract installation files. [root@localhost netbraintemp8.0.3]# tar -zxvf netbrain-frontserver-linux-x86_64-rhel7-8.0.3.tar.gz FrontServer/ FrontServer/config/ FrontServer/upgrade.sh ...
6. Run the cd FrontServer command to navigate to the FrontServer directory.
7. Run the ./upgrade.sh script under the FrontServer directory to upgrade the Front Server.
1) Read the License Agreement, and type YES.
2) Type I ACCEPT to accept the License Agreement. The script starts to install the Front Server. [root@localhost FrontServer]# ./upgrade.sh Please read the End User License Agreement (“EULA”) for the license type (perpetual or subscription) purchased in the order form at https://www.netbraintech.com/legal-tc/ carefully. I have read the subscription EULA, if I have purchased a subscription license, or the perpetual EULA, if I have purchased a perpetual license, at the link provided above. Please type “YES” if you have read the applicable EULA and understand its contents, or “NO” if you have not read the
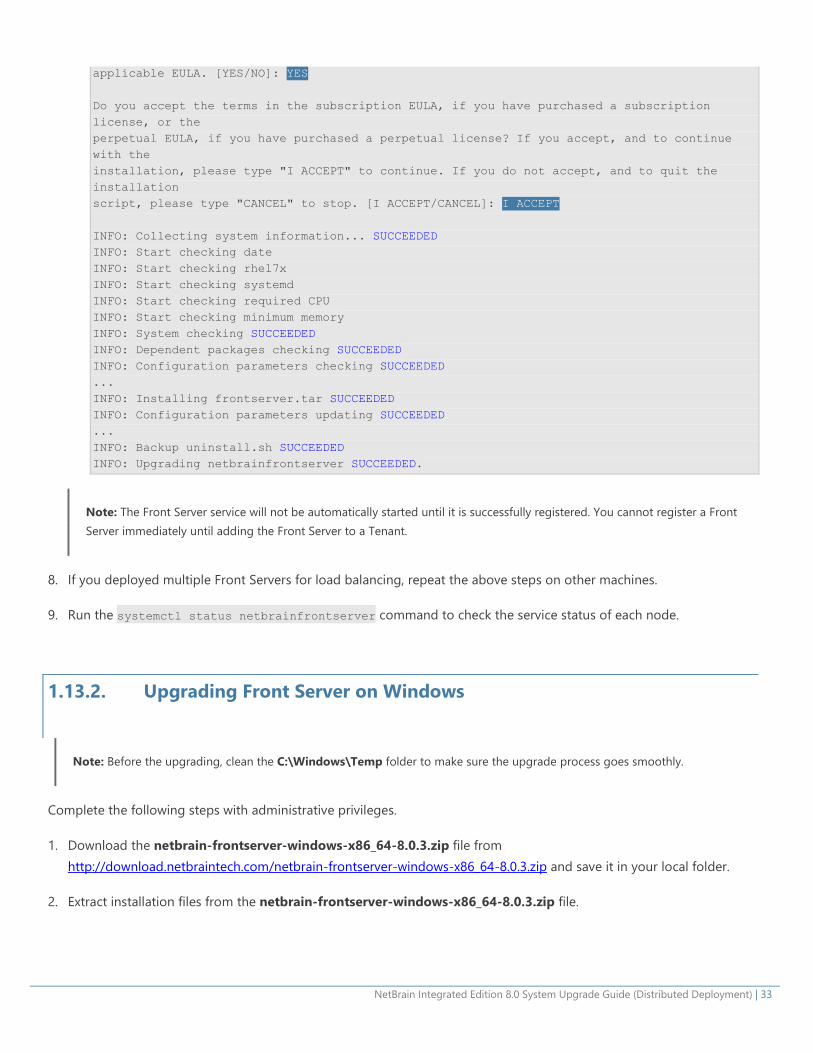
NetBrain Integrated Edition 8.0 System Upgrade Guide (Distributed Deployment) | 33
applicable EULA. [YES/NO]: YES Do you accept the terms in the subscription EULA, if you have purchased a subscription license, or the perpetual EULA, if you have purchased a perpetual license? If you accept, and to continue with the installation, please type "I ACCEPT" to continue. If you do not accept, and to quit the installation script, please type "CANCEL" to stop. [I ACCEPT/CANCEL]: I ACCEPT INFO: Collecting system information... SUCCEEDED INFO: Start checking date INFO: Start checking rhel7x INFO: Start checking systemd INFO: Start checking required CPU INFO: Start checking minimum memory INFO: System checking SUCCEEDED INFO: Dependent packages checking SUCCEEDED INFO: Configuration parameters checking SUCCEEDED ... INFO: Installing frontserver.tar SUCCEEDED INFO: Configuration parameters updating SUCCEEDED ... INFO: Backup uninstall.sh SUCCEEDED INFO: Upgrading netbrainfrontserver SUCCEEDED.
Note: The Front Server service will not be automatically started until it is successfully registered. You cannot register a Front Server immediately until adding the Front Server to a Tenant.
8. If you deployed multiple Front Servers for load balancing, repeat the above steps on other machines.
9. Run the systemctl status netbrainfrontserver command to check the service status of each node.
1.13.2. Upgrading Front Server on Windows
Note: Before the upgrading, clean the C:\Windows\Temp folder to make sure the upgrade process goes smoothly.
Complete the following steps with administrative privileges.
1. Download the netbrain-frontserver-windows-x86_64-8.0.3.zip file from http://download.netbraintech.com/netbrain-frontserver-windows-x86_64-8.0.3.zip and save it in your local folder.
2. Extract installation files from the netbrain-frontserver-windows-x86_64-8.0.3.zip file.
34 | NetBrain Integrated Edition 8.0 System Upgrade Guide (Distributed Deployment)
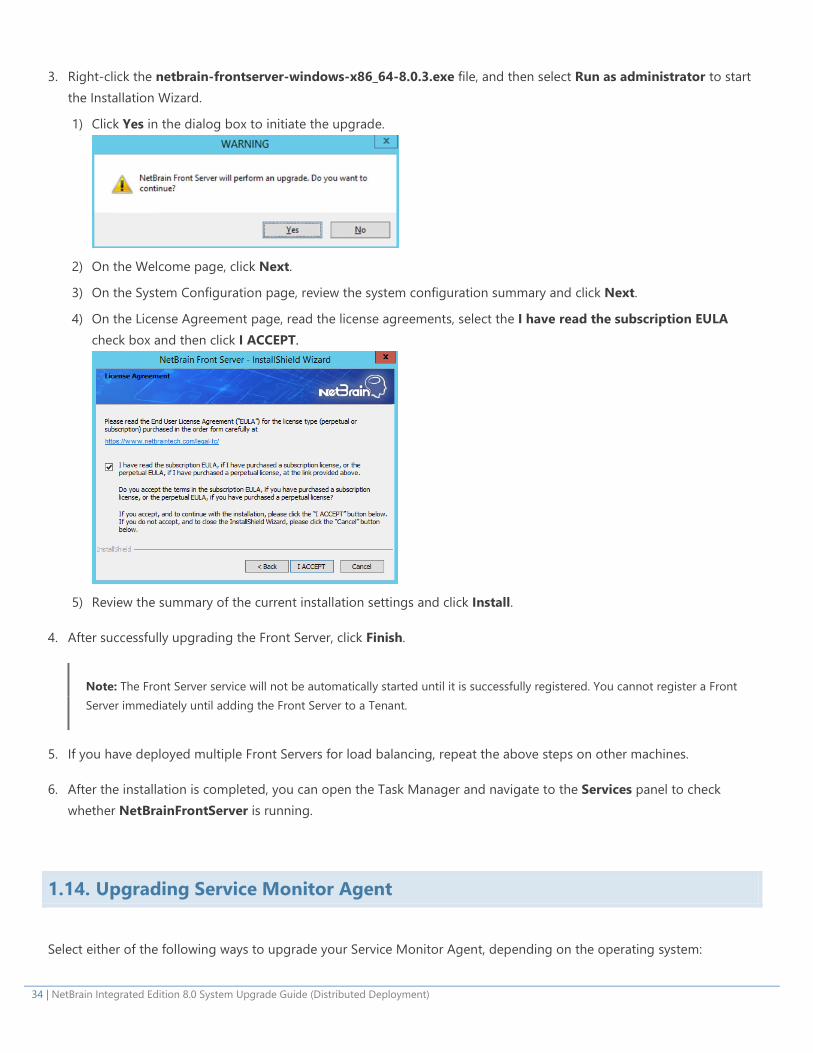
3. Right-click the netbrain-frontserver-windows-x86_64-8.0.3.exe file, and then select Run as administrator to start the Installation Wizard.
1) Click Yes in the dialog box to initiate the upgrade.
2) On the Welcome page, click Next.
3) On the System Configuration page, review the system configuration summary and click Next.
4) On the License Agreement page, read the license agreements, select the I have read the subscription EULA check box and then click I ACCEPT.
5) Review the summary of the current installation settings and click Install.
4. After successfully upgrading the Front Server, click Finish.
Note: The Front Server service will not be automatically started until it is successfully registered. You cannot register a Front Server immediately until adding the Front Server to a Tenant.
5. If you have deployed multiple Front Servers for load balancing, repeat the above steps on other machines.
6. After the installation is completed, you can open the Task Manager and navigate to the Services panel to check whether NetBrainFrontServer is running.
1.14. Upgrading Service Monitor Agent
Select either of the following ways to upgrade your Service Monitor Agent, depending on the operating system:
NetBrain Integrated Edition 8.0 System Upgrade Guide (Distributed Deployment) | 35
Upgrading Service Monitor Agent on Linux
Upgrading Service Monitor Agent on Windows
1.14.1. Upgrading Service Monitor Agent on Linux
Pre-Upgrade Tasks
Service Monitor Agent has dependencies on the third-party package on zlib-devel readline-devel bzip2-devel ncurses-devel gdbm-devel xz-devel tk-devel libffi-devel. Run the rpm -qa|grep -E "zlib-devel|readline-devel|bzip2-devel|ncurses-devel|gdbm-devel|xz-devel|tk-devel|libffi-devel" command to check whether zlib-devel readline-devel bzip2-devel ncurses-devel gdbm-devel xz-devel tk-devel libffi-devel has been installed on this Linux server. If it has not been installed, you can choose either option below to install the dependencies:
o Online Install: run the yum -y install zlib-devel readline-devel bzip2-devel ncurses-devel gdbm-
devel xz-devel tk-devel libffi-devel command to install it online.
o Offline Install: see Appendix for more details.
Upgrading Service Monitor Agent on Linux
1. Log in to the Linux server as the root user.
2. Run the cd /opt/netbraintemp8.0.3 command to navigate to the /opt/netbraintemp8.0.3 directory.
3. Download the installation package.
Option 1: If the Linux server has no access to the Internet, obtain the netbrain-servicemonitoragent-linux-x86_64-rhel7-8.0.3.tar.gz file from NetBrain and then upload it to the /opt/netbraintemp8.0.3 directory by using a file transfer tool.
Option 2: If the Linux server has access to the Internet, run the wget http://download.netbraintech.com/netbrain-servicemonitoragent-linux-x86_64-rhel7-
8.0.3.tar.gz command under the /opt/netbraintemp8.0.3 directory to directly download the netbrain-servicemonitoragent-linux-x86_64-rhel7-8.0.3.tar.gz file from NetBrain official download site.
Note: The download link is case-sensitive.
Tip: Run the yum -y install wget command to install the wget command if it has not been installed on the server.
4. Run the tar -zxvf netbrain-servicemonitoragent-linux-x86_64-rhel7-8.0.3.tar.gz command under the /opt/netbraintemp8.0.3 directory to extract installation files. [root@localhost netbraintemp8.0.3]# tar -zxvf netbrain-servicemonitoragent-linux-x86_64-rhel7-8.0.3.tar.gz ServiceMonitorAgent/

36 | NetBrain Integrated Edition 8.0 System Upgrade Guide (Distributed Deployment)
ServiceMonitorAgent/config/ ServiceMonitorAgent/config/setup.conf ... ServiceMonitorAgent/upgrade.sh ...
5. Run the cd ServiceMonitorAgent command to navigate to the ServiceMonitorAgent directory.
6. Run the ./upgrade.sh script under the ServiceMonitorAgent directory to upgrade the Service Monitor Agent.
1) Read the License Agreement, and type YES.
2) Type I ACCEPT to accept the License Agreement. The script starts to install Service Monitor Agent. [root@localhost ServiceMonitorAgent]# ./upgrade.sh Please read the End User License Agreement (“EULA”) for the license type (perpetual or subscription) purchased in the order form at https://www.netbraintech.com/legal-tc/ carefully. I have read the subscription EULA, if I have purchased a subscription license, or the perpetual EULA, if I have purchased a perpetual license, at the link provided above. Please type “YES” if you have read the applicable EULA and understand its contents, or “NO” if you have not read the applicable EULA. [YES/NO]: YES Do you accept the terms in the subscription EULA, if you have purchased a subscription license, or the perpetual EULA, if you have purchased a perpetual license? If you accept, and to continue with the installation, please type "I Accept" to continue. If you do not accept, and to quit the installation script, please type "CANCEL" to stop. [I ACCEPT/CANCEL]: I ACCEPT INFO: Collecting system information SUCCEEDED. Starting to upgrade Service Monitor Agent... Starting to get previous installation parameters... Getting the previous installation parameters SUCCEEDED. ... Configuration parameters updating SUCCEEDED. Starting to permission assigning... Permission assigning SUCCEEDED. Starting to deamon setting... Deamon setting SUCCEEDED. INFO: Backing up uninstall.sh SUCCEEDED ... Successfully upgraded Service Monitor Agent. Service is running.
7. Run the systemctl status netbrainagent command to verify whether its service starts successfully. [root@localhost ~]# systemctl status netbrainagent netbrainagent.service - NetBrain Service Monitor Agent Daemon Loaded: loaded (/usr/lib/systemd/system/netbrainagent.service; enabled; vendor preset: disabled) Active: active (running) since Tue 2020-07-14 13:36:28 EDT; 71ms ago Main PID: 4520 (python3) Memory: 73.5M ...
8. Repeat the above steps to upgrade the Service Monitor Agent on more Linux servers.
NetBrain Integrated Edition 8.0 System Upgrade Guide (Distributed Deployment) | 37
Tip: It is highly recommended to run the rm -rf /opt/netbraintemp8.0.3/servicemonitoragent/config/setup.conf command to delete the setup.conf file from the server after Service Monitor Agent is successfully upgraded because the file may cause security vulnerability.
1.14.2. Upgrading Service Monitor Agent on Windows
Complete the following steps with administrative privileges.
1. Download the netbrain-servicemonitoragent-windows-x86_64-8.0.3.zip file from http://download.netbraintech.com/netbrain-servicemonitoragent-windows-x86_64-8.0.3.zip and save it in your local folder.
2. Extract installation files from the netbrain-servicemonitoragent-windows-x86_64-8.0.3.zip file.
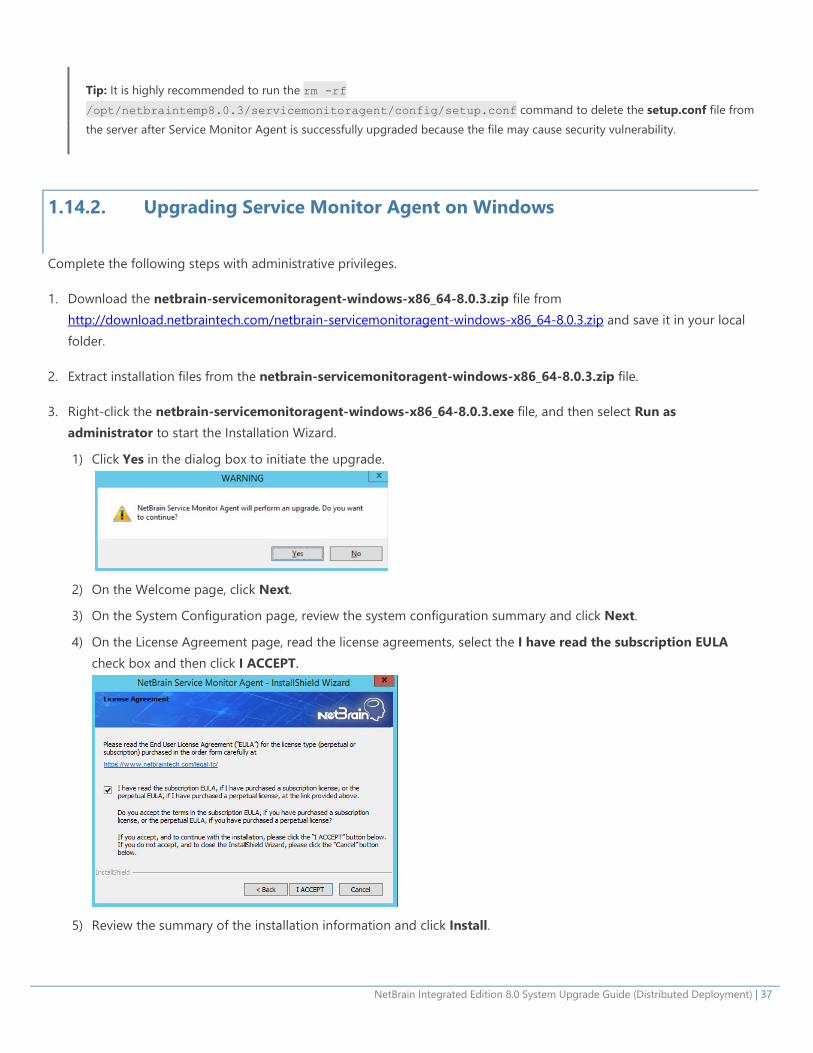
3. Right-click the netbrain-servicemonitoragent-windows-x86_64-8.0.3.exe file, and then select Run as administrator to start the Installation Wizard.
1) Click Yes in the dialog box to initiate the upgrade.
2) On the Welcome page, click Next.
3) On the System Configuration page, review the system configuration summary and click Next.
4) On the License Agreement page, read the license agreements, select the I have read the subscription EULA check box and then click I ACCEPT.
5) Review the summary of the installation information and click Install.
38 | NetBrain Integrated Edition 8.0 System Upgrade Guide (Distributed Deployment)
4. After successfully upgrading the Service Monitor Agent, click Finish.
Tip: You can open the Task Manager and navigate to the Services panel to check whether NetBrainAgent is running.
5. Repeat the above steps to upgrade the Service Monitor Agent on more Windows servers.
1.15. Verifying Upgrade Results
1. Do the following steps to check the IE version in web browser:
Note: It is highly recommended to clear your web browser’s cache before reloading the IE web page.
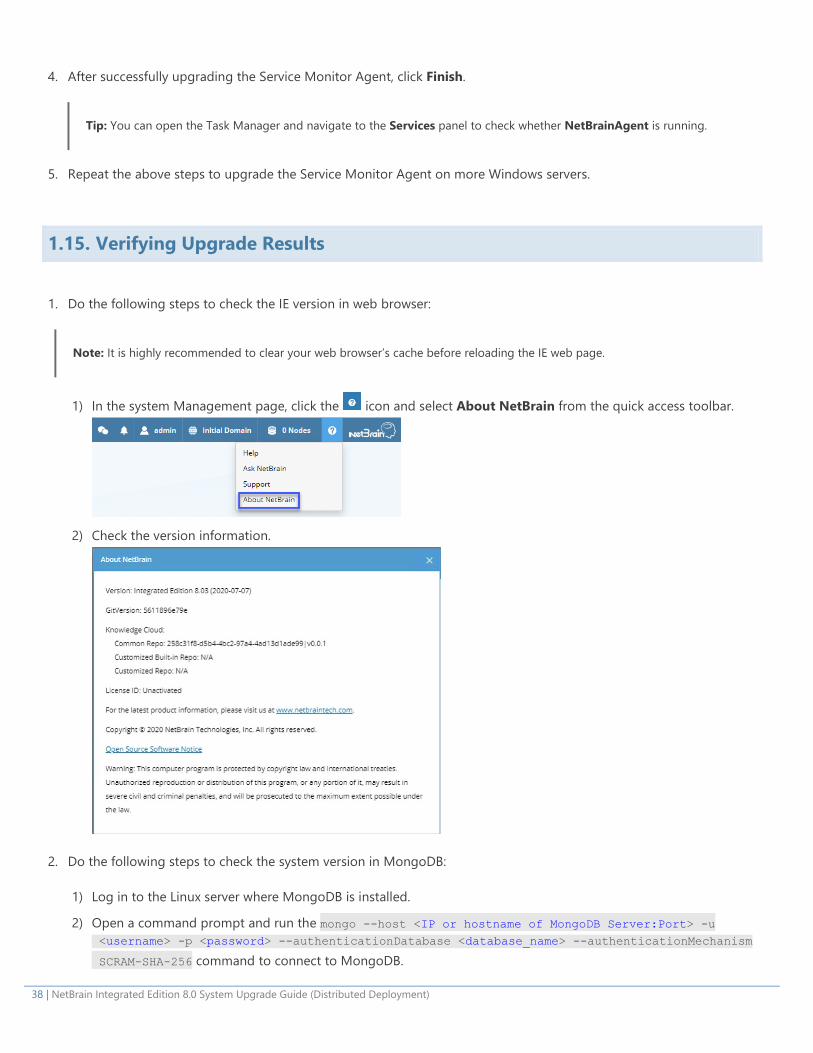
1) In the system Management page, click the icon and select About NetBrain from the quick access toolbar.
2) Check the version information.
2. Do the following steps to check the system version in MongoDB:
1) Log in to the Linux server where MongoDB is installed.
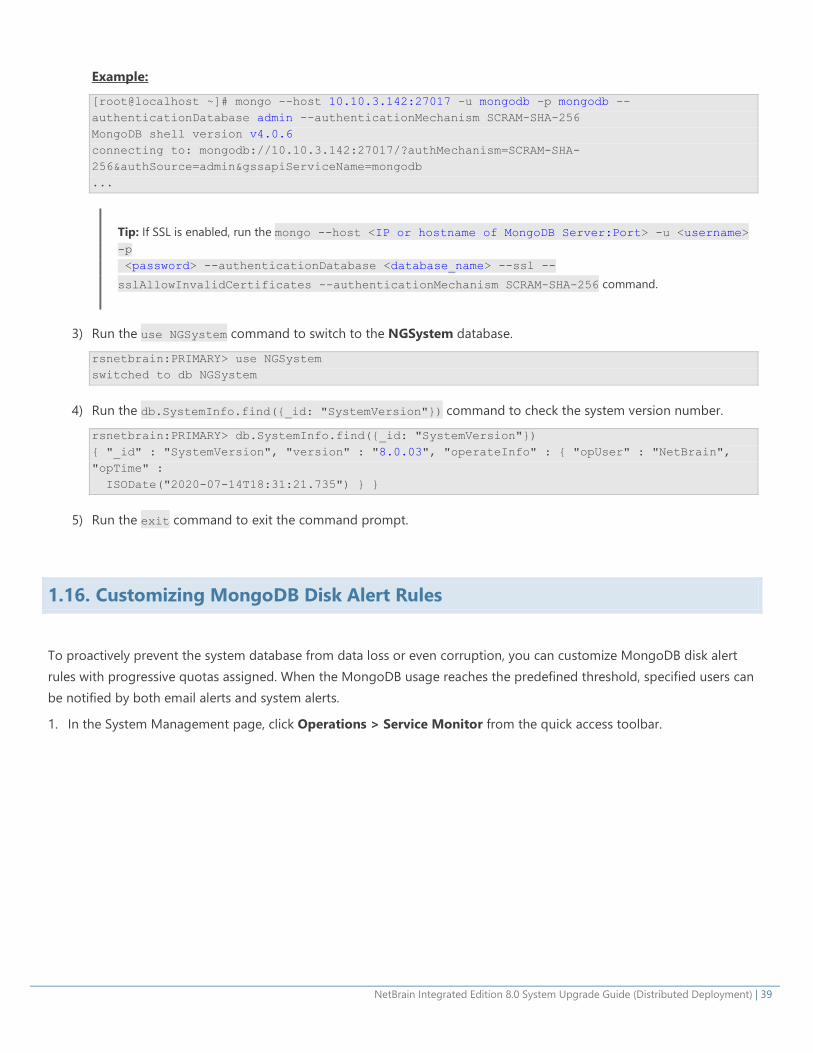
2) Open a command prompt and run the mongo --host <IP or hostname of MongoDB Server:Port> -u <username> -p <password> --authenticationDatabase <database_name> --authenticationMechanism SCRAM-SHA-256 command to connect to MongoDB.
NetBrain Integrated Edition 8.0 System Upgrade Guide (Distributed Deployment) | 39
Example:
[root@localhost ~]# mongo --host 10.10.3.142:27017 -u mongodb -p mongodb -- authenticationDatabase admin --authenticationMechanism SCRAM-SHA-256 MongoDB shell version v4.0.6 connecting to: mongodb://10.10.3.142:27017/?authMechanism=SCRAM-SHA- 256&authSource=admin&gssapiServiceName=mongodb ...
Tip: If SSL is enabled, run the mongo --host <IP or hostname of MongoDB Server:Port> -u <username> -p <password> --authenticationDatabase <database_name> --ssl -- sslAllowInvalidCertificates --authenticationMechanism SCRAM-SHA-256 command.
3) Run the use NGSystem command to switch to the NGSystem database.
rsnetbrain:PRIMARY> use NGSystem switched to db NGSystem
4) Run the db.SystemInfo.find({_id: "SystemVersion"}) command to check the system version number.
rsnetbrain:PRIMARY> db.SystemInfo.find({_id: "SystemVersion"}) { "_id" : "SystemVersion", "version" : "8.0.03", "operateInfo" : { "opUser" : "NetBrain", "opTime" : ISODate("2020-07-14T18:31:21.735") } }
5) Run the exit command to exit the command prompt.
1.16. Customizing MongoDB Disk Alert Rules
To proactively prevent the system database from data loss or even corruption, you can customize MongoDB disk alert rules with progressive quotas assigned. When the MongoDB usage reaches the predefined threshold, specified users can be notified by both email alerts and system alerts.
1. In the System Management page, click Operations > Service Monitor from the quick access toolbar.
40 | NetBrain Integrated Edition 8.0 System Upgrade Guide (Distributed Deployment)
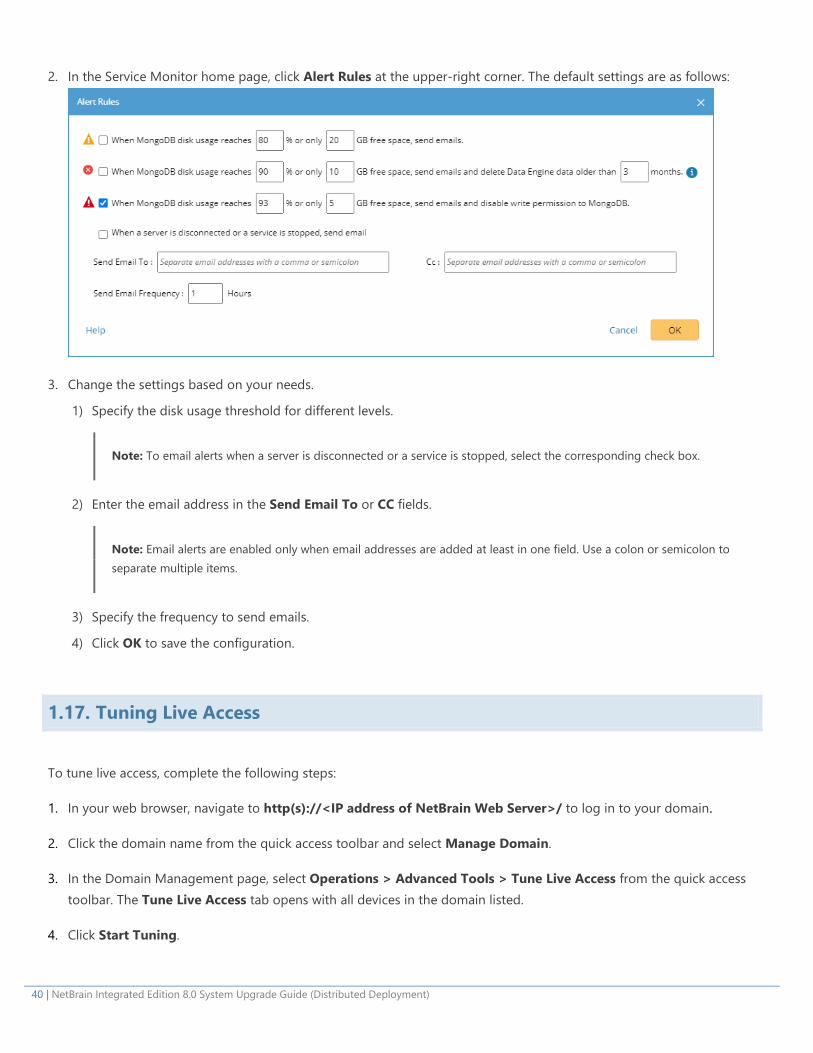
2. In the Service Monitor home page, click Alert Rules at the upper-right corner. The default settings are as follows:
3. Change the settings based on your needs.
1) Specify the disk usage threshold for different levels.
Note: To email alerts when a server is disconnected or a service is stopped, select the corresponding check box.
2) Enter the email address in the Send Email To or CC fields.
Note: Email alerts are enabled only when email addresses are added at least in one field. Use a colon or semicolon to separate multiple items.
3) Specify the frequency to send emails.
4) Click OK to save the configuration.
1.17. Tuning Live Access
To tune live access, complete the following steps:
1. In your web browser, navigate to http(s)://<IP address of NetBrain Web Server>/ to log in to your domain.
2. Click the domain name from the quick access toolbar and select Manage Domain.
3. In the Domain Management page, select Operations > Advanced Tools > Tune Live Access from the quick access toolbar. The Tune Live Access tab opens with all devices in the domain listed.
4. Click Start Tuning.
NetBrain Integrated Edition 8.0 System Upgrade Guide (Distributed Deployment) | 41
5. When the tuning process is completed, a notification message is displayed. Click OK.
1.18. Scheduling Benchmark Task
1. In the Domain Management page, select Operations > Schedule Task from the quick access toolbar.
2. On the Schedule Task > Schedule Discovery/Benchmark tab, select the Enable check box for the Basic System Benchmark entry.
3. Click the icon to select the Run Now option from the drop-down list to run the benchmark task immediately.
Note: If you have multiple Front Servers, go to Operations > Benchmark Tools > CheckPoint OPSEC Manager to specify the target Front Server to access your CheckPoint firewalls and retrieve live data.
42 | NetBrain Integrated Edition 8.0 System Upgrade Guide (Distributed Deployment)
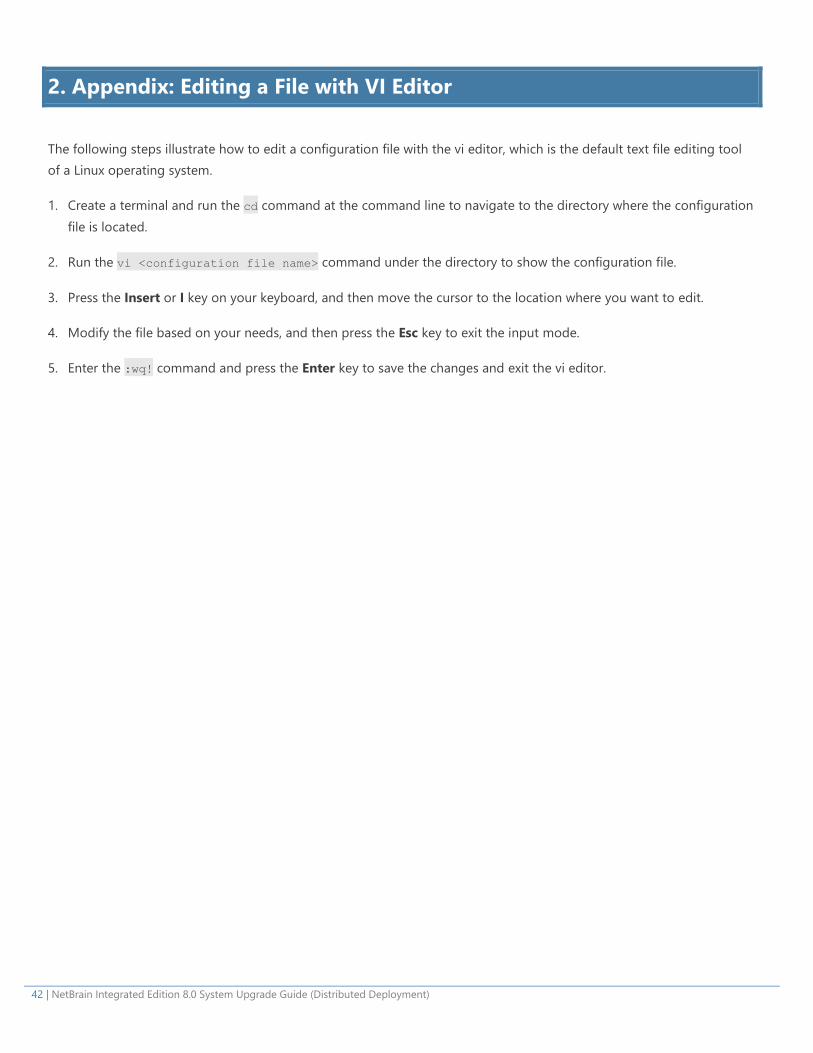
2. Appendix: Editing a File with VI Editor
The following steps illustrate how to edit a configuration file with the vi editor, which is the default text file editing tool of a Linux operating system.
1. Create a terminal and run the cd command at the command line to navigate to the directory where the configuration file is located.
2. Run the vi <configuration file name> command under the directory to show the configuration file.
3. Press the Insert or I key on your keyboard, and then move the cursor to the location where you want to edit.
4. Modify the file based on your needs, and then press the Esc key to exit the input mode.
5. Enter the :wq! command and press the Enter key to save the changes and exit the vi editor.
NetBrain Integrated Edition 8.0 System Upgrade Guide (Distributed Deployment) | 43
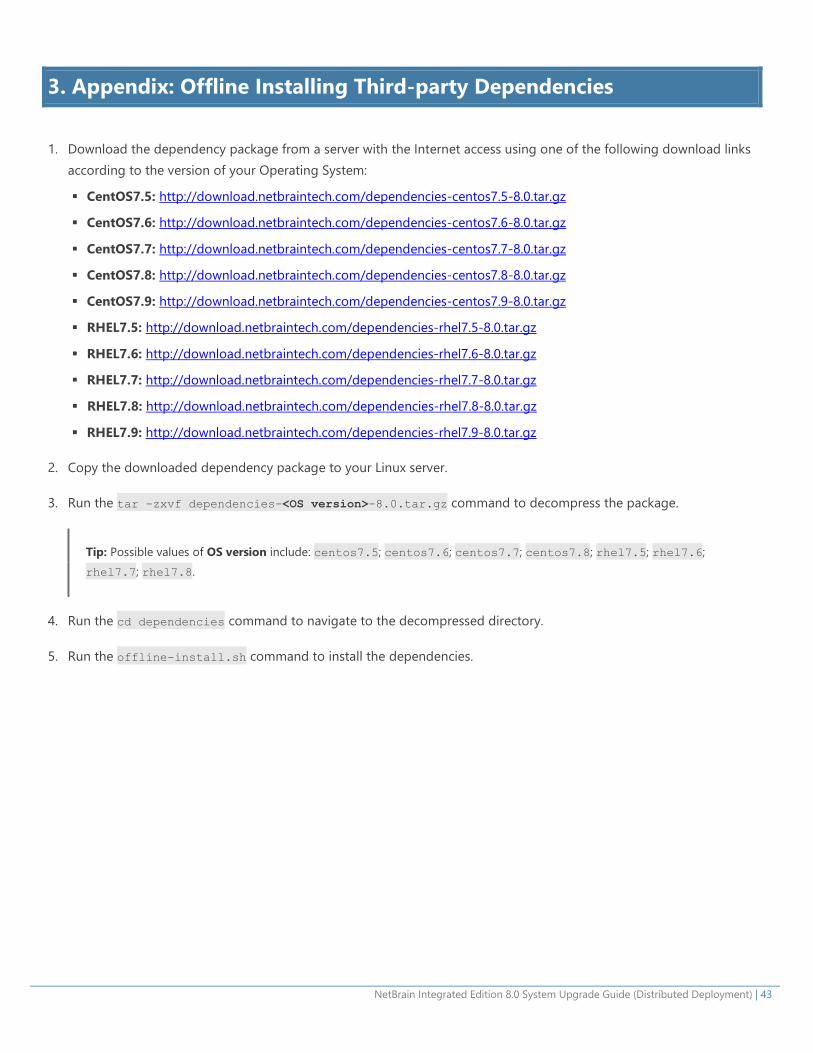
3. Appendix: Offline Installing Third-party Dependencies
1. Download the dependency package from a server with the Internet access using one of the following download links according to the version of your Operating System:
CentOS7.5: http://download.netbraintech.com/dependencies-centos7.5-8.0.tar.gz
CentOS7.6: http://download.netbraintech.com/dependencies-centos7.6-8.0.tar.gz
CentOS7.7: http://download.netbraintech.com/dependencies-centos7.7-8.0.tar.gz
CentOS7.8: http://download.netbraintech.com/dependencies-centos7.8-8.0.tar.gz
CentOS7.9: http://download.netbraintech.com/dependencies-centos7.9-8.0.tar.gz
RHEL7.5: http://download.netbraintech.com/dependencies-rhel7.5-8.0.tar.gz
RHEL7.6: http://download.netbraintech.com/dependencies-rhel7.6-8.0.tar.gz
RHEL7.7: http://download.netbraintech.com/dependencies-rhel7.7-8.0.tar.gz
RHEL7.8: http://download.netbraintech.com/dependencies-rhel7.8-8.0.tar.gz
RHEL7.9: http://download.netbraintech.com/dependencies-rhel7.9-8.0.tar.gz
2. Copy the downloaded dependency package to your Linux server.
3. Run the tar -zxvf dependencies-<OS version>-8.0.tar.gz command to decompress the package.
Tip: Possible values of OS version include: centos7.5; centos7.6; centos7.7; centos7.8; rhel7.5; rhel7.6; rhel7.7; rhel7.8.
4. Run the cd dependencies command to navigate to the decompressed directory.
5. Run the offline-install.sh command to install the dependencies.
44 | NetBrain Integrated Edition 8.0 System Upgrade Guide (Distributed Deployment)
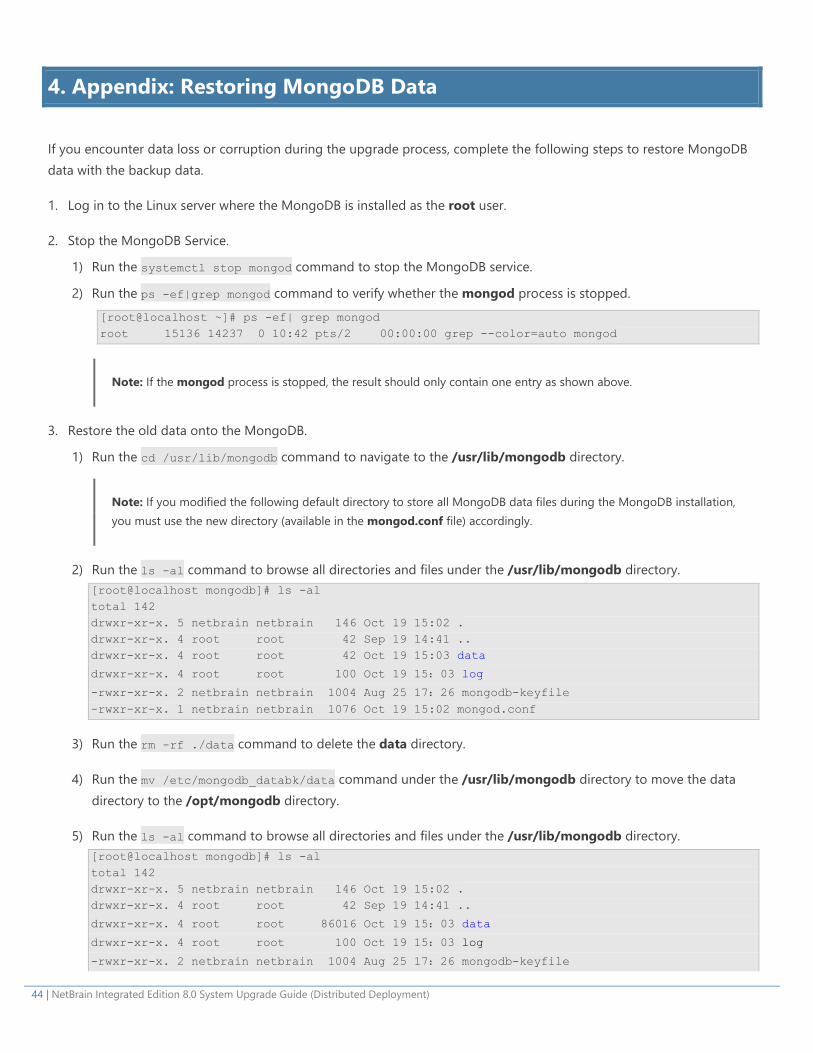
4. Appendix: Restoring MongoDB Data
If you encounter data loss or corruption during the upgrade process, complete the following steps to restore MongoDB data with the backup data.
1. Log in to the Linux server where the MongoDB is installed as the root user.
2. Stop the MongoDB Service.
1) Run the systemctl stop mongod command to stop the MongoDB service.
2) Run the ps -ef|grep mongod command to verify whether the mongod process is stopped. [root@localhost ~]# ps -ef| grep mongod root 15136 14237 0 10:42 pts/2 00:00:00 grep --color=auto mongod
Note: If the mongod process is stopped, the result should only contain one entry as shown above.
3. Restore the old data onto the MongoDB.
1) Run the cd /usr/lib/mongodb command to navigate to the /usr/lib/mongodb directory.
Note: If you modified the following default directory to store all MongoDB data files during the MongoDB installation, you must use the new directory (available in the mongod.conf file) accordingly.
2) Run the ls -al command to browse all directories and files under the /usr/lib/mongodb directory. [root@localhost mongodb]# ls -al total 142 drwxr-xr-x. 5 netbrain netbrain 146 Oct 19 15:02 . drwxr-xr-x. 4 root root 42 Sep 19 14:41 .. drwxr-xr-x. 4 root root 42 Oct 19 15:03 data
drwxr-xr-x. 4 root root 100 Oct 19 15:03 log
-rwxr-xr-x. 2 netbrain netbrain 1004 Aug 25 17:26 mongodb-keyfile -rwxr-xr-x. 1 netbrain netbrain 1076 Oct 19 15:02 mongod.conf
3) Run the rm -rf ./data command to delete the data directory.
4) Run the mv /etc/mongodb_databk/data command under the /usr/lib/mongodb directory to move the data directory to the /opt/mongodb directory.
5) Run the ls -al command to browse all directories and files under the /usr/lib/mongodb directory. [root@localhost mongodb]# ls -al total 142 drwxr-xr-x. 5 netbrain netbrain 146 Oct 19 15:02 . drwxr-xr-x. 4 root root 42 Sep 19 14:41 ..
drwxr-xr-x. 4 root root 86016 Oct 19 15:03 data
drwxr-xr-x. 4 root root 100 Oct 19 15:03 log
-rwxr-xr-x. 2 netbrain netbrain 1004 Aug 25 17:26 mongodb-keyfile
NetBrain Integrated Edition 8.0 System Upgrade Guide (Distributed Deployment) | 45
-rwxr-xr-x. 1 netbrain netbrain 1076 Oct 19 15:02 mongod.conf -rwxr-xr-x. 1 netbrain netbrain 1147 Oct 19 14:51 mongod.conf2017|Oct|19|10:15:50
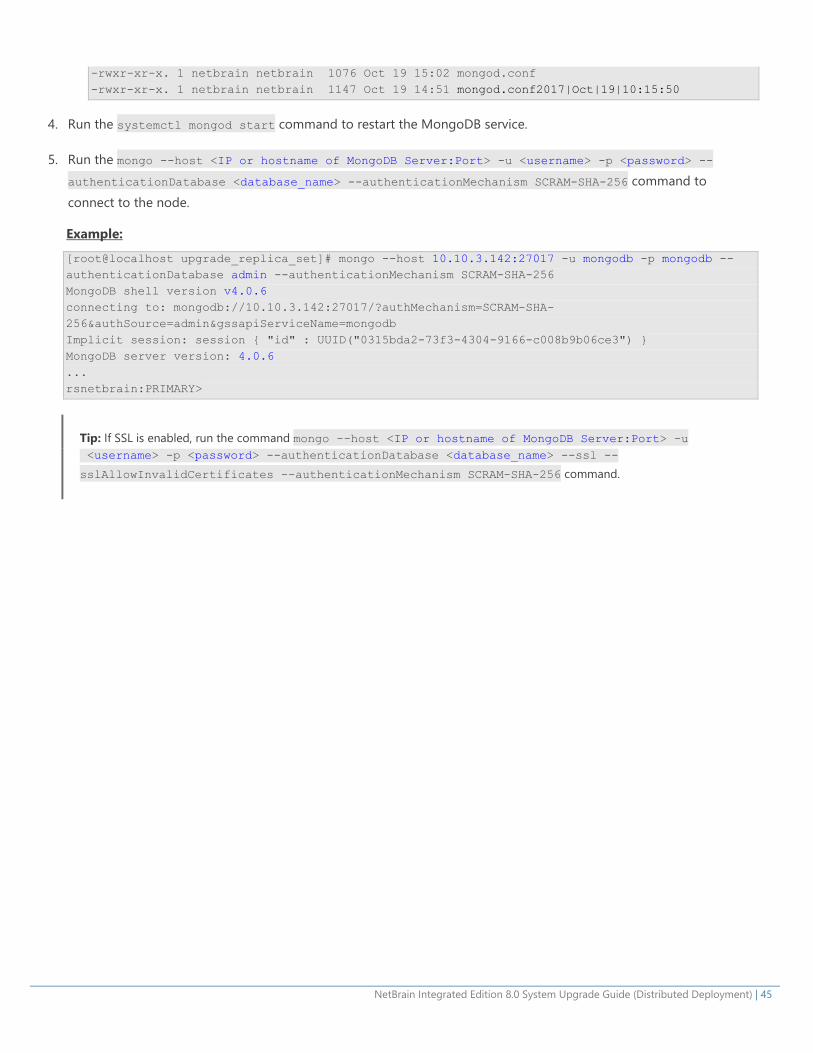
4. Run the systemctl mongod start command to restart the MongoDB service.
5. Run the mongo --host <IP or hostname of MongoDB Server:Port> -u <username> -p <password> --authenticationDatabase <database_name> --authenticationMechanism SCRAM-SHA-256 command to connect to the node.
Example:
[root@localhost upgrade_replica_set]# mongo --host 10.10.3.142:27017 -u mongodb -p mongodb --authenticationDatabase admin --authenticationMechanism SCRAM-SHA-256 MongoDB shell version v4.0.6 connecting to: mongodb://10.10.3.142:27017/?authMechanism=SCRAM-SHA-256&authSource=admin&gssapiServiceName=mongodb Implicit session: session { "id" : UUID("0315bda2-73f3-4304-9166-c008b9b06ce3") } MongoDB server version: 4.0.6 ... rsnetbrain:PRIMARY>
Tip: If SSL is enabled, run the command mongo --host <IP or hostname of MongoDB Server:Port> -u <username> -p <password> --authenticationDatabase <database_name> --ssl -- sslAllowInvalidCertificates --authenticationMechanism SCRAM-SHA-256 command.
46 | NetBrain Integrated Edition 8.0 System Upgrade Guide (Distributed Deployment)
5. Appendix: Dumping MongoDB Data
The built-in MongoDB command mongodump is a simple and efficient tool for backing up a small volume of MongoDB data. However, for a large volume of data, it is more time-consuming than using the cp command introduced in Backing Up MongoDB Data.
Note: Make sure the service of MongoDB is running when you run the mongodump command.
Note: The dumped data can be used to restore data in any server.
1. Log in to the Linux server where the MongoDB is installed as root user.
2. Open a command prompt and run the [root@localhost ~]# mkdir /etc/mongodb_databk command to create a directory under the /etc directory to save the backup data.
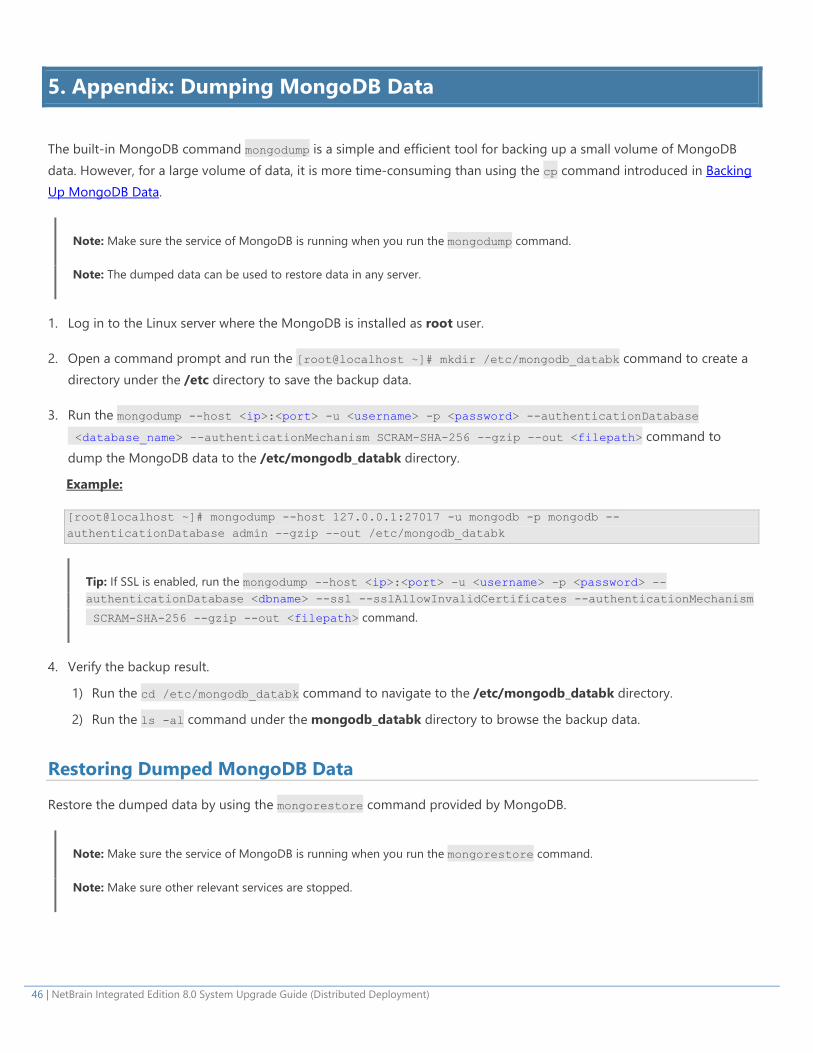
3. Run the mongodump --host <ip>:<port> -u <username> -p <password> --authenticationDatabase <database_name> --authenticationMechanism SCRAM-SHA-256 --gzip --out <filepath> command to dump the MongoDB data to the /etc/mongodb_databk directory.
Example:
[root@localhost ~]# mongodump --host 127.0.0.1:27017 -u mongodb -p mongodb --authenticationDatabase admin --gzip --out /etc/mongodb_databk
Tip: If SSL is enabled, run the mongodump --host <ip>:<port> -u <username> -p <password> -- authenticationDatabase <dbname> --ssl --sslAllowInvalidCertificates --authenticationMechanism SCRAM-SHA-256 --gzip --out <filepath> command.
4. Verify the backup result.
1) Run the cd /etc/mongodb_databk command to navigate to the /etc/mongodb_databk directory.
2) Run the ls -al command under the mongodb_databk directory to browse the backup data.
Restoring Dumped MongoDB Data
Restore the dumped data by using the mongorestore command provided by MongoDB.
Note: Make sure the service of MongoDB is running when you run the mongorestore command.
Note: Make sure other relevant services are stopped.
NetBrain Integrated Edition 8.0 System Upgrade Guide (Distributed Deployment) | 47
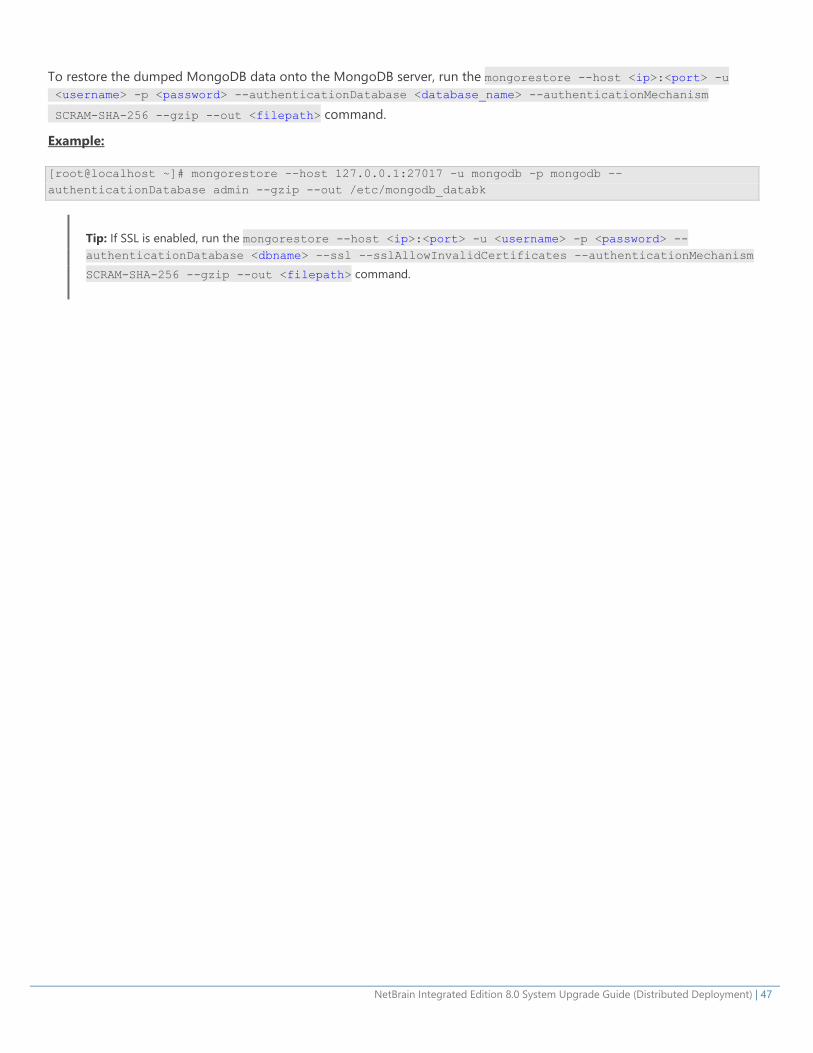
To restore the dumped MongoDB data onto the MongoDB server, run the mongorestore --host <ip>:<port> -u <username> -p <password> --authenticationDatabase <database_name> --authenticationMechanism SCRAM-SHA-256 --gzip --out <filepath> command.
Example:
[root@localhost ~]# mongorestore --host 127.0.0.1:27017 -u mongodb -p mongodb --authenticationDatabase admin --gzip --out /etc/mongodb_databk
Tip: If SSL is enabled, run the mongorestore --host <ip>:<port> -u <username> -p <password> --authenticationDatabase <dbname> --ssl --sslAllowInvalidCertificates --authenticationMechanism
SCRAM-SHA-256 --gzip --out <filepath> command.
Related Documents