Necromunda nce table-side rules Compiled by Blood Donor Based on the August 2014 NCE Rules compiled by Anthony Case Fan rules based on the Necromunda Living Rulebook, with writing credits and other major accreditations to Rick Priestley, Jervis Johnson, Andy Chambers, Chris Colston, Matt Keefe, Andy Hall, Robert J. Reiner, Nick Jakos, and John French. Games Workshop, the Games Workshop logo, Citadel and the Citadel Castle, Necromunda, the Necromunda Stencil logo, the Necromunda Plate logo, Underhive and all associated marks, logos, devices, names, characters, illustrations and images from the Necromunda world and Warhammer 40K universe are either ®, TM and/or © Games Workshop Ltd 2000- 2003, variably registered in the UK and other countries around the world. All Rights Reserved. © Copyright Games Workshop Limited 2003. All Rights Reserved.

Welcome message from author
This document is posted to help you gain knowledge. Please leave a comment to let me know what you think about it! Share it to your friends and learn new things together.
Transcript

Necromundance table-side rules
Compiled by Blood Donor
Based on the August 2014 NCE Rules compiled by Anthony Case
Fan rules based on the Necromunda Living Rulebook, with writing credits and other major accreditations to Rick Priestley, Jervis Johnson, Andy Chambers, Chris Colston, Matt Keefe, Andy Hall, Robert J. Reiner, Nick Jakos, and John French.Games Workshop, the Games Workshop logo, Citadel and the Citadel Castle, Necromunda, the Necromunda Stencil logo, the Necromunda Plate logo, Underhive and all associated marks, logos, devices, names, characters, illustrations and images from the Necromunda world and Warhammer 40K universe are either ®, TM and/or © Games Workshop Ltd 2000-2003, variably registered in the UK and other countries around the world. All Rights Reserved.© Copyright Games Workshop Limited 2003. All Rights Reserved.
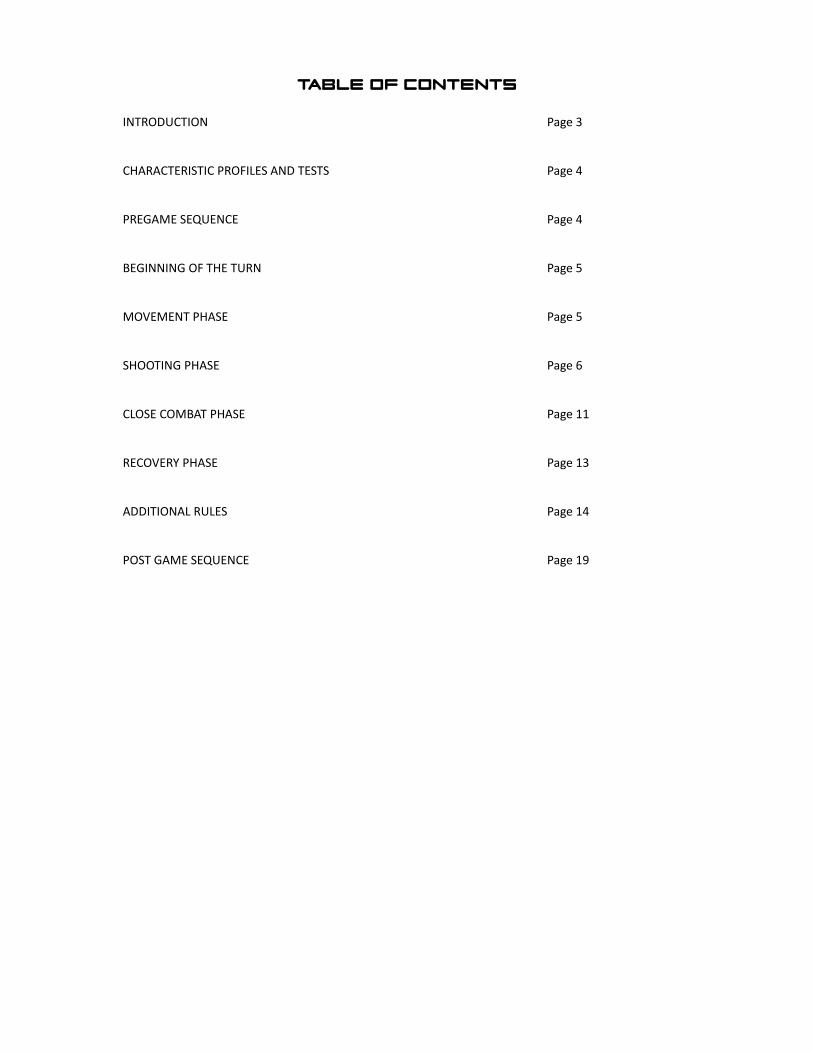
Table of contents
INTRODUCTION Page 3
CHARACTERISTIC PROFILES AND TESTS Page 4
PREGAME SEQUENCE Page 4
BEGINNING OF THE TURN Page 5
MOVEMENT PHASE Page 5
SHOOTING PHASE Page 6
CLOSE COMBAT PHASE Page 11
RECOVERY PHASE Page 13
ADDITIONAL RULES Page 14
POST GAME SEQUENCE Page 19
Introduction
The following rules have been prepared to make for a very streamlined, minimalist version of all the in-game content from the Necromunda Community Edition (NCE) rulebook so that any referencing to the rules by players during game play can be done so in an easy and effective manner. For the purposes of skimming the length of the rules, only the sections applicable to in-game play have been included – most notably absent are the Gang Creation and Scenarios sections. The material that has been included is arranged and organized in as close a matter as possible to an individual player's turn within the Turn Sequence of the game : the layout of these rules will follow the Beginning of the Turn, Movement Phase, Shooting Phase, Close Combat Phase, and Recovery Phase order of events, followed by a section of Additional Rules that are important to the play of the game without being specific to any single one of the mentioned game phases.
In addition to the phases of play within the turn, these rules will begin with Characteristic Profiles and Tests and the Pregame Sequence, and end with the Post Game Sequence. These rules have all the necessary information from the NCE for in-game play, but in an effort to reduce the size of the document, the heart, soul, and character of the NCE rules have been whittled down to as skeletal a format as deemed appropriate. The format is meant to read more fluidly through the play of the game, (hopefully) making it easier for a first time player to have a more solid understanding of Necromundaafter a single read through of these rules. Whereas rules in the NCE can sometimes be laid out in a somewhat fragmented format, this document strives to cover aspects in as linear a manner as possible for the purpose of in-game back checking. That being said, read and enjoy the actual NCE rules, as the weapons will seem cooler, the equipment more colourful, and the Underhive in general a more vibrant setting. Use the NCE for setting up your gang as well as finding out how all the scenarios are to be set up and what the special rules for each of them are. But when you and your fellow gamers are sittingaround the table and need to double check, for example, what the special Injury rules are for Shock Mauls in close combat,these NCE Table-side Rules should make the back-checking process as painless as possible.
As is discussed in the NCE rules, Necromunda uses templates, miniatures, measurements, and dice during game play:
The three templates are the teardrop shaped Flamer Template, the smaller circular Blast Template, and the larger circular Ordinance Template.
Miniatures are a 28mm standard, often posed dramatically. Proper judgement must be used depending on how much of a model is in view if they are to be fired upon, as these dramatic poses can allow for a hand/ sword/ gun to be exposed even when a character is justifiably out of sight. When hiding, it is assumed a character is crouched behind cover even though it is impossible to do so.
All measurements in Necromunda rules are in inches. Pre-measuring is not allowed, as it must be in a players judgement whether a distance is within range for shooting, charging, throwing a grenade, etc.
Five kinds of dice rolls are used in Necromunda: Six sided die, known as D6 A D3, which uses a D6 where 1-2=1, 3-4=2, and 4-5=3 2D6, which is the cumulative amount of two D6's, with outcomes from 2 to 12 D66 is two D6 where one represents the first digit and the other represents the second digit, with outcomes
from 11 to 16, 21 to 26, 31 to 36, 41 to 46, 51 to 56, and 61 to 66. It is recommended for D66 rolls that two separate coloured die are used, agreeing which represents which digit before rolling
Two six sided Scatter Dice are used to determine where a shot fired from a blast weapon or grenade lands if itdoes not hit its target. One die has an arrow on five sides and the word “Hit” on one, and the other has numbers on five sides and the word “Misfire” on one. The “Hit” side of the die with arrows on it also has an arrow for specific situations.
Hope you enjoy and happy gaming!
- Blood Donor
Characteristic profiles and tests
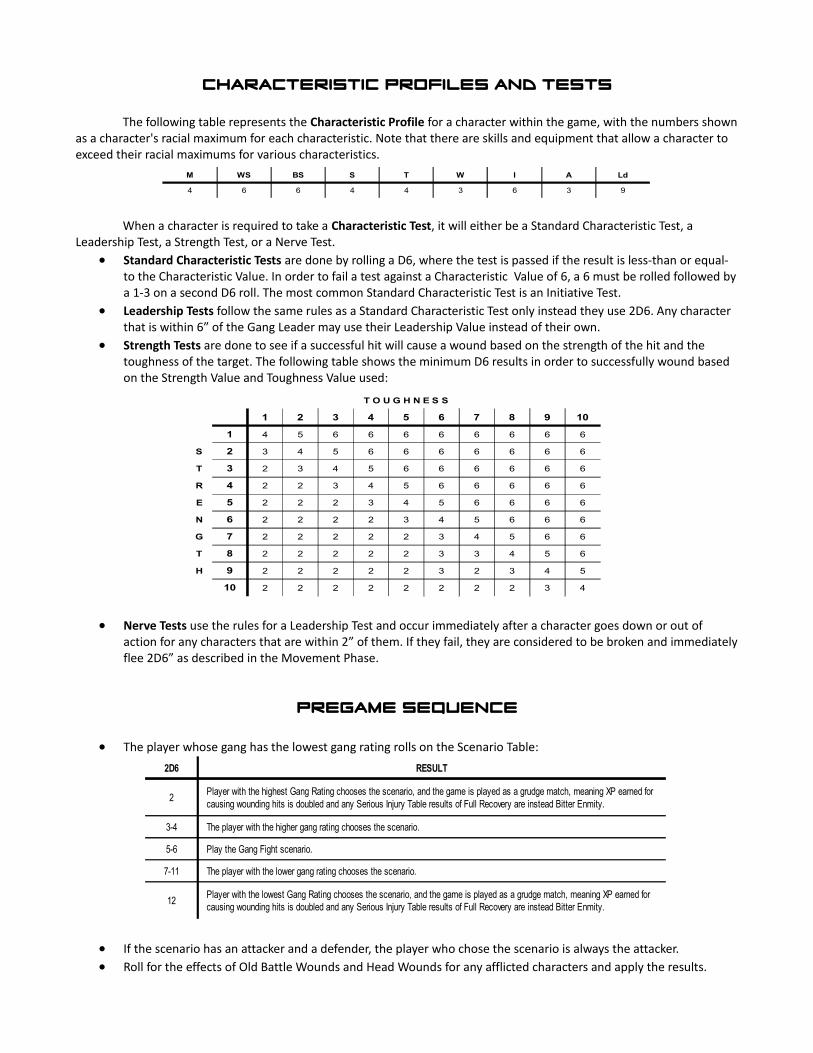
The following table represents the Characteristic Profile for a character within the game, with the numbers shownas a character's racial maximum for each characteristic. Note that there are skills and equipment that allow a character to exceed their racial maximums for various characteristics.
When a character is required to take a Characteristic Test, it will either be a Standard Characteristic Test, a Leadership Test, a Strength Test, or a Nerve Test.
Standard Characteristic Tests are done by rolling a D6, where the test is passed if the result is less-than or equal-to the Characteristic Value. In order to fail a test against a Characteristic Value of 6, a 6 must be rolled followed bya 1-3 on a second D6 roll. The most common Standard Characteristic Test is an Initiative Test.
Leadership Tests follow the same rules as a Standard Characteristic Test only instead they use 2D6. Any character that is within 6” of the Gang Leader may use their Leadership Value instead of their own.
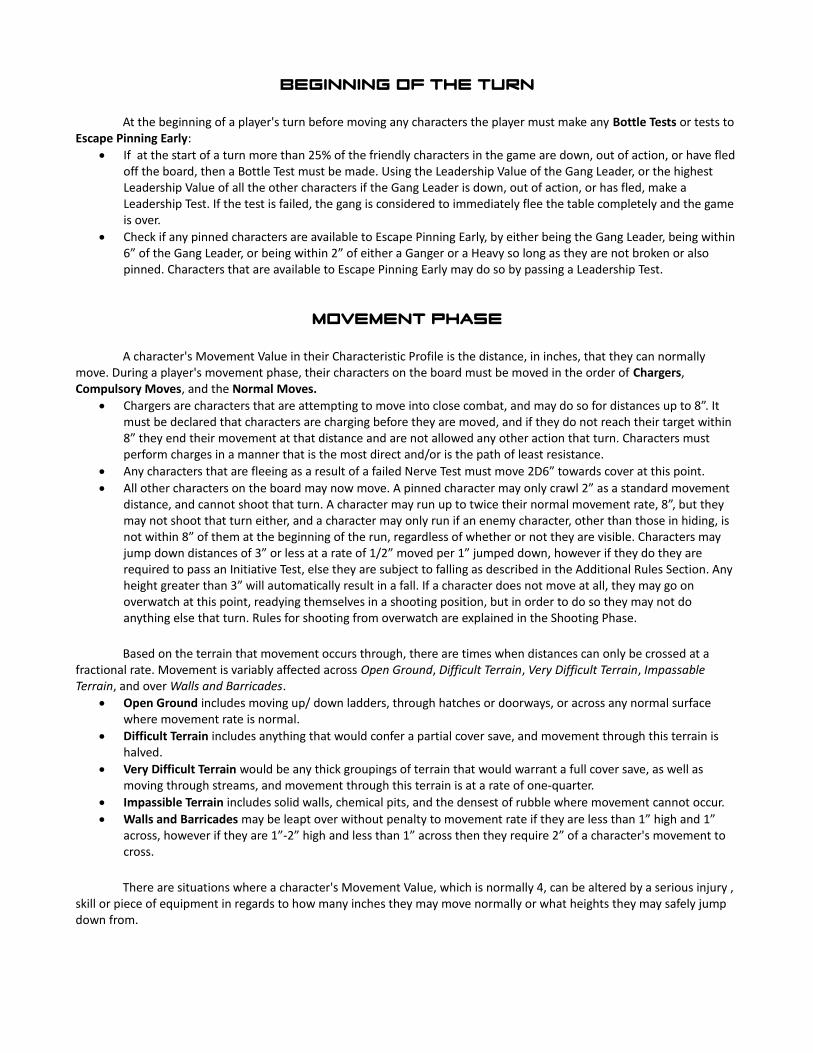
Strength Tests are done to see if a successful hit will cause a wound based on the strength of the hit and the toughness of the target. The following table shows the minimum D6 results in order to successfully wound based on the Strength Value and Toughness Value used:
Nerve Tests use the rules for a Leadership Test and occur immediately after a character goes down or out of action for any characters that are within 2” of them. If they fail, they are considered to be broken and immediatelyflee 2D6” as described in the Movement Phase.
pregame sequence
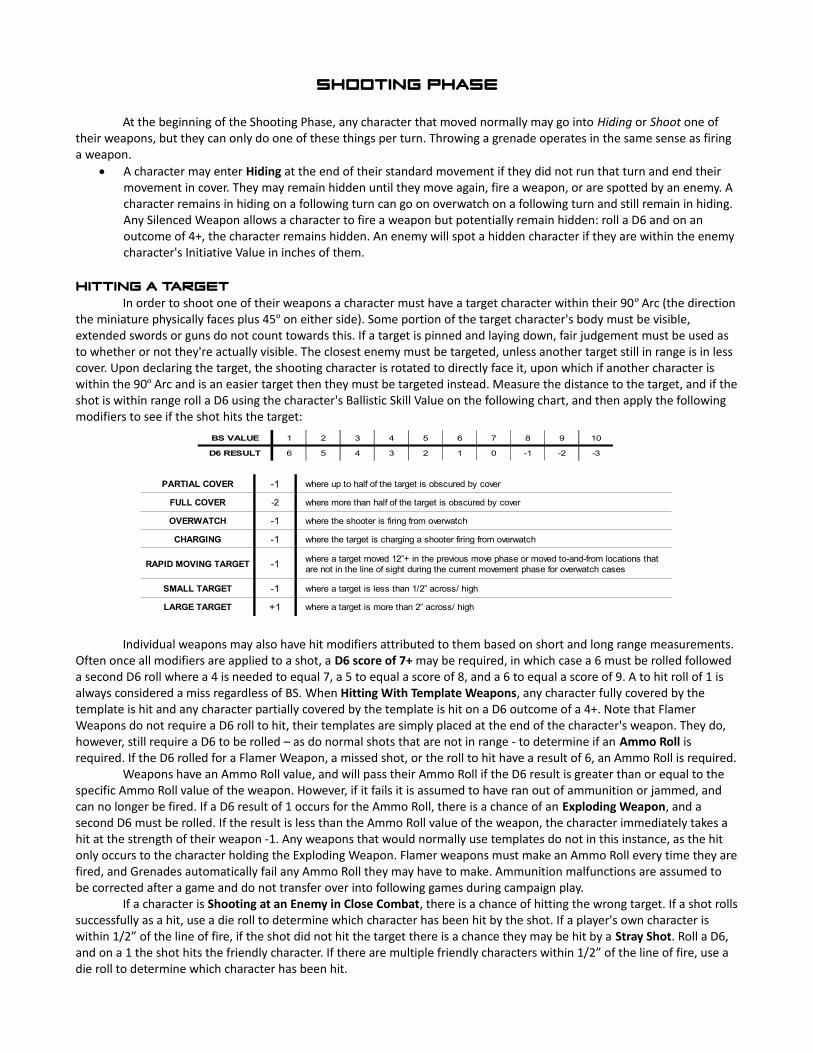
The player whose gang has the lowest gang rating rolls on the Scenario Table:
If the scenario has an attacker and a defender, the player who chose the scenario is always the attacker. Roll for the effects of Old Battle Wounds and Head Wounds for any afflicted characters and apply the results.
M WS BS S T W I A
4 6 6 4 4 3 6 3 9
Ld
T O U G H N E S S
1 2 3 4 5 6 7 8 9 10
1 4 5 6 6 6 6 6 6 6 6
S 2 3 4 5 6 6 6 6 6 6 6
T 3 2 3 4 5 6 6 6 6 6 6
R 4 2 2 3 4 5 6 6 6 6 6
E 5 2 2 2 3 4 5 6 6 6 6
N 6 2 2 2 2 3 4 5 6 6 6
G 7 2 2 2 2 2 3 4 5 6 6
T 8 2 2 2 2 2 3 3 4 5 6
H 9 2 2 2 2 2 3 2 3 4 5
10 2 2 2 2 2 2 2 2 3 4
2D6 RESULT
2
3-4 The player with the higher gang rating chooses the scenario.
5-6 Play the Gang Fight scenario.
7-11 The player with the lower gang rating chooses the scenario.
12
Player with the highest Gang Rating chooses the scenario, and the game is played as a grudge match, meaning XP earned for causing wounding hits is doubled and any Serious Injury Table results of Full Recovery are instead Bitter Enmity.
Player with the lowest Gang Rating chooses the scenario, and the game is played as a grudge match, meaning XP earned for causing wounding hits is doubled and any Serious Injury Table results of Full Recovery are instead Bitter Enmity.
Beginning of the turn
At the beginning of a player's turn before moving any characters the player must make any Bottle Tests or tests to Escape Pinning Early:
If at the start of a turn more than 25% of the friendly characters in the game are down, out of action, or have fledoff the board, then a Bottle Test must be made. Using the Leadership Value of the Gang Leader, or the highest Leadership Value of all the other characters if the Gang Leader is down, out of action, or has fled, make a Leadership Test. If the test is failed, the gang is considered to immediately flee the table completely and the game is over.
Check if any pinned characters are available to Escape Pinning Early, by either being the Gang Leader, being within6” of the Gang Leader, or being within 2” of either a Ganger or a Heavy so long as they are not broken or also pinned. Characters that are available to Escape Pinning Early may do so by passing a Leadership Test.
Movement phase
A character's Movement Value in their Characteristic Profile is the distance, in inches, that they can normally move. During a player's movement phase, their characters on the board must be moved in the order of Chargers, Compulsory Moves, and the Normal Moves.
Chargers are characters that are attempting to move into close combat, and may do so for distances up to 8”. It must be declared that characters are charging before they are moved, and if they do not reach their target within 8” they end their movement at that distance and are not allowed any other action that turn. Characters must perform charges in a manner that is the most direct and/or is the path of least resistance.
Any characters that are fleeing as a result of a failed Nerve Test must move 2D6” towards cover at this point. All other characters on the board may now move. A pinned character may only crawl 2” as a standard movement
distance, and cannot shoot that turn. A character may run up to twice their normal movement rate, 8”, but they may not shoot that turn either, and a character may only run if an enemy character, other than those in hiding, is not within 8” of them at the beginning of the run, regardless of whether or not they are visible. Characters may jump down distances of 3” or less at a rate of 1/2” moved per 1” jumped down, however if they do they are required to pass an Initiative Test, else they are subject to falling as described in the Additional Rules Section. Any height greater than 3” will automatically result in a fall. If a character does not move at all, they may go on overwatch at this point, readying themselves in a shooting position, but in order to do so they may not do anything else that turn. Rules for shooting from overwatch are explained in the Shooting Phase.
Based on the terrain that movement occurs through, there are times when distances can only be crossed at a fractional rate. Movement is variably affected across Open Ground, Difficult Terrain, Very Difficult Terrain, Impassable Terrain, and over Walls and Barricades.
Open Ground includes moving up/ down ladders, through hatches or doorways, or across any normal surface where movement rate is normal.
Difficult Terrain includes anything that would confer a partial cover save, and movement through this terrain is halved.
Very Difficult Terrain would be any thick groupings of terrain that would warrant a full cover save, as well as moving through streams, and movement through this terrain is at a rate of one-quarter.
Impassible Terrain includes solid walls, chemical pits, and the densest of rubble where movement cannot occur. Walls and Barricades may be leapt over without penalty to movement rate if they are less than 1” high and 1”
across, however if they are 1”-2” high and less than 1” across then they require 2” of a character's movement to cross.
There are situations where a character's Movement Value, which is normally 4, can be altered by a serious injury , skill or piece of equipment in regards to how many inches they may move normally or what heights they may safely jump down from.
Shooting phase
At the beginning of the Shooting Phase, any character that moved normally may go into Hiding or Shoot one of their weapons, but they can only do one of these things per turn. Throwing a grenade operates in the same sense as firing a weapon.
A character may enter Hiding at the end of their standard movement if they did not run that turn and end their movement in cover. They may remain hidden until they move again, fire a weapon, or are spotted by an enemy. A character remains in hiding on a following turn can go on overwatch on a following turn and still remain in hiding. Any Silenced Weapon allows a character to fire a weapon but potentially remain hidden: roll a D6 and on an outcome of 4+, the character remains hidden. An enemy will spot a hidden character if they are within the enemy character's Initiative Value in inches of them.
Hitting a targetIn order to shoot one of their weapons a character must have a target character within their 90º Arc (the direction
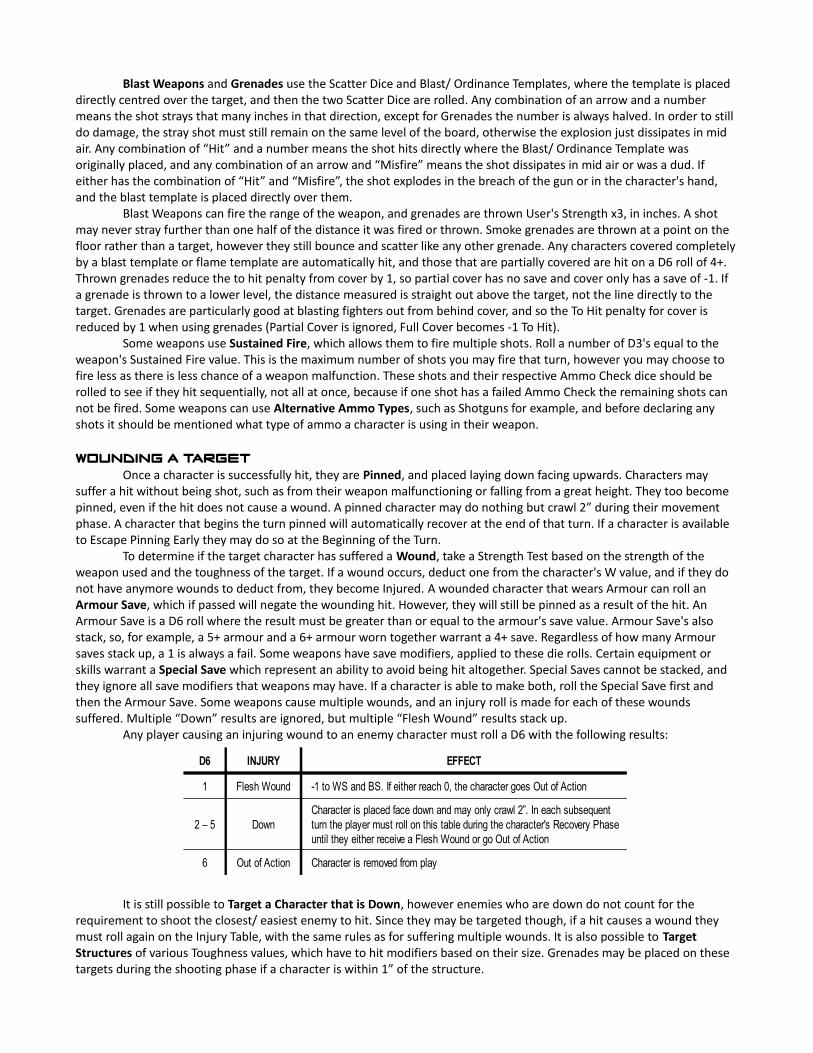
the miniature physically faces plus 45º on either side). Some portion of the target character's body must be visible, extended swords or guns do not count towards this. If a target is pinned and laying down, fair judgement must be used as to whether or not they're actually visible. The closest enemy must be targeted, unless another target still in range is in less cover. Upon declaring the target, the shooting character is rotated to directly face it, upon which if another character is within the 90º Arc and is an easier target then they must be targeted instead. Measure the distance to the target, and if theshot is within range roll a D6 using the character's Ballistic Skill Value on the following chart, and then apply the following modifiers to see if the shot hits the target:
Individual weapons may also have hit modifiers attributed to them based on short and long range measurements. Often once all modifiers are applied to a shot, a D6 score of 7+ may be required, in which case a 6 must be rolled followed a second D6 roll where a 4 is needed to equal 7, a 5 to equal a score of 8, and a 6 to equal a score of 9. A to hit roll of 1 is always considered a miss regardless of BS. When Hitting With Template Weapons, any character fully covered by the template is hit and any character partially covered by the template is hit on a D6 outcome of a 4+. Note that Flamer Weapons do not require a D6 roll to hit, their templates are simply placed at the end of the character's weapon. They do, however, still require a D6 to be rolled – as do normal shots that are not in range - to determine if an Ammo Roll is required. If the D6 rolled for a Flamer Weapon, a missed shot, or the roll to hit have a result of 6, an Ammo Roll is required.
Weapons have an Ammo Roll value, and will pass their Ammo Roll if the D6 result is greater than or equal to the specific Ammo Roll value of the weapon. However, if it fails it is assumed to have ran out of ammunition or jammed, and can no longer be fired. If a D6 result of 1 occurs for the Ammo Roll, there is a chance of an Exploding Weapon, and a second D6 must be rolled. If the result is less than the Ammo Roll value of the weapon, the character immediately takes a hit at the strength of their weapon -1. Any weapons that would normally use templates do not in this instance, as the hit only occurs to the character holding the Exploding Weapon. Flamer weapons must make an Ammo Roll every time they arefired, and Grenades automatically fail any Ammo Roll they may have to make. Ammunition malfunctions are assumed to be corrected after a game and do not transfer over into following games during campaign play.
If a character is Shooting at an Enemy in Close Combat, there is a chance of hitting the wrong target. If a shot rollssuccessfully as a hit, use a die roll to determine which character has been hit by the shot. If a player's own character is within 1/2” of the line of fire, if the shot did not hit the target there is a chance they may be hit by a Stray Shot. Roll a D6, and on a 1 the shot hits the friendly character. If there are multiple friendly characters within 1/2” of the line of fire, use a die roll to determine which character has been hit.
PARTIAL COVER -1 where up to half of the target is obscured by cover
FULL COVER -2 where more than half of the target is obscured by cover
OVERWATCH -1 where the shooter is firing from overwatch
CHARGING -1 where the target is charging a shooter firing from overwatch
RAPID MOVING TARGET -1
SMALL TARGET -1 where a target is less than 1/2” across/ high
LARGE TARGET +1 where a target is more than 2” across/ high
where a target moved 12”+ in the previous move phase or moved to-and-from locations that are not in the line of sight during the current movement phase for overwatch cases
BS VALUE 1 2 3 4 5 6 7 8 9 10
D6 RESULT 6 5 4 3 2 1 0 -1 -2 -3
Blast Weapons and Grenades use the Scatter Dice and Blast/ Ordinance Templates, where the template is placed directly centred over the target, and then the two Scatter Dice are rolled. Any combination of an arrow and a number means the shot strays that many inches in that direction, except for Grenades the number is always halved. In order to still do damage, the stray shot must still remain on the same level of the board, otherwise the explosion just dissipates in mid air. Any combination of “Hit” and a number means the shot hits directly where the Blast/ Ordinance Template was originally placed, and any combination of an arrow and “Misfire” means the shot dissipates in mid air or was a dud. If either has the combination of “Hit” and “Misfire”, the shot explodes in the breach of the gun or in the character's hand, and the blast template is placed directly over them.
Blast Weapons can fire the range of the weapon, and grenades are thrown User's Strength x3, in inches. A shot may never stray further than one half of the distance it was fired or thrown. Smoke grenades are thrown at a point on the floor rather than a target, however they still bounce and scatter like any other grenade. Any characters covered completelyby a blast template or flame template are automatically hit, and those that are partially covered are hit on a D6 roll of 4+. Thrown grenades reduce the to hit penalty from cover by 1, so partial cover has no save and cover only has a save of -1. If a grenade is thrown to a lower level, the distance measured is straight out above the target, not the line directly to the target. Grenades are particularly good at blasting fighters out from behind cover, and so the To Hit penalty for cover is reduced by 1 when using grenades (Partial Cover is ignored, Full Cover becomes -1 To Hit).
Some weapons use Sustained Fire, which allows them to fire multiple shots. Roll a number of D3's equal to the weapon's Sustained Fire value. This is the maximum number of shots you may fire that turn, however you may choose to fire less as there is less chance of a weapon malfunction. These shots and their respective Ammo Check dice should be rolled to see if they hit sequentially, not all at once, because if one shot has a failed Ammo Check the remaining shots can not be fired. Some weapons can use Alternative Ammo Types, such as Shotguns for example, and before declaring any shots it should be mentioned what type of ammo a character is using in their weapon.
Wounding a targetOnce a character is successfully hit, they are Pinned, and placed laying down facing upwards. Characters may
suffer a hit without being shot, such as from their weapon malfunctioning or falling from a great height. They too become pinned, even if the hit does not cause a wound. A pinned character may do nothing but crawl 2” during their movement phase. A character that begins the turn pinned will automatically recover at the end of that turn. If a character is available to Escape Pinning Early they may do so at the Beginning of the Turn.
To determine if the target character has suffered a Wound, take a Strength Test based on the strength of the weapon used and the toughness of the target. If a wound occurs, deduct one from the character's W value, and if they do not have anymore wounds to deduct from, they become Injured. A wounded character that wears Armour can roll an Armour Save, which if passed will negate the wounding hit. However, they will still be pinned as a result of the hit. An Armour Save is a D6 roll where the result must be greater than or equal to the armour's save value. Armour Save's also stack, so, for example, a 5+ armour and a 6+ armour worn together warrant a 4+ save. Regardless of how many Armour saves stack up, a 1 is always a fail. Some weapons have save modifiers, applied to these die rolls. Certain equipment or skills warrant a Special Save which represent an ability to avoid being hit altogether. Special Saves cannot be stacked, and they ignore all save modifiers that weapons may have. If a character is able to make both, roll the Special Save first and then the Armour Save. Some weapons cause multiple wounds, and an injury roll is made for each of these wounds suffered. Multiple “Down” results are ignored, but multiple “Flesh Wound” results stack up.
Any player causing an injuring wound to an enemy character must roll a D6 with the following results:
It is still possible to Target a Character that is Down, however enemies who are down do not count for the requirement to shoot the closest/ easiest enemy to hit. Since they may be targeted though, if a hit causes a wound they must roll again on the Injury Table, with the same rules as for suffering multiple wounds. It is also possible to Target Structures of various Toughness values, which have to hit modifiers based on their size. Grenades may be placed on these targets during the shooting phase if a character is within 1” of the structure.
D6 INJURY EFFECT
1 Flesh Wound -1 to WS and BS. If either reach 0, the character goes Out of Action
2 – 5 Down
6 Out of Action Character is removed from play
Character is placed face down and may only crawl 2”. In each subsequent turn the player must roll on this table during the character's Recovery Phase until they either receive a Flesh Wound or go Out of Action
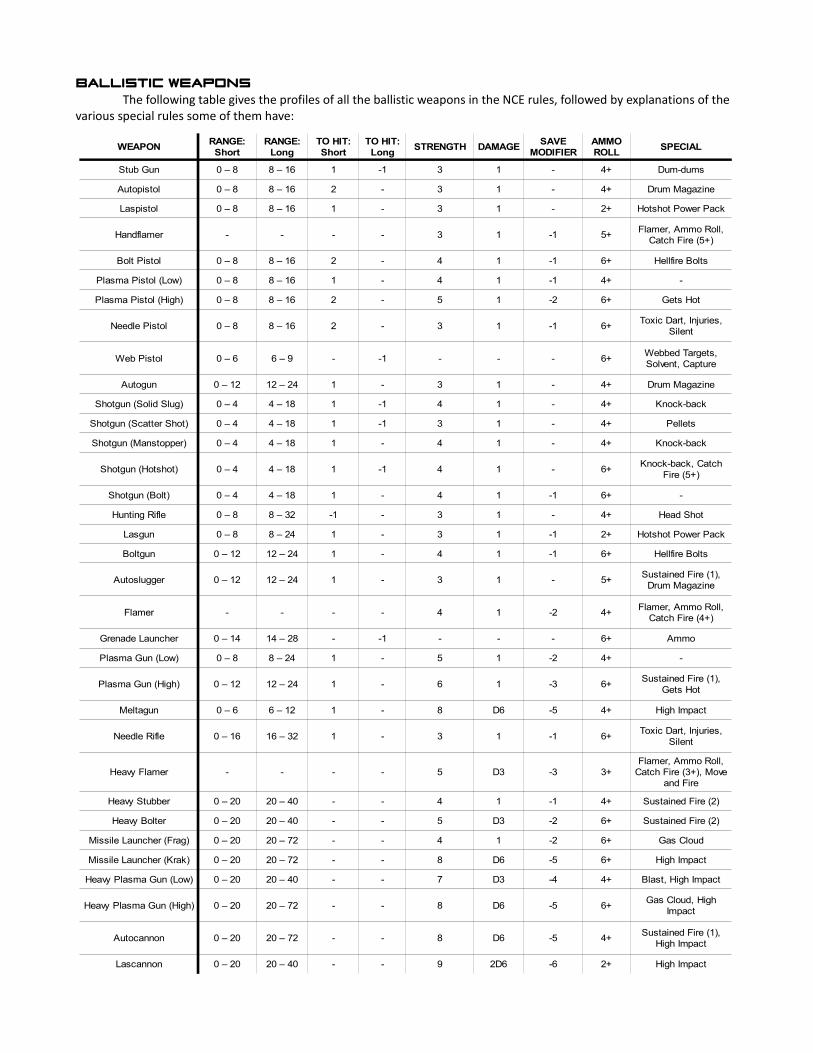
Ballistic weaponsThe following table gives the profiles of all the ballistic weapons in the NCE rules, followed by explanations of the
various special rules some of them have:
WEAPON STRENGTH DAMAGE SPECIAL
Stub Gun 0 – 8 8 – 16 1 -1 3 1 - 4+ Dum-dums
Autopistol 0 – 8 8 – 16 2 - 3 1 - 4+ Drum Magazine
Laspistol 0 – 8 8 – 16 1 - 3 1 - 2+ Hotshot Power Pack
Handflamer - - - - 3 1 -1 5+
Bolt Pistol 0 – 8 8 – 16 2 - 4 1 -1 6+ Hellfire Bolts
Plasma Pistol (Low) 0 – 8 8 – 16 1 - 4 1 -1 4+ -
Plasma Pistol (High) 0 – 8 8 – 16 2 - 5 1 -2 6+ Gets Hot
Needle Pistol 0 – 8 8 – 16 2 - 3 1 -1 6+
Web Pistol 0 – 6 6 – 9 - -1 - - - 6+
Autogun 0 – 12 12 – 24 1 - 3 1 - 4+ Drum Magazine
Shotgun (Solid Slug) 0 – 4 4 – 18 1 -1 4 1 - 4+ Knock-back
Shotgun (Scatter Shot) 0 – 4 4 – 18 1 -1 3 1 - 4+ Pellets
Shotgun (Manstopper) 0 – 4 4 – 18 1 - 4 1 - 4+ Knock-back
Shotgun (Hotshot) 0 – 4 4 – 18 1 -1 4 1 - 6+
Shotgun (Bolt) 0 – 4 4 – 18 1 - 4 1 -1 6+ -
Hunting Rifle 0 – 8 8 – 32 -1 - 3 1 - 4+ Head Shot
Lasgun 0 – 8 8 – 24 1 - 3 1 -1 2+ Hotshot Power Pack
Boltgun 0 – 12 12 – 24 1 - 4 1 -1 6+ Hellfire Bolts
Autoslugger 0 – 12 12 – 24 1 - 3 1 - 5+
Flamer - - - - 4 1 -2 4+
Grenade Launcher 0 – 14 14 – 28 - -1 - - - 6+ Ammo
Plasma Gun (Low) 0 – 8 8 – 24 1 - 5 1 -2 4+ -
Plasma Gun (High) 0 – 12 12 – 24 1 - 6 1 -3 6+
Meltagun 0 – 6 6 – 12 1 - 8 D6 -5 4+ High Impact
Needle Rifle 0 – 16 16 – 32 1 - 3 1 -1 6+
Heavy Flamer - - - - 5 D3 -3 3+
Heavy Stubber 0 – 20 20 – 40 - - 4 1 -1 4+ Sustained Fire (2)
Heavy Bolter 0 – 20 20 – 40 - - 5 D3 -2 6+ Sustained Fire (2)
Missile Launcher (Frag) 0 – 20 20 – 72 - - 4 1 -2 6+ Gas Cloud
Missile Launcher (Krak) 0 – 20 20 – 72 - - 8 D6 -5 6+ High Impact
Heavy Plasma Gun (Low) 0 – 20 20 – 40 - - 7 D3 -4 4+ Blast, High Impact
Heavy Plasma Gun (High) 0 – 20 20 – 72 - - 8 D6 -5 6+
Autocannon 0 – 20 20 – 72 - - 8 D6 -5 4+
Lascannon 0 – 20 20 – 40 - - 9 2D6 -6 2+ High Impact
RANGE: Short
RANGE: Long
TO HIT: Short
TO HIT: Long
SAVE MODIFIER
AMMO ROLL
Flamer, Ammo Roll, Catch Fire (5+)
Toxic Dart, Injuries, Silent
Webbed Targets, Solvent, Capture
Knock-back, Catch Fire (5+)
Sustained Fire (1), Drum Magazine
Flamer, Ammo Roll, Catch Fire (4+)
Sustained Fire (1), Gets Hot
Toxic Dart, Injuries, Silent
Flamer, Ammo Roll, Catch Fire (3+), Move
and Fire
Gas Cloud, High Impact
Sustained Fire (1), High Impact
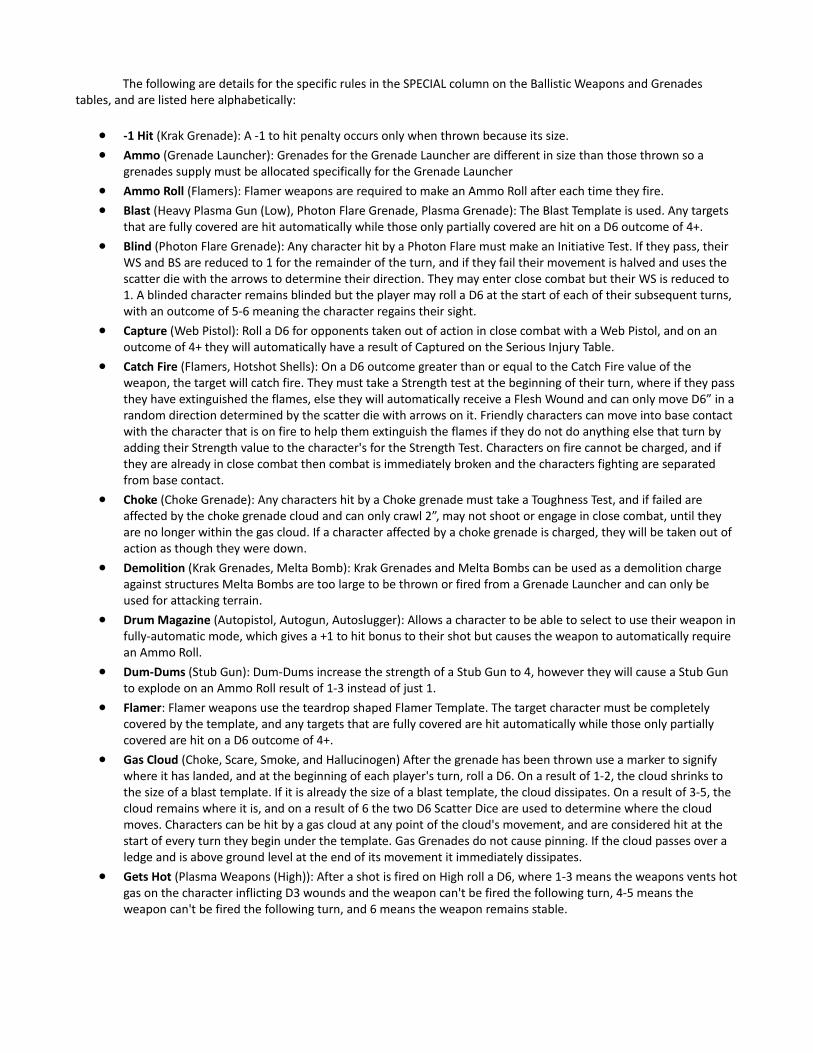
The following are details for the specific rules in the SPECIAL column on the Ballistic Weapons and Grenades tables, and are listed here alphabetically:
-1 Hit (Krak Grenade): A -1 to hit penalty occurs only when thrown because its size. Ammo (Grenade Launcher): Grenades for the Grenade Launcher are different in size than those thrown so a
grenades supply must be allocated specifically for the Grenade Launcher Ammo Roll (Flamers): Flamer weapons are required to make an Ammo Roll after each time they fire. Blast (Heavy Plasma Gun (Low), Photon Flare Grenade, Plasma Grenade): The Blast Template is used. Any targets
that are fully covered are hit automatically while those only partially covered are hit on a D6 outcome of 4+. Blind (Photon Flare Grenade): Any character hit by a Photon Flare must make an Initiative Test. If they pass, their
WS and BS are reduced to 1 for the remainder of the turn, and if they fail their movement is halved and uses the scatter die with the arrows to determine their direction. They may enter close combat but their WS is reduced to 1. A blinded character remains blinded but the player may roll a D6 at the start of each of their subsequent turns, with an outcome of 5-6 meaning the character regains their sight.
Capture (Web Pistol): Roll a D6 for opponents taken out of action in close combat with a Web Pistol, and on an outcome of 4+ they will automatically have a result of Captured on the Serious Injury Table.
Catch Fire (Flamers, Hotshot Shells): On a D6 outcome greater than or equal to the Catch Fire value of the weapon, the target will catch fire. They must take a Strength test at the beginning of their turn, where if they pass they have extinguished the flames, else they will automatically receive a Flesh Wound and can only move D6” in a random direction determined by the scatter die with arrows on it. Friendly characters can move into base contact with the character that is on fire to help them extinguish the flames if they do not do anything else that turn by adding their Strength value to the character's for the Strength Test. Characters on fire cannot be charged, and if they are already in close combat then combat is immediately broken and the characters fighting are separated from base contact.
Choke (Choke Grenade): Any characters hit by a Choke grenade must take a Toughness Test, and if failed are affected by the choke grenade cloud and can only crawl 2”, may not shoot or engage in close combat, until they are no longer within the gas cloud. If a character affected by a choke grenade is charged, they will be taken out of action as though they were down.
Demolition (Krak Grenades, Melta Bomb): Krak Grenades and Melta Bombs can be used as a demolition charge against structures Melta Bombs are too large to be thrown or fired from a Grenade Launcher and can only be used for attacking terrain.
Drum Magazine (Autopistol, Autogun, Autoslugger): Allows a character to be able to select to use their weapon infully-automatic mode, which gives a +1 to hit bonus to their shot but causes the weapon to automatically require an Ammo Roll.
Dum-Dums (Stub Gun): Dum-Dums increase the strength of a Stub Gun to 4, however they will cause a Stub Gun to explode on an Ammo Roll result of 1-3 instead of just 1.
Flamer: Flamer weapons use the teardrop shaped Flamer Template. The target character must be completely covered by the template, and any targets that are fully covered are hit automatically while those only partially covered are hit on a D6 outcome of 4+.
Gas Cloud (Choke, Scare, Smoke, and Hallucinogen) After the grenade has been thrown use a marker to signify where it has landed, and at the beginning of each player's turn, roll a D6. On a result of 1-2, the cloud shrinks to the size of a blast template. If it is already the size of a blast template, the cloud dissipates. On a result of 3-5, the cloud remains where it is, and on a result of 6 the two D6 Scatter Dice are used to determine where the cloud moves. Characters can be hit by a gas cloud at any point of the cloud's movement, and are considered hit at the start of every turn they begin under the template. Gas Grenades do not cause pinning. If the cloud passes over a ledge and is above ground level at the end of its movement it immediately dissipates.
Gets Hot (Plasma Weapons (High)): After a shot is fired on High roll a D6, where 1-3 means the weapons vents hotgas on the character inflicting D3 wounds and the weapon can't be fired the following turn, 4-5 means the weapon can't be fired the following turn, and 6 means the weapon remains stable.
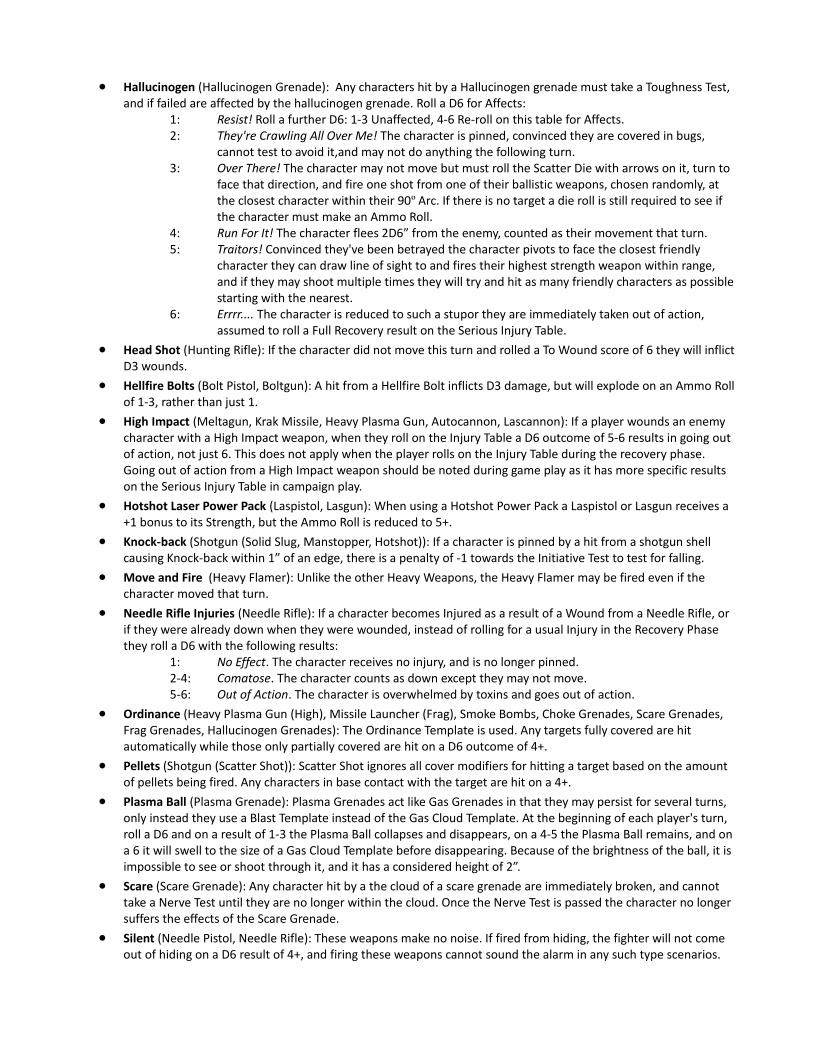
Hallucinogen (Hallucinogen Grenade): Any characters hit by a Hallucinogen grenade must take a Toughness Test, and if failed are affected by the hallucinogen grenade. Roll a D6 for Affects:
1: Resist! Roll a further D6: 1-3 Unaffected, 4-6 Re-roll on this table for Affects.2: They're Crawling All Over Me! The character is pinned, convinced they are covered in bugs,
cannot test to avoid it,and may not do anything the following turn.3: Over There! The character may not move but must roll the Scatter Die with arrows on it, turn to
face that direction, and fire one shot from one of their ballistic weapons, chosen randomly, at the closest character within their 90º Arc. If there is no target a die roll is still required to see if the character must make an Ammo Roll.
4: Run For It! The character flees 2D6” from the enemy, counted as their movement that turn.5: Traitors! Convinced they've been betrayed the character pivots to face the closest friendly
character they can draw line of sight to and fires their highest strength weapon within range, and if they may shoot multiple times they will try and hit as many friendly characters as possible starting with the nearest.
6: Errrr.... The character is reduced to such a stupor they are immediately taken out of action, assumed to roll a Full Recovery result on the Serious Injury Table.
Head Shot (Hunting Rifle): If the character did not move this turn and rolled a To Wound score of 6 they will inflict D3 wounds.
Hellfire Bolts (Bolt Pistol, Boltgun): A hit from a Hellfire Bolt inflicts D3 damage, but will explode on an Ammo Roll of 1-3, rather than just 1.
High Impact (Meltagun, Krak Missile, Heavy Plasma Gun, Autocannon, Lascannon): If a player wounds an enemy character with a High Impact weapon, when they roll on the Injury Table a D6 outcome of 5-6 results in going out of action, not just 6. This does not apply when the player rolls on the Injury Table during the recovery phase. Going out of action from a High Impact weapon should be noted during game play as it has more specific results on the Serious Injury Table in campaign play.
Hotshot Laser Power Pack (Laspistol, Lasgun): When using a Hotshot Power Pack a Laspistol or Lasgun receives a +1 bonus to its Strength, but the Ammo Roll is reduced to 5+.
Knock-back (Shotgun (Solid Slug, Manstopper, Hotshot)): If a character is pinned by a hit from a shotgun shell causing Knock-back within 1” of an edge, there is a penalty of -1 towards the Initiative Test to test for falling.
Move and Fire (Heavy Flamer): Unlike the other Heavy Weapons, the Heavy Flamer may be fired even if the character moved that turn.
Needle Rifle Injuries (Needle Rifle): If a character becomes Injured as a result of a Wound from a Needle Rifle, or if they were already down when they were wounded, instead of rolling for a usual Injury in the Recovery Phase they roll a D6 with the following results:
1: No Effect. The character receives no injury, and is no longer pinned.2-4: Comatose. The character counts as down except they may not move.5-6: Out of Action. The character is overwhelmed by toxins and goes out of action.
Ordinance (Heavy Plasma Gun (High), Missile Launcher (Frag), Smoke Bombs, Choke Grenades, Scare Grenades, Frag Grenades, Hallucinogen Grenades): The Ordinance Template is used. Any targets fully covered are hit automatically while those only partially covered are hit on a D6 outcome of 4+.
Pellets (Shotgun (Scatter Shot)): Scatter Shot ignores all cover modifiers for hitting a target based on the amount of pellets being fired. Any characters in base contact with the target are hit on a 4+.
Plasma Ball (Plasma Grenade): Plasma Grenades act like Gas Grenades in that they may persist for several turns, only instead they use a Blast Template instead of the Gas Cloud Template. At the beginning of each player's turn, roll a D6 and on a result of 1-3 the Plasma Ball collapses and disappears, on a 4-5 the Plasma Ball remains, and on a 6 it will swell to the size of a Gas Cloud Template before disappearing. Because of the brightness of the ball, it is impossible to see or shoot through it, and it has a considered height of 2”.
Scare (Scare Grenade): Any character hit by a the cloud of a scare grenade are immediately broken, and cannot take a Nerve Test until they are no longer within the cloud. Once the Nerve Test is passed the character no longer suffers the effects of the Scare Grenade.
Silent (Needle Pistol, Needle Rifle): These weapons make no noise. If fired from hiding, the fighter will not come out of hiding on a D6 result of 4+, and firing these weapons cannot sound the alarm in any such type scenarios.
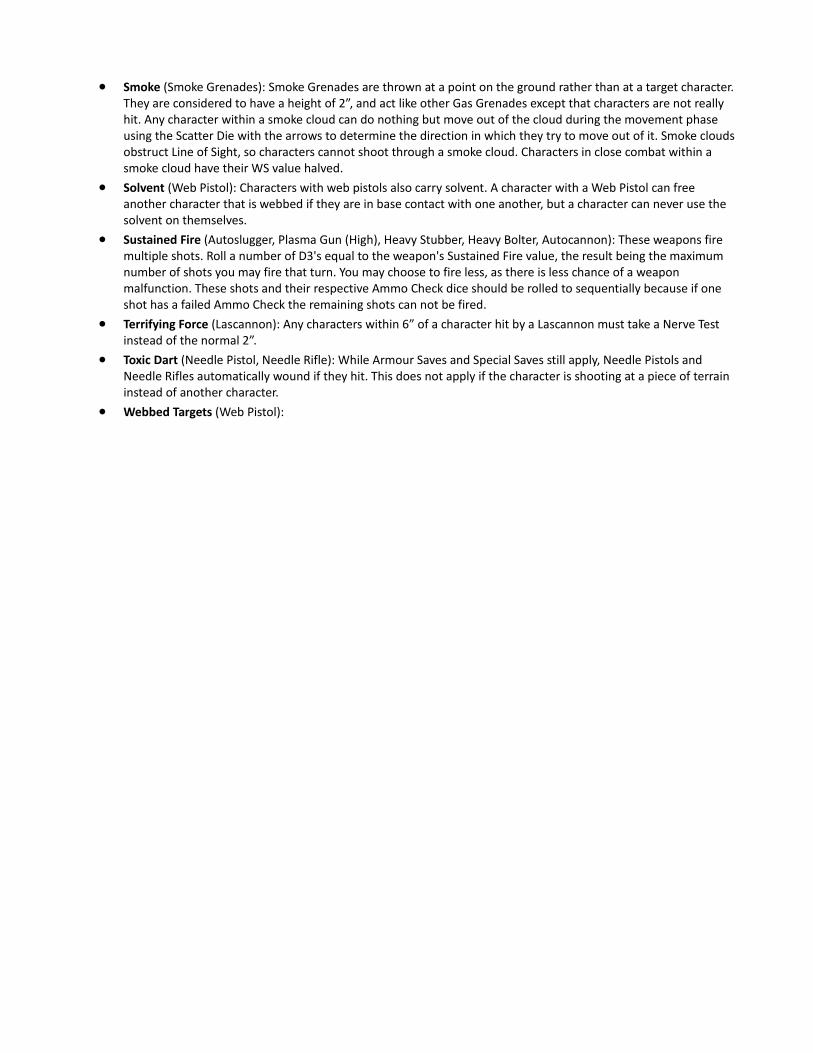
Smoke (Smoke Grenades): Smoke Grenades are thrown at a point on the ground rather than at a target character. They are considered to have a height of 2”, and act like other Gas Grenades except that characters are not really hit. Any character within a smoke cloud can do nothing but move out of the cloud during the movement phase using the Scatter Die with the arrows to determine the direction in which they try to move out of it. Smoke clouds obstruct Line of Sight, so characters cannot shoot through a smoke cloud. Characters in close combat within a smoke cloud have their WS value halved.
Solvent (Web Pistol): Characters with web pistols also carry solvent. A character with a Web Pistol can free another character that is webbed if they are in base contact with one another, but a character can never use the solvent on themselves.
Sustained Fire (Autoslugger, Plasma Gun (High), Heavy Stubber, Heavy Bolter, Autocannon): These weapons fire multiple shots. Roll a number of D3's equal to the weapon's Sustained Fire value, the result being the maximum number of shots you may fire that turn. You may choose to fire less, as there is less chance of a weapon malfunction. These shots and their respective Ammo Check dice should be rolled to sequentially because if one shot has a failed Ammo Check the remaining shots can not be fired.
Terrifying Force (Lascannon): Any characters within 6” of a character hit by a Lascannon must take a Nerve Test instead of the normal 2”.
Toxic Dart (Needle Pistol, Needle Rifle): While Armour Saves and Special Saves still apply, Needle Pistols and Needle Rifles automatically wound if they hit. This does not apply if the character is shooting at a piece of terrain instead of another character.
Webbed Targets (Web Pistol):
Close combat phase
Opposing characters that are in base-to-base contact are engaged in Close Combat. This includes if a character is in base contact with a platform no higher than 2” with the opponent on the edge. Characters may use any weapons they have, up to two, however they must use the same weapons for the whole of the Close Combat phase. The only two ways to enter Close Combat are through a charge or the follow up move after combat, and characters involved in Close Combat cannot do anything else. The Follow Up Move is when a characters opponent goes out of action in Close Combat, they are allowed to make a 2” move at the end of the Close Combat phase. This can be into further Close Combat, but no Combat Score Modifier will occur for charging at this point. If Close Combat is between two opposing characters, they roll off against one another. If there are Multiple Combatants mobbed together, they each pair up and if there is an odd number then one fighter will fight against two. Subsequently, there can be situations where one character is fighting against multiple opponents. In these situations, the outnumbered character must fight one opponent, and then if they survive the next and so on. The player with the outnumbering combatants would choose which order their characters would fight in. For every subsequent character that the outnumbered character fights after the first, they gain +1 Attack Die and a +1 Combat Score Modifier.
The first step of Close Combat is to Roll Attack Dice. Each character in Close Combat rolls a number of D6 dice equal to their Attacks value. Any character that does not have a Basic Weapon, Special Weapon, or Heavy Weapon and has at least two close combat weapons may roll an additional Attack Die to represent their less encumbered nature.
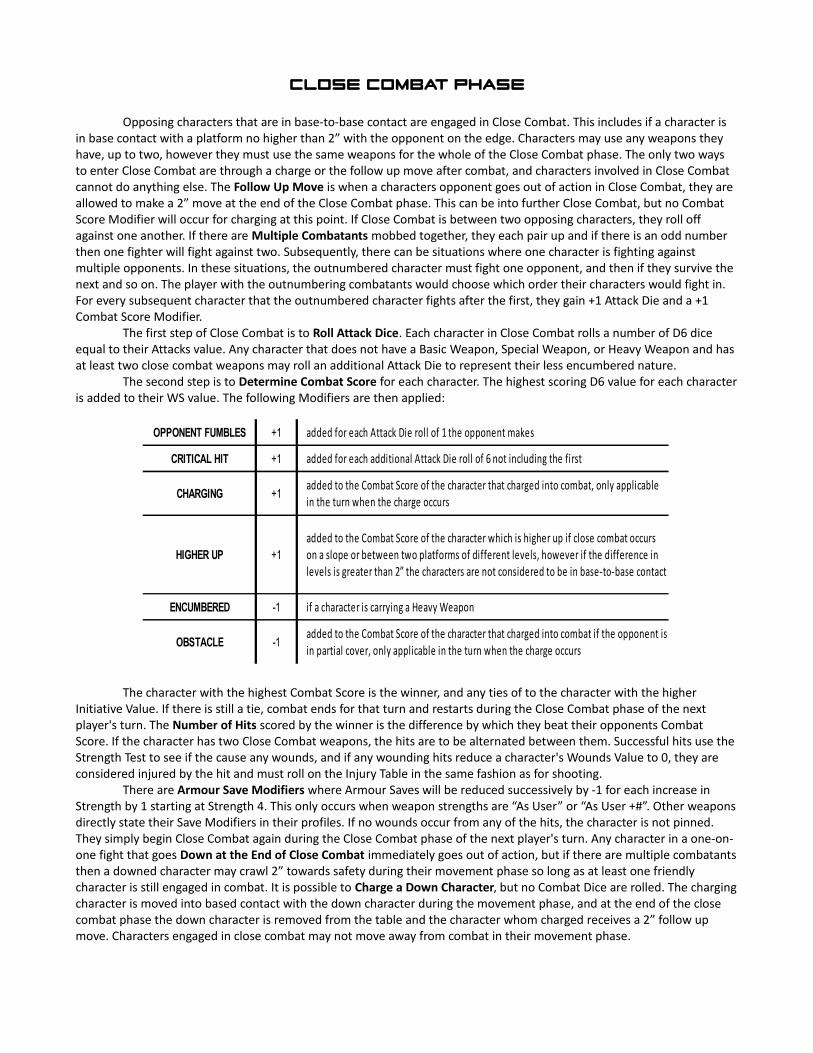
The second step is to Determine Combat Score for each character. The highest scoring D6 value for each characteris added to their WS value. The following Modifiers are then applied:
The character with the highest Combat Score is the winner, and any ties of to the character with the higher Initiative Value. If there is still a tie, combat ends for that turn and restarts during the Close Combat phase of the next player's turn. The Number of Hits scored by the winner is the difference by which they beat their opponents Combat Score. If the character has two Close Combat weapons, the hits are to be alternated between them. Successful hits use the Strength Test to see if the cause any wounds, and if any wounding hits reduce a character's Wounds Value to 0, they are considered injured by the hit and must roll on the Injury Table in the same fashion as for shooting.
There are Armour Save Modifiers where Armour Saves will be reduced successively by -1 for each increase in Strength by 1 starting at Strength 4. This only occurs when weapon strengths are “As User” or “As User +#”. Other weaponsdirectly state their Save Modifiers in their profiles. If no wounds occur from any of the hits, the character is not pinned. They simply begin Close Combat again during the Close Combat phase of the next player's turn. Any character in a one-on-one fight that goes Down at the End of Close Combat immediately goes out of action, but if there are multiple combatantsthen a downed character may crawl 2” towards safety during their movement phase so long as at least one friendly character is still engaged in combat. It is possible to Charge a Down Character, but no Combat Dice are rolled. The chargingcharacter is moved into based contact with the down character during the movement phase, and at the end of the close combat phase the down character is removed from the table and the character whom charged receives a 2” follow up move. Characters engaged in close combat may not move away from combat in their movement phase.
OPPONENT FUMBLES +1 added for each Attack Die roll of 1 the opponent makes
CRITICAL HIT +1 added for each additional Attack Die roll of 6 not including the first
CHARGING +1
HIGHER UP +1
ENCUMBERED -1 if a character is carrying a Heavy Weapon
OBSTACLE -1
added to the Combat Score of the character that charged into combat, only applicable in the turn when the charge occurs
added to the Combat Score of the character which is higher up if close combat occurs on a slope or between two platforms of different levels, however if the difference in levels is greater than 2” the characters are not considered to be in base-to-base contact
added to the Combat Score of the character that charged into combat if the opponent is in partial cover, only applicable in the turn when the charge occurs
If a character Charges a Broken Character, the broken character has a WS value of 1 during combat, and if they survive or even win combat, they will break from combat and flee 2D6” at the end of the combat phase. Similarly, if a character loses their nerve and becomes Broken During Close Combat they turn and flee 2D6” as normal, however before they move theiropponent receives one automatic hit against the breaking character. If a broken character that is charged survives combat they will receive the automatic hit right before they flee as well, but if they win combat they will not as their opponent will be down and unable to strike at them.
A character may also Attack Structures during their close combat phase. They may charge into base contact with the structure during their movement phase, and during their close combat phase they receive one hit against the target structure's Toughness.
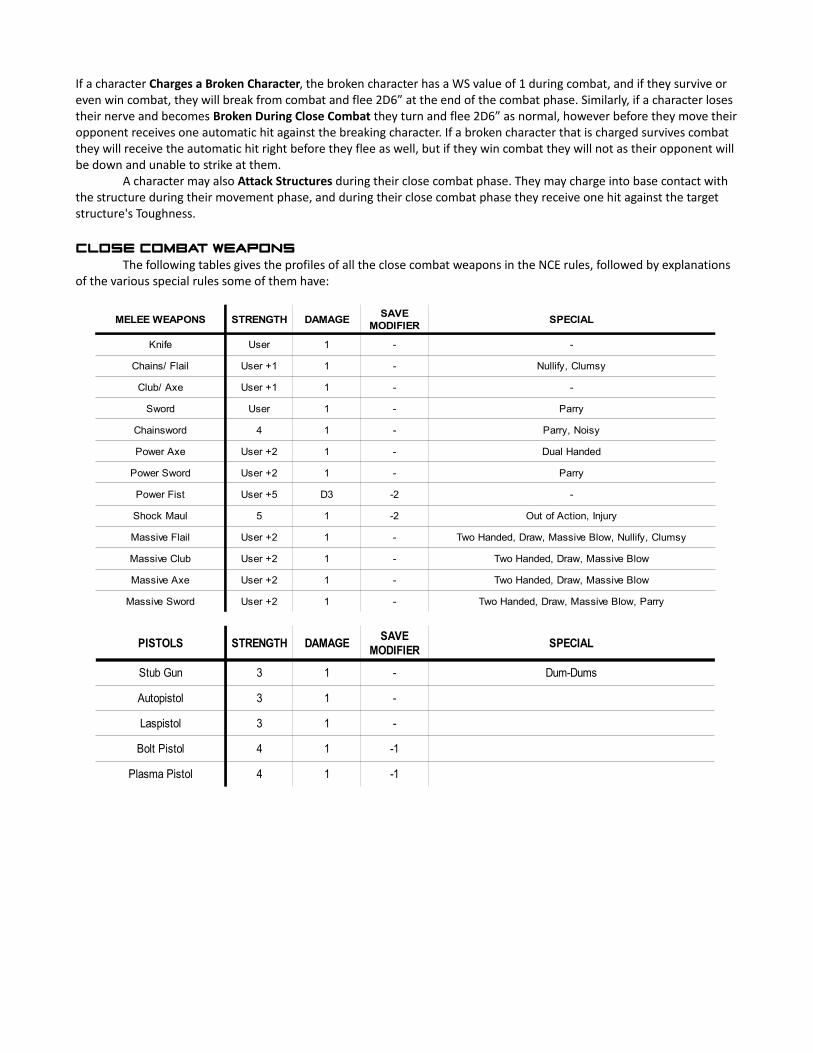
Close combat weaponsThe following tables gives the profiles of all the close combat weapons in the NCE rules, followed by explanations
of the various special rules some of them have:
PISTOLS STRENGTH DAMAGE SPECIAL
Stub Gun 3 1 - Dum-Dums
Autopistol 3 1 -
Laspistol 3 1 -
Bolt Pistol 4 1 -1
Plasma Pistol 4 1 -1
SAVE MODIFIER
MELEE WEAPONS STRENGTH DAMAGE SPECIAL
Knife User 1 - -
Chains/ Flail User +1 1 - Nullify, Clumsy
Club/ Axe User +1 1 - -
Sword User 1 - Parry
Chainsword 4 1 - Parry, Noisy
Power Axe User +2 1 - Dual Handed
Power Sword User +2 1 - Parry
Power Fist User +5 D3 -2 -
Shock Maul 5 1 -2 Out of Action, Injury
Massive Flail User +2 1 - Two Handed, Draw, Massive Blow, Nullify, Clumsy
Massive Club User +2 1 - Two Handed, Draw, Massive Blow
Massive Axe User +2 1 - Two Handed, Draw, Massive Blow
Massive Sword User +2 1 - Two Handed, Draw, Massive Blow, Parry
SAVE MODIFIER
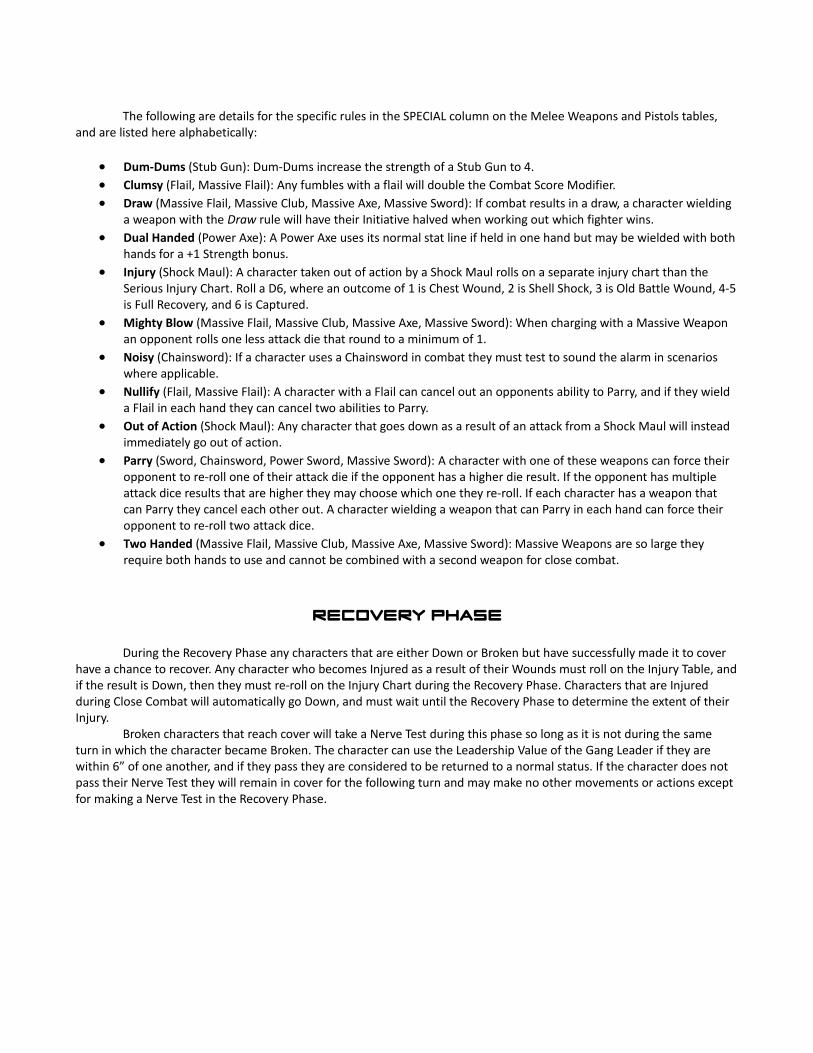
The following are details for the specific rules in the SPECIAL column on the Melee Weapons and Pistols tables, and are listed here alphabetically:
Dum-Dums (Stub Gun): Dum-Dums increase the strength of a Stub Gun to 4. Clumsy (Flail, Massive Flail): Any fumbles with a flail will double the Combat Score Modifier. Draw (Massive Flail, Massive Club, Massive Axe, Massive Sword): If combat results in a draw, a character wielding
a weapon with the Draw rule will have their Initiative halved when working out which fighter wins. Dual Handed (Power Axe): A Power Axe uses its normal stat line if held in one hand but may be wielded with both
hands for a +1 Strength bonus. Injury (Shock Maul): A character taken out of action by a Shock Maul rolls on a separate injury chart than the
Serious Injury Chart. Roll a D6, where an outcome of 1 is Chest Wound, 2 is Shell Shock, 3 is Old Battle Wound, 4-5is Full Recovery, and 6 is Captured.
Mighty Blow (Massive Flail, Massive Club, Massive Axe, Massive Sword): When charging with a Massive Weapon an opponent rolls one less attack die that round to a minimum of 1.
Noisy (Chainsword): If a character uses a Chainsword in combat they must test to sound the alarm in scenarios where applicable.
Nullify (Flail, Massive Flail): A character with a Flail can cancel out an opponents ability to Parry, and if they wield a Flail in each hand they can cancel two abilities to Parry.
Out of Action (Shock Maul): Any character that goes down as a result of an attack from a Shock Maul will instead immediately go out of action.
Parry (Sword, Chainsword, Power Sword, Massive Sword): A character with one of these weapons can force their opponent to re-roll one of their attack die if the opponent has a higher die result. If the opponent has multiple attack dice results that are higher they may choose which one they re-roll. If each character has a weapon that can Parry they cancel each other out. A character wielding a weapon that can Parry in each hand can force their opponent to re-roll two attack dice.
Two Handed (Massive Flail, Massive Club, Massive Axe, Massive Sword): Massive Weapons are so large they require both hands to use and cannot be combined with a second weapon for close combat.
Recovery phase
During the Recovery Phase any characters that are either Down or Broken but have successfully made it to cover have a chance to recover. Any character who becomes Injured as a result of their Wounds must roll on the Injury Table, andif the result is Down, then they must re-roll on the Injury Chart during the Recovery Phase. Characters that are Injured during Close Combat will automatically go Down, and must wait until the Recovery Phase to determine the extent of their Injury.
Broken characters that reach cover will take a Nerve Test during this phase so long as it is not during the same turn in which the character became Broken. The character can use the Leadership Value of the Gang Leader if they are within 6” of one another, and if they pass they are considered to be returned to a normal status. If the character does not pass their Nerve Test they will remain in cover for the following turn and may make no other movements or actions except for making a Nerve Test in the Recovery Phase.
Additional rules
In addition to the rules for Movement, Shooting, Close Combat, and Recovery, there are certain rules that are applicable throughout every phase of the game. At any point in the game a character might be susceptible to PsychologicalEffects, Falling, and there are also times when the normal rules in the game might be augmented by the Equipment a character possesses or the Skills that they might have obtained.
Psychological effects
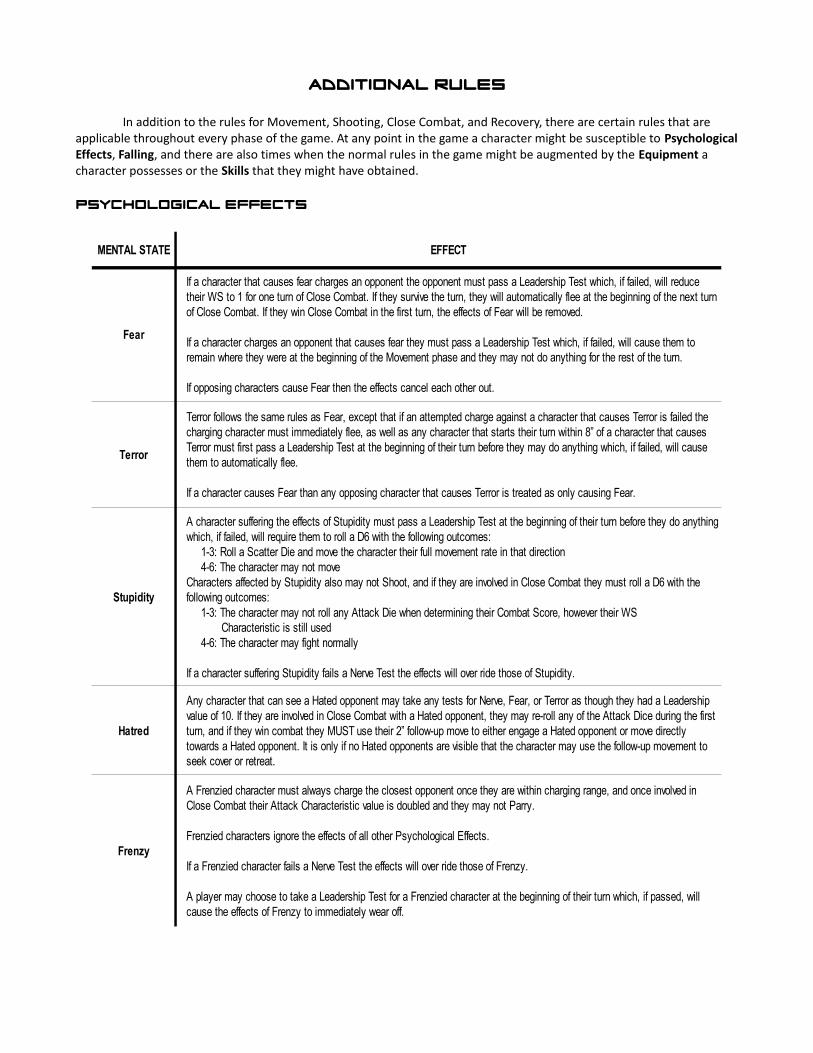
MENTAL STATE EFFECT
Fear
Terror
Stupidity
Hatred
Frenzy
If a character that causes fear charges an opponent the opponent must pass a Leadership Test which, if failed, will reduce their WS to 1 for one turn of Close Combat. If they survive the turn, they will automatically flee at the beginning of the next turn of Close Combat. If they win Close Combat in the first turn, the effects of Fear will be removed.
If a character charges an opponent that causes fear they must pass a Leadership Test which, if failed, will cause them to remain where they were at the beginning of the Movement phase and they may not do anything for the rest of the turn.
If opposing characters cause Fear then the effects cancel each other out.
Terror follows the same rules as Fear, except that if an attempted charge against a character that causes Terror is failed the charging character must immediately flee, as well as any character that starts their turn within 8” of a character that causes Terror must first pass a Leadership Test at the beginning of their turn before they may do anything which, if failed, will cause them to automatically flee.
If a character causes Fear than any opposing character that causes Terror is treated as only causing Fear.
A character suffering the effects of Stupidity must pass a Leadership Test at the beginning of their turn before they do anything which, if failed, will require them to roll a D6 with the following outcomes: 1-3: Roll a Scatter Die and move the character their full movement rate in that direction 4-6: The character may not moveCharacters affected by Stupidity also may not Shoot, and if they are involved in Close Combat they must roll a D6 with the following outcomes: 1-3: The character may not roll any Attack Die when determining their Combat Score, however their WS Characteristic is still used 4-6: The character may fight normally
If a character suffering Stupidity fails a Nerve Test the effects will over ride those of Stupidity.
Any character that can see a Hated opponent may take any tests for Nerve, Fear, or Terror as though they had a Leadership value of 10. If they are involved in Close Combat with a Hated opponent, they may re-roll any of the Attack Dice during the first turn, and if they win combat they MUST use their 2” follow-up move to either engage a Hated opponent or move directly towards a Hated opponent. It is only if no Hated opponents are visible that the character may use the follow-up movement to seek cover or retreat.
A Frenzied character must always charge the closest opponent once they are within charging range, and once involved in Close Combat their Attack Characteristic value is doubled and they may not Parry.
Frenzied characters ignore the effects of all other Psychological Effects.
If a Frenzied character fails a Nerve Test the effects will over ride those of Frenzy.
A player may choose to take a Leadership Test for a Frenzied character at the beginning of their turn which, if passed, will cause the effects of Frenzy to immediately wear off.
hiding
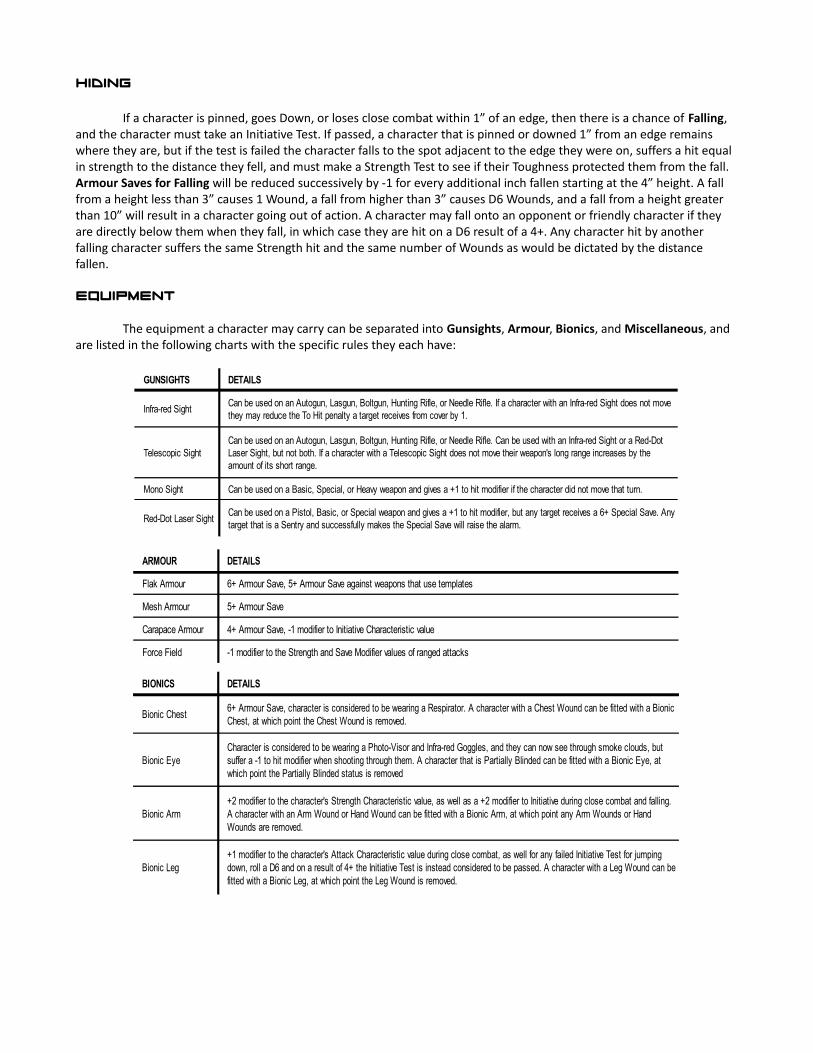
If a character is pinned, goes Down, or loses close combat within 1” of an edge, then there is a chance of Falling, and the character must take an Initiative Test. If passed, a character that is pinned or downed 1” from an edge remains where they are, but if the test is failed the character falls to the spot adjacent to the edge they were on, suffers a hit equal in strength to the distance they fell, and must make a Strength Test to see if their Toughness protected them from the fall. Armour Saves for Falling will be reduced successively by -1 for every additional inch fallen starting at the 4” height. A fall from a height less than 3” causes 1 Wound, a fall from higher than 3” causes D6 Wounds, and a fall from a height greater than 10” will result in a character going out of action. A character may fall onto an opponent or friendly character if they are directly below them when they fall, in which case they are hit on a D6 result of a 4+. Any character hit by another falling character suffers the same Strength hit and the same number of Wounds as would be dictated by the distance fallen.
EQUIPMENT
The equipment a character may carry can be separated into Gunsights, Armour, Bionics, and Miscellaneous, and are listed in the following charts with the specific rules they each have:
GUNSIGHTS DETAILS
Infra-red Sight
Telescopic Sight
Mono Sight Can be used on a Basic, Special, or Heavy weapon and gives a +1 to hit modifier if the character did not move that turn.
Red-Dot Laser Sight
Can be used on an Autogun, Lasgun, Boltgun, Hunting Rifle, or Needle Rifle. If a character with an Infra-red Sight does not move they may reduce the To Hit penalty a target receives from cover by 1.
Can be used on an Autogun, Lasgun, Boltgun, Hunting Rifle, or Needle Rifle. Can be used with an Infra-red Sight or a Red-Dot Laser Sight, but not both. If a character with a Telescopic Sight does not move their weapon's long range increases by the amount of its short range.
Can be used on a Pistol, Basic, or Special weapon and gives a +1 to hit modifier, but any target receives a 6+ Special Save. Any target that is a Sentry and successfully makes the Special Save will raise the alarm.
ARMOUR DETAILS
Flak Armour 6+ Armour Save, 5+ Armour Save against weapons that use templates
Mesh Armour 5+ Armour Save
Carapace Armour 4+ Armour Save, -1 modifier to Initiative Characteristic value
Force Field -1 modifier to the Strength and Save Modifier values of ranged attacks
BIONICS DETAILS
Bionic Chest
Bionic Eye
Bionic Arm
Bionic Leg
6+ Armour Save, character is considered to be wearing a Respirator. A character with a Chest Wound can be fitted with a Bionic Chest, at which point the Chest Wound is removed.
Character is considered to be wearing a Photo-Visor and Infra-red Goggles, and they can now see through smoke clouds, but suffer a -1 to hit modifier when shooting through them. A character that is Partially Blinded can be fitted with a Bionic Eye, at which point the Partially Blinded status is removed
+2 modifier to the character's Strength Characteristic value, as well as a +2 modifier to Initiative during close combat and falling. A character with an Arm Wound or Hand Wound can be fitted with a Bionic Arm, at which point any Arm Wounds or Hand Wounds are removed.
+1 modifier to the character's Attack Characteristic value during close combat, as well for any failed Initiative Test for jumping down, roll a D6 and on a result of 4+ the Initiative Test is instead considered to be passed. A character with a Leg Wound can be fitted with a Bionic Leg, at which point the Leg Wound is removed.
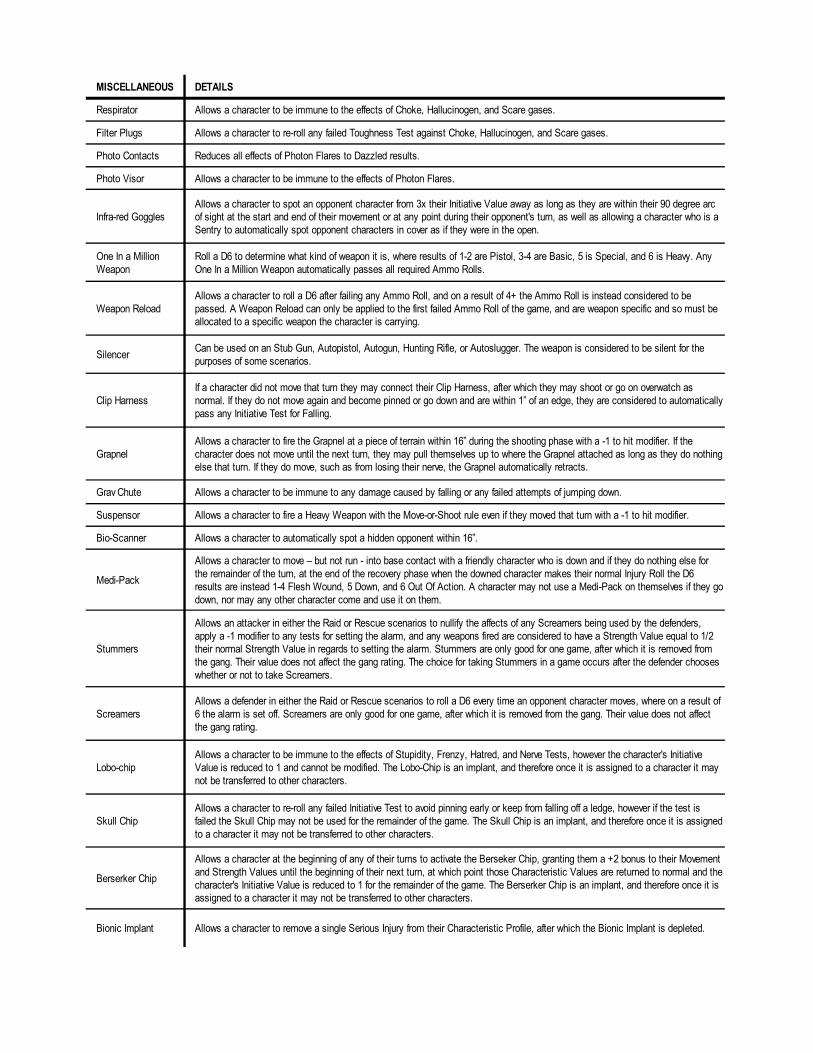
MISCELLANEOUS DETAILS
Respirator Allows a character to be immune to the effects of Choke, Hallucinogen, and Scare gases.
Filter Plugs Allows a character to re-roll any failed Toughness Test against Choke, Hallucinogen, and Scare gases.
Photo Contacts Reduces all effects of Photon Flares to Dazzled results.
Photo Visor Allows a character to be immune to the effects of Photon Flares.
Infra-red Goggles
Weapon Reload
Silencer
Clip Harness
Grapnel
Grav Chute Allows a character to be immune to any damage caused by falling or any failed attempts of jumping down.
Suspensor Allows a character to fire a Heavy Weapon with the Move-or-Shoot rule even if they moved that turn with a -1 to hit modifier.
Bio-Scanner Allows a character to automatically spot a hidden opponent within 16”.
Medi-Pack
Stummers
Screamers
Lobo-chip
Skull Chip
Berserker Chip
Bionic Implant Allows a character to remove a single Serious Injury from their Characteristic Profile, after which the Bionic Implant is depleted.
Allows a character to spot an opponent character from 3x their Initiative Value away as long as they are within their 90 degree arc of sight at the start and end of their movement or at any point during their opponent's turn, as well as allowing a character who is a Sentry to automatically spot opponent characters in cover as if they were in the open.
One In a Million Weapon
Roll a D6 to determine what kind of weapon it is, where results of 1-2 are Pistol, 3-4 are Basic, 5 is Special, and 6 is Heavy. Any One In a Million Weapon automatically passes all required Ammo Rolls.
Allows a character to roll a D6 after failing any Ammo Roll, and on a result of 4+ the Ammo Roll is instead considered to be passed. A Weapon Reload can only be applied to the first failed Ammo Roll of the game, and are weapon specific and so must be allocated to a specific weapon the character is carrying.
Can be used on an Stub Gun, Autopistol, Autogun, Hunting Rifle, or Autoslugger. The weapon is considered to be silent for the purposes of some scenarios.
If a character did not move that turn they may connect their Clip Harness, after which they may shoot or go on overwatch as normal. If they do not move again and become pinned or go down and are within 1” of an edge, they are considered to automatically pass any Initiative Test for Falling.
Allows a character to fire the Grapnel at a piece of terrain within 16” during the shooting phase with a -1 to hit modifier. If the character does not move until the next turn, they may pull themselves up to where the Grapnel attached as long as they do nothing else that turn. If they do move, such as from losing their nerve, the Grapnel automatically retracts.
Allows a character to move – but not run - into base contact with a friendly character who is down and if they do nothing else for the remainder of the turn, at the end of the recovery phase when the downed character makes their normal Injury Roll the D6 results are instead 1-4 Flesh Wound, 5 Down, and 6 Out Of Action. A character may not use a Medi-Pack on themselves if they go down, nor may any other character come and use it on them.
Allows an attacker in either the Raid or Rescue scenarios to nullify the affects of any Screamers being used by the defenders, apply a -1 modifier to any tests for setting the alarm, and any weapons fired are considered to have a Strength Value equal to 1/2 their normal Strength Value in regards to setting the alarm. Stummers are only good for one game, after which it is removed from the gang. Their value does not affect the gang rating. The choice for taking Stummers in a game occurs after the defender chooses whether or not to take Screamers.
Allows a defender in either the Raid or Rescue scenarios to roll a D6 every time an opponent character moves, where on a result of 6 the alarm is set off. Screamers are only good for one game, after which it is removed from the gang. Their value does not affect the gang rating.
Allows a character to be immune to the effects of Stupidity, Frenzy, Hatred, and Nerve Tests, however the character's Initiative Value is reduced to 1 and cannot be modified. The Lobo-Chip is an implant, and therefore once it is assigned to a character it may not be transferred to other characters.
Allows a character to re-roll any failed Initiative Test to avoid pinning early or keep from falling off a ledge, however if the test is failed the Skull Chip may not be used for the remainder of the game. The Skull Chip is an implant, and therefore once it is assigned to a character it may not be transferred to other characters.
Allows a character at the beginning of any of their turns to activate the Berseker Chip, granting them a +2 bonus to their Movement and Strength Values until the beginning of their next turn, at which point those Characteristic Values are returned to normal and the character's Initiative Value is reduced to 1 for the remainder of the game. The Berserker Chip is an implant, and therefore once it is assigned to a character it may not be transferred to other characters.
SKILLS
The skills a character may carry can be separated into Agility, Combat, Ferocity, Muscle, Shooting, Stealth, and Techno, and are listed in the following charts with the specific rules they each have:
DETAILS
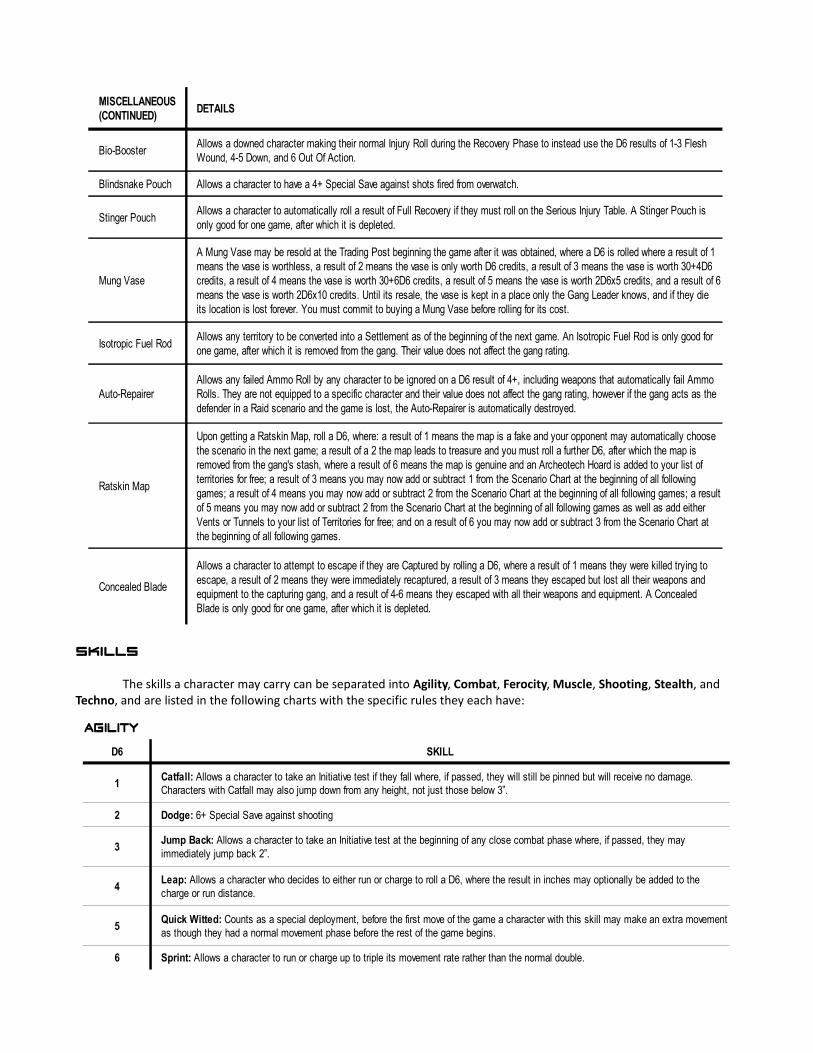
Bio-Booster
Blindsnake Pouch Allows a character to have a 4+ Special Save against shots fired from overwatch.
Stinger Pouch
Mung Vase
Isotropic Fuel Rod
Auto-Repairer
Ratskin Map
Concealed Blade
MISCELLANEOUS (CONTINUED)
Allows a downed character making their normal Injury Roll during the Recovery Phase to instead use the D6 results of 1-3 Flesh Wound, 4-5 Down, and 6 Out Of Action.
Allows a character to automatically roll a result of Full Recovery if they must roll on the Serious Injury Table. A Stinger Pouch is only good for one game, after which it is depleted.
A Mung Vase may be resold at the Trading Post beginning the game after it was obtained, where a D6 is rolled where a result of 1 means the vase is worthless, a result of 2 means the vase is only worth D6 credits, a result of 3 means the vase is worth 30+4D6 credits, a result of 4 means the vase is worth 30+6D6 credits, a result of 5 means the vase is worth 2D6x5 credits, and a result of 6 means the vase is worth 2D6x10 credits. Until its resale, the vase is kept in a place only the Gang Leader knows, and if they die its location is lost forever. You must commit to buying a Mung Vase before rolling for its cost.
Allows any territory to be converted into a Settlement as of the beginning of the next game. An Isotropic Fuel Rod is only good for one game, after which it is removed from the gang. Their value does not affect the gang rating.
Allows any failed Ammo Roll by any character to be ignored on a D6 result of 4+, including weapons that automatically fail Ammo Rolls. They are not equipped to a specific character and their value does not affect the gang rating, however if the gang acts as the defender in a Raid scenario and the game is lost, the Auto-Repairer is automatically destroyed.
Upon getting a Ratskin Map, roll a D6, where: a result of 1 means the map is a fake and your opponent may automatically choose the scenario in the next game; a result of a 2 the map leads to treasure and you must roll a further D6, after which the map is removed from the gang's stash, where a result of 6 means the map is genuine and an Archeotech Hoard is added to your list of territories for free; a result of 3 means you may now add or subtract 1 from the Scenario Chart at the beginning of all following games; a result of 4 means you may now add or subtract 2 from the Scenario Chart at the beginning of all following games; a result of 5 means you may now add or subtract 2 from the Scenario Chart at the beginning of all following games as well as add either Vents or Tunnels to your list of Territories for free; and on a result of 6 you may now add or subtract 3 from the Scenario Chart at the beginning of all following games.
Allows a character to attempt to escape if they are Captured by rolling a D6, where a result of 1 means they were killed trying to escape, a result of 2 means they were immediately recaptured, a result of 3 means they escaped but lost all their weapons and equipment to the capturing gang, and a result of 4-6 means they escaped with all their weapons and equipment. A Concealed Blade is only good for one game, after which it is depleted.
AGILITY
D6 SKILL
1
2
3
4
5
6
Catfall: Allows a character to take an Initiative test if they fall where, if passed, they will still be pinned but will receive no damage. Characters with Catfall may also jump down from any height, not just those below 3”.
Dodge: 6+ Special Save against shooting
Jump Back: Allows a character to take an Initiative test at the beginning of any close combat phase where, if passed, they may immediately jump back 2”.
Leap: Allows a character who decides to either run or charge to roll a D6, where the result in inches may optionally be added to the charge or run distance.
Quick Witted: Counts as a special deployment, before the first move of the game a character with this skill may make an extra movement as though they had a normal movement phase before the rest of the game begins.
Sprint: Allows a character to run or charge up to triple its movement rate rather than the normal double.
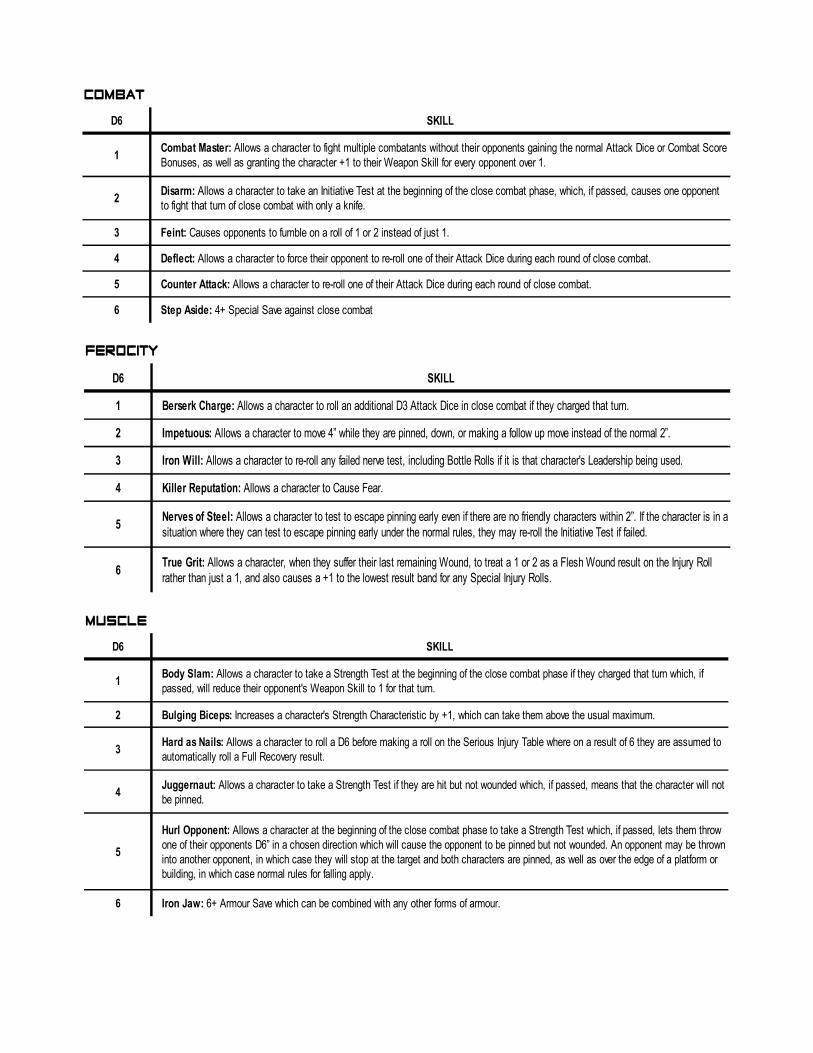
COMBAT
D6 SKILL
1
2
3
4
5
6
Combat Master: Allows a character to fight multiple combatants without their opponents gaining the normal Attack Dice or Combat Score Bonuses, as well as granting the character +1 to their Weapon Skill for every opponent over 1.
Disarm: Allows a character to take an Initiative Test at the beginning of the close combat phase, which, if passed, causes one opponent to fight that turn of close combat with only a knife.
Feint: Causes opponents to fumble on a roll of 1 or 2 instead of just 1.
Deflect: Allows a character to force their opponent to re-roll one of their Attack Dice during each round of close combat.
Counter Attack: Allows a character to re-roll one of their Attack Dice during each round of close combat.
Step Aside: 4+ Special Save against close combat
FEROCITY
D6 SKILL
1
2
3
4
5
6
Berserk Charge: Allows a character to roll an additional D3 Attack Dice in close combat if they charged that turn.
Impetuous: Allows a character to move 4” while they are pinned, down, or making a follow up move instead of the normal 2”.
Iron Will: Allows a character to re-roll any failed nerve test, including Bottle Rolls if it is that character's Leadership being used.
Killer Reputation: Allows a character to Cause Fear.
Nerves of Steel: Allows a character to test to escape pinning early even if there are no friendly characters within 2”. If the character is in a situation where they can test to escape pinning early under the normal rules, they may re-roll the Initiative Test if failed.
True Grit: Allows a character, when they suffer their last remaining Wound, to treat a 1 or 2 as a Flesh Wound result on the Injury Roll rather than just a 1, and also causes a +1 to the lowest result band for any Special Injury Rolls.
MUSCLE
D6 SKILL
1
2
3
4
5
6
Body Slam: Allows a character to take a Strength Test at the beginning of the close combat phase if they charged that turn which, if passed, will reduce their opponent's Weapon Skill to 1 for that turn.
Bulging Biceps: Increases a character's Strength Characteristic by +1, which can take them above the usual maximum.
Hard as Nails: Allows a character to roll a D6 before making a roll on the Serious Injury Table where on a result of 6 they are assumed to automatically roll a Full Recovery result.
Juggernaut: Allows a character to take a Strength Test if they are hit but not wounded which, if passed, means that the character will not be pinned.
Hurl Opponent: Allows a character at the beginning of the close combat phase to take a Strength Test which, if passed, lets them throw one of their opponents D6” in a chosen direction which will cause the opponent to be pinned but not wounded. An opponent may be thrown into another opponent, in which case they will stop at the target and both characters are pinned, as well as over the edge of a platform or building, in which case normal rules for falling apply.
Iron Jaw: 6+ Armour Save which can be combined with any other forms of armour.
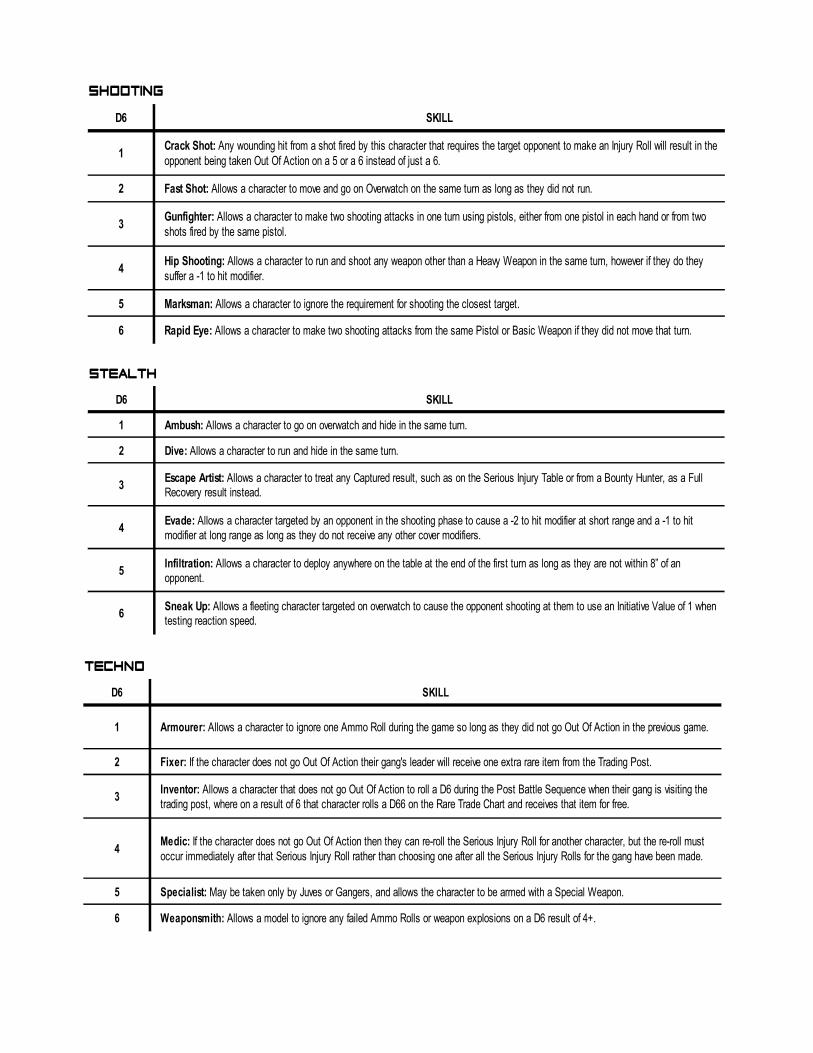
SHOOTING
D6 SKILL
1
2
3
4
5
6
Crack Shot: Any wounding hit from a shot fired by this character that requires the target opponent to make an Injury Roll will result in the opponent being taken Out Of Action on a 5 or a 6 instead of just a 6.
Fast Shot: Allows a character to move and go on Overwatch on the same turn as long as they did not run.
Gunfighter: Allows a character to make two shooting attacks in one turn using pistols, either from one pistol in each hand or from two shots fired by the same pistol.
Hip Shooting: Allows a character to run and shoot any weapon other than a Heavy Weapon in the same turn, however if they do they suffer a -1 to hit modifier.
Marksman: Allows a character to ignore the requirement for shooting the closest target.
Rapid Eye: Allows a character to make two shooting attacks from the same Pistol or Basic Weapon if they did not move that turn.
STEALTH
D6 SKILL
1
2
3
4
5
6
Ambush: Allows a character to go on overwatch and hide in the same turn.
Dive: Allows a character to run and hide in the same turn.
Escape Artist: Allows a character to treat any Captured result, such as on the Serious Injury Table or from a Bounty Hunter, as a Full Recovery result instead.
Evade: Allows a character targeted by an opponent in the shooting phase to cause a -2 to hit modifier at short range and a -1 to hit modifier at long range as long as they do not receive any other cover modifiers.
Infiltration: Allows a character to deploy anywhere on the table at the end of the first turn as long as they are not within 8” of an opponent.
Sneak Up: Allows a fleeting character targeted on overwatch to cause the opponent shooting at them to use an Initiative Value of 1 when testing reaction speed.
TECHNO
D6 SKILL
1
2
3
4
5
6
Armourer: Allows a character to ignore one Ammo Roll during the game so long as they did not go Out Of Action in the previous game.
Fixer: If the character does not go Out Of Action their gang's leader will receive one extra rare item from the Trading Post.
Inventor: Allows a character that does not go Out Of Action to roll a D6 during the Post Battle Sequence when their gang is visiting the trading post, where on a result of 6 that character rolls a D66 on the Rare Trade Chart and receives that item for free.
Medic: If the character does not go Out Of Action then they can re-roll the Serious Injury Roll for another character, but the re-roll must occur immediately after that Serious Injury Roll rather than choosing one after all the Serious Injury Rolls for the gang have been made.
Specialist: May be taken only by Juves or Gangers, and allows the character to be armed with a Special Weapon.
Weaponsmith: Allows a model to ignore any failed Ammo Rolls or weapon explosions on a D6 result of 4+.
post game sequence
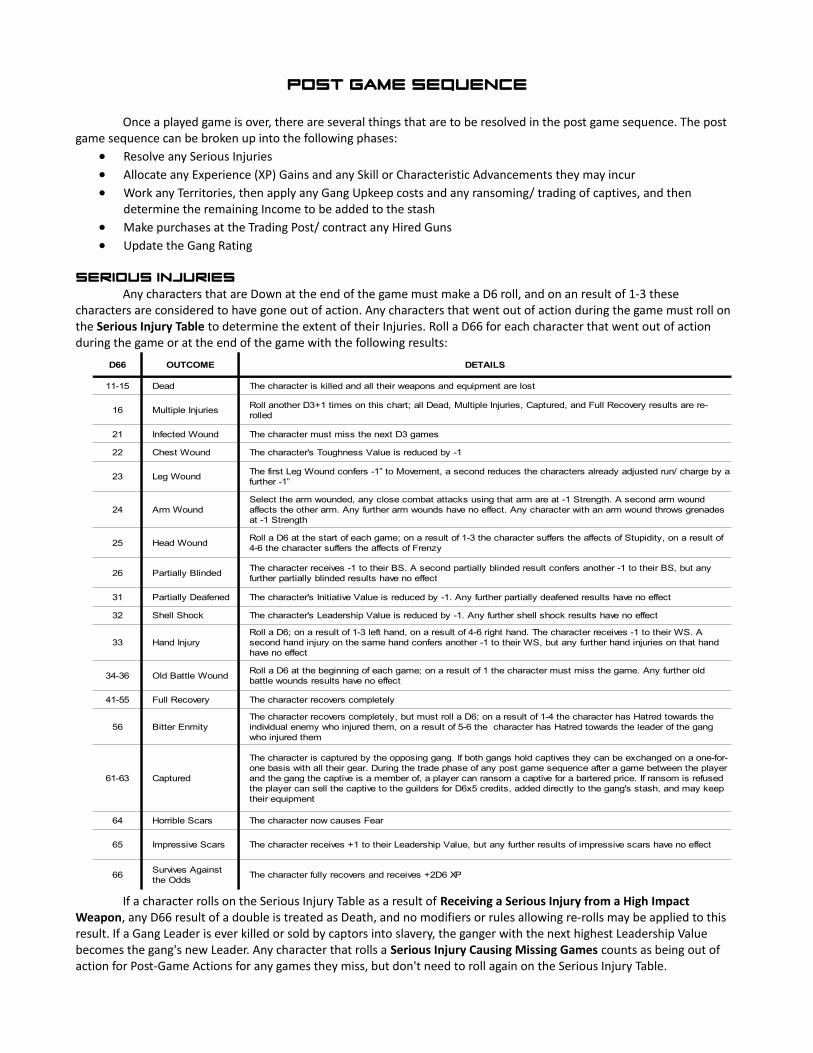
Once a played game is over, there are several things that are to be resolved in the post game sequence. The post game sequence can be broken up into the following phases:
Resolve any Serious Injuries Allocate any Experience (XP) Gains and any Skill or Characteristic Advancements they may incur Work any Territories, then apply any Gang Upkeep costs and any ransoming/ trading of captives, and then
determine the remaining Income to be added to the stash Make purchases at the Trading Post/ contract any Hired Guns Update the Gang Rating
serious injuriesAny characters that are Down at the end of the game must make a D6 roll, and on an result of 1-3 these
characters are considered to have gone out of action. Any characters that went out of action during the game must roll on the Serious Injury Table to determine the extent of their Injuries. Roll a D66 for each character that went out of action during the game or at the end of the game with the following results:
If a character rolls on the Serious Injury Table as a result of Receiving a Serious Injury from a High Impact Weapon, any D66 result of a double is treated as Death, and no modifiers or rules allowing re-rolls may be applied to this result. If a Gang Leader is ever killed or sold by captors into slavery, the ganger with the next highest Leadership Value becomes the gang's new Leader. Any character that rolls a Serious Injury Causing Missing Games counts as being out of action for Post-Game Actions for any games they miss, but don't need to roll again on the Serious Injury Table.
D66 OUTCOME DETAILS
11-15 Dead The character is killed and all their weapons and equipment are lost
16 Multiple Injuries
21 Infected Wound The character must miss the next D3 games
22 Chest Wound The character's Toughness Value is reduced by -1
23 Leg Wound
24 Arm Wound
25 Head Wound
26 Partially Blinded
31 Partially Deafened The character's Initiative Value is reduced by -1. Any further partially deafened results have no effect
32 Shell Shock The character's Leadership Value is reduced by -1. Any further shell shock results have no effect
33 Hand Injury
34-36 Old Battle Wound
41-55 Full Recovery The character recovers completely
56 Bitter Enmity
61-63 Captured
64 Horrible Scars The character now causes Fear
65 Impressive Scars The character receives +1 to their Leadership Value, but any further results of impressive scars have no effect
66 The character fully recovers and receives +2D6 XP
Roll another D3+1 times on this chart; all Dead, Multiple Injuries, Captured, and Full Recovery results are re-rolled
The first Leg Wound confers -1” to Movement, a second reduces the characters already adjusted run/ charge by a further -1”
Select the arm wounded, any close combat attacks using that arm are at -1 Strength. A second arm wound affects the other arm. Any further arm wounds have no effect. Any character with an arm wound throws grenades at -1 Strength
Roll a D6 at the start of each game; on a result of 1-3 the character suffers the affects of Stupidity, on a result of 4-6 the character suffers the affects of Frenzy
The character receives -1 to their BS. A second partially blinded result confers another -1 to their BS, but any further partially blinded results have no effect
Roll a D6; on a result of 1-3 left hand, on a result of 4-6 right hand. The character receives -1 to their WS. A second hand injury on the same hand confers another -1 to their WS, but any further hand injuries on that hand have no effect
Roll a D6 at the beginning of each game; on a result of 1 the character must miss the game. Any further old battle wounds results have no effect
The character recovers completely, but must roll a D6; on a result of 1-4 the character has Hatred towards the individual enemy who injured them, on a result of 5-6 the character has Hatred towards the leader of the gang who injured them
The character is captured by the opposing gang. If both gangs hold captives they can be exchanged on a one-for-one basis with all their gear. During the trade phase of any post game sequence after a game between the player and the gang the captive is a member of, a player can ransom a captive for a bartered price. If ransom is refused the player can sell the captive to the guilders for D6x5 credits, added directly to the gang's stash, and may keep their equipment
Survives Against the Odds
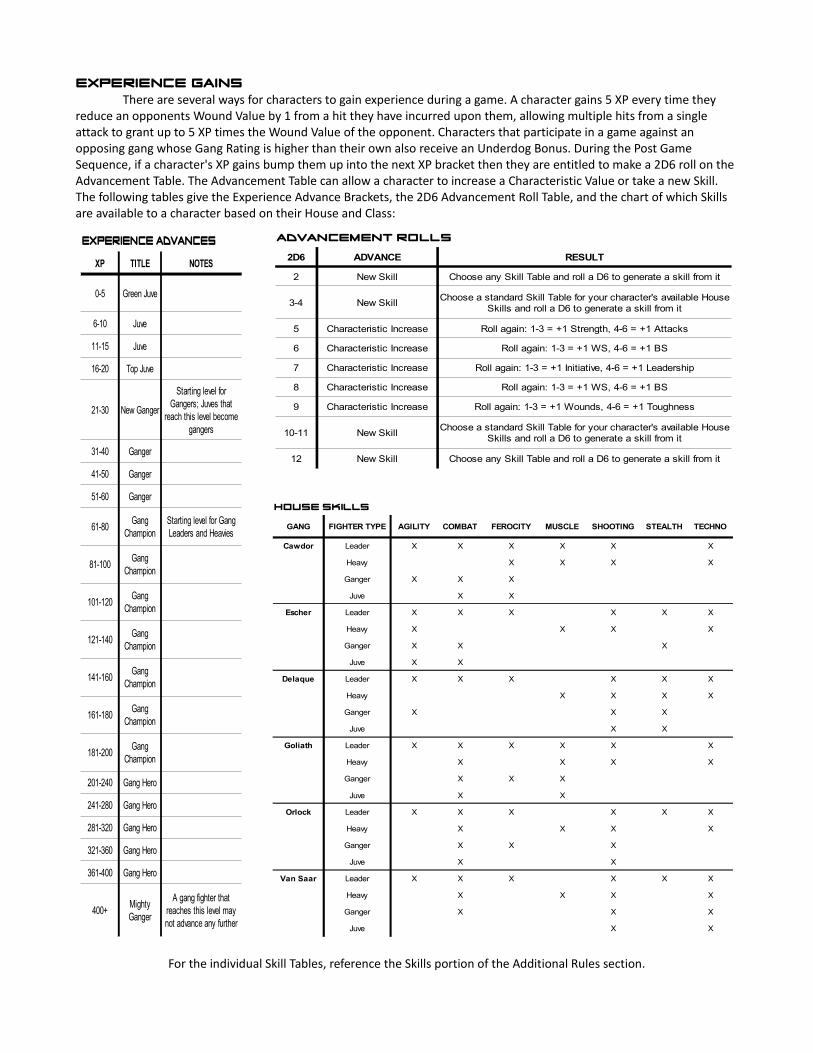
Experience gainsThere are several ways for characters to gain experience during a game. A character gains 5 XP every time they
reduce an opponents Wound Value by 1 from a hit they have incurred upon them, allowing multiple hits from a single attack to grant up to 5 XP times the Wound Value of the opponent. Characters that participate in a game against an opposing gang whose Gang Rating is higher than their own also receive an Underdog Bonus. During the Post Game Sequence, if a character's XP gains bump them up into the next XP bracket then they are entitled to make a 2D6 roll on the Advancement Table. The Advancement Table can allow a character to increase a Characteristic Value or take a new Skill. The following tables give the Experience Advance Brackets, the 2D6 Advancement Roll Table, and the chart of which Skills are available to a character based on their House and Class:
For the individual Skill Tables, reference the Skills portion of the Additional Rules section.
ADVANCEMENT ROLLS
2D6 ADVANCE RESULT
2 New Skill Choose any Skill Table and roll a D6 to generate a skill from it
3-4 New Skill
5 Characteristic Increase Roll again: 1-3 = +1 Strength, 4-6 = +1 Attacks
6 Characteristic Increase Roll again: 1-3 = +1 WS, 4-6 = +1 BS
7 Characteristic Increase Roll again: 1-3 = +1 Initiative, 4-6 = +1 Leadership
8 Characteristic Increase Roll again: 1-3 = +1 WS, 4-6 = +1 BS
9 Characteristic Increase Roll again: 1-3 = +1 Wounds, 4-6 = +1 Toughness
10-11 New Skill
12 New Skill Choose any Skill Table and roll a D6 to generate a skill from it
Choose a standard Skill Table for your character's available House Skills and roll a D6 to generate a skill from it
Choose a standard Skill Table for your character's available House Skills and roll a D6 to generate a skill from it
HOUSE SKILLS
GANG FIGHTER TYPE AGILITY COMBAT FEROCITY MUSCLE SHOOTING STEALTH TECHNO
Cawdor Leader X X X X X X
Heavy X X X X
Ganger X X X
Juve X X
Escher Leader X X X X X X
Heavy X X X X
Ganger X X X
Juve X X
Delaque Leader X X X X X X
Heavy X X X X
Ganger X X X
Juve X X
Goliath Leader X X X X X X
Heavy X X X X
Ganger X X X
Juve X X
Orlock Leader X X X X X X
Heavy X X X X
Ganger X X X
Juve X X
Van Saar Leader X X X X X X
Heavy X X X X
Ganger X X X
Juve X X
EXPERIENCE ADVANCES
XP TITLE NOTES
0-5 Green Juve
6-10 Juve
11-15 Juve
16-20 Top Juve
21-30 New Ganger
31-40 Ganger
41-50 Ganger
51-60 Ganger
61-80
81-100
101-120
121-140
141-160
161-180
181-200
201-240 Gang Hero
241-280 Gang Hero
281-320 Gang Hero
321-360 Gang Hero
361-400 Gang Hero
400+
Starting level for Gangers; Juves that
reach this level become gangers
Gang Champion
Starting level for Gang Leaders and Heavies
Gang Champion
Gang Champion
Gang Champion
Gang Champion
Gang Champion
Gang Champion
Mighty Ganger
A gang fighter that reaches this level may not advance any further
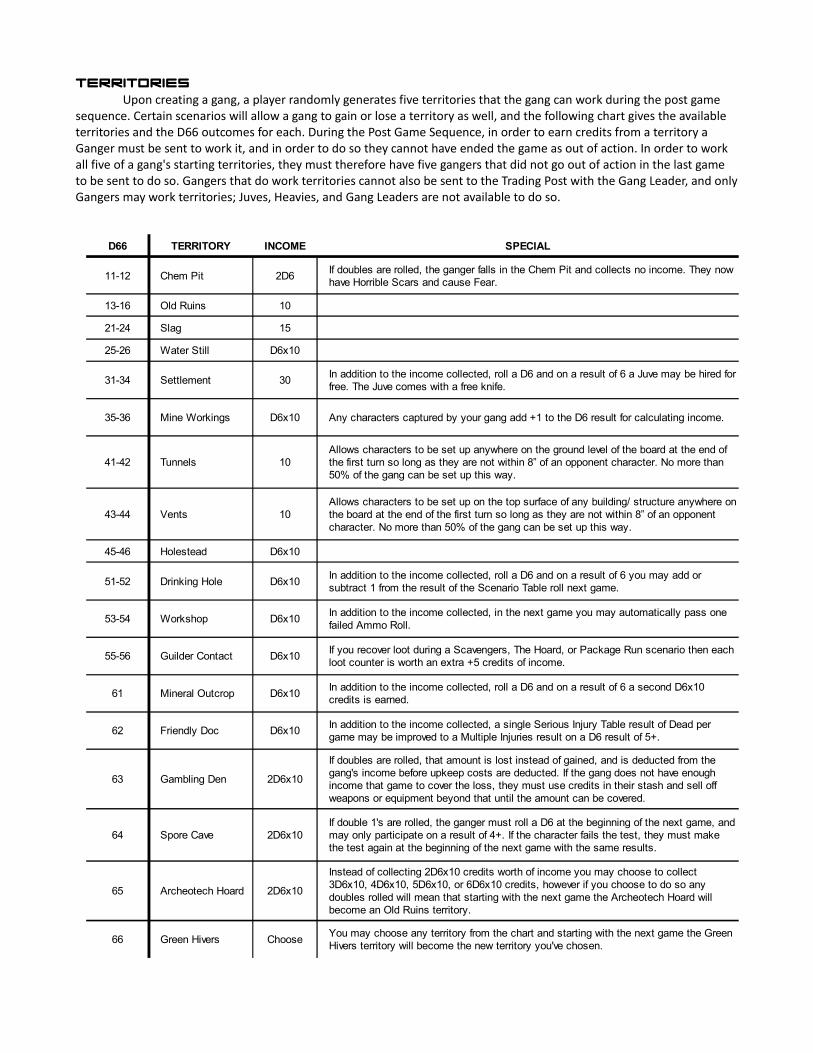
TerritoriesUpon creating a gang, a player randomly generates five territories that the gang can work during the post game
sequence. Certain scenarios will allow a gang to gain or lose a territory as well, and the following chart gives the available territories and the D66 outcomes for each. During the Post Game Sequence, in order to earn credits from a territory a Ganger must be sent to work it, and in order to do so they cannot have ended the game as out of action. In order to work all five of a gang's starting territories, they must therefore have five gangers that did not go out of action in the last game to be sent to do so. Gangers that do work territories cannot also be sent to the Trading Post with the Gang Leader, and onlyGangers may work territories; Juves, Heavies, and Gang Leaders are not available to do so.
D66 TERRITORY INCOME SPECIAL
11-12 Chem Pit 2D6
13-16 Old Ruins 10
21-24 Slag 15
25-26 Water Still D6x10
31-34 Settlement 30
35-36 Mine Workings D6x10 Any characters captured by your gang add +1 to the D6 result for calculating income.
41-42 Tunnels 10
43-44 Vents 10
45-46 Holestead D6x10
51-52 Drinking Hole D6x10
53-54 Workshop D6x10
55-56 Guilder Contact D6x10
61 Mineral Outcrop D6x10
62 Friendly Doc D6x10
63 Gambling Den 2D6x10
64 Spore Cave 2D6x10
65 Archeotech Hoard 2D6x10
66 Green Hivers Choose
If doubles are rolled, the ganger falls in the Chem Pit and collects no income. They now have Horrible Scars and cause Fear.
In addition to the income collected, roll a D6 and on a result of 6 a Juve may be hired for free. The Juve comes with a free knife.
Allows characters to be set up anywhere on the ground level of the board at the end of the first turn so long as they are not within 8” of an opponent character. No more than 50% of the gang can be set up this way.
Allows characters to be set up on the top surface of any building/ structure anywhere on the board at the end of the first turn so long as they are not within 8” of an opponent character. No more than 50% of the gang can be set up this way.
In addition to the income collected, roll a D6 and on a result of 6 you may add or subtract 1 from the result of the Scenario Table roll next game.
In addition to the income collected, in the next game you may automatically pass one failed Ammo Roll.
If you recover loot during a Scavengers, The Hoard, or Package Run scenario then each loot counter is worth an extra +5 credits of income.
In addition to the income collected, roll a D6 and on a result of 6 a second D6x10 credits is earned.
In addition to the income collected, a single Serious Injury Table result of Dead per game may be improved to a Multiple Injuries result on a D6 result of 5+.
If doubles are rolled, that amount is lost instead of gained, and is deducted from the gang's income before upkeep costs are deducted. If the gang does not have enough income that game to cover the loss, they must use credits in their stash and sell off weapons or equipment beyond that until the amount can be covered.
If double 1's are rolled, the ganger must roll a D6 at the beginning of the next game, and may only participate on a result of 4+. If the character fails the test, they must make the test again at the beginning of the next game with the same results.
Instead of collecting 2D6x10 credits worth of income you may choose to collect 3D6x10, 4D6x10, 5D6x10, or 6D6x10 credits, however if you choose to do so any doubles rolled will mean that starting with the next game the Archeotech Hoard will become an Old Ruins territory.
You may choose any territory from the chart and starting with the next game the Green Hivers territory will become the new territory you've chosen.

Income and upkeep costs
Related Documents